Embed Size (px)
Citation preview
Block Walling: Advantages
Versatile, durable and strong
Fire resistant
Excellent sound insulation
Ideal background for dry lining wet
finishes and fixings
Inherent thermal mass acts as heat
store
Recyclable
Proven building method and
longevity
Widely and readily available
Cost effective
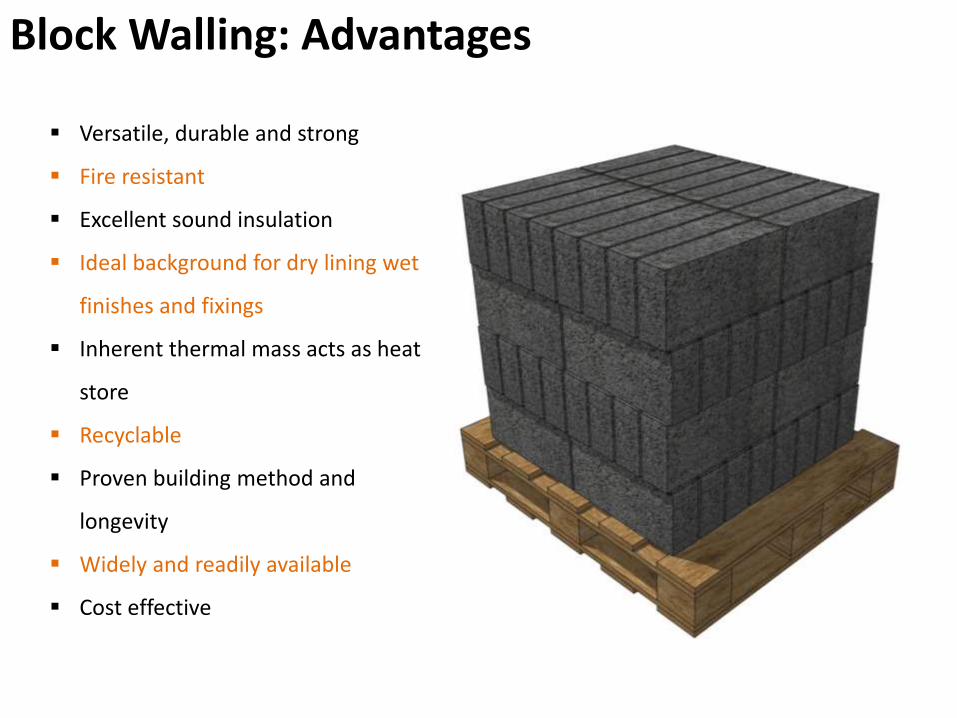
Block Walling: Standard Dimensions
The standard size of a concrete block is 440mm x 100mm x 215mm.
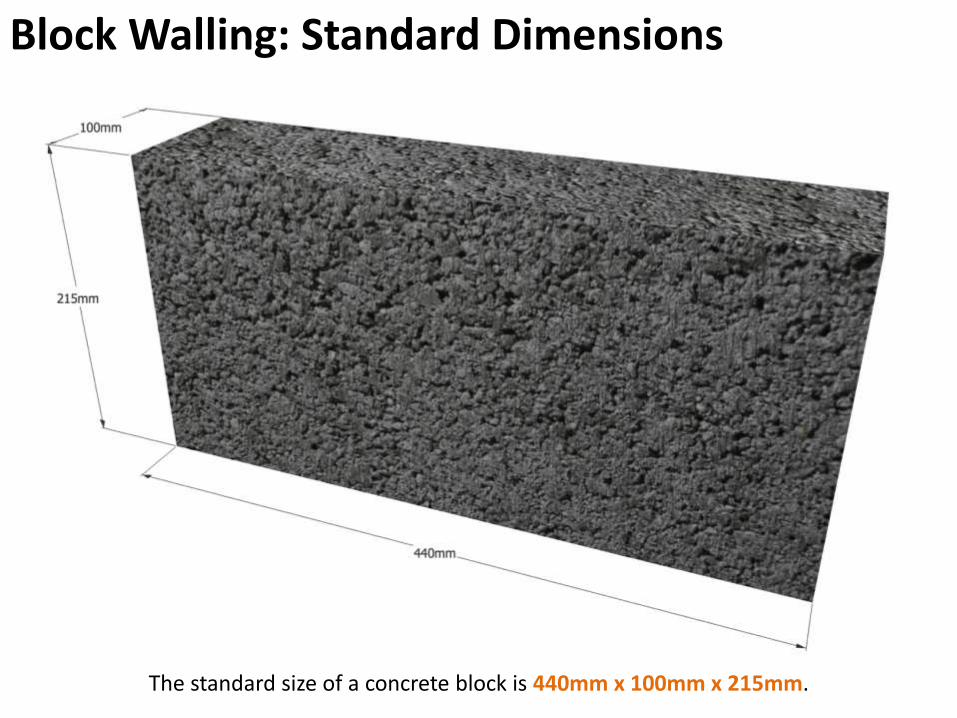
Block Walling: Nominal Weights
The weight of a concrete block is dependant upon the type of block (e.g. solid, hollow, cellular, special), the classification of the block (e.g. dense, lightweight, super-lightweight) and the
manufacturer. The table above shows examples of block weights. It is recommended that you consult the product data sheet to establish the weight of a specific block.
Description of Block Weight of Block
Solid dense block (standard) 18.5kg
Solid lightweight block 13.2kg
Hollow dense block 18.7kg
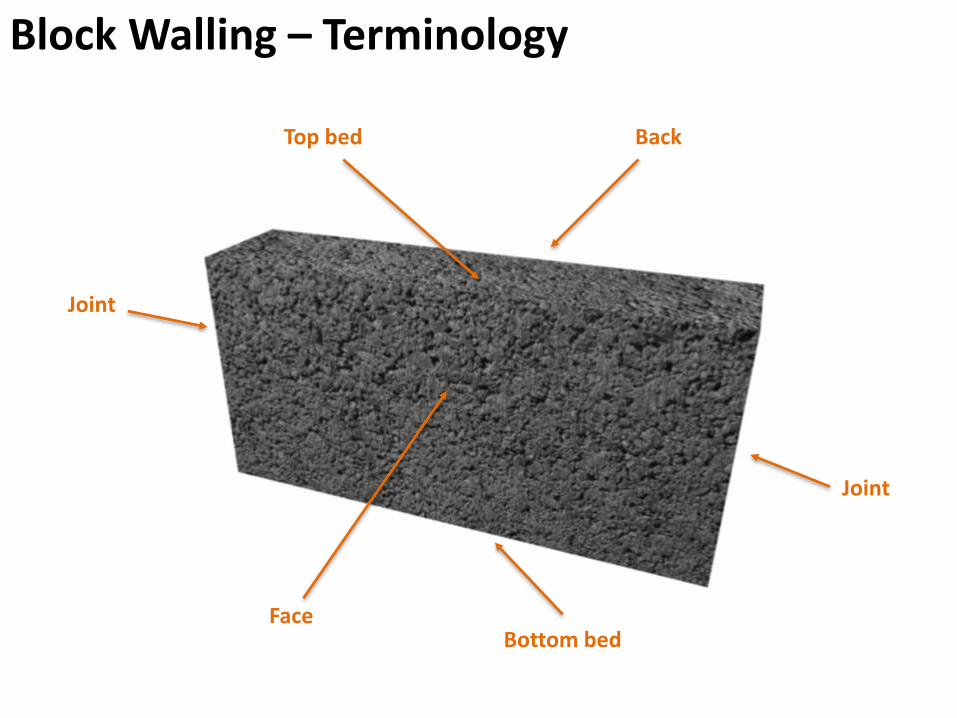
Block Walling – Terminology
Back
Face
Joint
Joint
Top bed
Bottom bed
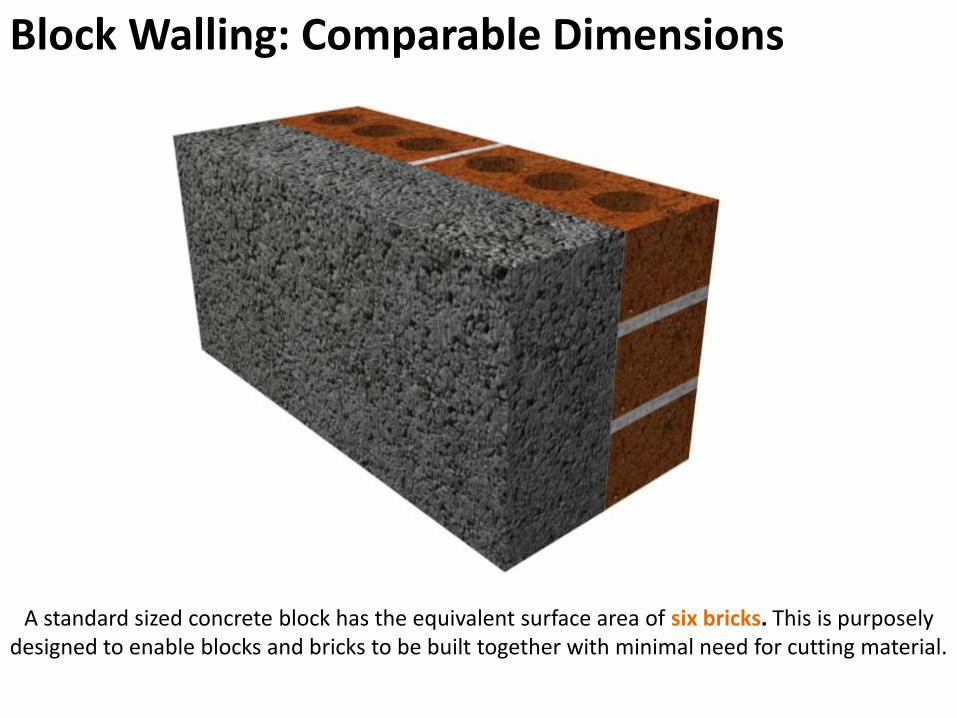
Block Walling: Comparable Dimensions
A standard sized concrete block has the equivalent surface area of six bricks. This is purposely designed to enable blocks and bricks to be built together with minimal need for cutting material.
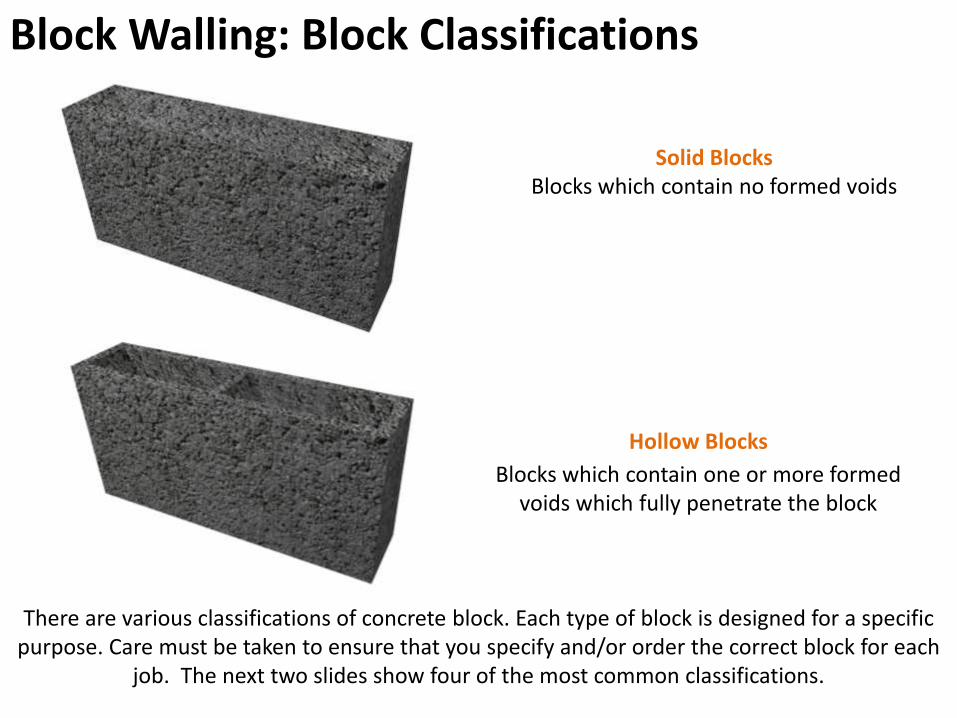
Block Walling: Block Classifications
There are various classifications of concrete block. Each type of block is designed for a specific purpose. Care must be taken to ensure that you specify and/or order the correct block for each
job. The next two slides show four of the most common classifications.
Hollow Blocks
Blocks which contain one or more formed voids which fully penetrate the block
Solid BlocksBlocks which contain no formed voids
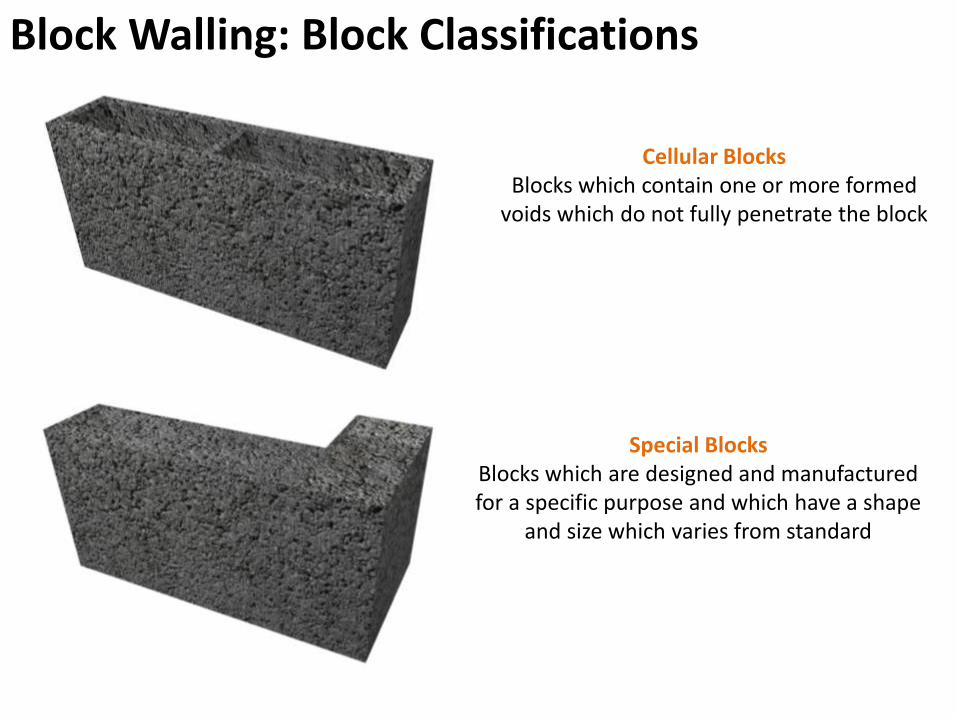
Block Walling: Block Classifications
Special BlocksBlocks which are designed and manufactured for a specific purpose and which have a shape
and size which varies from standard
Cellular BlocksBlocks which contain one or more formed
voids which do not fully penetrate the block
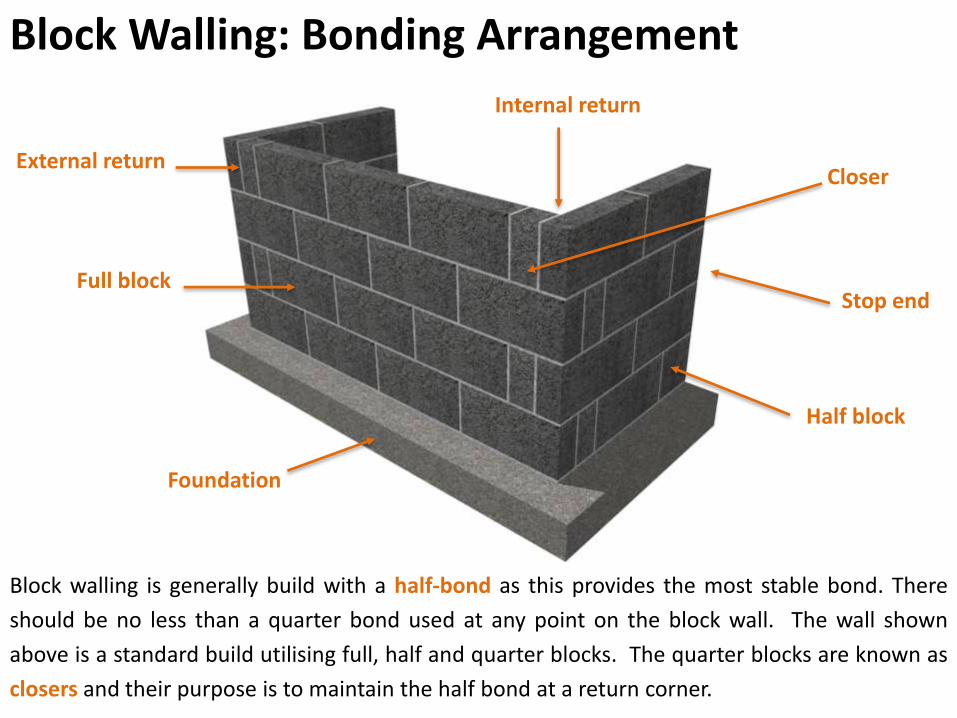
Block Walling: Bonding Arrangement
Block walling is generally build with a half-bond as this provides the most stable bond. There
should be no less than a quarter bond used at any point on the block wall. The wall shown
above is a standard build utilising full, half and quarter blocks. The quarter blocks are known as
closers and their purpose is to maintain the half bond at a return corner.
Half block
External return
Internal return
Foundation
Closer
Full blockStop end
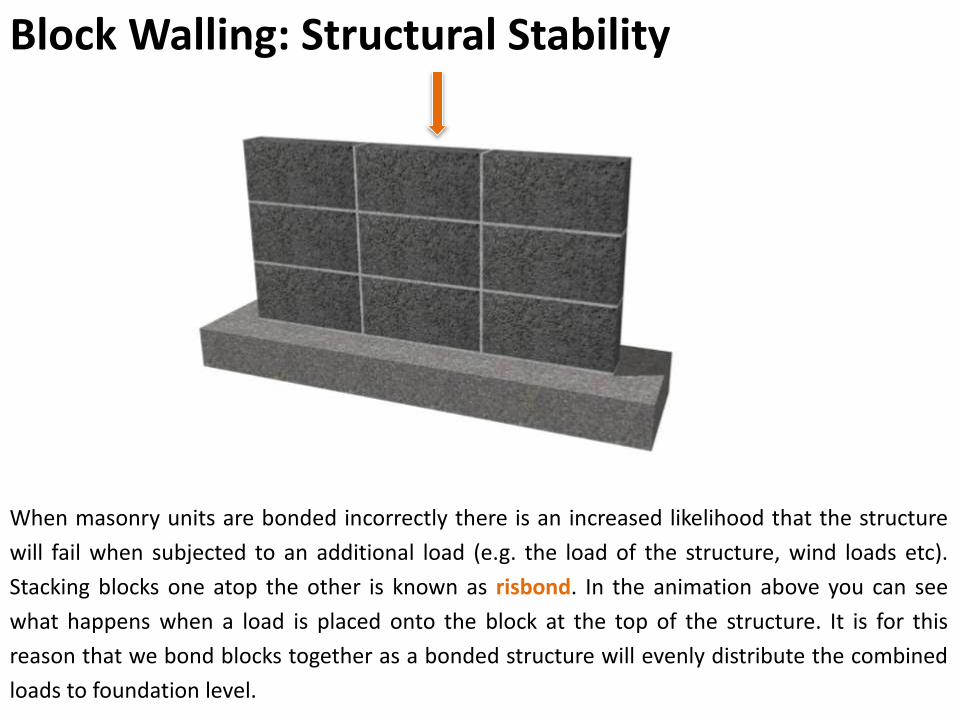
Block Walling: Structural Stability
When masonry units are bonded incorrectly there is an increased likelihood that the structure
will fail when subjected to an additional load (e.g. the load of the structure, wind loads etc).
Stacking blocks one atop the other is known as risbond. In the animation above you can see
what happens when a load is placed onto the block at the top of the structure. It is for this
reason that we bond blocks together as a bonded structure will evenly distribute the combined
loads to foundation level.
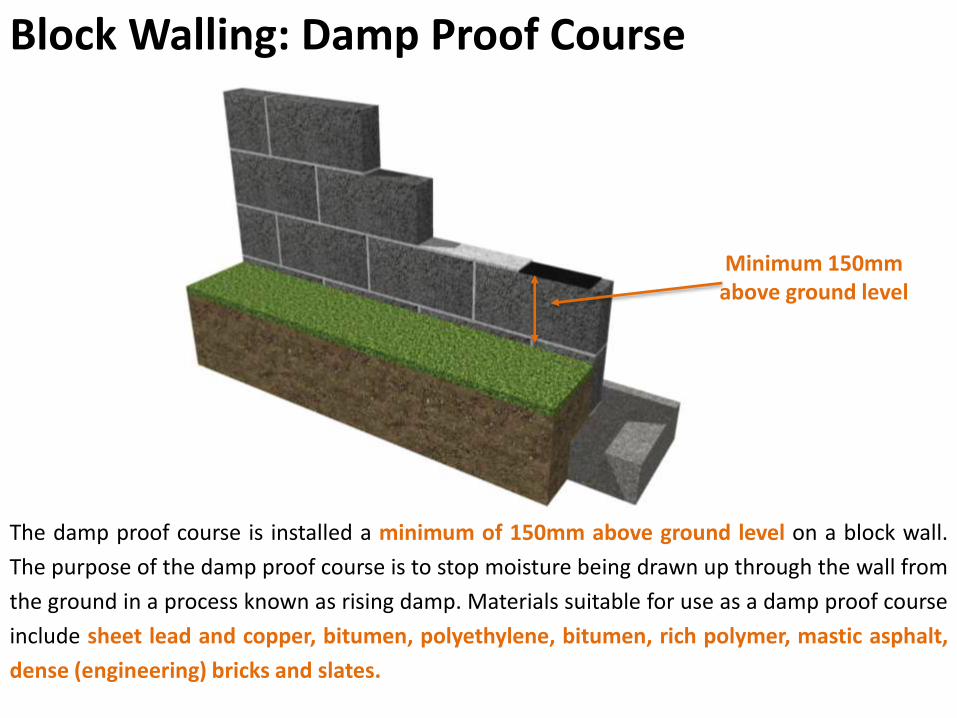
Block Walling: Damp Proof Course
The damp proof course is installed a minimum of 150mm above ground level on a block wall.
The purpose of the damp proof course is to stop moisture being drawn up through the wall from
the ground in a process known as rising damp. Materials suitable for use as a damp proof course
include sheet lead and copper, bitumen, polyethylene, bitumen, rich polymer, mastic asphalt,
dense (engineering) bricks and slates.
Minimum 150mm above ground level
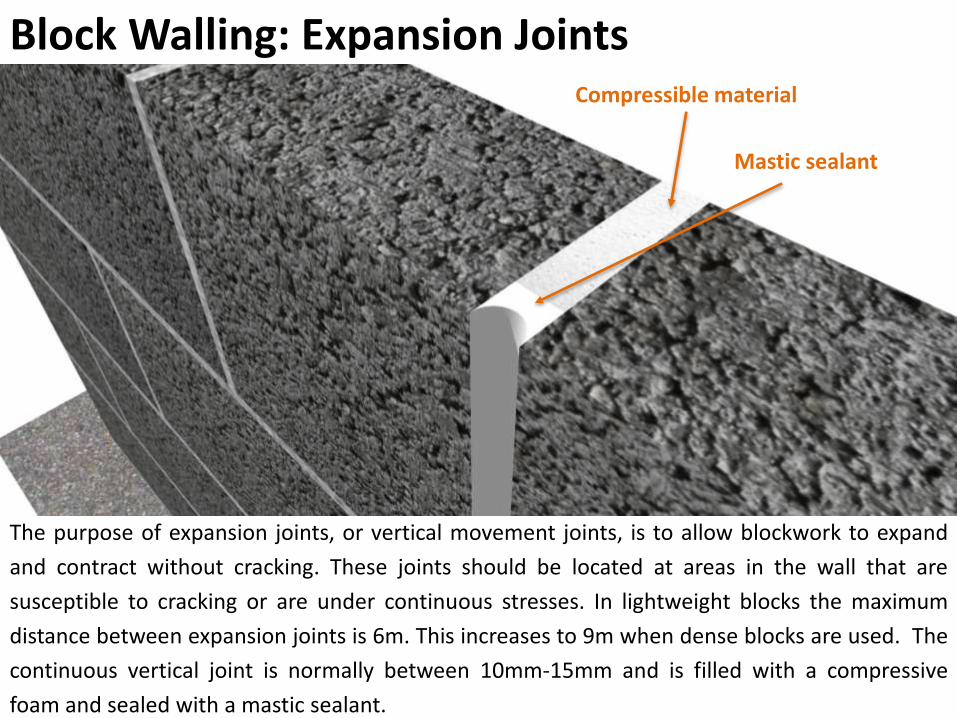
Block Walling: Expansion Joints
The purpose of expansion joints, or vertical movement joints, is to allow blockwork to expand
and contract without cracking. These joints should be located at areas in the wall that are
susceptible to cracking or are under continuous stresses. In lightweight blocks the maximum
distance between expansion joints is 6m. This increases to 9m when dense blocks are used. The
continuous vertical joint is normally between 10mm-15mm and is filled with a compressive
foam and sealed with a mastic sealant.
Compressible material
Mastic sealant
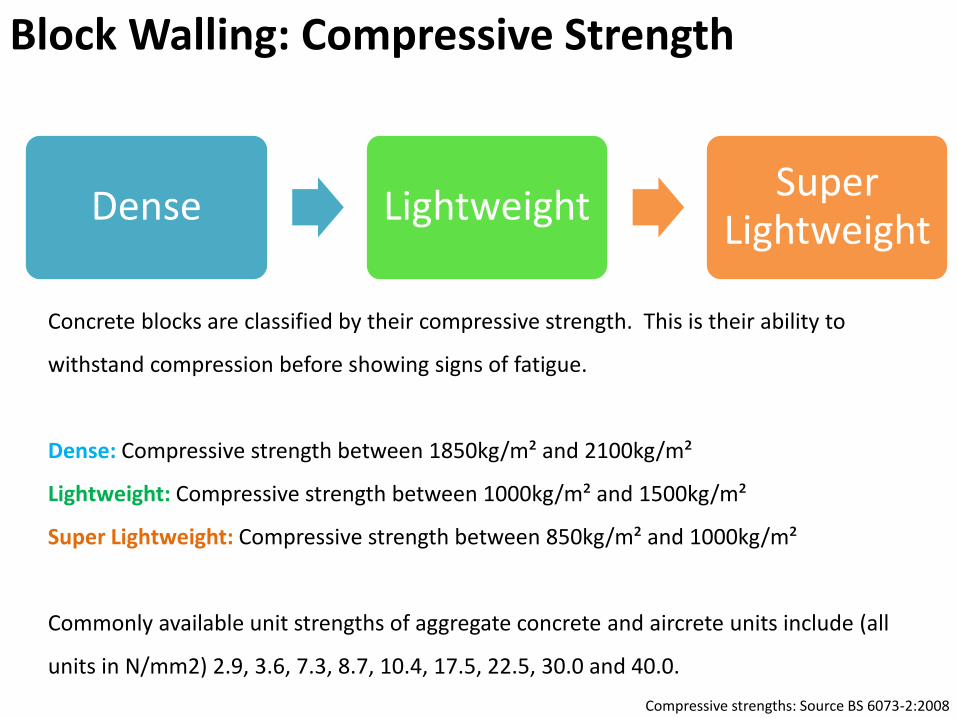
Block Walling: Compressive Strength
Dense LightweightSuper
Lightweight
Concrete blocks are classified by their compressive strength. This is their ability to
withstand compression before showing signs of fatigue.
Dense: Compressive strength between 1850kg/m² and 2100kg/m²
Lightweight: Compressive strength between 1000kg/m² and 1500kg/m²
Super Lightweight: Compressive strength between 850kg/m² and 1000kg/m²
Commonly available unit strengths of aggregate concrete and aircrete units include (all
units in N/mm2) 2.9, 3.6, 7.3, 8.7, 10.4, 17.5, 22.5, 30.0 and 40.0.
Compressive strengths: Source BS 6073-2:2008
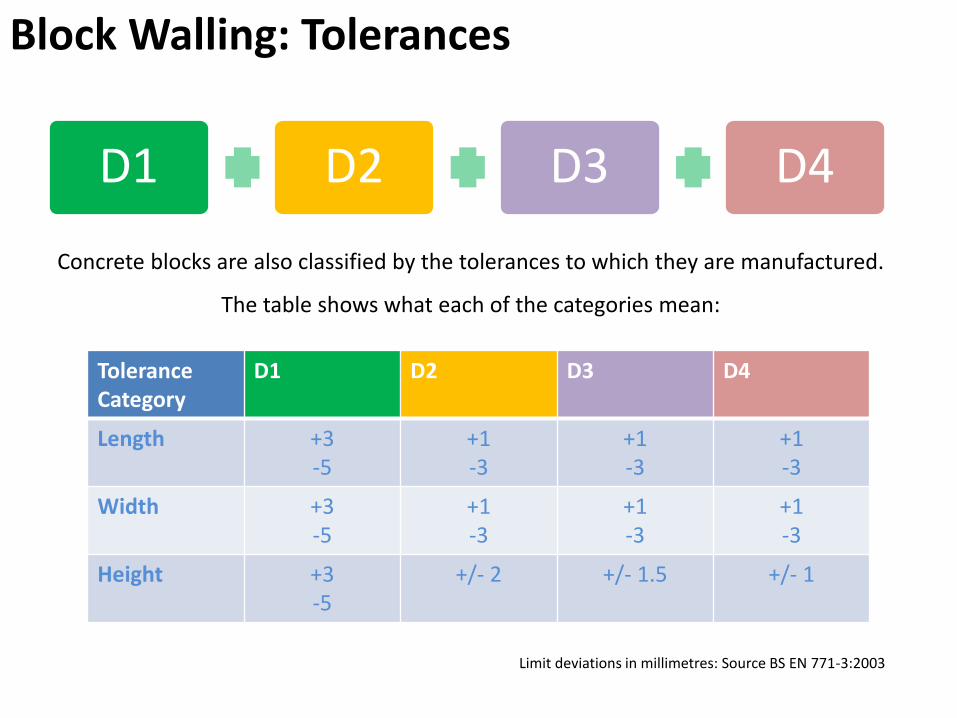
Block Walling: Tolerances
D1 D2 D3 D4
Concrete blocks are also classified by the tolerances to which they are manufactured.
The table shows what each of the categories mean:
Tolerance Category
D1 D2 D3 D4
Length +3-5
+1-3
+1-3
+1-3
Width +3-5
+1-3
+1-3
+1-3
Height +3-5
+/- 2 +/- 1.5 +/- 1
Limit deviations in millimetres: Source BS EN 771-3:2003
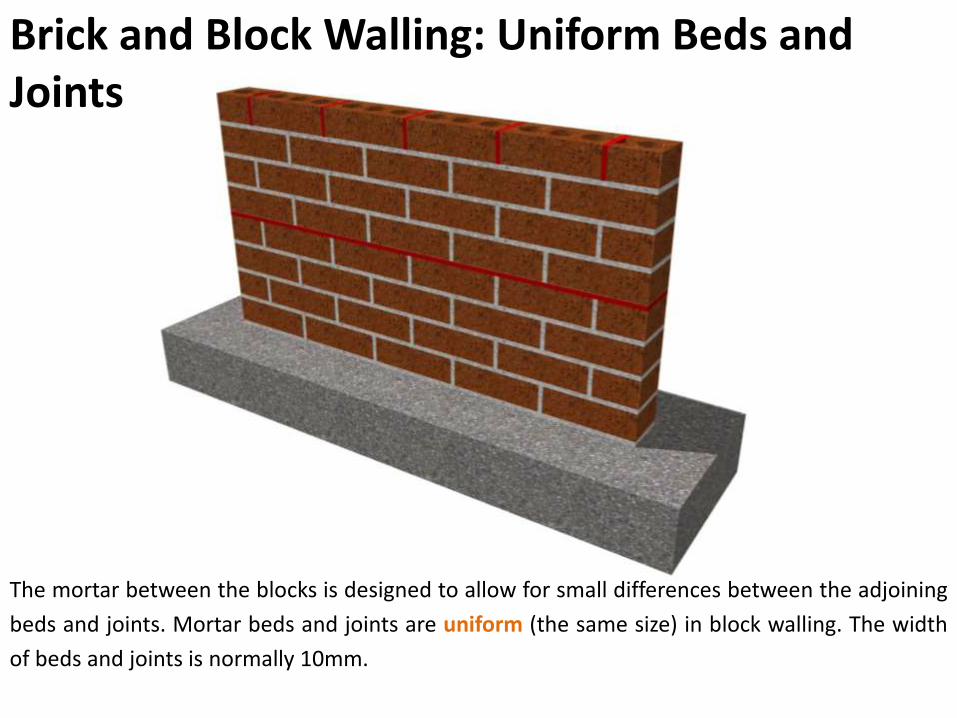
Brick and Block Walling: Uniform Beds and Joints
The mortar between the blocks is designed to allow for small differences between the adjoining
beds and joints. Mortar beds and joints are uniform (the same size) in block walling. The width
of beds and joints is normally 10mm.
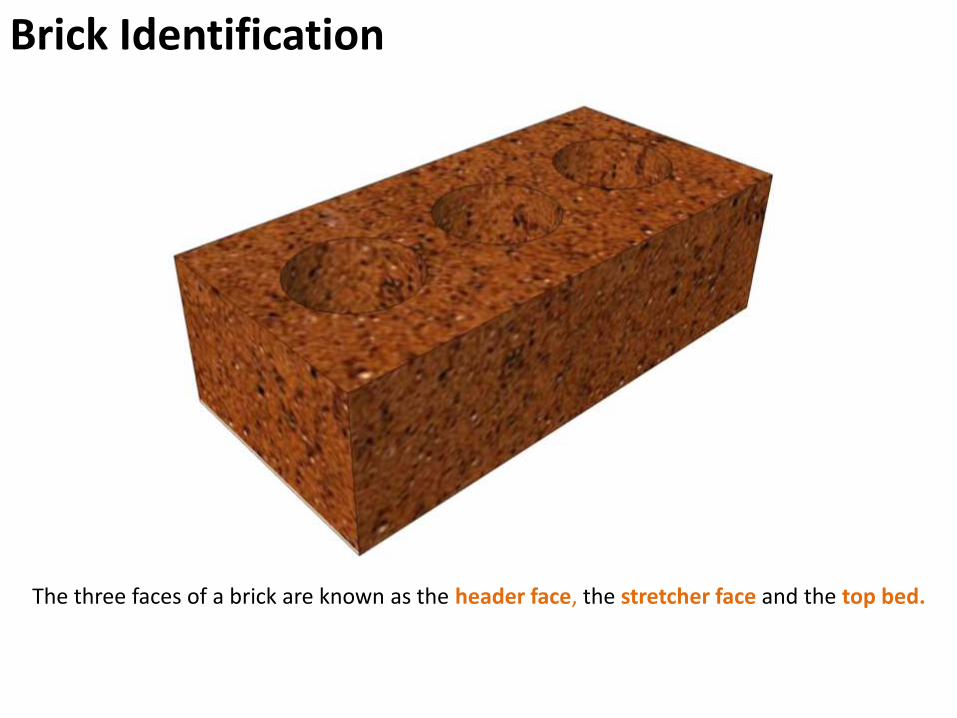
Brick Identification
The three faces of a brick are known as the header face, the stretcher face and the top bed.
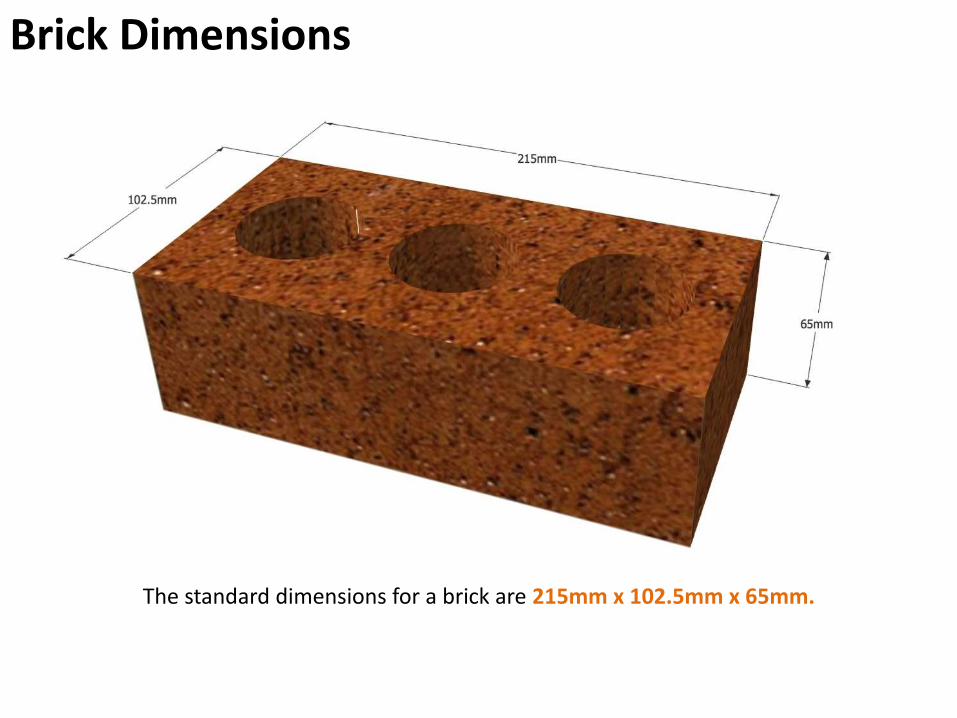
Brick Dimensions
The standard dimensions for a brick are 215mm x 102.5mm x 65mm.
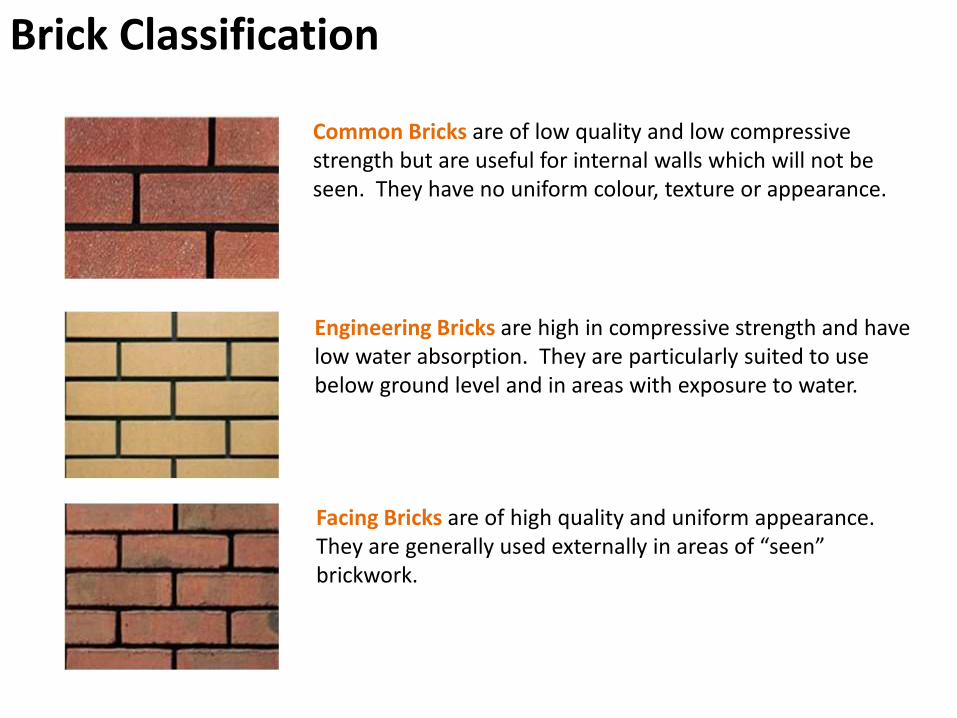
Brick Classification
Common Bricks are of low quality and low compressive strength but are useful for internal walls which will not be seen. They have no uniform colour, texture or appearance.
Facing Bricks are of high quality and uniform appearance. They are generally used externally in areas of “seen” brickwork.
Engineering Bricks are high in compressive strength and have low water absorption. They are particularly suited to use below ground level and in areas with exposure to water.
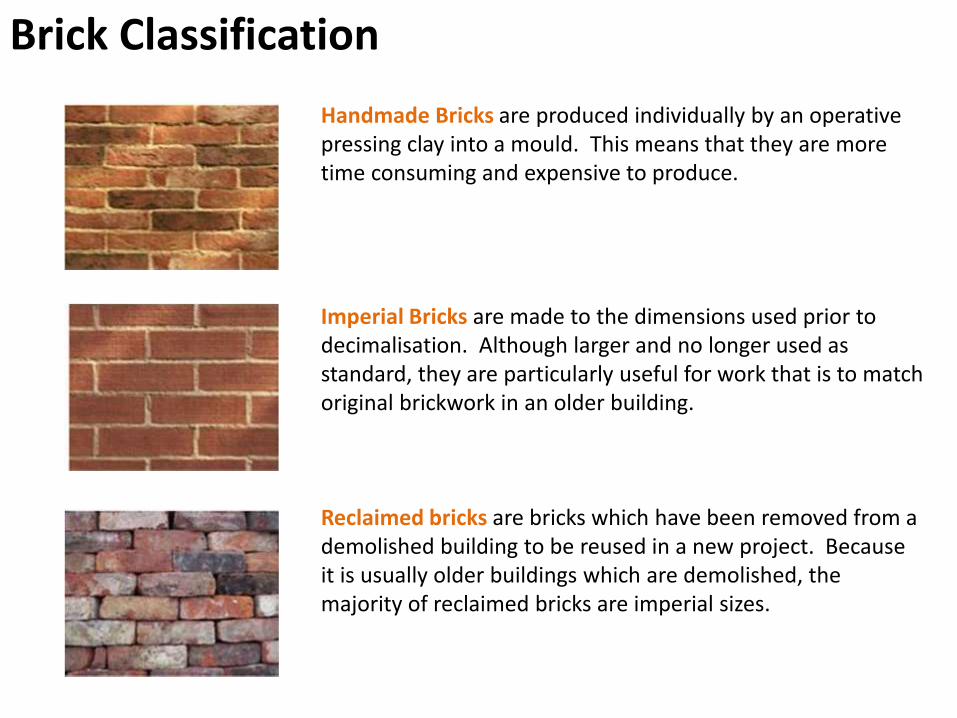
Brick Classification
Handmade Bricks are produced individually by an operative pressing clay into a mould. This means that they are more time consuming and expensive to produce.
Imperial Bricks are made to the dimensions used prior to decimalisation. Although larger and no longer used as standard, they are particularly useful for work that is to match original brickwork in an older building.
Reclaimed bricks are bricks which have been removed from a demolished building to be reused in a new project. Because it is usually older buildings which are demolished, the majority of reclaimed bricks are imperial sizes.
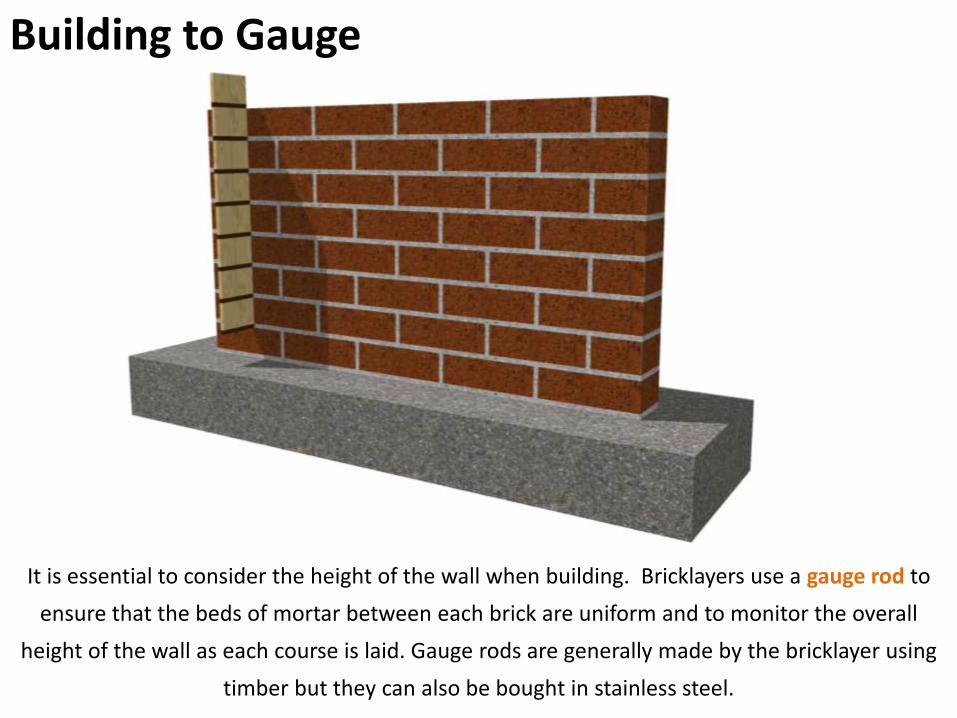
Building to Gauge
It is essential to consider the height of the wall when building. Bricklayers use a gauge rod to
ensure that the beds of mortar between each brick are uniform and to monitor the overall
height of the wall as each course is laid. Gauge rods are generally made by the bricklayer using
timber but they can also be bought in stainless steel.
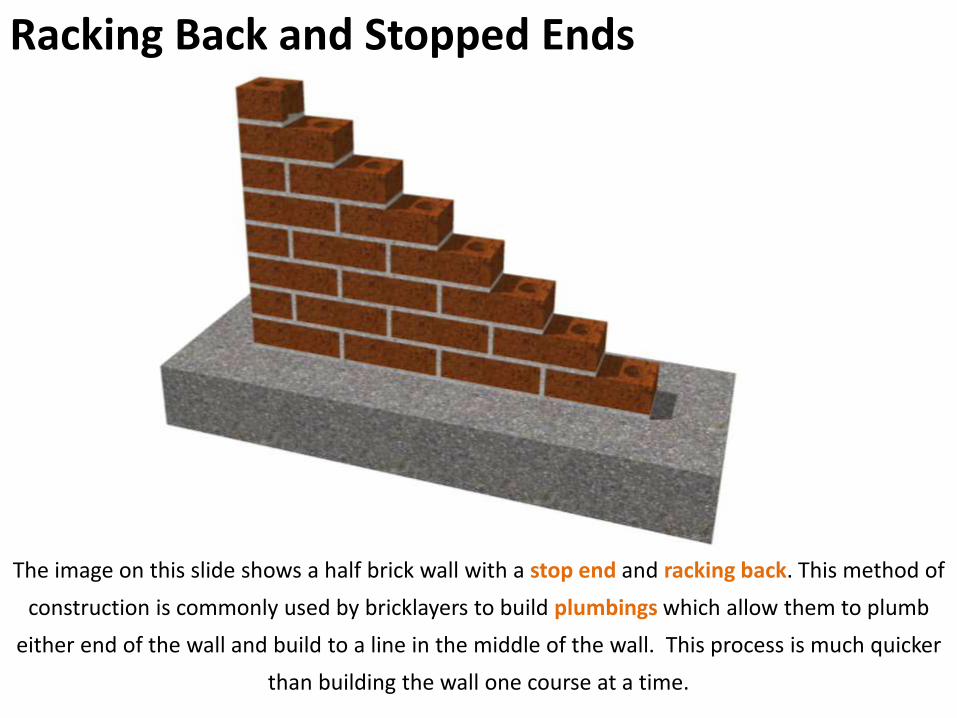
Racking Back and Stopped Ends
The image on this slide shows a half brick wall with a stop end and racking back. This method of
construction is commonly used by bricklayers to build plumbings which allow them to plumb
either end of the wall and build to a line in the middle of the wall. This process is much quicker
than building the wall one course at a time.
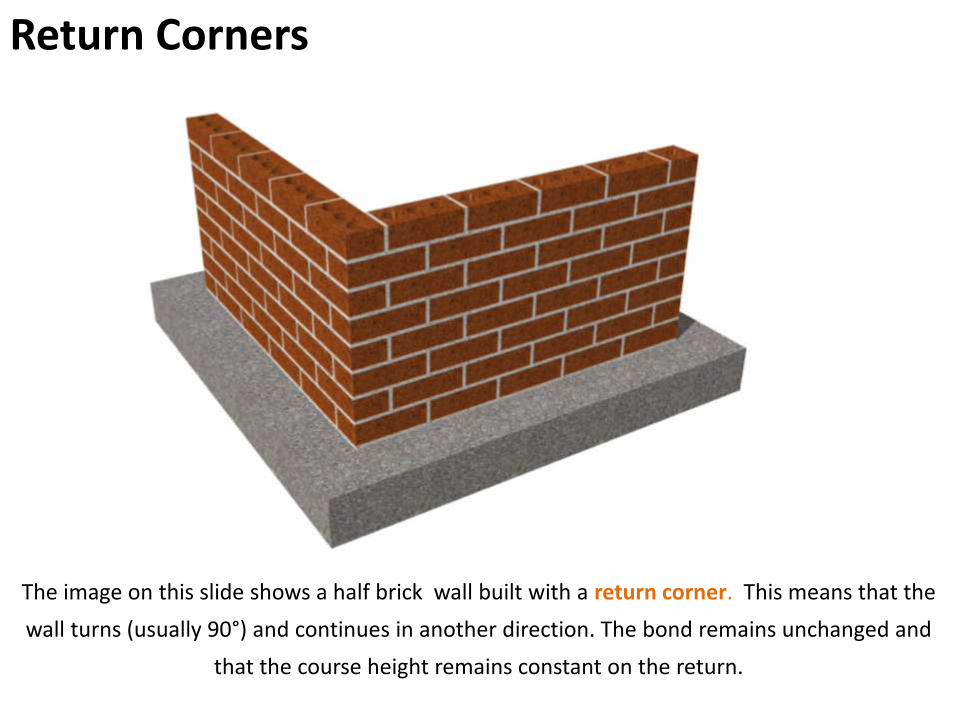
Return Corners
The image on this slide shows a half brick wall built with a return corner. This means that the
wall turns (usually 90°) and continues in another direction. The bond remains unchanged and
that the course height remains constant on the return.
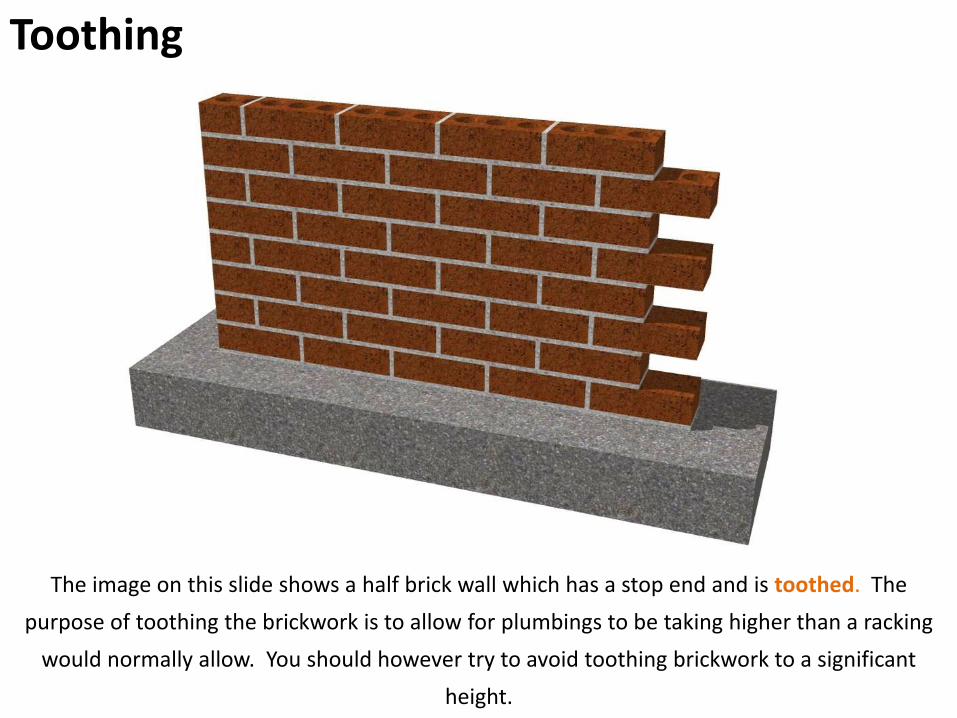
Toothing
The image on this slide shows a half brick wall which has a stop end and is toothed. The
purpose of toothing the brickwork is to allow for plumbings to be taking higher than a racking
would normally allow. You should however try to avoid toothing brickwork to a significant
height.
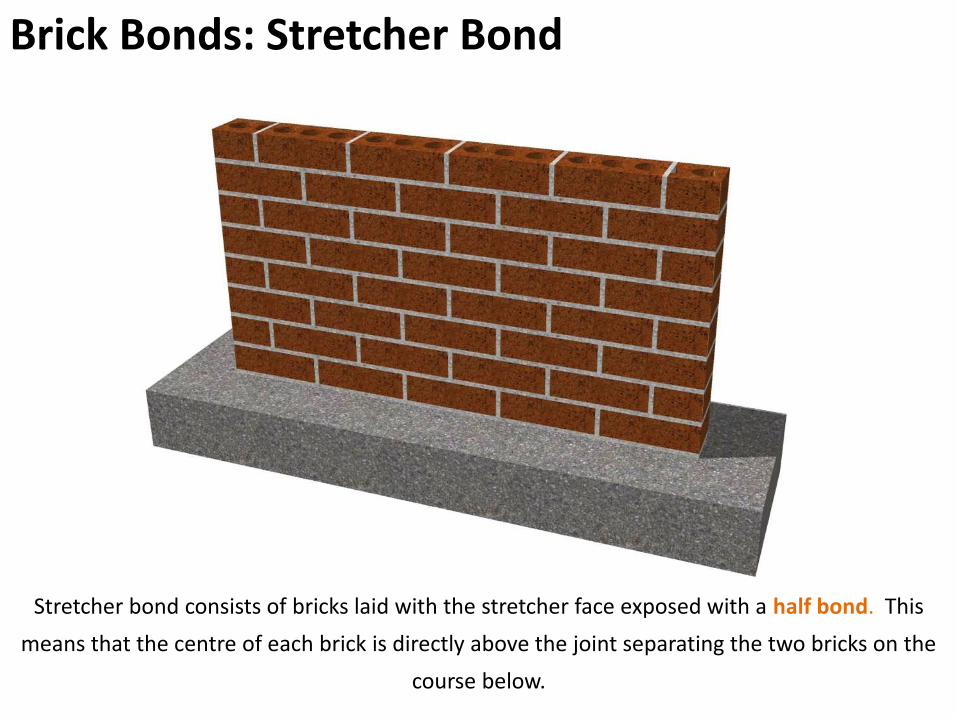
Brick Bonds: Stretcher Bond
Stretcher bond consists of bricks laid with the stretcher face exposed with a half bond. This
means that the centre of each brick is directly above the joint separating the two bricks on the
course below.
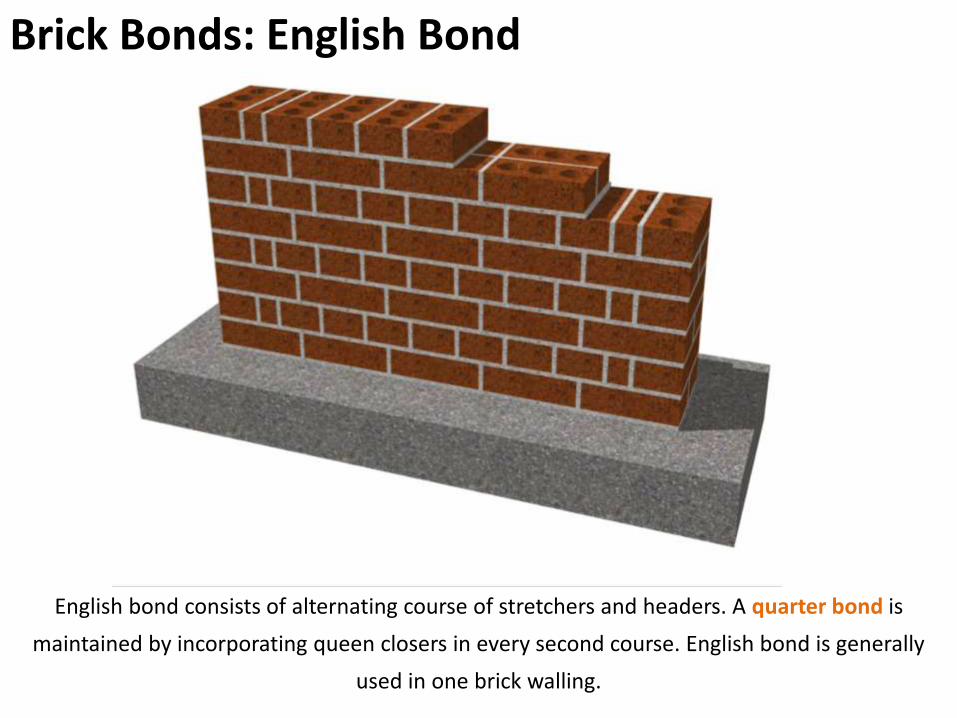
Brick Bonds: English Bond
English bond consists of alternating course of stretchers and headers. A quarter bond is
maintained by incorporating queen closers in every second course. English bond is generally
used in one brick walling.
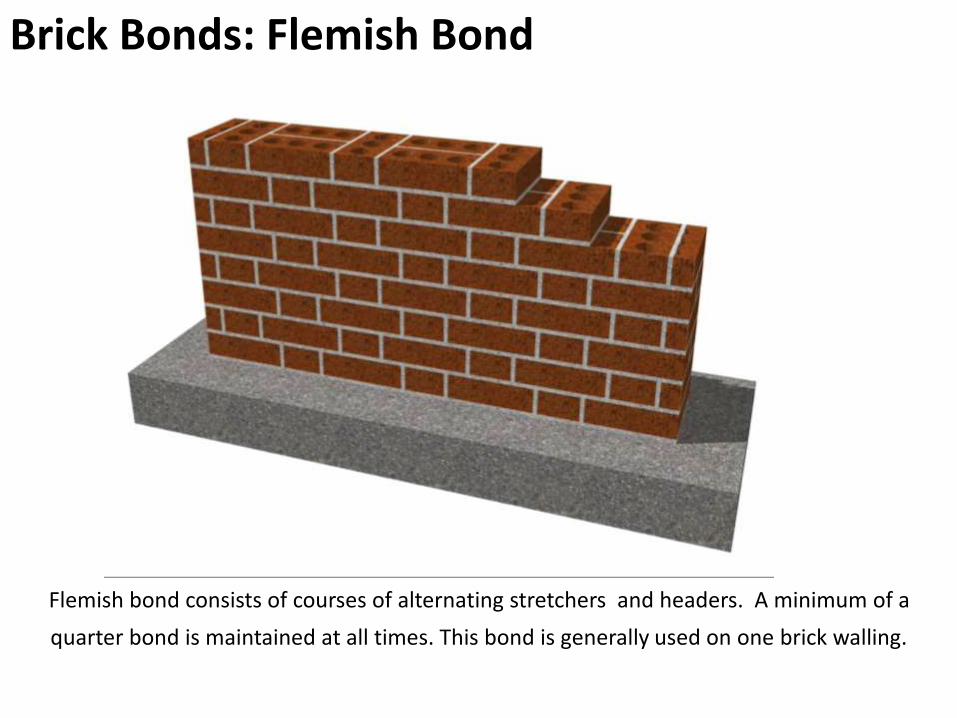
Brick Bonds: Flemish Bond
Flemish bond consists of courses of alternating stretchers and headers. A minimum of a
quarter bond is maintained at all times. This bond is generally used on one brick walling.
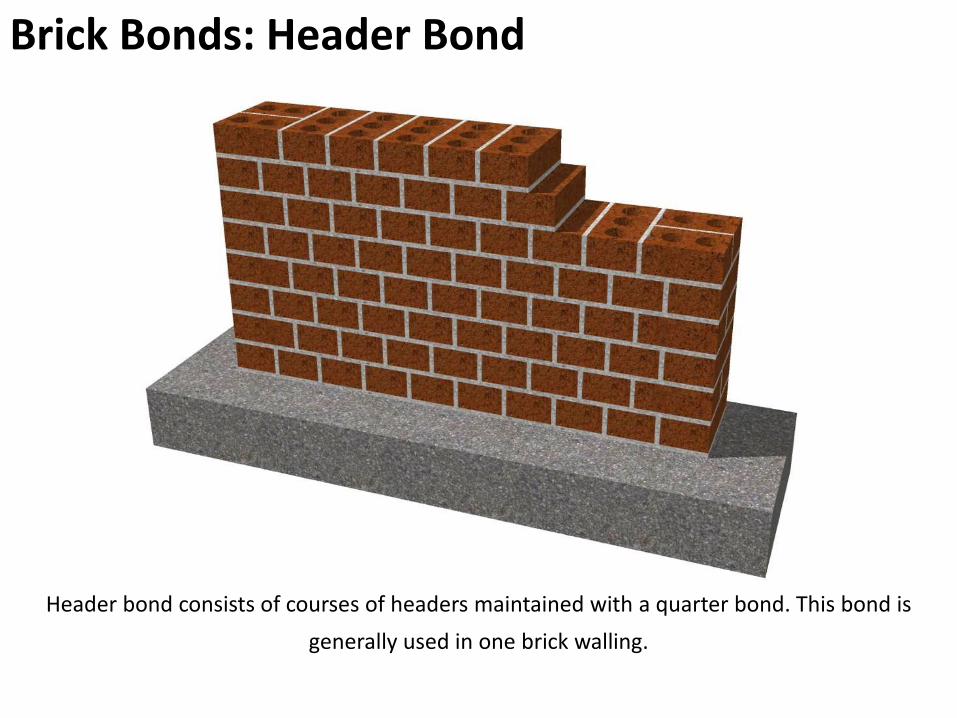
Brick Bonds: Header Bond
Header bond consists of courses of headers maintained with a quarter bond. This bond is
generally used in one brick walling.
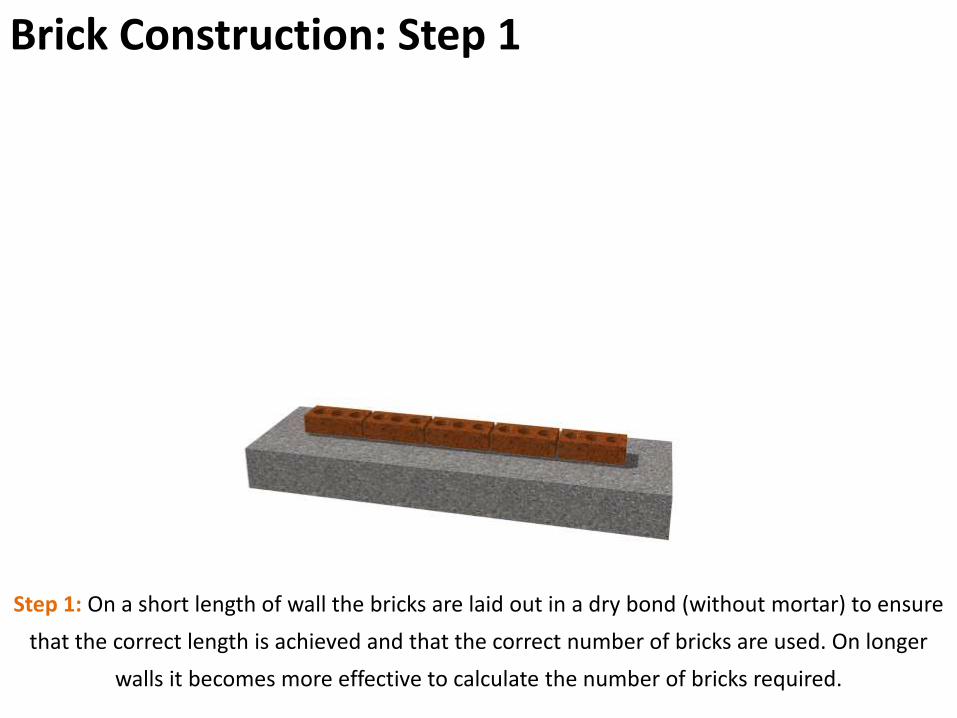
Brick Construction: Step 1
Step 1: On a short length of wall the bricks are laid out in a dry bond (without mortar) to ensure
that the correct length is achieved and that the correct number of bricks are used. On longer
walls it becomes more effective to calculate the number of bricks required.
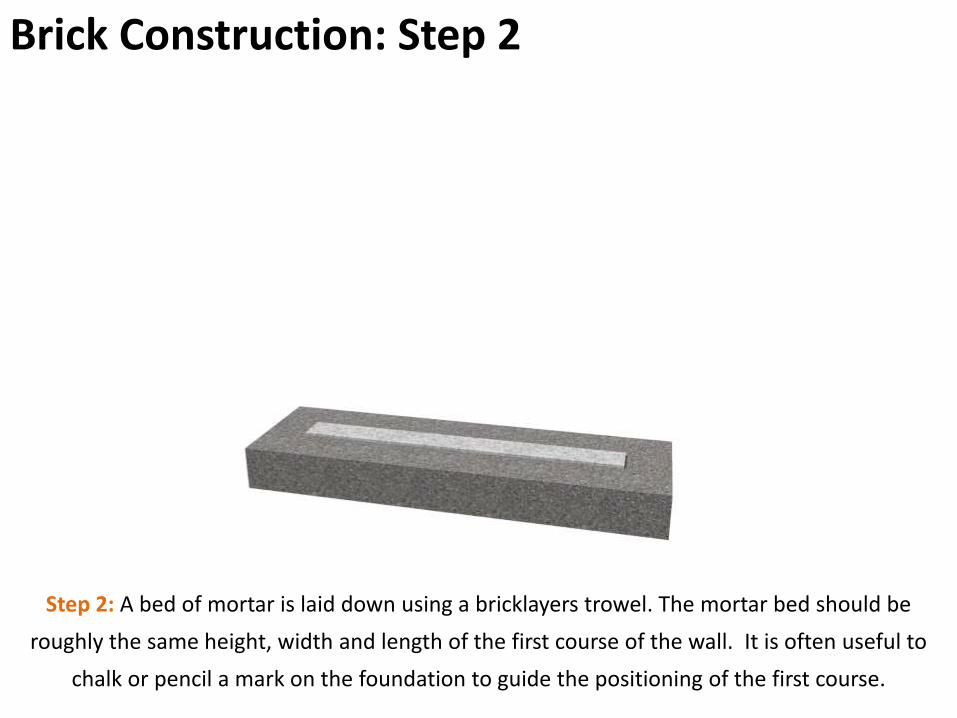
Brick Construction: Step 2
Step 2: A bed of mortar is laid down using a bricklayers trowel. The mortar bed should be
roughly the same height, width and length of the first course of the wall. It is often useful to
chalk or pencil a mark on the foundation to guide the positioning of the first course.
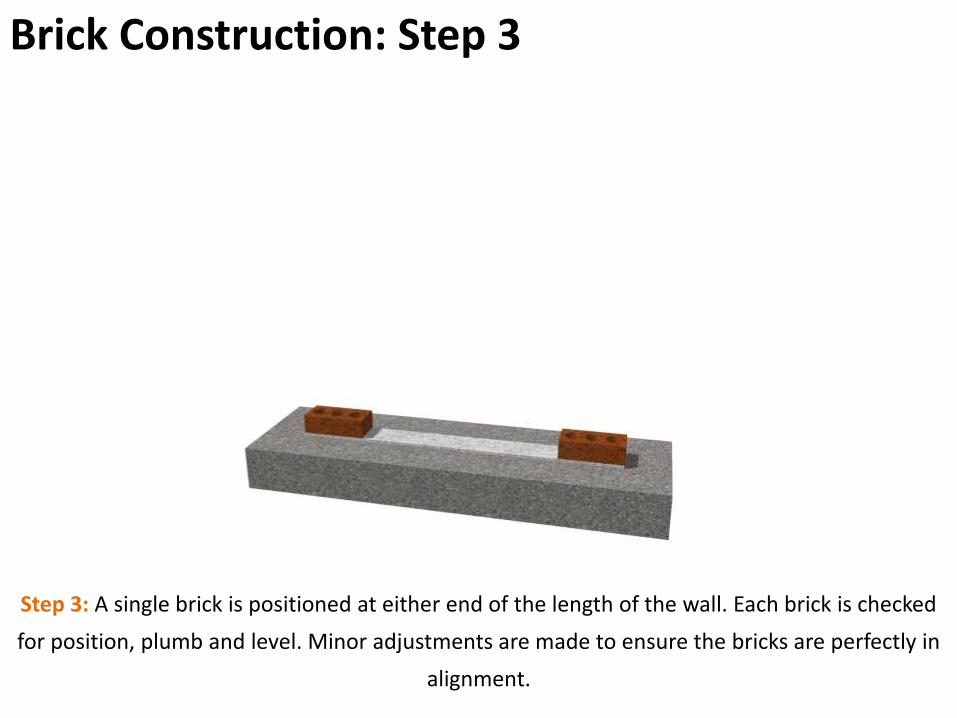
Brick Construction: Step 3
Step 3: A single brick is positioned at either end of the length of the wall. Each brick is checked
for position, plumb and level. Minor adjustments are made to ensure the bricks are perfectly in
alignment.
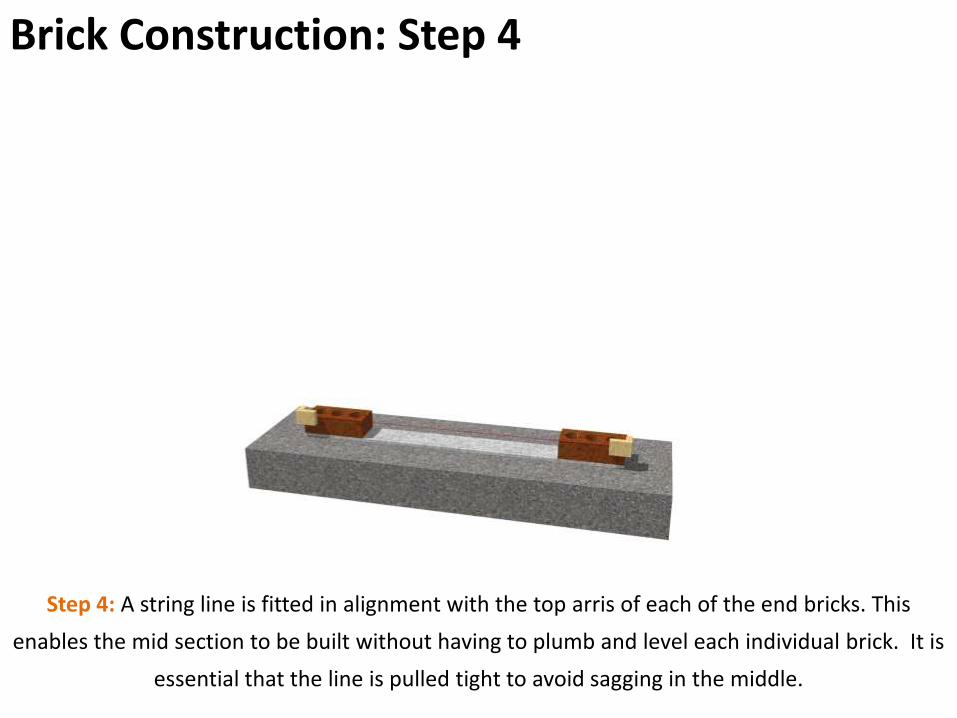
Brick Construction: Step 4
Step 4: A string line is fitted in alignment with the top arris of each of the end bricks. This
enables the mid section to be built without having to plumb and level each individual brick. It is
essential that the line is pulled tight to avoid sagging in the middle.
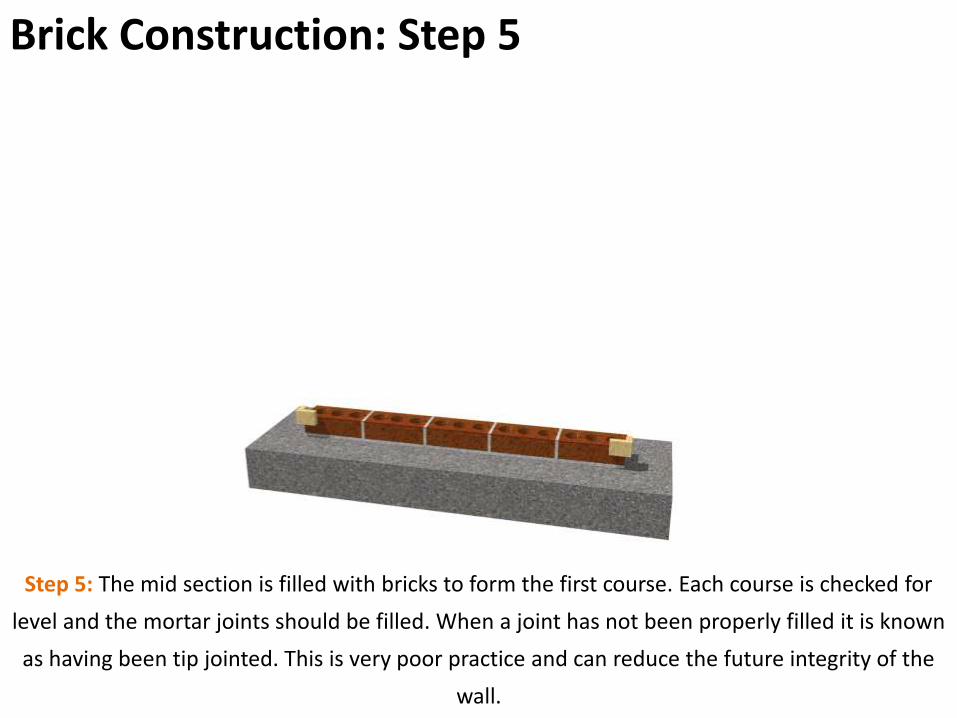
Brick Construction: Step 5
Step 5: The mid section is filled with bricks to form the first course. Each course is checked for
level and the mortar joints should be filled. When a joint has not been properly filled it is known
as having been tip jointed. This is very poor practice and can reduce the future integrity of the
wall.
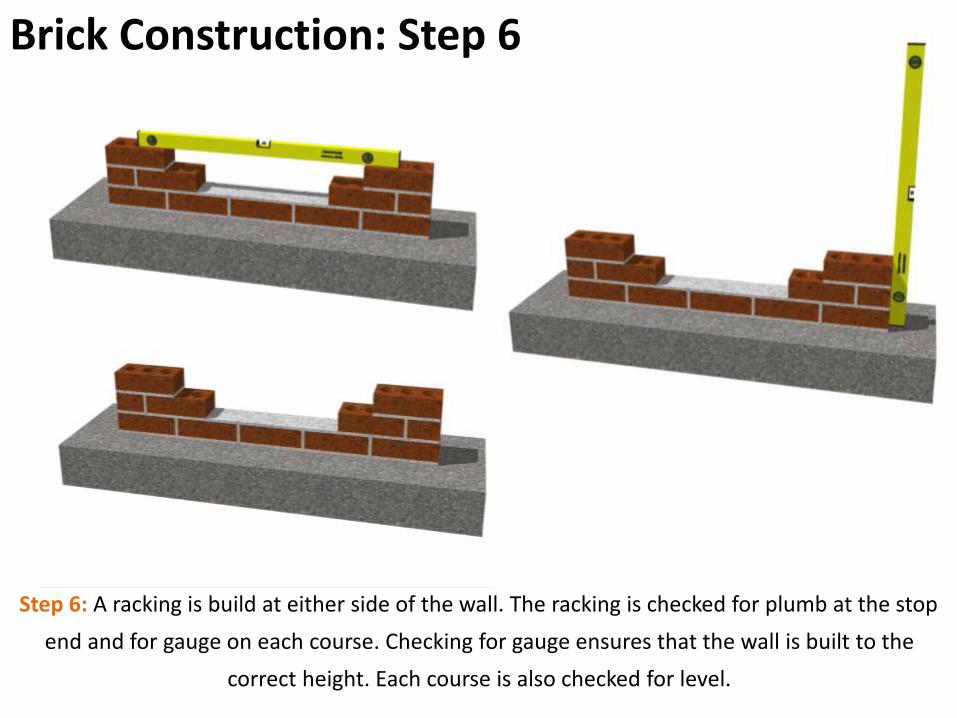
Brick Construction: Step 6
Step 6: A racking is build at either side of the wall. The racking is checked for plumb at the stop
end and for gauge on each course. Checking for gauge ensures that the wall is built to the
correct height. Each course is also checked for level.
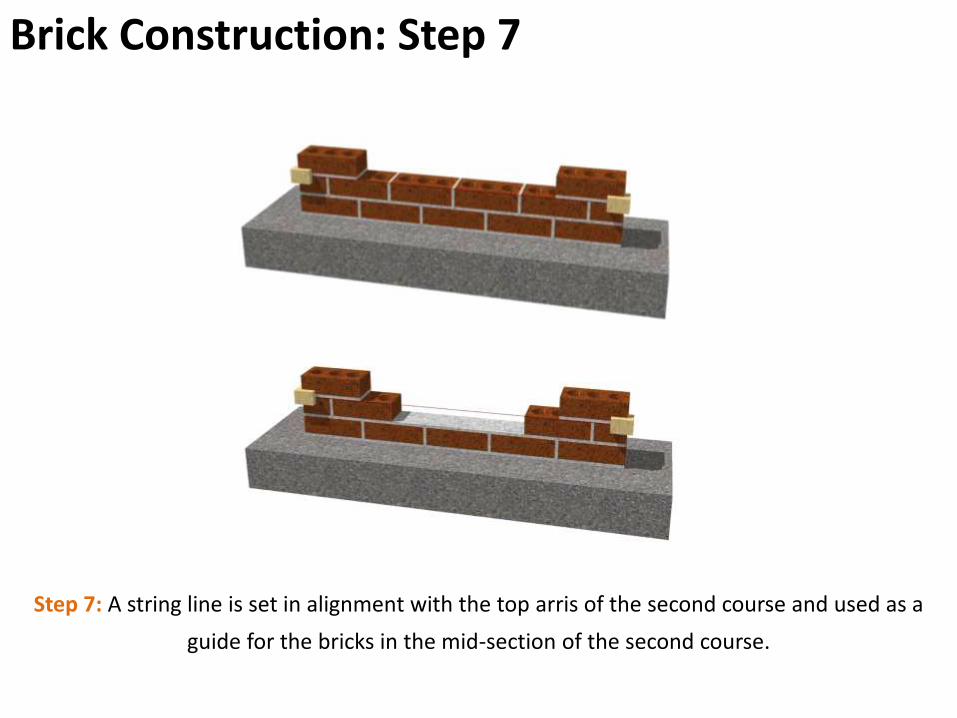
Brick Construction: Step 7
Step 7: A string line is set in alignment with the top arris of the second course and used as a
guide for the bricks in the mid-section of the second course.
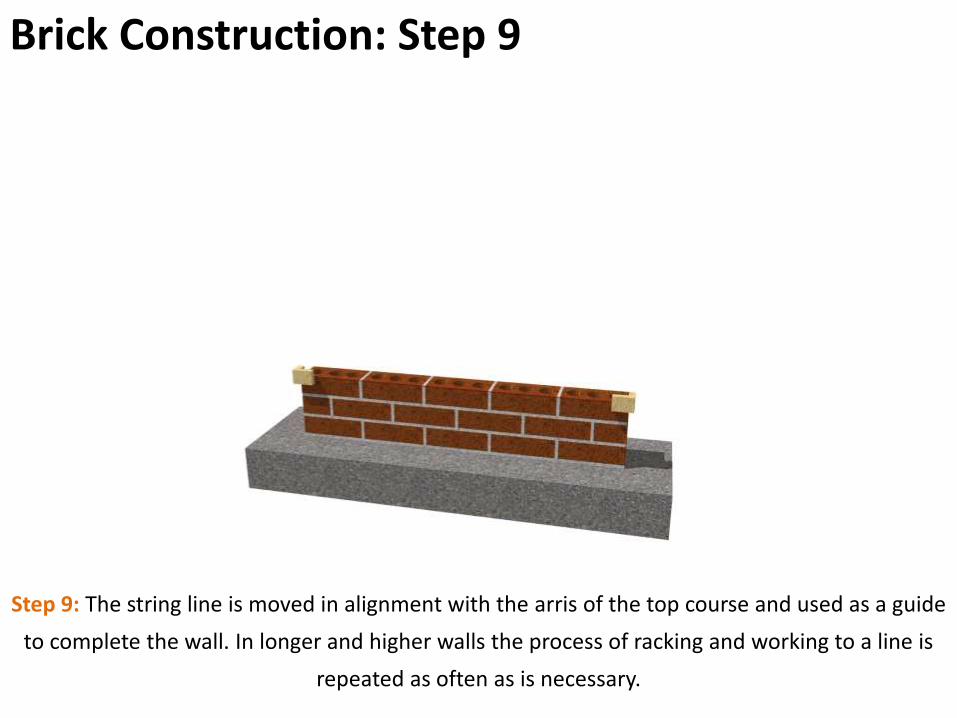
Brick Construction: Step 9
Step 9: The string line is moved in alignment with the arris of the top course and used as a guide
to complete the wall. In longer and higher walls the process of racking and working to a line is
repeated as often as is necessary.
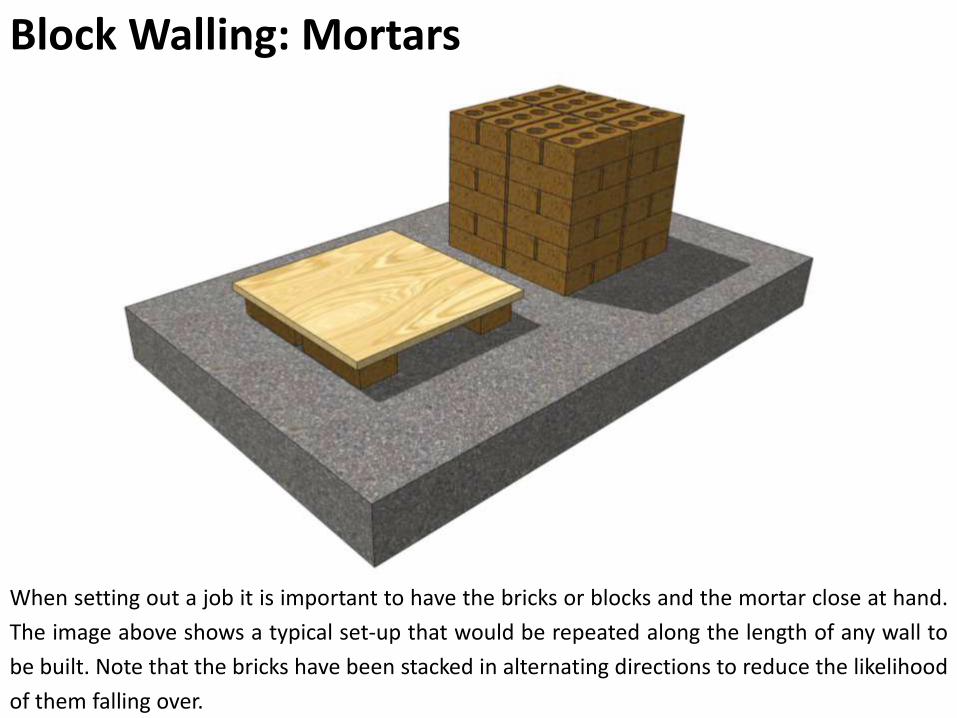
Block Walling: Mortars
When setting out a job it is important to have the bricks or blocks and the mortar close at hand.
The image above shows a typical set-up that would be repeated along the length of any wall to
be built. Note that the bricks have been stacked in alternating directions to reduce the likelihood
of them falling over.
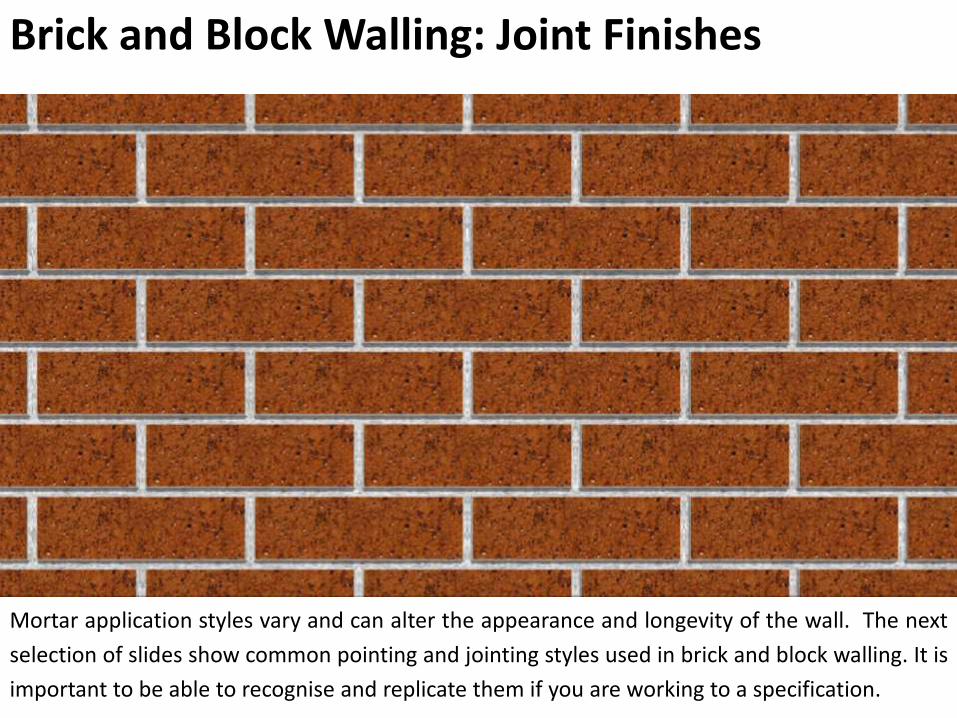
Brick and Block Walling: Joint Finishes
Mortar application styles vary and can alter the appearance and longevity of the wall. The next
selection of slides show common pointing and jointing styles used in brick and block walling. It is
important to be able to recognise and replicate them if you are working to a specification.
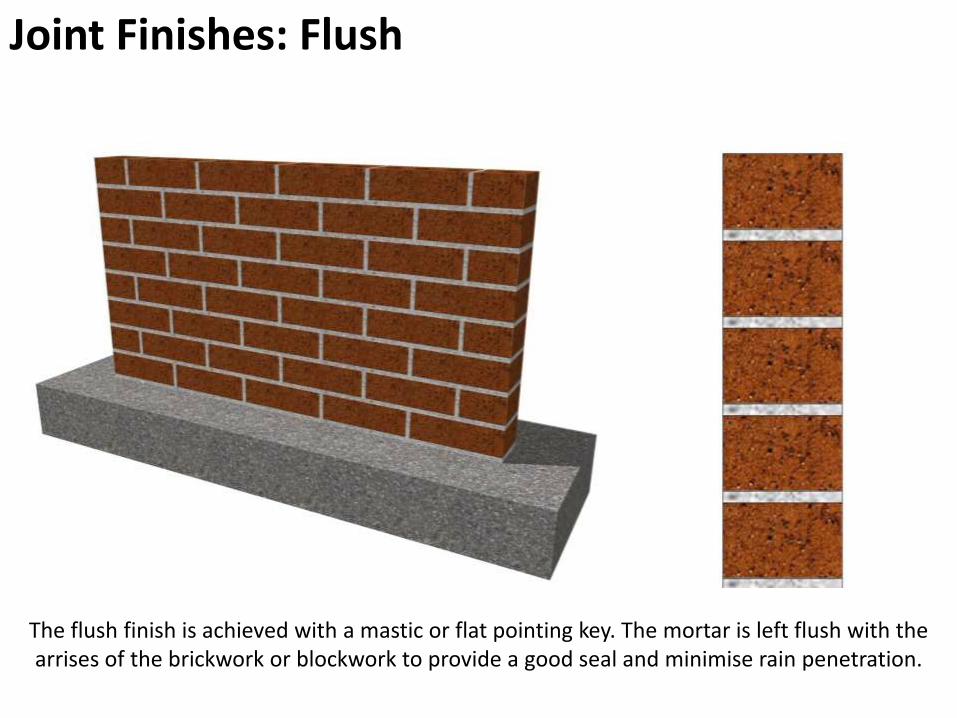
Joint Finishes: Flush
The flush finish is achieved with a mastic or flat pointing key. The mortar is left flush with the arrises of the brickwork or blockwork to provide a good seal and minimise rain penetration.
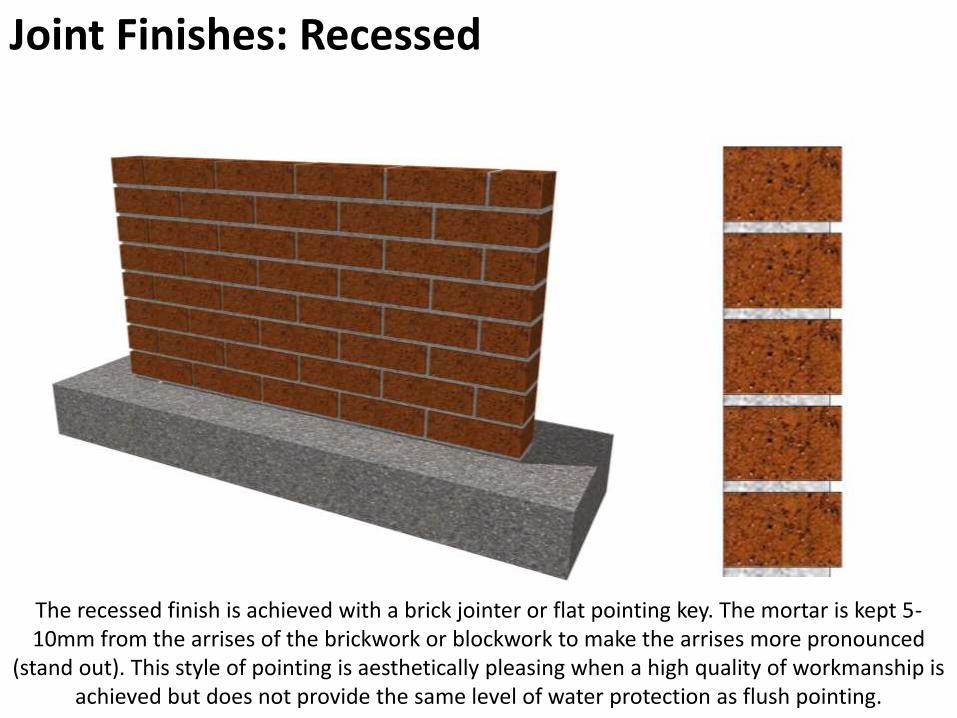
Joint Finishes: Recessed
The recessed finish is achieved with a brick jointer or flat pointing key. The mortar is kept 5-10mm from the arrises of the brickwork or blockwork to make the arrises more pronounced
(stand out). This style of pointing is aesthetically pleasing when a high quality of workmanship is achieved but does not provide the same level of water protection as flush pointing.
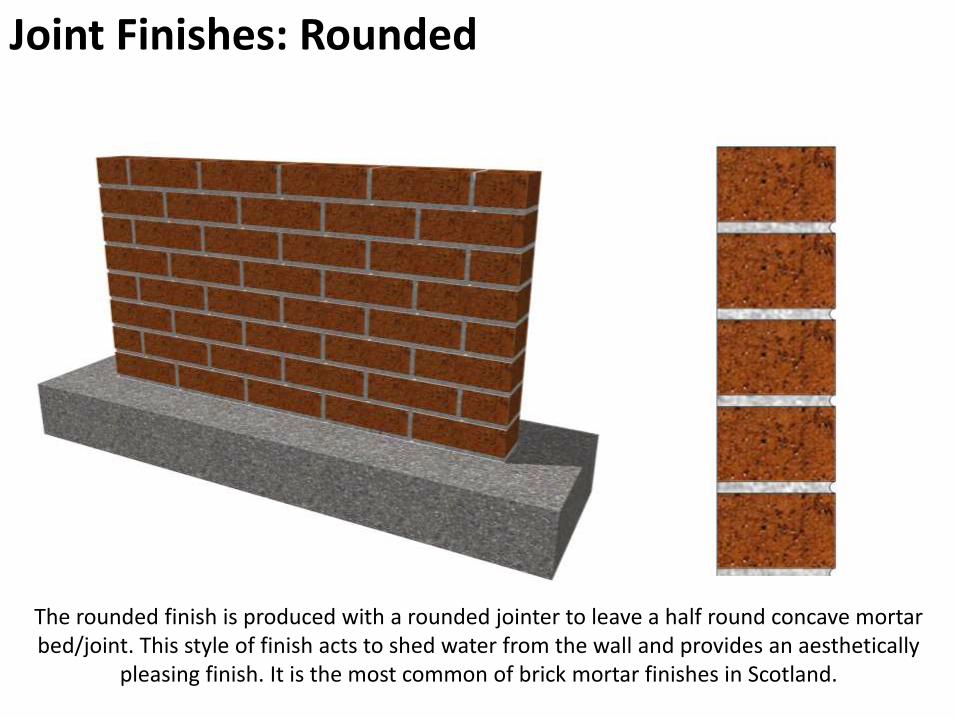
Joint Finishes: Rounded
The rounded finish is produced with a rounded jointer to leave a half round concave mortar bed/joint. This style of finish acts to shed water from the wall and provides an aesthetically
pleasing finish. It is the most common of brick mortar finishes in Scotland.
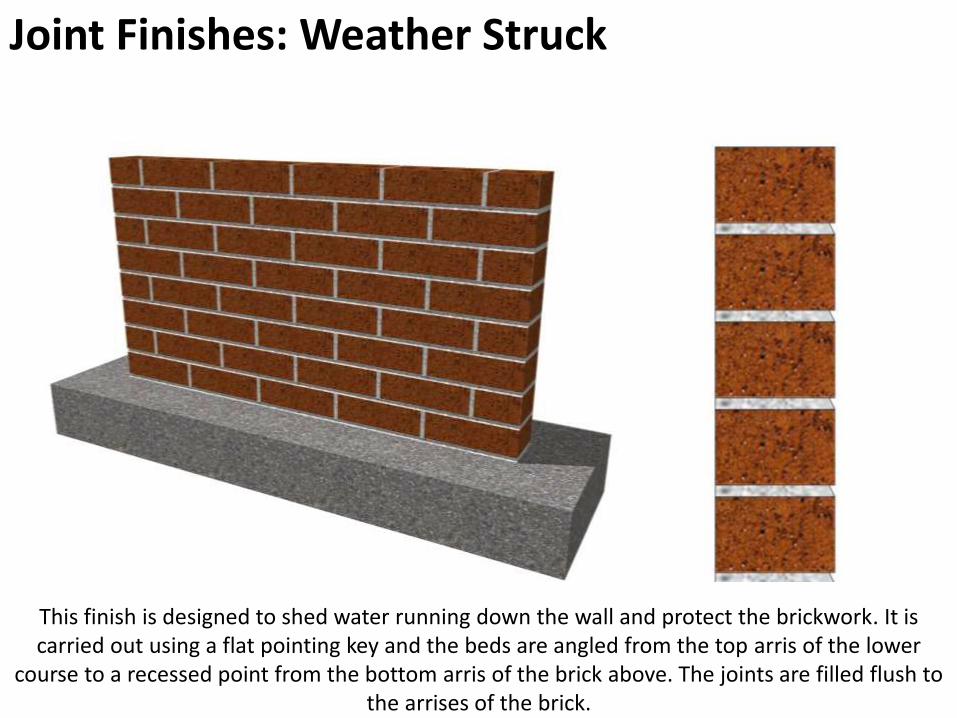
Joint Finishes: Weather Struck
This finish is designed to shed water running down the wall and protect the brickwork. It is carried out using a flat pointing key and the beds are angled from the top arris of the lower
course to a recessed point from the bottom arris of the brick above. The joints are filled flush to the arrises of the brick.
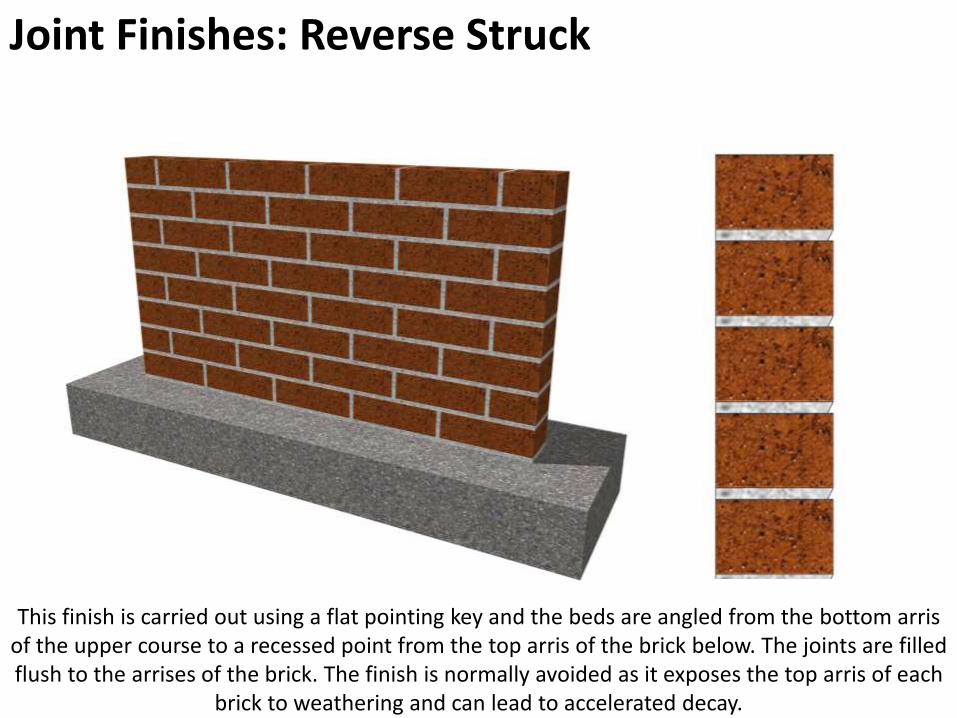
Joint Finishes: Reverse Struck
This finish is carried out using a flat pointing key and the beds are angled from the bottom arrisof the upper course to a recessed point from the top arris of the brick below. The joints are filled flush to the arrises of the brick. The finish is normally avoided as it exposes the top arris of each
brick to weathering and can lead to accelerated decay.