Embed Size (px)
Citation preview

1
UML Modelling with
with NetBeans IDE
Mark Burleigh
January 2010
2
Notes
This usual manual has been based on the tutorial notes from the official Java tutorial. That tutorial is
available on Sun’s website. The screenshots in this manual may not be exactly as on the computer
screen, however, ask the lab tutors if you have any problems. If you intend to further your interest in
software development using the Java language, I would strongly recommend that you download the
entire Java tutorial from Sun website.
It has fully compiled code examples on each and every java topic. (Remove the package in each
example first!) The downloadable Java tutorial enables you to engage in referenced based
programming where the developer can build his application directly on the in-depth examples. I
would consider this approach to programming by far the most direct form of software applications
development where a developer learns while developing. There is an option to download the entire
Official tutorial. If you need help in finding the location, let me know.
NetBeans IDE is available free from Sun’s website. It compliments TogetherSoft IDE in the fact that
the NetBeans GUI generator and code editor components are more advanced than the TogetherSoft
IDE version available in your lab. However, TogetherSoft is a very good at depicting the high level
architecture of a system e.g. component modelling, conceptual modelling, collaboration modelling,
sequence modelling and UML modelling. Effectively describing the high level architecture of a system
is probably the most important aspect of any project. It is essential for both customers and indeed all
actors of the systems. Take note of this advice when writing one’s report.
3
Table of Contents
Chapter 1: Getting Started......................................................................................................................... 4
Learning Swing with the NetBeans IDE ............................................................................................... 4
Setting up the CelsiusConverter Project ............................................................................................... 5
Step 1: Create a New Project ................................................................................................................ 6
Step 2: Choose General -> Java Application ........................................................................................ 6
Step 3: Set a Project Name .................................................................................................................... 7
Step 4: Add a JFrame Form .................................................................................................................. 9
Step 5: Name the GUI Class ................................................................................................................. 9
Chapter 2: NetBeans IDE Basics ............................................................................................................ 12
The Palette........................................................................................................................................... 12
The Design Area ................................................................................................................................. 13
The Property Editor ............................................................................................................................. 14
The Inspector....................................................................................................................................... 15
Chapter 3: Creating the CelsiusConverter .............................................................................................. 16
Step 1: Set the Title ............................................................................................................................. 16
Step 2: Add a JTextField ..................................................................................................................... 17
Step 3: Add a JLabel ........................................................................................................................... 18
Step 4: Add a JButton ......................................................................................................................... 19
Step 5: Add a Second JLabel .......................................................................................................... 20
Chapter 4: Adjusting the CelsiusConverter GUI .................................................................................... 21
Step 1: Set the Component Text ..................................................................................................... 21
Step 2: Set the Component Size .......................................................................................................... 22
Step 3: Remove Extra Space ............................................................................................................... 23
Chapter 5: Adding Application Logic ..................................................................................................... 25
Step 1: Change the Default Variable Names ...................................................................................... 25
Step 2: Register the Event Listeners ................................................................................................... 26
Step 3: Add the Temperature Conversion Code ................................................................................. 28
Step 4: Run the Application ................................................................................................................ 28
4
1 Getting Started
This Chapter shows how to launch Sun’s NetBeans IDE from the start menu of windows and it also
shows how to create and save a project.
Learning Swing with the NetBeans IDE
This lesson provides an introduction to Graphical User Interface (GUI) programming with Swing and
the NetBeans IDE. The NetBeans IDE is a free, open-source, cross-platform integrated development
environment with built-in support for the Java programming language. It offers many advantages over
coding with a text editor; we recommend its use whenever possible. If you have not yet read the above
lesson, please take a moment to do so now. It provides valuable information about downloading and
installing the JDK and NetBeans IDE.
Chapter 1: Getting Started
5
The goal of this lesson is to introduce the Swing API by designing a simple
application that converts temperature from Celsius to Fahrenheit. Its GUI will be
basic, focusing on only a subset of the available Swing components. We will use the
NetBeans IDE GUI builder, which makes user interface creation a simple matter of
drag and drop. Its automatic code generation feature simplifies the GUI development
process, letting you focus on the application logic instead of the underlying
infrastructure.
Because this lesson is a step-by-step checklist of specific actions to take, we
recommend that you run the NetBeans IDE and perform each step as you read along.
This will be the quickest and easiest way to begin programming with Swing. If you
are unable to do so, simply reading along should still be useful, since each step is
illustrated with screenshots.
If you prefer the traditional approach of programming each component manually
(without the assistance of an IDE), think of this lesson as an entry point into the
lower-level discussions already provided elsewhere in the tutorial. Hyperlinks in each
discussion will take you to related lessons, should you wish to learn such lower-level
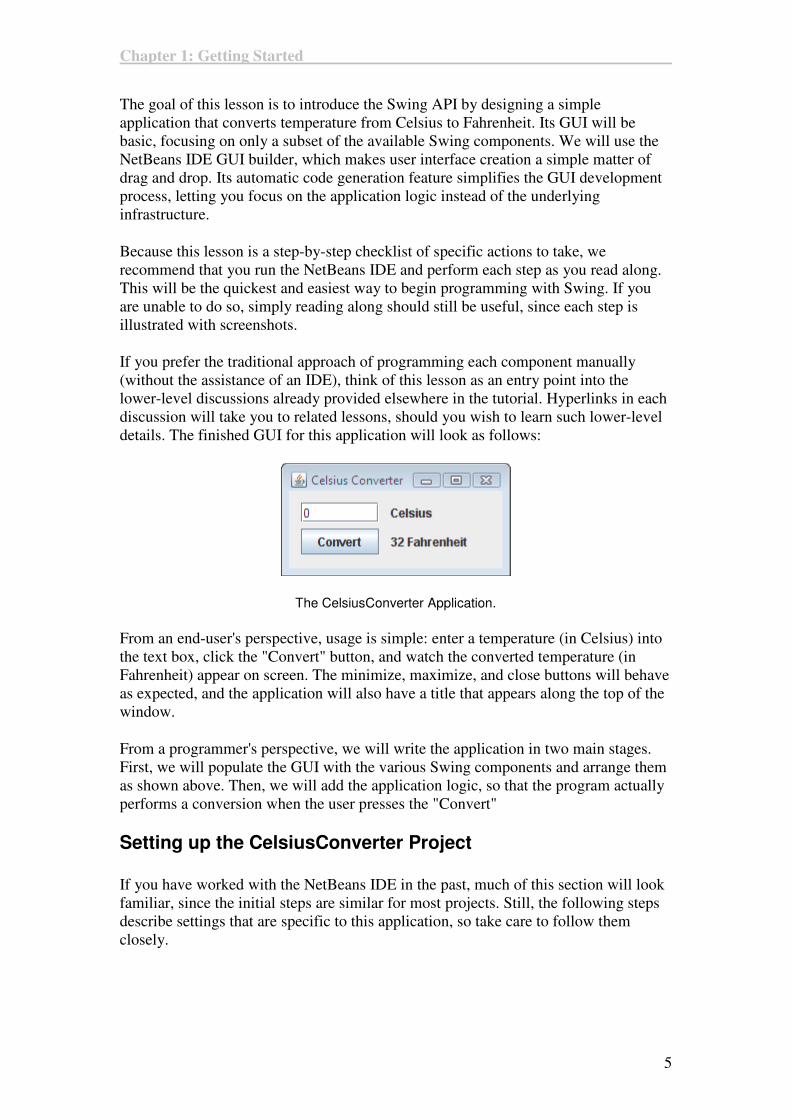
details. The finished GUI for this application will look as follows:
The CelsiusConverter Application.
From an end-user's perspective, usage is simple: enter a temperature (in Celsius) into
the text box, click the "Convert" button, and watch the converted temperature (in
Fahrenheit) appear on screen. The minimize, maximize, and close buttons will behave
as expected, and the application will also have a title that appears along the top of the
window.
From a programmer's perspective, we will write the application in two main stages.
First, we will populate the GUI with the various Swing components and arrange them
as shown above. Then, we will add the application logic, so that the program actually
performs a conversion when the user presses the "Convert"
Setting up the CelsiusConverter Project
If you have worked with the NetBeans IDE in the past, much of this section will look
familiar, since the initial steps are similar for most projects. Still, the following steps
describe settings that are specific to this application, so take care to follow them
closely.
Chapter 1: Getting Started
6
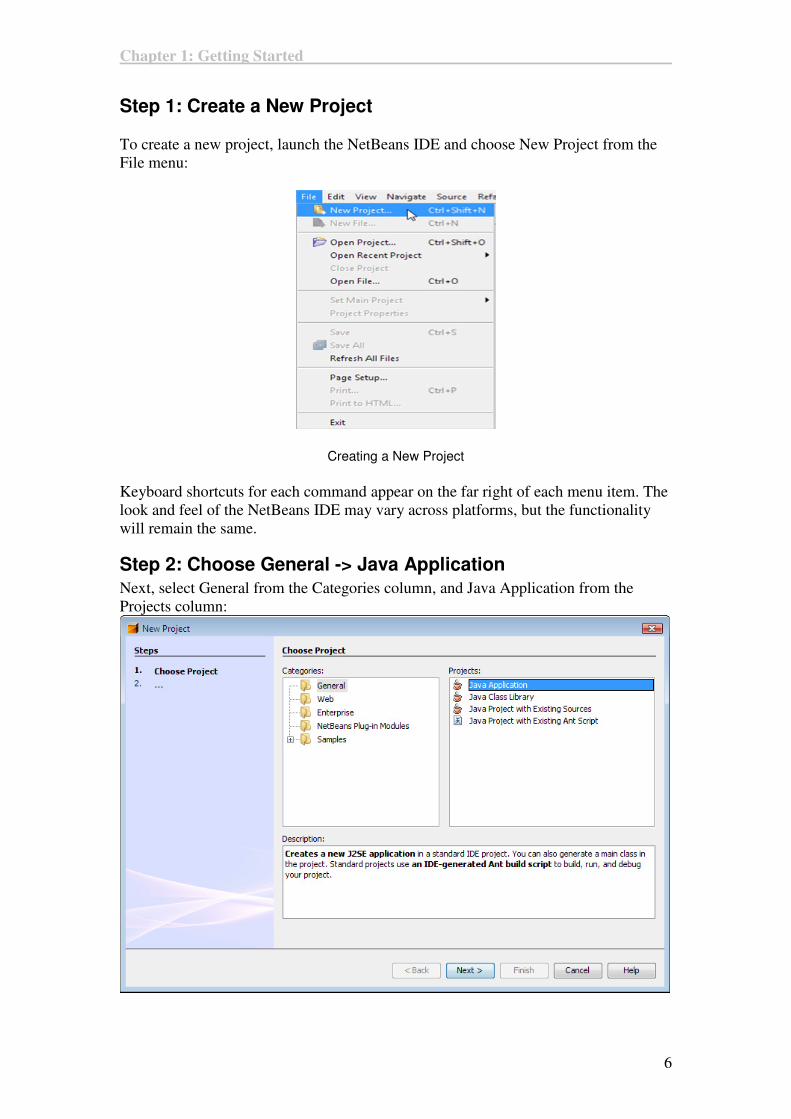
Step 1: Create a New Project
To create a new project, launch the NetBeans IDE and choose New Project from the
File menu:
Creating a New Project
Keyboard shortcuts for each command appear on the far right of each menu item. The
look and feel of the NetBeans IDE may vary across platforms, but the functionality
will remain the same.
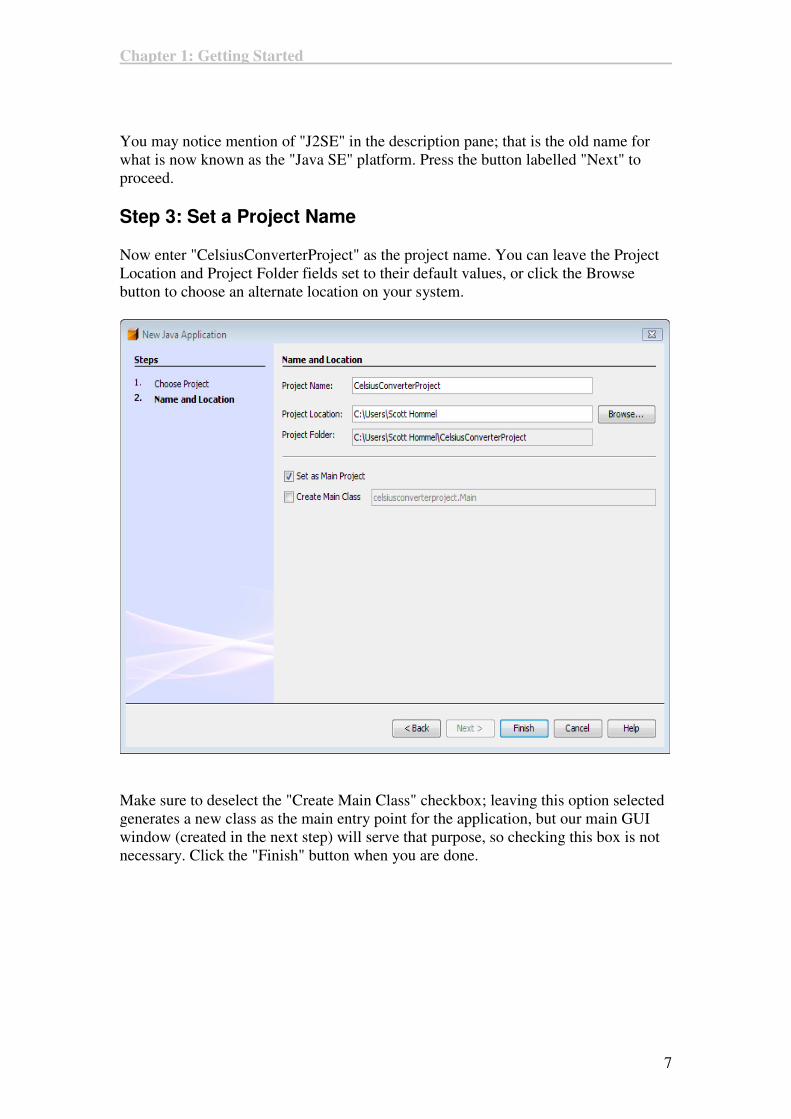
Step 2: Choose General -> Java Application
Next, select General from the Categories column, and Java Application from the
Projects column:
Chapter 1: Getting Started
7
You may notice mention of "J2SE" in the description pane; that is the old name for
what is now known as the "Java SE" platform. Press the button labelled "Next" to
proceed.
Step 3: Set a Project Name
Now enter "CelsiusConverterProject" as the project name. You can leave the Project
Location and Project Folder fields set to their default values, or click the Browse
button to choose an alternate location on your system.
Make sure to deselect the "Create Main Class" checkbox; leaving this option selected
generates a new class as the main entry point for the application, but our main GUI
window (created in the next step) will serve that purpose, so checking this box is not
necessary. Click the "Finish" button when you are done.
Chapter 1: Getting Started
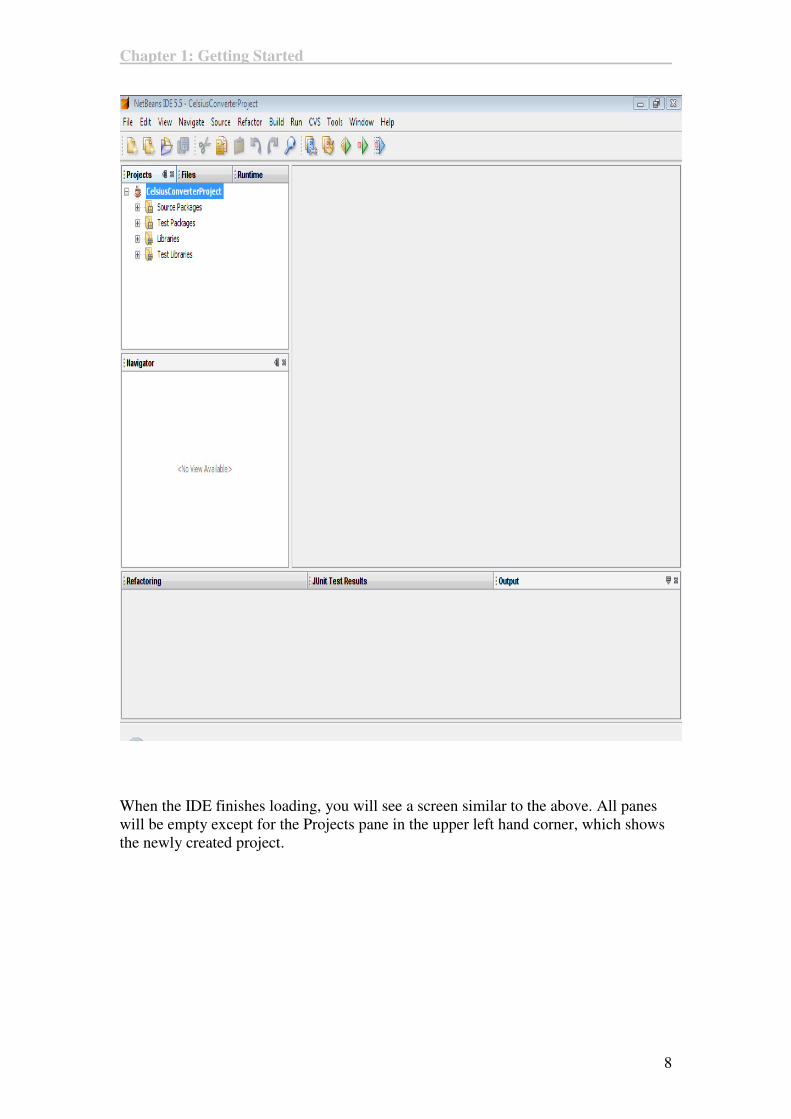
8
When the IDE finishes loading, you will see a screen similar to the above. All panes
will be empty except for the Projects pane in the upper left hand corner, which shows
the newly created project.
Chapter 1: Getting Started
9
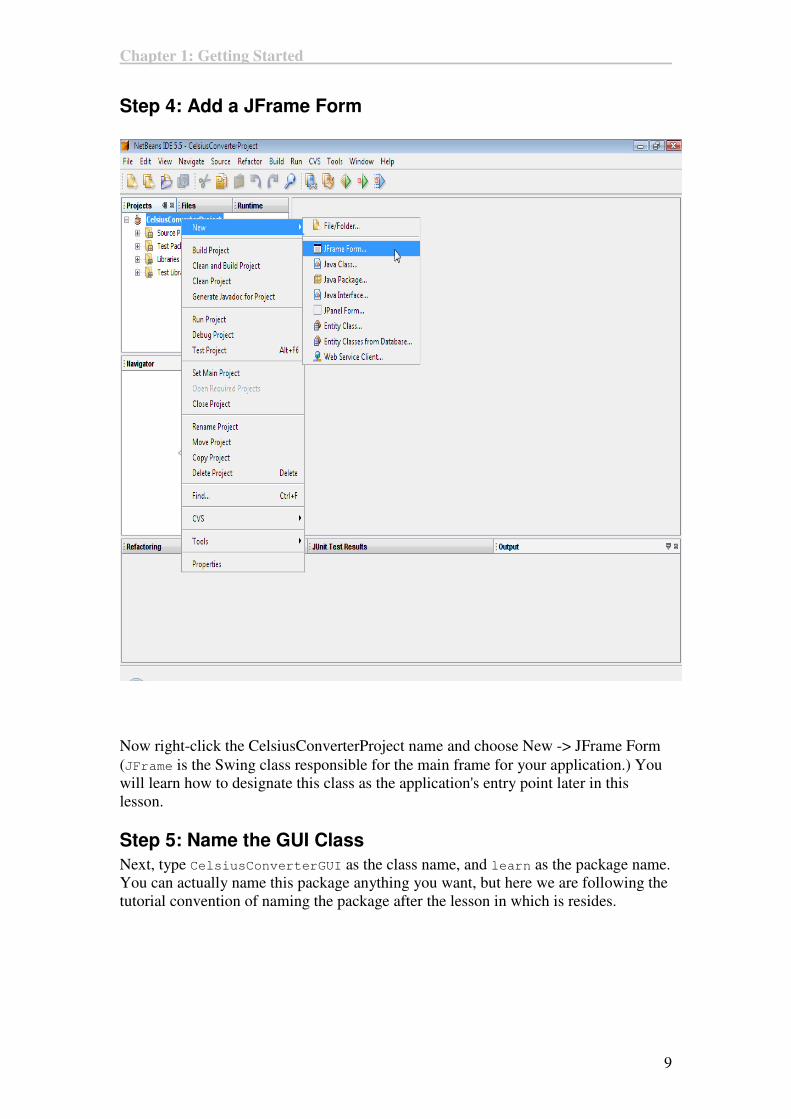
Step 4: Add a JFrame Form
Now right-click the CelsiusConverterProject name and choose New -> JFrame Form
(JFrame is the Swing class responsible for the main frame for your application.) You
will learn how to designate this class as the application's entry point later in this
lesson.
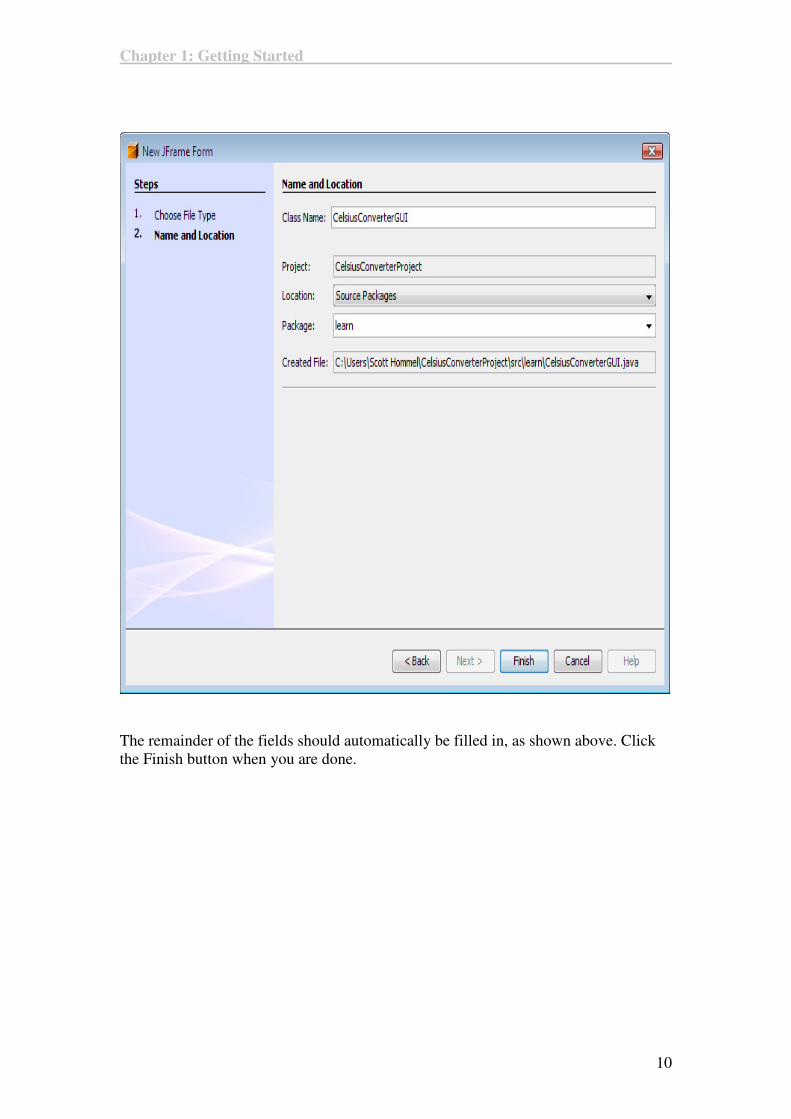
Step 5: Name the GUI Class
Next, type CelsiusConverterGUI as the class name, and learn as the package name.
You can actually name this package anything you want, but here we are following the
tutorial convention of naming the package after the lesson in which is resides.
Chapter 1: Getting Started
10
The remainder of the fields should automatically be filled in, as shown above. Click
the Finish button when you are done.
Chapter 1: Getting Started
11
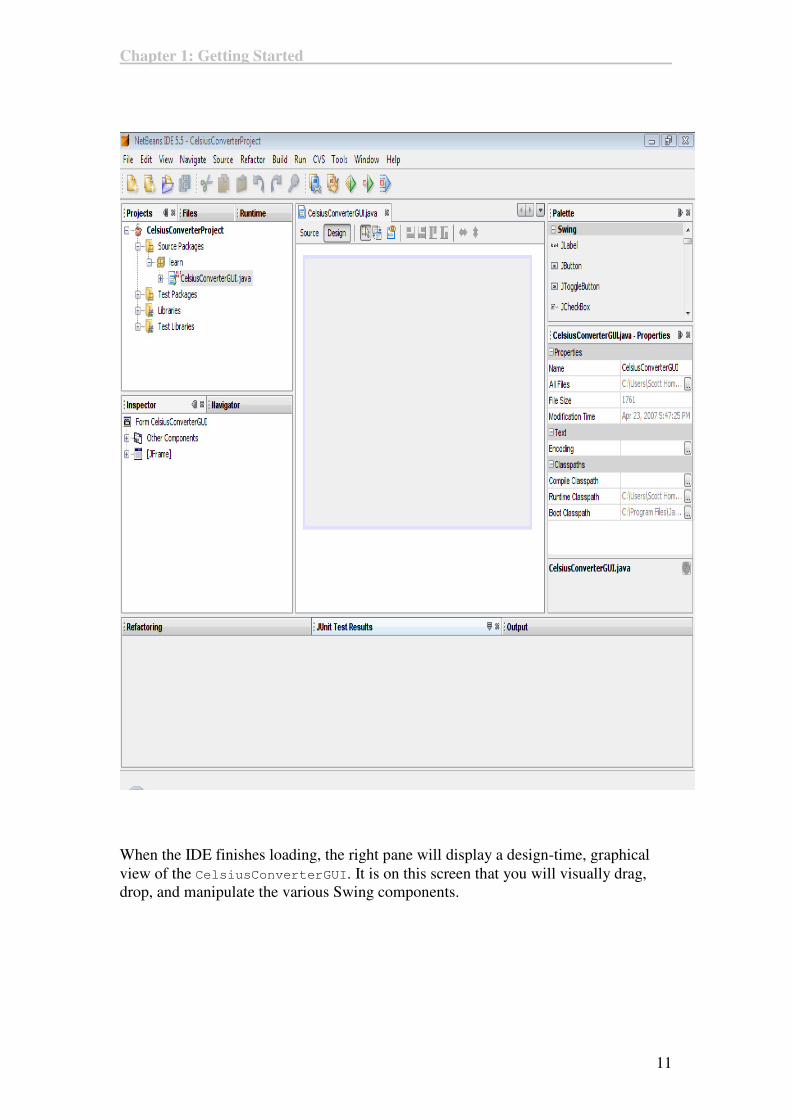
When the IDE finishes loading, the right pane will display a design-time, graphical
view of the CelsiusConverterGUI. It is on this screen that you will visually drag,
drop, and manipulate the various Swing components.
12
2 NetBeans IDE Basics
It is not necessary to learn every feature of the NetBeans IDE before exploring its
GUI creation capabilities. In fact, the only features that you really need to understand
are the Palette, the Design Area, the Property Editor, and the Inspector. We will
discuss these features below.
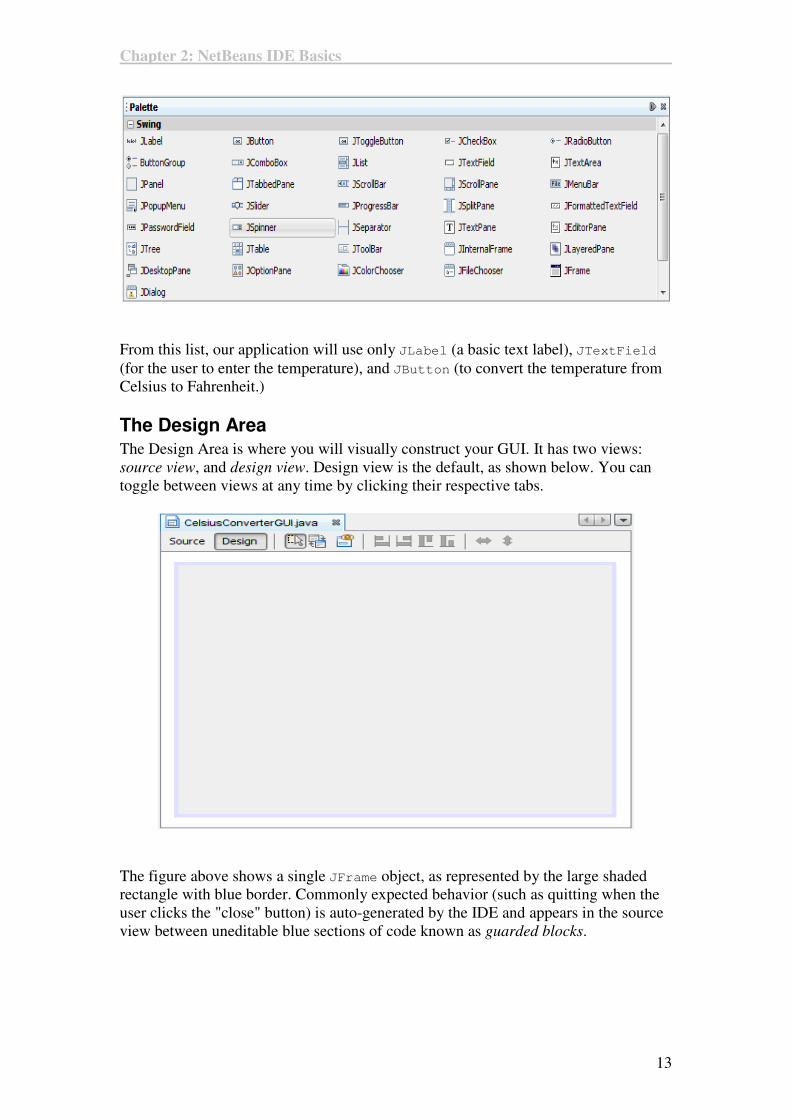
The Palette
The Palette contains all of the components offered by the Swing API. You can
probably already guess what many of these components are for, even if this is your
first time using them (JLabel is a text label, JList is a drop-down list, etc
Chapter 2: NetBeans IDE Basics
13
From this list, our application will use only JLabel (a basic text label), JTextField
(for the user to enter the temperature), and JButton (to convert the temperature from
Celsius to Fahrenheit.)
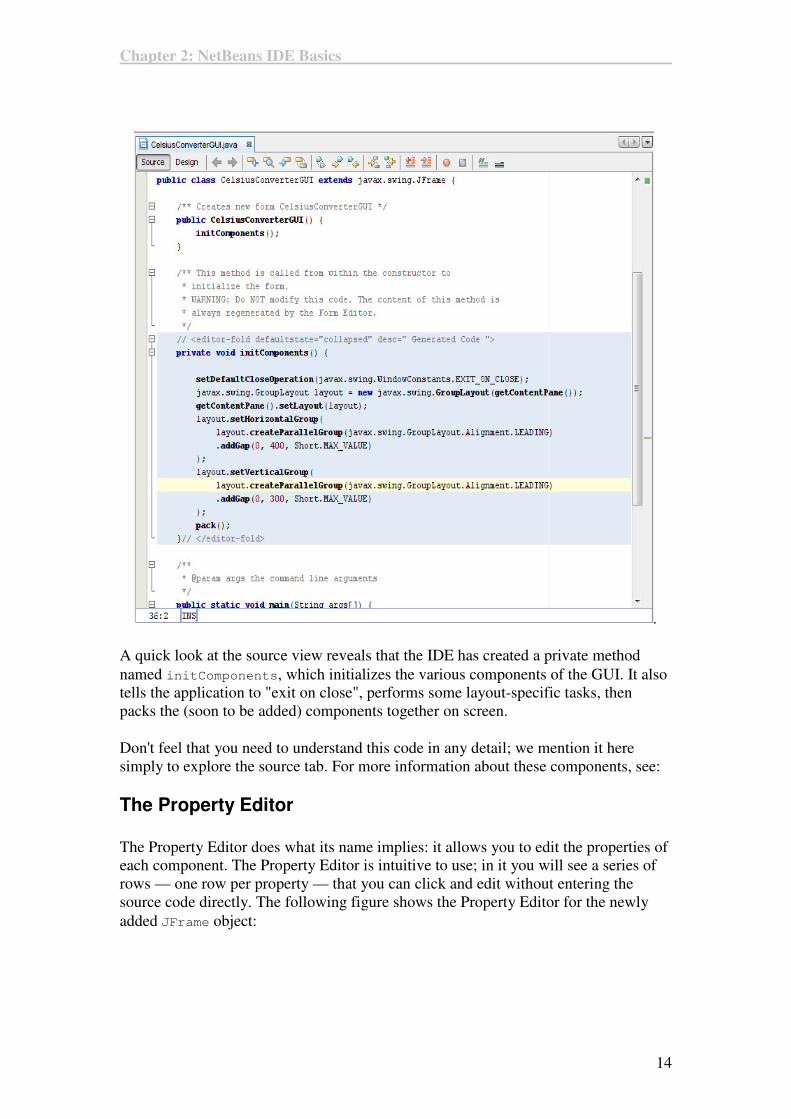
The Design Area
The Design Area is where you will visually construct your GUI. It has two views:
source view, and design view. Design view is the default, as shown below. You can
toggle between views at any time by clicking their respective tabs.
The figure above shows a single JFrame object, as represented by the large shaded
rectangle with blue border. Commonly expected behavior (such as quitting when the
user clicks the "close" button) is auto-generated by the IDE and appears in the source
view between uneditable blue sections of code known as guarded blocks.
Chapter 2: NetBeans IDE Basics
14
.
A quick look at the source view reveals that the IDE has created a private method
named initComponents, which initializes the various components of the GUI. It also
tells the application to "exit on close", performs some layout-specific tasks, then
packs the (soon to be added) components together on screen.
Don't feel that you need to understand this code in any detail; we mention it here
simply to explore the source tab. For more information about these components, see:
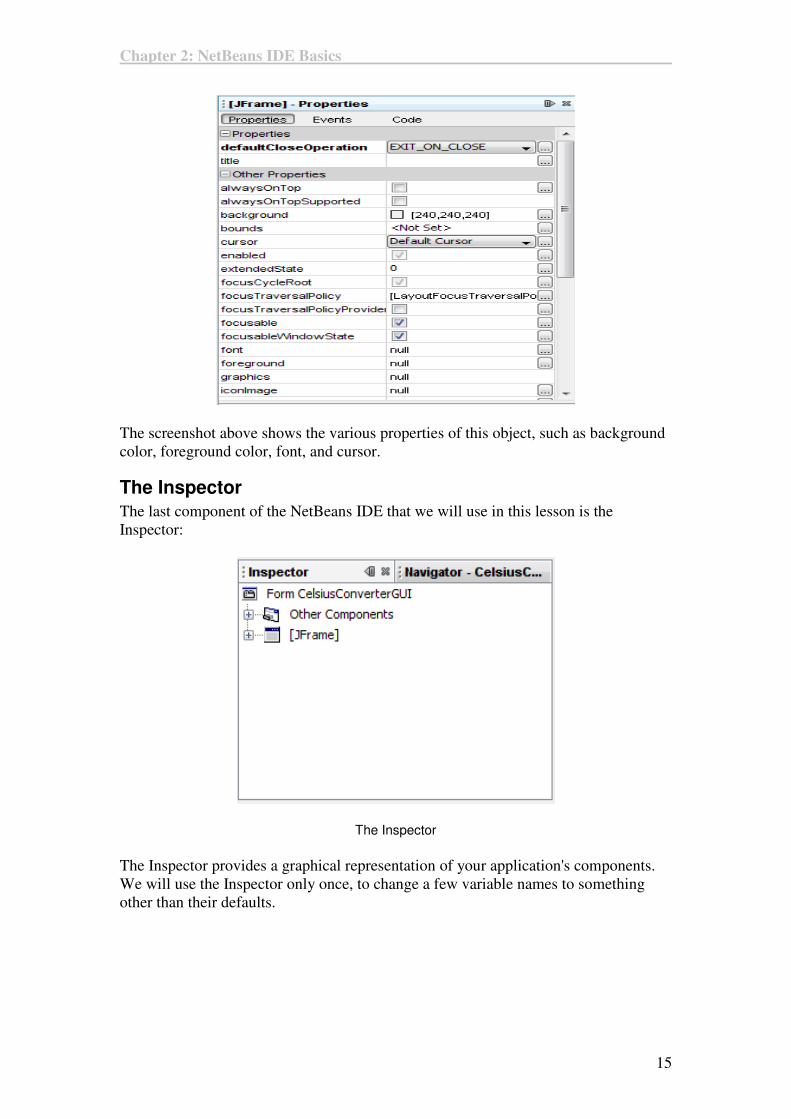
The Property Editor
The Property Editor does what its name implies: it allows you to edit the properties of
each component. The Property Editor is intuitive to use; in it you will see a series of
rows — one row per property — that you can click and edit without entering the
source code directly. The following figure shows the Property Editor for the newly
added JFrame object:
Chapter 2: NetBeans IDE Basics
15
The screenshot above shows the various properties of this object, such as background
color, foreground color, font, and cursor.
The Inspector
The last component of the NetBeans IDE that we will use in this lesson is the
Inspector:
The Inspector
The Inspector provides a graphical representation of your application's components.
We will use the Inspector only once, to change a few variable names to something
other than their defaults.
16
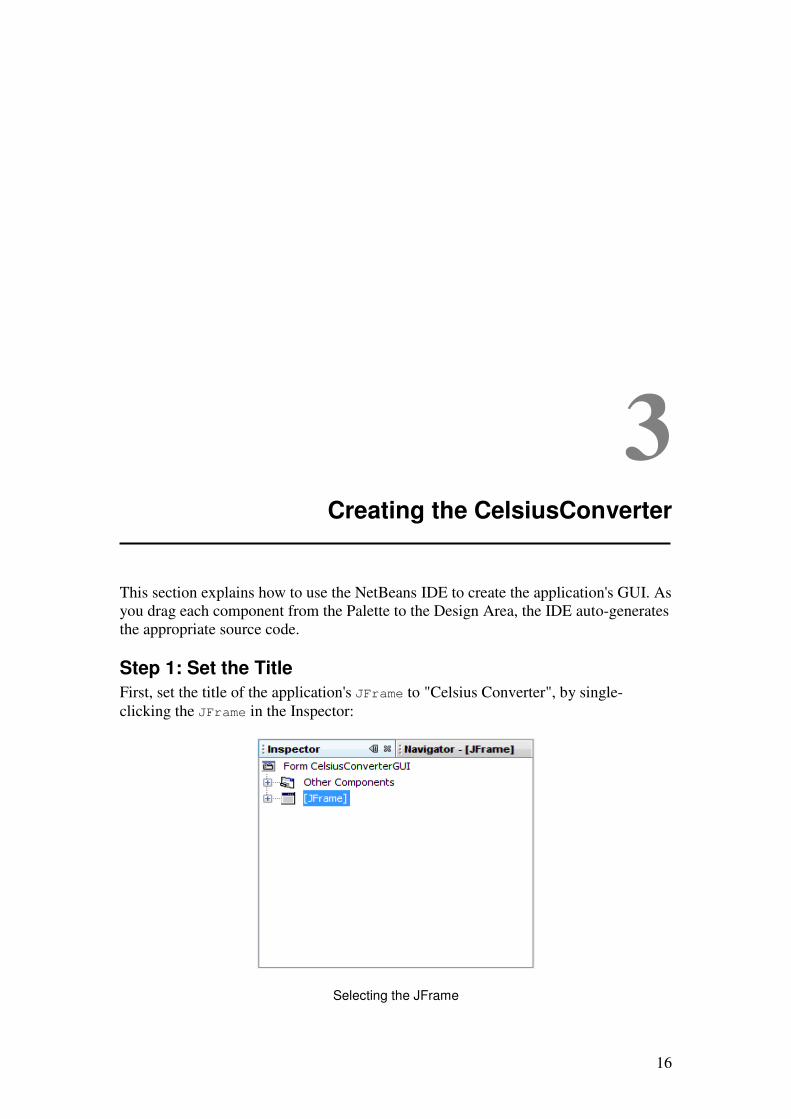
3 Creating the CelsiusConverter
This section explains how to use the NetBeans IDE to create the application's GUI. As
you drag each component from the Palette to the Design Area, the IDE auto-generates
the appropriate source code.
Step 1: Set the Title
First, set the title of the application's JFrame to "Celsius Converter", by single-
clicking the JFrame in the Inspector:
Selecting the JFrame
Chapter 3: Creating The Celsius Converter
17
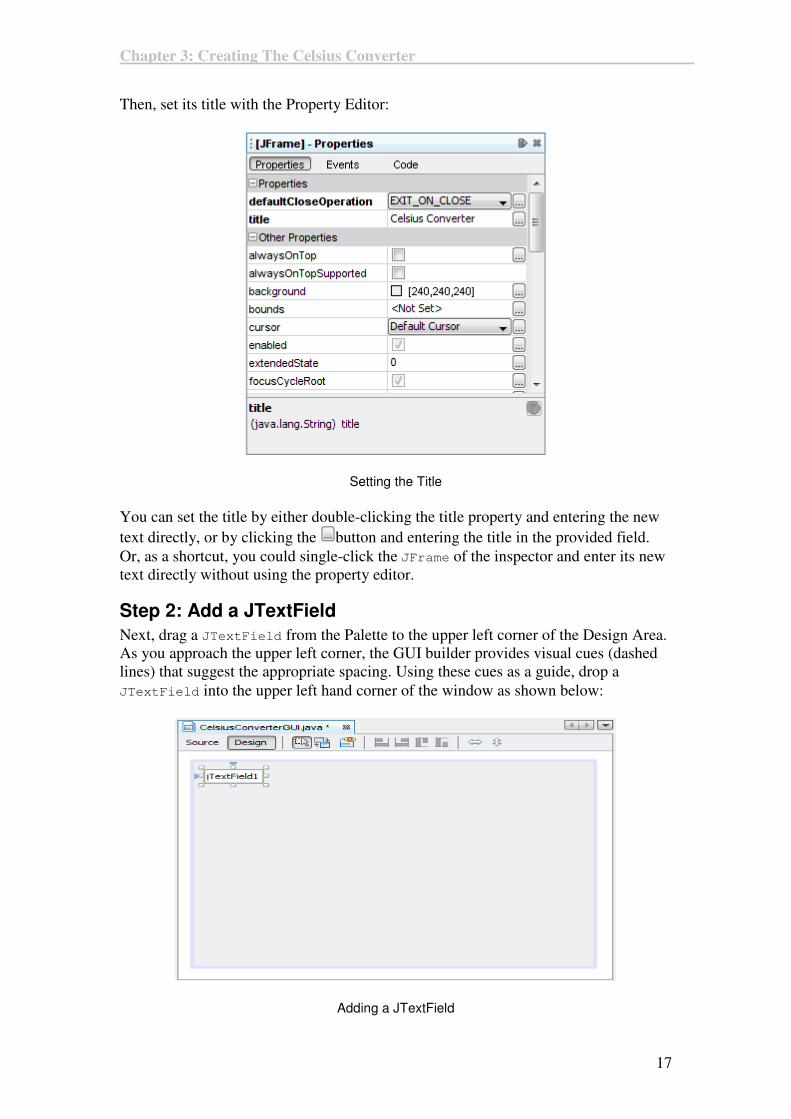
Then, set its title with the Property Editor:
Setting the Title
You can set the title by either double-clicking the title property and entering the new
text directly, or by clicking the button and entering the title in the provided field.
Or, as a shortcut, you could single-click the JFrame of the inspector and enter its new
text directly without using the property editor.
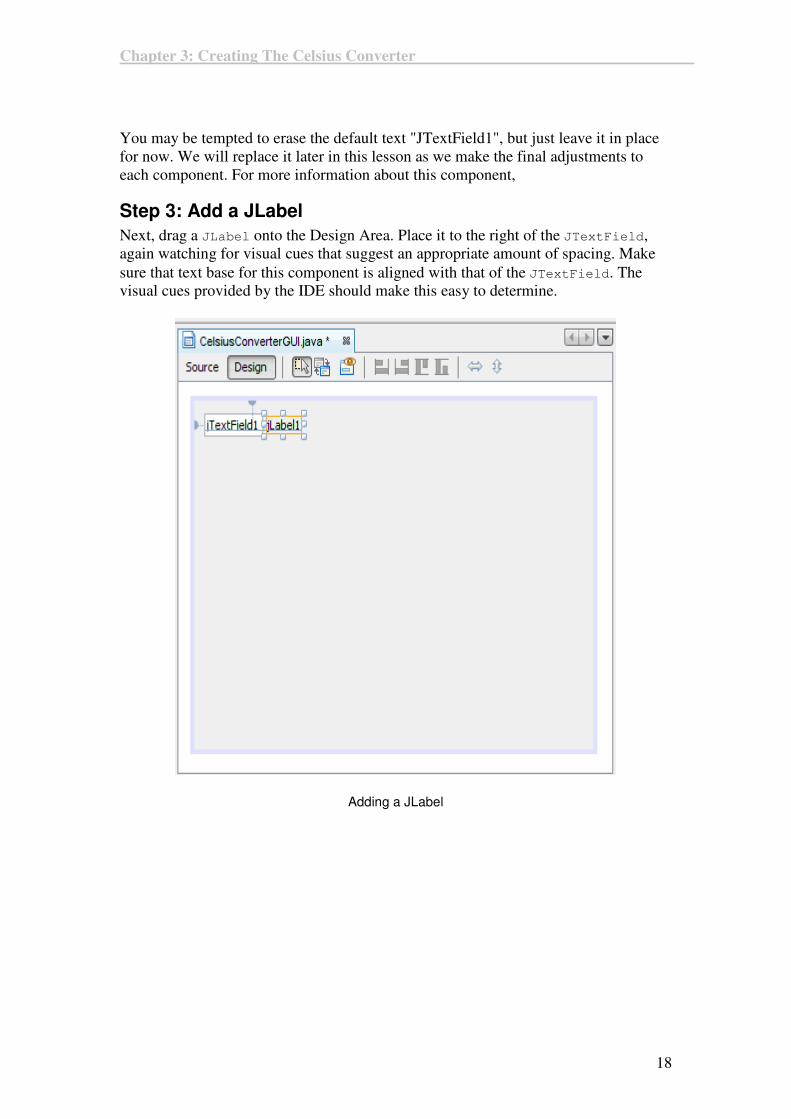
Step 2: Add a JTextField
Next, drag a JTextField from the Palette to the upper left corner of the Design Area.
As you approach the upper left corner, the GUI builder provides visual cues (dashed
lines) that suggest the appropriate spacing. Using these cues as a guide, drop a
JTextField into the upper left hand corner of the window as shown below:
Adding a JTextField
Chapter 3: Creating The Celsius Converter
18
You may be tempted to erase the default text "JTextField1", but just leave it in place
for now. We will replace it later in this lesson as we make the final adjustments to
each component. For more information about this component,
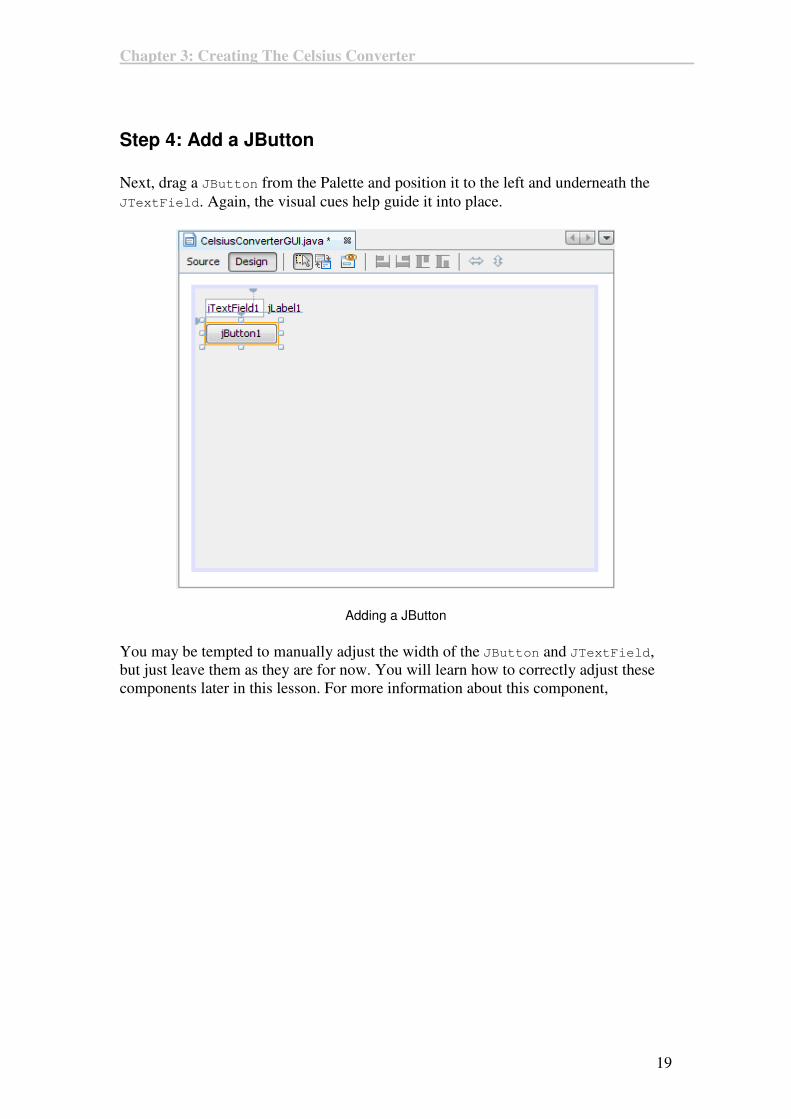
Step 3: Add a JLabel
Next, drag a JLabel onto the Design Area. Place it to the right of the JTextField,
again watching for visual cues that suggest an appropriate amount of spacing. Make
sure that text base for this component is aligned with that of the JTextField. The
visual cues provided by the IDE should make this easy to determine.
Adding a JLabel
Chapter 3: Creating The Celsius Converter
19
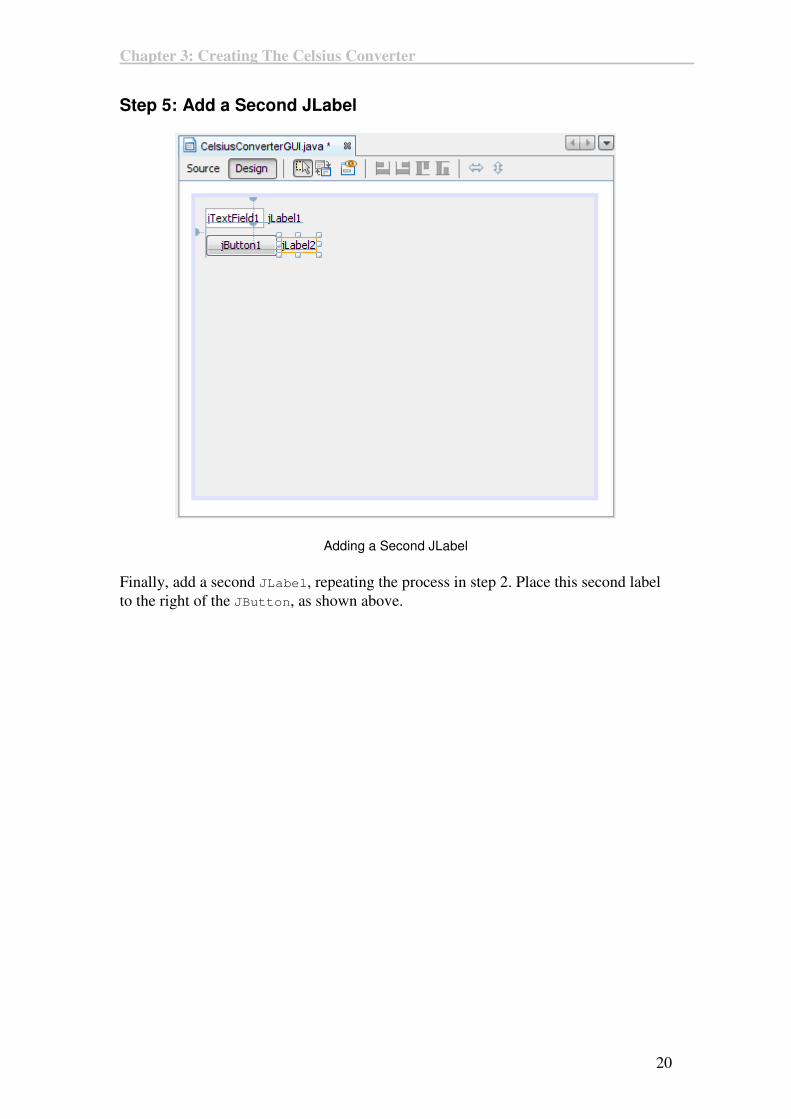
Step 4: Add a JButton
Next, drag a JButton from the Palette and position it to the left and underneath the
JTextField. Again, the visual cues help guide it into place.
Adding a JButton
You may be tempted to manually adjust the width of the JButton and JTextField,
but just leave them as they are for now. You will learn how to correctly adjust these
components later in this lesson. For more information about this component,
Chapter 3: Creating The Celsius Converter
20
Step 5: Add a Second JLabel
Adding a Second JLabel
Finally, add a second JLabel, repeating the process in step 2. Place this second label
to the right of the JButton, as shown above.
21
4 Adjusting the CelsiusConverter GUI
With the GUI components now in place, it is time to make the final adjustments.
There are a few different ways to do this; the order suggested here is just one possible
approach.
Step 1: Set the Component Text
First, double-click the JTextField and JButton to change the default text that was
inserted by the IDE. When you erase the text from the JTextField, it will shrink in
size as shown below. Change the text of the JButton from "JButton1" to "Convert."
Also change the top JLabel text to "Celsius" and the bottom to "Fahrenheit."
Chapter 3: Adjusting the CelsiusConverter GUI
22
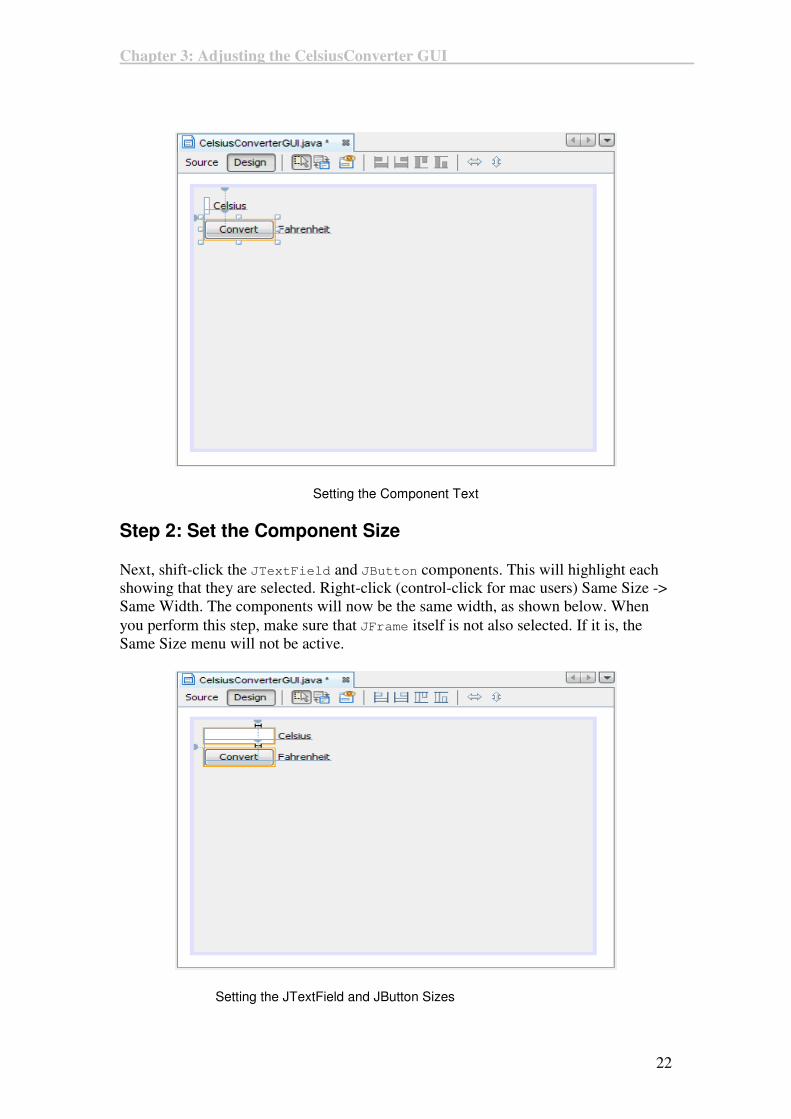
Setting the Component Text
Step 2: Set the Component Size
Next, shift-click the JTextField and JButton components. This will highlight each
showing that they are selected. Right-click (control-click for mac users) Same Size ->
Same Width. The components will now be the same width, as shown below. When
you perform this step, make sure that JFrame itself is not also selected. If it is, the
Same Size menu will not be active.
Setting the JTextField and JButton Sizes
Chapter 3: Adjusting the CelsiusConverter GUI
23
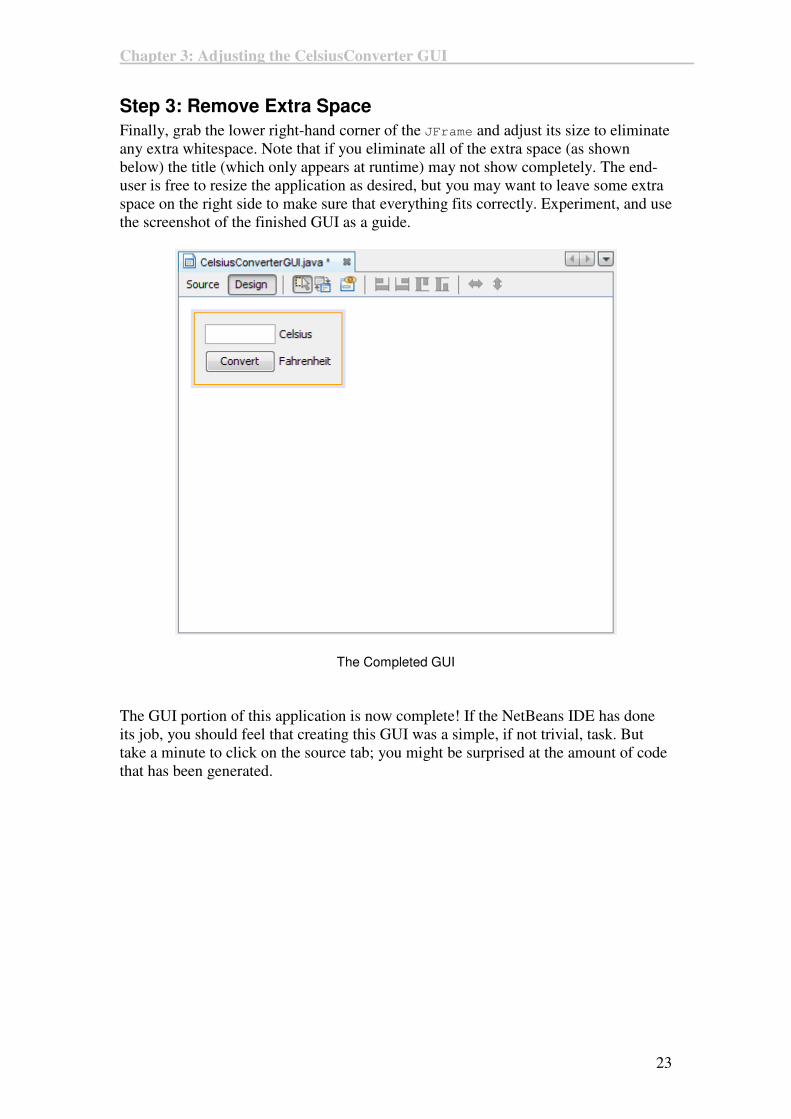
Step 3: Remove Extra Space
Finally, grab the lower right-hand corner of the JFrame and adjust its size to eliminate
any extra whitespace. Note that if you eliminate all of the extra space (as shown
below) the title (which only appears at runtime) may not show completely. The end-
user is free to resize the application as desired, but you may want to leave some extra
space on the right side to make sure that everything fits correctly. Experiment, and use
the screenshot of the finished GUI as a guide.
The Completed GUI
The GUI portion of this application is now complete! If the NetBeans IDE has done
its job, you should feel that creating this GUI was a simple, if not trivial, task. But
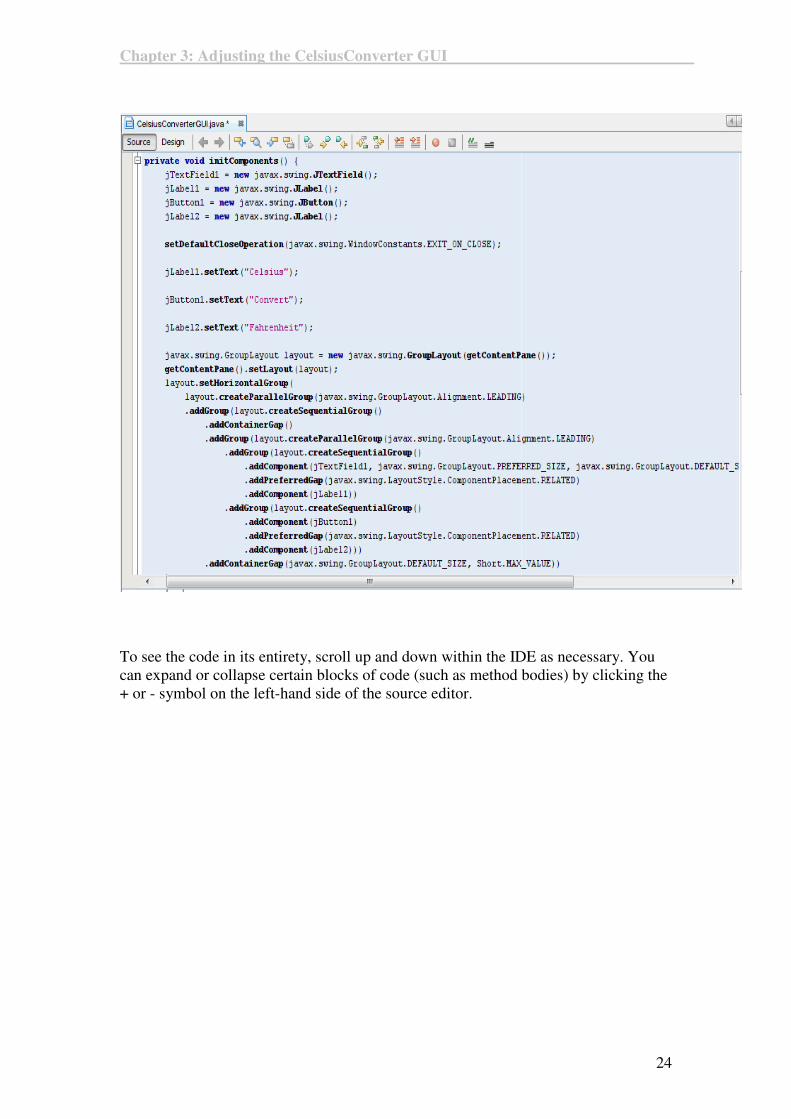
take a minute to click on the source tab; you might be surprised at the amount of code
that has been generated.
Chapter 3: Adjusting the CelsiusConverter GUI
24
To see the code in its entirety, scroll up and down within the IDE as necessary. You
can expand or collapse certain blocks of code (such as method bodies) by clicking the
+ or - symbol on the left-hand side of the source editor.
25
5
Adding Application Logic
It is now time to add in the application logic.
Step 1: Change the Default Variable Names
The figure below shows the default variable names as they currently appear within the
Inspector. For each component, the variable name appears first, followed by the
object's type in square brackets. For example, jTextField1 [JTextField] means
that "jTextField1" is the variable name and "JTextField" is its type
Chapter 4: Adding Application Logic
26
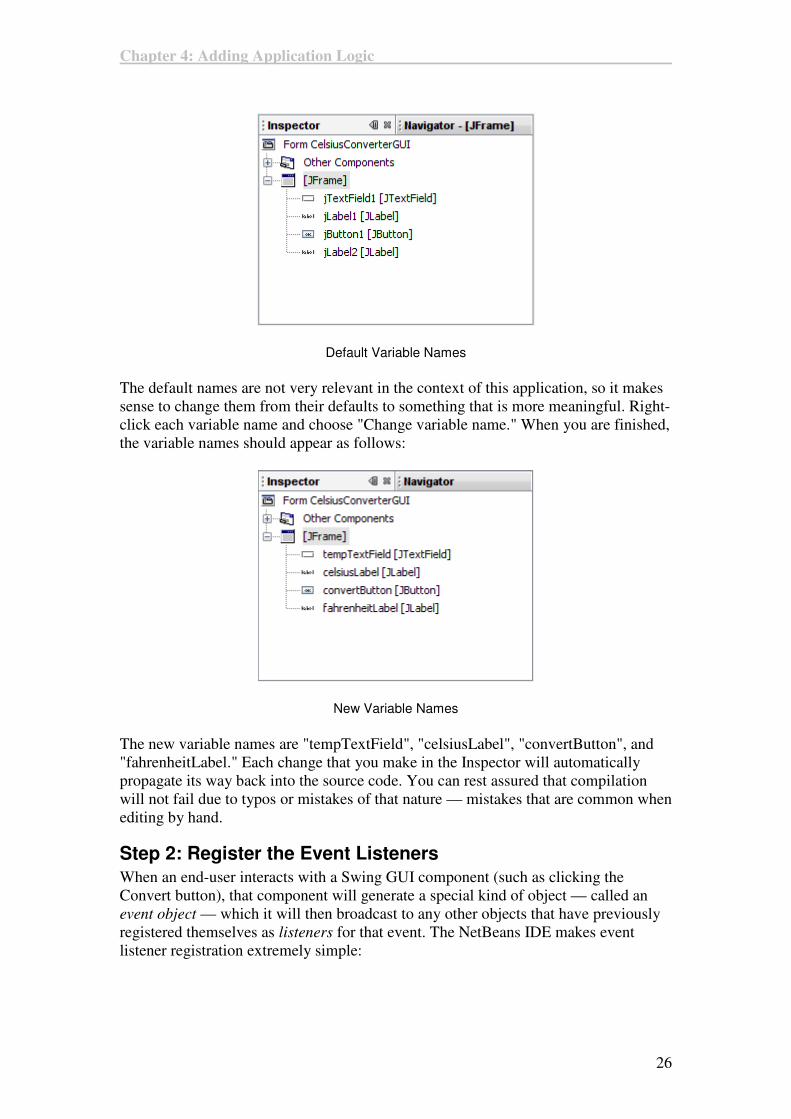
Default Variable Names
The default names are not very relevant in the context of this application, so it makes
sense to change them from their defaults to something that is more meaningful. Right-
click each variable name and choose "Change variable name." When you are finished,
the variable names should appear as follows:
New Variable Names
The new variable names are "tempTextField", "celsiusLabel", "convertButton", and
"fahrenheitLabel." Each change that you make in the Inspector will automatically
propagate its way back into the source code. You can rest assured that compilation
will not fail due to typos or mistakes of that nature — mistakes that are common when
editing by hand.
Step 2: Register the Event Listeners
When an end-user interacts with a Swing GUI component (such as clicking the
Convert button), that component will generate a special kind of object — called an
event object — which it will then broadcast to any other objects that have previously
registered themselves as listeners for that event. The NetBeans IDE makes event
listener registration extremely simple:
Chapter 4: Adding Application Logic
27
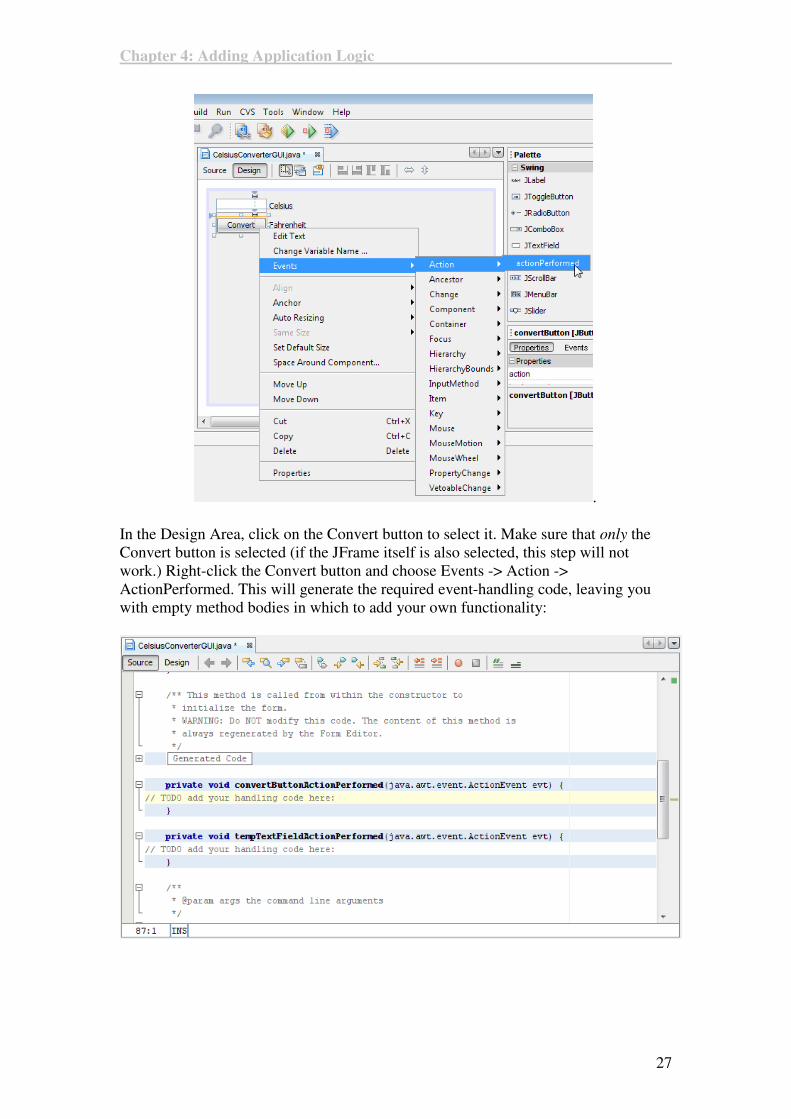
.
In the Design Area, click on the Convert button to select it. Make sure that only the
Convert button is selected (if the JFrame itself is also selected, this step will not
work.) Right-click the Convert button and choose Events -> Action ->
ActionPerformed. This will generate the required event-handling code, leaving you
with empty method bodies in which to add your own functionality:
Chapter 4: Adding Application Logic
28
There are many different event types representing the various kinds of actions that an
end-user can take (clicking the mouse triggers one type of event, typing at the
keyboard triggers another, moving the mouse yet another, and so on.) Our application
is only concerned with the ActionEvent;
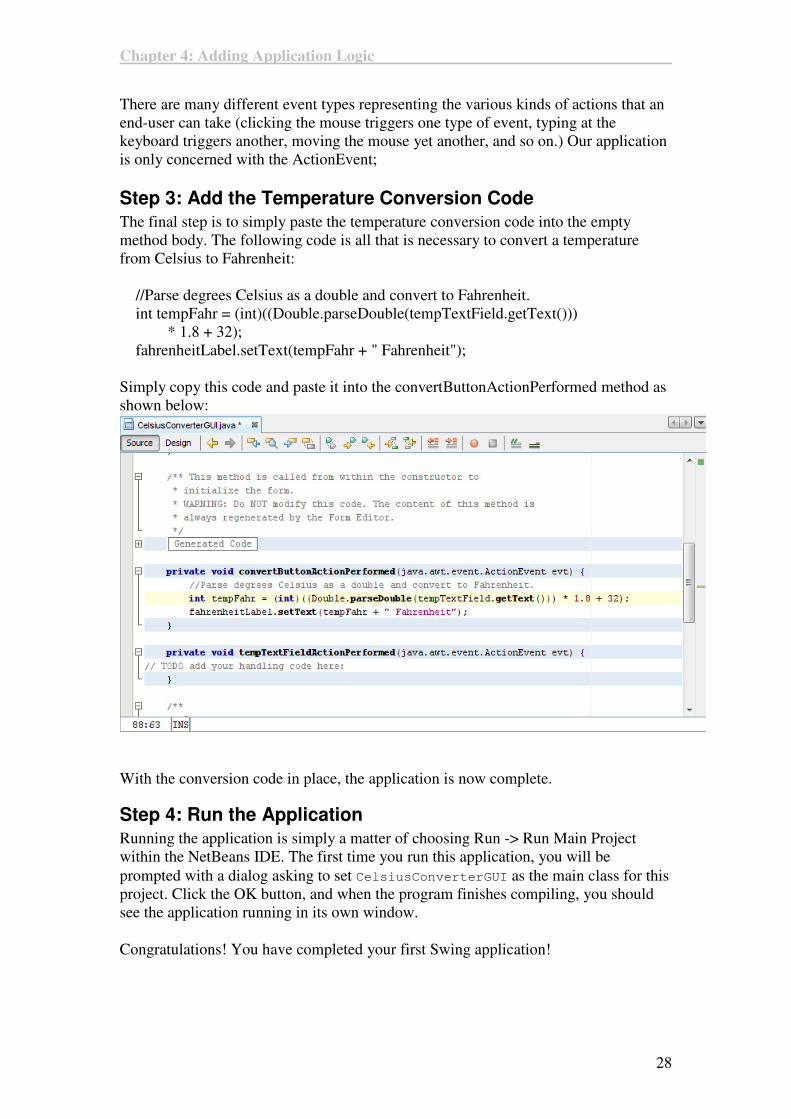
Step 3: Add the Temperature Conversion Code
The final step is to simply paste the temperature conversion code into the empty
method body. The following code is all that is necessary to convert a temperature
from Celsius to Fahrenheit:
//Parse degrees Celsius as a double and convert to Fahrenheit.
int tempFahr = (int)((Double.parseDouble(tempTextField.getText()))
* 1.8 + 32);
fahrenheitLabel.setText(tempFahr + " Fahrenheit");
Simply copy this code and paste it into the convertButtonActionPerformed method as
shown below:
With the conversion code in place, the application is now complete.
Step 4: Run the Application
Running the application is simply a matter of choosing Run -> Run Main Project
within the NetBeans IDE. The first time you run this application, you will be
prompted with a dialog asking to set CelsiusConverterGUI as the main class for this
project. Click the OK button, and when the program finishes compiling, you should
see the application running in its own window.
Congratulations! You have completed your first Swing application!

Index
29
ActionPerformed, 28
application logic, 5, 26
Categories column, 6
CelsiusConverterProject, 7, 9
Change variable name, 27
Create Main Class, 7
Design Area, 3, 12, 14, 17, 18, 19, 28
design view, 14
event, 27, 28, 29
guarded blocks, 14
GUI, 2, 3, 4, 5, 7, 9, 12, 14, 15, 17, 18,
22, 24, 27
IDE, 1, 2, 3, 4, 5, 6, 8, 11, 12, 14, 15,
16, 17, 19, 22, 24, 25, 27, 29
initComponents, 15
Inspector, 3, 12, 16, 17, 26, 27
J2SE, 7
JButton, 3, 14, 20, 21, 22, 23, 24
JFrame, 3, 9, 14, 15, 17, 18, 23, 24, 28
JLabel, 3, 13, 14, 19, 21, 22
JList, 13
JTextField, 3, 14, 18, 19, 20, 22, 23,
24, 26
listeners, 27
NetBeans, 1, 2, 3, 4, 5, 6, 12, 16, 17,
24, 27, 29
Palette, 3, 12, 17, 18, 20
Projects column, 6
Projects pane, 8
Property Editor, 3, 12, 15, 18
referenced based programming, 2
Run, 29
Same Size, 23
source view, 14, 15
Swing API, 5, 12
Swing components, 5, 11
temperature conversion code, 29
TogetherSoft, 2
views, 14