Embed Size (px)
Citation preview

CA Clarity™ Project & Portfolio Manager
Project Management User Guide v12.0.0

This documentation and any related computer software help programs (hereinafter referred to as the “Documentation”) is for the end user’s informational purposes only and is subject to change or withdrawal by CA at any time.
This Documentation may not be copied, transferred, reproduced, disclosed, modified or duplicated, in whole or in part, without the prior written consent of CA. This Documentation is confidential and proprietary information of CA and protected by the copyright laws of the United States and international treaties.
Notwithstanding the foregoing, licensed users may print a reasonable number of copies of the Documentation for their own internal use, and may make one copy of the related software as reasonably required for back-up and disaster recovery purposes, provided that all CA copyright notices and legends are affixed to each reproduced copy. Only authorized employees, consultants, or agents of the user who are bound by the provisions of the license for the Product are permitted to have access to such copies.
The right to print copies of the Documentation and to make a copy of the related software is limited to the period during which the applicable license for the Product remains in full force and effect. Should the license terminate for any reason, it shall be the user’s responsibility to certify in writing to CA that all copies and partial copies of the Documentation have been returned to CA or destroyed.
EXCEPT AS OTHERWISE STATED IN THE APPLICABLE LICENSE AGREEMENT, TO THE EXTENT PERMITTED BY APPLICABLE LAW, CA PROVIDES THIS DOCUMENTATION “AS IS” WITHOUT WARRANTY OF ANY KIND, INCLUDING WITHOUT LIMITATION, ANY IMPLIED WARRANTIES OF MERCHANTABILITY, FITNESS FOR A PARTICULAR PURPOSE OR NONINFRINGEMENT. IN NO EVENT WILL CA BE LIABLE TO THE END USER OR ANY THIRD PARTY FOR ANY LOSS OR DAMAGE, DIRECT OR INDIRECT, FROM THE USE OF THIS DOCUMENTATION, INCLUDING WITHOUT LIMITATION, LOST PROFITS, BUSINESS INTERRUPTION, GOODWILL, OR LOST DATA, EVEN IF CA IS EXPRESSLY ADVISED OF SUCH LOSS OR DAMAGE.
The use of any product referenced in the Documentation is governed by the end user’s applicable license agreement.
The manufacturer of this Documentation is CA.
Provided with “Restricted Rights.” Use, duplication or disclosure by the United States Government is subject to the restrictions set forth in FAR Sections 12.212, 52.227-14, and 52.227-19(c)(1) - (2) and DFARS Section 252.227-7014(b)(3), as applicable, or their successors.
All trademarks, trade names, service marks, and logos referenced herein belong to their respective companies.
Copyright © 2008 CA. All rights reserved.

Contact CA Contact Technical Support
For online technical assistance and a complete list of locations, primary service hours, and telephone numbers, contact Technical Support at http://ca.com/support.
Provide Feedback
If you have comments or questions about CA product documentation, you can send a message to [email protected].
If you would like to provide feedback about CA product documentation, please complete our short customer survey, which is also available on the CA Support website.


Contents
Chapter 1: Project Management Overview 13 Project Management Components.......................................................................................... 14 Advance Project Planning ..................................................................................................... 15 How to Create and Manage Projects....................................................................................... 16 Access Project Management.................................................................................................. 16 Collaboration Tools.............................................................................................................. 17 Access Rights ..................................................................................................................... 18 Project Management Reports ................................................................................................ 19 Project Management Jobs..................................................................................................... 20
Chapter 2: Managing Projects 21 How to Create Projects ........................................................................................................ 22
Create New Projects....................................................................................................... 23 Project Templates.......................................................................................................... 25 Create Projects from Project Templates............................................................................. 27 Copy Project Template Data into Projects .......................................................................... 28 How to Copy Financial Plans from Project Templates ........................................................... 30 Fields Used for Copying Financial Plans ............................................................................. 31
Open Projects in Open Workbench ......................................................................................... 33 Project Properties................................................................................................................ 33
Edit General Properties................................................................................................... 34 Scheduling Properties..................................................................................................... 36 Risks ........................................................................................................................... 43 Budget Properties .......................................................................................................... 44 Financial Processing ....................................................................................................... 46 Access to this Project ..................................................................................................... 53
Estimates at the Project Level ............................................................................................... 54 How to Define Project Estimates ...................................................................................... 54 How ETC is Calculated .................................................................................................... 55 View ETC...................................................................................................................... 55 How to Modify ETC at the Project Level ............................................................................. 56
Earned Value...................................................................................................................... 58 Baselines and Earned Value Computations......................................................................... 58 Earned Value Data Fields ................................................................................................ 59
Contents 5

Earned Value Calculation Methods.................................................................................... 62 How Earned Value Calculation Methods are Applied............................................................. 64 How to Calculate and Record Earned Value Totals............................................................... 65 Display Earned Value Data .............................................................................................. 67
Define Project Contracts....................................................................................................... 67 Master Projects and Subprojects............................................................................................ 69
Add Subprojects to Master Projects .................................................................................. 70 Add Projects to Subprojects ............................................................................................ 70 View Combined Subproject Actuals and Estimates .............................................................. 70 Remove Subprojects from Projects................................................................................... 72 Control Access to Subprojects ......................................................................................... 72 Master Project and Subproject Baselines ........................................................................... 73
Dependencies..................................................................................................................... 73 Create Project Dependencies ........................................................................................... 74 View Project Dependencies ............................................................................................. 75 Remove Project Dependencies ......................................................................................... 75
Associated Releases ............................................................................................................ 76 View a List of Associated Releases.................................................................................... 76 Open Releases Associated to Projects or Programs ............................................................. 76 Unlink Projects or Programs from Releases........................................................................ 77
Baselines ........................................................................................................................... 77 Create New Baselines..................................................................................................... 78 Master Project and Subproject Baselines ........................................................................... 79 Edit Baselines ............................................................................................................... 79 Display Master Project Baselines ...................................................................................... 82 View Current Baseline .................................................................................................... 82 View Baseline Work Allocation and EV Data ....................................................................... 83 How to Manually Update Baselines ................................................................................... 84 Delete Baselines............................................................................................................ 86
Autoschedule...................................................................................................................... 87 Display Schedules.......................................................................................................... 88 Return to the Plan of Record Without Publishing ................................................................. 89 Define Autoschedule Parameters and Autoschedule ............................................................ 89 Check Autoschedule Progress .......................................................................................... 91 View Autoschedule Results.............................................................................................. 92 Cancel Autoscheduling.................................................................................................... 92 Projects Locks and Tentative Schedule Mode...................................................................... 92 Schedule Subnets .......................................................................................................... 96
Add and Remove Projects to the Overview: General Page ......................................................... 97 Monitor Project Performance................................................................................................. 98
The Labor Effort Portlet .................................................................................................. 98 Team Utilization Portlet .................................................................................................. 99
6 Project Management User Guide

How to Delete Projects........................................................................................................102 Deactivate Projects .......................................................................................................103 Mark Project for Deletion ...............................................................................................103 Cancel Project Marked for Deletion..................................................................................104
Chapter 3: Managing Tasks 105 Project Task Overview ........................................................................................................105
Project Task Terminology...............................................................................................105 How to Design Tasks and Milestones ...............................................................................107 Task Work Breakdown Structures Guidelines ....................................................................108
How to Create Key and Milestone Tasks.................................................................................108 Create Tasks and Milestones ..........................................................................................109 Create Tasks from Project Templates...............................................................................112 Create New Tasks in the Work Breakdown Structure ..........................................................113
View a List of and Open Tasks..............................................................................................113 Associated Task Forms........................................................................................................114
Add New Forms to Tasks ...............................................................................................114 View a List of and Open Forms .......................................................................................116 Grant Form Permissions.................................................................................................117 Start Processes for Forms ..............................................................................................118 Delete Forms from Tasks ...............................................................................................118
Task Properties..................................................................................................................119 General Properties ........................................................................................................119 Set Default Earned Value Options at the Task Level ...........................................................120 Manually Override BCWP at the Task Level .......................................................................122
Task Relationships and Dependencies ...................................................................................123 Create Task Dependencies .............................................................................................127 Display Task Relationships and Dependencies ...................................................................129 Edit Task Dependencies .................................................................................................130 How to Manipulate the Gantt View...................................................................................131 Finish-Start Dependency Links........................................................................................132
Task Associated Risks and Issues .........................................................................................132 View a List of Risks Associated with Tasks ........................................................................133 View a List of Issues Associated with Tasks ......................................................................133
Associated Requirements ....................................................................................................134 View a List of Associated Requirements............................................................................134 Open Requirements Associated to Project Tasks ................................................................134 Unlink Project Tasks from Requirements ..........................................................................135
Task Work Breakdown Structure ..........................................................................................136 Indent and Outdent Tasks in Work Breakdown Structure ....................................................137 Move Tasks in Work Breakdown Structure ........................................................................138 Sort Tasks in Work Breakdown Structure .........................................................................139
Contents 7

Expand and Collapse the Work Breakdown Structure .........................................................140 Edit Tasks in the WBS ...................................................................................................141 Configure Columns in the Work Breakdown Structure.........................................................142 Assign Resources to Tasks in the WBS .............................................................................143
Resource Utilization............................................................................................................143 How to View Resource Utilization ....................................................................................144 Edit Resource Utilization ................................................................................................146
Estimates (ETC) at the Task Level ........................................................................................148 Define ETC at the Task Level ..........................................................................................148 How to Modify ETC at the Task Level ...............................................................................149 Task Estimating Rules ...................................................................................................152
Edit Tasks and Milestones....................................................................................................159 Delete Tasks and Milestones ................................................................................................160
Chapter 4: Building Project Teams 161 Project Team Overview .......................................................................................................161 How to Manage Project Teams .............................................................................................162 Staff Project Tasks .............................................................................................................163
How to Assign Staff to Projects .......................................................................................163 Resource Loading Patterns .............................................................................................165 Define Staff Assignment Properties .................................................................................166 Remove Staff from Assignments .....................................................................................167 View and Edit Task Assignments .....................................................................................167 How to Replace Staff Assigned to Projects or Tasks............................................................168 Change Staff Member Roles on Projects ...........................................................................174 Remove Staff Members from Projects ..............................................................................175
How to Staff Projects ..........................................................................................................176 Add Resources or Roles to Project Staff............................................................................177 View Project Staff .........................................................................................................178 Edit Staff Member Details ..............................................................................................181 Resource Requisitions ...................................................................................................182
Role Capacity ....................................................................................................................197 Manage Project Participants.................................................................................................198
Add Participants to Projects............................................................................................199 Remove Participants from Projects ..................................................................................200 Designate Participants as Collaboration Managers..............................................................201 Remove Collaboration Manager Rights .............................................................................202 Create Participant Groups ..............................................................................................203 Add Resources to Participant Groups ...............................................................................204 Remove Resources from Participant Groups......................................................................205 Delete Participant Groups ..............................................................................................205
Staff Allocations.................................................................................................................206
8 Project Management User Guide

Edit Staff Allocations .....................................................................................................206 Edit Team Allocations from the Team Grid ........................................................................208 Edit Resource Allocations ...............................................................................................210 Reset Staff Allocations...................................................................................................211 Change Default Allocation for a Resource .........................................................................216 Shift and Scale Resource Allocations................................................................................218
Chapter 5: Project Hierarchies 221 Project Hierarchy Overview..................................................................................................221 Build your Hierarchy...........................................................................................................222
Add Child Investments and Services from the Financial Rollup.............................................222 Remove Child Investments or Services from the Financial Rollup .........................................223
View the Project's Financial Rollup ........................................................................................224 Define Child Investment Allocations ......................................................................................225 Filter the List of Child Investments and Services .....................................................................225 Return to the Project ..........................................................................................................226 View Project Total Cost of Ownership ....................................................................................226 View the Project's Effort Rollup ............................................................................................226 View the Project's Parent Investments and Services ................................................................227
Add and Remove Parent Investment Associations..............................................................228 Define Parent Investment Allocations...............................................................................229 Share Projects Across Investments or Services .................................................................229
Chapter 6: Risks, Issues, and Change Requests 231 Risk Management Overview.................................................................................................232 Rate Pre-Defined Risk Factors ..............................................................................................233
Assign Rates to Risk Factors...........................................................................................234 How to Create and Manage Risks..........................................................................................237
Create Risks ................................................................................................................238 Create Issues from Risks ...............................................................................................241 Create Risks from Change Requests ................................................................................242 Create Risks from Issues ...............................................................................................243 Calculated Risk Score ....................................................................................................244 Define Risk Properties ...................................................................................................245 Edit, View, Close, and Delete Risks..................................................................................246 How to Design Risk Response Strategies ..........................................................................249 Risk Notes ...................................................................................................................251 View a List of Action Items Associated to Risks .................................................................252 Risks Associated to Tasks ..............................................................................................253 Risk Audit Trail.............................................................................................................254 Risk Management Processes...........................................................................................255
Contents 9

How to Create and Manage Issues ........................................................................................256 Create Issues...............................................................................................................256 Import Issues from Another System of Record ..................................................................258 Attach Documents to Issues ...........................................................................................258 Convert Change Requests into Issues ..............................................................................259 Define Issue Properties..................................................................................................260 Edit Issues ..................................................................................................................261 Issue Notes .................................................................................................................262 Issue Action Items........................................................................................................263 Tasks Associated to Issues.............................................................................................264 Issue Audit Trail ...........................................................................................................265 Issue Processes............................................................................................................265 Resolve Issues .............................................................................................................266
Create Change Requests .....................................................................................................266 Create Change Requests from Issues...............................................................................269 Create Change Requests from Risks ................................................................................270 Define Change Request Properties...................................................................................270 Edit, View, Close and Delete Change Requests ..................................................................271 Change Request Notes ..................................................................................................272 Change Request Audit Trail ............................................................................................273 Change Request Processes.............................................................................................274
Chapter 7: Programs 275 The Differences Between Projects and Programs.....................................................................275
Access Rights for Programs ............................................................................................277 Access Programs ..........................................................................................................278
How to Create Programs .....................................................................................................279 Create New Programs....................................................................................................279 Convert Projects into Programs.......................................................................................281 Program Properties .......................................................................................................282 Access to this Program ..................................................................................................291
Open Programs in Open Workbench......................................................................................291 Add Projects to Programs ....................................................................................................292
View Combined Subproject Actuals and Estimates .............................................................292 Remove Projects from Programs .....................................................................................294
Program Dependencies .......................................................................................................294 Create Program Dependencies........................................................................................295 View Program Dependencies ..........................................................................................296 Remove Dependencies ..................................................................................................296
Associated Releases ...........................................................................................................296 View a List of Associated Releases...................................................................................297 Open Releases Associated to Projects or Programs ............................................................297
10 Project Management User Guide

Contents 11
Unlink Projects or Programs from Releases.......................................................................298 Monitor Program Performance..............................................................................................299
The Labor Effort Portlet .................................................................................................300 Team Utilization Portlet .................................................................................................301
How to Delete Programs......................................................................................................302 Cancel Programs Marked for Deletion....................................................................................302
Appendix A: Access Rights 303 Project Access Rights..........................................................................................................303 Program Access Rights........................................................................................................308
Index 309


Chapter 1: Project Management Overview
Projects are sets of activities designed to achieve a specific objective. Their key elements are tasks, which define project work, and staff, the resources who perform them. Projects are guided by time and budget constraints that estimate and determine how long each task (and therefore the entire project) will take, and how much it will cost.
CA Clarity PPM's Project Management module provides you with a framework in which you can define and track each aspect of your project, from tasks and staff to budgets, actuals, and risks. In addition, you can create master projects that group related subprojects, and programs, which not only group related projects but also allow you to view and analyze the combined costs, estimates, and actuals of its subprojects.
This section contains the following topics:
Project Management Components (see page 14) Advance Project Planning (see page 15) How to Create and Manage Projects (see page 16) Access Project Management (see page 16) Collaboration Tools (see page 17) Access Rights (see page 18) Project Management Reports (see page 19) Project Management Jobs (see page 20)
Chapter 1: Project Management Overview 13
Project Management Components
Project Management Components The project's tabs allow project managers to define and manage a wide range of project elements such as staffing the project, recording risks and issues, and activating processes.
When you first open your project, the Project: Properties: Main - General page appears. To view this page, from the Projects list page, click the name of the project you want to view. The tabs—Properties, Team, Tasks, Financial Plan, Chargebacks, Hierarchy, Collaboration, Risks/Issues/Changes, Processes, Audit Trail, and Dashboard—display at the top of the page when you have a project.
Project Management consists of the following components:
■ Properties. You can define project basics, such as the project's name, schedule, earned value details, to baselines that capture snapshots of the project at various stages in its lifecycle.
■ Team. You can build a team that includes the staff who will perform the tasks and non-staff participants who can assist staff by communicating information, suggestions, and concerns.
■ Tasks. You can create tasks and define a task hierarchy. You can also associate risks and issues to tasks to help monitor trouble spots.
■ Financial Plan. You can create a detailed budget.
Note: See the Financial Management User Guide for more information.
■ Chargebacks. You can set up chargeback options, set up the project's debit rules, and view transactions.
Note: See the Financial Management User Guide for more information.
■ Hierarchy. You can build an investment hierarchy; view the financial and effort rollup of child investments; and view parent investments and services.
■ Risks/Issues/Changes. You can identify and track the risks and issues that can endanger the project.
■ Collaboration. Use this component to add folders and documents to the project.
Note: See the Common Features and Personal Options User Guide for more information.
■ Processes. You can create and run project-related processes.
Note: See the Common Features and Personal Options User Guide for more information on how to create, run, or cancel a process.
■ Audit Trail. You can record your project-related activity.
14 Project Management User Guide

Advance Project Planning
Note: See the Common Features and Personal Options User Guide for more information on how to use auditing.
■ Dashboard. You can view a summary of project labor and team utilization data in graph and table formats.
■ Reporting and Analysis. You can use reports and dashboards to track and analyze project activities and progress.
Advance Project Planning Before you begin creating a project, it is helpful to have a general idea of its scope—the tasks that need to be performed and a timeframe in which to complete them. This makes the initial data entry and set-up easier for you. Once you populate the project with tasks and resources, keep it accurate and up to date. A detailed project plan that is regularly maintained is the most effective way to measure performance and status, and to ensure that the work gets done.
The more detailed and accurate your project plan, the more useful it will be. It is helpful, for example, to use system-generated work estimates, or to create your own. Estimates are helpful in planning task and project duration, and also for comparison with actuals once the project is underway. Baselines are another useful tool to help you measure progress. Though creating estimates and baselines can take a little more time, the long term benefits to you and your team can be enormous.
Chapter 1: Project Management Overview 15

How to Create and Manage Projects
How to Create and Manage Projects If you are new to project management, consider using the following process when creating and managing new projects:
1. Create the project (see page 22).
2. Define its properties (see page 33).
3. Create the project tasks (see page 108).
4. Define the task work breakdown structure (see page 136).
5. Build the project team (see page 161).
6. Assign staff to the tasks (see page 163).
Note: It is recommended that you create the project tasks before assigning staff to them. Unless your CA Clarity PPM administrator changes the default setting, a placeholder effort task is automatically created if you staff your project before creating tasks. When this happens, you can either delete this effort task, or redefine its properties and continue to use it. You can create budgets, financial plans, risks, and issues at any time.
Note: Contact your CA Clarity PPM administrator or see the Administration Guide for more information on disabling the effort task.
Access Project Management To access project management, select Projects from the Portfolio Management menu. The Projects list page appears, where all of the projects to which you have been assigned and that you have created are displayed in the list.
16 Project Management User Guide

Collaboration Tools
Collaboration Tools CA Clarity PPM provides a number of tools that project participants and staff can use to collaborate with one another about project activities and deadlines.
These tools are:
■ Project Form Manager. Use the Form Manager to build a repository for project-related forms.
■ Project Document Manager. Use the Document Manager to build a repository for project-related documents.
■ Action Items. Action items are the units of work that you assign to members of a project, or to yourself. Use action items to track the progress of projects and ensure that the project is complete and on time.
■ Discussions. Use discussions to exchange ideas and communicate in a common location on project-related topics.
■ Calendar. Use your Calendar to view events that have been assigned to you. If you are the project's manager or creator, you can also use the calendar to view the calendar events of project participants.
Note: See the Common Features and Personal Options User Guide for more information and detailed descriptions of each tool, and for instructions on how to use the tools.
The project collaboration tools are available from the tool bar on the Project Document Manager page (default page). To view this page, open the project and select the Collaboration tab.
You can also access many of the collaboration tools directly from the Projects list page by clicking one of the listed icons. To access the project calendar, click the Calendar icon. To access the Document Manager, click the Document Manager icon. To access project discussions, click the Discussions icon.
Chapter 1: Project Management Overview 17

Access Rights
Access Rights Access to project management functionality is managed by the use of access rights. Rights are provided on a number of levels to offer maximum flexibility and protection to CA Clarity PPM users. Your CA Clarity PPM administrator, resource manager, or project manager can grant access rights. When you are given access rights, you should be notified. If you are unsure of your access rights, contact your CA Clarity PPM administrator, resource manager, or project manager.
Access rights are assigned at the following levels:
■ Global. Granted globally to all instances of the object. Global access rights are followed by the word "All," as in Project - Edit - All.
Example: If you are granted the Project - Edit - All access right, you can edit all projects.
■ Instance. Granted one project at a time. Instance access rights and are not followed by the word "All." With project edit instance-level access rights, you can edit only the project instance to which you have been granted access.
Example: If you are granted the Project - Edit access right to the "Call Center Improvements" project, you can edit that project's properties. In this case, you cannot edit any other projects unless you have instance or global level access to them. Most users have only instance-level access rights to certain objects.
■ Group. Instance and global access rights granted at the group level. When you are a member of the group, you receive the access rights that have been set up for the group.
■ OBS. Instance and global access rights granted at the OBS unit or department level. When you are a member of the OBS unit or department, you receive the access rights that have been set up for the OBS unit or department.
18 Project Management User Guide

Project Management Reports
Project Management Reports The following are suggested CA Clarity PPM reports for project management:
■ Budget/Forecast Analysis
■ Company Listing
■ Customer Invoice
■ Key Tasks and Milestone Status
■ Project Analysis and Profitability
■ Project Listing
■ Project Snapshot
■ Project Transactions Inquiry
■ Timesheet Detail
■ Transaction Inquiry
■ Unfilled Roles
Note: See the Common Features and Personal Options User Guide for more information on running reports and for detailed descriptions of all CA Clarity PPM reports.
Chapter 1: Project Management Overview 19
Project Management Jobs
20 Project Management User Guide
Project Management Jobs The following jobs may influence data or performance in project management:
■ Autoschedule Project
■ Batch Printing
■ Calendar Background Process
■ Clean Temporary Allocation Tables
■ Clean User Session
■ Datamart Extraction
■ Datamart Rollup - Time Facts and Time Summary
■ Delete Investments
■ Import Financial Actuals
■ Index Contents and Documents for Searches
■ LDAP - Synchronize New and Changed Users
■ LDAP - Synchronize Obsolete Users
■ Post Timesheets
■ Post Transactions to Financial
■ Purge Documents
■ Rate Matrix Extraction
■ Send Calendar Reminders
■ Time Slicing
■ Update Earned Value History
■ Update Earned Value Totals
Note: Contact your CA Clarity PPM administrator or see the Administration Guide for more information on running jobs and for detailed descriptions of all jobs.

Chapter 2: Managing Projects
This section contains the following topics:
How to Create Projects (see page 22) Open Projects in Open Workbench (see page 33) Project Properties (see page 33) Estimates at the Project Level (see page 54) Earned Value (see page 58) Define Project Contracts (see page 67) Master Projects and Subprojects (see page 69) Dependencies (see page 73) Associated Releases (see page 76) Baselines (see page 77) Autoschedule (see page 87) Add and Remove Projects to the Overview: General Page (see page 97) Monitor Project Performance (see page 98) How to Delete Projects (see page 102)
Chapter 2: Managing Projects 21

How to Create Projects
How to Create Projects You can create projects using the following methods:
■ New. Builds a new project from the ground up. You can define the project's properties from scratch.
■ New from template. Creates a new project based on the tasks, general properties, staff, and financial properties of a similar project that has been created to use as a model for the type of project you are creating.
■ Copy from template. Copies tasks, task estimates, and staff assignments from a template project into a new project.
■ Converting an idea into a project. Creates a project from an idea saved in CA Clarity PPM. To use this method, you must be granted access to the Demand Management menu and ideas.
Note: See the Demand Management User Guide for more information on converting ideas to projects.
When you create a new project, you become the project's collaboration manager. As the collaboration manager, you can create action items, start discussions, add documents, create events, and create processes for the project. You can also assign others the role of collaboration manager.
You also can define a number of project-specific properties. For example, you can add a simple or detailed budget, and identify various risk factors that might occur over the course of the project. In addition, you can baseline to create snapshots of project costs and work effort at various stages in the project's life cycle. You can also identify dependencies that exist between a project that you create or manage and other portfolio investments.
No matter which method you choose, define the project in two stages:
1. Create the project (see page 23).
2. Define the project's properties (see page 33).
22 Project Management User Guide

How to Create Projects
Create New Projects
You can complete project basics such as the project's name, duration, priority, and status using the Create Project page.
To create a new project
1. Select Projects from the Portfolio Management menu.
The Projects list page appears displaying a list of existing projects.
2. Click New.
The Create Project page appears.
3. Complete the following required fields:
Project Name
Defines the project's unique name.
Limits: 80 characters.
Project ID
Defines the project's unique identifier.
Limits: 20 characters.
Page Layout
Defines the page layout you want to use to view project or program data.
Values:
■ Program Layout. Use this layout to view budget data on the Project Dashboard page.
■ Project Default Layout. Use this layout to view the default labor and team utilization charts on the Project Dashboard page.
■ Program Status Dashboard. This layout is only available if you have installed the PMO Accelerator add-in.
Note: See the PMO Accelerator Product Guide for more information.
■ Project Status Dashboard. This layout is only available if you have installed the PMO Accelerator add-in.
Note: See the PMO Accelerator Product Guide for more information.
Start Date
Defines the project's start date.
Chapter 2: Managing Projects 23
How to Create Projects
Finish Date
Defines the project's finish date.
Progress
Indicates the level of work that has been completed on the project's tasks. Use the following as a guideline:
■ Not Started = 0%
■ Started = 1 - 99%
■ Completed = 100%
Options: Completed, Started, and Not Started.
Default: Not Started.
Status
Indicates the project's current status.
Values: Approved, Unapproved, or Rejected.
Default: Unapproved
4. Click Submit.
24 Project Management User Guide
How to Create Projects
Project Templates
Instead of creating a project from scratch, you can copy the contents of a project template into a new project. When you create a project from a template, the following information is copied from the template to the new project:
■ General project attributes and any custom fields
■ Staff, participants, and participant groups. You can copy over multiple roles for each entry on the template and maintain distinct assignments for each role.
■ Tasks, work breakdown structures (if they exist in the template), and task assignments
■ Financial plans (budget or forecast)
■ OBS unit associations
■ Document and folder structure
■ Forms and folder structure
Note: You cannot copy start and finish dates, baseline information, financial properties, calendar, discussions, and action items from project templates.
In addition to modifying the new project's properties, you can modify the tasks, staff, and other information inherited from the template.
If a resource is defined in the template, the resource (or role) allocation fields (that is, % Allocation and Allocation) are copied over accurately into the new project so that the ETC lines up with the allocation fields. Any hard-booked resources on the source template are converted to soft booked.
Instead of copying all of a template project's contents as is, you can scale the project's overall work estimate and budget by a percentage you choose.
Chapter 2: Managing Projects 25

How to Create Projects
Designate Projects as Project Template
To make project creation more efficient, if you are a project's owner you can designate a project as a project template and then use the template to create new projects.
Before you can designate a project as a project template, ensure the following conditions are true for the project:
■ It contains no WIP entries.
■ It contains no non-zero time entries.
■ It is not financially enabled.
To designate a project as a project template
1. Open the project you want to designate as a template.
The Project: Properties: Main - General page appears.
2. Select the Template check box.
Note: If you cannot select this box, check to see that the project contains no WIP or non-zero time entries, and that it is financially disabled.
3. Click Save.
The project is designated as a template, and displays in the list.
26 Project Management User Guide

How to Create Projects
Create Projects from Project Templates
You can create a new project by copying a project template and then modifying the template according to the new projects requirements. When you create a new project from a template, a version of the Create Project page appears with additional template-related fields. Some of the fields are populated with data from the template. Others need your input. You can edit any of the fields available on this page.
To create a project from a project template
1. Select Projects from the Portfolio Management menu.
The Projects list page appears.
2. Click New from Template.
The Select Project Template page appears.
3. Select the template you want to use and click Next.
The Create Project page appears.
4. Do the following, and click Submit:
■ Complete the required fields in the General section.
■ Complete the following fields in the Copy Template Project Options section:
Template Name
Displays the template name that is used to populate the new project.
Scale Work By
Enter the percentage amount by which you want to increase or decrease the work estimates on each task for the new project, relative to the template.
Values: 0% means no change.
Scale Budget By
Enter the percentage amount by which you want to increase or decrease (use a negative number) the budget for the new project, relative to the budget figures entered in the template. This applies to the project's financial plans (cost and benefit plans).
Values: 0% means no change.
Convert resources to roles
Select this option to convert all resources from the project template into roles in the new project.
Chapter 2: Managing Projects 27

How to Create Projects
Copy Project Template Data into Projects
You can populate projects by copying data from a project template using the [Copy from Template] link on the Project: Properties: Main - General page. When you populate the project using this method, you cannot scale by budget, but you copy data from within an already existing project.
If a resource is defined in the template, the resource (or role) allocation fields (that is, % Allocation and Allocation) are copied over into the new project so that the ETC lines up with the allocation fields. Any hard-booked resources on the source template are converted to soft booked.
Detailed budget data may not copy completely. If you are copying from a project template containing a detailed budget plan, check the project's Planning and Budget pages to see if the data copied correctly.
When you add a copy, new distinct roles are added; existing team roles are not reused. You can consolidate the work for existing team members or request new resources to replace the newly added roles.
To copy project template data into your new project
1. Open the project to which you want to copy project template data.
The Project: Properties: Main - General page appears.
2. Click the [Copy from Template] link on the section toolbar.
The Select Project Template page appears.
3. Select the template you want to use and click Next.
The Copy Template Options page appears.
4. Complete the following fields, and click Copy:
Template Name
Displays the template name that is used to populate the new project.
Scale Work By
Enter the percentage amount by which you want to increase or decrease the work estimates on each task for the new project, relative to the template.
Values: 0% means no change.
Scale Budget By
Enter the percentage amount by which you want to increase or decrease (use a negative number) the budget for the new project, relative to the budget figures entered in the template. This applies to the project's financial plans (cost and benefit plans).
Values: 0% means no change.
28 Project Management User Guide

How to Create Projects
Convert resources to roles
Select this option to convert all resources copied from the project template into roles in this project.
The template's contents are copied into the current project and the Project: Properties: Main - General page appears.
Chapter 2: Managing Projects 29

How to Create Projects
How to Copy Financial Plans from Project Templates
When you populate projects using data from a project template that contains cost plans and benefit plans, these plans and their association are copied over from the template to the new project. The dates on these plans shift according to the project's start date. While copying over, you can scale the costs of the plans in the template by a defined percentage.
Note: See the Financial Management User Guide for more information about financial plans.
Before copying financial plans from a project template, you must make sure that fiscal time periods exist that include the start dates of the template project and the new project.
Note: See the Administration Guide for more information on creating fiscal time periods.
You can copy financial plans from a template in the following ways:
■ Create a project using a template (see page 27).
■ Manually copy from a template into an existing project (see page 28).
■ Run a process that copies from a template into an existing project.
Note: See the Administration Guide for more information on defining and running processes.
Irrespective of the method you use for copying financial plans from project templates where there are existing cost plans and benefit plans in place, the copy behavior is as follows:
■ If you choose to copy from a template associated to an entity that is not the entity to which your target project is associated, all data including the simple budget is copied from the template to the new project template's, except for the financial plans.
■ A financial plan's ID is unique within each individual project. If the template's financial plan ID is the same as that of the target project's ID, the financial plan from the template is copied and its ID is modified so that it is unique within the specific project. If there is already a Plan Of Record (POR) in the destination project, the POR from the template loses its POR flag.
■ The time lapse between the financial plans and the start date of the project in the template is measured. This same time lapse is carried forward when setting the new start dates of the financial plans based on the target project's start date.
30 Project Management User Guide

How to Create Projects
Note: This behavior applies to tasks and staffing data. However, if a project template does not include tasks and only has staffing requirements, you can expand or collapse the time duration of the target project.
■ You have the option to scale the project template's budget with a percentage factor (positive or negative) to define the budget of the target project.
■ If only the project template's budget properties are defined, the budget properties' Planned Cost and Planned Benefit dollar values are copied to the target project with the scaling factor applied.
■ If the project template's detail cost plan is defined, the budget properties' Planned Cost and Planned Benefit dollar values reflect the dollar amount in the POR and the dollar amount in the benefit plan associated to the POR with the scaling factor applied. Regardless of whether you selected to set the planned cost dates, the dates in the budget properties reflect the dates in the POR and its associated benefit plan.
■ All budgets with various statuses (Submitted, Approved, Rejected) are not copied from the project template to the target project.
Forecast costs are not copied when copying the project from a template, creating a new project from a template.
Fields Used for Copying Financial Plans
When you copy financial plans, some of the fields defined when you first created the project are used. The following fields on the Create Projects page affect how the financial plans are copied over:
Start Date
Defines the new project's start date that you specified. The dates on the financial plans that are copied over from the template, shift in the new project according to this start date. The End Date field in the template is ignored during the financial plan copy process. The new end date is automatically calculated for each cost plan and benefit plan based on their original plan durations in the template and their new start dates.
Example: Consider that a project template includes the following financial plans and the project start date is December 2008.
■ Cost Plan A is POR and spans two years from Jan 2009-Dec 2010.
■ Cost Plan B spans two years from June 2009-June 2011.
■ Benefit plan C (associated with Cost Plan A) spans three years from Jan 2011 – Dec 2014.
■ Benefit plan D (associated with Cost Plan B) spans four years from July 2011 – July 2015.
Chapter 2: Managing Projects 31

How to Create Projects
■ Benefit plan E (unassociated) spans four years from June 2011 – June 2015.
When you copy the project template data to the new project with a start date of December 2011, the financial plans shift as per this new start date but maintain the same time lapse (between their start and end dates) as was originally in the template. Accordingly, they have the following new start and end dates:
■ Cost plan A is POR and still spans two years from Jan 2012 – Dec 2013 (maintains the one month lapse with the project start date as before).
■ Cost plan B still spans two years from June 2012 – June 2014 (maintains the six months lapse with the project start date as before).
■ Benefit plan C still spans three years from Jan 2014 – Dec 2017 (maintains the two years and one month lapse with the project start date as before).
■ Benefit plan D still spans four years from July 2014 – July 2018 (maintains the two years and seven months lapse with the project start date as before).
■ Benefit plan E still spans four years from June 2014 – June 2018 (maintains the two years and six months lapse with the project start date as before).
Set Planned Cost Dates (Keep Planned Cost Dates in Sync with Investment Dates)
This field is only taken into consideration when there are no detail budgets available in the project template. This is ignored when there are detail budgets in the project template. If this option is checked, the dates for Planned Cost and Planned Benefit are kept the same as the project start and end dates. If the option is not checked, the dates for Planned Cost and Planned Benefit are shifted based on the difference between the template project start date and the destination project start date.
Department
This field allows you to select a different entity and department OBS for the new project. If the template project has Department defined, this field is automatically populated from the template as a default. If you select the same department or a different department that belongs to the same entity as the template, the financial plans are copied to the new project. If you select a different department that belongs to a different entity than the template, the financial plans are not copied to the new project. However, simple budget is copied from the template to the new project.
32 Project Management User Guide

Open Projects in Open Workbench
Scale Budget By
This field allows you to enter a percentage (positive or negative) as the scaling factor for the dollar amounts defined in project template's cost plans and benefit plans.
Example: Consider that a template project starts from 1/1/2009 to 12/31/2009 and allocates $10,000 for Planned Cost and $20,000 for Planned Benefit with a duration of 2/1/2009 to 12/31/2009. In the new project, the plans copy over as follows (assuming a Scale Budget By value of 20%): the new project dates are from 1/1/2009 to 12/31/2009. The simple budget under project property shows the budget duration as 2/1/2009 to 12/31/2009. The Planned Cost shows $12000 and the Planned Benefit shows $24,000 (both scaled up by an additional 20% of the original values).
Open Projects in Open Workbench You can open projects in Open Workbench using CA Clarity PPM.
Note: See the Open Workbench User Guide for more information on opening CA Clarity PPM projects in Open Workbench using CA Clarity PPM.
To open a project in Open Workbench
1. Open the project.
The Project: Properties: Main - General page appears.
2. Next to Open in Workbench field, click Go.
The project is opened in Open Workbench.
Project Properties You can use the project's properties pages to define the project's general properties, scheduling properties, budget, and baselines. You can also add subprojects and identify dependencies.
You can access a number of links that allow you to define a wide variety of project characteristics on the Project: Properties: Main - General page. The Main tab is the default page that displays. Use this page to view the general project properties page.
Chapter 2: Managing Projects 33

Project Properties
Edit General Properties
You can edit the general properties of any project to which you have access. Generally, if you are a project's creator or manager, you have full access to the project.
The Project: Properties: Main - General page is the default page that displays when you open a project. It displays all of the fields that you defined when you created the project using the Create Project page, as well as additional fields you can complete and links you can use. You can edit many of the fields displayed on this page.
To edit the project's general properties
1. Open the project to which you want to edit general property data.
The Project: Properties: Main - General page appears.
2. In the General section, complete following fields:
Project Name
Defines the project's unique name.
Limits: 80 characters.
Project ID
Defines the project's unique identifier.
Limits: 20 characters.
Description
Defines the project's description (up to 254 characters).
Manager
Defaults to the name of the user who create the project. Click the Browse icon to select another user.
Page Layout
Defines the page layout you want to use to view project or program data.
Values:
■ Program Layout. Use this layout to view budget data on the Project Dashboard page.
■ Project Default Layout. Use this layout to view the default labor and team utilization charts on the Project Dashboard page.
34 Project Management User Guide

Project Properties
■ Program Status Dashboard. This layout is only available if you have installed the PMO Accelerator add-in.
Note: See the PMO Accelerator Product Guide for more information.
■ Project Status Dashboard. This layout is only available if you have installed the PMO Accelerator add-in.
Note: See the PMO Accelerator Product Guide for more information.
Risk
Displays a stoplight that indicates the project's risk status, as defined by your selections on the Project: Properties: Main - Risk page and on the Project: Risks/Issues/Changes: Risks page.
Values:
■ Green = Low Risk
■ Yellow = Medium Risk
■ Red = High Risk
Goal
Specifies the purpose or business case for the project.
Values: Cost Avoidance, Cost Reduction, Grow the Business, Infrastructure Improvement, Maintain the Business
Default: None
Alignment
Displays a stoplight that indicates the project's alignment status.
■ Green = Aligned
■ Yellow = Alignment at risk
■ Red = Out of alignment
Status
Indicates the project's current status.
Values: Approved, Unapproved, or Rejected.
Default: Unapproved
Stage
Defines the funnel that displays the number of investments in a particular process stage. This metric is used in portfolio management analysis.
Click the Browse icon to select a company-defined stage for this project.
Chapter 2: Managing Projects 35
Project Properties
Active
Specifies whether the project is active. You must activate the project to allow billing and to allow timesheets to be posted against it.
Default: Selected
Program
Select this field if you want to convert the project to a program. For projects to be used as a program, they cannot contain tasks, staff member assignments, nor be financially enabled.
Template
Specifies whether or not you want to use the project as a template for other projects.
Note: For projects to be used as a template, they cannot have time entries against it nor be financially enabled.
Required
Used during scenario generation, specifies whether or not this project should be pinned.
Note: See the Portfolio Management User Guide for more information about pinned investments and portfolio scenarios.
3. In the Organizational Breakdown Structure section, click the Browse icon next to the OBS you want to associate with this project for security, organizational, or reporting purposes. The Department OBS is used to associate the project with a department. It is listed last if multiple OBS's exist.
Note: See the Common Features and Personal Options User Guide for more information on working with departments.
4. Click Submit.
Scheduling Properties
You can define the project's start and finish dates, open the project for time entry, enter staffing details, and define the project's earned value details using the Project: Properties: Main - Schedule page.
36 Project Management User Guide

Project Properties
Open and Close Projects for Time Tracking
To allow staff members to track time spent on project tasks on their timesheets, you must open the project for time tracking and select CA Clarity PPM as the track mode. The staff member's profile must also be open for time entry to enter time on project tasks.
Note: See the Common Features and Personal Options User Guide for more information on how to use and manage timesheets and on how to open a resource's profile for time entry.
To open a project for time tracking
1. Open the project.
The Project: Properties: Main - General page appears.
2. Select Schedule from the content menu.
The Project: Properties: Main - Schedule page appears.
3. In the Tracking section of the page, complete the following fields:
Time Entry
Select this field to allow staff members to record the time they work on this project on their timesheets.
Default: Selected
Track Mode
Indicates the method you want staff members to use to enter time for hours worked on this project.
Options:
■ Clarity. Staff members record time using timesheets.
■ None. Non-labor resources track actuals through transaction vouchers, or when enter actuals through a scheduler, such as Open Workbench.
■ Other. Import actuals from a third-party application.
Default: Clarity
Charge Code
Select a default charge code to use for all project tasks. If you enter different charge codes at the task level on timesheets, then the task-level charge codes override the project-level charge code.
4. Click Submit.
Chapter 2: Managing Projects 37
Project Properties
Define Scheduling Properties
To define the project's scheduling properties
1. Open the project.
The Project: Properties: Main - General page appears.
2. Click Schedule on the content menu.
The Project: Properties: Main - Schedule page appears.
3. In the Schedule section, complete the following fields, and click Submit:
Start Date
Defines the project's start date.
Finish Date
Defines the project's finish date.
Set Planned Cost Dates
Specifies whether or not to keep planned cost dates synchronized with the investment dates.
Default: Selected
As of Date
Defines the date by which you want data to be included in time and budget estimates. This date is used in Earned Value Analysis (EVA) calculations, such as Budgeted Cost of Work Scheduled (BCWS).
Progress
Indicates the level of work that has been completed on the project's tasks. Use the following as a guideline:
■ Not Started = 0%
■ Started = 1 - 99%
■ Completed = 100%
Options: Completed, Started, and Not Started.
Default: Not Started.
Priority
If you are using CA Clarity PPM with Open Workbench, defines the relative importance of this project in relation to all other projects. The priority controls the order in which tasks are scheduled during Autoschedule. The priority is subject to dependency constraints.
Values: 0-36, 0 being the highest.
Default: 10
38 Project Management User Guide

Project Properties
Status Indicator
Indicates the project's status.
Stoplight values:
■ Green = On Track
■ Yellow = Marginal
■ Red = Critical
Status Comment
Defines any comments about the project's status.
Your changes are saved.
Chapter 2: Managing Projects 39
Project Properties
Define Default Staffing Options
You can define a project's default staffing options in the Staffing section of the Project: Properties: Main - Schedule page. The OBS you choose as the default staff OBS unit is used to more fully describe a staffing requirement. This is done by mapping roles with OBS units with resource managers. The staff OBS can be anything such as resource pool, a specific location, or a department. For example, if you need a programmer (role) from Atlanta (staff OBS), then you can use the project's default OBS value to route the role requisition to the resource manager responsible for allocating resources from Atlanta OBS.
The staff OBS you identify is also used during capacity planning. You can filter capacity and demand based on staff OBS. For example, you can use it to find out if you have enough capacity for programmers in Atlanta to fulfill the demand for programmers in that location.
You can also specify whether or not you want to require resource requisitions be approved before they can be booked. When you select the Requisition Approval Required check box, the following rules apply:
■ Resources must have the Project - Edit access right to book proposed resources to a project or reject them. If resources also have hard-booking rights, they can hard book those resources directly to the project. Without this access right, resources can only propose resources, which submits the booking for approval.
■ If you request a named resource and the booking manager proposes the same resource with the same allocation, the proposal is approved automatically and a notification is sent. There is no formal approval required.
To define a project's default staffing options
1. Open the project.
The Project: Properties: Main - General page appears.
2. Select Schedule from the content menu.
The Project: Properties: Main - Schedule page appears.
3. In the Staffing section, complete the following fields:
Default Staff OBS Unit
Select the project's OBS unit that will be used as the default OBS unit for all resources or team members assigned to this project.
Requisition Approval Required
Specifies whether you want to require that requisitions be approved before they can be booked.
4. Click Submit.
40 Project Management User Guide

Project Properties
Set Default Earned Value Options at the Project Level
If your organization uses earned value management methodology for measuring project performance, you can use the fields in the Earned Value section of the Project: Properties: Main - Schedule page to set the default earned value calculation method. By default, the earned value calculation method is percent complete. Use this page to also associate your project to an earned value reporting period.
The earned value reporting period defines the frequency and the interval for the Update Earned Value History job to take historical earned value snapshots of performance and save snapshot in the earned value history table. When using earned value methodologies to analyze project performance, the earned value reporting period is used by the job to take the snapshot and is saved based on a project's association to the period. The project manager associates the project to the appropriate period.
Note: See the Administration Guide for more information on the earned value jobs and the earned value history table.
To set the project's earned value options
1. Open the project.
The Project: Properties: Main - General page appears.
2. Select Schedule from the content menu.
The Project: Properties: Main - Schedule page appears.
3. In the Earned Value section, complete the following fields and click Submit:
Earned Value Reporting Period
Defines this project's assigned reporting period. Set the period if your organization uses earned value methodology for measuring project performance. Once the Update Earned Value History job runs, this field is locked.
Default: Unlocked
If your project has tasks that are linked to a work package, CA recommends that you associate the same earned value reporting period to this project as the one that is associated to the contract.
Note: See the Earned Value Manager Product Guide for more information on linking work packages to projects or tasks and associating contracts to earned value reporting periods.
Chapter 2: Managing Projects 41

Project Properties
EV Calculation Method
Defines the default earned value calculation method used when calculating earned value (EV).
Options: Percent Complete, 0/100, 50/50, Level of Effort, Weighted Milestones, Milestone Percent Complete (PC), and Apportioned Effort (AE)
BCWP Override
Defines the Budgeted Cost of Work Performed (BCWP). This value overrides the system-calculated BCWP and is used for all earned value metrics that are based on BCWP. If you choose an earned value calculation method—such as Weighted Milestones, Milestone Percent Complete (PC), and Apportioned Effort (AE)—you must manually enter the BCWP value.
Important! CA recommends that you manually enter a value in this field only if you are tracking and calculating earned value in an external system and are not using CA Clarity PPM to calculate earned value.
BCWP
Displays the system-calculated value of Budgeted Cost of Work Performed (BCWP). This value is calculated and recorded when you baseline your project or when you update earned value totals and is based on the cost and rate matrices associated at the project level. BCWP is also referred to as the earned value (EV).
Calculations are made based on the level at which the calculation is being made. BCWP is calculated at the following levels:
■ Task. BCWP is based on the selected EV calculation method.
■ Project. BCWP is the sum of BCWP for all WBS Level 1 tasks in the project.
Earned Value Last Updated
Read-only. Displays the date the earned value was last updated, by either manually updating the earned value or by running the Update Earned Value Totals job.
The project's default earned value settings are defined.
42 Project Management User Guide
Project Properties
Manually Override BCWP at the Project Level
Earned value (EV) is the value of work performed expressed in terms of the approved budget assigned to that work for a scheduled activity or work breakdown structure. Earned value is also referred to as the budgeted cost of work performed (BCWP). If you choose an earned value calculation method for your project and all of its tasks that is not system calculated—such as weighted milestones, milestone percent complete, or apportioned effort—you must manually enter your project's BCWP value. You can also manually override BCWP for specific tasks.
Regardless of the earned value calculation method you set for your project, the value you enter in the BCWP Override field on this page overrides the system-calculated BCWP values and is used in all EV calculations that require BCWP as a parameter.
To manually override BCWP at the project level
1. Open your project for which you want to define BCWP.
The Project: Properties: Main - General page appears.
2. Select Schedule from the content menu.
The Project: Properties: Main - Schedule page appears.
3. Enter the overall earned value in the BCWP Override field and click Submit.
The project's earned value is defined.
Risks
You can rate your project's risk from a pre-defined list of risk factors by severity level using the Project: Properties: Main - Risk page.
Chapter 2: Managing Projects 43

Project Properties
Budget Properties
You can define your project's budget properties using the Project: Properties: Main - Budget page. Budget data is essential in managing and analyzing portfolios. Correctly defining and recording planned cost and benefit information is key to accurately assessing and analyzing projects.
With a simple budget, you can define metrics such as the project’s planned cost, Net Present Value (NPV), Return on Investment (ROI), and breakeven information.
You can also use this page to define the project’s simple forecasted costs and benefits. You can set the start and end date over which the budget is experienced. Money flows constantly and evenly over this period. The values you enter are applied over only one time period—from the investment’s start date to the finish date—and are applied only to your investment not to any of its child or parent investments.
Alternatively, a detailed financial plan lets you budget costs over multiple periods. If you choose to create a financial plan, data from the plan is automatically populated in the budget properties page.
Note: See the Financial Management User Guide for more information on working with financial plans.
Define Simple Budgets
You can define your project's simple budget using the Project: Properties: Main - Budget page. If you later define a detailed plan, data from the detailed plan override the simple budget, and the fields on this page become read-only.
Note: See the Financial Management User Guide for more information on creating a detailed financial plan.
To define a simple budget
1. Open the project.
The Project: Properties: Main - General page appears.
2. Select Budget from the content menu.
The Project: Properties: Main - Budget page appears.
3. Complete the following fields:
Currency
Select the currency you want to use when calculating the project's budget and forecast values.
44 Project Management User Guide

Project Properties
Planned Cost
Enter a planned cost for the entire project. The value is distributed between the planned cost start and planned cost finish dates.
Planned Cost Start
Defines the scheduled start date for the project's budget. Click Browse to select another date.
Planned Cost Finish
Defines the scheduled finish date for the project's budget. Click Browse to select another date.
Planned Benefit
Defines the anticipated financial benefit for this project. The value is distributed between the planned benefit start and finish dates.
Planned Benefit Start
Defines the scheduled start date for the project's benefit. Click Browse to select another date.
Planned Benefit Finish
Defines the scheduled finish date for the project's benefit. Click Browse to select another date.
Planned NPV
This field is calculated based on the following formula: Planned NPV = Planned Benefit - Planned Cost
Note: To make this field available for data entry, clear the Calculate NPV Data field.
Default: Locked
Planned ROI
The value in this field is calculated based on the following formula: Planned ROI = Planned NPV / Planned Cost
Note: To make this field available for data entry, clear the Calculate NPV Data field.
Default: Locked
Planned Breakeven
Displays the date and amount to indicate the period and value at which the program becomes profitable.
Note: To make this field available for data entry, clear the Calculate NPV Data field.
Default: Locked
Chapter 2: Managing Projects 45
Project Properties
Calculate NPV Data
Specifies whether you want to have the project's net present value (NVP), which includes the Planned NPV, Planned ROI, and Planned Breakeven data, system calculated based on the formulas listed in the fields' descriptions.
Default: Selected
4. Click Save.
Financial Processing
You must financially enable your project in order to:
■ Process financial transactions.
■ Define contract properties.
Financially enabling projects is required for:
■ Setting up for external billing, such as specifying the company that is billed for projects, and the billing method.
■ Setting up for chargebacks, such as specifying the department that incurred the project cost and its location.
■ Setting up financial transaction defaults, such as specifying the WIP or investment class, and cost and rate matrices. These selections will automatically populate transaction entry upon selecting the project.
Define Financial Properties
Use the project's general financial properties to:
■ Associate a company name for external billing purposes and to enable contracts.
■ Specify a department and location to credit for project costs.
■ Specify the billing type and status.
■ Associate the project with a WIP and investment class.
■ Financially enable your project.
To define a project's financial properties
1. Open the project.
The Project: Properties: Main - General appears.
2. Select Financial from the content menu.
The Project: Properties: Main - Financial page appears.
3. In the General section, complete the following fields, and click Submit:
46 Project Management User Guide

Project Properties
Company Name
(Required for external billing and to enable contracts.) Defines the company to bill for project costs. Click the Browse icon to select a company. You must create a company profile.
Note: See the Financial Management User Guide for more information, or contact your finance manager.
Project ID
Read-only. Defines the project ID.
Affiliated Project
Defines the project that is financially tied to this project. Click the Browse icon to select an affiliated project.
Department
(Required for any type of financial processing.) Defines the department who incurred the cost of the project, investment, or services.
Location
(Required for any type of financial processing.) Defines the location to be used to match the project with rate and cost matrices if system or entity-level defaults indicate that the source location is taken from the investment.
Note: Contact your CA Clarity PPM administrator or see the Administration Guide for more information on setting the source location as a system level or entity level financial default.
Financial Status
(Required.) Defines the status that determines how transactions entered against this project are handled.
Values:
■ Open. All transactions entered against a project can be fully processed.
■ Hold. New transactions cannot accumulate on the project, but existing transactions can be processed against the project.
■ Closed. New transactions cannot accumulate and credit memos cannot be issued against a project. When you mark the project's financial status as "Closed", it no longer is open for financial processing.
Chapter 2: Managing Projects 47

Project Properties
Type
(Required.) Defines the billing method required for financial transactions.
Values:
■ Standard. Standard bills let transactions accumulate over a given cycle and let you to bill resulting transactions at any time. You can bill this type through demand billing and chargebacks. This type can process billable and non-billable financial transactions. Users can enforce a contract amount if desired.
■ Contract. Contract bills have a specified limit on the final amount. You can bill this type through advanced billing or through demand billing. You can enforce the contract amount.
■ Retainer. Retainer bills have no predetermined limit on the final amount You can process this type through advanced billing or demand billing. You cannot enforce retainer amounts.
■ Internal. This non-billable type is used to track financial transactions that are not used for billing or chargebacks.
Note: See the Financial Management User Guide for more information on financial processing, advanced billing, demand billing, and chargebacks.
WIP Class
Defines the transaction category used to group projects for reporting. Click the Browse icon to select a Work In Progress (WIP) class.
Investment Class
Defines the project used to group projects for reporting. Click the Browse icon to select an investment class.
The project is financially enabled.
48 Project Management User Guide

Project Properties
Define Billing Information (Projects)
You specify the project's billing information only if you process external bills. Billing information is not required for chargeback setup.
Once you have entered the billing information, you can associate rate and cost matrices to the project.
To define a project's billing information
1. Open the project you want to define billing information.
The Project: Properties: Main - General appears.
2. Select Financial from the content menu.
The Project: Properties: Main - Financial page appears.
3. In the Billing section, enter the following:
Billing Project
Defines the parent project that will be billed for project costs. Click the Browse icon to select a parent project. Parent and child projects must use the same financial type, company, and billing currency.
Send Bill To
Defines the company that will receive project bills. Click the Browse icon to select the company.
Bill Expenses
Specifies whether the project team can bill project expenses.
Batch Cycle
Defines the batch cycle used to process transactions for this project. Click the Browse icon to select a batch cycle.
Billing Currency (Required)
Defines the currency used to process billing and financial transactions on this project. Click the Browse icon to select the billing currency. This value becomes read-only after transactions have been processed on the project.
4. Submit changes.
Chapter 2: Managing Projects 49

Project Properties
Financially Close Project
Before you can deactivate or delete a project, you must close its financial properties. In addition, when a project is complete, it is good practice to close the project financially to ensure that additional funds are not assigned to or billed for the project.
Financially Closing Projects Rules and Guidelines
Before you financially close a project, review the following rules and guidelines:
■ For Contract and Retainer project types, you must close all child projects before you can close the billing projects. Do this in billing hierarchies where one project's costs are billed to another.
■ For Standard project types, you must adhere to the rule for Contract and Retainer project types, but with the following exceptions:
■ For projects where the contract amount is not being enforced, transactions in WIP must have an amount remaining of zero.
■ For projects where the contract amount is being enforced, transactions in WIP do not have to have an amount remaining of zero provided that total billings are equal to the contract amount.
■ When a project belongs to a hierarchy that consists of multiple branches, you must follow all of these rules and guidelines for each project within the branch.
To financially close a project
1. Open the project you want to financially close.
The Project: Properties: Main - General page appears.
2. Click the Financial link on the content menu.
The Project: Properties: Main - Financial page appears.
3. Select Closed from the Financial Status drop-down and click Save.
The project is financially closed.
50 Project Management User Guide

Project Properties
How to Set Up Projects for Tracking Costs
Use the following process to set up projects for tracking costs:
■ Create and define one or more cost/rate matrices.
■ Create a project (see page 16).
■ Financially enable the project (see page 46).
■ Set the project's EV calculation method (see page 41).
■ Associate the cost/rate matrices to the project's resource types (see page 52).
■ Assign staff to project tasks (see page 163).
■ Create a cost plan using the team allocations.
■ Schedule the Rate Matrix Extraction job.
■ Baseline the project (see page 78).
■ Calculate and record earned value data (see page 65).
Note: Contact your CA Clarity PPM administrator or see the Administration Guide for more information on creating financial matrices and on how to schedule job runs.
Chapter 2: Managing Projects 51
Project Properties
Cost/Rate Matrices and Projects
Cost and rate matrices are used for billing and tracking purposes. You must associate a cost and rate matrix to your project for budgeted cost of work performed (BCWP) and earned value (EV) data to be calculated. You can associate a cost and rate matrix at the project level for labor, material, and equipment resources, and for expenses incurred against your projects. These matrices determine the amount billed externally to customers for project costs or charged internally to departments via chargebacks.
For example, suppose that you bill the labor costs of your project to a customer, you could associate a rate matrix to your project that specifies the billable rate for a resource per hour. When transactions on the project are processed, the selected matrix is used to calculate billable cost.
You also use matrices to create certain project cost data in reports or from the project's baseline. In order for these values to calculate, you must first assign resources or roles to tasks and then have your CA Clarity PPM administrator schedule the Rate Matrix Extraction job to run.
If you do not specify a default matrix at the project or entity level, your finance manager must specify a rate when creating transactions to process costs.
Note: Contact your finance manager or see the Administration Guide for more information on setting default matrices at the entity level, and for more information on scheduling job runs.
Associate Cost/Rate Matrices to Project
Use this procedure to associate cost/rate matrices to a project's resource types. These cost/rate matrices are used to calculate project rates.
Important! Before you can associate a cost/rate matrix with a project, you must first create the cost/rate matrices.
Note: Contact your finance manager or see the Administration Guide for more information on setting up default rate matrices.
To associate a cost/rate matrix to a project's resource types
1. Open the project to which you want to associate cost and rate matrices.
The Project: Properties: Main - General appears.
2. Select Financial from the content menu.
The Project: Properties: Main - Financial page appears.
3. In the Labor Transaction Rates, Material Transaction Rates, Equipment Transaction Rates, and Expense Transaction Rates sections, enter the following cost or rate information as needed:
52 Project Management User Guide

Project Properties
Rate Source
Defines the rate matrix that is used to calculate the benefit amount of the transaction entry. Click the Browse icon to search for and add the rate and cost matrix from which project rates are calculated.
Cost Source
Defines the cost matrix that is used to calculate the cost amount of the transaction entry. Click the Browse icon to search for and add the cost matrix from which project costs are calculated.
Exchange Rate Type
Displayed only when multiple currencies are available. Defines the exchange rate type that is used for transactions entered against the project. When the project is approved, you cannot modify the exchange rate type.
Values:
■ Average. The blended derived rate over a period of time, usually weekly or monthly.
■ Fixed. The fixed rate that does not change over a defined period of time.
■ Spot. The variable rate that changes over the course of a day.
Note: Contact your CA Clarity PPM administrator or see the Administration Guide for more information on exchange rates.
4. Submit your changes.
Access to this Project
Use the Access to This Project section to view, grant, and edit access rights to your project. The links in this section—Full View, Resource, Group, and OBS unit—allow you to view, edit, and grant instance-level access to this project.
Note: Contact your CA Clarity PPM administrator or see the Administration Guide for more information on how to use this section.
Chapter 2: Managing Projects 53

Estimates at the Project Level
Estimates at the Project Level The Estimate to Complete (ETC) is the estimated time for a resource to complete an assignment. This value is important for both project planning and revenue recognition. In the short run, estimates help project managers more effectively allocate work hours. In the long run, project managers can compare estimates to actuals, which can help produce more accurate forecasting and planning.
Timesheet actuals are generated from the approved hours staff members record on timesheets.
After assigning staff to tasks, you can view and edit combined ETC of all project tasks on the Project: Properties: Main - Estimating page.
Note: See the Common Features and Personal Options User Guide for more information on how to use and manage timesheets.
How to Define Project Estimates
The following process outlines how to define a project's estimates:
1. Assign staff to tasks (see page 163).
2. Generate the project's estimates (see page 54).
3. Define estimates:
■ At the project level (see page 55).
■ At the task level (see page 149).
4. View and edit allocations (see page 206) by individual resource.
54 Project Management User Guide

Estimates at the Project Level
How ETC is Calculated
Every time you assign a staff member to a task, the task's ETC is automatically generated. The ETC is based on the following formula:
ETC = the number of working days the resource is assigned to work on the task * the number of hours each day that the resource is available for work
The resource's calendar and daily availability is used to determine the resource's total availability. Unless you specify a different number in the resource's profile, by default 8 hours of work time are available daily for each resource is assumed.
For example, if you schedule a task between 6/30/09 and 7/30/09 and it contains 22 working days and has one resource assigned to it for 8 hours a day for all 22 days, then the task's ETC is calculated at 176 hours (22 days * 8 hours each day). If you assign two resources to the task, each with a total daily availability of 8 hours, one for 50% of the resource's available time and the other for 100%, then the combined ETC would be calculated at 264.
Note: See the Resource Management User Guide for more information about resource profiles.
View ETC
Use the Project: Properties: Main - Estimating page to view and edit the combined ETC of all the tasks in the project. The Current ETC column displays the system-generated combined ETC for all of the tasks in each phase of the project.
To view the ETC for each task in the phase or group, click the Plus icon in front of a task grouping. A task grouping refers to any group that consists of a top-level task and its subordinates.
Important! Resources must be assigned to tasks in order to modify and view ETC.
To view generated ETC
1. Open the project.
The Project: Properties: Main - General page appears.
2. Click Estimating from the content menu.
The Project: Properties: Main - Estimating page appears.
3. Click Preview.
A breakdown of project ETC by phase or task grouping is displayed. This lists the ETC for each task grouping.
Chapter 2: Managing Projects 55

Estimates at the Project Level
How to Modify ETC at the Project Level
You can change the project-level ETC in the following ways:
■ Apply new estimates across project tasks (see page 56).
■ Apply the top-down estimating mode (see page 56).
■ Use the estimating rules mode (see page 56).
Apply New ETC Across Project Tasks
When you change the ETC value at the project level, CA Clarity PPM distributes the value across all of the project's tasks according to task duration, resource availability, and the percentage of time the resource is allocated to the task. The current ETC assumes the new value.
To apply a new ETC across all of the project's tasks
1. Open the project to which you want to edit tasks.
The Project: Properties: Main - General page appears.
2. Select Estimating from the content menu.
The Project: Properties: Main - Estimating page appears.
3. In the New ETC field, enter in the new estimate you want to apply across all of the tasks in the project, and click Apply.
The new ETC is applied.
Apply Top-Down Estimating at the Project Level
Important! Before applying top-down estimating, make sure that for each task you want to share a portion of the top-down distribution, you enter the percentage of the top-down estimate distributed to the task.
To apply top-down estimating
1. Open the project.
The Project: Properties: Main - General page appears.
2. Click Estimating from the content menu.
The Project: Properties: Main - Estimating page appears.
3. Complete the following fields:
Mode
Defines the mode for estimating.
Value: Top-Down Estimating
56 Project Management User Guide

Estimates at the Project Level
New ETC
Defines the amount of ETC you want to distribute.
4. Click Apply.
The ETC is distributed to the tasks set up to receive the top-down distribution.
Apply Estimating Rules at the Project Level
You can create and apply estimating rules when you want to distribute ETC numbers in a specific way. For example, you can create an estimating rule for a specific group of tasks that considers the planned cost of the tasks in the estimate.
You must create the estimating rules at the task level, and you can only run them for the tasks for which they were created. Though you can apply estimating rules at the project level, you cannot create them at the project level.
The names of the phases or groupings for which the rule was run are highlighted in a different color. Use the ETC From Rules column to compare the ETC previously generated for the phase or grouping in the Current ETC column with the ETC generated from the applied rule(s).
To apply an estimating rule at the project level
1. Open the project.
The Project: Properties: Main - General page appears.
2. Select the Tasks tab.
The Project: Tasks: Task List page appears.
3. Open the task you want to which you want to apply an estimating rule.
The Task Properties page appears.
4. Click the Estimating tab.
The Task Estimating Properties page appears.
5. Choose Estimating Rules from the Mode drop-down, and click Apply.
The page refreshes and the list of phases or groupings displays.
Chapter 2: Managing Projects 57

Earned Value
Earned Value Earned value (EV) is the value of work performed expressed in terms of the approved budget assigned to that work for a scheduled activity or work breakdown structure. Earned value is also referred to as the budgeted cost of work performed (BCWP).
The earned value reporting period defines the frequency and the interval for the Update Earned Value History job to take historical earned value snapshots of performance and save snapshot in the earned value history table. When using earned value methodologies to analyze project performance, the earned value reporting period is used by the job to take the snapshot and is saved based on a project's association to the period. The project manager associates the project to the appropriate period. You must associate a reporting period to the project. You can use the EV data to review historical performance and to predict future performance.
Note: Contact your CA Clarity PPM administrator or see the Administration Guide for more information on setting the default earned value calculation method, on setting up the reporting periods for earned value management, on running jobs, and for more information on the earned value history table.
Baselines and Earned Value Computations
Baseline information is factored in to many of the calculations performed in earned value analysis. You must baseline your project to attain earned value data or estimate at completion (EAC) variances. Earned Value Analysis (EVA) is a statistical operation that compares the project's present actuals against what was planned. For example, EVA may compare the length of time a task would take, according to a baseline budget plan, to the actual length of time it took. EVA is also sometimes referred to as Performance Measurement.
All of the earned value fields contain the fundamental calculations used for EVA. The following EV values are calculated for every scheduled activity:
■ Budgeted Cost of Work Scheduled (BCWS)
■ Actual Cost of Work Performed (ACWP)
■ Budgeted Cost of Work Performed (BCWP)
These values are used together to determine if work is being performed as planned. The most frequently employed measures are:
■ Cost Variance (CV)
■ Schedule Variance (SV)
■ Cost Performance Index (CPI)
■ Schedule Performance Index (SPI)
58 Project Management User Guide

Earned Value
Earned Value Data Fields
Use the EV fields to track work performance to account for cost and schedule variances. The following earned value data fields are included and can be displayed on list pages and portlets:
ACWP
Read-only. Displays the system-calculated value of Actual Cost Of Work Performed (ACWP), which is the total direct and indirect cost incurred in performing work during a given period of time based on posted actuals.
Calculations are made based on the level at which the calculation is being made. ACWP is calculated at the following levels:
■ Detail-task. The calculation is based on the following formula: ACWP = Actuals Work Units * Billing Rate
■ Summary-task. The calculation is based on the following formula: ACWP = Sum of ACWP for all detail tasks in project
■ Project. The calculation is based on the following formula: ACWP = Sum of ACWP for all WBS Level 1 tasks in project
BAC
Read-only. Displays the system-calculated value of Budget at Completion (BAC), which is the budgeted total cost at the time of the baseline, based on the following formula: ((Actuals + Remaining Work) x Billing Rate) taken at time of baseline
BCWP
Displays the system-calculated value of Budgeted Cost of Work Performed (BCWP). This value is calculated and recorded when you baseline your project or when you update earned value totals and is based on the cost and rate matrices associated at the project level. BCWP is also referred to as the earned value (EV).
Calculations are made based on the level at which the calculation is being made. BCWP is calculated at the following levels:
■ Task. BCWP is based on the selected EV calculation method.
■ Project. BCWP is the sum of BCWP for all WBS Level 1 tasks in the project.
Chapter 2: Managing Projects 59

Earned Value
BCWS
Read-only. Displays the system-calculated value of Budgeted Cost of Work Scheduled (BCWS), which is the budgeted amount to be spent on the project in a given period of time. This point is either the project's as of date or the system date if the project's as of date is not defined. BCWS is also referred to as the planned value (PV).
The BCWS is calculated based on the following formula: BCWS = Sum of BAC through a point in time
CPI
Displays the system-calculated value of Cost Performance Index (CPI), which is an efficiency rating for work accomplished, based on the following formula: CPI = BCWP / ACWP
Note: A value greater than one indicates the costs are running over budget.
CV
Displays the system-calculated value of Cost Variance (CV), which is the value of what has been accomplished to date versus what has been spent to date, based on the following formula: CV = BCWP - ACWP
EAC
Read-only. Displays the system-calculated value of estimate at completion (EAC), which is the total cost of all actual work completed to date plus the predicted cost finishing the remaining work, based on the following formula: EAC = ACWP + ((BAC - BCWP)/CPIc)
EAC (T)
Read-only. Displays the system-calculated value of estimate at completion (EAC). This calculation is most often used when current variances are seen as typical of future variances, and is based on the following formula: EAC (T) = ACWP + ETC
EAC (AT)
Read-only. Displays the system-calculated value of estimate at completion (EAC). This calculation is most often used when current variances are seen as atypical and the project management team expectations are that similar variances will not occur in the future. This value is calculated based on the following formula: EAC (AT) = (ACWP + (BAC - BCWP))
60 Project Management User Guide

Earned Value
ETC (Cost)
Read-only. Displays the system-calculated value of estimate at completion (ETC). This value is calculated based on the following formula: ETC (Cost) = remaining labor cost + remaining non-labor cost
ETC (T)
Read-only. Displays the system-calculated value of estimate at completion (ETC) using earned value data. This calculation is most often used when current variances are seen as typical of future variances. This value is calculated based on the following formula: ETC (T) = ((BAC – BCWPc)/CPIc
ETC (AT)
Read-only. Displays the system-calculated value of estimate at completion (ETC) using earned value data. This calculation is most often used when current variances are seen as atypical and the project management team expectations are that similar variances will not occur in the future. This value is calculated based on the following formula: ETC (AT) = BAC – BCWPc
SPI
Displays the system-calculated value of Schedule Performance Index (CPI), which is the ratio of work performed to work scheduled, based on the following formula: SPI = BCWP / BCWS
Note: A value less than one indicates the work is behind schedule.
SV
Displays the system-calculated value of Schedule Variance (CV), which is the value of what has been scheduled to date versus what has been performed to date, based on the following formula: CV = BCWP - BCWS
Chapter 2: Managing Projects 61
Earned Value
Earned Value Calculation Methods
An earned value calculation method is the method by which various earned value metrics are calculated. Some of the methods are system calculated. For those that are not system calculated, you must manually enter your project's Budgeted Cost of Work Performed (BCWP).
Note: If you are using CA Clarity PPM with Open Workbench or Microsoft Project, these schedulers only support the percent complete calculation method. If your company uses earned value management methodology for measuring project performance other than percent complete, you must use CA Clarity PPM to generate your earned value data.
The following earned value calculation methods are available:
Percent Complete (PC)
Defines an estimate expressed as a percent of the amount of work that has been completed on a task or work breakdown structure. The EV calculation method where Budgeted Cost of Work Performed (BCWP) is system calculated using the following formula:
BCWP = Budget at Completion (BAC) * % complete
0/100
Defines the EV calculation method where Budgeted Cost of Work Performed (BCWP) is system calculated using the following fixed formula: If % complete = 100, then BCWP = Budget at Completion (BAC); otherwise, BCWP = zero
Use this method when project work begins and completes in a single reporting period, and credit is only earned when the project or task is 100 percent complete.
50/50
Defines the EV calculation method where Budgeted Cost of Work Performed (BCWP) is system calculated using the following formula: If % complete > zero but < 100, then BCWP = Budget at Completion (BAC) / 2. If % complete = 100, then BCWP = BAC. If % complete = zero, then BCWP = zero
Use this method when project work begins and completes within two reporting periods, and 50 percent credit is earned when a project or task is started and the remaining 50 percent is earned upon completion.
Level of Effort (LOE)
Defines the EV calculation method where Budgeted Cost of Work Performed (BCWP) is system calculated using the following formula: BCWP = Budgeted Cost of Work Scheduled (BCWS)
62 Project Management User Guide

Earned Value
Weighted Milestones
Defines the EV calculation method where Budgeted Cost of Work Performed (BCWP) is user defined. The project manager assigns weights to milestones across the duration of the summary task. As each milestone in the summary task is reached, a specific percent of the work is completed until 100% is reached. Use this method if your organization uses earned value management methodology for measuring project performance and has projects and tasks that use this method. When you choose this method, you must then manually enter task BCWP.
Milestone Percent Complete (PC)
Defines the EV calculation method where Budgeted Cost of Work Performed (BCWP) is not system calculated but user defined. Dollar amounts are selected for the weighting of each time period, instead of a percentage. EV credit is earned as a percentage of the milestone value assigned. Use this method if your organization uses earned value management methodology for measuring project performance and has projects and tasks that use this method. When you choose this method, you must then manually enter task BCWP.
Apportioned Effort (AE)
Defines the EV calculation method where Budgeted Cost of Work Performed (BCWP) is not system calculated but is user defined. Task work effort is tied to other task work efforts. As the base task completes work, the apportioned task earns completed work. The task uses the work effort tied to other tasks to drive its performance. Use this method for discrete work that is related to other discrete work. Use this method if your organization uses earned value management methodology for measuring project performance and has projects and tasks that use this method. When you choose this method, you must then manually enter task BCWP.
Chapter 2: Managing Projects 63

Earned Value
How Earned Value Calculation Methods are Applied
By default, the default earned value (EV) calculation method for projects and tasks is percent complete. If your organization uses earned value management methodology for measuring project performance, your CA Clarity PPM administrator can change the default earned value calculation method setting to the method your company uses for projects and tasks. CA recommends that your CA Clarity PPM administrator define the object-level default setting for projects and tasks. In this way, the EV calculation method defaults to this object-level setting when you create new projects or tasks.
You can override the object-level EV calculation method setting at the project and at the task level. When calculating the earned value metrics, the earned value calculation method setting you establish at the task-level is used and the results are rolled up to the project. If you leave the task's method value blank, the task inherits the method from its parent task. If you leave the parent task's method blank or if the task is a top-level task, it inherits the project's method setting. If you do not set the project's earned value calculation method, the task is ignored when the earned value is calculated.
If you create projects from project templates, you can set the earned value calculation method in the project template so that the projects you create from the template inherit the template's setting.
Note: If you are using CA Clarity PPM with Open Workbench or Microsoft Project and you specify an earned value calculation method other than percent complete, you must use CA Clarity PPM to calculate, display, and report earned value metrics.
Note: Contact your CA Clarity PPM administrator or see the Administration Guide for more information on setting the object-level default earned value calculation method for projects and tasks.
64 Project Management User Guide

Earned Value
Chapter 2: Managing Projects 65
How to Calculate and Record Earned Value Totals
A snapshot of your project's earned value is saved to the earned value history table during the scheduled run of the Updated Earned Value Totals job. This job calculates and records the project's current earned value data totals, which you can display on project and task list pages and portlets.
Do the following to calculate and record current earned value metrics:
1. Override the default object-level earned value options:
■ At the project level (see page 41)
■ At the task level (see page 120)
2. Do one of the following:
■ Have your CA Clarity PPM administrator schedule the Updated Earned Value Totals job to run periodically.
■ Manually update the earned value data from the:
■ Baseline page (see page 65)
■ WBS (see page 66)
■ Task list (see page 66)
Note: Contact your CA Clarity PPM administrator or see the Administration Guide for more information on scheduling the earned value jobs and on setting the system-level default earned value options.
Manually Update Earned Value Data from the Baseline Page
You can manually update your project's earned value data from the Project: Properties: Baseline page. This is one of the ways you can save a snapshot of your project's current earned value.
Note: You must have at least one baseline for the Update Earned Value button to display on the page.
To manually update your project's earned value data from the baseline page
1. Open the project for which you want to calculate earned value.
The Project: Properties: Main - General page appears.
2. Select the Baseline subtab.
The Project: Properties: Baseline page appears.
3. Click Update Earned Value.
A snapshot of your project's current earned value is saved.

Earned Value
Manually Update Earned Value Data from the Work Breakdown Structure
You can manually update your project's earned value data on the Project: Tasks: Work Breakdown Structure page. This is one of the ways you can save a snapshot of your project's current earned value.
To manually update your project's earned value data from the Work Breakdown Structure
1. Open the project for which you want to calculate earned value.
The Project: Properties: Main - General page appears.
2. Click the Tasks tab.
The Project: Tasks: Task List page appears.
3. Select the Work Breakdown Structure subtab from the toolbar.
The Project: Tasks: Work Breakdown Structure page appears.
4. Click Update Earned Value.
A snapshot of your project's current earned value is saved.
Manually Update Earned Value Data from the Task List
You can manually update your project's earned value data on the Project: Tasks: Task List page. This is one of the ways you can save a snapshot of your project's current earned value.
To manually update your project's earned value data from the task list
1. Open the project for which you want to calculate earned value.
The Project: Properties: Main - General page appears.
2. Click Tasks tab.
The Project: Tasks: Task List page appears.
3. Click Update Earned Value.
A snapshot of your project's current earned value is saved.
66 Project Management User Guide
Define Project Contracts
Display Earned Value Data
You can display earned value data fields on any list page or portlet that bases its data from the project or task. In order to display this data on pages or portlets that do not already display the data, you must configure the page to display those list columns. You can also have your CA Clarity PPM administrator configure a page or portlet at the system-level (and not just for a particular user) using Studio.
Note: See the Common Features and Personal Options User Guide for more information on configuring pages and portlets.
Note: Contact your CA Clarity PPM administrator or see the Studio Developer's Guide for more information on adding attributes to objects.
Define Project Contracts Use the Project: Properties: Main - Contract Properties page to define the amount of the contract or statement of work you expect to use on the project. The contract information is used for billing and tracking purposes. The fields on this page vary according to the financial type you selected when you financially enabled the project.
Note: See the Financial Management User Guide for more information on billing.
Important! You must first financially enable the project and associate a company to the project before you can define the project's contract properties.
To define a project's contract information
1. Open the project.
The Project: Properties: Main - General page appears.
2. Select Contract from the content menu.
The Project: Properties: Main - Contract Properties page appears.
3. Complete the following fields:
Document Number
(Required for Contract or Retainer billing type projects.) Defines the tracking number that is associated with the contract or statement of work.
Chapter 2: Managing Projects 67
Define Project Contracts
Contract Amount
(Required for Contract or Retainer billing type projects.) Defines the limit of the billable monetary amount of the contract.
Note: The currency code defaults to the billing currency.
Enforce Contract Amount
(Displayed only for standard billing type projects that do not specify a separate billing project.) Specifies whether you want to prevent billing when costs exceed the contract amount.
Default: Cleared
Date
(Required for Contract or Retainer billing type projects.) Defines the start date of the contract or statement of work.
Bill Amount
(Displayed for Contract or Retainer billing type projects.) Defines the amount billed for each advanced billing.
Note: The currency code defaults to the billing currency.
Number of Bills
(Displayed for Contract or Retainer billing type projects.) Enter the number of advanced bills you want to generate.
Bill Frequency
(Displayed for Contract or Retainer billing type projects.) Defines the billing period to determine how often billings occur for this project.
Values: Weekly, Monthly, or Quarterly.
Default: Cleared
First Bill Date
(Displayed for Contract or Retainer billing type projects.) Defines the date of the first advanced bill.
Default Tax Code
(Displayed for Contract or Retainer billing type projects.) Defines the tax code to use when an advanced bill is generated.
Note: Contact your finance manager or see the Administration Guide for more information if no tax codes are available.
Default Administration Code
(Displayed for Contract or Retainer billing type projects.) Defines the administration code to use when an advanced bill is generated.
Note: Contact your finance manager or see the Administration Guide for more information if no administration codes are available.
68 Project Management User Guide
Master Projects and Subprojects
Notes
Specifies additional information about the contract.
4. Click Submit.
Master Projects and Subprojects Use subprojects to group related projects together under one master project. You can associate any number of projects to a master project by adding the subprojects to the master project. For example, the "Database Reconstruction" project might contain subprojects entitled "Oracle", "Sybase", and "Foxpro". Data is not shared between the subprojects and the master project, or between the subprojects themselves. However you can view combined actuals and ETC for all of the master project's subprojects on the Project: Properties: Subprojects page.
The ability to establish subproject links means you can create plans and track and analyze an individual project in detail while viewing, summarizing, and analyzing the progress of several projects at the master project level. You can use master projects with subprojects to perform top-down planning and to share resource availability across projects.
When you add or remove subprojects to and from your master project, the subproject is also added to your project's hierarchy as a child investment. You can view a list of your child investments, services, and ideas on the Project: Hierarchy: Financial Rollup page.
Chapter 2: Managing Projects 69
Master Projects and Subprojects
Add Subprojects to Master Projects
You can add an unlimited number of subprojects to a master project. You can add any project to which you have access as a subproject to any other project to which you have access.
To add a subproject to a master project
1. Open the master project to which you want to add a subproject.
The Project: Properties: Main - General page appears.
2. Select the Subprojects subtab.
The Project: Properties: Subprojects page appears.
3. Click Add.
The Select Projects page appears.
4. Select the check box next to the project you want to add as a subproject, and click Add.
The added subproject displayed in the list on the Project: Properties: Subprojects page.
Add Projects to Subprojects
Just as you can add subprojects to master projects, you can add projects as subprojects to a subproject. The procedure for adding projects to subprojects is the same as adding subprojects to master projects.
View Combined Subproject Actuals and Estimates
You can view combined subproject actuals and estimates using the Project: Properties: Subprojects page. The following list describes the columns and data that display on this page:
Count
Indicates the number of subprojects a subproject (or in the case of a program, a project) has.
Actuals
Displays the actuals that have been posted for the tasks in each subproject. The value in the Total cell reflects the combined actuals for all of the project's subprojects.
70 Project Management User Guide
Master Projects and Subprojects
ETC
Displays the subproject's estimate to complete. The Estimate to Complete (ETC) is the estimated time for a resource to complete an assignment. The value in the Total cell reflects the combined ETC for all of the project's subprojects.
Total Effort
Displays the subproject's total effort, based on the following formula: Total Effort = Actuals + Remaining ETC
The value in the Total cell reflects the combined effort for all of the project's subprojects.
% Expended
Displays the percentage of resource usage expended on this subproject. The value in the Total cell reflects the combined percentage for all of the project's subprojects.
Baseline
Displays the subproject's usage value for the most current baseline, based on the following formula: Usage = Total Effort (Actuals + Remaining ETC) to date
Status
Displays a stoplight indicator with the subproject's approval status.
Values:
■ Green. The subproject is approved
■ Yellow. The subproject is on-hold
■ Red. The project is unapproved.
Total
Displays a stoplight indicator with the subproject's overall approval status.
Read Only
Specifies whether the subproject is accessible to project participants in read-only mode.
Chapter 2: Managing Projects 71
Master Projects and Subprojects
Remove Subprojects from Projects
To remove a subproject from a project
1. Open the project from which you want to remove a subproject.
The Project: Properties: Main - General page appears.
2. Select the subproject you want to remove, and click Remove.
The subproject is removed from the project.
Control Access to Subprojects
By default, all project participants have read/write access to any subproject added to the project. However, you can change the access settings of individual subprojects to read-only and you can also change those set to read-only back to read/write.
To limit access to a subproject
1. Open the project you want to set access to the subproject.
The Project: Properties: Main - General page appears.
2. Click the Subprojects subtab.
The Project: Properties: Subprojects page appears.
3. Select the check box next to the subproject to which you want to limit access, and click Set Read-Only.
The subproject is now only accessible to project participants in read-only mode. A check appears in the Read Only column for that subproject.
To allow access to a subproject
1. Open the project you want to set access to the subproject.
The Project: Properties: Main - General page appears.
2. Click the Subprojects subtab.
The Project: Properties: Subprojects page appears.
3. Select the check box next to the subproject to which you want to allow access, and click Set Read/Write.
The subproject is now accessible to project participants in read/write mode. A check disappears from the Read Only column for that subproject.
72 Project Management User Guide
Dependencies
Master Project and Subproject Baselines
The master project's baseline data is an aggregation of its own baseline data and its subprojects. It is dynamically aggregated at the time you set the baseline. The master project's resource baseline data is an aggregation of the team baseline data.
How Master Project and Subproject Baselines Work
When you baseline a master project, a subproject baseline is also created for those subprojects you have marked as Read/Write. Baselines are created for the subprojects you mark as read-only, but they are not saved. Their values, however, are included in the master-level baseline. All subproject data is aggregated and is rolled up to the master baseline, including subprojects marked as read-only.
When you baseline the master project, its subprojects are locked. If all of the subprojects cannot be locked, the baseline operation stops and an error message displays.
The subproject baseline inherits the name and the ID of the master’s baseline. If the subproject already has a baseline with the same ID, that baseline is updated and a new baseline is not created. The link between the master project's baseline and the subproject's baseline is created based on the baseline ID and the same ID is shared between the two baselines.
When you delete a master baseline, the subproject's baseline is also deleted.
Dependencies Projects are considered investments in a portfolio. Other types of investments are assets, applications, and products. You can indicate dependency relationships that exist between investments in a portfolio using the Project: Properties: Dependencies page. A dependency can occur when a task in one investment must be completed before a task in another investment can begin. Or, for example, it could be that project A must be cancelled if a certain application runs significantly over budget.
Dependency information is used when creating portfolio scenarios. You can view dependency connections from a portfolio's Scenario: Efficient Frontier page within scenarios that include data from the investments you identify on the Project: Properties: Dependencies page.
Note: See the Portfolio Management User Guide for more information on how to create and use scenarios.
Chapter 2: Managing Projects 73
Dependencies
Create Project Dependencies
You can create dependencies to other investments or create a dependency to another project on which this project depends.
To create a dependency link between two projects
1. Open the project for which you want to create a dependency relationship.
The Project: Properties: Main - General page appears.
2. Select the Dependencies subtab.
The Project: Properties: Dependencies page appears.
3. Complete the following field, and click Add:
Mode
Specifies the dependency mode you want to use.
Values:
■ Investments that depend on this one. Use this mode to create one or more dependencies that depend on this project.
■ Investments this one depends on. Use this mode to create one or more dependencies that this project depends on.
The dependency structure is designed according to your selection, and the Select Investments page appears.
4. Select the check box next to the project to which you want to create a dependency and click Add.
A list of the project dependencies are displayed in the list on the Project: Properties: Dependencies page.
5. Filter the list by investment type.
Those investments (by type) to which you have access display in the list.
Default: Application
The investments are displayed in the list.
6. Select the check box next to the investment with which you want to create the dependency, and click Add.
The added investment is displayed in the list as a dependency on the Project: Properties: Dependencies page.
74 Project Management User Guide

Dependencies
View Project Dependencies
You can view a list of investments that are dependent on a project, or a list of investments that depend on a project using the Project: Properties: Dependencies page.
You can also view dependency relationships from a portfolio's Scenario: Efficient Frontier page within scenarios that include data from the investments you identify on the Project: Properties: Dependencies page.
Note: See the Portfolio Management User Guide for more information on scenarios.
To view a list of investments that are dependent on this project
1. Open the project.
The Project: Properties: Main - General page appears.
2. Select the Dependencies subtab.
The Project: Properties: Dependencies page appears. The dependencies display in the list.
Remove Project Dependencies
To remove a project dependency
1. Open the project.
The Project: Properties: Main - General page appears.
2. Select the Dependencies subtab.
The dependencies display in the list on the Project: Properties: Dependencies page.
3. Select the dependency you want to remove, and click Remove.
The dependency no longer displays in the list.
Chapter 2: Managing Projects 75

Associated Releases
Associated Releases Releases represent new future deliverables. You can link releases to the project or program that will track the release's implementation effort. This association is established from the release. There is no limit to the number of releases that you can associate to a project or program.
Note: See the Requirements Planning User Guide for more information on how to work with releases and for more information on establishing release associations.
View a List of Associated Releases
You can view a list of releases that are associated to your project or program using the Project: Properties - Releases page.
To view a list of releases associated to a project or program
1. Open the project or program.
The Project: Properties: Main - General page appears.
2. Select the Associated Requirements subtab.
The Project: Properties - Releases page appears.
Open Releases Associated to Projects or Programs
You can open the releases that are associated to your project or program using the Project: Properties - Releases page.
To open the release associated to a project or program
1. Open the project or program.
The Project: Properties: Main - General page appears.
2. Select the Associated Releases subtab.
The Project: Properties - Releases page appears.
3. Click the name of the release you want to open.
The Release Properties: General page appears.
76 Project Management User Guide

Baselines
Unlink Projects or Programs from Releases
You can unlink a release from the project to which it is associated using the Project: Properties - Releases page. You can also remove the association by opening the release and unlinking the release from the project or program.
Note: See the Requirements Planning User Guide for more information on how to unlink releases from projects or program.
To unlink a project or program from a release
1. Open the project or program.
The Project: Properties: Main - General page appears.
2. Select the Associated Releases subtab.
The Project: Properties - Releases page appears.
3. Select the check box next to the release you want to unlink from the project or program, and click Unlink.
The release is removed from the list on the Project: Properties - Releases page and is unlinked from the project or program.
Baselines Baselines are snapshots of a project's total planned effort and cost estimates at the moment you capture it. Baselines are static; the changes you make to your project after you create your baseline do not automatically appear in the current baseline. You can update a baseline to include newly entered or posted information.
Chapter 2: Managing Projects 77

Baselines
Create New Baselines
There is no limit to the number of baselines you can create for your project. Generally you take an initial baseline before resources enter time on a project. After you create this initial baseline, you can create additional ones at various intervals, such as mid-way through the project, when different phases complete, and at the project's end. The initial baseline allows you to compare estimates to actuals once the project is under way.
The following rules are enforced when creating baselines:
■ You can only baseline unlocked projects. A project is automatically locked when you have it open in Open Workbench. To unlock a project, close it in Open Workbench.
■ You can only baseline entire projects. To perform detailed baselining, use Open Workbench or Microsoft Project. With Open Workbench, you can baseline the entire project, all of the tasks in a view, or selected tasks.
Note: See the Open Workbench User Guide for more information.
Note: See the Using CA Clarity PPM with Open Workbench and Microsoft Project Guide for more information.
Create Master Project Baselines
When you create a new master project baseline, you also create new baselines for each subproject that is marked as Read/Write in the master project's subproject hierarchy. This new baseline becomes the current baseline for the master project.
To baseline a project
1. Open the project you want to baseline.
The Project: Properties: Main - General page appears.
2. Select the Baseline subtab.
The Project: Properties: Baseline page appears.
3. Click New.
The Baseline Revision Properties page appears.
4. Complete the following fields:
Revision Name
Defines the baseline revision's name.
Example:
Initial Baseline, Mid-Term Baseline, or Final Baseline.
78 Project Management User Guide
Baselines
Revision ID
Defines the baseline revision's unique identifier.
Example:
The baseline version number, such as v1 or v5.
Description
Defines the baseline revision's description.
Current Revision
Specifies whether or not you want to make this baseline the current baseline. This field is unlocked only when multiple baseline revisions exist.
Default: Selected
5. Click Submit.
The new baseline displays on the Project: Properties: Baseline page.
Master Project and Subproject Baselines
The master project's baseline data is an aggregation of its own baseline data and its subprojects. It is dynamically aggregated at the time you set the baseline. The master project's resource baseline data is an aggregation of the team baseline data.
Edit Baselines
You can edit the baseline revision's name, ID, and description using the Baseline Revision Properties page. You can also view the baseline revision's baseline start date, finish date, usage data, and BCWP on this page.
To edit a project baseline
1. Open the project for which you want to edit a baseline.
The Project: Properties: Main - General page appears.
2. Select the Baseline subtab.
The Project: Properties: Baseline page appears.
3. Click the name of a baseline revision.
The Baseline Revision Properties page appears.
4. Complete the following fields:
Chapter 2: Managing Projects 79
Baselines
Revision Name
Defines the baseline revision's name.
Example:
Initial Baseline, Mid-Term Baseline, or Final Baseline.
Revision ID
Defines the baseline revision's unique identifier.
Example:
The baseline version number, such as v1 or v5.
Description
Defines the baseline revision's description.
Baseline Start
Displays the project or task's start date at the time you take the baseline.
Baseline Finish
Displays the project or task's finish date at the time you take the baseline.
Baseline Usage
Displays the system-generated usage at the time you take the baseline using the following formula: Usage = Total of Actuals + ETC
BCWP
Displays the system-calculated value of Budgeted Cost of Work Performed (BCWP). This value is calculated and recorded when you baseline your project or when you update earned value totals and is based on the cost and rate matrices associated at the project level. BCWP is also referred to as the earned value (EV).
Calculations are made based on the level at which the calculation is being made. BCWP is calculated at the following levels:
■ Task. BCWP is based on the selected EV calculation method.
■ Project. BCWP is the sum of BCWP for all WBS Level 1 tasks in the project.
80 Project Management User Guide

Baselines
Current Revision
Specifies whether or not you want to make this baseline the current baseline. This field is unlocked only when multiple baseline revisions exist.
Default: Selected
5. Click Submit.
Define which Baseline is Current
The baseline you create last becomes the current project baseline, by default. If you have defined only one baseline, this baseline is marked as the current baseline.
To define which baseline is current
1. Open the project.
The Project: Properties: Main - General page appears.
2. Click the Baseline subtab.
The Project: Properties: Baseline page appears.
3. Open the baseline you want to be current.
The Baseline Revision Properties page appears.
4. Select the Current Revision field, and then click Submit.
The baseline revision is saved as the current baseline.
Chapter 2: Managing Projects 81

Baselines
Display Master Project Baselines
When you open a master project that you have not baselined, but you have baselined one of the subprojects, the current baseline for that subproject is displayed in views. For example, if you have a master project with two subprojects, Subproject1 and Subproject2, and only Subproject1 has a current baseline, Baseline1, and you rename that baseline, and you baseline a selected task in Subproject2, then Subproject1's baseline is deleted and is replaced with Subproject2's baseline. Subproject2's baseline is marked as the current baseline.
If you are using CA Clarity PPM with Open Workbench and you create multiple baselines for a master project, a baseline (Baseline1) is created for the master project and its subprojects. When you save the master project back to CA Clarity PPM, the baseline data for the master includes the values from the subprojects. For example, if you have a master project that has a task with 5 hours of ETC, and its two subprojects have a task with 10 hours ETC each, then when you save the project back to CA Clarity PPM, the master project baseline usage is 25 hours.
If you open a master project that you have baselined, and then add a new subproject, the existing subproject's current baseline is saved. If you baseline the master project, the subproject's baseline is replaced by the new baseline. If the master project's subprojects have more then one baseline, the baseline that is marked as the current baseline displays in views.
View Current Baseline
You can verify which baseline is current on the Project: Properties: Baseline page. When you manually update the baseline from the project, the current baseline's data overrides the previously marked current baseline. A yellow check mark appears in the Current column for that baseline revision.
To view the current baseline
1. Open the project you want to view current baseline data.
The Project: Properties: Main - General page appears.
2. Click the Baseline subtab.
The Project: Properties: Baseline page appears displaying the list of the baselines, including the current baseline.
82 Project Management User Guide

Baselines
View Baseline Work Allocation and EV Data
You can view the baseline's cost and work allocation data and other data such as Earned Value (EV) data on project performance that is most relevant to your project and organization. When you take a baseline, the Update Earned Value Totals job runs. When this job runs, all of the EV metrics are updated. Use the Project: Properties: Baseline page to view this information.
By default, only the baseline usage and BCWP values are displayed on the page. You can display additional cost and allocation information, such as Schedule Performance Index (SPI), Actual Cost of Work Performed (ACWP), and Budget at Completion (BAC), by configuring the page to display those list columns.
Note: See the Administration Guide for more information on the Update Earned Value Totals job.
To view a baseline's work allocation and EV data
1. Open the project for which you want to view cost and allocation data.
The Project: Properties: Main - General page appears.
2. Click the Baseline subtab.
The Project: Properties: Baseline page appears.
3. View EV data from the following columns on the page:
Usage
Displays the total effort to date based on the following formula: Total Effort = Actuals + Remaining ETC
BCWP
Displays the system-calculated value of Budgeted Cost of Work Performed (BCWP). This value is calculated and recorded when you baseline your project or when you update earned value totals and is based on the cost and rate matrices associated at the project level. BCWP is also referred to as the earned value (EV).
Calculations are made based on the level at which the calculation is being made. BCWP is calculated at the following levels:
■ Task. BCWP is based on the selected EV calculation method.
■ Project. BCWP is the sum of BCWP for all WBS Level 1 tasks in the project.
Chapter 2: Managing Projects 83
Baselines
84 Project Management User Guide
How to Manually Update Baselines
You can manually update a baseline from the:
■ Master project (see page 84)
■ Subproject (see page 84)
■ Task (see page 85)
Manually Update Baselines at the Project Level
You can update existing project baselines to reflect changes to task assignments and other information. For example, you might want to update an existing baseline to include data from recently posted actuals. When you update a baseline, it becomes the current baseline revision.
When you update a baseline from the project, all of the changes you made to task assignments, estimates, and budgets since the last update are included. Updating a baseline changes its values accordingly.
When you update a master project's baseline, you also update the baselines for each subproject listed in the master project's subproject hierarchy. This baseline becomes the current baseline for the master project and its subprojects.
When you update a subproject's baseline, baseline and earned value data are not rolled up. You must initiate the update from the master project in order to roll up baseline data through the master project's subproject hierarchy.
Note: When you initiate an update from the master project, only the subproject’s that you have marked as Read/Write are updated.
Use this procedure to manually update master project and subproject baselines.
To manually update a baseline at the project level
1. Open the project for which you want to update the baseline.
The Project: Properties: Main - General page appears.
2. Click the Baseline subtab.
The Project: Properties: Baseline page appears.
3. Select the check box next to the baseline you want to update, and click Update Baseline.
The Confirm Revision Update message appears.
4. Click Yes to continue.
The updated project baseline displays on the Project: Properties: Baseline page.

Baselines
Manually Update Baselines at the Task Level
You can create project baselines and then update them at the task level. You can do this from the Project: Tasks: Task List page or on the Project: Tasks: Work Breakdown Structure page. When you manually update baselines from the task, all of the changes you made to task assignments, estimates, and budgets since the last update are included. When you update a baseline at the task level, the update only includes changes to the selected tasks; changes made to the budget or to unselected tasks are not included.
When updating baselines, the baseline marked Current is updated. You can verify which baseline is current on the Project: Properties: Baseline page. If applicable, the update is reflected in the Gantt bar on the Project: Tasks: Task List page. You can also view the updated data on the Project: Properties: Baseline page.
The following instructions explain how to update a project baseline at the task level, from the Project: Tasks: Task List page.
To manually update a baseline at the task level
1. Open the project for which you want to update the baseline.
The Project: Properties: Main - General page appears.
2. Click the Tasks tab.
The Project: Tasks: Task List page appears.
3. Select the task(s) that contain the data with which you want to update the project baseline, and click Update Baseline.
The Confirm Update Task Baseline message appears.
4. Click Yes to continue.
The current baseline is updated. The Project: Tasks: Task List page appears.
Update Master Project Baselines
When you update a master project's baseline, you also update the baselines for each subproject listed in the master project's subproject hierarchy. This baseline becomes the current baseline for the master project and its subprojects.
When you update a subproject's baseline, baseline and earned value data are not rolled up. You must initiate the update from the master project in order to roll up baseline data through the master project's subproject hierarchy.
Note: When you initiate an update from the master project, only the subproject’s that you have marked as Read/Write are updated.
Chapter 2: Managing Projects 85

Baselines
Delete Baselines
If you delete the current baseline and another baseline revision exists, the remaining baseline becomes the current revision.
To delete a project baseline
1. Open the project.
The Project: Properties: Main - General page appears.
2. Click the Baseline subtab.
The Project: Properties: Baseline page appears.
3. Select the check box next to the baseline you want to delete, and then click Delete.
The Confirm Revision Delete page appears.
4. Click Yes to confirm the deletion.
The baseline is removed from the list.
86 Project Management User Guide

Autoschedule
Autoschedule Autoschedule is an automated way for you to create project schedules. Autoschedule schedules tasks based on an internal set of rules that are set by the system. Each task is scheduled:
■ To use availability as early in the project as possible
■ To start at the earliest or latest possible time, subject to constraints
■ To minimize the duration of the critical path
Autoschedule automatically schedules tasks based on task dependencies, constraints, priority order, and related date and resource logic. Autoscheduling allows you to model your plan and generate dates for your tasks and your overall project. Before publishing a schedule as a plan of record, you are able to see the results of scheduling and make any adjustments. By default, Autoschedule is designed to eliminate or minimize resource overallocation.
Autoschedule uses task duration and task date constraint and dependency information to identify the project's critical path—the best way to schedule project tasks while minimizing the delays and expansions that can cause deadline slippage, and at the same time, minimizing resource overallocation. The critical path determines the earliest finish date of the project.
Autoschedule uses critical path data to make the following scheduling adjustments:
■ Determines early and late start and finish dates for each task.
■ Moves the early start forward or back, as applicable.
■ Checks for fixed loading patterns and adjusts early start and finish dates as needed to fit.
■ Builds new ETC curves based on the recalculated early start and finish dates for the tasks and subtracts as applicable from remaining resource availability.
■ In order to eliminate or minimize resource overallocation, autoschedule calculations may move out a task's finish date, or the project's finish date.
Chapter 2: Managing Projects 87

Autoschedule
Display Schedules
You can display the plan of record (current schedule) and any existing tentative schedules. Use the Schedule toolbar to display the schedule. This toolbar appears on most of the project task pages including:
■ The Project: Properties: Main - Schedule page
■ The Project: Tasks: Task List page
■ The Project: Tasks: Work Breakdown Structure page
■ The Project: Tasks: Resource Utilization page
■ The Project: Tasks: Assignments page
■ The Project Dashboard page
If a project is locked—either because you have it checked out in Open Workbench or Microsoft Project, or because a tentative schedule was created for it by another user—the Schedule toolbar only displays for the resource that locked the project.
If you select to display a tentative schedule, the Schedule toolbar changes to yellow which indicates the project is in tentative schedule mode.
Tentative Schedule and Master Projects
Multiple tentative schedules can exist for a project but only in the context of being a subproject within a master project. For example, if you create a tentative schedule for a master project, then a tentative schedule is also created for all of its subprojects. One or more of the subprojects could already have tentative plans created explicitly for them. If a subproject is locked when the master project tentative schedule is created, then a non-publishable schedule is created for that subproject. Else, the subproject is locked and a publishable schedule is created for it. A subproject can thus have one publishable tentative plan (explicitly for itself) and another non-publishable plan from being a subproject.
To display a schedule
1. Open the project.
The Project: Properties: Main - General page appears.
2. From any project page displaying the Schedule toolbar, choose Plan Of Record from the Schedule toolbar.
The plan of record displays.
88 Project Management User Guide

Autoschedule
Return to the Plan of Record Without Publishing
If you do not want to publish a tentative plan, you can return to the plan of record (the current schedule). Once you revert to the plan of record, you can delete the tentative plan or create a new one.
To return to the plan of record while in tentative schedule mode
1. Open the project.
The Project: Properties: Main - General page appears.
2. Select the Tasks tab.
The Project: Tasks: Task List page appears.
3. Select Plan of Record from the Schedule menu.
The project reverts to the current plan, though the tentative schedule is still available.
Define Autoschedule Parameters and Autoschedule
You can specify scheduling criteria and begin scheduling tasks using Autoschedule using the Autoschedule page. You can autoschedule an entire project or only tasks that occur between ranges of dates. Use this page to specify the deviations from the current schedule and automatically create a new tentative schedule.
To define autoschedule parameters and autoschedule a project
1. Open the project.
The Project: Properties: Main - General page appears.
2. Select Schedule from the content menu.
The Project: Properties: Main - Schedule page appears.
3. Click Autoschedule from the Schedule toolbar.
The Autoschedule page appears.
4. Complete the following fields:
Autoschedule Date
Defines the date from which to begin scheduling tasks. Click the Select Date icon to select another date.
Note: If you are scheduling from the finish date, enter the date on or before which you want to begin scheduling tasks. If the project has not yet started, enter the project's start date. If the project is already in progress, enter the first day after the last timesheet posting date.
Chapter 2: Managing Projects 89
Autoschedule
Ignore Tasks Starting Before
Defines the date before which you want tasks to be excluded.
Example: If you enter 7/3/08 as the Ignore Tasks Starting Before date, and you have a task that starts on 6/20/08, this task will be excluded from the schedule.
Ignore Tasks Starting After
Defines the date after which you want tasks to be excluded.
Example: If you enter 7/3/08 as the Ignore Tasks Starting After date, and you have a task that starts on 8/14/08, this task will be excluded from the schedule.
Enter or select a date in this field if you want CA Clarity PPM to exclude all tasks that start after this date.
5. Choose from the following:
Resource Constraints
Specifies whether or not you want Autoschedule to consider resource availability when scheduling the project.
Default: Selected
Note: If you clear this check box, Autoschedule treats resources as if they have unlimited availability. Each task is scheduled against the resources total availability, not against the resources remaining availability which takes other task assignments into consideration. This results in the shortest possible schedule, but it can also cause resources to be overcommitted.
Schedule from Finish Date
Specify whether you want Autoschedule to perform a backwards schedule from a defined deadline date. Use this option if you need the last task to complete by the project's finish date.
Default: Cleared
Note: If you choose to schedule from the finish date, then enter the finish date into the Autoschedule Date field.
Subnets
Specifies whether you want Autoschedule to calculate the critical path for the entire project. When this field is checked, a separate critical path is calculated for each subnet.
Default: Cleared
90 Project Management User Guide

Autoschedule
Honor Constraints on Started Tasks
Select this field to autoschedule the remaining work on this task according to its normal autoschedule logic, including any task constraints and dependencies. Leave this field clear to ignore the task during autoscheduling.
Default: Cleared
Schedule Assignments on Excluded Tasks
Specifies whether you want to allow changes to excluded task resource assignment dates during autoscheduling, as long as the new dates stay within the task's start and finish dates.
Default: Cleared
Note: This field works in conjunction with the Exclude from Autoscheduling field on the Task Properties page.
Start Successors on Next Day
Specifies whether you want Autoschedule to start successor tasks with zero lag the day after the predecessor task finishes. When cleared, successor tasks start the same day as the predecessor task finishes as long as the resource has availability left.
Default: Cleared
Publish After Scheduling
Specifies whether you want to automatically publish the changes made in the tentative schedule to the plan of record (or the current plan). When selected, the tentative plan is deleted and the project is unlocked.
Default: Cleared
6. Click Autoschedule.
A temporary Project: Tasks: Task Resource Utilization page appears while the autoscheduling is in process.
Check Autoschedule Progress
You can check autoschedule progress using the blue Progress bar on the Schedule toolbar on the Project: Tasks: Task Resource Utilization page. This progress bar only displays during the autoschedule process. If your project contains a large number of tasks, autoscheduling may take a few moments. When the autoscheduling completes, the project is locked and in tentative schedule mode.
Chapter 2: Managing Projects 91

Autoschedule
View Autoschedule Results
You can view autoschedule results on the Project: Tasks: Task Resource Utilization page. This page displays the combined resource utilization (e.g. total effort) for each task in a Gantt format.
Review the Gantt chart and the start and finish dates for each task to see how they are scheduled. Results are displayed in a Gantt format so that you can see at a glance how the tasks span the different project time periods.
Cancel Autoscheduling
You can cancel autoscheduling while the autoscheduling is in progress. During the process, a temporary Project: Tasks: Task Resource Utilization page appears. The Cancel Autoschedule button only appears on this temporary page. Once autoschedule completes, you cannot cancel autoscheduling.
To cancel autoscheduling
1. Open the project.
The Project: Properties: Main - General page appears.
2. Select the Tasks tab.
The Project: Tasks: Task List page appears.
3. Select the Resource Utilization subtab.
The Project: Tasks: Resource Utilization page appears.
4. Autoschedule the project.
While the autoscheduling is in process, a temporary Project: Tasks: Task Resource Utilization page appears.
5. Click Cancel Autoschedule.
The autoscheduling process is canceled.
Projects Locks and Tentative Schedule Mode
When you run Autoschedule, your project is locked and the project is in tentative-schedule mode. A tentative schedule is created based on Autoschedule's calculations and displays. This allows you the opportunity to review these results and decide whether to accept them. During this time, the plan of record (current schedule) is hidden. Published schedules become the plan of record.
92 Project Management User Guide

Autoschedule
How to Schedule Projects while in Tentative Schedule Mode
You can do the following while your project is in tentative schedule mode:
■ Publish the tentative schedule (see page 94).
■ Return to the current schedule without publishing (see page 89).
■ Delete the tentative schedule (see page 95).
■ Generate the tentative schedule automatically (see page 89).
Create New Tentative Schedules
You can create tentative schedules by autoscheduling or by creating a new schedule. You cannot create new tentative schedule when one already exists for the project. The New Schedule button does not display. If this is the case, then the project is locked and is in tentative schedule mode. You can change the schedule manually by adjusting each scheduled task, or delete the tentative schedule and create a new one.
To create a new tentative schedule
1. Open the project.
The Project: Properties: Main - General page appears.
2. Click Schedule from the content menu.
The Project: Properties: Main - Schedule page appears.
3. Click New Schedule from the Schedule toolbar.
A new tentative schedule is created for the project.
Return to Unpublished Tentative Schedules
You can return to the unpublished tentative schedule if you do not want to publish the tentative plan. Unpublished tentative schedules are automatically saved. Until you delete it, you can return to it at any time. When you create a tentative schedule for your project, the project is locked.
To return to the unpublished tentative schedule
1. Open the project.
The Project: Properties: Main - General page appears.
2. Click Schedule from the content menu.
The Project: Properties: Main - Schedule page appears.
3. Select Tentative Schedule from the Schedule menu.
The tentative schedule is displayed.
Chapter 2: Managing Projects 93

Autoschedule
Publish Tentative Schedules
Once you have autoscheduled your project, you can accept the tentative schedule by publishing it. At any given time there can only be one tentative schedule that is publishable for a project. When you publish the tentative schedule, you incorporate the changes made in the tentative schedule into the plan of record (current plan) and the project unlocks.
To publish the tentative schedule
1. Open the project for which you want to publish a tentative schedule.
The Project: Properties: Main - General page appears.
2. Click Schedule from the content menu.
The Project: Properties: Main - Schedule page appears.
3. Click Publish from the Schedule toolbar.
The Confirm Publish Tentative Schedule page appears.
4. Click Yes to publish the schedule.
The tentative schedule is published and becomes the project's plan of record.
Unlock Projects in Tentative Schedule Mode
You can unlock projects in tentative schedule mode from the page displaying the current schedule. You cannot edit locked projects. You cannot edit tasks or any of the other project fields and pages until you unlock the project. Only the person who locked it, or a user with the Administration - Application access access right, can unlock it.
To unlock a project that is in tentative schedule mode
1. Open the project for which you want to publish a tentative schedule.
The Project: Properties: Main - General page appears.
2. Select Schedule from the content menu.
The Project: Properties: Main - Schedule page appears.
3. Click Unlock from the main toolbar.
The project is unlocked.
94 Project Management User Guide

Autoschedule
Delete Tentative Schedules
You can delete tentative schedule from the page displaying the current schedule. You must be in tentative-schedule mode to delete a tentative schedule. Once deleted, the tentative schedule no longer displays in the Schedule menu on the Schedule toolbar.
To delete a tentative schedule
1. Open the project.
The Project: Properties: Main - General page appears.
2. Select Schedule from the content menu.
The Project: Properties: Main - Schedule page appears.
3. Select Tentative Schedule from the Schedule menu.
The project is locked and in tentative schedule mode.
4. Click Delete Schedule.
The Confirm Delete Tentative Schedule page appears.
5. Click Yes to confirm the deletion.
The tentative schedule is deleted.
Chapter 2: Managing Projects 95

Autoschedule
Schedule Subnets
Subnets are a set of project tasks that have dependencies among themselves, or a single task with no dependencies. During Autoschedule, you can choose to calculate and display separate critical paths for each subnet and for each task that does not have dependencies. Otherwise, only one critical path—the longest path—is calculated for the project.
There are several key benefits to scheduling subnets:
■ If you are working with a master project that contains multiple projects, you can calculate and display the critical path of each subproject and not just the longest critical path.
■ If you are working with a project where you have structured the work breakdown structure to support multiple concurrent critical paths, you can display all critical paths.
■ If you have a project that contains management tasks that span the project's life, you can display the management tasks and the true critical path.
To schedule subnets during Autoschedule
1. Open the project.
The Project: Properties: Main - General page appears.
2. Select Schedule from the content menu.
The Project: Properties: Main - Schedule page appears.
3. Click Autoschedule from the Schedule toolbar.
The Autoschedule page appears.
4. Select the Subnets check box, and click Autoschedule.
Your project is set up to calculate separate critical paths and separate critical paths are calculated for your project.
96 Project Management User Guide
Add and Remove Projects to the Overview: General Page
Add and Remove Projects to the Overview: General Page You can choose to make a project available by listing it in the My Projects section of your Overview: General page. You can also choose to remove the project from the list. Once you have added the project to the list, the Add to My Projects link on the Project: Properties: Main - General page changes to Remove from My Projects.
To add a project to your Overview: General page
1. Open the project you want to add to the page.
The Project: Properties: Main - General page appears.
2. Click the Add to My Projects link.
The project is added to the list in the My Projects section of your Overview: General page.
To remove a project from your Overview: General page
1. Open the project you want to remove from the page.
The Project: Properties: Main - General page appears.
2. Click the Remove from My Projects link.
The project is removed from the list in the My Projects section of your Overview: General page.
Chapter 2: Managing Projects 97

Monitor Project Performance
Monitor Project Performance You can monitor project performance using the Project Dashboard page. You can view summary views of project labor and team utilization data in graph and table formats on the this page. The data on this page is read-only. Dashboard data is drawn from the information you enter in the task and resource assignment fields, and on data submitted in staff member timesheets. It is automatically updated when you add or post new information to the project.
By default, this page displays the following portlets:
■ General portlet. This read-only view displays basic information about the project such as name, ID, and start and finish dates. The icon in the Status Indicator field displays the project's status.
■ Labor Effort portlet. This view displays the project's up-to-date actuals, ETC, and allocation information.
■ Team Utilization portlet. This view displays total effort per resource across all of the project's tasks to which the resource is assigned. You can drill down from this view to view utilization by individual resource and task.
You can use these portlets to view resource allocation and availability information and to compare actuals to estimates. Though you cannot change the appearance or data in the General and Labor Effort portlets, you can configure some of the settings on the Team Utilization graph.
You can customize this page by adding or removing portlets. Your CA Clarity PPM administrator can do this from the Project Default Layout portlet page's Dashboard tab’s content using Studio.
Note: Contact your CA Clarity PPM administrator or see the Studio Developer's Guide for more information on customizing page layouts and defining additional portlets.
The Labor Effort Portlet
The Labor Effort portlet allows you to quickly compare up-to-date actuals and estimates, and see in a glance overall baseline and allocation variances.
The following describes the Labor Effort portlet fields:
Total Effort
Defines the total effort based on the following formula: Total effort = Actuals + remaining ETC
98 Project Management User Guide

Monitor Project Performance
Actuals
Defines the total number of hours that have been submitted and posted against project tasks.
Estimate to Complete (ETC)
Defines the number of hours that are estimated to complete a project or task. Once a project or task is underway, ETC reflects the number of remaining hours estimated to complete the project.
Baseline
Displays the usage number for the current baseline, based on the following formula: Usage = Actuals + remaining ETC; If a baseline is not being used, Usage = zero.
Baseline Variance
Displays the variance between total effort and baseline usage.
Remaining Allocation
Displays the number of hours allocated to the project after subtracting actuals.
Allocation Variance
Displays the variance between Remaining Allocation and Total Effort.
Team Utilization Portlet
Use the Team Utilization portlet to view total effort (actuals + remaining ETC) for each staff member who is assigned to project tasks. By default, this portlet's graph displays aggregate effort by each staff member. Aggregate in this case refers to the effort for all of the tasks to which they are assigned. However, you can drill down through the graph to view individual effort by individual task.
Chapter 2: Managing Projects 99

Monitor Project Performance
Data is displayed on this portlet by resource by time period. The time period columns are, by default, set to weekly, and always start with the current week. When you scroll over a time period, a note appears that provides a brief summary of what you see. In this example, the note explains that while resource Gibson was allocated for 40 hours during the week of 6/13/05, she actually worked only 30. Scrolling over the week of 7/4/05 for resource Dossola displays her Allocation Threshold (in yellow) is 40 hours, she has been booked (in red) for 80.
The allocation color code works as follows:
■ Yellow. Indicates that the resource is allocated at or under availability for that time period.
■ Red. Indicates that the resource is overallocated (i.e. the amount of time booked exceeds availability) for that time period.
■ Green. Indicates that actuals recorded by the resource for that time period. Only posted actuals appear in the graph. If no actuals have been posted, no actuals appear in the graph.
You can change any of the values in the Team Utilization portlet, including the color codes. The following list describes the Team Utilization portlet columns and icons:
Properties Icon
Click to go to open the staff member's properties page.
Note: See the Resource Management User Guide for more information.
Resource Allocation Icon
Click this icon to open the resource's Resource/Role Allocations page.
Note: See the Resource Management User Guide for more information.
List of Tasks Icon
Click this icon to open the Project Tasks: Task Resource Utilization List page for that resource.
Resource
Click a resource's name to open the resource's General Properties page.
Average Allocation %
Displays the average percentage of available time that a resource is allocated to the tasks to which they are assigned.
100 Project Management User Guide

Monitor Project Performance
Time Periods
Displays the time periods, and vary according to the selected Time Scaled Values options. Data for the time periods is displayed in a colored histogram.
Default: Weekly
Values:
■ Green. Represents actual hours recorded to date.
■ Yellow. Represents the availability threshold for that resource (the maximum number of hours a resource is available for work).
■ Red. The resource is overallocated.
View Utilization by Resource and Task
You can view the name of the resource you assigned to a task in the Task filter section of the Project: Tasks: Resource Utilization page. The tasks to which the resource is assigned are displayed in the list.
The Gantt bar indicates the amount of time the resource has been allocated to each task during the time periods displayed. The amount of time indicated by the bar should be equal to the number in the Total Effort column for that task.
To view resource utilization by task
1. Open the project you want to view resource utilization.
The Project: Properties: Main - General page appears.
2. Click the Dashboard tab.
The Project Dashboard page appears.
3. On the Team Utilization portlet, click the List of Tasks icon for the resource for which you want to view effort by task.
The Project: Tasks: Resource Utilization page for that resource appears.
Chapter 2: Managing Projects 101

How to Delete Projects
How to Delete Projects Deleting projects is a three-step process:
1. Deactivate the project (see page 103).
2. Mark the project for deletion (see page 103).
3. The Delete Projects job runs.
Note: Your CA Clarity PPM administrator schedules the job runs, usually on a regular basis.
Until the Delete Projects job runs, the marked project remains listed on the Projects page. If necessary, you can cancel the deletion process before the job run.
Project Deletion Guidelines
Before you delete a project, ensure the following conditions are true for the project you want to delete. The project:
■ Is inactive.
■ Contains no WIP entries.
■ Contains no non-zero time entries.
■ Is financially closed.
102 Project Management User Guide

How to Delete Projects
Deactivate Projects
Deactivate a project when you want to remove it from the list of active projects. You must financially close the project before you can deactivate it.
When you deactivate your project, you cannot:
■ Record time spent on the project.
■ View the project in a scheduler, such as Open Workbench.
■ Post timesheets against the project.
■ Bill the project.
Note: You can reactivate the project at anytime.
To deactivate a project
1. Open the project you want to deactivate.
The Project: Properties: Main - General page appears.
2. Clear the Active field, and click Submit.
The project no longer appears in the list of active projects on the Projects page.
Mark Project for Deletion
You can mark a project for deletion only when the project is inactive. Projects that you mark for deletion remain listed on the Projects page until the Delete Projects job runs.
Note: See the Common Features and Personal Options User Guide for more information on filtering list pages.
To mark a project for deletion
1. Select Projects from the Portfolio Management menu.
The Projects page appears.
2. Filter the list for inactive projects.
A list of inactive projects display.
3. Select the check box next to the project you want to mark for deletion, and click Mark for Deletion.
The Delete Confirmation page appears.
4. Click Yes to confirm the deletion.
The project is marked for deletion.
Chapter 2: Managing Projects 103

How to Delete Projects
104 Project Management User Guide
Cancel Project Marked for Deletion
You can cancel projects marked for deletion when the following conditions are true:
■ The Delete Projects job has not run since you marked the project for deletion.
■ The project remains inactive and listed on the Projects page.
■ You have not added WIP or time entries to the project.
When you cancel an inactive project marked for deletion, the project is not deleted when the Delete Projects job runs. Inactive projects continue to appear in the list of inactive projects.
Note: Contact your CA Clarity PPM administrator or see the Administration Guide for more information on jobs.
To cancel a project marked for deletion
1. Click Projects from the Portfolio Management menu.
The Projects page appears.
2. Filter the list for inactive projects.
A list of inactive projects displays.
3. Select the check box next to the project you want to cancel deletion, and click Cancel Deletion.
The Cancel Deletion Confirmation page appears.
4. Click Yes to confirm the cancellation.
The project remains listed on the Projects page and is no longer marked for deletion.

Chapter 3: Managing Tasks
This section contains the following topics:
Project Task Overview (see page 105) How to Create Key and Milestone Tasks (see page 108) View a List of and Open Tasks (see page 113) Associated Task Forms (see page 114) Task Properties (see page 119) Task Relationships and Dependencies (see page 123) Task Associated Risks and Issues (see page 132) Associated Requirements (see page 134) Task Work Breakdown Structure (see page 136) Resource Utilization (see page 143) Estimates (ETC) at the Task Level (see page 148) Edit Tasks and Milestones (see page 159) Delete Tasks and Milestones (see page 160)
Project Task Overview Tasks identify the work required to complete a project. Tasks have a start date, an end date and a period in between when the work is performed. Milestones are tasks that have a due date but not a duration. Generally speaking, project managers assign tasks to staff and set milestones to measure their progress.
You can create and manage project tasks and assign staff to them. Define all of the project's tasks to start and complete within the project's start and finish dates. You can also create a Work Breakdown Structure (WBS) for your project tasks and view resource utilization by task assignment.
In addition, you can use Autoschedule to create and publish an automated schedule based on task constraints and dependencies that you create. Autoschedule is designed to eliminate or minimize the over allocation of resources. It is particularly useful when you want to update the project schedule after you or others have made small, quick changes to it. You can review your changes before publishing them and accordingly arrive at a practical result.
Project Task Terminology
The following terms are used with tasks:
Chapter 3: Managing Tasks 105

Project Task Overview
Outdent
Defines a task that often has subordinate tasks beneath it. You can outdent the task to designate it as a top-level or parent task.
Indent
Defines a task that is a subordinate task and is dependent on a higher-level task in some way. You can indent the task to designate it as a subordinate or child task.
Key
Defines a task that is significant in some way.
Non-Key
Defines a task that is not identified as Key and that can be either a parent or a child task.
Parent or Summary
Defines a task that is a top-level task that has subordinate or child tasks beneath it. A parent task cannot have a parent task.
Child
Defines a task that is nested beneath a summary or parent task.
106 Project Management User Guide

Project Task Overview
How to Design Tasks and Milestones
You can design tasks and milestones in one of two ways:
■ In a list format that might be in chronological order but which does not otherwise indicate a relationship between tasks.
■ In a Work Breakdown Structure (WBS) that defines a hierarchical (parent-child) relationship between tasks.
You also have a choice of tools: you can create tasks and milestones using Project Management, or you can create them using a scheduling tool such as Open Workbench or Microsoft Project. Because the scheduling tools are integrated, you can use CA Clarity PPM in combination with Open Workbench or Microsoft Project. The following list provides a brief description of each tool:
■ Project Management. You can:
■ Design a project plan with a simple or structured design.
■ Assign resources to the tasks.
■ Track actuals by resource and task.
■ Use Autoschedule to automatically schedule the tasks according to the task constraints and dependencies you create.
■ Modify the current schedule by creating a tentative schedule and then review and publish the changes to the current schedule.
■ Open Workbench (OWB). You can build plans that tie estimates to the resources performing the tasks.
Note: See the Open Workbench User Guide for more information on how to use Open Workbench with CA Clarity PPM.
■ Microsoft Project. You can build plans that generate estimates for project resources based on task durations.
Note: See the Using CA Clarity PPM with Open Workbench and Microsoft Project Guide for more information on using Microsoft Project with CA Clarity PPM.
Chapter 3: Managing Tasks 107

How to Create Key and Milestone Tasks
Task Work Breakdown Structures Guidelines
It is most efficient to begin with some knowledge of the task hierarchy in which you want to order the tasks. Consider the following guidelines when creating your tasks and shaping your task hierarchy:
■ Name top-level tasks that will have subordinate tasks a name that implies a logical, organizational grouping.
Example: Phase I, Phase II, and Phase III.
■ Use non-key and key tasks at any level of the task hierarchy.
■ Create tasks before building a team and assigning staff to the project.
How to Create Key and Milestone Tasks You can create tasks and milestones from scratch, or you can copy task definitions (start and finish dates, and estimating, forms, risk, and issue information) from a project template and edit them. You can create tasks from the Project Tasks: Task List page or the Project Tasks: Work Breakdown Structure page. You do not have to create a task hierarchy using the Project Tasks: Work Breakdown Structure page, though that is its primary purpose.
Do the following to create key and milestone tasks:
1. Create the task:
■ From the task list (see page 109).
■ From a project template (see page 112).
■ From the WBS (see page 113).
2. Define the task's properties (see page 119).
3. Design a task hierarchy (see page 136).
4. Assign staff to the tasks (see page 163).
5. Create task dependencies (see page 123).
108 Project Management User Guide
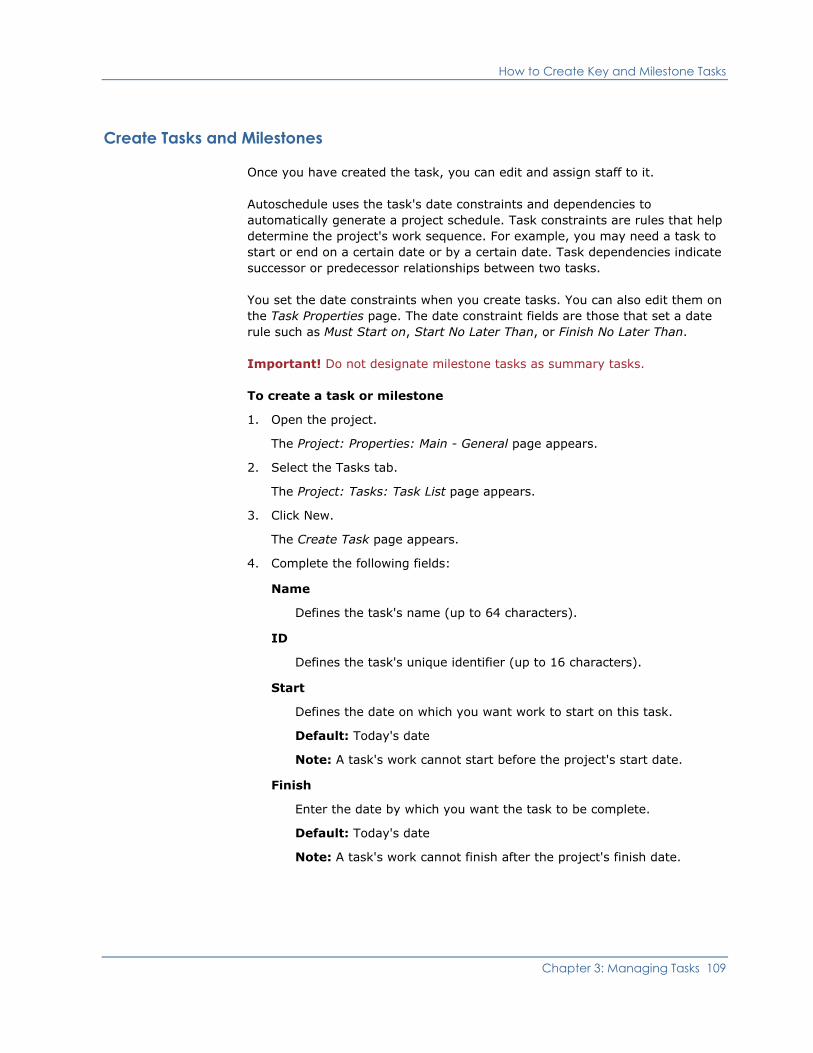
How to Create Key and Milestone Tasks
Create Tasks and Milestones
Once you have created the task, you can edit and assign staff to it.
Autoschedule uses the task's date constraints and dependencies to automatically generate a project schedule. Task constraints are rules that help determine the project's work sequence. For example, you may need a task to start or end on a certain date or by a certain date. Task dependencies indicate successor or predecessor relationships between two tasks.
You set the date constraints when you create tasks. You can also edit them on the Task Properties page. The date constraint fields are those that set a date rule such as Must Start on, Start No Later Than, or Finish No Later Than.
Important! Do not designate milestone tasks as summary tasks.
To create a task or milestone
1. Open the project.
The Project: Properties: Main - General page appears.
2. Select the Tasks tab.
The Project: Tasks: Task List page appears.
3. Click New.
The Create Task page appears.
4. Complete the following fields:
Name
Defines the task's name (up to 64 characters).
ID
Defines the task's unique identifier (up to 16 characters).
Start
Defines the date on which you want work to start on this task.
Default: Today's date
Note: A task's work cannot start before the project's start date.
Finish
Enter the date by which you want the task to be complete.
Default: Today's date
Note: A task's work cannot finish after the project's finish date.
Chapter 3: Managing Tasks 109
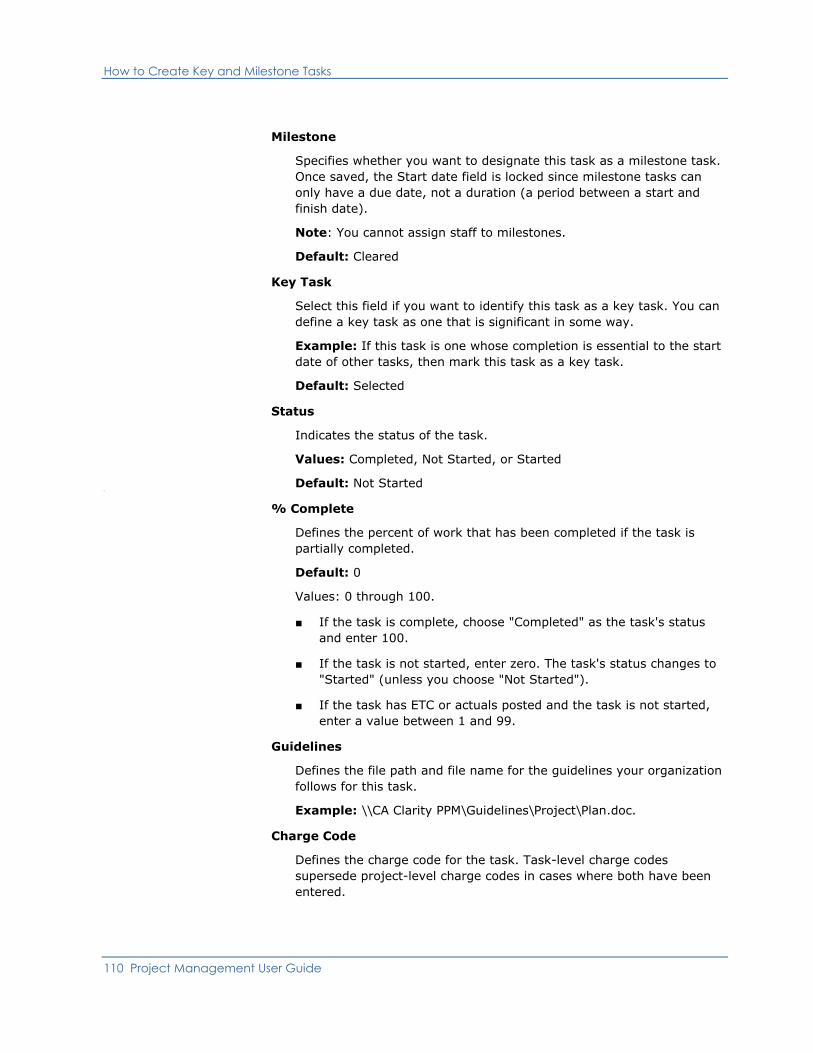
How to Create Key and Milestone Tasks
Milestone
Specifies whether you want to designate this task as a milestone task. Once saved, the Start date field is locked since milestone tasks can only have a due date, not a duration (a period between a start and finish date).
Note: You cannot assign staff to milestones.
Default: Cleared
Key Task
Select this field if you want to identify this task as a key task. You can define a key task as one that is significant in some way.
Example: If this task is one whose completion is essential to the start date of other tasks, then mark this task as a key task.
Default: Selected
Status
Indicates the status of the task.
Values: Completed, Not Started, or Started
Default: Not Started a
% Complete
Defines the percent of work that has been completed if the task is partially completed.
Default: 0
Values: 0 through 100.
■ If the task is complete, choose "Completed" as the task's status and enter 100.
■ If the task is not started, enter zero. The task's status changes to "Started" (unless you choose "Not Started").
■ If the task has ETC or actuals posted and the task is not started, enter a value between 1 and 99.
Guidelines
Defines the file path and file name for the guidelines your organization follows for this task.
Example: \\CA Clarity PPM\Guidelines\Project\Plan.doc.
Charge Code
Defines the charge code for the task. Task-level charge codes supersede project-level charge codes in cases where both have been entered.
110 Project Management User Guide
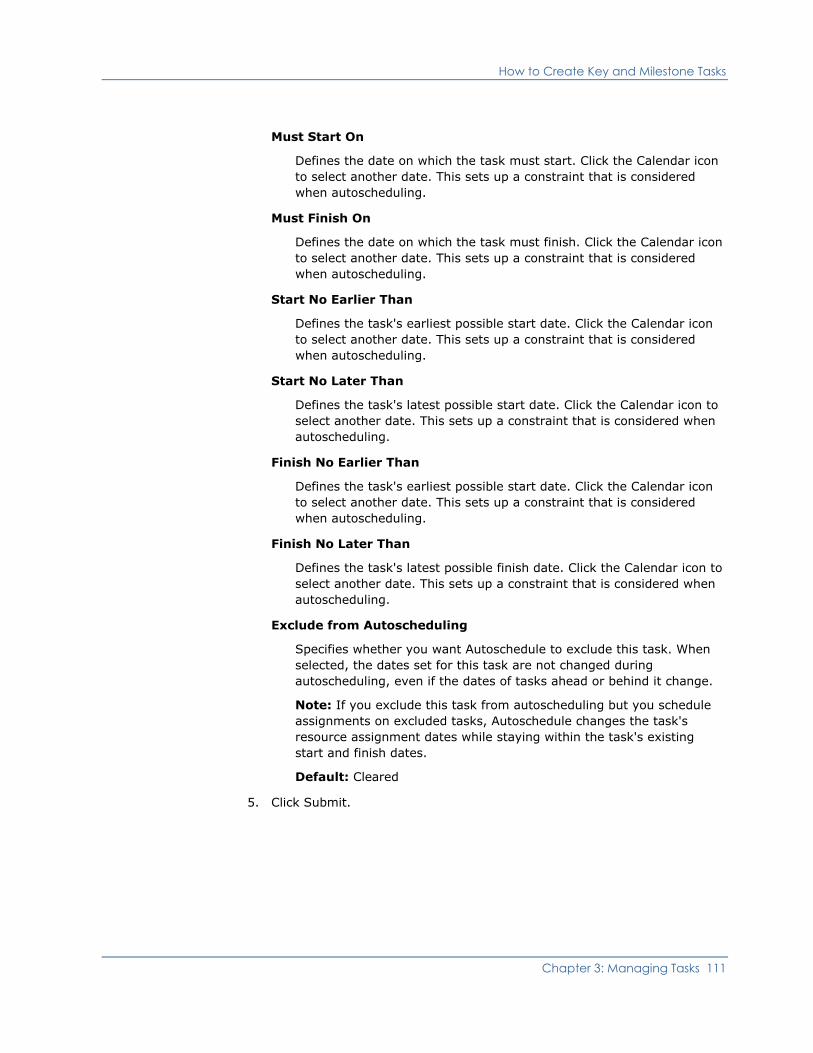
How to Create Key and Milestone Tasks
Must Start On
Defines the date on which the task must start. Click the Calendar icon to select another date. This sets up a constraint that is considered when autoscheduling.
Must Finish On
Defines the date on which the task must finish. Click the Calendar icon to select another date. This sets up a constraint that is considered when autoscheduling.
Start No Earlier Than
Defines the task's earliest possible start date. Click the Calendar icon to select another date. This sets up a constraint that is considered when autoscheduling.
Start No Later Than
Defines the task's latest possible start date. Click the Calendar icon to select another date. This sets up a constraint that is considered when autoscheduling.
Finish No Earlier Than
Defines the task's earliest possible start date. Click the Calendar icon to select another date. This sets up a constraint that is considered when autoscheduling.
Finish No Later Than
Defines the task's latest possible finish date. Click the Calendar icon to select another date. This sets up a constraint that is considered when autoscheduling.
Exclude from Autoscheduling
Specifies whether you want Autoschedule to exclude this task. When selected, the dates set for this task are not changed during autoscheduling, even if the dates of tasks ahead or behind it change.
Note: If you exclude this task from autoscheduling but you schedule assignments on excluded tasks, Autoschedule changes the task's resource assignment dates while staying within the task's existing start and finish dates.
Default: Cleared
5. Click Submit.
Chapter 3: Managing Tasks 111
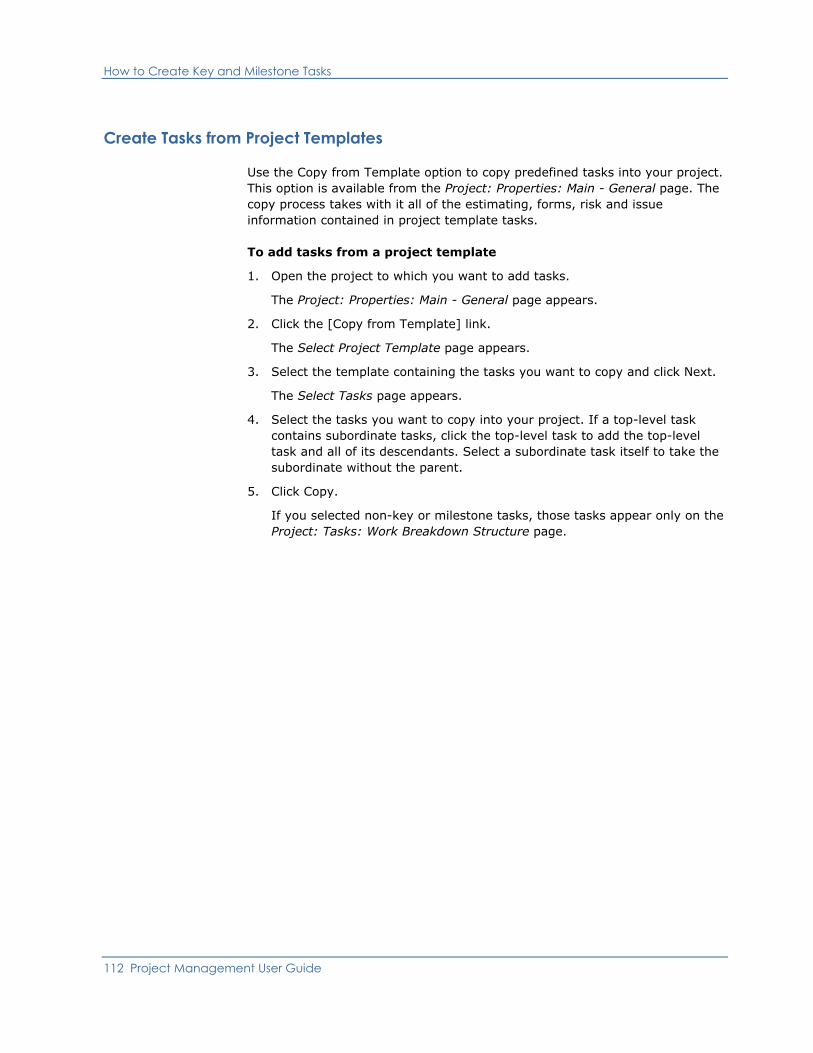
How to Create Key and Milestone Tasks
Create Tasks from Project Templates
Use the Copy from Template option to copy predefined tasks into your project. This option is available from the Project: Properties: Main - General page. The copy process takes with it all of the estimating, forms, risk and issue information contained in project template tasks.
To add tasks from a project template
1. Open the project to which you want to add tasks.
The Project: Properties: Main - General page appears.
2. Click the [Copy from Template] link.
The Select Project Template page appears.
3. Select the template containing the tasks you want to copy and click Next.
The Select Tasks page appears.
4. Select the tasks you want to copy into your project. If a top-level task contains subordinate tasks, click the top-level task to add the top-level task and all of its descendants. Select a subordinate task itself to take the subordinate without the parent.
5. Click Copy.
If you selected non-key or milestone tasks, those tasks appear only on the Project: Tasks: Work Breakdown Structure page.
112 Project Management User Guide

View a List of and Open Tasks
Create New Tasks in the Work Breakdown Structure
You can create new tasks at a specific point in the hierarchy.
To create a new task in the WBS
1. Open the project.
The Project: Properties: Main - General page appears.
2. Select the Tasks tab.
The Project: Tasks: Task List page appears.
3. Click the Work Breakdown Structure subtab.
The Project: Tasks: Work Breakdown Structure page appears.
4. Click New.
The Create Task page appears.
5. Create and submit the task information.
The Project: Tasks: Work Breakdown Structure page appears listing the new task at the bottom of the grid.
6. Move the task to where you want in located in the WBS hierarchy.
View a List of and Open Tasks You can view a list of tasks using the Project: Tasks - Task List page. By default, this page displays only key tasks. To display all tasks, click the Expand Filter link, then the Show All link. All of the tasks created for the project display in alphabetical order.
To view a list of and open a task
1. Open the project.
The Project: Properties: Main - General page appears.
2. Select the Tasks tab.
A list of tasks are displayed on the Project: Tasks: Task List page.
3. Click the name of the task whose properties you want to open.
The Task Properties page appears.
Chapter 3: Managing Tasks 113

Associated Task Forms
Associated Task Forms You can attach forms that are related to a task or project using the Task: Associated Forms page. For example, you might want someone to complete the form as part of the task, or you might want the task assignee to use the form as a guideline to completing the task. You can add an unlimited number of forms to the task.
Add New Forms to Tasks
To add a form to a task
1. Open the task to which you want to add a form.
The Task Properties page appears.
2. Select the Associated Forms tab.
The Task: Associated Forms page appears.
3. Click New.
A list of all of the folders that are available display on the Add Form page.
4. Select the folder in which you want to store the form.
The Form Properties page appears.
5. Complete the following fields in the General section:
Item Name
Required. Enter a descriptive name for the task (up to 64 characters).
Form Folder
Required. This is a read-only field that displays the name of the form you selected on the previous page.
Activity Status
Specifies the activity status. Select an activity status for the form.
Values: Open, In-Progress, and Done
Default: Open
Related Task
This field displays the name of the task associated to this form. Click the Browse icon to select additional tasks if you want to share the form.
Description
Defines the description for the form.
114 Project Management User Guide
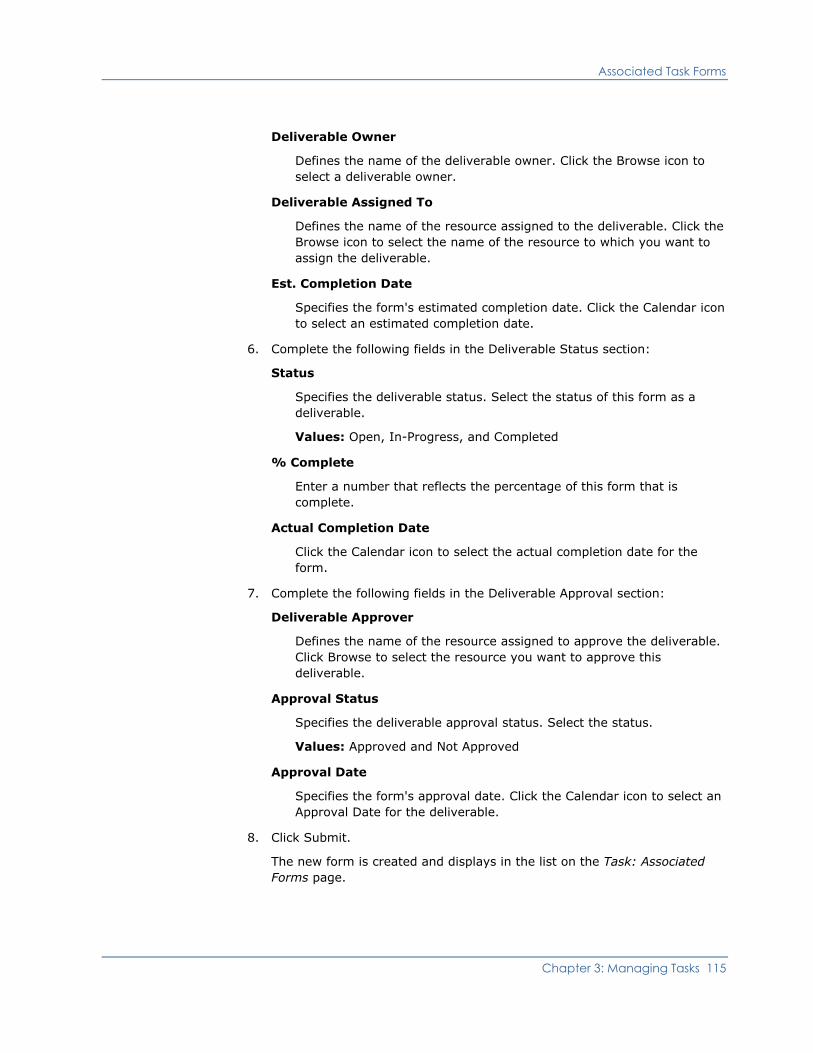
Associated Task Forms
Deliverable Owner
Defines the name of the deliverable owner. Click the Browse icon to select a deliverable owner.
Deliverable Assigned To
Defines the name of the resource assigned to the deliverable. Click the Browse icon to select the name of the resource to which you want to assign the deliverable.
Est. Completion Date
Specifies the form's estimated completion date. Click the Calendar icon to select an estimated completion date.
6. Complete the following fields in the Deliverable Status section:
Status
Specifies the deliverable status. Select the status of this form as a deliverable.
Values: Open, In-Progress, and Completed
% Complete
Enter a number that reflects the percentage of this form that is complete.
Actual Completion Date
Click the Calendar icon to select the actual completion date for the form.
7. Complete the following fields in the Deliverable Approval section:
Deliverable Approver
Defines the name of the resource assigned to approve the deliverable. Click Browse to select the resource you want to approve this deliverable.
Approval Status
Specifies the deliverable approval status. Select the status.
Values: Approved and Not Approved
Approval Date
Specifies the form's approval date. Click the Calendar icon to select an Approval Date for the deliverable.
8. Click Submit.
The new form is created and displays in the list on the Task: Associated Forms page.
Chapter 3: Managing Tasks 115

Associated Task Forms
View a List of and Open Forms
The forms you add display on the Task: Associated Forms page.
To view a list of and open forms
1. Open the task associated to the form you want to open.
The Key Milestone Properties page appears.
2. Click the Associated Forms tab.
The Task: Associated Forms page appears.
3. Click the name of the form you want to open.
The Form Properties page appears.
116 Project Management User Guide

Associated Task Forms
Grant Form Permissions
Read/Write access to forms are automatically granted to all of the project's staff and participants. The form's owner and creator are automatically granted Read/Write/Delete access. You can change the access rights for any of these resources, and can also grant access to non-participants.
You can change the permission rights of any of the Resources/Groups listed using the Permissions page.
To add or change form permissions
1. Open the task associated to the form to which you want to add or change form permissions.
The Task Properties page appears.
2. Click the Associated Forms tab.
The Task: Associated Forms page appears.
3. Choose Permissions from the Actions menu in the Type column.
The Permissions page appears.
4. Do the following:
■ To change the permission rights of any of the Resources/Groups listed on this page, click in the column for the right you want to give the resource/group.
Values: None, Read, Read/Write, Read/Write/Delete, and Cascade Permissions.
■ To give resources who are not team members, access to the form, clear the Allow Non-Participants to Access Folder field.
Default: Selected
5. Click Submit.
Form permissions have been granted.
Chapter 3: Managing Tasks 117

Associated Task Forms
Start Processes for Forms
If a process has been associated with forms, you can start and monitor the form from the Associated Forms page.
To start a process for a form
1. Open the task associated to the form for which you want to start a process.
The Task Properties page appears.
2. Select the Associated Forms tab.
The Task: Associated Forms page appears.
3. Select Processes from the Form Actions field in the Type column.
The Form: Available Processes page appears.
4. Select the process you want to run and click Run.
The Form: Initiated Processes page appears, where you can monitor the progress of the process.
Delete Forms from Tasks
To delete a form from a task
1. Open the task associated to the form you want to delete.
The Task Properties page appears.
2. Select the Associated Forms tab.
The Task: Associated Forms page appears.
3. Select the form you want to delete, and click Delete.
The form is removed from the list of forms.
118 Project Management User Guide
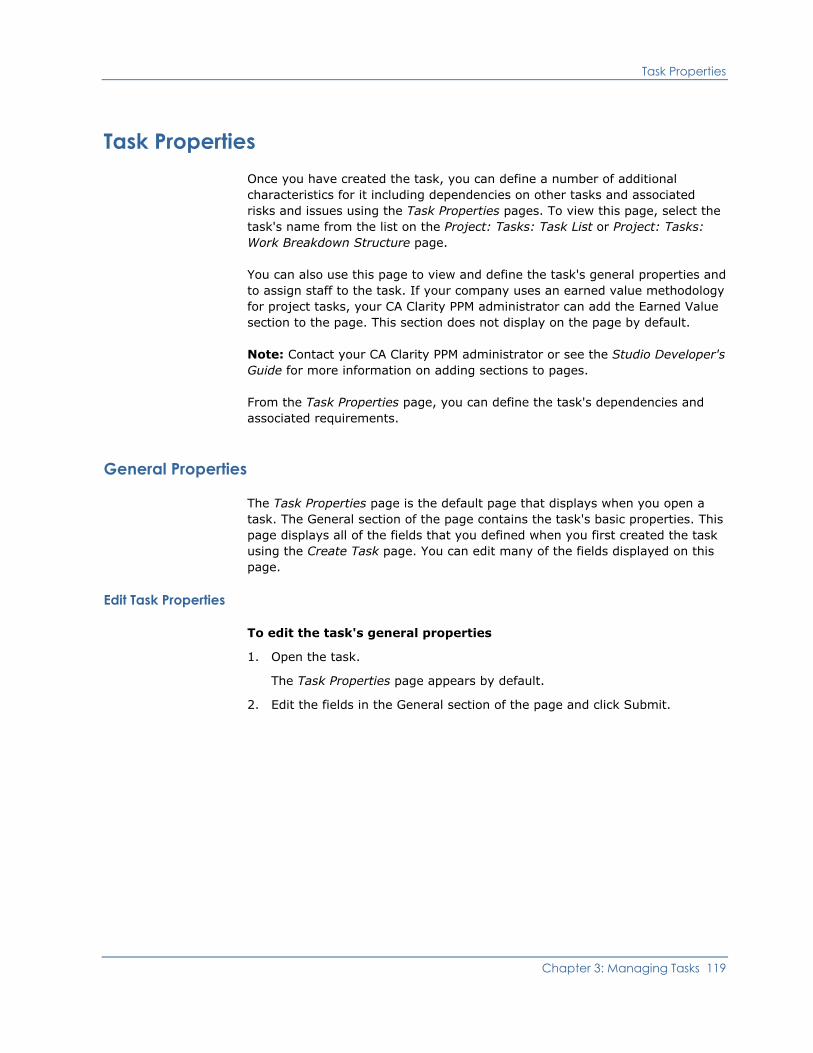
Task Properties
Task Properties Once you have created the task, you can define a number of additional characteristics for it including dependencies on other tasks and associated risks and issues using the Task Properties pages. To view this page, select the task's name from the list on the Project: Tasks: Task List or Project: Tasks: Work Breakdown Structure page.
You can also use this page to view and define the task's general properties and to assign staff to the task. If your company uses an earned value methodology for project tasks, your CA Clarity PPM administrator can add the Earned Value section to the page. This section does not display on the page by default.
Note: Contact your CA Clarity PPM administrator or see the Studio Developer's Guide for more information on adding sections to pages.
From the Task Properties page, you can define the task's dependencies and associated requirements.
General Properties
The Task Properties page is the default page that displays when you open a task. The General section of the page contains the task's basic properties. This page displays all of the fields that you defined when you first created the task using the Create Task page. You can edit many of the fields displayed on this page.
Edit Task Properties
To edit the task's general properties
1. Open the task.
The Task Properties page appears by default.
2. Edit the fields in the General section of the page and click Submit.
Chapter 3: Managing Tasks 119

Task Properties
Set Default Earned Value Options at the Task Level
Task-level earned value fields are available, but they do not display by default on the Task Properties page. Before you can view and use these fields, they must be added to the page. These fields display in the Earned Value section of the Task Properties page, and is a global configuration your CA Clarity PPM administrator can add. You can also personalize your task properties page to include earned value fields.
If your company uses an earned value management methodology for measuring project performance, you can use the fields in this section to override the task default earned value calculation method. The default earned value calculation method is percent complete.
Note: Contact your CA Clarity PPM administrator or see the Studio Developer's Guide for more information on adding sections to pages.
Note: See the Common Features and Personal Options User Guide for more information on personalizing pages.
Note: See the Administration Guide for more information on the Update Earned Value Totals and Update Earned Value History jobs, and for more information on the earned value history table.
To set the task's default earned value options
1. Open the task for which you want to define earned value settings.
The Task Properties page appears.
2. In the Earned Value section, complete the following fields and click Submit:
EV Calculation Method
Defines the default earned value calculation method used when calculating earned value (EV).
Options: Percent Complete, 0/100, 50/50, Level of Effort, Weighted Milestones, Milestone Percent Complete (PC), and Apportioned Effort (AE)
120 Project Management User Guide

Task Properties
BCWP Override
Defines the Budgeted Cost of Work Performed (BCWP). This value overrides the system-calculated BCWP and is used for all earned value metrics that are based on BCWP. If you choose an earned value calculation method—such as Weighted Milestones, Milestone Percent Complete (PC), and Apportioned Effort (AE)—you must manually enter the BCWP value.
Important! CA recommends that you manually enter a value in this field only if you are tracking and calculating earned value in an external system and are not using CA Clarity PPM to calculate earned value.
BCWP
Displays the system-calculated value of Budgeted Cost of Work Performed (BCWP). This value is calculated and recorded when you baseline your project or when you update earned value totals and is based on the cost and rate matrices associated at the project level. BCWP is also referred to as the earned value (EV).
Calculations are made based on the level at which the calculation is being made. BCWP is calculated at the following levels:
■ Task. BCWP is based on the selected EV calculation method.
■ Project. BCWP is the sum of BCWP for all WBS Level 1 tasks in the project.
Earned Value Last Updated
Read-only. Displays the date the earned value was last updated, by either manually updating the earned value or by running the Update Earned Value Totals job.
The task's default earned value settings are defined.
Chapter 3: Managing Tasks 121

Task Properties
Manually Override BCWP at the Task Level
The BCWP Override field does not display on this page by default. Your CA Clarity PPM administrator can add this field to the page.
Note: Contact your CA Clarity PPM administrator or see the Studio Developer's Guide for more information on adding attributes to objects.
You can manually override BCWP for a specific task on the Task Properties page. If you choose an earned value calculation method—such as weighted milestones, milestone percent complete, or apportioned effort—for your task, you must manually enter the BCWP value for the task.
To manually override BCWP at the task level
1. Open the task for which you want to manually enter the current value for BCWP.
The Task Properties page appears.
2. Enter the overall earned value in the BCWP Override field and click Submit.
The task's earned value is defined.
122 Project Management User Guide

Task Relationships and Dependencies
Task Relationships and Dependencies You can view tasks relationships and dependencies within a specific project. Use the Gantt chart to view the following task dependency information:
■ All top level tasks in the project including subprojects.
■ Summary tasks and subprojects.
■ Tasks or sub projects that have dependencies on other tasks.
■ Tasks that have external project dependency.
Chapter 3: Managing Tasks 123

Task Relationships and Dependencies
To improve performance, child tasks are not loaded initially. They are loaded when you expand the summary task to which they belong.
To view tasks in the Gantt chart, you must have appropriate view rights to the project, such as the Project - View Tasks access right.
Read and Understand the Gantt View
The Gantt chart uses the following attributes to indicate task dependencies and relationships:
■ Task name on the bars
■ Colors
■ Lines and arrows
■ Colors
The colors of the task bars on the chart indicate schedule conditions such as critical tasks, external dependencies, and summary tasks. See the following table for examples:
Gantt View Description
Blue diamond indicates milestone
Red diamond indicates critical milestone
Grey bar indicates an external dependent task
Blue bar indicates regular task without any sub-tasks or child tasks.
Light blue bar indicates summary task
Light gray bar indicates subproject summary task
Red bar indicates critical task without any dependency
124 Project Management User Guide

Task Relationships and Dependencies
Graphical Bars with Dependency Lines and Arrows
All tasks are represented with graphical Gantt bars. Task dependencies can be as follows:
Gantt Bars Description
From the start of one task to the start of the next task
From the start of one task to the finish of the next task
From the finish of one task to the start of the next task
From the finish of one task to the finish of the next task
Chapter 3: Managing Tasks 125
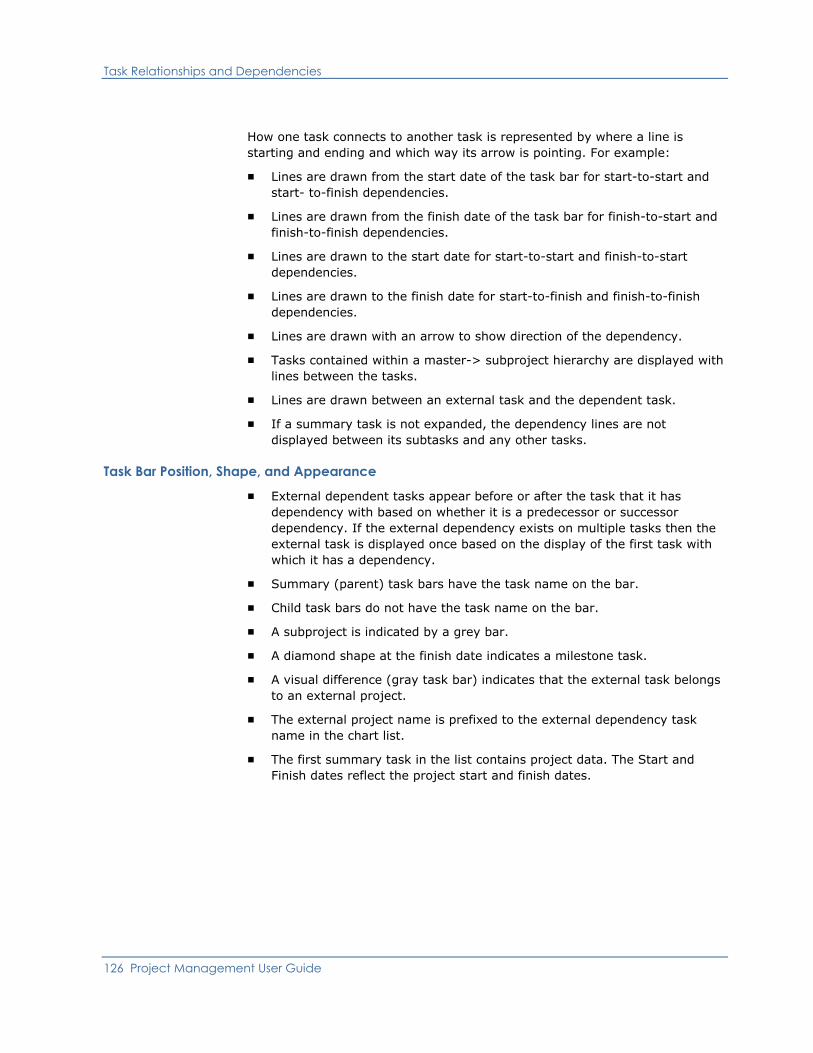
Task Relationships and Dependencies
How one task connects to another task is represented by where a line is starting and ending and which way its arrow is pointing. For example:
■ Lines are drawn from the start date of the task bar for start-to-start and start- to-finish dependencies.
■ Lines are drawn from the finish date of the task bar for finish-to-start and finish-to-finish dependencies.
■ Lines are drawn to the start date for start-to-start and finish-to-start dependencies.
■ Lines are drawn to the finish date for start-to-finish and finish-to-finish dependencies.
■ Lines are drawn with an arrow to show direction of the dependency.
■ Tasks contained within a master-> subproject hierarchy are displayed with lines between the tasks.
■ Lines are drawn between an external task and the dependent task.
■ If a summary task is not expanded, the dependency lines are not displayed between its subtasks and any other tasks.
Task Bar Position, Shape, and Appearance ■ External dependent tasks appear before or after the task that it has
dependency with based on whether it is a predecessor or successor dependency. If the external dependency exists on multiple tasks then the external task is displayed once based on the display of the first task with which it has a dependency.
■ Summary (parent) task bars have the task name on the bar.
■ Child task bars do not have the task name on the bar.
■ A subproject is indicated by a grey bar.
■ A diamond shape at the finish date indicates a milestone task.
■ A visual difference (gray task bar) indicates that the external task belongs to an external project.
■ The external project name is prefixed to the external dependency task name in the chart list.
■ The first summary task in the list contains project data. The Start and Finish dates reflect the project start and finish dates.
126 Project Management User Guide

Task Relationships and Dependencies
Create Task Dependencies
You can create dependencies between tasks in the same project or in different projects using the Task Dependencies page. You can view a list of all of the tasks in the current project on the Select Tasks page. The Project field displays the name of the current project.
You can create dependencies between tasks in the same project or between tasks in different projects. You can only create one dependency at a time for a task, but a task can have dependencies to many tasks.
As with task constraints, Autoschedule uses task dependencies to help determine a work sequence for the project. Task dependencies allows you to designate a successor or predecessor task for a task and to indicate the type of relationship you want the tasks to have.
Example
You could indicate that the "Object Design" task must complete one day before the "Object Integration" task can begin. Autoschedule would consider this dependency and any other dependencies and constraints during autoscheduling.
To create task dependencies
1. Open the task for which you want to create a task dependency.
The Task Properties page appears.
2. Select the Dependencies subtab.
The Task Dependencies page appears.
3. Click New.
The Select Tasks page appears.
4. Filter the list by the name of the project associated to the task to which this project is dependent.
The tasks assigned to that project display in the list.
5. Select the task with which you want to create a dependency, and click Next.
The Task Dependency Properties page appears. The task you selected is identified on this page as the dependent task.
6. Complete the following fields:
Chapter 3: Managing Tasks 127

Task Relationships and Dependencies
Relationship
Defines the relationship between the current task and the task you selected. If you want the task you selected to precede the current task, select Predecessor. If you want the task you selected to secede the current task, select Successor.
Values: Predecessor, Successor
Default: Predecessor
Type
Use this field to define the type of relationship you want to have between the two tasks.
Values: Finish-Finish, Finish-Start, Start-Finish, and Start-Start
Default: Finish-Start
Example: If you select predecessor as the relationship and Finish-Start as the type, the predecessor task is scheduled to finish before the successor task starts. Alternatively, if you select successor as the relationship, and Finish-Finish as the type, the successor task is scheduled to finish before the predecessor task finishes.
Lag
Identifies the lag period between the two tasks.
Default: 0.00
Example: Assuming a Finish-Start type of relationship, you could create a lag period of 5 days between the finish date of the predecessor task and the start of the successor task.
Lag Type
Use this field to indicate the type of lag you want to exist between the dependent tasks.
Values: Daily or Percent
Default: Daily
Example: If you enter 5 as the lag and daily as the lag type, a lag of 5 days is created. A lag time percent is based on the duration of the predecessor task. For example, if the duration is 100 days, and you enter 20 as the lag and percent as the lag type, for a lag of 20% of 100 days, a lag period of 20 days between the tasks is created.
7. Click Submit.
The Task Dependencies page appears displaying the newly created dependency.
128 Project Management User Guide

Task Relationships and Dependencies
Display Task Relationships and Dependencies
You can view a Gantt chart that displays your Plan of Record (POR) project data or tentative schedule data that was created when you autoscheduled your project. This Gantt chart also displays graphical dependencies between all tasks in your project. The chart includes data from master and subprojects based on the current project's work breakdown structure (WBS). You can only open one Gantt chart at a time.
The following columns are displayed on the left pane:
Task
Displays the task's name.
ID
Displays the task's unique identifier.
Start
Displays the task's start date.
Finish
Displays the task's finish date.
Finish Variance
Displays the variation from the finish date, based on the following formula: Finish Variance = Finish - Baseline Finish
ETC
Displays the task's estimated time for completion in hours.
Values:
■ Actuals. Displays the actual hours posted against the task.
■ Total Effort. Displays the total hours used, based on the following formula: Total Effort = ETC + Actuals
■ % Complete. Displays the task's percent complete value.
Chapter 3: Managing Tasks 129

Task Relationships and Dependencies
To display all task relationships and dependencies for a project
1. Open the project for which you want to view task relationships and dependency information.
The Project: Properties: Main - General page appear.
2. Click the Tasks tab.
The Project: Tasks: Task List page appears.
3. Click Gantt.
A Gantt chart appears displaying task dependencies and relationships for the current project.
Edit Task Dependencies
To edit a task dependency link
1. Open the task link for which you want to edit the dependency link.
The Task Properties page appears.
2. Click the Dependencies subtab.
The Task Dependencies page appears.
3. Click the link for the dependent task that you want to edit.
The Task Dependency Properties page appears.
4. Edit the fields, and click Submit.
Your changes are saved.
130 Project Management User Guide

Task Relationships and Dependencies
How to Manipulate the Gantt View
You can do the following to manipulate the Gantt view:
■ Expand and collapse the task hierarchies to see nested tasks. Dependencies between the tasks are drawn in the Gantt chart.
■ Expand subproject tasks within the task hierarchy list. Dependencies between tasks in subprojects and the master project are drawn in the Gantt chart.
■ Use the handle in the lower right-hand corner of the chart to drag the window inwards or outwards to make it smaller or larger. When you place your cursor on this handle, it changes to a double-headed arrow.
■ Move the vertical separator bar between the task list and the Gantt chart.
■ Use the icons on the toolbar to manipulate the left and right frames of the Gantt chart as follows:
■ Expand/Collapse Gantt Table Rows. Use this icon and then click the plus sign before a row to display the list of tasks. Click the minus sign to collapse the row and hide the tasks.
■ Pan Gantt Sheet. Use this icon for scrolling the Gantt chart left and right along the project timeline. This is typically used for viewing an earlier or later point in the project timeline. Hold the left-mouse button down, drag the right frame of the Gantt chart left or right; then release the mouse button. The Gantt chart is refreshed at the new position.
■ Zoom In. Use this icon to zoom in and drill into the timeline. The timeline is automatically adjusted as you zoom in.
■ Zoom Out. Use this icon to zoom out and see a higher level of detail. The timeline is automatically adjusted as you zoom out.
■ Zoom To Fit. Use this icon to automatically fit the entire schedule into one viewable area.
■ Refresh. Use this icon to reload the Gantt chart with current data from the project. The Gantt chart is updated with any changes you make to your projects or tasks.
Chapter 3: Managing Tasks 131

Task Associated Risks and Issues
Finish-Start Dependency Links
You can create finish-start dependency chains between two or more tasks in the WBS using the Link button on the Project: Tasks: Work Breakdown Structure page. Project tasks are linked using their relative position in the hierarchy. For example, a chain is created from Task 1 to Task 2, and from Task 2 to Task 3.
After you create a dependency, you can move tasks without affecting the dependency. You cannot create dependencies to and from summary tasks or tasks that are in a subproject.
After establishing the dependency links, you can click Gantt to open a new Gantt chart and see the dependencies between the tasks in a graphical format.
You can also click Autoschedule from the toolbar to see the results of linking the tasks on your project schedule.
Create Finish-Start Dependency Chains
Use the following procedure to create a finish-start dependency chain between two tasks.
To create a finish-start dependency chain
1. Open the project containing the task for which you want to create a dependency relationship.
The Project: Properties: Main - General page appears.
2. Select the Tasks tab.
The Project: Tasks: Task List page appears.
3. Select the Work Breakdown Structure subtab.
The Project: Tasks: Work Breakdown Structure page appears.
4. Select the check boxes next to the tasks which will form a finish-start dependency chain, and click Link.
A link is created between the two tasks.
Task Associated Risks and Issues You can associate the risks and issues you create to your tasks. You can only associate risks and issues with key tasks. These risks and issues display on the task's Task Associated Risks page and the Task Associated Issues page.
You cannot reply to or edit the risks and issues that are listed on these pages. You can only view them from this page.
132 Project Management User Guide

Task Associated Risks and Issues
View a List of Risks Associated with Tasks
You can view a list of risks associated with a task using the Task Associated Risks page. This page displays the risk's name, priority, status, impact date, and the assignee's name. Resources with project access can view the risks.
To view a list of risks associated with a task
1. Open the project.
The Project: Properties: Main - General page appears.
2. Select the Tasks tab.
The Project: Tasks: Task List page appears.
3. Open the task containing the risk you want to open.
The Task Properties page for that task appears.
4. Select the Associated Risks/Issues tab.
A list of associated risks are displayed on the Task Associated Risks page.
View a List of Issues Associated with Tasks
You can view a list of issues associated with a task using the Task Associated Issues page. This page displays the issue's name, priority, target resolution date, and the assignee's name. Resources with project access can view the issues.
To view a list of issues associated with a task
1. Open the project.
The Project: Properties: Main - General page appears.
2. Select the Tasks tab.
The Project: Tasks: Task List page appears.
3. Open the task containing the issue you want to view.
The Task Properties page for that task appears.
4. Select the Associated Risks/Issues tab.
The Associated Risks page appears by default.
5. Click the Issues subtab.
A list of associated issues are displayed on the Task Associated Issues page.
Chapter 3: Managing Tasks 133
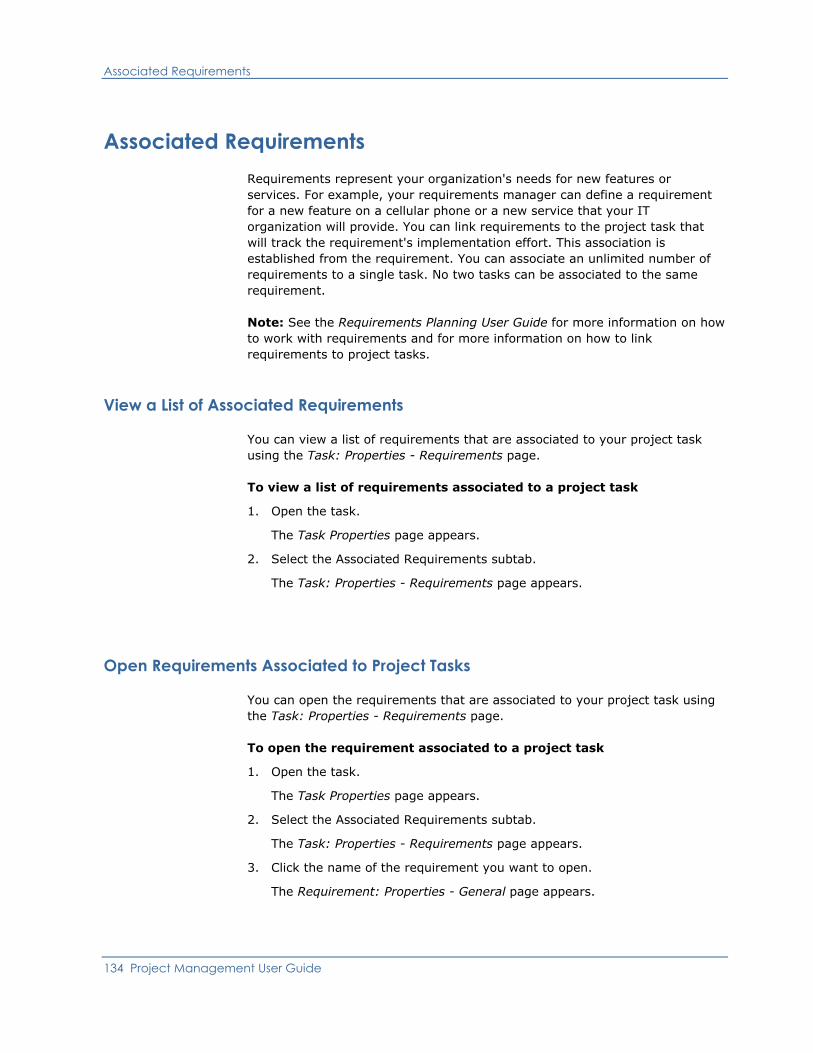
Associated Requirements
Associated Requirements Requirements represent your organization's needs for new features or services. For example, your requirements manager can define a requirement for a new feature on a cellular phone or a new service that your IT organization will provide. You can link requirements to the project task that will track the requirement's implementation effort. This association is established from the requirement. You can associate an unlimited number of requirements to a single task. No two tasks can be associated to the same requirement.
Note: See the Requirements Planning User Guide for more information on how to work with requirements and for more information on how to link requirements to project tasks.
View a List of Associated Requirements
You can view a list of requirements that are associated to your project task using the Task: Properties - Requirements page.
To view a list of requirements associated to a project task
1. Open the task.
The Task Properties page appears.
2. Select the Associated Requirements subtab.
The Task: Properties - Requirements page appears.
Open Requirements Associated to Project Tasks
You can open the requirements that are associated to your project task using the Task: Properties - Requirements page.
To open the requirement associated to a project task
1. Open the task.
The Task Properties page appears.
2. Select the Associated Requirements subtab.
The Task: Properties - Requirements page appears.
3. Click the name of the requirement you want to open.
The Requirement: Properties - General page appears.
134 Project Management User Guide

Associated Requirements
Unlink Project Tasks from Requirements
You can unlink a requirement from the project task to which it is associated using the Task: Properties - Requirements page. You can also remove the association by opening the requirement and unlinking the requirement from the project task.
Note: See the Requirements Planning User Guide for more information on how to unlink requirements from project tasks.
To unlink a project task from a requirement
1. Open the task.
The Task Properties page appears.
2. Select the Associated Requirements subtab.
The Task: Properties - Requirements page appears.
3. Select the check box next to the requirement you want to unlink from the project task, and click Unlink.
The requirement is removed from the list on the Task: Properties - Requirements page and is unlinked from the project task.
Chapter 3: Managing Tasks 135

Task Work Breakdown Structure
Task Work Breakdown Structure You can view all of the tasks you create—subordinate tasks, non-key subordinate tasks, and milestone tasks—using the Project: Tasks: Work Breakdown Structure page. Use this page to design a hierarchical (parent-child) relationship between the tasks you create. You can create, edit, and reorder tasks from this page.
Tasks appear on the WBS hierarchy in the order you created them. Use the Indent, Outdent, Move, and Reorder buttons to create a hierarchical structure for your tasks. The order indicates their relationship with each other. Clicking the name of a subproject in the WBS hierarchy takes you to the Project: Tasks: Work Breakdown Structure page for the subproject.
The summary task's start date is determined by the earliest start date of one or more of its child tasks. The summary task finish date is determined by the latest end date of one or more of its child tasks. After you have entered these dates and created the task, you can edit them by changing the dates of one or more of its child tasks. You can change the start and finish dates of non-summary tasks at any time from the Task Properties page.
WBS Guidelines
As you design your structure, keep the following rules and guidelines in mind:
■ You cannot assign resources to summary (e.g., top-level) tasks that have subordinate tasks.
■ You can use non-key and key tasks at any level of the task hierarchy.
■ You cannot designate a milestone task as a summary task.
136 Project Management User Guide

Task Work Breakdown Structure
Indent and Outdent Tasks in Work Breakdown Structure
You can create hierarchical relationships between tasks. Indent a task to make it a child of the task above it.
Use the Indent or Outdent links to designate individual tasks as parent or children. Parent tasks are top-level tasks that have child tasks associated with them. Child tasks are nested beneath parent tasks. The task above it in the hierarchy can be a top-most task, or a second-, third-, or fourth level task relative to the task above it. You can create an unlimited number of hierarchy levels on the work breakdown structure.
Rules for Indenting and Outdenting ■ You can indent tasks an unlimited number of times. However, a higher-
level task must always be exactly one indent level above the task you indent.
■ You can only outdent indented tasks.
■ You can outdent tasks the same number of times you have indented them.
■ If the task you want to outdent has subordinate tasks beneath it, the subordinate tasks automatically follow to their parent.
■ When you are indenting to the same level, you can select multiple tasks at once.
■ An error message appears if you cannot indent a task. If you select multiple tasks for indenting and one of them cannot be indented, an error message appears and none of the selected tasks are indented. The same rule applies for outdenting.
To indent or outdent a task
1. Open the project.
The Project: Properties: Main - General page appears.
2. Select the Tasks tab.
The Project: Tasks: Task List page appears.
3. Select the Work Breakdown Structure subtab.
The Project: Tasks: Work Breakdown Structure page appears.
4. Select the task you want to indent or outdent, click WBS Layout>>, and do one of the following:
■ Select Indent.
The page refreshes. The task you indented has folded one level under the nearest higher level task. A Plus icon appears in front of the higher level task.
■ Select Outdent.
Chapter 3: Managing Tasks 137
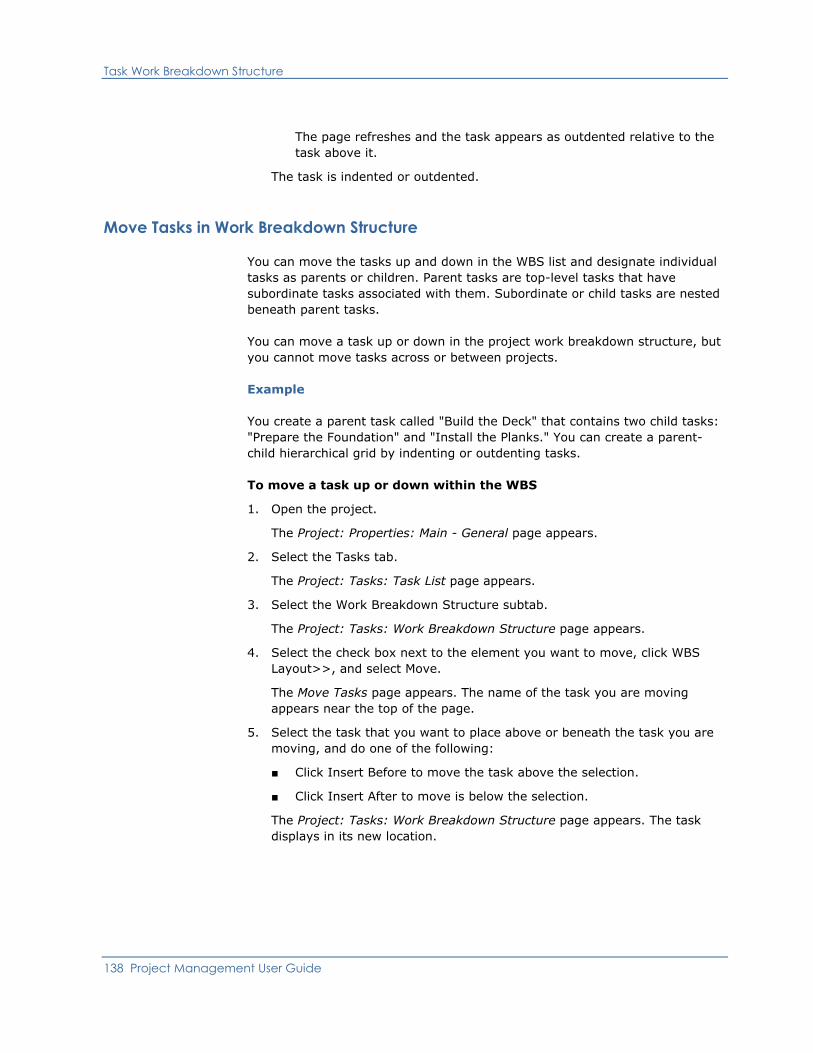
Task Work Breakdown Structure
The page refreshes and the task appears as outdented relative to the task above it.
The task is indented or outdented.
Move Tasks in Work Breakdown Structure
You can move the tasks up and down in the WBS list and designate individual tasks as parents or children. Parent tasks are top-level tasks that have subordinate tasks associated with them. Subordinate or child tasks are nested beneath parent tasks.
You can move a task up or down in the project work breakdown structure, but you cannot move tasks across or between projects.
Example
You create a parent task called "Build the Deck" that contains two child tasks: "Prepare the Foundation" and "Install the Planks." You can create a parent-child hierarchical grid by indenting or outdenting tasks.
To move a task up or down within the WBS
1. Open the project.
The Project: Properties: Main - General page appears.
2. Select the Tasks tab.
The Project: Tasks: Task List page appears.
3. Select the Work Breakdown Structure subtab.
The Project: Tasks: Work Breakdown Structure page appears.
4. Select the check box next to the element you want to move, click WBS Layout>>, and select Move.
The Move Tasks page appears. The name of the task you are moving appears near the top of the page.
5. Select the task that you want to place above or beneath the task you are moving, and do one of the following:
■ Click Insert Before to move the task above the selection.
■ Click Insert After to move is below the selection.
The Project: Tasks: Work Breakdown Structure page appears. The task displays in its new location.
138 Project Management User Guide

Task Work Breakdown Structure
Sort Tasks in Work Breakdown Structure
By default, tasks on the Project: Tasks: Work Breakdown Structure page are sorted in the order in which you place them, or the order in which they were created. When the WBS is sorted, the Indent, Outdent, and Move buttons do not display on the page. To return to the original task ordering, click Remove Sort.
When sorted, an arrow appears in the column header.
Note: See the Common Features and Personal Options User Guide for more information on sorting columns on list pages.
To sort tasks in the work breakdown structure
1. Open the project.
The Project: Properties: Main - General page appears.
2. Select the Tasks tab.
The Project: Tasks: Task List page appears.
3. Select the Work Breakdown Structure subtab.
The Project: Tasks: Work Breakdown Structure page appears.
4. Do one of the following:
■ To sort tasks in ascending order by name, click the Task column.
Tasks with the same parent appear in ascending order by name. A new link, Remove Sort, displays on the page. You can also sort the list in ascending or descending order by ID, Start or Finish Date, and % Complete.
■ To sort the tasks in descending order by name, click the Task column again.
The columns are sorted.
Chapter 3: Managing Tasks 139

Task Work Breakdown Structure
Expand and Collapse the Work Breakdown Structure
You can expand and collapse multiple branches of the WBS hierarchy at the same time and view tasks that are in multiple branches of the hierarchy. This is useful when you have defined a WBS with multiple branches and you have inserted sub-projects into the WBS. You can see an overall picture of your WBS, or you can collapse some tasks and expand others.
Expand the Work Breakdown Structure View
You can expand a project to view the top-level tasks in the project. Indented tasks are folded one level under the nearest higher-level task. A plus (+) sign appears in front of the higher-level task.
To expand the view of a collapsed group of tasks
1. Open the project.
The Project: Properties: Main - General page appears.
2. Select the Tasks tab.
The Project: Tasks: Task List page appears.
3. Select the Work Breakdown Structure subtab.
The Project: Tasks: Work Breakdown Structure page appears, displaying only the top level tasks.
4. Click the plus (+) sign next to each summary task.
The higher-level summary task is expanded, and the lower-level tasks that are indented beneath it display on the page.
Collapse the Work Breakdown Structure View
The collapsed view is useful when you want to view a small group of tasks (a parent and descendents) alone. You can collapse all of the expanded tasks in the list at the same time.
To collapse the view of an expanded group of tasks
1. Open the project.
The Project: Properties: Main - General page appears.
2. Select the Tasks tab.
The Project: Tasks: Task List page appears.
3. Select the Work Breakdown Structure subtab.
The Project: Tasks: Work Breakdown Structure page appears, displaying only the top level tasks.
4. Click the minus (–) sign next to each summary task.
140 Project Management User Guide

Task Work Breakdown Structure
The lower-level tasks are collapsed under the higher-level summary task.
Edit Tasks in the WBS
You can edit a task's name, ID, start date, finish date, and % complete from the WBS grid. The start and finish dates of a summary task may change depending on how you edit the start and finish dates of its sub-tasks.
You cannot edit subproject tasks from the WBS grid of the parent project. To edit the subproject tasks, expand the subproject and click a task link to access the WBS grid of the subproject. Then edit the tasks in the WBS.
To edit project tasks in the WBS grid
1. Open the project.
The Project: Properties: Main - General page appears.
2. Select the Tasks tab.
The Project: Tasks: Task List page appears.
3. Select the Work Breakdown Structure subtab.
The Project: Tasks: Work Breakdown Structure page appears.
4. From the Actions menu, select Edit Mode.
Some of the fields on the page are editable.
5. Edit the following task fields and save your changes:
Name
Defines the task's name (up to 64 characters).
ID
Defines the task's unique identifier (up to 16 characters).
Start
Defines the date on which you want work to start on this task.
Default: Today's date
Note: A task's work cannot start before the project's start date.
Finish
Enter the date by which you want the task to be complete.
Default: Today's date
Note: A task's work cannot finish after the project's finish date.
Chapter 3: Managing Tasks 141

Task Work Breakdown Structure
% Complete
Defines the percent of work that has been completed if the task is partially completed.
Default: 0
Values: 0 through 100.
■ If the task is complete, choose "Completed" as the task's status and enter 100.
■ If the task is not started, enter zero. The task's status changes to "Started" (unless you choose "Not Started").
■ If the task has ETC or actuals posted and the task is not started, enter a value between 1 and 99.
Configure Columns in the Work Breakdown Structure
The WBS grid is a list page, and therefore, you can configure the WBS grid to display additional columns and data fields, such as aggregation and variance data.
Note: See the Common Features and Personal Options User Guide for more information on configuring list pages.
142 Project Management User Guide
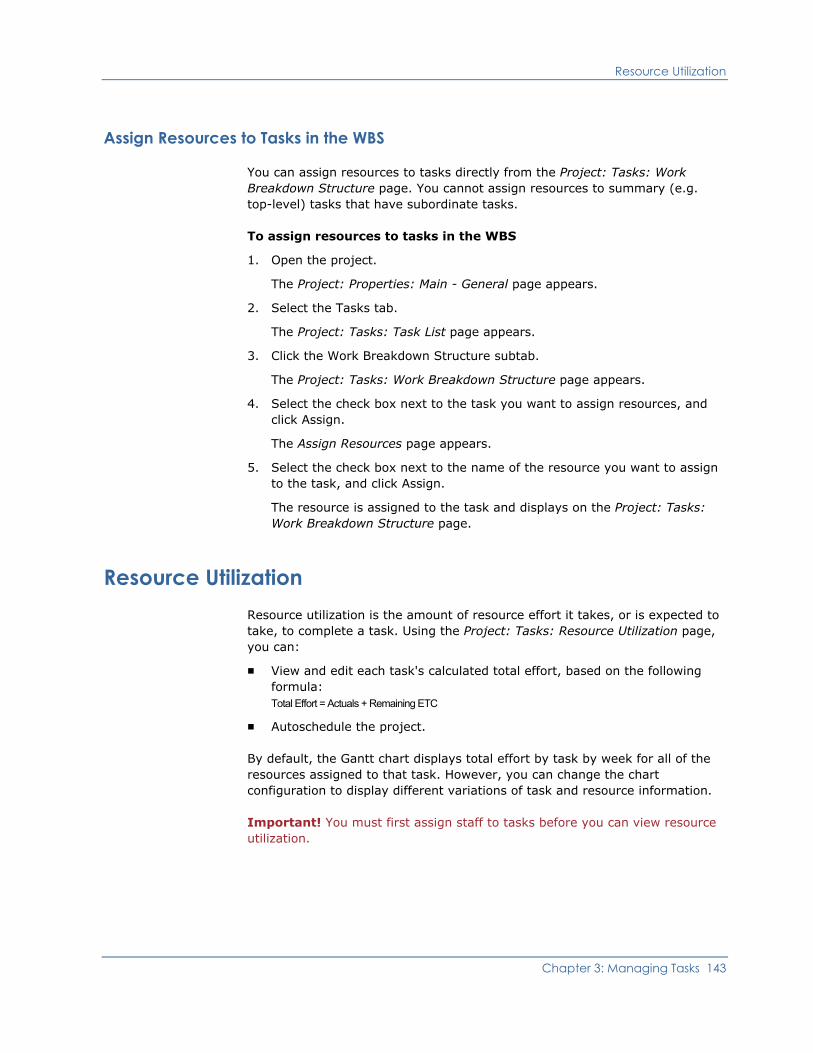
Resource Utilization
Assign Resources to Tasks in the WBS
You can assign resources to tasks directly from the Project: Tasks: Work Breakdown Structure page. You cannot assign resources to summary (e.g. top-level) tasks that have subordinate tasks.
To assign resources to tasks in the WBS
1. Open the project.
The Project: Properties: Main - General page appears.
2. Select the Tasks tab.
The Project: Tasks: Task List page appears.
3. Click the Work Breakdown Structure subtab.
The Project: Tasks: Work Breakdown Structure page appears.
4. Select the check box next to the task you want to assign resources, and click Assign.
The Assign Resources page appears.
5. Select the check box next to the name of the resource you want to assign to the task, and click Assign.
The resource is assigned to the task and displays on the Project: Tasks: Work Breakdown Structure page.
Resource Utilization Resource utilization is the amount of resource effort it takes, or is expected to take, to complete a task. Using the Project: Tasks: Resource Utilization page, you can:
■ View and edit each task's calculated total effort, based on the following formula: Total Effort = Actuals + Remaining ETC
■ Autoschedule the project.
By default, the Gantt chart displays total effort by task by week for all of the resources assigned to that task. However, you can change the chart configuration to display different variations of task and resource information.
Important! You must first assign staff to tasks before you can view resource utilization.
Chapter 3: Managing Tasks 143

Resource Utilization
How to View Resource Utilization
You can view resource utilization:
■ In aggregate (see page 145).
■ By resource (see page 101).
144 Project Management User Guide

Resource Utilization
View Resource Utilization in Aggregate
This version of the Project: Tasks: Resource Utilization page displays data in aggregate. The utilization (Total Effort) is displayed by task for all of the resources assigned to that task.
The blue Gantt bar in a task's date cells means that a resource has been allocated to the task. The default time period is weekly, always starting with the current week. The colored bars in the Total row at the bottom of the chart indicate total resource allocation (or overallocation) for each time period. When you scroll over a cell, a note displays that allows you to compare total effort for that time period to total allocation ("Project Aggregate Allocation") for that period. Red in the Total row means that resources have been overallocated.
By default, the resource utilization color code works as follows:
■ Blue. Indicates the total amount of time staff resources have been allocated to each task during the time periods displayed. The amount of time indicated by the bar should be equal to the number in the Total Effort column for that task.
■ Yellow. Resource is allocated at or under availability for that time period.
■ Red. Resource is overallocated (i.e. the amount of time booked exceeds availability) for that time period.
■ Green. Actuals recorded by the resource for that time period.
Note: A Plus sign in front of a task's name indicates that child tasks exist for that task. Click this sign to expand the view to see resource utilization for all of the child tasks as well as for the summary tasks.
You can change many of the values displayed in the Gantt chart.
To view resource utilization in aggregate
1. Open the project you want to view resource utilization.
The Project: Properties: Main - General page appears.
2. Click the Tasks tab.
The Project: Tasks: Task List page appears.
3. Click the Resource Utilization subtab.
The Project: Tasks: Resource Utilization page appears. All of the resources assigned to the task with their resource utilization display in the list.
Chapter 3: Managing Tasks 145

Resource Utilization
Edit Resource Utilization
When you adjust the fields on the Project: Tasks: Resource Utilization page, the graph displays accordingly. For example, if you enter the name of a new task or ID, data in the other cells change to reflect resource utilization for that task. Or, if you change the start or finish dates for a task, the time cells in the graph change to reflect the new dates.
In addition, if you change the name or ID of the task, the change is reflected on the Project: Tasks: Task List and Project: Tasks: Work Breakdown Structure pages, and on the staff assignment pages.
To edit resource utilization
1. Open the project.
The Project: Properties: Main - General page appears.
2. Select the Tasks tab.
The Project: Tasks: Task List page appears.
3. Select the Resource Utilization subtab.
The Project: Tasks: Resource Utilization page appears.
4. Choose Edit Mode from the Actions menu.
Some of the resource utilization fields are editable from the list page.
5. You can adjust the following fields on this page:
Name
Defines the task's name (up to 64 characters).
ID
Defines the task's unique identifier (up to 16 characters).
Start
Defines the date on which you want work to start on this task.
Default: Today's date
Note: A task's work cannot start before the project's start date.
Note: If the task has already started and/or finished, this field is not available.
146 Project Management User Guide
Resource Utilization
Finish
Enter the date by which you want the task to be complete.
Default: Today's date
Note: A task's work cannot finish after the project's finish date.
Note: If the task has already started and/or finished, this field is not available.
6. Click Save.
Your changes are saved.
7. Select Display Mode from the Actions menu to return the page to display mode.
Chapter 3: Managing Tasks 147
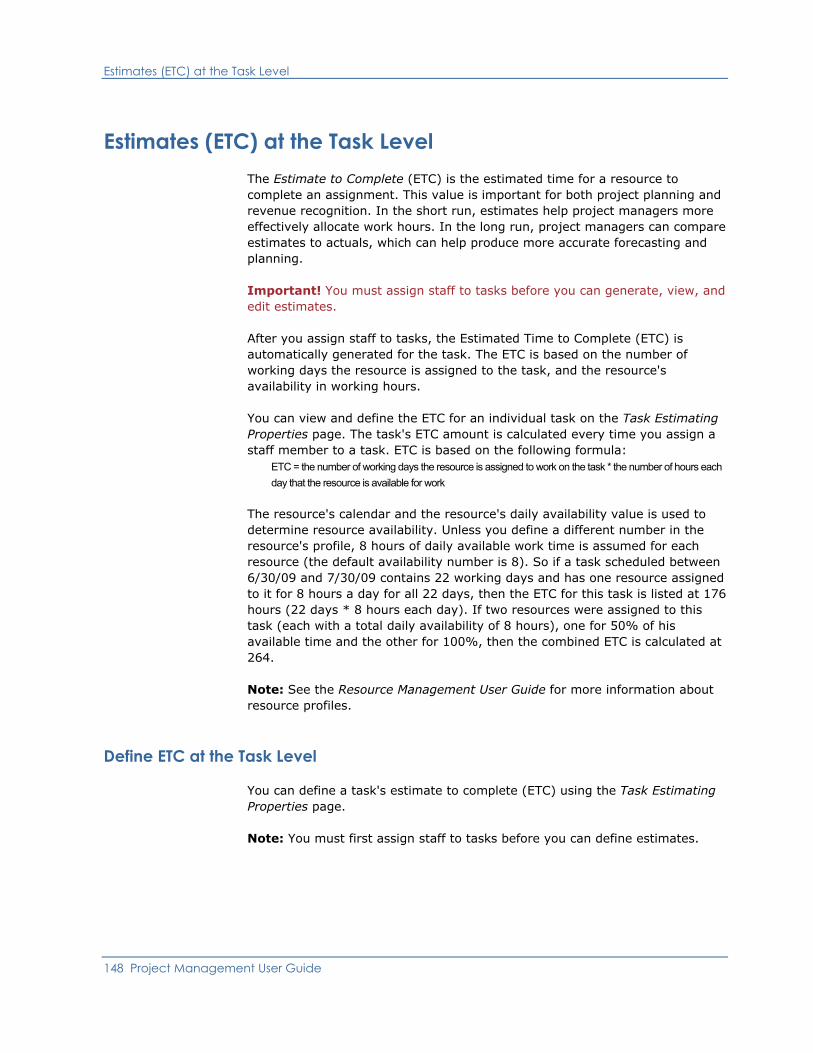
Estimates (ETC) at the Task Level
Estimates (ETC) at the Task Level The Estimate to Complete (ETC) is the estimated time for a resource to complete an assignment. This value is important for both project planning and revenue recognition. In the short run, estimates help project managers more effectively allocate work hours. In the long run, project managers can compare estimates to actuals, which can help produce more accurate forecasting and planning.
Important! You must assign staff to tasks before you can generate, view, and edit estimates.
After you assign staff to tasks, the Estimated Time to Complete (ETC) is automatically generated for the task. The ETC is based on the number of working days the resource is assigned to the task, and the resource's availability in working hours.
You can view and define the ETC for an individual task on the Task Estimating Properties page. The task's ETC amount is calculated every time you assign a staff member to a task. ETC is based on the following formula:
ETC = the number of working days the resource is assigned to work on the task * the number of hours each day that the resource is available for work
The resource's calendar and the resource's daily availability value is used to determine resource availability. Unless you define a different number in the resource's profile, 8 hours of daily available work time is assumed for each resource (the default availability number is 8). So if a task scheduled between 6/30/09 and 7/30/09 contains 22 working days and has one resource assigned to it for 8 hours a day for all 22 days, then the ETC for this task is listed at 176 hours (22 days * 8 hours each day). If two resources were assigned to this task (each with a total daily availability of 8 hours), one for 50% of his available time and the other for 100%, then the combined ETC is calculated at 264.
Note: See the Resource Management User Guide for more information about resource profiles.
Define ETC at the Task Level
You can define a task's estimate to complete (ETC) using the Task Estimating Properties page.
Note: You must first assign staff to tasks before you can define estimates.
148 Project Management User Guide

Estimates (ETC) at the Task Level
How to Modify ETC at the Task Level
You can change the task-level ETC in the following ways:
■ Set tasks for top-down estimating (see page 150).
■ Apply top-down estimating using the estimating rules mode (see page 151).
Chapter 3: Managing Tasks 149

Estimates (ETC) at the Task Level
Set Up Tasks for Top-Down Estimating
Important! Before you can set up and apply top-down estimating at the task level, you must zero-out existing estimates. To set up top-down estimating for subordinate tasks, you must zero-out the ETC amount of its parent task.
You can also apply top-down distributions at the project level.
To set up tasks for top down estimating
1. Open the project.
The Project: Properties: Main - General page appears.
2. Zero out existing estimates:
a. Select the Tasks tab.
The Project: Tasks: Task List page appears.
b. Open the parent or top level task of the tasks for which you want to set percentages.
The Task Properties page appears.
c. Click the Estimating tab.
The Task Estimating Properties page appears.
d. Verify that the ETC field is set to zero (0.00). If it is not, delete the amount and enter 0, and then click Apply.
The estimates are zeroed out.
e. Click Cancel.
The Project: Tasks: Task List page appears.
3. For each task you want to share a portion of the top-down distribution, do the following:
a. Open a task for which you want to enter a distribution percentage.
The Task Properties page appears.
b. Click the Estimating tab.
The Task Estimating Properties page appears.
c. In the Top-down % field, enter the percentage of the top-down estimate that you want distributed to this task, and click Save.
4. Open the top level task for which you will enter the ETC to be distributed.
The Task Properties page appears.
5. Click the Estimating tab.
The Task Estimating Properties page appears.
150 Project Management User Guide

Estimates (ETC) at the Task Level
6. Enter the ETC number you want to distribute throughout the parent task's subordinates in the ETC field, and click Preview.
The Preview ETC Change page appears, where you can view a summary of how the percentages were distributed.
7. Click Apply.
The distribution is saved and distributed for each task. The phase or top-level task page appears, where the ETC you entered displays.
Apply Top-Down Estimating Using the Estimating Rules Mode
You can apply top-down estimating to the tasks set up to receive the top down distribution using the estimating rules mode. Use this mode when you have a good idea of the number of hours it will take to complete all of the tasks in a grouping or project. At the parent-task level, the number is distributed through all of the parent's child tasks that have resource assignments.
You must first prepare the tasks to receive the top-down distribution. For example, suppose you know that Phase I will take 100 hours. Before you can enter the number and apply it, you must set up the phase's tasks to receive a percentage of those 100 hours. In this case, you might enter 60% for Task A and 40% for Task B. Once the tasks have been set up to receive a percentage, you can apply the ETC. The number is distributed accordingly.
The top-down method can be most effectively used when assignments have no existing estimates (i.e. the ETC field is set to 0).
To apply top-down estimating using the estimating rules mode
1. Open the task to which you want to apply top-down estimating.
The Task Properties page appears.
2. Click the Estimating tab.
The Task Estimating Properties page appears.
3. In the General section, enter the amount of ETC you want to distribute in the ETC field and click Preview.
The Preview ETC Change page appears.
4. Click Apply.
The ETC is distributed to the tasks set up to receive the top down distribution.
Chapter 3: Managing Tasks 151
Estimates (ETC) at the Task Level
Task Estimating Rules
Create and apply estimating rules when you want estimates to be calculated in a specific way. For example, you can create an estimating rule for a group of tasks that considers the budgeted cost of the tasks in the estimate.
You must create estimating rules at the task level, and you can only run the rules for the tasks for which they were created. For example, if you create a rule at the phase level for a phase containing two subordinate tasks, this rule is applied to all of the tasks in the phase. If you create the rule at the subordinate task level, you can only run the rule for that task.
Though you can create multiple rules for the same task, only one can serve as the default rule. You can run any rule from any page on which it exists at any time. All rules except default rules require executing conditions.
152 Project Management User Guide

Estimates (ETC) at the Task Level
Create Task Estimating Rules
To create a new task estimating rule
1. Open the task for which you want to create an estimating rule.
The Task Properties page for that task appears.
2. Click the Estimating tab.
The Task Estimating Properties page appears.
3. In the Task Estimating Rules section, click New.
The Step 1 of 2: Create Estimating Rule page appears.
4. Select one of the following from the Value field:
■ Estimate for Another Task. Select this value to allow to choose the estimates from another task on this project. Click Browse to search for the task.
Note: The task must have a defined ID for it to appear in the Select Task browse window.
■ Constant. Select this field and enter a number (integer or decimal) that serves as a fixed value for the estimating rule.
■ Project Attribute. Select this field to choose from the list of numeric project attributes. You can use any numeric attribute in the estimating rule.
5. Click Add.
The Operator field is editable.
6. Select the operator you want to use in the formula. You can choose addition, subtraction, multiplication, division, exponential, or modulus as valid operands.
7. Click Add.
The expression is evaluated and, if successful, the new rule appears in the Estimating Rule field. If the expression does not evaluate successfully, an error message displays in the field.
Note: You can bypass the Operator and Value fields and type or paste a formula directly into the Estimated Rule field. Then click Evaluate to evaluate the expression.
8. After a successful evaluation, do one of the following:
■ Click Finish if this rule is the default rule for the task or phase.
The Task Estimating Properties page appears. The rule appears in the Task Estimating Rules section of the page.
■ Click Next if this rule is not the default rule.
Chapter 3: Managing Tasks 153

Estimates (ETC) at the Task Level
The Step 2 of 2: Create Execute Condition page appears. Use this page to define the conditions that determine when the rule is to run. An executing condition is not required for the default rule.
9. Select an Object. Choices are "Project" or "Task".
10. The field that appears or becomes available next depends upon the type of object you chose.
■ If you choose "Project": select the Field or Operation field.
■ If you choose "Task": select the Field field.
11. Select an Operator.
12. In the Right section, choose a Constant or an Object.
13. Click Add to evaluate the expression.
If successful, the new rule displays in the Estimating Rule field. If the expression does not evaluate successfully, an error message displays in the field.
Note: You can bypass the Operator and Value fields and type or paste a formula directly into the Estimated Rule field. Then click Evaluate to evaluate the expression.
14. Click Finish to complete the creation process.
The Task Estimating Properties page appears and the new execution condition is displayed along with the task estimating rule.
154 Project Management User Guide

Estimates (ETC) at the Task Level
Run and Apply Task Estimating Rules
You can run an estimating rule at the phase, task, or project level. Rules are checked in the order listed. You can select a row and click Run to run individual estimating rules. Or you can click Run without selecting a row to run them all.
Important! In order to run task estimating rules, a team member must first be assigned to the task.
To run a task estimating rule at the phase or task level
1. Open the project.
The Project: Properties: Main - General page appears.
2. Select the Tasks tab.
The Project: Tasks: Task List page appears.
3. Open the phase or task for which you want to run the rule.
The Task Properties page for that phase or task appears.
4. Click the Estimating tab.
The Task Estimating Properties page appears.
5. Select the box next to the rule you want to run and click Run.
The task estimating rule is applied to the phase or task and to any subordinate tasks. The Run Estimating Rules page appears.
6. Select the box next to the task from which you want to apply ETCs, and click Apply ETC from Rules.
Compare Generated ETC with Current ETC
You can compare the ETC generated by the rule with the current ETC (the one in place before running the task estimating rules) using the Run Estimating Rules page.
Chapter 3: Managing Tasks 155

Estimates (ETC) at the Task Level
Apply Task Estimating Rules
If you run a task estimating rule for a phase or task that has subordinate tasks, you can select the phase or top level task to apply the rule to all of the subordinate tasks. Or you can select one or more of the subordinate tasks to apply the rule individually.
The order in which tasks are listed on the Task Estimating Properties page is important. If none of the task estimating rules meets its execution conditions, the default rule is run. If only a default rule exists, then that rule is run. You do not have to manually select, run, and apply rules. This process is executed automatically after checking all the rules in the list in the order in which they are listed.
You can either run the task estimating rule on all listed tasks or select which tasks to run the rule. If you do not select a rule to run, all of the rules are evaluated in the order in which they appear and the first rule that meets its execution conditions is run.
To apply a task estimating rule
1. Open the project.
The Project: Properties: Main - General page appears.
2. Select the Tasks tab.
The Project: Tasks: Task List page appears.
3. Open the phase or task for which you want to run the rule.
The Task Properties page for that phase or task appears.
4. Click the Estimating tab.
The Task Estimating Properties page appears.
5. Select the tasks to which you want to apply the estimates from the rule and click Apply ETC from Rules.
The current ETC is overridden.
156 Project Management User Guide
Estimates (ETC) at the Task Level
Edit Task Estimating Rules
For each task estimating rule you create, a row for that rule is displayed in the list on the Task Estimating Properties page. Once you have created a rule for a task, you can edit either the rule itself or its execution condition (if applicable).
Edit Estimating Rule Formula
To edit a rule's formula
1. Open the project.
The Project: Properties: Main - General page appears.
2. Select the Tasks tab.
The Project: Tasks: Task List page appears.
3. Open the phase or task for which you want to change the estimating rule.
The Task Properties page for that task appears.
4. Click the Estimating tab.
The Task Estimating Properties page appears.
5. Click the name of the rule you want to change.
The Estimating Rule page appears.
6. Change the formula and click Submit.
The Task Estimating Properties page appears.
Edit Estimating Rule Executing Condition
To edit a rule's executing condition
1. Open the project.
The Project: Properties: Main - General page appears.
2. Select the Tasks tab.
The Project: Tasks: Task List page appears.
3. Open the phase or task for which you want to change the estimating rule.
The Task Properties page for that task appears.
4. Click the Estimating tab.
The Task Estimating Properties page appears.
5. Do one of the following:
■ Click the name of the execution condition you want to change
■ Click [Define execution conditions] to define a condition for the default rule.
Chapter 3: Managing Tasks 157

Estimates (ETC) at the Task Level
The Executing Conditions page appears.
6. Change the fields and click Submit.
The Task Estimating Properties page appears.
Reorder Task Estimating Rules
When there are two or more estimating rules with estimating conditions displayed in the list on the Task Estimating Properties page, you can re-order the list.
Default rules are not available for reordering. The default rule cannot have an executing condition.
To reorder the rules
1. Open the project.
The Project: Properties: Main - General page appears.
2. Select the Tasks tab.
The Project: Tasks: Task List page appears.
3. Open the task you want to reorder rules.
The Task Properties page for that task appears.
4. Select the Estimating tab.
The Task Estimating Properties page appears.
5. Click Reorder.
The Reorder Estimating Rules page appears.
6. Use the up and down arrows to change the position of the rules, and click Submit.
The Task Estimating Properties page appears, where the rules display in the order you set.
158 Project Management User Guide
Edit Tasks and Milestones
Delete Task Estimating Rules
To delete an estimating rule
1. Open the project.
The Project: Properties: Main - General page appears.
2. Select the Tasks tab.
The Project: Tasks: Task List page appears.
3. Open the task you want to delete estimating rules.
The Task Properties page for that task appears.
4. Select the Estimating tab.
The Task Estimating Properties page appears.
5. Select the check box next to the estimating rule you want to delete, and click Delete.
The rule is deleted and no longer displays in the list.
Edit Tasks and Milestones As a task's owner, you can edit any of its properties at any time. You can change any of the available fields on any of the tabs.
To edit a task or milestone
1. Open the project.
The Project: Properties: Main - General page appears.
2. Select the Tasks tab.
The Project: Tasks: Task List page appears.
3. Open the task.
The Task Properties page for that task appears.
4. Select the tab containing the fields you want to edit, edit the fields, and click Save.
Your changes are saved.
Chapter 3: Managing Tasks 159

Delete Tasks and Milestones
160 Project Management User Guide
Delete Tasks and Milestones You can delete tasks from the Project: Tasks: Task List page and the Project: Tasks: Work Breakdown Structure page. The following procedures details how to deleted tasks and milestones from the task list.
Before deleting a task, consider the following:
■ Deleting a task does not delete the assigned resources.
■ Deleting a task containing subordinates deletes only the top-level task. The subordinate tasks remain part of the project.
■ You cannot delete tasks with actuals posted against them; instead, they are placed in a deleted tasks phase. The task's estimates are set to zero and its status is set to "Complete."
■ Deleting a task containing subordinate key tasks can affect their schedule. When the schedule is affected, it is updated to accommodate the change.
To delete a task or milestone
1. Open the project.
The Project: Properties: Main - General page appears.
2. Select the Tasks tab.
The Project: Tasks: Task List page appears.
3. Do one of the following:
■ To delete one task, select the check box of the specific task you want to delete.
■ To delete all tasks listed, click the Select All icon.
4. Click Delete.
The Delete Confirmation page appears listing the task to be deleted.
5. Click Yes to confirm the prompt.
The task is deleted.

Chapter 4: Building Project Teams
This section contains the following topics:
Project Team Overview (see page 161) How to Manage Project Teams (see page 162) Staff Project Tasks (see page 163) How to Staff Projects (see page 176) Role Capacity (see page 197) Manage Project Participants (see page 198) Staff Allocations (see page 206)
Project Team Overview Team members and tasks are the core elements of a project. Both are essential to meeting project objectives. Team members are necessary to perform the tasks, generate ideas, and monitor progress. Once the project is under way, staff can record actuals for time spent on project tasks on their timesheet. Project managers can then compare actuals to estimates for planning, tracking, and budgeting purposes.
Chapter 4: Building Project Teams 161

How to Manage Project Teams
How to Manage Project Teams You can manage your project team information from the pages you can access from the Team tab. You can access project team pages from any project page by selecting the Team tab.
If you have added or copied staff to the project, the Project: Team: Staff page appears by default when you click the Team tab. The name of the project manager (typically the person who created the project) displays in the list on this page, and any other participants. Otherwise, the Project: Team: Participants page appears.
You can manage project teams in the following ways:
■ Add staff to the project (see page 163).
■ Add participants to the project (see page 199).
■ View and manage staff detail (see page 206).
■ View role capacity (see page 197).
■ Create participant groups (see page 198).
■ Add staffing requirements for requisitions (see page 206).
■ Create and manage resource requisitions (see page 182).
■ Designate participants as collaboration managers (see page 201).
162 Project Management User Guide
Staff Project Tasks
Staff Project Tasks After you have created tasks and assigned staff to the project, you can assign staff members to the tasks. Staff members can be resources or a roles. Once staffed to the project, resources can then add the tasks to their timesheets and record time spent on them. Timesheet actuals are generated from the approved hours staff members record on timesheets.
Note: See the Common Features and Personal Options User Guide for more information on how to use and manage Timesheets.
Use a role as a placeholder when you do not know the name of a resource, or if a resource is not available. You can staff a project with multiple instances of the same role but you cannot add multiple instances of the same named resource to a project.
Staff Assignment Guidelines
When assigning resources to tasks, keep the following in mind:
■ You cannot add staff to milestone or summary (parent) tasks.
■ Avoid overallocating resources, which can cause scheduling delays and less effective performance. Use Project Management to track resource allocation. If you have access to the Resource Management module, you can also perform resource planning to monitor resource allocation.
Note: See the Resource Management User Guide for more information about resource planning.
■ If it helps to create a more accurate schedule, you can allow project resources one or two hours each working day, or each week, for alternative work or non-project meetings.
How to Assign Staff to Projects
You can assign staff to your project from:
■ Tasks (see page 164)
■ Task assignments (see page 164)
Chapter 4: Building Project Teams 163

Staff Project Tasks
Assign Staff from Tasks
Once you assign a resource to a task, that resource can add the task to their timesheets and, after the task start date, record time spent on the task. Use the Actuals and ETC columns in the Assignments section of the Task Properties page to compare actuals to estimates.
To assign staff to tasks from a task
1. Open the task to which you want to assign staff.
The Task Properties page for that task appears.
2. In the Assignments section of the page, click Assign.
The Assign Resources page appears.
3. Select the resource you want to assign to the task and click Assign.
The selected resource is assigned to the task and appears in the Assignments section of the Task Properties page.
Assign Staff from Task Assignments
You can assign resources to a task only after you have assigned at least one resource to the task. Use the Project: Tasks: Assignments page to assign staff. Once staff start recording time spent on the tasks, you can use this page to compare actuals to estimates.
To assign resources from task assignments
1. Open the project.
The Project: Properties: Main - General page appears.
2. Select the Tasks tab.
The Project: Tasks: Task List page appears.
3. Select the Assignments subtab.
The Project: Tasks: Assignments page appears.
4. Select the task to which you want to assign staff, and click Assign.
The Assign Resources page appears displaying a list of all of the staff who have been assigned to the team.
5. Select the additional staff you want to add, and click Assign (or Assign and Select More).
The selected resources display below their assigned task on the Project: Tasks: Assignments page.
164 Project Management User Guide
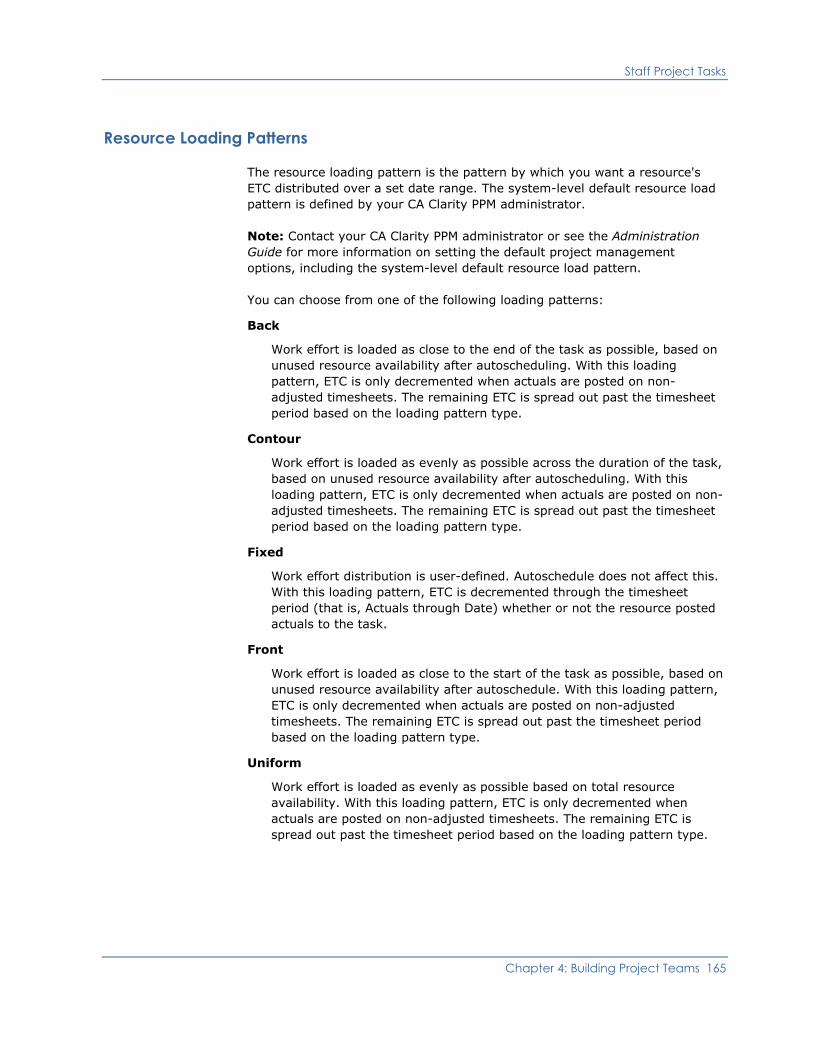
Staff Project Tasks
Resource Loading Patterns
The resource loading pattern is the pattern by which you want a resource's ETC distributed over a set date range. The system-level default resource load pattern is defined by your CA Clarity PPM administrator.
Note: Contact your CA Clarity PPM administrator or see the Administration Guide for more information on setting the default project management options, including the system-level default resource load pattern.
You can choose from one of the following loading patterns:
Back
Work effort is loaded as close to the end of the task as possible, based on unused resource availability after autoscheduling. With this loading pattern, ETC is only decremented when actuals are posted on non-adjusted timesheets. The remaining ETC is spread out past the timesheet period based on the loading pattern type.
Contour
Work effort is loaded as evenly as possible across the duration of the task, based on unused resource availability after autoscheduling. With this loading pattern, ETC is only decremented when actuals are posted on non-adjusted timesheets. The remaining ETC is spread out past the timesheet period based on the loading pattern type.
Fixed
Work effort distribution is user-defined. Autoschedule does not affect this. With this loading pattern, ETC is decremented through the timesheet period (that is, Actuals through Date) whether or not the resource posted actuals to the task.
Front
Work effort is loaded as close to the start of the task as possible, based on unused resource availability after autoschedule. With this loading pattern, ETC is only decremented when actuals are posted on non-adjusted timesheets. The remaining ETC is spread out past the timesheet period based on the loading pattern type.
Uniform
Work effort is loaded as evenly as possible based on total resource availability. With this loading pattern, ETC is only decremented when actuals are posted on non-adjusted timesheets. The remaining ETC is spread out past the timesheet period based on the loading pattern type.
Chapter 4: Building Project Teams 165

Staff Project Tasks
Define Staff Assignment Properties
To define assignment properties of a resource assigned to a task
1. Open the project.
The Project: Properties: Main - General page appears.
2. Select the Tasks tab.
The Project: Tasks: Task List page appears.
3. Select the Assignments subtab on the tasks page toolbar.
The Project: Tasks: Assignments page appears.
4. Click the Properties icon next to the name of the resource whose assignment properties you want to define.
The Assignment Properties page appears.
5. Complete the following fields:
Role
Defines the assignment's role on the task.
Loading Pattern
Defines the loading pattern by which you want to distribute this assignment's ETC over the date range.
Options: Back, Uniform, Fixed, Contour, or Front
Start
Defines the start date for the assignment. If an assignment has actuals, you cannot change this date.
Finish
Defines the finish date for the assignment.
ETC
Defines the ETC to be distributed across the date range according to the loading pattern.
6. Click Submit.
Your changes to the staff assignment properties are saved.
166 Project Management User Guide
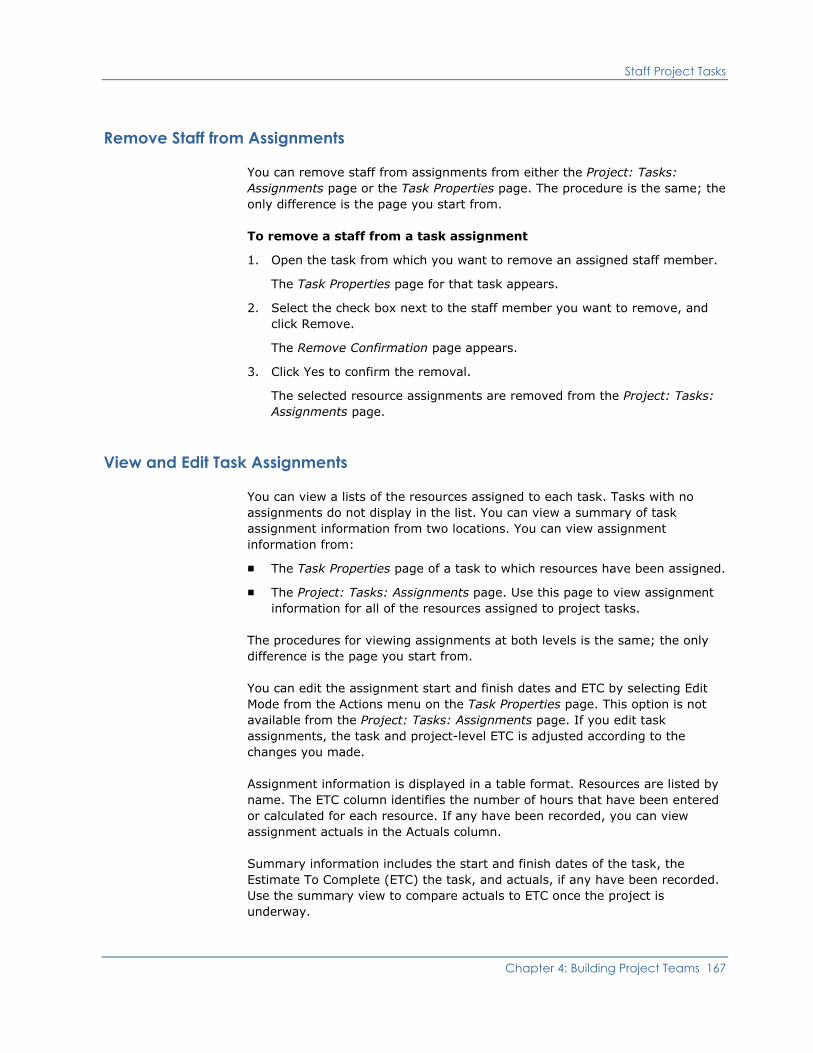
Staff Project Tasks
Remove Staff from Assignments
You can remove staff from assignments from either the Project: Tasks: Assignments page or the Task Properties page. The procedure is the same; the only difference is the page you start from.
To remove a staff from a task assignment
1. Open the task from which you want to remove an assigned staff member.
The Task Properties page for that task appears.
2. Select the check box next to the staff member you want to remove, and click Remove.
The Remove Confirmation page appears.
3. Click Yes to confirm the removal.
The selected resource assignments are removed from the Project: Tasks: Assignments page.
View and Edit Task Assignments
You can view a lists of the resources assigned to each task. Tasks with no assignments do not display in the list. You can view a summary of task assignment information from two locations. You can view assignment information from:
■ The Task Properties page of a task to which resources have been assigned.
■ The Project: Tasks: Assignments page. Use this page to view assignment information for all of the resources assigned to project tasks.
The procedures for viewing assignments at both levels is the same; the only difference is the page you start from.
You can edit the assignment start and finish dates and ETC by selecting Edit Mode from the Actions menu on the Task Properties page. This option is not available from the Project: Tasks: Assignments page. If you edit task assignments, the task and project-level ETC is adjusted according to the changes you made.
Assignment information is displayed in a table format. Resources are listed by name. The ETC column identifies the number of hours that have been entered or calculated for each resource. If any have been recorded, you can view assignment actuals in the Actuals column.
Summary information includes the start and finish dates of the task, the Estimate To Complete (ETC) the task, and actuals, if any have been recorded. Use the summary view to compare actuals to ETC once the project is underway.
Chapter 4: Building Project Teams 167

Staff Project Tasks
How to Replace Staff Assigned to Projects or Tasks
You can only replace staff members on unlocked projects. However, if the project is locked, you may be allowed to replace a staff member role only (without replacing tasks) depending on the project management settings. If the project is unlocked, in which case you are allowed to replace not only resources and roles but also assignments, you can transfer assignments when a role or resource is replaced by a single resource and the original role or resource has no allocation remaining.
Note: Contact your CA Clarity PPM administrator or see the Administration Guide for more information on your project management settings.
You can replace:
■ A resource with a role or a different resource. If the resource being replaced is the same as the resource coming in, nothing is updated or transferred and an error message appears at the top of the Team page indicating that the resource was not booked as it already exists on the team.
■ A role with a resource or a different role. When you replace a role with a resource that is already assigned to the project or investment, the allocation from the role is added to the resource's existing allocation and the role's allocation is decremented by what was added to the resource.
You can replace a staff member assignment in the following ways:
■ Use an availability score (see page 171). Use this replacement method to replace a staff member assigned to a task when you want to use an availability score to find a replacement at the team level.
■ Replace staff assignment with an unassigned team member (see page 172). Use this replacement method to replace a staff member assigned to a task with a member who is assigned to the same team but not to the same task.
■ Replace staff assignment with an assigned team member (see page 173). Use this replacement method when you want to replace a staff member with any other member of the same staff, including those already assigned to the task.
Important! When replacing staff assigned to a project or project task, you can overallocate the member who is replacing the previous member or members.
168 Project Management User Guide

Staff Project Tasks
Guidelines for Staff Member Replacements
Consider the following before making a staff member replacement:
When you replace a resource with a different resource, the actuals and pending actuals (if any) of the original staff member are not transferred to the new staff member. Only the remaining ETC is transferred to the new staff member.
The original staff member should complete time entries so that the actual data is posted before the replacement occurs.
The project role of the original staff member is transferred to the new staff member (unless you are replacing a role with a different role).
Role Replacement Behavior
Consider the following behavior when replacing roles:
When a role is fully decremented by replacement with one named resource, the following behaviors are seen:
■ The role's allocation is decremented to zero and the role is removed from the team list.
■ All assignments and ETC that were assigned to the role are transferred to the named resource.
■ The role's allocation is added to the named resource's allocation. In this case, it is possible to overallocate the named resource (that is allocate at greater than 100%).
When a role is partially replaced by one or more named resources, the following behaviors are seen:
■ The role's allocation is decremented by the amount being replaced and the role remains on the team list.
■ No transfer of assignments is made to the named resources.
■ The amount of the replaced role allocation is added to the named resource's allocations.
When a role has assignments with ETC and is replaced so that the allocation is zero, the role remains on the team list. You should manually re-assign the task to the appropriate named resources and then manually remove the role from the team list.
Chapter 4: Building Project Teams 169

Staff Project Tasks
How Data Transfers to Replacement Staff
The following table identifies how data from the replaced staff member transfers to the new staff member:
Data Type Transfers?
Available Start Yes, if the Available Start date has not passed and if new resource is not booked on that date.
Available Finish Yes
Remaining Allocation Yes
Percent (%) Allocation Yes
ETC Yes
Assigned Tasks Yes
Project Role Yes
Completed Assignments No
Existing Actuals No
Pending Actuals No
Pending Estimates No
Baselines No
170 Project Management User Guide

Staff Project Tasks
Use Availability Score to Find Staff Replacements
When you replace a resource from the Project: Team: Staff page, a list of resources who share the same role as the resource being replaced, and who are available during the project's time period is generated. You can replace a resource using the Project: Team: Staff page or the Project: Team: Staff Detail page.
Use this method when you want to use an availability score to help you select which resource would be best suited, in terms of availability, to replace the other. CA Clarity PPM automatically generates an availability score for each of the resources to which you have access. This score indicates how close the availability of the possible replacement resources comes to being an exact match to the availability of the resource selected for replacement. Availability is based on the duration of the assignment and the daily availability of the resource. Generally speaking, the higher the score, the closer the match.
Use the Replace Resource page to replace staff members. This page lists all of the resources to which you have access.
The Availability field at the top right of the page identifies the assignment period and the number of hours the resource you are replacing was allocated to the project. Both the dates and the hours allocated are transferred to the new replacement.
The Availability Match column displays a score that factors in the work period and the availability of each resource. If you do not add any skill specifications to your search criteria, the Total Match column duplicates the Availability Match score and the Skill Match column appears blank. If you search by skills criteria as well as availability criteria, the Total Match column displays an average of the two scores.
The following message may display at the top of the page: "Match scores may be inaccurate if availability dates do not fall into the following range: ddmmyy - ddmmyy,"
When this displays, a discrepancy between the date range in the message and the dates in the Availability field exists, and the Availability Match score might be inaccurate. For example, if the dates in the Availability field are 9/1/09 - 2/7/10 and the date range in the message is 9/7/09 - 9/7/10, a one-to-one comparison cannot be found for any resource, which lowers the overall availability match scores.
To replace a staff member on a project
1. Open the project.
The Project: Properties: Main - General page appears.
2. Select the Team tab.
The Project: Team: Staff page appears.
Chapter 4: Building Project Teams 171

Staff Project Tasks
3. For the staff member you want to replace, click the Resource Finder icon.
The Find Resources page appears.
4. Select the check box for the resource with whom you want to replace the previous resource, and click Replace.
The Booking Confirmation page appears.
5. Confirm the selection by clicking Yes.
The name of the resource you selected replaces the previous staff member on the Project: Team: Staff page.
If desired, you can narrow your replacement search by using the other filtering fields on the Replace Resources page.
Note: See the Resource Management User Guide for more information on replacing resources on projects.
Replace Staff Assignments with Unassigned Team Member
You can replace a staff member assigned to a task with a staff member who is not assigned to the same task. You can replace one resource with another resource, or you can replace multiple resources with one resource. For example, you might want to replace two resources with one resource if you think one resource would do the job just as effectively.
The ETC and assignment dates associated with the previous resource is transferred to the replacement resource. When you replace multiple resources with one resource, the combined ETC is transferred from the replaced members to the replacement member.
Task assignment dates override project assignment dates. Staff members can be assigned to a task whose end date exceeds the date the member was assigned to the project.
To replace a staff assignment with an unassigned team member
1. Open the task to which the current staff member is assigned.
The Task Properties page appears.
2. In the Assignments section of the page, select the check box next to the resource you want to replace, and click Replace.
The Replace Resources page appears, which displays the assignment dates and ETC of the member(s) you are replacing and lists all of the staff members currently assigned to the project staff, including those already assigned to the task.
3. Select the resource or role with whom you want to replace the current member, and click Replace.
The Task Properties page appears listing the name of the newly assigned resource.
172 Project Management User Guide

Staff Project Tasks
Replace Staff Assignments with Assigned Team Member
This replacement method offers the same functionality as replacing staff assignments with another team member, but also allows you to:
■ Replace a staff member with any staff member, including those already assigned to the same task. This allows you to consolidate the number of members assigned to the same task.
■ Replace a member assigned to a different task with the same team member.
Using this method, the name of the resource you select as the replacement replaces the name or names of the resource or resources you chose to replace. ETC is adjusted accordingly; it is transferred "as is" if the transfer was from a single member or combined if multiple members were selected for replacement.
To replace a staff assignment with an assigned team member
1. Open the task to which the current staff member is assigned.
The Task Properties page appears.
2. In the Assignments section of the page, select the check boxes next to the resource you want to replace, and click Replace.
The Replace Resources page appears, which displays the assignment dates and ETC of the member(s) you are replacing and lists all of the staff members currently assigned to the project staff, including those already assigned to the task.
3. Select the resource or role with whom you want to replace the current member, and click Replace.
The Task Properties page appears listing the name of the newly assigned resource.
Chapter 4: Building Project Teams 173

Staff Project Tasks
Change Staff Member Roles on Projects
You can change a staff member's role on a project-by-project basis. This does not change the role identified for them in their resource profile. You can replace role assignments from either the Project: Team: Staff page or the Project: Team: Detail page.
To change a staff member's role on a project
1. Open the project.
The Project: Properties: Main - General page appears.
2. Select the Team tab.
The Project: Team: Staff page appears.
3. For the resource for whom you want to change the role, click the Properties icon.
The Staff Member Properties page appears.
4. In the General section of the page, for Investment Role, click the Browse icon.
The Select Role's window opens.
5. Select the role that you want to assign to the resource for this project, and click Add.
The role displays in the list.
6. Click Submit.
Your changes are saved. The Project: Team: Staff page appears, where the name of the resource's role has changed and displays in the Project Role field.
174 Project Management User Guide
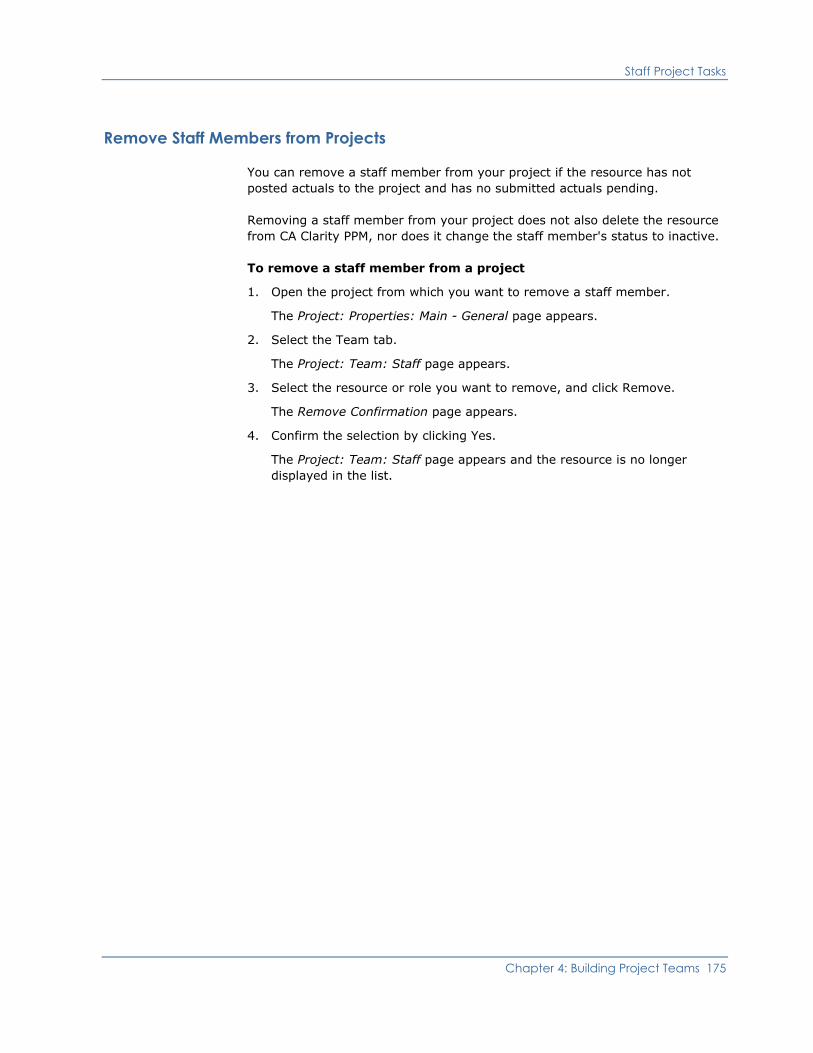
Staff Project Tasks
Remove Staff Members from Projects
You can remove a staff member from your project if the resource has not posted actuals to the project and has no submitted actuals pending.
Removing a staff member from your project does not also delete the resource from CA Clarity PPM, nor does it change the staff member's status to inactive.
To remove a staff member from a project
1. Open the project from which you want to remove a staff member.
The Project: Properties: Main - General page appears.
2. Select the Team tab.
The Project: Team: Staff page appears.
3. Select the resource or role you want to remove, and click Remove.
The Remove Confirmation page appears.
4. Confirm the selection by clicking Yes.
The Project: Team: Staff page appears and the resource is no longer displayed in the list.
Chapter 4: Building Project Teams 175
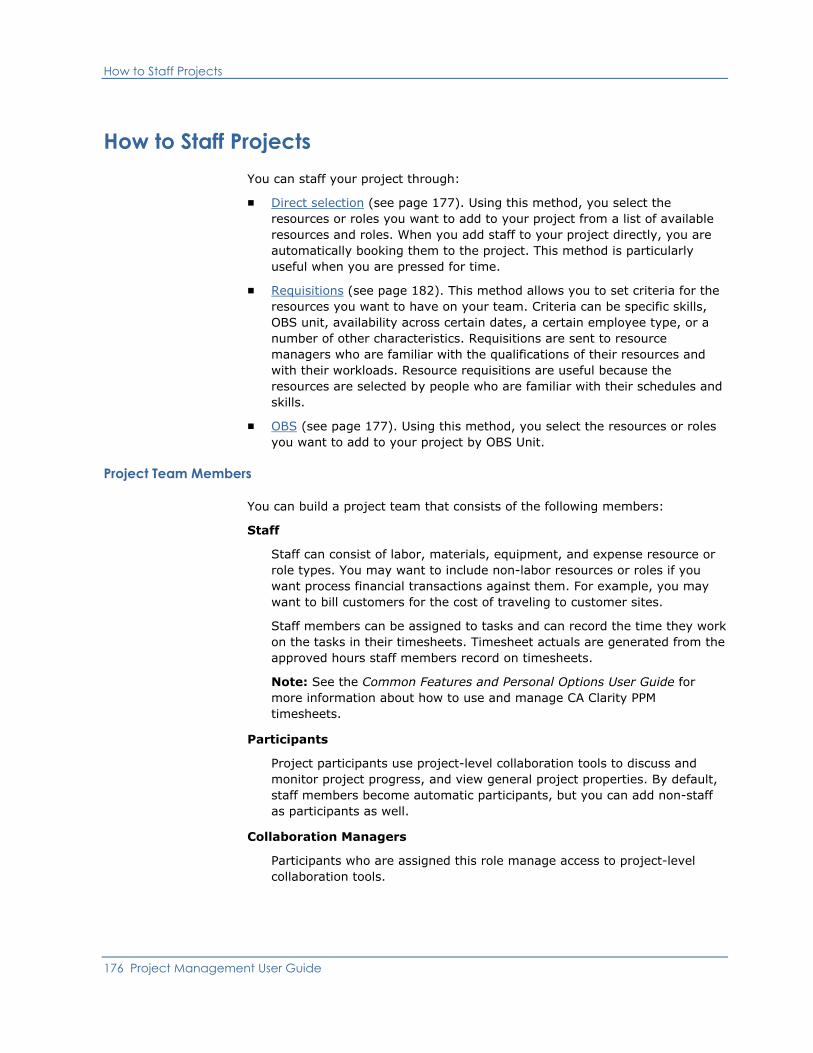
How to Staff Projects
How to Staff Projects You can staff your project through:
■ Direct selection (see page 177). Using this method, you select the resources or roles you want to add to your project from a list of available resources and roles. When you add staff to your project directly, you are automatically booking them to the project. This method is particularly useful when you are pressed for time.
■ Requisitions (see page 182). This method allows you to set criteria for the resources you want to have on your team. Criteria can be specific skills, OBS unit, availability across certain dates, a certain employee type, or a number of other characteristics. Requisitions are sent to resource managers who are familiar with the qualifications of their resources and with their workloads. Resource requisitions are useful because the resources are selected by people who are familiar with their schedules and skills.
■ OBS (see page 177). Using this method, you select the resources or roles you want to add to your project by OBS Unit.
Project Team Members
You can build a project team that consists of the following members:
Staff
Staff can consist of labor, materials, equipment, and expense resource or role types. You may want to include non-labor resources or roles if you want process financial transactions against them. For example, you may want to bill customers for the cost of traveling to customer sites.
Staff members can be assigned to tasks and can record the time they work on the tasks in their timesheets. Timesheet actuals are generated from the approved hours staff members record on timesheets.
Note: See the Common Features and Personal Options User Guide for more information about how to use and manage CA Clarity PPM timesheets.
Participants
Project participants use project-level collaboration tools to discuss and monitor project progress, and view general project properties. By default, staff members become automatic participants, but you can add non-staff as participants as well.
Collaboration Managers
Participants who are assigned this role manage access to project-level collaboration tools.
176 Project Management User Guide
How to Staff Projects
Participant Groups
You can give participant groups collaboration access to projects.
Add Resources or Roles to Project Staff
To add a resource or role to the project staff
1. Open the project.
The Project: Properties: Main - General page appears.
2. Click the Team tab.
The Project: Team: Staff page appears.
3. Click Add.
The Select Resources page appears.
4. Select the resources or roles you want to add to the project staff, and click Add to add the resources or roles you selected.
Overallocate Resources to Projects
When adding resources to your project staff, you can overallocate the resource. If this occurs, a confirmation page appears that allows you to either overallocate the resource, or to accept any remaining availability the resource might have.
Allocate Resources to Projects by OBS Unit
To allocate a resource to the project by OBS Unit
1. Open the project.
The Project: Properties: Main - General page appears.
2. Click the Team tab.
The Project: Team: Staff page appears.
3. Click Add/Update by OBS.
The Select Resources page appears.
4. Select the OBS and click Add.
The resources are booked to the project. A summary page displays listing any over allocated resources as well as summary information.
Chapter 4: Building Project Teams 177

How to Staff Projects
Book Already-booked Resources to Projects
The following error message appears under the following circumstances: Resource not booked because it already exists on the team. Use the team properties page to update this resource's allocation.
Circumstances:
■ When you try to book a resource to project to which they are already booked.
■ When you try to book a resource that is already on the project team, and you select "No" on the prompt that asks you to reduce a matching role allocation.
You can add multiple instances of a role to a project but not multiple instances of the same named resource.
Example
You can assign "programmer (1)" and "programmer (2)" staffing requirements to the same task.
View Project Staff
You can view a list of the resources or roles that have been added to your project on the Project: Team: Staff page. All resources are automatically allocated at 100% of their available working days.
To view the staff added to your project
1. Open the project.
The Project: Properties: Main - General page appears.
2. Click the Team tab.
The Project: Team: Staff page appears.
3. View the following:
Properties
Click this icon to view some of the basic resource profile fields, and to change allocation information, including planned and hard allocations.
Note: See the Resource Management User Guide for more information about the resource profile.
Resource Finder
Click this icon to replace a resource or role with a different resource or role.
178 Project Management User Guide

How to Staff Projects
Resource Name
Click the resource name to view the resource or role's Resource: Properties: Main - General page.
Resource Allocation
Click this icon to go to the Resource/Role Allocations page for that resource or role.
Note: See the Resource Management User Guide for more information about resource and role properties.
Project Role
This column identifies the resource's role on the project, which can be different from the primary role selected in the resource's profile.
Time
A yellow checkmark appears in this column if the resource or role is allowed to enter time worked on this project.
Booking Status
This column identifies whether the resource or role has been hard booked, soft booked, or mixed booked.
Values:
■ Hard. The resource has been committed to the project.
■ Soft. The resource has been tentatively scheduled for the project.
■ Mixed. Both soft and hard allocation exists for the resource.
Note: The "Mixed" booking option may not be available to you depending on your project management settings. For more information, contact your CA Clarity PPM administrator.
Start Date
Unless you change it, this column defaults to the start date of the project.
Finish Date
Unless you change it, this column defaults to the finish date of the project.
% Allocation
CA Clarity PPM assumes that each staff member is assigned to the project and to each task at 100% of his or her available time. This might be true if the resource is not allocated to other tasks on other projects.
Chapter 4: Building Project Teams 179

How to Staff Projects
Allocation
This column displays the number of hours the resource has been tentatively booked to the project. Unless you change the booking dates, CA Clarity PPM automatically books staff members for the entire duration of the project. Staff members may or may not be assigned to tasks for all of the hours they are allocated to the project. The Allocation cells are not editable but change to reflect edits you make using:
■ The setting allocation options.
■ The new allocation curves defined on the Staff Member Properties page.
■ The Shift Allocation option.
Actuals
This column displays the total number of hours the resource has recorded to date for tasks on this project.
ETC
ETC equals the Estimated Time to Complete. This column displays the estimate of how many hours the resource will work on the project based on the number of working days s/he has been assigned to tasks, and to the number of hours s/he has available each day. The cells in this column are not editable but change if you change the way ETC is calculated.
Note: If you use Open Workbench or Microsoft Project to calculate or edit estimates, then the ETC displayed here comes from the scheduling tool rather than from CA Clarity PPM.
180 Project Management User Guide

How to Staff Projects
Edit Staff Member Details
Once you have added the resource or role to the project, you can specify the details for that staffing requirement. When you have specified the details, create requisitions for the staffing requirements.
When you first add a staffing resource to your project, the project's default staff OBS is used as the staff member's staff OBS unit. If the named resource has the same resource OBS type as the project's default staff OBS, then this value is set to the OBS unit of the named resource. If the staff member does not have the same resource OBS type as the project's default staff OBS, then this value is left blank. If you have not defined a default staff OBS for the project, then the staff member's staff OBS is left blank. The staff OBS value is assigned to the staffing requirement and does not change even if the resource record for the named resource has a different value.
When booking a requisition, the booked resource's staff OBS value is set using the same rules as replace.
To edit staff member details
1. Open the project.
The Project: Properties: Main - General page appears.
2. Click the Team tab.
The Project: Team: Staff page appears.
3. Click the Properties icon for the resource or role to specify the details for that staffing requirement.
The Staff Member Properties page appears.
4. Specify the staff member properties:
Booking Status
Choose the staff member's booking status.
Values: Soft, Hard, or Mixed
Request status
The requisition status if a requisition is linked to the team record. Whenever the actual requisition status changes on the Requisition Properties page, this request status field is updated. This provides the project manager an indicator of the state of their requisitions. When you first create a staffing requirement, the request status is "New" because you have not yet asked the resource manager to fill the staffing needs. This field is read-only unless the requisition status is "Closed" or "Booked" or there are no requisitions. If there is more than one requisition attached, then this field displays the status of the open (not closed) requisition. You can use this status for manually booking a resource without using a formal requisition.
Chapter 4: Building Project Teams 181

How to Staff Projects
Values: New, Open, Proposed, Booked, or Closed (if there are no requisitions associated with this team member).
Note: See the Resource Management User Guide for more information about requisition status descriptions.
Investment Role
The role for which resources are being requested for this investment (for example, developer, business analyst, or architect.)
Staff OBS Unit
Defines the staff member's OBS Unit affiliation.
Default: The project's Staff OBS Unit value if one is defined for the project.
Planned Allocation
This value represents the time duration for which the resource is needed on the project. It represents the total amount of availability the resource has to the project (as requested by the project manager).
Hard Allocation
This value represents the total amount of hard-booked availability the resource has to the project (as filled out by the resource manager). There is no hard allocation value until the resource manager hard-books the allocations.
5. Click Submit.
Resource Requisitions
You can requisition resources such as is deployed in a matrix organization. A likely scenario is a mixed model, where project managers control some resources and use an informal staffing model, while other resources must be requested using a formal model through requisitions.
Using requisitions can reduce the risk that you might assign an overburdened or improperly skilled resource to your project. In addition, using requisitions allows you to:
■ Negotiate on a resource and its allocation.
■ Maintain requisition records for future project staffing.
■ Unbook a resource or ask for additional allocation.
■ Receive notification on request status changes.
182 Project Management User Guide

How to Staff Projects
How to Requisition Tasks
The following is a high-level overview of the flow of tasks performed by the project manager and the resource manager to fulfill project staffing requirements through the process of creating and submitting requisitions:
1. The project manager defines staffing requirements by adding soft-booked resources or roles as project team members.
2. The project manager creates requisitions based on the pre-defined staffing requirements.
3. The project manager submits new requisitions so resource managers can start looking at them. The requisition is routed to the appropriate resource managers based on the default booking manager defined for the resource or role in the requisition.
Note: See the Resource Management User Guide for more information.
4. The resource manager addresses requisitions by proposing a list of resources. The resource manager can also decline a requisition. In both cases, the project manager is notified.
Note: See the Resource Management User Guide for more information.
5. The project manager reviews the proposed allocations and either:
■ Rejects the proposed requisition. In this case the requisition is re-opened and the resource manager is notified. The resource manager modifies and resubmits the proposals.
Note: See the Resource Management User Guide for more information.
■ Accepts the proposed requisition. In this case the resource requisition is hard booked to the project.
A resource manager can also directly hard-book a resource (depending on whether they have the required rights and whether or not the Requisition Approval Required flag is turned on).
6. The project manager can make the following changes to the resource allocation after a resource has been hard booked to a project:
■ Reduce allocation. If a resource is booked to a project for a longer time than needed, or if a resource is going to be unavailable during a specific time period, the project manager can un-book the resource for the time they will not be needed or will be unavailable.
■ Extend allocation. If a projects gets extended, the project manager can request additional booking for a particular resource.
■ Replace a resource or role. If a resource is being un-booked, the project manager can request a replacement for that resource.
Chapter 4: Building Project Teams 183

How to Staff Projects
Create Requisitions
Requisitions are associated with single staffing requirements; they always contain references to a specific resource or role. The requisition uses the details from the staffing requirement to pre-populate the requisition.
When selecting multiple resources or roles, a new requisition is created for each resource or role (staffing requirement). For a given staffing requirement, there can be only one outstanding requisition (that is, with a status of "New", "Open", or "Proposed"). You cannot create requisitions for staffing requirements that already have outstanding requisitions. If you cannot create requisitions for any of the staffing requirements selected, then the create operation fails for all requisitions and an alert message appears instead.
As a project manager, you may want to edit the requested allocation amount in a requisition. You can edit a requisition as long as its status is still "New." This is to avoid situations where the resource manager is already working on the request, may even have a shortlist partly put together, and then the request changes on them.
When you create the requisition, you can do one of the following:
■ Create the requisition and set its status to "New". In this was you can edit the requisitions to add additional information not carried over from the staffing requirement. You may also want to change the default values such as the due date or the amount requisitioned. After modifying, you must manually open or submit the requisitions.
■ Create the requisition and set its status to "Open". In this way you can quickly submit all your requisitions when you do not need to edit any of the details already defined in the staffing requirement. After a requisition is submitted, the resource manager is notified via email and can take action on the requisition
To create a requisition based on the soft-booked allocations on the team records
1. Open the project for which you want to create a requisition.
The Project: Properties: Main - General page appears.
2. Click the Team tab.
The Project: Team: Staff page appears.
3. Select the check box for a soft-booked resource or role, click the More button, and select Create Requisitions.
The Create Requisitions page appears.
4. Select a requisition type:
Values:
■ Request Resources: Select this option to create new requisitions.
184 Project Management User Guide

How to Staff Projects
■ Unbook Resources: Select this option to create requisitions to unbook and release hard-booked time.
■ Replace Resources: Select this option to unbook and replace a hard-booked resource.
5. Select a booking manager by clicking the Browse icon for each resource or role. If a default booking manager was already specified by the resource manager or administrator, this value is automatically populated.
6. Do one of the following:
■ Click Create to create requisitions with a status of "New".
■ Click Create and Open to create a requisition, set the status to "Open".
The requisition is created and displays on the Project: Team: Staff page.
7. Submit your changes.
Chapter 4: Building Project Teams 185

How to Staff Projects
Edit Unopened Requisition Requests
After creating requisitions, you can view your new requisitions from the Project: Team: Staff page or the Project: Team: Requisitions page. From this page, you can monitor your open requisitions and edit any unopened requisitions.
You can view a requisition's status in the Request Status field on the Project: Team: Staff page. Whenever the requisition status changes, the team Request Status field is updated. This provides you an indicator of the state of your requisitions.
You can only edit requisition requests that have a status of "New."
After you submit an open requisition, the resource manager receives notification to work on the request. If a requisition is for a named resource, the named resource is automatically added to the resource list for the requisition when the status changes to "Open." The resource is selected or "Proposed."
Note: See the Resource Management User Guide for more information.
To edit an unopened requisition request
1. Open the project.
The Project: Properties: Main - General page appears.
2. Select the Team tab.
The Project: Team: Staff page appears by default.
3. Select the Requisitions subtab on the team page toolbar.
The Project: Team: Requisitions page appears.
4. Click the name of the requisition to which you want to edit the properties.
The Requisitions Properties page appears for that requisition.
5. Complete the following fields:
Requisition Name
Required. Change the name of the requisition as needed to better describe the staffing requirement. When this requisition was created, this field was populated with the name of the selected staffing requirement.
Requisition ID
Required. This field is pre-populated with a unique ID generated by the system.
186 Project Management User Guide
How to Staff Projects
Description
Enter a general description or additional information you want the requisition recipient to consider.
Due Date
Select the date by which you want the requisition to be filled. This is generally sometime before your need for this resource begins.
Priority
Select a priority level for this requisition. The default is Medium; alternatives are Low and High.
Status
Required. This field indicates the status of the requisition (New, Open, Proposed, or Closed). To submit a requisition, you must change its status from New to Open.
Requested By
This field is pre-populated with the name of the project manager who created the requisition. Click the Browse icon to select a different resource.
Booking Manager
This field is pre-populated with the booking manager name of the resource/role indicated by the staffing requirement. If none was selected, click the Browse icon to select a booking manager.
Requirement Name
Displays the staffing requirement name. Each requisition can access all information from the team member (for example, skills, allocation needed, or role) on which it is based.
Requested Resource
Displays the name of the requested resource or role.
Project
Displays the name of the project for the requisition.
Unbook
Displays status based on the option you selected (that is, Request Resources, Unbook Resources, or Replace Resources) when you created the requisition.
Replace
Displays status based on the option you selected when you created the requisition.
Values: Request Resources, Unbook Resources, or Replace Resources
Chapter 4: Building Project Teams 187

How to Staff Projects
Requested Amount
Define the period or periods that you want the resource to work on the project. Also specify what percentage of the resource's available time you need.
6. Click Submit.
The Project: Team: Staff page appears.
Review and Book Proposed Allocations
A requisition can have many bookings associated with it. Each resource that you add to the requisition shortlist constitutes a booking. A booking is simply a record of a resource attached to the shortlist and contains the amount of time the resource is booked to the project. The status of the booking determines whether the resource is proposed, rejected, or actually booked to a project.
After a resource manager works on a requisition, as the person who requested the requisition, you receive notification that someone has filled or partly filled a requisition and you can view information about the resources they offer to determine whether they meet your requirements. You can also see which staffing requirements have a "Proposed" status from the Project: Team: Staff page. This tells you that the resource manager has proposed allocations on the requisition.
At this point, there is still no committed (or hard) allocation for the resources because you have not yet accepted the proposals. Click the Requisitions subtab on the team page toolbar to see all the requested versus proposed amounts and accept many requisitions at once. You can also drill into any individual requisition from either the Project: Team: Staff page or the Project: Team: Requisitions page.
You can hard book resources to projects as follows:
Note: The Requisition Approval Required field displays in the Staffing section of the Project: Properties: Main - Schedule page.
Requisition Approval Required field
Method
Selected Project manager books a requisition proposed by a resource manager.
Selected Project manager hard-books a resource or role directly to the project if they have hard-booking rights and the Project – Edit access right.
188 Project Management User Guide

How to Staff Projects
Chapter 4: Building Project Teams 189
Requisition Approval Required field
Method
Cleared Project manager or resource manager hard-books a resource or role directly to the project if they have hard-booking rights.
View Resource Allocations
Before you accept a proposed resource or book them to a project, you can check their allocations to other projects.
You can view allocation details on the Project: Team: Detail page. To view this page, open the project, select the Team tab, and click the Detail subtab on the team page toolbar. This page lists all of the investments to which the resource is allocated, along with the number of hours the resource is allocated to each investment.
Note: See the Resource Management User Guide for more information on how to edit allocations from the Project: Team: Detail page.
To view a resource's allocations
1. Open the project.
The Project: Properties: Main - General page appears.
2. Select the Team tab.
The Project: Team: Staff page appears by default.
3. Click the Resource Allocation icon next to the resource you want to view allocations.
The Resource/Role Allocations summary page for that resource appears.

How to Staff Projects
Accept and Book a Single Requisition
Before accepting a proposed booking, you can view the details of the requisition. As project manager, you see the same view the resource manager saw that displays the details of the requisition. You see how much time you requested, how much the resource manager proposed, and who the resource manager proposed.
If you select the Requisition Approval Required field, the resource manager cannot book team members directly onto a project – even with hard-booking access rights.
On the Project: Team: Staff page, you can see that the resource has committed allocation to the project. The request status is now "Booked." The booking status has changed from "Soft" to "Hard."
To view a requisition and hard book a resource to your project
1. Open the project.
The Project: Properties: Main - General page appears.
2. Select the Team tab.
The Project: Team: Staff page appears by default.
3. Select the Requisitions subtab on the team page toolbar.
The Project: Team: Requisitions page appears.
4. Click the Person with List icon to the right of the requisition that you want to review.
The Requisition Resources page appears. This page displays the requested allocation, the proposed allocation, and the variance. The histogram shows you the overall availability of the proposed resources.
5. To accept the proposal, click Book.
The resource is hard booked.
190 Project Management User Guide

How to Staff Projects
Accept and Book Multiple Requisitions
You can review and accept multiple requisitions at the same time on the Project Team: Staff page. From this page you can view the average availability rate of the proposed requisitions. You can select multiple requisitions and click the Book button to accept all proposals at once.
When a project manager or resource manager books a resource to a project or a project manager changes the planned allocation for a resource, the associated staffing requirement's booking status is automatically updated to reflect the current status.
The booking status in the staffing requirement changes based on the values in the following table:
Planned Allocation
Hard Allocation Booking Status
Date range and allocation have been set
None Soft
Date range and allocation have been set
Equals planned allocation
Hard
Date range and allocation have been set
Date range and allocation is less than planned allocation
Mixed
This booking status displays only if the system setting for Allow Mixed Booking is turned on. By default it is turned on.
Note: Contact your CA Clarity PPM administrator or see the Administration Guide for more information.
Date range and allocation have been set
Date range and allocation is more than planned allocation
Mixed
Chapter 4: Building Project Teams 191

How to Staff Projects
To book multiple proposals from search results
1. Open the project.
The Project: Properties: Main - General page appears.
2. Select the Team tab.
The Project: Team: Staff page appears by default.
3. Select the Requisitions subtab on the team page toolbar.
The Project: Team: Requisitions page appears.
4. Select the requisitions that have been proposed, and click Book to accept the selected requisitions.
5. Return to the Project: Team: Staff page.
You can see that all team members have a request status of Booked, a booking status of Hard and that the planned and committed allocations equal each other.
Reject a Requisition
If you are not satisfied with the proposed availability of a named resource, then you can reject the requisition. You can also reject one or more resources from the shortlist of resources proposed by the resource manager for a specific role. When you reject a resource requisition, the resource manager is notified about the reopened requisition.
You can also open up a requisition, view the requisition properties, and then reject the requisition using the Reject button. Use the Discussions tab to record why you are rejecting a requisition.
Note: See the Resource Management User Guide for more information on managing resource requisitions.
To reject one or more requisitions
1. Open the project.
The Project: Properties: Main - General page appears.
2. Select the Team tab.
The Project: Team: Staff page appears by default.
3. Select the Requisitions subtab on the team page toolbar.
The Project: Team: Requisitions page appears.
4. Select one or more proposed requisitions that you want to reject, and click Reject.
The status of the requisition changes from Proposed to Open.
192 Project Management User Guide

How to Staff Projects
Book Overallocated Resources
If a resource's available hours are less than the total number of requested hours, instead of the Booking Confirmation page appearing, the Remaining Availability Confirmation page appears.
The Remaining Availability Confirmation page indicates that the resource is overbooked if you add them to the project or investment. The 100% Resource Allocation column lists the number of hours that is used if you book the resource at 100% of their availability, which is the default booking percentage. The Remaining Availability column indicates the actual number of work hours the resource has available to work on your project. When this page appears, you can:
■ Overallocate the resource.
■ Book the resource for the amount remaining only. This amount is listed in the Remaining Availability column.
Chapter 4: Building Project Teams 193

How to Staff Projects
Unbook Hard-Booked Resources Using Requisitions
When you reduce the scope of a projects or when a resource is unavailable during a particular time period in the project, you can unbook hard-booked resources from your project so that you can use their unbooked time on another project.
You can unbook a resource completely or partially from projects. The unbooked amount defaults to the hard allocation of the team member less the planned allocation.
After you unbook the resource requisition, the associated resource manager is notified. The resource manager can proceed to address the unbooked resource requisition.
Note: See the Resource Management User Guide for more information on addressing unbooked resource requisitions.
To unbook a hard-booked resource completely from a project
1. Open the project.
The Project: Properties: Main - General page appears.
2. Select the Team tab.
The Project: Team: Staff page appears.
3. Select the check box next to the name of the hard-booked resource that you want to unbook, click More on the section toolbar, and select Create Requisitions.
The Create Requisitions page appears.
4. In the Select Requisition Type section, choose Unbook Resources (Remove all hard allocation not in plan).
5. In the Resources section, click Create and Open to unbook the resource completely.
The Project Team: Staff page appears showing the booking status as "Mixed". An unbook requisition has been created to totally unbook this resource for the entire amount by which it was hard-allocated.
To unbook a hard-booked resource partially from a project
1. Open the project.
The Project: Properties: Main - General page appears.
2. Select the Team tab.
The Project: Team: Staff page appears.
194 Project Management User Guide

How to Staff Projects
3. Select the check box next to the name of the hard-booked resource that you want to unbook, click More on the section toolbar, and select Create Requisitions.
The Create Requisitions page appears.
4. In the Select Requisition Type section, choose Unbook Resources (Remove all hard allocation not in plan).
5. In the resources section, click Create.
The Project: Team - Staff page appears.
6. Click the request status link for the resource which shows a status of "New."
The Requisition Properties page appears.
7. Specify the requested amount that you want to unbook (that is, indicate for what time period and by how much percent you want to unbook), change the status to "Open," and click Submit.
Note: You can also do this from the Staff Member Properties: General page prior to unbooking the resource requisition.
Replace Unbooked Resource Requisitions
When unbooking a resource through a requisition, you can request a replacement team member. This allows you to unbook the selected resource and request a new team member.
To replace an unbooked resource requisition with a replacement team member
1. Open the project.
The Project: Properties: Main - General page appears.
2. Select the Team tab.
The Project: Team: Staff page appears.
3. Click the name of the hard-booked resource that you want to unbook, click More on the section toolbar, and select Create Requisitions.
The Create Requisitions page appears.
4. In the Select Requisition Type section, choose Replace Resources (Replace all hard allocation with new resource).
5. In the Resources section, click Create and Open to unbook the resource completely.
The Project: Team: Staff page appears showing the booking status as "Mixed". An unbook requisition has been created to totally unbook this resource for the entire amount by which it was hard-allocated.
Chapter 4: Building Project Teams 195

How to Staff Projects
Request Additional Bookings
If the project gets extended, you can add additional planned allocation for a resource.
The requisition submit, propose, and accept process is identical to the process described in the earlier sections. The two requisitions (the one created initially and the one created to request additional booking) are stored as two separate records of the individual transactions.
Unlike un-booking a resource (where you reduce the planned booking), for additional booking, you need to increase the planned booking compared to the hard booking.
Split Booking
When there is an additional and an unbook requisition, (for example if a project is delayed), you can change allocations using the Shift Allocation option. You then create a regular requisition and select the Unbook option to create an unbook requisition. You must perform the two distinct actions as separate tasks. A team record can have up to one open requisition and one open unbook requisition at the same time.
To request additional booking for a resource
1. Open the project.
The Project: Properties: Main - General page appears.
2. Select the Team tab.
The Project Team: Staff page appears.
3. Click the Properties icon for the hard-booked resource.
The Staff Member Properties: General page appears.
4. Edit the resource's Planned Allocation chart.
5. Create a new requisition.
The new requisition automatically asks for the difference between the planned and committed time.
196 Project Management User Guide

Role Capacity
Delete Resource Requisitions from Projects
You can delete resource requisitions at any time and in any state. You can also delete requisitions with approved bookings. The results of the booking (e.g. the team members that got hard-booked to the project) remain, but the record of the booking transaction (e.g. the requisition itself) can be deleted.
To delete a resource requisition from a project
1. Open the project.
The Project: Properties: Main - General page appears.
2. Select the Team tab.
The Project: Team: Staff page appears.
3. Select the Requisitions subtab from the toolbar.
The Project: Team: Requisitions page appears.
4. Select the requisition you want to delete.
5. Click Delete.
The Confirm Requisition Delete page appears.
6. Click Yes to confirm the deletion.
The resource requisition no longer displays on the Project: Team: Requisitions page.
Role Capacity The Project: Team: Role Capacity page provides an aggregated view of all role demand whether generated by role-based team members or named resources. You can view this information against the capacity of the resources that fill those roles. To access this page, from a project's Team tab, select the Role Capacity subtab on the team page toolbar. Resources without a primary role are captured on this page in the [No Role] row.
From this page you can view:
■ Role allocation to this investment and sub-investments versus allocation to other investments and over-allocations. Data is aggregated by role through the investments hierarchy and each sub-investment allocates a specific percentage to the investment.
■ Available role capacity for this investment and sub-investments.
You can view this information both inside and outside of a scenario. If a role appears over-allocated, click the role to go to the Project: Team: Staff page and see all resources using that role.
Chapter 4: Building Project Teams 197

Manage Project Participants
Manage Project Participants Project participants can use the project-level collaboration tools to discuss and monitor project progress. By default, staff automatically become participants when added to a project, but you can add non-staff as participants as well. Non-staff participants can use the project-level collaboration tools but cannot be assigned to tasks, and cannot add project tasks to their timesheets.
If you do not want staff members to automatically become participants, see your CA Clarity PPM administrator, who can change that setting in the Administration Tool.
Use the Project: Team: Participants page to view a list of all the resources you have added to your project, to view the name of the project's manager and staff, and to view the Participants list.
198 Project Management User Guide
Manage Project Participants
Add Participants to Projects
Use the Project: Team: Participants: Add Resources page to add participants to your project. This page lists all of the resources to which you have access.
To add resources as participants to the project
1. Open the project.
The Project: Properties: Main - General page appears.
2. Select the Team tab.
The Project: Team: Staff page appears by default.
3. Select the Participants subtab on the team page toolbar.
The Project: Team: Participants page appears.
4. Click Add.
The Project: Team: Participants: Add Resources page appears.
5. Select the resources you want to add as participants, and click Add or Add and Select More until all selected resources are added as project participants.
The Project Team: Participants page appears.
Add Participants by Resource ID
Use the Add by Resource ID field to add individual resources by their ID name or number. This field appears on the Project Team: Participants page.
To add participants by resource ID
1. Open the project.
The Project: Properties: Main - General page appears.
2. Select the Team tab.
The Project: Team: Staff page appears by default.
3. Select the Participants subtab.
The Project: Team: Participants page appears.
4. Enter the ID name or number of the resource you want to add as a participants into the Add by Resource ID field.
5. Click Add.
The resource's name appears in the list of project participants.
Chapter 4: Building Project Teams 199

Manage Project Participants
Remove Participants from Projects
Collaboration managers can remove participants from projects.
To remove a participant
1. Open the project.
The Project: Properties: Main - General page appears.
2. Select the Team tab.
The Project: Team: Staff page appears by default.
3. Select the Participants subtab.
The Project :Team: Participants page appears.
4. Select each participant you want to remove from the project, and click Remove.
The Remove Participants Confirmation page appears.
5. Click Yes to confirm the removal.
The selected participants are removed from the project.
200 Project Management User Guide

Manage Project Participants
Designate Participants as Collaboration Managers
Unlike regular participants, collaboration managers can add and remove participants to the project. The collaboration manager can be any participant, staff or non-staff. You can assign this role to multiple participants.
The project creator automatically becomes a collaboration manager. You can retain this role, or you can remove your collaboration manager status. You can identify which participants are collaboration managers on the Project: Team: Participants page by the Collaboration Manager icon.
To designate a participant as collaboration manager
1. Open the project.
The Project: Properties: Main - General page appears.
2. Select the Team tab.
The Project: Team: Staff page appears.
3. Select the Participants subtab.
The Project: Team: Participants page appears.
4. Select the check box next to the participant you want to make a collaboration manager and click Make Collaboration Manager.
The Make Collaboration Manager Confirmation page appears.
5. Click Yes to confirm the prompt.
The participant is designated as collaboration manager.
Chapter 4: Building Project Teams 201

Manage Project Participants
Remove Collaboration Manager Rights
Collaboration Managers can revoke Collaboration Manager status from other Collaboration Managers. When you revoke the role of Collaboration Manager from a resource, the former Collaboration Manager returns to project participant status.
To remove Collaboration Manager access rights from a resource
1. Open the project.
The Project: Properties: Main - General page appears.
2. Click the Team tab.
The Project Team: Staff page appears.
3. Select the Participants subtab.
The Project: Team: Participants page appears.
4. Select the check boxes next to each collaboration manager you want to revoke Collaboration Manager role, and click Make Participant.
The Revoke Collaboration Manager Confirmation page appears.
5. Click Yes to confirm.
The selected resource is no longer a collaboration manager and can participate on the project as a project participant.
202 Project Management User Guide

Manage Project Participants
Create Participant Groups
If you are a project Collaboration Manager, you can create groups of participants to collaborate on the project. Assigning participants to groups can make assigning some document permissions quicker and easier. Though this procedure adds staff to the project before adding non-staff participants, it does not matter if you add staff before adding non-staff participants or vice versa.
To create a participant group
1. Open the project.
The Project: Properties - Main - General page appears.
2. Select the Team tab.
The Project: Team - Staff page appears.
3. Select the Participant Groups subtab on the team page toolbar.
The Project: Team - Participant Groups page appears.
4. Click Add.
The Project: Team - Participant Groups: Group Properties page appears.
5. Complete the following fields:
Group Name
Defines the group's name.
Description
Defines the group's brief description.
Select Participants
Click the Browse icon to select the participants you want to add to the group. The Resource Participants window opens. This page lists all of the participants that have been assigned to the project.
6. Click Submit.
Chapter 4: Building Project Teams 203
Manage Project Participants
Add Resources to Participant Groups
If you have Collaboration Manager access rights, you can add resources as participants to participant groups.
To add a resource to a participant group
1. Open the project.
The Project: Properties - Main - General page appears.
2. Select the Team tab.
The Project Team: Staff page appears.
3. Select the Participant Groups subtab on the team page toolbar.
The Project: Team - Participant Groups page appears.
4. Click the name of the group you want to edit.
The Project: Team - Participant Group: Group Properties page appears.
5. Click the Browse icon next to the Select Participants field.
The Resource Participants window opens.
6. Select the resource you want to add as a participant to the group and click Add.
The resource is added to the participant group.
7. Click Submit.
204 Project Management User Guide

Manage Project Participants
Remove Resources from Participant Groups
If you have Collaboration Manager access rights, you can remove resources as participants from participant groups.
To remove a resource from a participant group
1. Open the project.
The Project: Properties - Main - General page appears.
2. Select the Team tab.
The Project Team: Staff page appears.
3. Select the Participant Groups subtab on the team page toolbar.
The Project: Team - Participant Groups page appears.
4. Click the name of the group you want to edit.
The Project: Team - Participant Group: Group Properties page appears.
5. Click the Browse icon next to the Select Participants field.
The Resource Participants window opens.
6. Select the resource you want to remove as a participant from the group and click Remove.
The resource is removed from the participant group.
7. Click Submit.
Delete Participant Groups
To delete a participant group
1. Open the project.
The Project: Properties: Main - General page appears.
2. Select the Team tab.
The Project: Team: Staff page appears.
3. Select the Participant Groups subtab.
The Project: Team: Participant Groups page appears.
4. Select the check box next to the participant group you want to delete, and click Remove.
The Delete Confirmation page appears.
5. Click Yes to confirm the deletion.
The group no longer appear on the Project: Team: Participant Groups page.
Chapter 4: Building Project Teams 205

Staff Allocations
Staff Allocations A staff's allocation is the period during which a resource is booked to a project. Unless you change the booking dates, staff members are booked for the entire duration of the project. An allocation amount is generated for each resource by multiplying the total number of working days between the start and finish dates of the project (including the start and finish dates) with the number of hours the resource is available to work each day. Allocation differs from ETC in that the ETC number is based on the number of hours a resource is assigned to actual tasks. Staff members may or may not be assigned to tasks for all of the hours they are allocated to the project.
Edit Staff Allocations
You can view and edit your project's staff allocation using the Project: Team: Staff page or the Project: Team: Detail page. You can also use these pages to compare allocation with ETC and to compare actuals to estimates after actuals have been recorded. You can use the Project: Team: Staff page to edit some of your allocation-related staff information when the page is in edit mode. To make the fields on this page editable, choose Edit Mode from the Actions menu.
If the project manager has the project checked out in Open Workbench or Microsoft Project and therefore the project is locked, then the resource manager is not allowed to edit allocations of existing team members.
To view the Project: Team: Staff page from any project properties page, select the Team tab.
Note: See the Resource Management User Guide for more information on viewing and editing resource allocation.
Note: See the Common Features and Personal Options User Guide for more information on editing data fields on list pages.
To edit staff allocations
1. Open the project you want to edit staff allocations.
The Project: Properties: Main - General page appears.
2. Select the Team tab.
The Project: Team: Staff page appears by default.
3. Choose Edit Mode from the Actions menu.
Many of the page's fields become editable.
4. Change the following fields:
206 Project Management User Guide
Staff Allocations
Project Role
Defines the role for this resource on this project.
Time
Choose whether or not this resource can enter time worked on this project.
Booking Status
Select the booking status for the resource on this project.
Note: See the Resource Management User Guide for more information.
Request Status
Select the requisition status for the resource on this project.
Note: See the Resource Management User Guide for more information.
Start and Finish dates
Change the start and finish dates of the project. Your changes here change the value in the Allocation column accordingly. This may also impact some of the task dates. If so, return to the Tasks tab to reschedule them.
% Allocation
Defines the amount this resource is allocated to this project. You can enter zero as the allocation percentage. Your edits change the value in the Allocation column, but not in the ETC column.
5. Click Save.
Your changes are saved.
6. Choose Display Mode from the Actions menu.
The Project: Team - Staff page appears where you can view your changes.
Chapter 4: Building Project Teams 207

Staff Allocations
Edit Team Allocations from the Team Grid
You can edit your project's team allocation using the Project: Team: Detail page. You can only edit a project' start or end date if you are the project manager. If the resource manager edits a grid cell (for example, to change the allocation of a team member) that contains the start or finish date, you are bounded by the team member's start and finish dates. The team member's start and finish dates are the team member's boundary dates. The boundary date within a grid cell defines the soonest or latest a resource can be allocated to the investment.
When you edit the dates in boundary cells, the team or investment dates are not changed. Allocation is spread equally within the boundary dates; it does not get spread to the date you enter in the cell. That is, the date or duration covered by a particular cell in the grid.
When you change the allocation for a specific time frame, the new data is distributed within the team member's existing start and finish dates. For unbounded team members, the boundary date is the same as the investment date range. The investment start or finish date is not affected by allocation changes.
The following business rules apply when you edit team allocation from this page. This rule is enforced only when the page is in edit mode, and in portlets that have allocation and hard allocation fields.
■ A team member's start and end dates for availability are not moved.
■ Editing is subject to special boundary dates. The boundary date is determined by the lesser of the team member's start and finish dates and the investment's start and finish dates. For example, if an investment's start and finish dates are 1/1/08 to 12/31/08, and team member's start and finish dates are 2/1/08 to 11/1/08, the boundary dates are 2/1/08 and 11/1/08.
■ When editing a grid cell that contains a boundary date, allocation data is bounded by the boundary date. The new allocation will not be spread equally between the start and finish date of the cell but rather within the boundary date of the cell.
■ If the new allocation causes a resource to be overallocated for the period in that cell, you will not receive an overallocation alert.
The rules do not apply under the following circumstances:
208 Project Management User Guide

Staff Allocations
■ If the new allocation finish date is greater than or equal to the date of the next period (which is outside of the boundary start/finish date), then it becomes a continuous allocation segment and is not bounded by the boundary dates. The investment schedule date could get moved in this situation. For example, if the boundary date is a Wednesday in a weekly cell, and you enter allocation into the boundary cell and the next cell. The result is one continuous allocation segment. If the new allocation date is beyond the original boundary date, the team start and/or investment date is moved.
■ You can edit non-contiguous allocation data outside of the boundary dates. This creates separate segments padded with 0% allocation between previous segments and the new segments. The team and investment schedule dates could get moved in this situation.
To edit staff allocations from the Team Grid
1. Open the project you want to edit staff allocations.
The Project: Properties: Main - General page appears.
2. Select the Team tab.
The Project: Team: Staff page appears by default.
Click the Details subtab.
The Project: Team: Detail page appears.
3. Choose Edit Mode from the Actions menu.
Many of the page's fields become editable.
4. Change the following fields:
Project Role
Defines the role for this resource on this project.
Weekly Allocation
Defines the amount this resource is allocated to this project. You can enter zero as the allocation percentage. Your edits change the value in the Allocation column, but not in the ETC column.
5. Click Save.
Your changes are saved.
6. Choose Display Mode from the Actions menu.
The Project: Team: Detail page appears where you can view your changes.
Chapter 4: Building Project Teams 209

Staff Allocations
Edit Resource Allocations
The Project: Team: Detail page lists planned and committed allocation for a project by resource by time period in a graph format. This view helps you determine if a resource is overbooked or underbooked and by how much. You can also ascertain a resource's availability for a project.
When this page is in edit mode, you can edit information such as the time cells for each resource. Changing the time cells changes the way planned and committed allocation is presented in the graph.
Data on the Project: Team: Detail page is displayed by resource, allocation, and time period. Scrolling over a time period displays a note providing you with a brief summary of what you see. The time period columns are, by default, set to weekly, and always start with the current week. The allocation color code works as follows:
■ Yellow: Resource is allocated at or under availability for that time period.
■ Red: Resource is overallocated (i.e. the amount of time booked exceeds availability) for that time period.
■ Green: Actuals recorded by the resource for that time period.
You can change many of the time-related values on this page.
210 Project Management User Guide

Staff Allocations
Reset Staff Allocations
When you assign staff to tasks, CA Clarity PPM immediately generates estimates based on allocation information (i.e., the number of working days the resource is assigned to the task multiplied by the resource's daily availability). You can also change the estimates in the following ways:
■ Use the Allocate From Estimates option when you have changed CA Clarity PPM's original estimates in some way, and want CA Clarity PPM to again calculate the allocation based on estimates.
■ Use the Estimate From Allocation option when you want CA Clarity PPM to generate estimates based on allocation.
■ Use the Set Allocation option to update the allocation of multiple team members at the same time.
■ Use the Commit Planned Allocation option to reset the hard allocation to be equal to the planned allocation. You may need to do this after editing the planned allocation segment for a resource as you may now want to hard-book those segments.
■ Use the Accept Hard Allocation option to reset the planned allocation to be equal to the hard-booked allocation. If there were soft-booked planned segments under the Planned Allocation section, they are removed and all segments are reset to equal the hard-booked segment.
These options are available from the More button on the Project Team: Staff page and the Project Team: Detail page.
Allocate from Estimates
Use the Allocate From Estimates option when you have changed your resources ETC and you want to calculate the allocation based on the new estimates. If a staff member's estimates contain allocation segments, the staff member's allocation to the project is rounded up to the nearest 25% of the estimate.
To allocate a resource based on estimates
1. Open the project.
The Project: Properties: Main - General page appears.
2. Select the Team tab.
The Project: Team: Staff page appears by default.
3. Select the resource for whom you want to set allocation from estimates, click More and select Allocate from Estimates.
The number in the Allocation column refreshes to match the ETC number.
Chapter 4: Building Project Teams 211

Staff Allocations
Estimate from Allocation
To generate resource estimates based on allocation
1. Open the project.
The Project: Properties: Main - General page appears.
2. Select the Team tab.
The Project: Team: Staff page appears by default.
3. Select the check box next to the resource for whom you want to generate estimates based on allocation, click the More button, and select Estimate from Allocation.
The number in the ETC column refreshes to match the Allocation number.
Set Allocation for Multiple Team Members
This option allows you to accommodate projects which are generally staffed outside the confines of an OBS.
To update the allocation for multiple team members at the same time
1. Open the project you want to edit staff allocations.
The Project: Properties: Main - General page appears.
2. Select the Team tab.
The Project: Team: Staff page appears by default.
3. Select the team members for whom you want to update allocation, click More and select Set Allocation.
The Set Allocation page appears.
4. In the General section of the page, set the following allocations for the selected team members:
Start Date
Enter or select the resource's start date on the project. Select the Reset to Match Investment Start Date check box to reset the resource's staffing requirements on this project to match the project's start date.
Finish Date
Enter or select the resource's end date on the project. Select the Reset to Match Investment Finish Date check box to reset the resource's staffing requirements on this project to match the project's finish date.
Default Allocation %
Enter or select the resource's allocation to the project.
212 Project Management User Guide

Staff Allocations
Booking Status
Select the booking status of the resource on the project (soft or hard).
Request Status
Select the requisition status of the resource on the project.
Note: See the Resource Management User Guide for more information on requisition statuses.
Open For Time Entry
Specify if the resource can enter time against the assigned tasks.
Staff OBS Unit
Select a Staff OBS Unit for the resource.
Project Role
Select a role for this resource on this project.
5. To remove all allocation segments for the selected team members, in the Existing Allocation Segments section of the page, select the Clear existing allocation segments check box.
6. To create a new allocation segment for the selected team members, complete the following fields in the New Allocation Segments section of the page:
Start
Enter or select the resource's start date on the project.
End
Enter or select the resource's end date on the project.
% Allocation
Enter or select the resource's allocation to the project.
7. Click Submit.
Chapter 4: Building Project Teams 213

Staff Allocations
Commit Planned Allocation
When you commit planned allocation you set the hard allocation to be equal to the planned allocation. When a resource has a hard booking status, that resource is fully committed. Committing planned allocation does not reset the default allocation percentage; it copies the planned allocation into the Hard Allocation section of the Project: Team: Staff page.
The Hard Allocation section of the page displays on the page depending on your project management Mixed Booking settings.
Note: Contact your CA Clarity PPM administrator or see the Administration Guide for more information on setting the default resource booking options.
To commit all planned allocation
1. Open the project.
The Project: Properties: Main - General page appears.
2. Select the Team tab.
The Project: Team: Staff page appears by default.
3. Select the resource for whom you want to commit planned allocation, and click More and select Commit Planned Allocation.
The Update Allocation Confirmation page appears..
4. Click Yes to confirm.
The resource's planned allocation is committed.
214 Project Management User Guide

Staff Allocations
Accept Hard Allocation
You can set a resource's planned allocation to equal committed allocation. Accordingly, the % Allocation and Allocation column values Project: Team: Staff page may change. When you accept the hard allocation, the resource's booking status displays as "Hard" since all of the allocation is fully committed.
Note: Accept Hard Allocation displays as an option depending on your project management Mixed Booking settings.
To accept hard allocations
1. Open the project.
The Project: Properties: Main - General page appears.
2. Select the Team tab.
The Project: Team: Staff page appears by default.
3. Select the resource for whom you want to accept hard allocation, click More and select Accept Hard Allocation.
The Update Allocation Confirmation page appears.
4. Click Yes.
The resource's planned allocation is reset to match the hard allocation.
Chapter 4: Building Project Teams 215

Staff Allocations
Change Default Allocation for a Resource
You can use the Planned Allocation and Hard Allocation sections on a resource's Staff Member Properties page to indicate any deviations from the Default % Allocation field. This page displays some of the basic profile fields and a number of editable allocation-related fields. You can unbook a hard-booked resource or extend a resource to do additional project planning.
While the Planned Allocation curve represents the default or total allocation amount requested by the project manager, the Hard Allocation curve represents the allocation amount actually committed by the resource manager. The booking status for a resource changes according to the allocation amounts in the planned and hard allocation curves.
Example: Create Two Allocation Curves
Suppose a resource's planned or default allocation is 100%. Suppose that this resource is booked to work on your project from 8/10 through 11/10, but that he is also scheduled to work on another project 50% of the time through September 1st, and, in addition, plans to be on vacation from September 15th through September 22nd. In this case, you could create two allocation curves for him: one that indicates a deviation to 50% from 8/01/10 through 9/01/10, and another that indicates a deviation to 0% from 9/15/10 to 9/22/10.
Example: Fill Gaps in Allocation Segments
When editing the default allocation segment for a resource, if there are segment gaps, a new segment is automatically created and filled with the default % allocation amount.
For example, say a resource is booked to a project with availability less than 100%. An allocation segment is added such that the allocation start date is greater than the previous allocation segment's end date. This created a gap is between the two segments:
■ Initial segment start and finish dates: 01/10/04 to 09/10/13.
■ New segment start and finish dates: 04/12/13 to 09/04/14.
A gap is created between two segments from 10/10/13 to 03/12/13 as unallocated.
To do this, create two allocation rows in the Planned Allocation and Hard Allocation sections of the resource's Staff Member Properties page, one to cover the period where the resource actually works at 50% (compared to the 100% default or planned allocation), and another for the period where the resource actually works at 0% (compared to the 100% default or planned allocation). When you save the page, a default segment is created for the gap period and populated with the allocation amount of 100%.
216 Project Management User Guide

Staff Allocations
To change a resource's default allocation on the project
1. Open the project.
The Project: Properties: Main - General page appears.
2. Select the Team tab.
The Project: Team: Staff page appears by default.
3. Click the Properties icon for the resource for which you want to change allocation.
The Staff Member Properties page appears.
4. Complete the following field in the General section:
Default % Allocation
Enter the percentage of time you want the resource to be allocated to this project (you can enter 0%). This amount is reflected in the Allocation and Allocation % columns on the Project: Team - Staff page.
5. In the Planned Allocation and Hard Allocation sections, create one row for each deviation from the default allocation. To create a planned or hard allocation period, complete the following fields in the row:
Start
Enter or select a start date for the period.
Finish
Enter or select a finish date for the period.
% Allocation
Enter the percentage of time you expect the resource to work (as tentative or committed). You can enter 0%.
6. Click Submit.
Chapter 4: Building Project Teams 217
Staff Allocations
Shift and Scale Resource Allocations
You can you shift or scale all or a portion of the resource allocations in one project using the Shift Allocation option on the Project: Team: Staff page. You can move resource allocations back and forward in time. Any segmented allocation dates are kept intact as the data is moved, though the percent allocated for each segment may change. Shifting a resource's allocation is particularly useful when you want to project allocations beyond the allowable time-scaled view, which can only extend for six months. The Shift Allocation option is available from both the Project: Team: Staff page and the Project: Team: Detail page.
Example
Consider an allocation that starts on May 1, continues at its default rate of 100% through the end of May, then goes through June at the reduced allocation of 50%. In this case, if you shift the allocation to start on June 1, it will go from June 1 through July 2 (for 31 calendar days) at 100%, then through August 2 at 50%. You can also shift allocations for time spans that contain no segments.
To shift or scale a resource's allocation
1. Open the project.
The Project: Properties: Main - General page appears.
2. Select the Team tab.
The Project: Team: Staff page appears by default.
3. Select the check box next to the resource whose allocations you want to shift, click More, and select Shift Allocation.
The Shift Allocation page for that resource appears.
4. In the Time Span to Shift section, click the Select Date icon to change the start and finish dates that the resource is allocated to work on this project.
Data shifts according to the dates you enter in these fields.
5. In the Time Shift Parameters section, complete the following fields:
Shift to Date
Defines the beginning date for the data that has been shifted. Click the Select Date icon to choose a new date. If this field is left empty, no shifting occurs.
Shift Cut-Off Date
Defines the last date to which data can be shifted. Click the Select Date icon to choose a new date. You cannot shift allocations beyond this date.
218 Project Management User Guide

Staff Allocations
Chapter 4: Building Project Teams 219
Scale Allocation % By
Defines the percentage change in the allocation that should be made in conjunction with the shift.
Note: If you leave this field empty, no scaling occurs.
6. Click Submit.
The changes you made are reflected in the Allocation column on the investment's Team: Staff page.

Chapter 5: Project Hierarchies
This section contains the following topics:
Project Hierarchy Overview (see page 221) Build your Hierarchy (see page 222) View the Project's Financial Rollup (see page 224) Define Child Investment Allocations (see page 225) Filter the List of Child Investments and Services (see page 225) Return to the Project (see page 226) View Project Total Cost of Ownership (see page 226) View the Project's Effort Rollup (see page 226) View the Project's Parent Investments and Services (see page 227)
Project Hierarchy Overview You can manage the investments and services that comprise your project from your project's investment hierarchy. To view this hierarchical list—the projects, assets, applications, products, services, and other work—select the Hierarchy tab. The Project: Hierarchy: Financial Rollup page is the default page that displays.
From this tab you can also access the Project: Hierarchy: Effort Rollup and the Project: Hierarchy: Parents pages by selecting the subtabs that appear on the hierarchy page toolbar. For example, to access the project's effort rollup, select the Effort Rollup subtab.
Both the financial rollup and the effort rollup are hierarchical representations of the investments, services, and ideas that comprise your project. You can expand and collapse the items listed on this page as well as add and remove child investments or services.
In the hierarchy, the "Self" line item displays the work values or costs that are specific to your project, the parent investment, depending on the view you have selected. The line items that lie below the "Self" line item are the child investment or services that comprise your project and the work values or costs specific to those child investment and services.
Chapter 5: Project Hierarchies 221

Build your Hierarchy
Build your Hierarchy You can add and remove child investments, services, and ideas to and from your project's investment hierarchy based on your company's business rules. The child investments, services, and ideas that are available for you to add to your project are those to which you have view access rights and those that are associated to the same entity as your project. Use the Project: Hierarchy: Financial Rollup or Project: Hierarchy: Effort Rollup page to add or remove associations of investment and services to your project's hierarchy.
As you build your hierarchy, the associated child investment or service planned costs (forecasted and budgeted) are rolled up to your project, the parent investment, as planned costs and are displayed on the financial rollup. Similarly, the associated child investment or service aggregated work values are rolled up to the parent investment and are displayed on the effort rollup. When you add or remove a project as a child investment to your project, it is also added or removed as a subproject to your project. You can view a list of your subprojects on the Project: Properties: Subprojects page.
Add Child Investments and Services from the Financial Rollup
You can add child investments, services, and ideas to your project from the Project: Hierarchy: Financial Rollup or Project: Hierarchy: Effort Rollup page. Use the Select Investments page to choose one or more child investments or services to add to your project.
Before adding investments, services, and ideas to your hierarchy, make sure that you have added them in CA Clarity PPM. You should also work with the other investment managers to determine and define the investment or service allocations for each of the child investments and services you are adding to the hierarchy.
To add an investment or service from your project's financial rollup, click Add Child, select the check box next to the investment, service, or idea you want to add, and then click Add Investment.
222 Project Management User Guide

Build your Hierarchy
Remove Child Investments or Services from the Financial Rollup
To remove a child investment or service from the hierarchy
1. Open the project.
The Project: Properties: Main - General page appears.
2. Select the Hierarchy tab.
The Project: Hierarchy: Financial Rollup page appears by default.
3. Select the check box next to the child investment or service you want to remove from the project, and then click Remove.
The Remove Confirmation page appears.
4. Click Yes to confirm the removal.
The child investment or service is removed from the hierarchy.
Chapter 5: Project Hierarchies 223

View the Project's Financial Rollup
View the Project's Financial Rollup You can view your project's financial rollup on the Project: Hierarchy: Financial Rollup page. This page displays a hierarchical list of the child investments, services, and ideas that comprise your project. All of the child costs and benefits are rolled up to your project, the parent investment, and are listed on the parent investment's line item.
From this page you can track the costs incurred to build, maintain, and support your project—allocation percentages, planned costs, actual costs, remaining costs, planned benefits, planned ROI, and planned NPV—and any other metric that are applicable to your project as a whole, as well as add and remove child investments to and from your project.
To view the financial rollup
1. Open the project you want to view the financial rollup.
The Project: Properties: Main - General page appears.
2. Select the Hierarchy tab.
The Project: Hierarchy: Financial Rollup page appears by default.
3. View the list of investments.
Understanding the Financial Rollup
The hierarchy displays an aggregation of the child investment, service, or idea's costs, planned, actual, and remaining. The values displayed are time-varying and factor in the investment allocation percentages that you have defined.
The value displayed in the Planned Cost column fields are the planned costs (forecasted and budgeted) that are rolled up from the child investment, service, or idea after the investment allocation percentages are factored in. The value displayed in the Actual Cost column fields are the costs that are incurred from billing and invoices. Like the planned cost, the actual costs are also rolled up from the child investment or service after the investment allocation percentage are factored in. If the project is unapproved, that is the project's status is something other than "Approved", actual costs do not display on the financial rollup because costs have yet to be incurred. The value displayed in the Remaining Cost column is the difference between the planned costs and the actual costs.
The Planned ROI and Planned NPV columns display the child investment, service, or idea ROI and NPV, and the Planned Benefit column displays the planned revenue (the sum of the planned benefit and forecast benefit from the investment, service, or idea's detailed budget).
224 Project Management User Guide

Define Child Investment Allocations
Define Child Investment Allocations When you first add a child investment or service to your project, its investment allocation is set at 100% by default. You can view the amount a child investment is allocated to your project from the allocation amount listed in the Allocation column on your project's financial and effort rollup.
Use the Set Allocations page to define the percentage amount a child service, investment, or idea is allocated to your project. This page displays a list of the parent investments to which an investment is allocated. You can distribute the amount the child investment is allocated to its parent investments by editing the Allocation field.
To define a child investment or service's allocation to your project
1. Select Projects from the Portfolio Management menu.
The Project: Properties: Main - General list page appears.
2. Click the name of the project you want to which you want to allocate investments.
The Project: Properties: Main - General page appears.
3. Select the Hierarchy tab.
The Project: Hierarchy: Financial Rollup page appears by default.
4. Click the allocation amount for the child investment or service you want to define.
The Set Allocations page appears.
5. In the Allocation field for your project, enter the amount this child investment is allocated to your project, the parent investment, and click Save.
Filter the List of Child Investments and Services By default, both the financial and effort rollup display a list of approved and unapproved child investment and services. You can choose to view only approved child investment and services or unapproved child investment and services by choosing the status from the Status field in the filter section of the page.
Note: See the Common Features and Personal Options User Guide for more information about filtering, configuring, and sorting lists.
Chapter 5: Project Hierarchies 225

Return to the Project
Return to the Project When you define the amount that a child investment or service is allocated to your project, you are defining this amount on the child investment or service's Hierarchy: Parents page. If you accessed this page by drilling down on the Allocations field from within your project's hierarchy, you can return to the parent investment by clicking the Back button that displays on the page.
View Project Total Cost of Ownership The total cost of ownership (TCO) is the aggregated amount of running or operating a project, including the investments, services, and ideas that support the project. The TCO tracks where costs are being spent, how costs are being shared. You can manage costs to keep on budget proactively.
Once you have added all of the child investments to your project, you can view the aggregated cost and labor totals from the hierarchical bill of investments to determine the project's TCO.
View the Project's Effort Rollup Use the Project: Hierarchy: Effort Rollup page to view the effort rollup of the investments, services, and ideas that comprise your project. This page displays the aggregation of the project's child investment labor-related information—such as ETC, estimate at completion (EAC), and work variances—while taking into account the child investment or service's allocation percentages. You can view these totals in the ETC, EAC, and Actual Work columns on this page.
The investments that display on this page are the same investments displayed on the Project: Hierarchy: Financial Rollup page. This page provides another view of your project's hierarchical list of child investments, services, and ideas.
To view the effort rollup
1. Open the project for which you want to view effort rollup.
The Project: Properties: Main- General list page appears.
2. Select the Hierarchy tab.
The Project: Hierarchy: Financial Rollup page appears by default.
3. Select the Effort Rollup subtab.
The Project: Hierarchy: Effort Rollup page appears.
4. View the list of investments.
226 Project Management User Guide

View the Project's Parent Investments and Services
View the Project's Parent Investments and Services Use the Project: Hierarchy: Parents page to view a list of parent investments and services to which your project is allocated and to view the percentage your project is allocated to each parent. You can also use this page to add parent investments to your project.
You can add any investment to which you have access rights as a parent investment to your project.
Chapter 5: Project Hierarchies 227

View the Project's Parent Investments and Services
Add and Remove Parent Investment Associations
You can add and remove parent investment associations to and from your project based on your company's business rules. You do this on the Project: Hierarchy: Parents page.
Add Parent Investments
Use the Project: Hierarchy: Parents page to add a parent investment association to your project. You can choose to add one parent investment or you can add multiple investments at one time.
Before adding parent investments, services, and ideas to your hierarchy, make sure that you have added them in CA Clarity PPM. You should also work with the other investment managers to determine and define the investment or service allocations for each of the child investments and services you are adding to the hierarchy.
To add a parent investment to your project
1. Open the project to which you want to add a parent investment.
The Project: Properties: Main - General page appears.
2. Select the Hierarchy tab.
The Project: Hierarchy: Financial Rollup page appears by default.
3. Select the Parents subtab on the hierarchy page toolbar.
The Project: Hierarchy: Parents page appears.
4. Click Add.
The Select Investments page appears.
5. Select the check box next to the parent investment you want to add, and then click Add.
The parent investment is added to the project.
Remove Parent Investments
To remove a parent investment from your project
1. Open the project to which you want to remove a parent investment.
The Project: Properties: Main - General page appears.
2. Select the Hierarchy tab.
The Project: Hierarchy: Financial Rollup page appears by default.
3. Select the Parents subtab on the hierarchy page toolbar.
The Project: Hierarchy: Parents page appears.
228 Project Management User Guide

View the Project's Parent Investments and Services
Chapter 5: Project Hierarchies 229
4. Select the check box next to the parent investment you want to remove from the project, and then click Remove.
The Remove Investment confirmation page appears.
5. Click Yes.
The parent investment is removed from the project.
Define Parent Investment Allocations
You can allocate investments and services to one or more child investments or services, however the total allocation percentage for a parent investment must equal 100%. You can view your project's parent investments allocation amounts on the Project: Hierarchy: Parents page.
To edit or define the percentage allocation of a parent investment, use the parent investment or service's Allocation field. This field displays on the Project: Hierarchy: Parents page. You can also define the parent investment allocation by clicking the percentage allocation amount on the Project: Hierarchy: Financial Rollup page or the Project: Hierarchy: Effort Rollup page, which opens the Set Allocations page.
Share Projects Across Investments or Services
You can share projects between other investments, services, and ideas. For example, you can share a database server that will support two software applications. To do this, first add the software applications as child investments to the database server's investment hierarchy, then edit the child investment or service's cost allocation percentage and time segments.
Your project's investment allocation percentage dictates the amount that the project is allocated to the investment, service, or idea. All cost information displayed in the investment hierarchy is based on the allocation percentages.
Child investment cost totals are automatically aggregated to the parent investment based on the investment allocation percentages.


Chapter 6: Risks, Issues, and Change Requests
This section contains the following topics:
Risk Management Overview (see page 232) Rate Pre-Defined Risk Factors (see page 233) How to Create and Manage Risks (see page 237) How to Create and Manage Issues (see page 256) Create Change Requests (see page 266)
Chapter 6: Risks, Issues, and Change Requests 231
Risk Management Overview
Risk Management Overview The process of risk management includes the identification, analysis, planning, tracking, and communication of risk. Risk strategies help project managers more effectively address uncertainty, thereby minimizing the costly consequences of unforeseen or unmanaged problems. Making informed decisions by consciously assessing potential problems and the severity of their impact is at the heart of project risk management.
You can identify risks at any time during a project's lifecycle. When you identify a significant risk that appears likely to impact the project in an important way, you can escalate it to an issue. Change requests result from risk and issue identification, and can help facilitate effective resolutions.
The Risk Management feature consists of the following components:
■ Risk Rating. Rate pre-defined risk factors by severity level.
■ Risks. Create, assign, and track risks, and design response strategies for them.
■ Issues. Create, assign, and track issues.
■ Change Requests. Create, assign, and track change requests.
There are no limits on the number of risks, issues, and change requests you can create for each project. You can convert risks to issues, issues to risks, and both to change requests.
You can rate your risks on the Project: Properties: Main - Risk page. All of the other risk management components and actions that you can perform are on the Project: Risks/Issues/Changes: Risks page within a project.
In addition, you can do the following for each risk, issue, and change request:
■ Create action items
■ Attach documents and notes
■ Create an audit trail to track progress
■ Create processes
232 Project Management User Guide

Rate Pre-Defined Risk Factors
Rate Pre-Defined Risk Factors Organizations typically prefer to allocate budgets to projects which offer low and medium risks. Unless a high-risk project can provide substantial benefits or is strategically essential to business goals, it may be terminated.
Use the Project: Properties: Main - Risk page to rate a pre-defined list of possible risk factors for each project. To view this page, open the project and click Risks from the content menu.
Risks are rated using the following scoring system:
■ Red stoplight = High risk
■ Yellow stoplight = Medium risk
■ Green stoplight = Low risk
After you assign risk rates to the individual factors, an overall risk level for the project is calculated based on the combined risk levels of all the risk factors in the list. The overall risk level appears at the top of the factor list.
Note: Contact your CA Clarity PPM administrator or see the Administration Guide for more information on setting up risk categories.
How the Risk Rating Component Works with the Other Risk Components
You can rate your project risks on the Project: Properties: Main - Risk page. All other risk management activities are done on the Project: Risks/Issues/Changes: Risks page. If you create a detailed risk on the Project: Risks/Issues/Changes: Risks page, you must assign it to a risk category that is equivalent to one of the risk categories/factors listed on the Project: Properties: Main - Risk page.
The two risk management components interact if you create a detailed risk and its overall score differs from the rating you assigned to that same factor on the Project: Properties: Main - Risk page. In that case, the score of the detailed risk you created overrides the rate you assigned. If you create detailed risk, but do not assign rates on the Project: Properties: Main - Risk page, scores from the risk entries will color the appropriate factor in the list.
You may see risk categories in the Contributing Factors section of the Project: Properties: Main - Risk page uneditable. Once you create a detailed risk and assign it a risk category, the corresponding risk category in the Contributing Factors section becomes uneditable. You can update the rating by updating the corresponding project risk.
Note: Contact your administrator or see the Administration Guide for more information on setting up risk categories, setting the risk threshold, and setting the risk score and overall risk threshold.
Chapter 6: Risks, Issues, and Change Requests 233
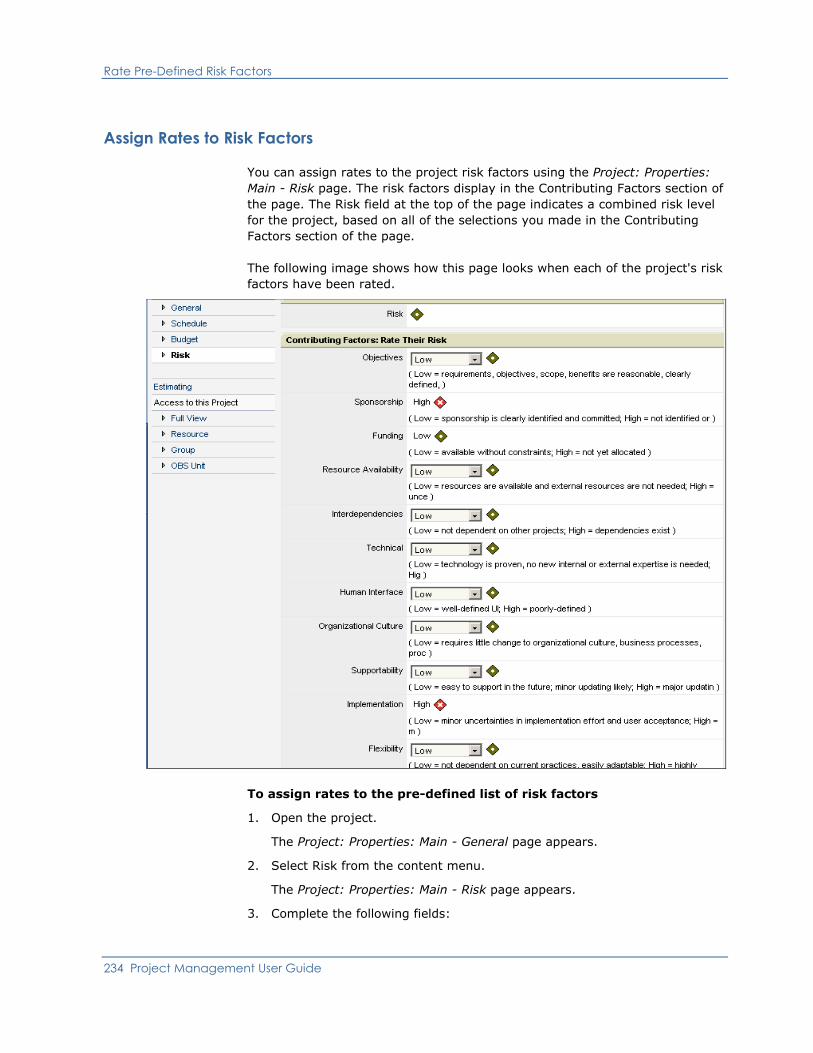
Rate Pre-Defined Risk Factors
Assign Rates to Risk Factors
You can assign rates to the project risk factors using the Project: Properties: Main - Risk page. The risk factors display in the Contributing Factors section of the page. The Risk field at the top of the page indicates a combined risk level for the project, based on all of the selections you made in the Contributing Factors section of the page.
The following image shows how this page looks when each of the project's risk factors have been rated.
To assign rates to the pre-defined list of risk factors
1. Open the project.
The Project: Properties: Main - General page appears.
2. Select Risk from the content menu.
The Project: Properties: Main - Risk page appears.
3. Complete the following fields:
234 Project Management User Guide

Rate Pre-Defined Risk Factors
Objectives
Specifies the project's risk in objectives.
Values:
■ Low. If the requirements, objectives, scope, and benefits are reasonable, clearly defined, measurable, and verifiable.
■ High. If the requirements, objectives, scope, and benefits are not reasonable, clearly defined, measurable, or verifiable.
Sponsorship
Specifies the project's risk in sponsorship.
Values:
■ Low. If the sponsorship is clearly identified and committed
■ High. If the sponsorship is not clearly identified and committed.
Funding
Specifies the project's risk in funding.
Values:
■ Low. If project funding is available without constraints.
■ High. If funding has not been allocated.
Resource Availability
Specifies the project's risk in resource availability.
Values:
■ Low. If internal resources are available for the project without constraints and if external resources are not needed.
■ High. If internal resource availability is uncertain or constrained, and/or if external resources are needed.
Interdependencies
Specifies the project's risk in interdependencies.
Values:
■ Low. If the project is not dependent on other projects.
■ High. If interdependencies exist.
Chapter 6: Risks, Issues, and Change Requests 235
Rate Pre-Defined Risk Factors
Technical
Specifies the project's risk in technology.
Values:
■ Low. If the project's technology is proven, and new internal or external expertise is needed.
■ High. If the project's technology is unproven, and/or if new expertise is needed.
Human Interface
Specifies the project's risk in human interface.
Values:
■ Low. If the project has a well-defined user interface (UI).
■ High. If the project has a poorly defined UI.
Organizational Culture
Specifies the project's risk in organizational culture.
Values:
■ Low. If the project requires little change to the organization culture, business processes, procedures, or policies.
■ High. If the project requires major changes to organization culture, business processes, procedures, or policies.
Supportability
Specifies the project's risk in supportability.
Values:
■ Low. If the project will be easy to support in the future, and not need major updating.
■ High. If the project will need lots of support and/or updating.
Implementation
Specifies the project's risk in implementation.
Values:
■ Low. If there are minor uncertainties in the implementation effort and user acceptance.
■ High. If there are major uncertainties and/or user resistance.
236 Project Management User Guide
How to Create and Manage Risks
Flexibility
Specifies the project's risk in flexibility.
Values:
■ Low. If the project is easily adaptable.
■ High. If the project is not easily adaptable.
4. Click Save.
The stoplights are changed next to each risk factor to the color assigned to the level you selected for each risk.
How to Create and Manage Risks Like projects and programs, risks are created in two stages:
1. Create the risk (see page 238).
2. Define the risk's properties (see page 245).
Chapter 6: Risks, Issues, and Change Requests 237
How to Create and Manage Risks
Create Risks
You can create risks using the Create Risks page. The fields on this page are divided into the following sections: General, Details, Quantify Risk, Attachments, and Resolution.
In the General section, you can define the risk's category. The risk categories are equivalent to the factors that appear in the Contributing Factors section of the Project: Properties: Main - Risk page. When you create a detailed risk and choose one of these risk categories, the overall score from the risk overrides any differing status selection you made for this risk category/factor on the Project: Properties: Main - Risk page.
In the Quantify Risk section, you can complete the risk's probability of occurrence and its impact on the project.
To create a project risk
1. Open the project for which you want to create a risk.
The Project: Properties: Main - General page appears.
2. Select the Risks/Issues/Changes tab.
The Project: Risks/Issues/Changes: Risks page appears. If you have not created any risks or had any assigned to you, then none risks will display on this page.
3. Click New.
The Create Risk page appears.
4. Complete the following fields in the General section of the page:
Risk Name
Enter short name for the risk.
Limit: 64 characters.
Risk ID
Enter a unique identifier assigned to the risk for tracking. This number must be unique. Once the risk is saved, the Risk ID cannot be changed.
Description
Enter a short description of the risk.
Category
Select the risk category to which you want to assign this risk.
Values: Objectives, Sponsorship, Funding, Resource Availability, Interdependencies, Technical, Human Interface, Organizational Culture, Supportability, Implementation, and Flexibility.
238 Project Management User Guide

How to Create and Manage Risks
Owner
Select an owner to manage the risk. This resource is responsible for ensuring that the risk is managed and tracked appropriately through its lifecycle. If an issue or change request is created from this risk, the owner information is carried over to the issue or change request.
Status
Select the status of this risk.
Values: Open, Work in Progress, Closed, or Resolved.
Creator
This read-only field displays the name of the resource who created this risk.
Date Created
This read-only field displays the date this risk was created.
Updated By
This read-only field displays the name of the resource who last updated this risk.
Date Last Updated
This read-only field displays the date this risk was last updated.
5. Complete the following fields in the Details section of the page:
Risk Symptoms
Enter the symptoms that have identified this as a risk.
Impact Description
Enter a description of the result this risk will have on the project.
Impact Date
Select the date by which repercussions from this risk might impact the project. If an impact date is identified, make sure to enter a target resolution date as well.
Target Resolution Date
Select the date this risk is targeted to be resolved. This date should be the same or earlier than the impact date.
Assumptions
Enter the assumptions that have determined that this may be a risk. You can verify these assumptions to make sure they continue to be valid through the duration of the risk's life. If the assumptions change, the impact or probability of the risk can also change.
Chapter 6: Risks, Issues, and Change Requests 239

How to Create and Manage Risks
Associated Risks
Select from a list of other risks within the same project (or program) that are associated with this risk. You cannot link this risk to risks outside the current project (or program).
Associated Issues
Select from a list of other issues within the same project (or program) that are associated with this risk. You cannot link this issue to issues outside the current project (or program).
Response Type
Select the type of response you want to make with this risk.
Values: Watch, Accept, Transfer, or Mitigate.
6. Complete the following fields in the Quantify Risk section of the page:
Probability
Select the probability that the impact will occur. The risk probability is used to calculate the risk exposure
Values: Low, Medium, or High.
Default: Low is assigned the value 1, Medium 2, and High 3.
Impact
Select the effect of the particular risk on the project, determined by the risk's effect on the project's performance, supportability, cost, and schedule. This risk impact is used to calculate the risk exposure. Choose the risk impact or consequence from the drop-down.
Values: Low, Medium, or High.
Default: Low is assigned the value 1, Medium 2, and High 3.
Calculated Risk
This is a read-only score calculated from the selections you make in the Probability and Impact fields.
7. Add one or more attachments in the Attachment field, if desired.
8. Complete the following fields in the Resolution section of the page:
Resolution
Enter the final resolution of this risk once the matter is resolved. The completion of this field, although not required, is useful for recalling the outcome of a risk response strategy when planning or approaching future project risk plans.
240 Project Management User Guide

How to Create and Manage Risks
Residual Risks
Select any risks (in the same project or program) that were encountered or created as a result of the mitigation taken to resolve this risk. Unlike associated risks, residual risks do not share similar outcomes, but result from an action you took in the resolution of a risk.
9. Click Submit.
Create Issues from Risks
When you have reviewed a risk's assumptions or symptoms and determined that the probability of the risk occurring is high, you can close the risk and track it as an issue. When you do this, the new issue inherits the risk's name and description and some of its values, such as Status ("Open") and Date Created (current calendar date).
Creating an issue from a risk brings awareness, actions, and tasks around an issue for conclusion by the project team. Additionally, it allows the team to keep a record of issues and their outcome for analysis at project closure and future project planning.
You can also connect other risks or issues related to this issue together. This can help you trace dependencies and recognize trends in future analysis and audits.
The Originating Risk field displays on the Issue Properties: Main page. This field is a link to the risk from which the issue derived.
To create an issue from a risk
1. Open the project.
The Project: Properties: Main - General page appears.
2. Select the Risks/Issues/Changes tab.
The Project: Risks/Issues/Changes: Risks page appears.
3. Open the risk from which you want to create an issue.
The Risk Properties: Main page appears.
4. Change the Status of the risk to "Closed", click Save, and then click Create Issue.
The Create Issue page appears.
5. Complete the remaining fields on the page, and click Submit.
The Project: Risks/Issues/Changes: Issues page appears, where the issue you created is displayed in the list on this page.
Chapter 6: Risks, Issues, and Change Requests 241
How to Create and Manage Risks
Create Risks from Change Requests
Click the ID in the Originating Change Request field to view the original change request.
To create a risk from a change request
1. Open the project containing the request to which you want to add a note.
The Project: Properties: Main - General page appears.
2. Select the Risks/Issues/Changes tab.
The Project: Risks/Issues/Changes: Risks page appears.
3. Click the Change Requests subtab.
The Project Risks/Issues/Changes: Change Requests page appears.
4. Open the change request from which you want to create a risk.
The Change Request Properties: Main page appears.
5. Click Create Risk.
The Create Risk page appears. Some of the fields will be populated with data from related change request fields.
6. Complete the fields on the page, and click Submit.
The Project Risks page appears, where the risk you created is displayed in the list on this page.
242 Project Management User Guide

How to Create and Manage Risks
Create Risks from Issues
You can quickly create a new risk from an existing issue. Basic information from common fields is carried over to the new issue for easy setup. A link back to the originating issue is provided on the Issue Properties: Main page for easy navigation between the records. In addition, you can manually associate risks or issues to each other. This is useful for understanding the relationships between the risks and issues, providing better overall management of a project.
To create a risk from an issue
1. Open the project.
The Project: Properties: Main - General page.
2. Select the Risks/Issues/Changes tab.
The Project: Risks/Issues/Changes: Risks page appears.
3. Click the Issues subtab.
The Project: Risks/Issues/Changes: Issues page appears.
4. Open the issue from which you want to create a risk.
The Issue Properties: Main page appears.
5. Click Create Risk.
The Create Risk page appears. Some of the fields are populated with data from related risk fields.
6. Complete the fields on the page, and click Submit.
The Project Risks page appears, where the risk you created is displayed in the list on this page.
Chapter 6: Risks, Issues, and Change Requests 243

How to Create and Manage Risks
Calculated Risk Score
You can enter and view a risk's calculated risk score in the Quantify Risk section of the Risk Properties: Main page. To view this page, open the project, click the Risks/Issues/Changes tab, and select the name of the risk you want to view.
The risk score is calculated based on the selections you make in the Probability and Impact fields on this page. By default, probability and impacts levels are rated as follows:
■ Low = 1
■ Medium = 2
■ High = 3
Probability and risk are aggregated to generate the calculated risk score. For example, if you set the risk's probability level to High (3) and the impact level to Medium (2), the calculated risk score is 6.
The calculated risk score works in conjunction with the system-level risk threshold value for all projects, which is set by your CA Clarity PPM administrator. The risk threshold is the acceptable level of risk that can be tolerated without acting out the risk response strategy.
The risk score matrix and the risk threshold contain default values. It can be set as high or low as appropriate for your organization. The risk threshold is useful because projects can have hundreds of risks, and the only way to mange them is to focus on the most important ones. You can view whether your risk is above the threshold on the Project: Risks/Issues/Changes: Risks page. You can design procedures or processes to deal with risks that exceed the threshold.
Note: Contact your CA Clarity PPM administrator or see the Administration Guide for more information on setting the risk threshold, setting the risk probability and risk impact values, altering the risk score matrix, and adding risk category types.
244 Project Management User Guide

How to Create and Manage Risks
Define Risk Properties
Once you have created the risk, define the risk's properties. After you save a new risk, or after you open an existing one, you are taken to the Risk Properties: Main page.
You can define the following risk properties from this page.
■ Define response strategies
■ Create and view notes for the risk
■ Create and edit action items for the risk
■ Create and edit tasks for the risk
■ View an audit trail of changed risk fields
■ Create, edit and run risk-related processes
You can edit fields on the Risk Properties: Main page (fields from the Create Risk page).
To define a risk's main properties
1. Open the project.
The Project: Properties: Main - General page appears.
2. Select the Risks/Issues/Changes tab.
The Project: Risks/Issues/Changes: Risks page appears.
3. Open the risk you want to define properties.
The Risk Properties: Main page appears.
4. Complete the fields on the page, and click Save.
Your changes are saved.
To define a risk's response strategy
1. Open the project.
The Project: Properties: Main - General page appears.
2. Select the Risks/Issues/Changes tab.
The Project: Risks/Issues/Changes: Risks page appears.
3. Open the risk you want to define properties.
The Risk Properties: Main page appears.
4. Click the Response Strategy subtab.
The Risk Properties: Response Strategy page appears.
5. Complete the following fields, and click Submit:
Chapter 6: Risks, Issues, and Change Requests 245
How to Create and Manage Risks
Response Strategy
Defines the response strategy.
Assigned To
Defines the name of the resource assigned to the risk.
Resolve By
Defines the name of the resource assigned to resolve the risk.
Your changes are saved.
Edit, View, Close, and Delete Risks
You can edit risks in the following ways: edit, close, and delete. You can edit any of a risk's properties.
View Risks
All of the risks to which you are assigned are listed on the Project: Risks/Issues/Changes: Risks list page. Each Risk Properties page contains five tabs: Main, Notes, Associated Action Items, Associated Tasks, Audit Trail, and Processes. You can select a tab to view the fields and other information on that tab.
Note: A check mark in the Above Threshold column of the Project: Risks/Issues/Changes: Risks page indicates that the risk score has exceeded the risk threshold.
To view a risk that has been assigned to you
1. Open the project.
The Project: Properties: Main - General page appears.
2. Select the Risks/Issues/Changes tab.
The Project Risks/Issues/Changes: Risks page appears.
3. Click the name of the risk you want to view.
The Risk Properties: Main page appears.
246 Project Management User Guide

How to Create and Manage Risks
Edit Risks
To edit a risk
1. Open the project.
The Project: Properties: Main - General page appears.
2. Select the Risks/Issues/Changes tab.
The Project: Risks/Issues/Changes: Risks page appears.
3. Click the name of the risk you want to edit.
The Risk Properties: Main page appears.
4. Edit the risk, and click Save when you are finished.
Your changes are saved.
Close Risks
Once a risk has been successfully mitigated, change the status of the risk to "Closed" and then enter the final resolution for the risk. A detailed resolution can help you to quickly recall the outcome of a risk response strategy when planning or approaching future project risk plans.
To close a risk
1. Open the project.
The Project: Properties: Main - General page appears.
2. Select the Risks/Issues/Changes tab.
The Project: Risks/Issues/Changes: Risks page appears.
3. Open the risk you want to close.
The Risk Properties: Main page appears.
4. Complete the following fields:
Status
Choose "Closed" as the status.
Resolution
Explain how the risk was resolved.
5. Click Save.
Chapter 6: Risks, Issues, and Change Requests 247

How to Create and Manage Risks
Delete Risks
Deleting a detailed risk changes the project's overall risk score as well as the combined risk score for that particular risk category. Both of these values appear in the Contributing Factors section of the Project: Properties: Main - Risk page. For example, if you delete a detailed Funding risk, and multiple risks of this risk category type exist, the risk score for that risk category/factor is recalculated based on the combined score of all the risks remaining in that category. If, however, you delete a Funding Risk and only one risk of this category remains, you can choose a risk value from the Funding drop-down.
Note: Contact your CA Clarity PPM administrator or see the Administration Guide for more information on setting up risk categories.
To delete a risk
1. Open the project.
The Project: Properties: Main - General page appears.
2. Select the Risks/Issues/Changes tab.
The Project: Risks/Issues/Changes: Risks page appears.
3. Select the check box next to the risk you want to delete, and click Delete.
The risk is removed from the list.
248 Project Management User Guide

How to Create and Manage Risks
How to Design Risk Response Strategies
Once a decision is made to resolve a risk, the project manager typically assigns the risk's owner to develop a response strategy. You can use the Risk Response Strategy feature to document the strategies, actions, goals, schedule dates, tracking requirements, and other supporting information needed to reduce risk probability and impact.
Generally speaking, you will want to create a risk response strategy when you select a Response Type of Mitigate on the Risk Properties: Main page, though you can create a response strategy at other times, too. The risk Response Type indicates whether you want to watch, accept, transfer, or mitigate a risk. In some cases, you may decide to accept the risk's exposure and not pursue the risk.
The following list provides detailed definition of response type options.
Watch
Use this type when you do not want to take action to respond to a risk. This type is typically assigned for any risk whose calculated risk score is low. In other words, though risk probability or impact is not sufficient to warrant action, you still want to keep the risk open and monitor it.
Accept
Use this type when the risk exposure is accepted, and in some cases, there is no intent to pursue the risk.
Transfer
Use this type when you want to transfer the risk to a different project. Once transferred, the risk can be closed for the current project.
Mitigate
Use type when you want to apply a risk response strategy to resolve the risk.
Note: Regardless of who owns the risk, individual response strategies can be assigned to different resources, and each response strategy can have its own due date. These dates and names can be used with processes to send notifications and reminders to risk owners.
Chapter 6: Risks, Issues, and Change Requests 249

How to Create and Manage Risks
Create the Risk Response Strategy
The fields on the Risk Properties: Main page are important indicators to reflect the changing probability of the culminating risk. However, to capture the details about the response, such as the mitigation steps, use the Risk Properties: Response Strategy page.
To enter a response strategy for the risk
1. Open the project.
The Project: Properties: Main - General page appears.
Select the Risks/Issues/Changes tab.
2. The Project: Risks/Issues/Changes: Risks page appears.
3. Open the risk for which you want to create a response strategy.
The Risk Properties: Main page appears.
4. Select the Response Strategy subtab on the properties page toolbar.
The Risk Properties: Response Strategy page appears.
5. Complete the following fields:
Response Strategy
Enter a strategy for addressing this risk.
Assigned To
Click Browse to select the resource to whom you want to assign the risk.
Resolve By
Click the Calendar icon to select the date by which you want the risk resolved.
6. Click Add.
The new response strategy is added to the risk and displays in a list on the bottom portion of the Risk Properties: Response Strategy page.
250 Project Management User Guide

How to Create and Manage Risks
Risk Notes
You can add notes to record additional information about a risk. The notes you add are displayed in a list on the Risk Notes page. They are listed in the order in which they were created, with the most recent note appearing at the top of the list. From this page, you can sort the list of notes and add additional notes.
You cannot:
■ Create replies to risk notes.
■ Edit risk notes.
■ Create replies to notes.
Create Risk Notes
To add a note to a risk
1. Open the project.
The Project: Properties: Main - General page appears.
2. Select the Risks/Issues/Changes tab.
The Project: Risks/Issues/Changes: Risks page appears.
3. Open the risk to which you want to add a note.
The Risk Properties: Main page appears.
4. Click the Notes tab.
The Risk Notes page appears.
5. Complete the following fields:
Subject
Enter a heading.
Description
Enter your note text.
6. Click Add.
The new note is displayed in the list of notes. Users with access to the Risk/Issues/Changes tab for this project can view these notes.
Chapter 6: Risks, Issues, and Change Requests 251
How to Create and Manage Risks
View a List of Action Items Associated to Risks
A list of action items related to a risk display on the Risk Associated Action Items page. From this page, you can create, delete, edit, filter, and sort your action items.
Note: See the Common Features and Personal Options User Guide for more information on managing action items.
To view a risk's associated action items
1. Open the project.
The Project: Properties: Main - General page appears.
2. Click the Risks/Issues/Changes tab.
The Project: Risks/Issues/Changes: Risks page appears.
3. Click the name of the risk.
The Risk Properties: Main page appears.
4. Click the Associated Action Items tab.
A list of action items associated to the risk display on the Risk Associated Action Items page.
252 Project Management User Guide
How to Create and Manage Risks
Create Action Items Associated to Risks
To create an action item associated to a risk
1. Open the project.
The Project: Properties: Main - General page appears.
2. Select the Risks/Issues/Changes tab.
The Project: Risks/Issues/Changes: Risks page appears.
3. Open the risk for which you want to create an action item.
The Risk Properties: Main page appears.
4. Click the Associated Action Items tab.
The Risk Associated Action Items page appears.
5. Click New.
The Action Item Properties: Create page appears.
6. Complete the fields on this page. Be sure to assign a resource to this action item. You can assign the action item to any resource to whom you have access.
Note: See the Common Features and Personal Options User Guide for more information about Action Item fields.
7. Click Submit.
The Risk Associated Action Items page appears, where the action item you created displays in the list on the page.
Risks Associated to Tasks
You may want to assign a risk to an existing key task or create a new key task for it. You can you to assign risks to one or more key tasks and view a list of the tasks that have been associated with the risk using the Risk Associated Tasks page.
Those who have access to the project containing the task can view the risk from the Task Associated Risks page.
Chapter 6: Risks, Issues, and Change Requests 253
How to Create and Manage Risks
Associate Key Tasks to Risks
You can associate key tasks to risks.
To associate a key task to a risk
1. Open the project.
The Project: Properties: Main - General page appears.
2. Select the Risks/Issues/Changes tab.
The Project: Risks/Issues/Changes: Risks page appears.
3. Open the risk to which you want to associate a key task.
The Risk Properties: Main page appears.
4. Click the Associated Tasks tab.
The Risk Associated Tasks page appears.
5. Do one of the following:
■ To create a new task, click New.
The Create Task page appears allowing you to create the new task.
■ To select an existing key task:
a. Click Add Existing Tasks.
The Select Tasks page appears.
b. Select the key tasks to which you want to associate the risk.
Note: Though non-key tasks display on this page, you can only associate key tasks to risks.
6. Click Submit.
The Risk Associated Tasks page appears, where the task you created or selected in the list of tasks displays on the page.
Risk Audit Trail
The Risk Audit Trail page allows you to see when certain risk fields were changed, and by whom. In this way, you can track changes by resource and date.
Your CA Clarity PPM administrator selects the risk fields that are available to you.
Note: Contact your CA Clarity PPM administrator or see the Studio Developer's Guide for more information if the Risk Audit Trail page is not active.
254 Project Management User Guide
How to Create and Manage Risks
View the Risk Audit Trail
To view the audit trail
1. Open the project.
The Project: Properties: Main - General page appears.
2. Select the Risks/Issues/Changes tab.
The Project: Risks/Issues/Changes: Risks page appears.
3. Open the risk whose audit trail you want to review.
The Risk Properties: Main page appears.
4. Click the Audit Trail tab.
The Risk Audit Trail page appears.
5. Complete the following filter fields:
Attribute Name
Choose the Attribute for which you want to see an audit trail.
Changed By
Enter a resource name.
Select From
To Dates
These dates refer to a period in which the risk may have been changed.
6. Click Filter.
If you have changed the attribute, it displays in the list along with the name of the resource who changed it, and the date on which it was changed.
Risk Management Processes
You can use processes to automate certain elements of the risk management process. For example, you can create processes to notify you when risk-related action items or tasks have been completed. However, before you begin creating and maintaining risk management processes, make sure that you understand what a process is and how it works.
Note: See the Common Features and Personal Options User Guide for more information and instructions on how to create, run, or cancel processes.
Chapter 6: Risks, Issues, and Change Requests 255

How to Create and Manage Issues
How to Create and Manage Issues You can create and manage issues using the Project: Risks/Issues/Changes: Issues page. You can create issues from risks as a way of escalating a serious risk to a higher level, or you can create issues that are independent of risks and change requests. As with risks, you can associate issues with action items, tasks, and processes.
Like projects, programs, and risks, you create issues in two stages:
1. Create the issue (see page 256).
2. Define the issue's properties (see page 260).
Create Issues
You can view a list of the issues you have created or that have been assigned to you using the Project: Risks/Issues/Changes: Issues page. Use this page to create new issues.
To create an issue
1. Open the project.
The Project: Properties: Main - General page appears.
2. Select the Risks/Issues/Changes tab.
The Project: Risks/Issues/Changes: Risks page appears.
3. Click the Issues subtab.
The Project: Risks/Issues/Changes: Issues page appears.
4. Click New.
The Create Issue page appears.
5. Complete the following fields in the General section of the page:
Issue Name
Defines the short name for the issue (up to 64 characters).
Issue ID
The unique identifier assigned to the issue for tracking. This number must be unique. Once the issue is saved, you cannot change the Issue ID.
Description
Enter a short description of the risk.
256 Project Management User Guide

How to Create and Manage Issues
Category
Select the category to which this issue is assigned.
Values: Flexibility, Funding, Human Interface, Implementation, Interdependencies, Objectives, Organizational Culture, Resource Availability, Sponsorship, Success Risk, Supportability, or Technical.
Owner
Select an owner to manage the issue. This resource is responsible for ensuring that the risk is managed and tracked appropriately through its lifecycle. If an issue or change request is created from this risk, for example, the owner information is carried over to the issue or change request.
Status
Select the status of this issue.
Values: Open, Work in Progress, Closed, or Resolved.
Creator
This read-only field displays the name of the resource who created this issue.
Date Created
This read-only field displays the date this issue was created.
Updated By
This read-only field displays the name of the resource who last updated this issue.
Date Last Updated
This read-only field displays the date this issue was last updated.
6. Complete the following fields in the Details section of the page:
Target Resolution Date
Select the date this issue is targeted to be resolved. This date should be earlier than the impact date.
Priority
Select the priority level of this issue.
Values: Low, Medium, and High.
7. Click Submit.
Chapter 6: Risks, Issues, and Change Requests 257
How to Create and Manage Issues
Import Issues from Another System of Record
If your organization uses a different system to create and monitor issues, such as Microsoft Excel or Access, you can use the XML Open Gateway (XOG) to import them into CA Clarity PPM.
Note: See the Integration Guide for more information on using the XOG to import issues.
Attach Documents to Issues
To attach a document to an issue
1. Open the project.
The Project: Properties: Main - General page appears.
2. Select the Risks/Issues/Changes tab.
The Project: Risks/Issues/Changes: Risks page appears.
3. Click the Issues subtab.
The Project: Risks/Issues/Changes: Issues page appears.
4. Click the name of the issue to which you want to add an attachment.
The Issue Properties page appears.
5. Add an attachment in the Document field, and click Submit.
The document is added to the issue.
258 Project Management User Guide
How to Create and Manage Issues
Convert Change Requests into Issues
You can quickly create a change request from an existing issue. Basic information from common fields is carried over to the new change request for easy setup. A link back to the originating issue is provided on the Change Request: Properties page for easy navigation between the records. In addition, you can manually associate issues or change requests to each other. This is useful for understanding the relationships between the issues and change requests, providing better overall management of the project.
Click the ID in the Originating Change Request field to view the original change request.
To convert a change request into an issue
1. Open the project containing the request you want to convert into an issue.
The Project: Properties: Main - General page appears.
2. Select the Risks/Issues/Changes tab.
The Project: Risks/Issues/Changes: Risks page appears.
3. Click the Change Requests subtab.
The Project: Risks/Issues/Changes: Change Requests page appears.
4. Open the change request from which you want to create an issue.
The Change Request Properties: Main page appears.
5. Change the status of the change request to "Closed", and click Save.
The change request is closed.
6. Click Create Issue.
The Create Issue page appears.
7. Complete the fields on the page, and click Submit.
The new issue is displayed on the Project: Risks/Issues/Changes: Issues page.
Chapter 6: Risks, Issues, and Change Requests 259

How to Create and Manage Issues
Define Issue Properties
Once you complete the Create Issue page, you can define issue properties. After you save a new issue, or after you open an existing one, you are taken to the Issue Properties: Main page.
You can define the following issue properties from this page:
■ Edit fields on the Main page (copied from the Create Issue page).
■ Create and view notes for the issue.
■ Create and edit action items for the issue.
■ Create and edit tasks for the issue.
■ View an audit trail of changed issue fields.
■ Create, edit and run issues-related processes.
260 Project Management User Guide

How to Create and Manage Issues
Edit Issues
You can edit issues in the following ways: edit, close, and delete.
Edit Issues
You can edit any issue's properties.
To edit an issue
1. Open the project containing the issue you want to edit.
The Project: Properties: Main - General page appears.
2. Select the Risks/Issues/Changes tab.
The Project: Risks/Issues/Changes: Risks page appears.
3. Click the Issues subtab.
The Project: Risks/Issues/Changes: Issues page appears.
4. Open the issue you want to edit.
The Issue Properties: Main page appears.
5. Edit the issue, and click Save.
Your changes are saved.
Close Issues
Once an issue has been resolved, change the Status of the issue to "Closed" and then enter a final resolution for the issue. A detailed resolution can help you to quickly recall the outcome of an issue when planning or approaching future projects.
To close an issue
1. Open the project containing the issue you want to close.
The Project: Properties: Main - General page appears.
2. Select the Risks/Issues/Changes tab.
The Project: Risks/Issues/Changes: Risks page appears.
3. Click the Issues subtab.
The Project: Risks/Issues/Changes: Issues page appears.
4. Open the issue you want to close.
The Issue Properties: Main page appears.
5. Complete the following fields, and click Save:
Status
Select "Closed".
Chapter 6: Risks, Issues, and Change Requests 261

How to Create and Manage Issues
Resolution
Explain how the issue was resolved.
Your changes are saved.
Delete Issues
To delete an issue
1. Open the project containing the issue you want to delete.
The Project: Properties: Main - General page appears.
2. Select the Risks/Issues/Changes tab.
The Project: Risks/Issues/Changes: Risks page appears.
3. Click the Issues subtab.
The Project: Risks/Issues/Changes: Issues page appears.
4. Select the check box next to the issue you want to delete, and click Delete.
The issue is deleted and no longer displays in the list.
View Issues
To view an issue that has been assigned to you
1. Open the project containing the issue you want to view.
The Project: Properties: Main - General page appears.
2. Select the Risks/Issues/Changes tab.
The Project: Risks/Issues/Changes: Risks page appears.
3. Click the Issues subtab.
The Project: Risks/Issues/Changes: Issues page appears.
4. Click the name of the issue you want to view.
The Issue Properties: Main page appears.
Issue Notes
You can add notes to record additional information about an issue. The notes you add are displayed in a list on the Issue Notes page. They are listed in the order in which they were created, with the most recent note appearing at the top of the list. From this page, you can sort the list of notes and add additional notes.
You cannot enter a reply to issue notes.
262 Project Management User Guide

How to Create and Manage Issues
Add Notes to Issues
You cannot edit issue notes. You can view notes in the list section of the page. You cannot create replies to notes. Users with access to the Risk/Issues/Changes tab for this project can view notes.
To add a note to an issue
1. Open the project.
The Project: Properties: Main - General page appears.
2. Select the Risks/Issues/Changes tab.
The Project: Risks/Issues/Changes: Risks page appears.
3. Click the Issues subtab.
The Project: Risks/Issues/Changes: Issues page appears.
4. Open the issue to which you want to add a note.
The Issue Properties: Main page appears.
5. Click the Notes tab.
The Issue Notes page appears.
6. Complete the following fields:
Subject
Defines the note's heading.
Description
Defines the note's text.
7. Click Add.
The new note is displayed in the list of notes.
Issue Action Items
The Associated Action Items page displays a list of action items related to this issue. From this page, you can create, delete, edit, filter, and sort your action items.
Note: See the Common Features and Personal Options User Guide for more information about how to manage action items.
Chapter 6: Risks, Issues, and Change Requests 263

How to Create and Manage Issues
Create Action Items Associated to Issues
The Issue Associated Action Items page displays a list of the action items you created. You can do the following on the Issue Associated Action Items page:
■ Click the name of the action item to open and view and/or edit it.
■ Delete the action item.
To create an action item for this issue
1. Open the project.
The Project: Properties: Main - General page appears.
2. Select the Risks/Issues/Changes tab.
The Project: Risks/Issues/Changes: Risks page appears.
3. Click the Issues subtab.
The Project: Risks/Issues/Changes: Issues page appears.
4. Open the issue for which you want to create an action item.
The Issue Properties: Main page appears.
5. Click the Associated Action Items tab.
The Risk Associated Action Items page appears.
6. Click New.
The Action Item Properties: Create page appears.
7. Complete the fields on this page.
Be sure to assign a resource to this action item. You can assign the action item to any resource to whom you have access.
8. Click Submit.
The Issue Associated Action Items page appears.
Tasks Associated to Issues
You can assign an issue to an existing key task, or create a new key task for it. You can assign the issue to one or more tasks, and lists the tasks that have been associated to issues using the Issue Associated Tasks page.
If you have access to the project containing the task you can view the issue from the Task Associated Issues page.
264 Project Management User Guide

How to Create and Manage Issues
Issue Audit Trail
The Issue Audit Trail page allows you to see when certain issue fields were changed, and by whom. In this way, you can track changes by resource and date.
Your CA Clarity PPM administrator selects the issue fields that are available to you.
Note: Contact your CA Clarity PPM administrator or see the Studio Developer's Guide for more information if the Audit Trail page is not active.
View Issue Audit Trail
If the attribute has been changed (or changed in the time period you indicated) it displays at the bottom half of the page, along with the name of the resource who changed it, and the date on which it was changed.
To view an issue's audit trail
1. Open the project.
The Project: Properties: Main - General page appears.
2. Select the Risks/Issues/Changes tab.
The Project: Risks/Issues/Changes: Risks page appears.
3. Click the Issues subtab.
The Project: Risks/Issues/Changes: Issues page appears.
4. Open the issue whose audit trail you want to review.
The Issue Properties: Main page appears.
5. Click the Audit Trail tab.
The Issue Audit Trail page appears.
Issue Processes
You can use processes to automate certain elements of the Issue management process. For example, you can create processes to notify you when Issue-related action items or tasks have been completed. However, before you begin creating and maintaining Issue Management processes, make sure that you understand what a process is and how it works.
Note: See the Administration Guide for more information on how to use, create, and run CA Clarity PPM processes.
Note: See the Common Features and Personal Options User Guide for more information on how to create, run, or cancel processes.
Chapter 6: Risks, Issues, and Change Requests 265

Create Change Requests
Resolve Issues
The completion of the Resolution field, although not required, is useful for recalling the outcome of an issue response strategy when planning or approaching future project issue plans.
To resolve an issue
1. Open the project.
The Project: Properties: Main - General page appears.
2. Select the Risks/Issues/Changes tab.
The Project: Risks/Issues/Changes: Risks page appears.
3. Click the Issues subtab.
The Project: Risks/Issues/Changes: Issues page appears.
4. Click the name of the issue you want to resolve.
The Issue Properties page appears.
5. In the Resolution section of the page, enter the final resolution of this issue once the matter is resolved in the Resolution field.
6. Click Submit.
Create Change Requests Use the Project: Risks/Issues/Changes: Change Requests page to create new change requests. If you have not created any change requests or had any assigned to you, then none appear in the list of Project Change Requests.
To create a change request
1. Open the project.
The Project: Properties: Main - General page appears.
2. Select the Risks/Issues/Changes tab.
The Project: Risks/Issues/Changes: Risks page appears.
3. Click the Change Requests subtab.
The Project: Risks/Issues/Changes: Change Requests page appears.
4. Click New.
The Create Change Request page appears.
5. Complete the following fields in the General section of the page:
266 Project Management User Guide

Create Change Requests
Change Request Name
Enter short name for the request
Limit: 64 characters
Change Request ID
The unique identifier assigned to the request for tracking. This number must be unique. Once the risk is saved, the request ID cannot be changed.
Description
Enter a short description of the request.
Category
Select the category to which this request is assigned. Choices are Flexibility, Funding, Human Interface, Implementation, Interdependencies, Objectives, Organizational Culture, Resource Availability, Schedule Risk, Sponsorship, Success Risk, Supportability, or Technical.
Owner
Select an owner to manage the request. This resource is responsible for ensuring that the request is managed and tracked appropriately through its lifecycle. If an issue or change request is created from this risk, for example, the owner information is carried over to the issue or change request.
Status
Select the status of this request.
Values: Open, Work in Progress, Closed, or Resolved.
Creator
This read-only field displays the name of the resource who created this request.
Date Created
This read-only field displays the date this request was created.
Updated By
This read-only field displays the name of the resource who last updated this request.
Date Last Updated
This read-only field displays the date this request was last updated.
6. Complete the following fields in the Details section of the page:
Chapter 6: Risks, Issues, and Change Requests 267

Create Change Requests
Reasons
Enter the reason(s) for the requested change.
Priority
Select the priority level of this request. Choices are Low, Medium, and High.
Expected Close Date
Select the date by which you expect to close the request.
Next Review Date
Select the date this by which you want the next review for this request to occur.
Date Closed
Enter a close date for the request.
7. Add an attachment in the Document field, if desired.
8. Complete the following fields in the Effect section of the page:
Impact on Baseline
Describe how the changes in this request will impact the project's baseline, if at all.
Impact on Other Projects
Describe how this request will impact other projects, if at all.
Benefits
Describe how this change will benefit the project.
Change in Cost
Enter an amount by which you think this request will change the budgeted cost of the project.
Change in Schedule
Enter the number of days by which this request will delay or hasten the overall project schedule.
Change in Resources
Enter a number that reflects the request for an increase or decrease in the number of resources needed for the project.
9. Complete the following fields in the Assessment section of the page:
Assessor
Click Browse to select the resource responsible for assessing this request.
268 Project Management User Guide
Create Change Requests
Date Assessed
Select the date by which the request should be assessed.
Approved By
Click Browse to select the resource responsible for approving this request.
Date Approved
Select the date by which the request should be approved.
10. Click Submit.
Create Change Requests from Issues
Create a change request when you think a change to the project plan is necessary. Use the Project: Risk/Issues/Changes: Change Requests page to capture basic information about the circumstances, impact, reasons, and time frames for changes to the project's scope.
You can create change requests from either the Project: Risk/Issues/Changes: Change Requests page or from the Properties page of an existing risk or issue.
Chapter 6: Risks, Issues, and Change Requests 269

Create Change Requests
Create Change Requests from Risks
You can quickly create new change requests from existing risks. Basic information, such as the risk's name and ID number, are carried over to the new change request for easy setup.
In addition, the Originating Risk field displays on the Change Request Properties: Main page. This field is a link to the risk from which the change request derived.
To create a change request from a risk
1. Open the project.
The Project: Properties: Main - General page appears.
2. Click the Risks/Issues/Changes tab.
The Project: Risks/Issues/Changes: Risks page appears.
3. Click the Change Requests subtab.
The Project: Risk/Issues/Changes: Change Requests page appears.
4. Click Create Change Request.
A new change request is created and is displayed on the Create Change Request page.
5. Complete the remaining fields on the page, and click Submit.
The new change request is displayed in the list on the Project: Change Requests page.
Define Change Request Properties
Once you have created the change request, you can define the issue's properties. You can define notes, an audit trail, and processes for a change request, but you cannot associate action items and tasks with them.
After you save a new change request, or after you open an existing one, the Change Request Properties: Main page appears. Use the links and tabs on this page to define the issue's properties.
You can define the following change request properties from this page:
■ Edit fields on the Main page (copied from the Create Change Request page).
■ Create and view notes for the issue.
■ View an audit trail of changed issue fields.
■ Create, edit and run issues-related processes.
270 Project Management User Guide

Create Change Requests
Edit, View, Close and Delete Change Requests
You can edit change requests in the following ways: edit, close, and delete.
Edit Change Requests
You can edit any of the change request's properties.
To edit a change request
1. Open the project containing the request you want to edit.
The Project: Properties: Main - General page appears.
2. Select the Risks/Issues/Changes tab.
The Project: Risks/Issues/Changes: Risks page appears.
3. Click the Change Requests subtab.
The Project: Risks/Issues/Changes: Change Requests page appears.
4. Open the change request you want to edit.
The Change Request Properties: Main page appears.
5. Edit the change request, and click Save.
Your changes are saved.
Close Change Requests
Once a change request has been resolved, change its Status to "Closed" and then enter a final resolution for the request. A detailed resolution can help you to quickly recall the outcome of a request when planning or approaching future projects.
To close a change request
1. Open the project containing the request you want to close.
The Project: Properties: Main - General page appears.
2. Select the Risks/Issues/Changes tab.
The Project: Risks/Issues/Changes: Risks page appears.
3. Click the Change Requests subtab.
The Project: Risks/Issues/Changes: Change Requests page appears.
4. Open the change request you want to close.
The Change Request Properties: Main page appears.
5. Complete the following fields, and click Save:
Status
Select "Closed".
Chapter 6: Risks, Issues, and Change Requests 271

Create Change Requests
Resolution
Explain how the change request was resolved.
Your changes are saved.
Delete Change Requests
To delete a change request
1. Open the project containing the request you want to delete.
The Project: Properties: Main - General page appears.
2. Select the Risks/Issues/Changes tab.
The Project: Risks/Issues/Changes: Risks page appears.
3. Click the Change Requests subtab.
The Project: Risks/Issues/Changes: Change Requests page appears.
4. Select the check box next to the request you want to delete, and click Delete.
The request is deleted and no longer displays in the list.
View Change Requests
To view a change request that has been assigned to you
1. Open the project containing the request you want to view.
The Project: Properties: Main - General page appears.
2. Select the Risks/Issues/Changes tab.
The Project: Risks/Issues/Changes: Risks page appears.
3. Click the Change Requests subtab.
The Project: Risks/Issues/Changes: Change Requests page appears.
4. Click the name of the request you want to view.
The Change Request Properties: Main page appears.
Change Request Notes
You can add notes to record additional information about a request. The notes you add are displayed in a list on the Change Request Notes page. They are listed in the order in which they were created, with the most recent note appearing at the top of the list. From this page, you can sort the list of notes and add additional notes.
You cannot create a reply to change request notes.
272 Project Management User Guide

Create Change Requests
Create Change Request Notes
The change requests you create appear on the Change Request Notes page. Change request notes are not editable and display in the list section of the page. You cannot create replies.
To add a note to a change request
1. Open the project containing the request to which you want to add a note.
The Project: Properties: Main - General page appears.
2. Select the Risks/Issues/Changes tab.
The Project: Risks/Issues/Changes: Risks page appears.
3. Click the Change Requests subtab.
The Project: Risks/Issues/Changes: Change Requests page appears.
4. Open the request to which you want to add a note.
The Change Request Properties: Main page appears.
5. Click the Notes tab.
The Change Request Notes page appears. The notes you create appear on this page.
6. Complete the following fields, and click Add:
Subject
Defines the change request note's subject.
Description
Defines your note text.
The new note is displayed in the list of notes. Users with access to the Risk/Issues/Changes tab for this project can view these notes.
Change Request Audit Trail
The Change Request Audit Trail page allows you to see when certain request fields were changed, and by whom. In this way, you can track changes by resource and date.
Your CA Clarity PPM administrator selects the request fields that are available to you.
Note: Contact your CA Clarity PPM administrator or see the Studio Developer's Guide for more information if the Audit Trail page is not active.
Chapter 6: Risks, Issues, and Change Requests 273

Create Change Requests
274 Project Management User Guide
View the Change Request Audit Trail
To view the change request's audit trail
1. Open the project.
The Project: Properties: Main - General page appears.
Select the Risks/Issues/Changes tab.
The Project: Risks/Issues/Changes: Risks page appears.
2. Click the Change Requests subtab.
The Project: Risks/Issues/Changes: Change Requests page appears.
3. Click the name of the request whose audit trail you want to review.
The Change Request Properties: Main page appears.
4. Click the Audit Trail tab.
The Change Request Audit Trail page appears.
5. Filter the list.
If the attribute has been changed (or changed in the time period you indicated) it appears on the bottom half of the page, along with the name of the resource who changed it, and the date on which it was changed.
Change Request Processes
You can use processes to automate certain elements of the change request process. For example, you can create processes to notify you when changes have been made to the change request audit trail. However, before you begin creating and maintaining change request processes, make sure that you understand what a process is and how it works.
Note: See the Administration Guide for more information on how to use, create, and run system-level processes.
Note: See the Common Features and Personal Options User Guide for more information on how to create and run processes.

Chapter 7: Programs
This section contains the following topics:
The Differences Between Projects and Programs (see page 275) How to Create Programs (see page 279) Open Programs in Open Workbench (see page 291) Add Projects to Programs (see page 292) Program Dependencies (see page 294) Associated Releases (see page 296) Monitor Program Performance (see page 299) How to Delete Programs (see page 302) Cancel Programs Marked for Deletion (see page 302)
The Differences Between Projects and Programs Programs are top-level projects that serve as the parent or umbrella project to one or more child projects. Unlike master projects, which also serve as parent projects to child projects, you can use programs to view combined actuals and effort for all of the projects contained within them. In this way, programs provide an important top-down summary view of an organization's goals and the plan to meet them.
Though a program is a project and shares some of the same functionality as a project or master projects, it also differs in a few significant ways. For example, you cannot create non-milestone tasks at the program level, nor can you staff a program. And while you cannot financially enable a program, you can create a financial plan for it and view plan data in a graph format. In addition, you can view the combined actuals and other totals for all of the projects in a program.
It is important to understand the differences and similarities between programs, projects, master projects, and subprojects. The following table provides a summary of the differences and similarities:
Attribute or Ability
Program Master Project
Regular Project
Comments
Displays sum of values from subprojects
Yes No N/A You can view the combined actuals and effort for all of the projects in a program. You cannot do this from master projects.
Chapter 7: Programs 275

The Differences Between Projects and Programs
276 Project Management User Guide
Attribute or Ability
Program Master Project
Regular Project
Comments
Assign Staff Members
No Yes Yes You cannot assign staff members to programs. The staff list that appears on a program is read-only and aggregated from the subprojects. You cannot edit this list.
Add Participants
Yes Yes Yes You can add participants to programs, master projects, and subprojects.
Create and apply a Work Breakdown Structure (WBS)
No Yes Yes Because you cannot staff or add non-milestone tasks to programs, you cannot create and apply a WBS to programs.
Use Tasks Milestones Only
Yes Yes You can add milestones to programs, but you cannot add key tasks or task estimates.
Use Planning features
Yes Yes Yes You can create budgets and forecasts for programs and projects.
Connect to Scheduling Tools
Read-only Read/Write Read/Write
Because it does not contain actuals of its own, a program can only viewed as read-only in Open Workbench and Microsoft Project.

The Differences Between Projects and Programs
Access Rights for Programs
The following access rights are available for users who will be creating and editing programs and subprojects:
Management - Programs
Allows user to access the programs to which you have access. This right is dependent on the user having rights to programs and projects at either the instance level or OBS level.
Type: Global
Project - Approve
Allows the user to approve a specific project. This right includes the Project - Edit access right.
Type: Instance
Project - Create
Allows user to create a new project or program specifying general project properties. A user granted this right will automatically become the collaboration manager for the project and will be able to create action items, discussion. This access right includes the Project - Create from Template access right.
Type: Global
Project - Create from Template
Allows user to create a new project or program using only templates. A user granted this right will automatically become the collaboration manager for the project and will be able to create action items, discussion.
Type: Global
Project - Delete
Combined with the Project - Edit access right, this right allows users to delete the projects and programs to which they have access.
Project - Edit
Allows user to edit all parts of a project or program except the collaboration tools (e.g. Document Manager, Action Items, Calendar, and Discussion pages). Also, allows user to accept requisitions if project manager approval is required.
Type: Instance
Project - Edit Access Rights
Combined with the Project - Edit Management access right, this right allows user to manage access rights to a project or program.
Type: Global
Chapter 7: Programs 277

The Differences Between Projects and Programs
Project - Edit Management
Allows user to edit general and management properties, to add staff, create tasks, and create and manage processes for the projects and programs to which the user has access. This includes the ability to add subprojects and to edit the project in Open Workbench or Microsoft Project.
Type: Instance.
Project - Manager (Auto)
Allows user to view and edit general and management properties for the projects and programs to which they have access.
Type: Instance
Access Programs
Use the Programs page to create and work with programs. The Programs page lists all of the programs you create and that you have access to. To access this page, select Programs from the Portfolio Management menu.
You can do the following from the Programs page:
■ Create new programs
■ Define program properties such as schedules and budgets and adding projects to the program
■ View the combined actuals and effort for all of the projects in a program
■ Edit existing programs
■ Delete programs
After creating a program and defining its properties, you can use the other program tabs to do the following:
■ Team. Use this tab to add participants and participant groups to the program. If the program's subprojects contain staff, the Staff link lists the names of all of the resources assigned as staff to the subprojects. You cannot add staff at the program level.
■ Tasks. Use this tab to create milestone tasks. The Work Breakdown Structure (WBS) link does not display.
■ Action Items, Document Manager, Calendar, Discussions, and Processes. Program participants can use all of the collaboration tool tabs from within the program.
■ Risks/Issues/Changes. Use this tab to rate risks and create risks, issues, and change requests from the Risks/Issues/Changes tab just as you can for a project.
278 Project Management User Guide

How to Create Programs
How to Create Programs Programs, like projects, are created in two stages:
1. Create the program (see page 281).
2. Define the program's properties (see page 283).
You can create new programs, or you can create them from an existing program template. This section explains how to create a program in both ways.
Create New Programs
To create a new program
1. Select Programs from the Portfolio Management menu.
The Programs page appears.
2. Click New.
The Create Program page appears.
3. Complete the following fields:
Program Name
Required. Enter a unique name for the program.
Limit: 80 characters
Program ID
Required. Enter a unique ID for the program.
Limit: 20 characters
Description
Enter a description of the program.
Limit: 254 characters
Manager
This fields defaults to the name of the user creating the new program. Click the Browse icon to select another user.
Chapter 7: Programs 279

How to Create Programs
Page Layout
Required. Select the Dashboard layout you want to use to view project or program data.
Values:
■ Project Default Layout. This is the default setting. Use this Layout to view default labor and team utilization charts on the Dashboard.
■ Program Layout. Use this layout to view budget data on the Dashboard.
■ Program Status Dashboard. This layout is only available if you have installed the Accelerator: Program Management Office add-in.
Note: See the PMO Accelerator Product Guide for more information.
■ Project status Dashboard. This layout is only available if you have installed the Accelerator: Program Management Office add-in.
Note: See the PMO Accelerator Product Guide for more information.
Start Date
Select or enter the date on which the program is to start.
Finish Date
Select or enter the date on which the program is to finish.
Stage
Click Browse to select a company-defined stage for this program, if applicable.
Goal
Choose a goal for the program.
Values: Cost Avoidance, Cost Reduction, Grow the Business, Infrastructure Improvement, and Maintain the Business.
Priority
This field is only applicable if you plan to work with the project in Open Workbench. The number entered is a score for the importance of this project in relation to all other projects in your organization. This score controls the order in which tasks are scheduled during Autoschedule, subject to dependency constraints.
Values: 0-36, with 0 being the highest.
Default: 10
280 Project Management User Guide
How to Create Programs
Progress
Select the program's progress.
Values: Completed, Started, and Not Started.
Default: Not Started.
Status
Select the program's status.
Values: Approved, Unapproved, and Rejected.
Default: Unapproved.
[OBS] Business Unit
Select a business unit to associate with the program, if desired.
Security OBS
Select the OBS security unit to associate with the company, if desired.
4. Click Submit.
Convert Projects into Programs
You can convert an existing project to a program only when the following conditions are true:
■ The project contains no tasks.
■ The project contains no staff.
■ The project is not financially enabled.
Once converted, you can open the program and add subprojects, participants, or edit any of the available properties. Once you convert a project to a program, the Template field, which is used to designate a project as a template, disappears. You cannot use programs as templates because you cannot financially enable them, and because they cannot contain staff or key tasks.
To create a program from an existing project
1. Open the project you want to convert to a program.
The Project: Properties: Main - General page for that project appears.
2. Select the Program check box, and click Save.
The project is converted to a program and no longer appears in your list of projects.
Chapter 7: Programs 281

How to Create Programs
Program Properties
The Program: Properties: Main - General page provides a number of links that allow you to define a wide variety of program characteristics.
You can define many of the same properties for a program that you can for a project. Following are descriptions of the subtabs and options available from the Program: Properties: Main - General page:
Main
This is the default Program Properties page. From this page you can use the following links on the content menu:
General
Edit the basic properties you defined on the Create Program page, as well as define a few additional, general characteristics.
Schedule
Define the program's start and finish dates.
Risk
Rate the risk level for a number of program characteristics.
Budget
Define the program's simple budget and forecast. You can use the Program Dashboard page to view program-level and subproject budget data. You cannot financially enable a program. However, you can use this page to create a simple budget.
Financial
Enable this program for transaction processing.
Subprojects
Add subprojects (i.e. projects) to the program.
Dependencies
Identify dependencies between portfolio investments.
282 Project Management User Guide

How to Create Programs
Define Program General Properties
The Program: Properties: Main - General page is the default page you see when you open a program. This page displays all of the fields you defined when you first created the program on the Create Program page, as well as additional fields you can complete and links you can use. You can edit any of the fields available on this page.
To define the program's general program properties
1. Open the program for which you want add or edit General Properties.
The Program: Properties: Main - General page for that program appears.
2. Complete the following General fields:
Program Name
Required. Enter a unique name for the program (up to 80 characters).
Program ID
Required. Enter a unique ID for the program (up to 20 characters).
Description
Enter a description of the program (up to 254 characters).
Manager
This fields defaults to the name of the user creating the new program. Click the Browse icon to select another user.
Page Layout
Required. The page layout for the program.
Risk
The stoplight in this field indicates the program's risk status, as defined by your selections on the Program Properties: Main - Risk page and on the Project Risks/Issues/Changes: Risks page.
Values:
■ Green = Low Risk
■ Yellow = Medium Risk
■ Red = High Risk.
Note: If you do not complete the fields on the Program: Properties: Main - Risk page or the Program: Risks/Issues/Changes: Risks page, then this field does not display in color.
Alignment
The stoplight in this field indicates the program's alignment status.
Chapter 7: Programs 283

How to Create Programs
Active
Clear this field when you want to deactivate the program. The program will no longer appear in the list of active programs.
Program
Since you are currently in an open program, this field will be selected.
Template
Select this field when you want to use this program as a template for other program.
Add to My Projects
Click this link to make this program available from the My Projects section of your Personal: General page. After you click this link and add the program, the link's name changes to [Remove from My Projects]. Click this link to remove the program from the list in the My Projects section of the page.
Copy from Template
Click this link to copy tasks, task estimates, and staff assignments from a template into the current project.
Organizational Breakdown Structures
Use this link if you want to associate a business unit or security OBS with the project.
Open in Workbench
Click Go to open the project in Open Workbench.
3. Click Save.
284 Project Management User Guide

How to Create Programs
Scheduling Properties
You can define your program's start and finish dates using the Program: Properties: Main - Schedule page. These dates should encompass the start and finish dates of all of the projects contained in the program. Be sure to set the dates of any program milestone tasks you set to ones between the program's start and finish dates.
Note: The As of Date field does not apply to programs, which cannot contain task-level estimating.
To specify the scheduling properties for a program
1. Open the program.
The Program: Properties: Main - General page appears.
2. Select Schedule from the content menu.
The Program: Properties: Main - Schedule page appears.
3. In the Scheduling section, complete the following fields:
Start Date
Defines the project's start date.
Finish Date
Defines the project's finish date.
Set Planned Cost Dates
Specifies whether or not to keep planned cost dates synchronized with the investment dates.
Default: Selected
As of Date
Defines the date by which you want data to be included in time and budget estimates. This date is used in Earned Value Analysis (EVA) calculations, such as Budgeted Cost of Work Scheduled (BCWS).
Progress
Indicates the level of work that has been completed on the project's tasks. Use the following as a guideline:
■ Not Started = 0%
■ Started = 1 - 99%
■ Completed = 100%
Options: Completed, Started, and Not Started.
Default: Not Started.
Chapter 7: Programs 285

How to Create Programs
Priority
If you are using CA Clarity PPM with Open Workbench, defines the relative importance of this project in relation to all other projects. The priority controls the order in which tasks are scheduled during Autoschedule. The priority is subject to dependency constraints.
Values: 0-36, 0 being the highest.
Default: 10
Status Indicator
Indicates the project's status.
Stoplight values:
■ Green = On Track
■ Yellow = Marginal
■ Red = Critical
Status Comment
Defines any comments about the project's status.
4. Click Save.
Open and Close Projects for Time Tracking
To allow staff members to track time spent on project tasks on their timesheets, you must open the project for time tracking and select CA Clarity PPM as the track mode. The staff member's profile must also be open for time entry to enter time on project tasks.
Note: See the Common Features and Personal Options User Guide for more information on how to use and manage timesheets and on how to open a resource's profile for time entry.
To open a project for time tracking
1. Open the project.
The Project: Properties: Main - General page appears.
2. Select Schedule from the content menu.
The Project: Properties: Main - Schedule page appears.
3. In the Tracking section of the page, complete the following fields:
Time Entry
Select this field to allow staff members to record the time they work on this project on their timesheets.
Default: Selected
286 Project Management User Guide

How to Create Programs
Track Mode
Indicates the method you want staff members to use to enter time for hours worked on this project.
Options:
■ Clarity. Staff members record time using timesheets.
■ None. Non-labor resources track actuals through transaction vouchers, or when enter actuals through a scheduler, such as Open Workbench.
■ Other. Import actuals from a third-party application.
Default: Clarity
Charge Code
Select a default charge code to use for all project tasks. If you enter different charge codes at the task level on timesheets, then the task-level charge codes override the project-level charge code.
4. Click Submit.
Chapter 7: Programs 287
How to Create Programs
Define Default Staffing Options
You can define a project's default staffing options in the Staffing section of the Project: Properties: Main - Schedule page. The OBS you choose as the default staff OBS unit is used to more fully describe a staffing requirement. This is done by mapping roles with OBS units with resource managers. The staff OBS can be anything such as resource pool, a specific location, or a department. For example, if you need a programmer (role) from Atlanta (staff OBS), then you can use the project's default OBS value to route the role requisition to the resource manager responsible for allocating resources from Atlanta OBS.
The staff OBS you identify is also used during capacity planning. You can filter capacity and demand based on staff OBS. For example, you can use it to find out if you have enough capacity for programmers in Atlanta to fulfill the demand for programmers in that location.
You can also specify whether or not you want to require resource requisitions be approved before they can be booked. When you select the Requisition Approval Required check box, the following rules apply:
■ Resources must have the Project - Edit access right to book proposed resources to a project or reject them. If resources also have hard-booking rights, they can hard book those resources directly to the project. Without this access right, resources can only propose resources, which submits the booking for approval.
■ If you request a named resource and the booking manager proposes the same resource with the same allocation, the proposal is approved automatically and a notification is sent. There is no formal approval required.
To define a project's default staffing options
1. Open the project.
The Project: Properties: Main - General page appears.
2. Select Schedule from the content menu.
The Project: Properties: Main - Schedule page appears.
3. In the Staffing section, complete the following fields:
Default Staff OBS Unit
Select the project's OBS unit that will be used as the default OBS unit for all resources or team members assigned to this project.
Requisition Approval Required
Specifies whether you want to require that requisitions be approved before they can be booked.
4. Click Submit.
288 Project Management User Guide

How to Create Programs
Define Program Budget Properties
Though it is not required that you create a budget for a program, you can create a simple one from the Program: Properties: Main - Budget page. This budget would apply only to the program, not to its subprojects. The financials page is not available for programs. However, you can use the planning page to create a detailed budget or forecast for the program.
Note: See the Financial Management User Guide for more information on how to create a detailed budget from within a program rather than a project.
You can view program budget data, and budget data generated from its subprojects, on the program's Dashboard page.
To define a simple budget and forecast for a program
1. Open the program.
The Program: Properties: Main - General page.
2. Click Budget.
The Program: Properties: Main - Budget page appears.
3. Complete the following fields:
Currency
Select the currency you want to use when calculating the program's budget and forecast values.
Planned Cost
Enter a planned cost for the entire program. The value you enter is distributed between the planned cost start and planned cost finish dates.
Planned Cost Start
Click Browse to select the start date for the budget. You may or may not want to use the program's start date.
Planned Cost Finish
Click Browse to select a finish date for the budget. You may or may not want to use the program's finish date.
Planned Benefit
Enter the anticipated financial benefit for this program. This value is distributed this value between the planned benefit start and finish dates.
Planned Benefit Start
Select the scheduled benefit start date.
Chapter 7: Programs 289

How to Create Programs
Planned Benefit Finish
Select the scheduled benefit end date.
Planned NPV
The in this field is calculated based on the following formula: Planned NPV = Planned Benefit - Planned Cost
You can make this field available for data entry if you clear the Calculate NPV Data field.
Planned ROI
The value in this field is calculated based on the following formula: Planned ROI = Planned NPV / Planned Cost
Note: You can make this field available for data entry if you clear the Calculate NPV Data field.
Planned Breakeven
The date and amount in this read-only field indicate the period and value at which the program becomes profitable.
Note: You can make this field available for data entry if you clear the Calculate NPV Data field.
Calculate NPV Data
NVP is the program's net present value. Specifies if the NPV data fields (Planned NPV, Planned ROI, and Planned Breakeven) are to be automatically populated using the formulas listed in the descriptions for those fields. Clear this field if you want the fields to be available for data entry.
Default: Selected
4. Click Save.
Program Risk Properties
Just as you can with projects, you can rate a predefined list of risks for programs, as well as create and track risks, issues, and change requests. The only difference is that you must perform your actions from within the program instead of from within the project.
290 Project Management User Guide
Open Programs in Open Workbench
Access to this Program
Use the Access to This Project section on the content menu to view, grant, and edit access rights to your program. The links in this section—Full View, Resource, Group, and OBS unit—allow you to view, edit, and grant instance-level access to this program.
Note: See the Common Features and Personal Options User Guide for more information on how to use this section.
Open Programs in Open Workbench Note: See the Open Workbench User Guide for more information.
To open a program in Open Workbench
1. Open the program.
The Program: Properties: Main - General page appears.
2. Next to Open in Workbench field, click Go.
The program is opened in Open Workbench.
Chapter 7: Programs 291

Add Projects to Programs
Add Projects to Programs Like the subprojects that are added to projects, data is not shared between the projects you add to programs. However, unlike master projects, programs generate and display combined actuals and estimates for all of the subprojects it contains. In addition, you can view program and project-level budget information on the Program Dashboard page.
The projects you add to programs retain all of the data they contained as independent projects, including complex planning and financial information and work breakdown structures, and staff. You can post vouchers and timesheet transactions to the project as usual. Projects contained in programs continue to be available from the Projects list page.
To add projects to a program
1. Open the program to which you want to add projects.
The Program: Properties: Main - General page for that program appears.
2. Click the Subprojects subtab.
The Project: Properties: Subprojects page appears for the program.
3. Click Add.
The Select Projects page appears.
4. Select the projects you want to add to the program, and click Add.
The projects are added to the program.
The projects you selected listed are added to the program and are displayed in the list on the Project: Properties: Subprojects page.
View Combined Subproject Actuals and Estimates
The Total row on the Project: Properties: Subprojects page displays the total number of actuals and estimates accrued and entered for all of the projects in the program.
The cells in the Total row display the combined total of the data in each column. Thus, in the sample screen above, the combined actuals for all of the projects in the program are 1,138, while the total ETC is 1,556.
The following table provides descriptions of the columns and data you see on this page.
Count
Subprojects are allowed to have their own subprojects. The number in the Count column indicates the number of subprojects a subproject (or in the case of a program, a project) contains.
292 Project Management User Guide
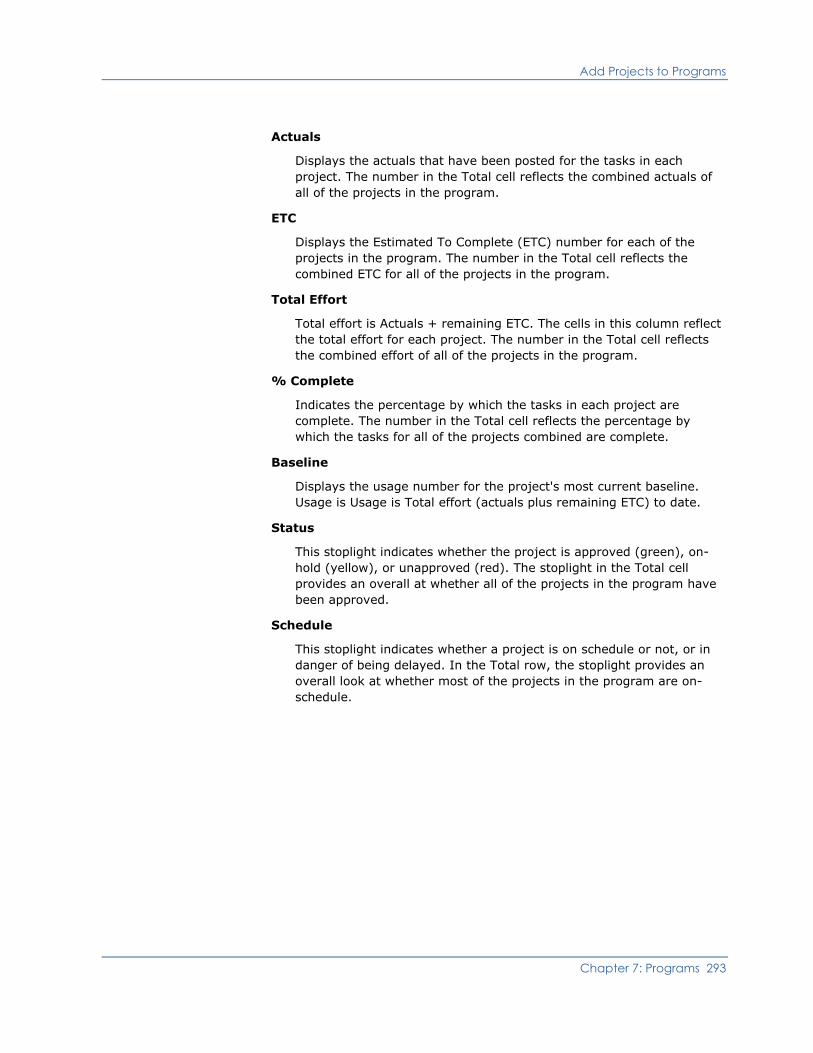
Add Projects to Programs
Actuals
Displays the actuals that have been posted for the tasks in each project. The number in the Total cell reflects the combined actuals of all of the projects in the program.
ETC
Displays the Estimated To Complete (ETC) number for each of the projects in the program. The number in the Total cell reflects the combined ETC for all of the projects in the program.
Total Effort
Total effort is Actuals + remaining ETC. The cells in this column reflect the total effort for each project. The number in the Total cell reflects the combined effort of all of the projects in the program.
% Complete
Indicates the percentage by which the tasks in each project are complete. The number in the Total cell reflects the percentage by which the tasks for all of the projects combined are complete.
Baseline
Displays the usage number for the project's most current baseline. Usage is Usage is Total effort (actuals plus remaining ETC) to date.
Status
This stoplight indicates whether the project is approved (green), on-hold (yellow), or unapproved (red). The stoplight in the Total cell provides an overall at whether all of the projects in the program have been approved.
Schedule
This stoplight indicates whether a project is on schedule or not, or in danger of being delayed. In the Total row, the stoplight provides an overall look at whether most of the projects in the program are on-schedule.
Chapter 7: Programs 293
Program Dependencies
Remove Projects from Programs
To remove a project from a program
1. Open the program for which you want to remove a project.
The Program: Properties: Main - General page appears.
2. Click the Subprojects subtab.
The Project: Properties: Subprojects page appears for the program.
3. Select the project or projects you want to remove, and click Remove.
The selected projects no longer display in the list of subprojects.
Program Dependencies Like a project, a program is considered an investment in a portfolio. Other types of investments are assets, applications, and products. You can indicate dependency relationships that exist between investments in a portfolio using the Program: Properties - Dependencies page.
A dependency can occur when a task in one investment must be completed before a task in another investment can begin. Or it could be that one or more of the projects in a program will have to be cancelled if a certain application runs significantly over budget.
Dependency information is used when creating portfolio management scenarios. You can view dependency connections from the Efficient Frontier page within scenarios that include data from the investments you identify on the Project: Properties: Dependencies page.
Note: See the Portfolio Management User Guide for more information on how to create and use scenarios.
294 Project Management User Guide

Program Dependencies
Create Program Dependencies
You can create dependencies to other investments or create a dependency to another program on which this program depends.
To create a dependency link between two programs
1. Open the program for which you want to create a dependency relationship.
The Program: Properties: Main - General page appears.
2. Select the Dependencies subtab.
The Project: Properties: Dependencies page appears for the program.
3. Choose the dependency mode you want to use from the drop-down.
Values:
■ Investments that depend on this one. Use this mode to create one or more dependencies that depend on this program.
■ Investments this one depends on. Use this mode to create one or more dependencies that this program depends on.
The dependency structure is designed according to your selections.
4. Click Add.
This Select Investments window appears.
5. Select the check box next to the program or investment to which you want to create a dependency and click Add.
The Project: Properties: Dependencies page appears, listing the project dependency.
6. Filter the list by investment type.
Those investments (by type) to which you have access display in the list.
Default: Application
7. Select the check box next to the investment with which you want to create the dependency, and click Add.
The investment is displayed in the list as a dependency on the Project: Properties: Dependencies page.
Chapter 7: Programs 295

Associated Releases
View Program Dependencies
You can view a list of investments that are dependent on a program, or a list of investments that depend on a program using the Project: Properties: Dependencies page.
You can also view dependency relationships from the Scenario: Efficient Frontier page within scenarios. This page includes data from the investments you identify on the Project: Properties: Dependencies page.
Note: See the Portfolio Management User Guide for more information on scenarios.
To view a list of investments that are dependent on this program
1. Open the program.
The Program: Properties: Main - General page appears.
2. Select the Dependencies subtab.
The dependencies display in the list on the Project: Properties: Dependencies page.
Remove Dependencies
To remove a dependency
1. Open the program.
The Program: Properties: Main - General page appears.
2. Click the Dependencies subtab.
The Project: Properties: Dependencies page for your program appears.
3. Select the dependency you want to remove, and click Remove.
The dependency no longer appears in the list of dependencies.
Associated Releases Releases represent new future deliverables. You can link releases to the project or program that will track the release's implementation effort. This association is established from the release. There is no limit to the number of releases that you can associate to a project or program.
Note: See the Requirements Planning User Guide for more information on how to work with releases and for more information on establishing release associations.
296 Project Management User Guide

Associated Releases
View a List of Associated Releases
You can view a list of releases that are associated to your project or program using the Project: Properties - Releases page.
To view a list of releases associated to a project or program
1. Open the project or program.
The Project: Properties: Main - General page appears.
2. Select the Associated Requirements subtab.
The Project: Properties - Releases page appears.
Open Releases Associated to Projects or Programs
You can open the releases that are associated to your project or program using the Project: Properties - Releases page.
To open the release associated to a project or program
1. Open the project or program.
The Project: Properties: Main - General page appears.
2. Select the Associated Releases subtab.
The Project: Properties - Releases page appears.
3. Click the name of the release you want to open.
The Release Properties: General page appears.
Chapter 7: Programs 297

Associated Releases
Unlink Projects or Programs from Releases
You can unlink a release from the project to which it is associated using the Project: Properties - Releases page. You can also remove the association by opening the release and unlinking the release from the project or program.
Note: See the Requirements Planning User Guide for more information on how to unlink releases from projects or program.
To unlink a project or program from a release
1. Open the project or program.
The Project: Properties: Main - General page appears.
2. Select the Associated Releases subtab.
The Project: Properties - Releases page appears.
3. Select the check box next to the release you want to unlink from the project or program, and click Unlink.
The release is removed from the list on the Project: Properties - Releases page and is unlinked from the project or program.
298 Project Management User Guide

Monitor Program Performance
Monitor Program Performance If you selected Program Layout as the layout option on the Program: Properties: Main - General page, you can view program Return on Investment (ROI) data on the program's Program Dashboard page (if you created a program-level budget). In addition, you can view summaries of the total effort and actuals accumulated for all of the program's projects, and can compare overall benefit information at the program level with combined benefit information for all of the program's projects.
Though it is called a program dashboard, you can also view projects on this page.
The following image displays a complete ROI graph:
By default, this page displays the following portlets:
■ General portlet. This read-only view displays basic information about the program, such as name, ID, and start and finish dates. The icon in the Status Indicator field displays the program status.
■ Labor Effort portlet. This view displays the program's up-to-date actuals, ETC, and allocation information.
■ Team Utilization portlet. This view displays total effort per resource across all of the program's tasks to which the resource is assigned. You can drill down from this view to view utilization by individual resource and task.
Chapter 7: Programs 299
Monitor Program Performance
You can customize this page by adding or removing portlets. Your CA Clarity PPM administrator can do this from the Program Layout portlet page's Dashboard tab’s content using Studio.
Note: Contact your CA Clarity PPM administrator or see the Studio Developer's Guide for more information on customizing page layouts and defining additional portlets.
The Labor Effort Portlet
The Labor Effort portlet allows you to quickly compare up-to-date actuals and estimates, and see in a glance overall baseline and allocation variances.
The following describes the Labor Effort portlet fields:
Total Effort
Defines the total effort based on the following formula: Total effort = Actuals + remaining ETC
Actuals
Defines the total number of hours that have been submitted and posted against project tasks.
Estimate to Complete (ETC)
Defines the number of hours that are estimated to complete a project or task. Once a project or task is underway, ETC reflects the number of remaining hours estimated to complete the project.
Baseline
Displays the usage number for the current baseline, based on the following formula: Usage = Actuals + remaining ETC; If a baseline is not being used, Usage = zero.
Baseline Variance
Displays the variance between total effort and baseline usage.
Remaining Allocation
Displays the number of hours allocated to the project after subtracting actuals.
Allocation Variance
Displays the variance between Remaining Allocation and Total Effort.
300 Project Management User Guide

Monitor Program Performance
Team Utilization Portlet
Use the Team Utilization portlet to view total effort (actuals + remaining ETC) for each staff member who is assigned to project tasks. By default, this portlet's graph displays aggregate effort by each staff member. Aggregate in this case refers to the effort for all of the tasks to which they are assigned. However, you can drill down through the graph to view individual effort by individual task.
Data is displayed on this portlet by resource by time period. The time period columns are, by default, set to weekly, and always start with the current week. When you scroll over a time period, a note appears that provides a brief summary of what you see. In this example, the note explains that while resource Gibson was allocated for 40 hours during the week of 6/13/05, she actually worked only 30. Scrolling over the week of 7/4/05 for resource Dossola displays her Allocation Threshold (in yellow) is 40 hours, she has been booked (in red) for 80.
The allocation color code works as follows:
■ Yellow. Indicates that the resource is allocated at or under availability for that time period.
■ Red. Indicates that the resource is overallocated (i.e. the amount of time booked exceeds availability) for that time period.
■ Green. Indicates that actuals recorded by the resource for that time period. Only posted actuals appear in the graph. If no actuals have been posted, no actuals appear in the graph.
You can change any of the values in the Team Utilization portlet, including the color codes. The following list describes the Team Utilization portlet columns and icons:
Chapter 7: Programs 301

How to Delete Programs
302 Project Management User Guide
Properties Icon
Click to go to open the staff member's properties page.
Note: See the Resource Management User Guide for more information.
Resource Allocation Icon
Click this icon to open the resource's Resource/Role Allocations page.
Note: See the Resource Management User Guide for more information.
List of Tasks Icon
Click this icon to open the Project Tasks: Task Resource Utilization List page for that resource.
Resource
Click a resource's name to open the resource's General Properties page.
Average Allocation %
Displays the average percentage of available time that a resource is allocated to the tasks to which they are assigned.
Time Periods
Displays the time periods, and vary according to the selected Time Scaled Values options. Data for the time periods is displayed in a colored histogram.
Default: Weekly
Values:
■ Green. Represents actual hours recorded to date.
■ Yellow. Represents the availability threshold for that resource (the maximum number of hours a resource is available for work).
■ Red. The resource is overallocated.
How to Delete Programs Just as you can delete projects, you can delete programs. The procedure for deleting programs is the same as deleting projects.
Cancel Programs Marked for Deletion Just as you can cancel projects marked for deletion, you can cancel programs marked for deletion. The procedure for canceling programs marked for deletion is the same as canceling projects marked for deletion.
Appendix A: Access Rights
This section contains the following topics:
Project Access Rights (see page 303) Program Access Rights (see page 308)
Project Access Rights The following access rights are required to work with projects.
Note: Contact your CA Clarity PPM administrator or see the Administration Guide for more information if you find that you require access to other modules.
Project - Approve
Allows the user to approve a specific project. This right includes the Project - Edit access right.
Type: Instance
Project - Approve - All
Allows the user to approve all projects. This right includes the Project - Edit - All access right.
Type: Global
Project - Attach Requisitions Entry Resources - All
Allows user to attach resources to all requisition entries. This right includes the right to navigate to the requisition pages, but does not include the right to create new requisitions or entries.
Type: Global
Project - Attach Requisitions Resources
Allows user to attach resources to requisition entries and includes adding, editing, proposing or deleting resources from the Request Results page. Only users with this access right can change project statuses to "Proposed" and "Booked". This right includes the Project – View Requisitions access right.
Type: Instance
Appendix A: Access Rights 303

Project Access Rights
Project - Create
Allows user to create a new project or program specifying general project properties. A user granted this right will automatically become the collaboration manager for the project and will be able to create action items, discussion. This access right includes the Project - Create from Template access right.
Type: Global
Project - Create from Template
Allows user to create a new project or program using only templates. A user granted this right will automatically become the collaboration manager for the project and will be able to create action items, discussion.
Type: Global
Project - Create/Edit Requisitions - All
Allows the user to create and edit requisition properties. This right includes the right to navigate to the requisition pages.
Type: Global
Project - Delete - All
Allows the user to delete any project or program. This right does not include the Project - View access right.
Type: Global
Project - Edit - All
Allows the user to edit all parts of any project, except Document Manager, Calendar, Action Items, Discussions and Custom Defined Fields.
Type: Global
Project - Edit Allocation Information - All
Allows the user to edit chargeback rules for all projects.
Type: Global
Project - Edit Assigned Tasks - All
Allows the user to edit assigned tasks on all projects.
Type: Global
Project - Edit Financial - All
Allows user to view and edit general properties, processes, and financial information on all projects. This right also allows the user to financially enable projects.
Type: Global
304 Project Management User Guide
Project Access Rights
Project - Edit Management - All
Allows the user to edit general and management properties for all projects. This right allows you to add staff and create tasks if projects are enabled for management. This right also includes the right to add subprojects to the project and edit the project in either Open Workbench or Microsoft Project.
Type: Global
Project - Edit Project Plan - All
Allows the user to add unplanned tasks to any projects when completing timesheets if the user is a team member.
Type: Global
Project - Enable Financial
Allows the user to financially enable all projects. The user must also be granted the Project - View access right, the Project - View Management access right, or the Project - Manager access right. If a participant or collaboration manager of a project, the user can also view financial properties.
Type: Global
Project - Hierarchy - Financial Rollup - Add - All
Allows the user to add investments to the financial rollup hierarchy of any project.
Type: Global
Project - Hierarchy - Financial Rollup - Edit - All
Allows the user to edit the financial rollup hierarchy of any project.
Type: Global
Project - Hierarchy - Parents - Add - All
Allows the user to add investments to parent hierarchy of any project.
Type: Global
Project - Hierarchy - Parents - Edit - All
Allows the user to edit the parent hierarchy of any project.
Type: Global
Project - Modify Baseline - All
Allows the user to baseline any project if it has been enabled for management. This right allows the user to view the general and management properties and processes.
Type: Global
Appendix A: Access Rights 305

Project Access Rights
Project - Reverse Charges - All
Allows the user to reverse charges for any project.
Type: Global
Project - Risk, Issue, Change Request - Delete - All
Allows the user staffed on any project or program to delete risks, issues, and change requests.
Type: Global
Project - Risk, Issue, Change Request - Edit - All
Allows the user to create and edit risks, issues, and changes requests for any project.
Type: Global
Project - Risk, Issue, Change Request - View - All
Allows user to view risks, issues, and change requests for any project.
Type: Global
Project - View Allocation Information All
Allows the user to view chargeback rules for any project.
Type: Global
Project - View Financial - All
Allows the user to view the general and financial properties for any project.
Type: Global
Project - View Management - All
Allows the user to view management properties and processes on any project that have been enabled for management.
Type: Global
Project - View Requisitions - All
Allows the user to view all requisitions for any project. The user is not granted view rights to individual requisition entries.
Type: Global
Project - View Tasks - All
Allows the user to view tasks and work breakdown structure for any project the user has been granted access.
Type: Global
306 Project Management User Guide

Project Access Rights
Project Benefit Plan - Edit - All
Allows the user to edit the benefit plans of any project.
Type: Global
Project Benefit Plan - View - All
Allows the user to view the benefit plans of any project.
Type: Global
Project Budget Plan - Approve All
Allows the user to approve the budget plans of any project.
Type: Global
Project Budget Plan - Edit All
Allows the user to view the budget plans of any project.
Type: Global
Project Budget Plan - View All
Allows the user to view the budget plans of any project.
Type: Global
Project Cost Plan - Edit All
Allows the user to edit the cost plans of any project.
Type: Global
Project Cost Plan - View All
Allows the user to view the cost plans of any project.
Type: Global
Project - View Chargebacks Information All
Allows user to view chargeback rules for any project.
Type: Global
Project - Edit Chargebacks Information All
Allows user to edit chargeback rules for any project.
Type: Global
Appendix A: Access Rights 307

Program Access Rights
308 Project Management User Guide
Program Access Rights The following access right is required to work with programs. Before you begin working in CA Clarity PPM, be sure you have the necessary access rights.
Note: Contact your CA Clarity PPM administrator or see the Administration Guide for more information if you find that you require access to other modules.
Management - Programs
Allows user to access the programs to which you have access. This right is dependent on the user having rights to programs and projects at either the instance level or OBS level.
Type: Global

Index
A C access rights change requests
projects • 18 audit trail for • 273 viewing users with access to programs •
291 categories of • 266 creating from risks • 270
allocations defining properties • 270 about • 206 processes • 274 accepting hard allocations • 215 using notes • 272 booking overallocated resources • 188 viewing • 271 booking proposed • 188 collaboration managers booking status changes • 188 identifying • 201 changing default (Project) • 216 removing access rights • 202 committing planned • 214 D editing • 210 estimating • 212 defining project • 67 hard-booking methods • 188
E rejecting proposed • 188 resetting • 211
earned value reviewing proposed • 188
about baselines and • 58 setting for multiple team members • 212
about baselines and EV computations • 58 setting from estimates • 211
about EV calculation methods • 62 shifting • 218
about EV data fields • 59 split booking • 196
applying EV calculation method • 64 viewing • 188
calculating and recording totals • 65 audit trail • 14, 254, 265, 273
displaying • 67 autoscheduling
manually overriding at the project level • 43 about • 87
manually overriding at the task level • 122 publishing • 89
setting default options at the project level • 41
return to current schedule without publishing • 89, 93
setting default options at the task level • 120 B
estimate to complete baselines applying a new ETC • 56
about • 77 applying at project level • 57 creating • 78 applying at task level • 152 defining current • 81 calculation • 55, 148 deleting • 86 changing at project level • 56 displaying the master project • 82 changing at task level • 149 editing • 77 viewing auto-generated estimates • 55 manually updating at the project level • 84
F manually updating at the task level • 85 viewing current • 82 financial properties viewing work allocation and earned value
data from • 83 defining • 46 disabling • 50
Index 309

removing from projects • 200 financial processing • 46 portlets financially closing projects • 50
general (program dashboard) • 299 H labor effort • 98, 299 team utilization • 99, 299 hierarchies
programs about • 221 about • 275 adding and removing parent investments •
228 access rights for • 277 adding projects to • 292 defining child allocations • 225 creating dependencies • 294 managing child investments • 225 creating from projects • 281 managing child investments and services •
221 creating new • 279 defining budget properties • 289 removing child investments • 222 defining properties • 282 sharing projects across investments • 229 deleting • 302 viewing allocation percentage to parent •
227 editing general properties • 283 editing risk properties • 290 viewing effort rollup • 226 editing scheduling properties • 285 viewing financial rollup • 224 program dashboard • 299
I removing dependencies • 296 removing projects from • 294 issues using the dashboard • 299 about managing • 256
project management creating and managing • 256 about • 17 creating from change requests • 259 accessing • 16 defining properties • 260 components • 14 using notes • 262 design methods and tools • 107 viewing • 261
projects working with action items • 263 about deleting • 102 working with tasks • 264 about teams • 161
J accessing • 53 accessing teams • 162
jobs • 20 accessing the dashboard • 98
L activating • 34 advance planning • 15
loading patterns • 166 aggregating costs • 229 canceling delete requests • 104 M copying from a template • 28 creating • 16, 21, 23 matrices creating a baseline • 78 about cost/rate matrices and projects • 52 creating from a template • 27 associating cost/rate matrices to projects •
52 deactivating • 103 defining investment allocations • 229 milestones, editing • 159 defining properties • 33
P defining risks • 43 defining scheduling properties • 36 participants designating as a template • 26 adding to projects • 199 editing • 34 creating groups • 205 editing baselines • 79 managing in projects • 198
310 Project Management User Guide

assigning access rights • 163 editing general properties • 34 assigning project tasks • 163 methods for creating • 22 assigning to project from a task • 163 project dashboard • 98 assigning to projects • 163 returning to • 226 building project teams • 161 setting up for tracking costs • 51 changing assignments • 166 versus programs • 275 data transferred during replacement of •
170 R defining the default OBS unit • 36 requisitions labor effort portlet • 98 about • 182 removing from projects • 175 deleting from projects • 197 replacing • 171, 172, 173 editing unopened requests • 186 replacing role assignments • 174 replacing unbooked resources • 194 selecting resources directly • 178 requesting additional bookings • 196 selecting resources for projects • 178 reviewing multiple requisitions • 188 staffing a project • 176 selecting approval required • 36 viewing assignments • 167 single • 188
subprojects task flow • 183 adding projects to • 70 unbooking • 194 adding to master project • 70 resource utilization comparing actuals and estimates • 70 editing • 146 controlling access • 72 team utilization portlet • 99 making read only • 72 viewing by resource and task • 101 removing from projects • 72 viewing in aggregate • 145 subprojects, about • 69 risk categories • 233, 238, 256 viewing actuals and estimates • 292 risks
about • 232 T audit trail for • 254 closing mitigated • 246 task estimates creating and managing • 237 creating estimating rules • 153 creating from change requests • 242 reordering estimating rules • 158 creating from issues • 243 running estimating rules • 155 defining properties • 245 top-down estimating at the project level •
56 defining risk factors • 43 deleting • 246 top-down estimating at the task level • 150 editing • 246 tasks processes for • 255 about • 105 rating risk factors • 233 about dependencies • 123 risk factors • 244 associating forms with • 114 viewing • 246 associating risks and issues with • 132 working with action items • 252 creating • 109 working with tasks • 253 creating dependencies • 132
role capacity (Project) • 197 creating from a template • 112 defining properties • 119 S deleting • 159 editing assignments • 167 scheduling properties (Project) • 36 estimating • 148 staff indenting and outdenting • 137 about replacing • 168 planning guidelines • 108 adding staffing requirements • 181
Index 311

312 Project Management User Guide
viewing dependencies in Gantt chart • 129 top-down estimating
applying rules at the project level • 57 using estimating rules mode • 151
total cost of ownership • 226
W work breakdown structure
configuring • 141 creating • 136 editing tasks • 141 expanding and collapsing • 140 guidelines • 136 inserting tasks • 113 moving tasks • 138