Embed Size (px)
Citation preview

PhotoshopElements
The®
®
TM
The ultimate guide to getting the most out of Photoshop Elements
Getting started • Amazing techniques • Creative projects
NEW tutorials forElements 11 inside

We’re very excited to have an entire book dedicated to this fantastic image-editing
software aimed at consumers, particularly as it’s often overshadowed by its CC sibling.
Sharing many of the features the professional version boasts, the revised edition of The
Photoshop Elements Book explores updates to Elements 11. Discover how to edit your
images, create digital art and share your projects with the wider world. Providing you
with an in-depth guide and step-by-step tutorials to fine-tune your techniques, this book
also comes with a free disc so you can follow along and experiment with free resources.
Welcome to
PhotoshopElements
The®
®
TM

Imagine Publishing Ltd
Richmond House
33 Richmond Hill
Bournemouth
Dorset BH2 6EZ
% +44 (0) 1202 586200
Website: www.imagine-publishing.co.uk
Head of PublishingAaron Asadi
Head of DesignRoss Andrews
Production EditorSarah Harrison
Senior Art EditorGreg Whitaker
DesignPerry Wardell-Wicks
Printed byWilliam Gibbons, 26 Planetary Road, Willenhall, West Midlands, WV13 3XT
Distributed in the UK & Eire by Imagine Publishing Ltd, www.imagineshop.co.uk. Tel 01202 586200
Distributed in Australia by Gordon & Gotch, Equinox Centre, 18 Rodborough Road, Frenchs Forest,
NSW 2086. Tel + 61 2 9972 8800
Distributed in the Rest of the World by Marketforce, Blue Fin Building, 110 Southwark Street, London, SE1 0SU
DisclaimerThe publisher cannot accept responsibility for any unsolicited material lost or damaged in the
post. All text and layout is the copyright of Imagine Publishing Ltd. Nothing in this bookazine may be reproduced in whole or part without the written permission of the publisher. All copyrights are
recognised and used specifically for the purpose of criticism and review. Although the bookazine has endeavoured to ensure all information is correct at time of print, prices and availability may change.
This bookazine is fully independent and not affiliated in any way with the companies mentioned herein.
Photoshop is either a registered trademark or trademark of Adobe Systems Incorporated in the United States and/or other countries and is used with express permission.
The Photoshop Elements Book Volume 1 Revised Edition © 2013 Imagine Publishing Ltd
ISBN 978-1909372726
bookazine series
Part of the
®
PhotoshopElements
The®
®
TM
Contents
PAGE 154
08 Ultimate guideExplore all Photoshop Elements has
to ofer, from editing images, creating
projects and sharing masterpieces
6 The Photoshop Elements Book
PAGE 76
Clone objectsDuplicate people in your photos
26
Get started with selectionsManipulate your images
28
Master selections and maskingCreate the out-of-bounds efect
30
Retouch photosTouch up your portraits
32
Control colourImprove the colour of photos
34
Get to know GradientsMaster this essential tool
36
Rescue old photosRestore faded family photos
40
Use brushes effectivelyDiscover how to use the Brush
palette to its full potential
44
Make one-click fixesDiscover auto options
58
Top guided editsMake your editing easier
62
Make essential adjustmentsUse blend modes for this efect
64
Edit portraitsImprove your portrait shots
66
70 Add drama with Dodge and BurnAdjust lighting
Master HDR toningFake the HDR look
72
Fix images with curvesPush contrast as far as you can
74
Convert images to black and whiteFrom colour to monochrome
76
Get the Lomo effectPush colour limits
78
Edit colours with Photo FilterFix white-balance problems
80
Perfect macroAdd layered macro efects
84
Fix heavy shadowsBring back some light
88
Create exposure effectsMake a layered composition
90
Light up your seascapesCreate some atmosphere
94
Improve exposureBring life back into images
48
Make creative panoramasUse the Photomerge function
52
Sharpen your imagesRemove subtle blurring
46
Photo editing
Techniques
PAGE 26 PAGE 30 PAGE 36 PAGE 58
PAGE 166 PAGE 90 PAGE 140
The Photoshop Elements Book 7
Improve your landscapesAdjust colour and exposure
98
Create the Dragan effectGet creative with this efect
100
Retouch for classic effectsCreate a vintage portrait efect
Use the Lighting Effects filterAdd stunning lighting efects
110
Add emphasis to eyesApply a rainbow efect
114
Create a comic- book effectUse the Color Halftone filter
122
Use Elements for stunning effectsMake the most of Elements
126
Smudge your way to an oil paintingCreate an oil portrait with the
Smudge tool
130
Create a family portraitFake a painted-portrait efect
with your family snaps
134
Create an art-deco styleMaster the Mezzotint filter
140
Design an abstractControl the Custom Shape tool
for abstract artwork
144
Paint portraitsMix tradition with digital
148
Create instant pop artRe-create Andy Warhol's work
154
Make your own watercolourMerge traditional art efects
156
Turn photos to sketchesGet creative with your images
160
Customise brushesCreate eye-catching art
162
Create underwater scenesUse filters and blend modes to
create a photomontage
184
Play with PerspectiveCreate a miniature efect
188
192 Design your own holiday postcardSend a modern-day postcard
the digital way
194 Build a photo albumCreate your own virtual album
196 Compose a mixed-media pieceCreate a musical composition
with a variety of media
200 Create a panoramic planetMake a 360-degree planet
202 Compose surreal artworkCreate a bizarre composite
Achieve a retro photo effectSend your photos back in time
with a retro efect
206
Photo project
Digital art
Create splatter effectsCombine brushes and assets
166
Apply texturesAdd some texture to your shots
170
Make water effectsUse filters and blend modes
174
Design ancient patternsCreate some ancient designs
for use in a variety of projects
180
Selective colour creationsBring out the tones
116
104
Photoshop Elements
8 The Photoshop Elements Book
PhotoshopElements
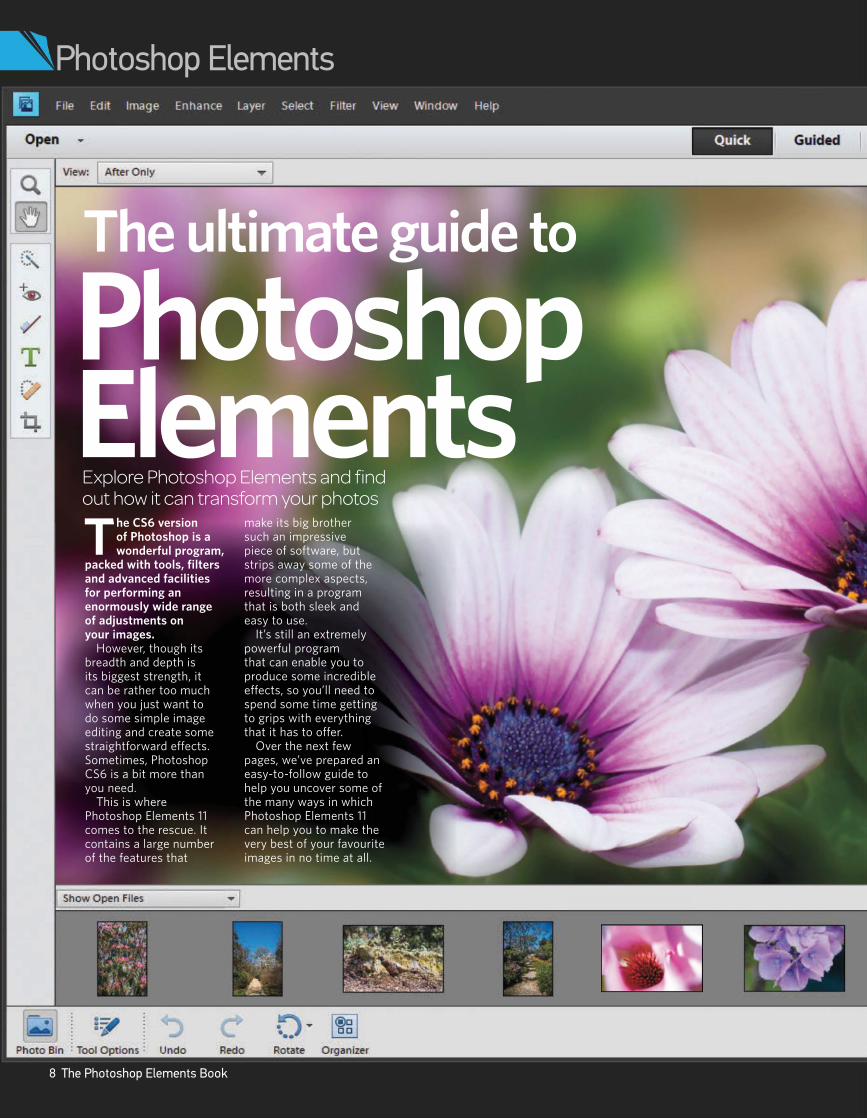
The ultimate guide to
Explore Photoshop Elements and find out how it can transform your photos
The CS6 version of Photoshop is a wonderful program,
packed with tools, filters and advanced facilities for performing an enormously wide range of adjustments on your images.
However, though its breadth and depth is its biggest strength, it can be rather too much when you just want to do some simple image editing and create some straightforward effects. Sometimes, Photoshop CS6 is a bit more than you need.
This is where Photoshop Elements 11 comes to the rescue. It contains a large number of the features that
make its big brother such an impressive piece of software, but strips away some of the more complex aspects, resulting in a program that is both sleek and easy to use.
It’s still an extremely powerful program that can enable you to produce some incredible effects, so you’ll need to spend some time getting to grips with everything that it has to offer.
Over the next few pages, we’ve prepared an easy-to-follow guide to help you uncover some of the many ways in which Photoshop Elements 11 can help you to make the very best of your favourite images in no time at all.

Ultimate guide
The Photoshop Elements Book 9
Photoshop Elements
10 The Photoshop Elements Book
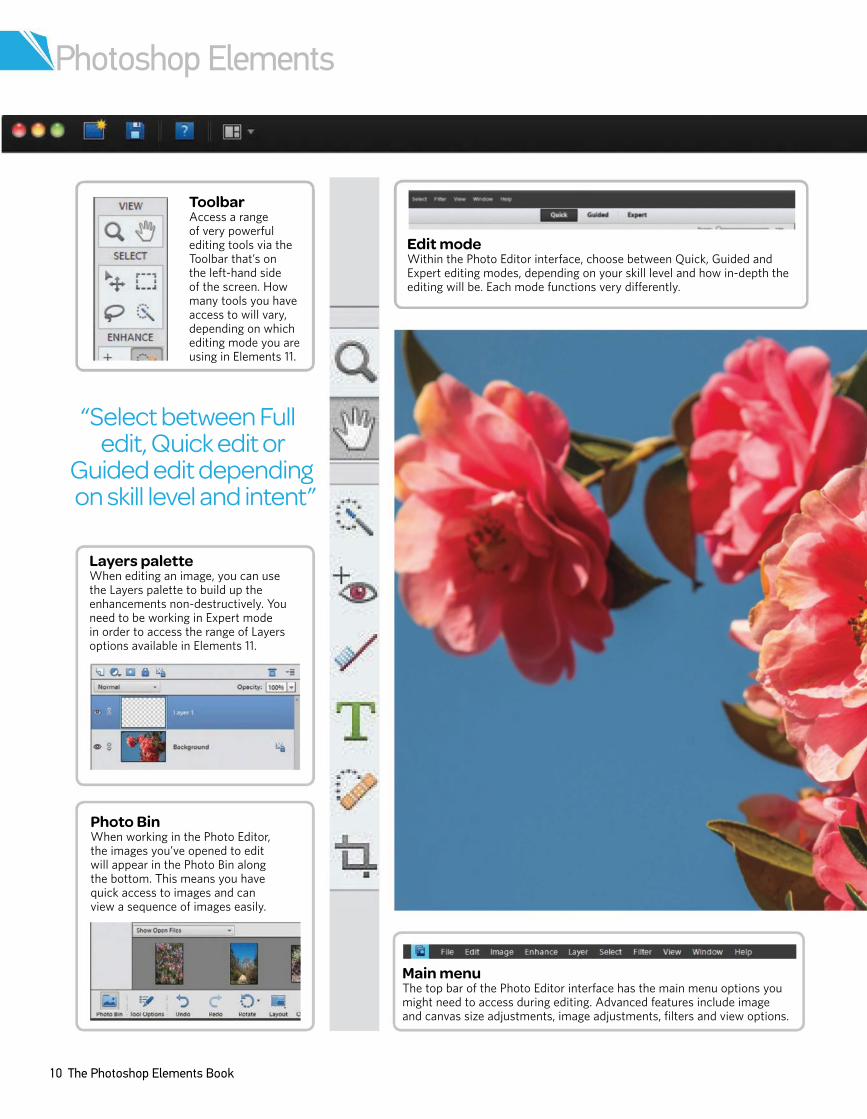
ToolbarAccess a range of very powerful editing tools via the Toolbar thatÕs on the left-hand side of the screen. How many tools you have access to will vary, depending on which editing mode you are using in Elements 11.
Main menu The top bar of the Photo Editor interface has the main menu options you might need to access during editing. Advanced features include image and canvas size adjustments, image adjustments, filters and view options.
Photo BinWhen working in the Photo Editor, the images youÕve opened to edit will appear in the Photo Bin along the bottom. This means you have quick access to images and can view a sequence of images easily.
Layers paletteWhen editing an image, you can use the Layers palette to build up the enhancements non-destructively. You need to be working in Expert mode in order to access the range of Layers options available in Elements 11.
Edit modeWithin the Photo Editor interface, choose between Quick, Guided and Expert editing modes, depending on your skill level and how in-depth the editing will be. Each mode functions very differently.
“Select between Full edit, Quick edit or
Guided edit depending on skill level and intent”
Ultimate guide
The Photoshop Elements Book 11
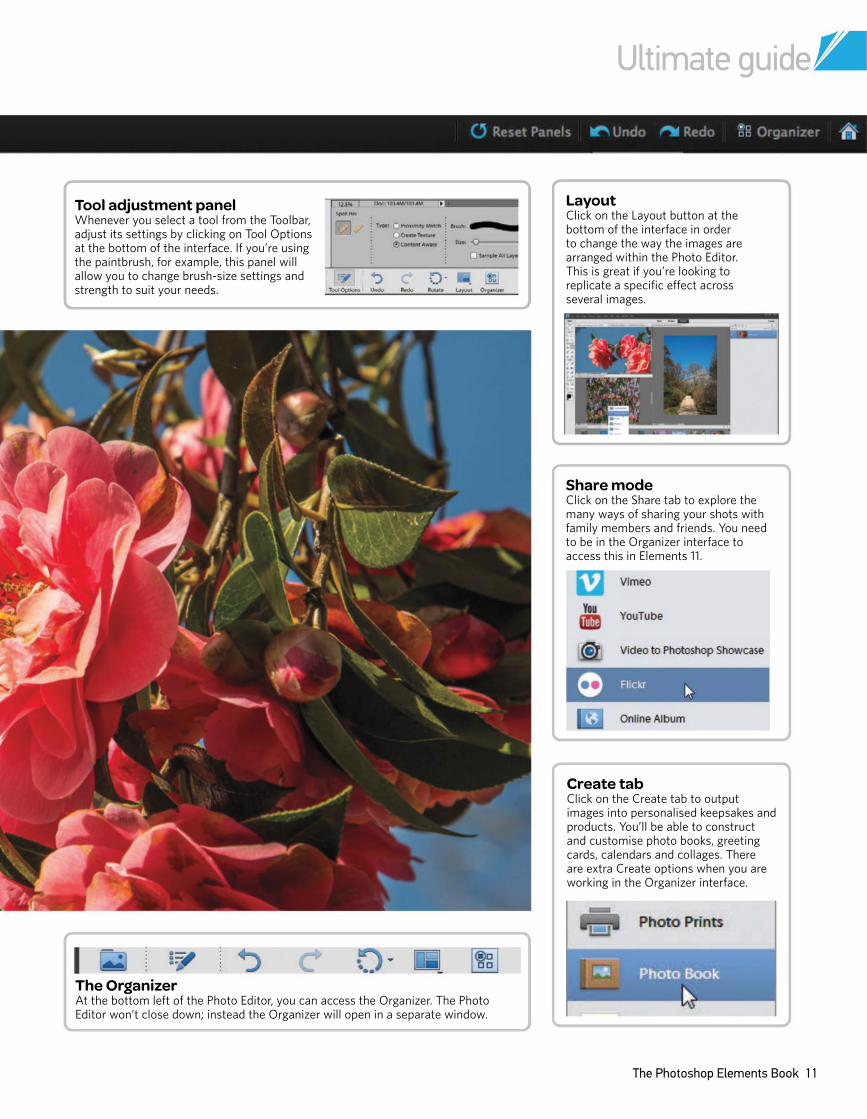
Share modeClick on the Share tab to explore the many ways of sharing your shots with family members and friends. You need to be in the Organizer interface to access this in Elements 11.
Tool adjustment panelWhenever you select a tool from the Toolbar, adjust its settings by clicking on Tool Options at the bottom of the interface. If youÕre using the paintbrush, for example, this panel will allow you to change brush-size settings and strength to suit your needs.
Create tabClick on the Create tab to output images into personalised keepsakes and products. YouÕll be able to construct and customise photo books, greeting cards, calendars and collages. There are extra Create options when you are working in the Organizer interface.
LayoutClick on the Layout button at the bottom of the interface in order to change the way the images are arranged within the Photo Editor. This is great if youÕre looking to replicate a specific effect across several images.
The OrganizerAt the bottom left of the Photo Editor, you can access the Organizer. The Photo Editor wonÕt close down; instead the Organizer will open in a separate window.
Photoshop Elements
12 The Photoshop Elements Book
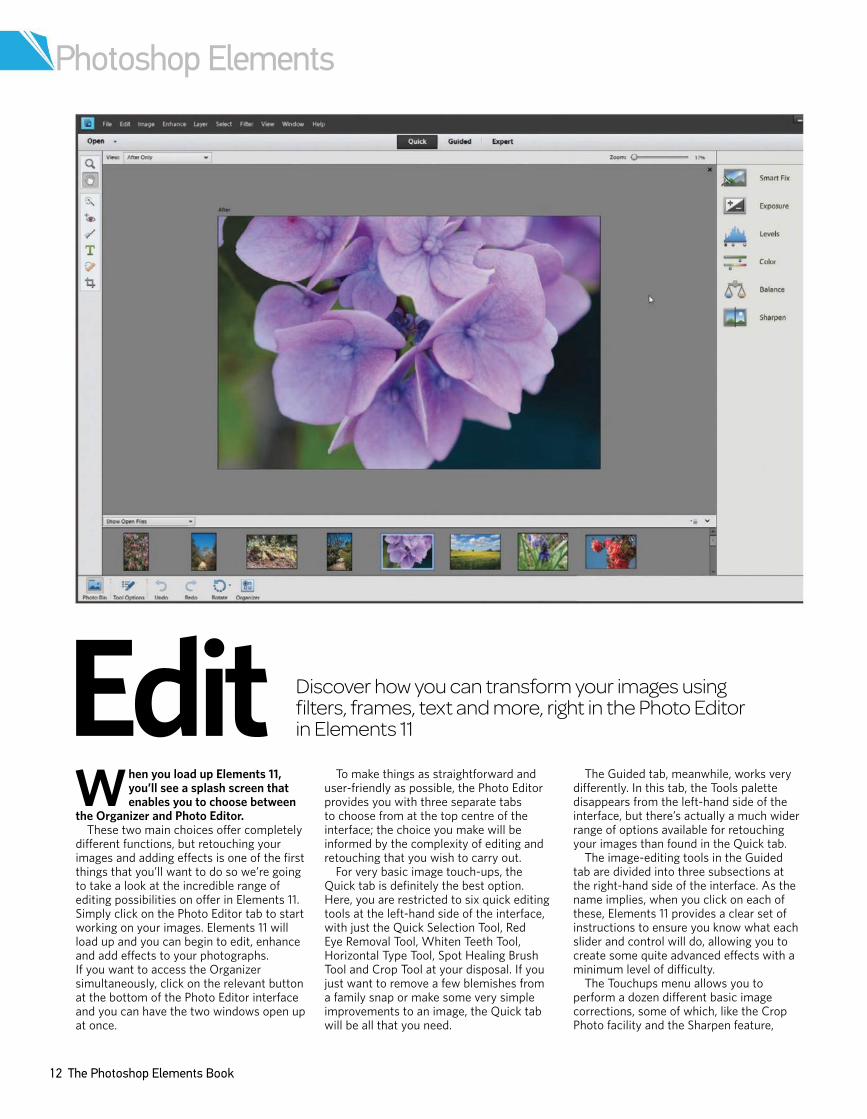
When you load up Elements 11, you’ll see a splash screen that enables you to choose between
the Organizer and Photo Editor. These two main choices offer completely
different functions, but retouching your images and adding effects is one of the first things that you’ll want to do so we’re going to take a look at the incredible range of editing possibilities on offer in Elements 11. Simply click on the Photo Editor tab to start working on your images. Elements 11 will load up and you can begin to edit, enhance and add effects to your photographs. If you want to access the Organizer simultaneously, click on the relevant button at the bottom of the Photo Editor interface and you can have the two windows open up at once.
To make things as straightforward and user-friendly as possible, the Photo Editor provides you with three separate tabs to choose from at the top centre of the interface; the choice you make will be informed by the complexity of editing and retouching that you wish to carry out.
For very basic image touch-ups, the Quick tab is definitely the best option. Here, you are restricted to six quick editing tools at the left-hand side of the interface, with just the Quick Selection Tool, Red Eye Removal Tool, Whiten Teeth Tool, Horizontal Type Tool, Spot Healing Brush Tool and Crop Tool at your disposal. If you just want to remove a few blemishes from a family snap or make some very simple improvements to an image, the Quick tab will be all that you need.
The Guided tab, meanwhile, works very differently. In this tab, the Tools palette disappears from the left-hand side of the interface, but there’s actually a much wider range of options available for retouching your images than found in the Quick tab.
The image-editing tools in the Guided tab are divided into three subsections at the right-hand side of the interface. As the name implies, when you click on each of these, Elements 11 provides a clear set of instructions to ensure you know what each slider and control will do, allowing you to create some quite advanced effects with a minimum level of difficulty.
The Touchups menu allows you to perform a dozen different basic image corrections, some of which, like the Crop Photo facility and the Sharpen feature,
Edit Discover how you can transform your images using filters, frames, text and more, right in the Photo Editor in Elements 11
Ultimate guide
The Photoshop Elements Book 13
are fairly basic, but others are much more in-depth and powerful, like the Perfect Portrait feature and the Recompose option.
If you want to get creative with your images, the Photo Effects subsection has plenty of fun on offer. There are ten effects to choose from, including a feature to help create an Old Fashioned Photo, a Line Drawing effect and the ability to add Depth of Field, Tilt-Shift and Vignette effects.
Photo Play is the third and final subsection, featuring four fairly advanced effects that would otherwise be difficult to reproduce. Out Of Bounds allows you to create the illusion of a part of your image, such as someone’s leg kicking a ball, coming out of the bounds of the image. Picture Stack allows you to present your image as four, eight, or twelve individual tiles, similar to a jigsaw puzzle. Pop Art allows you to
choose from two different, Warhol-esque Pop Art effects, while the Reflection option allows you to create a reflection effect completely from scratch.
If you want to take things further, visit the Expert tab. This is similar to the main Photoshop interface, and offers significant levels of creative control once your image-editing confidence grows.
There is an extensive Tools palette at the left-hand side of the interface, with four different selection tools, six enhancing tools, eight drawing tools and four modifying tools. Over on the right-hand side of the interface, there’s a Layers palette. When combined with blending modes, this allows you to take very extensive control over your image adjustments, and it’s not too difficult to get to grips with after a little bit of experimentation.
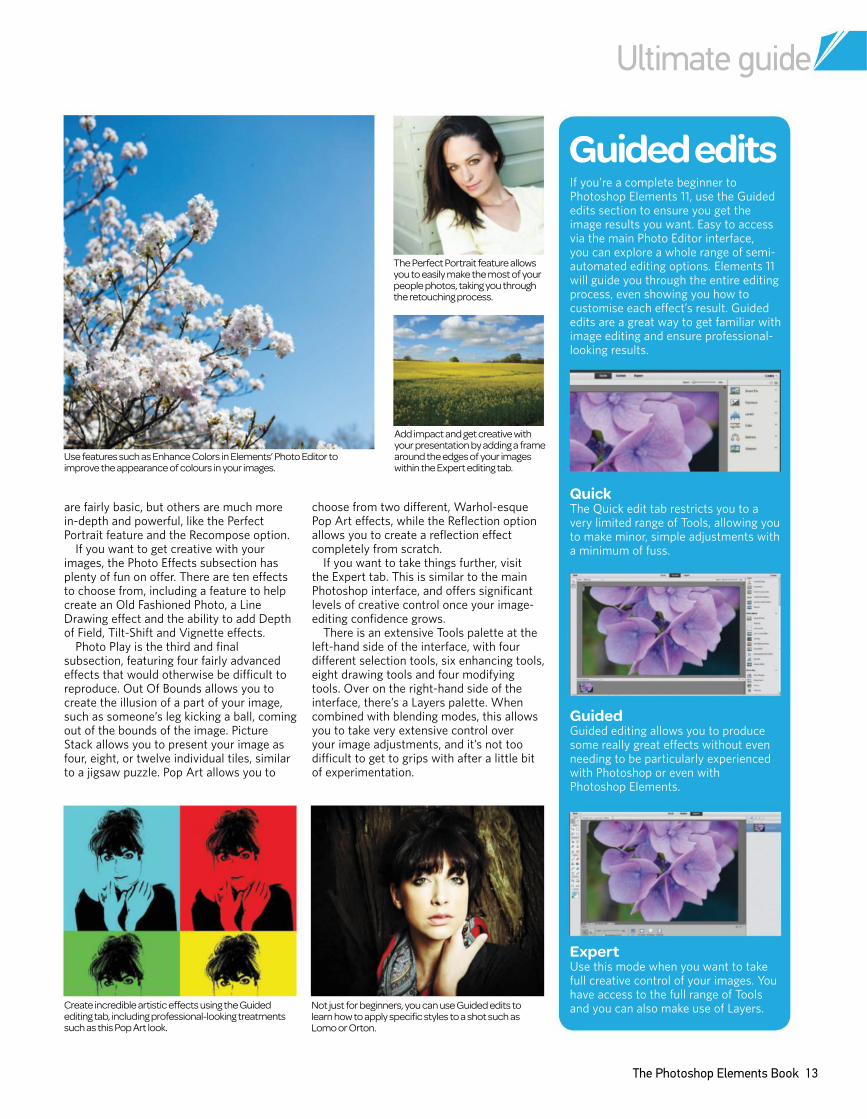
Guided editsIf you’re a complete beginner to Photoshop Elements 11, use the Guided edits section to ensure you get the image results you want. Easy to access via the main Photo Editor interface, you can explore a whole range of semi-automated editing options. Elements 11 will guide you through the entire editing process, even showing you how to customise each effect’s result. Guided edits are a great way to get familiar with image editing and ensure professional-looking results.
QuickThe Quick edit tab restricts you to a very limited range of Tools, allowing you to make minor, simple adjustments with a minimum of fuss.
GuidedGuided editing allows you to produce some really great effects without even needing to be particularly experienced with Photoshop or even with Photoshop Elements.
ExpertUse this mode when you want to take full creative control of your images. You have access to the full range of Tools and you can also make use of Layers.
Use features such as Enhance Colors in Elements’ Photo Editor to improve the appearance of colours in your images.
The Perfect Portrait feature allows you to easily make the most of your people photos, taking you through the retouching process.
Add impact and get creative with your presentation by adding a frame around the edges of your images within the Expert editing tab.
Create incredible artistic effects using the Guided editing tab, including professional-looking treatments such as this Pop Art look.
Not just for beginners, you can use Guided edits to learn how to apply specific styles to a shot such as Lomo or Orton.
Photoshop Elements
14 The Photoshop Elements Book
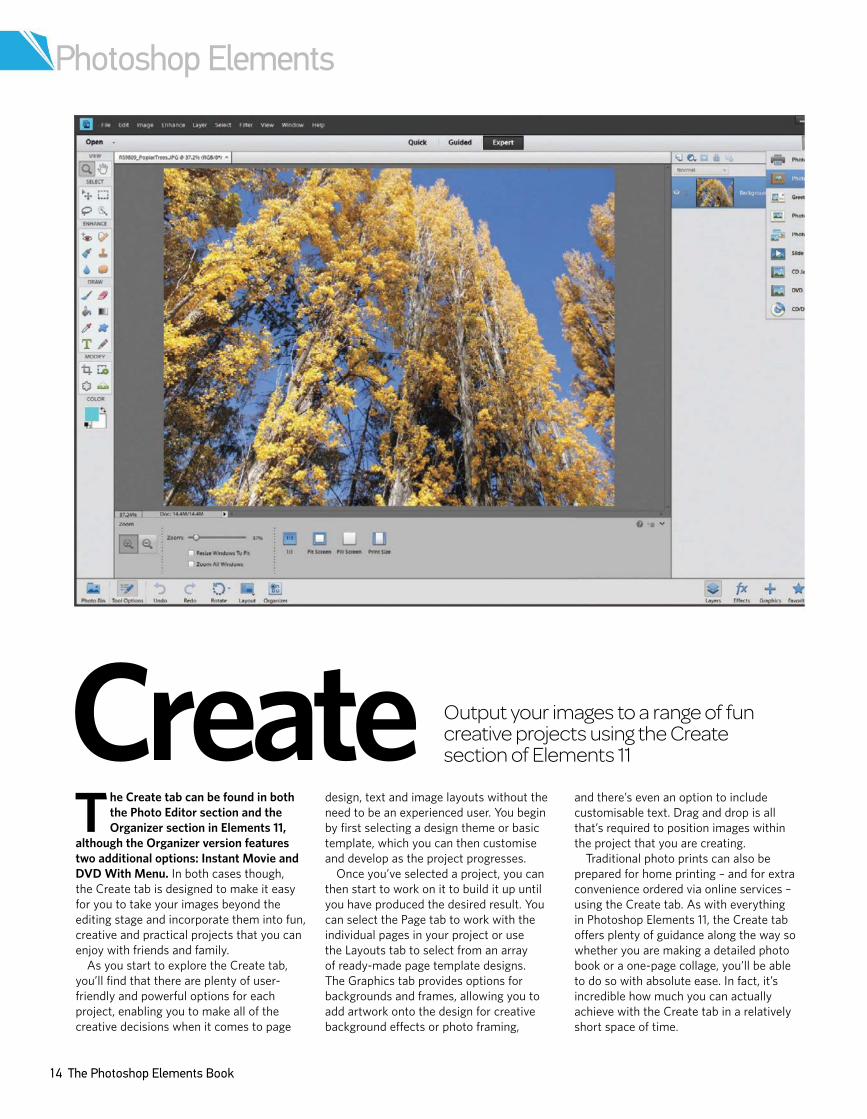
The Create tab can be found in both
the Photo Editor section and the
Organizer section in Elements 11,
although the Organizer version features
two additional options: Instant Movie and
DVD With Menu. In both cases though,
the Create tab is designed to make it easy
for you to take your images beyond the
editing stage and incorporate them into fun,
creative and practical projects that you can
enjoy with friends and family.
As you start to explore the Create tab,
youÕll find that there are plenty of user-
friendly and powerful options for each
project, enabling you to make all of the
creative decisions when it comes to page
design, text and image layouts without the
need to be an experienced user. You begin
by first selecting a design theme or basic
template, which you can then customise
and develop as the project progresses.
Once youÕve selected a project, you can
then start to work on it to build it up until
you have produced the desired result. You
can select the Page tab to work with the
individual pages in your project or use
the Layouts tab to select from an array
of ready-made page template designs.
The Graphics tab provides options for
backgrounds and frames, allowing you to
add artwork onto the design for creative
background effects or photo framing,
and thereÕs even an option to include
customisable text. Drag and drop is all
thatÕs required to position images within
the project that you are creating.
Traditional photo prints can also be
prepared for home printing Ð and for extra
convenience ordered via online services Ð
using the Create tab. As with everything
in Photoshop Elements 11, the Create tab
offers plenty of guidance along the way so
whether you are making a detailed photo
book or a one-page collage, youÕll be able
to do so with absolute ease. In fact, itÕs
incredible how much you can actually
achieve with the Create tab in a relatively
short space of time.
Create Output your images to a range of fun creative projects using the Create section of Elements 11

Ultimate guide
The Photoshop Elements Book 15
Creating a photo bookA photo book is a fantastic keepsake that can take far less time to put together than a photo album, full of prints. Easy to design and customisable in the Create tab of Elements 11, you can decide on page layouts, design and text as you go. There are plenty of starter themes and optional book sizes you can select from before you begin too. To get started on your own photo-book project, select the Photo Book option from the available projects in the Create tab. You can now follow along with us as we take you through the basic steps of putting together your own personalised photo book in Elements 11.
Inside pageUsing the arrows along the bottom, scroll through to the inside pages. If text is not available on the layout but you would like to add some, go to the Create tab and text then click Add Text Block and apply anywhere on the page.
Create a photo bookClick on the Create button and locate the Photo Book option from the drop-down menu. In the dialog box select a Photo Book style that you would like, add in the page amount and then un-check ÔAutofill with Selected imagesÕ.
Design layoutYou can scroll through the Create tab options and add in additional artwork to your photo book design or alternatively change the page layouts by selecting a new page template from the Layouts tab.
Design your coverYou can now begin designing your cover. Drag an image from the Project Bin up or double-click on the space to open one from a separate file. Drag to the space allocated.
Add in pagesYou may need more pages than you originally intended. To add more into your photo book, go to Pages in the Create tab and select the + sign to add more in.
Add in textClick on the text space to activate and adjust the text font, size, style and alignment within the Create tab. You can also adjust colour here and warp text for more creative results. Now type in your photo book title.
Photoshop Elements
16 The Photoshop Elements Book
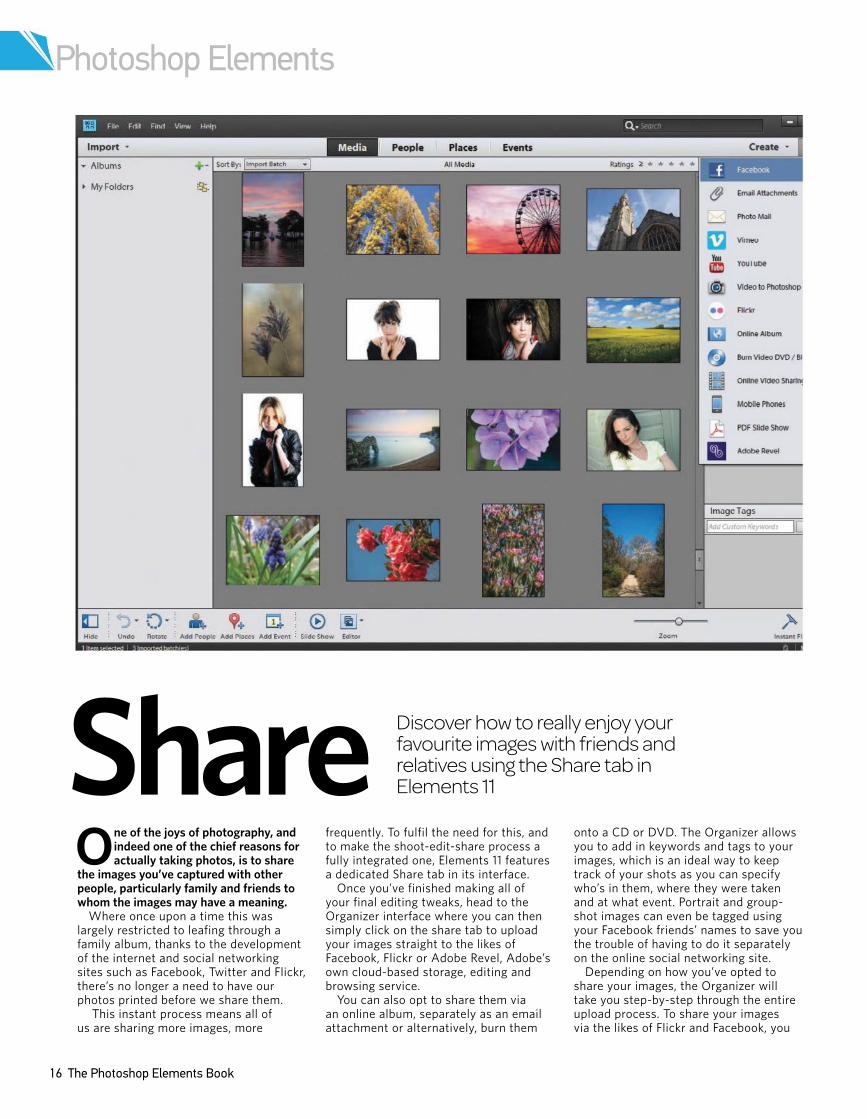
One of the joys of photography, and indeed one of the chief reasons for actually taking photos, is to share
the images you’ve captured with other people, particularly family and friends to whom the images may have a meaning.
Where once upon a time this was largely restricted to leafing through a family album, thanks to the development of the internet and social networking sites such as Facebook, Twitter and Flickr, there’s no longer a need to have our photos printed before we share them.
This instant process means all of us are sharing more images, more
frequently. To fulfil the need for this, and to make the shoot-edit-share process a fully integrated one, Elements 11 features a dedicated Share tab in its interface.
Once you’ve finished making all of your final editing tweaks, head to the Organizer interface where you can then simply click on the share tab to upload your images straight to the likes of Facebook, Flickr or Adobe Revel, Adobe’s own cloud-based storage, editing and browsing service.
You can also opt to share them via an online album, separately as an email attachment or alternatively, burn them
onto a CD or DVD. The Organizer allows you to add in keywords and tags to your images, which is an ideal way to keep track of your shots as you can specify who’s in them, where they were taken and at what event. Portrait and group-shot images can even be tagged using your Facebook friends’ names to save you the trouble of having to do it separately on the online social networking site.
Depending on how you’ve opted to share your images, the Organizer will take you step-by-step through the entire upload process. To share your images via the likes of Flickr and Facebook, you
ShareDiscover how to really enjoy your favourite images with friends and relatives using the Share tab in Elements 11
Ultimate guide
The Photoshop Elements Book 17
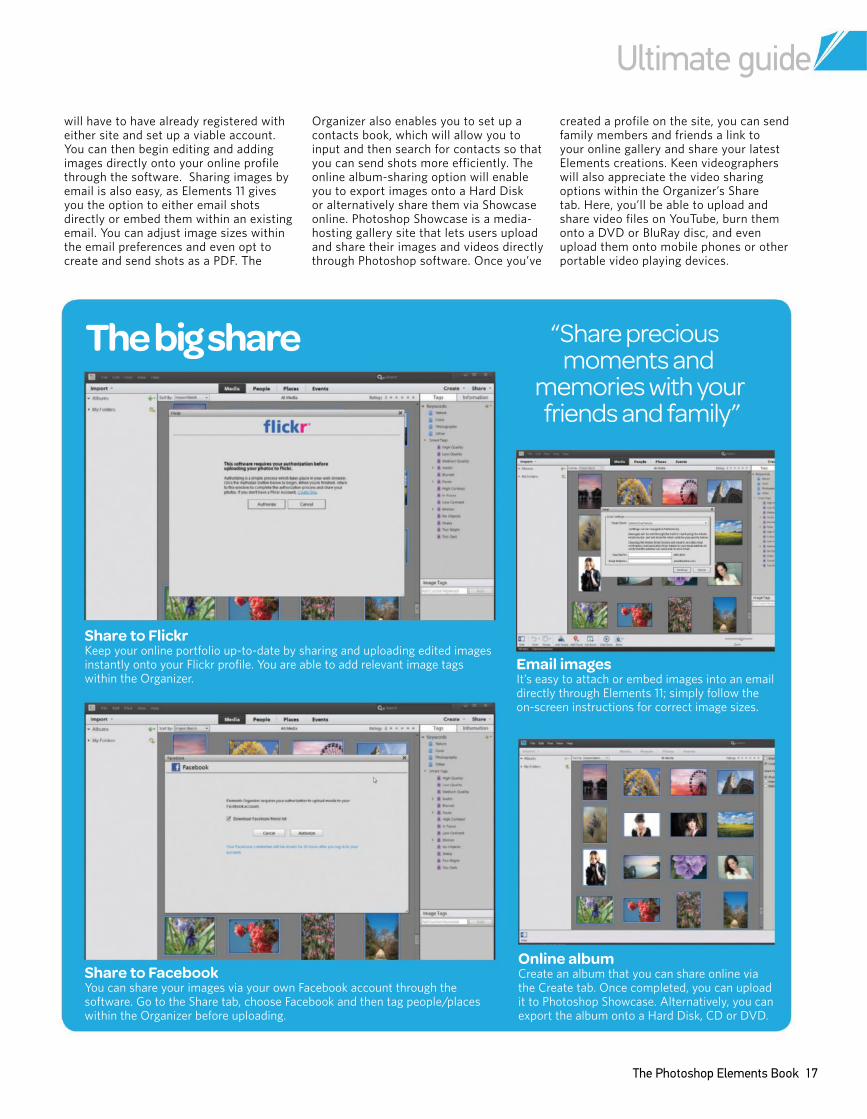
The big share
Email images ItÕs easy to attach or embed images into an email directly through Elements 11; simply follow the on-screen instructions for correct image sizes.
Share to FlickrKeep your online portfolio up-to-date by sharing and uploading edited images instantly onto your Flickr profile. You are able to add relevant image tags within the Organizer.
Share to Facebook You can share your images via your own Facebook account through the software. Go to the Share tab, choose Facebook and then tag people/places within the Organizer before uploading.
Online album Create an album that you can share online via the Create tab. Once completed, you can upload it to Photoshop Showcase. Alternatively, you can export the album onto a Hard Disk, CD or DVD.
will have to have already registered with either site and set up a viable account. You can then begin editing and adding images directly onto your online profile through the software. Sharing images by email is also easy, as Elements 11 gives you the option to either email shots directly or embed them within an existing email. You can adjust image sizes within the email preferences and even opt to create and send shots as a PDF. The
Organizer also enables you to set up a contacts book, which will allow you to input and then search for contacts so that you can send shots more efficiently. The online album-sharing option will enable you to export images onto a Hard Disk or alternatively share them via Showcase online. Photoshop Showcase is a media-hosting gallery site that lets users upload and share their images and videos directly through Photoshop software. Once youÕve
created a profile on the site, you can send family members and friends a link to your online gallery and share your latest Elements creations. Keen videographers will also appreciate the video sharing options within the OrganizerÕs Share tab. Here, youÕll be able to upload and share video files on YouTube, burn them onto a DVD or BluRay disc, and even upload them onto mobile phones or other portable video playing devices.
“Share precious moments and
memories with your friends and family”
Photoshop Elements
18 The Photoshop Elements Book
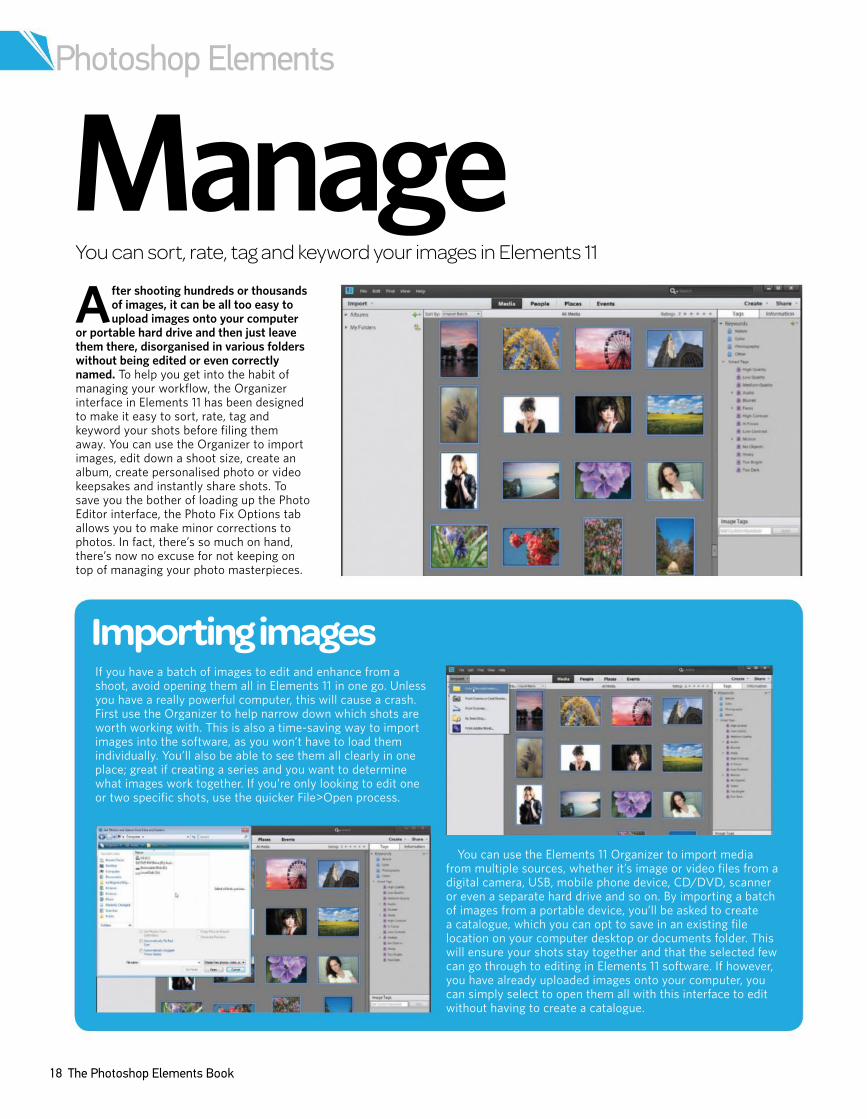
After shooting hundreds or thousands of images, it can be all too easy to upload images onto your computer
or portable hard drive and then just leave them there, disorganised in various folders without being edited or even correctly named. To help you get into the habit of managing your workflow, the Organizer interface in Elements 11 has been designed to make it easy to sort, rate, tag and keyword your shots before filing them away. You can use the Organizer to import images, edit down a shoot size, create an album, create personalised photo or video keepsakes and instantly share shots. To save you the bother of loading up the Photo Editor interface, the Photo Fix Options tab allows you to make minor corrections to photos. In fact, thereÕs so much on hand, thereÕs now no excuse for not keeping on top of managing your photo masterpieces.
ManageYou can sort, rate, tag and keyword your images in Elements 11
Importing imagesIf you have a batch of images to edit and enhance from a shoot, avoid opening them all in Elements 11 in one go. Unless you have a really powerful computer, this will cause a crash. First use the Organizer to help narrow down which shots are worth working with. This is also a time-saving way to import images into the software, as you wonÕt have to load them individually. YouÕll also be able to see them all clearly in one place; great if creating a series and you want to determine what images work together. If youÕre only looking to edit one or two specific shots, use the quicker File>Open process.
You can use the Elements 11 Organizer to import media from multiple sources, whether itÕs image or video files from a digital camera, USB, mobile phone device, CD/DVD, scanner or even a separate hard drive and so on. By importing a batch of images from a portable device, youÕll be asked to create a catalogue, which you can opt to save in an existing file location on your computer desktop or documents folder. This will ensure your shots stay together and that the selected few can go through to editing in Elements 11 software. If however, you have already uploaded images onto your computer, you can simply select to open them all with this interface to edit without having to create a catalogue.
Ultimate guide
The Photoshop Elements Book 19
Find imagesKeyword Tags
Photo Bin
Once youÕve built up a good image-management system with the use of keywords and tags, youÕll be able to search for and find specific shots quite easily. Photoshop Elements 11 features a simple search-and-find function for efficiency. To find tagged images, you can simply enter a keyword into the search bar or alternatively, select one of the active key words from the lists of Keywords and Smart Tags to bring up the right results.
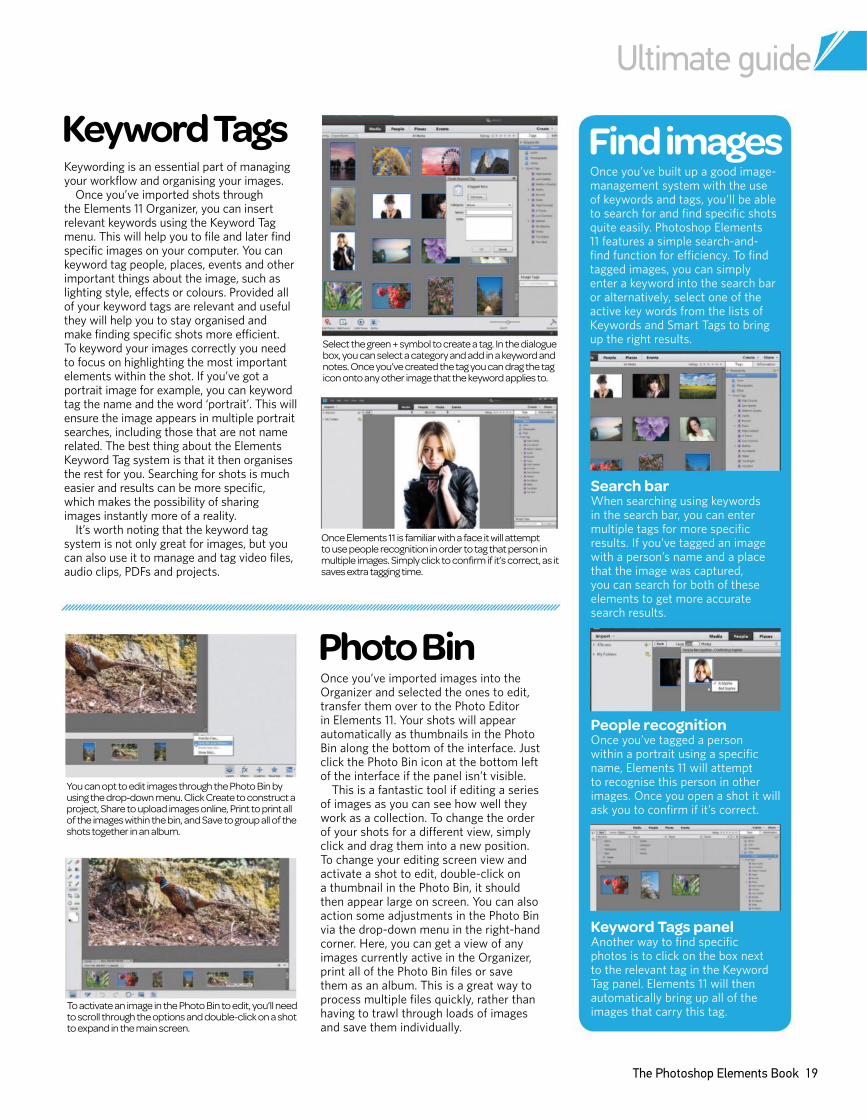
Keywording is an essential part of managing your workflow and organising your images.
Once youÕve imported shots through the Elements 11 Organizer, you can insert relevant keywords using the Keyword Tag menu. This will help you to file and later find specific images on your computer. You can keyword tag people, places, events and other important things about the image, such as lighting style, effects or colours. Provided all of your keyword tags are relevant and useful they will help you to stay organised and make finding specific shots more efficient. To keyword your images correctly you need to focus on highlighting the most important elements within the shot. If youÕve got a portrait image for example, you can keyword tag the name and the word ÔportraitÕ. This will ensure the image appears in multiple portrait searches, including those that are not name related. The best thing about the Elements Keyword Tag system is that it then organises the rest for you. Searching for shots is much easier and results can be more specific, which makes the possibility of sharing images instantly more of a reality.
ItÕs worth noting that the keyword tag system is not only great for images, but you can also use it to manage and tag video files, audio clips, PDFs and projects.
Once youÕve imported images into the Organizer and selected the ones to edit, transfer them over to the Photo Editor in Elements 11. Your shots will appear automatically as thumbnails in the Photo Bin along the bottom of the interface. Just click the Photo Bin icon at the bottom left of the interface if the panel isnÕt visible.
This is a fantastic tool if editing a series of images as you can see how well they work as a collection. To change the order of your shots for a different view, simply click and drag them into a new position. To change your editing screen view and activate a shot to edit, double-click on a thumbnail in the Photo Bin, it should then appear large on screen. You can also action some adjustments in the Photo Bin via the drop-down menu in the right-hand corner. Here, you can get a view of any images currently active in the Organizer, print all of the Photo Bin files or save them as an album. This is a great way to process multiple files quickly, rather than having to trawl through loads of images and save them individually.
Search bar When searching using keywords in the search bar, you can enter multiple tags for more specific results. If youÕve tagged an image with a personÕs name and a place that the image was captured, you can search for both of these elements to get more accurate search results.
People recognition Once youÕve tagged a person within a portrait using a specific name, Elements 11 will attempt to recognise this person in other images. Once you open a shot it will ask you to confirm if itÕs correct.
Keyword Tags panel Another way to find specific photos is to click on the box next to the relevant tag in the Keyword Tag panel. Elements 11 will then automatically bring up all of the images that carry this tag.
Select the green + symbol to create a tag. In the dialogue box, you can select a category and add in a keyword and notes. Once you’ve created the tag you can drag the tag icon onto any other image that the keyword applies to.
Once Elements 11 is familiar with a face it will attempt to use people recognition in order to tag that person in multiple images. Simply click to confirm if it’s correct, as it saves extra tagging time.
You can opt to edit images through the Photo Bin by using the drop-down menu. Click Create to construct a project, Share to upload images online, Print to print all of the images within the bin, and Save to group all of the shots together in an album.
To activate an image in the Photo Bin to edit, you’ll need to scroll through the options and double-click on a shot to expand in the main screen.
Photoshop Elements
20 The Photoshop Elements Book
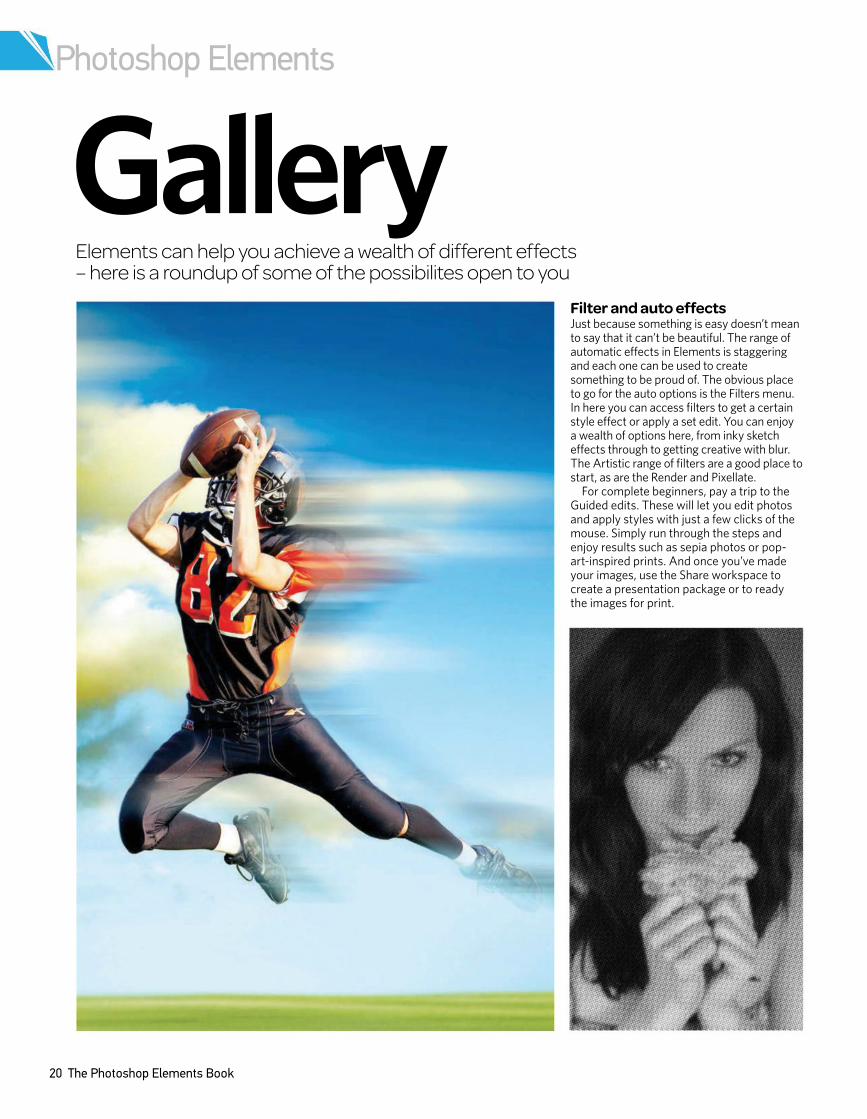
GalleryElements can help you achieve a wealth of different effects Ð here is a roundup of some of the possibilites open to you
Filter and auto effects
Just because something is easy doesn’t mean to say that it can’t be beautiful. The range of automatic efects in Elements is staggering and each one can be used to create something to be proud of. The obvious place to go for the auto options is the Filters menu. In here you can access filters to get a certain style efect or apply a set edit. You can enjoy a wealth of options here, from inky sketch efects through to getting creative with blur. The Artistic range of filters are a good place to start, as are the Render and Pixellate.
For complete beginners, pay a trip to the Guided edits. These will let you edit photos and apply styles with just a few clicks of the mouse. Simply run through the steps and enjoy results such as sepia photos or pop-art-inspired prints. And once you’ve made your images, use the Share workspace to create a presentation package or to ready the images for print.
Ultimate guide
The Photoshop Elements Book 21
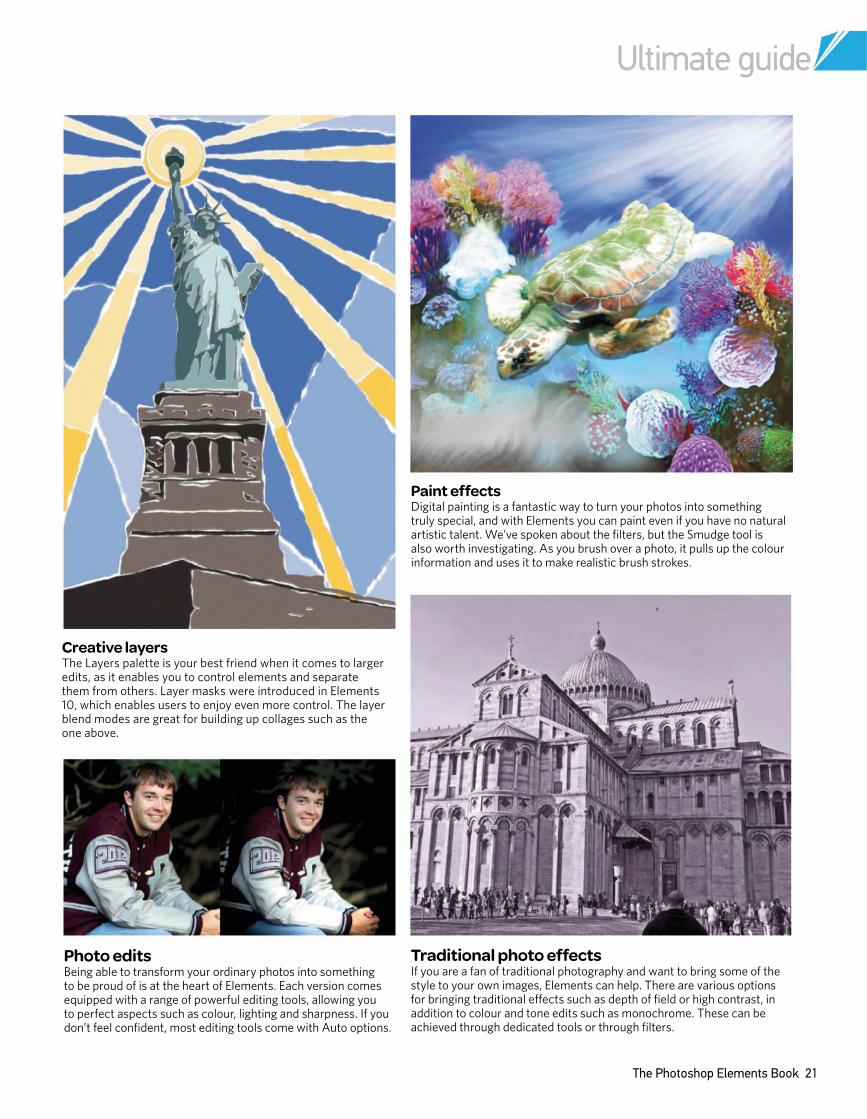
Creative layersThe Layers palette is your best friend when it comes to larger edits, as it enables you to control elements and separate them from others. Layer masks were introduced in Elements 10, which enables users to enjoy even more control. The layer blend modes are great for building up collages such as the one above.
Paint effectsDigital painting is a fantastic way to turn your photos into something truly special, and with Elements you can paint even if you have no natural artistic talent. We’ve spoken about the filters, but the Smudge tool is also worth investigating. As you brush over a photo, it pulls up the colour information and uses it to make realistic brush strokes.
Photo editsBeing able to transform your ordinary photos into something to be proud of is at the heart of Elements. Each version comes equipped with a range of powerful editing tools, allowing you to perfect aspects such as colour, lighting and sharpness. If you don’t feel confident, most editing tools come with Auto options.
Traditional photo effectsIf you are a fan of traditional photography and want to bring some of the style to your own images, Elements can help. There are various options for bringing traditional efects such as depth of field or high contrast, in addition to colour and tone edits such as monochrome. These can be achieved through dedicated tools or through filters.
QUICK, GUIDED AND EXPERT MODES
01 The three modes in Photoshop Elements 11 have taken
centre stage. Edit images in either Quick, Guided or Expert
mode. Quick contains a few of the basic tools for enhancing
images, Guided guides you through some great creative effects,
and Expert features the entire program.
Ten reasons why Photoshop Elements is better than ever
Photoshop Elements 11 has been altered; not just in the way
that it looks, but also in the effects and tools it has on offer.
Here are ten improvements to the latest version of the
beginner’s choice in photo-editing software.
10 improvements to Photoshop Elements 11
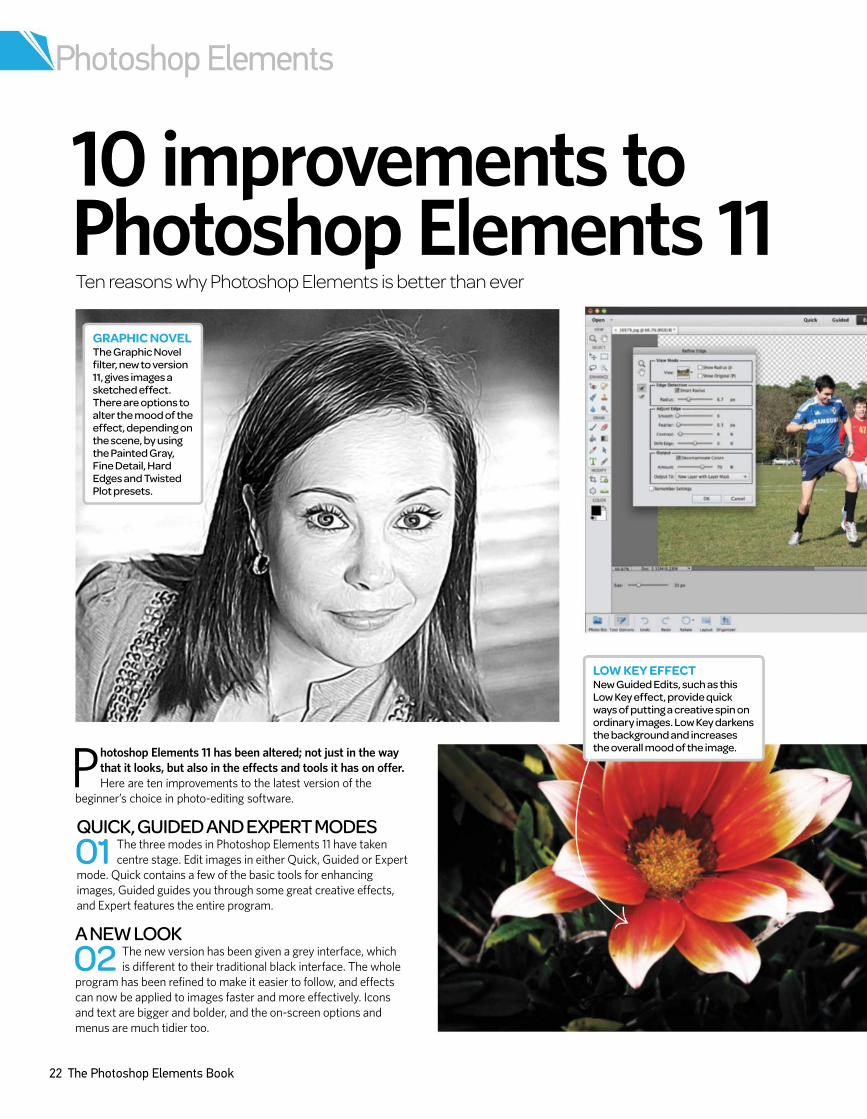
GRAPHIC NOVEL
The Graphic Novel filter, new to version 11, gives images a sketched effect. There are options to alter the mood of the effect, depending on the scene, by using the Painted Gray, Fine Detail, Hard Edges and Twisted Plot presets.
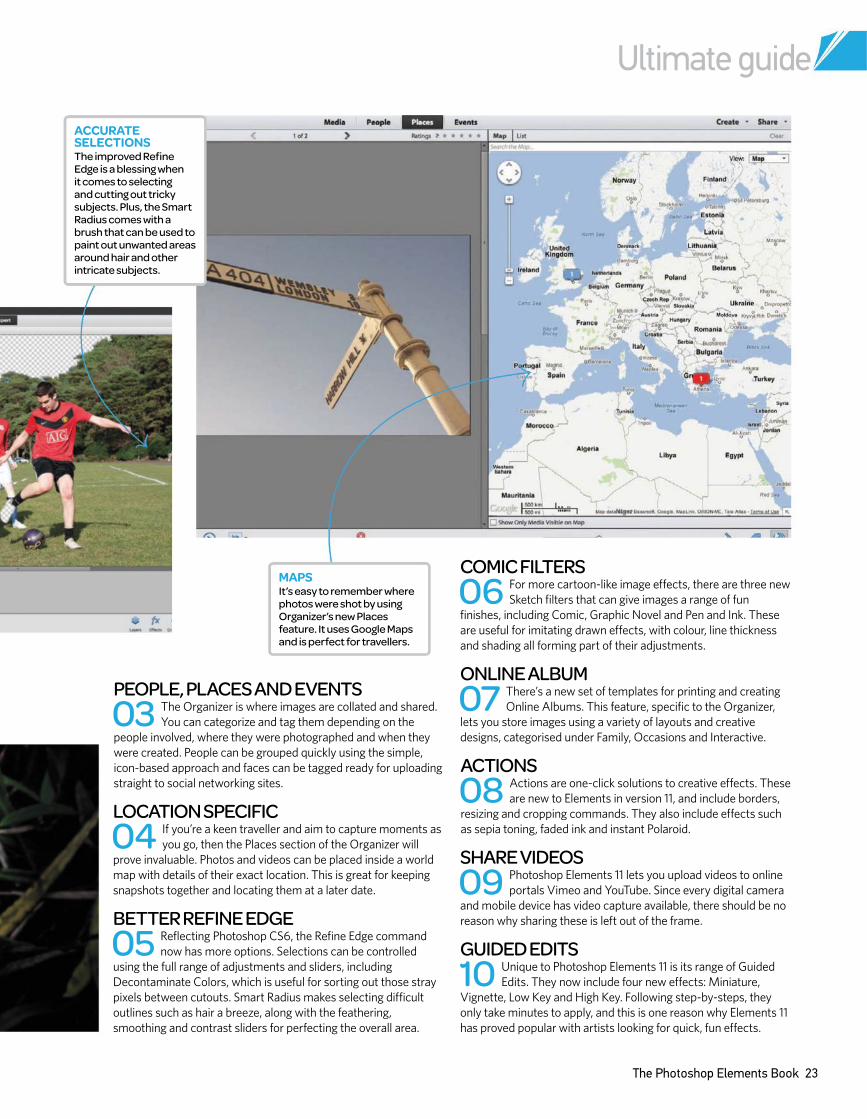
LOW KEY EFFECT
New Guided Edits, such as this Low Key effect, provide quick ways of putting a creative spin on ordinary images. Low Key darkens the background and increases the overall mood of the image.
A NEW LOOK
02 The new version has been given a grey interface, which
is different to their traditional black interface. The whole
program has been refined to make it easier to follow, and effects
can now be applied to images faster and more effectively. Icons
and text are bigger and bolder, and the on-screen options and
menus are much tidier too.
Photoshop Elements
22 The Photoshop Elements Book
ONLINE ALBUM
07
There’s a new set of templates for printing and creating
Online Albums. This feature, specific to the Organizer,
lets you store images using a variety of layouts and creative
designs, categorised under Family, Occasions and Interactive.
ACTIONS
08 Actions are one-click solutions to creative effects. These
are new to Elements in version 11, and include borders,
resizing and cropping commands. They also include effects such
as sepia toning, faded ink and instant Polaroid.
PEOPLE, PLACES AND EVENTS
03
The Organizer is where images are collated and shared.
You can categorize and tag them depending on the
people involved, where they were photographed and when they
were created. People can be grouped quickly using the simple,
icon-based approach and faces can be tagged ready for uploading
straight to social networking sites.
SHARE VIDEOS
09
Photoshop Elements 11 lets you upload videos to online
portals Vimeo and YouTube. Since every digital camera
and mobile device has video capture available, there should be no
reason why sharing these is left out of the frame.
GUIDED EDITS
10
Unique to Photoshop Elements 11 is its range of Guided
Edits. They now include four new effects: Miniature,
Vignette, Low Key and High Key. Following step-by-steps, they
only take minutes to apply, and this is one reason why Elements 11
has proved popular with artists looking for quick, fun effects.
LOCATION SPECIFIC
you go, then the Places section of the Organizer will 04
If you’re a keen traveller and aim to capture moments as
prove invaluable. Photos and videos can be placed inside a world
map with details of their exact location. This is great for keeping
snapshots together and locating them at a later date.
BETTER REFINE EDGE
05
Reflecting Photoshop CS6, the Refine Edge command
now has more options. Selections can be controlled
using the full range of adjustments and sliders, including
Decontaminate Colors, which is useful for sorting out those stray
pixels between cutouts. Smart Radius makes selecting difficult
outlines such as hair a breeze, along with the feathering,
smoothing and contrast sliders for perfecting the overall area.
COMIC FILTERS
06 For more cartoon-like image effects, there are three new
Sketch filters that can give images a range of fun
finishes, including Comic, Graphic Novel and Pen and Ink. These
are useful for imitating drawn effects, with colour, line thickness
and shading all forming part of their adjustments.
Ultimate guide
ACCURATE
SELECTIONS
The improved Refine Edge is a blessing when it comes to selecting and cutting out tricky subjects. Plus, the Smart Radius comes with a brush that can be used to paint out unwanted areas around hair and other intricate subjects.
MAPS
It’s easy to remember where photos were shot by using Organizer’s new Places feature. It uses Google Maps and is perfect for travellers.
The Photoshop Elements Book 23
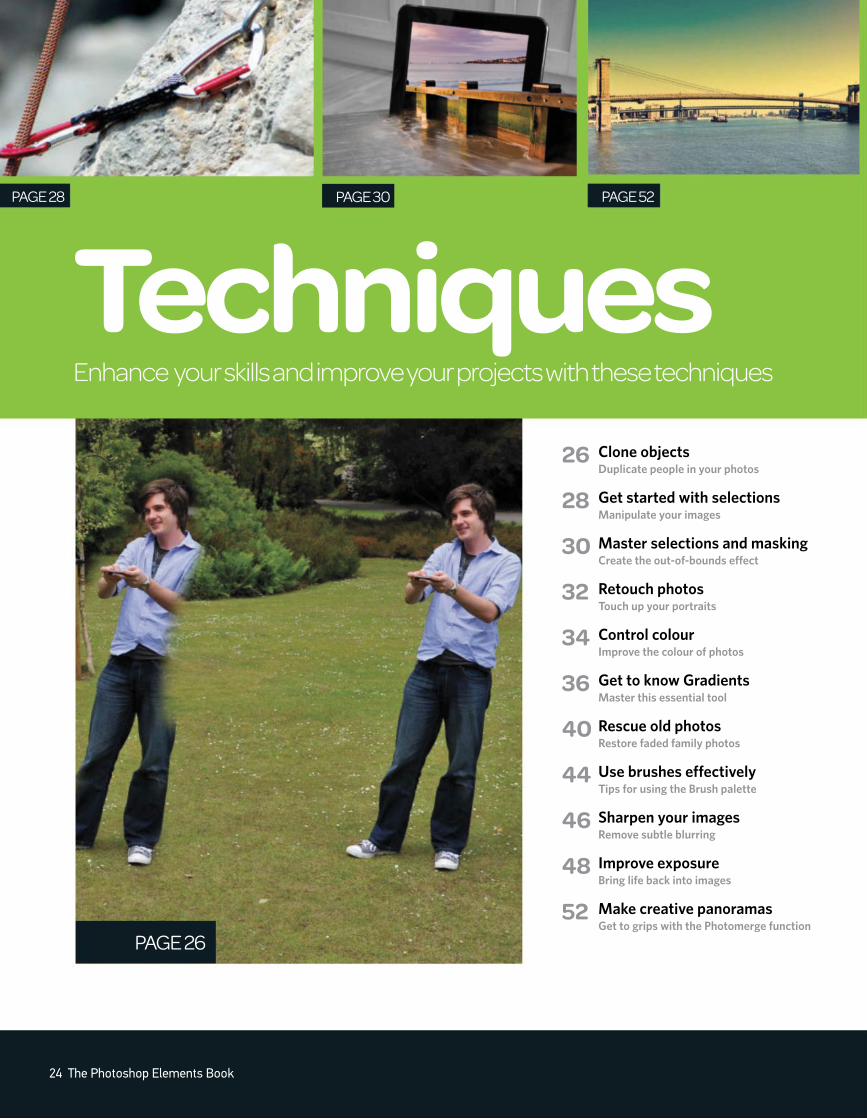
TechniquesPAGE 28 PAGE 30 PAGE 52
PAGE 26
Enhance your skills and improve your projects with these techniques
24 The Photoshop Elements Book
Clone objectsDuplicate people in your photos
26
Get started with selectionsManipulate your images
28
Master selections and maskingCreate the out-of-bounds efect
30
Retouch photosTouch up your portraits
32
Control colourImprove the colour of photos
34
Get to know GradientsMaster this essential tool
36
Rescue old photosRestore faded family photos
40
Use brushes effectivelyTips for using the Brush palette
44
Sharpen your imagesRemove subtle blurring
46
PAGE 150Improve exposureBring life back into images
48
Make creative panoramasGet to grips with the Photomerge function
52
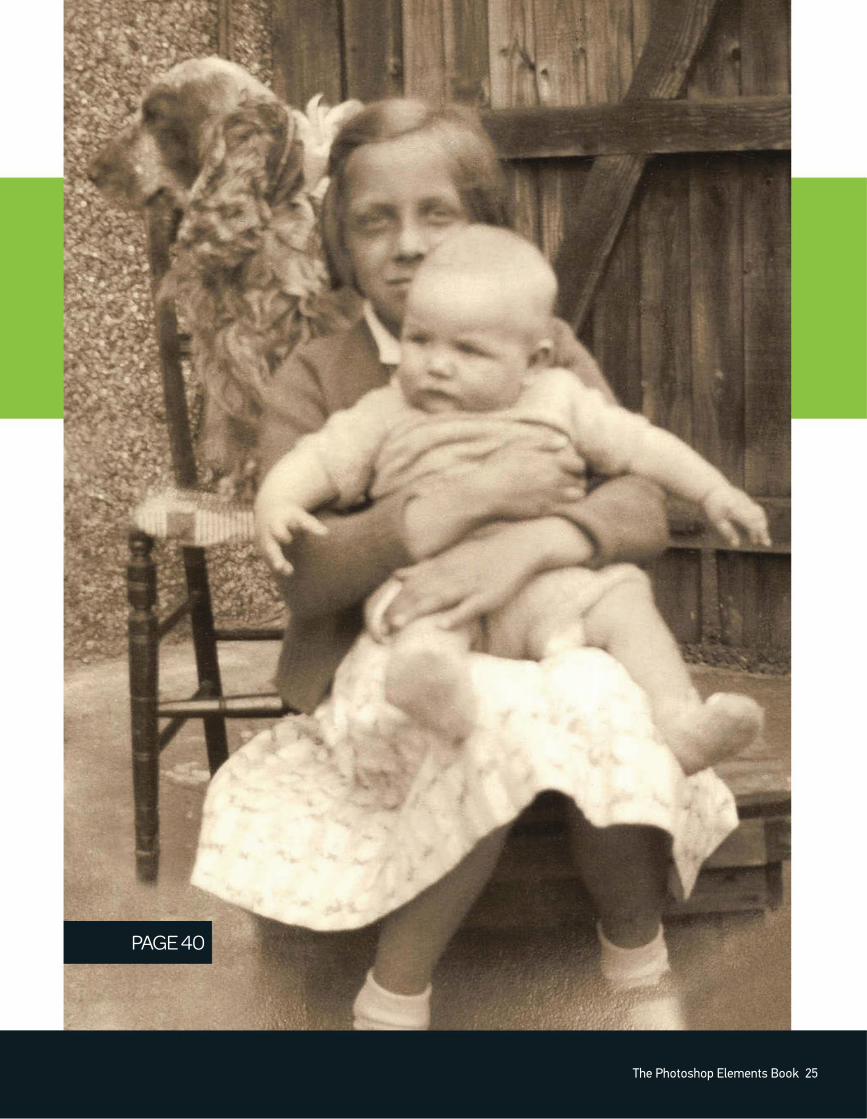
PAGE 40
The Photoshop Elements Book 25
Techniques
26 The Photoshop Elements Book
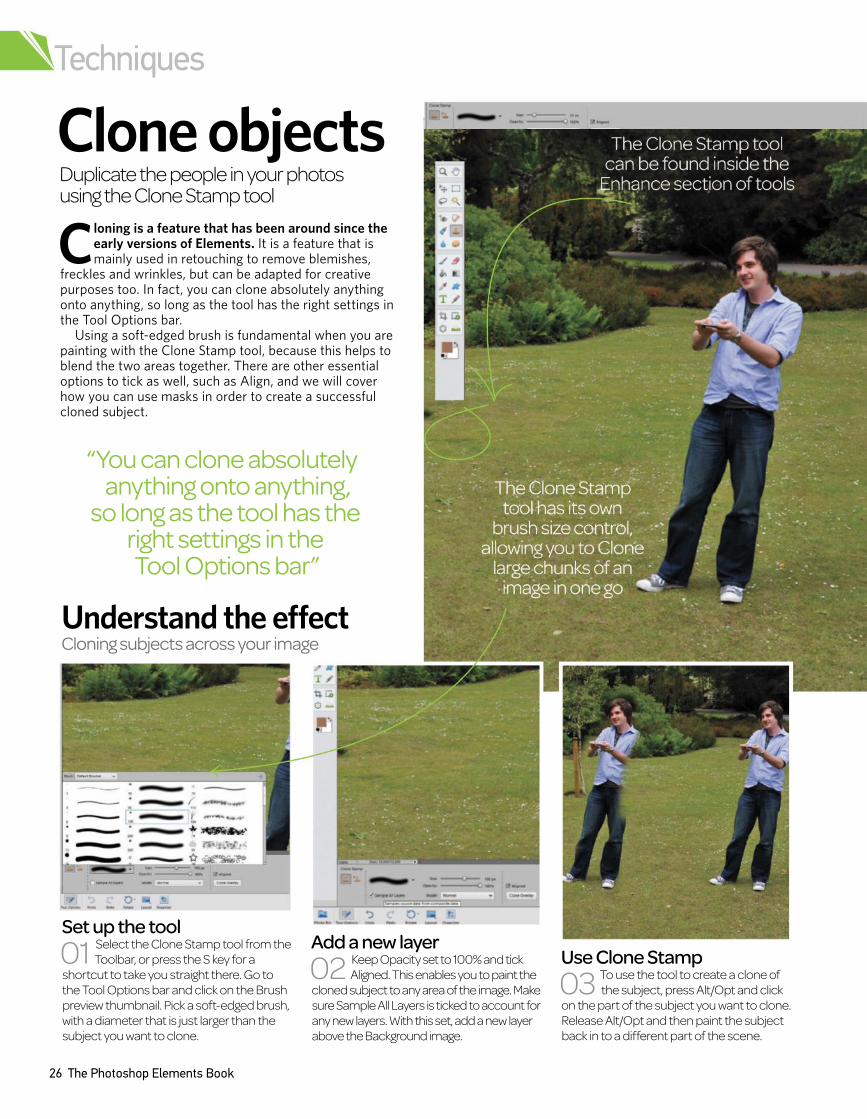
Understand the effect Cloning subjects across your image
Set up the tool
01 Select the Clone Stamp tool from the
Toolbar, or press the S key for a
shortcut to take you straight there. Go to
the Tool Options bar and click on the Brush
preview thumbnail. Pick a soft-edged brush,
with a diameter that is just larger than the
subject you want to clone.
Clone objectsDuplicate the people in your photos using the Clone Stamp tool
Cloning is a feature that has been around since the early versions of Elements. It is a feature that is mainly used in retouching to remove blemishes,
freckles and wrinkles, but can be adapted for creative purposes too. In fact, you can clone absolutely anything onto anything, so long as the tool has the right settings in the Tool Options bar.
Using a soft-edged brush is fundamental when you are painting with the Clone Stamp tool, because this helps to blend the two areas together. There are other essential options to tick as well, such as Align, and we will cover how you can use masks in order to create a successful cloned subject.
“You can clone absolutely anything onto anything,
so long as the tool has the right settings in the Tool Options bar”
Add a new layer
02 Keep Opacity set to 100% and tick
Aligned. This enables you to paint the
cloned subject to any area of the image. Make
sure Sample All Layers is ticked to account for
any new layers. With this set, add a new layer
above the Background image.
Use Clone Stamp
03 To use the tool to create a clone of
the subject, press Alt/Opt and click
on the part of the subject you want to clone.
Release Alt/Opt and then paint the subject
back in to a different part of the scene.
Clone objects
The Photoshop Elements Book 27
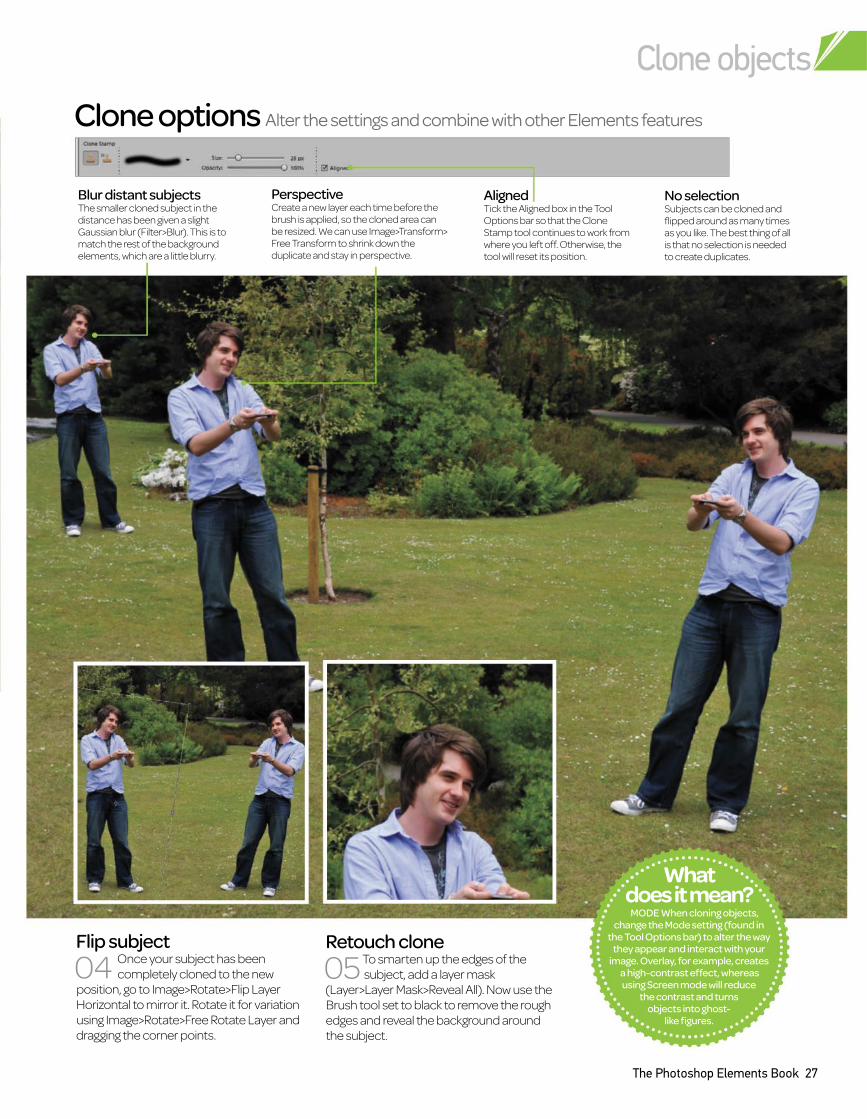
Clone options Alter the settings and combine with other Elements features
What does it mean?
MODE When cloning objects, change the Mode setting (found in
the Tool Options bar) to alter the way they appear and interact with your
image. Overlay, for example, creates a high-contrast effect, whereas using Screen mode will reduce
the contrast and turns objects into ghost-
like figures.
Retouch clone
subject, add a layer mask 05 To smarten up the edges of the
(Layer>Layer Mask>Reveal All). Now use the
Brush tool set to black to remove the rough
edges and reveal the background around
the subject.
Flip subject
04 Once your subject has been
completely cloned to the new
position, go to Image>Rotate>Flip Layer
Horizontal to mirror it. Rotate it for variation
using Image>Rotate>Free Rotate Layer and
dragging the corner points.
PerspectiveCreate a new layer each time before the brush is applied, so the cloned area can be resized. We can use Image>Transform> Free Transform to shrink down the duplicate and stay in perspective.
Blur distant subjectsThe smaller cloned subject in the distance has been given a slight Gaussian blur (Filter>Blur). This is to match the rest of the background elements, which are a little blurry.
AlignedTick the Aligned box in the Tool Options bar so that the Clone Stamp tool continues to work from where you left off. Otherwise, the tool will reset its position.
No selection Subjects can be cloned and flipped around as many times as you like. The best thing of all is that no selection is needed to create duplicates.
Techniques
28 The Photoshop Elements Book
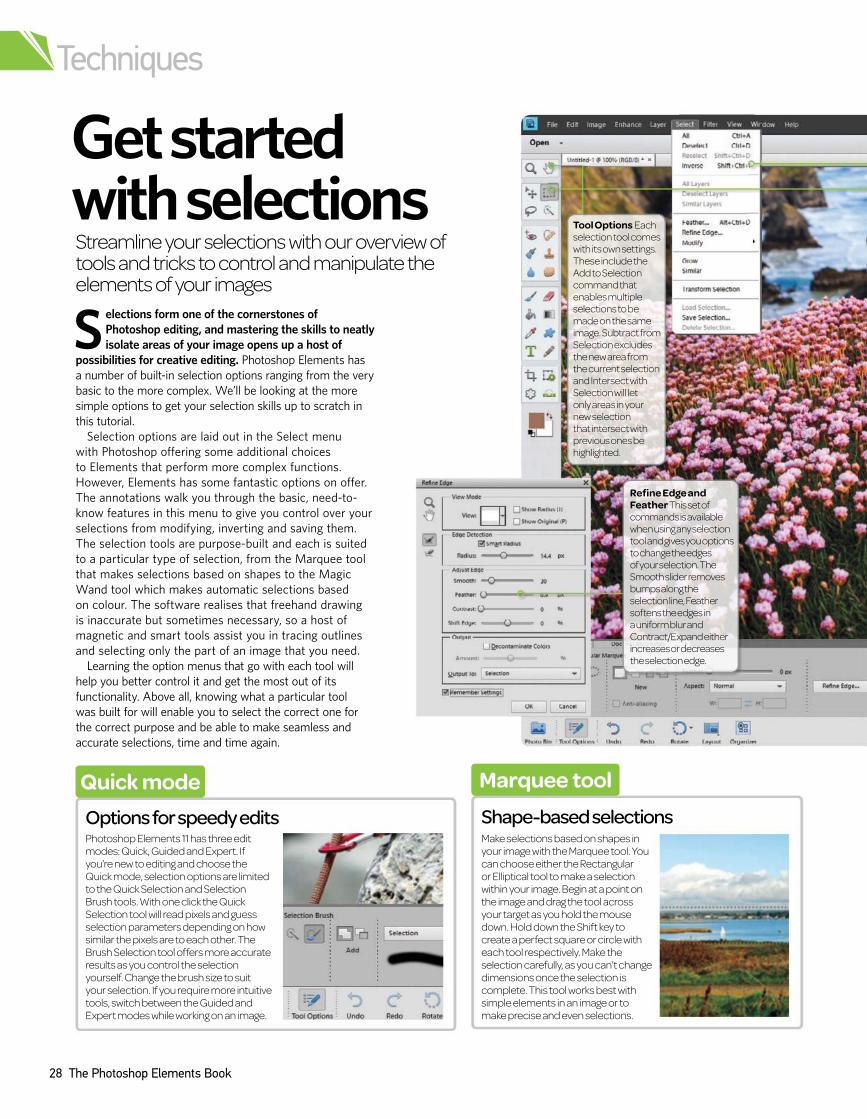
S
elections form one of the cornerstones of
Photoshop editing, and mastering the skills to neatly
isolate areas of your image opens up a host of
possibilities for creative editing. Photoshop Elements has
a number of built-in selection options ranging from the very
basic to the more complex. We’ll be looking at the more
simple options to get your selection skills up to scratch in
this tutorial.
Selection options are laid out in the Select menu
with Photoshop ofering some additional choices
to Elements that perform more complex functions.
However, Elements has some fantastic options on ofer.
The annotations walk you through the basic, need-to-
know features in this menu to give you control over your
selections from modifying, inverting and saving them.
The selection tools are purpose-built and each is suited
to a particular type of selection, from the Marquee tool
that makes selections based on shapes to the Magic
Wand tool which makes automatic selections based
on colour. The software realises that freehand drawing
is inaccurate but sometimes necessary, so a host of
magnetic and smart tools assist you in tracing outlines
and selecting only the part of an image that you need.
Learning the option menus that go with each tool will
help you better control it and get the most out of its
functionality. Above all, knowing what a particular tool
was built for will enable you to select the correct one for
the correct purpose and be able to make seamless and
accurate selections, time and time again.
Get started with selectionsStreamline your selections with our overview of tools and tricks to control and manipulate the elements of your images
Quick mode
Options for speedy editsPhotoshop Elements 11 has three edit modes: Quick, Guided and Expert. If youÕre new to editing and choose the Quick mode, selection options are limited to the Quick Selection and Selection Brush tools. With one click the Quick Selection tool will read pixels and guess selection parameters depending on how similar the pixels are to each other. The Brush Selection tool offers more accurate results as you control the selection yourself. Change the brush size to suit your selection. If you require more intuitive tools, switch between the Guided and Expert modes while working on an image.
Marquee tool
Shape-based selectionsMake selections based on shapes in your image with the Marquee tool. You can choose either the Rectangular or Elliptical tool to make a selection within your image. Begin at a point on the image and drag the tool across your target as you hold the mouse down. Hold down the Shift key to create a perfect square or circle with each tool respectively. Make the selection carefully, as you canÕt change dimensions once the selection is complete. This tool works best with simple elements in an image or to make precise and even selections.
Refine Edge and Feather This set of commands is available when using any selection tool and gives you options to change the edges of your selection. The Smooth slider removes bumps along the selection line, Feather softens the edges in a uniform blur and Contract/Expand either increases or decreases the selection edge.
Tool Options Each selection tool comes with its own settings. These include the Add to Selection command that enables multiple selections to be made on the same image. Subtract from Selection excludes the new area from the current selection and Intersect with Selection will let only areas in your new selection that intersect with
previous ones be highlighted.
Get started with Selections
The Photoshop Elements Book 29
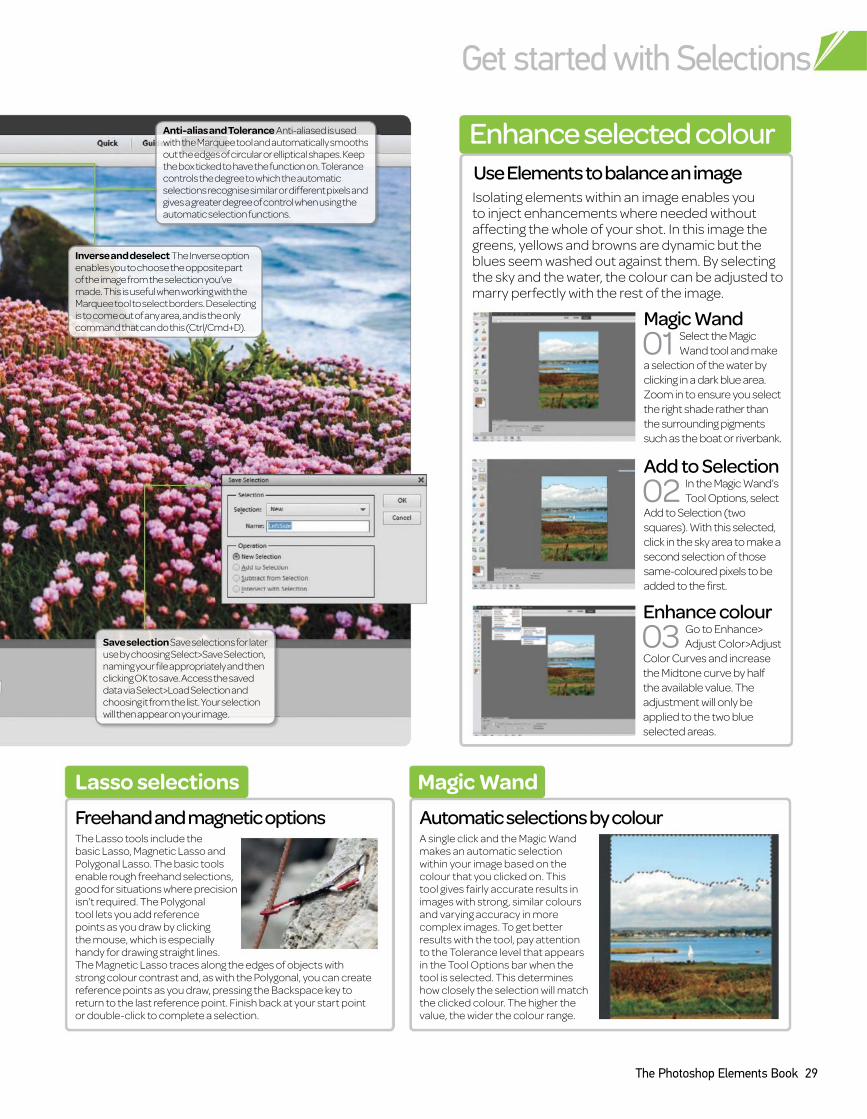
Add to Selection
02 In the Magic Wand’s
Tool Options, select
Add to Selection (two
squares). With this selected,
click in the sky area to make a
second selection of those
same-coloured pixels to be
added to the first.
Lasso selections
Freehand and magnetic optionsThe Lasso tools include the basic Lasso, Magnetic Lasso and Polygonal Lasso. The basic tools enable rough freehand selections, good for situations where precision isn’t required. The Polygonal tool lets you add reference points as you draw by clicking the mouse, which is especially handy for drawing straight lines. The Magnetic Lasso traces along the edges of objects with strong colour contrast and, as with the Polygonal, you can create reference points as you draw, pressing the Backspace key to return to the last reference point. Finish back at your start point or double-click to complete a selection.
Magic Wand
Automatic selections by colourA single click and the Magic Wand makes an automatic selection within your image based on the colour that you clicked on. This tool gives fairly accurate results in images with strong, similar colours and varying accuracy in more complex images. To get better results with the tool, pay attention to the Tolerance level that appears in the Tool Options bar when the tool is selected. This determines how closely the selection will match the clicked colour. The higher the value, the wider the colour range.
Isolating elements within an image enables you to inject enhancements where needed without affecting the whole of your shot. In this image the greens, yellows and browns are dynamic but the blues seem washed out against them. By selecting the sky and the water, the colour can be adjusted to marry perfectly with the rest of the image.
Enhance selected colour
Use Elements to balance an image
Magic Wand
01 Select the Magic
Wand tool and make
a selection of the water by
clicking in a dark blue area.
Zoom in to ensure you select
the right shade rather than
the surrounding pigments
such as the boat or riverbank.
Enhance colour
03 Go to Enhance>
Adjust Color>Adjust
Color Curves and increase
the Midtone curve by half
the available value. The
adjustment will only be
applied to the two blue
selected areas.
Anti-alias and Tolerance Anti-aliased is used with the Marquee tool and automatically smooths out the edges of circular or elliptical shapes. Keep the box ticked to have the function on. Tolerance controls the degree to which the automatic selections recognise similar or different pixels and gives a greater degree of control when using the automatic selection functions.
Save selection Save selections for later use by choosing Select>Save Selection, naming your file appropriately and then
clicking OK to save. Access the saved data via Select>Load Selection and choosing it from the list. Your selection will then appear on your image.
Inverse and deselect The Inverse option enables you to choose the opposite part of the image from the selection you’ve made. This is useful when working with the Marquee tool to select borders. Deselecting is to come out of any area, and is the only command that can do this (Ctrl/Cmd+D).
30 The Photoshop Elements Book
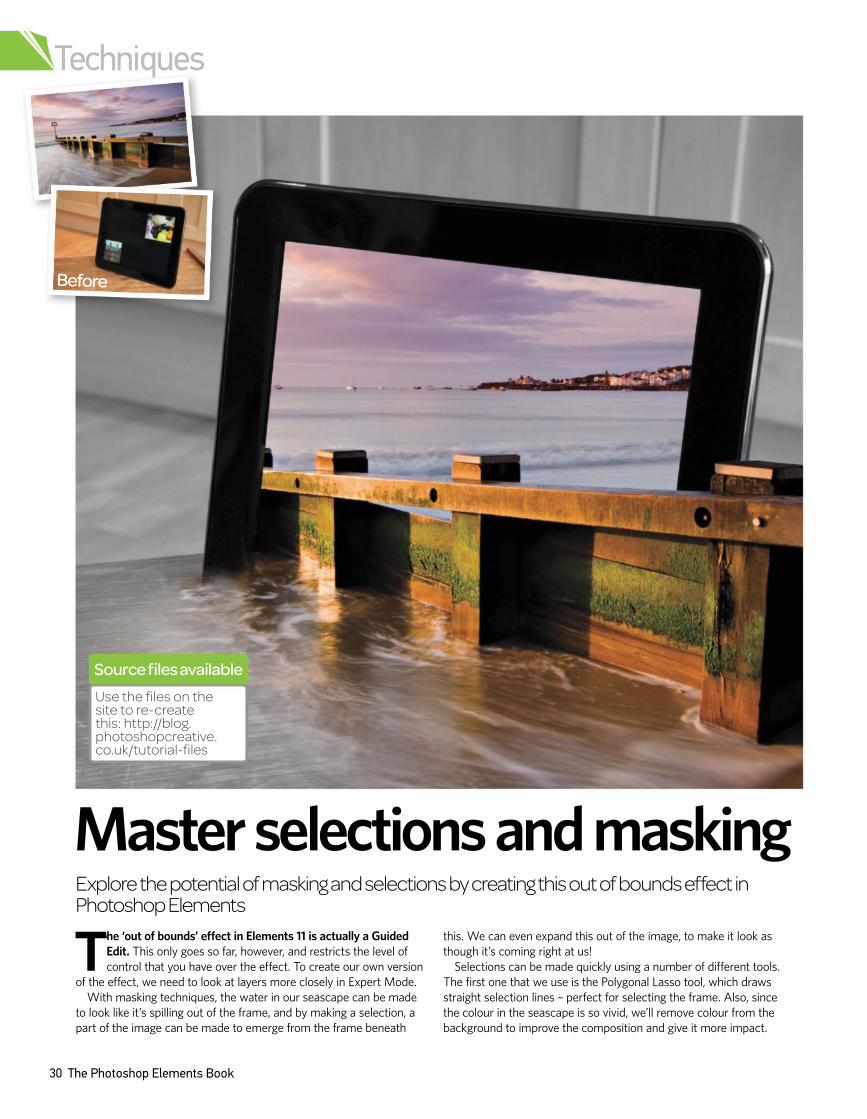
The ‘out of bounds’ effect in Elements 11 is actually a Guided
Edit. This only goes so far, however, and restricts the level of
control that you have over the effect. To create our own version
of the effect, we need to look at layers more closely in Expert Mode.
With masking techniques, the water in our seascape can be made
to look like it’s spilling out of the frame, and by making a selection, a
part of the image can be made to emerge from the frame beneath
this. We can even expand this out of the image, to make it look as
though it’s coming right at us!
Selections can be made quickly using a number of different tools.
The first one that we use is the Polygonal Lasso tool, which draws
straight selection lines – perfect for selecting the frame. Also, since
the colour in the seascape is so vivid, we’ll remove colour from the
background to improve the composition and give it more impact.
Master selections and maskingExplore the potential of masking and selections by creating this out of bounds effect in Photoshop Elements
Before
Techniques
Source files available
Use the files on the site to re-create this: http://blog.photoshopcreative.co.uk/tutorial-files
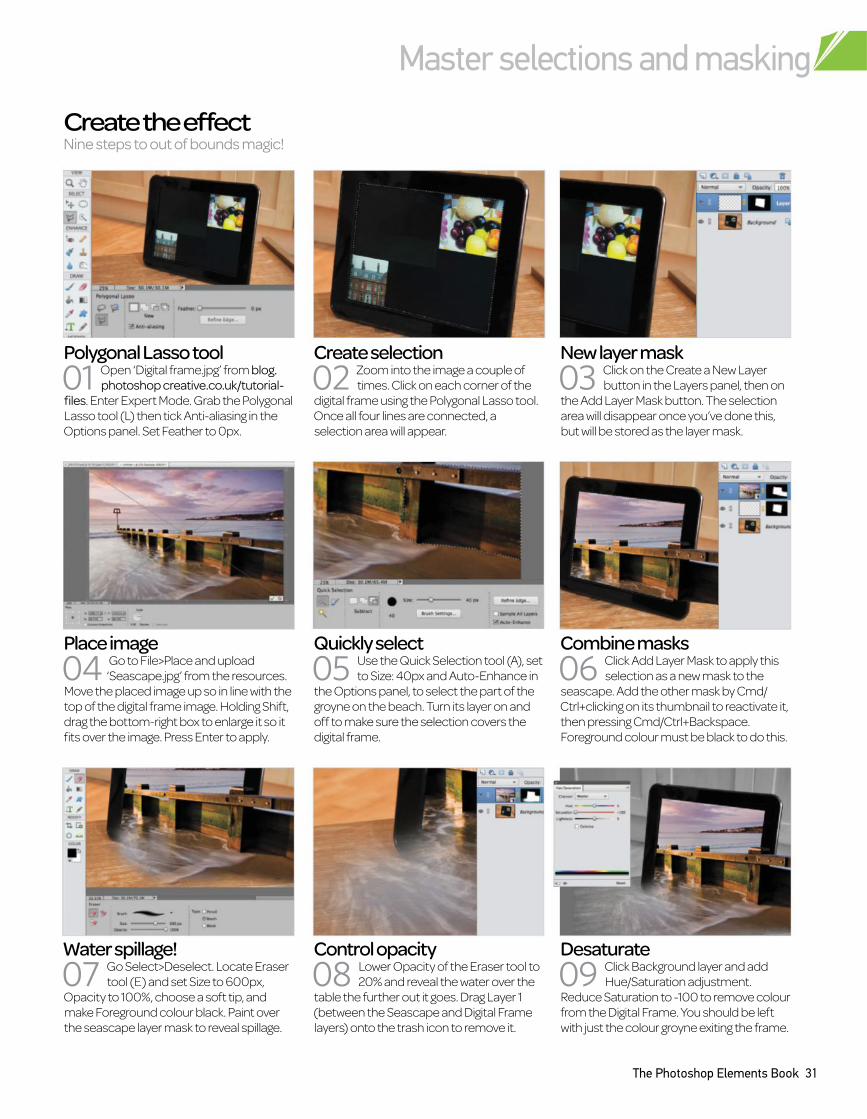
Create the effectNine steps to out of bounds magic!
Create selection
02 Zoom into the image a couple of
times. Click on each corner of the
digital frame using the Polygonal Lasso tool.
Once all four lines are connected, a
selection area will appear.
New layer mask
03 Click on the Create a New Layer
button in the Layers panel, then on
the Add Layer Mask button. The selection
area will disappear once you’ve done this,
but will be stored as the layer mask.
Polygonal Lasso tool
01 Open ‘Digital frame.jpg’ from blog.
photoshop creative.co.uk/tutorial-
files. Enter Expert Mode. Grab the Polygonal
Lasso tool (L) then tick Anti-aliasing in the
Options panel. Set Feather to 0px.
Control opacity
08 Lower Opacity of the Eraser tool to
20% and reveal the water over the
table the further out it goes. Drag Layer 1
(between the Seascape and Digital Frame
layers) onto the trash icon to remove it.
Desaturate
09 Click Background layer and add
Hue/Saturation adjustment.
Reduce Saturation to -100 to remove colour
from the Digital Frame. You should be left
with just the colour groyne exiting the frame.
Water spillage!
07 Go Select>Deselect. Locate Eraser
tool (E) and set Size to 600px,
Opacity to 100%, choose a soft tip, and
make Foreground colour black. Paint over
the seascape layer mask to reveal spillage.
Quickly select
05 Use the Quick Selection tool (A), set
to Size: 40px and Auto-Enhance in
the Options panel, to select the part of the
groyne on the beach. Turn its layer on and
off to make sure the selection covers the
digital frame.
Combine masks
06 Click Add Layer Mask to apply this
selection as a new mask to the
seascape. Add the other mask by Cmd/
Ctrl+clicking on its thumbnail to reactivate it,
then pressing Cmd/Ctrl+Backspace.
Foreground colour must be black to do this.
Place image
04 Go to File>Place and upload
‘Seascape.jpg’ from the resources.
Move the placed image up so in line with the
top of the digital frame image. Holding Shift,
drag the bottom-right box to enlarge it so it
fits over the image. Press Enter to apply.
The Photoshop Elements Book 31
Master selections and masking

Techniques
32 The Photoshop Elements Book
Elements is the tool of choice for starting out with retouching. You
are given the same tools as the pros to give your own portrait shots
a desirable veneer. Before you flick past in horror, we aren’t going to
suggest you spend your life airbrushing through your family photos. Even
five-minute edits can suddenly bring a portrait to life and Elements users
will find a lot of automated options for retouching tasks. However, we
are going to look at the manual tools here and show you how easy it is to
create the maximum impact.
Common retouching tasks will focus on the face, whether it’s
smoothing out skin or doing a touch of spot or blemish removal.
Whitening the eyes or teeth is another easy edit that can really make a
Don’t be intimidated by the thought of retouching portraits – Elements has
a host of beginner-friendly tools that do most of the work for you
Retouch photos
“Even five-minute edits can suddenly bring a portrait back to life”
The camera was set incorrectly here, causing the image to be overexposed. This harsh light has accentuated the woman’s lines.
We have applied a colour correction as well as using the Clone Stamp and Spot Healing Brush to tame the lines and wrinkles.
diference. The most important thing to remember, though, is to keep
your edits subtle. Like it or not, wrinkles and wobbly bits give us character
and if you wade in with a virtual plastic surgeon’s knife, you won’t improve
an image. A light touch here and there is all you need for the best results.
We’re also going to be covering another Elements skill within the
‘retouching’ monicker, and that is restoring old photos. Similar skills
and tools can be transferred from something like removing wrinkles
to removing creases and tears in scanned images, so the two really go
hand in hand.
It’s also worth pointing out that some of the other tools we’ve looked
at can be called upon here. For example, if you want to whiten eyes
or teeth, use one of the selection methods we suggested and then
use the Color Curves command to target the highlights and brighten
things up. As you use Elements more and more, you’ll see these
repetitions pop up time and again.
BEFORE AFTER
Retouch photos
The Photoshop Elements Book 33
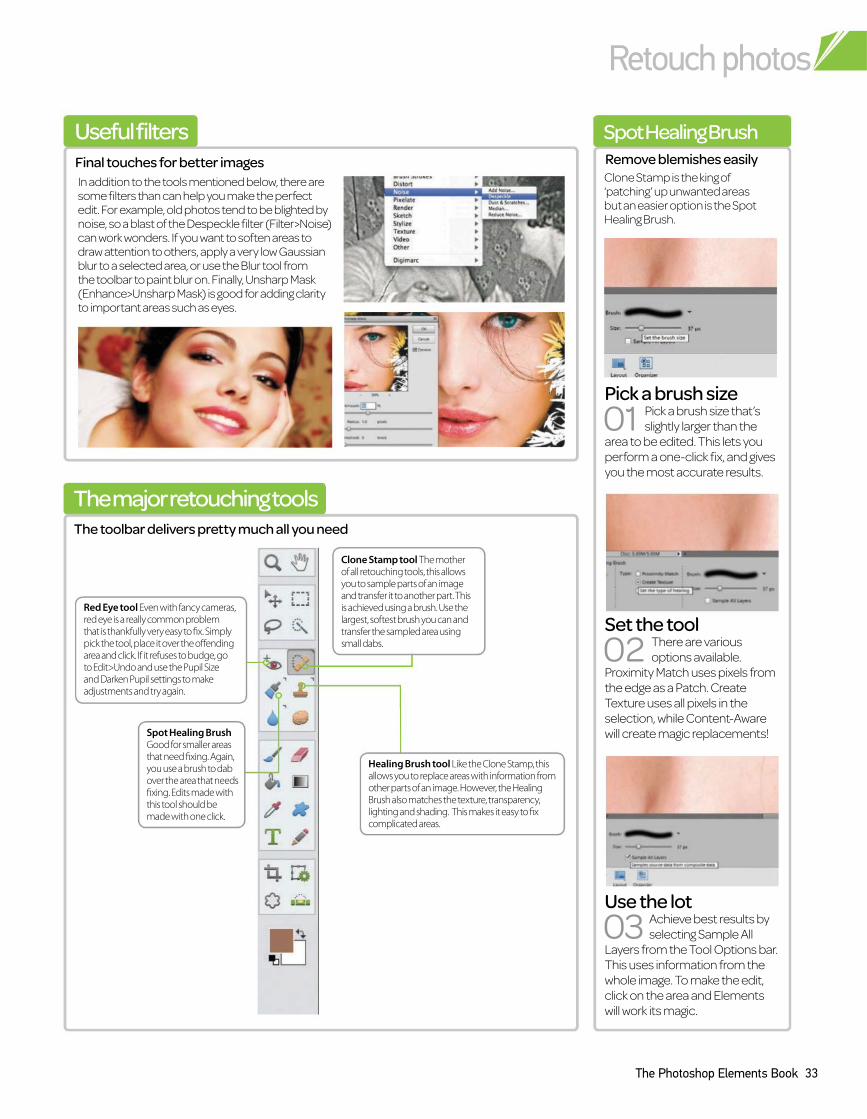
The major retouching tools
The toolbar delivers pretty much all you need
Clone Stamp is the king of ‘patching’ up unwanted areas but an easier option is the Spot Healing Brush.
Spot Healing Brush
Remove blemishes easily
Red Eye tool Even with fancy cameras, red eye is a really common problem that is thankfully very easy to fx. Simply pick the tool, place it over the ofending area and click. If it refuses to budge, go to Edit>Undo and use the Pupil Size and Darken Pupil settings to make adjustments and try again.
Healing Brush tool Like the Clone Stamp, this allows you to replace areas with information from other parts of an image. However, the Healing Brush also matches the texture, transparency, lighting and shading. This makes it easy to fx complicated areas.
Spot Healing BrushGood for smaller areas that need fxing. Again, you use a brush to dab over the area that needs fxing. Edits made with this tool should be made with one click.
Pick a brush size
01 Pick a brush size that’s
slightly larger than the
area to be edited. This lets you
perform a one-click fix, and gives
you the most accurate results.
Set the tool
02 There are various
options available.
Proximity Match uses pixels from
the edge as a Patch. Create
Texture uses all pixels in the
selection, while Content-Aware
will create magic replacements!
Use the lot
03 Achieve best results by
selecting Sample All
Layers from the Tool Options bar.
This uses information from the
whole image. To make the edit,
click on the area and Elements
will work its magic.
Final touches for better images
In addition to the tools mentioned below, there are some filters than can help you make the perfect edit. For example, old photos tend to be blighted by noise, so a blast of the Despeckle filter (Filter>Noise) can work wonders. If you want to soften areas to draw attention to others, apply a very low Gaussian blur to a selected area, or use the Blur tool from the toolbar to paint blur on. Finally, Unsharp Mask (Enhance>Unsharp Mask) is good for adding clarity to important areas such as eyes.
Useful filters
Clone Stamp tool The mother of all retouching tools, this allows you to sample parts of an image and transfer it to another part. This is achieved using a brush. Use the largest, softest brush you can and transfer the sampled area using small dabs.
Techniques
34 The Photoshop Elements Book
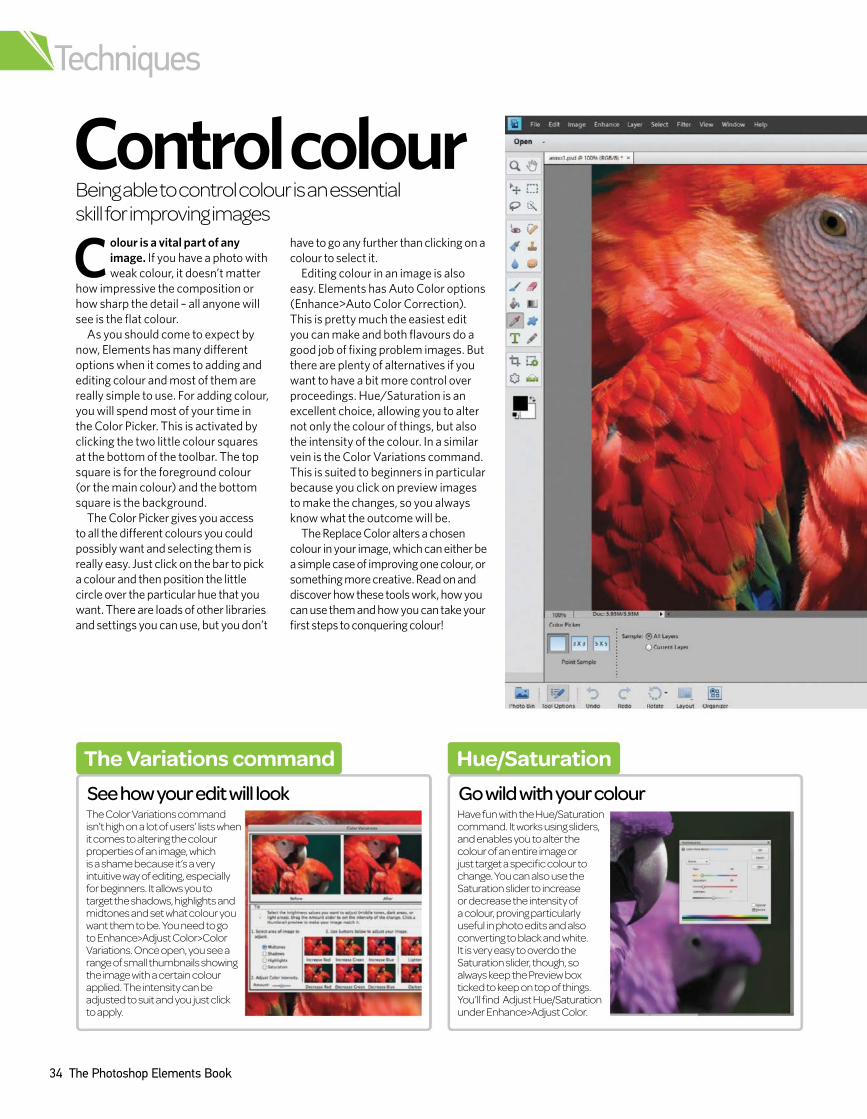
Colour is a vital part of any
image. If you have a photo with
weak colour, it doesn’t matter
how impressive the composition or
how sharp the detail – all anyone will
see is the flat colour.
As you should come to expect by
now, Elements has many diferent
options when it comes to adding and
editing colour and most of them are
really simple to use. For adding colour,
you will spend most of your time in
the Color Picker. This is activated by
clicking the two little colour squares
at the bottom of the toolbar. The top
square is for the foreground colour
(or the main colour) and the bottom
square is the background.
The Color Picker gives you access
to all the diferent colours you could
possibly want and selecting them is
really easy. Just click on the bar to pick
a colour and then position the little
circle over the particular hue that you
want. There are loads of other libraries
and settings you can use, but you don’t
have to go any further than clicking on a
colour to select it.
Editing colour in an image is also
easy. Elements has Auto Color options
(Enhance>Auto Color Correction).
This is pretty much the easiest edit
you can make and both flavours do a
good job of fixing problem images. But
there are plenty of alternatives if you
want to have a bit more control over
proceedings. Hue/Saturation is an
excellent choice, allowing you to alter
not only the colour of things, but also
the intensity of the colour. In a similar
vein is the Color Variations command.
This is suited to beginners in particular
because you click on preview images
to make the changes, so you always
know what the outcome will be.
The Replace Color alters a chosen
colour in your image, which can either be
a simple case of improving one colour, or
something more creative. Read on and
discover how these tools work, how you
can use them and how you can take your
first steps to conquering colour!
Being able to control colour is an essential skill for improving images
Control colour
The Variations command
The Color Variations command isn’t high on a lot of users’ lists when it comes to altering the colour properties of an image, which is a shame because it’s a very intuitive way of editing, especially for beginners. It allows you to target the shadows, highlights and midtones and set what colour you want them to be. You need to go to Enhance>Adjust Color>Color Variations. Once open, you see a range of small thumbnails showing the image with a certain colour applied. The intensity can be adjusted to suit and you just click to apply.
See how your edit will look
Hue/Saturation
Have fun with the Hue/Saturation command. It works using sliders, and enables you to alter the colour of an entire image or just target a specific colour to change. You can also use the Saturation slider to increase or decrease the intensity of a colour, proving particularly useful in photo edits and also converting to black and white. It is very easy to overdo the Saturation slider, though, so always keep the Preview box ticked to keep on top of things. You’ll find Adjust Hue/Saturation under Enhance>Adjust Color.
Go wild with your colour
Control colour
The Photoshop Elements Book 35
The edits
01 The Balance
command
adjusts the temperature
and tint of a photo, with a
slider for each. It’s just a
case of moving the slider left or right to increase
or decrease the effect.
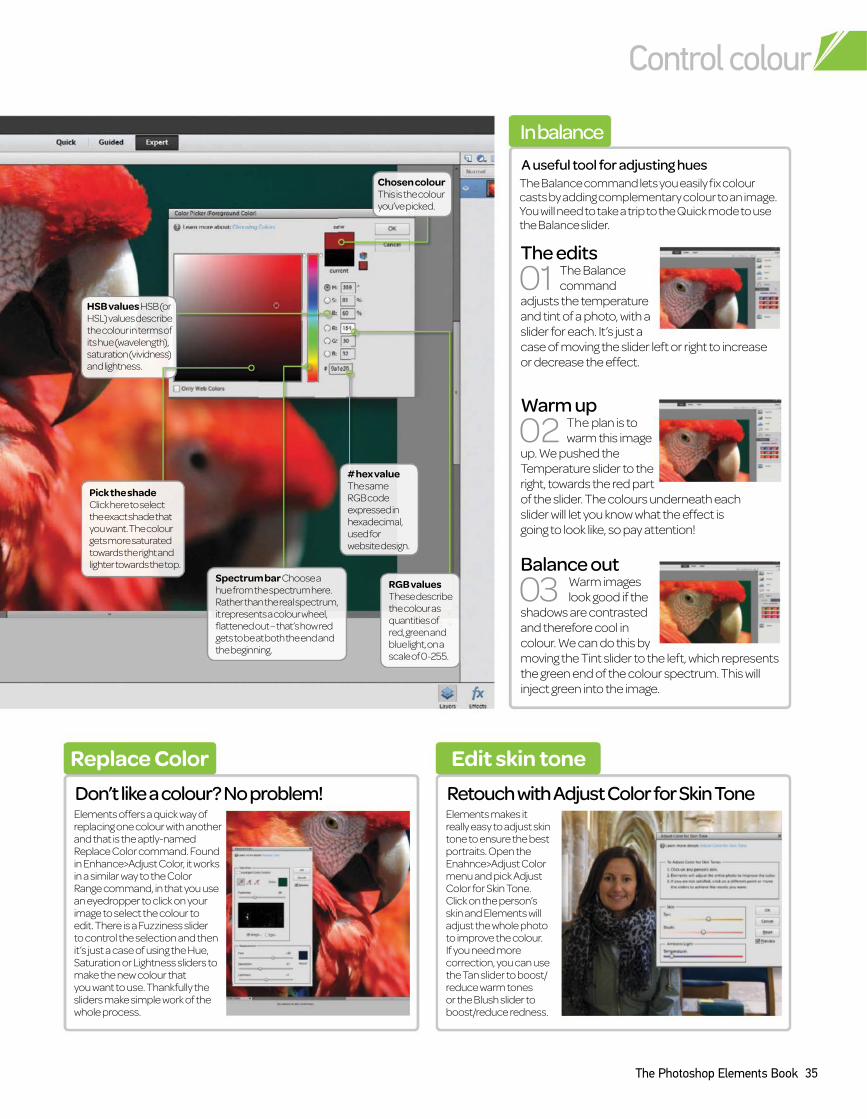
Chosen colourThis is the colour you’ve picked.
HSB values HSB (or HSL) values describe the colour in terms of its hue (wavelength), saturation (vividness) and lightness.
RGB values These describe the colour as quantities of red, green and blue light, on a scale of 0-255.
# hex valueThe same RGB code expressed in hexadecimal, used for website design.
Spectrum bar Choose a hue from the spectrum here. Rather than the real spectrum, it represents a colour wheel, flattened out – that’s how red gets to be at both the end and the beginning.
Pick the shadeClick here to select the exact shade that you want. The colour gets more saturated towards the right and lighter towards the top.
Replace Color
Elements offers a quick way of replacing one colour with another and that is the aptly-named Replace Color command. Found in Enhance>Adjust Color, it works in a similar way to the Color Range command, in that you use an eyedropper to click on your image to select the colour to edit. There is a Fuzziness slider to control the selection and then it’s just a case of using the Hue, Saturation or Lightness sliders to make the new colour that you want to use. Thankfully the sliders make simple work of the whole process.
Don’t like a colour? No problem!
Edit skin tone
Elements makes it really easy to adjust skin tone to ensure the best portraits. Open the Enahnce>Adjust Color menu and pick Adjust Color for Skin Tone. Click on the person’s skin and Elements will adjust the whole photo to improve the colour. If you need more correction, you can use the Tan slider to boost/reduce warm tones or the Blush slider to boost/reduce redness.
Retouch with Adjust Color for Skin Tone
The Balance command lets you easily fix colour casts by adding complementary colour to an image. You will need to take a trip to the Quick mode to use the Balance slider.
In balance
A useful tool for adjusting hues
Warm up
02 The plan is to
warm this image
up. We pushed the
Temperature slider to the
right, towards the red part
of the slider. The colours underneath each
slider will let you know what the effect is
going to look like, so pay attention!
Balance out
03 Warm images
look good if the
shadows are contrasted
and therefore cool in
colour. We can do this by
moving the Tint slider to the left, which represents
the green end of the colour spectrum. This will
inject green into the image.
AFTER
Techniques
36 The Photoshop Elements Book
The Gradient tool can be a very exciting and underestimated feature. You shouldn’t be shy to
use them, but if you are just use these tips and tricks to get to know them a bit better. They can be used in numerous ways to achieve several effects within your work, and when used cleverly they can help you soften transitions from one image or colour to another. The Gradient tool can be used on its own to build
dynamic backgrounds and textures, and it can also be used to create masks and feathered edges. You can even fake depth of field through gradient masks for a photographic touch.
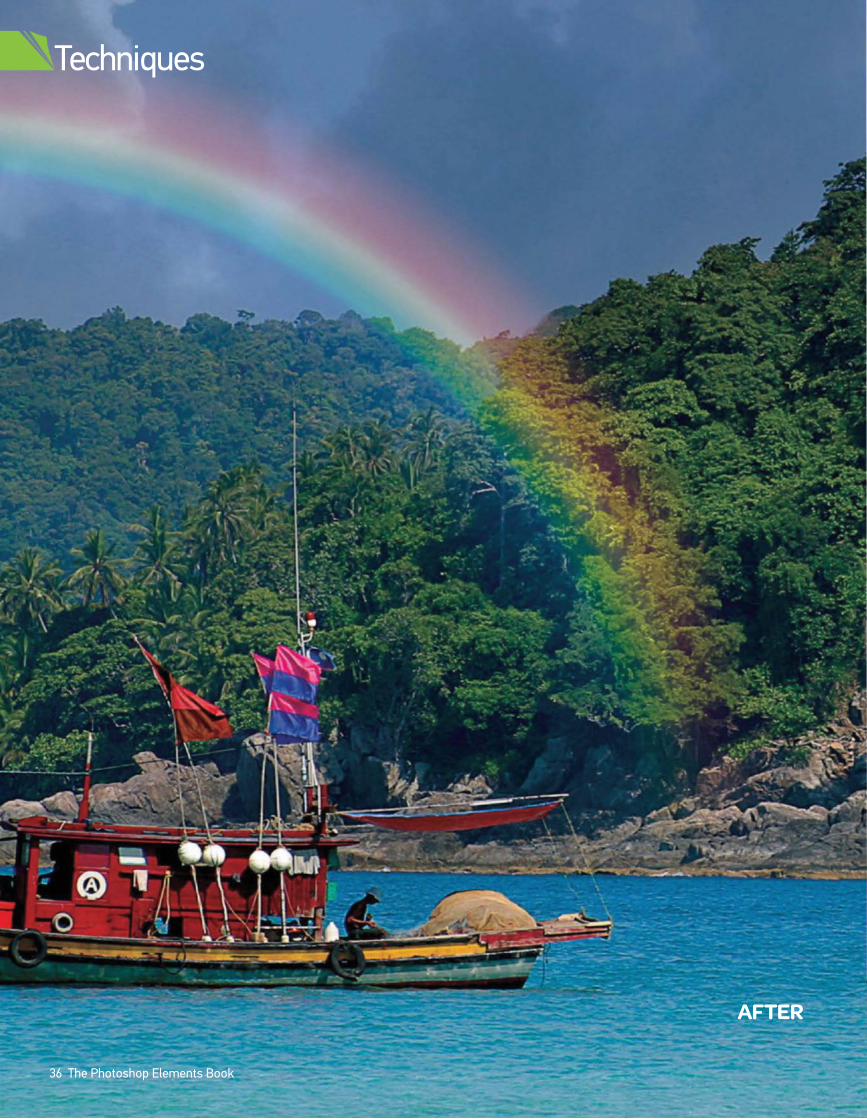
Here we’ll show off the tool in full colour, as we teach you how to create a rainbow using the Radial Gradient preset. We’ve chosen a holiday snap from Thailand for this example and you can download that from the website,
www.photoshopcreative.co.uk, but any image you want to jazz up with a beautiful rainbow will work. You’ll also learn how to use the Gradient tool to mask the cloudy sky, so let’s jump right in and explore some of the options.
Get to know gradients The Gradient tool can be extremely useful in all types of Photoshop scenarios so take a closer look
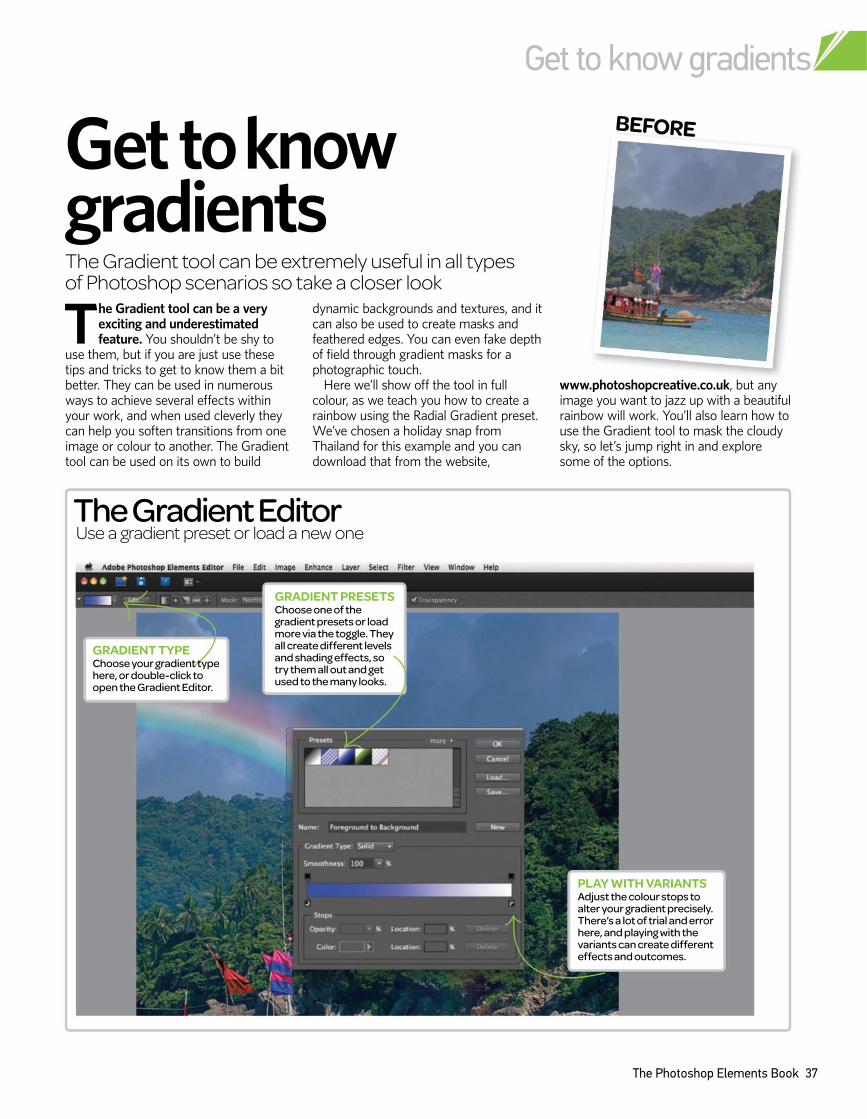
Use a gradient preset or load a new oneThe Gradient Editor
PLAY WITH VARIANTS
Adjust the colour stops to alter your gradient precisely. ThereÕs a lot of trial and error here, and playing with the variants can create different effects and outcomes.
GRADIENT PRESETS
Choose one of the gradient presets or load more via the toggle. They all create different levels and shading effects, so try them all out and get used to the many looks.
GRADIENT TYPE
Choose your gradient type here, or double-click to open the Gradient Editor.
BEFORE
Get to know gradients
The Photoshop Elements Book 37
Use the Gradient tool to create a simple rainbowMake a rainbow
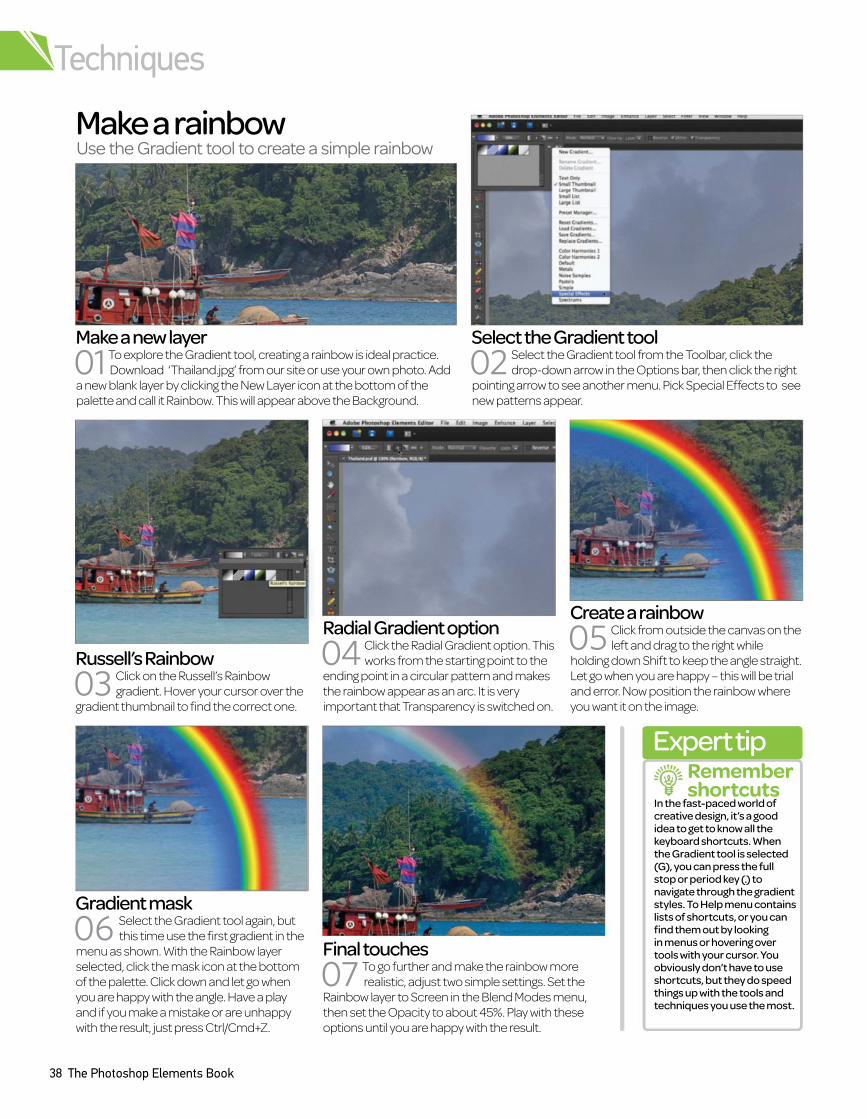
Select the Gradient tool
02 Select the Gradient tool from the Toolbar, click the
drop-down arrow in the Options bar, then click the right
pointing arrow to see another menu. Pick Special Effects to see
new patterns appear.
Make a new layer
01 To explore the Gradient tool, creating a rainbow is ideal practice.
Download ‘Thailand.jpg’ from our site or use your own photo. Add
a new blank layer by clicking the New Layer icon at the bottom of the
palette and call it Rainbow. This will appear above the Background.
Russell’s Rainbow
03 Click on the Russell’s Rainbow
gradient. Hover your cursor over the
gradient thumbnail to find the correct one.
Radial Gradient option
04 Click the Radial Gradient option. This
works from the starting point to the
ending point in a circular pattern and makes
the rainbow appear as an arc. It is very
important that Transparency is switched on.
Final touches
realistic, adjust two simple settings. Set the 07 To go further and make the rainbow more
Rainbow layer to Screen in the Blend Modes menu,
then set the Opacity to about 45%. Play with these
options until you are happy with the result.
Create a rainbow
05 Click from outside the canvas on the
left and drag to the right while
holding down Shift to keep the angle straight.
Let go when you are happy – this will be trial
and error. Now position the rainbow where
you want it on the image.
Gradient mask
06 Select the Gradient tool again, but
this time use the first gradient in the
menu as shown. With the Rainbow layer
selected, click the mask icon at the bottom
of the palette. Click down and let go when
you are happy with the angle. Have a play
and if you make a mistake or are unhappy
with the result, just press Ctrl/Cmd+Z.
Expert tip
In the fast-paced world of creative design, it’s a good idea to get to know all the keyboard shortcuts. When the Gradient tool is selected (G), you can press the full stop or period key (.) to navigate through the gradient styles. To Help menu contains lists of shortcuts, or you can find them out by looking in menus or hovering over tools with your cursor. You obviously don’t have to use shortcuts, but they do speed things up with the tools and techniques you use the most.
Remember shortcuts
Techniques
38 The Photoshop Elements Book
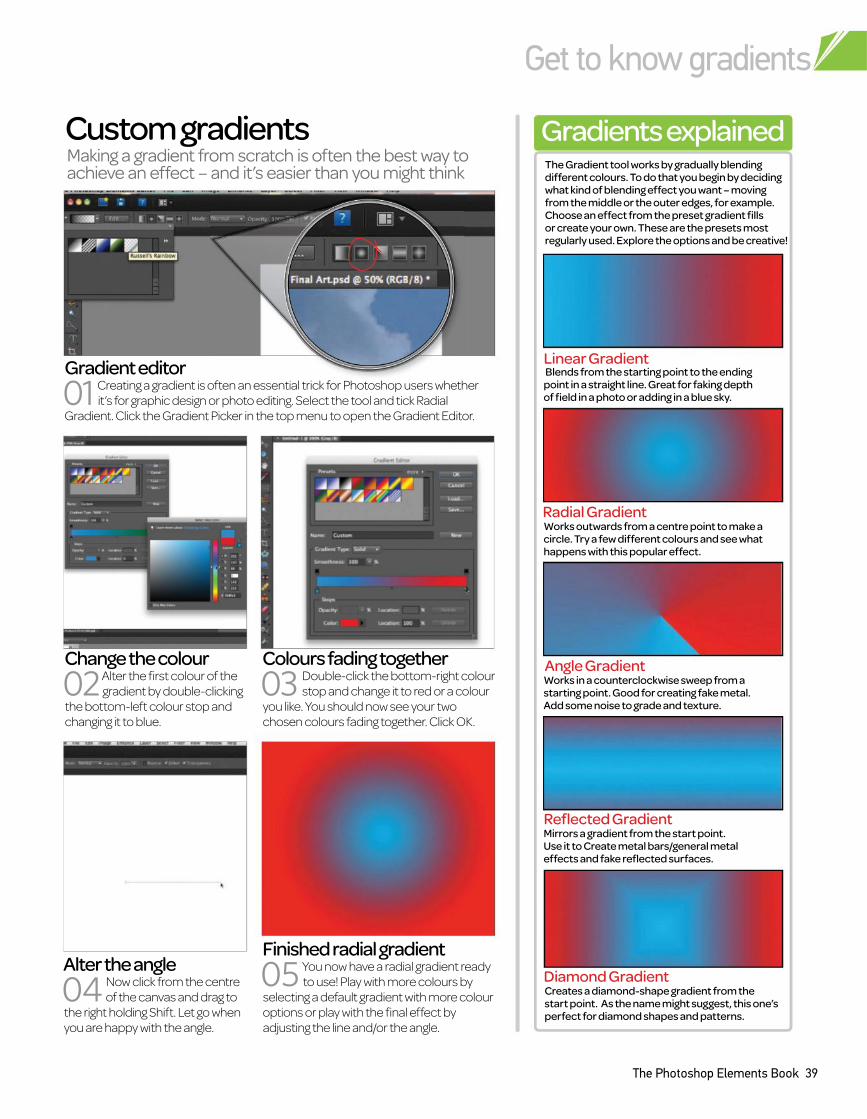
Gradients explained
Blends from the starting point to the ending point in a straight line. Great for faking depth of field in a photo or adding in a blue sky.
Works outwards from a centre point to make a circle. Try a few different colours and see what happens with this popular effect.
Works in a counterclockwise sweep from a starting point. Good for creating fake metal. Add some noise to grade and texture.
Mirrors a gradient from the start point. Use it to Create metal bars/general metal effects and fake reflected surfaces.
Creates a diamond-shape gradient from the start point. As the name might suggest, this one’s perfect for diamond shapes and patterns.
The Gradient tool works by gradually blending different colours. To do that you begin by deciding what kind of blending effect you want – moving from the middle or the outer edges, for example. Choose an effect from the preset gradient fills or create your own. These are the presets most regularly used. Explore the options and be creative!
Linear Gradient
Radial Gradient
Angle Gradient
Reflected Gradient
Diamond GradientAlter the angle
04 Now click from the centre
of the canvas and drag to
the right holding Shift. Let go when
you are happy with the angle.
Change the colour
02 Alter the first colour of the
gradient by double-clicking
the bottom-left colour stop and
changing it to blue.
Finished radial gradient
05 You now have a radial gradient ready
to use! Play with more colours by
selecting a default gradient with more colour
options or play with the final effect by
adjusting the line and/or the angle.
Colours fading together
03 Double-click the bottom-right colour
stop and change it to red or a colour
you like. You should now see your two
chosen colours fading together. Click OK.
Gradient editor
01 Creating a gradient is often an essential trick for Photoshop users whether
it’s for graphic design or photo editing. Select the tool and tick Radial
Gradient. Click the Gradient Picker in the top menu to open the Gradient Editor.
Making a gradient from scratch is often the best way to achieve an effect – and it’s easier than you might think
Custom gradients
Get to know gradients
The Photoshop Elements Book 39
Techniques
40 The Photoshop Elements Book
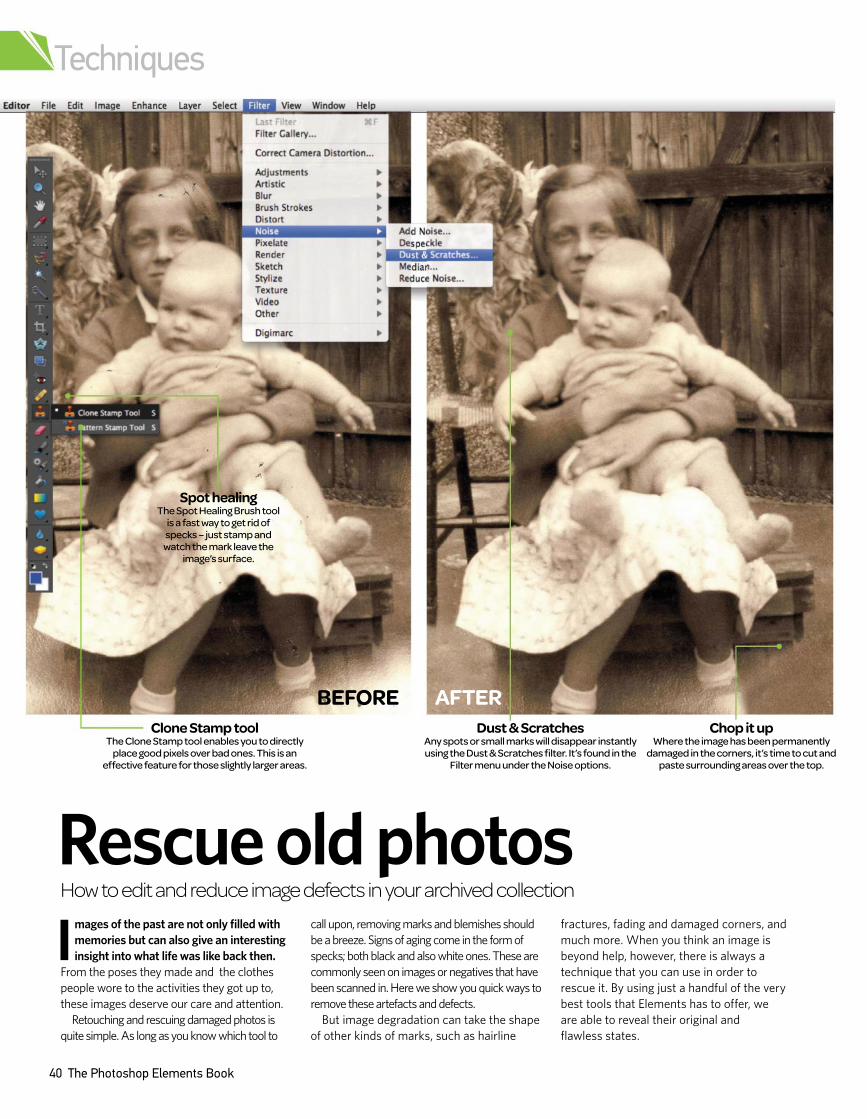
Chop it upWhere the image has been permanently
damaged in the corners, it’s time to cut and paste surrounding areas over the top.
BEFORE AFTER
Images of the past are not only filled with
memories but can also give an interesting
insight into what life was like back then.
From the poses they made and the clothes
people wore to the activities they got up to,
these images deserve our care and attention.
Retouching and rescuing damaged photos is
quite simple. As long as you know which tool to
call upon, removing marks and blemishes should
be a breeze. Signs of aging come in the form of
specks; both black and also white ones. These are
commonly seen on images or negatives that have
been scanned in. Here we show you quick ways to
remove these artefacts and defects.
But image degradation can take the shape
of other kinds of marks, such as hairline
fractures, fading and damaged corners, and
much more. When you think an image is
beyond help, however, there is always a
technique that you can use in order to
rescue it. By using just a handful of the very
best tools that Elements has to offer, we
are able to reveal their original and
flawless states.
Rescue old photosHow to edit and reduce image defects in your archived collection
Dust & ScratchesAny spots or small marks will disappear instantly using the Dust & Scratches filter. It’s found in the
Filter menu under the Noise options.
Spot healing The Spot Healing Brush tool
is a fast way to get rid of specks – just stamp and
watch the mark leave the image’s surface.
Clone Stamp tool The Clone Stamp tool enables you to directly
place good pixels over bad ones. This is an effective feature for those slightly larger areas.
Rescue old photos
The Photoshop Elements Book 41
AFTER BEFORE
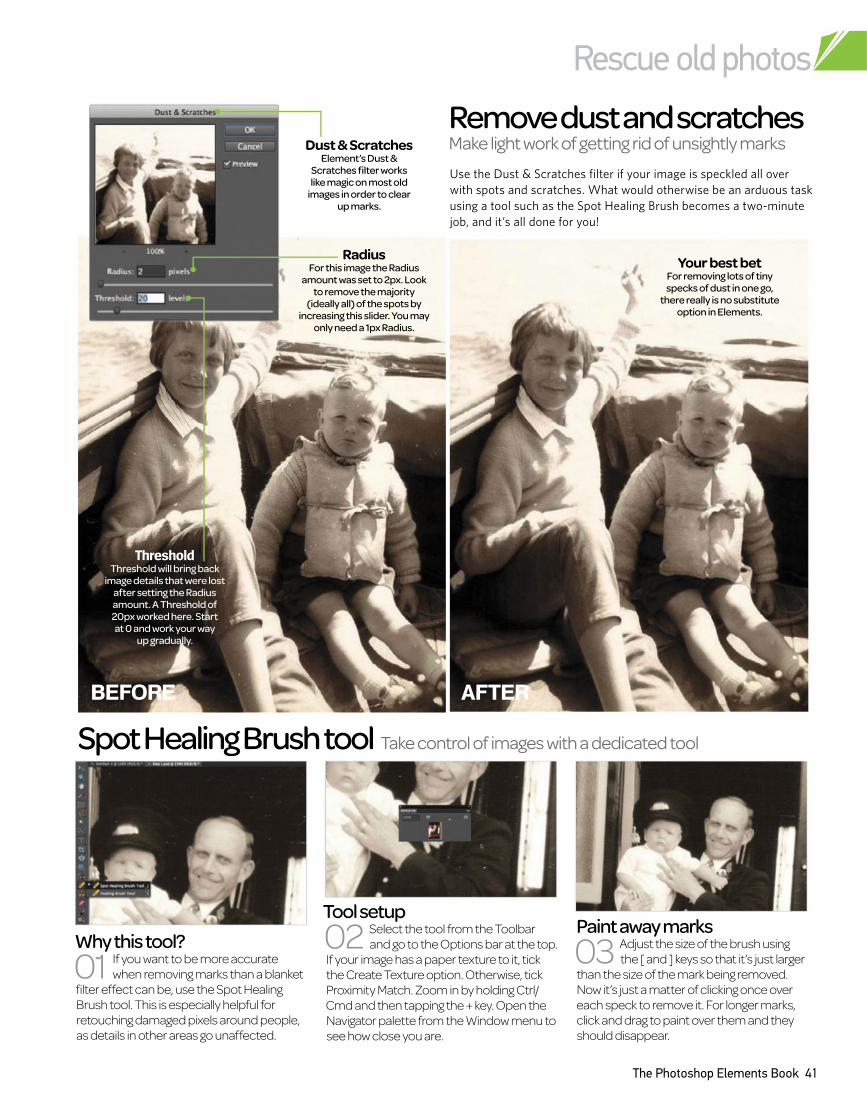
Why this tool?
01 If you want to be more accurate
when removing marks than a blanket
filter effect can be, use the Spot Healing
Brush tool. This is especially helpful for
retouching damaged pixels around people,
as details in other areas go unaffected.
Tool setup
02 Select the tool from the Toolbar
and go to the Options bar at the top.
If your image has a paper texture to it, tick
the Create Texture option. Otherwise, tick
Proximity Match. Zoom in by holding Ctrl/
Cmd and then tapping the + key. Open the
Navigator palette from the Window menu to
see how close you are.
Paint away marks
03 Adjust the size of the brush using
the [ and ] keys so that it’s just larger
than the size of the mark being removed.
Now it’s just a matter of clicking once over
each speck to remove it. For longer marks,
click and drag to paint over them and they
should disappear.
Spot Healing Brush tool Take control of images with a dedicated tool
Remove dust and scratchesMake light work of getting rid of unsightly marks
Use the Dust & Scratches filter if your image is speckled all over
with spots and scratches. What would otherwise be an arduous task
using a tool such as the Spot Healing Brush becomes a two-minute
job, and it’s all done for you!
ThresholdThreshold will bring back
image details that were lost after setting the Radius amount. A Threshold of 20px worked here. Start at 0 and work your way
up gradually.
RadiusFor this image the Radius
amount was set to 2px. Look to remove the majority
(ideally all) of the spots by increasing this slider. You may
only need a 1px Radius.
Your best betFor removing lots of tiny specks of dust in one go,
there really is no substitute option in Elements.
Dust & ScratchesElementÕs Dust &
Scratches filter works like magic on most old
images in order to clear up marks.
Techniques
42 The Photoshop Elements Book
BEFORE AFTER
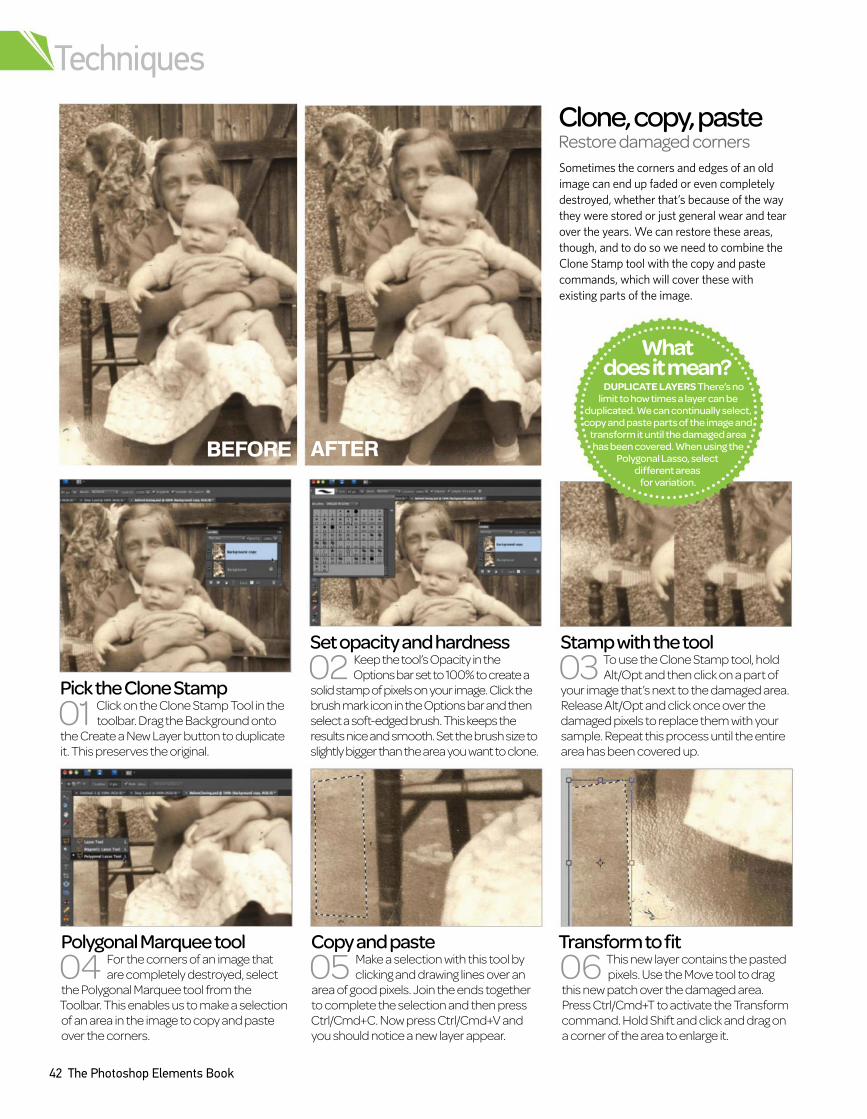
Pick the Clone Stamp
01 Click on the Clone Stamp Tool in the
toolbar. Drag the Background onto
the Create a New Layer button to duplicate
it. This preserves the original.
Set opacity and hardness
02 Keep the tool’s Opacity in the
Options bar set to 100% to create a
solid stamp of pixels on your image. Click the
brush mark icon in the Options bar and then
select a soft-edged brush. This keeps the
results nice and smooth. Set the brush size to
slightly bigger than the area you want to clone.
Stamp with the tool
03 To use the Clone Stamp tool, hold
Alt/Opt and then click on a part of
your image that’s next to the damaged area.
Release Alt/Opt and click once over the
damaged pixels to replace them with your
sample. Repeat this process until the entire
area has been covered up.
Polygonal Marquee tool
04 For the corners of an image that
are completely destroyed, select
the Polygonal Marquee tool from the
Toolbar. This enables us to make a selection
of an area in the image to copy and paste
over the corners.
Copy and paste
05 Make a selection with this tool by
clicking and drawing lines over an
area of good pixels. Join the ends together
to complete the selection and then press
Ctrl/Cmd+C. Now press Ctrl/Cmd+V and
you should notice a new layer appear.
Transform to fit
06 This new layer contains the pasted
pixels. Use the Move tool to drag
this new patch over the damaged area.
Press Ctrl/Cmd+T to activate the Transform
command. Hold Shift and click and drag on
a corner of the area to enlarge it.
Clone, copy, paste
Restore damaged corners
Sometimes the corners and edges of an old
image can end up faded or even completely
destroyed, whether that’s because of the way
they were stored or just general wear and tear
over the years. We can restore these areas,
though, and to do so we need to combine the
Clone Stamp tool with the copy and paste
commands, which will cover these with
existing parts of the image.
What does it mean?DUPLICATE LAYERS ThereÕs no
limit to how times a layer can be duplicated. We can continually select, copy and paste parts of the image and
transform it until the damaged area has been covered. When using the
Polygonal Lasso, select different areas
for variation.
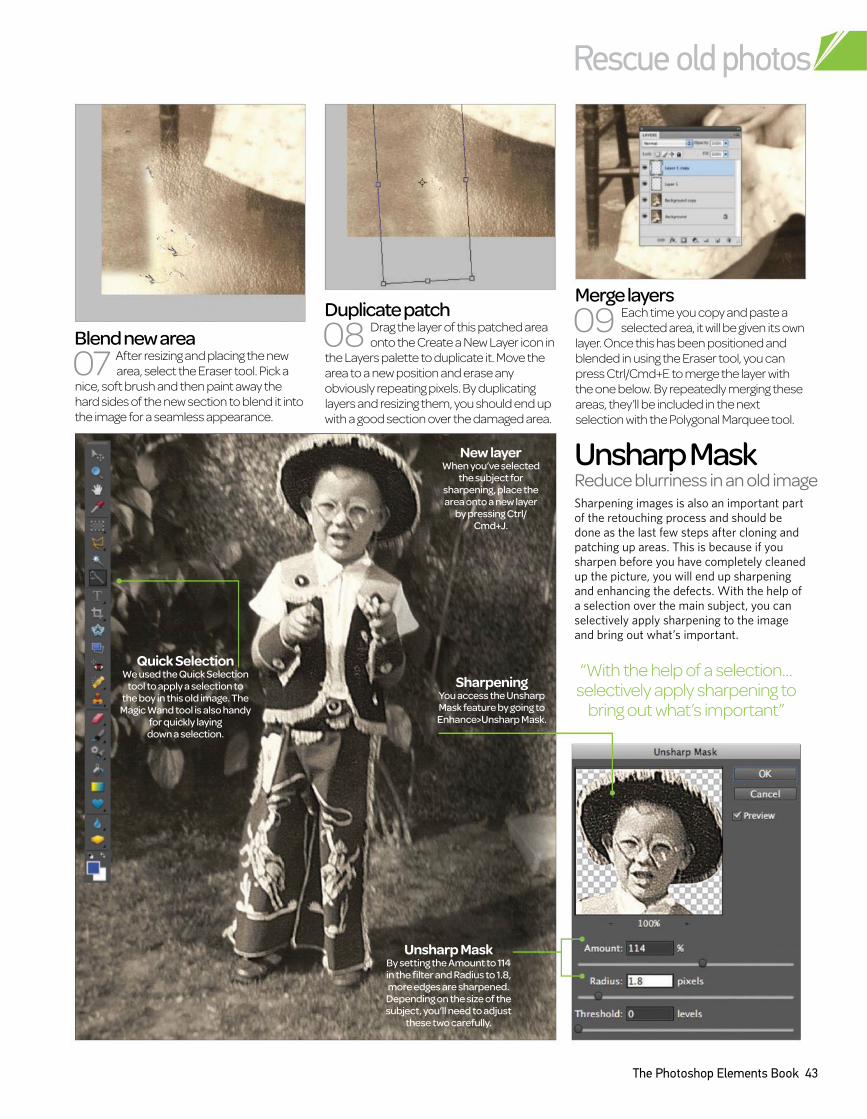
Rescue old photos
The Photoshop Elements Book 43
Duplicate patch
08 Drag the layer of this patched area
onto the Create a New Layer icon in
the Layers palette to duplicate it. Move the
area to a new position and erase any
obviously repeating pixels. By duplicating
layers and resizing them, you should end up
with a good section over the damaged area.
Merge layers
09 Each time you copy and paste a
selected area, it will be given its own
layer. Once this has been positioned and
blended in using the Eraser tool, you can
press Ctrl/Cmd+E to merge the layer with
the one below. By repeatedly merging these
areas, they’ll be included in the next
selection with the Polygonal Marquee tool.
Blend new area
07 After resizing and placing the new
area, select the Eraser tool. Pick a
nice, soft brush and then paint away the
hard sides of the new section to blend it into
the image for a seamless appearance.
Unsharp MaskReduce blurriness in an old image
Sharpening images is also an important part
of the retouching process and should be
done as the last few steps after cloning and
patching up areas. This is because if you
sharpen before you have completely cleaned
up the picture, you will end up sharpening
and enhancing the defects. With the help of
a selection over the main subject, you can
selectively apply sharpening to the image
and bring out what’s important.
New layerWhen you’ve selected
the subject for sharpening, place the area onto a new layer
by pressing Ctrl/Cmd+J.
“With the help of a selection… selectively apply sharpening to
bring out what’s important”
Quick Selection We used the Quick Selection
tool to apply a selection to the boy in this old image. The
Magic Wand tool is also handy for quickly laying down a selection.
Unsharp Mask By setting the Amount to 114 in the filter and Radius to 1.8, more edges are sharpened. Depending on the size of the subject, you’ll need to adjust
these two carefully.
SharpeningYou access the Unsharp Mask feature by going to Enhance>Unsharp Mask.
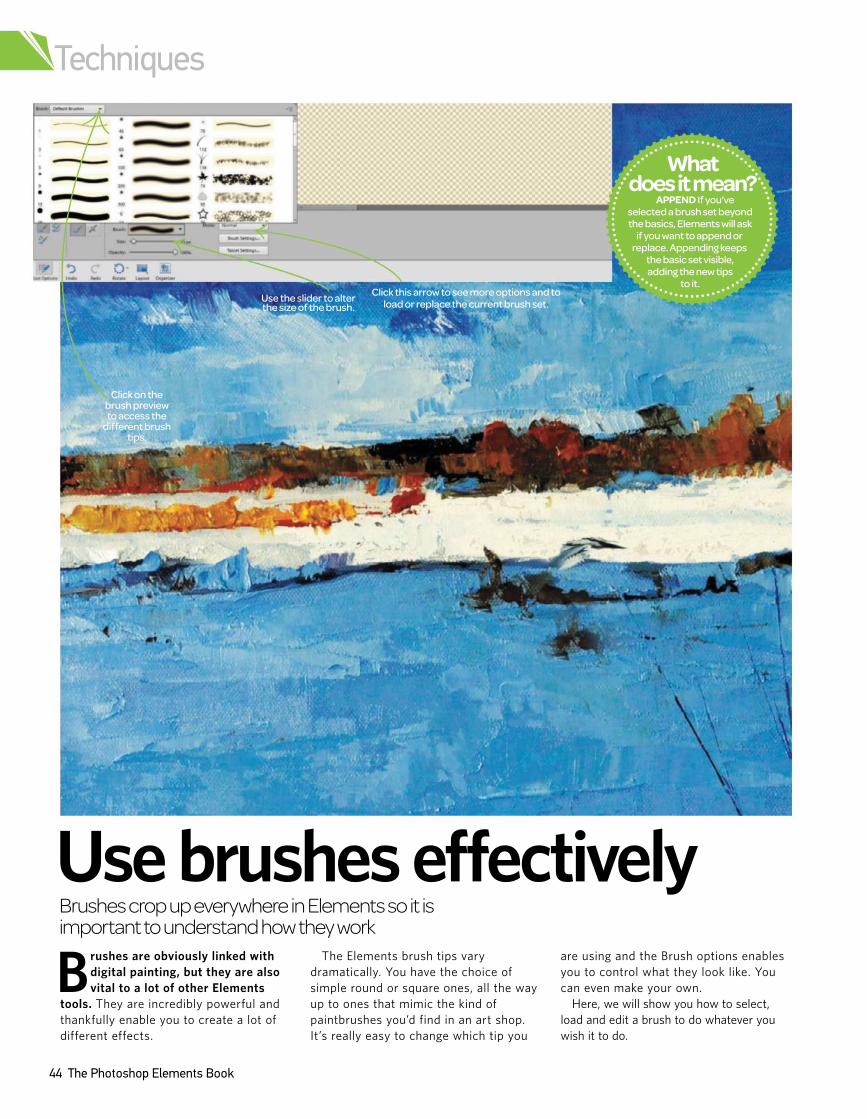
Click on the brush preview to access the
different brush tips.
Click this arrow to see more options and to load or replace the current brush set.
Use the slider to alter the size of the brush.
Techniques
44 The Photoshop Elements Book
What does it mean?
APPEND If you’ve selected a brush set beyond the basics, Elements will ask
if you want to append or replace. Appending keeps
the basic set visible, adding the new tips
to it.
Brushes are obviously linked with
digital painting, but they are also
vital to a lot of other Elements
tools. They are incredibly powerful and
thankfully enable you to create a lot of
different effects.
The Elements brush tips vary
dramatically. You have the choice of
simple round or square ones, all the way
up to ones that mimic the kind of
paintbrushes you’d find in an art shop.
It’s really easy to change which tip you
are using and the Brush options enables
you to control what they look like. You
can even make your own.
Here, we will show you how to select,
load and edit a brush to do whatever you
wish it to do.
Use brushes effectivelyBrushes crop up everywhere in Elements so it is important to understand how they work
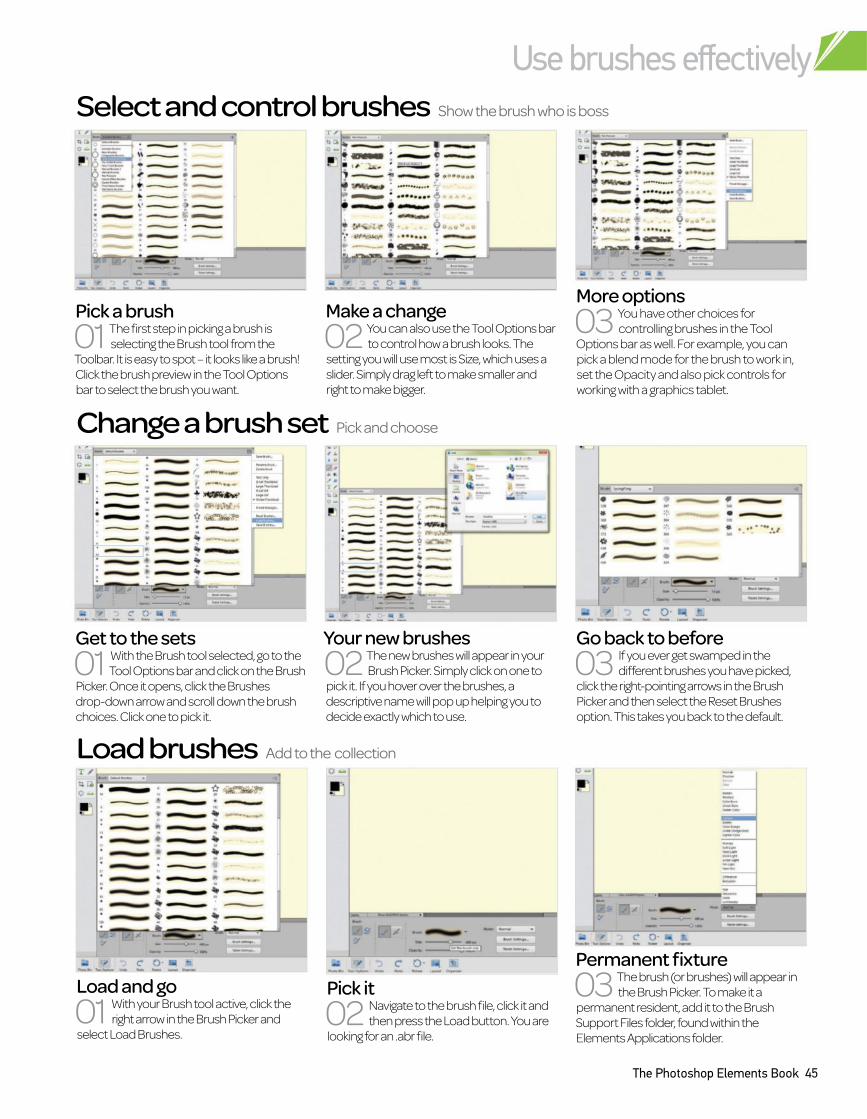
Use brushes effectively
The Photoshop Elements Book 45
Load and go
01 With your Brush tool active, click the
right arrow in the Brush Picker and
select Load Brushes.
Pick it
02 Navigate to the brush file, click it and
then press the Load button. You are
looking for an .abr file.
Permanent fixture
03 The brush (or brushes) will appear in
the Brush Picker. To make it a
permanent resident, add it to the Brush
Support Files folder, found within the
Elements Applications folder.
Load brushes Add to the collection
Get to the sets
01 With the Brush tool selected, go to the
Tool Options bar and click on the Brush
Picker. Once it opens, click the Brushes
drop-down arrow and scroll down the brush
choices. Click one to pick it.
Your new brushes
02 The new brushes will appear in your
Brush Picker. Simply click on one to
pick it. If you hover over the brushes, a
descriptive name will pop up helping you to
decide exactly which to use.
Go back to before
03 If you ever get swamped in the
different brushes you have picked,
click the right-pointing arrows in the Brush
Picker and then select the Reset Brushes
option. This takes you back to the default.
Change a brush set Pick and choose
Pick a brush
01 The first step in picking a brush is
selecting the Brush tool from the
Toolbar. It is easy to spot – it looks like a brush!
Click the brush preview in the Tool Options
bar to select the brush you want.
Make a change
02 You can also use the Tool Options bar
to control how a brush looks. The
setting you will use most is Size, which uses a
slider. Simply drag left to make smaller and
right to make bigger.
More options
03 You have other choices for
controlling brushes in the Tool
Options bar as well. For example, you can
pick a blend mode for the brush to work in,
set the Opacity and also pick controls for
working with a graphics tablet.
Select and control brushes Show the brush who is boss
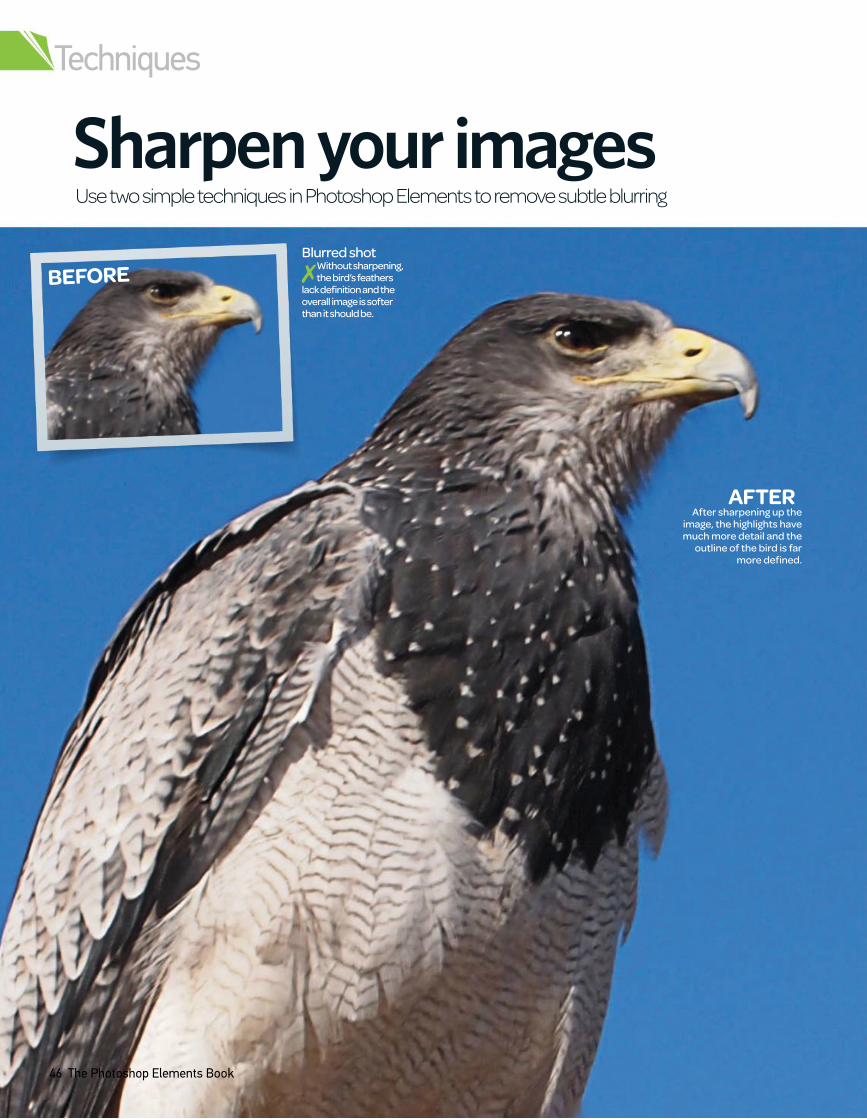
Techniques
46 The Photoshop Elements Book
Use two simple techniques in Photoshop Elements to remove subtle blurring
Sharpen your images
After sharpening up the image, the highlights have much more detail and the
outline of the bird is far more defined.
Blurred shot
✗ Without sharpening, the bird’s feathers
lack definition and the overall image is softer than it should be.
BEFORE
AFTER
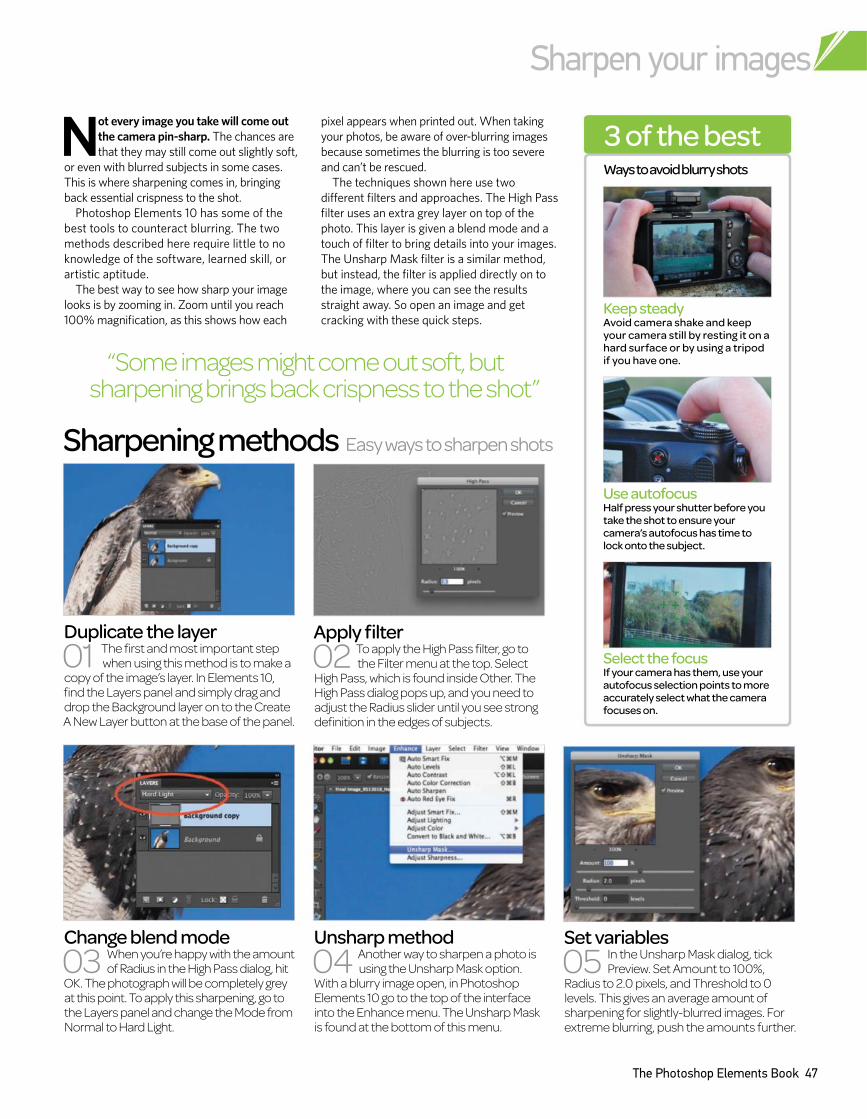
Sharpen your images
The Photoshop Elements Book 47
Ways to avoid blurry shots
3 of the best
Duplicate the layer
01 The first and most important step when using this method is to make a
copy of the image’s layer. In Elements 10, find the Layers panel and simply drag and drop the Background layer on to the Create A New Layer button at the base of the panel.
Apply filter
the Filter menu at the top. Select 02 To apply the High Pass filter, go to
High Pass, which is found inside Other. The High Pass dialog pops up, and you need to adjust the Radius slider until you see strong definition in the edges of subjects.
Change blend mode
03 When you’re happy with the amount of Radius in the High Pass dialog, hit
OK. The photograph will be completely grey at this point. To apply this sharpening, go to the Layers panel and change the Mode from Normal to Hard Light.
Unsharp method
04 Another way to sharpen a photo is using the Unsharp Mask option.
With a blurry image open, in Photoshop Elements 10 go to the top of the interface into the Enhance menu. The Unsharp Mask is found at the bottom of this menu.
Set variables
05 In the Unsharp Mask dialog, tick Preview. Set Amount to 100%,
Radius to 2.0 pixels, and Threshold to 0 levels. This gives an average amount of sharpening for slightly-blurred images. For extreme blurring, push the amounts further.
Not every image you take will come out
the camera pin-sharp. The chances are
that they may still come out slightly soft,
or even with blurred subjects in some cases.
This is where sharpening comes in, bringing
back essential crispness to the shot.
Photoshop Elements 10 has some of the
best tools to counteract blurring. The two
methods described here require little to no
knowledge of the software, learned skill, or
artistic aptitude.
The best way to see how sharp your image
looks is by zooming in. Zoom until you reach
100% magnification, as this shows how each
pixel appears when printed out. When taking
your photos, be aware of over-blurring images
because sometimes the blurring is too severe
and can’t be rescued.
The techniques shown here use two
diferent filters and approaches. The High Pass
filter uses an extra grey layer on top of the
photo. This layer is given a blend mode and a
touch of filter to bring details into your images.
The Unsharp Mask filter is a similar method,
but instead, the filter is applied directly on to
the image, where you can see the results
straight away. So open an image and get
cracking with these quick steps.
Sharpening methods Easy ways to sharpen shots
“Some images might come out soft, but sharpening brings back crispness to the shot”
Keep steadyAvoid camera shake and keep your camera still by resting it on a hard surface or by using a tripod if you have one.
Use autofocusHalf press your shutter before you take the shot to ensure your camera’s autofocus has time to lock onto the subject.
Select the focusIf your camera has them, use your autofocus selection points to more accurately select what the camera focuses on.
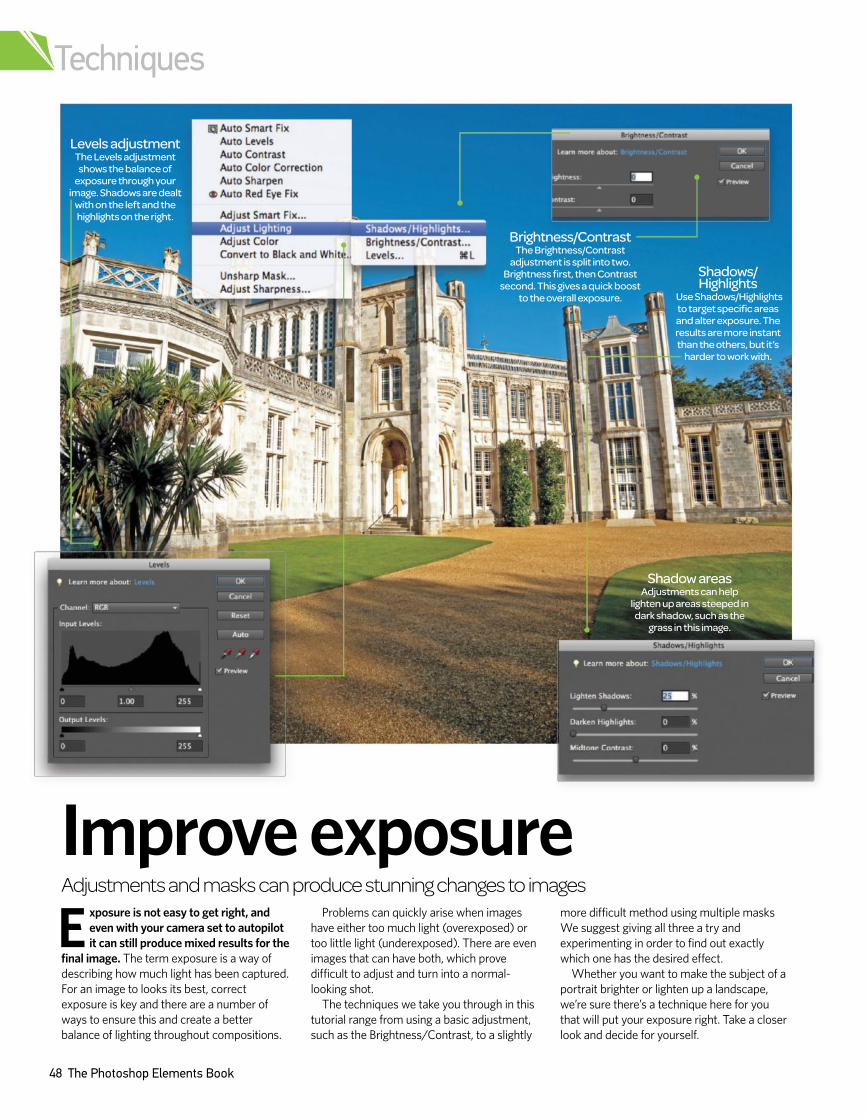
Shadow areasAdjustments can help
lighten up areas steeped in dark shadow, such as the
grass in this image.
Techniques
48 The Photoshop Elements Book
Exposure is not easy to get right, and
even with your camera set to autopilot
it can still produce mixed results for the
final image. The term exposure is a way of
describing how much light has been captured.
For an image to looks its best, correct
exposure is key and there are a number of
ways to ensure this and create a better
balance of lighting throughout compositions.
Problems can quickly arise when images
have either too much light (overexposed) or
too little light (underexposed). There are even
images that can have both, which prove
difficult to adjust and turn into a normal-
looking shot.
The techniques we take you through in this
tutorial range from using a basic adjustment,
such as the Brightness/Contrast, to a slightly
more difficult method using multiple masks
We suggest giving all three a try and
experimenting in order to find out exactly
which one has the desired effect.
Whether you want to make the subject of a
portrait brighter or lighten up a landscape,
we’re sure there’s a technique here for you
that will put your exposure right. Take a closer
look and decide for yourself.
Improve exposureAdjustments and masks can produce stunning changes to images
Levels adjustment The Levels adjustment
shows the balance of exposure through your
image. Shadows are dealt with on the left and the highlights on the right.
Brightness/ContrastThe Brightness/Contrast
adjustment is split into two. Brightness first, then Contrast
second. This gives a quick boost to the overall exposure.
Shadows/Highlights
Use Shadows/Highlights to target specific areas and alter exposure. The results are more instant than the others, but it’s
harder to work with.
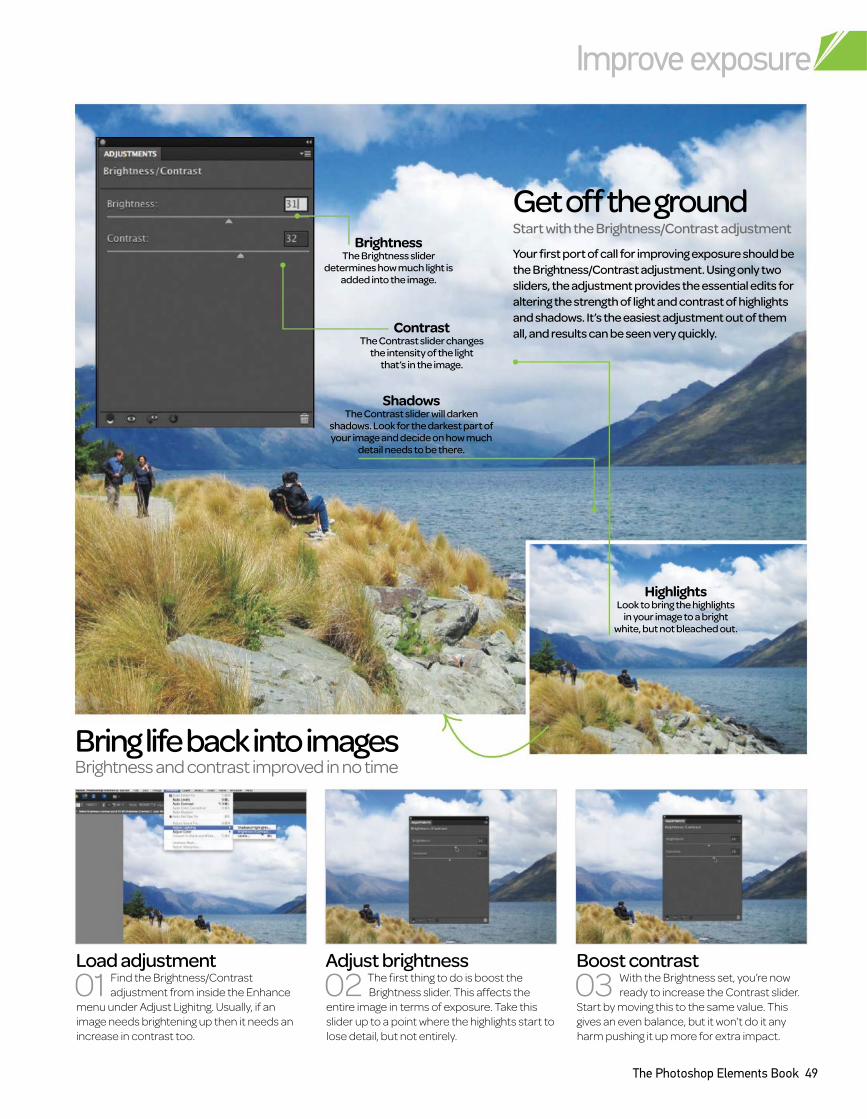
Improve exposure
The Photoshop Elements Book 49
Bring life back into imagesBrightness and contrast improved in no time
Load adjustment
01 Find the Brightness/Contrast
adjustment from inside the Enhance
menu under Adjust Lighitng. Usually, if an
image needs brightening up then it needs an
increase in contrast too.
Adjust brightness
02 The first thing to do is boost the
Brightness slider. This affects the
entire image in terms of exposure. Take this
slider up to a point where the highlights start to
lose detail, but not entirely.
Boost contrast
03 With the Brightness set, you’re now
ready to increase the Contrast slider.
Start by moving this to the same value. This
gives an even balance, but it won’t do it any
harm pushing it up more for extra impact.
Get off the ground Start with the Brightness/Contrast adjustment
Your first port of call for improving exposure should be
the Brightness/Contrast adjustment. Using only two
sliders, the adjustment provides the essential edits for
altering the strength of light and contrast of highlights
and shadows. It’s the easiest adjustment out of them
all, and results can be seen very quickly.ContrastThe Contrast slider changes
the intensity of the light that’s in the image.
ShadowsThe Contrast slider will darken
shadows. Look for the darkest part of your image and decide on how much
detail needs to be there.
BrightnessThe Brightness slider
determines how much light is added into the image.
Highlights Look to bring the highlights
in your image to a bright white, but not bleached out.
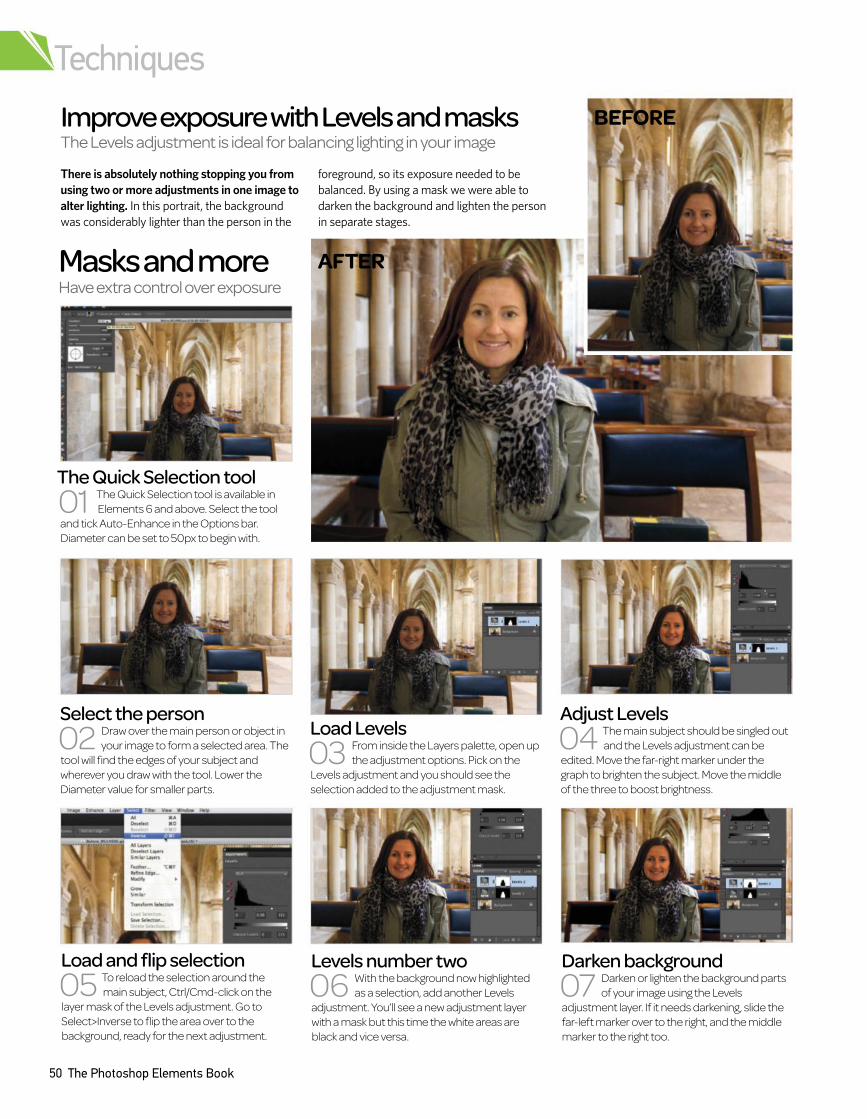
BEFORE
AFTER
Techniques
50 The Photoshop Elements Book
Select the person
02 Draw over the main person or object in
your image to form a selected area. The
tool will find the edges of your subject and
wherever you draw with the tool. Lower the
Diameter value for smaller parts.
The Quick Selection tool
01 The Quick Selection tool is available in
Elements 6 and above. Select the tool
and tick Auto-Enhance in the Options bar.
Diameter can be set to 50px to begin with.
Load Levels
the adjustment options. Pick on the 03 From inside the Layers palette, open up
Levels adjustment and you should see the
selection added to the adjustment mask.
Adjust Levels
04 The main subject should be singled out
and the Levels adjustment can be
edited. Move the far-right marker under the
graph to brighten the subject. Move the middle
of the three to boost brightness.
Masks and moreHave extra control over exposure
Load and flip selection
main subject, Ctrl/Cmd-click on the 05 To reload the selection around the
layer mask of the Levels adjustment. Go to
Select>Inverse to flip the area over to the
background, ready for the next adjustment.
Levels number two
06 With the background now highlighted
as a selection, add another Levels
adjustment. You’ll see a new adjustment layer
with a mask but this time the white areas are
black and vice versa.
Darken background
07 Darken or lighten the background parts
of your image using the Levels
adjustment layer. If it needs darkening, slide the
far-left marker over to the right, and the middle
marker to the right too.
Improve exposure with Levels and masks The Levels adjustment is ideal for balancing lighting in your image
There is absolutely nothing stopping you from
using two or more adjustments in one image to
alter lighting. In this portrait, the background
was considerably lighter than the person in the
foreground, so its exposure needed to be
balanced. By using a mask we were able to
darken the background and lighten the person
in separate stages.
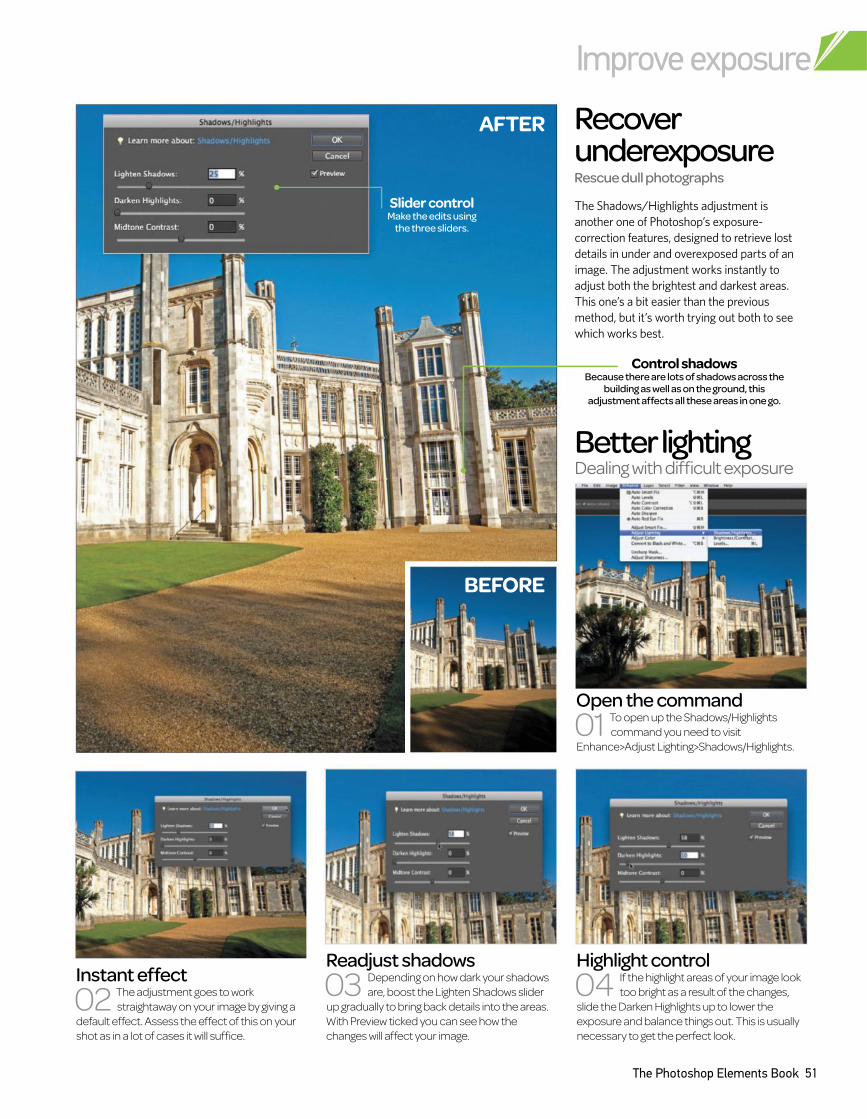
Improve exposure
The Photoshop Elements Book 51
Open the command
01 To open up the Shadows/Highlights
command you need to visit
Enhance>Adjust Lighting>Shadows/Highlights.
Readjust shadows
03 Depending on how dark your shadows
are, boost the Lighten Shadows slider
up gradually to bring back details into the areas.
With Preview ticked you can see how the
changes will affect your image.
Highlight control
04 If the highlight areas of your image look
too bright as a result of the changes,
slide the Darken Highlights up to lower the
exposure and balance things out. This is usually
necessary to get the perfect look.
Better lightingDealing with difficult exposure
Instant effect
02 The adjustment goes to work
straightaway on your image by giving a
default effect. Assess the effect of this on your
shot as in a lot of cases it will suffice.
Recover underexposureRescue dull photographs
The Shadows/Highlights adjustment is
another one of Photoshop’s exposure-
correction features, designed to retrieve lost
details in under and overexposed parts of an
image. The adjustment works instantly to
adjust both the brightest and darkest areas.
This one’s a bit easier than the previous
method, but it’s worth trying out both to see
which works best.
Slider controlMake the edits using
the three sliders.
Control shadowsBecause there are lots of shadows across the
building as well as on the ground, this adjustment affects all these areas in one go.
BEFORE
AFTER
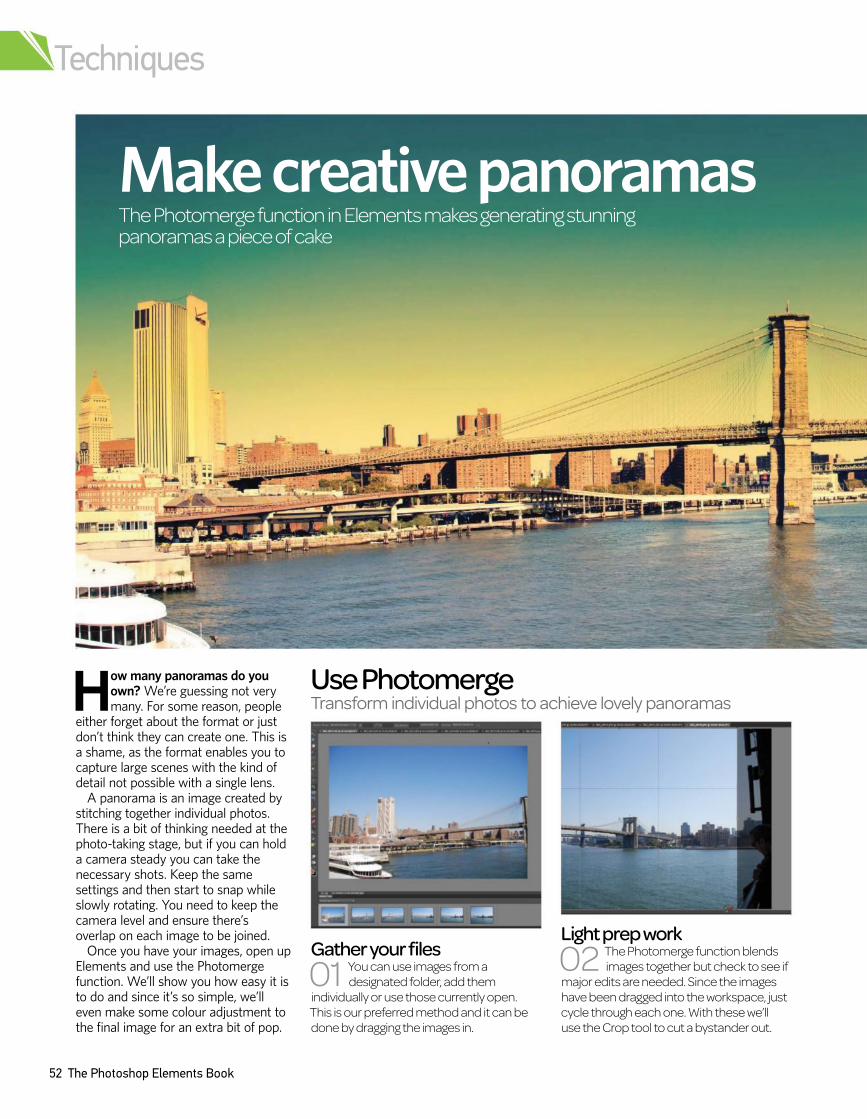
52 The Photoshop Elements Book
How many panoramas do you own? WeÕre guessing not very many. For some reason, people
either forget about the format or just donÕt think they can create one. This is a shame, as the format enables you to capture large scenes with the kind of detail not possible with a single lens.
A panorama is an image created by stitching together individual photos. There is a bit of thinking needed at the photo-taking stage, but if you can hold a camera steady you can take the necessary shots. Keep the same settings and then start to snap while slowly rotating. You need to keep the camera level and ensure thereÕs overlap on each image to be joined.
Once you have your images, open up Elements and use the Photomerge function. WeÕll show you how easy it is to do and since itÕs so simple, weÕll even make some colour adjustment to the final image for an extra bit of pop.
Make creative panoramasThe Photomerge function in Elements makes generating stunning panoramas a piece of cake
Light prep work
02 The Photomerge function blends
images together but check to see if
major edits are needed. Since the images
have been dragged into the workspace, just
cycle through each one. With these we’ll
use the Crop tool to cut a bystander out.
Gather your files
01 You can use images from a
designated folder, add them
individually or use those currently open.
This is our preferred method and it can be
done by dragging the images in.
Use Photomerge Transform individual photos to achieve lovely panoramas
Techniques
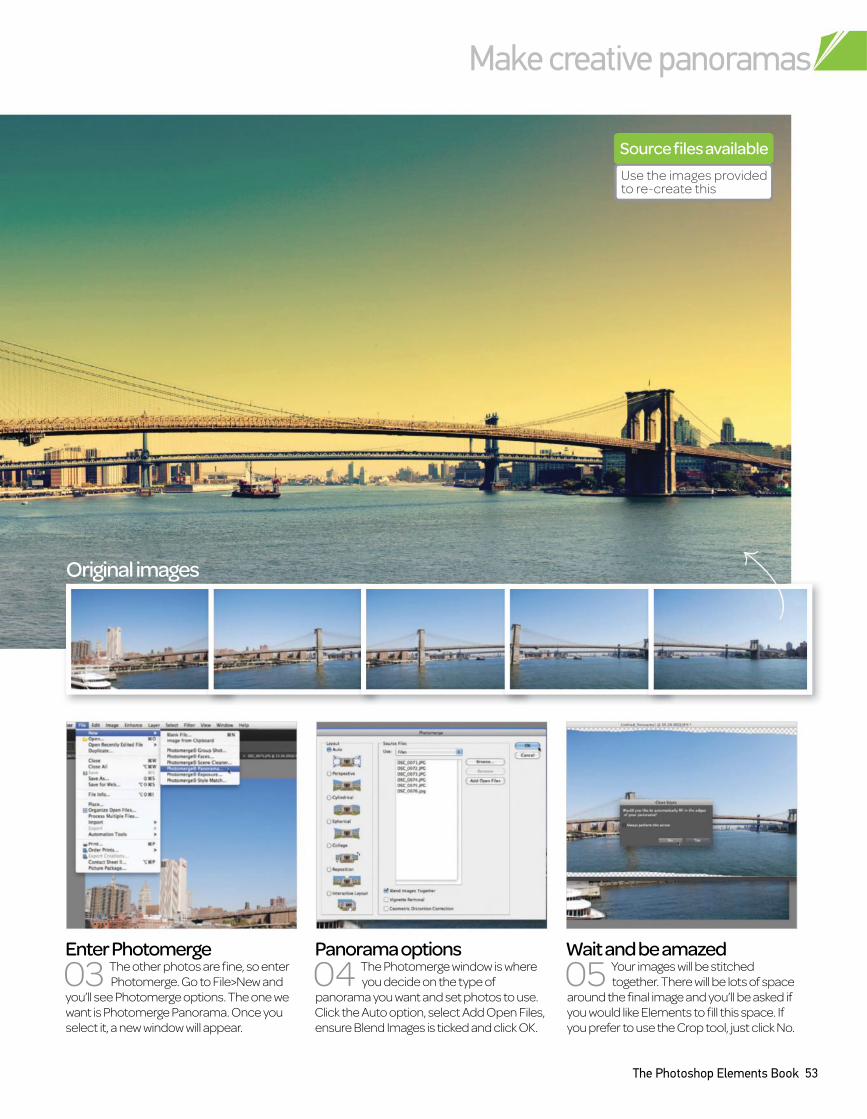
The Photoshop Elements Book 53
Panorama options
04 The Photomerge window is where
you decide on the type of
panorama you want and set photos to use.
Click the Auto option, select Add Open Files,
ensure Blend Images is ticked and click OK.
Wait and be amazed
05 Your images will be stitched
together. There will be lots of space
around the final image and you’ll be asked if
you would like Elements to fill this space. If
you prefer to use the Crop tool, just click No.
Enter Photomerge
03 The other photos are fine, so enter
Photomerge. Go to File>New and
you’ll see Photomerge options. The one we
want is Photomerge Panorama. Once you
select it, a new window will appear.
Original images
Make creative panoramas
Source files available
Use the images provided to re-create this
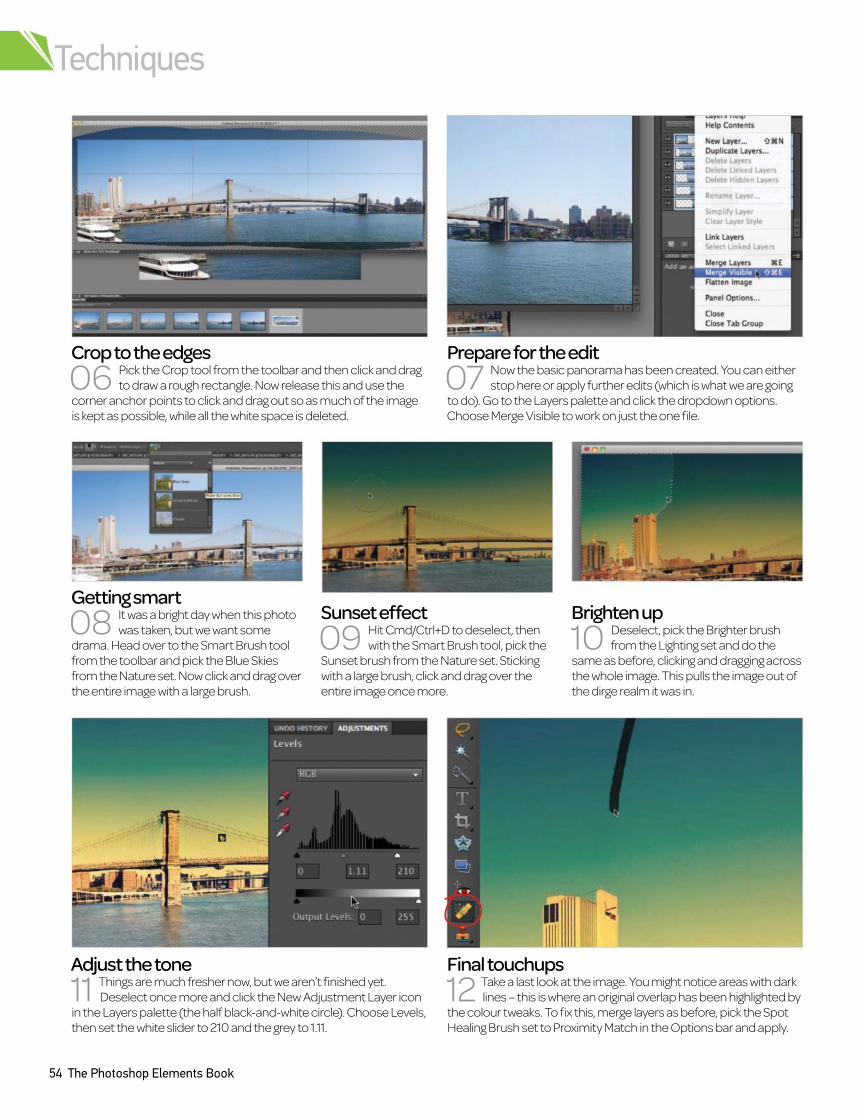
Sunset effect
09 Hit Cmd/Ctrl+D to deselect, then
with the Smart Brush tool, pick the
Sunset brush from the Nature set. Sticking
with a large brush, click and drag over the
entire image once more.
Brighten up
10 Deselect, pick the Brighter brush
from the Lighting set and do the
same as before, clicking and dragging across
the whole image. This pulls the image out of
the dirge realm it was in.
Getting smart
08 It was a bright day when this photo
was taken, but we want some
drama. Head over to the Smart Brush tool
from the toolbar and pick the Blue Skies
from the Nature set. Now click and drag over
the entire image with a large brush.
Crop to the edges
06 Pick the Crop tool from the toolbar and then click and drag
to draw a rough rectangle. Now release this and use the
corner anchor points to click and drag out so as much of the image
is kept as possible, while all the white space is deleted.
Prepare for the edit
stop here or apply further edits (which is what we are going 07 Now the basic panorama has been created. You can either
to do). Go to the Layers palette and click the dropdown options.
Choose Merge Visible to work on just the one file.
Adjust the tone
11 Things are much fresher now, but we aren’t finished yet.
Deselect once more and click the New Adjustment Layer icon
in the Layers palette (the half black-and-white circle). Choose Levels,
then set the white slider to 210 and the grey to 1.11.
Final touchups
12 Take a last look at the image. You might notice areas with dark
lines – this is where an original overlap has been highlighted by
the colour tweaks. To fix this, merge layers as before, pick the Spot
Healing Brush set to Proximity Match in the Options bar and apply.
54 The Photoshop Elements Book
Techniques
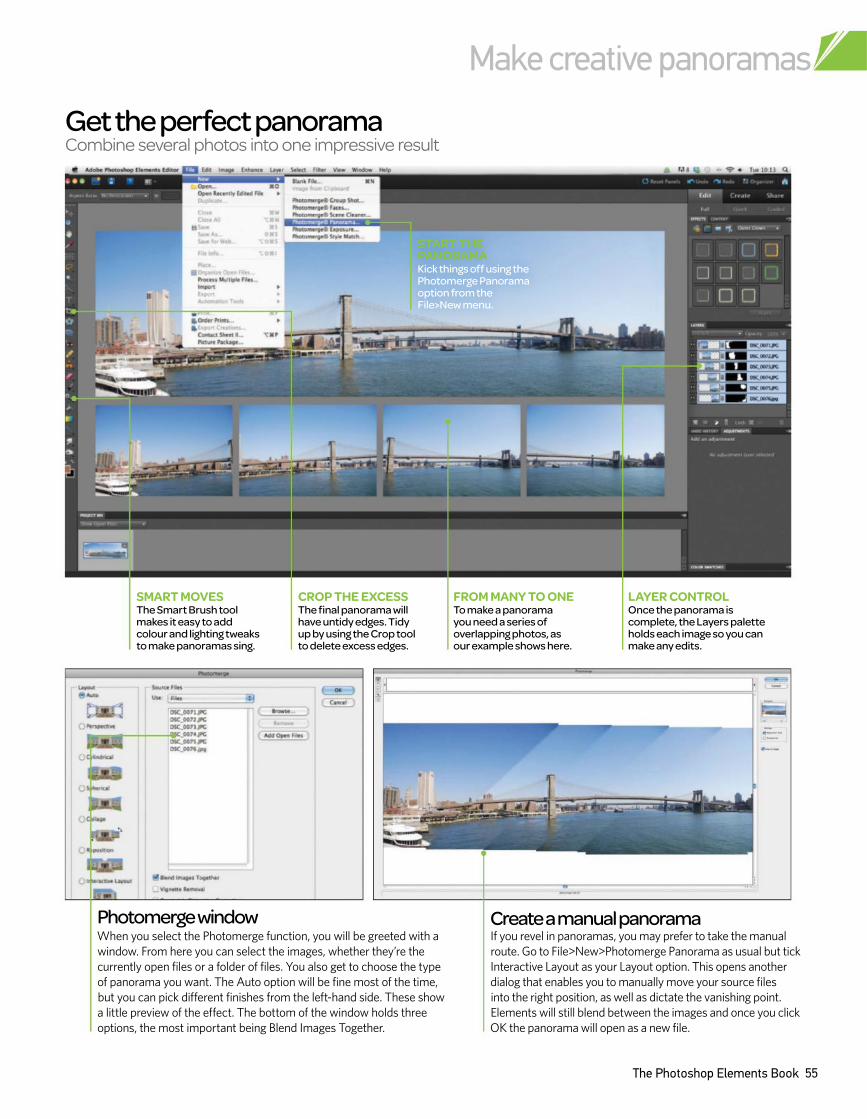
Get the perfect panorama Combine several photos into one impressive result
Photomerge windowWhen you select the Photomerge function, you will be greeted with a
window. From here you can select the images, whether theyÕre the
currently open files or a folder of files. You also get to choose the type
of panorama you want. The Auto option will be fine most of the time,
but you can pick different finishes from the left-hand side. These show
a little preview of the effect. The bottom of the window holds three
options, the most important being Blend Images Together.
Create a manual panoramaIf you revel in panoramas, you may prefer to take the manual
route. Go to File>New>Photomerge Panorama as usual but tick
Interactive Layout as your Layout option. This opens another
dialog that enables you to manually move your source files
into the right position, as well as dictate the vanishing point.
Elements will still blend between the images and once you click
OK the panorama will open as a new file.
START THE
PANORAMA
Kick things off using the Photomerge Panorama option from the File>New menu.
LAYER CONTROL
Once the panorama is complete, the Layers palette holds each image so you can make any edits.
FROM MANY TO ONE
To make a panorama you need a series of overlapping photos, as our example shows here.
CROP THE EXCESS
The final panorama will have untidy edges. Tidy up by using the Crop tool to delete excess edges.
SMART MOVES
The Smart Brush tool makes it easy to add colour and lighting tweaks to make panoramas sing.
The Photoshop Elements Book 55
Make creative panoramas
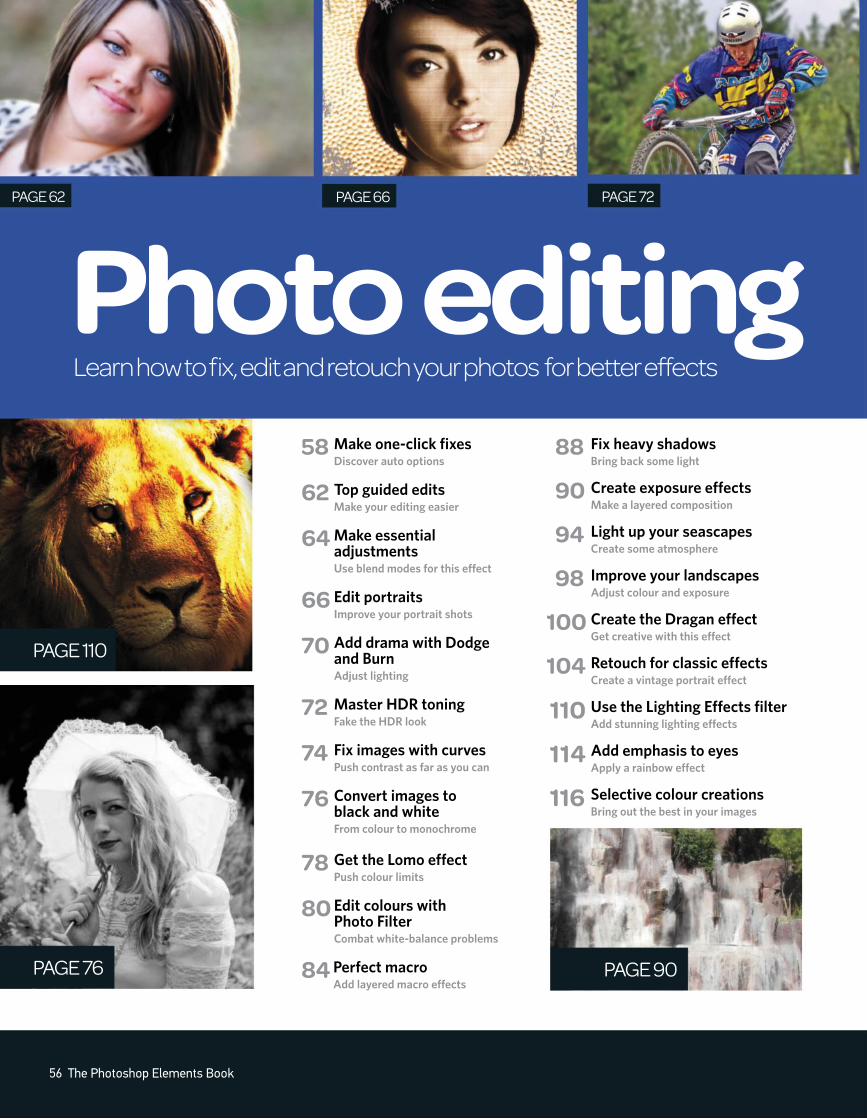
PAGE 90
Photo editingPAGE 62 PAGE 66 PAGE 72
PAGE 110
Learn how to fix, edit and retouch your photos for better effects
PAGE 76
56 The Photoshop Elements Book
Make one-click fixes Discover auto options
58
Top guided edits Make your editing easier
62
Make essential adjustmentsUse blend modes for this efect
64
Edit portraitsImprove your portrait shots
66
Add drama with Dodge and BurnAdjust lighting
70
Master HDR toningFake the HDR look
72
Fix images with curvesPush contrast as far as you can
74
Convert images to black and whiteFrom colour to monochrome
76
Get the Lomo effectPush colour limits
78
Edit colours with Photo FilterCombat white-balance problems
80
Perfect macroAdd layered macro efects
84
Fix heavy shadowsBring back some light
88
Create exposure effectsMake a layered composition
90
Light up your seascapesCreate some atmosphere
94
Improve your landscapesAdjust colour and exposure
98
Create the Dragan effectGet creative with this efect
100
Retouch for classic effectsCreate a vintage portrait efect
104
Use the Lighting Effects filterAdd stunning lighting efects
110
Add emphasis to eyesApply a rainbow efect
114
Selective colour creationsBring out the best in your images
116
PAGE 58
The Photoshop Elements Book 57
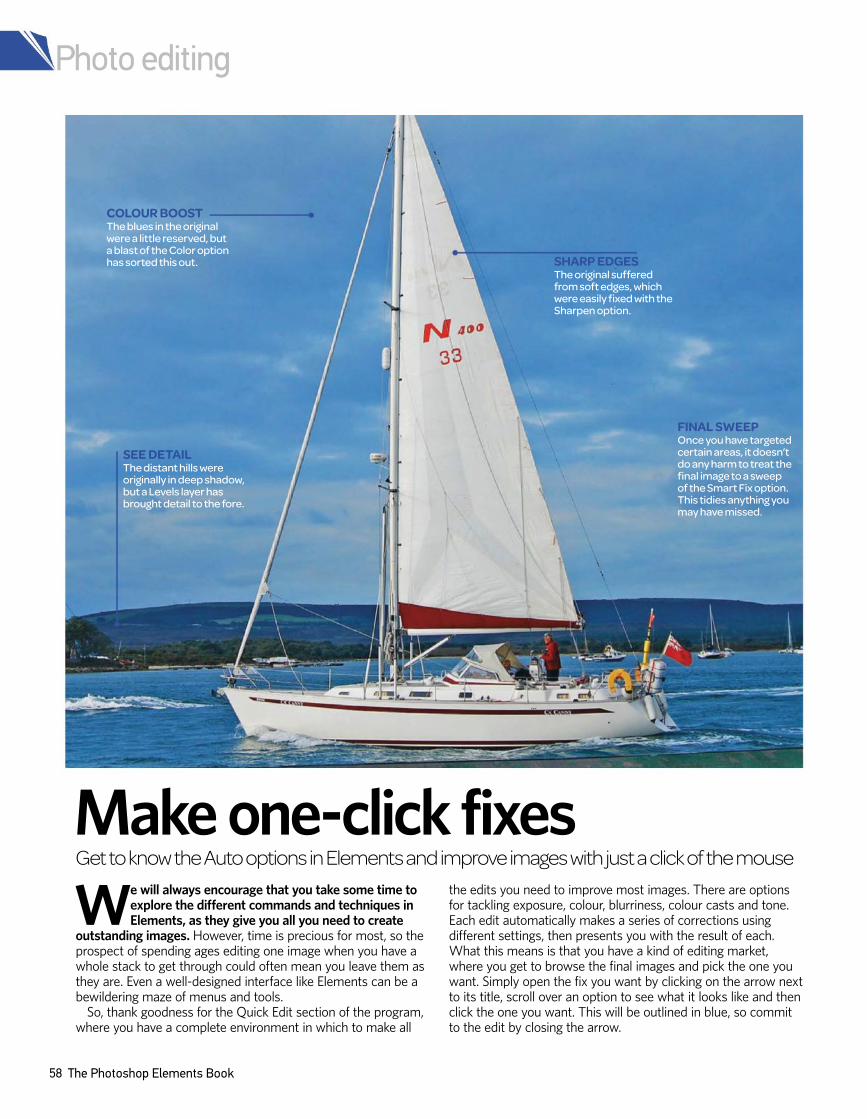
Photo editing
58 The Photoshop Elements Book
Make one-click fixesGet to know the Auto options in Elements and improve images with just a click of the mouse
We will always encourage that you take some time to explore the different commands and techniques in Elements, as they give you all you need to create
outstanding images. However, time is precious for most, so the prospect of spending ages editing one image when you have a whole stack to get through could often mean you leave them as they are. Even a well-designed interface like Elements can be a bewildering maze of menus and tools.
So, thank goodness for the Quick Edit section of the program, where you have a complete environment in which to make all
the edits you need to improve most images. There are options for tackling exposure, colour, blurriness, colour casts and tone. Each edit automatically makes a series of corrections using different settings, then presents you with the result of each. What this means is that you have a kind of editing market, where you get to browse the final images and pick the one you want. Simply open the fix you want by clicking on the arrow next to its title, scroll over an option to see what it looks like and then click the one you want. This will be outlined in blue, so commit to the edit by closing the arrow.
COLOUR BOOST
The blues in the original were a little reserved, but a blast of the Color option has sorted this out.
SEE DETAIL
The distant hills were originally in deep shadow, but a Levels layer has brought detail to the fore.
SHARP EDGES
The original suffered from soft edges, which were easily fixed with the Sharpen option.
FINAL SWEEP
Once you have targeted certain areas, it doesn’t do any harm to treat the final image to a sweep of the Smart Fix option. This tidies anything you may have missed.
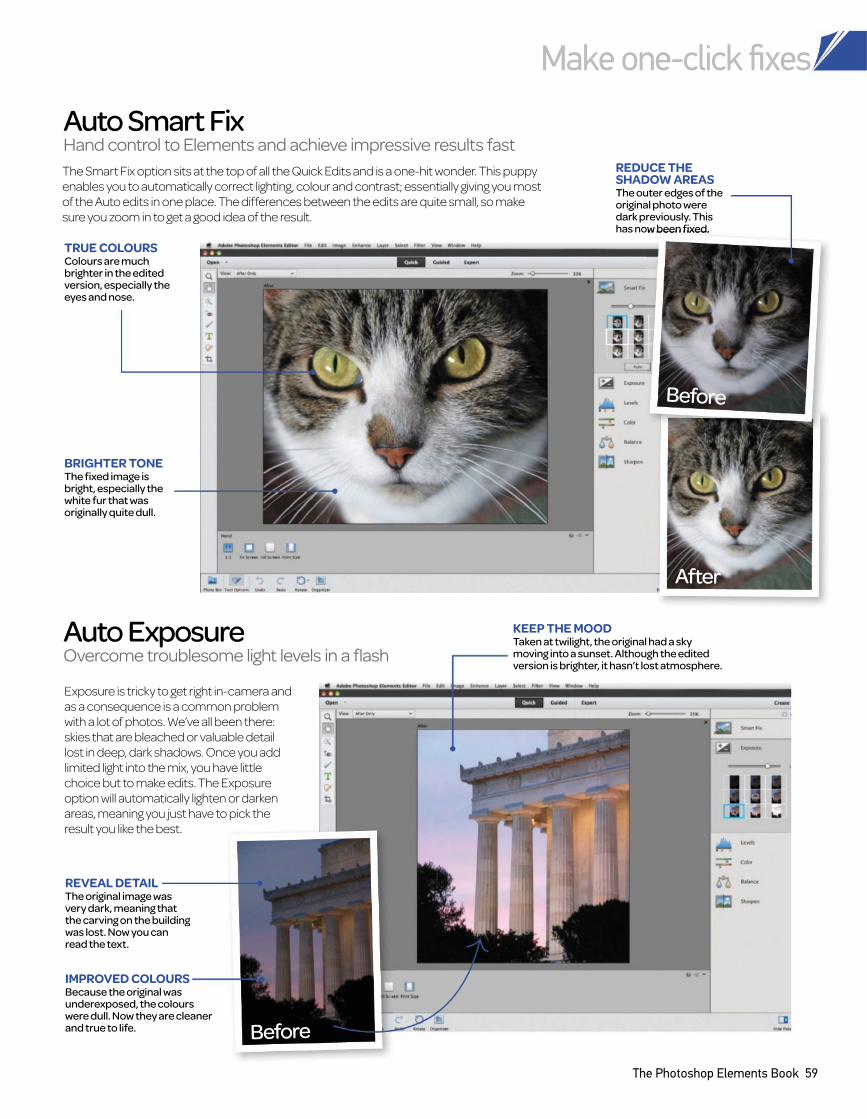
Make one-click fixes
The Photoshop Elements Book 59
REDUCE THE
SHADOW AREAS
The outer edges of the original photo were dark previously. This has now been fixed.
BRIGHTER TONE
The fixed image is bright, especially the white fur that was originally quite dull.
REVEAL DETAIL
The original image was very dark, meaning that the carving on the building was lost. Now you can read the text.
IMPROVED COLOURS
Because the original was underexposed, the colours were dull. Now they are cleaner and true to life.
TRUE COLOURS
Colours are much brighter in the edited version, especially the eyes and nose.
Auto Smart FixHand control to Elements and achieve impressive results fast
Auto ExposureOvercome troublesome light levels in a flash
The Smart Fix option sits at the top of all the Quick Edits and is a one-hit wonder. This puppy
enables you to automatically correct lighting, colour and contrast; essentially giving you most
of the Auto edits in one place. The differences between the edits are quite small, so make
sure you zoom in to get a good idea of the result.
Exposure is tricky to get right in-camera and
as a consequence is a common problem
with a lot of photos. We’ve all been there:
skies that are bleached or valuable detail
lost in deep, dark shadows. Once you add
limited light into the mix, you have little
choice but to make edits. The Exposure
option will automatically lighten or darken
areas, meaning you just have to pick the
result you like the best.
After
Before
Before
KEEP THE MOOD
Taken at twilight, the original had a sky moving into a sunset. Although the edited version is brighter, it hasn’t lost atmosphere.
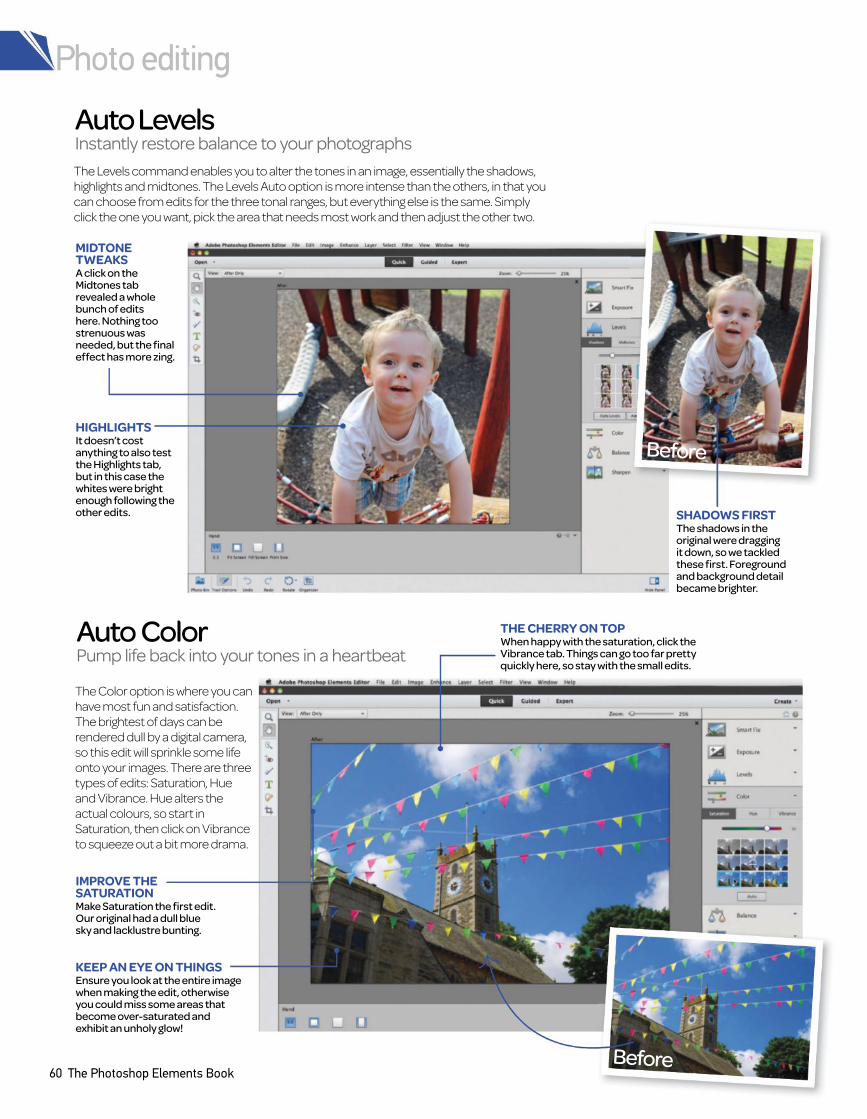
60 The Photoshop Elements Book
SHADOWS FIRST
The shadows in the original were dragging it down, so we tackled these first. Foreground and background detail became brighter.
HIGHLIGHTS
It doesn’t cost anything to also test the Highlights tab, but in this case the whites were bright enough following the other edits.
MIDTONE
TWEAKS
A click on the Midtones tab revealed a whole bunch of edits here. Nothing too strenuous was needed, but the final effect has more zing.
Auto LevelsInstantly restore balance to your photographs
Auto ColorPump life back into your tones in a heartbeat
The Levels command enables you to alter the tones in an image, essentially the shadows,
highlights and midtones. The Levels Auto option is more intense than the others, in that you
can choose from edits for the three tonal ranges, but everything else is the same. Simply
click the one you want, pick the area that needs most work and then adjust the other two.
The Color option is where you can
have most fun and satisfaction.
The brightest of days can be
rendered dull by a digital camera,
so this edit will sprinkle some life
onto your images. There are three
types of edits: Saturation, Hue
and Vibrance. Hue alters the
actual colours, so start in
Saturation, then click on Vibrance
to squeeze out a bit more drama.
Before
Before
THE CHERRY ON TOP
When happy with the saturation, click the Vibrance tab. Things can go too far pretty quickly here, so stay with the small edits.
IMPROVE THE
SATURATION
Make Saturation the first edit. Our original had a dull blue sky and lacklustre bunting.
KEEP AN EYE ON THINGS
Ensure you look at the entire image when making the edit, otherwise you could miss some areas that become over-saturated and exhibit an unholy glow!
Photo editing

The Photoshop Elements Book 61
BACK ON TRACK
The original image was a lot cooler than the flowers were in real life, so we needed to sort that out.
TINT
A quick visit to the Tint tab offered an option where the flowers’ tones became dominant, forcing the green to recede.
SECOND PASS
A good technique is to make a small edit, commit to it and then open Sharpen once more to add another tiny edit.
EXPLORE THE OPTIONS
It’s best to keep edits small, otherwise you will end up with halos around the edges.
BACK TO PINK
The Saturation tab presented an option that was true to the original, with warm pinky tones rather than a cold purple.
Auto BalanceReplace original vibrancy and heal undesirable effects
Auto SharpenQuickly refine your close-up shots for quality results
The Balance option primarily sorts colour casts. If your image was taken under artificial light,
it will probably have a yellow wash over it, so use the Temperature tab in the Balance
command to counteract this and produce a neutral image. The Tint tab produces subtle
shifts in colours and can help restore any of the original strength.
Regardless of the type of camera you have,
or your abilities as a photographer, digital
images will suffer from softness. A lot of the
time this isn’t noticed, but when it comes to
close-up shots, those soft edges make
themselves known. The Sharpness option
tackles this and defines the edges across the
image. This may not work on extremely blurry
images, but it will sort out most.
After
Before
Before
ZOOM
Look at your image and decide on the area that you want to sharpen, which should be the point in the most focus. Use the Zoom slider to enlarge this.
Make one-click fixes
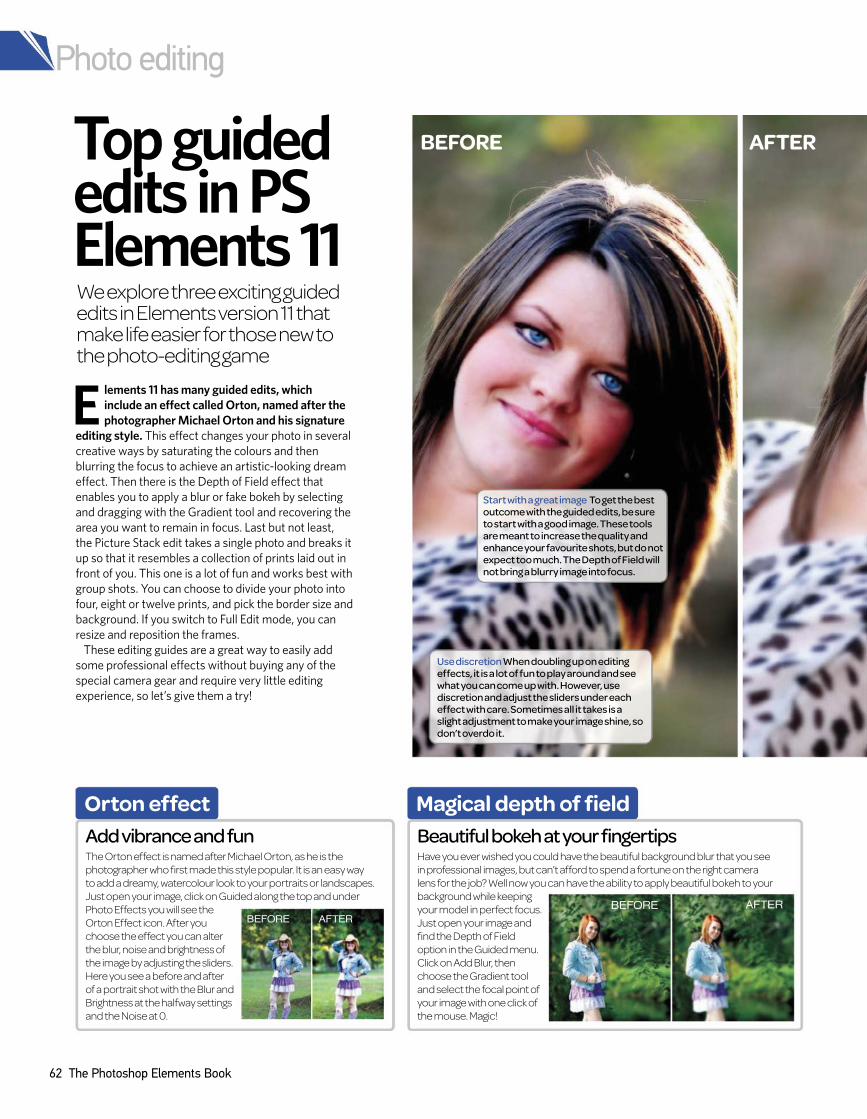
E
lements 11 has many guided edits, which
include an efect called Orton, named after the
photographer Michael Orton and his signature
editing style. This efect changes your photo in several
creative ways by saturating the colours and then
blurring the focus to achieve an artistic-looking dream
efect. Then there is the Depth of Field efect that
enables you to apply a blur or fake bokeh by selecting
and dragging with the Gradient tool and recovering the
area you want to remain in focus. Last but not least,
the Picture Stack edit takes a single photo and breaks it
up so that it resembles a collection of prints laid out in
front of you. This one is a lot of fun and works best with
group shots. You can choose to divide your photo into
four, eight or twelve prints, and pick the border size and
background. If you switch to Full Edit mode, you can
resize and reposition the frames.
These editing guides are a great way to easily add
some professional efects without buying any of the
special camera gear and require very little editing
experience, so let’s give them a try!
We explore three exciting guided edits in Elements version 11 that make life easier for those new to the photo-editing game
Top guided edits in PS Elements 11
BEFORE AFTER
Use discretion When doubling up on editing effects, it is a lot of fun to play around and see what you can come up with. However, use discretion and adjust the sliders under each effect with care. Sometimes all it takes is a slight adjustment to make your image shine, so don’t overdo it.
Start with a great image To get the best outcome with the guided edits, be sure to start with a good image. These tools are meant to increase the quality and enhance your favourite shots, but do not expect too much. The Depth of Field will not bring a blurry image into focus.
Orton effect
Add vibrance and funThe Orton effect is named after Michael Orton, as he is the
photographer who first made this style popular. It is an easy way
to add a dreamy, watercolour look to your portraits or landscapes.
Just open your image, click on Guided along the top and under
Photo Effects you will see the
Orton Effect icon. After you
choose the effect you can alter
the blur, noise and brightness of
the image by adjusting the sliders.
Here you see a before and after
of a portrait shot with the Blur and
Brightness at the halfway settings
and the Noise at 0.
BEFORE AFTER
Magical depth of field
Beautiful bokeh at your fingertipsHave you ever wished you could have the beautiful background blur that you see
in professional images, but can’t afford to spend a fortune on the right camera
lens for the job? Well now you can have the ability to apply beautiful bokeh to your
background while keeping
your model in perfect focus.
Just open your image and
find the Depth of Field
option in the Guided menu.
Click on Add Blur, then
choose the Gradient tool
and select the focal point of
your image with one click of
the mouse. Magic!
BEFORE AFTER
Photo editing
62 The Photoshop Elements Book
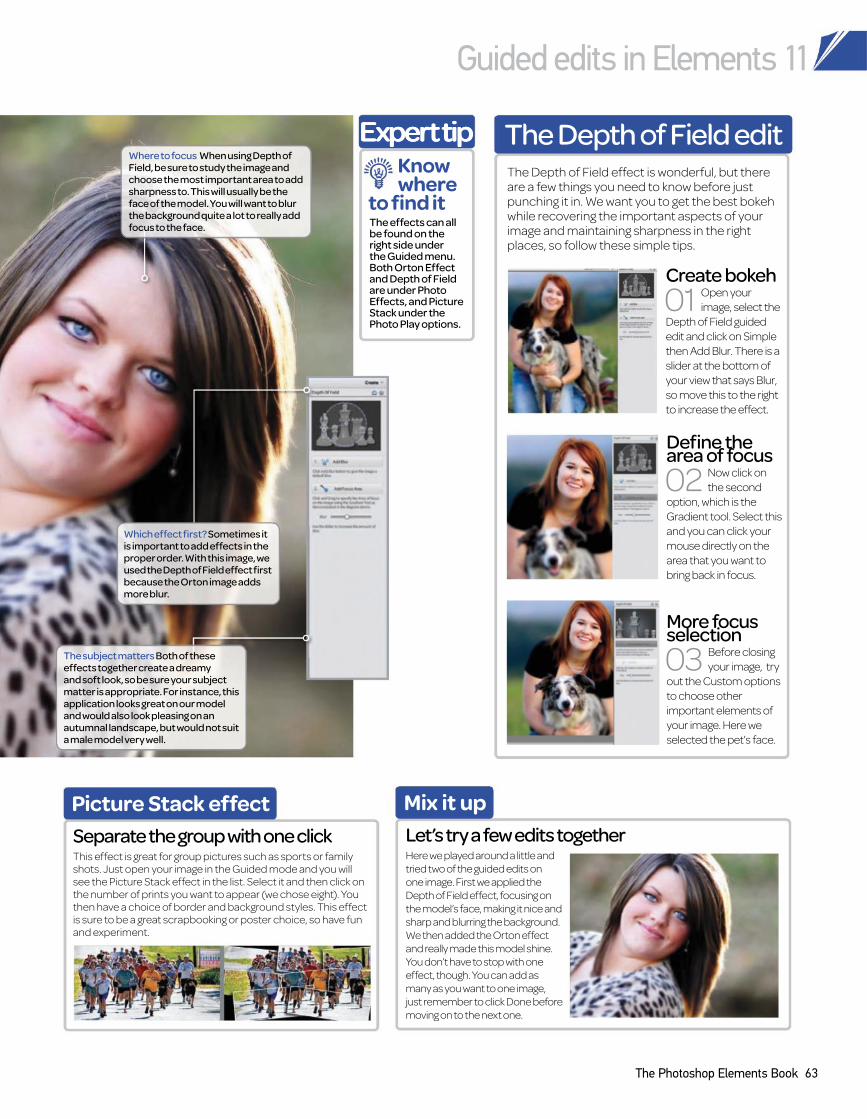
Know where to find it
This effect is great for group pictures such as sports or family shots. Just open your image in the Guided mode and you will see the Picture Stack effect in the list. Select it and then click on the number of prints you want to appear (we chose eight). You then have a choice of border and background styles. This effect is sure to be a great scrapbooking or poster choice, so have fun and experiment.
Which effect first? Sometimes it is important to add effects in the proper order. With this image, we used the Depth of Field effect first because the Orton image adds more blur.
The subject matters Both of these effects together create a dreamy and soft look, so be sure your subject matter is appropriate. For instance, this application looks great on our model and would also look pleasing on an autumnal landscape, but would not suit a male model very well.
Where to focus When using Depth of Field, be sure to study the image and choose the most important area to add sharpness to. This will usually be the face of the model. You will want to blur the background quite a lot to really add focus to the face.
Picture Stack effect
Separate the group with one click
Mix it up
Let’s try a few edits togetherHere we played around a little and
tried two of the guided edits on
one image. First we applied the
Depth of Field effect, focusing on
the model’s face, making it nice and
sharp and blurring the background.
We then added the Orton effect
and really made this model shine.
You don’t have to stop with one
effect, though. You can add as
many as you want to one image,
just remember to click Done before
moving on to the next one.
Create bokeh
01 Open your
image, select the
Depth of Field guided
edit and click on Simple
then Add Blur. There is a
slider at the bottom of
your view that says Blur,
so move this to the right
to increase the effect.
Define the area of focus
02 Now click on
the second
option, which is the
Gradient tool. Select this
and you can click your
mouse directly on the
area that you want to
bring back in focus.
More focus selection
03 Before closing
your image, try
out the Custom options
to choose other
important elements of
your image. Here we
selected the pet’s face.
The Depth of Field effect is wonderful, but there are a few things you need to know before just punching it in. We want you to get the best bokeh while recovering the important aspects of your image and maintaining sharpness in the right places, so follow these simple tips.
The Depth of Field edit
The effects can all be found on the right side under the Guided menu. Both Orton Effect and Depth of Field are under Photo Effects, and Picture Stack under the Photo Play options.
EEExxxpppeeerrrttt tttiiippp
Guided edits in Elements 11
The Photoshop Elements Book 63
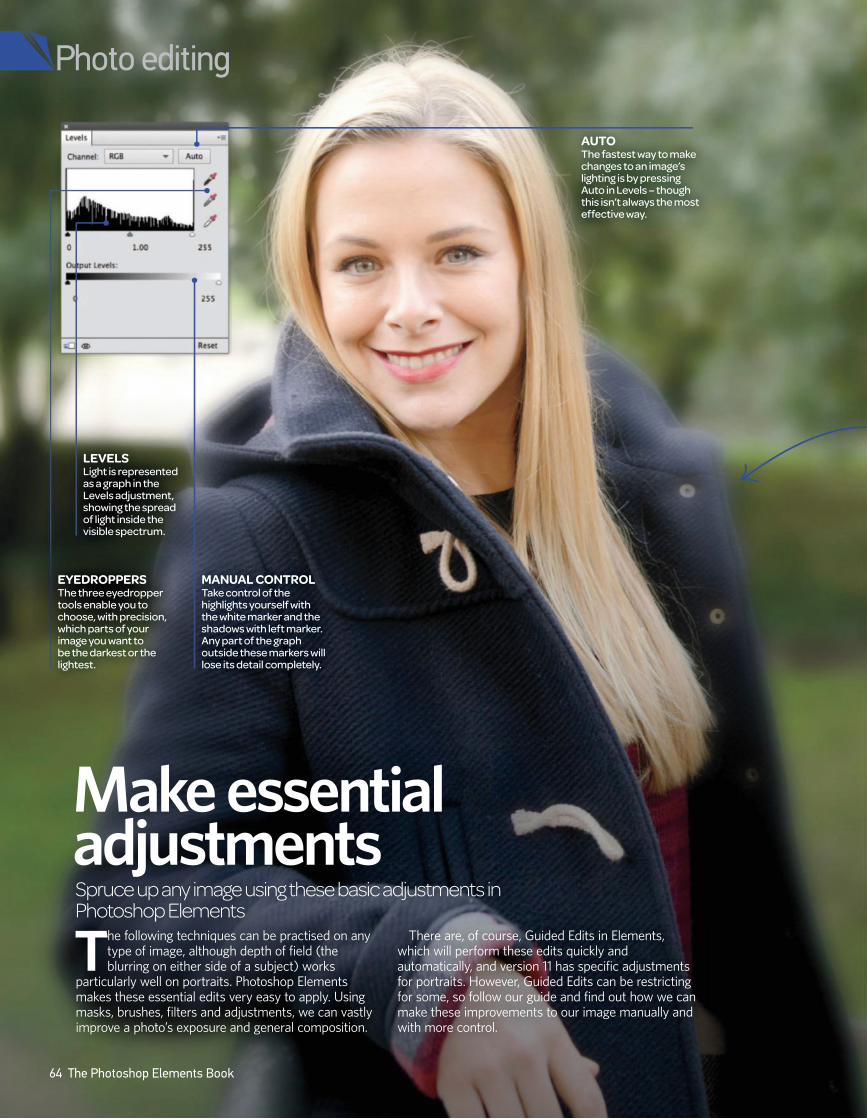
Make essential adjustmentsSpruce up any image using these basic adjustments in Photoshop Elements
The following techniques can be practised on any type of image, although depth of field (the blurring on either side of a subject) works
particularly well on portraits. Photoshop Elements makes these essential edits very easy to apply. Using masks, brushes, filters and adjustments, we can vastly improve a photo’s exposure and general composition.
There are, of course, Guided Edits in Elements, which will perform these edits quickly and automatically, and version 11 has specific adjustments for portraits. However, Guided Edits can be restricting for some, so follow our guide and find out how we can make these improvements to our image manually and with more control.
AUTO
The fastest way to make changes to an image’s lighting is by pressing Auto in Levels – though this isn’t always the most effective way.
64 The Photoshop Elements Book
Photo editing
EYEDROPPERS
The three eyedropper tools enable you to choose, with precision, which parts of your image you want to be the darkest or the lightest.
LEVELS
Light is represented as a graph in the Levels adjustment, showing the spread of light inside the visible spectrum.
MANUAL CONTROL
Take control of the highlights yourself with the white marker and the shadows with left marker. Any part of the graph outside these markers will lose its detail completely.

Make essential adjustments
The Photoshop Elements Book 65
Mask away!
06 In the Layers panel, click Add Layer
Mask to apply a white mask to the
blurred layer. Hit D to reset Foreground
colour to black. Grab the Brush tool (B) and
set Opacity to 100% with a soft brush tip.
Custom depth
07 Start with faces and remove blurring
by painting over them repeatedly.
Get close to the edges to reveal the person.
Get creative with the blurring, so leave some
clothing blurred and shift the depth of field.
Give your photos an instant boostTake control of light and depth in an image to vastly improve its composition and impact
Depth of field
05 Click the Background layer and go
to Layer>Duplicate Layer. Go to
Filter>Blur>Gaussian Blur and boost Radius
to 27 pixels. This will blur the entire image,
but it’s the background we must look at.
Brightest spots
04 Select the White eyedropper in
Levels and click on a bright area of
the image. This should increase contrast of
the image significantly. If you need to undo
changes at any point, press Cmd/Ctrl+Z.
What does it mean?OUTPUT LEVELS In the Levels
adjustment, the Output Levels sliders control the lightness of the image, rather than the exposure.
Sliding the black marker will lighten and fade the image, whereas the white marker
has the opposite effect.
START PHOTO
The quality of this portrait is lacking in
exposure and contrast, and it needs a
stronger composition
Automatic start
02 Open up the Levels adjustment
from the black and white circle in
the Layers panel. ‘Levels 1’ should appear
above the Background layer. Click on Auto
inside the adjustment.
Shadows
03 If Auto hasn’t produced the ‘goods’,
hit Reset to undo. Click on the Black
eyedropper tool in the adjustment and click
on a dark part of your image, like a shadow.
This will darken the image’s exposure.
Crop for impact
01 Remove background parts of your
image and centre the subject by
using the Crop tool (C). Click and drag with
the tool from one corner to another, lining
up the central crosshairs with the person.
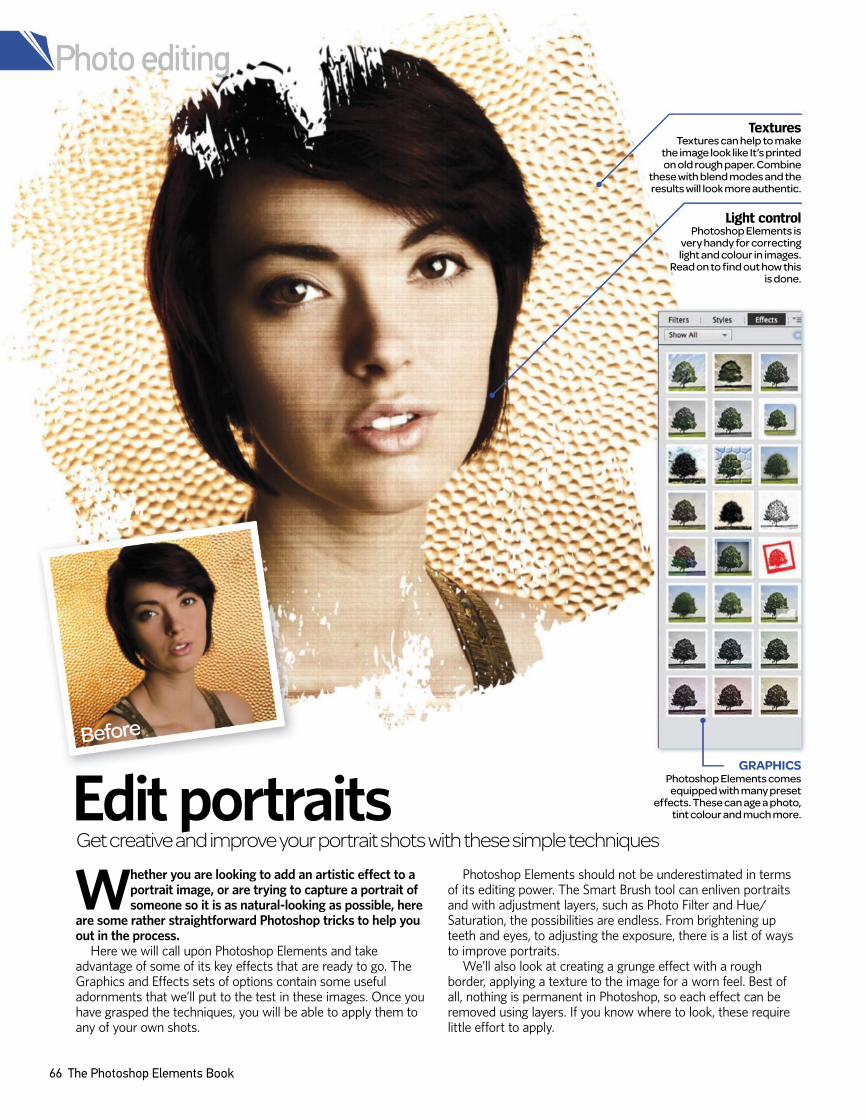
Photo editing
66 The Photoshop Elements Book
Edit portraitsGet creative and improve your portrait shots with these simple techniques
Whether you are looking to add an artistic effect to a portrait image, or are trying to capture a portrait of someone so it is as natural-looking as possible, here
are some rather straightforward Photoshop tricks to help you out in the process.
Here we will call upon Photoshop Elements and take advantage of some of its key effects that are ready to go. The Graphics and Effects sets of options contain some useful adornments that we’ll put to the test in these images. Once you have grasped the techniques, you will be able to apply them to any of your own shots.
Photoshop Elements should not be underestimated in terms of its editing power. The Smart Brush tool can enliven portraits and with adjustment layers, such as Photo Filter and Hue/Saturation, the possibilities are endless. From brightening up teeth and eyes, to adjusting the exposure, there is a list of ways to improve portraits.
We’ll also look at creating a grunge effect with a rough border, applying a texture to the image for a worn feel. Best of all, nothing is permanent in Photoshop, so each effect can be removed using layers. If you know where to look, these require little effort to apply.
GRAPHICS
Photoshop Elements comes equipped with many preset
effects. These can age a photo, tint colour and much more.
TexturesTextures can help to make
the image look like It’s printed on old rough paper. Combine
these with blend modes and the results will look more authentic.
Light controlPhotoshop Elements is
very handy for correcting light and colour in images.
Read on to find out how this is done.
Before
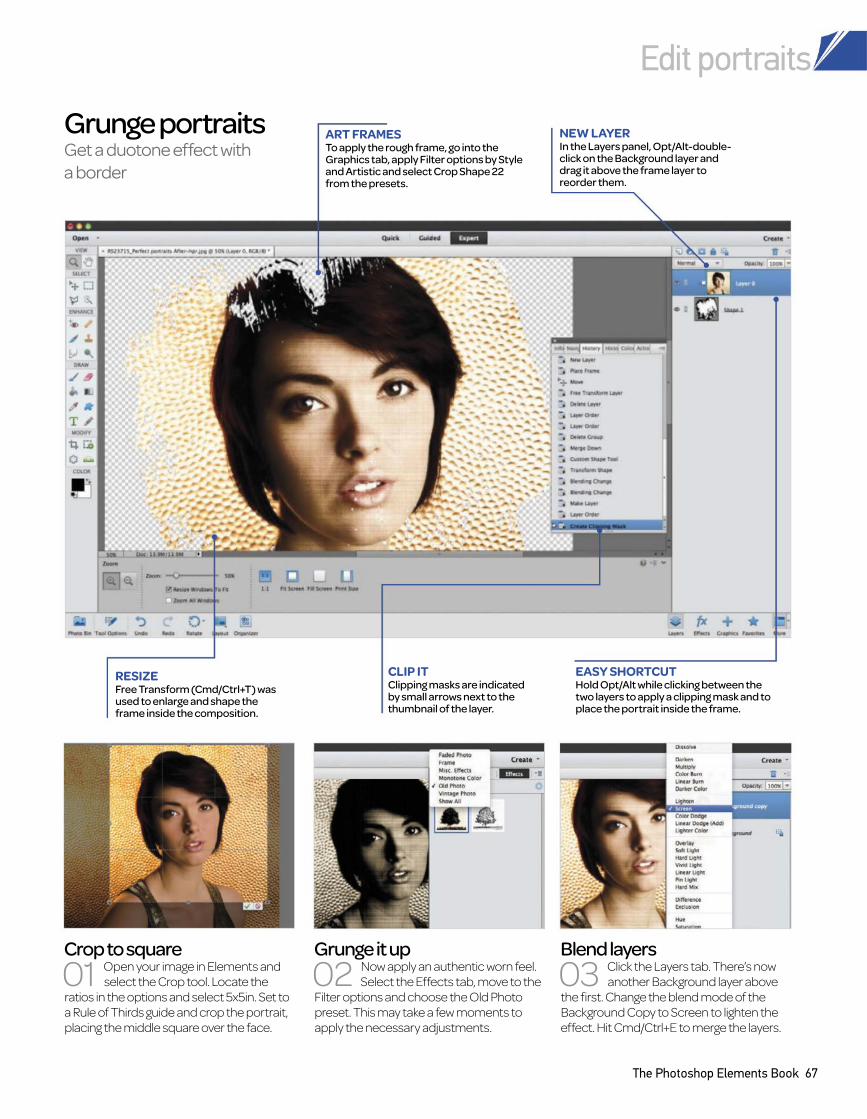
Edit portraits
The Photoshop Elements Book 67
Grunge portraits Get a duotone effect with
a border
Grunge it up
02 Now apply an authentic worn feel.
Select the Effects tab, move to the
Filter options and choose the Old Photo
preset. This may take a few moments to
apply the necessary adjustments.
Blend layers
03 Click the Layers tab. There’s now
another Background layer above
the first. Change the blend mode of the
Background Copy to Screen to lighten the
effect. Hit Cmd/Ctrl+E to merge the layers.
Crop to square
01 Open your image in Elements and
select the Crop tool. Locate the
ratios in the options and select 5x5in. Set to
a Rule of Thirds guide and crop the portrait,
placing the middle square over the face.
ART FRAMES
To apply the rough frame, go into the Graphics tab, apply Filter options by Style and Artistic and select Crop Shape 22 from the presets.
RESIZE
Free Transform (Cmd/Ctrl+T) was used to enlarge and shape the frame inside the composition.
NEW LAYER
In the Layers panel, Opt/Alt-double-click on the Background layer and drag it above the frame layer to reorder them.
EASY SHORTCUT
Hold Opt/Alt while clicking between the two layers to apply a clipping mask and to place the portrait inside the frame.
CLIP IT
Clipping masks are indicated by small arrows next to the thumbnail of the layer.
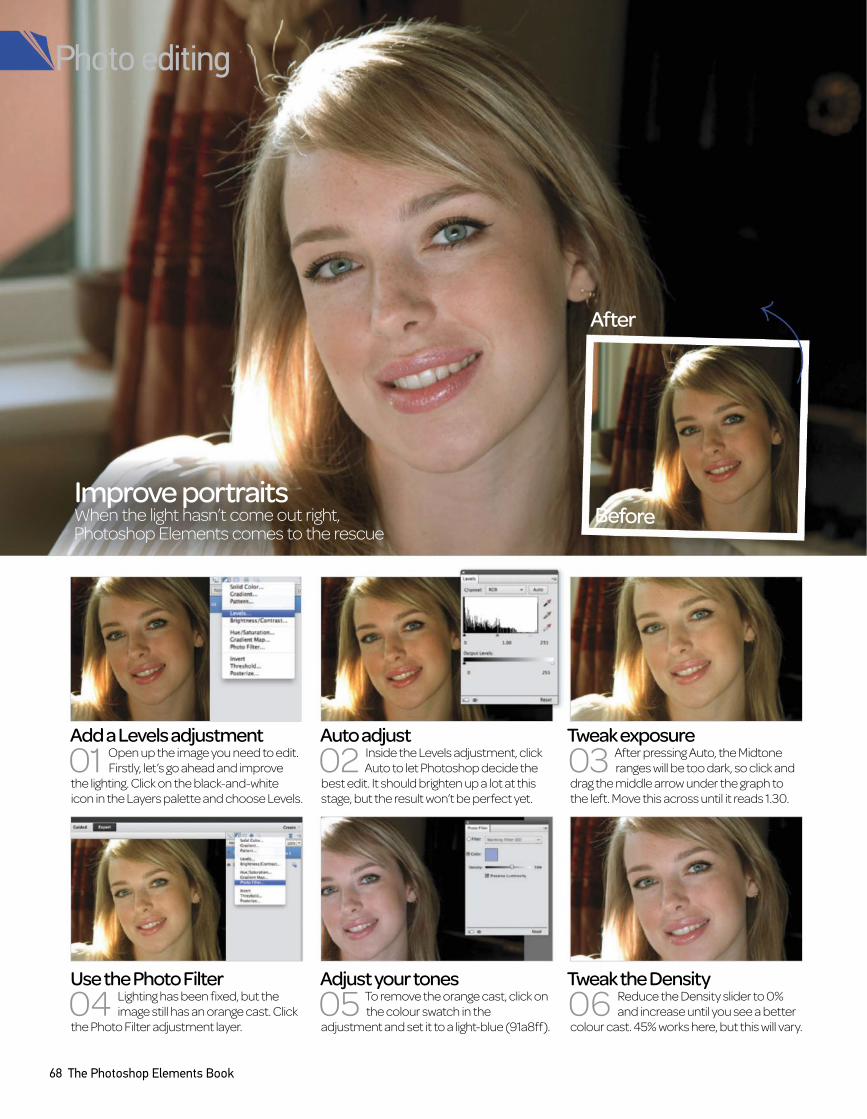
68 The Photoshop Elements Book
Tweak the Density
06 Reduce the Density slider to 0%
and increase until you see a better
colour cast. 45% works here, but this will vary.
Adjust your tones
the colour swatch in the 05 To remove the orange cast, click on
adjustment and set it to a light-blue (91a8ff).
Use the Photo Filter
04 Lighting has been fixed, but the
image still has an orange cast. Click
the Photo Filter adjustment layer.
Tweak exposure
03 After pressing Auto, the Midtone
ranges will be too dark, so click and
drag the middle arrow under the graph to
the left. Move this across until it reads 1.30.
Auto adjust
02 Inside the Levels adjustment, click
Auto to let Photoshop decide the
best edit. It should brighten up a lot at this
stage, but the result won’t be perfect yet.
Add a Levels adjustment
01 Open up the image you need to edit.
Firstly, let’s go ahead and improve
the lighting. Click on the black-and-white
icon in the Layers palette and choose Levels.
Before
After
Photo editing
Improve portraits When the light hasn’t come out right, Photoshop Elements comes to the rescue
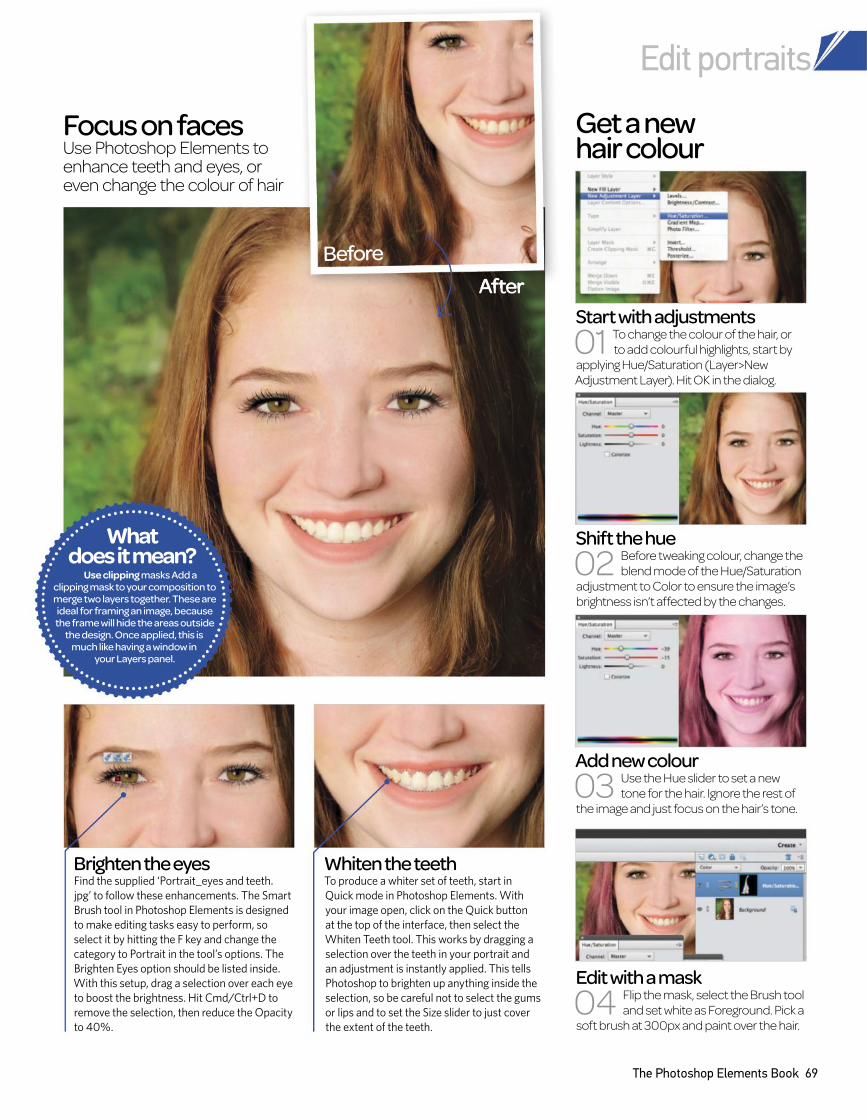
Edit portraits
The Photoshop Elements Book 69
Focus on faces Use Photoshop Elements to enhance teeth and eyes, or even change the colour of hair
Start with adjustments
to add colourful highlights, start by 01 To change the colour of the hair, or
applying Hue/Saturation (Layer>New
Adjustment Layer). Hit OK in the dialog.
Shift the hue
02 Before tweaking colour, change the
blend mode of the Hue/Saturation
adjustment to Color to ensure the image’s
brightness isn’t affected by the changes.
Add new colour
03 Use the Hue slider to set a new
tone for the hair. Ignore the rest of
the image and just focus on the hair’s tone.
Edit with a mask
04 Flip the mask, select the Brush tool
and set white as Foreground. Pick a
soft brush at 300px and paint over the hair.
After
Brighten the eyesFind the supplied ‘Portrait_eyes and teeth.
jpg’ to follow these enhancements. The Smart
Brush tool in Photoshop Elements is designed
to make editing tasks easy to perform, so
select it by hitting the F key and change the
category to Portrait in the tool’s options. The
Brighten Eyes option should be listed inside.
With this setup, drag a selection over each eye
to boost the brightness. Hit Cmd/Ctrl+D to
remove the selection, then reduce the Opacity
to 40%.
Whiten the teethTo produce a whiter set of teeth, start in
Quick mode in Photoshop Elements. With
your image open, click on the Quick button
at the top of the interface, then select the
Whiten Teeth tool. This works by dragging a
selection over the teeth in your portrait and
an adjustment is instantly applied. This tells
Photoshop to brighten up anything inside the
selection, so be careful not to select the gums
or lips and to set the Size slider to just cover
the extent of the teeth.
Before
Get a new hair colour
What does it mean?
Use clipping masks Add a clipping mask to your composition to merge two layers together. These are ideal for framing an image, because the frame will hide the areas outside
the design. Once applied, this is much like having a window in
your Layers panel.

Photo editing
70 The Photoshop Elements Book
Anyone who has been using Photoshop
Elements for a while will know that
there are many ways of doing the
same thing. There are times when this feels like
a curse but, more often than not, it is a blessing
because if you can’t face a certain task you can
bet your bottom dollar there is a swift
workaround somewhere.
The Dodge and Burn tools offer such a
solution. Ordinarily, if you have a photo that
needs some areas to be darker or lighter, but
different strengths of light and dark, you would
be looking at making selections for the different
edits. This isn’t a problem if it’s an image made
up of simple shapes but not so great if it’s a bit
more complicated (like trees), or an image with
a lack of definition between colours.
The Dodge and Burn tools are useful in
cases such as this because you use
brushes to apply the effect. You can adapt
the size of brush to suit different areas and
can also adjust the Flow value to set how
intense the edit is for each of the parts.
Dodging and burning is a destructive
method in Elements, so always make sure that
you are working on duplicate layers or a copy
of your original image so that you always have
a backup. The prinicples covered here will
work on any image, or download our one from
kozzi.com, image number 24708757.
You don’t have to make a raft of selections, just use the Dodge and Burn tools to adjust lighting exactly where you want to
Add drama with Dodge and Burn
BEFORE AFTER
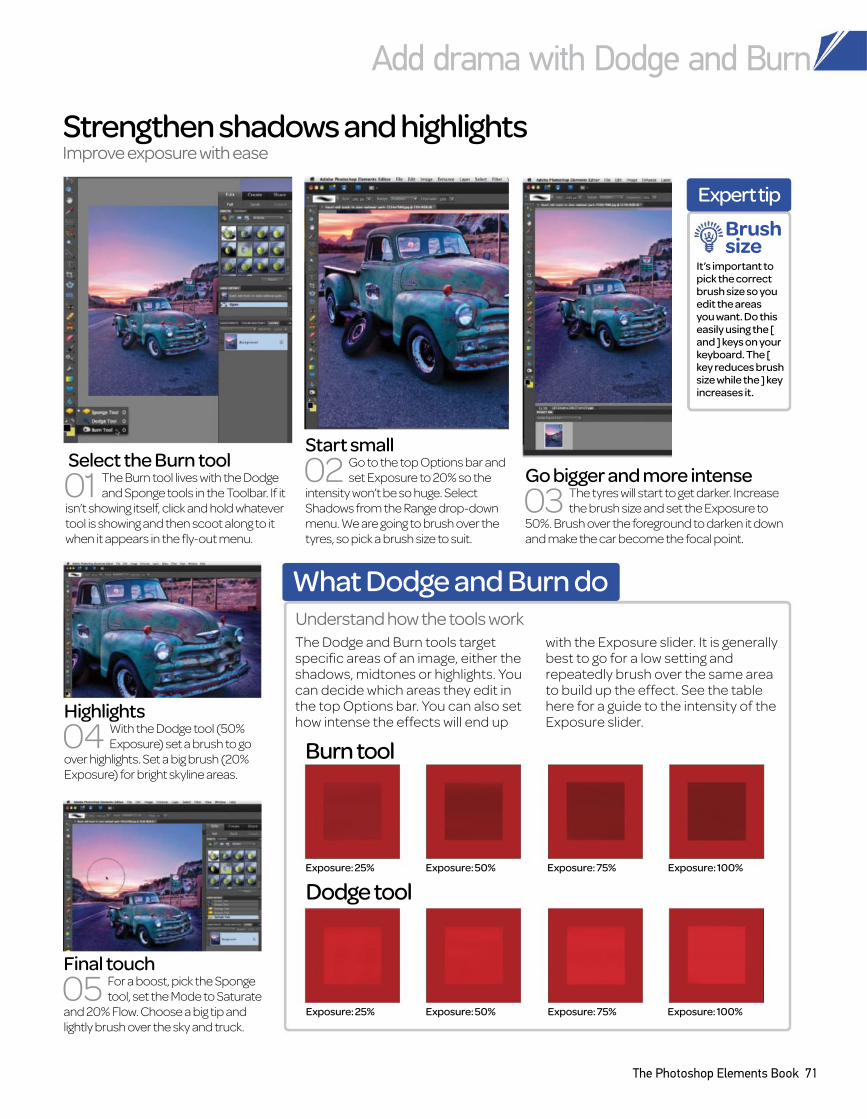
Add drama with Dodge and Burn
The Photoshop Elements Book 71
Strengthen shadows and highlightsImprove exposure with ease
Understand how the tools work
Dodge tool
Burn tool
Exposure: 25%
Exposure: 25%
Exposure: 50%
Exposure: 50%
Exposure: 75%
Exposure: 75%
Exposure: 100%
Exposure: 100%
Expert tip
It’s important to pick the correct brush size so you edit the areas you want. Do this easily using the [ and ] keys on your keyboard. The [ key reduces brush size while the ] key increases it.
Brush size
Start small
02 Go to the top Options bar and
set Exposure to 20% so the
intensity won’t be so huge. Select
Shadows from the Range drop-down
menu. We are going to brush over the
tyres, so pick a brush size to suit.
Select the Burn tool
01 The Burn tool lives with the Dodge
and Sponge tools in the Toolbar. If it
isn’t showing itself, click and hold whatever
tool is showing and then scoot along to it
when it appears in the fly-out menu.
Go bigger and more intense
03 The tyres will start to get darker. Increase
the brush size and set the Exposure to
50%. Brush over the foreground to darken it down
and make the car become the focal point.
Final touch
05 For a boost, pick the Sponge
tool, set the Mode to Saturate
and 20% Flow. Choose a big tip and
lightly brush over the sky and truck.
Highlights
04 With the Dodge tool (50%
Exposure) set a brush to go
over highlights. Set a big brush (20%
Exposure) for bright skyline areas.
The Dodge and Burn tools target specific areas of an image, either the shadows, midtones or highlights. You can decide which areas they edit in the top Options bar. You can also set how intense the effects will end up
with the Exposure slider. It is generally best to go for a low setting and repeatedly brush over the same area to build up the effect. See the table here for a guide to the intensity of the Exposure slider.
What Dodge and Burn do
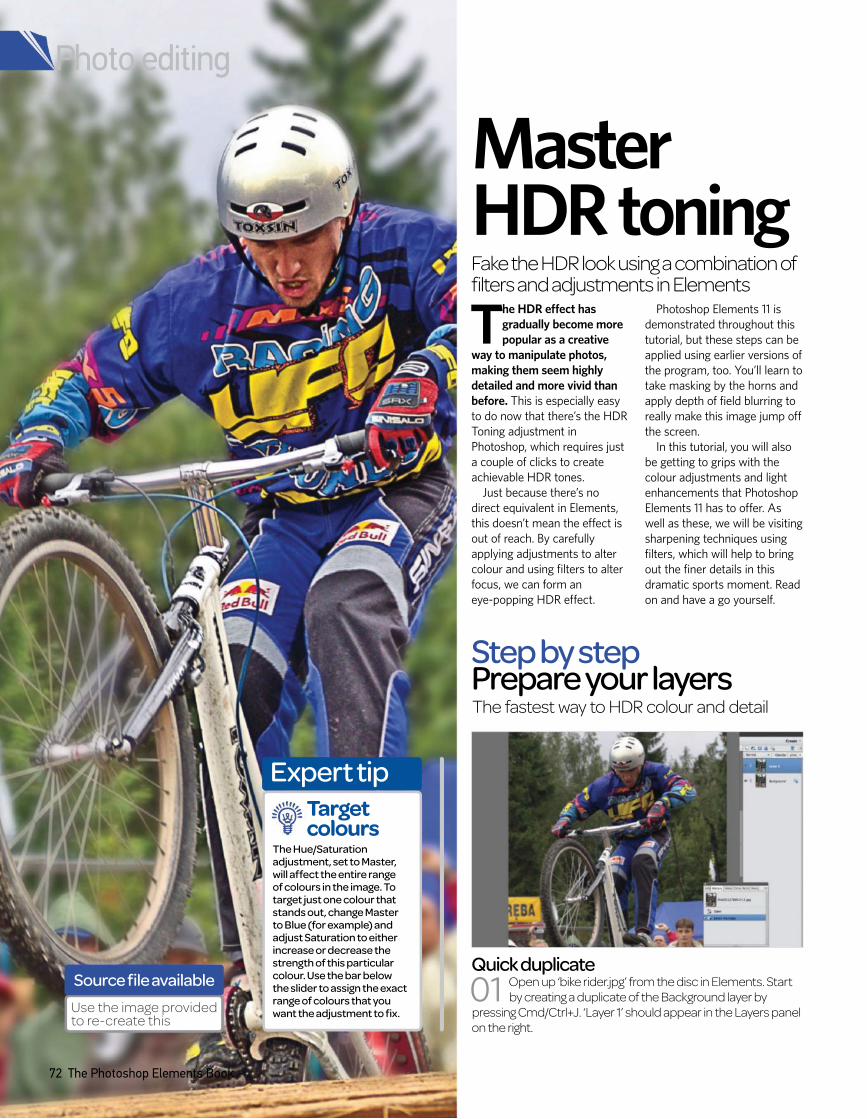
72 The Photoshop Elements Book
The HDR effect has
gradually become more
popular as a creative
way to manipulate photos,
making them seem highly
detailed and more vivid than
before. This is especially easy
to do now that there’s the HDR
Toning adjustment in
Photoshop, which requires just
a couple of clicks to create
achievable HDR tones.
Just because there’s no
direct equivalent in Elements,
this doesn’t mean the effect is
out of reach. By carefully
applying adjustments to alter
colour and using filters to alter
focus, we can form an
eye-popping HDR effect.
Photoshop Elements 11 is
demonstrated throughout this
tutorial, but these steps can be
applied using earlier versions of
the program, too. You’ll learn to
take masking by the horns and
apply depth of field blurring to
really make this image jump off
the screen.
In this tutorial, you will also
be getting to grips with the
colour adjustments and light
enhancements that Photoshop
Elements 11 has to offer. As
well as these, we will be visiting
sharpening techniques using
filters, which will help to bring
out the finer details in this
dramatic sports moment. Read
on and have a go yourself.
Master HDR toningFake the HDR look using a combination of filters and adjustments in Elements
The fastest way to HDR colour and detail
Step by step Prepare your layers
Quick duplicate
01 Open up ‘bike rider.jpg’ from the disc in Elements. Start
by creating a duplicate of the Background layer by
pressing Cmd/Ctrl+J. ‘Layer 1’ should appear in the Layers panel
on the right.
Photo editing
Expert tip
The Hue/Saturation adjustment, set to Master, will affect the entire range of colours in the image. To target just one colour that stands out, change Master to Blue (for example) and adjust Saturation to either increase or decrease the strength of this particular colour. Use the bar below the slider to assign the exact range of colours that you want the adjustment to fix.
Target colours
Source file available
Use the image provided to re-create this
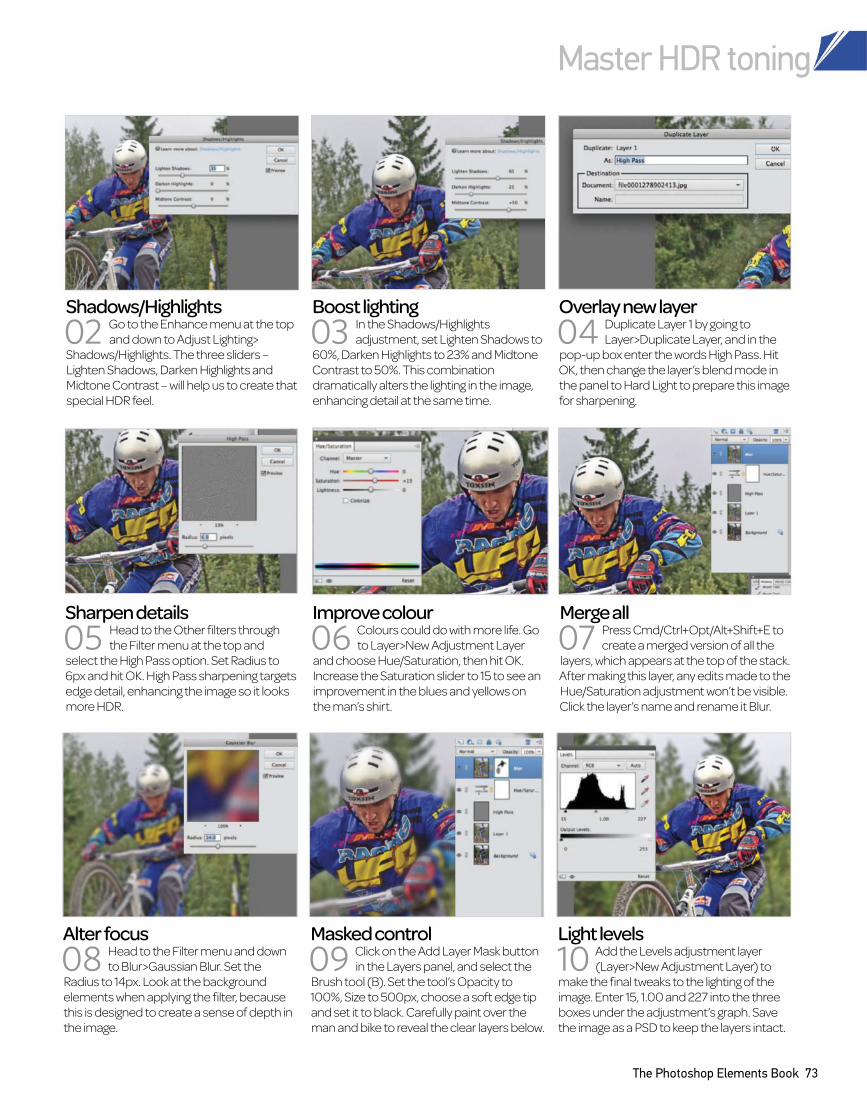
Sharpen details
05 Head to the Other filters through
the Filter menu at the top and
select the High Pass option. Set Radius to
6px and hit OK. High Pass sharpening targets
edge detail, enhancing the image so it looks
more HDR.
Overlay new layer
04 Duplicate Layer 1 by going to
Layer>Duplicate Layer, and in the
pop-up box enter the words High Pass. Hit
OK, then change the layerÕs blend mode in
the panel to Hard Light to prepare this image
for sharpening.
Improve colour
06 Colours could do with more life. Go
to Layer>New Adjustment Layer
and choose Hue/Saturation, then hit OK.
Increase the Saturation slider to 15 to see an
improvement in the blues and yellows on
the manÕs shirt.
Masked control
09 Click on the Add Layer Mask button
in the Layers panel, and select the
Brush tool (B). Set the toolÕs Opacity to
100%, Size to 500px, choose a soft edge tip
and set it to black. Carefully paint over the
man and bike to reveal the clear layers below.
Merge all
07 Press Cmd/Ctrl+Opt/Alt+Shift+E to
create a merged version of all the
layers, which appears at the top of the stack.
After making this layer, any edits made to the
Hue/Saturation adjustment wonÕt be visible.
Click the layerÕs name and rename it Blur.
Light levels
10 Add the Levels adjustment layer
(Layer>New Adjustment Layer) to
make the final tweaks to the lighting of the
image. Enter 15, 1.00 and 227 into the three
boxes under the adjustmentÕs graph. Save
the image as a PSD to keep the layers intact.
Alter focus
08 Head to the Filter menu and down
to Blur>Gaussian Blur. Set the
Radius to 14px. Look at the background
elements when applying the filter, because
this is designed to create a sense of depth in
the image.
The Photoshop Elements Book 73
Boost lighting
03 In the Shadows/Highlights
adjustment, set Lighten Shadows to
60%, Darken Highlights to 23% and Midtone
Contrast to 50%. This combination
dramatically alters the lighting in the image,
enhancing detail at the same time.
Shadows/Highlights
02 Go to the Enhance menu at the top
and down to Adjust Lighting>
Shadows/Highlights. The three sliders Ð
Lighten Shadows, Darken Highlights and
Midtone Contrast Ð will help us to create that
special HDR feel.
Master HDR toning
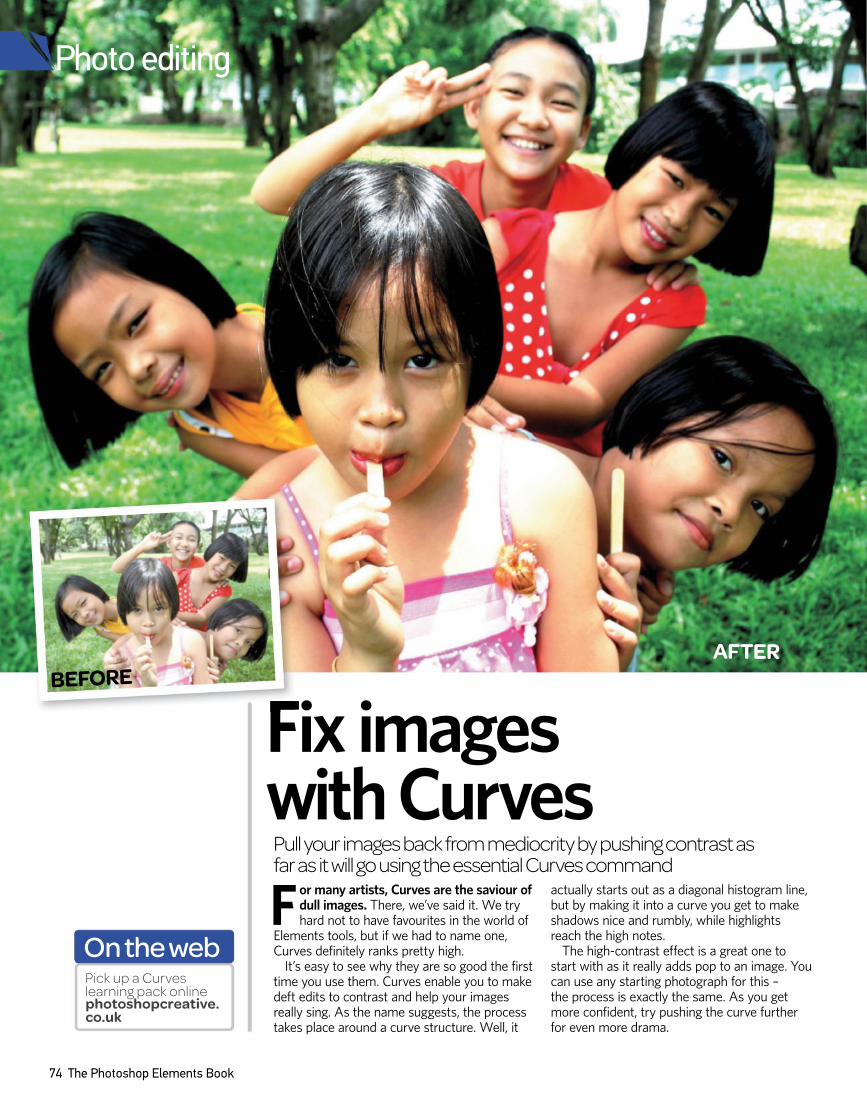
For many artists, Curves are the saviour of dull images. There, we’ve said it. We try hard not to have favourites in the world of
Elements tools, but if we had to name one, Curves definitely ranks pretty high.
It’s easy to see why they are so good the first time you use them. Curves enable you to make deft edits to contrast and help your images really sing. As the name suggests, the process takes place around a curve structure. Well, it
actually starts out as a diagonal histogram line, but by making it into a curve you get to make shadows nice and rumbly, while highlights reach the high notes.
The high-contrast effect is a great one to start with as it really adds pop to an image. You can use any starting photograph for this – the process is exactly the same. As you get more confident, try pushing the curve further for even more drama.
Fix images with Curves
Pull your images back from mediocrity by pushing contrast as far as it will go using the essential Curves command
On the web
Pick up a Curves learning pack onlinephotoshopcreative.co.uk
BEFORE
AFTER
Photo editing
74 The Photoshop Elements Book
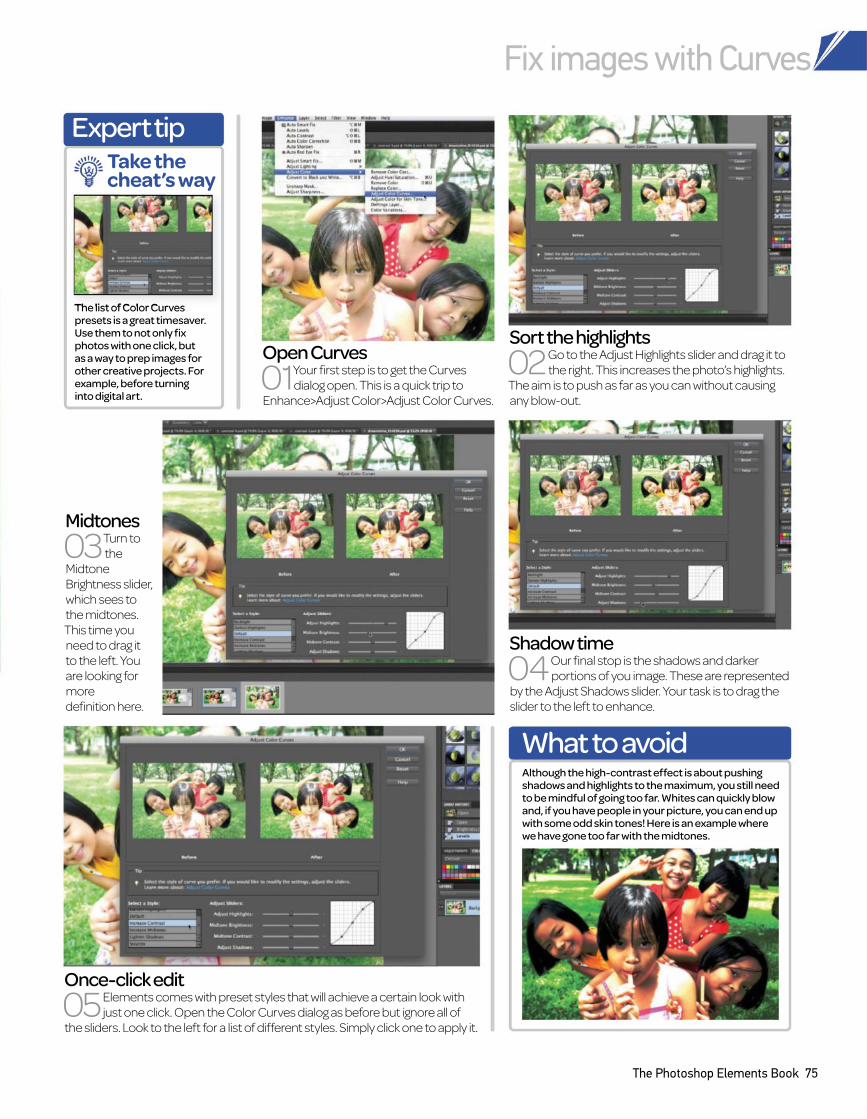
Sort the highlights
the right. This increases the photo’s highlights. 02 Go to the Adjust Highlights slider and drag it to
The aim is to push as far as you can without causing
any blow-out.
Open Curves
01 Your first step is to get the Curves
dialog open. This is a quick trip to
Enhance>Adjust Color>Adjust Color Curves.
Shadow time
04
Our final stop is the shadows and darker
portions of you image. These are represented
by the Adjust Shadows slider. Your task is to drag the
slider to the left to enhance.
Once-click edit
05
Elements comes with preset styles that will achieve a certain look with
just one click. Open the Color Curves dialog as before but ignore all of
the sliders. Look to the left for a list of different styles. Simply click one to apply it.
Midtones
03
Turn to
the
Midtone
Brightness slider,
which sees to
the midtones.
This time you
need to drag it
to the left. You
are looking for
more
definition here.
Expert tip
The list of Color Curves presets is a great timesaver. Use them to not only fix photos with one click, but as a way to prep images for other creative projects. For example, before turning into digital art.
Take the cheat’s way
What to avoidAlthough the high-contrast effect is about pushing shadows and highlights to the maximum, you still need to be mindful of going too far. Whites can quickly blow and, if you have people in your picture, you can end up with some odd skin tones! Here is an example where we have gone too far with the midtones.
Fix images with Curves
The Photoshop Elements Book 75
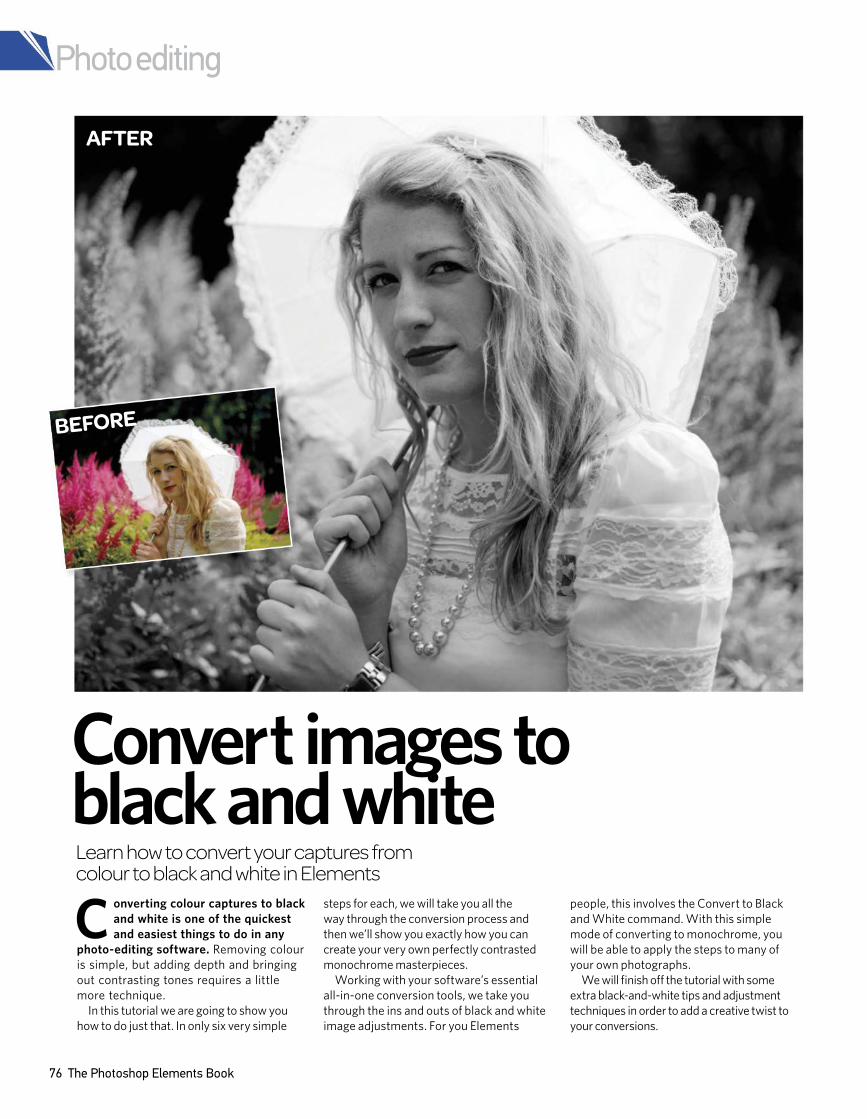
Photo editing
76 The Photoshop Elements Book
Learn how to convert your captures from colour to black and white in Elements
Convert images to black and white
BEFORE
AFTER
Converting colour captures to black
and white is one of the quickest
and easiest things to do in any
photo-editing software. Removing colour
is simple, but adding depth and bringing
out contrasting tones requires a little
more technique.
In this tutorial we are going to show you
how to do just that. In only six very simple
steps for each, we will take you all the
way through the conversion process and
then we’ll show you exactly how you can
create your very own perfectly contrasted
monochrome masterpieces.
Working with your software’s essential
all-in-one conversion tools, we take you
through the ins and outs of black and white
image adjustments. For you Elements
people, this involves the Convert to Black
and White command. With this simple
mode of converting to monochrome, you
will be able to apply the steps to many of
your own photographs.
We will finish of the tutorial with some
extra black-and-white tips and adjustment
techniques in order to add a creative twist to
your conversions.

Convert images to black and white
The Photoshop Elements Book 77
Convert colour in ElementsUse the Convert to Black and White command
Prepare the image
01 Open your image in Elements.
Select it from the bar at the bottom,
ready to begin making adjustments. Click
on the Background layer in the Layers
palette and Ctrl/right-click to select
Duplicate Layer. Rename the new layer
Black and White.
Tonal enhancement
04 Adjust the Green and Blue sliders to
add more tonal contrast to the
image. Set the Green to around +39 and Blue
to +14. You can also use the Undo and Redo
buttons on the left if you make a mistake or
want to go back to a previous slider position.
Convert to Black and White
02 Convert your image by going to
Enhance>Convert to Black and White.
Your original colour photograph should now
appear in the command adjustment box
showing a before and after preview. Begin by
selecting the appropriate image style option;
Portraits in our case. You can preview
alternative adjustments for a comparison.
Control contrast
05 Now adjust the Contrast slider to
create a punchier result. Bring the
value up to around +7 and make sure you
preview the results as you go to avoid creating
an unwanted posterisation effect on the image.
Once you are happy with the results, click OK.
Channel adjustments
03 You will need to make further
adjustments to the channel
sliders in the Effects palette to increase
contrast and improve the effect. Slowly
increase the Red channel to around +43
which will add a punchier contrast result.
This will work particularly well on skin tones
and red lipstick.
Save it out
06 Finally you will need to flatten the
original and the black and white
layer in order to save your image. Select
Flatten Image in the Layer’s palette and
you can then go to File>Save As and save it
as a JPEG.
Monochrome in Elements
Understand the options
1. Select the appropriate style option to help save time when converting colour captures to black and white.
2. Use the Red, Green and Blue channel adjustment sliders to increase contrast and add more tonal definition to your image.
3. Punch up the tones using the Contrast adjustment slider, increase it slowly and preview the result.
4. Use the Undo and Redo buttons to correct any mistakes or return to a previous setting.

Photo editing
78 The Photoshop Elements Book
The Lomo effect has become something of a
classic style to emulate, and Elements has
alll you need to be the program of choice
for a do-it-yourself digital Lomograph. The original
Lomographic camera came out of Austria in the
early Nineties after the discovery of the captivating
Lomo Kompakt Automat, a Russian film camera of
the time. The style of this little shooter sparked the
inspiration for the hundreds upon hundreds of
photo effects that soon followed.
Through these steps, we show you how this
stylish and distinctive type of photograph can be
re-created. We’ve pulled out some of the finest
adjustments that Elements has to offer, with a few
brush techniques thrown in for good measure.
The strong and abstract mixture of colours in a
Lomo image can be made using a gradient map,
and this is really open to artistic interpretation.
The number of possible styles is endless, as it’s
an expression of creativity rather than an effect
that can ever be rendered correctly or with
precision. For inspiration for more effects, look up
www.lomography.com, the official website that
exhibits the creations of Lomographers and puts
the multiple cameras and films to use. The
combinations vary greatly, with effects including
overexposure, blurring, fisheye, distorted hues,
grain and a film negative frame. You can really let
your hair down on this project, with no
boundaries on what’s wrong, right, bad or good.
Follow our steps for an effective variant, but don’t
be afraid to experiment.
Digitally master the effects of Lomography using Elements as your darkroom
Get the Lomo efect
BEFORE
AFTER
Source file available
Use the image provided to re-create this
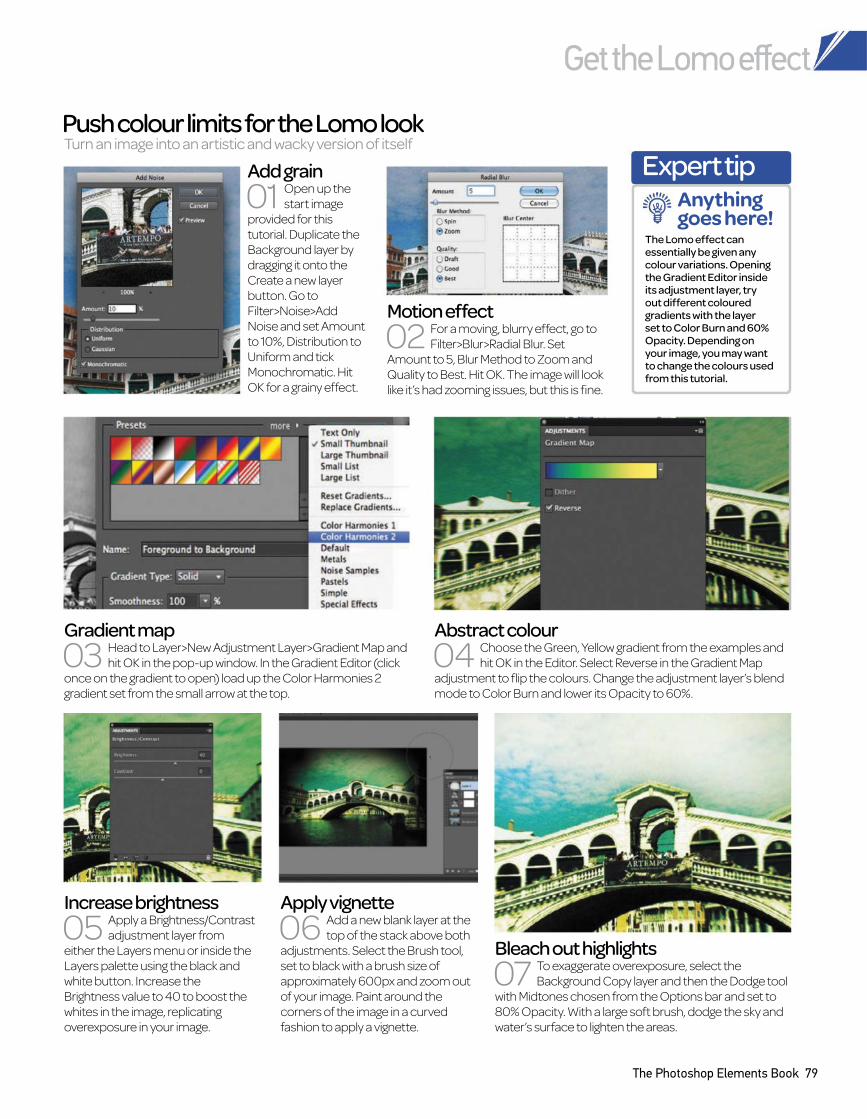
Get the Lomo effect
The Photoshop Elements Book 79
Push colour limits for the Lomo lookTurn an image into an artistic and wacky version of itself
Expert tip
The Lomo effect can essentially be given any colour variations. Opening the Gradient Editor inside its adjustment layer, try out different coloured gradients with the layer set to Color Burn and 60% Opacity. Depending on your image, you may want to change the colours used from this tutorial.
Anything goes here!
Motion effect
02 For a moving, blurry effect, go to
Filter>Blur>Radial Blur. Set
Amount to 5, Blur Method to Zoom and
Quality to Best. Hit OK. The image will look
like it’s had zooming issues, but this is fine.
Add grain
01 Open up the
start image
provided for this
tutorial. Duplicate the
Background layer by
dragging it onto the
Create a new layer
button. Go to
Filter>Noise>Add
Noise and set Amount
to 10%, Distribution to
Uniform and tick
Monochromatic. Hit
OK for a grainy effect.
Apply vignette
06 Add a new blank layer at the
top of the stack above both
adjustments. Select the Brush tool,
set to black with a brush size of
approximately 600px and zoom out
of your image. Paint around the
corners of the image in a curved
fashion to apply a vignette.
Increase brightness
05 Apply a Brightness/Contrast
adjustment layer from
either the Layers menu or inside the
Layers palette using the black and
white button. Increase the
Brightness value to 40 to boost the
whites in the image, replicating
overexposure in your image.
Abstract colour
04 Choose the Green, Yellow gradient from the examples and
hit OK in the Editor. Select Reverse in the Gradient Map
adjustment to flip the colours. Change the adjustment layer’s blend
mode to Color Burn and lower its Opacity to 60%.
Gradient map
03 Head to Layer>New Adjustment Layer>Gradient Map and
hit OK in the pop-up window. In the Gradient Editor (click
once on the gradient to open) load up the Color Harmonies 2
gradient set from the small arrow at the top.
Bleach out highlights
07 To exaggerate overexposure, select the
Background Copy layer and then the Dodge tool
with Midtones chosen from the Options bar and set to
80% Opacity. With a large soft brush, dodge the sky and
water’s surface to lighten the areas.
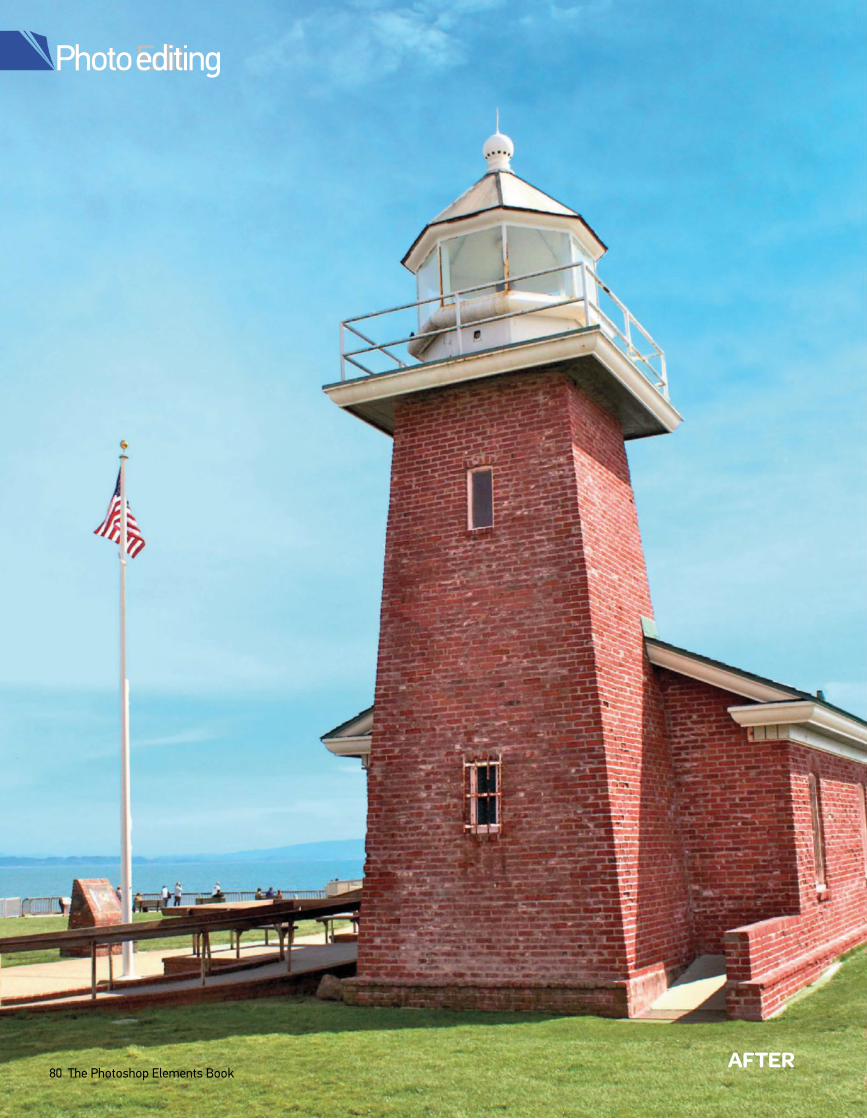
Photo EditPhoto editing
80 The Photoshop Elements BookAFTER
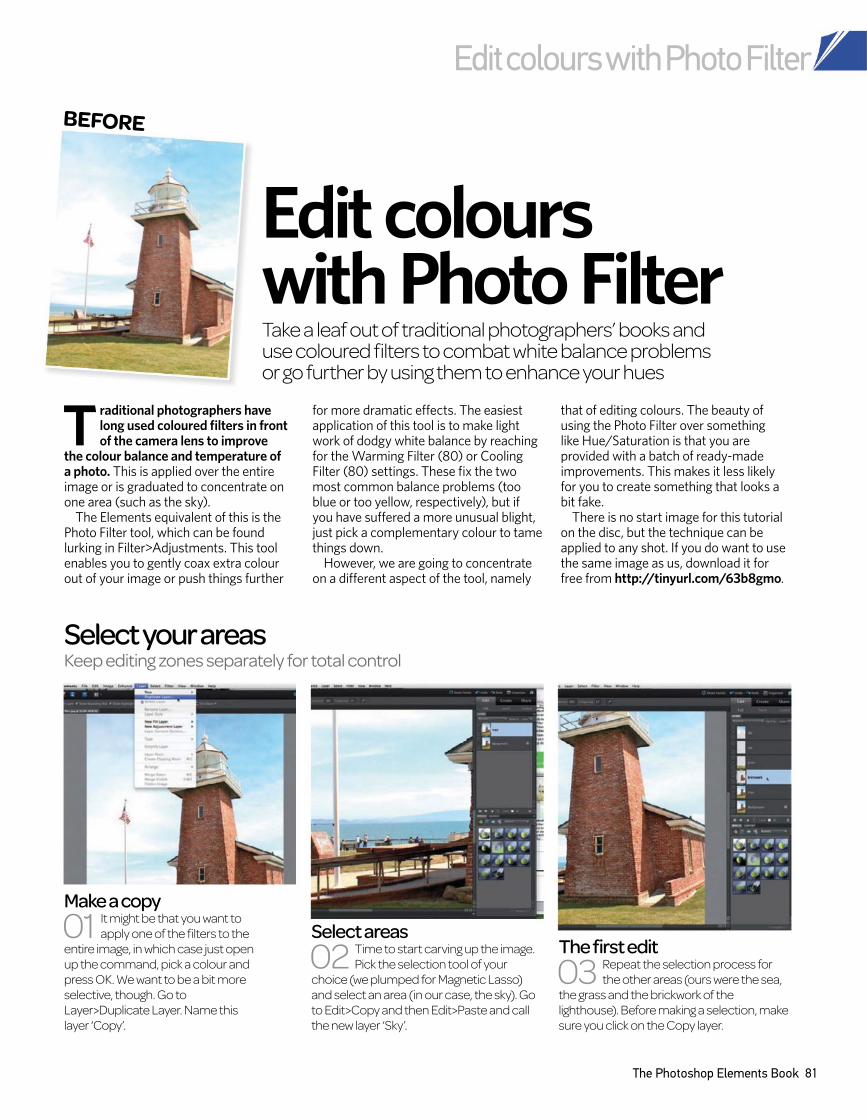
Edit colours with Photo Filter
The Photoshop Elements Book 81
Take a leaf out of traditional photographers’ books and use coloured filters to combat white balance problems or go further by using them to enhance your hues
Edit colours with Photo Filter
Select your areasKeep editing zones separately for total control
Make a copy
01 It might be that you want to
apply one of the filters to the
entire image, in which case just open
up the command, pick a colour and
press OK. We want to be a bit more
selective, though. Go to
Layer>Duplicate Layer. Name this
layer ‘Copy’.
Select areas
02 Time to start carving up the image.
Pick the selection tool of your
choice (we plumped for Magnetic Lasso)
and select an area (in our case, the sky). Go
to Edit>Copy and then Edit>Paste and call
the new layer ‘Sky’.
The first edit
03 Repeat the selection process for
the other areas (ours were the sea,
the grass and the brickwork of the
lighthouse). Before making a selection, make
sure you click on the Copy layer.
BEFORE
Traditional photographers have long used coloured filters in front of the camera lens to improve
the colour balance and temperature of a photo. This is applied over the entire image or is graduated to concentrate on one area (such as the sky).
The Elements equivalent of this is the Photo Filter tool, which can be found lurking in Filter>Adjustments. This tool enables you to gently coax extra colour out of your image or push things further
for more dramatic efects. The easiest application of this tool is to make light work of dodgy white balance by reaching for the Warming Filter (80) or Cooling Filter (80) settings. These fix the two most common balance problems (too blue or too yellow, respectively), but if you have sufered a more unusual blight, just pick a complementary colour to tame things down.
However, we are going to concentrate on a diferent aspect of the tool, namely
that of editing colours. The beauty of using the Photo Filter over something like Hue/Saturation is that you are provided with a batch of ready-made improvements. This makes it less likely for you to create something that looks a bit fake.
There is no start image for this tutorial on the disc, but the technique can be applied to any shot. If you do want to use the same image as us, download it for free from http://tinyurl.com/63b8gmo.
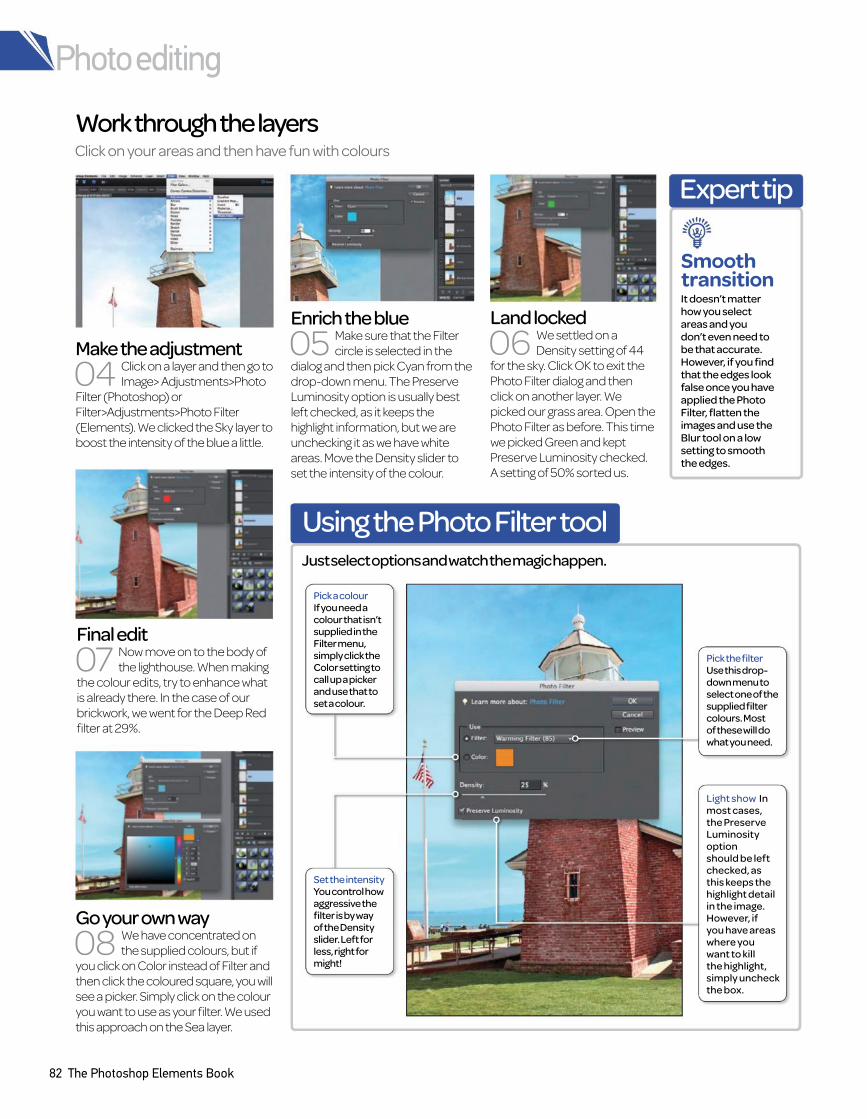
Photo editing
82 The Photoshop Elements Book
Work through the layersClick on your areas and then have fun with colours
Pick the filter Use this drop-down menu to select one of the supplied filter colours. Most of these will do what you need.
Light show In most cases, the Preserve Luminosity option should be left checked, as this keeps the highlight detail in the image. However, if you have areas where you want to kill the highlight, simply uncheck the box.
Pick a colour If you need a colour that isn’t supplied in the Filter menu, simply click the Color setting to call up a picker and use that to set a colour.
Set the intensityYou control how aggressive the filter is by way of the Density slider. Left for less, right for might!
Expert tip
It doesn’t matter how you select areas and you don’t even need to be that accurate. However, if you find that the edges look false once you have applied the Photo Filter, flatten the images and use the Blur tool on a low setting to smooth the edges.
Smooth transition
Make the adjustment
04 Click on a layer and then go to
Image> Adjustments>Photo
Filter (Photoshop) or
Filter>Adjustments>Photo Filter
(Elements). We clicked the Sky layer to
boost the intensity of the blue a little.
Enrich the blue
05 Make sure that the Filter
circle is selected in the
dialog and then pick Cyan from the
drop-down menu. The Preserve
Luminosity option is usually best
left checked, as it keeps the
highlight information, but we are
unchecking it as we have white
areas. Move the Density slider to
set the intensity of the colour.
Land locked
06 We settled on a
Density setting of 44
for the sky. Click OK to exit the
Photo Filter dialog and then
click on another layer. We
picked our grass area. Open the
Photo Filter as before. This time
we picked Green and kept
Preserve Luminosity checked.
A setting of 50% sorted us.
Final edit
07 Now move on to the body of
the lighthouse. When making
the colour edits, try to enhance what
is already there. In the case of our
brickwork, we went for the Deep Red
filter at 29%.
Go your own way
08 We have concentrated on
the supplied colours, but if
you click on Color instead of Filter and
then click the coloured square, you will
see a picker. Simply click on the colour
you want to use as your filter. We used
this approach on the Sea layer.
Using the Photo Filter toolJust select options and watch the magic happen.
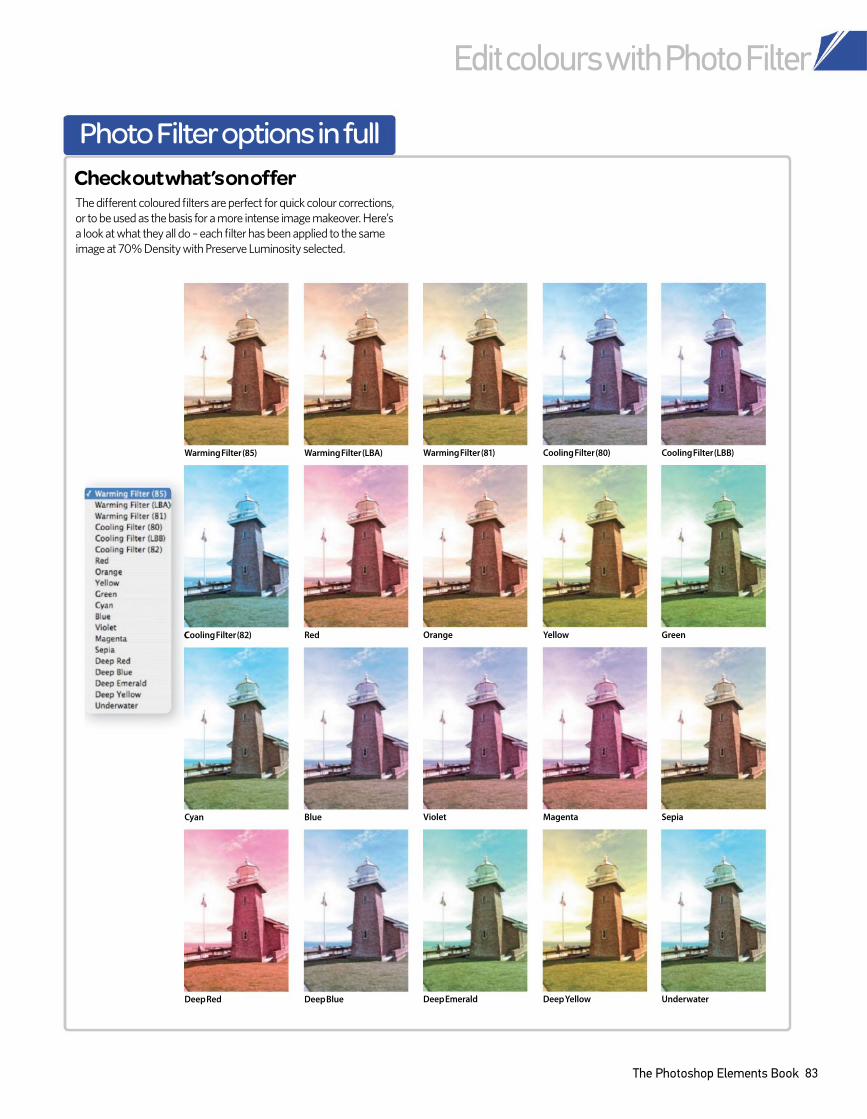
Edit colours with Photo Filter
The Photoshop Elements Book 83
Red Cooling Filter (82) Orange Yellow Green
Blue Cyan Violet Magenta Sepia
Deep Blue Deep Red Deep Emerald Deep Yellow Underwater
Warming Filter (LBA)Warming Filter (85) Warming Filter (81) Cooling Filter (80) Cooling Filter (LBB)
The diferent coloured filters are perfect for quick colour corrections,
or to be used as the basis for a more intense image makeover. Here’s
a look at what they all do – each filter has been applied to the same
image at 70% Density with Preserve Luminosity selected.
Check out what’s on offer
Photo Filter options in full
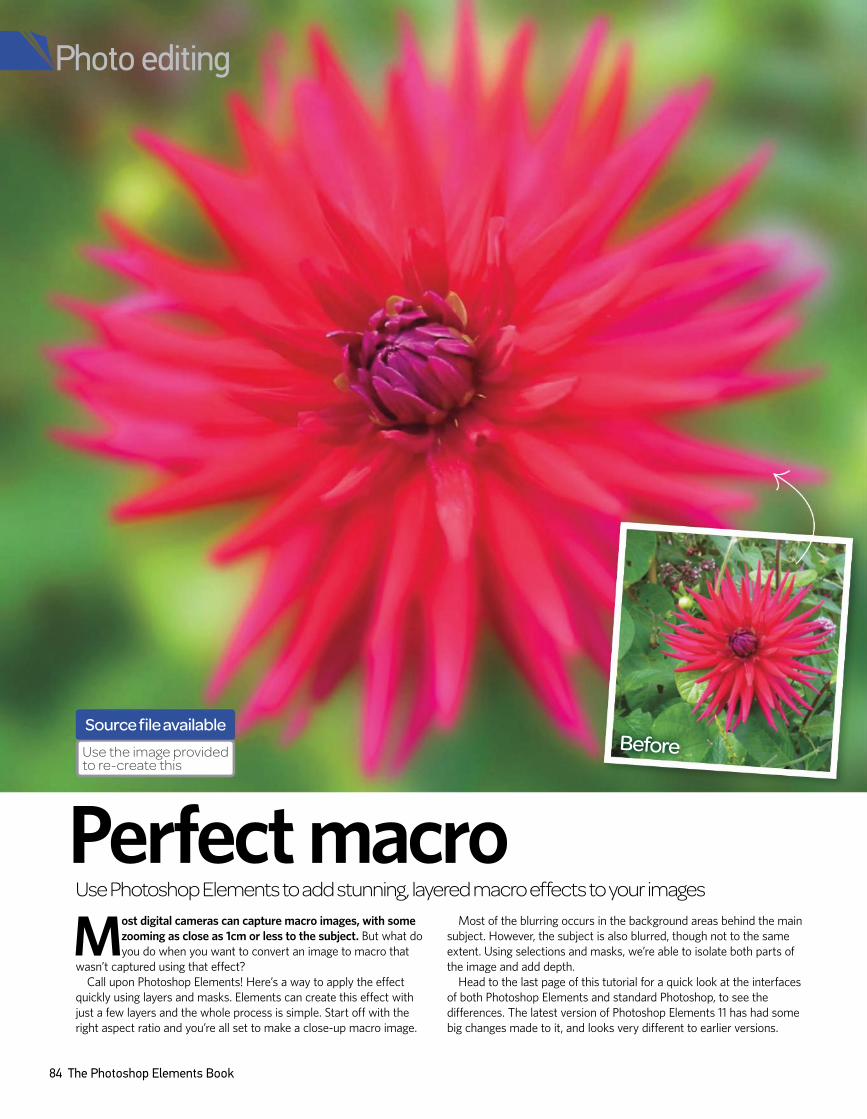
84 The Photoshop Elements Book
Perfect macroM
ost digital cameras can capture macro images, with some
zooming as close as 1cm or less to the subject. But what do
you do when you want to convert an image to macro that
wasn’t captured using that effect?
Call upon Photoshop Elements! Here’s a way to apply the effect
quickly using layers and masks. Elements can create this effect with
just a few layers and the whole process is simple. Start off with the
right aspect ratio and you’re all set to make a close-up macro image.
Most of the blurring occurs in the background areas behind the main
subject. However, the subject is also blurred, though not to the same
extent. Using selections and masks, we’re able to isolate both parts of
the image and add depth.
Head to the last page of this tutorial for a quick look at the interfaces
of both Photoshop Elements and standard Photoshop, to see the
differences. The latest version of Photoshop Elements 11 has had some
big changes made to it, and looks very different to earlier versions.
Before
Use Photoshop Elements to add stunning, layered macro effects to your images
Photo editing
Source file available
Use the image provided to re-create this
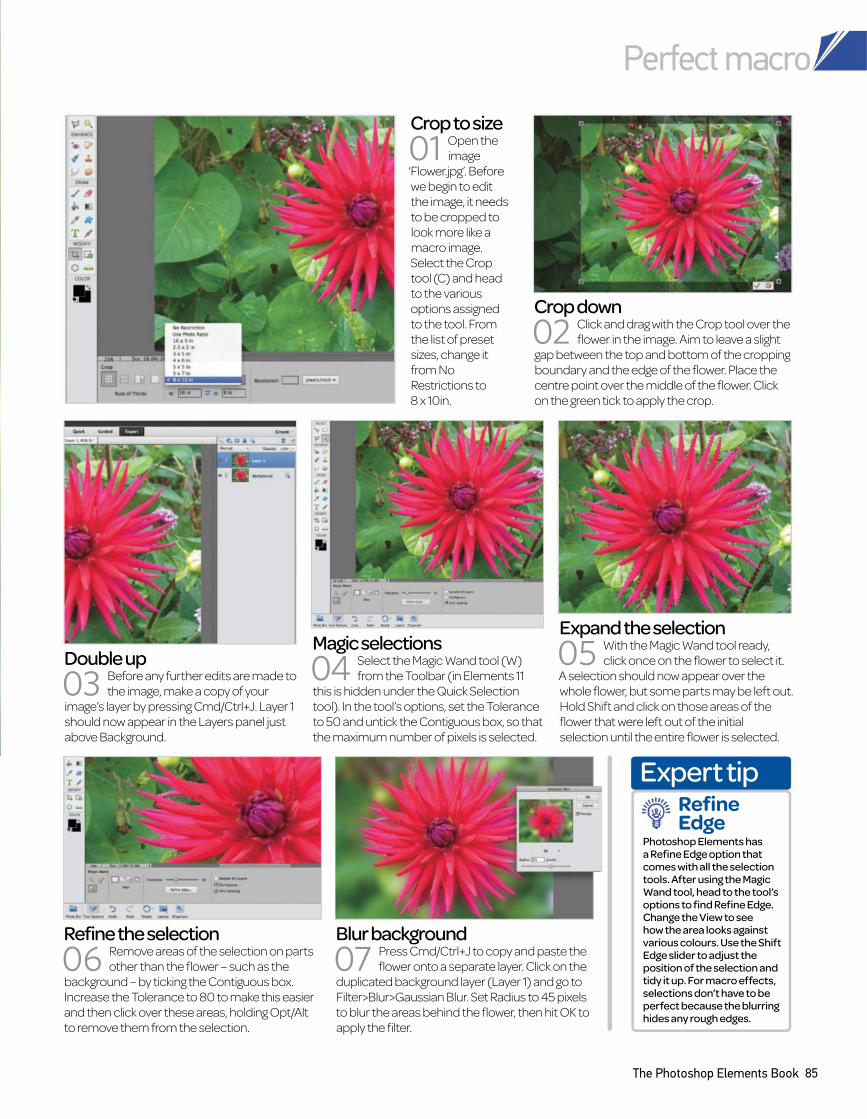
The Photoshop Elements Book 85
Blur background
07 Press Cmd/Ctrl+J to copy and paste the
flower onto a separate layer. Click on the
duplicated background layer (Layer 1) and go to
Filter>Blur>Gaussian Blur. Set Radius to 45 pixels
to blur the areas behind the flower, then hit OK to
apply the filter.
Refine the selection
06 Remove areas of the selection on parts
other than the flower – such as the
background – by ticking the Contiguous box.
Increase the Tolerance to 80 to make this easier
and then click over these areas, holding Opt/Alt
to remove them from the selection.
Double up
03 Before any further edits are made to
the image, make a copy of your
image’s layer by pressing Cmd/Ctrl+J. Layer 1
should now appear in the Layers panel just
above Background.
Magic selections
04 Select the Magic Wand tool (W)
from the Toolbar (in Elements 11
this is hidden under the Quick Selection
tool). In the tool’s options, set the Tolerance
to 50 and untick the Contiguous box, so that
the maximum number of pixels is selected.
Expand the selection
05 With the Magic Wand tool ready,
click once on the flower to select it.
A selection should now appear over the
whole flower, but some parts may be left out.
Hold Shift and click on those areas of the
flower that were left out of the initial
selection until the entire flower is selected.
Crop to size
01 Open the
image
‘Flower.jpg’. Before
we begin to edit
the image, it needs
to be cropped to
look more like a
macro image.
Select the Crop
tool (C) and head
to the various
options assigned
to the tool. From
the list of preset
sizes, change it
from No
Restrictions to
8 x 10in.
Crop down
02 Click and drag with the Crop tool over the
flower in the image. Aim to leave a slight
gap between the top and bottom of the cropping
boundary and the edge of the flower. Place the
centre point over the middle of the flower. Click
on the green tick to apply the crop.
Expert tip
Photoshop Elements has a Refine Edge option that comes with all the selection tools. After using the Magic Wand tool, head to the tool’s options to find Refine Edge. Change the View to see how the area looks against various colours. Use the Shift Edge slider to adjust the position of the selection and tidy it up. For macro effects, selections don’t have to be perfect because the blurring hides any rough edges.
Refine Edge
Perfect macro
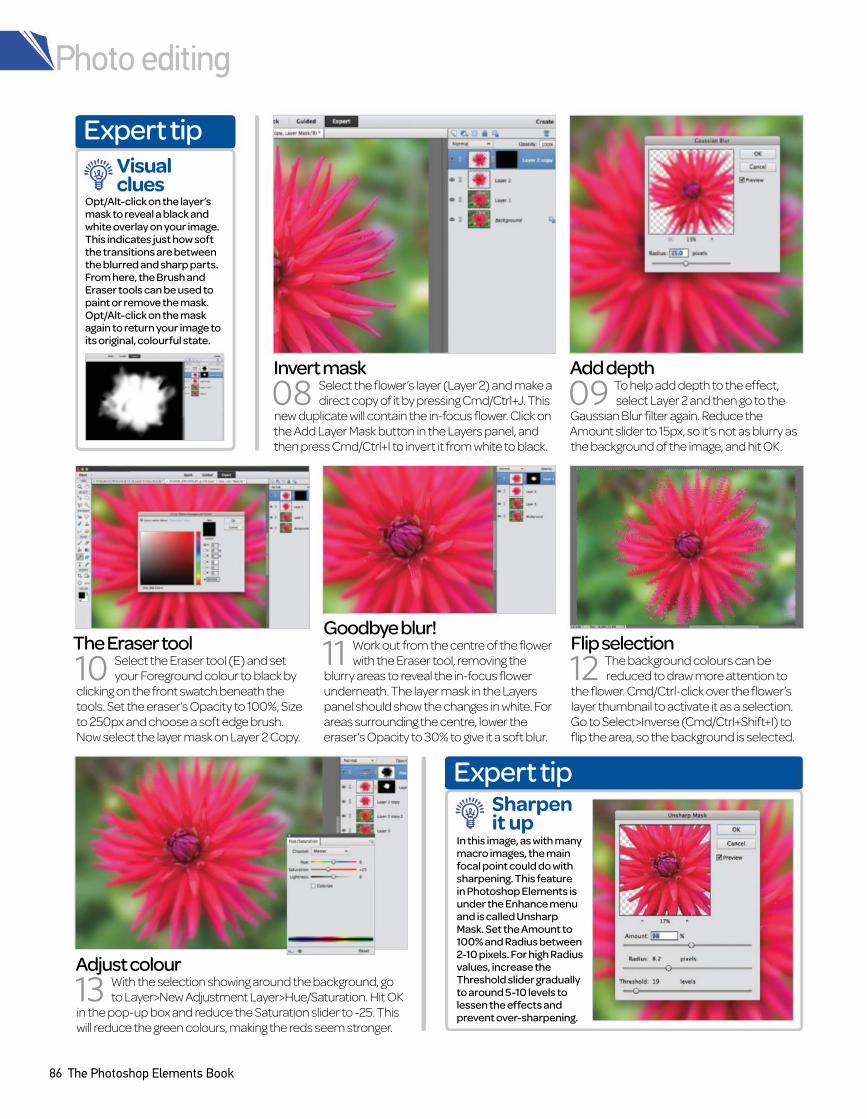
86 The Photoshop Elements Book
Add depth
09 To help add depth to the effect,
select Layer 2 and then go to the
Gaussian Blur filter again. Reduce the
Amount slider to 15px, so it’s not as blurry as
the background of the image, and hit OK.
Invert mask
08 Select the flower’s layer (Layer 2) and make a
direct copy of it by pressing Cmd/Ctrl+J. This
new duplicate will contain the in-focus flower. Click on
the Add Layer Mask button in the Layers panel, and
then press Cmd/Ctrl+I to invert it from white to black.
The Eraser tool
10 Select the Eraser tool (E) and set
your Foreground colour to black by
clicking on the front swatch beneath the
tools. Set the eraser’s Opacity to 100%, Size
to 250px and choose a soft edge brush.
Now select the layer mask on Layer 2 Copy.
Goodbye blur!
11 Work out from the centre of the flower
with the Eraser tool, removing the
blurry areas to reveal the in-focus flower
underneath. The layer mask in the Layers
panel should show the changes in white. For
areas surrounding the centre, lower the
eraser’s Opacity to 30% to give it a soft blur.
Flip selection
12 The background colours can be
reduced to draw more attention to
the flower. Cmd/Ctrl-click over the flower’s
layer thumbnail to activate it as a selection.
Go to Select>Inverse (Cmd/Ctrl+Shift+I) to
flip the area, so the background is selected.
Adjust colour
13 With the selection showing around the background, go
to Layer>New Adjustment Layer>Hue/Saturation. Hit OK
in the pop-up box and reduce the Saturation slider to -25. This
will reduce the green colours, making the reds seem stronger.
Expert tip
Opt/Alt-click on the layer’s mask to reveal a black and white overlay on your image. This indicates just how soft the transitions are between the blurred and sharp parts. From here, the Brush and Eraser tools can be used to paint or remove the mask. Opt/Alt-click on the mask again to return your image to its original, colourful state.
Visual clues
Expert tip
In this image, as with many macro images, the main focal point could do with sharpening. This feature in Photoshop Elements is under the Enhance menu and is called Unsharp Mask. Set the Amount to 100% and Radius between 2-10 pixels. For high Radius values, increase the Threshold slider gradually to around 5-10 levels to lessen the effects and prevent over-sharpening.
Sharpen it up
Photo editing
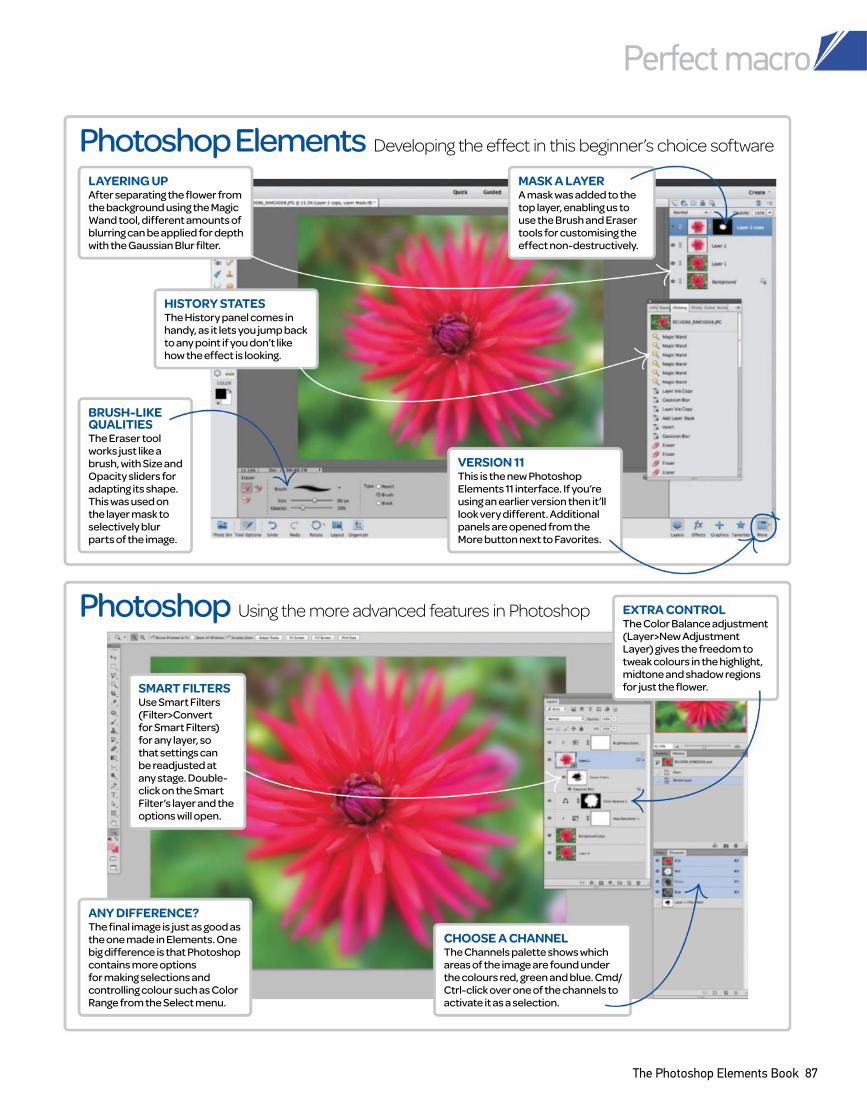
The Photoshop Elements Book 87
Developing the effect in this beginner’s choice softwarePhotoshop Elements
Using the more advanced features in PhotoshopPhotoshop
VERSION 11
This is the new Photoshop Elements 11 interface. If you’re using an earlier version then it’ll look very different. Additional panels are opened from the More button next to Favorites.
SMART FILTERS
Use Smart Filters (Filter>Convert for Smart Filters) for any layer, so that settings can be readjusted at any stage. Double-click on the Smart Filter’s layer and the options will open.
MASK A LAYER
A mask was added to the top layer, enabling us to use the Brush and Eraser tools for customising the effect non-destructively.
CHOOSE A CHANNEL
The Channels palette shows which areas of the image are found under the colours red, green and blue. Cmd/Ctrl-click over one of the channels to activate it as a selection.
BRUSH-LIKE
QUALITIES
The Eraser tool works just like a brush, with Size and Opacity sliders for adapting its shape. This was used on the layer mask to selectively blur parts of the image.
EXTRA CONTROL
The Color Balance adjustment (Layer>New Adjustment Layer) gives the freedom to tweak colours in the highlight, midtone and shadow regions for just the flower.
HISTORY STATES
The History panel comes in handy, as it lets you jump back to any point if you don’t like how the effect is looking.
ANY DIFFERENCE?
The final image is just as good as the one made in Elements. One big difference is that Photoshop contains more options for making selections and controlling colour such as Color Range from the Select menu.
LAYERING UP
After separating the flower from the background using the Magic Wand tool, different amounts of blurring can be applied for depth with the Gaussian Blur filter.
Perfect macro
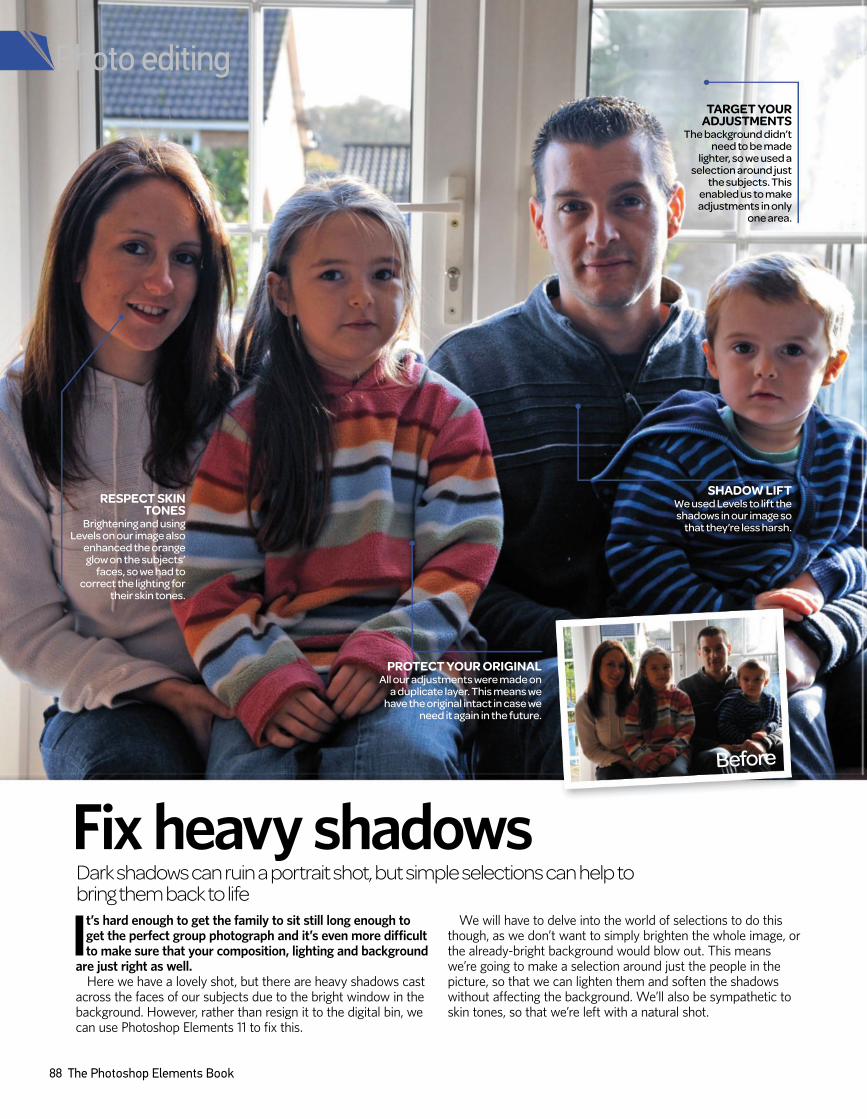
88 The Photoshop Elements Book
Fix heavy shadowsDark shadows can ruin a portrait shot, but simple selections can help to bring them back to life
It’s hard enough to get the family to sit still long enough to get the perfect group photograph and it’s even more difficult to make sure that your composition, lighting and background
are just right as well. Here we have a lovely shot, but there are heavy shadows cast
across the faces of our subjects due to the bright window in the background. However, rather than resign it to the digital bin, we can use Photoshop Elements 11 to fix this.
We will have to delve into the world of selections to do this though, as we don’t want to simply brighten the whole image, or the already-bright background would blow out. This means we’re going to make a selection around just the people in the picture, so that we can lighten them and soften the shadows without affecting the background. We’ll also be sympathetic to skin tones, so that we’re left with a natural shot.
SHADOW LIFT
We used Levels to lift the shadows in our image so
that they’re less harsh.
TARGET YOUR
ADJUSTMENTS
The background didn’t need to be made
lighter, so we used a selection around just
the subjects. This enabled us to make adjustments in only
one area.
RESPECT SKIN
TONES
Brightening and using Levels on our image also
enhanced the orange glow on the subjects’
faces, so we had to correct the lighting for
their skin tones.
PROTECT YOUR ORIGINAL
All our adjustments were made on a duplicate layer. This means we
have the original intact in case we need it again in the future.
Before
Photo editing
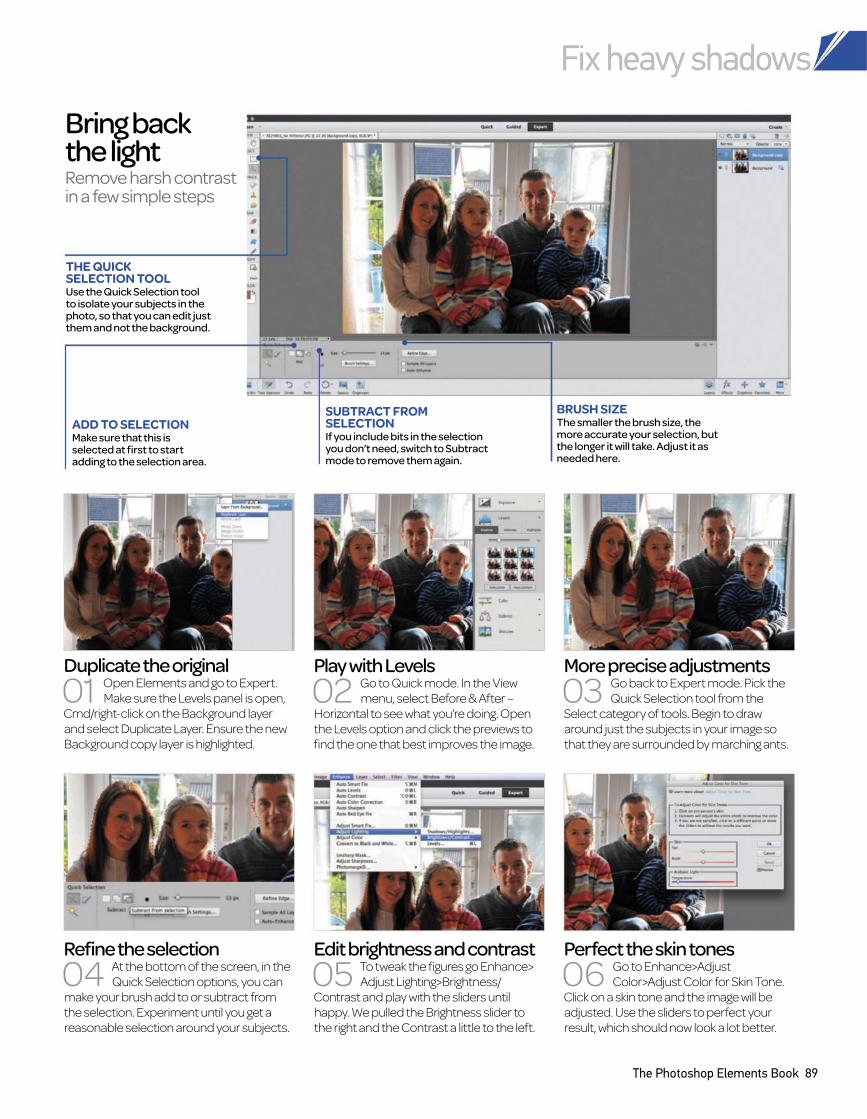
Fix heavy shadows
The Photoshop Elements Book 89
Bring back the lightRemove harsh contrast in a few simple steps
Duplicate the original
01 Open Elements and go to Expert.
Make sure the Levels panel is open,
Cmd/right-click on the Background layer
and select Duplicate Layer. Ensure the new
Background copy layer is highlighted.
Refine the selection
04 At the bottom of the screen, in the
Quick Selection options, you can
make your brush add to or subtract from
the selection. Experiment until you get a
reasonable selection around your subjects.
Play with Levels
02 Go to Quick mode. In the View
menu, select Before & After –
Horizontal to see what you’re doing. Open
the Levels option and click the previews to
find the one that best improves the image.
Edit brightness and contrast
05 To tweak the figures go Enhance>
Adjust Lighting>Brightness/
Contrast and play with the sliders until
happy. We pulled the Brightness slider to
the right and the Contrast a little to the left.
More precise adjustments
03 Go back to Expert mode. Pick the
Quick Selection tool from the
Select category of tools. Begin to draw
around just the subjects in your image so
that they are surrounded by marching ants.
Perfect the skin tones
06 Go to Enhance>Adjust
Color>Adjust Color for Skin Tone.
Click on a skin tone and the image will be
adjusted. Use the sliders to perfect your
result, which should now look a lot better.
THE QUICK
SELECTION TOOL
Use the Quick Selection tool to isolate your subjects in the photo, so that you can edit just them and not the background.
ADD TO SELECTION
Make sure that this is selected at first to start adding to the selection area.
SUBTRACT FROM
SELECTION
If you include bits in the selection you don’t need, switch to Subtract mode to remove them again.
BRUSH SIZE
The smaller the brush size, the more accurate your selection, but the longer it will take. Adjust it as needed here.

Create exposure effectsAdd movement to subjects and double up on exposure with these techniques in Elements
Some artists refer to Photoshop Elements 11 as a condensed Photoshop CS6. To an extent this is true, but this shouldn’t lower your expectations of what can
be done. For effects such as these that involve exposure, Photoshop Elements performs just as well as its big brother. Masking, blurring and adjustment layers are all included in Elements, and in an interface that’s much friendlier for beginners.
Here, we show you three types of effects involving layering and blurring. The double-exposure effect creates a
two-in-one image, whereby details from one are overlapped onto another and then faded out. Any images can be used to create this, and the results can be quite abstract.
Following this, we show you blurring techniques for adding movement and rotation to objects such as water and an umbrella. These are the sorts of effects that photographers capture by adapting their camera’s settings, but, thankfully, Photoshop Elements lets us skip this difficult camera work and get straight to it!
What does it mean?
Layer masks – When a mask is applied to a layer, parts of the
image can be hidden by using the Brush tool. Masks offer the
best way to edit images without actually deleting
any of the important pixels.
PHOTOSHOP ELEMENTS 11This is how the Layers panel looks inside Photoshop Elements 11. Commands for adding new layers, masks and adjustments are featured at the top.
LAYERSLayers contain various effects that are stacked up, the order of which can be altered by dragging them up or down the panel.
EXTRA STYLETo add some distortion to the effect, the highlights were bleached out in this image by using the Levels adjustment.
LEVELS ADJUSTMENTThe Levels adjustment layer only
affects the layers underneath it. Pull the points under its graph
to the left and right to adjust the contrast in the highlight and
shadow regions.
Photo editing
90 The Photoshop Elements Book
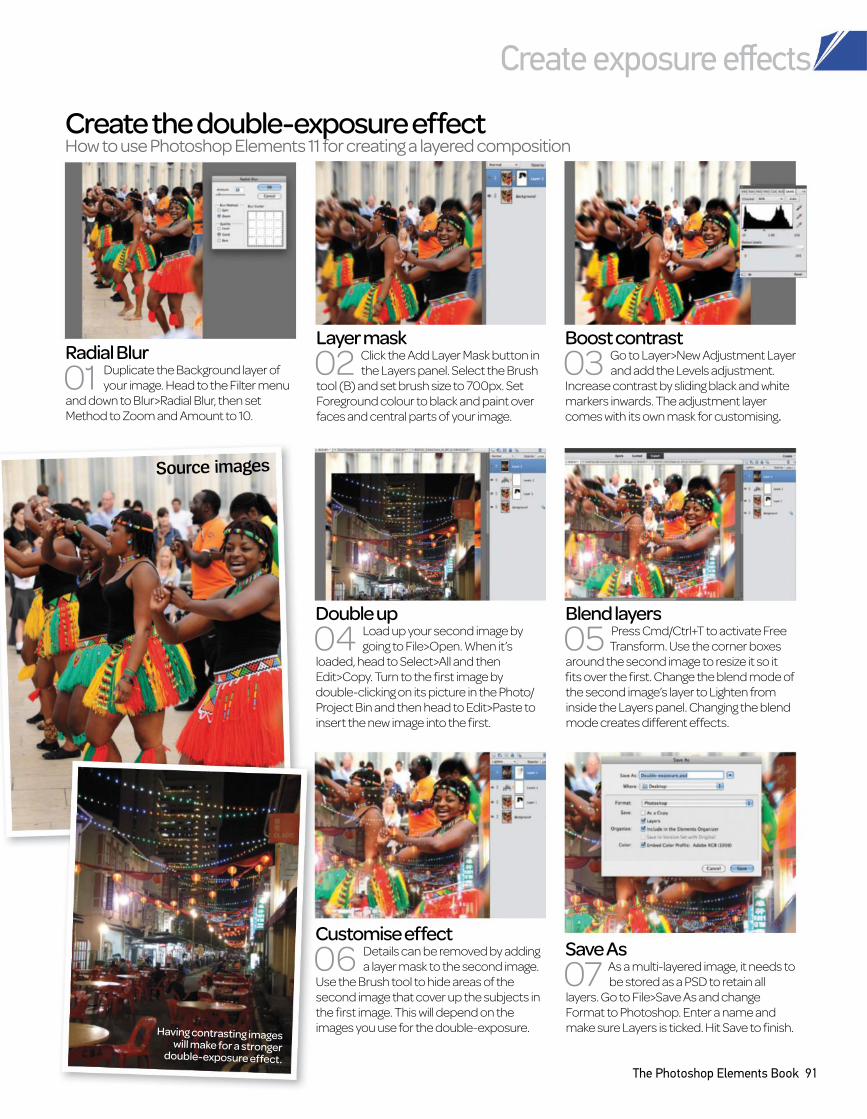
Create exposure effects
The Photoshop Elements Book 91
Blend layers
05 Press Cmd/Ctrl+T to activate Free
Transform. Use the corner boxes
around the second image to resize it so it
fits over the first. Change the blend mode of
the second image’s layer to Lighten from
inside the Layers panel. Changing the blend
mode creates different effects.
Customise effect
06 Details can be removed by adding
a layer mask to the second image.
Use the Brush tool to hide areas of the
second image that cover up the subjects in
the first image. This will depend on the
images you use for the double-exposure.
Save As
07 As a multi-layered image, it needs to
be stored as a PSD to retain all
layers. Go to File>Save As and change
Format to Photoshop. Enter a name and
make sure Layers is ticked. Hit Save to finish.
Double up
04 Load up your second image by
going to File>Open. When it’s
loaded, head to Select>All and then
Edit>Copy. Turn to the first image by
double-clicking on its picture in the Photo/
Project Bin and then head to Edit>Paste to
insert the new image into the first.
Source images
Having contrasting images will make for a stronger
double-exposure effect.
Layer mask
02 Click the Add Layer Mask button in
the Layers panel. Select the Brush
tool (B) and set brush size to 700px. Set
Foreground colour to black and paint over
faces and central parts of your image.
Radial Blur
01 Duplicate the Background layer of
your image. Head to the Filter menu
and down to Blur>Radial Blur, then set
Method to Zoom and Amount to 10.
Boost contrast
03 Go to Layer>New Adjustment Layer
and add the Levels adjustment.
Increase contrast by sliding black and white
markers inwards. The adjustment layer
comes with its own mask for customising.
Create the double-exposure effect How to use Photoshop Elements 11 for creating a layered composition
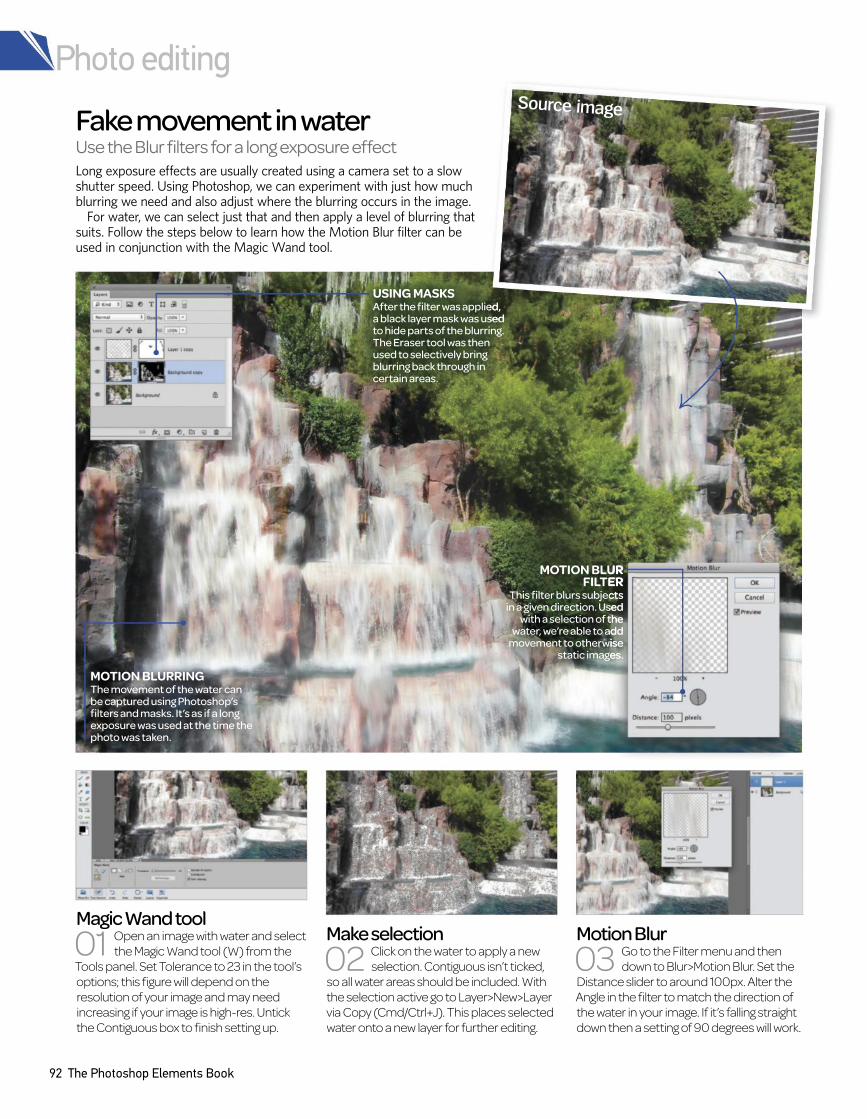
Photo editing
92 The Photoshop Elements Book
Motion Blur
03 Go to the Filter menu and then
down to Blur>Motion Blur. Set the
Distance slider to around 100px. Alter the
Angle in the filter to match the direction of
the water in your image. If it’s falling straight
down then a setting of 90 degrees will work.
Make selection
02 Click on the water to apply a new
selection. Contiguous isn’t ticked,
so all water areas should be included. With
the selection active go to Layer>New>Layer
via Copy (Cmd/Ctrl+J). This places selected
water onto a new layer for further editing.
Magic Wand tool
01 Open an image with water and select
the Magic Wand tool (W) from the
Tools panel. Set Tolerance to 23 in the tool’s
options; this figure will depend on the
resolution of your image and may need
increasing if your image is high-res. Untick
the Contiguous box to finish setting up.
Long exposure effects are usually created using a camera set to a slow shutter speed. Using Photoshop, we can experiment with just how much blurring we need and also adjust where the blurring occurs in the image.
For water, we can select just that and then apply a level of blurring that suits. Follow the steps below to learn how the Motion Blur filter can be used in conjunction with the Magic Wand tool.
Fake movement in waterUse the Blur filters for a long exposure effect
MOTION BLUR
FILTER
This filter blurs subjects in a given direction. Used
with a selection of the water, we’re able to add
movement to otherwise static images.
USING MASKS
After the filter was applied, a black layer mask was used to hide parts of the blurring. The Eraser tool was then used to selectively bring blurring back through in certain areas.
MOTION BLURRING
The movement of the water can be captured using Photoshop’s filters and masks. It’s as if a long exposure was used at the time the photo was taken.
Source image

Create exposure effects
The Photoshop Elements Book 93
Eraser tool
03 Grab the Eraser tool (E) and set it
to a soft brush tip at around 400px.
With your Foreground colour set to black,
paint over the part you want blurry. Note
how white areas appear on the mask,
indicating changes being made.
Invert mask
02 Apply a layer mask to this duplicate
layer from inside the Layers panel.
Go to Filter>Adjustments>Invert to turn the
white mask to black.
Duplicate and spin
01 Duplicate the Background layer.
Apply Radial Blur filter. Set Amount
slider to 20 and Method to Spin. Ensure the
Blur Center box shows blurring around the
same location as your image’s main object.
The Magic Wand tool comes with the Refine Edge command, found with the tool’s options. Click and select a View mode such as On Black to see just how the selection looks and which areas have been included or excluded. Adjustments inside Refine Edge enable you to customise the selection and tweak it for a better Motion Blur effect.
This visual trick makes an object appear as if it’s spinning around quickly in a circle. This uses the Radial Blur filter and clever brushwork to make the object appear as though it’s moving quickly, without affecting the person or the background areas. This works best on round objects, such as umbrellas or wheels of some sort, as the filter uses a central point to rotate around.
Circular blur effects Use this quick technique for spinning objects
Refine EdgePreview the selection
SPIN BLUR
Movement was added to this umbrella by setting the Radial Blur filter to Spin.
AFTER EFFECT
This is a creative way to transform a
normal image with a blurring effect.
Add blur
05 Click the Add Layer Mask button then
press Cmd/Ctrl+I to invert the white
mask to black. The blurring should disappear.
Select the Eraser tool (E), then set its colour to
black, Size to 200px and Opacity to 50%. Paint
over and around the water to soften hard edges.
Duplicate Background
04 Click on the Background layer and
create a duplicate. Go to the Blur
filters and this time to the Gaussian Blur
option. Set the Radius slider to 12 pixels and
hit OK. The entire image will appear blurry,
but this can be fixed with a layer mask.
HIDING
LAYERS
Masks are crucial in
this effect to hide the
background and woman
from the blurry
umbrella.
Source image
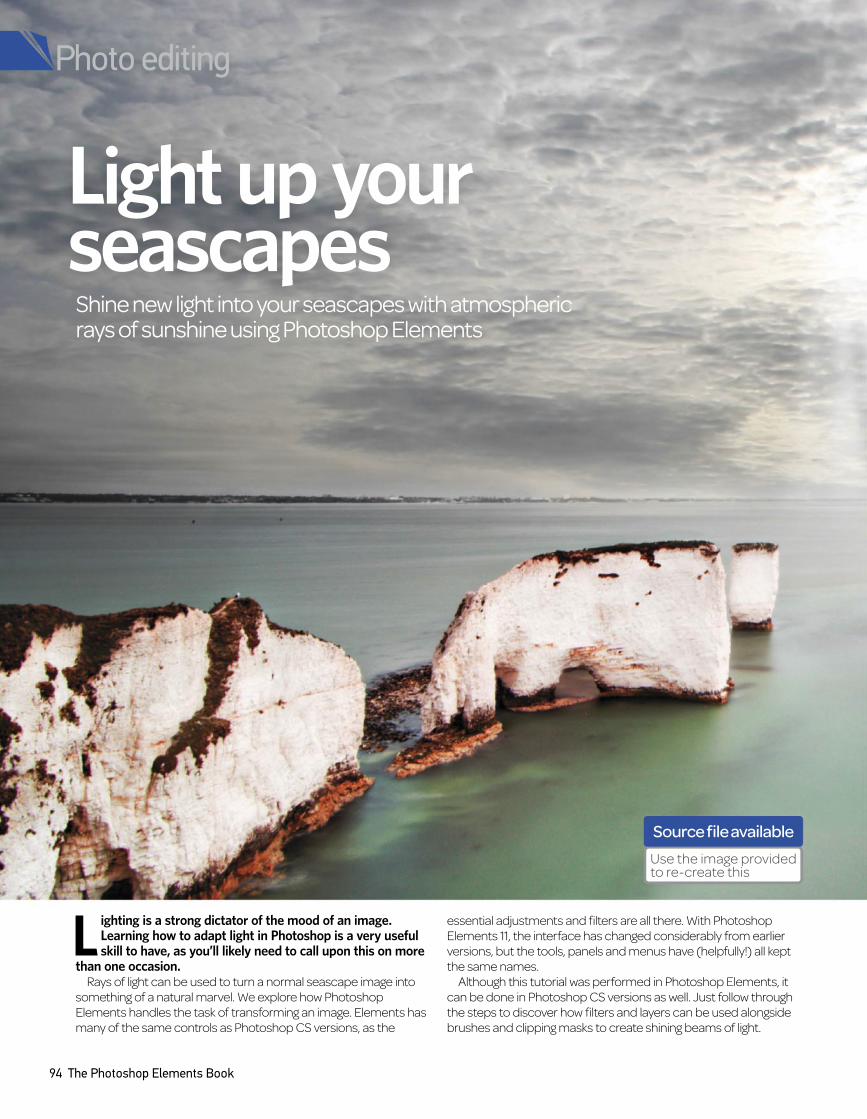
94 The Photoshop Elements Book
Lighting is a strong dictator of the mood of an image. Learning how to adapt light in Photoshop is a very useful skill to have, as you’ll likely need to call upon this on more
than one occasion.Rays of light can be used to turn a normal seascape image into
something of a natural marvel. We explore how Photoshop
Elements handles the task of transforming an image. Elements has
many of the same controls as Photoshop CS versions, as the
essential adjustments and filters are all there. With Photoshop
Elements 11, the interface has changed considerably from earlier
versions, but the tools, panels and menus have (helpfully!) all kept
the same names.
Although this tutorial was performed in Photoshop Elements, it
can be done in Photoshop CS versions as well. Just follow through
the steps to discover how filters and layers can be used alongside
brushes and clipping masks to create shining beams of light.
Light up your seascapes
Shine new light into your seascapes with atmospheric rays of sunshine using Photoshop Elements
Photo editing
Source file available
Use the image provided to re-create this
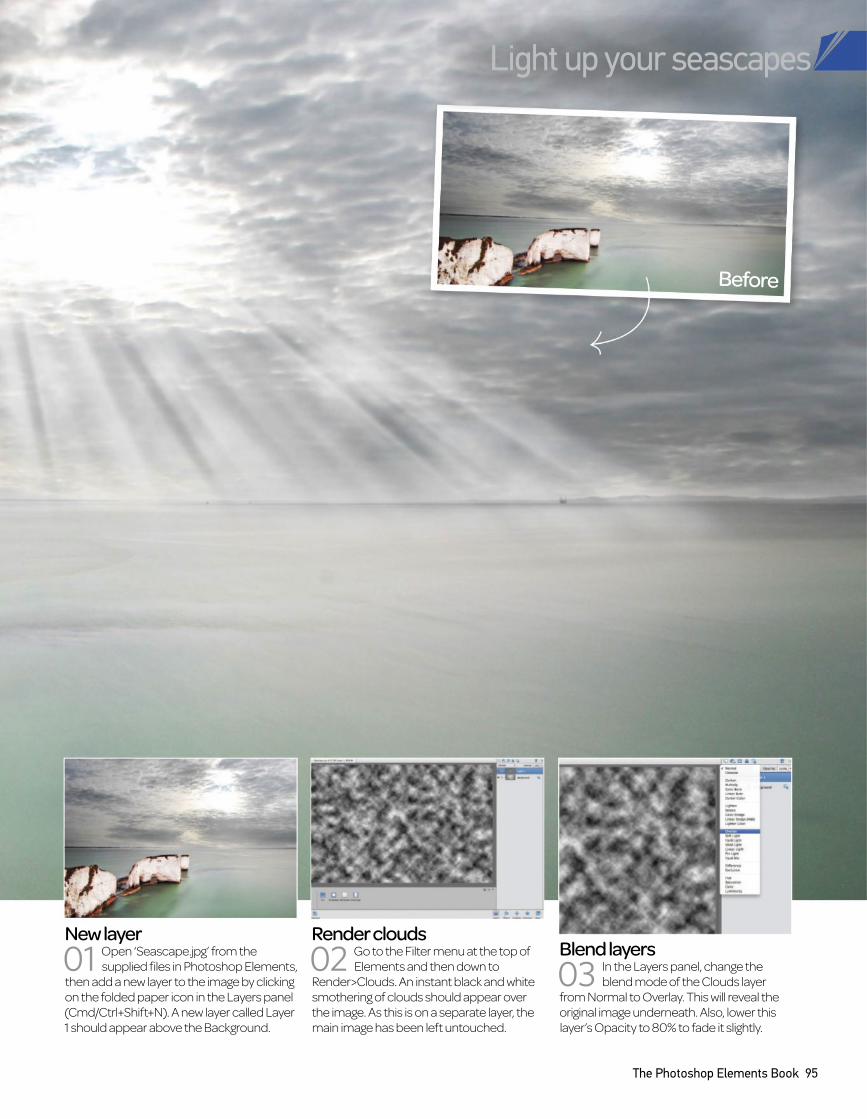
The Photoshop Elements Book 95
Having contrasting images will make for a stronger
double-exposure effect.
New layer
01 Open ‘Seascape.jpg’ from the
supplied files in Photoshop Elements,
then add a new layer to the image by clicking
on the folded paper icon in the Layers panel
(Cmd/Ctrl+Shift+N). A new layer called Layer
1 should appear above the Background.
Render clouds
02 Go to the Filter menu at the top of
Elements and then down to
Render>Clouds. An instant black and white
smothering of clouds should appear over
the image. As this is on a separate layer, the
main image has been left untouched.
Blend layers
blend mode of the Clouds layer 03 In the Layers panel, change the
from Normal to Overlay. This will reveal the
original image underneath. Also, lower this
layer’s Opacity to 80% to fade it slightly.
Before
Light up your seascapes
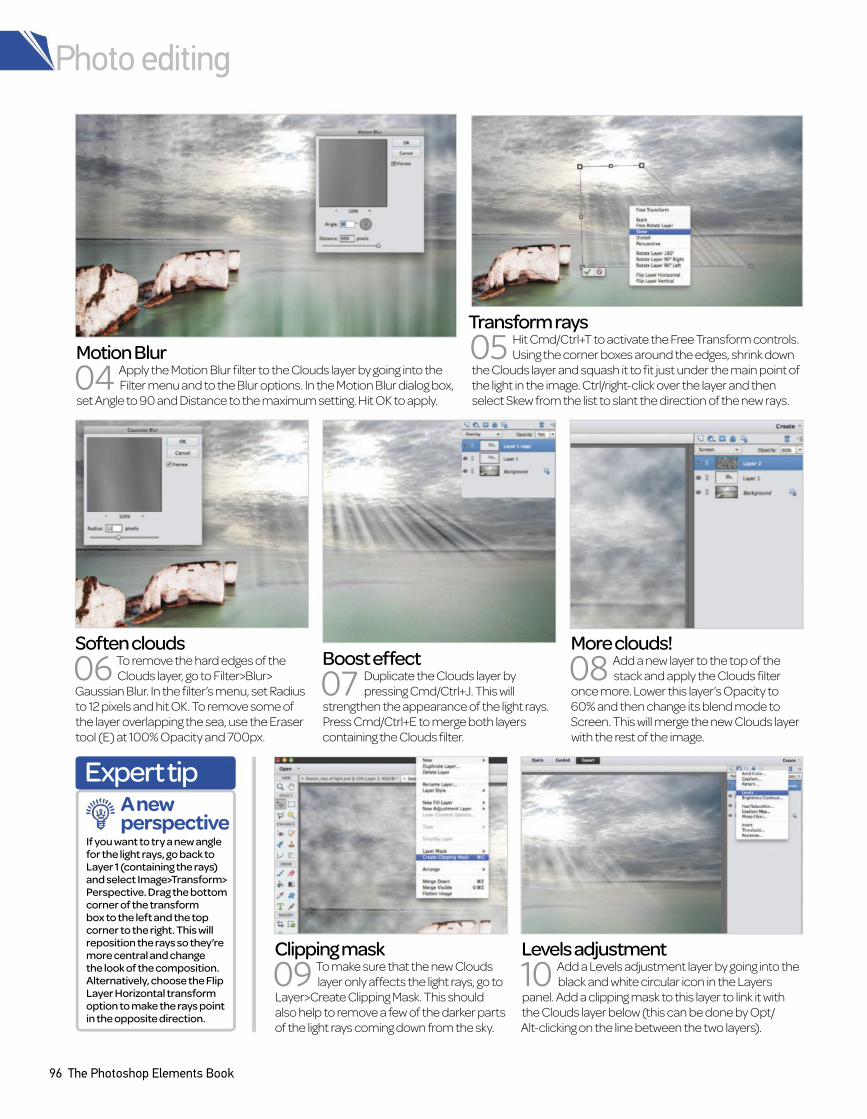
Photo editing
96 The Photoshop Elements Book
Clipping mask
09 To make sure that the new Clouds
layer only affects the light rays, go to
Layer>Create Clipping Mask. This should
also help to remove a few of the darker parts
of the light rays coming down from the sky.
Levels adjustment
10 Add a Levels adjustment layer by going into the
black and white circular icon in the Layers
panel. Add a clipping mask to this layer to link it with
the Clouds layer below (this can be done by Opt/
Alt-clicking on the line between the two layers).
Expert tip
If you want to try a new angle for the light rays, go back to Layer 1 (containing the rays) and select Image>Transform> Perspective. Drag the bottom corner of the transform box to the left and the top corner to the right. This will reposition the rays so they’re more central and change the look of the composition. Alternatively, choose the Flip Layer Horizontal transform option to make the rays point in the opposite direction.
A new perspective
Boost effect
07 Duplicate the Clouds layer by
pressing Cmd/Ctrl+J. This will
strengthen the appearance of the light rays.
Press Cmd/Ctrl+E to merge both layers
containing the Clouds filter.
More clouds!
08 Add a new layer to the top of the
stack and apply the Clouds filter
once more. Lower this layer’s Opacity to
60% and then change its blend mode to
Screen. This will merge the new Clouds layer
with the rest of the image.
Soften clouds
06 To remove the hard edges of the
Clouds layer, go to Filter>Blur>
Gaussian Blur. In the filter’s menu, set Radius
to 12 pixels and hit OK. To remove some of
the layer overlapping the sea, use the Eraser
tool (E) at 100% Opacity and 700px.
Motion Blur
04 Apply the Motion Blur filter to the Clouds layer by going into the
Filter menu and to the Blur options. In the Motion Blur dialog box,
set Angle to 90 and Distance to the maximum setting. Hit OK to apply.
Transform rays
05 Hit Cmd/Ctrl+T to activate the Free Transform controls.
Using the corner boxes around the edges, shrink down
the Clouds layer and squash it to fit just under the main point of
the light in the image. Ctrl/right-click over the layer and then
select Skew from the list to slant the direction of the new rays.
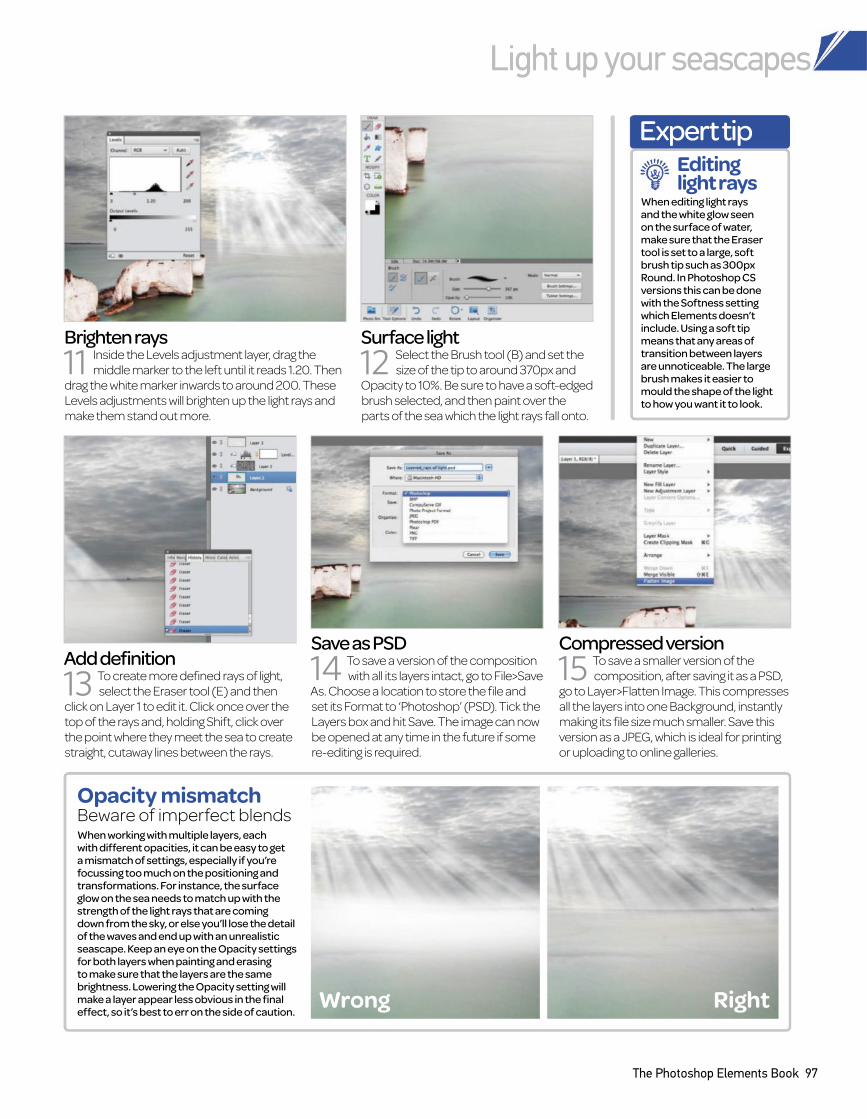
Light up your seascapes
The Photoshop Elements Book 97
Brighten rays
11 Inside the Levels adjustment layer, drag the
middle marker to the left until it reads 1.20. Then
drag the white marker inwards to around 200. These
Levels adjustments will brighten up the light rays and
make them stand out more.
Add definition
13 To create more defined rays of light,
select the Eraser tool (E) and then
click on Layer 1 to edit it. Click once over the
top of the rays and, holding Shift, click over
the point where they meet the sea to create
straight, cutaway lines between the rays.
Surface light
12 Select the Brush tool (B) and set the
size of the tip to around 370px and
Opacity to 10%. Be sure to have a soft-edged
brush selected, and then paint over the
parts of the sea which the light rays fall onto.
Save as PSD
14 To save a version of the composition
with all its layers intact, go to File>Save
As. Choose a location to store the file and
set its Format to ‘Photoshop’ (PSD). Tick the
Layers box and hit Save. The image can now
be opened at any time in the future if some
re-editing is required.
Compressed version
15 To save a smaller version of the
composition, after saving it as a PSD,
go to Layer>Flatten Image. This compresses
all the layers into one Background, instantly
making its file size much smaller. Save this
version as a JPEG, which is ideal for printing
or uploading to online galleries.
Expert tip
When editing light rays and the white glow seen on the surface of water, make sure that the Eraser tool is set to a large, soft brush tip such as 300px Round. In Photoshop CS versions this can be done with the Softness setting which Elements doesn’t include. Using a soft tip means that any areas of transition between layers are unnoticeable. The large brush makes it easier to mould the shape of the light to how you want it to look.
Editing light rays
When working with multiple layers, each with different opacities, it can be easy to get a mismatch of settings, especially if you’re focussing too much on the positioning and transformations. For instance, the surface glow on the sea needs to match up with the strength of the light rays that are coming down from the sky, or else you’ll lose the detail of the waves and end up with an unrealistic seascape. Keep an eye on the Opacity settings for both layers when painting and erasing to make sure that the layers are the same brightness. Lowering the Opacity setting will make a layer appear less obvious in the final effect, so it’s best to err on the side of caution.
Beware of imperfect blends
Wrong Right
Opacity mismatch
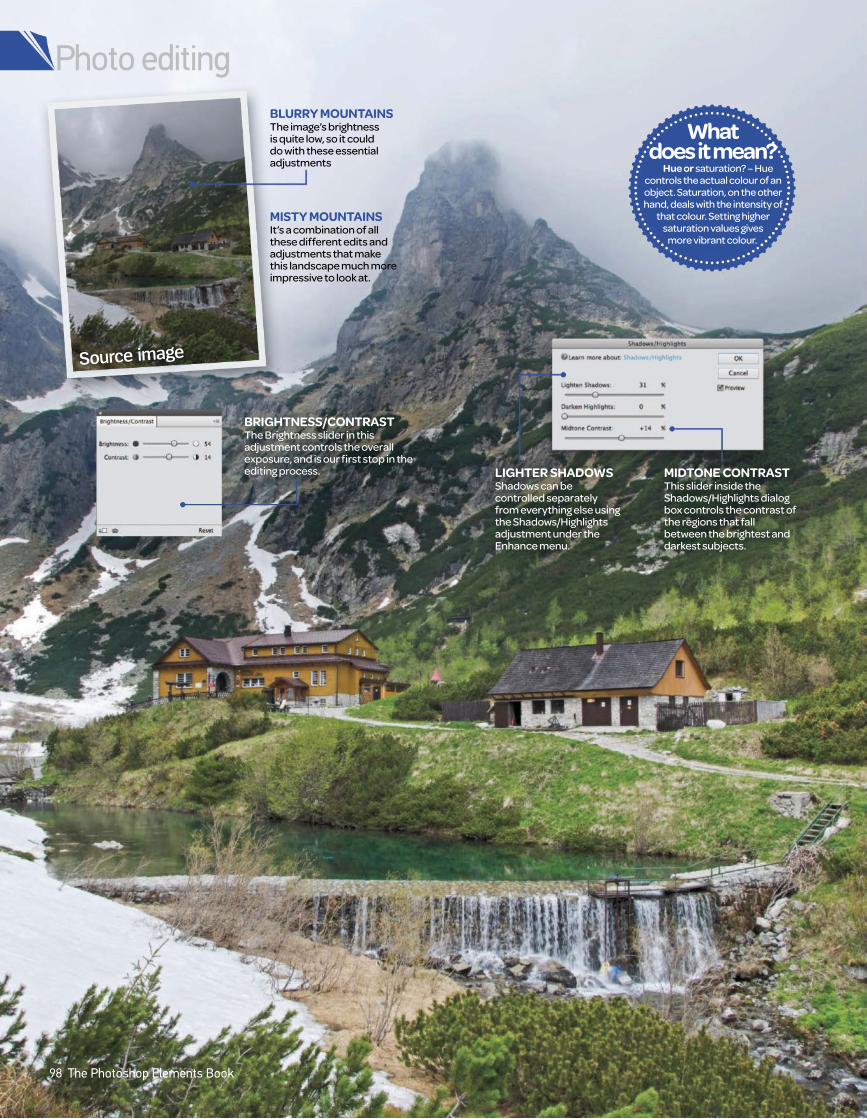
What does it mean?
Hue or saturation? – Hue controls the actual colour of an object. Saturation, on the other hand, deals with the intensity of
that colour. Setting higher saturation values gives
more vibrant colour.
Source image
BLURRY MOUNTAINSThe image’s brightness is quite low, so it could do with these essential adjustments
MISTY MOUNTAINSIt’s a combination of all these different edits and adjustments that make this landscape much more impressive to look at.
MIDTONE CONTRAST
This slider inside the Shadows/Highlights dialog box controls the contrast of the regions that fall between the brightest and darkest subjects.
LIGHTER SHADOWSShadows can be controlled separately from everything else using the Shadows/Highlights adjustment under the Enhance menu.
BRIGHTNESS/CONTRASTThe Brightness slider in this adjustment controls the overall exposure, and is our first stop in the editing process.
Photo editing
98 The Photoshop Elements Book
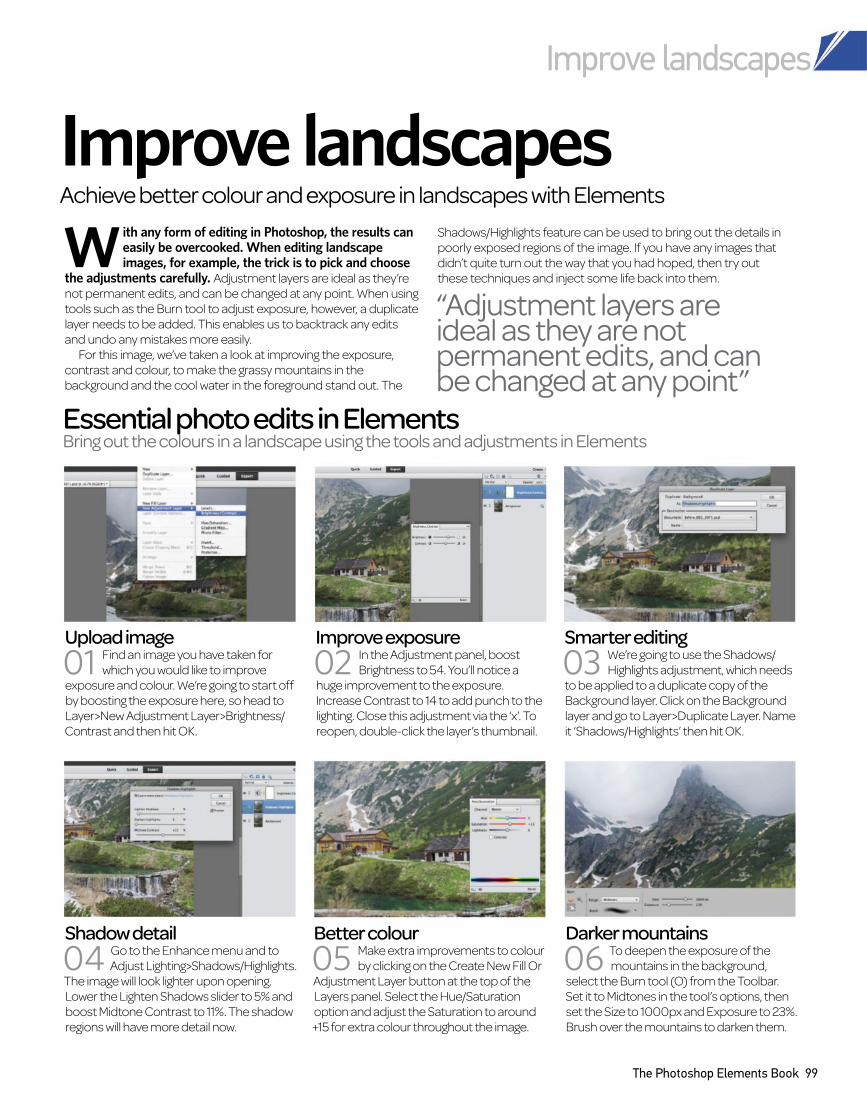
The Photoshop Elements Book 99
Having contrasting images will make for a stronger
double-exposure effect.
Improve landscapes
Improve landscapesAchieve better colour and exposure in landscapes with Elements
With any form of editing in Photoshop, the results can easily be overcooked. When editing landscape images, for example, the trick is to pick and choose
the adjustments carefully. Adjustment layers are ideal as they’re
not permanent edits, and can be changed at any point. When using
tools such as the Burn tool to adjust exposure, however, a duplicate
layer needs to be added. This enables us to backtrack any edits
and undo any mistakes more easily.
For this image, we’ve taken a look at improving the exposure,
contrast and colour, to make the grassy mountains in the
background and the cool water in the foreground stand out. The
Shadows/Highlights feature can be used to bring out the details in
poorly exposed regions of the image. If you have any images that
didn’t quite turn out the way that you had hoped, then try out
these techniques and inject some life back into them.
Better colour
05 Make extra improvements to colour
by clicking on the Create New Fill Or
Adjustment Layer button at the top of the
Layers panel. Select the Hue/Saturation
option and adjust the Saturation to around
+15 for extra colour throughout the image.
Darker mountains
06 To deepen the exposure of the
mountains in the background,
select the Burn tool (O) from the Toolbar.
Set it to Midtones in the tool’s options, then
set the Size to 1000px and Exposure to 23%.
Brush over the mountains to darken them.
Shadow detail
04 Go to the Enhance menu and to
Adjust Lighting>Shadows/Highlights.
The image will look lighter upon opening.
Lower the Lighten Shadows slider to 5% and
boost Midtone Contrast to 11%. The shadow
regions will have more detail now.
Improve exposure
02 In the Adjustment panel, boost
Brightness to 54. You’ll notice a
huge improvement to the exposure.
Increase Contrast to 14 to add punch to the
lighting. Close this adjustment via the ‘x’. To
reopen, double-click the layer’s thumbnail.
Smarter editing
03 We’re going to use the Shadows/
Highlights adjustment, which needs
to be applied to a duplicate copy of the
Background layer. Click on the Background
layer and go to Layer>Duplicate Layer. Name
it ‘Shadows/Highlights’ then hit OK.
Upload image
01 Find an image you have taken for
which you would like to improve
exposure and colour. We’re going to start off
by boosting the exposure here, so head to
Layer>New Adjustment Layer>Brightness/
Contrast and then hit OK.
Essential photo edits in Elements Bring out the colours in a landscape using the tools and adjustments in Elements
“Adjustment layers are ideal as they are not permanent edits, and can be changed at any point”

AFTER
Photo editing
100 The Photoshop Elements Book
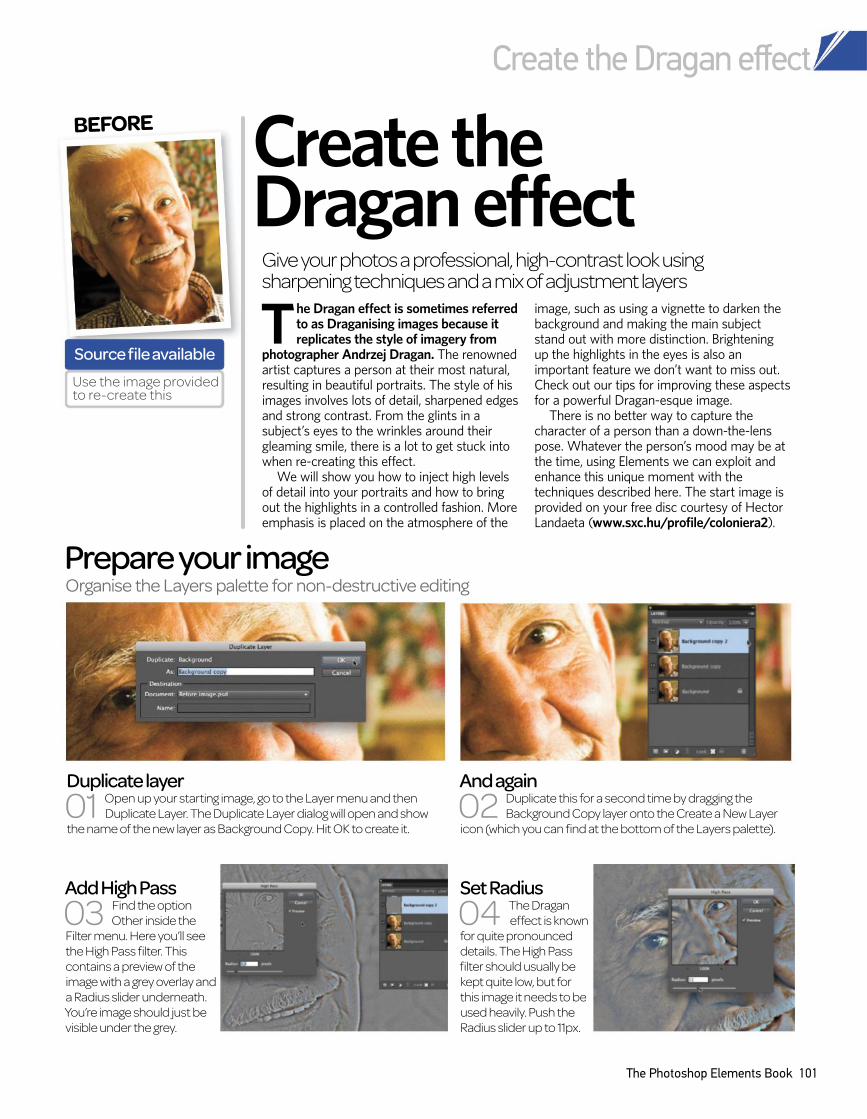
The Dragan effect is sometimes referred to as Draganising images because it replicates the style of imagery from
photographer Andrzej Dragan. The renowned artist captures a person at their most natural, resulting in beautiful portraits. The style of his images involves lots of detail, sharpened edges and strong contrast. From the glints in a subject’s eyes to the wrinkles around their gleaming smile, there is a lot to get stuck into when re-creating this effect.
We will show you how to inject high levels of detail into your portraits and how to bring out the highlights in a controlled fashion. More emphasis is placed on the atmosphere of the
image, such as using a vignette to darken the background and making the main subject stand out with more distinction. Brightening up the highlights in the eyes is also an important feature we don’t want to miss out. Check out our tips for improving these aspects for a powerful Dragan-esque image.
There is no better way to capture the character of a person than a down-the-lens pose. Whatever the person’s mood may be at the time, using Elements we can exploit and enhance this unique moment with the techniques described here. The start image is provided on your free disc courtesy of Hector Landaeta (www.sxc.hu/profile/coloniera2).
Organise the Layers palette for non-destructive editing
Prepare your image
And again
02 Duplicate this for a second time by dragging the
Background Copy layer onto the Create a New Layer
icon (which you can find at the bottom of the Layers palette).
BEFORE
Create the Dragan effect
Give your photos a professional, high-contrast look using sharpening techniques and a mix of adjustment layers
Source file available
Use the image provided to re-create this
Duplicate layer
01 Open up your starting image, go to the Layer menu and then
Duplicate Layer. The Duplicate Layer dialog will open and show
the name of the new layer as Background Copy. Hit OK to create it.
Set Radius
04 The Dragan
effect is known
for quite pronounced
details. The High Pass
filter should usually be
kept quite low, but for
this image it needs to be
used heavily. Push the
Radius slider up to 11px.
Add High Pass
03 Find the option
Other inside the
Filter menu. Here you’ll see
the High Pass filter. This
contains a preview of the
image with a grey overlay and
a Radius slider underneath.
You’re image should just be
visible under the grey.
Create the Dragan effect
The Photoshop Elements Book 101
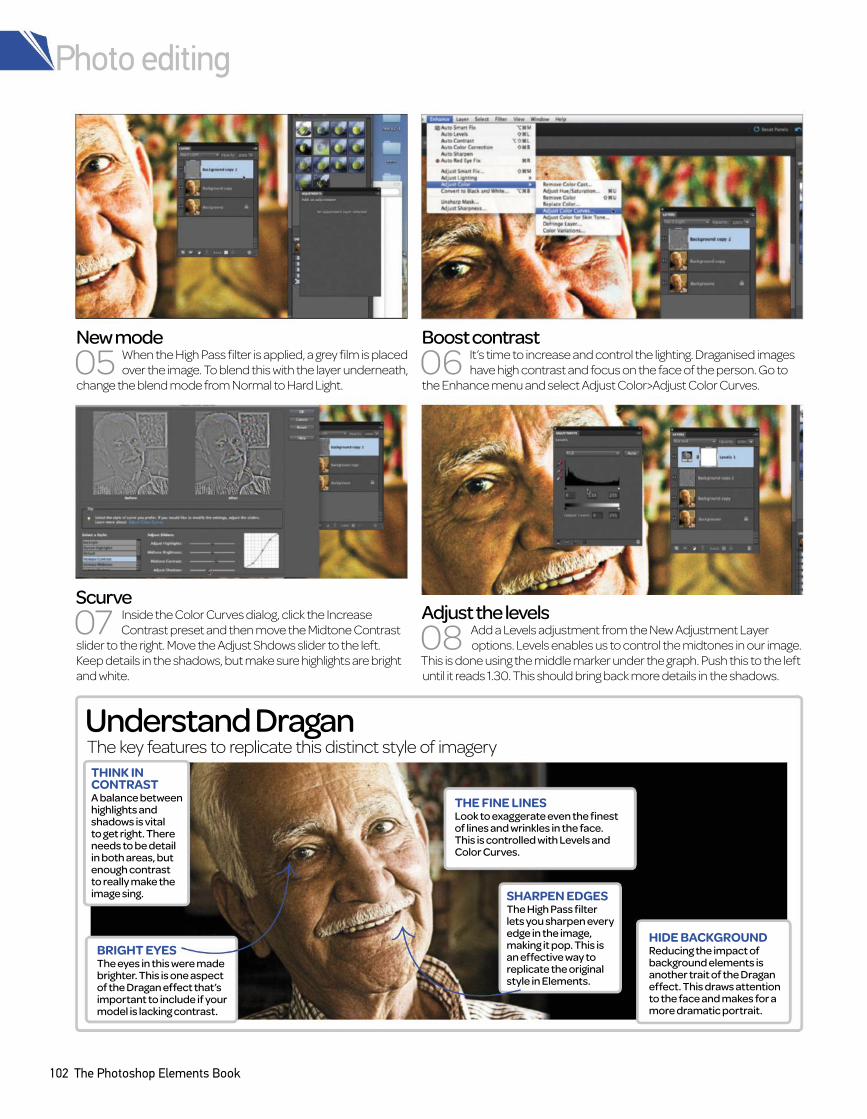
New mode
05 When the High Pass filter is applied, a grey film is placed
over the image. To blend this with the layer underneath,
change the blend mode from Normal to Hard Light.
Boost contrast
06 It’s time to increase and control the lighting. Draganised images
have high contrast and focus on the face of the person. Go to
the Enhance menu and select Adjust Color>Adjust Color Curves.
Scurve
07 Inside the Color Curves dialog, click the Increase
Contrast preset and then move the Midtone Contrast
slider to the right. Move the Adjust Shdows slider to the left.
Keep details in the shadows, but make sure highlights are bright
and white.
Adjust the levels
08 Add a Levels adjustment from the New Adjustment Layer
options. Levels enables us to control the midtones in our image.
This is done using the middle marker under the graph. Push this to the left
until it reads 1.30. This should bring back more details in the shadows.
The key features to replicate this distinct style of imagery
Understand Dragan
THE FINE LINES
Look to exaggerate even the finest of lines and wrinkles in the face. This is controlled with Levels and Color Curves.
HIDE BACKGROUND
Reducing the impact of background elements is another trait of the Dragan effect. This draws attention to the face and makes for a more dramatic portrait.
SHARPEN EDGES
The High Pass filter lets you sharpen every edge in the image, making it pop. This is an effective way to replicate the original style in Elements.
BRIGHT EYES
The eyes in this were made brighter. This is one aspect of the Dragan effect that’s important to include if your model is lacking contrast.
THINK IN
CONTRAST
A balance between highlights and shadows is vital to get right. There needs to be detail in both areas, but enough contrast to really make the image sing.
Photo editing
102 The Photoshop Elements Book
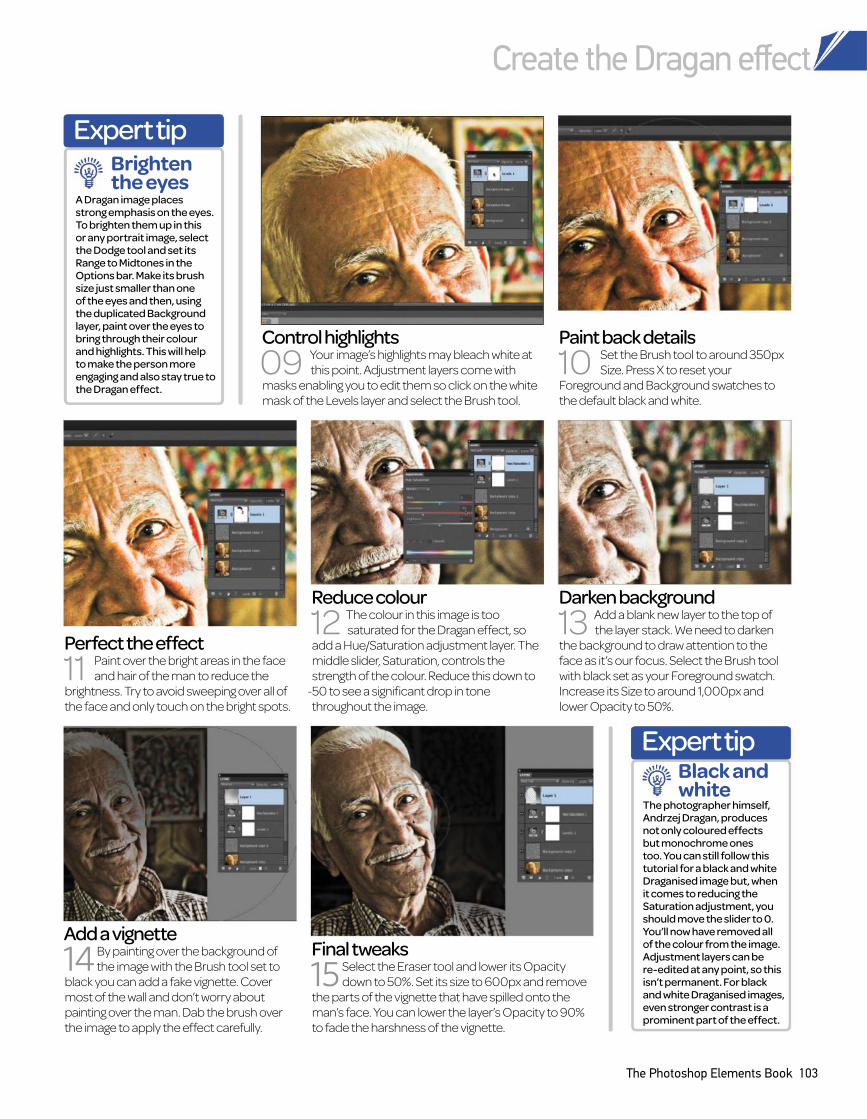
Paint back details
10 Set the Brush tool to around 350px
Size. Press X to reset your
Foreground and Background swatches to
the default black and white.
Control highlights
09 Your image’s highlights may bleach white at
this point. Adjustment layers come with
masks enabling you to edit them so click on the white
mask of the Levels layer and select the Brush tool.
Perfect the effect
11 Paint over the bright areas in the face
and hair of the man to reduce the
brightness. Try to avoid sweeping over all of
the face and only touch on the bright spots.
Reduce colour
12 The colour in this image is too
saturated for the Dragan effect, so
add a Hue/Saturation adjustment layer. The
middle slider, Saturation, controls the
strength of the colour. Reduce this down to
-50 to see a significant drop in tone
throughout the image.
Final tweaks
15 Select the Eraser tool and lower its Opacity
down to 50%. Set its size to 600px and remove
the parts of the vignette that have spilled onto the
man’s face. You can lower the layer’s Opacity to 90%
to fade the harshness of the vignette.
Darken background
13 Add a blank new layer to the top of
the layer stack. We need to darken
the background to draw attention to the
face as it’s our focus. Select the Brush tool
with black set as your Foreground swatch.
Increase its Size to around 1,000px and
lower Opacity to 50%.
Add a vignette
14 By painting over the background of
the image with the Brush tool set to
black you can add a fake vignette. Cover
most of the wall and don’t worry about
painting over the man. Dab the brush over
the image to apply the effect carefully.
Expert tip
A Dragan image places strong emphasis on the eyes. To brighten them up in this or any portrait image, select the Dodge tool and set its Range to Midtones in the Options bar. Make its brush size just smaller than one of the eyes and then, using the duplicated Background layer, paint over the eyes to bring through their colour and highlights. This will help to make the person more engaging and also stay true to the Dragan effect.
Brighten the eyes
Expert tip
The photographer himself, Andrzej Dragan, produces not only coloured effects but monochrome ones too. You can still follow this tutorial for a black and white Draganised image but, when it comes to reducing the Saturation adjustment, you should move the slider to 0. You’ll now have removed all of the colour from the image. Adjustment layers can be re-edited at any point, so this isn’t permanent. For black and white Draganised images, even stronger contrast is a prominent part of the effect.
Black and white
Create the Dragan effect
The Photoshop Elements Book 103
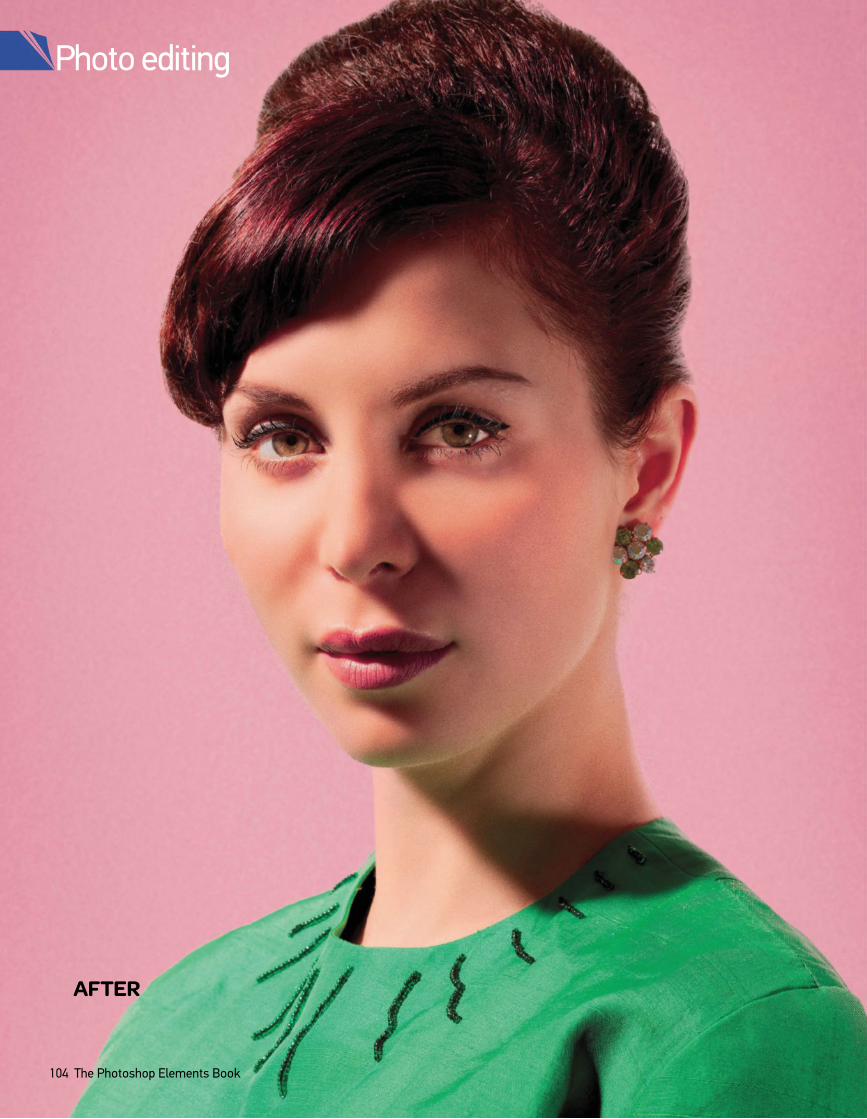
AFTER
Photo editing
104 The Photoshop Elements Book
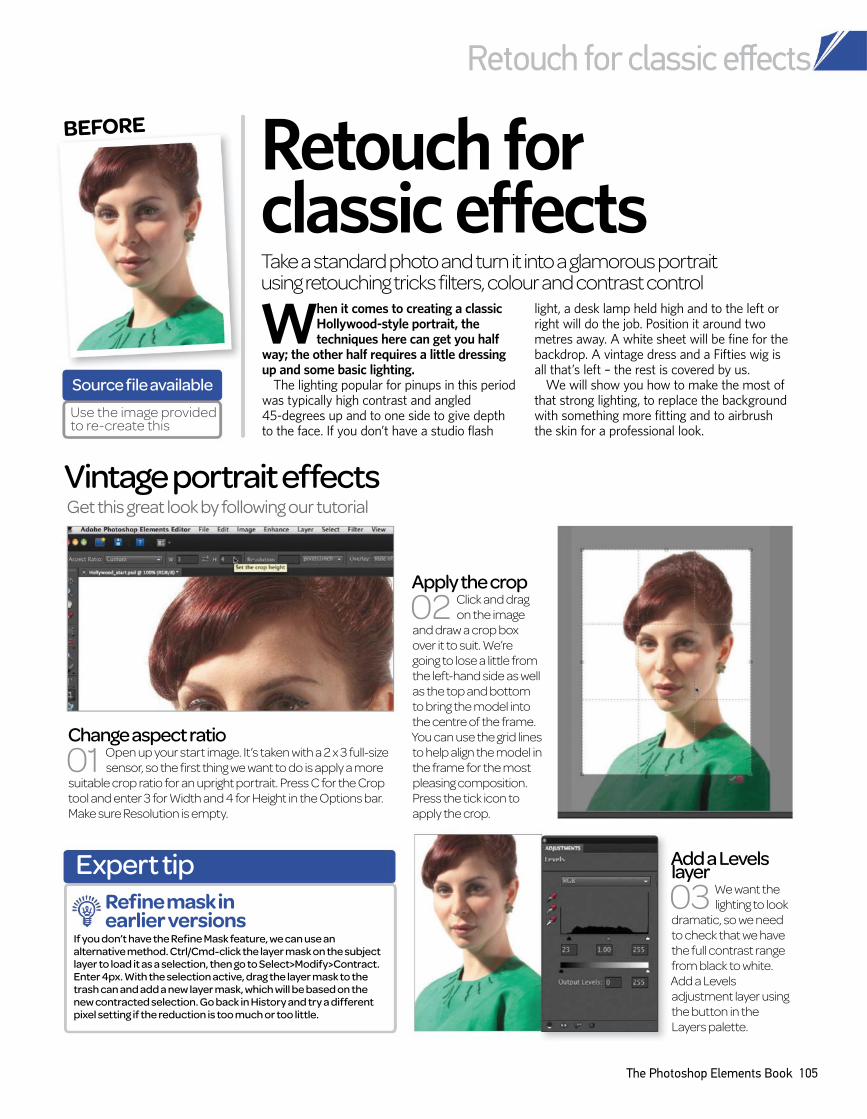
When it comes to creating a classic Hollywood-style portrait, the techniques here can get you half
way; the other half requires a little dressing up and some basic lighting.
The lighting popular for pinups in this period was typically high contrast and angled 45-degrees up and to one side to give depth to the face. If you don’t have a studio flash
light, a desk lamp held high and to the left or right will do the job. Position it around two metres away. A white sheet will be fine for the backdrop. A vintage dress and a Fifties wig is all that’s left – the rest is covered by us.
We will show you how to make the most of that strong lighting, to replace the background with something more fitting and to airbrush the skin for a professional look.
BEFORE
Retouch for classic effects
Get this great look by following our tutorial
Vintage portrait effects
Take a standard photo and turn it into a glamorous portrait using retouching tricks filters, colour and contrast control
Apply the crop
02 Click and drag
on the image
and draw a crop box
over it to suit. We’re
going to lose a little from
the left-hand side as well
as the top and bottom
to bring the model into
the centre of the frame.
You can use the grid lines
to help align the model in
the frame for the most
pleasing composition.
Press the tick icon to
apply the crop.
Change aspect ratio
01 Open up your start image. It’s taken with a 2 x 3 full-size
sensor, so the first thing we want to do is apply a more
suitable crop ratio for an upright portrait. Press C for the Crop
tool and enter 3 for Width and 4 for Height in the Options bar.
Make sure Resolution is empty.
Source file available
Use the image provided to re-create this
Expert tip
If you don’t have the Refine Mask feature, we can use an alternative method. Ctrl/Cmd-click the layer mask on the subject layer to load it as a selection, then go to Select>Modify>Contract. Enter 4px. With the selection active, drag the layer mask to the trash can and add a new layer mask, which will be based on the new contracted selection. Go back in History and try a different pixel setting if the reduction is too much or too little.
Refine mask in earlier versions
Add a Levels layer
03 We want the
lighting to look
dramatic, so we need
to check that we have
the full contrast range
from black to white.
Add a Levels
adjustment layer using
the button in the
Layers palette.
Retouch for classic effects
The Photoshop Elements Book 105
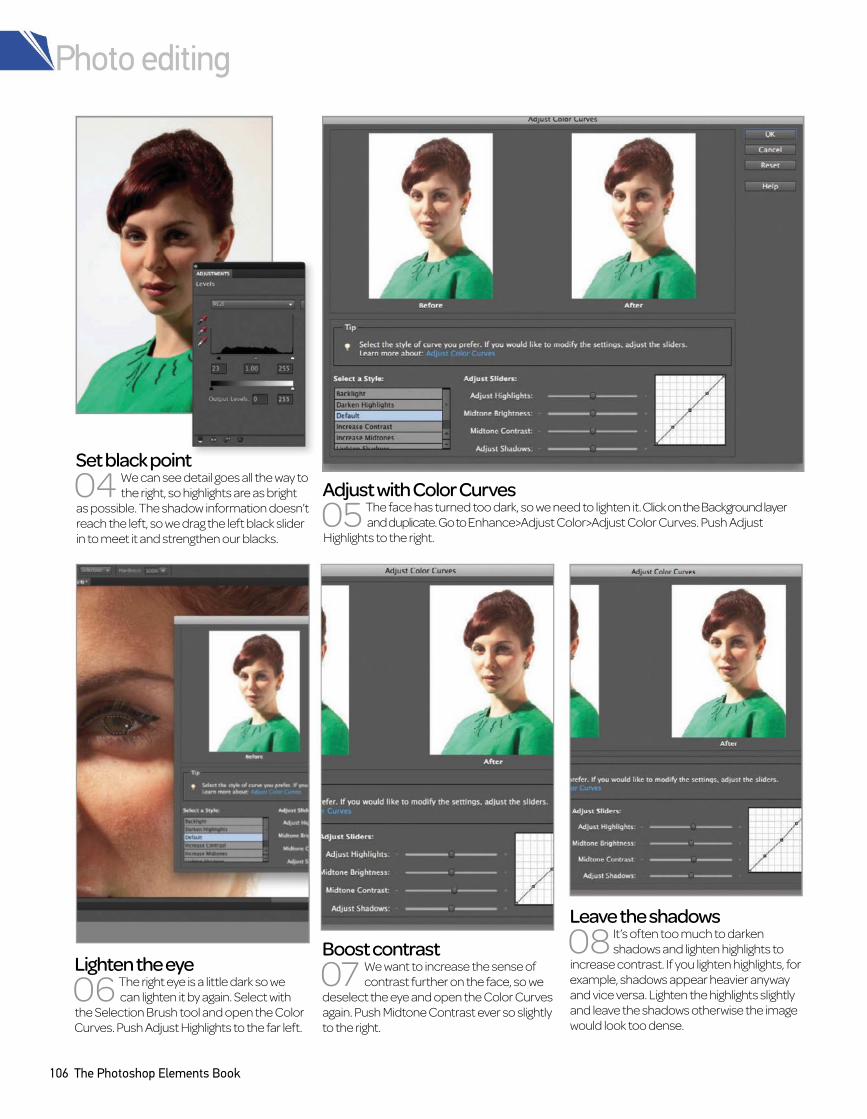
Set black point
04 We can see detail goes all the way to
the right, so highlights are as bright
as possible. The shadow information doesn’t
reach the left, so we drag the left black slider
in to meet it and strengthen our blacks.
Adjust with Color Curves
andduplicate.GotoEnhance>Adjust Color>Adjust Color Curves. Push Adjust 05 The face has turned too dark, so we need to lighten it.ClickontheBackgroundlayer
Highlights to the right.
Lighten the eye
06 The right eye is a little dark so we
can lighten it by again. Select with
the Selection Brush tool and open the Color
Curves. Push Adjust Highlights to the far left.
Boost contrast
07 We want to increase the sense of
contrast further on the face, so we
deselect the eye and open the Color Curves
again. Push Midtone Contrast ever so slightly
to the right.
Leave the shadows
08 It’s often too much to darken
shadows and lighten highlights to
increase contrast. If you lighten highlights, for
example, shadows appear heavier anyway
and vice versa. Lighten the highlights slightly
and leave the shadows otherwise the image
would look too dense.
Photo editing
106 The Photoshop Elements Book
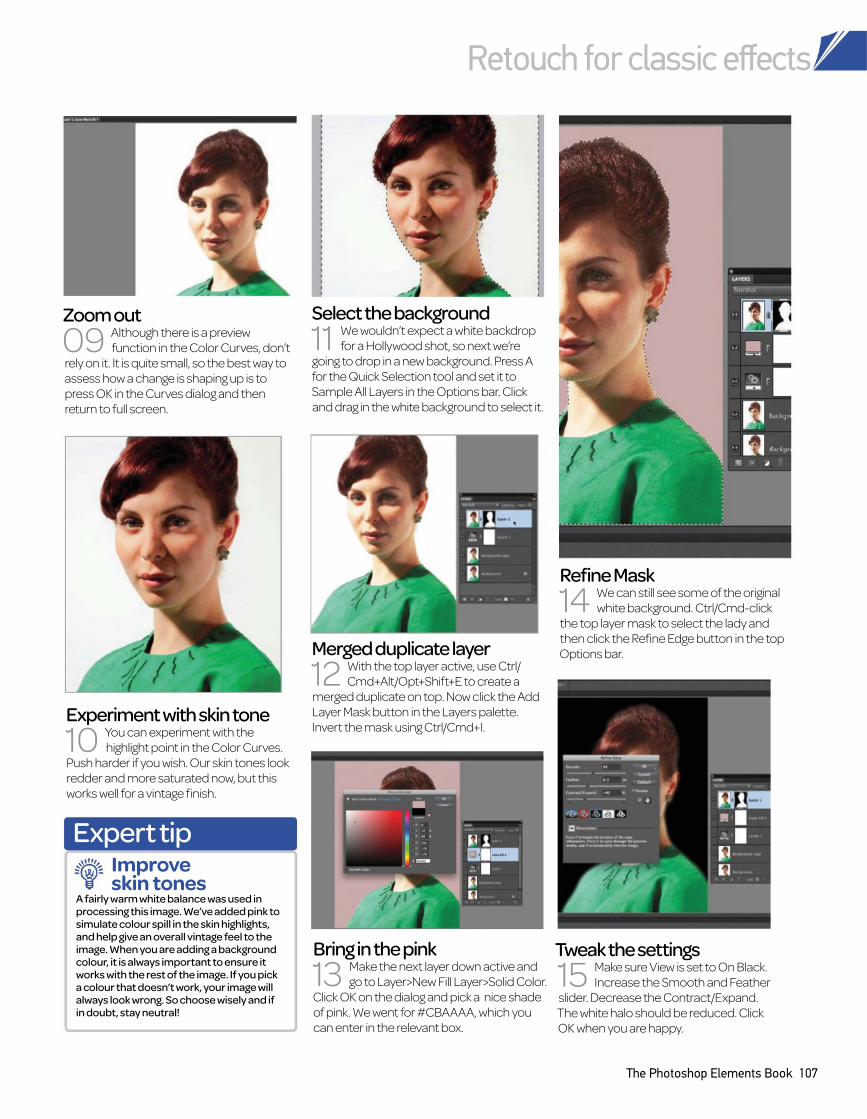
Zoom out
09 Although there is a preview
function in the Color Curves, don’t
rely on it. It is quite small, so the best way to
assess how a change is shaping up is to
press OK in the Curves dialog and then
return to full screen.
Experiment with skin tone
10 You can experiment with the
highlight point in the Color Curves.
Push harder if you wish. Our skin tones look
redder and more saturated now, but this
works well for a vintage finish.
Select the background
11 We wouldn’t expect a white backdrop
for a Hollywood shot, so next we’re
going to drop in a new background. Press A
for the Quick Selection tool and set it to
Sample All Layers in the Options bar. Click
and drag in the white background to select it.
Merged duplicate layer
12 With the top layer active, use Ctrl/
Cmd+Alt/Opt+Shift+E to create a
merged duplicate on top. Now click the Add
Layer Mask button in the Layers palette.
Invert the mask using Ctrl/Cmd+I.
Tweak the settings
15 Make sure View is set to On Black.
Increase the Smooth and Feather
slider. Decrease the Contract/Expand.
The white halo should be reduced. Click
OK when you are happy.
Bring in the pink
13 Make the next layer down active and
go to Layer>New Fill Layer>Solid Color.
Click OK on the dialog and pick a nice shade
of pink. We went for #CBAAAA, which you
can enter in the relevant box.
Refine Mask
14 We can still see some of the original
white background. Ctrl/Cmd-click
the top layer mask to select the lady and
then click the Refine Edge button in the top
Options bar.
Expert tip
A fairly warm white balance was used in processing this image. We’ve added pink to simulate colour spill in the skin highlights, and help give an overall vintage feel to the image. When you are adding a background colour, it is always important to ensure it works with the rest of the image. If you pick a colour that doesn’t work, your image will always look wrong. So choose wisely and if in doubt, stay neutral!
Improve skin tones
Retouch for classic effects
The Photoshop Elements Book 107
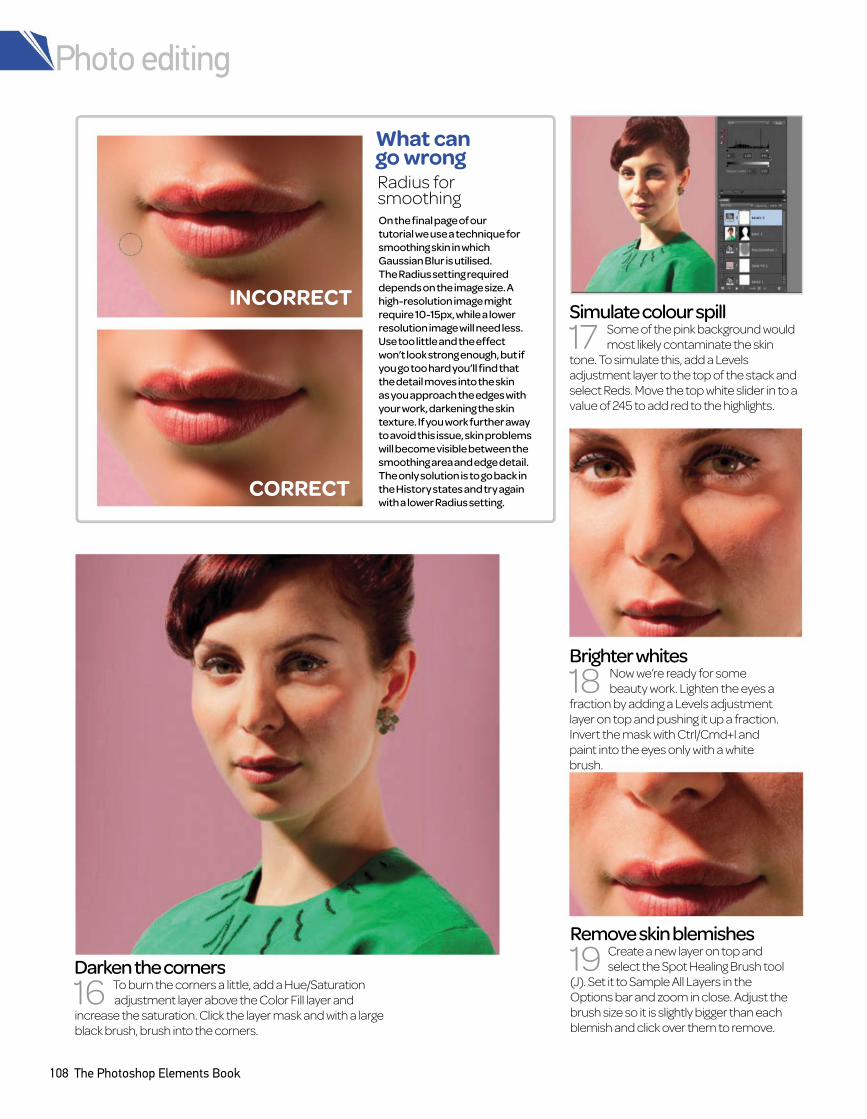
Brighter whites
18 Now we’re ready for some
beauty work. Lighten the eyes a
fraction by adding a Levels adjustment
layer on top and pushing it up a fraction.
Invert the mask with Ctrl/Cmd+I and
paint into the eyes only with a white
brush.
Remove skin blemishes
19 Create a new layer on top and
select the Spot Healing Brush tool
(J). Set it to Sample All Layers in the
Options bar and zoom in close. Adjust the
brush size so it is slightly bigger than each
blemish and click over them to remove.
Simulate colour spill
17 Some of the pink background would
most likely contaminate the skin
tone. To simulate this, add a Levels
adjustment layer to the top of the stack and
select Reds. Move the top white slider in to a
value of 245 to add red to the highlights.
On the final page of our
tutorial we use a technique for
smoothing skin in which
Gaussian Blur is utilised.
The Radius setting required
depends on the image size. A
high-resolution image might
require 10-15px, while a lower
resolution image will need less.
Use too little and the effect
won’t look strong enough, but if
you go too hard you’ll find that
the detail moves into the skin
as you approach the edges with
your work, darkening the skin
texture. If you work further away
to avoid this issue, skin problems
will become visible between the
smoothing area and edge detail.
The only solution is to go back in
the History states and try again
with a lower Radius setting.
Radius for smoothing
INCORRECT
CORRECT
What can go wrong
Darken the corners
adjustment layer above the Color Fill layer and 16 To burn the corners a little, add a Hue/Saturation
increase the saturation. Click the layer mask and with a large
black brush, brush into the corners.
Photo editing
108 The Photoshop Elements Book
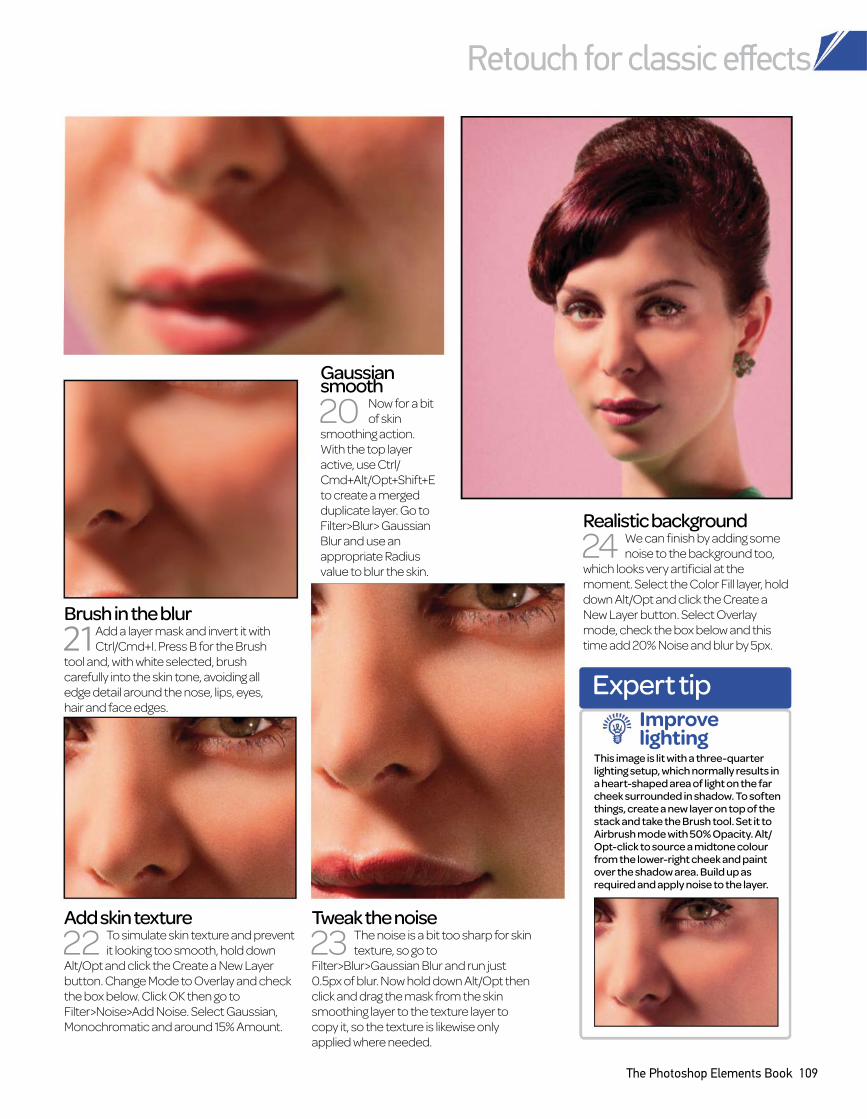
Gaussian smooth
20 Now for a bit
of skin
smoothing action.
With the top layer
active, use Ctrl/
Cmd+Alt/Opt+Shift+E
to create a merged
duplicate layer. Go to
Filter>Blur> Gaussian
Blur and use an
appropriate Radius
value to blur the skin.
Realistic background
24 We can finish by adding some
noise to the background too,
which looks very artificial at the
moment. Select the Color Fill layer, hold
down Alt/Opt and click the Create a
New Layer button. Select Overlay
mode, check the box below and this
time add 20% Noise and blur by 5px.
Brush in the blur
21 Add a layer mask and invert it with
Ctrl/Cmd+I. Press B for the Brush
tool and, with white selected, brush
carefully into the skin tone, avoiding all
edge detail around the nose, lips, eyes,
hair and face edges.
Add skin texture
22 To simulate skin texture and prevent
it looking too smooth, hold down
Alt/Opt and click the Create a New Layer
button. Change Mode to Overlay and check
the box below. Click OK then go to
Filter>Noise>Add Noise. Select Gaussian,
Monochromatic and around 15% Amount.
Tweak the noise
23 The noise is a bit too sharp for skin
texture, so go to
Filter>Blur>Gaussian Blur and run just
0.5px of blur. Now hold down Alt/Opt then
click and drag the mask from the skin
smoothing layer to the texture layer to
copy it, so the texture is likewise only
applied where needed.
Expert tip
This image is lit with a three-quarter lighting setup, which normally results in a heart-shaped area of light on the far cheek surrounded in shadow. To soften things, create a new layer on top of the stack and take the Brush tool. Set it to Airbrush mode with 50% Opacity. Alt/Opt-click to source a midtone colour from the lower-right cheek and paint over the shadow area. Build up as required and apply noise to the layer.
Improve lighting
Retouch for classic effects
The Photoshop Elements Book 109
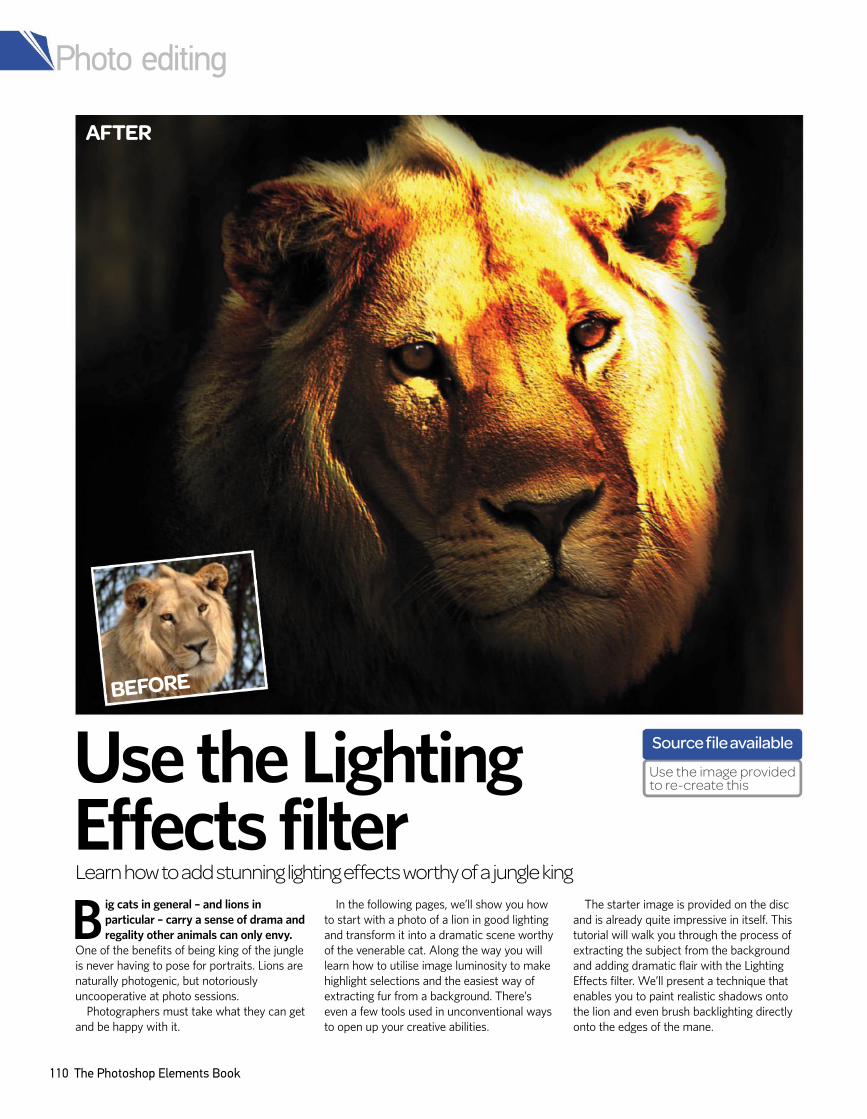
Photo editing
110 The Photoshop Elements Book
Big cats in general – and lions in
particular – carry a sense of drama and
regality other animals can only envy.
One of the benefits of being king of the jungle
is never having to pose for portraits. Lions are
naturally photogenic, but notoriously
uncooperative at photo sessions.
Photographers must take what they can get
and be happy with it.
In the following pages, we’ll show you how
to start with a photo of a lion in good lighting
and transform it into a dramatic scene worthy
of the venerable cat. Along the way you will
learn how to utilise image luminosity to make
highlight selections and the easiest way of
extracting fur from a background. There’s
even a few tools used in unconventional ways
to open up your creative abilities.
The starter image is provided on the disc
and is already quite impressive in itself. This
tutorial will walk you through the process of
extracting the subject from the background
and adding dramatic flair with the Lighting
Effects filter. We’ll present a technique that
enables you to paint realistic shadows onto
the lion and even brush backlighting directly
onto the edges of the mane.
Learn how to add stunning lighting effects worthy of a jungle king
Use the Lighting Effects filter
BEFORE
AFTER
Source file available
Use the image provided to re-create this
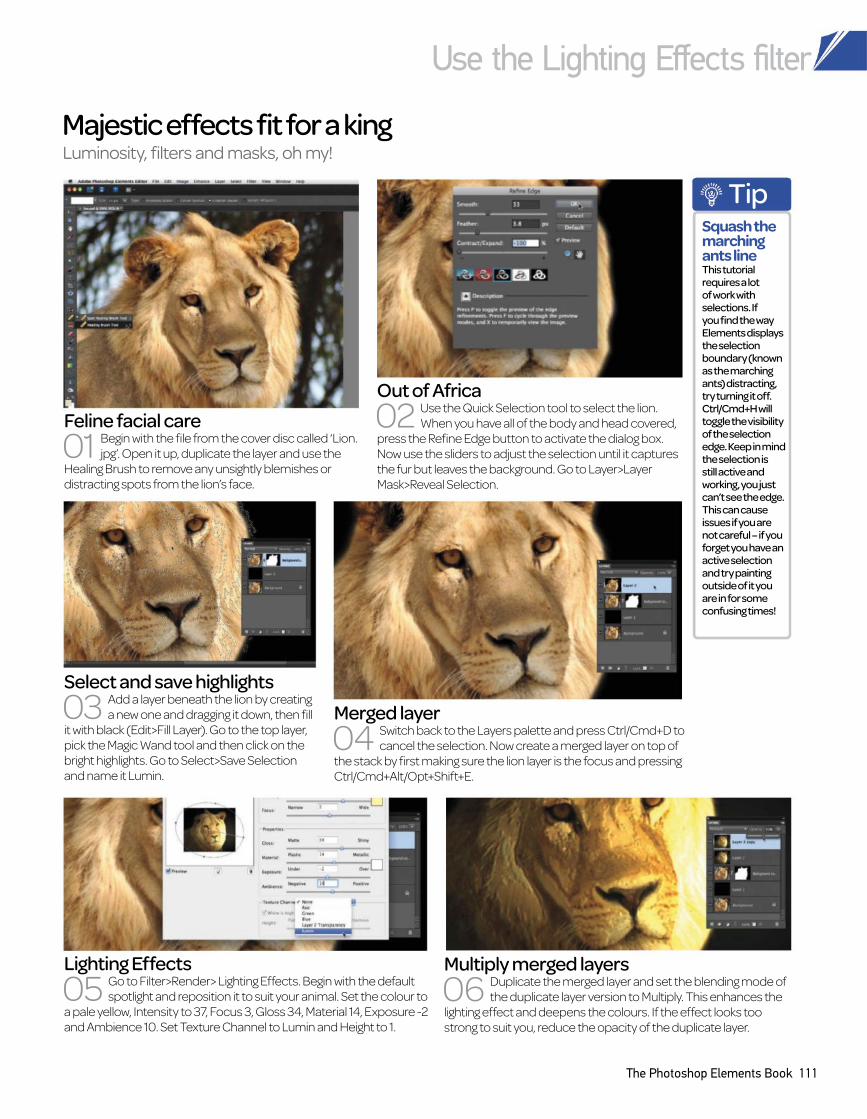
Use the Lighting Effects filter
The Photoshop Elements Book 111
Majestic effects fit for a kingLuminosity, filters and masks, oh my!
Feline facial care
01 Begin with the file from the cover disc called ‘Lion.
jpg’. Open it up, duplicate the layer and use the
Healing Brush to remove any unsightly blemishes or
distracting spots from the lion’s face.
Out of Africa
02 Use the Quick Selection tool to select the lion.
When you have all of the body and head covered,
press the Refine Edge button to activate the dialog box.
Now use the sliders to adjust the selection until it captures
the fur but leaves the background. Go to Layer>Layer
Mask>Reveal Selection.
Select and save highlights
03 Add a layer beneath the lion by creating
a new one and dragging it down, then fill
it with black (Edit>Fill Layer). Go to the top layer,
pick the Magic Wand tool and then click on the
bright highlights. Go to Select>Save Selection
and name it Lumin.
Merged layer
04 Switch back to the Layers palette and press Ctrl/Cmd+D to
cancel the selection. Now create a merged layer on top of
the stack by first making sure the lion layer is the focus and pressing
Ctrl/Cmd+Alt/Opt+Shift+E.
Lighting Effects
05 Go to Filter>Render> Lighting Effects. Begin with the default
spotlight and reposition it to suit your animal. Set the colour to
a pale yellow, Intensity to 37, Focus 3, Gloss 34, Material 14, Exposure -2
and Ambience 10. Set Texture Channel to Lumin and Height to 1.
Multiply merged layers
the duplicate layer version to Multiply. This enhances the 06 Duplicate the merged layer and set the blending mode of
lighting effect and deepens the colours. If the effect looks too
strong to suit you, reduce the opacity of the duplicate layer.
TipSquash the marching ants lineThis tutorial requires a lot of work with selections. If you find the way Elements displays the selection boundary (known as the marching ants) distracting, try turning it off. Ctrl/Cmd+H will toggle the visibility of the selection edge. Keep in mind the selection is still active and working, you just can’t see the edge. This can cause issues if you are not careful – if you forget you have an active selection and try painting outside of it you are in for some confusing times!
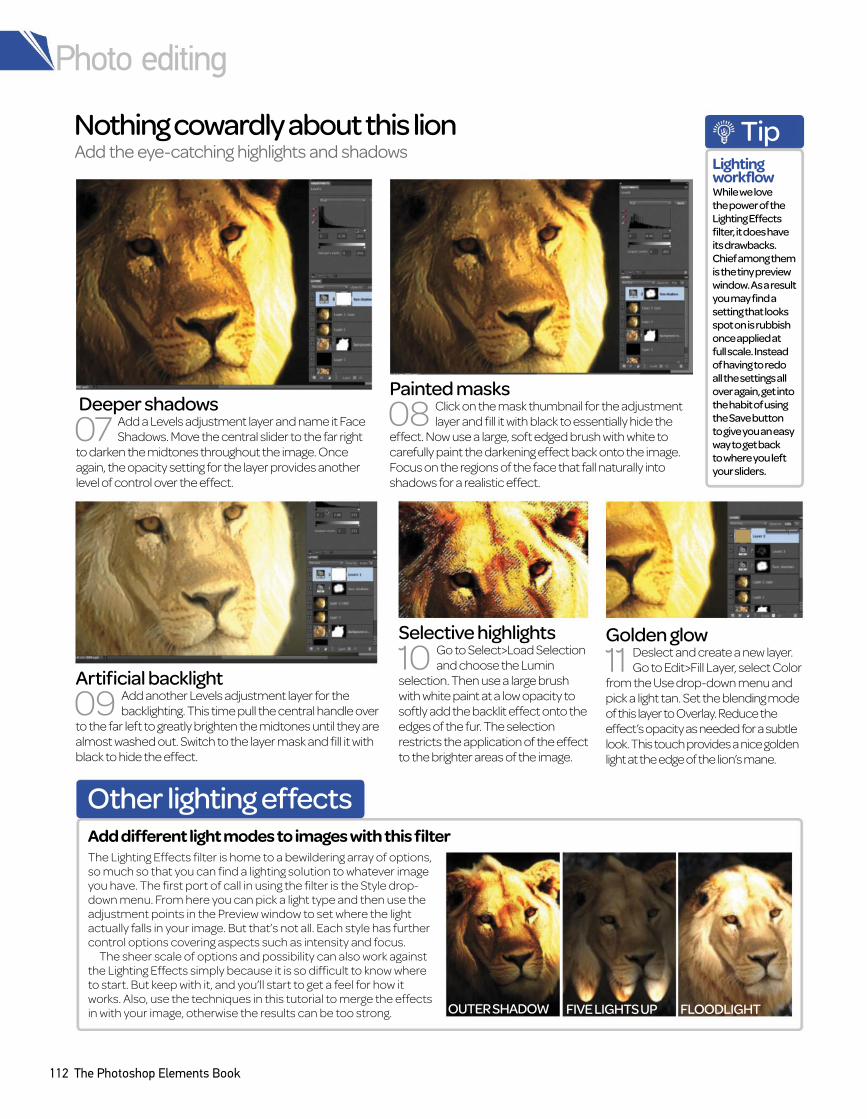
Photo editing
112 The Photoshop Elements Book
Nothing cowardly about this lionAdd the eye-catching highlights and shadows
Add different light modes to images with this filter
OUTER SHADOW
TipLighting workflowWhile we love
the power of the
Lighting Effects
filter, it does have
its drawbacks.
Chief among them
is the tiny preview
window. As a result
you may find a
setting that looks
spot on is rubbish
once applied at
full scale. Instead
of having to redo
all the settings all
over again, get into
the habit of using
the Save button
to give you an easy
way to get back
to where you left
your sliders.
Deeper shadows
07 Add a Levels adjustment layer and name it Face
Shadows. Move the central slider to the far right
to darken the midtones throughout the image. Once
again, the opacity setting for the layer provides another
level of control over the effect.
Painted masks
layer and fill it with black to essentially hide the 08 Click on the mask thumbnail for the adjustment
effect. Now use a large, soft edged brush with white to
carefully paint the darkening effect back onto the image.
Focus on the regions of the face that fall naturally into
shadows for a realistic effect.
Artificial backlight
09 Add another Levels adjustment layer for the
backlighting. This time pull the central handle over
to the far left to greatly brighten the midtones until they are
almost washed out. Switch to the layer mask and fill it with
black to hide the effect.
Selective highlights
10 Go to Select>Load Selection
and choose the Lumin
selection. Then use a large brush
with white paint at a low opacity to
softly add the backlit effect onto the
edges of the fur. The selection
restricts the application of the effect
to the brighter areas of the image.
Golden glow
11 Deslect and create a new layer.
Go to Edit>Fill Layer, select Color
from the Use drop-down menu and
pick a light tan. Set the blending mode
of this layer to Overlay. Reduce the
effect’s opacity as needed for a subtle
look. This touch provides a nice golden
light at the edge of the lion’s mane.
The Lighting Effects filter is home to a bewildering array of options, so much so that you can find a lighting solution to whatever image you have. The first port of call in using the filter is the Style drop-down menu. From here you can pick a light type and then use the adjustment points in the Preview window to set where the light actually falls in your image. But that’s not all. Each style has further control options covering aspects such as intensity and focus.
The sheer scale of options and possibility can also work against the Lighting Effects simply because it is so difficult to know where to start. But keep with it, and you’ll start to get a feel for how it works. Also, use the techniques in this tutorial to merge the effects in with your image, otherwise the results can be too strong.
Other lighting effects
FIVE LIGHTS UP FLOODLIGHT
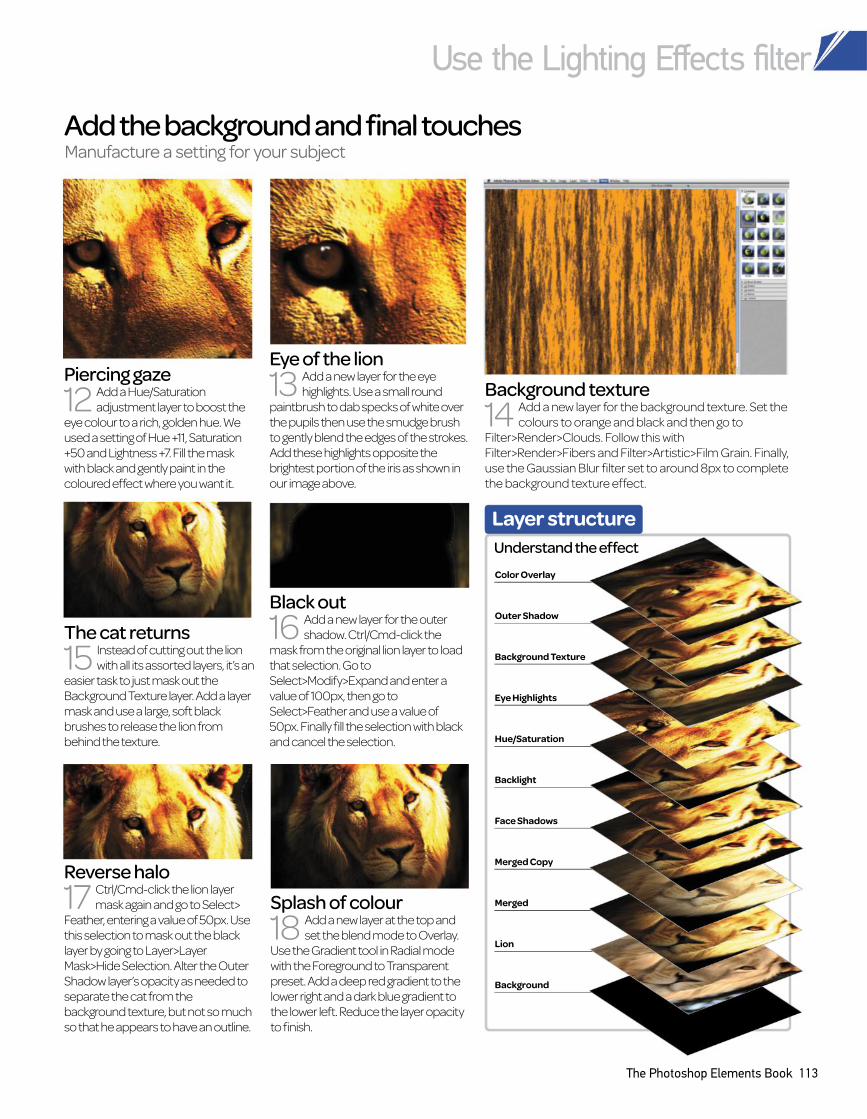
Use the Lighting Effects filter
The Photoshop Elements Book 113
Add the background and final touchesManufacture a setting for your subject
Color Overlay
Outer Shadow
Background Texture
Eye Highlights
Hue/Saturation
Backlight
Face Shadows
Merged Copy
Merged
Lion
Background
Layer structure
Understand the effect
Piercing gaze
12 Add a Hue/Saturation
adjustment layer to boost the
eye colour to a rich, golden hue. We
used a setting of Hue +11, Saturation
+50 and Lightness +7. Fill the mask
with black and gently paint in the
coloured effect where you want it.
The cat returns
15 Instead of cutting out the lion
with all its assorted layers, it’s an
easier task to just mask out the
Background Texture layer. Add a layer
mask and use a large, soft black
brushes to release the lion from
behind the texture.
Reverse halo
17 Ctrl/Cmd-click the lion layer
mask again and go to Select>
Feather, entering a value of 50px. Use
this selection to mask out the black
layer by going to Layer>Layer
Mask>Hide Selection. Alter the Outer
Shadow layer’s opacity as needed to
separate the cat from the
background texture, but not so much
so that he appears to have an outline.
Background texture
14 Add a new layer for the background texture. Set the
colours to orange and black and then go to
Filter>Render>Clouds. Follow this with
Filter>Render>Fibers and Filter>Artistic>Film Grain. Finally,
use the Gaussian Blur filter set to around 8px to complete
the background texture effect.
Eye of the lion
13 Add a new layer for the eye
highlights. Use a small round
paintbrush to dab specks of white over
the pupils then use the smudge brush
to gently blend the edges of the strokes.
Add these highlights opposite the
brightest portion of the iris as shown in
our image above.
Black out
16 Add a new layer for the outer
shadow. Ctrl/Cmd-click the
mask from the original lion layer to load
that selection. Go to
Select>Modify>Expand and enter a
value of 100px, then go to
Select>Feather and use a value of
50px. Finally fill the selection with black
and cancel the selection.
Splash of colour
18 Add a new layer at the top and
set the blend mode to Overlay.
Use the Gradient tool in Radial mode
with the Foreground to Transparent
preset. Add a deep red gradient to the
lower right and a dark blue gradient to
the lower left. Reduce the layer opacity
to finish.
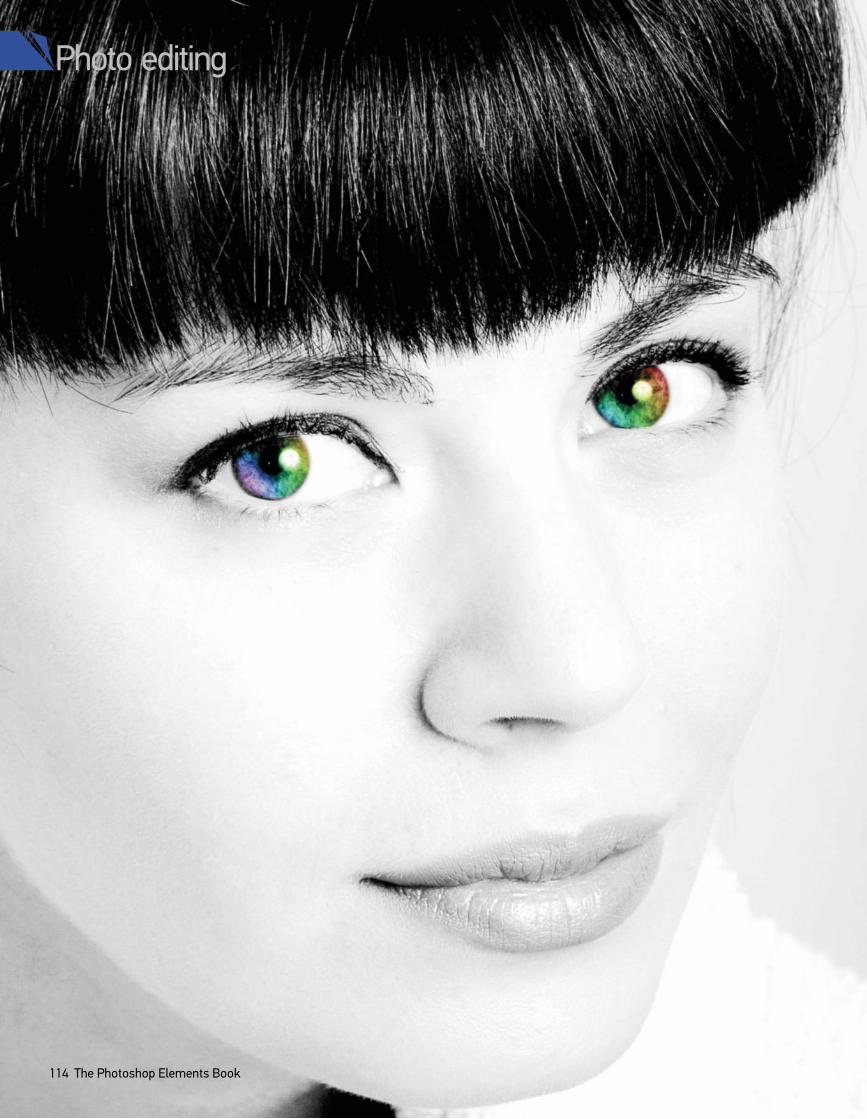
114 The Photoshop Elements Book
Photo editing
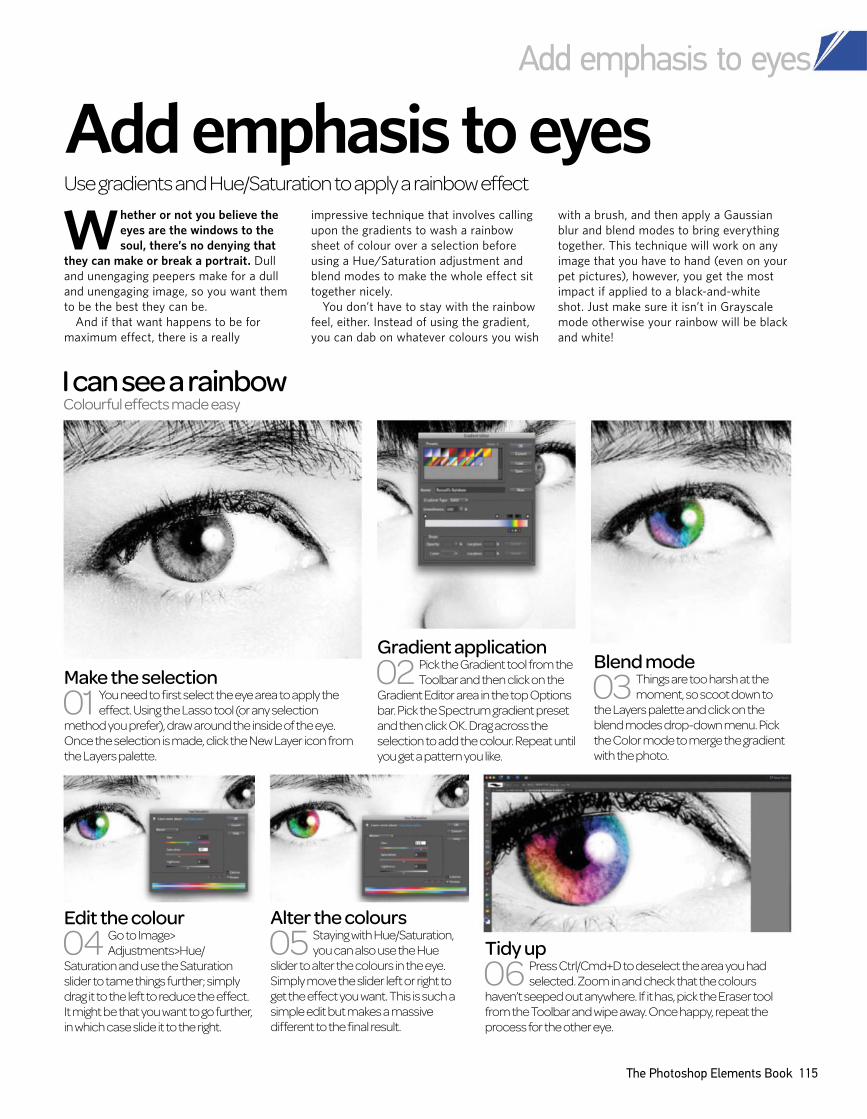
Add emphasis to eyes
The Photoshop Elements Book 115
Whether or not you believe the
eyes are the windows to the
soul, there’s no denying that
they can make or break a portrait. Dull
and unengaging peepers make for a dull
and unengaging image, so you want them
to be the best they can be.
And if that want happens to be for
maximum effect, there is a really
impressive technique that involves calling
upon the gradients to wash a rainbow
sheet of colour over a selection before
using a Hue/Saturation adjustment and
blend modes to make the whole effect sit
together nicely.
You don’t have to stay with the rainbow
feel, either. Instead of using the gradient,
you can dab on whatever colours you wish
with a brush, and then apply a Gaussian
blur and blend modes to bring everything
together. This technique will work on any
image that you have to hand (even on your
pet pictures), however, you get the most
impact if applied to a black-and-white
shot. Just make sure it isn’t in Grayscale
mode otherwise your rainbow will be black
and white!
Use gradients and Hue/Saturation to apply a rainbow effect
Add emphasis to eyes
I can see a rainbowColourful effects made easy
Make the selection
01 You need to first select the eye area to apply the
effect. Using the Lasso tool (or any selection
method you prefer), draw around the inside of the eye.
Once the selection is made, click the New Layer icon from
the Layers palette.
Edit the colour
04 Go to Image>
Adjustments>Hue/
Saturation and use the Saturation
slider to tame things further; simply
drag it to the left to reduce the effect.
It might be that you want to go further,
in which case slide it to the right.
Alter the colours
05 Staying with Hue/Saturation,
you can also use the Hue
slider to alter the colours in the eye.
Simply move the slider left or right to
get the effect you want. This is such a
simple edit but makes a massive
different to the final result.
Gradient application
02 Pick the Gradient tool from the
Toolbar and then click on the
Gradient Editor area in the top Options
bar. Pick the Spectrum gradient preset
and then click OK. Drag across the
selection to add the colour. Repeat until
you get a pattern you like.
Blend mode
03 Things are too harsh at the
moment, so scoot down to
the Layers palette and click on the
blend modes drop-down menu. Pick
the Color mode to merge the gradient
with the photo.
Tidy up
06 Press Ctrl/Cmd+D to deselect the area you had
selected. Zoom in and check that the colours
haven’t seeped out anywhere. If it has, pick the Eraser tool
from the Toolbar and wipe away. Once happy, repeat the
process for the other eye.
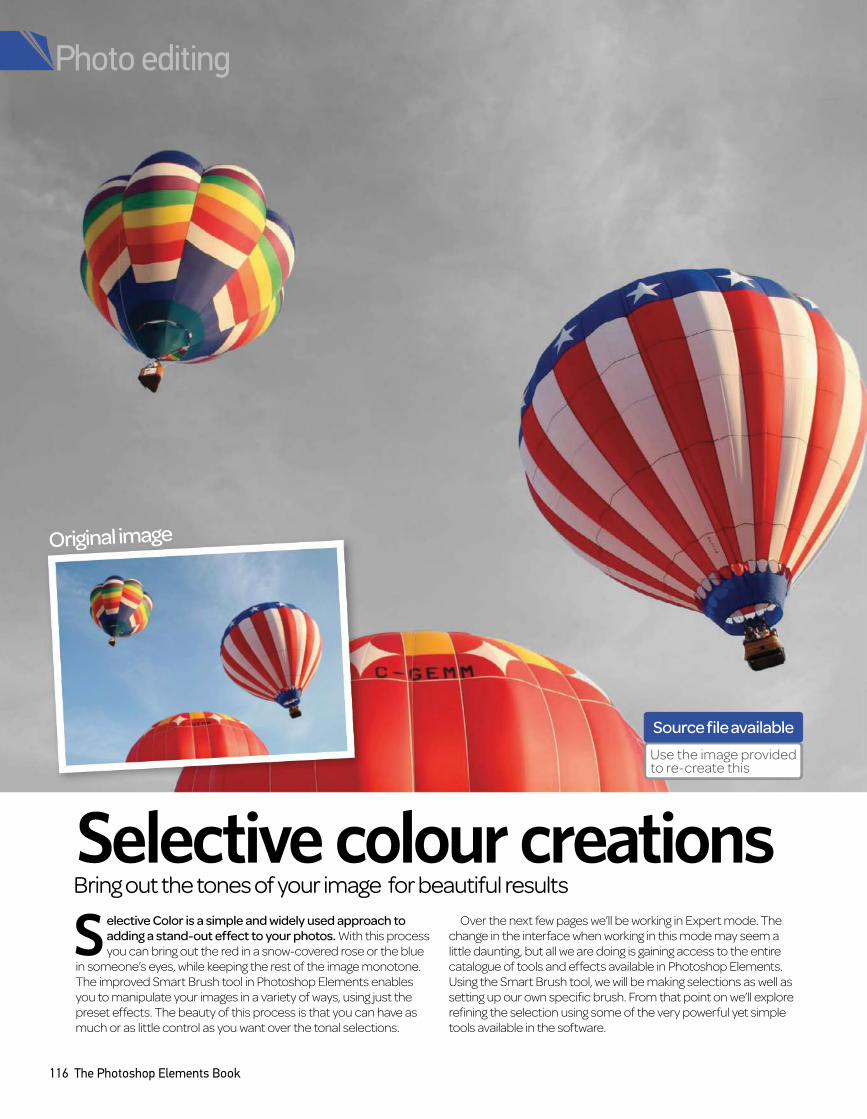
116 The Photoshop Elements Book
Selective colour creationsBring out the tones of your image for beautiful results
Selective Color is a simple and widely used approach to
adding a stand-out effect to your photos. With this process
you can bring out the red in a snow-covered rose or the blue
in someone’s eyes, while keeping the rest of the image monotone.
The improved Smart Brush tool in Photoshop Elements enables
you to manipulate your images in a variety of ways, using just the
preset effects. The beauty of this process is that you can have as
much or as little control as you want over the tonal selections.
Over the next few pages we’ll be working in Expert mode. The
change in the interface when working in this mode may seem a
little daunting, but all we are doing is gaining access to the entire
catalogue of tools and effects available in Photoshop Elements.
Using the Smart Brush tool, we will be making selections as well as
setting up our own specific brush. From that point on we’ll explore
refining the selection using some of the very powerful yet simple
tools available in the software.
Original image
Photo editing
Source file available
Use the image provided to re-create this
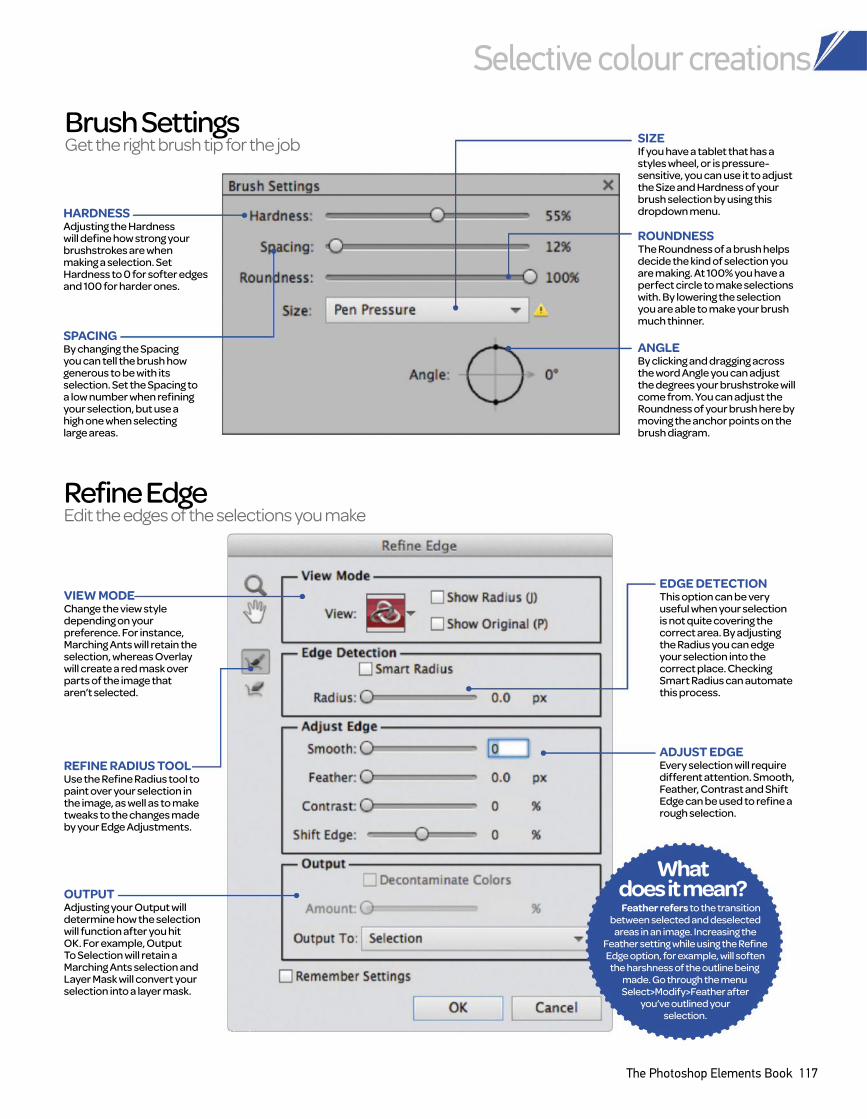
The Photoshop Elements Book 117
Having contrasting images will make for a stronger
double-exposure effect.
Selective colour creations
Brush Settings Get the right brush tip for the job
HARDNESS
Adjusting the Hardness will define how strong your brushstrokes are when making a selection. Set Hardness to 0 for softer edges and 100 for harder ones.
ROUNDNESS
The Roundness of a brush helps decide the kind of selection you are making. At 100% you have a perfect circle to make selections with. By lowering the selection you are able to make your brush much thinner.
SIZE
If you have a tablet that has a styles wheel, or is pressure-sensitive, you can use it to adjust the Size and Hardness of your brush selection by using this dropdown menu.
ANGLE
By clicking and dragging across the word Angle you can adjust the degrees your brushstroke will come from. You can adjust the Roundness of your brush here by moving the anchor points on the brush diagram.
SPACING
By changing the Spacing you can tell the brush how generous to be with its selection. Set the Spacing to a low number when refining your selection, but use a high one when selecting large areas.
Refine EdgeEdit the edges of the selections you make
VIEW MODE
Change the view style depending on your preference. For instance, Marching Ants will retain the selection, whereas Overlay will create a red mask over parts of the image that aren’t selected.
REFINE RADIUS TOOL
Use the Refine Radius tool to paint over your selection in the image, as well as to make tweaks to the changes made by your Edge Adjustments.
OUTPUT
Adjusting your Output will determine how the selection will function after you hit OK. For example, Output To Selection will retain a Marching Ants selection and Layer Mask will convert your selection into a layer mask.
ADJUST EDGE
Every selection will require different attention. Smooth, Feather, Contrast and Shift Edge can be used to refine a rough selection.
EDGE DETECTION
This option can be very useful when your selection is not quite covering the correct area. By adjusting the Radius you can edge your selection into the correct place. Checking Smart Radius can automate this process.
What does it mean?Feather refers to the transition
between selected and deselected areas in an image. Increasing the
Feather setting while using the Refine Edge option, for example, will soften
the harshness of the outline being made. Go through the menu Select>Modify>Feather after
you’ve outlined your selection.
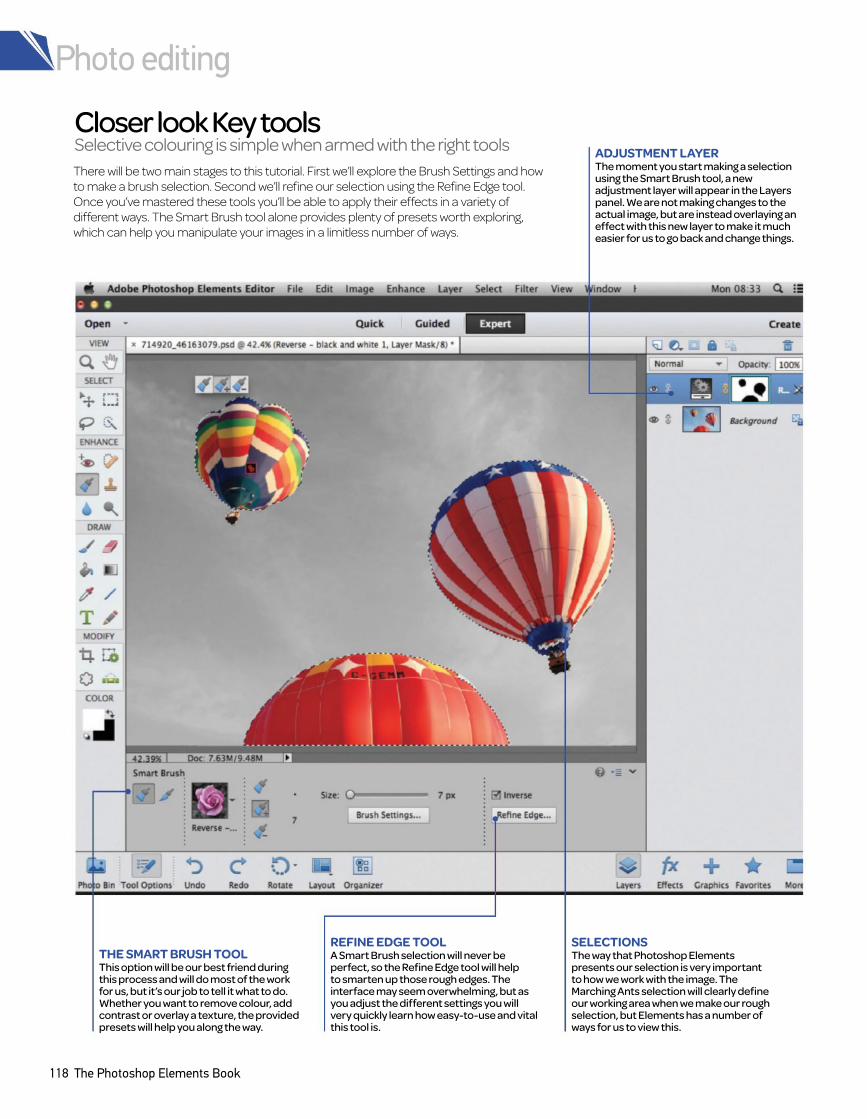
Photo editing
118 The Photoshop Elements Book
Closer look Key toolsSelective colouring is simple when armed with the right tools
REFINE EDGE TOOL
A Smart Brush selection will never be perfect, so the Refine Edge tool will help to smarten up those rough edges. The interface may seem overwhelming, but as you adjust the different settings you will very quickly learn how easy-to-use and vital this tool is.
ADJUSTMENT LAYER
The moment you start making a selection using the Smart Brush tool, a new adjustment layer will appear in the Layers panel. We are not making changes to the actual image, but are instead overlaying an effect with this new layer to make it much easier for us to go back and change things.
THE SMART BRUSH TOOL
This option will be our best friend during this process and will do most of the work for us, but it’s our job to tell it what to do. Whether you want to remove colour, add contrast or overlay a texture, the provided presets will help you along the way.
SELECTIONS
The way that Photoshop Elements presents our selection is very important to how we work with the image. The Marching Ants selection will clearly define our working area when we make our rough selection, but Elements has a number of ways for us to view this.
There will be two main stages to this tutorial. First we’ll explore the Brush Settings and how
to make a brush selection. Second we’ll refine our selection using the Refine Edge tool.
Once you’ve mastered these tools you’ll be able to apply their effects in a variety of
different ways. The Smart Brush tool alone provides plenty of presets worth exploring,
which can help you manipulate your images in a limitless number of ways.
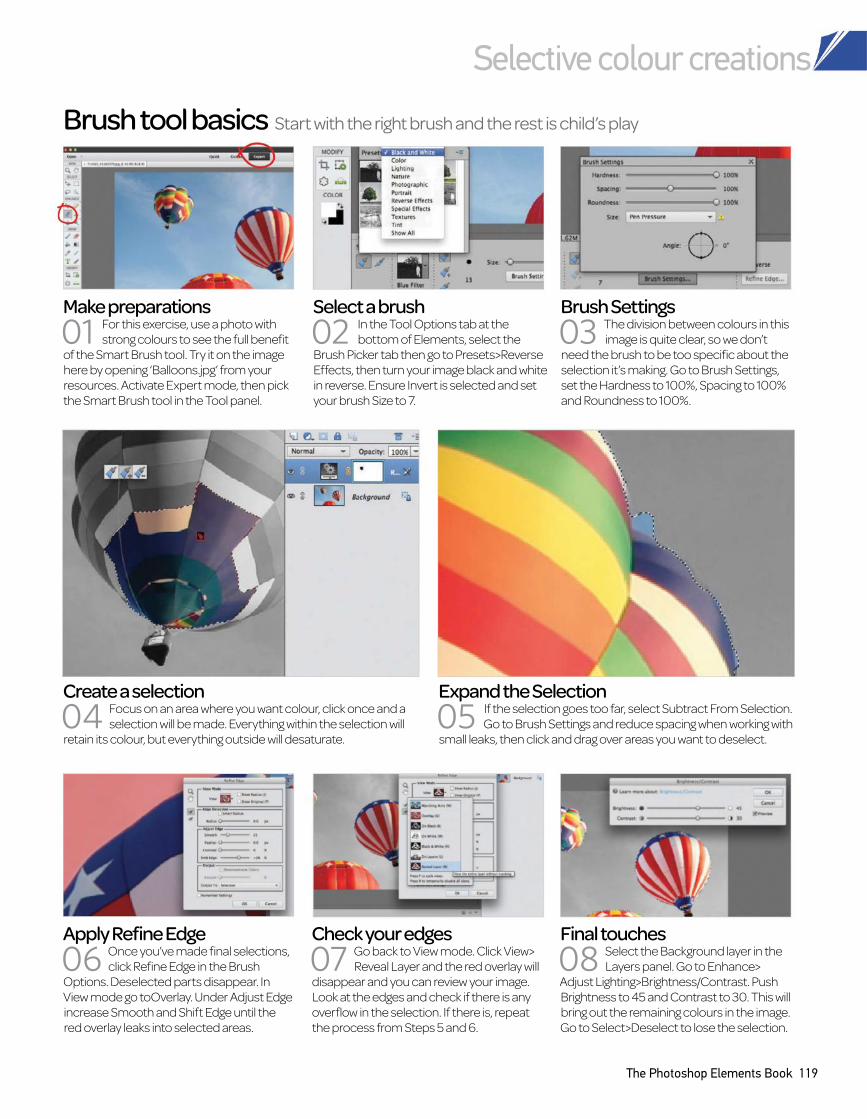
Selective colour creations
The Photoshop Elements Book 119
Brush tool basics Start with the right brush and the rest is child’s play
Check your edges
07 Go back to View mode. Click View>
Reveal Layer and the red overlay will
disappear and you can review your image.
Look at the edges and check if there is any
overflow in the selection. If there is, repeat
the process from Steps 5 and 6.
Final touches
08 Select the Background layer in the
Layers panel. Go to Enhance>
Adjust Lighting>Brightness/Contrast. Push
Brightness to 45 and Contrast to 30. This will
bring out the remaining colours in the image.
Go to Select>Deselect to lose the selection.
Expand the Selection
05 If the selection goes too far, select Subtract From Selection.
Go to Brush Settings and reduce spacing when working with
small leaks, then click and drag over areas you want to deselect.
Brush Settings
03 The division between colours in this
image is quite clear, so we don’t
need the brush to be too specific about the
selection it’s making. Go to Brush Settings,
set the Hardness to 100%, Spacing to 100%
and Roundness to 100%.
Create a selection
04 Focus on an area where you want colour, click once and a
selection will be made. Everything within the selection will
retain its colour, but everything outside will desaturate.
Apply Refine Edge
06 Once you’ve made final selections,
click Refine Edge in the Brush
Options. Deselected parts disappear. In
View mode go toOverlay. Under Adjust Edge
increase Smooth and Shift Edge until the
red overlay leaks into selected areas.
Make preparations
01 For this exercise, use a photo with
strong colours to see the full benefit
of the Smart Brush tool. Try it on the image
here by opening ‘Balloons.jpg’ from your
resources. Activate Expert mode, then pick
the Smart Brush tool in the Tool panel.
Select a brush
02 In the Tool Options tab at the
bottom of Elements, select the
Brush Picker tab then go to Presets>Reverse
Effects, then turn your image black and white
in reverse. Ensure Invert is selected and set
your brush Size to 7.
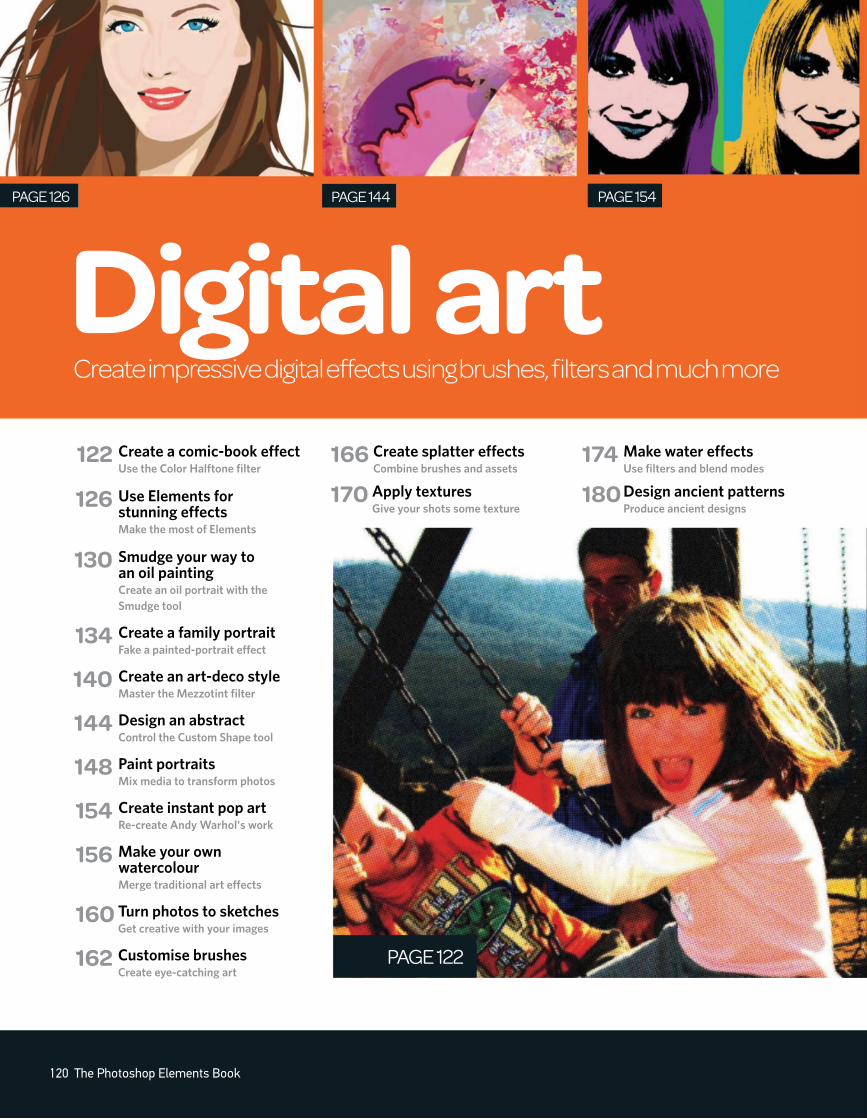
Digital artPAGE 126 PAGE 144 PAGE 154
PAGE 122
Create impressive digital effects using brushes, filters and much more
120 The Photoshop Elements Book
Create a comic-book effectUse the Color Halftone filter
122
Use Elements for stunning effectsMake the most of Elements
126
130 Smudge your way to an oil paintingCreate an oil portrait with the
Smudge tool
134 Create a family portrait Fake a painted-portrait efect
Customise brushesCreate eye-catching art
162
Create splatter effectsCombine brushes and assets
166
Apply texturesGive your shots some texture
170
Make water effectsUse filters and blend modes
174
Design ancient patternsProduce ancient designs
180
140 Create an art-deco styleMaster the Mezzotint filter
144 Design an abstractControl the Custom Shape tool
148 Paint portraitsMix media to transform photos
154 Create instant pop artRe-create Andy Warhol's work
156 Make your own watercolourMerge traditional art efects
160 Turn photos to sketchesGet creative with your images
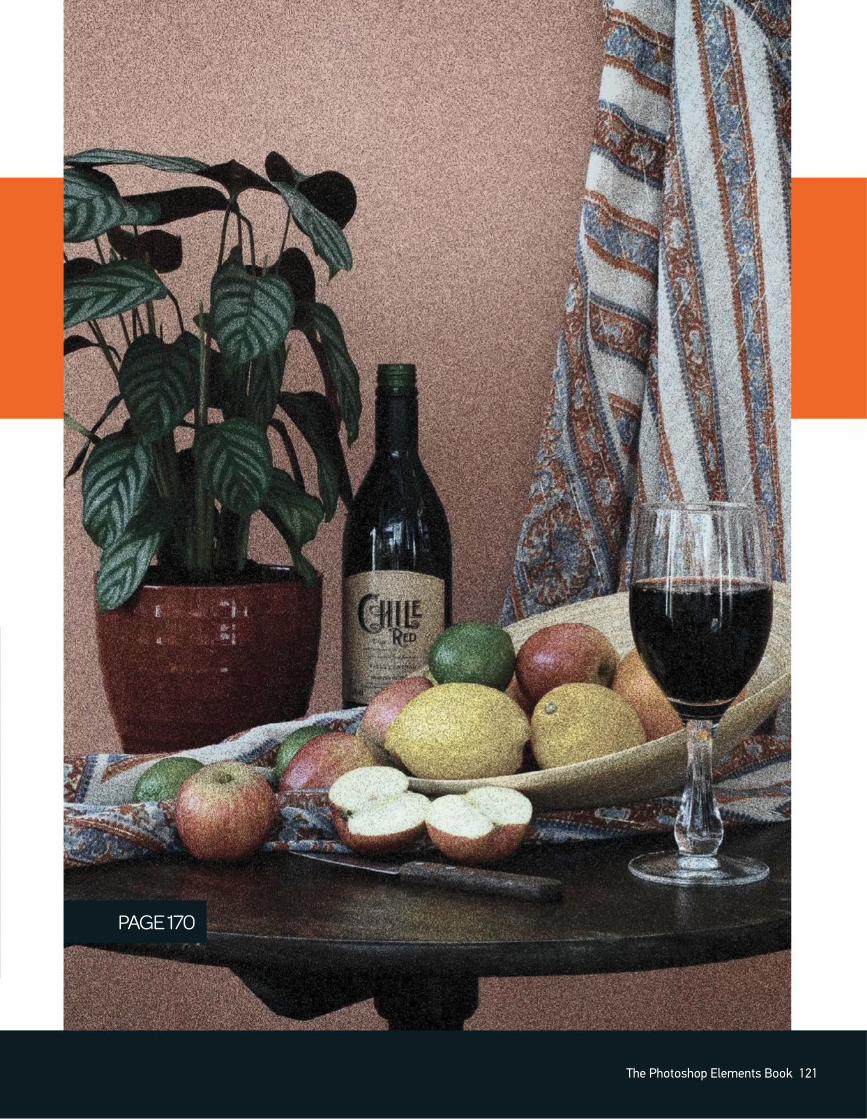
PAGE 170
The Photoshop Elements Book 121
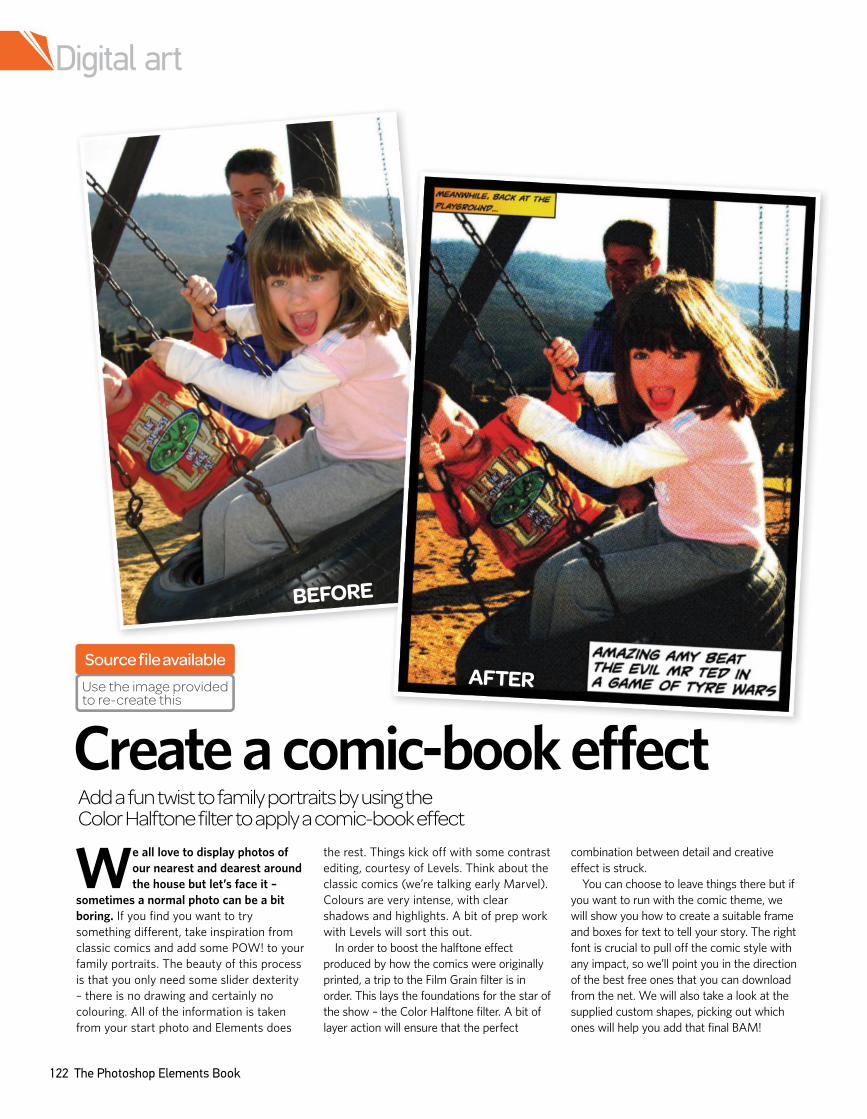
Digital art
122 The Photoshop Elements Book
Create a comic-book effect
We all love to display photos of
our nearest and dearest around
the house but let’s face it –
sometimes a normal photo can be a bit
boring. If you find you want to try
something different, take inspiration from
classic comics and add some POW! to your
family portraits. The beauty of this process
is that you only need some slider dexterity
– there is no drawing and certainly no
colouring. All of the information is taken
from your start photo and Elements does
the rest. Things kick off with some contrast
editing, courtesy of Levels. Think about the
classic comics (we’re talking early Marvel).
Colours are very intense, with clear
shadows and highlights. A bit of prep work
with Levels will sort this out.
In order to boost the halftone effect
produced by how the comics were originally
printed, a trip to the Film Grain filter is in
order. This lays the foundations for the star of
the show – the Color Halftone filter. A bit of
layer action will ensure that the perfect
combination between detail and creative
effect is struck.
You can choose to leave things there but if
you want to run with the comic theme, we
will show you how to create a suitable frame
and boxes for text to tell your story. The right
font is crucial to pull off the comic style with
any impact, so we’ll point you in the direction
of the best free ones that you can download
from the net. We will also take a look at the
supplied custom shapes, picking out which
ones will help you add that final BAM!
Add a fun twist to family portraits by using the Color Halftone filter to apply a comic-book effect
BEFORE
AFTER
Source file available
Use the image provided to re-create this
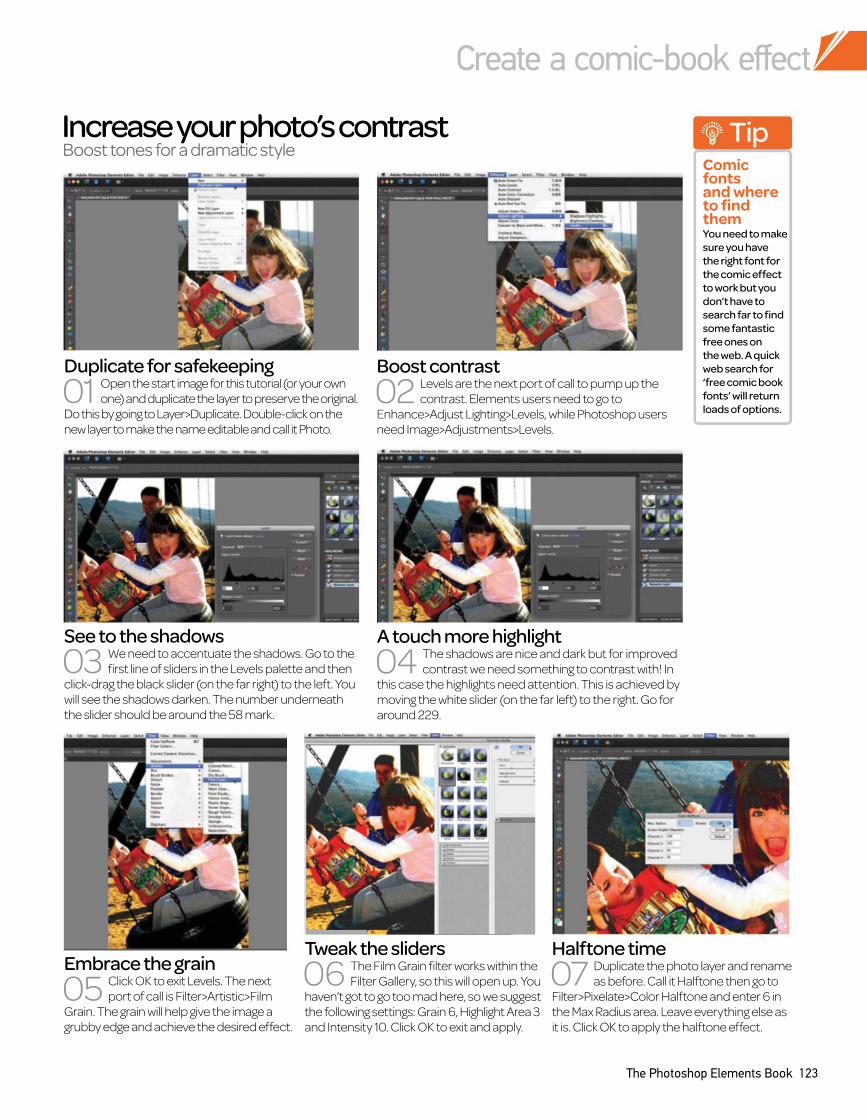
Create a comic-book effect
The Photoshop Elements Book 123
Increase your photo’s contrastBoost tones for a dramatic style
Boost contrast
02 Levels are the next port of call to pump up the
contrast. Elements users need to go to
Enhance>Adjust Lighting>Levels, while Photoshop users
need Image>Adjustments>Levels.
A touch more highlight
04 The shadows are nice and dark but for improved
contrast we need something to contrast with! In
this case the highlights need attention. This is achieved by
moving the white slider (on the far left) to the right. Go for
around 229.
Duplicate for safekeeping
01 Open the start image for this tutorial (or your own
one) and duplicate the layer to preserve the original.
Do this by going to Layer>Duplicate. Double-click on the
new layer to make the name editable and call it Photo.
See to the shadows
03 We need to accentuate the shadows. Go to the
first line of sliders in the Levels palette and then
click-drag the black slider (on the far right) to the left. You
will see the shadows darken. The number underneath
the slider should be around the 58 mark.
Embrace the grain
05 Click OK to exit Levels. The next
port of call is Filter>Artistic>Film
Grain. The grain will help give the image a
grubby edge and achieve the desired effect.
Tweak the sliders
06 The Film Grain filter works within the
Filter Gallery, so this will open up. You
haven’t got to go too mad here, so we suggest
the following settings: Grain 6, Highlight Area 3
and Intensity 10. Click OK to exit and apply.
Halftone time
07 Duplicate the photo layer and rename
as before. Call it Halftone then go to
Filter>Pixelate>Color Halftone and enter 6 in
the Max Radius area. Leave everything else as
it is. Click OK to apply the halftone effect.
TipComic fontsand where to find themYou need to make
sure you have
the right font for
the comic effect
to work but you
don’t have to
search far to find
some fantastic
free ones on
the web. A quick
web search for
‘free comic book
fonts’ will return
loads of options.
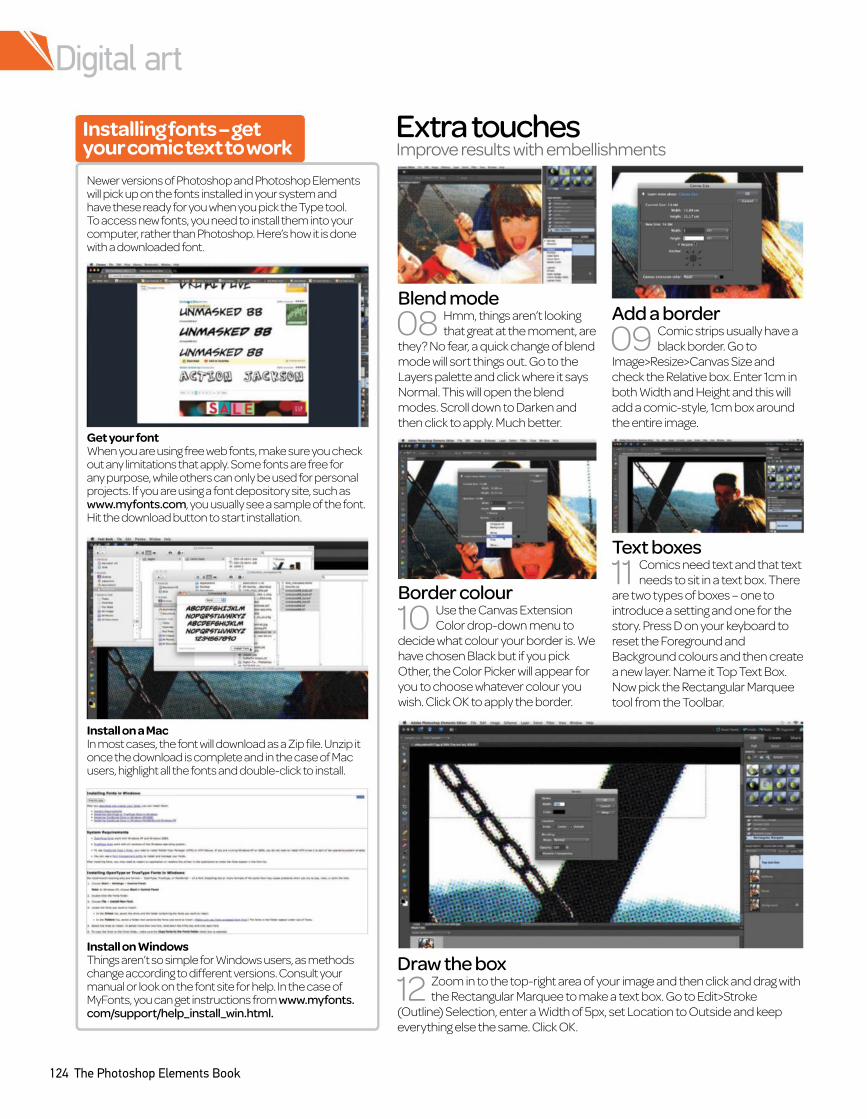
Digital art
124 The Photoshop Elements Book
Install on a MacIn most cases, the font will download as a Zip file. Unzip it once the download is complete and in the case of Mac users, highlight all the fonts and double-click to install.
Install on WindowsThings aren’t so simple for Windows users, as methods change according to different versions. Consult your manual or look on the font site for help. In the case of MyFonts, you can get instructions from www.myfonts.com/support/help_install_win.html.
Extra touchesImprove results with embellishments
Border colour
10 Use the Canvas Extension
Color drop-down menu to
decide what colour your border is. We
have chosen Black but if you pick
Other, the Color Picker will appear for
you to choose whatever colour you
wish. Click OK to apply the border.
Draw the box
12 Zoom in to the top-right area of your image and then click and drag with
the Rectangular Marquee to make a text box. Go to Edit>Stroke
(Outline) Selection, enter a Width of 5px, set Location to Outside and keep
everything else the same. Click OK.
Text boxes
11 Comics need text and that text
needs to sit in a text box. There
are two types of boxes – one to
introduce a setting and one for the
story. Press D on your keyboard to
reset the Foreground and
Background colours and then create
a new layer. Name it Top Text Box.
Now pick the Rectangular Marquee
tool from the Toolbar.
Blend mode
08 Hmm, things aren’t looking
that great at the moment, are
they? No fear, a quick change of blend
mode will sort things out. Go to the
Layers palette and click where it says
Normal. This will open the blend
modes. Scroll down to Darken and
then click to apply. Much better.
Add a border
09 Comic strips usually have a
black border. Go to
Image>Resize>Canvas Size and
check the Relative box. Enter 1cm in
both Width and Height and this will
add a comic-style, 1cm box around
the entire image.
Installing fonts – get your comic text to work
Newer versions of Photoshop and Photoshop Elements will pick up on the fonts installed in your system and have these ready for you when you pick the Type tool. To access new fonts, you need to install them into your computer, rather than Photoshop. Here’s how it is done with a downloaded font.
Get your fontWhen you are using free web fonts, make sure you check out any limitations that apply. Some fonts are free for any purpose, while others can only be used for personal projects. If you are using a font depository site, such as www.myfonts.com, you usually see a sample of the font. Hit the download button to start installation.
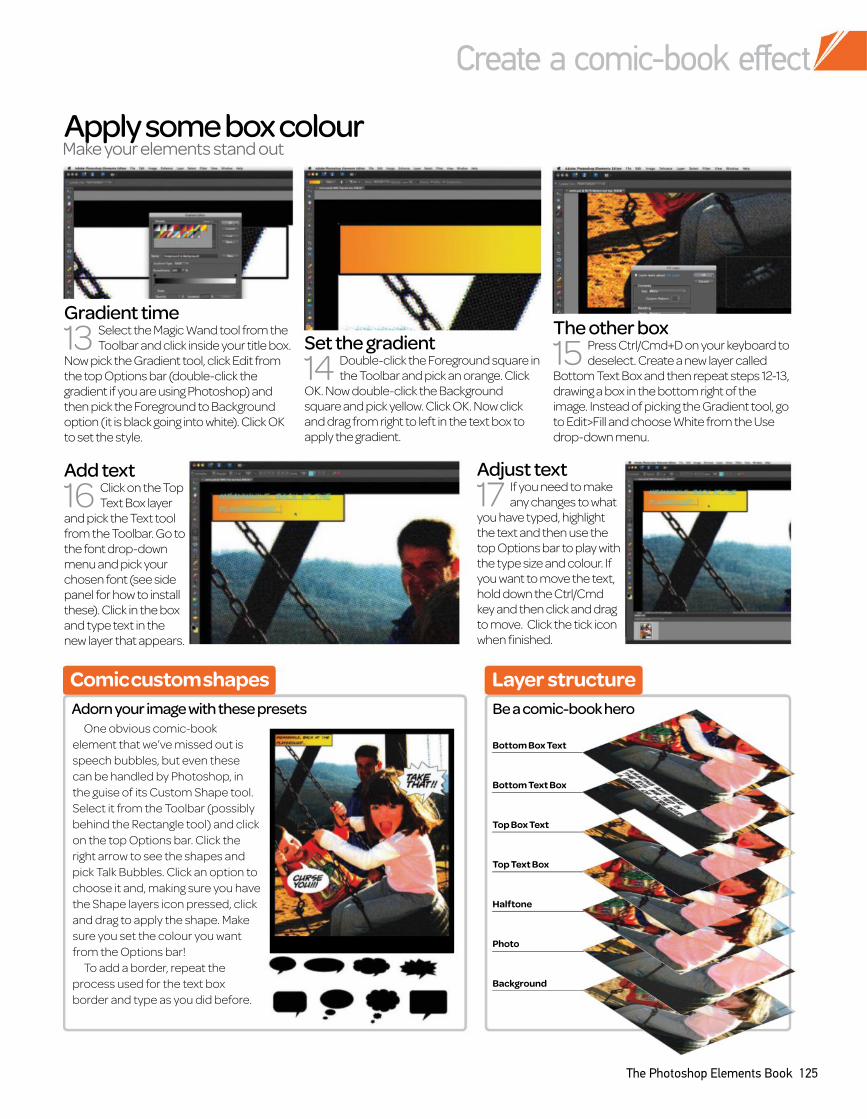
Create a comic-book effect
The Photoshop Elements Book 125
Comic custom shapes
Adorn your image with these presets
One obvious comic-book
element that we’ve missed out is
speech bubbles, but even these
can be handled by Photoshop, in
the guise of its Custom Shape tool.
Select it from the Toolbar (possibly
behind the Rectangle tool) and click
on the top Options bar. Click the
right arrow to see the shapes and
pick Talk Bubbles. Click an option to
choose it and, making sure you have
the Shape layers icon pressed, click
and drag to apply the shape. Make
sure you set the colour you want
from the Options bar!
To add a border, repeat the
process used for the text box
border and type as you did before.
Layer structure
Be a comic-book hero
Apply some box colourMake your elements stand out
Bottom Box Text
Bottom Text Box
Top Box Text
Top Text Box
Halftone
Photo
Background
Gradient time
13 Select the Magic Wand tool from the
Toolbar and click inside your title box.
Now pick the Gradient tool, click Edit from
the top Options bar (double-click the
gradient if you are using Photoshop) and
then pick the Foreground to Background
option (it is black going into white). Click OK
to set the style.
The other box
15 Press Ctrl/Cmd+D on your keyboard to
deselect. Create a new layer called
Bottom Text Box and then repeat steps 12-13,
drawing a box in the bottom right of the
image. Instead of picking the Gradient tool, go
to Edit>Fill and choose White from the Use
drop-down menu.
Add text
16 Click on the Top
Text Box layer
and pick the Text tool
from the Toolbar. Go to
the font drop-down
menu and pick your
chosen font (see side
panel for how to install
these). Click in the box
and type text in the
new layer that appears.
Adjust text
17 If you need to make
any changes to what
you have typed, highlight
the text and then use the
top Options bar to play with
the type size and colour. If
you want to move the text,
hold down the Ctrl/Cmd
key and then click and drag
to move. Click the tick icon
when finished.
Set the gradient
14 Double-click the Foreground square in
the Toolbar and pick an orange. Click
OK. Now double-click the Background
square and pick yellow. Click OK. Now click
and drag from right to left in the text box to
apply the gradient.
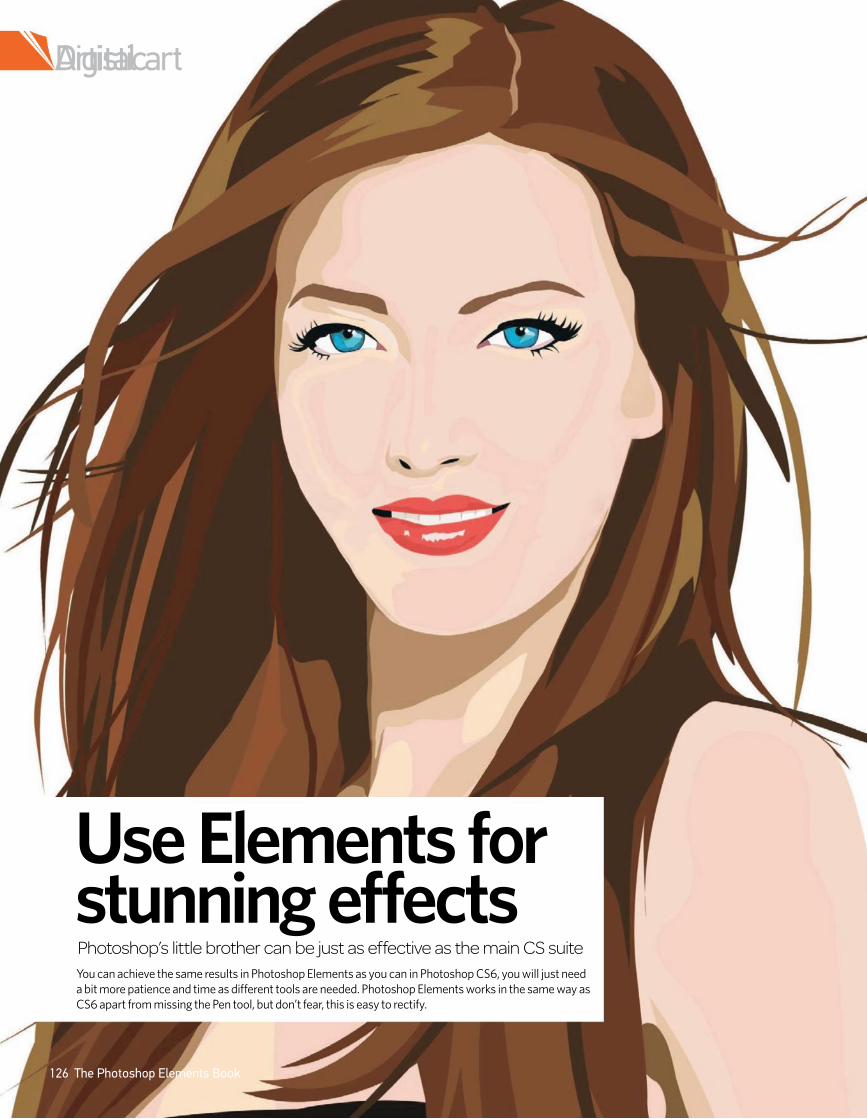
Artiiistic
You can achieve the same results in Photoshop Elements as you can in Photoshop CS6, you will just need
a bit more patience and time as diferent tools are needed. Photoshop Elements works in the same way as
CS6 apart from missing the Pen tool, but don’t fear, this is easy to rectify.
Digtal art
126 The Photoshop Elements Book
Use Elements for stunning effectsPhotoshop’s little brother can be just as effective as the main CS suite
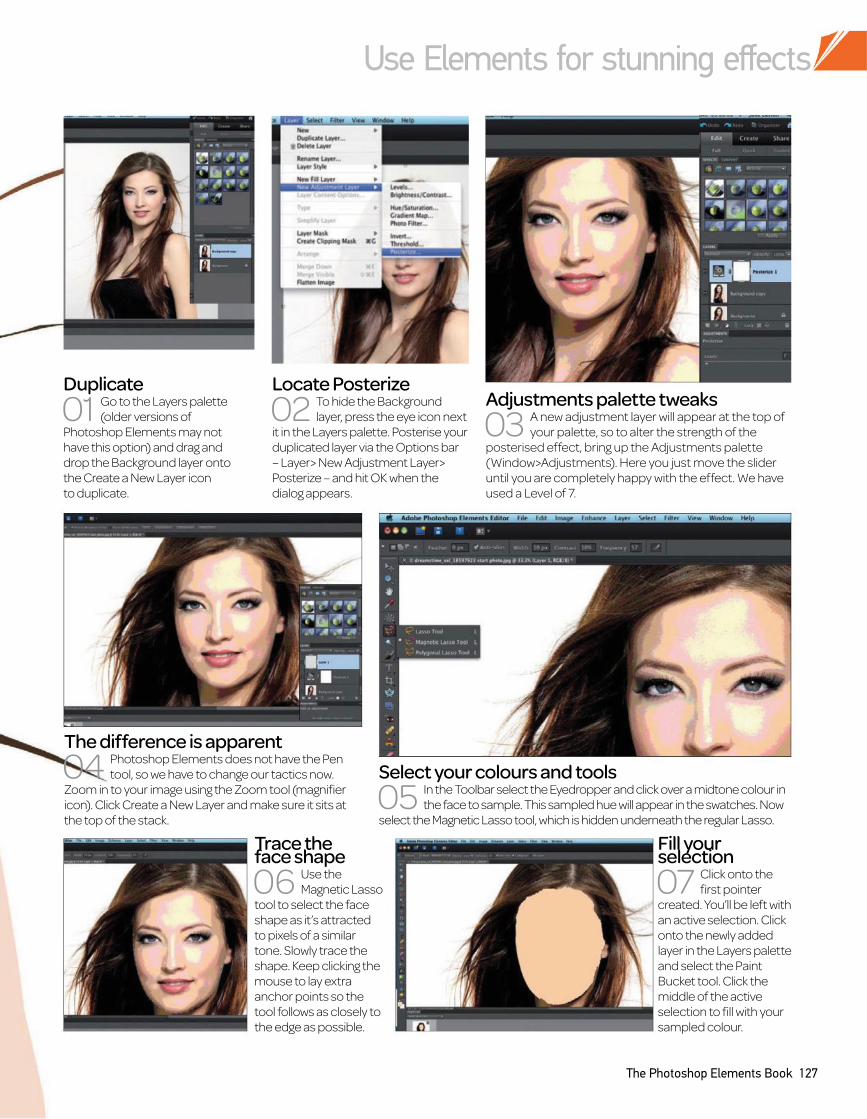
Use Elements for stunning effects
The Photoshop Elements Book 127
The difference is apparent
04 Photoshop Elements does not have the Pen
tool, so we have to change our tactics now.
Zoom in to your image using the Zoom tool (magnifier
icon). Click Create a New Layer and make sure it sits at
the top of the stack.
Fill your selection
07 Click onto the
first pointer
created. You’ll be left with
an active selection. Click
onto the newly added
layer in the Layers palette
and select the Paint
Bucket tool. Click the
middle of the active
selection to fill with your
sampled colour.
Select your colours and tools
05 In the Toolbar select the Eyedropper and click over a midtone colour in
the face to sample. This sampled hue will appear in the swatches. Now
select the Magnetic Lasso tool, which is hidden underneath the regular Lasso.
Trace the face shape
06 Use the
Magnetic Lasso
tool to select the face
shape as it’s attracted
to pixels of a similar
tone. Slowly trace the
shape. Keep clicking the
mouse to lay extra
anchor points so the
tool follows as closely to
the edge as possible.
Duplicate
01 Go to the Layers palette
(older versions of
Photoshop Elements may not
have this option) and drag and
drop the Background layer onto
the Create a New Layer icon
to duplicate.
Locate Posterize
02 To hide the Background
layer, press the eye icon next
it in the Layers palette. Posterise your
duplicated layer via the Options bar
– Layer> New Adjustment Layer>
Posterize – and hit OK when the
dialog appears.
Adjustments palette tweaks
03 A new adjustment layer will appear at the top of
your palette, so to alter the strength of the
posterised effect, bring up the Adjustments palette
(Window>Adjustments). Here you just move the slider
until you are completely happy with the effect. We have
used a Level of 7.
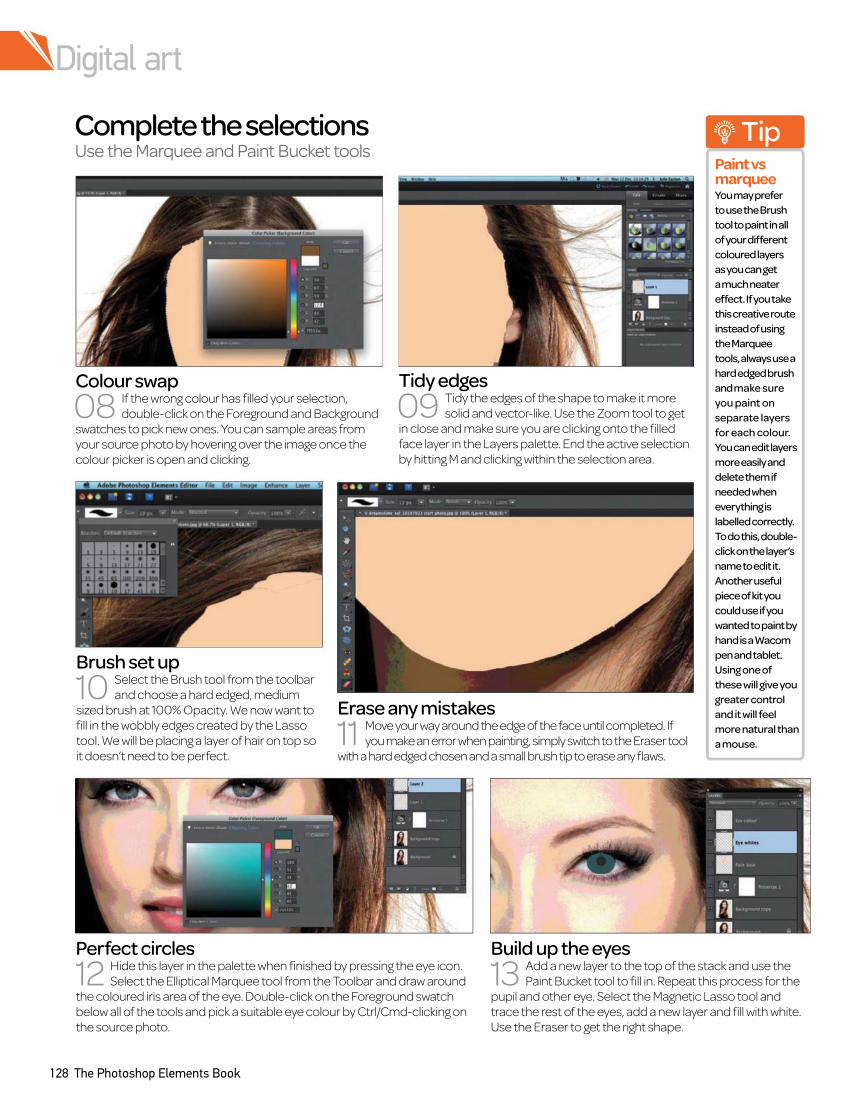
Digital art
128 The Photoshop Elements Book
Complete the selectionsUse the Marquee and Paint Bucket tools
Tidy edges
09 Tidy the edges of the shape to make it more
solid and vector-like. Use the Zoom tool to get
in close and make sure you are clicking onto the filled
face layer in the Layers palette. End the active selection
by hitting M and clicking within the selection area.
Colour swap
08 If the wrong colour has filled your selection,
double-click on the Foreground and Background
swatches to pick new ones. You can sample areas from
your source photo by hovering over the image once the
colour picker is open and clicking.
Erase any mistakes
11 Move your way around the edge of the face until completed. If
you make an error when painting, simply switch to the Eraser tool
with a hard edged chosen and a small brush tip to erase any flaws.
Brush set up
10 Select the Brush tool from the toolbar
and choose a hard edged, medium
sized brush at 100% Opacity. We now want to
fill in the wobbly edges created by the Lasso
tool. We will be placing a layer of hair on top so
it doesn’t need to be perfect.
Perfect circles
12 Hide this layer in the palette when finished by pressing the eye icon.
Select the Elliptical Marquee tool from the Toolbar and draw around
the coloured iris area of the eye. Double-click on the Foreground swatch
below all of the tools and pick a suitable eye colour by Ctrl/Cmd-clicking on
the source photo.
Build up the eyes
13 Add a new layer to the top of the stack and use the
Paint Bucket tool to fill in. Repeat this process for the
pupil and other eye. Select the Magnetic Lasso tool and
trace the rest of the eyes, add a new layer and fill with white.
Use the Eraser to get the right shape.
TipPaint vs marqueeYou may prefer
to use the Brush
tool to paint in all
of your different
coloured layers
as you can get
a much neater
effect. If you take
this creative route
instead of using
the Marquee
tools, always use a
hard edged brush
and make sure
you paint on
separate layers
for each colour.
You can edit layers
more easily and
delete them if
needed when
everything is
labelled correctly.
To do this, double-
click on the layer’s
name to edit it.
Another useful
piece of kit you
could use if you
wanted to paint by
hand is a Wacom
pen and tablet.
Using one of
these will give you
greater control
and it will feel
more natural than
a mouse.
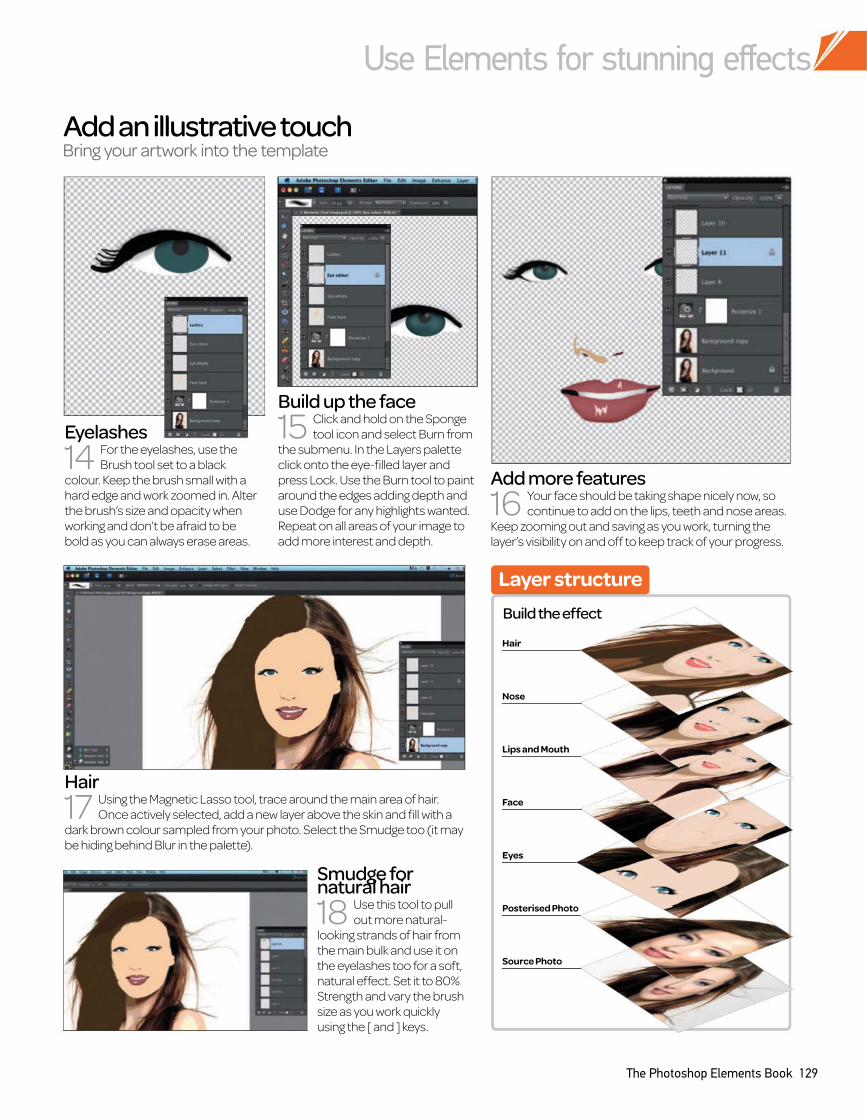
Use Elements for stunning effects
The Photoshop Elements Book 129
Build the effect
Add an illustrative touchBring your artwork into the template
Hair
Nose
Lips and Mouth
Face
Eyes
Posterised Photo
Source Photo
Eyelashes
14 For the eyelashes, use the
Brush tool set to a black
colour. Keep the brush small with a
hard edge and work zoomed in. Alter
the brush’s size and opacity when
working and don’t be afraid to be
bold as you can always erase areas.
Add more features
continue to add on the lips, teeth and nose areas. 16 Your face should be taking shape nicely now, so
Keep zooming out and saving as you work, turning the
layer’s visibility on and off to keep track of your progress.
Hair
17 Using the Magnetic Lasso tool, trace around the main area of hair.
Once actively selected, add a new layer above the skin and fill with a
dark brown colour sampled from your photo. Select the Smudge too (it may
be hiding behind Blur in the palette).
Smudge for natural hair
18 Use this tool to pull
out more natural-
looking strands of hair from
the main bulk and use it on
the eyelashes too for a soft,
natural effect. Set it to 80%
Strength and vary the brush
size as you work quickly
using the [ and ] keys.
Build up the face
15 Click and hold on the Sponge
tool icon and select Burn from
the submenu. In the Layers palette
click onto the eye-filled layer and
press Lock. Use the Burn tool to paint
around the edges adding depth and
use Dodge for any highlights wanted.
Repeat on all areas of your image to
add more interest and depth.
Layer structure
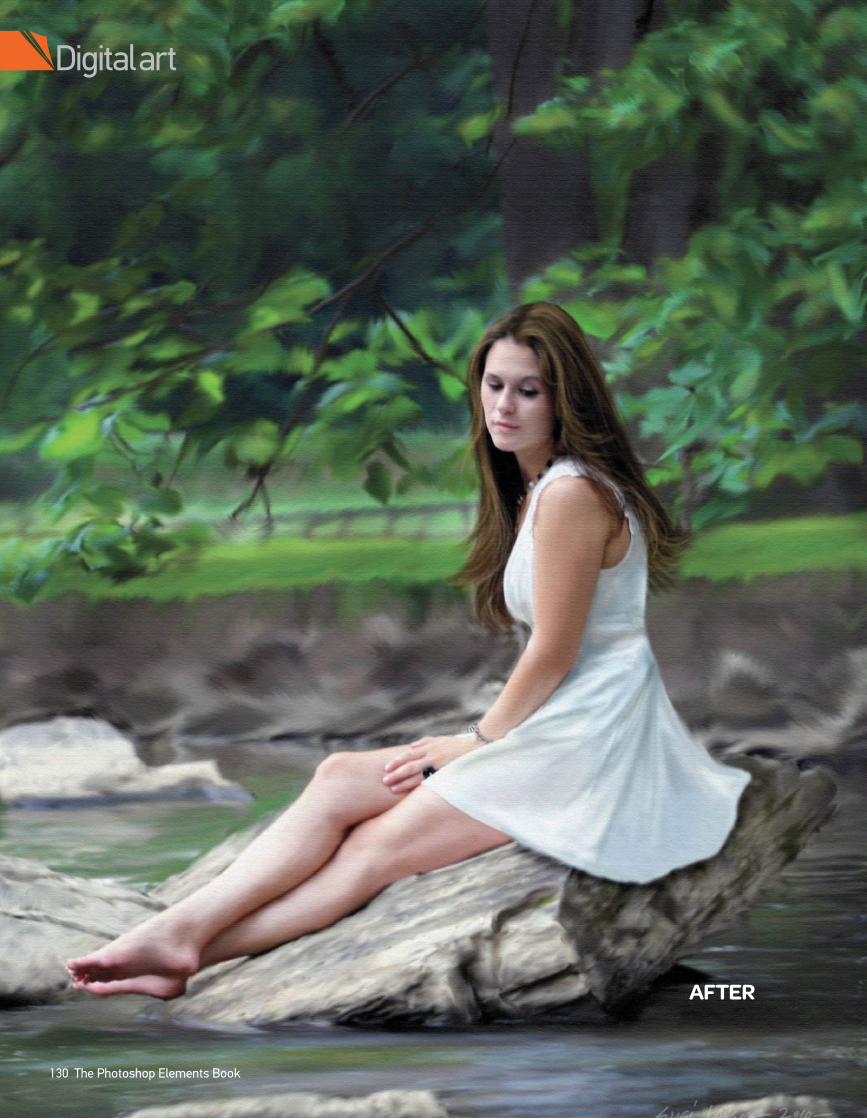
Digital art
130 The Photoshop Elements Book
AFTER
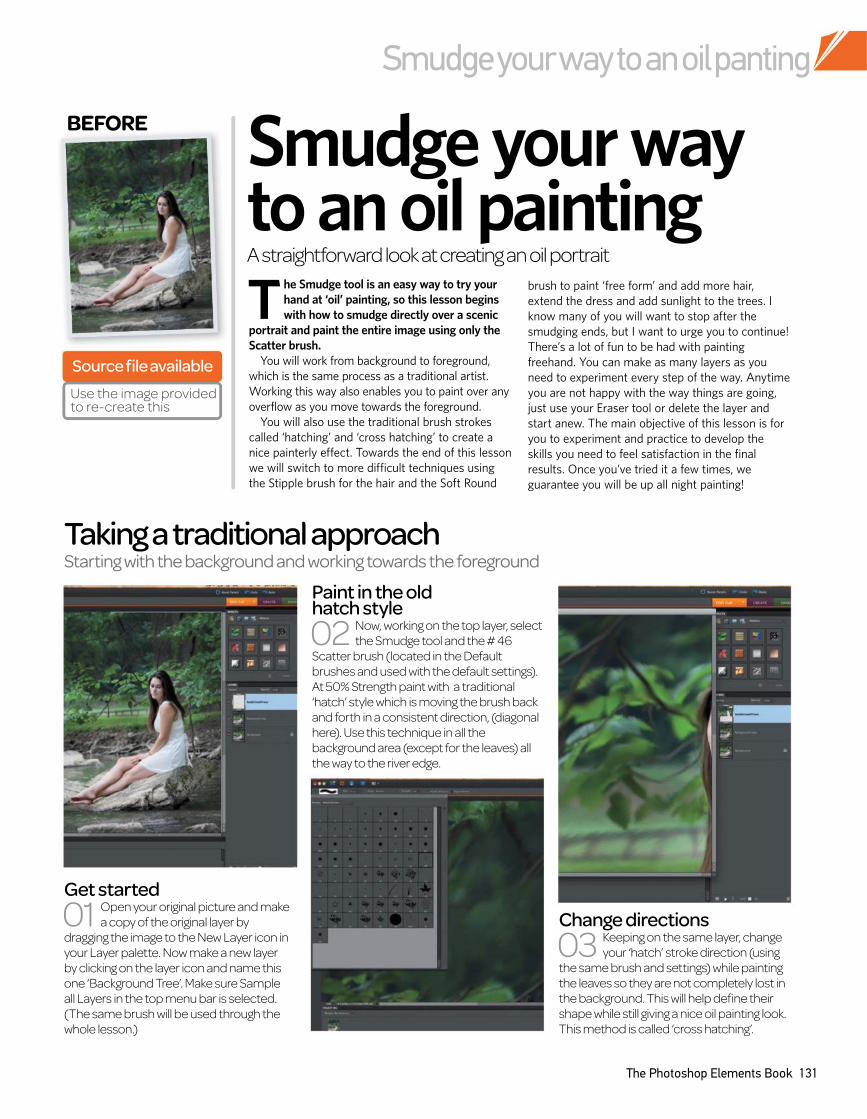
Smudge your way to an oil panting
The Photoshop Elements Book 131
The Smudge tool is an easy way to try your
hand at ‘oil’ painting, so this lesson begins
with how to smudge directly over a scenic
portrait and paint the entire image using only the
Scatter brush.
You will work from background to foreground,
which is the same process as a traditional artist.
Working this way also enables you to paint over any
overflow as you move towards the foreground.
You will also use the traditional brush strokes
called ‘hatching’ and ‘cross hatching’ to create a
nice painterly effect. Towards the end of this lesson
we will switch to more difficult techniques using
the Stipple brush for the hair and the Soft Round
brush to paint ‘free form’ and add more hair,
extend the dress and add sunlight to the trees. I
know many of you will want to stop after the
smudging ends, but I want to urge you to continue!
There’s a lot of fun to be had with painting
freehand. You can make as many layers as you
need to experiment every step of the way. Anytime
you are not happy with the way things are going,
just use your Eraser tool or delete the layer and
start anew. The main objective of this lesson is for
you to experiment and practice to develop the
skills you need to feel satisfaction in the final
results. Once you’ve tried it a few times, we
guarantee you will be up all night painting!
Taking a traditional approachStarting with the background and working towards the foreground
A straightforward look at creating an oil portrait
Smudge your way to an oil painting
Get started
01 Open your original picture and make
a copy of the original layer by
dragging the image to the New Layer icon in
your Layer palette. Now make a new layer
by clicking on the layer icon and name this
one ‘Background Tree’. Make sure Sample
all Layers in the top menu bar is selected.
(The same brush will be used through the
whole lesson.)
Paint in the old hatch style
02 Now, working on the top layer, select
the Smudge tool and the # 46
Scatter brush (located in the Default
brushes and used with the default settings).
At 50% Strength paint with a traditional
‘hatch’ style which is moving the brush back
and forth in a consistent direction, (diagonal
here). Use this technique in all the
background area (except for the leaves) all
the way to the river edge.
Change directions
03 Keeping on the same layer, change
your ‘hatch’ stroke direction (using
the same brush and settings) while painting
the leaves so they are not completely lost in
the background. This will help define their
shape while still giving a nice oil painting look.
This method is called ‘cross hatching’.
BEFORE
Source file available
Use the image provided to re-create this
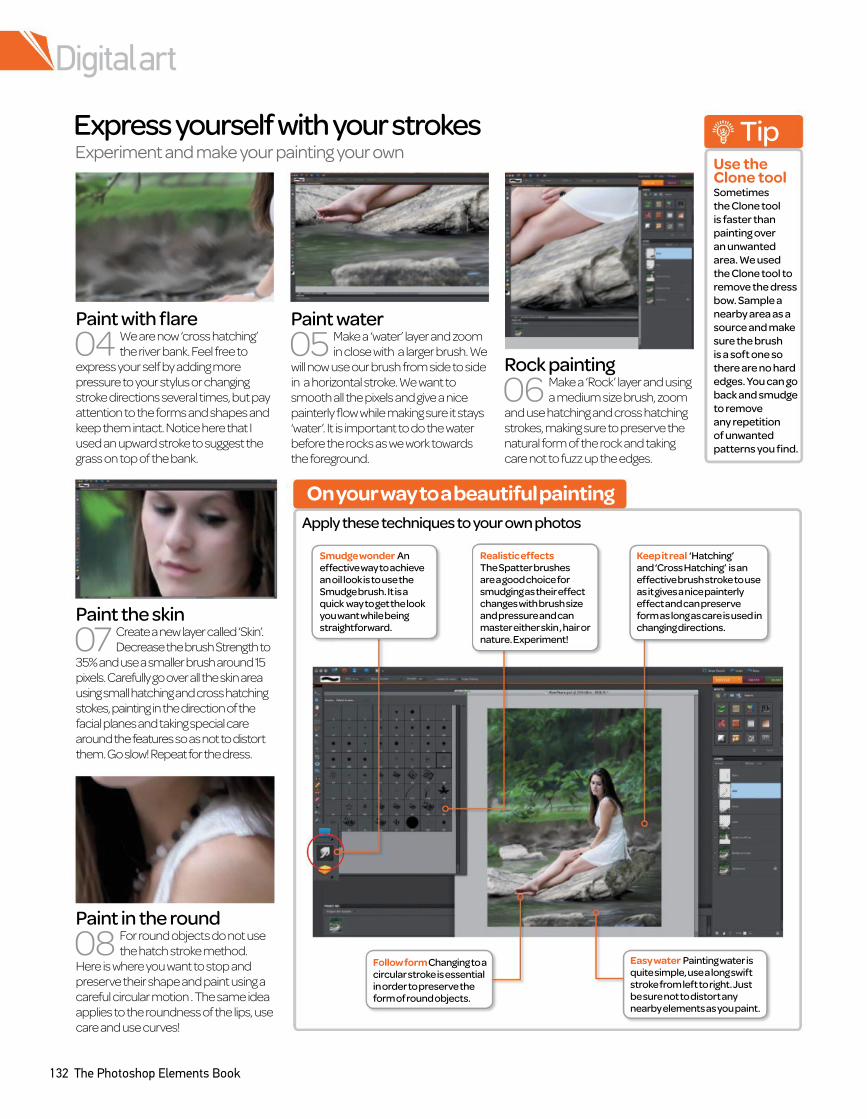
Digital art
132 The Photoshop Elements Book
Express yourself with your strokesExperiment and make your painting your own
Easy water Painting water is quite simple, use a long swift stroke from left to right. Just be sure not to distort any nearby elements as you paint.
Realistic effects The Spatter brushes are a good choice for smudging as their effect changes with brush size and pressure and can master either skin , hair or nature. Experiment!
Follow form Changing to a circular stroke is essential in order to preserve the form of round objects.
TipUse the Clone toolSometimes
the Clone tool
is faster than
painting over
an unwanted
area. We used
the Clone tool to
remove the dress
bow. Sample a
nearby area as a
source and make
sure the brush
is a soft one so
there are no hard
edges. You can go
back and smudge
to remove
any repetition
of unwanted
patterns you find.
Paint with flare
04 We are now ‘cross hatching’
the river bank. Feel free to
express your self by adding more
pressure to your stylus or changing
stroke directions several times, but pay
attention to the forms and shapes and
keep them intact. Notice here that I
used an upward stroke to suggest the
grass on top of the bank.
Paint the skin
07 Create a new layer called ‘Skin’.
Decrease the brush Strength to
35% and use a smaller brush around 15
pixels. Carefully go over all the skin area
using small hatching and cross hatching
stokes, painting in the direction of the
facial planes and taking special care
around the features so as not to distort
them. Go slow! Repeat for the dress.
Paint water
05 Make a ‘water’ layer and zoom
in close with a larger brush. We
will now use our brush from side to side
in a horizontal stroke. We want to
smooth all the pixels and give a nice
painterly flow while making sure it stays
‘water’. It is important to do the water
before the rocks as we work towards
the foreground.
Rock painting
06 Make a ‘Rock’ layer and using
a medium size brush, zoom
and use hatching and cross hatching
strokes, making sure to preserve the
natural form of the rock and taking
care not to fuzz up the edges.
Paint in the round
08 For round objects do not use
the hatch stroke method.
Here is where you want to stop and
preserve their shape and paint using a
careful circular motion . The same idea
applies to the roundness of the lips, use
care and use curves!
On your way to a beautiful painting
Apply these techniques to your own photos
Smudge wonder An effective way to achieve an oil look is to use the Smudge brush. It is a quick way to get the look you want while being straightforward.
Keep it real ‘Hatching’ and ‘Cross Hatching’ is an effective brush stroke to use as it gives a nice painterly effect and can preserve form as long as care is used in changing directions.

Smudge your way to an oil panting
The Photoshop Elements Book 133
Layer structure
Painting with ease
Finishing up and changing brushesLearn to embellish your image with final details
Painted leaves
Dress paint
Hair highlights
Hair
Dress
Skin
Rocks
Water
Background trees
Original layer
Paint hair
09 Make a new layer called
Hair. Zoom in close at 50%
Strength and vary your brush size
as you work. Paint as you would if
you were actually brushing her hair.
Paint right over any background
edge spillage .
Paint and extend the dress
12 Go back to the Default brushes
and choose a Soft Round at
100%. Paint directly over the dress
extending it over the rock behind her.
Alt click on her dress to sample the
colours of the shadows and paint in the
folds , shadows and light to make it
more natural.
Switch from Smudge to paint
10 To bring some life to the hair,
change from the Smudge tool
to the regular paint brush and choose a
Stipple brush from the Natural Brushes
gallery. Set the Strength to 50% and
now click on the Brush icon at the top
to change the fade to 65%. Make a new
layer called Hair Highlights.
Sunlight in the trees
14 Make a new layer called Painted
Leaves. Bring up the color box
and choose a pretty yellow/ green. Use
the Soft Round brush at 50% to paint
sunlight over the existing leaves varying
direction and size. Adjust the layer for a
more subtle effect.
Paint the hair
11 Now, using the settings in step 10,
bring up the colour box and
choose a golden yellow-brown and
begin painting in highlights. Take care to
vary the colour , keeping the lightest at
the top. Swing your brush outward to
imitate the motion of hair in the
breeze. Decrease brush size for
thinner strands of hair.
Cast a skirt shadow
13 Go back to the layer called ‘Rock’,
choose the Burn tool and using a
soft round brush, burn the area around
the skirt so it looks as though there is a
shadow on the rock. This makes the
dress extension much more credible.
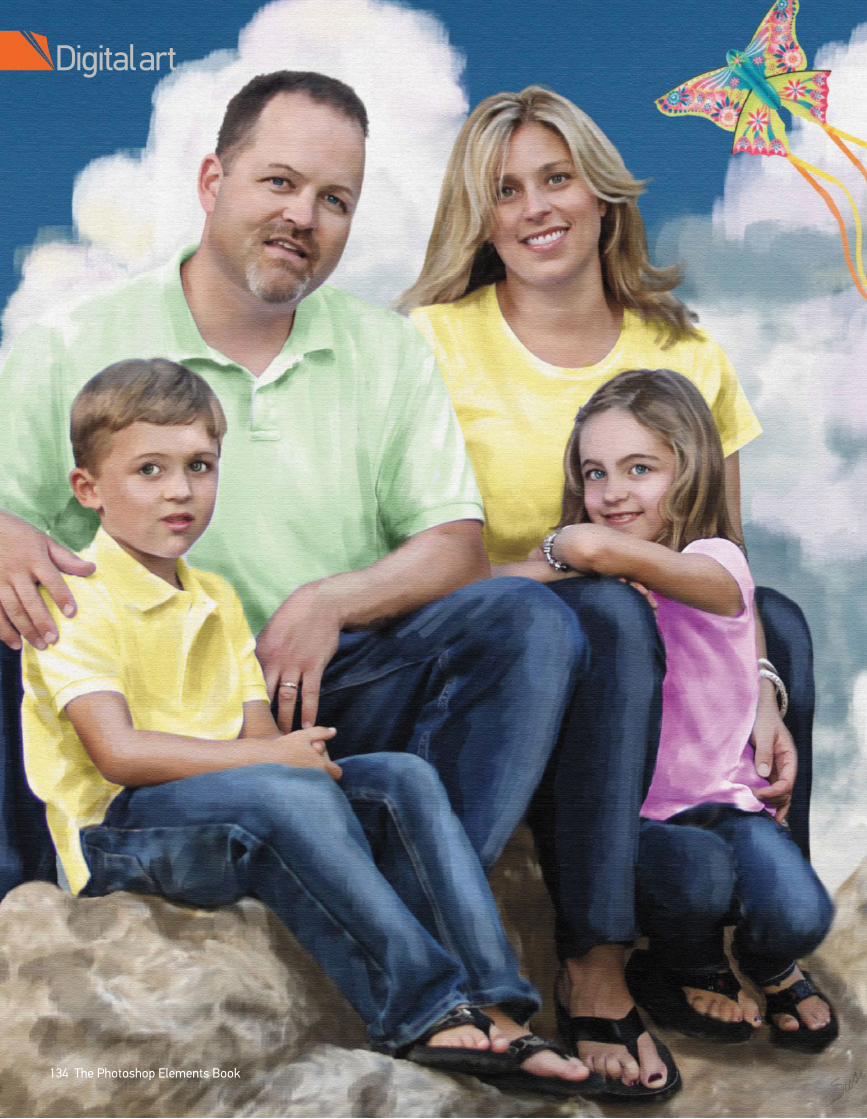
Digital art
134 The Photoshop Elements Book
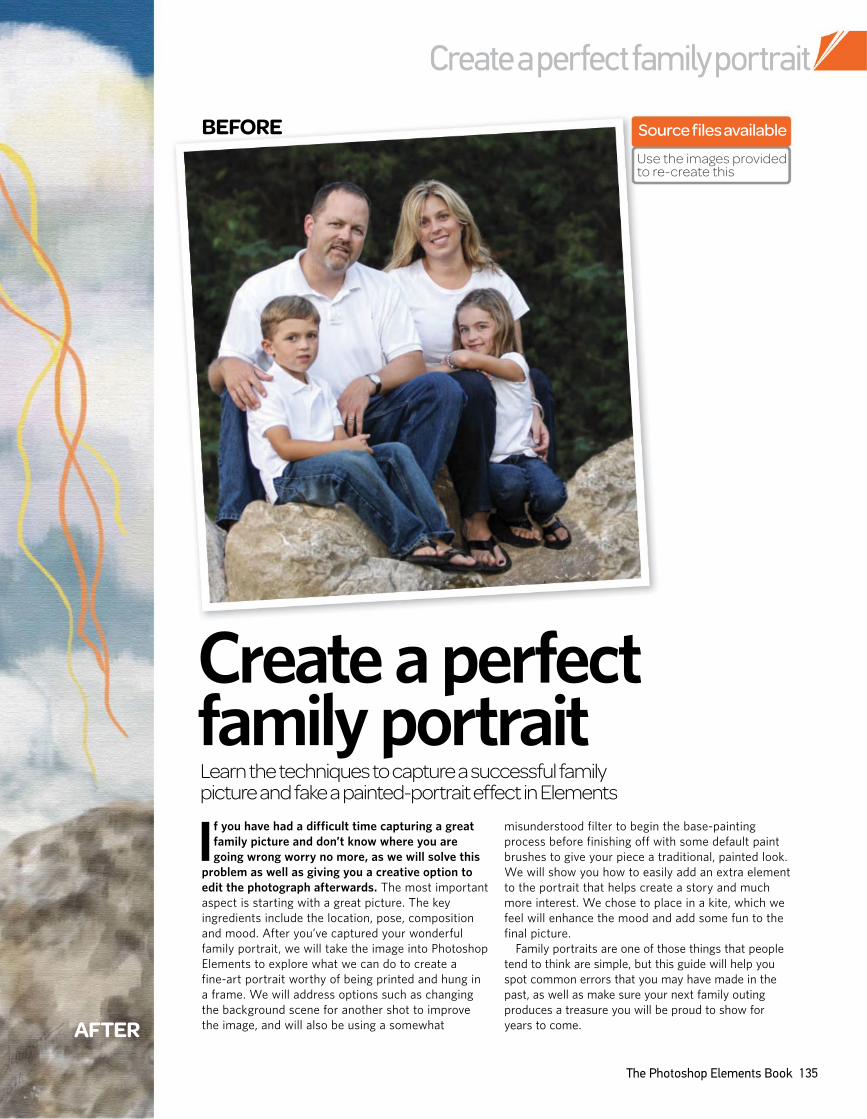
Create a perfect family portrait
The Photoshop Elements Book 135
If you have had a difficult time capturing a great
family picture and don’t know where you are
going wrong worry no more, as we will solve this
problem as well as giving you a creative option to
edit the photograph afterwards. The most important
aspect is starting with a great picture. The key
ingredients include the location, pose, composition
and mood. After you’ve captured your wonderful
family portrait, we will take the image into Photoshop
Elements to explore what we can do to create a
fine-art portrait worthy of being printed and hung in
a frame. We will address options such as changing
the background scene for another shot to improve
the image, and will also be using a somewhat
misunderstood filter to begin the base-painting
process before finishing off with some default paint
brushes to give your piece a traditional, painted look.
We will show you how to easily add an extra element
to the portrait that helps create a story and much
more interest. We chose to place in a kite, which we
feel will enhance the mood and add some fun to the
final picture.
Family portraits are one of those things that people
tend to think are simple, but this guide will help you
spot common errors that you may have made in the
past, as well as make sure your next family outing
produces a treasure you will be proud to show for
years to come.
Create a perfect family portraitLearn the techniques to capture a successful family picture and fake a painted-portrait effect in Elements
BEFORE
AFTER
Source files available
Use the images provided to re-create this
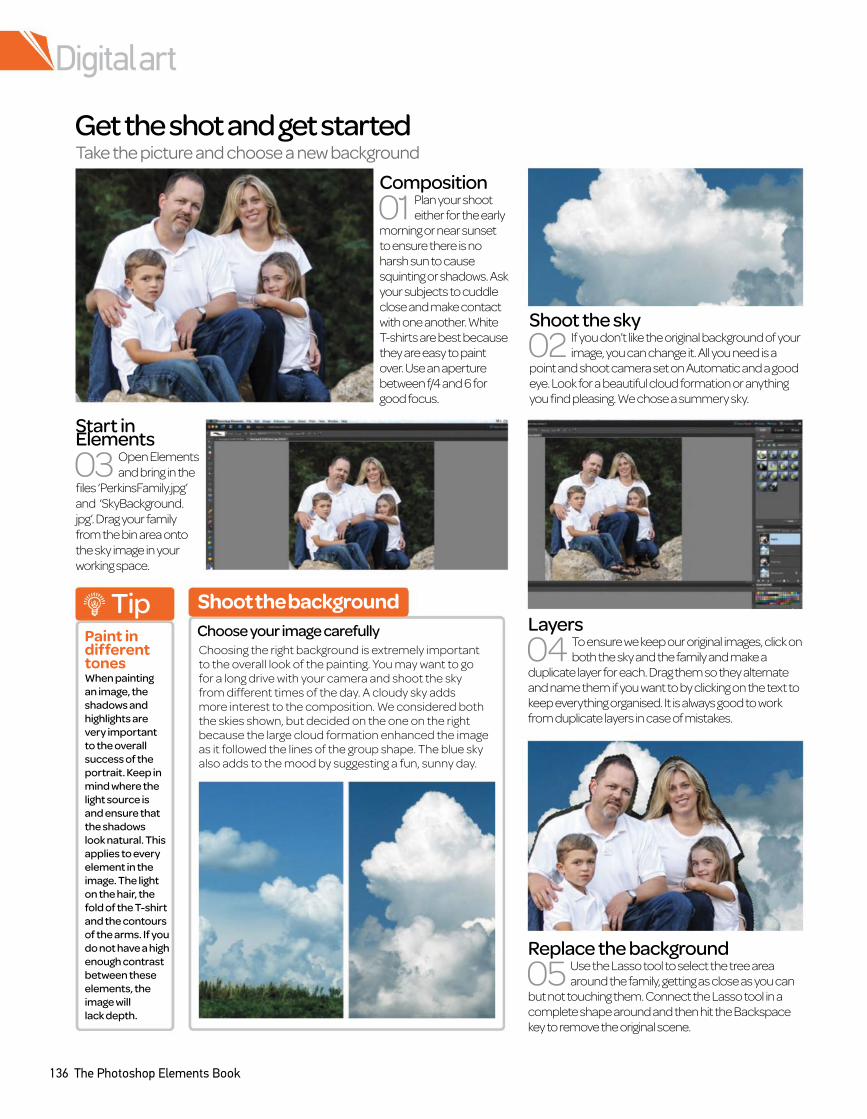
Digital art
136 The Photoshop Elements Book
Get the shot and get startedTake the picture and choose a new background
TipPaint in different tonesWhen painting
an image, the
shadows and
highlights are
very important
to the overall
success of the
portrait. Keep in
mind where the
light source is
and ensure that
the shadows
look natural. This
applies to every
element in the
image. The light
on the hair, the
fold of the T-shirt
and the contours
of the arms. If you
do not have a high
enough contrast
between these
elements, the
image will
lack depth.
Replace the background
05 Use the Lasso tool to select the tree area
around the family, getting as close as you can
but not touching them. Connect the Lasso tool in a
complete shape around and then hit the Backspace
key to remove the original scene.
Shoot the sky
02 If you don’t like the original background of your
image, you can change it. All you need is a
point and shoot camera set on Automatic and a good
eye. Look for a beautiful cloud formation or anything
you find pleasing. We chose a summery sky.
Layers
04 To ensure we keep our original images, click on
both the sky and the family and make a
duplicate layer for each. Drag them so they alternate
and name them if you want to by clicking on the text to
keep everything organised. It is always good to work
from duplicate layers in case of mistakes.
Composition
01 Plan your shoot
either for the early
morning or near sunset
to ensure there is no
harsh sun to cause
squinting or shadows. Ask
your subjects to cuddle
close and make contact
with one another. White
T-shirts are best because
they are easy to paint
over. Use an aperture
between f/4 and 6 for
good focus.
Start in Elements
03 Open Elements
and bring in the
files ‘PerkinsFamily.jpg’
and ‘SkyBackground.
jpg’. Drag your family
from the bin area onto
the sky image in your
working space.
Shoot the background
Choose your image carefullyChoosing the right background is extremely important to the overall look of the painting. You may want to go for a long drive with your camera and shoot the sky from different times of the day. A cloudy sky adds more interest to the composition. We considered both the skies shown, but decided on the one on the right because the large cloud formation enhanced the image as it followed the lines of the group shape. The blue sky also adds to the mood by suggesting a fun, sunny day.
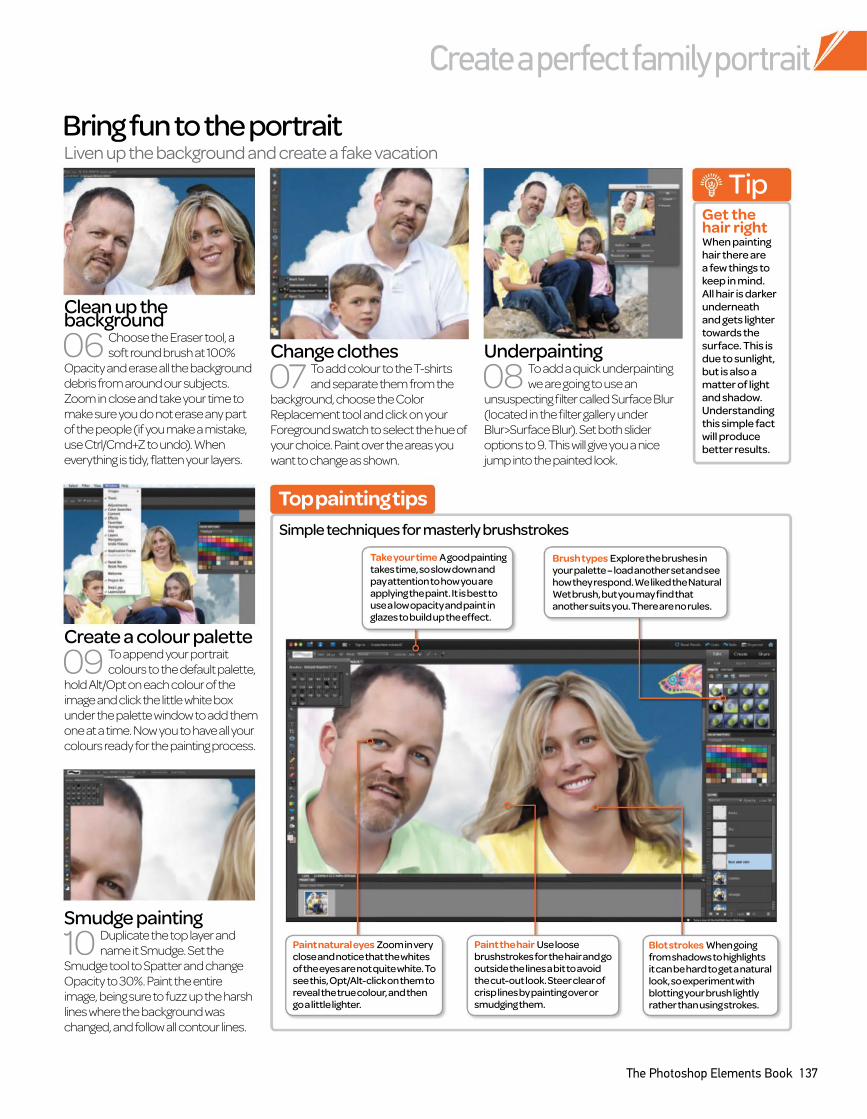
Create a perfect family portrait
The Photoshop Elements Book 137
Bring fun to the portraitLiven up the background and create a fake vacation
Paint natural eyes Zoom in very close and notice that the whites of the eyes are not quite white. To see this, Opt/Alt-click on them to reveal the true colour, and then go a little lighter.
Blot strokes When going from shadows to highlights it can be hard to get a natural look, so experiment with blotting your brush lightly rather than using strokes.
TipGet the hair rightWhen painting
hair there are
a few things to
keep in mind.
All hair is darker
underneath
and gets lighter
towards the
surface. This is
due to sunlight,
but is also a
matter of light
and shadow.
Understanding
this simple fact
will produce
better results.
Clean up the background
06 Choose the Eraser tool, a
soft round brush at 100%
Opacity and erase all the background
debris from around our subjects.
Zoom in close and take your time to
make sure you do not erase any part
of the people (if you make a mistake,
use Ctrl/Cmd+Z to undo). When
everything is tidy, flatten your layers.
Change clothes
07 To add colour to the T-shirts
and separate them from the
background, choose the Color
Replacement tool and click on your
Foreground swatch to select the hue of
your choice. Paint over the areas you
want to change as shown.
Underpainting
08 To add a quick underpainting
we are going to use an
unsuspecting filter called Surface Blur
(located in the filter gallery under
Blur>Surface Blur). Set both slider
options to 9. This will give you a nice
jump into the painted look.
Smudge painting
10 Duplicate the top layer and
name it Smudge. Set the
Smudge tool to Spatter and change
Opacity to 30%. Paint the entire
image, being sure to fuzz up the harsh
lines where the background was
changed, and follow all contour lines.
Create a colour palette
09 To append your portrait
colours to the default palette,
hold Alt/Opt on each colour of the
image and click the little white box
under the palette window to add them
one at a time. Now you to have all your
colours ready for the painting process.
Paint the hair Use loose brushstrokes for the hair and go outside the lines a bit to avoid the cut-out look. Steer clear of crisp lines by painting over or smudging them.
Top painting tips
Simple techniques for masterly brushstrokes
Brush types Explore the brushes in your palette – load another set and see how they respond. We liked the Natural Wet brush, but you may find that another suits you. There are no rules.
Take your time A good painting takes time, so slow down and pay attention to how you are applying the paint. It is best to use a low opacity and paint in glazes to build up the effect.
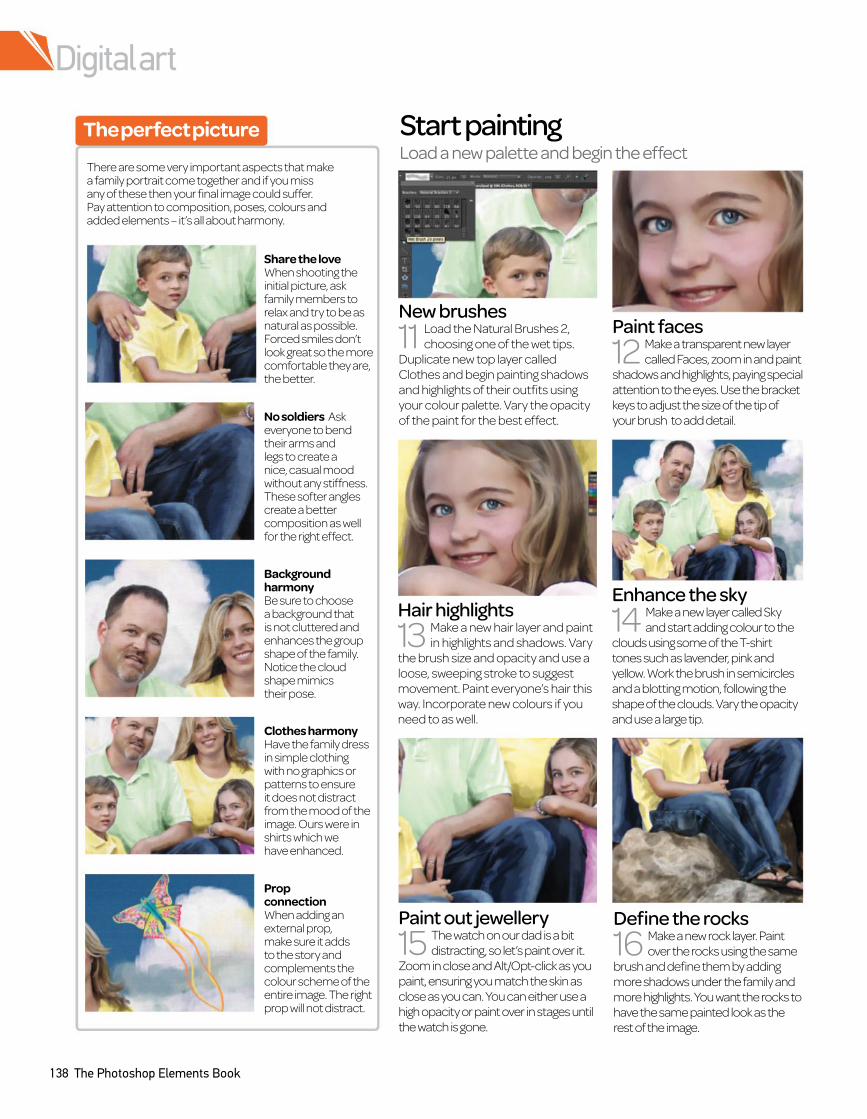
Digital art
138 The Photoshop Elements Book
Start paintingLoad a new palette and begin the effect
Share the love
When shooting the initial picture, ask family members to relax and try to be as natural as possible. Forced smiles don’t look great so the more comfortable they are, the better.
No soldiers Ask everyone to bend their arms and legs to create a nice, casual mood without any stiffness. These softer angles create a better composition as well for the right effect.
Background harmony Be sure to choose a background that is not cluttered and enhances the group shape of the family. Notice the cloud shape mimics their pose.
Clothes harmony Have the family dress in simple clothing with no graphics or patterns to ensure it does not distract from the mood of the image. Ours were in shirts which we have enhanced.
Prop connection When adding an external prop, make sure it adds to the story and complements the colour scheme of the entire image. The right prop will not distract.
The perfect picture
There are some very important aspects that make a family portrait come together and if you miss any of these then your final image could suffer. Pay attention to composition, poses, colours and added elements – it’s all about harmony.
Hair highlights
13 Make a new hair layer and paint
in highlights and shadows. Vary
the brush size and opacity and use a
loose, sweeping stroke to suggest
movement. Paint everyone’s hair this
way. Incorporate new colours if you
need to as well.
Paint faces
12 Make a transparent new layer
called Faces, zoom in and paint
shadows and highlights, paying special
attention to the eyes. Use the bracket
keys to adjust the size of the tip of
your brush to add detail.
New brushes
11 Load the Natural Brushes 2,
choosing one of the wet tips.
Duplicate new top layer called
Clothes and begin painting shadows
and highlights of their outfits using
your colour palette. Vary the opacity
of the paint for the best effect.
Enhance the sky
14 Make a new layer called Sky
and start adding colour to the
clouds using some of the T-shirt
tones such as lavender, pink and
yellow. Work the brush in semicircles
and a blotting motion, following the
shape of the clouds. Vary the opacity
and use a large tip.
Paint out jewellery
15 The watch on our dad is a bit
distracting, so let’s paint over it.
Zoom in close and Alt/Opt-click as you
paint, ensuring you match the skin as
close as you can. You can either use a
high opacity or paint over in stages until
the watch is gone.
Define the rocks
16 Make a new rock layer. Paint
over the rocks using the same
brush and define them by adding
more shadows under the family and
more highlights. You want the rocks to
have the same painted look as the
rest of the image.
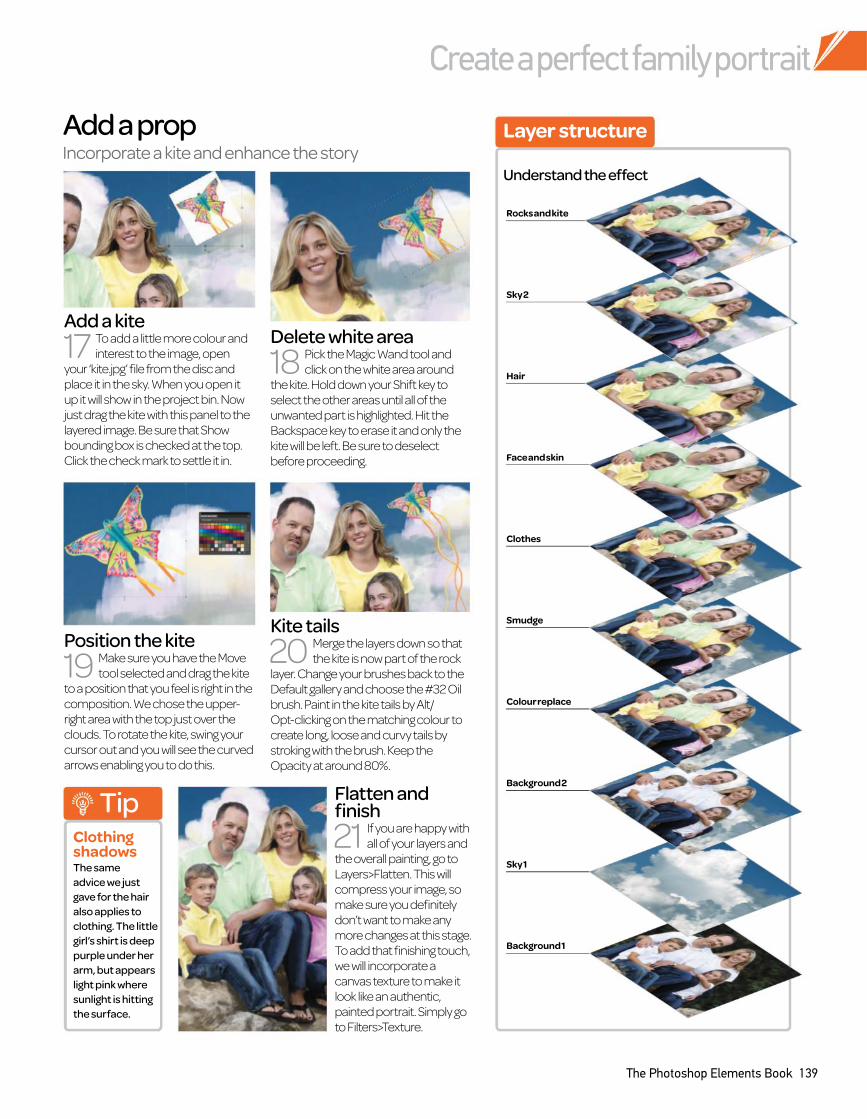
Create a perfect family portrait
The Photoshop Elements Book 139
Rocks and kite
Sky 2
Hair
Face and skin
Clothes
Smudge
Colour replace
Background 2
Sky 1
Background 1
Add a propIncorporate a kite and enhance the story
TipClothing shadowsThe same
advice we just
gave for the hair
also applies to
clothing. The little
girl’s shirt is deep
purple under her
arm, but appears
light pink where
sunlight is hitting
the surface.
Position the kite
19 Make sure you have the Move
tool selected and drag the kite
to a position that you feel is right in the
composition. We chose the upper-
right area with the top just over the
clouds. To rotate the kite, swing your
cursor out and you will see the curved
arrows enabling you to do this.
Delete white area
18 Pick the Magic Wand tool and
click on the white area around
the kite. Hold down your Shift key to
select the other areas until all of the
unwanted part is highlighted. Hit the
Backspace key to erase it and only the
kite will be left. Be sure to deselect
before proceeding.
Add a kite
17 To add a little more colour and
interest to the image, open
your ‘kite.jpg’ file from the disc and
place it in the sky. When you open it
up it will show in the project bin. Now
just drag the kite with this panel to the
layered image. Be sure that Show
bounding box is checked at the top.
Click the check mark to settle it in.
Flatten and finish
21 If you are happy with
all of your layers and
the overall painting, go to
Layers>Flatten. This will
compress your image, so
make sure you definitely
don’t want to make any
more changes at this stage.
To add that finishing touch,
we will incorporate a
canvas texture to make it
look like an authentic,
painted portrait. Simply go
to Filters>Texture.
Kite tails
20 Merge the layers down so that
the kite is now part of the rock
layer. Change your brushes back to the
Default gallery and choose the #32 Oil
brush. Paint in the kite tails by Alt/
Opt-clicking on the matching colour to
create long, loose and curvy tails by
stroking with the brush. Keep the
Opacity at around 80%.
Layer structure
Understand the effect
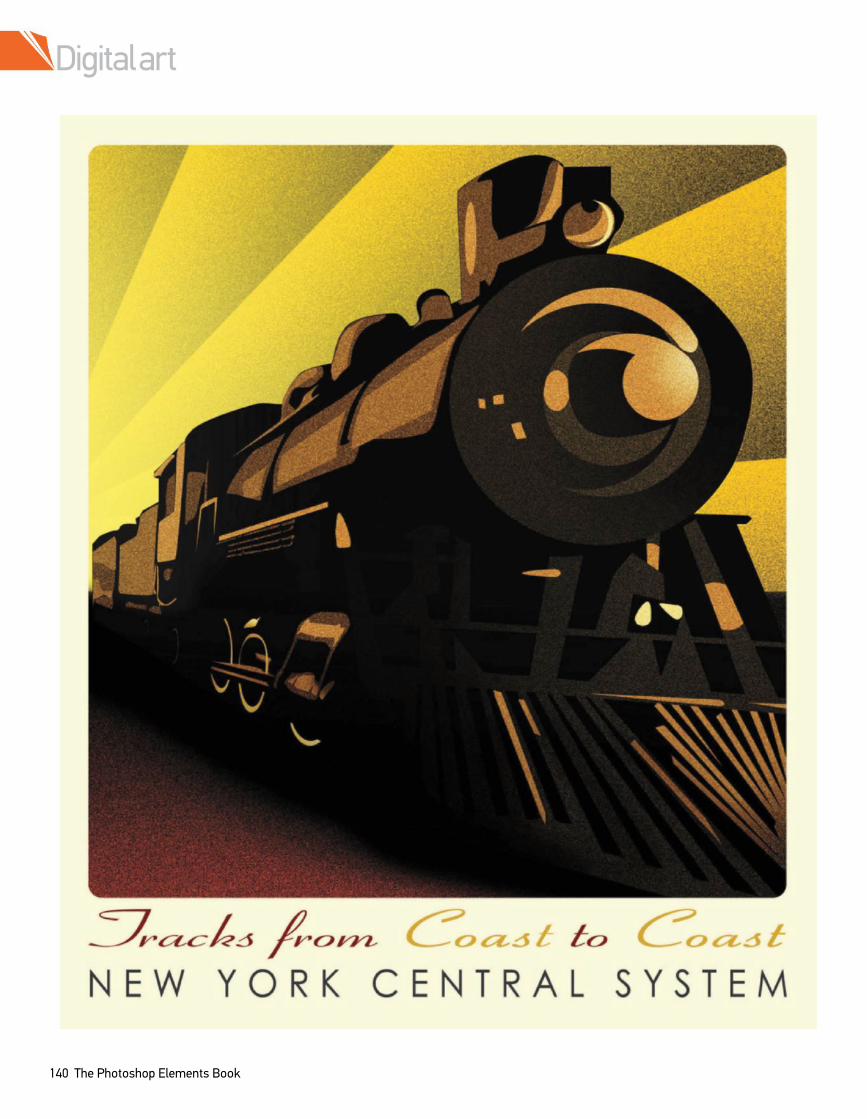
Digital art
140 The Photoshop Elements Book
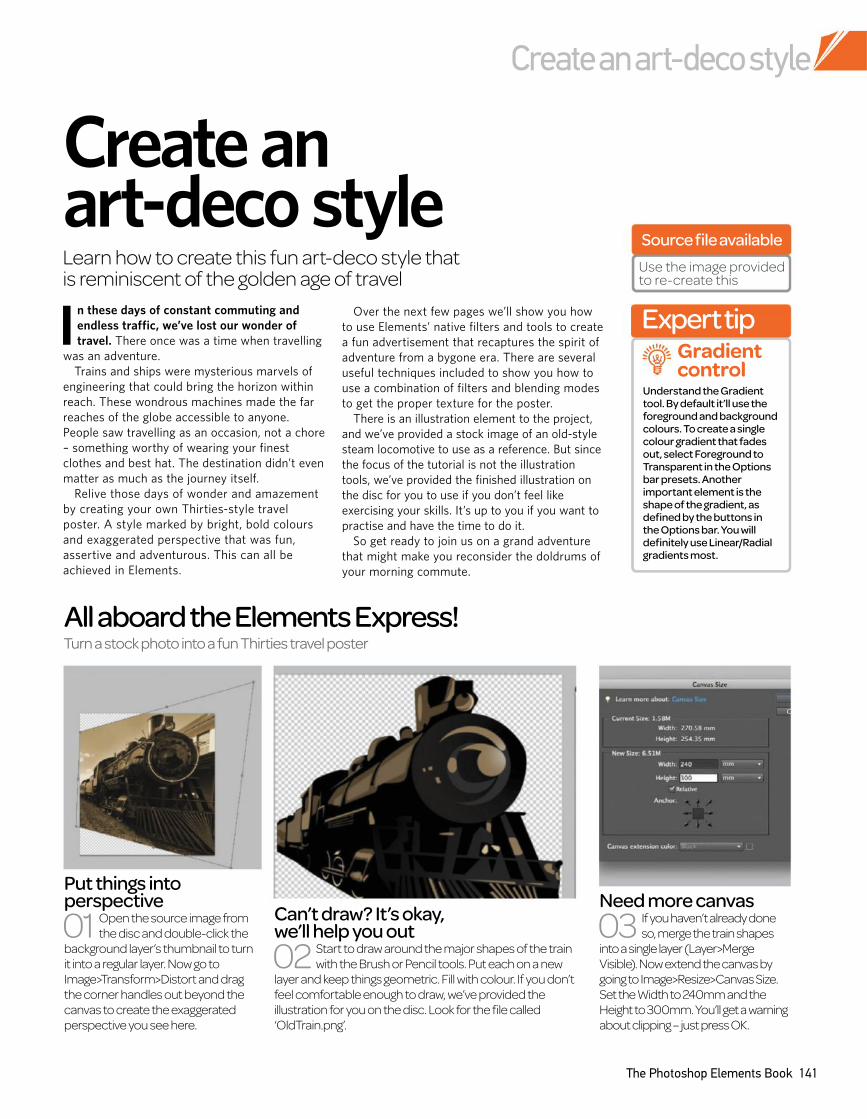
Create an art-deco style
The Photoshop Elements Book 141
In these days of constant commuting and
endless traffic, we’ve lost our wonder of
travel. There once was a time when travelling
was an adventure.
Trains and ships were mysterious marvels of
engineering that could bring the horizon within
reach. These wondrous machines made the far
reaches of the globe accessible to anyone.
People saw travelling as an occasion, not a chore
Ð something worthy of wearing your finest
clothes and best hat. The destination didn’t even
matter as much as the journey itself.
Relive those days of wonder and amazement
by creating your own Thirties-style travel
poster. A style marked by bright, bold colours
and exaggerated perspective that was fun,
assertive and adventurous. This can all be
achieved in Elements.
Over the next few pages we’ll show you how
to use Elements’ native filters and tools to create
a fun advertisement that recaptures the spirit of
adventure from a bygone era. There are several
useful techniques included to show you how to
use a combination of filters and blending modes
to get the proper texture for the poster.
There is an illustration element to the project,
and we’ve provided a stock image of an old-style
steam locomotive to use as a reference. But since
the focus of the tutorial is not the illustration
tools, we’ve provided the finished illustration on
the disc for you to use if you don’t feel like
exercising your skills. It’s up to you if you want to
practise and have the time to do it.
So get ready to join us on a grand adventure
that might make you reconsider the doldrums of
your morning commute.
Create an art-deco styleLearn how to create this fun art-deco style that is reminiscent of the golden age of travel
All aboard the Elements Express!Turn a stock photo into a fun Thirties travel poster
Can’t draw? It’s okay, we’ll help you out
02 Start to draw around the major shapes of the train
with the Brush or Pencil tools. Put each on a new
layer and keep things geometric. Fill with colour. If you don’t
feel comfortable enough to draw, we’ve provided the
illustration for you on the disc. Look for the file called
‘OldTrain.png’.
Put things into perspective
01 Open the source image from
the disc and double-click the
background layer’s thumbnail to turn
it into a regular layer. Now go to
Image>Transform>Distort and drag
the corner handles out beyond the
canvas to create the exaggerated
perspective you see here.
Need more canvas
03 If you haven’t already done
so, merge the train shapes
into a single layer (Layer>Merge
Visible). Now extend the canvas by
going to Image>Resize>Canvas Size.
Set the Width to 240mm and the
Height to 300mm. You’ll get a warning
about clipping – just press OK.
Expert tip
Understand the Gradient tool. By default it’ll use the foreground and background colours. To create a single colour gradient that fades out, select Foreground to Transparent in the Options bar presets. Another important element is the shape of the gradient, as defined by the buttons in the Options bar. You will definitely use Linear/Radial gradients most.
Gradient control
Source file available
Use the image provided to re-create this
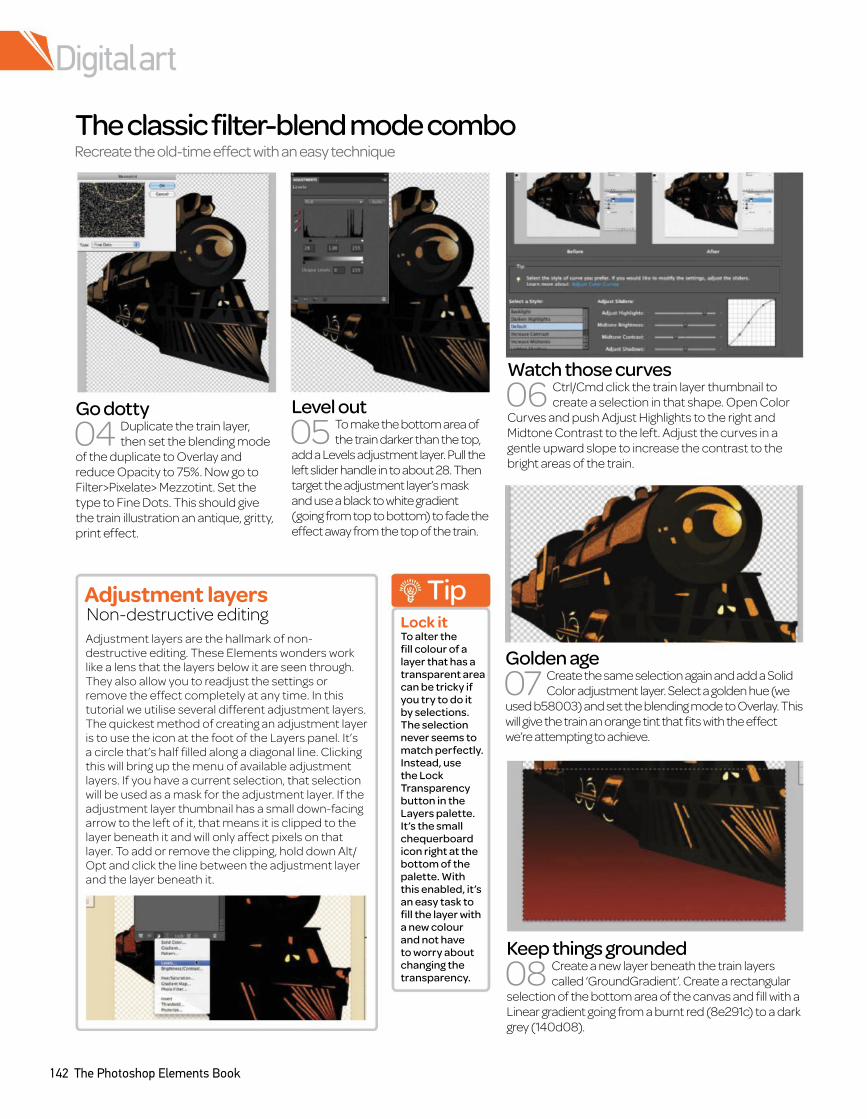
Digital art
142 The Photoshop Elements Book
Adjustment layers are the hallmark of non-destructive editing. These Elements wonders work like a lens that the layers below it are seen through. They also allow you to readjust the settings or remove the effect completely at any time. In this tutorial we utilise several different adjustment layers. The quickest method of creating an adjustment layer is to use the icon at the foot of the Layers panel. It’s a circle that’s half filled along a diagonal line. Clicking this will bring up the menu of available adjustment layers. If you have a current selection, that selection will be used as a mask for the adjustment layer. If the adjustment layer thumbnail has a small down-facing arrow to the left of it, that means it is clipped to the layer beneath it and will only affect pixels on that layer. To add or remove the clipping, hold down Alt/Opt and click the line between the adjustment layer and the layer beneath it.
The classic filter-blend mode comboRecreate the old-time effect with an easy technique
TipLock itTo alter the fill colour of a layer that has a transparent area can be tricky if you try to do it by selections. The selection never seems to match perfectly. Instead, use the Lock Transparency button in the Layers palette. It’s the small chequerboard icon right at the bottom of the palette. With this enabled, it’s an easy task to fill the layer with a new colour and not have to worry about changing the transparency.
Golden age
07 Create the same selection again and add a Solid
Color adjustment layer. Select a golden hue (we
used b58003) and set the blending mode to Overlay. This
will give the train an orange tint that fits with the effect
we’re attempting to achieve.
Level out
05 To make the bottom area of
the train darker than the top,
add a Levels adjustment layer. Pull the
left slider handle in to about 28. Then
target the adjustment layer’s mask
and use a black to white gradient
(going from top to bottom) to fade the
effect away from the top of the train.
Go dotty
04 Duplicate the train layer,
then set the blending mode
of the duplicate to Overlay and
reduce Opacity to 75%. Now go to
Filter>Pixelate> Mezzotint. Set the
type to Fine Dots. This should give
the train illustration an antique, gritty,
print effect.
Watch those curves
06 Ctrl/Cmd click the train layer thumbnail to
create a selection in that shape. Open Color
Curves and push Adjust Highlights to the right and
Midtone Contrast to the left. Adjust the curves in a
gentle upward slope to increase the contrast to the
bright areas of the train.
Keep things grounded
08 Create a new layer beneath the train layers
called ‘GroundGradient’. Create a rectangular
selection of the bottom area of the canvas and fill with a
Linear gradient going from a burnt red (8e291c) to a dark
grey (140d08).
Non-destructive editingAdjustment layers
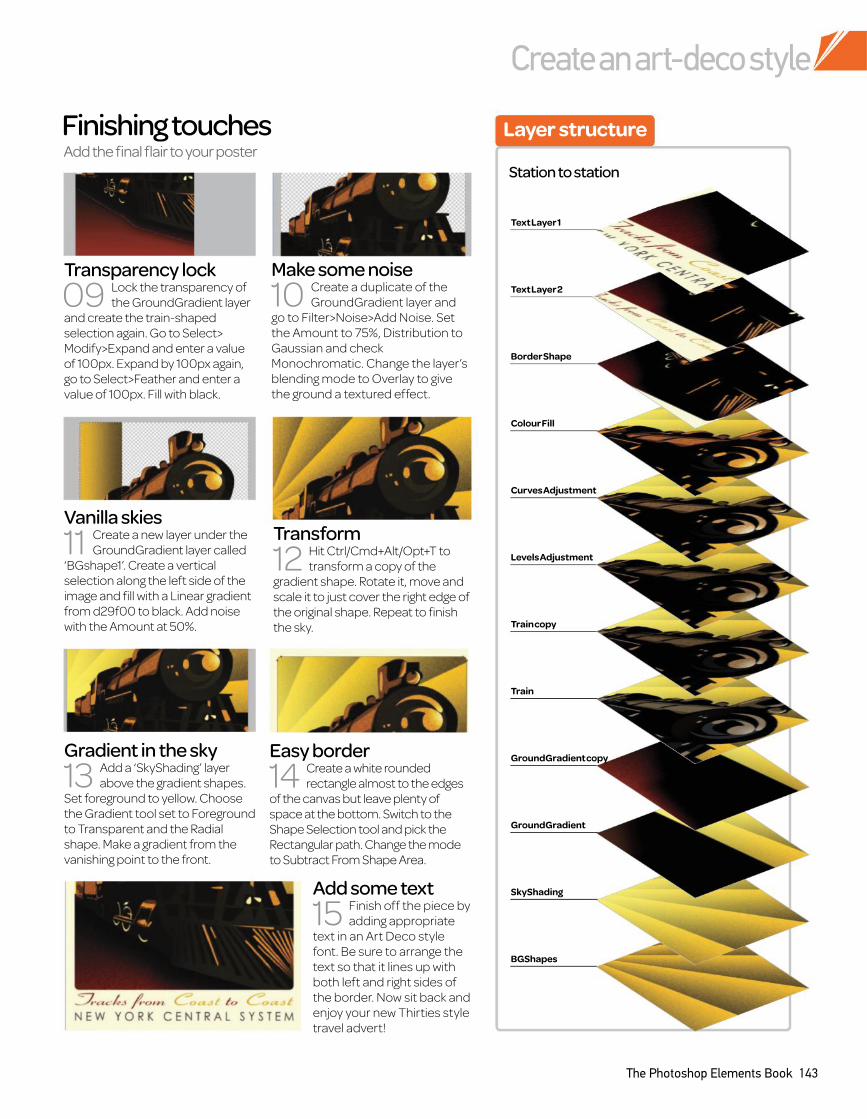
Create an art-deco style
The Photoshop Elements Book 143
Finishing touchesAdd the final flair to your poster
Make some noise
10 Create a duplicate of the
GroundGradient layer and
go to Filter>Noise>Add Noise. Set
the Amount to 75%, Distribution to
Gaussian and check
Monochromatic. Change the layer’s
blending mode to Overlay to give
the ground a textured effect.
Transparency lock
09 Lock the transparency of
the GroundGradient layer
and create the train-shaped
selection again. Go to Select>
Modify>Expand and enter a value
of 100px. Expand by 100px again,
go to Select>Feather and enter a
value of 100px. Fill with black.
Add some text
15 Finish off the piece by
adding appropriate
text in an Art Deco style
font. Be sure to arrange the
text so that it lines up with
both left and right sides of
the border. Now sit back and
enjoy your new Thirties style
travel advert!
Transform
12 Hit Ctrl/Cmd+Alt/Opt+T to
transform a copy of the
gradient shape. Rotate it, move and
scale it to just cover the right edge of
the original shape. Repeat to finish
the sky.
Vanilla skies
11 Create a new layer under the
GroundGradient layer called
‘BGshape1’. Create a vertical
selection along the left side of the
image and fill with a Linear gradient
from d29f00 to black. Add noise
with the Amount at 50%.
Easy border
14 Create a white rounded
rectangle almost to the edges
of the canvas but leave plenty of
space at the bottom. Switch to the
Shape Selection tool and pick the
Rectangular path. Change the mode
to Subtract From Shape Area.
Gradient in the sky
13 Add a ‘SkyShading’ layer
above the gradient shapes.
Set foreground to yellow. Choose
the Gradient tool set to Foreground
to Transparent and the Radial
shape. Make a gradient from the
vanishing point to the front.
Layer structure
Station to station
Text Layer 1
Text Layer 2
Border Shape
Colour Fill
Curves Adjustment
Levels Adjustment
Train copy
Train
GroundGradient copy
GroundGradient
SkyShading
BGShapes
144 The Photoshop Elements Book
Digital art
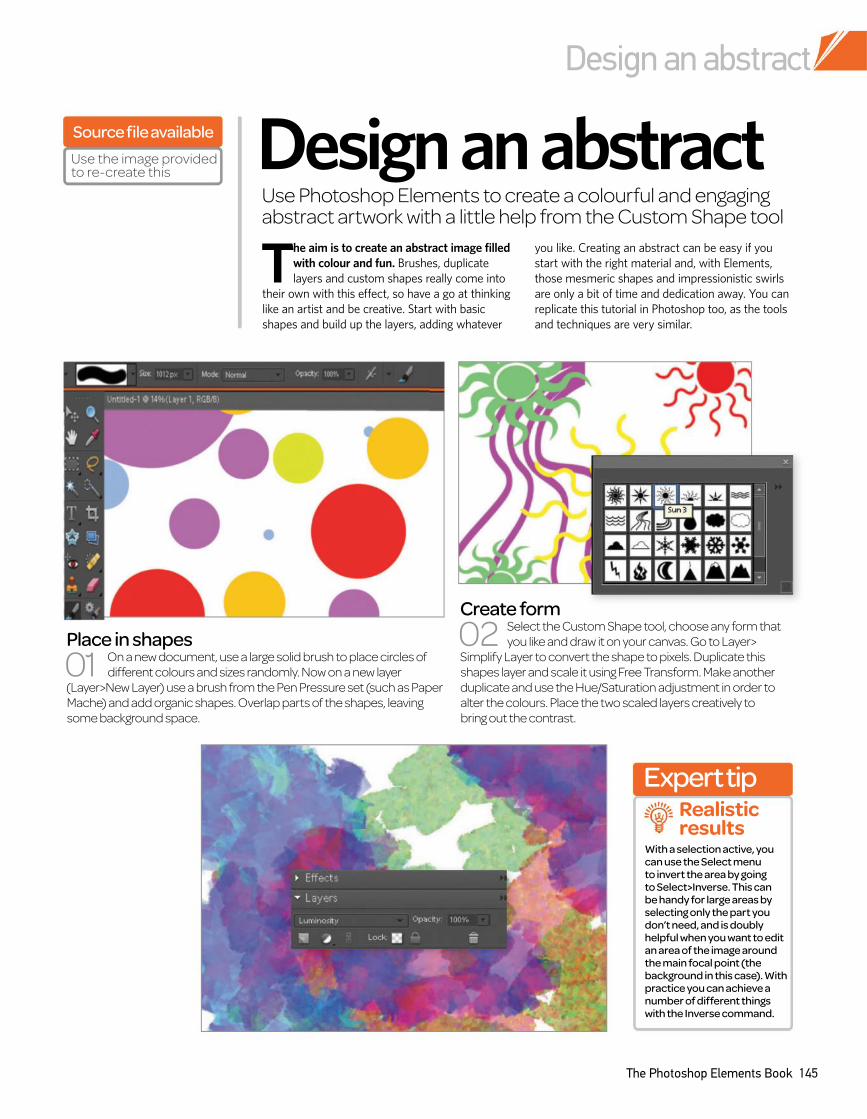
Design an abstract
The Photoshop Elements Book 145
The aim is to create an abstract image filled
with colour and fun. Brushes, duplicate
layers and custom shapes really come into
their own with this effect, so have a go at thinking
like an artist and be creative. Start with basic
shapes and build up the layers, adding whatever
you like. Creating an abstract can be easy if you
start with the right material and, with Elements,
those mesmeric shapes and impressionistic swirls
are only a bit of time and dedication away. You can
replicate this tutorial in Photoshop too, as the tools
and techniques are very similar.
Design an abstractUse Photoshop Elements to create a colourful and engaging abstract artwork with a little help from the Custom Shape tool
Create form
02 Select the Custom Shape tool, choose any form that
you like and draw it on your canvas. Go to Layer>
Simplify Layer to convert the shape to pixels. Duplicate this
shapes layer and scale it using Free Transform. Make another
duplicate and use the Hue/Saturation adjustment in order to
alter the colours. Place the two scaled layers creatively to
bring out the contrast.
Place in shapes
different colours and sizes randomly. Now on a new layer 01 On a new document, use a large solid brush to place circles of
(Layer>New Layer) use a brush from the Pen Pressure set (such as Paper
Mache) and add organic shapes. Overlap parts of the shapes, leaving
some background space.
Source file available
Use the image providedto re-create this
Expert tip
With a selection active, you can use the Select menu to invert the area by going to Select>Inverse. This can be handy for large areas by selecting only the part you don’t need, and is doubly helpful when you want to edit an area of the image around the main focal point (the background in this case). With practice you can achieve a number of different things with the Inverse command.
Realistic results
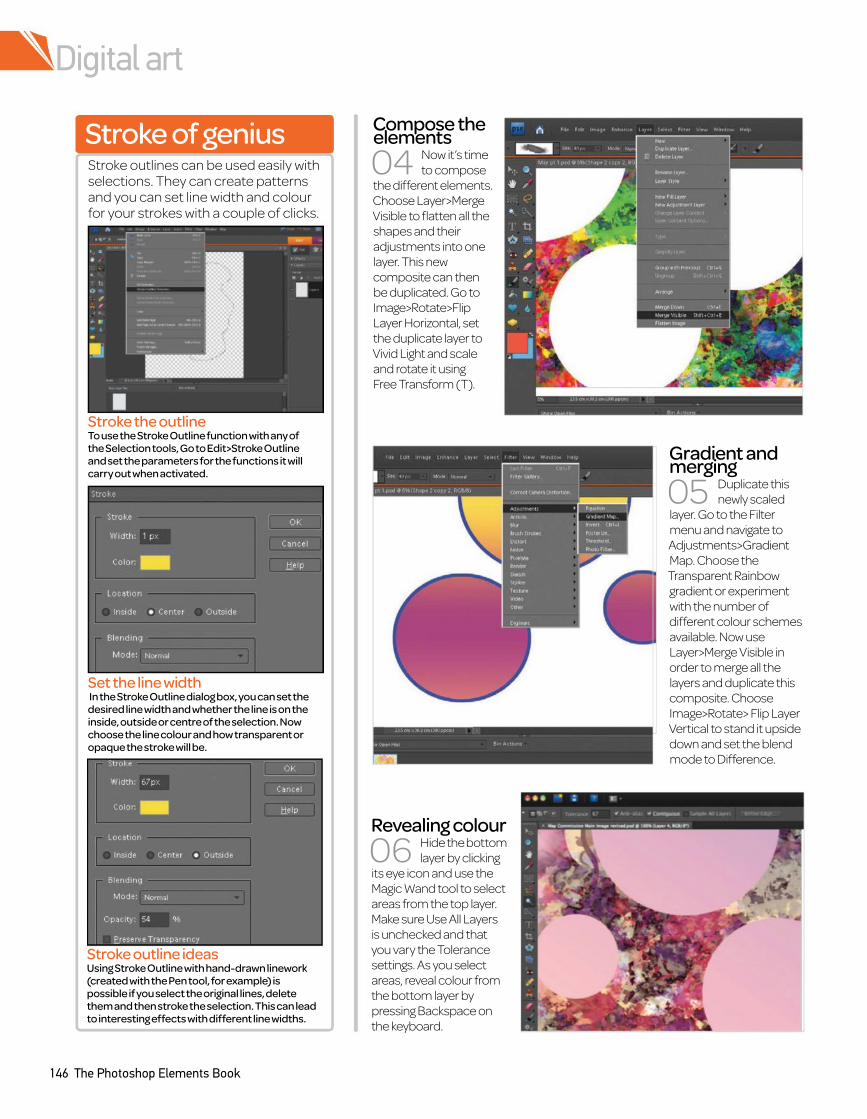
Digital art
146 The Photoshop Elements Book
Stroke outlines can be used easily with selections. They can create patterns and you can set line width and colour for your strokes with a couple of clicks.
Stroke of genius
Stroke the outlineTo use the Stroke Outline function with any of the Selection tools, Go to Edit>Stroke Outline and set the parameters for the functions it will carry out when activated.
Set the line width In the Stroke Outline dialog box, you can set the desired line width and whether the line is on the inside, outside or centre of the selection. Now choose the line colour and how transparent or opaque the stroke will be.
Stroke outline ideasUsing Stroke Outline with hand-drawn linework (created with the Pen tool, for example) is possible if you select the original lines, delete them and then stroke the selection. This can lead to interesting effects with different line widths.
Compose the elements
04 Now it’s time
to compose
the different elements.
Choose Layer>Merge
Visible to flatten all the
shapes and their
adjustments into one
layer. This new
composite can then
be duplicated. Go to
Image>Rotate>Flip
Layer Horizontal, set
the duplicate layer to
Vivid Light and scale
and rotate it using
Free Transform (T).
Gradient and merging
05 Duplicate this
newly scaled
layer. Go to the Filter
menu and navigate to
Adjustments>Gradient
Map. Choose the
Transparent Rainbow
gradient or experiment
with the number of
different colour schemes
available. Now use
Layer>Merge Visible in
order to merge all the
layers and duplicate this
composite. Choose
Image>Rotate> Flip Layer
Vertical to stand it upside
down and set the blend
mode to Difference.
Revealing colour
06 Hide the bottom
layer by clicking
its eye icon and use the
Magic Wand tool to select
areas from the top layer.
Make sure Use All Layers
is unchecked and that
you vary the Tolerance
settings. As you select
areas, reveal colour from
the bottom layer by
pressing Backspace on
the keyboard.
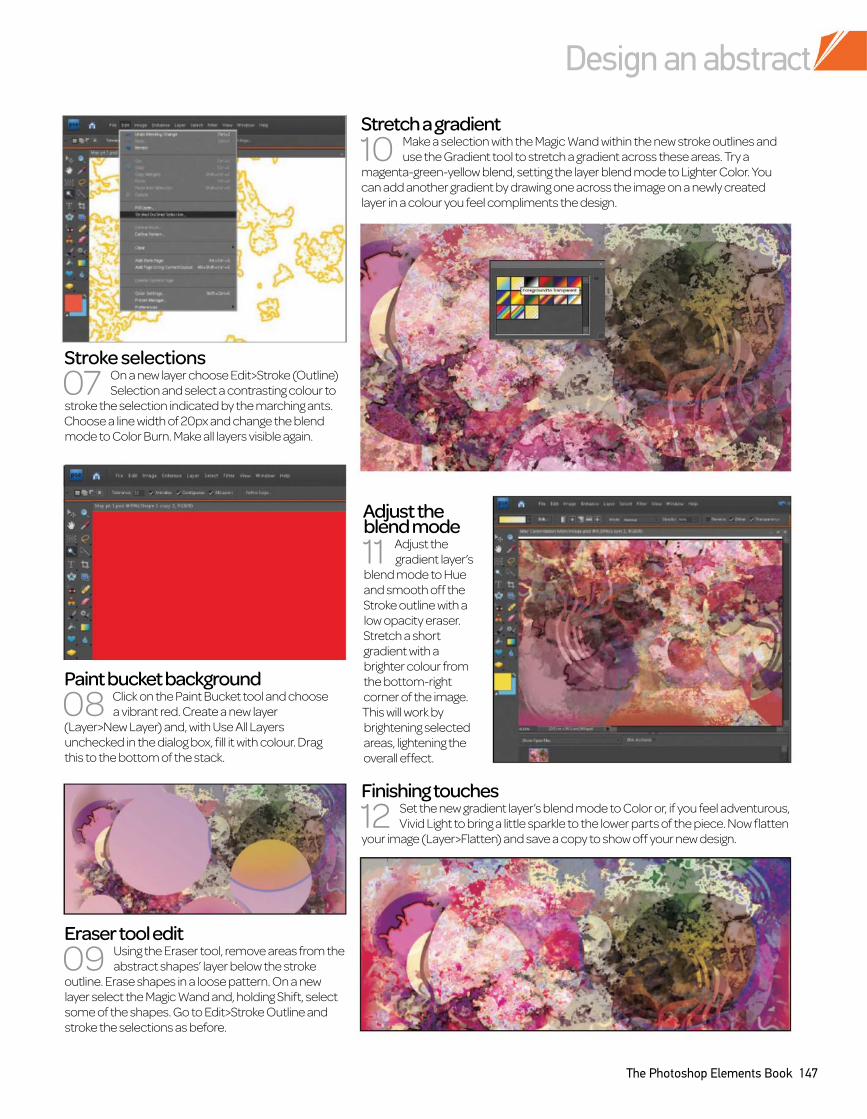
Design an abstract
The Photoshop Elements Book 147
Paint bucket background
08 Click on the Paint Bucket tool and choose
a vibrant red. Create a new layer
(Layer>New Layer) and, with Use All Layers
unchecked in the dialog box, fill it with colour. Drag
this to the bottom of the stack.
Adjust the blend mode
11 Adjust the
gradient layer’s
blend mode to Hue
and smooth off the
Stroke outline with a
low opacity eraser.
Stretch a short
gradient with a
brighter colour from
the bottom-right
corner of the image.
This will work by
brightening selected
areas, lightening the
overall effect.
Stretch a gradient
10 Make a selection with the Magic Wand within the new stroke outlines and
use the Gradient tool to stretch a gradient across these areas. Try a
magenta-green-yellow blend, setting the layer blend mode to Lighter Color. You
can add another gradient by drawing one across the image on a newly created
layer in a colour you feel compliments the design.
Eraser tool edit
09 Using the Eraser tool, remove areas from the
abstract shapes’ layer below the stroke
outline. Erase shapes in a loose pattern. On a new
layer select the Magic Wand and, holding Shift, select
some of the shapes. Go to Edit>Stroke Outline and
stroke the selections as before.
Finishing touches
12 Set the new gradient layer’s blend mode to Color or, if you feel adventurous,
Vivid Light to bring a little sparkle to the lower parts of the piece. Now flatten
your image (Layer>Flatten) and save a copy to show off your new design.
Stroke selections
07 On a new layer choose Edit>Stroke (Outline)
Selection and select a contrasting colour to
stroke the selection indicated by the marching ants.
Choose a line width of 20px and change the blend
mode to Color Burn. Make all layers visible again.
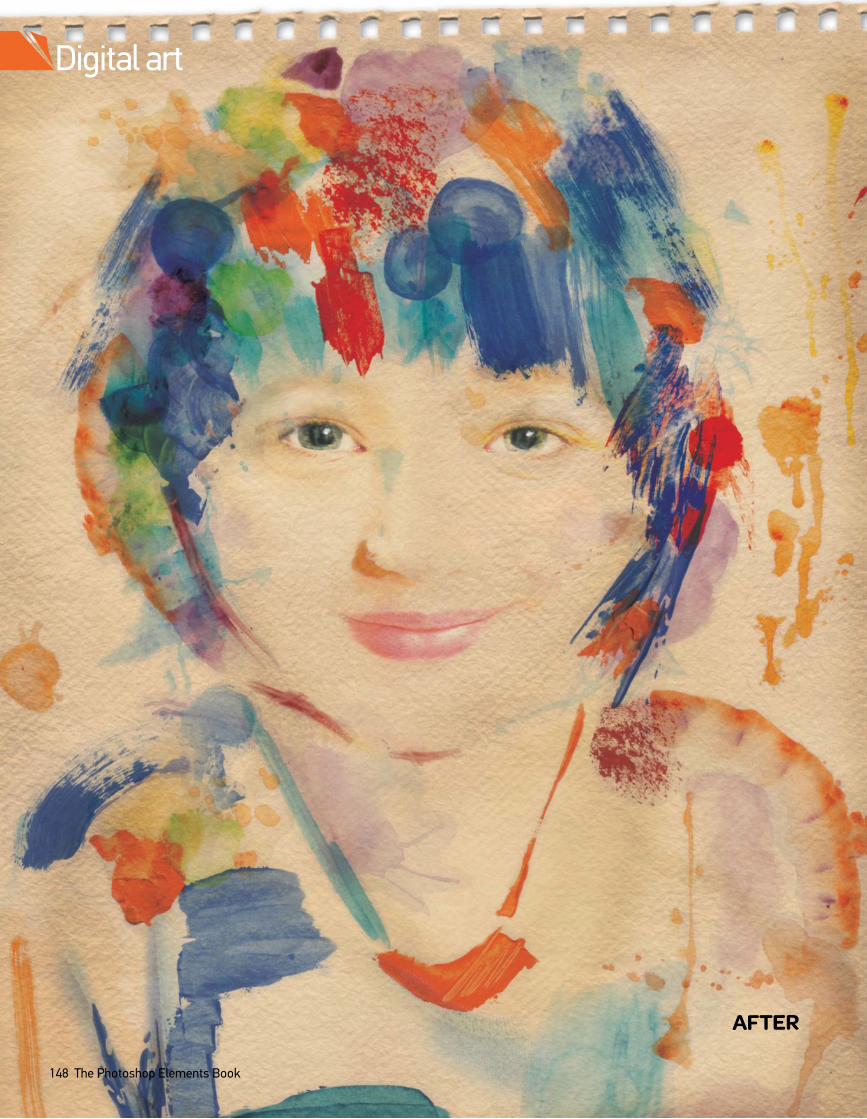
AFTER
148 The Photoshop Elements Book
Digital art
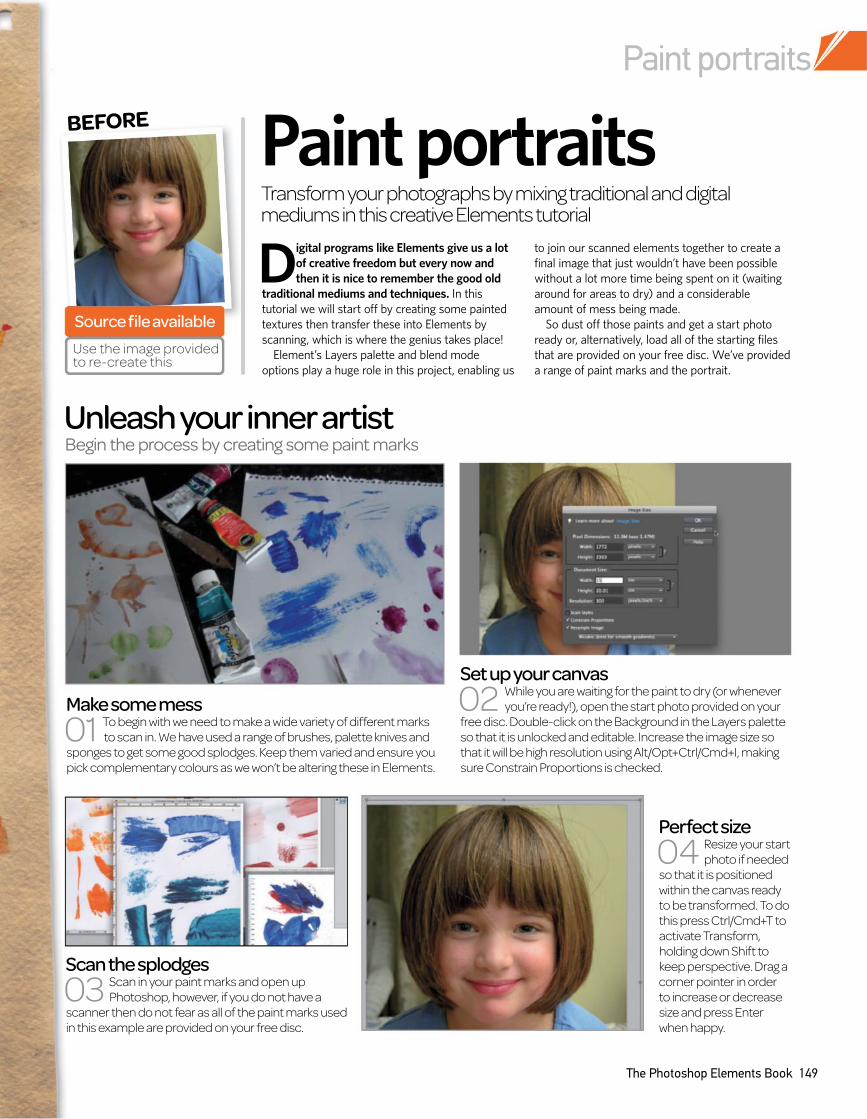
Digital programs like Elements give us a lot
of creative freedom but every now and
then it is nice to remember the good old
traditional mediums and techniques. In this
tutorial we will start off by creating some painted
textures then transfer these into Elements by
scanning, which is where the genius takes place!
Element’s Layers palette and blend mode
options play a huge role in this project, enabling us
to join our scanned elements together to create a
final image that just wouldn’t have been possible
without a lot more time being spent on it (waiting
around for areas to dry) and a considerable
amount of mess being made.
So dust off those paints and get a start photo
ready or, alternatively, load all of the starting files
that are provided on your free disc. We’ve provided
a range of paint marks and the portrait.
Paint portraits
Begin the process by creating some paint marks
Unleash your inner artist
Transform your photographs by mixing traditional and digital mediums in this creative Elements tutorial
Set up your canvas
02 While you are waiting for the paint to dry (or whenever
you’re ready!), open the start photo provided on your
free disc. Double-click on the Background in the Layers palette
so that it is unlocked and editable. Increase the image size so
that it will be high resolution using Alt/Opt+Ctrl/Cmd+I, making
sure Constrain Proportions is checked.
Make some mess
01 To begin with we need to make a wide variety of different marks
to scan in. We have used a range of brushes, palette knives and
sponges to get some good splodges. Keep them varied and ensure you
pick complementary colours as we won’t be altering these in Elements.
Source file available
Use the image provided to re-create this
BEFORE
Perfect size
04 Resize your start
photo if needed
so that it is positioned
within the canvas ready
to be transformed. To do
this press Ctrl/Cmd+T to
activate Transform,
holding down Shift to
keep perspective. Drag a
corner pointer in order
to increase or decrease
size and press Enter
when happy.
Scan the splodges
03 Scan in your paint marks and open up
Photoshop, however, if you do not have a
scanner then do not fear as all of the paint marks used
in this example are provided on your free disc.
Paint portraits
The Photoshop Elements Book 149
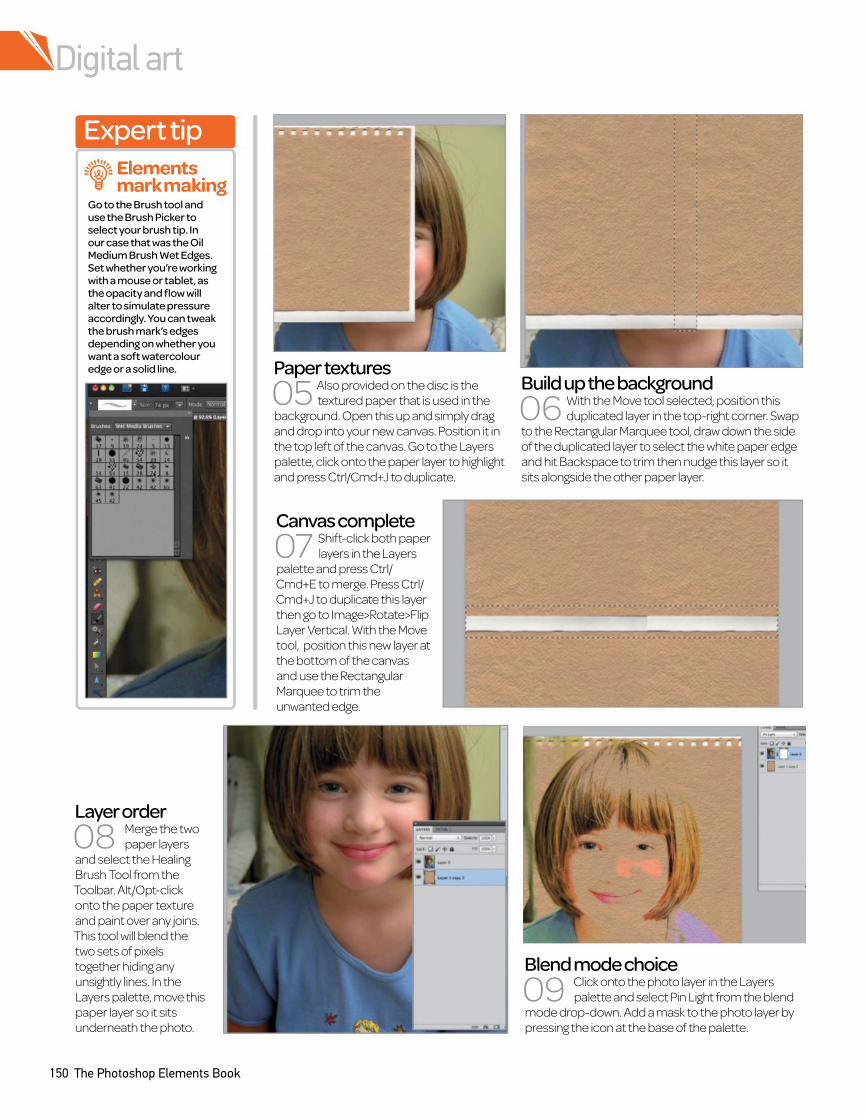
Digital art
150 The Photoshop Elements Book
Paper textures
textured paper that is used in the 05 Also provided on the disc is the
background. Open this up and simply drag
and drop into your new canvas. Position it in
the top left of the canvas. Go to the Layers
palette, click onto the paper layer to highlight
and press Ctrl/Cmd+J to duplicate.
Build up the background
06 With the Move tool selected, position this
duplicated layer in the top-right corner. Swap
to the Rectangular Marquee tool, draw down the side
of the duplicated layer to select the white paper edge
and hit Backspace to trim then nudge this layer so it
sits alongside the other paper layer.
Canvas complete
07 Shift-click both paper
layers in the Layers
palette and press Ctrl/
Cmd+E to merge. Press Ctrl/
Cmd+J to duplicate this layer
then go to Image>Rotate>Flip
Layer Vertical. With the Move
tool, position this new layer at
the bottom of the canvas
and use the Rectangular
Marquee to trim the
unwanted edge.
Blend mode choice
09 Click onto the photo layer in the Layers
palette and select Pin Light from the blend
mode drop-down. Add a mask to the photo layer by
pressing the icon at the base of the palette.
Layer order
08 Merge the two
paper layers
and select the Healing
Brush Tool from the
Toolbar. Alt/Opt-click
onto the paper texture
and paint over any joins.
This tool will blend the
two sets of pixels
together hiding any
unsightly lines. In the
Layers palette, move this
paper layer so it sits
underneath the photo.
Expert tip
Go to the Brush tool and use the Brush Picker to select your brush tip. In our case that was the Oil Medium Brush Wet Edges. Set whether you’re working with a mouse or tablet, as the opacity and flow will alter to simulate pressure accordingly. You can tweak the brush mark’s edges depending on whether you want a soft watercolour edge or a solid line.
Elements mark making
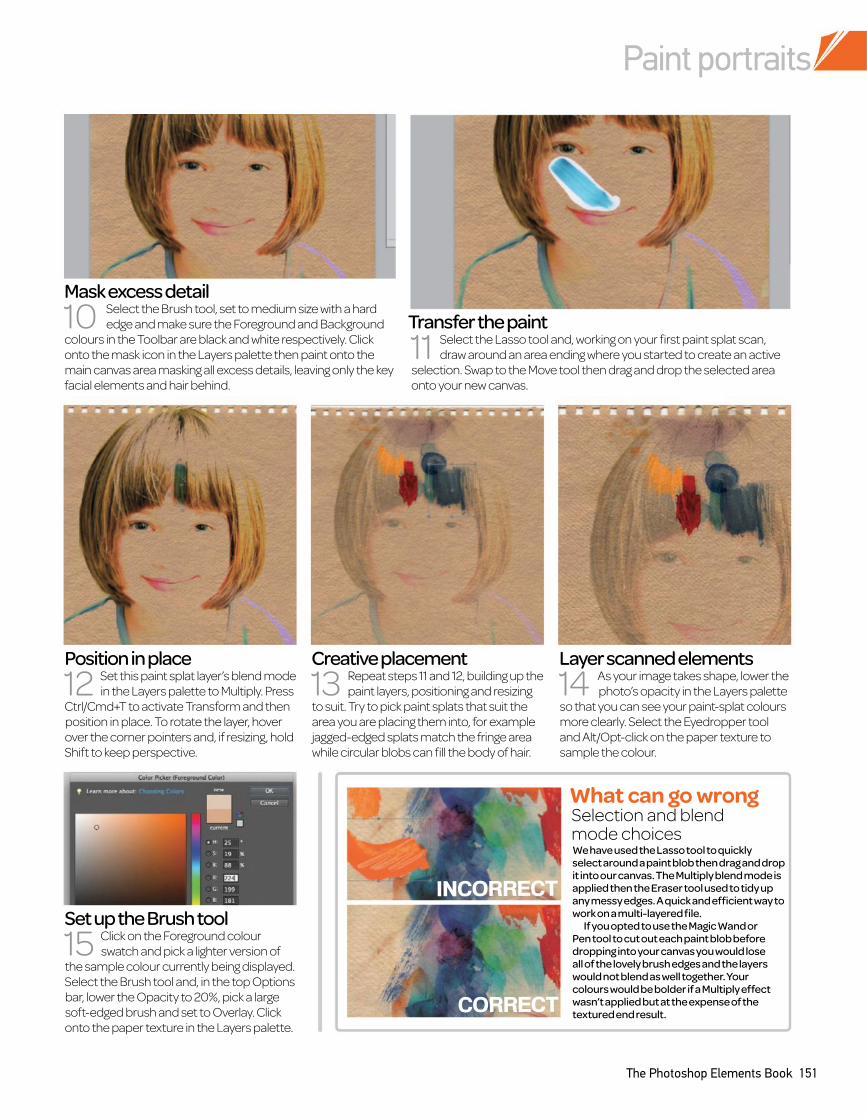
Paint portraits
The Photoshop Elements Book 151
We have used the Lasso tool to quickly select around a paint blob then drag and drop it into our canvas. The Multiply blend mode is applied then the Eraser tool used to tidy up any messy edges. A quick and efficient way to work on a multi-layered file.
If you opted to use the Magic Wand or Pen tool to cut out each paint blob before dropping into your canvas you would lose all of the lovely brush edges and the layers would not blend as well together. Your colours would be bolder if a Multiply effect wasn’t applied but at the expense of the textured end result.
Selection and blend mode choices
What can go wrong
Mask excess detail
10 Select the Brush tool, set to medium size with a hard
edge and make sure the Foreground and Background
colours in the Toolbar are black and white respectively. Click
onto the mask icon in the Layers palette then paint onto the
main canvas area masking all excess details, leaving only the key
facial elements and hair behind.
Creative placement
13 Repeat steps 11 and 12, building up the
paint layers, positioning and resizing
to suit. Try to pick paint splats that suit the
area you are placing them into, for example
jagged-edged splats match the fringe area
while circular blobs can fill the body of hair.
Transfer the paint
11 Select the Lasso tool and, working on your first paint splat scan,
draw around an area ending where you started to create an active
selection. Swap to the Move tool then drag and drop the selected area
onto your new canvas.
Layer scanned elements
photo’s opacity in the Layers palette 14 As your image takes shape, lower the
so that you can see your paint-splat colours
more clearly. Select the Eyedropper tool
and Alt/Opt-click on the paper texture to
sample the colour.
Position in place
12 Set this paint splat layer’s blend mode
in the Layers palette to Multiply. Press
Ctrl/Cmd+T to activate Transform and then
position in place. To rotate the layer, hover
over the corner pointers and, if resizing, hold
Shift to keep perspective.
Set up the Brush tool
15 Click on the Foreground colour
swatch and pick a lighter version of
the sample colour currently being displayed.
Select the Brush tool and, in the top Options
bar, lower the Opacity to 20%, pick a large
soft-edged brush and set to Overlay. Click
onto the paper texture in the Layers palette.
INCORRECT
CORRECT
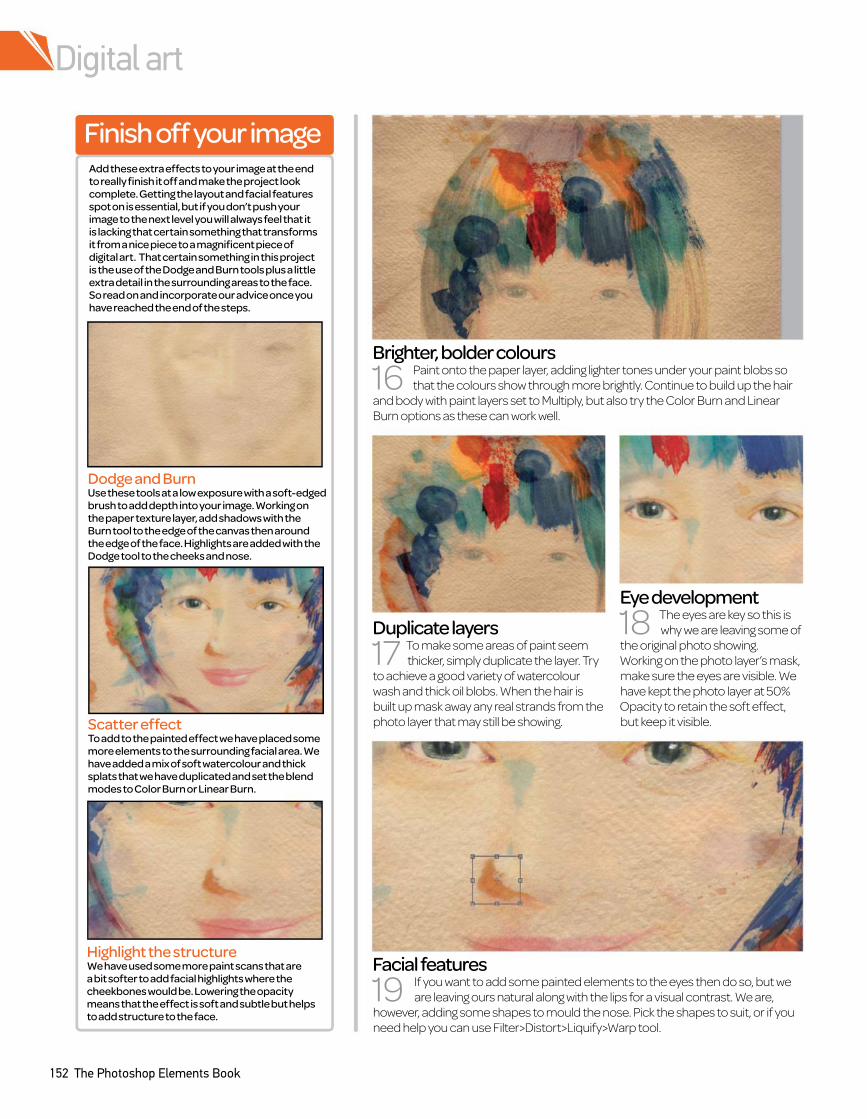
Digital art
152 The Photoshop Elements Book
Add these extra effects to your image at the end to really finish it off and make the project look complete. Getting the layout and facial features spot on is essential, but if you don’t push your image to the next level you will always feel that it is lacking that certain something that transforms it from a nice piece to a magnificent piece of digital art. That certain something in this project is the use of the Dodge and Burn tools plus a little extra detail in the surrounding areas to the face. So read on and incorporate our advice once you have reached the end of the steps.
Brighter, bolder colours
16 Paint onto the paper layer, adding lighter tones under your paint blobs so
that the colours show through more brightly. Continue to build up the hair
and body with paint layers set to Multiply, but also try the Color Burn and Linear
Burn options as these can work well.
Facial features
are leaving ours natural along with the lips for a visual contrast. We are, 19 If you want to add some painted elements to the eyes then do so, but we
however, adding some shapes to mould the nose. Pick the shapes to suit, or if you
need help you can use Filter>Distort>Liquify>Warp tool.
Duplicate layers
17 To make some areas of paint seem
thicker, simply duplicate the layer. Try
to achieve a good variety of watercolour
wash and thick oil blobs. When the hair is
built up mask away any real strands from the
photo layer that may still be showing.
Eye development
18 The eyes are key so this is
why we are leaving some of
the original photo showing.
Working on the photo layer’s mask,
make sure the eyes are visible. We
have kept the photo layer at 50%
Opacity to retain the soft effect,
but keep it visible.
Finish off your image
Highlight the structure We have used some more paint scans that are a bit softer to add facial highlights where the cheekbones would be. Lowering the opacity means that the effect is soft and subtle but helps to add structure to the face.
Scatter effectTo add to the painted effect we have placed some more elements to the surrounding facial area. We have added a mix of soft watercolour and thick splats that we have duplicated and set the blend modes to Color Burn or Linear Burn.
Dodge and BurnUse these tools at a low exposure with a soft-edged brush to add depth into your image. Working on the paper texture layer, add shadows with the Burn tool to the edge of the canvas then around the edge of the face. Highlights are added with the Dodge tool to the cheeks and nose.
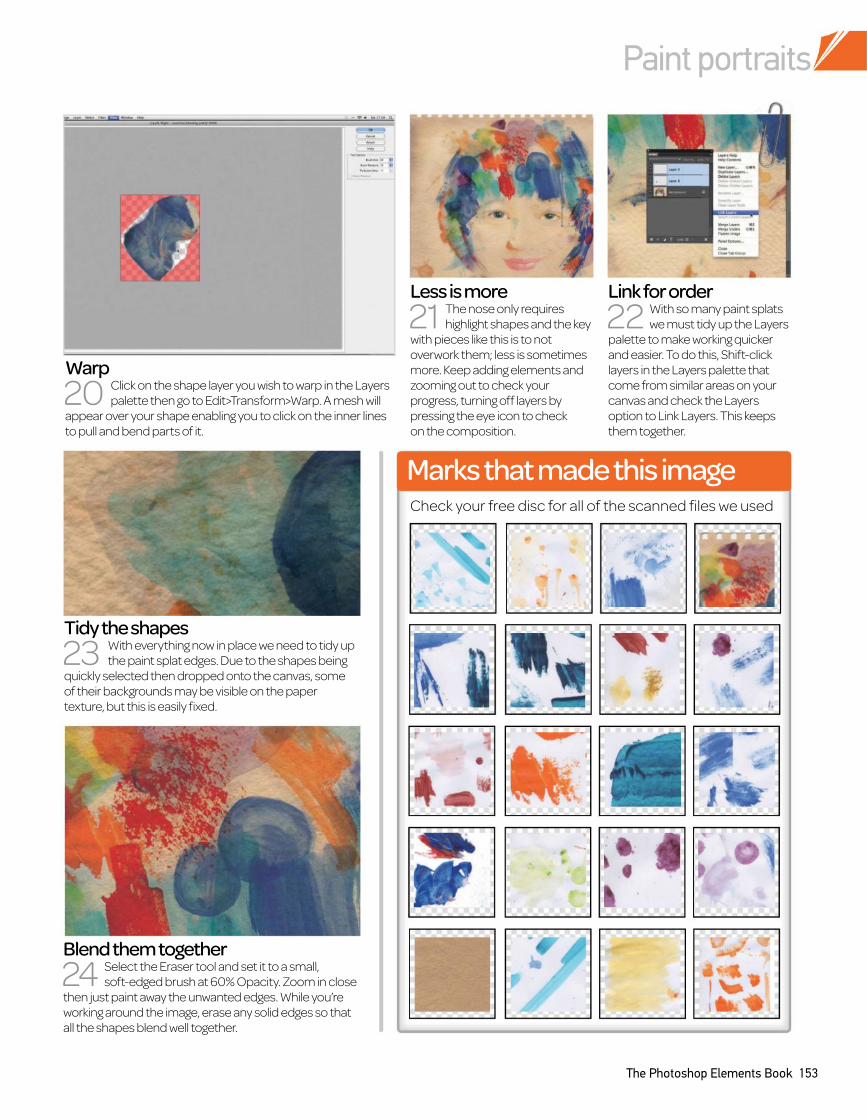
Paint portraits
The Photoshop Elements Book 153
Tidy the shapes
23
With everything now in place we need to tidy up
the paint splat edges. Due to the shapes being
quickly selected then dropped onto the canvas, some
of their backgrounds may be visible on the paper
texture, but this is easily fixed.
Blend them together
24 Select the Eraser tool and set it to a small,
soft-edged brush at 60% Opacity. Zoom in close
then just paint away the unwanted edges. While you’re
working around the image, erase any solid edges so that
all the shapes blend well together.
Less is more
21 The nose only requires
highlight shapes and the key
with pieces like this is to not
overwork them; less is sometimes
more. Keep adding elements and
zooming out to check your
progress, turning off layers by
pressing the eye icon to check
on the composition.
Link for order
22
With so many paint splats
we must tidy up the Layers
palette to make working quicker
and easier. To do this, Shift-click
layers in the Layers palette that
come from similar areas on your
canvas and check the Layers
option to Link Layers. This keeps
them together.
Warp
20
Click on the shape layer you wish to warp in the Layers
palette then go to Edit>Transform>Warp. A mesh will
appear over your shape enabling you to click on the inner lines
to pull and bend parts of it.
Marks that made this imageCheck your free disc for all of the scanned files we used
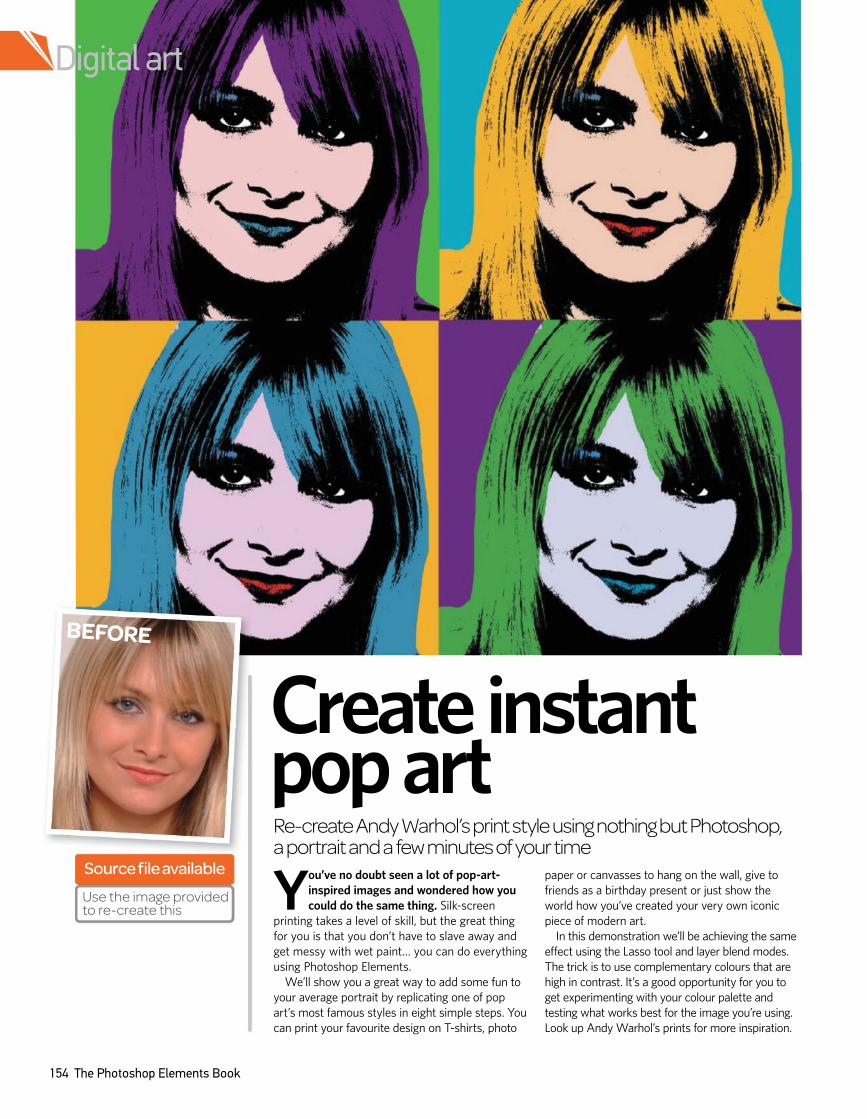
154 The Photoshop Elements Book
Y ou’ve no doubt seen a lot of pop-art-
inspired images and wondered how you
could do the same thing. Silk-screen
printing takes a level of skill, but the great thing
for you is that you don’t have to slave away and
get messy with wet paint… you can do everything
using Photoshop Elements.
We’ll show you a great way to add some fun to
your average portrait by replicating one of pop
art’s most famous styles in eight simple steps. You
can print your favourite design on T-shirts, photo
paper or canvasses to hang on the wall, give to
friends as a birthday present or just show the
world how you’ve created your very own iconic
piece of modern art.
In this demonstration we’ll be achieving the same
effect using the Lasso tool and layer blend modes.
The trick is to use complementary colours that are
high in contrast. It’s a good opportunity for you to
get experimenting with your colour palette and
testing what works best for the image you’re using.
Look up Andy Warhol’s prints for more inspiration.
Create instant pop art Re-create Andy Warhol’s print style using nothing but Photoshop, a portrait and a few minutes of your time
Source file available
Use the image provided to re-create this
BEFORE
Digital art
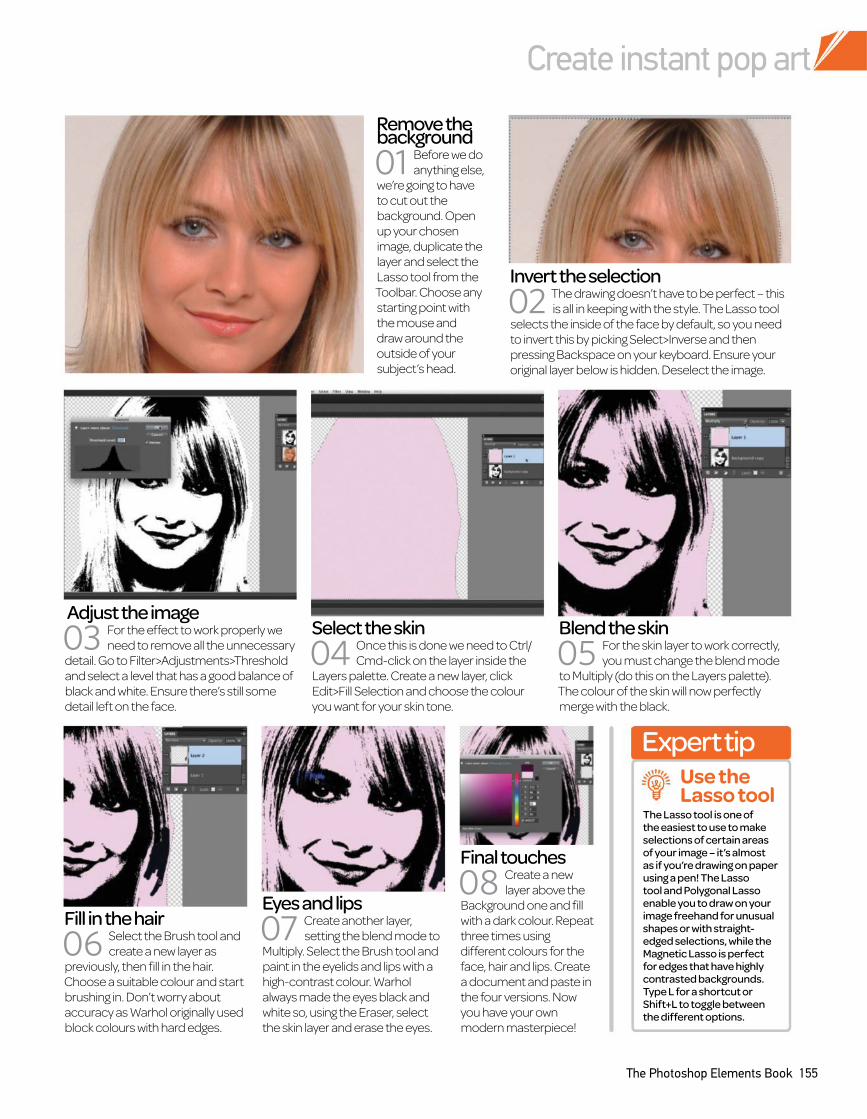
Create instant pop art
The Photoshop Elements Book 155
Invert the selection
02 The drawing doesn’t have to be perfect – this
is all in keeping with the style. The Lasso tool
selects the inside of the face by default, so you need
to invert this by picking Select>Inverse and then
pressing Backspace on your keyboard. Ensure your
original layer below is hidden. Deselect the image.
Remove the background
01 Before we do
anything else,
we’re going to have
to cut out the
background. Open
up your chosen
image, duplicate the
layer and select the
Lasso tool from the
Toolbar. Choose any
starting point with
the mouse and
draw around the
outside of your
subject’s head.
Adjust the image
03 For the effect to work properly we
need to remove all the unnecessary
detail. Go to Filter>Adjustments>Threshold
and select a level that has a good balance of
black and white. Ensure there’s still some
detail left on the face.
Select the skin
04 Once this is done we need to Ctrl/
Cmd-click on the layer inside the
Layers palette. Create a new layer, click
Edit>Fill Selection and choose the colour
you want for your skin tone.
Eyes and lips
07 Create another layer,
setting the blend mode to
Multiply. Select the Brush tool and
paint in the eyelids and lips with a
high-contrast colour. Warhol
always made the eyes black and
white so, using the Eraser, select
the skin layer and erase the eyes.
Final touches
08 Create a new
layer above the
Background one and fill
with a dark colour. Repeat
three times using
different colours for the
face, hair and lips. Create
a document and paste in
the four versions. Now
you have your own
modern masterpiece!
Blend the skin
05 For the skin layer to work correctly,
you must change the blend mode
to Multiply (do this on the Layers palette).
The colour of the skin will now perfectly
merge with the black.
Fill in the hair
06 Select the Brush tool and
create a new layer as
previously, then fill in the hair.
Choose a suitable colour and start
brushing in. Don’t worry about
accuracy as Warhol originally used
block colours with hard edges.
Expert tip
The Lasso tool is one of the easiest to use to make selections of certain areas of your image – it’s almost as if you’re drawing on paper using a pen! The Lasso tool and Polygonal Lasso enable you to draw on your image freehand for unusual shapes or with straight-edged selections, while the Magnetic Lasso is perfect for edges that have highly contrasted backgrounds. Type L for a shortcut or Shift+L to toggle between the different options.
Use the Lasso tool
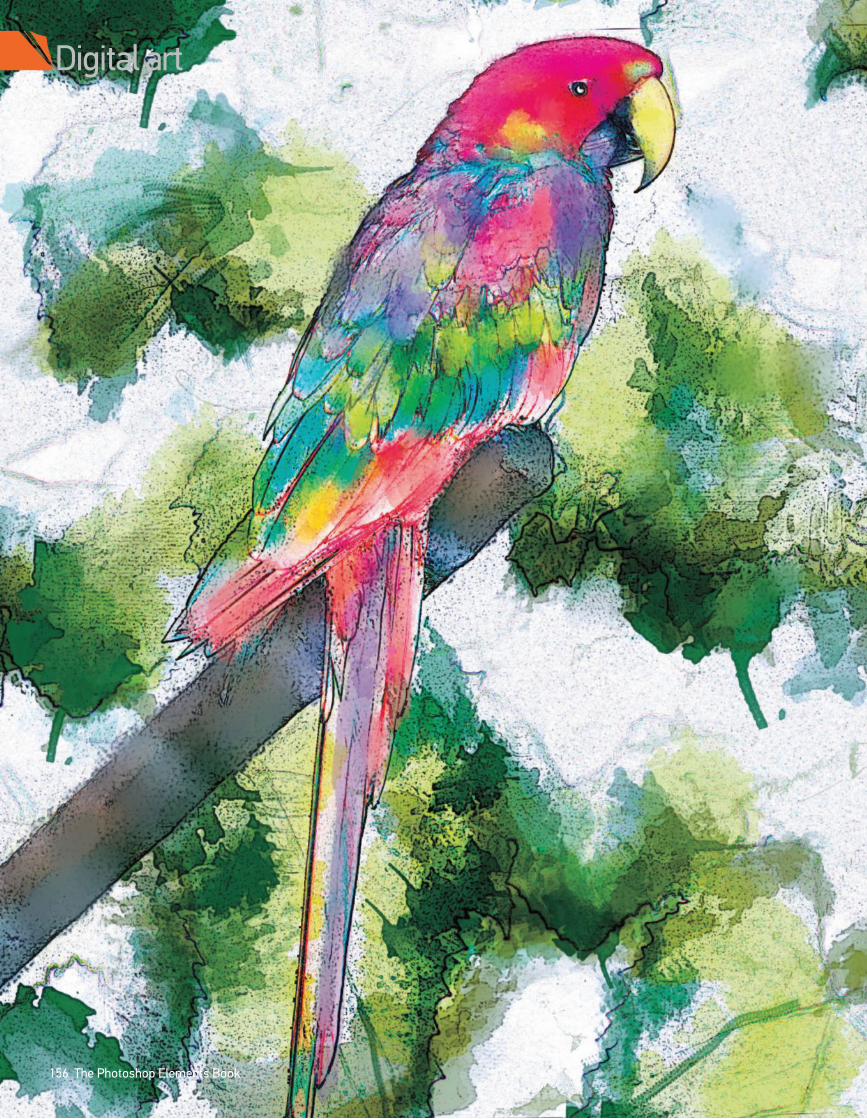
156 The Photoshop Elements Book
Digital art
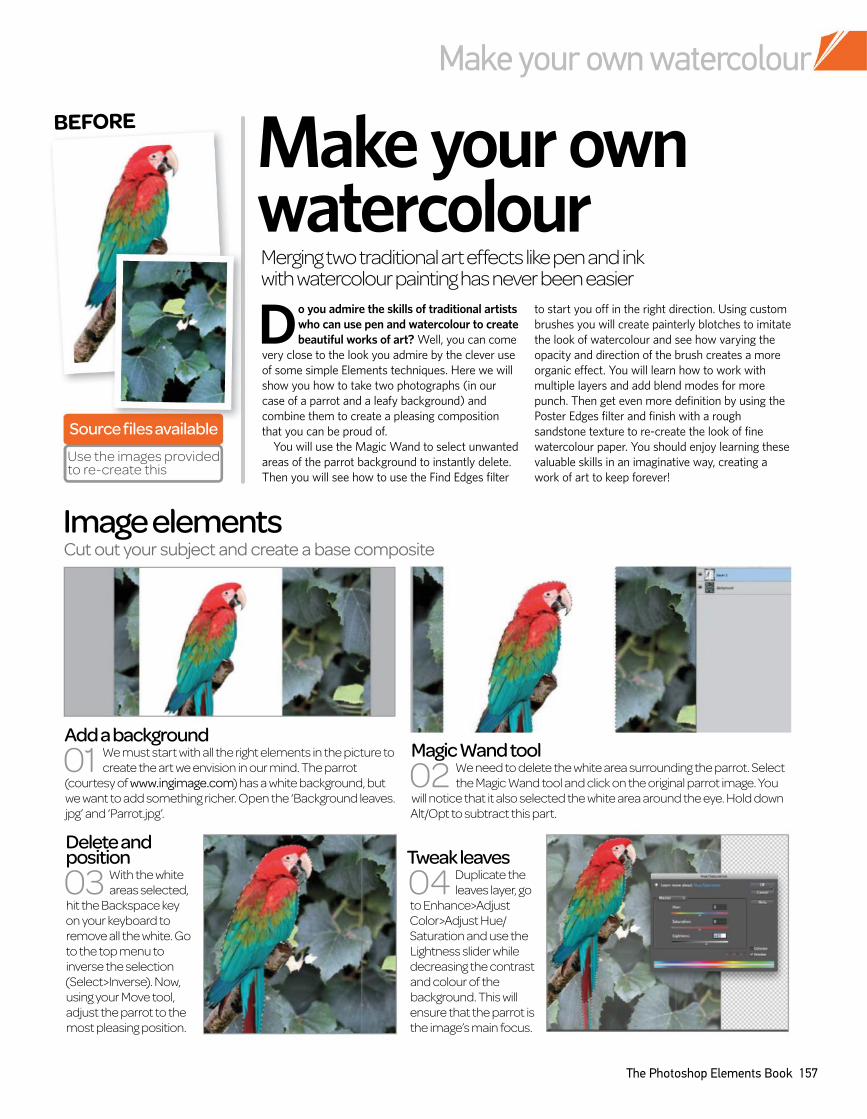
Make your own watercolour
The Photoshop Elements Book 157
Do you admire the skills of traditional artists
who can use pen and watercolour to create
beautiful works of art? Well, you can come
very close to the look you admire by the clever use
of some simple Elements techniques. Here we will
show you how to take two photographs (in our
case of a parrot and a leafy background) and
combine them to create a pleasing composition
that you can be proud of.
You will use the Magic Wand to select unwanted
areas of the parrot background to instantly delete.
Then you will see how to use the Find Edges filter
to start you off in the right direction. Using custom
brushes you will create painterly blotches to imitate
the look of watercolour and see how varying the
opacity and direction of the brush creates a more
organic effect. You will learn how to work with
multiple layers and add blend modes for more
punch. Then get even more definition by using the
Poster Edges filter and finish with a rough
sandstone texture to re-create the look of fine
watercolour paper. You should enjoy learning these
valuable skills in an imaginative way, creating a
work of art to keep forever!
Make your own watercolour
Cut out your subject and create a base composite
Image elements
Merging two traditional art effects like pen and ink with watercolour painting has never been easier
Magic Wand tool
02 We need to delete the white area surrounding the parrot. Select
the Magic Wand tool and click on the original parrot image. You
will notice that it also selected the white area around the eye. Hold down
Alt/Opt to subtract this part.
Source files available
Use the images provided to re-create this
Add a background
01 We must start with all the right elements in the picture to
create the art we envision in our mind. The parrot
(courtesy of www.ingimage.com) has a white background, but
we want to add something richer. Open the ‘Background leaves.
jpg’ and ‘Parrot.jpg’.
BEFORE
Tweak leaves
04 Duplicate the
leaves layer, go
to Enhance>Adjust
Color>Adjust Hue/
Saturation and use the
Lightness slider while
decreasing the contrast
and colour of the
background. This will
ensure that the parrot is
the image’s main focus.
Delete and position
03 With the white
areas selected,
hit the Backspace key
on your keyboard to
remove all the white. Go
to the top menu to
inverse the selection
(Select>Inverse). Now,
using your Move tool,
adjust the parrot to the
most pleasing position.
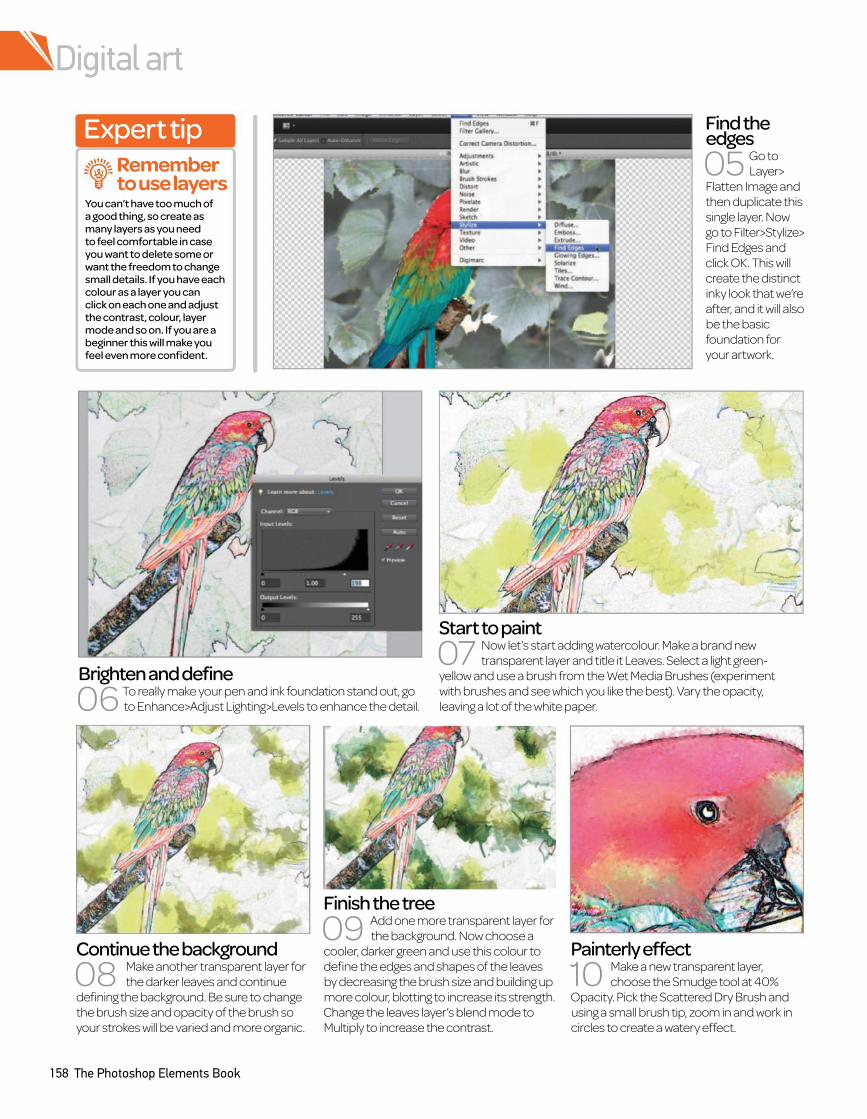
Digital art
158 The Photoshop Elements Book
Find the edges
05 Go to
Layer>
Flatten Image and
then duplicate this
single layer. Now
go to Filter>Stylize>
Find Edges and
click OK. This will
create the distinct
inky look that we’re
after, and it will also
be the basic
foundation for
your artwork.
Brighten and define
06 To really make your pen and ink foundation stand out, go
to Enhance>Adjust Lighting>Levels to enhance the detail.
Finish the tree
09 Add one more transparent layer for
the background. Now choose a
cooler, darker green and use this colour to
define the edges and shapes of the leaves
by decreasing the brush size and building up
more colour, blotting to increase its strength.
Change the leaves layer’s blend mode to
Multiply to increase the contrast.
Start to paint
07 Now let’s start adding watercolour. Make a brand new
transparent layer and title it Leaves. Select a light green-
yellow and use a brush from the Wet Media Brushes (experiment
with brushes and see which you like the best). Vary the opacity,
leaving a lot of the white paper.
Painterly effect
10 Make a new transparent layer,
choose the Smudge tool at 40%
Opacity. Pick the Scattered Dry Brush and
using a small brush tip, zoom in and work in
circles to create a watery effect.
Continue the background
08 Make another transparent layer for
the darker leaves and continue
defining the background. Be sure to change
the brush size and opacity of the brush so
your strokes will be varied and more organic.
Expert tip
You can’t have too much of a good thing, so create as many layers as you need to feel comfortable in case you want to delete some or want the freedom to change small details. If you have each colour as a layer you can click on each one and adjust the contrast, colour, layer mode and so on. If you are a beginner this will make you feel even more confident.
Remember to use layers
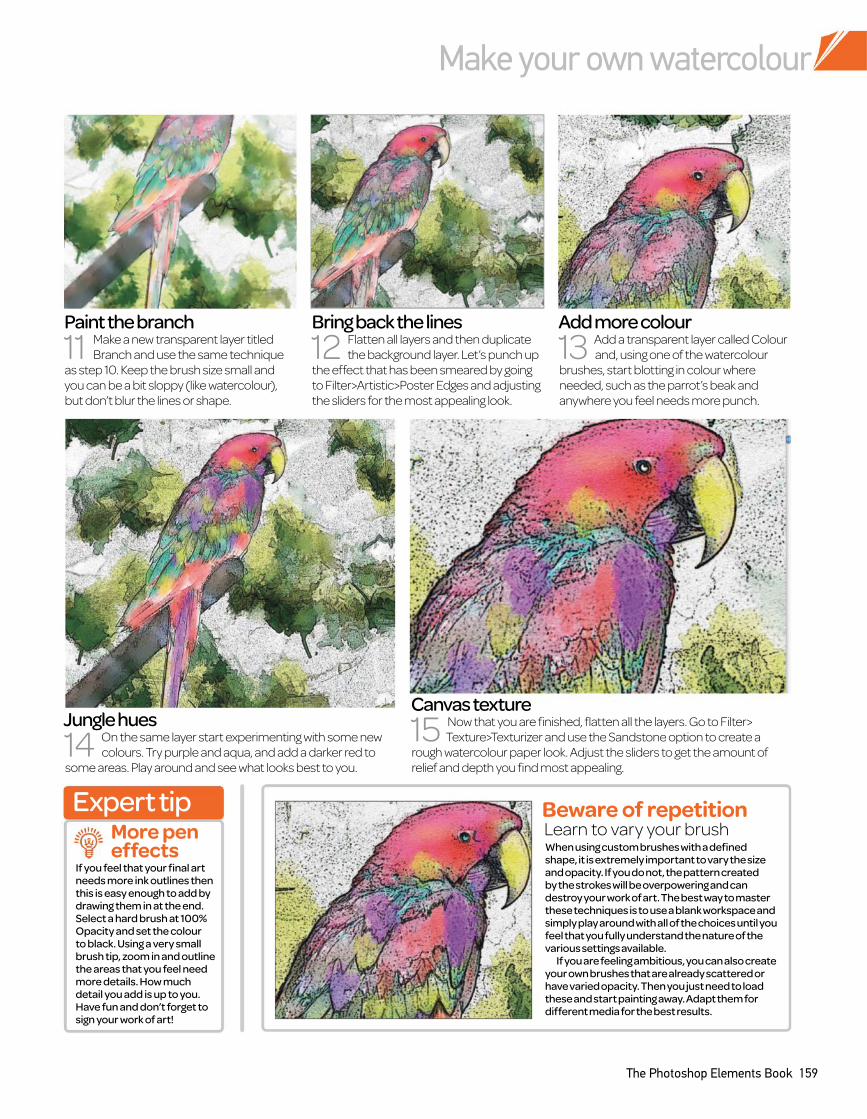
Make your own watercolour
The Photoshop Elements Book 159
When using custom brushes with a defined shape, it is extremely important to vary the size and opacity. If you do not, the pattern created by the strokes will be overpowering and can destroy your work of art. The best way to master these techniques is to use a blank workspace and simply play around with all of the choices until you feel that you fully understand the nature of the various settings available.
If you are feeling ambitious, you can also create your own brushes that are already scattered or have varied opacity. Then you just need to load these and start painting away. Adapt them for different media for the best results.
Learn to vary your brush
Paint the branch
11 Make a new transparent layer titled
Branch and use the same technique
as step 10. Keep the brush size small and
you can be a bit sloppy (like watercolour),
but don’t blur the lines or shape.
Bring back the lines
12 Flatten all layers and then duplicate
the background layer. Let’s punch up
the effect that has been smeared by going
to Filter>Artistic>Poster Edges and adjusting
the sliders for the most appealing look.
Canvas texture
15 Now that you are finished, flatten all the layers. Go to Filter>
Texture>Texturizer and use the Sandstone option to create a
rough watercolour paper look. Adjust the sliders to get the amount of
relief and depth you find most appealing.
Add more colour
13 Add a transparent layer called Colour
and, using one of the watercolour
brushes, start blotting in colour where
needed, such as the parrot’s beak and
anywhere you feel needs more punch.
Jungle hues
14 On the same layer start experimenting with some new
colours. Try purple and aqua, and add a darker red to
some areas. Play around and see what looks best to you.
Expert tip
If you feel that your final art needs more ink outlines then this is easy enough to add by drawing them in at the end. Select a hard brush at 100% Opacity and set the colour to black. Using a very small brush tip, zoom in and outline the areas that you feel need more details. How much detail you add is up to you. Have fun and don’t forget to sign your work of art!
More pen effects
Beware of repetition
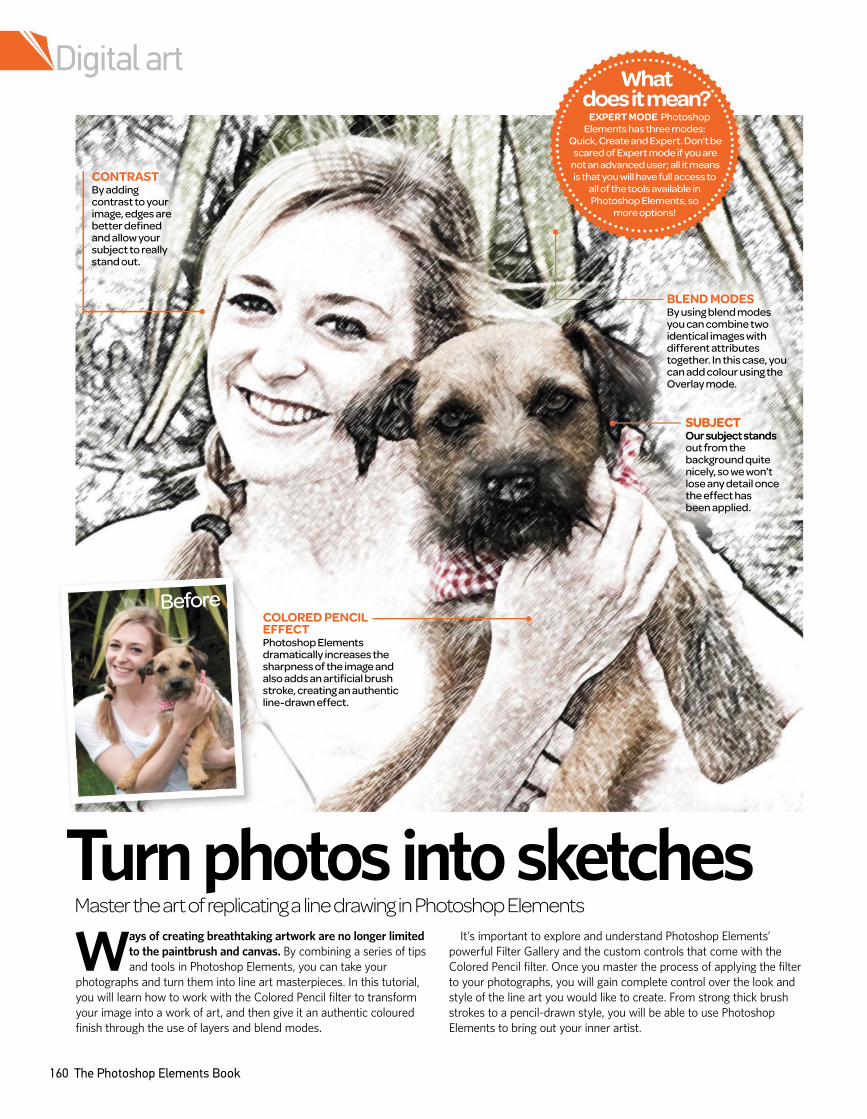
160 The Photoshop Elements Book
Ways of creating breathtaking artwork are no longer limited
to the paintbrush and canvas. By combining a series of tips
and tools in Photoshop Elements, you can take your
photographs and turn them into line art masterpieces. In this tutorial,
you will learn how to work with the Colored Pencil filter to transform
your image into a work of art, and then give it an authentic coloured
finish through the use of layers and blend modes.
ItÕs important to explore and understand Photoshop ElementsÕ
powerful Filter Gallery and the custom controls that come with the
Colored Pencil filter. Once you master the process of applying the filter
to your photographs, you will gain complete control over the look and
style of the line art you would like to create. From strong thick brush
strokes to a pencil-drawn style, you will be able to use Photoshop
Elements to bring out your inner artist.
Turn photos into sketchesMaster the art of replicating a line drawing in Photoshop Elements
SUBJECT
Our subject stands out from the background quite nicely, so we won’t lose any detail once the effect has been applied.
CONTRAST
By adding contrast to your image, edges are better defined and allow your subject to really stand out.
COLORED PENCIL EFFECT
Photoshop Elements dramatically increases the sharpness of the image and also adds an artificial brush stroke, creating an authentic line-drawn effect.
BLEND MODES
By using blend modes you can combine two identical images with different attributes together. In this case, you can add colour using the Overlay mode.
Before
Digital artWhat
does it mean?EXPERT MODE Photoshop
Elements has three modes: Quick, Create and Expert. Don’t be
scared of Expert mode if you are not an advanced user; all it means is that you will have full access to
all of the tools available in Photoshop Elements, so
more options!
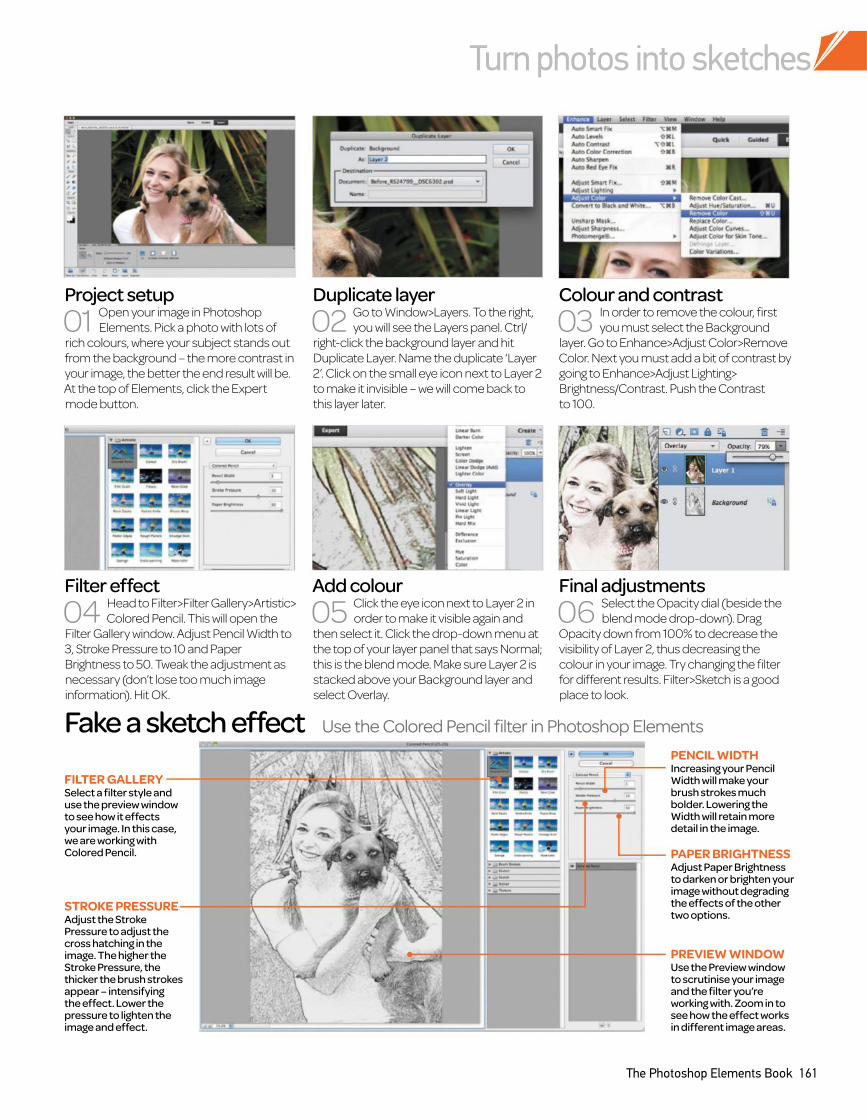
The Photoshop Elements Book 161
Duplicate layer
02 Go to Window>Layers. To the right,
you will see the Layers panel. Ctrl/
right-click the background layer and hit
Duplicate Layer. Name the duplicate ‘Layer
2’. Click on the small eye icon next to Layer 2
to make it invisible – we will come back to
this layer later.
Project setup
01 Open your image in Photoshop
Elements. Pick a photo with lots of
rich colours, where your subject stands out
from the background – the more contrast in
your image, the better the end result will be.
At the top of Elements, click the Expert
mode button.
Fake a sketch effect Use the Colored Pencil filter in Photoshop Elements
Add colour
05 Click the eye icon next to Layer 2 in
order to make it visible again and
then select it. Click the drop-down menu at
the top of your layer panel that says Normal;
this is the blend mode. Make sure Layer 2 is
stacked above your Background layer and
select Overlay.
Final adjustments
06 Select the Opacity dial (beside the
blend mode drop-down). Drag
Opacity down from 100% to decrease the
visibility of Layer 2, thus decreasing the
colour in your image. Try changing the filter
for different results. Filter>Sketch is a good
place to look.
Filter effect
04 Head to Filter>Filter Gallery>Artistic>
Colored Pencil. This will open the
Filter Gallery window. Adjust Pencil Width to
3, Stroke Pressure to 10 and Paper
Brightness to 50. Tweak the adjustment as
necessary (don’t lose too much image
information). Hit OK.
PENCIL WIDTH
Increasing your Pencil Width will make your brush strokes much bolder. Lowering the Width will retain more detail in the image.
PAPER BRIGHTNESS
Adjust Paper Brightness to darken or brighten your image without degrading the effects of the other two options.
FILTER GALLERY
Select a filter style and use the preview window to see how it effects your image. In this case, we are working with Colored Pencil.
PREVIEW WINDOW
Use the Preview window to scrutinise your image and the filter you’re working with. Zoom in to see how the effect works in different image areas.
STROKE PRESSURE
Adjust the Stroke Pressure to adjust the cross hatching in the image. The higher the Stroke Pressure, the thicker the brush strokes appear – intensifying the effect. Lower the pressure to lighten the image and effect.
Colour and contrast
03 In order to remove the colour, first
you must select the Background
layer. Go to Enhance>Adjust Color>Remove
Color. Next you must add a bit of contrast by
going to Enhance>Adjust Lighting>
Brightness/Contrast. Push the Contrast
to 100.
Turn photos into sketches
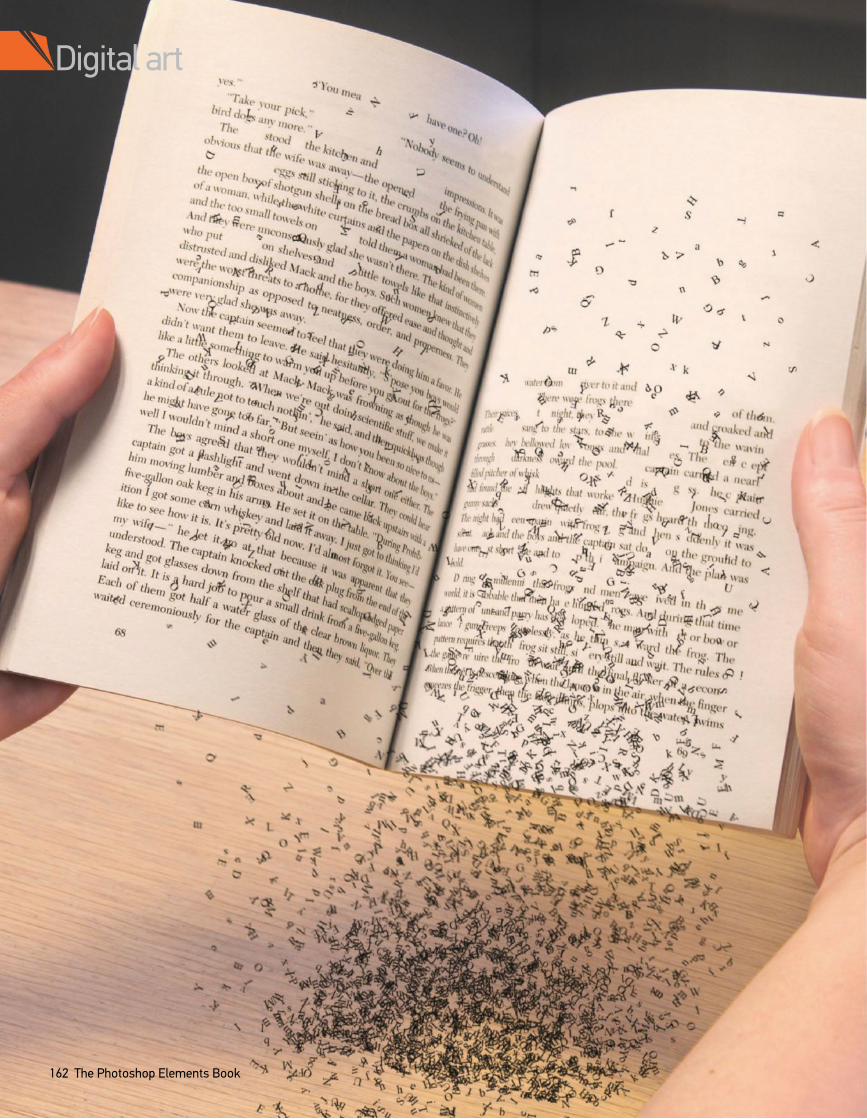
Digital art
162 The Photoshop Elements Book
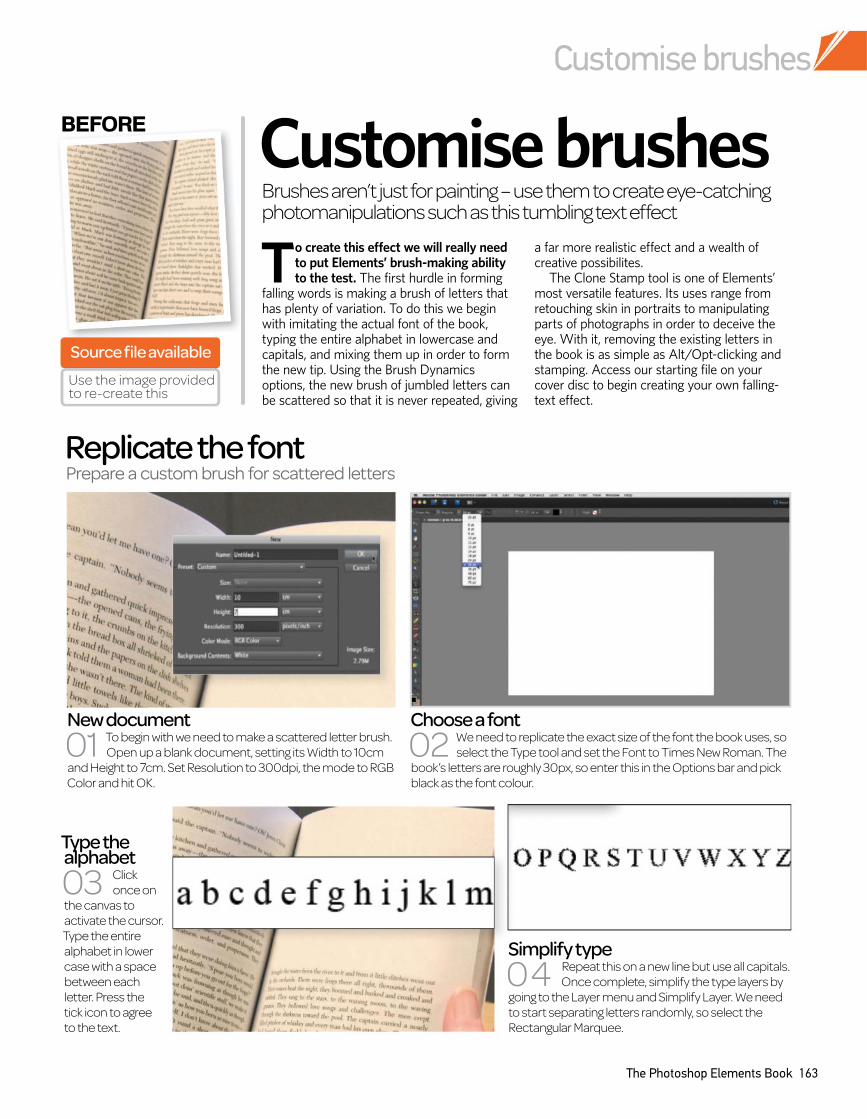
To create this effect we will really need to put Elements’ brush-making ability to the test. The first hurdle in forming
falling words is making a brush of letters that has plenty of variation. To do this we begin with imitating the actual font of the book, typing the entire alphabet in lowercase and capitals, and mixing them up in order to form the new tip. Using the Brush Dynamics options, the new brush of jumbled letters can be scattered so that it is never repeated, giving
a far more realistic effect and a wealth of creative possibilites.
The Clone Stamp tool is one of Elements’ most versatile features. Its uses range from retouching skin in portraits to manipulating parts of photographs in order to deceive the eye. With it, removing the existing letters in the book is as simple as Alt/Opt-clicking and stamping. Access our starting file on your cover disc to begin creating your own falling-text effect.
Prepare a custom brush for scattered letters
Replicate the font
Choose a font
select the Type tool and set the Font to Times New Roman. The 02 We need to replicate the exact size of the font the book uses, so
book’s letters are roughly 30px, so enter this in the Options bar and pick
black as the font colour.
New document
01 To begin with we need to make a scattered letter brush.
Open up a blank document, setting its Width to 10cm
and Height to 7cm. Set Resolution to 300dpi, the mode to RGB
Color and hit OK.
Customise brushesBrushes aren’t just for painting – use them to create eye-catching photomanipulations such as this tumbling text effect
Source file available
Use the image provided to re-create this
BEFORE
Type the alphabet
03 Click
once on
the canvas to
activate the cursor.
Type the entire
alphabet in lower
case with a space
between each
letter. Press the
tick icon to agree
to the text.
Simplify type
04 Repeat this on a new line but use all capitals.
Once complete, simplify the type layers by
going to the Layer menu and Simplify Layer. We need
to start separating letters randomly, so select the
Rectangular Marquee.
Customise brushes
The Photoshop Elements Book 163
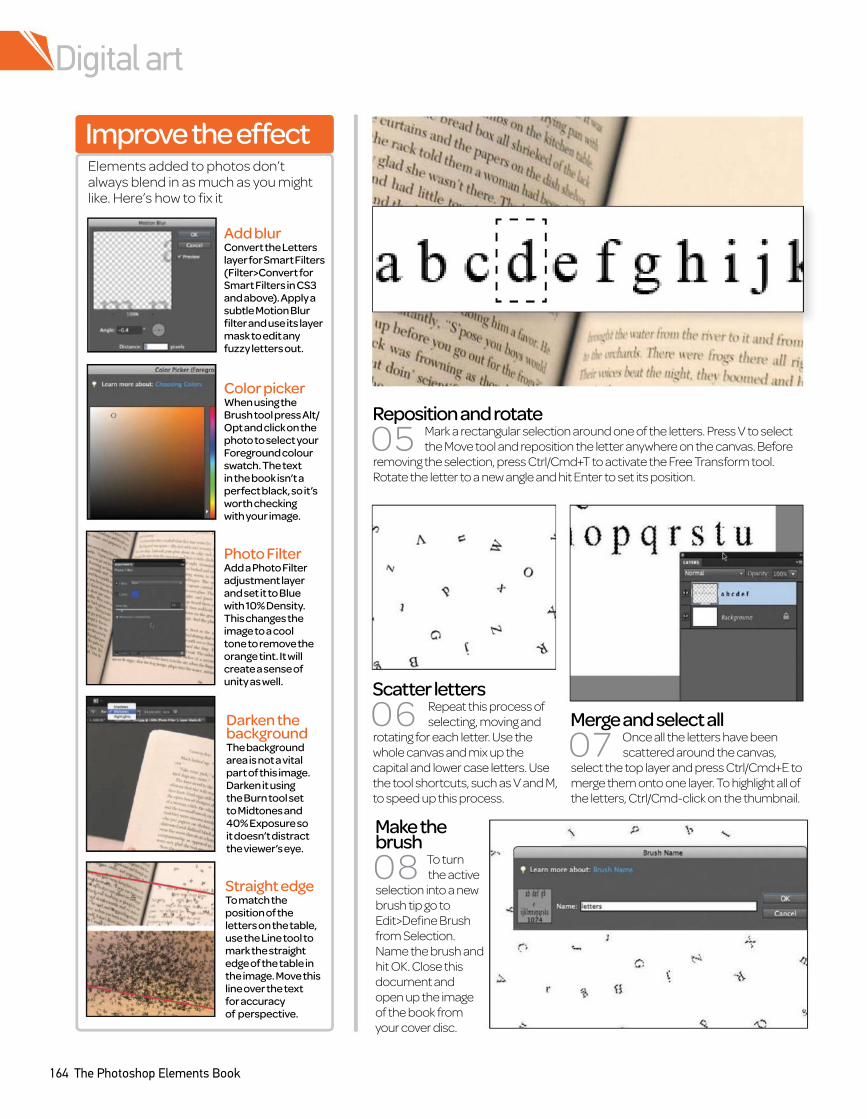
Elements added to photos don’t always blend in as much as you might like. Here’s how to fix it
Scatter letters
06 Repeat this process of
selecting, moving and
rotating for each letter. Use the
whole canvas and mix up the
capital and lower case letters. Use
the tool shortcuts, such as V and M,
to speed up this process.
Reposition and rotate
05 Mark a rectangular selection around one of the letters. Press V to select
the Move tool and reposition the letter anywhere on the canvas. Before
removing the selection, press Ctrl/Cmd+T to activate the Free Transform tool.
Rotate the letter to a new angle and hit Enter to set its position.
Merge and select all
07 Once all the letters have been
scattered around the canvas,
select the top layer and press Ctrl/Cmd+E to
merge them onto one layer. To highlight all of
the letters, Ctrl/Cmd-click on the thumbnail.
Make the brush
08 To turn
the active
selection into a new
brush tip go to
Edit>Define Brush
from Selection.
Name the brush and
hit OK. Close this
document and
open up the image
of the book from
your cover disc.
Improve the effect
Add blurConvert the Letters layer for Smart Filters (Filter>Convert for Smart Filters in CS3 and above). Apply a subtle Motion Blur filter and use its layer mask to edit any fuzzy letters out.
Color pickerWhen using the Brush tool press Alt/Opt and click on the photo to select your Foreground colour swatch. The text in the book isn’t a perfect black, so it’s worth checking with your image.
Photo FilterAdd a Photo Filter adjustment layer and set it to Blue with 10% Density. This changes the image to a cool tone to remove the orange tint. It will create a sense of unity as well.
Darken the backgroundThe background area is not a vital part of this image. Darken it using the Burn tool set to Midtones and 40% Exposure so it doesn’t distract the viewer’s eye.
Straight edgeTo match the position of the letters on the table, use the Line tool to mark the straight edge of the table in the image. Move this line over the text for accuracy of perspective.
Digital art
164 The Photoshop Elements Book

As if by magic
09 In the book image, duplicate the
Background layer. Select the Clone Stamp
tool and set it to 100% Opacity. Start with the right
page and Alt/Opt-click on the top margin. Now simply
brush over the letters to remove them.
Break up words
10 Remove individual words from the
page using the Clone Stamp tool.
By lowering the size of the brush, letters can
be removed one by one from the page. Be
careful where you sample and try to match
brightness; the middle of the page is darker.
Brush settings
11 Select the Brush tool and set your Foreground colour to
brown (#0b0900). Go to the Brush Picker and choose
the brush tip you made earlier. Click the brush icon in the top
Options bar for the brush dynamics.
Erase overflow
14 Some letters will fall over the hand
and forearm, as well as spilling
across the table. Use a solid Eraser with the
same Diameter as the letters and remove
any that are overflowing. Keep fewer letters
at the top of the page than at the bottom.
Apply the brush
12 Set Scattering and Spacing to 50%. Create a new layer and paint
the letters over the page and onto the tabletop. Don’t worry if
some of the letters fall over the hand.
Enhance the effect
15 Use the Clone Stamp tool in the left
page of the book to remove blocks
of text. Pick the Brush tool but this time
increase Spacing to 50%. Add letters to this
page to finish the composition.
More letters
13 To create a heavier concentration of
letters on the tabletop, reduce
Scatter amount to 25%. Apply letters to the
table clumped together. Two or three clicks
should be just the right amount.
Expert tip
You can paint with the Clone Stamp tool to quickly remove entire lines of text at once. This is extremely useful when it comes to removing large chunks of the words from the original book photograph.
The tool looks at the pixels ahead from the point first clicked, so it’s important when painting that there are enough good pixels that flow in the same direction. On something like our evenly toned page this should be relatively easy.
Cloning made easy
Customise brushes
The Photoshop Elements Book 165
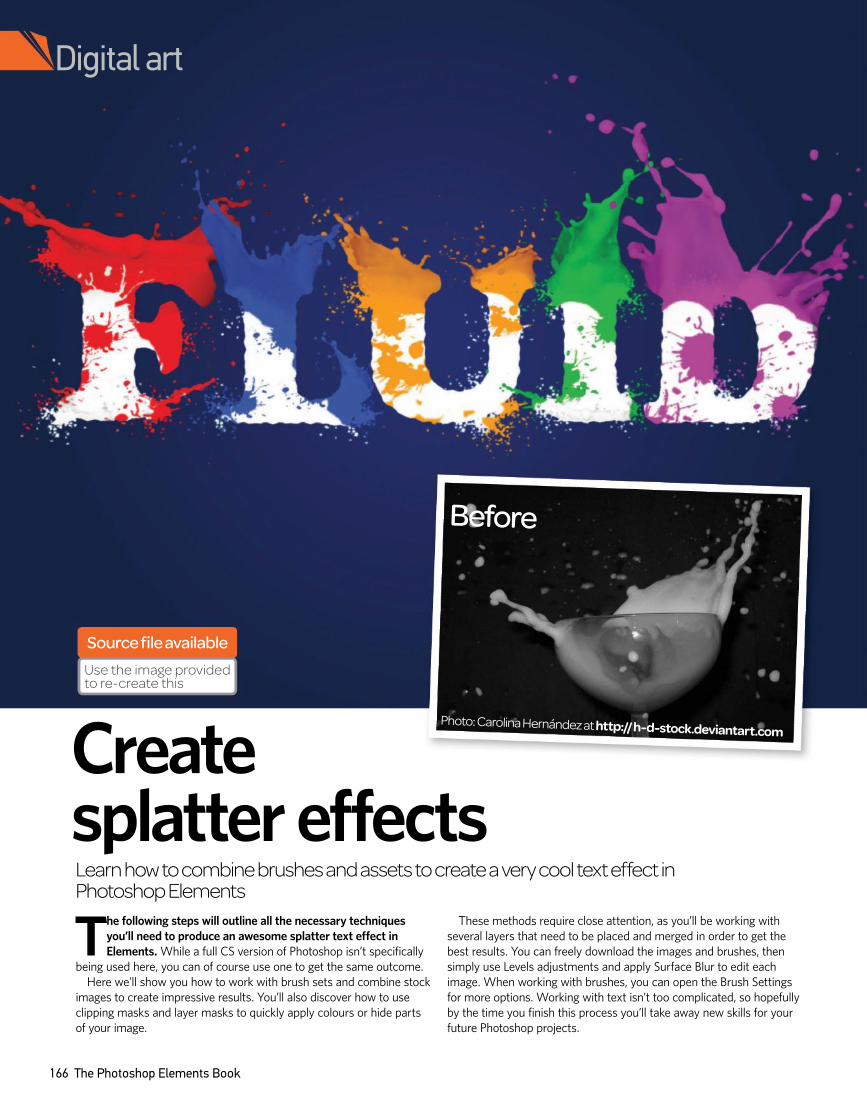
166 The Photoshop Elements Book
The following steps will outline all the necessary techniques
you’ll need to produce an awesome splatter text effect in
Elements. While a full CS version of Photoshop isn’t specifically
being used here, you can of course use one to get the same outcome.
Here we’ll show you how to work with brush sets and combine stock
images to create impressive results. You’ll also discover how to use
clipping masks and layer masks to quickly apply colours or hide parts
of your image.
These methods require close attention, as you’ll be working with
several layers that need to be placed and merged in order to get the
best results. You can freely download the images and brushes, then
simply use Levels adjustments and apply Surface Blur to edit each
image. When working with brushes, you can open the Brush Settings
for more options. Working with text isn’t too complicated, so hopefully
by the time you finish this process you’ll take away new skills for your
future Photoshop projects.
Create splatter effectsLearn how to combine brushes and assets to create a very cool text effect in Photoshop Elements
Before
Photo: Carolina Hernández at http://h-d-stock.deviantart.com
Digital art
Source file available
Use the image provided to re-create this
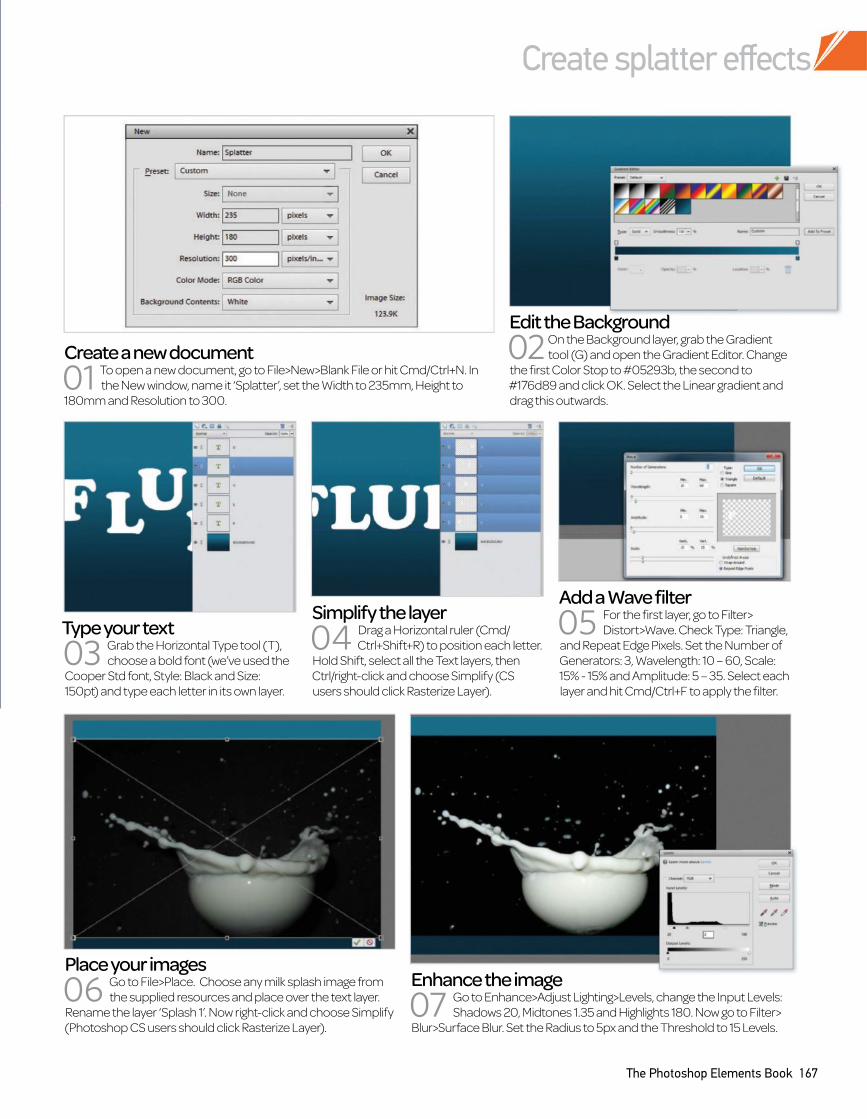
The Photoshop Elements Book 167
Create splatter effects
Edit the Background
02 On the Background layer, grab the Gradient
tool (G) and open the Gradient Editor. Change
the first Color Stop to #05293b, the second to
#176d89 and click OK. Select the Linear gradient and
drag this outwards.
Create a new document
the New window, name it ‘Splatter’, set the Width to 235mm, Height to 01 To open a new document, go to File>New>Blank File or hit Cmd/Ctrl+N. In
180mm and Resolution to 300.
Place your images
06 Go to File>Place. Choose any milk splash image from
the supplied resources and place over the text layer.
Rename the layer ‘Splash 1’. Now right-click and choose Simplify
(Photoshop CS users should click Rasterize Layer).
Enhance the image
07 Go to Enhance>Adjust Lighting>Levels, change the Input Levels:
Shadows 20, Midtones 1.35 and Highlights 180. Now go to Filter>
Blur>Surface Blur. Set the Radius to 5px and the Threshold to 15 Levels.
Type your text
03 Grab the Horizontal Type tool (T),
choose a bold font (we’ve used the
Cooper Std font, Style: Black and Size:
150pt) and type each letter in its own layer.
Add a Wave filter
05 For the first layer, go to Filter>
Distort>Wave. Check Type: Triangle,
and Repeat Edge Pixels. Set the Number of
Generators: 3, Wavelength: 10 – 60, Scale:
15% - 15% and Amplitude: 5 – 35. Select each
layer and hit Cmd/Ctrl+F to apply the filter.
Simplify the layer
04 Drag a Horizontal ruler (Cmd/
Ctrl+Shift+R) to position each letter.
Hold Shift, select all the Text layers, then
Ctrl/right-click and choose Simplify (CS
users should click Rasterize Layer).
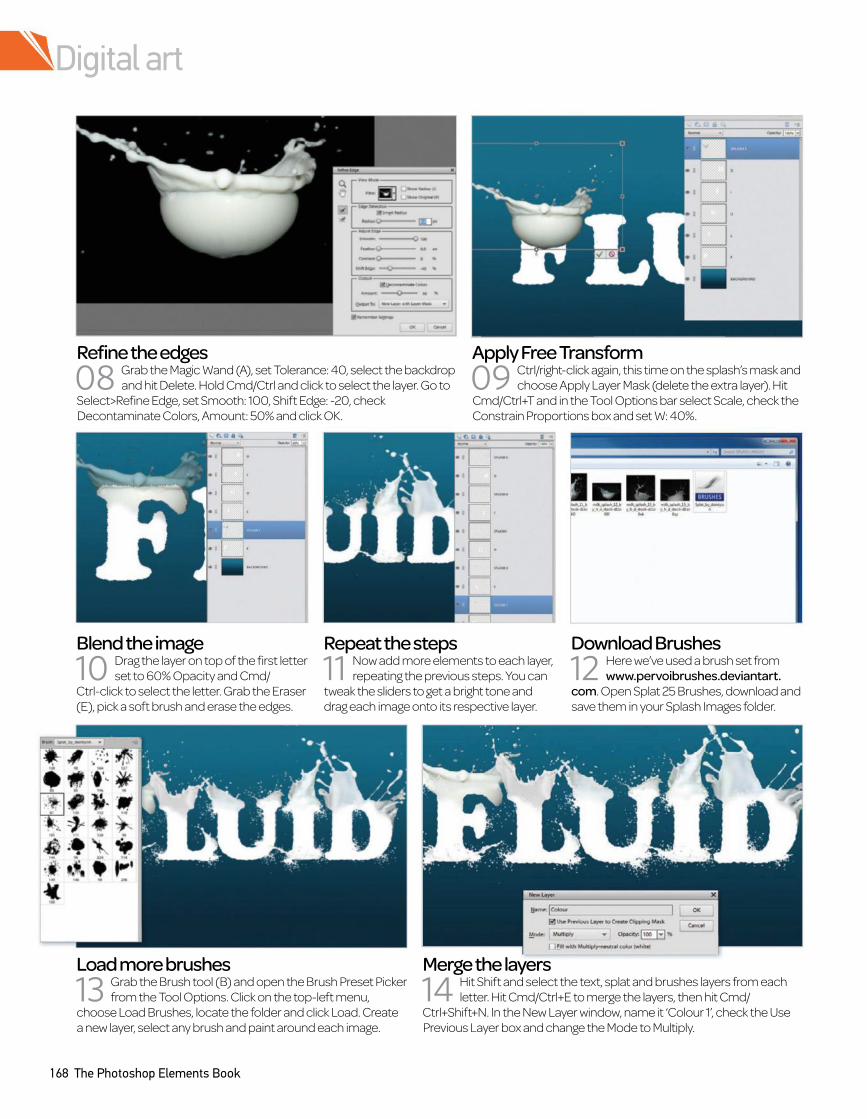
Digital art
168 The Photoshop Elements Book
Apply Free Transform
choose Apply Layer Mask (delete the extra layer). Hit 09 Ctrl/right-click again, this time on the splash’s mask and
Cmd/Ctrl+T and in the Tool Options bar select Scale, check the
Constrain Proportions box and set W: 40%.
Refine the edges
08 Grab the Magic Wand (A), set Tolerance: 40, select the backdrop
and hit Delete. Hold Cmd/Ctrl and click to select the layer. Go to
Select>Refine Edge, set Smooth: 100, Shift Edge: -20, check
Decontaminate Colors, Amount: 50% and click OK.
Load more brushes
13 Grab the Brush tool (B) and open the Brush Preset Picker
from the Tool Options. Click on the top-left menu,
choose Load Brushes, locate the folder and click Load. Create
a new layer, select any brush and paint around each image.
Merge the layers
letter. Hit Cmd/Ctrl+E to merge the layers, then hit Cmd/14 Hit Shift and select the text, splat and brushes layers from each
Ctrl+Shift+N. In the New Layer window, name it ‘Colour 1’, check the Use
Previous Layer box and change the Mode to Multiply.
Blend the image
10 Drag the layer on top of the first letter
set to 60% Opacity and Cmd/
Ctrl-click to select the letter. Grab the Eraser
(E), pick a soft brush and erase the edges.
Download Brushes
www.pervoibrushes.deviantart.12 Here we’ve used a brush set from
com. Open Splat 25 Brushes, download and
save them in your Splash Images folder.
Repeat the steps
11 Now add more elements to each layer,
repeating the previous steps. You can
tweak the sliders to get a bright tone and
drag each image onto its respective layer.
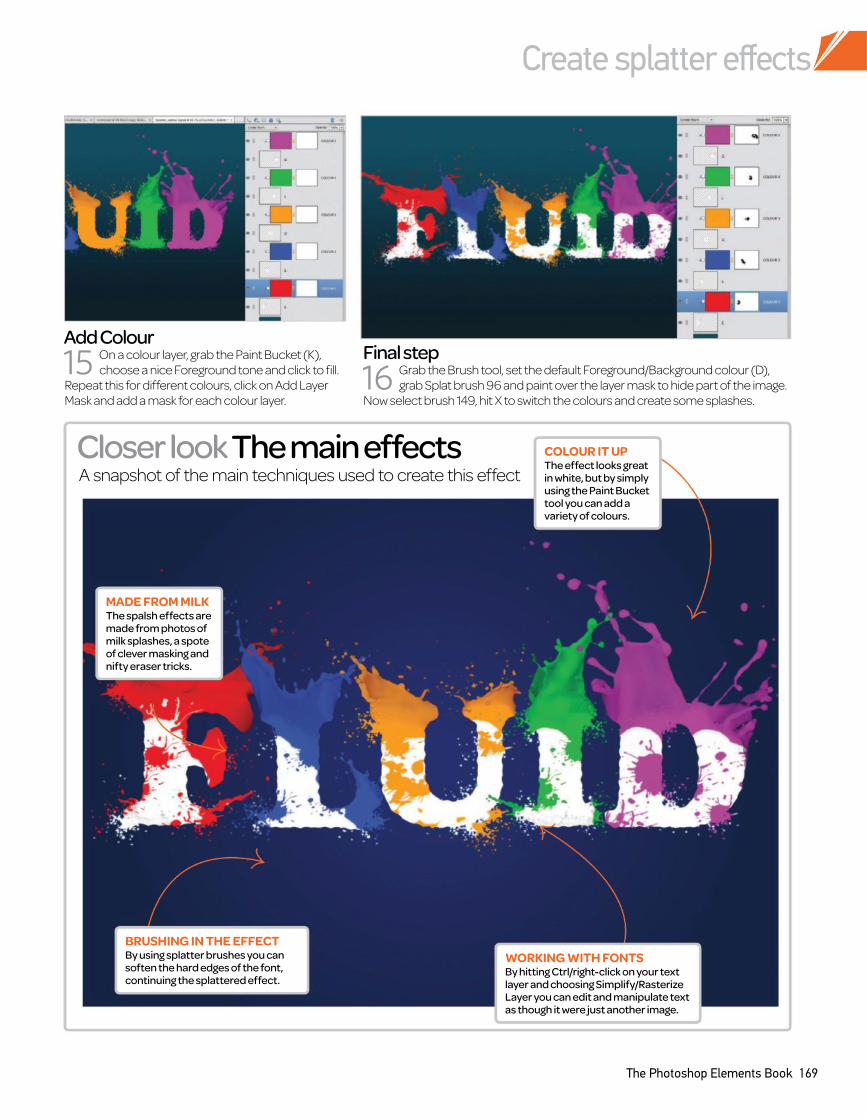
Create splatter effects
The Photoshop Elements Book 169
Add Colour
15 On a colour layer, grab the Paint Bucket (K),
choose a nice Foreground tone and click to fill.
Repeat this for different colours, click on Add Layer
Mask and add a mask for each colour layer.
Final step
16 Grab the Brush tool, set the default Foreground/Background colour (D),
grab Splat brush 96 and paint over the layer mask to hide part of the image.
Now select brush 149, hit X to switch the colours and create some splashes.
A snapshot of the main techniques used to create this effect
Closer look The main effects
MADE FROM MILK
The spalsh effects are made from photos of milk splashes, a spote of clever masking and nifty eraser tricks.
WORKING WITH FONTS
By hitting Ctrl/right-click on your text layer and choosing Simplify/Rasterize Layer you can edit and manipulate text as though it were just another image.
COLOUR IT UP
The effect looks great in white, but by simply using the Paint Bucket tool you can add a variety of colours.
BRUSHING IN THE EFFECT
By using splatter brushes you can soften the hard edges of the font, continuing the splattered effect.
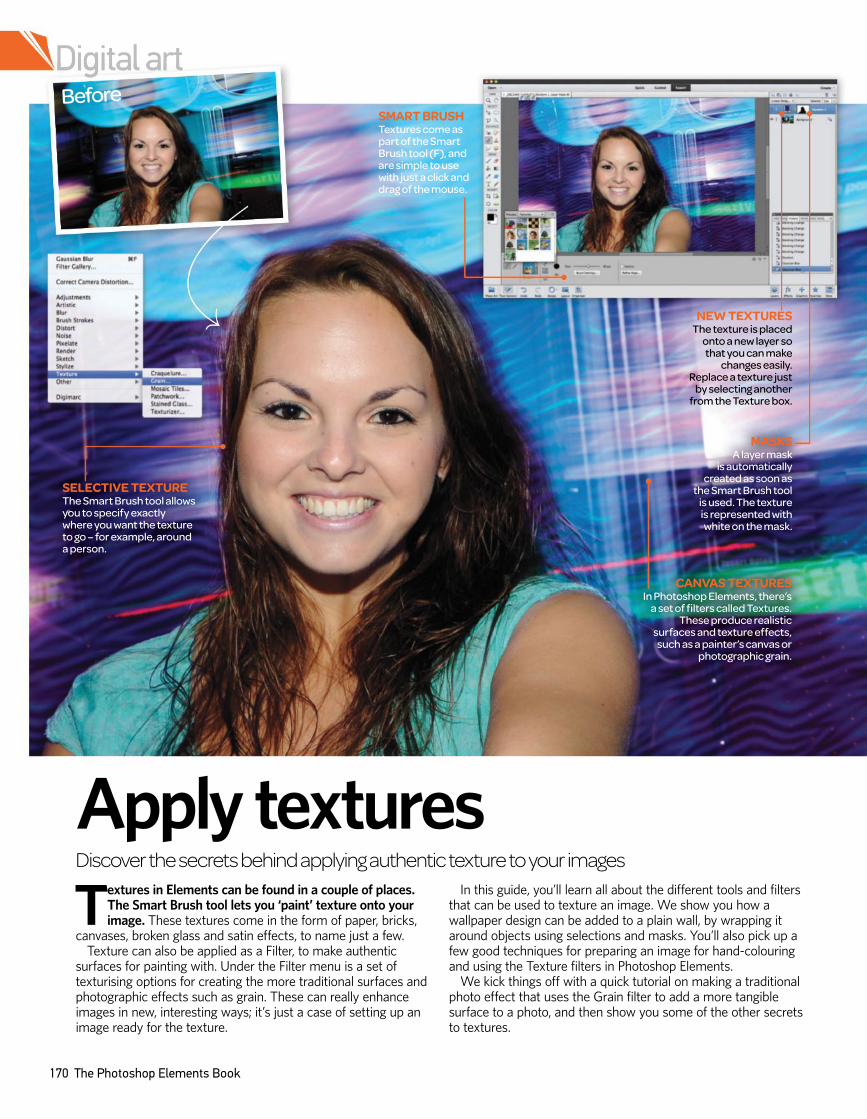
170 The Photoshop Elements Book
Digital art
Apply textures Discover the secrets behind applying authentic texture to your images
Textures in Elements can be found in a couple of places. The Smart Brush tool lets you ‘paint’ texture onto your image. These textures come in the form of paper, bricks,
canvases, broken glass and satin effects, to name just a few.Texture can also be applied as a Filter, to make authentic
surfaces for painting with. Under the Filter menu is a set of texturising options for creating the more traditional surfaces and photographic effects such as grain. These can really enhance images in new, interesting ways; it’s just a case of setting up an image ready for the texture.
In this guide, you’ll learn all about the different tools and filters that can be used to texture an image. We show you how a wallpaper design can be added to a plain wall, by wrapping it around objects using selections and masks. You’ll also pick up a few good techniques for preparing an image for hand-colouring and using the Texture filters in Photoshop Elements.
We kick things off with a quick tutorial on making a traditional photo effect that uses the Grain filter to add a more tangible surface to a photo, and then show you some of the other secrets to textures.
SELECTIVE TEXTURE
The Smart Brush tool allows you to specify exactly where you want the texture to go – for example, around a person.
MASKS
A layer mask is automatically
created as soon as the Smart Brush tool
is used. The texture is represented with white on the mask.
CANVAS TEXTURES
In Photoshop Elements, there’s a set of filters called Textures.
These produce realistic surfaces and texture effects, such as a painter’s canvas or
photographic grain.
SMART BRUSH
Textures come as part of the Smart Brush tool (F), and are simple to use with just a click and drag of the mouse.
Before
NEW TEXTURES
The texture is placed onto a new layer so that you can make
changes easily. Replace a texture just
by selecting another from the Texture box.
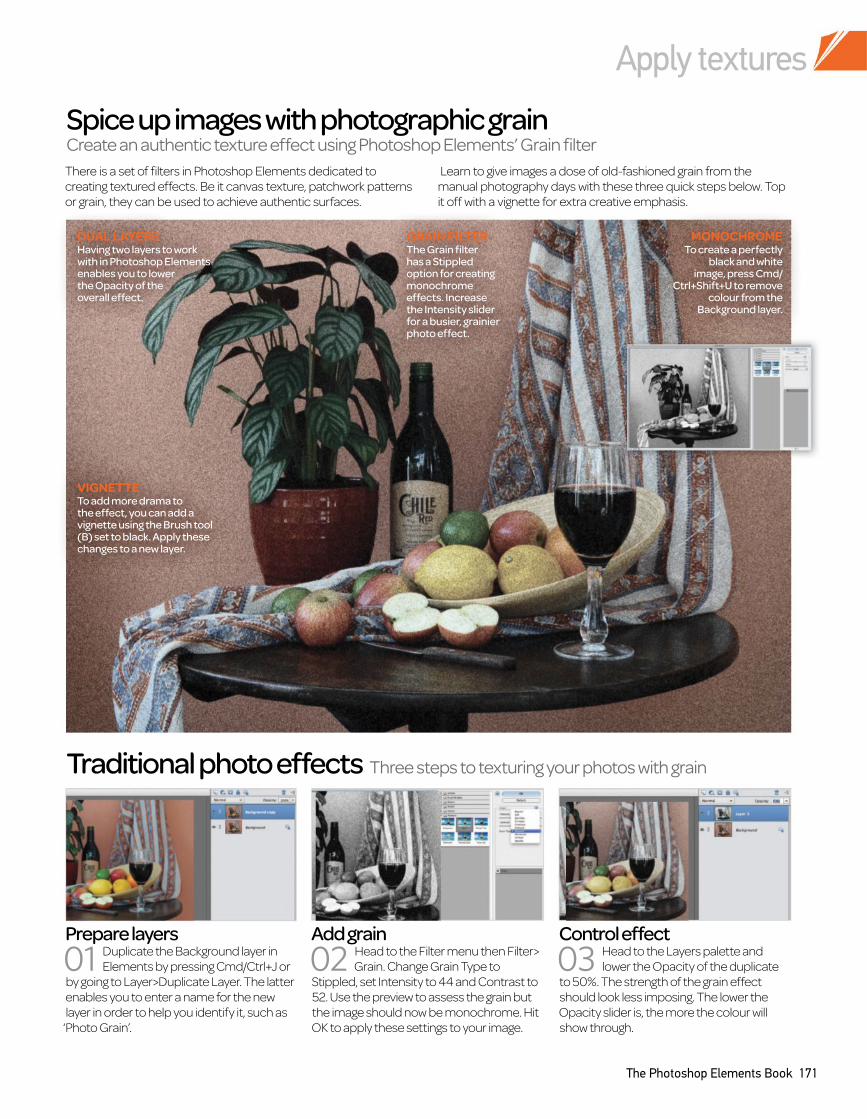
The Photoshop Elements Book 171
Apply textures
Spice up images with photographic grain Create an authentic texture effect using Photoshop Elements’ Grain filter
DUAL LAYERS
Having two layers to work with in Photoshop Elements enables you to lower the Opacity of the overall effect.
VIGNETTE
To add more drama to the effect, you can add a vignette using the Brush tool (B) set to black. Apply these changes to a new layer.
MONOCHROME
To create a perfectly black and white
image, press Cmd/Ctrl+Shift+U to remove
colour from the Background layer.
GRAIN FILTER
The Grain filter has a Stippled option for creating monochrome effects. Increase the Intensity slider for a busier, grainier photo effect.
Add grain
02 Head to the Filter menu then Filter>
Grain. Change Grain Type to
Stippled, set Intensity to 44 and Contrast to
52. Use the preview to assess the grain but
the image should now be monochrome. Hit
OK to apply these settings to your image.
Control effect
03 Head to the Layers palette and
lower the Opacity of the duplicate
to 50%. The strength of the grain effect
should look less imposing. The lower the
Opacity slider is, the more the colour will
show through.
Prepare layers
01 Duplicate the Background layer in
Elements by pressing Cmd/Ctrl+J or
by going to Layer>Duplicate Layer. The latter
enables you to enter a name for the new
layer in order to help you identify it, such as
‘Photo Grain’.
Traditional photo effects Three steps to texturing your photos with grain
There is a set of filters in Photoshop Elements dedicated to
creating textured effects. Be it canvas texture, patchwork patterns
or grain, they can be used to achieve authentic surfaces.
Learn to give images a dose of old-fashioned grain from the
manual photography days with these three quick steps below. Top
it off with a vignette for extra creative emphasis.
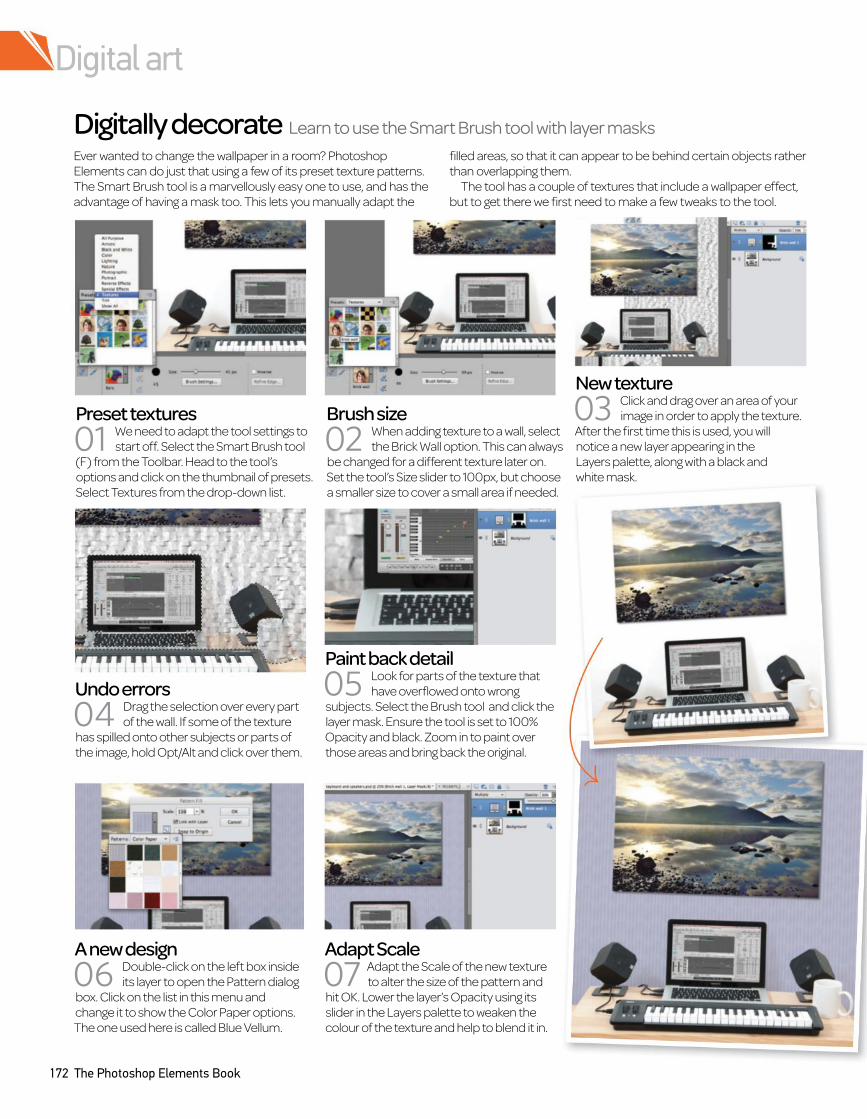
Digital art
172 The Photoshop Elements Book
A new design
06 Double-click on the left box inside
its layer to open the Pattern dialog
box. Click on the list in this menu and
change it to show the Color Paper options.
The one used here is called Blue Vellum.
Adapt Scale
07 Adapt the Scale of the new texture
to alter the size of the pattern and
hit OK. Lower the layer’s Opacity using its
slider in the Layers palette to weaken the
colour of the texture and help to blend it in.
Paint back detail
05 Look for parts of the texture that
have overflowed onto wrong
subjects. Select the Brush tool and click the
layer mask. Ensure the tool is set to 100%
Opacity and black. Zoom in to paint over
those areas and bring back the original.
Digitally decorate Learn to use the Smart Brush tool with layer masks
Undo errors
04 Drag the selection over every part
of the wall. If some of the texture
has spilled onto other subjects or parts of
the image, hold Opt/Alt and click over them.
Brush size
02 When adding texture to a wall, select
the Brick Wall option. This can always
be changed for a different texture later on.
Set the tool’s Size slider to 100px, but choose
a smaller size to cover a small area if needed.
New texture
03 Click and drag over an area of your
image in order to apply the texture.
After the first time this is used, you will
notice a new layer appearing in the
Layers palette, along with a black and
white mask.
Preset textures
01 We need to adapt the tool settings to
start off. Select the Smart Brush tool
(F) from the Toolbar. Head to the tool’s
options and click on the thumbnail of presets.
Select Textures from the drop-down list.
Ever wanted to change the wallpaper in a room? Photoshop
Elements can do just that using a few of its preset texture patterns.
The Smart Brush tool is a marvellously easy one to use, and has the
advantage of having a mask too. This lets you manually adapt the
filled areas, so that it can appear to be behind certain objects rather
than overlapping them.
The tool has a couple of textures that include a wallpaper effect,
but to get there we first need to make a few tweaks to the tool.
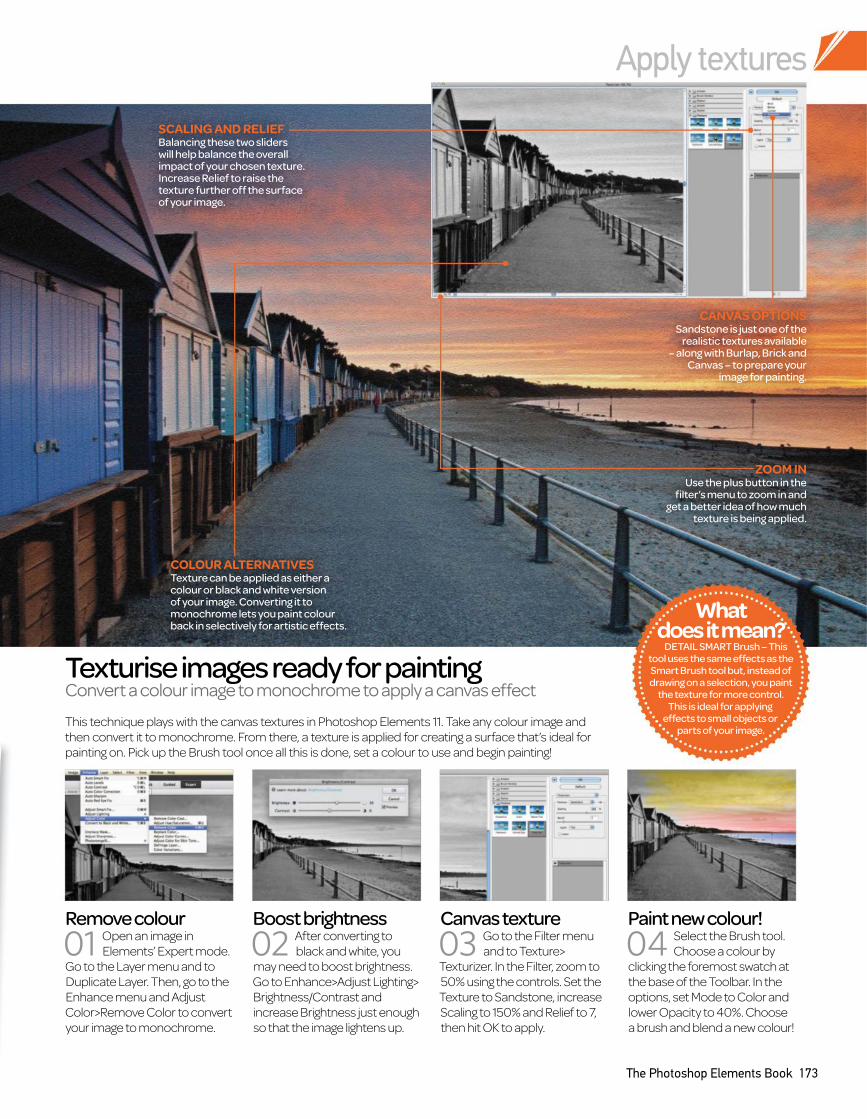
Apply textures
The Photoshop Elements Book 173
Texturise images ready for painting Convert a colour image to monochrome to apply a canvas effect
Canvas texture
03 Go to the Filter menu
and to Texture>
Texturizer. In the Filter, zoom to
50% using the controls. Set the
Texture to Sandstone, increase
Scaling to 150% and Relief to 7,
then hit OK to apply.
Boost brightness
02 After converting to
black and white, you
may need to boost brightness.
Go to Enhance>Adjust Lighting>
Brightness/Contrast and
increase Brightness just enough
so that the image lightens up.
Remove colour
01 Open an image in
Elements’ Expert mode.
Go to the Layer menu and to
Duplicate Layer. Then, go to the
Enhance menu and Adjust
Color>Remove Color to convert
your image to monochrome.
Paint new colour!
04 Select the Brush tool.
Choose a colour by
clicking the foremost swatch at
the base of the Toolbar. In the
options, set Mode to Color and
lower Opacity to 40%. Choose
a brush and blend a new colour!
This technique plays with the canvas textures in Photoshop Elements 11. Take any colour image and
then convert it to monochrome. From there, a texture is applied for creating a surface that’s ideal for
painting on. Pick up the Brush tool once all this is done, set a colour to use and begin painting!
What does it mean?
DETAIL SMART Brush – This tool uses the same effects as the Smart Brush tool but, instead of drawing on a selection, you paint
the texture for more control. This is ideal for applying
effects to small objects or parts of your image.
CANVAS OPTIONS
Sandstone is just one of the realistic textures available
– along with Burlap, Brick and Canvas – to prepare your
image for painting.
SCALING AND RELIEF
Balancing these two sliders will help balance the overall impact of your chosen texture. Increase Relief to raise the texture further off the surface of your image.
COLOUR ALTERNATIVES
Texture can be applied as either a colour or black and white version of your image. Converting it to monochrome lets you paint colour back in selectively for artistic effects.
ZOOM IN
Use the plus button in the filter’s menu to zoom in and
get a better idea of how much texture is being applied.
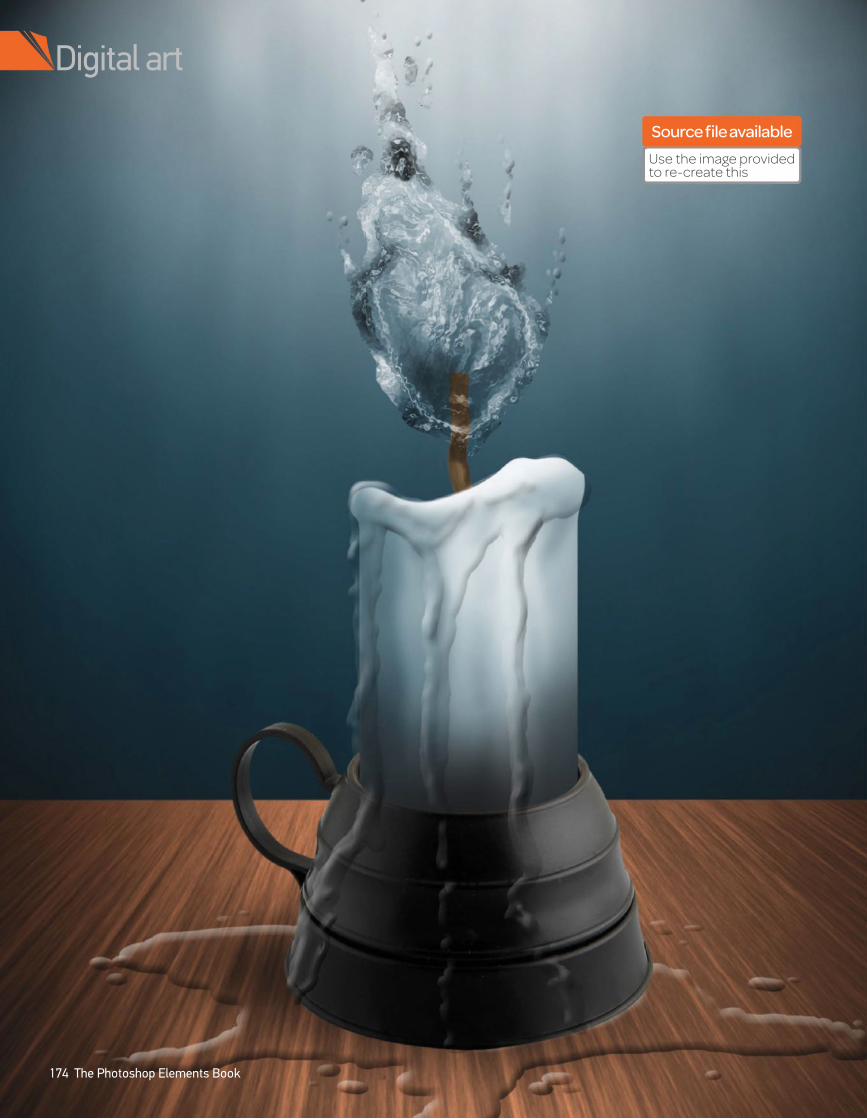
Digital art
174 The Photoshop Elements Book
Source file available
Use the image provided to re-create this
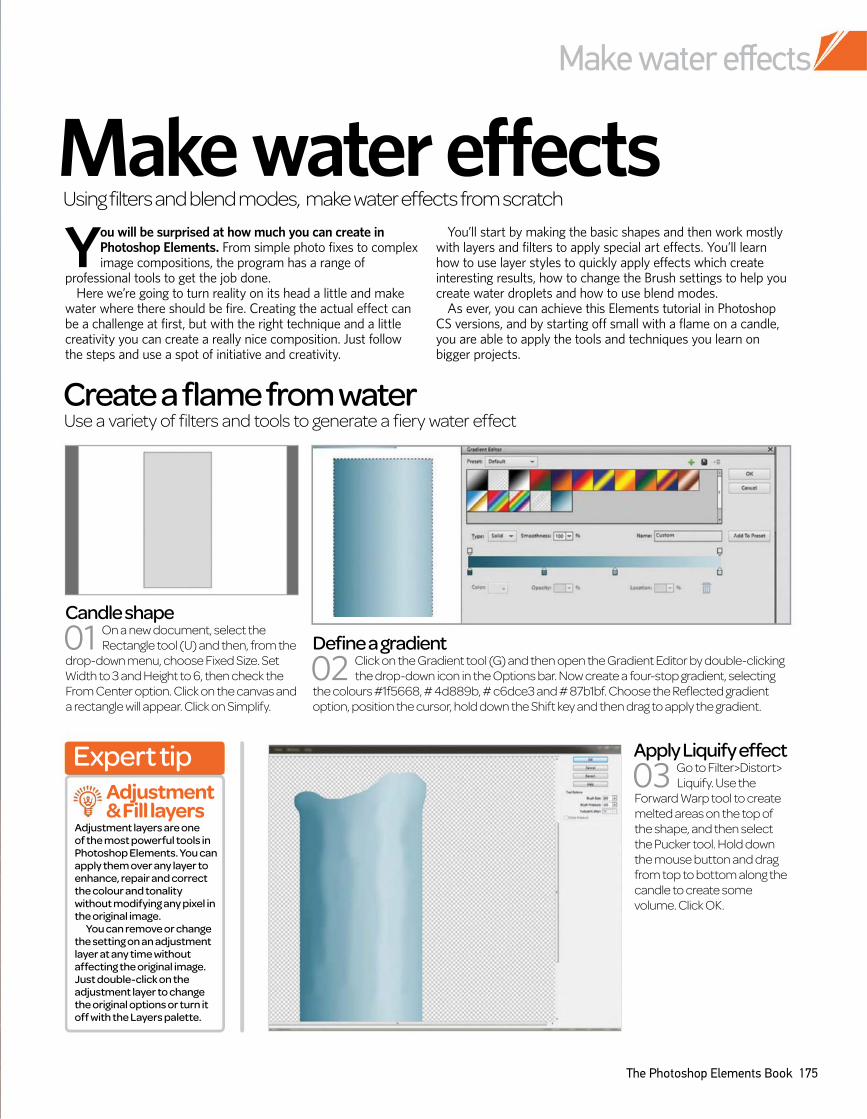
Make water effects
The Photoshop Elements Book 175
You will be surprised at how much you can create in Photoshop Elements. From simple photo fixes to complex image compositions, the program has a range of
professional tools to get the job done. Here we’re going to turn reality on its head a little and make
water where there should be fire. Creating the actual effect can be a challenge at first, but with the right technique and a little creativity you can create a really nice composition. Just follow the steps and use a spot of initiative and creativity.
You’ll start by making the basic shapes and then work mostly with layers and filters to apply special art effects. You’ll learn how to use layer styles to quickly apply effects which create interesting results, how to change the Brush settings to help you create water droplets and how to use blend modes.
As ever, you can achieve this Elements tutorial in Photoshop CS versions, and by starting off small with a flame on a candle, you are able to apply the tools and techniques you learn on bigger projects.
Make water effects
Use a variety of filters and tools to generate a fiery water effect
Create a flame from water
Using filters and blend modes, make water effects from scratch
Define a gradient
the drop-down icon in the Options bar. Now create a four-stop gradient, selecting 02 Click on the Gradient tool (G) and then open the Gradient Editor by double-clicking
the colours #1f5668, # 4d889b, # c6dce3 and # 87b1bf. Choose the Reflected gradient
option, position the cursor, hold down the Shift key and then drag to apply the gradient.
Candle shape
01 On a new document, select the
Rectangle tool (U) and then, from the
drop-down menu, choose Fixed Size. Set
Width to 3 and Height to 6, then check the
From Center option. Click on the canvas and
a rectangle will appear. Click on Simplify.
Apply Liquify effect
03 Go to Filter>Distort>
Liquify. Use the
Forward Warp tool to create
melted areas on the top of
the shape, and then select
the Pucker tool. Hold down
the mouse button and drag
from top to bottom along the
candle to create some
volume. Click OK.
Expert tip
Adjustment layers are one of the most powerful tools in Photoshop Elements. You can apply them over any layer to enhance, repair and correct the colour and tonality without modifying any pixel in the original image.
You can remove or change the setting on an adjustment layer at any time without affecting the original image. Just double-click on the adjustment layer to change the original options or turn it off with the Layers palette.
Adjustment & Fill layers
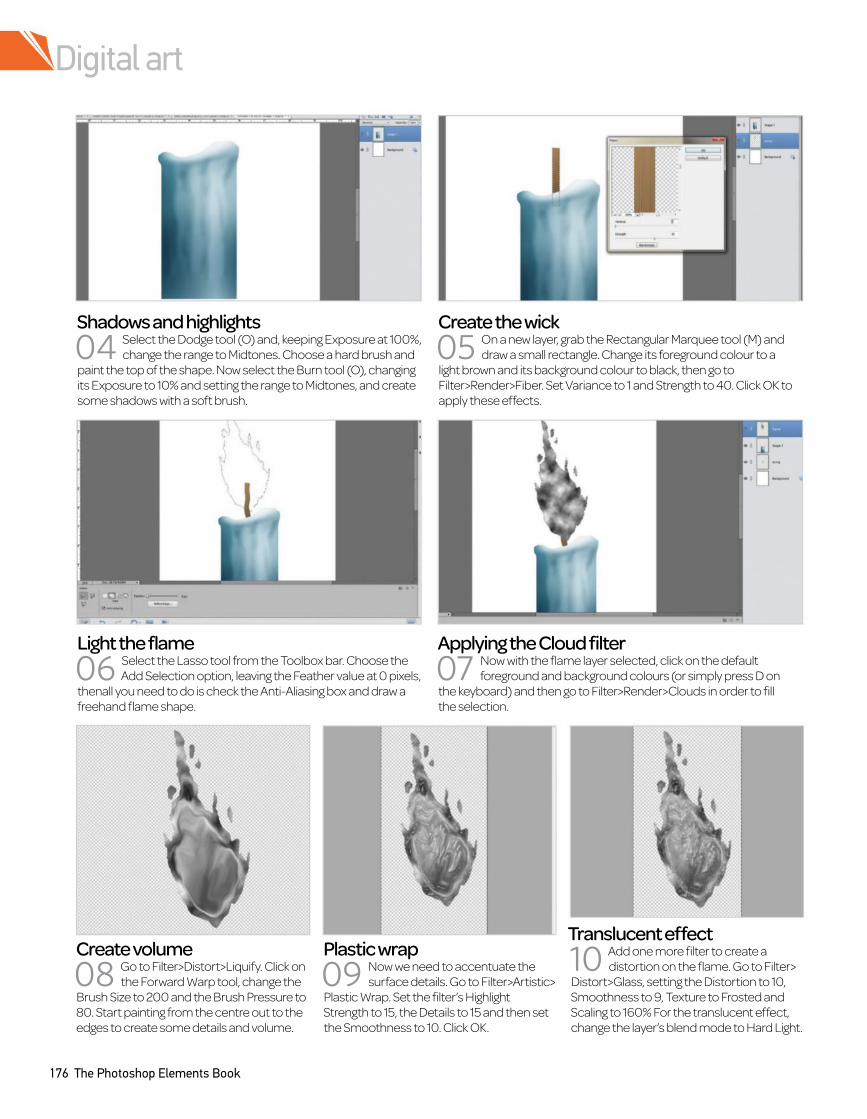
Digital art
176 The Photoshop Elements Book
Shadows and highlights
04 Select the Dodge tool (O) and, keeping Exposure at 100%,
change the range to Midtones. Choose a hard brush and
paint the top of the shape. Now select the Burn tool (O), changing
its Exposure to 10% and setting the range to Midtones, and create
some shadows with a soft brush.
Create the wick
05 On a new layer, grab the Rectangular Marquee tool (M) and
draw a small rectangle. Change its foreground colour to a
light brown and its background colour to black, then go to
Filter>Render>Fiber. Set Variance to 1 and Strength to 40. Click OK to
apply these effects.
Light the flame
06 Select the Lasso tool from the Toolbox bar. Choose the
Add Selection option, leaving the Feather value at 0 pixels,
thenall you need to do is check the Anti-Aliasing box and draw a
freehand flame shape.
Plastic wrap
09 Now we need to accentuate the
surface details. Go to Filter>Artistic>
Plastic Wrap. Set the filter’s Highlight
Strength to 15, the Details to 15 and then set
the Smoothness to 10. Click OK.
Applying the Cloud filter
07 Now with the flame layer selected, click on the default
foreground and background colours (or simply press D on
the keyboard) and then go to Filter>Render>Clouds in order to fill
the selection.
Translucent effect
10 Add one more filter to create a
distortion on the flame. Go to Filter>
Distort>Glass, setting the Distortion to 10,
Smoothness to 9, Texture to Frosted and
Scaling to 160% For the translucent effect,
change the layer’s blend mode to Hard Light.
Create volume
08 Go to Filter>Distort>Liquify. Click on
the Forward Warp tool, change the
Brush Size to 200 and the Brush Pressure to
80. Start painting from the centre out to the
edges to create some details and volume.
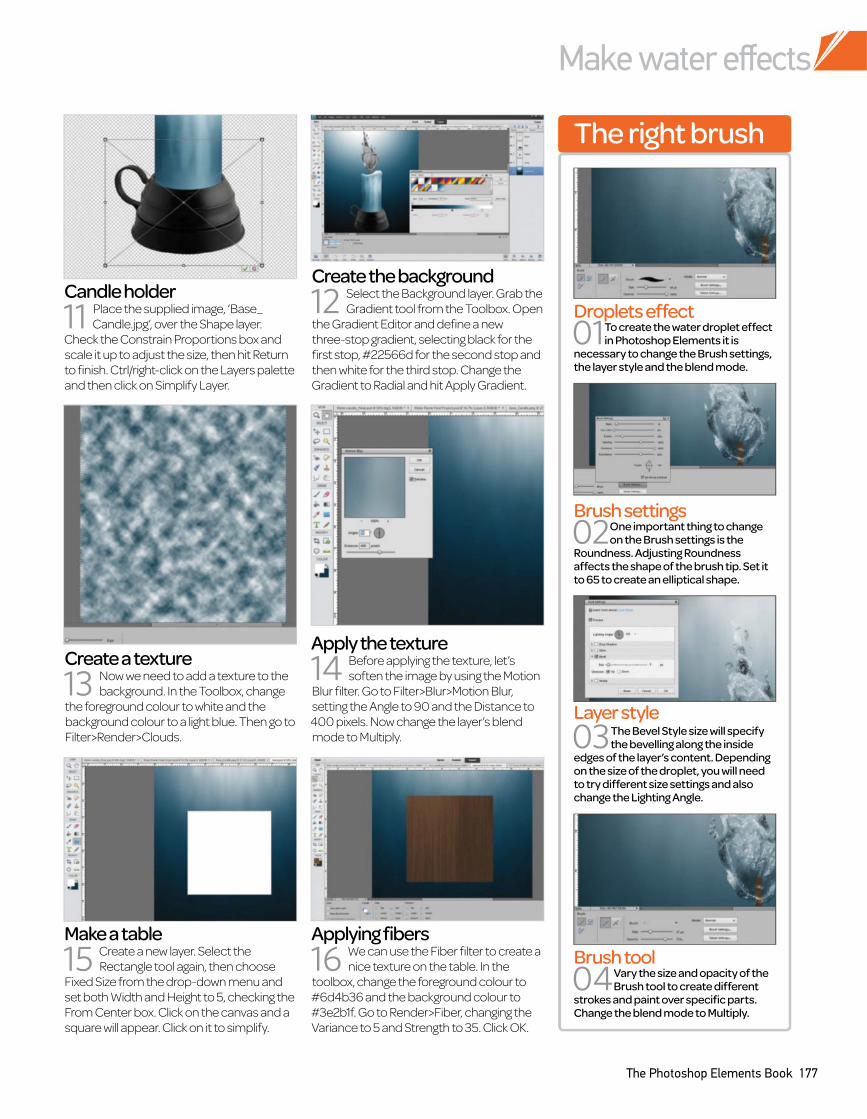
Make water effects
The Photoshop Elements Book 177
Candle holder
11 Place the supplied image, ‘Base_
Candle.jpg’, over the Shape layer.
Check the Constrain Proportions box and
scale it up to adjust the size, then hit Return
to finish. Ctrl/right-click on the Layers palette
and then click on Simplify Layer.
Make a table
15 Create a new layer. Select the
Rectangle tool again, then choose
Fixed Size from the drop-down menu and
set both Width and Height to 5, checking the
From Center box. Click on the canvas and a
square will appear. Click on it to simplify.
Create the background
12 Select the Background layer. Grab the
Gradient tool from the Toolbox. Open
the Gradient Editor and define a new
three-stop gradient, selecting black for the
first stop, #22566d for the second stop and
then white for the third stop. Change the
Gradient to Radial and hit Apply Gradient.
Applying fibers
16 We can use the Fiber filter to create a
nice texture on the table. In the
toolbox, change the foreground colour to
#6d4b36 and the background colour to
#3e2b1f. Go to Render>Fiber, changing the
Variance to 5 and Strength to 35. Click OK.
Apply the texture
14 Before applying the texture, let’s
soften the image by using the Motion
Blur filter. Go to Filter>Blur>Motion Blur,
setting the Angle to 90 and the Distance to
400 pixels. Now change the layer’s blend
mode to Multiply.
Create a texture
13 Now we need to add a texture to the
background. In the Toolbox, change
the foreground colour to white and the
background colour to a light blue. Then go to
Filter>Render>Clouds.
Droplets effect
01 To create the water droplet effect in Photoshop Elements it is
necessary to change the Brush settings, the layer style and the blend mode.
Layer style
03 The Bevel Style size will specify the bevelling along the inside
edges of the layer’s content. Depending on the size of the droplet, you will need to try different size settings and also change the Lighting Angle.
Brush settings
02 One important thing to change on the Brush settings is the
Roundness. Adjusting Roundness affects the shape of the brush tip. Set it to 65 to create an elliptical shape.
Brush tool
04 Vary the size and opacity of the Brush tool to create different
strokes and paint over specific parts. Change the blend mode to Multiply.
The right brush
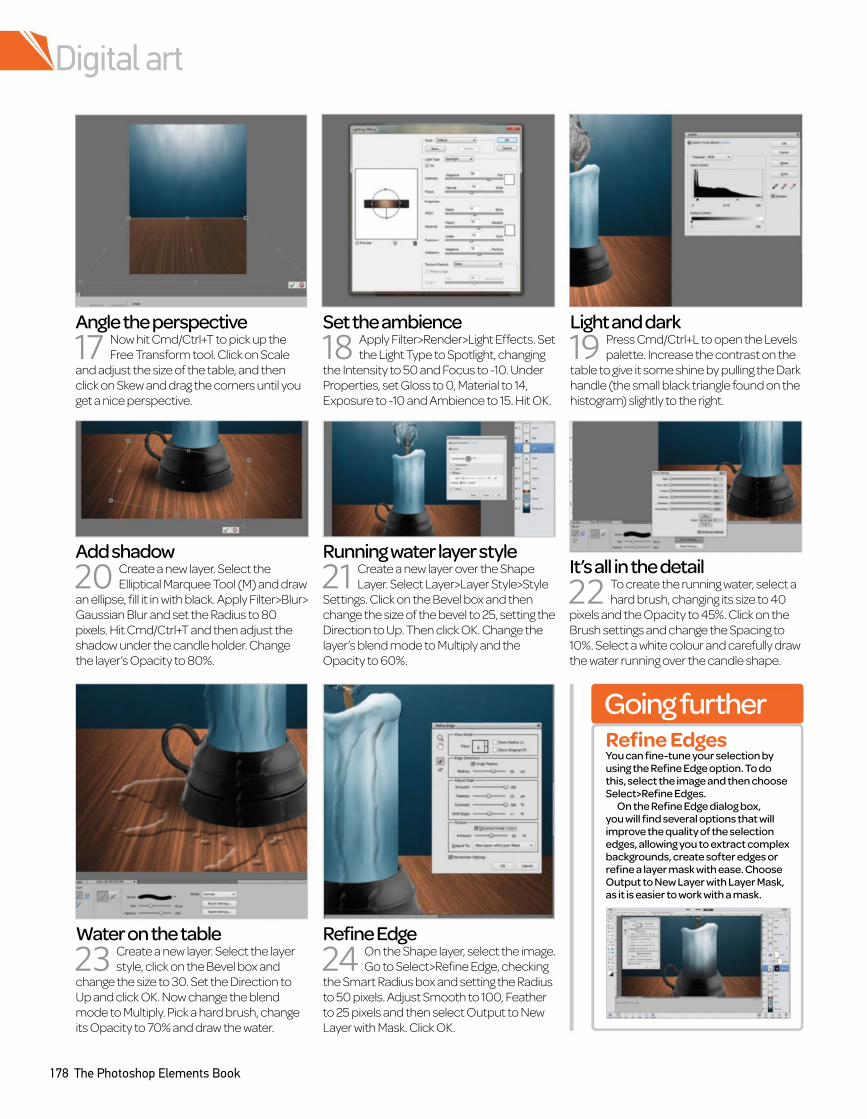
Digital art
178 The Photoshop Elements Book
Add shadow
20 Create a new layer. Select the
Elliptical Marquee Tool (M) and draw
an ellipse, fill it in with black. Apply Filter>Blur>
Gaussian Blur and set the Radius to 80
pixels. Hit Cmd/Ctrl+T and then adjust the
shadow under the candle holder. Change
the layer’s Opacity to 80%.
Refine Edge
24 On the Shape layer, select the image.
Go to Select>Refine Edge, checking
the Smart Radius box and setting the Radius
to 50 pixels. Adjust Smooth to 100, Feather
to 25 pixels and then select Output to New
Layer with Mask. Click OK.
Set the ambience
18 Apply Filter>Render>Light Effects. Set
the Light Type to Spotlight, changing
the Intensity to 50 and Focus to -10. Under
Properties, set Gloss to 0, Material to 14,
Exposure to -10 and Ambience to 15. Hit OK.
Running water layer style
21 Create a new layer over the Shape
Layer. Select Layer>Layer Style>Style
Settings. Click on the Bevel box and then
change the size of the bevel to 25, setting the
Direction to Up. Then click OK. Change the
layer’s blend mode to Multiply and the
Opacity to 60%.
It’s all in the detail
22 To create the running water, select a
hard brush, changing its size to 40
pixels and the Opacity to 45%. Click on the
Brush settings and change the Spacing to
10%. Select a white colour and carefully draw
the water running over the candle shape.
Water on the table
23 Create a new layer. Select the layer
style, click on the Bevel box and
change the size to 30. Set the Direction to
Up and click OK. Now change the blend
mode to Multiply. Pick a hard brush, change
its Opacity to 70% and draw the water.
Light and dark
19 Press Cmd/Ctrl+L to open the Levels
palette. Increase the contrast on the
table to give it some shine by pulling the Dark
handle (the small black triangle found on the
histogram) slightly to the right.
Angle the perspective
17 Now hit Cmd/Ctrl+T to pick up the
Free Transform tool. Click on Scale
and adjust the size of the table, and then
click on Skew and drag the corners until you
get a nice perspective.
Going furtherRefine EdgesYou can fine-tune your selection by using the Refine Edge option. To do this, select the image and then choose Select>Refine Edges.
On the Refine Edge dialog box, you will find several options that will improve the quality of the selection edges, allowing you to extract complex backgrounds, create softer edges or refine a layer mask with ease. Choose Output to New Layer with Layer Mask, as it is easier to work with a mask.
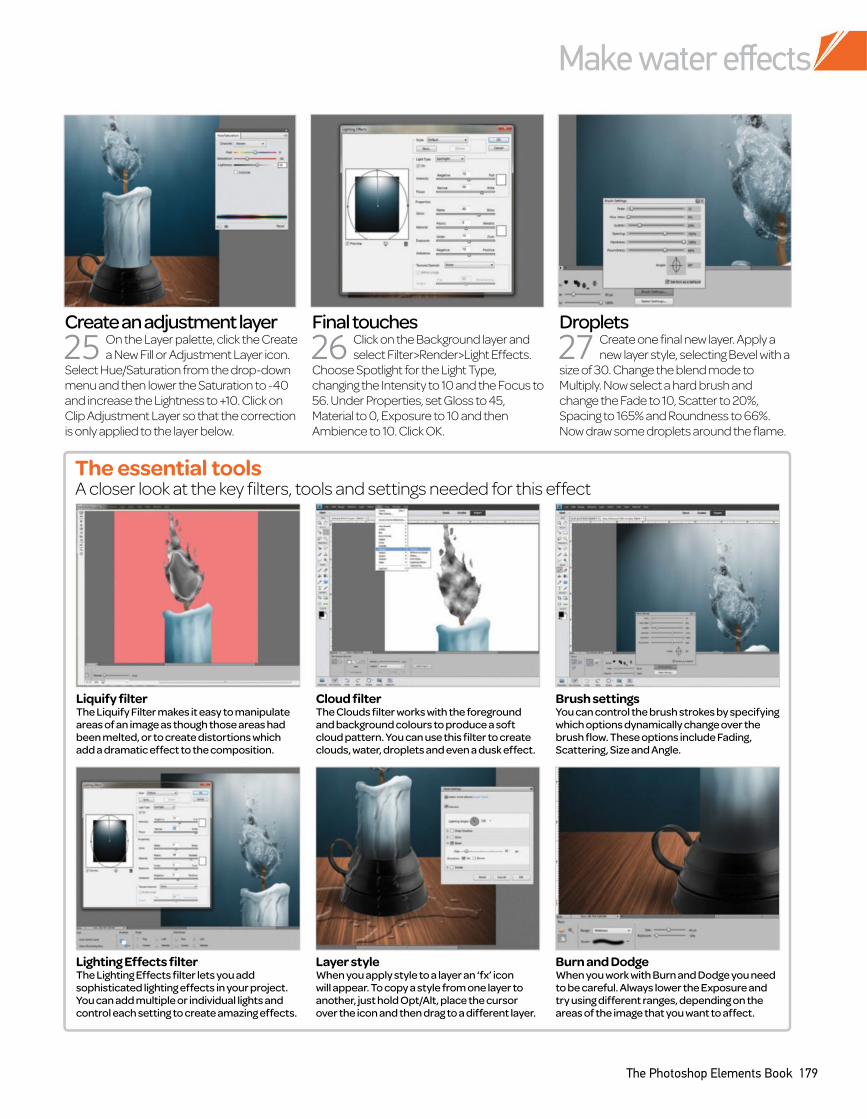
Make water effects
The Photoshop Elements Book 179
Final touches
26 Click on the Background layer and
select Filter>Render>Light Effects.
Choose Spotlight for the Light Type,
changing the Intensity to 10 and the Focus to
56. Under Properties, set Gloss to 45,
Material to 0, Exposure to 10 and then
Ambience to 10. Click OK.
Droplets
27 Create one final new layer. Apply a
new layer style, selecting Bevel with a
size of 30. Change the blend mode to
Multiply. Now select a hard brush and
change the Fade to 10, Scatter to 20%,
Spacing to 165% and Roundness to 66%.
Now draw some droplets around the flame.
Create an adjustment layer
25 On the Layer palette, click the Create
a New Fill or Adjustment Layer icon.
Select Hue/Saturation from the drop-down
menu and then lower the Saturation to -40
and increase the Lightness to +10. Click on
Clip Adjustment Layer so that the correction
is only applied to the layer below.
A closer look at the key filters, tools and settings needed for this effectThe essential tools
Liquify filterThe Liquify Filter makes it easy to manipulate areas of an image as though those areas had been melted, or to create distortions which add a dramatic effect to the composition.
Cloud filterThe Clouds filter works with the foreground and background colours to produce a soft cloud pattern. You can use this filter to create clouds, water, droplets and even a dusk effect.
Brush settingsYou can control the brush strokes by specifying which options dynamically change over the brush flow. These options include Fading, Scattering, Size and Angle.
Lighting Effects filterThe Lighting Effects filter lets you add sophisticated lighting effects in your project. You can add multiple or individual lights and control each setting to create amazing effects.
Layer styleWhen you apply style to a layer an ‘fx’ icon will appear. To copy a style from one layer to another, just hold Opt/Alt, place the cursor over the icon and then drag to a different layer.
Burn and DodgeWhen you work with Burn and Dodge you need to be careful. Always lower the Exposure and try using different ranges, depending on the areas of the image that you want to affect.
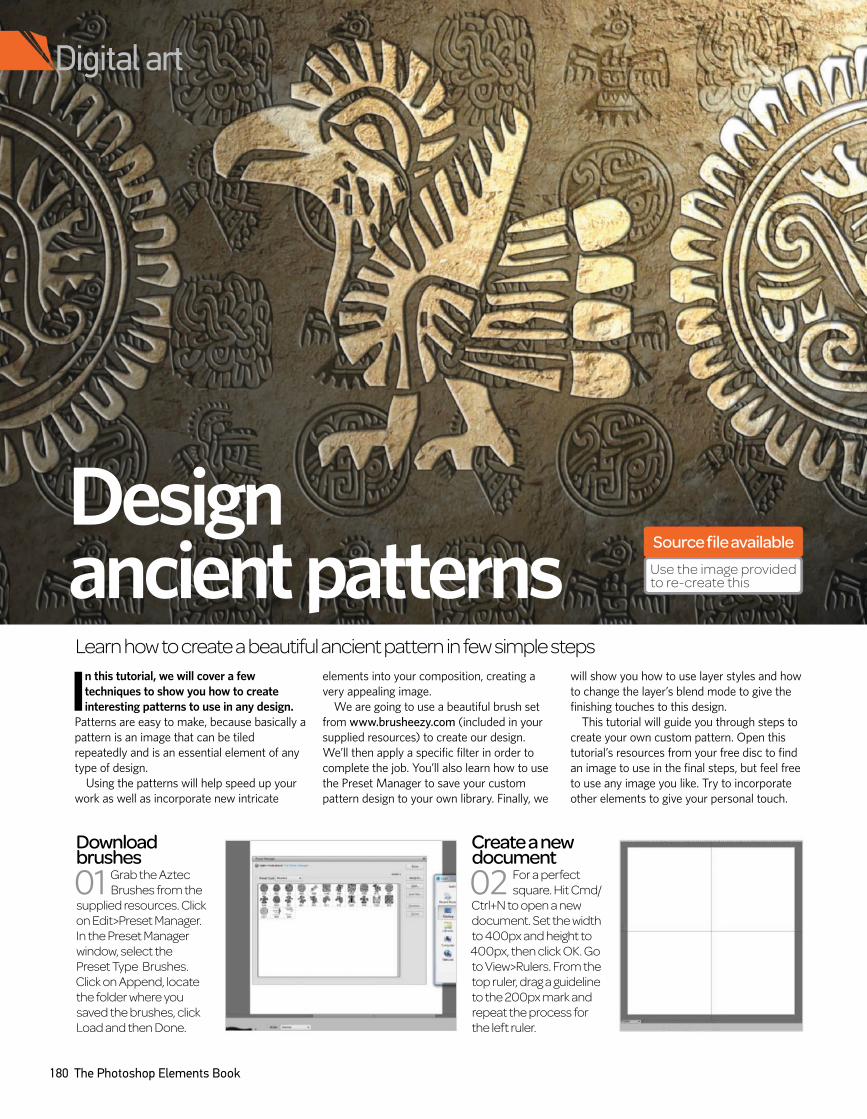
Create a new document
02 For a perfect
square. Hit Cmd/
Ctrl+N to open a new
document. Set the width
to 400px and height to
400px, then click OK. Go
to View>Rulers. From the
top ruler, drag a guideline
to the 200px mark and
repeat the process for
the left ruler.
Download brushes
01 Grab the Aztec
Brushes from the
supplied resources. Click
on Edit>Preset Manager.
In the Preset Manager
window, select the
Preset Type Brushes.
Click on Append, locate
the folder where you
saved the brushes, click
Load and then Done.
180 The Photoshop Elements Book
In this tutorial, we will cover a few
techniques to show you how to create
interesting patterns to use in any design.
Patterns are easy to make, because basically a
pattern is an image that can be tiled
repeatedly and is an essential element of any
type of design.
Using the patterns will help speed up your
work as well as incorporate new intricate
elements into your composition, creating a
very appealing image.
We are going to use a beautiful brush set
from www.brusheezy.com (included in your
supplied resources) to create our design.
We’ll then apply a specific filter in order to
complete the job. You’ll also learn how to use
the Preset Manager to save your custom
pattern design to your own library. Finally, we
will show you how to use layer styles and how
to change the layer’s blend mode to give the
finishing touches to this design.
This tutorial will guide you through steps to
create your own custom pattern. Open this
tutorial’s resources from your free disc to find
an image to use in the final steps, but feel free
to use any image you like. Try to incorporate
other elements to give your personal touch.
Design ancient patterns
Learn how to create a beautiful ancient pattern in few simple steps
Digital art
Source file available
Use the image provided to re-create this

Select the brushes
03 Set the Foreground colour to black and select
the Brush tool (B). Click to open the Brush
Preset Picker and choose any Aztec Brush you like.
Create a new layer, change the Brush size to 180px
and then click the brush inside one of the squares.
Fill up the canvas
04 Create a new layer, choose a new
Aztec Brush and fill up the next
square. Repeat until you fill them all up. Use
the arrow keys on your keyboard to move
the images into place. Select the layers and
hit Cmd/Ctrl+E to merge into a single layer.
Apply the pattern
07 Open the supplied ‘wall.jpg’ image. In
the Layers panel, click on the Create
New Fill or Adjustment Layer icon and
choose Pattern. Click on the Pattern Picker
window to select your Pattern. Scale it to size
and then click OK.
Create the pattern
05 Delete the Background layer. From
the Filter menu, choose Others and
click Offset. In the Offset window, set the
Horizontal to 100 pixels right and the Vertical
to 100 pixels down. In Undefined Areas,
select Wrap Around and then click OK.
Save the pattern
06 To save the new pattern, go to
Edit>Define Pattern, name your file
Ancient Pattern, then click OK. Go to
Edit>Preset Manager. In the Preset manager
window, select the Preset Type Patterns and
click on the pattern you just created. Select
Save Set, type the name again, and then
click Save.
Expert tip
Create a new layer and select the Brush tool (B), choosing a very large Aztec brush. Use white as the Foreground colour and draw on some figures. Go to Layer Style and click on Bevel. Set the Size to 10px and click on Stroke, then set that Size to 3px and lower the Opacity to 50%. Change the blend mode for the layer to Overlay. As a final step, hold Cmd/Ctrl and then click on the layer to select the whole image, and now click on the Pattern Fill layer and press the Delete key.
Add wall figures
Simplify layer
08 Duplicate the Pattern Fill Layer and
hide it by clicking on the eye icon in
the Layers panel. Ctrl/right-click the Pattern
Fill Layer and choose Simplify Layer. Apply
some styles and add depth to the layer.
Layer Style
09 Click on Layer>Layer Style>Style
Settings. In the Style Setting window,
change Lighting Angle to -150º, select Bevel,
change Size to 5px and Direction to Up.
Change the layer’s blend mode to Soft Light.
Change the colour
10 Click Create New Fill or Adjustment
Layer and choose Hue/Saturation.
On the Hue/Saturation panel, click the
bottom left icon to clip the layer, check the
Colorize box and play with the settings.
The Photoshop Elements Book 181
Design ancient patterns
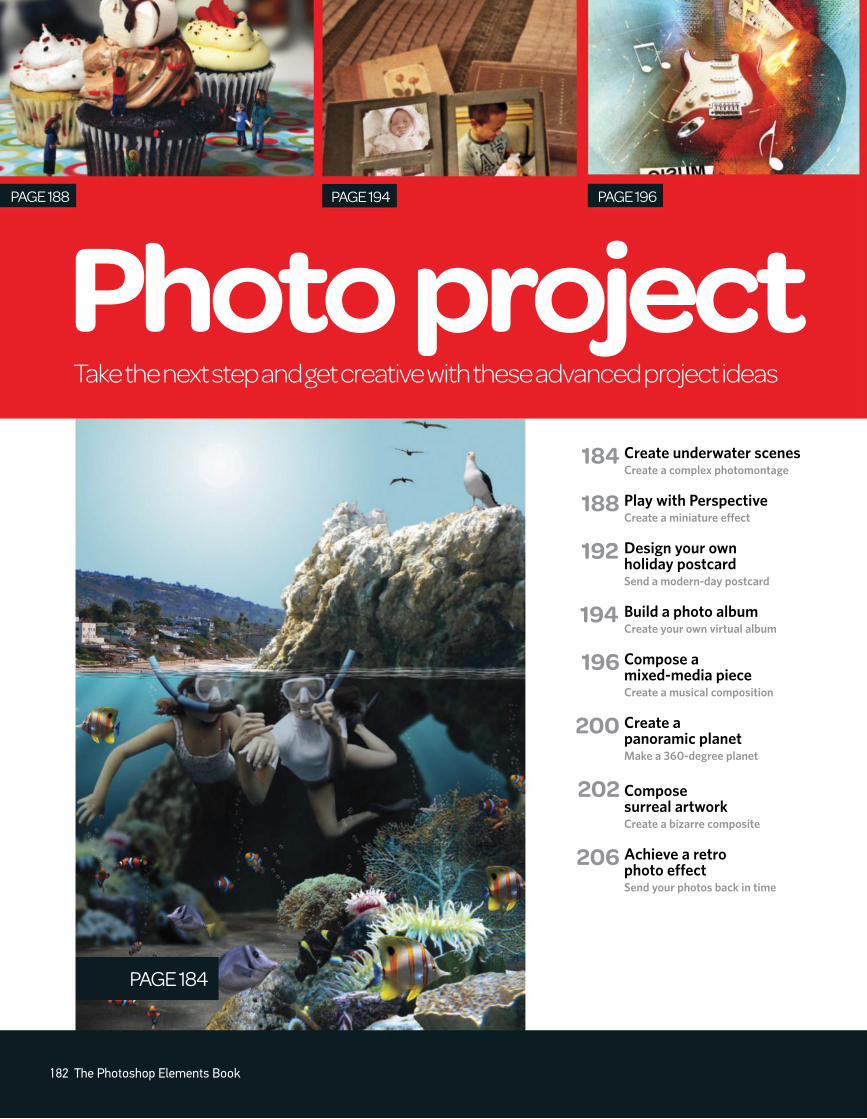
PAGE 184
Photo projectPAGE 188 PAGE 194 PAGE 196
Take the next step and get creative with these advanced project ideas
182 The Photoshop Elements Book
Create underwater scenesCreate a complex photomontage
184
Play with PerspectiveCreate a miniature efect
188
Design your own holiday postcardSend a modern-day postcard
192
Build a photo albumCreate your own virtual album
194
Compose a mixed-media pieceCreate a musical composition
196
Create a panoramic planetMake a 360-degree planet
200
Compose surreal artworkCreate a bizarre composite
202
Achieve a retro photo effectSend your photos back in time
206
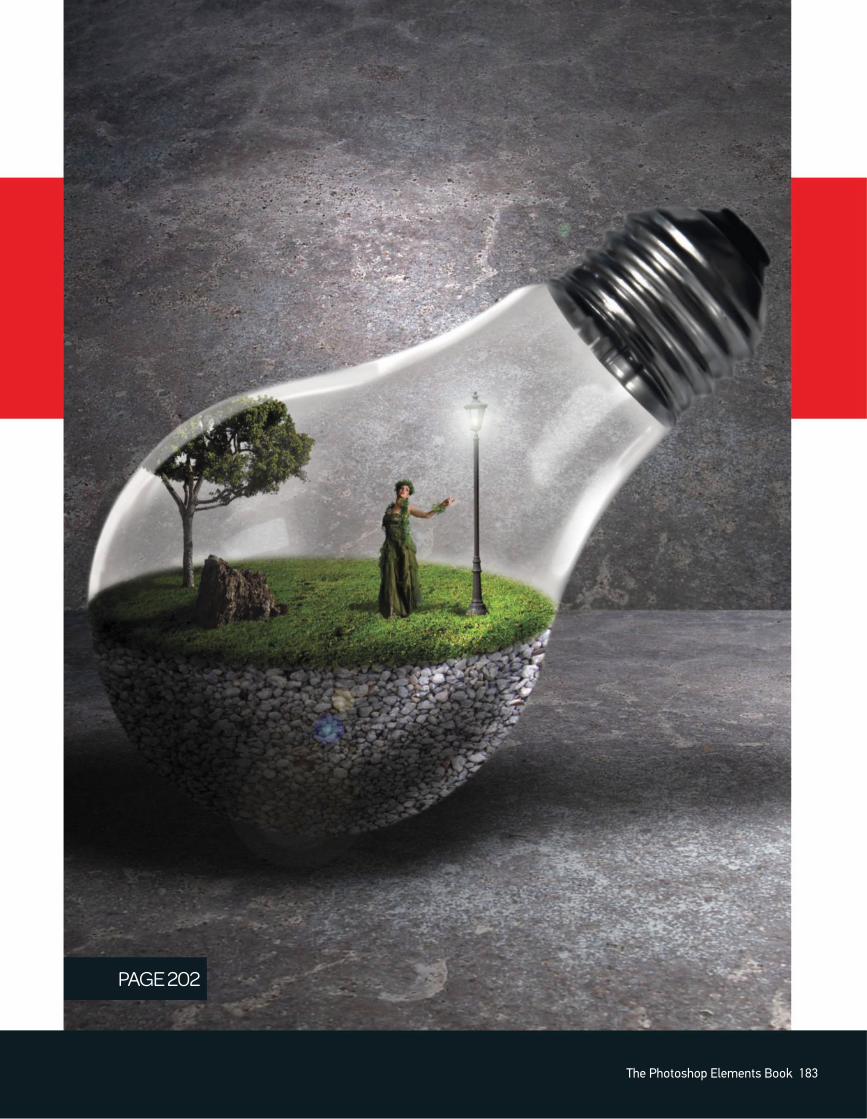
PAGE 202
The Photoshop Elements Book 183
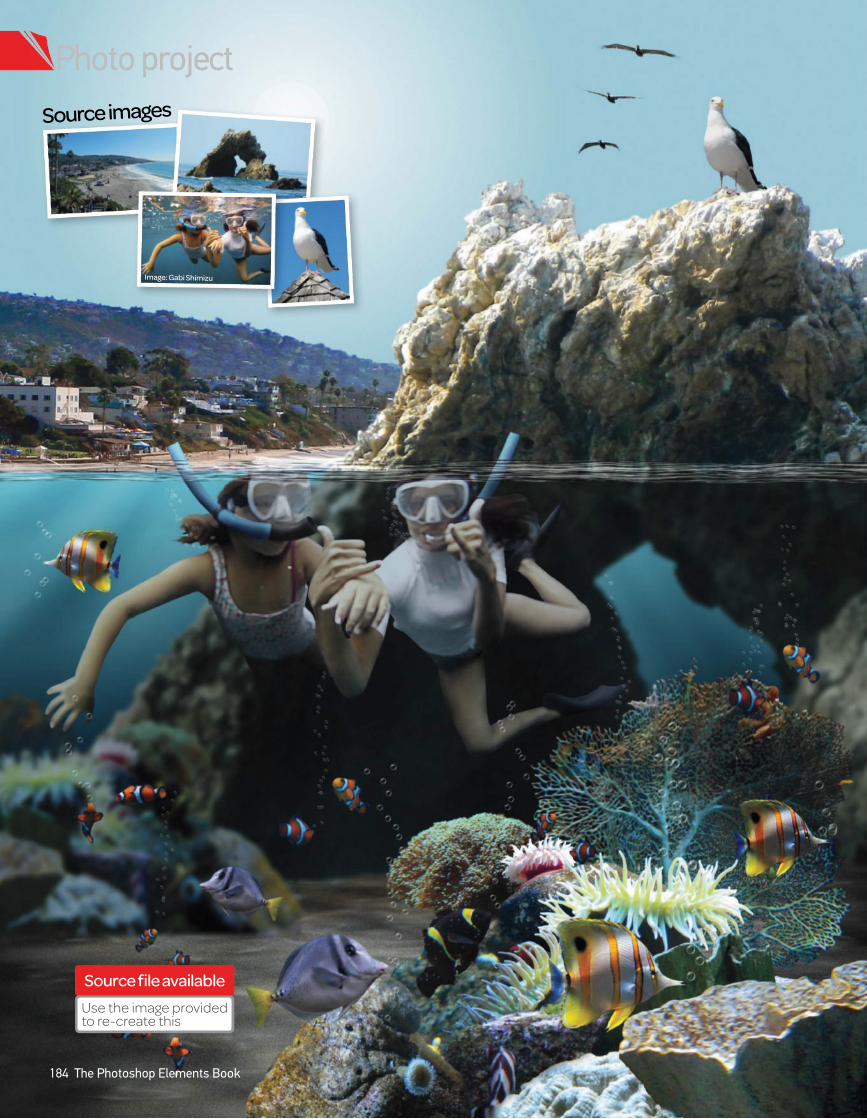
Photo project
Source images
Image: Gabi Shimizu
184 The Photoshop Elements Book
Source file available
Use the image provided to re-create this
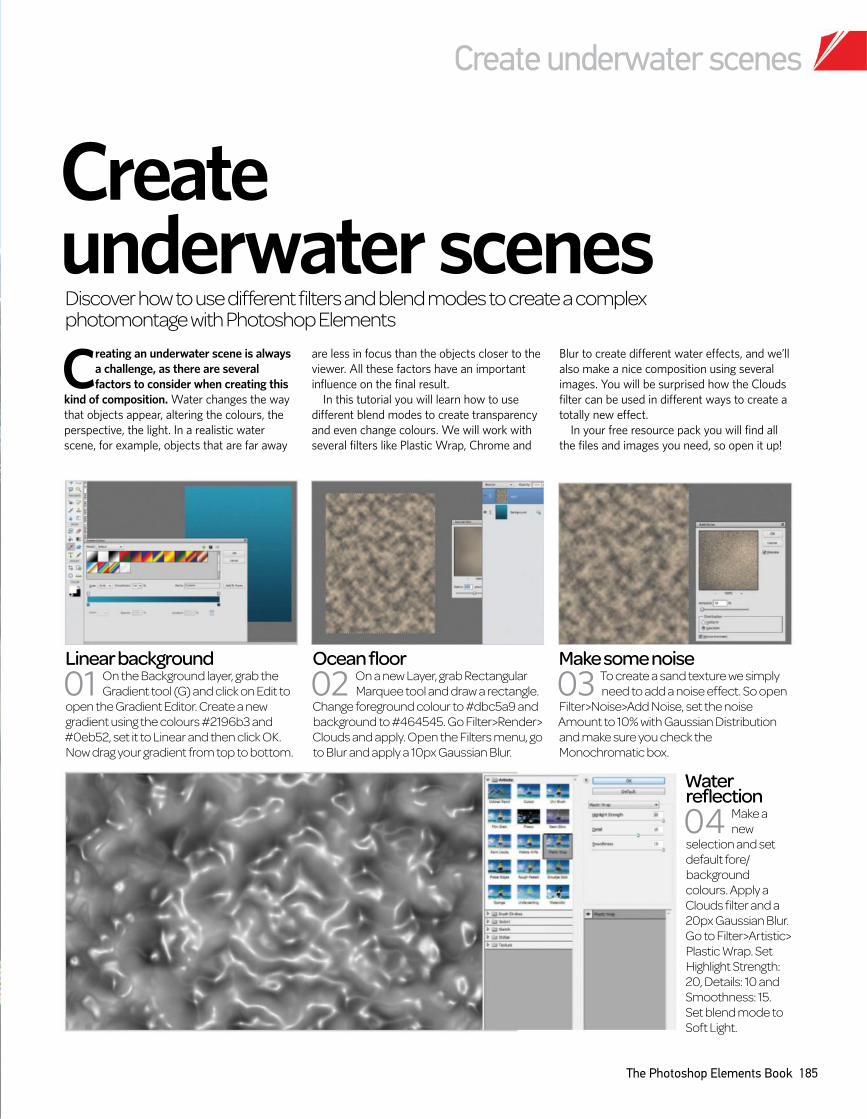
Create underwater scenes
The Photoshop Elements Book 185
Creating an underwater scene is always
a challenge, as there are several
factors to consider when creating this
kind of composition. Water changes the way
that objects appear, altering the colours, the
perspective, the light. In a realistic water
scene, for example, objects that are far away
are less in focus than the objects closer to the
viewer. All these factors have an important
influence on the final result.
In this tutorial you will learn how to use
different blend modes to create transparency
and even change colours. We will work with
several filters like Plastic Wrap, Chrome and
Blur to create different water effects, and we’ll
also make a nice composition using several
images. You will be surprised how the Clouds
filter can be used in different ways to create a
totally new effect.
In your free resource pack you will find all
the files and images you need, so open it up!
Create underwater scenesDiscover how to use different filters and blend modes to create a complex photomontage with Photoshop Elements
Water reflection
04 Make a
new
selection and set
default fore/
background
colours. Apply a
Clouds filter and a
20px Gaussian Blur.
Go to Filter>Artistic>
Plastic Wrap. Set
Highlight Strength:
20, Details: 10 and
Smoothness: 15.
Set blend mode to
Soft Light.
Ocean floor
02 On a new Layer, grab Rectangular
Marquee tool and draw a rectangle.
Change foreground colour to #dbc5a9 and
background to #464545. Go Filter>Render>
Clouds and apply. Open the Filters menu, go
to Blur and apply a 10px Gaussian Blur.
Make some noise
03 To create a sand texture we simply
need to add a noise effect. So open
Filter>Noise>Add Noise, set the noise
Amount to 10% with Gaussian Distribution
and make sure you check the
Monochromatic box.
Linear background
01 On the Background layer, grab the
Gradient tool (G) and click on Edit to
open the Gradient Editor. Create a new
gradient using the colours #2196b3 and
#0eb52, set it to Linear and then click OK.
Now drag your gradient from top to bottom.
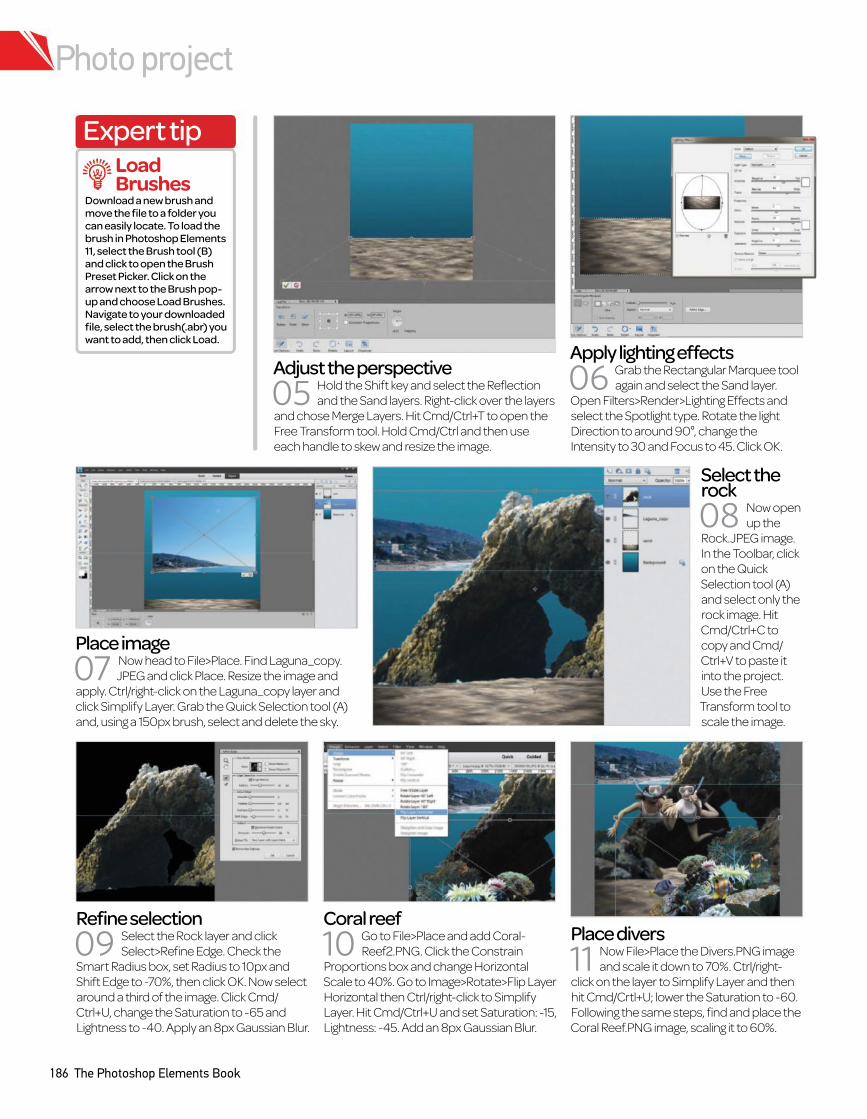
Photo project
186 The Photoshop Elements Book
Apply lighting effects
06 Grab the Rectangular Marquee tool
again and select the Sand layer.
Open Filters>Render>Lighting Effects and
select the Spotlight type. Rotate the light
Direction to around 90°, change the
Intensity to 30 and Focus to 45. Click OK.
Adjust the perspective
05 Hold the Shift key and select the Reflection
and the Sand layers. Right-click over the layers
and chose Merge Layers. Hit Cmd/Ctrl+T to open the
Free Transform tool. Hold Cmd/Ctrl and then use
each handle to skew and resize the image.
Place image
07 Now head to File>Place. Find Laguna_copy.
JPEG and click Place. Resize the image and
apply. Ctrl/right-click on the Laguna_copy layer and
click Simplify Layer. Grab the Quick Selection tool (A)
and, using a 150px brush, select and delete the sky.
Coral reef
10 Go to File>Place and add Coral-
Reef2.PNG. Click the Constrain
Proportions box and change Horizontal
Scale to 40%. Go to Image>Rotate>Flip Layer
Horizontal then Ctrl/right-click to Simplify
Layer. Hit Cmd/Ctrl+U and set Saturation: -15,
Lightness: -45. Add an 8px Gaussian Blur.
Select the rock
08 Now open
up the
Rock.JPEG image.
In the Toolbar, click
on the Quick
Selection tool (A)
and select only the
rock image. Hit
Cmd/Ctrl+C to
copy and Cmd/
Ctrl+V to paste it
into the project.
Use the Free
Transform tool to
scale the image.
Place divers
11 Now File>Place the Divers.PNG image
and scale it down to 70%. Ctrl/right-
click on the layer to Simplify Layer and then
hit Cmd/Crtl+U; lower the Saturation to -60.
Following the same steps, find and place the
Coral Reef.PNG image, scaling it to 60%.
Refine selection
09 Select the Rock layer and click
Select>Refine Edge. Check the
Smart Radius box, set Radius to 10px and
Shift Edge to -70%, then click OK. Now select
around a third of the image. Click Cmd/
Ctrl+U, change the Saturation to -65 and
Lightness to -40. Apply an 8px Gaussian Blur.
Expert tip
Download a new brush and move the file to a folder you can easily locate. To load the brush in Photoshop Elements 11, select the Brush tool (B) and click to open the Brush Preset Picker. Click on the arrow next to the Brush pop-up and choose Load Brushes. Navigate to your downloaded file, select the brush(.abr) you want to add, then click Load.
Load Brushes
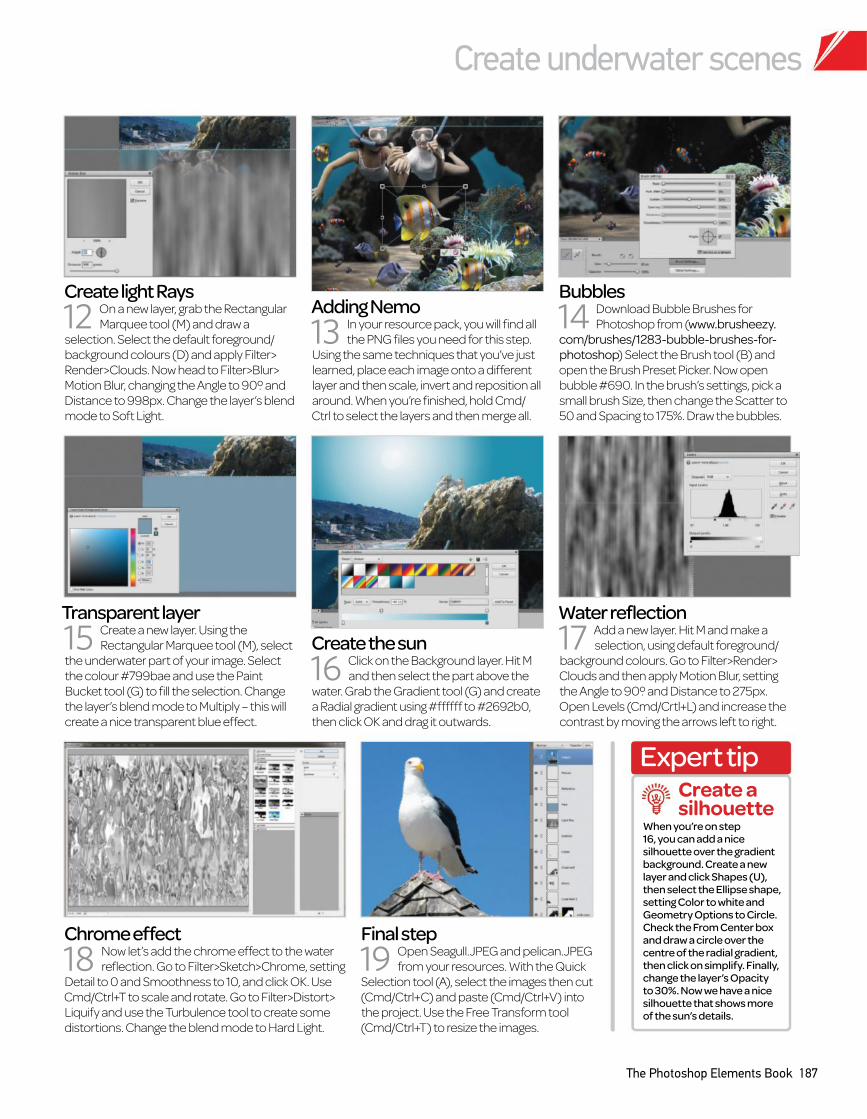
Create underwater scenes
The Photoshop Elements Book 187
Create light Rays
12 On a new layer, grab the Rectangular
Marquee tool (M) and draw a
selection. Select the default foreground/
background colours (D) and apply Filter>
Render>Clouds. Now head to Filter>Blur>
Motion Blur, changing the Angle to 90º and
Distance to 998px. Change the layer’s blend
mode to Soft Light.
Chrome effect
18 Now let’s add the chrome effect to the water
reflection. Go to Filter>Sketch>Chrome, setting
Detail to 0 and Smoothness to 10, and click OK. Use
Cmd/Ctrl+T to scale and rotate. Go to Filter>Distort>
Liquify and use the Turbulence tool to create some
distortions. Change the blend mode to Hard Light.
Adding Nemo
13 In your resource pack, you will find all
the PNG files you need for this step.
Using the same techniques that you’ve just
learned, place each image onto a different
layer and then scale, invert and reposition all
around. When you’re finished, hold Cmd/
Ctrl to select the layers and then merge all.
Final step
19 Open Seagull.JPEG and pelican.JPEG
from your resources. With the Quick
Selection tool (A), select the images then cut
(Cmd/Ctrl+C) and paste (Cmd/Ctrl+V) into
the project. Use the Free Transform tool
(Cmd/Ctrl+T) to resize the images.
Create the sun
16 Click on the Background layer. Hit M
and then select the part above the
water. Grab the Gradient tool (G) and create
a Radial gradient using #ffffff to #2692b0,
then click OK and drag it outwards.
Bubbles
14 Download Bubble Brushes for
Photoshop from (www.brusheezy.
com/brushes/1283-bubble-brushes-for-
photoshop) Select the Brush tool (B) and
open the Brush Preset Picker. Now open
bubble #690. In the brush’s settings, pick a
small brush Size, then change the Scatter to
50 and Spacing to 175%. Draw the bubbles.
Water reflection
17 Add a new layer. Hit M and make a
selection, using default foreground/
background colours. Go to Filter>Render>
Clouds and then apply Motion Blur, setting
the Angle to 90º and Distance to 275px.
Open Levels (Cmd/Crtl+L) and increase the
contrast by moving the arrows left to right.
Transparent layer
15 Create a new layer. Using the
Rectangular Marquee tool (M), select
the underwater part of your image. Select
the colour #799bae and use the Paint
Bucket tool (G) to fill the selection. Change
the layer’s blend mode to Multiply – this will
create a nice transparent blue effect.
Expert tip
When you’re on step 16, you can add a nice silhouette over the gradient background. Create a new layer and click Shapes (U), then select the Ellipse shape, setting Color to white and Geometry Options to Circle. Check the From Center box and draw a circle over the centre of the radial gradient, then click on simplify. Finally, change the layer’s Opacity to 30%. Now we have a nice silhouette that shows more of the sun’s details.
Create a silhouette
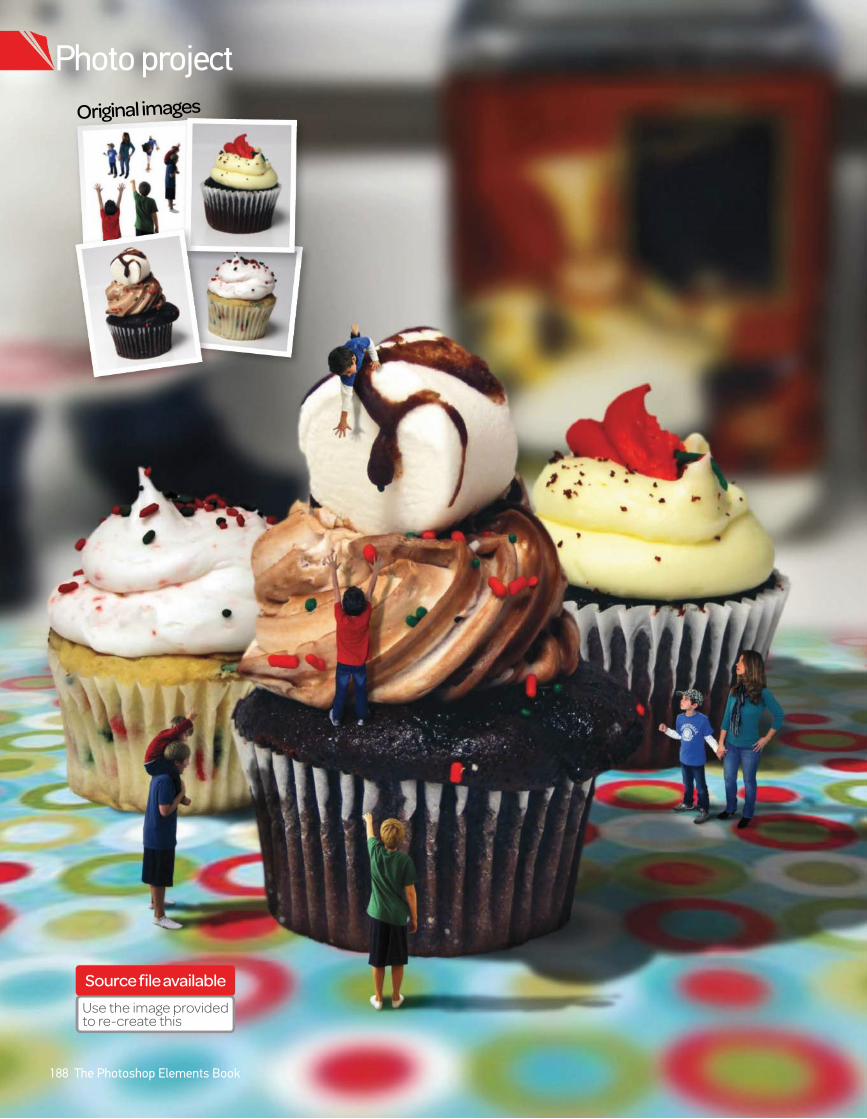
Original images
Photo project
Source file available
Use the image provided to re-create this
188 The Photoshop Elements Book
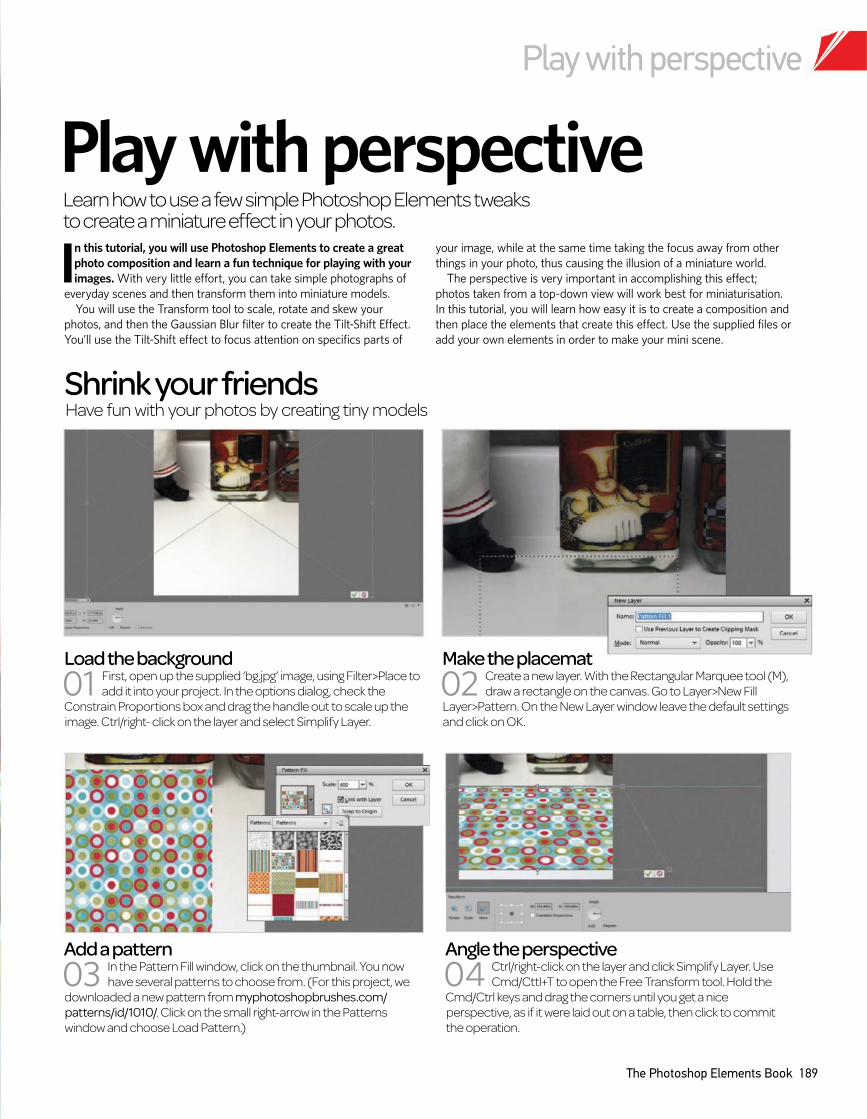
Play with perspective
In this tutorial, you will use Photoshop Elements to create a great
photo composition and learn a fun technique for playing with your
images. With very little effort, you can take simple photographs of
everyday scenes and then transform them into miniature models.
You will use the Transform tool to scale, rotate and skew your
photos, and then the Gaussian Blur filter to create the Tilt-Shift Effect.
You’ll use the Tilt-Shift effect to focus attention on specifics parts of
your image, while at the same time taking the focus away from other
things in your photo, thus causing the illusion of a miniature world.
The perspective is very important in accomplishing this effect;
photos taken from a top-down view will work best for miniaturisation.
In this tutorial, you will learn how easy it is to create a composition and
then place the elements that create this effect. Use the supplied files or
add your own elements in order to make your mini scene.
Play with perspective
Have fun with your photos by creating tiny models
Shrink your friends
Learn how to use a few simple Photoshop Elements tweaks to create a miniature effect in your photos.
Load the background
01 First, open up the supplied ‘bg.jpg’ image, using Filter>Place to
add it into your project. In the options dialog, check the
Constrain Proportions box and drag the handle out to scale up the
image. Ctrl/right- click on the layer and select Simplify Layer.
Add a pattern
03 In the Pattern Fill window, click on the thumbnail. You now
have several patterns to choose from. (For this project, we
downloaded a new pattern from myphotoshopbrushes.com/
patterns/id/1010/. Click on the small right-arrow in the Patterns
window and choose Load Pattern.)
Make the placemat
02 Create a new layer. With the Rectangular Marquee tool (M),
draw a rectangle on the canvas. Go to Layer>New Fill
Layer>Pattern. On the New Layer window leave the default settings
and click on OK.
The Photoshop Elements Book 189
Angle the perspective
04 Ctrl/right-click on the layer and click Simplify Layer. Use
Cmd/Cttl+T to open the Free Transform tool. Hold the
Cmd/Ctrl keys and drag the corners until you get a nice
perspective, as if it were laid out on a table, then click to commit
the operation.
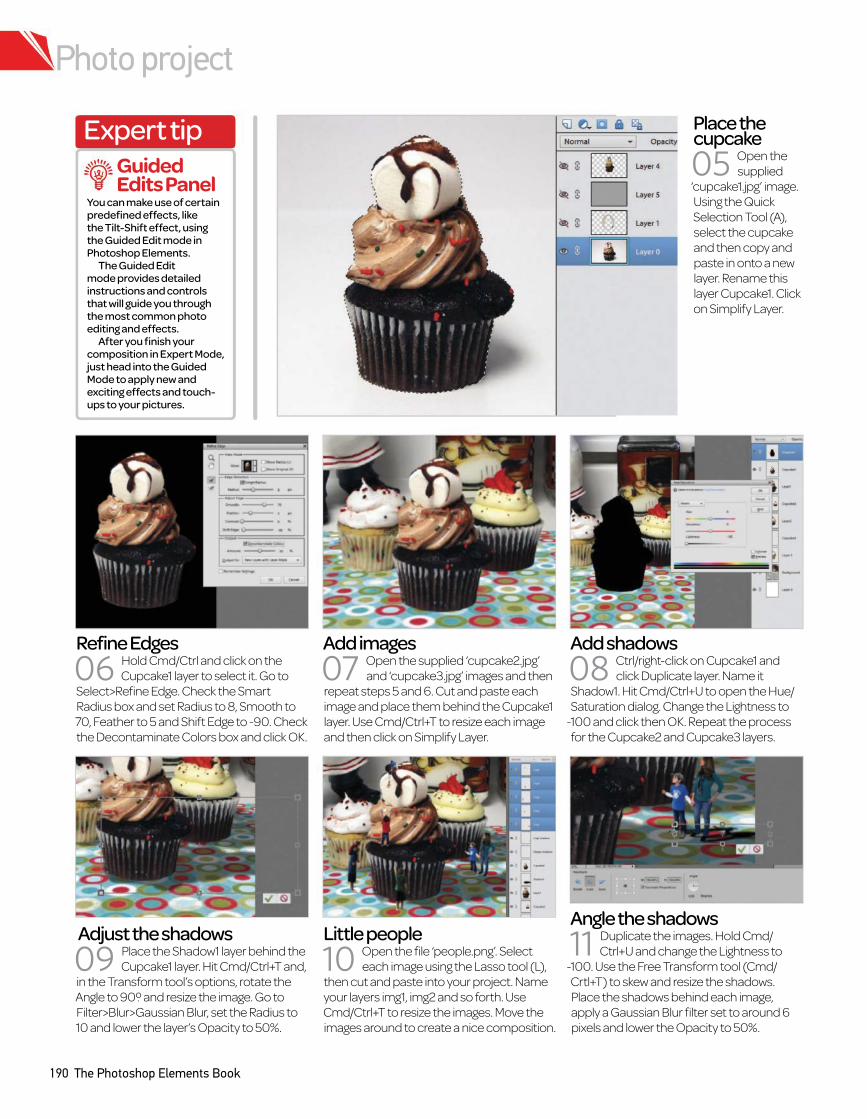
Photo project
190 The Photoshop Elements Book
Place the cupcake
05 Open the
supplied
‘cupcake1.jpg’ image.
Using the Quick
Selection Tool (A),
select the cupcake
and then copy and
paste in onto a new
layer. Rename this
layer Cupcake1. Click
on Simplify Layer.
Little people
10 Open the file ‘people.png’. Select
each image using the Lasso tool (L),
then cut and paste into your project. Name
your layers img1, img2 and so forth. Use
Cmd/Ctrl+T to resize the images. Move the
images around to create a nice composition.
Angle the shadows
11 Duplicate the images. Hold Cmd/
Ctrl+U and change the Lightness to
-100. Use the Free Transform tool (Cmd/
Crtl+T) to skew and resize the shadows.
Place the shadows behind each image,
apply a Gaussian Blur filter set to around 6
pixels and lower the Opacity to 50%.
Adjust the shadows
09 Place the Shadow1 layer behind the
Cupcake1 layer. Hit Cmd/Ctrl+T and,
in the Transform tool’s options, rotate the
Angle to 90º and resize the image. Go to
Filter>Blur>Gaussian Blur, set the Radius to
10 and lower the layer’s Opacity to 50%.
Expert tip
You can make use of certain predefined effects, like the Tilt-Shift effect, using the Guided Edit mode in Photoshop Elements.
The Guided Edit mode provides detailed instructions and controls that will guide you through the most common photo editing and effects.
After you finish your composition in Expert Mode, just head into the Guided Mode to apply new and exciting effects and touch-ups to your pictures.
Guided Edits Panel
Refine Edges
06 Hold Cmd/Ctrl and click on the
Cupcake1 layer to select it. Go to
Select>Refine Edge. Check the Smart
Radius box and set Radius to 8, Smooth to
70, Feather to 5 and Shift Edge to -90. Check
the Decontaminate Colors box and click OK.
Add images
07 Open the supplied ‘cupcake2.jpg’
and ‘cupcake3.jpg’ images and then
repeat steps 5 and 6. Cut and paste each
image and place them behind the Cupcake1
layer. Use Cmd/Ctrl+T to resize each image
and then click on Simplify Layer.
Add shadows
08 Ctrl/right-click on Cupcake1 and
click Duplicate layer. Name it
Shadow1. Hit Cmd/Ctrl+U to open the Hue/
Saturation dialog. Change the Lightness to
-100 and click then OK. Repeat the process
for the Cupcake2 and Cupcake3 layers.
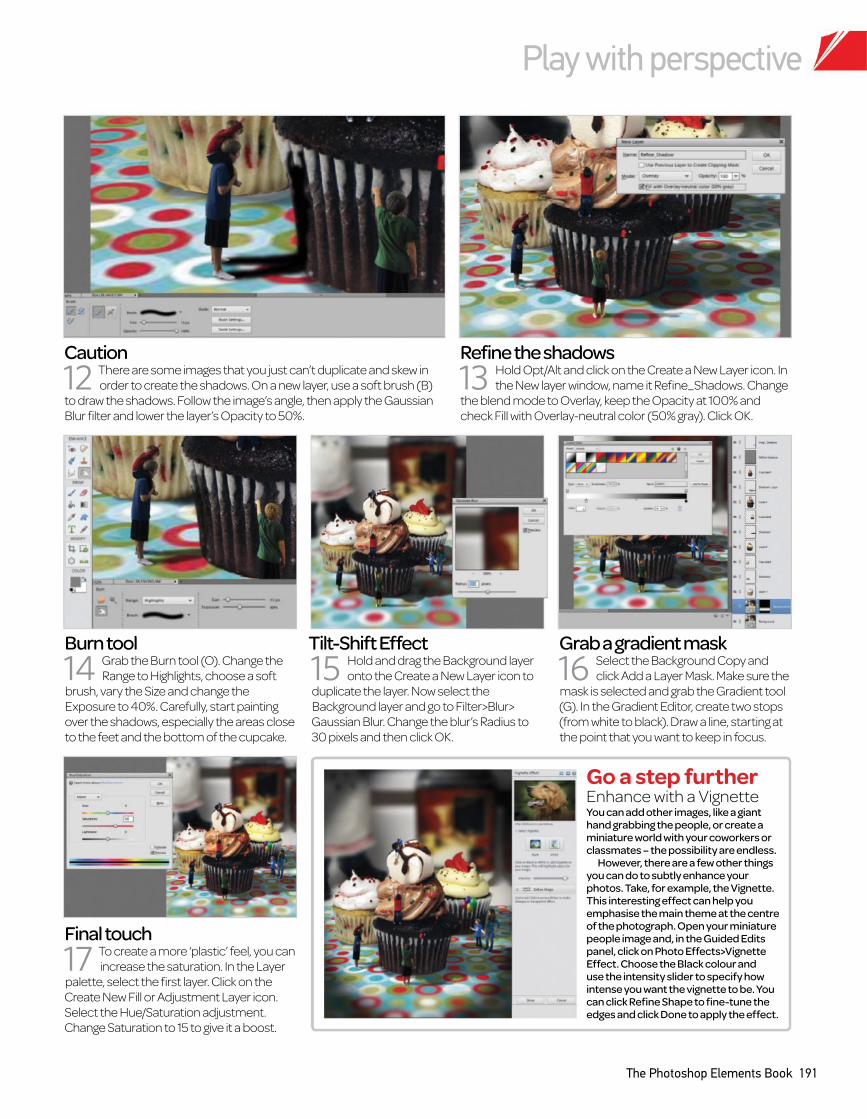
Play with perspective
The Photoshop Elements Book 191
You can add other images, like a giant hand grabbing the people, or create a miniature world with your coworkers or classmates – the possibility are endless.
However, there are a few other things you can do to subtly enhance your photos. Take, for example, the Vignette. This interesting effect can help you emphasise the main theme at the centre of the photograph. Open your miniature people image and, in the Guided Edits panel, click on Photo Effects>Vignette Effect. Choose the Black colour and use the intensity slider to specify how intense you want the vignette to be. You can click Refine Shape to fine-tune the edges and click Done to apply the effect.
Enhance with a VignetteGo a step further
Caution
12 There are some images that you just can’t duplicate and skew in
order to create the shadows. On a new layer, use a soft brush (B)
to draw the shadows. Follow the image’s angle, then apply the Gaussian
Blur filter and lower the layer’s Opacity to 50%.
Refine the shadows
13 Hold Opt/Alt and click on the Create a New Layer icon. In
the New layer window, name it Refine_Shadows. Change
the blend mode to Overlay, keep the Opacity at 100% and
check Fill with Overlay-neutral color (50% gray). Click OK.
Tilt-Shift Effect
15 Hold and drag the Background layer
onto the Create a New Layer icon to
duplicate the layer. Now select the
Background layer and go to Filter>Blur>
Gaussian Blur. Change the blur’s Radius to
30 pixels and then click OK.
Grab a gradient mask
16 Select the Background Copy and
click Add a Layer Mask. Make sure the
mask is selected and grab the Gradient tool
(G). In the Gradient Editor, create two stops
(from white to black). Draw a line, starting at
the point that you want to keep in focus.
Burn tool
14 Grab the Burn tool (O). Change the
Range to Highlights, choose a soft
brush, vary the Size and change the
Exposure to 40%. Carefully, start painting
over the shadows, especially the areas close
to the feet and the bottom of the cupcake.
Final touch
17 To create a more ‘plastic’ feel, you can
increase the saturation. In the Layer
palette, select the first layer. Click on the
Create New Fill or Adjustment Layer icon.
Select the Hue/Saturation adjustment.
Change Saturation to 15 to give it a boost.
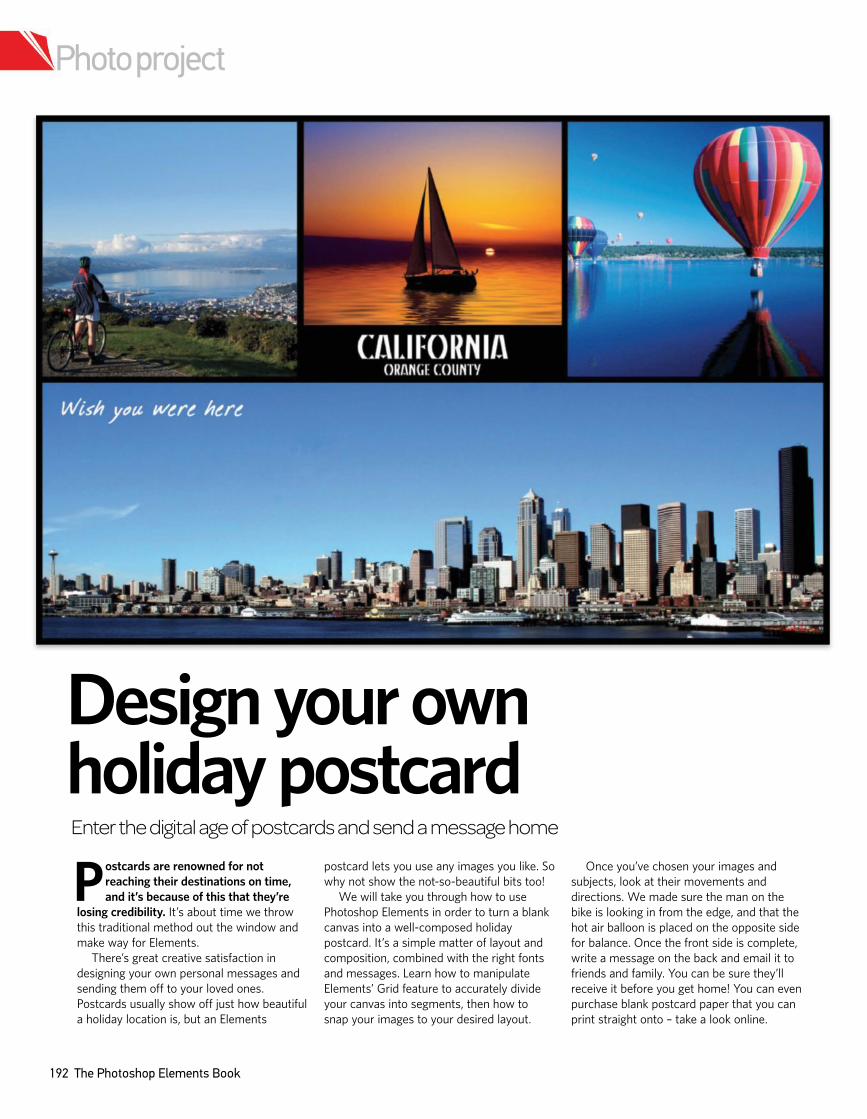
192 The Photoshop Elements Book
Photo project
Enter the digital age of postcards and send a message home
Design your own holiday postcard
Postcards are renowned for not
reaching their destinations on time,
and it’s because of this that they’re
losing credibility. It’s about time we throw
this traditional method out the window and
make way for Elements.
There’s great creative satisfaction in
designing your own personal messages and
sending them off to your loved ones.
Postcards usually show off just how beautiful
a holiday location is, but an Elements
postcard lets you use any images you like. So
why not show the not-so-beautiful bits too!
We will take you through how to use
Photoshop Elements in order to turn a blank
canvas into a well-composed holiday
postcard. It’s a simple matter of layout and
composition, combined with the right fonts
and messages. Learn how to manipulate
Elements’ Grid feature to accurately divide
your canvas into segments, then how to
snap your images to your desired layout.
Once you’ve chosen your images and
subjects, look at their movements and
directions. We made sure the man on the
bike is looking in from the edge, and that the
hot air balloon is placed on the opposite side
for balance. Once the front side is complete,
write a message on the back and email it to
friends and family. You can be sure they’ll
receive it before you get home! You can even
purchase blank postcard paper that you can
print straight onto – take a look online.
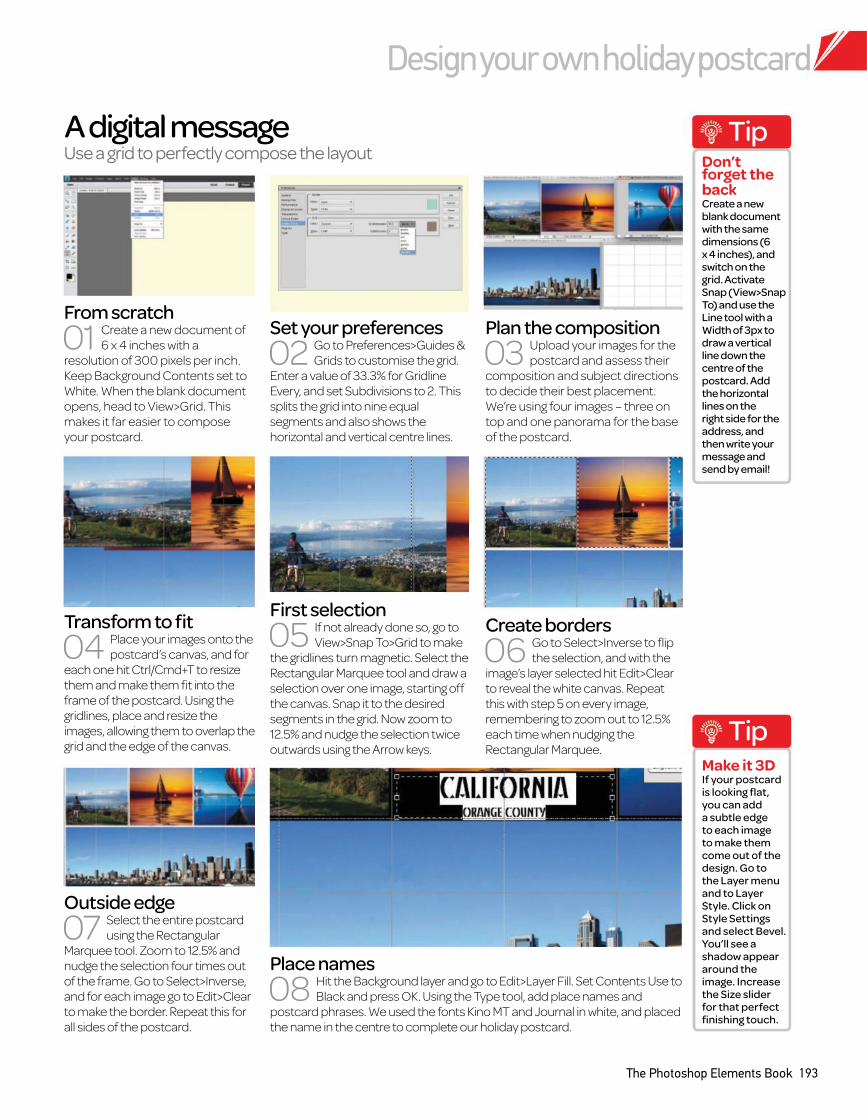
Design your own holiday postcard
The Photoshop Elements Book 193
A digital messageUse a grid to perfectly compose the layout
TipMake it 3DIf your postcard is looking flat, you can add a subtle edge to each image to make them come out of the design. Go to the Layer menu and to Layer Style. Click on Style Settings and select Bevel. You’ll see a shadow appear around the image. Increase the Size slider for that perfect finishing touch.
TipDon’t forget the backCreate a new blank document with the same dimensions (6 x 4 inches), and switch on the grid. Activate Snap (View>Snap To) and use the Line tool with a Width of 3px to draw a vertical line down the centre of the postcard. Add the horizontal lines on the right side for the address, and then write your message and send by email!
Transform to fit
04 Place your images onto the
postcard’s canvas, and for
each one hit Ctrl/Cmd+T to resize
them and make them fit into the
frame of the postcard. Using the
gridlines, place and resize the
images, allowing them to overlap the
grid and the edge of the canvas.
First selection
05 If not already done so, go to
View>Snap To>Grid to make
the gridlines turn magnetic. Select the
Rectangular Marquee tool and draw a
selection over one image, starting off
the canvas. Snap it to the desired
segments in the grid. Now zoom to
12.5% and nudge the selection twice
outwards using the Arrow keys.
Create borders
06 Go to Select>Inverse to flip
the selection, and with the
image’s layer selected hit Edit>Clear
to reveal the white canvas. Repeat
this with step 5 on every image,
remembering to zoom out to 12.5%
each time when nudging the
Rectangular Marquee.
From scratch
01 Create a new document of
6 x 4 inches with a
resolution of 300 pixels per inch.
Keep Background Contents set to
White. When the blank document
opens, head to View>Grid. This
makes it far easier to compose
your postcard.
Set your preferences
02 Go to Preferences>Guides &
Grids to customise the grid.
Enter a value of 33.3% for Gridline
Every, and set Subdivisions to 2. This
splits the grid into nine equal
segments and also shows the
horizontal and vertical centre lines.
Outside edge
07 Select the entire postcard
using the Rectangular
Marquee tool. Zoom to 12.5% and
nudge the selection four times out
of the frame. Go to Select>Inverse,
and for each image go to Edit>Clear
to make the border. Repeat this for
all sides of the postcard.
Place names
08 Hit the Background layer and go to Edit>Layer Fill. Set Contents Use to
Black and press OK. Using the Type tool, add place names and
postcard phrases. We used the fonts Kino MT and Journal in white, and placed
the name in the centre to complete our holiday postcard.
Plan the composition
03 Upload your images for the
postcard and assess their
composition and subject directions
to decide their best placement.
We’re using four images – three on
top and one panorama for the base
of the postcard.
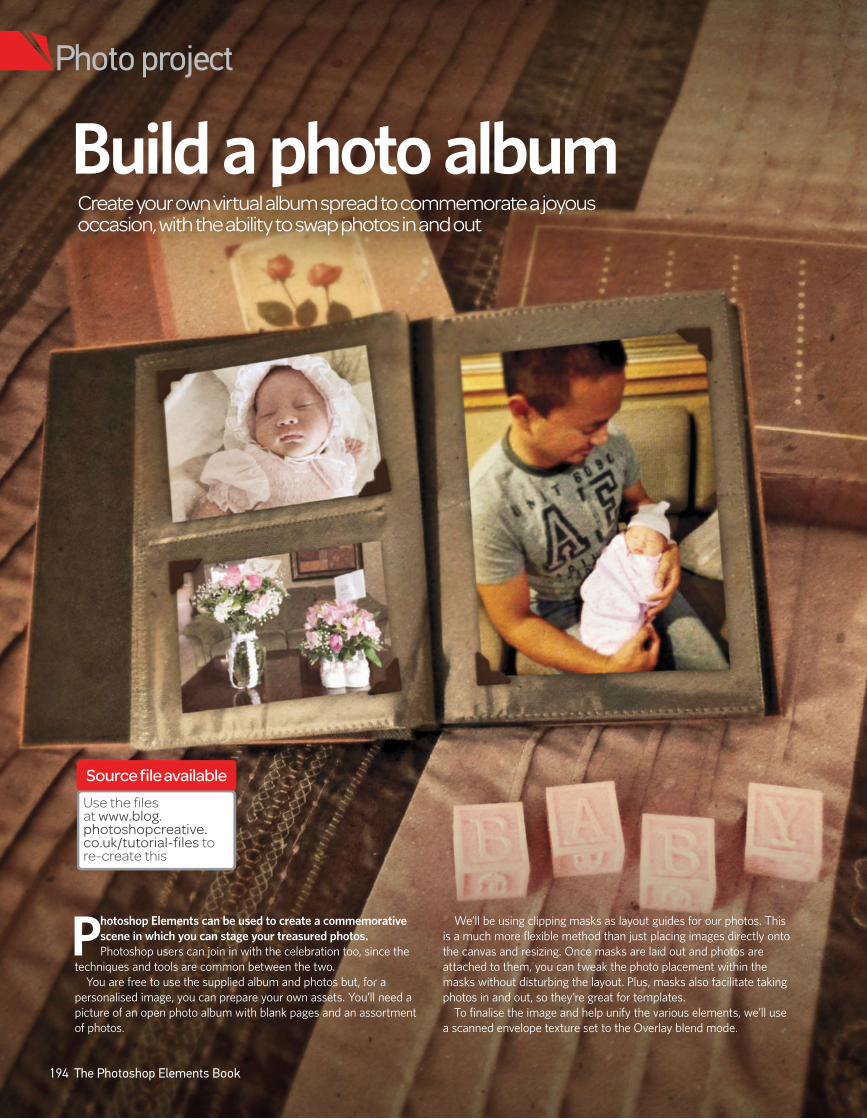
Build a photo albumCreate your own virtual album spread to commemorate a joyous occasion, with the ability to swap photos in and out
Photoshop Elements can be used to create a commemorative
scene in which you can stage your treasured photos.
Photoshop users can join in with the celebration too, since the
techniques and tools are common between the two.
You are free to use the supplied album and photos but, for a
personalised image, you can prepare your own assets. You’ll need a
picture of an open photo album with blank pages and an assortment
of photos.
We’ll be using clipping masks as layout guides for our photos. This
is a much more flexible method than just placing images directly onto
the canvas and resizing. Once masks are laid out and photos are
attached to them, you can tweak the photo placement within the
masks without disturbing the layout. Plus, masks also facilitate taking
photos in and out, so they’re great for templates.
To finalise the image and help unify the various elements, we’ll use
a scanned envelope texture set to the Overlay blend mode.
194 The Photoshop Elements Book
Photo project
Source file available
Use the files
at www.blog.photoshopcreative.co.uk/tutorial-files to
re-create this
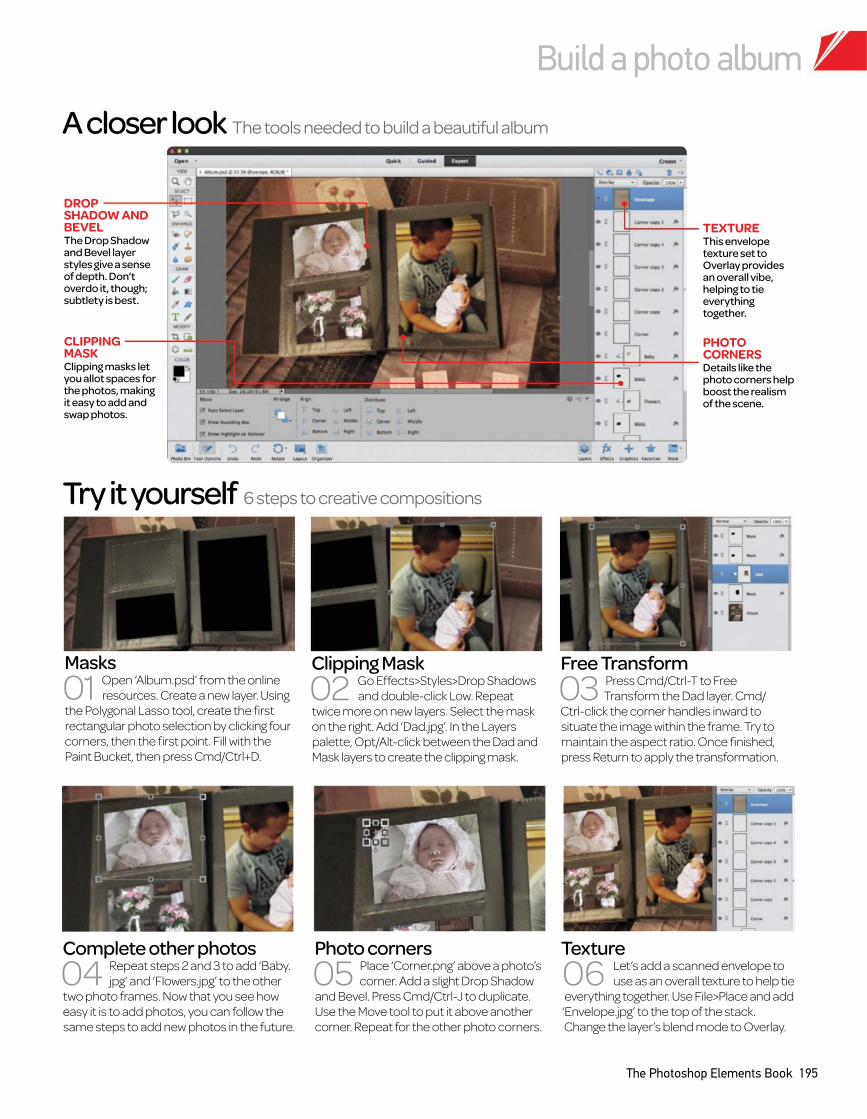
Build a photo album
The Photoshop Elements Book 195
Try it yourself 6 steps to creative compositions
A closer look The tools needed to build a beautiful album
Free Transform
03 Press Cmd/Ctrl-T to Free
Transform the Dad layer. Cmd/
Ctrl-click the corner handles inward to
situate the image within the frame. Try to
maintain the aspect ratio. Once finished,
press Return to apply the transformation.
Clipping Mask
02 Go Effects>Styles>Drop Shadows
and double-click Low. Repeat
twice more on new layers. Select the mask
on the right. Add ‘Dad.jpg’. In the Layers
palette, Opt/Alt-click between the Dad and
Mask layers to create the clipping mask.
Masks
01 Open ‘Album.psd’ from the online
resources. Create a new layer. Using
the Polygonal Lasso tool, create the first
rectangular photo selection by clicking four
corners, then the first point. Fill with the
Paint Bucket, then press Cmd/Ctrl+D.
Texture
06 Let’s add a scanned envelope to
use as an overall texture to help tie
everything together. Use File>Place and add
‘Envelope.jpg’ to the top of the stack.
Change the layer’s blend mode to Overlay.
Photo corners
corner. Add a slight Drop Shadow 05 Place ‘Corner.png’ above a photo’s
and Bevel. Press Cmd/Ctrl-J to duplicate.
Use the Move tool to put it above another
corner. Repeat for the other photo corners.
Complete other photos
04 Repeat steps 2 and 3 to add ‘Baby.
jpg’ and ‘Flowers.jpg’ to the other
two photo frames. Now that you see how
easy it is to add photos, you can follow the
same steps to add new photos in the future.
CLIPPING
MASK
Clipping masks let you allot spaces for the photos, making it easy to add and swap photos.
PHOTO
CORNERS
Details like the photo corners help boost the realism of the scene.
DROP
SHADOW AND
BEVEL
The Drop Shadow and Bevel layer styles give a sense of depth. Don’t overdo it, though; subtlety is best.
TEXTURE
This envelope texture set to Overlay provides an overall vibe, helping to tie everything together.
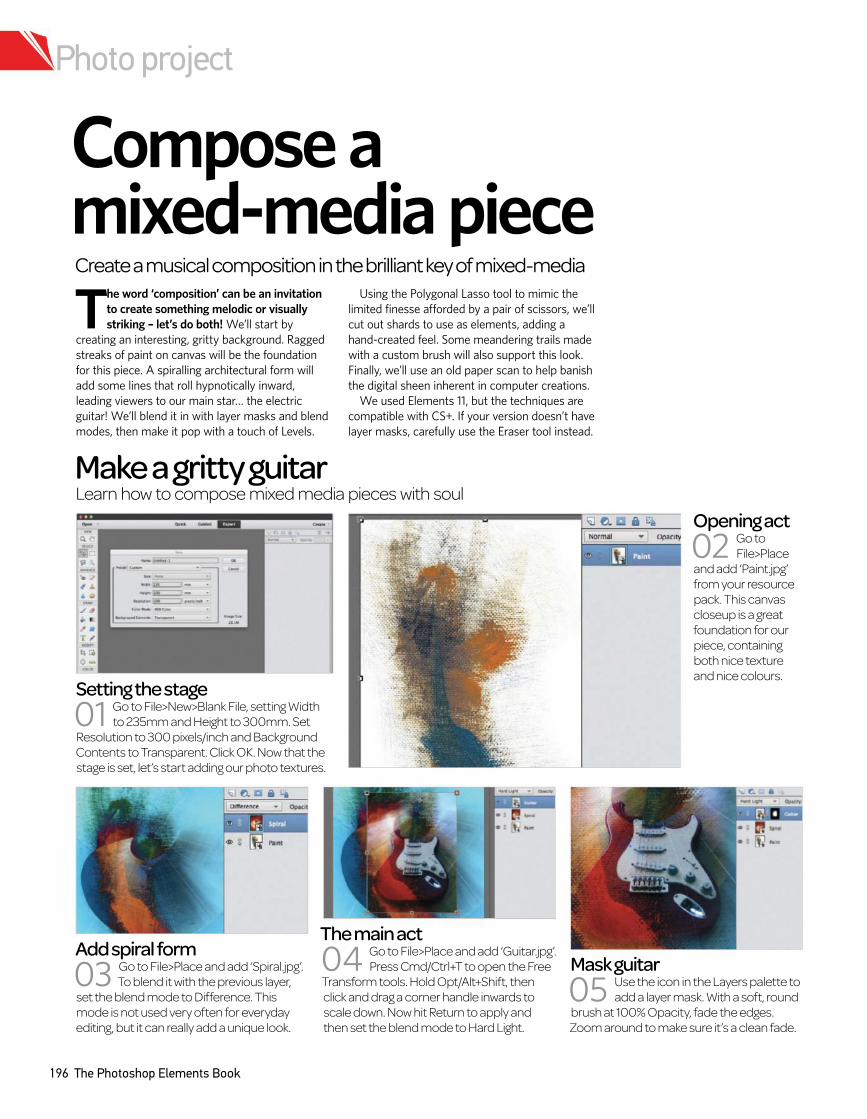
Photo project
196 The Photoshop Elements Book
The word ‘composition’ can be an invitation
to create something melodic or visually
striking – let’s do both! We’ll start by
creating an interesting, gritty background. Ragged
streaks of paint on canvas will be the foundation
for this piece. A spiralling architectural form will
add some lines that roll hypnotically inward,
leading viewers to our main star… the electric
guitar! We’ll blend it in with layer masks and blend
modes, then make it pop with a touch of Levels.
Using the Polygonal Lasso tool to mimic the
limited finesse afforded by a pair of scissors, we’ll
cut out shards to use as elements, adding a
hand-created feel. Some meandering trails made
with a custom brush will also support this look.
Finally, we’ll use an old paper scan to help banish
the digital sheen inherent in computer creations.
We used Elements 11, but the techniques are
compatible with CS+. If your version doesn’t have
layer masks, carefully use the Eraser tool instead.
Compose a mixed-media pieceCreate a musical composition in the brilliant key of mixed-media
Add spiral form
03 Go to File>Place and add ‘Spiral.jpg’.
To blend it with the previous layer,
set the blend mode to Difference. This
mode is not used very often for everyday
editing, but it can really add a unique look.
The main act
04 Go to File>Place and add ‘Guitar.jpg’.
Press Cmd/Ctrl+T to open the Free
Transform tools. Hold Opt/Alt+Shift, then
click and drag a corner handle inwards to
scale down. Now hit Return to apply and
then set the blend mode to Hard Light.
Mask guitar
05 Use the icon in the Layers palette to
add a layer mask. With a soft, round
brush at 100% Opacity, fade the edges.
Zoom around to make sure it’s a clean fade.
Setting the stage
01 Go to File>New>Blank File, setting Width
to 235mm and Height to 300mm. Set
Resolution to 300 pixels/inch and Background
Contents to Transparent. Click OK. Now that the
stage is set, let’s start adding our photo textures.
Opening act
02 Go to
File>Place
and add ‘Paint.jpg’
from your resource
pack. This canvas
closeup is a great
foundation for our
piece, containing
both nice texture
and nice colours.
Learn how to compose mixed media pieces with soul
Make a gritty guitar

Source images
The Photoshop Elements Book 197
Source file available
Use the image provided to re-create this
Compose a mixed-media piece
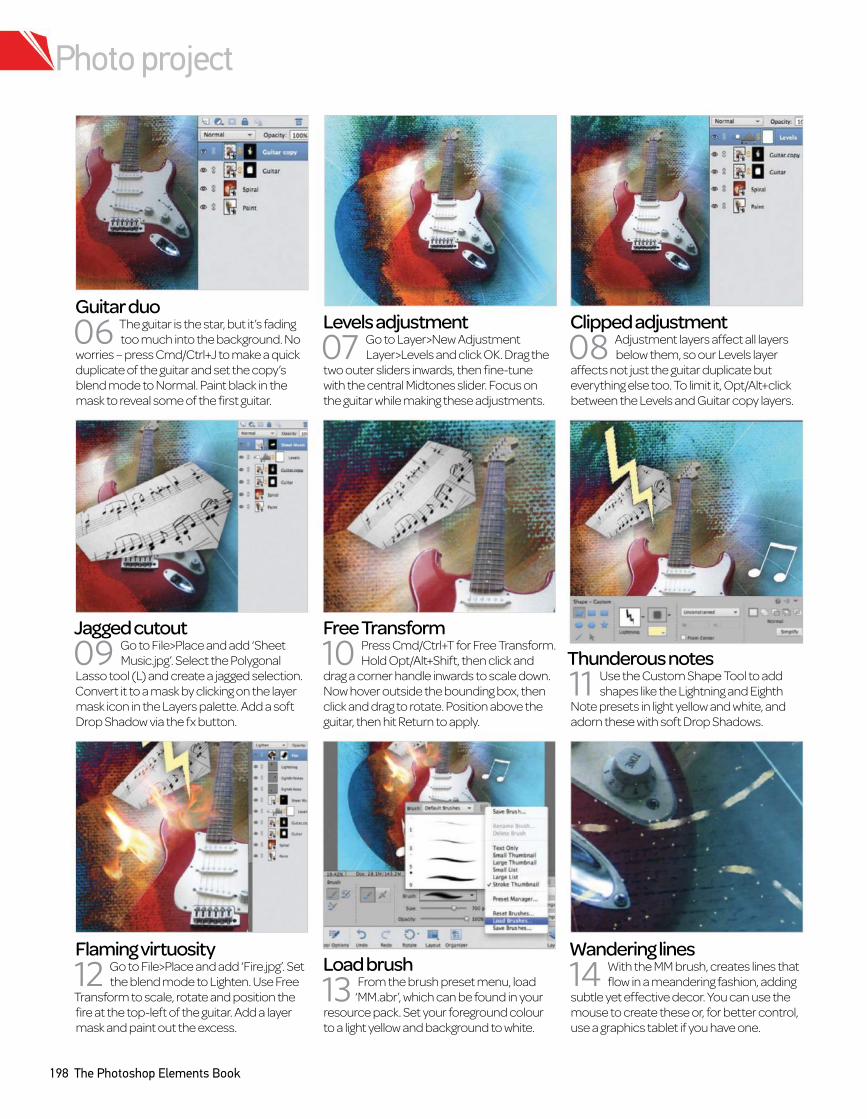
Photo project
198 The Photoshop Elements Book
Levels adjustment
07 Go to Layer>New Adjustment
Layer>Levels and click OK. Drag the
two outer sliders inwards, then fine-tune
with the central Midtones slider. Focus on
the guitar while making these adjustments.
Guitar duo
06 The guitar is the star, but it’s fading
too much into the background. No
worries – press Cmd/Ctrl+J to make a quick
duplicate of the guitar and set the copy’s
blend mode to Normal. Paint black in the
mask to reveal some of the first guitar.
Clipped adjustment
08 Adjustment layers affect all layers
below them, so our Levels layer
affects not just the guitar duplicate but
everything else too. To limit it, Opt/Alt+click
between the Levels and Guitar copy layers.
Jagged cutout
09 Go to File>Place and add ‘Sheet
Music.jpg’. Select the Polygonal
Lasso tool (L) and create a jagged selection.
Convert it to a mask by clicking on the layer
mask icon in the Layers palette. Add a soft
Drop Shadow via the fx button.
Flaming virtuosity
12 Go to File>Place and add ‘Fire.jpg’. Set
the blend mode to Lighten. Use Free
Transform to scale, rotate and position the
fire at the top-left of the guitar. Add a layer
mask and paint out the excess.
Free Transform
10 Press Cmd/Ctrl+T for Free Transform.
Hold Opt/Alt+Shift, then click and
drag a corner handle inwards to scale down.
Now hover outside the bounding box, then
click and drag to rotate. Position above the
guitar, then hit Return to apply.
Load brush
13 From the brush preset menu, load
‘MM.abr’, which can be found in your
resource pack. Set your foreground colour
to a light yellow and background to white.
Thunderous notes
11 Use the Custom Shape Tool to add
shapes like the Lightning and Eighth
Note presets in light yellow and white, and
adorn these with soft Drop Shadows.
Wandering lines
14 With the MM brush, creates lines that
flow in a meandering fashion, adding
subtle yet effective decor. You can use the
mouse to create these or, for better control,
use a graphics tablet if you have one.
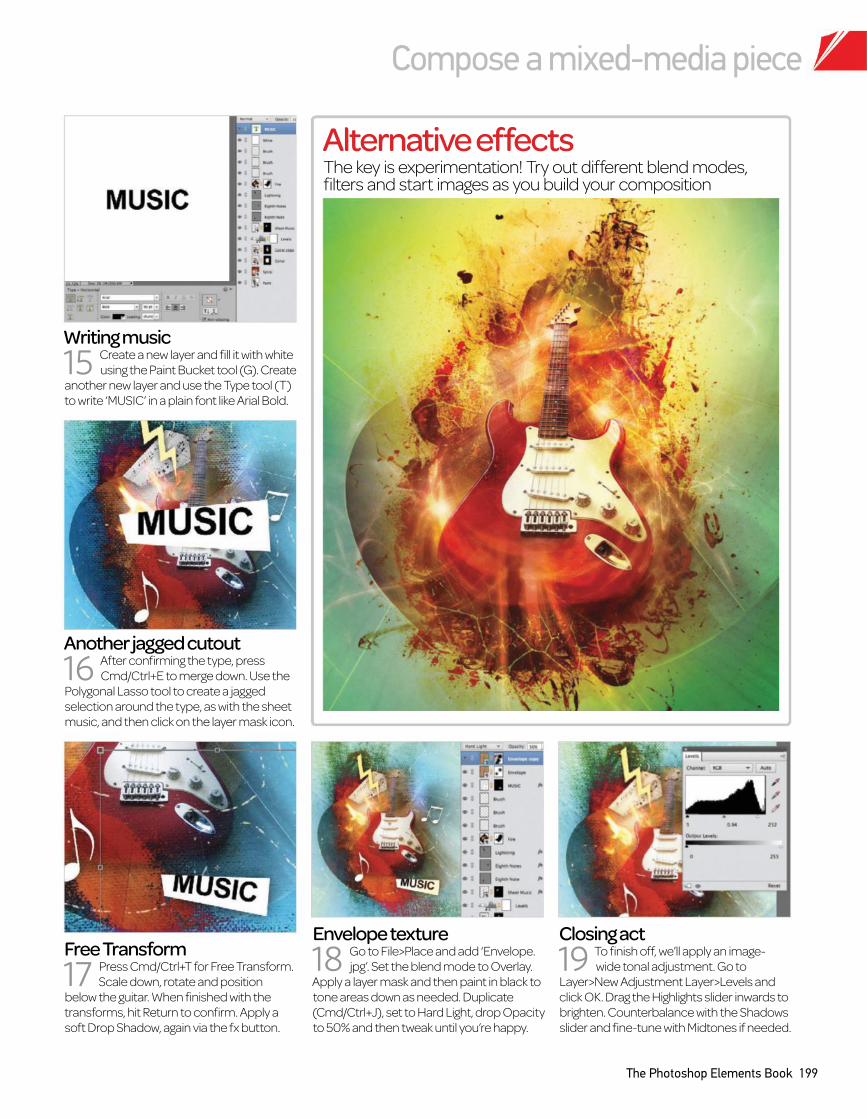
Compose a mixed-media piece
The Photoshop Elements Book 199
Another jagged cutout
16 After confirming the type, press
Cmd/Ctrl+E to merge down. Use the
Polygonal Lasso tool to create a jagged
selection around the type, as with the sheet
music, and then click on the layer mask icon.
Envelope texture
18 Go to File>Place and add ‘Envelope.
jpg’. Set the blend mode to Overlay.
Apply a layer mask and then paint in black to
tone areas down as needed. Duplicate
(Cmd/Ctrl+J), set to Hard Light, drop Opacity
to 50% and then tweak until you’re happy.
Writing music
15 Create a new layer and fill it with white
using the Paint Bucket tool (G). Create
another new layer and use the Type tool (T)
to write ‘MUSIC’ in a plain font like Arial Bold.
Free Transform
17 Press Cmd/Ctrl+T for Free Transform.
Scale down, rotate and position
below the guitar. When finished with the
transforms, hit Return to confirm. Apply a
soft Drop Shadow, again via the fx button.
Closing act
19 To finish off, we’ll apply an image-
wide tonal adjustment. Go to
Layer>New Adjustment Layer>Levels and
click OK. Drag the Highlights slider inwards to
brighten. Counterbalance with the Shadows
slider and fine-tune with Midtones if needed.
The key is experimentation! Try out different blend modes, filters and start images as you build your composition
Alternative effects
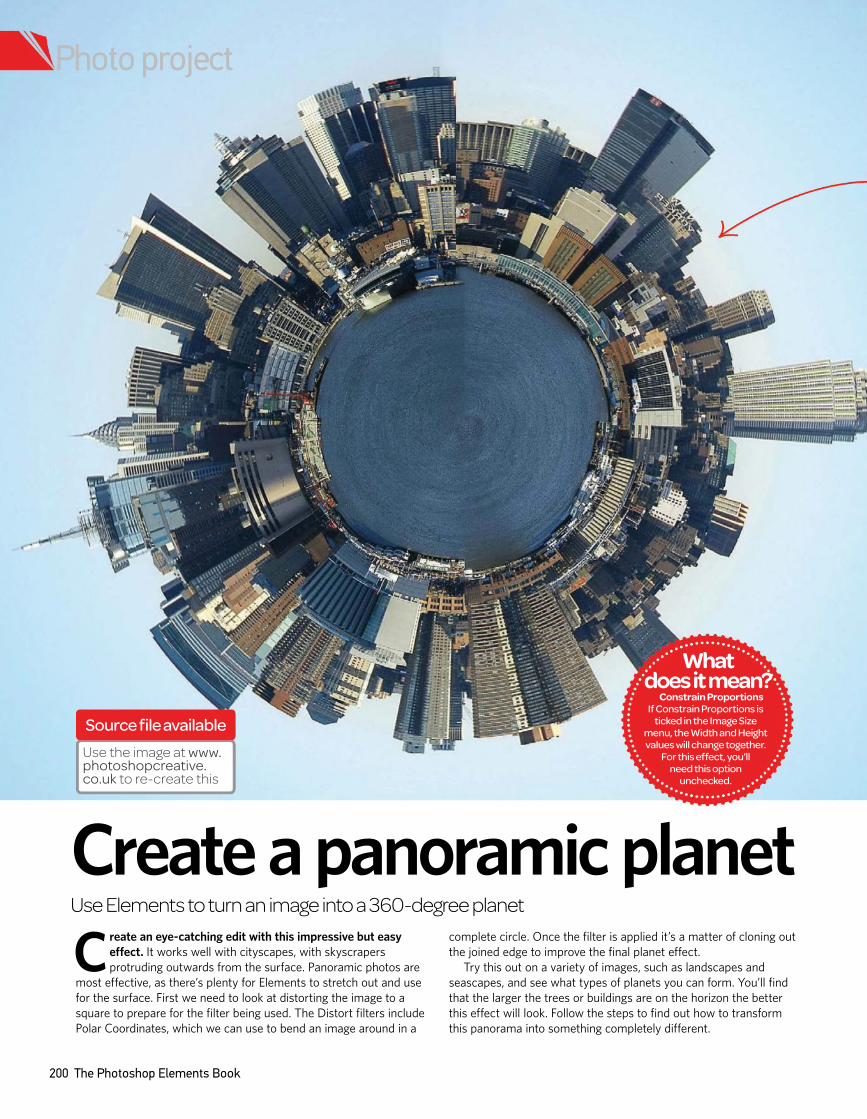
200 The Photoshop Elements Book
Create a panoramic planetUse Elements to turn an image into a 360-degree planet
Create an eye-catching edit with this impressive but easy
effect. It works well with cityscapes, with skyscrapers
protruding outwards from the surface. Panoramic photos are
most effective, as there’s plenty for Elements to stretch out and use
for the surface. First we need to look at distorting the image to a
square to prepare for the filter being used. The Distort filters include
Polar Coordinates, which we can use to bend an image around in a
complete circle. Once the filter is applied it’s a matter of cloning out
the joined edge to improve the final planet effect.
Try this out on a variety of images, such as landscapes and
seascapes, and see what types of planets you can form. You’ll find
that the larger the trees or buildings are on the horizon the better
this effect will look. Follow the steps to find out how to transform
this panorama into something completely different.
What does it mean?
Constrain ProportionsIf Constrain Proportions is
ticked in the Image Size menu, the Width and Height values will change together.
For this effect, you’ll need this option
unchecked.
Photo project
Source file available
Use the image at www.photoshopcreative.co.uk to re-create this
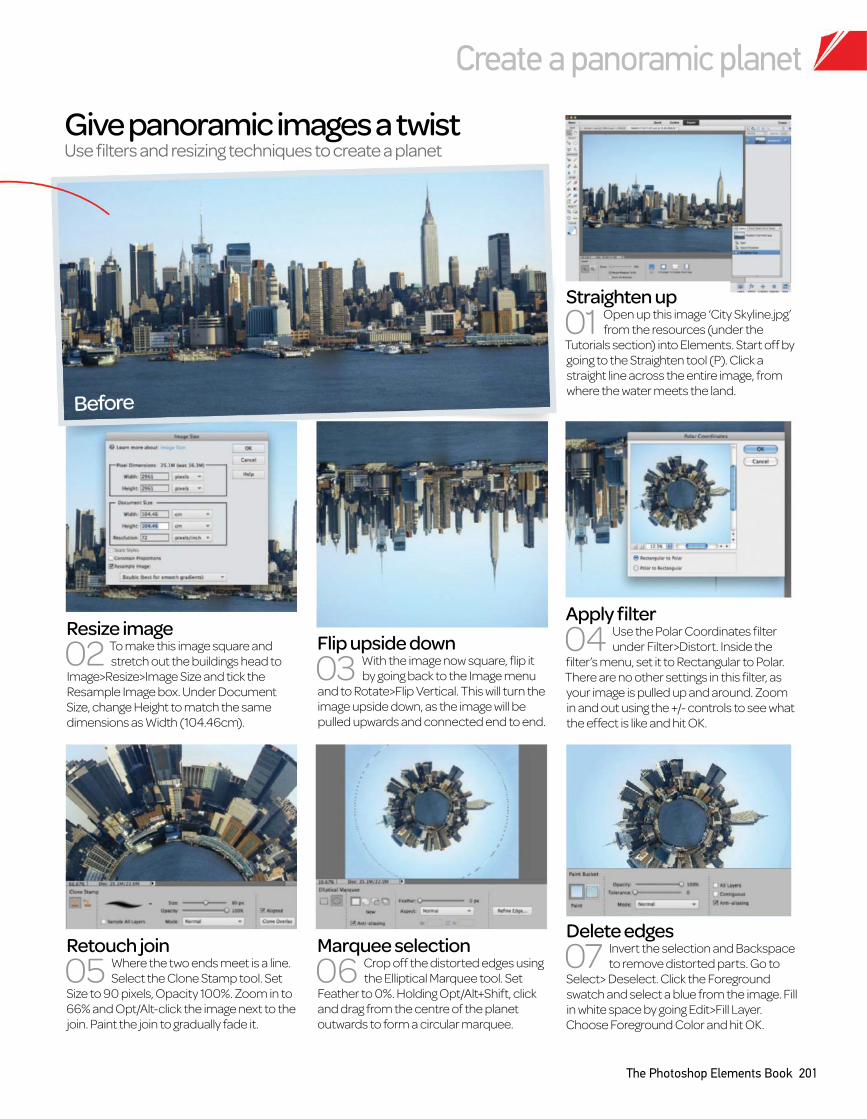
Create a panoramic planet
The Photoshop Elements Book 201
Give panoramic images a twist Use filters and resizing techniques to create a planet
Marquee selection
06 Crop off the distorted edges using
the Elliptical Marquee tool. Set
Feather to 0%. Holding Opt/Alt+Shift, click
and drag from the centre of the planet
outwards to form a circular marquee.
Delete edges
07 Invert the selection and Backspace
to remove distorted parts. Go to
Select> Deselect. Click the Foreground
swatch and select a blue from the image. Fill
in white space by going Edit>Fill Layer.
Choose Foreground Color and hit OK.
Retouch join
05 Where the two ends meet is a line.
Select the Clone Stamp tool. Set
Size to 90 pixels, Opacity 100%. Zoom in to
66% and Opt/Alt-click the image next to the
join. Paint the join to gradually fade it.
Straighten up
01 Open up this image ‘City Skyline.jpg’
from the resources (under the
Tutorials section) into Elements. Start off by
going to the Straighten tool (P). Click a
straight line across the entire image, from
where the water meets the land.
Apply filter
04 Use the Polar Coordinates filter
under Filter>Distort. Inside the
filter’s menu, set it to Rectangular to Polar.
There are no other settings in this filter, as
your image is pulled up and around. Zoom
in and out using the +/- controls to see what
the effect is like and hit OK.
Flip upside down
03 With the image now square, flip it
by going back to the Image menu
and to Rotate>Flip Vertical. This will turn the
image upside down, as the image will be
pulled upwards and connected end to end.
Resize image
stretch out the buildings head to 02 To make this image square and
Image>Resize>Image Size and tick the
Resample Image box. Under Document
Size, change Height to match the same
dimensions as Width (104.46cm).
Before
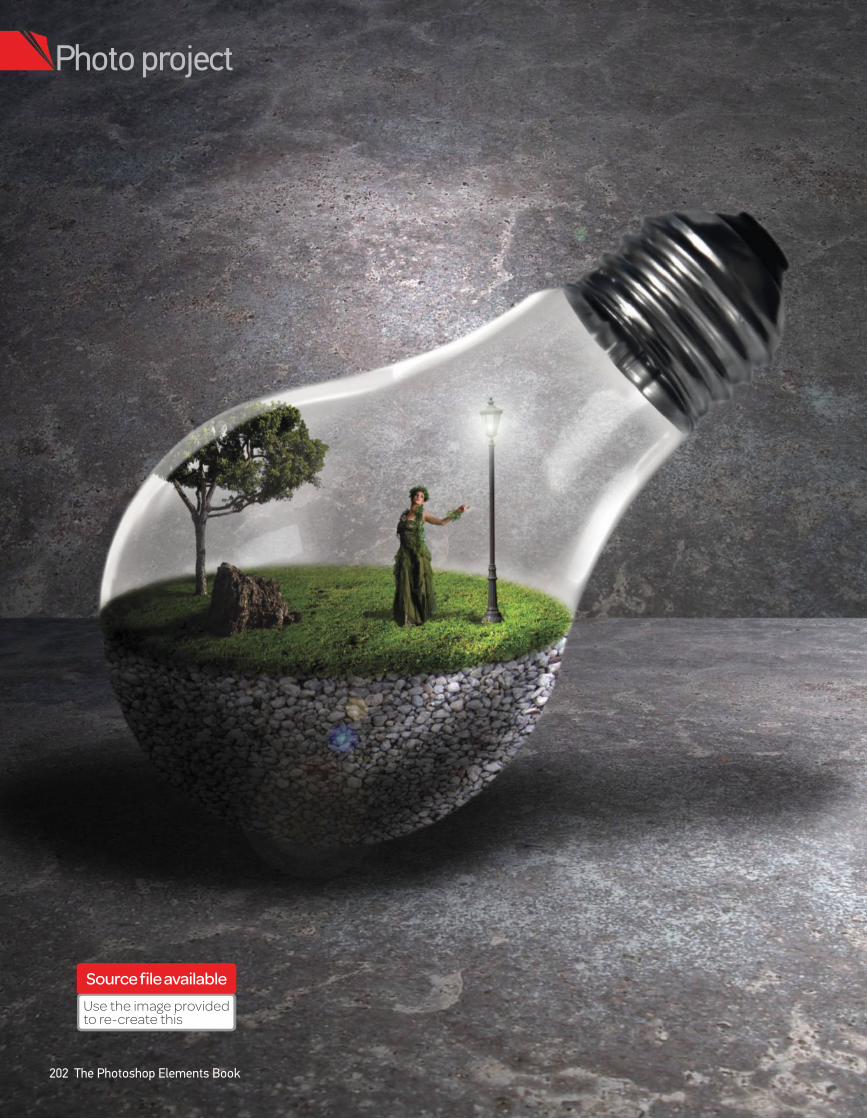
Photo project
Source file available
202 The Photoshop Elements Book
Use the image provided to re-create this
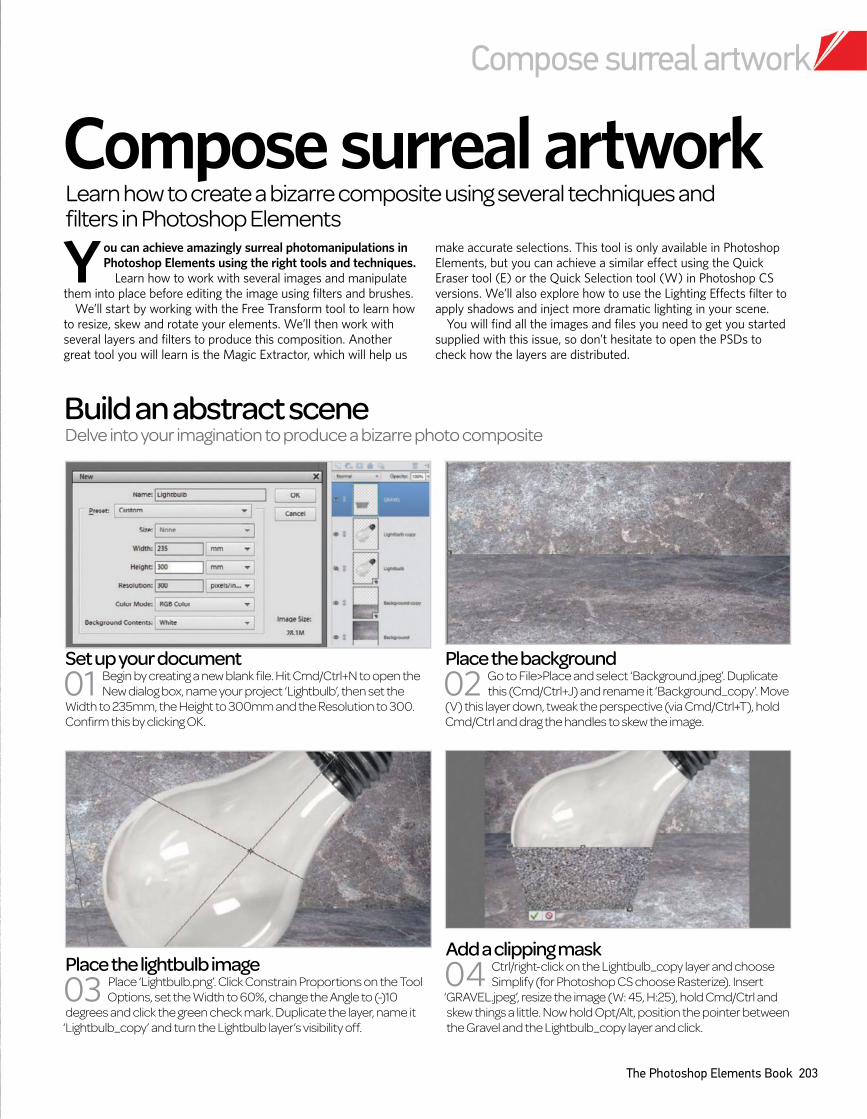
Compose surreal artwork
The Photoshop Elements Book 203
You can achieve amazingly surreal photomanipulations in
Photoshop Elements using the right tools and techniques. Learn how to work with several images and manipulate
them into place before editing the image using filters and brushes.
We’ll start by working with the Free Transform tool to learn how
to resize, skew and rotate your elements. We’ll then work with
several layers and filters to produce this composition. Another
great tool you will learn is the Magic Extractor, which will help us
make accurate selections. This tool is only available in Photoshop
Elements, but you can achieve a similar effect using the Quick
Eraser tool (E) or the Quick Selection tool (W) in Photoshop CS
versions. We’ll also explore how to use the Lighting Effects filter to
apply shadows and inject more dramatic lighting in your scene.
You will find all the images and files you need to get you started
supplied with this issue, so don’t hesitate to open the PSDs to
check how the layers are distributed.
Compose surreal artworkLearn how to create a bizarre composite using several techniques and filters in Photoshop Elements
Set up your document
01 Begin by creating a new blank file. Hit Cmd/Ctrl+N to open the
New dialog box, name your project ‘Lightbulb’, then set the
Width to 235mm, the Height to 300mm and the Resolution to 300.
Confirm this by clicking OK.
Place the background
this (Cmd/Ctrl+J) and rename it ‘Background_copy’. Move 02 Go to File>Place and select ‘Background.jpeg’. Duplicate
(V) this layer down, tweak the perspective (via Cmd/Ctrl+T), hold
Cmd/Ctrl and drag the handles to skew the image.
Place the lightbulb image
03 Place ‘Lightbulb.png’. Click Constrain Proportions on the Tool
Options, set the Width to 60%, change the Angle to (-)10
degrees and click the green check mark. Duplicate the layer, name it
‘Lightbulb_copy’ and turn the Lightbulb layer’s visibility off.
Delve into your imagination to produce a bizarre photo composite
Build an abstract scene
Add a clipping mask
04 Ctrl/right-click on the Lightbulb_copy layer and choose
Simplify (for Photoshop CS choose Rasterize). Insert
‘GRAVEL.jpeg’, resize the image (W: 45, H:25), hold Cmd/Ctrl and
skew things a little. Now hold Opt/Alt, position the pointer between
the Gravel and the Lightbulb_copy layer and click.
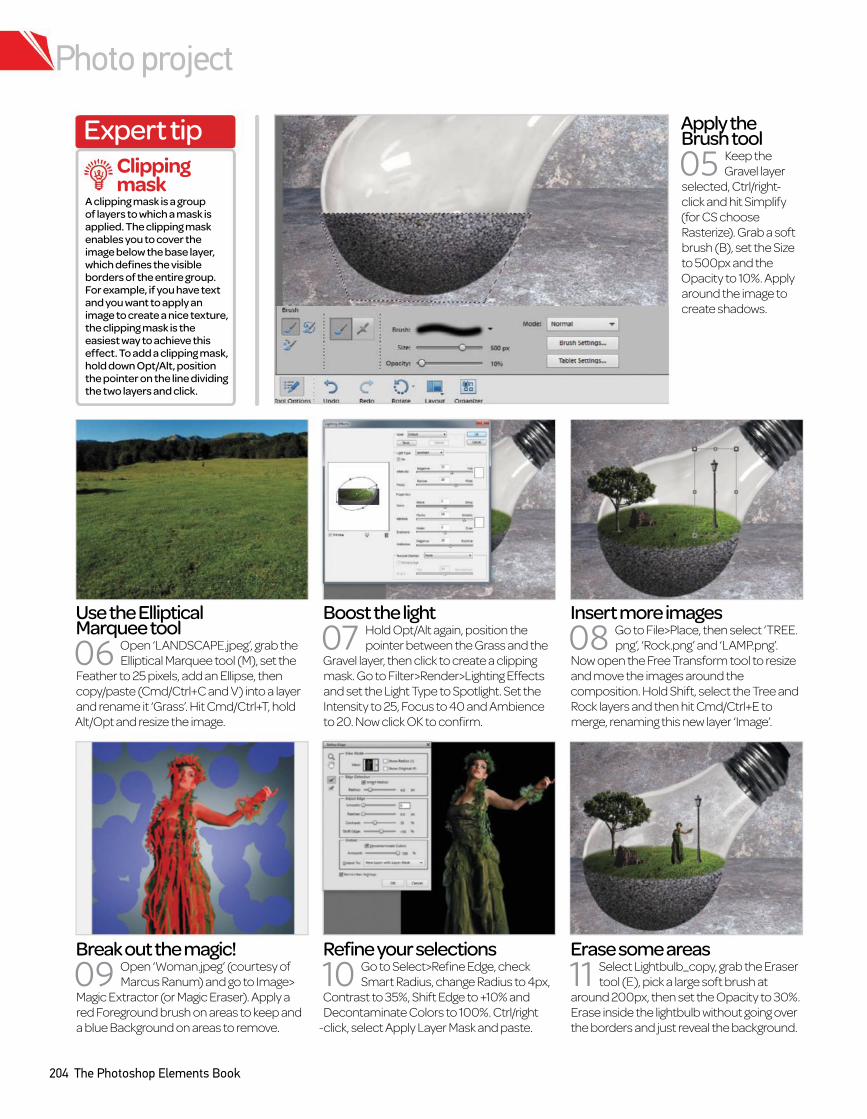
Photo project
204 The Photoshop Elements Book
Apply the Brush tool
05 Keep the
Gravel layer
selected, Ctrl/right-
click and hit Simplify
(for CS choose
Rasterize). Grab a soft
brush (B), set the Size
to 500px and the
Opacity to 10%. Apply
around the image to
create shadows.
Insert more images
png’, ‘Rock.png’ and ‘LAMP.png’. 08 Go to File>Place, then select ‘TREE.
Now open the Free Transform tool to resize
and move the images around the
composition. Hold Shift, select the Tree and
Rock layers and then hit Cmd/Ctrl+E to
merge, renaming this new layer ‘Image’.
Boost the light
07 Hold Opt/Alt again, position the
pointer between the Grass and the
Gravel layer, then click to create a clipping
mask. Go to Filter>Render>Lighting Effects
and set the Light Type to Spotlight. Set the
Intensity to 25, Focus to 40 and Ambience
to 20. Now click OK to confirm.
Use the Elliptical Marquee tool
06 Open ‘LANDSCAPE.jpeg’, grab the
Elliptical Marquee tool (M), set the
Feather to 25 pixels, add an Ellipse, then
copy/paste (Cmd/Ctrl+C and V) into a layer
and rename it ‘Grass’. Hit Cmd/Ctrl+T, hold
Alt/Opt and resize the image.
Erase some areas
11 Select Lightbulb_copy, grab the Eraser
tool (E), pick a large soft brush at
around 200px, then set the Opacity to 30%.
Erase inside the lightbulb without going over
the borders and just reveal the background.
Refine your selections
10 Go to Select>Refine Edge, check
Smart Radius, change Radius to 4px,
Contrast to 35%, Shift Edge to +10% and
Decontaminate Colors to 100%. Ctrl/right
-click, select Apply Layer Mask and paste.
Break out the magic!
09 Open ‘Woman.jpeg’ (courtesy of
Marcus Ranum) and go to Image>
Magic Extractor (or Magic Eraser). Apply a
red Foreground brush on areas to keep and
a blue Background on areas to remove.
Expert tip
A clipping mask is a group of layers to which a mask is applied. The clipping mask enables you to cover the image below the base layer, which defines the visible borders of the entire group. For example, if you have text and you want to apply an image to create a nice texture, the clipping mask is the easiest way to achieve this effect. To add a clipping mask, hold down Opt/Alt, position the pointer on the line dividing the two layers and click.
Clipping mask
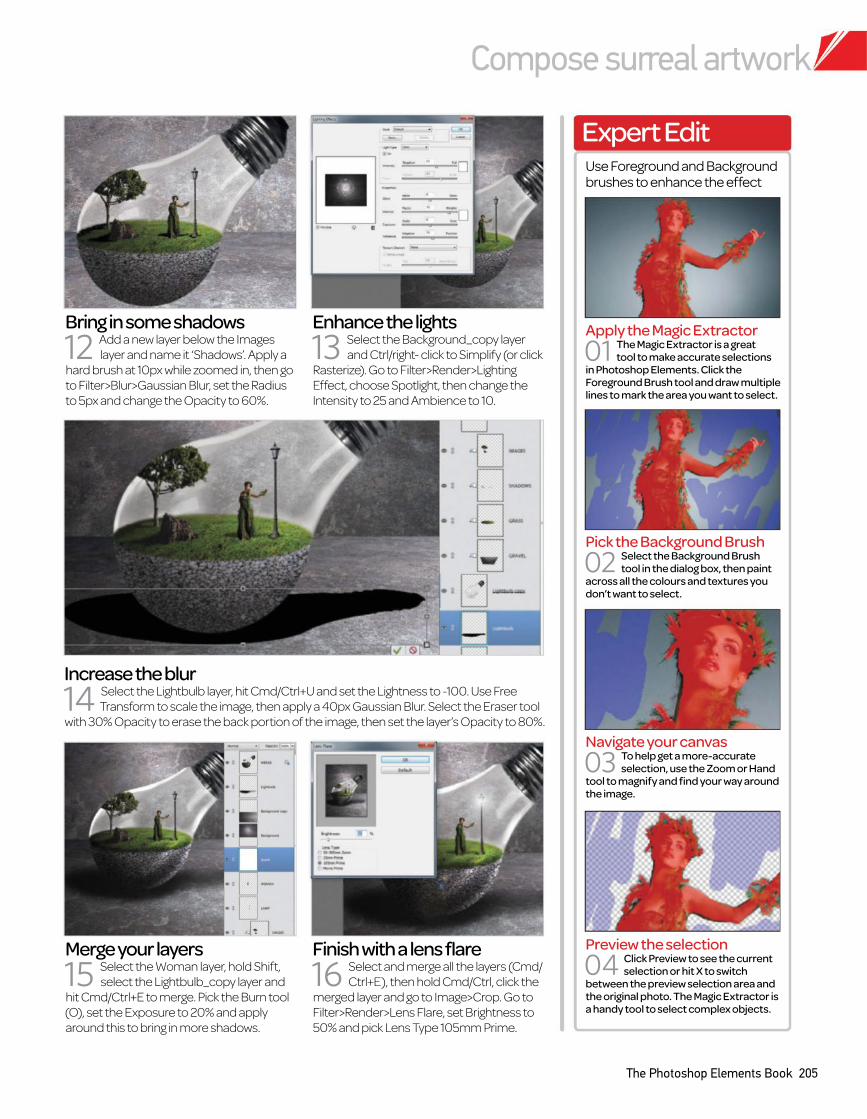
Compose surreal artwork
The Photoshop Elements Book 205
Bring in some shadows
12 Add a new layer below the Images
layer and name it ‘Shadows’. Apply a
hard brush at 10px while zoomed in, then go
to Filter>Blur>Gaussian Blur, set the Radius
to 5px and change the Opacity to 60%.
Merge your layers
15 Select the Woman layer, hold Shift,
select the Lightbulb_copy layer and
hit Cmd/Ctrl+E to merge. Pick the Burn tool
(O), set the Exposure to 20% and apply
around this to bring in more shadows.
Enhance the lights
13 Select the Background_copy layer
and Ctrl/right- click to Simplify (or click
Rasterize). Go to Filter>Render>Lighting
Effect, choose Spotlight, then change the
Intensity to 25 and Ambience to 10.
Finish with a lens flare
16 Select and merge all the layers (Cmd/
Ctrl+E), then hold Cmd/Ctrl, click the
merged layer and go to Image>Crop. Go to
Filter>Render>Lens Flare, set Brightness to
50% and pick Lens Type 105mm Prime.
Increase the blur
14 Select the Lightbulb layer, hit Cmd/Ctrl+U and set the Lightness to -100. Use Free
Transform to scale the image, then apply a 40px Gaussian Blur. Select the Eraser tool
with 30% Opacity to erase the back portion of the image, then set the layer’s Opacity to 80%.
Expert Edit
Apply the Magic Extractor
01 The Magic Extractor is a great tool to make accurate selections
in Photoshop Elements. Click the Foreground Brush tool and draw multiple lines to mark the area you want to select.
Pick the Background Brush
02 Select the Background Brush tool in the dialog box, then paint
across all the colours and textures you don’t want to select.
Navigate your canvas
03 To help get a more-accurate selection, use the Zoom or Hand
tool to magnify and find your way around the image.
Preview the selection
04 Click Preview to see the current selection or hit X to switch
between the preview selection area and the original photo. The Magic Extractor is a handy tool to select complex objects.
Use Foreground and Background brushes to enhance the effect
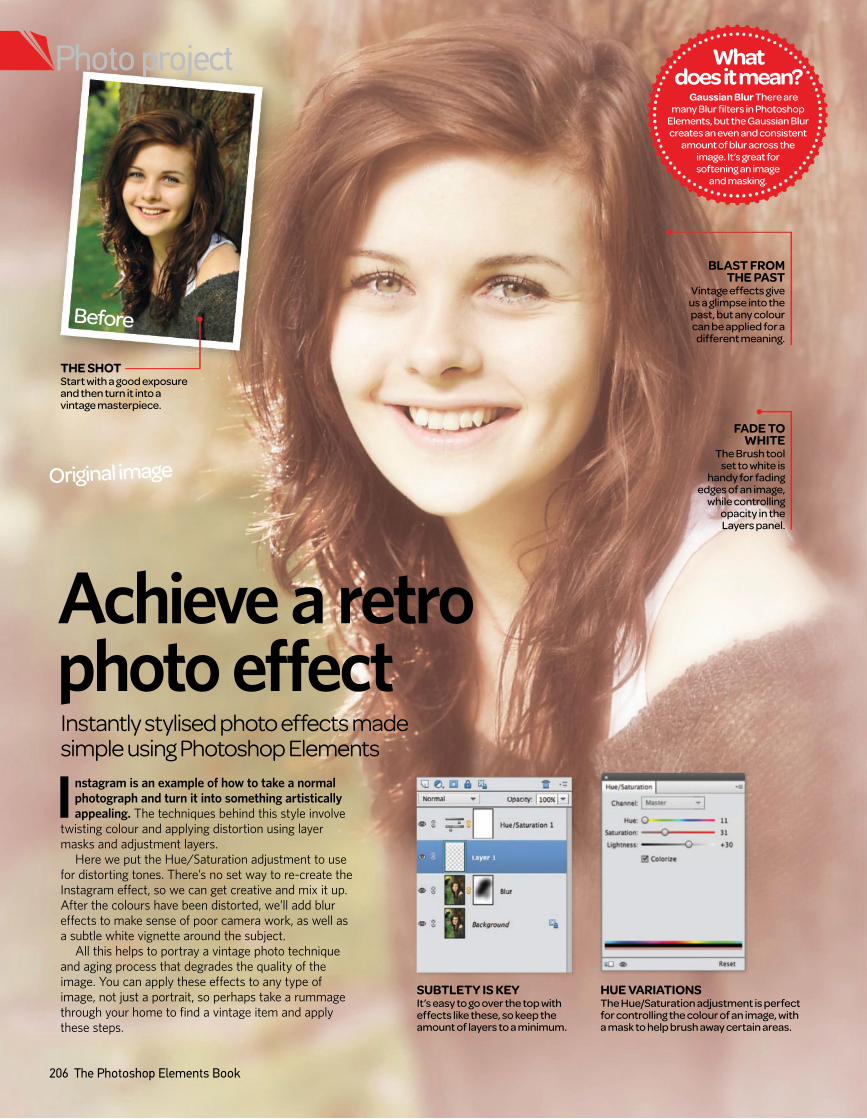
Original image
Achieve a retro photo effectInstantly stylised photo effects made simple using Photoshop Elements
Instagram is an example of how to take a normal
photograph and turn it into something artistically
appealing. The techniques behind this style involve
twisting colour and applying distortion using layer
masks and adjustment layers.
Here we put the Hue/Saturation adjustment to use
for distorting tones. There’s no set way to re-create the
Instagram effect, so we can get creative and mix it up.
After the colours have been distorted, we’ll add blur
effects to make sense of poor camera work, as well as
a subtle white vignette around the subject.
All this helps to portray a vintage photo technique
and aging process that degrades the quality of the
image. You can apply these effects to any type of
image, not just a portrait, so perhaps take a rummage
through your home to find a vintage item and apply
these steps.
What does it mean?
Gaussian Blur There are many Blur filters in Photoshop
Elements, but the Gaussian Blur creates an even and consistent
amount of blur across the image. It’s great for softening an image
and masking.
SUBTLETY IS KEY
It’s easy to go over the top with effects like these, so keep the amount of layers to a minimum.
HUE VARIATIONS
The Hue/Saturation adjustment is perfect for controlling the colour of an image, with a mask to help brush away certain areas.
BLAST FROM THE PAST
Vintage effects give us a glimpse into the past, but any colour can be applied for a
different meaning.
Before
THE SHOT
Start with a good exposure and then turn it into a vintage masterpiece.
FADE TO WHITE
The Brush tool set to white is
handy for fading edges of an image,
while controlling opacity in the Layers panel.
206 The Photoshop Elements Book
Photo project
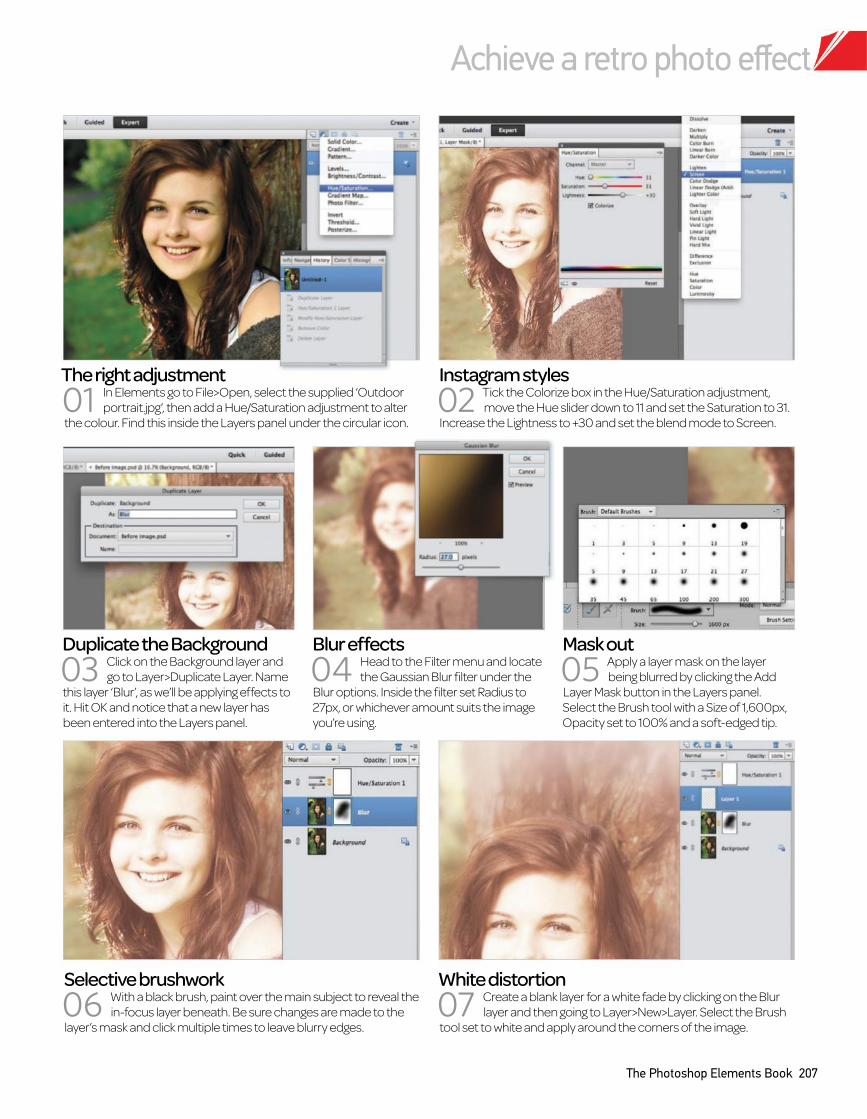
Achieve a retro photo effect
The Photoshop Elements Book 207
The right adjustment
01 In Elements go to File>Open, select the supplied ‘Outdoor
portrait.jpg’, then add a Hue/Saturation adjustment to alter
the colour. Find this inside the Layers panel under the circular icon.
Selective brushwork
06 With a black brush, paint over the main subject to reveal the
in-focus layer beneath. Be sure changes are made to the
layer’s mask and click multiple times to leave blurry edges.
Instagram styles
02 Tick the Colorize box in the Hue/Saturation adjustment,
move the Hue slider down to 11 and set the Saturation to 31.
Increase the Lightness to +30 and set the blend mode to Screen.
White distortion
07 Create a blank layer for a white fade by clicking on the Blur
layer and then going to Layer>New>Layer. Select the Brush
tool set to white and apply around the corners of the image.
Duplicate the Background
03 Click on the Background layer and
go to Layer>Duplicate Layer. Name
this layer ‘Blur’, as we’ll be applying effects to
it. Hit OK and notice that a new layer has
been entered into the Layers panel.
Blur effects
04 Head to the Filter menu and locate
the Gaussian Blur filter under the
Blur options. Inside the filter set Radius to
27px, or whichever amount suits the image
you’re using.
Mask out
05 Apply a layer mask on the layer
being blurred by clicking the Add
Layer Mask button in the Layers panel.
Select the Brush tool with a Size of 1,600px,
Opacity set to 100% and a soft-edged tip.
FREE
PhotoshopElements
The®
®
TM
The ultimate guide to getting the most out of Photoshop Elements
Getting started • Amazing techniques • Creative projects
NEWtutorials forElements 11inside
* This offer entitles new UK Direct Debit subscribers to receive their first 3 issues for £5. After these issues, subscribers will then pay £25.20 every 6 issues. Subscribers can cancel this subscription at any time. New subscriptions will start from the next available issue. Offer code ‘ZGGZ ’ must be quoted to receive this special subscription price. Direct Debit Guarantee available on request.
** This is a US subscription offer. The USA issue rate is based on an annual subscription price of £65 for 13 issues which is equivalent to $102 at the time of writing compared with the newsstand price of $15.50 for 13 issues being $201.50. Your subscription will start from the next available issue.
Special
tria
l offer
Exclusive offer for new subscrib
Enjoyed this book?
Try 3 issues for just
£ 5 *
IN

For amazing offers please visit www.imaginesubs.co.uk/pcr Quote code ZGGZ
Try 3 issues for £5 in the UK* or just $7.85 per issue in the USA** (saving 49% off the newsstand price)
Master theart of PhotoshopExpert tutorialsIn-depth guides and step-by-step tutorials to help with your Photoshop and Elements projects
Inspirational featuresGet inspired with the features and interviews, and learn from the experts
Plus a free CD!
Or telephone: UK 0844 848 8415 Overseas +44 (0) 1795 592 871
w subscribers to…
About the mag
Co
urt
es
y o
f D
ell
In
c.
®
IN

✓iPad ✓iPhone ✓Android phone ✓Android tablet ✓Apple Mac ✓Windows PC

To get the most out of your digital
editions, be sure to enjoy all of our
fantastic features, including:
• Zoomable text and pictures
• In-app browsing
• Searchable text
• Take your collection with you
• Read offl ine
Imagine digital editions are a new and exciting way to experience our
world-leading magazines and bookazines.
No Disc. No ProblemMany of the f les you’re looking for can be
found on the magazine’s website
o buy more Imagine digital editions and for the
latest issues and best offers, please go to www.GreatDigitalMags.com
www.imaginebookshop.co.uk
From the makers of
®
Create stunning images with this expert guide, packed with
step-by-step tutorials and creative project ideas
PhotoshopElements
The®
®
TM
VOLUME 1 REVISED EDITION