Embed Size (px)
Citation preview

Motorola C6
Digital Cordless PhoneFor C601, C602, C603 and C604
WarningCharge the handset for 24 hours before use.

� All ha� 50 N� Spea� Calle in a Calls list.*� Redi� Regi with up to 4 different
base� Make� Choo as well as numbers
store*You or these features to work. A subsPlea calls when the power fails. Alter
Need heIf you ha tomer Services on 0800 08
Alternati his guide.
Welcome...to yo s Phone!
ndsets are fully cordless for locating anywhere within range.ame and Number phonebook.kerphone for hands-free conversations.r ID shows you who�s calling and see details of the last 40 callersal up to 10 of the last numbers called.ster up to 5 handsets to a single base and register each handset s. internal calls and transfer external calls between handsets.se from 10 different ringer melodies for internal and external callsd in the phonebook.must subscribe to your network provider�s Caller ID or Call Waiting service fcription fee may be payable.se note that this equipment is not designed for making emergency telephonenative arrangements should be made for access to emergency services.
lp?ve any problems setting up or using your C6, please contact Cus20750.
vely, you may find the answer in the �Help� section at the back of t
ur new Motorola C6 Digital Cordles

IMPORTANTOnly use the telephoThis equipment is no ower fails. Alternative arrangem
Got everything?� C6 handset� C6 base� User guide� 2 x AAA NiMH re� Power adaptor fo� Telephone line c
If you have purchas ditional items:� C6 handset & ch� 2 x AAA NiMH re� Power adaptor fo
This User Guide provides you with all the information you need to get the most from your phone.Before you make your first call, you need to set up your phone. Follow the arted�, on the next few pages.
ne line cord supplied.t designed for making emergency telephone calls when the pents should be made for access to emergency services.
chargeable batteriesr the base
ord
ed a C6 multiple pack you will also have the following adargerchargeable batteriesr the charger
simple instructions in �Getting St

4
1. Gett2. Gett3. Usin
3.13.2
3.33.43.5
3.6
3.7
he keypad......................................16andset ..........................................16
...............................................17 and number..................................17n entry ...........................................17nd number ....................................18ry ...................................................18
gs ..........................................19r volume .......................................19r melody .......................................19
.......................................................19e ....................................................19.......................................................20.......................................................20arning beep ...................................20warning beep.................................20using the menu ..............................21
...............................................21olume ............................................21elody ............................................21
PIN code ......................................22.......................................................22.......................................................22ult settings......................................22efault .............................................23
ing started ................................................6ing to know your phone ..........................9g the phone............................................13
Switch the handset on / off ................................ 13Calls................................................................... 133.2.1 Make a call ............................................ 133.2.2 Preparatory dialling ............................... 133.2.3 End a call .............................................. 133.2.4 Receive a call ........................................ 13Adjust the earpiece volume ............................... 13Secrecy.............................................................. 13Intercom............................................................. 143.5.1 Make an internal call ............................. 143.5.2 Receive an internal call ......................... 143.5.3 Transfer a call ....................................... 143.5.4 3-way conference call ........................... 14Hands-free speakerphone ................................. 153.6.1 Make a hands-free call .......................... 153.6.2 Answer a call hands-free ...................... 153.6.3 Switch to hands-free during a call ......... 15Redial ................................................................ 153.7.1 View or dial an entry ............................. 153.7.2 Copy a Redial list number to
the phonebook ...................................... 153.7.3 Delete an entry ...................................... 163.7.4 Delete the entire Redial list ................... 16
3.8 Lock/unlock t3.9 Paging/Find h
4. Phonebook.....4.1 Store a name4.2 View or dial a4.3 Edit a name a4.4 Delete an ent
5. Handset settin5.1 Handset ringe5.2 Handset ringe5.3 Auto answer5.4 Handset nam5.5 Language ....5.6 Key beep .....5.7 Battery low w5.8 Out of range 5.9 Keypad lock
6. Base settings .6.1 Base ringer v6.2 Base ringer m6.3 Change base6.4 Dial mode ....6.5 Recall mode6.6 Restore defa6.7 Emergency d

5
6.6.
7. C7.7.7.7.
8. C8.8.
9. U9.9.
9.9.
.....................................................30ormation .....................................31
8 Eco mode ...........................................................239 Default settings ..................................................24
lock & alarm............................................... 241 Set the date........................................................242 Set the time ........................................................243 Set alarm............................................................254 Switch off alarm ring...........................................25
aller ID and the Calls list........................... 251 Caller ID .............................................................252 Calls list ..............................................................26
8.2.1 View the Calls list ..................................268.2.2 Dial a number in the Calls list ................268.2.3 Modify and dial a number in the
Calls list .................................................268.2.4 Copy a Calls list number to
the phonebook .......................................278.2.5 Delete an entry ......................................278.2.6 Delete the entire Calls list ......................27
sing additional handsets .......................... 281 Registering an additional handset......................282 Register a different make of handset to
your C6 base......................................................293 Select a base .....................................................294 De-register a handset.........................................29
10. Help...........11. General inf

6 Getting started
1. GetWARNINDo not pl
LocatioYou needpower anreach. ThequipmenMake surelectrical sending rstrength oPlacing itHANDSEThe unit his a clear obstructiorange sigeither indmetres. TSIGNAL The icrange of icon flashbeep.
e handset moves out of range of the e base. The handset will to the base.
e plugged into the mains power at all e telephone line cord into the wall
is fully charged. Use only the power ine cord supplied with the product.TOR?a clear connecter is for the base unit ith a red colour connecter is for the
ack only).
ase
ine cord into the socket marked e of the base.
ting startedGace your C6 in the bathroom or other humid areas.
n to place your C6 base within 2 metres of the mains d telephone wall sockets so that the cables will e socket-outlet shall be installed near the t and shall be easily accessible.e that it is at least 1 metre away from other appliances to avoid interference. Your C6 works by adio signals between the handset and base. The f the signal depends on where you place the base.
as high as possible ensures the best signal. T RANGEas a range of up to 300 metres outdoors when there line of sight between the base and handset. Any n between the base and handset will reduce the nificantly. With the base indoors and the handset oors or outdoors, the range will normally be up to 50 hick concrete walls can severely affect the range.STRENGTHon on your handset indicates that you are within
the base. When out of range of the base, the es. If you are on a call, you will hear a warning
The line will hang up if thbase. Move closer to thautomatically reconnect
Setting upIMPORTANTThe base station must btimes. Do not connect thsocket until the handsetadaptor and telephone lWHICH POWER ADAPThe power adaptor with and the power adaptor wcharger unit (for multi-p
Connecting the b
1. Plug the telephone l on the undersid

Getting 7
2. PlusocpluSw
InstaRemovinsert tPleasecompa3. Sli4. If y
thecon
5. Whappteleplu
Conn(for mIf you hout this1. Plu
socand
ry cover from the back of the handset AAA NiMH rechargeble batteries ote the �+� and �-� markings inside the
ent and insert in the correct direction. over back into place.g the batteries for the first time, place e charger to charge for at least 24 y.t is fully charged, icon will the display. ow the time and handset number that it is registered to the base.
approved rechargeable Ni-MH battery 550mA rechargeable batteries) .
started
g the power adaptor with clear connecter into the ket marked on the underside of the base and g the other end into the mains power wall socket. itch on the mains power.
lling and charging the handsete the battery cover from the back of the handset and he 2 x AAA NiMH rechargeble batteries supplied. note the �+� and �-� markings inside the battery rtment and insert in the correct direction. de the battery cover back into place.ou are charging the batteries for the first time, place handset on the base to charge for at least 24 hours tinuously.en the handset is fully charged, icon will ear steadily on the display. Plug the other end of the phone line cord (make sure that one end is already
gged into the base) into the telephone wall socket.
ecting the handset and charger ulti-pack only)
ave purchased a multiple pack, you will need to carry process for all the handsets and chargers.g the power adaptor with red connecter into the ket marked on the underside of the charger plug the other end into the mains power wall socket.
2. Remove the batteand insert the 2 xsupplied. Please nbattery compartm
3. Slide the battery c4. If you are chargin
the handset on thhours continuousl
5. When the handseappear steadily onThe display will sh(e.g. 2) to indicate
IMPORTANTWarning! Use only thecells (2 x AAA Ni-MHsupplied with your C6

8 Getting started
BATTERIf icbeep evethe handsWhen chaBATTERIn ideal c12 hours single chNote thatthey haveTo keep yhandset oRunning help themThe chargwith time standby tAfter chacharging handset m
* All talk afeatures s
d to Caller ID Service, the date and lly for all handsets when you receive
ler ID service, you can set the date and
allyd to DATE-TIME and press m. s DATE SET. ct. g. 12--08 for 12th of August) and press
allyd to DATE-TIME and press m. SET and pressm. 4 hour format (e.g. 18--30 for 6:30pm) confirm.y for use.
Y LOW WARNINGon flashes on the display and you hear a warning ry minute during a call, you will need to recharge et before you can use it again. rging, icon will scroll on the display.
Y PERFORMANCEonditions, fully charged batteries should give up to talk time and up to 250 hours standby time on a arge*. new batteries do not reach their full capacity until been put to normal use for several days.our batteries in the best condition, leave the ff the base for a few hours at a time.
the batteries right down at least once a week will last as long as possible.e capacity of rechargeable batteries will reduce as they wear out, giving the handset less talk/ime. Eventually they will need to be replaced. rging your handset for the first time, subsequent time is about 6�8 hours a day. Batteries and ay become warm during charging. This is normal.
nd standby times are approximate and depend on elected and usage pattern.
Date and timeIf you have subscribetime is set automaticayour first call.If you do not have Caltime manually.
Set the date manu1. Press m, scroll The display show2. Press m to sele3. Enter the date (e.m to confirm.
Set the time manu1. Press m, scroll 2. Scroll d to CLOCK3. Enter the time in 2
and press m to Your C6 is now read

Getting 9
2. GOver n overview of the display icons.
/ Backs to switch Secrecy on/off, page 13.ess to return to previous menu or press to standby.ress to delete characters and digits. redial/calls list, press to delete the press and hold to delete all entries.
Menu, page 11.nu options and to confirm a displayed option.
press to open the redial list, page 15.s to increase earpiece volume, page 13.s ringing, press to increase the handset ge 19.ugh the menu options, redial list, calls list
ntries.
press to open the calls list, page 26.s to decrease earpiece volume, page 13.s ringing, press to decrease the handset ge 19.ugh the menu options, redial list, calls list
ntries.itress to open the phonebook menu, page 17. redial/calls list or when editing, press to standby.
to know your phone
etting to know your phoneview of your handset
A EarpieceB Display
See page 10 for aC Secrecy / Clear
During a call, presIn menu mode, prand hold to returnIn editing mode, pWhen viewing thedisplayed entry or
D Menu / OKPress to open the Press to select me
E Redial / Up In standby mode,During a call, presWhen the phone iringer volume, paPress to scroll throand phonebook e
F Calls list / DownIn standby mode,During a call, presWhen the phone iringer volume, paPress to scroll throand phonebook e
G Phonebook / ExIn standby mode, pWhen viewing theexit and return to
A
B
GFE
D
C
HI
K
L
J

10 Getting to know your phone
H HandDurin
I TalkPress
J * / KPressTo un
K InterUsedhand
L RecaUse wserviPress
Handse
te an incoming external call
ogress
te an incoming internal call
gress
ress or transfer an external call to set registered to the base
new voicemail messages received* e no new voicemail messages
trengthndset is not registered to the base f range
is ON
ened
te new calls list entries received*
hen viewing the Calls list)*
(when viewing the Calls list)*
Eco modCircle around appears when Ecmode is
han
s-freeg a call, press to switch hands-free on and off, page 15. / End call to make, receive and end calls, page 13.
eypad lock and hold to lock the keypad, page 16.lock, press any key and follow the on screen instructions.com to make internal calls and transfer calls to other C6 sets registered to the base, page 14.ll / Power on/offith switchboard/PABX services and some network
ces. and hold to switch the handset on/off, page 13.
t LCD Display
Display iconsFlashes to indica
External call in pr
Flashes to indica
Internal call in pro
3-way call in proganother C6 hand
Eco mode is ON
Flashes to indicateOff when you hav
Indicates signal sFlashes when haor if you go out o
Hands-free mode
Menu is opened
Phonebook is op
Flashes to indica
Answered call (w
Unanswered call
Battery statusScrolls when charging
e
o ON
Time or Handset nameIn standby mode, press and hold 0 to switchdset idle screen between handset name or time.

Getting 11
The apas follo
* For thservicesubscr
Over
ress to ring the handset(s), page 16.nter registration mode when registering
enuso use menu system.f options, which you can see on the wing page.witched on and in standby:the main menu.uttons to scroll through the available
t an option.vious menu level, press n. return to standby, press and hold n.
ed for 30 seconds, the handset matically.
to know your phone
Keypad is locked
Displayed number is longer than 12 digits
proximate power levels of your battery are indicated ws:
Battery is fully charged
Battery is partially charged
Battery is running lowFlashes when battery is almost fully dischargedis feature to work, you must subscribe to Voicemail or Caller ID from your network operator. A iption fee may be payable.
view of the base
A Paging KeyIn standby mode, pPress and hold to ehandsets, page 28.
Navigating the mYour C6 has an easy tEach menu has a list omenu map on the folloWhen the handset is s1. Press m to open 2. Then use u or d b
options.3. Press m to selec
To return to the preTo exit the menu and
NOTEIf no buttons are pressreturns to standby autoA

12 Getting to know your phone
Menu mPHONEB E REGISTER
ADD ENTMODIFY DELETE
SELECT BASEREG BASE
apOOK SETUP HANDSET DATE - TIM
RYENTRYENTRY
BASE VOLUMEBASE MELODYDEL HANDSETPIN CODEDIAL MODERECALLDEFAULTECO MODE
BEEPINT RING VOLEXT RING VOLINT MELODYEXT MELODYAUTO ANSWERNAMELANGUAGEKEYLOCK ?
DATE SETCLOCK SETALARM SET

Using 13
3. UNOTEYour hexternsecondof your
3.1Press
3.23.2.11. Pre2. Wh3.2.21. Dia
de2. PreNOTEIf the nname
e handset back on the base or charger. call external call, the phone rings and isplay. er the call, or simply lift up the handset l.
< when you lift up the handset to ill need to switch Auto answer off, see
e earpiece volume or d to increase or decrease the
andset so that you can talk to someone caller hearing.ss n. The display shows MUTE and t hear you.to resume your call.
the phone
sing the phone
andset will automatically time the duration of all al calls. The call timer will display after the first 15 s of your call. When the call ends, the total duration talk time is shown for 5 seconds.
Switch the handset on / offR to switch the handset on or off.
CallsMake a call
ss <.en you hear the dial tone, dial the number.
Preparatory diallingl the number first. If you make a mistake press n to
lete the last digit.ss < to dial.
umber dialled matches an entry in the phonebook, the is displayed.
3.2.3 End a callPress <, or place th3.2.4 Receive aWhen you receive anicon flashes on the d1. Press < to answ
to answer the calNOTEIf you prefer to pressanswer a call, you wpage 19.
3.3 Adjust thDuring a call, press uvolume.
3.4 SecrecyYou can mute your hnearby without your 1. During a call, pre
your caller canno2. Press n again

14 Using the phone
3.53.5.1If you havyou can m
icon 1. Press
you w3.5.2When youhandset n1. Press3.5.3You can registeredDuring an1. Press
you w2. When
the tra
m the other handset and you wish to caller, press I.
es automatically after 30 seconds if
rence callconference call between 2 internal caller.xternal caller:d by the handset number (1-5) that sh a conference call.dset answers, press to connect egin the conference call.
ed.r from the other handset, press I ternal caller.e call.
#
IntercomMake an internal calle more than one handset registered to the base, ake internal calls between two handsets.
is displayed to indicate an internal call. I followed by the number (1-5) of the handset ant to call.Receive an internal call receive an internal call, icon flashes and the umber that is calling you is displayed. < to answer the call.Transfer a calltransfer an external call to another handset to the base. external call: I followed by the handset number (1-5) that ant to transfer to. the other handset answers, press < to complete nsfer.
TIPIf there is no answer froreturn to your external Your external call resumthere is no answer.
3.5.4 3-way confeYou can hold a 3-way callers and 1 external During a call with an e1. Press I followe
you want to establi2. When the other han
all three callers to b icon is display
3. If there is no answeto return to your ex
4. Press < to end th

Using 15
3.6Handshandsethe con3.6.11. Dia
han2. Pre
the3. PreTIPDuring3.6.2When 3.6.3DuringTo swipress S
ialled are stored in the redial list.ial an entryn the Redial list. the entry you want.
the displayed entry or press B to y.
r exactly matches an entry stored in the e is displayed. Press m to see the
edial list number to the phonebookn the Redial list. the entry you want.
ws ADD ?..ws NAME ?.and pressm. The number is displayed. if necessary, then pressm.
the phone
Hands-free speakerphone-free lets you talk to your caller without holding the t. It also enables other people in the room to listen to versation over the loudspeaker.
Make a hands-free calll the number then press S. icon is displayed and you will hear the call over the dset loudspeaker.ss S to switch the call between the earpiece and loudspeaker.ss < to end the call.
a hands-free call, press u or d to adjust the volume.Answer a call hands-free
the phone rings, press S to answer the call. Switch to hands-free during a call
a call, press S to put the call on the loudspeaker. tch hands-free off and return the call to the earpiece,
again.
3.7 RedialThe last 10 entries d3.7.1 View or d1. Press u to ope2. Scroll u or d to3. Press < to dial
return to standbTIPIf the caller�s numbephonebook, the namcaller�s number.
3.7.2 Copy a R1. Press u to ope2. Scroll u or d to3. Press m.
The display sho4. Press m again
The display sho5. Enter the name 6. Edit the number

16 Using the phone
7. Presspress
NOTESee �ENTpage 17.3.7.31. Press2. Scroll
The d3. Press3.7.41. Press2. Press
The d3. Press
3.8You can accidentaNOTEWhen thecalls andends, the
. ed. ad, press any key on your handset. PRESS *.ck the keypad.
nd handsett user that they are wanted or locate
answered by a handset.ase. All handsets registered to the
, press p on the base again or n the handset.
u or d to select the ringer melody you want and m. The number is stored.
ERING NAMES� and �WRITING TIPS� on
Delete an entry u to open the Redial list. u or d to the entry you want and press n. isplay shows DELETE ?. m to confirm or n to cancel.Delete the entire Redial list u to open the Redial list. and hold n. isplay shows DELETE ALL ?. m to confirm or n to cancel.
Lock/unlock the keypadlock the keypad so that it cannot be operated lly while carrying it around.
keypad is locked, you can still answer incoming operate the handset as normal. When the call keypad lock comes on again.
1. Press and hold * icon is display
2. To unlock the keypThe display shows
3. Press * to unlo
3.9 Paging/FiYou can alert a handsea missing handset.Paging calls cannot be1. Press p on the b
base will ring.2. To stop the ringing
press any button o

Phone 17
4. PYou caphonenumbemelodi
4.1If you hdisplaythe fullphoneYou caHowevcan on1. Pre
Th2. Pre
Th3. Pre
Th4. En
Th
er and press m. ws MELODY 1.o select the ringer melody you want and
ws ADD ENTRY.ame and number entry that you wish to onebook or press n twice to return to
Sters to enter names, e.g. to store TOM: enter T.mes to enter O. enter M.
the last character or digit.ove between characters/digits.t a space.nsert a dash.
dial an entry
layed.
book
honebookn store up to 50 names and numbers in the
book. Names can be up to 12 characters long and rs up to 24 digits. You can also select different ringer es for the phonebook entries.
Store a name and numberave subscribed to Caller ID Service and wish to the name of your caller instead of the number, save telephone number including the area code to your book.n store multiple entries with the same number. er, to prevent unnecessary duplicated entries, you ly store the same name once.ss m.
e display shows PHONEBOOK.ss m to select.
e display shows ADD ENTRY. ss m to select.
e display shows NAME ?.ter the name and press m. e display shows NUMBER ?.
5. Enter the numbThe display sho
6. Press u or d tpress m. The display sho
7. Enter the next nstore in your phstandby.
ENTERING NAMEUse the keypad letPress 8 once toPress 6 three tiPress 6 once to
WRITING TIPSPress n to deletePress u or d to mPress 1 to inserUse 1 twice to i
4.2 View or1. Press B.
icon is disp
18 Phonebook
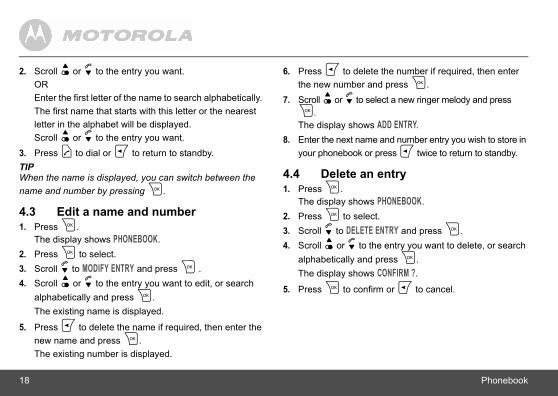
2. ScrollOR EnterThe filetter Scroll
3. PressTIPWhen thename and
4.31. Press
The d2. Press3. Scroll4. Scroll
alphaThe e
5. Pressnew nThe e
the number if required, then enter press m.ct a new ringer melody and press
DD ENTRY.and number entry you wish to store in ress n twice to return to standby.
ntry
HONEBOOK. NTRY and press m. entry you want to delete, or search ress m. ONFIRM ?.
or n to cancel.
u or d to the entry you want.
the first letter of the name to search alphabetically. rst name that starts with this letter or the nearest in the alphabet will be displayed. u or d to the entry you want. < to dial or n to return to standby.
name is displayed, you can switch between the number by pressing m.
Edit a name and number m. isplay shows PHONEBOOK. m to select. d to MODIFY ENTRY and press m . u or d to the entry you want to edit, or search betically and press m. xisting name is displayed.
n to delete the name if required, then enter the ame and press m. xisting number is displayed.
6. Press n to delete the new number and
7. Scroll u or d to selem. The display shows A
8. Enter the next name your phonebook or p
4.4 Delete an e1. Press m.
The display shows P2. Press m to select.3. Scroll d to DELETE E4. Scroll u or d to the
alphabetically and pThe display shows C
5. Press m to confirm

Hands 19
5. H5.1You calevels volume1. Pre2. Pre
pre3. Pre4. PreTIPWhen by pre
5.2You caexternYou wi1. Pre2. Pre
pre3. Pre
firm or n to return to the previous menu.
ers that you have stored in the using the ringer melody you have set entry.
swer answer calls by lifting the handset off the u can switch this feature off so that calls ed by pressing <.
ll d to HANDSET and press m. ANSWER and press m. select ON or OFF and press m to
t namee than one handset with your C6 base, nalized name for each handset to easily them.o 10 characters long.ll d to HANDSET and press m. and press m.
andset name and press m to confirm.
et settings
andset settingsHandset ringer volume
n adjust the ring volume and set different volume for your internal and external calls. Choose from 5 levels or Off.ss m, scroll d to HANDSET and press m.ss u or d to select INT RING VOL or EXT RING VOL and ss m.ss u or d to select the volume (1 - 5 or OFF) . ss m to confirm or n to return to the previous menu.
the phone is ringing, you can adjust the ringer volume ssing u or d.
Handset ringer melodyn set different ringer melodies for your internal and
al calls. Choose from 10 different ringer melodies.ll hear a sample ring as you scroll to each ring melody.ss m, scroll d to HANDSET and press m.ss u or d to select INT MELODY or EXT MELODY and ss m.ss u or d to select the ringer melody (1 - 10).
4. Press m to conNOTECalls from the numbphonebook will ringwhen you store the
5.3 Auto anYour phone is set tobase or charger. Yocan only be answer
1. Press m, scro2. Scroll d to AUTO3. Press u or d to
confirm.
5.4 HandseIf you are using moryou can set a persodistinguish betweenA name can be up t1. Press m, scro2. Scroll d to NAME3. Enter the new h

20 Handset settings
NOTEThe handseconds wpress n
See �ENTpage 17.
5.51. Press2. Scroll3. Press
press
5.6When yohear a be1. Press
The d2. Press
The d3. Press4. Press
confir
warning beepost fully discharged, you will hear a ute during a call. You can switch
to HANDSET and press m. EEP.
TERY and press m.lect ON or OFF and press m to
ge warning beepf range, you will hear warning beeps witch these beeps on or off. to HANDSET and press m. EEP. E and press m. lect ON or OFF and press m to
set name will only be displayed for approximately 20 hen no button is pressed. If you make a mistake,
to delete the last character or digit.
ERING NAMES� and �WRITING TIPS� on
Language m, scroll d to HANDSET and press m. d to LANGUAGE and press m. u or d to select your preferred language and m to confirm.
Key beepu press a button on the handset keypad, you will ep. You can switch these beeps on or off. m, scroll d to HANDSET and press m. isplay shows BEEP. m to select. isplay shows KEYTONE. m to select. u or d to select ON or OFF and press m to m.
5.7 Battery lowWhen the battery is almwarning beep every minthese beeps on or off.1. Press m, scroll d
The display shows B2. Press m to select.3. Scroll d to LOW BAT4. Press u or d to se
confirm.
5.8 Out of ranIf the handset goes out oduring a call. You can s1. Press m, scroll d
The display shows B2. Press m to select.3. Scroll d to OUT RANG4. Press u or d to se
confirm.
Base s 21
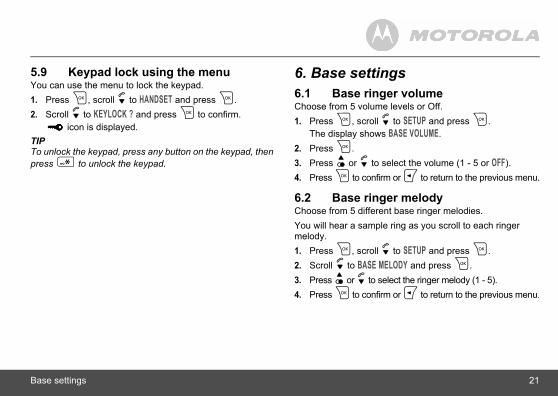
5.9You ca1. Pre2. Sc
TIPTo unlpress *
ngs ger volumee levels or Off.d to SETUP and press m.s BASE VOLUME.
select the volume (1 - 5 or OFF). rm or n to return to the previous menu.
ger melodynt base ringer melodies.
le ring as you scroll to each ringer
d to SETUP and press m.ELODY and press m.elect the ringer melody (1 - 5). rm or n to return to the previous menu.
ettings
Keypad lock using the menun use the menu to lock the keypad.ss m, scroll d to HANDSET and press m.
roll d to KEYLOCK ? and press m to confirm. icon is displayed.
ock the keypad, press any button on the keypad, then to unlock the keypad.
6. Base setti6.1 Base rinChoose from 5 volum1. Press m, scroll
The display show2. Press m.3. Press u or d to4. Press m to confi
6.2 Base rinChoose from 5 differeYou will hear a sampmelody.1. Press m, scroll 2. Scroll d to BASE M3. Press u or d to s4. Press m to confi

22 Base settings
6.3Some funmust be edefault PIpreferredWhen yo1. Press2. Scroll3. Enter 4. Re-enIMPORTAIf you chanumber.
6.4Your C6 change thwhich req1. Press2. Scroll3. Press
press
etry and network operator, your C6
s 100 ms (RECALL 1). It is unlikely this setting unless advised to do so.to SETUP and press m.nd press m.ect RECALL 1 (short flash time) or ime) and press m to confirm.
fault settings to its default (original) settings. registered to the base will be
its default settings will delete all and Calls list. All handset and base t.to SETUP and press m.and press m.ode (default = 0000) and press m. NFIRM ?.
or n to return to the previous menu. utomatically.
Change base PIN codections are protected by a 4 digit PIN code which ntered if you want to change the settings. The N is 0000. You can change this to your own number.u enter a PIN, the digits are shown as ****. m, scroll d to SETUP and press m. d to PIN CODE and press m.the 4 digit PIN code (default = 0000) and press m.ter the new PIN again and press m to confirm.NT
nge the PIN code, please keep a record of the new
Dial modeis set to tone dialling. You should only need to is if connected to an older type of switchboard/PBX uires Pulse dialling. m, scroll d to SETUP and press m. d to DIAL MODE and press m. u or d to select TONE DIAL or PULSE DIAL and m to confirm.
6.5 Recall modDepending on your counhas the recall time set athat you need to change1. Press m, scroll d 2. Scroll d to RECALL a3. Press u or d to sel
RECALL 2 (long flash t
6.6 Restore deYou can restore your C6All the handsets that areretained. WARNINGResetting your phone toentries in the Phonebooksettings will also be rese1. Press m, scroll d 2. Scroll d to DEFAULT 3. Enter the 4 digit PIN c
The display shows CO4. Press m to confirm
Your C6 will restart a

Base s 23
6.7If you hto its d1. Re2. Pre
Th3. Pre
6.8Your Ctransmon. ThTo swi1. Pre2. Sc
select ON or OFF and press m to
witched off, the circle around
set to ON, the handset range will be
ettings
Emergency defaultave lost your PIN code, you can still restore your C6
efault settings.move the batteries from the handset.ss and hold * while replacing the batteries.
e display shows DEFAULT.ss m to confirm. Your C6 will restart automatically.
Eco mode6 offers ECO mode function which reduces the itted power and energy consumption when switched is feature is set to OFF by default.tch Eco mode on:ss m, scroll d to SETUP and press m.
roll d to ECO MODE and press m.
3. Press u or d toconfirm.
When Eco mode is sdisappears.NOTEWhen ECO mode is reduced.
Eco mode ON

24 Clock & alarm
6.9 mo Caller ID Service, the date and ur handsets whenever a call is anually set the date and time on the
eto DATE-TIME and press m. ATE SET. 2--08 for 12th of August) and press
eto DATE-TIME and press m. T and press m. hour format (e.g. 18--30 for 6:30pm) nfirm.
Low battOut of raKey beeAuto ansInternal mInternal vExternalExternalEar voluBase meBase rinPhoneboCalls listRedial lisPIN codeDial modRecall mEco modKeypad
Default settings 7. Clock & alarIf you have subscribed ttime will be set on all yoreceived. You can also mindividual handsets.
7.1 Set the dat1. Press m, scroll d
The display shows D2. Press m to select.3. Enter the date (e.g. 1m to confirm.
7.2 Set the tim1. Press m, scroll d 2. Scroll d to CLOCK SE3. Enter the time in 24
and press m to co
ery beeps ONnge warning beeps ONp ONwer ONelody 1
olume 3 melody 3 volume 3me 3lody 2ger volume 3ok Empty
Emptyt Empty
0000e Toneode RECALL 1 (100 ms)e OFFlock OFF

Caller 25
7.3Each h1. Pre2. Sc3. Pre
con4. If y
07-
7.4When NOTEIf you aring is
nd the Calls list
must first subscribe to the service from er. A subscription fee may be payable.ller's name is displayed, make sure you
telephone number, including the area ok.r is stored in the phonebook, the name displayed.ld call, WITHHELD will be displayed.vailable, UNAVAILABLE will be displayed.international number, INTERNATIONAL will
operator, OPERATOR will be displayed. ayphone, PAYPHONE will be displayed.gback request, RINGBACK will be displayed.
d to a Caller ID Service, you will be able umber on your handset (provided it is answering the call. The display can its or characters of the phone numbers
ID and the Calls list
Set alarmandset can have a different alarm setting.ss m, scroll d to DATE-TIME and press m.
roll d to ALARM SET and press m. ss u or d to select ON or OFF and press m to firm.ou select ON, enter the time in 24 hour format (e.g. -30 for 7:30am) and press m to confirm.
Switch off alarm ringthe alarm sounds, press any button to switch it off.
re using the handset to make a call when the alarm due, you will hear a beep in the earpiece.
8. Caller ID aIMPORTANTTo use Caller ID, youyour network providTo ensure that the cahave stored the full code in the phoneboIf the caller�s numbeassigned to it will beIf the call is a withheIf the number is unaIf the call is from an be displayed.If the call is from theIf the call is from a pIf the call is from a rin
8.1 Caller IDIf you have subscribeto see your caller�s nnot withheld) prior toshow the first 12 digand names.

26 Caller ID and the Calls list
If your caphoneboothe caller
8.2The CallsincludingThe CallsThe calleyou havehandsetsnew call iautomaticWhen a nflash on thave viewwill remai
8.2.11. Press
list, th2. Press
� If thscrois dthe
ber exactly matches an entry nebook, the display will alternate e and the number. Press m to umber.number is longer than 12 digits, yed. Press m to see the
to see the time and date of the call. to access the option to store the nebook. r in the Calls list Calls list. entry you want.displayed entry.ial a number in the Calls list Calls list. entry you want.y until the display shows MODIFY
e display shows NUMBER.ove the cursor to edit or delete
ller�s name and number are stored in the k and a name/number match is found, you will see
�s name on the display instead.
Calls list list stores details of your last 40 received calls, the phone number and date and time of the call. list also alerts you when you have unanswered calls.r�s details are stored in the Calls list whether or not answered the call. The list is shared by all registered to the base. When the list is full, and a s received, the oldest entry will be deleted ally.ew call is received in the Calls list, icon will
he display in standby mode to alert you. When you ed the new call, icon disappears but icon n.
View the Calls list d to open the Calls list. If there are no calls in the e display shows EMPTY. u or d to scroll through the list. e call was answered, icon is displayed as you ll to the entry. If the call was unanswered, icon
isplayed as you scroll to the entry. When you reach end of the list, the handset will beep.
� If the caller�s numstored in the phobetween the namsee the caller�s n
� If the telephone icon is displa
remaining digits.
� Press m again� Press m again
entry in your pho8.2.2 Dial a numbe1. Press d to open the2. Scroll u or d to the3. Press < to dial the 8.2.3 Modify and d1. Press d to open the2. Scroll u or d to the3. Press m repeatedl
ENTRY ?.4. Press m again. Th5. Press u or d to m
number.

Caller 27
6. Prenum
7. PreNOTEThe ed8.2.41. Pre2. Sc3. Pre
ADD4. Pre
Th5. En
Th6. Ed7. Pre
preNOTESee �Epage 1
entry the Calls list. the entry you want and press n.
ws DELETE ?.nfirm or n to cancel.e entire Calls list the Calls list.n. ws DELETE ALL ?.nfirm or n to cancel.
ID and the Calls list
ss Digit key to input a number or n to delete a ber.
ss < to dial out using the modified number.
ited entry cannot be saved in the Calls list.Copy a Calls list number to the phonebook
ss d to open the Calls list.roll u or d to the entry you want.ss twice m, then, press d, until the display shows ?.ss m again.
e display shows NAME ?.ter the name and press m. e number is displayed.it the number if necessary, then press m.ss u or d to select the ringer melody you want and ss m. The number is stored.
NTERING NAMES� and �WRITING TIPS� on 7.
8.2.5 Delete an1. Press d to open2. Scroll u or d to
The display sho3. Press m to co8.2.6 Delete th1. Press d to open2. Press and hold
The display sho3. Press m to co

28 Using additional handsets
9. UsiYou can extend yosockets fEach C6 You can If you havhandsetsIf you havmust regi
9.1NOTEHandset register. HregistratioHandsetspre-registOn the b1. Press
beepssecon
to REGISTER and press m. and press m.er (1 - 4).
hat are already in use flashes. The HING.... nds the base signal, the display where X indicates the base r.for the PIN to be entered. Enter the fault = 0000) and press m. if the registration is successful. matically assigned an available e this number when making
essful the first time, please repeat e the base registration period ran not found after a few seconds, the by. Try registering again.ndsets registered to the base, the must de-register another handset a new one.
ng additional handsetsregister up to five handsets to your C6 base to ur phone system without having to install extension
or each new phone.handset can be registered with up to four bases. then select the base you prefer to use. e purchased a C6 multiple pack, all additional
come pre-registered to the base.e purchased an additional handset separately, you ster it to your C6 base before it can be used.
Registering an additional handset
batteries must be fully charged before you start to old your handset close to the base during the n process. that were supplied with your C6 base are already ered.ase: and hold p for 3 seconds until you hear two . The base will remain in registration mode for 90 ds.
On the handset:1. Press m, scroll d 2. Scroll d to REG BASE3. Enter the base numb
The base numbers tdisplay shows SEARC
4. When the handset fishows SEARCHING...X,identification numbe
5. The display will ask 4 digit PIN code (deYou will hear a beepThe handset is autohandset number. Usinternal calls.
NOTEIf registration is not succthe process again in casout of time. If the base ishandset returns to standIf there are already 5 haregistration will fail. Youbefore you can register

Using 29
9.2
IMPORDECT functioof handeviceOn the1. Pre
beesec
On theFollowuser g
9.3If yourone atuse. Each h1. Pre
Th
bases that your handset has been be displayed, e.g. BASE 1 2 3 4. The base number flashes.mber that you want to use.
ss u or d to scroll to AUTO.firm. You will hear a confirmation beep ill return to the previous menu.
ur handset will automatically search for ase with the strongest signal.
ter a handsete-register another. You cannot et that you are using.
d to SETUP and press m.ANDSET and press m.IN code (default = 0000) and press m.t number that you want to de-register. nfirmation beep and the display will ious menu.
additional handsets
Register a different make of handset to your C6 base
TANTGAP Profile only guarantees that basic calling ns will work correctly between different makes/types dset and base. There is a possibility that certain s such as Caller ID will not work correctly. base:ss and hold p for 3 seconds until you hear two ps. The base will remain in registration mode for 90 onds. handset:
the registration instructions given in your handset�s uide.
Select a base C6 handset is registered to more than one base (e.g. work and one at home), you can select which base to
andset can be registered with up to four bases.ss m, scroll d to REGISTER and press m.
e display shows SELECT BASE.
2. Press m. All theregistered to will currently selected
3. Enter the base nuAlternatively, pre
4. Press m to conand the display w
TIPIf you select AUTO, yoand connect to the b
9.4 De-regisUse one handset to dde-register the hands1. Press m, scroll2. Scroll d to DEL H3. Enter the 4 digit P4. Enter the handse
You will hear a coreturn to the prev

30 Help
10. HeNo dial � Use on� Check� Check
switch
No disp� Check
chargesupplie
� Check � Reset
disconsecondminute
icon� Hands� Make s
page 2� Check
switch� Switch
Keypad� Check
lling during chargeightly on the base.ontacts with a cloth moistened with
power is connected properly and
hen the handset is fully charged, r steadily on the display.
ion with your network operator, see
withheld their number. found in your phonebook. Check rect name/number stored in your full area code.
PIN!s default settings, see �6.7 page 23.
andset to the baseo a maximum of 5 handsets to a C6 gister a handset in order to register 29.
entered the correct PIN code
lptonely the telephone line cord supplied.
that the telephone line cord is connected properly. that the mains power is connected properly and ed on.
lay that the batteries are inserted correctly and fully d. Use only approved rechargeable batteries d.that the handset is switched on. Press and hold R.the base by removing the batteries and necting the mains power. Wait for around 15 s before connecting it again. Allow up to one for the handset and base to synchronize.
flasheset is out of range. Move closer to the base.ure that the handset is registered to the base, see 8. that the mains power is connected properly and ed on. OFF the Eco mode.
does not seem to work that the keypad lock is not on, see page 16.
icon is not scro� Adjust the handset sl� Clean the charging c
alcohol.� Check that the mains
switched on.� The battery is full. W
icon will appea
No Caller ID� Check your subscript
page 25.� The caller may have � The record cannot be
that you have the corphonebook, with the
I have forgotten my� Restore your C6 to it
Emergency default�,
Cannot register a h� You can register up t
base. You must de-rea new one, see page
� Check that you have(default = 0000).

Gener 31
� Cheelecregi
Hand� The
pag
Base � The
Noiseelectr� Plac
appinte
Hand� Plea
you
nformation
designed to make emergency telephone fails. Alternative arrangements should be
ergency services.ed for connection to analogue public etworks and private switchboards in
y instructionsrecautions when using your phone to , electric shock, and injury to persons
openings of the phone unblocked. Do on a heating register or over a hat proper ventilation is provided at the
wet or while standing in water.roduct near water (for example, near a sink, or swimming pool).thing to rest on the power cord. Place o that it will not be walked on.cts of any kind into the product vents lt in fire or electric shock.
al information
ck that you are at least one metre away from other trical equipment to avoid interference when stering.
set does not ring handset ringer volume may be set to Off, see e 19.
unit does not ring base ringer volume may be set to Off, see page 21.
interference on my phone or on other ical equipment nearbye your C6 at least one metre away from electrical
liances or any metal obstructions to avoid any risk of rference.
set display shows NOT REGse refer to page 28 of the user guide to re-register
r handset to the base.
11. General iIMPORTANTThis equipment is notcalls when the power made for access to emThis product is intendswitched telephone nthe United Kingdom.
Important safetFollow these safety preduce the risk of fireor property:1. Keep all slits and
not set the phoneradiator. Ensure tinstallation site.
2. Do not use while3. Do not use this p
bath tub, kitchen 4. Do not allow any
the power cord s5. Never insert obje
as that may resu

32 General information
6. UnpluDo nodamp
7. Do nowork found
8. Do no9. Avoid
protec10. Do no
you aCAUTIONTo reduceadaptor.
Unplugfrom an� The po� Liquid � The pr
retrievunplugretriev
� The prdamag
� The pr
elinesnd all instructions and save them for
and instructions marked on the
roduct near a bath tub, sink, or
using only the power source that is rking label. If you are unsure of the r home, consult with your dealer or y.oduct on an unstable cart, stand, or may fall, causing serious damage to
ntrols that are covered by the ns. Improper adjustment of other in damage and will often require store the product to normal
ith a soft, damp cloth. Do not use ng agents to clean this phone. supply that came with this unit. upplies may damage the unit. operates on electricity, you should one in your home that could operate the case the power in your home
g this product from the wall outlet before cleaning. t use liquid cleaners or aerosol cleaners. Use a cloth for cleaning.t disassemble this product. If service or repair is required, contact the customer service helpline in this user's Guide.t overload wall outlets and extension cords. using during an electrical storm. Use a surge tor to protect the equipment.t use this phone to report a gas leak, especially if re in the vicinity of the gas line.
the risk of fire, use only the supplied power
this cordless phone immediately outlet if:
wer cord or plug is damaged or frayed.has been spilled on the product.oduct has been exposed to rain or water. Do not e the handset or base until after you have ged the power and phone from the wall. Then e the unit by the unplugged cords.oduct has been dropped or the cabinet has been ed.
oduct exhibits a distinct change in performance.
Installation Guid1. Read and understa
future reference.2. Follow all warnings
product.3. Do not install this p
shower.4. Operate this phone
indicated on the mapower supply to youlocal power compan
5. Do not place this prtable. This product the product.
6. Adjust only those cooperating instructiocontrols may result extensive work to reoperation.
7. Clean this product wchemicals or cleani
8. Use only the powerUsing other power s
9. Because this phonehave at least one phwithout electricity ingoes out.

Gener 33
10. To theor
Batte� Do
battrele
CAUTThere incorrewith yorecom� Kee� Rem� Do
in e� The
musrecyConmet
Clean� Clea
(not
old polish as this will damage the e a dry cloth as this may cause static
direct sunlight. become warm when the batteries are during prolonged periods of use. This is we recommend that to avoid damage, roduct on antique/veneered wood. product on carpets or other surfaces res, or place it in locations preventing
r over its surfaces. any part of your product in water and mp or humid conditions, such as
ur product to fire, explosives or other ions.hance that your phone could be ectrical storm. We recommend that you and telephone line cord during an
al instructions (EU) Waste of Electrical and ment (WEEE) directiveion's WEEE directive requires that EU countries must have the crossed
al information
avoid interference to nearby appliances, do not place base of the phone on or near a TV, microwave oven, VCR.
ry Safety Instructionsnot burn, disassemble, mutilate, or puncture the ery. The battery contains toxic materials that could be ased, resulting in injury.IONis a risk of explosion if you replace the battery with an ct battery type. Use only the battery pack that came ur phone or an authorized replacement
mended by the manufacturer.p battery packs out of the reach of children.ove battery packs if storing over 30 days.
not dispose of battery packs in fire, which could result xplosion. rechargeable battery packs that power this product t be disposed of properly and may need to be cled. Refer to your battery�s label for battery type. tact your local recycling center for proper disposal hods.
SAVE THESE INSTRUCTIONS
ingn the handset and base (or charger) with a damp
wet) cloth, or an anti-static wipe.
� Never use househproduct. Never usshock.
Environmental� Do not expose to � The handset may
being charged or normal. However,do not place the p
� Do not place yourwhich generate fibthe free flow of ai
� Do not submergedo not use it in dabathrooms.
� Do not expose yohazardous condit
� There is a slight cdamaged by an elunplug the powerelectrical storm.
Product dispos� European Union
Electronic EquipThe European Unproducts sold into
34 General information
out tracases)out train EU celectricCustomtheir locentrein their
� The W(WEEErecyclerecyclienvirothe inc
ProductWhen youbatteries your locainformatiowhere theProductBusinessterms andthat this pfor dispos
ts and Accessories
g this Motorola branded product nse by Suncorp Technologies a Resources Building, 26 Harbour
Kong. ("Suncorp")nty Cover?
s contained below, SUNCORP warrants that this Motorola branded rtified accessory ("Accessory") sold that it manufactured to be free from workmanship under normal period outlined below. This Limited ve warranty and is not transferable.
nly to the first consumer purchaser,
TECHNOLOGIES LTD do?GIES LTD or its authorized distributor commercially reasonable time, will at ce any Products or Accessories that limited warranty. We may use conditioned/ refurbished/ pre-owned ories or parts.
shbin label on the product (or the package in some . As defined by the WEEE directive, this crossed-shbin label means that customers and end-users ountries should not dispose of electronic and al equipment or accessories in household waste. ers or end-users in EU countries should contact
cal equipment supplier representative or service for information about the waste collection system country.aste of Electrical and Electronic Equipment ) Directive (2002/96/EC) has been put in place to products using best available recovery and
ng techniques to minimize the impact on the nment, treat any hazardous substances and avoid reasing landfill. disposal instructions for residential users have no further use for it, please remove any
and dispose of them and the product according to l authority�s recycling processes. For more n, please contact your local authority or the retailer product was purchased.
disposal instructions for business users users should contact their suppliers and check the conditions of the purchase contract and ensure roduct is not mixed with other commercial waste al.
Consumer ProducWarrantyThank you for purchasinmanufactured under liceLimited, 3001-3005 ChinRoad, Wan Chai, Hong What Does this WarraSubject to the exclusionTECHNOLOGIES LTD. product ("Product") or cefor use with this product defects in materials andconsumer usage for theWarranty is your exclusiWho is covered?This warranty extends oand is not transferable.What will SUNCORP SUNCORP TECHNOLOat its option and within a no charge repair or repladoes not conform to this functionally equivalent reor new Products, Access

Gener 35
What ANY IMLIMITAMERCPURPOTHIS LREPLALIMITETHE COTHEREVENTTECHNCONTDAMAPRODINCIDEOF ANOF BUFINANWITH PRODTHESESome incidenlength exclusspecifivary fr
ar. Periodic maintenance, repair and ue to normal wear and tear are
ge. ies whose fully charged capacity falls ed capacity and batteries that leak are warranty.
fects or damage that result from: (a) torage, misuse or abuse, accident or ical damage (cracks, scratches, etc.) roduct resulting from misuse; (b) ter, rain, extreme humidity or heavy
Length of Coverage One (1) year from the date of
the products original purchase by the first consumer purchaser of the product.
ries ly(s)
Ninety (90) days from the date of the accessories original purchase by the first consumer purchaser of the product.
and d
The balance of the original warranty or for ninety (90) days from the date returned to the consumer, whichever is longer.
al information
Other Limitations Are There?PLIED WARRANTIES, INCLUDING WITHOUT TION THE IMPLIED WARRANTIES OF HANTABILITY AND FITNESS FOR A PARTICULAR
SE, SHALL BE LIMITED TO THE DURATION OF IMITED WARRANTY, OTHERWISE THE REPAIR OR CEMENT PROVIDED UNDER THIS EXPRESS D WARRANTY IS THE EXCLUSIVE REMEDY OF ONSUMER, AND IS PROVIDED IN LIEU OF ALL WARRANTIES, EXPRESS OF IMPLIED. IN NO SHALL MOTOROLA OR SUNCORP OLOGIES LTD BE LIABLE, WHETHER IN
RACT OR TORT (INCLUDING NEGLIGENCE) FOR GES IN EXCESS OF THE PURCHASE PRICE OF THE UCT OR ACCESSORY, OR FOR ANY INDIRECT, NTAL, SPECIAL OR CONSEQUENTIAL DAMAGES
Y KIND, OR LOSS OF REVENUE OR PROFITS, LOSS SINESS, LOSS OF INFORMATION OR OTHER CIAL LOSS ARISING OUT OF OR IN CONNECTION THE ABILITY OR INABILITY TO USE THE UCTS OR ACCESSORIES TO THE FULL EXTENT DAMAGES MAY BE DISCLAIMED BY LAW.
jurisdictions do not allow the limitation or exclusion of tal or consequential damages, or limitation on the of an implied warranty, so the above limitations or ions may not apply to you. This warranty gives you c legal rights, and you may also have other rights that om one jurisdiction to another.
ExclusionsNormal Wear and Tereplacement of parts dexcluded from coveraBatteries. Only batterbelow 80% of their ratcovered by this limitedAbuse & Misuse. Deimproper operation, sneglect, such as physto the surface of the pcontact with liquid, wa
Products CoveredConsumer Products
Consumer Accesso(battery, power suppand line cords)
Consumer ProductsAccessories that areRepaired or Replace
36 General information
perspiratiuse of theor subjecconditionMotorola excludedUse of NAccessoNon-Motoor other pUnauthodamagesinstallatioway by soTECHNOexcludedAltered Pnumbers obliteratetamperingnonconfoare excluCommunof Producservice oProducts
nty Service or Other
mation, please call: 0800 0820750ons on how to ship the Products or ense, to SUNCORP It is the responsibility of the nearest authorised service center/ product at the purchaser's risk to enter.
enterust include: (a) the Product or al proof of purchase (receipt) which
and seller of the Product; (c) if a ed in your box, a completed
he serial number of the Product; (d) he problem; and, most importantly; ephone number.
on, sand, dirt or the like, extreme heat, or food; (c) Products or Accessories for commercial purposes ting the Product or Accessory to abnormal usage or s; or (d) other acts which are not the fault of or SUNCORP TECHNOLOGIES LTD., are from coverage. on-Motorola branded Products and ries. Defects or damage that result from the use of rola branded or certified Products or Accessories eripheral equipment are excluded from coverage. rized Service or Modification. Defects or resulting from service, testing, adjustment, n, maintenance, alteration, or modification in any meone other than Motorola, SUNCORP LOGIES LTD. or its authorized service centers, are from coverage. roducts. Products or Accessories with (a) serial or date tags that have been removed, altered or d; (b) broken seals or that show evidence of ; (c) mismatched board serial numbers; or (d)
rming or non-Motorola branded housings, or parts, ded from coverage. ication Services. Defects, damages, or the failure ts or Accessories due to any communication r signal you may subscribe to or use with the or Accessories is excluded from coverage.
How to Obtain WarraInformation?To obtain service or inforYou will receive instructiAccessories at your expTECHNOLOGIES LTD. purchaser to contact thedistributor and bring thethat authorised service c
Authorized Repair CTo obtain service, you mAccessory; (b) the originincludes the date, placewarranty card was includwarranty card showing ta written description of t(e) your address and tel

Gener 37
TechHow mAll itemNumbeitems wYour Ctotal RWith dringingAny ada REN
R&TTThis eqthe RaEquipm
ConnThis prfor con
RecaYou mto a swinform
al information
nical Informationany telephones can I have?
s of telephone equipment have a Ringer Equivalence r (REN), which is used to calculate the number of hich may be connected to any one telephone line.
6 has a REN of 1. A total REN of 4 is allowed. If the EN of 4 is exceeded, the telephones may not ring. ifferent telephone types, there is no guarantee of , even when the REN is less than 4.ditional handsets and chargers that you register have of 0.
Euipment complies with the essential requirements for
dio Equipment and Telecommunications Terminal ent Directive 1999/5/EC.
ecting to a switchboardoduct is intended for use within the United Kingdom nection to the public telephone network.
llay need to use the recall function if you are connected itch. Contact your PABX supplier for further
ation.

38 General information
De
cla
ratio
n o
f Co
nfo
rmity
(Do
C)
Su
nco
rp d
ecla
res th
at th
e fo
llow
ing p
roducts
:
Bra
ndnam
e:
M
oto
rola
Type:
C601, C
602, C
603 a
nd C
604
Descrip
tions:
DE
CT
phone w
ithout te
lephone a
nsw
erin
g m
achin
e (C
60x) a
nd th
eir
mu
lti-ha
nd
se
t ve
rsio
ns.
to w
hic
h th
is d
ecla
ratio
n re
late
d is
in c
onfo
rmity
with
the e
ssentia
l require
ments
of th
e fo
llow
ing
dire
ctiv
es o
f the C
ouncil o
f the E
uro
pean C
om
munitie
s:
- R
&T
TE
Dire
ctiv
e (1
999/5
/EC
)
- E
codesig
n D
irectiv
e (2
005/3
2/E
C)
The p
roducts
are
com
plia
nt w
ith th
e fo
llow
ing s
tandard
s:
Sa
fety
:
E
N6
09
50
-1:2
00
6
EM
C:
EN
301489-1
v1.6
.1 a
nd E
N301489-6
v1.2
.1
RF
Sp
ectru
m:
EN
30
14
06
v1
.5.1
Ecodesig
n:
E
C N
o 2
78/2
009, 6
April 2
009
For a
nd o
n b
ehalf o
f Suncorp
Technolo
gie
s L
imite
d,
Sig
natu
re:
______________________
Prin
ted
na
me
& P
ositio
n:
CW
Ch
eu
ng
- Ch
ief T
ech
nic
al O
ffice
r
Da
te:
1
st J
une 2
010
Pla
ce:
3001-3
005 C
hin
a R
esourc
es B
uild
ing, 2
6 H
arb
our R
oad,
Wan C
hai, H
ong K
ong

Manufactured, distributed or sold by Suncorp Technologies Ltd. official licensee for this product. MOTOROLA and the Stylized M Logo, and other Motorola trademarks and trade dress are owned by Motorola, Inc. and are used under license from Motorola, Inc. MOTOROLA and the Stylized M Logo are registered in the US Patent & Trademark Office. All other product or service names are the property of their respective owners. © Motorola, Inc. 2010. All rights reserved.
Version 4 (UK)