Embed Size (px)
Citation preview

Nano 5 Features
a.- 6 analog inputs (ADCs, 12 bits, 2.5V) b.- 2 Analog outputs (DAC, 12 bits, 2.5V) c.- 1 Switch d.- 1 Led e.- 2 PWMs f.- 2 Interrupts inputs g.- 1 Real Time Clock (PCF2127T) h.- 8 GPIO (digital) i.- 4 GPIO (Open collector, digital) j.- 2 Relays k.- 2 Timer Counters l.- Communication: UART, I2C and SPI m.- Power: USB/Raspberry Pi n.- Microconverter model: ADuC842, 16MHz o.- Memory: Program: 64K x 8 Flash: 4K x 8 User RAM : 256 x 8 User XRAM: 2K x 8
Nano 5 Interfaces
a.- Raspberry Pi: UART, I2C, Power Supply b.- LCD: 4 lines, 20 columns (NHD‐0420D3Z‐NSW‐BBW‐V3, I2C Mode) c.- IR Receiver Module: IRM-3638N3 or compatible d.- Rotary encoder (24 steps)

Communication and GPIO Connector
Description: [P0+, P0-]: P0 Port, 8 bits, digital, Input-Output P2- : P2 Port, 4 bits, digital, input-Output, Open Drain Power: +5V, selected from USB or Raspberry Pi (in picture, USB) UART Connection: Normally closed (in picture). Open to use UART directly from Microconverter UART Selection: USB: For programming and use PC as terminal Raspberry Pi: UART communication with Raspberry Pi
P2.3 P0.7
P2.2 P0.6
P2.1 P0.5
P2.0 P0.4
P0.3 /SS
P0.2 INT1/MISO
P0.1 SDA/MOSI
P0.0 SCL
+5V GND
TX_UART
RX_UART
UART Selection
USB
Raspberry Pi
Power USB
Raspberry Pi
UART Connection
I2C, SPI
P0+
P0-
P2-
UART

Analog and Digital Functions
Description: IR Selection: Connected to use IR Remote Controller (INT0 interrupt is used)
+5V GND
ADC1 RESET (HIGH)
ADC2 /RESET (LOW)
ADC3 PWM0 (P2.6)
ADC4 PWM1 (P2.7)
ADC6 T0 (P3.4)
ADC7 T1 (P3.5)
DAC0 INT0
DAC1 INT1/MISO
IR Selection (INT0)
ON, P3.6 = 1 (RESET, LED ON)
Pulse Width Modulation
External Interrupts
Counter Timers / GPIO
6 Analog to Digital Converters, 12 bits, 2.5V
2 Digital to Analog Converters, 12 bits, 2.5V
Relay 1 (LS1)
Relay 2 (LS2)
ON, P3.6 = 0
ON, P3.7 = 1 (RESET, LED ON)
ON, P3.7 = 0
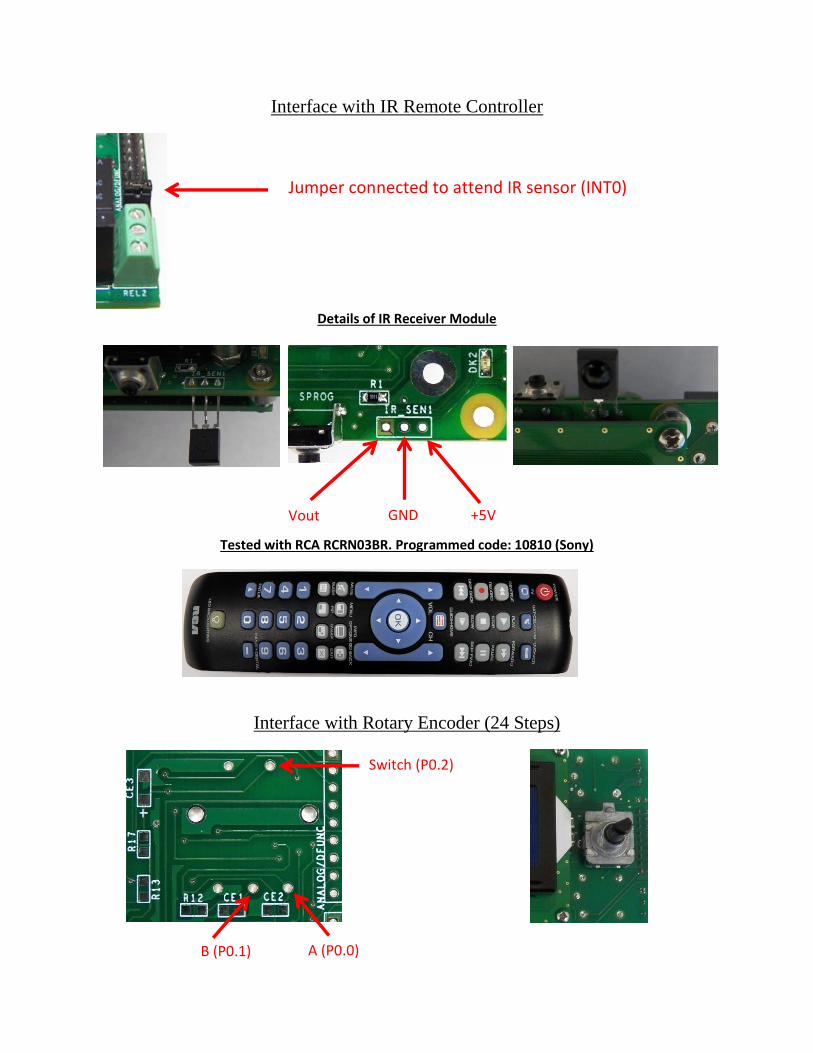
Interface with IR Remote Controller
Details of IR Receiver Module
Tested with RCA RCRN03BR. Programmed code: 10810 (Sony)
Interface with Rotary Encoder (24 Steps)
Jumper connected to attend IR sensor (INT0)
GND +5V Vout
B (P0.1) A (P0.0)
Switch (P0.2)

Interface with LCD (I2C)
Assembly Details
+5V GND SDA SCL

Interface with Raspberry Pi
Assembly Details
GND
+3.3V
+5V
SDA (+3.3V) SCL (+3.3V)
Tx_UART (+3.3V)
Rx_UART (+3.3V)
Conversion Module (5V <-> 3.3V)

Testing the Interface with Raspberry Pi using minicom
Sending Text
Receiving Char

Basic Applications
1.- A first program 2.- Led flashing 3.- Switch 4.- UART Communication 5.- Testing ADCs and DACs 6.- Rotary Encoder 7.- Testing PWMs and Buzzer 8.- Transfer using Data Flash 9.- Keypad 4x4 10.- Calibration of ADCs 11.- IR Remote Controller 12.- Power Down Mode 13.- LCD Interface 14.- LCD and ADCs 15.- Internal Temperature Sensor 16.- External temperature Sensor (LM35DT) 17.- LCD Rotary Encoder 18.- LCD IR Remote Controller 19.- Real Time Clock