Embed Size (px)
Citation preview
DoCoMo W-CDMA SystemThank you for selecting the FOMA D702iF.Carefully read this manual and other manuals delivered with devices such as the battery pack, before using your FOMA D702iF, and consult the corresponding manuals while using the phone so that you are able to use it correctly and effectively. If you are unclear as to any point indicated in any of these manuals, contact the DoCoMo Information Center that is listed on the back of this manual.Your FOMA D702iF is a valuable asset. Handle it with care and it will be your trusted partner for years to come.
Before using your FOMA terminal● The FOMA terminal is cordless so you may not be able to use it in certain locations where
signals cannot penetrate, such as in tunnels, underground, in some buildings or outdoors if the signal is weak or you are outside the service area. You also may not be able to use your FOMA terminal on the upper floors of some highrise building, even though there is nothing around you that interferes with the signal. Please note that your call may be disconnected even when the signal is strong (when the signal strength indication shows three bars) and you are not moving.
●When using the FOMA terminal in public, busy or quiet places, be careful not to disturb others.● Since the FOMA terminal relies on radio transmission, it is theoretically possible for third
parties to intercept a call; however, because the W-CDMA system automatically employs a secrecy function for all calls, a third party will pick up nothing but signal noise.
● Since the FOMA terminal operates by the wireless transmission of voices converted to digital signals, if you are in a location where the signal is weak, the original voice may not be accurately reproduced from the received digital signal, therefore, the voice you hear may differ from the original sound of the speaker’s voice.
● DoCoMo asks that you keep a separate record (e.g. written copy) of all information you store in your FOMA terminal. DoCoMo accepts no responsibility whatsoever for any loss that occurs should the contents of the FOMA terminal’s memory be lost or altered.
● The user hereby agrees that the user shall be solely responsible for the result of the use of SSL. Neither DoCoMo nor the certifier as listed herein makes any representation and warranty as for the security in the use of SSL. In the event that the user shall sustain damage or loss due to the use of SSL, neither DoCoMo nor the certifier shall be responsible for any such damage or loss.Certifier: VeriSign Japan K.K., Betrusted Japan Co., Ltd., GeoTrust Japan, inc., RSA Security
Japan Ltd., Secom Trust Systems Co.,Ltd.● The FOMA terminal can be used in the FOMA Plus-Area.● The FOMA terminal can be used only via the FOMA network provided by DoCoMo.
For first time user of the FOMA terminalIf this is your first FOMA terminal, read this manual in the following order. You can understand the preparations for using the FOMA terminal and its basic operations.
1. Install the battery pack and charge it. ☛P38, P392. Turn the power on, make initial settings, and then confirm your phone number. ☛P43, P463. Understand the functions of keys on the terminal. ☛P244. Understand the meaning of icons displayed on the screen. ☛P265. Understand how to use the menus. ☛P296. Understand how to make and receive calls. ☛P48, P60
The latest information about this manual can be downloaded from the DoCoMo website.
● User’s Manual Download(http://www.nttdocomo.co.jp/english/support/manual/index.html)
Note: The URL and site contents are subject to change without prior notice.
1
Quick Search/
Contents/Cautions
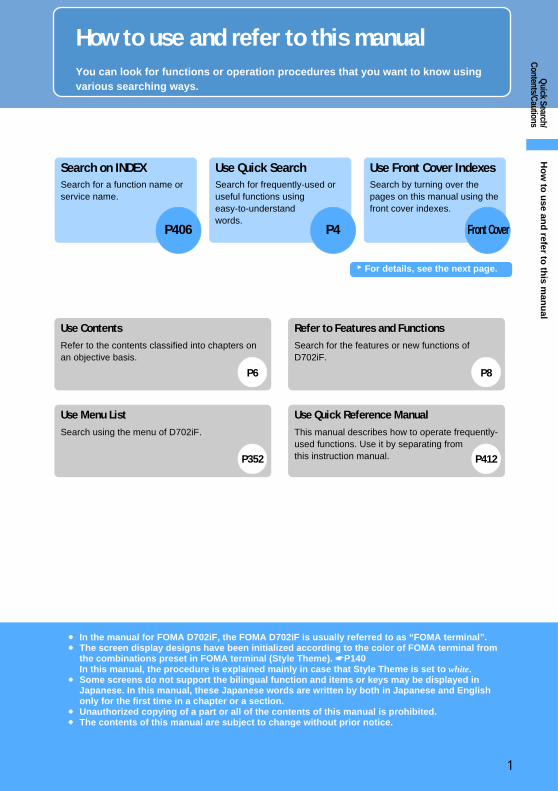
How to use and refer to this manualYou can look for functions or operation procedures that you want to know using various searching ways.
Search on INDEXSearch for a function name or service name.
Use Quick SearchSearch for frequently-used or useful functions using easy-to-understand words.
Use Front Cover IndexesSearch by turning over the pages on this manual using the front cover indexes.
Use ContentsRefer to the contents classified into chapters on an objective basis.
Refer to Features and FunctionsSearch for the features or new functions of D702iF.
Use Menu List Search using the menu of D702iF.
Use Quick Reference ManualThis manual describes how to operate frequently-used functions. Use it by separating from this instruction manual.
● In the manual for FOMA D702iF, the FOMA D702iF is usually referred to as “FOMA terminal”.● The screen display designs have been initialized according to the color of FOMA terminal from
the combinations preset in FOMA terminal (Style Theme). ☛P140In this manual, the procedure is explained mainly in case that Style Theme is set to white.
● Some screens do not support the bilingual function and items or keys may be displayed in Japanese. In this manual, these Japanese words are written by both in Japanese and English only for the first time in a chapter or a section.
● Unauthorized copying of a part or all of the contents of this manual is prohibited.● The contents of this manual are subject to change without prior notice.
Ho
w to
use an
d refer to
this m
anu
al
For details, see the next page.
P406 P4 Front Cover
P6 P8
P412P352
▲
2
Quick Search/
Contents/Cautions
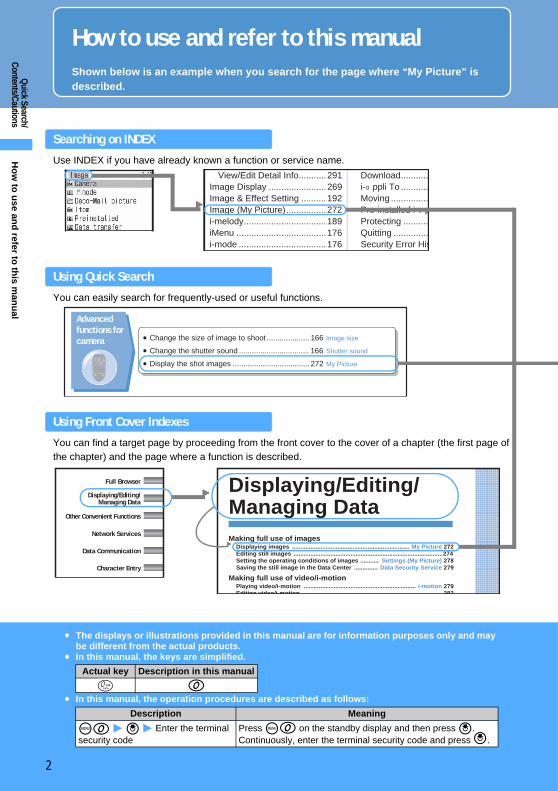
How to use and refer to this manualShown below is an example when you search for the page where “My Picture” is described.
Searching on INDEX
Use INDEX if you have already known a function or service name.
Using Quick Search
You can easily search for frequently-used or useful functions.
Using Front Cover Indexes
You can find a target page by proceeding from the front cover to the cover of a chapter (the first page ofthe chapter) and the page where a function is described.
View/Edit Detail Info...........291Image Display .......................269Image & Effect Setting ..........192Image (My Picture)................272i-melody.................................189iMenu ....................................176i-mode ...................................176
Download...........i- ppli To ...........Moving ...............Pre-installed i- pProtecting ..........Quitting ..............Security Error His
α
α
▲
Advanced functions for camera • Change the size of image to shoot .................... 166 Image size
• Change the shutter sound ................................. 166 Shutter sound
• Display the shot images .................................... 272 My Picture
resworB lluF
/gnitidE/gniyalpsiDataD gniganaM
snoitcnuF tneinevnoC rehtO
secivreS krowteN
noitacinummoC ataD
yrtnE retcarahC
Displaying/Editing/Managing DataMaking full use of images
Displaying images ...................................................................... My Picture 272Editing still images .........................................................................................274Setting the operating conditions of images ........... Settings (My Picture) 278Saving the still image in the Data Center .............. Data Security Service 279
Making full use of video/i-motionPlaying video/i-motion ................................................................... i-motion 279Editing video/i-motion 282
▲▲
● The displays or illustrations provided in this manual are for information purposes only and may be different from the actual products.
● In this manual, the keys are simplified.
● In this manual, the operation procedures are described as follows:
Actual key Description in this manual
0
Description Meaning
m0 z o z Enter the terminal security code
Press m0 on the standby display and then press o. Continuously, enter the terminal security code and press o.
Ho
w to
use an
d refer to
this m
anu
al
3
Quick Search/
Contents/Cautions
● If there is especially no notice, the operation procedures from the standby display are mentioned.● The operation procedure is mainly explained in shortcut operations using the normal menu.
When there are two or more possible procedures, the simplest one is mentioned.● In this manual, to place the cursor at an item with (Easy Selector Plus) is referred to as
“highlight”. In addition, to select an item by placing the cursor with (Easy Selector Plus) and pressing (Enter key) is referred to as “select”. The step of pressing which is required after entering characters in the entry field is omitted in description.
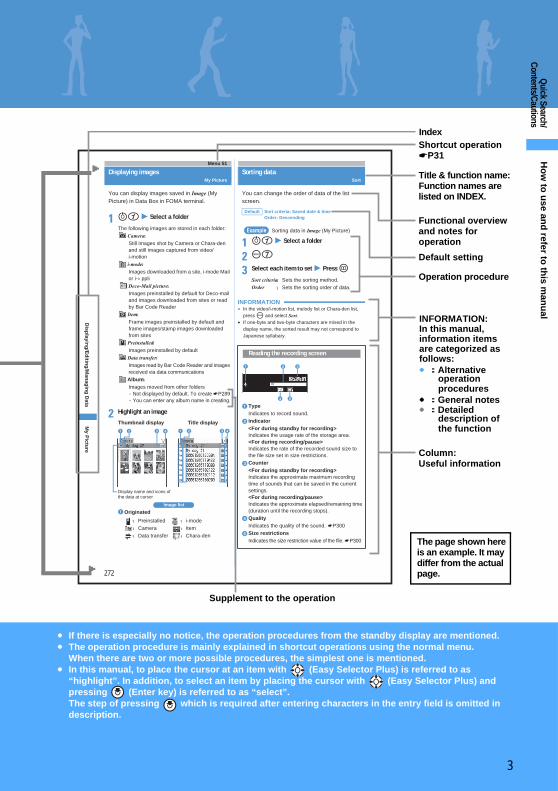
272
ata
D g
niga
naM /
gni
t id
E/g
n iya
lps
iD
Making full use of images
Menu 51
Displaying imagesMy Picture
You can display images saved in Image (My Picture) in Data Box in FOMA terminal.
1 u1 z Select a folder
2 Highlight an image
aOriginated
Sorting dataSort
You can change the order of data of the list screen.
Sorting data in Image (My Picture)
1 u1 z Select a folder
2 m7
3 Select each item to set z Press p
INFORMATION● In the video/i-motion list, melody list or Chara-den list,
press m and select Sort.● If one-byte and two-byte characters are mixed in the
display name, the sorted result may not correspond to Japanese syllabary.
The following images are stored in each folder:Camera:Still images shot by Camera or Chara-den and still images captured from video/i-motioni-mode:Images downloaded from a site, i-mode Mail or i- ppliDeco-Mail picture:Images preinstalled by default for Deco-mail and images downloaded from sites or read by Bar Code ReaderItem:Frame images preinstalled by default and frame images/stamp images downloaded from sitesPreinstalled:Images preinstalled by defaultData transfer:Images read by Bar Code Reader and images received via data communicationsAlbum:Images moved from other folders・ Not displayed by default. To create P289・ You can enter any album name in creating.
:Preinstalled :i-mode:Camera :Item:Data transfer :Chara-den
c da b
Display name and icons of the data at cursor
Title display
Image list
Thumbnail display
cdba
Default Sort criteria: Saved date & time Order: Descending
Sort criteria:Sets the sorting method.Order :Sets the sorting order of data.
Reading the recording screen
Example
aTypeIndicates to record sound.
b Indicator<For during standby for recording>Indicates the usage rate of the storage area.<For during recording/pause>Indicates the rate of the recorded sound size to the file size set in size restrictions.
cCounter<For during standby for recording>Indicates the approximate maximum recording time of sounds that can be saved in the current settings.<For during recording/pause>Indicates the approximate elapsed/remaining time (duration until the recording stops).
dQualityIndicates the quality of the sound. P300
eSize restrictionsIndicates the size restriction value of the file. P300
c
d e
a b
erut
ciP
yM
α
Title & function name: Function names are listed on INDEX.
Functional overview and notes for operation
Default setting
Operation procedure
Supplement to the operation
Shortcut operation☛P31
Column:Useful information
▲
INFORMATION:In this manual, information items are categorized as follows:●:Alternative
operation procedures
●:General notes●:Detailed
description of the function
▲
Index
The page shown here is an example. It may differ from the actual page.
Ho
w to
use an
d refer to
this m
anu
al
4
Quick Search/
Contents/Cautions
Quick Search
Use this Quick Search to look for the frequently-used or convenient functions directly.
Useful functions for phone calls
• Notify/not notify your phone number.................... 46 Caller ID Notification
• Put the current call on hold.................................. 49 On-hold
• Switch to videophone call during voice call ......... 51 Switch to videophone
• Adjust the volume of the other party’s voice........ 66 Listen Volume
• Talk facing the phone screen .............................. 79 Speakerphone function
When unable to answer an incoming call • Put the incoming call on hold............................... 69 Response and Hold
• Record caller’s messages ................................... 73 Answer Machine
• Use Voice Mail Service...................................... 330 Voice Mail
How to change melodies or lighting patterns
• Adjust the volume of ring alerts ........................... 66 Call alert volume
• Use a personal ring alert for each caller.............. 98 Alert by Contact
• Use your favorite ring alerts............................... 116 Sound Setting
• Mute the sound heard when pressing keypads.....118 Keypad Sound
• Use the vibrator for incoming calls .................... 119 Vibrator Setting
• Turn Silent Mode on .......................................... 121 Silent Mode
• Customize the incoming lighting color and pattern ....136 Light Alert Setting
How to change the screen display
• Learn the meaning of icons on the screen .......... 26 Reading display
• Adjust the date and time...................................... 44 Date and Time Setting
• Customize the standby display (wallpaper) ....... 123 Standby Display Setting
• Show a calendar on the standby display .......... 126 Calendar
• Change the size of characters........................... 138 Font Size Setting
Qu
ick Search
5
Quick Search/
Contents/Cautions
Advanced functions for mail • Send your original Deco-mail ............................ 208 Deco-mail
• Send images with mail....................................... 212 Attachment
• Sort and save mail automatically....................... 231 Sort Criteria
Advanced functions for camera • Change the size of image to shoot .................... 166 Image size
• Change the shutter sound ................................. 166 Shutter sound
• Display the shot images .................................... 272 My Picture
Settings for your phone safety
• Keep your phonebook data secret..................... 112 Secret Attribute
• Lock your phone remotely when it is lost etc..... 147 Omakase Lock
• Disable the key operation .................................. 151 Side Key Guard
• Reject calls without caller ID.............................. 154 Anonymous Caller
• Reject callers not registered in the phonebook... 156 Reject non-Reg. Caller
• Save the phonebook and other data to prevent data loss ............................................... 157 Data Security Service*1
*1 This is a pay service and requires a subscription.
• Call up function menus quickly ............................ 31 Shortcut operations
• Read a QR code or barcode.............................. 172 Bar Code Reader
• Send/receive data via infrared communication ... 293 Infrared communication
• Use your phone as an alarm clock .................... 305 Alarm Clock
• Use your phone as a calculator ......................... 322 Calculator
• Update software ................................................ 391 Software Update
• Update the security............................................ 395 Virus Scan Function
Other useful functions
Qu
ick Search
6
Quick Search/
Contents/Cautions
Before using your FOMA terminal ............. Inside front coverFor first time user of the FOMA terminal ... Inside front coverHow to use and refer to this manual ................................... 1Quick Search....................................................................... 4Features and functions of FOMA D702iF............................ 8Making full use of D702iF.................................................. 10SAFETY PRECAUTIONS (Always follow these directions) ..... 12Handling instructions......................................................... 18About intellectual property rights....................................... 20Basic package and optional accessories .......................... 22
Before Using D702iF 23Names and functions of parts Reading the display Reading the sub-display Selecting the menu Using the UIM (FOMA card) Attaching/removing the battery pack Charging Battery Level Power ON/OFF Select Language Date and Time Setting Caller ID Notification Own Number etc.
Making/Receiving Calls 47Making calls Chaku-moji Redial 186/184 Call WORLD CALL Receiving calls Any Key Answer Open Answer Close Setting Received Calls Listen Volume Adjust Volume Response and Hold Public mode (Driving mode/power off) Answer Machine etc.
Making/Receiving Videophone Calls 77Making videophone calls Receiving videophone calls Using Chara-den Setting images to send Customizing display during videophone call Videophone Settings etc.
Phonebook 93Phonebook New Entry Group Setting Phonebook Search Edit Phonebook Delete Phonebook Secret Attribute Quick Dial etc.
Sounds/Displays/Lights Settings 115Sound Setting Vibrator Setting Silent Mode Standby Display Setting Mail/Call Image Sub-display Setting Menu Setting Light Alert Setting Indicator Light Clock Display Format Style Theme etc.
Safety Settings 141Security code Change Security Code PIN code All Lock Omakase Lock Self Mode PIM Lock Keypad Dial Lock Privacy Mode Setting Side Key Guard Lock on Close Secret Mode Data Security Service etc.
Camera 159Still Camera Movie Camera Setting for shooting Bar Code Reader etc.
i-mode/i-motion 175What’s i-mode? Site display Change i-mode Password Internet Connection BookmarkScreen Memo Save Image i-melody i-mode Setting Message R/F Certificate i-motion Downloading i-motion i-motion Setting etc.
Contents
Co
nten
ts
C o n t e n t s
7
Quick Search/
Contents/Cautions
Mail 201Composing and sending i-mode Mail Deco-mail Attachment Save Mail Receiving i-mode Mail Check i-mode Message Display/Save Image i-motion Mail Play/Save Melody Mail Setting Composing and sending chat mail Composing and sending SMS etc.
i-αppli 245i-αppli Downloading Starting i-αppli i-αppli To i-αppli Standby Display etc.
i-channel 259i-channel Channel List Ticker Setting
Full Browser 263Full Browser Browser Setting
Displaying/Editing/Managing Data 271Displaying/editing images Playing/editing video/i-motion Chara-den Playing melodiesManaging data Infrared communication Sound Recorder etc.
Other Convenient Functions 301Multiaccess Multitask Auto Power ON/OFF Timer Alarm Clock Safety MelodyScheduler Custom Menu Own Number Voice Memo/Video Memo Call Duration/Call Cost Reset Call Cost Call Cost Limit Calculator Notepad Electronic dictionaries Earphone/Microphone Set with Switch Quick Start-up Reset Delete All Data etc.
Network Services 329Voice Mail Call Waiting Call Forwarding Nuisance Call Blocking Caller ID Request Dual Network English Guidance Service Dialing Number Arrival call act Remote Control Multi Number etc.
Data Communication 337Data communication Flow of setup AT command
Character Entry 341Entering characters 5-touch Input Method Save Phrase Copy Character KUTEN Code Input Save Word Download Dictionary Slot Input Method Input Method Setting
Appendix/Data Interchange/Troubleshooting 351Menu list Data set by default List of dial keys and character assignments Troubleshooting Error Message Warranty and After-Sales Service Software Update Virus Scan Function Main specification etc.
INDEX/Quick Reference Manual 405INDEX Quick Reference Manual
Co
nten
ts
8
Quick Search/
Contents/Cautions
Features and functions of FOMA D702iF
FOMA is the name of a set of services provided by DoCoMo based on W-CDMA, which is recognized as one of the systems compliant to the global standard for third generation mobile communications (IMT-2000).
It’s amazing because it’s i-mode!i-mode is an online service used with i-mode terminals. This service supports connection to i-mode Sites (Programs) or i-mode compatible Internet websites that provide a variety of useful information, and allows you to exchange i-mode Mail.
i-motion ☛P198
Video/sound can be downloaded from i-mode or Internet web sites to enjoy them. i-motion saved in FOMA terminal can be set as a ring alert or incoming image (Movie ringtone (Chaku-motion)).
i-motion Mail ☛P212
Video taken with the built-in camera or i-motion downloaded from sites can be attached to i-mode Mail to send.
Main functions of FOMA D702iF
i-channel ☛P260
Allows you to receive graphical information about news and weather conditions. You can get information on a regular basis and the latest information is run on the standby display as tickers. Also, the information can be displayed in the channel list by pressing the i-channel compatible key (c). Furthermore, you can get rich, detailed information by selecting your desired channel in the channel list.In addition, free trial service is available over the fixed period of time for customers who have not applied to i-channel service.・ i-channel is a pay service and requires a subscription.
Chaku-moji ☛P52
When you call someone, you can have a message be displayed on the incoming screen of his/her terminal. The called party can see your message and know in advance what the matter is and how you are feeling.
Videophone ☛P78
Allows you to see and talk with the party in the distance and show the surrounding scenery to the other party by switching to the out-camera. This function also supports Chara-den which displays a character instead of your self image. In addition, you can switch to a videophone call even while making a usual voice call without disconnecting the call. At the time of purchase, you can begin to talk immediately because the other party’s voice is set to sound through the speaker.
Deco-mail ☛P208
Allows you to compose and send your original messages. Enjoy expressive decorated mail by changing the character color and size or background color, and by pasting images such as Deco-mail pictures or still images shot with the built-in camera in the text. You can save Deco-mail you have received or downloaded from sites as a template. The template enables you to create Deco-mail easily.
i-αppli/i-αppli DX ☛P246
Various types of i-αppli can be downloaded to be used or to be set for the standby display. i-αppli DX provides better uses in conjunction with i-mode terminal information such as the phonebook and mail.
Safety settings・ Side Key Guard ☛P151・ Secret Mode ☛P153・ Privacy Mode ☛P150Other safety settings ☛P141
Omakase Lock ☛P147
You can lock your FOMA terminal in case it is lost and also cancel the lock, by contacting DoCoMo.For contact information, refer to the back of this manual.
Data Security ServiceAllows you to back up the phonebook data, still images and mails stored in FOMA terminal to the Data Center. When your FOMA terminal is lost, etc., you can restore the backup data to the new FOMA terminal. In addition, you can edit and manage the backup data in the Data Center from your PC, and save the edited data to your FOMA terminal. ☛P157For important notes on using Data Security Service and detail information about how to use the service, see “i-mode User’s Manual”. For contact information, refer to the back of this manual.・ This is a pay service and requires a subscription.
Featu
res and
fun
ction
s of F
OM
A D
702iF
9
Quick Search/
Contents/Cautions
Wide array of network services・ Voice Mail Service (charged)*1 ☛P330・ Call Forwarding Service (free of charge)*1 ☛P332・ SMS (Short Message) (free of charge) ☛P240・ Call Waiting Service (charged)*1 ☛P331・ Dual Network Service (charged)*1 ☛P333*1 Separate application is required.
Useful functions
Sub-display・ You can confirm the time, or reception of a call or
mail on the sub-display with FOMA terminal closed. ☛P28・ The sub-display lights up in various patterns when
there is an incoming call, etc. ☛P136
High-definition large displayThe 2.0-inch large TFT LCD (240 x 320 dots) is provided for the display. It clearly displays fine images and characters.
High-quality melody playbackFOMA terminal also supports ring alerts such as PCM generated 64-note harmonic, voice and sound effects (ADPCM sounds), etc.
Automatic time correction ☛P44
The time in FOMA terminal is automatically corrected by the time information from DoCoMo network. Also you can set the time on your phone ahead or back, if you want.
Built-in camera・ FOMA terminal contains an out-camera and in-
camera, which allow you to take images while viewing the large display. You can shoot a still image of up to 1.3M pixels. In addition to a maximum 4x zoom, various modes are available for shooting including close-up and framed shooting. ☛P160Out-camera: Effective pixels: 1.3M (Max record
pixels: 1.3M)In-camera : Effective pixels: 0.1M (Max record
pixels: 0.1M)・ Allows you to record or play video with smooth
motion and high quality. ☛P164, P279
Bar Code Reader ☛P172
JAN codes or QR codes can be scanned with the built-in camera. Using scan results, you can perform a variety of operations such as registering phonebook entries, connecting to sites and sending mail.
Infrared communication/infrared remote control ☛P293, P297
Exchange data between two FOMA terminals using infrared communication. Also, you can operate devices that support TV infrared remote control from your FOMA terminal.
More usable mail functions・When you move from outside the service area to
inside the service area, unsent mail set to auto-send is sent automatically. ☛P215・ If the text of reply mail is registered beforehand, you
can reply mail easily (Quick Reply). ☛P235・ You can search mail from the phonebook or the
calendar easily. ☛P102, P313・ The characters can be converted efficiently with
ATOK+APOT (AI presumption conversion) provided.
Multiaccess function ☛P302
Voice call and packet communication can be used simultaneously. This allows you to talk during i-mode connection or to send and receive mail while talking.
Multitask function ☛P303
You can execute several functions at the same time and perform operations by switching the screen. For example, you can read mail or register phonebook entries while making a call.
Safety Melody ☛P307
When Safety Melody is set, you can play the preset melody, simply by holding down C for over a second. You can pretend to receive a call.
Simple menu ☛P29
In addition to the normal menu, you can use another menu to display frequently-used functions such as でんわ(phone), メール(mail), カメラ(camera) and iモード(i-mode) in large size of characters. Characters in the phonebook or mails are displayed larger in this menu.
Animation menu ☛P29
The menu that uses animation by Flash movie (Flash® menu) is provided.
Electronic dictionaries ☛P324
Handy Japanese, English-Japanese, and Japanese-English dictionaries are preloaded on FOMA terminal.
Full Browser ☛P264
Allows you to view web sites for PC on FOMA terminal.
Featu
res and
fun
ction
s of F
OM
A D
702iF
10
Quick Search/
Contents/Cautions
Making full use of D702iF
A variety of functions of D702iF visual communications are explained here.
Videophone
You can see and talk with a party in the distance. You can also show to the other party a surrounding scenery image through the out-camera or a Chara-den character instead of your image.
Chaku-moji
i-channel
You can receive a variety of information on a regular basis without additional operations.In addition, press the i-channel compatible key (c) to display the channel list so that you can get more richly detailed information. ☛P260
Talk while seeing each other. ☛P78, P81 Image of your surroundings is displayed. ☛P86
Your screen The other party’s screen The other party’s screen The other party’s screen
Character is displayed. ☛P83
The other party’s screen
Chaku-moji
When you make a call, you can set a message (Chaku-moji) to be displayed on the other party’s incoming screen. The other party can see the message (Chaku-moji) and know in advance what the matter is and how you are feeling. ☛P52
Not subscribed After subscription
Connect
Makin
g fu
ll use o
f D702iF
11
Quick Search/
Contents/Cautions
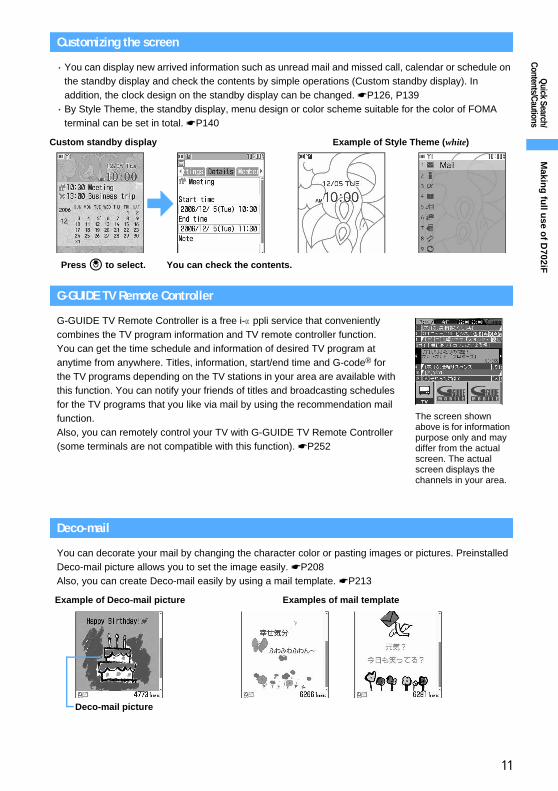
Customizing the screen
・ You can display new arrived information such as unread mail and missed call, calendar or schedule on the standby display and check the contents by simple operations (Custom standby display). In addition, the clock design on the standby display can be changed. ☛P126, P139・ By Style Theme, the standby display, menu design or color scheme suitable for the color of FOMA
terminal can be set in total. ☛P140
G-GUIDE TV Remote Controller
G-GUIDE TV Remote Controller is a free i-αppli service that conveniently combines the TV program information and TV remote controller function. You can get the time schedule and information of desired TV program at anytime from anywhere. Titles, information, start/end time and G-code® for the TV programs depending on the TV stations in your area are available with this function. You can notify your friends of titles and broadcasting schedules for the TV programs that you like via mail by using the recommendation mail function.Also, you can remotely control your TV with G-GUIDE TV Remote Controller (some terminals are not compatible with this function). ☛P252
Deco-mail
You can decorate your mail by changing the character color or pasting images or pictures. Preinstalled Deco-mail picture allows you to set the image easily. ☛P208Also, you can create Deco-mail easily by using a mail template. ☛P213
Press o to select. You can check the contents.
Custom standby display Example of Style Theme (white)
The screen shown above is for information purpose only and may differ from the actual screen. The actual screen displays the channels in your area.
Example of Deco-mail picture Examples of mail template
Deco-mail picture
Makin
g fu
ll use o
f D702iF
12
Quick Search/
Contents/Cautions
SAFETY PRECAUTIONS (Always follow these directions)
● Read the following SAFETY PRECAUTIONS to ensure that the phone is used correctly. Also, store this manual in a convenient location for future reference.
● It is essential that these precautions be observed to prevent injury to the user and third parties as well as damage to property.
● The following symbols are used to indicate the degree of danger or damage that may result from failing to follow the specified precautions.
● The following symbols are used to highlight instructions that are very important and that must be strictly followed.
● SAFETY PRECAUTIONS is separated into six categories.
Handling the FOMA terminal, battery pack, adapter (and charger) and the UIM (general information) ......... P13Handling the FOMA terminal......................................................................................................... P14Handling the battery pack ............................................................................................................. P15Handling optional devices (AC adapter/DC adapter/desktop holder/in-car holder) ...................... P16Handling the UIM (FOMA card) .................................................................................................... P17Handling the FOMA terminal in the vicinity of medical devices .................................................... P17
Indicates an imminently hazardous situation, which, if not avoided, will result in death or serious injury.
Indicates a potentially hazardous situation, which, if not avoided, may result in injury or property damage.
Indicates a potentially hazardous situation, which, if not avoided, could result in death or serious injury.WARNING
CAUTION
DANGER
This indicates the action is prohibited.
This indicates disassembly is prohibited.
This indicates that handling with wet hands is prohibited.
This indicates the part must not be exposed to water.
This indicates an action that must be performed in accordance with the directions.
This indicates you must remove the plug from the power outlet.
SA
FE
TY
PR
EC
AU
TIO
NS
13
Quick Search/
Contents/Cautions
Handling the FOMA terminal, battery pack,adapter (and charger) and the UIM (generalinformation)
Use only DoCoMo-certified battery packs and adapters (and chargers) with the FOMA terminal.Use of non-specified items could cause the FOMA terminal, battery pack or other devices to leak, overheat, rupture, catch fire or malfunction.
Do not attempt to disassemble or remodel. In addition, do not attempt to solder.Attempting to do so will lead to an accident, such as a fire, injury, or electrical shock and damage the equipment. Doing so may also cause the battery pack to leak, overheat, rupture, or ignite.
Do not use or leave in a place near fire or heaters. Also avoid a high-temperature place exposed to direct sunlight or a car under the scorching sun.Otherwise, the equipment will get deformed or troubled. The battery pack may leak, overheat, rupture, or ignite. Other possible problems include a reduction in performance and life. Sometimes, the casing will partly get heated, resulting in an extremely high temperature to get you burnt.
Do not expose to water.The equipment may overheat, cause electric shock, fire, damage or injury if exposed to water, pet urine or other liquids. Do not use the equipment in locations where it could get wet.
DANGER
Battery pack: D05Desktop holder: D10Rear cover: D12FOMA AC adapter: 01FOMA DC adapter: 01FOMA battery adapter: 01In-car holder: 01Data communication adapter D01FOMA domestic/overseas AC adapter 01・ For additional items related to the
compatible products, contact the nearest DoCoMo Shop.
Do not use in environments exposed to combustible or explosive materials, such as a gas station.Using the equipment in locations exposed to flammable gases or liquids such as propane or gasoline could cause fire or explosion.
Do not place the battery pack, FOMA terminal, adapter (and charger) or UIM in the microwave oven, high-pressure cooker or other cooking appliances.Doing so could cause the battery pack to leak, overheat, rupture or ignite, and could damage the circuitry of the FOMA terminal and adapter (and charger), causing overheat, smoke or fire.
Do not expose to strong shocks by dropping or throwing.Doing so could cause the battery pack to leak, overheat, rupture or ignite, and damage the equipment, resulting in fire.
Do not let the recharging terminal and external device terminal touch any conductive material, such as a piece of metal or lead. Also do not put any conductive material into the recharging terminal and external device terminal.The battery can short-circuit, causing fire and damage.
If there is anything wrong (such as strange odor, heat generation, color change, deformation, or the like) during use, battery charge or storage, you should take the following steps immediately.1. Remove the power plug from
the wall outlet or cigarette lighter socket.
2. Turn off the FOMA terminal.3. Remove the battery pack from
the FOMA terminal.Continuing to use the equipment without taking these steps will cause it to overheat, rupture, or ignite or cause the battery pack to leak.
WARNINGS
AF
ET
Y P
RE
CA
UT
ION
S
Next
14
Quick Search/
Contents/CautionsHandling the FOMA terminal
When a child uses the FOMA terminal, first be sure an experienced adult teaches proper usage methods and techniques. Observe the child to determine that they are using the FOMA terminal correctly.Failure to do so could result in injury.
Do not place on an unstable or tilted surface.Doing so could cause the equipment to slide off, possibly causing personal injury or damaging the equipment.
Keep out of the reach of small children.The components can be accidentally swallowed, resulting in injury.
Do not store in locations subject to high temperature and humidity or excessive dust.Doing so could damage the equipment.
The temperature of the FOMA terminal, battery pack or adapter (and charger) may become high when charging the battery, recording/playing a video, or using videophone, i-mode or i-αppli repeatedly or for a long period of time. If you touch the part with a high temperature directly for a long period of time, redness, itchiness, rash, etc. may arise in your skin depending on your constitution or condition.Be especially careful when you use the FOMA terminal connected to an adapter (and charger) continuously for a prolonged period.
Turn off the FOMA terminal inside an aircraft, hospital or other location where use of mobile phones is prohibited.The FOMA terminal may interfere with the correct functioning of electronic equipment. If the automatic power on function is used, cancel the setting and turn the power off. Observe any regulations posted in medical facilities.If you have done prohibition acts such as using the FOMA terminal inside an aircraft, you may be punished as stipulated by law.
CAUTION
WARNING
Turn off the FOMA terminal in the vicinity of electronic equipment that relies on high-precision control or faint signals.The FOMA terminal may interfere with the correct functioning of such electronic equipment. ・ Examples: hearing aids, implanted
cardiac pacemakers, implanted defibrillators, other medical devices, fire alarms, automatic doors and other automatically controlled equipment. Users of such medical equipments should check with the electronic equipment or device manufacturer with respect to the effect of electromagnetic interference.
Do not place the FOMA terminal in a breast or inner pocket if you are carrying or using electronic medical equipment.The FOMA terminal could cause any medical equipment in its vicinity to malfunction.
People with weak hearts should take care with respect to setting the incoming vibrator and ring volume.The FOMA terminal may affect hearts.
Do not use the FOMA terminal while driving.From November 1, 2004, using mobile phones while driving is set as the object of penal regulations. Even if you use the handsfree device, park the car in a safe place before using the phone. Use Public mode or Voice Mail Service while driving.
Do not aim the infrared port at eyes and attempt to transmit.Eyes could be affected. Aiming at other infrared devices and transmitting could cause other devices to malfunction.
When you talk under handsfree settings (with the speakerphone function), be sure to keep a distance between FOMA terminal and your ear.Failure to do so could cause the hearing loss.
Do not place the FOMA terminal in an area over an air bag or in an air bag deployment area such as on a dashboard in a vehicle.If the air bag inflates, the FOMA terminal may hit you and injury and damage to itself could result.
SA
FE
TY
PR
EC
AU
TIO
NS
15
Quick Search/
Contents/Cautions
Handling the battery pack
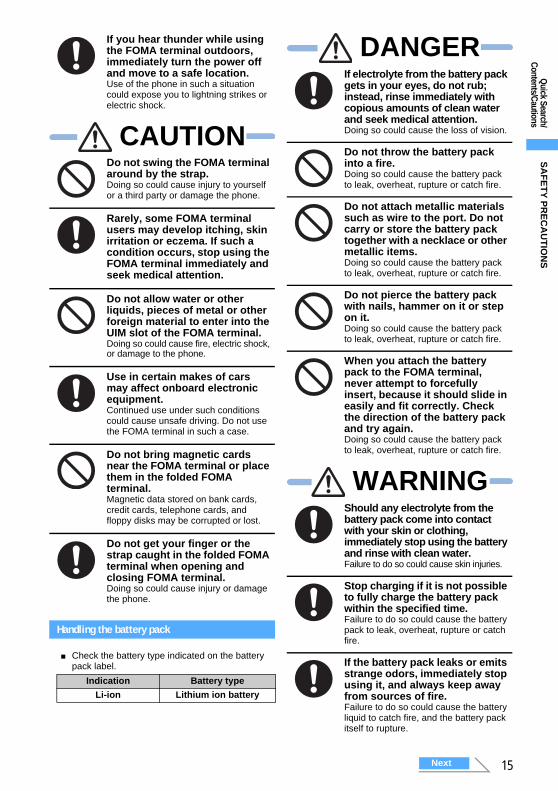
If you hear thunder while using the FOMA terminal outdoors, immediately turn the power off and move to a safe location.Use of the phone in such a situation could expose you to lightning strikes or electric shock.
Do not swing the FOMA terminal around by the strap.Doing so could cause injury to yourself or a third party or damage the phone.
Rarely, some FOMA terminal users may develop itching, skin irritation or eczema. If such a condition occurs, stop using the FOMA terminal immediately and seek medical attention.
Do not allow water or other liquids, pieces of metal or other foreign material to enter into the UIM slot of the FOMA terminal.Doing so could cause fire, electric shock, or damage to the phone.
Use in certain makes of cars may affect onboard electronic equipment.Continued use under such conditions could cause unsafe driving. Do not use the FOMA terminal in such a case.
Do not bring magnetic cards near the FOMA terminal or place them in the folded FOMA terminal.Magnetic data stored on bank cards, credit cards, telephone cards, and floppy disks may be corrupted or lost.
Do not get your finger or the strap caught in the folded FOMA terminal when opening and closing FOMA terminal.Doing so could cause injury or damage the phone.
■Check the battery type indicated on the battery pack label.
Indication Battery type
Li-ion Lithium ion battery
CAUTION
If electrolyte from the battery pack gets in your eyes, do not rub; instead, rinse immediately with copious amounts of clean water and seek medical attention.Doing so could cause the loss of vision.
Do not throw the battery pack into a fire.Doing so could cause the battery pack to leak, overheat, rupture or catch fire.
Do not attach metallic materials such as wire to the port. Do not carry or store the battery pack together with a necklace or other metallic items.Doing so could cause the battery pack to leak, overheat, rupture or catch fire.
Do not pierce the battery pack with nails, hammer on it or step on it.Doing so could cause the battery pack to leak, overheat, rupture or catch fire.
When you attach the battery pack to the FOMA terminal, never attempt to forcefully insert, because it should slide in easily and fit correctly. Check the direction of the battery pack and try again.Doing so could cause the battery pack to leak, overheat, rupture or catch fire.
Should any electrolyte from the battery pack come into contact with your skin or clothing, immediately stop using the battery and rinse with clean water.Failure to do so could cause skin injuries.
Stop charging if it is not possible to fully charge the battery pack within the specified time.Failure to do so could cause the battery pack to leak, overheat, rupture or catch fire.
If the battery pack leaks or emits strange odors, immediately stop using it, and always keep away from sources of fire.Failure to do so could cause the battery liquid to catch fire, and the battery pack itself to rupture.
DANGER
WARNING
SA
FE
TY
PR
EC
AU
TIO
NS
Next
16
Quick Search/
Contents/Cautions
Handling optional devices (AC adapter/DC adapter/desktop holder/in-car holder)
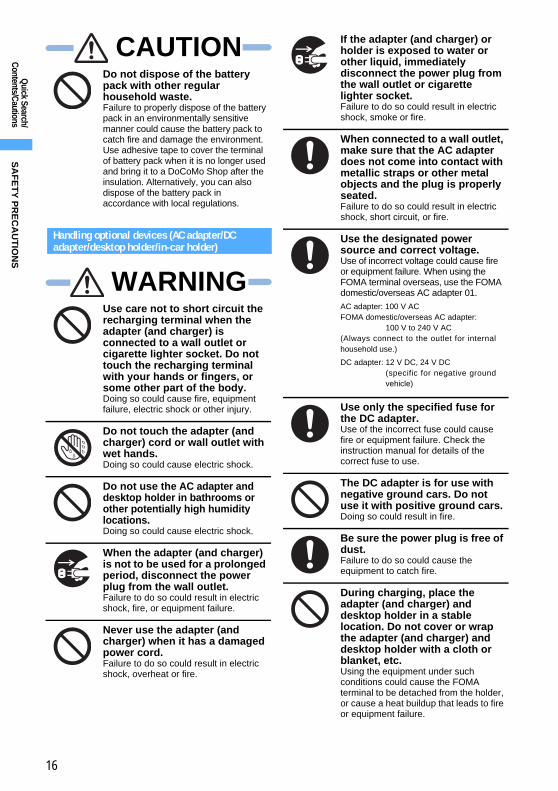
Do not dispose of the battery pack with other regular household waste.Failure to properly dispose of the battery pack in an environmentally sensitive manner could cause the battery pack to catch fire and damage the environment. Use adhesive tape to cover the terminal of battery pack when it is no longer used and bring it to a DoCoMo Shop after the insulation. Alternatively, you can also dispose of the battery pack in accordance with local regulations.
Use care not to short circuit the recharging terminal when the adapter (and charger) is connected to a wall outlet or cigarette lighter socket. Do not touch the recharging terminal with your hands or fingers, or some other part of the body.Doing so could cause fire, equipment failure, electric shock or other injury.
Do not touch the adapter (and charger) cord or wall outlet with wet hands.Doing so could cause electric shock.
Do not use the AC adapter and desktop holder in bathrooms or other potentially high humidity locations.Doing so could cause electric shock.
When the adapter (and charger) is not to be used for a prolonged period, disconnect the power plug from the wall outlet.Failure to do so could result in electric shock, fire, or equipment failure.
Never use the adapter (and charger) when it has a damaged power cord.Failure to do so could result in electric shock, overheat or fire.
CAUTION
WARNING
If the adapter (and charger) or holder is exposed to water or other liquid, immediately disconnect the power plug from the wall outlet or cigarette lighter socket.Failure to do so could result in electric shock, smoke or fire.
When connected to a wall outlet, make sure that the AC adapter does not come into contact with metallic straps or other metal objects and the plug is properly seated.Failure to do so could result in electric shock, short circuit, or fire.
Use the designated power source and correct voltage.Use of incorrect voltage could cause fire or equipment failure. When using the FOMA terminal overseas, use the FOMA domestic/overseas AC adapter 01.
Use only the specified fuse for the DC adapter.Use of the incorrect fuse could cause fire or equipment failure. Check the instruction manual for details of the correct fuse to use.
The DC adapter is for use with negative ground cars. Do not use it with positive ground cars.Doing so could result in fire.
Be sure the power plug is free of dust.Failure to do so could cause the equipment to catch fire.
During charging, place the adapter (and charger) and desktop holder in a stable location. Do not cover or wrap the adapter (and charger) and desktop holder with a cloth or blanket, etc.Using the equipment under such conditions could cause the FOMA terminal to be detached from the holder, or cause a heat buildup that leads to fire or equipment failure.
AC adapter: 100 V ACFOMA domestic/overseas AC adapter:
100 V to 240 V AC(Always connect to the outlet for internalhousehold use.)
DC adapter: 12 V DC, 24 V DC(specific for negative groundvehicle)
SA
FE
TY
PR
EC
AU
TIO
NS
17
Quick Search/
Contents/Cautions
Handling the UIM (FOMA card)
Handling the FOMA terminal in the vicinity of medical devices
The information given below conforms to the guidelines set forth by the Electromagnetic Compatibility Conference regarding the protection of electronic medical equipment from radio waves emitted by mobile phone units.
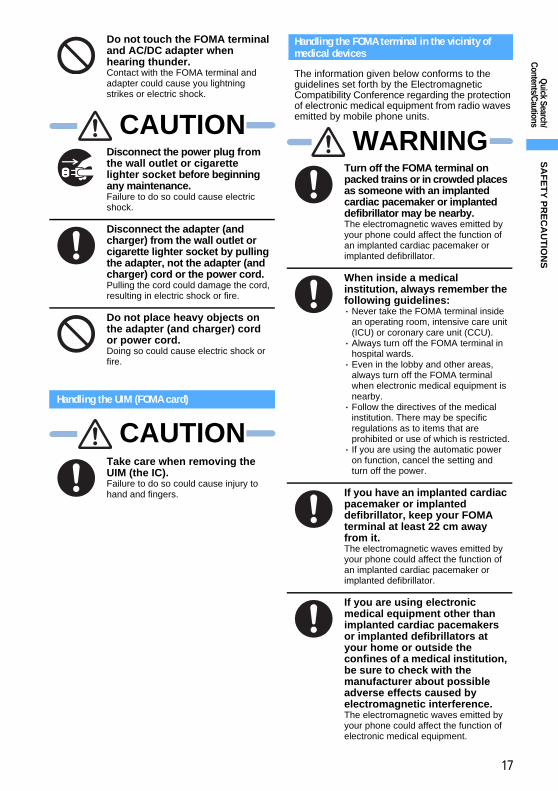
Do not touch the FOMA terminal and AC/DC adapter when hearing thunder.Contact with the FOMA terminal and adapter could cause you lightning strikes or electric shock.
Disconnect the power plug from the wall outlet or cigarette lighter socket before beginning any maintenance.Failure to do so could cause electric shock.
Disconnect the adapter (and charger) from the wall outlet or cigarette lighter socket by pulling the adapter, not the adapter (and charger) cord or the power cord.Pulling the cord could damage the cord, resulting in electric shock or fire.
Do not place heavy objects on the adapter (and charger) cord or power cord.Doing so could cause electric shock or fire.
Take care when removing the UIM (the IC).Failure to do so could cause injury to hand and fingers.
CAUTION
CAUTION
Turn off the FOMA terminal on packed trains or in crowded places as someone with an implanted cardiac pacemaker or implanted defibrillator may be nearby.The electromagnetic waves emitted by your phone could affect the function of an implanted cardiac pacemaker or implanted defibrillator.
When inside a medical institution, always remember the following guidelines:・ Never take the FOMA terminal inside
an operating room, intensive care unit (ICU) or coronary care unit (CCU).・ Always turn off the FOMA terminal in
hospital wards.・ Even in the lobby and other areas,
always turn off the FOMA terminal when electronic medical equipment is nearby.・ Follow the directives of the medical
institution. There may be specific regulations as to items that are prohibited or use of which is restricted.・ If you are using the automatic power
on function, cancel the setting and turn off the power.
If you have an implanted cardiac pacemaker or implanted defibrillator, keep your FOMA terminal at least 22 cm away from it.The electromagnetic waves emitted by your phone could affect the function of an implanted cardiac pacemaker or implanted defibrillator.
If you are using electronic medical equipment other than implanted cardiac pacemakers or implanted defibrillators at your home or outside the confines of a medical institution, be sure to check with the manufacturer about possible adverse effects caused by electromagnetic interference.The electromagnetic waves emitted by your phone could affect the function of electronic medical equipment.
WARNING
SA
FE
TY
PR
EC
AU
TIO
NS

18
Quick Search/
Contents/Cautions
Handling instructions
General
●Do not get the components wet.The FOMA terminal, battery pack, adapter (and charger) and UIM are not waterproof. Avoid using the components in a bathroom or other high humidity areas or locations exposed to rain. If you carry the components, sweat could cause internal corrosion that leads to equipment failure. As a result of investigation, if component failure is found to be water-related, repair is not covered by the warranty and may not be able to be performed.In such a case, should it be found to be possible to repair the unit, you will be billed for all repairs.
●Clean the components with a soft dry cloth (such as a lens cloth).• The FOMA terminal display may have a special
coating on it so that the color LCD provides a clear view. Rubbing the display strongly with a dry cloth for cleaning could damage the display. Handle with care and clean the display with a soft dry cloth (such as a lens cloth). Also note that leaving the display with dirt or moisture attached could cause spots or remove the coating on it.
• Using alcohol, thinner, benzene or detergents could cause the printed text to fade or disappear, or the equipment to become discolored.
●Occasionally clean the terminals with a dry cotton swab.Dirty terminals could cause intermittent contact that could interrupt the flow of power to the unit. Such a situation also causes insufficient charging. Use a dry cloth or cotton swab to clean the terminals.
●Do not place the components near an air conditioner vent.Sudden changes in temperature could cause condensation, leading to corrosion inside the components and equipment failure.
●Do not place the FOMA terminal in locations where it could be exposed to excessive pressure.Do not place it in a bag together with many other things or in your pocket when you sit down as this could exert pressure on the LCD or damage the internal boards, resulting in equipment failure. Damage arising from such causes is not covered by the warranty.
● Carefully read the instruction manuals supplied with the battery pack and adapter (and charger) before use.
FOMA terminal
● Avoid extremely high or low temperatures.Use in an environment with a temperature of 5 to 35 °C and relative humidity of 45 to 85 %.
● If the FOMA terminal is used near a radio, television or general subscriber phone, it could affect such equipment. Use the phone as far away from such equipment as possible.
●With regard to data stored in the FOMA terminal, keep it separately in a memo, etc. so as not to permanently lose important data.NTT DoCoMo cannot be held responsible in any way for the loss of stored data.
● Do not put the FOMA terminal in your back pocket and sit on it. Avoid putting the phone in the bottom of a bag, etc. where it is subject to excessive pressure.Damage may result.
● Do not close the FOMA terminal with the strap held inside.Malfunction or damage may result.
● It is normal for the FOMA terminal to become warm during using or recharging. You can continue to use it while warm.
● Do not aim the camera directly at the sun and leave it.Elements may be discolored or baked.
● The FOMA terminal is compatible with Omakase Lock (☛P147).Omakase Lock is a service that locks FOMA terminal at the request from the subscriber.Note that the FOMA terminal is locked when a request is made by the subscriber even if the subscriber is not the user of FOMA terminal.
Han
dlin
g in
structio
ns
19
Quick Search/
Contents/Cautions
Battery pack
● The battery pack will gradually wear out.Battery life also depends on how you use the battery pack; you know it is time to replace it when the usage time is very short even though you fully charge it. The specified battery pack can be purchased separately.
●Recharge the battery pack in locations where the ambient temperature is between 5 °C and 35 °C.
●When using for the first time or after a long period of non-use, be sure to fully charge the battery pack before use.
● The time of use provided by the battery pack depends on the ambient conditions and the condition of the battery pack itself.
●Depending on usage, the battery pack may swell as it nears the end of its life, but this will not cause a problem.
●Do not expose to the direct sunlight and high temperature. Please keep your battery in an airy and cool place.When you do not use your phone for a long period of time, remove the battery pack from the FOMA terminal with the battery used up, put into the packing plastic bag or other container, and keep it.
Adapter (and charger)
●Recharge the battery pack in a location where the ambient temperature is between 5 °C and 35 °C.
●Do not recharge in the following locations:• Locations that are subject to high humidity, dust
or excessive vibration• Near general subscriber phones, TVs or radios
● It is normal for the adapter (and charger) to become warm during recharging. You can continue charging with a warm adapter.
●When the battery pack is recharged using the DC adapter, always keep the car engine running.Failure to do so could cause the car battery to run down more quickly than normal.
●When an outlet with falling prevention mechanism is used, check the instruction manual for the outlet before use.
●Do not expose to the strong shock and deform the recharging terminal.Giving the strong shock on an adapter can cause damage.
UIM (FOMA card)
● Do not use excessive force to remove the UIM.● Do not place an excessive load on the UIM when
inserting it into the terminal.● The UIM becomes warm during use. This is
normal and not a cause for concern.● Note that any card failures resulting from inserting
the UIM in an IC card reader/writer not designated by NTT DoCoMo are the responsibility of the customer.
●Make sure that the ICs are kept clean.● Clean the UIM with a soft dry cloth (such as a
lens cloth).● It is recommended that users maintain data
stored on the UIM in some other form.If the data should be erased, NTT DoCoMo assumes no responsibility for the loss of any data.
● The UIMs that are no longer used should be returned to a DoCoMo Shop for environmental protection.
● Avoid extremely high or low temperature.● Take care not to damage, touch, or short-circuit
the ICs to prevent them from losing their data or from malfunctioning.
● Take care not to drop the UIM or give shock to the UIM to prevent it from malfunctioning.
● Do not bend the UIM and place heavy stuff on it to avoid a failure.
Camera
If you should use the FOMA terminal to make a public nuisance, you might be punished under the laws and bylaws such as Japan’s nuisance prevention ordinance.
Please be considerate of the privacy of individuals around you when taking and sending images using camera-equipped mobile phones.
Han
dlin
g in
structio
ns
20
Quick Search/
Contents/Cautions
About intellectual property rights
Copyrights and portrait rights
Except in cases where reproduction and quoting for private use is sanctioned under copyright laws, the reproduction, alteration and public transmission of such content as text, images, music or software for which another party owns the copyrights, whether accomplished by using this product to photograph or record that content or by downloading it from Internet websites, is prohibited without the permission of the owner.Taking photographs or recordings of such events as performances and exhibitions may be prohibited even for purposes of private use.In addition, if you use this product to take another person’s photograph without their permission, or display such a photograph without their permission on an Internet website and make that content public to an indeterminate number of people, you may be in violation of portrait rights.
Trademarks
Company names and trade names used in this manual are the trademarks or registered trademarks of their respective companies.・ “FOMA”, “mova”, “i-motion”, “i-mode”, “i-αppli”,
“i-motion mail”, “i-shot”, “i-melody”, “i-anime”, “DoPa”, “mopera”, “mopera U”, “WORLD CALL”, “WORLD WING”, “Short Mail”, “QUICKCAST”, “Chaku-motion”, “Deco-mail”, “V-Live”, “i-area”, “pake-hodai”, “Chara-den”, “i-αppli DX”, “Dual Network”, “visualnet”, “i-channel”, “FirstPass”, “sigmarion”, “Security Scan”, “musea”, “Public mode”, “トクだねニュース便” and “My DoCoMo”, and FOMA, i-mode and i-αppli logos are trademarks or registered trademarks of NTT DoCoMo, Inc.・ “キャッチホン (Call Waiting)” is a registered
trademark of Nippon Telegraph and Telephone Corporation.・ The toll-free service name and the toll-free service
logo mark are trademarks of NTT Communications Corporation.・Microsoft® and Windows® are registered
trademarks of Microsoft Corporation in the United States and/or other countries.・ Java and all Java-related trademarks are trademarks
or registered trademarks of Sun Microsystems, Inc. in the United States and other countries.
・ Powered by JBlendTM Copyright 2002-2006 Aplix Corporation. All rights reserved. JBlend and all JBlend-based trademarks and logos are trademarks or registered trademarks of Aplix Corporation in Japan and other countries.・ “Multitask” is a registered trademark of NEC
Corporation.・ This product contains NetFront of ACCESS CO.,
LTD. to provide Internet function. NetFront is a trademark or registered trademark of ACCESS CO., LTD. in Japan and other countries. Copyright © 1996-2006 ACCESS CO., LTD.・ Contains Macromedia® Flash® Player technology
by Macromedia, Inc., Copyright© 1995-2006 Macromedia, Inc. All rights reserved.Macromedia, Flash and Macromedia Flash are trademarks or registered trademarks of Macromedia, Inc. in the United States and other countries.・McAfee and VirusScan are registered trademarks
or trademarks of McAfee, Inc. and/or its affiliates in the US and/or other countries.All other registered and unregistered trademarks herein are the sole property of their respective owners.©2006 Networks Associates Technology, Inc. All Rights Reserved.・ QR code is a registered trademark of DENSO
WAVE INCORPORATED.・ Adobe and Adobe Reader are either registered
trademarks or trademarks of Adobe Systems Incorporated in the United States and/or other countries. ・ Powered By Mascot Capsule®/Micro3D EditionTM
Mascot Capsule® is a registered trademark of HI CORPORATION.・ “ATOK” and “APOT” (Advanced Prediction
Optimization Technology) are registered trademarks of Justsystem Corporation.・ G-GUIDE, G-GUIDE MOBILE and the
logos associated with G-GUIDE are registered trademarks of Gemstar-TV Guide International, Inc. and/or its affiliates in Japan.・ QuickTime is a registered trademark of Apple
Computer, Inc. in the US and other countries.・ “Privacy Mode” is a registered trademark of
FUJITSU LIMITED.
Ab
ou
t intellectu
al pro
perty rig
hts
21
Quick Search/
Contents/Cautions・
This product includes software licensed from Symbian Software Ltd. ‘Symbian’, ‘Symbian OS’ and other associated Symbian marks are all trademarks of Symbian Software Ltd. ©1998-2006 Symbian Software Ltd. All rights reserved.・ In addition to the above, company names and trade
names used in this manual are the trademarks or registered trademarks of their respective companies.
Other rights and responsibilities
・ This product is licensed based on MPEG-4 Visual Patent Portfolio License. The use of MPEG-4 Video Codec function is allowed for personal and nonprofit use only in the following cases:・ Recording videos that conform to MPEG-4 Visual
Standard (hereinafter referred to as MPEG-4 Video)・ Playing MPEG-4 Videos recorded personally by
consumers not engaged in profit activities・ Playing MPEG-4 Videos obtained from the
provider licensed from MPEG LAFor further utilizing such as promotion, in-house use or profit-making business, please contact MPEG LA, LLC in the US.・ Licensed by QUALCOMM Incorporated under one
or more of the following United States Patents and/or their counterparts in other nations:
・ This product contains a module developed by the Independent JPEG Group.・ “Meikyo Mobile Japanese Dictionary”, “G-Mobile
English-Japanese Dictionary” and “G-Mobile Japanese-English Dictionary” are copyrighted works of TAISHUKAN Publishing Co., Ltd.・ In this manual, each OS (Japanese version) is
written for short as follows: ・Windows XP is the abbreviation for Microsoft®
Windows® XP Professional operating system or Microsoft® Windows® XP Home Edition operating system.・Windows 2000 is the abbreviation for Microsoft®
Windows® 2000 Professional operating system.
・Windows NT Server is the abbreviation for Microsoft® Windows NT® Server Network operating system Version 4.0.・ It may describe like Windows XP and 2000 in
parallel.
4,901,307 5,504,773 5,109,390
5,535,239 5,267,262 5,600,754
5,416,797 5,490,165 5,101,501
5,511,073 5,267,261 5,568,483
5,414,796 5,659,569 5,056,109
5,506,865 5,228,054 5,544,196
5,337,338 5,657,420 5,710,784
5,778,338
Ab
ou
t intellectu
al pro
perty rig
hts
22
Quick Search/
Contents/Cautions
Basic package and optional accessories
Basic package
Optional accessories
・Other optional accessories ☛P379
FOMA D702iF(including the written warranty and the rear cover D12)
Manual
Instruction manual (this book)
Quick Reference Manual ☛P412
CD-ROM for FOMA D702iF
The PDF version of “Manual for Data Communication” is contained.
FOMA AC adapter 01(including the written warranty and the instruction manual)
Desktop holder D10(including the instruction manual)
Battery pack D05(including the instruction manual)
Basic p
ackage an
d o
ptio
nal accesso
ries
23
Before Using D702iFNames and functions of parts .........................................................................24Reading the display ..........................................................................................26Reading the sub-display ..................................................................................28Selecting the menu ...........................................................................................29Number of saved, registered and protected items in D702iF .......................35Using the UIM (FOMA card) .............................................................................36Attaching/removing the battery pack .............................................................38Charging the battery of FOMA terminal ..........................................................39Checking the remaining battery level .................................... Battery Level 42Turning the power on/off ..................................................... Power ON/OFF 43Switching to English display ............................................ Select Language 44Setting the date and time ......................................... Date and Time Setting 44Notifying your phone number to the other party ..... Caller ID Notification 46Checking your own phone number ........................................ Own Number 46
24
Befo
re Usin
g D
702iFN
ames an
d fu
nctio
ns o
f parts
Names and functions of parts
a EarpieceThe other party’s voice comes out of here.
b Display ☛P26
cmMENU/Upper left soft keyUse this key to display menus, perform the operation shown in the upper left part of the guide row, set/cancel Side Key Guard, etc.
d wEasy Selector Plus
oEnter keyUse this key to perform the selected operation, activate Focus Mode, start i-αppli set for One-key Shortcut, etc.uData Box/↑ keyUse this key to display the Data Box menu, activate Camera with the in-camera on, move the cursor upward, adjust volume, etc.di-mode/i-αppli/↓keyUse this key to display the i-mode menu or i-αppli folder list, move the cursor downward, adjust volume, etc.lReceived Calls/←(previous) keyUse this key to display the received call history, switch between pages, move the cursor leftward, set/cancel Privacy Mode, etc.rRedial/→(next) keyUse this key to display the redial data, switch between pages, move the cursor rightward, etc.
etStart videophone/Scroll/Lower left soft keyUse this key to make/answer videophone calls, scroll mail or site display by a page, switch between upper/lower cases when entering characters, perform the operation shown in the lower left part of the guide row, etc.
fc i-channel/Clear keyUse this key to display the channel list, delete characters, return to the previous screen, set/cancel Self Mode, etc. On the i-αppli standby display, press this key to start i-αppli.
gnStart voice call/Speakerphone/Character keyUse this key to make/answer voice calls, turn on/off the speakerphone function, switch input modes when entering characters, etc.
h Dial keys (0 to 9), (, #KeysUsed to enter phone numbers and text and to select menu items.( /Public mode (Driving mode) keyUse this key to enter “ ”, set/cancel Public mode (Driving mode), etc.##/Silent Mode/Line-feed keyUse this key to enter “#”, set/cancel Silent Mode, start a new line when entering characters, etc.
i Earphone/microphone jackUsed to connect a flat type earphone/microphone set with switch (optional).
Size (mm) : 100 (H) x 48 (W) x 24 (D) (when closed)
Weight (g) : Approx. 97 (with battery pack)
l
m
o
p
k
j
n
a
c
b
de
fg
h
i
t
p
s
r
q
z
A
vwx
y
u
i
25
Befo
re Usin
g D
702iF
j MicrophonePicks up your voice.
k Infrared data port ☛P294Exchange data via infrared communication.
l In-camera ☛P86, P160Used to shoot yourself with Camera or Movie Camera and send your image during a videophone call.
mpPhonebook/Schedule/Upper right soft keyUse this key to display the phonebook or schedules, perform the operation shown in the upper right part of the guide row, etc.
naMail/Scroll/Lower right soft keyUse this key to display the Mail menu, compose new mail, scroll mail or site display by a page, perform the operation shown in the lower right part of the guide row, etc.
ofPower/End/Hold keyUse this key to turn the power on/off, end calls or functions in operation, place incoming calls on hold, cancel Secret Mode, switch displaying/not displaying the custom standby display, etc.
p External connection terminals ☛P41Used to connect various optional accessories.
q Antenna (built-in)Take care not to cover the built-in antenna with your hand so that you can use FOMA terminal on better conditions.
r Sub-display ☛P28Lights or flashes when a call or mail is received, etc. The lighting pattern and color can be set (☛P136). Also, it flashes when there is new information (☛P137) and when the display light is turned off with FOMA terminal open. It lights in red during charging.
sbTASK/Silent Mode keyUse this key during Multiaccess or Multitask or to set/cancel Silent Mode, switch displays on the sub-display, etc.
tCAnswer Machine/Shutter/Safety Melody keyUse this key to display the Answer Machine/Voice Memo menu, start Quick Record Message, activate Camera and shoot images, stop ring alert/alarm, activate Safety Melody, switch displays on the sub-display, etc.
u Out-camera ☛P86, P160 Used to shoot people or landscape with Camera or Movie Camera and send these images during a videophone call.
v Camera indicatorLights or flashes when shooting with the camera.
w Macro mode switch ☛P168Switches between the standard mode and the macro mode during the out-camera use.
x SpeakerRing alert and other sounds come out of here. When the speakerphone function is used, the other party’s voice comes out.
y Strap opening
z Rear cover
A Charging terminalsUsed when charging FOMA terminal in the desktop holder (optional).
・ You can plug in a flat type earphone/microphone set with switch (optional) and use it. Using the earphone jack converter adapter P001 (optional) allows you to use an existing earphone/microphone set.
Connecting the earphone/microphone set with switch
Nam
es and
fun
ction
s of p
arts
26
Befo
re Usin
g D
702iF
Reading the display
The description of icons displayed at the top or the bottom of the display are shown below:
a : Battery level ☛P42b : Received signal level ☛P43
: Out of service area ☛P43: Self Mode is set ☛P148: During data transfer ☛P293Data link software in progress ☛P379
c : In i-mode communication (during i-mode connection) ☛P180
: In i-mode communication (during packet communication) ☛P193, P216
d : During infrared communication ☛P293Infrared remote control function in operation ☛P297
e : Speakerphone function in operation ☛P49
: Connecting to USB handsfree compatible device ☛P60:Total call cost exceeds the maximum
limit ☛P321f : i-mode Mail and Message R/F storage
space is full in the Center*2 ☛P217, P193
/ /: i-mode Mail or Message R/F storage space is full in the Center ☛P217, P193
: Both i-mode Mail and Message R/F exist unreceived in the Center ☛P217, P193
/ /: i-mode Mail or Message R/F exists unreceived in the Center ☛P217, P193
g : Unread i-mode Mail and/or SMS fills storage space and also SMS storage space is full on UIM ☛P242
: Unread i-mode Mail and/or SMS fills storage space ☛P217, P242
: SMS full on UIM ☛P242: Unread i-mode Mail and SMS exist ☛P216, P241
: Unread i-mode Mail exists ☛P216: Unread SMS exists ☛P241
h / : Unread Message R exists/fills storage space ☛P193
i / : Unread Message F exists/fills storage space ☛P193
j : i-αppli running ☛P248: i-αppli standby display on ☛P125: Starting i-αppli from the i-αppli standby display ☛P254
: i-αppli DX running ☛P248: i-αppli DX standby display on ☛P125: Starting i-αppli from the i-αppli DX standby display ☛P254
k : Displaying SSL page, using i-αppli downloaded from SSL pages and in SSL communication with i-αppli ☛P181Displaying TLS/SSL page ☛P266
: Auto-send mail failed exists ☛P215: Auto-send mail exists ☛P215
l : Secret Mode is set ☛P153m : i-αppli Auto Start failed ☛P254n : Focus Mode icon ☛P34o : General silent mode is set ☛P121
: Personalized silent mode is set ☛P122p : Call alert volume is set to SILENT ☛P66
: Vibrator for incoming voice call is set ☛P119
: Call alert volume is set to SILENT and vibrator for incoming voice call is set
q : Public mode (Driving mode) is set ☛P70
r : Answer Machine is set ☛P73: Recorded messages full ☛P73
s : Lock on Close is set ☛P152t : Connecting to external device via the
FOMA USB cable (optional) ☛P92u /
: Effective Easy Selector Plus keys in Focus Mode ☛P34
v : Safety Melody is set ☛P307
a - m
Date, day of the week and time
no - z
When you use i-channel, if Show ticker is set to Yes in Ticker Setting, the received i-channel information is displayed as ticker on the standby display. ☛P262
Received i-channel information
*1
*1
*1
*1
Read
ing
the d
isplay

27
Befo
re Usin
g D
702iF
w : Reading the UIM ☛P43x : PIM Lock is set ☛P148
: Keypad Dial Lock is set ☛P149: Side Key Guard is set ☛P151
y : Alarm Clock is set ☛P305: Schedule is set ☛P310
: Alarm Clock and schedule are set simultaneously
z : Software Update reserved ☛P394/ (succeeded/failed): Result of auto-update of the latest pattern definition ☛P396
*1 The current highest priority item is displayed. These icons are listed in the order of priority from the top.*2 Displayed when the storage space for either i-mode Mail or Message R/F is full and also unreceived mails/messages exist.
Reading the guide row
Operations that can be executed by pressing m, t, o, p and a are displayed in the guide row.
Guide row for the mail message entry screen
Reading the task bar
The icon for the function (task) in progress appears on the task bar (up to 9 icons). You can confirm functions being used and run. In addition, when receiving mails/messages, the reception result is scrolled.・While entering characters, the input mode appears on the task bar. ☛P343
*1
*1
Example
Guide row
The display positions and the keys correspond as shown in the figure. In this manual, the operations displayed in the guide row are explained using the corresponding keys (mtopa).The operations displayed in the guide row differ depending on the screen.・ on the guide row corresponds to O of the Easy Selector Plus (it
may be different depending on the function, site or Internet web page in use).
: Voice call/: Videophone (64K/32K): Switching voice/videophone
call: Ending call: Videophone call through
external device: Adjusting volume using
Multitask: Mail: Receiving i-mode Mail/
Message R/F: Receiving SMS: Chat Mail: Message R/F: Check i-mode Message/SMS: i-mode/i-channel: i-mode Bookmark/Internet
Connection/Screen Memo/i-mode Shortcut
: i-αppli
: Full Browser: My Picture (Image) : i-motion : Melody : Chara-den : Camera : Movie Camera : Sound Recorder : Bar Code Reader : Phonebook : Received Calls : Redial : Answer Machine/Voice Memo: Own Number : Timer: Alarm Clock set/alarm
sounding: Scheduler : Schedule alarm sounding: Notepad : Calculator
: Dictionaries: Safety Melody: Data exchanging through
external device: Setting reception method for
infrared communication/saving to INBOX
: 64K data communication/: Originating/communicating/sending/receiving packet via USB
/ (dark/light): Setting/holding each function: Software Update activated: Software Update notified: Update Definition activated/
version display: Setting each network service: Accessing Data Center: Displaying communication
log with Data Center
Task bar (when schedule calendar is displayed during a voice call)
Read
ing
the d
isplay
28
Befo
re Usin
g D
702iF
Reading the list screen
The setting screen for Sub-display Light Color
INFORMATION● Note that the following cases may occur due to the characteristics of liquid crystal display (LCD) and they are not
defects in FOMA terminal.・ FOMA terminal display is manufactured by taking advantage of highly advanced technology but some dots may be
always or never lit.・When the battery pack is removed from FOMA terminal with the power turned on, residual images may remain on the
display and sub-display for some time. Remove the battery pack with the power turned off.・When a screen has been displayed for a certain time, if you change it to another screen by performing some
operations, residual images of the previous screen may remain on the display and sub-display.
Reading the sub-display
When the sub-display light is turned off with FOMA terminal closed (in standby), you can display the date/time and icons by pressing C or b.A message also appears on the sub-display to notify you of unread mail (including SMS) or missed call, if any exists.・ Pressing C or b switches the sub-display between the following 3 displays:
a : Battery levelb : Received signal level : Out of service area : In Self Modec Flashes in i-mode communication
*1 The time is displayed in the 24-hour format.
・When FOMA terminal is closed, the following terminal states are indicated on the sub-display:・Voice call, videophone call, and message recording status・Checking or receiving i-mode Mail, SMS or Message R/F・Schedule alarm or timer alarm ringing・Alarm clock ringing or snooze active・Packet communication, 64K data communication, communication via USB or infrared communication
status・Shooting status with the camera*1
・No battery*1 Displayed regardless of whether FOMA terminal is open or closed.・ You can change the light color of the sub-display. ☛P131
Example
The number of the currently displayed page and the total number of pages (when a list extends over multiple pages)
indicates that other selectable items exist above and below the highlighted item.
・ Press % to move the cursor.・ If you press d on the last item of the page, the next page appears, and if you press u on the first item of the page, the previous page appears.
indicates that selectable items exist over multiple pages.
・ Press & to switch between pages.・ You cannot switch between pages on the icon selection screen, etc.・ Color names are for information purpose only.
a b c
Pattern 1
Time*1
Pattern 2 Pattern 3
Date Day Time*1 Time*1
Read
ing
the su
b-d
isplay
29
Befo
re Usin
g D
702iF
INFORMATION● Set Hide callers’ info in Sub-display Info not to display the other party’s phone number or name on the sub-display when
receiving a call.●When All Lock, Omakase Lock or Side Key Guard is on, press C or b to display the message indicating that the lock
is set. Then the display switches to the date/time screen.● The sub-display indication disappears when you open FOMA terminal or when you do not press any keys for a specified
period of time.● If On-hold or Continue(mute) is set in Close Setting, when you close FOMA terminal during a call, the current state of the
terminal such as Talking or On hold appears on the sub-display.
Selecting the menu
In addition to the normal menu, the simple menu which offers popular features is provided.In the simple menu, the menu items are displayed in large letters. Also, you can create your original menu (Custom Menu ☛P315).
Switching to the simple menu
The simple menu can be used only in Japanese display. Switch to Japanese display before performing these operations.
1 m
Display format for the normal menu and the custom menu
Animation in the normal menu is set by default. Select from the following types (Menu Setting ☛P134).The following screens are examples of the normal menu displayed when Style Theme is set to white.
List view Tile display Animation*1
*1 Available only for the normal menu
The normal menu appears.・When the custom menu is displayed: p
Selectin
g th
e men
u
Next
30
Befo
re Usin
g D
702iF
2 Press a
■ Switching to the normal menu: ma on the standby display・ To switch to the custom menu: mp on the standby display
INFORMATION● You cannot switch FOMA terminal to the simple menu when English display is set in Select Language. Also, when you
choose the simple menu, the setting for Select Language is not available.● Even if you selected the simple menu, when you insert the UIM for which English display is specified as language, the
menu will change to the normal one.
Functions available on the simple menu
Menu item Shortcut Menu item Shortcutでんわ 電話帳検索 m11 iモード 画面メモ m44
電話帳登録 m12 iチャネル一覧 m45リダイヤル m13 テロップ表示設定 m46着信履歴 m14 iアプリ ソフト一覧 m51伝言メモ一覧 m15 待受画面設定 m52自局番号 m16/
m0iアプリ設定 m53
データBOX
マイピクチャ m61メール 受信メール m21 iモーション m62
送信メール m22 メロディ m63未送信メール m23 キャラ電 m64新規メール m24 設定/
ステーショナリー
音/バイブ m71iモード問合せ m25 ディスプレイ m72
カメラ カメラ m31 目覚まし m73マイピクチャ m32 電卓 m74待受画面設定 m33 伝言メモ設定 m75
iモード iMenu m41 情報表示/リセット m76Bookmark m42 留守番電話 m77ラストURL m43
When the simple menu is set
●During calling or talking, you can see how to adjust the volume of other party’s voice.● Enter a phone number to see the operation to be performed subsequently.●On the standby display, enter the phonebook No. (1 to 9) to see the registered name and phone number.
Key operations for making a voice call/videophone call are also shown. During a voice call, you can also press m, select ダイヤル入力 (Dial) and enter a phonebook number to see the same information.
● The characters in the redials, received calls, phonebook list/group list, mail view screen, site screen, screen memo screen, message text entry screen and character entry screen (full-screen entry) are displayed in large font. When the simple menu is set, the font size cannot be changed.
The simple menu appears.
Selectin
g th
e men
u
31
Befo
re Usin
g D
702iF
Selecting functions from the menu
Select menu items by the dial keys (Shortcut operations). Also, use the Easy Selector Plus to select menu items.・ In this manual, the operation procedure is explained mainly in shortcut operations of the normal menu.・When any lock function is set or the UIM is not inserted, some functions are disabled. The disabled
functions are indicated by or dimmed. However, if the menu display format is set to Animation, a message appears when menu items for the disable functions are selected.
Each menu item has a number (item number) and can be selected by pressing the corresponding key.
Executing Phonebook new entry with the normal menu
1 Press m42The phonebook registration screen appears.
Executing Phonebook new entry from the normal menu (Type1 of animation menu)
1 m
Selecting menu items with the dial keys (Shortcut operations)
When several shortcuts are available
When there are multiple shortcut operations available with the normal menu, the shortcut operations other than described in the operating procedure are shown at the far right of the title in the body text.
For redialing
Selecting menu items with the Easy Selector Plus
Example
4 2
Example
Menu 45
sly called numbers Redial
s that you made as dialed calls (Redial). When the other party is busy, etc., ration.
When the number exceeds 30, the oldest one is deleted chronologically.
Press m to show the menu, then press 4 and 5 to show the redial list.・ ! means pressing a, and ? means pressing d.
Example
・ In case of the animation menu, in the guide row does not appear.
Selectin
g th
e men
u
Next
32
Befo
re Usin
g D
702iF
2 O to highlight 4 Phonebook & Logs z o・ To return to the previous screen: c・ To return to the standby display: f
3 O to highlight Phonebook new entry z Press oThe phonebook registration screen appears.
Selecting menu items (List view)
Selecting menu items (Tile display)
Selecting menu items (Simple menu)
Press % to highlight a menu item and press o or r.・ You can also select an item by the dial key for the
item number.・ To return to the previous menu: l or c
Menu item that has been highlightedMenu item that cannot be selected (dimmed)
Lower-level menu exists.
Press O to highlight a menu item and press o.・ You can also select an item by the dial key for the item number.・ To return to the previous menu: c
When Type1 is set
Press % to highlight a menu item and press o or r.・ You can also select an item by the dial key for the item number.・ To return to the previous menu: l or c
Selectin
g th
e men
u

33
Befo
re Usin
g D
702iF
Highlight a menu item in other than the animation menu. After a brief interval, description of the item’s function appears.
In the normal menu
Selecting functions from the submenu
When MENU is displayed at the upper left of the guide row, you can use the submenu to perform various operations.
Displaying the Redial submenu
1 m in the redial list
2 % to highlight a submenu item z Press o or r・ You can select an item by the dial key for the item number. Even for the same function, the item numbers
may differ depending on the screen.・ To return to the menu of previous level: l or c・ To close the submenu: m
Setting each item on the screen
1 % to highlight Yes or No z Press o
Displaying description of menu items (Describe function)
Selecting Yes or No on the confirmation screen
Example
・ The function description appears briefly then disappears.・ You can set FOMA terminal not to display the function description. ☛P134
Function description of Data Box menu is displayed.
Example
Shows that a submenu exists.
Item that has been highlighted
Lower-level menu exists.
・ For some functions, items other than Yes or No may appear.
Selectin
g th
e men
u
Next
34
Befo
re Usin
g D
702iF
1 % to highlight an item
2 o to display the pulldown menu z % to highlight an item z Press o
1 % to highlight a check box z Press o
Displaying information quickly Focus Mode
When the icons such as or are displayed on the standby display, you can quickly display the information.
1 o z & to highlight an icon such as or
Selecting an item from the pulldown menu
Selecting an item from the check box
・ You can select an item by the dial key for the item number.
Pulldown menu
The check box changes from to , and is selected.・ Select the selected item ( ) to cancel the selection ( ).・ Depending on the function, you can select/cancel all items by pressing m. ・ You can select or cancel an item by the dial key for the item number.
The color of the highlighted icon changes.
Effective Easy Selector Plus keys
・ The number of stored items is displayed at the right of each icon.・ To cancel Focus Mode: c or f・When or is displayed: o z % to highlight the icon
Missed call (unanswered call) exists.
Unplayed recorded message exists.
Voice mail message exists.
Unread received mail exists.
Data of the latest pattern definition updated automatically exists. ( , )S
electing
the m
enu
35
Befo
re Usin
g D
702iF
2 Press oThe screen corresponding to the selected icon appears.
: The received call list appears, letting you check the date and time, the caller information, etc. : The recorded message list appears, letting you play the recorded messages. : The confirmation screen for playing voice mail messages appears, letting you play the messages. : The received mail folder list appears, letting you check unread mail.
/ (succeeded/failed):The data of the latest pattern definition updated automatically can be checked. ☛P396
INFORMATION●When you highlight an icon and hold down c for over a second, the icon temporarily disappears from the screen. It
reappears when new information is stored or the number of stored items changes by viewing information, etc. For the icon indicating voice mail messages, however, a confirmation screen appears asking whether to clear the icon. Select Yes to clear it temporarily.
Number of saved, registered and protected items in D702iF
*1 Depending on the size of data, the actual number of items that can be saved and registered may be fewer.*2 The total number of i-mode Mail and SMS.*3 The total number of sent and received SMS. The number of delivered report is not included.*4 Up to 5 items of Message i-αppli (included in the 100 items, maximum number of i-αppli that can be saved) can be
saved. Depending on the i-αppli size, the actual number of items that can be saved may be fewer.
INFORMATION● Because the data saved in FOMA terminal may be lost due to failure, repair or other handlings of FOMA terminal, it is
recommended that you maintain a separate record of the important data. Please note that we are not responsible for any lost data.
● Depending on the function, the displayed size of data in FOMA terminal may differ slightly.● If you have a PC, you can use the FOMA D series data link software contained in the attached CD-ROM and the FOMA
USB cable (optional) to transfer and save the data such as mail, bookmarks, images, melodies, video/i-motion to your PC.
TypeMax number of
saved/registered items
Max number of protected
itemsType
Max number of saved/registered
items
Max number of protected
items
Mail Received mail*1, *2 1,000 500 Screen memo*1 100 50
Sent mail*1, *2 200 100 i-αppli*4 100 100
Unsent mail*1, *2 200 100 Image*1 1,000 -Template*1 100 - Video/i-motion, sound
recorded with Sound Recorder*1
100 -SMS in the UIM*3 20 -Message R*1 100 50
Message F*1 50 25 Melody*1 500 -Bookmark i-mode 100 - Chara-den*1 50 -
Full Browser 100 -
Nu
mb
er of saved
, registered
and
pro
tected item
s in D
702iF
36
Befo
re Usin
g D
702iF
Using the UIM (FOMA card)
The UIM (FOMA card) is a card in which your phone number and other information are recorded.Insert the UIM into FOMA terminal to use it.・ For details on handling the UIM, refer to the UIM manual.
Inserting/removing the UIM
Use your FOMA terminal with the UIM inserted. If the UIM is not inserted in your FOMA terminal, first insert it.・ Before inserting or removing the UIM, turn the power off and remove the rear cover and battery pack.
Attaching/removing the rear cover and battery pack ☛P38, P39・ Insert or remove the UIM with FOMA terminal closed using both hands.
INFORMATION● Insert or remove the UIM carefully as forcing it may damage the card.● Carefully handle the removed UIM so that it does not become lost.
Inserting the card
aRemove the rear cover and then the battery pack. ☛P39
bPull out the UIM slot tray.Place your finger on the slot cover and slide it out until the slot tray stops.
cInsert the UIM into the slot with the IC side of the card facing down.
dLift the slot cover until its bottom is even with the slot tray.Align the cut corner of the slot cover to the cut corner of the UIM.
ePush the slot tray in until it stops.
fReattach the battery pack and then the rear cover. ☛P38
Removing the card
UIM
Cut corner
IC
Slot tray
UIM slot cover
Cut corner
Tray is pulled out until it stops.
aPull out the UIM slot tray.・ The operations are the same as a to b in
“Inserting the card”.bRemove the UIM by sliding it out.
When the UIM slot tray is removedInsert the UIM slot tray and push the tray straight in.● Remove the UIM
before replacing the slot tray.
Usin
g th
e UIM
(FO
MA
card)
37
Befo
re Usin
g D
702iF
●When attaching the battery pack, make sure that the UIM slot tray is in place. If not, you cannot attach the battery pack. Forcibly attaching the battery pack may damage the UIM or the UIM slot tray.
●When pushing the UIM slot tray in, make sure that the UIM is properly placed in the slot tray and the slot cover. Forcibly pushing the slot tray into FOMA terminal may cause an operation error.
UIM security codes
The PIN1 and PIN2 codes are used for the UIM.Both codes are set to “0000” at the time of subscription to the FOMA service. You can change this to any code (4 to 8 digits). ☛P144
UIM operation restriction function
FOMA terminal is provided with the UIM operation restriction function for protecting your data and files.・When the data or files downloaded from sites or the data attached to mail are saved in FOMA terminal with
the UIM inserted, the UIM operation restriction is automatically set to these data or files.・ If the UIM is replaced by another UIM or is removed from FOMA terminal, the data or files with the UIM
operation restriction set cannot be displayed or played.・ The data or files with the UIM operation restriction set cannot be sent by infrared communication.・ The data which is subject to the restriction is as follows:
・ For i-αppli with the UIM operation restriction set, the following operations are disabled when the UIM is replaced by another UIM or is removed from FOMA terminal:
INFORMATION●When the data with the UIM operation restriction enabled is set for the standby display, call image or ring alert, the
image and sound settings return to the default if the UIM is replaced by another UIM or is removed from FOMA terminal. In this case, the image and sound that are actually displayed/generated may differ from the settings. Inserting the UIM that was used when the data was downloaded cancels the operation restriction of the data and restores the original settings. (Note that the setting may be canceled if the data was used for Random Display Image.)
● The UIM operation restriction is not set to the data obtained via infrared communication or data link software, or to the still images or videos taken with the built-in camera. The UIM operation restriction may not be set to some mail templates such as the one containing only text.
●When the UIM is inserted in other i-channel compatible terminals, the i-channel information is not displayed as ticker on the standby display. After that, if the information is updated automatically or if you press c on the standby display to display the channel list, the latest information is received and then displayed as ticker on the standby display.
●When the UIM is not inserted, the i-channel information is not displayed as ticker on the standby display.
・Screen memo ・Message R/F・Image inserted in Deco-mail or signature ・File attached to i-mode Mail・i-αppli (including the i-αppli standby display) ・i-motion ・Image (including animation and Flash movie) ・Chara-den・Melody ・Recorded message for videophone call・Video memo
・Start ・Displaying the detail information of i-αppli・Operation settings for i-αppli ・Auto Start・Changing the setting of Auto Start ・Setting the i-αppli standby display・Upgrade
Settings saved into the UIM
The following settings are saved into the UIM. If the UIM is replaced, the settings saved in the new UIM become available. ・ Font type, storage period in the SMS Center, SMSC, address, type of number set in SMS Setting・ DoCoMo certificate and user certificate set in Certificate Setting ・My phone number・ Select Language ・ The PIN1/PIN2 code of the UIM and PIN1 Code ON/OFF
Usin
g th
e UIM
(FO
MA
card)
38
Befo
re Usin
g D
702iF
Functional differences between the UIM types
There are 2 types of the UIM: green and blue. The functions differ depending on the type as shown below:
Attaching/removing the battery pack
・ Turn the power off before attaching or removing the battery pack. Also, attach or remove it with FOMA terminal closed using both hands.・ Be careful not to touch the camera lens.・ Use the specified battery pack D05.
Item UIM (green) UIM (blue) Page
Number of digits of a phone number that can be registered in the UIM phonebook
Up to 26 digits Up to 20 digits P99
Certificate Download for using FirstPass
Available Unavailable P196
WORLD WING service Available Unavailable P38
Service Dialing Number Calling DoCoMo for Repairs and DoCoMo for General Inquiries (DoCoMo Information
Center) available
Unavailable P334
WORLD WING
WORLD WING is the DoCoMo FOMA international roaming service. By taking out the UIM (green) from the FOMA terminal you normally use and inserting it into a FOMA terminal supporting the service or an overseas mobile phone (W-CDMA or GSM handset), you can make/receive calls in foreign countries with your own mobile phone number.
You can use WORLD WING without subscription. ● If you subscribed to the FOMA service before August 31, 2005 but have not subscribed to WORLD WING,
a separate subscription is required to use WORLD WING.● This service cannot be used with some billing plans.● If you lose the UIM (green) or have it stolen overseas, contact DoCoMo immediately to have the card
suspended. For contact information, refer to “General Inquiries” on the back of this manual. Note that any call or communication charges incurred after the UIM is stolen will be borne by the customer.
Attaching the battery pack
aRemove the rear cover.While pressing the top of the rear cover with your thumb, slide it in the direction of the arrow and remove the rear cover.
Press here.
Attach
ing
/remo
ving
the b
attery pack
39
Befo
re Usin
g D
702iF
INFORMATION● The FOMA terminal display uses an active LCD. Due to the characteristics of active LCD, residual images or crossbar
may remain for a while when the battery pack is attached or removed. This is not a fault of FOMA terminal.
Charging the battery of FOMA terminal
When the battery level is low, charge the battery.・ The battery level icon shows how much charge remains in the battery. ☛P42
・ Continuous call time is an estimate of call time for FOMA terminal when it can send or receive signals normally.・ Continuous standby time is an estimate of operation time of FOMA terminal when it is closed and able
to receive signals normally. The call time and standby time may be reduced to about half, depending on the amount of charge in the battery, the function settings, the ambient temperature and signal conditions (radio waves do not or hardly reach). Using i-mode communication reduces the call (communication) time and standby time. Even if you do not make a call or use i-mode, the call (communication) time and standby time will be reduced by composing i-mode Mail, or starting the i-αppli software downloaded from sites or on the i-αppli standby display.・ Continuous standby time (while standing still) is the average operation time of FOMA terminal when it
is standing still, closed and able to receive signals normally.
bWith the surface with the DoCoMo logo and the recycle mark facing up, insert the battery pack into FOMA terminal at the angle as shown in the figure.Do not force the battery pack into FOMA terminal. Doing so could damage the body connector or battery pack terminals.
cPush the battery pack in.dPlace the rear cover plate so that it can slide
about 2 mm on FOMA terminal.eSlide the rear cover in the direction of the arrow
pushing its center with your thumb so that FOMA terminal and the rear cover do not gap.
Failure to follow the correct procedure could damage the rear cover.
Removing the battery pack
aRemove the rear cover.bLift the projection part of the battery pack and
remove it.
Charging time and operation time on full charge (estimates)
Charging time Continuous call time Continuous standby time
Approx.140 minutes
During a voice call: Approx. 150 minutesDuring a videophone call: Approx. 90 minutes
While standing still: Approx. 460 hoursWhile moving: Approx. 330 hours
Next
Ch
argin
g th
e battery o
f FO
MA
termin
al
40
Befo
re Usin
g D
702iF
・ Continuous standby time (while moving) is the average operation time of FOMA terminal that is standing still, moving and outside the service area when it is closed and able to receive signals normally.・ Alternatively, if you perform data communication or Multiaccess, use Camera or play video/i-motion,
the call (communication) time and standby time will be reduced.
The battery pack can be charged regardless of whether FOMA terminal is turned on or off. However, charging takes longer with the power turned on.・When charging starts, the sub-display lights in red.
When FOMA terminal is turned on, the charge alert sounds and the battery level icon blinks.
・You can change the icon design with Battery Icon. ☛P135・If the sub-display does not light in red at the start of charging or it flashes in red, charging is unsuccessful. The
battery may not be charged when the temperature of FOMA terminal is high. Stop any function in progress and confirm that the temperature is low before charging again. If the battery pack still cannot be charged even after charging again, contact “Repairs” on the back of this manual.
・When charging is completed, the sub-display goes off.When FOMA terminal is turned on, the charge alert sounds and the battery level icon lights. ・ If the battery level icon blinks, charging is not completed.・ You can set the charge alert not to sound. ☛P120・ Do not charge the battery for an extended period (longer than a full day) with FOMA terminal turned
on. FOMA terminal uses power so the adapter continues charging until FOMA terminal is unplugged from the adapter. In such a case, the AC or DC adapter charges again but when FOMA terminal is removed in the middle of charging, the following could occur:・Low battery level・Message appears indicating that the battery runs down.・FOMA terminal is operational for a short time.
・ If the battery is fully charged, connecting FOMA terminal to the AC or DC adapter may not start charging.・ If you use FOMA terminal for an extended period while charging the battery with the AC or DC adapter
connected, the battery may not be charged temporarily by temperature rise.・ Insert or remove the connector to/from FOMA terminal slowly and firmly without forcing it. When
removing it, be sure to press the release buttons on both sides of the connector and pull it out. Forcibly pulling the connector could cause equipment failure.・ Insert or remove the AC adapter connector straight to/from FOMA terminal.
The battery pack is a consumable part and will gradually wear out. Each time it is charged, it will accept slightly less charge than the previous time. When the battery charge lasts only half as long as when it was new, replace it with a new one. The battery pack life is about 1 year. This life may be shorter depending on the frequency of use.・ FOMA terminal uses a lithium ion battery containing valuable materials that should be recycled. To protect
the environment, return used batteries to an NTT DoCoMo service counter, NTT DoCoMo agent or recycling center.・ Please take the following precautions when recycling batteries:・Attach a piece of adhesive tape on the terminals of used battery packs・Do not disassemble or modify battery packs
Starting/ending charging and other items to note
Icon Sub-display Meaning Charging: Blinks ( Charged: Lights ) Charging: Lights in red
Charged: Goes offCharging normally.
Battery pack life
Li-ion
Ch
argin
g th
e battery o
f FO
MA
termin
al
41
Befo
re Usin
g D
702iF
Use the FOMA AC adapter 01 (optional) to charge the battery. Also it can be used with the desktop holder D10 (optional).You can charge the battery with FOMA terminal either closed or open.・ The battery pack can only be charged when it is attached to FOMA terminal.・ For details, refer to the manuals for the AC adapter and the desktop holder.
■ Charging the battery with the AC adapter alone
■ Charging the battery in the desktop holder
・When inserting FOMA terminal into the desktop holder, be careful not to put a strap in the holder.・When FOMA terminal is not inserted firmly or it leans, the battery is not charged normally. Insert
FOMA terminal until it is locked certainly.
Charging from a wall outlet
aUnfold the power plug from the AC adapter and plug it into a 100 V AC outlet.
bOpen the external connection terminal cap of FOMA terminal.
cInsert the AC adapter connector in firmly until it clicks.
dCheck that charging starts.Check that the sub-display lights in red.When charging is completed, remove the AC adapter connector from FOMA terminal while pressing the release buttons on both sides of the connector, and unplug the AC adapter from the outlet. Then, close the terminal cap.
aUnfold the power plug from the AC adapter and plug it into a 100 V AC outlet.
bInsert the AC adapter connector in the desktop holder until it clicks.
cInsert the pointed end of FOMA terminal as shown in the figure.
dPush the other end of FOMA terminal in the direction of arrow until it is locked.
eCheck that charging starts.Check that the sub-display lights in red. When charging is completed, hold the desktop holder by hand and pull up the back of FOMA terminal to release the lock. Then remove FOMA terminal from the desktop holder.
Sub-display
Release button
Power plug
100 V AC outlet
AC adapter Connector
( up)
Sub-display
Desktop holder
AC adapter
Power plug
100 V AC outlet
Connector( down)
Ch
argin
g th
e battery o
f FO
MA
termin
al
Next
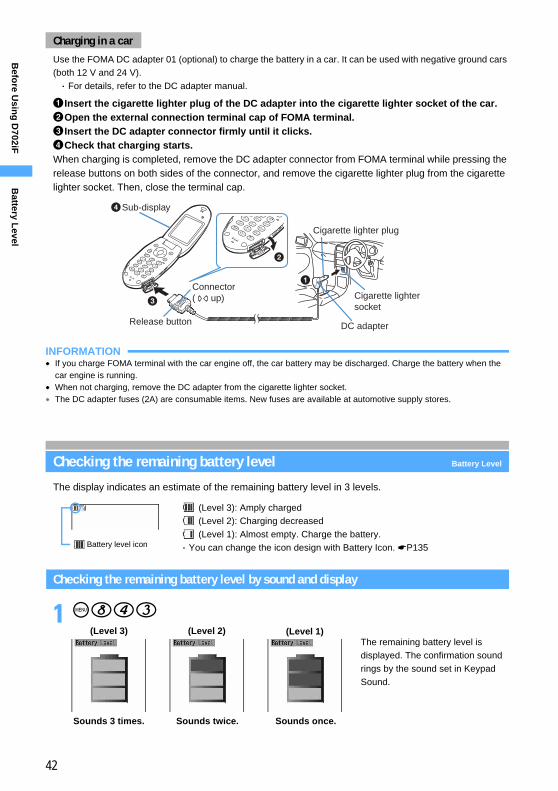
42
Befo
re Usin
g D
702iF
Use the FOMA DC adapter 01 (optional) to charge the battery in a car. It can be used with negative ground cars (both 12 V and 24 V).・ For details, refer to the DC adapter manual.
aInsert the cigarette lighter plug of the DC adapter into the cigarette lighter socket of the car.bOpen the external connection terminal cap of FOMA terminal.cInsert the DC adapter connector firmly until it clicks.dCheck that charging starts.When charging is completed, remove the DC adapter connector from FOMA terminal while pressing the release buttons on both sides of the connector, and remove the cigarette lighter plug from the cigarette lighter socket. Then, close the terminal cap.
INFORMATION● If you charge FOMA terminal with the car engine off, the car battery may be discharged. Charge the battery when the
car engine is running.●When not charging, remove the DC adapter from the cigarette lighter socket.● The DC adapter fuses (2A) are consumable items. New fuses are available at automotive supply stores.
Checking the remaining battery level Battery Level
The display indicates an estimate of the remaining battery level in 3 levels.
Checking the remaining battery level by sound and display
1 m843
Charging in a car
Sub-display
Cigarette lighter plug
Cigarette lighter socket
DC adapterRelease button
Connector( up)
(Level 3): Amply charged (Level 2): Charging decreased (Level 1): Almost empty. Charge the battery.
・ You can change the icon design with Battery Icon. ☛P135Battery level icon
Sounds 3 times. Sounds twice. Sounds once.
(Level 3) (Level 2) (Level 1)The remaining battery level is displayed. The confirmation sound rings by the sound set in Keypad Sound.
Battery L
evel
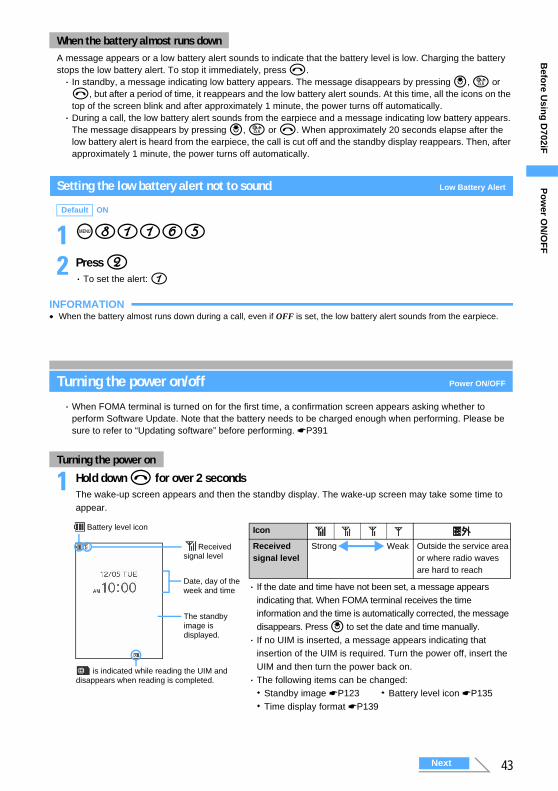
43
Befo
re Usin
g D
702iF
A message appears or a low battery alert sounds to indicate that the battery level is low. Charging the battery stops the low battery alert. To stop it immediately, press f.・ In standby, a message indicating low battery appears. The message disappears by pressing o, c or f, but after a period of time, it reappears and the low battery alert sounds. At this time, all the icons on the top of the screen blink and after approximately 1 minute, the power turns off automatically.・ During a call, the low battery alert sounds from the earpiece and a message indicating low battery appears.
The message disappears by pressing o, c or f. When approximately 20 seconds elapse after the low battery alert is heard from the earpiece, the call is cut off and the standby display reappears. Then, after approximately 1 minute, the power turns off automatically.
Setting the low battery alert not to sound Low Battery Alert
1 m81165
2 Press 2・ To set the alert: 1
INFORMATION●When the battery almost runs down during a call, even if OFF is set, the low battery alert sounds from the earpiece.
Turning the power on/off Power ON/OFF
・When FOMA terminal is turned on for the first time, a confirmation screen appears asking whether to perform Software Update. Note that the battery needs to be charged enough when performing. Please be sure to refer to “Updating software” before performing. ☛P391
1 Hold down f for over 2 secondsThe wake-up screen appears and then the standby display. The wake-up screen may take some time to appear.
When the battery almost runs down
Default ON
Turning the power on
Battery level icon
・ If the date and time have not been set, a message appears indicating that. When FOMA terminal receives the time information and the time is automatically corrected, the message disappears. Press o to set the date and time manually. ・ If no UIM is inserted, a message appears indicating that
insertion of the UIM is required. Turn the power off, insert the UIM and then turn the power back on.・ The following items can be changed:・Standby image ☛P123 ・Battery level icon ☛P135・Time display format ☛P139
Icon
Received signal level
Strong Weak Outside the service area or where radio waves are hard to reach
is indicated while reading the UIM and disappears when reading is completed.
Date, day of the week and time
Received signal level
The standby image is displayed.
Po
wer O
N/O
FF
Next
44
Befo
re Usin
g D
702iF
1 Hold down f for over 2 seconds
INFORMATION●When you turn on the power of FOMA terminal after replacing the UIM (except when Omakase Lock (Remote Lock) is set),
entry of the 4 to 8-digit terminal security code is required. After entering the correct terminal security code, the standby display appears. If a wrong terminal security code is entered 5 times consecutively, the power is turned off (but can be turned on again).
● Calls may be cut off even when is indicated and you are not moving.●When Lock on Close is set to ON, entry of the terminal security code is required.●When PIN1 Code ON/OFF is set to ON, entry of the PIN1 code is required.●When Reset Call Cost is set to ON, entry of the PIN2 code is required.●When Normal use of Display light time in Display Light Setting is set to other than Always, if you do not press any keys for
about 5 minutes while the standby display is on with FOMA terminal open, the display disappears and FOMA terminal goes into a power saving mode. While the display is off with FOMA terminal open, the sub-display flashes in white at about 6-second intervals. If there is any key operation*1 or an incoming call, the display appears again (except in Public mode (Driving mode)). However, FOMA terminal does not turn into a power saving mode in the following cases:・ During a videophone call・While charging with AC adapter connected of Display light time set to Always on・While executing the function for which Display light time is set to Always on・While running i-αppli with i-αppli active of Display light time set to Software*1 Pressing keys does not enter numbers, etc.
Switching to English display Select Language
1 m8272
2 Press 2・ To switch to Japanese display: 1
INFORMATION● This setting is saved in the UIM.
Setting the date and time Date and Time Setting
The time setting can be performed in 2 ways: obtaining the time information from the DoCoMo network to adjust the time setting of FOMA terminal, or manually entering the current time to the terminal.
1 m851
Turning the power off
Default Japanese
Default Auto time adjust: ON Offset: +, 00h00m
Select L
ang
uag
e
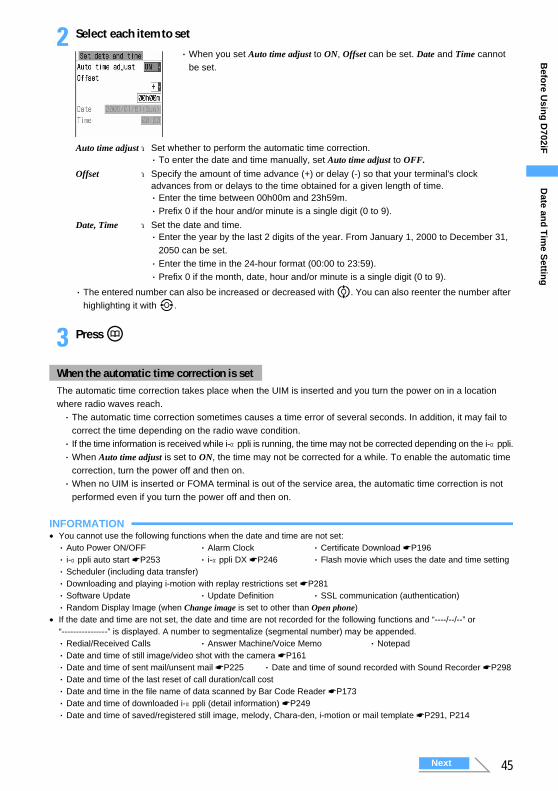
45
Befo
re Usin
g D
702iF
2 Select each item to set
・ The entered number can also be increased or decreased with %. You can also reenter the number after highlighting it with &.
3 Press p
The automatic time correction takes place when the UIM is inserted and you turn the power on in a location where radio waves reach.・ The automatic time correction sometimes causes a time error of several seconds. In addition, it may fail to
correct the time depending on the radio wave condition.・ If the time information is received while i-αppli is running, the time may not be corrected depending on the i-αppli.・When Auto time adjust is set to ON, the time may not be corrected for a while. To enable the automatic time
correction, turn the power off and then on.・When no UIM is inserted or FOMA terminal is out of the service area, the automatic time correction is not
performed even if you turn the power off and then on.
INFORMATION● You cannot use the following functions when the date and time are not set:・ Auto Power ON/OFF ・ Alarm Clock ・ Certificate Download ☛P196・ i-αppli auto start ☛P253 ・ i-αppli DX ☛P246 ・ Flash movie which uses the date and time setting・ Scheduler (including data transfer)・ Downloading and playing i-motion with replay restrictions set ☛P281・ Software Update ・ Update Definition ・ SSL communication (authentication)・ Random Display Image (when Change image is set to other than Open phone)
● If the date and time are not set, the date and time are not recorded for the following functions and “----/--/--” or “----------------” is displayed. A number to segmentalize (segmental number) may be appended.・ Redial/Received Calls ・ Answer Machine/Voice Memo ・ Notepad・ Date and time of still image/video shot with the camera ☛P161・ Date and time of sent mail/unsent mail ☛P225 ・ Date and time of sound recorded with Sound Recorder ☛P298・ Date and time of the last reset of call duration/call cost・ Date and time in the file name of data scanned by Bar Code Reader ☛P173・ Date and time of downloaded i-αppli (detail information) ☛P249・ Date and time of saved/registered still image, melody, Chara-den, i-motion or mail template ☛P291, P214
Auto time adjust:Set whether to perform the automatic time correction. ・ To enter the date and time manually, set Auto time adjust to OFF.
Offset :Specify the amount of time advance (+) or delay (-) so that your terminal's clock advances from or delays to the time obtained for a given length of time. ・ Enter the time between 00h00m and 23h59m.・ Prefix 0 if the hour and/or minute is a single digit (0 to 9).
Date, Time :Set the date and time. ・ Enter the year by the last 2 digits of the year. From January 1, 2000 to December 31,
2050 can be set.・ Enter the time in the 24-hour format (00:00 to 23:59).・ Prefix 0 if the month, date, hour and/or minute is a single digit (0 to 9).
When the automatic time correction is set
・When you set Auto time adjust to ON, Offset can be set. Date and Time cannot be set.
Date an
d T
ime S
etting
Next
46
Befo
re Usin
g D
702iF
● The set time is retained even when the battery pack is replaced, but may be reset if the battery pack is removed for an extended period. In that case, set the date and time again.
●When Reset Call Cost is set to ON, entry of the terminal security code is required.
Notifying your phone number to the other party Caller ID Notification
Set FOMA terminal to send your phone number (caller ID) to be displayed on the other party’s phone every time you make a call.・ The caller ID is your important information. Carefully consider whether to send your caller ID.・ The caller ID is displayed only when the other party’s phone can display the caller ID.・ Caller ID Notification cannot be set outside the service area. Set in a location with good radio reception.・ For details, see “Network Services User’s Guide”.
1 m951 ・ To check the current setting: m952 z Select Yes
2 Enter the network security code z Press 1・ The network security code entered is masked with “ * ”.・ To hide the caller ID: 2
INFORMATION● You can also use the following ways to show/hide the caller ID.・ Setting to show/hide the caller ID for each phonebook entry ☛P110・ Setting to show/hide the caller ID when making a call ☛P55
● If you hear a guidance requesting your caller ID when you make a call, call back after setting to send caller ID. ●When setting/operating multiple caller ID notification methods at the same time, the caller ID is notified in the following
priority. However, the setting of showing/hiding the caller ID shown on the display may be different from the actual setting.a Caller ID notification method set in Call Option when making a call ☛P55b Setting by adding “186”/”184” before the other party’s phone numberc Caller ID Setting of the phonebookd Caller ID Notification setting
Menu 47
Checking your own phone number Own Number
Check your phone number (My phone number), name, mail address, etc.
1 Press m0 ・ The phone number of the UIM inserted in FOMA terminal is displayed for My phone number.・ To check your i-mode Mail address: d1 to display iMenu → Select ENGLISH → dOptions → aMail
Settings → Confirm Mail Address
INFORMATION● To check your phone number during a call: b0
Default My phone number: subscribed phone number Other than that: not recordedC
aller ID N
otificatio
n

47
Making/Receiving CallsMaking calls
Making calls ......................................................................................................48Switching from a voice call to a videophone call ..........................................51Setting Chaku-moji ...................................................................... Chaku-moji 52Calling back previously called numbers ........................................... Redial 54Showing/hiding the caller ID for each call ............................... 186/184 Call 55Making calls by setting the conditions .......................................Call Option 55Using international calls ........................................................ WORLD CALL 56Making a call by specifying a sub-address ............................ Sub Address 58Setting the alarm indicating reconnection of interrupted call............................................................................................. Reconnect Alarm 59Suppressing ambient noises to improve the call quality.............................................................................................. Noise Reduction 59Talking without using hands in a car ............................... In-car Handsfree 60
Receiving callsReceiving calls ..................................................................................................60Receiving a call by switching from a voice call to a videophone call .........62Enabling use of dial keys to answer a call ...................... Any Key Answer 63Setting to start talking by opening FOMA terminal .............. Open Answer 63Disconnecting/holding/continuing a call by closing FOMA terminal.................................................................................................... Close Setting 63Using Received Calls ........................................................... Received Calls 64Adjusting the volume of the other party’s voice during a call.................................................................................................. Listen Volume 66Adjusting the volume of ring alerts and other sounds emitted from FOMA terminal ................................................................................... Adjust Volume 66Setting for incoming voice/videophone calls............................................................................ Call Alert/Videophone Alert 67Setting the priority screen for incoming calls during a call or packet communication ............................................................ Priority Comm Mode 68
When you can/could not answer a callPutting incoming calls on hold when you cannot answer right away ......................................................................................... Response and Hold 69Setting the response hold guidance .................................. Status Message 69Setting the on-hold tone ........................................................ On-hold Tone 70Using Public mode (Driving mode) ............... Public mode (Driving mode) 70Using Public mode (power off) ........................................................................72Allowing the caller to leave message when you cannot answer the call .............................................................................................. Answer Machine 73
48
Makin
g/R
eceiving
Calls
Making calls
Making calls
The operations common to voice calls and videophone calls are explained here.・ Do not cover the built-in antenna with your hands during a call.
1 Enter the phone number
2 n
3 Press f when you finish the call・ You can also end the call by closing FOMA terminal. To keep the call connected when you close FOMA
terminal, change the setting in Close Setting.
INFORMATION● You can also make a call in order of Step 2, Step 1. A voice call will be made automatically about 5 seconds after you
have pressed n and entered the phone number.● If a guidance requesting your caller ID is heard when a call is made, call again after setting FOMA terminal to send caller
ID. ☛P46●When you have subscribed to the Multi Number service, you can call after selecting a registered multi-number. ☛P335
・ Up to 80 digits can be entered. However, only 24 digits are displayed.・ To correct the phone number: c・ To return to the standby display: c (for over a second)
Calling general subscriber phones
Always include the area code even when calling from the same city.
Calling mobile phones 090 - XXXX - XXXX, 080 - XXXX - XXXX
Calling PHS phones 070 - XXXX - XXXX
You will hear a dial tone. You can start talking when the call is answered.・ If the other party is busy, you will hear a busy signal. Press f to end the call
and call again later. You can call back quickly using Redial.・ If the other party’s mobile phone or PHS is turned off or is in an area where
radio waves are hard to reach, a guidance informs that the connection is unavailable.
Makin
g calls
49
Makin
g/R
eceiving
Calls
Putting calls on hold while talking On-hold
Putting the call on hold while talking allows you to talk without the other party hearing your voice.・ Callers are charged for the time spent on hold.
1 Press o during a call
・ Press o or n while a voice call is on hold to cancel the hold.・ Press o while a videophone call is on hold to cancel the hold and send the image that has been sent
before the hold. Press t or n to cancel the hold and send your image to the other party and press a to cancel the hold and send a substitute image.・ To put the call on hold by closing FOMA terminal, change the setting in Close Setting.
Using the speakerphone function
You can make a call allowing the other party’s voice to be heard through the speaker.
1 Enter the phone number z Hold down n for over a second・ To make a videophone call: Enter the phone number z t
If Speakerphone is set to OFF in Videophone Settings, hold down t for over a second.・When you make a videophone call, the speakerphone function is automatically turned on. To make a
videophone call without using the speakerphone, change the setting in Videophone Settings.・ You can turn on/off the speakerphone function by pressing n while dialing or calling, and by pressing a or n during a call.・ appears at the top of the display while the speakerphone function is on.・ The same operation is possible from the phonebook list, redial list, received call list, recorded message
list and voice memo list.
■Adjusting the speakerphone volume: % during a voice call z O to adjust the volume・ For a videophone call: m8 during a videophone call z O to adjust the volume・ The setting is retained even after the call is ended, and is also reflected to the volume of playback
sound for recorded videophone call messages.
INFORMATION●When the speakerphone function is turned on, the volume may suddenly increase and damage your ears. Use it with
FOMA terminal away from your ears.● If a call is hard to hear with a large amount of noise around you or the other party, turn off the speakerphone function.● Talk to FOMA terminal within about 30 cm.●When a flat type earphone/microphone set with switch (optional) or the In-Car Hands-Free Kit 01 (optional) is connected
to FOMA terminal, use the connected device to communicate.● The speakerphone function can be used even when Silent Mode is on.
Voice call on hold Videophone call on hold
On-hold image
Flashes The call is put on hold and the on-hold tone is played. For videophone calls, the on-hold image appears on your and the other party’s terminals.
Makin
g calls
50
Makin
g/R
eceiving
Calls
Operations available from the submenu during a voice call
*1 The setting can be changed while an alarm is sounding. It becomes effective when the alarm is stopped.・ The following key operations are available during a call:・%: Adjust the volume ・l: Display received calls ・r: Display redials
・t : Activate Camera ・p: Start the phonebook
・C (for over a second): Record the other party’s voice (Talking Voice Memo)
Entering pauses or timed pauses
Pauses and timed pauses are available only for voice calls.
Calling to “03XXXXXXXXP12345” (P=Entered pause)
When you press o after the call is connected, the numbers after the pause are sent.
A pause (P) is used for sending messages to beepers*, operating the answering system at home, reserving tickets, etc. At the point the pause (P) is entered, the dial digits are separated and tone signals (DTMF) are sent.
1 Hold down ( for over a second・ You cannot make a call if a pause is entered at the beginning of the phone number.
A timed pause (T) is used to dial outside line numbers with extensions. Enter “T” between the outside line and extension numbers to dial the extension number after a set number of seconds following the outside line number.
Submenu item Description Page
aSwitch to V-phone Switches from a voice call to a videophone call. P51
bReceived calls Displays received calls. P64
cRedial Displays redials. P54
dSet time Sets the date and time. P44
eReconnect alarm*1 Sets an alarm indicating reconnection of a call under improved signal quality which has been cut off due to poor signal quality.
P59
fQuality alarm*1 Sets whether to sound an alarm when your call is about to be cut off due to poor signal quality.
P121
gTerminal close Sets the operations (whether the call is disconnected, held or continued) when FOMA terminal is closed during a call.
P63
hDial up Makes a call to another party during a call using Call Waiting Service. P331
iListen volume Adjusts the earpiece volume. P66
Entering a pause “P”
Entering a timed pause “T”
Example
Makin
g calls
* From January 2001, the DoCoMo display beeper name has changed to “QUICKCAST”.
51
Makin
g/R
eceiving
Calls
1 Hold down # for over a second・ Timed pauses can be entered in succession.・ Each timed pause is followed by a second interval.・ You cannot make a call if a timed pause is entered at the beginning of the phone number.
INFORMATION● Tone signals (DTMF) may not be received depending on the receiving device.● You cannot make a call to another party by putting the current call on hold and entering a pause (P) or timed pause (T).●When it is necessary to send tone signals (DTMF) following voice prompts as in making ticket reservations, the
speakerphone function is useful. In this case, input tone signals (DTMF) after turning on the speakerphone function.
Switching from a voice call to a videophone call
You can switch to a videophone call by operating from the submenu during a voice call when the other party’s terminal can switch calls. Switching can be performed only from the terminal that made the voice call.・ This operation can be performed between the terminals that support switching between voice call/
videophone call.・ To switch to a videophone call, the other party needs to set Indication ON of Notify Switchable Mode in
advance. ☛P90
1 m1 during a voice call z Select Yes
・ A guidance informing that the call is being switched is played during switching.・ Select No to return to the voice call talking screen.・ If Speakerphone is set to ON in Videophone Settings, the speakerphone function is automatically turned
on when the call is switched to a videophone call.
INFORMATION● During packet communication, disconnect the packet communication and switch to a videophone call.●When the other party is during packet communication, the call cannot be switched to a videophone call.●While talking on the phone using Call Waiting Service, you cannot switch the call to a videophone call.● It takes about 5 seconds to switch. However, it may take longer depending on radio wave conditions. ● Depending on radio wave conditions, a voice call and videophone call may not be switched and the call my be
disconnected.● A second call received while switching calls is rejected.● The speakerphone function is turned off when a videophone call is switched to a voice call.● The settings (such as switching the cameras or selecting the frame) made during a videophone call are canceled every
time a voice call and videophone call are switched. ● According to the call duration of a voice call and videophone call, the call charges are added up, respectively.● The call is not charged while Switching... is displayed.● Switching from a videophone call to a voice call ☛P80
Sw
itchin
g fro
m a vo
ice call to a vid
eop
ho
ne call
52
Makin
g/R
eceiving
Calls
Setting Chaku-moji Chaku-moji
You can have a message (Chaku-moji) displayed on the incoming screen of the other party’s terminal for outgoing voice/videophone calls, letting him/her know what the matter is in advance. Also, whether to display Chaku-moji for incoming calls with Chaku-moji can be set.
Editing and setting for Chaku-moji
・ Up to 10 messages can be registered.
1 m941
2 Select <New message>
3 Enter a message (up to 10 one-byte or two-byte characters)・ Kanji, hiragana, katakana, alphabetic and numeric characters, symbols, and pictograms can be entered.
4 Press p・When you have edited a registered Chaku-moji message, a confirmation screen appears asking whether
to register it. Select Yes to overwrite.
Creating a Chaku-moji message
Chaku-moji appears on the incoming screen of the other party’s terminal. When the call is answered, the Chaku-moji is cleared.
・ Supporting models: 902iS series SH902iSL, SH702iS and P702iD・ Senders are charged, but receivers are not charged.・ Received Chaku-moji is registered in the received call history.
■ Using the sent message history:a m1b Select a Chaku-moji message
■ Deleting:a Highlight a Chaku-moji message z m2 ・ To delete all: m3
b Select Yes
Ch
aku-m
oji
53
Makin
g/R
eceiving
Calls
1 m942
2 Press any of 1 to 4
Making a call by attaching Chaku-moji
・ Up to 10 messages can be recorded in the sent message history. When the number of recorded messages exceeds 10, they are deleted, oldest first.
1 Enter the phone number z m4
2 Select Chaku-moji field z Select a Chaku-moji message
3 m z Select Yes・When the Chaku-moji is received by the other party’s terminal, Transmission completed appears and
transmission fee is charged.・When the Chaku-moji is sent to an incompatible terminal or is not received due to Message Display
Setting of the other party’s terminal, Transmission failed appears and transmission fee is not charged.
INFORMATION● If the receiver’s terminal is in one of the following cases, the Chaku-moji is not received and the call is not recorded in
the received call history. In addition, the transmission result does not appear on the sender’s screen. In this case, transmission fee is not charged.・ Outside the service area or turned off ・ In Public mode (Driving mode)・When the response time of Answer Machine is set to 0 second, etc.
● Even when Chaku-moji is received, the transmission result may not appear on the sender’s screen depending on radio wave conditions. In this case, the sender is charged for the transmission.
●When a call with Chaku-moji is received within the delay time set in Mute Ring Time Setting, the Chaku-moji is displayed and the call is registered in the received call history. In this case, the sender is charged for the transmission.
● You cannot send Chaku-moji to a party overseas.
Making the Chaku-moji reception setting Message Display Setting
Default Only with Caller ID
Display all :Displays all Chaku-moji.
Hide all :Hides Chaku-moji.
Only from stored No.:Displays Chaku-moji only from a party registered in the phonebook.
Only with Caller ID :Displays Chaku-moji only from a party with the caller ID.
■ Canceling Chaku-moji: 1■ Creating/editing a message: 2 z Create a Chaku-moji message・ Follow the procedure from Step 2 in “Creating a Chaku-moji message”.
☛P52
■ Selecting a registered message: 3 z Select a Chaku-moji message
■ Selecting from the sent message history: 4 z Select a Chaku-moji message
Ch
aku-m
oji
54
Makin
g/R
eceiving
Calls
Menu 45
Calling back previously called numbers Redial
This function records the calls that you made as dialed calls (Redial). When the other party is busy, etc., you can redial by simple operation.・ Up to 30 calls are recorded. When the number exceeds 30, the oldest one is deleted chronologically.
1 r z Highlight a party in the redial list
*1 When the phone number is registered in the phonebook (while not in Secret Mode, the phone number is displayed if it is registered in a phonebook entry with Secret Attribute)
*2 When you have subscribed to the Multi Number service (the name of the basic number or additional number used when you dialed)
*3 When the image is registered in the phonebook
・ To switch between the redial/received call lists: p■Registering an entry in the phonebook:
aHighlight a redial z m1・ To add to an existing phonebook entry: m2
b1 or 2 z Register the name or address ☛P95, P99・ To add to an existing phonebook entry: 1 or 2 z Select the party z Edit the data ☛P107
■Composing SMS: Highlight a redial z a (for over a second)The SMS composition screen with the redial phone number specified as the address appears.・ If the redial phone number is saved in the phonebook together with mail addresses, pressing a
displays the i-mode Mail composition screen with the first mail address specified as the address. If not, the i-mode Mail composition screen appears with the redial phone number specified as the address.
2 Press n (for voice call) or t (for videophone call)・ To make a call with the same call type as the highlighted redial: o・For a 32K videophone call, the call is made at 64K when redialing.
INFORMATION● You can make calls by setting conditions. ☛P55●When you switch between a voice call and videophone call during a call, the call type (voice call/videophone call) that
was specified when you dialed will be recorded in the redial data.●When multiple voice/videophone calls are made to the same number, only the most recent call is recorded for each
caller ID preference: show, hide or no setting.● Selecting a multi-number registered for Multi Number ☛P335
Phone number or name*1 is displayed.
:Call with caller ID set to show in Call Option :Call with caller ID set to hide in Call Option
:International call
:Videophone call No icon: Voice call
Date and time of dialing to the highlighted party
Image*3
Phone number
Name of the multi-number selected in Call Option*2Red
ial
55
Makin
g/R
eceiving
Calls
Deleting redials Delete Redial
1 r
2 Highlight a redial z m41・ To delete all: m42
3 Select Yes
Showing/hiding the caller ID for each call 186/184 Call
Set whether to make your phone number (caller ID) to be displayed on the other party’s phone when you make a call. Prefix a specific number to the beginning of the phone number when you make a call.・ The caller ID is your important information. Carefully consider whether to send your caller ID.・ The caller ID is displayed only when the other party’s phone can display caller ID.
Showing your caller ID
1 186 z Enter the phone number z Press n (for voice call) or t (for videophone call)
Hiding your caller ID
1 184 z Enter the phone number z Press n (for voice call) or t (for videophone call)
INFORMATION● If a guidance requesting your caller ID is heard when you make a call, call again by adding “186”.● For an international call, the caller ID may not be notified depending on the phone company that handles a call even if
“186” is added.●When making a call by adding “186”/“184” to the other party’s phone number, the phone number with “186”/“184” added
is recorded in the redial data.● Caller ID notification priority ☛P46
Making calls by setting the conditions Call Option
This function allows you to create or select Chaku-moji, select a multi-number, select a call type, show/hide your caller ID and append a prefix or international code for each voice/videophone call.
1 Enter the phone number z m4■Making an international call: Enter the country code z phone number z m4・ For an international call, dial without 0 when the area code begins with 0 (when calling to a general
subscriber phone and other phones in Italy, you need to dial 0).
186/184 Call
Next
56
Makin
g/R
eceiving
Calls
2 Select each item to set the dialing conditions
3 m z Select YesA call is made by the settings.・When you select 64K V.phone or 32K V.phone in Call type, press t and select Yes to select Chara-den to
be displayed during a videophone call.
INFORMATION● In the redial list, received call list, recorded message list, voice memo list, details screen of Own Number or member list
for schedule, press m and select Call option.● In the FOMA terminal phonebook list/details screen or the UIM phonebook list/details screen, highlight a phone number,
press m and select Mail/Call option → Call option.● For an international call, the caller ID may not be notified depending on the phone company that handles a call even
when Notify is selected for Caller ID.
Using international calls WORLD CALL
DoCoMo international call service “WORLD CALL”
・ The international call service “WORLD CALL” is available for DoCoMo mobile phones.・ How to call
・ You can call to approximately 240 countries and regions around the world.・WORLD CALL charges are added to the FOMA service charges every month.・ No subscription charges or monthly fee is required.・You were subscribed to “WORLD CALL” as one of standard services at the time of subscription to the
FOMA service (unless you request not to subscribe to it).・ Changes in international call dialing procedure
MY LINE service is not applicable to mobile phone communications, including WORLD CALL service. However, along with the introduction of MY LINE service, the dialing procedure for international calls using a mobile phone was changed. Consequently, the previous dialing procedure (without prefix “010”) no longer be used.・ Contact “General Inquiries” on the back of this manual for details.・To use international call services other than the DoCoMo service, contact each carrier for details.・ This service cannot be used with some billing plans.
Chaku-moji:Create or select the Chaku-moji message to be sent to the other party. ☛P53Multi-No :Select the number to be notified to the other party from the basic number or additional
numbers. ☛P335Call type :Select from Voice call, 64K V.phone or 32K V.phone.Caller ID :Set to show/hide caller ID.
・ Caller ID notification priority ☛P46Prefix :Select the number (prefix) to be appended before the phone number.
・ Prefix ☛P58International Call:
Select the name of international code.・ Int’l Dial Setting ☛P57
009130 z 010 z Enter the country code z area code z phone number z
n・ The above phone number can be registered in the FOMA terminal phonebook.・When the area code begins with “0”, dial without “0” (when calling to a general subscriber phone and
other phones in Italy, you need to dial “0”).W
OR
LD
CA
LL
57
Makin
g/R
eceiving
Calls
Using “WORLD CALL” by simplified dialing Int’l Dial Setting
When the auto assist setting is set to Auto assist ON in this setting, entering “+” when you make an international call automatically adds the preset international code to the phone number. This allows you to make international calls easily. ・ If you dial by prefixing “+” to the country code of Japan “81”, the international code is not added.
1 m86731
2 Press 1・ To cancel the setting: 2
・ Up to 3 international codes can be registered.
1 m86732
2 Highlight <Not recorded> z m2
3 Enter a name (up to 16 one-byte or 8 two-byte characters) z Enter a code (up to 10 digits) z p
4 Press p
“International videophone” calls to parties using specific overseas 3G mobile phone terminals can be made by dialing as described above and placing a call in the videophone mode.・ For the countries and overseas carriers you can connect to, visit the DoCoMo website.・ The image of the other party displayed on FOMA terminal may be distorted or connection may not be established
depending on the terminal at the other end of the international videophone line.
Setting the auto assist setting
Default Auto assist ON
Registering an international code
Default Name: World Call Prefix: 009130010
WO
RL
D C
AL
L
Next
58
Makin
g/R
eceiving
Calls
Select the international code that will be added automatically when “+” is entered.
1 m86732■Confirming the registered information: Highlight an item z m1■ Editing: Highlight an item z m2 z Edit the data・ You can also edit by pressing p on the confirmation screen of registered information. Follow the
procedure from Step 3 in “Registering an international code”. ☛P57
■Deleting: Highlight an item z m3 z Select Yes・ You cannot delete the international code that is set to be automatically added.
2 Select an item
3 Press p
1 0 (for over a second) z Enter the country code z phone number z n z Select Yes・ Hold down 0 for over a second to enter “+”.
Setting numbers other than “WORLD CALL” Prefix
By registering the number (prefix) to add to the beginning of the phone number in advance, you can add a prefix after entering the phone number to make an international call easily.・ The default setting is “009130010” for DoCoMo’s international calls.
1 m8672
2 Select Prefix1 to 3 field z Enter a number・ Up to 3 numbers in total and up to 10 digits for each number can be entered.・ Do not include a pause or timed pause in the number (prefix). If you set a prefix containing a pause or
timed pause, you cannot add the prefix when making a call.・ “009130010” can be changed.
3 Press p
Making a call by specifying a sub-address Sub Address
Specify a sub-address to call a specific phone or communication device.・ This setting is also used to select the contents in a video delivery service, “V-Live”.
Setting the international code
Making a call easily by using Int’l Dial Setting
Default 009130010
Su
b A
dd
ress
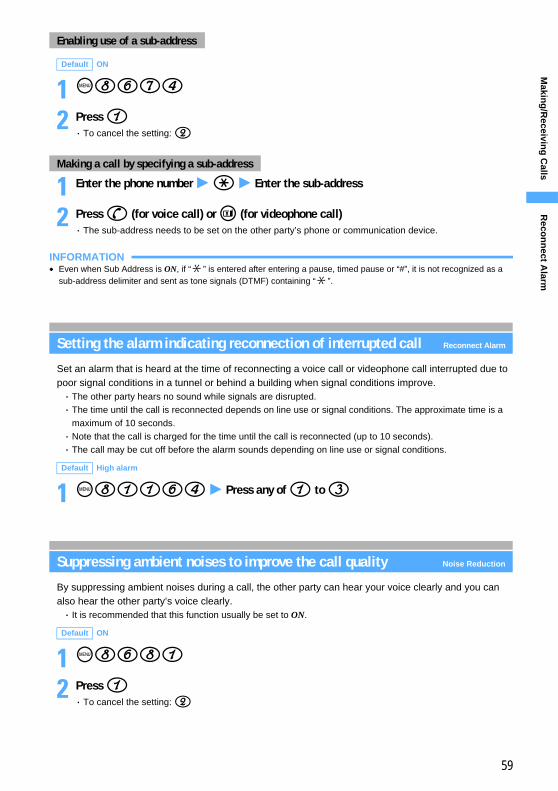
59
Makin
g/R
eceiving
Calls
1 m8674
2 Press 1・ To cancel the setting: 2
1 Enter the phone number z ( z Enter the sub-address
2 Press n (for voice call) or t (for videophone call)・ The sub-address needs to be set on the other party’s phone or communication device.
INFORMATION● Even when Sub Address is ON, if “ ” is entered after entering a pause, timed pause or “#”, it is not recognized as a
sub-address delimiter and sent as tone signals (DTMF) containing “ ”.
Setting the alarm indicating reconnection of interrupted call Reconnect Alarm
Set an alarm that is heard at the time of reconnecting a voice call or videophone call interrupted due to poor signal conditions in a tunnel or behind a building when signal conditions improve.・ The other party hears no sound while signals are disrupted.・ The time until the call is reconnected depends on line use or signal conditions. The approximate time is a
maximum of 10 seconds.・ Note that the call is charged for the time until the call is reconnected (up to 10 seconds).・ The call may be cut off before the alarm sounds depending on line use or signal conditions.
1 m81164 z Press any of 1 to 3
Suppressing ambient noises to improve the call quality Noise Reduction
By suppressing ambient noises during a call, the other party can hear your voice clearly and you can also hear the other party’s voice clearly.・ It is recommended that this function usually be set to ON.
1 m8681
2 Press 1・ To cancel the setting: 2
Enabling use of a sub-address
Default ON
Making a call by specifying a sub-address
Default High alarm
Default ON
Reco
nn
ect Alarm

60
Makin
g/R
eceiving
Calls
Talking without using hands in a car In-car Handsfree
You can make and receive voice calls from a handsfree compatible device by connecting FOMA terminal via USB to such device as the In-Car Hands-Free Kit 01 (optional) or car navigation system.・ For operations of handsfree devices, refer to the instruction manual for each handsfree device. Note that the
FOMA In-Car Hands-Free Cable 01 (optional) is required to use the In-Car Hands-Free Kit 01 (optional).
INFORMATION● The display and ring alert for incoming calls follow the FOMA terminal settings.● If the setting is made to play sounds from a handsfree device, the ring alert sounds from a handsfree device regardless
of whether Silent Mode is on or of the ring alert settings on FOMA terminal.● The operation during incoming calls in Public mode (Driving mode) follows the Public mode (Driving mode) settings.● If a videophone call is made with a handsfree device using the phonebook or redial data, the communication speed set
by the handsfree device is used. If it is not set, the videophone call is made at fixed 64K.●When a videophone call is made/received with a handsfree device, a substitute image is sent to the other party.● The operation during incoming calls when Answer Machine is set follows the Answer Machine settings.● If the setting is made to play sounds from FOMA terminal, the operation when FOMA terminal is closed during a call
follows Close Setting. If the setting is made to play sounds from a handsfree device, the call continues even if FOMA terminal is closed, regardless of Close Setting.
Receiving calls
Receiving calls
The operations common to voice calls and videophone calls are explained here.・ For voice calls, calls can also be answered by pressing 0 to 9, (, or # other than n (Any Key
Answer). ☛P63
1 A call is receivedThe ring alert sounds, the display lights up and the sub-display lights/flashes.・ To put the call on hold (Response and Hold): f
2 n
3 Press f when you finish the call・ You can also end the call by closing FOMA terminal. To keep the call connected when you close FOMA
terminal, change the setting in Close Setting.
You can talk. The call duration is displayed.・ To put the call on hold (On-hold): o・ To turn on the speakerphone function: a or n・ You can also answer the call by opening FOMA terminal. ☛P63
In-car H
and
sfree
61
Makin
g/R
eceiving
Calls
The caller’s phone number, name, image and/or video/i-motion will be displayed on the screen according to the dialing condition of the caller and the FOMA terminal settings. You can set FOMA terminal not to display the name or phone number. ☛P130
■ When the caller has notified caller ID
■ When the caller has not notified caller IDThe reason why no caller ID is sent is displayed.
When a voice call arrives, the incoming operation and image set in Anonymous Caller is prioritized. When a videophone call comes in, the incoming image set in Videophone Alert is prioritized.
■ When a call with Chaku-moji is received
The sub-display (indication and lighting/flashing) and the ring alert notify you of incoming calls.・When the caller has sent the caller ID, the name registered in the FOMA terminal phonebook is displayed.
The reason for no caller ID is displayed when the caller ID has not been sent. Name displays ☛P95・When Hide callers’ info is set in Sub-display Info, the caller’s phone number or name is not displayed
regardless of whether the caller ID has been sent or not.
Display information
Operations when FOMA terminal is closed
If the caller’s phone number is not registered in your phonebook, the phone number is displayed. Also, the image set in Call Alert or Videophone Alert is displayed.
If the caller’s phone number is already registered in your phonebook, the name and phone number are displayed. When Contact Image is set to ON, the image or video/i-motion set in the phonebook is also displayed. ☛P130
Reason for no caller ID
Description
User unset The caller selected not to send the caller ID.
Payphone The call was made from a payphone, etc.
Not supported The call was made from a party who cannot send caller ID, such as a call from overseas or from a general subscriber phone via forwarding service (however, caller ID may be displayed depending on the phone company that handles a call).
Chaku-moji is displayed according to Message Display Setting. When you answer the call, the Chaku-moji is cleared.・ Received Chaku-moji is registered in the received call history.
Receivin
g calls
Next
62
Makin
g/R
eceiving
Calls
If you set Arrival call act to Answer, the same operations are available from the submenu when there is another incoming voice call during a call.
* 1 Valid when you have subscribed to Voice Mail Service.* 2 Valid when you have subscribed to Call Forwarding Service and have set the forwarding phone number.・C (for over a second): Answer by Answer Machine (Quick Record Message)・C : Stop the ring alert/vibrator・% : Adjust the ring volume
If Voice Mail Service, Call Waiting Service or Call Forwarding Service is subscribed, you will hear beeps (call waiting ring tone) when you receive another incoming call while talking and the following operations can be performed:
*1 Available from the submenu when Arrival call act is set to Answer and Set arrival act is active.・ If Call Waiting Service is not subscribed, you cannot answer the call even if you hear beeps.
INFORMATION●When a call forwarded from FOMA terminal arrives, the phone number from which it was forwarded is displayed if it is
not registered in the phonebook. If it is registered, the name is displayed. However, the phone number or name may not be displayed depending on the forwarding source.
● Even if video/i-motion is set as the incoming image in the phonebook or in Call Alert, it is not played and the first frame of the video/i-motion is displayed when there is an incoming voice call during a voice call.
●When you receive an international call, a plus sign (+) appears at the beginning of the caller ID.● For calls received from callers not registered in the phonebook, you can reject calls or set the ring alert and vibrator
ringer action not to start immediately. ☛P156, P155● Call rejection can be set for some parties registered in the phonebook. ☛P153
Receiving a call by switching from a voice call to a videophone call
・ The switching operation can be performed only from the terminal that made the voice call. It cannot be performed from the terminal that received the voice call. ・ To receive the request of switching to a videophone call, set Indication ON of Notify Switchable Mode in
advance. ☛P90
Operations available from the submenu while receiving a voice call
Submenu item Description
aCall Rejection Disconnects the call (the caller does not pay for the call).
bVoice Mail*1 Connects the incoming call to the Voice Mail Service Center.
cCall Forwarding*2 Forwards the incoming call to the forwarding phone number.
When you hear beeps (call waiting ring tone) during a voice call
Service Operation Page
Voice Mail Service*1 Connects the second call to the Voice Mail Service Center. P330
Call Waiting Service Puts the current call on hold and answers the second call. P331
Call Forwarding Service*1 Forwards the second call to the forwarding phone number. P332
Receivin
g a call b
y switch
ing
from
a voice call to
a video
ph
on
e call
63
Makin
g/R
eceiving
Calls
1 Receive the request of switching to a videophone call during a voice call
2 Select YesThe call is switched to a videophone call and your self image is sent to the other party.・ To send the substitute image: Select No・When you select Yes, your self image is sent for the first time.
Enabling use of dial keys to answer a call Any Key Answer
Allows you to answer a call by pressing 0 to 9, (, or # other than n.・ This function is available only for voice calls. However, it is unavailable when receiving a call while talking.
1 m864
2 Press 1・ To cancel the setting: 2
Setting to start talking by opening FOMA terminal Open Answer
・ This function is available only for voice calls (available even while Lock on Close is on).
1 m8675
2 Press 1・ To cancel the setting: 2
Disconnecting/holding/continuing a call by closing FOMA terminal Close Setting
・ This function does not operate during 64K data communication or packet communication.
1 m8682
Default ON
Default OFF
Default End the call
・ A guidance informing that the call is being switched is played during switching.
An
y Key A
nsw
er
Next
64
Makin
g/R
eceiving
Calls
2 Press any of 1 to 3End the call :Ends the call.On-hold :Puts the call on hold. The other party hears the on-hold tone.Continue(mute):Continues the call.
INFORMATION● If Continue(mute) is set or if FOMA terminal is connected to a flat type earphone/microphone set with switch (optional) or
a handsfree device, the following operations occur when you close FOMA terminal during a videophone call:・While sending your self image, the substitute image is sent to the other party.・While sending the substitute image or a still image, the image continues to be sent to the other party.
● If On-hold is set, the operations are as follows:・When you close FOMA terminal during a videophone call while sending a still image or your image with frame on it,
the still image or frame will be canceled after the hold is released. ・When you close FOMA terminal while sending tone signals (DTMF), the call is put on hold after tone signal
transmission is completed.・When you close FOMA terminal while switching between a voice call and videophone call, the call is put on hold after
switching is completed.・When the call is put on hold by closing FOMA terminal, the hold cannot be released even if FOMA terminal is opened.
●When you close FOMA terminal during a call using a flat type earphone/microphone set with switch (optional) or a handsfree device (available in market), the call continues regardless of this setting if the settings is made to play sounds from the connected device. Even if you remove the flat type earphone/microphone set with switch (optional) or handsfree device in this state, the call will continue.
●When you close FOMA terminal while recording a message, the recording is continued regardless of this setting.● This setting applies when you close FOMA terminal while recording a talking voice memo/video memo. If On-hold is set,
the contents recorded just before putting a call on hold are saved.
Menu 44
Using Received Calls Received Calls
The calls that you received and unanswered calls (missed calls) are recorded in memory. Recorded messages are also included in the list.・ Up to 30 calls are recorded. When the number exceeds 30, the oldest one is deleted chronologically.
Making a call from the received call history
1 l z Highlight a received call in the list
*1 When the phone number is registered in the phonebook*2 When the image is registered in the phonebook*3 When you have subscribed to the Multi Number service (the name of the basic number or additional number
used by the received call)
・ To switch between the received call/redial lists: p
Example
Phone number, name*1 or reason for no caller ID (☛P61) is displayed.
: Videophone call : 64K data communication No icon: Voice call
: International call
Image*2
Chaku-moji
Received call status (with Chaku-moji/without Chaku-moji)/No icon: Answered / : Missed call (checked) / : Missed call (unchecked)/ : Recorded message / : Recorded message (deleted)
Phone number or reason for no caller IDName of the multi-number used*3
Date and time of receiving from the highlighted party (and the ringing time for missed calls)R
eceived C
alls
65
Makin
g/R
eceiving
Calls
■Registering an entry in the phonebook:aHighlight a received call z m1・ To add to an existing phonebook entry: m2
b1 or 2 z Register the name or address ☛P95, P99・ To add to an existing phonebook entry: 1 or 2 z Select the party z Edit the data ☛P107
■Composing SMS: Highlight a received call z a (for over a second)The SMS composition screen with the phone number of the received call specified as the address appears.・ If the phone number of the received call is registered in the phonebook together with mail addresses,
pressing a displays the i-mode Mail composition screen with the first mail address specified as the address. If not, the i-mode Mail composition screen appears with the phone number of the received call specified as the address.
2 Press n (for voice call) or t (for videophone call)・ To make a call with the same call type as the highlighted received call: o・When you make a call from the received call with Chaku-moji, the Chaku-moji is not attached.
(with the number of missed calls) is indicated and the call is recorded in the received call history. ☛P34・When there is a missed call from an unknown phone number, the ringing time enables you to check whether
the call is a malicious call (One-Ring Call, etc.) made for the sole purpose of leaving the phone number in the received call history.
INFORMATION● Press m51 in the received call list to display all the calls including the missed calls of which ringing times are
shorter than the delay time set in Mute Ring Time Setting. To hide such short ringing calls, press m52.● You can make calls by setting conditions. ☛P55● If only missed calls of which ringing times are shorter than the delay time set in Mute Ring Time Setting are recorded as
received calls, pressing l on the standby display displays a confirmation screen asking whether to display missed calls. When Yes is selected, such short ringing calls are displayed.
● Calls received from callers using dial-in services in such as office may display different numbers from the caller’s dial-in number.
●When you switch between voice call and videophone call during a call, the call type (voice call/videophone call) that was specified when you received it will be recorded in the received call history.
●When Keypad Dial Lock or PIM Lock is set, the numbers stored in the received call history up to that point are deleted. However, the calls received after that are recorded in the received call history, and a call can be made using the received call history during PIM Lock.
● Selecting a multi-number registered for Multi Number ☛P335
Deleting received calls Delete Received Calls
1 l
2 Highlight a received call z m41・ To delete all: m42
3 Select Yes
Unanswered calls (Missed calls)
Received
Calls
66
Makin
g/R
eceiving
Calls
Adjusting the volume of the other party’s voice during a call Listen Volume
The volume of the other party’s voice can be adjusted from level 1 (lowest volume) to level 6 (highest volume).・ The volume changed while talking is retained even after the call is ended.・ The set volume is retained even if the power is turned off.
1 % during a call z O to adjust the volumeThe volume is set automatically by pressing o or waiting for a while after you stop key operations.・ To turn up the volume: u or r・ To turn down the volume: d or l・ To adjust the volume during a videophone call: m8 during a videophone call z O to adjust the
volume
INFORMATION● How to adjust the earpiece volume in standby, and the sounds to which the earpiece volume applies ☛P66
Adjusting the volume of ring alerts and other sounds emitted from FOMA terminal Adjust Volume
Adjust the volume of call, mail and Message R/F ring alerts; alarm clock; schedule alarm; and i-αppli sound.・ The volume can be adjusted in 7 levels, from SILENT to level 1 to level 6 (the volume of Movie ringtone can
also be adjusted in 7 levels). You can also set STEPTONE (the volume changes into SILENT → level 1→ ... → level 6 about every 3 seconds) in standby.
Adjusting the volume of call ring alerts while receiving a call
・ The ring volume changed while receiving a call is reset to the original volume when the call is ended.
1 % while receiving a call z O to adjust the volumeThe volume is set automatically by pressing o or waiting for a while after you stop key operations.・ To turn up the volume: u or r・ To turn down the volume: d or l
INFORMATION● To stop the ring alert and vibrator: C while receiving a call● If STEPTONE is set for the call alert volume, the volume will be changed from level 6 when you adjust it while receiving
a call.
Adjusting the volume of ring alerts and other sounds in standby
・ Listen volume cannot be set to SILENT.・ Listen volume and i-αppli effect sound cannot be set to STEPTONE.・ The ring volume changed while in standby is retained even if the power is turned off.
1 m812
Default LEVEL 4
Default LEVEL 4 (all)
Listen
Vo
lum
e
67
Makin
g/R
eceiving
Calls
2 1 to 3, or 5■Adjusting the volume of alarm clock: 41■Adjusting the volume of schedule alarm: 42
3 O to adjust the volume z Press o・ To set to STEPTONE: u or r when the volume is level 6・ To set to SILENT: d or l when the volume is level 1
INFORMATION● is indicated on the standby display when Call alert volume is set to SILENT. If the vibrator for incoming voice calls is
set at the same time, is indicated.
Setting for incoming voice/videophone calls Call Alert/Videophone Alert
・ The settings of this function are reflected to the settings of Sound Setting, Vibrator Setting and Light Alert Setting. The setting of Show image is reflected to the settings of Incoming Call and Videophone Receiving of Mail/Call Image.
Setting operations when receiving a voice call
1 m862■ Setting operations when receiving a videophone call: m872
2 Select each item to set
・ Playing and checking a melody or video/i-motion file when selecting ☛P117
Call alert volume :Adjusts the ring volume for voice calls and videophone calls.The set volume also applies to the following sounds:Timer alarm, alarm for Call Cost Limit, sound indicating the battery level, and playback sound of melodies attached to mail
Mail/Msg alert vol.:Adjusts the ring volume for mails, chat mails and Message R/Fs.Listen volume :Adjusts the earpiece volume during a voice call and videophone call.
The set volume also applies to the following sounds:Keypad sound and playback sound of voice call messages and voice memos
Alarm clock sound:Adjusts the volume of the alarm clock that will be used when the volume is set to Terminal setting on the Set sound screen of Alarm Clock.
Schedule reminder:Adjusts the volume of the schedule alarm.i-αppli effect sound:Adjusts the volume of the effect sound for i-αppli.
Default Ring alert: Melody/パターン1(Pattern 1) (Call Alert), Melody/パターン4(Pattern 4) (Videophone Alert)Show image: Standard image Vibrate alert: OFF Light alert: Flash/Aqua
Ring alert :Sets a ring alert for incoming calls.・When OFF is selected, no ring alert emits.・When Melody or Movie ringtone is selected, select a melody or video/i-motion file.
Show image:Sets an image displayed for incoming calls.・When Select image is selected, select Select image (from List images) to set an image.・When i-motion is selected, select a video/i-motion file from the folder list. If the folder list is
not displayed, select Select image (from List images).Vibrate alert:Sets the vibration for incoming calls.Light alert :Sets the lighting pattern and color of the sub-display for incoming calls.
Example
Call A
lert/Vid
eop
ho
ne A
lert
Next
68
Makin
g/R
eceiving
Calls
3 Press p
INFORMATION● Setting Created animation for the image displays the first frame.●When the video/i-motion with sound only (i-motion without image such as singer’s vocals) is set for Ring alert, if Show
image is reset to the video/i-motion with image only or Flash movie, the ring alert sounds by パターン1 for voice call or by パターン4 for videophone call.
● Some video/i-motion may not be set for the image. Also, the video/i-motion with sound cannot be set.● Even when you set Sync melody for Vibrate alert or Light alert, the vibrator or lighting may not be activated depending on
the melody.
Setting the priority screen for incoming calls during a call or packet communication Priority Comm Mode
This function allows you to select the voice call or packet communication screen to be given priority when a packet communication (or voice) call is received during a voice (or packet communication) call.・When there is incoming i-mode packet communication, the voice call talking screen appears by priority
regardless of this setting.・ The screen change caused by this function does not interrupt the call or packet communication.
1 m8671
2 Press any of 1 to 3No Set Up:Displays the screen for the latest incoming call/communication without setting the priority.Voice call:Displays the voice call talking screen by priority.Packet :Displays the incoming packet communication screen by priority. When a voice call is received
during i-mode packet communication, you can press b and display the Switch Task menu to answer the call.
The following screen appears depending on the setting for Priority Comm Mode:
Default No Set Up
Screen display
SettingIncoming packet communication (other than
i-mode) during voice call*1, *2
Incoming voice call during packet communication*3
No Set Up Voice call talking screen Incoming voice call screen
Voice callPacket Incoming packet communication screen Screen displayed during i-mode communication
*1 The screen displayed for incoming voice calls depends on the setting for Arrival call act. ☛P334*2 Packet communication in modes other than i-mode does not include receiving of i-mode Mail, SMS and
Message R/F. *3 Packet communication in modes other than i-mode cannot be received during i-mode communication. ☛P374
Prio
rity Co
mm
Mo
de
69
Makin
g/R
eceiving
Calls
When you can/could not answer a call
Putting incoming calls on hold when you cannot answer right away Response and Hold
・ Callers are charged for the time spent on hold.
1 f while receiving a call
2 Press n when you are ready to answer the call・ For a voice call, you can also answer the call by opening FOMA terminal. ☛P63・ Press t or n for a videophone call. Press a to send the substitute image (☛P89) to the other party.・ If f is pressed or the other party hangs up during Response and Hold, the call is ended.
INFORMATION●When you have subscribed to Voice Mail Service or Call Forwarding Service, you can use the service by pressing m
and selecting Voice Mail (V-phone answerphone for videophone call) or Call Forwarding while receiving a call.
Setting the response hold guidance Status Message
You can record your own voice as response hold guidance.・ One guidance of up to about 10 seconds long can be recorded.・While a voice call or videophone call is during Response and Hold, the guidance set by this function is
played.
Setting a recorded guidance
1 m81161
2 Select On-hold tone field z 2・ To reset to the default guidance: 1 z Go to Step 4
Default Standard
Incoming voice call on hold
Incoming videophone call on hold
The incoming call is put on hold (Response and Hold). The other party hears the response hold guidance.For videophone calls, the response hold image appears on your and the other party’s terminals.
Example
Resp
on
se and
Ho
ld
Next
70
Makin
g/R
eceiving
Calls
3 Select Record in Edit message field z Speak a response hold guidance after a tone (beep)
4 Press p
INFORMATION● If you delete the recorded guidance, the default guidance is restored.● If Standard is set, the guidance “I cannot answer the phone right now. Please wait or call back later (in Japanese)” is
played for the other party during Response and Hold.
Setting the on-hold tone On-hold Tone
・While a voice call or videophone call is during On-hold, the melody set by this function is played.
1 m81162
2 Press any of 1 to 3・ To play a melody: Highlight a melody z p
INFORMATION● The volume of the on-hold tone cannot be changed.
Using Public mode (Driving mode) Public mode (Driving mode)
Public mode is an automatic answering service considering etiquette in highly public places. When Public mode is activated and a call is received, a guidance is played and informs the caller that the called party is driving or in an area (train, bus, movie theater, etc.) where use of the phone should be refrained and cannot answer the call. Then the call is disconnected. ・ Public mode can be activated/canceled only in standby (including when 圏外 (outside service area) is
displayed on the screen).・ Even in Public mode you can make calls as normal. ・ This function cannot be used during data communication.
Default エステ荘の噴水(Fountain a la Vila d’Este)
Indication of the allowable recording time
Recording will start after a message appears.・ An end tone (beep) sounds in about 10 seconds
from the start of recording.・ To stop the recording: o・ To check the recorded guidance: Select Play・ Record cannot be selected when a recorded
guidance has already been registered. Select Delete, select Yes and record after deleting the recorded guidance.
On
-ho
ld T
on
e

71
Makin
g/R
eceiving
Calls
Activating Public mode (Driving mode)
1 Hold down ( for over a secondPublic mode is activated and appears.When a call is received, a guidance is played saying “The person you are calling is currently driving or in an area where cellphone should not be used. Please try again later”.・When Silent Mode is activated at the same time, Public mode takes precedence.
■Canceling: ( (for over a second)
■ When Public mode (Driving mode) is activatedNo ring alert plays when your FOMA terminal receives a call. appears on the screen and the call is recorded in the received call history.The caller hears a guidance informing that you are driving or in an area where use of the mobile phone should be refrained and the call is then ended.
■ Operation when receiving calls in Public mode (Driving mode) with network service activated
*1 If the ringing time for Call Waiting Service is set to 0 second, the Public mode guidance is not played.*2 As of August 2006, the call is disconnected without being connected to the Voice Mail Service Center.
INFORMATION● In Public mode, the following sounds are disabled. In addition, the vibrator does not operate or the sub-display does not
light/flash for incoming calls/mails, etc.・ Ring alert ・ Alarm clock ・ Schedule alarm ・ Timer alarm・ i-αppli sound ・ Charge alert ・ Low battery alert・ Alarm for Call Cost Limit (a message not displayed even if Alert for Call Cost Limit is set to ON and an alarm is set)
● Even in Public mode, keypad sound and shutter sound are played.● In Public mode, the i-channel information does not scroll on the standby display.● In Public mode, Chaku-moji is not displayed.● Even if a mail or Message R/F is received, the receiving screen and reception result screen are not displayed. But, when
Check i-mode Message is performed, these screens appear. If a mail or Message R/F is received at this time, the receiving screen appears and the reception result is updated when receiving is completed.
●When FOMA terminal is turned off or outside the service area, the caller hears a guidance informing out-of-service area instead of the Public mode guidance.
Service Receiving voice calls Receiving videophone calls
Voice Mail Service
The caller hears the Public mode guidance and the call is then connected to the Voice Mail Service Center.*1
The call is connected to the Voice Mail Service Center without the Public mode video guidance.*2
Call Forwarding Service
The caller hears the Public mode guidance and the call is then forwarded to the specified destination.*1
Whether the caller hears the guidance or not depends on the setting for Call Forwarding Service.When the guidance is on, the Public mode guidance is played. When the guidance is off, no guidance is played.
The call is forwarded to the specified destination without the Public mode video guidance.If the destination party uses the phone not compatible with videophone, the call is disconnected.
Call Waiting Service
The caller hears the Public mode guidance and the call is then disconnected.
The caller sees the Public mode video guidance and the call is then disconnected.
Nuisance Call Blocking Service
If registered as nuisance caller, the caller hears a guidance indicating that the call cannot be connected and the call is then disconnected.
If registered as nuisance caller, the caller sees a video guidance indicating that the call cannot be connected and the call is then disconnected.
Caller ID Request Service
・ The caller who has not notified the caller ID hears a guidance requesting caller ID and the call is then disconnected.・ The caller who has notified the caller ID
hears the Public mode guidance and the call is then disconnected.
・ The caller who has not notified the caller ID sees a video guidance requesting caller ID and the call is then disconnected.・ The caller who has notified the caller ID sees
the Public mode video guidance and the call is then disconnected.
Pu
blic m
od
e (Drivin
g m
od
e)
Next
72
Makin
g/R
eceiving
Calls
● Making emergency calls (110, 119 or 118) in Public mode cancels Public mode. However, it is not canceled when emergency calls are made using videophone.
Using Public mode (power off)
Public mode (power off) is an automatic answering service considering etiquettes in highly public places. When Public mode (power off) is set and then a call is received with FOMA terminal switched off, a guidance is played and informs the caller that the called party is in an area (hospital, airplane, priority seat area on a train, etc) where the phone should be turned off and cannot answer the call. Then the call is disconnected.
Activating Public mode (power off)
1 (25251 z Press nPublic mode (power off) is set. There will be no change on the standby display.When you subsequently turn the power off, Public mode (power off) is activated.In Public mode (power off) if a call is received with FOMA terminal off, a guidance is played saying “The person you are calling is currently in an area where use is prohibited. Please try again later”.
■Canceling: (25250 z n■Checking the setting: (25259 z n
■ When Public mode (power off) is activatedThe setting is retained until Public mode (power off) is canceled by dialing “ 25250”. The setting is not canceled by turning the power on.The Public mode (power off) guidance is played even in locations outside the service area or where radio waves are hard to reach.The caller hears a guidance informing that you are in an area where the phone should be turned off and the call is then ended.
■ Operation when receiving calls in Public mode (power off) with network service activated
*1 If the ringing for Call Waiting Service is set to 0 second, the Public mode (power off) guidance is not played.*2 As of August 2006, the call is disconnected without being connected to the Voice Mail Service Center.
Service Receiving voice calls Receiving videophone calls
Voice Mail Service
The caller hears the Public mode (power off) guidance and the call is then connected to the Voice Mail Service Center.*1
The call is connected to the Voice Mail Service Center without the Public mode (power off) video guidance.*2
Call Forwarding Service
The caller hears the Public mode (power off) guidance and the call is then forwarded to the specified destination.*1
Whether the caller hears the guidance or not depends on the setting for Call Forwarding Service.When the guidance is on, the Public mode guidance is played. When the guidance is off, no guidance is played.
The call is forwarded to the specified destination without the Public mode (power off) video guidance.If the destination party uses the phone not compatible with videophone, the call is disconnected.
Nuisance Call Blocking Service
If registered as nuisance caller, the caller hears a guidance indicating that the call cannot be connected and the call is then disconnected.
If registered as nuisance caller, the caller sees a video guidance indicating that the call cannot be connected and the call is then disconnected.
Caller ID Request Service
・ The caller who has not notified the caller ID hears a guidance requesting caller ID and the call is then disconnected.・ The caller who has notified the caller ID hears
the Public mode (power off) guidance and the call is then disconnected.
・ The caller who has not notified the caller ID sees a video guidance requesting caller ID and the call is then disconnected.・ The caller who has notified the caller ID sees
the Public mode (power off) video guidance and the call is then disconnected.
Usin
g P
ub
lic mo
de (p
ow
er off)
73
Makin
g/R
eceiving
Calls
Allowing the caller to leave message when you cannot answer the call Answer Machine
By setting Answer Machine, you can play the greeting message and record the caller’s message when you cannot answer the call.・ Up to 4 messages can be recorded for voice/videophone calls in total, a maximum of about 30 seconds for
each.・ For voice calls, the caller’s voice is recorded. For videophone calls, the caller’s voice and image are
recorded.・ You can set the time interval between the reception of the call and the start of the greeting.・ The greeting in your own voice can be recorded.・ It is advisable that the contents of recorded messages be separately written down in a notebook, etc.
Recorded data may be lost due to failure, repair, change of model or other handlings of FOMA terminal. If the data should be erased, DoCoMo assumes no responsibility for the loss of any data.
Menu 4611
Setting Answer Machine
1 Press C11 appears on the standby display.
■Canceling: C12
When Answer Machine has not been set to start, you can activate this function only once by holding down C for over a second while receiving a call. This operation does not set Answer Machine to start.
INFORMATION●When the number of recorded messages reaches 4, is indicated on the standby display. The icon does not
disappear even if Answer Machine is canceled.● If there are already 4 recorded messages, Answer Machine cannot be set. If you attempt to activate Quick Record
Message by holding down C for over a second while receiving a call, the warning tone (rapid beeps) sounds and the ring alert keeps sounding. Delete unnecessary recorded messages and set again.
Receiving a call while Answer Machine is set
1 A call is receivedAfter the ring alert sounds according to Greeting Response Time, the greeting message screen appears.・When the greeting message is set to Preinstalled, the caller hears the guidance “I cannot answer the
phone right now, please leave your name and message after the beep (in Japanese)”. Set Personalized to play a recorded guidance.
Default Deactivate
Replying with Quick Record Message
An
swer M
achin
e
Next
74
Makin
g/R
eceiving
Calls
2 Recording the caller’s message starts
3 When the recording is completed, the call is disconnected (with the number of recorded messages) is indicated.
INFORMATION●When FOMA terminal is turned off or outside the service area, Answer Machine does not operate. Use Voice Mail
Service (pay service).● Answer Machine does not operate and the ring alert keeps sounding when 4 messages have already been recorded. If
Voice Mail Service or Call Forwarding Service is activated, each service starts its operation.● Public mode (Driving mode) takes precedence over Answer Machine. In Public mode (Driving mode), Answer Machine
does not operate.● The recording may be disrupted or the screen may be distorted if the signal conditions are poor.● Another call received while playing the greeting or recording a message is rejected and playing or recording continues.
If Voice Mail Service, Call Forwarding Service or Call Waiting Service is subscribed, the rejected incoming call is recorded in the received call history.
● You can answer a call even while playing the greeting or recording a message. Press n to answer a voice call. For a videophone call, press n or t to answer by sending your image or a to answer by sending the substitute image. For a voice call, you can also answer the call by opening FOMA terminal. ☛P63 If the message is being recorded at this time, the contents before answering the call will not be recorded.
Menu 4613
Setting the response time until the greeting starts Greeting Response Time
1 C13
2 Enter the response time (0 to 120 seconds)・ To increase or decrease the entered values: %
INFORMATION●When Auto Answer, Voice Mail Service or Call Forwarding Service and this function are set simultaneously, the priority
depends on the ringing time set for each service and function. To give priority to Answer Machine, the response time for this function should be set shorter than the ringing times set for Auto Answer, Voice Mail Service and Call Forwarding Service. Note that Answer Machine may not be given priority depending on the signal conditions. In this case, answer a call with Quick Record Message.
● The delayed time of Auto Answer and the response time of Answer Machine cannot be set to the same time period.
Default 008 Sec.
Recording a voice call message
Recording a videophone call message
Indication of the allowable recording time
・ A beep announces the caller the start and end of the recording. And when about 25 seconds have elapsed since the start of recording, rapid beeps sound to indicate that the end of recording is approaching.
An
swer M
achin
e
75
Makin
g/R
eceiving
Calls
Menu 4614
Setting the greeting message Greeting Message Setting
You can record your own voice as greeting message.・ One greeting of up to about 10 seconds long can be recorded.
Setting a recorded greeting
1 C14
2 Select Greeting message field z 2・ To reset to the default greeting: 1 z Go to Step 4
3 Select Record in Edit message field z Speak a greeting message after a tone (beep)・ The operation procedure is the same as when recording the response hold guidance. ☛P69
4 Press p
INFORMATION● If you delete the recorded greeting, the default greeting is restored.
Menu 462
Playing recorded messages
You can play or delete recorded messages from the list.・ Unplayed recorded messages, if any, can be played quickly from the standby display. ☛P34
1 C2
Default Preinstalled
Example
On the recorded message list screen, the recording date and time and the caller’s phone number appear.
: Voice call message (unplayed) : Videophone call message (unplayed): Voice call message (played) : Videophone call message (played)
・ If the caller’s phone number is notified, it is displayed. If not, the reason for no caller ID is displayed. If the notified caller’s phone number is registered in the phonebook, the name is displayed.・When you have subscribed to the Multi Number service, the name of basic
number or additional number used by a received call is also displayed.
An
swer M
achin
e
Next
76
Makin
g/R
eceiving
Calls
2 Select a recorded message to play
3 Select whether to delete the played recorded message・ To delete the recorded message: Select Yes
・ During playback, the following operations are available:
■ Deleting: a Highlight a recorded message z m21・ To delete all: m22
b Select Yes
■ Registering an entry in the phonebook:a Highlight a recorded message z m4・ To add to an existing phonebook entry: m5
b 1 or 2 z Register the name or address ☛P95, P99・ To add to an existing phonebook entry: 1 or 2 z Select the party
z Edit the data ☛P107
■ Making a call: Highlight a recorded message z n (for voice call) or t (for videophone call)・ You can make calls by setting conditions. ☛P55
% :Adjust volume o:Stop
n:Speakerphone on/off (for voice call messages only)
Indication of the playing time
Playing a voice call message
An
swer M
achin
e
77
Making/Receiving Videophone Calls
Videophone .......................................................................................................78Making videophone calls .................................................................................78Receiving videophone calls .............................................................................81Using Chara-den ...............................................................................................83Setting images to be sent to the other party ..................................................83Customizing the display settings during a videophone call ........................87Changing the videophone settings ........................... Videophone Settings 88Setting of switching between a voice call and videophone call.................................................................................. Notify Switchable Mode 90Setting how incoming videophone calls are handled during i-mode................................................................................. Data Session Arrival Act 91Using the videophone by connecting to an external device ................................................................................................ External Device 92
78
Makin
g/R
eceiving
Vid
eop
ho
ne C
alls
Videophone
The videophone function is available between terminals that support DoCoMo’s videophone. By using the videophone, you can talk on the phone while looking each other images. It is also possible to display a still image, substitute image, Chara-den, etc. instead of your self image.
DoCoMo videophone specifications are compliant with “3G-324M*1 that has been standardized by the international standard 3GPP*2”. Note that the connection with videophones of different specifications cannot be established.
*1 3G-324M…An international standard for the 3rd generation mobile videophone.*2 3GPP (3rd Generation Partnership Project)…Area standardization organization established to develop the
standard technology specification for the 3rd generation mobile communications systems (IMT-2000).
・ The following 2 communication speeds are provided for the videophone:・64K: Connects at communication speed of 64 kbps. ・32K: Connects at communication speed of 32 kbps.
Screen display during a videophone call
Making videophone calls
・ International videophone calls are available by using the DoCoMo’s international call service “WORLD CALL”. ☛P56
1 Enter the phone number・ Do the same as you enter a number for a voice call.
*1 Displayed only on the caller’s terminal.
a Main screen Image of the other party is displayed by default.
b Communication speed
: 64K : 32K
c Speakerphone function
: On No icon: Off
d Sub screen Your image is displayed by default.
e Zoom to : Normal to 4x (out-camera only)
f Status : Sending your self image
: Sending the camera-off image
: Sending Chara-den : Sending a frame
: Sending a still image : On-hold
: On Response and Hold : Recording a message
: Recording a video memo
Action mode : Action : Action of parts
g Scene mode/effect
: Full auto, etc.The icons for other modes/effects ☛P85
h Quality of outgoing image
No icon: Normal : Prefer image quality: Prefer motion speed
i Sound/image sending and receiving status
: Sending and receiving sound
: Sending and receiving image
: Sending and receiving sound/image
j Videophone and voice call switching
No icon: Switching is not available. : Switching is available.*1
k Call duration Displayed in the HH:MM:SS format
d
a cb
k-e j
Vid
eop
ho
ne
79
Makin
g/R
eceiving
Vid
eop
ho
ne C
alls
2 t
3 Talk with the other party
4 Press f when you finish the call・ You can also end the call by closing FOMA terminal. To keep the call connected when you close FOMA
terminal, change the setting in Close Setting.
INFORMATION● You can also make a videophone call by performing in order of Steps 2, Step 1. A videophone call will be made
automatically about 5 seconds after you press t and enter the phone number.● You can make videophone calls by attaching Chaku-moji. ☛P53● You can make videophone calls by setting conditions. ☛P55●When Speakerphone is set to ON in Videophone Settings and Silent Mode is active, if you make a videophone call, a
confirmation screen appears asking whether to switch to the speakerphone call. Select Yes or No.● If a videophone call is not connected, one of the following messages appears on the screen and then the standby
display returns. Note that the displayed message may not reflect the status of the other party’s terminal correctly, depending on the type of the terminal or the network service used by the other party.
*1 The message may also appear when the other party is in packet communication, depending on his/her terminal.*2 As of August 2006, the message may also appear when the other party has activated Voice Mail Service.
Message DescriptionCheck number, then redial. You dialed the phone number not used.Busy. The other party is busy.*1
Out of service area/power off. The other party is outside the service area or the other party’s terminal is turned off.Set Caller ID to ON. This message appears in case of connecting without notifying the caller ID (when
accessing to V-Live or visualnet).Redial using voice call. This message appears when the other party has activated Call Forwarding Service
with the forwarding destination set to a terminal incompatible with videophone.*2
Busy with packet transmission. The other party is in packet communication.Connection failed. Set Caller ID Notification to Notify and dial again.
・ The message may appear in cases other than the above.
Your image is displayed while being connected.・ If the other party is busy, you will hear a busy signal. The message, Busy. or
Connection failed. appears on the screen. Press f to end the call and call again later. You can call back quickly by using Redial.・ Pressing t while being connected sends the substitute image set in Image
Setting. When the substitute image is set to Chara-den, Chara-den may not be displayed. If this happens, the default image for the substitute image setting is sent to the other party. ☛P89・ Charging begins when Connected to videophone. appears.
The other party’s voice comes out of the speaker (Speakerphone function).・ To put the call on hold: o・ To turn on/off the speakerphone function: a or n・ Depending on the other party’s settings, the substitute image may be
displayed.・ To disable turning on the speakerphone function automatically, change the
setting in Videophone Settings.
Makin
g vid
eop
ho
ne calls
Next
80
Makin
g/R
eceiving
Vid
eop
ho
ne C
alls
● If a videophone call is not connected, redialing is automatically performed as described below:
●When there is an incoming call while dialing a videophone call or redialing, the dialing may be interrupted and the ring alert may sound.
● Even if sending/receiving the voice or image is aborted and (voice only) or (image only) appears during a videophone call, the call may be continued.
●When you talk on a videophone call while a flat type earphone/microphone set with switch (optional) is connected, the voice sounds from the connected earphone/microphone regardless of the setting of Speakerphone in Videophone Settings.
● Please note that digital communication charges apply for videophone calls instead of voice call charges even if the substitute image or Chara-den is used.
● Videophone at 32K is intended for connection with devices such as PHS with which videophone calls at 64K may not be available depending on the network condition. When a videophone call is made at 64K, the call type is automatically switched to 32K when redialing if the communication environment of the other party is found to be 32K area. When ON is set for Auto redial as voice in Videophone Settings, redialing at 32K is also given priority. ☛P88・ Even if a call is made at 32K, the 64K digital communication charges will apply.
● If a videophone call is made to emergency calls (110, 119 or 118) from FOMA terminal while Auto redial as voice is set to ON in Videophone Settings, the call automatically switches to a voice call.
Switching from a videophone call to a voice call
You can switch to a voice call by operating from the submenu during a videophone call when the other party’s terminal can switch calls. Switching can be performed only from the terminal that made the videophone call.・ This operation can be performed between the terminals that support switching between voice call/videophone
call. ・ To switch to a voice call, the other party needs to set Indication ON of Notify Switchable Mode in advance.
☛P90
1 m1 during a videophone call z Select Yes
・ A guidance informing that the call is being switched is played during switching.・ Select No to return to the videophone talking screen.
INFORMATION● For precautions when switching between a voice call and videophone call, see INFORMATION in “Switching from a
voice call to a videophone call”. ☛P51● Switching from a voice call to a videophone call ☛P51
Call typeAuto redial as voice setting
Redialing operationWhen a videophone call is made by specifying a multi-number, redialing will be made with the specified number.When a videophone call with Chaku-moji is made, redialing will be made with the same Chaku-moji attached.If redialing as voice call occurs, voice call charges apply.
64K ON 64K → 32K → Voice callOFF 64K → 32K → Disconnection
32K ON 32K → Voice callOFF 32K → Disconnection
Makin
g vid
eop
ho
ne calls
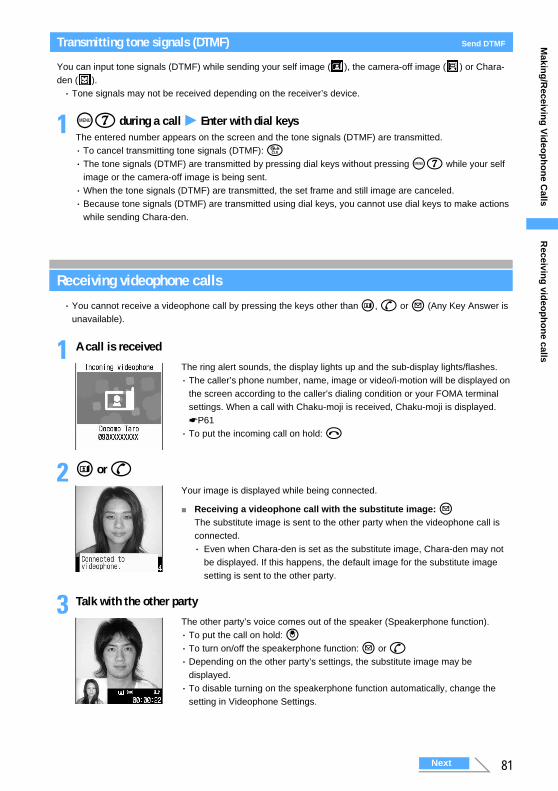
81
Makin
g/R
eceiving
Vid
eop
ho
ne C
alls
Transmitting tone signals (DTMF) Send DTMF
You can input tone signals (DTMF) while sending your self image ( ), the camera-off image ( ) or Chara-den ( ).・ Tone signals may not be received depending on the receiver’s device.
1 m7 during a call z Enter with dial keysThe entered number appears on the screen and the tone signals (DTMF) are transmitted.・ To cancel transmitting tone signals (DTMF): c・ The tone signals (DTMF) are transmitted by pressing dial keys without pressing m7 while your self
image or the camera-off image is being sent.・When the tone signals (DTMF) are transmitted, the set frame and still image are canceled.・ Because tone signals (DTMF) are transmitted using dial keys, you cannot use dial keys to make actions
while sending Chara-den.
Receiving videophone calls
・ You cannot receive a videophone call by pressing the keys other than t, n or a (Any Key Answer is unavailable).
1 A call is received
2 t or n
3 Talk with the other party
The ring alert sounds, the display lights up and the sub-display lights/flashes.・ The caller’s phone number, name, image or video/i-motion will be displayed on
the screen according to the caller’s dialing condition or your FOMA terminal settings. When a call with Chaku-moji is received, Chaku-moji is displayed. ☛P61・ To put the incoming call on hold: f
Your image is displayed while being connected.
■ Receiving a videophone call with the substitute image: aThe substitute image is sent to the other party when the videophone call is connected.・ Even when Chara-den is set as the substitute image, Chara-den may not
be displayed. If this happens, the default image for the substitute image setting is sent to the other party.
The other party’s voice comes out of the speaker (Speakerphone function).・ To put the call on hold: o・ To turn on/off the speakerphone function: a or n・ Depending on the other party’s settings, the substitute image may be
displayed.・ To disable turning on the speakerphone function automatically, change the
setting in Videophone Settings.
Receivin
g vid
eop
ho
ne calls
Next
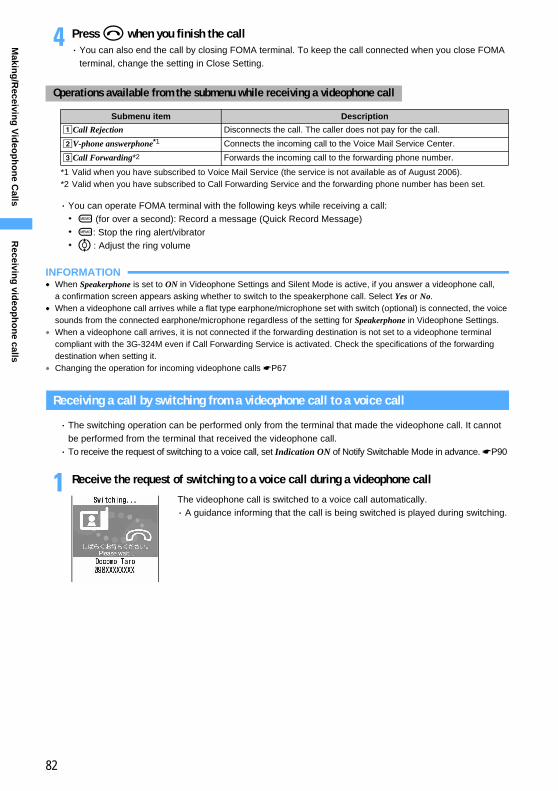
82
Makin
g/R
eceiving
Vid
eop
ho
ne C
alls
4 Press f when you finish the call・ You can also end the call by closing FOMA terminal. To keep the call connected when you close FOMA
terminal, change the setting in Close Setting.
*1 Valid when you have subscribed to Voice Mail Service (the service is not available as of August 2006).*2 Valid when you have subscribed to Call Forwarding Service and the forwarding phone number has been set.
・ You can operate FOMA terminal with the following keys while receiving a call:・C (for over a second): Record a message (Quick Record Message)・C: Stop the ring alert/vibrator・% : Adjust the ring volume
INFORMATION●When Speakerphone is set to ON in Videophone Settings and Silent Mode is active, if you answer a videophone call,
a confirmation screen appears asking whether to switch to the speakerphone call. Select Yes or No.●When a videophone call arrives while a flat type earphone/microphone set with switch (optional) is connected, the voice
sounds from the connected earphone/microphone regardless of the setting for Speakerphone in Videophone Settings. ●When a videophone call arrives, it is not connected if the forwarding destination is not set to a videophone terminal
compliant with the 3G-324M even if Call Forwarding Service is activated. Check the specifications of the forwarding destination when setting it.
● Changing the operation for incoming videophone calls ☛P67
Receiving a call by switching from a videophone call to a voice call
・ The switching operation can be performed only from the terminal that made the videophone call. It cannot be performed from the terminal that received the videophone call.・ To receive the request of switching to a voice call, set Indication ON of Notify Switchable Mode in advance. ☛P90
1 Receive the request of switching to a voice call during a videophone call
Operations available from the submenu while receiving a videophone call
Submenu item Description
aCall Rejection Disconnects the call. The caller does not pay for the call.
bV-phone answerphone*1 Connects the incoming call to the Voice Mail Service Center.
cCall Forwarding*2 Forwards the incoming call to the forwarding phone number.
The videophone call is switched to a voice call automatically.・ A guidance informing that the call is being switched is played during switching.
Receivin
g vid
eop
ho
ne calls
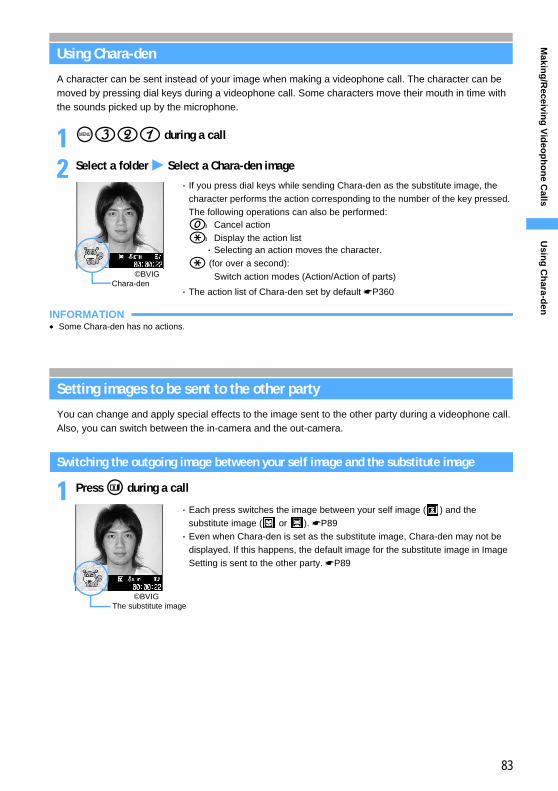
83
Makin
g/R
eceiving
Vid
eop
ho
ne C
alls
Using Chara-den
A character can be sent instead of your image when making a videophone call. The character can be moved by pressing dial keys during a videophone call. Some characters move their mouth in time with the sounds picked up by the microphone.
1 m321 during a call
2 Select a folder z Select a Chara-den image
INFORMATION● Some Chara-den has no actions.
Setting images to be sent to the other party
You can change and apply special effects to the image sent to the other party during a videophone call. Also, you can switch between the in-camera and the out-camera.
Switching the outgoing image between your self image and the substitute image
1 Press t during a call
・ If you press dial keys while sending Chara-den as the substitute image, the character performs the action corresponding to the number of the key pressed. The following operations can also be performed:
・ The action list of Chara-den set by default ☛P360
0:Cancel action(:Display the action list ・ Selecting an action moves the character.
( (for over a second):Switch action modes (Action/Action of parts)
Chara-den©BVIG
・ Each press switches the image between your self image ( ) and the substitute image ( or ). ☛P89・ Even when Chara-den is set as the substitute image, Chara-den may not be
displayed. If this happens, the default image for the substitute image in Image Setting is sent to the other party. ☛P89
The substitute image©BVIG
Usin
g C
hara-d
en
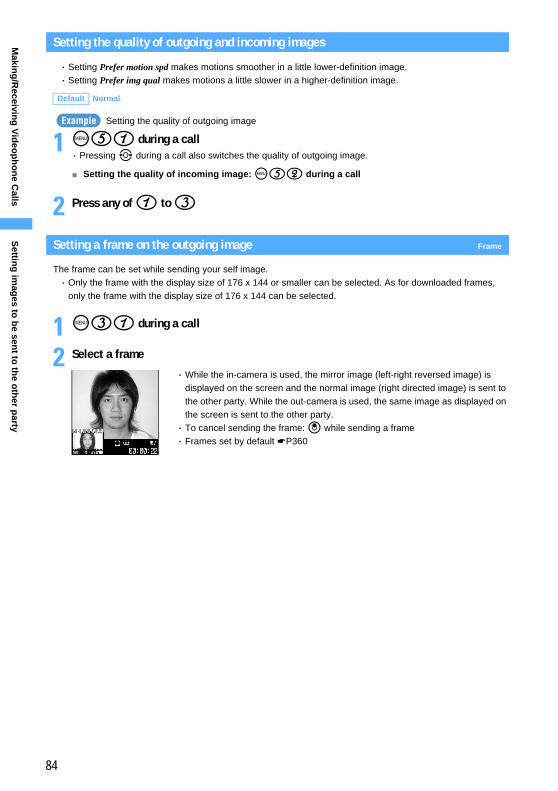
84
Makin
g/R
eceiving
Vid
eop
ho
ne C
alls
Setting the quality of outgoing and incoming images
・ Setting Prefer motion spd makes motions smoother in a little lower-definition image.・ Setting Prefer img qual makes motions a little slower in a higher-definition image.
Setting the quality of outgoing image
1 m51 during a call・ Pressing & during a call also switches the quality of outgoing image.
■ Setting the quality of incoming image: m52 during a call
2 Press any of 1 to 3
Setting a frame on the outgoing image Frame
The frame can be set while sending your self image.・ Only the frame with the display size of 176 x 144 or smaller can be selected. As for downloaded frames,
only the frame with the display size of 176 x 144 can be selected.
1 m31 during a call
2 Select a frame
Default Normal
Example
・While the in-camera is used, the mirror image (left-right reversed image) is displayed on the screen and the normal image (right directed image) is sent to the other party. While the out-camera is used, the same image as displayed on the screen is sent to the other party.・ To cancel sending the frame: o while sending a frame・ Frames set by default ☛P360
Settin
g im
ages to
be sen
t to th
e oth
er party
85
Makin
g/R
eceiving
Vid
eop
ho
ne C
alls
Applying special effects to outgoing image Scene Mode/Effect
・ This setting can be changed only while sending your self image.
1 m21 during a call
2 Press any of 1 to 6
Adjusting the brightness/color density of outgoing image Camera Setting
You can adjust the brightness and color density in 5 levels.・ This setting can be changed only while sending your self image.・ This setting is retained even after the call is finished.
1 m22 during a call z Highlight Brightness slider z &
2 d to highlight Density slider z & z p・ Your self image is displayed on the main screen while adjusting. You can check the change of brightness
or color density as you shift the slider’s position.・ If you do nothing on the terminal for some time after changing the slider’s position, the settings are not
changed and the talking screen reappears.
Default Full auto
Default Brightness: level 3 Density: level 3
・ You can apply the following effects to outgoing images.
Item Icon Description
aFull auto Sends standard images.
bAdjust backlight Used when shooting subjects against the light (available with the out-camera only).
cSepia Used for shooting in sepia colors.
dMonochrome Used for shooting in black and white.
eTwilight Used when shooting subjects in the sunset.
fSurf&Snow Suitable for shooting sea or snow with light reflection.
Current effect applied
Settin
g im
ages to
be sen
t to th
e oth
er party
86
Makin
g/R
eceiving
Vid
eop
ho
ne C
alls
Sending the still image/camera-off image
Select a still image or the image displayed as Camera off (camera-off image).・ This setting is not available while a frame is being sent. ☛P84・ Only the still image that is 176 x 144 or smaller and is permitted to output from FOMA terminal can be set.
1 m3 during a call z Select an item■ Sending the camera-off image: 3・When the camera-off image is set, the substitute image set in Image Setting is sent.
However, if Chara-den is set as the substitute image, the default image (camera-off image) is sent.
■ Sending a still image:
Switching the in-camera and out-camera
・ Available only while your self image is being sent.
1 Press m4 during a callThe image through the selected camera is sent.
INFORMATION●When taking and sending the image of an object about 7 to 10 cm away with the out-camera, turn the macro mode on.
☛P168
Default in-camera
a 4 z Select a folderb Select a still image・ To view a still image: Highlight a still image z p・ To send the previous image: o while sending a still image
・ Each press switches between the in-camera and out-camera.・ Even if you switch the cameras, the frame and the
brightness/color density settings of outgoing image are kept.
In-camera selected Out-camera selected
Settin
g im
ages to
be sen
t to th
e oth
er party
87
Makin
g/R
eceiving
Vid
eop
ho
ne C
alls
Switching display magnifications Zoom
・ Available only while your self image is being sent using the out-camera.
1 Press % during a call・ Each press of u switches the magnification of image as follows. Press d to switch in the reverse
order.Normal ( ) → 2x ( ) → 4x ( )
INFORMATION● Zooming will be canceled if you switch to the in-camera.
Customizing the display settings during a videophone call・ The settings are retained even after the call is finished.
1 Press p during a call・ Each press switches the images on the main screen and sub screen by turns.
1 Hold down p for over a second during a call・ Each press switches the screen size in the following order: large → standard → small → large → .
1 m6 during a call
2 Select each item to set・ For setting each item (Display setting, Sub screen, Screen size and Display light), follow Step 2 in “Changing
the videophone settings”. ☛P88
3 Press p
Default normal ( )
Switching between the main screen and sub screen
Default Main screen image: other party’s image Sub screen image: your self image
Main screen: other party’s image Main screen: your self imageSub screen: your self image Sub screen: other party’s image
Changing the main screen size
Default large
Setting the screen displayed during a call Videophone Settings during a call
Default Display setting: Both sides Sub screen: My side Screen size: Large Display light: Always on(normal)
…
Cu
stom
izing
the d
isplay settin
gs d
urin
g a vid
eop
ho
ne call
88
Makin
g/R
eceiving
Vid
eop
ho
ne C
alls
Changing the videophone settings Videophone Settings
Set the operation to be performed when a videophone call is not connected, the screen displayed during a videophone call, etc.・ The auto redial as voice function is provided to ensure access to the other party. By setting this function to
ON, a dialed videophone call will be automatically redialed as voice call if the other party’s terminal does not support the videophone function or cannot receive the videophone call while using the mova service through Dual Network Service. Redialing does not occur, however, if you call an ISDN-sync 64 kbps or PIAFS access point, or an ISDN videophone incompatible with 3G-324M (as of August 2006), or if you dial the wrong number. Note that some calls may require the call charge.
1 m873
2 Select each item to set
3 Press p
INFORMATION● Even when Auto redial as voice is set to ON, redialing may not be performed depending on the situation of the other party
or the network.●When Auto redial as voice is set to ON, if you make a videophone call during a packet communication with a PC
connected, the call is redialed as voice call without connecting to a videophone call. During a voice call or 64K data communication, the call is not connected to a videophone call and redialing is not performed, either.
● If redialing as voice call occurs with Auto redial as voice set to ON, voice call charges apply instead of digital communication charges.
●When Speakerphone is set to ON and Silent Mode is active, if you make a videophone call, a confirmation screen appears asking whether to switch to the speakerphone call. Select Yes or No.
Default Auto redial as voice: OFF Display setting: Both sides Sub screen: My side Screen size : LargeVisual preference: Normal Display light: Always on(normal) Speakerphone: ON
Auto redial as voice:Sets whether to redial as voice call automatically when a videophone call is not connected.
Display setting :Specifies whether to display either your self image or the other party’s image or both images during a videophone call.・ If you set other than Both sides, Sub screen cannot be set.
Sub screen :Specifies whether to display your self image or the other party’s image on the sub screen during a videophone call.
Screen size :Sets the main screen view size.
Visual preference :Sets the quality of outgoing image.
Display light :Sets the display light during a videophone call.・When Terminal settings is set, the setting of Display light time (Normal use) in Display
Light Setting (☛P132) applies.
Speakerphone :Specifies whether to turn on the speakerphone function automatically once a videophone call is connected.
Vid
eop
ho
ne S
etting
s
89
Makin
g/R
eceiving
Vid
eop
ho
ne C
alls
Menu 8234
Setting the images to be displayed during a videophone call Image Setting
Change the images to be sent to the other party during a videophone call such as the substitute image, answer machine image, response hold image, on-hold image and video memo image.・ You cannot set the following images:・Still image with a size larger than 176 x 144 ・Animation and Created animation・Still image in the format other than JPEG and GIF・Image not permitted to output from FOMA terminal
1 m875
2 1 z Select Image field
■ Setting other still images:a4 z Select Select image (from List images) z Select a folderbSelect a still image・ To display a still image: Highlight a still image z p・ The selected image with the text message on it appears on the other party’s terminal.
3 Press p
INFORMATION● If the Chara-den set as the substitute image is deleted, the substitute image is reset to Default Chara-den. If the still
image or the default Chara-den is deleted, the substitute image is reset to Default image.
Setting the substitute image
Default Default Chara-den
■ Setting the default Chara-den: 1Default Chara-den (Dimo) is set.
■ Setting the default still image: 2Default image (camera-off image) is set.
■ Setting other Chara-den:a 3 z Select Select image (from List images) z Select
a folderb Select a Chara-den image・ To display Chara-den: Highlight a Chara-den image z
p
Chara-den©BVIG
Vid
eop
ho
ne S
etting
s
Next
90
Makin
g/R
eceiving
Vid
eop
ho
ne C
alls
1 m875
2 2 to 5 z Select Image field
3 Press p
Setting of switching between a voice call and videophone call Notify Switchable Mode
Set whether to notify the other party’s terminal that your terminal can switch between a voice call and a videophone call.・ You cannot change the setting during a voice call or videophone call.・ This setting cannot be made outside the service area. Operate the terminal in locations with good radio
wave condition.
1 m8771■Deactivating: m8772■Checking the current setting: m8773
2 Select Yes
Changing the answer machine/response hold/on-hold/video memo images
Default Answer machine image, Response hold image, On-hold image, Movie memo image: Default
Default Indication ON: active
■ Setting the default still image: 1The default image is set.
■ Setting other still images:a 2 z Select Select image (from List images) z Select a folderb Select a still image・ To display a still image: Highlight a still image z p・ The selected image with the text message on it appears on the other
party’s terminal.In case of the answer
machine imageNo
tify Sw
itchab
le Mo
de
91
Makin
g/R
eceiving
Vid
eop
ho
ne C
alls
Setting how incoming videophone calls are handled during i-mode Data Session Arrival Act
Videophone calls can be received during i-mode packet communication.
1 m874
2 Press any of 1 to 4
*1 The service is not available as of August 2006.
INFORMATION● Voice Mail Service and Call Forwarding Service are optional subscriber services. Without subscription, even if you set
V.phone answerphone or Call forwarding, the action of Packet DL priority takes place.● If Voice Mail Service or Call Forwarding Service is activated and the ringing time for each service is set to 0 second,
either service starts its operation, regardless of this setting. Incoming calls are not registered in the received call history.
Default V.phone priority
V.phone priority :Receives a videophone call. When the call is answered, the current packet communication is disconnected.
Packet DL priority :Rejects an incoming videophone call and continues the packet communication.
V.phone answerphone:Connects an incoming videophone call to the Voice Mail Service Center.*1
Call forwarding :Forwards an incoming videophone call to the forwarding phone number.
Data S
ession
Arrival A
ct
92
Makin
g/R
eceiving
Vid
eop
ho
ne C
alls
Using the videophone by connecting to an external device External Device
By connecting FOMA terminal to an external device such as PC by the FOMA USB cable (optional), you can make and receive videophone calls from the external device.To use this function, install a videophone application in a dedicated external device or a PC, and prepare devices such as an earphone/microphone or USB-compatible Web camera (available in market).・ This function is not available when FOMA terminal is not connected to an external device.・ Refer to the instruction manual of external devices for hardware requirements or setting/operating
instructions of videophone applications.・ The application called “ドコモテレビ電話ソフト 2005 (DoCoMo videophone software 2005)” that is
compatible with this function is available on the DoCoMo videophone software website. Visit the site below and download it (visit the support website for details of the environment for usage on PC):
1 m876
2 Press 1 or 2
INFORMATION● A videophone call cannot be made from an external device during a voice call.●When Call Waiting Service is subscrided, if a videophone call is received through an external device during a voice call,
it is recorded as a missed call in the received call history. The same applies when a voice call, videophone call or 64K data communication is received during a videophone call using an external device.
http://videophonesoft.nttdocomo.co.jp/ (in Japanese only)
Default Terminal
Base station
FOMA network
FOMA videophone communication speed: 64K or 32K
Extern
al Device
93
PhonebookPhonebooks supported by FOMA terminal ....................................................94Registering entries into the FOMA terminal phonebook ..................................................................................... Phonebook New Entry 95Registering entries into the UIM phonebook ............................................................................. UIM Phonebook New Entry 99Setting group names and incoming/outgoing actions ...... Group Setting 100Making calls from the phonebook .............................. Phonebook Search 101Editing phonebook entries .............................................. Edit Phonebook 107Copying phonebook entries ..........................................................................109Deleting phonebook entries ........................................ Delete Phonebook 110Saving the phonebook data to the Data Center .....Data Security Service 110Setting functions for phonebook entries .....................................................110Protecting the secret phonebook entries ........................ Secret Attribute 112Checking the number of registered phonebook entries........................................................................................ Check No. of Items 113Using simple dialing to make calls ........................................... Quick Dial 113Using Data Security Service ................................... Data Security Service 114
94
Ph
on
ebo
ok
Phonebooks supported by FOMA terminal
FOMA D702iF supports the FOMA terminal phonebook and UIM phonebook. ・ The items that can be registered in the FOMA terminal phonebook and UIM phonebook are as follows:
*1 The number of items that can be registered may be decreased depending on the type of data registered.*2 The following settings are available:
Birthday, note, postal code/address, company name, job title and URL*3 Ring alert, vibrator, lighting pattern and lighting color for incoming calls or mails can be set. In settings for incoming
calls, the substitute image for videophone can also be set. In addition, the settings for incoming/outgoing calls by groups are available.
○: Available ×: Not available
Item FOMA terminal phonebook UIM phonebookThe number of entries Up to 700*1 Up to 50Entry items
Phonebook No. ○ ×Name/reading Up to 32 one-byte or 16 two-byte
characters for name and up to 32 one-byte characters for reading can be set.
Up to 21 one-byte or 10 two-byte characters for name and up to 25 one-byte or 12 two-byte characters for reading can be set.
Image/video 1 entry per person ×Group Entries can be classified into 30 groups
and グループなし (No group).Entries can be classified into 10 groups and グループなし.
Phone number/icon Up to 5 phone numbers per person, 2,105 in total*1 can be set. An icon can be set for each.
Only one phone number can be set per person. Icons cannot be set.
Mail address/icon Up to 5 mail addresses per person, 2,105 in total*1 can be set. An icon can be set for each.
Only one mail address can be set per person. Icons cannot be set.
Other settings*2 ○ ×Phonebook Search
Show All Names ○ ○Group Search ○ ○Name Search ○ ○Ranking Search ○ ×Ph Book No. Search ○ ×Number Search ○ ○Secrecy Search ○ ×
Various settingsAlert by Contact*3 ○ ×Secret Attribute ○ ×Caller ID Setting ○ ×Reject/Accept Call ○ ×Secret Code ○ ×Connection Speed ○ ×
OthersChanging order of phone numbers, mail addresses and phonebook Nos.
○ ×
Quick Dial ○ ×Quick Mail ○ ×Mail Search ○ ○Site display ○ ×Send Ir Data ○ ○Data Security Service ○ ×
Ph
on
ebo
oks su
pp
orted
by F
OM
A term
inal
95
Ph
on
ebo
ok
95
If a call is made/received to/from a party registered in the FOMA terminal phonebook or UIM phonebook, the name and the phone number registered in the phonebook appears on the screen displayed while dialing, calling, talking or receiving a call. In addition, the name registered in the phonebook is also displayed in the redial data, received call history, recorded messages, senders of received mail, addresses of sent/unsent mail, custom menu’s person, etc. It is also displayed when you enter the phone number or mail address without searching the phonebook.・When phonebook entries of different names with the same phone number/mail address are registered in
both phonebooks, the name registered in the FOMA terminal phonebook is displayed.・ In case some different names are registered for the same phone number or mail address in the FOMA
terminal phonebook, the name registered first is displayed.・When a mail is received, if the mail address including the @ and the following domain name exactly
matches a mail address registered in the phonebook, the settings of the phonebook take precedence and the name registered in the phonebook is displayed. Note that in case i-mode terminal is used by sender, even when the mail address is registered in the phonebook without the domain name “@docomo.ne.jp”, the settings of the phonebook take precedence and the name registered in the phonebook is displayed. When the mail address is “mobile phone number @docomo.ne.jp”, register in the phonebook without “@docomo.ne.jp”.・When SMS is received and the phone number exactly matches a phone number registered in the
phonebook, the settings of phonebook take precedence.・ If there is an incoming mail from the other party saved in the phonebook, the name registered in the
phonebook is displayed as ticker on the task bar. Note that if mail is received from the other party with Secret Attribute set while not in Secret Mode, the mail address is displayed on the task bar.
Registering entries into the FOMA terminal phonebook Phonebook New Entry
・Maximum number of items that can be registered ☛P94・ It is recommended that you keep a separate written record of all the information you register in the
phonebook. If you have a PC, you can use the data link software and the FOMA USB cable (optional) to send data to the PC. Also, if you have subtracted to Data Security Service (charges apply), you can save the data to the Data Center.・ Registered data may be lost due to failure, repair, change of model or other handlings of FOMA terminal.
DoCoMo assumes no responsibility for accidentally erased data.・ Please be informed that if you copy the data registered in FOMA terminal to a new terminal at a DoCoMo
Shop when switching to a new model, etc., the specifications of some new models may not allow copying of the data.
1 m42
2 Enter the name (Up to 32 one-byte or 16 two-byte characters) z p
Name displays
・ Kanji, hiragana, katakana, alphabetic and numeric characters, symbols and pictograms can be entered. However, symbols and pictograms entered may not appear correctly if transferred by infrared communication, etc.・ If a name is not entered, the entry cannot be registered.
Next
Ph
on
ebo
ok N
ew E
ntry
96
Ph
on
ebo
ok
3 Select each item to set
Phonebook No. :The lowest available phonebook No. is assigned automatically.
■ Changing the phonebook No.: Enter a number (0 to 699) ・ Zeroes before single- or double-digit phonebook No. can be omitted.
Name :Check the name.
■ Correcting the name: Select the name field z Correct the name z pReading :Check the reading.
■ Correcting the reading: Select the reading field z Correct the reading (up to 32 one-byte characters)・ If you correct the name, the changes will not be automatically reflected to the
reading of the name.
Select/Shoot image:Set an image or a video/i-motion file that is displayed when a call is made/received or the phonebook data is checked.Select Select/Shoot image field and operate as follows:
■ Setting an image: 1 z Select a folder z Select an image・ If an image with horizontal and vertical (or vertical and horizontal) sizes exceeding
640 x 480 is selected, a confirmation screen appears asking whether to save the reduced image. If you select Yes and set the image, the image of which size is reduced to 96 x 72 (phonebook) or smaller is saved. ・When a call is made/received or the phonebook data is checked, for animation,
the playing image is displayed and for Created animation, the first image is displayed.
■ Shooting a still image with Camera to set: 2 z Shoot the still image z o・ The size of a still image is set to 96 x 72 (phonebook) automatically.
■ Setting video/i-motion: 3 z Select a folder z Select video/i-motion・ You can set video/i-motion with only images when the size is set to 128 x 96 (Sub-
QCIF) or 176 x 144 (QCIF).・ Playing and checking a video/i-motion file when selecting ☛P117・When a call is made, the first frame of the video/i-motion is displayed.
■ Recording video with Movie Camera to set: 4 z Shoot video z o・ The size of a video is set to 176 x 144 (QCIF) automatically. Sounds are not
recorded.
■ Restoring the default setting: 5Group :Select a group. グループなし (No group) is set by default.
Group Setting ☛P100
■ Adding the groups: Select the group field z a z Enter the name of the group (Up to 20 one-byte or 10 two-byte characters) z p ・ Other than グループなし, up to 30 groups can be registered.
Phone number:Enter the phone number including the area code (up to 26 digits) and select an icon.・ Up to 5 phone numbers per person can be registered. Saving the first phone number
displays items to be added.・ Pause (P), timed pause (T), “ + ”, “ # ” and sub-address delimiter ( ) can be registered.
・ Press & to switch the pages.
Phonebook No., name and reading
Ph
on
ebo
ok N
ew E
ntry
97
Ph
on
ebo
ok
97
4 Press p・When a phonebook No. that has already been used to save information is specified, a confirmation screen
appears asking whether to overwrite. Select New entry not to overwrite and specify another phonebook No.
INFORMATION● A phone number saved in the phonebook with preceding “184” or “186” does not allow sending of SMS even if it is
selected as the address. In addition, if a party whose mail address is “mobile phone [email protected]” is saved in the phonebook with preceding “184” or “186”, no i-mode Mail can be sent to the address.
● For saving mail addresses of i-mode terminals, the domain name “@docomo.ne.jp” of the addresses can be omitted, however, it is recommended to save the whole addresses including “@docomo.ne.jp”. ・ For saving mail addresses of i-mode terminals as chat members, save the whole addresses including “@docomo.ne.jp”.・When receiving mail, if a mail address of incoming mail including the@ and the following domain name does not
match a mail address registered in the phonebook completely, the settings specified for the phonebook data or group is not used. However, in case of a mail address of i-mode terminal, the settings specified is available without “@docomo.ne.jp”.
Mail address :Up to 50 one-byte characters can be entered. Select an icon.・ Up to 5 addresses per person can be registered. Saving the first mail address
displays items to be added.・When the other party has registered a secret code ☛P111
Birthday :Set Set birthday to ON and enter the birthday in the Birthday field.
Note :Up to 200 one-byte or 100 two-byte characters can be entered.
PostalCode/Address:Up to 7 digits can be entered for postal code. And up to 200 one-byte or 100 two-byte characters can be entered for address.
Company name:Up to 100 one-byte or 50 two-byte characters can be entered.
Job title :Up to 100 one-byte or 50 two-byte characters can be entered.
URL :Up to 256 one-byte characters can be entered.
Ph
on
ebo
ok N
ew E
ntry
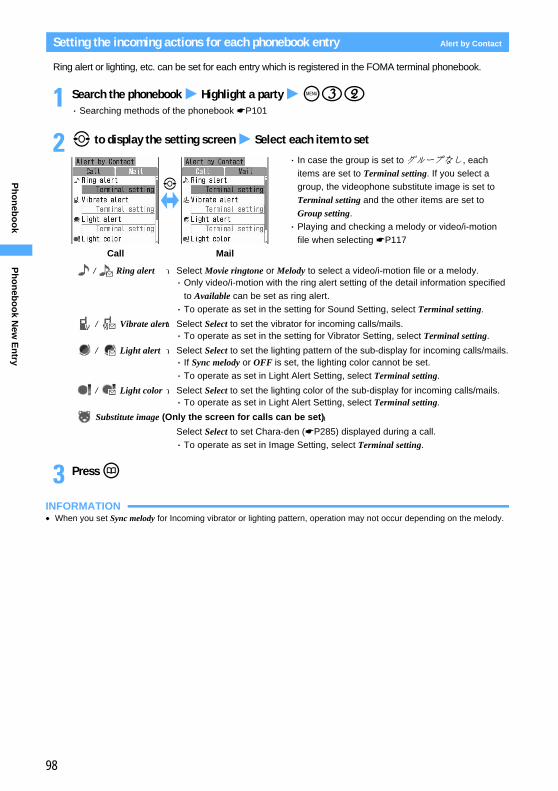
98
Ph
on
ebo
ok
Setting the incoming actions for each phonebook entry Alert by Contact
Ring alert or lighting, etc. can be set for each entry which is registered in the FOMA terminal phonebook.
1 Search the phonebook z Highlight a party z m32・ Searching methods of the phonebook ☛P101
2 & to display the setting screen z Select each item to set
3 Press p
INFORMATION●When you set Sync melody for Incoming vibrator or lighting pattern, operation may not occur depending on the melody.
/ Ring alert :Select Movie ringtone or Melody to select a video/i-motion file or a melody.・ Only video/i-motion with the ring alert setting of the detail information specified
to Available can be set as ring alert.・ To operate as set in the setting for Sound Setting, select Terminal setting.
/ Vibrate alert:Select Select to set the vibrator for incoming calls/mails.・ To operate as set in the setting for Vibrator Setting, select Terminal setting.
/ Light alert :Select Select to set the lighting pattern of the sub-display for incoming calls/mails.・ If Sync melody or OFF is set, the lighting color cannot be set.・ To operate as set in Light Alert Setting, select Terminal setting.
/ Light color :Select Select to set the lighting color of the sub-display for incoming calls/mails.・ To operate as set in Light Alert Setting, select Terminal setting.
Substitute image (Only the screen for calls can be set):Select Select to set Chara-den (☛P285) displayed during a call.・ To operate as set in Image Setting, select Terminal setting.
Call Mail
&
・ In case the group is set to グループなし, each items are set to Terminal setting. If you select a group, the videophone substitute image is set to Terminal setting and the other items are set to Group setting.・ Playing and checking a melody or video/i-motion
file when selecting ☛P117
Ph
on
ebo
ok N
ew E
ntry
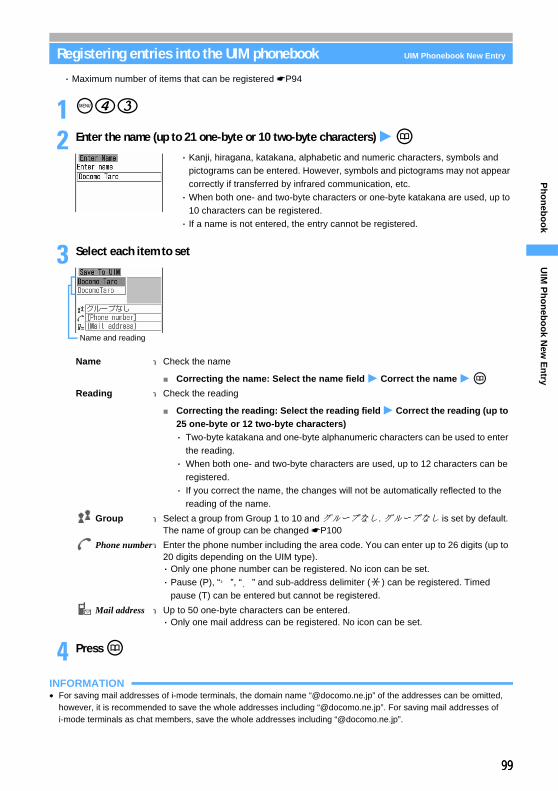
99
Ph
on
ebo
ok
99
Registering entries into the UIM phonebook UIM Phonebook New Entry
・Maximum number of items that can be registered ☛P94
1 m43
2 Enter the name (up to 21 one-byte or 10 two-byte characters) z p
3 Select each item to set
4 Press p
INFORMATION● For saving mail addresses of i-mode terminals, the domain name “@docomo.ne.jp” of the addresses can be omitted,
however, it is recommended to save the whole addresses including “@docomo.ne.jp”. For saving mail addresses of i-mode terminals as chat members, save the whole addresses including “@docomo.ne.jp”.
Name :Check the name
■ Correcting the name: Select the name field z Correct the name z pReading :Check the reading
■ Correcting the reading: Select the reading field z Correct the reading (up to 25 one-byte or 12 two-byte characters)・ Two-byte katakana and one-byte alphanumeric characters can be used to enter
the reading.・ When both one- and two-byte characters are used, up to 12 characters can be
registered.・ If you correct the name, the changes will not be automatically reflected to the
reading of the name.
Group :Select a group from Group 1 to 10 and グループなし. グループなし is set by default. The name of group can be changed ☛P100
Phone number:Enter the phone number including the area code. You can enter up to 26 digits (up to 20 digits depending on the UIM type).・ Only one phone number can be registered. No icon can be set.・ Pause (P), “+”, “#” and sub-address delimiter ( ) can be registered. Timed
pause (T) can be entered but cannot be registered.
Mail address :Up to 50 one-byte characters can be entered.・ Only one mail address can be registered. No icon can be set.
・ Kanji, hiragana, katakana, alphabetic and numeric characters, symbols and pictograms can be entered. However, symbols and pictograms may not appear correctly if transferred by infrared communication, etc.・When both one- and two-byte characters or one-byte katakana are used, up to
10 characters can be registered.・ If a name is not entered, the entry cannot be registered.
Name and reading
UIM
Ph
on
ebo
ok N
ew E
ntry
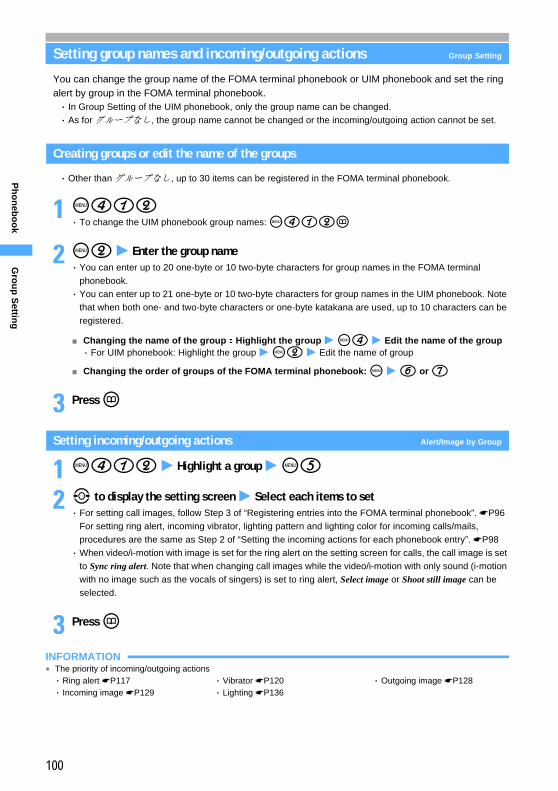
100
Ph
on
ebo
ok
Setting group names and incoming/outgoing actions Group Setting
You can change the group name of the FOMA terminal phonebook or UIM phonebook and set the ring alert by group in the FOMA terminal phonebook.・ In Group Setting of the UIM phonebook, only the group name can be changed.・ As for グループなし, the group name cannot be changed or the incoming/outgoing action cannot be set.
Creating groups or edit the name of the groups
・ Other than グループなし, up to 30 items can be registered in the FOMA terminal phonebook.
1 m412・ To change the UIM phonebook group names: m412p
2 m2 z Enter the group name・ You can enter up to 20 one-byte or 10 two-byte characters for group names in the FOMA terminal
phonebook.・ You can enter up to 21 one-byte or 10 two-byte characters for group names in the UIM phonebook. Note
that when both one- and two-byte characters or one-byte katakana are used, up to 10 characters can be registered.
■Changing the name of the group:Highlight the group z m4 z Edit the name of the group・ For UIM phonebook: Highlight the group z m2 z Edit the name of group
■Changing the order of groups of the FOMA terminal phonebook: m z 6 or 7
3 Press p
Setting incoming/outgoing actions Alert/Image by Group
1 m412 z Highlight a group z m5
2 & to display the setting screen z Select each items to set・ For setting call images, follow Step 3 of “Registering entries into the FOMA terminal phonebook”. ☛P96
For setting ring alert, incoming vibrator, lighting pattern and lighting color for incoming calls/mails, procedures are the same as Step 2 of “Setting the incoming actions for each phonebook entry”. ☛P98・When video/i-motion with image is set for the ring alert on the setting screen for calls, the call image is set
to Sync ring alert. Note that when changing call images while the video/i-motion with only sound (i-motion with no image such as the vocals of singers) is set to ring alert, Select image or Shoot still image can be selected.
3 Press p
INFORMATION● The priority of incoming/outgoing actions・ Ring alert ☛P117 ・ Vibrator ☛P120 ・ Outgoing image ☛P128・ Incoming image ☛P129 ・ Lighting ☛P136
Gro
up
Settin
g
101
Ph
on
ebo
ok
101
Deleting the group of FOMA terminal phonebook
If you delete a group, all the phonebook entries registered in the group are also deleted.・ The phonebook entries with Secret Attribute are also deleted.・When you select グループなし, only the phonebook entries are deleted, but not the group.
1 m412 z Highlight a group z m3
2 Enter the terminal security code z Select Yes
Menu 41
Making calls from the phonebook Phonebook Search
You can make a call easily by calling the other party’s phonebook data from the FOMA terminal phonebook or UIM phonebook.・ The phonebook data can be called by specifying the following search methods.
*1 Cannot be used in the UIM phonebook.・ You can specify the searching method displayed by pressing p on the standby display. ☛P105・ Also you can change the searching method by pressing m and selecting Search criteria from the phonebook list.・ In the searching method also available in the UIM phonebook, each press of p switches the FOMA
terminal phonebook list and the UIM phonebook list.・ The UIM phonebook list indicates in front of each entry name.
1 p
2 Highlight a party z Press n・ To make a videophone call: Highlight a party z t・When multiple phone numbers are registered, select a phone number.・When you operate on the details screen, highlight a phone number and press any of n, o, or t.
■Composing i-mode Mail: Highlight a party z a・When multiple mail addresses have been registered, select a mail address.・ Composing and sending i-mode Mail ☛P206・ In the details screen, highlight a mail address and press o or a.・ You can also operate in the same way on the user information screen. The mail address registered
first is set as the address.・ Operation is available in case the mail address is registered.
・Show All Names ☛P102 ・Group Search ☛P103 ・Name Search ☛P103・Ranking Search*1 ☛P103 ・Ph Book No. Search*1 ☛P104 ・Number Search ☛P104・Column Search ☛P105 ・Secrecy Search*1 ☛P112
The first time you use the search method, the phonebook list by showing all names (Japanese syllabary order) is displayed. In case that the searching method is specified, the phonebook list is displayed by the specified method.Icon set for the first phone number
Number of phone numbers and mail addresses registered in the highlighted entry
The first phone number registered in the highlighted entry (The part that cannot be displayed will be omitted.)
Show All Names
Ph
on
ebo
ok S
earch
Next
102
Ph
on
ebo
ok
■Composing SMS: Highlight a party z a (for over a second)・When multiple phone numbers have been registered, select a phone number.・ Composing and sending SMS ☛P240・ In the details screen, highlight a phone number and press a.・ You can also operate in the same way on the user information screen. The phone number registered
first is set as the address.・ Operation is available in case the phone number is registered. ・ You can also operate in the same way by pressing a in case the mail address is not registered.
■Displaying sites: Select a party z & to highlight a URL z o
Searching received mail from the FOMA terminal phonebook
1 p
2 Highlight a party z Press m151
INFORMATION● You can make a call with conditions set. ☛P55
Displaying the phonebook data in order of Japanese syllabary Show All Names
The phonebook data is displayed in the order of Japanese syllabary as shown below: Line あ (a)→ line か (ka)→ line さ (sa)→…→ 他 (others) including alphabets, numbers, readings which start with blank, symbols and no reading.
1 m411
2 & to select the line・ Pressing 0 to 9, ( or # instead of & displays the line to which the dial key is assigned. For
example, pressing 1 displays line あ. To display other than Japanese syllabary, press ( or #.
Searching mail
Example
Received mails from the party highlighted are listed.・ For reading received/sent mail ☛P223・ To return to the phonebook list: c or m0・ Operation is also available after the mail address or the phone number is
highlighted from the details screen.・ In case of the UIM phonebook, highlight a party and press m141 for
received mail and for sent mail, press m142.
■ To search sent mail: Highlight a party z m152
Ph
on
ebo
ok S
earch
103
Ph
on
ebo
ok
103
Searching by group Group Search
・ Phonebook entries registered without specifying group are saved under グループなし.
1 m412
2 Select a group
Searching by name Name Search
Enter a name to search for the entries that start with the first character of the entered name.
1 m413
2 Enter a name z Press p
Searching by the call or mail frequency rank Ranking Search
The phonebook data saved in the FOMA terminal phonebook can be sorted by the number of calls that took place (Call frequency rank) or by the number of i-mode Mail sent or received (Mail frequency rank).・ The total number of calls and mails are displayed up to 9999.・ Counting is also available in case a phone number or mail address registered in the phonebook is entered directly.
Displaying call frequency rank
1 Press m4141
・ The entries in the group are displayed in the following order:1. Japanese syllabary order
2. Alphabetical order 3. Numbers
4. Entries starting with blank 5. Symbols
6. No reading
・ You can search for the entry by entering the first part of the name. Also, even if you enter nothing, entries are searched.
Example
・ The total number of calls is the number of calls made or received up to the present after the purchase or the last reset. Counting is started with the call made or received after the phonebook data is saved in the FOMA terminal phonebook.
■ Displaying mail frequency rank: m4142・ The total number of mails is the number of mails sent or received up to the
present after the purchase or the last reset. Counting is started with the i-mode Mail sent or received after the phonebook data is saved in the FOMA terminal phonebook.
Total number of calls
Ph
on
ebo
ok S
earch
Next
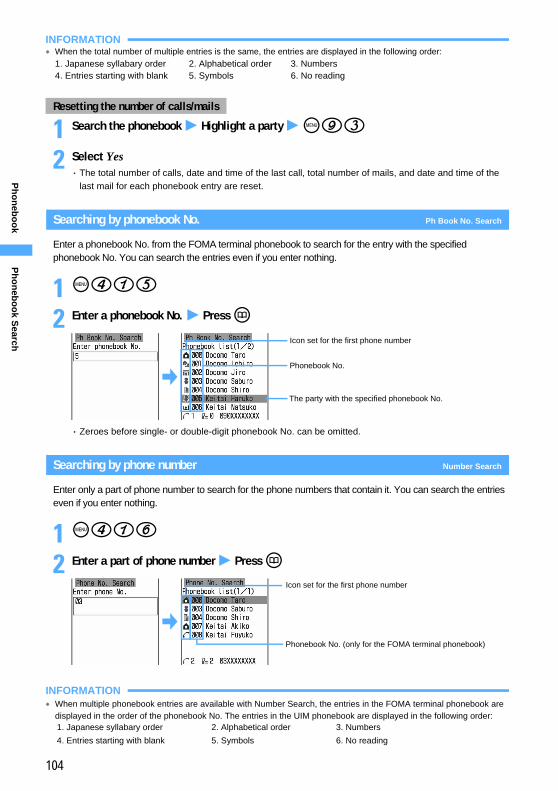
104
Ph
on
ebo
ok
INFORMATION●When the total number of multiple entries is the same, the entries are displayed in the following order:
1. Japanese syllabary order 2. Alphabetical order 3. Numbers4. Entries starting with blank 5. Symbols 6. No reading
1 Search the phonebook z Highlight a party z m93
2 Select Yes・ The total number of calls, date and time of the last call, total number of mails, and date and time of the
last mail for each phonebook entry are reset.
Searching by phonebook No. Ph Book No. Search
Enter a phonebook No. from the FOMA terminal phonebook to search for the entry with the specified phonebook No. You can search the entries even if you enter nothing.
1 m415
2 Enter a phonebook No. z Press p
・ Zeroes before single- or double-digit phonebook No. can be omitted.
Searching by phone number Number Search
Enter only a part of phone number to search for the phone numbers that contain it. You can search the entries even if you enter nothing.
1 m416
2 Enter a part of phone number z Press p
INFORMATION●When multiple phonebook entries are available with Number Search, the entries in the FOMA terminal phonebook are
displayed in the order of the phonebook No. The entries in the UIM phonebook are displayed in the following order:
Resetting the number of calls/mails
1. Japanese syllabary order 2. Alphabetical order 3. Numbers
4. Entries starting with blank 5. Symbols 6. No reading
Icon set for the first phone number
Phonebook No.
The party with the specified phonebook No.
Icon set for the first phone number
Phonebook No. (only for the FOMA terminal phonebook)
Ph
on
ebo
ok S
earch
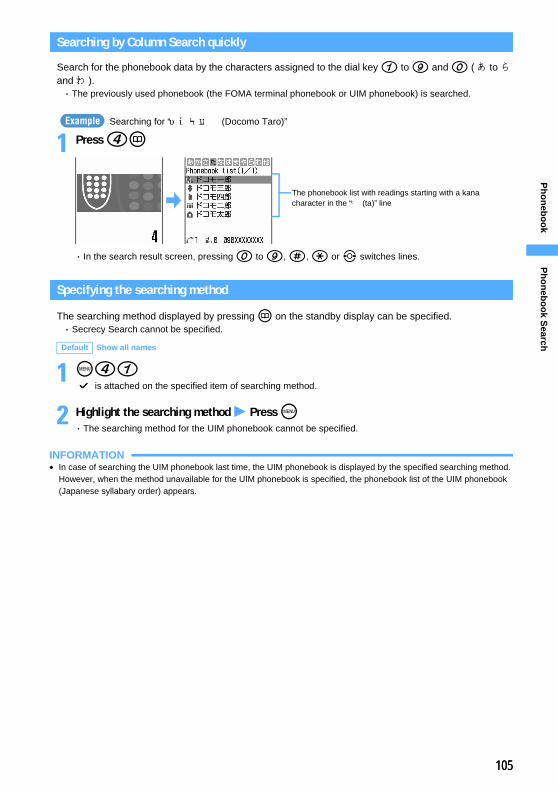
105
Ph
on
ebo
ok
105
Searching by Column Search quickly
Search for the phonebook data by the characters assigned to the dial key 1 to 9 and 0 (あ to ら andわ ).・ The previously used phonebook (the FOMA terminal phonebook or UIM phonebook) is searched.
Searching for “ドコモ太郎 (Docomo Taro)”
1 Press 4p
・ In the search result screen, pressing 0 to 9, #, ( or & switches lines.
Specifying the searching method
The searching method displayed by pressing p on the standby display can be specified.・ Secrecy Search cannot be specified.
1 m41 is attached on the specified item of searching method.
2 Highlight the searching method z Press m・ The searching method for the UIM phonebook cannot be specified.
INFORMATION● In case of searching the UIM phonebook last time, the UIM phonebook is displayed by the specified searching method.
However, when the method unavailable for the UIM phonebook is specified, the phonebook list of the UIM phonebook (Japanese syllabary order) appears.
Default Show all names
Example
The phonebook list with readings starting with a kana character in the “た (ta)” line
Ph
on
ebo
ok S
earch
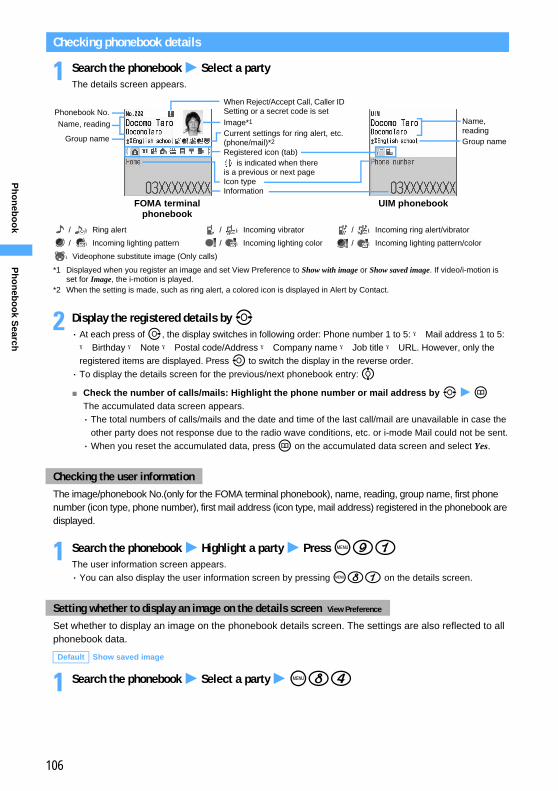
106
Ph
on
ebo
ok
Checking phonebook details
1 Search the phonebook z Select a partyThe details screen appears.
2 Display the registered details by &・ At each press of r, the display switches in following order: Phone number 1 to 5: → Mail address 1 to 5: → Birthday → Note → Postal code/Address → Company name → Job title → URL. However, only the registered items are displayed. Press l to switch the display in the reverse order.・ To display the details screen for the previous/next phonebook entry: %■Check the number of calls/mails: Highlight the phone number or mail address by & z p
The accumulated data screen appears.・ The total numbers of calls/mails and the date and time of the last call/mail are unavailable in case the
other party does not response due to the radio wave conditions, etc. or i-mode Mail could not be sent.・When you reset the accumulated data, press p on the accumulated data screen and select Yes.
The image/phonebook No.(only for the FOMA terminal phonebook), name, reading, group name, first phone number (icon type, phone number), first mail address (icon type, mail address) registered in the phonebook are displayed.
1 Search the phonebook z Highlight a party z Press m91The user information screen appears.・ You can also display the user information screen by pressing m81 on the details screen.
Set whether to display an image on the phonebook details screen. The settings are also reflected to all phonebook data.
1 Search the phonebook z Select a party z m84
Checking the user information
Setting whether to display an image on the details screen View Preference
Default Show saved image
FOMA terminal phonebook
UIM phonebook
Phonebook No.
Name, reading
Group name
Image*1
Registered icon (tab) is indicated when there
is a previous or next page
Name, readingGroup name
Icon typeInformation
/ :Ring alert / :Incoming vibrator / :Incoming ring alert/vibrator
/ :Incoming lighting pattern / :Incoming lighting color / :Incoming lighting pattern/color
:Videophone substitute image (Only calls)
*1 Displayed when you register an image and set View Preference to Show with image or Show saved image. If video/i-motion is set for Image, the i-motion is played.
*2 When the setting is made, such as ring alert, a colored icon is displayed in Alert by Contact.
When Reject/Accept Call, Caller ID Setting or a secret code is set
Current settings for ring alert, etc.(phone/mail)*2
Ph
on
ebo
ok S
earch
107
Ph
on
ebo
ok
107
2 Press any of 1 to 3
INFORMATION● On the details screen of the UIM phonebook, press m and select Info/View pref. → View preference.● The setting of this function is also reflected to the Own Number details screen. Also, when this function is set from Own
Number, the settings are also reflected to the phonebook details screen.●When the name is too long, all of the name may not be displayed.
Editing phonebook entries Edit Phonebook
You can edit or copy the phonebook data and change the order of the phone numbers and mail addresses in the data. In addition, the phonebook Nos. for the phonebook data can be switched.
Editing saved phonebook entries
Editing the data of FOMA terminal phonebook
1 Search the phonebook z Highlight a party z m31・ For the UIM phonebook: Search the phonebook z Highlight a party z m3
2 Edit the phonebook data・ For details:
Follow the procedure from Step 3 of “Registering entries into the FOMA terminal phonebook”. ☛P96Follow the procedure from Step 3 of “Registering entries into the UIM phonebook”. ☛P99
3 Press p
4 Select Overwrite or New entry・When you register a new phonebook entry to FOMA terminal without changing the phonebook No., the
entry screen for phonebook No. appears. Enter the number if needed, and re-operate from Step 3.・ In case of overwriting, the previous phonebook data are discarded. For new entry, the previous
phonebook data remains, and data are registered newly.
INFORMATION● The data may not be overwritten when registering if “ ” is included in the phonebook data in the UIM phonebook. In
that case, a confirmation screen appears asking whether to make a new entry. Select Yes to register as a new entry.●When multiple phone numbers and mail addresses are registered, if the phone number or mail address other than the
last one is deleted, the followings are moved up and registered.
Show with image:Displaying the images by priority.
Show only name :Displaying the names. Images are not displayed.
Show saved image:Images are displayed only when the images are registered. If image is not registered, the name is displayed.
Example
Ed
it Ph
on
ebo
ok
108
Ph
on
ebo
ok
Copying registered information
Copied items can be pasted into the entry field on the screen such as the mail composition and phonebook registration screens.・ Copied items remain recorded until the power is turned off. They can be pasted any number of times while
the power is on.・ Only one item can be recorded. Copying a new item overwrites the retained item.
1 Search the phonebook z Highlight a party z m6
2 1 to 8
3 Display the character entry screen to be pasted z Paste the characters
INFORMATION● On the FOMA terminal phonebook details screen, the UIM phonebook list/details screen, press m and select Copy.● Selecting Phone number/Mail address copies the item registered first. To copy the second or after phone number or mail
address, highlight the phone number or mail address to copy on the details screen.
Changing the order of phone numbers, mail addresses and phonebook Nos.
When multiple phone numbers or mail addresses are registered in the phonebook data, the order of the phone numbers and mail addresses can be changed on the search result screen of the FOMA terminal phonebook. In addition, the phonebook Nos. for 2 phonebook entries can be switched.
1 Search the phonebook z Change the order■Changing the order of phone numbers:
■Changing the order of mail addresses:aHighlight a party z m332bSelect a mail address to register as the first mail address.
The positions of the selected mail address and the first mail address are changed.
■Changing the phonebook Nos:aHighlight a party z m333bSelect the entry to replace the phonebook No. with
INFORMATION● On the FOMA terminal phonebook details screen, press m and select Edit/Settings → Switch order → Phone numbers,
Mail addresses or Phonebook Nos.
The data of selected item is recorded temporarily.
FOMA terminal phonebook
a Highlight a party z m331b Select a phone number to register as the first phone number
The positions of the selected phone number and the first phone numberare changed.
Ed
it Ph
on
ebo
ok

109
Ph
on
ebo
ok
109
Copying phonebook entries
Copy phonebook entries from the FOMA terminal phonebook to the UIM phonebook or from the UIM phonebook to FOMA terminal.・ If the group in the phonebook data to copy has the same name as the group in the target phonebook, the
data is copied to that group.
■ Items copied from the FOMA terminal phonebook to UIM phonebook
・ Note that if the number of characters exceeds the maximum number of characters that can be saved in the UIM phonebook, the exceeding part is deleted.
■ Items copied from the UIM phonebook to FOMA terminal phonebook
Copying from the FOMA terminal phonebook to the UIM phonebook
1 Search the phonebook z m71
2 Select a party
3 Press p
INFORMATION● On the FOMA terminal phonebook details screen, press m and select Data backup → Copy to UIM. On the UIM
phonebook list/details screen, press m and select Copy to phone.
Name Copies the name (up to 21 one-byte or 10 two-byte characters, however, up to 10 characters can be copied when both one- and two-byte characters or one-byte katakana are used).
Reading Copies the reading (up to 25 one-byte or 12 two-byte characters, however in case of one- and two-byte are mixed or containing one-byte katakana, up to 12 characters). One-byte katakana changes to two-byte katakana.
Phone number Copies the first registered phone number (up to 26 digits, however, 20 digits depending on the UIM types ☛P38). If a timed pause (T) is registered, only the timed pause (T) is deleted. For all icons, is set.
Mail address Copies the first registered mail address (up to 50 one-byte characters). is set for all icons.
Name Copies the name.
Reading Copies the reading. Two-byte katakana are changed to one-byte katakana.
Phone number Copies the phone number. For the icon, is set.
Mail address Copies the mail address. For the icon, is set.
Example
Co
pyin
g p
ho
neb
oo
k entries
110
Ph
on
ebo
ok
Deleting phonebook entries Delete Phonebook
Delete a phonebook entry from the phonebook.・When you delete all, the created groups are all deleted.・When you delete all, all the phonebook data with Secret Attribute set will be deleted, even if you are not in
Secret Mode.・ UIM phonebook cannot be all deleted.
1 Search the phonebook z Highlight a party z m41■Deleting an entry of the UIM phonebook: Search the phonebook z Highlight a party z m4■Deleting all: Search the phonebook z m42 z Enter the terminal security code
2 Select Yes
Saving the phonebook data to the Data Center Data Security Service
You can save the FOMA terminal phonebook data at the Data Center using Data Security Service.・ The details for saving the phonebook data ☛P114
1 Search the phonebook z m72 z Select Yes z Enter the terminal security codeFOMA terminal is connected to the Data Center and start updating. When updating is completed, the result screen appears.・ The result screen disappears in about 5 seconds, and returns to the standby display. Press o to return
to the display immediately.
Setting functions for phonebook entries
You can set the showing/hiding of caller ID or the videophone communication speed for each phone number in the phonebook data saved in the FOMA terminal phonebook. In addition, a secret code can be set for each mail address.・ The function described here cannot be set in the UIM phonebook.
Setting to show/hide caller ID for each phone number Caller ID Setting
1 Search the phonebook z Highlight a party z m342
2 Enter the terminal security code z Select a phone number
Default No setting
Delete P
ho
neb
oo
k
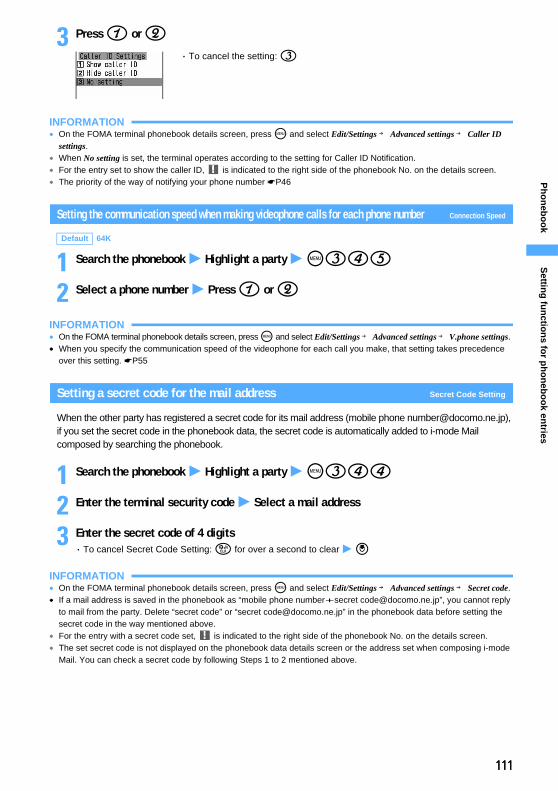
111
Ph
on
ebo
ok
111
3 Press 1 or 2
INFORMATION● On the FOMA terminal phonebook details screen, press m and select Edit/Settings → Advanced settings → Caller ID
settings.●When No setting is set, the terminal operates according to the setting for Caller ID Notification.● For the entry set to show the caller ID, is indicated to the right side of the phonebook No. on the details screen.● The priority of the way of notifying your phone number ☛P46
Setting the communication speed when making videophone calls for each phone number Connection Speed
1 Search the phonebook z Highlight a party z m345
2 Select a phone number z Press 1 or 2
INFORMATION● On the FOMA terminal phonebook details screen, press m and select Edit/Settings → Advanced settings → V.phone settings.●When you specify the communication speed of the videophone for each call you make, that setting takes precedence
over this setting. ☛P55
Setting a secret code for the mail address Secret Code Setting
When the other party has registered a secret code for its mail address (mobile phone [email protected]), if you set the secret code in the phonebook data, the secret code is automatically added to i-mode Mail composed by searching the phonebook.
1 Search the phonebook z Highlight a party z m344
2 Enter the terminal security code z Select a mail address
3 Enter the secret code of 4 digits・ To cancel Secret Code Setting: c for over a second to clear z o
INFORMATION● On the FOMA terminal phonebook details screen, press m and select Edit/Settings → Advanced settings → Secret code.● If a mail address is saved in the phonebook as “mobile phone number+secret [email protected]”, you cannot reply
to mail from the party. Delete “secret code” or “secret [email protected]” in the phonebook data before setting the secret code in the way mentioned above.
● For the entry with a secret code set, is indicated to the right side of the phonebook No. on the details screen. ● The set secret code is not displayed on the phonebook data details screen or the address set when composing i-mode
Mail. You can check a secret code by following Steps 1 to 2 mentioned above.
Default 64K
・ To cancel the setting: 3
Settin
g fu
nctio
ns fo
r ph
on
ebo
ok en
tries
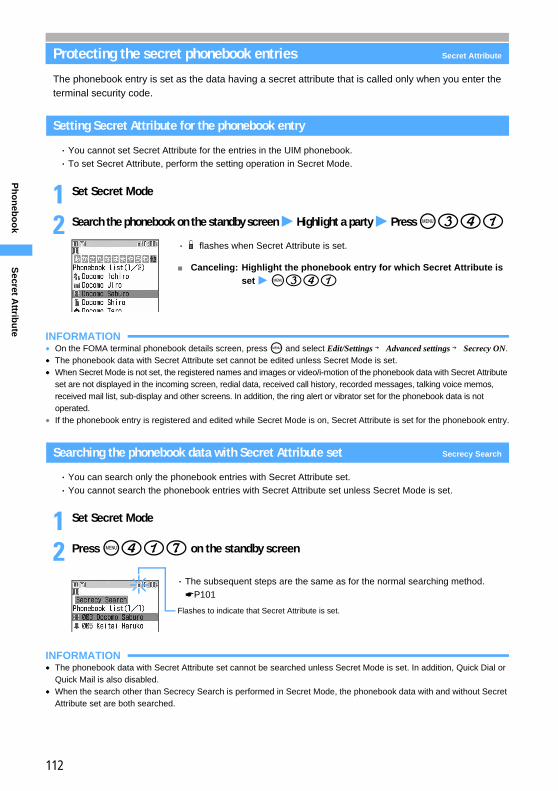
112
Ph
on
ebo
ok
Protecting the secret phonebook entries Secret Attribute
The phonebook entry is set as the data having a secret attribute that is called only when you enter the terminal security code.
Setting Secret Attribute for the phonebook entry
・ You cannot set Secret Attribute for the entries in the UIM phonebook.・ To set Secret Attribute, perform the setting operation in Secret Mode.
1 Set Secret Mode
2 Search the phonebook on the standby screen z Highlight a party z Press m341
INFORMATION● On the FOMA terminal phonebook details screen, press m and select Edit/Settings → Advanced settings → Secrecy ON.● The phonebook data with Secret Attribute set cannot be edited unless Secret Mode is set.●When Secret Mode is not set, the registered names and images or video/i-motion of the phonebook data with Secret Attribute
set are not displayed in the incoming screen, redial data, received call history, recorded messages, talking voice memos, received mail list, sub-display and other screens. In addition, the ring alert or vibrator set for the phonebook data is not operated.
● If the phonebook entry is registered and edited while Secret Mode is on, Secret Attribute is set for the phonebook entry.
Searching the phonebook data with Secret Attribute set Secrecy Search
・ You can search only the phonebook entries with Secret Attribute set.・ You cannot search the phonebook entries with Secret Attribute set unless Secret Mode is set.
1 Set Secret Mode
2 Press m417 on the standby screen
INFORMATION● The phonebook data with Secret Attribute set cannot be searched unless Secret Mode is set. In addition, Quick Dial or
Quick Mail is also disabled.●When the search other than Secrecy Search is performed in Secret Mode, the phonebook data with and without Secret
Attribute set are both searched.
■ Canceling: Highlight the phonebook entry for which Secret Attribute is set z m341
・ flashes when Secret Attribute is set.
・ The subsequent steps are the same as for the normal searching method. ☛P101
Flashes to indicate that Secret Attribute is set.
Secret A
ttribu
te
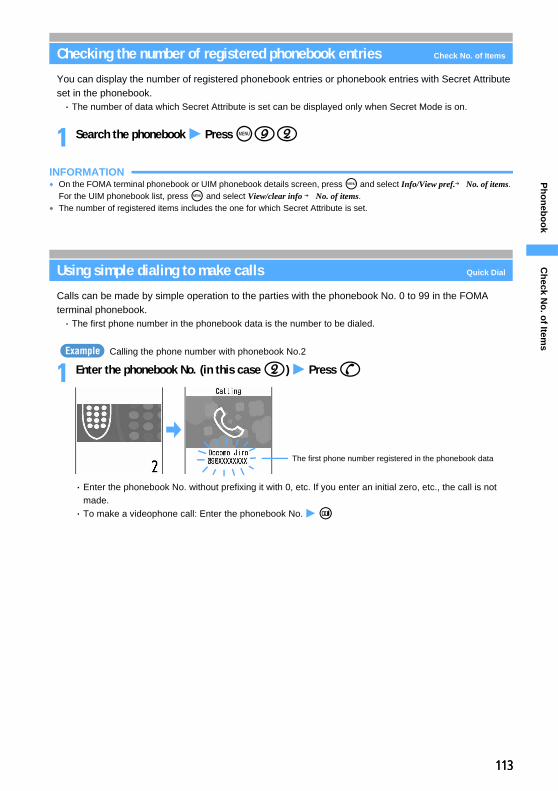
113
Ph
on
ebo
ok
113
Checking the number of registered phonebook entries Check No. of Items
You can display the number of registered phonebook entries or phonebook entries with Secret Attribute set in the phonebook.・ The number of data which Secret Attribute is set can be displayed only when Secret Mode is on.
1 Search the phonebook z Press m92
INFORMATION● On the FOMA terminal phonebook or UIM phonebook details screen, press m and select Info/View pref.→ No. of items.
For the UIM phonebook list, press m and select View/clear info → No. of items.● The number of registered items includes the one for which Secret Attribute is set.
Using simple dialing to make calls Quick Dial
Calls can be made by simple operation to the parties with the phonebook No. 0 to 99 in the FOMA terminal phonebook.・ The first phone number in the phonebook data is the number to be dialed.
Calling the phone number with phonebook No.2
1 Enter the phonebook No. (in this case 2) z Press n
・ Enter the phonebook No. without prefixing it with 0, etc. If you enter an initial zero, etc., the call is not made.・ To make a videophone call: Enter the phonebook No. z t
Example
The first phone number registered in the phonebook data
Ch
eck No
. of Item
s
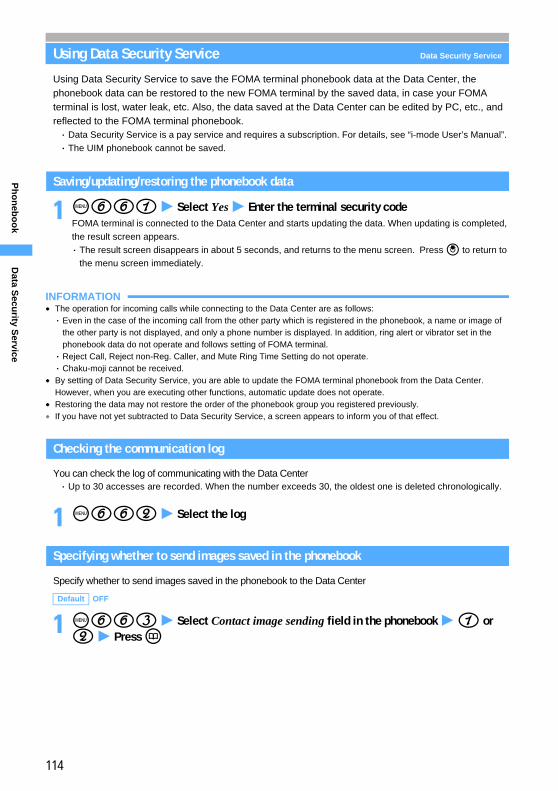
114
Ph
on
ebo
ok
Using Data Security Service Data Security Service
Using Data Security Service to save the FOMA terminal phonebook data at the Data Center, the phonebook data can be restored to the new FOMA terminal by the saved data, in case your FOMA terminal is lost, water leak, etc. Also, the data saved at the Data Center can be edited by PC, etc., and reflected to the FOMA terminal phonebook.・ Data Security Service is a pay service and requires a subscription. For details, see “i-mode User’s Manual”. ・ The UIM phonebook cannot be saved.
Saving/updating/restoring the phonebook data
1 m661 z Select Yes z Enter the terminal security codeFOMA terminal is connected to the Data Center and starts updating the data. When updating is completed, the result screen appears. ・ The result screen disappears in about 5 seconds, and returns to the menu screen. Press o to return to
the menu screen immediately.
INFORMATION● The operation for incoming calls while connecting to the Data Center are as follows: ・ Even in the case of the incoming call from the other party which is registered in the phonebook, a name or image of
the other party is not displayed, and only a phone number is displayed. In addition, ring alert or vibrator set in the phonebook data do not operate and follows setting of FOMA terminal. ・ Reject Call, Reject non-Reg. Caller, and Mute Ring Time Setting do not operate.・ Chaku-moji cannot be received.
● By setting of Data Security Service, you are able to update the FOMA terminal phonebook from the Data Center. However, when you are executing other functions, automatic update does not operate.
● Restoring the data may not restore the order of the phonebook group you registered previously.● If you have not yet subtracted to Data Security Service, a screen appears to inform you of that effect.
Checking the communication log
You can check the log of communicating with the Data Center ・ Up to 30 accesses are recorded. When the number exceeds 30, the oldest one is deleted chronologically.
1 m662 z Select the log
Specifying whether to send images saved in the phonebook
Specify whether to send images saved in the phonebook to the Data Center
1 m663 z Select Contact image sending field in the phonebook z 1 or 2 z Press p
Default OFF
Data S
ecurity S
ervice
115
Sounds/Displays/Lights SettingsSound Setting
Changing the FOMA terminal sound ................................. Sound Setting 116Using vibrator to signal incoming calls and alarms ....... Vibrator Setting 119Setting the alert sound for charging ..................................... Charge Alert 120Setting the alarm announcing that the call is about to be cut off
................................................................................................. Quality Alarm 121Making FOMA terminal silent .................................................. Silent Mode 121Customizing Silent Mode ..................................... Customize Silent Mode 122
Displays/Lights SettingsChanging the standby display ............................ Standby Display Setting 123Changing images to be displayed for incoming/outgoing calls/mails
............................................................................................... Mail/Call Image 128Setting the display and light for the sub-display ........................................................................................ Sub-display Setting 131Setting the light for the display and keys ............... Display Light Setting 132Changing the display color .................................................. Color Scheme 133Setting the menu display format or menu design .............. Menu Setting 134Changing the battery level icon ............................................. Battery Icon 135Setting the lighting pattern and color for incoming calls/mails, etc. .......................................................................................... Light Alert Setting 136Flashing the sub-display when receiving new information ................................................................................................ Indicator Light 137Changing the font size .................................................... Font Size Setting 138Setting the clock display ......................................... Clock Display Format 139Coordinating according to the color of FOMA terminal ....... Style Theme 140
116
So
un
ds/D
isplays/L
igh
ts Settin
gs
Sound Setting
Changing the FOMA terminal sound Sound Setting
Set the sound to announce the reception of call, mail, Message R/F, etc. In addition, the alarm clock sound, schedule reminder and the various operation sounds can be set. ・ To set other sounds, see the following:・Charge alert ☛P120 ・Response hold guidance ☛P69 ・On-hold tone ☛P70・Quality alarm ☛P121 ・Reconnect alarm ☛P59 ・Low battery alert ☛P43
Setting ring alerts for calls, mails, messages, etc. Call Ring Alert/Mail/Msg Ring Alert
・ If video/i-motion is set as a ring alert, an image and/or sound is played for incoming calls or mails (Movie ringtone (Chaku-motion)).・ To set the ring alert for incoming voice calls with no caller ID ☛P154・ The settings of this function are also reflected to the settings of Call Alert, Videophone Alert, Mail Alert, Chat
Mail Alert and Message Alert.
Setting ring alerts for calls
1 m8111■ Setting ring alerts for mails/messages: m8112
2 1 or 2・ To set ring alerts for mails/messages: 1 to 4
3 Select each item to set
4 Press p
Default Call ring alert: Melody/パターン1(Pattern 1) V.phone ring alert: Melody/パターン4(Pattern 4) Mail ring alert: Melody/キラリン(Kirarin) Chat M ring alert: Melody/小鳥(Little bird) Msg R ring alert, Msg F ring alert: Melody/パターン5(Pattern 5)
Example
・When Melody is selected, select the melody field and select a melody.・When Movie ringtone is selected, select the melody field and select a video/
i-motion file.・When OFF is set, the ring alert does not sound.・ If the chat mail ring alert is set to Sync msg alert, the setting for the mail ring alert
is used.
So
un
d S
etting
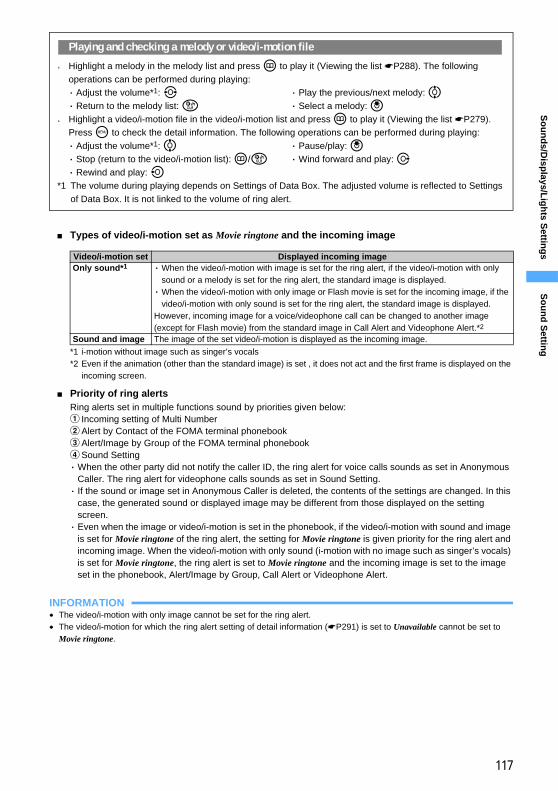
117
So
un
ds/D
isplays/L
igh
ts Settin
gs
■ Types of video/i-motion set as Movie ringtone and the incoming image
*1 i-motion without image such as singer’s vocals *2 Even if the animation (other than the standard image) is set , it does not act and the first frame is displayed on the
incoming screen.
■ Priority of ring alertsRing alerts set in multiple functions sound by priorities given below:a Incoming setting of Multi NumberbAlert by Contact of the FOMA terminal phonebookcAlert/Image by Group of the FOMA terminal phonebookdSound Setting・When the other party did not notify the caller ID, the ring alert for voice calls sounds as set in Anonymous
Caller. The ring alert for videophone calls sounds as set in Sound Setting.・ If the sound or image set in Anonymous Caller is deleted, the contents of the settings are changed. In this
case, the generated sound or displayed image may be different from those displayed on the setting screen. ・ Even when the image or video/i-motion is set in the phonebook, if the video/i-motion with sound and image
is set for Movie ringtone of the ring alert, the setting for Movie ringtone is given priority for the ring alert and incoming image. When the video/i-motion with only sound (i-motion with no image such as singer’s vocals) is set for Movie ringtone, the ring alert is set to Movie ringtone and the incoming image is set to the image set in the phonebook, Alert/Image by Group, Call Alert or Videophone Alert.
INFORMATION● The video/i-motion with only image cannot be set for the ring alert.● The video/i-motion for which the ring alert setting of detail information (☛P291) is set to Unavailable cannot be set to
Movie ringtone.
Playing and checking a melody or video/i-motion file
● Highlight a melody in the melody list and press p to play it (Viewing the list ☛P288). The following operations can be performed during playing:・ Adjust the volume*1: & ・ Play the previous/next melody: %・ Return to the melody list: c ・ Select a melody: o
● Highlight a video/i-motion file in the video/i-motion list and press p to play it (Viewing the list ☛P279). Press m to check the detail information. The following operations can be performed during playing:・ Adjust the volume*1: % ・ Pause/play: o・ Stop (return to the video/i-motion list): p/c ・Wind forward and play: r・ Rewind and play: l
*1 The volume during playing depends on Settings of Data Box. The adjusted volume is reflected to Settings of Data Box. It is not linked to the volume of ring alert.
Video/i-motion set Displayed incoming imageOnly sound*1 ・When the video/i-motion with image is set for the ring alert, if the video/i-motion with only
sound or a melody is set for the ring alert, the standard image is displayed.・When the video/i-motion with only image or Flash movie is set for the incoming image, if the
video/i-motion with only sound is set for the ring alert, the standard image is displayed.However, incoming image for a voice/videophone call can be changed to another image (except for Flash movie) from the standard image in Call Alert and Videophone Alert.*2
Sound and image The image of the set video/i-motion is displayed as the incoming image.
So
un
d S
etting
118
So
un
ds/D
isplays/L
igh
ts Settin
gs
Setting the alarm clock sound or schedule reminder Alarm Clock Sound/Schedule Reminder
Set the sound generated when alarm clock sound or schedule reminder is set to Terminal setting in Alarm Clock or Scheduler.
Setting the alarm clock sound
1 m81131■ Setting the schedule reminder: m81132
2 Select each item to set
3 Press p
Setting the sound generated when pressing keys Keypad Sound
・When the keypad sound is changed, the confirmation sound for displaying the battery level is also changed.・ The sound is not generated when pressing C.
1 m81141
2 Press any of 1 to 3・ To set not to sound: 4・ The highlighted sound is generated. However, in case of OFF, nothing is heard.
INFORMATION●When OFF is set, the following sounds are not generated.・ The confirmation sound when the battery level is indicated・ The alert tone indicating the end of infrared communication or data transmission
● In the following cases, the sound is not generated even if set to other than OFF:・ In Silent Mode (Note that the sound is heard in the personalized silent mode and when the keypad sound of
Customize Silent Mode is set to other than OFF.)・When i-αppli is running (The sound is heard in case of switching the screen or displaying another screen during
Multitask.)・ During video recording・ During recording with Sound Recorder・When pressing b with FOMA terminal closed
Default ●Alarm clock soundMelody/ アラーム・メロディ (Alarm, melody)
●Schedule reminderAlarm on time: Melody/パターン2(Pattern 2) Alarm in advance: Melody/パターン3(Pattern 3)
Default Keypad sound1
Example
・When Melody is selected, select the melody field and select a melody.・When i-motion is selected, select the melody field and select a video/i-motion
file. If the video/i-motion with sound and image is set, the image of video/i-motion is displayed.S
ou
nd
Settin
g
119
So
un
ds/D
isplays/L
igh
ts Settin
gs
Setting the shutter sound Shutter Sound
・When Movie camera sound is changed, the shutter sound of Sound Recorder is also changed.・ The setting of this function is reflected to the settings of Still Image Setting and Recording Setting.
Setting the shutter sound of Camera
1 m81142■ Setting the shutter sound of Movie Camera: m81143
2 Press any of 1 to 3・ The highlighted sound is generated.
The following melodies are provided in the Preinstalled folder of Melody by default.・Melody names that are too long to be shown on the display are partially omitted.
■ Other sound settings・ Setting the mail ring alert or lighting, etc. ☛P236・ Setting to sound the ring alert only from the earphone when connecting a flat type earphone/microphone
set with switch (optional) ☛P326
Using vibrator to signal incoming calls and alarms Vibrator Setting
The reception of call, mail, Message R/F, etc. or the date and time set in Alarm Clock or Scheduler is indicated by vibraton. In addition, the vibrator operation by i-αppli can be allowed/rejected.・When the vibrator is set to Terminal setting in Alarm Clock, this setting of Alarm clock will be valid.・ The settings of this function are also reflected to the settings of Call Alert, Videophone Alert, Mail Alert, Chat
Mail Alert, Message Alert, and Vibrate Effect for i-αppli.・ Note that if FOMA terminal is placed on a desk, etc. with Vibrator Setting on, the vibrations of the vibrator
operation may cause it to fall off.
Default Shutter sound: Shutter sound3 Movie camera sound: Shutter sound1
List of melodies which can be set as the ring alert, etc.
Title (composer in [ ]) Title (composer in [ ]) Title (composer in [ ])
パターン1 to 6 (Pattern 1 to 6)
ベル (Bell) エステ荘の噴水 (Fountain a la Villa d’Este) [LISZT FRANZ]キラリン (Kirarin)
アラーム・メロディ (Alarm, melody)
小鳥 (Little bird) 交響曲第29番第1楽章 (The first from Symphony No.29 in A major)[MOZART WOLFGANG AMADEUS]
The Servants Chorus[LOEWE FREDERICK][LERNER ALAN JAY]ほっとメロディ (Safety melody)
メール・メロディ A(Mail, melody A) Check On It
[BEYINCE ANGELA RENEE]メール・メロディ B(Mail, melody B)
License number: T-0660138・ The composers are described in accordance with the JASRAC website.
Default Call vibrate alert, V.phone vibe alert, Mail vibrate alert, Chat M vibrate alert, Msg R vibrate alert, Msg F vibrate alert, Alarm clock, Schedule reminder: OFF i-αppli effect: ON
Example
Vib
rator S
etting
Next
120
So
un
ds/D
isplays/L
igh
ts Settin
gs
Setting the operation of vibrator for incoming calls
1 m8131■ Setting the operation for incoming mails/messages: m8132■ Setting the operation while an alarm is sounding: m8133■ Setting the operation while using i-αppli: m8134 z Go to Step 3
2 1 or 2・ To set the operation for incoming mails/messages: 1 to 4
However, if Alert setting is set to Same: Mail setting in Chat Mail Alert, Chat M vibrate alert cannot be set.・ To set the operation while an alarm is sounding: 1 or 2
3 Press any of 1 to 5・ To set the operation while using i-αppli: 1 or 2・ If you set to Pattern A, the terminal vibrates as follows: about 0.7 second vibration → about 0.7 second
pause → about 0.7 second vibration → about 1.5 second pause (repeated)
・ If you set to Pattern B, the terminal vibrates as follows: about 1 second vibration → about 2 second pause (repeated)
・ If you set to Pattern C, the terminal vibrates as follows: about 0.7 second vibration → about 0.7 second pause (repeated)・ If you set to Sync melody, the terminal vibrates along with the melody set as ring alert, alarm clock sound
or schedule reminder. Note that it may not vibrate depending on melodies. In addition, vibration may not synchronize with the theme.・ If OFF is set, the terminal does not vibrate.・ The vibrator operates by the highlighted pattern except when Sync melody or OFF is highlighted.・When Call vibrate alert is set, (when the call alert volume is set to SILENT, ) is indicated on the
standby display.
■ Priority of vibrator When the vibrator is set in multiple functions, the vibrator operates by priorities given below: aAlert by Contact of the FOMA terminal phonebookbAlert/Image by Group of the FOMA terminal phonebookcVibrator Setting
INFORMATION● The vibrator does not operate when a call is received during another call.● Even when OFF is set, the vibrator may be activated while some Flash movies are being played.
Setting the alert sound for charging Charge Alert
Set whether to sound the alert sound for the start and completion of charging.
1 m8115 z Press 1 or 2
INFORMATION● Even when ON is set, the charge alert sound is not played in the following cases:・ In Silent Mode ・ In Public mode (Driving mode) ・ During a voice call・ During a videophone call ・ During 64K data communication ・ During i-mode communication・ During packet communication
Default ON
Example
Ch
arge A
lert
121
So
un
ds/D
isplays/L
igh
ts Settin
gs
Setting the alarm announcing that the call is about to be cut off Quality Alarm
When signal conditions deteriorate, an alarm sounds just before the voice call is cut off on the way.・ If signal conditions deteriorate suddenly, the call may be cut off before the alarm sounds.・ This function applies only to voice calls.
1 m81163
2 Press 1 or 2・ To set not to sound: 3
Making FOMA terminal silent Silent Mode
Disable the sounds from FOMA terminal in order to prevent disturbance to the people around you by enabling the vibrator for incoming calls or muting the keypad sound.
1 Hold down # for over a second The silent mode that is specified in Customize Silent Mode is set and (in the general silent mode) or (in the personalized silent mode) is indicated on the standby display.
■Canceling: # (for over a second)
■ Setting/canceling with FOMA terminal closed: b (for over a second)
INFORMATION● Even in Silent Mode, the shutter sound is generated (except when recording Chara-den).● In the general silent mode, even if Alert is set to ON in Call Cost Limit and the setting notified by alarm is made, only a
message is displayed. In the personalized silent mode, the alarm sounds according to the call alert volume set in Customize Silent Mode.
Default High alarm
Default not set
When the general silent mode is set
Incoming call or mail is notified with vibrator by muting sounds heard from FOMA terminal such as ring alert, keypad sound and alarm. Microphone is sensitized so that a call can be made in a small voice.● In the following cases, the vibrator operates in Pattern A.・When calls or mails are received. ・When the time specified in Timer has passed.・When the date and time set in Scheduler arrives. ・When Safety Melody is activated.
●When the time set in Alarm Clock arrives, the vibrator operates as set in Alarm Clock. ●Melodies are not played automatically even if received mail or Message R/F is displayed with Auto play set
for Attachment Auto-play.●When playing a melody, a confirmation screen asking whether to play the melody is displayed. When Yes is
selected, the melody is played.●When playing the video/i-motion with sound, a confirmation screen asking whether to play the sound is
displayed. When Yes is selected, the sound is played. When playing the video/i-motion with image, if No is selected, only the image is played.
Qu
ality Alarm
122
So
un
ds/D
isplays/L
igh
ts Settin
gs
Customizing Silent Mode Customize Silent Mode
The setting for Silent Mode can be changed (Customize Silent Mode). Which mode is set can be selected from the general silent mode and the personalized silent mode.
1 m814
2 2・ Pressing 1 sets the general silent mode and the previous screen reappears.
3 Select each item to set
4 Press pThe personalized silent mode is set.
Default General
Vibrate alert :Sets whether to operate the vibrator for incoming calls or mails, etc.・When ON is set, an incoming call or mail is informed by vibration according to
Vibrator Setting (☛P119). Note that when OFF is set in Vibrator Setting, the vibrator operates in Pattern A.
Keypad sound :Sets the keypad sound.
Call alert volume :Sets the ring volume for incoming calls.
Mail alert volume :Sets the ring volume for incoming mails.
Low Battery Alert :Sets whether to sound an alarm when the battery becomes low.
Alarm sound :Sets whether to sound the alarm clock and timer alarm.・When ON is set, the alarm clock sounds according to the setting of Alarm Clock and
the timer alarm sounds by アラーム・メロディ (Alarm, melody) at the call alert volume set in this function.
Schedule sound :Sets whether to sound a schedule reminder.・When ON is set, it sounds according to the setting of schedule and the schedule
alarm volume.
i-αppli sound :Sets whether to generate the i-αppli sound.・When ON is set, it sounds according to the i-αppli sound volume.
Safety melody sound:Sets whether to sound a safety melody・When ON is set, it sounds according to the setting of Safety Melody.
Sensitize microphone:Sets whether to sensitize the microphone.
Cu
stom
ize Silen
t Mo
de
123
So
un
ds/D
isplays/L
igh
ts Settin
gs
Displays/Lights Settings
Changing the standby display Standby Display Setting
You can change the standby display to your favorite image.・ Depending on the image, video/i-motion, Chara-den or i-αppli, the settings for the standby display will be
disabled if you do not insert the same UIM as used when downloading the data (UIM operation restriction function).・ Setting the clock display ☛P139・ Setting the battery level icon ☛P135・ Setting to display the i-channel ticker ☛P262
Setting images, video/i-motion or Chara-den as the standby display
The image, video/i-motion or Chara-den saved from an i-mode site or mail and the still image or video shot with FOMA terminal can be set as the standby display. Animation and Created animation can also be set.・ Preinstalled images/i-motion/Chara-den ☛P358, P360・ If you set a video/i-motion or Chara-den for the standby display when Show ticker in Ticker Setting is set to
Yes, Show ticker is canceled. After that, if you set other than the video/i-motion, Chara-den and i-αppli standby display, Show ticker in Ticker Setting returns to Yes.
1 m8211
2 1, 3 or 4
3 Select a folder z Select the image, video/i-motion or Chara-den・ To check an image, highlight the image in the image list and press p. The following operations can be
performed on the image display screen:・Display the previous/next image: % ・Return to the image list: c ・Select a image: o・ To check Chara-den, highlight the Chara-den in the Chara-den list and press p. The following
operations can be performed on the Chara-den display screen:・Switch between Action and Action of Parts: t・Display the action list: a ・Switch between large size and same size display: %・Return to the Chara-den list: o/c・ Playing and checking a video/i-motion file when selecting ☛P117
■ Setting the action of Chara-den:aHighlight Chara-den in the Chara-den list z mbSelect Stand-by field z 1 to 4・ Set the action for missed call or unread mail in the same way.・When Action or Action of Parts is selected, select an action from the action list.・When Input is selected, enter the number corresponding to the action. ☛P360・When OFF is set, the preset action is played and another action cannot be set.
cSelect Interval (sec) field z 1 to 6・When OFF is set, the selected action of Chara-den is played only once.
dp
Default use Style Theme setting
Stan
db
y Disp
lay Settin
g
Next
124
So
un
ds/D
isplays/L
igh
ts Settin
gs
4 Select Yes・ If the selected image, video/i-motion or Chara-den can be zoomed, displaying at the same size or large
size can be selected on the confirmation screen. Select Yes(Same size) to maintain the image size or select Yes(Large size) to enlarge the image to the screen size.・ If the i-αppli standby display is set, a confirmation screen subsequently appears asking whether to cancel it.
INFORMATION●While All Lock, PIM Lock (when the data which is subject to PIM Lock is set for the standby display) or Omakase Lock
(Remote Lock) is on, the set standby image is canceled and the image of the default setting is displayed temporarily. The set standby image reappears when lock is canceled. However, if the data in the Preinstalled folder is set, the set data is displayed even when PIM Lock is on.
● The setting may not be available depending on the image.● The video/i-motion with restriction of the number of replay or replay period set or the video/i-motion with only sound
(i-motion with no image such as singer’s vocals) cannot be set for the standby display. In addition, some video/i-motion cannot be set for the standby display.
●When the standby display appears, the set Flash movie or animation starts playing and stops after a certain period of time. However, the melody of Flash movie is not played.
●When Show ticker in Ticker Setting is set to Yes, the playback of animation, Created animation or Flash movie set for the standby display stops after about 5 seconds and i-channel ticker is displayed. However, in case of playing by f, i-channel ticker is displayed after completing the playback.
● Even if animation, Created animation, Flash movie or video/i-motion is set for the standby display, playing and stopping cannot be performed while Lock on Close is on.
● If an animation is set in zoom display, the display may be distorted.● Even if Phone To (AV Phone To), Mail To and Web To functions are set as links in tickers of the video/i-motion, these
links cannot be available from the standby display.●When the action is set for multiple items for Chara-den, the action is played by priorities given below:
aAction set for Missed call or Unread messagebAction set for Stand-by・When both action for missed calls and action for unread mail are set and there are both missed calls and unread mail,
the action set for each item is played repeatedly by turns.
Displaying images in a random order Random Display Image
Images can be displayed in a random order on the standby display every fixed time or each time you open FOMA terminal.
1 m82112
Playing the video/i-motion, animation or Chara-den set as the standby display
● The following operations are available for video/i-motion:・ Play: c/open FOMA terminal ・ Stop: c/f ・Adjust volume: %
● The following operations are available for animation, Created animation or Flash movie:・ Play: Open FOMA terminal/return to the standby display/turn the power on・ Pause/replay: f
● The following operations are available for Chara-den:・ Play (when the interval for the action is set, the action is played repeatedly at the set interval): c/open FOMA terminal・ Stop: c/f
Stan
db
y Disp
lay Settin
g
125
So
un
ds/D
isplays/L
igh
ts Settin
gs
2 Select each item to set
3 p z Select Yes・ If the i-αppli standby display is set, a confirmation screen subsequently appears asking whether to cancel it.
INFORMATION● The following images cannot be displayed: ・ Created animation ・ Animation ・ Flash movie
● In case the power is turned off at the time of switching images, the image is not switched.● Even if the still image currently displayed on the standby display is moved to another folder or Created animation is
composed using the image, that image is displayed until it switches to the next image. After that, it is not displayed.●When there is no still image that can be displayed as the result of deleting the selected folder, moving or deleting still
images in the folder or composing Created animation, the default image is displayed on the standby display and Random Display Image is canceled (if the still image is moved or Created animation is composed, the image is displayed until it switches to the next image).
● Even when Change image is set to Open phone, if you repeat opening/closing FOMA terminal quickly, the image may not be switched.
Setting the i-αppli standby display
・ The i-αppli standby display can be set simultaneously with other standby display settings including the custom standby display. When they are set simultaneously, the i-αppli standby display is displayed by priority.・Multiple i-αppli applications cannot be set on the i-αppli standby display.・ The i-αppli 花・星時計 preinstalled by default can be set as the i-αppli standby display:・ If you set i-αppli for the standby display when Show ticker in Ticker Setting is set to Yes, Show ticker is
canceled. After that, if you set other than the video/i-motion, Chara-den and i-αppli standby display, Show ticker in Ticker Setting returns to Yes.
1 m82115 A list of i-αppli available for the i-αppli standby display appears.
2 Select i-αppli z Select YesThe i-αppli standby display is set and or is indicated on the standby display.
INFORMATION●While PIM Lock or Privacy Mode (with Authorized access set for i-αppli) is on, the i-αppli standby display is not displayed
but a standby image set previously is displayed. Note that while PIM Lock is on, the default standby image is displayed when the data which is subject to PIM Lock has been set. While All Lock or Omakase Lock is on, the default standby display appears.
● Operating the i-αppli standby display ☛P254
Folder:Selects a folder in which the images are saved from the folders in Image (My Picture).・ The folder with no image which can be displayed cannot be selected.
Change image:Sets the timing that the image is switched.・When Every 15 seconds is set, images are switched every 15 seconds after returning to the
standby display. ・When any of Every minute, Every 15 minutes or Every hour is set, the image is switched according to
the clock time. (For example, when Every minute is set, the image is switched per minute at 0 second.)・When Every day is set, the images are switched at 00:00 a.m. every day.・When Open phone is set, the images are switched each time you open FOMA terminal.
Stan
db
y Disp
lay Settin
g
126
So
un
ds/D
isplays/L
igh
ts Settin
gs
Customizing the standby display Info/Calendar Layout
The standby display can be divided into several areas to display new information such as unread mail or missed calls, notes, schedules or calendar for each area (Custom standby display). The pattern of dividing areas can be selected from the following 7 types:
1 m8214
2 1・ Pressing 2 cancels the setting and the display returns to the previous screen.
3 & to switch patterns
4 Select an area z 1 to 5
■ Setting to display new information: Select an area z 2 z Select the information type z p
■ Setting to display notes: aSelect an area z 3 bSelect a note ・ Highlight a note and press p to display the content of the note. Press c to return to the note list.
Also, press o on the notepad view screen to set.
■Resetting the displayed items in all the areas: m z Select Yes
5 p z Select Yes・ If the i-αppli standby display is set, a confirmation screen subsequently appears asking whether to cancel
it.
INFORMATION● If you change the setting for Style Theme, the custom standby display is not displayed, but the setting is saved. If you
operate in order of Step 1, Step 2 and Step 5, the custom standby display set before is displayed.
Pattern 1 Pattern 2 Pattern 3 Pattern 4 Pattern 5 Pattern 6 Pattern 7
・ If the pattern including multiple areas is selected, repeat Step 4.・ The calendar cannot be set in an area smaller than half of the screen. (e.g. Set
Area1 of Pattern 3)
Stan
db
y Disp
lay Settin
g
127
So
un
ds/D
isplays/L
igh
ts Settin
gs
1 o
2 Select an area
INFORMATION● An image and a custom standby display can be set at the same time, but if an animation, Created animation or Flash
movie is set, press f after the playback is stopped or paused to display the information of the custom standby display.
The custom standby display and various information appear as follows:・ The numbers of information and lines displayed differ depending on the area size.・ For the date and time of each information entry, the time is displayed for the current day and the date is
displayed for the other days.
Checking information on the custom standby display
Displayed information
Unread messages:The reception date and time and the first part of subject are displayed. Select the area when this item is displayed at the beginning to display the received mail folder list.
MessageR/ MessageF:The reception date and time and the first part of title are displayed. Select the area when this item is displayed at the beginning to display the Message R/F list.
Missed calls: The date and time of incoming call and the phone number of the other party (or the name when registered in the phonebook) are displayed. Select the area when this item is displayed at the beginning to display the received call list.
Recorded messages:The date and time of recording and the phone number of the other party (or the name when registered in the phonebook) are displayed. Select the area when this item is displayed at the beginning to display the recorded message list.
The selected area is surrounded with a cursor. When an icon such as (with the number of information items) is indicated, the icon is surrounded with a cursor.・ Press % to move the cursor frame.・ In case the information of the custom standby display is not shown, display by
pressing f repeatedly on the standby display and press o.
The items set in New arrival are listed starting with the most recent item.
■ New arrival
The first part of the contents recorded in a note is displayed. Select this area to display the details of the note.
■ Notes
Stan
db
y Disp
lay Settin
g
Next
128
So
un
ds/D
isplays/L
igh
ts Settin
gs
・ In case of the date-straddled long-term schedule, is indicated instead of the registered icon. The start date or start time (when it is before the start time on the current day) is displayed behind the icon. The date-straddled long-term schedule is displayed until the end date/time has elapsed.・ If any schedule for all day is set on the current day, AllDay is displayed instead of the start time.
Changing images to be displayed for incoming/outgoing calls/mails Mail/Call Image
Set images to be displayed for outgoing/incoming calls, incoming/outgoing mails or for message retrieval.
Menu 861 / Menu 871
Changing images to be displayed for outgoing calls Outgoing Call/Videophone Dialing
Set images to be displayed for outgoing voice/videophone calls.
Setting the image for outgoing voice calls
1 m82321 ■ Setting the image for outgoing videophone calls: m82323
2 Select each item to set
3 Press p
■ Priority of outgoing imagesWhen the outgoing images are set in multiple functions, the images are displayed by priorities given below:a The setting of the FOMA terminal phonebook*1
b Alert/Image by Group of the FOMA terminal phonebookc Mail/Call Image (Outgoing Call/Videophone Dialing) *1 Available when Contact Image is set to ON.
Default Default
The scheduled entries with the start time not passed are displayed in the order of the date and time. Select this area to display the details of the first schedule.・ The icon, the date and time and the first part of the contents are displayed.
■ Schedule
The current calendar is displayed. Select this area to display the schedule calendar screen of Scheduler.・When a schedule is set, a dot is displayed on the upper right of the date.
Note that when all schedules set on a day have Secret Attribute, it is displayed only when Secret Mode is on. In addition, it is not displayed when Privacy Mode (with Authorized access set for Schedule) or PIM Lock is on.・ Day Off Setting or Holiday Setting of Scheduler is not reflected.
■ Calendar
DotThe current day is indicated in pink.
Example
・When selecting Default, the default image is set.・When selecting Select image, select Select image (from Image list) and select an
image.
Mail/C
all Imag
e

129
So
un
ds/D
isplays/L
igh
ts Settin
gs
INFORMATION● Setting Created animation displays the first frame.
Changing images to be displayed for incoming calls Incoming Call/Videophone Receiving
Set images to be displayed for incoming voice/videophone calls.・ The settings of this function are also reflected to the settings for Call Alert and Videophone Alert.・ Setting the image for incoming voice calls with no caller ID ☛P154
Setting the image to be displayed for incoming voice calls
1 m82322■ Setting the image for incoming videophone calls: m82324
2 Select each item to set
3 Press p
■ Priority of incoming imagesIncoming images set in multiple functions are displayed by priorities given below:a Incoming setting of Multi Numberb The setting of the FOMA terminal phonebook*1/Alert by Contact of the FOMA terminal phonebook*2
c Alert/Image by Group of the FOMA terminal phonebookd Mail/Call Image (Incoming Call/Videophone Receiving)/Sound Setting*2
*1 Available when Contact Image is set to ON.*2 Available when the video/i-motion with sound and image is set for ring alert.・When the other party did not notify the caller ID, the incoming image for voice calls conforms to the setting
of Anonymous Caller. The incoming image for videophone calls conforms to the setting of Mail/Call Image (Videophone Receiving) or Sound Setting.・ If the sound or image set in Anonymous Caller is deleted, the settings are changed. In this case, the
generated sound or displayed image may be different from those displayed on the setting screen.
INFORMATION● If Created animation is set, the first frame is displayed.●When the video/i-motion with only sound (i-motion without image such as singer’s vocals) is set for the ring alert, if Show
image is reset to the video/i-motion with only image or Flash movie, the ring alert sounds by パターン1 (Pattern 1) for voice call or by パターン4 (Pattern 4) for videophone call. The melody can be changed.
● Some video/i-motion may not be set to the image. And the video/i-motion with sound cannot be set.
Default Standard image
Example
・When Standard image is selected, the default image is set.・When Select image is selected, select Select image (from List images) and select
an image.・When i-motion is selected, select a video/i-motion file from the folder list.
In case the folder list is not displayed, select Select image (from List images).・ If the video/i-motion with sound and image is set for the ring alert, Sync ring
alert is set.・ Playing and checking a video/i-motion file when selecting ☛P117
Mail/C
all Imag
e
130
So
un
ds/D
isplays/L
igh
ts Settin
gs
Displaying images saved in the phonebook for incoming/outgoing calls Contact Image
When a voice/videophone call from/to the other party registered in the phonebook is made/received, the portrait image saved in the phonebook can be displayed.
1 m82325
2 Press 1 ・ To set not to display the image: 2
Changing images for incoming/outgoing mails or for message retrieval Outgoing Message/Incoming Message/Message Retrieval
・ You cannot set Flash movie as the image for message retrieval.
Setting the image for sending i-mode Mail or SMS
1 m82327 ■ Setting the image to be displayed when receiving i-mode Mail, SMS or Message R/F:
m82328■ Setting the image to be displayed when performing Check i-mode Message or Check SMS:
m82329
2 Select an image to register・ Follow the procedure from Step 2 in “Changing images to be displayed for outgoing calls”. ☛P128
Displaying the other party’s phone number and name when receiving calls Receive Display
Set whether to display the phone number and name when a voice/videophone call is received as well as setting the font size for the name.In addition, set whether to scroll the reception result on the task bar when i-mode Mail, SMS or Message R/F is received.・ Name displays ☛P95
1 m8233
2 Select each item to set
3 Press p
Default ON
Default Default
Default Caller’s phone number: Display Caller’s name: Standard Receive mail/message: Display
Caller’s phone number:Sets whether to display the phone number when a call is received.
Caller’s name:Sets whether to display the name in the normal size, in the small size or not to display the name when a call is received.
Receive mail/message:Sets whether to display the reception result on the task bar when i-mode Mail, SMS or Message R/F is received.・When Display is set, the reception result is scrolled on the task bar.
Example
Mail/C
all Imag
e
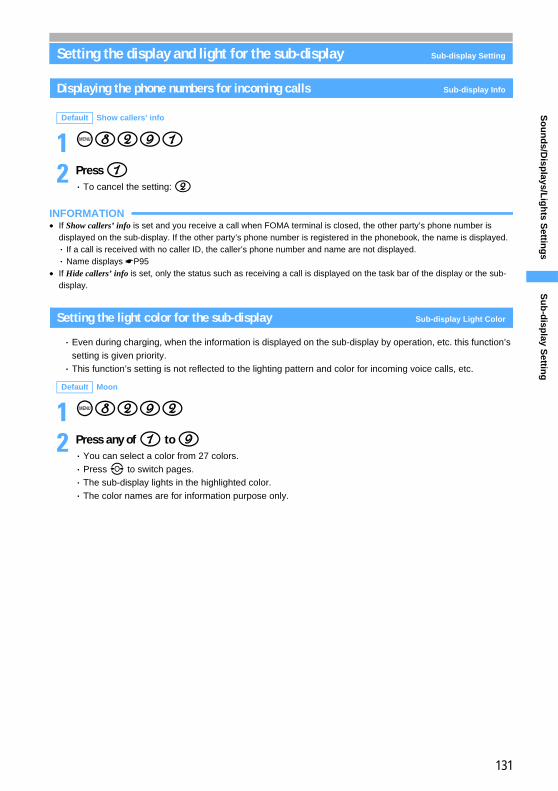
131
So
un
ds/D
isplays/L
igh
ts Settin
gs
Setting the display and light for the sub-display Sub-display Setting
Displaying the phone numbers for incoming calls Sub-display Info
1 m8291
2 Press 1・ To cancel the setting: 2
INFORMATION● If Show callers’ info is set and you receive a call when FOMA terminal is closed, the other party’s phone number is
displayed on the sub-display. If the other party’s phone number is registered in the phonebook, the name is displayed.・ If a call is received with no caller ID, the caller’s phone number and name are not displayed.・ Name displays ☛P95
● If Hide callers’ info is set, only the status such as receiving a call is displayed on the task bar of the display or the sub-display.
Setting the light color for the sub-display Sub-display Light Color
・ Even during charging, when the information is displayed on the sub-display by operation, etc. this function’s setting is given priority. ・ This function’s setting is not reflected to the lighting pattern and color for incoming voice calls, etc.
1 m8292
2 Press any of 1 to 9・ You can select a color from 27 colors.・ Press & to switch pages.・ The sub-display lights in the highlighted color.・ The color names are for information purpose only.
Default Show callers’ info
Default Moon
Su
b-d
isplay S
etting
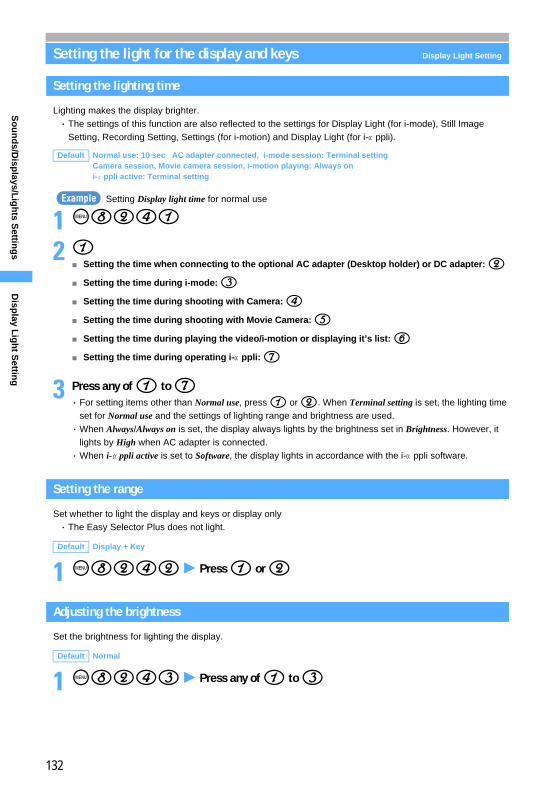
132
So
un
ds/D
isplays/L
igh
ts Settin
gs
Setting the light for the display and keys Display Light Setting
Setting the lighting time
Lighting makes the display brighter.・ The settings of this function are also reflected to the settings for Display Light (for i-mode), Still Image
Setting, Recording Setting, Settings (for i-motion) and Display Light (for i-αppli).
Setting Display light time for normal use
1 m8241
2 1 ■ Setting the time when connecting to the optional AC adapter (Desktop holder) or DC adapter: 2■ Setting the time during i-mode: 3■ Setting the time during shooting with Camera: 4■ Setting the time during shooting with Movie Camera: 5■ Setting the time during playing the video/i-motion or displaying it’s list: 6■ Setting the time during operating i-αppli: 7
3 Press any of 1 to 7・ For setting items other than Normal use, press 1 or 2. When Terminal setting is set, the lighting time
set for Normal use and the settings of lighting range and brightness are used.・When Always/Always on is set, the display always lights by the brightness set in Brightness. However, it
lights by High when AC adapter is connected.・When i-αppli active is set to Software, the display lights in accordance with the i-αppli software.
Setting the range
Set whether to light the display and keys or display only・ The Easy Selector Plus does not light.
1 m8242 z Press 1 or 2
Adjusting the brightness
Set the brightness for lighting the display.
1 m8243 z Press any of 1 to 3
Default Normal use: 10 sec AC adapter connected, i-mode session: Terminal setting Camera session, Movie camera session, i-motion playing: Always on i-αppli active: Terminal setting
Default Display + Key
Default Normal
Example
Disp
lay Lig
ht S
etting
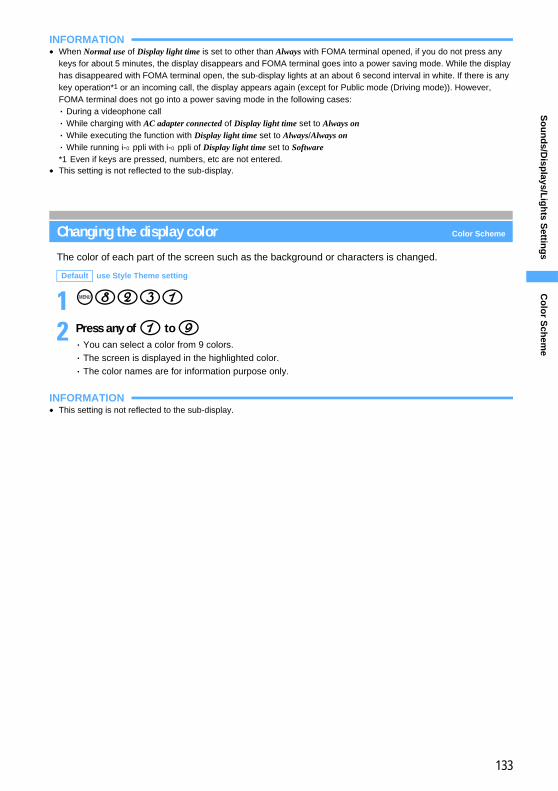
133
So
un
ds/D
isplays/L
igh
ts Settin
gs
INFORMATION●When Normal use of Display light time is set to other than Always with FOMA terminal opened, if you do not press any
keys for about 5 minutes, the display disappears and FOMA terminal goes into a power saving mode. While the display has disappeared with FOMA terminal open, the sub-display lights at an about 6 second interval in white. If there is any key operation*1 or an incoming call, the display appears again (except for Public mode (Driving mode)). However, FOMA terminal does not go into a power saving mode in the following cases:・ During a videophone call・While charging with AC adapter connected of Display light time set to Always on・While executing the function with Display light time set to Always/Always on・While running i-αppli with i-αppli of Display light time set to Software*1 Even if keys are pressed, numbers, etc are not entered.
● This setting is not reflected to the sub-display.
Changing the display color Color Scheme
The color of each part of the screen such as the background or characters is changed.
1 m8231
2 Press any of 1 to 9・ You can select a color from 9 colors.・ The screen is displayed in the highlighted color.・ The color names are for information purpose only.
INFORMATION● This setting is not reflected to the sub-display.
Default use Style Theme setting
Co
lor S
chem
e
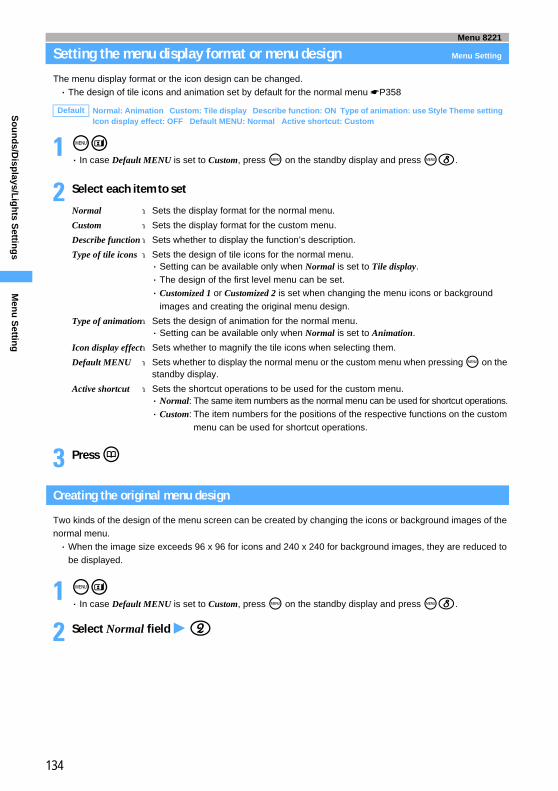
134
So
un
ds/D
isplays/L
igh
ts Settin
gs
Menu 8221
Setting the menu display format or menu design Menu Setting
The menu display format or the icon design can be changed.・ The design of tile icons and animation set by default for the normal menu ☛P358
1 mt ・ In case Default MENU is set to Custom, press m on the standby display and press m8.
2 Select each item to set
3 Press p
Creating the original menu design
Two kinds of the design of the menu screen can be created by changing the icons or background images of the normal menu.・When the image size exceeds 96 x 96 for icons and 240 x 240 for background images, they are reduced to
be displayed.
1 mt・ In case Default MENU is set to Custom, press m on the standby display and press m8.
2 Select Normal field z 2
Default Normal: Animation Custom: Tile display Describe function: ON Type of animation: use Style Theme setting Icon display effect: OFF Default MENU: Normal Active shortcut: Custom
Normal :Sets the display format for the normal menu.
Custom :Sets the display format for the custom menu.
Describe function:Sets whether to display the function’s description.
Type of tile icons :Sets the design of tile icons for the normal menu.・ Setting can be available only when Normal is set to Tile display.・ The design of the first level menu can be set.・ Customized 1 or Customized 2 is set when changing the menu icons or background
images and creating the original menu design.
Type of animation:Sets the design of animation for the normal menu.・ Setting can be available only when Normal is set to Animation.
Icon display effect:Sets whether to magnify the tile icons when selecting them.
Default MENU :Sets whether to display the normal menu or the custom menu when pressing m on the standby display.
Active shortcut :Sets the shortcut operations to be used for the custom menu.・ Normal: The same item numbers as the normal menu can be used for shortcut operations.・ Custom: The item numbers for the positions of the respective functions on the custom
menu can be used for shortcut operations.
Men
u S
etting
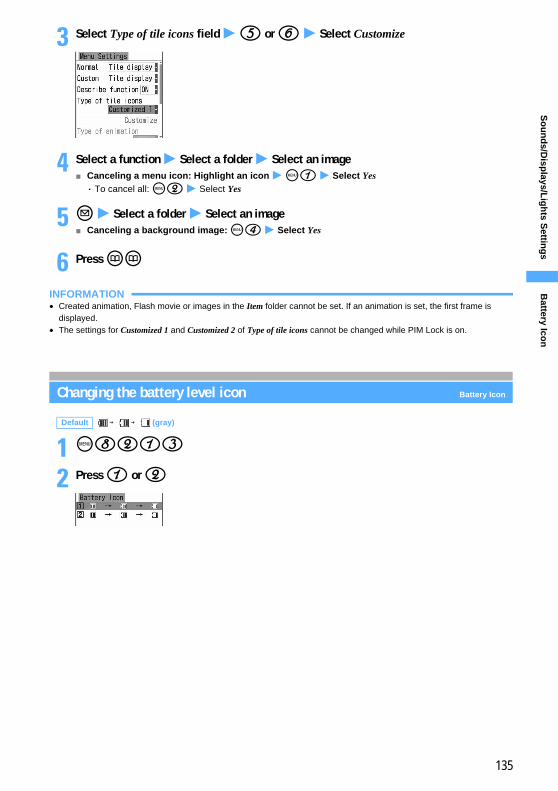
135
So
un
ds/D
isplays/L
igh
ts Settin
gs
3 Select Type of tile icons field z 5 or 6 z Select Customize
4 Select a function z Select a folder z Select an image■Canceling a menu icon: Highlight an icon z m1 z Select Yes・ To cancel all: m2 z Select Yes
5 a z Select a folder z Select an image■Canceling a background image: m4 z Select Yes
6 Press pp
INFORMATION● Created animation, Flash movie or images in the Item folder cannot be set. If an animation is set, the first frame is
displayed.● The settings for Customized 1 and Customized 2 of Type of tile icons cannot be changed while PIM Lock is on.
Changing the battery level icon Battery Icon
1 m8213
2 Press 1 or 2
Default → → (gray)
Battery Ico
n
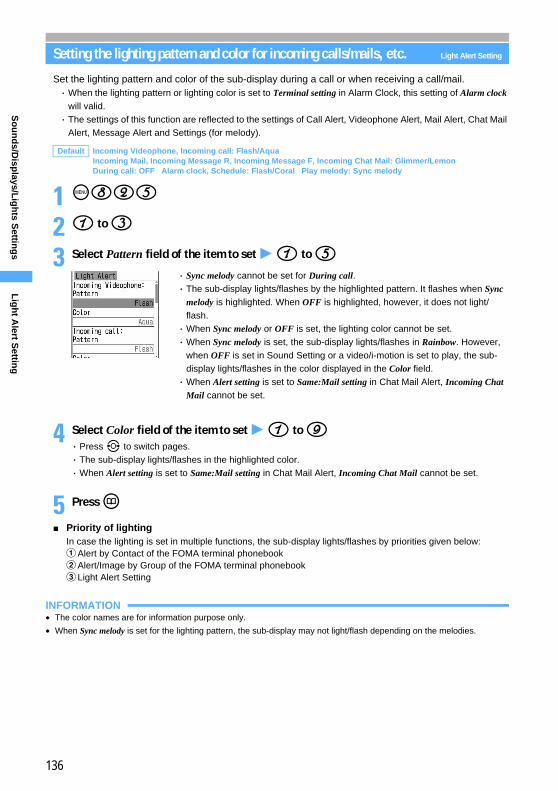
136
So
un
ds/D
isplays/L
igh
ts Settin
gs
Setting the lighting pattern and color for incoming calls/mails, etc. Light Alert Setting
Set the lighting pattern and color of the sub-display during a call or when receiving a call/mail.・When the lighting pattern or lighting color is set to Terminal setting in Alarm Clock, this setting of Alarm clock
will valid.・ The settings of this function are reflected to the settings of Call Alert, Videophone Alert, Mail Alert, Chat Mail
Alert, Message Alert and Settings (for melody).
1 m825
2 1 to 3
3 Select Pattern field of the item to set z 1 to 5
4 Select Color field of the item to set z 1 to 9・ Press & to switch pages.・ The sub-display lights/flashes in the highlighted color.・When Alert setting is set to Same:Mail setting in Chat Mail Alert, Incoming Chat Mail cannot be set.
5 Press p
■ Priority of lightingIn case the lighting is set in multiple functions, the sub-display lights/flashes by priorities given below:aAlert by Contact of the FOMA terminal phonebookbAlert/Image by Group of the FOMA terminal phonebookcLight Alert Setting
INFORMATION● The color names are for information purpose only.
●When Sync melody is set for the lighting pattern, the sub-display may not light/flash depending on the melodies.
Default Incoming Videophone, Incoming call: Flash/Aqua Incoming Mail, Incoming Message R, Incoming Message F, Incoming Chat Mail: Glimmer/Lemon During call: OFF Alarm clock, Schedule: Flash/Coral Play melody: Sync melody
・ Sync melody cannot be set for During call. ・ The sub-display lights/flashes by the highlighted pattern. It flashes when Sync
melody is highlighted. When OFF is highlighted, however, it does not light/flash.・When Sync melody or OFF is set, the lighting color cannot be set. ・When Sync melody is set, the sub-display lights/flashes in Rainbow. However,
when OFF is set in Sound Setting or a video/i-motion is set to play, the sub-display lights/flashes in the color displayed in the Color field. ・When Alert setting is set to Same:Mail setting in Chat Mail Alert, Incoming Chat
Mail cannot be set.
Lig
ht A
lert Settin
g
137
So
un
ds/D
isplays/L
igh
ts Settin
gs
Flashing the sub-display when receiving new information Indicator Light
The sub-display flashes if FOMA terminal is closed when there is new information such as missed calls, unread mails, etc.
1 m826
2 Press 1・ To cancel the setting: 2
INFORMATION● Even when ON is set, the sub-display does not flash in the following cases: ・While receiving a call ・While talking ・ In Public mode (Driving mode)
・ During All Lock ・While activating Camera/Movie Camera/Sound Recorder
・While the sub-display is lighting (excluding the case where the sub-display is lighting during charging)
● Even when ON is set, if there is no new information for about 6 hours since the first arrival of new information or if or (with the number of information items) on the standby display is cleared, the sub-display stops
flashing even if the information has not been checked.●When ON is set, the sub-display flashes at about 6 second intervals in the lighting color set in each of the following
settings when FOMA terminal is closed. It does not conform to the setting of Alert by Contact or Alert/Image by Group. If the newly arrived information is confirmed, it stops flashing.・ Missed calls (voice call/videophone call/recorded message): Incoming call in Light Alert Setting ・ Unread information (mail/chat mail/SMS): Incoming Mail in Light Alert Setting・ Unread information (Message R/Message F): Incoming Message R/Incoming Message F in Light Alert Setting
●When ON is set and there are multiple newly arrived information, the sub-display flashes in the following priority.
Default OFF
aMissed calls (voice call/videophone call/recorded message)bUnread messages (mail/chat mail/SMS)cUnread messages (Message R)dUnread messages (Message F)
Ind
icator L
igh
t
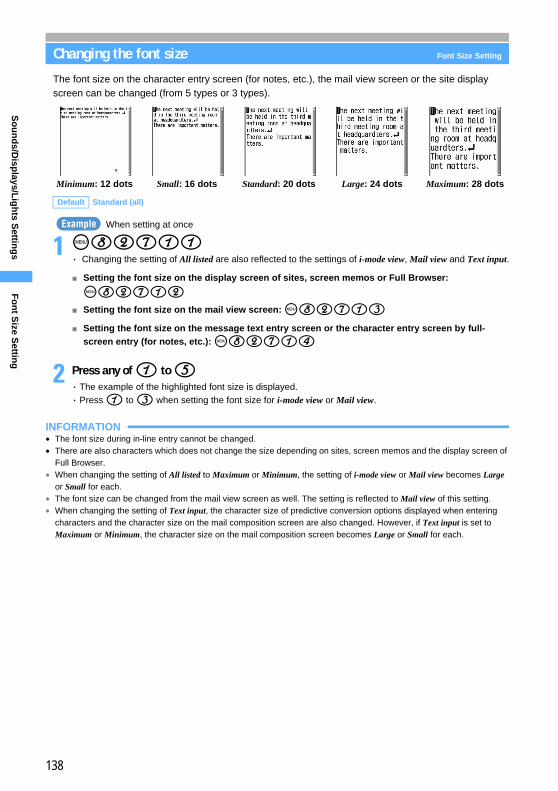
138
So
un
ds/D
isplays/L
igh
ts Settin
gs
Changing the font size Font Size Setting
The font size on the character entry screen (for notes, etc.), the mail view screen or the site display screen can be changed (from 5 types or 3 types).
When setting at once
1 m82711・ Changing the setting of All listed are also reflected to the settings of i-mode view, Mail view and Text input.
■ Setting the font size on the display screen of sites, screen memos or Full Browser:
m82712■ Setting the font size on the mail view screen: m82713■ Setting the font size on the message text entry screen or the character entry screen by full-
screen entry (for notes, etc.): m82714
2 Press any of 1 to 5 ・ The example of the highlighted font size is displayed.・ Press 1 to 3 when setting the font size for i-mode view or Mail view.
INFORMATION● The font size during in-line entry cannot be changed.● There are also characters which does not change the size depending on sites, screen memos and the display screen of
Full Browser.●When changing the setting of All listed to Maximum or Minimum, the setting of i-mode view or Mail view becomes Large
or Small for each.● The font size can be changed from the mail view screen as well. The setting is reflected to Mail view of this setting.●When changing the setting of Text input, the character size of predictive conversion options displayed when entering
characters and the character size on the mail composition screen are also changed. However, if Text input is set to Maximum or Minimum, the character size on the mail composition screen becomes Large or Small for each.
Default Standard (all)
Minimum: 12 dots Small: 16 dots Standard: 20 dots Large: 24 dots Maximum: 28 dots
Example
Fo
nt S
ize Settin
g
139
So
un
ds/D
isplays/L
igh
ts Settin
gs
Menu 8212
Setting the clock display Clock Display Format
Set whether to display the clock on the standby display. The clock design, the time display format (24 hour format/12 hour format), the clock display position and the language used to display the day of the week can also be set.
The example of setting
1 m854
2 Select each item to set
3 Press p
INFORMATION● In the following cases, the digital clock (the fixed design) is displayed on the upper part of the display regardless of the
setting for Style or Clock layout.・When video/i-motion or Chara-den is displayed on the standby display・When the i-αppli standby display is displayed
Default use Style Theme setting for Style Time format: 12 hour Clock layout: Center Day: English
Style :Sets whether to display the clock. Also, sets the displayed clock design. ・When ON is set, select the design.・When OFF is set, Clock layout and Day cannot be set.
Time format:Specifies 24 hour format or 12 hour format to display the clock.・ The display of analog clock is not changed.
Clock layout:Sets the position to display the clock.Day :Specifies whether to display a day of the week in Japanese or English.
・When Terminal settings is set, the display conforms to the setting of Select Language.
Displaying Analog 3 at the bottom
Displaying Analog 4 at the center
Displaying Analog 1 at the center
Displaying Analog 2 at the top
Displaying Digital 3 by 12 hour format
at the bottom
Displaying Digital 4 by 24 hour format
at the center
Displaying Digital 1 by 12 hour format
at the top
Displaying Digital 2 by 24 hour format
at the center
Clo
ck Disp
lay Fo
rmat
Next
140
So
un
ds/D
isplays/L
igh
ts Settin
gs
●While All Lock or Omakase Lock is on, the clock is displayed on the upper part of the display regardless of this function’s setting.
● This setting is not reflected to the sub-display.● On the screen other than the standby display, the clock is displayed on the upper right of the display. The time display
format (24 hour format/12 hour format) follows this function’s setting.
Coordinating according to the color of FOMA terminal Style Theme
The standby display, battery icon, clock display, color scheme and menu design are coordinated in total by the color of FOMA terminal. They can also be changed to the style corresponding to the other colors.
・ The default settings are as follows:
1 m828
2 Press any of 1 to 4
INFORMATION● Even if Battery Icon, Style, Clock layout and Day of Clock Display Format, Normal of Menu Setting or Sub-display Light
Color is set, setting this function returns to the default state.
Functions and items to be coordinated
Style Theme
white coral green lilac
Standby image Life Beauty Intelligence Imagination
Style of Clock Display Format
ON/Digital 1 ON/Digital 2 ON/Digital 3 ON/Digital 4
Color Scheme WarmBeige Purple WarmGray Pink
Animation type of Menu Setting
Type1 Type2 Type3 Type4
Body color of FOMA terminal
Style Theme
White sand whiteCoral coral coralGreen air greenLilac mirage lilac
Style T
hem
e
141
Safety SettingsSecurity code
Security codes ................................................................................................142Changing the terminal security code ................... Change Security Code 143Setting the PIN code .......................................................................................144Unblocking the PIN lock .................................................................................145
Restricting Mobile Phone OperationsVarious lock functions ...................................................................................146Preventing unauthorized use of your terminal ............................ All Lock 146Using Omakase Lock ......................................................... Omakase Lock 147Preventing making/receiving calls ............................................. Self Mode 148Preventing display of the phonebook or schedule ................... PIM Lock 148Prohibiting keypad dial .................................................. Keypad Dial Lock 149Preventing unauthorized use of the functions such as phonebook or mail.................................................................................... Privacy Mode Setting 150Preventing the side key errors ......................................... Side Key Guard 151Disabling the key operation each time FOMA terminal is closed................................................................................................ Lock on Close 152Displaying the data with Secret Attribute set ...................... Secret Mode 153
Restricting outgoing/incoming or sending/receiving actionsRejecting/accepting incoming calls from the specified phone numbers ......................................................................................... Reject/Accept Call 153Setting the operations for incoming calls with no caller ID ......................................................................................... Anonymous Caller 154Delaying the ringer action for calls from the party not registered in the phonebook.............................................................................................. Mute Ring Time Setting 155Rejecting calls from phone numbers not registered in the phonebook .................................................................................. Reject non-Reg. Caller 156
Other “Safety settings”Using Data Security Service ....................................Data Security Service 157Other “Safety settings” ..................................................................................158
142
Safety S
etting
s
Security code
Security codes
Some FOMA terminal functions for convenient use require the entry of security codes. There are security codes such as the network security code for use in network services and the password for i-mode in addition to the terminal security code for various terminal functions. Fully use your FOMA terminal by choosing the security code to suit your needs.
Terminal security code
The default terminal security code is “0000”, which can be changed to a code of your own choice. ☛P143
Network security code
Network security code is the arbitrary 4-digit code that is set at subscription to FOMA terminal for various procedures for the DoCoMo e-site and usage of network services. You can optionally change the code.If you have “My DoCoMo ID/Password” for “My DoCoMo” which is the total support site for PC, you can perform the change procedure for a new network security code from a PC.From i-mode, you can change the code by yourself accessing 各種手続き (Procedures) in DoCoMo e-site.・ Please refer to the back of this manual for “My DoCoMo” and “DoCoMo e-site”.
i-mode password
A 4-digit “i-mode password” is required to store/delete sites in My Menu or apply to/cancel Message Service or i-mode pay services (in addition, there may be passwords required by individual information service providers). The default i-mode password is “0000”, which can be changed to a code of your own choice.When changing from i-mode, select iMenu → ENGLISH → dOptions → bChange i-mode Password.
PIN1 code/PIN2 code
The PIN1 and PIN2 codes can be set for the UIM. Both codes are set to “0000” at the subscription and can be changed to a code of your own choice. ☛P144The PIN1 code is the 4 to 8 digits security code entered to confirm the user every time the UIM is inserted to FOMA terminal or the power of FOMA terminal is turned on to protect your FOMA terminal from unauthorized use by the third party. Entering the PIN1 code enables making or receiving calls and FOMA terminal operations. The PIN2 code is the 4 to 8 digits security code required when resetting the total calls cost, or using a user certificate or requesting the issue of it.・ The settings of the PIN1/PIN2 codes and PIN1 Code ON/OFF are recorded in the UIM. When using the
current UIM to a FOMA terminal you newly purchased, the PIN1/PIN2 codes that you set previously can be used likewise.
Precautions for security codes・ As for the security code to set, please avoid the number intelligible for others, such as “a birth
date”, “a part of phone number”, “an address number or a room number”, “1111” or “1234”.In addition, be sure to keep a separate note of the set security code not to forget.・ Please be careful never to reveal your security code to others. If your security code is known and
misused by others, DoCoMo accepts no responsibility whatsoever for the damages.・ DoCoMo will never ask your security code.・ Please note that, if you forget the security codes, you need to bring a document (such as a driver’s
license) for identifying that you are a subscriber, your FOMA terminal and the UIM to a DoCoMo Shop.For the detail information, contact “General Inquiries” on the back of this manual.
Secu
rity cod
es
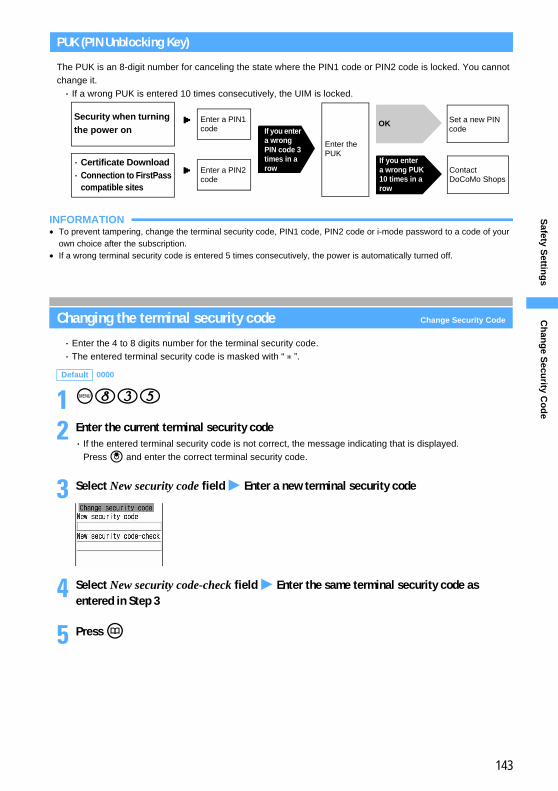
143
Safety S
etting
s
PUK (PIN Unblocking Key)
The PUK is an 8-digit number for canceling the state where the PIN1 code or PIN2 code is locked. You cannot change it.・ If a wrong PUK is entered 10 times consecutively, the UIM is locked.
INFORMATION● To prevent tampering, change the terminal security code, PIN1 code, PIN2 code or i-mode password to a code of your
own choice after the subscription.● If a wrong terminal security code is entered 5 times consecutively, the power is automatically turned off.
Changing the terminal security code Change Security Code
・ Enter the 4 to 8 digits number for the terminal security code.・ The entered terminal security code is masked with “ * ”.
1 m835
2 Enter the current terminal security code・ If the entered terminal security code is not correct, the message indicating that is displayed.
Press o and enter the correct terminal security code.
3 Select New security code field z Enter a new terminal security code
4 Select New security code-check field z Enter the same terminal security code as entered in Step 3
5 Press p
Default 0000▲
▲
If you enter a wrong PIN code 3 times in a row
Enter the PUK
If you enter a wrong PUK 10 times in a row
OK Set a new PIN code
Contact DoCoMo Shops
Security when turning the power on
・ Certificate Download・ Connection to FirstPass
compatible sites
Enter a PIN1 code
Enter a PIN2 code
Ch
ang
e Secu
rity Co
de
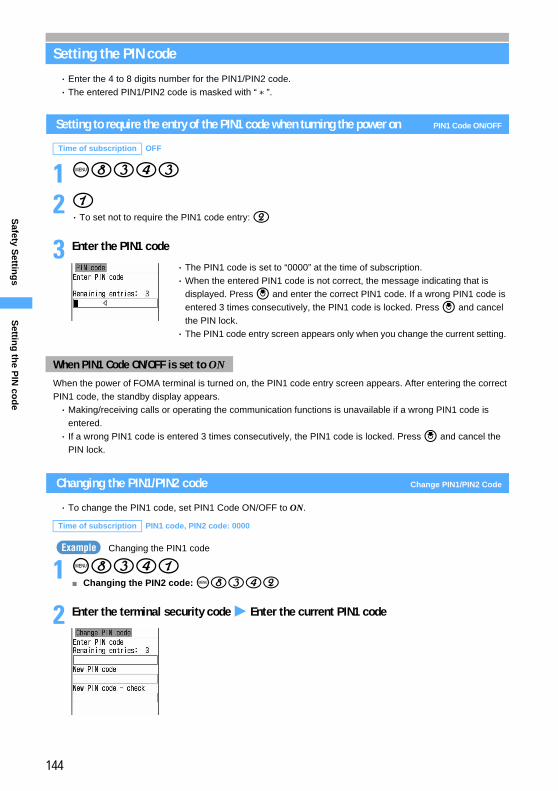
144
Safety S
etting
s
Setting the PIN code
・ Enter the 4 to 8 digits number for the PIN1/PIN2 code.・ The entered PIN1/PIN2 code is masked with “ * ”.
Setting to require the entry of the PIN1 code when turning the power on PIN1 Code ON/OFF
1 m8343
2 1・ To set not to require the PIN1 code entry: 2
3 Enter the PIN1 code
When the power of FOMA terminal is turned on, the PIN1 code entry screen appears. After entering the correct PIN1 code, the standby display appears.・Making/receiving calls or operating the communication functions is unavailable if a wrong PIN1 code is
entered.・ If a wrong PIN1 code is entered 3 times consecutively, the PIN1 code is locked. Press o and cancel the
PIN lock.
Changing the PIN1/PIN2 code Change PIN1/PIN2 Code
・ To change the PIN1 code, set PIN1 Code ON/OFF to ON.
Changing the PIN1 code
1 m8341■Changing the PIN2 code: m8342
2 Enter the terminal security code z Enter the current PIN1 code
Time of subscription OFF
When PIN1 Code ON/OFF is set to ON
Time of subscription PIN1 code, PIN2 code: 0000
・ The PIN1 code is set to “0000” at the time of subscription.・When the entered PIN1 code is not correct, the message indicating that is
displayed. Press o and enter the correct PIN1 code. If a wrong PIN1 code is entered 3 times consecutively, the PIN1 code is locked. Press o and cancel the PIN lock. ・ The PIN1 code entry screen appears only when you change the current setting.
ExampleS
etting
the P
IN co
de
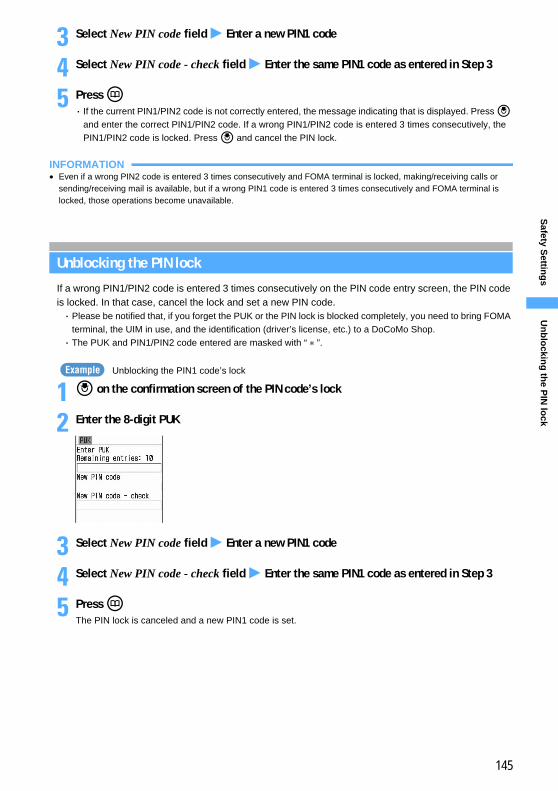
145
Safety S
etting
s
3 Select New PIN code field z Enter a new PIN1 code
4 Select New PIN code - check field z Enter the same PIN1 code as entered in Step 3
5 Press p・ If the current PIN1/PIN2 code is not correctly entered, the message indicating that is displayed. Press o
and enter the correct PIN1/PIN2 code. If a wrong PIN1/PIN2 code is entered 3 times consecutively, the PIN1/PIN2 code is locked. Press o and cancel the PIN lock.
INFORMATION● Even if a wrong PIN2 code is entered 3 times consecutively and FOMA terminal is locked, making/receiving calls or
sending/receiving mail is available, but if a wrong PIN1 code is entered 3 times consecutively and FOMA terminal is locked, those operations become unavailable.
Unblocking the PIN lock
If a wrong PIN1/PIN2 code is entered 3 times consecutively on the PIN code entry screen, the PIN code is locked. In that case, cancel the lock and set a new PIN code.・ Please be notified that, if you forget the PUK or the PIN lock is blocked completely, you need to bring FOMA
terminal, the UIM in use, and the identification (driver’s license, etc.) to a DoCoMo Shop.・ The PUK and PIN1/PIN2 code entered are masked with “ * ”.
Unblocking the PIN1 code’s lock
1 o on the confirmation screen of the PIN code’s lock
2 Enter the 8-digit PUK
3 Select New PIN code field z Enter a new PIN1 code
4 Select New PIN code - check field z Enter the same PIN1 code as entered in Step 3
5 Press pThe PIN lock is canceled and a new PIN1 code is set.
Example
Un
blo
cking
the P
IN lo
ck
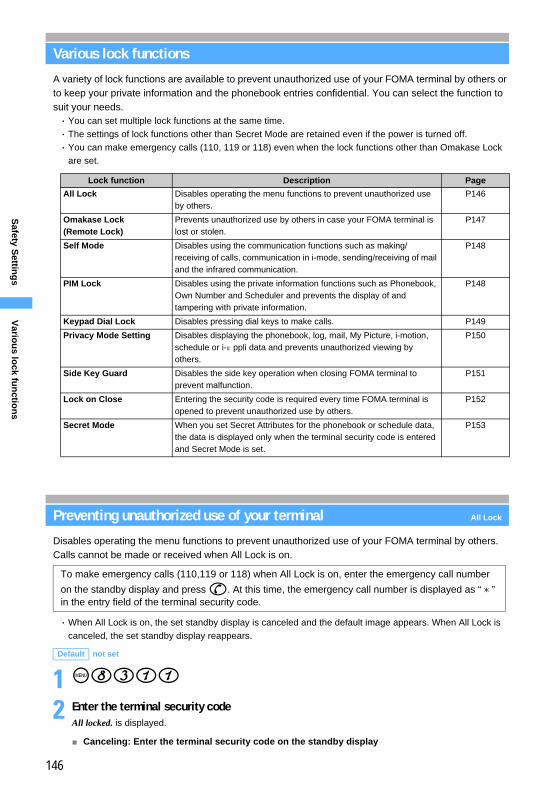
146
Safety S
etting
s
Restricting Mobile Phone Operations
Various lock functions
A variety of lock functions are available to prevent unauthorized use of your FOMA terminal by others or to keep your private information and the phonebook entries confidential. You can select the function to suit your needs.・ You can set multiple lock functions at the same time.・ The settings of lock functions other than Secret Mode are retained even if the power is turned off.・ You can make emergency calls (110, 119 or 118) even when the lock functions other than Omakase Lock
are set.
Preventing unauthorized use of your terminal All Lock
Disables operating the menu functions to prevent unauthorized use of your FOMA terminal by others. Calls cannot be made or received when All Lock is on.
・When All Lock is on, the set standby display is canceled and the default image appears. When All Lock is canceled, the set standby display reappears.
1 m8311
2 Enter the terminal security codeAll locked. is displayed.
■Canceling: Enter the terminal security code on the standby display
Lock function Description Page
All Lock Disables operating the menu functions to prevent unauthorized use by others.
P146
Omakase Lock(Remote Lock)
Prevents unauthorized use by others in case your FOMA terminal is lost or stolen.
P147
Self Mode Disables using the communication functions such as making/receiving of calls, communication in i-mode, sending/receiving of mail and the infrared communication.
P148
PIM Lock Disables using the private information functions such as Phonebook, Own Number and Scheduler and prevents the display of and tampering with private information.
P148
Keypad Dial Lock Disables pressing dial keys to make calls. P149
Privacy Mode Setting Disables displaying the phonebook, log, mail, My Picture, i-motion, schedule or i-αppli data and prevents unauthorized viewing by others.
P150
Side Key Guard Disables the side key operation when closing FOMA terminal to prevent malfunction.
P151
Lock on Close Entering the security code is required every time FOMA terminal is opened to prevent unauthorized use by others.
P152
Secret Mode When you set Secret Attributes for the phonebook or schedule data, the data is displayed only when the terminal security code is entered and Secret Mode is set.
P153
To make emergency calls (110,119 or 118) when All Lock is on, enter the emergency call number
on the standby display and press n. At this time, the emergency call number is displayed as “ * ” in the entry field of the terminal security code.
Default not set
Vario
us lo
ck fun
ction
s
147
Safety S
etting
s
INFORMATION●When All Lock is on, the alarm clock or schedule does not operate even when the specified date and time arrives.●When All Lock is on, the i-channel information is not displayed as ticker on the standby display.●When All Lock is on, using Data Security Service does not allow you to save/update/restore the data from FOMA terminal. ● If a wrong terminal security code is entered 5 times consecutively when canceling All Lock, the power is automatically turned off.● The calls received during All Lock are rejected and the busy tone is heard by the caller, but they are recorded as missed
calls in the received call history. When All Lock is canceled, (with the number of missed calls) appears on the standby display.
● i-mode Mail, SMS and Message R/F can be received even when All Lock is on, but the receiving screen, icon for the receiving mail and reception result screen are not displayed and the ring alert does not sound. When All Lock is canceled, the icon for the unread mail or unread Message R/F is displayed.
●When All Lock is on, the sub-display does not flash even if Indicator Light is set to ON and there is a newly-arrived information.● You can turn the power on/off. In addition, when Auto Power ON/OFF is set, it is executed.
Using Omakase Lock Omakase Lock
This is a service that you can lock your FOMA terminal using remote control by informing DoCoMo or by operating from My DoCoMo in case it is lost or stolen. The contents of your important private information are protected. The lock can be canceled by phone call from you.
・ For details of usage of Omakase Lock, see “Subscriber’s Guide” or contact “General Inquiries” on the back of this manual.
・ Omakase Lock is a service to lock your FOMA terminal in which the UIM you have subscribed to is inserted.・While Omakase Lock is on, all the key operations are disabled except for receiving voice/videophone calls
and turning the power on/off. Using functions is disabled. ・ A voice/videophone call can be received, but the name or image registered in the phonebook is not
displayed and only the phone number appears. In addition, the incoming image, ring alert, incoming vibrator and incoming lighting depend on the default setting. Canceling Omakase Lock (Remote Lock) returns to the former status.・ The mail received during Omakase Lock is stored in the Mail Center.・ The operation of turning the power on/off is available, but the lock setting is not canceled, even though the
power is turned off.・ Note that the UIM is not locked.
INFORMATION● Even if other functions are activated, those functions are ended and Omakase Lock is set. When there is data during
editing, the data is saved and the function is ended● Even if other lock functions are used, Omakase Lock can be set.●When your FOMA terminal is outside the service area, turned off or during Self Mode, the lock is not set.● Omakase Lock is not set when you are subscribing to Dual Network Service and using the mova service.● Omakase Lock is a service which locks FOMA terminal by the offer of the FOMA card subscriber. The lock is set when
an offer is made by the subscriber even if the subscriber is not the user of FOMA terminal.
Setting/canceling Omakase Lock0120-524-360 Office hours: for 24 hours
・Omakase Lock can be set/canceled on the My DoCoMo website from a PC.
Omakase Lock active. is displayed and Omakase Lock is set.
Om
akase Lo
ck
Next

148
Safety S
etting
s
● Canceling the lock is available only when the same UIM as the time of setting the lock is inserted. When the lock cannot be canceled, contact “General Inquiries” on the back of this manual.
Menu 869
Preventing making/receiving calls Self Mode
Disables all functions that require communications such as making or receiving calls, communication in i-mode or sending/receiving mails. Infrared communication, infrared remote control and data transfer by USB connection are also disabled.
1 c (for over a second) z Select YesSelf Mode is set and is indicated on the standby display. Pressing Cb when FOMA terminal is closed displays on the sub-display.・When you use shortcut operations: 1 z Select Yes
■Canceling: c (for over a second) z Select Yes・When you use shortcut operations: 2 z Select Yes
INFORMATION● Note that if emergency calls (110, 119 or 118) are dialed in Self Mode, Self Mode is canceled.● If you receive a call when Self Mode is on, a guidance is played for the caller that radio waves are hard to reach or the
power of your terminal is turned off. You can use Voice Mail Service and Call Forwarding Service.● i-mode Mail or Message R/F sent during Self Mode are stored at the i-mode Center and SMS are stored at the SMS
Center. When you receive messages, cancel Self Mode and perform Check i-mode Message or Check SMS.
Preventing display of the phonebook or schedule PIM Lock
PIM Lock prevents the display of and tampering with private information:・ This function cannot be set when Reject Non-Reg. Caller is set to ON.・When this function is set to ON, the previous redial data and received call history are deleted. Note that
outgoing and incoming calls after the setting is made are recorded and dialing from the redial data or received call history can be performed.
1 m8312
2 Enter the terminal security code z Press 1PIM Lock is set and is indicated on the standby display.・ To cancel the setting: Enter the terminal security code z 2
・ The following operations (the whole operation or part of the setting) become unavailable.
Default OFF
Default OFF
When PIM Lock is on
・Mail/Chat Mail/SMS/Message R/F*1 ・i-mode ・Check i-mode Message・Full Browser ・i-αppli ・Phonebook・Answer Machine/Voice Memo ・My Picture (Image) ・i-motion・Melody ・Chara-den ・Camera ・Movie Camera・Sound Recorder ・Bar Code Reader ・Scheduler ・Call Cost Limit・Reset ・Delete All Data ・Notepad ・Headset Key Control
Self M
od
e
149
Safety S
etting
s
*1 Messages can be received but the receiving screen, the icon for the receiving mail and the reception result screen are not displayed and the ring alert does not sound.
・ Even if a call is made/received to/from a caller registered in the phonebook, only phone number is displayed instead of the name and image. ・ is not indicated on the standby display because Answer Machine does not operate even when Answer
Machine is set. An icon for a recorded message which has not been played is not displayed either.・ The i-channel information is not displayed as ticker on the standby display.
INFORMATION●When the data which is subject to PIM Lock has been set for the standby display or the ring alert, the default setting is
applied while PIM Lock is on. The setting you made is restored when PIM Lock is canceled. However, when data saved in the Preinstalled folder is set, the set standby display or ring alert is used even if PIM Lock is on.
●With PIM Lock on, Default image (camera-off image) appears as the substitute image for videophone.●With PIM Lock on, ほっとメロディ is sounded as Safety Melody.●When PIM Lock is on, the notification such as by alert tone is not made when the number of voice messages of Voice
Mail Service is increased.
Prohibiting keypad dial Keypad Dial Lock
Disables making a call by dialing a phone number (Keypad dial).・ You can make a call using the phonebook and redial data.・When this function is set to ON, the previous redial data and received call history are deleted. Note that the
numbers dialed from the phonebook entries after the setting is made are recorded under the redial data.
1 m833
2 Enter the terminal security code z Press 1Keypad Dial Lock is set and is indicated on the standby display.・ To cancel the setting: Enter the terminal security code z 2
・ Dialing from the received call history・ Editing, adding or deleting the phonebook data and Group Setting・ Editing and resetting Own Number data ・ Phone To (AV Phone To) and Mail To functions・ Transferring the phonebook data to/from the external devices・ Sending i-mode Mail/SMS
(Mail can be sent by specifying addresses using the phonebook or mail from the party registered in the phonebook can be replied.)・ Reading mail template from the mail composition screen・ Composing mail on the template list/view screen
(Composing mail is available from the template if the mail address entered in the adress field of the template is registered in the phonebook.)・ Using network services by the dial key operation
・Alarm Clock ・Software Update ・Own Number ・Virus Scan Function・i-channel ・Data transfer via infrared communication ・Chaku-moji・Call Ring Alert ・Mail/Msg Ring Alert ・Alarm sound ・Standby Display Setting・Ticker Setting ・Image Setting ・Anonymous Caller・Mail/Call Image(except for Contact Image) ・Outgoing Call ・Call Alert・Reject/Accept Call ・Videophone Dialing ・Videophone Alert ・Data Security Service・Tone/Vibration message notification ・Number Setting/Incoming settings for Multi Number・Menu Setting (changing the settings for Customized 1 or Customized 2 of Type of tile icons)
Default OFF
Unavailable operations when Keypad Dial Lock is on
Keyp
ad D
ial Lo
ck
150
Safety S
etting
s
Preventing unauthorized use of the functions such as phonebook or mail Privacy Mode Setting
Setting the Privacy Mode operation
Set whether to enter the terminal security code when using the phonebook, mail or My Picture while Privacy Mode is on. Also, you can set Privacy Mode to manually start or to automatically start when no operation has taken place in a certain period of time.・ To enable Privacy Mode Setting, you need to start Privacy Mode.
1 m836
2 Enter the terminal security code z Select each item to set・ In case Authorized access is set, the terminal security code must be entered when using the following
functions in Privacy Mode.
3 p z Press o
INFORMATION● If all items except Auto start are set to Show all, Privacy Mode is not activated. In addition, when Privacy Mode has been
activated, it is canceled automatically.
Starting Privacy Mode
・ If you set Privacy Mode to start automatically in Privacy Mode Setting, it is started according to the setting.
1 Hold down l for over a second■Canceling: l (for over a second) z Enter the terminal security code
Default Phonebook & Logs, Mail, My picture, i-motion, Schedule, i-αppli: Show all Auto start: OFF
Phonebook & Logs:Sets for displaying the phonebook, redials, received calls, recorded messages or voice memos.
Mail :Sets for displaying mails.・ Setting Hide secret fldrs hides the folders with the privacy set to ON. However, holding down c for over a second on the applicable folder list screen and entering the terminal security code cancel Privacy Mode temporarily and display the folder.
My picture:Sets for using My Picture (Image).
i-motion :Sets for using i-motion.
Schedule :Sets for using schedules.
i-αppli :Sets for using i-αppli.
Auto start:Sets the time period until Privacy Mode is started automatically, if no operation is performed during standby.
Privacy M
od
e Settin
g
151
Safety S
etting
s
INFORMATION●When Privacy Mode is on, some restrictions apply in case Authorized access is set for the following items:
●When you use the function which is set to Authorized access in Privacy Mode, if you enter the terminal security code once, entry of the terminal security code is not required until the standby display is returned. It is also the same as when using multiple items which are set to Authorized access.(Example) In case you try to send the image saved in My Picture by mail in Privacy Mode (with Phonebook & Logs and
My picture set to Authorized access), entry of the terminal security code is not required even when trying toaccess to the phonebook from the mail composition screen because the terminal security code is alreadyentered in starting My Picture.
In Privacy Mode (with Authorized access set for Phonebook & Logs), if you enter the terminal security code once, forexample, in case of calling from the phonebook, the name and image registered in the phonebook are displayed on theoutgoing/incoming screen and the call alert set in the phonebook is used until the standby display is returned.
●When Authorized access is set for any of My picture, i-motion and i-αppli, if you try to perform the settings which may require using these data and enter the terminal security code in Privacy Mode, a message is displayed indicating that the items set not to be displayed in Privacy Mode Setting are reflected when Privacy Mode is canceled.
Preventing the side key errors Side Key Guard
Disable the side key operations when FOMA terminal is closed and prevent the malfunction while you carry the terminal around by putting it in a bag.・ Even while Side Key Guard is on, you can operate the side keys when FOMA terminal is opened.
1 Hold down m for over a secondSide Key Guard is set and is indicated on the standby display.
■Canceling: m (for over a second)
INFORMATION● Even if Side Key Guard is on, the following key operations are available:・ Press C or b to display the date and time screen on the sub-display.・ Hold down C for over a second to sound a safety melody.
Item Restriction
Phonebook & Logs
・ The name and image of the other party registered in the phonebook are not displayed for incoming/outgoing calls/mails, and only the phone number or mail address is displayed.・ The ring alert, vibrator or the videophone substitute image set in the phonebook data does not
operate. They operate according to the settings for FOMA terminal.
Mail If you search mails from the phonebook or schedule or download, update or delete Message i-αppli, entry of the terminal security code is required.
My picture/i-motion
[General informaion]・When the data other than the Preinstalled folder data is set for the ring alert or image in the
FOMA terminal phonebook, the setting is disabled.[My picture]・When Image of Scheduler is set to Yes and the data except the Preinstalled folder data is set,
the setting is disabled.・ In still image shooting or video recording, shooting using a frame cannot be performed.[i-motion]・When the data other than the Preinstalled folder data is set for the alarm clock sound or schedule
sound, the setting is disabled. ・ Editing tickers directly after recording video cannot be performed.
i-αppli When you select the mail folder for Message i-αppli or download i-αppli, entry of the terminal security code is required.
Default not set
Sid
e Key G
uard
152
Safety S
etting
s
Disabling the key operation each time FOMA terminal is closed Lock on Close
If you set Lock on Close to ON, you need to enter the terminal security code each time you open FOMA terminal. This prevents unauthorized use of your FOMA terminal by others.
・ Even if Lock on Close is on, you can answer incoming calls and turn off the power.
1 m8313
2 Enter the terminal security code z 1・ To set not to activate Lock on Close when FOMA terminal is closed: Enter the terminal security code z 2
3 Close FOMA terminal when it shows its standby display.Lock on Close is set and a message appears on the sub-display indicating that Lock on Close is set.
1 Open FOMA terminal and enter the terminal security code・ If the standby display reappears by pressing f, is indicated. When you press b or a dial key
(0 to 9), the terminal security code entry screen is displayed. Key operations other than that will be invalid.・ Lock on Close is set every time you close FOMA terminal.
INFORMATION● Lock on Close is not set even though FOMA terminal is closed on the display other than the standby display. Also, it is
not set if a message appears on the standby display. Press any key other than b to delete the message and close FOMA terminal.
●While Lock on Close is set, when there is an incoming call from the caller registered in the phonebook, only the caller’s name or image appears and a phone number is not displayed.
● During a call while Lock on Close is set, Voice Memo/Video Memo cannot be activated and only switching the speakerphone function on/off, putting calls on hold or adjusting Listen Volume is available. During a video-phone call, the main screen and sub screen can be switched and the substitute image and your self image can be switched as well.
●While Lock on Close is set, Lock on Close is activated by turning the power off and on. In addition, while Omakase Lock (Remote Lock) is activated, Lock on Close is set by canceling Omakase Lock.
● In case i-αppli starts automatically while Lock on Close is on, press b and enter the terminal security code to operate.● Even when Lock on Close is activated, you can make a voice call by holding down the switch of the flat type earphone/
microphone set with switch (optional) for over a second or answer voice calls or video-phone calls.
To make emergency calls (110, 119, or 118) when Lock on Close is on, enter an emergency call number on the terminal security code entry screen and press n. However, when returning to the standby display after pressing f on the terminal security code entry screen, enter the emergency call number and press n. Entered emergency call number is displayed as “ * ”.
Default OFF
Operating FOMA terminal while Lock on Close is on
Lo
ck on
Clo
se
153
Safety S
etting
s
Restricting outgoing/incoming or sending/receiving actions
Displaying the data with Secret Attribute set Secret Mode
If Secret Mode is set, the phonebook data/the schedule data with Secret Attribute set can be displayed. When you set/cancel Secret Attribute, you need to set Secret Mode on.
1 m832
2 Enter the terminal security codeSecret Mode is set and is indicated on the upper part of the display.
■Canceling: f on the standby display・ Also, press m832 on the standby display to cancel it.
INFORMATION● If an animation, Created animation or Flash movie is set on the standby display while Secret Mode is on, the first frame
is displayed. If you press f, Secret Mode is canceled and the animation, Created animation or Flash movie is played. ●When a call/mail is received from the other party with Secret Attribute set while Secret Mode is on, the ring alert, the
incoming vibrator and the incoming lighting set in the phonebook data are used. While not in Secret Mode, each setting in Sound Setting, Vibrator Setting and Light Alert Setting is applied.
Rejecting/accepting incoming calls from the specified phone numbers Reject/Accept Call
Reject/Accept Call is set for each phone number registered in the FOMA terminal phonebook.・ To use this function, set Reject/Accept Call for each phone number and then enable Reject/Accept Call in
this setting. The items to be set and operations of rejecting/accepting incoming calls are as follows:
*1 Even if a call is received from the set phone number, the call is disconnected without the ring alert sounding and the other party hears busy signals.
・ This function is activated only when the other party notifies the caller ID.・ The rejected calls are recorded as missed calls in the received call history.・ If the ringing time is set to 0 second for Voice Mail Service or Call Forwarding Service, Voice Mail Service or
Call Forwarding Service is activated and the call is not recorded in the received call history.・ Combination with Caller ID Request Service and Anonymous Caller is recommended when used.
Specifying phone numbers to reject/accept
Reject/Accept Call is set for the phone numbers registered in the FOMA terminal phonebook.・ Reject/Accept Call cannot be set for the phone numbers registered in the UIM phonebook.
1 Search the phonebook z Highlight a party z m343
2 Enter the terminal security code z Select a phone number
Default not set
Reject/Accept Call
Reject/Accept Call setting for each phone number
Accept call Reject call No settingCancel settings Accept Accept Accept
Reject call Accept Reject*1 Accept
Accept call Accept Reject*1 Reject*1
Secret M
od
e
Next
154
Safety S
etting
s
3 Press 1 or 2・ To cancel the setting: 3・ is indicated to the right side of the phonebook No. on the details screen of the phonebook data for
which Reject/Accept Call is set.・ To reject/accept incoming calls from the specified phone numbers, enable Reject/Accept Call continuously.
INFORMATION● On the FOMA terminal phonebook details screen, press m and select Edit/Settings → Advanced settings → Accept/Reject
call.● If the phone number with Reject/Accept Call set is changed or deleted, this function’s setting is canceled. In that case,
set Reject/Accept Call for the phone number changed or registered again.
Enabling Reject/Accept Call
・ The setting of this function applies to all phone numbers with Reject/Accept Call set.・ Reject Call and Accept Call cannot be enabled at the same time.
1 m8661
2 Enter the terminal security code z Press 2 or 3・ To cancel the setting: Enter the terminal security code z 1
INFORMATION● If a call with no caller ID is received from a party that you set Reject Call to, FOMA terminal operates according to
Anonymous Caller regardless of this function’s setting.● i-mode Mail or SMS is received regardless of this function’s setting.
Menu 81113 / Menu 82326
Setting the operations for incoming calls with no caller ID Anonymous Caller
The operation for an incoming call with no caller ID can be set for each reason for no caller ID.・ For the ring alert and incoming image in case there is an incoming voice call without caller ID notification,
this function’s setting is given priority over the setting of Call Alert.・When there is an incoming videophone call without caller ID notification, this function operates only when
the incoming setting is set to Call Rejection. If set otherwise, it operates as set in Videophone Alert.
1 m863 z Enter the terminal security code
2 1 to 3・ Perform Step 2 to 4 repeatedly for every reason for no caller ID.・ The reason for no caller ID ☛P61
Default Cancel settings
Default Disable settings (all)A
no
nym
ou
s Caller
155
Safety S
etting
s
3 Select each item to set
・ Playing and checking a melody or video/i-motion file when selecting ☛P117
4 Press p
INFORMATION●When Call Rejection has been set, the rejected calls are recorded as missed calls in the received call history.● Standard image may be set for Show image when the video/i-motion with only sounds (i-motion with no image such as
singer’s vocals) is set for Movie ringtone in the incoming setting. Note that the image can be changed to another image (except for Flash movie) by selecting Select image in the Show image field.
●When Reject non-Reg. Caller is set and a call without caller ID notification is received, the setting of Reject non-Reg. Caller takes precedence over this function.
Ring Alert Action
Delaying the ringer action for calls from the party not registered in the phonebook Mute Ring Time Setting
The ringer action by a ring alert or vibrator is set to be activated for an incoming voice call or videophone call from a caller who is not registered in the phonebook or does not notify the phone number after the specified time has elapsed. The function is effective to nuisance calls such as “One-Ring Call”.・ This function cannot be set when Reject non-Reg. Caller is set to ON.
1 m815
2 Select each item to set
Incoming setting:Sets the operation for an incoming call with no caller ID.・When Disable settings is set, the ring alert set in Call Alert sounds.・ Setting Call Rejection rejects an incoming call.・ Setting Ring alert off makes the ring alert to be silent.・When Select ring tone or Movie ringtone is selected, select a melody or video/i-motion file.・When Disable settings or Call Rejection is set, Show image cannot be set. When a video/
i-motion with sound and image is set for Movie ringtone, Show image is set to Sync ring alert.Show image:Sets an image displayed for an incoming call with no caller ID.
・When Standard image is selected, the default image is set.・When Select image is selected, select Select image (under List images) to select an image.・When i-motion is selected, select a video/i-motion file from the folder list. When the folder
list is not displayed, select Select image (under List images).
Default OFF
Delayed ring alert:Specifies whether to enable this setting.・When OFF is set, the following items cannot be set. The ringer action will be started
immediately after receiving a call.
Delay time (sec) :Sets the time between the arrival of calls and the start of ringing (between 1 to 99 seconds).
Missed call :Sets whether to display a missed call which ends in less than the time set in Delay time in the received call history.
Incoming setting
Mu
te Rin
g T
ime S
etting
Next
156
Safety S
etting
s
3 Press p
When there is an incoming call from a caller who is not registered in the phonebook, the call will be notified only on the display for the set time period. After the set time has elapsed, normal ringer action will start.・ Even before the set time passes, answering an incoming call or replying by Answer Machine can be
performed. ・ This function operates even for incoming calls from the party registered in the phonebook while PIM Lock or
Privacy Mode is on (with Authorized access set for Phonebook & Logs).・ This function also operates in the following cases:・When a call with no caller ID is received even if the party is registered in the phonebook.・While not in Secret Mode, there is an incoming call from the party registered in the phonebook as an entry
with Secret Attribute set.
INFORMATION● The following functions and services are operated regardless of this function’s settings:
● If you receive a call from the phone number set to be rejected in Anonymous Caller, Anonymous Caller is prioritized over this function.
● In case Delay time is set to the same number of seconds as the set time for Voice Mail Service or Call Forwarding Service, the ring alert may sound.
Rejecting calls from phone numbers not registered in the phonebook Reject non-Reg. Caller
・ Combination with Caller ID Request Service is recommended to use.・When Delayed ring alert in Mute Ring Time Setting is set to ON, this function cannot be set.
1 m8662
2 Enter the terminal security code z Press 1・ To cancel the setting: Enter the terminal security code z 2
When there is an incoming call from the party who is not registered in the phonebook, the call is disconnected without activating the ring alert and the caller hears busy signals.・ The rejected calls are recorded as missed calls in the received call history.・ The call is also rejected in the following cases:・When a call with no caller ID is received even if the party is registered in the phonebook.・While not in Secret Mode, there is an incoming call from the party registered in the phonebook as an entry
with Secret Attribute set.
INFORMATION●When there is an incoming call with no caller ID, this function’s setting is prioritized over Anonymous Caller.● i-mode Mail or SMS is received regardless of this function’s setting.
When Mute Ring Time Setting is on
・ Public mode (Driving mode) ・ Answer Machine ・ Voice Mail Service ・ Call Forwarding Service
Default OFF
When Reject non-Reg. Caller is onR
eject no
n-R
eg. C
aller
157
Safety S
etting
s
Using Data Security Service Data Security Service
Data Security Service is a service which allows you to save the phonebook data, still images and mails in your FOMA terminal (hereinafter called the saved data) to the Data Center of DoCoMo.Even if your FOMA terminal is lost or exposed to water and the saved data is cleared, you can restore the phonebook data, etc. saved in the Data Center to a new FOMA terminal by operating in i-mode. In addition, you can edit easily the saved data in the Center from a PC by operating on the My DoCoMo web page and reflect the edited data to your FOMA terminal.・ For details of usage of Data Security Service, see “i-mode User’s Manual”.
・ Data Security Service is a pay service for which subscription is required (it requires i-mode subscription).・ To save or restore the data, refer to the following pages:・Phonebook data ☛P110, P114 ・Still images ☛P279 ・Mails ☛P230
FOMA terminal
Save the phonebook data, still images and mails
Data Center PC, etc.
InternetRestore the data easily when you have lost it
Reflect the edited contents by PC View and edit the
saved data
Data S
ecurity S
ervice
158
Safety S
etting
s
Other “Safety settings”
Other “Safety settings”
The following Safety settings can be used:
Purpose Function or Service Page
To enable safe and reliable data communications by using the electronic authentication service, “FirstPass” (FirstPass-compatible sites only)
FirstPass P181P196
To receive only necessary mails out of large-volume messages received
Receive Option Setting P233
To register/check the safety of relatives by using i-mode when a disaster occurs
i-mode Disaster Message Board Service
See “ i-mode User’s
Manual”.To change mail addresses Change Mail Address
To receive/reject only mails sent from the specified domains Receive/Reject Mail Settings(against nuisance mail)To receive/reject mails only between i-mode terminals
To receive/reject only mails from the specified addresses
To reject SMS SMS Rejection Settings(against nuisance mail)
To reject i-mode mails after 200th mail sent from an i-mode terminal (including mova terminal) in a day
Reject Mass i-mode Mail Senders
To reject unsolicited AD mails Reject Unsolicited Ad Mail
To stop the mail function temporarily Suspend Mail
To reject “Nuisance calls” including malicious calls and repeating misdialed calls
Nuisance Call Blocking Service P332
To update FOMA terminal software by using packet communication Software Update P391
To protect FOMA terminal from viruses by deleting data that may cause problems or stopping the starting of applications
Virus Scan Function P395
Oth
er “Safety settin
gs”
159
CameraBefore using the camera.................................................................................160Shooting still images with Camera ..........................................Still Camera 162Recording videos with Movie Camera................................. Movie Camera 164Setting the still image/video size or the saving method .......................................................... Still Image Setting/Recording Setting 166Shooting by various methods ........................................................................167Changing the settings during shooting.........................................................168Sending still images shot during voice calls ...............One-shot Message 171Using Bar Code Reader.....................................................Bar Code Reader 172
160
Cam
era
Before using the camera
Still images and videos can be shot with your FOMA terminal camera. Still images and videos can be displayed/played on FOMA terminal, sent via i-mode Mail as attachments or sent via infrared communication.
Precautions for using the camera
・ Though the camera is manufactured using extremely accurate technology, some pixels and lines may always be displayed to be lighter or darker than you expect. Noise such as dots and lines may increase especially when you shoot in a place with very low light intensity, but note that such noise is not a malfunction. ・When the lens is exposed to direct sunlight for a
long period of time, the inside color filter will become discolored and images may be correspondingly discolored as well. ・When you attempt to shoot a strong light source
such as the sun or a lamp or when the battery level is low, the image may become dark or degraded. ・ Depending on the characteristics of the lens,
displayed images may be distorted. ・ Capturing under illumination flickering at high
frequencies such as fluorescent lights, mercury vapor lights, or sodium lights may make the screen flicker, but this is not a malfunction. Flickers may be reduced by changing the distance or the angle of shooting the object or by moving to another position.・ Images taken with the camera may differ from the
actual subjects in color and brightness, depending on conditions.
・ If the lens is contaminated with fingerprints or skin oil, you cannot shoot clean images. Use a soft cloth to remove any such contaminants before shooting.・ Do not cover the lens with fingers or a strap.・When shooting, hold your FOMA terminal firmly to
avoid camera shake. The auto timer is also effective to avoid camera shake because the shutter is automatically released. ☛P168・When shooting with the out-camera, keep a
distance of at least 50 cm from the object. You can switch to the macro mode when you want to come closer to the object during shooting. ☛P168
・ Set the brightness depending on the situation of the shooting. ☛P169・ There is a small time lag between taking a picture
and pressing o or C. Do not move FOMA terminal for period after pressing o or C. If you shoot a fast moving subject, the shot image might slightly differ from the subject displayed on the screen when you press o or C. ・ If you shoot the quickly moving subjects with Movie
Camera, the image may be blurred. ・When you direct the camera toward yourself by
using the in-camera, the screen displays a mirror image, but shot still images and videos are normal. For still images, setting Auto save of Still Image Setting to No can be used to save as mirror images.・When you use the camera from i-αppli, the shot still
images and the recorded videos are not saved in the Image (My Picture) or i-motion folder but saved in i-αppli. For some i-αppli applications, however, such images and videos may be saved in the i-mode folder or the Deco-Mail picture folder of Image (My Picture) or in the i-mode folder of i-motion. Shot images and videos may be automatically sent to the server. ・ If the battery power goes out before saving a shot
still image or video, it is not saved. ・ Because the camera consumes a lot of battery power,
do not leave the camera activated long time or do not keep shot images long time without being saved. ・ Some settings may require extra time to show an
image on the shooting screen after you start the camera.
The copyright laws prohibit unauthorized use, such as reproduction, alteration and modification, of photographs or videos and i-mode or Internet web site information obtained by using the FOMA terminal without the permission of the relevant copyright holders except for personal use. Please refrain from unauthorized use of portraits or names of other persons that may infringe on portrait rights. When you release shot or recorded work on web pages, use care not to infringe on copyrights or portrait rights. Note that shooting or recordings at some demonstrations, performances or exhibitions may be prohibited even when only for personal use.
Please be considerate of the privacy of individuals around you when taking and sending images using camera-equipped mobile phones.
About the camera
Points of concern when shooting images
About copyrights and portrait rights
Befo
re usin
g th
e camera
161
Cam
era
Shooting screen
INFORMATION● The indicator, counter and size restrictions are not
displayed when the screen is started from i-αppli. You can only switch the in-camera/out-camera, start auto timer and zoom in/out.
● During video recording, when the horizontal shot for 320 x 240 (QVGA) is taken place, (recording standby), (recording) and
(in pause) are indicated and the display position for the counter is changed:
File names and file formats
The shooting date/time is automatically assigned as the file name and displayed name of the shot image or recorded video file, or as the title of the recorded video file.(Example) In case of 12:34:56 on December 5, 2006
→ 20061205123456The file format is as follows:
■ Format of still image files
■ Format of video files
INFORMATION● The file name and display name can be changed after
shooting. ☛P291
Viewing the shooting/recording screen
b c d
g h i kjfe
e g h kjif
a Recording type
Indicates the type of the video to be recorded. ☛P167
: Video + Voice : Video only
b Auto timer
Indicates during the auto timer setting. ☛P168
c Indicator
<During standby for shooting>Indicates the available storage space during the normal shooting. Indicates the time remaining until the shutter is released during auto timer count down. <During video recording/pause>Indicates the rate of the recorded image size to the file size set in size restrictions.
d Counter
<During standby for shooting>During the normal shooting, it indicates the maximum number (estimate) of still images or the maximum recording time (estimate) of videos that can be saved in the current setting. Indicates the time remaining until the shutter is released during auto timer count down.<During video recording/pause>Indicates the elapsed/remaining time (estimated remaining time before the recording stops).
e Scene mode/effect
Indicates the scene mode/effect. ☛P169
f Brightness
Indicates the current brightness setting. ☛P169
db ca
Still image shooting screen
Video recording screen
Item Contents
File format JPEG (compatible to Exif format, PRINT Image Matching Ⅲ)
Extension jpg
Item Contents
File format MP4 (MobileMP4)
Encoding method
Video: MPEG-4 Sound: AMR
Extension 3gp
g Color density
Indicates the current color density setting. ☛P169
h Frame
Indicates the current frame setting. ☛P170
i Quality
Indicates the setting of the quality of the still image and video. ☛P170
j Size restrictions
Indicates the size restrictions of the file. ☛P170
k Size
Indicates the size of the still image to shoot and the video to record. ☛P171
Befo
re usin
g th
e camera
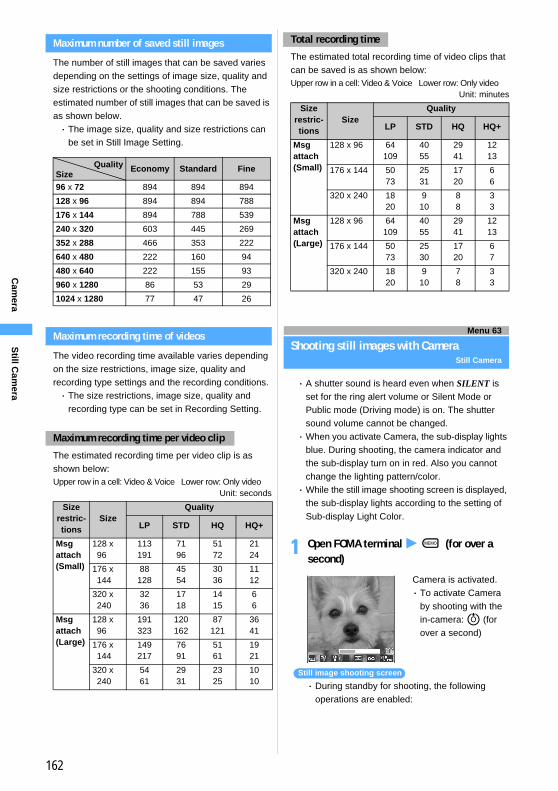
162
Cam
era
Maximum number of saved still images
The number of still images that can be saved varies depending on the settings of image size, quality and size restrictions or the shooting conditions. The estimated number of still images that can be saved is as shown below.・ The image size, quality and size restrictions can
be set in Still Image Setting.
Maximum recording time of videos
The video recording time available varies depending on the size restrictions, image size, quality and recording type settings and the recording conditions. ・ The size restrictions, image size, quality and
recording type can be set in Recording Setting.
The estimated recording time per video clip is as shown below:Upper row in a cell: Video & Voice Lower row: Only video
Unit: seconds
The estimated total recording time of video clips that can be saved is as shown below:Upper row in a cell: Video & Voice Lower row: Only video
Unit: minutes
Menu 63
Shooting still images with CameraStill Camera
・ A shutter sound is heard even when SILENT is set for the ring alert volume or Silent Mode or Public mode (Driving mode) is on. The shutter sound volume cannot be changed. ・When you activate Camera, the sub-display lights
blue. During shooting, the camera indicator and the sub-display turn on in red. Also you cannot change the lighting pattern/color.・While the still image shooting screen is displayed,
the sub-display lights according to the setting of Sub-display Light Color.
1 Open FOMA terminal z C (for over a second)
・ During standby for shooting, the following operations are enabled:
Maximum recording time per video clip
Size restric-tions
SizeQuality
LP STD HQ HQ+
Msg attach (Small)
128 x 96
113191
7196
5172
2124
176 x 144
88128
4554
3036
1112
320 x 240
3236
1718
1415
66
Msg attach (Large)
128 x 96
191323
120162
87121
3641
176 x 144
149217
7691
5161
1921
320 x 240
5461
2931
2325
1010
QualitySize
Economy Standard Fine
96 x 72 894 894 894
128 x 96 894 894 788
176 x 144 894 788 539
240 x 320 603 445 269
352 x 288 466 353 222
640 x 480 222 160 94
480 x 640 222 155 93
960 x 1280 86 53 29
1024 x 1280 77 47 26
Total recording time
Size restric-tions
SizeQuality
LP STD HQ HQ+
Msg attach (Small)
128 x 96 64109
4055
2941
1213
176 x 144 5073
2531
1720
66
320 x 240 1820
910
88
33
Msg attach (Large)
128 x 96 64109
4055
2941
1213
176 x 144 5073
2530
1720
67
320 x 240 1820
910
78
33
Camera is activated. ・ To activate Camera
by shooting with the in-camera: u (for over a second)
Still image shooting screen
Still C
amera
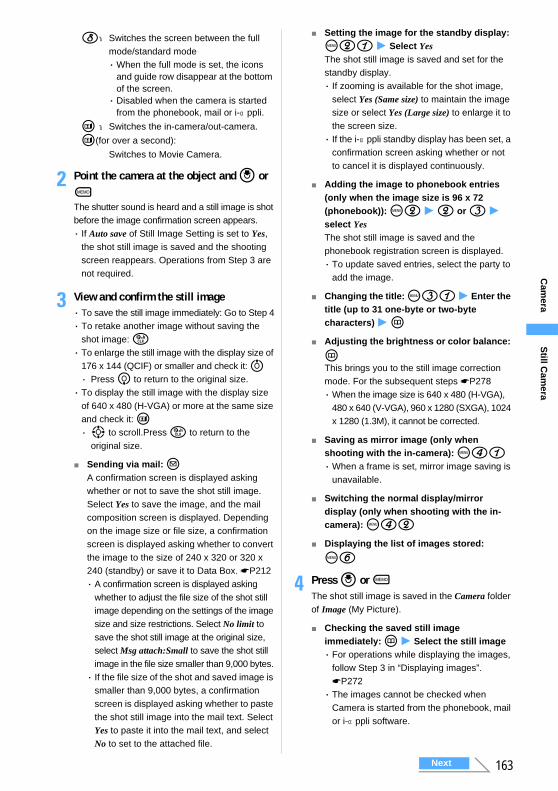
163
Cam
era
2 Point the camera at the object and o or CThe shutter sound is heard and a still image is shot before the image confirmation screen appears. ・ If Auto save of Still Image Setting is set to Yes,
the shot still image is saved and the shooting screen reappears. Operations from Step 3 are not required.
3 View and confirm the still image・ To save the still image immediately: Go to Step 4・ To retake another image without saving the
shot image: c・ To enlarge the still image with the display size of
176 x 144 (QCIF) or smaller and check it: u・ Press d to return to the original size. ・ To display the still image with the display size
of 640 x 480 (H-VGA) or more at the same size and check it: t・ O to scroll.Press c to return to the
original size.
■ Sending via mail: aA confirmation screen is displayed asking whether or not to save the shot still image. Select Yes to save the image, and the mail composition screen is displayed. Depending on the image size or file size, a confirmation screen is displayed asking whether to convert the image to the size of 240 x 320 or 320 x 240 (standby) or save it to Data Box. ☛P212・ A confirmation screen is displayed asking
whether to adjust the file size of the shot still image depending on the settings of the image size and size restrictions. Select No limit to save the shot still image at the original size, select Msg attach:Small to save the shot still image in the file size smaller than 9,000 bytes. ・ If the file size of the shot and saved image is
smaller than 9,000 bytes, a confirmation screen is displayed asking whether to paste the shot still image into the mail text. Select Yes to paste it into the mail text, and select No to set to the attached file.
■ Setting the image for the standby display: m21 z Select YesThe shot still image is saved and set for the standby display.・ If zooming is available for the shot image,
select Yes (Same size) to maintain the image size or select Yes (Large size) to enlarge it to the screen size.・ If the i-αppli standby display has been set, a
confirmation screen asking whether or not to cancel it is displayed continuously.
■ Adding the image to phonebook entries (only when the image size is 96 x 72 (phonebook)): m2 z 2 or 3 z select YesThe shot still image is saved and the phonebook registration screen is displayed. ・ To update saved entries, select the party to
add the image.
■ Changing the title: m31 z Enter the title (up to 31 one-byte or two-byte characters) z p
■ Adjusting the brightness or color balance:
pThis brings you to the still image correction mode. For the subsequent steps ☛P278・When the image size is 640 x 480 (H-VGA),
480 x 640 (V-VGA), 960 x 1280 (SXGA), 1024 x 1280 (1.3M), it cannot be corrected.
■ Saving as mirror image (only when shooting with the in-camera): m41・When a frame is set, mirror image saving is
unavailable.
■ Switching the normal display/mirror display (only when shooting with the in-camera): m42
■ Displaying the list of images stored:
m6
4 Press o or CThe shot still image is saved in the Camera folder of Image (My Picture).
■ Checking the saved still image immediately: p z Select the still image・ For operations while displaying the images,
follow Step 3 in “Displaying images”. ☛P272・ The images cannot be checked when
Camera is started from the phonebook, mail or i-αppli software.
8:Switches the screen between the full mode/standard mode・When the full mode is set, the icons
and guide row disappear at the bottom of the screen. ・ Disabled when the camera is started
from the phonebook, mail or i-αppli.
t :Switches the in-camera/out-camera.
t(for over a second):
Switches to Movie Camera.
Next
Still C
amera
164
Cam
era
INFORMATIONINFORMATION
● Saving the shot still image may take time depending on the image size or quality.
●When there is not enough available storage space to save, or you have exceeded the maximum allowable number of images, delete unnecessary images according to the screen or change the settings of image size and quality to lower values.
● Shooting still images during a voice call may interrupt the call. ● If there is an incoming call before the shutter sound is
heard during standby for shooting still image, shooting will stop. When the shutter sound has been heard and a still image has been shot already, the still image is saved automatically if Auto save is set to Yes. If Auto save is set to No, a confirmation screen is displayed after the end of the call or communication. However, the shot still images may be discarded depending on the timing of receiving calls.
● You cannot use the following functions at the confirmation screen when Camera is started from the phonebook or mail:・ Composing mail ・ Standby display settings・ Saving images in the phonebook・ Adjusting images ・ Displaying at the same size・ Displaying the image list
● Even if you shoot while setting the shooting date/time to Date or Date+Time in Still Image Setting, the date or the time is not displayed on the image confirmation screen. The date or the time is displayed on the saved still image. In addition, on the still image with the display size of 640 x 480 (H-VGA) or more, if you press t on the image confirmation screen and display the still image at the same size, the date or the time is displayed.
● The following should be set for the out-camera and the in-camera separately. When you switch between the cameras, the settings are also switched accordingly. ・ Scene mode/effect ・ Frame・ Image quality ・ Size restrictions・ Size
Recording videos with Movie CameraMovie Camera
・ At the time of purchase, the video with sound is set to be shot. It can be changed in Recording Setting.・ A shutter sound is heard even when SILENT is
set for the ring alert volume or Silent Mode or Public mode (Driving mode) is on. The shutter sound volume cannot be changed. ・When you activate Movie Camera, the sub-
display lights blue. While you are shooting, the camera indicator flashes in red and the sub-display flashes in multiple colors. During pause, the camera indicator lights red and the sub-display lights green. Also you cannot change the lighting pattern/color.
・While the video recording screen is displayed, the sub-display lights according to the setting of Sub-display Light Color.
1 m64
・ During standby for recording, the following operations are enabled:
2 Point the camera at the object and o or C
・ Press o to pause during shooting. switches to . Press o or C, and the recording restarts. ・ Recording cannot be paused when Movie
Camera is started from the phonebook, mail or i-αppli software.
3 p or CThe shutter sound is heard and the recording is finished. The image confirmation screen is displayed. ・ If Auto save of Recording Setting is set to Yes,
the shooting screen reappears after saving the video shot. The operations from Step 4 are not needed. ・ In the following cases, shooting ends
automatically. The video recorded up to that point is saved.・ When the size of a video file reaches the limit
while shooting
8:Switches the vertical shot/horizontal shot (only when the image size is set to 320 x 240 (QVGA)).*1
t :Switches the in-camera/out-camera.
t (for over a second):
Switches to Still Camera.
*1 You can perform this operation only when shooting with the out-camera.
Movie Camera is activated.
Video recording screen
The shutter sound is heard and recording is started. appears at the lower part of the screen.
Mo
vie Cam
era
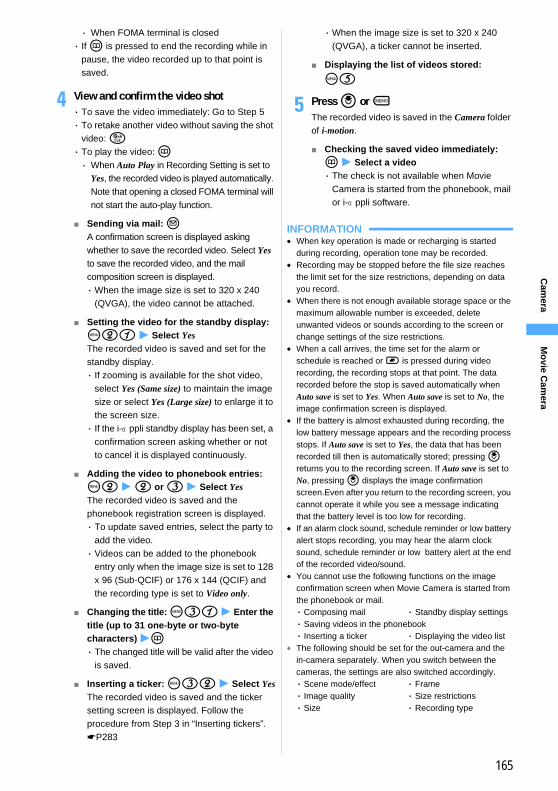
165
Cam
era
・ When FOMA terminal is closed・ If p is pressed to end the recording while in
pause, the video recorded up to that point is saved.
4 View and confirm the video shot・ To save the video immediately: Go to Step 5・ To retake another video without saving the shot
video: c・ To play the video: p・ When Auto Play in Recording Setting is set to
Yes, the recorded video is played automatically. Note that opening a closed FOMA terminal will not start the auto-play function.
■ Sending via mail: aA confirmation screen is displayed asking whether to save the recorded video. Select Yes to save the recorded video, and the mail composition screen is displayed. ・When the image size is set to 320 x 240
(QVGA), the video cannot be attached.
■ Setting the video for the standby display: m21 z Select YesThe recorded video is saved and set for the standby display. ・ If zooming is available for the shot video,
select Yes (Same size) to maintain the image size or select Yes (Large size) to enlarge it to the screen size. ・ If the i-αppli standby display has been set, a
confirmation screen asking whether or not to cancel it is displayed continuously.
■ Adding the video to phonebook entries: m2 z 2 or 3 z Select YesThe recorded video is saved and the phonebook registration screen is displayed. ・ To update saved entries, select the party to
add the video.・ Videos can be added to the phonebook
entry only when the image size is set to 128 x 96 (Sub-QCIF) or 176 x 144 (QCIF) and the recording type is set to Video only.
■ Changing the title: m31 z Enter the title (up to 31 one-byte or two-byte characters) zp・ The changed title will be valid after the video
is saved.
■ Inserting a ticker: m32 z Select YesThe recorded video is saved and the ticker setting screen is displayed. Follow the procedure from Step 3 in “Inserting tickers”. ☛P283
・When the image size is set to 320 x 240 (QVGA), a ticker cannot be inserted.
■ Displaying the list of videos stored:
m5
5 Press o or CThe recorded video is saved in the Camera folder of i-motion.
■ Checking the saved video immediately: p z Select a video・ The check is not available when Movie
Camera is started from the phonebook, mail or i-αppli software.
INFORMATIONINFORMATION
●When key operation is made or recharging is started during recording, operation tone may be recorded.
● Recording may be stopped before the file size reaches the limit set for the size restrictions, depending on data you record.
●When there is not enough available storage space or the maximum allowable number is exceeded, delete unwanted videos or sounds according to the screen or change settings of the size restrictions.
●When a call arrives, the time set for the alarm or schedule is reached or b is pressed during video recording, the recording stops at that point. The data recorded before the stop is saved automatically when Auto save is set to Yes. When Auto save is set to No, the image confirmation screen is displayed.
● If the battery is almost exhausted during recording, the low battery message appears and the recording process stops. If Auto save is set to Yes, the data that has been recorded till then is automatically stored; pressing o returns you to the recording screen. If Auto save is set to No, pressing o displays the image confirmation screen.Even after you return to the recording screen, you cannot operate it while you see a message indicating that the battery level is too low for recording.
● If an alarm clock sound, schedule reminder or low battery alert stops recording, you may hear the alarm clock sound, schedule reminder or low battery alert at the end of the recorded video/sound.
● You cannot use the following functions on the image confirmation screen when Movie Camera is started from the phonebook or mail. ・ Composing mail ・ Standby display settings・ Saving videos in the phonebook・ Inserting a ticker ・ Displaying the video list
● The following should be set for the out-camera and the in-camera separately. When you switch between the cameras, the settings are also switched accordingly. ・ Scene mode/effect ・ Frame・ Image quality ・ Size restrictions・ Size ・ Recording type
Mo
vie Cam
era
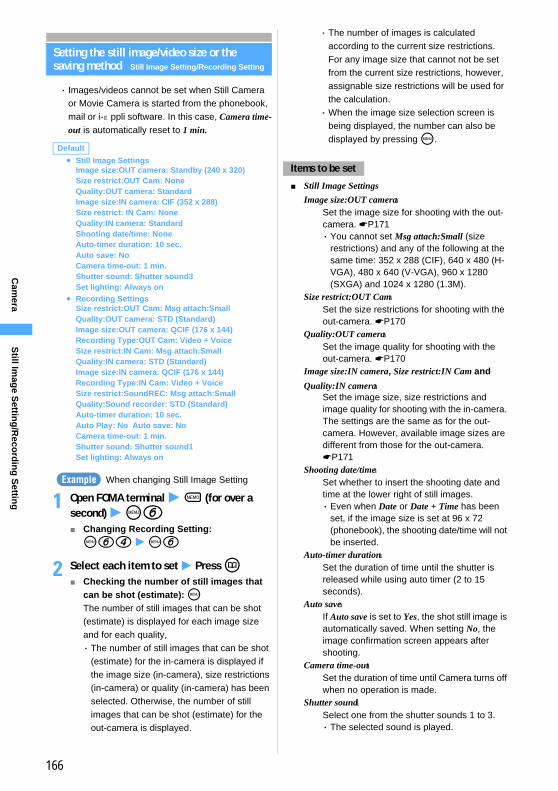
166
Cam
era
Setting the still image/video size or the saving method Still Image Setting/Recording Setting
・ Images/videos cannot be set when Still Camera or Movie Camera is started from the phonebook, mail or i-αppli software. In this case, Camera time-out is automatically reset to 1 min.
When changing Still Image Setting
1 Open FOMA terminal z C (for over a second) z m6■ Changing Recording Setting:
m64 z m6
2 Select each item to set z Press p■ Checking the number of still images that
can be shot (estimate): mThe number of still images that can be shot (estimate) is displayed for each image size and for each quality, ・ The number of still images that can be shot
(estimate) for the in-camera is displayed if the image size (in-camera), size restrictions (in-camera) or quality (in-camera) has been selected. Otherwise, the number of still images that can be shot (estimate) for the out-camera is displayed.
・ The number of images is calculated according to the current size restrictions. For any image size that cannot not be set from the current size restrictions, however, assignable size restrictions will be used for the calculation. ・When the image size selection screen is
being displayed, the number can also be displayed by pressing m.
■ Still Image Settings
Default
●Still Image SettingsImage size:OUT camera: Standby (240 x 320)Size restrict:OUT Cam: NoneQuality:OUT camera: StandardImage size:IN camera: CIF (352 x 288)Size restrict: IN Cam: NoneQuality:IN camera: StandardShooting date/time: NoneAuto-timer duration: 10 sec.Auto save: No Camera time-out: 1 min.Shutter sound: Shutter sound3Set lighting: Always on
●Recording SettingsSize restrict:OUT Cam: Msg attach:SmallQuality:OUT camera: STD (Standard)Image size:OUT camera: QCIF (176 x 144) Recording Type:OUT Cam: Video + VoiceSize restrict:IN Cam: Msg attach:SmallQuality:IN camera: STD (Standard)Image size:IN camera: QCIF (176 x 144) Recording Type:IN Cam: Video + VoiceSize restrict:SoundREC: Msg attach:SmallQuality:Sound recorder: STD (Standard)Auto-timer duration: 10 sec.Auto Play: No Auto save: No Camera time-out: 1 min. Shutter sound: Shutter sound1Set lighting: Always on
Example
Items to be set
Image size:OUT camera:Set the image size for shooting with the out-camera. ☛P171・ You cannot set Msg attach:Small (size
restrictions) and any of the following at the same time: 352 x 288 (CIF), 640 x 480 (H-VGA), 480 x 640 (V-VGA), 960 x 1280 (SXGA) and 1024 x 1280 (1.3M).
Size restrict:OUT Cam:Set the size restrictions for shooting with the out-camera. ☛P170
Quality:OUT camera:Set the image quality for shooting with the out-camera. ☛P170
Image size:IN camera, Size restrict:IN Cam and Quality:IN camera:
Set the image size, size restrictions and image quality for shooting with the in-camera. The settings are the same as for the out-camera. However, available image sizes are different from those for the out-camera. ☛P171
Shooting date/time:Set whether to insert the shooting date and time at the lower right of still images. ・ Even when Date or Date + Time has been
set, if the image size is set at 96 x 72 (phonebook), the shooting date/time will not be inserted.
Auto-timer duration:Set the duration of time until the shutter is released while using auto timer (2 to 15 seconds).
Auto save:If Auto save is set to Yes, the shot still image is automatically saved. When setting No, the image confirmation screen appears after shooting.
Camera time-out:Set the duration of time until Camera turns off when no operation is made.
Shutter sound:Select one from the shutter sounds 1 to 3. ・ The selected sound is played.
Still Im
age S
etting
/Reco
rdin
g S
etting
167
Cam
era
■ Recording Settings INFORMATION● You can also change the recording settings by pressing
m in the Sound Recorder screen and selecting Recording settings.
● If Recording Setting is set in Movie Camera or Sound Recorder, both settings for Movie Camera and Sound Recorder are changed.
● The setting of Shutter sound is reflected to the settings of Operation sound (Shutter sound, Movie camera sound) of Set Sound. The Set lighting setting is reflected to the settings of Display light time (Camera session, Movie camera session) of Display Light Setting.
Shooting by various methods
Zooming
The display magnifications which can be changed in each image size are as follows:
■ With the out-camera・ During still image shooting
・ During video recording
■ With the in-cameraZooming is not possible.
Set lighting:When Always on is set, the lighting of the display stays on while the still image shooting screen is displayed. When Phone settings is set, the setting conforms to Normal use of Display light time of Display Light Setting. ☛P132
Size restrict:OUT Cam:Set the size restrictions for recording with the out-camera. ☛P170
Quality:OUT camera:Set the video quality for recording with the out-camera. ☛P170
Image size:OUT camera:Set the image size for recording with the out-camera. ☛P171
Recording Type:Out Cam:Select Video + Voice or Video only as the recording type for shooting with the out-camera.
Size restrict:IN Cam, Quality:IN camera, Image size:IN camera and Recording Type:IN Cam:
Set the size restrictions, image quality, image size and recording type for recording with the in-camera. The settings are the same as for the out-camera.
Size restrict:SoundREC:Set the restrictions on file size for the voice recorded with Sound Recorder. ☛P300
Quality:Sound recorder:Set the sound quality of the voice recorded with Sound Recorder. ☛P300
Auto-timer duration:Set the duration of time until the shutter is released while using auto timer (2 to 15 seconds).
Auto Play:Set whether to play the video/sound automatically when the image confirmation screen is displayed.
Auto save:If Auto save is set to Yes, the recorded video/sound is automatically saved. Selecting No displays the image confirmation screen after recording.
Camera time-out:Set the duration of time until Movie Camera/Sound Recorder turns off when no operation is made.
Shutter sound:Select one from the shutter sounds 1 to 3. ・ The selected sound is played.
Set lighting:When Always on is set, the lighting of the display stays on while the video/sound recording screen is displayed. When Phone settings is set, the setting conforms to Normal use of Display light time of Display Light Setting. ☛P132
Image size Display magnification96 x 72 (phonebook) From x1 to x4 (16 steps)
128 x 96 (Sub-QCIF) From x1 to x4 (16 steps)
176 x 144 (QCIF) From x1 to x4 (16 steps)
240 x 320 (standby) From x1 to x4 (16 steps)
352 x 288 (CIF) From x1 to x2 (6 steps)
640 x 480 (H-VGA) Zooming not possible
480 x 640 (V-VGA) From x1 to x2 (6 steps)
960 x 1280 (SXGA) Zooming not possible
1024 x 1280 (1.3M) Zooming not possible
Image size Display magnification128x96 (Sub-QCIF) x1, x2, x4
176 x 144 (QCIF) x1, x2, x4
320 x 240 (V-QVGA movie)
x1, x2
320 x 240 (H-QVGA movie)
x1, x2, x4
Sh
oo
ting
by vario
us m
etho
ds
Next

168
Cam
era
1 Press % on the still image shooting screen or the video recording screen
Using auto timer
Since the shutter is automatically released after the specified number of second has elapsed, you can take your own picture and avoid blurring of images due to camera shake. ・ The number of seconds until the shutter is
released can be set in Still image Setting or Recording Setting.
1 m4 on the still image shooting screen or the video recording screen
2 Point the camera at the object and press o or CThe countdown sound is heard and the auto timer starts countdown. The indicator and counter show an estimate of the remaining time before shooting and the remaining number of seconds. The interval of sounds becomes shorter as the shooting time approaches. After the specified number of seconds has elapsed, the shutter sound is heard and shooting is started.・ During countdown, the camera indicator
flashes in red and the sub-display flashes in green. The intervals of flashing become shorter as the shooting time approaches. ・ A countdown sound is heard even when
SILENT is set for the ring alert volume or while Silent Mode or Public mode (Driving mode) is on. The countdown sound volume cannot be changed.・ To stop the auto timer on the way: p・ Closing FOMA terminal during countdown
stops shooting.
・ The shooting stops if a call arrives, the time set for the alarm clock or schedule reminder arrives, or b is pressed during countdown.
Shooting nearby object Macro
To shoot an object from a very short distance with the out-camera, switch the macro mode switch to (Macro).
・ Slide the switch until it stops at the side.・When shooting, keep a distance of 7 to 10 cm in
the macro mode or at least 50 cm in the normal mode.・ In the macro mode, you can shoot in the same
way as the usual mode.・ At the end of shooting in the macro mode,
remember to turn the macro mode switch back to (normal mode). If you shoot a distant object
without canceling (Macro), you cannot get a sharp picture.・ Even if you switch to (Macro), the shooting
distance for the in-camera remains the same.
Changing the settings during shooting
Scene mode/effect, brightness, color density, frames, quality, size restrictions or image size can be set. ・ The following settings will be kept even if you
finish using Camera or Movie camera. ・ Brightness ・ Color density ・ Quality・ Size restrictions ・ Image size
Each time you press, the slider shifts. ・ Shooting procedures
for still images and videos are the same as in normal shooting.
During still image shooting
Slider
Icon of auto timer
Auto timer is set and is indicated. ・ To cancel the setting: m4 again
Default SceneModes: Full auto Brightness: ±0ColorDnsty: ±0 Frame: not set Quality: <Still image> Standard <Video> STD Size Limit: <Still image> None <Video> Msg attach SSize: <Still image, out-camera> 240 x 320 <Still image, in-camera> 352 x 288 <Video> 176 x 144
Macro mode switch (switched to Macro)
Ch
ang
ing
the settin
gs d
urin
g sh
oo
ting
169
Cam
era
Setting a frame
1 & to highlight the icon of frame on the still image shooting screen or the video recording screen
・ Similarly, to change other settings than a frame, highlight each icon. ・ Keypads of 1 to 7 are assigned for each
icon from the left. Icons can be selected also by pressing the relevant keypad.
2 % to switch between frames z Press o・ To change other settings, switch the value with % and press o in the same manner.・ For scene mode/effect, frame, quality, size
restrictions and image size, you can also switch the value by pressing the corresponding keys (1, 4 to 7) and then pressing o.
INFORMATION● If you close FOMA terminal while changing the settings,
the changes become invalid and the display returns to the shooting screen.
●& or dial keys are not available to change settings when Still Camera or Movie Camera is started from the phonebook or mail. To change the setting of the scene mode/effect, brightness or color density, press m and select Scene mode/effect or Camera settings. The quality, size restrictions, image size and frame cannot be set.
● The settings cannot be changed when Still Camera or Movie Camera is started from i-αppli software.
Scene mode/effect
8 setting types are available according to color tone and shooting situation. ・ For details of operation ☛P168
*1 When you select the icon, Backlight is displayed on the screen.
・When recording videos, you cannot set Scenery or Night.・ Adjust backlight is unavailable during the in-camera
shooting.・ In Night mode, color is captured more precisely;
due to the camera characteristics, there may be noise (such as lines) in the image when shootings are done in a low-light situation. ・ Press m1 on the still image shooting screen or
video recording screen to select a mode while viewing the description of each mode.
Brightness
Brightness level can be set from among 5 levels.・ For details of operation ☛P168
: -2 : -1 : ±0: +1 : +2
・ If you change the level, it may not give much effect depending on the object.
Color density
Color density level can be set from among 5 levels.・ For details of operation ☛P168
: -2 : -1 : ±0: +1 : +2
・ If you change the level, it may not give much effect depending on the object.
1:Scene mode/effect2:Brightness 3:Color density4:Frame 5:Quality6:Size restrictions7:Image size
Full auto:Standard scene mode/effect. Use this mode normally.
Example
Current setting
Icon of frame
Name of icon
Adjust backlight *1:Compensates backlight images by adjusting brightness of the darkened part such as face.
Sepia:Shoots in sepia colors.
Monochrome:Shoots images like black-and-white photographs.
Twilight:
Suitable for shooting the beautiful sunset scenery. With high intensity, images tend to look rather cyan.
Surf&Snow:Enhances the blue of the sky and sea, and the white of snow.
Scenery:Suitable for shooting nature or cityscape vividly. Intensity and sharpness are set rather high.
Night:Slows the shutter speed for night shooting. Hold the terminal firmly to prevent blurring.
Ch
ang
ing
the settin
gs d
urin
g sh
oo
ting
170
Cam
era
Frames
You can select frames saved in FOMA terminal or frame images downloaded from sites. ・ For details of operation ☛P168
: Frame is set : Frame is canceled・ The frames registered in FOMA terminal by default
are applicable to image sizes of 176 x 144 (QCIF) and 240 x 320 (standby). ☛P360・ Frames cannot be set when 96 x 72 (phonebook),
640 x 480 (H-VGA), 480 x 640 (V-VGA), 960 x 1280 (SXGA) or 1024 x 1280 (1.3M) for image size of still image, or 320 x 240 (QVGA) for image size of video is set. ・ Canceling: 4 (for over a second)
INFORMATION● You can also select frames from the list by pressing
m31 on the still image shooting screen or video recording screen.
● If you select a frame that is opposite in horizontal and vertical values to the image size, the frame is displayed after rotating 90 degrees clockwise; for example, suppose that you have selected a 144 x 176 frame when the image size is 176 x 144 (QCIF). In this case, the frame rotates 180 degrees by pressing m33 on the still image shooting screen or video recording screen. Note that your frame cannot be rotated if it is the same as the image size in terms of horizontal and vertical values.
● If the frame is downloaded from a site during shooting, the added frame becomes selectable by pressing m34 on the still image shooting screen or video recording screen.
Quality
Set the quality of still image or video to shoot.・ For details of operation ☛P168
■ During still image shooting
■ During video recording
Size restrictions
Set the size restrictions of files.・ For details of operation ☛P168
■ During still image shootingWhen the file size of the shot still image is larger than the limit value, this setting automatically degrades the quality or reduce the file size to save the image.
・Msg attach:Small can be set only for the image with the size of 240 x 320 (standby) or smaller. ・ The setting for size restrictions may be changed
automatically depending on the setting for the image size.
■ During video recordingWhen the file size of video exceeds the limit value during video recording, recording ends automatically.
*1 When you select the icon, Msg attach S or Msg attach L is displayed on the screen.
Economy:Provides the lowest quality. The file size is reduced.
Standard:Provides the standard quality.
Fine:Provides the highest quality. The file size is enlarged.
LP:Provides the lowest quality. The file size is reduced and the recording time becomes the longest.
STD:Provides the standard quality
HQ:The video motion becomes smooth.
HQ+:Provides the highest quality. The file size is enlarged and the recording time becomes the shortest.
Msg attach:Small*1:Restricts the file size to 9,000 bytes. The image with this file size is suitable for attaching to i-mode Mail.
Msg attach:Large*1:Restricts the file size to 500 Kbytes. You can attach the image to i-mode Mail without changing the file size.
None:No restriction for the file size.
Msg attach:Small*1:Restricts the file size to 290 Kbytes. The image with this file size can be attached to i-mode Mail and sent to the terminal which does not support large message.
Msg attach:Large*1:Restricts the file size to 490 Kbytes. The image with this file size can be sent to the terminal which supports large message.
Ch
ang
ing
the settin
gs d
urin
g sh
oo
ting
171
Cam
era
Image size
You can set the following image size:・ For details of operation ☛P168
a: Images can be attached to i-mode Mail to send to an i-mode terminal or PC. In addition, these sizes are suitable for attaching to Deco-mail.
b: Images can be attached to i-mode Mail to send to an i-mode terminal or PC. A confirmation screen is displayed asking whether to convert to 240 x 320 or 320 x 240 (standby) when attaching files to mail.
c: Images can be attached to i-mode Mail to send to an i-mode terminal or PC.
d: Images cannot be attached to i-mode Mail. ・When shooting still images with the in-camera, the
following settings are unavailable: 240×320 (standby), 640×480 (H-VGA), 480×640 (V-VGA), 960 x 1280 (SXGA) and 1024×1280 (1.3M).・ The maximum size of an image file that can be sent
to the i-mode terminal is 500 Kbytes. ・ The still image size best suited for viewing on the
i-mode terminal is 240 x 320 (standby). ・ The setting for size restrictions may be changed
automatically depending on the setting for the image size. ・While i-αppli is running or being set as the i-αppli
standby display, the image size cannot be set to 1024 x 1280 (1.3M). If the still image shooting screen is displayed during i-αppli running when the image size is set to 1024 x 1280 (1.3M), the image size is changed to 960 x 1280 (SXGA).
Restoring the default settings for shooting
Reset the settings for the scene mode/effect, brightness and color density to the default settings. ・ For the scene mode/effect, only the out-camera
setting is reset during the out-camera shooting; only the in-camera setting is reset during the in-camera shooting.
1 m23 on the still image shooting screen or the video recording screen
2 Select Yes
Sending still images shot during voice calls One-shot Message
Send the still image shot during a voice call by attaching it to i-mode Mail to the other party during the call.
1 t during a voice call
2 Shoot a still image・When Yes is set for Auto save in Still Image
Setting, a confirmation screen is displayed asking whether to attach the shot image to mail. If Yes is selected, the shot still image can be checked.
3 a z Select YesThe shot still image is saved and the mail composition screen is displayed. If the mail address of the other party you are talking to has been registered in the phonebook, the other party’s address is inserted in the receiver field automatically. However, the mail address is not inserted when Privacy Mode is active (with Authorized access set for Phonebook & Logs) ・ Depending on the image size or the file size of
the shot image, a confirmation screen is displayed asking whether to convert the image size to 240 x 320 or 320 x 240 (standby) or save the image to Data Box. ☛P212・ A confirmation screen is displayed asking
whether to adjust the file size of the shot still image depending on the settings of the image size and size restrictions. Select No limit to save the shot still image at the original size, select Msg attach:Small to save the shot still image in the file size smaller than 9,000 bytes.
Shooting method
Icon Image size Remarks
Still Camera
96 x 72 (phonebook)
a128 x 96 (Sub-QCIF)
176 x 144 (QCIF)
240 x 320 (standby)
352 x 288 (CIF)
b
640 x 480 (H-VGA)
480 x 640 (V-VGA)
960 x 1280 (SXGA)
1024 x 1280 (1.3M)
Movie Camera
128 x 96 (Sub-QCIF)c
176 x 144 (QCIF)
320 x 240 (QVGA) d
Next
On
e-sho
t Messag
e
172
Cam
era
・ If the file size of the shot and saved image is smaller than 9,000 bytes, a confirmation screen is displayed asking whether to paste the shot still image into the mail text. Select Yes to paste it into the mail text, and select No to set to the attached file.
4 Compose and send i-mode Mail・ To return to the talking screen: c
Using Bar Code ReaderBar Code Reader
Data such as text and number contained in the JAN code or QR code can be scanned using the camera. The scanned data can be saved as the phonebook or bookmark data. Also, the Phone To (AV Phone To), Mail To and Web To functions are available from the data. ・ You can save the scanned data up to 5 items. ・ Bar Code Reader can be used only with the out-
camera. ・ The bar codes and two-dimensional codes other
than JAN and QR codes cannot be scanned. ・ Some bar codes may not be scanned depending
on the types and sizes. ・ Scratches, dirt, damages, the low print quality, the
strong reflection of light or some QR code versions may prevent the codes from being scanned.・ You can activate Bar Code Reader on the
character entry screen and enter the scanned data directly. ☛P347
The JAN code is one of the bar codes indicating numbers with the vertical lines (bars) of different width. The bar codes of 8 digits (JAN8) or 13 digits (JAN13) can be scanned. The JAN code below shows the numeral data “4942857125054”.
The QR code is one of the two-dimensional codes indicating a string of alphanumeric and other characters (kanji, kana and pictograms) or data such as melody or image with the vertical and horizontal patterns.
Keep the out-camera about 7 to 10 cm away from the code to scan.
1 m61 z Switch the macro mode switch to (Macro).
・ After bar code scanning has finished, turn the macro mode switch back to (normal mode) to make the camera ready for a next shooting occasion. If you shoot a distant object without canceling (Macro), you cannot get a sharp picture.・ Switch to the normal mode before scanning a
large size code.
2 Scan the codeWhen you point the out-camera toward the code, the code is scanned automatically. If scanned correctly, a confirmation sound is played and the scanned data is displayed.
・When it is hard to scan the code, if you adjust the distance, angle or direction of the code and the out-camera, the code may be able to be scanned.
JAN Code
QR Code
Scanning the code
The left QR code shows the text data “FOMA D702iF”.
7 to 10 cm Approx.
Macro mode switch (switched to Macro)
Bar C
od
e Read
er
173
Cam
era
・ If the data exceeds 11,000 one-byte or 5,500 two-byte characters, the exceeded characters are not displayed, but can be saved. ・When scanning is paused such as while a
submenu is displayed, the icon indicated at the upper right of the screen changes to .
■ Re-scanning the code: p
3 Press m4The scanned data is saved. ・When 5 data has already saved or the memory
is not enough, a confirmation screen is displayed asking whether to delete the saved data. Select Yes to delete the saved data.
■ Copying the text data in the scanned data:am1 z Select the start position to
copy・ To copy the entire text data: mo
bSelect the end position to copy
When the data is divided into multiple parts (up to 16), scan them one by one according to messages displayed on the screen.
・ Press c to cancel scanning on the way. Select Yes when a confirmation screen is displayed asking whether to discard the scanned QR code data.
INFORMATION● If you press m on the still image shooting screen or
video recording screen and select Switch mode → Bar code reader, Bar Code Reader can be used as well.
●When Call alert volume or Mail/Msg alert vol. is set to SILENT or Silent Mode or Public mode (Driving mode) is on, the confirmation sound for scanning the bar code does not sound.
● Press m1 on the bar code reading screen and press 1 or 2 to switch to Still Camera or Movie Camera. When Bar Code Reader is started from other than the character entry screen or i-αppli, switching is not available.
● The scanned data is given a file name made up of the scanned date and time + serial file number + .jan or .qr (“.jan” is for JAN code and “.qr” for QR code). The file name 20061205123400.jan, for example, means the JAN code scanned at 12:34 on December 5, 2006. When
there are any previously saved data at the same date and time, 1 is added to the serial file number.
Using the scanned data
The available operations vary depending on the scanned data.
Adding data to the phonebook
1 m61 z p
2 Select the scanned data■ Deleting the scanned data: Highlight the
data z m31 z Select Yes・ To delete all: m32 z Enter the
terminal security code z Select Yes
3 Highlight the data to add to the phonebook z m31 (Add new data) or m32 (Update) z Press 1 or 2The registration screen for the phonebook is displayed with the highlighted data entered. ・ To update saved entries, select the party to
add the data.
■ Adding all data to the phonebook at one time: Select Add to phonebook z 1 or 2The registration screen for the phonebook is displayed. The name and the reading are also entered depending on the data.
■ Sending i-mode Mail: Select a mail address or Compose messageThe mail composition screen is displayed. ・When Compose message is selected, the
subject and the text are entered depending on the data.
■ Connecting i-mode sites or Internet websites: Select a URL z Select Yes
■ Saving URLs as bookmarks:aHighlight a URL z m33 or select
Add bookmarkbSelect a foldercEnter a title name (up to 24 one-byte or
12 two-byte characters) z p・When Add bookmark is selected, the title
name is also entered depending on the data.
■ Starting i-αppli: Select Start i-αppli
Scanning divided QR codes
Remaining number of QR codes/total number of QR codes
State of scanning the QR codeGreen: Last scanned codeBlue: Scanned codesGray: Remaining unscanned
codes
Example
Bar C
od
e Read
er
Next
174
Cam
era
■ Making voice/videophone calls:aSelect a phone number z Set the
dialing conditions ☛P55bm z Select Yes
■ Saving still images:aSelect the file name of a still image z
Select Save・ To display a still image: Select Display
bSelect each item to set z p ☛P291cSelect a folder to save
■ Saving melodies:aSelect a file name of melody z Select
Save・ To play the melody: Select Play
bEnter a display name z pThe melody is saved in the Data transfer folder of Melody in Data Box.
Bar C
od
e Read
er
175
i-mode/i-motionWhat’s i-mode? ...............................................................................................176
Displaying sitesDisplaying sites ..............................................................................................180Reading and operating sites ..........................................................................182Using My Menu ............................................................................. My Menu 183Changing your current i-mode password ....... Change i-mode Password 184Displaying Internet websites ..................................... Internet Connection 184Registering websites and i-mode sites for quick browsing ... Bookmark 185Saving site contents ............................................................. Screen Memo 187
Downloading images and melodies from sitesDownloading images from sites .............................................. Save Image 188Downloading melodies from sites ............................................... i-melody 189Downloading dictionaries from sites ............................................................189Downloading Chara-den from sites ..............................................................189
Useful functions of i-modeUseful functions of i-mode ............................................................................190
Making i-mode settingsMaking i-mode settings ....................................................... i-mode Setting 191
Using Message ServiceWhen Message R/F is received .............................. Receive Message R/F 193Displaying saved Message R/F ................................. Message R/Message F 194
Using certificateOperating certificates .....................................................................................196
Using i-motioni-motion ............................................................................................................198Downloading i-motion from sites ..................................................................198Setting whether to play i-motion automatically ............. i-motion Setting 200
176
i-mo
de/i-m
otio
n
What’s i-mode?
With i-mode, you can use online services such as connecting to Sites (Programs) or Internet websites, or sending and receiving i-mode Mail by using the display of i-mode compatible FOMA terminal (hereinafter called the i-mode terminal).
■ Sites (Programs) connectionYou can access various online services such as weather information or news provided by IPs (Information Providers) from Menu List of iMenu. You can also download and enjoy games, standby images, etc.
■ Internet connectionYou can view a wide variety of i-mode compatible websites by directly entering the URLs into your i-mode terminal.
■ i-mode MailYou can exchange e-mail (of up to 5,000 two-byte characters) with other i-mode terminals and with anyone with Internet mail address. You can also transmit Deco-mail or mail with still image and video.
・ i-mode is an optional service to be charged requiring subscription. Please refer to the back of this manual for further information on subscription.
INFORMATION●When you newly subscribe to the FOMA service, all services
are available as of the first day. ● The contents of My Menu are carried over as it is when
you change the mova service (with i-mode subscription) to the FOMA service. However, some sites may not be carried over to My Menu of the FOMA service. In that case, register them again. You can check the sites that can be carried over to My Menu in お知らせ of iMenu.
● i-mode service is charged based on the sent/received information volume (packet count). This manual does not include fee-related information. For details of usage fees, see “i-mode User’s Manual” you received when you subscribed to i-mode.
● i-mode service contents are subject to change; for details, see the latest “i-mode User’s Manual”.
Sites (Programs) connection
You can access sites using simple key operations and use various online services provided by IPs. For example, you can check your bank balance, make wire transfers, reserve tickets, watch news, search dictionaries, download melodies, etc.
When you are connected to the i-mode Center, iMenu is displayed first. From this menu, you can access Sites (Programs), 週刊iガイド, etc. Service schematic
FOMA service area
i-mode terminal
Provides Sites (Programs).
Internet
PC, etc.IP
The i-mode service area is the same as the FOMA service area (call-enabled area).
Connects IPs and i-mode terminals. It also stores mail.
i-mode Center
Displaying sites
a マイメニュー (My Menu)You can register your favorite sites and quickly access the sites later. ☛P183 Pay sites in iMenu are automatically registered. Up to 45 sites can be registered.
b メニューリスト (Menu List)
Lists all sites by categories or regions. You can access the desired site from here.
c 週刊iガイド (Weekly i Guide)The latest site information including new and recommended sites is released and updated every day from Monday to Friday every week. The special feature corners of music and game are also provided.
・ Sites displaying procedure ☛P180・ The screen shown here
is for information purpose only. The display may differ depending on the settings.
Wh
at’s i-mo
de?
177
i-mo
de/i-m
otio
n
INFORMATION● You may need to pay information fee to access certain
sites (i-mode pay sites). ● You may need to subscribe to use some services
provided by IPs. ● You will not be charged for packet communication unless
the i-mode Center is accessed, even if flashes. ● The screen such as iMenu appears different for Dual
Network Service subscribers.
■ i-channelThis service is provided by DoCoMo or IPs and delivers graphical information such as news and weather information to your i-mode terminal. You can receive information regularly, and read the latest information as it appears on the standby display as ticker. You can also view the information in the channel list by pressing c. In addition, you can download rich, detail information by selecting your favorite channel in the channel list. ・ Supporting models: i-channel compatible
models. For more information, see “i-mode User’s Manual”.
■ i-motionYou can download videos and sounds from sites to your i-mode terminal and play or set them for the standby display. ・ Downloading i-motion ☛P198・ Playing i-motion ☛P279・ Setting auto play of i-motion ☛P200
■ Movie ringtone (Chaku-motion)/Chaku-Uta®
i-motion can be downloaded from i-mode sites to your i-mode terminal and set as ring tone or incoming image. The vocals of your favorite singers can be used as ring tone as well as melodies (some i-motion may not be set for Movie ringtone). ・ Setting Movie ringtone ☛P116, P281・ “Chaku-Uta” is a registered trademark of Sony
Music Entertainment (Japan) Inc.
■ i-αppliYou can conveniently use your i-mode terminal by downloading i-αppli from sites. For example, you can download games to play or i-αppli stock software to automatically check stock prices periodically. Furthermore, because the map-related i-αppli downloads only necessary data, smooth scrolling can be performed. ・ Downloading i-αppli ☛P247・ Starting i-αppli ☛P248・ Automatically starting i-αppli ☛P253
d とくするメニュー (Tokusuru Menu)
Includes information on exciting campaigns, gifts, and discount coupons. The information is updated every week (provided by D2 Communications).
e iエリア (i-area)
You can easily check the weather, map and town information of your place or vicinity.
f かんたん検索 (Easy Search)
You can search sites easily by keyword from categories such as game and standby display.
g マイボックス (My Box)
This is a service for members to access more conveniently to certain shop information and sites through advance registration.
h 料金&お申込・設定 (Charges & Applications/Setting)
You can confirm or pay the fees, change subscriptions, or apply for services. In addition, you can set i-mode Mail and change i-mode password.
□ お知らせ (Notice)
Includes information from DoCoMo, i-mode operation procedures and rules.
□ TOPICSThe latest topics are introduced.
ENGLISHiMenu changes to English display. ・ Same menus in Japanese iMenu are not
supported in English iMenu.
Other convenient functions
i-mode terminal i-mode Center
IP
News video, sounds, etc.
i-motion
Next
Wh
at’s i-mo
de?
178
i-mo
de/i-m
otio
n
■ i-αppli standby displayOn the i-αppli standby display, i-αppli can be used as the standby display, which also allows directly receiving mail and making phone calls. The function of the standby display can be enhanced by setting it to display news and weather forecast update or by using your favorite character to inform you of incoming mail and alarms. ・ Setting the i-αppli standby display ☛P125
■ i-αppli DXi-αppli DX is more useful and enjoyable i-αppli. In conjunction with the i-mode terminal data (such as mail, call log or phonebook data), i-αppli DX allows you to compose a message on your favorite character screen and to inform you of the caller of incoming call by character’s comments. Also, i-αppli DX updates stock price information, game status, or other information in real time in conjunction with mail. ・ i-αppli DX ☛P246
■ Chara-denWhen using videophone, you can have a character displayed on the other party’s videophone terminal instead of your image, move its mouth in response to sounds, and make motions by key operation. You can download your favorite character and set it for the standby display. Also you can record the Chara-den in an image or video file and set the file for the standby display or attach it to mail to send (you cannot send image/video files that are prohibited from being attached to mail or output from FOMA terminal). ・ Downloading Chara-den ☛P189・ Displaying Chara-den ☛P285・ Setting Chara-den ☛P83, P89, P286・ Operating Chara-den ☛P286・ Recording Chara-den ☛P286
■ Infrared communication functionPhonebook data, mail, bookmarks, etc. can be exchanged with mobile phones, PCs and other devices that are provided with the infrared communication function.*1
In addition, by using the infrared communication with i-αppli, you can use your terminal in a wide range of ways in conjunction with other devices provided with the infrared communication function. For example, a mobile phone with this function can be used as a TV remote control or member card, etc. *1 Some types of data may not be exchanged
depending on the other party’s device, even if it is provided with the infrared communication function.
・ Using infrared communication ☛P293, P258
■ SSL communicationSSL is a safer data communication method that uses certification/encryption technology to protect privacy. On SSL pages, data is encrypted and sent/received to prevent information interception, impersonation or alteration, thus allowing personal information such as credit card numbers and street addresses to be exchanged more safely. There are 2 types of SSL communication: one is to display SSL compatible sites (SSL pages) using the CA certificate stored in your i-mode terminal and the other is to display SSL compatible sites (SSL pages) using the user certificate downloaded from the FirstPass center. The certificates used to display sites differ depending on the site. ☛P196・ Using the CA certificate stored in your i-mode
terminal ☛P196・ Using the user certificate of FirstPass ☛P196
Videophone
Key operation
Chara-den contents
Download
Videophone terminal Videophone terminal
IP
Chara-den image Camera image
i-mode Center
Impersonation
Impersonation: A third party pretends to be a valid site to obtain customer information illegally.
InterceptionAlteration
Decoding Encoding
Decoding
Encoding
i-mode terminal
IP
Wh
at’s i-mo
de?
179
i-mo
de/i-m
otio
n
■ UIM operation restriction functionWhen the UIM containing user information (phone numbers, part of phonebook data, etc.) is inserted in your i-mode terminal, this function restricts operations of melodies, still images and i-motion downloaded from sites or received by mail. When the terminal is turned on with another UIM or no UIM inserted, playing or displaying of these obtained files will be disabled. ☛P37・ This function does not apply to still images or
videos you shot with the camera, or files saved to your i-mode terminal via infrared communication.・ This function resets the ring alert and standby
display or other settings, if any, made in your i-mode terminal.
■ i-melodyYou can download the latest music or your favorite music from sites to your i-mode terminal and use them as ring alert. ☛P189
■ i-animeYou can download your favorite animation from sites to your i-mode terminal and use it as the standby image or incoming image. ☛P188
■ Flash®
Flash is an animation technology that uses images and sounds, which makes colorful animations and expressive sites by displayed. Images using Flash movie can be downloaded to i-mode terminals and set for the standby display. Some Flash movies can reference the information of your i-mode terminal. The information to be used is as follows:・ Battery level ・ Received signal level・ Time information・ Ring volume for calls・ Select Language ・Model information
■ Message ServiceMessage Service is a service that automatically delivers desired information (messages) to your i-mode terminal. There are 2 types of Message Service: Message R (request) and Message F (free).
・ Receiving Message R/F ☛P193, P218
・ If you apply to the i-mode service at the same time as new subscription to FOMA on or after October 1, 2004, the initial Message F (free) setting is 受信する (Receive). Please note that, if you do not like to receive Message F, you have to change the setting to 受信しない (Not receive) by yourself. ・ If you like to use Message F in cases other
than above, you have to make the setting from オプション設定 of iMenu in advance. The initial setting is 受信しない.
・Message R/F is stored in the i-mode Center when i-mode terminal is off or outside the service area. ・ The maximum number of Message R/Fs and the
period they are stored at the i-mode Center are as follows. Message R/F will be deleted after the maximum storage period expires. When the maximum number of messages that can be stored is exceeded, Message R/F is deleted beginning with the chronologically oldest message.
・ You can use Check i-mode Message (☛P218) to receive Message R/F stored in the i-mode Center.
■ トクだねニュース便 (Convenient News)This service is provided by DoCoMo and delivers information such as news and weather information to your i-mode terminal using Message R (request). トクだねニュース便 is a pay service for which subscription is required. After application, this service is automatically registered in My Menu, and you can access the same information from My Menu.・ Reading the Message R screen ☛P194
■ i-mode passwordYou need an i-mode password to register and delete sites in My Menu, or make i-mode Mail settings. By default, the i-mode password is set to “0000”. Be sure to change it to a 4-digit number of your own choice. ☛P184 Be careful never to reveal your i-mode password to others.
Message R(request)
Information is delivered automatically after subscribing to a site that provides Message Service.
Message F(free)
Messages are delivered free of packet communication fee.
Message type
Maximum number of
items
Maximum storage period
Message R 300 72 hours
Message F 300 72 hours Wh
at’s i-mo
de?
180
i-mo
de/i-m
otio
n
Internet connection
You can display i-mode compatible websites via the Internet by entering the addresses (URLs). ・ Displaying procedures ☛P184
INFORMATION● Internet websites other than i-mode compatible websites
(sites created using i-mode compatible tags) may not be displayed correctly.
● Sites may be displayed differently on a PC. ● Internet websites with the URLs longer than 512
characters may not be displayed. ● If you have a PC, data such as mail and bookmarks can be
saved to the PC by using data link software and the FOMA USB cable (optional). If you subscribe to Data Security Service (charged), you can save mails in the Data Center.
Displaying sites
Menu 21
Displaying sites
1 d1 z Select ENGLISH
・ Press o on the connecting screen to stop connection. ・ Item with the number such as a or b can be
selected by pressing the key of number corresponding to the item (Direct key function). However, you may not be able to select them on some sites.
2 Select cMenu List
3 Select an itemYou are connected to a site. You can display the target page by repeating this operation.
4 f when you finish viewing the site z Select Yes
INFORMATION●When you display a site containing an image, the
following icons may be displayed instead of the image: :When Not display is set for Image in Image &
Effect Setting ( in case of undownloaded image of Message R/F) :When no image has been received because,
for example, the image data is invalid, the image is missing, or FOMA terminal is out of the service area :When the image cannot be displayed because
of incorrect URL● i-mode requires online connection and cannot be used
outside the service area. ● To return to iMenu during site display, press m and
select iMenu.
Before using i-mode
● The contents of Sites (Programs) and Internet websites are usually protected by copyright laws. All or any portion of text, image or other data downloaded to your i-mode terminal from a Site (Program) or Internet website cannot be used or altered except for personal use, and cannot be sold or redistributed in any form without the express permission of the copyright holder.
●Data saved/registered in your i-mode terminal (mail, Message R/F, screen memo, i-αppli, i-motion, and bookmark) may be erased due to failure, repair, or other handling of i-mode terminal. It is recommended that you maintain a separate record of the data you saved/registered in your i-mode terminal. We are not responsible for any lost data.
●When i-mode terminal is sent for repair, the data you downloaded using i-mode, i-αppli or i-motion (except some data) is not transferred to the new mobile terminal in accordance with copyright laws. Depending on the model, you cannot display or play still images, i-motion, or melodies downloaded from sites, files (images, videos, melodies, etc.) attached to sent/received mail, screen memos or Message R/Fs when your terminal is turned on with another UIM or no UIM inserted.
●When data with the UIM operation restriction enabled is set for the standby display or ring alert, the settings return to default if another UIM other than yours or no UIM is inserted. It returns to the previous settings when the UIM that was used during downloading the data is inserted.
Flashes in i-mode communication.
・ Press p while accessing the page to stop downloading.
Disp
laying
sites
181
i-mo
de/i-m
otio
n
●When a site requests your FOMA terminal/FOMA card (UIM) serial number, a confirmation screen appears. When you select Yes, your FOMA terminal/FOMA card (UIM) serial number is sent. The IP uses the FOMA terminal/FOMA card (UIM) serial number to identify you for providing the information customized for you or for determining whether your FOMA terminal supports the site content provided by the IP. Since your FOMA terminal/FOMA card (UIM) serial number is sent to the IP via the Internet, there is a possibility the information could be intercepted by third parties. However, your information such as FOMA terminal’s phone number, your address, age, and sex will never be disclosed to the IP with this operation.
● If a site requests entry of the user name and password, the entry screen is displayed. Enter the user name and password of the site and select OK.
Connecting to SSL pages
You can display SSL compatible sites (SSL pages) by the same operation as for ordinary sites.・ Some SSL pages may not allow connection
unless the date and time are set.・ To connect to a FirstPass compatible site, you
need to download a user certificate for the site from the FirstPass center and save it in the UIM.
A screen informing you of the start of an SSL session is displayed. appears on the top of the screen when the SSL page is displayed.
■ Displaying a certificate during SSL page display: m92・ The content of certificate ☛P196
A confirmation screen appears. Select Yes to display an ordinary page and disappears on the top of the screen.
The following screens appear:
aSelect YesbEnter the PIN2 code
The user certificate is sent and the FirstPass compatible page is displayed. ・ If the correct PIN2 code is not entered within 60
seconds, the SSL communication is disconnected.
INFORMATION● Establishment of SSL session requires electronic
information called “certificate” for the connected site and FOMA terminal issued by the same certifier. ☛P196
● Packet communication fee while being connected to FirstPass compatible sites will be included in the Pake-Houdai service. However, the fee for data communication using a connected PC will not be included in the Pake-Houdai service.
Menu 233Reconnecting to the last page displayed
Last Visited URL
Last Visited URL allows you to quickly reconnect to the page displayed last. ・ Some pages may not be displayed. In addition,
pages different from the last visited one may be displayed.
1 d33・When no last visited URL is recorded, a message
indicating you that there is no record appears.
2 Press o
Connecting to an SSL page
Displaying an ordinary page from an SSL page
Connecting to a FirstPass compatible page
Disp
laying
sites
182
i-mo
de/i-m
otio
n
Reading and operating sites
Selecting links and items
Selectable items and entry fields appear depending on the page. Press % to highlight an item or entry field and press o to select the item or enter characters.
aLinkSelect to jump to a related page. The link is highlighted when the cursor is placed over.
bCharacter entry fieldEnter characters. The character types and the maximum number of characters that can be entered depend on the character entry field.
cRadio button ( : Unselected : Selected)You can select only one from selections.
dCheck box ( : Unselected : Selected)You can select multiple items from selections. Press o to switch between and .
ePulldown menuSelect an item from the item list.
fButton (name differs depending on the site) You can send page settings to a site or cancel the settings.
INFORMATION● Some images may have links. ● Items with numbers such as a and b can be selected by
pressing the corresponding numbers (Direct key function). You may not be able to select them on some sites.
● On the character entry screen allows you to enter the phonebook data, registered contents of your phone number and character strings information of the JAN or QR code read by Bar Code Reader. ☛P346
● Depending on the pulldown menu, multiple items can be selected by pressing o. After selecting items, press p.
● The information set or entered using radio buttons, check boxes, pulldown menus, or character entry fields does not replace the contents of registered bookmarks or screen memos.
Flash movie displays
Flash movie allows expressive sites to be displayed.・ Flash movie is not displayed when Not display is
set for Image in Image & Effect Setting.・ Some sites that use Flash movie may not be
operated or displayed in the same way as normal sites. ・When saved as an image or screen memo, some
Flash movies may appear different from those displayed on sites because part of the image is not saved. ・ The sound of Flash movie set for the standby
display or incoming image does not play. ・ Even if Flash movie is displayed, it may not
operate correctly. Also, you may not be able to save Flash movie that does not operate correctly. ・ If an error occurs while playing Flash movie, the
image cannot be saved. ・ Even if is not indicated, some Flash movies
may be operated. ・ To play Flash movie from the beginning, press m97. ・ Some Flash movies may have sound effects. The
volume conforms to the ring alert volume for calls specified by Adjust Volume. To disable sound effects during site display, press m93 and set Sound effect setting to OFF. ・ Even if Vibrator Setting is other than OFF, FOMA
terminal does not vibrate when the sound of Flash movie plays. ・ Note that some Flash movies may vibrate FOMA
terminal during play even if Vibrator Setting is OFF. ・ If no operation is performed for 30 seconds or
longer while playing Flash movie, it is brought to a pause. To replay, press any of the following keys: o, %, n, t, a, p, 0 to 9, (, #, C.・ Some Flash movies use the information of i-mode
terminal. To allow use of the terminal information, set Use phone information to Yes in Image & Effect Setting. It is set to Yes by default. The information to be used is as follows:・ Battery level ・ Received signal level・ Time information ・ Ring volume for calls ・ Selected language ・ Model information
a
b
c
d
e
f
Read
ing
and
op
erating
sites
183
i-mo
de/i-m
otio
n
Displaying the previous or next page
FOMA terminal keeps a record of the last 20 pages displayed in a “cache”. ・ Cache is a storage space in FOMA terminal that
temporarily records the displayed pages. You can display the recorded pages by pressing & without establishing communication. In case the cache is full or a page that is set by the site to load the latest page is displayed, FOMA terminal starts communication.・ This function is unavailable while being
connected to the FirstPass center. ☛P196
INFORMATION● Records in the cache may be deleted when it is full.
Pressing l may not return to previous pages.● Information such as entered characters or settings is not
recorded.●When you terminate i-mode, all records in the cache are
deleted.● The operation may differ when Flash movie is displayed.●When you display page A → page B → page C in this
order (a, b), return to page A (c, d), and proceed to page D (e), the display record of page A → page B → page C is deleted. You can return to page A from page D but you cannot then return to page B.
Scrolling the screen
・ Press % to scroll the screen. Hold down the button to scroll continuously. ・ Press t or a to scroll the screen by a page.
Hold down the button to scroll the screen continuously by a page.
Reloading data
When sites cannot be displayed because of connection interruption, etc., you may be able to display the sites by reloading.
1 Press m5 during site display
Displaying the URL of current site
1 Press m91 during site display
INFORMATION● In the URL history list, bookmark list, i-mode shortcut list,
or screen memo list, press p. Pressing m and selecting URL can also display the URL.
Using My MenuMy Menu
You can register i-mode sites in My Menu, which allows you to quickly access the sites later. ・ Up to 45 sites can be registered. ・ You need the i-mode password to register sites.
The i-mode password is set to “0000” by default. ・When you submit an application to a pay site
registered in Menu List of iMenu, the site is automatically registered in My Menu. ・ Only the sites listed in Menu List of iMenu can be
registered in My Menu. However, some sites cannot be registered in My Menu. To register the site which cannot be registered or Internet websites, use Bookmark.
1 page before the current page
Current page
Indicates you can proceed to the next page.
Indicates you can return to the previous page.
r
l
When there are more rows or links not shown on the screen,
and appear on the guide row to allow scrolling.
My M
enu
184
i-mo
de/i-m
otio
n
Registering sites in My Menu
1 Select マイメニュー登録 (Register) during site display・ Since the page structure differs depending on
the site, press the key of the number corresponding to the item or select the applicable item.
2 Select the i-mode password entry field z Enter the i-mode password・ The entered i-mode password is masked with
“ * ”.
3 Select 決定 (OK)
Displaying sites from My Menu
1 Select aMy Menu in iMenu (English) z Select a site
Changing your current i-mode password Change i-mode Password
Your i-mode password is required to register/delete sites in/from My Menu, subscribe to/cancel Message Service or i-mode pay sites, or make the mail settings. The i-mode password is set to “0000” by default; be sure to change it to your own number (4 digits). Be careful never to reveal your i-mode password to others.・ The entered i-mode password is masked with “ * ”. ・ Please note that, if you forget the i-mode password,
you need to bring the identification (driver’s license, etc.) to a DoCoMo Shop.
1 Select dOptions in iMenu (English) z Select bChange i-mode Password
2 Select Current Password field z Enter the current i-mode password
3 Select New Password field z Enter a new password
4 Select New Password (Confirmation) field z Re-enter the password entered in Step 3
5 Select Select・When there is an error or omission in the
entered contents, an error screen is displayed. Select Re-enter and operate from Step 2 again.
Menu 231
Displaying Internet websitesInternet Connection
・ Internet websites incompatible with i-mode may not be displayed correctly.・ You can switch i-mode to Full Browser. ☛P267
1 d31・ From the next time, the last URL you connected to
appears.
2 Enter a URL (up to 256 one-byte characters) z Press p・ Press 1 repeatedly in the alphabet input
mode to enter “ / ”, “ . ”, “ - ”, etc. To enter “http://www.”, “.co.jp”, “.ne.jp”, “.com” and “.html”, press ( repeatedly in the alphabet input mode.
INFORMATION● On the site screen, press m and select Go to location →
Enter URL. ● A message is displayed when received data exceeds the
maximum size for a page. Press o to clear the message and display the received data.
● The operation procedures when displaying Internet website are the same as when displaying i-mode site.
Menu 232
Displaying sites using URL history URL History
The terminal keeps a record of the last 20 URLs you connected to. You can use this URL History to connect to Internet websites.
1 d32
2 Select the URL of an Internet website・ A long URL is shown only partially. To check
the URL, highlight it and press p.
Ch
ang
e i-mo
de P
asswo
rd
185
i-mo
de/i-m
otio
n
■ Editing the URL and connecting to it:aHighlight a URL in the URL history list z
m6bEdit the URL z p
■ Deleting URL history:aHighlight a URL in the URL history list z
m41・ To delete all: m42 in the URL
history list z Enter the terminal security code
bSelect Yes
INFORMATION● On the site screen, press m and select Go to location →
URL history. ●When the number of recorded URLs exceeds 20, the
oldest URL is overwritten.
Displaying characters correctly Character Encode
When characters are not displayed correctly on i-mode or Internet web sites, they may be displayed correctly by changing the character encode. Character encode is a generic term for the encoding scheme and structure developed for making characters available on computers.
1 Press m961 during i-mode or Internet web site display・ Each press of these keys switches the character
encode in the following order: Auto switch → SJIS → EUC → JIS → UTF8. Pressing the keys 5 times returns to the original encode. Pressing m962 returns to Auto switch. ・When you display an i-mode or Internet web
site, Auto switch is set. ・ Characters may not be displayed correctly
even if you change character encodes. ・ Changing the character encode while
characters are displayed correctly may cause them not to be displayed correctly.
Registering websites and i-mode sites for quick browsing Bookmark
If you register your favorite sites or Internet websites in Bookmark, you can quickly display the pages by only selecting bookmarks. ・ The maximum number of bookmarks that can be
registered ☛P35
・ You cannot register URLs longer than 256 one-byte characters in Bookmark.・ Some sites may not be registered in Bookmark.
Registering in Bookmark
1 Display an i-mode or Internet web site z m21 z Select a folder to save the bookmark to
2 Enter a title name (up to 24 one-byte or 12 two-byte characters) z p・ If you save the bookmark without entering a
title, the URL is displayed in the bookmark list. ・ In the bookmark list, up to 21 one-byte or 10
two-byte characters of a title or URL are displayed and the remaining characters, if any, are omitted.
INFORMATION● In the screen memo list, screen memo display, or URL
history list, press m and select Add bookmark. ●When the number of bookmarks exceeds the maximum
number, a confirmation screen is displayed asking whether to overwrite registered bookmarks. To register, select the bookmark to overwrite.
Menu 22
Displaying websites or i-mode sites from Bookmark
1 d2
2 Select a folder: No bookmark : Bookmark present
3 Select a bookmark■ Checking the URL: Highlight a bookmark
z p
INFORMATION● On the site screen, press m and select Bookmark →
Display.
Connecting to sites using simple key operationi-mode Shortcut
When you register a bookmark as i-mode shortcut, you can quickly display i-mode or Internet web site from the standby display. ・ Up to 10 sites can be registered in total for i-mode
and Full Browser.
1 d2 z Select a folder
Bo
okm
ark
Next
186
i-mo
de/i-m
otio
n
2 Highlight a bookmark z m2・ If a bookmark unregistered as an i-mode
shortcut has been highlighted, you can also register it by pressing a.
■ Canceling: Highlight a bookmark z m2
3 Select the registration destination・ The icon numbers ( to ) correspond to
the dial keys (0 to 9) used to display the site with i-mode Shortcut.・ In the bookmark list, the icon changes from
to - when registered. ・ If the registered folder to save is selected,
a confirmation screen is displayed asking whether to overwrite it. When Yes is selected, it is overwritten.
1 The dial key (0 to 9) z Press d
1 Press d81The list of i-mode shortcuts is displayed. ・ is indicated for a bookmark of Full Browser.
■ Displaying a site: Select a bookmark
■ Registering a site: aHighlight Not recorded z m11・ Registering a bookmark of Full Browser:
Highlight Not recorded z m12bSelect a folder z Select a bookmark
■ Canceling an i-mode shortcut: Highlight a bookmark z m2 z Select Yes
■ Checking the URL: Highlight a bookmark z p
Creating/deleting folders
・ Up to 20 folders including フォルダ1 can be registered.
1 d2 z m1■ Changing a folder name: Highlight a folder
in the folder list z m3■ Changing the order of folders: Highlight a
folder in the folder list zm z 6 or 7
2 Enter a folder name (up to 16 one-byte or 8 two-byte characters) z Press p
・When only one folder exists, it cannot be deleted.・ Deleting a folder also deletes the bookmark in the
folder.
1 d2 z Highlight a folder z m2
2 Enter the terminal security code z Select Yes
Moving bookmarks
Bookmarks can be moved to the folders.
1 d2 z Select a folder
2 Highlight a bookmark z m61■ Moving selected bookmarks: m62
z Select bookmarks z p
3 Select a folder to move the bookmark to
Renaming bookmark titles
1 d2 z Select a folder z Highlight a bookmark z Press t・ Follow the procedure from Step 2 of
“Registering in Bookmark”. ☛P185
Deleting bookmarks
1 d2 z Select a folder■ Deleting all bookmarks: m4 on the
folder list z Enter the terminal security code z Go to Step 3
2 Highlight a bookmark zm31■ Deleting selected bookmarks: m32
z Select bookmarks zp■ Deleting all bookmarks in the folder:
m33 z Enter the terminal security code
3 Select Yes
INFORMATION● If you delete an i-mode shortcut bookmark, i-mode
Shortcut is also canceled.
Displaying a site using an i-mode shortcut
Operating from the list of i-mode shortcuts
Creating a folder
Menu 281
Deleting folders
Bo
okm
ark
187
i-mo
de/i-m
otio
n
Sorting bookmarks Sort
Bookmarks in the list are temporally sorted. When you quit the display, By access date returns. ・ All the folders are the target of sorting. ・ You can select from By access date, By title, By
URL or By access frequency.
1 d2 z Select a folder z m7 z Press any of 1 to 4
INFORMATION●When By title is set, if one-byte, two-byte, alphabetic, and
kanji characters and URLs are mixed in titles, the result may not be in the order of the Japanese syllabary.
Saving site contentsScreen Memo
Saving screen memos
・ The maximum number of items that can be saved ☛P35・ The maximum size of a screen memo that can be
saved is 100 Kbytes including images, on the screen, etc.
1 Display a site z m41
2 Enter a title name (up to 24 one-byte or 12 two-byte characters) z Press p・When you save the screen memo without
entering a title, No title is displayed in the screen memo list.・ In the Screen Memo list, up to 21 one-byte or 10
two-byte characters of a title are displayed and the remaining characters, if any, are omitted.
INFORMATION●When there is not enough available storage space or the
maximum allowable number of saved items is exceeded, a confirmation screen is displayed asking whether to overwrite saved screen memos. Select the screen memos to overwrite. The protected screen memos are not overwritten.
Menu 24
Displaying screen memos
1 d4
2 Select a screen memo: Ordinary screen memo: Protected screen memo
・ The available operations are the same as on site displays, with a few exceptions.☛P182
INFORMATION● On the site screen, press m and select Screen memo →
Display. At this time, if the character encode has been changed, it is reset to Auto switch when returning to the site from the displayed screen memo.
● To play Flash movie again during screen memo display, press m and select Display → Retry.
Renaming screen memo titles
1 d4 z Highlight a screen memo z Press t・ Follow the procedure from Step 2 of “Saving
screen memos”.
INFORMATION● During screen memo display, press m and select
Rename title.
Protecting screen memos
・ The maximum number of items that can be protected ☛P35
1 d4
2 Highlight a screen memo z Press m11The screen memo is protected and the icon changes from to .・ To cancel protection: Highlight a screen memo z m13■ Protecting selected screen memos:
m12 z Select screen memos z p■ Canceling protection of selected screen
memos: m14 z Select screen memos z p
■ Canceling protection of all screen memos:
m15
Default By access date
Screen
Mem
o
Next
188
i-mo
de/i-m
otio
n
INFORMATION● During screen memo display, press m and select
Protect or Release.
Deleting screen memos
・ Protected screen memos cannot be deleted. Cancel protection first and then delete them.
1 d4
2 Highlight a screen memo zm21■ Deleting selected screen memos:
m22 z Select screen memos z p■ Deleting all screen memos: m23 z
Enter the terminal security code
3 Select Yes
INFORMATION● During screen memo display, press m and select Delete.
Downloading images and melodies from sites
Downloading images from sitesSave Image
Images or frames can be downloaded and saved from the site. The saved images can be viewed from Image (My Picture) or set for the standby display. ・ The maximum number of items that can be saved
☛P35・ The maximum size of an image that can be saved
is 100 Kbytes. ・ Images in GIF, JPEG or Flash format can be saved.
Downloading an image from a site
1 Display a site zm61■ Saving the background image on site:
Display a site z m62 z Go to Step 3
2 Select an image
3 Select each item to set
4 p z Select the folder to save the image to
INFORMATION● Some images may not be displayed correctly. ● Images with horizontal and vertical (or vertical and
horizontal) sizes exceeding 640 x 480 in GIF format or 1728 x 2304 in JPEG format cannot be saved. Also, some JPEG images may not be saved.
●When there is not enough available storage space to save or the maximum allowable number is exceeded, a confirmation screen is displayed asking whether to delete the saved images. Follow the instructions on the screen and delete images. Before deletion, an image can be displayed by pressing p on the image list and detail information on the image can be displayed by pressing m.
Example
Image to be saved is surrounded with a frame.
The file name and file size are displayed.・ Press any key other than b to clear the indication.
・ For images that are prohibited from being attached to mail or output from FOMA terminal (file restriction set to File restricted), you can change the display name only.
Display name:36 one byte or two-byte characters can be entered.
File name:36 characters including one-byte alphanumeric, “.”, “ - ” and “_” can be entered. However, “.” character cannot be used for the first character of file name.
Comment:100 one-byte or two-byte characters can be entered.
Use as frame:Sets whether to enable an image to be pasted as a frame image.・ Images with horizontal and vertical (or
vertical and horizontal) sizes exceeding 352 x 288 cannot be changed to Yes.
Use as stamp:Sets whether to enable an image to be pasted as a stamp image. ・ Images with horizontal and vertical (or
vertical and horizontal) sizes exceeding 240 x 320 cannot be changed to Yes.
File restriction:When you send an image to another mobile phone via mail attachment, you can set whether to restrict that image from being sent again from the received party’s mobile phone to any other mobile phone.・ The image files downloaded from sites
cannot be changed.・ Some items may not be available for setting
depending on the image file.・ Press m to display the menu list for setting
images for the standby display, etc. ☛P273
Save Im
age
189
i-mo
de/i-m
otio
n
●When displaying a site containing an image wider than the display, the image will be reduced.
Downloading melodies from sitesi-melody
Your terminal can download melodies from sites and play and save them (compatible with i-melody). The saved melodies can be played from Melody or used as ring alert. ・ The maximum number of items that can be saved
☛P35・ The maximum size of a melody that can be saved
is 100 Kbytes. ・Melodies in the SMF and MFi formats can be
saved.
1 Display a site z Select a melody・ Press p to stop downloading.
2 Select Save・ To play the melody: Select Play・ To cancel saving: Select Back z Select No
3 Enter a display name (up to 50 one-byte or 25 two-byte characters) z Press pThe melody is saved in the i-mode folder of Melody. ☛P288
INFORMATION● Some melodies may not play correctly.●When there is not enough available storage space or the
maximum allowable number of saved items is exceeded, a confirmation screen is displayed asking whether to delete saved melodies. Follow the instructions on the screen and delete the melodies. Before deletion, you can play a melody by pressing p on the melody list and view detail information on the melody by pressing m.
Downloading dictionaries from sites
You can download dictionaries from sites and save them. ・ Up to 10 items can be saved・ The maximum size of a dictionary that can be
saved is 32 Kbytes.・ Using the downloaded dictionary ☛P349
1 Display a site z Select a dictionary・ Press p to stop downloading
2 Select Save・ To cancel saving: Select Back z Select No
3 Press oDownload a dictionary from sites and save it.
INFORMATION●When the maximum number of saved items is exceeded,
the dictionary cannot be saved. Follow the instructions on the screen and delete any of the saved dictionaries.
Downloading Chara-den from sites
You can download Chara-den images from sites and save them. ・ The maximum number of items that can be saved
☛P35・ The maximum size of a Chara-den image that
can be saved is 100 Kbytes.
1 Display a site z Select Chara-den・ Press p to stop downloading.
2 Select Save・ To check the Chara-den: Select Display・ To cancel saving: Select Back z Select No
3 Select each item to set
Display name:Up to 36 one-byte or two-byte characters can be entered.
Comment:Up to 100 one-byte or two-byte characters can be entered.
i-melo
dy
Next
190
i-mo
de/i-m
otio
n
4 Press pThe Chara-den is saved in the i-mode folder of Chara-den. ☛P285
INFORMATION●When there is not enough available storage space or the
maximum allowable number of saved items is exceeded, a confirmation screen is displayed asking whether to delete saved Chara-den. Follow the instructions on the screen and delete. Before deletion, Chara-den can be displayed by pressing p on the Chara-den list and detail information can be viewed by pressing m.
● If preinstalled Chara-den has been deleted, it can be downloaded from the i-mode site, My D-style. ☛P361
Useful functions of i-mode
Useful functions of i-mode
Using Phone To (AV Phone To)/Mail To/Web To
When phone numbers, mail addresses, or URLs are displayed on the screen (site, screen memo, Message R/F, etc.), select them to make voice calls or videophone calls (Phone To/AV Phone To), compose i-mode Mail (Mail To), or connect to i-mode or Internet web sites (Web To). ・ Some functions may not be available depending on
i-mode or Internet web sites.
1 Display a site z Select a phone number, mail address, or URL・ You can select only highlighted phone
numbers, mail addresses and URLs.
■ Phone To (AV Phone To):The Call Option screen appears. aSet dialing conditions ☛P55bm z Select Yes
■ Mail To:The mail composition screen with the selected mail address set as the receiver is displayed. aCompose and send i-mode Mail・When multiple addresses are listed with
no space in between, the Mail To function may not be available.
■ Web To:You are connected to the selected i-mode or Internet web site.
Copying the URL
Copy the URL of the site or screen memo being displayed. The copied text can be pasted in the entry fields on the mail composition screen, phonebook registration screen, etc. ・ The copied text is recorded until the power of
FOMA terminal is turned off. You can paste it in other locations any number of times. ・ Only one item can be recorded. When you copy a
new item, it overwrites the previously copied text.
Copying the URL of current site
1 Display the URL of a site z m1・ Displaying the URL ☛P183
2 Select the start position of the copying range z Select the end position・ Press mo to select all the text. ・ Press c to specify the start position again. ・ Press m or p after specifying the start
position to move the cursor to the beginning or end of the text.
3 Display a character entry screen z Paste the copied text
INFORMATION● In the URL history list, i-mode shortcuts, or screen memo
list, press m and select Copy URL. In the bookmark list, press m and select Enter URL/Copy URL → Copy URL. When you operate from any of these screens, the whole URL is copied.
● To paste the URL of the current site to mail, press m during site display and select Compose message. The mail composition screen is displayed with the URL of the site pasted in the message text.
Registering phone numbers and mail addresses in the phonebook Add to Phonebook
When phone numbers or mail addresses are displayed on the screen (site, screen memo or Message R/F), you can register them in the phonebook. You can register a new entry or add data to an existing entry.・ You may be able to register the data other than
displayed items depending on the sites. ・ The previously registered data may be changed
when you add to an existing entry. Confirm the data on the phonebook edit screen.
Example
Usefu
l fun
ction
s of i-m
od
e
191
i-mo
de/i-m
otio
n
Registering a new phone number displayed on the site screen
1 Display a site z Highlight a phone number・ You can register only highlighted phone
numbers or mail addresses.
2 m81・ To add to an existing entry: m82
3 1 or 2 z Register the name, etc. ☛P95, P99・ To add the data to the registered phonebook
data: 1 or 2 z Select the party z Modify the data ☛P107
INFORMATION● During screen memo display, press m and select
Phonebook → Add to phonebook or Update phonebook, and on the Message R/F view screen, press m and select Record → Add to phonebook or Update phonebook.
Registering URLs in the phonebook
Add URLs to the phonebook from the bookmark list or screen memo list. You can register a new entry or add data to an existing entry. ・ The registered data may be changed when you
update an existing entry. Confirm the data on the phonebook edit screen.
Registering a URL from the bookmark list
1 d2 z Select a folder
2 Highlight a bookmark z m81・ To add to an existing phonebook entry:
Highlight a bookmark z m82
3 Register the name, etc. ☛P95, P99・ To add the data to the registered phonebook
data: Select the party z Modify the data ☛P107
INFORMATION● In the screen memo list, press m and select Phonebook → Add to phonebook or Update phonebook.
●When displayed from a site screen, the URL cannot be saved.
Making i-mode settings
Making i-mode settingsi-mode Setting
Menu 282Setting the connection timeout
Connection Timeout Setting
Set the timeout for connection to the i-mode Center. If a connection is not established correctly, it is automatically interrupted after the set period of time and you do not need to perform any key operation.
1 d82 z Press any of 1 to 3
INFORMATION● Even if you set the connection timeout to Unlimited, a
connection with the i-mode Center may be interrupted due to poor signal conditions, etc.
Menu 287Changing the host from i-mode (ISP Connection Communication) Host Selection
■ About ISP connection communicationYou can connect to various providers (ISPs) by changing the host of i-mode terminal of DoCoMo. Packet communication fee is charged for the ISP connection communication. ・ Please note that packet communication fee for
connection to the ISP will not be included in the Pake Houdai service.・ You do not need to additionally subscribe to
DoCoMo.
■ About provider subscription・ You need to separately subscribe to a provider to
use the ISP connection communication. Contact the provider for details on services (site and Internet connection, mail function, etc.) and subscription. ・ Information fee may be charged for some
services, but DoCoMo will never charge you for it. ・ Your phone number may be sent to the provider
for some sites you visit. ・ Up to 10 hosts can be registered. ・ You cannot make or change the host settings
during communication.
1 d87
Example
Example
Default 60 seconds
* You do not have to change the settings when using DoCoMo i-mode service.
Default i-mode(UIM)
i-mo
de S
etting
Next
192
i-mo
de/i-m
otio
n
2 Highlight one from User host1 to 10 z m z Enter the terminal security code■ Restoring the setting for using i-mode:
Select i-mode (UIM) z Go to Step 5
■ Changing to the previously set host: Select a host z Go to Step 5
3 Select each item to set z p
・ You can delete all the contents entered by pressing m.
4 Select the edited host
5 Press p
INFORMATION● If you change the host, the i-channel information will no
longer be displayed as a ticker on the standby display. When the i-channel information is automatically updated or when you press c on the standby display to show the channel list, the latest information is received and displayed as a ticker on the standby display.
Menu 285Setting image display and sound effects
Image & Effect Setting
You can set image display and sound effects (when playing Flash movie) on a site, screen memo, etc.
1 d85
2 Select each item to set
3 Press p
INFORMATION● On the site screen or during screen memo display, press
m and select Display → Set image & effect. ● Press m on the i-channel list and select Sound effect
setting to set whether to play beep sound for Flash movie.●When Not display is set for Image, the images attached to
i-mode Mail using the Web To function are not displayed or saved.
● Even if Not display is set for Animation, Flash movie plays.
● The setting for Image does not apply to the images attached as attachment or images inserted in the text of Message R/F. In addition, ON/OFF of Sound effect setting does not have effect on Message R/F, either.
●When Yes is set for Use phone information, information such as the battery level, received signal level, time, ring volume for calls, selected language, and terminal model may be sent to IPs via the Internet, which may give the information to third parties.
Menu 283Setting the display lighting for use during site display Display Light
You can set the lighting for a site, screen memo, Message R/F, etc. ・ This setting is also reflected to i-mode session of
Display light time of Display Light Setting. ☛P132
1 d83 z Press 1 or 2
INFORMATION● On the site screen or during screen memo display, press
m and select Display → Set lighting.
Host name:Up to 16 one-byte or 8 two-byte characters can be entered.
Access point:Up to 99 one-byte alphanumeric characters can be entered.
Host address:Up to 30 one-byte alphanumeric characters can be entered.
Host address2:Up to 30 one byte alphanumeric characters can be entered.・ Host address2 is the host of i-channel. ☛P261
Default Image, Animation: DisplayUse phone information: YesSound effect setting: ON
Image:Specifies whether to display images.・When Not display is set, images, Flash
movie or animation are not displayed and is displayed instead. Also, Animation
and Use phone information cannot be set.
Animation:Specifies whether to play animation. ・When Not display is set, the first frame of
animation is displayed. Use phone information:
Specifies whether to use the data saved in FOMA terminal when displaying Flash movie.
Sound effect setting:Specifies whether to play the beep sound of Flash movie.
Default Terminal setting
Terminal setting:The display light conforms to the setting of Normal use of Display light time of the Display Light setting.
Always ON:The display always lights up.
i-mo
de S
etting
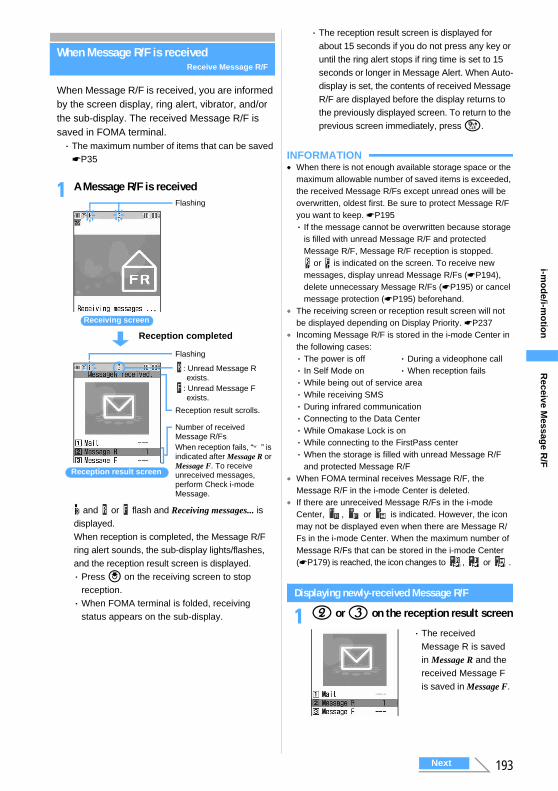
193
i-mo
de/i-m
otio
n
Using Message Service
When Message R/F is receivedReceive Message R/F
When Message R/F is received, you are informed by the screen display, ring alert, vibrator, and/or the sub-display. The received Message R/F is saved in FOMA terminal.・ The maximum number of items that can be saved
☛P35
1 A Message R/F is received
and or flash and Receiving messages... is displayed.When reception is completed, the Message R/F ring alert sounds, the sub-display lights/flashes, and the reception result screen is displayed. ・ Press o on the receiving screen to stop
reception.・When FOMA terminal is folded, receiving
status appears on the sub-display.
・ The reception result screen is displayed for about 15 seconds if you do not press any key or until the ring alert stops if ring time is set to 15 seconds or longer in Message Alert. When Auto-display is set, the contents of received Message R/F are displayed before the display returns to the previously displayed screen. To return to the previous screen immediately, press c.
INFORMATION●When there is not enough available storage space or the
maximum allowable number of saved items is exceeded, the received Message R/Fs except unread ones will be overwritten, oldest first. Be sure to protect Message R/F you want to keep. ☛P195・ If the message cannot be overwritten because storage
is filled with unread Message R/F and protected Message R/F, Message R/F reception is stopped.
or is indicated on the screen. To receive new messages, display unread Message R/Fs (☛P194), delete unnecessary Message R/Fs (☛P195) or cancel message protection (☛P195) beforehand.
● The receiving screen or reception result screen will not be displayed depending on Display Priority. ☛P237
● Incoming Message R/F is stored in the i-mode Center in the following cases:・ The power is off ・ During a videophone call・ In Self Mode on ・When reception fails・While being out of service area・While receiving SMS・ During infrared communication・ Connecting to the Data Center・While Omakase Lock is on・While connecting to the FirstPass center・When the storage is filled with unread Message R/F
and protected Message R/F●When FOMA terminal receives Message R/F, the
Message R/F in the i-mode Center is deleted. ● If there are unreceived Message R/Fs in the i-mode
Center, , or is indicated. However, the icon may not be displayed even when there are Message R/Fs in the i-mode Center. When the maximum number of Message R/Fs that can be stored in the i-mode Center (☛P179) is reached, the icon changes to , or .
Displaying newly-received Message R/F
1 2 or 3 on the reception result screen
Reception completed
Receiving screen
Flashing
: Unread Message R exists.
: Unread Message F exists.
Number of received Message R/FsWhen reception fails, “×” is indicated after Message R or Message F. To receive unreceived messages, perform Check i-mode Message.
Reception result scrolls.
Reception result screen
Flashing
・ The received Message R is saved in Message R and the received Message F is saved in Message F.
Receive M
essage R
/F
Next
194
i-mo
de/i-m
otio
n
2 Select a Message R/F・When a melody is attached, it plays
automatically. Auto play can be turned off. ☛P235However, when a Message R/F is displayed automatically, it does not play.・ Viewing the Message R/F screen ☛P194
Menu 2631Displaying Message R/F automatically
Auto-display
Sets whether to automatically open and display Message R/Fs for about 15 seconds upon reception. In addition, either one of Message R/F or Message R/F is set.You can set the priority of messages to be displayed.
1 d631 z Press any of 1 to 5
INFORMATION● Auto-display is available only from the standby display. When
you display a mail or Message R/F from the reception result screen or when you receive a Message R/F using Check i-mode Message, Auto-display is not performed.
●When Auto-display is set, the contents of received Message R/F are automatically displayed when the Message R/F reception result screen returns to the screen that was displayed prior to reception. If you do not press any key during Auto-display, the Message R/F is saved as unread.
Menu 2634
Setting operations for incoming Message R/FMessage Alert
・ This setting is also reflected to Sound Setting, Light Alert Setting and Vibrator Setting.
Setting operations for incoming Message R
1 d6341■ Setting operations for incoming Message F:
d6342
2 Select each item to set
3 Press p
INFORMATION● If you set Sync melody for Light alert or Vibrate alert, lighting
or vibrator may not operate depending on the melody.
Menu 261 / Menu 262
Displaying saved Message R/FMessage R/Message F
・ If unread Message R/F exists, or is displayed on the standby display.
Displaying Message R
1 d61■ Displaying Message F: d62
2 Select a Message R
Default MessageR preferred
Default Ring alert: Melody/パターン5 (Pattern 5)Light alert: Glimmer/Lemon Vibrate alert: OFFRing time (sec): 10
Example
Ring alert:Selects Melody or Movie ringtone and then select a melody or video/i-motion.・When OFF is selected, the ring alert does
not sound.・ Playing and checking a melody or video/
i-motion ☛P117Light alert:
Sets the lighting pattern and color of the sub-display for incoming messages. ・When you set the lighting pattern to Sync
melody or OFF, the lighting color cannot be set.
Vibrate alert:Sets the vibration of incoming messages.
Ring time (sec):Sets the sound duration of ring alert, etc (1 to 30 seconds).
Reading the Message R/F list/view screen
Reading Message F is the same as that of Message R.
■ Message R/F list screen
Example
Page No./total numberReception date/time and subject・ In the reception date/time
column, the time is displayed on the current day and the date is displayed on the other days.
a
b
a : Unread : Read : Protected
b : Image attached : Melody attached: Multiple files attached
Messag
e R/M
essage F
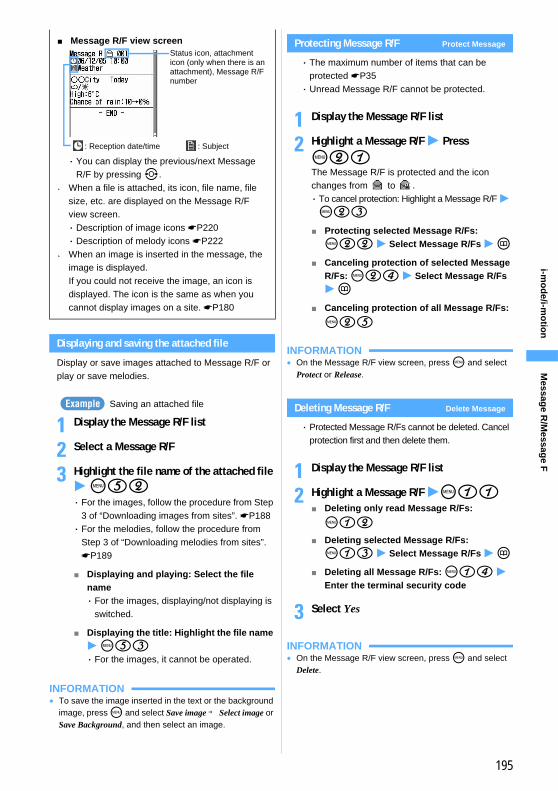
195
i-mo
de/i-m
otio
n
Displaying and saving the attached file
Display or save images attached to Message R/F or play or save melodies.
Saving an attached file
1 Display the Message R/F list
2 Select a Message R/F
3 Highlight the file name of the attached file z m52・ For the images, follow the procedure from Step
3 of “Downloading images from sites”. ☛P188・ For the melodies, follow the procedure from
Step 3 of “Downloading melodies from sites”. ☛P189
■ Displaying and playing: Select the file name・ For the images, displaying/not displaying is
switched.
■ Displaying the title: Highlight the file name z m53 ・ For the images, it cannot be operated.
INFORMATION● To save the image inserted in the text or the background
image, press m and select Save image → Select image or Save Background, and then select an image.
Protecting Message R/F Protect Message
・ The maximum number of items that can be protected ☛P35・ Unread Message R/F cannot be protected.
1 Display the Message R/F list
2 Highlight a Message R/F z Press m21The Message R/F is protected and the icon changes from to . ・ To cancel protection: Highlight a Message R/F z m23
■ Protecting selected Message R/Fs: m22 z Select Message R/Fs z p
■ Canceling protection of selected Message R/Fs: m24 z Select Message R/Fs z p
■ Canceling protection of all Message R/Fs:
m25
INFORMATION● On the Message R/F view screen, press m and select
Protect or Release.
Deleting Message R/F Delete Message
・ Protected Message R/Fs cannot be deleted. Cancel protection first and then delete them.
1 Display the Message R/F list
2 Highlight a Message R/F zm11■ Deleting only read Message R/Fs:
m12■ Deleting selected Message R/Fs:
m13 z Select Message R/Fs z p■ Deleting all Message R/Fs: m14 z
Enter the terminal security code
3 Select Yes
INFORMATION● On the Message R/F view screen, press m and select
Delete.
■ Message R/F view screen
・ You can display the previous/next Message R/F by pressing &.
●When a file is attached, its icon, file name, file size, etc. are displayed on the Message R/F view screen.・ Description of image icons ☛P220・ Description of melody icons ☛P222
●When an image is inserted in the message, the image is displayed.If you could not receive the image, an icon is displayed. The icon is the same as when you cannot display images on a site. ☛P180
Status icon, attachment icon (only when there is an attachment), Message R/F number
: Reception date/time : Subject
Example
Messag
e R/M
essage F
196
i-mo
de/i-m
otio
n
Selecting the type of Message R/F to displayDisplay by Type
Display only the specified type of Message R/F temporarily on the Message R/F list. When displaying is ended, Display all returns.・ You can select from Display all, Display unread
only, Display read only, or Display protected.
1 Display the Message R/F list z m3 z Press any of 1 to 4・When you select Display read only, the
protected Message R/F is not displayed.
Using certificate
Operating certificates
Perform the operation of certificates required for the SSL communication.
Menu 2841Displaying certificates and setting certificate validity/invalidity Certificate Setting
・ User certificate is displayed after it has been downloaded. ・When the blue UIM is inserted in FOMA terminal,
DoCoMo Cert or User Certificate is not displayed.
1 d841 z Select a certificate
INFORMATION● Certificate contents displayed:
UserCN= :(Common Name) Server name,
administrator name, or discrimination number
O= :(Organization) Company name, etc.C= :(Country) Country name
Issued byCN= :(Common Name) Server name,
administrator name, or discrimination number
OU= :(Organization Unit) Departments or other positions in the company
O= :(Organization) Company name, etc.Expiration dateSerial number
●When a certificate has no information on the user, issuer and/or expiration date, only the item names are displayed.
1 d841
2 Highlight a certificate z m・ Each press switches On/Off.
3 Press pThe checked certificate is set as valid.
INFORMATION● DoCoMo Cert2 cannot be disabled. ● The settings for DoCoMo Cert and User Certificate are
saved in the UIM.
Menu 2842
Setting FirstPass Certificate Download
Connect to the FirstPass center to request an user certificate and download it. ・ The screens and operations displayed by the
FirstPass center may be changed. ・Mail cannot be sent/received and Message R/F
cannot be received while being connected to the FirstPass center.
1 d842
Default all valid
Displaying a certificate
CA Certificate:It is a certificate issued by the certifier. It is stored in FOMA terminal by default.
DoCoMo Cert:It is a certificate required for connecting to the FirstPass center and FirstPass compatible sites. It is saved in the UIM in advance.
User Certificate:It is a certificate required for connecting to FirstPass compatible sites. You request the FirstPass center to issue the certificate and download. The downloaded certificate is saved in the UIM.
Setting validity/invalidity of certificate
Op
erating
certificates
197
i-mo
de/i-m
otio
n
2 Select English z Select aRequest your certificate
■ Invalidating the issued certificate:aSelect English z Select c Other settingsbSelect a Revoke your certificate z Select
YescEnter the PIN2 code z Select ContinuedSelect ContinueeSelect Continue
3 Select Continue
4 Enter the PIN2 code・ If the PIN2 code is not entered within 60
seconds, the request is canceled.
5 Select Download z Select Continue
・ The downloaded user certificate is added to the certificate list. ☛P196
INFORMATION● Packet communication fee is not charged for connection
to the FirstPass center. ● The user certificate certifies that you have subscribed to the
FOMA service. Downloaded user certificate is saved on the UIM and it can be used in FirstPass compatible sites.
● If you install FirstPass PC software in the attached CD-ROM to your PC, you can connect FOMA terminal to the PC and perform communication using FirstPass. See “FirstPassManual” in the attached CD-ROM for details. To view “FirstPassManual” (PDF format), Adobe Reader (version 6.0 or later is recommended) is required. If Adobe Reader is not installed in your PC, see after installing Adobe Reader in the same CD-ROM.Adobe Reader is not installed in your PC, download the latest version from the Adobe Systems Incorporated website. For details of usage, see Adobe Reader Help.
Using FirstPass
● FirstPass is DoCoMo’s electronic authentication service. Using FirstPass allows client authentication, in which a site and the FOMA terminal exchange and verify each other’s certificate for authenticating each other.
● FirstPass can be used for Internet communication using FOMA terminal and for Internet communication using the FOMA terminal that is connected to a PC. To use FirstPass with a PC, FirstPass PC software in the attached CD-ROM is needed.
●When requesting a user certificate, be sure to read FirstPass usage regulation displayed on the screen and accept the terms and conditions.
●Use of a user certificate requires entry of the PIN2 code.
● All operations made after the entry of the PIN2 code are regarded as operations you made. Use abundance of caution not to let the UIM or PIN2 code used by any third party.
● If the UIM is lost or stolen, you can contact “General Inquiries” on the back of this manual to have the user certificate nullified.
●Under no circumstances shall DoCoMo have any obligation or be held responsible for sites and information provided by FirstPass compatible sites. Any issue that arises must be settled between you and the FirstPass compatible site concerned.
●Neither DoCoMo nor the certifier provides any guarantee for security, etc. in use of FirstPass or SSL. Use the services on your own judgment and responsibility.
Op
erating
certificates
198
i-mo
de/i-m
otio
n
Menu 2843
Changing the certificate host Certificate Host
If you use services other than FirstPass, set the connection destination. If you change this setting, you cannot connect to the FirstPass center.
1 d843
2 Select HOST field z 2・ To restore settings for connecting to FirstPass:
Select HOST field z 1 z Go to Step 5
3 Select User host field z Enter the connection destination (up to 99 one-byte alphanumeric characters)
4 Select User host URL field z Enter the URL (up to 100 one-byte alphanumeric characters)
5 Press p
Using i-motion
i-motion
Images or sounds downloaded and saved from i-mode or Internet website can be played as “i-motion” or can be set for Movie ringtone (Chaku-motion). The vocals of your favorite singers can be used as ring tone as well as melodies (some i-motion may not be set for Movie ringtone). Generally, there are 2 types of i-motion as follows. You cannot change or select the data type when downloading the data.・ D702iF does not support streaming type i-motion.
■ Normal type (can be saved*1)
*1 Some i-motion cannot be saved.
■ Streaming type (cannot be saved)
Downloading i-motion from sites
・ The maximum number of items that can be protected ☛P35
1 Display a site z Select i-motionA message indicating the completion appears when downloading i-motion is finished. ・ In case of streaming type i-motion or i-motion
exceeding 500 Kbytes, a message appears indicating that it cannot be played and playing and saving cannot be performed.
■ i-motion replayed while the data is being downloaded:i-motion is replayed while the data is being downloaded. After finishing the replay, the operation is the same as the i-motion replayed after downloading data.
Usually, you do not need to change this setting.
Default DoCoMo
Playing action Description
Replay while downloading data (up to 500 KB)
The i-motion file is played while the data is being downloaded. After downloading data is completed, the i-motion can be operated in the same way as the i-motion replayed after downloading all data.
Replay after downloading data (up to 500 KB)
The i-motion file is played after downloading all data.
Playing action Description
Replay while downloading data (up to 2 MB)
The i-motion file is played while the data is being downloaded. The i-motion data is deleted after playback is completed and cannot be stored in FOMA terminal.
Amount of received data/total data
i-mo
tion
199
i-mo
de/i-m
otio
n
・ During playback, the following operations are enabled:
・ Even if you pause or stop playing, the data reception continues. ・When the operation is interrupted, a
confirmation screen is displayed. Select Yes to interrupt. ・When i-motion Setting is set to Auto Play
OFF, i-motion is not played automatically.
■ i-motion played after downloading data:i-motion is played automatically when downloading is completed.
・ During playback, the following operations are enabled:
・When i-motion Setting is set to Auto Play OFF, i-motion is not played automatically.
2 Select Save・ Streaming i-motion cannot be saved. ・ To play i-motion again: Select Play・ To display detail information: Select File property・ To cancel saving: Select Back z Select No
3 Enter a display name (up to 36 one- or two-byte characters) z Press pThe downloaded i-motion is saved in the i-mode folder of i-motion.
■ When a link is set within ticker stream of downloaded i-motion:If a link such as a phone number, a mail address, or a site is set in a ticker, you can use Phone To, AV Phone To, Mail To, and Web To after playback is finished or interrupted. For Phone To and AV Phone To, the Call Option screen appears. For Mail To and Web To, a confirmation screen is displayed. ・When the link type is Phone To (AV Phone To),
pressing p allows you to add phone numbers to the phonebook. Selecting Add to phonebook allows you to add mail addresses to the phonebook when the link type is Mail To. ・ If no i-motion is saved, a confirmation screen
is displayed asking whether to save it. ・When there are two or more link items, only
one will be effective. The item which is to become effective depends on i-motion data.
■ Setting for the standby display: m1 z Select Yes・ If zooming is available, select Yes (Same
size) to maintain the image size or select Yes (Large size) to enlarge it to the screen size. ・ If the i-αppli standby display has already been
set, a confirmation screen is displayed asking whether to cancel it.
■ Registering a new phonebook entry: m2 z Set the name, etc. and register
■ Adding to an existing phonebook entry: m3 z Select a party z Confirm the contents and register・ If video/i-motion is already set, it is replaced
by the selected video/i-motion.
■ Setting as Movie ringtone: m4 z 1 to 6
■ Setting as memory ring alert (call, mail):am4 z 7 or 8 z Select a partybp after confirming the contents・When a ring alert has been set, it will be
replaced by the selected video/i-motion. ・ For entering the phonebook No., follow
Step 4 of “Editing saved phonebook entries”. ☛P107
■ Setting as incoming image (voice call, videophone call): m5 z 1 or 2・When an incoming image has been set, it
will be replaced by the selected video/i-motion.
o:Pause/play
%:Adjust volume
p:Stop (Press o to play from the beginning.)
m:Display detail information
o:Pause/replay
%:Adjust volume
r:Play at fast speed
l:Rewind and play
p:Stop (the message is displayed indicating the completion of downloading.)
m:Display detail information
Do
wn
load
ing
i-mo
tion
from
sites
Next
200
i-mo
de/i-m
otio
n
INFORMATION● Precautions of setting data in the standby display and
phonebook ☛P281● Only the i-motion in MP4 (Mobile MP4) format can be
downloaded and played. i-motion in ASF format cannot be downloaded and played.
● The replay restrictions such as number of replayable times or expiration of playback may be set for i-motion files.
●When i-motion is replayed while the data is being downloaded, replay may be temporarily stopped in wait for data reception. The replay is automatically resumed when data reception is restarted.
●When i-motion is replayed while the data is being downloaded, i-motion may become unable to play or may be blurred depending on radio wave conditions. In such a case, the i-motion can be replayed after the completion of downloading if the data is normally received. However, some i-motion files may allow downloading of data but may not be replayed correctly.
● Even for the type of i-motion which is replayed while the data is being downloaded, it may not be played during downloading depending on the status of sites.
●When i-motion data is improper, reception of i-motion may be canceled.
● Sometimes it cannot be saved even if Ring alert and Receive display are set to Available in the detail information of i-motion. In this case you cannot set the i-motion as the ring alert or incoming image.
●When FOMA terminal is folded during playing i-motion, playing is stopped while downloading is being continued.
●When there is not enough available storage space, or the maximum number of saved items is exceeded, a confirmation screen appears asking whether to delete data. Follow the instructions on the screen and delete the saved video/i-motion. Before deleting, you can play video/i-motion by pressing p on the video/i-motion list or view the detail information about it by pressing m.
Menu 286
Setting whether to play i-motion automatically i-motion Setting
1 d86
2 Select Auto replay setting field z 1 or 2・ Even when Auto Play OFF is set, i-motion can
be played by selecting Play after downloading i-motion.
3 Press p
INFORMATION● On the site screen, press m and select Display → i-motion
settings.
Default Auto Play ON
i-mo
tion
Settin
g
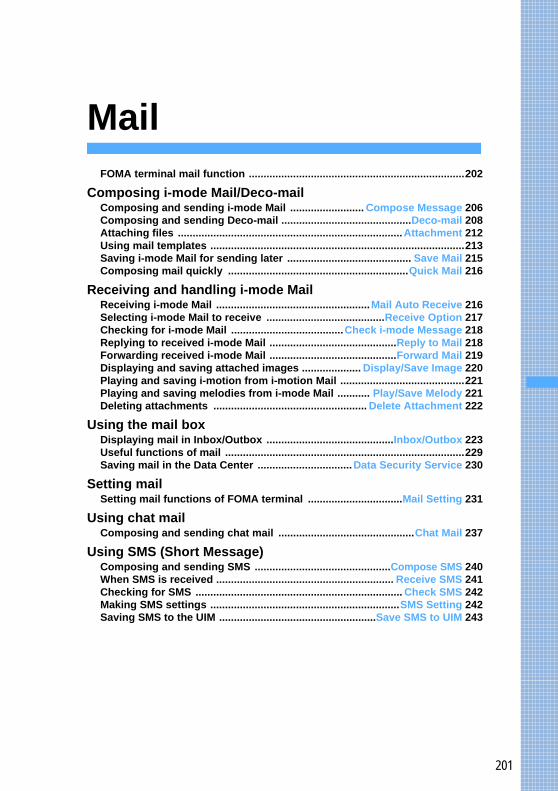
201
MailFOMA terminal mail function .........................................................................202
Composing i-mode Mail/Deco-mailComposing and sending i-mode Mail ......................... Compose Message 206Composing and sending Deco-mail ............................................Deco-mail 208Attaching files ............................................................................Attachment 212Using mail templates ......................................................................................213Saving i-mode Mail for sending later .......................................... Save Mail 215Composing mail quickly .............................................................Quick Mail 216
Receiving and handling i-mode MailReceiving i-mode Mail ....................................................Mail Auto Receive 216Selecting i-mode Mail to receive ........................................Receive Option 217Checking for i-mode Mail ......................................Check i-mode Message 218Replying to received i-mode Mail ...........................................Reply to Mail 218Forwarding received i-mode Mail ...........................................Forward Mail 219Displaying and saving attached images .................... Display/Save Image 220Playing and saving i-motion from i-motion Mail ..........................................221Playing and saving melodies from i-mode Mail ........... Play/Save Melody 221Deleting attachments .................................................... Delete Attachment 222
Using the mail boxDisplaying mail in Inbox/Outbox ...........................................Inbox/Outbox 223Useful functions of mail .................................................................................229Saving mail in the Data Center ................................Data Security Service 230
Setting mailSetting mail functions of FOMA terminal ................................Mail Setting 231
Using chat mailComposing and sending chat mail ..............................................Chat Mail 237
Using SMS (Short Message)Composing and sending SMS ..............................................Compose SMS 240When SMS is received ............................................................ Receive SMS 241Checking for SMS ...................................................................... Check SMS 242Making SMS settings ................................................................SMS Setting 242Saving SMS to the UIM .....................................................Save SMS to UIM 243
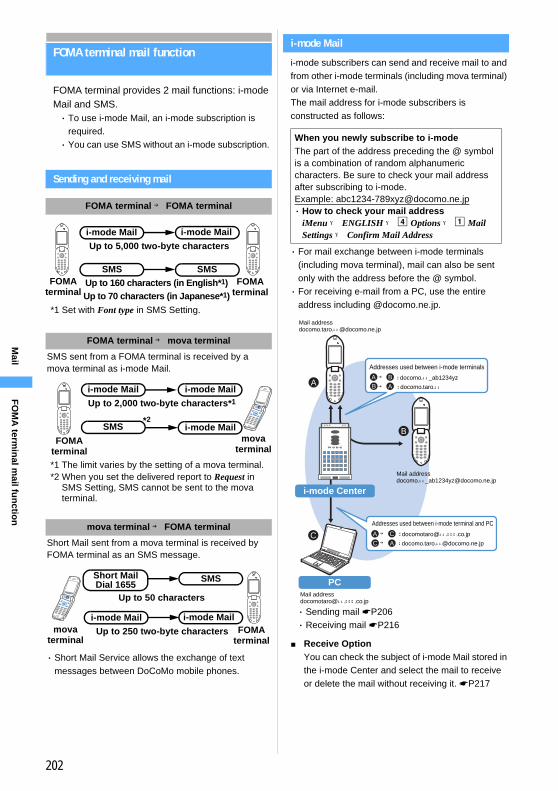
202
FOMA terminal mail function
FOMA terminal provides 2 mail functions: i-mode Mail and SMS. ・ To use i-mode Mail, an i-mode subscription is
required. ・ You can use SMS without an i-mode subscription.
Sending and receiving mail
i-mode Mail
i-mode subscribers can send and receive mail to and from other i-mode terminals (including mova terminal) or via Internet e-mail. The mail address for i-mode subscribers is constructed as follows:
・ For mail exchange between i-mode terminals (including mova terminal), mail can also be sent only with the address before the @ symbol. ・ For receiving e-mail from a PC, use the entire
address including @docomo.ne.jp.
・ Sending mail ☛P206・ Receiving mail ☛P216
■ Receive OptionYou can check the subject of i-mode Mail stored in the i-mode Center and select the mail to receive or delete the mail without receiving it. ☛P217
FOMA terminal → FOMA terminal
FOMA terminal → mova terminal
SMS sent from a FOMA terminal is received by a mova terminal as i-mode Mail.
mova terminal → FOMA terminal
Short Mail sent from a mova terminal is received by FOMA terminal as an SMS message.
・ Short Mail Service allows the exchange of text messages between DoCoMo mobile phones.
i-mode Mail
Up to 5,000 two-byte characters
i-mode Mail
SMS SMSFOMA
terminalFOMA
terminalUp to 160 characters (in English*1)Up to 70 characters (in Japanese*1)
*1 Set with Font type in SMS Setting.
i-mode Mail
SMS
Up to 2,000 two-byte characters*1
FOMA terminal*1 The limit varies by the setting of a mova terminal.*2 When you set the delivered report to Request in
SMS Setting, SMS cannot be sent to the mova terminal.
mova terminal
i-mode Mail
*2i-mode Mail
Up to 50 characters
Up to 250 two-byte characters
i-mode Mail i-mode MailFOMA
terminalmova
terminal
SMSShort MailDial 1655
When you newly subscribe to i-modeThe part of the address preceding the @ symbol is a combination of random alphanumeric characters. Be sure to check your mail address after subscribing to i-mode. Example: [email protected]・ How to check your mail address
iMenu → ENGLISH → d Options → a Mail Settings → Confirm Mail Address
A
C
B
A BAB
A C
AC→ : docomotaro@△△.□□□.co.jp
→ : docomo.taro.△△@docomo.ne.jp
Addresses used between i-mode terminal and PC
PC
Mail addressdocomo.taro.△△@docomo.ne.jp
→ : docomo.△△_ab1234yz
→ : docomo.taro.△△
Addresses used between i-mode terminals
Mail addressdocomo.△△[email protected]
i-mode Center
Mail addressdocomotaro@△△.□□□.co.jp
FO
MA
termin
al mail fu
nctio
n
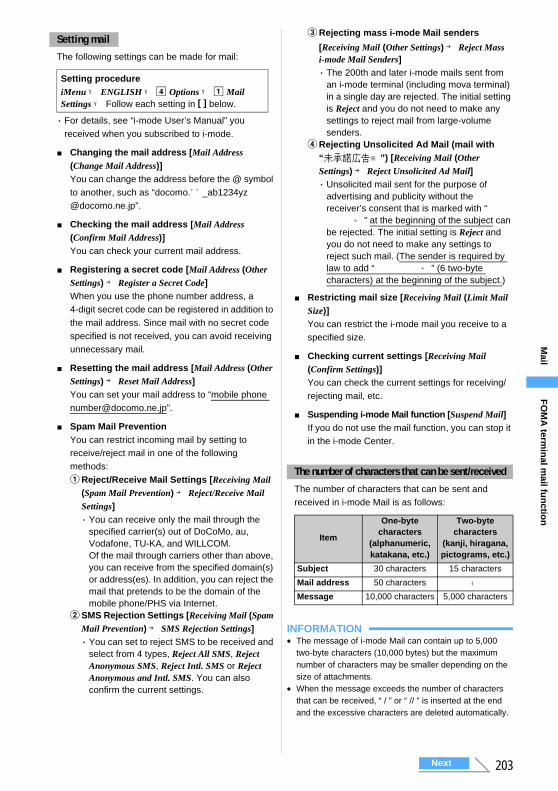
203
The following settings can be made for mail:
・ For details, see “i-mode User’s Manual” you received when you subscribed to i-mode.
■ Changing the mail address [Mail Address (Change Mail Address)]You can change the address before the @ symbol to another, such as “docomo.△△[email protected]”.
■ Checking the mail address [Mail Address (Confirm Mail Address)]You can check your current mail address.
■ Registering a secret code [Mail Address (Other Settings) → Register a Secret Code]When you use the phone number address, a 4-digit secret code can be registered in addition to the mail address. Since mail with no secret code specified is not received, you can avoid receiving unnecessary mail.
■ Resetting the mail address [Mail Address (Other Settings) → Reset Mail Address]You can set your mail address to “mobile phone [email protected]”.
■ Spam Mail PreventionYou can restrict incoming mail by setting to receive/reject mail in one of the following methods:aReject/Receive Mail Settings [Receiving Mail
(Spam Mail Prevention) → Reject/Receive Mail Settings]・ You can receive only the mail through the
specified carrier(s) out of DoCoMo, au, Vodafone, TU-KA, and WILLCOM. Of the mail through carriers other than above, you can receive from the specified domain(s) or address(es). In addition, you can reject the mail that pretends to be the domain of the mobile phone/PHS via Internet.
bSMS Rejection Settings [Receiving Mail (Spam Mail Prevention) → SMS Rejection Settings]・ You can set to reject SMS to be received and
select from 4 types, Reject All SMS, Reject Anonymous SMS, Reject Intl. SMS or Reject Anonymous and Intl. SMS. You can also confirm the current settings.
cRejecting mass i-mode Mail senders
[Receiving Mail (Other Settings) → Reject Mass i-mode Mail Senders]・ The 200th and later i-mode mails sent from
an i-mode terminal (including mova terminal) in a single day are rejected. The initial setting is Reject and you do not need to make any settings to reject mail from large-volume senders.
dRejecting Unsolicited Ad Mail (mail with “未承諾広告※”) [Receiving Mail (Other Settings) → Reject Unsolicited Ad Mail] ・ Unsolicited mail sent for the purpose of
advertising and publicity without the receiver’s consent that is marked with “未承諾広告※” at the beginning of the subject can be rejected. The initial setting is Reject and you do not need to make any settings to reject such mail. (The sender is required by law to add “未承諾広告※” (6 two-byte characters) at the beginning of the subject.)
■ Restricting mail size [Receiving Mail (Limit Mail Size)]You can restrict the i-mode mail you receive to a specified size.
■ Checking current settings [Receiving Mail (Confirm Settings)]You can check the current settings for receiving/rejecting mail, etc.
■ Suspending i-mode Mail function [Suspend Mail]If you do not use the mail function, you can stop it in the i-mode Center.
The number of characters that can be sent and received in i-mode Mail is as follows:
INFORMATION● The message of i-mode Mail can contain up to 5,000
two-byte characters (10,000 bytes) but the maximum number of characters may be smaller depending on the size of attachments.
●When the message exceeds the number of characters that can be received, “ / ” or “ // ” is inserted at the end and the excessive characters are deleted automatically.
Setting mail
Setting procedureiMenu → ENGLISH → d Options → a Mail Settings → Follow each setting in [ ] below.
The number of characters that can be sent/received
Item
One-byte characters
(alphanumeric, katakana, etc.)
Two-byte characters
(kanji, hiragana, pictograms, etc.)
Subject 30 characters 15 characters
Mail address 50 characters -Message 10,000 characters 5,000 characters
Next
FO
MA
termin
al mail fu
nctio
n
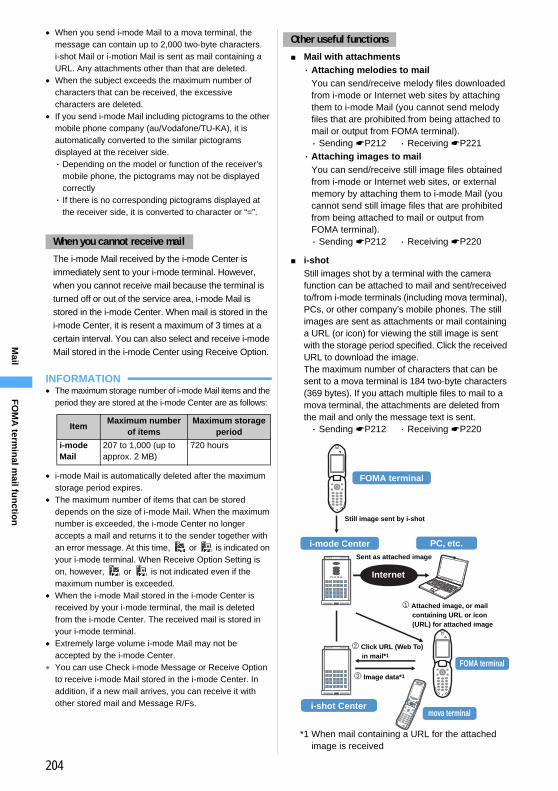
204
●When you send i-mode Mail to a mova terminal, the message can contain up to 2,000 two-byte characters. i-shot Mail or i-motion Mail is sent as mail containing a URL. Any attachments other than that are deleted.
●When the subject exceeds the maximum number of characters that can be received, the excessive characters are deleted.
● If you send i-mode Mail including pictograms to the other mobile phone company (au/Vodafone/TU-KA), it is automatically converted to the similar pictograms displayed at the receiver side.・ Depending on the model or function of the receiver’s
mobile phone, the pictograms may not be displayed correctly・ If there is no corresponding pictograms displayed at
the receiver side, it is converted to character or “=”.
The i-mode Mail received by the i-mode Center is immediately sent to your i-mode terminal. However, when you cannot receive mail because the terminal is turned off or out of the service area, i-mode Mail is stored in the i-mode Center. When mail is stored in the i-mode Center, it is resent a maximum of 3 times at a certain interval. You can also select and receive i-mode Mail stored in the i-mode Center using Receive Option.
INFORMATION● The maximum storage number of i-mode Mail items and the
period they are stored at the i-mode Center are as follows:
● i-mode Mail is automatically deleted after the maximum storage period expires.
● The maximum number of items that can be stored depends on the size of i-mode Mail. When the maximum number is exceeded, the i-mode Center no longer accepts a mail and returns it to the sender together with an error message. At this time, or is indicated on your i-mode terminal. When Receive Option Setting is on, however, or is not indicated even if the maximum number is exceeded.
●When the i-mode Mail stored in the i-mode Center is received by your i-mode terminal, the mail is deleted from the i-mode Center. The received mail is stored in your i-mode terminal.
● Extremely large volume i-mode Mail may not be accepted by the i-mode Center.
● You can use Check i-mode Message or Receive Option to receive i-mode Mail stored in the i-mode Center. In addition, if a new mail arrives, you can receive it with other stored mail and Message R/Fs.
■ Mail with attachments・ Attaching melodies to mail
You can send/receive melody files downloaded from i-mode or Internet web sites by attaching them to i-mode Mail (you cannot send melody files that are prohibited from being attached to mail or output from FOMA terminal). ・ Sending ☛P212 ・ Receiving ☛P221・ Attaching images to mail
You can send/receive still image files obtained from i-mode or Internet web sites, or external memory by attaching them to i-mode Mail (you cannot send still image files that are prohibited from being attached to mail or output from FOMA terminal). ・ Sending ☛P212 ・ Receiving ☛P220
■ i-shotStill images shot by a terminal with the camera function can be attached to mail and sent/received to/from i-mode terminals (including mova terminal), PCs, or other company’s mobile phones. The still images are sent as attachments or mail containing a URL (or icon) for viewing the still image is sent with the storage period specified. Click the received URL to download the image. The maximum number of characters that can be sent to a mova terminal is 184 two-byte characters (369 bytes). If you attach multiple files to mail to a mova terminal, the attachments are deleted from the mail and only the message text is sent. ・ Sending ☛P212 ・ Receiving ☛P220
When you cannot receive mail
ItemMaximum number
of itemsMaximum storage
period
i-mode Mail
207 to 1,000 (up to approx. 2 MB)
720 hours
Other useful functions
FOMA terminal
Still image sent by i-shot
i-mode Center
Internet
PC, etc.
① Attached image, or mail containing URL or icon (URL) for attached image
② Click URL (Web To) in mail*1
③ Image data*1
i-shot Centermova terminal
FOMA terminal
Sent as attached image
*1 When mail containing a URL for the attached image is received
FO
MA
termin
al mail fu
nctio
n
205
・ The i-shot Center stores images for up to 10 days and deletes the images automatically after that period. ・ i-mode terminals can send still image files of up
to 500 Kbytes. When you send an image exceeding 20 Kbytes as mail attachment to an i-mode terminal, the image will be automatically reduced and downloaded to the receiver’s terminal.
■ i-motion MailVideos recorded with an i-motion Mail compatible terminal or downloaded from sites can be sent/received to/from i-motion Mail compatible terminals, PCs, or other company’s mobile phones (you cannot send video files that are prohibited from being attached to mail or output from FOMA terminal). ・ Sending ☛P212 ・ Receiving ☛P221・ Service schematic
Video files attached to i-motion Mail are sent to the i-motion Mail Center and stored there (if the destination is a PC, the file is directly sent to the PC as an attachment). When i-motion Mail is received by an i-motion Mail compatible terminal, the video can be downloaded by clicking the URL displayed in the message text. When received by a non-compatible terminal, the video is converted to continuous still images and received as mail containing a URL. The receiver can download the continuous still images by clicking the displayed URL.
・ The i-motion Mail Center stores images for up to 10 days and deletes the images automatically after that period. ・ i-motion Mail compatible terminals can receive
video files of up to 500 Kbytes. When attached videos are downloaded, the image sizes are automatically changed to fit the terminal screen.
■ Deco-mailCompose and send your original i-mode Mail messages by changing the character size/background color or inserting images in the text, and also enjoy receiving decorated mail (when decorated mail is received from a PC, operations may not be the same as on PC because some decorations are not supported by i-mode terminals). When Deco-mail is sent to a non-compatible terminal, it is received as mail containing a URL. The receiver can view Deco-mail by clicking the displayed URL. ・ Editing Deco-mail ☛P208・ Sending Deco-mail ☛P208・ Supporting models: Available with Deco-mail
compatible models. For details, see “i-mode User’s Manual”.
■ Sending mail to multiple addressesYou can send i-mode Mail to multiple addresses (up to 5) at one time. ☛P207・ The communication fee is the same as for
sending one mail (however, the communication fee increases corresponding to the information volume for additional addresses).
■ Sending/receiving CC and BCCWhen editing i-mode Mail, you can select the address type from TO, CC and BCC in the same way as on PCs. If there is no TO address, however, mail cannot be sent. ☛P207
■ Chat mailMail can be sent and received to/from multiple addresses like making conversation. ・ The communication fee for chat mail to multiple
addresses is the same as for sending mail to multiple addresses at one time.
SMS (Short Message)
Text messages can be exchanged between FOMA terminals. ・ Sending ☛P240 ・ Receiving ☛P241・ Checking for SMS ☛P242
i-motion Mail compatible FOMA terminal
i-motion Mail compatible FOMA terminal
i-motion Mail incompatible terminal
Sent as i-mode Mail
Sent as attached video
PC, etc.i-mode Center
① Mail containing URL for attached video
③ Attached video or continuous still image data
i-motion Mail Center
② Click URL (Web To) in mail
Internet
Next
FO
MA
termin
al mail fu
nctio
n
206
The address of SMS is the subscribed mobile phone number. ・ You can exchange SMS with users of overseas
carriers other than DoCoMo. For more information, visit the DoCoMo website.
The maximum number of characters differs depending on the font type setting. ☛P243
*1 If a one-byte “+” is contained, up to 21 characters can be entered.
*2 One-byte alphanumerics and symbols (except for `。「」、・゙ and ゚) can be sent. When symbols (|^{ } [ ] ̃ and ¥ ) are entered, the number of characters that can be sent is reduced.
SMS sent to your FOMA terminal is received by the SMS Center and sent to your FOMA terminal immediately. When you cannot receive messages because the terminal is turned off or outside the service area, the messages are stored in the SMS Center.
INFORMATION● The SMS Center stores messages for a maximum of 72
hours. The sender can specify the storage period. ☛P242
● The messages are automatically deleted after the maximum storage period expires.
● You can use Check SMS to receive the messages stored in the SMS Center. ☛P242
●When FOMA terminal receives the messages stored in the SMS Center, the messages are deleted from the Center. Received SMS is stored in FOMA terminal.
■ Delivered reportYou can receive a delivered report that informs you whether the other party has received the sent SMS. ☛P242
■ Saving to the UIMYou can save received and sent SMS to the UIM. ☛P243
Composing i-mode Mail/Deco-mail
Menu 12 / !2
Composing and sending i-mode MailCompose Message
1 a (for over a second) z Select field
2 Select Direct input z Enter the address (up to 50 one-byte characters)・When sending mail to an i-mode terminal, you
may omit “@docomo.ne.jp” in the mail address. ・ In 5-touch Input Method, press 1 repeatedly
in the alphabet input mode to enter “ . ”, “@”, “ - ”, etc. In addition, “.com”, “.ne.jp”, “.co.jp”, etc. can be entered by pressing ( repeatedly in the alphabet input mode.・When the other party has registered a secret code,
enter the other party’s i-mode terminal phone number followed by the 4-digit secret code.
■ Searching the phonebook: Select View phonebook z Select a party・When multiple mail addresses are
registered, select a mail address.
■ Using a mail group: Select Mail group z Select a mail group・Mail addresses must be registered in a mail
group in advance.・ If the total of entered addresses exceeds 5,
the mail group cannot be added.・ Highlight a mail group and press m to
check the mail group details.
3 Select field z Enter the subject (up to 30 one-byte or 15 two-byte characters)
4 Select z Enter the message (up to 10,000 one-byte or 5,000 two-byte characters)・ Line feeds can be inserted in the message.
Press # to enter a line feed in 5-touch Input Method (except for the one-byte/two-byte numeric modes).
Address of SMS
The number of characters that can be sent/received
Item English Japanese
Address 20 characters (numbers only)*1
Message 160 one-byte characters*2
70 one- or two-byte characters
When you cannot receive SMS
Other useful functions
Mail composition screen Remaining number of one-byte characters that can be entered
Co
mp
ose M
essage
207
・ A space of one- or two-byte or a line feed is also counted as a character in the message. ・ The text can be decorated. ☛P208
■ Inserting a signature: m55・ Signature must be registered beforehand.
5 Press p・ Press o on the connecting screen, press p
on the sending screen to stop sending and to save the i-mode Mail to the Unsent messages folder of Unsent messages. Even when saved in the Unsent messages folder, the i-mode Mail may be sent depending on the operation timing.・When you are outside the service area and the
auto-send mails already saved is 4 or less, a confirmation screen appears asking whether to send mail automatically in the service area. When you select Yes, the mail is saved as auto-send mail in the Unsent messages folder of Unsent messages.
INFORMATION●When mail exceeding 10,000 bytes was automatically
saved due to start of other functions, part of the mail being composed may not be saved.
● Depending on signal conditions, characters may not be displayed correctly at the receiver side.
●When transmission is completed correctly, the i-mode Mail is saved in the Outbox folder of Outbox. However, when the sent mail matches the criteria specified in Sort Criteria, it is saved in the specified folder. When there is not enough available storage space, or the maximum number of saved items is exceeded, the oldest sent mail is overwritten. Be sure to protect sent mail you want to keep.
●When transmission fails, an error message is displayed and the i-mode Mail is saved in the Unsent messages folder of Unsent messages. You can edit and send i-mode Mail from Unsent messages.
● Even if i-mode Mail is sent correctly, “Transmission failed.” may be displayed depending on signal conditions, and the mail may be saved in the Unsent messages folder of Unsent messages.
● Depending on the settings of the receiver’s terminal such as the number of characters that can be displayed, the font or its display size, the pictograms may not be displayed correctly and their shapes and views may be different from the original ones.
● An error message for address unknown etc. may not be received when mail is sent to addresses other than DoCoMo.
●When there is not enough available storage space, or the maximum number of saved items is exceeded, i-mode Mail cannot be composed. Delete unnecessary i-mode Mail and/or SMS from Unsent messages. ☛P229
Adding receivers Add Address
You can send i-mode Mail to up to 5 addresses at one time (Multi-address transmission). ・ There are 3 address types: (TO),
(CC) and (BCC). : Used for usual addresses. : Used when you want to inform the other
party of the content of the particular mail sent to the TO address.
: Used when you want to inform the other party as with CC, but the BCC-specified address is not shown for the other party.
・Mail with no address entered in the field cannot be sent.
1 Highlight the address field on the mail composition screen z a
■ Adding CC and BCC:am7 on the mail composition screen
z Select an input methodbSelect CC or BCC z Enter a mail
address・ TO can also be selected. ・When you have added by selecting Mail
group, TO, CC and BCC are set as registered for the mail group.
■ Changing TO, CC and BCC: Highlight an address field z m9 z Select an address type
■ Deleting the added address field: Highlight an address field z m8 z Select Yes・ Only the address in the field is deleted when
there is only one field.
2 Enter the address in the added field z Press p・ The operation is the same as when there is
only one address field.
An address field is added. ・ Repeat the same
procedure to add as many more fields as you want.
Co
mp
ose M
essage
Next
208
INFORMATION● The mail address entered in the field and
field can be seen at the receiver side. However, it may not be displayed depending on the terminal, device, or mailing software.
●When sending of mail to some addresses fails, an error message is displayed. Pressing o may display a list of mail addresses for which transmission failed.
」
Composing and sending Deco-mail Deco-mail
You can decorate the i-mode mail message by changing the font size, font color, or background color and inserting still images including the ones shot with the camera to compose Deco-mail.
■ Examples of decoration
■ Flow of Deco-mail composition
INFORMATION● Even if you delete decorated characters, the decoration
data may remain and the number of characters to be entered may be fewer. Cancel the decoration first and then delete characters. Holding down c for over a second deletes all the characters and decoration (except the background color).
●When sent and received to/from other than the Deco-mail compatible FOMA terminal such as a PC, the decoration in Deco-mail may not be correctly displayed.
● The actions of decoration such as blink, ticker, swing, and animation stop automatically after a certain period of time on the mail composition screen or the preview screen.
●When a Deco-mail is sent to a non-compatible terminal, it will be received as a mail containing a URL for viewing the Deco-mail. The Deco-mail cannot be viewed from the mail containing the URL that has been transferred or by entering the URL directly (it can be viewed only on the terminal of the original receiver).
Entering characters after specifying the decoration method
1 Select on the mail composition screen z a
aChanging font color bChanging font size
c Inserting images dBlinking characters
eSetting tickers fSwinging characters left and right
gChanging word alignment
h Inserting lines (ruled lines)
iChanging background color
Step 1Display the message text entry screen from the mail composition screen
Start composing i-mode Mail and display the message text entry screen.
Step 2 Enter characters and decorate them
・ Enter decorated characters and images: For the operation procedure (☛P208), refer to “Entering characters after specifying the decoration method”.・ Decorate entered characters: For the
operation procedure (☛P210), refer to “Specifying decoration method after entering characters”.・ Press m0 during editing to check
the decoration on the preview screen.
Step 3Confirm the decoration before sending
Check the decoration on the mail composition screen.
Deco
209
2 Select the decoration z Enter characters
・ To set more than one decoration: Highlight icons on the decoration selection screen z m・ To cancel a selected decoration and enter
characters: Place the cursor on the character entry position z a z t Font color, Font size, Blink, Ticker, Swing and Word alignment can be canceled.
3 m0 z Check the decorationYou can check the set decoration and the accurate remaining number of bytes that can be entered.
4 o after checking the details■ Changing the decoration: m18 z
Place the cursor on the start position z
o・ Follow the procedure from Step 2 in
“Specifying decoration method after entering characters”. ☛P210
■ Canceling all the decorations: m19
5 o z Press p
INFORMATION● You can also select decorations by pressing m on the
message text entry screen and selecting Decorate mail.
Operations on the decoration selection screen
・ The number in parentheses ( ) indicates the example of decoration in P208.
■ Changing the font color (example a): Select z Select a color z Enter characters
・ Select from 20 standard colors or 64 colors in Other color. ・ The color of pictograms is also changed. To
return to the original color, specify the range and select Default. For operations, see “Specifying decoration method after entering characters”. ☛P210
■ Changing the font size (example b): Select (or ) z Select a size z Enter characters
■ Inserting images (example c): Select z Select Data Box z Select a folder z
Select an image・ To take and insert a still image: Select Use
still camera z Shoot z o・ The size of still image is automatically set
to 96 x 72 (phonebook).
Font color:Changes the color of characters and lines (ruled lines).
Font size:Changes the font size.
Insert image: Inserts images.Blink:Displays characters that blink.Ticker:
Displays characters in a ticker (ticker display).
Swing:Displays characters that swing left and right.
Word alignment:Changes the position of characters or images.
Insert line:Inserts separating lines (ruled lines).
Background color:Changes the background color.
Undo:Restores the previous condition.
Decoration selection screenIcon
Highlight an icon on the decoration selection screen and press o to select a decoration. You can set more than one decoration by selecting multiple icons. However, Ticker, Swing and Word alignment cannot be selected at the same time.
large selected
Deco
Next
210
・ Deco-mail pictures set by default ☛P359
■ Making characters blink (example d): Select z Enter characters
■ Making characters into ticker to run from right to left (example e): Select z Enter characters
■ Making characters swing left and right (example f): Select z Enter characters
■ Changing word alignment (example g): Select (or ) z Select the display position z Enter characters
・When characters are already entered and the cursor is placed between characters, a new blank line is started at the selected position.
■ Inserting lines (ruled lines ) (example h): Select
■ Changing text background color (example i): Select z Select a color
・ Select from 20 standard colors or 64 colors in Other color.
■ Restoring the previous condition: Select The last decoration or characters entered are canceled.
Specifying decoration method after entering characters
You can decorate entered characters and change the decoration of characters by specifying the range. ・ The number in parentheses ( ) in Step 3 indicates
the example of decoration in P208. ・ You cannot insert lines or images, or change the
background color. Specify the decoration first.
1 Highlight the start position on the message text entry screen z t
2 Place the cursor on the end position z o
The image is inserted at the cursor position.・ In case the available
number of characters exceeds the limit by inserting an image, a message appears indicating that it cannot be inserted.
・ Enter characters between and
.
・ Enter characters between and
.
right selected
A line (ruled line) is inserted in the color specified with font color ( ).
・ To select from the start position to the beginning of the text:
mo・ To select from the
start position to the end of the text:
po・ To select all the text:
a
Deco
211
3 Select the decoration method
■ Changing the font color (example a): 1 z Select a color・ The color of lines (ruled lines) is also changed.
■ Changing the font size (example b): 2 z 1 to 3
■ Making characters blink (example d):
31・ To cancel: 32
■ Making characters into ticker to run from right to left (example e): 41・ To cancel: 42
■ Making characters swing left and right (example f): 51・ To cancel: 52
■ Changing the word alignment (example g): 6 z 1 to 3・ The display position of an image is also
changed.
■ Copying characters: 7■ Cutting characters: 8■ Restoring the previous condition: 9・ The last decoration or characters entered
are canceled.
■ Decorating characters continuously: m z Repeat Step 3
4 oThe selection of decorated characters is canceled. ・ You can also unselect it by pressing O.
5 o z Press p
INFORMATION● On the message text entry screen, press m and select
Decorate mail → Edit decoration.● Press m0 on the message text entry screen to
display the preview screen and confirm the accurate remaining number of bytes that can be entered at the lower right of the screen.
Attaching melodies to Deco-mail Melo-deco
1 a on the decoration selection screen・When a melody is already attached, the list of
attached melodies is displayed. Go to Step 2, “Attaching another melody” or “Removing an attached melody”.
2 Select a folder z Select a melodyThe melody is attached and its file name and file size are displayed in the list of attached melodies. ・Melodies that cannot be attached are not
displayed. Highlight a melody and press p to play the melody. Press o to attach it or c to return to the list.
■ Attaching another melody:am in the list of attached melodies z
Select a folder z Select a melody
■ Removing an attached melody: Highlight a melody in the list of attached melodies z a z Select Yes・ If all the melodies are deleted, a message
appears indicating that there is no attached melodies. Press o
■ Playing melodies: Select a melody in the list of attached melodies・ Completing the play returns to the list.
3 p appears at the lower part of the screen.
4 o z Press p
The following melodies are saved in the Mail attach melody folder by default.
・ The composer’s name are described in accordance with the JASRAC website.
・ The procedure for confirming and canceling decorations is the same as when entering characters after specifying decoration. ☛P208
Mail attachment melodies
Title Song title (composer name in [ ] )
クリスマス (Christmas)
JOY TO THE WORLD [HANDEL GEORGE FRIDERIC/MASON LOWELL]
結婚式 (Wedding)
BRIDAL MARCH [WAGNER RICHARD WILHELM]
誕生日 (Birthday) -
お正月 (New Year) -
Deco
212
Attaching filesAttachment
You can send i-mode mail with images, video/i-motion or melodies attached. ・ The type of attachable files and the maximum
number of files that can be attached to one mail are as shown below:
*1 Depending on the receiver’s device (terminal, PC, etc.), images will be received as attachments to mail or mail containing URLs.
*2 Depending on the receiver’s model, video may be degraded or displayed as continuous images. Video with the image size other than 176 x 144 (QCIF) or 128 x 96 (Sub-QCIF) cannot be attached regardless of the file size.
*3 Some files without replay restriction may not be attached.
*4 Up to 10 melodies and images in total can be attached on condition that the total size including the message text is 10,000 bytes or smaller. The number of files that can be attached, however, may be reduced depending on the size of the attachment.
・ The maximum number of characters in a message differs by the size of attachment. ・When the remaining data amount that can be
entered in the message text (after melodies and images of up to 10,000 bytes are attached) is less than 200 one-byte or 100 two-byte characters (400 one-byte or 200 two-byte characters for Deco-mail), you cannot attach video/i-motion or images exceeding 10,000 bytes. ・ Files prohibited from being attached to mail or
output from FOMA terminal (except images with the file restriction set to File restricted on your terminal) and files with the UIM operation restriction set cannot be attached.
・ Only one JPEG image can be attached and sent to a mova terminal. In this case, it is received as mail containing a URL (i-shot Mail). ・ Recorded video of up to 500 Kbytes (excluding
the message) can be attached to i-motion Mail. ・ The data recorded with Sound Recorder is saved
as i-motion and can be attached to mail. ・When sent to other than FOMA D701i, D701iWM,
D702i, D702iBCL, D702iF, D851iWM, D901i, D901iS, D902i, or D902iS, melodies may not play correctly at the receiver side.
1 Select field on the mail composition screen
2 Select the attachment type z Select a file■ Attaching an image:
aSelect ImagebSelect Data Box z Select a folder・ To take and attach a still image: Select
Use still camera z Shoot z o z Go to Step 3・ The size of the still image to shoot is
automatically set to 240 x 320 (standby) for the out-camera or 352 x 288 (CIF) for the in-camera.
cSelect an imageThe file name of the selected image is displayed in the field of the mail composition screen. ・ Images that cannot be attached are not
displayed. Highlight an image and press p to display. Press o to attach it or c to return to the list.・ For a JPEG image with the image size
exceeding 240 x 320 or 320 x 240 (QVGA), a confirmation screen appears asking whether to reduce it to 240 x 320 (QVGA). When file size of the reduced image exceeds 10,000 bytes, a confirmation screen appears asking whether to save the image to Data Box. When you do not save it to Data Box or a message saying that saving failed appears, the reduced image is not saved. When the mail is saved, attached files are canceled. Also, the attachment to auto-send mail will not be sent. ・ For a JPEG image exceeding 500
Kbytes, it is automatically reduced to a size that can be attached to mail, and a confirmation screen appears asking whether to save the image to Data Box. This operation may take some time.
File typeMaximum number of
files
Melody (Melodies in SMF format can be attached only)
10*4Image of up to 10,000 bytes*1 (only images in JPEG and GIF formats can be attached; Created animation cannot be attached)
Image exceeding 10,000 bytes and up to 500 KB*1 (only images in JPEG format can be attached; Created animation cannot be attached) 1
Video/i-motion of up to 500 KB*2 (files with replay restriction cannot be attached*3)
Attach
men
t
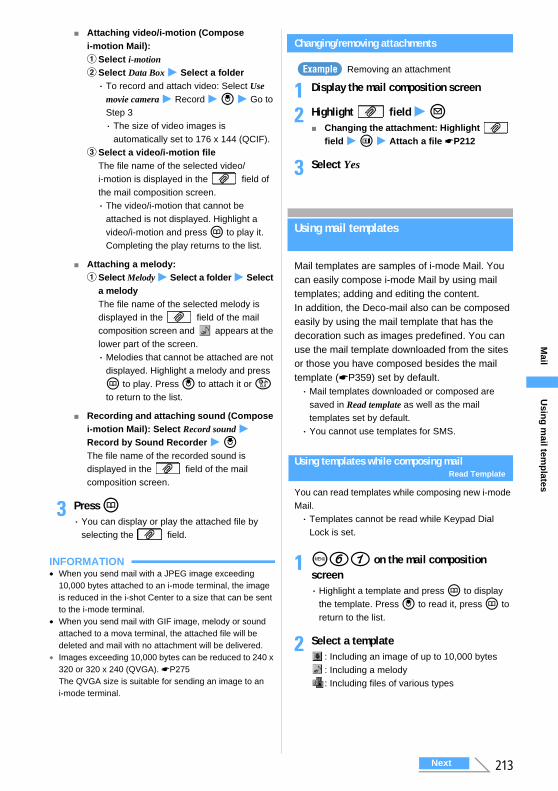
213
■ Attaching video/i-motion (Compose i-motion Mail):aSelect i-motionbSelect Data Box z Select a folder・ To record and attach video: Select Use
movie camera z Record z o z Go to Step 3・ The size of video images is
automatically set to 176 x 144 (QCIF). cSelect a video/i-motion file
The file name of the selected video/i-motion is displayed in the field of the mail composition screen. ・ The video/i-motion that cannot be
attached is not displayed. Highlight a video/i-motion and press p to play it. Completing the play returns to the list.
■ Attaching a melody:aSelect Melody z Select a folder z Select
a melodyThe file name of the selected melody is displayed in the field of the mail composition screen and appears at the lower part of the screen. ・Melodies that cannot be attached are not
displayed. Highlight a melody and press p to play. Press o to attach it or c to return to the list.
■ Recording and attaching sound (Compose i-motion Mail): Select Record sound z Record by Sound Recorder z oThe file name of the recorded sound is displayed in the field of the mail composition screen.
3 Press p・ You can display or play the attached file by
selecting the field.
INFORMATION●When you send mail with a JPEG image exceeding
10,000 bytes attached to an i-mode terminal, the image is reduced in the i-shot Center to a size that can be sent to the i-mode terminal.
●When you send mail with GIF image, melody or sound attached to a mova terminal, the attached file will be deleted and mail with no attachment will be delivered.
● Images exceeding 10,000 bytes can be reduced to 240 x 320 or 320 x 240 (QVGA). ☛P275 The QVGA size is suitable for sending an image to an i-mode terminal.
Changing/removing attachments
Removing an attachment
1 Display the mail composition screen
2 Highlight field z a■ Changing the attachment: Highlight
field z t z Attach a file ☛P212
3 Select Yes
Using mail templates
Mail templates are samples of i-mode Mail. You can easily compose i-mode Mail by using mail templates; adding and editing the content. In addition, the Deco-mail also can be composed easily by using the mail template that has the decoration such as images predefined. You can use the mail template downloaded from the sites or those you have composed besides the mail template (☛P359) set by default.・Mail templates downloaded or composed are
saved in Read template as well as the mail templates set by default.・ You cannot use templates for SMS.
Using templates while composing mailRead Template
You can read templates while composing new i-mode Mail. ・ Templates cannot be read while Keypad Dial
Lock is set.
1 m61 on the mail composition screen・ Highlight a template and press p to display
the template. Press o to read it, press p to return to the list.
2 Select a template: Including an image of up to 10,000 bytes: Including a melody: Including files of various types
Example
Usin
g m
ail temp
lates
Next
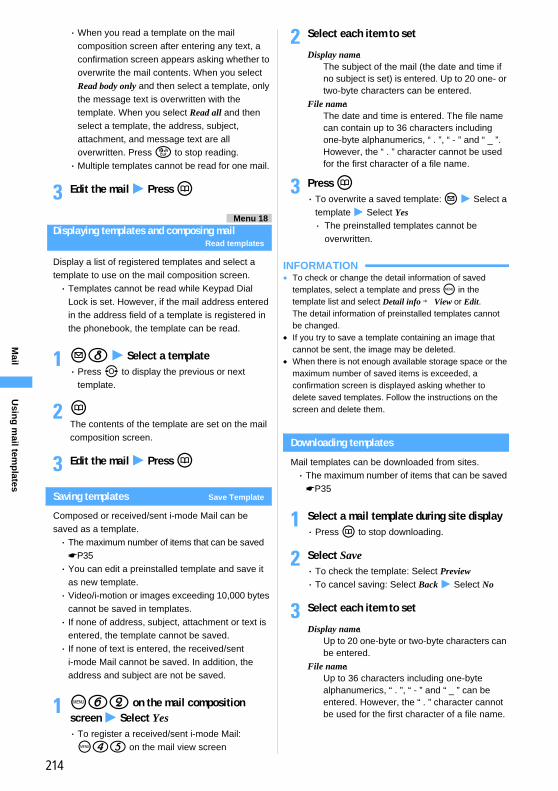
214
・When you read a template on the mail composition screen after entering any text, a confirmation screen appears asking whether to overwrite the mail contents. When you select Read body only and then select a template, only the message text is overwritten with the template. When you select Read all and then select a template, the address, subject, attachment, and message text are all overwritten. Press c to stop reading. ・Multiple templates cannot be read for one mail.
3 Edit the mail z Press p
Menu 18Displaying templates and composing mail
Read templates
Display a list of registered templates and select a template to use on the mail composition screen. ・ Templates cannot be read while Keypad Dial
Lock is set. However, if the mail address entered in the address field of a template is registered in the phonebook, the template can be read.
1 a8 z Select a template・ Press & to display the previous or next
template.
2 pThe contents of the template are set on the mail composition screen.
3 Edit the mail z Press p
Saving templates Save Template
Composed or received/sent i-mode Mail can be saved as a template. ・ The maximum number of items that can be saved
☛P35・ You can edit a preinstalled template and save it
as new template. ・ Video/i-motion or images exceeding 10,000 bytes
cannot be saved in templates. ・ If none of address, subject, attachment or text is
entered, the template cannot be saved. ・ If none of text is entered, the received/sent
i-mode Mail cannot be saved. In addition, the address and subject are not be saved.
1 m62 on the mail composition screen z Select Yes・ To register a received/sent i-mode Mail: m45 on the mail view screen
2 Select each item to set
3 Press p・ To overwrite a saved template: a z Select a
template z Select Yes・ The preinstalled templates cannot be
overwritten.
INFORMATION● To check or change the detail information of saved
templates, select a template and press m in the template list and select Detail info → View or Edit. The detail information of preinstalled templates cannot be changed.
● If you try to save a template containing an image that cannot be sent, the image may be deleted.
●When there is not enough available storage space or the maximum number of saved items is exceeded, a confirmation screen is displayed asking whether to delete saved templates. Follow the instructions on the screen and delete them.
Downloading templates
Mail templates can be downloaded from sites.・ The maximum number of items that can be saved
☛P35
1 Select a mail template during site display・ Press p to stop downloading.
2 Select Save・ To check the template: Select Preview・ To cancel saving: Select Back z Select No
3 Select each item to set
Display name:The subject of the mail (the date and time if no subject is set) is entered. Up to 20 one- or two-byte characters can be entered.
File name:The date and time is entered. The file name can contain up to 36 characters including one-byte alphanumerics, “ . ”, “ - ” and “ _ ”. However, the “ . ” character cannot be used for the first character of a file name.
Display name:Up to 20 one-byte or two-byte characters can be entered.
File name:Up to 36 characters including one-byte alphanumerics, “ . ”, “ - ” and “ _ ” can be entered. However, the “ . ” character cannot be used for the first character of a file name.
Usin
g m
ail temp
lates
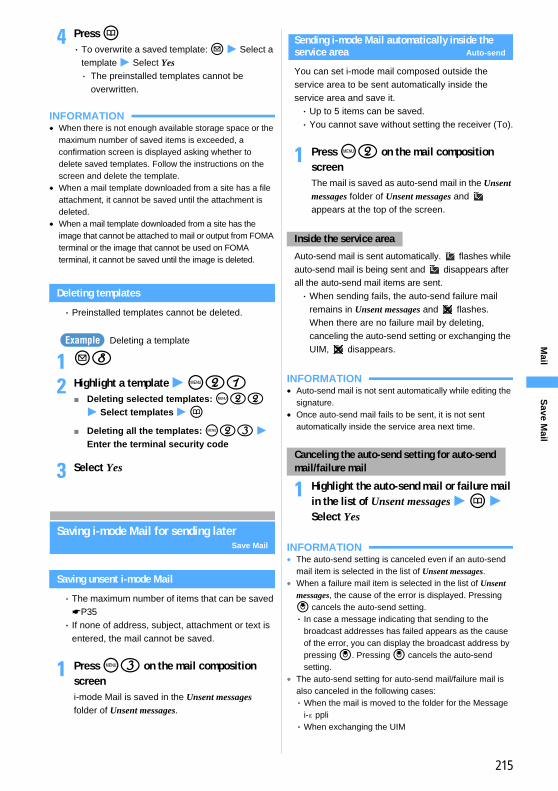
215
4 Press p・ To overwrite a saved template: a z Select a
template z Select Yes・ The preinstalled templates cannot be
overwritten.
INFORMATION●When there is not enough available storage space or the
maximum number of saved items is exceeded, a confirmation screen is displayed asking whether to delete saved templates. Follow the instructions on the screen and delete the template.
●When a mail template downloaded from a site has a file attachment, it cannot be saved until the attachment is deleted.
●When a mail template downloaded from a site has the image that cannot be attached to mail or output from FOMA terminal or the image that cannot be used on FOMA terminal, it cannot be saved until the image is deleted.
Deleting templates
・ Preinstalled templates cannot be deleted.
Deleting a template
1 a8
2 Highlight a template z m21■ Deleting selected templates: m22
z Select templates z p■ Deleting all the templates: m23 z
Enter the terminal security code
3 Select Yes
Saving i-mode Mail for sending laterSave Mail
Saving unsent i-mode Mail
・ The maximum number of items that can be saved ☛P35・ If none of address, subject, attachment or text is
entered, the mail cannot be saved.
1 Press m3 on the mail composition screeni-mode Mail is saved in the Unsent messages folder of Unsent messages.
Sending i-mode Mail automatically inside the service area Auto-send
You can set i-mode mail composed outside the service area to be sent automatically inside the service area and save it.・ Up to 5 items can be saved.・ You cannot save without setting the receiver (To).
1 Press m2 on the mail composition screenThe mail is saved as auto-send mail in the Unsent messages folder of Unsent messages and appears at the top of the screen.
Auto-send mail is sent automatically. flashes while auto-send mail is being sent and disappears after all the auto-send mail items are sent.・When sending fails, the auto-send failure mail
remains in Unsent messages and flashes. When there are no failure mail by deleting, canceling the auto-send setting or exchanging the UIM, disappears.
INFORMATION● Auto-send mail is not sent automatically while editing the
signature.● Once auto-send mail fails to be sent, it is not sent
automatically inside the service area next time.
1 Highlight the auto-send mail or failure mail in the list of Unsent messages z p z Select Yes
INFORMATION● The auto-send setting is canceled even if an auto-send
mail item is selected in the list of Unsent messages.●When a failure mail item is selected in the list of Unsent
messages, the cause of the error is displayed. Pressing o cancels the auto-send setting.・ In case a message indicating that sending to the
broadcast addresses has failed appears as the cause of the error, you can display the broadcast address by pressing o. Pressing o cancels the auto-send setting.
● The auto-send setting for auto-send mail/failure mail is also canceled in the following cases:・When the mail is moved to the folder for the Message
i-αppli・When exchanging the UIM
Example
Inside the service area
Canceling the auto-send setting for auto-send mail/failure mail
Save M
ail
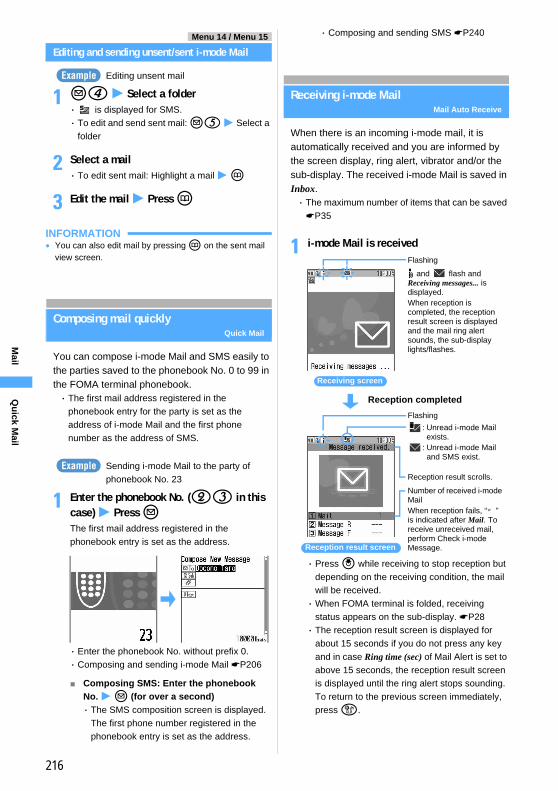
216
Menu 14 / Menu 15
Editing and sending unsent/sent i-mode Mail
Editing unsent mail
1 a4 z Select a folder・ is displayed for SMS. ・ To edit and send sent mail: a5 z Select a
folder
2 Select a mail・ To edit sent mail: Highlight a mail z p
3 Edit the mail z Press p
INFORMATION● You can also edit mail by pressing p on the sent mail
view screen.
Composing mail quicklyQuick Mail
You can compose i-mode Mail and SMS easily to the parties saved to the phonebook No. 0 to 99 in the FOMA terminal phonebook. ・ The first mail address registered in the
phonebook entry for the party is set as the address of i-mode Mail and the first phone number as the address of SMS.
Sending i-mode Mail to the party of phonebook No. 23
1 Enter the phonebook No. (23 in this case) z Press aThe first mail address registered in the phonebook entry is set as the address.
・ Enter the phonebook No. without prefix 0. ・ Composing and sending i-mode Mail ☛P206
■ Composing SMS: Enter the phonebook No. z a (for over a second)・ The SMS composition screen is displayed.
The first phone number registered in the phonebook entry is set as the address.
・ Composing and sending SMS ☛P240
Receiving and handling i-mode Mail
Receiving i-mode MailMail Auto Receive
When there is an incoming i-mode mail, it is automatically received and you are informed by the screen display, ring alert, vibrator and/or the sub-display. The received i-mode Mail is saved in Inbox. ・ The maximum number of items that can be saved
☛P35
1 i-mode Mail is received
・ Press o while receiving to stop reception but depending on the receiving condition, the mail will be received. ・When FOMA terminal is folded, receiving
status appears on the sub-display. ☛P28・ The reception result screen is displayed for
about 15 seconds if you do not press any key and in case Ring time (sec) of Mail Alert is set to above 15 seconds, the reception result screen is displayed until the ring alert stops sounding. To return to the previous screen immediately, press c.
Example
Example
Flashing
Reception completed
: Unread i-mode Mail exists.
: Unread i-mode Mail and SMS exist.
Number of received i-mode MailWhen reception fails, “×” is indicated after Mail. To receive unreceived mail, perform Check i-mode Message.
Reception result scrolls.
Receiving screen
Reception result screen
Flashing
and flash and Receiving messages... is displayed. When reception is completed, the reception result screen is displayed and the mail ring alert sounds, the sub-display lights/flashes.
Qu
ick Mail
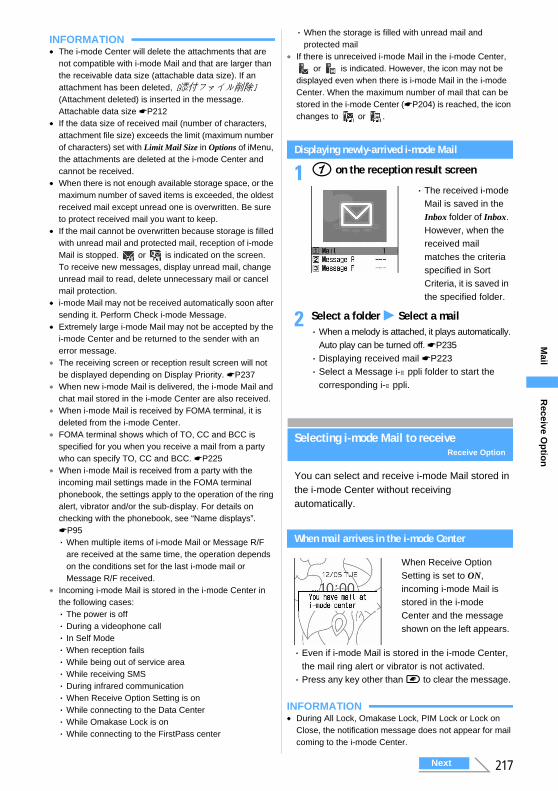
217
INFORMATION● The i-mode Center will delete the attachments that are
not compatible with i-mode Mail and that are larger than the receivable data size (attachable data size). If an attachment has been deleted, [添付ファイル削除] (Attachment deleted) is inserted in the message. Attachable data size ☛P212
● If the data size of received mail (number of characters, attachment file size) exceeds the limit (maximum number of characters) set with Limit Mail Size in Options of iMenu, the attachments are deleted at the i-mode Center and cannot be received.
●When there is not enough available storage space, or the maximum number of saved items is exceeded, the oldest received mail except unread one is overwritten. Be sure to protect received mail you want to keep.
● If the mail cannot be overwritten because storage is filled with unread mail and protected mail, reception of i-mode Mail is stopped. or is indicated on the screen. To receive new messages, display unread mail, change unread mail to read, delete unnecessary mail or cancel mail protection.
● i-mode Mail may not be received automatically soon after sending it. Perform Check i-mode Message.
● Extremely large i-mode Mail may not be accepted by the i-mode Center and be returned to the sender with an error message.
● The receiving screen or reception result screen will not be displayed depending on Display Priority. ☛P237
●When new i-mode Mail is delivered, the i-mode Mail and chat mail stored in the i-mode Center are also received.
●When i-mode Mail is received by FOMA terminal, it is deleted from the i-mode Center.
● FOMA terminal shows which of TO, CC and BCC is specified for you when you receive a mail from a party who can specify TO, CC and BCC. ☛P225
●When i-mode Mail is received from a party with the incoming mail settings made in the FOMA terminal phonebook, the settings apply to the operation of the ring alert, vibrator and/or the sub-display. For details on checking with the phonebook, see “Name displays”. ☛P95 ・When multiple items of i-mode Mail or Message R/F
are received at the same time, the operation depends on the conditions set for the last i-mode mail or Message R/F received.
● Incoming i-mode Mail is stored in the i-mode Center in the following cases:・ The power is off・ During a videophone call・ In Self Mode・When reception fails・While being out of service area・While receiving SMS・ During infrared communication・When Receive Option Setting is on・While connecting to the Data Center・While Omakase Lock is on・While connecting to the FirstPass center
・When the storage is filled with unread mail and protected mail
● If there is unreceived i-mode Mail in the i-mode Center, or is indicated. However, the icon may not be
displayed even when there is i-mode Mail in the i-mode Center. When the maximum number of mail that can be stored in the i-mode Center (☛P204) is reached, the icon changes to or .
Displaying newly-arrived i-mode Mail
1 1 on the reception result screen
2 Select a folder z Select a mail・When a melody is attached, it plays automatically.
Auto play can be turned off. ☛P235・ Displaying received mail ☛P223・ Select a Message i-αppli folder to start the
corresponding i-αppli.
Selecting i-mode Mail to receiveReceive Option
You can select and receive i-mode Mail stored in the i-mode Center without receiving automatically.
When mail arrives in the i-mode Center
・ Even if i-mode Mail is stored in the i-mode Center, the mail ring alert or vibrator is not activated. ・ Press any key other than b to clear the message.
INFORMATION● During All Lock, Omakase Lock, PIM Lock or Lock on
Close, the notification message does not appear for mail coming to the i-mode Center.
・ The received i-mode Mail is saved in the Inbox folder of Inbox. However, when the received mail matches the criteria specified in Sort Criteria, it is saved in the specified folder.
When Receive Option Setting is set to ON, incoming i-mode Mail is stored in the i-mode Center and the message shown on the left appears.
Receive O
ptio
n
Next
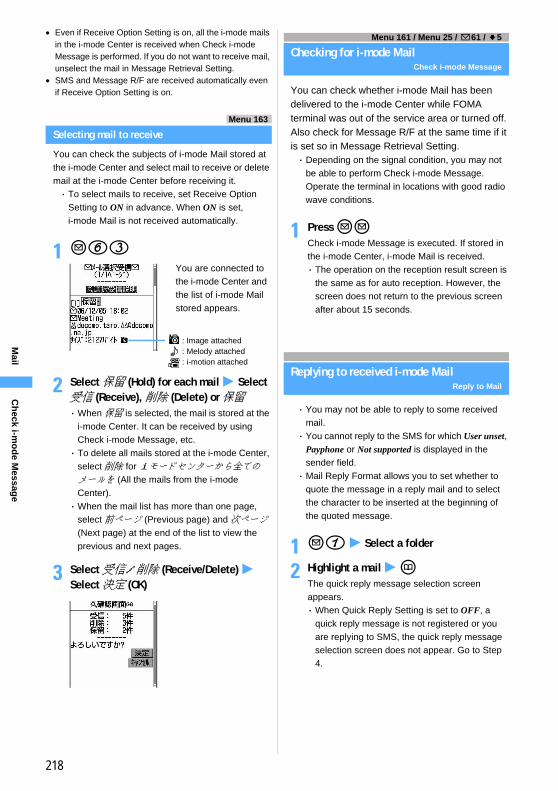
218
● Even if Receive Option Setting is on, all the i-mode mails in the i-mode Center is received when Check i-mode Message is performed. If you do not want to receive mail, unselect the mail in Message Retrieval Setting.
● SMS and Message R/F are received automatically even if Receive Option Setting is on.
Menu 163
Selecting mail to receive
You can check the subjects of i-mode Mail stored at the i-mode Center and select mail to receive or delete mail at the i-mode Center before receiving it. ・ To select mails to receive, set Receive Option
Setting to ON in advance. When ON is set, i-mode Mail is not received automatically.
1 a63
2 Select 保留 (Hold) for each mail z Select 受信 (Receive), 削除 (Delete) or 保留・When 保留 is selected, the mail is stored at the
i-mode Center. It can be received by using Check i-mode Message, etc. ・ To delete all mails stored at the i-mode Center,
select 削除 for iモードセンターから全てのメールを (All the mails from the i-mode Center). ・When the mail list has more than one page,
select 前ページ (Previous page) and 次ページ (Next page) at the end of the list to view the previous and next pages.
3 Select 受信/削除 (Receive/Delete) z Select 決定 (OK)
Menu 161 / Menu 25 / !61 / ?5
Checking for i-mode MailCheck i-mode Message
You can check whether i-mode Mail has been delivered to the i-mode Center while FOMA terminal was out of the service area or turned off. Also check for Message R/F at the same time if it is set so in Message Retrieval Setting. ・ Depending on the signal condition, you may not
be able to perform Check i-mode Message. Operate the terminal in locations with good radio wave conditions.
1 Press aaCheck i-mode Message is executed. If stored in the i-mode Center, i-mode Mail is received. ・ The operation on the reception result screen is
the same as for auto reception. However, the screen does not return to the previous screen after about 15 seconds.
Replying to received i-mode MailReply to Mail
・ You may not be able to reply to some received mail. ・ You cannot reply to the SMS for which User unset,
Payphone or Not supported is displayed in the sender field. ・Mail Reply Format allows you to set whether to
quote the message in a reply mail and to select the character to be inserted at the beginning of the quoted message.
1 a1 z Select a folder
2 Highlight a mail z pThe quick reply message selection screen appears. ・When Quick Reply Setting is set to OFF, a
quick reply message is not registered or you are replying to SMS, the quick reply message selection screen does not appear. Go to Step 4.
You are connected to the i-mode Center and the list of i-mode Mail stored appears.
: Image attached: Melody attached: i-motion attached
Ch
eck i-mo
de M
essage
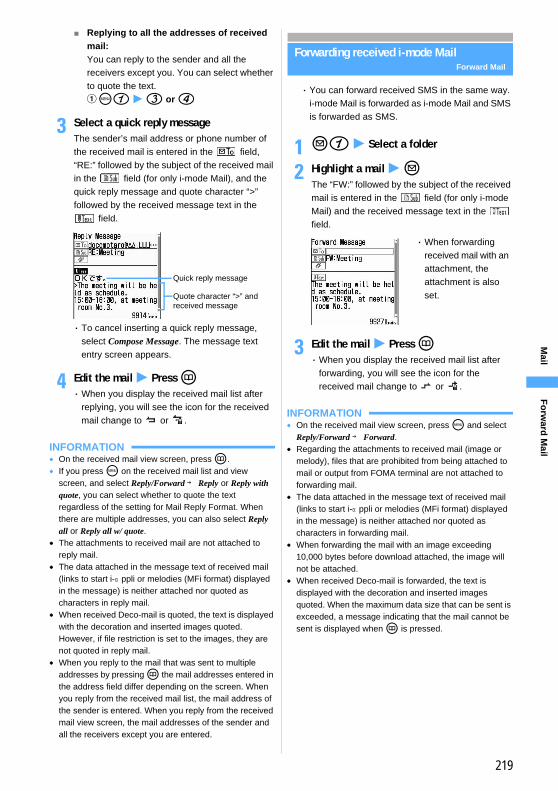
219
■ Replying to all the addresses of received mail: You can reply to the sender and all the receivers except you. You can select whether to quote the text.am1 z 3 or 4
3 Select a quick reply messageThe sender’s mail address or phone number of the received mail is entered in the field, “RE:” followed by the subject of the received mail in the field (for only i-mode Mail), and the quick reply message and quote character “>” followed by the received message text in the
field.
・ To cancel inserting a quick reply message, select Compose Message. The message text entry screen appears.
4 Edit the mail z Press p・When you display the received mail list after
replying, you will see the icon for the received mail change to or .
INFORMATION● On the received mail view screen, press p. ● If you press m on the received mail list and view
screen, and select Reply/Forward → Reply or Reply with quote, you can select whether to quote the text regardless of the setting for Mail Reply Format. When there are multiple addresses, you can also select Reply all or Reply all w/ quote.
● The attachments to received mail are not attached to reply mail.
● The data attached in the message text of received mail (links to start i-αppli or melodies (MFi format) displayed in the message) is neither attached nor quoted as characters in reply mail.
●When received Deco-mail is quoted, the text is displayed with the decoration and inserted images quoted. However, if file restriction is set to the images, they are not quoted in reply mail.
●When you reply to the mail that was sent to multiple addresses by pressing p the mail addresses entered in the address field differ depending on the screen. When you reply from the received mail list, the mail address of the sender is entered. When you reply from the received mail view screen, the mail addresses of the sender and all the receivers except you are entered.
Forwarding received i-mode MailForward Mail
・ You can forward received SMS in the same way. i-mode Mail is forwarded as i-mode Mail and SMS is forwarded as SMS.
1 a1 z Select a folder
2 Highlight a mail z aThe “FW:” followed by the subject of the received mail is entered in the field (for only i-mode Mail) and the received message text in the field.
3 Edit the mail z Press p・When you display the received mail list after
forwarding, you will see the icon for the received mail change to or .
INFORMATION● On the received mail view screen, press m and select
Reply/Forward → Forward. ● Regarding the attachments to received mail (image or
melody), files that are prohibited from being attached to mail or output from FOMA terminal are not attached to forwarding mail.
● The data attached in the message text of received mail (links to start i-αppli or melodies (MFi format) displayed in the message) is neither attached nor quoted as characters in forwarding mail.
●When forwarding the mail with an image exceeding 10,000 bytes before download attached, the image will not be attached.
●When received Deco-mail is forwarded, the text is displayed with the decoration and inserted images quoted. When the maximum data size that can be sent is exceeded, a message indicating that the mail cannot be sent is displayed when p is pressed.
Quick reply message
Quote character “>” and received message
・When forwarding received mail with an attachment, the attachment is also set.
Fo
rward
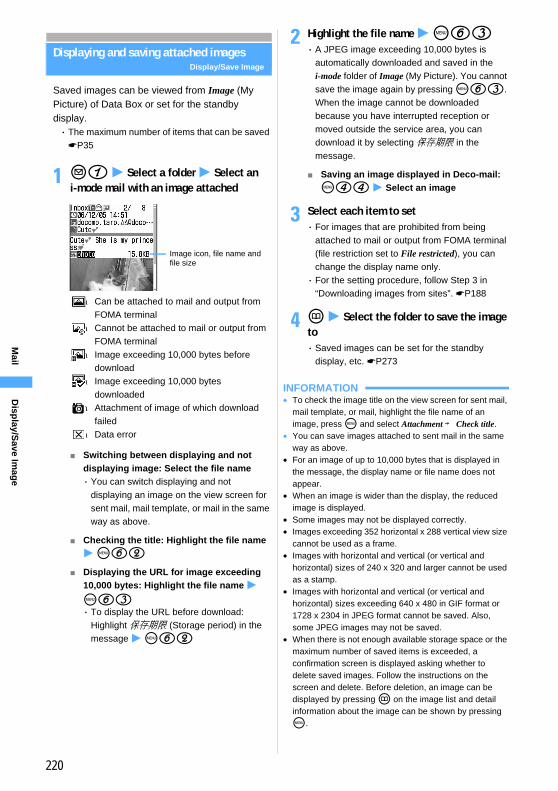
220
Displaying and saving attached imagesDisplay/Save Image
Saved images can be viewed from Image (My Picture) of Data Box or set for the standby display. ・ The maximum number of items that can be saved
☛P35
1 a1 z Select a folder z Select an i-mode mail with an image attached
■ Switching between displaying and not displaying image: Select the file name・ You can switch displaying and not
displaying an image on the view screen for sent mail, mail template, or mail in the same way as above.
■ Checking the title: Highlight the file name z m62
■ Displaying the URL for image exceeding 10,000 bytes: Highlight the file name z
m63・ To display the URL before download:
Highlight 保存期限 (Storage period) in the message z m62
2 Highlight the file name z m63・ A JPEG image exceeding 10,000 bytes is
automatically downloaded and saved in the i-mode folder of Image (My Picture). You cannot save the image again by pressing m63. When the image cannot be downloaded because you have interrupted reception or moved outside the service area, you can download it by selecting 保存期限 in the message.
■ Saving an image displayed in Deco-mail: m44 z Select an image
3 Select each item to set・ For images that are prohibited from being
attached to mail or output from FOMA terminal (file restriction set to File restricted), you can change the display name only. ・ For the setting procedure, follow Step 3 in
“Downloading images from sites”. ☛P188
4 p z Select the folder to save the image to・ Saved images can be set for the standby
display, etc. ☛P273
INFORMATION● To check the image title on the view screen for sent mail,
mail template, or mail, highlight the file name of an image, press m and select Attachment → Check title.
● You can save images attached to sent mail in the same way as above.
● For an image of up to 10,000 bytes that is displayed in the message, the display name or file name does not appear.
●When an image is wider than the display, the reduced image is displayed.
● Some images may not be displayed correctly. ● Images exceeding 352 horizontal x 288 vertical view size
cannot be used as a frame. ● Images with horizontal and vertical (or vertical and
horizontal) sizes of 240 x 320 and larger cannot be used as a stamp.
● Images with horizontal and vertical (or vertical and horizontal) sizes exceeding 640 x 480 in GIF format or 1728 x 2304 in JPEG format cannot be saved. Also, some JPEG images may not be saved.
●When there is not enough available storage space or the maximum number of saved items is exceeded, a confirmation screen is displayed asking whether to delete saved images. Follow the instructions on the screen and delete. Before deletion, an image can be displayed by pressing p on the image list and detail information about the image can be shown by pressing m.
:Can be attached to mail and output from FOMA terminal
:Cannot be attached to mail or output from FOMA terminal
:Image exceeding 10,000 bytes before download
:Image exceeding 10,000 bytes downloaded
:Attachment of image of which download failed
:Data error
Image icon, file name and file size
Disp
lay/Save Im
age
221
● Images of up to 100 Kbytes in JPEG or GIF format can be downloaded.
●When received mail with an image attached is displayed, the attached image is automatically displayed. The image inserted in the message text of received Deco-mail is also displayed automatically, but the image attached to Deco-mail is not displayed automatically. Select the file name of image to display the image.
Playing and saving i-motion from i-motion Mail
When video/i-motion is attached to mail and sent, it is stored at the i-motion Mail Center and mail containing a URL to view the i-motion is received. Select the URL to download and play or save the i-motion. Saved i-motion can be played from i-motion of Data Box or set for the standby display. ・ The maximum number of items that can be saved
☛P35・ i-motion of up to 500 Kbytes can be downloaded.
1 a1 z Select a folder z Select an i-mode mail containing a URL for i-motion
2 Select the URL z Select YesFOMA terminal is connected to the i-motion Mail Center and i-motion download/playback begins. ・ Playback screen operating procedure ☛P279
a Indicates that i-motion is attached. bURL for i-motioncStorage period of i-motion at the i-motion Mail
Center
3 Select Save when the play ends・ To play the i-motion again: Select Play・ To display the information on the i-motion:
Select File property・ To cancel saving: Select Back z Select No
4 Enter a display name (up to 36 one-byte or two-byte characters) z pThe downloaded i-motion is saved in the i-mode folder of i-motion.
■ Setting for the standby display: m1 z Select Yes・ Video/i-motion without image, i-motion with
replay restrictions set and i-motion with the image size exceeding 320 x 240 cannot be set for the standby display. ・ If zooming is available for the video/i-motion,
you can select the same size or large size.・ If the i-αppli standby display has already
been set, a confirmation screen is displayed asking whether to cancel it.・ Playing the video/i-motion set as the
standby display ☛P124
5 Select Back
INFORMATION● You can play video/i-motion attached to sent mail by
selecting the file name in the same way as above. However, you cannot play the video/i-motion if it has been deleted from FOMA terminal.
●When there is not enough available storage space or the maximum allowable number of saved items is exceeded, a confirmation screen is displayed asking whether to delete saved video/i-motion. Follow the instructions on the screen and delete. Before deletion, you can play video/i-motion by pressing p on the video/i-motion list and view detail information by pressing m.
● Playing i-motion attached to mail on a PC requires special software. ☛P380
●When i-motion Mail is sent to an i-mode terminal, i-motion can be downloaded up to 50 times for each URL for viewing the i-motion saved at the i-motion Mail Center. When 50 times have been exceeded, i-motion download will be disabled.
Playing and saving melodies from i-mode Mail Play/Save Melody
Saved melodies can be played from Melody of Data Box or used as a ring alert. ・ If the sender uses a terminal other than FOMA
D701i, D701iWM, D702i, D702iBCL, D702iF, D851iWM, D901i, D901iS, D902i and D902iS, the received melodies may not play correctly. ・ The maximum number of items that can be saved
☛P35
a
b
c
Playin
g an
d savin
g i-m
otio
n fro
m i-m
otio
n M
ail
Next
222
1 a1 z Select a folder z Select an i-mode mail with a melody attached・ There are 2 types of display formats for
attached melodies depending on the file type.
■ Playing the melody: Select the melodyThe melody plays at the volume set for the call alert volume. ・ To stop playback: c
■ Checking the title:・ For melodies displayed under the message
(SMF format): Highlight the melody z
m65・ For melodies displayed in the message (MFi
format): Highlight the melody z
m64■ Displaying the data as text (data display):・ This function is not available with melodies
(SMF format) that appear under the message.
aHighlight the melody z m65・ To return to the title display: Highlight the
first row of the melody data z
m65
2 Highlight the melody z m62
3 Enter a display name (up to 50 one-byte or 25 two-byte characters) z Press pThe melody is saved in the i-mode folder of Melody.
INFORMATION● To play and save the melody during data display,
highlight the first row of the displayed data, press m, and select Attachment → Play or Save.
● On the sent mail view screen, highlight a melody, press m and select Attachment → Save.
● You can play melodies attached to sent mail, mail template, and mail in the same way as above.
●When there is not enough available storage space or the maximum number of saved items is exceeded, a confirmation screen appears asking whether to delete saved melodies. Follow the instructions on the screen and delete. Before deletion, you can play a melody by pressing p on the melody list and view detail information on the melody by pressing m.
●When an attached melody in MFi format has no title, the mail reception date and time are displayed as the title.
Deleting attachmentsDelete Attachment
You can delete images and melodies attached to received mail. ・Melodies (MFi format) displayed in the message
or links to start i-αppli cannot be deleted. ・ Images exceeding 10,000 bytes can be deleted
from the i-mode folder of Image (My Picture).
Deleting an attached image
1 a1 z Select a folder z Select an i-mode mail with an image attached
2 Highlight the file name z m64・ To delete all the attachments: m65
3 Select Yes・ The file name of the deleted attachment is
displayed in a light color and cannot be selected.
INFORMATION● On the sent mail view screen, highlight an image or
melody, press m and select Attachment → Delete or Delete all.
●When you display a received mail with the attached image exceeding 10,000 bytes that has been deleted, the storage period of the attached image is displayed in a light color and cannot be selected.
:Can be attached to mail and output from FOMA terminal
:Cannot be attached to mail or output from FOMA terminal
:Data error
Melody icon, file name and file size
Displayed under message (SMF format)
Melody icon, title and file size
Displayed in message (MFi format)
Example
Delete A
ttachm
ent
223
Using the mail box
Menu 11 / Menu 14 / Menu 15
Displaying mail in Inbox/OutboxInbox/Outbox
You can check received/sent/unsent i-mode Mail and SMS. The received i-mode Mail and SMS are saved to folders in Inbox and the sent i-mode Mail and SMS are to folders in Outbox. Folders in Unsent messages contain the i-mode Mail and SMS that were saved without sending and that failed to be sent and the i-mode Mail that is set to be sent automatically upon entering the service area. ・ The maximum number of items that can be saved
☛P35
Displaying received mail in Inbox
1 a1・ To display sent mail in Outbox: a5・ To display unsent mail in Unsent messages: a4
2 Select a folderThe received mail list is displayed. ・ Select a Message i-αppli folder to start the
corresponding i-αppli. ・ To display mail in a Message i-αppli folder
without starting i-αppli: Highlight the folder z
m1
3 Select a mail・ You can make calls, send i-mode Mail, or
display sites using phone numbers, mail addresses, or URLs. You can also register the phone numbers, mail addresses, or URLs in the phonebook and the URLs in Bookmark. In addition, you can copy text. ☛P229・ Selecting mail from the unsent mail list displays
the mail composition screen.
Example
Reading the folder list screen
■ Received mail folder list screen
(in gray): No mail (in tint yellow): No unread mail
:No mail/No unread mail (Privacy on):No mail/No unread mail (used for Message
i-αppli)
:Unread mail exists:Unread mail exists (Privacy on):Unread mail exists (used for Message
i-αppli)
■ Sent/unsent mail folder list screen
(in gray): No mail (in tint yellow): Mail exists
:Privacy on:Message i-αppli
Storage space status bar and page No./total number
Page No./total number
Inb
ox/O
utb
ox
Next
224
Reading the mail list screen
■ Received mail list screenPage No./total number
ab
Reception date/time and sender
Subject (for SMS, beginning of message)
・ For replied/forwarded mail, icon indication priority is given to the last operation made.
・When Display 1 row is set in Mail List Setting, is displayed before the subject of a mail
with attachment. ・When an image exceeding 10,000 bytes is
attached, the icons for attached images of up to 10,000 bytes or attached melodies are not displayed. ・When the sender is registered in the
phonebook, the name is displayed. ・ For SMS sent from overseas, “+” is appended
at the beginning of the sender address. ・ In the reception date/time field, the time is
displayed on the current day and the date is displayed on the other days. ・ The subject may not be displayed depending
on the received i-mode Mail. ・ For SMS which contains an error, is
indicated and the reception date/time becomes “--/--” (only on the reception day). The sender is not displayed.
a :Unread:Unread (unable to reply):Read:Read (unable to reply):Read (replied):Read (forwarded):Protected:Protected (unable to reply):Protected (replied):Protected (forwarded)
b :Image of up to 10,000 bytes attached:Image exceeding 10,000 bytes attached:Melody attached:Files of various types attached:SMS:Delivered report/missed call notice: i-αppli To:Mail used for Message i-αppli
■ Sent/unsent mail list screen
Page No./total number
Sent or saved date/time and receiver
Subject (for SMS, beginning of message)
・When Display 1 row is set in Mail List Setting, is displayed before the subject of a mail
with attachment in the sent mail list. ・When an i-motion or image exceeding 10,000
bytes is attached, the icons for attached images of up to 10,000 bytes or melodies are not displayed. ・ In the sent or saved date/time field, the time is
displayed on the current day and the date is displayed on the other days. ・When the receiver is registered in the
phonebook, the name is displayed.
aNo icon: Unprotected:Protected:Auto-send:Protected (auto-send):Auto-send failure:Protected (auto-send failure):Image of up to 10,000 bytes attached:Image exceeding 10,000 bytes attached:Melody attached:i-motion attached:Files of various types attached:SMS:Mail used for Message i-αppli
a
Inb
ox/O
utb
ox

225
INFORMATION● The character which cannot be displayed is replaced by
a blank, etc.●When decorated mail is received from a PC, operations
may not be the same as on the PC. ●When there is more than one data item attached in the
message text (links to start i-αppli or melodies (MFi format) displayed in the message), the attached data becomes invalid. In this case, is displayed for the attachment icon.
●When viewing Deco-mail, URLs for downloading images or i-motion may not be visible depending on the background color of the mail.
● For i-mode Mail, the mail address of sender or receiver is checked against the mail address field in the phonebook data. For SMS, the phone number of sender or receiver is checked against the phone number field in the phonebook data. For details on checking with the phonebook, see “Name displays”. ☛P95
● The subject and sender of the received SMS, delivered report, and missed call notice are displayed on the view screen as shown below:
・When the phone number is registered in the phonebook, the name is displayed in the sender field. ・When the caller ID is not notified, the following
characters are displayed in the sender field:
●When there are attachments or links to start i-αppli, the icon, the file name, etc. are displayed on the view screen. ・ Description of image icons ☛P220・ Description of melody icons ☛P222・ Starting i-αppli from links ☛P254
Adding/deleting folders
・ In Inbox, you can add up to 40 folders other than the Inbox folder and Message i-αppli folders.・ In Outbox or Unsent messages, you can add up to
20 folders other than the Outbox folder or the Unsent messages folder and Message i-αppli folders respectively. ・ Folder settings for the Inbox, Outbox and Unsent
messages folders and Message i-αppli folders cannot be changed.
Adding a folder in Inbox
1 a1・ Outbox ☛P223 ・ Unsent messages ☛P223
Reading the mail view screen
■ Received mail view screen
■ Sent mail view screen
Receiver icon*1, status icon, attachment icon, SMS icon, and mail number/count*1 TO, CC or BCC is
indicated (for i-mode Mail).
・ For SMS which contains an error, is displayed.
a :Reception date and time:Sender:Receiver (TO) (only i-mode Mail):Receiver (CC) (only i-mode Mail):Subject (Received SMS, SMS report request
or Notify missed call for SMS):Sender (unable to reply):Receiver (To) (unable to reply) (only
i-mode Mail):Receiver (CC) (unable to reply) (only
i-mode Mail)
a
Status icon, attachment icon, SMS icon, and mail number/counta
a :Sent date and time:Receiver (TO):Receiver (CC) (only i-mode Mail):Receiver (BCC) (only i-mode Mail):Subject (Sent SMS for SMS)
Item SMSDelivered
reportMissed call
notice
Subject Received SMS
SMS report request
Notify missed call
Sender Phone number
SMS Center DoCoMo SMS
User unset:Message was sent by setting not to notify the caller ID
Payphone:Message was sent from a payphone
Not supported:Message was sent using a procedure that does not provide the caller ID
Adding folders
Example
Inb
ox/O
utb
ox
Next
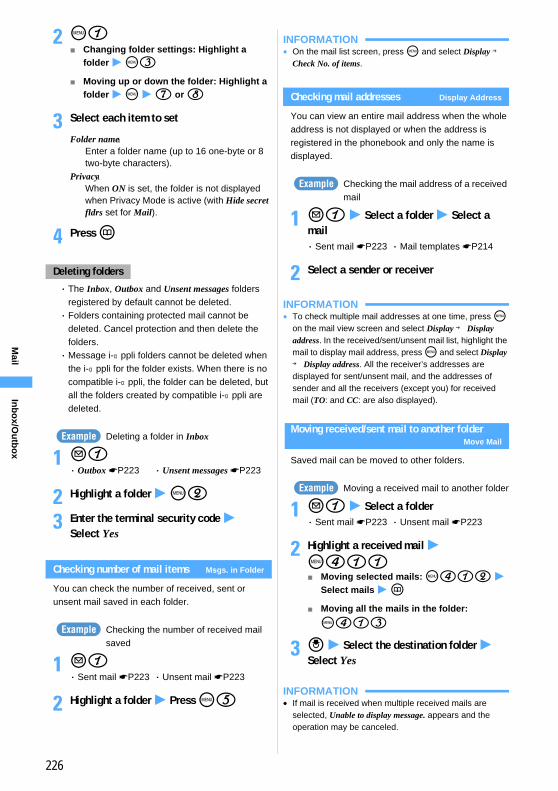
226
2 m1■ Changing folder settings: Highlight a
folder z m3■ Moving up or down the folder: Highlight a
folder z m z 7 or 8
3 Select each item to set
4 Press p
・ The Inbox, Outbox and Unsent messages folders registered by default cannot be deleted. ・ Folders containing protected mail cannot be
deleted. Cancel protection and then delete the folders. ・Message i-αppli folders cannot be deleted when
the i-αppli for the folder exists. When there is no compatible i-αppli, the folder can be deleted, but all the folders created by compatible i-αppli are deleted.
Deleting a folder in Inbox
1 a1・ Outbox ☛P223 ・ Unsent messages ☛P223
2 Highlight a folder z m2
3 Enter the terminal security code z Select Yes
Checking number of mail items Msgs. in Folder
You can check the number of received, sent or unsent mail saved in each folder.
Checking the number of received mail saved
1 a1・ Sent mail ☛P223 ・ Unsent mail ☛P223
2 Highlight a folder z Press m5
INFORMATION● On the mail list screen, press m and select Display →
Check No. of items.
Checking mail addresses Display Address
You can view an entire mail address when the whole address is not displayed or when the address is registered in the phonebook and only the name is displayed.
Checking the mail address of a received mail
1 a1 z Select a folder z Select a mail・ Sent mail ☛P223 ・Mail templates ☛P214
2 Select a sender or receiver
INFORMATION● To check multiple mail addresses at one time, press m
on the mail view screen and select Display → Display address. In the received/sent/unsent mail list, highlight the mail to display mail address, press m and select Display → Display address. All the receiver’s addresses are displayed for sent/unsent mail, and the addresses of sender and all the receivers (except you) for received mail (TO: and CC: are also displayed).
Moving received/sent mail to another folderMove Mail
Saved mail can be moved to other folders.
Moving a received mail to another folder
1 a1 z Select a folder・ Sent mail ☛P223 ・ Unsent mail ☛P223
2 Highlight a received mail z m411■ Moving selected mails: m412 z
Select mails z p■ Moving all the mails in the folder:
m413
3 o z Select the destination folder z Select Yes
INFORMATION● If mail is received when multiple received mails are
selected, Unable to display message. appears and the operation may be canceled.
Folder name:Enter a folder name (up to 16 one-byte or 8 two-byte characters).
Privacy:When ON is set, the folder is not displayed when Privacy Mode is active (with Hide secret fldrs set for Mail).
Deleting folders
Example
Example
Example
Example
Inb
ox/O
utb
ox
227
●When i-mode mail with the auto-send setting is moved to a Message i-αppli folder, the auto-send setting is canceled.
Searching mail Mail Search
Search received/sent mail by specifying sender/receiver or by received/sent date. ・ Received mails are searched by specifying
sender or received date. ・ Sent mails are searched by specifying receiver or
sent date.
Searching received mails by sender
1 a1・ Sent mail ☛P223
2 m91 z Select the phonebook entry to use for search
・ To search by received date or sent date: m92 z Select the date・When you highlight a phonebook entry or a
date, when Display 1 row is set in Mail List Setting, the first 4 mails that meet the search condition are displayed. When Display 2 rows is set, the first 2 mails that meet the search condition are displayed. ・ Press o to display all the mails in a list that
meet the search condition. ・ If you search sent mails by receiver, the
mails are searched even if the party registered in the phonebook is set in the address after the second item (the first address is displayed on the screen).
・ To display the phonebook entry with Secret Attribute set, activate Secret Mode.
3 Select a mail to display・ The search result screen can be operated in
the same way as the mail list. ・ To cancel mail search: m0
INFORMATION● In the received mail or sent mail list, press m and select
Search message → With phonebook or With scheduler. In this case, only the mails in the selected folder are searched.
Sorting the received/sent mails Sort
You can temporarily change the order of received or sent mail list. Closing the list resets the sorting order to By date. ・ You can select from By date, By sender (By address
for sent mail), or By title. ・ You cannot change the order of unsent mail and
received/sent SMS in the UIM.
Sorting the received mail list
1 a1 z Select a folder・ Sent mail ☛P223
2 m74 z Press any of 1 to 3■ Sorting the sent mail list: m5 z
1 to 3
INFORMATION●When By sender or By address is set, the mail will be
sorted by mail address not by name in the phonebook even if the mail address is registered in the phonebook.
●When By title is set, if the subject contains both one-byte and two-byte characters, the mail may not be properly sorted in the order of the Japanese syllabary.
●When By title is set, the mail will not be properly sorted in the order of the Japanese syllabary if any SMS is saved in the same folder and beginning of the message is displayed as subject.
Changing the read/unread status of received mail
・ You cannot change the read/unread status of protected received mail.
Changing a read mail to unread
1 a1 z Select a folder
2 Highlight a mail z Press m52■ Changing an unread mail to read:
Highlight a mail z m51■ Changing multiple read mails to unread:
m54 z Select mails z p z Select Yes
■ Changing multiple unread mails to read: m53 z Select mails z p z Select Yes
■ Changing all the mails in the folder to unread: m56 z Select Yes
■ Changing all the mails in the folder to read: m55 z Select Yes
Example
Default By date
Example
Example
Inb
ox/O
utb
ox
228
Protecting received/sent mail Protect Mail
You can protect received, sent and unsent mail to avoid accidental deletion or being overwritten when there is not enough storage space. ・ The maximum number of items that can be
protected ☛P35・ Unread mail cannot be protected.
Protecting a received mail
1 a1 z Select a folder・ Sent mail ☛P223 ・ Unsent mail ☛P223
2 Highlight a mail z Press m31The mail is protected and the icon changes to one of the following:
■ Protecting selected mails:m32 z Select mails z p・ Selecting all is not possible when the
number of unprotected mail being saved exceeds the limit.
■ Protecting all the mails in the folder:
m33■ Canceling protection of selected mails:
m35 z Select mails z p■ Canceling protection of all the mails:
m36
INFORMATION● On the mail view screen, press m and select Protect or
Cancel protection. ● If mail is received when multiple received mails are
selected, Unable to display message. appears and the operation may be canceled.
●When Protect all is selected, mails are protected in the chronological order, most recent first, until the limit is reached.
Deleting received/sent mail Delete Mail
Unnecessary mail can be deleted from Inbox, Outbox and Unsent messages. ・ Protected mail cannot be deleted. When you
delete all the mails at one time, protected mail remains undeleted even if it matches the specified criteria. Cancel protection first and then delete them.
○: Available ×: Not available
*1 Not available from the mail search results list*2 Available only from the mail search results list*3 Mail is deleted when the specified number of days has
passed since it was received.・When you delete all the mails at one time, unread mails
that match the specified criteria are also deleted.
Deleting a received mail
1 a1■ Deleting all the mails: m46 z Enter
the terminal security code z Go to Step 4
2 Select a folder
3 Highlight a received mail z m21■ Deleting selected mails: m22 z
Select mails z p■ Deleting read mail in the folder:
m23■ Deleting all the mails in the folder: m24
z Enter the terminal security code
■ Deleting when the specified number of days has passed: m2 z 5 to 7
4 Select Yes
INFORMATION● On the mail view screen, press m and select Delete. ● If mail is received when multiple received mails are
selected, Unable to display message. appears and the operation may be canceled.
Received mail : (read) (unable to reply)(replied) (forwarded)
Sent/unsent mail: ・ To cancel protection: Highlight a mail z
m34
Example
Deleting received mail
Deletion methodScreen for starting operation
Folder list Mail list Mail view
All messages ○ × ×Read in folder ○ ○*1 ×All in folder ○ ○*1 ×7days past in fldr*3 ○ ○*1 ×14days past in fldr*3
○ ○*1 ×
30days past in fldr*3
○ ○*1 ×
One item/Selected item*2
× ○ ○
Selected items × ○ ×All search result × ○*2 ×
Example
Inb
ox/O
utb
ox
229
○: Available ×: Not available
*1 Deleting all the mails in the folder*2 Not available from the sent mail search results list*3 Available only from the sent mail search results list
Deleting a sent mail
1 a5・ Unsent mail ☛P223
■ Deleting all the mails: m42 z Enter the terminal security code z Go to Step 4
2 Select a folder
3 Highlight a mail z m21■ Deleting selected mails: m22 z
Select mails z p■ Deleting all the sent mails in the folder:
m23 z Enter the terminal security code
4 Select Yes
INFORMATION● In the folder list, press m and select Delete message.● On the mail view screen, press m and select Delete.
Useful functions of mail
When a mail message contains phone numbers, mail addresses or URLs, select them to make voice/videophone calls (Phone To/AV Phone To), compose i-mode Mail (Mail To), or connect to sites (Web To). You can also copy characters in the i-mode Mail or SMS and save phone numbers or mail addresses, etc. in the phonebook.
Using Phone To (AV Phone To)/Mail To/Web To
・ The operation is the same as when performing the Phone To (AV Phone To), Mail To, or Web To function from sites. ・When mail is received from a PC, these functions
may not be available.
Copying text
You can copy characters in the i-mode Mail, SMS, or mail template being displayed. Copied text can be pasted in entry fields on the mail composition screen, phonebook registration screen, etc. ・ For SMS stored in the UIM, you can copy the
message text, receiver and sender. ・ For Deco-mail, only the text can be copied. ・ Copied text is recorded until FOMA terminal is
turned off and it can be pasted into other locations any number of times. ・ Only one item can be retained. When you copy a
new item, it overwrites the previously copied text.
Copying text from the received mail view screen
1 Display the received mail view screen・ Highlight the item to copy when copying a
selected item.
2 m2・When a mail template is displayed, press m3.
3 Select the copying method
・ For Copy text, specify the copy range. Follow Step 2 in “Copying the URL”. ☛P190
4 Display a character entry screen z Paste the copied text
INFORMATION●When text in the Date To format is included in the
message, it needs to be pasted and saved to Notepad before saving as schedule.
Deleting sent/unsent mail
Deletion methodScreen for starting operation
Folder list Mail listMail view
(sent mail)
All messages ○ × ×All in folder ○ × ×All items*1 × ○*2 ×One item/Selected item*3
× ○ ○
Selected items × ○ ×All search result × ○*3 ×
Example
Copy text:Copies a specified range of the message text.
Copy title: Copies the subject.Copy selected item:
Copies a highlighted item.
Example
Usefu
l fun
ction
s of m
ail
230
Making calls from received/sent mail Phone Call
Calls can be made to the sender of received mail or the receiver of sent mail. ・ The mail address (except “mobile phone
[email protected]”) and phone number must be registered in the phonebook. ・When mail addresses are registered in the
phonebook entry with Secret Attribute set, calls can be made only in Secret Mode.
Making a call from received mail
1 Display the received mail list
2 Highlight a mail z m6・ In the received/sent mail view screen, highlight
the party to call (sender/receiver) and press m7. ・When there are multiple receivers, the mail
address selection screen appears. Select the mail address to make a call to.
3 Set dialing conditions
4 m z Select Yes
Registering phone numbers, addresses and URLs in the phonebook
You can register phone numbers, mail addresses and URLs in the i-mode Mail or SMS being displayed in the phonebook. You can register the data as a new entry or add the data to an existing entry.
Registering data from the received mail view screen
1 Display the mail containing an item
2 Highlight the item z m4・ You can register only the items that can be
highlighted.
3 Press 1 to register a new entry or 2 to add to an existing entry・ Follow the procedure from Step 3 in
“Registering phone numbers and mail addresses in the phonebook”. ☛P191
INFORMATION● On the view screen for sent mail or SMS in the UIM,
press m and select Save. ● Registration may not be made from Deco-mail.●When multiple addresses are listed with no space in the
message text, you may not be able to register them.
Registering URLs in Bookmark
You can register URLs in the message text of the i-mode Mail or SMS being displayed in Bookmark.
Registering a bookmark from the received mail view screen
1 Display the mail containing a URL
2 Highlight the URL z m43
3 Select a folder・ Follow the procedure from Step 2 of
“Registering in Bookmark”. ☛P185
INFORMATION● Registration may not be made from Deco-mail.
Saving mail in the Data Center Data Security Service
Data Security Service allows you to save i-mode Mail and SMS in the Data Center. ・ Data Security Service is a fee-based service that
requires you to make an application. For more information, see “i-mode User’s Manual”.
Saving mail
・Mail for which the file capacity of one item exceeds 10,000 bytes cannot be saved.
Saving received mail
1 a1 z Select a folder・ Sent mail ☛P223 ・ Unsent mail ☛P223
2 m44 z Select mail z p・ Up to 10 items can be selected.・ Delivered report cannot be saved.
■ Saving sent mail: m44 z Select mail z p
■ Saving unsent mail: m42 z Select mail z p
Example
Example
Example
Example
Data S
ecurity S
ervice
231
3 Select Yes z Enter the terminal security codeThe selected mail is saved in the Data Center. When saving is completed, the result is displayed.・ The result disappears in about 5 seconds and
returns to the mail list. Press o to return to the list immediately.
INFORMATION● If you have not yet subscribed to Data Security Service,
a screen appears to inform you of that effect.
Restoring mail
Mail saved in the Data Center is saved from the site of the Data Center to FOMA terminal. For more information, see “i-mode User’s Manual”.・ Files will be protected when restored. However,
this is not applicable in the following cases:・When unread mail saved in the Data Center is
restored・When the maximum number of protected mails
that can be saved in FOMA terminal is reached
Checking the communication log
You can check the log of communication with the Data Center. ・ Up to 30 accesses are recorded. When the
number exceeds 30, the oldest one is deleted chronologically.
1 m662 z Select the communication log
Setting mail
Setting mail functions of FOMA terminalMail Setting
Menu 193Sorting mails automatically into designated folders Sort Criteria
Received/sent i-mode Mail and SMS can be sorted into the specified folders automatically according to the set criteria. ・ Up to 30 criteria can be registered for received
mail and sent mail respectively.
・ To set and activate the criteria, set auto sort to ON for received mail and sent mail. It is set to ON by default. ☛P232・ The criteria are valid for the mail received/sent
after setting the criteria. Previously received/sent mail is not resorted. ・ You can sort normal mail to Message i-αppli
folders. ・ If the corresponding Message i-αppli folder
exists, any mail for Message i-αppli is saved in that folder, regardless of the sort criteria.
Setting sort criteria for incoming mail
1 a93
2 1・ To set sort criteria for outgoing mail: 2
3 m1 z Set the sort criteria
■ Specifying a mail address:Sorts mail by sender/receiver mail address. Specify an entire address including characters following the @ symbol (up to 50 one-byte characters). You cannot sort mail by specifying part of the mail address. If you specify a phone number, you can sort SMS as well. a12 z Enter a mail address z p・ Specifying a mail address registered in
the phonebook: 11 z Select a party・When multiple mail addresses are
registered, select a mail address.
Setting sort criteria
a :Receiver mail address:Sender mail address:Phonebook No. :Not in phonebook:Subject :Group:No criteria
Example
Auto sort on/off
Registered sort criteria (listed in the order of priority)
a
Sort criteria setting screen
Mail S
etting
Next
232
■ Specifying a subject:Sorts mail having a subject that includes the specified characters (up to 30 one-byte or 15 two-byte characters). You cannot sort SMS by subject. a2 z Enter a subject z p
■ Specifying a phonebook No.:Sorts mail to/from the mail address or phone number corresponding to the specified FOMA terminal phonebook No. i-mode Mail is sorted by checking the mail address in the phonebook. SMS is sorted by checking the phone number in the phonebook. a3 z Enter the phonebook No. z pbSelect the phonebook data
■ Specifying a group:Sorts mail to/from the mail address or phone number saved to the specified group. a4b1 to specify the FOMA terminal
phonebook or 2 to specify the UIM phonebook
cSelect the group
■ Specifying “Not in phonebook”: 5Sorts mail to/from the mail address or phone number not saved in the phonebook. i-mode Mail is checked against the mail address in the phonebook. SMS is checked against the phone number in the phonebook.
■ Setting “no criteria”: 6Sorts all the mails without setting criteria.
4 Select the folder to sort mail to
・When a Message i-αppli folder is selected, a message appears indicating that mail in the selected folder is used for i-αppli. To set as the folder to sort mail to, select Yes.
5 Specify the priorityThe new criteria is added above the selected row.
・ To set the first criteria in the list: Select [Add last].
・ To add the criteria to the end of the list: Select [Add last].・ Criteria are listed in the order of priority. ・When registered criteria are changed, [Move to
last] is displayed instead of [Add last].
INFORMATION● If the sender uses an i-mode terminal with its phone number
set as the mail address, only the phone number is received as the address. Therefore, no sorting occurs when “mobile phone number @docomo.ne.jp” is specified in the criteria.
●When the same mail address is registered in both of the FOMA terminal phonebook and the UIM phonebook, the FOMA terminal phonebook addresses are given priority for sorting. The sort priority set in this function may not apply.
● The criteria are checked in accordance with their priority. For example, when 2 criteria are set, mail is sorted as follows:aMail is checked to determine if it matches the
criteria of first priority; if so, it is saved in the specified folder. If not, the procedure goes to b.
bMail is checked to determine if it matches the criteria of second priority; if so, it is saved in the specified folder. If not, it is saved in the Inbox folder or the Outbox folder.
1 a93 z 1 or 2
2 Select the sort criteria・ You can change or delete sort criteria while
checking it.
■ Changing registered sort criteria:aHighlight the sort criteria z m2 z
Specify the sort criteria・ Follow the procedure from Step 3 in
“Setting sort criteria”. ☛P231bSelect Yes
■ Changing the priority: Highlight the sort criteria z m5 z Select the position・ The criteria is moved to just above the
selected row. To move to the end of the list, select [Move to last].
■ Deleting criteria: Highlight the sort criteria z m3 z Select Yes・ To delete all: m4 z Enter the terminal
security code z Select Yes
・ Even if ON is set, no sorting occurs when sort criteria are not set.
Checking and changing sort criteria
Setting auto sort
Default all ON
Mail S
etting
233
Sorting received mail automatically
1 a93
2 1 z m6・ To sort sent mail automatically 2 z m6
3 Press 1 or 2
Menu 194
Registering signature for mail Signature
You can register the signature to be inserted in the message of i-mode Mail and SMS. You can also set whether to automatically insert the signature when you compose mail.
・ The signature can be decorated. However, Melo-deco cannot be used. Decoration reduces the number of characters you can enter accordingly.・Mail becomes Deco-mail if any decorated
signature is inserted into the mail.
1 a94 z 2 z o
2 Enter the signature (up to 9,998 one-byte or 4,999 two-byte characters)・ Up to 10,000 one-byte or 5,000 two-byte
characters can be entered. However, since a line feed is entered when you insert a signature, reduce 2 one-byte or 1 two-byte for line feed.
3 Press p
・ Even if ON is set, the signature cannot be inserted when not registered.
1 a94 z 1
2 Press 1 or 2
INFORMATION● The signature text is counted as characters in the
message. If there is no available space, for number of characters of the signature and line feed, a signature cannot be inserted.
●When Auto add is set to ON, the signature is always inserted at the end of message when replying and
forwarding. However, as for the background color which is set for Signature, it is reflected only at the state of composing i-mode Mail or replying to received i-mode Mail without quoting.
●When a signature is registered, you can insert the signature by pressing m in the message text entry screen and selecting Phrase/Kuten/Quote → Add signature, regardless of this function’s setting. However, as for the background color which is set for Signature, it is reflected only at the state of non-input in i-mode Mail
● The signature cannot be inserted in SMS in following cases:・When the number of characters exceed 70 (one- or
two-byte), if you add the signature.・When the signature is decorated.・When composing SMS if the font type is set to English
in SMS Setting. ・When replying to or forwarding SMS for which the font
type is set to English. ●When the registered signature includes phone number,
mail address or URL and is sent to an i-mode terminal, the receiver can use the Phone To (AV Phone To), Mail To, or Web To function.
Menu 164 / Menu 2632 /?632
Setting items to inquire to the i-mode CenterMessage Retrieval Setting
・Mail, MessageR, and MessageF are all selected as by default. If you do not want to check for any
item, change it to .
1 a64
2 Select the item to inquire・ You cannot save the setting with no items
selected.
3 Press p
Menu 1972
Setting to select and receive only necessary mail Receive Option Setting
1 a972 z Press 1 or 2・When ON is selected, a message appears
indicating that mails will not be automatically delivered. Press o.
Editing and registering signature for mail
Default not recorded
Setting whether to insert signature automatically
Default ON
Example
Default selected (all)
Default OFF
Mail S
etting
234
Menu 196Registering addresses in a mail group
Mail Group Setting
By registering multiple mail addresses in a mail group, multiple addresses can be set by a simple operation when composing i-mode Mail. ・ Up to 20 mail groups can be registered. Up to 5
mail addresses can be saved in each mail group.
1 a96
2 p■ Renaming a mail group: Highlight a mail
group z m2■ Copying a mail group: Highlight a mail
group z m3■ Deleting a mail group: Highlight a mail
group z m41 z Select Yes
■ Deleting all the mail groups: m42 z Enter the terminal security code z Select
Yes
3 Enter a mail group name (up to 16 one-byte or 8 two-byte characters) z p・ To add another group: p
4 Select a mail group
5 a z Select each item to set
6 p・When the mail address is registered in the
phonebook, the name in the phonebook is displayed. When the mail address is not registered in the phonebook, the mail address is displayed. ・ To add another mail address to the mail group:
Repeat from Step 5
■ Editing a mail address: Select a mail address (or name) z Edit the mail address z p
■ Deleting a mail address: Highlight a mail address (or name) z m2 z Select Yes
■ Displaying mail address details: m3 z o after checking the details
7 Press pThe mail addresses are registered in the mail group. ・ Highlight a mail group and press a to
compose i-mode Mail.
INFORMATION● If there is no TO address entered, mail cannot be sent.
Menu 1951Setting whether to quote the message when replying Mail Reply Format
You can set whether to quote the message text when you reply to i-mode Mail or SMS. In addition, you set the quote characters that are added to the quoted message.
1 a951
2 Select each item to set
3 Press p
Menu 1952Setting whether to insert a quick reply message when replying Quick Reply Setting
・ Quick reply messages cannot be inserted in SMS messages. ・ Even if ON is set, a quick reply message cannot
be inserted when not registered.
1 a952 z Press 1 or 2
Address Type:Set TO, CC and BCC. ☛P207
Address:Enter a mail address (up to 50 one-byte characters).・ To select from the phonebook: t z
Select the party・When multiple mail addresses have
been registered, select a mail address.
Default Quote:Yes Quote characters:> (one-byte character)
Quote:Set whether to quote the message when replying to mail.
Quote characters:Up to 2 one-byte or 1 two-byte character can be entered. ・ The quote characters are counted as
characters in the message. ・ If a character that cannot be sent is
specified, the default character is used.
Default ON
Mail S
etting
235
Menu 1953Registering quick reply messages to be inserted when replying Quick Reply Template
・ Up to 5 messages can be registered. ・ To add a new quick reply message when there
are 5 default messages, select and edit or delete a default message.
1 a953 z Select a message
2 Enter the message (up to 40 one-byte or 20 two-byte characters) z p z Select Yes・ A line feed cannot be inserted.
■ Viewing a registered message: Highlight a message in the quick reply message list z p
■ Deleting a registered message:Highlight a message in the quick reply message list z m1 z Select Yes
■ Registering a new message: Select <New reply template> in the quick reply message list z Enter the message z p
■ Restoring the default settings: m2 in the quick reply message list z Enter the terminal security code z Select Yes
Menu 1975
Setting the display style of the mail listMail List Setting
The display style of the mail list can be set for received/sent mail. ・ The 2-row display applies to unsent mail and
SMS in the UIM regardless of this setting.
1 a975 z Press 1 or 2
Menu 1973Setting whether to receive attachments
Incoming Msg. Attach.
You can set whether to receive images and melodies attached to i-mode Mail.
1 a973 z Press any of 1 to 4
INFORMATION●When Not receive or Melody only is set, images inserted in
a message cannot be received. ● Note that unreceived attachments are deleted in the
i-mode Center and become unavailable. ● Melodies in MFi format pasted in the message are
received regardless of this setting.
Menu 1974 / Menu 2633 /?633Setting whether to play melodies automatically
Attachment Auto-play
You can set whether to play melodies attached to i-mode Mail or Message R/F automatically when the mail or message is displayed.
1 a974 z Press 1 or 2
INFORMATION●When Auto play is set, displaying received mail, sent
mail, mail template or Message R/F with a melody attached plays the melody once at the ring volume for call set in at the volume set for the ring volume for calls. When more than one melody is attached, the melodies play one after another. Press c to stop playing.
●When Message R/F is displayed automatically, melodies are not played automatically even Auto play is set.
Selecting the type of mail to display Display Type
Only mail of the specified type is displayed. Closing the list resets the setting to Display all items. ・ For received mail, you can select from Display all
items, Unread item only, Read item only, or Protected item only. ・ For sent mail, you can select Display all or Display
protected. ・ You cannot change the display type of unsent
mail and received/sent SMS in UIM.
Default OKです。 (OK) NGです。 (No good) ありがとう! (Thank you!) ゴメンなさい! (Sorry!) 後ほど連絡します。 (Get in touch later.)
Default Display 2 rows
Display 2 rows Display 1 row
Sender address of the highlighted received mail (first receiver address for sent mail)
Default Image/Melody
Default Auto play
Default Display all items (for received mail)/Display all (for sent mail)
Mail S
etting
Next
236
Selecting the display type for received mail
1 a1 z Select a folder・ Sent mail ☛P223
2 m72 z Press any of 1 to 4
INFORMATION●When Read item only is set, protected mail is not
displayed.
Changing the font size of the mail view screenFont Size
You can change the font size of the displayed message for received mail, sent mail and mail template. ・ The change of font size applies to all the mails
including incoming/outgoing mail and mail template. ・ The settings in this function are reflected to Mail
view of Font Size Setting.
Changing on the received mail view screen
1 a1 z Select a folder・ Sent mail ☛P223
2 Select a mail z m31・When a mail template is displayed, press m41.
3 Press any of 1 to 3
INFORMATION● The font size can be changed from All listed or Mail view
of Font Size Setting.● The new font size of the mail view screen is retained until
it is changed. ● The font size at the time of composing and editing mail
can be changed from or All listed or Text input of Font Size Setting.
Menu 191
Setting operations for incoming mails Mail Alert
You can set the operations that are performed when i-mode Mail or SMS is received. ・ The settings of this function are also reflected to
Sound Setting, Light Alert Setting and Vibrator Setting.
1 a91
2 Select each item to set
3 Press p
INFORMATION● Even if you set Sync melody for Light alert or vibrate alert,
operation of lighting or vibrator may not occur depending on the melody.
●When mail is received from a sender with the incoming mail settings made in the phonebook, the phonebook settings take precedence. ☛P98
Default Medium (standard)
Example
Medium (standard): 20 dots
Large: 24 dots
Small: 16 dots
Example
Default Ring alert: Melody/キラリン (Kirarin) Light alert: Glimmer/Lemon Vibrate alert: OFF Ring time (sec): 10
Ring alert:Selects Melody or Movie ringtone and then select a melody or video/i-motion. To disable the ring alert, select OFF. ・ Playing and checking a melody or video/
i-motion ☛P117Light alert:
Sets the lighting pattern and color of the sub-display. ・When you set the lighting pattern to Sync
melody or OFF, the lighting color cannot be set.Vibrate alert:
Sets the operation of vibrator. Ring time (sec):
Sets the duration of ring alert (1 to 30 seconds).
Mail S
etting
237
Menu 1971
Setting mail reception notification Display Priority
You can set whether or not to give priority to the display of receiving screen and reception result screen when i-mode Mail, SMS, or Message R/F is received during FOMA terminal operation.
1 a971 z Press 1 or 2
INFORMATION●When Continue operation is set, the receiving screen or
reception result screen is not displayed and the mail ring alert is not activated in any mode other than the standby mode (while other function is running). The sub-display for incoming mails does not light nor flash.
● Even when Show message is set, the receiving screen or reception result screen is not displayed and the mail ring alert is not activated during a voice call, videophone call, camera use, i-αppli operation, alarm clock or alarm sounding. The sub-display for incoming mails does not light nor flash.
●When Lock on Close (when FOMA terminal is opened), All Lock, PIM Lock, or Public mode (Driving mode) is active, the receiving screen or reception result screen is not displayed and the mail ring alert is not activated, regardless of the setting. The sub-display for incoming calls does not light nor flash.
Using chat mail
Composing and sending chat mailChat Mail
Mail can be sent and received to/from multiple addresses like making conversation. The sent and received mail can be read on the same screen. ・Mail addresses of the receivers must be
registered as chat members in advance. ・ Chat mail is not available when Receive Option
Setting is ON or there is no available storage space for received/sent mail.
・When chat mail is sent to a non-compatible terminal, it is received as a mail with the subject “チャットメール (Chat mail)”. If a mail with the subject containing “チャットメール” is sent from a registered chat member who uses a non-compatible terminal, FOMA terminal can receive it as chat mail. ・ The communication fee for sending and receiving
chat mail to/from multiple parties is the same as that for sending broadcast mail.
Menu 13
Adding chat members Chat Member Setting
・ Up to 5 chat members can be registered. You cannot register the same mail address for multiple members.
1 a3A confirmation screen appears asking whether to add chat members. ・When a member is already registered, the chat
mail screen appears. To add another member, press m7 and go to Step 3.
2 Select Yes
3 a
Default Show message
Continue operation:Displays neither the receiving screen nor reception result screen.
Show message:Displays the receiving screen and reception result screen.
Chat mail screen
aSent/received log100 items from the latest history can be displayed.・ Press % to scroll the log when △▽ is
displayed in the guide row. ・ To scroll by a page: t/a・ To move to the first row: m51・ To move to the last row: m52
bDetails fieldDisplays details of the latest chat mail or the highlighted chat mail. Up to 500 one-byte or 250 two-byte characters can be displayed.
cText entry field
a
b
c
Received or sent date/time of the chat mail
Sender’s nickname
: Broadcast address not registered as a chat member exists.
When the details cannot be displayed in a single page, is indicated. Press &to switch between pages.
▲
▲
Ch
at Mail
Next

238
4 Select Address field z Enter a mail address (up to 50 one-byte characters)・When registering a mail address for which a
secret code is set, register the mail address and set the secret code in the phonebook, and then register only the phone number for chat member.
■ Searching the phonebook: t z Select the party・When multiple mail addresses are
registered, select a mail address.
5 Select Nickname field z Enter a nickname (up to 8 one-byte or 4 two-byte characters)・When the mail address matches the address
registered in the phonebook, the name registered in the phonebook (the first 8 one-byte or 4 two-byte characters) is displayed in the Nickname field. ・When no nickname is entered, the first 8
characters preceding the @ symbol in the mail address are displayed.
6 Select Font color field z Select a color・ The color not used for registered members is
displayed in the following priority order: blue, red, green, orange, and black. ・ The nickname is displayed in the selected color
on the chat mail screen.
7 pThe chat member is displayed. ・ To add another member: a z Repeat Steps
4 to 7
8 Press p
Menu 13
Composing and sending chat mail
・ Chat mail is sent to all the registered members by default. You can select members when sending, but the setting returns to default when you quit chat mail or change chat member information. ・ The sent chat mail is saved in the Outbox folder of
Outbox. However, when the sent mail matches the criteria specified in Sort Criteria, it is saved in the specified folder.
1 a3・When a confirmation screen appears asking
whether to add members, select Yes and register.
2 Select the text entry field z Enter a message (up to 500 one-byte or 250 two-byte characters)■ Copying and pasting text from chat mail
log:aHighlight a chat mail z m6 z
Specify the range・ Specifying the range ☛P347
bSelect the text entry field z Specify the paste location z m3
■ Selecting members to send mail: m3 z Select addresses z p
3 Press p・When the chat mail is sent correctly, it is
displayed on the chat mail screen.
■ Replying to all the broadcast addresses of received mail: m22
INFORMATION● Chat mail can be displayed on the chat mail screen by
the following operations:・ In the received/sent mail list, highlight a chat mail,
press m and select Display → Start chat mail. ・ In the received/sent mail view screen, press m and
select Display → Start chat mail. ● If chat mail fails to be sent or is unsent when quitting chat
mail, it is saved in the Unsent messages folder of Unsent messages. In this folder, only one chat mail item can be saved. If sending of another chat mail fails, the chat mail saved in the Unsent messages folder is overwritten. In addition, the chat mail saved in the Unsent messages folder is displayed in the text entry field next time chat mail is started. To resend unsent chat mail, start operation from the chat mail screen.
Receiving chat mail Receive Chat Mail
When mail with the subject containing “チャットメール” in one-byte or two-byte characters is received from a registered chat member, a message indicating that the log is updated appears and the received chat mail is added on the chat mail screen. ・When chat mail has been activated, the ring alert
or vibrator does not start even if a chat mail is received. The sub-display for incoming mails does not light nor flash.
When chat mail has been started
Ch
at Mail
239
・When chat mail is received from a sender not registered as a chat member, follow the procedure in “When chat mail has not been started” below to display the mail on the chat mail screen.
Chat mail is saved in the Inbox folder of Inbox as i-mode Mail. ・When received chat mail matches the criteria set
in Sort Criteria, it is saved in the specified folder.
1 Highlight the mail to display as chat mail in the received mail list z Press m75・ In the received mail view screen, press m33. ・ If the sender address of the selected mail is not
registered as a chat member, a confirmation screen appears asking whether to register it. Select Yes to register. ☛P237・ Deco-mail or HTML mail received from PCs
cannot be displayed on the chat mail screen.
1 Press m1 on the chat mail screenIf there is chat mail stored in the i-mode Center, a message indicating that the log is updated appears and the received chat mail is added on the chat mail screen. ・When chat mail is received using Check i-mode
Message, i-mode Mail is also received at the same time.
INFORMATION● Even if the message on the chat mail screen contains
phone number, mail address or URL, the Phone To (AV Phone To), Mail To, Web To, or i-αppli To function is not available. No attachments are displayed. When you quit chat mail and display the chat mail from Inbox, these functions become available.
●When you delete chat mail from Inbox, the nickname appears as “--------”, date/time as “--/--” and text as Deleted. on the chat mail screen.
● Chat mail received from a registered chat member while chat mail is not started will be displayed on the chat mail screen next time chat mail is started.
● The chat mail displayed on the chat mail screen will be marked as read in Inbox.
●When mail is sent or received from Message i-αppli, the mail is displayed on the chat mail screen when received as chat mail.
Broadcast addresses of received mail can be displayed.
1 Highlight a mail on the chat mail screen z Press m4・When a broadcast address is not registered as
a chat member, Not recorded appears in the nickname field. When the mail address is registered in the phonebook, the registered name appears instead of the mail address. Press o to display the mail address.
■ Adding unregistered broadcast address for chat member: Highlight an address z
p・ Follow the procedure from Step 5 in “Adding
chat members”. ☛P238
■ Copying broadcast addresses: Highlight an address z m2
All the chat mails on the chat mail screen can be deleted. ・ The chat mail in Inbox or Outbox is also deleted
except for protected mail.
1 m9 on the chat mail screen z Select Yes
Editing chat members
You can edit chat member information and add/delete members. Also, you can check the information about registered members and replace all the registered members.
1 m7 on the chat mail screen
2 Select a member z Edit■ Deleting a member: Highlight a member z
m2 z Select Yes
■ Displaying member details:am3bo after checking the details
■ Adding a member: a■ Replacing all the members by mail group:
m5 z Select a mail group z Select YesAll the members are replaced by those registered in the selected mail group.
When chat mail has not been started
Receiving chat mail stored in the i-mode Center
Displaying broadcast addresses
Deleting all the chat mail log
Ch
at Mail
Next
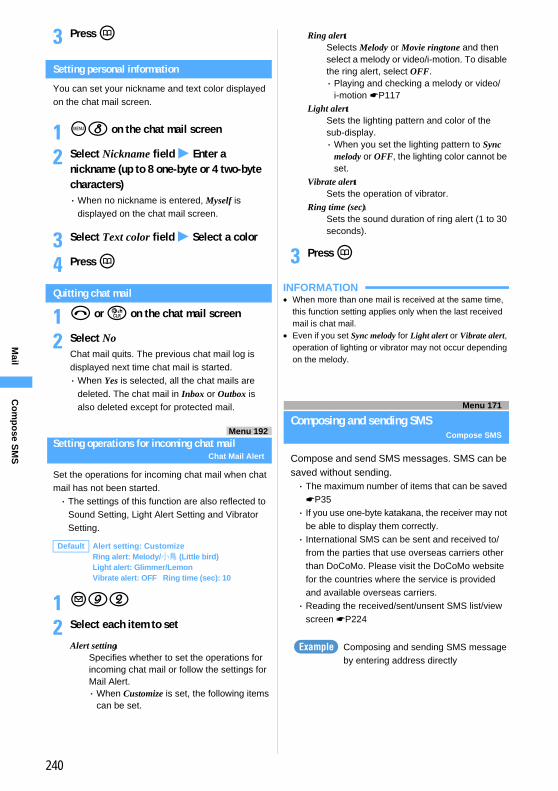
240
3 Press p
Setting personal information
You can set your nickname and text color displayed on the chat mail screen.
1 m8 on the chat mail screen
2 Select Nickname field z Enter a nickname (up to 8 one-byte or 4 two-byte characters)・When no nickname is entered, Myself is
displayed on the chat mail screen.
3 Select Text color field z Select a color
4 Press p
Quitting chat mail
1 f or c on the chat mail screen
2 Select NoChat mail quits. The previous chat mail log is displayed next time chat mail is started. ・When Yes is selected, all the chat mails are
deleted. The chat mail in Inbox or Outbox is also deleted except for protected mail.
Menu 192Setting operations for incoming chat mail
Chat Mail Alert
Set the operations for incoming chat mail when chat mail has not been started. ・ The settings of this function are also reflected to
Sound Setting, Light Alert Setting and Vibrator Setting.
1 a92
2 Select each item to set
3 Press p
INFORMATION●When more than one mail is received at the same time,
this function setting applies only when the last received mail is chat mail.
● Even if you set Sync melody for Light alert or Vibrate alert, operation of lighting or vibrator may not occur depending on the melody.
Using SMS (Short Message)
Menu 171
Composing and sending SMSCompose SMS
Compose and send SMS messages. SMS can be saved without sending. ・ The maximum number of items that can be saved
☛P35・ If you use one-byte katakana, the receiver may not
be able to display them correctly. ・ International SMS can be sent and received to/
from the parties that use overseas carriers other than DoCoMo. Please visit the DoCoMo website for the countries where the service is provided and available overseas carriers. ・ Reading the received/sent/unsent SMS list/view
screen ☛P224
Composing and sending SMS message by entering address directly
Default Alert setting: Customize Ring alert: Melody/小鳥 (Little bird) Light alert: Glimmer/Lemon Vibrate alert: OFF Ring time (sec): 10
Alert setting:Specifies whether to set the operations for incoming chat mail or follow the settings for Mail Alert. ・When Customize is set, the following items
can be set.
Ring alert:Selects Melody or Movie ringtone and then select a melody or video/i-motion. To disable the ring alert, select OFF. ・ Playing and checking a melody or video/
i-motion ☛P117Light alert:
Sets the lighting pattern and color of the sub-display. ・When you set the lighting pattern to Sync
melody or OFF, the lighting color cannot be set.
Vibrate alert:Sets the operation of vibrator.
Ring time (sec):Sets the sound duration of ring alert (1 to 30 seconds).
Example
Co
mp
ose S
MS
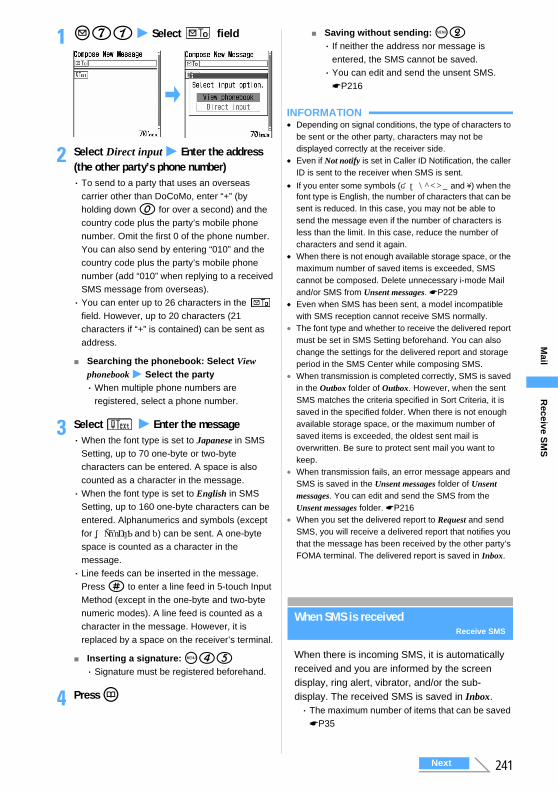
241
1 a71 z Select field
2 Select Direct input z Enter the address (the other party’s phone number)・ To send to a party that uses an overseas
carrier other than DoCoMo, enter “+” (by holding down 0 for over a second) and the country code plus the party’s mobile phone number. Omit the first 0 of the phone number. You can also send by entering “010” and the country code plus the party’s mobile phone number (add “010” when replying to a received SMS message from overseas). ・ You can enter up to 26 characters in the
field. However, up to 20 characters (21 characters if “+” is contained) can be sent as address.
■ Searching the phonebook: Select View phonebook z Select the party・When multiple phone numbers are
registered, select a phone number.
3 Select z Enter the message・When the font type is set to Japanese in SMS
Setting, up to 70 one-byte or two-byte characters can be entered. A space is also counted as a character in the message. ・When the font type is set to English in SMS
Setting, up to 160 one-byte characters can be entered. Alphanumerics and symbols (except for `。「」、・゙ and ゚) can be sent. A one-byte space is counted as a character in the message. ・ Line feeds can be inserted in the message.
Press # to enter a line feed in 5-touch Input Method (except in the one-byte and two-byte numeric modes). A line feed is counted as a character in the message. However, it is replaced by a space on the receiver’s terminal.
■ Inserting a signature: m45・ Signature must be registered beforehand.
4 Press p
■ Saving without sending: m2・ If neither the address nor message is
entered, the SMS cannot be saved. ・ You can edit and send the unsent SMS.
☛P216
INFORMATION● Depending on signal conditions, the type of characters to
be sent or the other party, characters may not be displayed correctly at the receiver side.
● Even if Not notify is set in Caller ID Notification, the caller ID is sent to the receiver when SMS is sent.
● If you enter some symbols (|^{ } [ ] ̃ and ¥) when the font type is English, the number of characters that can be sent is reduced. In this case, you may not be able to send the message even if the number of characters is less than the limit. In this case, reduce the number of characters and send it again.
●When there is not enough available storage space, or the maximum number of saved items is exceeded, SMS cannot be composed. Delete unnecessary i-mode Mail and/or SMS from Unsent messages. ☛P229
● Even when SMS has been sent, a model incompatible with SMS reception cannot receive SMS normally.
● The font type and whether to receive the delivered report must be set in SMS Setting beforehand. You can also change the settings for the delivered report and storage period in the SMS Center while composing SMS.
●When transmission is completed correctly, SMS is saved in the Outbox folder of Outbox. However, when the sent SMS matches the criteria specified in Sort Criteria, it is saved in the specified folder. When there is not enough available storage space, or the maximum number of saved items is exceeded, the oldest sent mail is overwritten. Be sure to protect sent mail you want to keep.
●When transmission fails, an error message appears and SMS is saved in the Unsent messages folder of Unsent messages. You can edit and send the SMS from the Unsent messages folder. ☛P216
●When you set the delivered report to Request and send SMS, you will receive a delivered report that notifies you that the message has been received by the other party’s FOMA terminal. The delivered report is saved in Inbox.
When SMS is receivedReceive SMS
When there is incoming SMS, it is automatically received and you are informed by the screen display, ring alert, vibrator, and/or the sub-display. The received SMS is saved in Inbox. ・ The maximum number of items that can be saved
☛P35
Receive S
MS
Next

242
1 An SMS message is received
・ Press f while receiving SMS to stop reception.・When FOMA terminal is folded, receiving
status appears on the sub-display. ☛P28・ The reception result screen is displayed for
about 15 seconds if you do not press any key, or until the ring alert stops, in case you set the Mail Alert for more than 15 seconds. To return to the previous screen immediately, press c.
■ Reading the received SMS immediately: o or 1 on the reception result screen z Select a folder z Select an SMS message・ You can reply to (☛P218) or forward
(☛P219) the received SMS. The operation is the same as for i-mode Mail.
INFORMATION●While receiving i-mode Mail or Message R/F, or
connecting to the Data Center, SMS is not automatically received. Perform Check SMS.
●When there is not enough available storage space, or the maximum number of saved items is exceeded, the oldest received mail except unread ones is overwritten. Be sure to protect received mail you want to keep. ・When the mail cannot be overwritten because storage
is filled with unread mail and protected mail, reception of SMS is stopped. or is indicated on the screen. To receive new messages, you need to display unread mail, change unread mail to read, delete unnecessary mail or cancel mail protection.
・When the UIM already contains 20 messages, SMS may not be received even though there is space available in Inbox. or is indicated on the screen. Move to FOMA terminal (☛P244) or delete SMS from the UIM (☛P244).
●When the received SMS has been set to be saved directly to the UIM, it will be saved directly on the UIM. Note that, when the number of messages in the UIM reaches 20, SMS cannot be received any more. Delete unnecessary messages and perform Check SMS again.
● The receiving screen or reception result screen may not be displayed depending on Display Priority.
● Short Mail sent from a mova terminal is received by FOMA terminal as SMS.
●When SMS is received from a party with the incoming mail settings made in the FOMA terminal phonebook, the settings apply to the operation of the ring alert, vibrator and/or the sub-display. For details on checking with the phonebook, see “Name displays”. ☛P95・When multiple items of SMS are received at the same
time, the operation depends on the conditions set for the last SMS received.
●When SMS is received from overseas carriers other than DoCoMo, “+” is added before the sender address. If the sender address with “+” in front of it is registered in the phonebook, the name in the phonebook is displayed.
Menu 162
Checking for SMSCheck SMS
You can make inquiry for any SMS delivered while FOMA terminal was out of service area or turned off. ・ Depending on signal condition, you may not be
able to perform Check SMS.
1 Press a62If the SMS Center stores any messages, they are received.
INFORMATION● It may take time to receive SMS with Check SMS.
Menu 174
Making SMS settingsSMS Setting
Flashing
: Unread SMS exists.: Unread SMS and i-mode Mail exist.
Number of received SMSWhen reception fails, “×” is indicated after Messages. To receive unreceived messages, perform Check SMS.
Reception completed
Reception result scrolls.
Receiving screen
Reception result screen
flashes and Receiving message... is displayed. When reception is completed, the reception result screen appears and the mail ring alert sounds and the sub-display lights/flashes.
Usually, you do not need to change SMSC, Address and Type of Number settings.
Ch
eck SM
S

243
1 a74
2 Select each item to set
3 Press p
INFORMATION● On the SMS composition screen, press m and select
SMS settings. In this case, only SMS report request and Keep in SMS center can be set and the settings are valid only for the SMS being composed.
● The settings for Font type, Keep in SMS center, SMSC and Type of Number are also saved in the UIM.
Saving SMS to the UIMSave SMS to UIM
You can move or copy sent and received SMS from FOMA terminal to the UIM.
Moving/copying SMS to the UIM
・ The maximum number of items that can be saved ☛P35
・ SMS in Unsent messages cannot be saved to the UIM. ・When you move or copy sent SMS, any
corresponding delivered reports are moved or copied to Received SMS together. You cannot move or copy only delivered reports.
Moving a received SMS message to the UIM
1 a1 z Select a folder・ Sent SMS ☛P223
2 Highlight an SMS message z m421■ Moving multiple messages:
m422 z Select messages z p■ Copying a message: Highlight a message
z m431■ Copying multiple messages:
m432 z Select messages z p
3 Select Yes
INFORMATION● On the received/sent mail view screen, press m and
select Move/Copy → Move to UIM or Copy to UIM.●When the UIM already contains 20 messages, you
cannot move or copy additional messages to the UIM. Delete unnecessary messages from the UIM.
● The protection setting is not moved/copied to the UIM.
Menu 172 / Menu 173
Displaying SMS in the UIM
Displaying received SMS
1 a72Received SMS is displayed in 2 rows on the received SMS (UIM) list screen.
Default Font type: Japanese SMS report request: Not request Keep in SMS center: 3 days SMSC: DoCoMo Address: 81903101652 Type of Number: international
Font type:Selects Japanese or English language of messages to be sent. The maximum number of characters that can be sent differs depending on the font type.
SMS report request:Specifies whether to request a delivered report when you send SMS.
Keep in SMS center:Sets the storage period of sent SMS in the SMS Center in cases the receiver cannot receive the message.
SMSC:Sets SMSC when you use SMS services other than DoCoMo. ・When Others is set, select the Address field
and enter the address (up to 20 one-byte characters).
Type of Number:Selects either international or unknown. ・When you select Others for SMSC and
enter only numbers or numbers plus “ ” or “#” in the Address field, select unknown.
a :Unread (able to reply):Unread (unable to reply):Read (able to reply):Read (unable to reply):Delivered report/missed call notice
Example
Example
Reception date/time and sender or receiver
The beginning of the message or SMS report request or Notify missed call
a
Page No./total number
Save S
MS
to U
IM
Next
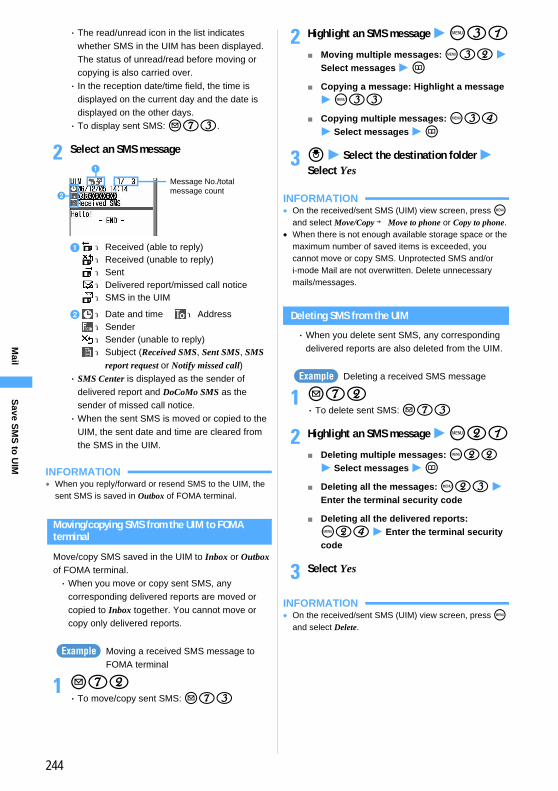
244
・ The read/unread icon in the list indicates whether SMS in the UIM has been displayed. The status of unread/read before moving or copying is also carried over. ・ In the reception date/time field, the time is
displayed on the current day and the date is displayed on the other days. ・ To display sent SMS: a73.
2 Select an SMS message
・ SMS Center is displayed as the sender of delivered report and DoCoMo SMS as the sender of missed call notice. ・When the sent SMS is moved or copied to the
UIM, the sent date and time are cleared from the SMS in the UIM.
INFORMATION●When you reply/forward or resend SMS to the UIM, the
sent SMS is saved in Outbox of FOMA terminal.
Moving/copying SMS from the UIM to FOMA terminal
Move/copy SMS saved in the UIM to Inbox or Outbox of FOMA terminal. ・When you move or copy sent SMS, any
corresponding delivered reports are moved or copied to Inbox together. You cannot move or copy only delivered reports.
Moving a received SMS message to FOMA terminal
1 a72・ To move/copy sent SMS: a73
2 Highlight an SMS message z m31■ Moving multiple messages: m32 z
Select messages z p■ Copying a message: Highlight a message
z m33■ Copying multiple messages: m34
z Select messages z p
3 o z Select the destination folder z Select Yes
INFORMATION● On the received/sent SMS (UIM) view screen, press m
and select Move/Copy → Move to phone or Copy to phone. ●When there is not enough available storage space or the
maximum number of saved items is exceeded, you cannot move or copy SMS. Unprotected SMS and/or i-mode Mail are not overwritten. Delete unnecessary mails/messages.
Deleting SMS from the UIM
・When you delete sent SMS, any corresponding delivered reports are also deleted from the UIM.
Deleting a received SMS message
1 a72・ To delete sent SMS: a73
2 Highlight an SMS message z m21■ Deleting multiple messages: m22
z Select messages z p■ Deleting all the messages: m23 z
Enter the terminal security code
■ Deleting all the delivered reports: m24 z Enter the terminal security code
3 Select Yes
INFORMATION● On the received/sent SMS (UIM) view screen, press m
and select Delete.
a :Received (able to reply):Received (unable to reply):Sent:Delivered report/missed call notice:SMS in the UIM
b :Date and time :Address:Sender:Sender (unable to reply):Subject (Received SMS, Sent SMS, SMS
report request or Notify missed call)
a
b
Message No./total message count
Example
Example
Save S
MS
to U
IM
245
i-αpplii-αppli ..............................................................................................................246Downloading i-αppli from sites ....................................................................247Starting i-αppli ...............................................................................................248Using pre-installed i-αppli ............................................................................251Starting i-αppli with One-key Shortcut ........................ One-key Shortcut 252Starting i-αppli with Two-key Shortcut ........................ Two-key Shortcut 252Automatically starting i-αppli .......................................................................253Starting i-αppli from a site or mail ........................................... i-αppli To 254Operating the i-αppli standby display .............. i-αppli Standby Display 254Managing i-αppli ............................................................................................255Using various functions from i-αppli ...........................................................257
246
i-αp
pli
i-αppli
Downloading i-αppli software from sites allows more convenient use of i-mode compatible FOMA terminal (hereinafter called the i-mode terminal). For example, various games can be downloaded to the i-mode terminal for amusement and i-αppli for stock price information can be downloaded for automatically checking stock prices at regular intervals. Map i-αppli downloads only necessary data and allows smooth scrolling. In addition, direct registration to the phonebook and schedule from i-αppli may be made and working with Data Box including saving and obtaining of image may be available with some i-αppli software.
・ Downloading i-αppli ☛P247・ Starting i-αppli ☛P248・ Automatically starting i-αppli ☛P253
INFORMATION● Some i-αppli may use the mobile phone or UIM serial
number of your i-mode terminal.● Some i-αppli attempts to make connection when
running. Such attempts can be disabled by presetting not to make connection. ☛P249
Some i-αppli allows viewing, registering and operating of the data (phonebook entries, bookmarks, schedules, images and icons) saved in your i-mode terminal. The following operations can be performed using saved data:・ Register phonebook entries・ Use icons ・ Add bookmarks・ Save schedules・ Obtain images from Data Box
・ Save images in Data Box
INFORMATION● Some i-αppli software may not be used in Privacy Mode
(with Authorized access set for Phonebook & Logs, My picture or Schedule).
● Any image saved by i-αppli is stored in the i-mode or Deco-Mail picture folder of Image (My Picture) and/or in the i-αppli.
i-αppli DX
i-αppli DX is more convenient and enjoyable i-αppli. In conjunction with i-mode terminal information (such as mail, call log or phonebook data), i-αppli DX allows you to compose mail on your favorite character screen and inform you of a sender of an incoming call by character’s comments when a call is received. Also, i-αppli DX updates desired information on stock price, game in progress or other information further in real time in conjunction with mail.
Some i-αppli DX allows viewing, registering and operating of saved data such as mails, redials, received calls and ring alerts in addition to the saved data available with standard i-αppli (phonebook entries, bookmarks, schedules, images and icons). The following operations can be performed using saved data:・ Register phonebook entries・ View phonebook data ・ Use icons・ Add bookmarks ・ Save schedules・ Use the Mail menu・ Use the mail composition screen・ View the latest redial・ View the latest received call・ View the latest unread mail・ Change ring alerts (phone, mail, Message R/F)・ Obtain images from Data Box・ Save images in Data Box・ Save videos in Data Box・ Save ring alerts in Data Box・ Change image settings (standby display, incoming/
outgoing call, incoming/outgoing videophone call, incoming/outgoing mail, Message R/F reception)
Using saved data
i-mode Center
Download
i-αppli
i-mode terminal
Games, stock price info, etc.
IP
Using saved data
i-αp
pli
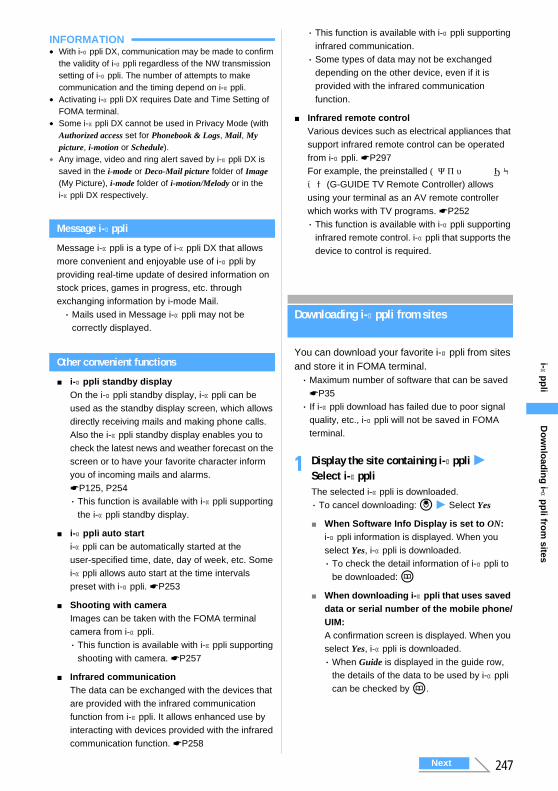
247
i-αp
pli
INFORMATION●With i-αppli DX, communication may be made to confirm
the validity of i-αppli regardless of the NW transmission setting of i-αppli. The number of attempts to make communication and the timing depend on i-αppli.
● Activating i-αppli DX requires Date and Time Setting of FOMA terminal.
● Some i-αppli DX cannot be used in Privacy Mode (with Authorized access set for Phonebook & Logs, Mail, My picture, i-motion or Schedule).
● Any image, video and ring alert saved by i-αppli DX is saved in the i-mode or Deco-Mail picture folder of Image (My Picture), i-mode folder of i-motion/Melody or in the i-αppli DX respectively.
Message i-αppli
Message i-αppli is a type of i-αppli DX that allows more convenient and enjoyable use of i-αppli by providing real-time update of desired information on stock prices, games in progress, etc. through exchanging information by i-mode Mail.・Mails used in Message i-αppli may not be
correctly displayed.
Other convenient functions
■ i-αppli standby displayOn the i-αppli standby display, i-αppli can be used as the standby display screen, which allows directly receiving mails and making phone calls. Also the i-αppli standby display enables you to check the latest news and weather forecast on the screen or to have your favorite character inform you of incoming mails and alarms. ☛P125, P254・ This function is available with i-αppli supporting
the i-αppli standby display.
■ i-αppli auto starti-αppli can be automatically started at the user-specified time, date, day of week, etc. Some i-αppli allows auto start at the time intervals preset with i-αppli. ☛P253
■ Shooting with cameraImages can be taken with the FOMA terminal camera from i-αppli.・ This function is available with i-αppli supporting
shooting with camera. ☛P257
■ Infrared communicationThe data can be exchanged with the devices that are provided with the infrared communication function from i-αppli. It allows enhanced use by interacting with devices provided with the infrared communication function. ☛P258
・ This function is available with i-αppli supporting infrared communication.・ Some types of data may not be exchanged
depending on the other device, even if it is provided with the infrared communication function.
■ Infrared remote controlVarious devices such as electrical appliances that support infrared remote control can be operated from i-αppli. ☛P297For example, the preinstalled Gガイド番組表リモコン(G-GUIDE TV Remote Controller) allows using your terminal as an AV remote controller which works with TV programs. ☛P252・ This function is available with i-αppli supporting
infrared remote control. i-αppli that supports the device to control is required.
Downloading i-αppli from sites
You can download your favorite i-αppli from sites and store it in FOMA terminal.・Maximum number of software that can be saved
☛P35・ If i-αppli download has failed due to poor signal
quality, etc., i-αppli will not be saved in FOMA terminal.
1 Display the site containing i-αppli z Select i-αppliThe selected i-αppli is downloaded.・ To cancel downloading: o z Select Yes
■ When Software Info Display is set to ON:i-αppli information is displayed. When you select Yes, i-αppli is downloaded.・ To check the detail information of i-αppli to
be downloaded: p■ When downloading i-αppli that uses saved
data or serial number of the mobile phone/UIM:A confirmation screen is displayed. When you select Yes, i-αppli is downloaded.・When Guide is displayed in the guide row,
the details of the data to be used by i-αppli can be checked by p.
Next
Do
wn
load
ing
i-αp
pli fro
m sites
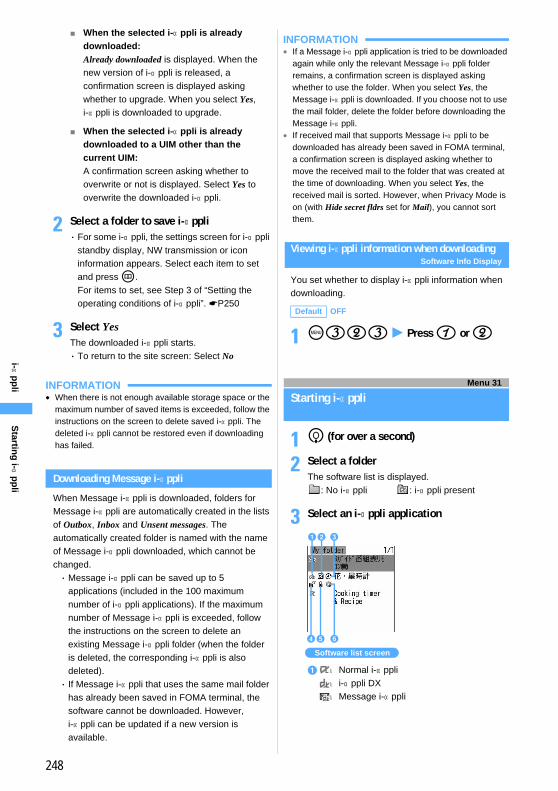
248
i-αp
pli
■ When the selected i-αppli is already downloaded:Already downloaded is displayed. When the new version of i-αppli is released, a confirmation screen is displayed asking whether to upgrade. When you select Yes, i-αppli is downloaded to upgrade.
■ When the selected i-αppli is already downloaded to a UIM other than the current UIM:A confirmation screen asking whether to overwrite or not is displayed. Select Yes to overwrite the downloaded i-αppli.
2 Select a folder to save i-αppli・ For some i-αppli, the settings screen for i-αppli
standby display, NW transmission or icon information appears. Select each item to set and press p. For items to set, see Step 3 of “Setting the operating conditions of i-αppli”. ☛P250
3 Select YesThe downloaded i-αppli starts.・ To return to the site screen: Select No
INFORMATION●When there is not enough available storage space or the
maximum number of saved items is exceeded, follow the instructions on the screen to delete saved i-αppli. The deleted i-αppli cannot be restored even if downloading has failed.
Downloading Message i-αppli
When Message i-αppli is downloaded, folders for Message i-αppli are automatically created in the lists of Outbox, Inbox and Unsent messages. The automatically created folder is named with the name of Message i-αppli downloaded, which cannot be changed.・Message i-αppli can be saved up to 5
applications (included in the 100 maximum number of i-αppli applications). If the maximum number of Message i-αppli is exceeded, follow the instructions on the screen to delete an existing Message i-αppli folder (when the folder is deleted, the corresponding i-αppli is also deleted).・ If Message i-αppli that uses the same mail folder
has already been saved in FOMA terminal, the software cannot be downloaded. However, i-αppli can be updated if a new version is available.
INFORMATION● If a Message i-αppli application is tried to be downloaded
again while only the relevant Message i-αppli folder remains, a confirmation screen is displayed asking whether to use the folder. When you select Yes, the Message i-αppli is downloaded. If you choose not to use the mail folder, delete the folder before downloading the Message i-αppli.
● If received mail that supports Message i-αppli to be downloaded has already been saved in FOMA terminal, a confirmation screen is displayed asking whether to move the received mail to the folder that was created at the time of downloading. When you select Yes, the received mail is sorted. However, when Privacy Mode is on (with Hide secret fldrs set for Mail), you cannot sort them.
Viewing i-αppli information when downloadingSoftware Info Display
You set whether to display i-αppli information when downloading.
1 m323 z Press 1 or 2
Menu 31
Starting i-αppli
1 d (for over a second)
2 Select a folderThe software list is displayed.
: No i-αppli : i-αppli present
3 Select an i-αppli application
Default OFF
a :Normal i-αppli: i-αppli DX:Message i-αppli
ab c
Software list screen
d fe
Startin
g i-α
pp
li
249
i-αp
pli
・When Confirm every session is set for NW transmission of i-αppli to be started, a confirmation screen is displayed asking whether to connect.
Quit i-αppli in the procedure specified for each.・ You can also quit i-αppli by pressing f and
selecting Yes.
INFORMATION● i-αppli is interrupted in the following cases. When you
quit the function being used and running, i-αppli is resumed. To resume i-αppli without quitting the current function, press b and select i-αppli. However, i-αppli may not be resumed by b depending on the function running. Some i-αppli may not return to the state before interruption when resumed.・When there is an incoming call (except when the
ringing time of Voice Mail Service and Call Forwarding Service is set to 0 Sec.)・When the time set by Timer has passed・When the time set in the schedule or Alarm Clock has
come・When you switch to another function
●When you are outside the service area or the saved data cannot be used, i-αppli may not start or not operate correctly.
● Images used on i-αppli or your entered data may automatically be sent to the server via Internet. Images used on i-αppli are images shot with the camera while i-αppli is activated, images obtained using the i-αppli infrared communication function, images downloaded by i-αppli from i-mode or Internet websites, or images obtained by i-αppli from Data Box.
● For some i-αppli, the IP (Information Provider) can access i-αppli saved in the mobile phone and directly stop its use. In this case, starting, setting for standby or upgrading of the i-αppli cannot be performed and only deleting and displaying the detailed information can be performed. To use again, please contact the IP to release suspension of i-αppli.
● For some i-αppli, the IP may send data to i-αppli saved in the mobile phone.
●When the IP requests to stop/restart i-αppli or send data to i-αppli, FOMA terminal communicates and blinks. In this case, the communication charge is not required.
● Because of the 3D polygon*1 engine loaded, 3 dimensional image can be displayed with i-αppli.*1 By combining polygons (triangles and squares), 3
dimensional image with depth can be displayed.● The sound volume for i-αppli operation can be set by
i-αppli effect sound. However, sound effect is unavailable for some i-αppli.
● To i-αppli creatorsIf i-αppli being created does not operate normally, “trace display” may help. Pressing m334 on the standby display displays the trace. Note that trace information cannot be displayed if i-αppli created to record trace information is not saved.To delete the trace information, press p and select Yes.
Displaying history when operation finishes without using saved data Security Error History
When i-αppli ended because of an error such that i-αppli cannot use the saved data, the name of i-αppli, date and time, cause of the security error is recorded.・ Up to 20 errors are recorded in the security error
history. When there are more than 20 abnormal exits, the 21st exit is written over the oldest one.
1 Press m333■ Deleting the history: p on the history
display screen z Select Yes
Displaying i-αppli detail information Detail Info
Detail information such as the name and version of i-αppli can be checked.
1 d (for over a second) z Select a folder
2 Highlight i-αppli z Press p・ The displayed items differ depending on
i-αppli.・ For i-αppli downloaded from SSL pages, you
can check the site certificate by pressing p on the software description screen.
Setting the operating conditions of i-αppli Settings
・ Items that can be set vary depending on i-αppli. ・ This function is unavailable for i-αppli having no
items to be set.
b :i-αppli that can be set for i-αppli standby display
:i-αppli that is set for i-αppli standby display
c :i-αppli with Auto Start on:i-αppli at stopped condition by IP
d to :i-αppli registered in Two-key Shortcut
e :Protected i-αppli:i-αppli downloaded from SSL pages:Protected i-αppli which was downloaded
from SSL pages
f :i-αppli registered in One-key Shortcut :Unavailable because of the UIM operation
restriction
Quitting i-αppli
Next
Startin
g i-α
pp
li
250
i-αp
pli
1 d (for over a second) z Select a folder
2 Highlight i-αppli z m7
3 Select each item to set
4 Press p ・When Set i-αppli display is set to Yes, a
confirmation screen appears asking whether to set i-αppli as the standby display. Selecting Yes sets the i-αppli standby display.
INFORMATION● Note that if you set No for Set NW transmission, i-αppli
may not be started and timely information such as stock prices or weather forecast may not be provided by i-αppli.
● If Yes is set for Use icons, information about icons for unread mail, unread Message R/F, remaining battery level, Silent Mode, and icons within service area/outside service area may be sent to IPs through the Internet, which may give the information to a third party. When Use icons is set to No, i-αppli that requires the icon information may not operate.
Setting the lighting and vibrator during i-αppli running Display Light/Vibrate Effect
・ The i-αppli standby display light operation conforms to the setting of Normal use of Display light time of Display Light Setting. ☛P132・While Public mode (Driving mode) is on, the light
does not operate while i-αppli is running even if Software is set.・ This setting is also reflected to i-αppli active of
Display light time of Display Light Setting.
1 m324 z Press 1 or 2
Allow the vibrator operation by i-αppli.・While Public mode (Driving mode) is on, the
vibrator does not operate while i-αppli is running regardless of this setting.・ This setting is also reflected to Vibrator Setting.
1 m325 z Press 1 or 2
Starting another i-αppli application from i-αppli
You can start i-αppli specified by some i-αppli applications, and enjoy it without returning to the software list.
1 If a message appears indicating that the specified i-αppli will be started, press o
INFORMATION● If the i-αppli to start is not specified, select i-αppli.●When the i-αppli does not exist in the software list even if
specified, it is necessary to download it.
Set i-αppli display:Used to set whether to set i-αppli which supports i-αppli standby display as your standby display.・ Only one i-αppli application can be set.
Set NW transmission during i-αppli display:Used to set whether to allow automatic connection while the i-αppli standby display is operating.
Set NW transmission:Used to set whether to allow automatic connection while i-αppli is running.
Use icons:Specifies whether to enable i-αppli to use icons for mail, Message R/F, remaining battery level, Silent Mode and received signal level.
Start from browser:Used to set whether to start i-αppli from sites (i-αppli To).
Start from mailer:Used to set whether to start i-αppli from mail (i-αppli To).
Start from external:Used to set whether to start i-αppli from external devices (i-αppli To).
Allow ring tone/image changes by software*1:Specifies whether to allow i-αppli to change the settings of ring alerts or images on the screen such as the standby display.
Confirm all changes*1:Specifies whether i-αppli displays a confirmation screen each time the settings of ring alerts or images are changed.
Allow access to phonebook/call records by software*1:Specifies whether to allow i-αppli to refer to the phonebook, redial data and received call history.
*1 This setting is available only for i-αppli DX.
Setting display light
Default Terminal setting
Terminal setting:The setting of Normal use of Display light time of Display Light Setting is assumed.
Software:The light comes on according to i-αppli.
Setting vibrator
Default ON
Startin
g i-α
pp
li

251
i-αp
pli
Using pre-installed i-αppli
The following i-αppli applications are registered by default:
Select each i-αppli application from the list to start.・ Some i-αppli names may be different from those
on the display.・花・星時計 can be set as the i-αppli standby
display.・ If you delete i-αppli preloaded by default, you can
download it from i-mode site “My D-style”. ☛P361
花・星時計 (Flower/Star Clock)
This i-αppli enables you to set a seasonal flower or constellation as the standby display and you can enjoy the flower growing on the screen. Also, this i-αppli provides tips for a happy everyday life and reminder for the next menstruation period.
■ 花・星時計 functionBeing set as the i-αppli standby display, this function displays a flower for each month. The flower grows for each call or mail you received and the number of flowers increases up to 4. The background changes depending on the time of the day. During night, stars or constellations are shown on the background. ・ After four flowers bloom, if an address group
(phonebook group) is set for the flower, the size and color of flowers change depending on the number of calls or mails coming from a party registered in that group. ・ The flower keeps growing even if the address
group is changed. When you cancel the address group, the flower stops growing.
Setting an address group:Highlight アドレスグループ指定 (Address group setting) in the main menu, press p, choose a flower and press p again. Then press po and select a phonebook group. ・ To cancel the setting, press ( in the
address group setting screen for the flower and select はい (Yes).
■ 今日のパワーチャージ(Power for today)In the first startup of the software for the day, some bits of knowledge are displayed. To display bits of knowledge after the second and subsequent startup, highlight 今日のパワーチャージ (Power for today) in the main menu and press p.
■ バイオリズムメモ(Biorhythm memo)If you enter the start date of the previous menstruation period, this software alerts you 3 days before or on the first day of the next menstruation period when you start the software first time for the day.Entering the start date of the previous menstruation period:
If バイオリズムメモ is not registered, highlight バイオリズムメモ (Biorhythm memo) in the main menu, press p and set the start date of the previous period and your menstrual cycle. Press p. The software calculates the start and end dates of the next period and displays the result.
Showing the start schedule date of the next period and the cycle:
You can check about the next period and the cycle by highlighting バイオリズムメモ in the main menu and pressing p. To edit the result, press p, highlight the start or end date and press p again.・ To cancel the next period, press ( in the
next menstruation period screen and select はい (Yes).
INFORMATION● The start and end dates of the menstruation period are
estimates and may differ from the actual dates.
・Gガイド番組表リモコン(G-GUIDE TV Remote Controller)・花・星時計 (Flower/Star Clock)・ Cooking timer & Recipe
i-αppli standby display Main menu
Usin
g p
re-installed
i-αp
pli

252
i-αp
pli
Cooking timer & Recipe
This is a collection of fancy and easy-to-cook recipes.
Gガイド番組表リモコン(G-GUIDE TV Remote Controller)
This is a free i-αppli service that conveniently combines the TV program information and TV remote controller.You can get TV program information at anytime and anyplace. You will be informed of the titles, descriptions, starting and ending times and G codes® of programs in your local area. If you find an interesting program, use the おすすめメール (Recommended mail) function to inform your friends of the program title and broadcast schedule via mail. You can also operate your TV remotely (this function is not supported for some TV models).・When using it for the first time, it is necessary to
make initial settings and consent to the agreements for use.・ Packet communication fee is separately required.・ For more information, see “i-mode User’s
Manual”.・ For remote control operation ☛P297
Starting i-αppli with One-key ShortcutOne-key Shortcut
Registering i-αppli to One-key Shortcut
・ Only one i-αppli can be registered.
1 d (for over a second) z Select a folder
2 Highlight i-αppli z Press m91・ To cancel: Highlight i-αppli z m91
INFORMATION● You can also register i-αppli by highlighting it in the
software list and press t.
Starting i-αppli with One-key Shortcut
1 Hold down o for over a second
Starting i-αppli with Two-key ShortcutTwo-key Shortcut
Registering i-αppli to Two-key Shortcut
・ Up to 10 i-αppli can be registered.
1 d (for over a second) z Select a folder
2 Highlight i-αppli z m92・ To cancel: Highlight i-αppli z m92
3 Select the registration destination・ The icon number ( to ) corresponds to
the dial key (0 to 9) used to start i-αppli.・When you select a dial key that has already
been assigned an i-αppli application, a confirmation screen appears asking whether to overwrite it. Select Yes to overwrite the previous registration.
INFORMATION● You can also register i-αppli by highlighting it in the
software list and press a.
Starting i-αppli with Two-key Shortcut
1 Dial key (0 to 9) z Hold down d for over a second
Displaying the Two-key Shortcut list
1 Press m326・ To start: Select i-αppli・ To display details: Highlight i-αppli z p・ To cancel registration: Highlight i-αppli z m2 z Select Yes
Select Menu on the title screen and choose a recipe.・ On the screen
describing a boiling or cooling process, you can use the timer by pressing p. ・While the timer is active,
the screen shows tips, etc.
・ The screen shown here is for information purpose only. It may differ from the actual screen. Channels in your local area are displayed.
On
e-key Sh
ortcu
t
253
i-αp
pli
Automatically starting i-αppli
Select whether to use auto starting and set different auto starting conditions for each i-αppli.・ Date and Time Setting of FOMA terminal is
required to start i-αppli automatically.
Specifying whether to start automaticallyAuto Start
・When set to OFF, Auto Start is also disabled for i-αppli even if User of Auto Start Info Setting is set to ON.
1 m322 z Press 1 or 2
Setting the date and time of Auto StartAuto Start Info Setting
Set Auto Start on/off or the start time for each i-αppli application and display the preset details.・ The conditions that can be set depend on i-αppli.・ Some i-αppli may not be started automatically.・When Auto Start is set to OFF, this setting is not
available.
1 d (for over a second) z Select a folder
2 Highlight i-αppli z m6
3 Select each item to set
4 Press p
INFORMATION● Even when auto starting is set, i-αppli is not started if the
time of activation arrives in one of the following situations. If i-αppli is not started for the following reasons (except for the ones marked with *1), is indicated on the standby display and the name of i-αppli, the date and time and the reason for the start failure are recorded in Start Failure History.・When FOMA terminal power is off*1
・When the UIM restricts operation・When the UIM cannot be detected・When Auto Start is set to OFF*1
・ The interval of auto starting is too short・ During a call or communication・When a screen other than the standby display is
displayed or i-αppli standby display operation is in progress・When any other function is being used (excluding the
list display and editing work of My Picture, the list display, replay, and editing work of i-motion, and the list display and replay of melody)・ In All Lock, PIM Lock or Omakase Lock (Remote Lock)・When Privacy Mode is on (with Authorized access set to
i-αppli)・While an alarm clock or schedule reminder is sounding
(including when the set time is the same as the time for Auto Start)・While the timer is in operation・When i-αppli usage is stopped by the IP
●When two or more i-αppli applications are specified to start automatically at the same time, only one i-αppli is activated. The failed i-αppli information is recorded in Start Failure History, but is not displayed on the standby display.
● In the User settings, the same setting set for other i-αppli cannot be set.
● If none of the set start times is later than the time set by Date and Time Setting, auto starting will be disabled.
Default ON
User:Select whether to set conditions of Auto Start.・When you select ON, set Time, Repeat,
Weekly and Date.Time:
Enter the time to automatically start i-αppli.Repeat:
Set the condition for repetitive automatic starting of i-αppli.・When OneTime is set, set the date for auto
starting in the Date field.・When Daily is set, i-αppli starts
automatically at the time set in the Time field every day.・When Weekly is set, set the day of week
for auto starting in the Weekly field.Weekly:
Set the day of week for auto starting when Weekly is set for Repeat.
Date:Set the date for auto starting when OneTime is set for Repeat.
Software:Specify whether to automatically start at the intervals preset for i-αppli.
i-αppli 1 to 4:Depending on i-αppli DX, up to 4 conditions of Auto Start can be set while it is operated. Specify whether to enable the settings.
Au
tom
atically starting
i-αp
pli
254
i-αp
pli
Displaying history when Auto Start of i-αppli fails Start Failure History
If automatic start of i-αppli fails, appears on the standby display and the i-αppli name, the date and time and the failure reason are registered.・ Up to 20 start failures are recorded. When there
are more than 20 abnormal exits, the 21st exit is written over the oldest one.・When you display the start failure history or when
the next automatic start is successful, on the standby display disappears.
1 Press m331■ Deleting the history: p on the history
display screen z Select Yes
Starting i-αppli from a site or maili-αppli To
Select a link item that can start i-αppli of the site or i-mode Mail and then start the i-αppli (i-αppli To).
1 Select a link item enabled to start i-αppli from the site or i-mode Mail
2 Select YesThe connection to the site is terminated and i-αppli is started.
INFORMATION● If the i-αppli you attempt to start with i-αppli To is not
saved in FOMA terminal, the message that there is no specified i-αppli is displayed and i-αppli cannot be started. Note that some i-αppli may start just after downloaded from sites even if it is not saved.・ For i-αppli that starts just after downloaded from a
site, a confirmation screen may be displayed asking whether to make communication while it is activated.・When you quit i-αppli started just after downloaded
from sites, a confirmation screen is displayed asking whether to save i-αppli. Note that some i-αppli may not be able to be saved in FOMA terminal.
● If the specified i-αppli is set not to start with i-αppli To, a message is displayed and i-αppli is not started. ☛P250
Operating the i-αppli standby displayi-αppli Standby Display
When i-αppli is set for the standby display, you can start i-αppli from the standby display to operate. On the i-αppli standby display or is indicated at the top of the screen. ・ It is necessary to set i-αppli for the standby
display beforehand. ☛P125
INFORMATION●When you set i-αppli that performs communication, it
may not operate correctly depending on radio wave conditions, etc.
●While All Lock, PIM Lock, Privacy Mode (with i-αppli set to Authorized access) or Omakase Lock is active, the i-αppli standby display will be canceled temporarily. If you cancel All Lock, PIM Lock, Omakase Lock, or Privacy Mode, the i-αppli standby display reappars.
● If the use of i-αppli set to the i-αppli standby display is stopped by IP, the i-αppli standby display is canceled.
●While the i-αppli standby display is activated, if an error that makes it difficult to continue the i-αppli standby display occurs, a confirmation screen appears asking whether you will cancel or not. When you select Yes, the i-αppli standby display setting is canceled. At this time, the name of i-αppli and end date/time are recorded in Abnormal Exit History.
● You cannot connect to a site (Web To) from the i-αppli standby display.
●When FOMA terminal is turned on with the i-αppli standby display set, a confirmation screen is displayed asking whether to start the i-αppli standby display. When you select Yes, the i-αppli standby display starts. When you select No, the i-αppli standby display setting is canceled. If you operate nothing within 5 seconds after the confirmation screen appeared, the i-αppli standby display starts automatically. When the power is turned on by Auto Power ON, the i-αppli standby display automatically starts, without displaying the confirmation screen.
Starting i-αppli of the i-αppli standby display
・ i-αppli cannot be started if the Lock on Close function is active.
1 Press c in the i-αppli standby displayThe screen is changed to the i-αppli screen and
or blinks at the top of the display.
i-αp
pli T
o
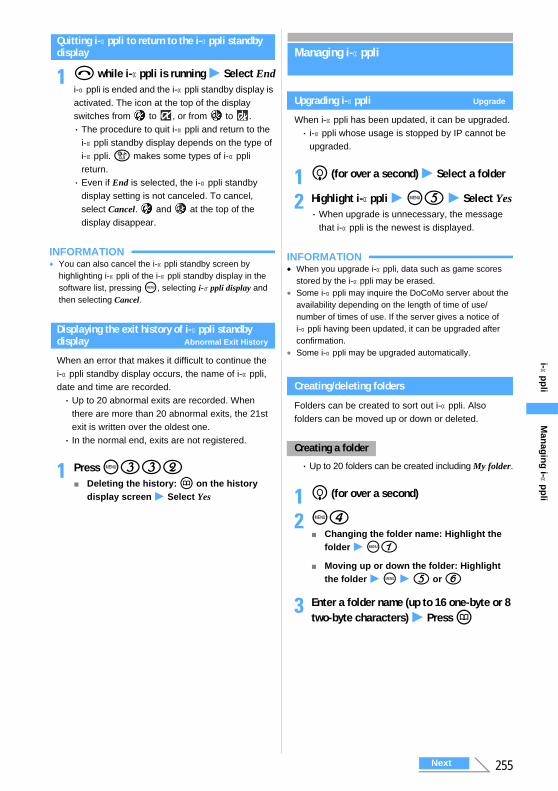
255
i-αp
pli
Quitting i-αppli to return to the i-αppli standby display
1 f while i-αppli is running z Select Endi-αppli is ended and the i-αppli standby display is activated. The icon at the top of the display switches from to , or from to .・ The procedure to quit i-αppli and return to the
i-αppli standby display depends on the type of i-αppli. c makes some types of i-αppli return.・ Even if End is selected, the i-αppli standby
display setting is not canceled. To cancel, select Cancel. and at the top of the display disappear.
INFORMATION● You can also cancel the i-αppli standby screen by
highlighting i-αppli of the i-αppli standby display in the software list, pressing m, selecting i-αppli display and then selecting Cancel.
Displaying the exit history of i-αppli standby display Abnormal Exit History
When an error that makes it difficult to continue the i-αppli standby display occurs, the name of i-αppli, date and time are recorded.・ Up to 20 abnormal exits are recorded. When
there are more than 20 abnormal exits, the 21st exit is written over the oldest one.・ In the normal end, exits are not registered.
1 Press m332■ Deleting the history: p on the history
display screen z Select Yes
Managing i-αppli
Upgrading i-αppli Upgrade
When i-αppli has been updated, it can be upgraded.・ i-αppli whose usage is stopped by IP cannot be
upgraded.
1 d (for over a second) z Select a folder
2 Highlight i-αppli z m5 z Select Yes・When upgrade is unnecessary, the message
that i-αppli is the newest is displayed.
INFORMATION●When you upgrade i-αppli, data such as game scores
stored by the i-αppli may be erased.● Some i-αppli may inquire the DoCoMo server about the
availability depending on the length of time of use/number of times of use. If the server gives a notice of i-αppli having been updated, it can be upgraded after confirmation.
● Some i-αppli may be upgraded automatically.
Creating/deleting folders
Folders can be created to sort out i-αppli. Also folders can be moved up or down or deleted.
・ Up to 20 folders can be created including My folder.
1 d (for over a second)
2 m4■ Changing the folder name: Highlight the
folder z m1■ Moving up or down the folder: Highlight
the folder z m z 5 or 6
3 Enter a folder name (up to 16 one-byte or 8 two-byte characters) z Press p
Creating a folder
Man
agin
g i-α
pp
li
Next
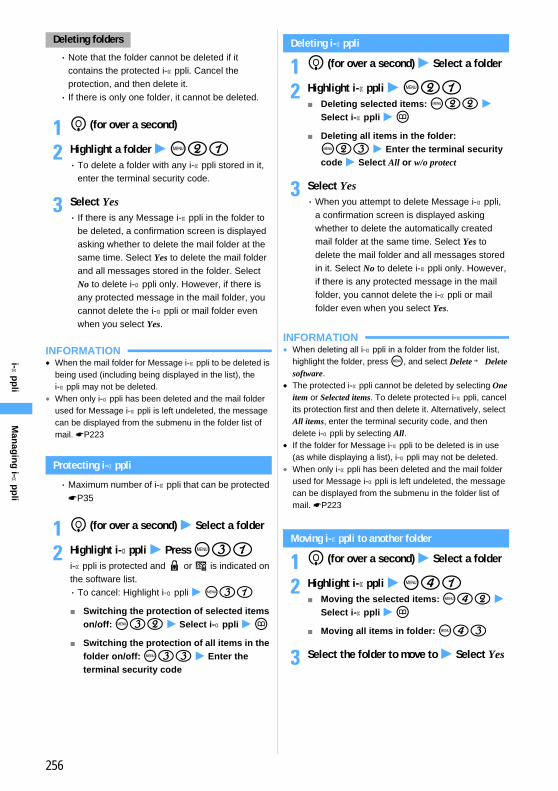
256
i-αp
pli
・ Note that the folder cannot be deleted if it contains the protected i-αppli. Cancel the protection, and then delete it.・ If there is only one folder, it cannot be deleted.
1 d (for over a second)
2 Highlight a folder z m21・ To delete a folder with any i-αppli stored in it,
enter the terminal security code.
3 Select Yes・ If there is any Message i-αppli in the folder to
be deleted, a confirmation screen is displayed asking whether to delete the mail folder at the same time. Select Yes to delete the mail folder and all messages stored in the folder. Select No to delete i-αppli only. However, if there is any protected message in the mail folder, you cannot delete the i-αppli or mail folder even when you select Yes.
INFORMATION●When the mail folder for Message i-αppli to be deleted is
being used (including being displayed in the list), the i-αppli may not be deleted.
●When only i-αppli has been deleted and the mail folder used for Message i-αppli is left undeleted, the message can be displayed from the submenu in the folder list of mail. ☛P223
Protecting i-αppli
・Maximum number of i-αppli that can be protected ☛P35
1 d (for over a second) z Select a folder
2 Highlight i-αppli z Press m31i-αppli is protected and or is indicated on the software list.・ To cancel: Highlight i-αppli z m31■ Switching the protection of selected items
on/off: m32 z Select i-αppli z p■ Switching the protection of all items in the
folder on/off: m33 z Enter the terminal security code
Deleting i-αppli
1 d (for over a second) z Select a folder
2 Highlight i-αppli z m21■ Deleting selected items: m22 z
Select i-αppli z p■ Deleting all items in the folder:
m23 z Enter the terminal security code z Select All or w/o protect
3 Select Yes・When you attempt to delete Message i-αppli,
a confirmation screen is displayed asking whether to delete the automatically created mail folder at the same time. Select Yes to delete the mail folder and all messages stored in it. Select No to delete i-αppli only. However, if there is any protected message in the mail folder, you cannot delete the i-αppli or mail folder even when you select Yes.
INFORMATION●When deleting all i-αppli in a folder from the folder list,
highlight the folder, press m, and select Delete → Delete software.
● The protected i-αppli cannot be deleted by selecting One item or Selected items. To delete protected i-αppli, cancel its protection first and then delete it. Alternatively, select All items, enter the terminal security code, and then delete i-αppli by selecting All.
● If the folder for Message i-αppli to be deleted is in use (as while displaying a list), i-αppli may not be deleted.
●When only i-αppli has been deleted and the mail folder used for Message i-αppli is left undeleted, the message can be displayed from the submenu in the folder list of mail. ☛P223
Moving i-αppli to another folder
1 d (for over a second) z Select a folder
2 Highlight i-αppli z m41■ Moving the selected items: m42 z
Select i-αppli z p■ Moving all items in folder: m43
3 Select the folder to move to z Select Yes
Deleting folders
Man
agin
g i-α
pp
li
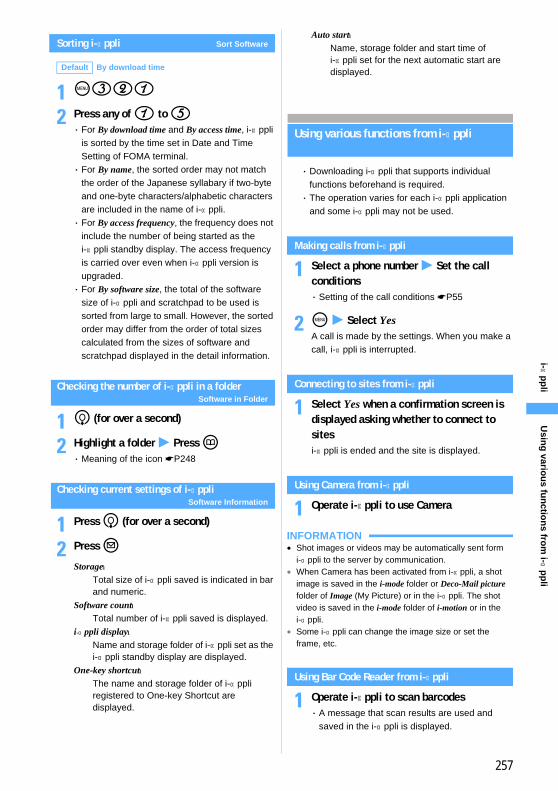
257
i-αp
pli
Sorting i-αppli Sort Software
1 m321
2 Press any of 1 to 5・ For By download time and By access time, i-αppli
is sorted by the time set in Date and Time Setting of FOMA terminal.・ For By name, the sorted order may not match
the order of the Japanese syllabary if two-byte and one-byte characters/alphabetic characters are included in the name of i-αppli.・ For By access frequency, the frequency does not
include the number of being started as the i-αppli standby display. The access frequency is carried over even when i-αppli version is upgraded.・ For By software size, the total of the software
size of i-αppli and scratchpad to be used is sorted from large to small. However, the sorted order may differ from the order of total sizes calculated from the sizes of software and scratchpad displayed in the detail information.
Checking the number of i-αppli in a folderSoftware in Folder
1 d (for over a second)
2 Highlight a folder z Press p・Meaning of the icon ☛P248
Checking current settings of i-αppliSoftware Information
1 Press d (for over a second)
2 Press a
Using various functions from i-αppli
・ Downloading i-αppli that supports individual functions beforehand is required.・ The operation varies for each i-αppli application
and some i-αppli may not be used.
Making calls from i-αppli
1 Select a phone number z Set the call conditions・ Setting of the call conditions ☛P55
2 m z Select YesA call is made by the settings. When you make a call, i-αppli is interrupted.
Connecting to sites from i-αppli
1 Select Yes when a confirmation screen is displayed asking whether to connect to sitesi-αppli is ended and the site is displayed.
Using Camera from i-αppli
1 Operate i-αppli to use Camera
INFORMATION● Shot images or videos may be automatically sent form
i-αppli to the server by communication.●When Camera has been activated from i-αppli, a shot
image is saved in the i-mode folder or Deco-Mail picture folder of Image (My Picture) or in the i-αppli. The shot video is saved in the i-mode folder of i-motion or in the i-αppli.
● Some i-αppli can change the image size or set the frame, etc.
Using Bar Code Reader from i-αppli
1 Operate i-αppli to scan barcodes・ A message that scan results are used and
saved in the i-αppli is displayed.
Default By download time
Storage:Total size of i-αppli saved is indicated in bar and numeric.
Software count:Total number of i-αppli saved is displayed.
i-αppli display:Name and storage folder of i-αppli set as the i-αppli standby display are displayed.
One-key shortcut:The name and storage folder of i-αppli registered to One-key Shortcut are displayed.
Auto start:Name, storage folder and start time of i-αppli set for the next automatic start are displayed.
Usin
g vario
us fu
nctio
ns fro
m i-α
pp
li
258
i-αp
pli
Using infrared communication from i-αppli
・ Infrared communication may not be made depending on the other device, even if it is provided with the infrared communication function.
1 Operate i-αppli to perform infrared communication・ i-αppli can also be started by receiving i-αppli
starting data via infrared communication.・ If you perform infrared communication while
your terminal is connected to a site or sending/receiving mail, the site connection or mail transmission is stopped.
Usin
g vario
us fu
nctio
ns fro
m i-α
pp
li
259
i-channeli-channel ..........................................................................................................260Displaying i-channel ............................................................... Channel List 261Changing i-channel settings ................................................ Ticker Setting 262
260
i-chan
nel
i-channel
i-channel is a service in which DoCoMo or IP (Information Provider) delivers graphical information such as news and weather information to i-channel compatible terminals. Users can receive information regularly, and read the latest information as it appears as tickers on the standby display or view it in the channel list by pressing the i-channel compatible key (c) (Displaying the channel list ☛P261). In addition, users can obtain rich, detail information by selecting a favorite channel in the channel list.・ i-channel information is displayed in Japanese
only.・ For important notes on using i-channel and detail
information about how to use i-channel, see “i-mode User’s Manual”.
There are 2 types of channels: “Basic channel” and “Favorite channel”. Basic channel is the pre-registered channel provided by DoCoMo and can be used immediately after starting use of i-channel. Packet communication fee for automatic update of information in relation to Basic channel is included in the i-channel service fee. Favorite channel is provided by non-DoCoMo IPs and users can register their favorite channel for viewing. Packet communication fee for automatic information update and other fees in relation to Favorite channel are not included in the i-channel service fee.Note that only Basic channel information appears as tickers on the standby display.・ Information charge may be imposed to use some
Favorite channels.・ Some Favorite channels require separate
subscription to the IPs who provide the channels.・ Viewing detail information from the channel list,
whether Basic channel or Favorite channel information, causes separate packet communication fee that is not covered by the i-channel service fee.
i-channel is a pay service for which subscription is required. (An i-mode subscription is required for the i-channel subscription.)・ Operating i-channel ☛P261・ Supporting models: Available with i-channel
compatible models. For details, see “i-mode User’s Manual”.
Before you subscribe to i-channel
After you subscribed to i-channel, tickers automatically run on the standby display as of receiving information or displaying the channel list.
Pressing c displays the channel list. Each channel contains various information in a list form including those that ran as tickers.
c
Pre-subscription
After subscription
Select each channel to view the detail information.・ The screens shown
here are for information purpose only and may differ from the actual screens.
% z o to make connection
IP
Basic channel info
Favorite channel info
i-mode terminal i-mode Center
IP
i-chan
nel
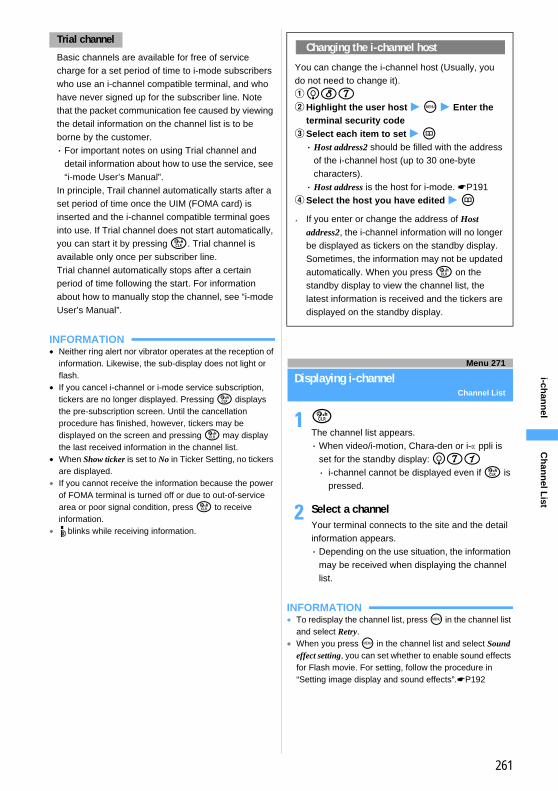
261
i-chan
nel
Basic channels are available for free of service charge for a set period of time to i-mode subscribers who use an i-channel compatible terminal, and who have never signed up for the subscriber line. Note that the packet communication fee caused by viewing the detail information on the channel list is to be borne by the customer.・ For important notes on using Trial channel and
detail information about how to use the service, see “i-mode User’s Manual”.
In principle, Trail channel automatically starts after a set period of time once the UIM (FOMA card) is inserted and the i-channel compatible terminal goes into use. If Trial channel does not start automatically, you can start it by pressing c. Trial channel is available only once per subscriber line.Trial channel automatically stops after a certain period of time following the start. For information about how to manually stop the channel, see “i-mode User’s Manual”.
INFORMATION● Neither ring alert nor vibrator operates at the reception of
information. Likewise, the sub-display does not light or flash.
● If you cancel i-channel or i-mode service subscription, tickers are no longer displayed. Pressing c displays the pre-subscription screen. Until the cancellation procedure has finished, however, tickers may be displayed on the screen and pressing c may display the last received information in the channel list.
●When Show ticker is set to No in Ticker Setting, no tickers are displayed.
● If you cannot receive the information because the power of FOMA terminal is turned off or due to out-of-service area or poor signal condition, press c to receive information.
● blinks while receiving information.
Menu 271
Displaying i-channelChannel List
1 cThe channel list appears.・When video/i-motion, Chara-den or i-αppli is
set for the standby display: d71 ・ i-channel cannot be displayed even if c is
pressed.
2 Select a channelYour terminal connects to the site and the detail information appears.・ Depending on the use situation, the information
may be received when displaying the channel list.
INFORMATION● To redisplay the channel list, press m in the channel list
and select Retry. ●When you press m in the channel list and select Sound
effect setting, you can set whether to enable sound effects for Flash movie. For setting, follow the procedure in “Setting image display and sound effects”.☛P192
Trial channelChanging the i-channel host
You can change the i-channel host (Usually, you do not need to change it).ad87bHighlight the user host z m z Enter the
terminal security codecSelect each item to set z p・ Host address2 should be filled with the address
of the i-channel host (up to 30 one-byte characters).・ Host address is the host for i-mode. ☛P191
dSelect the host you have edited z p● If you enter or change the address of Host
address2, the i-channel information will no longer be displayed as tickers on the standby display. Sometimes, the information may not be updated automatically. When you press c on the standby display to view the channel list, the latest information is received and the tickers are displayed on the standby display.
Ch
ann
el List
262
i-chan
nel
Menu 272 / Menu 8215
Changing i-channel settingsTicker Setting
You can set whether to run tickers of received i-channel information on the standby display. You can also set the ticker running speed.・When Show ticker is set to Yes, up to 10 tickers for
the newest information are shown on the standby display each time the display appears until the display items disappear. When Show ticker is set to No, no tickers are displayed.・ In the default state or in case the UIM is replaced,
or the host address 2 is changed, if the i-channel information is automatically updated or if you press c to display the channel list, the ticker is displayed and you can perform Ticker Setting.
1 d72
2 Select each item to set
3 Press p・ If Show ticker is set to Yes, a confirmation
screen appears when video/i-motion, Chara-den or i-αppli is set for the standby display. If you select Yes, the video/i-motion, Chara-den or i-αppli is released.
INFORMATION● In the following cases, i-channel information is not
displayed in the ticker.・ In All Lock ・ In PIM Lock・ In Omakase Lock (Remote Lock)・ In Public mode (Driving mode)・When the UIM not inserted
Default Show ticker: Yes Ticker speed: Normal
Show ticker:Select Yes or No.・ If No is selected, Ticker speed cannot be
set.Ticker speed:
Select from Slow, Normal, or Fast.
Ticker S
etting
263
Full BrowserViewing Internet web pages designed for PC .......................Full Browser 264Setting Full Browser .......................................................... Browser Setting 268

264
Fu
ll Bro
wser
Menu 29
Viewing Internet web pages designed for PCFull Browser
You can view Internet web pages designed for PCs on FOMA terminal. ・ Some web pages may not be downloaded or
displayed properly. ・ Packet communication fee is required for usage
of Full Browser. Full Browser is not supported by the Pake-Houdai service.
1 d9 z Select the viewing method ・ For the first time after you purchased FOMA
terminal, enter the URL to view a web page. ・ If Access Setting of Browser Setting is set to
No, the access setting screen appears. If it is set to Yes, Full Browser appears. For Access Setting ☛P269
■ Viewing the home page: 1・ Your FOMA terminal is connected to the
web page registered as a home page. No home page is registered by default. For registering a home page ☛P268・ If the home page is not registered yet, press 1 to go to the home page setting screen.
■ Selecting URL from Bookmark: 2 z Select a folder z Select a bookmark ・ No bookmark is registered by default. For
registering a bookmark ☛P267・ Operations available from the folder list or
bookmark list are the same as those for i-mode bookmarks. For details of operation ☛P185
■ Entering the URL of a web page to view: 31 z Enter URL (up to 512 one-byte characters) z p・ Enter a URL in the same manner as for
i-mode. For details of operation ☛P184
■ Using URL History to view web pages: 32 z Select URL ・ URL History contains last 20 URLs you
connected to.・ Operations available from the URL history list
are the same as those from the URL history list of i-mode. For details of operation ☛P184
■ Reconnecting to the last page displayed (Last Visited URL): 33 z o・ Some pages may not be displayed. Or a
different page from the last visited one may be displayed.
2 f when you finish viewing Internet web pages z Select Yes
INFORMATION● You can also display the Internet web page by
registering a bookmark of Full Browser to i-mode Shortcut. For details of operation ☛P185
● Some pages may take some time to appear. ● The following functions are not supported.・ Viewing Flash movies ・ Viewing PDF data・ Plug-in ・ Playing sound・ Saving screen memos ・ Phone To
● To stop displaying the page, press m or c while downloading the data.
Viewing web pages by Full Browser
■ Switching between the mobile mode and the PC mode・ You cannot change the modes while
downloading the data. a(・ Each time you press the key, the mode
switches.・ The setting is saved even after Full Browser
ends.
Full Browser screen
The Full Browser screen is available in two modes: the mobile mode and the PC mode. In the mobile mode, the layout of a page is adjusted to the width of the FOMA terminal screen. Scroll up and down to see the hiding part of the page. In the PC mode, a web page is displayed without being adjusted to the screen size. To view the entire page, scroll both vertically and horizontally. The default is the mobile mode.
aPage title・ appears before the title while the data is
being downloaded.・ If the page has no title, the URL is shown.
bDisplay mode icon: Mobile mode : PC mode
● Displaying a page divided into frames ☛P266●Multi-window display ☛P266
Mobile mode PC mode
a b a b
Fu
ll Bro
wser
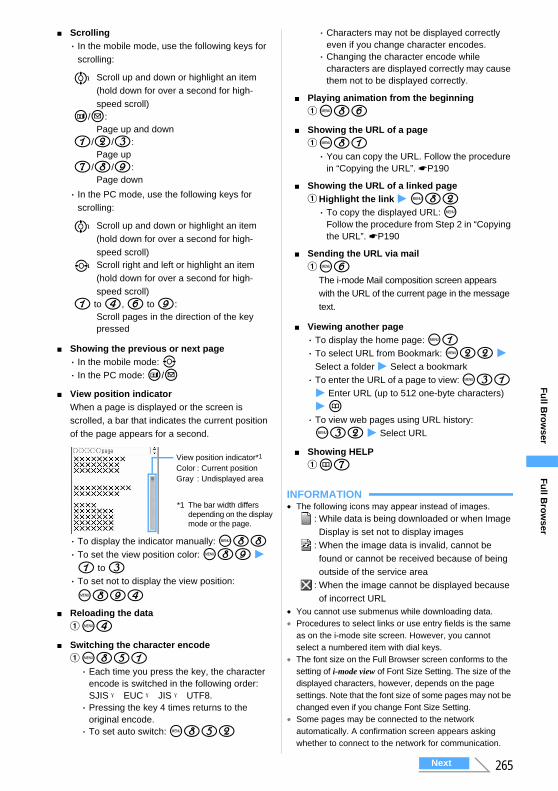
265
Fu
ll Bro
wser
■ Scrolling・ In the mobile mode, use the following keys for
scrolling:
・ In the PC mode, use the following keys for scrolling:
■ Showing the previous or next page・ In the mobile mode: &・ In the PC mode: t/a
■ View position indicatorWhen a page is displayed or the screen is scrolled, a bar that indicates the current position of the page appears for a second.
・ To display the indicator manually: m88・ To set the view position color: m89 z 1 to 3・ To set not to display the view position:
m894■ Reloading the data
am4■ Switching the character encode
am851・ Each time you press the key, the character
encode is switched in the following order: SJIS → EUC → JIS → UTF8. ・ Pressing the key 4 times returns to the
original encode. ・ To set auto switch: m852
・ Characters may not be displayed correctly even if you change character encodes. ・ Changing the character encode while
characters are displayed correctly may cause them not to be displayed correctly.
■ Playing animation from the beginning am86
■ Showing the URL of a pageam81・ You can copy the URL. Follow the procedure
in “Copying the URL”. ☛P190
■ Showing the URL of a linked pageaHighlight the link z m82・ To copy the displayed URL: m
Follow the procedure from Step 2 in “Copying the URL”. ☛P190
■ Sending the URL via mailam6
The i-mode Mail composition screen appears with the URL of the current page in the message text.
■ Viewing another page・ To display the home page: m1・ To select URL from Bookmark: m22 z
Select a folder z Select a bookmark ・ To enter the URL of a page to view: m31 z Enter URL (up to 512 one-byte characters) z p・ To view web pages using URL history: m32 z Select URL
■ Showing HELPap7
INFORMATION● The following icons may appear instead of images.
: While data is being downloaded or when Image Display is set not to display images
: When the image data is invalid, cannot be found or cannot be received because of being outside of the service area
: When the image cannot be displayed because of incorrect URL
● You cannot use submenus while downloading data. ● Procedures to select links or use entry fields is the same
as on the i-mode site screen. However, you cannot select a numbered item with dial keys.
● The font size on the Full Browser screen conforms to the setting of i-mode view of Font Size Setting. The size of the displayed characters, however, depends on the page settings. Note that the font size of some pages may not be changed even if you change Font Size Setting.
● Some pages may be connected to the network automatically. A confirmation screen appears asking whether to connect to the network for communication.
%:Scroll up and down or highlight an item (hold down for over a second for high-speed scroll)
t/a:Page up and down
1/2/3:Page up
7/8/9:Page down
%:Scroll up and down or highlight an item (hold down for over a second for high-speed scroll)
&:Scroll right and left or highlight an item (hold down for over a second for high-speed scroll)
1 to 4, 6 to 9:Scroll pages in the direction of the key pressed
View position indicator*1
Color : Current position Gray : Undisplayed area
*1 The bar width differs depending on the display mode or the page.
Fu
ll Bro
wser
Next
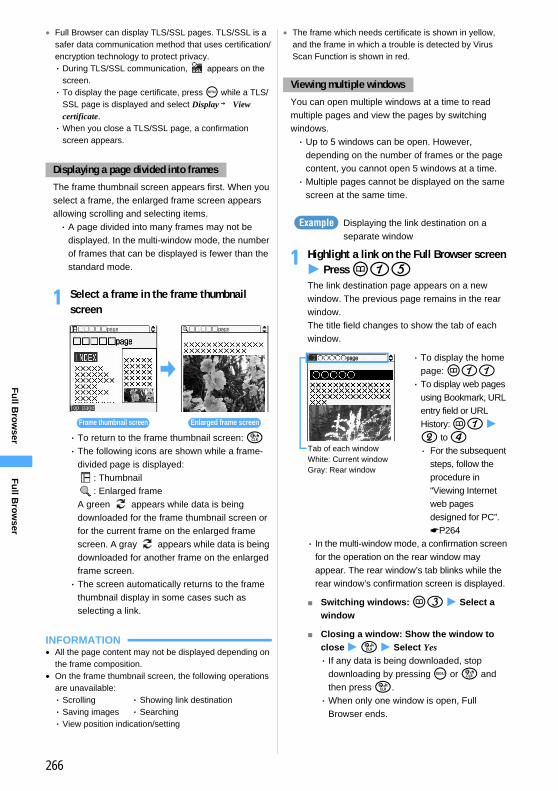
266
Fu
ll Bro
wser
● Full Browser can display TLS/SSL pages. TLS/SSL is a safer data communication method that uses certification/encryption technology to protect privacy. ・ During TLS/SSL communication, appears on the
screen. ・ To display the page certificate, press m while a TLS/
SSL page is displayed and select Display → View certificate. ・When you close a TLS/SSL page, a confirmation
screen appears.
The frame thumbnail screen appears first. When you select a frame, the enlarged frame screen appears allowing scrolling and selecting items. ・ A page divided into many frames may not be
displayed. In the multi-window mode, the number of frames that can be displayed is fewer than the standard mode.
1 Select a frame in the frame thumbnail screen
・ To return to the frame thumbnail screen: c・ The following icons are shown while a frame-
divided page is displayed:: Thumbnail: Enlarged frame
A green appears while data is being downloaded for the frame thumbnail screen or for the current frame on the enlarged frame screen. A gray appears while data is being downloaded for another frame on the enlarged frame screen.・ The screen automatically returns to the frame
thumbnail display in some cases such as selecting a link.
INFORMATION● All the page content may not be displayed depending on
the frame composition.● On the frame thumbnail screen, the following operations
are unavailable:・ Scrolling ・ Showing link destination・ Saving images ・ Searching・ View position indication/setting
● The frame which needs certificate is shown in yellow, and the frame in which a trouble is detected by Virus Scan Function is shown in red.
You can open multiple windows at a time to read multiple pages and view the pages by switching windows. ・ Up to 5 windows can be open. However,
depending on the number of frames or the page content, you cannot open 5 windows at a time. ・Multiple pages cannot be displayed on the same
screen at the same time.
Displaying the link destination on a separate window
1 Highlight a link on the Full Browser screen z Press p15The link destination page appears on a new window. The previous page remains in the rear window.The title field changes to show the tab of each window.
・ In the multi-window mode, a confirmation screen for the operation on the rear window may appear. The rear window’s tab blinks while the rear window’s confirmation screen is displayed.
■ Switching windows: p3 z Select a window
■ Closing a window: Show the window to close z c z Select Yes・ If any data is being downloaded, stop
downloading by pressing m or c and then press c.・When only one window is open, Full
Browser ends.
Displaying a page divided into frames
Enlarged frame screenFrame thumbnail screen
Viewing multiple windows
Example
Tab of each windowWhite: Current windowGray: Rear window
・ To display the home page: p11・ To display web pages
using Bookmark, URL entry field or URL History: p1 z 2 to 4・ For the subsequent
steps, follow the procedure in “Viewing Internet web pages designed for PC”. ☛P264
Fu
ll Bro
wser
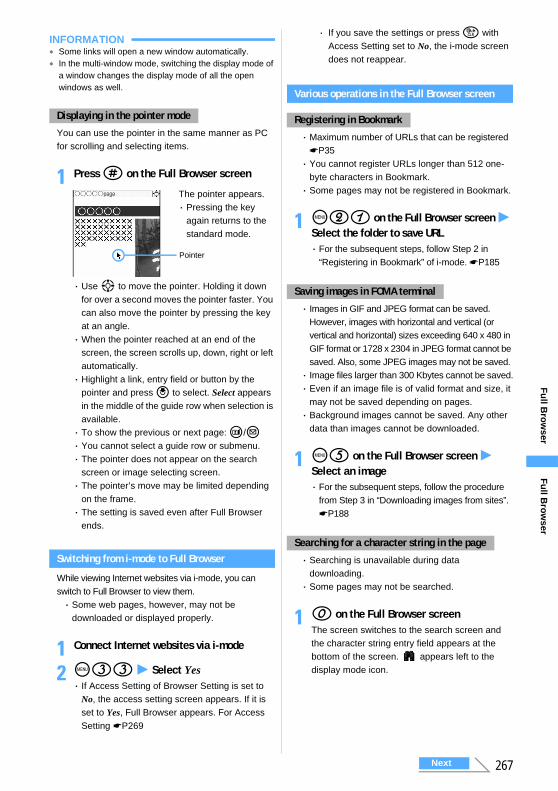
267
Fu
ll Bro
wser
INFORMATION● Some links will open a new window automatically. ● In the multi-window mode, switching the display mode of
a window changes the display mode of all the open windows as well.
You can use the pointer in the same manner as PC for scrolling and selecting items.
1 Press # on the Full Browser screen
・ Use O to move the pointer. Holding it down for over a second moves the pointer faster. You can also move the pointer by pressing the key at an angle. ・When the pointer reached at an end of the
screen, the screen scrolls up, down, right or left automatically. ・ Highlight a link, entry field or button by the
pointer and press o to select. Select appears in the middle of the guide row when selection is available.・ To show the previous or next page: t/a・ You cannot select a guide row or submenu. ・ The pointer does not appear on the search
screen or image selecting screen. ・ The pointer’s move may be limited depending
on the frame.・ The setting is saved even after Full Browser
ends.
Switching from i-mode to Full Browser
While viewing Internet websites via i-mode, you can switch to Full Browser to view them. ・ Some web pages, however, may not be
downloaded or displayed properly.
1 Connect Internet websites via i-mode
2 m33 z Select Yes・ If Access Setting of Browser Setting is set to
No, the access setting screen appears. If it is set to Yes, Full Browser appears. For Access Setting ☛P269
・ If you save the settings or press c with Access Setting set to No, the i-mode screen does not reappear.
Various operations in the Full Browser screen
・Maximum number of URLs that can be registered ☛P35・ You cannot register URLs longer than 512 one-
byte characters in Bookmark. ・ Some pages may not be registered in Bookmark.
1 m21 on the Full Browser screen z Select the folder to save URL ・ For the subsequent steps, follow Step 2 in
“Registering in Bookmark” of i-mode. ☛P185
・ Images in GIF and JPEG format can be saved. However, images with horizontal and vertical (or vertical and horizontal) sizes exceeding 640 x 480 in GIF format or 1728 x 2304 in JPEG format cannot be saved. Also, some JPEG images may not be saved.・ Image files larger than 300 Kbytes cannot be saved.・ Even if an image file is of valid format and size, it
may not be saved depending on pages.・ Background images cannot be saved. Any other
data than images cannot be downloaded.
1 m5 on the Full Browser screen z Select an image・ For the subsequent steps, follow the procedure
from Step 3 in “Downloading images from sites”. ☛P188
・ Searching is unavailable during data downloading.・ Some pages may not be searched.
1 0 on the Full Browser screenThe screen switches to the search screen and the character string entry field appears at the bottom of the screen. appears left to the display mode icon.
Displaying in the pointer mode
Pointer
The pointer appears.・ Pressing the key
again returns to the standard mode.
Registering in Bookmark
Saving images in FOMA terminal
Searching for a character string in the page
Fu
ll Bro
wser
Next
268
Fu
ll Bro
wser
2 Enter a character string (up to 40 one-byte or 20 two-byte characters)Searching is executed and the words matched to the entered character string is highlighted. ・ To search for the next matched word: a・ To search for the previous matched word: t・ To end searching: p■ Setting the detailed conditions: m on the
search screen z Select items and set z p・ To search for a completely matched one-
byte character string, set the search option to Exact match. For example, in case of entering “cat”, when selecting Partial match, “cats” is also highlighted, but with Exact match, “cats” is not highlighted. ・ To distinguish between upper/lower cases,
select Yes in Case-sensitive. ・ The setting is saved even after Full Browser
ends.
INFORMATION● The search results sometimes overlap the character string
entry field. To check the entry field content, press p.
You can upload images of FOMA terminal to the website supporting image uploading. ・ Images in GIF and JPEG format can be uploaded.
The image file size must be up to 80 Kbytes. If the image file contains character string or more than one image are to be uploaded, the total size is up to 100 Kbytes.・ You cannot upload images not permitted to attach
to mail or to output from FOMA terminal (excluding images with file restriction set at your terminal). Any other data than images and character strings cannot be uploaded.・ The uploading method varies depending on web
pages.
1 Select the Browse button on the page for uploading the image・ The Browse button appears when images can
be uploaded from FOMA terminal. If you view the same page by PC, you will see a different button in place of Browse.
■ Changing a selected file: Select Browse button z Select Change
■ Canceling a selected file: Select Browse button z Select Cancel
2 Select a folder z Select an image
Setting Full BrowserBrowser Setting
・ The following i-mode settings are also valid for Full Browser.・ Connection Timeout Setting・ Host Selection・ Certificate Setting・ Display Light
Menu 2941
Setting a home page Home URL
1 d941
2 Enter a URL (up to 512 one-byte characters) z Press p
INFORMATION● You can also set a home page by pressing m while a
web page to be set as a home page is displayed and selecting Set as home URL and Yes. You cannot register URL longer than 512 one-byte characters.
Menu 2942
Setting cookies Cookie Setting/Deleting
Cookie is the mechanism for temporarily saving the data about a user (the user name, etc.) in FOMA terminal when the user accesses Internet websites and sending the saved data to the same website when the user accesses again. Cookie is used, for example, to automatically display the user-specific page. ・ Please note that NTT DoCoMo is not responsible
for any reveal of your information to third parties because of enabling cookies. ・ If cookies are disabled, some web pages will not
be displayed properly or cannot be used.
1 d942
2 Select each item to set z Press p
Uploading images
Default not recorded
Default Valid
Cookie:When you set this to Valid, cookies are always enabled. When setting Valid(notify), a confirmation screen appears before transmission. When you set Cookie to Invalid, cookies are always disabled.
Bro
wser S
etting
269
Fu
ll Bro
wser
■ Deleting all cookies saved: m z Enter the terminal security code z Select Yes
INFORMATION●When you change the UIM with another, Cookie is set to
Invalid.●When you change Cookie from Invalid to Valid or
Valid(notify), the terminal security code may be required. A confirmation screen may appear asking whether to delete saved cookies.
● You cannot display saved cookies or delete each of them.
Menu 2943
Setting script Script Setting
Make setting of JavaScript of the Internet web pages. ・ JavaScript is a program running on the Internet
web pages. ・ If you set Script Setting to Invalid, some web
pages may not be displayed correctly.
1 d943
2 Select each item to set z Press p
INFORMATION● Also you can change the window open guard setting by
pressing m on the Full Browser screen and selecting Display → Window open guard → Yes.
●With Window Open Guard set to Valid, when JavaScript requires to open a new window on the Full Browser screen and the setting works, appears in the position of the display mode icon.
Menu 2944
Setting the display mode Display Mode Setting
Select a display mode (the mobile mode or PC mode) in which Full Browser opens.
1 d944 z Press 1 or 2
Menu 2945
Setting whether to display images Image Display
1 d945
2 Select each item to set z Press p
INFORMATION● You can also make this setting by pressing m on the
Full Browser screen and selecting Display → Image settings.
Menu 2946
Setting whether to use Full BrowserAccess Setting
1 d946
2 Select Yes or No z Press p・ If you select Display, notes are displayed.
Please read the notes before you select Yes.
INFORMATION●When you change the UIM with another, Access Setting
is set to No.
Notify:Select when to display the confirmation screen from among Sending, Receiving, and Sending/receiving, when Valid(notify) is set.
Default Script Setting: ValidWindow Open Guard: Invalid
Script Setting:Set whether to enable JavaScript.
Window Open Guard:Specify whether to open a new window in response to a request from a JavaScript program. When Invalid is set, a confirmation screen appears asking whether to open a new window. Selecting Yes on that screen opens a new window. When Valid is set, a new window does not open.
Default Mobile mode
Default Image, Animation: Display
Image:Specifies whether to display images or animation. ・When Not display is set, Animation
cannot be set. Animation:
Specifies whether to play animation. When Not display is set, the first frame of animation appears.
Default No
Bro
wser S
etting
270
Fu
ll Bro
wser
Menu 2947
Setting Referer Referer Setting
You can set whether to send “Referer” (the link source information to show the page from which you accessed the linked page) when you select a link to view the link destination page. ・ Select Send, Notify or Unsend. Selecting Notify
displays a confirmation screen before sending Referer. ・ Please note that NTT DoCoMo is not responsible for
any reveal of your information to third parties because of sending Referer.
1 d947 z Press any of 1 to 3
Menu 2948Hiding the guide row from the Full Browser screen Screen View Setting
Hide the guide row from the Full Browser screen and show the page content on the full screen. ・ On the full screen, you can perform operations in
the same manner as the standard screen.
1 d948
2 Press 2・ To show the guide row: 1
Default Send
Default With menu icon view
Bro
wser S
etting
271
Displaying/Editing/Managing DataMaking full use of images
Displaying images ...................................................................... My Picture 272Editing still images .........................................................................................274Setting the operating conditions of images ........... Settings (My Picture) 278Saving the still image in the Data Center .............. Data Security Service 279
Making full use of video/i-motionPlaying video/i-motion ................................................................... i-motion 279Editing video/i-motion ....................................................................................282Setting the operating conditions of video/i-motion ... Settings (i-motion) 285
Making full use of Chara-denChara-den ........................................................................................................285Displaying Chara-den ................................................................. Chara-den 285Recording Chara-den .................................................... Record Chara-den 286Setting the operating conditions of Chara-den ..... Settings (Chara-den) 288
Making full use of melodiesPlaying melodies ............................................................................. Melody 288Setting the operating conditions of melodies .............. Settings (Melody) 289
Managing various dataUsing the album ..............................................................................................289Checking/editing detail information of the data ..... View/Edit Detail Info 291Deleting data ...................................................................................................293Sorting data ............................................................................................ Sort 293
Making full use of infrared communicationAbout infrared communication .....................................................................293Sending data by infrared communication ............................. Send Ir Data 294Receiving data by infrared communication ..................... Receive Ir Data 295Activating infrared communication mode..................................................................... Infrared Communication Mode 297Using the infrared remote control function ..................................................297Setting operations for data transfer ....................... Data Transfer Setting 298
Making full use of Sound RecorderRecording sound with Sound Recorder ......................... Sound Recorder 298
272
Disp
laying
/Ed
iting
/Man
agin
g D
ata
Making full use of images
Menu 51
Displaying imagesMy Picture
You can display images saved in Image (My Picture) in Data Box in FOMA terminal.
1 u1 z Select a folder
2 Highlight an image
aOriginated
bType of image
cFile format
dFile restriction
・ Each time you press t, thumbnail display and title display are switched.・ Images with the UIM operation restriction
function set are displayed with in the thumbnail display.・ Display name and other items can be modified.
☛P291
■ Sending mail with images attached: Highlight an image z aThe mail composition screen is displayed with the selected image attached.・When the file size of still image is under
9,000 bytes, a confirmation screen is displayed asking whether to paste in the text field. Select Yes to paste in the mail message and select No to attach to mail.・ Depending on the image size or file size of
the still image, a confirmation screen is displayed asking whether to convert the image to 240 x 320 or 320 x 240 (standby) or save it to Data Box. ☛P212・ Images that can be attached to mail ☛P212
3 Press o
・ Press % to display the previous or next image.・ Animation, Created animation and Flash
movies are replayed automatically when displaying. During playback, the following operations are enabled:
The following images are stored in each folder:Camera:Still images shot by Camera or Chara-den and still images captured from video/i-motioni-mode:Images downloaded from a site, i-mode Mail or i-αppliDeco-Mail picture:Images preinstalled by default for Deco-mail and images downloaded from sites or read by Bar Code ReaderItem:Frame images preinstalled by default and frame images/stamp images downloaded from sitesPreinstalled:Images preinstalled by defaultData transfer:Images read by Bar Code Reader and images received via data communicationsAlbum:Images moved from other folders・ Not displayed by default. To create ☛P289・ You can enter any album name in creating.
:Preinstalled : i-mode:Camera :Item:Data transfer :Chara-den
c da b
Display name and icons of the data at cursor
Title display
Image list
Thumbnail display
cdba
No icon: Still image:Created animation:Animation/Flash movie
:GIF image :JPEG image:SWF (Flash movie)
No icon: Created animation
(in blue):Without file restriction(in gray):With file restriction
o :Pause/replaym0:Retry (replay from the beginning)
Display name
Comment
The image is displayed.
My P
icture
273
Disp
laying
/Ed
iting
/Man
agin
g D
ata
■ Displaying images at the same magnification: o z O to scroll・ It is available for only the image of which the
size exceeds 240 x 320.・ Animation, Created animation and Flash
movies cannot be displayed at the same magnification.・ Terminating displaying at the same
magnification: c■ Displaying the image using full-screen
display: tThe display name and guide row disappears and the image is displayed in the entire screen.・ Press % to display the previous or next
image.・ The image smaller than the screen is not
enlarged.・ In case the auto scroll setting during full-
screen display is on in Settings, when the image of the JPEG format is larger than the screen, the image is displayed by magnification to fit either vertically or horizontally and scrolled automatically.・ Press o during the auto scroll to suspend/
restart. The scrolling cannot be performed again after finishing the operation.・When the vertical and horizontal sizes of
the image have about the same ratio as that of the screen, the entire image is displayed and not scrolled.・When the vertical or horizontal size is
smaller than that of the screen, the image is not enlarged.
Viewing a slide show
The images in the folder can be displayed with switching automatically. ・ The speed of switching images or the order
depends on Settings.
1 u1
2 Highlight a folder z Press m5Slide show is started.・ The folder list returns after displaying all the
images in the folder.・ Created animation is not displayed.・ Sound effects of an image are not played.
・ To quit halfway: c・ Images cannot be switched by pressing keys.
Setting images to the standby display or phonebook data
1 u1 z Select a folder
2 Highlight an image z m2
3 Select an item■ Setting to the standby display: 1 z
Select Yes・ If image zooming is available, select Yes
(Same size) to maintain the image size or select Yes (Large size) to enlarge it to the screen size.・ If the i-αppli standby display has already
been set, a confirmation screen is displayed asking whether to cancel it continuously.・ Setting may be unavailable depending on
images.
■ Registering as new phonebook data: 2・ Registering entries to the phonebook ☛P95
■ Updating the existing phonebook data: 3 z Select a party・ If an image or video/i-motion has already
been set, the image is replaced by the selected image.
■ Setting as call image: 4 z 1 or 2■ Setting as videophone call image,
substitute image or on-hold image: 5 z 1 to 7・ Images whose size exceeds 176 x 144 and
images unavailable for output from FOMA terminal can be set only as call image.
■ Setting as outgoing/incoming message image or message retrieval Image: 6 z 1 to 3・ The outgoing/incoming image is also
displayed even when Message R/F or SMS is sent or received.・ Flash movies cannot be set as the message
retrieval image.
■ Setting to the menu icon: 7 or 8 z 1 to 9 or 0The selected image is set as a menu icon of Customized 1 or Customized 2 of tile display.・ Created animation, Flash movies and item
images cannot be set as a menu icon.
p :Slow-down playback (only in stop for
playing Created animation)t :Full-screen display
My P
icture

274
Disp
laying
/Ed
iting
/Man
agin
g D
ata
Creating animation
You can create animation by selecting and saving still images (up to 6) in the same folder.・ Animation, Created animation, Flash movies and
still images with a size of more than 640 x 480 cannot be saved to Created animation.・ Still images saved in Created animation cannot
be displayed or edited respectively.
1 u1 z Select a folder
2 m41■ To cancel the setting: highlight the
Created animation z m42
3 Select images
・ Each time you press t, thumbnail display and title display are switched.・ To cancel all the selections: m
4 p z Enter a display name (up to 36 characters regardless of one- or two- byte) z Press pIn the image list, and the display name are displayed. In the thumbnail display, the first cartoon panel is displayed.
Editing still images
You can edit still images saved in Image (My Picture). The editing items and the maximum editable image size are as follows:
*1 When the image cannot be edited because the size of it is too large, it can be reduced to the editable size using Change size.
・ The following images cannot be edited:・ Animation, Created animation, Flash movies,
item images and images in the Preinstalled folder・ Still images not permitted to attach to mail or to
output from FOMA terminal (excluding still images with file restriction set with your terminal)・ Still images with either the vertical or horizontal
size is under 8 dots・ Editing of Brightness/Tone or Effects may display
the image smaller. The image size is not influenced. Save as it is. The size of saved images is correct.
1 u1 z Select a folder
2 Highlight a still image z pThe still image edit screen appears.・ Adjustment ☛P278
3 m
4 Select an editing item z Edit the still image
Editing items Maximum editable image size (dot) *1
Change size 1728 x 2304 (352 x 288 for zoom in/out)
Clip 1728 x 2304 (The still image of 1728 x 2304 cannot be clipped specifying the range.)
Brightness/Tone 352 x 288
Effects 240 x 320
Reverse/Rotate 480 x 640
Frames 352 x 288
Paste stamp 352 x 288
The number is displayed on the image in the order of selection.
Paste text 352 x 288
Cut 240 x 320
Size limitation 1728 x 2304
Adjust 352 x 288
1:Change size ☛P2752:Clip ☛P2753:Brightness/Tone ☛P2764:Effects ☛P2765:Reverse/Rotate ☛P2766:Frames ☛P2767:Paste stamp ☛P2768:Paste text ☛P2779:Cut ☛P2770:Size limitation ☛P277
Editing items Maximum editable image size (dot) *1
Still image edit screen Edit menu screen
Ed
iting
still imag
es
275
Disp
laying
/Ed
iting
/Man
agin
g D
ata
5 o after editing z Select SaveEdited still image is saved as a new still image in the same folder.・ Select As frame/stamp to save as an image for
frame or stamp. Images that can be available as frame/stamp ☛P291
INFORMATION● After editing, the file size of still images may become
larger.●When there is not enough available storage space to
save, or you have exceeded the maximum allowable number of images, you cannot save it. Save the image after deleting unnecessary images first.
● Areas in a still image edited which are transparent on FOMA terminal are displayed as white when viewed on a PC.
● Larger still images than display area are reduced. However, images are displayed at same magnification in the case of Paste stamp, Paste text, Cut and Zoom in/out of Change size.
Changing the size
・ Changing the size of still image may deteriorate the image quality.
1 1 on the edit menu screen
2 Change the image size■ Changing it to the specified size: 1 to
8If the horizontal to vertical ratio of specified size and still image is same, the size is changed and the still image edit screen reappears. If the horizontal to vertical ratio differs, a size frame is displayed. Press %/& to adjust the position of the size frame, and press o to change the area encompassed by the size frame to the specified size.
■ Zooming in/out:a9 z & to zoom in/out
・ Press m to zoom out by 20% or press p to zoom in by 20%.・ The vertically long still image can be
zoomed in up to 288 x 352 and the horizontally long still image can be zoomed in up to 352 x 288 (up to the limit of the either).・ Images can be reduced up to 8 dots in
either of horizontal or vertical.bo
The still image edit screen reappears.
Clipping images to desired sizes
You can clip a part of the still image by specifying the size or range.・When the original still image is less than 16 x 16,
clipping is unavailable.
1 2 on the edit menu screen
2 Clip the still image■ Clipping the image to the specified size:
a1 to 8 z O to adjust the clipping position
boThe still image is clipped into the selected size and the still image edit screen reappears.
・ Putting the whole still image in the specified size by ignoring the aspect ratio (Stretch): m・ Putting the entire
still image in the specified size by maintaining the aspect ratio (Fit): p
Size frame
You can zoom in/out by 5% with horizontal and vertical ratio held. The current image size and the rate of zoom in/out are displayed on the upper right of the screen.
Clipping frame
・ Switching the vertical/horizontal of the clipping frame: p・ Changing the
clipping size:
t・ Specifying the
clipping range:
m
Ed
iting
still imag
es
Next

276
Disp
laying
/Ed
iting
/Man
agin
g D
ata
■ Specifying the range and clipping:a9 z O to adjust the position of
z o
bO to adjust the position of z pThe clipping range is set and the range specification frame is displayed in solid line.・ Press o instead of p to change the
position of the upper left again.・O after pressing p to move the range
specification frame.co
The still image is clipped into the specified range and the still image edit screen reappears.
Changing brightness and tone
1 3 on the edit menu screen
2 Change the brightness and tone■ Adjusting the brightness:
a1 z & to adjust the brightness
boThe still image edit screen reappears.
■ Changing the tone to monotone or sepia:2 or 3The tone is modified and the still image edit screen reappears.
Applying special effects
1 4 on the edit menu screen
2 Select the type of effectThe effect is applied to the still image and the still image edit screen reappears.
Reversing/rotating
1 5 on the edit menu screen
2 Reverse/rotate the still image
3 Press oThe still image edit screen reappears.
Overlaying a frame
・ Frames set by default ☛P360
1 6 on the edit menu screenThe same size frames as the still image being edited are listed.・ Images set as frame option in Edit Detail Info
are displayed even if their size differs from that of the still image edited.
2 Select a frame
3 Check the still image z Press o
Pasting stamps
・ Stamps set by default ☛P360
1 7 on the edit menu screenThe smaller size stamps than the still image being edited are listed.
The position of upper left of the range specification frame is set and
is displayed on the lower right of the frame.
Range specification frame
Level
・Maximizing: p・Minimizing : m
Soften :Softens the image.Spherical:Swells the still image spherically from
the center.Emboss :Turns leaden color and emphases
concavity and convexity.Spiral :Makes the still image look as if it is
spiraling out from the center.Shiny :Attaches a mark as glistening.Mosaic :Attaches a mosaic.
%:Reverse up and down
&:Reverse left and right
m:Rotate 90 degrees to the left
p:Rotate 90 degrees to the right
The still image edit screen reappears.・ Switching frames: %・ Rotating a frame 180
degrees: m
Ed
iting
still imag
es
277
Disp
laying
/Ed
iting
/Man
agin
g D
ata
・ Images set as stamp option in Edit Detail Info and stamps preset by default are displayed even if their size is larger than that of still image edited.
2 Select a stampThe selected stamp is displayed in the center of the screen.
3 O to move the stamp z o
・ Deleting all the pasted stamps: m・ The volume of a beep sound depends on
Listen Volume.
4 Press p The still image edit screen reappears.
Pasting characters Paste Text
1 8 on the edit menu screen
2 Select each item to set
3 pThe text (in case of By character set for Paste method, the first character) is displayed in the center of the screen.
4 O to move the text z o
・When By character is set for Paste method, each pressing of o pastes each character. When the last character is pasted, the first character appears.・ Deleting all the pasted text: m・ The volume of a beep sound depends on
Listen Volume.
5 Press p The still image edit screen reappears.
Cutting a desired section out
You can select a color and cut the section of the similar color.
1 9 on the edit menu screen
2 O to place to the color to cut and oThe section with a similar color as the color at is cut out.
・ You can cut another area continuously.
3 Press p The still image edit screen reappears.
Limiting file size for saving
You can limit the file size to a size below 9,000 bytes for Msg attach:Small and a size below 500 Kbytes for Msg attach:Large for saving.
1 0 on the edit menu screen z Select a sizeThe image is saved as a new image with a size below the specified size in the same folder.・ Still images with a size larger than 352 x 288
cannot be set as Msg attach:Small.
Text :Enters the text (up to 40 one-byte or 20 two-byte characters).
Font type:Sets the text type.Font size :Sets the text size.Font color:Sets the text color.Font border color:
Sets the text bordering color.Background color:
Sets the text background color.Paste method:
If By block is set, text is pasted at the same time. If By character is set, text can be pasted on a different position by character.
A beep sound is heard and the stamp is pasted.・ You can paste
stamps in another location continuously.
A beep sound is heard and text is pasted.・ You can paste text
in another location continuously.
Ed
iting
still imag
es
278
Disp
laying
/Ed
iting
/Man
agin
g D
ata
Adjusting brightness and tone balance
・ Adjusting may not have much effect depending on the still image.
1 p on the still image edit screenThe still image adjustment mode is activated.
2 % to switch the adjustment mode
3 & to adjust the level・Maximizing:a・Minimizing:t・ The brightness and color tone change
depending on the level.
4 Press oThe still image edit screen reappears.
Setting the operating conditions of images Settings (My Picture)
1 u1 z m4
2 Select each item to set
3 Press p
INFORMATION● In the image list and image display screen, press m and
then select Settings.
Close-up:Makes appropriate adjustment for images such as still objects and plants.
Near view:Makes appropriate adjustment for the background.
Distant view:Gives vivid brightness and contrast to a landscape image.
Beautiful skin:Gives an effect to make the skin look white and smooth on a portrait image.
Tanned :Gives an effect to make the skin look tanned on a portrait image.
Pale :Gives an effect to make the skin look pale on a portrait image.
Drunk :Gives an effect to make the skin look ruddy on a portrait image.
・ The adjustment mode can also be selected by pressing m and 1 to 7.
Level
Current adjustment mode
Default View format: Display 12 icons Display title: YesDisplay number: Yes Display comments: YesScale up image: No Sound effect: YesAuto scroll mode: NoSlide show speed: NormalSlide show random: No
View format:The thumbnails appear when setting to Display 12 icons, and the title display appears when setting to List view.
Display title:Sets whether to show a display name on the image display screen.
Display number:Sets whether to display the number of images on the image display screen.
Display comments:Sets whether to display comments on the image display screen.
Scale up image:Sets whether to scale up an image smaller than the display area by maintaining its aspect ratio when displaying it.・ Even when set to Yes, the image is not
scaled up in case of the full-screen display.
Sound effect:Sets whether to play effect sounds set for images when an image is displayed.
Auto scroll mode:Sets whether the auto scroll is enabled when t is pressed on the image display screen.
Slide show speed:Selects the switching speed of slide show among Fast, Normal or Slow.
Slide show random:Sets whether to display images randomly in slide show.
Settin
gs (M
y Pictu
re)
279
Disp
laying
/Ed
iting
/Man
agin
g D
ata
Saving the still image in the Data CenterData Security Service
You can save still images in the Data Center using Data Security Service.・ This service is a pay service and requires a
subscription. Please refer to “i-mode User’s Manual” for the details.
Saving still images
・ The still image that exceeds 100 Kbytes cannot be saved.・ Still images not permitted to attach to mail or to
output from FOMA terminal (excluding still images with file restriction set with your terminal) cannot be saved.・ Created animation, Flash movies, item images, or
the image in the Preinstalled folder cannot be saved.
1 u1 z Select a folder
2 m54 z Select a still image z p・ Up to 10 data can be selected.
3 Select Yes z Enter the terminal security codeSelected still images are saved at the Data Center. When saving is completed, the execution result is displayed.・ The execution result disappears in about 5
seconds and the image list returns. Press o to return to the list immediately.
INFORMATION● In case you have not subscribed to Data Security
Service, a screen for indicating that appears.
Restoring still images
Restore still images saved in the Data Center from the sites of the Data Center to FOMA terminal. Please refer to “i-mode User’s Manual” for the details.
Confirming the communication log
You can confirm the log of communicating with the Data Center.・ The log is recorded up to 30. When exceeding 30
logs, the oldest one will be deleted.
1 m662 z Select a communication log
Making full use of video/i-motion
Menu 52
Playing video/i-motioni-motion
You can play video/i-motion saved in i-motion of Data Box in FOMA terminal.・ Video/i-motion files (MP4 files) with an image size
from 48 x 48 to 320 x 240 can be played.
1 u2 z Select a folder
2 Highlight a video/i-motion file
aOriginated
The following video/i-motion files are stored in each folder:
Camera:Videos recorded with Movie Camera or Chara-den and sounds recorded with Sound Recorder and video memosi-mode:i-motion downloaded from sites or i-motion MailPreinstalled:Videos preinstalled by defaultData transfer:Video/i-motion files received by data communicationAlbum:Videos/i-motion files moved from other folders・ Not displayed by default. To create ☛P289・ You can enter any album name in creating.
:Preinstalled :i-mode:Camera :Data transfer:Chara-den :Videophone
c da b
Display name and icons of the data at cursor
Title display
cda b
Video/i-motion list
Thumbnail display
Data S
ecurity S
ervice
Next
280
Disp
laying
/Ed
iting
/Man
agin
g D
ata
bReplay restriction
cFile types
dFile restriction
・ Each time you press t, thumbnail display and title display are switched.・ Sounds recorded with Sound Recorder or
video/i-motion only with sound (i-motion without image such as singer’s vocals) is displayed as
and video/i-motion with the UIM operation restriction function set is displayed as in the thumbnail display.・ Display name and other items can be modified.
☛P291
■ Sending mail with video/i-motion attached (i-motion Mail): Highlight a video/i-motion file z aThe mail composition screen with the video/i-motion attached is displayed.・ Video/i-motion that can be attached to mail
☛P212
3 Press o
aPlay volume:Indicates the current volume.
bPlaying status
cFile types
dEnlargement/reduction
ePlaying duration:Indicates the current playing time/full duration in numeric and bar.
・ In case Size adjustment is set to Normal in Settings, a confirmation message appears when trying to replay the video reduced. Press o.・ The following operations are available while
playing video/i-motion:
■ Setting a bookmark: In case of setting a bookmark, when playing a video/i-motion with a set bookmark from the list, a confirmation screen appears asking whether to play from the bookmark position. When selecting Yes, playing is started from a bookmark position and when selecting No, playing is started from the beginning.・ In case of playing it by pressing o while in
pause on the play screen, playing is started from the beginning even when a bookmark is set.・ The number of the bookmark to be set is
only one in all the video/i-motion of FOMA terminal. If a bookmark is already set, it is discarded and the new bookmark is set.・ You cannot set in i-motion whose replay
restriction is set. In addition, when playing from the phonebook registration screen, mail composition screen, setting screen for sound and display, a bookmark cannot be set and playing from a bookmark cannot be performed.
aDuring playback, t at the position to set a bookmark z Select Yes・ Playing continuously: o・ To cancel the bookmark: Stop the
playback and t
:No restriction:Restriction on the number of times:Restriction on expiration:Restriction on period
:MP4 :MP4 with bookmark
(in blue):Without file restriction(in gray):With file restriction
: in play: in stop: in pause
:only image :only sound:only text :image + sound:image + text :sound + text:image + sound + text
The video/i-motion is played.
a
b
dc e
:enlarged :reducedNo icon:
Displayed at the same magnification・Whether to enlarge or not can be set in
Settings.
o:Pause/replay, Play from the beginning (after stopping)
%:Adjust volumep:Stop
r:Play at fast speed
l:Rewind and playc:Return to the video/i-motion list
i-mo
tion
281
Disp
laying
/Ed
iting
/Man
agin
g D
ata
■ Playing horizontally: (・ Each time you press, playing horizontally
and vertically is switched.・ For video/i-motion with the ticker, switching
is unavailable.
INFORMATION●When saving video/i-motion, acquisition of thumbnail
images may not be available due to the effect of other functions. Such video/i-motion is displayed as in thumbnail display.
● During playback, closing your FOMA terminal will cause the playback to pause. Open your FOMA terminal and press o to resume playback from the pause point. Playback may be resumed from the beginning, however, if you closed your FOMA terminal while playing video/i-motion with some other function.
A confirmation screen is displayed before playback starts. Replay restriction types and contents to check are as follows:
■ Restriction on the number of times
■ Restriction on expiration
■ Restriction on period
・ You can check remaining playback counts, replay expiration and playback period in View Detail Info.・ Even if you change the date and time, expiration
time and period of restriction cannot be changed.・ In case the date and time is set with the automatic
time correction set to off, the date and time may be reset if the battery pack is removed or not charged for a while with the battery exhausted. If this happens, i-motion with a replay restriction on expiration or period cannot be played.
Setting video/i-motion to the standby display or phonebook data
・ Video/i-motion without an image, i-motion whose replay restriction is set and i-motion whose image size is beyond 320 x 240 cannot be set as the standby display.・ Video/i-motion can be set for the phonebook,
Movie ringtone (Chaku-motion) or incoming image when the image size is 128 x 96 (Sub-QCIF) or 176 x 144 (QCIF). However, only the video/i-motion with only image can be set for the phonebook or incoming image.・ The video/i-motion for which Available is set for
Ring alert and Receive display in detail information can be set as Movie ringtone and incoming image. However, you cannot set any video/i-motion files sent back to your FOMA terminal after they are transferred to a PC or other FOMA terminal using infrared communication or data link software.
1 u2 z Select a folder
2 Highlight a video/i-motion file z m2
3 Select each item to set■ Setting to the standby display: 1 z
Select Yes・ If zooming is available for the video/i-motion,
select Yes(Same size) to maintain the image size or select Yes(Large size) to enlarge it to the screen size.・ If the i-αppli standby display has already
been set, a confirmation screen is displayed asking whether to cancel it continuously.・ Playing the video/i-motion set as the
standby display ☛P124
■ Registering as new phonebook data: 2・ Registering entries to the phonebook ☛P95
When the replay restriction is set
Status Description
Playback countsremain
Available to replay x (x/all) time(s). Play? is displayed. To play, select Yes; to stop, select No.
Maximum number of plays reached
This data can no longer be replayed. Delete? is displayed. To delete, select Yes; to cancel, select No.
Status Description
Within expiration
Available to replay until year/month/date hour: minutes. Play? is displayed. To play, select Yes; to stop, select No.
After expiration
Replay period has expired. Delete? is displayed. To delete, select Yes; to cancel, select No.
Status Description
Within period
Available to replay from year/month/date hour: minutes to year/month/date hour: minutes. Play? is displayed. To play, select Yes; to stop, select No.
Before period
Replay period has not yet started. is displayed. Press o to return to the video/i-motion list.
After period
Replay period has expired. Delete? is displayed. To delete, select Yes; to cancel, select No.
i-mo
tion
Next
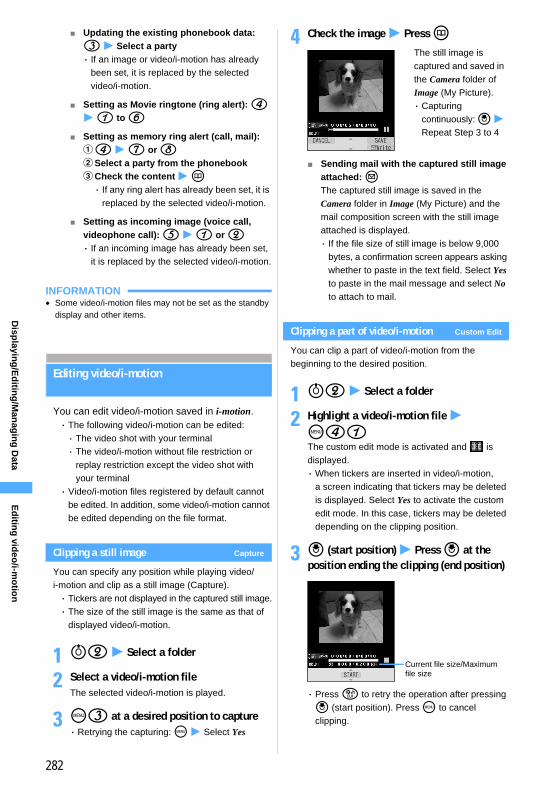
282
Disp
laying
/Ed
iting
/Man
agin
g D
ata
■ Updating the existing phonebook data: 3 z Select a party・ If an image or video/i-motion has already
been set, it is replaced by the selected video/i-motion.
■ Setting as Movie ringtone (ring alert): 4 z 1 to 6
■ Setting as memory ring alert (call, mail):a4 z 7 or 8bSelect a party from the phonebook cCheck the content z p・ If any ring alert has already been set, it is
replaced by the selected video/i-motion.
■ Setting as incoming image (voice call, videophone call): 5 z 1 or 2・ If an incoming image has already been set,
it is replaced by the selected video/i-motion.
INFORMATION● Some video/i-motion files may not be set as the standby
display and other items.
Editing video/i-motion
You can edit video/i-motion saved in i-motion.・ The following video/i-motion can be edited:・ The video shot with your terminal・ The video/i-motion without file restriction or
replay restriction except the video shot with your terminal
・ Video/i-motion files registered by default cannot be edited. In addition, some video/i-motion cannot be edited depending on the file format.
Clipping a still image Capture
You can specify any position while playing video/i-motion and clip as a still image (Capture).・ Tickers are not displayed in the captured still image.・ The size of the still image is the same as that of
displayed video/i-motion.
1 u2 z Select a folder
2 Select a video/i-motion fileThe selected video/i-motion is played.
3 m3 at a desired position to capture・ Retrying the capturing: m z Select Yes
4 Check the image z Press p
■ Sending mail with the captured still image attached: aThe captured still image is saved in the Camera folder in Image (My Picture) and the mail composition screen with the still image attached is displayed.・ If the file size of still image is below 9,000
bytes, a confirmation screen appears asking whether to paste in the text field. Select Yes to paste in the mail message and select No to attach to mail.
Clipping a part of video/i-motion Custom Edit
You can clip a part of video/i-motion from the beginning to the desired position.
1 u2 z Select a folder
2 Highlight a video/i-motion file z m41The custom edit mode is activated and is displayed.・When tickers are inserted in video/i-motion,
a screen indicating that tickers may be deleted is displayed. Select Yes to activate the custom edit mode. In this case, tickers may be deleted depending on the clipping position.
3 o (start position) z Press o at the position ending the clipping (end position)
・ Press c to retry the operation after pressing o (start position). Press m to cancel clipping.
The still image is captured and saved in the Camera folder of Image (My Picture).・ Capturing
continuously: o z Repeat Step 3 to 4
Current file size/Maximum file size
Ed
iting
video
/i-mo
tion
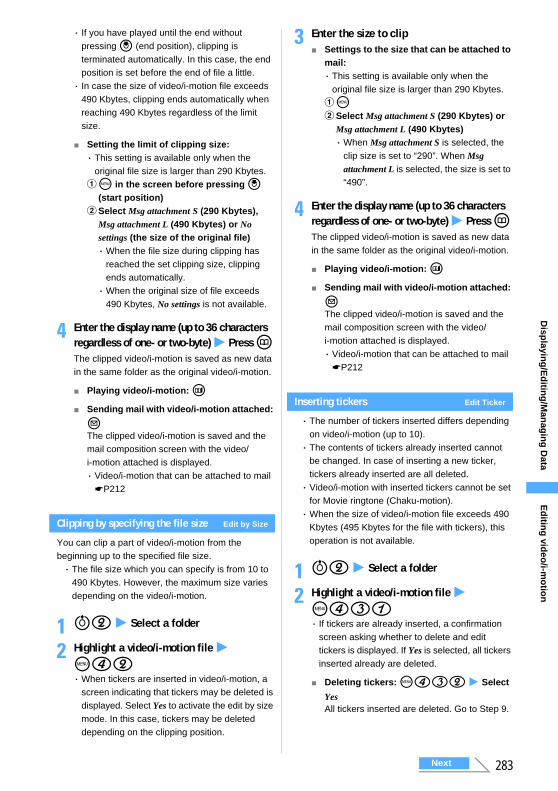
283
Disp
laying
/Ed
iting
/Man
agin
g D
ata
・ If you have played until the end without pressing o (end position), clipping is terminated automatically. In this case, the end position is set before the end of file a little.・ In case the size of video/i-motion file exceeds
490 Kbytes, clipping ends automatically when reaching 490 Kbytes regardless of the limit size.
■ Setting the limit of clipping size:・ This setting is available only when the
original file size is larger than 290 Kbytes.am in the screen before pressing o
(start position)bSelect Msg attachment S (290 Kbytes),
Msg attachment L (490 Kbytes) or No settings (the size of the original file)・When the file size during clipping has
reached the set clipping size, clipping ends automatically.・When the original size of file exceeds
490 Kbytes, No settings is not available.
4 Enter the display name (up to 36 characters regardless of one- or two-byte) z Press pThe clipped video/i-motion is saved as new data in the same folder as the original video/i-motion.
■ Playing video/i-motion: t■ Sending mail with video/i-motion attached:
aThe clipped video/i-motion is saved and the mail composition screen with the video/i-motion attached is displayed.・ Video/i-motion that can be attached to mail
☛P212
Clipping by specifying the file size Edit by Size
You can clip a part of video/i-motion from the beginning up to the specified file size.・ The file size which you can specify is from 10 to
490 Kbytes. However, the maximum size varies depending on the video/i-motion.
1 u2 z Select a folder
2 Highlight a video/i-motion file z m42・When tickers are inserted in video/i-motion, a
screen indicating that tickers may be deleted is displayed. Select Yes to activate the edit by size mode. In this case, tickers may be deleted depending on the clipping position.
3 Enter the size to clip■ Settings to the size that can be attached to
mail:・ This setting is available only when the
original file size is larger than 290 Kbytes.ambSelect Msg attachment S (290 Kbytes) or
Msg attachment L (490 Kbytes)・When Msg attachment S is selected, the
clip size is set to “290”. When Msg attachment L is selected, the size is set to “490”.
4 Enter the display name (up to 36 characters regardless of one- or two-byte) z Press pThe clipped video/i-motion is saved as new data in the same folder as the original video/i-motion.
■ Playing video/i-motion: t■ Sending mail with video/i-motion attached:
aThe clipped video/i-motion is saved and the mail composition screen with the video/i-motion attached is displayed.・ Video/i-motion that can be attached to mail
☛P212
Inserting tickers Edit Ticker
・ The number of tickers inserted differs depending on video/i-motion (up to 10).・ The contents of tickers already inserted cannot
be changed. In case of inserting a new ticker, tickers already inserted are all deleted.・ Video/i-motion with inserted tickers cannot be set
for Movie ringtone (Chaku-motion).・When the size of video/i-motion file exceeds 490
Kbytes (495 Kbytes for the file with tickers), this operation is not available.
1 u2 z Select a folder
2 Highlight a video/i-motion file z m431・ If tickers are already inserted, a confirmation
screen asking whether to delete and edit tickers is displayed. If Yes is selected, all tickers inserted already are deleted.
■ Deleting tickers: m432 z Select
YesAll tickers inserted are deleted. Go to Step 9.
Ed
iting
video
/i-mo
tion
Next
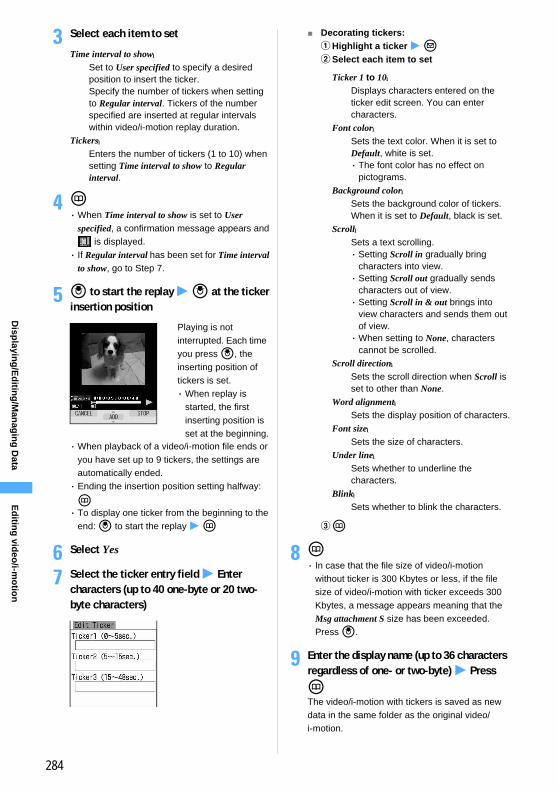
284
Disp
laying
/Ed
iting
/Man
agin
g D
ata
3 Select each item to set
4 p・When Time interval to show is set to User
specified, a confirmation message appears and is displayed.
・ If Regular interval has been set for Time interval to show, go to Step 7.
5 o to start the replay z o at the ticker insertion position
・When playback of a video/i-motion file ends or you have set up to 9 tickers, the settings are automatically ended.・ Ending the insertion position setting halfway:
p・ To display one ticker from the beginning to the
end: o to start the replay z p
6 Select Yes
7 Select the ticker entry field z Enter characters (up to 40 one-byte or 20 two-byte characters)
■ Decorating tickers:aHighlight a ticker z abSelect each item to set
cp
8 p・ In case that the file size of video/i-motion
without ticker is 300 Kbytes or less, if the file size of video/i-motion with ticker exceeds 300 Kbytes, a message appears meaning that the Msg attachment S size has been exceeded. Press o.
9 Enter the display name (up to 36 characters regardless of one- or two-byte) z Press pThe video/i-motion with tickers is saved as new data in the same folder as the original video/i-motion.
Time interval to show:Set to User specified to specify a desired position to insert the ticker.Specify the number of tickers when setting to Regular interval. Tickers of the number specified are inserted at regular intervals within video/i-motion replay duration.
Tickers:Enters the number of tickers (1 to 10) when setting Time interval to show to Regular interval.
Playing is not interrupted. Each time you press o, the inserting position of tickers is set.・When replay is
started, the first inserting position is set at the beginning.
Ticker 1 to 10:Displays characters entered on the ticker edit screen. You can enter characters.
Font color:Sets the text color. When it is set to Default, white is set.・ The font color has no effect on
pictograms.Background color:
Sets the background color of tickers. When it is set to Default, black is set.
Scroll:Sets a text scrolling.・ Setting Scroll in gradually bring
characters into view.・ Setting Scroll out gradually sends
characters out of view.・ Setting Scroll in & out brings into
view characters and sends them out of view.・When setting to None, characters
cannot be scrolled.Scroll direction:
Sets the scroll direction when Scroll is set to other than None.
Word alignment:Sets the display position of characters.
Font size:Sets the size of characters.
Under line:Sets whether to underline the characters.
Blink:Sets whether to blink the characters.E
ditin
g vid
eo/i-m
otio
n
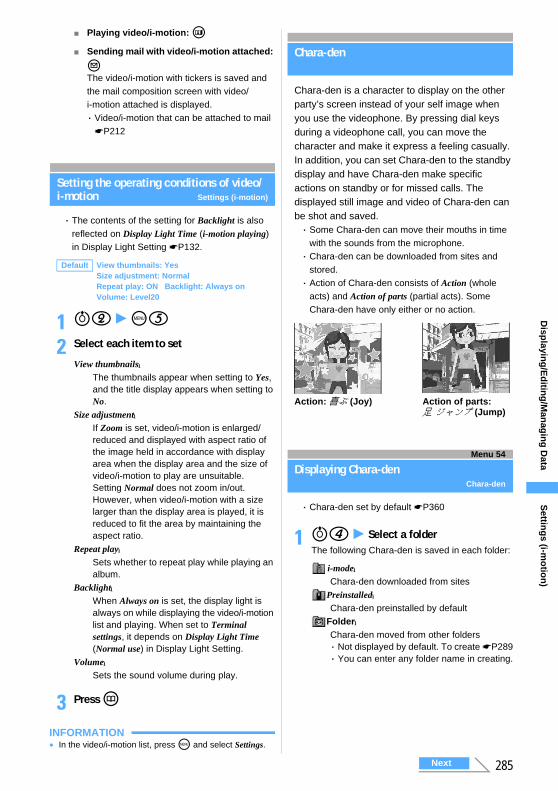
285
Disp
laying
/Ed
iting
/Man
agin
g D
ata
■ Playing video/i-motion: t■ Sending mail with video/i-motion attached:
aThe video/i-motion with tickers is saved and the mail composition screen with video/i-motion attached is displayed.・ Video/i-motion that can be attached to mail
☛P212
Setting the operating conditions of video/i-motion Settings (i-motion)
・ The contents of the setting for Backlight is also reflected on Display Light Time (i-motion playing) in Display Light Setting ☛P132.
1 u2 z m5
2 Select each item to set
3 Press p
INFORMATION● In the video/i-motion list, press m and select Settings.
Making full use of Chara-den
Chara-den
Chara-den is a character to display on the other party’s screen instead of your self image when you use the videophone. By pressing dial keys during a videophone call, you can move the character and make it express a feeling casually. In addition, you can set Chara-den to the standby display and have Chara-den make specific actions on standby or for missed calls. The displayed still image and video of Chara-den can be shot and saved.・ Some Chara-den can move their mouths in time
with the sounds from the microphone.・ Chara-den can be downloaded from sites and
stored.・ Action of Chara-den consists of Action (whole
acts) and Action of parts (partial acts). Some Chara-den have only either or no action.
Menu 54
Displaying Chara-denChara-den
・ Chara-den set by default ☛P360
1 u4 z Select a folderThe following Chara-den is saved in each folder:
Default View thumbnails: YesSize adjustment: NormalRepeat play: ON Backlight: Always onVolume: Level20
View thumbnails:The thumbnails appear when setting to Yes, and the title display appears when setting to No.
Size adjustment:If Zoom is set, video/i-motion is enlarged/reduced and displayed with aspect ratio of the image held in accordance with display area when the display area and the size of video/i-motion to play are unsuitable.Setting Normal does not zoom in/out. However, when video/i-motion with a size larger than the display area is played, it is reduced to fit the area by maintaining the aspect ratio.
Repeat play:Sets whether to repeat play while playing an album.
Backlight:When Always on is set, the display light is always on while displaying the video/i-motion list and playing. When set to Terminal settings, it depends on Display Light Time (Normal use) in Display Light Setting.
Volume:Sets the sound volume during play.
i-mode:Chara-den downloaded from sites
Preinstalled:Chara-den preinstalled by default
Folder:Chara-den moved from other folders・ Not displayed by default. To create ☛P289・ You can enter any folder name in creating.
Action: 喜ぶ (Joy) Action of parts: 足 ジャンプ (Jump)
Settin
gs (i-m
otio
n)
Next
286
Disp
laying
/Ed
iting
/Man
agin
g D
ata
2 Highlight a Chara-den image
■ Making a videophone call using Chara-den:aHighlight a Chara-den image z tbEnter the phone number z t・ Phone number can be entered from the
phonebook by pressing p.・ Press m to set the conditions and make
a videophone call. ☛P55・ Operating procedure of the videophone
☛P78・ Using Chara-den while making a
videophone call ☛P83
■ Setting Chara-den to the videophone substitute image: Highlight a Chara-den image z a・ You can also set by holding down t for
over a second in the Chara-den display screen.
■ Setting Chara-den to the standby display:aHighlight a Chara-den image z m4bSet the type of action and the interval
for action z p・ For details, follow Step b to c in
“Setting the action of Chara-den”. ☛P123cSelect Yes(Same size) or Yes(Large size)・ If the i-αppli standby display has already
been set, a confirmation screen is displayed asking whether to cancel it continuously.
3 Press o
・ Pressing a dial key performs action in accordance with the number.・ Stopping the action: 0
■ Switching between large size and same size display: u for large size and d for same size・ If a comment has been set for Chara-den,
displaying the image at the same size causes the comment to be shown.
■ Switching Chara-den images:am91 z Select a folderbSelect a Chara-den image
■ Displaying the action list: aThe action list for the current action mode is displayed.・ Selecting an action activates the Chara-den.・ Highlight an action and press m to confirm
the details.
■ Switching between Action and Action of parts: a (for over a second)・ Each time you hold down, Action and Action
of parts are switched.
INFORMATION● Chara-den cannot be edited or saved by attaching mail
or data transfer out of FOMA terminal.
Recording Chara-denRecord Chara-den
・ Still images and videos shot are saved in the same file format as still images and videos shot with the camera. Image file saving format ☛P161
1 u4 z Select a folder
2 Highlight a Chara-den image z pThe Chara-den recording screen appears.
3 t to switch the recording types
ba
Chara-den list
aOriginated
bFile restriction(in gray): With file
restriction・ Display name and
other items can be modified. ☛P291
:i-mode:Preinstalled
Action mode
: Action
: Action of parts
The Chara-den image is displayed.
Video & Voice:Records Chara-den with sounds from the microphone. For Chara-den that reacts with sounds from the microphone, the mouth in the image moves in time with the sounds.
Action mode
Recording type
・ You can also switch by pressing 1 to 4 after pressing m3.
Reco
rd C
hara-d
en
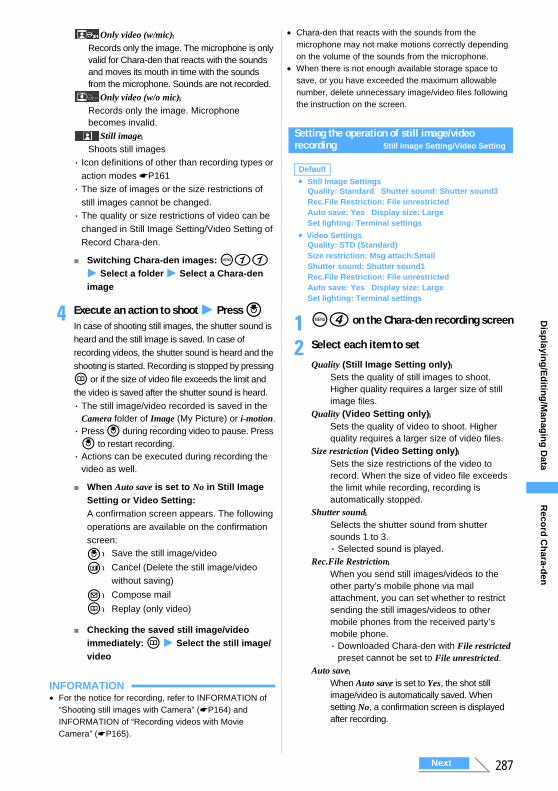
287
Disp
laying
/Ed
iting
/Man
agin
g D
ata
■ Switching Chara-den images: m11 z Select a folder z Select a Chara-den image
4 Execute an action to shoot z Press oIn case of shooting still images, the shutter sound is heard and the still image is saved. In case of recording videos, the shutter sound is heard and the shooting is started. Recording is stopped by pressing p or if the size of video file exceeds the limit and the video is saved after the shutter sound is heard.・ The still image/video recorded is saved in the
Camera folder of Image (My Picture) or i-motion.・ Press o during recording video to pause. Press o to restart recording.・ Actions can be executed during recording the
video as well.
■ When Auto save is set to No in Still Image Setting or Video Setting:A confirmation screen appears. The following operations are available on the confirmation screen:
■ Checking the saved still image/video immediately: p z Select the still image/video
INFORMATION● For the notice for recording, refer to INFORMATION of
“Shooting still images with Camera” (☛P164) and INFORMATION of “Recording videos with Movie Camera” (☛P165).
● Chara-den that reacts with the sounds from the microphone may not make motions correctly depending on the volume of the sounds from the microphone.
●When there is not enough available storage space to save, or you have exceeded the maximum allowable number, delete unnecessary image/video files following the instruction on the screen.
Setting the operation of still image/video recording Still Image Setting/Video Setting
1 m4 on the Chara-den recording screen
2 Select each item to set
Only video (w/mic):Records only the image. The microphone is only valid for Chara-den that reacts with the sounds and moves its mouth in time with the sounds from the microphone. Sounds are not recorded.
Only video (w/o mic):Records only the image. Microphone becomes invalid.
Still image:Shoots still images
・ Icon definitions of other than recording types or action modes ☛P161・ The size of images or the size restrictions of
still images cannot be changed.・ The quality or size restrictions of video can be
changed in Still Image Setting/Video Setting of Record Chara-den.
o:Save the still image/video
t:Cancel (Delete the still image/video without saving)
a:Compose mail
p:Replay (only video)
Default
●Still Image SettingsQuality: Standard Shutter sound: Shutter sound3Rec.File Restriction: File unrestrictedAuto save: Yes Display size: LargeSet lighting: Terminal settings
●Video SettingsQuality: STD (Standard)Size restriction: Msg attach:SmallShutter sound: Shutter sound1Rec.File Restriction: File unrestrictedAuto save: Yes Display size: LargeSet lighting: Terminal settings
Quality (Still Image Setting only):Sets the quality of still images to shoot. Higher quality requires a larger size of still image files.
Quality (Video Setting only):Sets the quality of video to shoot. Higher quality requires a larger size of video files.
Size restriction (Video Setting only):Sets the size restrictions of the video to record. When the size of video file exceeds the limit while recording, recording is automatically stopped.
Shutter sound:Selects the shutter sound from shutter sounds 1 to 3.・ Selected sound is played.
Rec.File Restriction:When you send still images/videos to the other party’s mobile phone via mail attachment, you can set whether to restrict sending the still images/videos to other mobile phones from the received party’s mobile phone.・ Downloaded Chara-den with File restricted
preset cannot be set to File unrestricted.Auto save:
When Auto save is set to Yes, the shot still image/video is automatically saved. When setting No, a confirmation screen is displayed after recording.
Reco
rd C
hara-d
en
Next
288
Disp
laying
/Ed
iting
/Man
agin
g D
ata
3 Press p
INFORMATION● If a still image/video is taken from the Chara-den for
which file restriction is set in Rec.File Restriction of detail information (except for the case with Rec.File Restriction set with your terminal), this still image/video cannot be edited, forwarded or attached to mail.
Setting the operating conditions of Chara-den Settings (Chara-den)
1 u4 z m4
2 Select each item to set
3 Press p
Making full use of melodies
Menu 53
Playing melodiesMelody
Play melodies saved in Melody of Data Box in FOMA terminal.
1 u3 z Select a folder
2 Highlight a melody
aOriginated
bFile restriction
・ Display name and other items can be modified. ☛P291
■ Sending mail with melodies attached: Highlight a melody z aThe mail composition screen with the melody attached is displayed.・ If the receiver is other than FOMA D701i,
D701iWM, D702i, D702iBCL, D702iF, D851iWM, D901i, D901iS, D902i or D902iS, the received melody may not be correctly played.・Melodies that can be attached to mail ☛P212
Display size:Specifies whether to enlarge Chara-den or to display in the same size.・ The setting takes effect the next time the
recording screen is displayed.Set lighting:
When Always on is set, the display light is always on while recording Chara-den. If you set Terminal settings, it depends on Display Light Time (Normal use) in Display Light Setting. ☛P132
Default Display size: Large Set lighting: Terminal settings
Display size:Specifies whether to enlarge Chara-den or to display in the same size.
Set lighting:When Always on is set, the display light is always on while displaying the Chara-den list or Chara-den. If you set Terminal settings, it depends on Display Light Time (Normal use) in Display Light Setting. ☛P132
The following melodies are saved in each folder:i-mode:Melodies downloaded from sites or i-mode MailPreinstalled:Melodies preinstalled in FOMA terminalMail attach melody:Melodies for attaching to mail, which are preset by defaultData transfer:Melodies read by Bar Code Reader or melodies received via data communicationAlbum:Melodies moved from other folders・ Not displayed by default. To create ☛P289・ You can enter any album name in creating.
: i-mode:Data transfer:Preinstalled
(in blue):Without file restriction(in gray):With file restriction
ba
Melody list
Settin
gs (C
hara-d
en)

289
Disp
laying
/Ed
iting
/Man
agin
g D
ata
3 Press o
・ The following operations are available while playing a melody:
・ If you close your FOMA terminal, the playback will not stop.
Setting melodies as ring alert
・Melodies in the Mail attach melody folder cannot be set as the ring alert.
1 u3 z Select a folder
2 Highlight a melody z m2
3 Select the type of sound to set■ Setting as ring alert for voice call, mail,
chat mail, Message R/F or videophone: 1 to 6
■ Setting as memory ring alert (call, mail):a7 or 8 z Select a party from the
phonebookbCheck the content z p・ If a ring alert has already been set, the ring
alert is replaced by the selected melody.
Setting the operating conditions of melodies Settings (Melody)
1 u3 z m5
2 Select each item to set
3 Press p
INFORMATION● In the melody list and melody play screen, press m and
select Settings.●When Sync melody is set for Light pattern or Vibrate,
the lighting or vibrator may not function for some melodies.● Even if Play portion is set for Play position, partial playing
may not be performed for some melodies.
Managing various data
Using the album
You can create albums (folders) in Image (My Picture), i-motion, Melody or Chara-den in Data Box in FOMA terminal and sort out the data. The album data in i-motion and Melody can be replayed at one time.・ In Chara-den, the album is referred to as “folder”.・ The fixed folder registered by default cannot be
renamed or deleted.
Creating albums
・ Up to 100 albums in Image (My Picture) and up to 10 albums respectively in i-motion, Melody or Chara-den can be created.・ No album is set by default.
Creating the album in Image (My Picture)
1 u1
&:Adjust volume
%:Play the previous/next melody
c/o:Return to the melody list
Default Volume: Level 3Light pattern: Sync melody Light color: RainbowVibrate: OFFPlay position: Play allPlay background: Standard
Volume:Sets the volume in playing melodies.
Current play position
The melody is played.
Play volume
Light pattern:Sets the lighting pattern of the sub-display in playing melodies. When Sync melody or OFF is set, Light color cannot be set.
Light color:Sets the color of the sub-display in playing melodies.
Vibrate:Sets the vibrator pattern in playing melodies.
Play position:Specifies whether to play the whole (Play all) or part of the melody (Play portion) in playing melodies.
Play background:Sets the image to be displayed on the screen for playing melodies. To set an image in Image (My Picture), set to Select and select an image.
Example
Settin
gs (M
elod
y)
Next
290
Disp
laying
/Ed
iting
/Man
agin
g D
ata
2 m1■ Changing the album name: Highlight the
album z m3■ Deleting albums:
When deleting the album, the data in the album are also deleted.aHighlight the album z m2・When data is saved in the album to
delete, enter the terminal security code.bSelect Yes
3 Enter the album name (up to 20 one-byte or 10 two-byte characters) z Press p・ For Chara-den, up to 10 one- or two-byte
characters can be entered.
INFORMATION● In the folder list of i-motion/Melody, press m and select
Create album, Rename album or Delete album.● In the folder list of Chara-den, press m and select Create
folder, Rename folder or Delete folder.
Moving/copying data to the album
You can move data in the fixed folder to an album or move it from album to album.・ Data can be moved from each folder of Image (My
Picture) to the Deco-Mail picture folder.・ Data saved in the Preinstalled folder or Mail attach
melody folder cannot be moved.
Moving data in Image (My Picture)
1 u1 z Select a folder
2 Highlight data z m511■ Moving selected items:
am512 z Select data・ Each time you press t, thumbnail
display and title display are switched.bp
■ Moving all the data in folder:
m513
3 Select the destination album z Select Yes
INFORMATION● In the image display screen, press m and select Move/
Copy → Move to album.● In the video/i-motion list, press m and select Move/Copy → Move to album → One item, Selected items or All items.
● In the melody list, press m and select Move → Move to album → One item, Selected items or All items. In the melody play screen, press m and select Move → Move to album → One item or All items.
● In the Chara-den list, press m and select Move → One item, Selected items or All items.
● In the Chara-den display screen, press m and select Move.
・ The operation of returning data to the fixed folder cannot be performed in Chara-den.
Returning album data in Image (My Picture) to the fixed folder
1 u1 z Select an album
2 Highlight data z m521■ Returning selected items:
am522 z Select data・ Each time you press t, thumbnail
display and title display are switched.bp
■ Returning all the data in the album:
m523
3 Select Yes
INFORMATION● In the image display screen, press m and select Move/
Copy → Return to folder.● In the video/i-motion list, press m and select Move/Copy → Return to folder → One item, Selected items or All items.
● In the melody list, press m and select Move → Restore to folder → One item, Selected items or All items. In the melody play screen, press m and select Move → Restore to folder → One item or All items.
● Preinstalled images registered in the Deco-Mail picture folder are moved to the i-mode folder by returning data to the fixed folder.
・ The following data cannot be copied:・ Created animation, item images, images in the
Preinstalled folder in Image (My Picture)・ Video/i-motion whose replay restriction is set or
video/i-motion downloaded from sites or mails which can be set as the ring alert・ Melody, Chara-den・ Data set to File restricted in file restriction
Note that the data whose file restriction is set to File restricted with FOMA terminal and data in the Data transfer folder are excluded.
Moving data to the album
Example
Returning album data to the fixed folder
Copying data
Example
Usin
g th
e albu
m
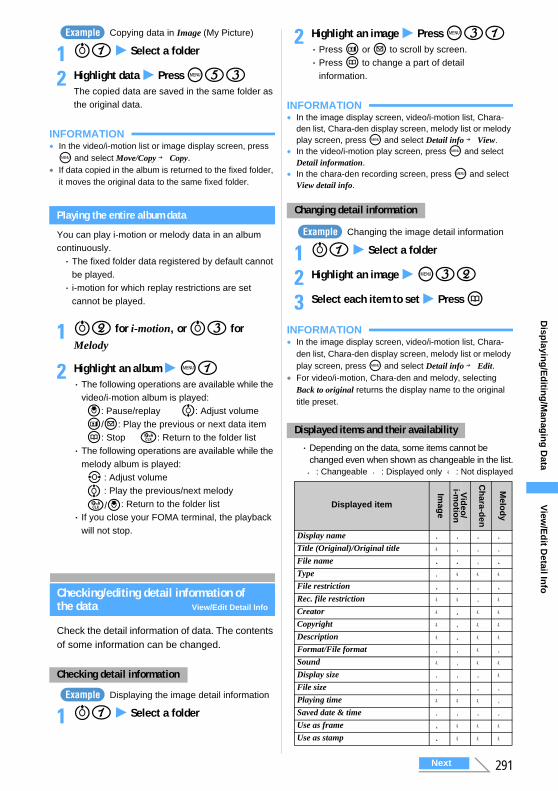
291
Disp
laying
/Ed
iting
/Man
agin
g D
ata
Copying data in Image (My Picture)
1 u1 z Select a folder
2 Highlight data z Press m53The copied data are saved in the same folder as the original data.
INFORMATION● In the video/i-motion list or image display screen, press
m and select Move/Copy → Copy.● If data copied in the album is returned to the fixed folder,
it moves the original data to the same fixed folder.
Playing the entire album data
You can play i-motion or melody data in an album continuously.・ The fixed folder data registered by default cannot
be played.・ i-motion for which replay restrictions are set
cannot be played.
1 u2 for i-motion, or u3 for Melody
2 Highlight an album z m1・ The following operations are available while the
video/i-motion album is played:o: Pause/replay %: Adjust volumet/a: Play the previous or next data itemp: Stop c: Return to the folder list
・ The following operations are available while the melody album is played:& : Adjust volume
% : Play the previous/next melody
c/o: Return to the folder list・ If you close your FOMA terminal, the playback
will not stop.
Checking/editing detail information of the data View/Edit Detail Info
Check the detail information of data. The contents of some information can be changed.
Displaying the image detail information
1 u1 z Select a folder
2 Highlight an image z Press m31・ Press t or a to scroll by screen.・ Press p to change a part of detail
information.
INFORMATION● In the image display screen, video/i-motion list, Chara-
den list, Chara-den display screen, melody list or melody play screen, press m and select Detail info → View.
● In the video/i-motion play screen, press m and select Detail information.
● In the chara-den recording screen, press m and select View detail info.
Changing the image detail information
1 u1 z Select a folder
2 Highlight an image z m32
3 Select each item to set z Press p
INFORMATION● In the image display screen, video/i-motion list, Chara-
den list, Chara-den display screen, melody list or melody play screen, press m and select Detail info → Edit.
● For video/i-motion, Chara-den and melody, selecting Back to original returns the display name to the original title preset.
・ Depending on the data, some items cannot be changed even when shown as changeable in the list.●: Changeable ○: Displayed only -: Not displayed
Checking detail information
Example
Example
Changing detail information
Displayed items and their availability
Displayed item
Imag
e
i-mo
tion
Vid
eo/
Ch
ara-den
Melo
dy
Display name ● ● ● ●Title (Original)/Original title - ○ ○ ○File name ● ● ○ ●Type ○ - - -File restriction ● ● ○ ●Rec. file restriction - - ○ -Creator - ● - -Copyright - ● - -Description - ● - -Format/File format ○ ○ - ○Sound - ○ - -Display size ○ ○ ○ -File size ○ ○ ○ ○Playing time - - - ○Saved date & time ○ ○ ○ ○Use as frame ● - - -Use as stamp ● - - -
Example
View
/Ed
it Detail In
fo
Next
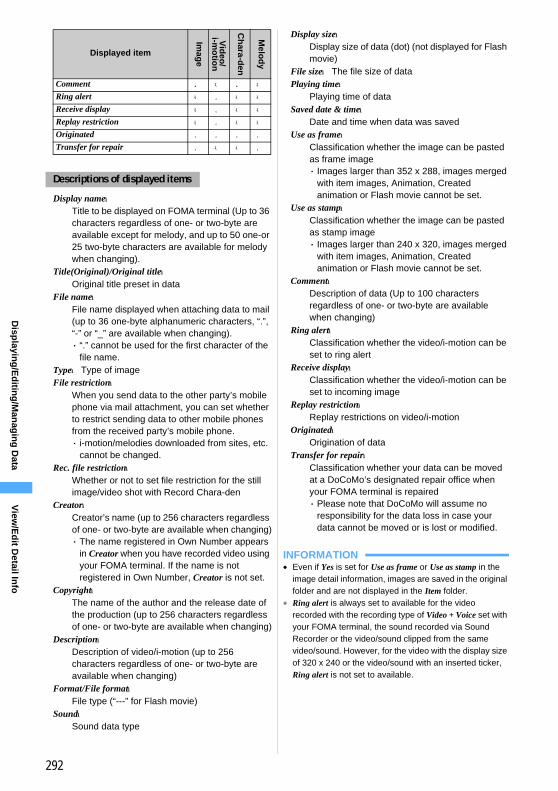
292
Disp
laying
/Ed
iting
/Man
agin
g D
ataINFORMATION● Even if Yes is set for Use as frame or Use as stamp in the
image detail information, images are saved in the original folder and are not displayed in the Item folder.
● Ring alert is always set to available for the video recorded with the recording type of Video + Voice set with your FOMA terminal, the sound recorded via Sound Recorder or the video/sound clipped from the same video/sound. However, for the video with the display size of 320 x 240 or the video/sound with an inserted ticker, Ring alert is not set to available.
Comment ● - ● -Ring alert - ○ - -Receive display - ○ - -Replay restriction - ○ - -Originated ○ ○ ○ ○Transfer for repair ○ - - ○
Descriptions of displayed items
Display name:Title to be displayed on FOMA terminal (Up to 36 characters regardless of one- or two-byte are available except for melody, and up to 50 one-or 25 two-byte characters are available for melody when changing).
Title(Original)/Original title:Original title preset in data
File name:File name displayed when attaching data to mail (up to 36 one-byte alphanumeric characters, “.”, “-” or “_” are available when changing).・ “.” cannot be used for the first character of the
file name.Type:Type of imageFile restriction:
When you send data to the other party’s mobile phone via mail attachment, you can set whether to restrict sending data to other mobile phones from the received party’s mobile phone.・ i-motion/melodies downloaded from sites, etc.
cannot be changed.Rec. file restriction:
Whether or not to set file restriction for the still image/video shot with Record Chara-den
Creator:Creator’s name (up to 256 characters regardless of one- or two-byte are available when changing)・ The name registered in Own Number appears
in Creator when you have recorded video using your FOMA terminal. If the name is not registered in Own Number, Creator is not set.
Copyright:The name of the author and the release date of the production (up to 256 characters regardless of one- or two-byte are available when changing)
Description:Description of video/i-motion (up to 256 characters regardless of one- or two-byte are available when changing)
Format/File format:File type (“---” for Flash movie)
Sound:Sound data type
Displayed item
Imag
e
i-mo
tion
Vid
eo/
Ch
ara-den
Melo
dy
Display size:Display size of data (dot) (not displayed for Flash movie)
File size:The file size of dataPlaying time:
Playing time of dataSaved date & time:
Date and time when data was savedUse as frame:
Classification whether the image can be pasted as frame image・ Images larger than 352 x 288, images merged
with item images, Animation, Created animation or Flash movie cannot be set.
Use as stamp:Classification whether the image can be pasted as stamp image・ Images larger than 240 x 320, images merged
with item images, Animation, Created animation or Flash movie cannot be set.
Comment:Description of data (Up to 100 characters regardless of one- or two-byte are available when changing)
Ring alert:Classification whether the video/i-motion can be set to ring alert
Receive display:Classification whether the video/i-motion can be set to incoming image
Replay restriction:Replay restrictions on video/i-motion
Originated:Origination of data
Transfer for repair:Classification whether your data can be moved at a DoCoMo’s designated repair office when your FOMA terminal is repaired・ Please note that DoCoMo will assume no
responsibility for the data loss in case your data cannot be moved or is lost or modified.
View
/Ed
it Detail In
fo
293
Disp
laying
/Ed
iting
/Man
agin
g D
ata
Deleting data
・ The data saved in the Preinstalled folder of Image (My Picture), i-motion or Melody or in the Mail attach melody folder of Melody cannot be deleted.
Deleting data in Image (My Picture)
1 u1 z Select a folder
2 Highlight the data z m61■ Deleting selected items:
am62 z Select the data・ Each time you press t, thumbnail
display and title display are switched.bp
■ Deleting all the data in a folder: m63 z Enter the terminal security code
3 Select Yes
INFORMATION● In the video/i-motion list, melody list or Chara-den list,
press m and select Delete → One item, Selected items or All items.
● In the image display screen or Chara-den display screen, press m and select Delete.
● In the melody play screen, press m and select Delete → One item or All items.
● If data set for the standby display or ring alert are deleted, each setting returns to the default. When data set to the phonebook are deleted, the operation follows the settings of Sound Setting or Mail/Call Image.
● If you delete Created animation, the original images composing Created animation are also deleted.
● In the case where Chara-den, Deco-mail picture or Frame registered by default has been deleted, you can download it from the i-mode site “My D-style”. ☛P361
Sorting dataSort
You can change the order of data of the list screen.
Sorting data in Image (My Picture)
1 u1 z Select a folder
2 m7
3 Select each item to set z Press p
INFORMATION● In the video/i-motion list, melody list or Chara-den list,
press m and select Sort.● If one-byte and two-byte characters are mixed in the
display name, the sorted result may not correspond to Japanese syllabary.
Making full use of infrared communication
About infrared communication
You can send and receive data to/from other FOMA terminals, mobile phones or PCs provided with an infrared communication function. Also, by using the i-αppli compatible with infrared communication, you can link to devices having an infrared communication function.・ Infrared communication is not available while All
Lock, PIM Lock, Lock on Close or Self Mode is on.・ Infrared communication and USB connection
cannot be performed at the same time.・ Data prohibited from outputting from FOMA
terminal cannot be sent/received. Note that the data whose file restriction is set to File restricted with the same terminal and data in the Data transfer folder are excluded.・ During infrared communication, and are
displayed on the top of the screen, and the terminal is in data transfer mode (the same status as outside the service area), so phone calls, i-mode connection and data communication are disabled. Also, you cannot switch to other functions by pressing b.・ The infrared communication function of FOMA
terminal conforms to IrMC 1.1.・ Even if the terminal of the other party conforms to
IrMC 1.1, some data may not be sent/received depending on the data type.・ The data including pictograms may not be displayed
correctly when sent to other than i-mode terminals. Even when sending to i-mode terminals, the data including pictogram 2 may not be displayed correctly depending on receiving terminals.Default Sort criteria: Saved date & time
Order: Descending
Example
Example
Sort criteria:Sets the sorting method.Order :Sets the sorting order of data.
Deletin
g d
ata
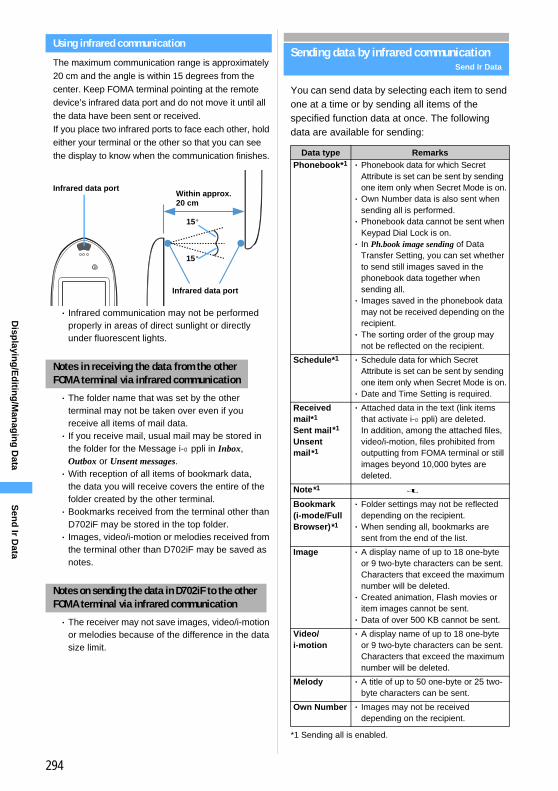
294
Disp
laying
/Ed
iting
/Man
agin
g D
ata
Using infrared communication
The maximum communication range is approximately 20 cm and the angle is within 15 degrees from the center. Keep FOMA terminal pointing at the remote device’s infrared data port and do not move it until all the data have been sent or received.If you place two infrared ports to face each other, hold either your terminal or the other so that you can see the display to know when the communication finishes.
・ Infrared communication may not be performed properly in areas of direct sunlight or directly under fluorescent lights.
・ The folder name that was set by the other terminal may not be taken over even if you receive all items of mail data.・ If you receive mail, usual mail may be stored in
the folder for the Message i-αppli in Inbox, Outbox or Unsent messages.・With reception of all items of bookmark data,
the data you will receive covers the entire of the folder created by the other terminal.・ Bookmarks received from the terminal other than
D702iF may be stored in the top folder.・ Images, video/i-motion or melodies received from
the terminal other than D702iF may be saved as notes.
・ The receiver may not save images, video/i-motion or melodies because of the difference in the data size limit.
Sending data by infrared communicationSend Ir Data
You can send data by selecting each item to send one at a time or by sending all items of the specified function data at once. The following data are available for sending:
*1 Sending all is enabled.
Notes in receiving the data from the other FOMA terminal via infrared communication
Notes on sending the data in D702iF to the other FOMA terminal via infrared communication
Infrared data portWithin approx. 20 cm
15°
15°
Infrared data port
Data type RemarksPhonebook*1 ・ Phonebook data for which Secret
Attribute is set can be sent by sending one item only when Secret Mode is on.・ Own Number data is also sent when
sending all is performed.・ Phonebook data cannot be sent when
Keypad Dial Lock is on.・ In Ph.book image sending of Data
Transfer Setting, you can set whether to send still images saved in the phonebook data together when sending all.・ Images saved in the phonebook data
may not be received depending on the recipient.・ The sorting order of the group may
not be reflected on the recipient.
Schedule*1 ・ Schedule data for which Secret Attribute is set can be sent by sending one item only when Secret Mode is on.・ Date and Time Setting is required.
Received mail*1
Sent mail*1
Unsent mail*1
・ Attached data in the text (link items that activate i-αppli) are deleted. In addition, among the attached files, video/i-motion, files prohibited from outputting from FOMA terminal or still images beyond 10,000 bytes are deleted.
Note*1 -Bookmark (i-mode/Full Browser)*1
・ Folder settings may not be reflected depending on the recipient.・When sending all, bookmarks are
sent from the end of the list.
Image ・ A display name of up to 18 one-byte or 9 two-byte characters can be sent. Characters that exceed the maximum number will be deleted.・ Created animation, Flash movies or
item images cannot be sent.・ Data of over 500 KB cannot be sent.
Video/i-motion
・ A display name of up to 18 one-byte or 9 two-byte characters can be sent. Characters that exceed the maximum number will be deleted.
Melody ・ A title of up to 50 one-byte or 25 two-byte characters can be sent.
Own Number ・ Images may not be received depending on the recipient.
Sen
d Ir D
ata
295
Disp
laying
/Ed
iting
/Man
agin
g D
ata
・ Data may not be transferred correctly when communication is performed with the terminals other than D702iF or the infrared communication devices. Items that cannot be saved by the receiver side are discarded.
Sending single data item
Sending a phonebook entry
1 Make FOMA terminal of the other party ready to receive
2 Search the phonebook z Highlight the phonebook data to send z m81
3 Select Yes・ To cancel sending data: o
INFORMATION● In the bookmark list, received mail list, sent mail list,
unsent mail list or the list of notes, press m and select Send Ir data → Selected item or Send.
● In the image list, video/i-motion list or melody list, press m and select Send Ir data.
● In the day view screen of the schedule, press m and select Infrared → Send Ir data.
● In the details screen of Own Number, press m and select Send own number.
Sending all data items
You can send all the data of phonebook, schedule, mail, note and bookmark via infrared communication.・ To send all the data, the same authentication
password must be entered both by the sender and receiver. Decide a 4-digit authentication password from 0000 to 9999 in advance.
1 Make FOMA terminal of the other party ready to receive
2 m621
3 Select the data type z Enter the terminal security code
4 Enter the 4-digit authentication passwordThe entered authentication password is masked with “ * ”.
5 Select Yes・ To cancel sending data: o
INFORMATION● In the phonebook list, bookmark list, received mail list,
sent mail list, unsent mail list or the list of notes, press m and select Send Ir data → Send all.
● In the folder list of the bookmark, received mail, sent mail or unsent mail, press m and select Send all Ir data.
● In the calendar screen or day view screen for schedule, press m and select Infrared → Send all Ir data.
●When all the data items are sent, the order of data may change in receiver’s side.
●When pressing m621 and selecting Bookmarks, both the i-mode bookmark and Full Browser bookmark data are sent all. In case of operating from the bookmark list of i-mode or Full Browser, the i-mode bookmark or Full Browser bookmark data are sent all respectively.
Receiving data by infrared communication Receive Ir Data
You can receive data by selecting each item to receive one at a time or by receiving all items of the specified function data at once. Received data are saved directly in FOMA terminal, or are saved in FOMA terminal after the data are saved temporarily in INBOX of Receive Ir Data and checked. The following data are available for receiving:
*1 Receiving all is enabled.・ Received data are saved in order as follows:・ Phonebook data and Own Number data are
saved in the smallest free phonebook No.・ Schedules and mails are saved in order of
date/time.・ Notes are saved in order of reception.・ Bookmarks, images, video/i-motion and
melodies are added in the top of the list.・ If you receive all phonebook items, Own Number
data except your phone number is overwritten.
Example
Data type Storage after receiving
Phonebook*1 Phonebook
Schedule*1 Scheduler
Received mail*1 InboxSent mail*1 OutboxUnsent mail*1 Unsent messagesNote*1 Notepad
Bookmark (i-mode/Full Browser)*1
Bookmark of i-mode/Full Browser
Image Data transfer folder of Image (My Picture)
Video/i-motion Data transfer folder of i-motionMelody Data transfer folder of MelodyOwn Number Phonebook
Next
Receive Ir D
ata
296
Disp
laying
/Ed
iting
/Man
agin
g D
ata
・ Phonebook data cannot be received when Keypad Dial Lock is set.・ Date and Time Setting is required for receiving a
schedule.・ For precautions of saving data, refer to
INFORMATION in “Saving received data”. ☛P297
Receiving single data item
・ You cannot receive data that exceed 512 Kbytes.
1 m6221The receive method selection screen appears.
2 1 or 2
3 Select YesReceiving standby condition is activated.
4 Send single data item on the sender sideWhen Confirm & save is selected in Step 2, the INBOX screen appears after receiving data. For saving method of data, refer to the procedure from Step 2 of “Saving received data”. ☛P297When Save is selected, the receive method selection screen reappears after receiving data.・ To cancel receiving data: o
Receiving all data items
You can receive all the data of phonebook, schedule, mail, note and bookmark via infrared communication.・ To receive all the data, the same authentication
password must be entered both by the receiver and sender. Decide a 4-digit authentication password from 0000 to 9999 in advance.
1 m6222The all receive method selection screen is displayed.
2 1 or 2
・ Note that the original data in FOMA terminal are all deleted by overwriting and replaced by new data.・ If you select Confirm & save, go to Step 4.
3 Select Yes z Enter the terminal security code
4 Enter the 4-digit authentication password・ The entered authentication password is
masked with “ * ”.
5 Select YesReceiving standby condition is activated.
6 Send all the data on the sender sideWhen selecting Confirm & save in Step 2, the INBOX screen appears after receiving is finished. For saving method of data, refer to the procedure from Step 2 of “Saving received data”. When selecting Overwrite, the all receive method selection screen reappears after reception.・ To cancel receiving data: o
INFORMATION● Receiving time differs depending on the type or number
of received data. It may take time to receive the data of large capacity or a large number.
Saving received data
You can save data stored in INBOX temporarily to FOMA terminal.・ If Confirm & save is selected when receiving a
single data item or all the data items, the INBOX screen appears automatically after finishing receiving.・ The data saved in FOMA terminal are deleted
from INBOX.
1 m6223
Confirm & save:Received data are saved temporarily in INBOX. Cannot be selected if INBOX has no free space. After receiving is finished, the INBOX data list appears.
Save:Received data is saved in FOMA terminal. After receiving is finished, the receive method selection screen reappears without displaying INBOX.
Confirm & save:Received data are saved temporarily in INBOX. Cannot be selected if INBOX has no free space. After receiving the data, the INBOX data list is displayed. Add or Overwrite can be selected when saving from INBOX.
Overwrite:Received data is overwritten and saved in FOMA terminal. After receiving is finished, the all receive method selection screen reappears without displaying INBOX.
Receive Ir D
ata
297
Disp
laying
/Ed
iting
/Man
agin
g D
ata
2 Select the data
■ Deleting one item: Highlight the data z m2 z Select Yes
■ Deleting all items: m3 z Enter the terminal security code z Select Yes
3 Select Yes■ When selecting multiple items:
aEnter the terminal security codebSelect Add to add data, or select
Overwrite to overwrite data・ Note that the original data in FOMA
terminal are all deleted by selecting Overwrite and replaced by new data.
INFORMATIONinformation
● Depending on the size of data to save, the maximum number of items that can be saved/registered in FOMA terminal may be fewer.
● ToDo data (a list function data to manage business) cannot be saved on D702iF. When receiving all items of ToDo data and schedule data at once from the model other than D702iF, only the schedule data is saved. Note that when all items of only ToDo data are received, all the schedule data registered in D702iF are deleted if you select to overwrite the received data.
●When the data received all at once are saved by overwriting, the protected data in FOMA terminal are also deleted.
●When multiple items of bookmark data are saved by overwriting, both of i-mode bookmarks and Full Browser bookmark data are overwritten. In case either of bookmark data of i-mode or Full Browser only exists, both are overwritten as well. Please note that the original data in FOMA terminal are deleted.
●When invalid characters are included in the received data, they are replaced by blank spaces or cut away.
● Any mail with ToruCa attached is saved after the ToruCa is deleted.
● Any PushTalk phonebook received is registered as an ordinary phonebook.
●When you have received any data that cannot be used in D702iF, the data sometimes is displayed as a memo in the INBOX folder and cannot be saved.
● Mail data received from the device that can save mail by the folder may be saved in the Message i-αppli folder. To check the saved mail data, select the Message i-αppli folder in which the data is saved and press m1.
Activating infrared communication modeInfrared Communication Mode
Activate i-αppli by receiving the data to start i-αppli via infrared communication device having the function of starting i-αppli.・ It is necessary to download the specified software
from sites, etc. beforehand.・ In case i-αppli is set not to start with the i-αppli
To function via an external device, i-αppli cannot be activated.
1 m62212 z Select YesReceiving standby condition is activated.
2 Receive the data to start i-αppli via infrared communication devicei-αppli is activated.・ To cancel receiving data: o
Using the infrared remote control function
FOMA terminal can be used as an infrared remote controller by downloading the i-αppli for infrared remote control.・ Download the i-αppli suited for the individual
device.・ If the preset i-αppli Gガイド番組表リモコン
(G-GUIDE TV Remote Controller) is activated, FOMA terminal can be used as an infrared remote controller for TV, etc.・ This function is unavailable during Self Mode is
on or infrared communication is executed.・ Communication may be influenced by the model
of the supported device used and ambient luminance.・ Some equipment cannot be operated even if it is
compatible with infrared remote control.
/ :Single item/multiple items of phonebook data
/ / :Single item of i-mode bookmark data/Full Browser bookmark data/multiple items of bookmark data
/ :Single item/multiple items of mail data/ :Single item/multiple items of schedule
data/ :Single item/multiple items of notes:Image:Video/i-motion:Melody
Next
Infrared
Co
mm
un
ication
Mo
de
298
Disp
laying
/Ed
iting
/Man
agin
g D
ataD
ata Tran
sfer Settin
g
Perform remote control operation with the infrared data port of FOMA terminal pointed at the infrared receiver of the supported device used (operating procedure differs depending on i-αppli). Angle for remote control is 15 degrees from the center and the distance is approximately 4 m at the maximum. However, the angle and distance allowed for the operation differs depending on the type of devices to operate and the level of brightness in the environment.・ The infrared port is on the display side. For smooth
operation, first put your finger on the button, face the infrared port to the infrared receiver of another device and then press the button.
Setting operations for data transferData Transfer Setting
Set operations for data transfer by infrared communication and USB connection.
1 m623
2 Select each item to set
3 Press p
Making full use of Sound Recorder
Recording sound with Sound RecorderSound Recorder
Sound can be recorded using Sound Recorder. Recorded sound can be played on your FOMA terminal. It can also be sent together with i-mode Mail and sent via infrared communication.・ Recorded sound is saved as video/i-motion
without image.
The date and time recorded is attached to the file name, display name and the title of the sound file automatically.(Example) In case of 12:34:56 on December 5, 2006.
→ 20061205123456The file format is as follows:
Remote control operation
Default End alert: OFF Auto Authentication: OFFPh. book image sending: ON
End alert:Specifies whether to sound a communication end tone at the end of communication.
Auto Authentication:Specifies whether to automatically exchange authentication codes with the other party while connecting to USB.・ To set ON, enter the terminal security code
and the 4 to 8-digit authentication codes for a mobile phone terminal (FOMA terminal)) and for PC (the other party), and then press p.
Ph. book image sending:Specifies whether to send images saved in the phonebook along with the all phonebook data when sending all data items.
Infrared receiver
Infrared data port
Approx. 4 m
15°
15°
Reading the recording screen
File name/File format
Item Contents
File format MP4 (MobileMP4)
Encoding method
AMR
Extension 3gp
aTypeIndicates to record sound.
b Indicator<For during standby for recording>Indicates the usage rate of the storage area.<For during recording/pause>Indicates the rate of the recorded sound size to the file size set in size restrictions.
cCounter<For during standby for recording>Indicates the approximate maximum recording time of sounds that can be saved in the current settings.<For during recording/pause>Indicates the approximate elapsed/remaining time (duration until the recording stops).
dQualityIndicates the quality of the sound. ☛P300
eSize restrictionsIndicates the size restriction value of the file. ☛P300
c
d e
a b
299
Disp
laying
/Ed
iting
/Man
agin
g D
ata
INFORMATION● After recording, the file name and display name can be
changed. ☛P291
The sound recording time varies depending on the setting of quality and size restrictions.The recording time for one operation (estimate) and the total time that can be recorded (estimate) are shown below:・ Quality and size restrictions can be set in
Recording Setting. ☛P166
Recording the sound
・ Record the sound in as quiet a place as possible with no or little noise.・ Even when SILENT is set for the ring alert
volume, Silent Mode or Public mode (Driving mode) is active and so on, the recording confirmation sound (shutter sound) is heard. Also, the volume of the shutter sound cannot be changed.・When you activate Sound Recorder, the sub-
display lights blue. While you are recording sound, the camera indicator flashes in red and the sub-display flashes in multiple colors. During pause, the camera indicator lights red and the sub-display lights green. The setting not to light/flash is unavailable and the lighting pattern/lighting color cannot be changed. ・While the recording screen is displayed, the sub-
display lights according to the setting of Sub-display Light Color.
1 m65
2 o or C
・ The sound is recorded from the microphone.・ Press o to pause recording. switches to
. Recording is resumed by pressing o or C. ・ Sound recording continues even if you close
FOMA terminal. To stop recording while the terminal is closed, press C. If you close the terminal during a pause, pressing C resumes recording.
3 p or CThe shutter sound is heard and recording is finished. A confirmation screen for the recorded sound is displayed.・When Auto save in Recording Setting is set to
Yes, the recorded sound is saved and the recording screen reappears. Operations from Step 4 are not required.・When the size of a file reaches the limit while
sound recording, sound recording ends automatically. The sound recorded up to that point is saved.・ If p is pressed to end the recording during
pause, the sound recorded up to that point can be saved.
4 Confirm the recorded sound・ To save the sound immediately: Go to Step 5・ To record again without saving: c・ To replay the sound: p・ When Auto Play in Recording Setting is set to
Yes, the recorded sound is played automatically. Note that opening a closed FOMA terminal will not start the auto-play function.
■ Sending mail with the recorded sound attached: aA confirmation screen is displayed asking whether to save the recorded sound. Select Yes to save the recorded sound, and the mail composition screen is displayed.
Recording time of sound
Max. recording
timeQuality
File size restrictions
Msg attach: Small
Msg attach:Large
For one operation
STD 4 min. 7 min.
HQ 3 min. 5 min.
Total STD 161 min. 161 min.
HQ 106 min. 106 min.
Recording screen
Sound Recorder is activated.
Recording is started after the shutter sound is heard. appears at the bottom of the screen.
So
un
d R
ecord
er
Next
300
Disp
laying
/Ed
iting
/Man
agin
g D
ata
■ Changing the title: m31 z Enter the title (up to 31 characters regardless of one- or two-byte) z p・ The changed title is valid after saving the
sound.
■ Inserting a ticker: m32 z Select YesThe recorded sound is saved and the ticker setting screen is displayed. Follow the procedure from Step 3 in “Inserting tickers”. ☛P283
■ Displaying the saved sounds in the list:
m5
5 Press o or CThe recorded sound is saved in the Camera folder of i-motion.
■ To check any recorded sound immediately: p z Select the sound
INFORMATION● Sound Recorder is activated by pressing m on the still
image shooting screen or video recording screen and selecting Switch mode → Sound recorder as well.
● For the usage precaution for Sound Recorder, refer to
INFORMATION in “Recording videos with Movie Camera”. ☛P165
● For the procedure of playing the recorded sound, follow steps in “Playing video/i-motion”. ☛P279
Setting the sound quality
1 & on the recording screen to highlight the quality icon ( , ) ・ You can also press 5 to highlight.
2 % to switch icons z Press o
Restricting the file size
1 & on the recording screen to highlight the icon ( , ) of size restrictions ・ You can also press 6 to highlight.
2 % to switch icons z Press o
STD:The sound quality is standard.HQ:The sound quality is enhanced, but the
available recording time becomes shorter.
・ You can also set by pressing 5 to switch icons and pressing o.
Msg attach: Small*1:Restricts the file size below 290 Kbytes. Being attached to i-mode Mail, data of this file size can be sent to the terminal unsupporting large capacity message.
Msg attach: Large*1:Restricts the file size below 490 Kbytes. Data of this file size can be sent to the terminal which supports large capacity message.
・ You can also set by pressing 6 to switch icons and pressing o.
*1 When selecting the icon, Msg attach S or Msg attach L is shown on the screen.
So
un
d R
ecord
er

301
Other Convenient Functions
Multiaccess .............................................................................. Multiaccess 302Multitask ........................................................................................ Multitask 303Turning power on/off automatically at the specified time...................................................................................... Auto Power ON/OFF 304Alerting with alarms after the specified time period has passed............................................................................................................... Timer 305Ringing the alarm clock at the set time ................................. Alarm Clock 305Setting to turn power on automatically at the time specified for the alarm................................................................................... Alarm Auto Power ON 307Using Safety Melody ............................................................. Safety Melody 307Managing schedules .................................................................. Scheduler 308Registering often-used functions ....................................... Custom Menu 315Registering your own name and mail address ................... Own Number 318Recording the voice and image ........................ Voice Memo/Video Memo 318Checking the call duration and the call cost ....... Call Duration/Call Cost 320Resetting the call cost automatically ............................... Reset Call Cost 321Setting to notify the limit of call cost ................................. Call Cost Limit 321Using Calculator ......................................................................... Calculator 322Composing notes .......................................................................... Notepad 322Using electronic dictionaries ........................................................................ 324Using the earphone/microphone set with switch....................................................... Earphone/Microphone Set with Switch 324Determining a service provider .................................. NW Search Method 326Reducing the start-up time after power-on ....................... Quick Start-up 326Checking current settings of functions ......................... Confirm Settings 327Resetting functions ............................................................................ Reset 327Deleting registered data collectively ................................. Delete All Data 327
302
Oth
er Co
nven
ient F
un
ction
s
MultiaccessMultiaccess
Multiaccess is a function that 3 functions (the voice call, packet communication, SMS) can be used at the same time.・ The icons for the functions in progress are
displayed on the task bar.・ The following functions can be used
simultaneously:・ Voice call: 1 line・ i-mode, i-αppli, i-mode Mail or packet
communication with PC connected: 1 line・ SMS: 1 line・Multiaccess combinations ☛P374
INFORMATION● During Multiaccess you are charged separately for each
communication.
Operations available during Multiaccess
You can receive i-mode Mail, SMS or voice call, or execute the other communication without interrupting the communication being connected.
1 Receive mail during a voice call
You can receive a voice call with a site being displayed.・ Similarly, you can receive a voice call during
packet communication with a PC connected.
1 A voice call is received during i-mode
2 Press n・ The talking screen and the site screen can be
switched using Multitask. ☛P304・ To quit displaying the site: f in the site
screen z Select Yes・ To end the call: f in the talking screen
1 b during a voice callThe New Task menu appears.・ If you switch the call to use the speakerphone
function on the talking screen, the site screen can be viewed while talking.
2 Press 21
・ The talking screen and the site screen can be switched using Multitask. ☛P304・ To quit displaying the site: f in the site
screen z Select Yes・ To end the call: f in the talking screen
1 b during a voice callThe New Task menu appears.・ If you switch the call to use the speakerphone
function on the talking screen, you can compose mail while talking.
Receiving i-mode Mail during a voice call
Receiving a voice call during i-mode communication
While receiving, and blinks at the top of the display, and when receiving is finished, blinks and
appears.・ stops blinking
automatically.
Connecting i-mode during a voice call
Sending i-mode Mail during a voice call
・ The screen displayed when a voice call is received depends on Priority Comm Mode.
New Task menu
Mu
ltiaccess
303
Oth
er Co
nven
ient F
un
ction
s
2 Press 12
・ The talking screen and the mail composition screen can be switched using Multitask. ☛P304・ To quit mail composition: f in the mail
composition screen・ To end the call: f in the talking screen
1 Send data from a PC while talkingThis action starts packet communication.・ The screen displayed when packet
communication is executed depends on Priority Comm Mode.・ To end the call: f in the talking screen
You can make a voice call with a site being displayed.・ Similarly, you can make a voice call during packet
communication with a PC connected.
1 b during i-mode communicationThe New Task menu appears.
2 n z Enter the phone number z Press
n
・ The talking screen and the site screen can be switched using Multitask. ☛P304・ To quit displaying the site: f in the site
screen z Select Yes・ To end the call: f in the talking screen
MultitaskMultitask
Multitask allows you to execute several functions at the same time and perform operations by switching screens.・ The icons for the functions in progress are
displayed on the task bar.・ The number of functions that can be performed
simultaneously is up to 2. However, the function of Dial, Own number or Silent mode ON/OFF can be activated even when 2 other functions are already active.・ Some functions may be restricted or unable to
start simultaneously with one another. Multitask combinations ☛P376
Executing a new function
Displaying/registering a schedule during a voice call
1 b during a voice callThe New Task menu appears.・ If you switch the call to use the speakerphone
function on the talking screen, the schedule screen can be viewed while talking.
2 71
3 View or register a schedule・ To quit the schedule: f in the schedule
screen・ To end the call: f in the talking screen
INFORMATION● If many functions are executed at once, for example, a
mail arrives while video or animation is being played or Camera is operated, the image displayed on the screen may not appear smoothly or the sound may be disrupted during play.
● If you press 0 in the first level of the New Task menu, Own Number is displayed. However, it may not be displayed depending on the current function or condition.
Performing packet communication during a voice call
Making a voice call during i-mode communication
When transmission of i-mode Mail is completed, the talking screen returns.
・ Select Phonebook & Logs from the New Task menu to call from the phonebook, received call history or redial data.
Example
Mu
ltitask
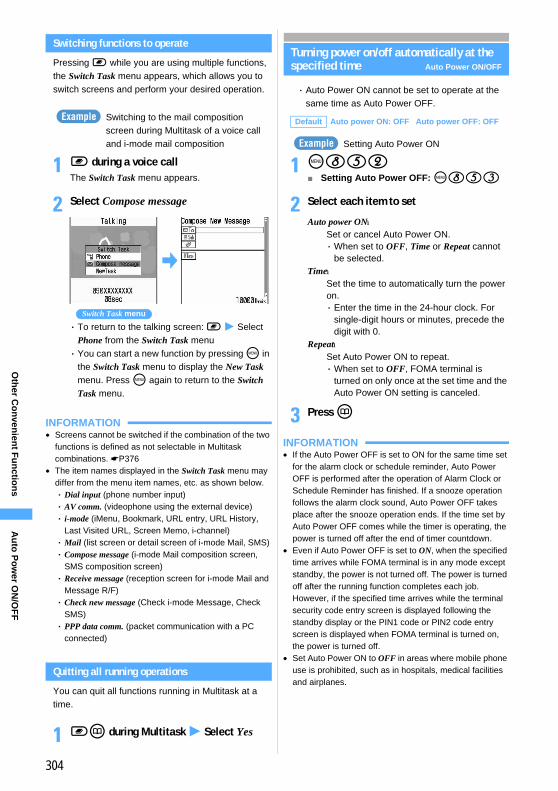
304
Oth
er Co
nven
ient F
un
ction
s
Switching functions to operate
Pressing b while you are using multiple functions, the Switch Task menu appears, which allows you to switch screens and perform your desired operation.
Switching to the mail composition screen during Multitask of a voice call and i-mode mail composition
1 b during a voice callThe Switch Task menu appears.
2 Select Compose message
・ To return to the talking screen: b z Select Phone from the Switch Task menu・ You can start a new function by pressing m in
the Switch Task menu to display the New Task menu. Press m again to return to the Switch Task menu.
INFORMATION● Screens cannot be switched if the combination of the two
functions is defined as not selectable in Multitask combinations. ☛P376
● The item names displayed in the Switch Task menu may differ from the menu item names, etc. as shown below.・ Dial input (phone number input)・ AV comm. (videophone using the external device)・ i-mode (iMenu, Bookmark, URL entry, URL History,
Last Visited URL, Screen Memo, i-channel)・Mail (list screen or detail screen of i-mode Mail, SMS)・ Compose message (i-mode Mail composition screen,
SMS composition screen)・ Receive message (reception screen for i-mode Mail and
Message R/F)・ Check new message (Check i-mode Message, Check
SMS)・ PPP data comm. (packet communication with a PC
connected)
Quitting all running operations
You can quit all functions running in Multitask at a time.
1 bp during Multitask z Select Yes
Turning power on/off automatically at the specified time Auto Power ON/OFF
・ Auto Power ON cannot be set to operate at the same time as Auto Power OFF.
Setting Auto Power ON
1 m852■ Setting Auto Power OFF: m853
2 Select each item to set
3 Press p
INFORMATION● If the Auto Power OFF is set to ON for the same time set
for the alarm clock or schedule reminder, Auto Power OFF is performed after the operation of Alarm Clock or Schedule Reminder has finished. If a snooze operation follows the alarm clock sound, Auto Power OFF takes place after the snooze operation ends. If the time set by Auto Power OFF comes while the timer is operating, the power is turned off after the end of timer countdown.
● Even if Auto Power OFF is set to ON, when the specified time arrives while FOMA terminal is in any mode except standby, the power is not turned off. The power is turned off after the running function completes each job. However, if the specified time arrives while the terminal security code entry screen is displayed following the standby display or the PIN1 code or PIN2 code entry screen is displayed when FOMA terminal is turned on, the power is turned off.
● Set Auto Power ON to OFF in areas where mobile phone use is prohibited, such as in hospitals, medical facilities and airplanes.
Example
Switch Task menu
Default Auto power ON: OFF Auto power OFF: OFF
Auto power ON:Set or cancel Auto Power ON.・When set to OFF, Time or Repeat cannot
be selected.Time:
Set the time to automatically turn the power on.・ Enter the time in the 24-hour clock. For
single-digit hours or minutes, precede the digit with 0.
Repeat:Set Auto Power ON to repeat.・When set to OFF, FOMA terminal is
turned on only once at the set time and the Auto Power ON setting is canceled.
Example
Au
to P
ow
er ON
/OF
F
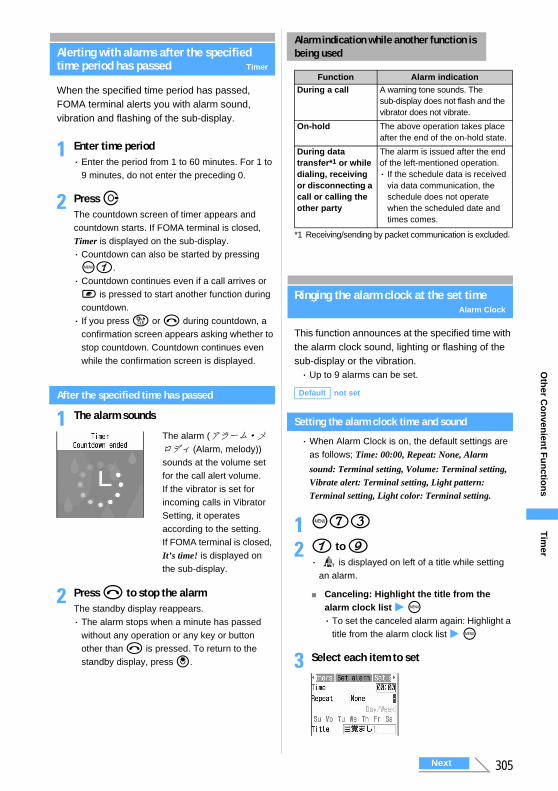
305
Oth
er Co
nven
ient F
un
ction
s
Alerting with alarms after the specified time period has passed Timer
When the specified time period has passed, FOMA terminal alerts you with alarm sound, vibration and flashing of the sub-display.
1 Enter time period・ Enter the period from 1 to 60 minutes. For 1 to
9 minutes, do not enter the preceding 0.
2 Press rThe countdown screen of timer appears and countdown starts. If FOMA terminal is closed, Timer is displayed on the sub-display.・ Countdown can also be started by pressing m1.・ Countdown continues even if a call arrives or b is pressed to start another function during countdown.・ If you press c or f during countdown, a
confirmation screen appears asking whether to stop countdown. Countdown continues even while the confirmation screen is displayed.
After the specified time has passed
1 The alarm sounds
2 Press f to stop the alarmThe standby display reappears.・ The alarm stops when a minute has passed
without any operation or any key or button other than f is pressed. To return to the standby display, press o.
*1 Receiving/sending by packet communication is excluded.
Ringing the alarm clock at the set timeAlarm Clock
This function announces at the specified time with the alarm clock sound, lighting or flashing of the sub-display or the vibration.・ Up to 9 alarms can be set.
Setting the alarm clock time and sound
・When Alarm Clock is on, the default settings are as follows; Time: 00:00, Repeat: None, Alarm sound: Terminal setting, Volume: Terminal setting, Vibrate alert: Terminal setting, Light pattern: Terminal setting, Light color: Terminal setting.
1 m73
2 1 to 9・ is displayed on left of a title while setting
an alarm.
■ Canceling: Highlight the title from the alarm clock list z m・ To set the canceled alarm again: Highlight a
title from the alarm clock list z m
3 Select each item to set
The alarm (アラーム・メロディ (Alarm, melody)) sounds at the volume set for the call alert volume.If the vibrator is set for incoming calls in Vibrator Setting, it operates according to the setting.If FOMA terminal is closed, It’s time! is displayed on the sub-display.
Alarm indication while another function is being used
Function Alarm indicationDuring a call A warning tone sounds. The
sub-display does not flash and the vibrator does not vibrate.
On-hold The above operation takes place after the end of the on-hold state.
During data transfer*1 or while dialing, receiving or disconnecting a call or calling the other party
The alarm is issued after the end of the left-mentioned operation.・ If the schedule data is received
via data communication, the schedule does not operate when the scheduled date and times comes.
Default not set
Tim
er
Next
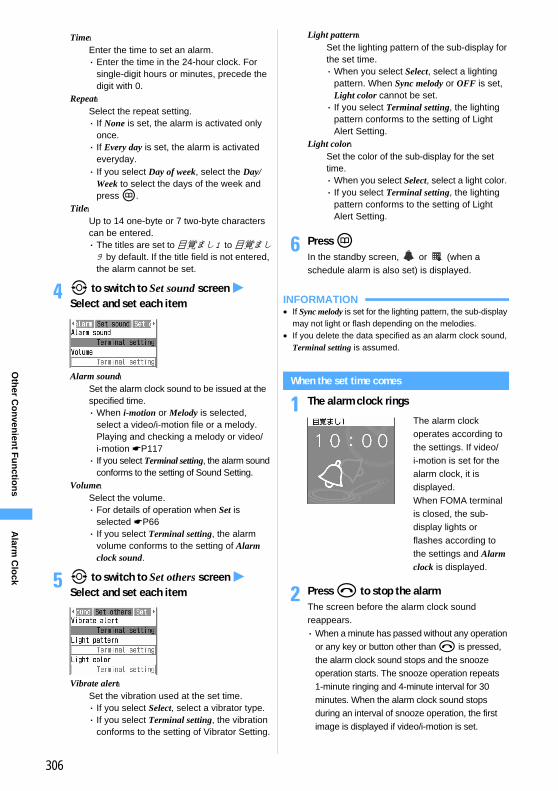
306
Oth
er Co
nven
ient F
un
ction
s
4 & to switch to Set sound screen z Select and set each item
5 & to switch to Set others screen z Select and set each item
6 Press pIn the standby screen, or (when a schedule alarm is also set) is displayed.
INFORMATION● If Sync melody is set for the lighting pattern, the sub-display
may not light or flash depending on the melodies.● If you delete the data specified as an alarm clock sound,
Terminal setting is assumed.
When the set time comes
1 The alarm clock rings
2 Press f to stop the alarmThe screen before the alarm clock sound reappears.・When a minute has passed without any operation
or any key or button other than f is pressed, the alarm clock sound stops and the snooze operation starts. The snooze operation repeats 1-minute ringing and 4-minute interval for 30 minutes. When the alarm clock sound stops during an interval of snooze operation, the first image is displayed if video/i-motion is set.
Time:Enter the time to set an alarm.・ Enter the time in the 24-hour clock. For
single-digit hours or minutes, precede the digit with 0.
Repeat:Select the repeat setting.・ If None is set, the alarm is activated only
once.・ If Every day is set, the alarm is activated
everyday.・ If you select Day of week, select the Day/
Week to select the days of the week and press p.
Title:Up to 14 one-byte or 7 two-byte characters can be entered.・ The titles are set to 目覚まし1 to 目覚まし9 by default. If the title field is not entered, the alarm cannot be set.
Alarm sound:Set the alarm clock sound to be issued at the specified time.・When i-motion or Melody is selected,
select a video/i-motion file or a melody.Playing and checking a melody or video/i-motion ☛P117・ If you select Terminal setting, the alarm sound
conforms to the setting of Sound Setting.Volume:
Select the volume.・ For details of operation when Set is
selected ☛P66・ If you select Terminal setting, the alarm
volume conforms to the setting of Alarm clock sound.
Vibrate alert:Set the vibration used at the set time.・ If you select Select, select a vibrator type.・ If you select Terminal setting, the vibration
conforms to the setting of Vibrator Setting.
Light pattern:Set the lighting pattern of the sub-display for the set time.・When you select Select, select a lighting
pattern. When Sync melody or OFF is set, Light color cannot be set.・ If you select Terminal setting, the lighting
pattern conforms to the setting of Light Alert Setting.
Light color:Set the color of the sub-display for the set time.・When you select Select, select a light color. ・ If you select Terminal setting, the lighting
pattern conforms to the setting of Light Alert Setting.
The alarm clock operates according to the settings. If video/i-motion is set for the alarm clock, it is displayed.When FOMA terminal is closed, the sub-display lights or flashes according to the settings and Alarm clock is displayed.
Alarm
Clo
ck
307
Oth
er Co
nven
ient F
un
ction
s
When you press f, the snooze operation terminates and the screen returns to the display before the alarm clock rang. ・ To stop the alarm while FOMA terminal is closed,
press C or b. While the Side Key Guard function is active, however, the alarm will not stop even if you press C or b.・ If a call arrives while the alarm clock is ringing,
the snooze operation starts. ・ If more than one alarm is set for the same time,
the one with the lowest item number in the alarm clock list takes effect.・ For alarm indication while another function is
being used ☛P305
・When power is off, the power is not turned on and the alarm clock does not ring. To enable the alarm clock while the power is off, set Alarm Auto Power ON to ON.・When All Lock or PIM Lock is activated, the alarm
clock does not ring.・When a Chara-den image is displayed at the set
time, the alarm may sound a few seconds later.・When the alarm clock and the schedule reminder
are set for the same time, the alarm clock operates first, followed by the snooze operation, and then the schedule alarm is issued. The snooze operation of the alarm clock continues even after you stop the schedule alarm.・ If a safety melody is sounding at the set time, the
alarm clock rings after the safety melody stops.
Setting to turn power on automatically at the time specified for the alarm Alarm Auto Power ON
Set to automatically turn the power on and issue a schedule alarm or alarm clock sound if the power is off at the date and time specified by Scheduler or Alarm Clock.
1 m855
2 Press 1・ To set not to turn the power on automatically:
2
INFORMATION● Set this function to OFF in areas where mobile phone
use is prohibited, such as in hospitals, medical facilities and airplanes.
● If Alarm Auto Power ON and PIN1 Code ON/OFF have been set to ON, the power is turned on and the alarm sounds before displaying the PIN1 code entry screen when the set date and time for an alarm or schedule arrives. When pressing f to stop the alarm, the PIN1 code entry screen appears. At this time, the default melody sounds as the schedule alarm or alarm clock sound even when the downloaded melody or i-motion is set for the alarm clock sound or the schedule reminder.
Using Safety MelodySafety Melody
If Safety Melody has been set, you can play the melody, with FOMA terminal closed, simply by holding down C for over a second. By sounding a safety melody, you can pretend as if you are receiving a call.
Setting the sound and volume of safety melody
1 m76
2 Select each item to set
3 Press p appears on the standby display.
When alarm clock does not ring at the set time
Default OFF
Default OFF
Set safety melody:Set whether to sound a safety melody when C is pressed for over a second.・ If OFF is set, the items below cannot be set.
Priority during melody:Set whether to answer a call arriving while a safety melody is sounding.・ If Incoming call pref is set, the safety
melody stops and the incoming screen appears.・ If you set Call rejection, the incoming call is
rejected and the safety melody continues to sound. The incoming call is recorded in the received call history.
Safety melody sound:Select the sound of the safety melody.・ Playing and checking a melody ☛P117
Volume:Setting the volume in playing the safety melody.
Alarm
Au
to P
ow
er ON
308
Oth
er Co
nven
ient F
un
ction
s
Playing a safety melody
1 Hold down C for over a second with FOMA terminal closedA safety melody is sounded according to the settings (ほっとメロディ sounds with PIM Lock on). The vibrator and the light of the sub-display operate according to the setting of Call Alert.
2 Press C to stop the safety melodyThe screen before the safety melody sound reappears. ・ A safety melody stops sounding when 10
minutes has passed without any operation or if you press any key other than C while the melody is sounding.
INFORMATION● Safety Melody does not start in the following cases:・ During a voice call ・ During a videophone call・ During packet communication connecting with a PC・ During 64K data communication ・While Camera is active・While Movie Camera is active・While Sound Recorder is active・While Bar Code Reader is active・While deleting, protecting, copying, or moving mails, or
changing the read/unread status of received mails・ During infrared communication or data reception or
deletion to/from INBOX・ During data transfer using a FOMA USB cable (option)・ During All Lock・ In Omakase Lock (Remote Lock)・While updating software
● Either in Silent Mode or in a personalized silent mode (with Safety melody sound set to OFF), a safety melody does not sound. The vibrator operates in the same way as for an incoming voice call.
● If Display Priority of Mail Setting is set to Show message, the safety melody sound stops when a mail, Message R/F or SMS arrives. However, even if Show message is set, the safety melody sound does not stop in the following cases:・While i-αppli is active・While FOMA terminal is open with Lock on Close
active・ In Public mode (Driving mode)・ During the snooze operation
●When Safety Melody is started, the following functions are activated after the safety melody stops.・ Auto Power OFF ・ Alarm Clock・ Schedule ・ Timer
● The safety melody is sounded from the FOMA terminal speaker, regardless of the setting of Alert Preference when a flat type earphone/microphone set with switch (option) or a handsfree compatible device is connected.
Menu 71
Managing schedulesScheduler
Save various schedules. You will be notified of it with the display and/or alarm sound at the set time.
Displaying the calendar
The calendar screen allows displaying schedules.
1 Hold down p for over a second
・ For a day with multiple schedules set, the item icon for the schedule planned for the earliest hour is indicated. Even if the time of the item set at the earliest time of the day is passed, the item icon set next is not displayed. ・ Press O to move the date. Pressing o
displays the day view screen.・ Pressing t displays the previous month and a displays the next month.・ The calendar appears as set when quit last
time.
■ Specifying a particular day to display:am42 in the calendar screen・ In the day view screen, press m52.
bEnter the year, month, and day・ Enter the last 2 digits of the year. For
single-digit months and days, precede the digit with 0.・ To return today: m41
To restore the current date display on the day view screen, press m51.
Item icon
The calendar screen appears. The date is displayed in beige for the current day, blue for Saturday, and pink for Sunday and national holidays. (The displayed color depends on the setting of Color Scheme).
Sch
edu
ler

309
Oth
er Co
nven
ient F
un
ction
s
INFORMATION● The national holidays on the calendar are based on the
Law Concerning National Holidays and a law that revises part of the Old Age People’s Welfare Law (law no. 59, June 22 in 2001) (as of August 2006).However, the Vernal Equinox and Autumnal Equinox may be different because the correct date is announced by an official gazette on February 1 of the previous year. The above law was in force on January in 2003. So, keep in mind that Marine day and Respect for the Aged day until 2002 are not displayed on the date as before they are revised.
● The calendar can display dates between January 1, 2000 and December 31, 2060.
Setting display style for the calendarCalendar View Mode
1 p (for over a second) z m61
2 Select each item to set
3 Press p
Setting days off Day Off Setting
You can set days off from the office or school. They can be set by specifying the date or day of the week.・When setting days off by specifying dates, up to
30 items can be registered.
Setting days off by specifying dates
1 p (for over a second)
2 Highlight the date to set to a day off z Press m621The color of the date specified as a day off changes.・ To set a day off to be repeated yearly: Highlight
the date to set to a day off z m622
■ Canceling: Highlight the day to cancel day off setting z m623・ To cancel all: m624
■ Setting days off by specifying the day of the week:am63b1 to 7 to select the day of the week
to set to days off・ By default, Sundays are set to days off.・ Reset is indicated in the guide row when a
day of the week other than Sunday is selected or the selection of Sunday is canceled. Pressing m restores the default setting.
cp・ If you register the calendar without
selecting the days of the week, it returns to the default state.
Setting national holidays Holiday Setting
Holidays can be changed and up to 5 new entries can be registered.
1 p (for over a second)
2 m64
3 p■ Changing: After Step 2, select the holiday
z Go to Step 4
■ Deleting: After Step 2, select the holiday z m z Select Yes・ You cannot delete holidays set by default.
4 Select each item to set
5 Press p
Default Scroll mode: Monthly modeDisplay mode: Normal mode
Scroll mode:Set the calendar display mode when you move between dates by pressing O.・ Set Monthly mode to switch the display
every month.・ Set to Slide mode to scroll the screen for
each week.Display mode:
Sets the beginning of the week (leftmost position).・ Set Normal mode to be Sunday.・ Set Business mode to be Monday.
Example
Holiday:Enter the holiday name (up to 22 one-byte or 11 two-byte characters).・ You cannot change the holiday name set
by default.Mark on calendar:
Specify whether to display the set holiday.・ If you select OFF, you cannot set Date.
Date:Enter a date to set as a holiday. For a month and day from 1 to 9, precede the digit with 0.・ To change the date of holiday set by
default, select Change and enter the date.
Sch
edu
ler
310
Oth
er Co
nven
ient F
un
ction
s
Saving the schedule
You can save multiple schedules for the same day.・ Up to 300 items can be recorded.
1 p (for over a second)
2 Highlight the date on which you want to register the schedule z p・ In the day view screen, also press p.
3 Select each item to set
4 & to switch to Select members screen
5 Select <Select member list> z Select members to register・ Up to 5 members can be registered. You can
make a call, and also can send mail.・ The first phone number, mail address, URL in
the phonebook data is registered.
■ Deleting: Highlight the member z m
6 & to switch to Reminder screen z Select and set each item
(Item icon):Select an icon.・ The selected icon is indicated in the
schedule heading.Schedule (Description input column):
The description equivalent for the selected icon is displayed. Change the description as required (up to 200 one-byte or 100 two-byte characters).・ The entered description is not changed if
you replace the icon by another after changing the description.
All day:Set whether to set the schedule to All day without specifying the time.・ If ON is set, the time and date display of
the schedule is marked with AllDay on the day view screen. If All day is set for the long-term schedule, the date is followed by AllDay.
Start time:Enter a start date and time for the schedule.・ Enter the last 2 digits of the year. For
single-digit months and days, precede the digit with 0.・ Enter the time in the 24-hour clock. For
single-digit hours or minutes, precede the digit with 0.・ You can set dates up to December 31,
2060.・ You cannot set the time if you set All day.
End time:Enter an end date and time for the schedule.・ The input method of the date and time is
the same as that of the start time.・ If you set this later than the start date,
is displayed at the upper right of the date set on the calendar screen. Also, appears under the item icon on the day view and schedule details screens (Long-term schedule).
Note:Enter schedule details (up to 600 one-byte or 300 two-byte characters).
Alarm on time (Schedule alarm):Set whether to sound an alarm.・ If you select Yes and then i-motion or Melody
in the alarm selection field, select a video/i-motion file or a melody for the alarm.Playing and checking a melody or video/i-motion ☛P117 ・ If you select Yes and Terminal setting, the
alarm conforms to the setting of Sound Setting.
Alarm in advance:Set whether to sound an alarm prior to the scheduled start time.・ The alarm selection method is the same
as for Alarm on time.・ If No is selected, Alarm before time cannot
be set.Alarm before time:
Set how many minutes before the scheduled start time you want the alarm to sound.
Sch
edu
ler
311
Oth
er Co
nven
ient F
un
ction
s
7 & to switch to Other settings screen z Select and set each item
8 Press p ・When a schedule set with an alarm or advance
alarm is saved, or (when Alarm Clock is also set) is indicated in the standby display.
You can add a schedule by simple key operation from the standby display without showing the calendar screen.
1 Enter the date and time (8 digits) to register schedule z pThe schedule entry screen is displayed.Example: For 3 p.m. on December 5: Enter “12051500”・ If you enter only hour and minute in 4 digits, the
current date is assumed. However, if you enter hour and minute earlier than the current time, the next day is assumed.
2 Save the schedule
INFORMATION● You cannot set long term schedule and repeat schedule
at the same time.● You can change the schedule alarm screen by the
following procedure. The last settings take effect.・ Select a video/i-motion on the Reminder screen*1.・ If a video/i-motion is set as a schedule reminder of
Sound Setting, select Terminal setting on the Reminder screen*1.・ Select an image on the Other settings screen*2.*1 If you perform this setting when an image has already
been set on the Other settings screen, Image is switched to No.
*2 If you perform this setting when a video/i-motion has already been set for Alarm on time or Alarm in advance, it is switched to Melody (default).
● If you delete the data specified as a schedule alarm or alarm in advance, Terminal setting is assumed.
● It is recommended that you keep a separate written record of the contents of Scheduler.Data link software and the FOMA USB cable (optional) can be used to send and save the data to the PC.
Repeat:Set the details of the repeating schedule.・When you set a 31st day or February 29 in
a leap year as the schedule starting date and Every month or Every year is selected in the repeat setting, the schedule repeating date becomes the last day for the year/month without the specified date (that is, 30th or February 28).・ If None is selected, the schedule alarm is
activated only once.・ If Day of week is selected, select Day/Week
field. And select a day of the week when the alarm is sounded, then press p.・When you set a repeat, is displayed at
the upper right of the date set on the calendar screen. However, the item icon appears only on the first repeating date on the calendar. Also, appears under the item icon on the day view and schedule details screens (Repeat schedule).
Image:Set the image to be displayed on the schedule alarm screen.・When you select Yes, select Image, and
then select an image. Flash movies cannot be set for images.・ If No is selected, the default image is
displayed.
Registering a schedule from the standby display
Sch
edu
ler
312
Oth
er Co
nven
ient F
un
ction
s
When the set time comes
1 The alarm sounds
2 Press f to stop the alarmThe screen before the alarm reappears.・ The alarm stops when a minute has passed
without any operation or any key or button other than f is pressed. The displayed screen depends on the setting as follows. To return to the display before the alarm, press o.
・ To stop the alarm while FOMA terminal is closed, press C or b. While Side Key Guard is active, however, the alarm will not stop even if you press C or b. ・When multiple schedules are set for the same
date/time, you can check other schedules by & after stopping the alarm.・ For alarm indication while another function is
being used ☛P305・ The schedule does not operate when Privacy
Mode is on (with Schedule set to Authorized access). When Secret Attribute is set, you need to set Secret Mode to enable the schedule. If the schedule alarm is not issued at the set date/time in any cases other than the above, see “When alarm clock does not ring at the set time”. ☛P307
INFORMATION● The alarm sounds at the volume set by Schedule reminder
of Adjust Volume.● If a schedule reminder is set in Light Alert Setting or
Vibrator Setting, lighting and vibration occur according to the settings.
● An alarm in advance, when set, sounds before the schedule start time.
●When you set schedule with All day, the alarm operates at 00:00 on the set date.
Setting defaults for the schedule alarmReminder Option
Set the defaults for the schedule alarm of a new schedule to be added.・ If you change the defaults, it may not affect the
settings of the registered schedules.
1 Hold down p for over a second z m65
2 Select each item to set
3 Press p
Checking saved schedule data
You can add, change and delete the schedules from the displayed schedule screen.
1 p (for over a second) z Select the date of the schedule
■ Displaying schedules for the specific item only (Display mode by item):ap (for over a second)bm32・ To show all items: m31・ In the day view screen, press m42. To restore the all items display, press m41.
cSelect an item iconThe selected item icon appears on the upper right of the calendar screen and the day view screen. Only the schedules for which the icon is set are displayed.
Setting Display
Image Set image
video/i-motion First frame
The schedule alarm operates according to the settings. If an image or video/i-motion is set for the schedule alarm, it is displayed. If Created animation is set for the image, the first frame is displayed.If FOMA terminal is closed, Schedule is displayed on the sub-display.
Schedule alarm screen
Default all Alarm:Yes
Set by scheduler:Set the default values of the schedule alarm for registering schedules from the calendar screen.
Set by quick-schedule:Set the default of the schedule alarm for registering schedules from the standby display.
Day view screen
・ Pressing & in the day view screen switches dates.
Sch
edu
ler
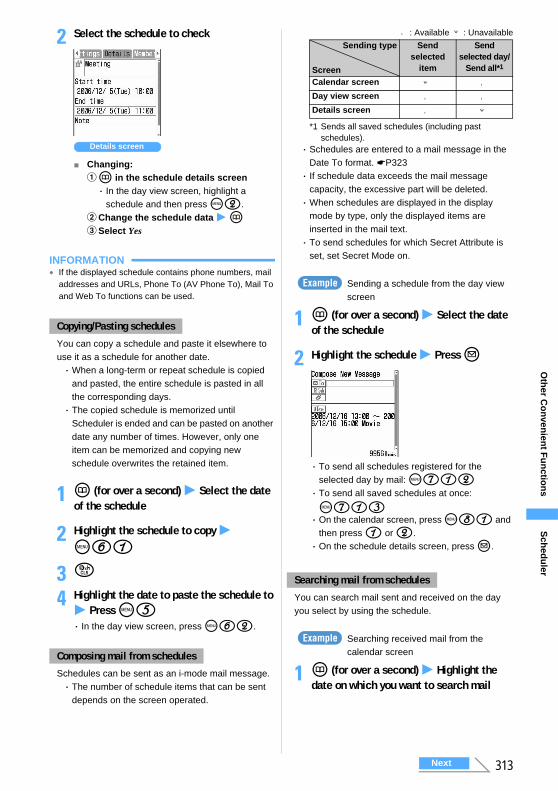
313
Oth
er Co
nven
ient F
un
ction
s
2 Select the schedule to check
■ Changing:ap in the schedule details screen・ In the day view screen, highlight a
schedule and then press m2.bChange the schedule data z pcSelect Yes
INFORMATION● If the displayed schedule contains phone numbers, mail
addresses and URLs, Phone To (AV Phone To), Mail To and Web To functions can be used.
You can copy a schedule and paste it elsewhere to use it as a schedule for another date.・When a long-term or repeat schedule is copied
and pasted, the entire schedule is pasted in all the corresponding days.・ The copied schedule is memorized until
Scheduler is ended and can be pasted on another date any number of times. However, only one item can be memorized and copying new schedule overwrites the retained item.
1 p (for over a second) z Select the date of the schedule
2 Highlight the schedule to copy z m61
3 c
4 Highlight the date to paste the schedule to z Press m5・ In the day view screen, press m62.
Schedules can be sent as an i-mode mail message.・ The number of schedule items that can be sent
depends on the screen operated.
○: Available ×: Unavailable
*1 Sends all saved schedules (including past schedules).
・ Schedules are entered to a mail message in the Date To format. ☛P323・ If schedule data exceeds the mail message
capacity, the excessive part will be deleted.・When schedules are displayed in the display
mode by type, only the displayed items are inserted in the mail text.・ To send schedules for which Secret Attribute is
set, set Secret Mode on.
Sending a schedule from the day view screen
1 p (for over a second) z Select the date of the schedule
2 Highlight the schedule z Press a
・ To send all schedules registered for the selected day by mail: m712・ To send all saved schedules at once:
m713・ On the calendar screen, press m81 and
then press 1 or 2.・ On the schedule details screen, press a.
You can search mail sent and received on the day you select by using the schedule.
Searching received mail from the calendar screen
1 p (for over a second) z Highlight the date on which you want to search mail
Copying/Pasting schedules
Composing mail from schedules
Details screen
Searching mail from schedules
Sending type
Screen
Send selected
item
Send selected day/
Send all*1
Calendar screen × ○Day view screen ○ ○Details screen ○ ×
Example
Example
Sch
edu
ler
Next
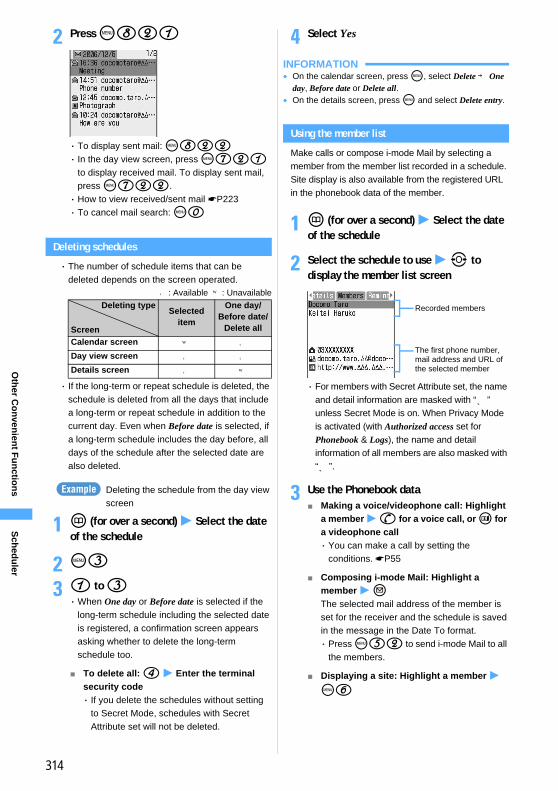
314
Oth
er Co
nven
ient F
un
ction
s
2 Press m821
・ To display sent mail: m822・ In the day view screen, press m721
to display received mail. To display sent mail, press m722.・ How to view received/sent mail ☛P223・ To cancel mail search: m0
Deleting schedules
・ The number of schedule items that can be deleted depends on the screen operated.
○: Available ×: Unavailable
・ If the long-term or repeat schedule is deleted, the schedule is deleted from all the days that include a long-term or repeat schedule in addition to the current day. Even when Before date is selected, if a long-term schedule includes the day before, all days of the schedule after the selected date are also deleted.
Deleting the schedule from the day view screen
1 p (for over a second) z Select the date of the schedule
2 m3
3 1 to 3・When One day or Before date is selected if the
long-term schedule including the selected date is registered, a confirmation screen appears asking whether to delete the long-term schedule too.
■ To delete all: 4 z Enter the terminal security code・ If you delete the schedules without setting
to Secret Mode, schedules with Secret Attribute set will not be deleted.
4 Select Yes
INFORMATION● On the calendar screen, press m, select Delete → One
day, Before date or Delete all.● On the details screen, press m and select Delete entry.
Using the member list
Make calls or compose i-mode Mail by selecting a member from the member list recorded in a schedule. Site display is also available from the registered URL in the phonebook data of the member.
1 p (for over a second) z Select the date of the schedule
2 Select the schedule to use z & to display the member list screen
・ For members with Secret Attribute set, the name and detail information are masked with “*” unless Secret Mode is on. When Privacy Mode is activated (with Authorized access set for Phonebook & Logs), the name and detail information of all members are also masked with “*”.
3 Use the Phonebook data■ Making a voice/videophone call: Highlight
a member z n for a voice call, or t for a videophone call・ You can make a call by setting the
conditions. ☛P55
■ Composing i-mode Mail: Highlight a member z aThe selected mail address of the member is set for the receiver and the schedule is saved in the message in the Date To format.・ Press m52 to send i-mode Mail to all
the members.
■ Displaying a site: Highlight a member z
m6
Deleting type
Screen
Selected item
One day/Before date/
Delete all
Calendar screen × ○Day view screen ○ ○Details screen ○ ×
Example
The first phone number, mail address and URL of the selected member
Recorded members
Sch
edu
ler
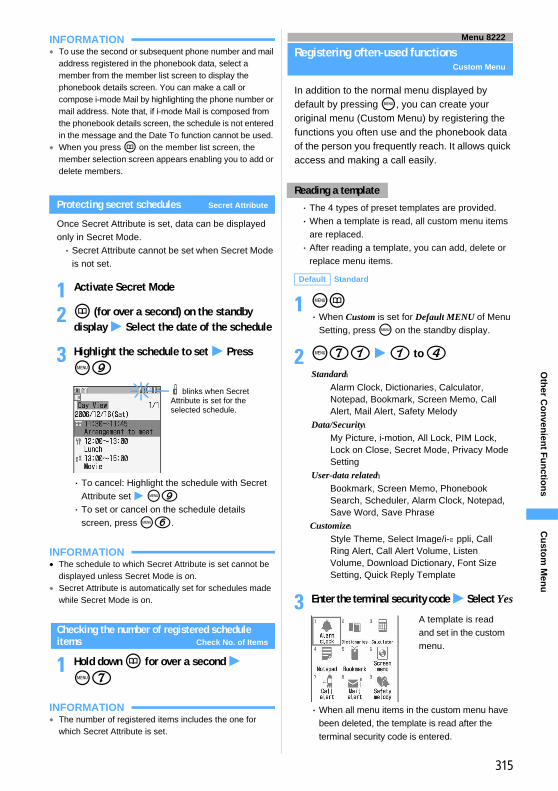
315
Oth
er Co
nven
ient F
un
ction
s
INFORMATION● To use the second or subsequent phone number and mail
address registered in the phonebook data, select a member from the member list screen to display the phonebook details screen. You can make a call or compose i-mode Mail by highlighting the phone number or mail address. Note that, if i-mode Mail is composed from the phonebook details screen, the schedule is not entered in the message and the Date To function cannot be used.
●When you press p on the member list screen, the member selection screen appears enabling you to add or delete members.
Protecting secret schedules Secret Attribute
Once Secret Attribute is set, data can be displayed only in Secret Mode.・ Secret Attribute cannot be set when Secret Mode
is not set.
1 Activate Secret Mode
2 p (for over a second) on the standby display z Select the date of the schedule
3 Highlight the schedule to set z Press m9
・ To cancel: Highlight the schedule with Secret Attribute set z m9・ To set or cancel on the schedule details
screen, press m6.
INFORMATION● The schedule to which Secret Attribute is set cannot be
displayed unless Secret Mode is on.● Secret Attribute is automatically set for schedules made
while Secret Mode is on.
Checking the number of registered schedule items Check No. of Items
1 Hold down p for over a second z m7
INFORMATION● The number of registered items includes the one for
which Secret Attribute is set.
Menu 8222
Registering often-used functionsCustom Menu
In addition to the normal menu displayed by default by pressing m, you can create your original menu (Custom Menu) by registering the functions you often use and the phonebook data of the person you frequently reach. It allows quick access and making a call easily.
・ The 4 types of preset templates are provided.・When a template is read, all custom menu items
are replaced.・ After reading a template, you can add, delete or
replace menu items.
1 mp・When Custom is set for Default MENU of Menu
Setting, press m on the standby display.
2 m71 z 1 to 4
3 Enter the terminal security code z Select Yes
・When all menu items in the custom menu have been deleted, the template is read after the terminal security code is entered.
blinks when Secret Attribute is set for the selected schedule.
Reading a template
Default Standard
Standard:Alarm Clock, Dictionaries, Calculator, Notepad, Bookmark, Screen Memo, Call Alert, Mail Alert, Safety Melody
Data/Security:My Picture, i-motion, All Lock, PIM Lock, Lock on Close, Secret Mode, Privacy Mode Setting
User-data related:Bookmark, Screen Memo, Phonebook Search, Scheduler, Alarm Clock, Notepad, Save Word, Save Phrase
Customize:Style Theme, Select Image/i-αppli, Call Ring Alert, Call Alert Volume, Listen Volume, Download Dictionary, Font Size Setting, Quick Reply Template
A template is read and set in the custom menu.
Cu
stom
Men
u
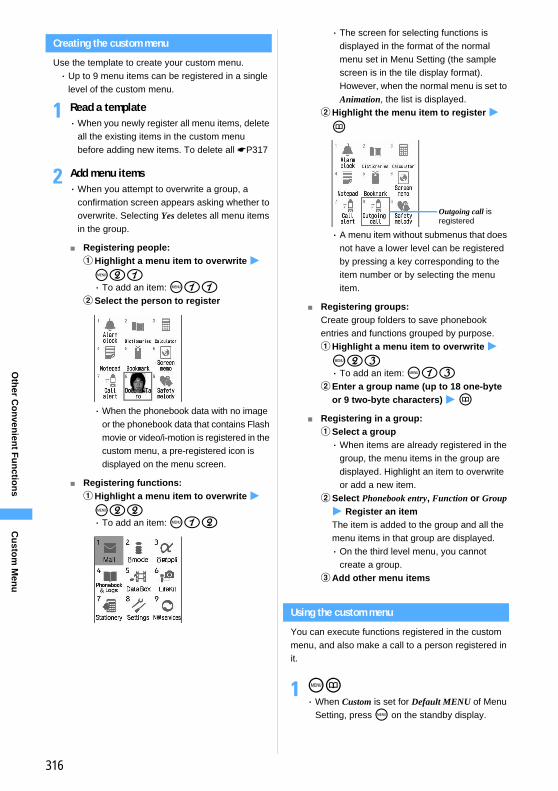
316
Oth
er Co
nven
ient F
un
ction
s
Creating the custom menu
Use the template to create your custom menu.・ Up to 9 menu items can be registered in a single
level of the custom menu.
1 Read a template・When you newly register all menu items, delete
all the existing items in the custom menu before adding new items. To delete all ☛P317
2 Add menu items・When you attempt to overwrite a group, a
confirmation screen appears asking whether to overwrite. Selecting Yes deletes all menu items in the group.
■ Registering people:aHighlight a menu item to overwrite z
m21・ To add an item: m11
bSelect the person to register
・When the phonebook data with no image or the phonebook data that contains Flash movie or video/i-motion is registered in the custom menu, a pre-registered icon is displayed on the menu screen.
■ Registering functions:aHighlight a menu item to overwrite z
m22・ To add an item: m12
・ The screen for selecting functions is displayed in the format of the normal menu set in Menu Setting (the sample screen is in the tile display format). However, when the normal menu is set to Animation, the list is displayed.
bHighlight the menu item to register z
p
・ A menu item without submenus that does not have a lower level can be registered by pressing a key corresponding to the item number or by selecting the menu item.
■ Registering groups:Create group folders to save phonebook entries and functions grouped by purpose. aHighlight a menu item to overwrite z
m23・ To add an item: m13
bEnter a group name (up to 18 one-byte or 9 two-byte characters) z p
■ Registering in a group:aSelect a group・When items are already registered in the
group, the menu items in the group are displayed. Highlight an item to overwrite or add a new item.
bSelect Phonebook entry, Function or Group z Register an itemThe item is added to the group and all the menu items in that group are displayed.・ On the third level menu, you cannot
create a group.cAdd other menu items
Using the custom menu
You can execute functions registered in the custom menu, and also make a call to a person registered in it.
1 mp・When Custom is set for Default MENU of Menu
Setting, press m on the standby display.
Outgoing call is registered
Cu
stom
Men
u
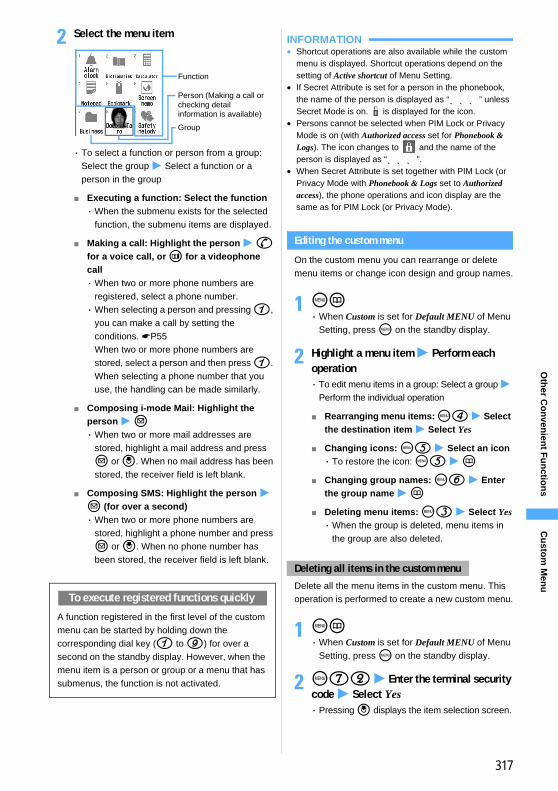
317
Oth
er Co
nven
ient F
un
ction
s
2 Select the menu item
・ To select a function or person from a group: Select the group z Select a function or a person in the group
■ Executing a function: Select the function・When the submenu exists for the selected
function, the submenu items are displayed.
■ Making a call: Highlight the person z n for a voice call, or t for a videophone call・When two or more phone numbers are
registered, select a phone number.・When selecting a person and pressing 1,
you can make a call by setting the conditions. ☛P55When two or more phone numbers are stored, select a person and then press 1. When selecting a phone number that you use, the handling can be made similarly.
■ Composing i-mode Mail: Highlight the person z a・When two or more mail addresses are
stored, highlight a mail address and press a or o. When no mail address has been stored, the receiver field is left blank.
■ Composing SMS: Highlight the person z a (for over a second)・When two or more phone numbers are
stored, highlight a phone number and press a or o. When no phone number has been stored, the receiver field is left blank.
INFORMATION● Shortcut operations are also available while the custom
menu is displayed. Shortcut operations depend on the setting of Active shortcut of Menu Setting.
● If Secret Attribute is set for a person in the phonebook, the name of the person is displayed as “***” unless Secret Mode is on. is displayed for the icon.
● Persons cannot be selected when PIM Lock or Privacy Mode is on (with Authorized access set for Phonebook & Logs). The icon changes to and the name of the person is displayed as “***”.
●When Secret Attribute is set together with PIM Lock (or Privacy Mode with Phonebook & Logs set to Authorized access), the phone operations and icon display are the same as for PIM Lock (or Privacy Mode).
Editing the custom menu
On the custom menu you can rearrange or delete menu items or change icon design and group names.
1 mp・When Custom is set for Default MENU of Menu
Setting, press m on the standby display.
2 Highlight a menu item z Perform each operation・ To edit menu items in a group: Select a group z
Perform the individual operation
■ Rearranging menu items: m4 z Select the destination item z Select Yes
■ Changing icons: m5 z Select an icon・ To restore the icon: m5 z p
■ Changing group names: m6 z Enter the group name z p
■ Deleting menu items: m3 z Select Yes・When the group is deleted, menu items in
the group are also deleted.
Delete all the menu items in the custom menu. This operation is performed to create a new custom menu.
1 mp・When Custom is set for Default MENU of Menu
Setting, press m on the standby display.
2 m72 z Enter the terminal security code z Select Yes・ Pressing o displays the item selection screen.
To execute registered functions quickly
A function registered in the first level of the custom menu can be started by holding down the corresponding dial key (1 to 9) for over a second on the standby display. However, when the menu item is a person or group or a menu that has submenus, the function is not activated.
Function
Group
Person (Making a call or checking detail information is available)
Deleting all items in the custom menu
Cu
stom
Men
u
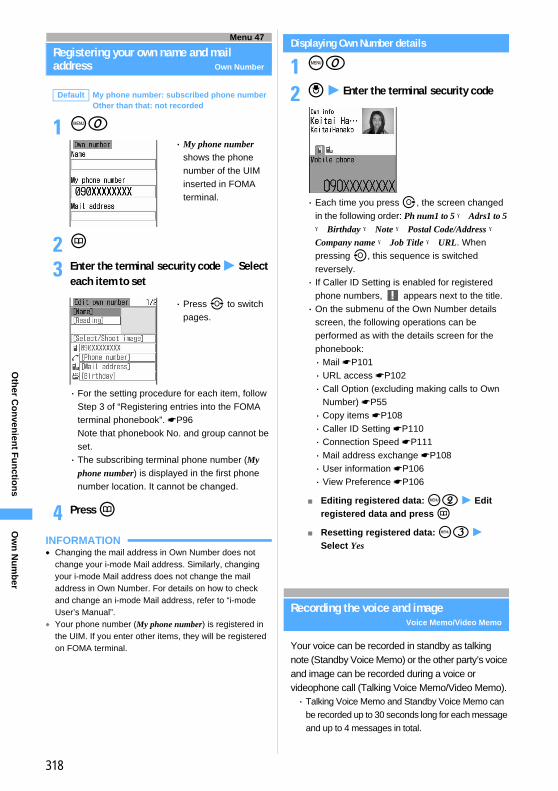
318
Oth
er Co
nven
ient F
un
ction
s
Menu 47
Registering your own name and mail address Own Number
1 m0
2 p
3 Enter the terminal security code z Select each item to set
・ For the setting procedure for each item, follow Step 3 of “Registering entries into the FOMA terminal phonebook”. ☛P96Note that phonebook No. and group cannot be set.・ The subscribing terminal phone number (My
phone number) is displayed in the first phone number location. It cannot be changed.
4 Press p
INFORMATION● Changing the mail address in Own Number does not
change your i-mode Mail address. Similarly, changing your i-mode Mail address does not change the mail address in Own Number. For details on how to check and change an i-mode Mail address, refer to “i-mode User’s Manual”.
● Your phone number (My phone number) is registered in the UIM. If you enter other items, they will be registered on FOMA terminal.
Displaying Own Number details
1 m0
2 o z Enter the terminal security code
・ Each time you press r, the screen changed in the following order: Ph num1 to 5 → Adrs1 to 5 → Birthday → Note → Postal Code/Address → Company name → Job Title → URL. When pressing l, this sequence is switched reversely.・ If Caller ID Setting is enabled for registered
phone numbers, appears next to the title.・ On the submenu of the Own Number details
screen, the following operations can be performed as with the details screen for the phonebook:・ Mail ☛P101・ URL access ☛P102・ Call Option (excluding making calls to Own
Number) ☛P55・ Copy items ☛P108・ Caller ID Setting ☛P110・ Connection Speed ☛P111・ Mail address exchange ☛P108・ User information ☛P106・ View Preference ☛P106
■ Editing registered data: m2 z Edit registered data and press p
■ Resetting registered data: m3 z Select Yes
Recording the voice and imageVoice Memo/Video Memo
Your voice can be recorded in standby as talking note (Standby Voice Memo) or the other party’s voice and image can be recorded during a voice or videophone call (Talking Voice Memo/Video Memo).・ Talking Voice Memo and Standby Voice Memo can
be recorded up to 30 seconds long for each message and up to 4 messages in total.
Default My phone number: subscribed phone numberOther than that: not recorded
・My phone number shows the phone number of the UIM inserted in FOMA terminal.
・ Press & to switch pages.
Ow
n N
um
ber
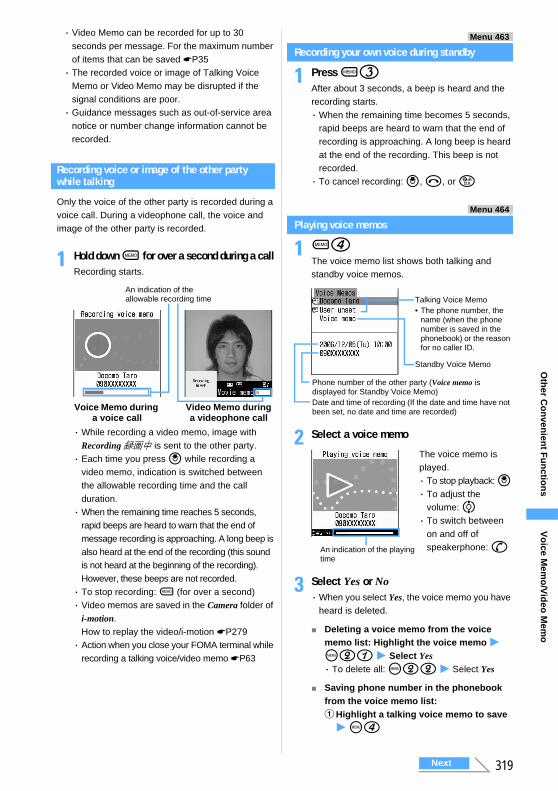
319
Oth
er Co
nven
ient F
un
ction
s
・ Video Memo can be recorded for up to 30 seconds per message. For the maximum number of items that can be saved ☛P35・ The recorded voice or image of Talking Voice
Memo or Video Memo may be disrupted if the signal conditions are poor. ・ Guidance messages such as out-of-service area
notice or number change information cannot be recorded.
Recording voice or image of the other party while talking
Only the voice of the other party is recorded during a voice call. During a videophone call, the voice and image of the other party is recorded.
1 Hold down C for over a second during a callRecording starts.
・While recording a video memo, image with Recording 録画中 is sent to the other party.・ Each time you press o while recording a
video memo, indication is switched between the allowable recording time and the call duration.・When the remaining time reaches 5 seconds,
rapid beeps are heard to warn that the end of message recording is approaching. A long beep is also heard at the end of the recording (this sound is not heard at the beginning of the recording). However, these beeps are not recorded.・ To stop recording: C (for over a second)・ Video memos are saved in the Camera folder of
i-motion.How to replay the video/i-motion ☛P279・ Action when you close your FOMA terminal while
recording a talking voice/video memo ☛P63
Menu 463
Recording your own voice during standby
1 Press C3After about 3 seconds, a beep is heard and the recording starts.・When the remaining time becomes 5 seconds,
rapid beeps are heard to warn that the end of recording is approaching. A long beep is heard at the end of the recording. This beep is not recorded.・ To cancel recording: o, f, or c
Menu 464
Playing voice memos
1 C4The voice memo list shows both talking and standby voice memos.
2 Select a voice memo
3 Select Yes or No・When you select Yes, the voice memo you have
heard is deleted.
■ Deleting a voice memo from the voice memo list: Highlight the voice memo z m21 z Select Yes・ To delete all: m22 z Select Yes
■ Saving phone number in the phonebook from the voice memo list:aHighlight a talking voice memo to save
z m4
An indication of the allowable recording time
Voice Memo during a voice call
Video Memo during a videophone call
Talking Voice Memo• The phone number, the
name (when the phone number is saved in the phonebook) or the reason for no caller ID.
Phone number of the other party (Voice memo is displayed for Standby Voice Memo)Date and time of recording (If the date and time have not been set, no date and time are recorded)
Standby Voice Memo
The voice memo is played.・ To stop playback: o・ To adjust the
volume: %・ To switch between
on and off of speakerphone: nAn indication of the playing
time
Vo
ice Mem
o/V
ideo
Mem
o
Next
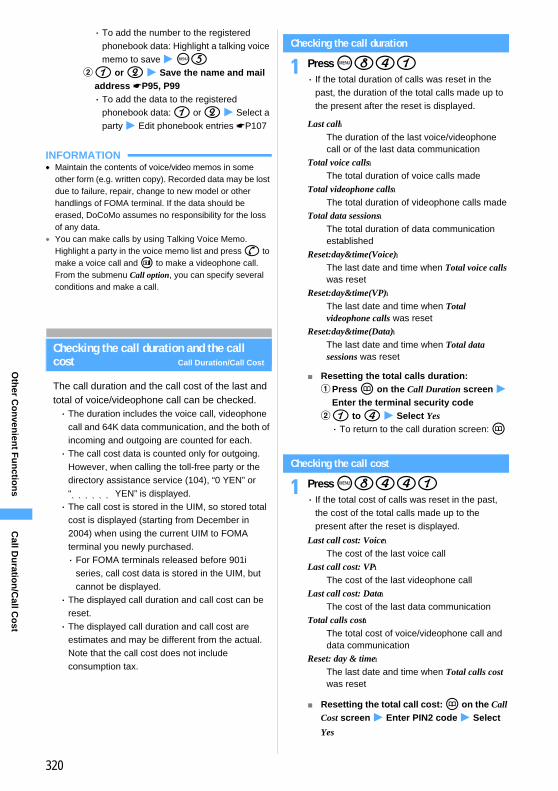
320
Oth
er Co
nven
ient F
un
ction
s
・ To add the number to the registered phonebook data: Highlight a talking voice memo to save z m5
b1 or 2 z Save the name and mail address ☛P95, P99・ To add the data to the registered
phonebook data: 1 or 2 z Select a party z Edit phonebook entries ☛P107
INFORMATION● Maintain the contents of voice/video memos in some
other form (e.g. written copy). Recorded data may be lost due to failure, repair, change to new model or other handlings of FOMA terminal. If the data should be erased, DoCoMo assumes no responsibility for the loss of any data.
● You can make calls by using Talking Voice Memo. Highlight a party in the voice memo list and press n to make a voice call and t to make a videophone call. From the submenu Call option, you can specify several conditions and make a call.
Checking the call duration and the call cost Call Duration/Call Cost
The call duration and the call cost of the last and total of voice/videophone call can be checked.・ The duration includes the voice call, videophone
call and 64K data communication, and the both of incoming and outgoing are counted for each.・ The call cost data is counted only for outgoing.
However, when calling the toll-free party or the directory assistance service (104), “0 YEN” or “****** YEN” is displayed.・ The call cost is stored in the UIM, so stored total
cost is displayed (starting from December in 2004) when using the current UIM to FOMA terminal you newly purchased.・ For FOMA terminals released before 901i
series, call cost data is stored in the UIM, but cannot be displayed.
・ The displayed call duration and call cost can be reset.・ The displayed call duration and call cost are
estimates and may be different from the actual. Note that the call cost does not include consumption tax.
Checking the call duration
1 Press m841・ If the total duration of calls was reset in the
past, the duration of the total calls made up to the present after the reset is displayed.
■ Resetting the total calls duration:aPress p on the Call Duration screen z
Enter the terminal security codeb1 to 4 z Select Yes・ To return to the call duration screen: p
Checking the call cost
1 Press m8441・ If the total cost of calls was reset in the past,
the cost of the total calls made up to the present after the reset is displayed.
■ Resetting the total call cost: p on the Call Cost screen z Enter PIN2 code z Select
Yes
Last call:The duration of the last voice/videophone call or of the last data communication
Total voice calls:The total duration of voice calls made
Total videophone calls:The total duration of videophone calls made
Total data sessions:The total duration of data communication established
Reset:day&time(Voice):The last date and time when Total voice calls was reset
Reset:day&time(VP):The last date and time when Total videophone calls was reset
Reset:day&time(Data):The last date and time when Total data sessions was reset
Last call cost: Voice:The cost of the last voice call
Last call cost: VP:The cost of the last videophone call
Last call cost: Data:The cost of the last data communication
Total calls cost:The total cost of voice/videophone call and data communication
Reset: day & time:The last date and time when Total calls cost was reset
Call D
uratio
n/C
all Co
st
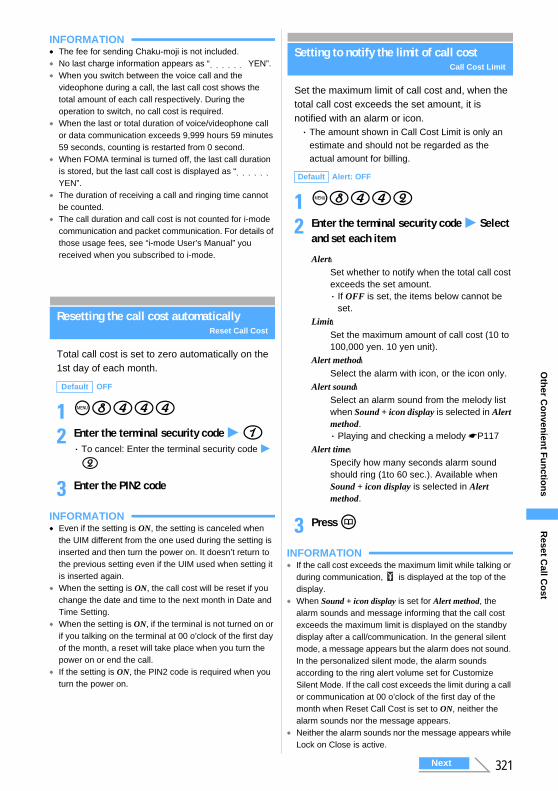
321
Oth
er Co
nven
ient F
un
ction
s
INFORMATION● The fee for sending Chaku-moji is not included. ● No last charge information appears as “****** YEN”.●When you switch between the voice call and the
videophone during a call, the last call cost shows the total amount of each call respectively. During the operation to switch, no call cost is required.
●When the last or total duration of voice/videophone call or data communication exceeds 9,999 hours 59 minutes 59 seconds, counting is restarted from 0 second.
●When FOMA terminal is turned off, the last call duration is stored, but the last call cost is displayed as “****** YEN”.
● The duration of receiving a call and ringing time cannot be counted.
● The call duration and call cost is not counted for i-mode communication and packet communication. For details of those usage fees, see “i-mode User’s Manual” you received when you subscribed to i-mode.
Resetting the call cost automaticallyReset Call Cost
Total call cost is set to zero automatically on the 1st day of each month.
1 m8444
2 Enter the terminal security code z 1・ To cancel: Enter the terminal security code z
2
3 Enter the PIN2 code
INFORMATION● Even if the setting is ON, the setting is canceled when
the UIM different from the one used during the setting is inserted and then turn the power on. It doesn’t return to the previous setting even if the UIM used when setting it is inserted again.
●When the setting is ON, the call cost will be reset if you change the date and time to the next month in Date and Time Setting.
●When the setting is ON, if the terminal is not turned on or if you talking on the terminal at 00 o’clock of the first day of the month, a reset will take place when you turn the power on or end the call.
● If the setting is ON, the PIN2 code is required when you turn the power on.
Setting to notify the limit of call costCall Cost Limit
Set the maximum limit of call cost and, when the total call cost exceeds the set amount, it is notified with an alarm or icon.・ The amount shown in Call Cost Limit is only an
estimate and should not be regarded as the actual amount for billing.
1 m8442
2 Enter the terminal security code z Select and set each item
3 Press p
INFORMATION● If the call cost exceeds the maximum limit while talking or
during communication, is displayed at the top of the display.
●When Sound + icon display is set for Alert method, the alarm sounds and message informing that the call cost exceeds the maximum limit is displayed on the standby display after a call/communication. In the general silent mode, a message appears but the alarm does not sound. In the personalized silent mode, the alarm sounds according to the ring alert volume set for Customize Silent Mode. If the call cost exceeds the limit during a call or communication at 00 o’clock of the first day of the month when Reset Call Cost is set to ON, neither the alarm sounds nor the message appears.
● Neither the alarm sounds nor the message appears while Lock on Close is active.
Default OFF
Default Alert: OFF
Alert:Set whether to notify when the total call cost exceeds the set amount.・ If OFF is set, the items below cannot be
set.Limit:
Set the maximum amount of call cost (10 to 100,000 yen. 10 yen unit).
Alert method:Select the alarm with icon, or the icon only.
Alert sound:Select an alarm sound from the melody list when Sound + icon display is selected in Alert method.・ Playing and checking a melody ☛P117
Alert time:Specify how many seconds alarm sound should ring (1to 60 sec.). Available when Sound + icon display is selected in Alert method.
Reset C
all Co
st
Next
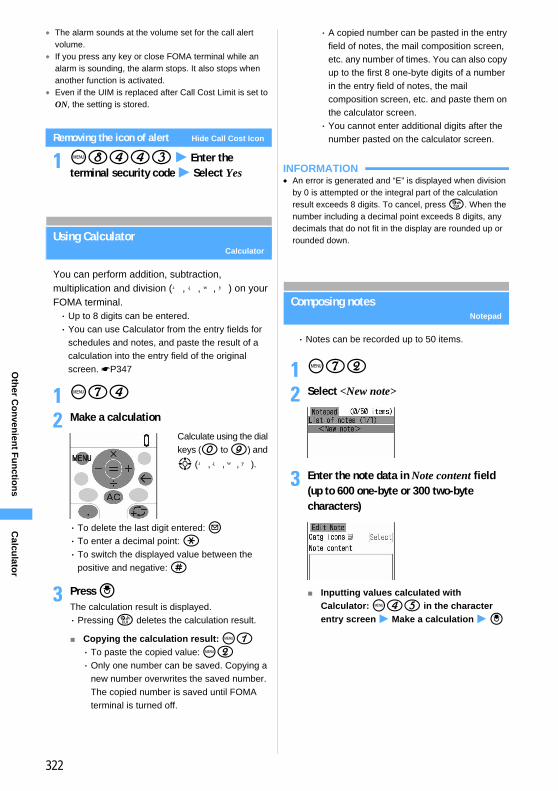
322
Oth
er Co
nven
ient F
un
ction
s
● The alarm sounds at the volume set for the call alert volume.
● If you press any key or close FOMA terminal while an alarm is sounding, the alarm stops. It also stops when another function is activated.
● Even if the UIM is replaced after Call Cost Limit is set to ON, the setting is stored.
Removing the icon of alert Hide Call Cost Icon
1 m8443 z Enter the terminal security code z Select Yes
Using CalculatorCalculator
You can perform addition, subtraction, multiplication and division (+, -, ×, ÷) on your FOMA terminal.・ Up to 8 digits can be entered.・ You can use Calculator from the entry fields for
schedules and notes, and paste the result of a calculation into the entry field of the original screen. ☛P347
1 m74
2 Make a calculation
・ To delete the last digit entered: a・ To enter a decimal point: (・ To switch the displayed value between the
positive and negative: #
3 Press o The calculation result is displayed.・ Pressing c deletes the calculation result.
■ Copying the calculation result: m1・ To paste the copied value: m2・ Only one number can be saved. Copying a
new number overwrites the saved number. The copied number is saved until FOMA terminal is turned off.
・ A copied number can be pasted in the entry field of notes, the mail composition screen, etc. any number of times. You can also copy up to the first 8 one-byte digits of a number in the entry field of notes, the mail composition screen, etc. and paste them on the calculator screen. ・ You cannot enter additional digits after the
number pasted on the calculator screen.
INFORMATION● An error is generated and “E” is displayed when division
by 0 is attempted or the integral part of the calculation result exceeds 8 digits. To cancel, press c. When the number including a decimal point exceeds 8 digits, any decimals that do not fit in the display are rounded up or rounded down.
Composing notesNotepad
・ Notes can be recorded up to 50 items.
1 m72
2 Select <New note>
3 Enter the note data in Note content field (up to 600 one-byte or 300 two-byte characters)
■ Inputting values calculated with Calculator: m45 in the character entry screen z Make a calculation z o
Calculate using the dial keys (0 to 9) and
O (+, -, ×, ÷).
Calcu
lator
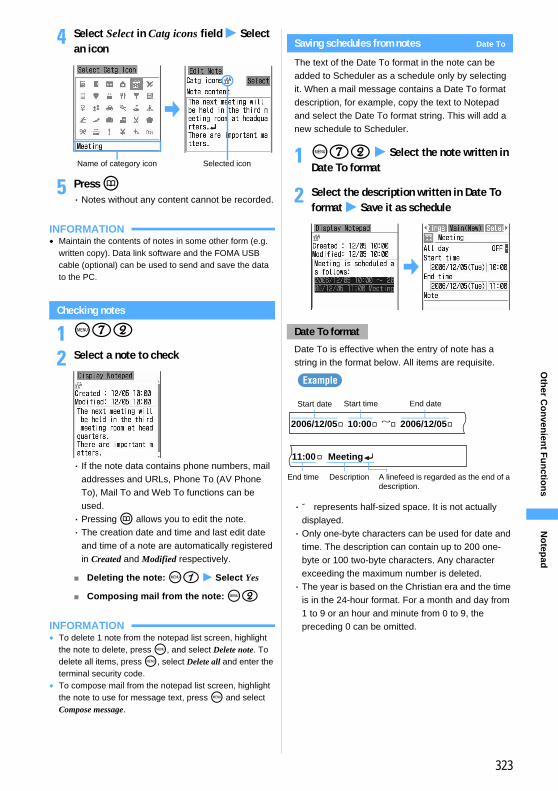
323
Oth
er Co
nven
ient F
un
ction
s
4 Select Select in Catg icons field z Select an icon
5 Press p ・ Notes without any content cannot be recorded.
INFORMATION● Maintain the contents of notes in some other form (e.g.
written copy). Data link software and the FOMA USB cable (optional) can be used to send and save the data to the PC.
Checking notes
1 m72
2 Select a note to check
・ If the note data contains phone numbers, mail addresses and URLs, Phone To (AV Phone To), Mail To and Web To functions can be used.・ Pressing p allows you to edit the note.・ The creation date and time and last edit date
and time of a note are automatically registered in Created and Modified respectively.
■ Deleting the note: m1 z Select Yes
■ Composing mail from the note: m2
INFORMATION● To delete 1 note from the notepad list screen, highlight
the note to delete, press m, and select Delete note. To delete all items, press m, select Delete all and enter the terminal security code.
● To compose mail from the notepad list screen, highlight the note to use for message text, press m and select Compose message.
Saving schedules from notes Date To
The text of the Date To format in the note can be added to Scheduler as a schedule only by selecting it. When a mail message contains a Date To format description, for example, copy the text to Notepad and select the Date To format string. This will add a new schedule to Scheduler.
1 m72 z Select the note written in Date To format
2 Select the description written in Date To format z Save it as schedule
Date To is effective when the entry of note has a string in the format below. All items are requisite.
・□ represents half-sized space. It is not actually displayed.・ Only one-byte characters can be used for date and
time. The description can contain up to 200 one-byte or 100 two-byte characters. Any character exceeding the maximum number is deleted.・ The year is based on the Christian era and the time
is in the 24-hour format. For a month and day from 1 to 9 or an hour and minute from 0 to 9, the preceding 0 can be omitted.
Name of category icon Selected icon
Date To format
Example
2006/12/05□10:00□~□2006/12/05□
Start date Start time End date
11:00 □Meeting
End time Description A linefeed is regarded as the end of a description.
No
tepad
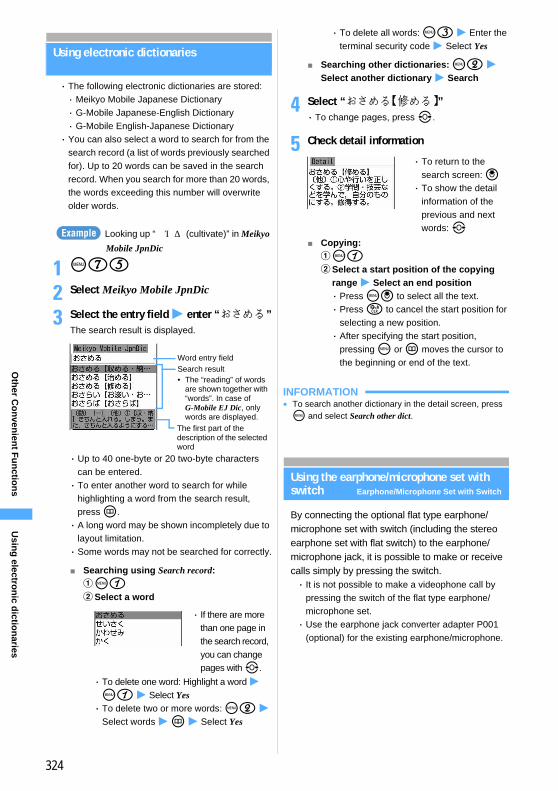
324
Oth
er Co
nven
ient F
un
ction
s
Using electronic dictionaries
・ The following electronic dictionaries are stored: ・ Meikyo Mobile Japanese Dictionary・ G-Mobile Japanese-English Dictionary・ G-Mobile English-Japanese Dictionary・ You can also select a word to search for from the
search record (a list of words previously searched for). Up to 20 words can be saved in the search record. When you search for more than 20 words, the words exceeding this number will overwrite older words.
Looking up “修める (cultivate)” in Meikyo Mobile JpnDic
1 m75
2 Select Meikyo Mobile JpnDic
3 Select the entry field z enter “おさめる”The search result is displayed.
・ Up to 40 one-byte or 20 two-byte characters can be entered. ・ To enter another word to search for while
highlighting a word from the search result, press p.・ A long word may be shown incompletely due to
layout limitation. ・ Some words may not be searched for correctly.
■ Searching using Search record: am1bSelect a word
・ To delete one word: Highlight a word z m1 z Select Yes ・ To delete two or more words: m2 z
Select words z p z Select Yes
・ To delete all words: m3 z Enter the terminal security code z Select Yes
■ Searching other dictionaries: m2 z Select another dictionary z Search
4 Select “おさめる【修める】”・ To change pages, press &.
5 Check detail information
■ Copying: am1bSelect a start position of the copying
range z Select an end position ・ Press mo to select all the text. ・ Press c to cancel the start position for
selecting a new position. ・ After specifying the start position,
pressing m or p moves the cursor to the beginning or end of the text.
INFORMATION● To search another dictionary in the detail screen, press
m and select Search other dict.
Using the earphone/microphone set with switch Earphone/Microphone Set with Switch
By connecting the optional flat type earphone/microphone set with switch (including the stereo earphone set with flat switch) to the earphone/microphone jack, it is possible to make or receive calls simply by pressing the switch.・ It is not possible to make a videophone call by
pressing the switch of the flat type earphone/microphone set.・ Use the earphone jack converter adapter P001
(optional) for the existing earphone/microphone.
Example
Word entry fieldSearch result• The “reading” of words
are shown together with “words”. In case of G-Mobile EJ Dic, only words are displayed.
The first part of the description of the selected word
・ If there are more than one page in the search record, you can change pages with &.
・ To return to the search screen: o・ To show the detail
information of the previous and next words: &
Usin
g electro
nic d
iction
aries
325
Oth
er Co
nven
ient F
un
ction
s
Connecting the earphone/microphone set with switch
To connect the flat type earphone/microphone set with switch to FOMA terminal, open the cover of the earphone/microphone jack and insert the connection plug of the flat type earphone/microphone set with switch. ☛P25・ Do not wrap the cord of the flat type earphone/
microphone set with switch around FOMA terminal. Reception level of radio waves may deteriorate.・When the cord of the flat type earphone/
microphone set with switch nears the antenna, a noise may be emitted.・ Insert the plug firmly. If it is not inserted
completely, there may be audio disruption.
Making voice calls by pressing the switch
By registering a phone number to the phonebook No. assigned by Headset Key Control, it is possible to make a voice call to that number only by pressing the switch on the flat type earphone/microphone set with switch.・ To make a call using a flat type earphone/
microphone set with switch, Control function must be set to ON in Headset Key Control.
1 Hold down the switch for over a second until you hear 2 short beepsA voice call will be made to the first registered phone number of the phonebook No. assigned by Headset Key Control.・ If more than one phone number has been
registered, the first phone number will be dialed.
2 Hold down the switch for over a second until you hear a short beep to end a call
INFORMATION● If Secret Attribute has been set for the phonebook No.
assigned by Headset Key Control, Secret Mode must be activated before operating.
● Even if Call Waiting Service is subscribed and activated, you cannot make another call during a call by entering the number of a third party and pressing the switch. Be aware that pressing the switch will terminate the first call.
Receiving calls by pressing the switch
1 When an incoming call is received, hold down the switch for over a second until you hear 2 short beeps・ The ring tone is emitted from the point set by
Alert Preference.
2 Hold down the switch for over a second until you hear a short beep to end a call
INFORMATION●When you receive a videophone call while a flat type
earphone/microphone set with switch is connected, holding down the earphone's switch for over a second sends your self image to the other party if FOMA terminal is open, or a substitute image if FOMA terminal is closed.
● Operations when FOMA terminal is closed during a call made with a flat type earphone/microphone with switch connected ☛P63
●When Call Waiting Service is subscribed and activated, you can receive a voice call during a call by holding down the switch for over a second.
Setting the earphone/microphone switch operation Headset Key Control
Set the number you call using a flat type earphone/microphone set with switch by selecting the phonebook No. of FOMA terminal.
1 m8653
2 Select Control function field z 1
3 Select Phonebook No. field
4 Select the receiver
5 Press p
INFORMATION●When the phonebook data of the Phonebook No. set by
this function is deleted or overwritten in other data, or the Phonebook No. is changed, this setting is canceled.
Default OFF
・ To cancel: 2 z Go to Step 5
Earp
ho
ne/M
icrop
ho
ne S
et with
Sw
itch

326
Oth
er Co
nven
ient F
un
ction
s
Answering a call automatically with the earphone/microphone connected Auto Answer
When using a flat type earphone/microphone set with switch, this sets whether to receive an incoming call automatically.When a voice or videophone call is automatically received, the voice of the other party is heard from the connected earphone/microphone.・ If an incoming call is received during another call,
this function is not activated.・ This function does not work in Public mode
(Driving mode).
1 m8652
2 Select Auto answering field z 1・ To cancel: Select Auto answering field z 2 z Go to Step 4
3 Select Delayed time(Sec) field z Enter the time (0 to 120 sec) before answering automatically
4 Press p
INFORMATION●When a videophone call has been answered by Auto
Answer, the substitute image set in Image Setting is sent and a videophone call is automatically started.
●When this function and Answer Machine, Voice Mail Service or Call Forwarding Service are set simultaneously, the set ringing time determines which function will be used.
● The same time period cannot be set for both the delayed time of Auto Answer and the response time of Answer Machine.
●When the setting of Delayed time(Sec) is within the time set by Mute Ring Time Setting, Auto Answer does not answer a call coming from a party not saved in the phonebook.
Hearing the ring tone only through the earphoneAlert Preference
When connecting a flat type earphone/microphone set with switch, you can set to hear the ring alert only through the earphone.
1 m8651
2 Press 2・ To hear the ring alert both through the
earphone and the speaker: 1
INFORMATION●When a flat type earphone/microphone set with switch is
not connected, the ring alert sounds through the speaker regardless of this setting.
● Even when you set to Headset only, you will also hear the ring tone through the speaker when 20 seconds pass without answering a call.
Determining a service providerNW Search Method
This function allows you to select a FOMA service provider. Select whether to set the service provider manually or using automatic search. Determine a service provider when you select Manual select.
1 m885
2 Select each item to set
3 Press p
Reducing the start-up time after power-on Quick Start-up
1 m887
2 Press 1・ To cancel: 2
Default OFF
Default Headset + speaker
Usually, you do not need to change this setting.
Default Auto select NW
Search method:Sets how to retrieve a network.・ If you select Auto select NW, you cannot
set Manual select.Manual select:
Determines a service provider.・ A service provider other than DoCoMo
cannot be selected for manual selection (as of August 2006).
Default ON
NW
Search
Meth
od
327
Oth
er Co
nven
ient F
un
ction
s
INFORMATION● Even when you set to ON, it takes the normal time to
start up in the following cases:・When the remaining battery level is 2 or lower・When the battery pack is replaced・When 24 hours passes after the power was turned offIt may also take the normal time to start up after you turn the power off with any other screen than the standby display or while is being displayed after power-on.
Checking current settings of functionsConfirm Settings
・ During PIM Lock, the specific setting of the item being locked is displayed as “---”.
1 m842
2 O to confirm the settings
Resetting functionsReset
This resets functions to their default settings.・ For the functions to be returned to the default
settings by resetting, see “Menu list”. The following functions and data, though not mentioned in “Menu list”, are also reset to the default settings:・When Preferences is selected:
Silent Mode, Public mode (Driving mode), Call cost icon, History of face marks, History of symbols and pictograms・When Full Browser Settings is selected:
Cookie information, Pointer mode, View position setting, Search setting・When Predict dict. data is selected:
Data recorded using the input prediction function
1 m845
2 Enter the terminal security code z Select the item
3 p z Select Yes
INFORMATION● If you reset i-mode preferences, i-channel information will
not be displayed in a ticker on the standby display. When this happens, if the i-channel information is automatically updated or if you press c to display the channel list, the latest information is received and you can display it in a ticker on the standby display.
Deleting registered data collectivelyDelete All Data
Deletes the saved data and returns the settings of the functions to the default.・ Protected data are also deleted.・ Delete All Data should be done with battery fully
charged. If the battery power is not enough, the data may not be deleted collectively.・ The following data preinstalled by default are
deleted:・ i-αppli ・ Chara-den・ Images in the Deco-Mail picture and Item folders
in Data Box・ The following data saved or registered are
deleted:・ Chaku-moji message (including sent message
log)・ Mail template ・ Mail group ・ Bookmark・ Entered URL ・ URL history ・ Screen memo・ Last visited URL・ i-channel (Received info)・ i-αppli ・ i-αppli display history・ Phonebook data・ Phonebook communication log of Data Security
Service・ Received call history・ Redial data ・ Voice memo・ Data read by Bar Code Reader・ Notepad ・ Call duration
・ Press & to switch between pages.
Co
nfirm
Settin
gs
Next

328
Oth
er Co
nven
ient F
un
ction
s
・ Saved word/fixed phrase・ Registered USSD・ Recorded answering message・ Own Number data (except for My phone
number)・ Search record of dictionaries・ Created folders/albums・ Message R/F ・ i-mode Mail・ Chat mail ・ SMS message・ Recorded message (including the greeting)・ Data in folders other than the Preinstalled and
Mail attach melody folders in Data Box・ Downloaded dictionaries・ Schedule・ The functions to be returned to the default by
Reset*1 and the following functions return to the default:・ Sort Criteria ・ Answer Machine・ Settings made in the chat mail screen・ Camera ・ Movie Camera・ Sound Recorder ・ Terminal security code・ Privacy Mode Setting・ Data and Time Setting・ External Device・ Reset Call Cost・ Arrival call act ・ Menu Setting・ Changed folder name・ Custom Menu・ i-mode Shortcut for bookmark・ Settings made in the i-αppli software list screen・ Settings made in the phonebook・ Sync setting of Data Security Service・ Settings made with Scheduler・ Settings for Image/i-motion/Melody/Chara-den・ Data exchange settings by infrared
communication・ Alarm Clock・ Software Update (Reserved Update)*1 SMS settings other than SMS report request
and the settings in Certificate Setting other than CA certificate 1 to 9 will not return to the default.
1 m846 z Enter the terminal security code z Select YesData are deleted collectively during restart.
INFORMATION● The following data will not be deleted. The default
settings cannot be restored either.・ The data saved, registered or set in the UIM・ Data communication setting set via a PC
● If there are large capacity data to be deleted, about 1 minute may be required to restart. Be careful not to turn off the power before completing the operation.
● If you perform Delete All Data, i-channel information will not be displayed in a ticker on the standby display. If the i-channel information is automatically updated or if you press c to display the channel list, the latest information is received and you can display it in a ticker on the standby display.
● If the data or i-αppli preinstalled by default are deleted, they can be downloaded from i-mode site “My D-style” (☛P361). Packet communication fee is required separately to download.
Delete A
ll Data
329
Network ServicesNetwork services available using FOMA terminal ......... Network Service 330Using Voice Mail Service ........................................................... Voice Mail 330Using Call Waiting Service ..................................................... Call Waiting 331Using Call Forwarding Service ......................................... Call Forwarding 332Using Nuisance Call Blocking Service ............... Nuisance Call Blocking 332Using Caller ID Request Service ................................... Caller ID Request 333Using Dual Network Service ................................................. Dual Network 333Switching languages for the guidance ........................ English Guidance 333Using Service Dialing Number ........................... Service Dialing Number 334Setting actions to receive incoming calls during a call ..............................334Setting Remote Control ..................................................... Remote Control 334Using Multi Number ............................................................... Multi Number 335Registering new network services ........ Added Service (Register USSD) 336
In this manual, the description of each network service is explained by the operation
procedure using the menu of FOMA terminal. For details, see “Network Services User’s
Guide”.
330
Netw
ork S
ervices
Network services available using FOMA terminal Network Service
This manual explains only the description of each network service.
・ In this manual, the description of each network service is explained by the operation procedure using the menu of FOMA terminal. For details, see “Network Services User’s Guide”.・When new network services are provided by
DoCoMo, you can register them in the menu. ☛P336
Using Voice Mail ServiceVoice Mail
Stores voice messages of incoming voice calls or videophone calls when you are in an area where there is no signal, turn off your terminal, or cannot answer a call.*1
・ Unanswered calls are transferred to the Voice Mail Service Center. The incoming voice messages are notified by the icon indicated on the standby display.・ Up to 20 messages can be recorded for voice
calls and videophone calls respectively, a maximum of 3 minutes long for each. Messages are stored for up to 72 hours.*1
・When Voice Mail Service is activated, ring alert sounds to alert you to incoming calls. You can receive the call while the ring alert is sounding. The ring alert sound duration (ringing time) can be changed. Note that if you set the ringing time to 0 second, the received call history will not be recorded in.・ You can forward incoming voice calls and
videophone calls to the Voice Mail Service Center manually. ☛P62, P82
*1 As of August 2006, Voice Mail Service on the videophone has not been provided yet.
Step 1 : Activate the service
Step 2 : The caller records a voice message/image
Step 3 : Play back the voice message
1 m91
2 Perform the following operations
Service ApplicationMonthly
feePage
Voice Mail Service
Required Charged P330
Call Waiting Service
Required Charged P331
Call Forwarding Service
Required Free P332
Nuisance Call Blocking Service
Required Free P332
Caller ID Request Service
Not required Free P333
Dual Network Service
Required Charged P333
English Guidance Not required Free P333
Multi Number Required Charged P335
Public mode (Driving mode)
Not required Free P70
Public mode (power off)
Not required Free P72
Basic flow of Voice Mail Service
Operation procedure
Item Operation procedure
Activate 11 z Select Yes z Select Yes z Enter the ringing time (0 to 120 sec)
Set ring time 12 z Select Yes z Enter the ringing time (0 to 120 sec)
Deactivate 13 z Select YesCheck setting 14 z Select YesPlay messages When a new voice message arrives,
(with the number of messages) is indicated on the standby display. 15 z Select Yes z Follow the voice prompts
Voice Mail setting
16 z Select Yes z Follow the voice prompts
Check messages 17 z Select YesWhen a new voice message arrives,
(with the number of messages) is indicated on the standby display.
Tone/Vibration message notification
Voice Mail alert: ONNotification melody:キラリン(Kirarin)
You can set an alert tone to sound when the caller left a new voice message, or when the number of voice messages has increased at the time you perform Check messages.a2 z Select Voice Mail alert fieldb1 ・ To disable the alert tone: 2 z
Go to Step dc Select Notification melody field z
Select a folder z Select a melodyd Press p
Default
Netw
ork S
ervice

331
Netw
ork S
ervices
INFORMATION● From the screen of Check setting, you can change the
setting by the submenu.m1: Activate Voice Mail Servicem2: Deactivate Voice Mail Servicem3: Set the ringing time of Voice Mail Service
● New voice messages can be played quickly from the standby display. ☛P34
● The 32K videophone call is not supported by Voice Mail Service.
● The number of messages displayed shows the number of new voice messages provided by guidance when the messages are played, which does not include the number of saved voice messages.
● Dial 1412 to use Voice Mail Service on the videophone.*1
●When connecting to the Voice Mail Service Center during Chara-den, switch to Send DTMF by selecting from the submenu to operate this service.*1 ☛P81
●When a new voice message is kept by videophone call, you are informed it by SMS.*1
*1 As of August 2006, this service has not been provided
yet.
Using Call Waiting ServiceCall Waiting
When a third party calls you while you are on the phone, this service notifies you with the call waiting ring alert. This allows you to put your current call on hold and then answer the other call.
1 m92
2 Perform the following operations
1 n during a callThe current call is put on hold and the second call can be answered.・Multi connecting appears on the screen.・ To switch the other parties: t・ You can put your current call on hold by
pressing o. Press o again to release the hold.・ To end the call on hold: m1 during Call
Waiting (multi-connection)
2 Press f when you finish talking to the other partyThe call is ended and the ring alert sounds.・ To resume talks with the other party on hold:
n
1 f during a callA ring alert sounds to indicate there is an incoming call.
2 Press nYou can receive a new call.
1 Enter the phone number during a call・ You can select the other party’s phone number
from the received call history by pressing l, from the redial data by pressing r, or from the phonebook by pressing p instead of entering the phone number.
2 nYour current call is automatically put on hold and you can begin talking to the other party you called.・Multi connecting appears on the screen.・ To switch the other parties: t
Notify missed call; Activate
When FOMA terminal is turned on or within the service area, this function notifies you of the calls received with FOMA terminal turned off or outside the service area using SMS.31 z Select Yes z Select Yes/NoYes: Notifies only the incoming calls with
caller ID.No: Notifies all the incoming calls.
Notify missed call; Deactivate
32 z Select Yes
Notify missed call; Check setting
33 z Select Yes
Hide Voice Mail icon
4 z Select YesThe icon that indicates the number of voice messages disappears.
Item Operation procedure
Item Operation procedure
Activate 1 z Select YesDeactivate 2 z Select YesCheck setting 3 z Select Yes
Putting the current call on hold to answer an incoming call:
Answering an incoming call after finishing the current call
Holding the current call and making another call
Call W
aiting
Next
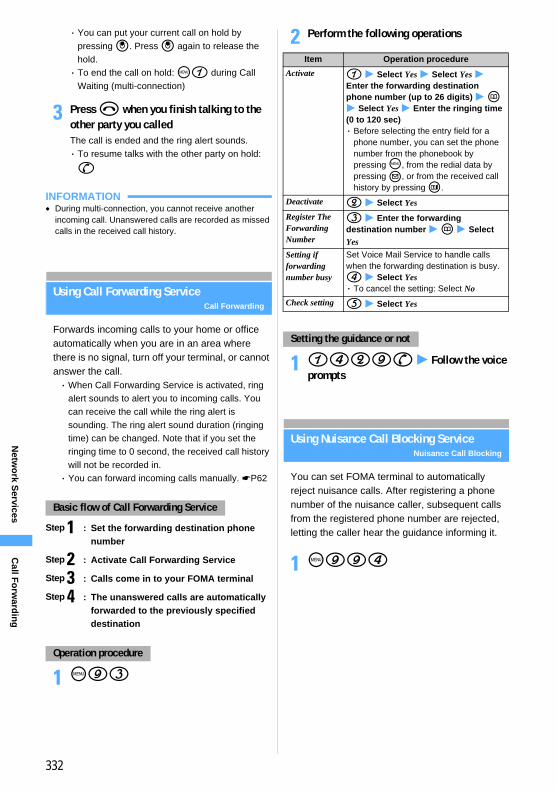
332
Netw
ork S
ervices
・ You can put your current call on hold by pressing o. Press o again to release the hold.・ To end the call on hold: m1 during Call
Waiting (multi-connection)
3 Press f when you finish talking to the other party you calledThe call is ended and the ring alert sounds.・ To resume talks with the other party on hold:
n
INFORMATION● During multi-connection, you cannot receive another
incoming call. Unanswered calls are recorded as missed calls in the received call history.
Using Call Forwarding ServiceCall Forwarding
Forwards incoming calls to your home or office automatically when you are in an area where there is no signal, turn off your terminal, or cannot answer the call.・When Call Forwarding Service is activated, ring
alert sounds to alert you to incoming calls. You can receive the call while the ring alert is sounding. The ring alert sound duration (ringing time) can be changed. Note that if you set the ringing time to 0 second, the received call history will not be recorded in.・ You can forward incoming calls manually. ☛P62
Step 1 : Set the forwarding destination phone number
Step 2 : Activate Call Forwarding Service
Step 3 : Calls come in to your FOMA terminal
Step 4 : The unanswered calls are automatically forwarded to the previously specified destination
1 m93
2 Perform the following operations
1 1429n z Follow the voice prompts
Using Nuisance Call Blocking ServiceNuisance Call Blocking
You can set FOMA terminal to automatically reject nuisance calls. After registering a phone number of the nuisance caller, subsequent calls from the registered phone number are rejected, letting the caller hear the guidance informing it.
1 m994
Basic flow of Call Forwarding Service
Operation procedure
Item Operation procedure
Activate 1 z Select Yes z Select Yes z Enter the forwarding destination phone number (up to 26 digits) z p z Select Yes z Enter the ringing time (0 to 120 sec)・ Before selecting the entry field for a
phone number, you can set the phone number from the phonebook by pressing m, from the redial data by pressing a, or from the received call history by pressing t.
Deactivate 2 z Select YesRegister The Forwarding Number
3 z Enter the forwarding destination number z p z Select Yes
Setting if forwarding number busy
Set Voice Mail Service to handle calls when the forwarding destination is busy.4 z Select Yes・ To cancel the setting: Select No
Check setting 5 z Select Yes
Setting the guidance or not
Call F
orw
ardin
g
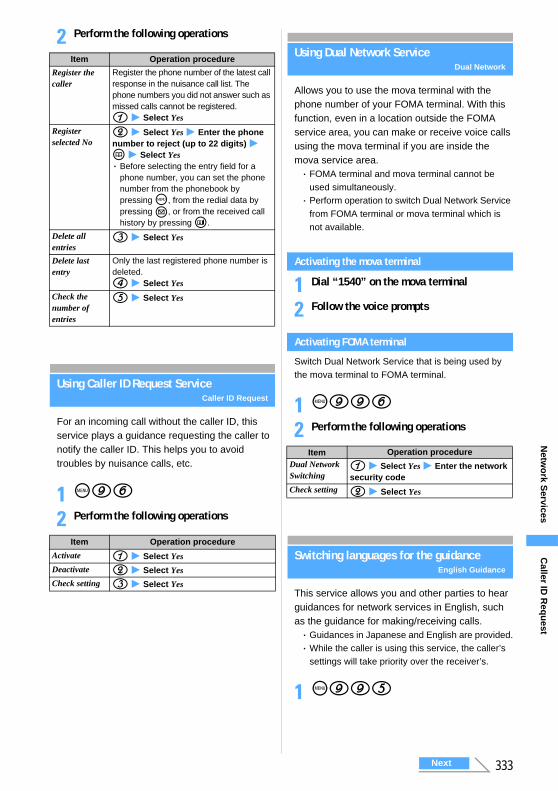
333
Netw
ork S
ervices
2 Perform the following operations
Using Caller ID Request ServiceCaller ID Request
For an incoming call without the caller ID, this service plays a guidance requesting the caller to notify the caller ID. This helps you to avoid troubles by nuisance calls, etc.
1 m96
2 Perform the following operations
Using Dual Network ServiceDual Network
Allows you to use the mova terminal with the phone number of your FOMA terminal. With this function, even in a location outside the FOMA service area, you can make or receive voice calls using the mova terminal if you are inside the mova service area.・ FOMA terminal and mova terminal cannot be
used simultaneously.・ Perform operation to switch Dual Network Service
from FOMA terminal or mova terminal which is not available.
Activating the mova terminal
1 Dial “1540” on the mova terminal
2 Follow the voice prompts
Activating FOMA terminal
Switch Dual Network Service that is being used by the mova terminal to FOMA terminal.
1 m996
2 Perform the following operations
Switching languages for the guidanceEnglish Guidance
This service allows you and other parties to hear guidances for network services in English, such as the guidance for making/receiving calls.・ Guidances in Japanese and English are provided.・While the caller is using this service, the caller’s
settings will take priority over the receiver’s.
1 m995
Item Operation procedure
Register the caller
Register the phone number of the latest call response in the nuisance call list. The phone numbers you did not answer such as missed calls cannot be registered.1 z Select Yes
Register selected No
2 z Select Yes z Enter the phone number to reject (up to 22 digits) z p z Select Yes・ Before selecting the entry field for a
phone number, you can set the phone number from the phonebook by pressing m, from the redial data by pressing a, or from the received call history by pressing t.
Delete all entries
3 z Select Yes
Delete last entry
Only the last registered phone number is deleted.4 z Select Yes
Check the number of entries
5 z Select Yes
Item Operation procedure
Activate 1 z Select YesDeactivate 2 z Select YesCheck setting 3 z Select Yes
Item Operation procedureDual Network Switching
1 z Select Yes z Enter the network security code
Check setting 2 z Select Yes
Caller ID
Req
uest
Next
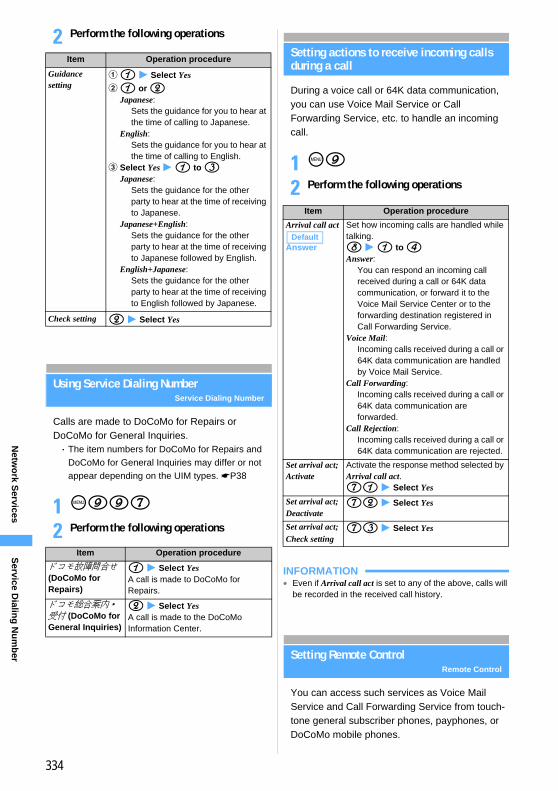
334
Netw
ork S
ervices
2 Perform the following operations
Using Service Dialing NumberService Dialing Number
Calls are made to DoCoMo for Repairs or DoCoMo for General Inquiries.・ The item numbers for DoCoMo for Repairs and
DoCoMo for General Inquiries may differ or not appear depending on the UIM types. ☛P38
1 m997
2 Perform the following operations
Setting actions to receive incoming calls during a call
During a voice call or 64K data communication, you can use Voice Mail Service or Call Forwarding Service, etc. to handle an incoming call.
1 m9
2 Perform the following operations
INFORMATION● Even if Arrival call act is set to any of the above, calls will
be recorded in the received call history.
Setting Remote ControlRemote Control
You can access such services as Voice Mail Service and Call Forwarding Service from touch-tone general subscriber phones, payphones, or DoCoMo mobile phones.
Item Operation procedure
Guidance setting
a1 z Select Yesb1 or 2
Japanese:Sets the guidance for you to hear at the time of calling to Japanese.
English:Sets the guidance for you to hear at the time of calling to English.
c Select Yes z 1 to 3Japanese:
Sets the guidance for the other party to hear at the time of receiving to Japanese.
Japanese+English:Sets the guidance for the other party to hear at the time of receiving to Japanese followed by English.
English+Japanese:Sets the guidance for the other party to hear at the time of receiving to English followed by Japanese.
Check setting 2 z Select Yes
Item Operation procedure
ドコモ故障問合せ (DoCoMo for Repairs)
1 z Select YesA call is made to DoCoMo for Repairs.
ドコモ総合案内・受付 (DoCoMo for General Inquiries)
2 z Select YesA call is made to the DoCoMo Information Center.
Item Operation procedure
Arrival call act
Answer
Set how incoming calls are handled while talking.8 z 1 to 4Answer:
You can respond an incoming call received during a call or 64K data communication, or forward it to the Voice Mail Service Center or to the forwarding destination registered in Call Forwarding Service.
Voice Mail:Incoming calls received during a call or 64K data communication are handled by Voice Mail Service.
Call Forwarding:Incoming calls received during a call or 64K data communication are forwarded.
Call Rejection:Incoming calls received during a call or 64K data communication are rejected.
Set arrival act;Activate
Activate the response method selected by Arrival call act.71 z Select Yes
Set arrival act;Deactivate
72 z Select Yes
Set arrival act;Check setting
73 z Select Yes
Default
Service D
ialing
Nu
mb
er
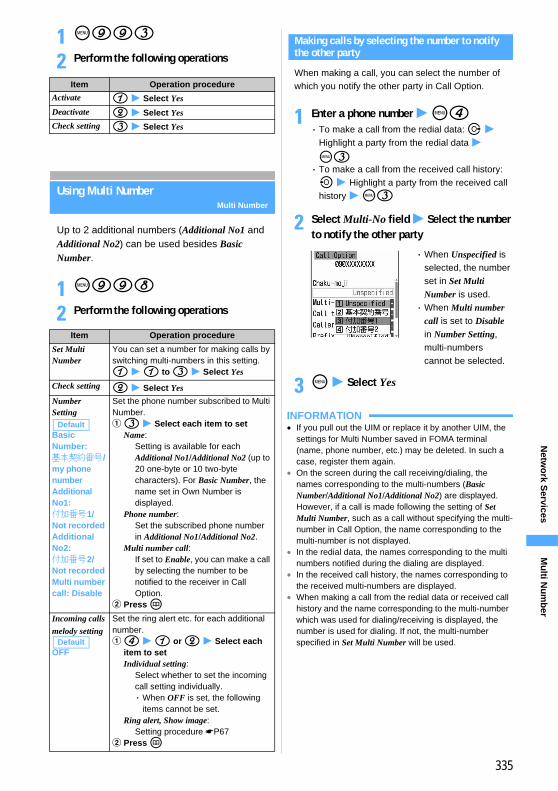
335
Netw
ork S
ervices
1 m993
2 Perform the following operations
Using Multi NumberMulti Number
Up to 2 additional numbers (Additional No1 and Additional No2) can be used besides Basic Number.
1 m998
2 Perform the following operations
Making calls by selecting the number to notify the other party
When making a call, you can select the number of which you notify the other party in Call Option.
1 Enter a phone number z m4・ To make a call from the redial data: r z
Highlight a party from the redial data z
m3・ To make a call from the received call history: l z Highlight a party from the received call history z m3
2 Select Multi-No field z Select the number to notify the other party
3 m z Select Yes
INFORMATION● If you pull out the UIM or replace it by another UIM, the
settings for Multi Number saved in FOMA terminal (name, phone number, etc.) may be deleted. In such a case, register them again.
● On the screen during the call receiving/dialing, the names corresponding to the multi-numbers (Basic Number/Additional No1/Additional No2) are displayed. However, if a call is made following the setting of Set Multi Number, such as a call without specifying the multi-number in Call Option, the name corresponding to the multi-number is not displayed.
● In the redial data, the names corresponding to the multi numbers notified during the dialing are displayed.
● In the received call history, the names corresponding to the received multi-numbers are displayed.
●When making a call from the redial data or received call history and the name corresponding to the multi-number which was used for dialing/receiving is displayed, the number is used for dialing. If not, the multi-number specified in Set Multi Number will be used.
Item Operation procedure
Activate 1 z Select YesDeactivate 2 z Select YesCheck setting 3 z Select Yes
Item Operation procedure
Set Multi Number
You can set a number for making calls by switching multi-numbers in this setting.1 z 1 to 3 z Select Yes
Check setting 2 z Select YesNumber Setting
Basic Number:基本契約番号/my phone number Additional No1:付加番号1/Not recorded Additional No2:付加番号2/Not recorded Multi number call: Disable
Set the phone number subscribed to Multi Number.a3 z Select each item to set
Name:Setting is available for each Additional No1/Additional No2 (up to 20 one-byte or 10 two-byte characters). For Basic Number, the name set in Own Number is displayed.
Phone number:Set the subscribed phone number in Additional No1/Additional No2.
Multi number call:If set to Enable, you can make a call by selecting the number to be notified to the receiver in Call Option.
b Press pIncoming calls melody setting
OFF
Set the ring alert etc. for each additional number.a4 z 1 or 2 z Select each
item to setIndividual setting:
Select whether to set the incoming call setting individually.・When OFF is set, the following
items cannot be set.Ring alert, Show image:
Setting procedure ☛P67b Press p
Default
Default
・When Unspecified is selected, the number set in Set Multi Number is used.・When Multi number
call is set to Disable in Number Setting, multi-numbers cannot be selected.
Mu
lti Nu
mb
er
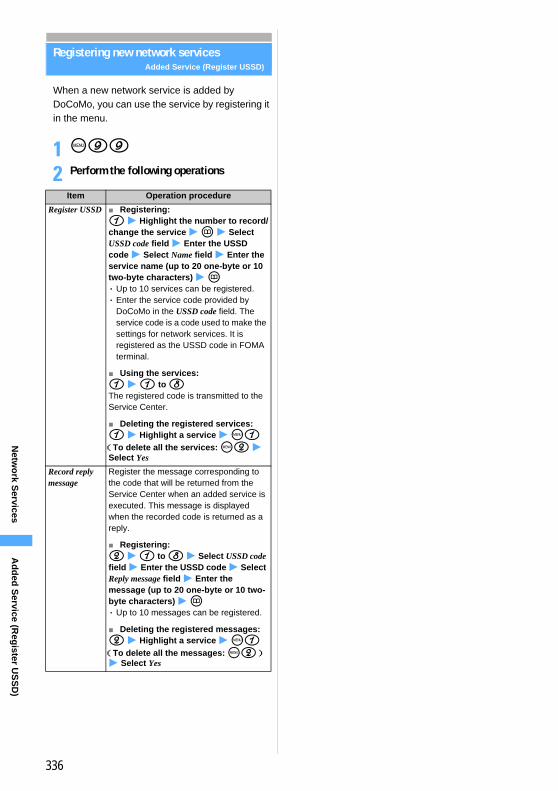
336
Netw
ork S
ervices
Registering new network servicesAdded Service (Register USSD)
When a new network service is added by DoCoMo, you can use the service by registering it in the menu.
1 m99
2 Perform the following operations
Item Operation procedure
Register USSD ■ Registering:1 z Highlight the number to record/change the service z p z Select USSD code field z Enter the USSD code z Select Name field z Enter the service name (up to 20 one-byte or 10 two-byte characters) z p・ Up to 10 services can be registered.・ Enter the service code provided by
DoCoMo in the USSD code field. The service code is a code used to make the settings for network services. It is registered as the USSD code in FOMA terminal.
■ Using the services:1 z 1 to 8The registered code is transmitted to the Service Center.
■ Deleting the registered services:1 z Highlight a service z m1 (To delete all the services: m2 z Select Yes
Record reply message
Register the message corresponding to the code that will be returned from the Service Center when an added service is executed. This message is displayed when the recorded code is returned as a reply.
■ Registering:2 z 1 to 8 z Select USSD code field z Enter the USSD code z Select Reply message field z Enter the message (up to 20 one-byte or 10 two-byte characters) z p・ Up to 10 messages can be registered.
■ Deleting the registered messages:2 z Highlight a service z m1(To delete all the messages: m2) z Select Yes
Ad
ded
Service (R
egister U
SS
D)
337337337
Data CommunicationData communication ......................................................................................338Flow of setup for data communication .........................................................339AT command ...................................................................................................340
For data communication, see the PDF version of “Manual for Data Communication” in CD-
ROM provided for details. To see the PDF version of “Manual for Data Communication”,
Adobe Reader (version 6.0 or later is recommended) is required. If Adobe Reader is not
installed in your PC, please install Adobe Reader in CD-ROM mentioned above beforehand.
For details on how to use, refer to the Help menu of Adobe Reader.
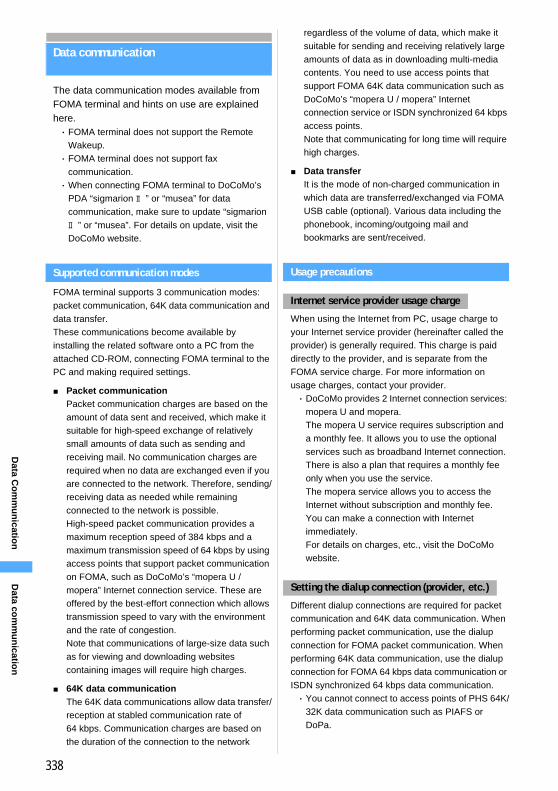
338
Data C
om
mu
nicatio
n
Data communication
The data communication modes available from FOMA terminal and hints on use are explained here.・ FOMA terminal does not support the Remote
Wakeup.・ FOMA terminal does not support fax
communication.・When connecting FOMA terminal to DoCoMo’s
PDA “sigmarion Ⅱ” or “musea” for data communication, make sure to update “sigmarion Ⅱ” or “musea”. For details on update, visit the DoCoMo website.
Supported communication modes
FOMA terminal supports 3 communication modes: packet communication, 64K data communication and data transfer.These communications become available by installing the related software onto a PC from the attached CD-ROM, connecting FOMA terminal to the PC and making required settings.
■ Packet communicationPacket communication charges are based on the amount of data sent and received, which make it suitable for high-speed exchange of relatively small amounts of data such as sending and receiving mail. No communication charges are required when no data are exchanged even if you are connected to the network. Therefore, sending/receiving data as needed while remaining connected to the network is possible.High-speed packet communication provides a maximum reception speed of 384 kbps and a maximum transmission speed of 64 kbps by using access points that support packet communication on FOMA, such as DoCoMo’s “mopera U / mopera” Internet connection service. These are offered by the best-effort connection which allows transmission speed to vary with the environment and the rate of congestion.Note that communications of large-size data such as for viewing and downloading websites containing images will require high charges.
■ 64K data communicationThe 64K data communications allow data transfer/reception at stabled communication rate of 64 kbps. Communication charges are based on the duration of the connection to the network
regardless of the volume of data, which make it suitable for sending and receiving relatively large amounts of data as in downloading multi-media contents. You need to use access points that support FOMA 64K data communication such as DoCoMo’s “mopera U / mopera” Internet connection service or ISDN synchronized 64 kbps access points.Note that communicating for long time will require high charges.
■ Data transferIt is the mode of non-charged communication in which data are transferred/exchanged via FOMA USB cable (optional). Various data including the phonebook, incoming/outgoing mail and bookmarks are sent/received.
Usage precautions
When using the Internet from PC, usage charge to your Internet service provider (hereinafter called the provider) is generally required. This charge is paid directly to the provider, and is separate from the FOMA service charge. For more information on usage charges, contact your provider.・ DoCoMo provides 2 Internet connection services:
mopera U and mopera.The mopera U service requires subscription and a monthly fee. It allows you to use the optional services such as broadband Internet connection. There is also a plan that requires a monthly fee only when you use the service. The mopera service allows you to access the Internet without subscription and monthly fee. You can make a connection with Internet immediately. For details on charges, etc., visit the DoCoMo website.
Different dialup connections are required for packet communication and 64K data communication. When performing packet communication, use the dialup connection for FOMA packet communication. When performing 64K data communication, use the dialup connection for FOMA 64 kbps data communication or ISDN synchronized 64 kbps data communication.・ You cannot connect to access points of PHS 64K/
32K data communication such as PIAFS or DoPa.
Internet service provider usage charge
Setting the dialup connection (provider, etc.)
Data co
mm
un
ication
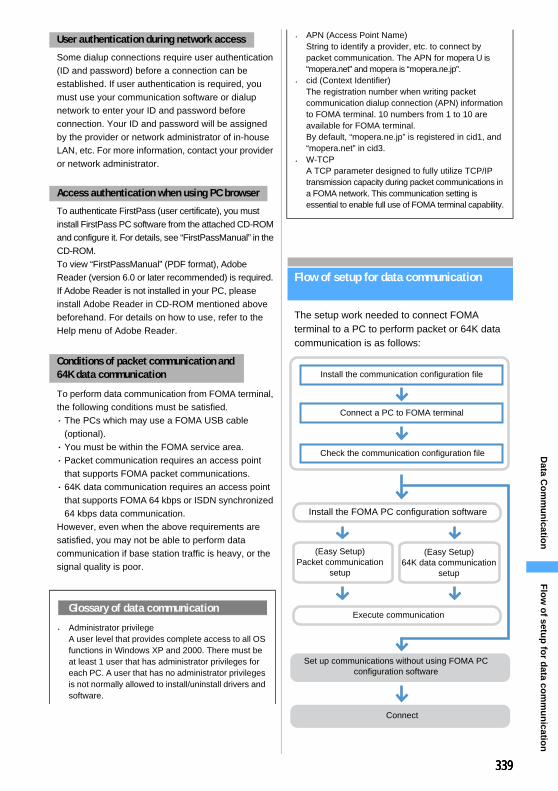
339339
Data C
om
mu
nicatio
n
339
Some dialup connections require user authentication (ID and password) before a connection can be established. If user authentication is required, you must use your communication software or dialup network to enter your ID and password before connection. Your ID and password will be assigned by the provider or network administrator of in-house LAN, etc. For more information, contact your provider or network administrator.
To authenticate FirstPass (user certificate), you must install FirstPass PC software from the attached CD-ROM and configure it. For details, see “FirstPassManual” in the CD-ROM.To view “FirstPassManual” (PDF format), Adobe Reader (version 6.0 or later recommended) is required. If Adobe Reader is not installed in your PC, please install Adobe Reader in CD-ROM mentioned above beforehand. For details on how to use, refer to the Help menu of Adobe Reader.
To perform data communication from FOMA terminal, the following conditions must be satisfied.・ The PCs which may use a FOMA USB cable
(optional).・ You must be within the FOMA service area.・ Packet communication requires an access point
that supports FOMA packet communications.・ 64K data communication requires an access point
that supports FOMA 64 kbps or ISDN synchronized 64 kbps data communication.
However, even when the above requirements are satisfied, you may not be able to perform data communication if base station traffic is heavy, or the signal quality is poor.
Flow of setup for data communication
The setup work needed to connect FOMA terminal to a PC to perform packet or 64K data communication is as follows:
User authentication during network access
Access authentication when using PC browser
Conditions of packet communication and 64K data communication
Glossary of data communication
● Administrator privilege A user level that provides complete access to all OS functions in Windows XP and 2000. There must be at least 1 user that has administrator privileges for each PC. A user that has no administrator privileges is not normally allowed to install/uninstall drivers and software.
● APN (Access Point Name) String to identify a provider, etc. to connect by packet communication. The APN for mopera U is “mopera.net” and mopera is “mopera.ne.jp”.
● cid (Context Identifier) The registration number when writing packet communication dialup connection (APN) information to FOMA terminal. 10 numbers from 1 to 10 are available for FOMA terminal.By default, “mopera.ne.jp” is registered in cid1, and “mopera.net” in cid3.
● W-TCP A TCP parameter designed to fully utilize TCP/IP transmission capacity during packet communications in a FOMA network. This communication setting is essential to enable full use of FOMA terminal capability.
Install the FOMA PC configuration software
(Easy Setup) Packet communication
setup
(Easy Setup)64K data communication
setup
Execute communication
Set up communications without using FOMA PC configuration software
Connect
Install the communication configuration file
Connect a PC to FOMA terminal
Check the communication configuration file
Flo
w o
f setup
for d
ata com
mu
nicatio
n
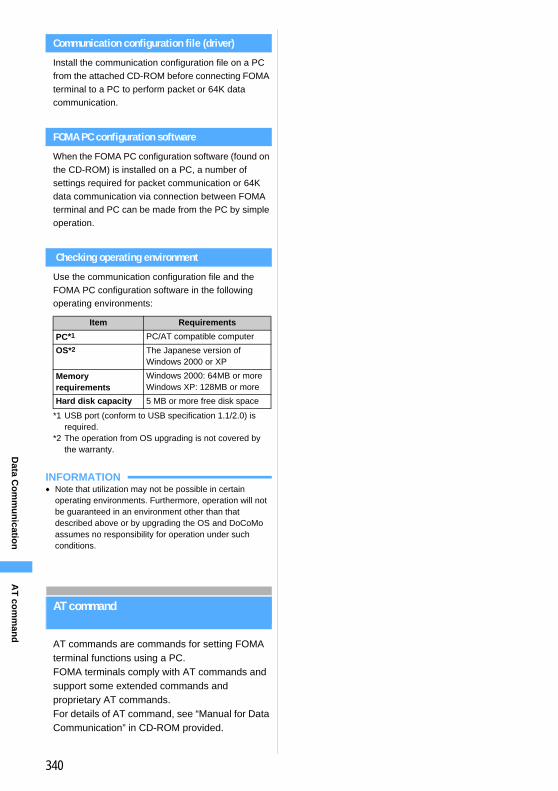
340
Data C
om
mu
nicatio
n
Communication configuration file (driver)
Install the communication configuration file on a PC from the attached CD-ROM before connecting FOMA terminal to a PC to perform packet or 64K data communication.
FOMA PC configuration software
When the FOMA PC configuration software (found on the CD-ROM) is installed on a PC, a number of settings required for packet communication or 64K data communication via connection between FOMA terminal and PC can be made from the PC by simple operation.
Checking operating environment
Use the communication configuration file and the FOMA PC configuration software in the following operating environments:
*1 USB port (conform to USB specification 1.1/2.0) is required.
*2 The operation from OS upgrading is not covered by the warranty.
INFORMATION● Note that utilization may not be possible in certain
operating environments. Furthermore, operation will not be guaranteed in an environment other than that described above or by upgrading the OS and DoCoMo assumes no responsibility for operation under such conditions.
AT command
AT commands are commands for setting FOMA terminal functions using a PC.FOMA terminals comply with AT commands and support some extended commands and proprietary AT commands.For details of AT command, see “Manual for Data Communication” in CD-ROM provided.
Item Requirements
PC*1 PC/AT compatible computer
OS*2 The Japanese version of Windows 2000 or XP
Memory requirements
Windows 2000: 64MB or moreWindows XP: 128MB or more
Hard disk capacity 5 MB or more free disk space
AT
com
man
d
341
Character EntryEntering characters ........................................................................................342Entering characters using 5-touch Input Method.................................................................................... 5-touch Input Method 343Registering fixed phrases ...................................................... Save Phrase 347Copying/cutting and pasting characters ......................... Copy Character 347Entering characters using codes ................................ KUTEN Code Input 348Registering frequently used words .......................................... Save Word 348Using the downloaded dictionary ............................Download Dictionary 349Entering characters using Slot Input Method ............. Slot Input Method 349Setting input method ................................................ Input Method Setting 350
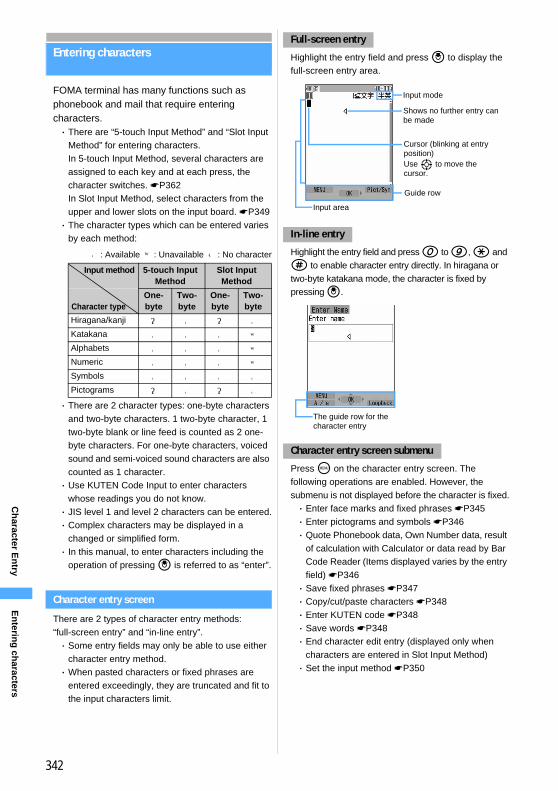
342
Ch
aracter En
try
Entering characters
FOMA terminal has many functions such as phonebook and mail that require entering characters.・ There are “5-touch Input Method” and “Slot Input
Method” for entering characters.In 5-touch Input Method, several characters are assigned to each key and at each press, the character switches. ☛P362In Slot Input Method, select characters from the upper and lower slots on the input board. ☛P349・ The character types which can be entered varies
by each method:
○: Available ×: Unavailable -: No character
・ There are 2 character types: one-byte characters and two-byte characters. 1 two-byte character, 1 two-byte blank or line feed is counted as 2 one-byte characters. For one-byte characters, voiced sound and semi-voiced sound characters are also counted as 1 character. ・ Use KUTEN Code Input to enter characters
whose readings you do not know.・ JIS level 1 and level 2 characters can be entered.・ Complex characters may be displayed in a
changed or simplified form.・ In this manual, to enter characters including the
operation of pressing o is referred to as “enter”.
Character entry screen
There are 2 types of character entry methods: “full-screen entry” and “in-line entry”.・ Some entry fields may only be able to use either
character entry method.・When pasted characters or fixed phrases are
entered exceedingly, they are truncated and fit to the input characters limit.
Highlight the entry field and press o to display the full-screen entry area.
Highlight the entry field and press 0 to 9, ( and # to enable character entry directly. In hiragana or two-byte katakana mode, the character is fixed by pressing o.
Press m on the character entry screen. The following operations are enabled. However, the submenu is not displayed before the character is fixed.・ Enter face marks and fixed phrases ☛P345・ Enter pictograms and symbols ☛P346・ Quote Phonebook data, Own Number data, result
of calculation with Calculator or data read by Bar Code Reader (Items displayed varies by the entry field) ☛P346・ Save fixed phrases ☛P347・ Copy/cut/paste characters ☛P348・ Enter KUTEN code ☛P348・ Save words ☛P348・ End character edit entry (displayed only when
characters are entered in Slot Input Method)・ Set the input method ☛P350
Input method 5-touch Input Method
Slot Input Method
Character type One-byte
Two-byte
One-byte
Two-byte
Hiragana/kanji ー ○ ー ○Katakana ○ ○ ○ ×Alphabets ○ ○ ○ ×Numeric ○ ○ ○ ×Symbols ○ ○ ○ ○Pictograms ー ○ ー ○
Full-screen entry
In-line entry
Character entry screen submenu
Input mode
Shows no further entry can be made
Guide row
Cursor (blinking at entry position)Use O to move the cursor.
Input area
The guide row for the character entry
En
tering
characters
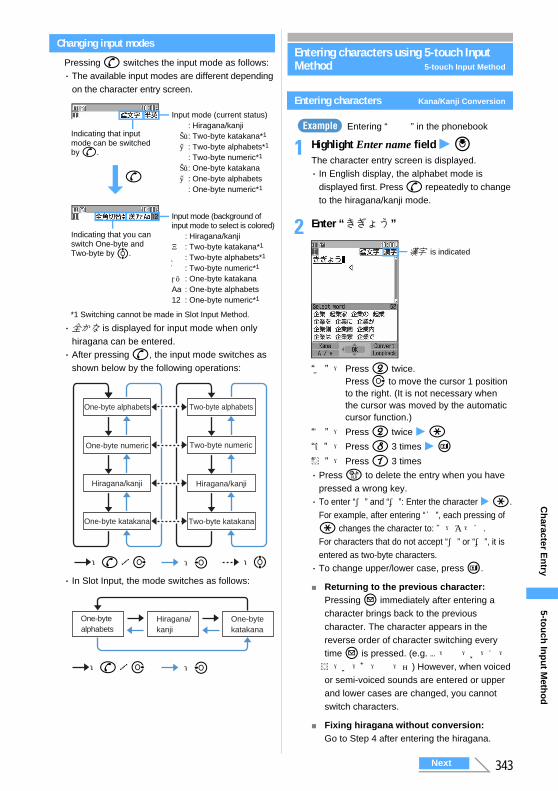
343
Ch
aracter En
try
Changing input modes
Pressing n switches the input mode as follows: ・ The available input modes are different depending
on the character entry screen.
・全かな is displayed for input mode when only hiragana can be entered.・ After pressing n, the input mode switches as
shown below by the following operations:
・ In Slot Input, the mode switches as follows:
Entering characters using 5-touch Input Method 5-touch Input Method
Entering characters Kana/Kanji Conversion
Entering “企業 ” in the phonebook
1 Highlight Enter name field z oThe character entry screen is displayed.・ In English display, the alphabet mode is
displayed first. Press n repeatedly to change to the hiragana/kanji mode.
2 Enter “きぎょう”
・ Press c to delete the entry when you have pressed a wrong key.・ To enter “゛” and “゜”: Enter the character z (.
For example, after entering “ほ”, each pressing of ( changes the character to: ぼ→ぽ→ほ.For characters that do not accept “゛” or “゜”, it is entered as two-byte characters.・ To change upper/lower case, press t.
■ Returning to the previous character:Pressing a immediately after entering a character brings back to the previous character. The character appears in the reverse order of character switching every time a is pressed. (e.g. …→ 1 →お→え→う→い→あ→ 1 →…) However, when voiced or semi-voiced sounds are entered or upper and lower cases are changed, you cannot switch characters.
■ Fixing hiragana without conversion:Go to Step 4 after entering the hiragana.
Input mode (current status)漢字: Hiragana/kanji全カナ: Two-byte katakana*1
全英: Two-byte alphabets*1
全数: Two-byte numeric*1
半カナ: One-byte katakana半英: One-byte alphabets半数: One-byte numeric*1
Indicating that input mode can be switched by n.
n
Input mode (background of input mode to select is colored)漢 : Hiragana/kanjiア : Two-byte katakana*1
A : Two-byte alphabets*1
1 : Two-byte numeric*1
アァ : One-byte katakanaAa : One-byte alphabets12 : One-byte numeric*1
Indicating that you can switch One-byte and Two-byte by %.
*1 Switching cannot be made in Slot Input Method.
One-byte numeric
Hiragana/kanji
One-byte alphabets
One-byte katakana
Two-byte numeric
Hiragana/kanji
Two-byte alphabets
Two-byte katakana
:l:n/r :%
Hiragana/kanji
One-byte katakana
One-byte alphabets
:n/r :l
“き” → Press 2 twice.Press r to move the cursor 1 position to the right. (It is not necessary when the cursor was moved by the automatic cursor function.)
“ぎ” → Press 2 twice z (“ょ” → Press 8 3 times z t“う” → Press 1 3 times
Example
漢字 is indicated
Next
5-tou
ch In
pu
t Meth
od
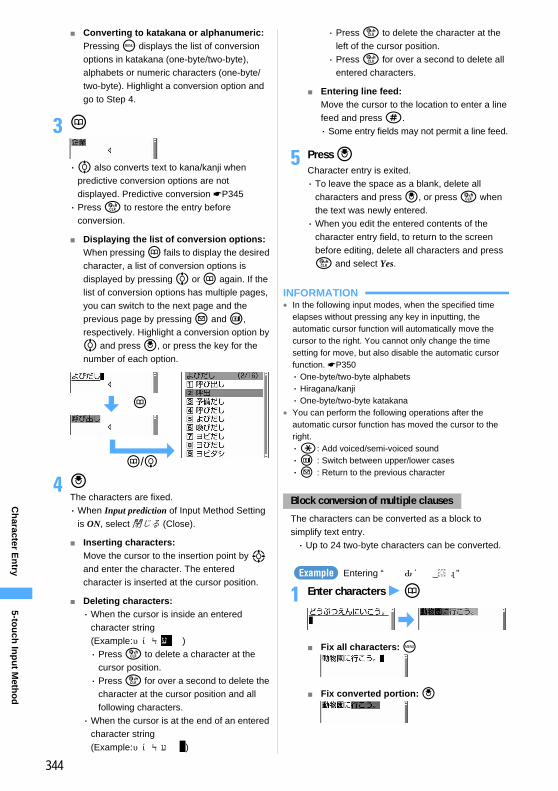
344
Ch
aracter En
try
■ Converting to katakana or alphanumeric:Pressing m displays the list of conversion options in katakana (one-byte/two-byte), alphabets or numeric characters (one-byte/two-byte). Highlight a conversion option and go to Step 4.
3 p
・% also converts text to kana/kanji when predictive conversion options are not displayed. Predictive conversion ☛P345・ Press c to restore the entry before
conversion.
■ Displaying the list of conversion options:When pressing p fails to display the desired character, a list of conversion options is displayed by pressing % or p again. If the list of conversion options has multiple pages, you can switch to the next page and the previous page by pressing a and t, respectively. Highlight a conversion option by % and press o, or press the key for the number of each option.
4 oThe characters are fixed.・When Input prediction of Input Method Setting
is ON, select 閉じる (Close).
■ Inserting characters:Move the cursor to the insertion point by O and enter the character. The entered character is inserted at the cursor position.
■ Deleting characters:・When the cursor is inside an entered
character string (Example:ドコモ 郎)・ Press c to delete a character at the
cursor position.・ Press c for over a second to delete the
character at the cursor position and all following characters.
・When the cursor is at the end of an entered character string (Example:ドコモ太郎 )
・ Press c to delete the character at the left of the cursor position.・ Press c for over a second to delete all
entered characters.
■ Entering line feed:Move the cursor to the location to enter a line feed and press #.・ Some entry fields may not permit a line feed.
5 Press oCharacter entry is exited.・ To leave the space as a blank, delete all
characters and press o, or press c when the text was newly entered.・When you edit the entered contents of the
character entry field, to return to the screen before editing, delete all characters and press c and select Yes.
INFORMATION● In the following input modes, when the specified time
elapses without pressing any key in inputting, the automatic cursor function will automatically move the cursor to the right. You cannot only change the time setting for move, but also disable the automatic cursor function. ☛P350・ One-byte/two-byte alphabets・ Hiragana/kanji・ One-byte/two-byte katakana
● You can perform the following operations after the automatic cursor function has moved the cursor to the right.・(: Add voiced/semi-voiced sound・t : Switch between upper/lower cases・a : Return to the previous character
The characters can be converted as a block to simplify text entry.・ Up to 24 two-byte characters can be converted.
Entering “動物園に行こう。”
1 Enter characters z p
■ Fix all characters: m
■ Fix converted portion: o
p
p/d
太
Block conversion of multiple clauses
Example
5-tou
ch In
pu
t Meth
od
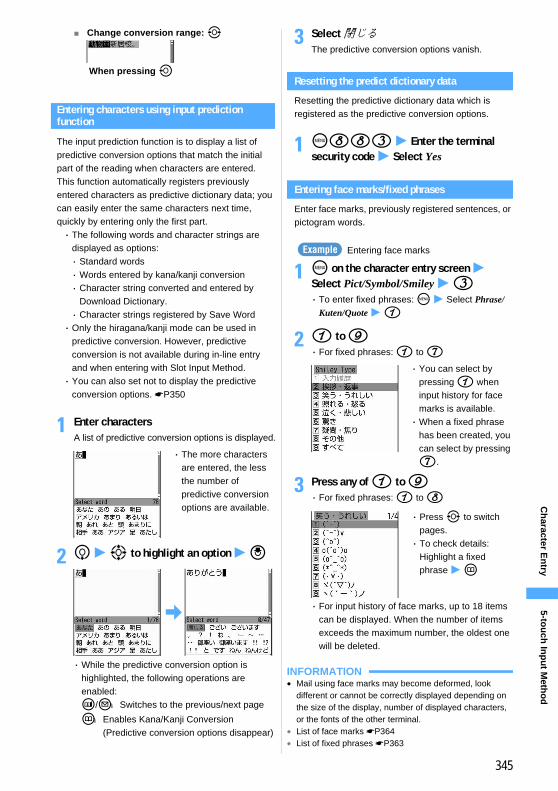
345
Ch
aracter En
try
■ Change conversion range: &
Entering characters using input prediction function
The input prediction function is to display a list of predictive conversion options that match the initial part of the reading when characters are entered.This function automatically registers previously entered characters as predictive dictionary data; you can easily enter the same characters next time, quickly by entering only the first part.・ The following words and character strings are
displayed as options:・ Standard words・Words entered by kana/kanji conversion・ Character string converted and entered by
Download Dictionary.・ Character strings registered by Save Word・ Only the hiragana/kanji mode can be used in
predictive conversion. However, predictive conversion is not available during in-line entry and when entering with Slot Input Method.・ You can also set not to display the predictive
conversion options. ☛P350
1 Enter charactersA list of predictive conversion options is displayed.
2 d z O to highlight an option z o
・While the predictive conversion option is highlighted, the following operations are enabled:
3 Select 閉じるThe predictive conversion options vanish.
Resetting the predict dictionary data
Resetting the predictive dictionary data which is registered as the predictive conversion options.
1 m883 z Enter the terminal security code z Select Yes
Entering face marks/fixed phrases
Enter face marks, previously registered sentences, or pictogram words.
Entering face marks
1 m on the character entry screen z Select Pict/Symbol/Smiley z 3・ To enter fixed phrases: m z Select Phrase/
Kuten/Quote z 1
2 1 to 9・ For fixed phrases: 1 to 7
3 Press any of 1 to 9・ For fixed phrases: 1 to 8
・ For input history of face marks, up to 18 items can be displayed. When the number of items exceeds the maximum number, the oldest one will be deleted.
INFORMATION● Mail using face marks may become deformed, look
different or cannot be correctly displayed depending on the size of the display, number of displayed characters, or the fonts of the other terminal.
● List of face marks ☛P364● List of fixed phrases ☛P363
t/a:Switches to the previous/next page
p:Enables Kana/Kanji Conversion (Predictive conversion options disappear)
When pressing l
・ The more characters are entered, the less the number of predictive conversion options are available.
Example
・ You can select by pressing 1 when input history for face marks is available. ・When a fixed phrase
has been created, you can select by pressing 7.
・ Press & to switch pages.・ To check details:
Highlight a fixed phrase z p
5-tou
ch In
pu
t Meth
od
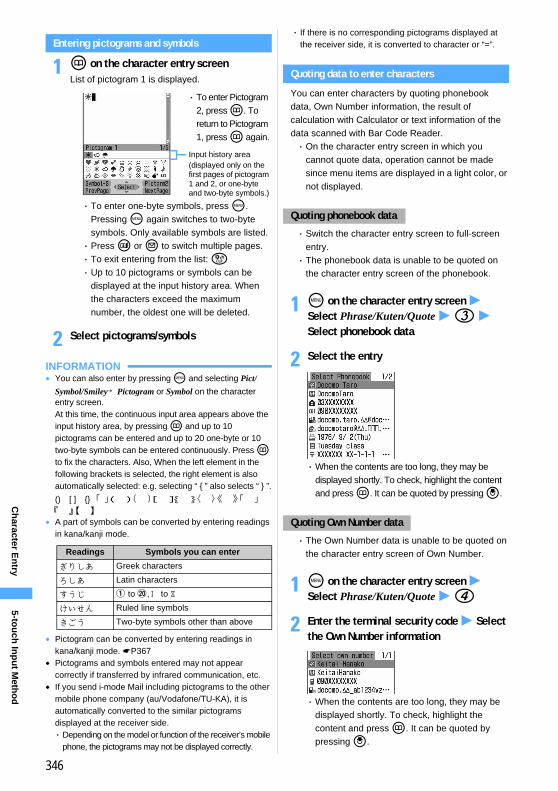
346
Ch
aracter En
try
Entering pictograms and symbols
1 p on the character entry screenList of pictogram 1 is displayed.
・ To enter one-byte symbols, press m. Pressing m again switches to two-byte symbols. Only available symbols are listed.・ Press t or a to switch multiple pages.・ To exit entering from the list: c・ Up to 10 pictograms or symbols can be
displayed at the input history area. When the characters exceed the maximum number, the oldest one will be deleted.
2 Select pictograms/symbols
INFORMATION● You can also enter by pressing m and selecting Pict/
Symbol/Smiley→Pictogram or Symbol on the character entry screen.At this time, the continuous input area appears above the input history area, by pressing p and up to 10 pictograms can be entered and up to 20 one-byte or 10 two-byte symbols can be entered continuously. Press p to fix the characters. Also, When the left element in the following brackets is selected, the right element is also automatically selected: e.g. selecting “ { ” also selects “ } ”.
() [ ] {} 「 」( )〔 〕[ ]{ }〈 〉《 》「 」『 』【 】● A part of symbols can be converted by entering readings
in kana/kanji mode.
● Pictogram can be converted by entering readings in kana/kanji mode. ☛P367
● Pictograms and symbols entered may not appear correctly if transferred by infrared communication, etc.
● If you send i-mode Mail including pictograms to the other mobile phone company (au/Vodafone/TU-KA), it is automatically converted to the similar pictograms displayed at the receiver side.・ Depending on the model or function of the receiver’s mobile
phone, the pictograms may not be displayed correctly.
・ If there is no corresponding pictograms displayed at the receiver side, it is converted to character or “=”.
Quoting data to enter characters
You can enter characters by quoting phonebook data, Own Number information, the result of calculation with Calculator or text information of the data scanned with Bar Code Reader.・ On the character entry screen in which you
cannot quote data, operation cannot be made since menu items are displayed in a light color, or not displayed.
・ Switch the character entry screen to full-screen entry.・ The phonebook data is unable to be quoted on
the character entry screen of the phonebook.
1 m on the character entry screen z Select Phrase/Kuten/Quote z 3 z Select phonebook data
2 Select the entry
・When the contents are too long, they may be displayed shortly. To check, highlight the content and press p. It can be quoted by pressing o.
・ The Own Number data is unable to be quoted on the character entry screen of Own Number.
1 m on the character entry screen z Select Phrase/Kuten/Quote z 4
2 Enter the terminal security code z Select the Own Number information
・When the contents are too long, they may be displayed shortly. To check, highlight the content and press p. It can be quoted by pressing o.
Readings Symbols you can enter
ぎりしあ Greek characters
ろしあ Latin characters
すうじ a to t,Ⅰ to Ⅹ
けいせん Ruled line symbols
きごう Two-byte symbols other than above
・ To enter Pictogram 2, press p. To return to Pictogram 1, press p again.
Input history area(displayed only on the first pages of pictogram 1 and 2, or one-byte and two-byte symbols.)
Quoting phonebook data
Quoting Own Number data
5-tou
ch In
pu
t Meth
od
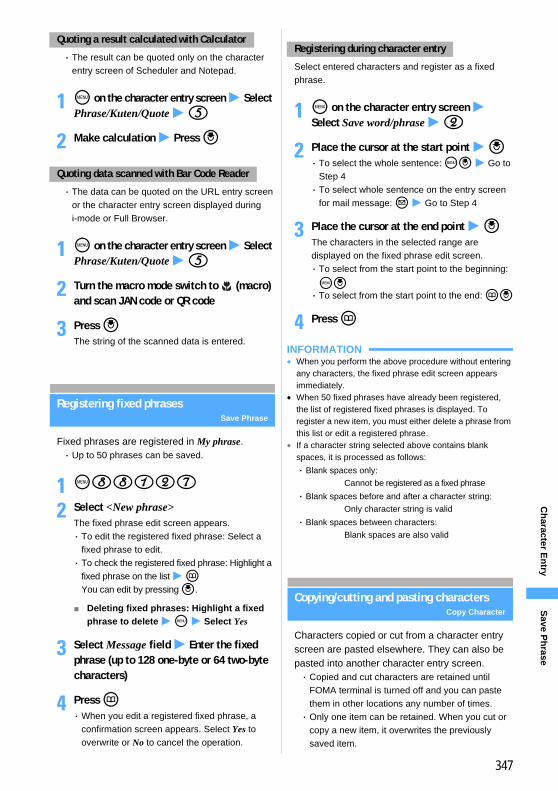
347
Ch
aracter En
try
・ The result can be quoted only on the character entry screen of Scheduler and Notepad.
1 m on the character entry screen z Select Phrase/Kuten/Quote z 5
2 Make calculation z Press o
・ The data can be quoted on the URL entry screen or the character entry screen displayed during i-mode or Full Browser.
1 m on the character entry screen z Select Phrase/Kuten/Quote z 5
2 Turn the macro mode switch to (macro) and scan JAN code or QR code
3 Press oThe string of the scanned data is entered.
Registering fixed phrasesSave Phrase
Fixed phrases are registered in My phrase.・ Up to 50 phrases can be saved.
1 m88127
2 Select <New phrase>The fixed phrase edit screen appears.・ To edit the registered fixed phrase: Select a
fixed phrase to edit.・ To check the registered fixed phrase: Highlight a
fixed phrase on the list z p You can edit by pressing o.
■ Deleting fixed phrases: Highlight a fixed phrase to delete z m z Select Yes
3 Select Message field z Enter the fixed phrase (up to 128 one-byte or 64 two-byte characters)
4 Press p・When you edit a registered fixed phrase, a
confirmation screen appears. Select Yes to overwrite or No to cancel the operation.
Select entered characters and register as a fixed phrase.
1 m on the character entry screen z Select Save word/phrase z 2
2 Place the cursor at the start point z o・ To select the whole sentence: mo z Go to
Step 4・ To select whole sentence on the entry screen
for mail message: a z Go to Step 4
3 Place the cursor at the end point z oThe characters in the selected range are displayed on the fixed phrase edit screen.・ To select from the start point to the beginning:
mo・ To select from the start point to the end: po
4 Press p
INFORMATION●When you perform the above procedure without entering
any characters, the fixed phrase edit screen appears immediately.
●When 50 fixed phrases have already been registered, the list of registered fixed phrases is displayed. To register a new item, you must either delete a phrase from this list or edit a registered phrase.
● If a character string selected above contains blank spaces, it is processed as follows:
Copying/cutting and pasting charactersCopy Character
Characters copied or cut from a character entry screen are pasted elsewhere. They can also be pasted into another character entry screen.・ Copied and cut characters are retained until
FOMA terminal is turned off and you can paste them in other locations any number of times.・ Only one item can be retained. When you cut or
copy a new item, it overwrites the previously saved item.
Quoting a result calculated with Calculator
Quoting data scanned with Bar Code Reader
Registering during character entry
・ Blank spaces only:
Cannot be registered as a fixed phrase
・ Blank spaces before and after a character string:
Only character string is valid
・ Blank spaces between characters:
Blank spaces are also valid
Save P
hrase
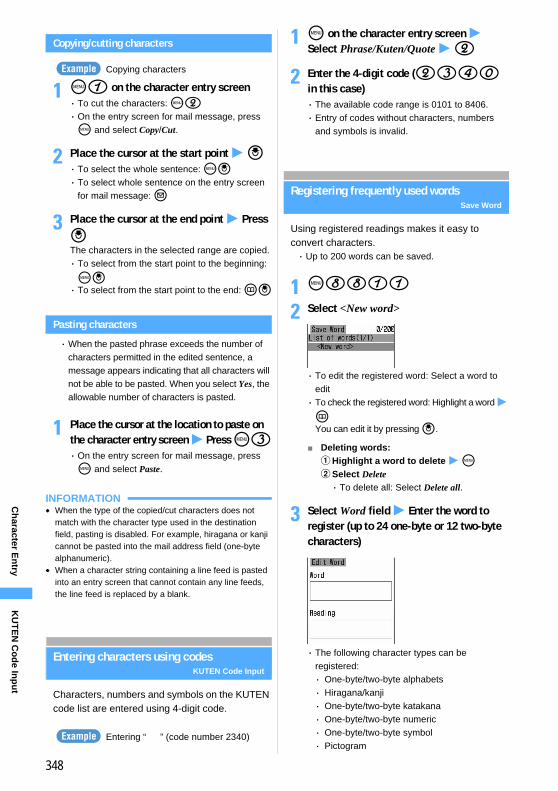
348
Ch
aracter En
try
Copying/cutting characters
Copying characters
1 m1 on the character entry screen・ To cut the characters: m2・ On the entry screen for mail message, press m and select Copy/Cut.
2 Place the cursor at the start point z o・ To select the whole sentence: mo・ To select whole sentence on the entry screen
for mail message: a
3 Place the cursor at the end point z Press oThe characters in the selected range are copied.・ To select from the start point to the beginning:
mo・ To select from the start point to the end: po
Pasting characters
・When the pasted phrase exceeds the number of characters permitted in the edited sentence, a message appears indicating that all characters will not be able to be pasted. When you select Yes, the allowable number of characters is pasted.
1 Place the cursor at the location to paste on the character entry screen z Press m3・ On the entry screen for mail message, press m and select Paste.
INFORMATION●When the type of the copied/cut characters does not
match with the character type used in the destination field, pasting is disabled. For example, hiragana or kanji cannot be pasted into the mail address field (one-byte alphanumeric).
●When a character string containing a line feed is pasted into an entry screen that cannot contain any line feeds, the line feed is replaced by a blank.
Entering characters using codesKUTEN Code Input
Characters, numbers and symbols on the KUTEN code list are entered using 4-digit code.
Entering “携 ” (code number 2340)
1 m on the character entry screen z Select Phrase/Kuten/Quote z 2
2 Enter the 4-digit code (2340 in this case)・ The available code range is 0101 to 8406.・ Entry of codes without characters, numbers
and symbols is invalid.
Registering frequently used wordsSave Word
Using registered readings makes it easy to convert characters.・ Up to 200 words can be saved.
1 m8811
2 Select <New word>
・ To edit the registered word: Select a word to edit・ To check the registered word: Highlight a word z
pYou can edit it by pressing o.
■ Deleting words:aHighlight a word to delete z mbSelect Delete・ To delete all: Select Delete all.
3 Select Word field z Enter the word to register (up to 24 one-byte or 12 two-byte characters)
・ The following character types can be registered: ・ One-byte/two-byte alphabets ・ Hiragana/kanji ・ One-byte/two-byte katakana・ One-byte/two-byte numeric・ One-byte/two-byte symbol ・ Pictogram
Example
Example
KU
TE
N C
od
e Inp
ut
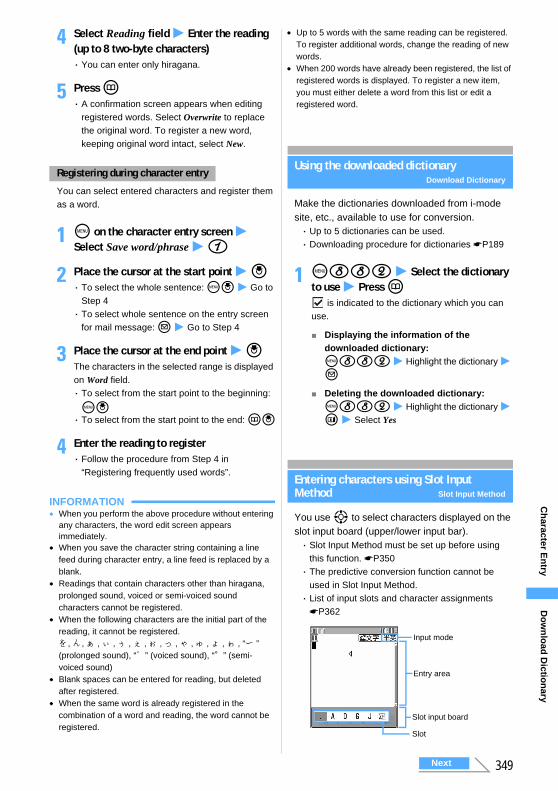
349
Ch
aracter En
try
4 Select Reading field z Enter the reading (up to 8 two-byte characters)・ You can enter only hiragana.
5 Press p・ A confirmation screen appears when editing
registered words. Select Overwrite to replace the original word. To register a new word, keeping original word intact, select New.
You can select entered characters and register them as a word.
1 m on the character entry screen z Select Save word/phrase z 1
2 Place the cursor at the start point z o・ To select the whole sentence: mo z Go to
Step 4・ To select whole sentence on the entry screen
for mail message: a z Go to Step 4
3 Place the cursor at the end point z oThe characters in the selected range is displayed on Word field.・ To select from the start point to the beginning:
mo・ To select from the start point to the end: po
4 Enter the reading to register・ Follow the procedure from Step 4 in
“Registering frequently used words”.
INFORMATION●When you perform the above procedure without entering
any characters, the word edit screen appears immediately.
●When you save the character string containing a line feed during character entry, a line feed is replaced by a blank.
● Readings that contain characters other than hiragana, prolonged sound, voiced or semi-voiced sound characters cannot be registered.
●When the following characters are the initial part of the reading, it cannot be registered.を, ん, ぁ , ぃ , ぅ , ぇ , ぉ , っ , ゃ , ゅ , ょ , ゎ , “ー ” (prolonged sound), “゛” (voiced sound), “゜” (semi-voiced sound)
● Blank spaces can be entered for reading, but deleted after registered.
●When the same word is already registered in the combination of a word and reading, the word cannot be registered.
● Up to 5 words with the same reading can be registered. To register additional words, change the reading of new words.
●When 200 words have already been registered, the list of registered words is displayed. To register a new item, you must either delete a word from this list or edit a registered word.
Using the downloaded dictionaryDownload Dictionary
Make the dictionaries downloaded from i-mode site, etc., available to use for conversion.・ Up to 5 dictionaries can be used.・ Downloading procedure for dictionaries ☛P189
1 m882 z Select the dictionary to use z Press p
is indicated to the dictionary which you can use.
■ Displaying the information of the downloaded dictionary:m882 z Highlight the dictionary z a
■ Deleting the downloaded dictionary:m882 z Highlight the dictionary z t z Select Yes
Entering characters using Slot Input Method Slot Input Method
You use O to select characters displayed on the slot input board (upper/lower input bar).・ Slot Input Method must be set up before using
this function. ☛P350・ The predictive conversion function cannot be
used in Slot Input Method.・ List of input slots and character assignments
☛P362
Registering during character entry
Slot input board
Input mode
Entry area
Slot
Do
wn
load
Dictio
nary
Next
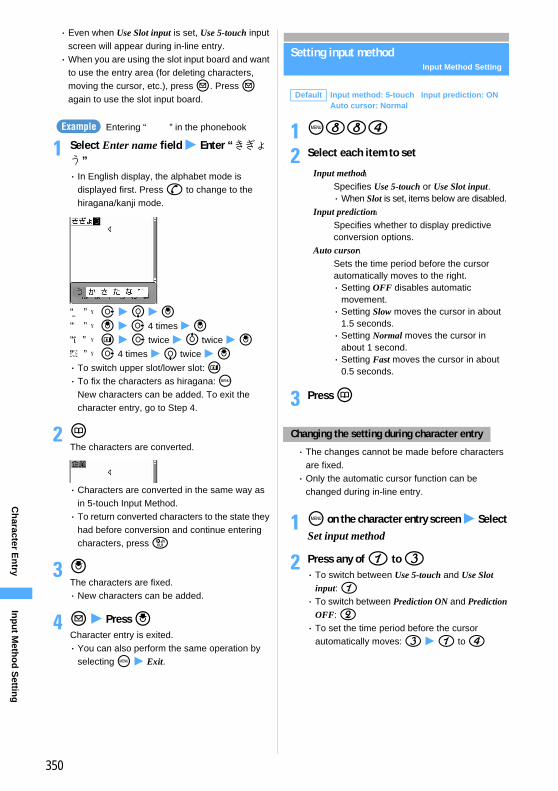
350
Ch
aracter En
try
・ Even when Use Slot input is set, Use 5-touch input screen will appear during in-line entry.・When you are using the slot input board and want
to use the entry area (for deleting characters, moving the cursor, etc.), press a. Press a again to use the slot input board.
Entering “企業 ” in the phonebook
1 Select Enter name field z Enter “きぎょう”・ In English display, the alphabet mode is
displayed first. Press n to change to the hiragana/kanji mode.
“き” →r z d z o“ぎ” →o z r 4 times z o“ょ” →t z r twice z u twice z o“う” →r 4 times z d twice z o・ To switch upper slot/lower slot: t・ To fix the characters as hiragana: m
New characters can be added. To exit the character entry, go to Step 4.
2 pThe characters are converted.
・ Characters are converted in the same way as in 5-touch Input Method.・ To return converted characters to the state they
had before conversion and continue entering characters, press c
3 oThe characters are fixed.・ New characters can be added.
4 a z Press oCharacter entry is exited.・ You can also perform the same operation by
selecting m z Exit.
Setting input methodInput Method Setting
1 m884
2 Select each item to set.
3 Press p
・ The changes cannot be made before characters are fixed.・ Only the automatic cursor function can be
changed during in-line entry.
1 m on the character entry screen z Select Set input method
2 Press any of 1 to 3・ To switch between Use 5-touch and Use Slot
input: 1・ To switch between Prediction ON and Prediction
OFF: 2・ To set the time period before the cursor
automatically moves: 3 z 1 to 4
Example
Default Input method: 5-touch Input prediction: ONAuto cursor: Normal
Input method:Specifies Use 5-touch or Use Slot input.・When Slot is set, items below are disabled.
Input prediction:Specifies whether to display predictive conversion options.
Auto cursor:Sets the time period before the cursor automatically moves to the right.・ Setting OFF disables automatic
movement.・ Setting Slow moves the cursor in about
1.5 seconds.・ Setting Normal moves the cursor in
about 1 second.・ Setting Fast moves the cursor in about
0.5 seconds.
Changing the setting during character entry
Inp
ut M
etho
d S
etting
351
Appendix/Data Interchange/Troubleshooting
Menu list ..........................................................................................................352Data set by default ..........................................................................................358List of dial keys and character assignments (5-touch Input Method) .......362List of input slots and character assignments (Slot Input Method) ..........362List of fixed phrases .......................................................................................363List of face marks ...........................................................................................364List of symbols ...............................................................................................367List of pictograms ...........................................................................................367KUTEN code input list ....................................................................................370Combination of operations during Multiaccess ..........................................374Combination of functions during Multitask .................................................376Services available for FOMA terminal ..........................................................379Options and related devices ..........................................................................379
Data Interchange using external devicesThe data link software ....................................................................................379About Video playing software .......................................................................380
TroubleshootingTroubleshooting .............................................................................................381Example of Error messages ............................................... Error Message 384Warranty and After-Sales Service .................................................................390Updating software ........................................................... Software Update 391Protecting FOMA terminal from hazardous data .... Virus Scan Function 395Main specification ...........................................................................................397SAR certification information ........................................................................398
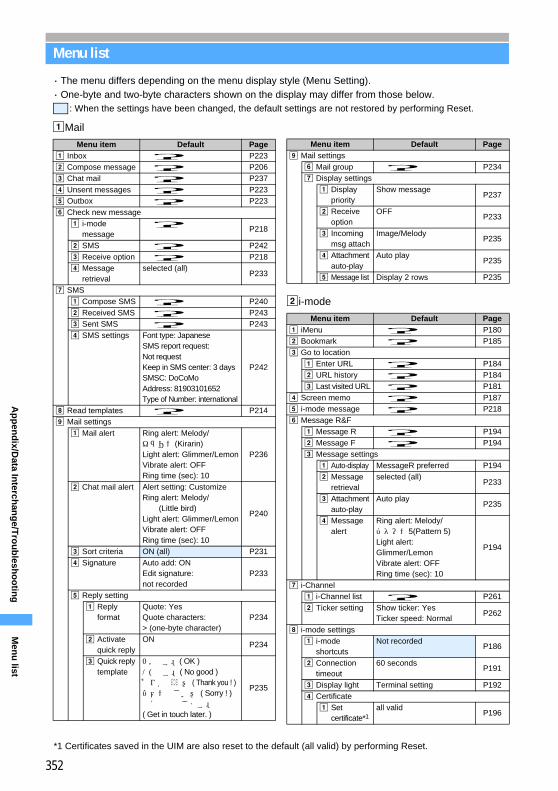
352
Ap
pen
dix/D
ata Interch
ang
e/Tro
ub
lesho
otin
g
Menu list
・ The menu differs depending on the menu display style (Menu Setting).・One-byte and two-byte characters shown on the display may differ from those below.
: When the settings have been changed, the default settings are not restored by performing Reset.
aMail
bi-mode
Menu item Default Pagea Inbox ー P223
b Compose messageー P206
c Chat mail ー P237
d Unsent messagesー P223
e Outbox ー P223
f Check new message
a i-mode messageー P218
b SMS ー P242
c Receive optionー P218
d Message retrieval
selected (all)P233
g SMS
a Compose SMSー P240
b Received SMSー P243
c Sent SMS ー P243
d SMS settings Font type: JapaneseSMS report request:Not requestKeep in SMS center: 3 daysSMSC: DoCoMoAddress: 81903101652Type of Number: international
P242
h Read templates ー P214
i Mail settings
a Mail alert Ring alert: Melody/キラリン(Kirarin)Light alert: Glimmer/LemonVibrate alert: OFFRing time (sec): 10
P236
b Chat mail alert Alert setting: CustomizeRing alert: Melody/小鳥(Little bird)Light alert: Glimmer/LemonVibrate alert: OFFRing time (sec): 10
P240
c Sort criteria ON (all) P231
d Signature Auto add: ONEdit signature: not recorded
P233
e Reply setting
a Reply format
Quote: YesQuote characters: > (one-byte character)
P234
b Activate quick reply
ONP234
c Quick reply template
OKです。( OK )NGです。( No good )ありがとう! ( Thank you ! )ゴメンなさい! ( Sorry ! )後ほど連絡します。( Get in touch later. )
P235
Menu item Default Pagei Mail settings
f Mail group ー P234
g Display settings
a Display priority
Show messageP237
b Receive option
OFFP233
c Incoming msg attach
Image/MelodyP235
d Attachment auto-play
Auto playP235
e Message list Display 2 rows P235
Menu item Default Pagea iMenu ー P180
b Bookmark ー P185
c Go to location
a Enter URL ー P184
b URL history ー P184
c Last visited URLー P181
d Screen memo ー P187
e i-mode message ー P218
f Message R&F
a Message R ー P194
b Message F ー P194
c Message settings
a Auto-display MessageR preferred P194
b Message retrieval
selected (all)P233
c Attachment auto-play
Auto playP235
d Message alert
Ring alert: Melody/パターン5(Pattern 5)Light alert:Glimmer/LemonVibrate alert: OFFRing time (sec): 10
P194
g i-Channel
a i-Channel list ー P261
b Ticker setting Show ticker: YesTicker speed: Normal
P262
h i-mode settings
a i-mode shortcuts
Not recordedP186
b Connection timeout
60 secondsP191
c Display light Terminal setting P192
d Certificate
a Set certificate*1
all validP196
Men
u list
*1 Certificates saved in the UIM are also reset to the default (all valid) by performing Reset.
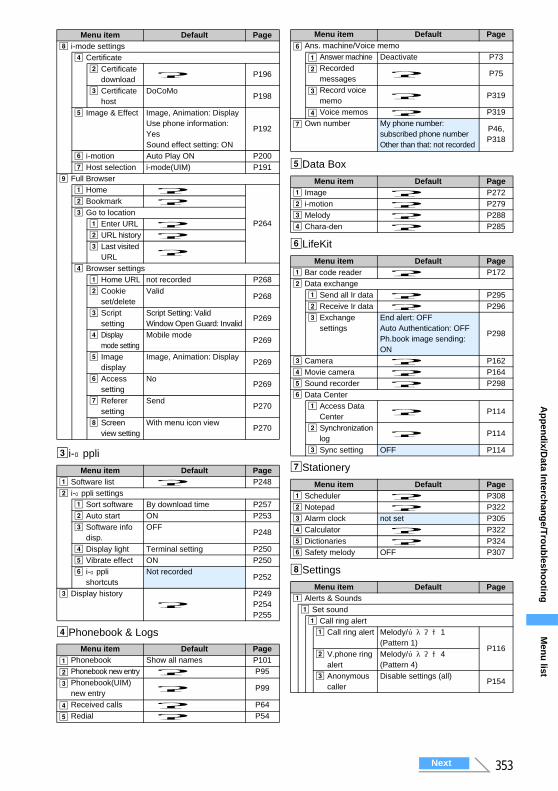
353
Ap
pen
dix/D
ata Interch
ang
e/Tro
ub
lesho
otin
g
ci-αppli
dPhonebook & Logs
eData Box
fLifeKit
gStationery
hSettings
h i-mode settings
d Certificate
b Certificate downloadー P196
c Certificate host
DoCoMoP198
e Image & Effect Image, Animation: DisplayUse phone information: YesSound effect setting: ON
P192
f i-motion Auto Play ON P200
g Host selection i-mode(UIM) P191
i Full Browser
a Home ー
P264
b Bookmark ーc Go to location
a Enter URLーb URL historyーc Last visited
URL ー
d Browser settings
a Home URL not recorded P268
b Cookie set/delete
ValidP268
c Script setting
Script Setting: ValidWindow Open Guard: Invalid
P269
d Display mode setting
Mobile mode P269
e Image display
Image, Animation: DisplayP269
f Access setting
NoP269
g Referer setting
SendP270
h Screen view setting
With menu icon viewP270
Menu item Default Pagea Software list ー P248
b i-αppli settings
a Sort software By download time P257
b Auto start ON P253
c Software info disp.
OFFP248
d Display light Terminal setting P250
e Vibrate effect ON P250
f i-αppli shortcuts
Not recordedP252
c Display history
ーP249P254P255
Menu item Default Page
a Phonebook Show all names P101
b Phonebook new entryー P95
c Phonebook(UIM) new entry ー P99
d Received calls ー P64
e Redial ー P54
Menu item Default Pagef Ans. machine/Voice memo
a Answer machine Deactivate P73
b Recorded messages ー P75
c Record voice memo ー P319
d Voice memosー P319
g Own number My phone number:subscribed phone numberOther than that: not recorded
P46, P318
Menu item Default Pagea Image ー P272
b i-motion ー P279
c Melody ー P288
d Chara-den ー P285
Menu item Default Pagea Bar code reader ー P172
b Data exchange
a Send all Ir dataー P295
b Receive Ir dataー P296
c Exchange settings
End alert: OFFAuto Authentication: OFFPh.book image sending: ON
P298
c Camera ー P162
d Movie camera ー P164
e Sound recorder ー P298
f Data Center
a Access Data Center ー P114
b Synchronization log ー P114
c Sync setting OFF P114
Menu item Default Pagea Scheduler ー P308
b Notepad ー P322
c Alarm clock not set P305
d Calculator ー P322
e Dictionaries ー P324
f Safety melody OFF P307
Menu item Default Pagea Alerts & Sounds
a Set sound
a Call ring alert
a Call ring alert Melody/パターン1(Pattern 1)
P116b V.phone ring
alertMelody/パターン4(Pattern 4)
c Anonymous caller
Disable settings (all)P154
Menu item Default Page
Next
Men
u list
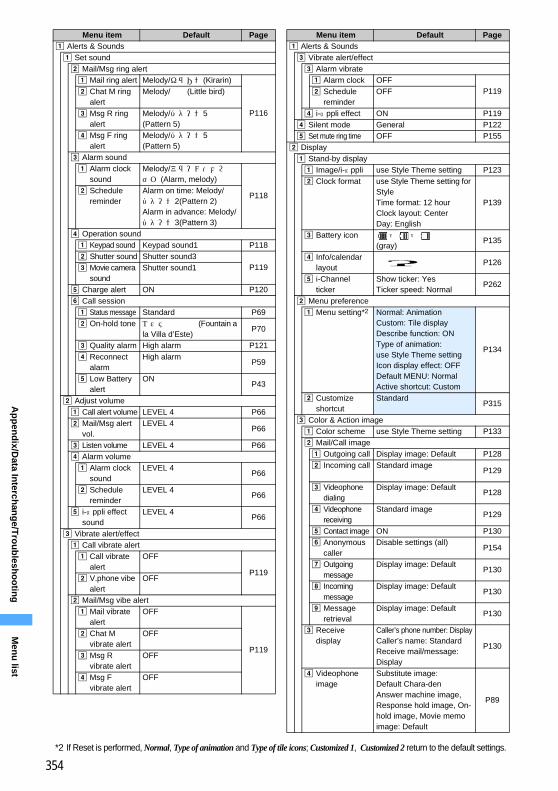
354
Ap
pen
dix/D
ata Interch
ang
e/Tro
ub
lesho
otin
g
Menu item Default Pagea Alerts & Sounds
a Set sound
b Mail/Msg ring alert
a Mail ring alert Melody/キラリン(Kirarin)
P116
b Chat M ring alert
Melody/小鳥(Little bird)
c Msg R ring alert
Melody/パターン5(Pattern 5)
d Msg F ring alert
Melody/パターン5(Pattern 5)
c Alarm sound
a Alarm clock sound
Melody/アラーム・メロディ (Alarm, melody)
P118b Schedule
reminderAlarm on time: Melody/パターン2(Pattern 2)Alarm in advance: Melody/パターン3(Pattern 3)
d Operation sound
a Keypad sound Keypad sound1 P118
b Shutter sound Shutter sound3P119c Movie camera
soundShutter sound1
e Charge alert ON P120
f Call session
a Status message Standard P69
b On-hold tone エステ荘の噴水(Fountain a la Villa d’Este)
P70
c Quality alarm High alarm P121
d Reconnect alarm
High alarmP59
e Low Battery alert
ONP43
b Adjust volume
a Call alert volume LEVEL 4 P66
b Mail/Msg alert vol.
LEVEL 4P66
c Listen volume LEVEL 4 P66
d Alarm volume
a Alarm clock sound
LEVEL 4P66
b Schedule reminder
LEVEL 4P66
e i-αppli effect sound
LEVEL 4P66
c Vibrate alert/effect
a Call vibrate alert
a Call vibrate alert
OFF
P119b V.phone vibe
alertOFF
b Mail/Msg vibe alert
a Mail vibrate alert
OFF
P119
b Chat M vibrate alert
OFF
c Msg R vibrate alert
OFF
d Msg F vibrate alert
OFF
Menu item Default Pagea Alerts & Sounds
c Vibrate alert/effect
c Alarm vibrate
a Alarm clock OFFP119b Schedule
reminderOFF
d i-αppli effect ON P119
d Silent mode General P122
e Set mute ring time OFF P155
b Display
a Stand-by display
a Image/i-αppli use Style Theme setting P123
b Clock format use Style Theme setting for StyleTime format: 12 hourClock layout: CenterDay: English
P139
c Battery icon → → (gray)
P135
d Info/calendar layout ー P126
e i-Channel ticker
Show ticker: YesTicker speed: Normal
P262
b Menu preference
a Menu setting*2 Normal: AnimationCustom: Tile displayDescribe function: ONType of animation: use Style Theme settingIcon display effect: OFFDefault MENU: NormalActive shortcut: Custom
P134
b Customize shortcut
StandardP315
c Color & Action image
a Color scheme use Style Theme setting P133
b Mail/Call image
a Outgoing call Display image: Default P128
b Incoming call Standard imageP129
c Videophone dialing
Display image: DefaultP128
d Videophone receiving
Standard imageP129
e Contact image ON P130
f Anonymous caller
Disable settings (all)P154
g Outgoing message
Display image: DefaultP130
h Incoming message
Display image: DefaultP130
i Message retrieval
Display image: DefaultP130
c Receive display
Caller’s phone number: DisplayCaller’s name: StandardReceive mail/message: Display
P130
d Videophone image
Substitute image: Default Chara-den Answer machine image, Response hold image, On-hold image, Movie memo image: Default
P89
Men
u list
*2 If Reset is performed, Normal, Type of animation and Type of tile icons; Customized 1, Customized 2 return to the default settings.
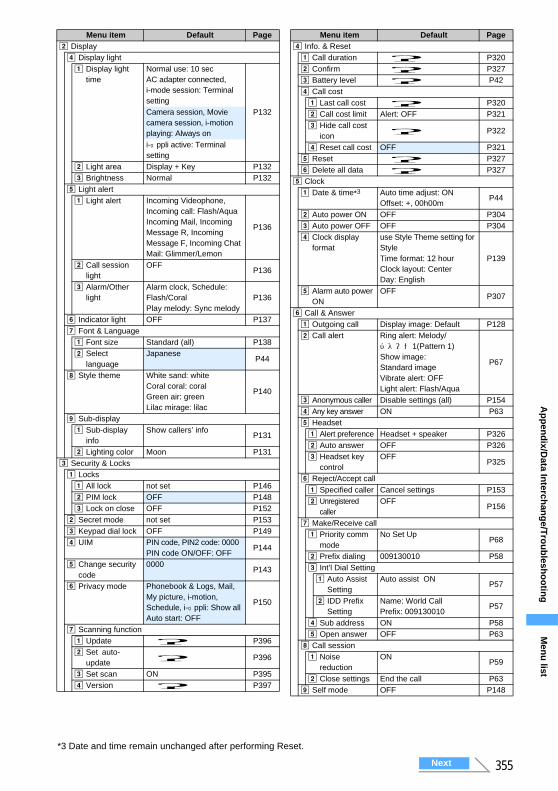
355
Ap
pen
dix/D
ata Interch
ang
e/Tro
ub
lesho
otin
g
Menu item Default Pageb Display
d Display light
a Display light time
Normal use: 10 secAC adapter connected, i-mode session: Terminal setting
P132Camera session, Movie camera session, i-motion playing: Always oni-αppli active: Terminal setting
b Light area Display + Key P132
c Brightness Normal P132
e Light alert
a Light alert Incoming Videophone, Incoming call: Flash/AquaIncoming Mail, Incoming Message R, Incoming Message F, Incoming Chat Mail: Glimmer/Lemon
P136
b Call session light
OFFP136
c Alarm/Other light
Alarm clock, Schedule: Flash/CoralPlay melody: Sync melody
P136
f Indicator light OFF P137
g Font & Language
a Font size Standard (all) P138
b Select language
JapaneseP44
h Style theme White sand: whiteCoral coral: coralGreen air: greenLilac mirage: lilac
P140
i Sub-display
a Sub-display info
Show callers’ infoP131
b Lighting color Moon P131
c Security & Locks
a Locks
a All lock not set P146
b PIM lock OFF P148
c Lock on close OFF P152
b Secret mode not set P153
c Keypad dial lock OFF P149
d UIM PIN code, PIN2 code: 0000PIN code ON/OFF: OFF
P144
e Change security code
0000P143
f Privacy mode Phonebook & Logs, Mail, My picture, i-motion, Schedule, i-αppli: Show all Auto start: OFF
P150
g Scanning function
a Update ー P396
b Set auto-update ー P396
c Set scan ON P395
d Version ー P397
Menu item Default Paged Info. & Reset
a Call duration ー P320
b Confirm ー P327
c Battery level ー P42
d Call cost
a Last call cost ー P320
b Call cost limit Alert: OFF P321
c Hide call cost icon ー P322
d Reset call cost OFF P321
e Reset ー P327
f Delete all data ー P327
e Clock
a Date & time*3 Auto time adjust: ONOffset: +, 00h00m
P44
b Auto power ON OFF P304
c Auto power OFF OFF P304
d Clock display format
use Style Theme setting for StyleTime format: 12 hourClock layout: CenterDay: English
P139
e Alarm auto power ON
OFFP307
f Call & Answer
a Outgoing call Display image: Default P128
b Call alert Ring alert: Melody/パターン1(Pattern 1)Show image: Standard imageVibrate alert: OFFLight alert: Flash/Aqua
P67
c Anonymous caller Disable settings (all) P154
d Any key answer ON P63
e Headset
a Alert preference Headset + speaker P326
b Auto answer OFF P326
c Headset key control
OFFP325
f Reject/Accept call
a Specified caller Cancel settings P153
b Unregistered caller
OFFP156
g Make/Receive call
a Priority comm mode
No Set UpP68
b Prefix dialing 009130010 P58
c Int’l Dial Setting
a Auto Assist Setting
Auto assist ONP57
b IDD Prefix Setting
Name: World CallPrefix: 009130010
P57
d Sub address ON P58
e Open answer OFF P63
h Call session
a Noise reduction
ONP59
b Close settings End the call P63
i Self mode OFF P148
Next
Men
u list
*3 Date and time remain unchanged after performing Reset.

356
Ap
pen
dix/D
ata Interch
ang
e/Tro
ub
lesho
otin
g
iNW services
Menu item Default Pageg Videophone
a V.phone dialing img.
Display image: DefaultP128
b Videophone alert Ring alert: Melody/パターン4(Pattern 4)Show image: Standard imageVibrate alert: OFFLight alert: Flash/Aqua
P67
c Operation Auto redial as voice: OFFDisplay setting: Both sidesSub screen: My sideScreen size: LargeVisual preference: NormalDisplay light: Always on (normal)Speakerphone: ON
P88
d DataSession arv. act
V.phone priorityP91
e Image setting Substitute image: Default Chara-denAnswer machine image,Response hold image, On-hold image, Movie memo image: Default
P89
f External device Terminal P92
g Notify switchable mode
a Indication ON
activeP90
b Indication OFF ー P90
c Service statusー P90
h Others
a Save word/phrase
a Save word ー P348
b Save phrase ー P347
b DL dictionary ー P349
c Reset prediction ー P345
d Text input method
Input method: 5-touchInput prediction: ONAuto cursor: Normal
P350
e NW search method
Auto select NWP326
f Software updateー P392
g Quick start-up ON P326
Menu item Default Pagea Voice Mail
a Voice Mail service
a Activate ー
P330
b Set ring time ーc Deactivate ーd Check setting ーe Play messages ーf Voice Mail
setting ー
g Check messages ー
b Tone/Vibration message notification
Voice Mail alert: ONNotification melody: キラリン (Kirarin)
Menu item Default Pagea Voice Mail
c Notify missed call
P330a Activate ーb Deactivate ーc Check setting ー
d Hide Voice Mail icon ー P330
b Call waiting
a Activate ーP331b Deactivate ー
c Check setting ーc Call forwarding
a Activate ー
P332
b Deactivate ーc Register The
Forwarding Numberー
d Setting if forwarding number busyー
e Check setting ーd Chaku-moji
a Create message ー P52
b Message display settings
Only with Caller IDP53
e Caller ID notification
a Activate/Deactivate ー P46
b Check setting ー P46
f Caller ID request
a Activate ーP333b Deactivate ー
c Check setting ーg Set arrival act
a Activate ー
P334b Deactivate ーc Check setting ー
h Arrival call act Answer
i Others
a Register USSD ーP336b Record reply
message ー
c Remote control
a Activate ーP335b Deactivate ー
c Check setting ーd Nuisance call barring
a Register the caller ー
P333
b Register selected No ー
c Delete all entries ー
d Delete last entry ー
e Check the number of entriesー
e English guidance
a Guidance setting ー P334
b Check setting ー
Men
u list
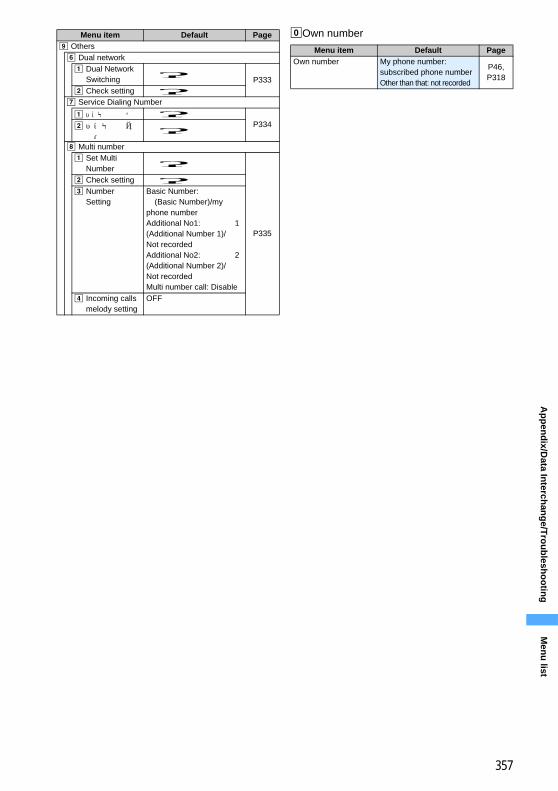
357
Ap
pen
dix/D
ata Interch
ang
e/Tro
ub
lesho
otin
g
0Own numberMenu item Default Pagei Others
f Dual network
a Dual Network Switching ー P333
b Check setting ーg Service Dialing Number
a ドコモ故障問合せ ーP334b ドコモ総合案
内・受付 ー
h Multi number
a Set Multi Number ー
P335
b Check setting ーc Number
SettingBasic Number: 基本契約番号(Basic Number)/my phone numberAdditional No1: 付加番号1(Additional Number 1)/Not recordedAdditional No2: 付加番号2(Additional Number 2)/Not recordedMulti number call: Disable
d Incoming calls melody setting
OFF
Menu item Default PageOwn number My phone number:
subscribed phone numberOther than that: not recorded
P46, P318
Men
u list
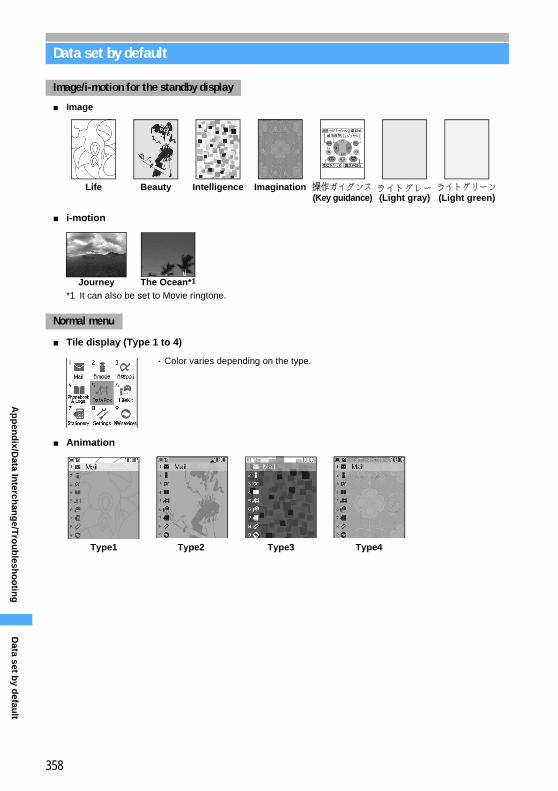
358
Ap
pen
dix/D
ata Interch
ang
e/Tro
ub
lesho
otin
g
Data set by default
■ Image
■ i-motion
*1 It can also be set to Movie ringtone.
■ Tile display (Type 1 to 4)
■ Animation
Image/i-motion for the standby display
Life Beauty Intelligence Imagination 操作ガイダンス (Key guidance)
ライトグレー(Light gray)
ライトグリーン(Light green)
Journey The Ocean*1
Normal menu
・ Color varies depending on the type.
Type1 Type2 Type3 Type4D
ata set by d
efault
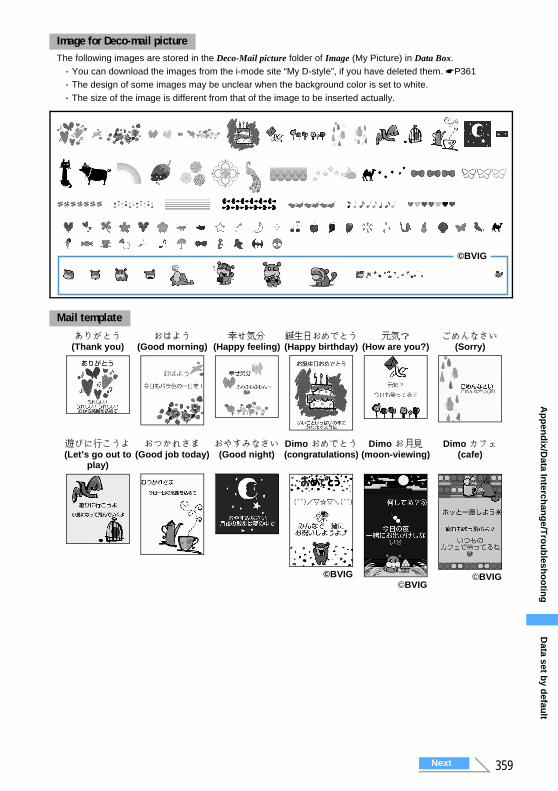
Ap
pen
dix/D
ata Interch
ang
e/Tro
ub
lesho
otin
g
359
The following images are stored in the Deco-Mail picture folder of Image (My Picture) in Data Box.・ You can download the images from the i-mode site “My D-style”, if you have deleted them. ☛P361・ The design of some images may be unclear when the background color is set to white.・ The size of the image is different from that of the image to be inserted actually.
Image for Deco-mail picture
Mail template
ありがとう(Thank you)
おはよう(Good morning)
幸せ気分(Happy feeling)
誕生日おめでとう(Happy birthday)
元気?(How are you?)
ごめんなさい(Sorry)
遊びに行こうよ(Let’s go out to
play)
おつかれさま(Good job today)
おやすみなさい(Good night)
Dimo おめでとう(congratulations)
Dimo お月見(moon-viewing)
Dimo カフェ(cafe)
©BVIG©BVIG
©BVIG
©BVIG
Data set b
y defau
lt
Next
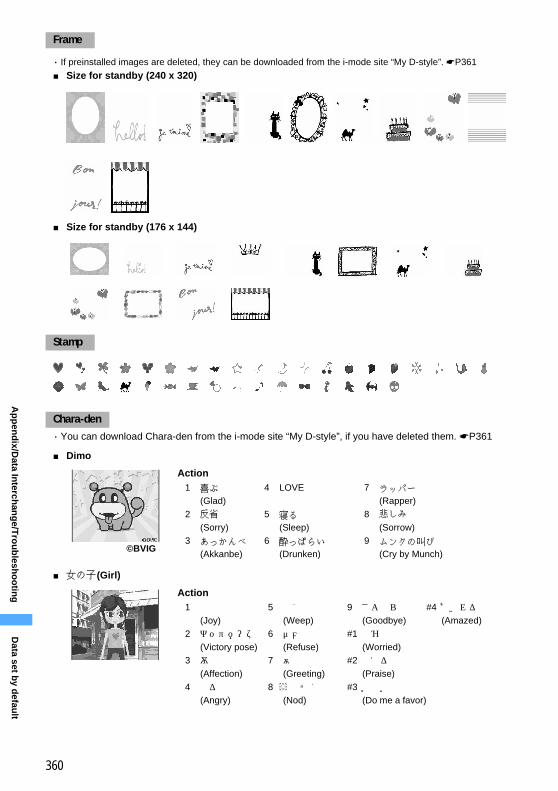
360
Ap
pen
dix/D
ata Interch
ang
e/Tro
ub
lesho
otin
g
・ If preinstalled images are deleted, they can be downloaded from the i-mode site “My D-style”. ☛P361
■ Size for standby (240 x 320)
■ Size for standby (176 x 144)
・ You can download Chara-den from the i-mode site “My D-style”, if you have deleted them. ☛P361
■ Dimo
■ 女の子(Girl)
Frame
Stamp
Chara-den
Action1 喜ぶ
(Glad)4 LOVE 7 ラッパー
(Rapper)2 反省
(Sorry)5 寝る
(Sleep)8 悲しみ
(Sorrow)3 あっかんべ
(Akkanbe)6 酔っぱらい
(Drunken)9 ムンクの叫び
(Cry by Munch)©BVIG
Action1 喜ぶ
(Joy)5 泣く
(Weep)9 さよなら
(Goodbye)#4 あきれる
(Amazed)2 ガッツポーズ
(Victory pose)6 ダメ
(Refuse)#1 悩む
(Worried)3 愛情
(Affection)7 挨拶
(Greeting)#2 称える
(Praise)4 怒る
(Angry)8 うなずく
(Nod)#3 お願い
(Do me a favor)
Data set b
y defau
lt
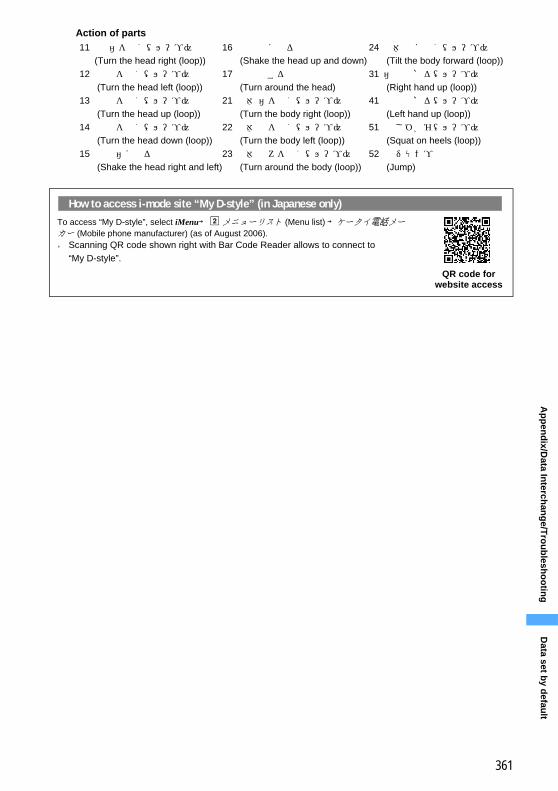
Ap
pen
dix/D
ata Interch
ang
e/Tro
ub
lesho
otin
g
361
Action of parts 11 頭 右を向く(ループ)
(Turn the head right (loop))16 頭 上下に振る
(Shake the head up and down)24 胴体 前に傾く(ループ)
(Tilt the body forward (loop))12 頭 左を向く(ループ)
(Turn the head left (loop))17 頭 回転する
(Turn around the head)31 右手 挙げる(ループ)
(Right hand up (loop))13 頭 上を向く(ループ)
(Turn the head up (loop))21 胴体 右を向く(ループ)
(Turn the body right (loop))41 左手 挙げる(ループ)
(Left hand up (loop))14 頭 下を向く(ループ)
(Turn the head down (loop))22 胴体 左を向く(ループ)
(Turn the body left (loop))51 足 しゃがむ(ループ)
(Squat on heels (loop))15 頭 左右に振る
(Shake the head right and left)23 胴体 後ろを向く(ループ)
(Turn around the body (loop))52 足 ジャンプ
(Jump)
How to access i-mode site “My D-style” (in Japanese only)
To access “My D-style”, select iMenu→ b メニューリスト (Menu list) →ケータイ電話メーカー (Mobile phone manufacturer) (as of August 2006).● Scanning QR code shown right with Bar Code Reader allows to connect to
“My D-style”.
QR code for website access
Data set b
y defau
lt
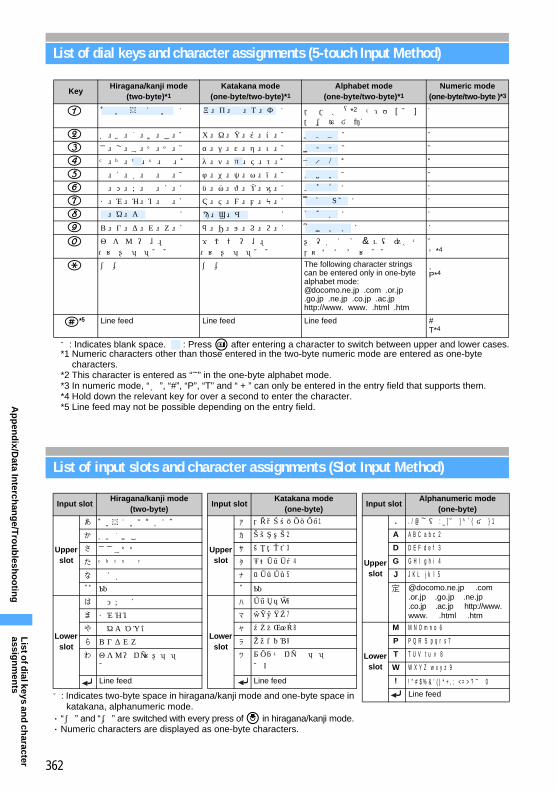
362
Ap
pen
dix/D
ata Interch
ang
e/Tro
ub
lesho
otin
g
List of dial keys and character assignments (5-touch Input Method)
□: Indicates blank space. : Press t after entering a character to switch between upper and lower cases.*1 Numeric characters other than those entered in the two-byte numeric mode are entered as one-byte
characters.*2 This character is entered as “~” in the one-byte alphabet mode.*3 In numeric mode, “*”, “#”, “P”, “T” and “ + ” can only be entered in the entry field that supports them.*4 Hold down the relevant key for over a second to enter the character.*5 Line feed may not be possible depending on the entry field.
List of input slots and character assignments (Slot Input Method)
KeyHiragana/kanji mode
(two-byte)*1Katakana mode
(one-byte/two-byte)*1Alphabet mode
(one-byte/two-byte)*1Numeric mode
(one-byte/two-byte )*3
1 1 1 . / @ ―*2 - : _ [ ¥ ] ^ ` { | }1
1
2 か き く け こ 2 カ キ ク ケ コ 2 2 23 さ し す せ そ 3 サ シ ス セ ソ 3 3 34 た ち て と 4 タ チ テ ト 4 4 45 な に ぬ ね の 5 ナ ニ ヌ ネ ノ 5 5 56 は ひ ふ へ ほ 6 ハ ヒ フ ヘ ホ 6 6 67 ま み む め も 7 マ ミ ム メ モ 7 7 78 8 8 8 89 ら り る れ ろ 9 ラ リ ル レ ロ 9 9 90 わ を ん ー 、 。
・? ! 「 」 □ 0ワ ヲ ン ー 、 。 ・? ! 「 」 □ 0
! ” # $ % & ’ ( ) * +, ; < = > ? □ 0
0+*4
( ゛ ゜ ゛ ゜ The following character strings can be entered only in one-byte alphabet mode:@docomo.ne.jp .com .or.jp.go.jp .ne.jp .co.jp .ac.jphttp://www. www. .html .htm
*P*4
#*5 Line feed Line feed Line feed #T*4
Input slotHiragana/kanji mode
(two-byte)Input slot
Katakana mode(one-byte)
Input slotAlphanumeric mode
(one-byte)
Upper slot
あ あいうえおぁぃぅぇぉ1
Upper slot
ア ア イ ウ エ オ ァ ィ ゥ ェ ォ 1
Upper slot
. . / @ ~ ― : _ [ ¥ ] ^ ` { | } 1
か かきくけこ 2 カ カ キ ク ケ コ 2 A A B C a b c 2
さ さしすせそ 3 サ サ シ ス セ ソ 3 D D E F d e f 3
た たちつてとっ 4 タ タ チ ツ テ ト ッ 4 G G H I g h i 4
な なにぬねの 5 ナ ナ ニ ヌ ネ ノ 5 J J K L j k l 5
゙゚ ゙゚ ゙ ゙゚ 定 @docomo.ne.jp .com .or.jp .go.jp .ne.jp .co.jp .ac.jp http://www. www. .html .htm
Lower slot
は はひふへほ 6
Lower slot
ハ ハ ヒ フ ヘ ホ 6
ま まみむめも 7 マ マ ミ ム メ モ 7
や やゆよ ゃゅょ 8 ヤ ヤ ユ ヨ ャ ュ ョ 8
Lower slot
M M N O m n o 6
ら らりるれろ 9 ラ ラ リ ル レ ロ 9 P P Q R S p q r s 7
わ わをんー 、 。?!「 」□ 0
ワ ワ ヲ ン - 、 。 ? !「 」□ 0
T T U V t u v 8
W W X Y Z w x y z 9
Line feed Line feed ! ! " # $ % & ' ( ) * + , ; < = > ? □ 0
□: Indicates two-byte space in hiragana/kanji mode and one-byte space in katakana, alphanumeric mode.
・ “゛ ” and “゜ ” are switched with every press of o in hiragana/kanji mode.・ Numeric characters are displayed as one-byte characters.
Line feed
あ い う え お ア イ ウ エ オ
a b c
d e f
つ ツ g h i
j k l
m n op q r s
や ゆ よ ヤ ユ ヨ t u v
w x y z
List o
f dial keys an
d ch
aracter assig
nm
ents
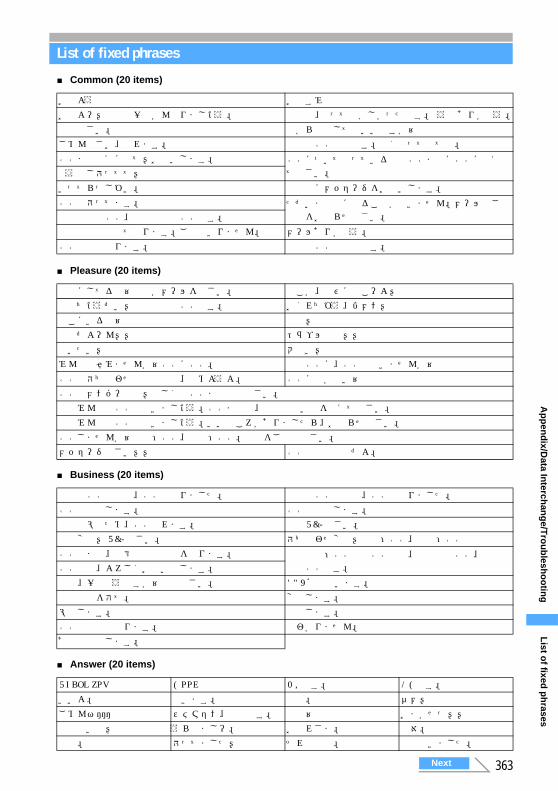
Ap
pen
dix/D
ata Interch
ang
e/Tro
ub
lesho
otin
g
363
List of fixed phrases
■ Common (20 items)
■ Pleasure (20 items)
■ Business (20 items)
■ Answer (20 items)
おはよう おやすみおはよー!今日も一日がんばりましょう。 昨日は、とっても楽しかったです。どうもありがとう。連絡下さい。 今から電話してもいいですか?ごめんなさい、遅れます。 今日は○○の日です。早く帰って来てね。○○まで迎えに来て!お願いします。 ○○について知っている人は○○までに○○に教え
て下さい。もう少し待ってて!いってらっしゃい。 留守電にメッセージをお願いします。○○で待ってます。 ただいま電話にでることができません。メールでご
用件をお知らせ下さい。集合時間は○○、集合場所は○○です。今日は外で食べて帰ります。ご飯はいりません。 メールありがとう。○○の写真送ります。 最近の○○の写真です。
今なにしてるの?電話かメールを下さい。 どこか、遊びに行こーよ!電話ちょうだい!電話番号は○○です。 おくれちゃう、ゴメン!どこにいるの? 集合!時間だよーん!! トラブル発生!!会いたい! 大好き!みんなで飲みませんか?○○に○○。 今日○○に、○○へ行きませんか?○○の待ち合わせ時間と場所、決めようよ。 ○○に行かない?○○のメンバー募集!詳しくは○○まで連絡下さい。今度みんなで○○へ行きましょう。○○までで、都合の良い日を教えて下さい。今度みんなで○○へ行きましょう。いいところがありましたら、お知らせ下さい。○○しませんか?日時:○○、場所:○○。出欠をご連絡下さい。メッセージ下さい!! ○○の時の写真だよ。
本日の○○会議は、○○となりました。 本日の○○訪問は、○○となりました。○○へ直行します。 ○○へ直帰します。電車遅延のため、○○遅れます。 至急TEL下さい。予定変更! TEL下さい。 待ち合わせ変更!場所:○○、時間:○○○○頃まで、携帯電話の電源を切ります。 振込口座:○○銀行○○支店、口座番号○○、名義
人名○○です。○○の件、よろしくお願い致します。今日、一杯どうですか?連絡下さい。 FAX確認願います。次の指示を待て。 変更します。延期します。 中止します。○○での写真送ります。 今わかりません。あとで連絡します。
Thank you! Good! OKです。 NGです。いいよ。 行きます。 了解。 ダメ!ごめんネ・・・ スミマセン、無理です。 本当? おまかせっ!!関係ないね! うらやましー。 お疲れさま。 反対。賛成。 待ってました! それは残念。 写真届きました。
List o
f fixed p
hrases
Next
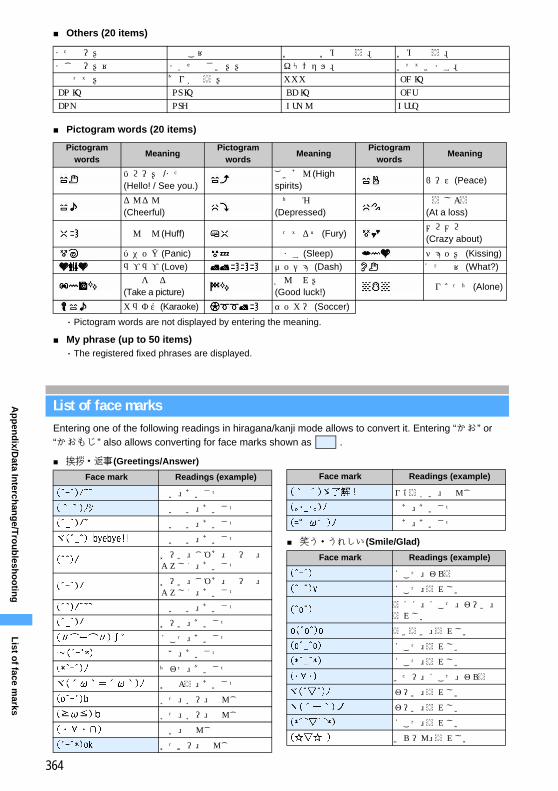
364
Ap
pen
dix/D
ata Interch
ang
e/Tro
ub
lesho
otin
g
■ Others (20 items)
■ Pictogram words (20 items)
・ Pictogram words are not displayed by entering the meaning.
■ My phrase (up to 50 items)・ The registered fixed phrases are displayed.
List of face marksEntering one of the following readings in hiragana/kanji mode allows to convert it. Entering “かお” or “かおもじ” also allows converting for face marks shown as .
■ 挨拶・返事(Greetings/Answer)
■ 笑う・うれしい(Smile/Glad)
またねー! 今どこ? お誕生日おめでとう。 おめでとう。まじでー!? まかせなさい!! キャンセル。 いってきます。頑張って! ありがとう! www. .ne.jp.co.jp .or.jp .ac.jp .net.com .org .html http://
Pictogram words
MeaningPictogram
wordsMeaning
Pictogram words
Meaning
ハロー! /またね(Hello! / See you.)
ごきげん(High spirits)
ピース(Peace)
るんるん(Cheerful)
落ち込む(Depressed)
どうしよう(At a loss)
ぷんぷん(Huff) 怒ってるぞ(Fury)メロメロ(Crazy about)
パニック(Panic) 寝ます(Sleep) チュッ! (Kissing)ラブラブ(Love) ダッシュ (Dash) えっ何? (What?)写真を撮る(Take a picture)
がんばれ!(Good luck!)
独りぼっち(Alone)
カラオケ(Karaoke) サッカー (Soccer)
Face mark Readings (example)
ばい あいさつ
ばいばい あいさつ
ばいばい あいさつ
ばいばい あいさつ
おーい じゃあ どーも よろしく あいさつ
おーい じゃあ どーも よろしく あいさつ
ばいばい あいさつ
おーい あいさつ
にこっ あいさつ
やぁ あいさつ
ちわっ あいさつ
おはよう あいさつ
ぐっ ぐー へんじ
ぐっ ぐー へんじ
はい へんじ
おっけー へんじ
Face mark Readings (example)
りょうかい へんじ
やあ あいさつ
やあ あいさつ
Face mark Readings (example)
にこっ わらう
にこっ うれしい
うほほ にこっ わーい うれしい
うきうき うれしい
にこっ うれしい
にこっ うれしい
きたー にこっ わらう
わーい うれしい
わーい うれしい
にこっ うれしい
きらーん うれしい
List o
f face marks
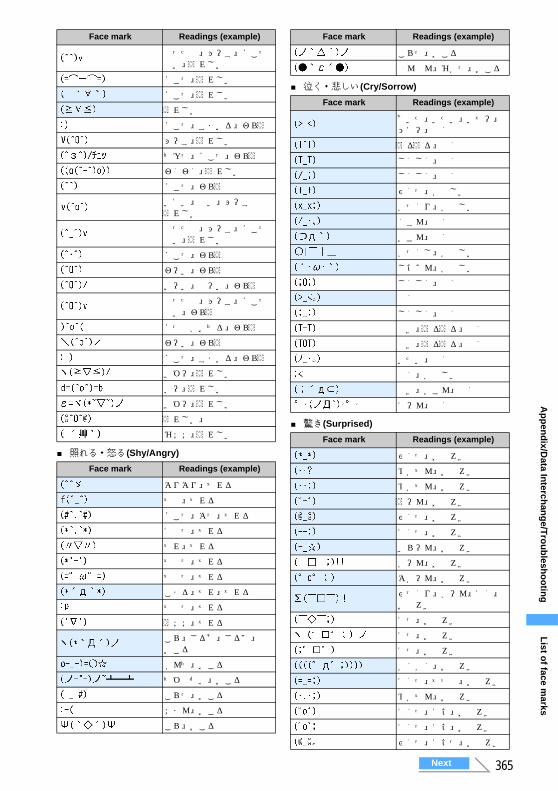
365
Ap
pen
dix/D
ata Interch
ang
e/Tro
ub
lesho
otin
g
■ 照れる・怒る(Shy/Angry)
■ 泣く・悲しい(Cry/Sorrow)
■ 驚き(Surprised)
やったね ぴーす にこっぶい うれしい
にこっ うれしい
にこっ うれしい
うれしい
にこっ すまいる わらう
ぴーす うれしい
ちゅっ にこっ わらう
わくわく うれしい
にこっ わらう
いえい ぶい ぴーすうれしい
やったね ぴーす にこっぶい うれしい
にこっ わらう
わーい わらう
おーい はーい わらう
やったね ぴーす にこっぶい わらう
ほっぺがおちる わらう
わーい わらう
にこっ すまいる わらう
きゃー うれしい
ぐー うれしい
きゃー うれしい
うれしい
むふふ うれしい
Face mark Readings (example)
ぽりぽり てれる
てへ てれる
にこっ ぽっ てれる
えへっ てれる
てれ てれる
てへっ てれる
てへっ てれる
こまる てれ てれる
てへっ てれる
うふふ てれる
こら ごるあ ごるぁ おこる
ぱんち おこる
ちゃぶだい おこる
こらっ おこる
ふまん おこる
こら おこる
Face mark Readings (example)
こらっ おこる
ぷんぷん むかっ おこる
Face mark Readings (example)
あいた いたい いてー ひぇー なく
うるうる なく
しくしく なく
しくしく なく
びくっ かなしい
がっくり かなしい
くすん なく
ぐすん なく
がっくし かなしい
しょぼん かなしい
しくしく なく
なく
しくしく なく
なき うるうる なく
なき うるうる なく
いたい なく
なく かなしい
なき ぐすん なく
えーん なく
Face mark Readings (example)
びくっ おどろき
めがてん おどろき
めがてん おどろき
うーん おどろき
びくっ おどろき
ぎくっ おどろき
きらーん おどろき
がーん おどろき
ぽかーん おどろき
びっくり がーん ぎく おどろき
えっ おどろき
えっ おどろき
えっ おどろき
がくがく おどろき
ぎくっ てつや おどろき
めがてん おどろき
ぎくっ ぎょ おどろき
ぎくっ ぎょ おどろき
びくっ ぎょっ おどろき
Face mark Readings (example)
List o
f face marks
Next
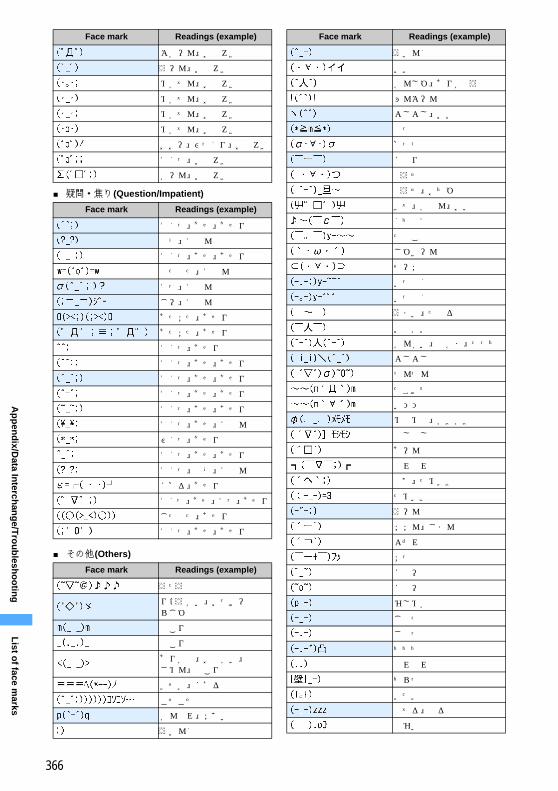
366
Ap
pen
dix/D
ata Interch
ang
e/Tro
ub
lesho
otin
g
■ 疑問・焦り(Question/Impatient)
■ その他(Others)
ぽかーん おどろき
うーん おどろき
めがてん おどろき
めがてん おどろき
めがてん おどろき
めがてん おどろき
おおー びっくり おどろき
ぎくっ おどろき
がーん おどろき
Face mark Readings (example)
ぎくっ あせ あせり
なぜ ぎもん
ぎくっ あせ あせり
ばたばた ぎもん
えっ ぎもん
じー ぎもん
あたふた あせり
あたふた あせり
ぎくっ あせり
ぎくっ あせ あせり
ぎくっ あせ あせり
ぎくっ あせ あせり
ぎくっ あせ あせり
ぎくっ あせ ぎもん
びくっ あせり
ぎくっ あせ あせり
ぎくっ なぜ ぎもん
にげる あせり
ぎくっ あせ えっ あせり
じたばた あせり
ぎくっ あせ あせり
Face mark Readings (example)
うたう
りょうかい おっけーらじゃ
ぺこり
ぺこり
ありがと おねがい ごめん ぺこり
いそぐ にげる
こそこそ
がんばれ ふぁいと
ういんく
Face mark Readings (example)
ういんく
いい
かんしゃ ありがとう
ぴんぽーん
よしよし おい
ぷっ
げっつ
にやり
どうぞ
どうぞ おちゃ
きて かもん おいで
くちぶえ
たばこ
しゃきーん
せーふ
いっぷく
いっぷく
うまい たべる
おねがい
かんぱい なかま たっち
よしよし
つんつん
たすけて
いひひ
めもめも かきかき
もしもし
あーん
やれやれ
はぁ ためいき
ためいき
うーん
ふふん じまん
よだれ
ふっ
ほへー
ほへー
むしめがね
じとっ
じとっ
ちちち
どれどれ
ちらっ
いたい
ねてる ねる
ねむい
Face mark Readings (example)
List o
f face marks
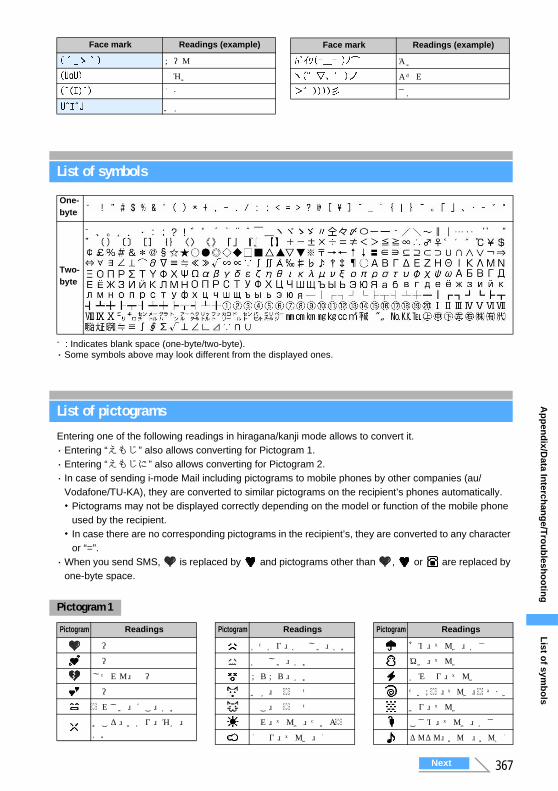
367
Ap
pen
dix/D
ata Interch
ang
e/Tro
ub
lesho
otin
g
List of symbols
□: Indicates blank space (one-byte/two-byte).・ Some symbols above may look different from the displayed ones.
List of pictograms
Entering one of the following readings in hiragana/kanji mode allows to convert it.・ Entering “えもじ” also allows converting for Pictogram 1.・ Entering “えもじに” also allows converting for Pictogram 2.・ In case of sending i-mode Mail including pictograms to mobile phones by other companies (au/
Vodafone/TU-KA), they are converted to similar pictograms on the recipient’s phones automatically.・Pictograms may not be displayed correctly depending on the model or function of the mobile phone
used by the recipient.・In case there are no corresponding pictograms in the recipient’s, they are converted to any character
or “=”.・When you send SMS, is replaced by and pictograms other than , or are replaced by
one-byte space.
Face mark Readings (example)
ふーん
ねむい
くま
いぬ
Face mark Readings (example)
ぽい
よだれ
さかな
One-byte
Two-byte
□
□
Pictogram 1
Pictogram Readings
はーと
はーと
しつれん はーと
はーと
うれしい にこ かお
おこる いかり むか かお
がっかり かなしい かお
かなしい かお
ふらふら かお
いぬ どうぶつ
ねこ どうぶつ
はれ てんき たいよう
くもり てんき くも
Pictogram Readings
あめ てんき かさ
ゆき てんき
かみなり てんき
たいふう てんき うずまき
きり てんき
こさめ てんき かさ
るんるん おんぷ おんがく
Pictogram Readings List o
f symb
ols
Next
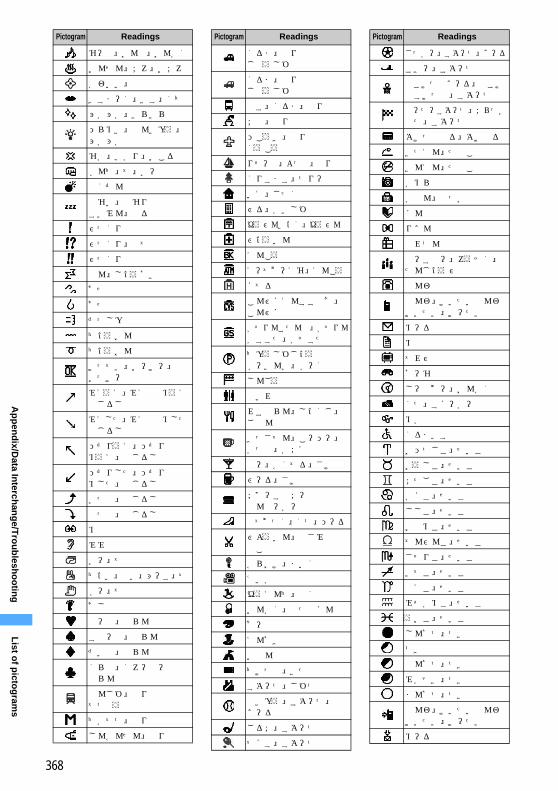
368
Ap
pen
dix/D
ata Interch
ang
e/Tro
ub
lesho
otin
g
むーど おんぷ おんがく
おんせん ふろ おふろ
かわいい はな
きすまーく きす くち
ぴかぴか きらきら
ひらめき でんきゅう ぴかぴか
むか いかり おこる
ぱんち て ぐー
ばくだん
ねむい ねむりすいみん ねる
びっくり
びっくり はてな
びっくり
どん しょうげき
あせ
あせ
だっしゅ
ちょうおん
ちょうおん
けってい おーけー おっけー
みぎうえ みぎななめうえやじるし
みぎした みぎななめしたやじるし
ひだりうえ ひだりななめうえ やじるし
ひだりした ひだりななめした やじるし
ぐっど やじるし
ばっど やじるし
め
みみ
ぐー て
ちょき ぶい ぴーす て
ぱー て
あし
はーと とらんぷ
すぺーど とらんぷ
だいや とらんぷ
くらぶ くろーばーとらんぷ
でんしゃ のりものてつどう
ちかてつ のりもの
しんかんせん のりもの
Pictogram Readings
くるま のりものじどうしゃ
くるま のりものじどうしゃ
ばす くるま のりもの
ふね のりもの
ひこうき のりものくうこう
りぞーと よっと のりもの
くりすます つりー
いえ じたく
びる かいしゃ
ゆうびんきょく ゆうびん
びょういん
ぎんこう
えーてぃーえむ ぎんこう
ほてる
こんびにえんすすとあ こんびに
がそりんすたんど がそりんがすすた がそすた
ちゅうしゃじょうぱーきんぐ ぱーく
しんごう
といれ
れすとらん しょくじ ごはん
きっさてん こーひー かっぷ かふぇ
ばー かくてる さけ
びーる さけ
ふぁーすとふーどはんばーがー
ぶてぃっく くつ ひーる
びよういん はさみとこや
からおけ まいく
えいが
ゆうえんち もくば
おんがく へっどほん
あーと
えんげき
いべんと
ちけっと きっぷ
すぽーつ しゃつ
やきゅう すぽーつ ぼーる
ごるふ すぽーつ
てにす すぽーつ
Pictogram Readings
さっかー すぽーつ ぼーる
すきー すぽーつ
ばすけっとぼーる ばすけばすけっと すぽーつ
もーたーすぽーつ ふらっぐはた すぽーつ
ぽけっとべる ぽけべる
きつえん たばこ
きんえん たばこ
かめら
かばん ばっぐ
ほん
りぼん
ぷれぜんと
ばーすでー ろうそく たんじょうび
でんわ
でんわ けいたいでんわけいたい けーたい
めーる
めも
てれび
げーむ
しーでぃー おんがく
くつ すにーかー
めがね
くるまいす
おひつじざ せいざ
おうしざ せいざ
ふたござ せいざ
かにざ せいざ
ししざ せいざ
おとめざ せいざ
てんびんざ せいざ
さそりざ せいざ
いてざ せいざ
やぎざ せいざ
みずがめざ せいざ
うおざ せいざ
しんげつ つき
つき
はんげつ つき
みかづき つき
まんげつ つき
でんわ けいたいでんわけいたい けーたい
めーる
Pictogram Readings
List o
f picto
gram
s
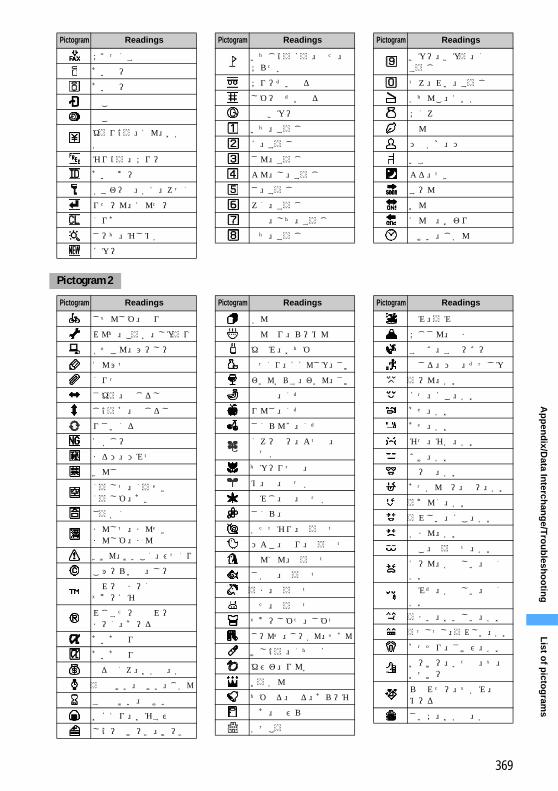
369
Ap
pen
dix/D
ata Interch
ang
e/Tro
ub
lesho
otin
g
Pictogram 2
Pictogram Readings
ふぁっくす
あいもーど
あいもーど
どこも
どこも
ゆうりょう えん おかねかね
むりょう ふりー
あいでぃー
ぱすわーど かぎ ろっく
りたーん えんたー
くりあ
さーち むしめがね
にゅー
いちじょうほう はた ふらっぐ
ふりーだいやる
しゃーぷだいやる
もばきゅー
いち すうじ
に すうじ
さん すうじ
よん し すうじ
ご すうじ
ろく すうじ
なな しち すうじ
はち すうじ
Pictogram Readings
きゅー きゅう くすうじ
ぜろ れい すうじ
かちんこ えいが
ふくろ
ぺん
ひとかげ ひと
いす
よる つき
すーん
おん
えんど おわり
とけい じかん
Pictogram Readings
Pictogram Readings
じてんしゃ のりもの
れんち こうぐ しゅうり
ぱそこん ぴーしー
えんぴつ
くりっぷ
さゆう やじるし
じょうげ やじるし
りさいくる
えぬじー
まるひ ひみつ
きんし
くうしつ くうせきくうしゃ あき
ごうかく
まんしつ まんせきまんしゃ まん
きけん けいこく びっくり
こぴーらいと しー
とれーどまーくてぃーえむ
れじすたーどとれーどまーく あーる
あいあぷり
あいあぷり
どるぶくろ おかね かね
うでどけい とけい じかん
すなどけい とけい
おにぎり おむすび
しょーとけーき けーき
ぱん
どんぶり らーめん
ゆのみ おちゃ
とっくり にほんしゅ さけ
わいんぐらす わいん さけ
ばなな くだもの
りんご くだもの
さくらんぼ くだもの
くろーばー よつば ははっぱ
ちゅーりっぷ はな
め は はっぱ
もみじ は はっぱ
さくら はな
かたつむり どうぶつ
ひよこ とり どうぶつ
ぺんぎん どうぶつ
さかな どうぶつ
うま どうぶつ
ぶた どうぶつ
てぃーしゃつ しゃつ
じーんず じーぱん ずぼん
けしょう くちべに
ゆびわ りんぐ
おうかん
ちゃぺる べる あらーむ
どあ とびら
がっこう
Pictogram Readings
なみ うみ
ふじさん やま
すのぼ すのーぼーど
はしる ひと だっしゅ
うーん かお
ほっ にこ かお
あせ かお
あせ かお
むっ むか かお
ぼけ かお
はーと かお
あっかんべー べー かお
うぃんく かお
うれしい にこ かお
がまん かお
ねこ どうぶつ かお
えーん かなしい なくかお
なみだ かなしい なくかお
うまい おいしい かお
うっしっし うれしい かお
げっそり さけび かお
おーけー ぐっど て おっけー
らぶれたー てがみ めーる
さいふ おかね かね
Pictogram Readings
List o
f picto
gram
s
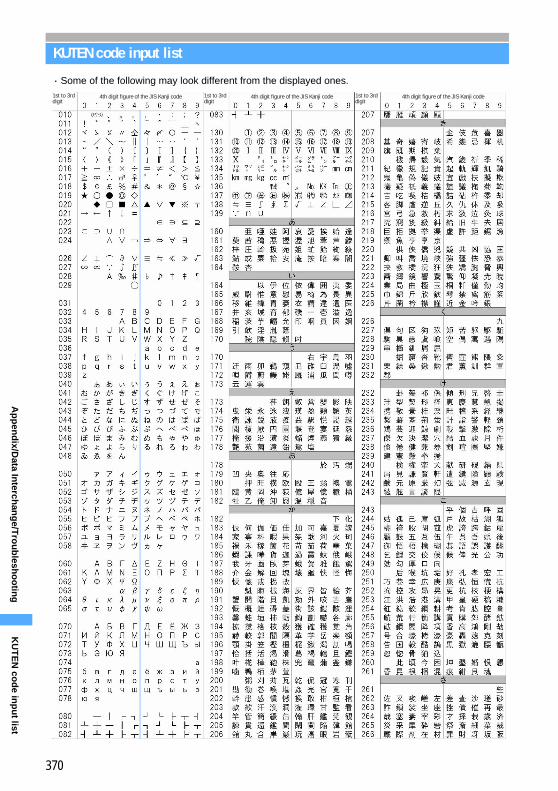
370
Ap
pen
dix/D
ata Interch
ang
e/Tro
ub
lesho
otin
g
KUTEN code input list
・ Some of the following may look different from the displayed ones.1st to 3rd digit
1st to 3rd digit
1st to 3rd digit
4th digit figure of the JIS Kanji code 4th digit figure of the JIS Kanji code 4th digit figure of the JIS Kanji code
KU
TE
N co
de in
pu
t list
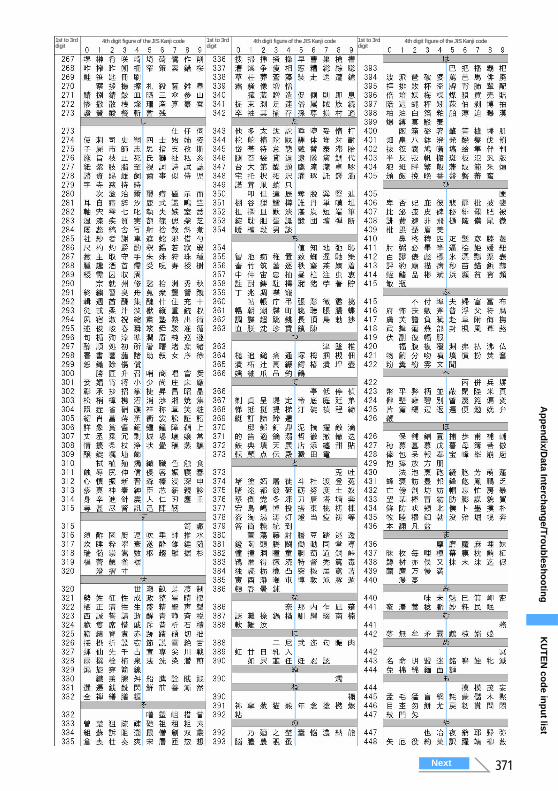
Ap
pen
dix/D
ata Interch
ang
e/Tro
ub
lesho
otin
g
371
1st to 3rd digit
1st to 3rd digit
1st to 3rd digit
4th digit figure of the JIS Kanji code 4th digit figure of the JIS Kanji code 4th digit figure of the JIS Kanji code
KU
TE
N co
de in
pu
t list
Next
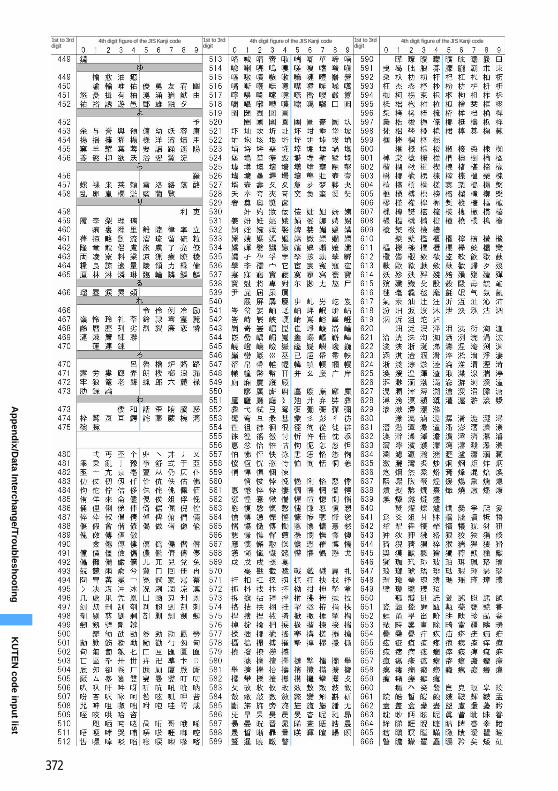
372
Ap
pen
dix/D
ata Interch
ang
e/Tro
ub
lesho
otin
g
1st to 3rd digit
1st to 3rd digit
1st to 3rd digit
4th digit figure of the JIS Kanji code 4th digit figure of the JIS Kanji code 4th digit figure of the JIS Kanji code
KU
TE
N co
de in
pu
t list
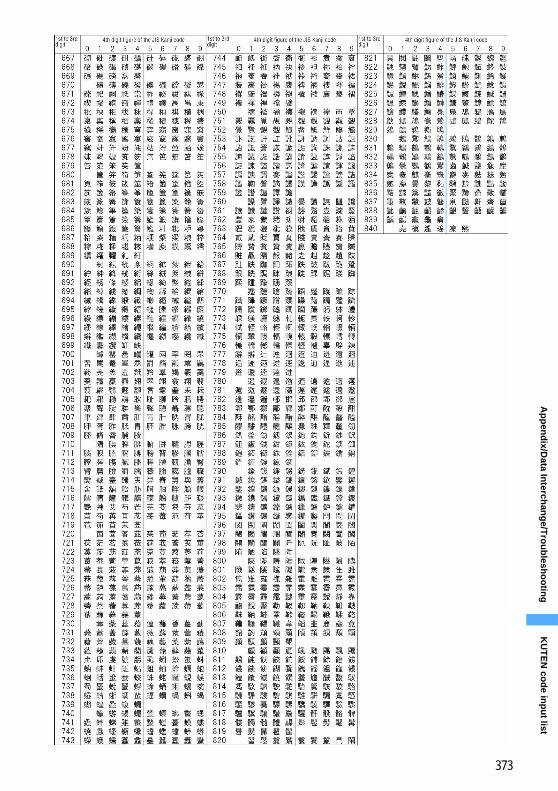
Ap
pen
dix/D
ata Interch
ang
e/Tro
ub
lesho
otin
g
373
KU
TE
N co
de in
pu
t list
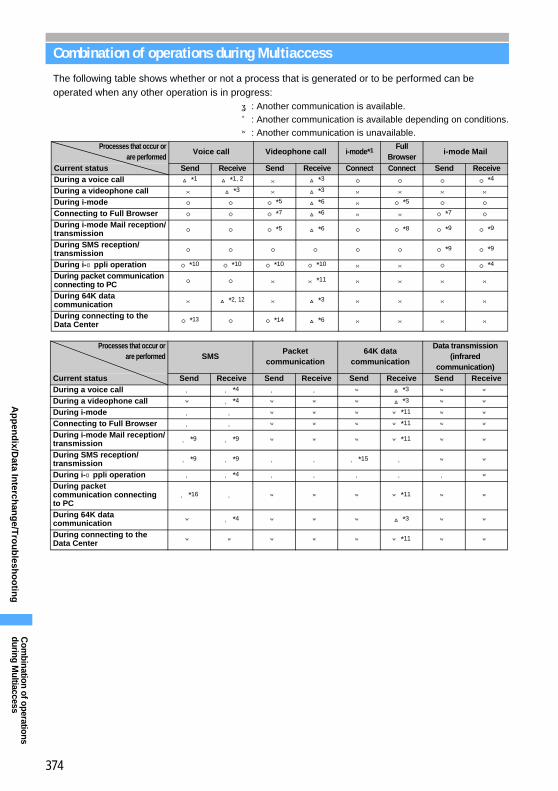
374
Ap
pen
dix/D
ata Interch
ang
e/Tro
ub
lesho
otin
g
Combination of operations during Multiaccess
The following table shows whether or not a process that is generated or to be performed can be operated when any other operation is in progress:
〇: Another communication is available.△: Another communication is available depending on conditions.×: Another communication is unavailable.
Processes that occur orare performed
Voice call Videophone call i-mode*1 Full Browser
i-mode Mail
Current status Send Receive Send Receive Connect Connect Send ReceiveDuring a voice call △*1 △*1, 2 × △*3 ○ ○ ○ ○*4
During a videophone call × △*3 × △*3 × × × ×During i-mode ○ ○ ○*5 △*6 × ○*5 ○ ○Connecting to Full Browser ○ ○ ○*7 △*6 × × ○*7 ○During i-mode Mail reception/transmission ○ ○ ○*5 △*6 ○ ○*8 ○*9 ○*9
During SMS reception/transmission ○ ○ ○ ○ ○ ○ ○*9 ○*9
During i-αppli operation ○*10 ○*10 ○*10 ○*10 × × ○ ○*4
During packet communication connecting to PC ○ ○ × ×*11 × × × ×
During 64K data communication × △*2, 12 × △*3 × × × ×
During connecting to the Data Center ○*13 ○ ○*14 △*6 × × × ×
Processes that occur orare performed SMS
Packet communication
64K data communication
Data transmission(infrared
communication)Current status Send Receive Send Receive Send Receive Send ReceiveDuring a voice call ○ ○*4 ○ ○ × △*3 × ×During a videophone call × ○*4 × × × △*3 × ×During i-mode ○ ○ × × × ×*11 × ×Connecting to Full Browser ○ ○ × × × ×*11 × ×During i-mode Mail reception/transmission ○*9 ○*9 × × × ×*11 × ×
During SMS reception/transmission ○*9 ○*9 ○ ○ ○*15 ○ × ×
During i-αppli operation ○ ○*4 ○ ○ ○ ○ ○ ×During packet communication connecting to PC
○*16 ○ × × × ×*11 × ×
During 64K data communication × ○*4 × × × △*3 × ×
During connecting to the Data Center × × × × × ×*11 × ×
Com
bination of operations during M
ultiaccess
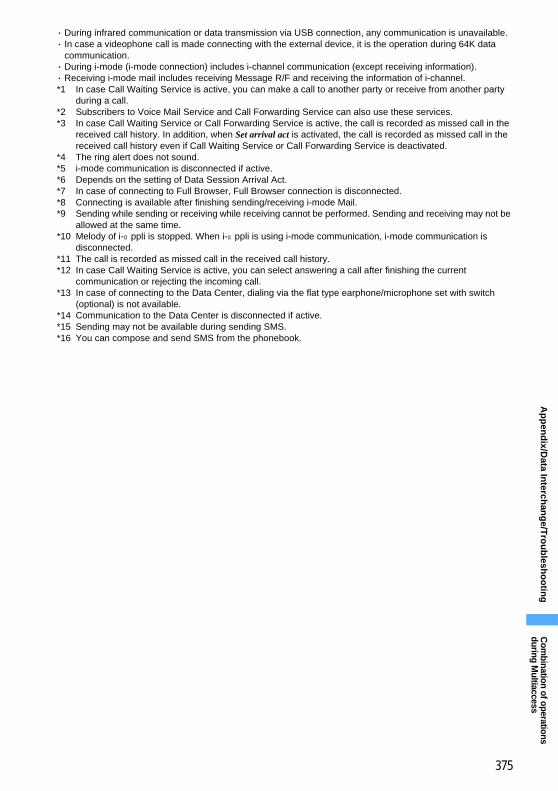
375
Ap
pen
dix/D
ata Interch
ang
e/Tro
ub
lesho
otin
g
・ During infrared communication or data transmission via USB connection, any communication is unavailable.・ In case a videophone call is made connecting with the external device, it is the operation during 64K data
communication.・ During i-mode (i-mode connection) includes i-channel communication (except receiving information).・ Receiving i-mode mail includes receiving Message R/F and receiving the information of i-channel.*1 In case Call Waiting Service is active, you can make a call to another party or receive from another party
during a call.*2 Subscribers to Voice Mail Service and Call Forwarding Service can also use these services.*3 In case Call Waiting Service or Call Forwarding Service is active, the call is recorded as missed call in the
received call history. In addition, when Set arrival act is activated, the call is recorded as missed call in the received call history even if Call Waiting Service or Call Forwarding Service is deactivated.
*4 The ring alert does not sound.*5 i-mode communication is disconnected if active.*6 Depends on the setting of Data Session Arrival Act.*7 In case of connecting to Full Browser, Full Browser connection is disconnected.*8 Connecting is available after finishing sending/receiving i-mode Mail.*9 Sending while sending or receiving while receiving cannot be performed. Sending and receiving may not be
allowed at the same time.*10 Melody of i-αppli is stopped. When i-αppli is using i-mode communication, i-mode communication is
disconnected.*11 The call is recorded as missed call in the received call history.*12 In case Call Waiting Service is active, you can select answering a call after finishing the current
communication or rejecting the incoming call.*13 In case of connecting to the Data Center, dialing via the flat type earphone/microphone set with switch
(optional) is not available.*14 Communication to the Data Center is disconnected if active.*15 Sending may not be available during sending SMS.*16 You can compose and send SMS from the phonebook.
Com
bination of operations during M
ultiaccess
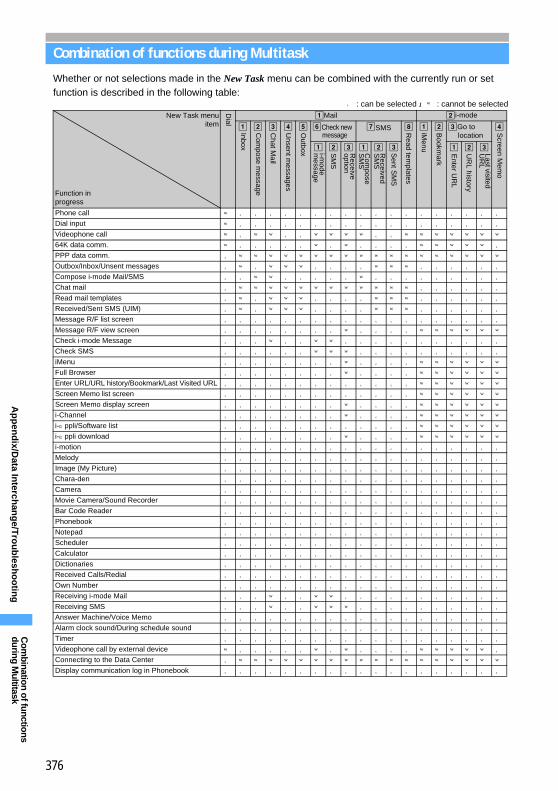
376
Ap
pen
dix/D
ata Interch
ang
e/Tro
ub
lesho
otin
g
Combination of functions during Multitask
Whether or not selections made in the New Task menu can be combined with the currently run or set function is described in the following table:
New Task menuitem
Function inprogress
aMail bi-mode
a b c d e fCheck new message
gSMS h a b cGo to location
d
a b c a b c a b c
Phone call × ○ ○ ○ ○ ○ ○ ○ ○ ○ ○ ○ ○ ○ ○ ○ ○ ○ ○Dial input × ○ ○ ○ ○ ○ ○ ○ ○ ○ ○ ○ ○ ○ ○ ○ ○ ○ ○Videophone call × ○ × × ○ ○ × × × × ○ ○ × × × × × × ×64K data comm. × ○ ○ ○ ○ ○ × ○ × ○ ○ ○ ○ × × × × × ○PPP data comm. ○ × × × × × × × × × × × × × × × × × ×Outbox/Inbox/Unsent messages ○ × ○ × × × ○ ○ ○ ○ × × × ○ ○ ○ ○ ○ ○Compose i-mode Mail/SMS ○ ○ × × ○ ○ ○ ○ ○ × ○ ○ ○ ○ ○ ○ ○ ○ ○Chat mail ○ × × × × × × × × × × × × ○ ○ ○ ○ ○ ○Read mail templates ○ × ○ × × × ○ ○ ○ ○ × × × ○ ○ ○ ○ ○ ○Received/Sent SMS (UIM) ○ × ○ × × × ○ ○ ○ ○ × × × ○ ○ ○ ○ ○ ○Message R/F list screen ○ ○ ○ ○ ○ ○ ○ ○ ○ ○ ○ ○ ○ ○ ○ ○ ○ ○ ○Message R/F view screen ○ ○ ○ ○ ○ ○ ○ ○ × ○ ○ ○ ○ × × × × × ×Check i-mode Message ○ ○ ○ × ○ ○ × × ○ ○ ○ ○ ○ ○ ○ ○ ○ ○ ○Check SMS ○ ○ ○ ○ ○ ○ × × × ○ ○ ○ ○ ○ ○ ○ ○ ○ ○iMenu ○ ○ ○ ○ ○ ○ ○ ○ × ○ ○ ○ ○ × × × × × ×Full Browser ○ ○ ○ ○ ○ ○ ○ ○ × ○ ○ ○ ○ × × × × × ×Enter URL/URL history/Bookmark/Last Visited URL ○ ○ ○ ○ ○ ○ ○ ○ ○ ○ ○ ○ ○ × × × × × ×Screen Memo list screen ○ ○ ○ ○ ○ ○ ○ ○ ○ ○ ○ ○ ○ × × × × × ×Screen Memo display screen ○ ○ ○ ○ ○ ○ ○ ○ × ○ ○ ○ ○ × × × × × ×i-Channel ○ ○ ○ ○ ○ ○ ○ ○ × ○ ○ ○ ○ × × × × × ×i-αppli/Software list ○ ○ ○ ○ ○ ○ ○ ○ ○ ○ ○ ○ ○ × × × × × ×i-αppli download ○ ○ ○ ○ ○ ○ ○ ○ × ○ ○ ○ ○ × × × × × ×i-motion ○ ○ ○ ○ ○ ○ ○ ○ ○ ○ ○ ○ ○ ○ ○ ○ ○ ○ ○Melody ○ ○ ○ ○ ○ ○ ○ ○ ○ ○ ○ ○ ○ ○ ○ ○ ○ ○ ○Image (My Picture) ○ ○ ○ ○ ○ ○ ○ ○ ○ ○ ○ ○ ○ ○ ○ ○ ○ ○ ○Chara-den ○ ○ ○ ○ ○ ○ ○ ○ ○ ○ ○ ○ ○ ○ ○ ○ ○ ○ ○Camera ○ ○ ○ ○ ○ ○ ○ ○ ○ ○ ○ ○ ○ ○ ○ ○ ○ ○ ○Movie Camera/Sound Recorder ○ ○ ○ ○ ○ ○ ○ ○ ○ ○ ○ ○ ○ ○ ○ ○ ○ ○ ○Bar Code Reader ○ ○ ○ ○ ○ ○ ○ ○ ○ ○ ○ ○ ○ ○ ○ ○ ○ ○ ○Phonebook ○ ○ ○ ○ ○ ○ ○ ○ ○ ○ ○ ○ ○ ○ ○ ○ ○ ○ ○Notepad ○ ○ ○ ○ ○ ○ ○ ○ ○ ○ ○ ○ ○ ○ ○ ○ ○ ○ ○Scheduler ○ ○ ○ ○ ○ ○ ○ ○ ○ ○ ○ ○ ○ ○ ○ ○ ○ ○ ○Calculator ○ ○ ○ ○ ○ ○ ○ ○ ○ ○ ○ ○ ○ ○ ○ ○ ○ ○ ○Dictionaries ○ ○ ○ ○ ○ ○ ○ ○ ○ ○ ○ ○ ○ ○ ○ ○ ○ ○ ○Received Calls/Redial ○ ○ ○ ○ ○ ○ ○ ○ ○ ○ ○ ○ ○ ○ ○ ○ ○ ○ ○Own Number ○ ○ ○ ○ ○ ○ ○ ○ ○ ○ ○ ○ ○ ○ ○ ○ ○ ○ ○Receiving i-mode Mail ○ ○ ○ × ○ ○ × × ○ ○ ○ ○ ○ ○ ○ ○ ○ ○ ○Receiving SMS ○ ○ ○ × ○ ○ × × × ○ ○ ○ ○ ○ ○ ○ ○ ○ ○Answer Machine/Voice Memo ○ ○ ○ ○ ○ ○ ○ ○ ○ ○ ○ ○ ○ ○ ○ ○ ○ ○ ○Alarm clock sound/During schedule sound ○ ○ ○ ○ ○ ○ ○ ○ ○ ○ ○ ○ ○ ○ ○ ○ ○ ○ ○Timer ○ ○ ○ ○ ○ ○ ○ ○ ○ ○ ○ ○ ○ ○ ○ ○ ○ ○ ○Videophone call by external device × ○ ○ ○ ○ ○ × ○ × ○ ○ ○ ○ × × × × × ○Connecting to the Data Center ○ × × × × × × × × × × × × × × × × × ×Display communication log in Phonebook ○ ○ ○ ○ ○ ○ ○ ○ ○ ○ ○ ○ ○ ○ ○ ○ ○ ○ ○
○ : can be selected × : cannot be selected
Com
pose message
Chat M
ail
Unsent m
essages
Dial
Inbox
Outbox S
MS
Receive
option
i-mode
message
Read tem
plates
iMenu
Bookm
ark
Enter U
RL
UR
L history
Screen M
emo
Sent S
MS
Com
pose S
MS
Received
SM
S
Last visited U
RL
Com
bination of functions during M
ultitask
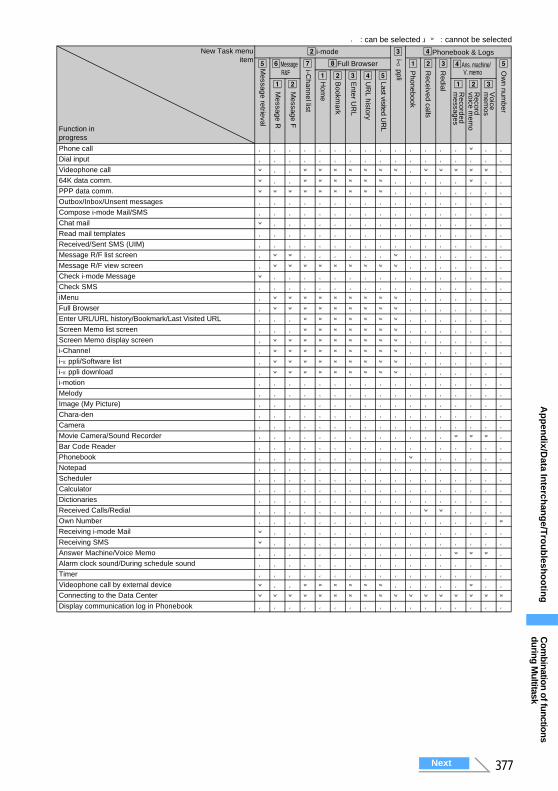
377
Ap
pen
dix/D
ata Interch
ang
e/Tro
ub
lesho
otin
g
New Task menuitem
Function inprogress
bi-mode c dPhonebook & Logs
e fMessage R&F
g hFull Browser a b c dAns. machine/ V. memo
e
a b c d ea b a b c
Phone call ○ ○ ○ ○ ○ ○ ○ ○ ○ ○ ○ ○ ○ ○ × ○ ○Dial input ○ ○ ○ ○ ○ ○ ○ ○ ○ ○ ○ ○ ○ ○ ○ ○ ○Videophone call × ○ ○ × × × × × × × ○ × × × × × ○64K data comm. × ○ ○ × × × × × × ○ ○ ○ ○ ○ × ○ ○PPP data comm. × × × × × × × × × ○ ○ ○ ○ ○ ○ ○ ○Outbox/Inbox/Unsent messages ○ ○ ○ ○ ○ ○ ○ ○ ○ ○ ○ ○ ○ ○ ○ ○ ○Compose i-mode Mail/SMS ○ ○ ○ ○ ○ ○ ○ ○ ○ ○ ○ ○ ○ ○ ○ ○ ○Chat mail × ○ ○ ○ ○ ○ ○ ○ ○ ○ ○ ○ ○ ○ ○ ○ ○Read mail templates ○ ○ ○ ○ ○ ○ ○ ○ ○ ○ ○ ○ ○ ○ ○ ○ ○Received/Sent SMS (UIM) ○ ○ ○ ○ ○ ○ ○ ○ ○ ○ ○ ○ ○ ○ ○ ○ ○Message R/F list screen ○ × × ○ ○ ○ ○ ○ ○ × ○ ○ ○ ○ ○ ○ ○Message R/F view screen ○ × × × × × × × × × ○ ○ ○ ○ ○ ○ ○Check i-mode Message × ○ ○ ○ ○ ○ ○ ○ ○ ○ ○ ○ ○ ○ ○ ○ ○Check SMS ○ ○ ○ ○ ○ ○ ○ ○ ○ ○ ○ ○ ○ ○ ○ ○ ○iMenu ○ × × × × × × × × × ○ ○ ○ ○ ○ ○ ○Full Browser ○ × × × × × × × × × ○ ○ ○ ○ ○ ○ ○Enter URL/URL history/Bookmark/Last Visited URL ○ ○ ○ × × × × × × × ○ ○ ○ ○ ○ ○ ○Screen Memo list screen ○ ○ ○ × × × × × × × ○ ○ ○ ○ ○ ○ ○Screen Memo display screen ○ × × × × × × × × × ○ ○ ○ ○ ○ ○ ○i-Channel ○ × × × × × × × × × ○ ○ ○ ○ ○ ○ ○i-αppli/Software list ○ × × × × × × × × × ○ ○ ○ ○ ○ ○ ○i-αppli download ○ × × × × × × × × × ○ ○ ○ ○ ○ ○ ○i-motion ○ ○ ○ ○ ○ ○ ○ ○ ○ ○ ○ ○ ○ ○ ○ ○ ○Melody ○ ○ ○ ○ ○ ○ ○ ○ ○ ○ ○ ○ ○ ○ ○ ○ ○Image (My Picture) ○ ○ ○ ○ ○ ○ ○ ○ ○ ○ ○ ○ ○ ○ ○ ○ ○Chara-den ○ ○ ○ ○ ○ ○ ○ ○ ○ ○ ○ ○ ○ ○ ○ ○ ○Camera ○ ○ ○ ○ ○ ○ ○ ○ ○ ○ ○ ○ ○ ○ ○ ○ ○Movie Camera/Sound Recorder ○ ○ ○ ○ ○ ○ ○ ○ ○ ○ ○ ○ ○ × × × ○Bar Code Reader ○ ○ ○ ○ ○ ○ ○ ○ ○ ○ ○ ○ ○ ○ ○ ○ ○Phonebook ○ ○ ○ ○ ○ ○ ○ ○ ○ ○ × ○ ○ ○ ○ ○ ○Notepad ○ ○ ○ ○ ○ ○ ○ ○ ○ ○ ○ ○ ○ ○ ○ ○ ○Scheduler ○ ○ ○ ○ ○ ○ ○ ○ ○ ○ ○ ○ ○ ○ ○ ○ ○Calculator ○ ○ ○ ○ ○ ○ ○ ○ ○ ○ ○ ○ ○ ○ ○ ○ ○Dictionaries ○ ○ ○ ○ ○ ○ ○ ○ ○ ○ ○ ○ ○ ○ ○ ○ ○Received Calls/Redial ○ ○ ○ ○ ○ ○ ○ ○ ○ ○ ○ × × ○ ○ ○ ○Own Number ○ ○ ○ ○ ○ ○ ○ ○ ○ ○ ○ ○ ○ ○ ○ ○ ×Receiving i-mode Mail × ○ ○ ○ ○ ○ ○ ○ ○ ○ ○ ○ ○ ○ ○ ○ ○Receiving SMS × ○ ○ ○ ○ ○ ○ ○ ○ ○ ○ ○ ○ ○ ○ ○ ○Answer Machine/Voice Memo ○ ○ ○ ○ ○ ○ ○ ○ ○ ○ ○ ○ ○ × × × ○Alarm clock sound/During schedule sound ○ ○ ○ ○ ○ ○ ○ ○ ○ ○ ○ ○ ○ ○ ○ ○ ○Timer ○ ○ ○ ○ ○ ○ ○ ○ ○ ○ ○ ○ ○ ○ ○ ○ ○Videophone call by external device × ○ ○ × × × × × × ○ ○ ○ ○ ○ × ○ ○Connecting to the Data Center × × × × × × × × × × × × × × × × ×Display communication log in Phonebook ○ ○ ○ ○ ○ ○ ○ ○ ○ ○ ○ ○ ○ ○ ○ ○ ○
○ : can be selected × : cannot be selected
Message retrieval
Message R
Message F
i-Channel list
Hom
e
Bookm
ark
Enter U
RL
UR
L history
Last visited UR
L
i- αppli
Phonebook
Received calls
Redial R
ecorded m
essages
Record
voice mem
o
Voice
mem
os
Ow
n number
Com
bination of functions during M
ultitask
Next
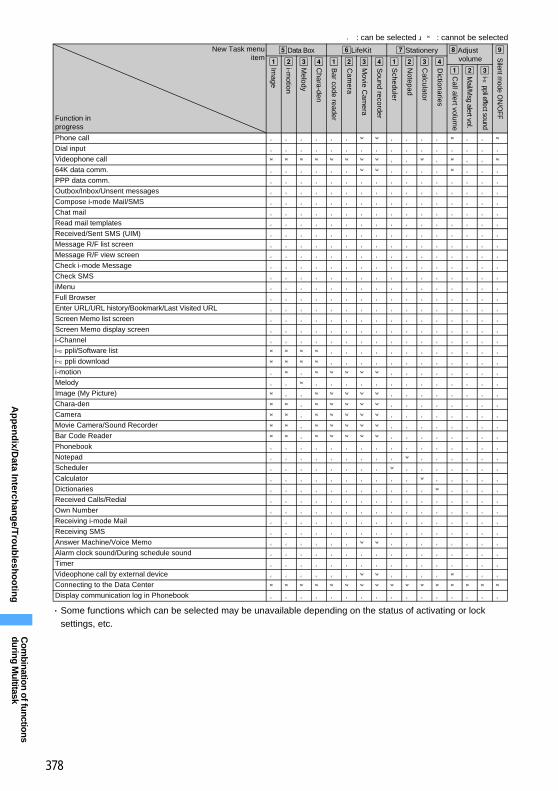
378
Ap
pen
dix/D
ata Interch
ang
e/Tro
ub
lesho
otin
g
・ Some functions which can be selected may be unavailable depending on the status of activating or lock settings, etc.
New Task menuitem
Function in progress
eData Box fLifeKit gStationery hAdjust volume
i
a b c d a b c d a b c da b c
Phone call ○ ○ ○ ○ ○ ○ × × ○ ○ ○ ○ × ○ ○ ×Dial input ○ ○ ○ ○ ○ ○ ○ ○ ○ ○ ○ ○ ○ ○ ○ ○Videophone call × × × × × × × × ○ ○ × ○ × ○ ○ ×64K data comm. ○ ○ ○ ○ ○ ○ × × ○ ○ ○ ○ × ○ ○ ○PPP data comm. ○ ○ ○ ○ ○ ○ ○ ○ ○ ○ ○ ○ ○ ○ ○ ○Outbox/Inbox/Unsent messages ○ ○ ○ ○ ○ ○ ○ ○ ○ ○ ○ ○ ○ ○ ○ ○Compose i-mode Mail/SMS ○ ○ ○ ○ ○ ○ ○ ○ ○ ○ ○ ○ ○ ○ ○ ○Chat mail ○ ○ ○ ○ ○ ○ ○ ○ ○ ○ ○ ○ ○ ○ ○ ○Read mail templates ○ ○ ○ ○ ○ ○ ○ ○ ○ ○ ○ ○ ○ ○ ○ ○Received/Sent SMS (UIM) ○ ○ ○ ○ ○ ○ ○ ○ ○ ○ ○ ○ ○ ○ ○ ○Message R/F list screen ○ ○ ○ ○ ○ ○ ○ ○ ○ ○ ○ ○ ○ ○ ○ ○Message R/F view screen ○ ○ ○ ○ ○ ○ ○ ○ ○ ○ ○ ○ ○ ○ ○ ○Check i-mode Message ○ ○ ○ ○ ○ ○ ○ ○ ○ ○ ○ ○ ○ ○ ○ ○Check SMS ○ ○ ○ ○ ○ ○ ○ ○ ○ ○ ○ ○ ○ ○ ○ ○iMenu ○ ○ ○ ○ ○ ○ ○ ○ ○ ○ ○ ○ ○ ○ ○ ○Full Browser ○ ○ ○ ○ ○ ○ ○ ○ ○ ○ ○ ○ ○ ○ ○ ○Enter URL/URL history/Bookmark/Last Visited URL ○ ○ ○ ○ ○ ○ ○ ○ ○ ○ ○ ○ ○ ○ ○ ○Screen Memo list screen ○ ○ ○ ○ ○ ○ ○ ○ ○ ○ ○ ○ ○ ○ ○ ○Screen Memo display screen ○ ○ ○ ○ ○ ○ ○ ○ ○ ○ ○ ○ ○ ○ ○ ○i-Channel ○ ○ ○ ○ ○ ○ ○ ○ ○ ○ ○ ○ ○ ○ ○ ○i-αppli/Software list × × × × ○ ○ ○ ○ ○ ○ ○ ○ ○ ○ ○ ○i-αppli download × × × × ○ ○ ○ ○ ○ ○ ○ ○ ○ ○ ○ ○i-motion ○ × ○ × × × × × ○ ○ ○ ○ ○ ○ ○ ○Melody ○ ○ × ○ ○ ○ ○ ○ ○ ○ ○ ○ ○ ○ ○ ○Image (My Picture) × ○ ○ × × × × × ○ ○ ○ ○ ○ ○ ○ ○Chara-den × × ○ × × × × × ○ ○ ○ ○ ○ ○ ○ ○Camera × × ○ × × × × × ○ ○ ○ ○ ○ ○ ○ ○Movie Camera/Sound Recorder × × ○ × × × × × ○ ○ ○ ○ ○ ○ ○ ○Bar Code Reader × × ○ × × × × × ○ ○ ○ ○ ○ ○ ○ ○Phonebook ○ ○ ○ ○ ○ ○ ○ ○ ○ ○ ○ ○ ○ ○ ○ ○Notepad ○ ○ ○ ○ ○ ○ ○ ○ ○ × ○ ○ ○ ○ ○ ○Scheduler ○ ○ ○ ○ ○ ○ ○ ○ × ○ ○ ○ ○ ○ ○ ○Calculator ○ ○ ○ ○ ○ ○ ○ ○ ○ ○ × ○ ○ ○ ○ ○Dictionaries ○ ○ ○ ○ ○ ○ ○ ○ ○ ○ ○ × ○ ○ ○ ○Received Calls/Redial ○ ○ ○ ○ ○ ○ ○ ○ ○ ○ ○ ○ ○ ○ ○ ○Own Number ○ ○ ○ ○ ○ ○ ○ ○ ○ ○ ○ ○ ○ ○ ○ ○Receiving i-mode Mail ○ ○ ○ ○ ○ ○ ○ ○ ○ ○ ○ ○ ○ ○ ○ ○Receiving SMS ○ ○ ○ ○ ○ ○ ○ ○ ○ ○ ○ ○ ○ ○ ○ ○Answer Machine/Voice Memo ○ ○ ○ ○ ○ ○ × × ○ ○ ○ ○ ○ ○ ○ ○Alarm clock sound/During schedule sound ○ ○ ○ ○ ○ ○ ○ ○ ○ ○ ○ ○ ○ ○ ○ ○Timer ○ ○ ○ ○ ○ ○ ○ ○ ○ ○ ○ ○ ○ ○ ○ ○Videophone call by external device ○ ○ ○ ○ ○ ○ × × ○ ○ ○ ○ × ○ ○ ○Connecting to the Data Center × × × × × × × × × × × × × × × ×Display communication log in Phonebook ○ ○ ○ ○ ○ ○ ○ ○ ○ ○ ○ ○ ○ ○ ○ ○
○ : can be selected × : cannot be selected
Image
i-motion
Melody
Chara-den
Bar code reader
Scheduler
Notepad
Calculator
Cam
era
Movie C
amera
Sound recorder
Dictionaries
Call alert volum
e
Mail/M
sg alert vol.
i-αppli effect sound
Silent m
ode ON
/OFF
Com
bination of functions during M
ultitask
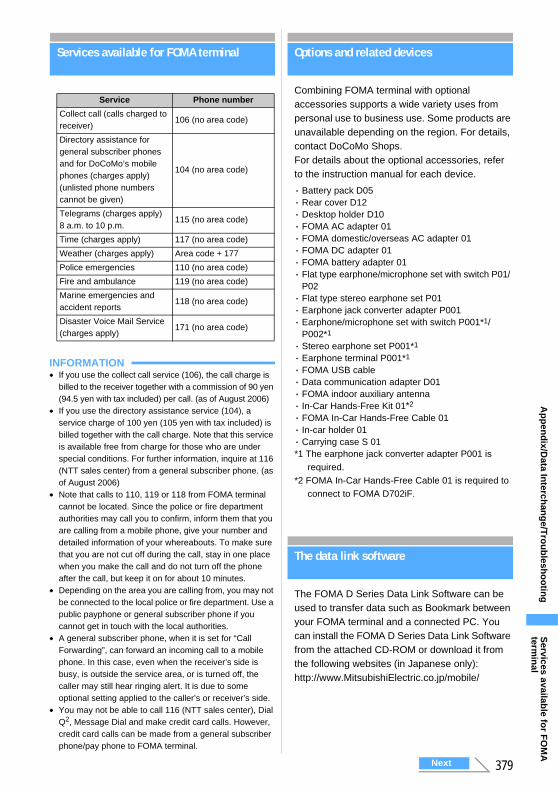
379
Ap
pen
dix/D
ata Interch
ang
e/Tro
ub
lesho
otin
g
Services available for FOMA terminal
INFORMATION● If you use the collect call service (106), the call charge is
billed to the receiver together with a commission of 90 yen (94.5 yen with tax included) per call. (as of August 2006)
● If you use the directory assistance service (104), a service charge of 100 yen (105 yen with tax included) is billed together with the call charge. Note that this service is available free from charge for those who are under special conditions. For further information, inquire at 116 (NTT sales center) from a general subscriber phone. (as of August 2006)
● Note that calls to 110, 119 or 118 from FOMA terminal cannot be located. Since the police or fire department authorities may call you to confirm, inform them that you are calling from a mobile phone, give your number and detailed information of your whereabouts. To make sure that you are not cut off during the call, stay in one place when you make the call and do not turn off the phone after the call, but keep it on for about 10 minutes.
● Depending on the area you are calling from, you may not be connected to the local police or fire department. Use a public payphone or general subscriber phone if you cannot get in touch with the local authorities.
● A general subscriber phone, when it is set for “Call Forwarding”, can forward an incoming call to a mobile phone. In this case, even when the receiver’s side is busy, is outside the service area, or is turned off, the caller may still hear ringing alert. It is due to some optional setting applied to the caller’s or receiver’s side.
● You may not be able to call 116 (NTT sales center), Dial Q2, Message Dial and make credit card calls. However, credit card calls can be made from a general subscriber phone/pay phone to FOMA terminal.
Options and related devices
Combining FOMA terminal with optional accessories supports a wide variety uses from personal use to business use. Some products are unavailable depending on the region. For details, contact DoCoMo Shops.For details about the optional accessories, refer to the instruction manual for each device.
*1 The earphone jack converter adapter P001 is required.
*2 FOMA In-Car Hands-Free Cable 01 is required to connect to FOMA D702iF.
Data Interchange using external devices
The data link software
The FOMA D Series Data Link Software can be used to transfer data such as Bookmark between your FOMA terminal and a connected PC. You can install the FOMA D Series Data Link Software from the attached CD-ROM or download it from the following websites (in Japanese only):http://www.MitsubishiElectric.co.jp/mobile/
Service Phone number
Collect call (calls charged to receiver)
106 (no area code)
Directory assistance for general subscriber phones and for DoCoMo’s mobile phones (charges apply)(unlisted phone numbers cannot be given)
104 (no area code)
Telegrams (charges apply) 8 a.m. to 10 p.m.
115 (no area code)
Time (charges apply) 117 (no area code)
Weather (charges apply) Area code + 177
Police emergencies 110 (no area code)
Fire and ambulance 119 (no area code)
Marine emergencies and accident reports
118 (no area code)
Disaster Voice Mail Service (charges apply)
171 (no area code)
・ Battery pack D05・ Rear cover D12・ Desktop holder D10・ FOMA AC adapter 01・ FOMA domestic/overseas AC adapter 01・ FOMA DC adapter 01・ FOMA battery adapter 01・ Flat type earphone/microphone set with switch P01/
P02・ Flat type stereo earphone set P01・ Earphone jack converter adapter P001・ Earphone/microphone set with switch P001*1/
P002*1
・ Stereo earphone set P001*1
・ Earphone terminal P001*1
・ FOMA USB cable・ Data communication adapter D01・ FOMA indoor auxiliary antenna・ In-Car Hands-Free Kit 01*2
・ FOMA In-Car Hands-Free Cable 01・ In-car holder 01・ Carrying case S 01
Services availab
le for F
OM
A
termin
al
Next

380
Ap
pen
dix/D
ata Interch
ang
e/Tro
ub
lesho
otin
g
・ The FOMA USB cable (optional) is required for connecting to PC.・ Copyright laws forbid transfer of downloaded
information from FOMA terminal to external sources even in its use of the data link software. Also, you cannot forward the data if it is prohibited from being output from FOMA terminal.
Windows 2000, XP・ A PC/AT compatible machine for the above OS is
required.
・ Copyright lawsAlthough this software is distributed as freeware, note that the copyright belongs to Mitsubishi Electric Corporation.・ Liability
Mitsubishi Electric Corporation assumes no legal responsibility for defect liability, including software issues and false operations and other responsibility. Additionally, Mitsubishi Electric Corporation makes no guarantees whatsoever as to the merchantability of the software and conformance to specific purposes of customers.
Mitsubishi Electric Data Link Support Center: 03-5319-5720Business hours: weekdays 9:00 to 12:00/13:00 to 17:00 (closed on Saturdays, Sundays, national holidays, new year’s holidays and company holidays)・ To avoid mistakes, please double-check the
number before dialing.
About Video playing software
Playing videos (MP4 file) on a PC requires QuickTime Player (free of charge) ver. 6.4 or later (or ver. 6.3 + 3GPP), which is provided by Apple Computer Inc.QuickTime Player can be downloaded from the website below:http://www.apple.com/jp/quicktime/download/・ Downloading the software requires a PC with
Internet access. Communication charges are separately required for downloading.・ For details including the operating environment,
downloading procedure and operation instructions, visit the website shown above.
●For details on the installation of data link software, see “README_DL” file (text format) of “DataLink” folder in the attached CD-ROM.
●For details on how to download, transferable data, operating procedure and operation environment, access the website above or refer to the data link software Help menu.
Supported OS
When using the data link software
Contact information for technical matters concerning the data link software
Ab
ou
t Vid
eo p
laying
softw
are
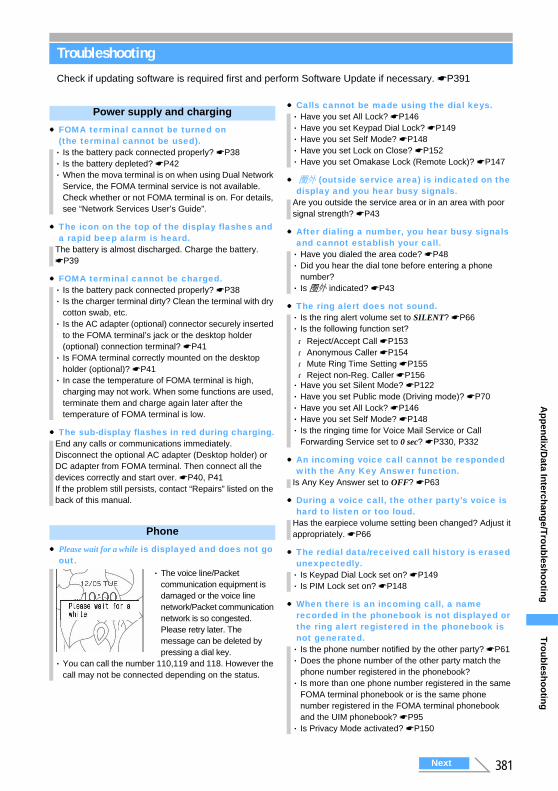
381
Ap
pen
dix/D
ata Interch
ang
e/Tro
ub
lesho
otin
gT
rou
blesh
oo
ting
Troubleshooting
Troubleshooting
Check if updating software is required first and perform Software Update if necessary. ☛P391
Power supply and charging
●FOMA terminal cannot be turned on (the terminal cannot be used).
●The icon on the top of the display flashes and a rapid beep alarm is heard.
●FOMA terminal cannot be charged.
●The sub-display flashes in red during charging.
Phone
●Please wait for a while is displayed and does not go out.
●Calls cannot be made using the dial keys.
● 圏外 (outside service area) is indicated on the display and you hear busy signals.
●After dialing a number, you hear busy signals and cannot establish your call.
●The ring alert does not sound.
●An incoming voice call cannot be responded with the Any Key Answer function.
●During a voice call, the other party’s voice is hard to listen or too loud.
●The redial data/received call history is erased unexpectedly.
●When there is an incoming call, a name recorded in the phonebook is not displayed or the ring alert registered in the phonebook is not generated.
・ Is the battery pack connected properly? ☛P38・ Is the battery depleted? ☛P42・When the mova terminal is on when using Dual Network
Service, the FOMA terminal service is not available. Check whether or not FOMA terminal is on. For details, see “Network Services User’s Guide”.
The battery is almost discharged. Charge the battery. ☛P39
・ Is the battery pack connected properly? ☛P38・ Is the charger terminal dirty? Clean the terminal with dry
cotton swab, etc.・ Is the AC adapter (optional) connector securely inserted
to the FOMA terminal’s jack or the desktop holder (optional) connection terminal? ☛P41・ Is FOMA terminal correctly mounted on the desktop
holder (optional)? ☛P41・ In case the temperature of FOMA terminal is high,
charging may not work. When some functions are used, terminate them and charge again later after the temperature of FOMA terminal is low.
End any calls or communications immediately. Disconnect the optional AC adapter (Desktop holder) or DC adapter from FOMA terminal. Then connect all the devices correctly and start over. ☛P40, P41If the problem still persists, contact “Repairs” listed on the back of this manual.
・ The voice line/Packet communication equipment is damaged or the voice line network/Packet communication network is so congested. Please retry later. The message can be deleted by pressing a dial key.
・ You can call the number 110,119 and 118. However the call may not be connected depending on the status.
・ Have you set All Lock? ☛P146・ Have you set Keypad Dial Lock? ☛P149・ Have you set Self Mode? ☛P148・ Have you set Lock on Close? ☛P152・ Have you set Omakase Lock (Remote Lock)? ☛P147
Are you outside the service area or in an area with poor signal strength? ☛P43
・ Have you dialed the area code? ☛P48・ Did you hear the dial tone before entering a phone
number?・ Is 圏外 indicated? ☛P43
・ Is the ring alert volume set to SILENT? ☛P66・ Is the following function set?・Reject/Accept Call ☛P153・Anonymous Caller ☛P154・Mute Ring Time Setting ☛P155・Reject non-Reg. Caller ☛P156・ Have you set Silent Mode? ☛P122・ Have you set Public mode (Driving mode)? ☛P70・ Have you set All Lock? ☛P146・ Have you set Self Mode? ☛P148・ Is the ringing time for Voice Mail Service or Call
Forwarding Service set to 0 sec? ☛P330, P332
Is Any Key Answer set to OFF? ☛P63
Has the earpiece volume setting been changed? Adjust it appropriately. ☛P66
・ Is Keypad Dial Lock set on? ☛P149・ Is PIM Lock set on? ☛P148
・ Is the phone number notified by the other party? ☛P61・ Does the phone number of the other party match the
phone number registered in the phonebook?・ Is more than one phone number registered in the same
FOMA terminal phonebook or is the same phone number registered in the FOMA terminal phonebook and the UIM phonebook? ☛P95・ Is Privacy Mode activated? ☛P150
Next
382
Ap
pen
dix/D
ata Interch
ang
e/Tro
ub
lesho
otin
g
●When there is an incoming call, a ring alert not set sounds.
●When there is an incoming call, an image not set appears.
●When there is an incoming call, the sub-display lights/flashes in a lighting pattern and lighting color not set.
Settings and operations
● is displayed instead of menu icon and icon cannot be selected.
●The keypad sound is not generated.
●A message Insert UIM. is displayed when FOMA terminal is powered on.
●The terminal security code entry screen appears each time FOMA terminal is opened.
●All locked. appears on the display.
● appears on the display and operations are disabled.
●Omakase Lock active. is displayed and cannot operate the terminal.
●When FOMA terminal is closed, the operation with the side key is disabled.
●Nothing is indicated on the display.
●The day of the week appears in Japanese.
●The display is dim.
●The lighting for the display and dial keys does not go on.
●When Auto Power ON is set, FOMA terminal cannot be turned on at the specified time.
●Even if Alarm Clock or the schedule is set, the alarm does not operate at the specified date and time when the power is turned off.
●Call cost has not been charged.
Mail and data
●Still images and video taken with the camera are blurred.
●Downloaded data, file attached to mail, or Message R/F cannot be displayed or played.
・ The ring alert set in multiple functions sounds depending on the priority levels given below:aIncoming settings of Multi NumberbAlert by Contact of the FOMA terminal phonebookcAlert/Image by Group of the FOMA terminal phonebookdSound Setting・ Is Privacy Mode activated? ☛P150
・When video/i-motion containing sound and image is set as ring alert for Call Alert, the set video/i-motion is used as the image.・When call images are set in multiple functions, the
image appears depending on the priority levels given below. For details ☛P129aIncoming settings of Multi NumberbThe setting of the FOMA terminal phonebook Alert by
Contact of the FOMA terminal phonebookcAlert/Image by Group of the FOMA terminal phonebookdMail/Call Image (Call Alert/Videophone Alert) or
Sound Setting・ Is Privacy Mode activated? ☛P150
・ If a lighting pattern or lighting color is set for multiple functions, the sub-display lights/flashes depending on the priority levels given below:aAlert by Contact of the FOMA terminal phonebookbAlert/Image by Group of the FOMA terminal phonebookcLight Alert Setting・ Is Privacy Mode activated? ☛P150
In case some functions cannot be activated because of various lock functions or the UIM not inserted, their icons change to and cannot be selected.
・ Is Keypad Sound set to OFF? ☛P118・ Have you activated Silent Mode? ☛P122
The UIM may not be properly attached or may be damaged. Check to see if the UIM is properly attached. ☛P36
Lock on Close is activated. Please cancel. ☛P152
All Lock is set. Cancel All Lock. ☛P146
Lock on Close is activated. Please cancel. ☛P152
Omakase Lock (Remote Lock) is set. ☛P147
Side Key Guard is activated. Please cancel. ☛P151
Is Normal use of Display light time in Display Light Setting set to other than Always? Screen display disappears after about 5 minutes have elapsed without any operation on the standby display. ☛P132Display reappears by any key operation.
・ Is Select Language set to 日本語 (Japanese)? ☛P44・ Is the day for Clock Display Format set to Japanese?
☛P139
Is Brightness in Display Light Setting set to Low? ☛P132
Is Normal use of Display light time in Display Light Setting set to 0 sec? ☛P132
If the power is turned off in a manner other than the power-off operation or Auto Power OFF function (battery pack came off, for example), this function is not activated.
・ If the power is turned off in a manner other than the power-off operation or Auto Power OFF function (battery pack came off, for example), this function is not activated.・ Set Alarm Auto Power ON to ON. ☛P307
The total cost for the UIM may exceed the limit (approx.16,770,000 yen).You can reset to 0 yen. ☛P320
When shooting an object nearby, use macro mode and switch to normal mode when shooting an object at a distance. ☛P168
Because of the UIM operation restriction function, these functions are not available when the UIM is replaced or no UIM is inserted. ☛P37
Tro
ub
lesho
otin
g
383
Ap
pen
dix/D
ata Interch
ang
e/Tro
ub
lesho
otin
g
●Names are not displayed or ring alert does not sound at the time of mail reception even though they have been registered in the phonebook.
●Mail reception is announced by other ring alert than that set for incoming mail.
●When mail is received, the sub-display lights/flashes in other lighting pattern and lighting color than those set for incoming mail.
●The image and video is displayed as and .
・ Does the mail address or number of the other party match that registered in the phonebook? Register correct phone numbers and mail address in the phonebook. ☛P95・ Is more than one mail addresses or phone number
registered in the same FOMA terminal phonebook, or is the same mail address or the phone number registered in the FOMA terminal phonebook and the UIM phonebook? ☛P95・ Is Privacy Mode activated? ☛P150
・When the mail ring alert is set for multiple functions, the ring alert sounds depending on the priority levels given below:a Alert by Contact of the FOMA terminal phonebookb Alert/Image by Group of the FOMA terminal phonebookc Sound Setting・When multiple mails are received at the same time, the
mail ring alert sounds depending on the conditions set for the last mail received.・ Is Privacy Mode activated? ☛P150
・When the incoming mail lighting pattern and color are set for multiple functions, the sub-display lights/flashes depending on the priority levels given below:a Alert by Contact of the FOMA terminal phonebookb Alert/Image by Group of the FOMA terminal phonebookc Light Alert Setting・When multiple mails are received at the same time,
the sub-display lights or flashes in the incoming mail lighting pattern and color corresponding to the last mail received.・ Is Privacy Mode activated? ☛P150
If the data has been destroyed, it cannot be correctly displayed and or appears.
Tro
ub
lesho
otin
g
384
Ap
pen
dix/D
ata Interch
ang
e/Tro
ub
lesho
otin
g
Example of Error messages Error Message
Main error messages displayed on FOMA terminal are shown in the alphabetical order as follows: ・ The “(number)” or “XXX” in error messages is a code used to distinguish the error sent from the i-mode
Center.
●Address is not valid. (451)
●Authentication interrupted.
●Authentication type is not supported. (401)
●Cannot execute because of other tasks.
●Can not open any more window.
●Certificate is rejected.(tampered)
●Chat mail data damaged. Restore default settings?
●Check address.
●Check address.
●Check SMS center setting.
●Connection failed.
●Connection failed. (403)
●Connection failed. (503)
●Connection failed. (562)
●Connection interrupted.
●Contains bad data.
●Content length exceeds replayable size for i-motion
●Continue using i-αppli and transmit data?
●Data damaged. Restore default settings?
●Data transmission is frequent. Continue transmission?
●Dial callout restricted.
●Download failed.
●Error in image.Does not work correctly.
●Error occurred. Unable to save.
●Exceeded number of maximum characters. Failed to quote partly.
●Failed to clear call cost information.
●Failed to connect
●Failed to move.
Failed to transmit the i-mode Mail or SMS messages. Make sure if the address is correct.
Displayed when you stop authentication on the screen.
The authentication type is not supported and connection to the specified i-mode or internet web site is disabled.
・ Stop all other functions running before executing.・ Cannot be executed because the
pattern definition is being updated. Execute after completing updating.
Cannot open a new window because the number of windows or frames is too many. It may be displayed when closing the open windows.
The site certificate is altered. Connection is suspended.
The data of chat mail contains error. Select Yes to return to the default setting. Select No to quit chat mail without returning to the default setting.
Failed to transmit SMS. Make sure if the address is correct.
The mail address in the mail group contains error or no mail address is entered. Check the mail address.
SMS setting at SMSC is incorrect. Check the setting. ☛P242
Failed to connect to the i-mode Center. Please move to another location with good radio reception and retry.
Failed to connect due to some cause such as connection to the specified i-mode or Internet web site was rejected.
Failed to connect because of the maintenance of the server or congestion of the line.Please retry after a while.
Failed to connect to the i-mode Center. Please move to another location with good radio reception and retry.
Please move to another location with good radio reception and retry. If the error persists, try again later.
i-αppli cannot be started from invalid data read with Bar Code Reader.
Reception was interrupted because the data size exceeded 500 Kbytes when downloading i-motion data.
The number of transmission is extremely large within the specified duration when using i-αppli and i-αppli tried to transmit again after the message Data transmission is frequent. Continue transmission? was displayed. Select Yes to use i-αppli successively, Terminate i-αppli to quit i-αppli.
The data of the mail contains error. Select Yes to return to the default setting. Mail cannot be started without restoring the default setting.
Displayed in case the number of transmission is extremely large within the specified duration when using i-αppli. Select Yes to use i-αppli successively, No to continue i-αppli after terminating i-αppli transmission or Terminate i-αppli to quit i-αppli.
This prohibited operation is unavailable with Keypad Dial Lock on.
Communication was interrupted during reception. Please move to another location with good radio reception and retry.
Flash movie cannot be displayed because of the error in the image data.
Cannot be saved because an error occurred during saving attachment.
SMS message exceeded 70 characters (160 characters for the font type of English) for reply, so some characters cannot be quoted.
The UIM is not correctly installed or the card is faulty. ☛P36
Failed to connect to the server. Please move to another location with good radio reception and retry.
When moving selected items or all items of the data, all data cannot be moved.
Erro
r Messag
e
385
Ap
pen
dix/D
ata Interch
ang
e/Tro
ub
lesho
otin
g
●Failed to read call cost information.
●Failed to retrieve i-Channel information.
●Failed to save.
●Failed to view message data.
●Folder is full.
●Frame number of this page is not supported.
●i-αppli stand-by display canceled due to security error.
●i-mode Center is busy. Please try again later. (555)
●Inbox full. Unable to retrieve new messages.
●Inbox full. Unable to retrieve new messages.
●Inbox is full.
●Incoming message data damaged. Restore default settings?
●Infrared Connection interrupted.
●InfraredFailed to connect via authentication.
●Infrared No response. Retry data exchange?
●Infrared No UIM. Unable to start requested software.
●Input error (205)
●Insufficient memory.
●Insufficient memory. Quitting application.
●Insufficient memory. Unable to edit signature. Delete signature.
●Insufficient memory. Unable to open window.
●Invalid content. Download failed.
●Invalid data.
●Invalid data. (XXX)
●Invalid data. Connection cannot be established. (400)
●Invalid data. Failed to save.
The UIM is not correctly installed or the card is faulty. ☛P36
Failed to connect to the i-mode Center. Please move to another location with good radio reception and retry.
Cannot be saved due to an error.
・When deleting or searching mail, the object mail data cannot be referenced because it is used for another processing. Retry later.・ Mail data cannot be referenced in
chat mail. Retry later.
Unable to receive Message R/F because the memory space is insufficient. Please read unread Message R/F, release protection of Message R/F or delete unnecessary Message R/F.
Cannot display because the number of frames is too many.In the multi-windows mode, it may be displayed when closing the open windows.
i-αppli standby display has exited due to unpermitted operation.
The i-mode Center is busy. Please try again later.
Unable to receive SMS because of insufficient storage space in the Inbox of FOMA terminal or UIM. Please read unread mail, release mail protection or delete unnecessary mail.
Unable to receive all SMS messages because there is insufficient storage space in the Inbox of FOMA terminal or the UIM. Please read unread mail, release mail protection or delete unnecessary mail and execute Check SMS again.
Unable to receive i-mode Mail because there is insufficient memory space in the Inbox. Please read unread i-mode Mail, release i-mode Mail protection or delete unnecessary i-mode Mail.
The received data of chat mail contains error. Select Yes to return to the default setting. Select No to quit chat mail without returning to the default setting.
An error occurred during infrared communication. During infrared communications, do not move FOMA terminal pointed at the other terminal’s infrared data port before data sending and receiving is complete. ☛P294
Sending all data was failed because the authentication password is not correct. Enter the same authentication password between sender and receiver. ☛P295, P296
After entering into the infrared communication state, 5 or more seconds have elapsed with no other terminals for communications found. Point FOMA terminal at the other terminal’s infrared data port with a distance of 20 cm or less and select Yes. ☛P294
Because no UIM is inserted, the specified i-αppli cannot be started even when i-αppli To is set in the data received by infrared communications.
Input data for i-mode or Internet web site contains error. Check the input data for errors.
Operation is interrupted due to insufficient memory.
The running function is terminated due to insufficient memory.
When editing the signature is started, memory shortage occurs. Delete the data of signature.
Windows cannot be opened because the memory is insufficient. Executing may be available by closing the windows opened already or terminating other running functions.
Cannot download because the object contents to be charged are invalid.
The downloaded data contains an error.
・ Dose not support the specified i-mode or Internet web site.・ The URL may be incorrect. Make
sure that the URL is correct. ・ Unable to display because there is
an error in the received data.・Within service area, sending auto
send mail was unsuccessful.
・ Cannot be connected because of the error in i-mode or Internet web site. The URL may be incorrect. Make sure that the URL is correct.・Within service area, sending auto
send mail was unsuccessful.
Attached melodies or video/i-motion files cannot be played because of the incorrect data.
Erro
r Messag
e
Next
386
Ap
pen
dix/D
ata Interch
ang
e/Tro
ub
lesho
otin
g
●Invalid data. Unable to save.
●Invalid data. Unable to save.
●Invalid UIM, requested service not available.
●Invalid UIM, requested software failed to start.
●Invalid URL.
●Lock on close active.
●Mail address not recorded.
●Mails could not be sent to following address. (561)
●Memory is full. Unable to save.
●Memory shortage Return to Main Menu.
●Message kept in center.
●Message rejected by recipient.
●Message rejected by recipient.
●Name too long. Saved with incomplete name.
●New pattern definitions for scanning function available.Please update.
●No content is available. (204)
●No data in ordinary phonebook.
●No Requested File. (492)
●No requested software.
●No response. (408)
●No signature set.
●No space to attach file.
●No space to attach signature.
●Not enough memory. Unable to connect.
●No UIM, requested software failed to start.
●Now calling. Unable to record movie.
●Number of characters exceeds limit.
●Omakase Lock active.
●Out of service area.
●Outgoing message data damaged. Restore default settings?
Data received through infrared communications cannot be saved because it is in a format incompatible with FOMA terminal.
The downloaded Chara-den cannot be saved because the Chara-den is invalid.
You tried to use data downloaded from i-mode or Internet web site or saved from attachments of mail or Message R/F with a UIM different from the one you used when the data was saved. Insert the same UIM as used when those data were downloaded to use it.
The i-αppli to be used together with the UIM used when downloading it from a site, etc. cannot be started. Insert the same UIM as used when the software was downloaded to use it.
The entered URL contains error. Check the URL.
Operation is unavailable because Lock on Close is active. ☛P152
The mail address is not saved in the selected mail group. Save the mail address in the mail group. ☛P234
Sending i-mode Mail is failed for some receivers. Pressing o displays the receiver that the transmission failed. Check to see if the address of the receiver is correct and retry transmission at another location with good radio wave condition.
FOMA terminal does not have enough memory space and SMS cannot be saved. Move SMS to UIM or delete i-mode Mail or SMS.
Operation is interrupted due to insufficient memory.
SMS messages have already been sent.
SMS is rejected by the SMS Center.
Transmitting SMS is rejected.
When registering an item selected from the display of a site, etc. to the phonebook, the number of characters has exceeded the specified value. Pressing o causes the phonebook registration screen to be displayed, with characters exceeding the limit deleted for each item.
Auto-update of the pattern definition was unsuccessful. Update the pattern definition manually. ☛P396
Could not find data at the specified site.
The entered phone number is not saved in the phonebook. Add the number to the phonebook.
The specified file could not be found during download of a still image above 10,000 bytes which could not be obtained when having received the mail.
The i-αppli specified by the mail and external equipment is not stored in your FOMA terminal.
Communication was disconnected because there was no response from i-mode or Internet web site within the specified time. Retry later.
Please retry to operate after registering the signature. ☛P233
Exceeds the maximum number of files attachable to one mail.
・ The signature cannot be inserted because of exceeding the maximum characters.・ The signature cannot be inserted
in SMS because it is decorated.・ The signature cannot be inserted
when English is set for Font type in SMS Setting. Change Font type to Japanese. ☛P242
Cannot connect because the memory is insufficient. Closing the window opened already or terminating other running functions may make connecting available.
The i-αppli to be used together with the UIM used when downloading it from a site, etc. cannot be started. Insert the same UIM as used when the software was downloaded to use it.
When using the camera during a call, it cannot be switched to video shooting and voice recording. End the call before switching to video shooting and voice recording.
The i-mode mail message exceeded 10,000 one-byte (5,000 two-byte) characters for reply. Please send after decreasing the number of characters.
Operations are disabled because Omakase Lock (Remote Lock) is set.You can answer incoming calls. ☛P147
Unable to execute because the terminal is in a place where radio waves do not reach or out of the service area.
The sent data of chat mail contains error. Select Yes to return to the default setting. Select No to quit chat mail without returning to the default setting.
Erro
r Messag
e
387
Ap
pen
dix/D
ata Interch
ang
e/Tro
ub
lesho
otin
g
●Page is not found. (404)
●Password is not correct. (401)
●PIM lock.
●Please wait.
●Please wait for a while (packet)
●PUK blocked.
●Receiving data exceeds replayable size for i-motion.
●Receiving messages. Retry later.
●Receiving messages stopped. Some messages unreceived.
●Registration is in progress. (554)
●Remotely Controllable services denied.
●Replay period has not yet started.
●Requested software unavailable.
●Root certificate has expired. Connect?
●Root certificate is not valid.
●Save unsaved data to phone memory or delete.
●Scheduled software update canceled. Retry update software.
●Self Mode activated.
●Service is not registered.
●Service unavailable.
●Signature, template and sort settings data damaged. Restore default settings?
●Size of this page is not supported.
●Software already updated.
●Software ended due to security error.
●SSL session cannot be established.
●SSL session failed.
●SSL session was terminated.
●Terminal memory full.
●This certificate has expired. Do you connect?
Unable to find i-mode site, etc.Make sure that the URL is correct.
The user name or password entered in the basic authentication screen of i-mode or Internet web site is incorrect. Please try again.
This prohibited operation is unavailable with PIM Lock on.
The voice line/packet communication equipment is damaged or the voice line network/packet communication network is so congested. Please try again later.
The packet communication equipment is damaged or the packet communication network is so congested. Please try again later.
Inquire at DoCoMo Shops.
Reception or replay has not been completed because the data size exceeded 500 Kbytes when downloading i-motion data or when playback was performed while downloading data.
i-channel cannot be activated during receiving mail or Message R/F. Retry after receiving.
Unable to receive all SMS messages because an error occurred during reception. Please move to another location with good radio reception and execute Check SMS again. ☛P242
User registration with i-mode is in process. Please try again later.
Voice Mail Service and Call Forwarding Service has not subscribed yet. It is required to subscribe to Voice Mail Service or Call Forwarding Service.
Unable to play because of the term prior to the playback period specified for i-motion. Please try again after the playback period has started. ☛P281
The i-αppli cannot be started because of an error in i-αppli.Starting specified i-αppli by i-αppli To function from a site, mail or an external device is disabled if there is a problem in i-αppli operation settings or start-up conditions.
The term of validity of FOMA terminal certificate is premature or overdue. Select Yes to connect or No not to connect. ☛P196 This message may be displayed when the date and time have not been set or are incorrect. Set the date and time correctly. ☛P44
The certificate in FOMA terminal is invalid. To establish a connection, change the setting. ☛P196
Infrared communications cannot end because the number of items to be saved is full in INBOX for infrared communications. Save the data in Inbox into FOMA terminal or delete it. ☛P296
Reservation for updating software is canceled because the battery has not been charged for a long while, etc. Start updating software and operate for reservation again. ☛P392, P394
This prohibited operation is unavailable during Self Mode.
・ You are not an i-mode subscriber. Apply to use the i-mode service.・ If you have subscribed to i-mode
after purchasing FOMA terminal, once turn FOMA terminal power off and then turn on.
SMS is not available.
The data of signature, template and sort settings contain the error. Select Yes to return to default settings. Cannot be activated without returning to default settings.
・ Downloading has stopped because i-mode or internet web site size was larger than the limit size. Press o to display the data already downloaded normally.・ Reception was interrupted
because the data size exceeds maximum size while downloading.
The i-αppli cannot be upgraded because it has already been upgraded to the latest version.
i-αppli has exited due to unpermitted operation. It is recorded in Security Error History.
SSL communication was interrupted due to an SSL communication error or an error on the server concerning the client authentication.
A problem was detected with the authentication process during SSL communication. Connection is suspended.
Some problem is detected with the site certificate during SSL communication.The message is displayed when you select No in the connection confirmation screen and SSL communication is disconnected.
Cannot be executed because the number of saved items in FOMA terminal is full or the memory is not enough. Delete corresponding unnecessary data.
The term of validity of the site certificate is premature or overdue. To connect, select Yes; to stop, select No.
Erro
r Messag
e
Next
388
Ap
pen
dix/D
ata Interch
ang
e/Tro
ub
lesho
otin
g
●This certificate is not valid for this URL. Connect?
●This data cannot be saved. Download?
●This data may not be replayed.
●This i-motion type is not supported.
●This site is not certified. Connect?
●This software contains an error.
●This software contains an error. Unable to download.
●This software is currently unavailable for use.
●This software is not supported by this phone.
●This UIM cannot be recognized.
●Time out
●TLS/SSL session cannot be established.
●TLS/SSL session failed.
●TLS/SSL session was terminated.
●Too much data was entered.
●Transmission failed.
●Transmission failed. (552)
●UIM full.
●UIM not inserted. Unable to use.
●Unable to call.
●Unable to check new messages.
●Unable to connect during outgoing call barring active.
●Unable to connect to server now.(502)
●Unable to display data.
●Unable to display image.
●Unable to display message.
●Unable to display some files.
●Unable to display this Chara-den.
●Unable to display version info.
●Unable to download. Data exceeds maximum size. (452)
●Unable to enter any more.
●Unable to move specified page.
●Unable to obtain data due to replay restriction data error.
●Unable to play.
●Unable to play this melody.
CN name (server name) of the site certificate does not match the actual server name. To connect, select Yes; to stop, select No. ☛P196
This i-motion file cannot be saved. Select Yes to download; select No not to download.
Video/i-motion file format not supported by FOMA terminal. Or the video file may be damaged.
This i-motion type cannot be replayed via D702iF.
The site certificate is not supported by FOMA terminal. Select Yes to connect or No not to connect.
Unable to download because the i-αppli data contains an error.
Unable to download because the i-αppli data contains an error.
Using the i-αppli is stopped by IP (Information Provider).
The i-αppli cannot be downloaded because it is not compatible with FOMA terminal.
The UIM is not correctly installed or the card is faulty. Check if the UIM is installed correctly. ☛P36
The i-mode Center is busy. Please try again later.
TLS/SSL communication was interrupted due to TLS/SSL communication error or an error on the server concerning the client authentication.
A problem was detected with the authentication process during TLS/SSL communication. Connection is suspended.
Some problem is detected with the site certificate during TLS/SSL communication. The message is displayed when you select No in the connection confirmation screen and TLS/SSL communication is disconnected.
Unable to transmit data because too many characters were entered in the entry field of i-mode or Internet web site. Please reduce the number of characters and retry transmission.
Failed to transmit the i-mode Mail or SMS. Please move to another location with good radio reception and retry transmission.
Failed to transmit the i-mode Mail or SMS due to the error of i-mode Center or the SMS Center. Please try to send again later.
UIM does not have enough storage space and SMS cannot be saved. Delete SMS from the UIM (☛P244) or move to FOMA terminal (☛P244).
The UIM is not inserted. Please use your FOMA terminal after inserting the UIM. ☛P36
A voice/videophone call cannot be made during voice/videophone calls or 64K data communication.
Please move to another location with good radio reception and retry. If the error persists, try again later.
Cannot connect because the outgoing call is restricted. Retry to operate later.
The equipment of the Data Center is damaged or the Data Center is congested. Retry to operate later.
Display failed because an error occurred in mail template.
Unable to display because the image contains error. Check the image.
Unable to display because there is an error in the received/sent mail.
Video/i-motion or an image above 10,000 bytes is attached to the downloaded mail. These data cannot be displayed/played from the downloaded mail.
Chara-den containing illegal data cannot be displayed.
The definition file version cannot be confirmed. Update the definition file again. ☛P396
Reception is disabled because i-mode or Internet web site size exceeds the maximum size.
The number of characters exceeds the limit. Reduce the number of characters.
When an i-motion ticker contains a link to a site (Web To), etc., in case the URL contains more than 256 characters or downloading was interrupted, the linked page cannot be displayed.
Cannot obtain because the replay restriction data is incorrect.
Melody or i-motion data cannot be played.
This melody cannot be played because the data contains an error.
Erro
r Messag
e
389
Ap
pen
dix/D
ata Interch
ang
e/Tro
ub
lesho
otin
g
●Unable to play this movie.
●Unable to record.
●Unable to retrieve the requested URL. (504)
●Unable to save.
●Unable to save specified image.
●Unable to switch to data transfer mode.
●Unable to update pattern definitions.
●Unable to view file. Access to URL is limited. (491)
●Unsent message data damaged. Restore default settings?
●Unsupported content.
●URL address changed. (301)
●URL is too long to register.
●Usage is currently restricted. Try again later.
●You have no certificate. Connect?
●Your certificate has expired. Connect?
No data or the format of the video/i-motion is unavailable.
The video memo cannot be recorded because the communication of image/sound is disconnected.
Failed to connect to the requested URL due to some cause. Please try again later.
Cannot be saved because the data contain an error or are not supported by D702iF.
The image cannot be saved because the image in the site, screen memo or Message R/F contains error.
FOMA terminal is communicating. Processes cannot be performed because switching to data transfer mode is unavailable. Terminate communicating or retry again later.
Updating the definition file has failed. Stop all other functions currently running and retry the update in a place with strong radio wave signals.
The specified access count was exceeded while downloading a still image above 10,000 bytes which could not be obtained when having received the mail.
The unsent data of chat mail contains error. Select Yes to return to the default setting. Select No to quit chat mail without returning to the default setting.
Operation is unavailable because the contents are not compatible with FOMA terminal.
i-mode or Internet web site forwards URL automatically or URL is changed.
Unable to register as a bookmark or a screen memo because the URL exceeds the number of characters that can be registered.
Displayed in case extremely large data communication is executed within the specified duration only when using i-mode packet fixed sum service. Connection may be unavailable for a certain period of time, so use i-mode/Full Browser a little while later.
The user certificate has not been downloaded. To continue the connection, select Yes; to stop, select No.
The user certificate has expired. To continue the connection, select Yes; to stop, select No. ☛P196
Erro
r Messag
e
390
Ap
pen
dix/D
ata Interch
ang
e/Tro
ub
lesho
otin
g
Warranty and After-Sales Service
Warranty
・ A written warranty is provided with every FOMA terminal; make sure that you receive it.Store the warranty in a safe place when you have read it and checked that it contains the “shop name/date” you purchased it. If it does not contain the necessary information, contact the shop where you bought it. The warranty is valid for a period of one year from the date of purchase.・ This product and all accessories are subject to
change, in part or whole, for the sake of improvement without prior notice.・ Data registered in the phonebook, etc. may be lost
or become corrupted due to failure, repair or other handlings of FOMA terminal. It is recommended that you make a note of the data in the phonebook, etc. When your FOMA terminal is repaired and so on, downloaded information via i-mode or i-αppli (except some data) are not forwarded to a new FOMA terminal according to the copyright laws.* In this FOMA terminal, the phonebook data, etc.
can be saved in Data Center by subscribing to Data Security Service (which is a pay service and requires a subscription).
* If you have a PC (Windows 2000, XP), you can use the specified data link software and FOMA USB cable (optional) to transfer and store the data registered in the phonebook, etc. on a PC.
After-Sales Service
■ When problems occurBefore requesting service, read the section “Troubleshooting”. ☛P381If the problem still persists, contact “Repairs” on the back of this manual.
■ If the result of inquiries indicates that a repair is requiredTake your FOMA terminal to a repair office designated by DoCoMo. Be sure to check the opening hours of the repair office before you go. Note that you must present the warranty.
■ In the warranty period・ The FOMA terminal will be repaired at no
charge subject to the conditions of the warranty.
・ The written warranty must be presented to receive warranty service. The subscriber will be charged for the repairs without presentation of the written warranty or repairs of defects resulting from misuse, accident or neglect, etc. even during the warranty period.・ The subscriber is charged even during the
warranty period for the repair of failures caused by the use of devices or consumable items that are not DoCoMo-specified.
■ Repairs may not be possible in the following cases:Repair may not be possible when corrosion due to exposure to moisture, condensation or perspiration is detected in a moisture seal reaction or test, or if any of the internal boards are damaged or deformed. Since these conditions are outside the scope of the warranty, a repair, if at all possible, will be charged.
■ After expiration of the warrantyAll repairs that are requested are charged.
■ Replacement partsBasically, FOMA terminal’s replacement parts (parts required to maintain product function) will be kept in stock for at least 6 years after termination of production. Please keep in mind that it may not be possible to repair your phone depending on the nature of the required repair because of a lack of parts, etc. It may still be possible to repair your phone depending on the nature of the required repair even after this period. Contact “Repairs” listed on the back of this manual.
■ Notes・ Do not modify the FOMA terminal or its
accessories.・ Fire, injury or damage may result.・ In order to prevent interference of radio waves
or network breakdown, the FOMA terminal and UIM are manufactured according to technical standards stipulated by law. Do not use FOMA terminals or UIMs that do not meet these standards.・ If the FOMA is modified (part replacement,
modification, painting, etc.) it will be repaired only after the modified parts have been restored to the condition at the time of purchase. However, repair may be refused depending on the nature of modification.・ Repair of failures or damage caused by
modification are charged even during the warranty period.
Warran
ty and
After-S
ales S
ervice
391
Ap
pen
dix/D
ata Interch
ang
e/Tro
ub
lesho
otin
gS
oftw
are Up
date
・ Do not remove any inscription stickers attached to your FOMA terminal.The inscription stickers certify that the FOMA terminal satisfies specific technical standards. Note that if stickers are removed intentionally or are reattached in such a way that confirmation of the sticker’s contents is impossible, repair or servicing may be refused because confirmation of whether or not the phone conforms to relevant technical standards cannot be made.・ The function settings, the information of total
calls duration, etc. may be cleared (reset) by failure, repair or other handling processes. Should this happen, set up the functions again.・Magnetic components are used in the earpiece
and speaker of the FOMA terminal. Do not allow cash cards or other devices that are vulnerable to magnetism to come into contact with the phone.・ If your phone becomes wet or moist, turn the
power off and remove the battery pack immediately and bring it to a repair office as soon as possible. However, repair may not be possible depending on the condition of the phone.
■ Phonebook data or downloaded data・Maintain a separate record of the data you
register in your FOMA terminal. DoCoMo will not accept any liability and responsibility whatsoever for changes or loss of information.・ Data created, imported or downloaded by the
subscriber may become corrupted or be lost when changing the model or repairing mobile phone. DoCoMo will not accept any responsibility for that.Also, DoCoMo may, at its option, repair a mobile phone by replacing it. In such an event, it will not be possible to transfer the data (except some data) to the new phone. Regarding this FOMA terminal, images and incoming melodies downloaded via i-mode official sites can be transferred when repairing the mobile phone (some contents cannot be transferred and transferring may be unavailable depending on the degree of malfunctions).
Updating softwareSoftware Update
This function checks for the necessity for updating FOMA terminal software and downloads part of the software as required through packet communication*1 to make updates of the software.
When software update is required, the information will be posted on the DoCoMo website or お知らせ (Notice) in iMenu.*1 Packet communication for software update is free
of charge.・ Software may be updated in the following 2
methods:
・ Software cannot be updated in the following cases:
・ At the time of updating software, the unique information of your mobile phone terminal (model or serial number, etc.) will be automatically sent to the server (the server for updating software managed by DoCoMo). DoCoMo will not use the sent information for any other purpose than software update.
INFORMATION● Software update (downloading or rewriting) may take time.● If software update is executed when ON is set for PIN1
Code On/Off, the PIN code entry screen will be displayed at the time of automatic reload after completion of software updating. You cannot make/receive calls and operate communication functions if the incorrect PIN1 code is entered.
●While software is being updated, making/receiving calls, various communication functions or other functions are not available (Incoming voice calls can be answered while downloading).
● If Movie ringtone has been set as a ring alert, a melody sounds for an incoming call during download instead of Movie ringtone. If you set video/i-motion as an image, the first image is displayed.
・ Immediate update:Update on the spot as desired.
・ Advanced update:Reserve a day and time-slot for automatic update of the software in the specified day and time.
・ During All Lock
・While using other functions
・When the date and time are not set
・When the UIM is not inserted
・When the battery is not fully charged
・When PIN1 code is being entered
・When PIN1 code is locked
・When 圏外 is indicated
・ During PIM Lock
・ The power is off
・ In Self Mode on
・While talking
・ During Omakase Lock (Remote Lock)
・ During packet communication connecting with a PC
・ During Safety Melody is sounding
Next
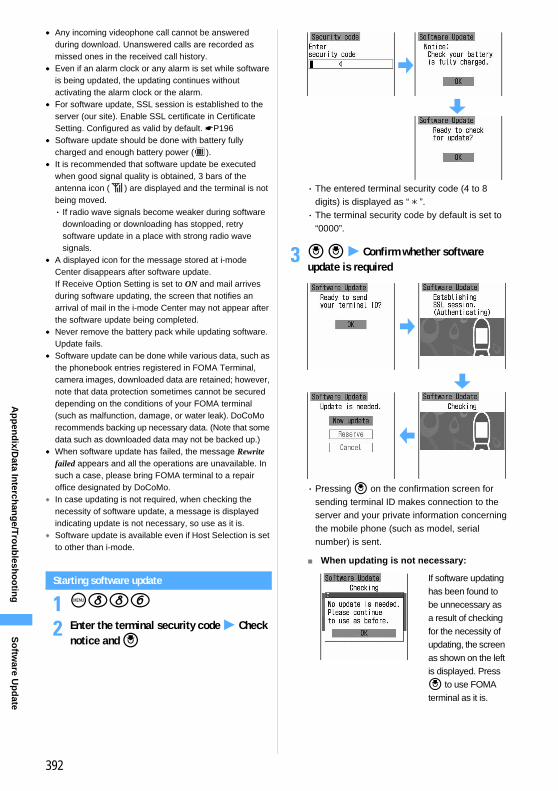
392
Ap
pen
dix/D
ata Interch
ang
e/Tro
ub
lesho
otin
g
● Any incoming videophone call cannot be answered during download. Unanswered calls are recorded as missed ones in the received call history.
● Even if an alarm clock or any alarm is set while software is being updated, the updating continues without activating the alarm clock or the alarm.
● For software update, SSL session is established to the server (our site). Enable SSL certificate in Certificate Setting. Configured as valid by default. ☛P196
● Software update should be done with battery fully charged and enough battery power ( ).
● It is recommended that software update be executed when good signal quality is obtained, 3 bars of the antenna icon ( ) are displayed and the terminal is not being moved.・ If radio wave signals become weaker during software
downloading or downloading has stopped, retry software update in a place with strong radio wave signals.
● A displayed icon for the message stored at i-mode Center disappears after software update.If Receive Option Setting is set to ON and mail arrives during software updating, the screen that notifies an arrival of mail in the i-mode Center may not appear after the software update being completed.
● Never remove the battery pack while updating software. Update fails.
● Software update can be done while various data, such as the phonebook entries registered in FOMA Terminal, camera images, downloaded data are retained; however, note that data protection sometimes cannot be secured depending on the conditions of your FOMA terminal (such as malfunction, damage, or water leak). DoCoMo recommends backing up necessary data. (Note that some data such as downloaded data may not be backed up.)
●When software update has failed, the message Rewrite failed appears and all the operations are unavailable. In such a case, please bring FOMA terminal to a repair office designated by DoCoMo.
● In case updating is not required, when checking the necessity of software update, a message is displayed indicating update is not necessary, so use as it is.
● Software update is available even if Host Selection is set to other than i-mode.
Starting software update
1 m886
2 Enter the terminal security code z Check notice and o
・ The entered terminal security code (4 to 8 digits) is displayed as “ * ”.・ The terminal security code by default is set to
“0000”.
3 o o z Confirm whether software update is required
・ Pressing o on the confirmation screen for sending terminal ID makes connection to the server and your private information concerning the mobile phone (such as model, serial number) is sent.
■ When updating is not necessary:
If software updating has been found to be unnecessary as a result of checking for the necessity of updating, the screen as shown on the left is displayed. Press o to use FOMA terminal as it is.
So
ftware U
pd
ate
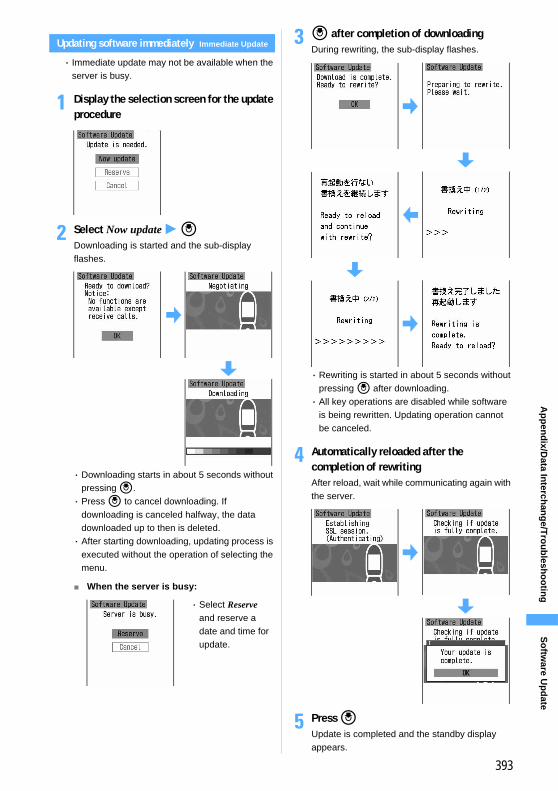
393
Ap
pen
dix/D
ata Interch
ang
e/Tro
ub
lesho
otin
g
Updating software immediately Immediate Update
・ Immediate update may not be available when the server is busy.
1 Display the selection screen for the update procedure
2 Select Now update z o Downloading is started and the sub-display flashes.
・ Downloading starts in about 5 seconds without pressing o.・ Press o to cancel downloading. If
downloading is canceled halfway, the data downloaded up to then is deleted.・ After starting downloading, updating process is
executed without the operation of selecting the menu.
■ When the server is busy:
3 o after completion of downloadingDuring rewriting, the sub-display flashes.
・ Rewriting is started in about 5 seconds without pressing o after downloading.・ All key operations are disabled while software
is being rewritten. Updating operation cannot be canceled.
4 Automatically reloaded after the completion of rewritingAfter reload, wait while communicating again with the server.
5 Press o Update is completed and the standby display appears.
・ Select Reserve and reserve a date and time for update.
So
ftware U
pd
ate
394
Ap
pen
dix/D
ata Interch
ang
e/Tro
ub
lesho
otin
g
Updating software at pre-specified timeReserved Update
When downloading takes time or the server is busy, you can choose to set the time to start software update in advance by communicating with the server.
1 Display the selection screen for the update procedure
2 Select ReserveInquire the options for preferred day and time by communicating with the server.
・ Available date and time for reservation will be shown by the time of the server.
3 Select preferred day and time■ Selecting from the options displayed:
Select preferred day and time z Select Yes
・ If there are more than one option page for preferred day and time, switch to the next or previous page with &.
■ Selecting from other than options displayed: aSelect Others z Select preferred day
and time-slot
bSelect preferred day and time-slotConnection is made to the server and the options close to preferred day and time-slot are displayed.・ If there are more than one option page
for preferred time-slot, switch to the next or previous page with &.・ Press p to display the description of the
symbol on the left of time-slot.cSelect preferred day and time z Select
Yes・ If there are more than one option page
for preferred day and time, switch to the next or previous page with &.
4 Press oReservation is completed and the menu is displayed.・ is shown on the standby display when
reservation is made.
1 m886
2 Enter the terminal security code z Check the contents
■ Changing reservation: aSelect Change
A confirmation screen for sending your terminal ID is displayed.
Checking/changing/canceling reservation
Availability for reservation at each time-slot will be shown:
○: available
△: barely available
・ To stop checking: Select OK
So
ftware U
pd
ate
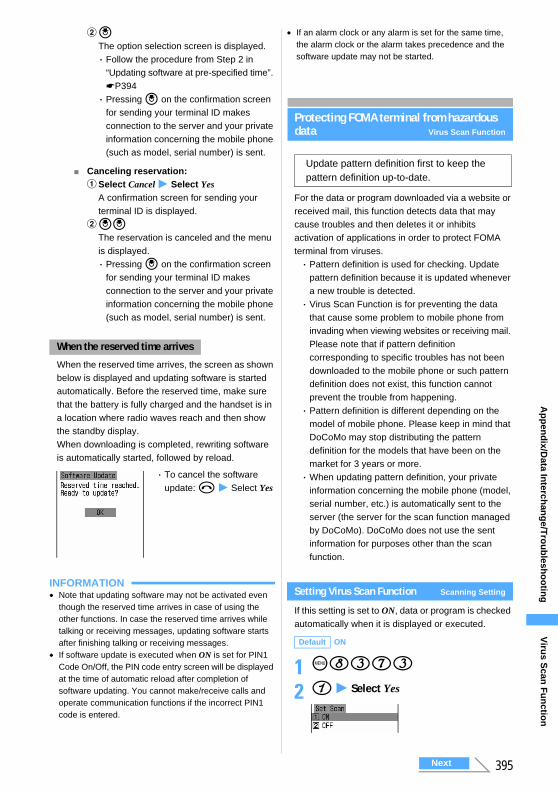
395
Ap
pen
dix/D
ata Interch
ang
e/Tro
ub
lesho
otin
g
boThe option selection screen is displayed.・ Follow the procedure from Step 2 in
“Updating software at pre-specified time”. ☛P394・ Pressing o on the confirmation screen
for sending your terminal ID makes connection to the server and your private information concerning the mobile phone (such as model, serial number) is sent.
■ Canceling reservation: aSelect Cancel z Select Yes
A confirmation screen for sending your terminal ID is displayed.
booThe reservation is canceled and the menu is displayed.・ Pressing o on the confirmation screen
for sending your terminal ID makes connection to the server and your private information concerning the mobile phone (such as model, serial number) is sent.
When the reserved time arrives, the screen as shown below is displayed and updating software is started automatically. Before the reserved time, make sure that the battery is fully charged and the handset is in a location where radio waves reach and then show the standby display. When downloading is completed, rewriting software is automatically started, followed by reload.
INFORMATION● Note that updating software may not be activated even
though the reserved time arrives in case of using the other functions. In case the reserved time arrives while talking or receiving messages, updating software starts after finishing talking or receiving messages.
● If software update is executed when ON is set for PIN1 Code On/Off, the PIN code entry screen will be displayed at the time of automatic reload after completion of software updating. You cannot make/receive calls and operate communication functions if the incorrect PIN1 code is entered.
● If an alarm clock or any alarm is set for the same time, the alarm clock or the alarm takes precedence and the software update may not be started.
Protecting FOMA terminal from hazardous data Virus Scan Function
For the data or program downloaded via a website or received mail, this function detects data that may cause troubles and then deletes it or inhibits activation of applications in order to protect FOMA terminal from viruses.・ Pattern definition is used for checking. Update
pattern definition because it is updated whenever a new trouble is detected.・ Virus Scan Function is for preventing the data
that cause some problem to mobile phone from invading when viewing websites or receiving mail. Please note that if pattern definition corresponding to specific troubles has not been downloaded to the mobile phone or such pattern definition does not exist, this function cannot prevent the trouble from happening.・ Pattern definition is different depending on the
model of mobile phone. Please keep in mind that DoCoMo may stop distributing the pattern definition for the models that have been on the market for 3 years or more.・When updating pattern definition, your private
information concerning the mobile phone (model, serial number, etc.) is automatically sent to the server (the server for the scan function managed by DoCoMo). DoCoMo does not use the sent information for purposes other than the scan function.
Setting Virus Scan Function Scanning Setting
If this setting is set to ON, data or program is checked automatically when it is displayed or executed.
1 m8373
2 1 z Select Yes
When the reserved time arrives
・ To cancel the software update: f z Select Yes
Update pattern definition first to keep the pattern definition up-to-date.
Default ON
Viru
s Scan
Fu
nctio
n
Next
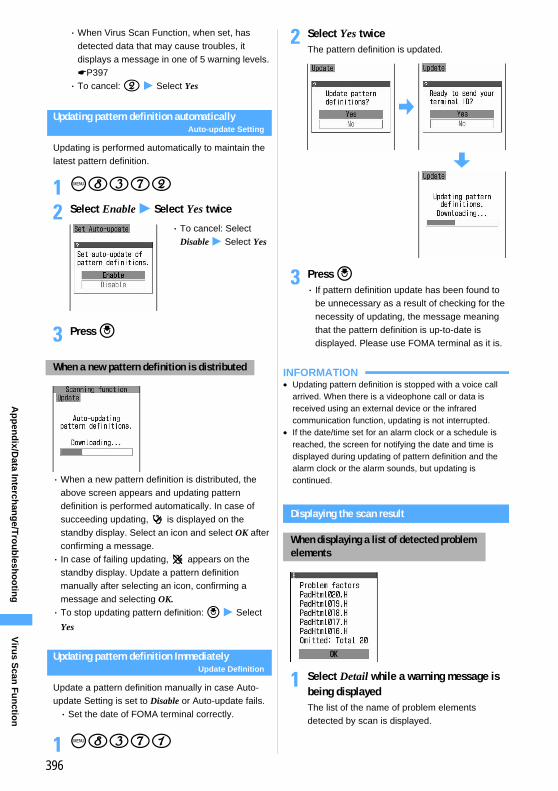
396
Ap
pen
dix/D
ata Interch
ang
e/Tro
ub
lesho
otin
g
・When Virus Scan Function, when set, has detected data that may cause troubles, it displays a message in one of 5 warning levels. ☛P397・ To cancel: 2 z Select Yes
Updating pattern definition automaticallyAuto-update Setting
Updating is performed automatically to maintain the latest pattern definition.
1 m8372
2 Select Enable z Select Yes twice
3 Press o
・When a new pattern definition is distributed, the above screen appears and updating pattern definition is performed automatically. In case of succeeding updating, is displayed on the standby display. Select an icon and select OK after confirming a message.・ In case of failing updating, appears on the
standby display. Update a pattern definition manually after selecting an icon, confirming a message and selecting OK.・ To stop updating pattern definition: o z Select
Yes
Updating pattern definition ImmediatelyUpdate Definition
Update a pattern definition manually in case Auto-update Setting is set to Disable or Auto-update fails.・ Set the date of FOMA terminal correctly.
1 m8371
2 Select Yes twiceThe pattern definition is updated.
3 Press o ・ If pattern definition update has been found to
be unnecessary as a result of checking for the necessity of updating, the message meaning that the pattern definition is up-to-date is displayed. Please use FOMA terminal as it is.
INFORMATION● Updating pattern definition is stopped with a voice call
arrived. When there is a videophone call or data is received using an external device or the infrared communication function, updating is not interrupted.
● If the date/time set for an alarm clock or a schedule is reached, the screen for notifying the date and time is displayed during updating of pattern definition and the alarm clock or the alarm sounds, but updating is continued.
Displaying the scan result
1 Select Detail while a warning message is being displayedThe list of the name of problem elements detected by scan is displayed.
When a new pattern definition is distributed
・ To cancel: Select Disable z Select Yes
When displaying a list of detected problem elements
Viru
s Scan
Fu
nctio
n
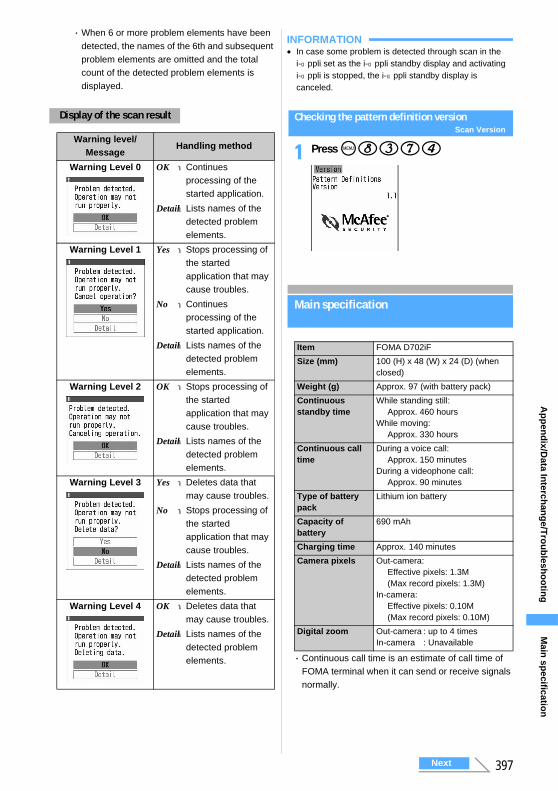
397
Ap
pen
dix/D
ata Interch
ang
e/Tro
ub
lesho
otin
g
・When 6 or more problem elements have been detected, the names of the 6th and subsequent problem elements are omitted and the total count of the detected problem elements is displayed.
INFORMATION● In case some problem is detected through scan in the
i-αppli set as the i-αppli standby display and activating i-αppli is stopped, the i-αppli standby display is canceled.
Checking the pattern definition versionScan Version
1 Press m8374
Main specification
・ Continuous call time is an estimate of call time of FOMA terminal when it can send or receive signals normally.
Display of the scan result
Warning level/Message
Handling method
Warning Level 0 OK :Continues processing of the started application.
Detail:Lists names of the detected problem elements.
Warning Level 1 Yes :Stops processing of the started application that may cause troubles.
No :Continues processing of the started application.
Detail:Lists names of the detected problem elements.
Warning Level 2 OK :Stops processing of the started application that may cause troubles.
Detail:Lists names of the detected problem elements.
Warning Level 3 Yes :Deletes data that may cause troubles.
No :Stops processing of the started application that may cause troubles.
Detail:Lists names of the detected problem elements.
Warning Level 4 OK :Deletes data that may cause troubles.
Detail:Lists names of the detected problem elements.
Item FOMA D702iF
Size (mm) 100 (H) x 48 (W) x 24 (D) (when closed)
Weight (g) Approx. 97 (with battery pack)
Continuous standby time
While standing still: Approx. 460 hours
While moving: Approx. 330 hours
Continuous call time
During a voice call: Approx. 150 minutes
During a videophone call: Approx. 90 minutes
Type of battery pack
Lithium ion battery
Capacity of battery
690 mAh
Charging time Approx. 140 minutes
Camera pixels Out-camera: Effective pixels: 1.3M (Max record pixels: 1.3M)
In-camera: Effective pixels: 0.10M (Max record pixels: 0.10M)
Digital zoom Out-camera : up to 4 timesIn-camera : Unavailable
Main
specificatio
n
Next
398
Ap
pen
dix/D
ata Interch
ang
e/Tro
ub
lesho
otin
g
・ Continuous standby time is an estimate of operation time of FOMA terminal when it is closed and able to receive signals normally. The call/standby time may be reduced to about half, depending on the amount of charge in the battery, the function settings, the ambient temperature and signal conditions (radio waves do not or hardly reach). Using i-mode communication reduces the call (communication)/standby time. Even if you do not make a call or use i-mode, the call (communication)/standby time will be reduced by composing i-mode Mail, or starting downloaded i-αppli software or the i-αppli standby display.・ Continuous standby time (while standing still) is the
average operation time of FOMA terminal when it is standing still, closed and able to receive signals normally.・ Continuous standby time (while moving) is the
average operation time of FOMA terminal that is standing still, moving and outside the service area when it is closed and able to receive signals normally.・ Alternatively, if you perform data communication or
Multiaccess, use Camera or play video/i-motion, the call (communication)/standby time will be reduced.・ The battery pack can be charged regardless of
whether FOMA terminal is turned on or off. However, charging takes longer with the power turned on.
SAR certification information
This model phone FOMA D702iF meets the MIC’s*1 technical regulation for exposure to radio waves.The technical regulation established permitted levels of radio frequency energy, based on standards that were developed by independent scientific organizations through periodic and through evaluation of scientific studies. The regulation employs a unit of measurement known as the Specific Absorption Rate, or SAR. The SAR limit is 2 watts/kilogram (W/kg)*2 averaged over ten grams of tissue. The limit includes a substantial safety margin designed to assure the safety of all persons, regardless of age and health. The value of the limit is equal to the international guidelines recommended by ICNIRP*3.
All phone models should be confirmed to comply with the regulation, before they are available for sale to the public. The highest SAR value for this model phone is 1.39 W/kg. It was taken by the Telecom Engineering Center (TELEC) and the test for SAR was conducted in accordance with the MIC testing procedure using standard operating positions with the phone transmitting at its highest permitted power level in all tested frequency bands. While there may be differences between the SAR levels of various phones and at various positions, they all meet the MIC’s technical regulation. Although the SAR is determined at the highest certified power level, the actual SAR of the phone during operation can be well below the maximum value.For further information about SAR, please see the following websites:
World Health Organization (WHO): http://www.who.int/peh-emf/ICNIRP: http://www.icnirp.de/MIC: http://www.soumu.go.jp/english/index.htmlTELEC: http://www.telec.or.jp/ENG/index_e.htmlNTT DoCoMo: http://www.nttdocomo.co.jp/product/ (in Japanese only)MITSUBISHI ELECTRIC: http://www.MitsubishiElectric.co.jp/mobile/
*1 Ministry of Internal Affairs and Communications*2 The technical regulation is provided in Article 14-2
of the Ministry Ordinance Regulating Radio Equipment.
*3 International Commission on Non-Ionizing Radiation Protection
SA
R certificatio
n in
form
ation
399
MEMO
400
MEMO

401
MEMO
402
MEMO

403
MEMO
404
MEMO
405
INDEX/Quick Reference Manual
INDEX................................................................................................................406Quick Reference Manual .................................................................................412
406
IND
EX
/Qu
ick Referen
ce Man
ual
INDEX
Access Setting ......................269Add Address..........................207Added Service.......................336Adjust Volume.........................66After-Sales Service ...............390Alarm Auto Power ON...........307Alarm Clock...........................305Alarm Clock Sound ...............118Album....................................289Alert Preference ....................326All Lock..................................146Anonymous Caller.................154Answer Machine......................73
Greeting Message Setting ...75Greeting Response Time.....74Play/delete messages..........75Quick Record Message .......73
Any Key Answer......................63Arrival call act........................334
Set arrival act.....................334AT command.........................340Attachment
Attaching............................212Auto-play............................235Changing/removing............213Delete Attachment .............222Display and save from Message R/F .....................195Display/Save Image...........220Incoming Msg. Attach. .......235Play and save i-motion ......221Play/Save Melody ..............221
Auto Answer..........................326Auto Power ON/OFF .............304Auto-display ..........................194Automatic time correction........45AV Phone To (→ Phone To)
Bar Code Reader ..................172Battery Icon ...........................135Battery Level ...........................42Battery pack ............................38Bookmark ..............................185
Create/delete folders .........186Deleting..............................186Display sites.......................184Display sites by shortcut ....186i-mode Shortcut .................185Moving ...............................186
Register from mail ............. 230Register from site .............. 185Renaming .......................... 186Sort .................................... 187
Cache.................................... 183Calculator.............................. 322Calendar (→ Scheduler)Call Alert ................................. 67
Change image ................... 129Call Cost
Call Cost Limit ................... 321Checking............................ 320Hide Call Cost Icon............ 322Reset Call Cost.................. 321
Call DurationChecking............................ 320Continuous call time ............ 39
Call Forwarding Service........ 332Call Option .............................. 55Call Ring Alert ....................... 116Call Waiting Service.............. 331Caller ID Notification ............... 46
Set for each call................... 55Caller ID Request Service..... 333Caller ID Setting.................... 110Camera ................................. 160
Auto timer .......................... 168Brightness.......................... 169Color density...................... 169File..................................... 161Frame ................................ 170Image size ......................... 171Macro................................. 168Movie Camera ................... 164Number of saved still images................................................. 162One-shot Message ............ 171Quality ............................... 170Recording Setting .............. 166Recording time of video..... 162Restore default settings..... 171Scene mode/effect............. 169Send images via mail ........ 163Shooting screen................. 161Size restrictions ................. 170Still Camera ....................... 162Still Image Setting.............. 166Switch in-camera/out-camera................................................. 163
Zooming ............................ 167Camera indicator .................... 25Certificate Download............. 196Certificate Host ..................... 198Certificate operation.............. 196
Certificate Setting .............. 196Chaku-moji.............................. 52
Message Display Setting..... 53Character Encode................. 185Characters entry ................... 342
Change input modes ......... 343Character assignments (Slot Input Method) .................... 362Character assignments (5-touch Input Method) ...... 362Copying (Copy Character).................................................347Cutting ............................... 348Deleting ............................. 344Download Dictionary ......... 349Enter face marks ............... 345Enter fixed phrases ........... 345Enter pictograms ............... 346Enter symbols.................... 346Full-screen entry................ 342In-line entry........................ 342Input Method Setting ......... 350Input prediction function .... 345Kana/Kanji Conversion...... 343KUTEN Code Input............ 348Line feed............................ 344Pasting .............................. 348Quote data......................... 346Reset predictive dictionary data.................................................345Save Phrase...................... 347Save Word......................... 348Slot Input Method .............. 3495-touch Input Method ........ 343
Chara-den............................. 285Action list ........................... 286Deleting ............................. 293Displaying.......................... 285Downloading...................... 189Moving............................... 290Record Chara-den............. 286Set as videophone substitute image................................. 286Settings ............................. 288Sort.................................... 293Still Image Setting/Video Setting ............................... 287
A
B
C
IND
EX
407
IND
EX
/Qu
ick Referen
ce Man
ual
Use folder .......................... 289Videophone call................... 83View/Edit Detail Info .......... 291
Charge Alert.......................... 120Charging ................................. 39Charging time ......................... 39Chat mail
Broadcast address ............ 239Chat Mail Alert................... 240Chat Member Setting ........ 237Composing/sending (Chat Mail)................................... 237Deleting ............................. 239Edit chat members ............ 239Quitting .............................. 240Receiving (Receive Chat Mail).................................................238Sending ............................. 238Set personal information ... 240
Check i-mode Message ........ 218Setting ............................... 233
Check new messageCheck i-mode Message..... 218Check SMS ....................... 242Message Retrieval Setting.................................................233
Check your phone number ..... 46Clock Display Format............ 139Close Setting .......................... 63Color Scheme ....................... 133Column Search ..................... 105Confirm Settings ................... 327Connection Speed ................ 111Connection Timeout Setting.....................................................191Contact Image ...................... 130Cookie Setting/Deleting ........ 268Copying................................. 347Custom Menu ....................... 315Custom standby display........ 127Customize Silent Mode......... 122Cutting .................................. 347
Data communication ............. 338Communication configuration file...................................... 340Flow of setup ..................... 339FOMA PC configuration software............................. 340Glossary ............................ 339
Data link software ................. 379Data Security Service ........... 157
Image ................................ 279Mail .................................... 230Phonebook ................ 110, 114
Data Session Arrival Act......... 91Data set by default................ 358Data Transfer Setting ........... 298Date and Time Setting............ 44Date To................................. 323Deco-mail
Composing ........................ 208Template ........................... 213
Delete All Data...................... 327Dictionaries
Downloading ..................... 189Using ................................. 349
Dictionaries (preinstalled) ..... 324Display.................................... 24
Guide row............................ 27Reading............................... 26Task bar .............................. 27
Display Address.................... 226Display Light Setting............. 132
i-mode ............................... 192i-αppli ................................ 250
Display Mode Setting............ 269Display Priority...................... 237Display sites by shortcut....... 186Driving mode .......................... 70Dual Network Service ........... 333
Earphone/microphone jack..... 24Earphone/Microphone Set with Switch
Connecting .......................... 25How to use ........................ 324
Earpiece ................................. 24Easy Selector Plus ................. 24Electronic dictionaries........... 324English display........................ 44English Guidance Service .... 333Enter characters (→ Characters entry)Error Message ...................... 384External connection terminals.......................................................25External Device (for videophone).......................................................92
Face marksEntering............................. 345List..................................... 364
FirstPass............................... 196Fixed phrases
Entering............................. 345List..................................... 363Registering ........................ 347
Flash......................................179Flash movie displays .............182Flat type earphone/microphone set with switch (→ Eeaphone/Microphone Set with Switch)Focus Mode.............................34FOMA card (→ UIM)Font Size Setting ...................138Font Size (for mail) ................236Forward Mail..........................219Full Browser
Browser Setting..................268
Group Search ........................103Group Setting ........................100
Alert/Image by Group.........100
Headset Key Control .............325Home URL.............................268Host Selection .......................191
Certificate Host ..................198
i-channel ................................260Channel List .......................261Ticker Setting .....................262
ImageAdjusting ............................278Change brightness and tone..................................................276Change size .......................275Clipping ..............................275Created animation..............274Cutting................................277Deleting..............................293Displaying ..........................272Displaying from mail...........220Editing ................................274Effects ................................276Frames...............................276Moving/copying ..................290Paste Text ..........................277Reversing/rotating..............276Save from mail ...................220Save from site (Save Image)..................................................188Send images via mail .........272Set to standby display. .......273Settings ..............................278Shooting.............................162Size limitation.....................277Slide show..........................273
D
E
F
G
H
I
IND
EX
Next
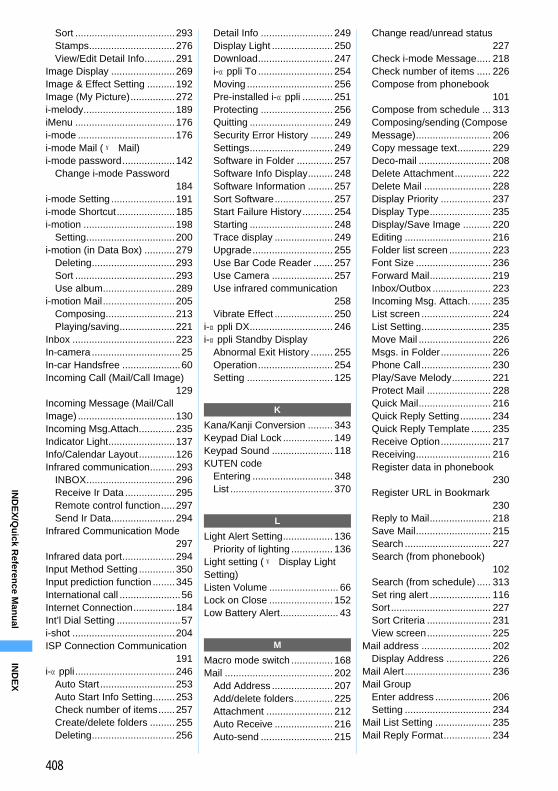
408
IND
EX
/Qu
ick Referen
ce Man
ual
Sort ....................................293Stamps...............................276View/Edit Detail Info...........291
Image Display .......................269Image & Effect Setting ..........192Image (My Picture)................272i-melody.................................189iMenu ....................................176i-mode ...................................176i-mode Mail (→Mail)i-mode password...................142
Change i-mode Password................................................. 184
i-mode Setting .......................191i-mode Shortcut.....................185i-motion .................................198
Setting................................200i-motion (in Data Box) ...........279
Deleting..............................293Sort ....................................293Use album..........................289
i-motion Mail..........................205Composing.........................213Playing/saving....................221
Inbox .....................................223In-camera ................................25In-car Handsfree .....................60Incoming Call (Mail/Call Image)..................................................... 129Incoming Message (Mail/Call Image) ...................................130Incoming Msg.Attach.............235Indicator Light........................137Info/Calendar Layout.............126Infrared communication.........293
INBOX................................296Receive Ir Data ..................295Remote control function.....297Send Ir Data.......................294
Infrared Communication Mode..................................................... 297Infrared data port...................294Input Method Setting .............350Input prediction function ........345International call ......................56Internet Connection...............184Int’l Dial Setting .......................57i-shot .....................................204ISP Connection Communication..................................................... 191i-αppli....................................246
Auto Start...........................253Auto Start Info Setting........253Check number of items......257Create/delete folders .........255Deleting..............................256
Detail Info .......................... 249Display Light ...................... 250Download........................... 247i-αppli To ........................... 254Moving ............................... 256Pre-installed i-αppli ........... 251Protecting .......................... 256Quitting .............................. 249Security Error History ........ 249Settings.............................. 249Software in Folder ............. 257Software Info Display......... 248Software Information ......... 257Sort Software..................... 257Start Failure History........... 254Starting .............................. 248Trace display ..................... 249Upgrade............................. 255Use Bar Code Reader ....... 257Use Camera ...................... 257Use infrared communication................................................. 258Vibrate Effect ..................... 250
i-αppli DX.............................. 246i-αppli Standby Display
Abnormal Exit History ........ 255Operation........................... 254Setting ............................... 125
Kana/Kanji Conversion ......... 343Keypad Dial Lock .................. 149Keypad Sound ...................... 118KUTEN code
Entering ............................. 348List ..................................... 370
Light Alert Setting.................. 136Priority of lighting ............... 136
Light setting (→ Display Light Setting)Listen Volume ......................... 66Lock on Close ....................... 152Low Battery Alert..................... 43
Macro mode switch ............... 168Mail ....................................... 202
Add Address ...................... 207Add/delete folders.............. 225Attachment ........................ 212Auto Receive ..................... 216Auto-send .......................... 215
Change read/unread status.................................................227Check i-mode Message..... 218Check number of items ..... 226Compose from phonebook.................................................101Compose from schedule ... 313Composing/sending (Compose Message)........................... 206Copy message text............ 229Deco-mail .......................... 208Delete Attachment............. 222Delete Mail ........................ 228Display Priority .................. 237Display Type...................... 235Display/Save Image .......... 220Editing ............................... 216Folder list screen ............... 223Font Size ........................... 236Forward Mail...................... 219Inbox/Outbox ..................... 223Incoming Msg. Attach........ 235List screen ......................... 224List Setting......................... 235Move Mail .......................... 226Msgs. in Folder.................. 226Phone Call......................... 230Play/Save Melody.............. 221Protect Mail ....................... 228Quick Mail.......................... 216Quick Reply Setting........... 234Quick Reply Template ....... 235Receive Option.................. 217Receiving........................... 216Register data in phonebook.................................................230Register URL in Bookmark.................................................230Reply to Mail...................... 218Save Mail........................... 215Search ............................... 227Search (from phonebook).................................................102Search (from schedule) ..... 313Set ring alert ...................... 116Sort.................................... 227Sort Criteria ....................... 231View screen....................... 225
Mail address ......................... 202Display Address ................ 226
Mail Alert ............................... 236Mail Group
Enter address .................... 206Setting ............................... 234
Mail List Setting .................... 235Mail Reply Format................. 234
K
L
M
IND
EX
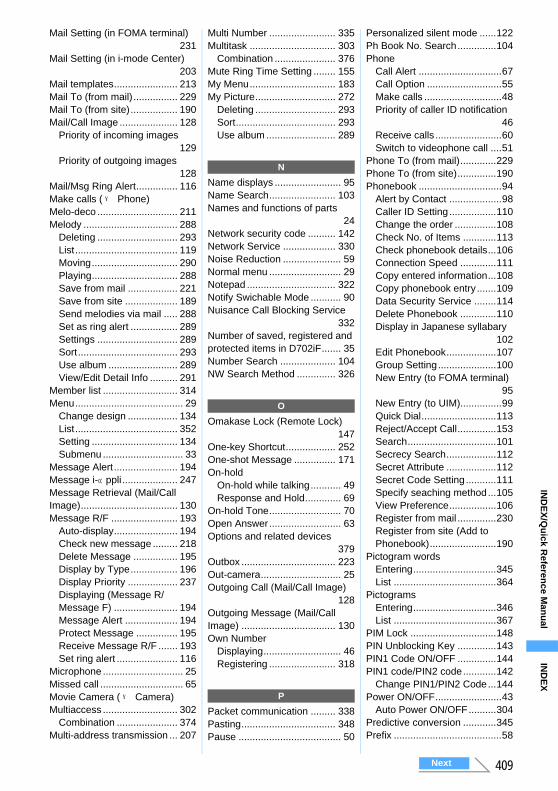
409
IND
EX
/Qu
ick Referen
ce Man
ual
Mail Setting (in FOMA terminal).....................................................231Mail Setting (in i-mode Center).....................................................203Mail templates....................... 213Mail To (from mail) ................ 229Mail To (from site)................. 190Mail/Call Image ..................... 128
Priority of incoming images.................................................129Priority of outgoing images.................................................128
Mail/Msg Ring Alert............... 116Make calls (→ Phone)Melo-deco ............................. 211Melody .................................. 288
Deleting ............................. 293List..................................... 119Moving............................... 290Playing............................... 288Save from mail .................. 221Save from site ................... 189Send melodies via mail ..... 288Set as ring alert ................. 289Settings ............................. 289Sort.................................... 293Use album ......................... 289View/Edit Detail Info .......... 291
Member list ........................... 314Menu....................................... 29
Change design .................. 134List..................................... 352Setting ............................... 134Submenu ............................. 33
Message Alert....................... 194Message i-αppli.................... 247Message Retrieval (Mail/Call Image)................................... 130Message R/F ........................ 193
Auto-display....................... 194Check new message ......... 218Delete Message ................ 195Display by Type................. 196Display Priority .................. 237Displaying (Message R/Message F) ....................... 194Message Alert ................... 194Protect Message ............... 195Receive Message R/F ....... 193Set ring alert ...................... 116
Microphone ............................. 25Missed call .............................. 65Movie Camera (→ Camera)Multiaccess ........................... 302
Combination ...................... 374Multi-address transmission ... 207
Multi Number ........................ 335Multitask ............................... 303
Combination ...................... 376Mute Ring Time Setting ........ 155My Menu............................... 183My Picture............................. 272
Deleting ............................. 293Sort.................................... 293Use album ......................... 289
Name displays ........................ 95Name Search........................ 103Names and functions of parts.......................................................24Network security code .......... 142Network Service ................... 330Noise Reduction ..................... 59Normal menu .......................... 29Notepad ................................ 322Notify Swichable Mode ........... 90Nuisance Call Blocking Service.....................................................332Number of saved, registered and protected items in D702iF....... 35Number Search .................... 104NW Search Method .............. 326
Omakase Lock (Remote Lock).....................................................147One-key Shortcut.................. 252One-shot Message ............... 171On-hold
On-hold while talking........... 49Response and Hold............. 69
On-hold Tone.......................... 70Open Answer.......................... 63Options and related devices.....................................................379Outbox .................................. 223Out-camera............................. 25Outgoing Call (Mail/Call Image).....................................................128Outgoing Message (Mail/Call Image) .................................. 130Own Number
Displaying............................ 46Registering ........................ 318
Packet communication ......... 338Pasting.................................. 348Pause ..................................... 50
Personalized silent mode ......122Ph Book No. Search..............104Phone
Call Alert ..............................67Call Option ...........................55Make calls ............................48Priority of caller ID notification....................................................46Receive calls ........................60Switch to videophone call ....51
Phone To (from mail).............229Phone To (from site)..............190Phonebook ..............................94
Alert by Contact ...................98Caller ID Setting .................110Change the order ...............108Check No. of Items ............113Check phonebook details...106Connection Speed .............111Copy entered information...108Copy phonebook entry .......109Data Security Service ........114Delete Phonebook .............110Display in Japanese syllabary..................................................102Edit Phonebook..................107Group Setting.....................100New Entry (to FOMA terminal)....................................................95New Entry (to UIM)...............99Quick Dial...........................113Reject/Accept Call..............153Search................................101Secrecy Search..................112Secret Attribute ..................112Secret Code Setting...........111Specify seaching method...105View Preference.................106Register from mail ..............230Register from site (Add to Phonebook)........................190
Pictogram wordsEntering..............................345List .....................................364
PictogramsEntering..............................346List .....................................367
PIM Lock ...............................148PIN Unblocking Key ..............143PIN1 Code ON/OFF ..............144PIN1 code/PIN2 code............142
Change PIN1/PIN2 Code...144Power ON/OFF........................43
Auto Power ON/OFF..........304Predictive conversion ............345Prefix .......................................58
N
O
P
IND
EX
Next
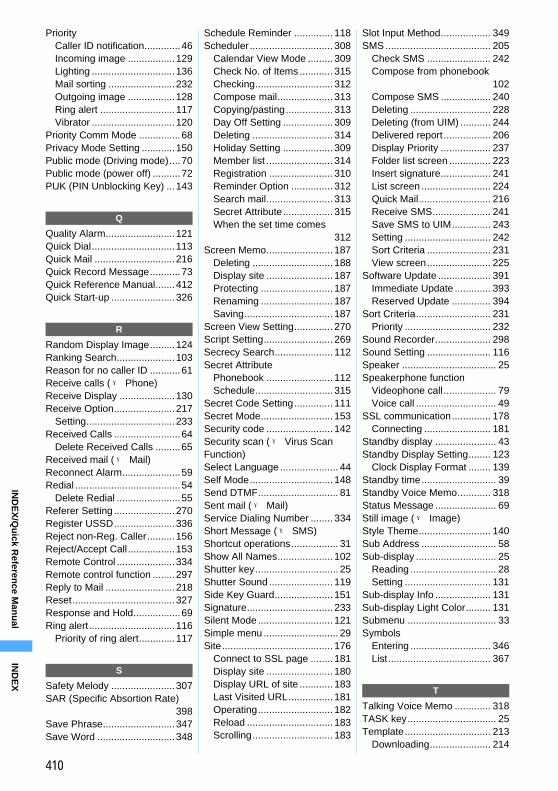
410
IND
EX
/Qu
ick Referen
ce Man
ual
PriorityCaller ID notification.............46Incoming image .................129Lighting ..............................136Mail sorting ........................232Outgoing image .................128Ring alert ...........................117Vibrator ..............................120
Priority Comm Mode ...............68Privacy Mode Setting ............150Public mode (Driving mode)....70Public mode (power off) ..........72PUK (PIN Unblocking Key) ...143
Quality Alarm.........................121Quick Dial..............................113Quick Mail .............................216Quick Record Message...........73Quick Reference Manual.......412Quick Start-up .......................326
Random Display Image.........124Ranking Search.....................103Reason for no caller ID ...........61Receive calls (→ Phone)Receive Display ....................130Receive Option......................217
Setting................................233Received Calls ........................64
Delete Received Calls .........65Received mail (→ Mail)Reconnect Alarm.....................59Redial ......................................54
Delete Redial .......................55Referer Setting ......................270Register USSD......................336Reject non-Reg. Caller..........156Reject/Accept Call.................153Remote Control .....................334Remote control function ........297Reply to Mail .........................218Reset.....................................327Response and Hold.................69Ring alert...............................116
Priority of ring alert.............117
Safety Melody .......................307SAR (Specific Absortion Rate)..................................................... 398Save Phrase..........................347Save Word ............................348
Schedule Reminder .............. 118Scheduler.............................. 308
Calendar View Mode ......... 309Check No. of Items ............ 315Checking............................ 312Compose mail.................... 313Copying/pasting................. 313Day Off Setting .................. 309Deleting ............................. 314Holiday Setting .................. 309Member list ........................ 314Registration ....................... 310Reminder Option ............... 312Search mail........................ 313Secret Attribute.................. 315When the set time comes................................................. 312
Screen Memo........................ 187Deleting ............................. 188Display site ........................ 187Protecting .......................... 187Renaming .......................... 187Saving................................ 187
Screen View Setting.............. 270Script Setting......................... 269Secrecy Search..................... 112Secret Attribute
Phonebook ........................ 112Schedule............................ 315
Secret Code Setting.............. 111Secret Mode.......................... 153Security code ........................ 142Security scan (→ Virus Scan Function)Select Language ..................... 44Self Mode.............................. 148Send DTMF............................. 81Sent mail (→Mail)Service Dialing Number ........ 334Short Message (→ SMS)Shortcut operations................. 31Show All Names.................... 102Shutter key.............................. 25Shutter Sound ....................... 119Side Key Guard..................... 151Signature............................... 233Silent Mode ........................... 121Simple menu ........................... 29Site........................................ 176
Connect to SSL page ........ 181Display site ........................ 180Display URL of site ............ 183Last Visited URL................ 181Operating........................... 182Reload ............................... 183Scrolling............................. 183
Slot Input Method.................. 349SMS ...................................... 205
Check SMS ....................... 242Compose from phonebook.................................................102Compose SMS .................. 240Deleting ............................. 228Deleting (from UIM) ........... 244Delivered report................. 206Display Priority .................. 237Folder list screen ............... 223Insert signature.................. 241List screen ......................... 224Quick Mail.......................... 216Receive SMS..................... 241Save SMS to UIM.............. 243Setting ............................... 242Sort Criteria ....................... 231View screen....................... 225
Software Update ................... 391Immediate Update ............. 393Reserved Update .............. 394
Sort Criteria........................... 231Priority ............................... 232
Sound Recorder.................... 298Sound Setting ....................... 116Speaker .................................. 25Speakerphone function
Videophone call ................... 79Voice call ............................. 49
SSL communication.............. 178Connecting ........................ 181
Standby display ...................... 43Standby Display Setting........ 123
Clock Display Format ........ 139Standby time........................... 39Standby Voice Memo............ 318Status Message ...................... 69Still image (→ Image)Style Theme.......................... 140Sub Address ........................... 58Sub-display ............................. 25
Reading ............................... 28Setting ............................... 131
Sub-display Info .................... 131Sub-display Light Color......... 131Submenu ................................ 33Symbols
Entering ............................. 346List..................................... 367
Talking Voice Memo ............. 318TASK key................................ 25Template............................... 213
Downloading...................... 214
Q
R
S
T
IND
EX
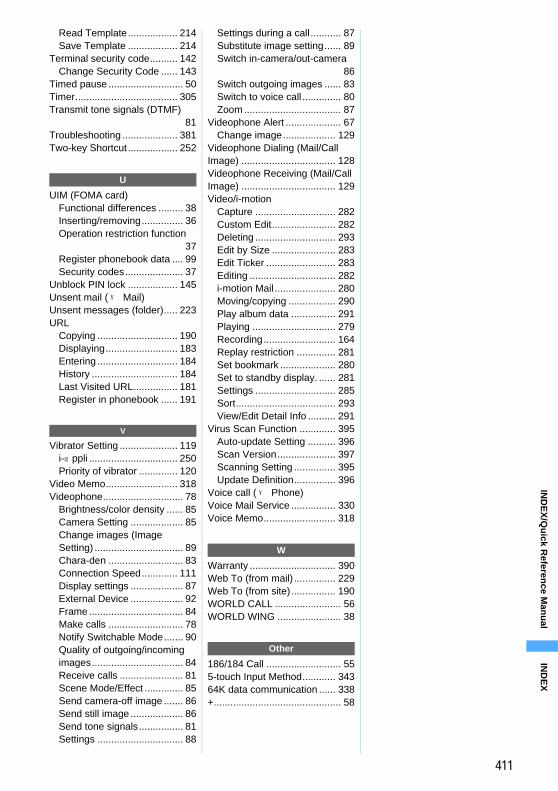
411
IND
EX
/Qu
ick Referen
ce Man
ual
Read Template.................. 214Save Template .................. 214
Terminal security code.......... 142Change Security Code ...... 143
Timed pause ........................... 50Timer..................................... 305Transmit tone signals (DTMF)....................................................... 81Troubleshooting .................... 381Two-key Shortcut.................. 252
UIM (FOMA card)Functional differences ......... 38Inserting/removing............... 36Operation restriction function................................................... 37Register phonebook data .... 99Security codes..................... 37
Unblock PIN lock .................. 145Unsent mail (→Mail)Unsent messages (folder)..... 223URL
Copying ............................. 190Displaying.......................... 183Entering ............................. 184History ............................... 184Last Visited URL................ 181Register in phonebook ...... 191
Vibrator Setting ..................... 119i-αppli ................................ 250Priority of vibrator .............. 120
Video Memo.......................... 318Videophone............................. 78
Brightness/color density ...... 85Camera Setting ................... 85Change images (Image Setting) ................................ 89Chara-den ........................... 83Connection Speed............. 111Display settings ................... 87External Device ................... 92Frame .................................. 84Make calls ........................... 78Notify Switchable Mode....... 90Quality of outgoing/incoming images................................. 84Receive calls ....................... 81Scene Mode/Effect .............. 85Send camera-off image ....... 86Send still image ................... 86Send tone signals................ 81Settings ............................... 88
Settings during a call ........... 87Substitute image setting...... 89Switch in-camera/out-camera...................................................86Switch outgoing images ...... 83Switch to voice call .............. 80Zoom ................................... 87
Videophone Alert .................... 67Change image................... 129
Videophone Dialing (Mail/Call Image) .................................. 128Videophone Receiving (Mail/Call Image) .................................. 129Video/i-motion
Capture ............................. 282Custom Edit....................... 282Deleting ............................. 293Edit by Size ....................... 283Edit Ticker ......................... 283Editing ............................... 282i-motion Mail ...................... 280Moving/copying ................. 290Play album data ................ 291Playing .............................. 279Recording.......................... 164Replay restriction .............. 281Set bookmark .................... 280Set to standby display. ...... 281Settings ............................. 285Sort.................................... 293View/Edit Detail Info .......... 291
Virus Scan Function ............. 395Auto-update Setting .......... 396Scan Version..................... 397Scanning Setting ............... 395Update Definition............... 396
Voice call (→ Phone)Voice Mail Service ................ 330Voice Memo.......................... 318
Warranty ............................... 390Web To (from mail) ............... 229Web To (from site)................ 190WORLD CALL ........................ 56WORLD WING ....................... 38
186/184 Call ........................... 555-touch Input Method............ 34364K data communication ...... 338+.............................................. 58
U
V
W
Other
IND
EX
412
IND
EX
/Qu
ick Referen
ce Man
ual
Quick Reference Manual
How to use Quick Reference Manual
Use Quick Reference Manual included in this manual as follows. In addition, please carry 2 sheets of Quick Reference Manual together.
Dotted line
a b c
FrontcoverFrontcover
Frontcover
Fold the sheet along the line so that the front cover is on top.
Cut along the dotted line.
● Be careful not to hurt yourself when cutting.
Qu
ick Referen
ce M
anu
al
Cut here
(In English)
(In Japanese only)
Registering entries in the phonebook
■R
egisterin
g en
tries into
the
FO
MA
termin
al ph
on
ebo
ok
1m
42
2E
nter a name z
p
3S
et each item z p
■R
egisterin
g en
tries into
the
UIM
ph
on
ebo
ok
1m
43
2E
nter a name z
p3
Set each item
z p
■R
egisterin
g fro
m th
e redial
data o
r received call h
istory
1r
or l
2H
ighlight the entry to register z m
1・
Adding to the registered entry: m
23
1 (F
OM
A term
inal phonebook) or2
(UIM
phonebook)・
Adding to the registered entry: S
elect the party to add
4S
et each item z
p・
Adding to the registered entry: S
elect O
verwrite or N
ew entry
Ed
iting
the p
ho
neb
oo
k entries
1p
・
Sw
itching the phonebook: p2
Highlight the entry to edit z
m3
1
・F
or the UIM
phonebook: Highlight the
entry to edit z m
33
Edit z
p4
Select O
verwrite or N
ew entry
Searching the phonebook entries
1m
41
・
Sw
itching the phonebook: p2
1 to 7
・F
or the UIM
phonebook, 1 to 4
Ch
aracter entry
■E
ntering and converting characters (5-touch Input M
ethod)〈
Exam
ple〉 Entering “企
業”
1E
nter characters in hiragana/kanji mode
“き”
:2 tw
ice z r
(It is not necessary w
hen the cursor was
moved by autom
atic cursor function.)
Gen
eral Inq
uiries
<Do
Co
Mo
Info
rmatio
n C
enter>
Rep
airs
Quick R
eference Manual
* Can be called from
mobile phones and P
HS
s.(In Japanese only)
0120-005-250 (toll free)
* Can only be called from
DoC
oMo m
obile phones and PH
Ss.
No
prefix 151 (to
ll free)
* Can be called from
mobile phones and P
HS
s.0120-800-000 (to
ll free)
* Can only be called from
DoC
oMo m
obile phones and PH
Ss.
No
prefix 113 (to
ll free)
* Can be called from
mobile phones and P
HS
s.
•Please confirm
the phone number before you dial.
•For further inform
ation, refer to the “Nationw
ide Service
Station List” included w
ith your FO
MA
terminal and
other devices.
0120-800-000 (toll free)
“ぎ”
: 2 tw
ice z (
“ょ”
:8 3 tim
es z t
“う”
:1 3 tim
es・
Available operation before converting
the entered charactersm
: Converts to katakana,
alphanumeric characters etc.
t: C
hanges upper/lower case
a: R
eturn to a previous character im
mediately after character entry
(example:…
→1→お→え→う→…
)(
: Adding voiced sound “゛
” and sem
i-voiced sound “゜”
(example: →
ぼ→ぽ→ほ→…
)c
: Canceling characters
・Inserting characters: M
ove the cursor to position to insert z
Enter characters
2p・
Displaying conversion option list: %
/p・
Returning to status before conversion:
c
3o
■S
witch
ing
inp
ut m
od
en
several times during character inputs
・S
witching betw
een two-byte and one-byte
katakana/alphanumeric characters: n
then
%■
Deletin
g ch
aracters●
Wh
en th
e curso
r is in th
e textc
: Deleting each character at the cursor
c (for over a second):
Deleting characters at the cursor
position and all the subsequent characters
●W
hen
the cu
rsor is in
the en
d o
f the text
c: D
eleting 1 character at the left of the cursor
c (for over a second):
Deleting all entered characters
■E
nterin
g p
ictog
rams, sym
bo
ls, face m
arks and
fixed p
hrases
●E
ntering pictograms, sym
bols or face marks
1m
while entering z
Select Pict/Sym
bol/Sm
iley z 1
or 3
2S
elect a pictogram or sym
bol・
Selecting a face m
ark: 1 to 9
z
1 to 9
●E
nterin
g fixed
ph
rasesm
while entering z
Select Phrase/K
uten/Q
uote z 1
z S
elect the type of fixed phrase z
Select a fixed phrase
■K
uten
Co
de In
pu
tm
while entering z
Select Phrase/K
uten/Q
uote z 2
z E
nter 4-digit code
Cam
era
■S
ho
otin
g still im
age/vid
eo●
Sh
oo
ting
still imag
e
1O
pen FO
MA
terminal z
C (for over a
second)
2P
oint the camera at the object and o
or C3
o or C
●R
ecord
ing
video
1m
64
2P
oint the camera at the object and o
or C3
p or C
4o
or C
■D
isplayin
g o
r playin
g sh
ot still
imag
e/video
●D
isplayin
g a still im
age
1u
1
2S
elect Cam
era z S
elect a still image
●P
laying
video
1u
2
12
376
54
Cut
her
e
2S
elec
t Cam
era z S
elec
t vid
eo・O
pera
tions
ava
ilabl
e du
ring
vide
o pl
ayba
ck
%:A
djus
t the
vol
ume
&:R
ewin
d an
d pl
ay/p
lay
fast
forw
ard
o:P
ause
/pla
y
p:S
top
Vid
eop
ho
ne
■M
akin
g v
ideo
ph
on
e ca
lls
1E
nter
the
phon
e nu
mbe
r
2t
3T
alk
with
the
othe
r pa
rty
・Pla
cing
cal
l on
hold
: o z
o to
can
cel
・Sw
itchi
ng th
e sp
eake
rpho
ne o
n/of
f: a
/n・S
witc
hing
the
imag
e to
sen
d: t
4f
whe
n yo
u fin
ish
the
call
■R
ecei
vin
g v
ideo
ph
on
e ca
lls
1A
cal
l is
rece
ived
・Hol
ding
ans
wer
: f2
t o
r n
・Ope
ratio
n du
ring
a ca
ll is
the
sam
e as
S
tep
3 of
“M
akin
g vi
deop
hone
cal
ls”
3f
whe
n yo
u fin
ish
the
call
i-m
od
e M
ail
■N
um
ber
of
char
acte
rs s
ent/
rece
ived
■C
om
po
sin
g a
nd
sen
din
g
i-m
od
e M
ail
1a
(fo
r ov
er a
sec
ond)
2S
elec
t the
add
ress
fiel
d z S
elec
t inp
ut
met
hod z
Ent
er o
r se
lect
add
ress
3S
elec
t the
sub
ject
fiel
d z
Ent
er s
ubje
ct
4S
elec
t the
mes
sage
fiel
d z
Ent
er m
essa
ge・C
ompo
sing
Dec
o-m
ail: a
z S
elec
t de
cora
tion
met
hod z
Ent
er c
hara
cter
s
5p ・S
avin
g m
ail: m
3・A
uto-
send
: m2
■F
ile a
ttac
hm
ents
1S
elec
t the
atta
chm
ent f
ield
on
the
mai
l co
mpo
sitio
n sc
reen
2S
elec
t atta
chm
ent t
ype
・Atta
chin
g m
elod
y: S
elec
t Mel
ody
and
go
to S
tep
4・S
hoot
ing
and
atta
chin
g st
ill im
age:
S
elec
t Im
age z
Sel
ect U
se st
ill c
amer
a・R
ecor
ding
and
atta
chin
g vi
deo:
Sel
ect
i-mot
ion z
Sel
ect U
se m
ovie
cam
era
・Rec
ordi
ng a
nd a
ttach
ing
soun
d: R
ecor
d so
und
3S
elec
t Dat
a B
ox
4S
elec
t a fo
lder
z S
elec
t a fi
le・R
emov
ing
atta
chm
ent:
Hig
hlig
ht th
e at
tach
men
t fie
ld z
a z
Sel
ect Y
es
■Ed
iting
and s
endin
g uns
ent/s
ent i-
mode
〈E
xam
ple〉
Edi
ting
unse
nt m
ail
1a
4
・Edi
ting
sent
mai
l: a
5
2S
elec
t a fo
lder
Item
On
e-b
yte
char
acte
rsT
wo
-byt
e ch
arac
ters
Su
bje
ct30
cha
ract
ers
15 c
hara
cter
s
Ad
dre
ss50
cha
ract
ers
-M
essa
ge
10,0
00 c
hara
cter
s5,
000
char
acte
rs
Add
ress
fiel
dS
ubje
ct fi
eld
Atta
chm
ent f
ield
Mes
sage
fiel
d
Rem
aini
ng n
umbe
r of o
ne-b
yte
char
acte
rs th
at c
an b
e en
tere
d
3S
elec
t a m
ail
・Edi
ting
sent
mai
l: H
ighl
ight
a m
ail z
p4
Edi
t z p
■R
ecei
vin
g i-
mo
de
Mai
l
1A
mai
l is
rece
ived
The
mai
l rin
g al
ert s
ound
s, th
e su
b-di
spla
y lig
hts/
flash
es a
nd th
e re
cept
ion
resu
lt sc
reen
is d
ispl
ayed
2o
or 1
z S
elec
t a fo
lder
z S
elec
t a
mai
l
■C
hec
kin
g f
or
i-m
od
e M
ail
aa
Men
u li
stP
ress
m a
nd in
put t
he n
umbe
r of
eac
h ite
m.
〈E
xam
ple〉
Dis
play
ing
a se
nt m
ail
m1
5a
Mai
la
Inbo
xb
Com
pose
mes
sage
cC
hat m
ail
dU
nsen
t mes
sage
se
Out
box
fC
heck
new
mes
sage
ai-m
ode
mes
sage
bS
MS
cR
ecei
ve o
ptio
nd
Mes
sage
retri
eval
gS
MS
aC
ompo
se S
MS
bR
ecei
ved
SM
Sc
Sen
t SM
Sd
SM
S s
ettin
gsh
Rea
d te
mpl
ates
iM
ail s
ettin
gsa
Mai
l ale
rtb
Cha
t mai
l ale
rtc
Sor
t crit
eria
dS
igna
ture
eR
eply
set
ting
aR
eply
form
atb
Act
ivat
e qu
ick
repl
yc
Qui
ck re
ply
tem
plat
ef
Mai
l gro
up
aM
ail
iM
ail s
ettin
gsg
Dis
play
set
tings
aD
ispl
ay p
riorit
yb
Rec
eive
opt
ion
cIn
com
ing
msg
atta
chd
Atta
chm
ent a
uto-
play
eM
essa
ge li
stb
i-mod
ea
iMen
ub
Boo
kmar
kc
Go
to lo
catio
na
Ent
er U
RL
bU
RL
hist
ory
cLa
st v
isite
d U
RL
dS
cree
n m
emo
ei-m
ode
mes
sage
fM
essa
ge R
&F
a
Mes
sage
Rb
Mes
sage
Fc
Mes
sage
set
tings
aA
uto-
disp
lay
bM
essa
ge re
triev
alc
Atta
chm
ent a
uto-
play
dM
essa
ge a
lert
gi-C
hann
ela
i-Cha
nnel
list
bT
icke
r set
ting
hi-m
ode
setti
ngs
ai-m
ode
shor
tcut
sb
Con
nect
ion
timeo
utc
Dis
play
ligh
td
Cer
tific
ate
aS
et c
ertif
icat
eb
Cer
tific
ate
dow
nloa
dc
Cer
tific
ate
host
eIm
age
& E
ffect
fi-m
otio
ng
Hos
t sel
ectio
n
bi-m
ode
iF
ull B
row
ser
aH
ome
bB
ookm
ark
cG
o to
loca
tion
aE
nter
UR
Lb
UR
L hi
stor
yc
Last
vis
ited
UR
Ld
Bro
wse
r set
tings
aH
ome
UR
Lb
Coo
kie
set/d
elet
ec
Scr
ipt s
ettin
gd
Dis
play
mod
e se
tting
eIm
age
disp
lay
fA
cces
s se
tting
gR
efer
er s
ettin
gh
Scr
een
view
set
ting
ci- α
ppli
aS
oftw
are
list
bi- α
ppli
setti
ngs
aS
ort s
oftw
are
bA
uto
star
tc
Sof
twar
e in
fo d
isp.
dD
ispl
ay li
ght
eV
ibra
te e
ffect
fi- α
ppli
shor
tcut
sc
Dis
play
his
tory
dP
hone
book
& L
ogs
aP
hone
book
bPh
oneb
ook
new
ent
ryc
Pho
nebo
ok(U
IM) n
ew e
ntry
dR
ecei
ved
calls
eR
edia
lf
Ans
. mac
hine
/Voi
ce m
emo
aA
nsw
er m
achi
neb
Rec
orde
d m
essa
ges
cR
ecor
d vo
ice
mem
od
Voi
ce m
emos
gO
wn
num
ber
1514
1312
1110
98
Cut here
eD
ata Box
aIm
ageb
i-motion
cM
elodyd
Chara-den
fLifeK
ita
Bar code reader
bD
ata exchangea
Send all Ir data
bR
eceive Ir datac
Exchange settings
cC
amera
dM
ovie camera
eS
ound recorderf
Data C
entera
Access D
ata Center
bS
ynchronization logc
Sync setting
gS
tationerya
Scheduler
bN
otepadc
Alarm
clockd
Calculator
eD
ictionaries f
Safety m
elodyh
Settings
aA
lerts & S
oundsa
Set sound
aC
all ring alertb
Mail/M
sg ring alertc
Alarm
soundd
Operation sound
eC
harge alertf
Call session
bA
djust volume
aC
all alert volume
bM
ail/Msg alert vol.
cListen volum
ed
Alarm
volume
ei-α
ppli effect sound
hS
ettingsa
Alerts &
Sounds
cV
ibrate alert/effecta
Call vibrate alert
bM
ail/Msg vibe alert
cA
larm vibrate
di-α
ppli effectd
Silent m
odee
Set m
ute ring time
bD
isplaya
Stand-by display
aIm
age/i-αppli
bC
lock format
cB
attery icond
Info/calendar layoute
i-Channel ticker
bM
enu preferencea
Menu setting
bC
ustomize shortcut
cC
olor & A
ction image
aC
olor scheme
bM
ail/Call im
agec
Receive display
dV
ideophone image
dD
isplay lighta
Display light tim
eb
Light areac
Brightness
eLight alerta
Light alertb
Call session light
cA
larm/O
ther lightf
Indicator lightg
Font &
Languagea
Font size
bS
elect language
hS
ettingsb
Display
hS
tyle theme
iS
ub-displaya
Sub-display info
bLighting color
cS
ecurity & Locks
aLocksa
All lock
bP
IM lock
cLock on close
bS
ecret mode
cK
eypad dial lockd
UIM
eC
hange security codef
Privacy m
ode
gS
canning function
aU
pdate b
Set auto-update
cS
et scand
Version
dInfo. &
Reset
aC
all durationb
Confirm
cB
attery leveld
Call cost
aLast call cost
bC
all cost limit
cH
ide call cost icond
Reset call cost
eR
esetf
Delete all data
eC
locka
Date &
time
bA
uto power O
Nc
Auto pow
er OF
Fd
Clock display form
ate
Alarm
auto power O
N
hS
ettingsf
Call &
Answ
era
Outgoing call
bC
all alertc
Anonym
ous callerd
Any key answ
ere
Headset
aA
lert preferenceb
Auto answ
erc
Headset key control
fR
eject/Accept call
aS
pecified callerb
Unregistered caller
gM
ake/Receive call
aP
riority comm
mode
bP
refix dialingc
Int’l Dial S
ettingd
Sub address
eO
pen answer
hC
all sessiona
Noise reduction
bC
lose settingsi
Self m
odeg
Videophone
aV
.phone dialing img.
bV
ideophone alertc
Operation
dD
ataSession arv. act
eIm
age settingf
External device
gN
otify switchable m
odeh
Others
aS
ave word/phrase
aS
ave word
bS
ave phraseb
DL dictionary
cR
eset prediction
■K
ey op
eration
s for fu
nctio
ns
Start operation on the standby display.
*1A
vailable only when P
rivacy Mode S
etting is made.
*2A
vailable only when S
afety melody is set.
hS
ettingsh
Others
dT
ext input method
eN
W search m
ethodf
Softw
are updateg
Quick start-up
iN
W S
ervicesa
Voice M
aila
Voice M
ail serviceb
Tone/V
ibration message notification
cN
otify missed call
dH
ide Voice M
ail iconb
Call w
aitinga
Activate
bD
eactivatec
Check setting
cC
all forwarding
aA
ctivateb
Deactivate
cR
egister The F
orwarding N
umber
dS
etting if forwarding num
ber busye
Check setting
dC
haku-moji
aC
reate message
bM
essage display settingse
Caller ID
notificationa
Activate/D
eactivateb
Check setting
fC
aller ID request
aA
ctivateb
Deactivate
cC
heck settingg
Set arrival act
aA
ctivateb
Deactivate
iN
W S
ervicesg
Set arrival act
cC
heck settingh
Arrival call act
iO
thersa
Register U
SS
Db
Record reply m
essagec
Rem
ote controld
Nuisance call barring
eE
nglish guidancef
Dual netw
orkg
Service Dialing N
umber
hM
ulti number
0O
wn num
ber
Fu
nctio
n
Op
eration
pro
cedu
re
Po
wer O
N/O
FF
f (for over 2 seconds)
Setting/canceling S
elf Mode
c (for over a second)
z S
elect Yes
Settin
g/can
celing
Sid
e Key
Gu
ardm
(for over a second)
i-Ch
ann
el listc
Settin
g/can
celing
Pu
blic
mo
de (D
riving
mo
de)
( (for over a second)
i-mo
de m
enu
d
i-αp
pli fo
lder list
d (for over a second)
Received
Calls
l
Activatin
g/can
celing
P
rivacy Mo
de* 1
To activate: l
(for over
a second)
To cancel: l
(for over
a second) z E
nter the
terminal security code
Red
ialr
Setting/canceling S
ilent Mode
# (for over a second)
or b (for over a
second) after closing
FO
MA
terminal
New
Task m
enu
b after opening F
OM
A
terminal
An
swer M
achin
e/Vo
ice M
emo
men
uC
Ph
on
ebo
ok
pS
ched
uler
p (for over a second)
Mail m
enu
aC
om
po
sing
i-mo
de M
aila
(for over a second)
Fu
nctio
n
Op
eration
pro
cedu
re
Data B
ox m
enu
u
Activate C
amera (w
ith o
ut-
camera)
C (for over a second)
after opening FO
MA
terminal
Activate C
amera (w
ith in
-cam
era)u
(for over a second)
So
un
din
g/can
celing
Safety
melo
dy* 2
To sound: C
(for over
a second) after closing
FO
MA
terminal
To cancel: C
Fu
nctio
n
Op
eration
pro
cedu
re
2322
2120
1918
1716
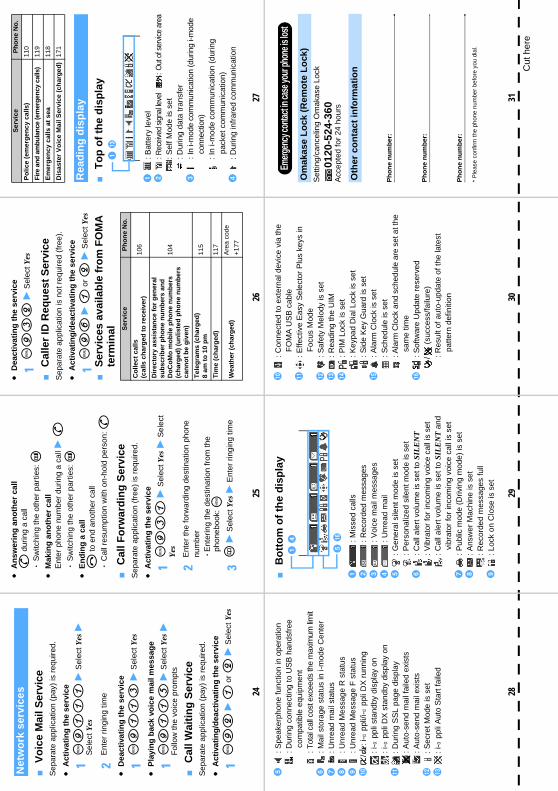
Cut
her
e
Net
wo
rk s
ervi
ces
■V
oic
e M
ail S
ervi
ceS
epar
ate
appl
icat
ion
(pay
) is
req
uire
d.
●A
ctiv
atin
g t
he
serv
ice
1m
91
11
z S
elec
t Yes
z
Sel
ect Y
es
2E
nter
rin
ging
tim
e
●D
eact
ivat
ing
th
e se
rvic
e
1m
91
13
z S
elec
t Yes
●P
layi
ng
bac
k vo
ice
mai
l mes
sag
e
1m
91
15
z S
elec
t Yes
z
Fol
low
the
voic
e pr
ompt
s
■C
all W
aiti
ng
Ser
vice
Sep
arat
e ap
plic
atio
n (p
ay)
is r
equi
red.
●A
ctiv
atin
g/d
eact
ivat
ing
th
e se
rvic
e
1m
92
z 1
or 2
z S
elec
t Yes
●A
nsw
erin
g a
no
ther
cal
ln
dur
ing
a ca
ll
・S
witc
hing
the
othe
r pa
rtie
s: t
●M
akin
g a
no
ther
cal
lE
nter
pho
ne n
umbe
r du
ring
a ca
ll z n
・S
witc
hing
the
othe
r pa
rtie
s: t
●E
nd
ing
a c
all
f to
end
ano
ther
cal
l
・C
all r
esum
ptio
n w
ith o
n-ho
ld p
erso
n: n
■C
all F
orw
ard
ing
Ser
vice
Sep
arat
e ap
plic
atio
n (f
ree)
is r
equi
red.
●A
ctiv
atin
g t
he
serv
ice
1m
93
1 z
Sel
ect Y
es z
Sel
ect
Yes
2E
nter
the
forw
ardi
ng d
estin
atio
n ph
one
num
ber
・Ent
erin
g th
e de
stin
atio
n fr
om th
e ph
oneb
ook:
m3
p z
Sel
ect Y
es z
Ent
er r
ingi
ng ti
me
●D
eact
ivat
ing
th
e se
rvic
e
1m
93
2 z
Sel
ect Y
es
■C
alle
r ID
Req
ues
t S
ervi
ceS
epar
ate
appl
icat
ion
is n
ot r
equi
red
(fre
e).
●A
ctiv
atin
g/d
eact
ivat
ing
th
e se
rvic
e
1m
96
z 1
or 2
z S
elec
t Yes
■S
ervi
ces
avai
lab
le fr
om
FO
MA
te
rmin
al
Rea
din
g d
isp
lay
■T
op
of
the
dis
pla
y
a: B
atte
ry le
vel
b: R
ecei
ved
sign
al le
vel
: Out
of s
ervi
ce a
rea
: Sel
f Mod
e is
set
: Dur
ing
data
tran
sfer
c: I
n i-m
ode
com
mun
icat
ion
(dur
ing
i-mod
e co
nnec
tion)
: In
i-mod
e co
mm
unic
atio
n (d
urin
g pa
cket
com
mun
icat
ion)
d: D
urin
g in
frar
ed c
omm
unic
atio
n
Ser
vice
Ph
on
e N
o.
Co
llect
cal
ls
(cal
ls c
har
ged
to
rec
eive
r)10
6
Dir
ecto
ry a
ssis
tan
ce f
or
gen
eral
su
bsc
rib
er p
ho
ne
nu
mb
ers
and
D
oC
oM
o m
ob
ile p
ho
ne
nu
mb
ers
(ch
arg
ed)
(un
liste
d p
ho
ne
nu
mb
ers
can
no
t b
e g
iven
)
104
Tel
egra
ms
(ch
arg
ed)
8 am
to
10
pm
115
Tim
e (c
har
ged
)11
7
Wea
ther
(ch
arg
ed)
Are
a co
de
+17
7
Po
lice
(em
erg
ency
cal
ls)
110
Fire
and
am
bula
nce
(em
erge
ncy
calls
)11
9
Em
erg
ency
cal
ls a
t se
a11
8
Dis
aste
r V
oic
e M
ail S
ervi
ce (
char
ged
)17
1
Ser
vice
Ph
on
e N
o.
a-m
e: S
peak
erph
one
func
tion
in o
pera
tion
: Dur
ing
conn
ectin
g to
US
B h
ands
free
co
mpa
tible
equ
ipm
ent
: Tot
al c
all c
ost e
xcee
ds th
e m
axim
um li
mit
f: M
ail s
tora
ge s
tatu
s in
i-m
ode
Cen
ter
g: U
nrea
d m
ail s
tatu
sh
: Unr
ead
Mes
sage
R s
tatu
si
: Unr
ead
Mes
sage
F s
tatu
sj
/: i
-αpp
li/i-α
ppli
DX
run
ning
: i
-αpp
li st
andb
y di
spla
y on
: i-α
ppli
DX
sta
ndby
dis
play
on
k: D
urin
g S
SL
page
dis
play
: Aut
o-se
nd m
ail f
aile
d ex
ists
: Aut
o-se
nd m
ail e
xist
sl
: Sec
ret M
ode
is s
etm
: i-α
ppli
Aut
o S
tart
faile
d
■B
ott
om
of
the
dis
pla
y
a: M
isse
d ca
llsb
: Rec
orde
d m
essa
ges
c: V
oice
mai
l mes
sage
sd
: Unr
ead
mai
le
: Gen
eral
sile
nt m
ode
is s
et: P
erso
naliz
ed s
ilent
mod
e is
set
f: C
all a
lert
vol
ume
is s
et to
SIL
EN
T: V
ibra
tor
for
inco
min
g vo
ice
call
is s
et
: Cal
l ale
rt v
olum
e is
set
to S
ILE
NT
and
vibr
ator
for
inco
min
g vo
ice
call
is s
etg
: Pub
lic m
ode
(Driv
ing
mod
e) is
set
h
: Ans
wer
Mac
hine
is s
et
: Rec
orde
d m
essa
ges
full
i: L
ock
on C
lose
is s
et
j: C
onne
cted
to e
xter
nal d
evic
e vi
a th
e F
OM
A U
SB
cab
le
k: E
ffect
ive
Eas
y S
elec
tor
Plu
s ke
ys in
F
ocus
Mod
el
: Saf
ety
Mel
ody
is s
etm
: Rea
ding
the
UIM
n: P
IM L
ock
is s
et: K
eypa
d D
ial L
ock
is s
et: S
ide
Key
Gua
rd is
set
o: A
larm
Clo
ck is
set
: Sch
edul
e is
set
: Ala
rm C
lock
and
sch
edul
e ar
e se
t at t
he
sam
e tim
ep
: Sof
twar
e U
pdat
e re
serv
ed/
(su
cces
s/fa
ilure
): R
esul
t of a
uto-
upda
te o
f the
late
st
patte
rn d
efin
ition
Emerg
ency
conta
ct in
case
your
phon
e is l
ost
Set
ting/
canc
elin
g O
mak
ase
Lock
0120
-524
-360
Acc
epte
d fo
r 24
hou
rs
Ph
on
e n
um
ber
:
Ph
on
e n
um
ber
:
Ph
on
e n
um
ber
:
* P
leas
e co
nfirm
the
phon
e nu
mbe
r be
fore
you
dia
l.
a-d
e-p
Om
akas
e L
ock
(R
emo
te L
ock
)
Oth
er c
on
tact
info
rmat
ion
3130
2928
2726
2524
Mobile phone etiquette
When using your FOMA terminal, always be considerate of your environment and those around you.
Turn the power off in the following situations■ In prohibited areas
Use of mobile phones in the following places is prohibited. You must turn off your FOMA terminal.・ Airplanes ・ HospitalsYou must also turn the power off when in lobbies or waiting rooms of hospitals as there could be people in such areas who could be adversely affected by mobile phone signals.
■While drivingUsing your FOMA terminal while driving could cause an accident. Stop the vehicle in a safe place before using the phone or use Public mode (Driving mode/power off).
■On crowded trains or in other areas where there could be a person with an implanted cardiac pacemaker or defibrillatorOperating a mobile phone could interfere with implanted cardiac pacemakers or defibrillators.
■When visiting live events, movie theaters, museums or other public placesThe ringing of your phone and your telephone conversations could disturb others around you in quiet public places.
Be considerate of your location and those around you with respect to the volume of your speaking voice and your FOMA terminal’s ring tone
■When using a mobile phone in a restaurant, hotel lobby or other quiet places, always remember to lower your voice.
■When using a mobile phone on the street, find a place that does not interfere with passing traffic.
Be considerate of privacyPlease be considerate of the privacy of individuals around you when taking and sending photos using camera-equipped mobile phones.
This printed matter is recyclable. Please recycle this manual when you no longer need it for reference purposes.
Functions convenient for public etiquetteYou may select a mode to reject incoming calls, turn off all sounds generated by your FOMA terminal, etc. from many modes to keep from disturbing those around you.●Silent Mode/Customize Silent Mode
Keypad sound, ring tones and all other sounds generated by the FOMA terminal are turned off (Silent Mode). ☛P121The user is allowed to change Silent Mode operations (Customize Silent Mode). ☛P122Even in Silent Mode, the shutter sound is heard while shooting.
●Public mode (Driving mode/power off)When a call is received, an announcement informs the caller that you are driving or in an area where use of the mobile phone should be refrained or that you are in an area where the phone should be turned off, and the call is then disconnected. ☛P70, P72
●VibratorWhen a call is received, the FOMA terminal vibrates instead of ringing. ☛P119
●Answer MachineWhen you cannot answer a call, the caller can leave a brief message. ☛P73
You may also use optional services such as Voice Mail Service or Call Forwarding Service. ☛P330, P332
Manual for Data Communication Data communication .......................................................................................... 1Flow of setup for data communication ............................................................ 2Connecting PC to FOMA terminal ..................................................................... 3Installation of the communication configuration file (driver) ........................ 4Communicating using the FOMA PC configuration software ........................ 5Communicating without using the FOMA PC configuration software ........ 15AT command ..................................................................................................... 23
■ About Manual for Data Communication
In this manual, the important items which are needed for data communication by
FOMA D702iF and the method of installing “communication configuration file (driver)
for D702iF” and “FOMA PC configuration software” are explained.
■ Operations for Windows
In this manual, the contents correspond to Windows XP Service Pack 2.
A part of the operations or screens may differ depending on the environment.
D702iF Manual for Data Commu.fm 0 ページ 2006年7月29日 土曜日 午後12時1分
1
Data communication
The data communication modes available from FOMA terminal and hints on use are explained here.・ FOMA terminal does not support the Remote
Wakeup.・ FOMA terminal does not support fax communication.・When connecting FOMA terminal to DoCoMo’s
PDA “sigmarion Ⅱ” or “musea” for data communication, make sure to update “sigmarion Ⅱ” or “musea”. For details on update, visit the DoCoMo website.
Supported communication modes
FOMA terminal supports 3 communication modes: packet communication, 64K data communication and data transfer.These communications become available by installing the related software onto a PC from the attached CD-ROM, connecting FOMA terminal to the PC and making required settings.
■ Packet communicationPacket communication charges are based on the amount of data sent and received, which make it suitable for high-speed exchange of relatively small amounts of data such as sending and receiving mail. No communication charges are required when no data are exchanged even if you are connected to the network. Therefore, sending/receiving data as needed while remaining connected to the network is possible.High-speed packet communication provides a maximum reception speed of 384 kbps and a maximum transmission speed of 64 kbps by using access points that support packet communication on FOMA, such as DoCoMo’s “mopera U/mopera” Internet connection service. These are offered by the best-effort connection which allows transmission speed to vary with the environment and the rate of congestion.Note that communications of large-size data such as for viewing and downloading websites containing images will require high charges.
■ 64K data communicationThe 64K data communications allow data transfer/reception at stabled communication rate of 64 kbps. Communication charges are based on the duration of the connection to the network regardless of the volume of data, which make it suitable for sending and receiving relatively large amounts of data as in downloading multi-media contents. You need to use access points that support FOMA 64K data communication such as DoCoMo’s “mopera U/mopera” Internet
connection service or ISDN synchronized 64 kbps access points.Note that communicating for long time will require high charges.
■ Data transferIt is the mode of non-charged communication in which data are transferred/exchanged via FOMA USB cable (optional). Various data including the phonebook, incoming/outgoing mail and bookmarks are sent/received.
Usage precautions
When using the Internet from PC, usage charge to your Internet service provider (hereinafter called the provider) is generally required. This charge is paid directly to the provider, and is separate from the FOMA service charge. For more information on usage charges, contact your provider.・ DoCoMo provides 2 Internet connection services:
mopera U and mopera. The mopera U service requires subscription and a monthly fee. It allows you to use the optional services such as broadband Internet connection. There is also a plan that requires a monthly fee only when you use the service. The mopera service allows you to access the Internet without subscription and monthly fee. You can make a connection with Internet immediately. For details such as on charges, visit the DoCoMo website.
Different dialup connections are required for packet communication and 64K data communication. When performing packet communication, use the dialup connection for FOMA packet communication. When performing 64K data communication, use the dialup connection for FOMA 64 kbps data communication or ISDN synchronized 64 kbps data communication.・ You cannot connect to access points of PHS 64K/
32K data communication such as PIAFS or DoPa.
Some dialup connections require user authentication (ID and password) before a connection can be established. If user authentication is required, you must use your communication software or dialup network to enter your ID and password before connection. Your ID and password will be assigned by the provider or network administrator of in-house LAN, etc. For more information, contact your provider or network administrator.
Internet service provider usage charge
Setting the dialup connection (provider, etc.)
User authentication during network access
Next
D702iF Manual for Data Commu.fm 1 ページ 2006年7月29日 土曜日 午後12時1分
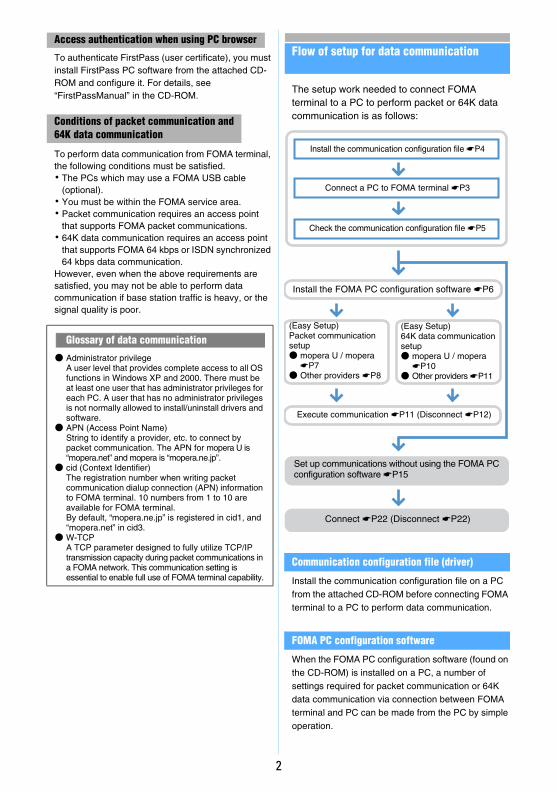
2
To authenticate FirstPass (user certificate), you must install FirstPass PC software from the attached CD-ROM and configure it. For details, see “FirstPassManual” in the CD-ROM.
To perform data communication from FOMA terminal, the following conditions must be satisfied.・ The PCs which may use a FOMA USB cable
(optional).・ You must be within the FOMA service area.・ Packet communication requires an access point
that supports FOMA packet communications.・ 64K data communication requires an access point
that supports FOMA 64 kbps or ISDN synchronized 64 kbps data communication.
However, even when the above requirements are satisfied, you may not be able to perform data communication if base station traffic is heavy, or the signal quality is poor.
Flow of setup for data communication
The setup work needed to connect FOMA terminal to a PC to perform packet or 64K data communication is as follows:
Communication configuration file (driver)
Install the communication configuration file on a PC from the attached CD-ROM before connecting FOMA terminal to a PC to perform data communication.
FOMA PC configuration software
When the FOMA PC configuration software (found on the CD-ROM) is installed on a PC, a number of settings required for packet communication or 64K data communication via connection between FOMA terminal and PC can be made from the PC by simple operation.
Access authentication when using PC browser
Conditions of packet communication and 64K data communication
Glossary of data communication
● Administrator privilege A user level that provides complete access to all OS functions in Windows XP and 2000. There must be at least one user that has administrator privileges for each PC. A user that has no administrator privileges is not normally allowed to install/uninstall drivers and software.
● APN (Access Point Name) String to identify a provider, etc. to connect by packet communication. The APN for mopera U is “mopera.net” and mopera is “mopera.ne.jp”.
● cid (Context Identifier) The registration number when writing packet communication dialup connection (APN) information to FOMA terminal. 10 numbers from 1 to 10 are available for FOMA terminal.By default, “mopera.ne.jp” is registered in cid1, and “mopera.net” in cid3.
● W-TCP A TCP parameter designed to fully utilize TCP/IP transmission capacity during packet communications in a FOMA network. This communication setting is essential to enable full use of FOMA terminal capability.
Install the FOMA PC configuration software ☛P6
(Easy Setup) Packet communication setup● mopera U / mopera
☛P7● Other providers ☛P8
(Easy Setup)64K data communication setup● mopera U / mopera
☛P10● Other providers ☛P11
Execute communication ☛P11 (Disconnect ☛P12)
Set up communications without using the FOMA PC configuration software ☛P15
Connect ☛P22 (Disconnect ☛P22)
Install the communication configuration file ☛P4
Connect a PC to FOMA terminal ☛P3
Check the communication configuration file ☛P5
D702iF Manual for Data Commu.fm 2 ページ 2006年7月29日 土曜日 午後12時1分
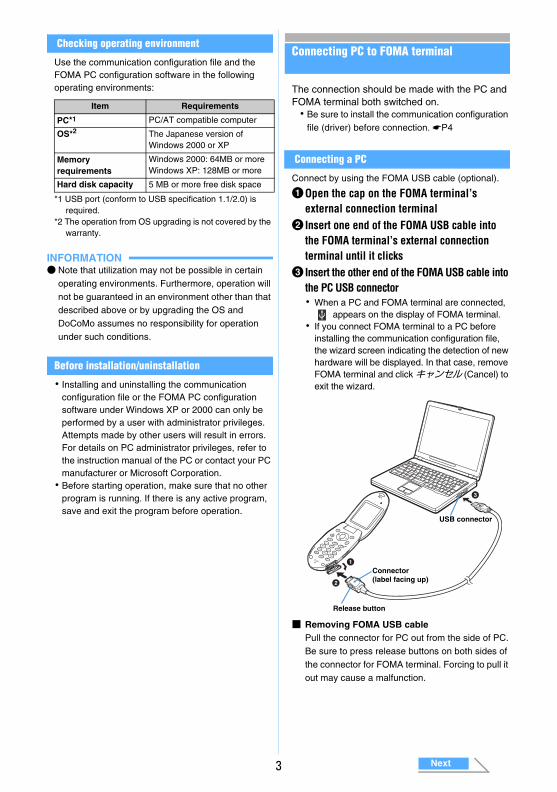
3
Checking operating environment
Use the communication configuration file and the FOMA PC configuration software in the following operating environments:
*1 USB port (conform to USB specification 1.1/2.0) is required.
*2 The operation from OS upgrading is not covered by the warranty.
INFORMATION● Note that utilization may not be possible in certain
operating environments. Furthermore, operation will not be guaranteed in an environment other than that described above or by upgrading the OS and DoCoMo assumes no responsibility for operation under such conditions.
Before installation/uninstallation
・ Installing and uninstalling the communication configuration file or the FOMA PC configuration software under Windows XP or 2000 can only be performed by a user with administrator privileges. Attempts made by other users will result in errors. For details on PC administrator privileges, refer to the instruction manual of the PC or contact your PC manufacturer or Microsoft Corporation.・ Before starting operation, make sure that no other
program is running. If there is any active program, save and exit the program before operation.
Connecting PC to FOMA terminal
The connection should be made with the PC and FOMA terminal both switched on.・ Be sure to install the communication configuration
file (driver) before connection. ☛P4
Connecting a PC
Connect by using the FOMA USB cable (optional).
aOpen the cap on the FOMA terminal’s external connection terminal
bInsert one end of the FOMA USB cable into the FOMA terminal’s external connection terminal until it clicks
cInsert the other end of the FOMA USB cable into the PC USB connector・ When a PC and FOMA terminal are connected,
appears on the display of FOMA terminal.・ If you connect FOMA terminal to a PC before
installing the communication configuration file, the wizard screen indicating the detection of new hardware will be displayed. In that case, remove FOMA terminal and click キャンセル (Cancel) to exit the wizard.
■ Removing FOMA USB cablePull the connector for PC out from the side of PC.Be sure to press release buttons on both sides of the connector for FOMA terminal. Forcing to pull it out may cause a malfunction.
Item Requirements
PC*1 PC/AT compatible computer
OS*2 The Japanese version of Windows 2000 or XP
Memory requirements
Windows 2000: 64MB or moreWindows XP: 128MB or more
Hard disk capacity 5 MB or more free disk space
Connector (label facing up)
Release button
USB connector
Next
D702iF Manual for Data Commu.fm 3 ページ 2006年7月29日 土曜日 午後12時1分
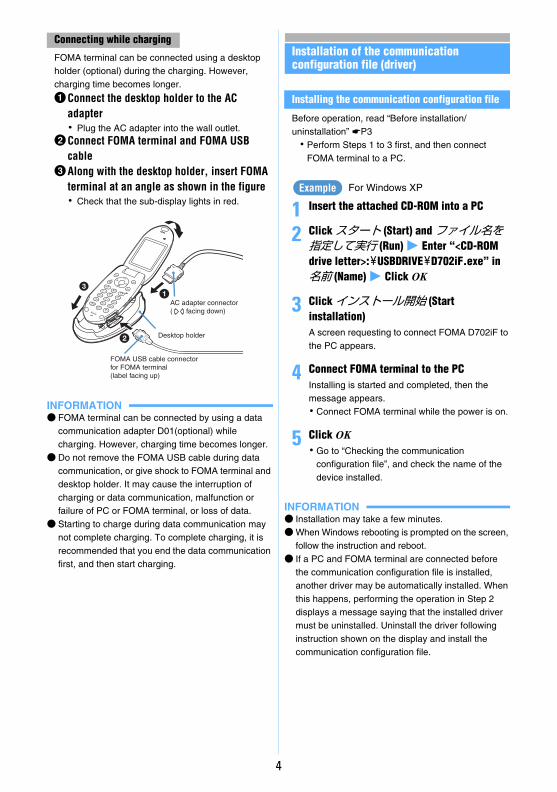
4
FOMA terminal can be connected using a desktop holder (optional) during the charging. However, charging time becomes longer.
aConnect the desktop holder to the AC adapter・ Plug the AC adapter into the wall outlet.
bConnect FOMA terminal and FOMA USB cable
cAlong with the desktop holder, insert FOMA terminal at an angle as shown in the figure・ Check that the sub-display lights in red.
INFORMATION● FOMA terminal can be connected by using a data
communication adapter D01(optional) while charging. However, charging time becomes longer.
● Do not remove the FOMA USB cable during data communication, or give shock to FOMA terminal and desktop holder. It may cause the interruption of charging or data communication, malfunction or failure of PC or FOMA terminal, or loss of data.
● Starting to charge during data communication may not complete charging. To complete charging, it is recommended that you end the data communication first, and then start charging.
Installation of the communication configuration file (driver)
Installing the communication configuration file
Before operation, read “Before installation/uninstallation” ☛P3・ Perform Steps 1 to 3 first, and then connect
FOMA terminal to a PC.
For Windows XP
1 Insert the attached CD-ROM into a PC
2 Click スタート (Start) and ファイル名を指定して実行 (Run) z Enter “<CD-ROM drive letter>:¥USBDRIVE¥D702iF.exe” in 名前 (Name) z Click OK
3 Click インストール開始 (Start installation)A screen requesting to connect FOMA D702iF to the PC appears.
4 Connect FOMA terminal to the PCInstalling is started and completed, then the message appears.・ Connect FOMA terminal while the power is on.
5 Click OK・ Go to “Checking the communication
configuration file”, and check the name of the device installed.
INFORMATION● Installation may take a few minutes.●When Windows rebooting is prompted on the screen,
follow the instruction and reboot.● If a PC and FOMA terminal are connected before
the communication configuration file is installed, another driver may be automatically installed. When this happens, performing the operation in Step 2 displays a message saying that the installed driver must be uninstalled. Uninstall the driver following instruction shown on the display and install the communication configuration file.
Connecting while charging
Desktop holder
FOMA USB cable connectorfor FOMA terminal (label facing up)
AC adapter connector( facing down)
Example
D702iF Manual for Data Commu.fm 4 ページ 2006年7月29日 土曜日 午後12時1分
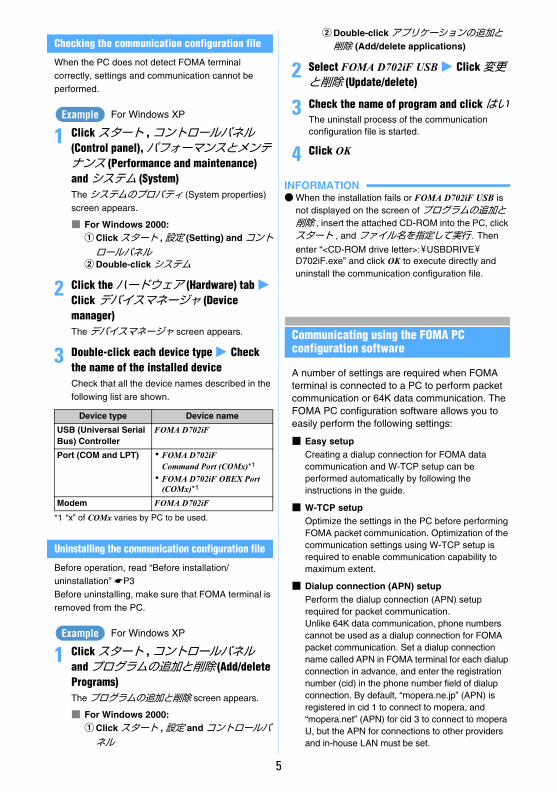
5
Checking the communication configuration file
When the PC does not detect FOMA terminal correctly, settings and communication cannot be performed.
For Windows XP
1 Click スタート , コントロールパネル(Control panel), パフォーマンスとメンテナンス (Performance and maintenance) andシステム (System)Theシステムのプロパティ (System properties) screen appears.
■ For Windows 2000:aClick スタート , 設定 (Setting) and コントロールパネル
bDouble-click システム
2 Click the ハードウェア (Hardware) tab z Click デバイスマネージャ (Device manager)The デバイスマネージャ screen appears.
3 Double-click each device type z Check the name of the installed deviceCheck that all the device names described in the following list are shown.
*1 “x” of COMx varies by PC to be used.
Uninstalling the communication configuration file
Before operation, read “Before installation/uninstallation” ☛P3Before uninstalling, make sure that FOMA terminal is removed from the PC.
For Windows XP
1 Click スタート , コントロールパネル and プログラムの追加と削除 (Add/delete Programs)The プログラムの追加と削除 screen appears.
■ For Windows 2000:aClick スタート , 設定 and コントロールパネル
bDouble-click アプリケーションの追加と削除 (Add/delete applications)
2 Select FOMA D702iF USB z Click 変更と削除 (Update/delete)
3 Check the name of program and click はいThe uninstall process of the communication configuration file is started.
4 Click OK
INFORMATION●When the installation fails or FOMA D702iF USB is
not displayed on the screen of プログラムの追加と削除 , insert the attached CD-ROM into the PC, click スタート , and ファイル名を指定して実行 . Then
enter “<CD-ROM drive letter>:¥USBDRIVE¥D702iF.exe” and click OK to execute directly and uninstall the communication configuration file.
Communicating using the FOMA PC configuration software
A number of settings are required when FOMA terminal is connected to a PC to perform packet communication or 64K data communication. The FOMA PC configuration software allows you to easily perform the following settings:
■ Easy setupCreating a dialup connection for FOMA data communication and W-TCP setup can be performed automatically by following the instructions in the guide.
■ W-TCP setupOptimize the settings in the PC before performing FOMA packet communication. Optimization of the communication settings using W-TCP setup is required to enable communication capability to maximum extent.
■ Dialup connection (APN) setupPerform the dialup connection (APN) setup required for packet communication.Unlike 64K data communication, phone numbers cannot be used as a dialup connection for FOMA packet communication. Set a dialup connection name called APN in FOMA terminal for each dialup connection in advance, and enter the registration number (cid) in the phone number field of dialup connection. By default, “mopera.ne.jp” (APN) is registered in cid 1 to connect to mopera, and “mopera.net” (APN) for cid 3 to connect to mopera U, but the APN for connections to other providers and in-house LAN must be set.
Device type Device name
USB (Universal Serial Bus) Controller
FOMA D702iF
Port (COM and LPT) ・ FOMA D702iF Command Port (COMx)*1
・ FOMA D702iF OBEX Port (COMx)*1
Modem FOMA D702iF
Example
Example
D702iF Manual for Data Commu.fm 5 ページ 2006年7月29日 土曜日 午後12時1分
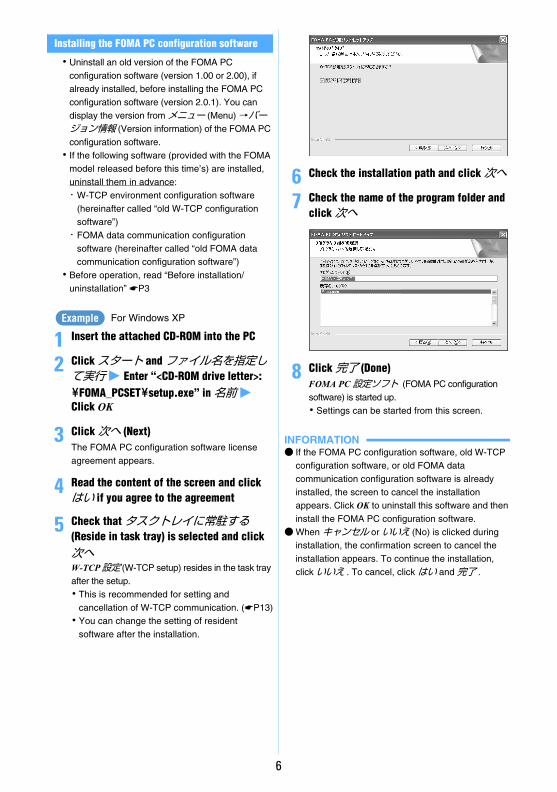
6
Installing the FOMA PC configuration software
・ Uninstall an old version of the FOMA PC configuration software (version 1.00 or 2.00), if already installed, before installing the FOMA PC configuration software (version 2.0.1). You can display the version from メニュー (Menu) →バージョン情報 (Version information) of the FOMA PC configuration software.・ If the following software (provided with the FOMA
model released before this time’s) are installed, uninstall them in advance:・W-TCP environment configuration software
(hereinafter called “old W-TCP configuration software”)・ FOMA data communication configuration
software (hereinafter called “old FOMA data communication configuration software”)
・ Before operation, read “Before installation/uninstallation” ☛P3
For Windows XP
1 Insert the attached CD-ROM into the PC
2 Click スタート and ファイル名を指定して実行 z Enter “<CD-ROM drive letter>:¥FOMA_PCSET¥setup.exe” in 名前 z Click OK
3 Click 次へ (Next)The FOMA PC configuration software license agreement appears.
4 Read the content of the screen and click はい if you agree to the agreement
5 Check that タスクトレイに常駐する (Reside in task tray) is selected and click 次へW-TCP設定 (W-TCP setup) resides in the task tray after the setup. ・ This is recommended for setting and
cancellation of W-TCP communication. (☛P13)・ You can change the setting of resident
software after the installation.
6 Check the installation path and click 次へ
7 Check the name of the program folder and click 次へ
8 Click 完了 (Done)FOMA PC 設定ソフト (FOMA PC configuration software) is started up.・ Settings can be started from this screen.
INFORMATION● If the FOMA PC configuration software, old W-TCP
configuration software, or old FOMA data communication configuration software is already installed, the screen to cancel the installation appears. Click OK to uninstall this software and then install the FOMA PC configuration software.
●When キャンセル or いいえ (No) is clicked during installation, the confirmation screen to cancel the installation appears. To continue the installation, click いいえ . To cancel, click はい and 完了 .
Example
D702iF Manual for Data Commu.fm 6 ページ 2006年7月29日 土曜日 午後12時1分
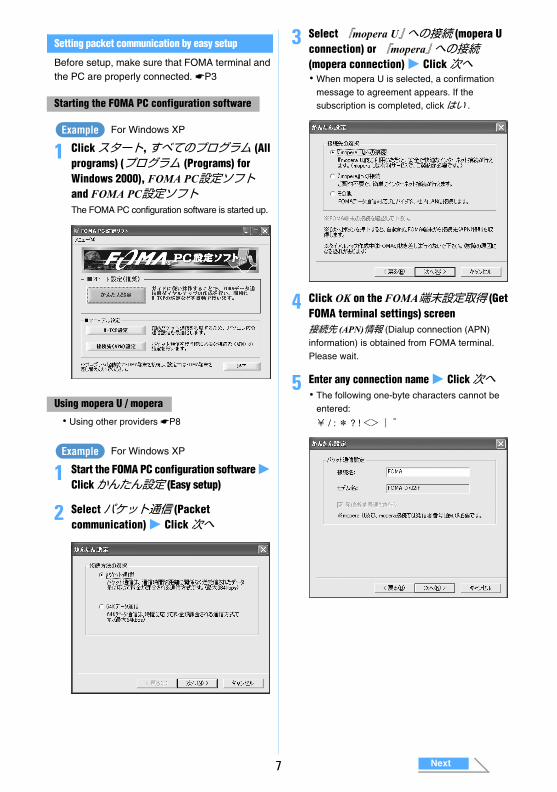
7
Setting packet communication by easy setup
Before setup, make sure that FOMA terminal and the PC are properly connected. ☛P3
For Windows XP
1 Click スタート, すべてのプログラム (All programs) (プログラム (Programs) for Windows 2000), FOMA PC設定ソフト and FOMA PC設定ソフトThe FOMA PC configuration software is started up.
・ Using other providers ☛P8
For Windows XP
1 Start the FOMA PC configuration software z Click かんたん設定 (Easy setup)
2 Select パケット通信 (Packet communication) z Click 次へ
3 Select 『mopera U』 への接続 (mopera U connection) or 『mopera』 への接続(mopera connection) z Click 次へ・When mopera U is selected, a confirmation
message to agreement appears. If the subscription is completed, click はい .
4 Click OK on the FOMA端末設定取得 (Get FOMA terminal settings) screen接続先 (APN)情報 (Dialup connection (APN) information) is obtained from FOMA terminal. Please wait.
5 Enter any connection name z Click 次へ・ The following one-byte characters cannot be
entered:
¥ / : * ? ! <> | ”
Starting the FOMA PC configuration software
Using mopera U / mopera
Example
Example
Next
D702iF Manual for Data Commu.fm 7 ページ 2006年7月29日 土曜日 午後12時1分
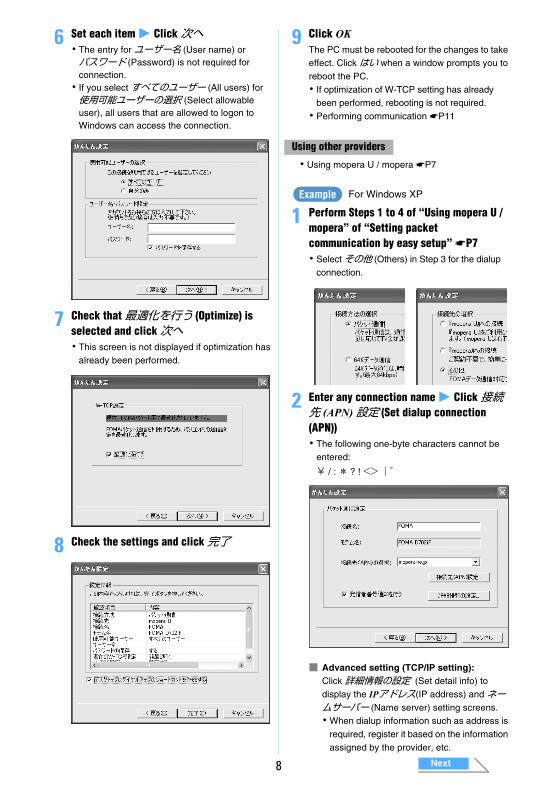
8
6 Set each item z Click 次へ・ The entry for ユーザー名 (User name) or パスワード (Password) is not required for connection.・ If you select すべてのユーザー (All users) for 使用可能ユーザーの選択 (Select allowable user), all users that are allowed to logon to Windows can access the connection.
7 Check that 最適化を行う (Optimize) is selected and click 次へ・ This screen is not displayed if optimization has
already been performed.
8 Check the settings and click 完了
9 Click OKThe PC must be rebooted for the changes to take effect. Click はい when a window prompts you to reboot the PC.・ If optimization of W-TCP setting has already
been performed, rebooting is not required.・ Performing communication ☛P11
・ Using mopera U / mopera ☛P7
For Windows XP
1 Perform Steps 1 to 4 of “Using mopera U / mopera” of “Setting packet communication by easy setup” ☛P7・ Select その他 (Others) in Step 3 for the dialup
connection.
2 Enter any connection name z Click 接続先 (APN) 設定 (Set dialup connection (APN))・ The following one-byte characters cannot be
entered:
¥ / : * ? ! <>|”
■ Advanced setting (TCP/IP setting):Click 詳細情報の設定 (Set detail info) to display the IPアドレス(IP address) and ネームサーバー (Name server) setting screens. ・When dialup information such as address is
required, register it based on the information assigned by the provider, etc.
Using other providers
Example
Next
D702iF Manual for Data Commu.fm 8 ページ 2006年7月29日 土曜日 午後12時1分
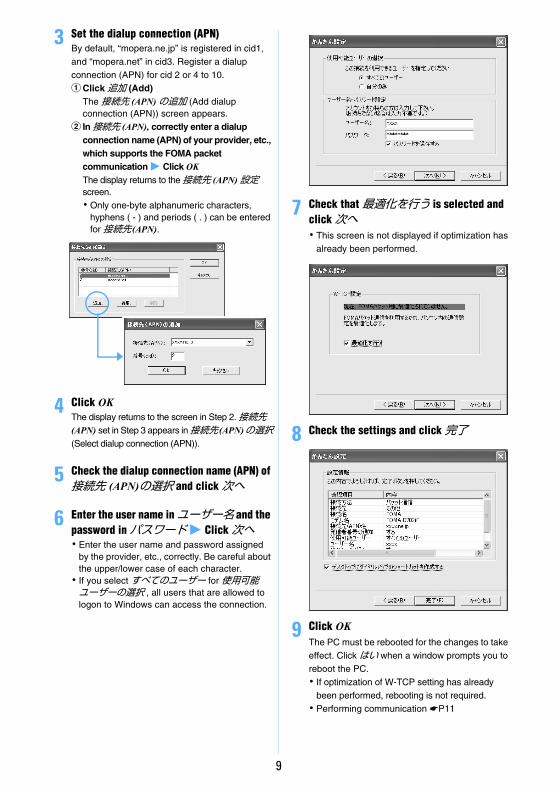
9
3 Set the dialup connection (APN)By default, “mopera.ne.jp” is registered in cid1, and “mopera.net” in cid3. Register a dialup connection (APN) for cid 2 or 4 to 10.aClick 追加 (Add)
The 接続先 (APN)の追加 (Add dialup connection (APN)) screen appears.
b In 接続先 (APN), correctly enter a dialup connection name (APN) of your provider, etc., which supports the FOMA packet communication z Click OKThe display returns to the 接続先 (APN)設定 screen.・ Only one-byte alphanumeric characters,
hyphens ( - ) and periods ( . ) can be entered for 接続先 (APN).
4 Click OKThe display returns to the screen in Step 2. 接続先(APN) set in Step 3 appears in 接続先 (APN)の選択(Select dialup connection (APN)).
5 Check the dialup connection name (APN) of 接続先 (APN)の選択 and click 次へ
6 Enter the user name in ユーザー名 and the password in パスワード z Click 次へ・ Enter the user name and password assigned
by the provider, etc., correctly. Be careful about the upper/lower case of each character.・ If you select すべてのユーザー for 使用可能ユーザーの選択 , all users that are allowed to logon to Windows can access the connection.
7 Check that 最適化を行う is selected and click 次へ・ This screen is not displayed if optimization has
already been performed.
8 Check the settings and click 完了
9 Click OKThe PC must be rebooted for the changes to take effect. Click はい when a window prompts you to reboot the PC.・ If optimization of W-TCP setting has already
been performed, rebooting is not required.・ Performing communication ☛P11
▼
D702iF Manual for Data Commu.fm 9 ページ 2006年7月29日 土曜日 午後12時1分

10
Setting 64K data communication by easy setup
Before setup, make sure that FOMA terminal and the PC are properly connected. ☛P3
・ Using other providers ☛P11
For Windows XP
1 Perform Steps 1 to 3 of “Using mopera U / mopera” of “Setting packet communication by easy setup” ☛P7・ Select 64Kデータ通信 (64K data communication)
in Step 2 for the communication procedure.
2 Enter any connection name and select the modem z Click 次へ・ The following one-byte characters cannot be
entered:
¥ / :* ? ! <>|”・ Check that FOMA D702iF is set for モデムの選択 (Modem selection).
3 Set each item z Click 次へ・ The entry for ユーザー名 or パスワード is not
required for connecting.・ If you select すべてのユーザー for 使用可能ユーザーの選択 , all users that are allowed to logon to Windows can access the connection.
4 Check the settings and click 完了
5 Click OK・ Performing communication ☛P11
Using mopera U / mopera
Example
Next
D702iF Manual for Data Commu.fm 10 ページ 2006年7月29日 土曜日 午後12時1分
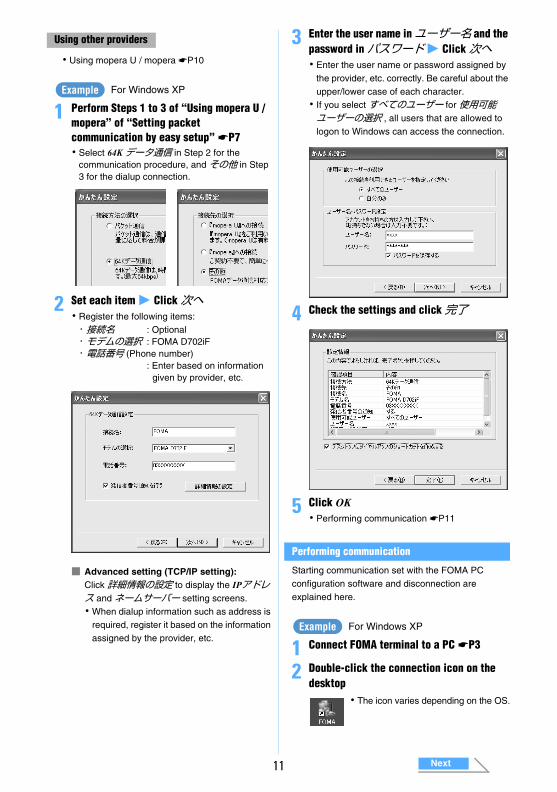
11
・ Using mopera U / mopera ☛P10
For Windows XP
1 Perform Steps 1 to 3 of “Using mopera U /mopera” of “Setting packet communication by easy setup” ☛P7・ Select 64K データ通信 in Step 2 for the
communication procedure, and その他 in Step 3 for the dialup connection.
2 Set each item z Click 次へ・ Register the following items:・ 接続名 : Optional・ モデムの選択 : FOMA D702iF・ 電話番号 (Phone number)
: Enter based on information given by provider, etc.
■ Advanced setting (TCP/IP setting):Click 詳細情報の設定 to display the IPアドレス and ネームサーバー setting screens.・When dialup information such as address is
required, register it based on the information assigned by the provider, etc.
3 Enter the user name in ユーザー名 and the password in パスワード z Click 次へ・ Enter the user name or password assigned by
the provider, etc. correctly. Be careful about the upper/lower case of each character.・ If you select すべてのユーザー for 使用可能ユーザーの選択 , all users that are allowed to logon to Windows can access the connection.
4 Check the settings and click 完了
5 Click OK・ Performing communication ☛P11
Performing communication
Starting communication set with the FOMA PC configuration software and disconnection are explained here.
For Windows XP
1 Connect FOMA terminal to a PC ☛P3
2 Double-click the connection icon on the desktop
Using other providers
Example
・ The icon varies depending on the OS.
Example
Next
D702iF Manual for Data Commu.fm 11 ページ 2006年7月29日 土曜日 午後12時1分
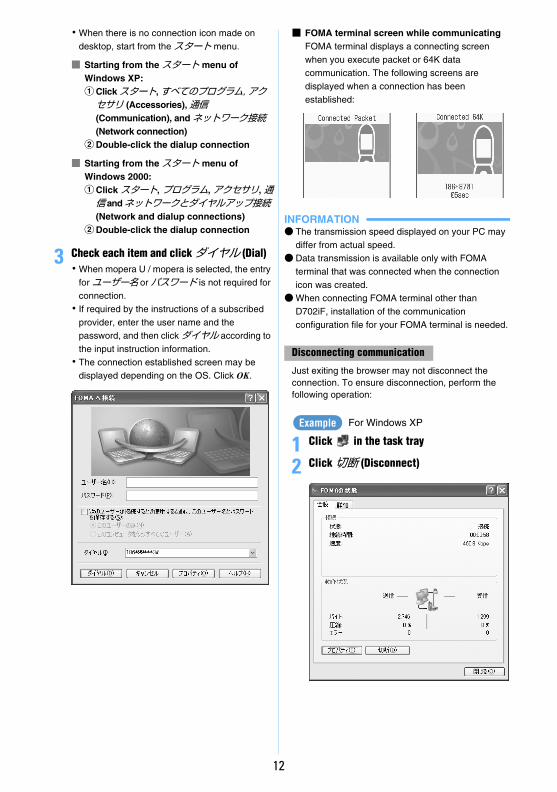
12
・When there is no connection icon made on desktop, start from the スタート menu.
■ Starting from the スタート menu of Windows XP:aClick スタート, すべてのプログラム, アクセサリ (Accessories), 通信 (Communication), and ネットワーク接続(Network connection)
bDouble-click the dialup connection
■ Starting from the スタート menu of Windows 2000:aClick スタート, プログラム, アクセサリ, 通信 and ネットワークとダイヤルアップ接続 (Network and dialup connections)
bDouble-click the dialup connection
3 Check each item and click ダイヤル (Dial)・When mopera U / mopera is selected, the entry
for ユーザー名 or パスワード is not required for connection.・ If required by the instructions of a subscribed
provider, enter the user name and the password, and then click ダイヤル according to the input instruction information.・ The connection established screen may be
displayed depending on the OS. Click OK.
■ FOMA terminal screen while communicatingFOMA terminal displays a connecting screen when you execute packet or 64K data communication. The following screens are displayed when a connection has been established:
INFORMATION● The transmission speed displayed on your PC may
differ from actual speed.● Data transmission is available only with FOMA
terminal that was connected when the connection icon was created.
●When connecting FOMA terminal other than D702iF, installation of the communication configuration file for your FOMA terminal is needed.
Just exiting the browser may not disconnect the connection. To ensure disconnection, perform the following operation:
For Windows XP
1 Click in the task tray
2 Click 切断 (Disconnect)
Disconnecting communication
Example
D702iF Manual for Data Commu.fm 12 ページ 2006年7月29日 土曜日 午後12時1分
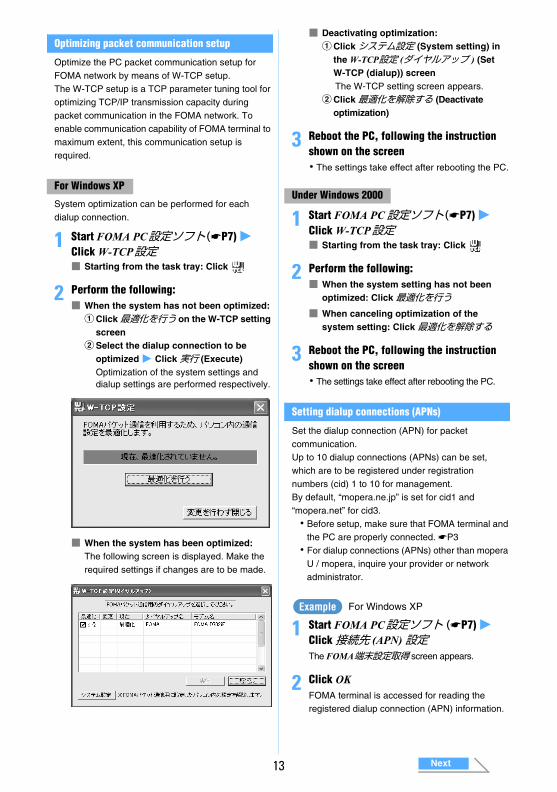
13
Optimizing packet communication setup
Optimize the PC packet communication setup for FOMA network by means of W-TCP setup.The W-TCP setup is a TCP parameter tuning tool for optimizing TCP/IP transmission capacity during packet communication in the FOMA network. To enable communication capability of FOMA terminal to maximum extent, this communication setup is required.
System optimization can be performed for each dialup connection.
1 Start FOMA PC設定ソフト (☛P7) z Click W-TCP設定 ■ Starting from the task tray: Click
2 Perform the following:■ When the system has not been optimized:
aClick 最適化を行う on the W-TCP setting screen
bSelect the dialup connection to be optimized z Click 実行 (Execute)Optimization of the system settings and dialup settings are performed respectively.
■ When the system has been optimized:The following screen is displayed. Make the required settings if changes are to be made.
■ Deactivating optimization:aClick システム設定 (System setting) in
the W-TCP設定 (ダイヤルアップ ) (Set W-TCP (dialup)) screenThe W-TCP setting screen appears.
bClick 最適化を解除する (Deactivate optimization)
3 Reboot the PC, following the instruction shown on the screen・ The settings take effect after rebooting the PC.
1 Start FOMA PC設定ソフト(☛P7) z Click W-TCP設定 ■ Starting from the task tray: Click
2 Perform the following:■ When the system setting has not been
optimized: Click 最適化を行う■ When canceling optimization of the
system setting: Click 最適化を解除する
3 Reboot the PC, following the instruction shown on the screen・ The settings take effect after rebooting the PC.
Setting dialup connections (APNs)
Set the dialup connection (APN) for packet communication.Up to 10 dialup connections (APNs) can be set, which are to be registered under registration numbers (cid) 1 to 10 for management. By default, “mopera.ne.jp” is set for cid1 and “mopera.net” for cid3.・ Before setup, make sure that FOMA terminal and
the PC are properly connected. ☛P3・ For dialup connections (APNs) other than mopera
U / mopera, inquire your provider or network administrator.
For Windows XP
1 Start FOMA PC設定ソフト (☛P7) z Click 接続先 (APN)設定 The FOMA端末設定取得 screen appears.
2 Click OKFOMA terminal is accessed for reading the registered dialup connection (APN) information.
For Windows XPUnder Windows 2000
Example
Next
D702iF Manual for Data Commu.fm 13 ページ 2006年7月29日 土曜日 午後12時1分

14
3 Make the dialup connection (APN) settings
■ Adding dialup connections (APNs): Click
追加■ Editing or correcting registered dialup
connections (APNs): Select the dialup connection (APN) from the list z Click 編集 (Edit)
■ Deleting the registered dialup connection (APN): Select the dialup connection (APN) from the list z Click 削除 (Delete)・ The dialup connection registered in cid1 and
cid3 cannot be deleted. (Selecting cid3 and clicking 削除 do not actually delete, but return to “mopera.net”.)
■ Saving settings as file: Click ファイル (File) and 名前を付けて保存 (Save as...) or 上書き保存 (Overwrite)・ Save the settings as a file to back up the
dialup connection (APN) settings registered in FOMA terminal or save the dialup connection (APN) settings during editing.
■ Importing settings from file: Click ファイル and 開く (Open)・ Import settings from a file to edit dialup
connections (APNs) saved on the PC or write to FOMA terminal.
■ Importing dialup connection (APN) information from FOMA terminal: Click ファイル and FOMA端末から設定を取得 (Import settings from FOMA terminal)Access manually to FOMA terminal to import the registered dialup connection (APN) settings.
■ Writing dialup connection (APN) information to FOMA terminal: Click FOMA 端末へ設定を書き込む (Write settings to FOMA terminal)The displayed dialup connection (APN) settings are written to FOMA terminal.
■ Creating dialup connections:aSelect an added or edited dialup
connection (APN) z Click ダイヤルアップ作成 (Create dialup connection)The FOMA端末設定書き込み (Write setting to FOMA terminal) screen appears.
bClick はい z Click OKThe パケット通信用ダイヤルアップの作成 (Create dialup connection for packet communication) screen appears.
cEnter any connection name z Click アカウント・パスワードの設定 (Set account and password)
dEnter the user name in ユーザー名 and the password in パスワード z Click OK・ Not required for mopera U / mopera for
connection.・ If you select すべてのユーザー for 使用可能ユーザーの選択 , all users that are allowed to logon to Windows can access the connection.・ Some providers may request you to
enter IP and DNS information settings. Should this be the case, click 詳細情報の設定 in the パケット通信用ダイヤルアップの作成 screen, register the required information and click OK.
eClick OK z Click OKfClick FOMA端末へ設定を書き込む
A confirmation screen appears asking whether to overwrite.
gClick はい z Click OK
INFORMATION● Since the dialup connection (APN) setting is
information saved in FOMA terminal, re-register the APN when connecting another FOMA terminal (terminal replaced by repair, etc.).
● To continue to use the dialup connection (APN) saved in the PC, save the registration number (cid) of the same APN to FOMA terminal.
D702iF Manual for Data Commu.fm 14 ページ 2006年7月29日 土曜日 午後12時1分
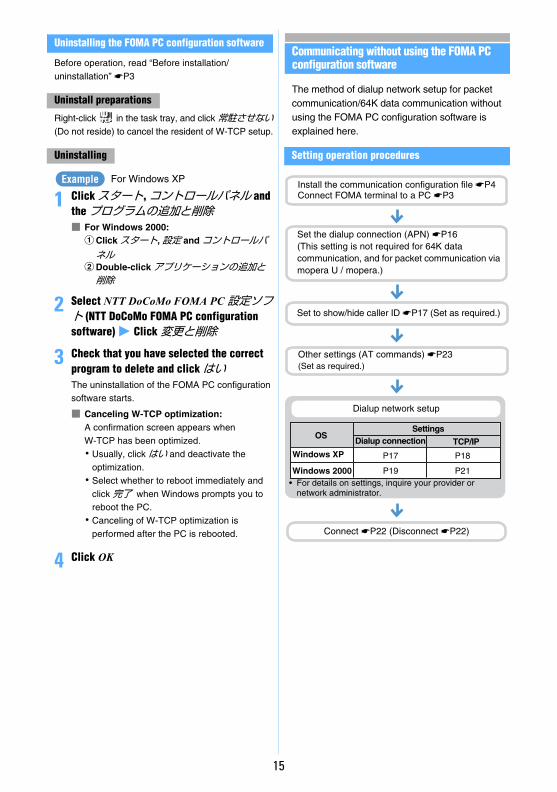
15
Uninstalling the FOMA PC configuration software
Before operation, read “Before installation/uninstallation” ☛P3
Right-click in the task tray, and click 常駐させない(Do not reside) to cancel the resident of W-TCP setup.
For Windows XP
1 Click スタート, コントロールパネル and the プログラムの追加と削除■ For Windows 2000:
aClick スタート, 設定 and コントロールパネル
bDouble-click アプリケーションの追加と削除
2 Select NTT DoCoMo FOMA PC 設定ソフト (NTT DoCoMo FOMA PC configuration software) z Click 変更と削除
3 Check that you have selected the correct program to delete and click はいThe uninstallation of the FOMA PC configuration software starts.
■ Canceling W-TCP optimization:A confirmation screen appears when W-TCP has been optimized.・ Usually, click はい and deactivate the
optimization.・ Select whether to reboot immediately and
click 完了 when Windows prompts you to reboot the PC.・ Canceling of W-TCP optimization is
performed after the PC is rebooted.
4 Click OK
Communication
Communicating without using the FOMA PC configuration software
The method of dialup network setup for packet communication/64K data communication without using the FOMA PC configuration software is explained here.
Setting operation procedures
Uninstall preparations
Uninstalling
Example Install the communication configuration file ☛P4Connect FOMA terminal to a PC ☛P3
Set the dialup connection (APN) ☛P16(This setting is not required for 64K data communication, and for packet communication via mopera U / mopera.)
Set to show/hide caller ID ☛P17 (Set as required.)
Other settings (AT commands) ☛P23(Set as required.)
Dialup network setup
OS
Windows XP
Windows 2000
Dialup connection TCP/IP
P17
P19
P18
P21• For details on settings, inquire your provider or
network administrator.
Connect ☛P22 (Disconnect ☛P22)
Settings
D702iF Manual for Data Commu.fm 15 ページ 2006年7月29日 土曜日 午後12時1分
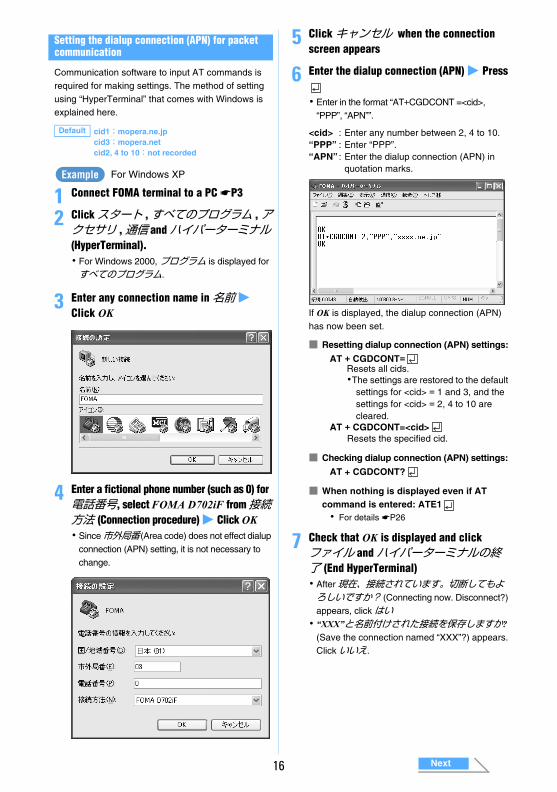
16
Setting the dialup connection (APN) for packet communication
Communication software to input AT commands is required for making settings. The method of setting using “HyperTerminal” that comes with Windows is explained here.
For Windows XP
1 Connect FOMA terminal to a PC ☛P3
2 Click スタート , すべてのプログラム , アクセサリ , 通信 andハイパーターミナル(HyperTerminal).・ For Windows 2000, プログラム is displayed for すべてのプログラム.
3 Enter any connection name in 名前 z Click OK
4 Enter a fictional phone number (such as 0) for 電話番号, select FOMA D702iF from 接続方法 (Connection procedure) z Click OK・ Since 市外局番 (Area code) does not effect dialup
connection (APN) setting, it is not necessary to change.
5 Click キャンセル when the connection screen appears
6 Enter the dialup connection (APN) z Press
・ Enter in the format “AT+CGDCONT =<cid>, “PPP”, “APN””.
If OK is displayed, the dialup connection (APN) has now been set.
■ Resetting dialup connection (APN) settings:
・The settings are restored to the default settings for <cid> = 1 and 3, and the settings for <cid> = 2, 4 to 10 are cleared.
■ Checking dialup connection (APN) settings:
■ When nothing is displayed even if AT command is entered: ATE1・ For details ☛P26
7 Check that OK is displayed and click ファイル and ハイパーターミナルの終了 (End HyperTerminal)・ After現在、接続されています。切断してもよろしいですか? (Connecting now. Disconnect?) appears, click はい・ “XXX”と名前付けされた接続を保存しますか?
(Save the connection named “XXX”?) appears. Click いいえ.
Default cid1:mopera.ne.jp cid3:mopera.netcid2, 4 to 10:not recorded
Example
<cid> : Enter any number between 2, 4 to 10.“PPP” : Enter “PPP”.“APN” : Enter the dialup connection (APN) in
quotation marks.
AT + CGDCONT=Resets all cids.
AT + CGDCONT=<cid>Resets the specified cid.
AT + CGDCONT?
Next
D702iF Manual for Data Commu.fm 16 ページ 2006年7月29日 土曜日 午後12時1分
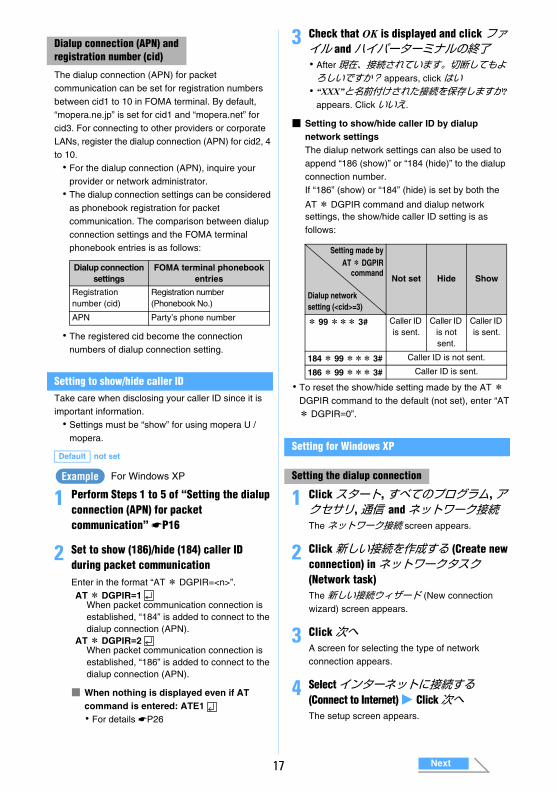
17
The dialup connection (APN) for packet communication can be set for registration numbers between cid1 to 10 in FOMA terminal. By default, “mopera.ne.jp” is set for cid1 and “mopera.net” for cid3. For connecting to other providers or corporate LANs, register the dialup connection (APN) for cid2, 4 to 10.・ For the dialup connection (APN), inquire your
provider or network administrator.・ The dialup connection settings can be considered
as phonebook registration for packet communication. The comparison between dialup connection settings and the FOMA terminal phonebook entries is as follows:
・ The registered cid become the connection numbers of dialup connection setting.
Setting to show/hide caller ID Take care when disclosing your caller ID since it is important information.・ Settings must be “show” for using mopera U /
mopera.
For Windows XP
1 Perform Steps 1 to 5 of “Setting the dialup connection (APN) for packet communication” ☛P16
2 Set to show (186)/hide (184) caller ID during packet communicationEnter in the format “AT* DGPIR=<n>”.
■ When nothing is displayed even if AT command is entered: ATE1・ For details ☛P26
3 Check that OK is displayed and click ファイル and ハイパーターミナルの終了・ After現在、接続されています。切断してもよろしいですか? appears, click はい・ “XXX”と名前付けされた接続を保存しますか?
appears. Click いいえ.
■ Setting to show/hide caller ID by dialup network settingsThe dialup network settings can also be used to append “186 (show)” or “184 (hide)” to the dialup connection number.If “186” (show) or “184” (hide) is set by both the
AT* DGPIR command and dialup network settings, the show/hide caller ID setting is as follows:
・ To reset the show/hide setting made by the AT *DGPIR command to the default (not set), enter “AT* DGPIR=0”.
Setting for Windows XP
1 Click スタート, すべてのプログラム, アクセサリ, 通信 and ネットワーク接続The ネットワーク接続 screen appears.
2 Click 新しい接続を作成する (Create new connection) in ネットワークタスク(Network task)The 新しい接続ウィザード (New connection wizard) screen appears.
3 Click 次へA screen for selecting the type of network connection appears.
4 Select インターネットに接続する(Connect to Internet) z Click 次へThe setup screen appears.
Dialup connection (APN) andregistration number (cid)
Dialup connection settings
FOMA terminal phonebook entries
Registration number (cid)
Registration number (Phonebook No.)
APN Party’s phone number
Default not set
AT* DGPIR=1When packet communication connection is established, “184” is added to connect to the dialup connection (APN).
AT* DGPIR=2When packet communication connection is established, “186” is added to connect to the dialup connection (APN).
Example Setting the dialup connection
Setting made byAT* DGPIR
command
Dialup network setting (<cid>=3)
Not set Hide Show
* 99*** 3# Caller ID is sent.
Caller ID is not sent.
Caller ID is sent.
184* 99*** 3# Caller ID is not sent.
186* 99*** 3# Caller ID is sent.
Next
D702iF Manual for Data Commu.fm 17 ページ 2006年7月29日 土曜日 午後12時1分

18
5 Select 接続を手動でセットアップする(Set up connection manually) z Click 次へThe Internet connection screen appears.
6 Select ダイヤルアップモデムを使用して接続する (Use dialup modem to connect) z Click 次へThe device selection screen appears.・ If there is only one modem installed, the device
selection screen is not displayed. Go to Step 8.
7 Select モデムー FOMA D702iF (COMx)*1 (Modem: FOMA D702iF (COMx)) z Click 次へ・ Check that only モデム-FOMA D702iF
(COMx)*1 is selected.*1 “x” of COMx varies by PC to be used.
8 Enter any connection name in ISP名 (ISP name) z Click 次へ
9 Enter the number of the dialup connection (one-byte) in 電話番号 z Click 次へ■ For packet communication:
Enter “* 99*** <cid>#”. ・ For <cid>, enter the cid number registered
in “Setting the dialup connection (APN) for packet communication” ☛P16. “*99***3#” for mopera U and “*99***1#” for mopera.
■ For 64K data communication:Enter the dialup connection phone number.・ “*8701” for mopera U and “ *9601” for
mopera.
10 Set each item z Click 次へ・When the dialup connection is mopera U /
mopera, the entry for ユーザー名 , パスワード and パスワードの確認入力 is not required for connection. Set other items as required.
11 Click 完了
12 Check the settings and click キャンセル・ Check the settings without connecting to the
Internet immediately.
1 Select the created dialup connection z Click ファイル and プロパティ (Properties)
Setting TCP/IP protocol
Next
D702iF Manual for Data Commu.fm 18 ページ 2006年7月29日 土曜日 午後12時1分
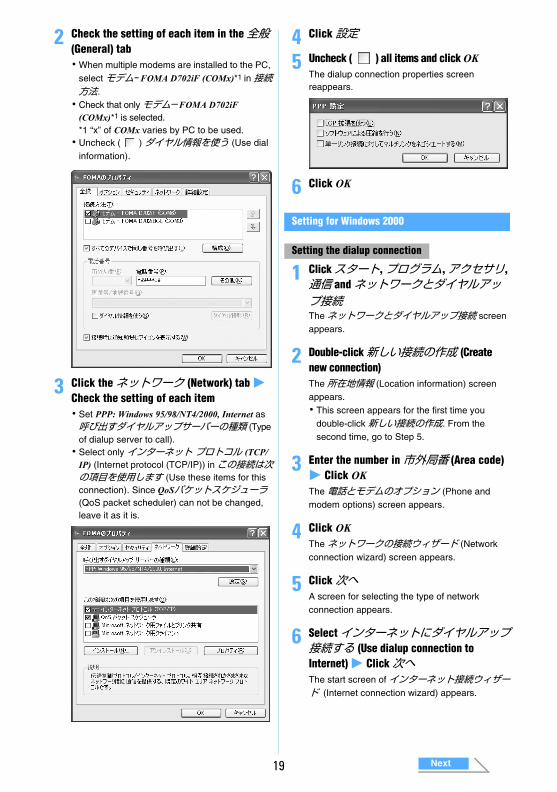
19
2 Check the setting of each item in the 全般 (General) tab・When multiple modems are installed to the PC,
select モデムー FOMA D702iF (COMx)*1 in 接続方法.・ Check that only モデム-FOMA D702iF
(COMx)*1 is selected.*1 “x” of COMx varies by PC to be used.・ Uncheck ( ) ダイヤル情報を使う (Use dial
information).
3 Click the ネットワーク (Network) tab z Check the setting of each item・ Set PPP: Windows 95/98/NT4/2000, Internet as 呼び出すダイヤルアップサーバーの種類 (Type of dialup server to call).・ Select only インターネット プロトコル (TCP/
IP) (Internet protocol (TCP/IP)) in この接続は次の項目を使用します (Use these items for this connection). Since QoSパケットスケジューラ(QoS packet scheduler) can not be changed, leave it as it is.
4 Click 設定
5 Uncheck ( ) all items and click OKThe dialup connection properties screen reappears.
6 Click OK
Setting for Windows 2000
1 Click スタート, プログラム, アクセサリ, 通信 and ネットワークとダイヤルアップ接続Theネットワークとダイヤルアップ接続 screen appears.
2 Double-click 新しい接続の作成 (Create new connection)The所在地情報 (Location information) screen appears.・ This screen appears for the first time you
double-click 新しい接続の作成. From the second time, go to Step 5.
3 Enter the number in 市外局番 (Area code) z Click OKThe 電話とモデムのオプション (Phone and modem options) screen appears.
4 Click OKThe ネットワークの接続ウィザード (Network connection wizard) screen appears.
5 Click 次へA screen for selecting the type of network connection appears.
6 Select インターネットにダイヤルアップ接続する (Use dialup connection to Internet) z Click 次へThe start screen of インターネット接続ウィザード (Internet connection wizard) appears.
Setting the dialup connection
Next
D702iF Manual for Data Commu.fm 19 ページ 2006年7月29日 土曜日 午後12時1分
20
7 Select インターネット接続を手動で設定するか、またはローカルエリアネットワーク (LAN)を使って接続します (Set the Internet connection manually or connect using local area network (LAN)) z Click 次へThe Internet connection setting selection screen appears.
8 Select 電話回線とモデムを使ってインターネットに接続します (Connect to Internet using phone line and modem) z Click 次へThe modem selection screen appears.・ This screen is not displayed if multiple modems
are not installed. Go to Step 10.
9 Check that インターネットへの接続に使うモデムを選択する (Select modem to use for connection to Internet) is set to FOMA D702iF and click 次へThe Internet account connection information screen appears.・ If FOMA D702iF is not set, set FOMA D702iF.
10 Enter the number of dialup connection (one-byte) in 電話番号 z Click 詳細設定(Detailed settings)・ Uncheck ( ) 市外局番とダイヤル情報を使う
(Use area code and dial information).
■ For packet communication:
Enter “*99***<cid>#”.・ For <cid>, enter the cid number registered in
“Setting the dialup connection (APN) for packet communication” ☛P16. “* 99*** 3#” for mopera U and “* 99*** 1#” for mopera.
■ For 64K data communication:Enter the dialup connection phone number.
・ “* 8701” for mopera U and “* 9601” for mopera.
11 Set each item in the 接続 tab as shown below
12 Click the アドレス (Address) tab z Set each item as shown below
13 Click OKThe Internet account connection information screen reappears.
14 Click 次へThe Internet account logon information screen appears.
15 Enter the user name in ユーザー名 and the password in パスワード z Click 次へ・When the dialup connection is mopera U /
mopera, the entry for ユーザー名 or パスワード is not required for connection. When a confirmation screen for no entry appears, click はい.
Next
D702iF Manual for Data Commu.fm 20 ページ 2006年7月29日 土曜日 午後12時1分
21
16 Enter any connection name in 接続名 z Click 次へ
17 Select いいえ z Click 次へ
18 Click 完了Theネットワークとダイヤルアップ接続 screen reappears.
1 Select the created dialup connection z Click ファイル and プロパティ
2 Check the setting of each item in the 全般 tab・ If multiple modems are installed in the PC,
select モデムー FOMA D702iF (COMx)*1 in 接続の方法 (Connection procedure).When the modem is changed, all items in 電話番号 is initialized. Re-enter the dialup connection phone number in that case.・ Check that only モデム-FOMA D702iF
(COMx)*1 is selected.*1 “x” of COMx varies by PC to be used.・ Uncheck ( ) ダイヤル情報を使う.
3 Click the ネットワーク tab z Check the setting of each item・ Set PPP: Windows 95/98/NT4/2000, Internet as 呼び出すダイヤルアップサーバーの種類.・ Select only インターネット プロトコル (TCP/
IP) for component.
4 Click 設定
Setting TCP/IP protocol
Next
D702iF Manual for Data Commu.fm 21 ページ 2006年7月29日 土曜日 午後12時1分
22
5 Uncheck all items ( ) and click OKThe dialup connection properties screen reappears.
6 Click OK
Connecting through dial-up
The method of dialup connection for packet communication/64K data communication is explained here.
For Windows XP
1 Connect FOMA terminal to a PC ☛P3
2 Click スタート, すべてのプログラム, アクセサリ, 通信 and ネットワーク接続The ネットワーク接続 screen appears.
■ Under the Windows 2000:aClick スタート , プログラム , アクセサリ , 通信 and ネットワークとダイヤルアップ接続 .
3 Double-click the dialup connection
4 Check each item and click ダイヤル ・ The number of dialup connection set for the
dialup network is shown in ダイヤル or 電話番号.・When the dialup connection is mopera U /
mopera, the entry for ユーザー名 or パスワード is not required for connection.
Just exiting the browser may not disconnect the connection. To ensure disconnection, perform the following operation:
1 Click in the task tray
2 Click 切断
Example
Disconnecting communication
D702iF Manual for Data Commu.fm 22 ページ 2006年7月29日 土曜日 午後12時1分
23
AT command
AT commands are commands for setting FOMA terminal functions using a PC.FOMA terminals comply with AT commands and support some extended commands and proprietary AT commands.
About the AT command
■ AT command input format“AT” must be entered before each AT command. Commands must be entered in one-byte alphanumeric characters. An input example is as follows:
AT commands and their parameters (numbers or symbols) must be entered on a single line. Enter all the characters from the first character to the character just before in a single line. Up to 160 characters (including “AT”) can be entered in each line.
■ AT command input modeTo operate FOMA terminal using AT commands, the PC must be in the terminal mode.Terminal mode is a mode that lets the PC operate as a single communication terminal. Characters entered from the keyboard are sent to the device or line connected to the communication port.・ Offline mode
FOMA terminal in standby status. Usually, FOMA terminal must be in this status to use AT commands to control it.・ Online data mode
FOMA terminal is in the communication mode. If you enter AT commands when FOMA terminal is performing communication, the received characters are sent directly to the communication receiver and may cause the receiver’s modem to malfunction. Do not enter AT commands while FOMA terminal is performing communication.・ Online command mode
AT commands allow you to operate FOMA terminal even when FOMA terminal is in the communication mode. These operations make it possible to execute AT commands without interfering with the connection to the communication receiver, and normal communication can be continued after the commands have finished executing.
Switching between the online data mode and online command mode
To switch FOMA terminal from the online data mode to online command mode, you can use either of the following procedures:・ Enter the “+++” command or the code set in the
“S2” register.・ Turn the RS-232C*1 ER signal off when set in
“AT&D1”.To switch from the online command mode to online data mode, enter “ATO ”.*1 The USB interface emulates an RS-232C signal line,
so RS-232C signal control using communication applications is possible.
ATD* 99*** 3#
Press Enter key.ParameterCommand
D702iF Manual for Data Commu.fm 23 ページ 2006年7月29日 土曜日 午後12時1分
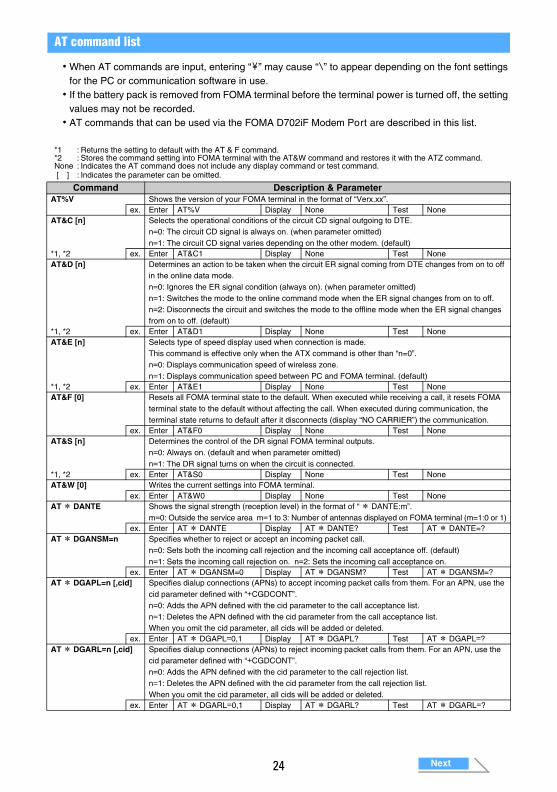
24
AT command list
・When AT commands are input, entering “¥” may cause “\” to appear depending on the font settings for the PC or communication software in use.・ If the battery pack is removed from FOMA terminal before the terminal power is turned off, the setting
values may not be recorded.・ AT commands that can be used via the FOMA D702iF Modem Port are described in this list.
*1 : Returns the setting to default with the AT & F command.*2 : Stores the command setting into FOMA terminal with the AT&W command and restores it with the ATZ command.None : Indicates the AT command does not include any display command or test command. [ ] : Indicates the parameter can be omitted.
Command Description & ParameterAT%V Shows the version of your FOMA terminal in the format of “Verx.xx”.
ex. Enter AT%V Display None Test NoneAT&C [n] Selects the operational conditions of the circuit CD signal outgoing to DTE.
n=0: The circuit CD signal is always on. (when parameter omitted)n=1: The circuit CD signal varies depending on the other modem. (default)
*1, *2 ex. Enter AT&C1 Display None Test NoneAT&D [n] Determines an action to be taken when the circuit ER signal coming from DTE changes from on to off
in the online data mode.n=0: Ignores the ER signal condition (always on). (when parameter omitted)n=1: Switches the mode to the online command mode when the ER signal changes from on to off.n=2: Disconnects the circuit and switches the mode to the offline mode when the ER signal changes from on to off. (default)
*1, *2 ex. Enter AT&D1 Display None Test NoneAT&E [n] Selects type of speed display used when connection is made.
This command is effective only when the ATX command is other than “n=0”.n=0: Displays communication speed of wireless zone.n=1: Displays communication speed between PC and FOMA terminal. (default)
*1, *2 ex. Enter AT&E1 Display None Test NoneAT&F [0] Resets all FOMA terminal state to the default. When executed while receiving a call, it resets FOMA
terminal state to the default without affecting the call. When executed during communication, the terminal state returns to default after it disconnects (display “NO CARRIER”) the communication.
ex. Enter AT&F0 Display None Test NoneAT&S [n] Determines the control of the DR signal FOMA terminal outputs.
n=0: Always on. (default and when parameter omitted)n=1: The DR signal turns on when the circuit is connected.
*1, *2 ex. Enter AT&S0 Display None Test NoneAT&W [0] Writes the current settings into FOMA terminal.
ex. Enter AT&W0 Display None Test NoneAT* DANTE Shows the signal strength (reception level) in the format of “* DANTE:m”.
m=0: Outside the service area m=1 to 3: Number of antennas displayed on FOMA terminal (m=1:0 or 1)ex. Enter AT* DANTE Display AT* DANTE? Test AT* DANTE=?
AT* DGANSM=n Specifies whether to reject or accept an incoming packet call.n=0: Sets both the incoming call rejection and the incoming call acceptance off. (default)n=1: Sets the incoming call rejection on. n=2: Sets the incoming call acceptance on.
ex. Enter AT* DGANSM=0 Display AT* DGANSM? Test AT* DGANSM=?AT* DGAPL=n [,cid] Specifies dialup connections (APNs) to accept incoming packet calls from them. For an APN, use the
cid parameter defined with “+CGDCONT”.n=0: Adds the APN defined with the cid parameter to the call acceptance list.n=1: Deletes the APN defined with the cid parameter from the call acceptance list.When you omit the cid parameter, all cids will be added or deleted.
ex. Enter AT* DGAPL=0,1 Display AT* DGAPL? Test AT* DGAPL=?AT* DGARL=n [,cid] Specifies dialup connections (APNs) to reject incoming packet calls from them. For an APN, use the
cid parameter defined with “+CGDCONT”.n=0: Adds the APN defined with the cid parameter to the call rejection list.n=1: Deletes the APN defined with the cid parameter from the call rejection list.When you omit the cid parameter, all cids will be added or deleted.
ex. Enter AT* DGARL=0,1 Display AT* DGARL? Test AT* DGARL=?
Next
D702iF Manual for Data Commu.fm 24 ページ 2006年7月29日 土曜日 午後12時1分
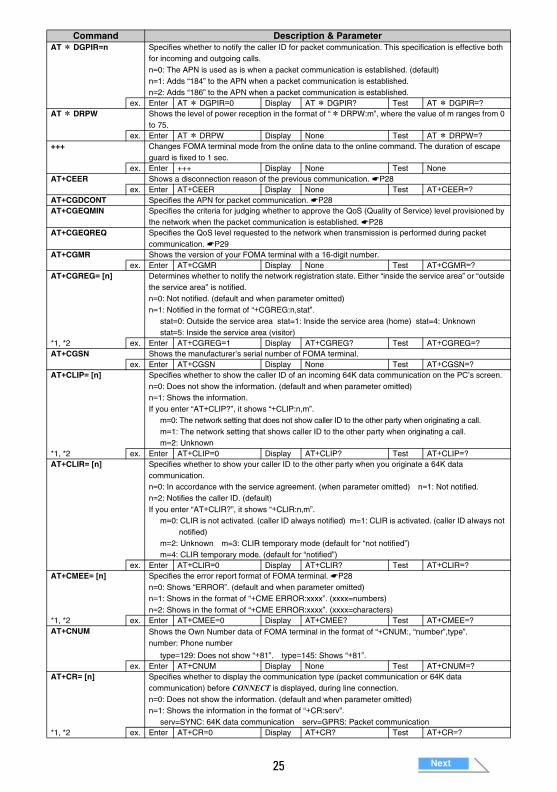
25
AT* DGPIR=n Specifies whether to notify the caller ID for packet communication. This specification is effective both for incoming and outgoing calls.n=0: The APN is used as is when a packet communication is established. (default)n=1: Adds “184” to the APN when a packet communication is established.n=2: Adds “186” to the APN when a packet communication is established.
ex. Enter AT* DGPIR=0 Display AT* DGPIR? Test AT* DGPIR=?AT* DRPW Shows the level of power reception in the format of “*DRPW:m”, where the value of m ranges from 0
to 75.ex. Enter AT* DRPW Display None Test AT* DRPW=?
+++ Changes FOMA terminal mode from the online data to the online command. The duration of escape guard is fixed to 1 sec.
ex. Enter +++ Display None Test NoneAT+CEER Shows a disconnection reason of the previous communication. ☛P28
ex. Enter AT+CEER Display None Test AT+CEER=?AT+CGDCONT Specifies the APN for packet communication. ☛P28AT+CGEQMIN Specifies the criteria for judging whether to approve the QoS (Quality of Service) level provisioned by
the network when the packet communication is established. ☛P28AT+CGEQREQ Specifies the QoS level requested to the network when transmission is performed during packet
communication. ☛P29AT+CGMR Shows the version of your FOMA terminal with a 16-digit number.
ex. Enter AT+CGMR Display None Test AT+CGMR=?AT+CGREG= [n] Determines whether to notify the network registration state. Either “inside the service area” or “outside
the service area” is notified.n=0: Not notified. (default and when parameter omitted) n=1: Notified in the format of “+CGREG:n,stat”.
stat=0: Outside the service area stat=1: Inside the service area (home) stat=4: Unknown stat=5: Inside the service area (visitor)
*1, *2 ex. Enter AT+CGREG=1 Display AT+CGREG? Test AT+CGREG=?AT+CGSN Shows the manufacturer’s serial number of FOMA terminal.
ex. Enter AT+CGSN Display None Test AT+CGSN=?AT+CLIP= [n] Specifies whether to show the caller ID of an incoming 64K data communication on the PC’s screen.
n=0: Does not show the information. (default and when parameter omitted)n=1: Shows the information.If you enter “AT+CLIP?”, it shows “+CLIP:n,m”.
m=0: The network setting that does not show caller ID to the other party when originating a call.m=1: The network setting that shows caller ID to the other party when originating a call. m=2: Unknown
*1, *2 ex. Enter AT+CLIP=0 Display AT+CLIP? Test AT+CLIP=?AT+CLIR= [n] Specifies whether to show your caller ID to the other party when you originate a 64K data
communication.n=0: In accordance with the service agreement. (when parameter omitted) n=1: Not notified.n=2: Notifies the caller ID. (default)If you enter “AT+CLIR?”, it shows “+CLIR:n,m”.
m=0: CLIR is not activated. (caller ID always notified) m=1: CLIR is activated. (caller ID always not notified)
m=2: Unknown m=3: CLIR temporary mode (default for “not notified”)m=4: CLIR temporary mode. (default for “notified”)
ex. Enter AT+CLIR=0 Display AT+CLIR? Test AT+CLIR=?AT+CMEE= [n] Specifies the error report format of FOMA terminal. ☛P28
n=0: Shows “ERROR”. (default and when parameter omitted)n=1: Shows in the format of “+CME ERROR:xxxx”. (xxxx=numbers)n=2: Shows in the format of “+CME ERROR:xxxx”. (xxxx=characters)
*1, *2 ex. Enter AT+CMEE=0 Display AT+CMEE? Test AT+CMEE=?AT+CNUM Shows the Own Number data of FOMA terminal in the format of “+CNUM:, “number”,type”.
number: Phone number
type=129: Does not show “+81”. type=145: Shows “+81”.ex. Enter AT+CNUM Display None Test AT+CNUM=?
AT+CR= [n] Specifies whether to display the communication type (packet communication or 64K data communication) before CONNECT is displayed, during line connection.n=0: Does not show the information. (default and when parameter omitted)n=1: Shows the information in the format of “+CR:serv”.
serv=SYNC: 64K data communication serv=GPRS: Packet communication*1, *2 ex. Enter AT+CR=0 Display AT+CR? Test AT+CR=?
Command Description & Parameter
Next
D702iF Manual for Data Commu.fm 25 ページ 2006年7月29日 土曜日 午後12時1分
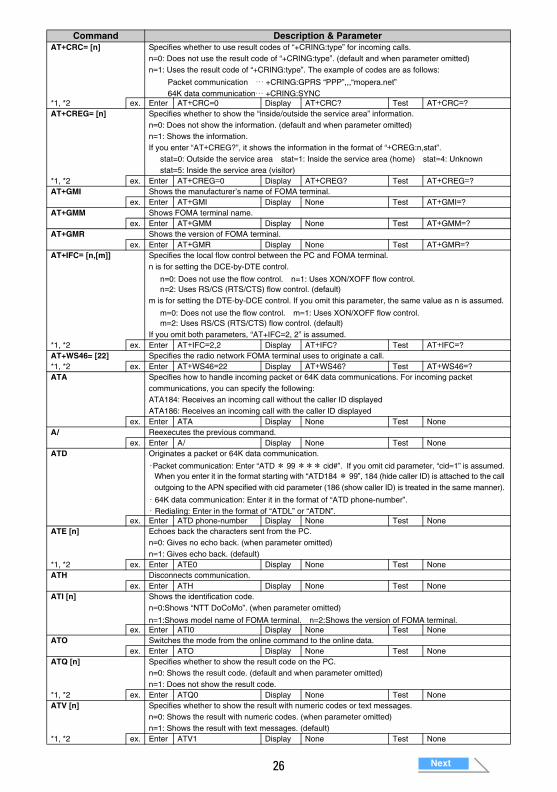
26
AT+CRC= [n] Specifies whether to use result codes of “+CRING:type” for incoming calls. n=0: Does not use the result code of “+CRING:type”. (default and when parameter omitted)n=1: Uses the result code of “+CRING:type”. The example of codes are as follows:
Packet communication … +CRING:GPRS “PPP”,,,“mopera.net”64K data communication… +CRING:SYNC
*1, *2 ex. Enter AT+CRC=0 Display AT+CRC? Test AT+CRC=?AT+CREG= [n] Specifies whether to show the “inside/outside the service area” information.
n=0: Does not show the information. (default and when parameter omitted) n=1: Shows the information.If you enter “AT+CREG?”, it shows the information in the format of “+CREG:n,stat”.
stat=0: Outside the service area stat=1: Inside the service area (home) stat=4: Unknown stat=5: Inside the service area (visitor)
*1, *2 ex. Enter AT+CREG=0 Display AT+CREG? Test AT+CREG=?AT+GMI Shows the manufacturer’s name of FOMA terminal.
ex. Enter AT+GMI Display None Test AT+GMI=?AT+GMM Shows FOMA terminal name.
ex. Enter AT+GMM Display None Test AT+GMM=?AT+GMR Shows the version of FOMA terminal.
ex. Enter AT+GMR Display None Test AT+GMR=?AT+IFC= [n,[m]] Specifies the local flow control between the PC and FOMA terminal.
n is for setting the DCE-by-DTE control.
n=0: Does not use the flow control. n=1: Uses XON/XOFF flow control.n=2: Uses RS/CS (RTS/CTS) flow control. (default)
m is for setting the DTE-by-DCE control. If you omit this parameter, the same value as n is assumed.
m=0: Does not use the flow control. m=1: Uses XON/XOFF flow control.m=2: Uses RS/CS (RTS/CTS) flow control. (default)
If you omit both parameters, “AT+IFC=2, 2” is assumed.*1, *2 ex. Enter AT+IFC=2,2 Display AT+IFC? Test AT+IFC=?AT+WS46= [22] Specifies the radio network FOMA terminal uses to originate a call.*1, *2 ex. Enter AT+WS46=22 Display AT+WS46? Test AT+WS46=?ATA Specifies how to handle incoming packet or 64K data communications. For incoming packet
communications, you can specify the following:ATA184: Receives an incoming call without the caller ID displayed ATA186: Receives an incoming call with the caller ID displayed
ex. Enter ATA Display None Test NoneA/ Reexecutes the previous command.
ex. Enter A/ Display None Test NoneATD Originates a packet or 64K data communication.
・Packet communication: Enter “ATD* 99*** cid#”. If you omit cid parameter, “cid=1” is assumed. When you enter it in the format starting with “ATD184* 99”, 184 (hide caller ID) is attached to the call outgoing to the APN specified with cid parameter (186 (show caller ID) is treated in the same manner).
・64K data communication: Enter it in the format of “ATD phone-number”.・Redialing: Enter in the format of “ATDL” or “ATDN”.
ex. Enter ATD phone-number Display None Test NoneATE [n] Echoes back the characters sent from the PC.
n=0: Gives no echo back. (when parameter omitted)n=1: Gives echo back. (default)
*1, *2 ex. Enter ATE0 Display None Test NoneATH Disconnects communication.
ex. Enter ATH Display None Test NoneATI [n] Shows the identification code.
n=0:Shows “NTT DoCoMo”. (when parameter omitted)
n=1:Shows model name of FOMA terminal. n=2:Shows the version of FOMA terminal.ex. Enter ATI0 Display None Test None
ATO Switches the mode from the online command to the online data.ex. Enter ATO Display None Test None
ATQ [n] Specifies whether to show the result code on the PC.n=0: Shows the result code. (default and when parameter omitted)n=1: Does not show the result code.
*1, *2 ex. Enter ATQ0 Display None Test NoneATV [n] Specifies whether to show the result with numeric codes or text messages.
n=0: Shows the result with numeric codes. (when parameter omitted)n=1: Shows the result with text messages. (default)
*1, *2 ex. Enter ATV1 Display None Test None
Command Description & Parameter
Next
D702iF Manual for Data Commu.fm 26 ページ 2006年7月29日 土曜日 午後12時1分
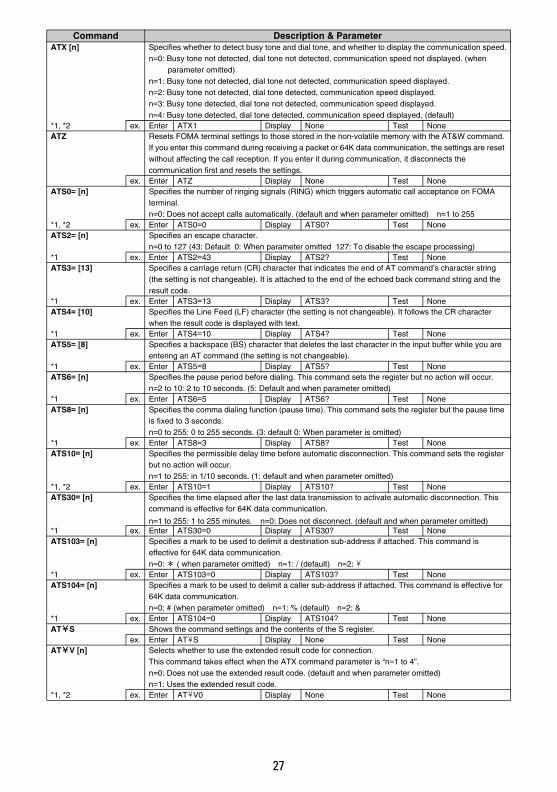
27
ATX [n] Specifies whether to detect busy tone and dial tone, and whether to display the communication speed.n=0: Busy tone not detected, dial tone not detected, communication speed not displayed. (when
parameter omitted)n=1: Busy tone not detected, dial tone not detected, communication speed displayed.n=2: Busy tone not detected, dial tone detected, communication speed displayed.n=3: Busy tone detected, dial tone not detected, communication speed displayed.n=4: Busy tone detected, dial tone detected, communication speed displayed. (default)
*1, *2 ex. Enter ATX1 Display None Test NoneATZ Resets FOMA terminal settings to those stored in the non-volatile memory with the AT&W command.
If you enter this command during receiving a packet or 64K data communication, the settings are reset without affecting the call reception. If you enter it during communication, it disconnects the communication first and resets the settings.
ex. Enter ATZ Display None Test NoneATS0= [n] Specifies the number of ringing signals (RING) which triggers automatic call acceptance on FOMA
terminal.n=0: Does not accept calls automatically. (default and when parameter omitted) n=1 to 255
*1, *2 ex. Enter ATS0=0 Display ATS0? Test NoneATS2= [n] Specifies an escape character.
n=0 to 127 (43: Default 0: When parameter omitted 127: To disable the escape processing)*1 ex. Enter ATS2=43 Display ATS2? Test NoneATS3= [13] Specifies a carriage return (CR) character that indicates the end of AT command’s character string
(the setting is not changeable). It is attached to the end of the echoed back command string and the result code.
*1 ex. Enter ATS3=13 Display ATS3? Test NoneATS4= [10] Specifies the Line Feed (LF) character (the setting is not changeable). It follows the CR character
when the result code is displayed with text.*1 ex. Enter ATS4=10 Display ATS4? Test NoneATS5= [8] Specifies a backspace (BS) character that deletes the last character in the input buffer while you are
entering an AT command (the setting is not changeable).*1 ex. Enter ATS5=8 Display ATS5? Test NoneATS6= [n] Specifies the pause period before dialing. This command sets the register but no action will occur.
n=2 to 10: 2 to 10 seconds. (5: Default and when parameter omitted)*1 ex. Enter ATS6=5 Display ATS6? Test NoneATS8= [n] Specifies the comma dialing function (pause time). This command sets the register but the pause time
is fixed to 3 seconds.n=0 to 255: 0 to 255 seconds. (3: default 0: When parameter is omitted)
*1 ex. Enter ATS8=3 Display ATS8? Test NoneATS10= [n] Specifies the permissible delay time before automatic disconnection. This command sets the register
but no action will occur.n=1 to 255: in 1/10 seconds. (1: default and when parameter omitted)
*1, *2 ex. Enter ATS10=1 Display ATS10? Test NoneATS30= [n] Specifies the time elapsed after the last data transmission to activate automatic disconnection. This
command is effective for 64K data communication.
n=1 to 255: 1 to 255 minutes. n=0: Does not disconnect. (default and when parameter omitted)*1 ex. Enter ATS30=0 Display ATS30? Test NoneATS103= [n] Specifies a mark to be used to delimit a destination sub-address if attached. This command is
effective for 64K data communication.n=0:* ( when parameter omitted) n=1: / (default) n=2: ¥
*1 ex. Enter ATS103=0 Display ATS103? Test NoneATS104= [n] Specifies a mark to be used to delimit a caller sub-address if attached. This command is effective for
64K data communication.n=0: # (when parameter omitted) n=1: % (default) n=2: &
*1 ex. Enter ATS104=0 Display ATS104? Test NoneAT¥S Shows the command settings and the contents of the S register.
ex. Enter AT¥S Display None Test NoneAT¥V [n] Selects whether to use the extended result code for connection.
This command takes effect when the ATX command parameter is “n=1 to 4”.n=0: Does not use the extended result code. (default and when parameter omitted)n=1: Uses the extended result code.
*1, *2 ex. Enter AT¥V0 Display None Test None
Command Description & Parameter
D702iF Manual for Data Commu.fm 27 ページ 2006年7月29日 土曜日 午後12時1分
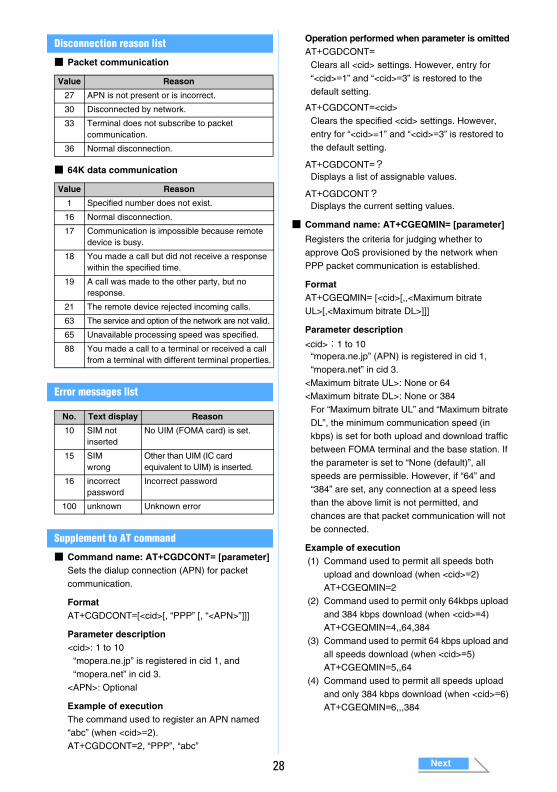
28
Disconnection reason list
■ Packet communication
■ 64K data communication
Error messages list
Supplement to AT command
■ Command name: AT+CGDCONT= [parameter]Sets the dialup connection (APN) for packet communication.
FormatAT+CGDCONT=[<cid>[, “PPP” [, “<APN>”]]]
Parameter description<cid>: 1 to 10
“mopera.ne.jp” is registered in cid 1, and “mopera.net” in cid 3.
<APN>: Optional
Example of executionThe command used to register an APN named “abc” (when <cid>=2).AT+CGDCONT=2, “PPP”, “abc”
Operation performed when parameter is omittedAT+CGDCONT=
Clears all <cid> settings. However, entry for “<cid>=1” and “<cid>=3” is restored to the default setting.
AT+CGDCONT=<cid>Clears the specified <cid> settings. However, entry for “<cid>=1” and “<cid>=3” is restored to the default setting.
AT+CGDCONT=?Displays a list of assignable values.
AT+CGDCONT?Displays the current setting values.
■ Command name: AT+CGEQMIN= [parameter]
Registers the criteria for judging whether to approve QoS provisioned by the network when PPP packet communication is established.
FormatAT+CGEQMIN= [<cid>[,,<Maximum bitrate UL>[,<Maximum bitrate DL>]]]
Parameter description
<cid>:1 to 10“mopera.ne.jp” (APN) is registered in cid 1, “mopera.net” in cid 3.
<Maximum bitrate UL>: None or 64<Maximum bitrate DL>: None or 384
For “Maximum bitrate UL” and “Maximum bitrate DL”, the minimum communication speed (in kbps) is set for both upload and download traffic between FOMA terminal and the base station. If the parameter is set to “None (default)”, all speeds are permissible. However, if “64” and “384” are set, any connection at a speed less than the above limit is not permitted, and chances are that packet communication will not be connected.
Example of execution (1) Command used to permit all speeds both
upload and download (when <cid>=2)AT+CGEQMIN=2
(2) Command used to permit only 64kbps upload and 384 kbps download (when <cid>=4)AT+CGEQMIN=4,,64,384
(3) Command used to permit 64 kbps upload and all speeds download (when <cid>=5)AT+CGEQMIN=5,,64
(4) Command used to permit all speeds upload and only 384 kbps download (when <cid>=6)AT+CGEQMIN=6,,,384
Value Reason
27 APN is not present or is incorrect.
30 Disconnected by network.
33 Terminal does not subscribe to packet communication.
36 Normal disconnection.
Value Reason
1 Specified number does not exist.
16 Normal disconnection.
17 Communication is impossible because remote device is busy.
18 You made a call but did not receive a response within the specified time.
19 A call was made to the other party, but no response.
21 The remote device rejected incoming calls.
63 The service and option of the network are not valid.
65 Unavailable processing speed was specified.
88 You made a call to a terminal or received a call from a terminal with different terminal properties.
No. Text display Reason
10 SIM notinserted
No UIM (FOMA card) is set.
15 SIMwrong
Other than UIM (IC card equivalent to UIM) is inserted.
16 incorrect password
Incorrect password
100 unknown Unknown error
Next
D702iF Manual for Data Commu.fm 28 ページ 2006年7月29日 土曜日 午後12時1分
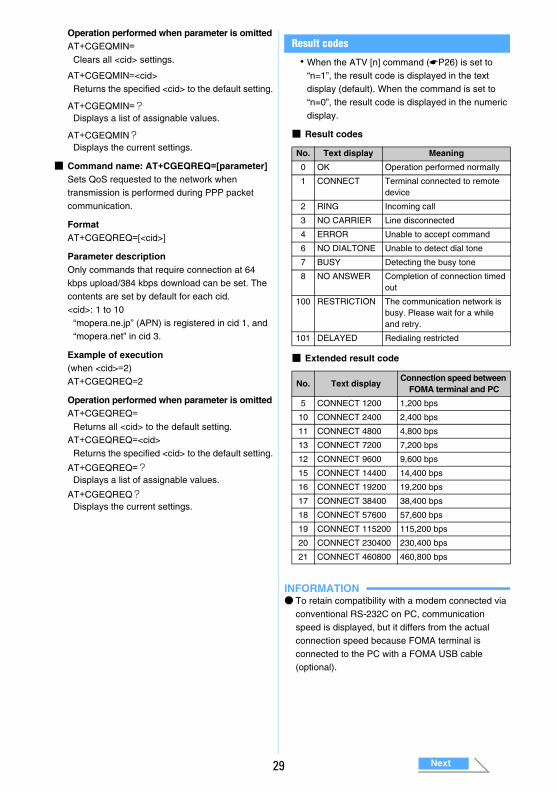
29
Operation performed when parameter is omittedAT+CGEQMIN=
Clears all <cid> settings.
AT+CGEQMIN=<cid>Returns the specified <cid> to the default setting.
AT+CGEQMIN=?Displays a list of assignable values.
AT+CGEQMIN?Displays the current settings.
■ Command name: AT+CGEQREQ=[parameter]Sets QoS requested to the network when transmission is performed during PPP packet communication.
FormatAT+CGEQREQ=[<cid>]
Parameter descriptionOnly commands that require connection at 64 kbps upload/384 kbps download can be set. The contents are set by default for each cid.<cid>: 1 to 10
“mopera.ne.jp” (APN) is registered in cid 1, and “mopera.net” in cid 3.
Example of execution(when <cid>=2)AT+CGEQREQ=2
Operation performed when parameter is omittedAT+CGEQREQ=
Returns all <cid> to the default setting.AT+CGEQREQ=<cid>
Returns the specified <cid> to the default setting.
AT+CGEQREQ=?Displays a list of assignable values.
AT+CGEQREQ?Displays the current settings.
Result codes
・When the ATV [n] command (☛P26) is set to “n=1”, the result code is displayed in the text display (default). When the command is set to “n=0”, the result code is displayed in the numeric display.
■ Result codes
■ Extended result code
INFORMATION● To retain compatibility with a modem connected via
conventional RS-232C on PC, communication speed is displayed, but it differs from the actual connection speed because FOMA terminal is connected to the PC with a FOMA USB cable (optional).
No. Text display Meaning
0 OK Operation performed normally
1 CONNECT Terminal connected to remote device
2 RING Incoming call
3 NO CARRIER Line disconnected
4 ERROR Unable to accept command
6 NO DIALTONE Unable to detect dial tone
7 BUSY Detecting the busy tone
8 NO ANSWER Completion of connection timed out
100 RESTRICTION The communication network is busy. Please wait for a while and retry.
101 DELAYED Redialing restricted
No. Text displayConnection speed between
FOMA terminal and PC
5 CONNECT 1200 1,200 bps
10 CONNECT 2400 2,400 bps
11 CONNECT 4800 4,800 bps
13 CONNECT 7200 7,200 bps
12 CONNECT 9600 9,600 bps
15 CONNECT 14400 14,400 bps
16 CONNECT 19200 19,200 bps
17 CONNECT 38400 38,400 bps
18 CONNECT 57600 57,600 bps
19 CONNECT 115200 115,200 bps
20 CONNECT 230400 230,400 bps
21 CONNECT 460800 460,800 bps
Next
D702iF Manual for Data Commu.fm 29 ページ 2006年7月29日 土曜日 午後12時1分
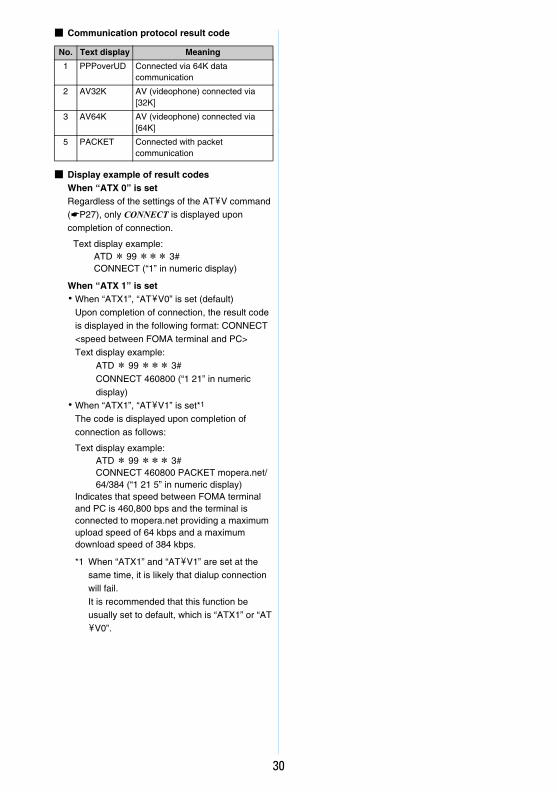
30
■ Communication protocol result code
■ Display example of result codesWhen “ATX 0” is setRegardless of the settings of the AT¥V command (☛P27), only CONNECT is displayed upon completion of connection.
When “ATX 1” is set・When “ATX1”, “AT¥V0” is set (default)
Upon completion of connection, the result code is displayed in the following format: CONNECT <speed between FOMA terminal and PC>Text display example:
ATD* 99*** 3#CONNECT 460800 (“1 21” in numeric display)
・When “ATX1”, “AT¥V1” is set*1
The code is displayed upon completion of connection as follows:
*1 When “ATX1” and “AT¥V1” are set at the same time, it is likely that dialup connection will fail. It is recommended that this function be usually set to default, which is “ATX1” or “AT¥V0”.
No. Text display Meaning
1 PPPoverUD Connected via 64K data communication
2 AV32K AV (videophone) connected via [32K]
3 AV64K AV (videophone) connected via [64K]
5 PACKET Connected with packet communication
Text display example:ATD* 99*** 3# CONNECT (“1” in numeric display)
Text display example:ATD* 99*** 3#CONNECT 460800 PACKET mopera.net/64/384 (“1 21 5” in numeric display)
Indicates that speed between FOMA terminal and PC is 460,800 bps and the terminal is connected to mopera.net providing a maximum upload speed of 64 kbps and a maximum download speed of 384 kbps.
D702iF Manual for Data Commu.fm 30 ページ 2006年7月29日 土曜日 午後12時1分


