Embed Size (px)
Citation preview

1. Руководство системного администратора . . . . . . . . . . . . . . . . . . . . . . . . . . . . . . . . . . . . . . . . . . . . . . . . . . . . . . . . . . . . . . . . . . . . . 21.1 English . . . . . . . . . . . . . . . . . . . . . . . . . . . . . . . . . . . . . . . . . . . . . . . . . . . . . . . . . . . . . . . . . . . . . . . . . . . . . . . . . . . . . . . . . . . . . . 2
1.1.1 General information . . . . . . . . . . . . . . . . . . . . . . . . . . . . . . . . . . . . . . . . . . . . . . . . . . . . . . . . . . . . . . . . . . . . . . . . . . . . . . . 21.1.1.1 System requirements . . . . . . . . . . . . . . . . . . . . . . . . . . . . . . . . . . . . . . . . . . . . . . . . . . . . . . . . . . . . . . . . . . . . . . . . 21.1.1.2 Load on server resources . . . . . . . . . . . . . . . . . . . . . . . . . . . . . . . . . . . . . . . . . . . . . . . . . . . . . . . . . . . . . . . . . . . . . 31.1.1.3 Why does Kickidler need access to the Internet? . . . . . . . . . . . . . . . . . . . . . . . . . . . . . . . . . . . . . . . . . . . . . . . . . . 31.1.1.4 Restrictions in functionality for different OS . . . . . . . . . . . . . . . . . . . . . . . . . . . . . . . . . . . . . . . . . . . . . . . . . . . . . . 31.1.1.5 Interaction with antiviruses . . . . . . . . . . . . . . . . . . . . . . . . . . . . . . . . . . . . . . . . . . . . . . . . . . . . . . . . . . . . . . . . . . . 3
1.1.2 Installation . . . . . . . . . . . . . . . . . . . . . . . . . . . . . . . . . . . . . . . . . . . . . . . . . . . . . . . . . . . . . . . . . . . . . . . . . . . . . . . . . . . . . . 41.1.2.1 Installation on Windows . . . . . . . . . . . . . . . . . . . . . . . . . . . . . . . . . . . . . . . . . . . . . . . . . . . . . . . . . . . . . . . . . . . . . . 5
1.1.2.1.1 Server Installation on Windows . . . . . . . . . . . . . . . . . . . . . . . . . . . . . . . . . . . . . . . . . . . . . . . . . . . . . . . . . . . 51.1.2.1.2 Grabber installation on Windows . . . . . . . . . . . . . . . . . . . . . . . . . . . . . . . . . . . . . . . . . . . . . . . . . . . . . . . . . . 121.1.2.1.3 Viewer installation on Windows . . . . . . . . . . . . . . . . . . . . . . . . . . . . . . . . . . . . . . . . . . . . . . . . . . . . . . . . . . . 161.1.2.1.4 Installation through Active Directory group policy. . . . . . . . . . . . . . . . . . . . . . . . . . . . . . . . . . . . . . . . . . . . 191.1.2.1.5 Remote installation on computers on a local network (without group policies) . . . . . . . . . . . . . . . . . . . . . 231.1.2.1.6 Special aspects with installation on Windows Vista . . . . . . . . . . . . . . . . . . . . . . . . . . . . . . . . . . . . . . . . . . . 24
1.1.2.2 Installation on GNU/Linux . . . . . . . . . . . . . . . . . . . . . . . . . . . . . . . . . . . . . . . . . . . . . . . . . . . . . . . . . . . . . . . . . . . . 241.1.2.2.1 Installation on Deb-based systems . . . . . . . . . . . . . . . . . . . . . . . . . . . . . . . . . . . . . . . . . . . . . . . . . . . . . . . . 251.1.2.2.2 Installation on RPM-based systems . . . . . . . . . . . . . . . . . . . . . . . . . . . . . . . . . . . . . . . . . . . . . . . . . . . . . . . . 34
1.1.2.3 Installation on Mac OS . . . . . . . . . . . . . . . . . . . . . . . . . . . . . . . . . . . . . . . . . . . . . . . . . . . . . . . . . . . . . . . . . . . . . . . 401.1.2.3.1 Agent installation o Mac OS . . . . . . . . . . . . . . . . . . . . . . . . . . . . . . . . . . . . . . . . . . . . . . . . . . . . . . . . . . . . . . 411.1.2.3.2 Viewer installation on Mac OS . . . . . . . . . . . . . . . . . . . . . . . . . . . . . . . . . . . . . . . . . . . . . . . . . . . . . . . . . . . . 44
1.1.3 Licensing center . . . . . . . . . . . . . . . . . . . . . . . . . . . . . . . . . . . . . . . . . . . . . . . . . . . . . . . . . . . . . . . . . . . . . . . . . . . . . . . . . . 471.1.3.1 Licensing center installation . . . . . . . . . . . . . . . . . . . . . . . . . . . . . . . . . . . . . . . . . . . . . . . . . . . . . . . . . . . . . . . . . . . 471.1.3.2 Running the system, installing the certificates . . . . . . . . . . . . . . . . . . . . . . . . . . . . . . . . . . . . . . . . . . . . . . . . . . . . 491.1.3.3 Setup of access of the program components to the Licensing center . . . . . . . . . . . . . . . . . . . . . . . . . . . . . . . . . . 501.1.3.4 Beginning of use . . . . . . . . . . . . . . . . . . . . . . . . . . . . . . . . . . . . . . . . . . . . . . . . . . . . . . . . . . . . . . . . . . . . . . . . . . . . 501.1.3.5 Updating the components . . . . . . . . . . . . . . . . . . . . . . . . . . . . . . . . . . . . . . . . . . . . . . . . . . . . . . . . . . . . . . . . . . . . . 511.1.3.6 Help and support . . . . . . . . . . . . . . . . . . . . . . . . . . . . . . . . . . . . . . . . . . . . . . . . . . . . . . . . . . . . . . . . . . . . . . . . . . . . 52
1.1.4 Settings . . . . . . . . . . . . . . . . . . . . . . . . . . . . . . . . . . . . . . . . . . . . . . . . . . . . . . . . . . . . . . . . . . . . . . . . . . . . . . . . . . . . . . . . 521.1.4.1 Settings for heterogeneous (different networks) networks . . . . . . . . . . . . . . . . . . . . . . . . . . . . . . . . . . . . . . . . . . 521.1.4.2 Proxy setup . . . . . . . . . . . . . . . . . . . . . . . . . . . . . . . . . . . . . . . . . . . . . . . . . . . . . . . . . . . . . . . . . . . . . . . . . . . . . . . . 571.1.4.3 Rules for firewall’s . . . . . . . . . . . . . . . . . . . . . . . . . . . . . . . . . . . . . . . . . . . . . . . . . . . . . . . . . . . . . . . . . . . . . . . . . . . 581.1.4.4 Settings for the save storage data . . . . . . . . . . . . . . . . . . . . . . . . . . . . . . . . . . . . . . . . . . . . . . . . . . . . . . . . . . . . . . 581.1.4.5 Selecting the Central Server . . . . . . . . . . . . . . . . . . . . . . . . . . . . . . . . . . . . . . . . . . . . . . . . . . . . . . . . . . . . . . . . . . . 58
1.1.5 Administration . . . . . . . . . . . . . . . . . . . . . . . . . . . . . . . . . . . . . . . . . . . . . . . . . . . . . . . . . . . . . . . . . . . . . . . . . . . . . . . . . . . 581.1.5.1 Windows components . . . . . . . . . . . . . . . . . . . . . . . . . . . . . . . . . . . . . . . . . . . . . . . . . . . . . . . . . . . . . . . . . . . . . . . . 58
1.1.5.1.1 Agent on Windows . . . . . . . . . . . . . . . . . . . . . . . . . . . . . . . . . . . . . . . . . . . . . . . . . . . . . . . . . . . . . . . . . . . . . 581.1.5.1.2 Server on Windows . . . . . . . . . . . . . . . . . . . . . . . . . . . . . . . . . . . . . . . . . . . . . . . . . . . . . . . . . . . . . . . . . . . . . 591.1.5.1.3 Viewer on Windows . . . . . . . . . . . . . . . . . . . . . . . . . . . . . . . . . . . . . . . . . . . . . . . . . . . . . . . . . . . . . . . . . . . . . 64
1.1.5.2 GNU_Linux components . . . . . . . . . . . . . . . . . . . . . . . . . . . . . . . . . . . . . . . . . . . . . . . . . . . . . . . . . . . . . . . . . . . . . . 641.1.5.2.1 Agent on GNU/Linux . . . . . . . . . . . . . . . . . . . . . . . . . . . . . . . . . . . . . . . . . . . . . . . . . . . . . . . . . . . . . . . . . . . . 651.1.5.2.2 Server on GNU/Linux . . . . . . . . . . . . . . . . . . . . . . . . . . . . . . . . . . . . . . . . . . . . . . . . . . . . . . . . . . . . . . . . . . . 661.1.5.2.3 Viewer on GNU/Linux . . . . . . . . . . . . . . . . . . . . . . . . . . . . . . . . . . . . . . . . . . . . . . . . . . . . . . . . . . . . . . . . . . . 70
1.1.5.3 Mac OS components . . . . . . . . . . . . . . . . . . . . . . . . . . . . . . . . . . . . . . . . . . . . . . . . . . . . . . . . . . . . . . . . . . . . . . . . . 711.1.5.3.1 Agent on MacOS . . . . . . . . . . . . . . . . . . . . . . . . . . . . . . . . . . . . . . . . . . . . . . . . . . . . . . . . . . . . . . . . . . . . . . . 711.1.5.3.2 Viewer on MacOS . . . . . . . . . . . . . . . . . . . . . . . . . . . . . . . . . . . . . . . . . . . . . . . . . . . . . . . . . . . . . . . . . . . . . . . 72
1.1.5.4 Components of the Local licensing center . . . . . . . . . . . . . . . . . . . . . . . . . . . . . . . . . . . . . . . . . . . . . . . . . . . . . . . . 721.1.6 Problems and solutions . . . . . . . . . . . . . . . . . . . . . . . . . . . . . . . . . . . . . . . . . . . . . . . . . . . . . . . . . . . . . . . . . . . . . . . . . . . . 73
1.1.6.1 Problem 1 . . . . . . . . . . . . . . . . . . . . . . . . . . . . . . . . . . . . . . . . . . . . . . . . . . . . . . . . . . . . . . . . . . . . . . . . . . . . . . . . . . 731.1.6.2 Problem 2 . . . . . . . . . . . . . . . . . . . . . . . . . . . . . . . . . . . . . . . . . . . . . . . . . . . . . . . . . . . . . . . . . . . . . . . . . . . . . . . . . . 741.1.6.3 Problem 3 . . . . . . . . . . . . . . . . . . . . . . . . . . . . . . . . . . . . . . . . . . . . . . . . . . . . . . . . . . . . . . . . . . . . . . . . . . . . . . . . . . 751.1.6.4 Problem 4 . . . . . . . . . . . . . . . . . . . . . . . . . . . . . . . . . . . . . . . . . . . . . . . . . . . . . . . . . . . . . . . . . . . . . . . . . . . . . . . . . . 761.1.6.5 Problem 5 . . . . . . . . . . . . . . . . . . . . . . . . . . . . . . . . . . . . . . . . . . . . . . . . . . . . . . . . . . . . . . . . . . . . . . . . . . . . . . . . . . 771.1.6.6 Problem 6 . . . . . . . . . . . . . . . . . . . . . . . . . . . . . . . . . . . . . . . . . . . . . . . . . . . . . . . . . . . . . . . . . . . . . . . . . . . . . . . . . . 781.1.6.7 Problem 7 . . . . . . . . . . . . . . . . . . . . . . . . . . . . . . . . . . . . . . . . . . . . . . . . . . . . . . . . . . . . . . . . . . . . . . . . . . . . . . . . . . 80

Руководство системного администратора
English
General informationKickidler's software package consists of 4 components, namely
Server – the program for installation on computers, where the data collected from the computers of employees will be stored.Central Server – one of the Servers of the company, where all data for reports are stored as well as the following settings:
Setting of structure of the organization of employees,Setting of assessment of efficiency of employees,Setting of filters of violations,For Servers:
Setting of parameters of storage of video and history,Setting of recording speed of history,Setting of volume of the maximum possible taken place on the disk for the embedded database of the Server,Setting of reception speed of data cached from Grabbers;
For Grabbers:Setting of volume of the maximum possible taken place on the disk for cached data,Distribution of Grabbers on Servers.
For Viewers:Setting of visibility of employees in Viewers.
Setting of work schedules of employees.The central Server has web interface, in which it is possible to edit above-mentioned settings and browse all reports. Bydefault the first installed Server in the company becomes the Central Server.
Agent (Grabber) – the program for installation on the computers of employees that will be supervised.Viewer – the program for viewing collected data; it is downloaded on computers of executives and other decision makers.
Purchase of licenses and control over them are conducted in the Personal account, which is located at https://my.kickidler.com/.
System requirements
Softwareproduct
Minimal requirements Recommended requirements
Agent
OS: (Vista, 7, XP (SP 3), 8, Server 2003, Server 2008, Server 2012, 10)WINDOWS
LINUX: Debian (7.0, 8.0), Ubuntu (12.04, 14.04,14.10, 15.04, 15.10, 16.04), Linux Mint (13, 17, 17.1, 17.2,17.3), 18,CentOS/RHEL 7, Fedora (22, 23)
MACOS: (10.11,10.12)
Internet access: low traffic
CPU: 1 Ghz CPU: 2 Ghz
RAM: 256 Mb RAM: 512 Mb
: 500 Kbp/sNetwork traffic with server Network traffic with server: 1 mbit/s
Server
OS: (Vista,7,8, Server2003,Server2008 (SP1), Server 2012, 10)WINDOWS:
LINUX: Debian (7.0, 8.0),Ubuntu (12.04, 14.04,14.10, 15.04, 15.10, 16.04), Linux Mint (13, 17, 17.1, 17.2,17.3), 18,CentOS/RHEL (6.7, 7), Fedora (22, 23)
Internet access: low traffic
CPU: 1 GHz + 50 MHz for each Agent and Viewer CPU:2 GHz + 100 MHz for each Agent and Viewer
RAM: 1 Gb + 50 mb for each Agent and Viewer RAM: 2 Gb + 50 mb for each Agent and Viewer

Network traffic with server: 500 Kbits/s Network traffic with server: 1 Mbit/s
Viewer
OS: (Vista, 7, 8, Server 2003, Server 2008, Server 2012, 10)WINDOWS:
LINUX: Debian (7.0, 8.0),Ubuntu (12.04, 14.04,14.10, 15.04, 15.10, 16.04), Linux Mint (13, 17, 17.1, 17.2,17.3), 18,CentOS/RHEL 7, Fedora (22, 23)
MAC OS: (10.10, 10.11, 10.12)
Internet access: low traffic
CPU: 1 Ghz CPU: 2 Ghz
RAM: 1 Gb RAM: 2 Gb
Network traffic with server: 1 Mbit/s Network traffic with server: 10 Mbit/s
Load on server resourcesPC configuration: Gigabyte Technology Co., Ltd., H57M-USB3 Intel(R) Core(TM) i5 CPU 650 @ 3.20GHz, 4 cores
Speed of video recording: 1 fps
Space on disc for one employee Net traffic for one employee Average processor load
~ 1,2 Gb ~ 120 kb/s 10 %
PC configuration: Virtual Machine, Hyper-V Intel(R) Xeon(R) CPU E5-2630 v2 @ 2.60GHz, 6 cores
Speed of video recording: 1 fpm
Space on disc for one employee Net traffic for one employee Average processor load
~ 190 mb ~ 35 kb/s 7 %
Why does Kickidler need access to the Internet?When you install and run the software package components, you must have TCP access on:
my.kickidler.com:40401.By this addressthe following is delivered
key activation check,license check,Central Server address check.
Restrictions in functionality for different OSWindowsAll components work without restrictions.
GNU/LinuxIn that moment program complex Kickidler on Linux work with this restrictions:
In some types of internet browsers, information about web pages don't collect
Mac OSIn that moment program complex Kickidler on Mac OS work with this restrictions:
Don't collecting information about web-pages in Opera browser..Agent on Mac OS don't install, if early in that agent license has expired.
Interaction with antivirusesProgram complex Kickidler not conflict with antiviruses at installation. But for future correct working, our program have are a number

Program complex Kickidler not conflict with antiviruses at installation. But for future correct working, our program have are a numberof features for some antiviruses.
Antivirus Comments Problems and solutions
Avast freeantivirus2015
Start additional scan at installing of server, but without result.
Рandaantiviruspro 201515.1.0
A sks for permission when installing components. If you allow the application Kickto work, the antivirus will no longer determine upon subsequent checks
idler as virus.
360 TotalSecurity
When agent Kickidler updating may display a message stating that theprogram is requesting an illegal action — changing a binary file. In thewindow, you can enable or disable the update. To continue the correctoperation of the Agent, you must enable the update. In the event of a ban, acopy of the Agent will be damaged and will not be able to continue working.
There are two ways to prevent conflicts:
When installing the Agent on acoputer with antivirus 360 TotalSecurity set it in folder C:\ProgramFiles... In that case, the antivirusskips the updates normaly withoutadditional confirmations.Add the Kickidler Agent to theantivirus white list immediatelyafter its installation.
KasperskyHome
Conflicts with a working Agent in the "Self-Defense" mode (enabled byantivirus by default). In this mode, in the "Reports" section there is nodetail on web pages and programs.Does not allow installing the Agent with the "Check secure connections"
In order for the Agent and theantivirus to work correctly, werecommend that you disable the"Self-defense" mode of theKaspersky antivirus. (Setu"Check secure connections"p - Advanced - Network section). Atthe time of installation, this optionshould be removed. You can turn iton later if you add the Agent to theexception
InstallationTo start using the software, you must install at least 2 components (Server, Agent). Install Viewers on executive computers.We recommend installing the components in the following order:
Server,Agent,Viewer.
When installing components, you will need to specify the activation key, which is located
In the letter "Access to Kickidler testing", which is sent to the mail specified during registration on the site. This activation keyis valid for 30 days from the date of registration.In the My Account, in the "Settings" section, click on the "Activation Key and Installation Files" button and copy the activationkey in the window that opens. Access to the Personal Account is provided when registering on the site. The data forauthorization is specified in the letter "Access to the Kickidler Personal Account".

1. 2. 3.
1. 2. 3.
Figure 1 - Activation key for installation
Installation on WindowsOn this moment you can install in that version OS:
Windows Vista,Windows 7,Windows XP (SP 3) – Only for Agent,Windows 8,Windows Server 2003,Windows Server 2008 – Need SP1 to install server,Windows Server 2012,Windows 10.
Installation filesFor 32-bit Windows:
Server, Agent,Viewer.
For 64-bit Windows:
Server,Agent,Viewer.
Server Installation on WindowsFor server installation follow next steps:
Run setup file node.x32.msi (or node.x64.msi for 64-bit OS) on the PC that will act as server for the software suite Kickidler in yourenterprise.
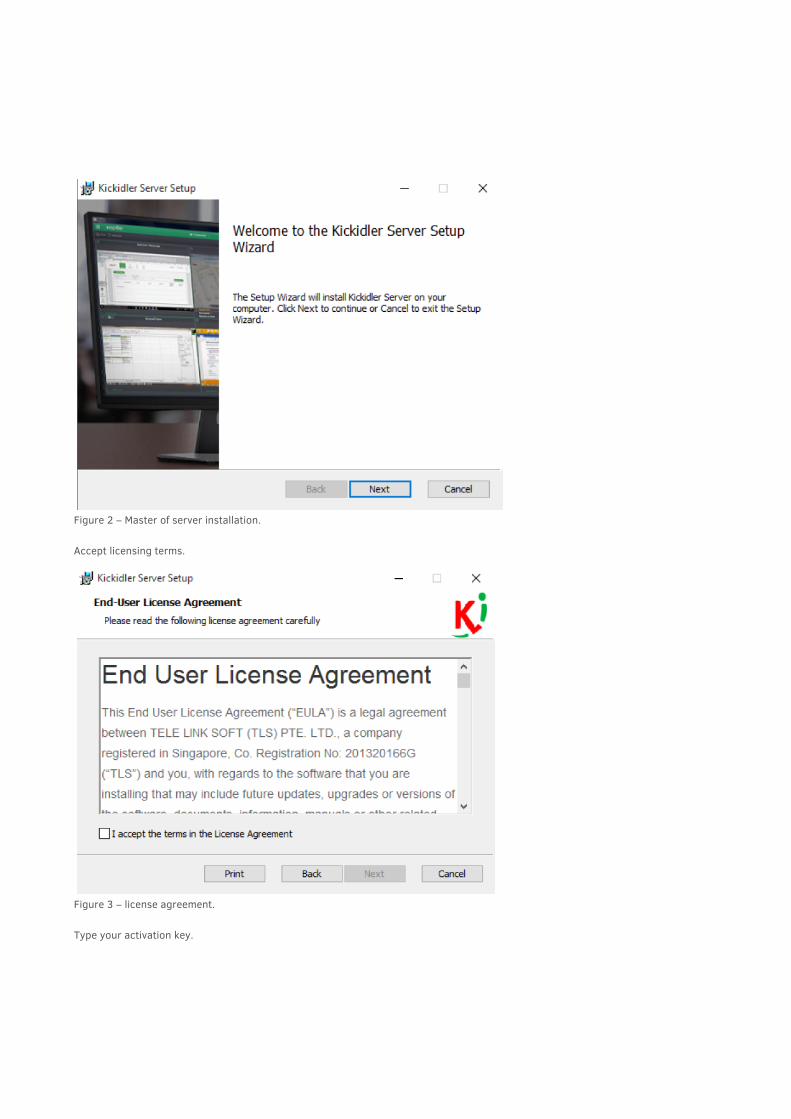
Figure 2 – Master of server installation.
Accept licensing terms.
Figure 3 – license agreement.
Type your activation key.

Figure 4 – Activation key.
Set up access to the Internet (if your company have access to the Internet through proxy-server).
If you do not need advanced settings, please select " " and click " ".Without additional settings Next
Figure 5 – Setting the default Internet access.For auto proxy detection (from OS settings), select " ", enter a comma-separated list of exceptions for localUse system proxy
addresses (if it's necessary) and click " ".Next

Figure 6 – Proxy system settings.For manual proxy setup select " ".Manual proxy settingsDuring manual setup you will need to specify protocol: SOCKS5 or HTTP and type corresponding values in the " " and " "Address Port
boxes.Enter a comma-separated list of exceptions for local addresses, if it's necessary.
Click " " toNext continue.
Figure 7– Proxy manual settings
Select storage type
Attention!
Server cannot work via HTTPS protocol. If proxy can handle only authorized connections, check the box " "Use authentication and type correct values in the " " and " " boxes.UIN PWD
Attention!
If your company do not use database or you do not know what it is, please select built-in database as storage.

When you select a as storage, PostgreSQL bundled with the Server will be used. Click " " to continue installation.built-in database Next
Figure 8– internal DBMS
When selecting external database engine, PostgreSQL database will not be installed during installation process. During next step youwill need to type following data to establish the database connection:
Server address, port, username, password, database name.
Example of database and user creating
CREATE ROLE kickidler_node LOGIN PASSWORD 'scout';CREATE DATABASE kickidler_node OWNER kickidler_node ENCODING 'UTF8' TEMPLATE template0;
Click "Test" button.
If it is impossible to connect to DB with the data entered or if it is impossible to deploy a required infrastructure in the specifieddatabase, dialog box with diagnostics of possible errors will appear. If the test is successful, entered data for connection will be fixedto prevent changes. Click " " to reset test results and unblock connection data. Click " " to continue installation.Edit Next
Attention!
If your company have own cluster optimized database storage with built-in security features, you will probably be interested inusing external database engines.

Figure 9– Configuring the connection to the internal database
Specify installation path. Confirm the installation on your computer.
Attention!
Installation path must be only in Latin. In the other case Server couldn't start correctly.

Figure 10 – Directory selection
When installation is complete, click " " to exit the wizard.Finish
Figure 11 – Finizh installation

Grabber installation on WindowsFor Grabber installation follow next steps:
Run setup file grabber.x32.msi (or grabber.x64.msi for 64-bit OS) on the PC of employee which will be monitored.
Figure 12 – Master of agent installation
Accept licensing terms. Continue the installation.
Figure 13 – license agreement
Type your activation key.

Figure 14 – Activation key
Set up access to the Internet (if your company have access to the Internet through proxy-server)
If you do not need advanced settings, please select " " and click " ". Without additional settings Next
Figure 15– Setting the default Internet access.For auto proxy detection (from OS settings), select " ", enter a comma-separated list of exceptions for localUse system proxyaddresses (if it's necessary) and click " ". Next

Figure 16– Proxy system settingsFor manual proxy setup select " ".Manual proxy settingsDuring manual setup you will need to specify protocol: SOCKS5 or HTTP and type corresponding values in the " " and " "Address Portboxes.Enter a comma-separated list of exceptions for local addresses, if it's necessary.
If proxy can handle only authorized connections, check the box " " and type correct values in the " " and " "Use authentication UIN PWDboxes. Enter a comma-separated list of exceptions for local addresses, if it's necessary.Click " " to continue.Next
Figure 17– Manual proxy settings
Choose hidden mode of Grabber's work (if you need it) and click " ".Next
Attention!
Server cannot work via HTTPS protocol..

Figure 18 – Settings for the hidden work
Specify installation path. Confirm the installation on your computer
Figure 19 – Directory selection
When installation is complete, click " " to exit the wizard.Finish
Features of Agent installation on WindowsBefore install the Agent on Windows pc, check if the Remote Desktop Service is running.
To do this, do the following :
Open the Administration section in the control panel,In the "Administration" section, select the "Services" subsection,Click mouse button on the service «Remote Desktop Service» (or «Term.service») in services list.Check the status of the service in the «Status» colum,
If the service is not running, start the service.

If the service is not running, start the service.
Figure 20 – Remote desktop services
Viewer installation on WindowsFor Viewer installation follow next steps:
Run setup file viewer.x32.msi (or viewer.x64.msi for 64-bit OS) on the PC of employee who will monitor.
Figure 21 – Master of viewer installation
Accept licensing terms. Continue the installation.

Figure 22 – license agreement
Type your activation key.
Figure 23 – Activation key
Set up access to the Internet (if your company have access to Internet through proxy-server).
If you do not need advanced settings, please select " " and click "Without additional settings Next".

Figure 24 – Setting the default Internet accessFor auto proxy detection (from OS settings), select " ", enter a comma-separated list of exceptions for localUse system proxyaddresses (if it's necessary) and click " ".Next
Figure 25 – System proxy setting
For manual proxy setup select " ".Manual proxy settingsDuring manual setup you will need to specify protocol: SOCKS5 or HTTP and type corresponding values in the " " and " "Address Port
boxes.

boxes.
If proxy can handle only authorized connections, check the box " " and type correct values in the " " and " "Use authentication UIN PWDboxes.Enter a comma-separated list of exceptions for local addresses, if it's necessary.Click " " to continue.Next
Figure 26 – Manual proxy settings
Specify installation path. Confirm the installation on your computer.
Figure 27 – Directory select
When installation is complete, click " " to exit the wizard.Finish
Installation through Active Directory group policy.
For organizations there is a way to group install software on all computers in the domain. To install software through group policy, please, follow the next procedure:
Attention!
Server cannot work via HTTPS protocol.

1. 2.
a. b. c.
To install software through group policy, please, follow the next procedure:
Set up installation file
Sew invite key other config in msi packageContact Kickidler support service via email to get setup file with built-in group activation [email protected]
E-mail, you registered on our site,The need to use the hidden mode of the Agent (the employee will not see the Agent in the task manager),Proxy options (if needed).
Put setup file in shared folder,
Open group policy management snap-in (Start — Administration — Group policy management),
Right-click tree node "Forest — Domains — [Your Domain] — Group Policy Objects" and select "Create",
Set the name for the group policy objects,
On the right side of panel in the "Region" tab in the group "Security filters" remove "Authenticated" and add "Domain computers" (you canalso choose particular computers in domain),
Right-click the created group policy object and select "Edit",
Select "Computer Configuration — Policies — Program Configuration",
Right-click on the right and select "Create — Package",
Select setup file in the shared folder (see step 2),
Select "Assigned" as the application launch mode,
Close properties window of group policy object,
Right-click on [Your Domain] and select "Bound existed group policy object",
Select created group policy object and click "OK",
Restart the computers in domain to apply group policy.
Embedding settings in the MSI Agent packageTo install through group policies, you must embed parameters for MSI packages.
To flash the settings, do the following:
Install program Orca.
Download Agent package for install linc.
In the context menu of the downloaded file, select "Edit with Orca".
Figure 28 – Starting editing the Agent's MSI package
In the list of tables, select "Property".

Figure 29 – Выбор таблицы Property
Enter the activation key in the "INVITE" line in the "Value" column (you can change the value using a double click).
Figure 30 – Activation key insertion
If necessary, add the parameter of the hidden work of the Agent (employees will not see the Agent processes in the Task Manager). Todo this, double-click on the empty line under the list of properties and values and enter the value HIDDENWORK in the "Property" fieldand the value yes in the "VALUE" field - yes.

Figure 31 – Embedding of the hidden mode of the Agent
If necessary, enter the Internet access settings by adding (see p. 6) and editing the following parameters.
Property Value Описание
PROXY_TYPE0 No use of advanced settings (default)
1 Use system proxy settings
2 Manual proxy settings
PROXY_PROTOCOL 0 SOCKS5
1 HTTP
PROXY_BYPASS_ENABLE
0 The option "Do not Use a proxy server for localaddresses" is disabled.
1 The option "Do not use a proxy server for localaddresses" is enabled.
PROXY_BYPASS Exceptions are comma separated: 192.168.8.15, 192.168.8.15:12345, *:,
:40401, 192.168.0.0/16my.kickidler.com
Entering proxy usage exceptions
PROXY Example:
http://kql-user:[email protected]:3128
Entering proxy settings by mask:protocol://[username:password@]hostname:port

1. 2. 3.
Click the button «Save».
Figure 32– Save the change
Remote installation on computers on a local network (without group policies)
Download program complex PsTools,
Unzip psexec.exe file in (C:\Windows\System32),
Sent to Kickidler tech support a letter in for requirements distributive file with wired activation key. Letter [email protected],have:
E-mail, указанный при регистрации на сайте,Не The employee should not see the agent in the task manager,And with. Proxy settings (if necessary)
Create a shared folder (all computers must have access to it),
Place the Agent distribution in the shared folder,
Open the command line (open the "Run" command window using the WIN + R combination, type cmd in it and click "OK") and executethe command:
psexec.exe [\ ip of employee's computer] [-u name of administrator's account of employee's computer] [-s] [C: \ Windows \System32 \ msiexec.exe / i full path to Agent
Example:psexec.exe 192.168.1.121 -u administrator -s C:\Windows\System32\msiexec.exe /i \\192.168.1.123\exchange\grabber.x64.msi /l*x\\192.168.1.123\exchange\log.txt /quiet
4) Enter the password of the employee's administrator's computer account,
5) Wait until the installation is completed (1-2 minutes).
If the installation is successful, you will see a message similar to the following: msiexec.exe exited on 192.168.1.121 with error code
Attention!
This instruction does not apply on home version Windows.
For remotely install the Agent on employee's pc in local network, follow these steps.

1. 2.
a.
1. 2. 3. 4.
1. 1. a.
2. a.
3. 4. 5. 6.
a.
1. 2.
3. 4.
If the installation is successful, you will see a message similar to the following: msiexec.exe exited on 192.168.1.121 with error code0.
Possible errors during installation and how to fix them
Problem Solution
Administrator account on employee'scomputer is missing password.
or add a password for the administrator's account on the employee's computer,or register in the registry.(HKEY_LOCAL_MACHINE\SYSTEM\CurrentControlSet\Control\Lsa) следующее:
"LimitBlankPasswordUse"=dword:00000000
The error text is displayed in anincomprehensible encoding.
In the command line, open "Properties"Select a different font (for example, lucida Console).Run the chcp 1251 command.Run the psexec command again.
Error with no access to theconnection
in the administrator command line on the employee's computer, run the command netsh advfirewall set allprofiles state off
in the administrator command line on the employee's computer, run the commandreg addHKLM\SOFTWARE\Microsoft\Windows\CurrentVersion\Policies\system /vLocalAccountTokenFilterPolicy /t REG_DWORD /d 1 /f
run secpol.msc on the employee's computer,open the Local Policies folder —Security Settings;find the Network Access: Sharing and Security Model for Local Accounts policy;Set the Normal option to local users to authenticate themselves
If the" normal "parameter has already been set, then apply the" guest"parameter, and then apply the" normal "parameter"
Special aspects with installation on Windows VistaBecause of Windows Vista features there could be problems with msi-files installation.
If the installation process does not start after the running of file, follow next procedures to install software component:
Start a command prompt as administrator (Start - cmd - context menu item "Run as administrator"),Browse to folder with setup file: at the command prompt type the following command: cd "C:%folder name with setup file%"(e.g., cd "C:\Program files"),Type the command: msiexec /i %name of the file with msi suffix%.msi (E.g., msiexec /igrabber.x32.msi),Follow the instructions of the installer.
Installation on GNU/LinuxYou will be able to install Kickidler components on the following distributions:
Debian:7.0 (wheezy),8.0 (jessie),9.0 (stretch)
Ubuntu: 12.04 (precise),14.04 (trusty),14.10 (utopic),15.04 (vivid),15.10 (wily),16.04 (xenital),17.04 (zesty zapus),17.10 (artful aardvark),18.04 (bionic beaver),18.10 (cosmic cuttlefish),19.04 (disco dingo).
Linux Mint:
Attention!
If you have an error message, make a screenshot of the error, copy the installation log and write to our technical supportspecialists ( )[email protected]

Linux Mint: 13 (maya),17 (qiana),17.1 (rebecca),17.2 (rafaela),17.3 (rosa),18 (sarah)
CentOS/RHEL: 6.7 (Server only),7
Fedora: 22,23
Installation on Deb-based systemsBefore installation
You can check your version using command:
lsb_release -a
Figure 33 – Checing version Debian
Figure 47 - Version checking Ubuntu
Figure 61 – Checing version Mint
Supported versions:
Installation on GNU/Linux
Common part
Add Kickidler GPG-key as trusted:
curl http://deb.kickidler.com/generic/repo.gpg | apt-key add -
Add repository in APT sources list:
Attention!
All commands are run as root

echo "deb http://deb.kickidler.com/generic stable non-free" > /etc/apt/sources.list.d/kickidler.list
Reload local APT cache:
apt-get update
Install necessary products
Server installation on Deb-based systemsStart the server installation
apt-get install kickidlernode
Figure 34 - Server installation Debian
Server installationFigure 48 - Ubuntu
Figure 62 - Server installation Mint
Set up activation key
Figure 35 - Activation key setup Debian

Figure 49 - Activation key setup Ubuntu
Figure 63 - Activation key setup Mint
Select a storage — during Server installation (kickidlernode)
If you choose PostgreSQL will be used as storage, bundled with the server. To continue the installation process, click on the auto -"Ok".
Figure 36 - configuration DB Debian
Figure 50 - configuration DB Ubuntu
Attention!
If your company has its own cluster optimized DBMS storage with all kinds of embedded security systems, you may beinterested in using external databases.

Figure 64 - configuration DB Mint
If you choose postgresql, the database will not be installed during the installation. In the next step, you need to enter data to connectto the DBMS:
Server addressPortDatabase nameUser namePassword
Figure 37 - Server address setup Debian
Figure 51 - Server address setup Ubuntu
Figure 65 - Server address setup Mint

Figure 38 - Server port setup Debian
Figure 52 - Server port setup Ubuntu
Figure 66 - Server port configuration Mint
Figure 39 - Database name setup Debian
Figure 53 - Database name setup Ubuntu

Figure 67 - Database name setup Mint
Figure 40 - Database username setup Debian
Figure 54 - Database username setup Ubuntu
Figure 68 - Database username setup Mint
Figure 41 - Database password setup Debian

Figure 55 - Database password setup Ubuntu
Figure 69 - Database password setup Mint
Agent installation on Deb-based systems
Start the agent installation
apt-get install kickidlergrabber
Figure 42 - Grabber installation Debian
Figure 56 - Grabber installation Ubuntu
Figure 70 - Grabber installation Mint
Type your activation key

Figure 43 - Activation key setup Debian
Figure 57 - Activation key setup Ubuntu
Figure 71 - Activation key setup Mint
Viewer installation on Deb-based systems
Start the viewer installation
apt-get install kickidlerviewer
Figure 44 - Viewer installation Debian
Figure 58 - Viewer installation Ubuntu

Figure 72 - Viewer installation Mint
Type your activation key
Figure 46 - Activation key setup Debian
Figure 59 - Activation key setup Ubuntu
Figure 73 - Activation key setup Mint
Choose users for work with Kickidler.
Figure 45 - Viewer`s user setup Debian

Figure 60 - Viewer`s user setup Ubuntu
Figure 74 - Viewer`s user setup Mint
Installation on RPM-based systemsSupported versions
Installation on GNU/Linux
Common part
Check your version
lsb_release -a
Figure 75 - Version checking
Add repository
# yum-config-manager --add-repo http://rpm.kickidler.com/kickidler.repo
For CentOS, RHEL, Fedora < 22
Attention!
For CentOS, RHEL, Fedora < 22 it's necessary to install a package yum-utils for these systems
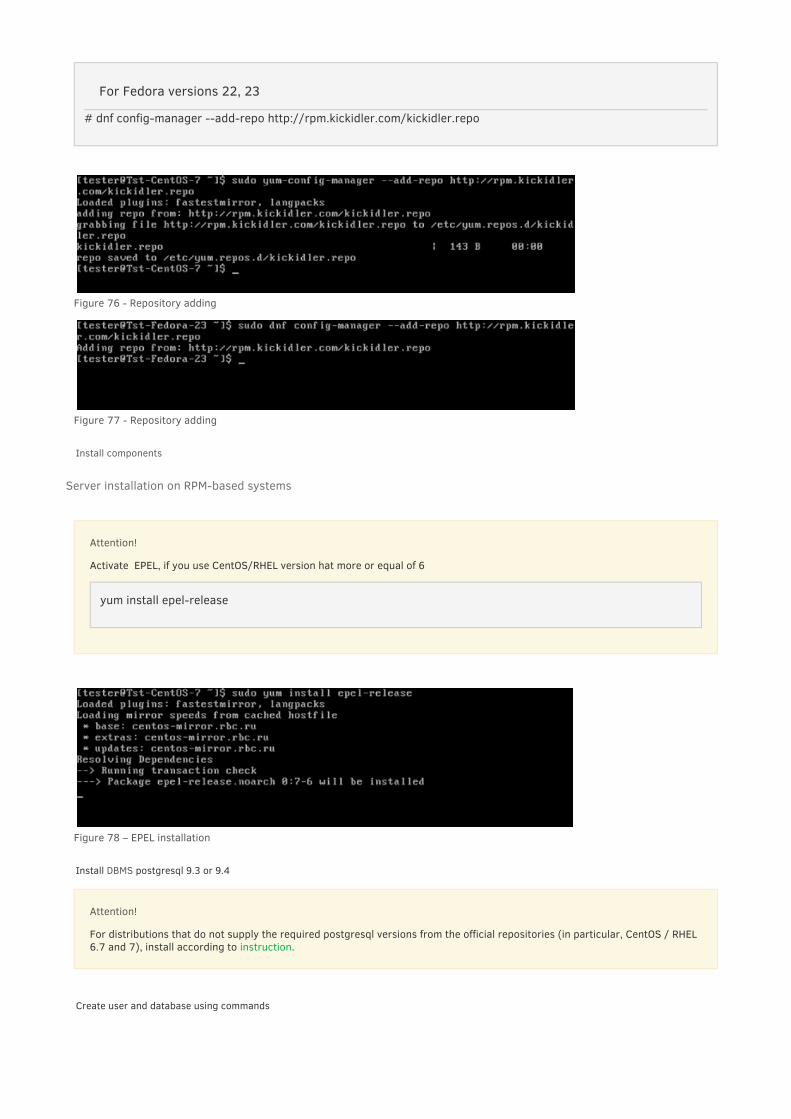
# dnf config-manager --add-repo http://rpm.kickidler.com/kickidler.repo
Figure 76 - Repository adding
Figure 77 - Repository adding
Install components
Server installation on RPM-based systems
Figure 78 – EPEL installation
DBMS Install postgresql 9.3 or 9.4
Create user and database using commands
For Fedora versions 22, 23
Attention!
Activate EPEL, if you use CentOS/RHEL version hat more or equal of 6
yum install epel-release
Attention!
For distributions that do not supply the required postgresql versions from the official repositories (in particular, CentOS / RHEL 6.7 and 7), install according to instruction.

CREATE ROLE kickidler_node LOGIN PASSWORD 'scout';
CREATE DATABASE kickidler_node OWNER kickidler_node ENCODING 'UTF8' TEMPLATE template0;
Figure 79 - Database user creation
Figure 80 - Database creation
Set the authentication mode tolocalhost в md5
For this in the file pg_hba.conf the lines should be written
/var/lib/pgsql/9.3/data/pg_hba.conf
host all all 127.0.0.1/32 md5host all all ::1/128 md5
Restart service after changes
Example for distributions with systemd (for CentoOS/RHEL 6.7 use service or init-scripts):
# systemctl restart postgresql-9.3
Figure 81 - Restarting service
Install the package and configure the activation key.
Create user
Create Database

# yum install kickidlernode
# /opt/KickidlerNode/bin/config-invite.sh
Figure82 - Serverinstallation
Figure 83 - Activation key setup
Figure 84 - Activation key entering
Sure that the database connection and correspond to the current settings.database access settings
specified in filedatabase connection and database access settings
/opt/KickidlerNode/config/node.ini
Start and stop service
For CentOS/RHEL 6.7:
# chkconfig kickidlernode on
# service kickidlernode start
For distributions с systemd:
# systemctl enable kickidlernode.service

# systemctl start kickidlernode.service
Figure 85 - Service turning on
Figure 86 - Service starting
Agent installation on RPM-based systems
Install the package
# yum install kickidlergrabber
Figure 87 - Grabber installation
Configure the activation key
# /opt/TeleLinkSoftHelper/bin/config-invite.sh
Figure 88 - Actication key setup
Type the activation key

Figure 89 - Activation key entering
Enable service
# systemctl enable kickidlergrabber.service
Figure 90 - Service turning on
Start service
# systemctl start kickidlergrabber.service
Figure 91 - Service staringt
Viewer installation on RPM-based systems
Install the package
# yum install kickidlerviewer

Figure 92 - Viewer installation
Configure the activation key
# /opt/KickidlerViewer/bin/config-invite.sh
Figure 93- Activation key setup
Type the activation key
Figure 94 - Activation key enteringThe viewer is launched via the graphic menu from the "Internet" section or from the console using the "kickidlerviewer" command.
Installation on Mac OSAt this moment, you will be able to install the Kickidler Agent and Viewer yourself for the following versions:
MAC OS 10.10 – Just for Viewer,MAC OS 10.11MAC OS 10.12MAC OS 10.13MAC OS 10.14MAC OS 10.15
Attention!
At the moment, the Kickidler software package on MAC OS works with restrictions, namely:

Installation files
1. ,Agent2. .Viewer
Agent installation o Mac OSSupported versions
Installation on Mac OS
Run the installation file grabber.pkg
Click on the button "Continue"
Figure 95 - Grabber installation
Read the license agreement
Click on the "Continue" button and confirm that you accept it.
information about web pages of browsers Opera, Firefox is not collected.

Figure 96 - License agreement
Familiarize yourself with the type of installation
Click Continue Installation

Figure 97 - Installation type
Enter your username and password
Click on "Install Software"
Figure 98 - Login, password setup
Enter the activation key
Click "OK"

Figure 99 - Activation key setup
Complete the installation
Click the "Restart" button.
Figure 100 - Installation complete
Viewer installation on Mac OSSupported versions
Installation on Mac OS
Run the installation file viewer.pkg
Сlick on the button "Continue"

Figure 101 - Viewer installation
Read the license agreement
Сlick on the "Continue" button and confirm that you accept it.
Figure 102 - License agreement
And another "I accept"
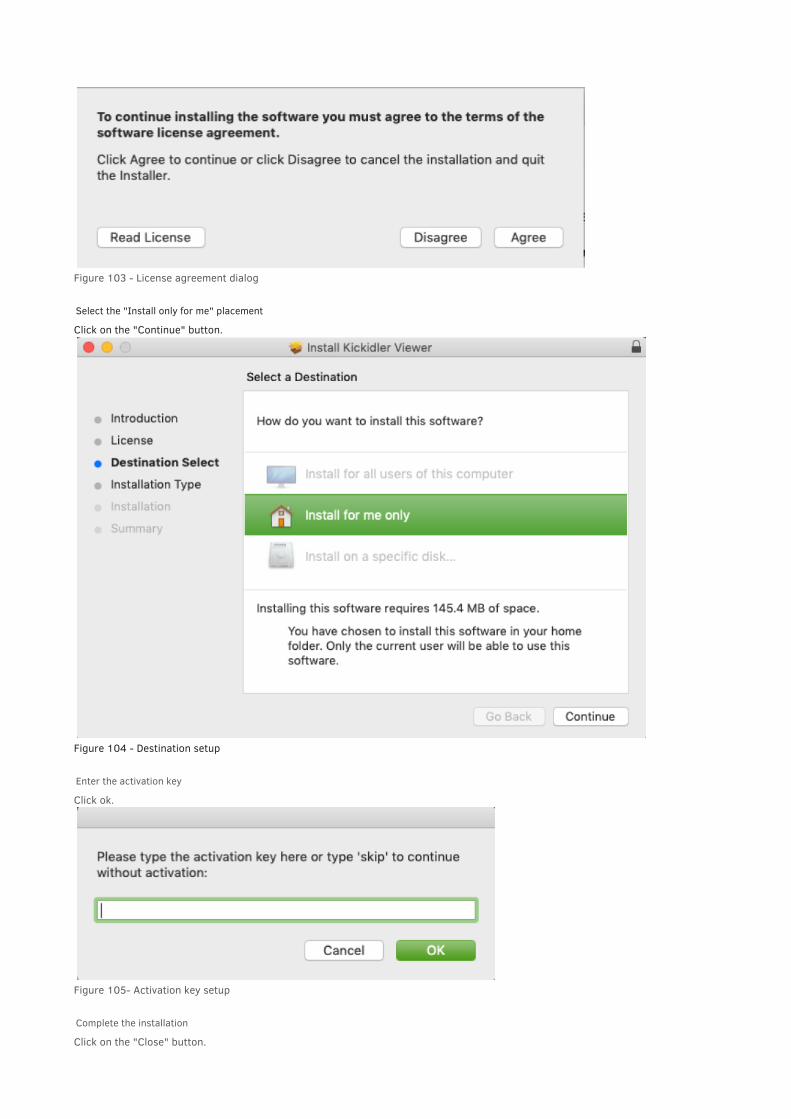
Figure 103 - License agreement dialog
Select the "Install only for me" placement
Click on the "Continue" button.
Figure 104 - Destination setup
Enter the activation key
Click ok.
Figure 105- Activation key setup
Complete the installation
Click on the "Close" button.

Figure 106 - Installation complete
Licensing center
General informationLicensing center comes in the format of a portable program that can be set on your device run by Linux OS.
You will be able to install Licensing center .on the following distributions
The program must be installed on a computer with 64-bit architecture.
The computer, on which you will unfold your local server, needs at least 2GB of RAM.
You can get the Licensing center installation files from .this link
Licensing center installationGet the attached program from the archive and place it on a Linux device that will act as the Licensing center.
Go to the directory and unpack the received archive
Unpack the archive to the folder /opt/
sudo tar -xzf /path/to/folder/…/master_X.XX.X.tar.gz -C /opt/
After unpacking the archive, make sure that you have configured all the necessary permissions on the folder and on theexecutable file of the licensing center. To do this, enter the commands:
ls -l /opt/KickidlerMasterls -l /opt/KickidlerMaster/bin/master
If it needed, change permissions for the executable file of the local center with the command:
sudo chmod +x /opt/KickidlerMaster/bin/master

Do the first test run of the program
opt/KickidlerMaster/bin/master
After the first startup, you should wait until the Licensing center deployment process is complete.
To view the local Licensing center, use the command
sudo tail -f /opt/KickidlerMaster/log/master
2019-09-17 14:37:01.861 2525 INFO start
2019-09-17 14:37:01.862 2525 INFO cert: MASTER for sample, dedicated
2019-09-17 14:37:01.862 2525 INFO allowedGrabbersBound: 1
2019-09-17 14:37:01.862 2525 INFO ssl/tls auth info loaded
2019-09-17 14:37:01.863 2525 INFO aup changes detected
2019-09-17 14:37:01.863 2525 INFO aup addIndex lin32.zip
2019-09-17 14:37:01.867 2525 INFO aup addIndex lin64.zip
2019-09-17 14:37:01.871 2525 INFO aup addIndex macsystem64.zip
2019-09-17 14:37:01.871 2525 INFO aup addIndex macviewer64.zip
2019-09-17 14:37:01.875 2525 INFO aup addIndex oldlin32.zip
2019-09-17 14:37:01.876 2525 INFO aup addIndex oldlin64.zip
2019-09-17 14:37:01.876 2525 INFO aup addIndex win32.zip
2019-09-17 14:37:01.882 2525 INFO aup addIndex win64.zip
2019-09-17 14:37:01.886 2525 INFO aup compileIndex
2019-09-17 14:37:01.888 2525 INFO aup body file created: /opt/mas…
…
…
…
2019-09-17 14:39:02.895 2525 INFO aup compileIndex done
2019-09-17 14:39:03.154 2525 INFO serverHandshakeTimeout: 2000
2019-09-17 14:39:03.154 2525 INFO server address: 0.0.0.0:7907
2019-09-17 14:39:03.154 2525 INFO billing server address: 0.0.0.0:40401
Terminate the Licensing center
Startup
Attention!
Wait for the deployment process to complete.
2019-09-17 14:39:02.895 2525 INFO aup compileIndex done
2019-09-17 14:39:03.154 2525 INFO serverHandshakeTimeout: 2000
2019-09-17 14:39:03.154 2525 INFO server address: 0.0.0.0:7907
2019-09-17 14:39:03.154 2525 INFO billing server address: 0.0.0.0:40401

sudo /opt/KickidlerMaster/bin/master -terminate
Carry out the integration with Linux initialization subsystem for the Licensing center
For easy integration, the archive contains a script.
Execute the command:
cp /opt/KickidlerMaster/kickidlermaster.service.example /lib/systemd/system/kickidlermaster.service
Configure auto start and start Licensing Center
systemctl daemon-reload
systemctl status kickidlermaster
systemctl enable kickidlermaster
systemctl start kickidlermaster
Running the system, installing the certificatesThe Licensing center requires the latest ssl certificates.
Certificate files obtained from our manager should be located in your Licensing center. You should write the path to them in theconfiguration file.
Extract the received files
Move the received certificate and key to the Licensing center folder
cp /path/to/folder/../keyname.example.key /opt/KickidlerMaster/ssl/cp /path/to/folder/../certname.example.crt /opt/KickidlerMaster/ssl/
Edit the Licensing center configuration files
Write the new names of the received certificates in the configuration file
/opt/KickidlerMaster/config/master.ini
certificate =../ssl/certname.example.crt
privateKey =../ssl/keyname.example.key
Autostart Setup
Startup
Attention!
In addition to the key path settings, this file also contains some other settings. It's not recommended to change them.
Restart the Licensing center
After you've done that, you should restart the Licensing center with the command:
systemctl restart kickidlermaster
Delete old certificates
After you replace the key with the new one, you can delete old certificates (they are no longer needed).
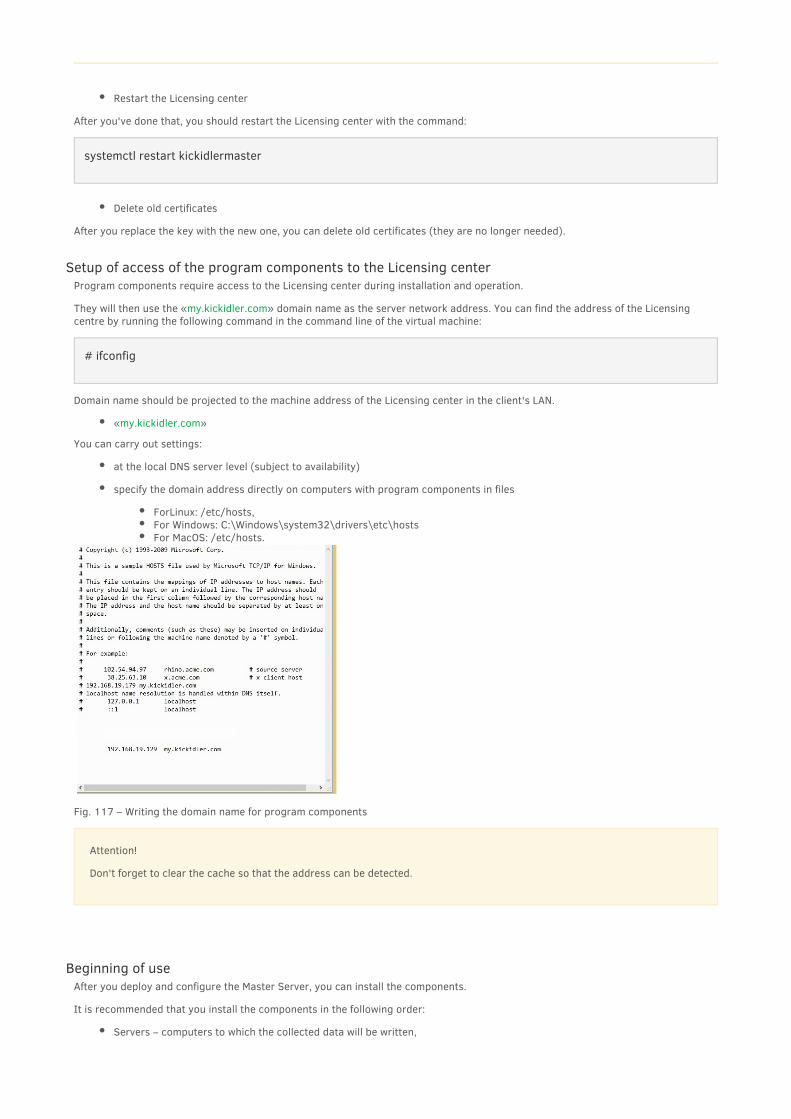
Setup of access of the program components to the Licensing centerProgram components require access to the Licensing center during installation and operation.
They will then use the « » domain name as the server network address. You can find the address of the Licensingmy.kickidler.comcentre by running the following command in the command line of the virtual machine:
# ifconfig
Domain name should be projected to the machine address of the Licensing center in the client's LAN.
« »my.kickidler.com
You can carry out settings:
at the local DNS server level (subject to availability)
specify the domain address directly on computers with program components in files
ForLinux: /etc/hosts,For Windows: C:\Windows\system32\drivers\etc\hostsFor MacOS: /etc/hosts.
Fig. 117 – Writing the domain name for program components
Beginning of useAfter you deploy and configure the Master Server, you can install the components.
It is recommended that you install the components in the following order:
Servers – computers to which the collected data will be written,
Grabbers – computers of the employees,
Attention!
Don't forget to clear the cache so that the address can be detected.

1. 2. 3.
1. 2. 3.
1.
2.
a.
1.
2.
a.
a.
i.
1.
2.
3.
Grabbers – computers of the employees,
Viewers – computers of superiors or people in charge.
Getting the inviteTo install components, you need an invite that can be retrieved from the Licensing center text file
/opt/KickidlerMaster/tmp/dedicatedMaster.state
Installing on WindowsDistribution kit for Windows installations
For 32-bit Windows:
Server GrabberViewer
For 64-bit Windows:
ServerGrabberViewer
To install components on Windows
Download the required installation file
Install the required components.
Installation on Windows
Installing on MacOSDistribution kit for MacOs installations
ViewerGrabber
To install components on MAC OS:
Download the required installation file
Install the required components.
Installation on Mac OS
Installation on GNU/LinuxTo install components on GNU/Linux:
Install the required components.
Installation on GNU/Linux
Updating the componentsFiles for updating components are located in the Licensing center folder at:
/opt/KickidlerMaster/aup/
If your Licensing Center has Internet access, follow these steps:
Go to the Licensing Center folder
cd /opt/KickidlerMaster/aup/sources
Run the downloading and implementing update files command
wget http://download.kickidler.com/aup/all.mzip -O all.mzip.dwnld && mv all.mzip.dwnld all.mzip
Wait while the Licensing Center updates.

3.
1.
2.
3.
4.
5.
Wait while the Licensing Center updates.
You can monitor the Licensing Center using the command sudo tail -f /opt/KickidlerMaster/log/master
2020-01-17 17:21:00.099 10795 INFO aup changes detected2020-01-17 17:21:00.099 10795 INFO aup reaprse sources in 300 seconds2020-01-17 17:21:10.093 10795 INFO aup reaprse sources in 291 seconds.........2020-01-17 17:27:48.961 11002 INFO aup compileIndex2020-01-17 17:28:18.911 11002 INFO aup compileIndex done2020-01-17 17:28:19.278 11002 INFO serverHandshakeTimeout: 20002020-01-17 17:28:19.279 11002 INFO server address: 0.0.0.0:79072020-01-17 17:28:19.279 11002 INFO billing server address: 0.0.0.0:40401
If your Licensing Center doesn't have Internet access, follow these steps:
Download the archive with updates from this link.
Copy the archive to external media.
Relocate external media toward the computer running Licensing Center
Copy the update archive to the Licensing Center folder using the following command:
cp -iv /path/to/folder/../all.mzip /opt/KickidlerMaster/aup/sources
Wait while the Licensing Center updates.
You can monitor the Licensing Center using the command sudo tail -f /opt/KickidlerMaster/log/master
2020-01-17 17:21:00.099 10795 INFO aup changes detected2020-01-17 17:21:00.099 10795 INFO aup reaprse sources in 300 seconds2020-01-17 17:21:10.093 10795 INFO aup reaprse sources in 291 seconds.........2020-01-17 17:27:48.961 11002 INFO aup compileIndex2020-01-17 17:28:18.911 11002 INFO aup compileIndex done2020-01-17 17:28:19.278 11002 INFO serverHandshakeTimeout: 20002020-01-17 17:28:19.279 11002 INFO server address: 0.0.0.0:79072020-01-17 17:28:19.279 11002 INFO billing server address: 0.0.0.0:40401
Help and supportFor all questions and problems that arise during the use of the product:
: 7 (495) 777 54 58 (ext. 2), Technical Support [email protected].
+7 (495) 777 54 58, Sales Department: [email protected].
10:00 – 19:00 (GMT+3).Working hours:
SettingsSettings for heterogeneous (different networks) networks
To operate the Kickidler complex in different networks, it is necessary to ensure the network availability of servers. Becouse, agentsand viewers need access to them for their normal operation.
At startup, the Server automatically tries to configure its network availability by performing a port forwarding procedure. Setup iscarried out on uPnP, IGD and NAT-PMP.

1. 2.
3.
carried out on uPnP, IGD and NAT-PMP.
This setup is carried out automatically. If you don't want the server to configure the network availability on its own, you should switchoff uPnP, IGD and NAT-PMP protocols on the router.
Agents and Viewers search for the server at the following addresses:
IP in internall LAN addresses,IP address in WAN. May be gray, white and static. If address gray, must be purchased from the provider static address orwhite address.additional addresses specified in the server configuration file parameter extra_declare_hosts (may be missing).
For successful operation, the server must be accessible to Agents and Viewers at least at one of these addresses.
If the Server does not have an external address (for example, is behind a NAT or firewall), to ensure the program works outside thelocal network, you need to configure the network equipment so that incoming TCP connections to one of the ports of the externaladdress are forwarded to the server address in the local network and the port specified in the port parameter in the serverconfiguration file. To do this, follow these steps.
Check the port specified in the Server Configuration File
To do this, you need to open the node.ini file located in the C:/Program Files/KickidlerNode/config directory and view the first line port= (Usually for Windows port 7906 is specified, for Linux – 1025, But this is not always the case. If port 7906 or 1025 already used,specify any other free port).
Make a tracing in the command line to any external address
To do this, you need to enter the command line
tracert ya.ru
# traceroute google.com
Attention!
If the automatic configuration did not happen, write to specifying your router model in the [email protected]
Windows
Linux

Figure 118 - Tracert to external address
If you don't have a router, the first is be the local address of the provider. In this case, you need at this step, contact the provider andask him to forward the port.
Allow the port to the first address from the trace results.

Figure 119 - Tracert to external addressGo to the first address in the browser (the address of your router) and in the settings add port forwarding to incoming TCPconnections using the port specified in the Server configuration file (item 1 of this instruction) before your ip address. You can findyour ip address on the command line by running the ipconfig command.

Figure 120 - Ip-address checkingDetailed instructions on port forwarding for your router model can be found .here
Check the second address as a result of tracing.
Figure 121 - Tracert to external address
If the second address as a result of tracing is local (starts from 192.168 .., or 10 .., or 172 ...), then this means that the provider mostlikely distributes the gray ip address to you. In this case, you need to order an external ip from the provider, or ask the provider toforward the port as in paragraph 3 of this manual, but before the address of the router.
If you have difficulties during setup, write a letter to , attach a screenshot of the result of the trace to it, [email protected]

If you have difficulties during setup, write a letter to , attach a screenshot of the result of the trace to it, [email protected] port under item 1 of this instruction and the router model.
Proxy setupIf Internet connection in your company is provided through proxy-server, additional setup is required during installation for normaloperation of Kickidler software.
CompatibilityOperation of software components is supported through SOCKS5 and HTTP protocols
Setup features of Grabbers and ViewersGrabbers and Viewers setup for work through network proxy service is performed during installation.
If necessary you can edit parameters of proxy with "proxy" variable (in [network] section) of configuration file (unit.*.stable.ini) in thefollowing format:
[network]proxy=protocol://[username:password@]hostname:port#proxy=auto#proxy=none
You can choose "http" or "socks5" as protocol.
Combination "username:password" can be omitted if proxy receive connections without authorization.
Combination "hostname:port" is required. You can use special values "none" and "auto" instead of URL for shut-off the proxy andautomatic use system proxy settings respectively.
When value "none" is used or variable is omitted, Viewer or Grabber will work without proxy.
Examples:
[network]proxy=none
[network]proxy=http://192.168.19.56:8888
[network]proxy=auto
If necessary, you can also add the proxyByPass variable, which lists all the addresses and networks that will be accessed directly(bypassing the proxy).
Addresses are specified in the form of IPv4 addresses with a mask. You can specify a remote port through the colon.
Examples:
Attention!
Software components can't work via HTTPS protocol.

1.
2. 3. 4.
192.168.8.15, 192.168.8.15:12345
*:
my.kickidler.com:40401, 192.168.0.0/16
Network proxy operational aspects
If network proxy service is selected for Server,
it will be used only for outgoing connections.
Proxy settings for the incoming connections will be ignored. For reference: Grabber and Viewer will use proxy server for allconnections.
Rules for firewall’sIf you need an installed third-party firewall, recommend for the correct operation of the Kickidler software package.
allow outgoing connections for all software components on my.kickidler.com with TCP port 40401,allow incoming connections to the TCP port that is specified in the node.ini file (by default for Windows: 7906, for Linux: 1025),and the web interface of the Central Server (8123 by default or the port that is registered in the node file .ini in the [http] block.
These rules are written by default for the Windows firewall.
Settings for the save storage dataThe default settings for each server are as follows:
3 years as a period of history storage on the Server,7 days as a period of video storage on the Server,1 FPS as video capture rate,Maximum speed of receiving data from Grabbers' cache is without restrictions.
If you want to change Server name and its settings, click the button " ", enter all changes and click the button " ".Edit Server Save
Selecting the Central ServerIn order to assign another server as the Central Server proceed as follows:
Login to your Personal account (the password and login to your Personal account have been sent at your e-mail address duringthe registration).Click the " " tab.SettingsSelect the Server in the drop-down list,Click the button " ".Save
Administration
Windows componentsFor maintenance of components of the software package use information that's given below.
Agent on WindowsAgent's logs are by default located here
C:\Program Files\TeleLinkSoftHelper\log
Agent's configuration files are by default located here
Attention!
All components can be managed only by the user with the rights of the administrator. We recommend you don't give the rights ofthe administrator to average employees in order to avoid errors in the software package.

C:\Program Files\TeleLinkSoftHelper\config
To work with the Agent's service, use the following commands
net start ngs
net stop ngs
To delete the Agent, execute the following command in the command line
msiexec.exe /X{EB1FBC37-0B97-4CF5-A329-CF28BA653748}
Server on WindowsServer's logs are by default
C:\Program Files\KickidlerNode\log
Server's configuration files are by default
C:\Program Files\KickidlerNode\config
Logs of the built-in PostgreSQL database are by default
C:\Program Files\KickidlerNode\pgsql\data\pg_log
Work with the Server's service
Start Server service
net start nns
Stop Server service
net stop nns
Server removing
To delete the Server, carry out the following actions
Open Service
Open the "Service" subsection of the "Administration" section,
Stop Server service
Find nns in the list of services and press the "Stop" button,
Start of the Agent's service
Stop of the Agent's service

Figure 122 – Services list
Open Control panel
Open the "Programs and Components" subsection of the "Control panel" section,
Select KickidlerNode in the list of programs
Remove Server
Press the "Delete" button.
Figure 123 - List of installed program and components
Transfer of the Server
Transfer the Server with data into another computer
To transfer the Server with data into another computer, carry out the following actions

To transfer the Server with data into another computer, carry out the following actions
Open the "Service" subsection of the "Administration" section,
Find nns in the list of services and press the "Stop" button,
Open the command line (cmd) and start the database using the command
"C:\Program Files\KickidlerNode\pgsql\bin\pg_ctl.exe" start D "C:/Program Files/KickidlerNode/pgsql/data" -w -o"logging-collector=on --log-destination=stderr --log-directory=pg_log --log-filename=ipg%a.log--log-truncate-on-rotation=on --log-rotation-age=1d --log-line-prefix=\"%m \"--log-timezone=\"Europe/Moscow\" --log-statement=ddl --log-connections=on --log-disconnections=on--listen-addresses=127.0.0.1 --port=5439 --max-connections=100 --shared-buffers=262144kB--wal-buffers=5242kB --effective-cache-size=734317kB --work-mem=7811kB--maintenance-work-mem=39059kB --checkpoint-segments=64 --checkpoint-completion-target=0.9"
whereC:\ProgramFiles\KickidlerNode is the directory where the Server is by default installed,
Start the process of creation of data backup with the command
"C:\Program Files\kickidlerNode\pgsql\bin\pg_dump.exe" -h 127.0.0.1 -p 5439 -U kickidler_node -c -b --inserts--file "C:\kickidlerdb.sql" –d kickidler_node
where C:\kickidlerdb.sql is the directory where the database backup will be recorded
Check to make sure that the kickidlerdb.sql file has appeared in the directory that was specified by you,
Delete the kickidlernode program through installation and removal of programs,
Install the new Server on other local drive (computer),
Stop nns service,
Open the command line (cmd) and start the database with the command,
"C:\Program Files\KickidlerNode\pgsql\bin\pg_ctl.exe" start D "C:/Program Files/KickidlerNode/pgsql/data" -w-o "logging-collector=on --log-destination=stderr --log-directory=pg_log --log-filename=ipg%a.log--log-truncate-on-rotation=on --log-rotation-age=1d --log-line-prefix=\"%m \"--log-timezone=\"Europe/Moscow\" --log-statement=ddl --log-connections=on --log-disconnections=on--listen-addresses=127.0.0.1 --port=5439 --max-connections=100 --shared-buffers=262144kB--wal-buffers=5242kB --effective-cache-size=734317kB --work-mem=7811kB--maintenance-work-mem=39059kB --checkpoint-segments=64 --checkpoint-completion-target=0.9"
Start the process of deployment of the database backup
"D:\kickidlerNode\pgsql\bin\psql.exe" -h 127.0.0.1 -p 5439 -U kickidler_node -f "C:\kickidlerdb.sql"
where D:\kickidlerNode\ is the directory that has been selected during the installation of the new Server.
Transfer the database to another local disk
To move the database to , carry out the following actionsanother local disk
Stop nns service,
Make sure that there are no working postgres.exe processes left. If there are working processes, they need to be completed,
Move the data folder (which is by default located in the C:\Program Files\KickidlerNode\pgsql\ directory) to another local disk (forexample, to the H:\KickidlerDatabase directory),
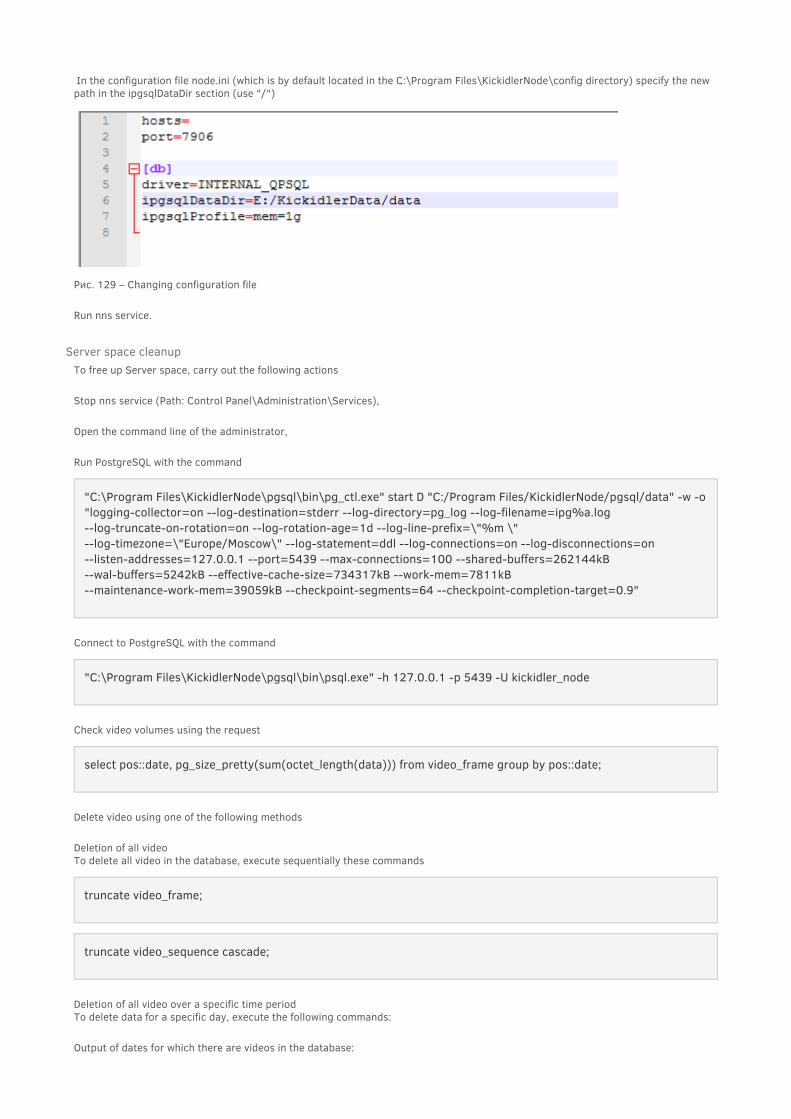
In the configuration file node.ini (which is by default located in the C:\Program Files\KickidlerNode\config directory) specify the newpath in the ipgsqlDataDir section (use "/")
Рис. 129 – Changing configuration file
Run nns service.
Server space cleanupTo free up Server space, carry out the following actions
Stop nns service (Path: Control Panel\Administration\Services),
Open the command line of the administrator,
Run PostgreSQL with the command
"C:\Program Files\KickidlerNode\pgsql\bin\pg_ctl.exe" start D "C:/Program Files/KickidlerNode/pgsql/data" -w -o"logging-collector=on --log-destination=stderr --log-directory=pg_log --log-filename=ipg%a.log--log-truncate-on-rotation=on --log-rotation-age=1d --log-line-prefix=\"%m \"--log-timezone=\"Europe/Moscow\" --log-statement=ddl --log-connections=on --log-disconnections=on--listen-addresses=127.0.0.1 --port=5439 --max-connections=100 --shared-buffers=262144kB--wal-buffers=5242kB --effective-cache-size=734317kB --work-mem=7811kB--maintenance-work-mem=39059kB --checkpoint-segments=64 --checkpoint-completion-target=0.9"
Connect to PostgreSQL with the command
"C:\Program Files\KickidlerNode\pgsql\bin\psql.exe" -h 127.0.0.1 -p 5439 -U kickidler_node
Check video volumes using the request
select pos::date, pg_size_pretty(sum(octet_length(data))) from video_frame group by pos::date;
Delete video using one of the following methods
Deletion of all videoTo delete all video in the database, execute sequentially these commands
truncate video_frame;
truncate video_sequence cascade;
Deletion of all video over a specific time periodTo delete data for a specific day, execute the following commands:
Output of dates for which there are videos in the database:

Output of dates for which there are videos in the database:
select pos::date from video_frame group by pos::date;
Deletion of video for a specific day:
delete from video_frame WHERE pos::date = '20160523'; delete from video_sequence WHERE first_frame_pos::date = '20160523';
Deletion of video from several different days:
delete from video_frame WHERE pos::date = '20160523' OR pos::date = '20160524' OR pos::date = '20160525'; delete from video_sequence WHERE first_frame_pos::date = '20160523' OR first_frame_pos::date = '20160524' OR first_frame_pos::date ='20160525';
Deletion of video for the period:
delete from video_frame WHERE pos::date >= '20160523' AND pos::date <= '20160525'; delete from video_sequence WHERE first_frame_pos::date >= '20160523' AND first_frame_pos::date <= '20160525';
where 20160523 is the date of the day, for which you want to delete the video, in the YYYYMMDD format
Deletion of all video regarding a certain user
To delete data on a certain user, execute the following commands:
Output of the list of user names-domain-computer name and video volume on them
SELECT online_session.user_name, online_session.user_domain, online_session.computer_name,pg_size_pretty(sum(octet_length(data))) FROM video_frame JOIN video_sequence ON (video_sequence.id=video_frame.sequence_id) JOIN online_session ON (video_sequence.online_session_id=online_session.id) GROUP BY online_session.user_name, online_session.user_domain, online_session.computer_nameORDER BY sum(octet_length(data)) DESC;
Deletion of video in respect of the employee
DELETE FROM video_sequence WHERE id IN(SELECT vs.id FROM video_sequence AS vsJOIN online_session AS s ON(vs.online_session_id=s.id)WHEREs.user_name='Эдуард' ANDs.computer_name='win10x64' ANDs.user_domain='workgroup'LIMIT 100);
Here s.user_name is the user name, s.computer_name is the computer name, s.user_domain is the domain name, according to which
the video needs to be deleted. If some of the parameters don't exist, then leave them empty in the request. The operations limit

the video needs to be deleted. If some of the parameters don't exist, then leave them empty in the request. The operations limit(Limit=100), which can be changed if necessary, is also displayed.
After commands of deletion execute the command that reclaims storage occupied by dead tuples vacuum full;
Activate nns service (Path: Control Panel\Administration\Services).
Viewer on WindowsViewer's logs are by default located here
C:\Users\User\AppData\Local\KickidlerViewer\log
Viewer's configuration files are by default located here
C:\Users\User\AppData\Local\KickidlerViewer\config
To delete the Viewer, carry out the following actionsOpen the "Programs and Components" subsection of the "Control panel" section,
Select KickidlerViewer in the list of programs,
Figure 124 - - List of installed program and components
Press the "Delete" button.
Warning!
"full" vacuum can reclaim more space, but takes much longer and exclusively locks the table. This method also requires extradisk space, since it writes a new copy of the table and doesn't release the old copy until the operation is complete. Usually thisshould only be used when a significant amount of space needs to be reclaimed from within the table.

GNU_Linux componentsAt service of components of a program complex use information given below.
Agent on GNU/LinuxAgent's logs are by default
/opt/TeleLinkSoftHelper/log
Agent's configuration files are by default
/opt/TeleLinkSoftHelper/config/
To work with the Agent, use the following commands
Debian, Ununtu, Linux Mint, CentOS/RHEL 6.7
service kickidlergrabber stop
service kickidlergrabber start
service kickidlergrabber restart
service kickidlergrabber status
RPM-based distribution kits with system:
systemctl kickidlergrabber stop
systemctl kickidlergrabber start
Stop of the Agent
Start of the Agent
Restart of the Agent
Status check of the Agent
Stop of the Agent
Start of the Agent

systemctl kickidlergrabber restart
systemctl kickidlergrabber status
To delete the Agent, execute the following command
Debian, Ununtu, Linux Mint:
apt-get purge kickidlergrabber
RPM-based distribution kits:
yum remove kickidlergrabber
dnf remove kickidlergrabber
Server on GNU/LinuxServer
Server's logs are by default
/opt/KickidlerNode/log/
Server's configuration files are by default
/opt/KickidlerNode/config/
To work with the Server, use the following commands
Debian, Ununtu, Linux Mint, CentOS/RHEL 6.7:
service kickidlernode stop
service kickidlernode start
Restart of the Agent
Status check of the Agent
For newer distribution kits
stop of the server
start of the server

service kickidlernode restart
service kickidlernode status
RPM-based distribution kits with systemd:
systemctl stop kickidlernode.service
systemctl start kickidlernode.service
systemctl restart kickidlernode.service
systemctl status kickidlernode.service
To delete the Server, execute the following command
Debian, Ununtu, Linux Mint
apt-get purge kickidlernode
RPM-based distribution kits:
yum remove kickidlernode
dnf remove kickidlernode
PostgreSQL
Logs of the PostgreSQL database are by default
restart of the server
status check of the server
stop of the server
start of the server
restart of the server
check of the start of the server
For newer distribution kits
/var/log/postgresql
To work with the database, use the following commands
Debian, Ununtu, Linux Mint, CentOS/RHEL 6.7:
service postgresql stop
service postgresql start
service postgresql restart
service postgresql status
RPM-based distribution kits with systemd:
systemctl postgresql stop
systemctl postgresql start
systemctl postgresql restart
systemctl postgresql status
Server on GNU/Linux space cleanupTo clean space on the Server, carry out the following steps
Stop kickidlernode service,
stop of the DB
start of the DB
restart of the DB
status check of the DB
stop of the DB
start of the DB
restart of the DB
status check of the DB

Connect to PostgreSQL with the command
sudo su postgres
psql -h 127.0.0.1 -p 5432 -U kickidler_node
Check video volumes using the request
select pos::date, pg_size_pretty(sum(octet_length(data))) from video_frame group by pos::date;
Delete video using one of the following methods
Deletion of all videoTo delete all video in the database, execute sequentially these commands
truncate video_frame;
truncate video_sequence cascade;
Deletion of all video over a specific time periodTo delete data for a specific day, execute the following commands:
Output of dates for which there are videos in the database:
select pos::date from video_frame group by pos::date;
Deletion of video for a specific day:
delete from video_frame WHERE pos::date = '20160523'; delete from video_sequence WHERE first_frame_pos::date = '20160523';
Deletion of video from several different days:
delete from video_frame WHERE pos::date = '20160523' OR pos::date = '20160524' OR pos::date = '20160525'; delete from video_sequence WHERE first_frame_pos::date = '20160523' OR first_frame_pos::date = '20160524' OR first_frame_pos::date ='20160525';
Deletion of video for the period:
delete from video_frame WHERE pos::date >= '20160523' AND pos::date <= '20160525'; delete from video_sequence WHERE first_frame_pos::date >= '20160523' AND first_frame_pos::date <= '20160525';
where 20160523 is the date of the day, for which you want to delete the video, in the YYYYMMDD format

where 20160523 is the date of the day, for which you want to delete the video, in the YYYYMMDD format
Deletion of all video regarding a certain user
To delete data on a certain user, execute the following commands:
Output of the list of user names-domain-computer name and video volume on them
SELECT online_session.user_name, online_session.user_domain, online_session.computer_name,pg_size_pretty(sum(octet_length(data))) FROM video_frame JOIN video_sequence ON (video_sequence.id=video_frame.sequence_id) JOIN online_session ON (video_sequence.online_session_id=online_session.id) GROUP BY online_session.user_name, online_session.user_domain, online_session.computer_nameORDER BY sum(octet_length(data)) DESC;
Deletion of video in respect of the employee
DELETE FROM video_sequence WHERE id IN(SELECT vs.id FROM video_sequence AS vsJOIN online_session AS s ON(vs.online_session_id=s.id)WHEREs.user_name='Эдуард' ANDs.computer_name='win10x64' ANDs.user_domain='workgroup'LIMIT 100);
Here s.user_name is the user name, s.computer_name is the computer name, s.user_domain is the domain name, according to whichthe video needs to be deleted. If some of the parameters don't exist, then leave them empty in the request. The operations limit(Limit=100), which can be changed if necessary, is also displayed.
After commands of deletion execute the command that reclaims storage occupied by dead tuples vacuum full;
Upon completion of removal run kickidlernode service.
Viewer on GNU/LinuxViewer's logs are by default
/opt/KickidlerViewer/log/
Viewer's configuration files are by default
/opt/KickidlerViewer/config/
To delete the Viewer, execute the following command
Debian, Ununtu, Linux Mint:
Warning!
"full" vacuum can reclaim more space, but takes much longer and exclusively locks the table. This method also requires extradisk space, since it writes a new copy of the table and doesn't release the old copy until the operation is complete. Usually thisshould only be used when a significant amount of space needs to be reclaimed from within the table.

Debian, Ununtu, Linux Mint:
apt-get purge kickidlerviewer
RPM-based distribution kits:
yum remove kickidlerviewer
dnf remove kickidlerviewer
Mac OS componentsFor maintenance of components of the software package use information that's given below.
Agent on MacOSAgent's logs are by default
/usr/local/opt/kickidlergrabber/log/
Agent's configuration files are by default
/usr/local/opt/kickidlergrabber/config
To work with the Agent, use the following commands
sudo launchctl start com.kickidler.grabber
sudo launchctl stop com.kickidler.grabber
sudo launchctl list |grep kickidler.grabber
To delete the Agent, execute the following command in the console
sudo /usr/local/opt/kickidlergrabber/bin/uninstall
For newer distribution kits
start of the Agent
stop of the Agent
display the status of the Agent

Viewer on MacOSViewer's logs are by default
/Users/User/Library/Application Support/KickidlerViewer/log
Viewer's configuration files are by default
/Users/tester-bug/Library/Application Support/KickidlerViewer/config
To delete the Viewer, use the AppCleaner program.
Learn more .here
Components of the Local licensing center
Information about the Local licensing center
Licensing center logs by default
/opt/KickidlerMaster/log/
Licensing center configuration files by default
/opt/KickidlerMaster/config/
Working with the licensing center
systemctl status kickidlermaster
systemctl stop kickidlermaster
systemctl start kickidlermaster
systemctl restart kickidlermaster
Deleting the licensing centerTo delete the licensing center, use the following command
Status
Stop
Start
Restart

rm -f /opt/KickidlerMaster/
Updating the componentsFiles for component updates are located in the Licensing center folder at:
/opt/KickidlerMaster/aup/
Problems and solutionsProblem 1
There is a following message in the Viewer "Warning! There is no access to the Central Server. To restore access call the systemadministrator of the Kickidler software package or use the following instruction".
To restore access on your own follow these steps:
Check the accessibility of the Central Server from the computer, on which the Viewer is installed.
How to understand that there is no access:
In the node.ini file find port (by default for Windows it's 7906, for Linux it's 1025) and in the command line execute the telnetcommand.
telnet %ip-Central server's address% 7906
telnet %ip-Central server's address% 1025
telnet 192.168.11.11 7906
Solution: if there is an error, that means there is no access and you need to perform configuration of the mixed networks. Learn more .here
Check whether the firewall is blocking the Viewer's and the Central Server's work.
How to understand that the firewall is indeed blocking the work:
Open the command line and execute the following commands:
telnet my.kickidler.com 40401telnet %ip-Central server's address% 8123 /8123 — port of the Central Server's web interface by default
Solution:To make sure Kickidler's software package works correctly, you should
Warning!
Before using the telnet command make sure that it's on.
Windows:
Linux:
Example:

To make sure Kickidler's software package works correctly, you should
permit outbound connections for the Viewer and the Central Server on to TCP port 40401,my.kickidler.compermit inbound connections to the TCP port that is stated in the node.ini file (by default for Windows it's 7906, for Linux it's1025), and the port of the Central Server's web interface (8123 by default or the port that is specified in the node.ini file inthe [http] block).
Check whether the Central Server is working.
How to understand that the Central Server is not working:
Go to the Personal account, open the "Licenses" section and find your Central Server.If date and time are shown in the table of licenses in the "Last Connection" column, then it is the date and time when theCentral Server was working for the last time, and the Central Server is offline now.
Possible reasons of inoperability:
Low disk space
Solution:
Open Central Server's logs, which are by default located here:
Windows:
C:\Program Files\KickidlerNode\log
Linux:
/opt/KickidlerNode/log/
Check whether there are these records in the log
ERROR std exception during log video frame: ERROR: could not extend file "base/16385/3710192.227": No spaceleft on deviceHINT: Check free disk space.
If there are such records in the log, you need to .free up space in the database
Server's service is not running (nns for Windows, kickidlernode for Linux).
Database cannot be startedSolution:Open Central Server's logs and check in the log for these records:
QPSQL: Unable to connect2016-10-20 14:07:40.142 2424 ERROR database connection failed: could not connect to server: Connectionrefused (0x0000274D/10061)
If there are such records, check whether PostgreSQL processes are running and whether they belong to the Server of the KickidlerSoftware Package component. If that's true, complete all PostgreSQL processes that have any relation to the Kickidler Server andrestart Server's service (nns for Windows, kickidlernode for Linux).
Directory in which the Server was installed is invalid for the databaseSolution:Open Central Server's logs and check in the log for these records:
2016-11-07 14:24:06.392 7696 FATAL unable to initialize data directory for internal postgresql instance
If there are such records, reinstall the Server to the directory using Latin alphabet.
Problem 2
The employees didn't appear in the Viewer after the installation of the Agents.
Warning!
If all above-mentioned didn't help solve the problem, call Kickidler's technical support service.

1. 2.
a. b. c.
1. 2. 3.
The employees didn't appear in the Viewer after the installation of the Agents.
Reasons
This problem can have several reasons:
Reason 1: Agents don't have access to the Server.Reason 2: Server is offline in the Viewer.Reason 3: Components of the software package (Server, Agent, Viewer) are located in different networks.Reason 4: You are using the extended version of the Viewer.
Reasons 1,2,3
Solution: Read more here Problem 1.
Reason 4
If you're using the extended version of the Viewer after installation of Agents on computers of the employees you need to completethe following steps
Go to the "Tracking" section ViewerAdd the employee to the Squarer box.
click the " " icon in an empty box,+select the added employee from the listpress the "OK" button.
Figure 132 - Adding employee to cell in viewer
Problem 3The employee disappeared in the Viewer from the Squarer box.
Reason 1: the employee isn't working for the company anymore.
Reason 2: in the Central Server the Viewer is not permitted to monitor the department of the employee.
Diagnostics
Go to the web interface of the Central Server into the "Employee" section,Find the employee in the structure of the organization,In the "Viewers Coordination" section check Viewer relation to employee.

1. 2. 3. 4.
Solution
In the "Viewers Coordination" section add check to employee.
Reason 3: the license for the employee's Agent has run out.
Diagnostics
Go to the Personal account to the "Licenses" section,Find the Agent of the employee by using the computer nameCheck the status in the "Status" column.Expired licenses will have the "EXPIRED" status.
Reason 4: The agent on the employee's computer is working incorrectly, or it has been deleted.
Diagnostics
Check that the route, where you've downloaded the Agent, has files.By default the routes are as follows:
for Windows: C:\Program Files\TeleLinkSoftHelperfor Linux: /opt/TeleLinkSoftHelper/for Mac: /usr/local/opt/kickidlergrabber.
Solution
If there is no route or there are no files in the folder, then your employee has deleted them himself, and you need to reinstall the Agent(before reinstallation all parts of the old Agent have to be deleted).
Diagnostics
Check whether the Agent's service is runningBy default:
for Windows: ngs,for Linux: kickidlergrabber,for Mac: kickidler.grabber.
Solution
If the service is not running, go to the Personal account and in the "Licenses" section check when the Agent has stopped working.
In the "History" section of the Viewer check what was happening before the disconnection of the Agent.
Perhaps, the employee himself has disconnected this service or there were electricity blackouts.
After you check the service reset the service to restart the Agent.
Problem 4There is no video when you're viewing history, yet other data is visible (keystrokes, running applications, histograms of violations).

Figure 133 - No video in history section
Reason
Video was created for the period that is out of video storage period.
Solution
to learn about video storage period of your Servers.
Problem 5special:fail and special:null occur in reports.

1. 2.
1. 2. 3.
a.
b. c.
i.
4.
5.
Figure 134 – Special:fail and special:null in reports
Reason
special:fail appears in the report if the employee opened in the browser a page, URL of which wasn't intercepted. Usuallyspecial:fail appears for the homepage of Yandex.Browser.special:null appears in the report if the employee opened in the browser a page, which has no URL. Usually special:nullappears for the homepage of the Edge browser.
Solution:
If all pages in the browser of the employee are intercepted as special:fail, do the following steps
Update the browser to the latest version, restart the browser and the Agent on the employee's computer,If this update didn't help, start the file on the computer where the Agent is downloaded.accreg.bat
Problem 6Viewer can't be started, fonts in the Viewer are blurred, or you can't open the main menu in the full-screen mode of the Viewer .
Reason
Viewer is working incorrectly with the video card.
Solution:
Update drivers of the video card.If drivers are updated, update DirectX. Details can be found through this .linkIf after these actions, the Viewer won't work correctly, select other software implementation of OpenGL. To do that, carry outthe following steps:
Open the Viewer's log and find the line with the information about the version of OpenGL specified in the line with theglVersionString parameterINFO glVersionString: OpenGL ES 2.0 (ANGLE 2.1.99f075dade7c)If "ANGLE" or "SOFTWARE" values are specified in the brackets, carry out the following steps:
Start the file (if Angle is specified), (if Software is specified) and run the Viewer. If thesoftware.bat angle.batproblem has disappeared, then place the .bat file in the bin folder of the Viewer. Create a label with the link tothe .bat file on the desktop, icon from the viewer.exe file and with "Minimized into an Icon" window
If after you change the software implementation of OpenGL the problem has remained, then run the (shutdownoffbanlist.batof the banlist of the video card's chips)If after all these actions the problem hasn't been solved, start the , file, copy the Viewer's logs and send to thegl_log.batKickidler's technical support.

Figure 135 - Shortcut settings

Figure 136 - Shortcut image changing
Problem 7Installation of a component is completed with the "Master of installation's work is complete prematurely" mistake.
Figure 137 - Incorrect installation

1. 2.
Reason
on the computer, where such problem with installation of a component of Kickidler's software package happens, most likely there havebeen previously installed other software products which could have damaged the register or they have been incorrectly removed.
Solution:
Run the , file, which will re-register in the register all records connected with a JS scriptjsreg.bat Restart the computer and start installation of a component once again.


