Embed Size (px)
Citation preview

Pair your Pi to your
smartphone
Discover the best
componentsRun RISC
OS on your Raspberry Pi
NEW
Raspberry Pi 100% unofficial Vital add-ons Python tips

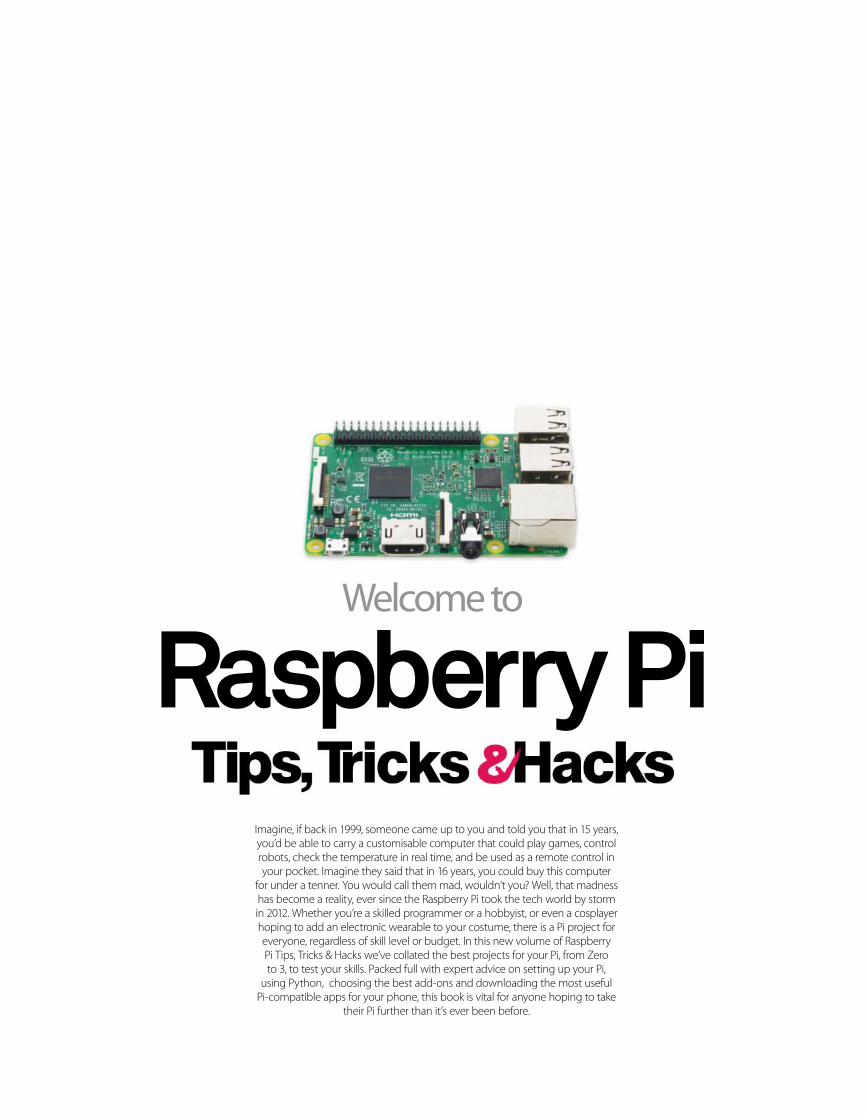
Imagine, if back in 1999, someone came up to you and told you that in 15 years, you’d be able to carry a customisable computer that could play games, control robots, check the temperature in real time, and be used as a remote control in your pocket. Imagine they said that in 16 years, you could buy this computer
for under a tenner. You would call them mad, wouldn’t you? Well, that madness has become a reality, ever since the Raspberry Pi took the tech world by storm in 2012. Whether you’re a skilled programmer or a hobbyist, or even a cosplayer hoping to add an electronic wearable to your costume, there is a Pi project for everyone, regardless of skill level or budget. In this new volume of Raspberry Pi Tips, Tricks & Hacks we’ve collated the best projects for your Pi, from Zero to 3, to test your skills. Packed full with expert advice on setting up your Pi,
using Python, choosing the best add-ons and downloading the most useful Pi-compatible apps for your phone, this book is vital for anyone hoping to take
their Pi further than it’s ever been before.
Welcome to
Raspberry Pi

Raspberry Pi
Future Publishing LtdRichmond House33 Richmond Hill
BournemouthDorset BH2 6EZ
+44 (0) 1202 586200Website www.futureplc.com
Creative Director Aaron Asadi
Editorial Director Ross Andrews
Editor In Chief Jon White
Production Editor Jasmin Snook
Senior Art Editor Greg Whitaker
Assistant Designer Steve Dacombe
Printed byWilliam Gibbons, 26 Planetary Road, Willenhall,
West Midlands, WV13 3XT
Distributed in the UK, Eire & the Rest of the World byMarketforce, 5 Churchill Place, Canary Wharf, London, E14 5HU.
0203 787 9060 www.marketforce.co.uk
Distributed in Australia by Gordon & Gotch Australia Pty Ltd, 26 Rodborough Road,
Frenchs Forest, NSW, 2086 Australia +61 2 9972 8800 www.gordongotch.com.au
DisclaimerThe publisher cannot accept responsibility for any unsolicited material lost or damaged in the post. All text and layout is the copyright of Future Publishing Limited. Nothing in
this bookazine may be reproduced in whole or part without the written permission of the publisher. All copyrights are recognised and used specifically for the purpose of criticism and review. Although the bookazine has endeavoured to ensure all information is correct
at time of print, prices and availability may change. This bookazine is fully independent and not affiliated in any way with the companies mentioned herein.
Raspberry Pi Tips, Tricks & Hacks Volume 2 Revised Edition© 2016 Future Publishing Limited
book series
Part of the

22 52
6 Raspberry Pi Tips, Tricks & Hacks
42
Contents08 25 maker
projects for Pi 322 Develop with Python
30 Get the new Pixel desktop
34 Multitasking with your Pi
36 Build a Pi-powered baby monitor
40 Run RISC OS on your Pi
42 Master essential Sense HAT
skills for an interactive game
50 Practise environmental science
with the Sensly HAT
52 Code a simple synthesiser
58 Display data from another
Raspberry Pi
• Learn about the latest updates
with the new Raspberry Pi 3
• Build a 3D printer
• Set up a WiFi hotspot anywhere
• Capture rare images with a
wildlife camera
• Put together your arcade cabinet
• Blast enemies with a Nerf shuffle
• Control the temperature
Tips 18 Set up your
Raspberry Pi Zero today
We’ve all been building Raspberry Pi robots for a while now – but with on-board Bluetooth and Wi-Fi?
• Learn the supplies you’ll need
• Get to grips with a soldering kit
• Configure WiFi
• Remotely access your Pi
• Set up a VNC server
58
Raspberry Pi Tips, Tricks & Hacks 7Raspberry Pi Tips, Tricks & Hacks Raspberry Pi Tips, Tricks & Hacks
64
86
8272 Zero-powered wearable
76 Build a Raspberry-Pi
Minecraft console
82 Create a Minecraft
Minesweeper game
86 Control lights with your Pi
90 Stream internet TV to your
Raspberry Pi
92 Underwater drone
94 Anonymise your web traffic with a
Pi Tor router
98 Create your own circuit diagrams
with Fritzing
102 Make a Pi 2 desktop PC
106 Set up a multi-room
sound system
Hacks
64 Xbox arcadewith a Pi Zero
Tricks
114 50 Ways to Hack your Raspberry Pi
122 10 awesome Raspberry Pi
upgrades
128 Hack a robot with Pi-mote
132 Self-driving RC car
136 Build a Pi cluster with
Docker Swan
140 Code a Tempest clone in
FUZE BASIC Part 1
144 Code a Tempest clone in
FUZE BASIC Part 2
148 Code a Tempest clone in
FUZE BASIC Part 3
152 Capture photos at night with the
NoIR Pi camera
156 Locate phones with Bluetooth
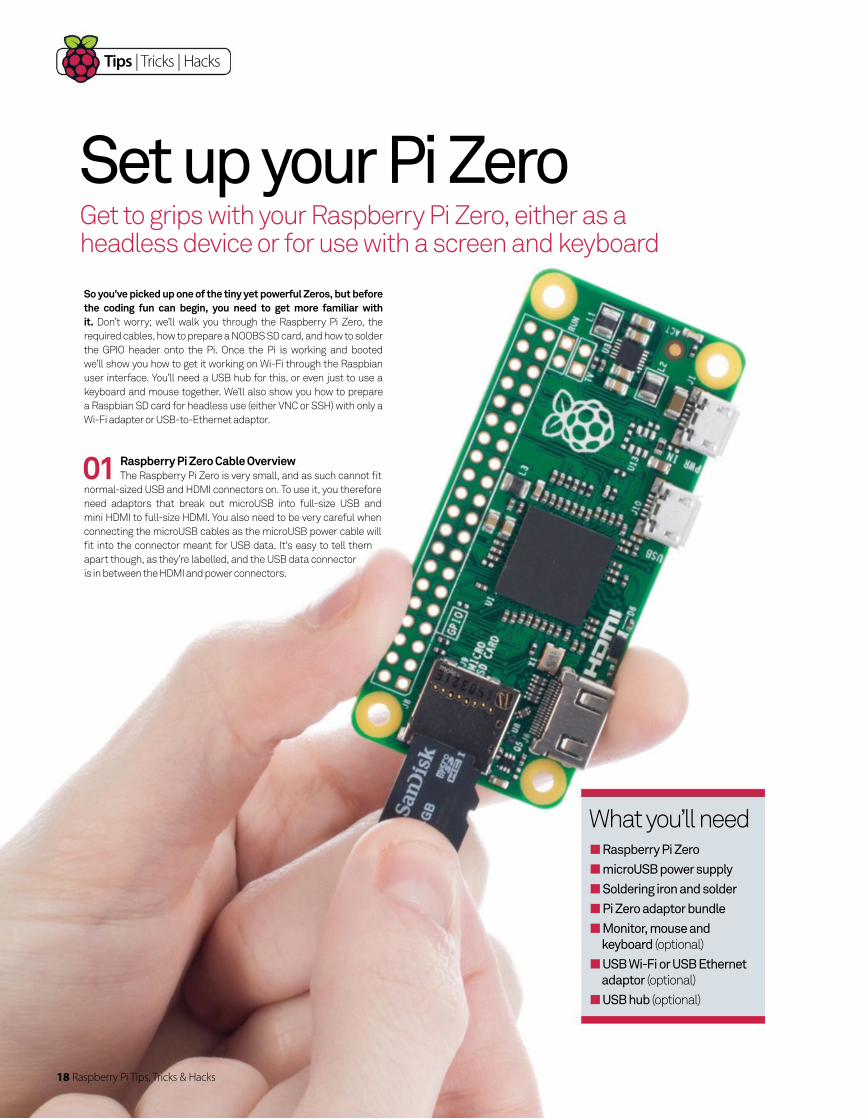
The Raspberry Pi Zero is very small, and as such cannot fit normal-sized USB and HDMI connectors on
72
FOR
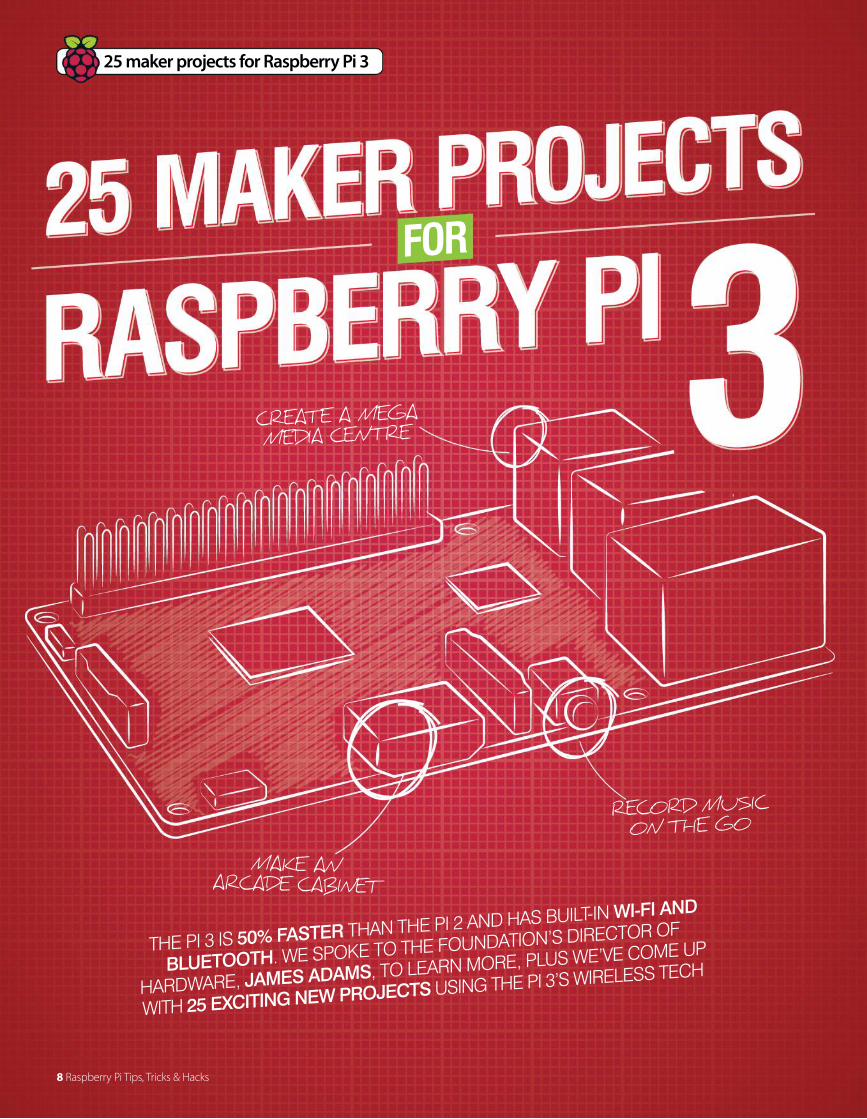
THE PI 3 IS 50% FASTER THAN THE PI 2 AND HAS BUILT-IN WI-FI AND
BLUETOOTH. WE SPOKE TO THE FOUNDATION’S DIRECTOR OF
HARDWARE, JAMES ADAMS, TO LEARN MORE, PLUS WE’VE COME UP
WITH 25 EXCITING NEW PROJECTS USING THE PI 3’S WIRELESS TECH
25 maker projects for Raspberry Pi 3
8 Raspberry Pi Tips, Tricks & Hacks
CREATE A MEGA MEDIA CENTRE
RECORD MUSIC ON THE GO
MAKE AN ARCADE CABINET
Raspberry Pi Tips, Tricks & Hacks 9
25 maker projects for Raspberry Pi 3
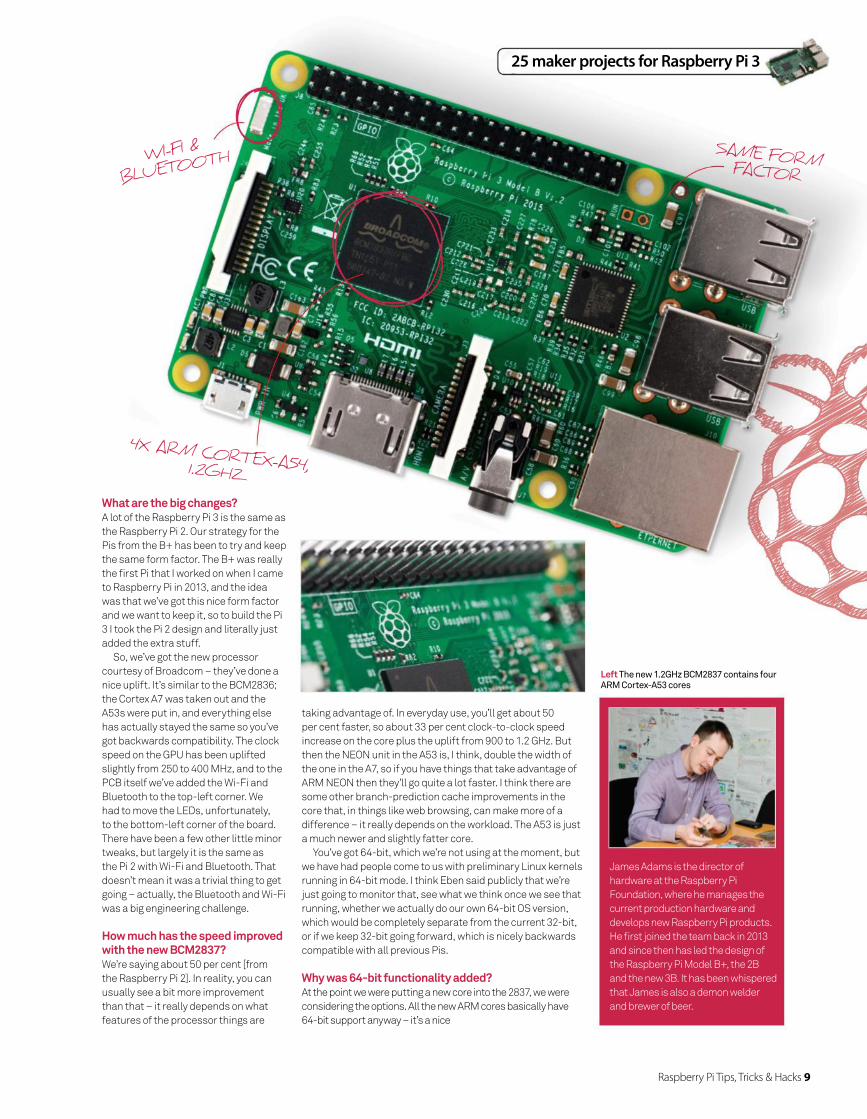
What are the big changes?A lot of the Raspberry Pi 3 is the same as
the Raspberry Pi 2. Our strategy for the
Pis from the B+ has been to try and keep
the same form factor. The B+ was really
the fi rst Pi that I worked on when I came
to Raspberry Pi in 2013, and the idea
was that we’ve got this nice form factor
and we want to keep it, so to build the Pi
3 I took the Pi 2 design and literally just
added the extra stuff.
So, we’ve got the new processor
courtesy of Broadcom – they’ve done a
nice uplift. It’s similar to the BCM2836;
the Cortex A7 was taken out and the
A53s were put in, and everything else
has actually stayed the same so you’ve
got backwards compatibility. The clock
speed on the GPU has been uplifted
slightly from 250 to 400 MHz, and to the
PCB itself we’ve added the Wi-Fi and
Bluetooth to the top-left corner. We
had to move the LEDs, unfortunately,
to the bottom-left corner of the board.
There have been a few other little minor
tweaks, but largely it is the same as
the Pi 2 with Wi-Fi and Bluetooth. That
doesn’t mean it was a trivial thing to get
going – actually, the Bluetooth and Wi-Fi
was a big engineering challenge.
How much has the speed improved with the new BCM2837?We’re saying about 50 per cent [from
the Raspberry Pi 2]. In reality, you can
usually see a bit more improvement
than that – it really depends on what
features of the processor things are
Left The new 1.2GHz BCM2837 contains four ARM Cortex-A53 cores
WI-FI &
BLUETOOTH SAME FORM FACTOR
4X ARM CORTEX-A54, 1.2GHZ
James Adams is the director of
hardware at the Raspberry Pi
Foundation, where he manages the
current production hardware and
develops new Raspberry Pi products.
He fi rst joined the team back in 2013
and since then has led the design of
the Raspberry Pi Model B+, the 2B
and the new 3B. It has been whispered
that James is also a demon welder
and brewer of beer.
taking advantage of. In everyday use, you’ll get about 50
per cent faster, so about 33 per cent clock-to-clock speed
increase on the core plus the uplift from 900 to 1.2 GHz. But
then the NEON unit in the A53 is, I think, double the width of
the one in the A7, so if you have things that take advantage of
ARM NEON then they’ll go quite a lot faster. I think there are
some other branch-prediction cache improvements in the
core that, in things like web browsing, can make more of a
difference – it really depends on the workload. The A53 is just
a much newer and slightly fatter core.
You’ve got 64-bit, which we’re not using at the moment, but
we have had people come to us with preliminary Linux kernels
running in 64-bit mode. I think Eben said publicly that we’re
just going to monitor that, see what we think once we see that
running, whether we actually do our own 64-bit OS version,
which would be completely separate from the current 32-bit,
or if we keep 32-bit going forward, which is nicely backwards
compatible with all previous Pis.
Why was 64-bit functionality added? At the point we were putting a new core into the 2837, we were
considering the options. All the new ARM cores basically have
64-bit support anyway – it’s a nice
25 maker projects for Raspberry Pi 3
10 Raspberry Pi Tips, Tricks & Hacks
The Pi will throttle the CPU speed when it reaches a hot
temperature – this is set to 85°C in the fi rmware. We’re still
talking to Gareth to see why he seems to get his Pi up to a
slightly hotter temperature. There is a bit of a temperature
gradient across the chip – the on-die temperature sensor is
in one corner of the chip – but in any case, we’re not worried
about it and we may update our temperature algorithms to be
more accurate, given Gareth’s data.
Having said that, though, these chips can get hot –
especially when pushed hard, and they will throttle; they’ll
drop their frequency and voltage. So a Pi 2 or 3 would benefi t
from a heat sink to reduce the amount of throttling if you are
using it in a very heavy workload continuously, whereas the
Pi 1, you could run it fl at-out all day and it would barely get
warm. There are now four signifi cantly fatter cores running at
a much faster rate, so we’re just bumping up against physics.
Your mobile phones work in the same way – they do this sprint
performance, where they’ll ramp the core right up to as fast as
possible, your phone will get warm, and as soon as it’s getting
to the point where it’s too hot, they’ll turn the frequency and
voltage down.
But for the standard ‘bursty’ workloads, like web browsing,
the chip on a Raspberry Pi cools down really quickly if you
stop doing a lot of work on it, so the board itself is quite a good
heatsink. Heat goes through the bottom of the solder balls
and into the ground planes of the board, and the board’s got
quite a lot of metal things soldered onto it – USB connectors
and such. It is important to stress that [the heat issue] is not
going to affect the lifetime of the Pi at all, we’re not really
worried about that.
feature for the future – but we’re very, very committed to
keeping form factors and software backwards-compatible,
at least as far as possible. So currently there are no plans to
do a 64-bit version of Raspbian. It will require two completely
separate OSs that we’ll then have to manage. We’d have to
recompile everything in userland to be 64-bit, so it’s an awful
lot of work, and then you’ve got the support burden as well.
Technically, it’s possible, and we’ll see what performance
gains 64-bit Linux has, and then we’ll take a view in the future
as to whether it’s worth it or not. Obviously, 64-bit ARMv8 is
the way that ARM cores are going, and all future ARM cores
will support it – so it’s a thing, but we don’t have an offi cial
position. We’ll see what happens; I think it’s a fi ne way to be.
A few people, like our reviewer Gareth Halfacree, have noticed that the Pi 3 runs hotter than its predecessors – should people restrict its uptime or is it still fi ne for extended use?The heating issue is something we can reproduce in a special
case. One thing I will say is that the Raspberry Pi 2 is similar
– it just takes a little bit longer to heat up. In terms of what’s
actually changed, the frequency has gone up a bit and we’ve
got a slightly bigger ARM core, so that core does generate
more heat. Now, the Pi 2 core still generated quite a lot of
heat compared to the Pi 1, if you run it fl at-out in the kind of
use cases that Gareth has been playing with. But will it kill
your Pi? Absolutely not. The 2837 SoC is qualifi ed for 125°C
temperature running for, I think, ten years of life – that’s where
they cut it off and say ‘That’s fi ne’ – so we’re not really worried
about the hardware falling over.
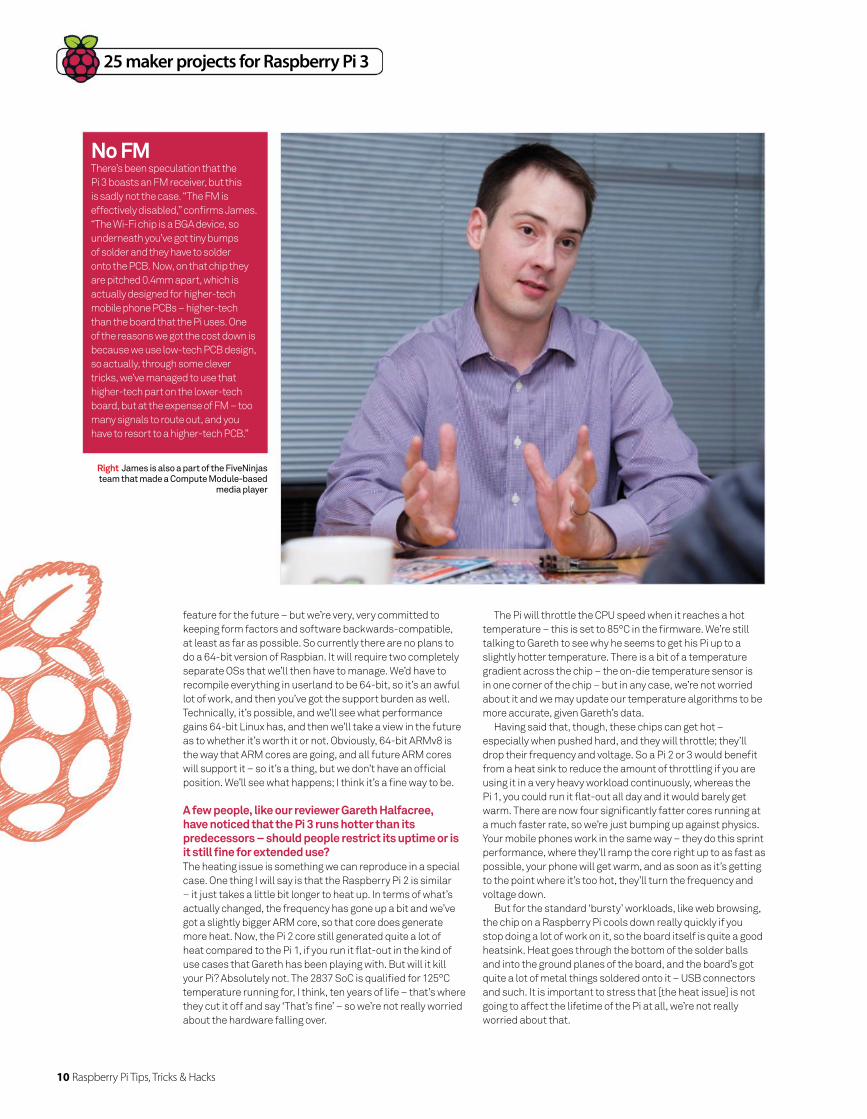
Right James is also a part of the FiveNinjas team that made a Compute Module-based
media player
No FM There’s been speculation that the
Pi 3 boasts an FM receiver, but this
is sadly not the case. “The FM is
effectively disabled,” confi rms James.
“The Wi-Fi chip is a BGA device, so
underneath you’ve got tiny bumps
of solder and they have to solder
onto the PCB. Now, on that chip they
are pitched 0.4mm apart, which is
actually designed for higher-tech
mobile phone PCBs – higher-tech
than the board that the Pi uses. One
of the reasons we got the cost down is
because we use low-tech PCB design,
so actually, through some clever
tricks, we’ve managed to use that
higher-tech part on the lower-tech
board, but at the expense of FM – too
many signals to route out, and you
have to resort to a higher-tech PCB.”
Raspberry Pi Tips, Tricks & Hacks 11
25 maker projects for Raspberry Pi 3
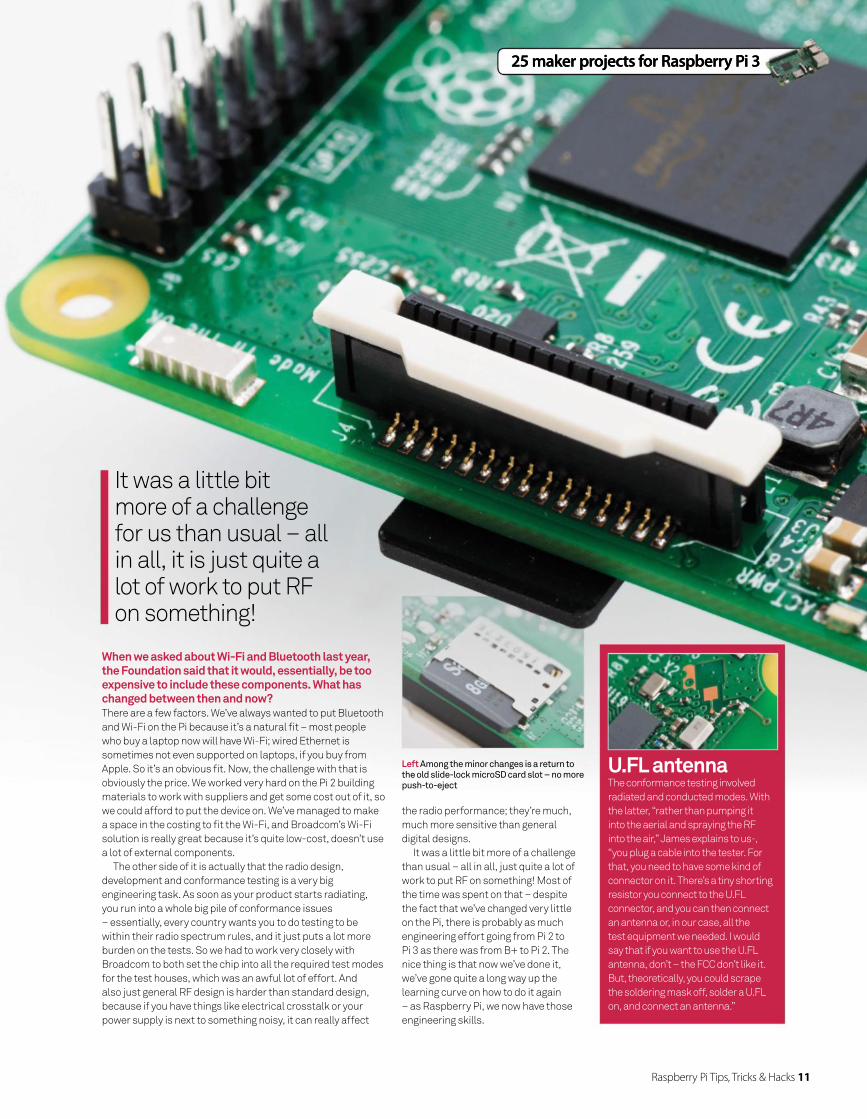
Left Among the minor changes is a return to the old slide-lock microSD card slot – no more push-to-eject
the radio performance; they’re much,
much more sensitive than general
digital designs.
It was a little bit more of a challenge
than usual – all in all, just quite a lot of
work to put RF on something! Most of
the time was spent on that – despite
the fact that we’ve changed very little
on the Pi, there is probably as much
engineering effort going from Pi 2 to
Pi 3 as there was from B+ to Pi 2. The
nice thing is that now we’ve done it,
we’ve gone quite a long way up the
learning curve on how to do it again
– as Raspberry Pi, we now have those
engineering skills.
U.FL antenna The conformance testing involved
radiated and conducted modes. With
the latter, “rather than pumping it
into the aerial and spraying the RF
into the air,” James explains to us-,
“you plug a cable into the tester. For
that, you need to have some kind of
connector on it. There’s a tiny shorting
resistor you connect to the U.FL
connector, and you can then connect
an antenna or, in our case, all the
test equipment we needed. I would
say that if you want to use the U.FL
antenna, don’t – the FCC don’t like it.
But, theoretically, you could scrape
the soldering mask off, solder a U.FL
on, and connect an antenna.”
25 maker projects for Raspberry Pi 3
It was a little bit more of a challenge for us than usual – all in all, it is just quite a lot of work to put RF on something!
When we asked about Wi-Fi and Bluetooth last year, the Foundation said that it would, essentially, be too expensive to include these components. What has changed between then and now?There are a few factors. We’ve always wanted to put Bluetooth
and Wi-Fi on the Pi because it’s a natural fi t – most people
who buy a laptop now will have Wi-Fi; wired Ethernet is
sometimes not even supported on laptops, if you buy from
Apple. So it’s an obvious fi t. Now, the challenge with that is
obviously the price. We worked very hard on the Pi 2 building
materials to work with suppliers and get some cost out of it, so
we could afford to put the device on. We’ve managed to make
a space in the costing to fi t the Wi-Fi, and Broadcom’s Wi-Fi
solution is really great because it’s quite low-cost, doesn’t use
a lot of external components.
The other side of it is actually that the radio design,
development and conformance testing is a very big
engineering task. As soon as your product starts radiating,
you run into a whole big pile of conformance issues
– essentially, every country wants you to do testing to be
within their radio spectrum rules, and it just puts a lot more
burden on the tests. So we had to work very closely with
Broadcom to both set the chip into all the required test modes
for the test houses, which was an awful lot of effort. And
also just general RF design is harder than standard design,
because if you have things like electrical crosstalk or your
power supply is next to something noisy, it can really affect
TAKE ADVANTAGE OF YOUR ON-BOARD
WI-FI AND BLUETOOTH WITH THESE NEW
AND UPGRADED PROJECT IDEAS
1
2
3
Wildlife camera
Weather station
Robot
Parts
Parts
Parts
While you can pick up a kit for this, like the
one from Naturebytes (bit.ly/1PdUNue), it’s
easy to put your own wildlife camera together.
Make sure that you have a waterproof case to
protect your Pi, the portable power supply and
your other electrical components against any
damage from rainwater; there are 3D models
(STL fi les) available, which you can easily tweak to fi t
the Pi 3 using a simple program like 123D Design. Then
you just need to use waterproof sealing on any joints
and on the hole through which the camera module
points – check out this guide: bit.ly/1mgUA2X.
You can set your Pi up to shoot during particular
times by triggering a Python script with a cron job – just
add a real-time clock module via your GPIO header so
the Pi knows what time it is while offl ine. If your Pi is
within reach of your Wi-Fi, it can automatically upload
or tweet photos for you. If you would prefer your camera
to only shoot when there is an animal to capture, set up
a PIR (passive infrared sensor) to monitor for changes
to the infrared picture it is seeing, which would indicate
a moving source of (body) heat.
With the Pi 3, you can hide your camera enclosure
away in some really tricky hiding places (buried in
bushes, tucked up inside trees…) and still have easy
access to it via the on-board Wi-Fi and SSH if you need
to make any changes to your scripts.
While a waterproof case is also a good
idea here, some of the sensors would
benefi t from being outside the case,
like the temperature sensor – there
are waterproofed variants available for
some of them. You could always use
a mix of sensors, so you can take an
average of the readings and also have
some built-in redundancy.
The idea here is to connect up lots of
sensors via the GPIOs in order to get
a reading of the weather state in your
area. With the Wi-Fi and portable power
pack, you can have the weather station
in your garden connected to your home
router (or a Wi-Fi repeater!) for an
internet connection, and you can post
all of the data onto an easily-accessed
WordPress site, hosted on the Pi.
Now, we’ve all been building Raspberry
Pi robots for a while now – but with
on-board Bluetooth and Wi-Fi? For a
start, you don’t need a Wi-Fi dongle in
order to access your robot and make
any changes to the control script on the
fl y, meaning that you can reduce the
footprint of your design. And if you do
use a dongle then you could even drive
your robot around to use as a mobile
Wi-Fi signal repeater! By setting up
the BlueZ stack, you could also use
your robot to control Bluetooth LE
devices – perhaps mounting a pair of
speakers on the back of your bot – as
well as use Bluetooth devices such
as the Wiimote to control movement
(see bit.ly/1RRh4Qu). Get yourself a
Bluetooth headset and you could even
set up a voice-controlled application
using something like Jasper (http://
jasperproject.github.io), which listens
out for your spoken commands.
– Waterproof case with a camera mount
– Portable power pack
– Camera module – PIR sensor – Real-time clock
– DHT22 sensor – BMP085 sensor – TGS 2600 – UV1-01 sensor – LDR (light
dependent resistor)
– ADC (analogue-to-digital convertor)
– Wind vane – Anemometer
– Wi-Fi dongle – Bluetooth
speakers – Bluetooth headset
Borrow a screen
Connect to a PC via Ethernet
and use Remote Desktop. You
still have internet access via
the Wi-Fi.
12 Raspberry Pi Tips, Tricks & Hacks

Get your monitor, speakers, keyboard and mouse plugged in, then install OSMC
– this is your main home theatre PC. Confi gure a Bluetooth remote control, or a
remote control app on your smartphone or tablet. Connect a powered external
hard drive to your Raspberry Pi, loaded up with all your
favourite music, movies and TV shows. Set up your OSMC
media centre by adding the content stored on your external
hard drive, and add new fi les from
USB fl ash drives as and when
you plug them in. Set your Pi up
as a media server for your mobile
devices. Finally, browse through
OSMC’s App Store for things like a
torrent client and TV tuner.
6
4
5
3D printer
Mega media centre
Wi-Fi hotspot
Super server
Parts
You can control a 3D printer using the
Pi 3, and the extra horsepower means
that you can handle the slicing on
the Pi as well. First of all, you’ll need
to either set up a bought kit or look
into the RepRap project – RepRaps
are 3D-printable 3D printers, so
you just need to fi nd a friend with a
machine or a high street 3D printer in
order to run off the parts, then pick
up the non-printable components
(start here: http://reprap.org/wiki/
RepRapPro_Huxley).
With your 3D printer set up, install
the OctoPi image onto your SD card
and then use the included software,
such as OctoPrint and
CuraEngine, to handle your G-Code
and slicing, driving it all via Wi-Fi. You
could even set up the camera module
inside the 3D printer and record time-
lapse footage of your prints, though
you’ll want a powered external hard
drive as well to store the video fi les.
Set up your Pi as a wireless access
point for other devices, which assigns IP
addresses. Connect it to the internet via
ethernet, and it will act as a bridge for
the devices connecting
via its Wi-Fi module.
If you’re trying to get
a connection down
into your garden, use
a portable power pack
and plug in a USB Wi-
Fi dongle. You then use
the on-board Wi-Fi to
connect to your home
router and the plug-in
Wi-Fi to broadcast into
your shed.
The Raspberry Pi 3 can keep up with
huge amounts of page requests – the
Pi Foundation ran an experiment during
the Pi 3 launch to see if it could keep up
with the huge number of visitors (http://
bit.ly/22mCjRR), and over 12 hours it
served 1.5 million requests. So, even
if your website is huge, you can serve
it from your Pi, and now it’s got Wi-Fi
you can confi gure it remotely while
it’s tucked away in a
drawer somewhere.
– 3D printer – Camera module – Powered external
hard drive
Parts – Home theatre
peripherals – Bluetooth
remote – Powered
external hard drive
Parts – Portable
power pack– Wi-Fi dongle
PiBook
PiPad
Smart TV
Speaker
Fit a display into a 3D-printed laptop case,
along with a keyboard and trackpad. Use
tiny Bluetooth speakers for audio and
connect to the internet via Wi-Fi. Switch
to a portable power pack if you want to go
mobile. Run something like Ubuntu MATE
if you want to complete the look.
Mount your Pi on the back of the offi cial
touchscreen display and wire it all up.
Use a regular power supply, and if you
want to be untethered then switch to a
portable power pack. Be sure to pair it
with a Bluetooth keyboard so you can
get to the command line.
Install Kodi, then mount your Pi onto the
back of your TV. Connect your TV to the Pi
via HDMI, using adaptors if your TV is DVI/
SVGA. Plug in powered external storage
to add videos, and set yourself up with
some streaming websites. Confi gure a
Bluetooth remote or grab the Kodi app.
Connect your speakers to the Pi via a
Class D amplifi er. Fit the setup inside a
case, leaving a space for the power cable
or including a portable power pack. Set
up a Logitech Media Server on your Pi
and control playback
using the Squeezer
app. Owners of a
Bluetooth speaker can
use BlueZ.
8
9
10
11
Practical gadgets
7
Raspberry Pi Tips, Tricks & Hacks 13
Go WirelessInvest in a Bluetooth
keyboard/mouse combo and
you'll free up all four of your
USB ports

Smart Home Technology
Auto-lightsMany Bluetooth LE light bulbs can be
reverse-engineered to work with BlueZ
– fi nd out which library to download to
work with it at bit.ly/1UjxGq8. You could
also choose to use Bluetooth home
automation switches – plug your non-
smart lights into those and then control
the switch itself.
12
Temperature control
Wire sensors like the DHT22 to your
Pi, stick everything inside a case, then
move the unit around the house to
get readings. Upload all the data to a
database on your Pi’s web server to
access it from a web page, and then
fi nd out where the hot and cold spots
are in your home.
14
Plant monitorUse an SHT10 soil monitor to sense
the temperature and moisture of the
earth around the roots, then feed that
data to a web server on your Pi that
you can check via your phone. Add a
portable power pack and a waterproof
enclosure for the Pi, and you can leave it
in the garden.
13
RC socketsWeMo switches plug straight into your
wall socket. You can then plug your
non-smart appliance into that socket,
and can remotely switch it on and off
by sending Bluetooth commands from
your Pi over the BlueZ stack. You can
then combine this with cronjobs, or a
mic and PocketSphinx…
15
14 Raspberry Pi Tips, Tricks & Hacks
16 DroneParts
There are some great resources if you want to build your
own drone – places like diydrones.com and instructables.
com – including all the motors you’ll need and 3D models for a
chassis. Or you could instead purchase a complete drone kit.
To actually power and drive the drone, you can use your Pi 3
with the new PXFmini autopilot shield. It’s an excellent device
designed for the Pi Zero but is perfectly compatible with the
Raspberry Pi 3, and its extra CPU power gives it a signifi cant
performance boost over a Pi Zero or Pi 2 drone. The PXFmini
includes a gyro and compass, accelerometer, magnetometer,
pressure and temperature sensor, plus an ADC – a very handy,
compact bit of kit! And with the Pi 3’s on-board Wi-Fi and
Bluetooth, you won’t need any extra modules in order to control
it while it’s in the air.
– Drone kit – PXFmini
autopilot shield
17 18On-location recording studio
Performance kit live audio
Add-ons like the
early Wolfson Audio
Card and the Pi-3
compatible Cirrus Logic
Audio Card enable
you to handle audio
far better on your Pi. With an audio card,
you can take advantage of tiny on-board
mics or plug in your own to capture audio.
There are also jacks for stereo line input,
into which you can plug your instruments
to capture high quality audio directly. You
can also plug in external amplifi ers or
powered speakers. The power of the Pi
3 means that you’ll be able to handle the
recording without slowdown, and if you
want to fi t a display as well (or use a VNC
app) then you can use Audacity to edit
your audio on-location.
Set up your
speakers using the
Class D amplifi er
and you’ve got
your audio output
sorted. Connect
your instrument via the USB sound
card, and then set up the Guitarix: this
is a virtual guitar amplifi er that can
take your raw input, add an effect,
then deliver a processed stereo signal
out to your speakers. If you pre-set
a few different effects, you can set
them up to be triggered by your
GPIO-connected push-buttons, or a
button panel add-on. Again, with the
souped-up Pi 3, you can now handle this
level of audio processing comfortably.
Alternatively, you could even have the Pi
automatically upload recorded tracks to
your Dropbox via Wi-Fi.
Parts – Cirrus Logic
Audio Card – Microphones – Instruments
Parts – USB sound card – Button input – Class D amplifier – Speakers
Phone your Pi
Need to check something
but your Pi is inaccessibly
buried inside a project?
Use JuiceSSH
25 maker projects for Raspberry Pi 3
25 maker projects for Raspberry Pi 3
Practical gadgets
Raspberry Pi Tips, Tricks & Hacks 15
19
Arcade Touch Table
Arcade Cabinet
Car entertainment
Parts
Parts
Parts
Wire up the offi cial touchscreen via the GPIOs and confi gure the
display for touch input. Build it into the surface of a table. Add
capacitive touch sensors in a D-pad plus buttons layout and
install speakers. Now follow the method
used by Frederick Vandenbosch for the
surface (see bit.ly/1lwEMJ8) – lay down
a sheet of clear Plexi over your capacitive
touch sensors, add a couple of layers of
paper to obscure the components, then
another layer of Plexi. The capacitive
touch sensors should be sensitive enough
for you to trigger them by placing your
hands over the surface, and you can even
shine LEDs through the paper. Now set up
RetroPie.
Grab an HDMI monitor (or DVI with an adaptor) and build it
into a chassis for the cabinet, along with speakers. Fit the
joystick and buttons, then wire them up to the GPIO pins. Install
RetroPie on the Pi, add the ROMs that you own, confi gure the
joystick and buttons, then confi gure any Bluetooth or USB
gamepads you have for additional players. Fit the Pi into the
cabinet – if you need to adjust your setup, you can either use
SSH, a Bluetooth keyboard/mouse, or leave access to two USB
ports for a keyboard and mouse.
Set up a Kodi media centre on your Raspberry Pi and add a
touchscreen display to make controlling it easy while driving.
Install the unit into your car inside the radio slot, and add wired
or wireless speakers, since you have your on-board Wi-Fi.
Check out bit.ly/1jdL8rQ for a little inspiration. Put a Bluetooth
keyboard somewhere handy and also grab any media-loaded
fl ash drives you have. Install a Kodi remote app onto your
smartphone, set it up and then and use it to control the car
stereo. You can also set up a portable wireless hotspot on your
mobile, with your 3G connection, and then access your hotspot
using the Pi’s Wi-Fi module. For the fi nishing touch, run Navit
with TTS output for a true sat-nav system.
– Coffee table (bought/made)
– Official 7” touchscreen display
– Speakers – 6-8 Capacitive
touch sensors (Pi Desk ones)
– Cabinet (bought/made)
– Monitor – Speakers – Joystick &
buttons – Gamepads
– Touchscreen display
– Back seat displays
– Speakers – Bluetooth
keyboard/mouse combo
21
20
25 maker projects for Raspberry Pi 3
Smart Toys
Nerf shuffle
Wireless projector
Minecraft magic wand
Find a medium-to-large toy and break
into it so that you can hide the Pi. Now wire
up your LEDs, camera module and mini
loudspeaker, then seal the toy back up
again. If you run a web server using the Pi’s
Wi-Fi then you can write a simple control
interface to activate lights and sounds.
Write a simple script to shuffl e your
music playlist on a given input, which in
this case can be a shot from a Nerf gun.
Wire up a medium vibration sensor so
that it can detect a hit on your target,
then pass that input to your script. Fire
gun, hit target, change song. Give this a
read: bit.ly/1RR9YLN.
Get something like the Brookstone
Pocket Projector and connect it to your
Pi, stick the setup inside an enclosure
and reposition a projected display on
the fl y. If the resolution isn’t quite there,
the Pi 3 can handle a smooth VNC
connection to your computer over Wi-Fi.
Connect your Pi to the Wiimote via
Bluetooth and then confi gure it with the
CWiid Python module (bit.ly/1Wtzb2Z).
With the Wiimote set up, you can now
use the Wiimote buttons to trigger
pre-made Python scripts to hack your
Minecraft world.
22
24
23
25

Tips• Set up a VNC server
• Remotely access your Pi
• Configure WiFi
• Get to grips with a soldering kit
• Learn the supplies you’ll need
16 Raspberry Pi Tips, Tricks & Hacks
18 Set up your Pi Zero
22 Develop with Python
30 Get the new Pixel desktop
34 Multitasking with your Pi
36 Build a Pi-powered baby monitor
40 Run RISC OS on your Pi
42 Master essential Sense HAT skills for
an interactive game
50 Practise environmental science with
the Sensly HAT
52 Code a simple synthesiser
58 Networked Sensor Display with
Pimoroni Scroll pHAT
Get to grips with a soldering kit• Get to grips with a soldering kit
Master essential Sense HAT skills for 42 Master essential Sense HAT skills for Master essential Sense HAT skills for Master essential Sense HAT skills for
Practise environmental science with
Master essential Sense HAT skills for
Get to grips with a soldering kit
Learn the supplies you’ll need
Remotely access your Pi
Configure WiFi
Get to grips with a soldering kit
Set up a VNC server
Develop with Python
Get the new Pixel desktop
Multitasking with your Pi
Build a Pi-powered baby monitor
Run RISC OS on your Pi
Master essential Sense HAT skills for Master essential Sense HAT skills for
an interactive game
Practise environmental science with
the Sensly HAT
Code a simple synthesiser
Networked Sensor Display with
Pimoroni Scroll pHAT
Get to grips with a soldering kit
Master essential Sense HAT skills for
Get to grips with a soldering kit
Learn the supplies you’ll need
Remotely access your Pi
Get to grips with a soldering kit
Get the new Pixel desktop
Multitasking with your Pi
Build a Pi-powered baby monitor
Master essential Sense HAT skills for Master essential Sense HAT skills for
Practise environmental science with
Code a simple synthesiser
Networked Sensor Display with
Get to grips with a soldering kit
Master essential Sense HAT skills for
Get to grips with a soldering kit
Learn the supplies you’ll need
Remotely access your Pi
Configure WiFi
Get to grips with a soldering kit
Set up a VNC server
Develop with Python
Get the new Pixel desktop
Multitasking with your Pi
Build a Pi-powered baby monitor
Run RISC OS on your Pi
Master essential Sense HAT skills for Master essential Sense HAT skills for
an interactive game
Practise environmental science with
the Sensly HAT
Code a simple synthesiser
Networked Sensor Display with
Pimoroni Scroll pHAT
Get to grips with a soldering kit
Master essential Sense HAT skills for
18
Get to grips with your Raspberry Pi Zero, either as a headless device or for use with a screen and keyboard
Raspberry Pi Tips, Tricks & Hacks 17Raspberry Pi Tips, Tricks & Hacks Raspberry Pi Tips, Tricks & Hacks
Discover the Sensly HAT
add-on
Masterthe Python
language
Get scientific with your
Sensly HAT
36
42 58
22
Tips | Tricks | Hacks
Get to grips with your Raspberry Pi Zero, either as a headless device or for use with a screen and keyboard
Set up your Pi Zero
So you’ve picked up one of the tiny yet powerful Zeros, but before the coding fun can begin, you need to get more familiar with it. Don’t worry; we’ll walk you through the Raspberry Pi Zero, the
required cables, how to prepare a NOOBS SD card, and how to solder
the GPIO header onto the Pi. Once the Pi is working and booted
we’ll show you how to get it working on Wi-Fi through the Raspbian
user interface. You’ll need a USB hub for this, or even just to use a
keyboard and mouse together. We’ll also show you how to prepare
a Raspbian SD card for headless use (either VNC or SSH) with only a
Wi-Fi adapter or USB-to-Ethernet adaptor.
01 Raspberry Pi Zero Cable OverviewThe Raspberry Pi Zero is very small, and as such cannot fi t
normal-sized USB and HDMI connectors on. To use it, you therefore
need adaptors that break out microUSB into full-size USB and
mini HDMI to full-size HDMI. You also need to be very careful when
connecting the microUSB cables as the microUSB power cable will
fi t into the connector meant for USB data. It‘s easy to tell them
apart though, as they’re labelled, and the USB data connector
is in between the HDMI and power connectors.
What you’ll need Raspberry Pi Zero
microUSB power supply
Soldering iron and solder
Pi Zero adaptor bundle
Monitor, mouse and
keyboard (optional)
USB Wi-Fi or USB Ethernet
adaptor (optional)
USB hub (optional)
18 Raspberry Pi Tips, Tricks & Hacks
Raspberry Pi Tips, Tricks & Hacks 19
Tips | Tricks | Hacks
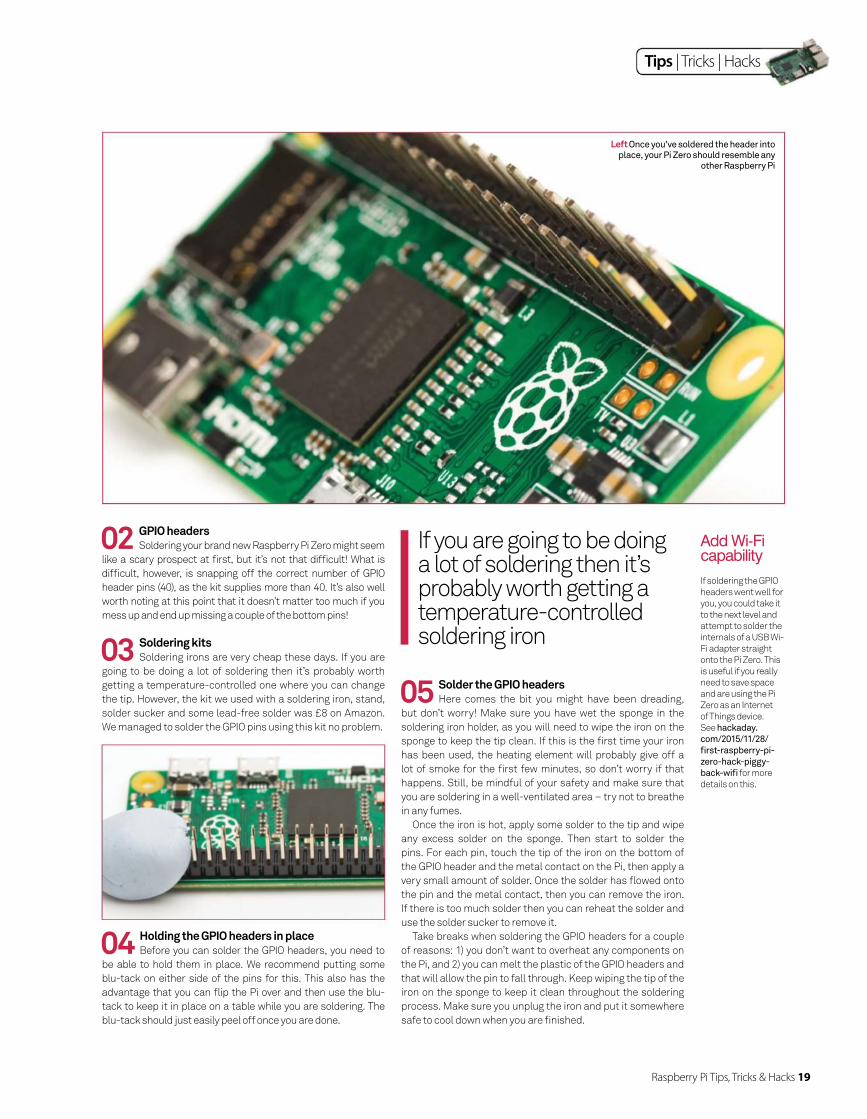
02 GPIO headersSoldering your brand new Raspberry Pi Zero might seem
like a scary prospect at fi rst, but it’s not that diffi cult! What is
diffi cult, however, is snapping off the correct number of GPIO
header pins (40), as the kit supplies more than 40. It’s also well
worth noting at this point that it doesn’t matter too much if you
mess up and end up missing a couple of the bottom pins!
03 Soldering kitsSoldering irons are very cheap these days. If you are
going to be doing a lot of soldering then it’s probably worth
getting a temperature-controlled one where you can change
the tip. However, the kit we used with a soldering iron, stand,
solder sucker and some lead-free solder was £8 on Amazon.
We managed to solder the GPIO pins using this kit no problem.
05 Solder the GPIO headersHere comes the bit you might have been dreading,
but don’t worry! Make sure you have wet the sponge in the
soldering iron holder, as you will need to wipe the iron on the
sponge to keep the tip clean. If this is the fi rst time your iron
has been used, the heating element will probably give off a
lot of smoke for the fi rst few minutes, so don’t worry if that
happens. Still, be mindful of your safety and make sure that
you are soldering in a well-ventilated area – try not to breathe
in any fumes.
Once the iron is hot, apply some solder to the tip and wipe
any excess solder on the sponge. Then start to solder the
pins. For each pin, touch the tip of the iron on the bottom of
the GPIO header and the metal contact on the Pi, then apply a
very small amount of solder. Once the solder has fl owed onto
the pin and the metal contact, then you can remove the iron.
If there is too much solder then you can reheat the solder and
use the solder sucker to remove it.
Take breaks when soldering the GPIO headers for a couple
of reasons: 1) you don’t want to overheat any components on
the Pi, and 2) you can melt the plastic of the GPIO headers and
that will allow the pin to fall through. Keep wiping the tip of the
iron on the sponge to keep it clean throughout the soldering
process. Make sure you unplug the iron and put it somewhere
safe to cool down when you are fi nished.
04 Holding the GPIO headers in placeBefore you can solder the GPIO headers, you need to
be able to hold them in place. We recommend putting some
blu-tack on either side of the pins for this. This also has the
advantage that you can fl ip the Pi over and then use the blu-
tack to keep it in place on a table while you are soldering. The
blu-tack should just easily peel off once you are done.
If soldering the GPIO
headers went well for
you, you could take it
to the next level and
attempt to solder the
internals of a USB Wi-
Fi adapter straight
onto the Pi Zero. This
is useful if you really
need to save space
and are using the Pi
Zero as an Internet
of Things device.
See hackaday.
com/2015/11/28/
fi rst-raspberry-pi-
zero-hack-piggy-
back-wifi for more
details on this.
Add Wi-Fi capability
If you are going to be doing a lot of soldering then it’s probably worth getting a temperature-controlled soldering iron
Left Once you’ve soldered the header into place, your Pi Zero should resemble any
other Raspberry Pi
Tips | Tricks | Hacks
The Pi Zero’s small
size means that you
can fi t it inside some
gaming controllers.
In fact, we know for
sure that It fi ts inside
the original Xbox
controller because
we’ve tracked down
someone who has
done it! Next issue
we’ll be running their
full write-up of the
Xbox Zero project,
so keep an eye out
for that in LU&D 163,
and make sure you’ve
got an old gamepad
kicking around that
you don’t mind taking
apart for this!
Retro gaming
06 Prepare NOOBS SD CardSee www.raspberrypi.org/help/noobs-setup for more
details. NOOBS requires an SD card formatted as FAT32. You
then need to download the latest NOOBS image from https://
downloads.raspberrypi.org/NOOBS_latest and then unzip it to
the SD card. On Linux, the steps are as follows:
sudo parted /dev/mmcblk0 (parted) mktable msdos (parted) mkpart primary fat32 0% 100% (parted) quit sudo mkfs.vfat /dev/mmcblk0p1 cd /mnt sudo mkdir pi sudo mount /dev/mmcblk0p1 pi cd pi sudo unzip ~/Downloads/NOOBS_v1_5_0.zip sync cd .. sudo umount pi
07 Boot NOOBS and install RaspbianConnect your Pi Zero up as shown in the fi rst step. The
minimum you need connected for a NOOBS install is a monitor
and a keyboard. However, a mouse and either an Ethernet
adaptor or Wi-Fi adaptor are also very useful. Press Enter to
select Raspbian and then press I to install. Then press Enter to
agree. Once it is fi nished it will say ‘OS installed successfully’.
Press OK and your Pi will reboot into Raspbian. Alternatively,
if you don’t want to use NOOBS, you can fl ash Raspbian to an
SD card in the usual manner. Raspbian will boot into a desktop
environment by default.
08 Confi gure Wi-FiIf you are using a USB-to-Ethernet adaptor then the Pi
should already be connected to the internet. If you are using a
Wi-Fi adapter then you will need to confi gure it to connect to your
wireless network. We are using an Edimax EW-7811UN, which
works perfectly with the Pi out of the box. Once at the Raspbian
desktop, you can click on the network icon in order to see the
available wireless networks. Once you click on one it will ask you
for the password. After that it should be associated; you can
hover your mouse over the icon and see the networks that you
are connected to.
09 Confi gure Wi-Fi from another machineIf you want to use the Pi Zero as a headless device with
Wi-Fi then you can prepare an SD card using another Linux
machine that will already be confi gured to connect to the correct
Wi-Fi network. You have to mount the SD card and edit /etc/wpa_
supplicant/wpa_supplicant.conf, which is the same fi le that is
confi gured by the Raspbian user interface from the previous
step. Insert the SD card into your Linux machine and work out
what the device is called.
dmesg | tail -n 3 [320516.612984] mmc0: new high speed SDHC card at address 0001
[320516.613437] mmcblk0: mmc0:0001 SD8GB 7.35 GiB
So the device is /dev/mmcblk0 – now we need to work out which
20 Raspberry Pi Tips, Tricks & Hacks
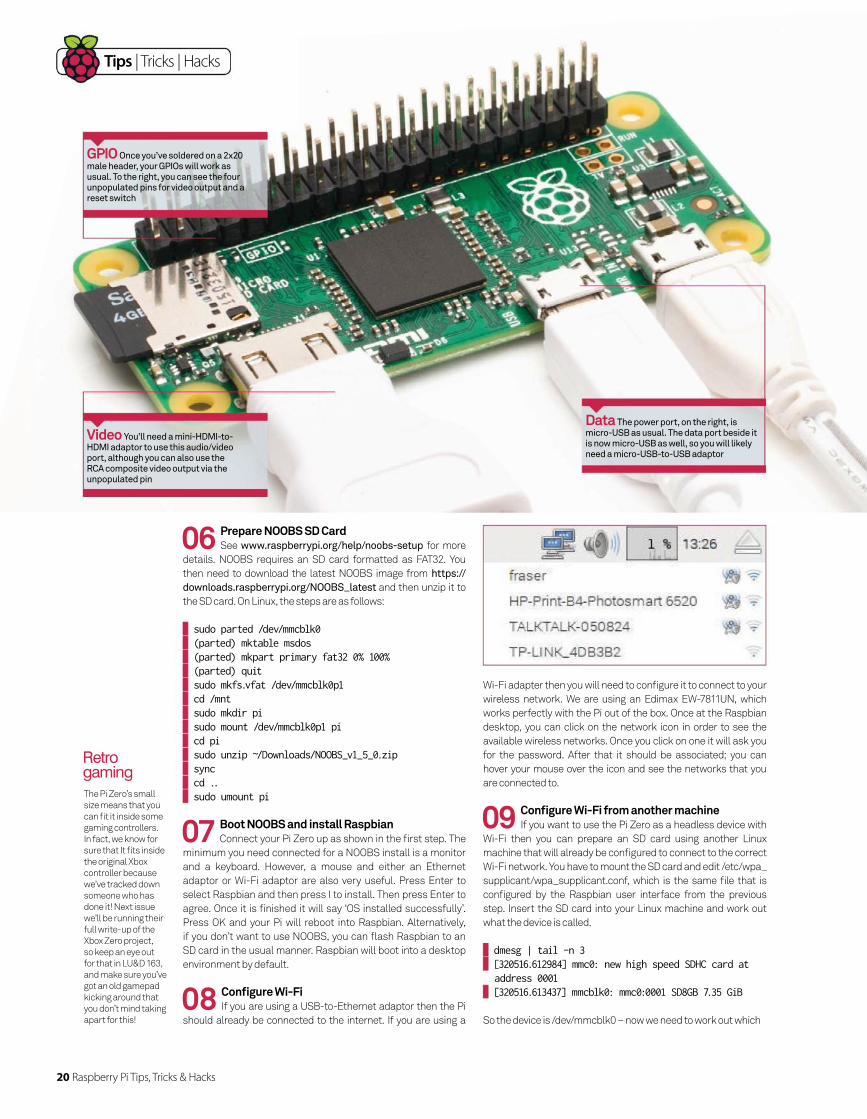
Data The power port, on the right, is micro-USB as usual. The data port beside it is now micro-USB as well, so you will likely need a micro-USB-to-USB adaptor
GPIO Once you’ve soldered on a 2x20 male header, your GPIOs will work as usual. To the right, you can see the four unpopulated pins for video output and a reset switch
Video You’ll need a mini-HDMI-to-HDMI adaptor to use this audio/video port, although you can also use the RCA composite video output via the unpopulated pin
Raspberry Pi Tips, Tricks & Hacks 21
Tips | Tricks | Hacks
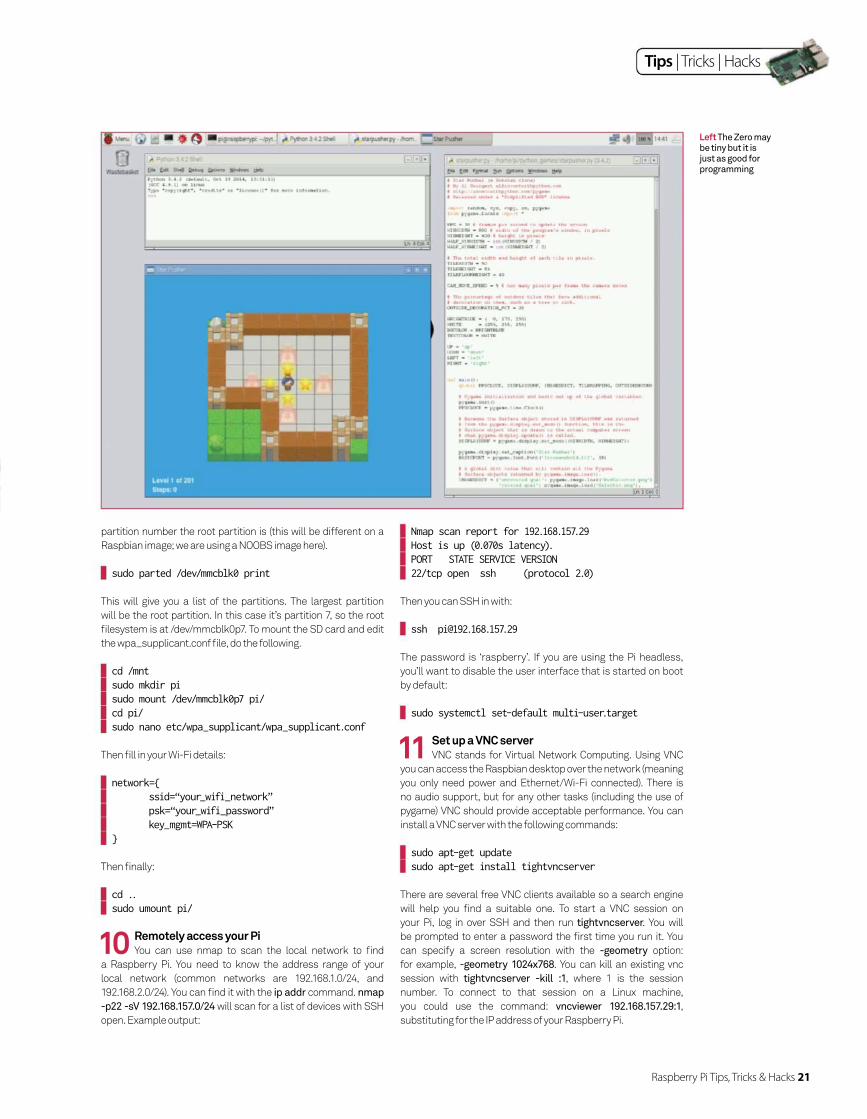
Left The Zero may be tiny but it is just as good for programming
partition number the root partition is (this will be different on a
Raspbian image; we are using a NOOBS image here).
sudo parted /dev/mmcblk0 print
This will give you a list of the partitions. The largest partition
will be the root partition. In this case it’s partition 7, so the root
fi lesystem is at /dev/mmcblk0p7. To mount the SD card and edit
the wpa_supplicant.conf fi le, do the following.
cd /mnt sudo mkdir pi sudo mount /dev/mmcblk0p7 pi/ cd pi/ sudo nano etc/wpa_supplicant/wpa_supplicant.conf
Then fi ll in your Wi-Fi details:
network={ ssid=“your_wifi_network” psk=“your_wifi_password” key_mgmt=WPA-PSK }
Then fi nally:
cd .. sudo umount pi/
10 Remotely access your PiYou can use nmap to scan the local network to fi nd
a Raspberry Pi. You need to know the address range of your
local network (common networks are 192.168.1.0/24, and
192.168.2.0/24). You can fi nd it with the ip addr command. nmap
-p22 -sV 192.168.157.0/24 will scan for a list of devices with SSH
open. Example output:
Nmap scan report for 192.168.157.29 Host is up (0.070s latency). PORT STATE SERVICE VERSION 22/tcp open ssh (protocol 2.0)
Then you can SSH in with:
The password is ‘raspberry’. If you are using the Pi headless,
you’ll want to disable the user interface that is started on boot
by default:
sudo systemctl set-default multi-user.target
11 Set up a VNC serverVNC stands for Virtual Network Computing. Using VNC
you can access the Raspbian desktop over the network (meaning
you only need power and Ethernet/Wi-Fi connected). There is
no audio support, but for any other tasks (including the use of
pygame) VNC should provide acceptable performance. You can
install a VNC server with the following commands:
sudo apt-get update sudo apt-get install tightvncserver
There are several free VNC clients available so a search engine
will help you fi nd a suitable one. To start a VNC session on
your Pi, log in over SSH and then run tightvncserver. You will
be prompted to enter a password the fi rst time you run it. You
can specify a screen resolution with the -geometry option:
for example, -geometry 1024x768. You can kill an existing vnc
session with tightvncserver -kill :1, where 1 is the session
number. To connect to that session on a Linux machine,
you could use the command: vncviewer 192.168.157.29:1,
substituting for the IP address of your Raspberry Pi.

22 Raspberry Pi Tips, Tricks & Hacks
Tips | Tricks | Hacks
Python is relied upon by web developers, academic researchers and engineers across the world. Here’s how to
put your Python skills to professional use

Raspberry Pi Tips, Tricks & Hacks 23
Tips | Tricks | Hacks
System administration
System administration tasks are some of the most annoying things that you need to deal with when you have to maintain your own system. Because of this, system administrators
have constantly been trying to fi nd ways to automate these
types of tasks to maximise their time. They started with
basic shell scripts, and then moved on to various scripting
languages. For a long time, Perl had been the language of
choice for developing these types of maintenance tools.
However, Python is now growing in popularity as the language
to use. It has reached the point where most Linux distributions
have a Python interpreter included in order to run system
scripts, so you shouldn’t have any excuse for not writing your
own scripts.
Because you will be doing a lot system level work, you
will have most need of a couple of key Python modules. The
fi rst module is “os”. This module provides the bulk of the
interfaces to interacting with the underlying system. The
usual fi rst step is to look at the environment your script is
running in to see what information might exist there to help
guide your script. The following code gives you a mapping
object where you can interact with the environment variables
active right now:
import os os.environ
You can get a list of the available environment variables with
the function os.environs.keys(), and then access individual
variables with os.environs[key]. These environment variables
are used when you spawn a subprocess, as well. So you will
want to change values, like the PATH or the current working
directory, in order to run these subprocesses correctly. While
there is a putenv function that edits these values, it doesn’t
exist on all systems, so the most benefi cial way in the long
run to approach this is to edit the values directly within the
environs mapping.
Another category of tasks you may want to automate is when
working with fi les. Get the current working directory with:
cwd = os.getcwd()
You can then get a list of the fi les in this directory with:
os.listdir(cwd)
You can move around the fi lesystem with the function
os.chdir(new_path). Once you’ve found the fi le you are
interested in, you can open it with os.open() and open it for
reading, writing and/or appending. You can then read or write
to it with the functions os.read() and os.write(). Once you are all
done, you can close the fi le with os.close().
Above Python scripts enable you to instruct and interact with your operating system
Get the most out of Python in handling all of the day-to-day upkeep that keeps your system healthy
Once you have your
scripts all written
up, you may want to
schedule them to
run automatically
without your
intervention. On
Unix systems,
you can have cron
run your script on
whatever schedule
is necessary. The
utility crontab -l lists
the current contents
of your cron fi le, and
crontab -e lets you
edit the scheduled
jobs that you want
cron to run.
Scheduling with cron
Running subprocesses from PythonThe underlying philosophy of Unix is to build small, specialised
programs that do one job extremely well. You then chain these
together to build more complex behaviours. There is no reason
why you shouldn’t use the same philosophy within your Python
scripts. There are several utility programs available to use with
very little work on your part. The older way of handling this was
through using functions like popen() and spawnl() from the
os module, but a better way of running other programs is by
using the subprocess module instead. You can then launch a
program, like ls, by using:
import subprocess subprocess.run([‘ls’, ‘-l’])
This gives a long fi le listing for the current directory. The
function run() was introduced in Python 3.5 and is the
suggested way of handling this. If you have an older version,
or need more control, you can use the underlying Popen()
function instead. If you want to get the output, you can use:
cmd_output = subprocess.run([‘ls’, ‘-l’], stdout=subprocess.PIPE)
The variable “cmd_output” is a CompletedProcess object
that contains the return code and a string holding the stdout
output. It may not be the same way that you are used to, but the
methodology is essentially the same.
SYSTEM ADMINISTRATION:BASH, PERL, PYTHON
OPERATING SYSTEM
CPU FILES/IO
24 Raspberry Pi Tips, Tricks & Hacks
Tips | Tricks | Hacks
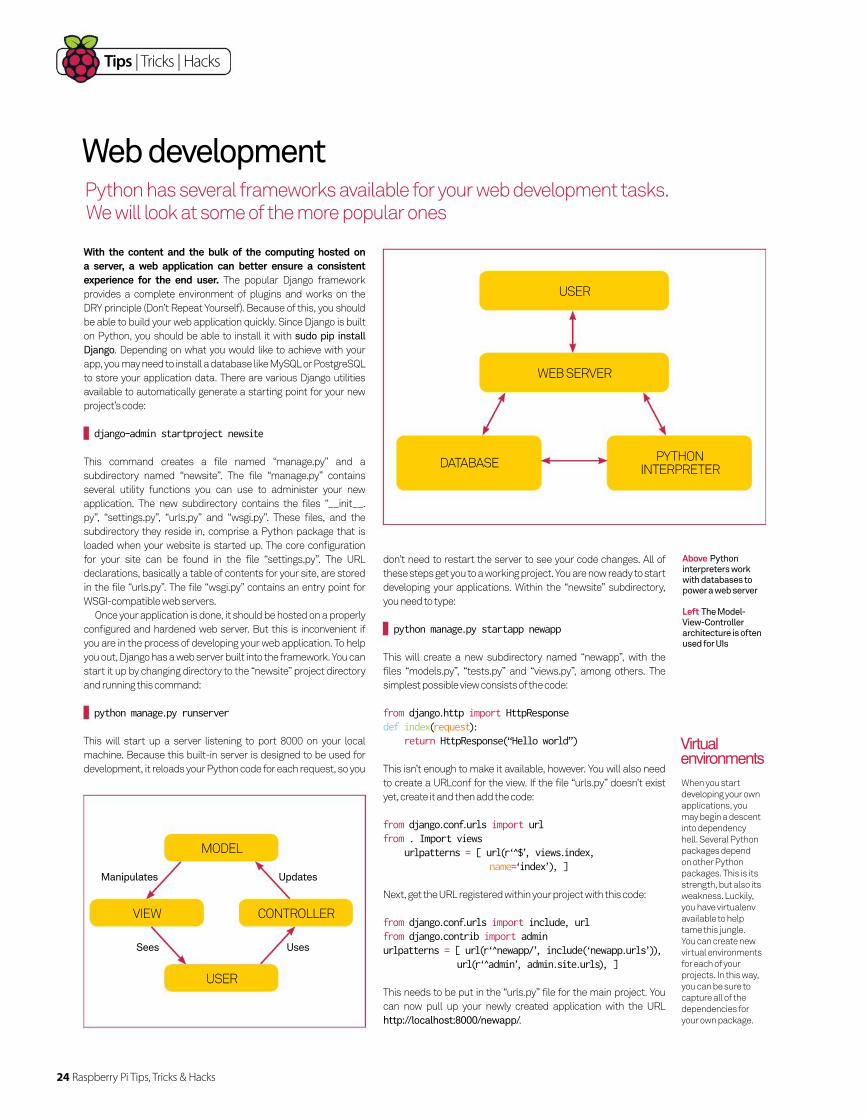
With the content and the bulk of the computing hosted on a server, a web application can better ensure a consistent experience for the end user. The popular Django framework
provides a complete environment of plugins and works on the
DRY principle (Don’t Repeat Yourself). Because of this, you should
be able to build your web application quickly. Since Django is built
on Python, you should be able to install it with sudo pip install
Django. Depending on what you would like to achieve with your
app, you may need to install a database like MySQL or PostgreSQL
to store your application data. There are various Django utilities
available to automatically generate a starting point for your new
project’s code:
django-admin startproject newsite
This command creates a file named “manage.py” and a
subdirectory named “newsite”. The file “manage.py” contains
several utility functions you can use to administer your new
application. The new subdirectory contains the files “__init__.
py”, “settings.py”, “urls.py” and “wsgi.py”. These files, and the
subdirectory they reside in, comprise a Python package that is
loaded when your website is started up. The core configuration
for your site can be found in the file “settings.py”. The URL
declarations, basically a table of contents for your site, are stored
in the file “urls.py”. The file “wsgi.py” contains an entry point for
WSGI-compatible web servers.
Once your application is done, it should be hosted on a properly
configured and hardened web server. But this is inconvenient if
you are in the process of developing your web application. To help
you out, Django has a web server built into the framework. You can
start it up by changing directory to the “newsite” project directory
and running this command:
python manage.py runserver
This will start up a server listening to port 8000 on your local
machine. Because this built-in server is designed to be used for
development, it reloads your Python code for each request, so you
Above Python interpreters work with databases to power a web server
Left The Model-View-Controller architecture is often used for UIs
don’t need to restart the server to see your code changes. All of
these steps get you to a working project. You are now ready to start
developing your applications. Within the “newsite” subdirectory,
you need to type:
python manage.py startapp newapp
This will create a new subdirectory named “newapp”, with the
files “models.py”, “tests.py” and “views.py”, among others. The
simplest possible view consists of the code:
from django.http import HttpResponsedef index(request):
return HttpResponse(“Hello world”)
This isn’t enough to make it available, however. You will also need
to create a URLconf for the view. If the file “urls.py” doesn’t exist
yet, create it and then add the code:
from django.conf.urls import urlfrom . Import views urlpatterns = [ url(r‘ $’, views.index,
name=‘index’), ]
Next, get the URL registered within your project with this code:
from django.conf.urls import include, urlfrom django.contrib import adminurlpatterns = [ url(r‘ newapp/’, include(‘newapp.urls’)), url(r‘ admin’, admin.site.urls), ]
This needs to be put in the “urls.py” file for the main project. You
can now pull up your newly created application with the URL
http://localhost:8000/newapp/.
Web developmentPython has several frameworks available for your web development tasks. We will look at some of the more popular ones
When you start
developing your own
applications, you
may begin a descent
into dependency
hell. Several Python
packages depend
on other Python
packages. This is its
strength, but also its
weakness. Luckily,
you have virtualenv
available to help
tame this jungle.
You can create new
virtual environments
for each of your
projects. In this way,
you can be sure to
capture all of the
dependencies for
your own package.
Virtual environments
USER
WEB SERVER
DATABASEPYTHON
INTERPRETER
MODEL
USER
VIEW CONTROLLER
Manipulates
Sees
Updates
Uses
Raspberry Pi Tips, Tricks & Hacks 25
Tips | Tricks | Hacks
The last part for applications is usually the database. The
actual connection details to the database, like the username and
password, are contained in the file “settings.py”. This connection
information is used for all of the applications that exist within the
same project. Create the core database tables for your site with:
python manage.py migrate
For your own applications, you can define the data model you
need within the file “models.py”. Once the data model is created,
you can add your application to the INSTALLED_APPS section
of the “settings.py” so that Django knows to include it in any
database activity. You initialise it with:
python manage.py makemigrations newapp
Once created, apply these migrations to the database:
python manage.py migrate
Any time you make changes to your model, you will need to run
the makemigrations and migrate steps again.
Once you have your application finished, you can make
the move to the final hosting server. Don’t forget to check the
available code within the Django framework before putting too
much work into developing your own.
Using the PyCharm IDE
Other Python FrameworksWhile Django is one of the most popular frameworks around
for doing web development, it is by no means the only one
around. There are several others available that may prove to
be a better fi t for particular problem domains. For example,
if you are looking for a really self-contained framework, you
could look at web2py. Everything you need to be able to have
a complete system, from databases to web servers to a
ticketing system, are included as part of the framework. It is
so self-contained that it can even run from a USB drive.
If you need even less of a framework, there are several
mini-frameworks that are available. For example, CherryPy
is a purely Pythonic multi-threaded web server that you
can embed within your own application. This is actually
the server included with TurboGears and web2py. A really
popular microframework is a project called fl ask. It includes
integrated unit testing support, jinja2 templating and RESTful
request dispatching.
One of the oldest frameworks around is zope, now up to
version 3. This latest version was renamed BlueBream. Zope
is fairly low-level, however. You may be more interested in
looking at some of the other frameworks that are built on
top of what is provided by zope. For example, pyramid is a
very fast, easy-to-use framework that focuses on the most
essential functions required by most web applications. To
this end, it provides templating, the serving of static content,
mapping of URLs to code, among other functions. It handles
this while providing tools for application security.
If you are looking for some ideas, there are several open
source projects that have been built using these frameworks,
from blogs and forums to ticketing systems. These projects
can provide some best-practices when you go to construct
your own application.
When you are in the
middle of developing
your application, you
may need to have
several different
terminal windows
open in order to
have a code editor
open, a monitor
on the server,
and potentially
somewhere to test
and monitor output.
If you are doing
this on your own
machine, this isn’t an
issue. But if you are
working remotely,
you should look into
using tmux. This
can provide a much
more robust terminal
environment for you
to work in.
Terminal development environments
To help you out, Django has a web server built into the framework
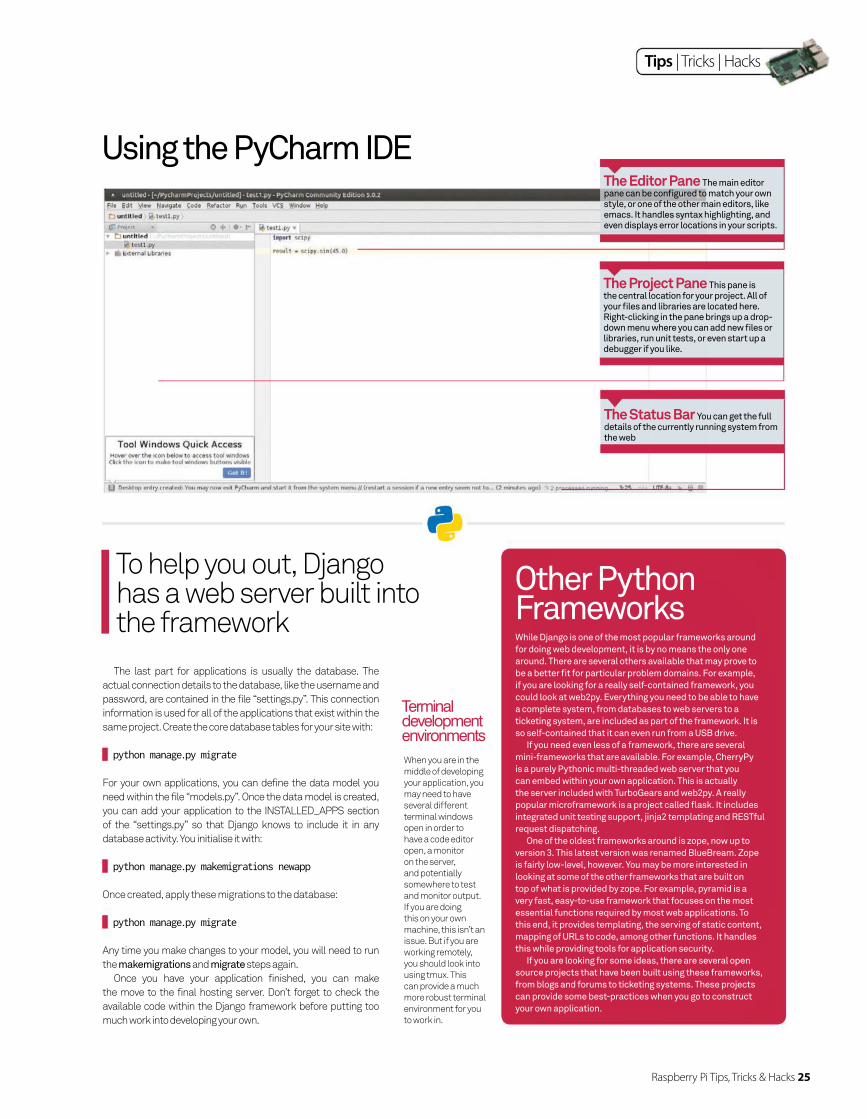
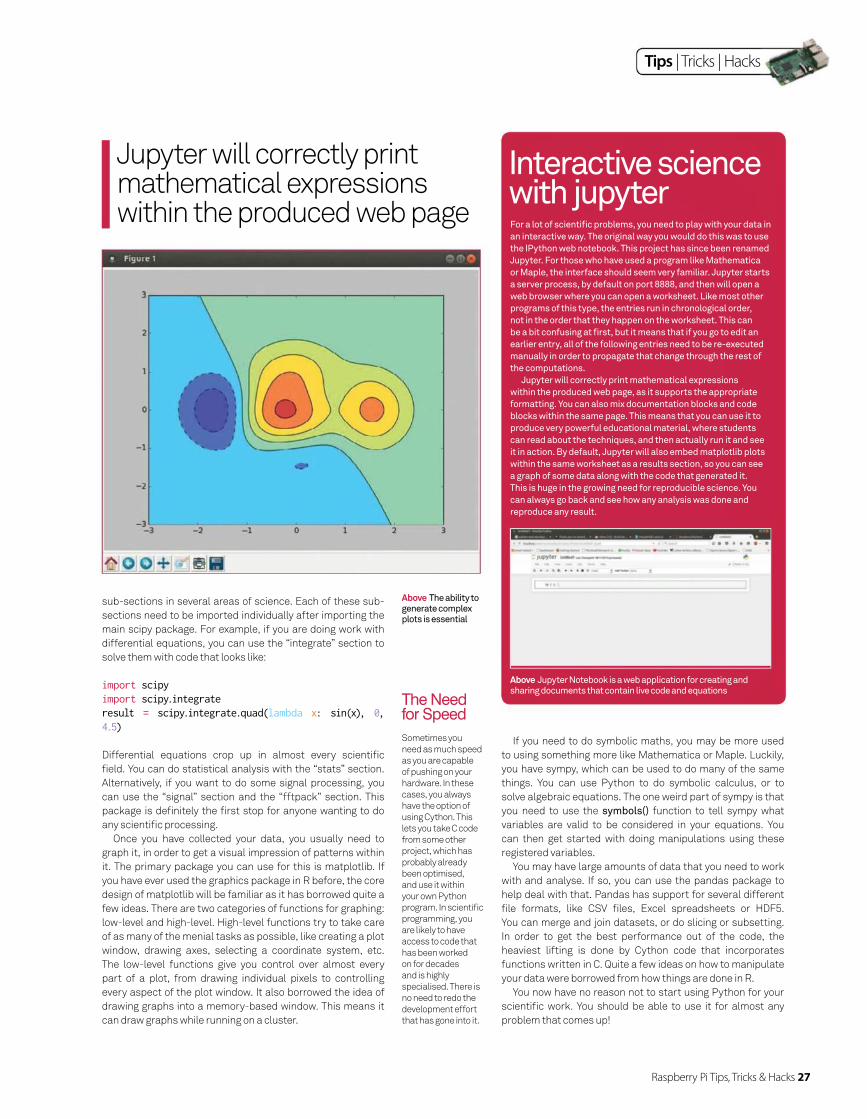
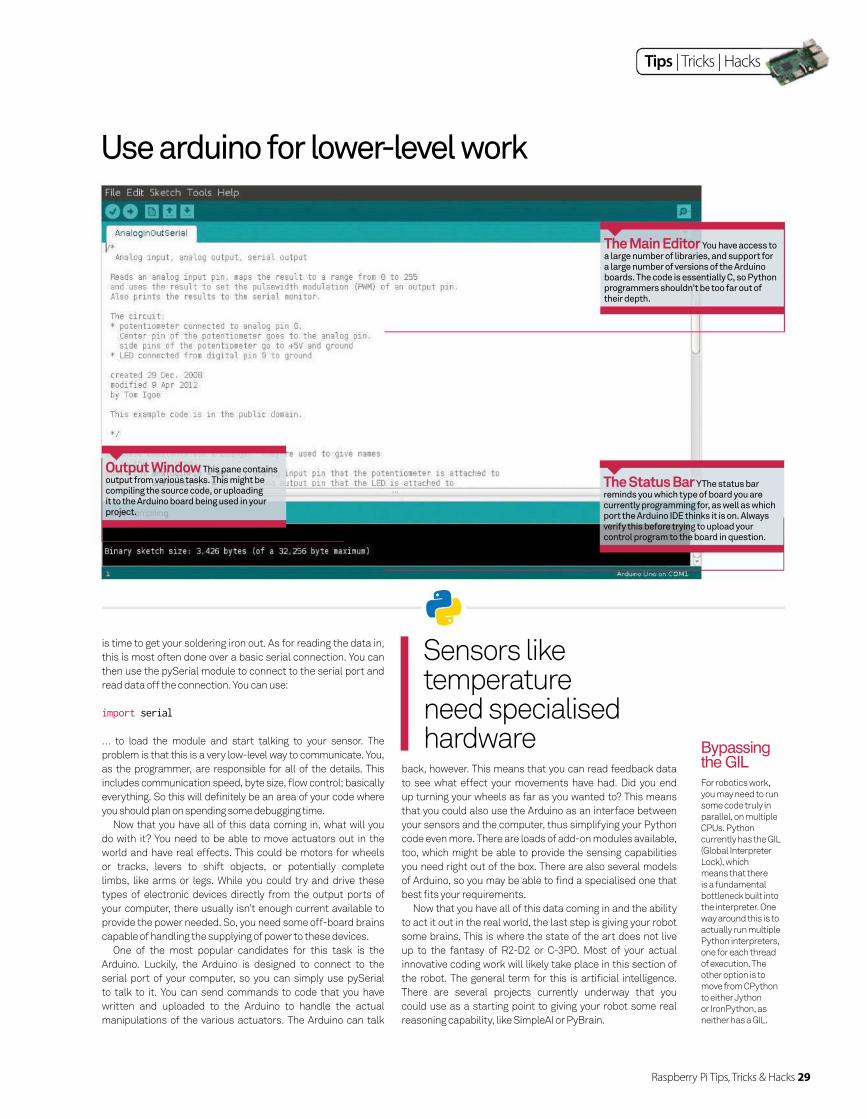
The Editor Pane The main editor pane can be confi gured to match your own style, or one of the other main editors, like emacs. It handles syntax highlighting, and even displays error locations in your scripts.
The Project Pane This pane is the central location for your project. All of your fi les and libraries are located here. Right-clicking in the pane brings up a drop-down menu where you can add new fi les or libraries, run unit tests, or even start up a debugger if you like.
The Status Bar You can get the full details of the currently running system from the web
26 Raspberry Pi Tips, Tricks & Hacks
Tips | Tricks | Hacks
Python has become one of the key languages used in science. There is a huge number of packages available to handle almost
any task that you may have and, importantly, Python knows
what it isn’t good at. To deal with this, Python has been designed
to easily incorporate code from C or FORTRAN. This way, you can
offl oad any heavy computations to more effi cient code.
The core package of most of the scientifi c code available
is numpy. One of the problems in Python is that the object-
oriented nature of the language is the source of its ineffi ciencies.
With no strict types, Python always needs to check parameters
on every operation. Numpy provides a new datatype, the array,
which helps solve some of these issues. Arrays can only hold
one type of object, and because Python knows this it can use
some optimisations to speed things up to almost what you can
get from writing your code directly in C or FORTRAN. The classic
example of the difference is the for loop. If you wanted to scale
a vector by some value, something like a*b, this would look like:
for elem in b: c.append(a * elem)
In numpy, this would look like:
a*b
So, not only is it faster, it is also written in a shorter, clearer
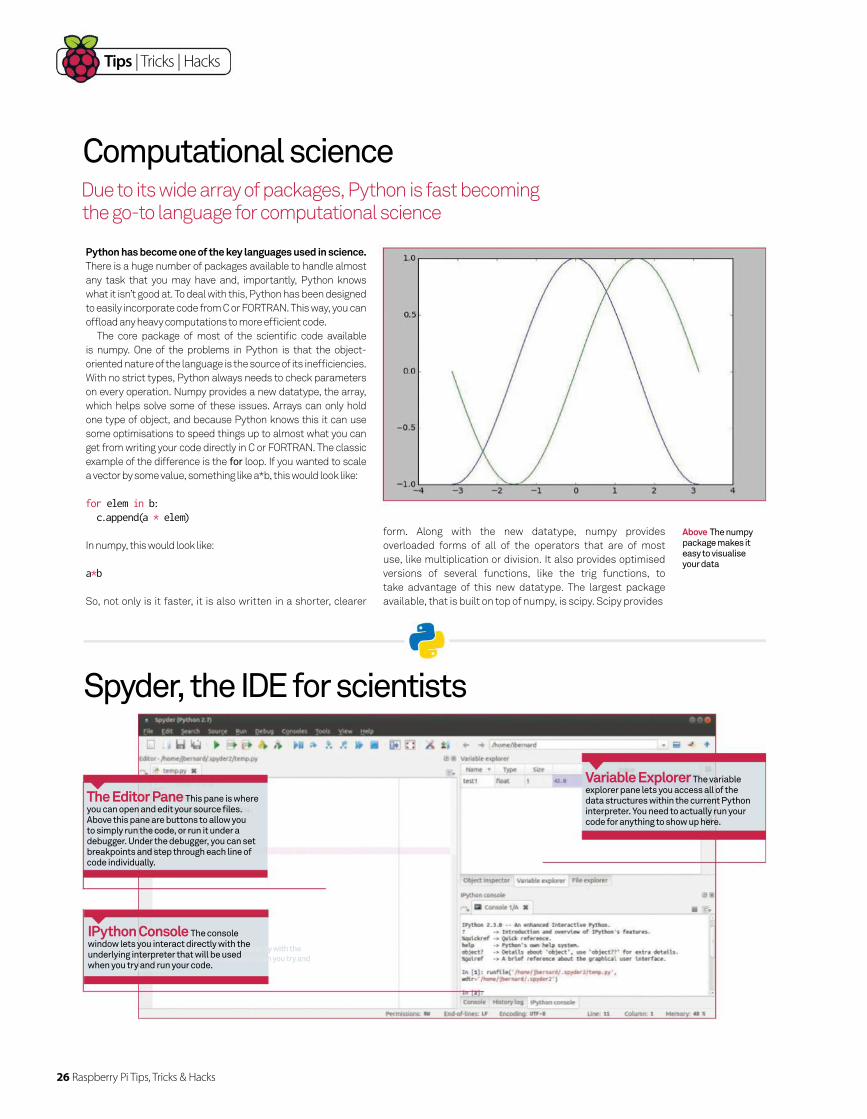
Above The numpy package makes it easy to visualise your data
form. Along with the new datatype, numpy provides
overloaded forms of all of the operators that are of most
use, like multiplication or division. It also provides optimised
versions of several functions, like the trig functions, to
take advantage of this new datatype. The largest package
available, that is built on top of numpy, is scipy. Scipy provides
Computational scienceDue to its wide array of packages, Python is fast becoming the go-to language for computational science
Spyder, the IDE for scientists
IPYTHON CONSOLEThe console window lets you interact directly with the
underlying interpreter that will be used when you try and
run your code.
The Editor Pane This pane is where you can open and edit your source fi les. Above this pane are buttons to allow you to simply run the code, or run it under a debugger. Under the debugger, you can set breakpoints and step through each line of code individually.
IPYTHON CONSOLEIPYTHON CONSOLEThe console window lets you interact directly with the The console window lets you interact directly with the
underlying interpreter that will be used when you try and underlying interpreter that will be used when you try and
run your code.run your code.
IPython Console The console window lets you interact directly with the underlying interpreter that will be used when you try and run your code.
Variable Explorer The variable explorer pane lets you access all of the data structures within the current Python interpreter. You need to actually run your code for anything to show up here.
Raspberry Pi Tips, Tricks & Hacks 27
Tips | Tricks | Hacks
Above The ability to generate complex plots is essential
Above Jupyter Notebook is a web application for creating and sharing documents that contain live code and equations
sub-sections in several areas of science. Each of these sub-
sections need to be imported individually after importing the
main scipy package. For example, if you are doing work with
differential equations, you can use the “integrate” section to
solve them with code that looks like:
import scipyimport scipy.integrateresult = scipy.integrate.quad(lambda x: sin(x), 0, 4.5)
Differential equations crop up in almost every scientifi c
fi eld. You can do statistical analysis with the “stats” section.
Alternatively, if you want to do some signal processing, you
can use the “signal” section and the “fftpack” section. This
package is defi nitely the fi rst stop for anyone wanting to do
any scientifi c processing.
Once you have collected your data, you usually need to
graph it, in order to get a visual impression of patterns within
it. The primary package you can use for this is matplotlib. If
you have ever used the graphics package in R before, the core
design of matplotlib will be familiar as it has borrowed quite a
few ideas. There are two categories of functions for graphing:
low-level and high-level. High-level functions try to take care
of as many of the menial tasks as possible, like creating a plot
window, drawing axes, selecting a coordinate system, etc.
The low-level functions give you control over almost every
part of a plot, from drawing individual pixels to controlling
every aspect of the plot window. It also borrowed the idea of
drawing graphs into a memory-based window. This means it
can draw graphs while running on a cluster.
Interactive science with jupyterFor a lot of scientifi c problems, you need to play with your data in
an interactive way. The original way you would do this was to use
the IPython web notebook. This project has since been renamed
Jupyter. For those who have used a program like Mathematica
or Maple, the interface should seem very familiar. Jupyter starts
a server process, by default on port 8888, and then will open a
web browser where you can open a worksheet. Like most other
programs of this type, the entries run in chronological order,
not in the order that they happen on the worksheet. This can
be a bit confusing at fi rst, but it means that if you go to edit an
earlier entry, all of the following entries need to be re-executed
manually in order to propagate that change through the rest of
the computations.
Jupyter will correctly print mathematical expressions
within the produced web page, as it supports the appropriate
formatting. You can also mix documentation blocks and code
blocks within the same page. This means that you can use it to
produce very powerful educational material, where students
can read about the techniques, and then actually run it and see
it in action. By default, Jupyter will also embed matplotlib plots
within the same worksheet as a results section, so you can see
a graph of some data along with the code that generated it.
This is huge in the growing need for reproducible science. You
can always go back and see how any analysis was done and
reproduce any result.
Sometimes you
need as much speed
as you are capable
of pushing on your
hardware. In these
cases, you always
have the option of
using Cython. This
lets you take C code
from some other
project, which has
probably already
been optimised,
and use it within
your own Python
program. In scientifi c
programming, you
are likely to have
access to code that
has been worked
on for decades
and is highly
specialised. There is
no need to redo the
development effort
that has gone into it.
The Need for Speed
If you need to do symbolic maths, you may be more used
to using something more like Mathematica or Maple. Luckily,
you have sympy, which can be used to do many of the same
things. You can use Python to do symbolic calculus, or to
solve algebraic equations. The one weird part of sympy is that
you need to use the symbols() function to tell sympy what
variables are valid to be considered in your equations. You
can then get started with doing manipulations using these
registered variables.
You may have large amounts of data that you need to work
with and analyse. If so, you can use the pandas package to
help deal with that. Pandas has support for several different
fi le formats, like CSV fi les, Excel spreadsheets or HDF5.
You can merge and join datasets, or do slicing or subsetting.
In order to get the best performance out of the code, the
heaviest lifting is done by Cython code that incorporates
functions written in C. Quite a few ideas on how to manipulate
your data were borrowed from how things are done in R.
You now have no reason not to start using Python for your
scientifi c work. You should be able to use it for almost any
problem that comes up!
Jupyter will correctly print mathematical expressions within the produced web page
28 Raspberry Pi Tips, Tricks & Hacks
Tips | Tricks | Hacks
ROS – Robot Operating SystemWhile you could simply write some code that runs on a standard
computer and a standard Linux distribution, this is usually not
optimal when trying to handle all of the data processing that a
robot needs when dealing with events in real-time. When you
reach this point, you may need to look at a dedicated operating
system – the Robot Operating System (ROS). ROS is designed
to provide the same type of interface between running code the
computer hardware it is running on, with the lowest possible
overhead. One of the really powerful features of ROS is that
it is designed to facilitate communication between different
processes running on the computer, or potentially over multiple
computers connected over some type of network. Instead of
each process being a silo that is protected from all other process,
ROS is more of a graph of processes with messages being passed
between them.
Because ROS is a complete operating system, rather than a
library, it is wrong to think that you can use it in your Python code.
It is better to think that you can write Python code that can be used
in ROS. The fundamental idea is to be as agnostic as possible;
interfaces to your code should be clean and not particularly care
where they are running or who is talking to them. Then, it can be
used within the graph of processes running within ROS. There
are standard libraries available that allow you to do coordinate
transformations, useful for fi guring out where sensors or limbs
are in space. There is a library available for creating preemptible
tasks for data processing, and another for creating and managing
the types of messages that can be handed around the various
processes. For extremely time-sensitive tasks, there is a plugin
library that allows you to write a C++ plugin that can be loaded
within ROS packages.
Robotics is the most direct way that your code can interact with the world. It can read actual sensor information and
move real actuators and get real work done.
The fi rst thing your robot needs is the ability to sense
the world around it. The one sense that we as humans feel
is most useful is sight. With web cameras being so cheap
and easy to connect to hardware, vision is easy to give to
your robot. The real problem is how to interpret this data.
Luckily, you can use the OpenCV project to do just that. It is
a vision package that can provide simple image gathering
and processing, to extremely complex functions like face
recognition and extraction of 3D objects. You can identify and
track objects moving through your fi eld of view. If you want,
you can also use OpenCV to give you robot some reasoning
capabilities, too. OpenCV includes a set of functions for
machine learning, where you can do statistical classifi cation
or data clustering, and use it to feed decision trees or even
neural networks.
Another important sense that you may want to use is sound.
The Jasper project is one that is developing a complete voice
control system. This project would give you the structure you
need to give your robot the ability to listen for and respond
to your verbal commands. The project has gotten to the
point where you can give it a command and the voice
recognition software can translate this into text. You
then need to build a mapping of which pieces of text
correspond to which commands to execute.
There are lots of other sensors you can use, but this
begins to leave the realm of store-bought hardware.
Most other sensors, like temperature, pressure, orientation
or location, need specialised hardware that needs to be
interfaced to the computer brain for your robot. This means it
Robotics and electronicsSee your code come to life in the real world around you with physical applications of robot technology
While we haven’t
discussed what kind
of computer to use
for your robotics
project, you should
consider the famous
Raspberry Pi. This
tiny computer should
be small enough to fi t
into almost any robot
structure that you
might be building.
Since it is already
running Linux and
Python, you should
be able to simply
copy your code
development work to
the Pi. It also includes
its own IO bus so that
you can have it read
its own sensors.
Raspberry Pi
In contrast to the
Raspberry Pi, which
runs a full OS from
its SD card, the
Arduino boards are
microcontrollers
rather than complete
computers. Instead
of running an OS, the
Arduino platform
executes code that
is interpreted by its
fi rmware. It is mainly
used to interface
with hardware such
as motors, servos,
sensors, etc.
Arduino
Raspberry Pi Tips, Tricks & Hacks 29
Tips | Tricks | Hacks
is time to get your soldering iron out. As for reading the data in,
this is most often done over a basic serial connection. You can
then use the pySerial module to connect to the serial port and
read data off the connection. You can use:
import serial
… to load the module and start talking to your sensor. The
problem is that this is a very low-level way to communicate. You,
as the programmer, are responsible for all of the details. This
includes communication speed, byte size, fl ow control; basically
everything. So this will defi nitely be an area of your code where
you should plan on spending some debugging time.
Now that you have all of this data coming in, what will you
do with it? You need to be able to move actuators out in the
world and have real effects. This could be motors for wheels
or tracks, levers to shift objects, or potentially complete
limbs, like arms or legs. While you could try and drive these
types of electronic devices directly from the output ports of
your computer, there usually isn’t enough current available to
provide the power needed. So, you need some off-board brains
capable of handling the supplying of power to these devices.
One of the most popular candidates for this task is the
Arduino. Luckily, the Arduino is designed to connect to the
serial port of your computer, so you can simply use pySerial
to talk to it. You can send commands to code that you have
written and uploaded to the Arduino to handle the actual
manipulations of the various actuators. The Arduino can talk
Use arduino for lower-level work
For robotics work,
you may need to run
some code truly in
parallel, on multiple
CPUs. Python
currently has the GIL
(Global Interpreter
Lock), which
means that there
is a fundamental
bottleneck built into
the interpreter. One
way around this is to
actually run multiple
Python interpreters,
one for each thread
of execution. The
other option is to
move from CPython
to either Jython
or IronPython, as
neither has a GIL.
Bypassing the GILback, however. This means that you can read feedback data
to see what effect your movements have had. Did you end
up turning your wheels as far as you wanted to? This means
that you could also use the Arduino as an interface between
your sensors and the computer, thus simplifying your Python
code even more. There are loads of add-on modules available,
too, which might be able to provide the sensing capabilities
you need right out of the box. There are also several models
of Arduino, so you may be able to fi nd a specialised one that
best fi ts your requirements.
Now that you have all of this data coming in and the ability
to act it out in the real world, the last step is giving your robot
some brains. This is where the state of the art does not live
up to the fantasy of R2-D2 or C-3PO. Most of your actual
innovative coding work will likely take place in this section of
the robot. The general term for this is artifi cial intelligence.
There are several projects currently underway that you
could use as a starting point to giving your robot some real
reasoning capability, like SimpleAI or PyBrain.
Sensors like temperature need specialised hardware
The Main Editor You have access to a large number of libraries, and support for a large number of versions of the Arduino boards. The code is essentially C, so Python programmers shouldn’t be too far out of their depth.
Output Window This pane contains output from various tasks. This might be compiling the source code, or uploading it to the Arduino board being used in your project.
The Status Bar YThe status bar reminds you which type of board you are currently programming for, as well as which port the Arduino IDE thinks it is on. Always verify this before trying to upload your control program to the board in question.

30 Raspberry Pi Tips, Tricks & Hacks
Tips | Tricks | Hacks
Explore Pixel, the new offi cial desktop environment for the Raspberry Pi
Get the new Pixel desktop
Pixel (Pi Improved Xwindows Environment, Lightweight), is the latest iteration of the Raspbian desktop. The major changes are
apparent the fi rst time you boot up – the multitude
of boot messages has been replaced with a simple
splash screen with the release number.
There are now 16 stunning desktop background
images to choose from thanks to Pi Foundation
developer Greg Annandale. The icons on the fi le
manager, task bar and menu now have a crisp,
professional appearance. Menus are also cleaner
and more readable as application icons no longer
appear by default.
The rather clunky windows we formerly knew in
Raspbian have now been replaced with rounded
corners and a modifi ed title bar. The infi nality
patchset actually also makes for much cleaner
font rendering.
Beneath the hood, RealVNC Server is now
bundled to allow you to easily select VNC from
the interfaces menu, then connect via a viewer.
There’s also a provisional release of Chromium for
the Pi, which in combination with the h264ify plugin
makes use of the Pi’s hardware to stream video.
01 Choose your install methodThere are several ways to install Raspbian
with Pixel. If you have Raspbian with NOOBS, you
can restart your Pi by holding Shift and choose
to reinstall. This will upgrade you to the latest
version using Pixel but will also wipe your existing
installation. Alternatively you can download the latest
Raspbian Image from https://www.raspberrypi.org/
downloads/raspbian/ and follow the easy installation
What you’ll need Raspberry Pi(Ideally a Pi 2 or 3 if you want to use
Chromium for streaming video)
If installing from Raspbian
from scratch, an 8GB Micro
SD card
Access to a computer for
connecting via SSH and/or
to install Raspbian Jessie
with Pixel
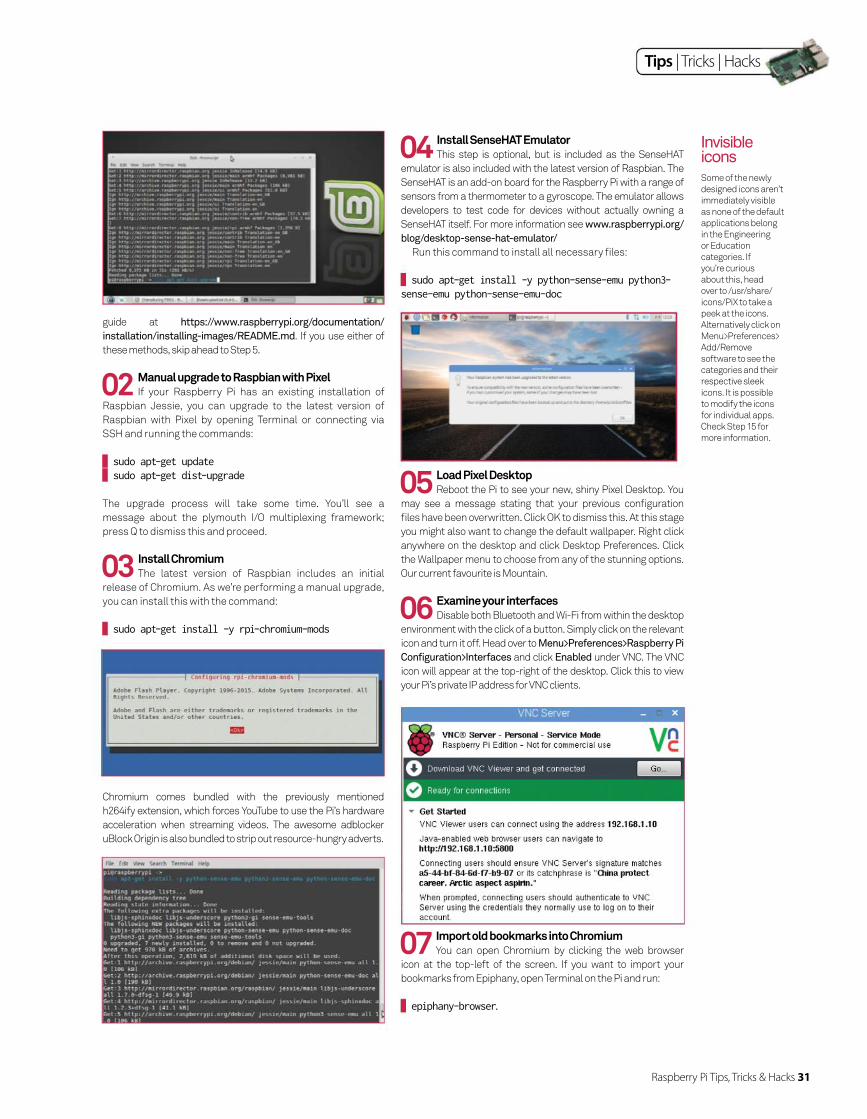
Tips | Tricks | Hacks
Raspberry Pi Tips, Tricks & Hacks 31
guide at https://www.raspberrypi.org/documentation/
installation/installing-images/README.md. If you use either of
these methods, skip ahead to Step 5.
02 Manual upgrade to Raspbian with PixelIf your Raspberry Pi has an existing installation of
Raspbian Jessie, you can upgrade to the latest version of
Raspbian with Pixel by opening Terminal or connecting via
SSH and running the commands:
sudo apt-get update sudo apt-get dist-upgrade
The upgrade process will take some time. You’ll see a
message about the plymouth I/O multiplexing framework;
press Q to dismiss this and proceed.
03 Install Chromium The latest version of Raspbian includes an initial
release of Chromium. As we’re performing a manual upgrade,
you can install this with the command:
sudo apt-get install -y rpi-chromium-mods
Chromium comes bundled with the previously mentioned
h264ify extension, which forces YouTube to use the Pi’s hardware
acceleration when streaming videos. The awesome adblocker
uBlock Origin is also bundled to strip out resource-hungry adverts.
Some of the newly
designed icons aren’t
immediately visible
as none of the default
applications belong
in the Engineering
or Education
categories. If
you’re curious
about this, head
over to /usr/share/
icons/PiX to take a
peek at the icons.
Alternatively click on
Menu>Preferences>
Add/Remove
software to see the
categories and their
respective sleek
icons. It is possible
to modify the icons
for individual apps.
Check Step 15 for
more information.
Invisible icons04 Install SenseHAT Emulator
This step is optional, but is included as the SenseHAT
emulator is also included with the latest version of Raspbian. The
SenseHAT is an add-on board for the Raspberry Pi with a range of
sensors from a thermometer to a gyroscope. The emulator allows
developers to test code for devices without actually owning a
SenseHAT itself. For more information see www.raspberrypi.org/
blog/desktop-sense-hat-emulator/
Run this command to install all necessary fi les:
sudo apt-get install -y python-sense-emu python3-sense-emu python-sense-emu-doc
05 Load Pixel Desktop Reboot the Pi to see your new, shiny Pixel Desktop. You
may see a message stating that your previous confi guration
fi les have been overwritten. Click OK to dismiss this. At this stage
you might also want to change the default wallpaper. Right click
anywhere on the desktop and click Desktop Preferences. Click
the Wallpaper menu to choose from any of the stunning options.
Our current favourite is Mountain.
06 Examine your interfacesDisable both Bluetooth and Wi-Fi from within the desktop
environment with the click of a button. Simply click on the relevant
icon and turn it off. Head over to Menu>Preferences>Raspberry Pi
Configuration>Interfaces and click Enabled under VNC. The VNC
icon will appear at the top-right of the desktop. Click this to view
your Pi’s private IP address for VNC clients.
07 Import old bookmarks into Chromium You can open Chromium by clicking the web browser
icon at the top-left of the screen. If you want to import your
bookmarks from Epiphany, open Terminal on the Pi and run:
epiphany-browser.

32 Raspberry Pi Tips, Tricks & Hacks
Tips | Tricks | Hacks
Click the Settings gear icon on the top-right and choose Edit
Bookmarks. On the window that opens you’ll have the option to
export your bookmarks to HTML format. Close Epiphany and
choose the blue link Import Bookmarks in Chromium to add
them there.
08 Change the Appearance Settings
While the default options make for a
stunning desktop, you may wish to
perform some small tweaks at this
stage, particularly if this is a new
install of Raspbian. In the main menu,
head over to Preferences>Appearance
Settings. If you’re used to a menu bar
at the bottom of the screen, change
the Position setting to Bottom. You
can also change the size of the bar to
medium or small.
09 Test SenseHAT Emulator If you installed the SenseHAT Emulator previously, you
can launch it from the Programming menu in Applications. The
Emulator comes bundled with around a dozen example scripts
to get you started. Simply click the File menu at the top-left of
the emulator window, then Open Example. There are beginner,
intermediate and advanced projects. If your interest has been
piqued, SenseHATs are currently available online from the Pi
Hut for £30. See https://thepihut.com/products/raspberry-
pi-sense-hat-astro-pi.
10 Enable login screen Now the Raspberry Pi has a rich desktop
environment and modern web browser, you may wish to
use it for a work or home computer. To make the Pi require
a password on startup, open Terminal on or connect via SSH
and run the command:
sudo nano /etc/lightdm/lightdm.conf
Scroll down to the line autologin-user=pi and put a hash (#)
at the start. Press Ctrl+X, then Y, then return to save and
exit. Remember the default password is ‘raspberry’.

Raspberry Pi Tips, Tricks & Hacks 33
11 Add new users If you followed the previous step, you may want to
add extra user accounts for your family or colleagues. First
open Terminal on the Pi or connect via SSH and then run the
following command:
passwd.
This will allow you to change the default password
‘raspberry’ to something more meaningful. Once you have
done this add more users with the command:
sudo adduser(e.g sudo adduser bob)
Now enter the password for the new user twice when
prompted to create the account.
12 Practise resizing windows One blessing of the old Raspbian desktop is that
window frames were quite thick whereas Pixel includes much
slicker, thinner windows so it can be tricky at fi rst to resize
them. Fortunately in the latest version of Raspbian the grab
handles now extend outside the window, so even if the mouse
is just outside the frame, you’ll see the cursor change.
13 Confi gure splash screen Pixel’s sedate splash screen on boot may not sit well
with some people’s principles; the previous text boot is also
very useful for detecting errors. If you wish to go back to the
old style boot screen, open Terminal or connect via SSH and
run the command:
sudo nano /boot/cmdline.txt
Use the right arrow to fi nd the text ‘quiet splash’ and delete
it. Use Ctrl+X, then Y, then return to save and exit.
14 Add temperature/voltage monitors In previous versions of Raspbian, if the Pi was
overheating or underpowered, you may have noticed crude
yellow and red squares appearing in the corner of the
screen. These have now been replaced with pictures of a
thermometer and lightning bolt respectively. Right-click
the task bar and Add Panel Items to display the system
temperature and voltage if you wish.
15 Explore your icons The icons have been painstakingly redrawn for
Pixel by Sam Alder and Alex Carter, who also illustrate the
graphics of the offi cial Raspberry Pi website. You can fi nd
all the system icons in /usr/share/icons/PiX. The icons are
very professional and easy on the eye, however if you wish to
replace any of them, make sure to try and use a .PNG image
and to give it the exact same name as the image you’re
replacing, for example launch.png.
Tips | Tricks | Hacks
Raspberry Pi Tips, Tricks & Hacks 33
34 Raspberry Pi Tips, Tricks & Hacks
Tips | Tricks | Hacks
Multitasking with your PiLearn how to add multitasking to your own Python code – perfect for those with multiple projects on the go
The majority of programmers will learn
single-threaded programming as their
first computational model. The basic
idea is that instructions for the computer
are processed sequentially, one after the
other. This works well enough in most
situations, but you will reach a point
where you need to start multitasking.
The classical situation for writing multi-
threaded applications is to have them
run on a multi-processor machine of
some persuasion. In these cases, you
would have some heavy, compute-bound
process running on each processor.
Since your Raspberry Pi is not a huge
16-core desktop machine, you might be
under the assumption that you can’t take
advantage of using multiple threads of
execution. This isn’t true, though.
There are lots of problems that map
naturally to the multiple thread model.
You may also have IO operations that
take a relatively large amount of time to
complete. In these cases, it is well worth
your programming effort to break your
problem down into a multi-threaded
model. Since Python is the language of
choice for the Raspberry Pi, we will look
at how you can add threads to your own
Python code. For those of you who have
looked into multi-threaded programming
in Python, you may have run into the GIL
(Global Interpreter Lock) before. This
lock means that only one thread can
actually be running at a time, so you
don’t get true parallel processing. But
on the Raspberry Pi, this is okay. We just
want to use a more natural programming
paradigm for certain problems where it
makes sense.
The first bit of code we need is to
import the correct module. For this
article, we will be using the threading
module. Once it is imported, you have
access to all of the functions and objects
that you would need to write your code.
The first step is to create a new thread
object with the constructor:
t = threading.Thread(target=my_func)
The Thread object takes some function
that you have created, my_func in the
above example, as the target code that
needs to be run. When the thread object
has finished its initialisation, it is alive
but not running. You need to explicitly
call the new thread’s start() method. This
will begin running the code within the
function handed to the thread.
You can check to verify that this
thread is alive and active by calling its
is_alive() method. Normally, this new
thread will run until the function exits
normally. The other way a thread can exit
is if an unhandled exception is raised.
Depending on your experience of parallel
programs, you may already have some
ideas on what types of code you want
to write. For example, in MPI programs,
you typically have the same overall code
running in multiple threads of execution.
You use the thread’s ID and a series of if
or case statements to have each thread
execute a different section of the code.
To do something similar, you can use
something like:
def my_func(): id = threading.get_ident() if (id == 1): do_something() thread1 = threading. Thread(target=my_func)
thread1.start()
This code works in Python 3, but the get_
ident() function doesn’t exist in Python 2.
Threading is one of those modules that is
a moving target when moving from one
version of Python to another, so always
check the documentation for the version
of Python your are coding for.
Another common task in parallel
programming is to farm out time-
intensive IO into separate threads. This
way, your main program can continue
on with the core work and all of the
computing resources are kept as busy
as possible. But how do you figure out
if the child thread is done yet or not?
You can use the is_alive() function
mentioned above, but what if you can’t
continue without the results from the
child thread? In these cases, you can
It’s the official
language of the
Raspberry Pi.
Read the docs at
python,org/doc.
Why Python?
use the join() method of the thread object
you are waiting on. This method blocks
until the thread in question returns. You
can include an optional parameter to
have the method time-out after some
number of seconds. This allows you to not
get trapped into a thread that will never
return due to some error or code bug.
Now that we have more than one thread
of execution happening at the same
time, we have a new set of issues to start
worrying about. The first is accessing
global data elements. What might happen
if you have two different threads that want
to read, or even worse write, to the same
variable in global memory? You can have
situations where changes to the value of
variables can get out of sync with what you
were expecting them to be.
These types of issues are called
race conditions, because the different
threads are racing with each other to see
in what order their updates to variables
will happen. There are two solutions
to this type of problem. The first is to
control access to these global variables
and only allow one thread at a time to be
able to work with them. The generic term
describing this control is to use a mutex
to control this access. A mutex is an
object that a thread needs to lock before
working with the associated variables. In
the Python threading module, this object
is called a lock. The first step is to create a
new Lock object with:
lock = threading.Lock()
This new lock is created in an unlocked
state, ready to be used. The thread
interested in using it must call the
acquire() method for the lock. If the lock
is currently available then it changes
state to the locked state and your thread
can run the code that is meant to be
protected. If the lock is currently in a
locked state, then your thread will sit in
a blocked state, waiting for the lock to
become free. Once you are done with
the protected code, you need to call the
release() method to free the lock and
make it available for the next thread. As
an example, you could control a variable
Tips | Tricks | Hacks
What if you need to actually have truly parallel code,
that has the ability to run on multiple cores? Because
Python has the GIL, you need to move away from
using threads and go to using separate processes to
handle the different tasks. Luckily, Python includes
a multiprocessing module that provides the process
equivalent to the threading module. As with the
threading module, you create a new process object
and hand in a target function to be run. You then
need to call the start() method to get it running. With
threads, sharing data is trivial because memory is
global and everybody can see everything.
However, different processes are in different
memory scopes. In order to share data, we need to
explicitly set up some form of communications. You
can create a queue object where you can transfer
objects. Processes can use the put() method to dump
objects on the queue, and other proceses can use the
get() method to pull objects off. If you want a bit more
control over who is talking to who, you can use pipes
to create a two-way communication channel between
two processes.
When you use pipes and queues, you need to hand
them in as arguments to your target function. The
other way you can share information is by creating
a section of shared memory. You can create a single
variable sharelocation with the Value object. If you
have a number of variables you need to pass, you
can put them in an Array object. As with pipes and
queues, you will need to pass them in as parameters
to your target function. When you need to wait for the
results from a process, you can use the join() method
to get the main process to block until the sub-process
fi nally fi nishes.
The processing module also includes the idea of
a process pool that is different from the threading
module. With a pool, you can pre-create a number of
processes that can be used in a map function. This
kind of construct is useful if you are applying the
same function to a number of different input values.
For people who are using the concepts of mapping
or applying functions from R, or Hadoop, this might
be a bit more of an intuitive model to use in your
Python code.
Processes Or threads?
It is worth the effort to break your problem down into a multi-threaded model
containing the sum of a series of results
with code like:
lock.acquire() sum_var += curr_val lock.release()
This can lead to another common issue in
parallel programs: deadlocks. These issues
occur when you have multiple locks that are
associated with different global variables.
Say you have the variables A and B, and
the associated locks lockA and lockB. If
thread 1 tries to get lockA then lockB, while
thread 2 tries to get lockB then lockA, you
could have the situation where they each
get their first requested lock, and then wait
forever for the second requested lock.
To avoid this type of bug, code your
program very carefully. Unfortunately,
messy code can always creep in. You can
try and catch this kind of bad behaviour by
including the optional timeout parameter
when you call the acquire() method. This
tells the lock to only try and get the lock for
some number of seconds. If the timeout is
reached, the acquire method returns. You
can tell whether or not it was successful
by checking the returned value. If it was
successful, acquire will return True.
Otherwise, it will return False.
The second way you can deal with
data access is by moving any variables
that you can to within the local scope of
the individual threads. The essential idea
is that each thread would have its own
local version of any required variables
that nobody else can see. This is done by
creating a local object. You can then add
attributes to this local object and use them
as local variables. Within the function
being run by your thread, you would have
code that looks like:
my_local = threading.local()
my_local.x = 42
The last topic we will look at is
synchronising your threads so that they
can work together effectively. There will
be times when a number of threads will
need to talk to each other after working
on their separate parts of a particular
problem. The only way they can share
their results is if they have all finished
calculating their individual results. You
can solve this problem by using a barrier,
which each thread will stop at until all
of the other threads have reached it.
In Python 3, there is a barrier object
that can be created for some number
of threads. It will provide a point where
threads will pause when they call the
barrier’s wait() method. Because you
need to explicitly tell the barrier object
how many threads will be taking part in
the barrier, this is another area where you
can have a bug. If you create fi ve threads
but create a barrier for ten threads, it
will never reach the point where all of
the expected threads have reached the
barrier. The other synchronisation tool is
the timer object. A timer is a subclass of
the thread class, and so takes a function
to run after some amount of time has
passed. As with a thread, you need to call
the timer’s start() method in order to start
the countdown to when the function gets
executed. A new method, cancel(), allows
you to stop the countdown of the timer if it
hasn’t reached zero yet.
You should now be able to have your
code running even more effi ciently by
farming out any time intensive parts
to other threads of execution. In this
way, the main part of your program
can remain as reactive as possible to
interaction with the end user and you
can keep all parts of your Raspberry Pi
as busy as possible.
Tips | Tricks | Hacks
Raspberry Pi Tips, Tricks & Hacks 35

Tips | Tricks | Hacks
Keep an eye on your little one while they sleep, thanks to your Raspberry Pi!
Get alerts with the Raspberry Pi baby monitor
While you’re settling down to enjoy your latest boxset, there’s always that nagging feeling at the back of your mind – is the baby asleep, or crying down the house? Surround
sound tends to get in the way, which means we need to rely on
baby monitors.
While audio monitors are useful, the trend these days is
more towards video baby monitors, in particular those that
display footage on an app or by opening an IP address in a
mobile browser. Throw in some motion detection and alert
software, and you’ve got an incredibly useful tool – which,
you won’t be surprised to learn, the Raspberry Pi can do for a
fraction of the cost.
All you’ll need is a Raspberry Pi (the newer the better), and
a USB webcam or the PiCam (the NoIR infrared version is
even more suited to nighttime use), and a device to view the
streamed footage on. You now don’t need to be worried about
baby again – just check your phone to see what they’re up to!
01 Survey the bedroomBefore you start installing and confi guring your Pi,
head to the baby’s bedroom and take a look around. Where
will you be placing the Raspberry Pi? Is it within reach of a
power source? Do you need to connect an Ethernet cable, or
is the wireless signal strong enough? It’s vital at this stage to
spend the necessary time planning the Pi’s position in relation
to power sources and network connectivity.
02 Enable the cameraIf you’re using the PiCam, this will be disabled by default.
You can enable this in the raspi-config tool. This can be accessed
in the GUI by opening Menu > Preferences > Raspberry Pi
Configuration, where you should select the Interfaces tab and
switch Camera to Enabled.
Alternatively, run sudo raspi-config and choose option 6, Enable
Camera. For USB webcams, use:
sudo apt-get install fswebcam
And test with:
What you’ll need Wireshark (www.wireshark.
org)
PiCam module or USB
webcam
36 Raspberry Pi Tips, Tricks & Hacks
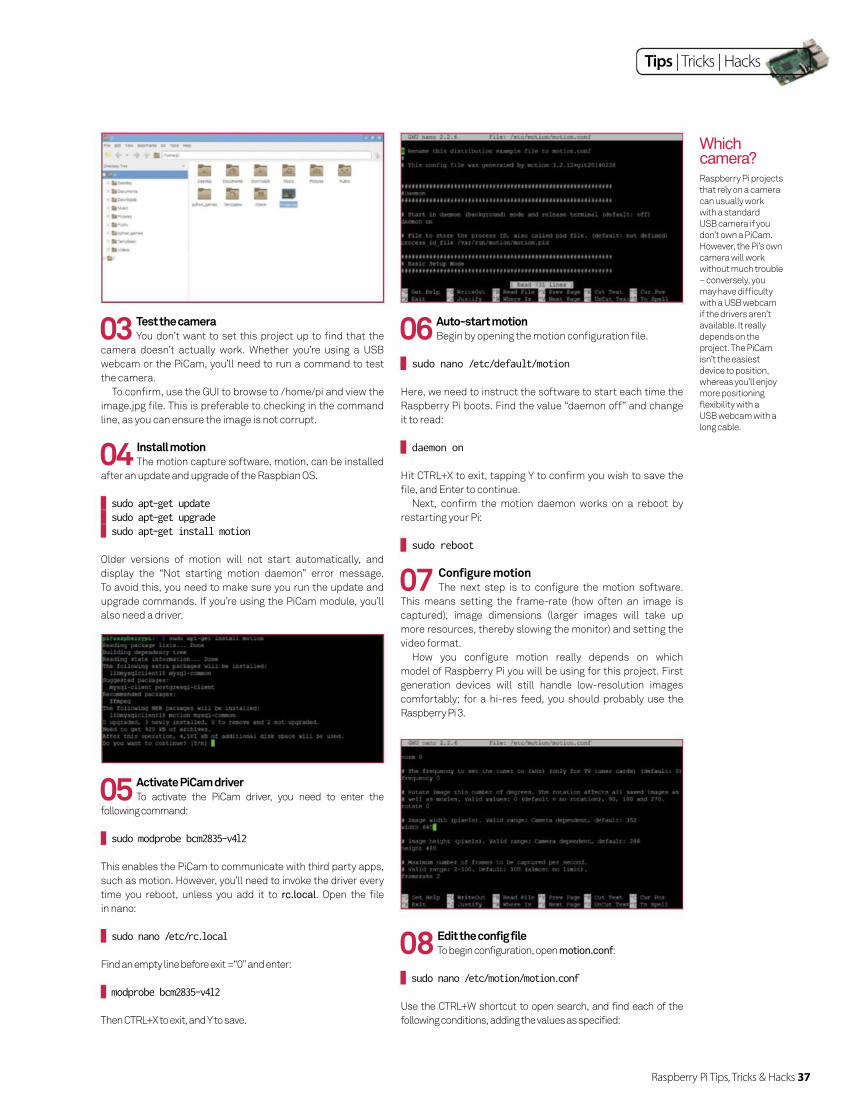
Raspberry Pi Tips, Tricks & Hacks 37
Tips | Tricks | Hacks
03 Test the cameraYou don’t want to set this project up to fi nd that the
camera doesn’t actually work. Whether you’re using a USB
webcam or the PiCam, you’ll need to run a command to test
the camera.
To confi rm, use the GUI to browse to /home/pi and view the
image.jpg fi le. This is preferable to checking in the command
line, as you can ensure the image is not corrupt.
04 Install motionThe motion capture software, motion, can be installed
after an update and upgrade of the Raspbian OS.
sudo apt-get update sudo apt-get upgrade sudo apt-get install motion
Older versions of motion will not start automatically, and
display the “Not starting motion daemon” error message.
To avoid this, you need to make sure you run the update and
upgrade commands. If you’re using the PiCam module, you’ll
also need a driver.
05 Activate PiCam driverTo activate the PiCam driver, you need to enter the
following command:
sudo modprobe bcm2835-v4l2
This enables the PiCam to communicate with third party apps,
such as motion. However, you’ll need to invoke the driver every
time you reboot, unless you add it to rc.local. Open the fi le
in nano:
sudo nano /etc/rc.local
Find an empty line before exit =“0” and enter:
modprobe bcm2835-v4l2
Then CTRL+X to exit, and Y to save.
Raspberry Pi projects
that rely on a camera
can usually work
with a standard
USB camera if you
don’t own a PiCam.
However, the Pi’s own
camera will work
without much trouble
– conversely, you
may have diffi culty
with a USB webcam
if the drivers aren’t
available. It really
depends on the
project. The PiCam
isn’t the easiest
device to position,
whereas you’ll enjoy
more positioning
fl exibility with a
USB webcam with a
long cable.
Which camera?
06 Auto-start motionBegin by opening the motion confi guration fi le.
sudo nano /etc/default/motion
Here, we need to instruct the software to start each time the
Raspberry Pi boots. Find the value “daemon off” and change
it to read:
daemon on
Hit CTRL+X to exit, tapping Y to confi rm you wish to save the
fi le, and Enter to continue.
Next, confi rm the motion daemon works on a reboot by
restarting your Pi:
sudo reboot
07 Confi gure motionThe next step is to confi gure the motion software.
This means setting the frame-rate (how often an image is
captured), image dimensions (larger images will take up
more resources, thereby slowing the monitor) and setting the
video format.
How you confi gure motion really depends on which
model of Raspberry Pi you will be using for this project. First
generation devices will still handle low-resolution images
comfortably; for a hi-res feed, you should probably use the
Raspberry Pi 3.
08 Edit the config fileTo begin configuration, open motion.conf:
sudo nano /etc/motion/motion.conf
Use the CTRL+W shortcut to open search, and find each of the
following conditions, adding the values as specified:
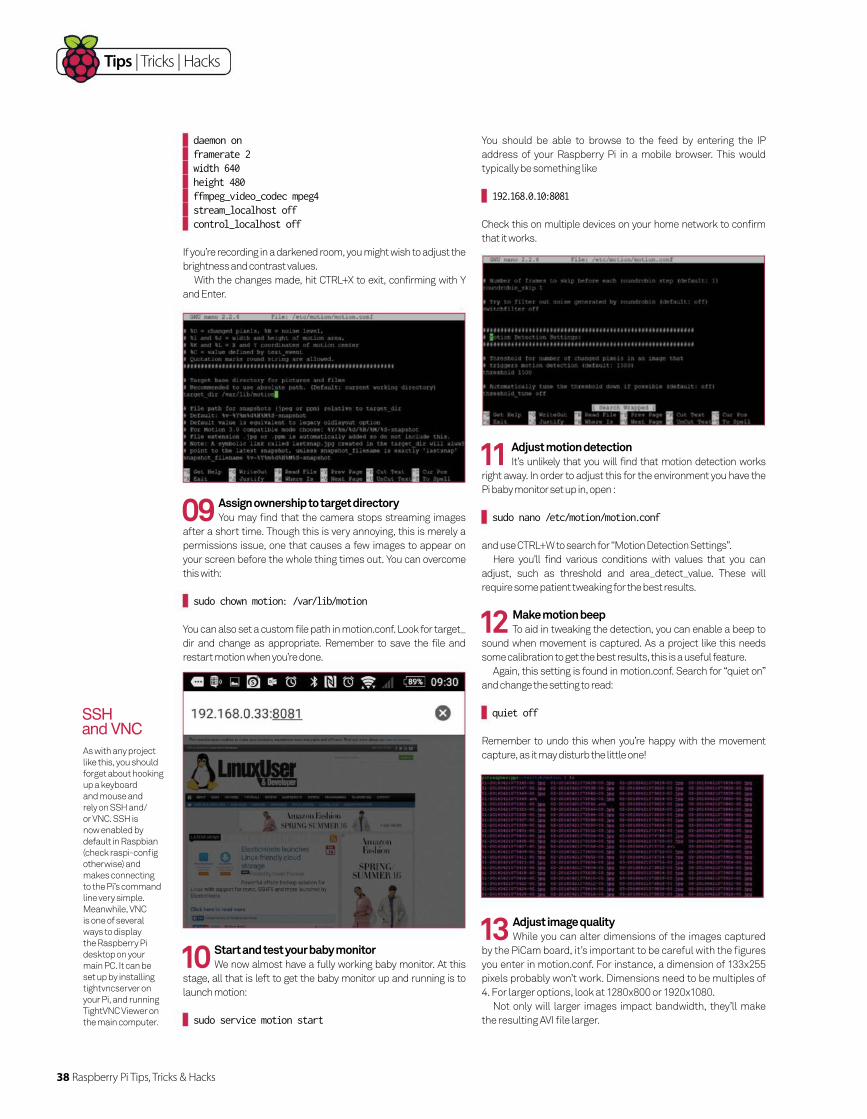
38 Raspberry Pi Tips, Tricks & Hacks
Tips | Tricks | Hacks
As with any project
like this, you should
forget about hooking
up a keyboard
and mouse and
rely on SSH and/
or VNC. SSH is
now enabled by
default in Raspbian
(check raspi-config
otherwise) and
makes connecting
to the Pi’s command
line very simple.
Meanwhile, VNC
is one of several
ways to display
the Raspberry Pi
desktop on your
main PC. It can be
set up by installing
tightvncserver on
your Pi, and running
TightVNC Viewer on
the main computer.
SSH and VNC
daemon on framerate 2 width 640 height 480 ffmpeg_video_codec mpeg4 stream_localhost off control_localhost off
If you’re recording in a darkened room, you might wish to adjust the
brightness and contrast values.
With the changes made, hit CTRL+X to exit, confirming with Y
and Enter.
09 Assign ownership to target directoryYou may find that the camera stops streaming images
after a short time. Though this is very annoying, this is merely a
permissions issue, one that causes a few images to appear on
your screen before the whole thing times out. You can overcome
this with:
sudo chown motion: /var/lib/motion
You can also set a custom file path in motion.conf. Look for target_
dir and change as appropriate. Remember to save the file and
restart motion when you’re done.
10 Start and test your baby monitorWe now almost have a fully working baby monitor. At this
stage, all that is left to get the baby monitor up and running is to
launch motion:
sudo service motion start
You should be able to browse to the feed by entering the IP
address of your Raspberry Pi in a mobile browser. This would
typically be something like
192.168.0.10:8081
Check this on multiple devices on your home network to confirm
that it works.
11 Adjust motion detectionIt’s unlikely that you will find that motion detection works
right away. In order to adjust this for the environment you have the
Pi baby monitor set up in, open :
sudo nano /etc/motion/motion.conf
and use CTRL+W to search for “Motion Detection Settings”.
Here you’ll find various conditions with values that you can
adjust, such as threshold and area_detect_value. These will
require some patient tweaking for the best results.
12 Make motion beepTo aid in tweaking the detection, you can enable a beep to
sound when movement is captured. As a project like this needs
some calibration to get the best results, this is a useful feature.
Again, this setting is found in motion.conf. Search for “quiet on”
and change the setting to read:
quiet off
Remember to undo this when you’re happy with the movement
capture, as it may disturb the little one!
13 Adjust image qualityWhile you can alter dimensions of the images captured
by the PiCam board, it’s important to be careful with the figures
you enter in motion.conf. For instance, a dimension of 133x255
pixels probably won’t work. Dimensions need to be multiples of
4. For larger options, look at 1280x800 or 1920x1080.
Not only will larger images impact bandwidth, they’ll make
the resulting AVI file larger.
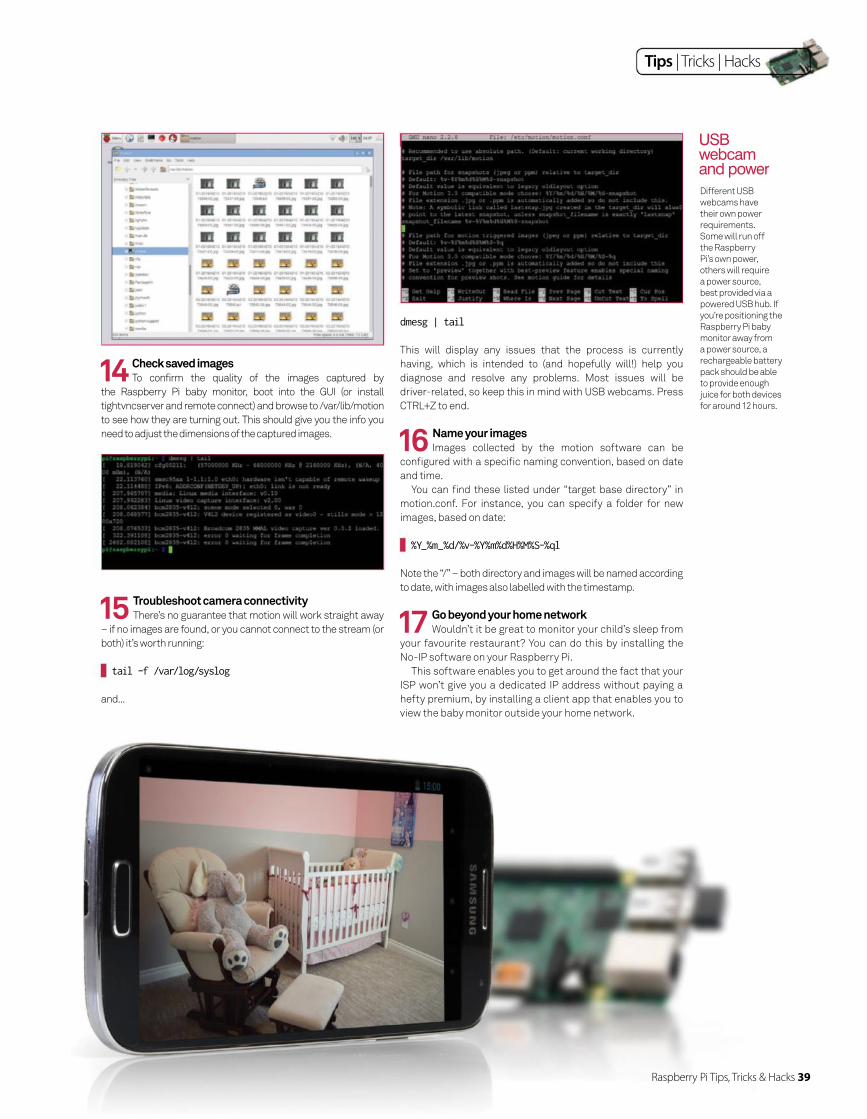
Tips | Tricks | Hacks
Different USB
webcams have
their own power
requirements.
Some will run off
the Raspberry
Pi’s own power,
others will require
a power source,
best provided via a
powered USB hub. If
you’re positioning the
Raspberry Pi baby
monitor away from
a power source, a
rechargeable battery
pack should be able
to provide enough
juice for both devices
for around 12 hours.
USB webcam and power
14 Check saved imagesTo confirm the quality of the images captured by
the Raspberry Pi baby monitor, boot into the GUI (or install
tightvncserver and remote connect) and browse to /var/lib/motion
to see how they are turning out. This should give you the info you
need to adjust the dimensions of the captured images.
15 Troubleshoot camera connectivityThere’s no guarantee that motion will work straight away
– if no images are found, or you cannot connect to the stream (or
both) it’s worth running:
tail -f /var/log/syslog
and...
dmesg | tail
This will display any issues that the process is currently
having, which is intended to (and hopefully will!) help you
diagnose and resolve any problems. Most issues will be
driver-related, so keep this in mind with USB webcams. Press
CTRL+Z to end.
16 Name your imagesImages collected by the motion software can be
confi gured with a specifi c naming convention, based on date
and time.
You can fi nd these listed under “target base directory” in
motion.conf. For instance, you can specify a folder for new
images, based on date:
%Y_%m_%d/%v-%Y%m%d%H%M%S-%ql
Note the “/” – both directory and images will be named according
to date, with images also labelled with the timestamp.
17 Go beyond your home networkWouldn’t it be great to monitor your child’s sleep from
your favourite restaurant? You can do this by installing the
No-IP software on your Raspberry Pi.
This software enables you to get around the fact that your
ISP won’t give you a dedicated IP address without paying a
hefty premium, by installing a client app that enables you to
view the baby monitor outside your home network.
Raspberry Pi Tips, Tricks & Hacks 39
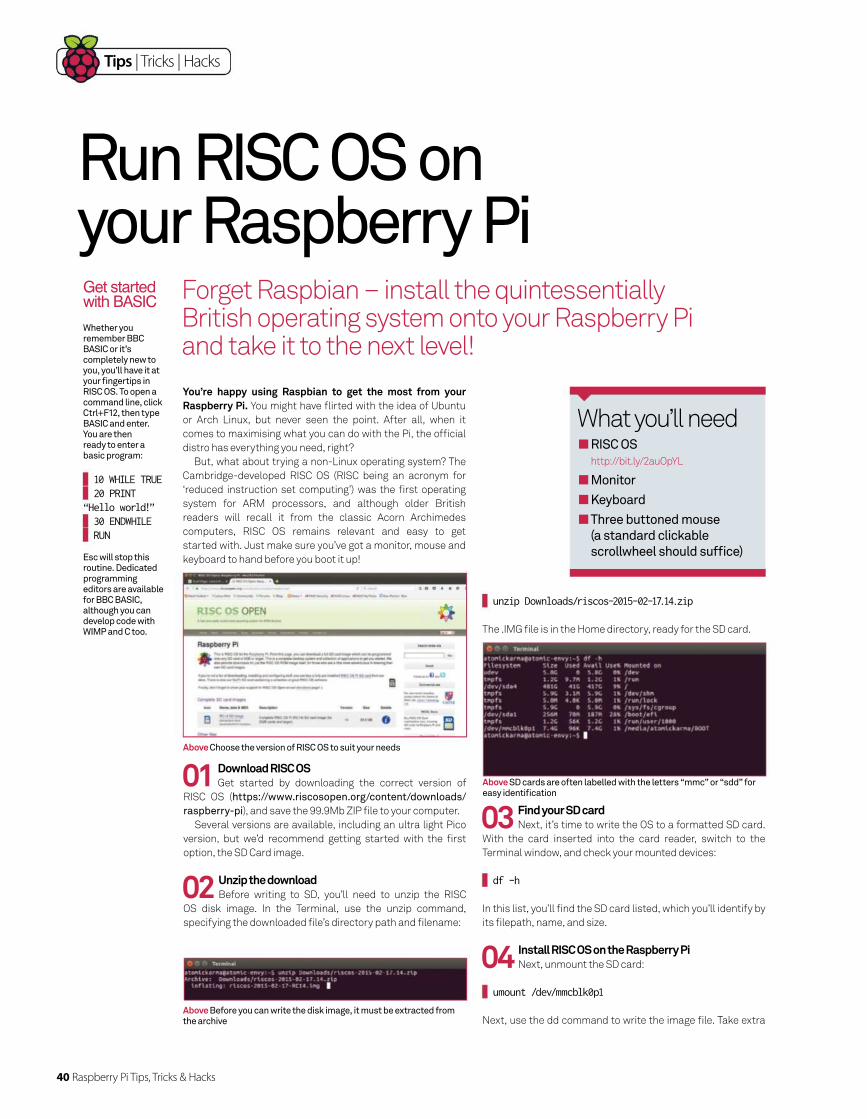
40 Raspberry Pi Tips, Tricks & Hacks
Tips | Tricks | Hacks
Forget Raspbian – install the quintessentially British operating system onto your Raspberry Pi and take it to the next level!
Run RISC OS on your Raspberry Pi
You’re happy using Raspbian to get the most from your Raspberry Pi. You might have fl irted with the idea of Ubuntu
or Arch Linux, but never seen the point. After all, when it
comes to maximising what you can do with the Pi, the offi cial
distro has everything you need, right?
But, what about trying a non-Linux operating system? The
Cambridge-developed RISC OS (RISC being an acronym for
‘reduced instruction set computing’) was the fi rst operating
system for ARM processors, and although older British
readers will recall it from the classic Acorn Archimedes
computers, RISC OS remains relevant and easy to get
started with. Just make sure you’ve got a monitor, mouse and
keyboard to hand before you boot it up!
01 Download RISC OSGet started by downloading the correct version of
RISC OS (https://www.riscosopen.org/content/downloads/
raspberry-pi), and save the 99.9Mb ZIP fi le to your computer.
Several versions are available, including an ultra light Pico
version, but we’d recommend getting started with the fi rst
option, the SD Card image.
02 Unzip the downloadBefore writing to SD, you’ll need to unzip the RISC
OS disk image. In the Terminal, use the unzip command,
specifying the downloaded fi le’s directory path and fi lename:
Above Choose the version of RISC OS to suit your needs
Above Before you can write the disk image, it must be extracted from the archive
Whether you remember BBC BASIC or it’s completely new to you, you’ll have it at your fi ngertips in RISC OS. To open a command line, click Ctrl+F12, then type BASIC and enter.You are then ready to enter a basic program:
10 WHILE TRUE 20 PRINT “Hello world!” 30 ENDWHILE RUN
Esc will stop this routine. Dedicated programming editors are available for BBC BASIC, although you can develop code with WIMP and C too.
Get started with BASIC
What you’ll need RISC OS
http://bit.ly/2auOpYL
Monitor
Keyboard
Three buttoned mouse
(a standard clickable
scrollwheel should suffi ce)
unzip Downloads/riscos-2015-02-17.14.zip
The .IMG fi le is in the Home directory, ready for the SD card.
03 Find your SD cardNext, it’s time to write the OS to a formatted SD card.
With the card inserted into the card reader, switch to the
Terminal window, and check your mounted devices:
df -h
In this list, you’ll fi nd the SD card listed, which you’ll identify by
its fi lepath, name, and size.
04 Install RISC OS on the Raspberry PiNext, unmount the SD card:
umount /dev/mmcblk0p1
Next, use the dd command to write the image fi le. Take extra
Above SD cards are often labelled with the letters “mmc” or “sdd” for easy identifi cation
Tips | Tricks | Hacks
Raspberry Pi Tips, Tricks & Hacks 41
Two package managers are included in RISC OS. Packman is designed to install and upgrade software, while !Store offers commercial software. Software can also be installed manually, by copying ZIP archives from your desktop computer to the SD card, and copying the fi les from the archive into the RISC OS fi le system. Note that old software you may have used at school probably won’t run, due to differences in the architecture of early ARM CPUs and modern iterations.
Installing software on RISC OS
care to enter the correct destination – a mistake can delete
your hard drive!
sudo dd bs=4M if=riscos-2015-02-17-RC14.img of /dev/mmcblk0
Take note here how the “p1” section is omitted, as this refers
to a partition.
05 Alternative installationIf you would rather avoid the Terminal-focused
installation of RISC OS, you can alternatively download the
NOOBS software and copy it to your SD card before booting
the Pi and selecting RISC OS as your operating system.
Once installed, proceed with the steps below to get familiar
with RISC OS.
06 Boot RISC OSAfter a few minutes unmount and insert into your Pi
before switching it on. Make sure you’ve got a mouse and
keyboard connected to your Raspberry Pi fi rst, as well as
an Ethernet cable, as RISC OS is unfortunately not currently
compatible with wireless networking.
07 Is your mouse compatible?Anyone who recalls the Acorn Archimedes will know
that RISC OS requires a three-button mouse. The middle
button is a dedicated context menu (like right-clicking in
Linux, OS X and Windows), but as long as you have a clickable
scrollwheel on your mouse, this shouldn’t be a problem.
08 Enable Ethernet on RISC OSBy default, Ethernet is disabled. To fix this,
follow the instructions in the welcome/html file on the
desktop. If this is missing, double-click on !Configure, then
Network>Internet>Enable TCP/IP Protocol Suite, followed by
Close>Save.
Finally, you can select Reboot now to restart the system with
Ethernet enabled.
09 Get to grips with RISC OSIf you have previous experience with RISC OS, much of
what you see on the desktop will be familiar. Otherwise, don’t
worry, it’s pretty straightforward. Applications are essentially
directories with ! (known in RISC OS as pling) as a prefi x, and
are launched by double-clicking the folder.
Above Ensure you enter the correct fi lepath and destination device name when writing to SD cards
Above Use a three buttoned mouse or your mouse scrollwheel to open the menu
Above You’ll need an Ethernet cable connected to your router, or an Ethernet Wi-Fi adaptor
Above Spend just a few minutes of your time familiarising yourself with the RISC OS desktop
Above NOOBS offers an alternative, Terminal-free method of installing RISC OS on your Raspberry Pi
Above You’ll need your keyboard and mouse connected to use RISC OS

Tips | Tricks | Hacks
Develop your Sense HAT skills and start a coding a version of Rock, Paper, Scissors, Lizard, Spock
Master essential Sense HAT skills
In 2015, two Raspberry Pi computers were each fitted with an Astro Pi, which is an add-on board boasting an array of sensors and an 8x8 LED matrix. These were fl own to the ISS
and delivered to Major Tim Peake with a selection of school
children’s experiments. Eventually, the Astro Pi was released for
sale to the public as the rebranded ‘Sense HAT’. This consists of
exactly the same hardware and sensors set found on the Astro
Pi but with a new ‘Sense HAT’ API. The fi rst part of this two-part
tutorial introduces you to the Sense HAT hardware and walks
you through the skills required to create a Sense HAT version of
the updated classic Rock, Paper, Scissors, Lizard, Spock game.
These skills also stand alone and you can adapt them for use in
your own projects.
01 Install the Sense HAT softwareFirst, attach the board to the GPIO header and install the
Sense HAT software. This is pre-installed on the latest Raspbian
images; for older images it can be downloaded – boot up your
Raspberry Pi, load the LX Terminal and type in sudo apt-get
install sense-hat to install the software. On completion reboot
your Raspberry Pi.
sudo apt-get update sudo apt-get install sense-hat sudo reboot
02 Scrolling a messageWriting code to scroll text on LCD / LED displays can be
challenging and frustrating. The Sense HAT API removes the
diffi culties and simplifi es the whole procedure to a simple line
of code: sense.show_message(“This is a test message”). Open
your Python editor and enter the code at the bottom of this step, Below The Sense HAT isn’t just about the LED array – it’s also packed full of useful sensors
What you’ll need Raspberry Pi
Sense HAT
42 Raspberry Pi Tips, Tricks & Hacks

Raspberry Pi Tips, Tricks & Hacks 43
Tips | Tricks | Hacks
save and then run it. Your message will be scrolled across the
Sense HAT LEDs. Change the text between the quotation marks
to add your own message. Adjust the colour of the message and
the time it takes to scroll by including the lines text_colour=[255,
0, 0]) (setting the RGB value) and scroll_speed=(0.05). Try
experimenting with the example code below:
from sense_hat import Sense HAT sense = SenseHat() sense.show_message(“Linux User and Developer”, text_colour=[255, 0, 0])
03 Taking a temperature readingThe Sense HAT has a built-in heat sensor that can be
used to read and return the current temperature (line 3). The
sensor is fairly close to the CPU and this may pick up some of
the residual heat. However, on the whole the reading is sound.
To measure the temperature, return to your Python editor and
type in the code below, then save and run the fi le. This will
return the current temperature reading and print it out:
from sense_hat import SenseHat sense = SenseHat() temp = sense.get_temperature() print(“Temperature: %s C” % temp)
04 Compass readingOne of the more nifty sensors is the magnetometer,
which can be used as a compass. This returns a measurement of
the Sense HAT’s position in relation to magnetic north. Again the
code is easy to use: sense.get_compass() in line 3 returns the
position, which is stored in a variable called north. The value that
is measured is then printed out in line 4. Use the code example
below to test the compass sensor and the readings:
from sense_hat import SenseHat sense = SenseHat() north = sense.get_compass() print(“North: %s” % north)
05 Mapping an LED image from a pictureImages are built up of pixels which combine to
create an overall picture. Each LED on the matrix can be
automatically set from an image fi le. For example, an image
of a lizard can be loaded, the colours and positions calculated,
and then the corresponding LEDs enabled. The image needs
to be 8 x 8 pixels in size so that it fi ts the LED Matrix. Download
the supplied test picture fi le, lizard.png, and save it into the
same folder as your program. Use the code below to open and
load the image of the lizard (line 3). The Sense HAT will do the
rest of the hard work for you:
from sense_hat import SenseHat sense = SenseHat() sense.load_image(“lizard.png”)
06 Make your own 8 x 8 imageThere are two further methods to create an image with
the LEDs. The fi rst is a superb on-screen program that enables
you to manipulate the LEDs in real time. You can change the
colours, rotate them and then export the image as code or as
an 8 x 8 PNG fi le.
Install ‘Python PNG library’ by opening the terminal and
typing sudo pip3 install pypng. After this has fi nished, type git
clone https://github.com/jrobinson-uk/RPi_8x8GridDraw.
Once the installation has completed, move to the RPi folder
with cd RPi_8x8GridDraw, then type python3 sense_grid.py to
run the application.
07 Create and export your imageThe Grid Editor enables you to select from a range of
colours displayed down the right-hand side of the window.
Simply choose the colour and then click the location of the LED
on the grid, select ‘Play on LEDs’ to display the colour on the
Sense HAT LED. Clear the LEDs using the ‘Clear Grid’ button
and then start over. Finally, when exporting the image, you can
either save as a PNG fi le and apply the code in the previous step
to display the picture, or you can export the layout as code and
import that into your program.
Sheldon Cooper from The Big Bang Theory famously brought the game into the mainstream media when he explained how it was played to his friend, though it wasn’t actually invented on the show. The original expansion of the classic Rock, Paper, Scissors game is attributed to Sam Kass and Karen Bryla.
The origins of RPSLS
Left Each of the LED squares in this grid can be individually controlled, so you can draw images

Tips | Tricks | Hacks
44 Raspberry Pi Tips, Tricks & Hacks
If you can’t wait for the next part of this tutorial, then you can play around with this Python version of the RPSLS game. The Sense HAT version uses similar mechanics to calculate the winner and losers of each round played: https://trinket.io/python/46302ff1af
Python version of RPSLS
Right The Sense HAT Grid Editor makes it easy to generate
your image code
10 Create an image of a lizardNow you can begin to customise your own images to use.
To get started, create a simple lizard using the LED layout. Then
experiment with your own ideas and concepts. Remember, you
will also need images for Rock, Paper, Scissors and Spock. Johan
Vinet has some excellent and inspirational examples of 8 x 8 pixel
art http://johanvinet.tumblr.com/image/127476776680.
11 Selecting a random imageNext you need a code to scroll through your images. Begin
by renaming each of the images starting from one – for example
1.png, 2.png. Create a new variable called playersChoice which
will store the current picture filename. Next, load the image using
the code sense.load_image(str(playersChoice) + “.png”) – note
that playersChoice needs to be converted into a string before it is
used. Once the picture is displayed, the variable is incremented,
which loads the next picture. Finally, add a conditional to check if
you have reached your last picture. For example, if you have five
images then use:
if playersChoice == 5: playersChoice = 0
… to check when the variable reaches the last image and to
reset the variable to zero. This loads the first picture and the loop
starts again from the beginning:
import time while True: sense.load_image(str(playersChoice) + “.png”) playersChoice = playersChoice + 1 time.sleep(1) if playersChoice == 5: playersChoice = 0
12 Clearing the imageWhen cycling through the images, the LEDs will turn
on and off to the corresponding requirements of your code.
However, there will be times when you need to turn off all the
LEDs at once. This is referred to as clearing them. To clear the
LEDs and set them all to ‘off’, use the line sense.clear().
13 Setting the joystick up in PyGameThe Sense HAT is equipped with a small multi-directional
joystick that can be programmed to respond to direction.
The RPSLS game makes use of the joystick to cycle through
your images and to select one. In a new Python file, set up the
PyGame window by importing the PyGame modules at the top of
your file (lines 1 and 2). Next, initialise with pygame.init(). PyGame
runs in a separate window, but since the game takes place on the
Sense HAT, the window is obsolete. You can therefore minimise
the size by using: pygame.display.set_mode((140, 180)) line 5.
import pygame from pygame.locals import *
###Set up PyGame Screen###
pygame.init() pygame.display.set_mode((140, 180))
14 Add joystick controlsTo add the joystick movement, create a variable called
“running” which is set to True (line 1). Then add a while statement
08 Code each LED: Part 1The second method to create an image is to individually
code each LED and combine these. To set the colour of an LED,
create a variable for a colour and assign an RGB value to it. Add
additional colours by creating additional variables. Now create
a representation of the image using the variable names: in this
example, the X and O symbols combine to make a question mark.
Set the LEDs with the code sense.set_pixels(question_mark):
from sense_hat import SenseHat sense = SenseHat() X = [255, 0, 0] # Red O = [255, 255, 255] # White question_mark = [ O, O, O, X, X, O, O, O, O, O, X, O, O, X, O, O, O, O, O, O, O, X, O, O, O, O, O, O, X, O, O, O, O, O, O, X, O, O, O, O, O, O, O, X, O, O, O, O, O, O, O, O, O, O, O, O, O, O, O, X, O, O, O, O ] sense.set_pixels(question_mark)
09 Code each LED: Part 2To add more colour variations to your image, create a
new variable and assign the RGB values using the same format.
Replace your previous code with the example below to create a
new image. Lots of websites can convert the RGB values for all
16,581,375 colours – try http://www.colorpicker.com.
X = [255, 0, 0] # Red O = [255, 255, 255] # White B = [0, 255, 0] #Green new_image = [ B, B, O, O, O, O, X, X, B, B, O, O, O, O, X, X, B, B, O, O, O, O, X, X, B, B, O, O, O, O, X, X, B, B, O, O, O, O, X, X, B, B, O, O, O, O, X, X, B, B, O, O, O, O, X, X, B, B, O, O, O, O, X, X ] sense.set_pixels(new_image)
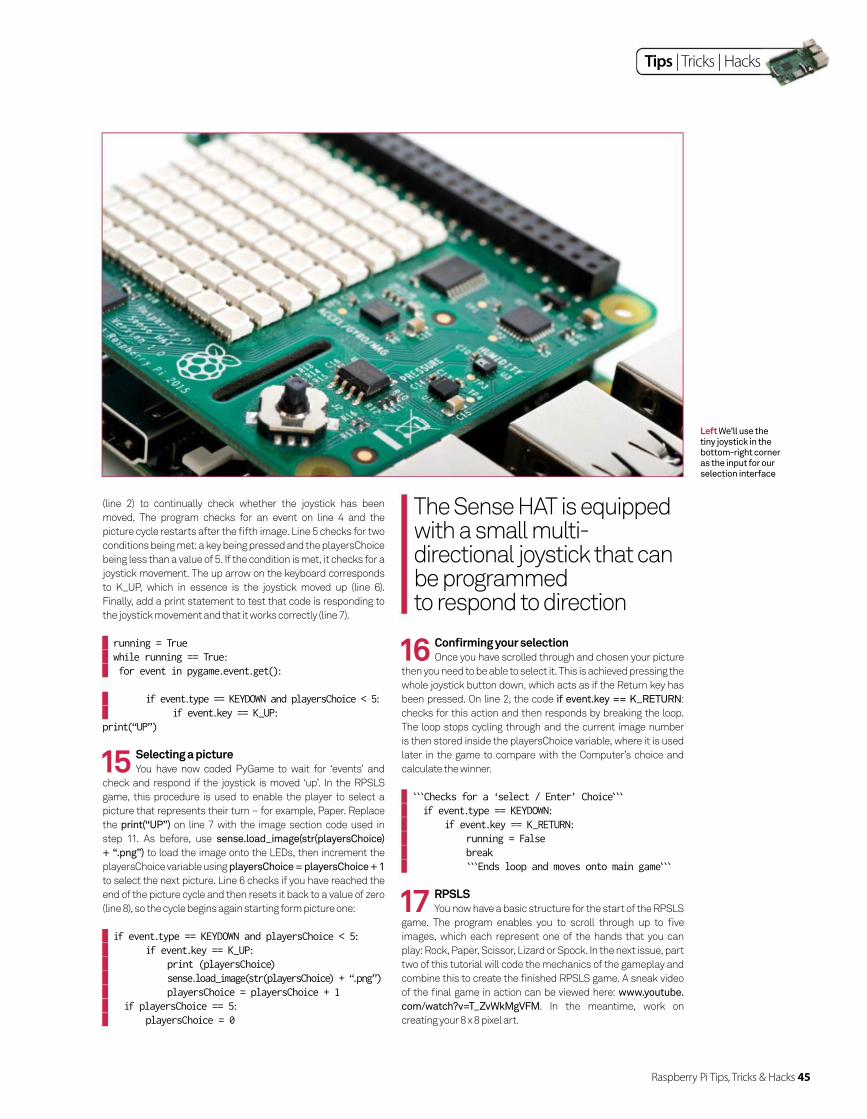
Raspberry Pi Tips, Tricks & Hacks 45
Tips | Tricks | Hacks
(line 2) to continually check whether the joystick has been
moved. The program checks for an event on line 4 and the
picture cycle restarts after the fi fth image. Line 5 checks for two
conditions being met: a key being pressed and the playersChoice
being less than a value of 5. If the condition is met, it checks for a
joystick movement. The up arrow on the keyboard corresponds
to K_UP, which in essence is the joystick moved up (line 6).
Finally, add a print statement to test that code is responding to
the joystick movement and that it works correctly (line 7).
running = True while running == True: for event in pygame.event.get(): if event.type == KEYDOWN and playersChoice < 5: if event.key == K_UP:print(“UP”)
15 Selecting a pictureYou have now coded PyGame to wait for ‘events’ and
check and respond if the joystick is moved ‘up’. In the RPSLS
game, this procedure is used to enable the player to select a
picture that represents their turn – for example, Paper. Replace
the print(“UP”) on line 7 with the image section code used in
step 11. As before, use sense.load_image(str(playersChoice)
+ “.png”) to load the image onto the LEDs, then increment the
playersChoice variable using playersChoice = playersChoice + 1
to select the next picture. Line 6 checks if you have reached the
end of the picture cycle and then resets it back to a value of zero
(line 8), so the cycle begins again starting form picture one:
if event.type == KEYDOWN and playersChoice < 5: if event.key == K_UP: print (playersChoice) sense.load_image(str(playersChoice) + “.png”) playersChoice = playersChoice + 1 if playersChoice == 5: playersChoice = 0
The Sense HAT is equipped with a small multi-directional joystick that can be programmed to respond to direction
16 Confi rming your selectionOnce you have scrolled through and chosen your picture
then you need to be able to select it. This is achieved pressing the
whole joystick button down, which acts as if the Return key has
been pressed. On line 2, the code if event.key == K_RETURN:
checks for this action and then responds by breaking the loop.
The loop stops cycling through and the current image number
is then stored inside the playersChoice variable, where it is used
later in the game to compare with the Computer’s choice and
calculate the winner.
` Checks for a ‘select / Enter’ Choice ` if event.type == KEYDOWN: if event.key == K_RETURN: running = False break ` Ends loop and moves onto main game `
17 RPSLSYou now have a basic structure for the start of the RPSLS
game. The program enables you to scroll through up to fi ve
images, which each represent one of the hands that you can
play: Rock, Paper, Scissor, Lizard or Spock. In the next issue, part
two of this tutorial will code the mechanics of the gameplay and
combine this to create the fi nished RPSLS game. A sneak video
of the fi nal game in action can be viewed here: www.youtube.
com/watch?v=T_ZvWkMgVFM. In the meantime, work on
creating your 8 x 8 pixel art.
Left We’ll use the tiny joystick in the bottom-right corner as the input for our selection interface
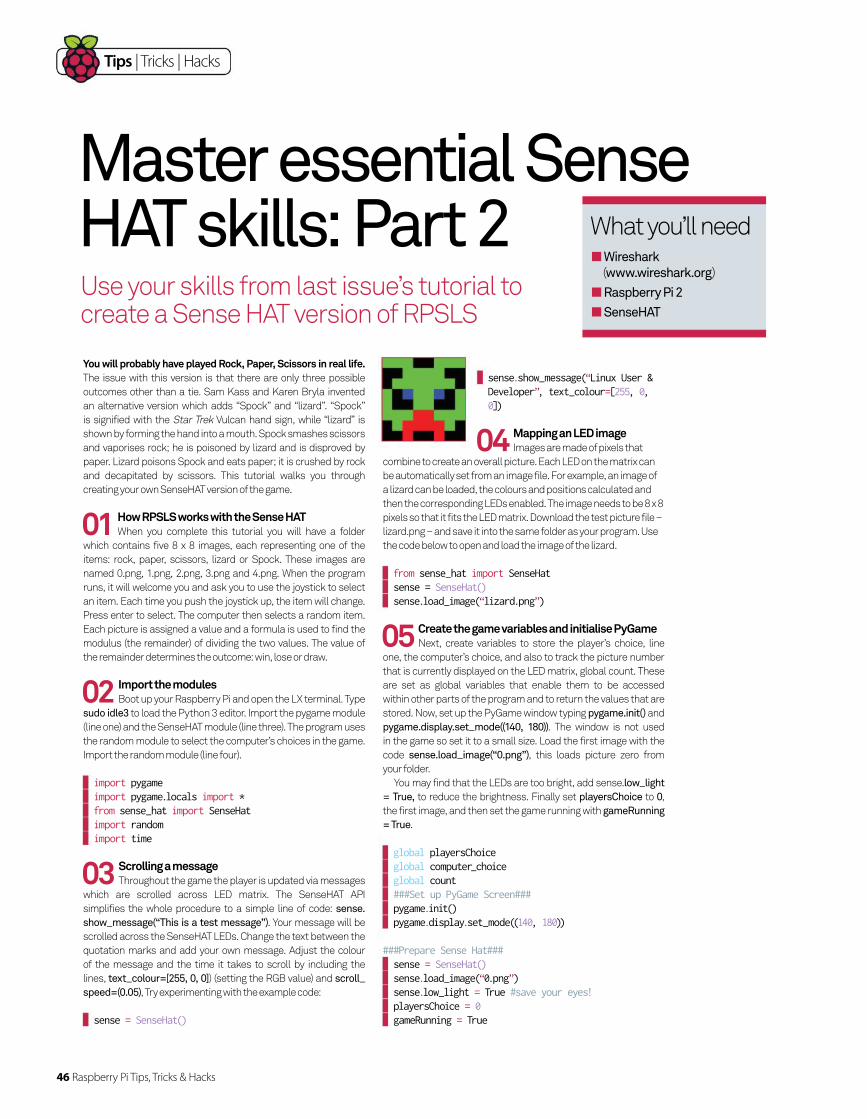
46 Raspberry Pi Tips, Tricks & Hacks
Tips | Tricks | Hacks
Use your skills from last issue’s tutorial to create a Sense HAT version of RPSLS
Master essential Sense HAT skills: Part 2
You will probably have played Rock, Paper, Scissors in real life. The issue with this version is that there are only three possible
outcomes other than a tie. Sam Kass and Karen Bryla invented
an alternative version which adds “Spock” and “lizard”. “Spock”
is signified with the Star Trek Vulcan hand sign, while “lizard” is
shown by forming the hand into a mouth. Spock smashes scissors
and vaporises rock; he is poisoned by lizard and is disproved by
paper. Lizard poisons Spock and eats paper; it is crushed by rock
and decapitated by scissors. This tutorial walks you through
creating your own SenseHAT version of the game.
01 How RPSLS works with the Sense HATWhen you complete this tutorial you will have a folder
which contains five 8 x 8 images, each representing one of the
items: rock, paper, scissors, lizard or Spock. These images are
named 0.png, 1.png, 2.png, 3.png and 4.png. When the program
runs, it will welcome you and ask you to use the joystick to select
an item. Each time you push the joystick up, the item will change.
Press enter to select. The computer then selects a random item.
Each picture is assigned a value and a formula is used to find the
modulus (the remainder) of dividing the two values. The value of
the remainder determines the outcome: win, lose or draw.
02 Import the modulesBoot up your Raspberry Pi and open the LX terminal. Type
sudo idle3 to load the Python 3 editor. Import the pygame module
(line one) and the SenseHAT module (line three). The program uses
the random module to select the computer’s choices in the game.
Import the random module (line four).
import pygame import pygame.locals import * from sense_hat import SenseHat import random import time
03 Scrolling a messageThroughout the game the player is updated via messages
which are scrolled across LED matrix. The SenseHAT API
simplifies the whole procedure to a simple line of code: sense.
show_message(“This is a test message”). Your message will be
scrolled across the SenseHAT LEDs. Change the text between the
quotation marks and add your own message. Adjust the colour
of the message and the time it takes to scroll by including the
lines, text_colour=[255, 0, 0]) (setting the RGB value) and scroll_
speed=(0.05), Try experimenting with the example code:
sense = SenseHat()
sense.show_message(“Linux User & Developer”, text_colour=[255, 0, 0])
04 Mapping an LED image Images are made of pixels that
combine to create an overall picture. Each LED on the matrix can
be automatically set from an image file. For example, an image of
a lizard can be loaded, the colours and positions calculated and
then the corresponding LEDs enabled. The image needs to be 8 x 8
pixels so that it fits the LED matrix. Download the test picture file –
lizard.png – and save it into the same folder as your program. Use
the code below to open and load the image of the lizard.
from sense_hat import SenseHat sense = SenseHat() sense.load_image(“lizard.png”)
05 Create the game variables and initialise PyGameNext, create variables to store the player’s choice, line
one, the computer’s choice, and also to track the picture number
that is currently displayed on the LED matrix, global count. These
are set as global variables that enable them to be accessed
within other parts of the program and to return the values that are
stored. Now, set up the PyGame window typing pygame.init() and
pygame.display.set_mode((140, 180)). The window is not used
in the game so set it to a small size. Load the first image with the
code sense.load_image(“0.png”), this loads picture zero from
your folder.
You may find that the LEDs are too bright, add sense.low_light
= True, to reduce the brightness. Finally set playersChoice to 0,
the first image, and then set the game running with gameRunning
= True.
global playersChoice global computer_choice global count ###Set up PyGame Screen### pygame.init() pygame.display.set_mode((140, 180))
###Prepare Sense Hat### sense = SenseHat() sense.load_image(“0.png”) sense.low_light = True #save your eyes! playersChoice = 0 gameRunning = True
What you’ll need Wireshark
(www.wireshark.org)
Raspberry Pi 2
SenseHAT
Raspberry Pi Tips, Tricks & Hacks 47
Tips | Tricks | Hacks
06 Convert the values / numbers into itemsDuring the RPSLS gameplay the program uses numbers
to identify the items instead of their names. This means you can
select a picture and also use a modulus operation to calculate
the outcome of the game. Create a function that converts
and assigns the value into the respective item name. A simple
conditional checks what the number is and returns the name
of the item. The value of ‘scissors’ is set twice – during the
gameplay a loop checks that the fi fth image has been loaded
and then resets the value to zero which would result in the fi fth
image not being displayed.
def number_to_name(number): if number == 0: return “Rock” elif number == 1: return “Spock” elif number == 2: return “Paper” elif number == 3: return “Lizard” elif number == -1: ### because value is 5 so re-sets to 0, zero - 1 = -1 ### return “Scissors” elif number == 4: ### because value is 5 so re-sets to 0, zero - 1 = -1 ### return “Scissors” ### for the computer
import pygamefrom pygame.locals import *from sense_hat import SenseHatimport randomimport time
global playersChoiceglobal computer_choiceglobal count
###Set up PyGame Screen###pygame.init()pygame.display.set_mode((140, 180))
###Prepare Sense Hat###sense = SenseHat()sense.load_image(“0.png”)sense.low_light = True #save your eyes!
playersChoice = 0gameRunning = True
‘’’Converts the Number into the choice i.e. lizard, spock etc ‘’’def number_to_name(number): if number == 0: return “Rock” elif number == 1: return “Spock” elif number == 2: return “Paper” elif number == 3: return “Lizard” elif number == -1: ### because value is 5 so re-sets to 0, zero - 1 = -1 ### return “Scissors”
Full code listing
07 Check for joystick movementCreate another function that holds the main mechanics
of the gameplay. Start by adding the global variables sense.
set_rotation(90), which positions the image correctly. Next use
for event in pygame.event.get(): to check for a joystick movement.
The joystick is used to cycle through a loop of the five LED images.
The line if event.type == KEYDOWN and playersChoice < 5:
checks that the player has moved the joystick up and also that
the picture number is less than 5. If it is equal to five then the
loop resets. If the playersChoice value is less than five then the
corresponding picture number is loaded to the LEDs using sense.
load_image(str(playersChoice) + “.png”) line 13 and the variable
incremented. The loop restarts from the beginning and checks for
a joystick movement and then displays the relevant picture file.
def mainGame(): ###PLAYER SELECTION### ###Loops while running variable is True###
running = True global playersChoice global computer_choice while running == True: sense.set_rotation(90) for event in pygame.event.get(): if event.type == KEYDOWN and playersChoice < 5: if event.key == K_UP:
elif number == 4: ### because value is 5 so re-sets to 0, zero - 1 = -1 ### return “Scissors” ### for the computer def mainGame(): ###PLAYER SELECTION### ###Loops while running variable is True### running = True global playersChoice global computer_choice while running == True: sense.set_rotation(90) for event in pygame.event.get(): if event.type == KEYDOWN and playersChoice < 5: if event.key == K_UP: print (playersChoice) sense.load_image(str(playersChoice) + “.png”) playersChoice = playersChoice + 1 if playersChoice == 5: playersChoice = 0 ‘’’Checks for a ‘select / enter’ Choice ‘’’ if event.type == KEYDOWN: if event.key == K_RETURN: running = False break ‘’’Ends loop and moves onto main game’’’ ‘’’Message for player about their choice’’’ #print (“Your Choice is”, playersChoice) #test
You will need an
image for Rock,
Paper, Scissors and
Spock. Johan Viet
has some excellent
and inspirational
examples of 8 x 8
pixel art. Check
them out at http://
johanvinet.tumblr.
com/image/
127476776680
Pixel inspiration
48 Raspberry Pi Tips, Tricks & Hacks
Tips | Tricks | Hacks
sense.load_image(str(computer_choice) + “.png”) count = count - 1
11 Game status updateThe next part is to use messages to update the player. Use
the function in step six to look up and convert the number into an
item: computerMessage = number_to_name(number). Now use
sense.show_message(“Computer = “, text_colour=[0, 150, 255],
scroll_speed = 0.06) to display the computer’s final choice:
#time.sleep(1) ‘’’Message for player about the computer’s choice’’’ print (“The computers choice is”, computer_choice) number = computer_choice computerMessage = number_to_name(number) print computerMessage ##test sense.set_rotation(0) sense.show_message(“Computer = “, text_colour=[0,
150, 255], scroll_speed = 0.06) #sense.show_message(computerMessage, text_colour=[0, 0, 255], scroll_speed = 0.08)
sense.load_image(str(computer_choice) + “.png”)
12 Did you win?The value of the computer’s choice is subtracted from
the value of the player’s choice and divided by five, returning the
remainder to determine the outcome of the game. Create a new
variable called result and assign the calculation to it, result =
(int(computer_choice - (playersChoice-1))) % 5. If the result is
zero, then the player and the computer have picked the same item:
the game is a tie. Use an IF statement on line five to check the value
and then display a message using sense.show_message(“Player
and Computer Tie!”, text_colour=[0, 0, 255], scroll_speed = 0.08).
###WINNER CALCULATED### ‘’’Calculates the Winner’’’ result = (int(computer_choice - (playersChoice-1))) % 5 #print result if result == 0: sense.show_message(“Player and Computer Tie!”,
text_colour=[0, 0, 255], scroll_speed = 0.08)
To win, the value of the remainder has to be greater than or equal
to three. Use an ELSE IF statement to check this, elif result >=3.
Any other value means that the computer has won this round. Add
an else statement and use sense.show_message(“Computer
Wins!”, text_colour=[255, 0, 0], scroll_speed = 0.08 to display the
winning or losing messages.
elif result >=3: sense.show_message(“Player Wins!”, text_colour=[0, 255, 0], scroll_speed = 0.08)
else: time.sleep(1) sense.show_message(“Computer Wins!”, text_colour=[255, 0, 0], scroll_speed = 0.08)##??
13 Introducing the gameNow to add an intro message and instructions. You could
add these into the main game loop but each time you start a new
round you have to wait for them to repeat. Type sense.show_
message(“Welcome to RPSLS!”, text_colour=[155, 100, 30],
scroll_speed = 0.08) to scroll the messages and load the first
image onto the LEDs with sense.load_image(“0.png”).
print (playersChoice) sense.load_image(str(playersChoice) + “.png”) playersChoice = playersChoice + 1 if playersChoice == 5: playersChoice = 0
08 Select your itemWhen you are scrolling through the images, you need
to be able to select an item to play. Press the joystick down to act
as the Return key. Add the line if event.key == K_RETURN: line
three, to respond to the joystick being pressed down, then end the
picture cycle loop using running = False. Finally ‘break’ out of the
loop to move onto the next part of the game.
‘’’Checks for a ‘select / Enter’ Choice ‘’’ if event.type == KEYDOWN: if event.key == K_RETURN: running = False break
09 Update the statusOnce you have made your selection, scroll a confirmation
message across the LEDs. Create a new variable called
number and assign the playersChoice value to it. Next, use
the function in step six to convert the number into the name
of the item, playerMessage = number_to_name(number).
Finally scroll the message across using the line, sense.show_
message(playerMessage, text_colour=[0, 0, 255], scroll_speed
= 0.08). You can change the text colour by altering the values within
the square brackets and also the speed of the scroll between the
values of zero and one.
‘’’Message for player about their choice’’’ number = playersChoice - 1 playerMessage = number_to_name(number) print playerMessage sense.set_rotation(0) sense.show_message(“You = “, text_colour=[0, 255, 255], scroll_speed = 0.08)
sense.show_message(playerMessage, text_colour=[0, 0, 255], scroll_speed = 0.08)
10 The computer’s selectionNow it’s the computer’s turn. First the computer
selects a random number between 5 and 50, count = random.
randrange(5,50). This is a random number of times that it will
cycle the choices to give the impression of ‘thinking’. Then
the computer selects a random number between 0 and 5,
computer_choice = random.randrange(0,5). This is the
computer’s ‘item’ selection. Then one is subtracted from the
cycle and the computer selects a new picture. This continues
while the value of count is greater than zero. In each cycle
the picture is displayed on the LED matrix with sense.load_
image(str(computer_choice) + “.png”)
###COMPUTER SELECTION ‘’’Computer selects a random choice from the
options’’’ count = random.randrange(5,50) sense.set_rotation(90) while count > 1: computer_choice = random.randrange(0,5) print computer_choice time.sleep(0.1)
A simple method to create your images is to use the RPi Grid Draw program. This enables you to manipulate the LEDs in real time. You can change the colours, rotate them and then export the image as code or as an 8 x 8 png file. Install ‘Python PNG library’, open the Terminal window and type: sudo pip3 install pypng. After this has finished type, git clone https://github.com/jrobinson-uk/RPi_8x8GridDraw. Once the installation has completed move to the RPi folder, type cd RPi_8x8GridDraw, type python3 sense_grid.py to run the application
Creating the 8 x 8 images
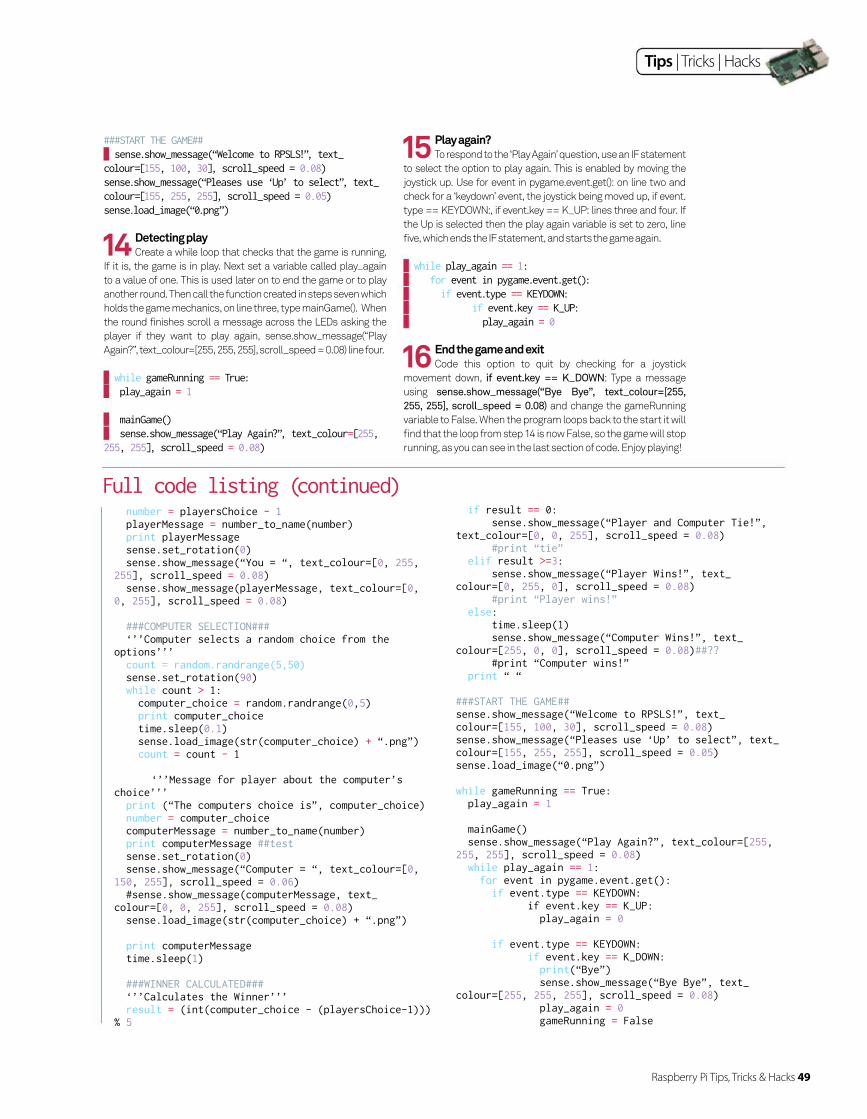
Raspberry Pi Tips, Tricks & Hacks 49
Tips | Tricks | Hacks
###START THE GAME## sense.show_message(“Welcome to RPSLS!”, text_ colour=[155, 100, 30], scroll_speed = 0.08)sense.show_message(“Pleases use ‘Up’ to select”, text_colour=[155, 255, 255], scroll_speed = 0.05)sense.load_image(“0.png”)
14 Detecting playCreate a while loop that checks that the game is running.
If it is, the game is in play. Next set a variable called play_again
to a value of one. This is used later on to end the game or to play
another round. Then call the function created in steps seven which
holds the game mechanics, on line three, type mainGame(). When
the round finishes scroll a message across the LEDs asking the
player if they want to play again, sense.show_message(“Play
Again?”, text_colour=[255, 255, 255], scroll_speed = 0.08) line four.
while gameRunning == True: play_again = 1 mainGame() sense.show_message(“Play Again?”, text_colour=[255, 255, 255], scroll_speed = 0.08)
Full code listing (continued) number = playersChoice - 1 playerMessage = number_to_name(number) print playerMessage sense.set_rotation(0) sense.show_message(“You = “, text_colour=[0, 255, 255], scroll_speed = 0.08) sense.show_message(playerMessage, text_colour=[0, 0, 255], scroll_speed = 0.08)
###COMPUTER SELECTION### ‘’’Computer selects a random choice from the options’’’ count = random.randrange(5,50) sense.set_rotation(90) while count > 1: computer_choice = random.randrange(0,5) print computer_choice time.sleep(0.1) sense.load_image(str(computer_choice) + “.png”) count = count - 1
‘’’Message for player about the computer’s choice’’’ print (“The computers choice is”, computer_choice) number = computer_choice computerMessage = number_to_name(number) print computerMessage ##test sense.set_rotation(0) sense.show_message(“Computer = “, text_colour=[0, 150, 255], scroll_speed = 0.06) #sense.show_message(computerMessage, text_colour=[0, 0, 255], scroll_speed = 0.08) sense.load_image(str(computer_choice) + “.png”) print computerMessage time.sleep(1) ###WINNER CALCULATED### ‘’’Calculates the Winner’’’ result = (int(computer_choice - (playersChoice-1))) % 5
if result == 0: sense.show_message(“Player and Computer Tie!”, text_colour=[0, 0, 255], scroll_speed = 0.08) #print “tie” elif result >=3: sense.show_message(“Player Wins!”, text_colour=[0, 255, 0], scroll_speed = 0.08) #print “Player wins!” else: time.sleep(1) sense.show_message(“Computer Wins!”, text_colour=[255, 0, 0], scroll_speed = 0.08)##?? #print “Computer wins!” print “ “ ###START THE GAME##sense.show_message(“Welcome to RPSLS!”, text_colour=[155, 100, 30], scroll_speed = 0.08)sense.show_message(“Pleases use ‘Up’ to select”, text_colour=[155, 255, 255], scroll_speed = 0.05)sense.load_image(“0.png”)
while gameRunning == True: play_again = 1 mainGame() sense.show_message(“Play Again?”, text_colour=[255, 255, 255], scroll_speed = 0.08) while play_again == 1: for event in pygame.event.get(): if event.type == KEYDOWN: if event.key == K_UP: play_again = 0 if event.type == KEYDOWN: if event.key == K_DOWN: print(“Bye”) sense.show_message(“Bye Bye”, text_colour=[255, 255, 255], scroll_speed = 0.08) play_again = 0 gameRunning = False
15 Play again?To respond to the ‘Play Again’ question, use an IF statement
to select the option to play again. This is enabled by moving the
joystick up. Use for event in pygame.event.get(): on line two and
check for a ‘keydown’ event, the joystick being moved up, if event.
type == KEYDOWN:, if event.key == K_UP: lines three and four. If
the Up is selected then the play again variable is set to zero, line
five, which ends the IF statement, and starts the game again.
while play_again == 1: for event in pygame.event.get(): if event.type == KEYDOWN: if event.key == K_UP: play_again = 0
16 End the game and exitCode this option to quit by checking for a joystick
movement down, if event.key == K_DOWN: Type a message
using sense.show_message(“Bye Bye”, text_colour=[255,
255, 255], scroll_speed = 0.08) and change the gameRunning
variable to False. When the program loops back to the start it will
fi nd that the loop from step 14 is now False, so the game will stop
running, as you can see in the last section of code. Enjoy playing!

50 Raspberry Pi Tips, Tricks & Hacks
Tips | Tricks | Hacks
Conduct experiments, monitor pollutants and more with this clever little module for your Raspberry Pi
Environmental science with the Sensly HAT
The Sensly is a smart module attached to the Raspberry Pi. It has its own microprocessor that can handle analog data and handle sampling from various sensors without the need to waste your Raspberry Pi’s processing power. There are
three different gas sensors attached to the board, allowing
you to sense a multitude of gases, as well as humidity and
temperature sensors. Plus, this Raspberry Pi HAT can be easily
extended with its array of analog ports and an I2C interface.
In keeping with the Raspberry Pi way of doing things, the
module also provides a Python API that does all of the hard
work for you. All of the maths, calibration and error correction
is handled by the API itself, allowing you to play around with
meaningful data immediately.
02 Testing the SenslyThe fi rst step is ensure the Raspberry Pi can
communicate with the Sensly HAT and make sure it is
functioning correctly. Type the following command and it will
respond with “ok”, and give a report if everything is working:
# Run test sequence on the Sensly sensly-test
What you’ll need Sensly HATsensly.uk
01 Setting up your Sensly HATThis tutorial assumes you have set up your Raspberry
Pi and it is connected to the Internet. So, the fi rst step is to plug
your Sensly HAT into the Raspberry Pi header. Once you have
done this, power on the Raspberry Pi and type the following
commands into the terminal:
# Install git so we can download the API sudo apt-get install git git clone https://github.com/Altitude-Tech/SenslyPi.git cd SenslyPi # Install the python API sudo python setup.py install

Raspberry Pi Tips, Tricks & Hacks 51
Tips | Tricks | Hacks
05 Getting pollution dataNow that we know how to get the gas sensors ready to
read data, it’s time to start taking some measurements. Add the
following code to the previous program:
While(True): # Print the general level of pollution print(“General pollution level (PPM)”) print( str( atmosphere.pollution()) )
# Print the level of industrial pollution # (e.g. benzene, nitrogen oxides) print(“Industrial Pollution (PPM)”) print( str( atmosphere.pollution.industrial()) )
# Print the Humidity print(“Humidity”) print( str( atmosphere.humidity()) )
time.sleep(20)
06 Adding custom sensorsThe Sensly provides fi ve ports for additional sensors,
which can easily be controlled with a simple Python script.
They are particularly useful because the Raspberry Pi does not
provide any native analog ports. This allows you to add extra
sensors to suit your projects, such as an LDR to measure light
pollution. Using the following script you can easily read analog
and digital data from the expansion ports:
import sensly from sensly import Port
sensor1 = Port(Sensly.port1)
print( str( sensor1.analog_read()) )
03 Using the APIWe are now going to use a terminal-based text editor to
write some code – we’re going to use Nano but you can use any
editor you like. The following command will create a fi le called
sensly.py and open it for editing.
nano sensly.py
You can type the following program to get basic data from the
Sensly.
import os from sensly import Gases
atmosphere = Gases()
while True: print(“Humidity Level:”) print( str(atmosphere.humidity()) ) print(“Temperature:”) print( str(atmosphere.temp()) ) time.sleep(5)
04 Getting started with gas sensorsTo start using the sensors, it gets a little bit more
complicated as we need to preheat the sensors to ensure the
readings from the Sensly are stable. To do this we use a loop
in the code which waits until the preheating sequence has
fi nished. This takes two to three minutes if you have only just
powered up the Sensly.
import os from sensly import Sensly
sensly = Sensly()
# Wait until preheating has finished # so we can get stable readings While (sensly.preheated() == False): print(“Preheating . . . . .”) time.sleep(1)
print(“Sensly is ready to read pollution levels!”)
Above Pygal is a dynamic SVG charting library that offers Python/CSS styling by means of preset themes
The brain of this
add-on board is its
ARM cortex, which
handles all of the
analogue signals,
data sampling and
communications
to the Pi. This is a
powerful little chip
with many features
and its fi rmware
is open source. As
a result, you can
fl ash reprogram
the HAT from your
Raspberry Pi, giving
you the fl exibility of a
microcontroller like
the Arduino but with
all the advantages
of a full operating
system – making this
a very fun little HAT to
tinker about with.
Unlocking the ARM cortex
07 Visualising your dataFor this we are going to use a great open source project
called pygal, which makes it easy to generate cool vector graphs
from your data. First of all we need to install pygal, and then we
can write some code to generate some information on pollution
levels. Run the following commands to set up pygal:
sudo apt-get install python-setuptools sudo easy_install pygal
The following code will sample the air for ten hours and generate
a vector graph, although you can edit the timings to suit
your needs:
import pygal import os from sensly import Gases
atmosphere = Gases() graph = pygal.Bar()
samples = [] for i in range(10): samples.append(atmosphere.pollution.industrial())
graph.add(‘pollution’, samples) graph.render_to_file(‘pollution.svg’) # Generate graph
52 Raspberry Pi Tips, Tricks & Hacks
Tips | Tricks | Hacks
We are going to take you through the basics of wavetable synthesis theory and use that knowledge to create a real-time synthesiser in Python. At the moment, it is controlled
by the computer keyboard, but it could easily be adapted to
accept a MIDI keyboard as input.
The Python implementation of such a synthesiser turns out
to be too slow for polyphonic sound (ie playing multiple notes
at the same time) so we’ll use Cython, which compiles Python
to C so that you can then compile it to native machine code to
improve the performance. The end result is polyphony of three
notes, so this is not intended for use as a serious synthesiser.
Instead, this tutorial will enable you to become familiar with
synthesis concepts in a comfortable language: Python.
Once you’re fi nished, try taking this project further by
customising the mapping to better fi t your keyboard layout, or
tweaking the code to read input from a MIDI keyboard.
01 Install packagesUsing the latest Raspbian image, install the required
packages with the following commands:
sudo apt-get update sudo apt-get upgrade sudo apt-get install python-pip python2.7-dev portaudio19-dev
sudo pip install cython pyaudio
The fi nal step compiles Cython and PyAudio from source, so you
might want to go and do something else while it works its magic.
02 Disable built-in sound cardWe had issues getting the Raspberry Pi’s built-in sound
card to work reliably while developing the synthesis code. For
What you’ll need Raspberry Pi 2
USB sound card (we used
a Behringer UCA202)
Full codeFileSilo.co.uk/bks-B38
Learn how to write a simple polyphonic synthesiser (and the theory behind it) using Python and Cython
Code a simple synthesiser
Tips | Tricks | Hacks
Raspberry Pi Tips, Tricks & Hacks 53
Tips | Tricks | Hacks
04 Start projectStart by creating a directory for the project. Then
download one cycle of a square wave that we will use as a
wavetable, like so:
mkdir synth cd synth wget liamfraser.co.uk/lud/synth/square.wav
03 Test sound cardNow we can test the USB sound card. Type alsamixer and
then ensure that the volume is set to a comfortable level. If you’re
plugging speakers in, you’ll probably want it set to 100%. Then
type speaker-test, which will generate some pink noise on the
speakers. Press Ctrl+C to exit once you are happy that it’s working.
05 Create compilation scriptWe need a script that will profi le our Python code
(resulting in synth.html). Generate a Cython code for it and
fi nally compile the Cython code to a binary with GCC:
editor compile.sh: #!/bin/bash cython -a synth.pyx cython --embed synth.pyx gcc -march=armv7-a -mfpu=neon-vfpv4 -mfloat-abi=hard -O3 -I /usr/include/python2.7 -o synth.bin synth.c -lpython2.7 -lpthread
(Notice the options that tell the compiler to use the fl oating
point unit.) Make it executable with:
chmod +x compile.sh
#!/usr/bin/python2
import pyaudioimport timefrom array import *from cpython cimport array as c_arrayimport waveimport threadingimport tty, termios, sys
class MIDITable: # Generation code from # http://www.adambuckley.net/software/beep.c
def __init__(self): self.notes = [] self.
def (self): # Frequency of MIDI note 0 in Hz frequency = 8.175799 # Ratio: 2 to the power 1/12 ratio = 1.0594631
for i in range(0, 128): self.notes.append(frequency) frequency = frequency * ratio
def get_note(self, n): return self.notes[n]
cdef class ADSR:
cdef public char state cdef int samples_per_ms, samples_gone
def __init__(self, sample_rate): self.attack = 1.0/100 self.decay = 1.0/300 self.sustain_amplitude = 0.7 self.release = 1.0/50 self.state = ‘A’ self.multiplier = 0.0 self.samples_per_ms = int(sample_rate / 1000) self.samples_gone = 0
def next_val(self): self.samples_gone += 1 if self.samples_gone > self.samples_per_ms: self.samples_gone = 0 else: return self.multiplier
if self.state == ‘A’: self.multiplier += self.attack if self.multiplier >= 1: self.state = ‘D’ elif self.state == ‘D’: self.multiplier -= self.decay if self.multiplier <= self.sustain_amplitude: self.state = ‘S’ elif self.state == ‘R’: self.multiplier -= self.release
return self.multiplier
Full code listing
Step 07
Step 08
that reason, we are using a USB sound card and will disable the
built-in card so that the default card is the USB one:
sudo rm /etc/modprobe.d/alsa* sudo editor /etc/modules
Change ‘snd-bcm2835’ to ‘#snd-bcm2835’ and save, then:
sudo reboot
Cython is a tool that compiles Python down to the C code that would be used by the interpreter to run the code. This has the advantage that you can optimise some parts of your Python code into pure C code, which is signifi cantly faster. This is achieved by giving C types, such as int, fl oat and char, to Python variables.
Once you have C code it can then be compiled with a C compiler (usually GCC) which can optimise the code even further. A downside to using Cython is that you can’t run Cython optimised code with a normal Python interpreter. Cython is a nice compromise because you get a similar simplicity to Python code but higher performance than usual. Cython has a profi ler which you can run using:
cython -a synth.pyx
The profi ler outputs a html fi le which shows where to make optimisations, giving insight into how much overhead using Python introduces. For more details go to http://cython.org.
Cython
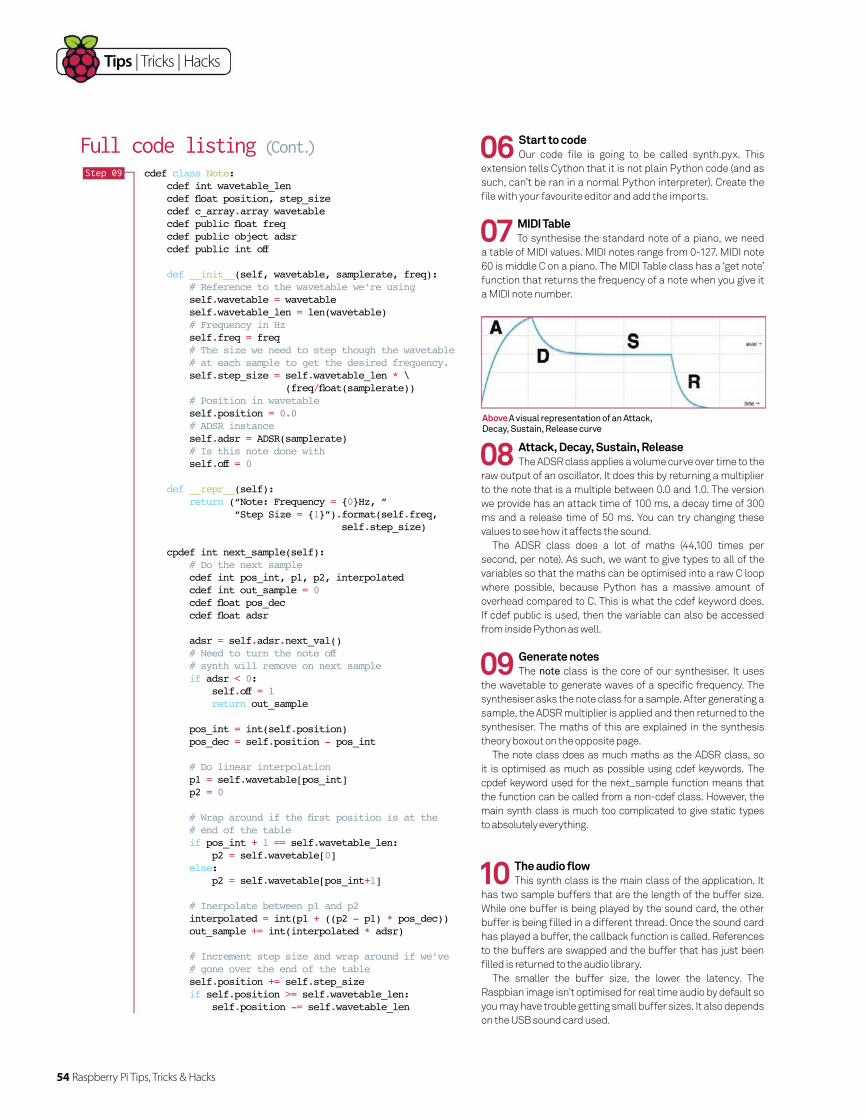
54 Raspberry Pi Tips, Tricks & Hacks
Tips | Tricks | Hacks
09 Generate notesThe note class is the core of our synthesiser. It uses
the wavetable to generate waves of a specific frequency. The
synthesiser asks the note class for a sample. After generating a
sample, the ADSR multiplier is applied and then returned to the
synthesiser. The maths of this are explained in the synthesis
theory boxout on the opposite page.
The note class does as much maths as the ADSR class, so
it is optimised as much as possible using cdef keywords. The
cpdef keyword used for the next_sample function means that
the function can be called from a non-cdef class. However, the
main synth class is much too complicated to give static types
to absolutely everything.
10 The audio flowThis synth class is the main class of the application. It
has two sample buffers that are the length of the buffer size.
While one buffer is being played by the sound card, the other
buffer is being filled in a different thread. Once the sound card
has played a buffer, the callback function is called. References
to the buffers are swapped and the buffer that has just been
filled is returned to the audio library.
The smaller the buffer size, the lower the latency. The
Raspbian image isn’t optimised for real time audio by default so
you may have trouble getting small buffer sizes. It also depends
on the USB sound card used.
cdef class Note: cdef int wavetable_len
cdef c_array.array wavetable
def __init__ self.wavetable = wavetable self.wavetable_len = self. = self. = self.wavetable_len * \
/ # Position in wavetable self. = 0.0 # ADSR instance self.adsr = # Is this note done with self. = 0
def = {0
= {1 . . self.
= 0
adsr = self.adsr. if adsr < 0: self. = 1
= int(self.= self. -
= self.= 0
# end of the table if + 1 == self.wavetable_len:
= self.wavetable[0 else:
= self. +1
= + - *
+= *
self. += self. if self. >= self.wavetable_len: self. -= self.wavetable_len
Full code listing (Cont.)Step 09
Above A visual representation of an Attack, Decay, Sustain, Release curve
08 Attack, Decay, Sustain, ReleaseThe ADSR class applies a volume curve over time to the
raw output of an oscillator. It does this by returning a multiplier
to the note that is a multiple between 0.0 and 1.0. The version
we provide has an attack time of 100 ms, a decay time of 300
ms and a release time of 50 ms. You can try changing these
values to see how it affects the sound.
The ADSR class does a lot of maths (44,100 times per
second, per note). As such, we want to give types to all of the
variables so that the maths can be optimised into a raw C loop
where possible, because Python has a massive amount of
overhead compared to C. This is what the cdef keyword does.
If cdef public is used, then the variable can also be accessed
from inside Python as well.
07 MIDI TableTo synthesise the standard note of a piano, we need
a table of MIDI values. MIDI notes range from 0-127. MIDI note
60 is middle C on a piano. The MIDI Table class has a ‘get note’
function that returns the frequency of a note when you give it
a MIDI note number.
06 Start to codeOur code file is going to be called synth.pyx. This
extension tells Cython that it is not plain Python code (and as
such, can’t be ran in a normal Python interpreter). Create the
file with your favourite editor and add the imports.
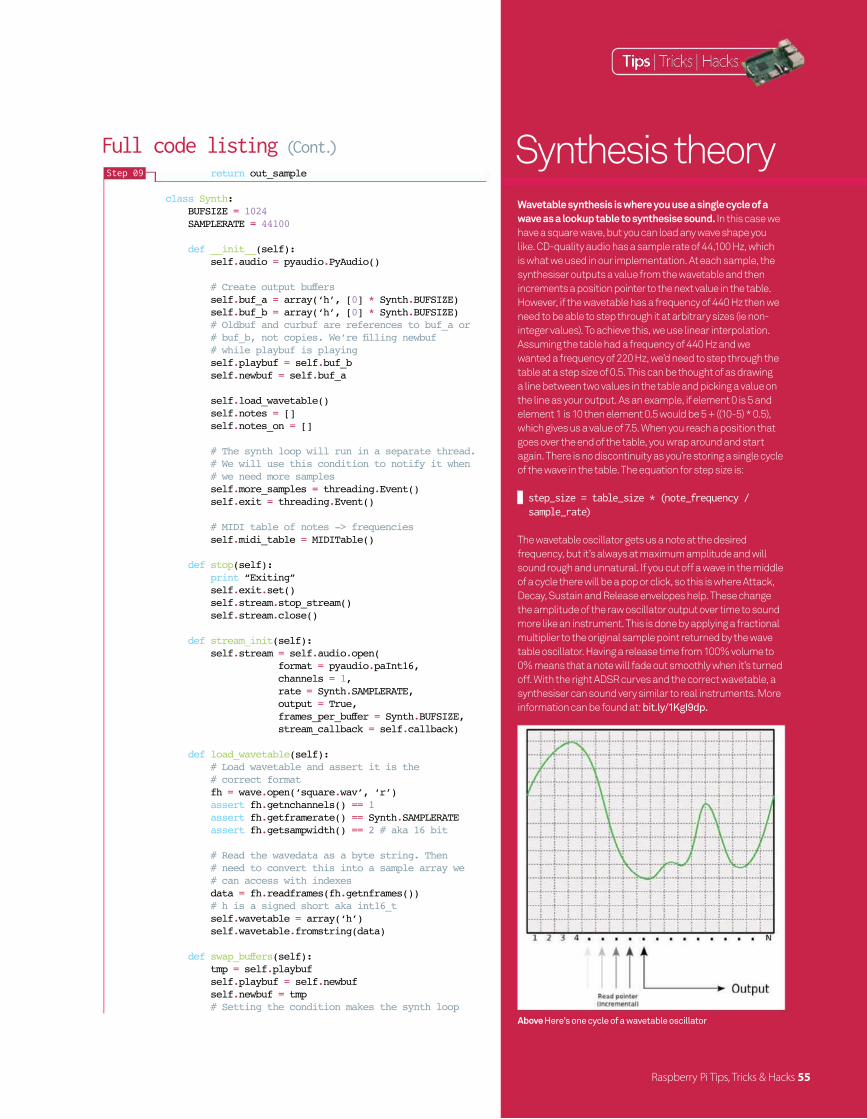
return out_sample
class Synth: BUFSIZE = 1024 SAMPLERATE = 44100
def __init__(self): self.audio = pyaudio.PyAudio()
self.buf_a = array(‘h’, [0] * Synth.BUFSIZE) self.buf_b = array(‘h’, [0] * Synth.BUFSIZE) # Oldbuf and curbuf are references to buf_a or self.playbuf = self.buf_b self. = self.buf_a self. self.notes = [] self.notes_on = []
self.more_samples = . self.exit = .
# MIDI table of notes -> frequencies self.midi_table = MIDITable() def stop(self): print self.exit.set() self.stream.stop_stream() self.stream.close()
def stream_init(self): self.stream = self.audio.open( format = pyaudio.paInt16, channels = 1, rate = Synth.SAMPLERATE, output = True,
= Synth.BUFSIZE, stream_callback = self.callback)
def (self): # correct format fh = .open(‘square. assert fh. == 1 assert fh. == Synth.SAMPLERATE assert fh. == 2 # aka 16 bit
data = fh.readframes(fh. self. = array(‘h’) self. .
def (self): tmp = self.playbuf self.playbuf = self. self. = tmp
Full code listing (Cont.)Step 09
Wavetable synthesis is where you use a single cycle of a wave as a lookup table to synthesise sound. In this case we
have a square wave, but you can load any wave shape you
like. CD-quality audio has a sample rate of 44,100 Hz, which
is what we used in our implementation. At each sample, the
synthesiser outputs a value from the wavetable and then
increments a position pointer to the next value in the table.
However, if the wavetable has a frequency of 440 Hz then we
need to be able to step through it at arbitrary sizes (ie non-
integer values). To achieve this, we use linear interpolation.
Assuming the table had a frequency of 440 Hz and we
wanted a frequency of 220 Hz, we’d need to step through the
table at a step size of 0.5. This can be thought of as drawing
a line between two values in the table and picking a value on
the line as your output. As an example, if element 0 is 5 and
element 1 is 10 then element 0.5 would be 5 + ((10-5) * 0.5),
which gives us a value of 7.5. When you reach a position that
goes over the end of the table, you wrap around and start
again. There is no discontinuity as you’re storing a single cycle
of the wave in the table. The equation for step size is:
step_size = table_size * (note_frequency / sample_rate)
The wavetable oscillator gets us a note at the desired
frequency, but it’s always at maximum amplitude and will
sound rough and unnatural. If you cut off a wave in the middle
of a cycle there will be a pop or click, so this is where Attack,
Decay, Sustain and Release envelopes help. These change
the amplitude of the raw oscillator output over time to sound
more like an instrument. This is done by applying a fractional
multiplier to the original sample point returned by the wave
table oscillator. Having a release time from 100% volume to
0% means that a note will fade out smoothly when it’s turned
off. With the right ADSR curves and the correct wavetable, a
synthesiser can sound very similar to real instruments. More
information can be found at: bit.ly/1KgI9dp.
Synthesis theory
Above Here’s one cycle of a wavetable oscillator
Raspberry Pi Tips, Tricks & Hacks 55

Tips | Tricks | Hacks
# generate more samples self.more_samples.set()
def callback(self, in_data, frame_count, time_info, status): # Audio card needs more samples so swap the self. return (self. .tostring(),
.paContinue)
def do_sample(self, int i): cdef int out_sample = 0 # Go through each note and let it add to the for note in self.notes: if note. self.notes. else: out_sample += note.next_sample() >> 3
self.newbuf[i] = out_sample
def (self): cdef int i while self.exit.is_set() == False: # For each sample we need to generate for i in range(0 .BUFSIZE): self.do_sample(i)
# samples self.more_samples.clear() self.more_samples.wait()
def start(self): self.stream_init() t = threading.Thread(target=self. t.start()
def freq_on n = Note(self. .SAMPLERATE, freq) print n self.notes.append(n)
def # Set the ADSR state to release for n in self.notes: if n.freq == freq: n.adsr.state =
def note_on(self, n): self.freq_on(self.midi_table.get_note(n)) self.notes_on.append(n)
Full code listing (Cont.)
Step 11
Step 12
Python introduces a number of performance issues compared to a native synthesiser implementation that is written in C or C++. Cython has been used in our
implementation to try and mitigate these issues but it is
nowhere near enough. As a rough comparison, our expert
worked on a synthesis project targeting 100 Mhz ARM
processors that were programmed in C and could get
around 30 notes of polyphony, compared to three in this
implementation on a 900 Mhz ARM core.
A major issue is that the sound card uses 16-bit signed
integers to represent a sample. However, Python doesn’t
natively support this type. To pass the data to the audio
library it needs to be encoded from an array of integers into
a byte string. Then at the other end, the Python that talks
to the audio library will decode this byte string back into
an integer array. If it was written in C or another lower-level
language like C++ or Rust, the sample could be passed
almost directly to the audio hardware.
Another issue is that Python has a large function call
overhead. In compiled languages, this can be optimised
out by compiling function calls in line with the caller
(effectively, copying the code from the function into the
caller). Variable access also has overhead because of all
the type checking required. There is also the overhead
of the garbage collector, which destroys
objects when there are no longer
references to them.
Performance issues
A major issue is that the sound card uses 16-bit signed integers to represent a sample. However, Python doesn’t support this type
Tips | Tricks | Hacks
56 Raspberry Pi Tips, Tricks & Hacks
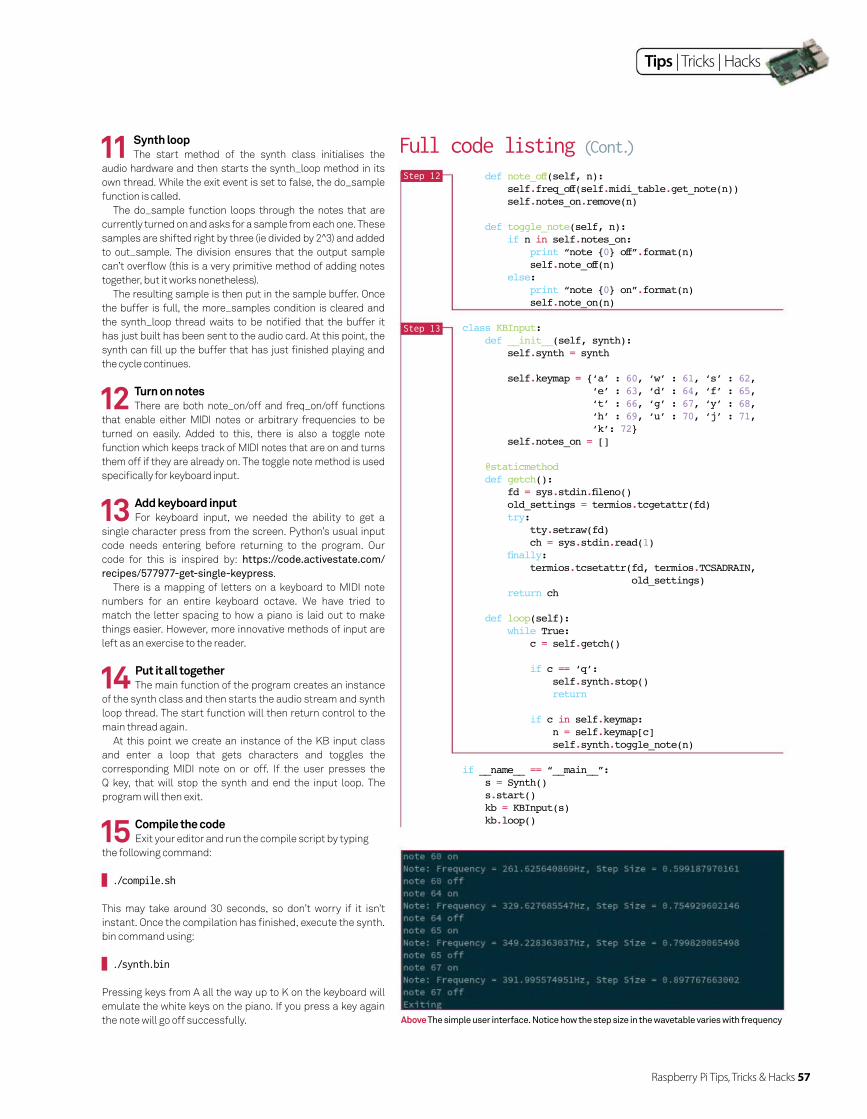
Raspberry Pi Tips, Tricks & Hacks 57
Tips | Tricks | Hacks
Above Here’s one cycle of a wavetable oscillator
def (self, n): self. .midi_table.get_note(n)) self.notes_on.remove(n)
def toggle_note(self, n): if n in self.notes_on: print “note {0 .format(n) self. else: print “note {0 .format(n) self.note_on(n)
class KBInput: def __init__(self, synth): self.synth = synth
self.keymap = {‘a’ : 60, ‘w’ : 61, ‘s’ : 62, ‘e’ : 63, ‘d’ : 64, ‘f’ : 65, ‘t’ : 66, ‘g’ : 67, ‘y’ : 68, ‘h’ : 69, ‘u’ : 70, ‘j’ : 71, ‘k’: 72} self.notes_on = []
@staticmethod def getch(): fd = sys.stdin. old_settings = termios.tcgetattr(fd) try: tty.setraw(fd) ch = sys.stdin.read(1) : termios.tcsetattr(fd, termios.TCSADRAIN, old_settings) return ch
def loop(self): while True: c = self.getch()
if c == ‘q’: self.synth.stop() return
if c in self.keymap: n = self.keymap[c] self.synth.toggle_note(n)
if __name__ == s = Synth() s.start() kb = KBInput(s) kb.loop()
Full code listing (Cont.)Step 12
Step 13
14 Put it all togetherThe main function of the program creates an instance
of the synth class and then starts the audio stream and synth
loop thread. The start function will then return control to the
main thread again.
At this point we create an instance of the KB input class
and enter a loop that gets characters and toggles the
corresponding MIDI note on or off. If the user presses the
Q key, that will stop the synth and end the input loop. The
program will then exit.
15 Compile the codeExit your editor and run the compile script by typing
the following command:
./compile.sh
This may take around 30 seconds, so don’t worry if it isn’t
instant. Once the compilation has fi nished, execute the synth.
bin command using:
./synth.bin
Pressing keys from A all the way up to K on the keyboard will
emulate the white keys on the piano. If you press a key again
the note will go off successfully. Above The simple user interface. Notice how the step size in the wavetable varies with frequency
12 Turn on notesThere are both note_on/off and freq_on/off functions
that enable either MIDI notes or arbitrary frequencies to be
turned on easily. Added to this, there is also a toggle note
function which keeps track of MIDI notes that are on and turns
them off if they are already on. The toggle note method is used
specifi cally for keyboard input.
13 Add keyboard inputFor keyboard input, we needed the ability to get a
single character press from the screen. Python’s usual input
code needs entering before returning to the program. Our
code for this is inspired by: https://code.activestate.com/
recipes/577977-get-single-keypress.
There is a mapping of letters on a keyboard to MIDI note
numbers for an entire keyboard octave. We have tried to
match the letter spacing to how a piano is laid out to make
things easier. However, more innovative methods of input are
left as an exercise to the reader.
11 Synth loopThe start method of the synth class initialises the
audio hardware and then starts the synth_loop method in its
own thread. While the exit event is set to false, the do_sample
function is called.
The do_sample function loops through the notes that are
currently turned on and asks for a sample from each one. These
samples are shifted right by three (ie divided by 2^3) and added
to out_sample. The division ensures that the output sample
can’t overfl ow (this is a very primitive method of adding notes
together, but it works nonetheless).
The resulting sample is then put in the sample buffer. Once
the buffer is full, the more_samples condition is cleared and
the synth_loop thread waits to be notifi ed that the buffer it
has just built has been sent to the audio card. At this point, the
synth can fi ll up the buffer that has just fi nished playing and
the cycle continues.
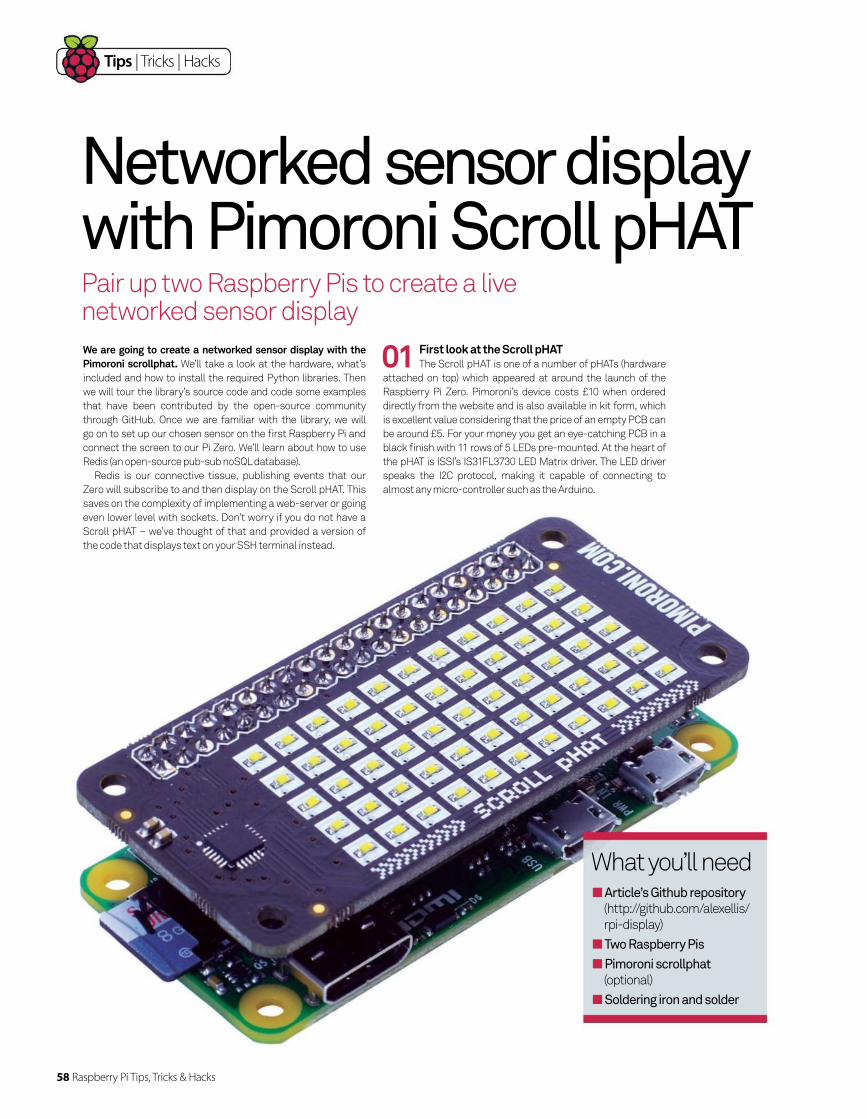
58 Raspberry Pi Tips, Tricks & Hacks
Tips | Tricks | Hacks
Pair up two Raspberry Pis to create a live networked sensor display
Networked sensor display with Pimoroni Scroll pHAT
We are going to create a networked sensor display with the Pimoroni scrollphat. We’ll take a look at the hardware, what’s
included and how to install the required Python libraries. Then
we will tour the library’s source code and code some examples
that have been contributed by the open-source community
through GitHub. Once we are familiar with the library, we will
go on to set up our chosen sensor on the fi rst Raspberry Pi and
connect the screen to our Pi Zero. We’ll learn about how to use
Redis (an open-source pub-sub noSQL database).
Redis is our connective tissue, publishing events that our
Zero will subscribe to and then display on the Scroll pHAT. This
saves on the complexity of implementing a web-server or going
even lower level with sockets. Don’t worry if you do not have a
Scroll pHAT – we’ve thought of that and provided a version of
the code that displays text on your SSH terminal instead.
01 First look at the Scroll pHATThe Scroll pHAT is one of a number of pHATs (hardware
attached on top) which appeared at around the launch of the
Raspberry Pi Zero. Pimoroni’s device costs £10 when ordered
directly from the website and is also available in kit form, which
is excellent value considering that the price of an empty PCB can
be around £5. For your money you get an eye-catching PCB in a
black fi nish with 11 rows of 5 LEDs pre-mounted. At the heart of
the pHAT is ISSI’s IS31FL3730 LED Matrix driver. The LED driver
speaks the I2C protocol, making it capable of connecting to
almost any micro-controller such as the Arduino.
What you’ll need Article’s Github repository
(http://github.com/alexellis/
rpi-display)
Two Raspberry Pis
Pimoroni scrollphat
(optional)
Soldering iron and solder
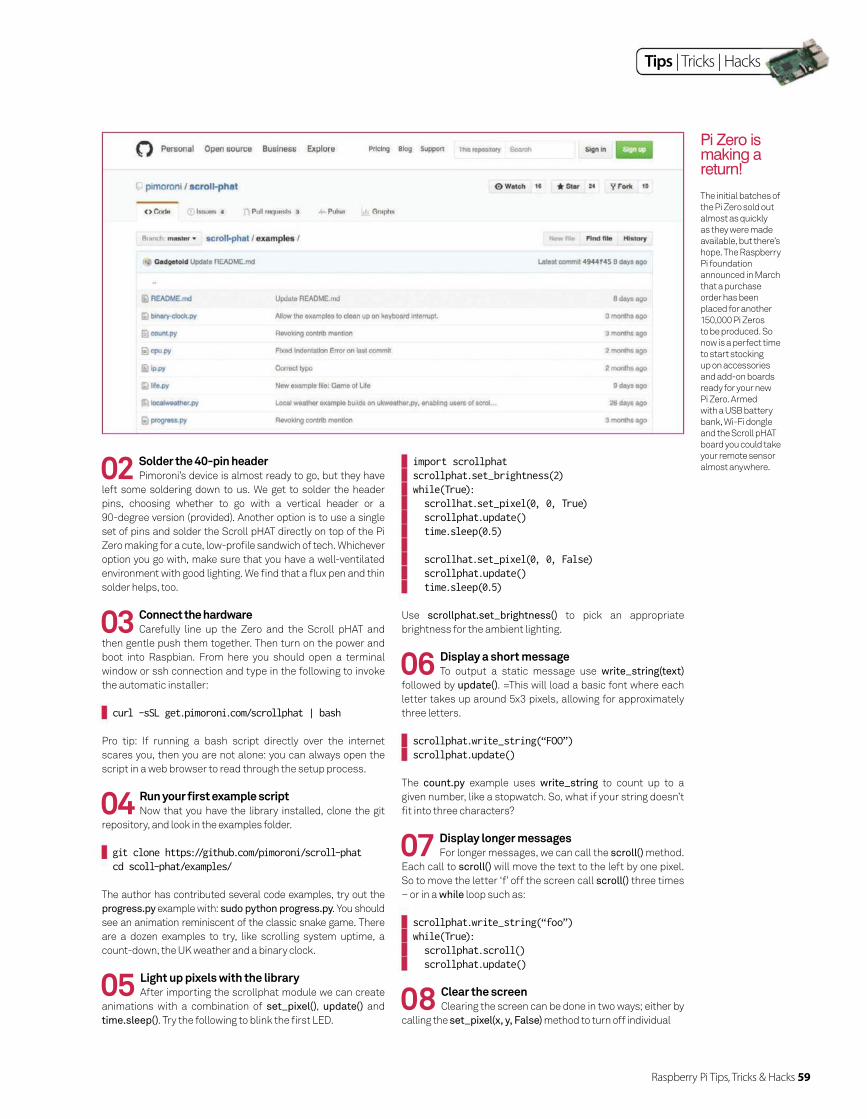
Raspberry Pi Tips, Tricks & Hacks 59
Tips | Tricks | Hacks
02 Solder the 40-pin headerPimoroni’s device is almost ready to go, but they have
left some soldering down to us. We get to solder the header
pins, choosing whether to go with a vertical header or a
90-degree version (provided). Another option is to use a single
set of pins and solder the Scroll pHAT directly on top of the Pi
Zero making for a cute, low-profi le sandwich of tech. Whichever
option you go with, make sure that you have a well-ventilated
environment with good lighting. We fi nd that a fl ux pen and thin
solder helps, too.
03 Connect the hardwareCarefully line up the Zero and the Scroll pHAT and
then gentle push them together. Then turn on the power and
boot into Raspbian. From here you should open a terminal
window or ssh connection and type in the following to invoke
the automatic installer:
curl -sSL get.pimoroni.com/scrollphat | bash
Pro tip: If running a bash script directly over the internet
scares you, then you are not alone: you can always open the
script in a web browser to read through the setup process.
04 Run your fi rst example scriptNow that you have the library installed, clone the git
repository, and look in the examples folder.
git clone https://github.com/pimoroni/scroll-phat cd scoll-phat/examples/
The author has contributed several code examples, try out the
progress.py example with: sudo python progress.py. You should
see an animation reminiscent of the classic snake game. There
are a dozen examples to try, like scrolling system uptime, a
count-down, the UK weather and a binary clock.
05 Light up pixels with the libraryAfter importing the scrollphat module we can create
animations with a combination of set_pixel(), update() and
time.sleep(). Try the following to blink the fi rst LED.
The initial batches of
the Pi Zero sold out
almost as quickly
as they were made
available, but there’s
hope. The Raspberry
Pi foundation
announced in March
that a purchase
order has been
placed for another
150,000 Pi Zeros
to be produced. So
now is a perfect time
to start stocking
up on accessories
and add-on boards
ready for your new
Pi Zero. Armed
with a USB battery
bank, Wi-Fi dongle
and the Scroll pHAT
board you could take
your remote sensor
almost anywhere.
Pi Zero is making a return!
import scrollphat scrollphat.set_brightness(2) while(True): scrollhat.set_pixel(0, 0, True) scrollphat.update() time.sleep(0.5) scrollhat.set_pixel(0, 0, False) scrollphat.update() time.sleep(0.5)
Use scrollphat.set_brightness() to pick an appropriate
brightness for the ambient lighting.
06 Display a short messageTo output a static message use write_string(text)
followed by update(). =This will load a basic font where each
letter takes up around 5x3 pixels, allowing for approximately
three letters.
scrollphat.write_string(“FOO”) scrollphat.update()
The count.py example uses write_string to count up to a
given number, like a stopwatch. So, what if your string doesn’t
fi t into three characters?
07 Display longer messagesFor longer messages, we can call the scroll() method.
Each call to scroll() will move the text to the left by one pixel.
So to move the letter ‘f’ off the screen call scroll() three times
– or in a while loop such as:
scrollphat.write_string(“foo”) while(True): scrollphat.scroll() scrollphat.update()
08 Clear the screenClearing the screen can be done in two ways; either by
calling the set_pixel(x, y, False) method to turn off individual
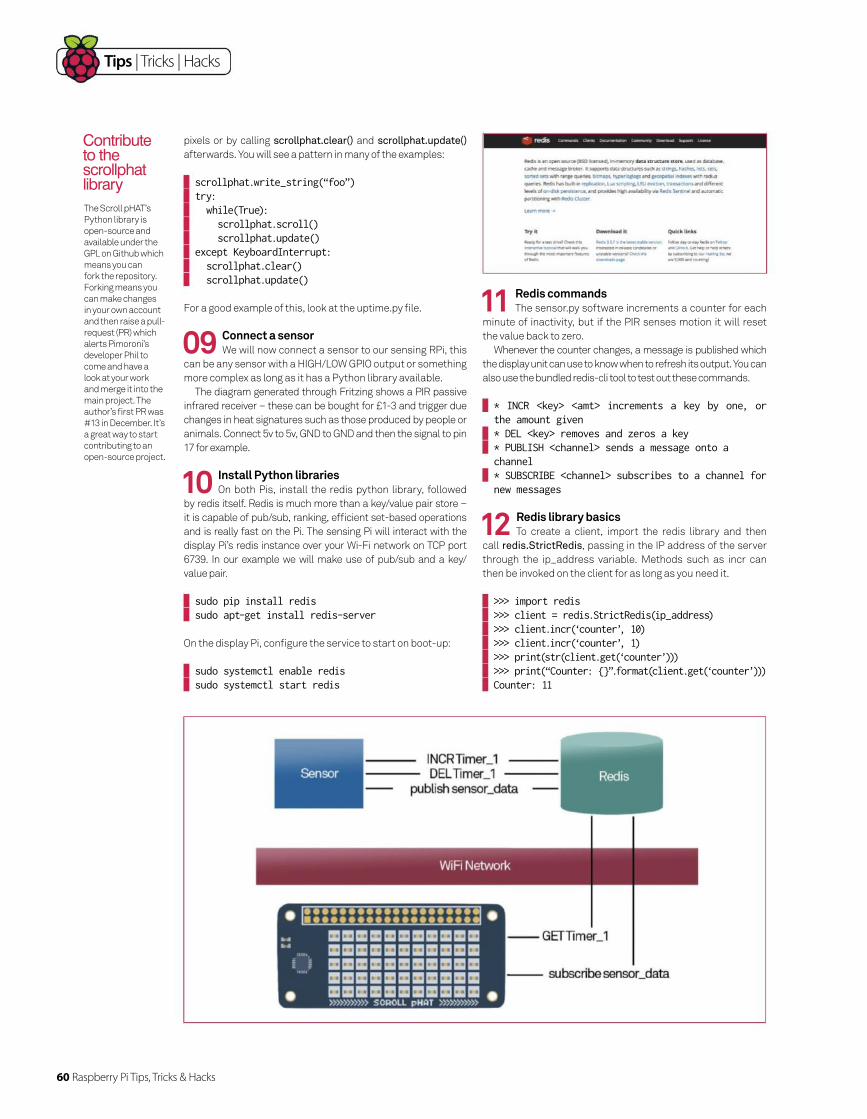
60 Raspberry Pi Tips, Tricks & Hacks
Tips | Tricks | Hacks
The Scroll pHAT’s
Python library is
open-source and
available under the
GPL on Github which
means you can
fork the repository.
Forking means you
can make changes
in your own account
and then raise a pull-
request (PR) which
alerts Pimoroni’s
developer Phil to
come and have a
look at your work
and merge it into the
main project. The
author’s fi rst PR was
#13 in December. It’s
a great way to start
contributing to an
open-source project.
Contribute to the scrollphat library
pixels or by calling scrollphat.clear() and scrollphat.update()
afterwards. You will see a pattern in many of the examples:
scrollphat.write_string(“foo”) try: while(True): scrollphat.scroll() scrollphat.update() except KeyboardInterrupt: scrollphat.clear() scrollphat.update()
For a good example of this, look at the uptime.py fi le.
09 Connect a sensorWe will now connect a sensor to our sensing RPi, this
can be any sensor with a HIGH/LOW GPIO output or something
more complex as long as it has a Python library available.
The diagram generated through Fritzing shows a PIR passive
infrared receiver – these can be bought for £1-3 and trigger due
changes in heat signatures such as those produced by people or
animals. Connect 5v to 5v, GND to GND and then the signal to pin
17 for example.
10 Install Python librariesOn both Pis, install the redis python library, followed
by redis itself. Redis is much more than a key/value pair store –
it is capable of pub/sub, ranking, effi cient set-based operations
and is really fast on the Pi. The sensing Pi will interact with the
display Pi’s redis instance over your Wi-Fi network on TCP port
6739. In our example we will make use of pub/sub and a key/
value pair.
sudo pip install redis sudo apt-get install redis-server
On the display Pi, confi gure the service to start on boot-up:
sudo systemctl enable redis sudo systemctl start redis
11 Redis commandsThe sensor.py software increments a counter for each
minute of inactivity, but if the PIR senses motion it will reset
the value back to zero.
Whenever the counter changes, a message is published which
the display unit can use to know when to refresh its output. You can
also use the bundled redis-cli tool to test out these commands.
* INCR <key> <amt> increments a key by one, or the amount given
* DEL <key> removes and zeros a key * PUBLISH <channel> sends a message onto a channel
* SUBSCRIBE <channel> subscribes to a channel for new messages
12 Redis library basicsTo create a client, import the redis library and then
call redis.StrictRedis, passing in the IP address of the server
through the ip_address variable. Methods such as incr can
then be invoked on the client for as long as you need it.
>>> import redis >>> client = redis.StrictRedis(ip_address) >>> client.incr(‘counter’, 10) >>> client.incr(‘counter’, 1) >>> print(str(client.get(‘counter’))) >>> print(“Counter: {}”.format(client.get(‘counter’))) Counter: 11
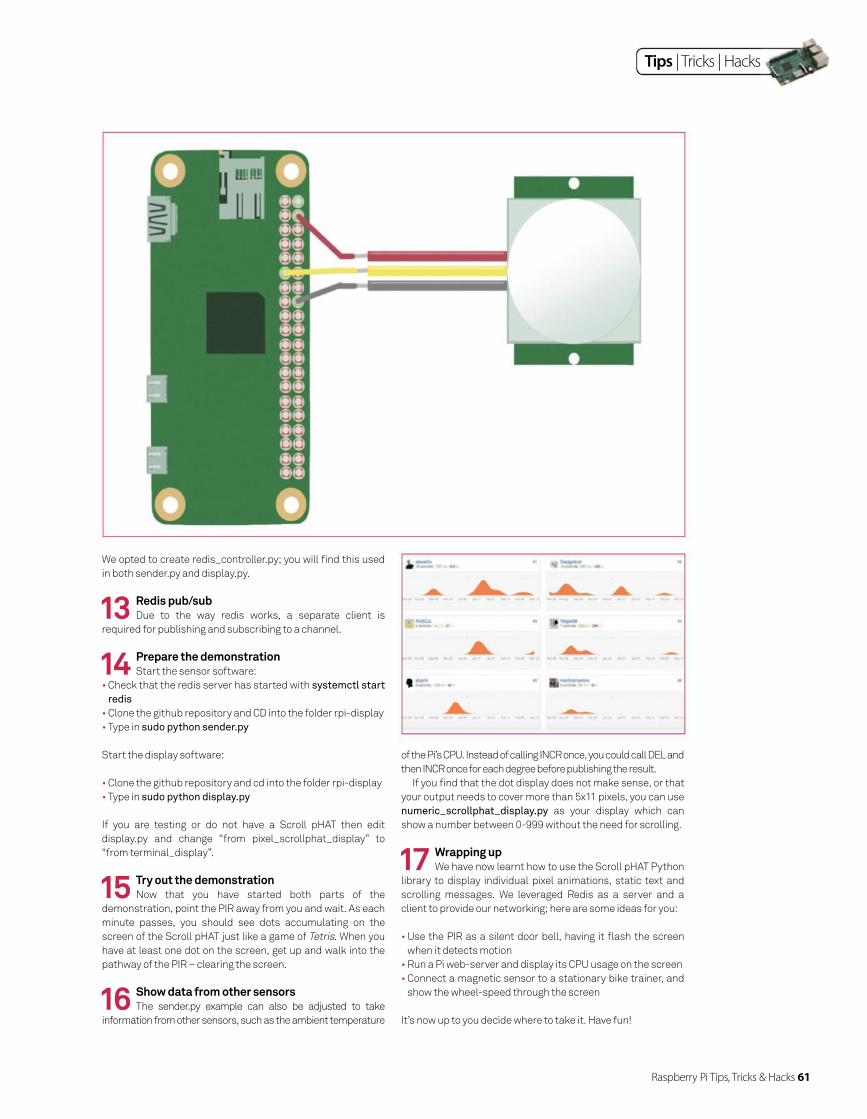
Raspberry Pi Tips, Tricks & Hacks 61
Tips | Tricks | Hacks
We opted to create redis_controller.py; you will fi nd this used
in both sender.py and display.py.
13 Redis pub/subDue to the way redis works, a separate client is
required for publishing and subscribing to a channel.
14 Prepare the demonstrationStart the sensor software:
• Check that the redis server has started with systemctl start
redis
• Clone the github repository and CD into the folder rpi-display
• Type in sudo python sender.py
Start the display software:
• Clone the github repository and cd into the folder rpi-display
• Type in sudo python display.py
If you are testing or do not have a Scroll pHAT then edit
display.py and change “from pixel_scrollphat_display” to
“from terminal_display”.
15 Try out the demonstrationNow that you have started both parts of the
demonstration, point the PIR away from you and wait. As each
minute passes, you should see dots accumulating on the
screen of the Scroll pHAT just like a game of Tetris. When you
have at least one dot on the screen, get up and walk into the
pathway of the PIR – clearing the screen.
16 Show data from other sensorsThe sender.py example can also be adjusted to take
information from other sensors, such as the ambient temperature
of the Pi’s CPU. Instead of calling INCR once, you could call DEL and
then INCR once for each degree before publishing the result.
If you fi nd that the dot display does not make sense, or that
your output needs to cover more than 5x11 pixels, you can use
numeric_scrollphat_display.py as your display which can
show a number between 0-999 without the need for scrolling.
17 Wrapping upWe have now learnt how to use the Scroll pHAT Python
library to display individual pixel animations, static text and
scrolling messages. We leveraged Redis as a server and a
client to provide our networking; here are some ideas for you:
• Use the PIR as a silent door bell, having it fl ash the screen
when it detects motion
• Run a Pi web-server and display its CPU usage on the screen
• Connect a magnetic sensor to a stationary bike trainer, and
show the wheel-speed through the screen
It’s now up to you decide where to take it. Have fun!

TricksThere are all sorts of electronic gadgets lying around your home which can be brought back to life with a little bit of effort – take old videogame controllers for instance
64 Xbox arcade with a Pi Zero• Use an old Xbox controller
• Play retro games on a Pi
• Learn soldering and assembling skills
• Recycle household items
64

Raspberry Pi Tips, Tricks & Hacks 63
72 Zero-Powered Wearable
76 Build a Raspberry-Pi Minecraft console
82 Create a Minecraft Minesweeper game
86 Control lights with your Pi
90 Stream internet TV to your
Raspberry Pi
92 Underwater drone
94 Anonymise your web traffic with a Pit
Tor router
98 Create your own circuit diagrams
with Fritzing
102 Make a Pi 2 desktop PC
106 Set up a multi-room
sound system
Tor router
76 Build a Raspberry-Pi Minecraft console
86 Control lights with your Pi
sound system
console
game
console
Zero-Powered Wearable
Build a Raspberry-Pi Minecraft
Create a Minecraft Minesweeper
Control lights with your Pi
Stream internet TV to your
Anonymise your web traffic with a Pit
Create your own circuit diagrams
Make a Pi 2 desktop PC
Set up a multi-room
Build a Raspberry-Pi Minecraft
Control lights with your Pi
Build a Raspberry-Pi Minecraft
Create a Minecraft Minesweeper
Anonymise your web traffic with a Pit
Create your own circuit diagrams
Build a Raspberry-Pi Minecraft
Zero-Powered Wearable
Build a Raspberry-Pi Minecraft
Create a Minecraft Minesweeper
Control lights with your Pi
Stream internet TV to your
Underwater drone
Anonymise your web traffic with a Pit
Tor router
Create your own circuit diagrams
102
106
Tor router
Build a Raspberry-Pi Minecraft
Control lights with your Pi
Zero-Powered Wearable
Build a Raspberry-Pi Minecraft
Create a Minecraft Minesweeper
Control lights with your Pi
Stream internet TV to your
Raspberry Pi
Underwater drone
Anonymise your web traffic with a Pit
Tor router
Create your own circuit diagrams
with Fritzing
Make a Pi 2 desktop PC
Set up a multi-room
sound system
Tor router
Build a Raspberry-Pi Minecraft
Control lights with your Pi
sound system
Raspberry Pi Tips, Tricks & Hacks Raspberry Pi Tips, Tricks & Hacks
Control the ambience
Draw circuit diagrams
Play Minecraft
on a Pi
Minecraft means many things to many people, and to Pi users it’s supposed to mean education. Not everyone knows you can still have fun and play it as you normally would
9886
76

Tips | Tricks | Hacks
64 Raspberry Pi Tips, Tricks & Hacks

Tips | Tricks | Hacks
Make a self-contained arcade machine out of old bits of kit, a spare Xbox pad and a Pi Zero!
Create your own Xbox Zero arcade
The Raspberry Pi Zero is tiny, ridiculously tiny. It’s a wonderful,
impressive piece of tech, but we can’t help wondering – because
we’re terribly serious adults, honestly – where can we stuff the
Zero for maximum fun? It’s small enough to be hidden in a variety
of household objects in order to enhance their capabilities.
Whatever you can fi nd to fi t it in, you can turn into some
kind of smart machine. Okay, wiring it in to your vacuum
cleaner in the hope of making an ersatz Roomba is
probably a little tricky – but there are all sorts of
electronic gadgets lying around your home
which can be brought back to life with
a little bit of effort. Take old game
controllers. If you’re anything
like us you’ve probably got
a couple of boxes full
of old computer
equipment
you just
can’t bear to throw away – an Atari Jaguar
that hasn’t been touched since the 90s,
a Sega Dreamcast which you’re sure
you’ll plug in again one day, an old Xbox
that lies languishing since you picked up
something bigger and better. Turns out it
actually was useful to keep them around
– it’s time to bring these old systems back
to life!
We’re going to show you how to gut an
old videogames controller, replace its
innards with a Raspberry Pi Zero, and
then load it up with a treasure trove of
retro games. From start to fi nish, this
project should take you under an hour to
complete – and then you’ll be able to load
up the ROMs you legally own on your new
console and enjoy them from the comfort
of your sofa.
Raspberry Pi Tips, Tricks & Hacks 65

66 Raspberry Pi Tips, Tricks & Hacks
Tips | Tricks | Hacks
When taking apart
electronics, keep
a few small bowls
or containers
nearby. Put each
type of screw in
its own separate
container so you
don’t accidentally
mix them up. With
the Xbox controllers,
you’ll fi nd that the
buttons especially
have a habit of
rolling away from
you, so stash them
somewhere safe
as well. Keep track
of any random bits
of plastic or rubber
which may be useful
in re-assembling.
Lots of little bits
Wire cutters
Craft knife
Isopropyl alcohol swabs
BluTak
Micro SD card
Original Xbox controller
Cross-head screwdriver
Micro USB-OTG cable
Raspberry Pi Zero
Electrical tape
Mini HDMI cable/adapter
2A micro USB power supply
What you’ll need
01 Gather your equipmentWhile the Zero doesn’t take up much space,
videogame controllers are often stuffed full of delicate
electronics. The trick here is to fi nd a games controller which
has enough space inside for the Zero. We’re going to be using
the original Xbox controller, nicknamed The Duke. If you don’t
have one to hand, they can be picked up for a couple of quid
from most second-hand electronics shops.
If you can’t fi nd one, you can use newer USB game pads
that are designed to look like controllers for classic systems
like the SNES and Mega Drive. Make sure you choose a
controller that has enough buttons for the games you want to
play – some classic fi ghting games, for example, really can’t
be played on a two-button NES controller!
02 Warning!Working with electrical items and sharp objects can
be dangerous. You risk damaging yourself or, worse, breaking
your toys. Please ensure everything is unplugged from
electrical supplies before attempting this project. As with any
electronics projects, you should also take care to fully ground
yourself before playing around with sensitive components –
the static electricity from your body can ruin them. Anti-static
wrist straps or a few taps on a radiator should do the trick.
03 The buildSee the image to the right – this is the controller we’ll
be working with. It has dual joysticks, six buttons, a D-Pad and
two triggers – it’s compatible with most retro games systems.
04 FittingIf you’re using a different controller, double-check
STEP
05
STEP
06
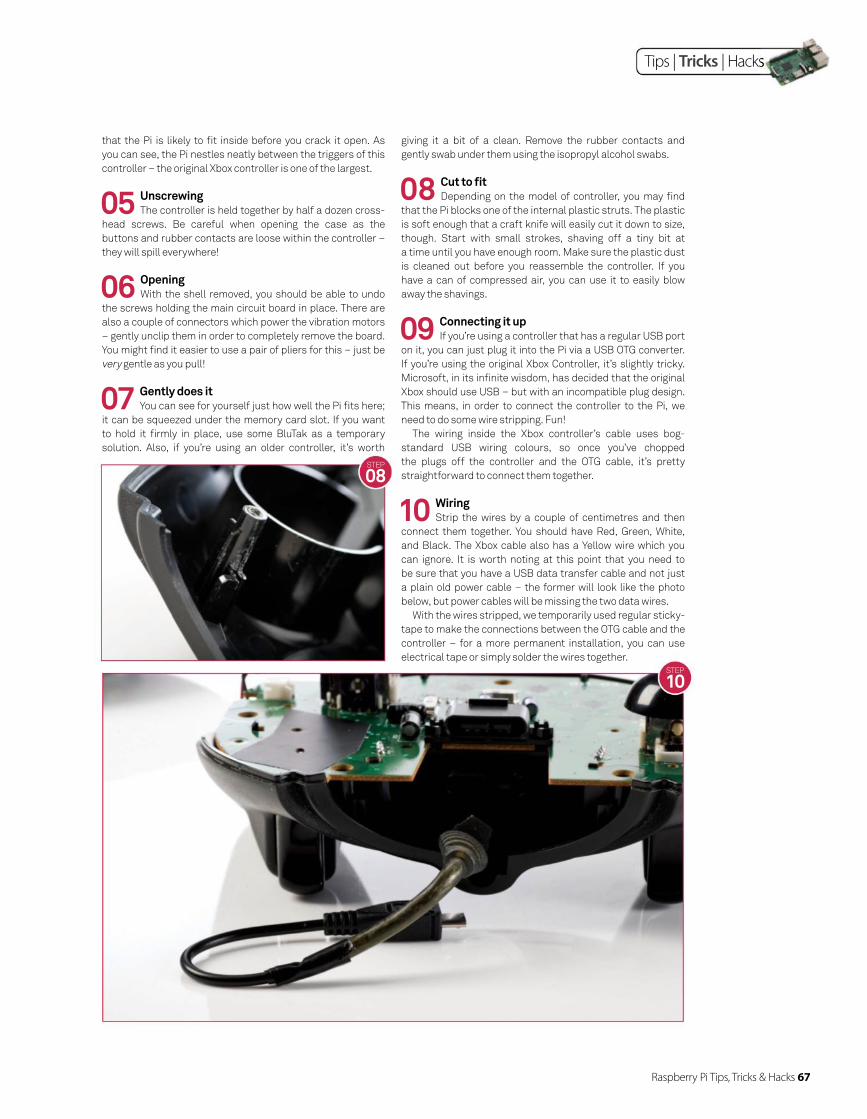
Raspberry Pi Tips, Tricks & Hacks 67
Tips | Tricks | Hacks
that the Pi is likely to fi t inside before you crack it open. As
you can see, the Pi nestles neatly between the triggers of this
controller – the original Xbox controller is one of the largest.
05 UnscrewingThe controller is held together by half a dozen cross-
head screws. Be careful when opening the case as the
buttons and rubber contacts are loose within the controller –
they will spill everywhere!
06 OpeningWith the shell removed, you should be able to undo
the screws holding the main circuit board in place. There are
also a couple of connectors which power the vibration motors
– gently unclip them in order to completely remove the board.
You might fi nd it easier to use a pair of pliers for this – just be
very gentle as you pull!
07 Gently does itYou can see for yourself just how well the Pi fi ts here;
it can be squeezed under the memory card slot. If you want
to hold it fi rmly in place, use some BluTak as a temporary
solution. Also, if you’re using an older controller, it’s worth
giving it a bit of a clean. Remove the rubber contacts and
gently swab under them using the isopropyl alcohol swabs.
08 Cut to fi tDepending on the model of controller, you may fi nd
that the Pi blocks one of the internal plastic struts. The plastic
is soft enough that a craft knife will easily cut it down to size,
though. Start with small strokes, shaving off a tiny bit at
a time until you have enough room. Make sure the plastic dust
is cleaned out before you reassemble the controller. If you
have a can of compressed air, you can use it to easily blow
away the shavings.
09 Connecting it upIf you’re using a controller that has a regular USB port
on it, you can just plug it into the Pi via a USB OTG converter.
If you’re using the original Xbox Controller, it’s slightly tricky.
Microsoft, in its infi nite wisdom, has decided that the original
Xbox should use USB – but with an incompatible plug design.
This means, in order to connect the controller to the Pi, we
need to do some wire stripping. Fun!
The wiring inside the Xbox controller’s cable uses bog-
standard USB wiring colours, so once you’ve chopped
the plugs off the controller and the OTG cable, it’s pretty
straightforward to connect them together.
10 WiringStrip the wires by a couple of centimetres and then
connect them together. You should have Red, Green, White,
and Black. The Xbox cable also has a Yellow wire which you
can ignore. It is worth noting at this point that you need to
be sure that you have a USB data transfer cable and not just
a plain old power cable – the former will look like the photo
below, but power cables will be missing the two data wires.
With the wires stripped, we temporarily used regular sticky-
tape to make the connections between the OTG cable and the
controller – for a more permanent installation, you can use
electrical tape or simply solder the wires together.
STEP
08
STEP
10

68 Raspberry Pi Tips, Tricks & Hacks
Tips | Tricks | Hacks
11 InsulationOne thing to note: you’ll need to insulate the bottom of the
Pi against all the contacts on the controller. For this quick hack,
we’ve used some of the cardboard packaging – but any non-
conductive material will do.
From there, it’s as simple as screwing the case back together.
Make sure that the controller’s buttons and joysticks don’t slip
out of alignment. Keep track of which coloured buttons go where
and you should be fi ne.
12 Wiring upThe Pi will need three wires connected to it in order to
work. The controller cable needs to be connected to the USB
OTG port. An HDMI cable goes from your TV to the mini HDMI
port on the Pi. Finally, a 2A micro USB power supply needs to be
plugged into the Pi’s power socket. We’ve used a standard mobile
phone charger, but you can use a USB battery pack if you want to
reduce the number of wires trailing around your room.
STEP
12
USB WiringThe older USB 1.0 and 2.0 cables have fewer wires than the newer 3.0 – here’s a quick guide
White This wire is one of two used for differential data signals. This white wire is the positive component and the green wire is the negative one
Red The red wire is one of two handling power. This one is a 5V power line that provides voltage to the circuit
Green The circuit can get the difference between the two data signals rather than between a single wire and ground – it’s a more effective transmission
Black This is the other wire associated with the power – the ground wire, which is the counterpart to the 5V wire
Yellow USB mini/micro cables will also have an additional wire that isn’t required for our particular project

Tips | Tricks | Hacks
13 A word about powerYou might be wondering whether
it’s possible to get the HDMI cable
to supply power from the TV to the
controller. Sadly, the HDMI specifi cation
doesn’t permit power to fl ow in that
direction. If your TV has a USB socket on
it, you could use that to supply the Pi with
power – just make sure the socket itself
is powerful enough. The Pi needs at least
1 Amp, and ideally 2 Amps. Many TVs will
only output 500mA which isn’t enough to
run the Pi.
14 Let’s play!Okay! It’s looking good – you’re
nearly ready to play. The next step is to get
some emulation software on this thing!
Second-hand stores
like CEX or GAME
often have some
older, obsolete
consoles and
accessories out of
public view, as they
aren’t particularly
high-selling these
days. It’s worth
asking the staff what
they have if you can’t
see what you need
on display. Some
charity shops also
have old consoles
for sale. Failing that,
local car boot sales
or simply asking your
gamer friends are
both excellent ways
to grab inexpensive
controllers for all
sorts of consoles.
The right controller
STEP
14
Raspberry Pi Tips, Tricks & Hacks 69
70 Raspberry Pi Tips, Tricks & Hacks
Tips | Tricks | Hacks
Left RetroPie can be restored straight to SD if you don’t need Raspbian as well
Bottom left If you see a splash screen like this when you power on again, the installation worked!
Installing and configuring the RetroPie emulatorWhat good is hardware without software? It’s not as diffi cult as you might think to run retro software through an emulator
Right, you’ve got your Pi safely ensconced in a controller – all you need now are some videogames to play! We’re going
to be using the RetroPie emulator. By the end of this tutorial,
you’ll be able to play games directly from your Raspberry Pi,
provided that you legally own the ROM fi les. It’s as easy as
installing the software onto your SD card and then copying
across any games that you want to play. If you’ve already
got Raspian installed on your Pi, you can install RetroPie
alongside it – or you can dedicate the whole disk to the
software.
01 Install RetroPie inside RaspbianIf you’ve already started using your Pi and want to add
RetroPie to it, you’ll need to install the software from GitHub.
The latest instructions can be found at github.com/RetroPie/
RetroPie-Setup.
Open up a terminal on your Pi (for example, by SSHing into
it from another machine, or by logging in directly to the Pi).
Update your repositories and make sure the latest version of
the Git software is installed:
sudo apt-get update sudo apt-get upgrade sudo apt-get install git
Download the latest version of the RetroPie setup script:
git clone --depth=1 https://github.com/RetroPie/RetroPie-Setup.git
If you’re security-conscious, it’s a good idea to check what
the script does before running it. Once you’re ready, you can
install it by changing into the correct directory and executing
the script:
cd RetroPie-Setup sudo ./retropie_setup.sh
The script will take several minutes to run, depending on the
speed of your internet connection. It may ask you for permission
to install extra software that is needed – you should allow this.
Once fully installed, you will need to reboot your Pi:
sudo reboot
RetroPie can now be run by typing emulationstation. We’ll come
on to configuring your setup in just a moment.
02 Install RetroPie onto a blank SD cardIf you want your Raspberry Pi Zero to be used solely as
a RetroPie machine, this is the choice for you. Be warned: it will
completely wipe a micro SD card, so if you’re using one you’ve used
before, make sure you back up any important data before starting.
Download the latest version of the software from
http://blog.petrockblock.com/retropie/retropie-downloads.
Make sure you download the correct SD card image for your
machine – the image for the Raspberry Pi 2 is not compatible with
the Raspberry Pi Zero. Download the Standard version (not the
BerryBoot version). The download is an 800MB .gz file. Unzip it and
extract the .img file, which will be around 2.6GB. You’ll now need
to write this image file onto your micro SD card. This is done in the
same way that you would install a normal Raspberry Pi image onto
a card. There are slightly different instructions for Linux, Mac as
well as Windows.
03 LinuxUse the Disk Manager to select the image file and the
micro SD card. Follow the on-screen instructions until the image
has been fully written to the card.
04 MacDownload the ApplePi Baker from www.tweaking4all.
com/hardware/raspberry-pi/macosx-apple-pi-baker. Once it is
installed, you can select the image file and the micro SD card.
Follow the on-screen instructions.
An emulator is
software which
lets your computer
pretend to be a
different sort of
computer. It will
allow a Raspberry
Pi Zero to run
software originally
designed for the
Sega Mega Drive,
or Nintendo N64,
old DOS-based
PCs, etc. Emulators
aren’t without their
problems, though –
it’s nearly impossible
to perfectly recreate
a games console
in software. Keep
in mind that older
games may have
bugs ranging from
minor sound and
graphical glitches to
full-blown crashes.
What is an emulator?

Tips | Tricks | Hacks
05 WindowsDownload the Win32 DiskImager from http://
sourceforge.net/projects/win32diskimager. Once installed,
you can select the image fi le and the micro SD card. Follow
the on-screen instructions until the image has been fully
written to the card.
06 Confi guringRight – you’re almost ready to play. Put the micro SD
card into the Raspberry Pi Zero, hook up the controller USB
cable and the HDMI cable. Finally, plug the Pi into the power. It
should boot up automatically and, after a few seconds, you’ll
be greeted with a confi guration screen.
RetroPie should automatically detect any connected USB
game pads and step you through setting up the buttons. Once
you’ve fi nished, you’ll be presented with a screen showing all
the choices you made.
07 Set up the diskBefore we get to playing any games, we need to make
sure that RetroPie is able to use all the space on the micro
SD card. This will allow you to store ROMs and save your
games. Select “RetroPie” from the menu. You’ll be presented
with several confi guration options. Select “Raspberry Pi
Confi guration Tool RASPI-CONFIG”
You can come back here later if you want to change
the default username and password; for now just use the
controller to select “Expand Filesystem”. Once highlighted,
press right until the “Select” button is highlight. Click on it.
After a short delay, you will see a success screen – press
OK and you’ll be taken back to the confi guration screen. Press
right until “Finish” is highlighted, then click on it. You should
now reboot your Raspberry Pi.
08 Adding ROMsThe fi nal step is adding new ROMs. Once you’ve
legally purchased and downloaded ROMs from the internet,
you’ll need to copy them onto the micro SD card.
ROMs are stored in a separate folder for each system. So,
for example, you need to place your Sega Master System
ROMs in ~/RetroPie/roms/mastersystem/. Once you’ve
installed ROMs, the systems will appear in the main menu.
You’re now ready to play!
09 PlayingOnce booted, you’ll see a menu with all the available
games systems on it. Some emulators will only show up once
game ROMs for that system are installed. Scroll until you fi nd
the game you want to play – then let rip!
You can always return back to RetroPie if you want to
change any of the confi guration options, or update the
software. And that’s all there is to it! Time to sit back and play
some games. If you want to fi nd out more about the RetroPie
software, visit http://blog.petrockblock.com/retropie.
Many older games
have, effectively,
been abandoned.
The original
publishers are
defunct and it’s not
clear legally who
owns the rights.
There are several
sites which claim
to have permission
from the original
creators to distribute
their games – but it’s
not always easy to
tell how legitimate
they are. You should
ensure that you
either buy legitimate
copies or download
from organisations
with the legal right to
distribute them.
Where do I get ROMs?
Emulationon RaspberryPi, Pi 2 & Pi 3
bit.ly/24poLHd

Tips | Tricks | Hacks
Harness the Twitter API to trigger displays in an LED-laden piece of clothing when set tweets are received
Make an interactive, Zero-powered wearable
Wearable tech is an ever-growing industry, bursting with smart watches, fitness gadgets and pulse-rate necklaces. For many, this technology is nothing new; enthusiasts have long
created their own wearable versions. Clothes that light up on
contact, masks that change voices and weapons that glow! In
this tutorial you will use your old Christmas LED lights, Python
and the Pi Zero to modify a hat that lights up when you receive a
specifi c tweet from your timeline. The Pi Zero is the perfect size
and can be embedded into the clothing. You can customise the
project for your own wearable tech, perhaps shoes that light up
or a pair of gloves or a jumper that responds to the weather.
01 Sign up for Twitter API keysTo interact with Twitter, you fi rst require consumer and
authorisation keys which are available from the Twitter API site.
If you already have these, you can jump to Step 04, but if not we’ll
take you through it all here. Head over to https://apps.twitter.
com sign in with your regular Twitter username and password.
Select the ‘create a new app’ button. Fill in the details for your
app as required, then tick and confi rm that you accept the
terms and conditions.
What you’ll need Pi Zero
USB portable power supply
USB Wi-Fi dongle
Micro USB convertor
Hat or other clothing of
your choice
Old LED Christmas lights
Left You can adapt this setup to any kind of clothing, which is awesome for cosplay
Full code
FileSilo.co.uk
/bks-B38
72 Raspberry Pi Tips, Tricks & Hacks

Raspberry Pi Tips, Tricks & Hacks 73
Tips | Tricks | Hacks
02 Permission settings On completion of this, you will be taken to the app
overview page. Here you need to select the ‘Access Level
Permission’ for your app. (This may require you to register a
mobile phone number, which is completed in your regular Twitter
account settings page.) There are three permission settings:
Read: This reads tweets from your timeline.
Read and write: This enables you to read tweets and write/send
tweets back to your timeline.
Read, write, direct: This permission setting permits you to send
and access your direct messages from your timeline.
For these sorts of projects, you will need to set the permission to
‘Read and write’.
03 API keysNow set up your ‘keys’. These are the codes that are
used to access your Twitter account via Python. Click the
‘Keys and access token’ page. You will be presented with your
consumer key and consumer secret. Copy these down as they
are required in step seven.
At the bottom of the page is the ‘access tokens’ that are
generated. Simply press the button and this will generate them.
Again, note these down for use in Step 07. Each time you press
the button, a new set of keys will be created; this is useful if they
become compromised.
05 SSH into the Pi ZeroNow the Wi-Fi is operational, download and install
an SSH client such as Putty onto your laptop. Run Putty, enter
the IP address of your Pi Zero (usually you can use the default
name raspberrypi). Enter your user name and password when
prompted and you will be presented with the terminal window.
This can be used to write code, run code and set up the project.
04 Set up the Wi-FiThe Pi Zero is the perfect size for embedding into
projects and hacks. When using it within clothing it is unlikely
that you will have a display or screen. A simple method to access
your Pi is via SSH (secure shell) – this requires Wi-Fi access. An
easy way to set this up is to hook up the Pi Zero to a monitor, boot
it up, select the Wi-Fi icon in the top-right corner and enter in
your pre-shared WEP key. Save the settings and each time your
Pi Zero starts up, it will attempt to connect to this Network.
The Pi Zero can be
tethered to a mobile
phone to ensure
that the Hat is
mobile-interactive
when out and
about. To maintain
the connection,
it is advisable to
disable the Wi-Fi
management.
To set this up type:
sudo nano /etc/
network/interfaces
Then add the line:
wireless-power off
Save the fi le and
reboot the Pi.
Tethering the Zero
Left We’ll need to register our application with Twitter in order to use it in our hat
06 Install TweepyYou have now registered your Twitter app, acquired the
consumer keys and tokens, and have access to your Pi. The next
step is to download Tweepy, the Python Twitter API. In the LX
Terminal type:
sudo apt-get install python-setuptools sudo easy_install tweepy
… or…
sudo pip install tweepy
Reboot your Pi Zero typing, sudo reboot. You will then need to
SSH in again. You can now use Python code to interact with your
Twitter feed.
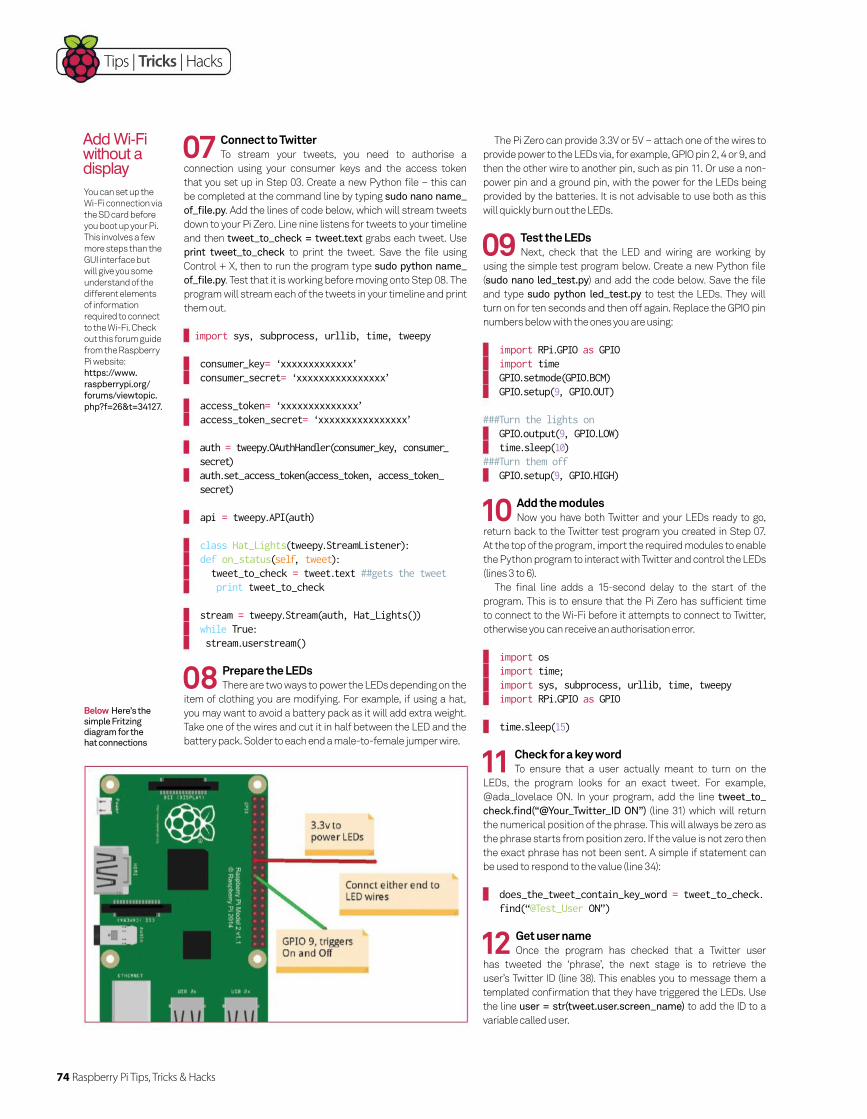
74 Raspberry Pi Tips, Tricks & Hacks
Tips | Tricks | Hacks
10 Add the modules Now you have both Twitter and your LEDs ready to go,
return back to the Twitter test program you created in Step 07.
At the top of the program, import the required modules to enable
the Python program to interact with Twitter and control the LEDs
(lines 3 to 6).
The final line adds a 15-second delay to the start of the
program. This is to ensure that the Pi Zero has sufficient time
to connect to the Wi-Fi before it attempts to connect to Twitter,
otherwise you can receive an authorisation error.
import os import time; import sys, subprocess, urllib, time, tweepy import RPi.GPIO as GPIO
time.sleep(15)
11 Check for a key wordTo ensure that a user actually meant to turn on the
LEDs, the program looks for an exact tweet. For example,
@ada_lovelace ON. In your program, add the line tweet_to_
check.find(“@Your_Twitter_ID ON”) (line 31) which will return
the numerical position of the phrase. This will always be zero as
the phrase starts from position zero. If the value is not zero then
the exact phrase has not been sent. A simple if statement can
be used to respond to the value (line 34):
does_the_tweet_contain_key_word = tweet_to_check.find(“@Test_User ON”)
You can set up the
Wi-Fi connection via
the SD card before
you boot up your Pi.
This involves a few
more steps than the
GUI interface but
will give you some
understand of the
different elements
of information
required to connect
to the Wi-Fi. Check
out this forum guide
from the Raspberry
Pi website:
https://www.
raspberrypi.org/
forums/viewtopic.
php?f=26&t=34127.
Add Wi-Fi without a display
12 Get user nameOnce the program has checked that a Twitter user
has tweeted the ‘phrase’, the next stage is to retrieve the
user’s Twitter ID (line 38). This enables you to message them a
templated confirmation that they have triggered the LEDs. Use
the line user = str(tweet.user.screen_name) to add the ID to a
variable called user.
08 Prepare the LEDsThere are two ways to power the LEDs depending on the
item of clothing you are modifying. For example, if using a hat,
you may want to avoid a battery pack as it will add extra weight.
Take one of the wires and cut it in half between the LED and the
battery pack. Solder to each end a male-to-female jumper wire.
09 Test the LEDsNext, check that the LED and wiring are working by
using the simple test program below. Create a new Python file
(sudo nano led_test.py) and add the code below. Save the file
and type sudo python led_test.py to test the LEDs. They will
turn on for ten seconds and then off again. Replace the GPIO pin
numbers below with the ones you are using:
import RPi.GPIO as GPIO import time GPIO.setmode(GPIO.BCM) GPIO.setup(9, GPIO.OUT) ###Turn the lights on GPIO.output(9, GPIO.LOW) time.sleep(10)###Turn them off GPIO.setup(9, GPIO.HIGH)
07 Connect to TwitterTo stream your tweets, you need to authorise a
connection using your consumer keys and the access token
that you set up in Step 03. Create a new Python file – this can
be completed at the command line by typing sudo nano name_
of_file.py. Add the lines of code below, which will stream tweets
down to your Pi Zero. Line nine listens for tweets to your timeline
and then tweet_to_check = tweet.text grabs each tweet. Use
print tweet_to_check to print the tweet. Save the file using
Control + X, then to run the program type sudo python name_
of_file.py. Test that it is working before moving onto Step 08. The
program will stream each of the tweets in your timeline and print
them out.
import sys, subprocess, urllib, time, tweepy
consumer_key= ‘xxxxxxxxxxxxx’ consumer_secret= ‘xxxxxxxxxxxxxxxx’
access_token= ‘xxxxxxxxxxxxxx’ access_token_secret= ‘xxxxxxxxxxxxxxxx’
auth = tweepy.OAuthHandler(consumer_key, consumer_secret)
auth.set_access_token(access_token, access_token_secret)
api = tweepy.API(auth)
class Hat_Lights(tweepy.StreamListener): def on_status(self, tweet): tweet_to_check = tweet.text ##gets the tweet print tweet_to_check stream = tweepy.Stream(auth, Hat_Lights()) while True: stream.userstream()
The Pi Zero can provide 3.3V or 5V – attach one of the wires to
provide power to the LEDs via, for example, GPIO pin 2, 4 or 9, and
then the other wire to another pin, such as pin 11. Or use a non-
power pin and a ground pin, with the power for the LEDs being
provided by the batteries. It is not advisable to use both as this
will quickly burn out the LEDs.
Below Here’s the simple Fritzing diagram for the hat connections
Raspberry Pi Tips, Tricks & Hacks 75
Tips | Tricks | Hacks
15 Combine the parts of the messageCombine the two parts from the previous steps to create
your fi nal message, stored in a variable called fi nal_tweet using
this code: fi nal_tweet = “@%s” %(user), message (line 42).
The “@%s” %(user) adds the user’s Twitter ID to the message,
which ensures that your tweet will appear in their timeline.
Finally, send your tweet using the update code:
api.update_with_media(pic, final_tweet)
16 Turn the lights onThis is same section of the code used in Step 09, which
switches the GPIO pin to low, creating a circuit and allowing the
current to fl ow through. This turns on the LED lights. Add a time
delay (line 46), so that they stay on for a short period of time
before breaking the circuit and then go off again: GPIO.setup(9,
GPIO.HIGH) (line 48).
###Turn the lights on GPIO.output(9, GPIO.LOW) time.sleep(10)###Turn them off GPIO.setup(9, GPIO.HIGH)
17 Automatically start the programSince the program is running on a Pi Zero and embedded
into the hat, it needs to start automatically when the power is
turned on. To enable the program to run at startup, type this
into the LX Terminal: sudo nano /etc/rc.local. At the bottom of
the fi le, add the fi le path of the program – for example, python
/home/pi/LED_Hat.py &. Don’t forget the & symbol at the end!
Reboot the Pi Zero and the program will start automatically. Pop
your hat on and get your followers to tweet at you!
14 Add a picture and message to the tweet This step combines your reply, a picture and the ‘time’
from the previous step to create a fi nal message which is sent to
the Twitter user who triggered your lights.
Create a new variable called message and add the text and
the time: message = “You turned on the Hat!”, time_sent (line
40). Locate a suitable picture that you wish to send and also store
this as a variable: pic = ‘/home/pi/lights.jpg’ (line 37).
13 Find the timeIf you send the same tweet multiple times, Twitter
assumes that you are a spam bot and will not permit the
message to be sent. To get around this, record the time that the
user triggered the LED lights and add the time to the message
(line 39). This also makes the tweets appear in real-time. To
retrieve the time that the interaction occurred, use:
time_sent = time.asctime( time.localtime(time.time()) )
This will check the local time of your Raspberry Pi and save it
to the variable ‘time_sent’. (Ensure that your Pi’s clock is set
correctly before you start your program.)
import osimport time;import sys, subprocess, urllib, time, tweepyimport RPi.GPIO as GPIO
time.sleep(10)
####TWITTER SECTION###
# == OAuth Authentication ==###############consumer_key= “xxxxxxxxxxxxxxxxx”consumer_secret= “xxxxxxxxxxxxxxxxxxxxxxxxx”
access_token= “xxxxxxxxxxxxxxxxxxxxxxxxxxxxxxxx”access_token_secret= “xxxxxxxxxxxxxxxxxxxxxxxx”
auth = tweepy.OAuthHandler(consumer_key, consumer_secret)auth.set_access_token(access_token, access_token_secret)
api = tweepy.API(auth)
###CODE TO GET TWITTER TO LISTEN FOR Phrase###class Hat_Lights(tweepy.StreamListener): def on_status(self, tweet): tweet_to_check = tweet.text ##gets the tweet print (tweet_to_check) ###Checks for tweets to @Your_Twitter_User_ID ###Add Yours does_the_tweet_contain_key_word = tweet_to_check.find(“@Your_ Twitter_User_ID ON”) ###Change to use code to find key word### print does_the_tweet_contain_key_word
if does_the_tweet_contain_key_word == 0: GPIO.setmode(GPIO.BCM) GPIO.setup(9, GPIO.OUT) pic = “/home/pi/lights.jpg” user = str(tweet.user.screen_name) time_sent = time.asctime( time.localtime(time.time()) ) message = “You turned on the LED Hat!”, time_sent #print error_tweet final_tweet = “@%s” %(user), message #print type(error) ###Turn the lights on GPIO.output(9, GPIO.LOW) time.sleep(8) ###Turn them off GPIO.setup(9, GPIO.HIGH) #GPIO.output(10, GPIO.HIGH)lights_on() api.update_with_media(pic, final_tweet) else: print (“no lights”) stream = tweepy.Stream(auth, Hat_Lights()) while True: stream.userstream()
Full code listingTo stream your tweets, you need to authorise a connection
bit.ly/24poLHd
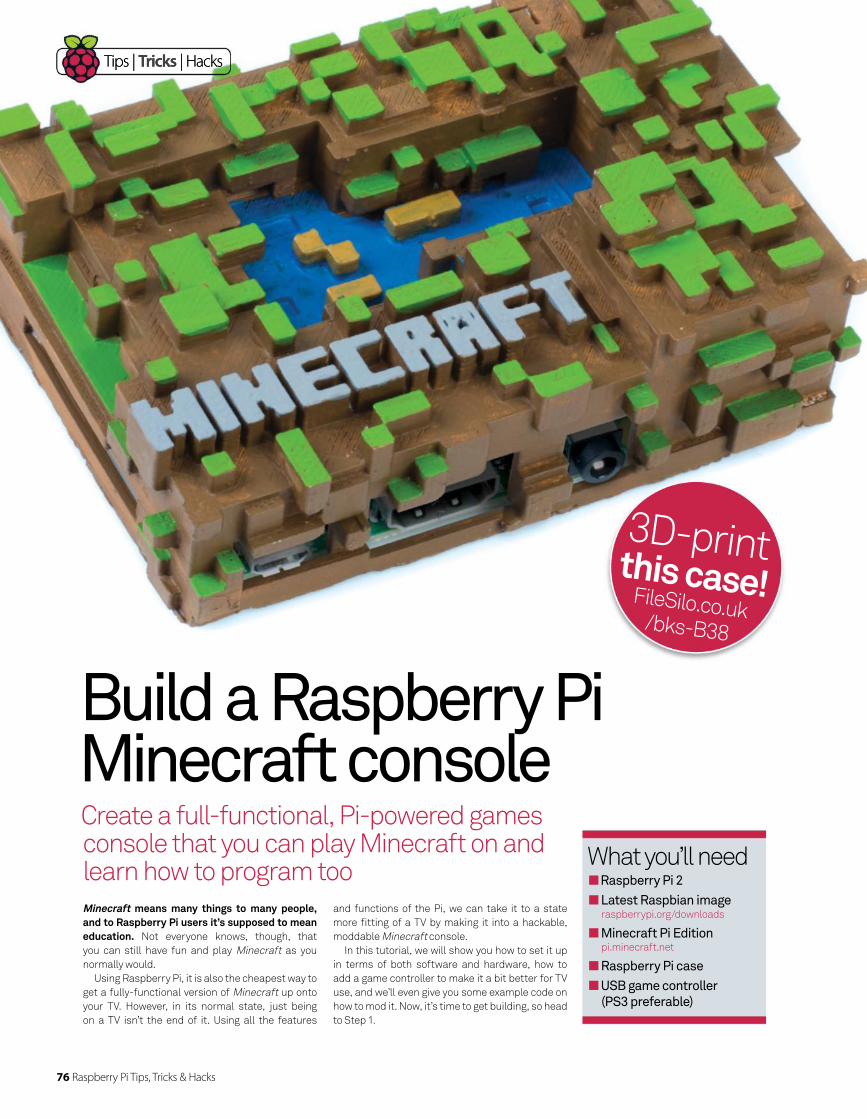
76 Raspberry Pi Tips, Tricks & Hacks
Tips | Tricks | Hacks
Create a full-functional, Pi-powered games console that you can play Minecraft on and learn how to program too
Build a Raspberry Pi Minecraft console
Minecraft means many things to many people, and to Raspberry Pi users it’s supposed to mean education. Not everyone knows, though, that
you can still have fun and play Minecraft as you
normally would.
Using Raspberry Pi, it is also the cheapest way to
get a fully-functional version of Minecraft up onto
your TV. However, in its normal state, just being
on a TV isn’t the end of it. Using all the features
and functions of the Pi, we can take it to a state
more fi tting of a TV by making it into a hackable,
moddable Minecraft console.
In this tutorial, we will show you how to set it up
in terms of both software and hardware, how to
add a game controller to make it a bit better for TV
use, and we’ll even give you some example code on
how to mod it. Now, it’s time to get building, so head
to Step 1.
What you’ll need Raspberry Pi 2
Latest Raspbian imageraspberrypi.org/downloads
Minecraft Pi Editionpi.minecraft.net
Raspberry Pi case
USB game controller
(PS3 preferable)
3D-print this case! FileSilo.co.uk/bks-B38
Tips | Tricks | Hacks
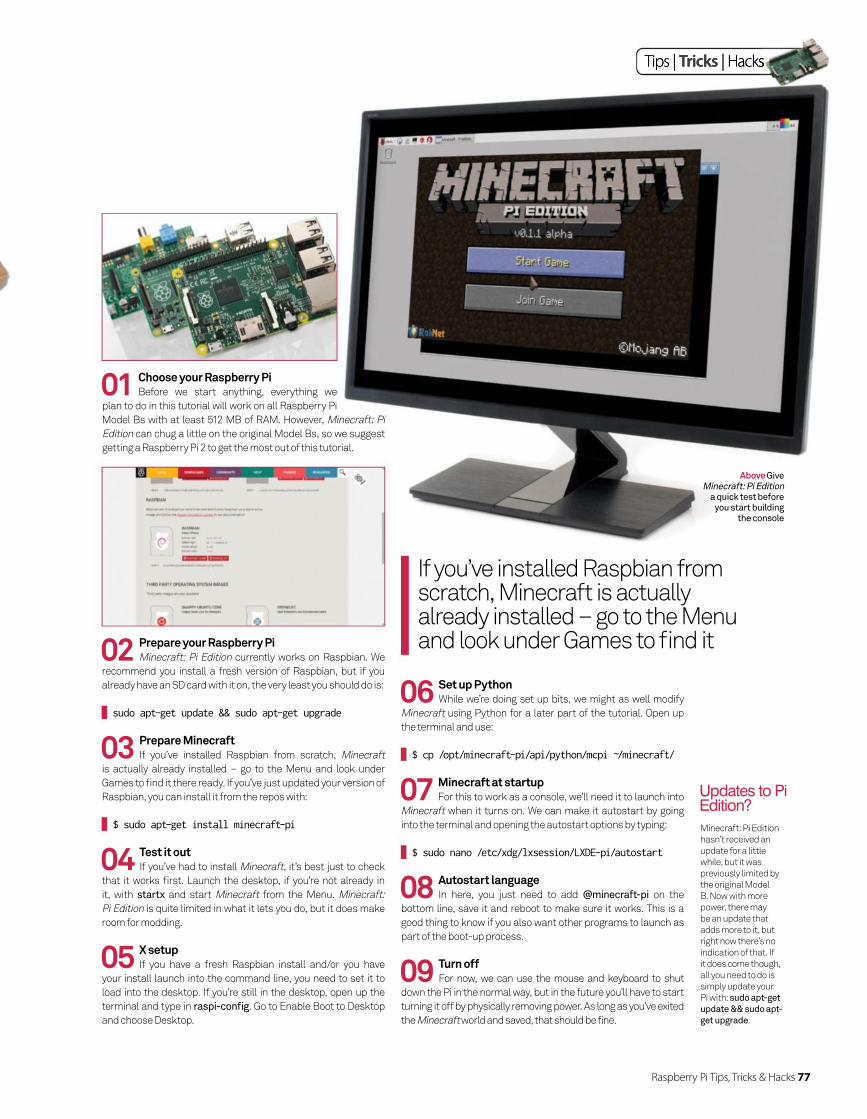
Raspberry Pi Tips, Tricks & Hacks 77
Tips | Tricks | Hacks
01 Choose your Raspberry PiBefore we start anything, everything we
plan to do in this tutorial will work on all Raspberry Pi
Model Bs with at least 512 MB of RAM. However, Minecraft: Pi
Edition can chug a little on the original Model Bs, so we suggest
getting a Raspberry Pi 2 to get the most out of this tutorial.
02 Prepare your Raspberry PiMinecraft: Pi Edition currently works on Raspbian. We
recommend you install a fresh version of Raspbian, but if you
already have an SD card with it on, the very least you should do is:
sudo apt-get update && sudo apt-get upgrade
05 X setup If you have a fresh Raspbian install and/or you have
your install launch into the command line, you need to set it to
load into the desktop. If you’re still in the desktop, open up the
terminal and type in raspi-confi g. Go to Enable Boot to Desktop
and choose Desktop.
03 Prepare MinecraftIf you’ve installed Raspbian from scratch, Minecraft
is actually already installed – go to the Menu and look under
Games to fi nd it there ready. If you’ve just updated your version of
Raspbian, you can install it from the repos with:
$ sudo apt-get install minecraft-pi
04 Test it out If you’ve had to install Minecraft, it’s best just to check
that it works fi rst. Launch the desktop, if you’re not already in
it, with startx and start Minecraft from the Menu. Minecraft:
Pi Edition is quite limited in what it lets you do, but it does make
room for modding.
Above Give Minecraft: Pi Edition
a quick test before you start building
the console
07 Minecraft at startupFor this to work as a console, we’ll need it to launch into
Minecraft when it turns on. We can make it autostart by going
into the terminal and opening the autostart options by typing:
$ sudo nano /etc/xdg/lxsession/LXDE-pi/autostart
06 Set up PythonWhile we’re doing set up bits, we might as well modify
Minecraft using Python for a later part of the tutorial. Open up
the terminal and use:
$ cp /opt/minecraft-pi/api/python/mcpi ~/minecraft/
09 Turn offFor now, we can use the mouse and keyboard to shut
down the Pi in the normal way, but in the future you’ll have to start
turning it off by physically removing power. As long as you’ve exited
the Minecraft world and saved, that should be fine.
08 Autostart languageIn here, you just need to add @minecraft-pi on the
bottom line, save it and reboot to make sure it works. This is a
good thing to know if you also want other programs to launch as
part of the boot-up process.
If you’ve installed Raspbian from scratch, Minecraft is actually already installed – go to the Menu and look under Games to fi nd it
Minecraft: Pi Edition
hasn’t received an
update for a little
while, but it was
previously limited by
the original Model
B. Now with more
power, there may
be an update that
adds more to it, but
right now there’s no
indication of that. If
it does come though,
all you need to do is
simply update your
Pi with: sudo apt-get
update && sudo apt-
get upgrade.
Updates to Pi Edition?
Tips | Tricks | Hacks

78 Raspberry Pi Tips, Tricks & Hacks
Tips | Tricks | Hacks Tips | Tricks | Hacks
Aaron Hicks at
Solid Technologies
designed this
Minecraft case for
the Raspberry Pi
and shared it on
GrabCAD. We’ve
uploaded our slightly
modifi ed version to
FileSilo.co.uk along
with your tutorial
fi les for this issue.
All you need to do is
send the STL fi le to
a 3D printing service
– many high street
printing shops have
at least a MakerBot
these days – and
they will 3D-print the
case for you. It should
only cost around £15.
3D-print a case
10 The correct caseIn this scenario, we’re hooking this Raspberry Pi up to a
TV, which means it needs a case so that there’s less chance of
damage to the components from dust or static. There are many
good cases you can get – we are using the Pimoroni Pibow here
as you can mount it to the back of the TV. Alternatively, you could
get really creative and 3D-print your own case, as you can see on
page 58. Check out the boxout just to the left.
11 Find the right power supplyGetting power to the Raspberry Pi 2 so that it runs
properly can be tricky if you’re using a USB port or a mobile phone
charger – the former will be underpowered and the latter is not
always powerful enough. Make sure you get a 2A supply, like the
offi cial Raspberry Pi one.
12 Go wirelessWe understand that not everyone has an ethernet cable
near their TV, so it may be a good idea to invest in a Wi-Fi adapter
instead. There is a great list of compatible Wi-Fi adapters on the
eLinux wiki: elinux.org/RPi_Verifi edPeripherals.
13 Mouse and keyboardNow that we have the Raspberry Pi ready to be hooked
up, you should look at your controller situation – do you want
to be limited by the wires or should you get a wireless solution
instead? We will cover controller solutions over the page, but it’s
worth considering now.
14 Get ready for SSHIt will be easier to create and apply scripts to Minecraft
by uploading them via the network rather than doing it straight
on the Pi. In the terminal, find out what the IP address is by using
ifconfig, and then you can access the Pi in the terminal of another
networked computer using the following:
ssh pi@[IP address]
15 Have a playAt this stage, what we have built is a fully-functional
Minecraft console. Now, at this point you could start playing if
you so wish and you don’t need to add a controller. You can fl ip
over to page 62 now if you want to begin learning how to mod your
Minecraft and do a bit more with it to suit your needs. However,
if you do want to add controller support then carry on and take a
look at Step 16.
Getting power to the Raspberry Pi 2 so that it runs properly can be tricky if you’re using a USB port
Tips | Tricks | Hacks

Raspberry Pi Tips, Tricks & Hacks 79
Tips | Tricks | Hacks Tips | Tricks | Hacks
16 Add controller support Make sure the controller input functions are installed
on the Raspberry Pi. To do this, ssh into the Raspberry Pi like
we did in Step 14 (where ‘raspberry’ is the password) and install
the following package:
$ sudo apt-get install xserver-xorg-input-joystick
17 Controller mappingWe have a controller map for the PS3 controller that
you can download straight to your Pi, and with a bit of tweaking
can fi t most USB controllers as well. Go to the controller
confi guration folder with:
$ cd /usr/share/X11/xorg.conf.d/
18 Replace the controller mappingWe’ll remove the current joystick controls by using
sudo rm 50-joystick.conf and then replace by downloading a
custom confi guration using:
$ sudo wget http://www.linuxuser.co.uk/wp-content/ uploads/2015/04/50-joystick.conf
19 Reboot to useAfter a reboot to make sure everything’s working, you
should be able to control the mouse input on the console. R2 and
L2 are the normal mouse clicks and can be used to navigate the
Minecraft menu to access the game.
20 Go full-screenSo far you may have noticed that Minecraft is running
in a window – you can click the full-screen button to make it fi ll
the screen, however you then heavily limit your mouse control.
Thanks to the controller, you can get around that. As soon as you
load the game, make sure you use the sticks for movement and
the d-pad for selecting items in the inventory.
R2 Right click (hit)L2 Right click (hit)
R1 Cycle held item
Right stick Camera
Start Escape
Select Escape
PS Button Connect
controller
L3 / R3 Descend
while fl yingLeft stick
Movement
L1 Cycle held item
Directional buttons
Movement
Inventory
Inventory
Escape
X Jump
Unfortunately, Xbox
360 controllers work
slightly differently
with Linux. As they
use their own drivers
that are separate
to the normal
joystick drivers we
used for the PS3
pad and other USB
controllers, a 360
controller doesn’t
work as a mouse and
is harder to assign
specifi c functions to.
This makes it tricky
to use in a situation
such as this.
Xbox controllers
Here’s the full
layout of the
buttons used
by the PS3
controller by
default – you can
change them in
the script that you
download in Step 18
Controls
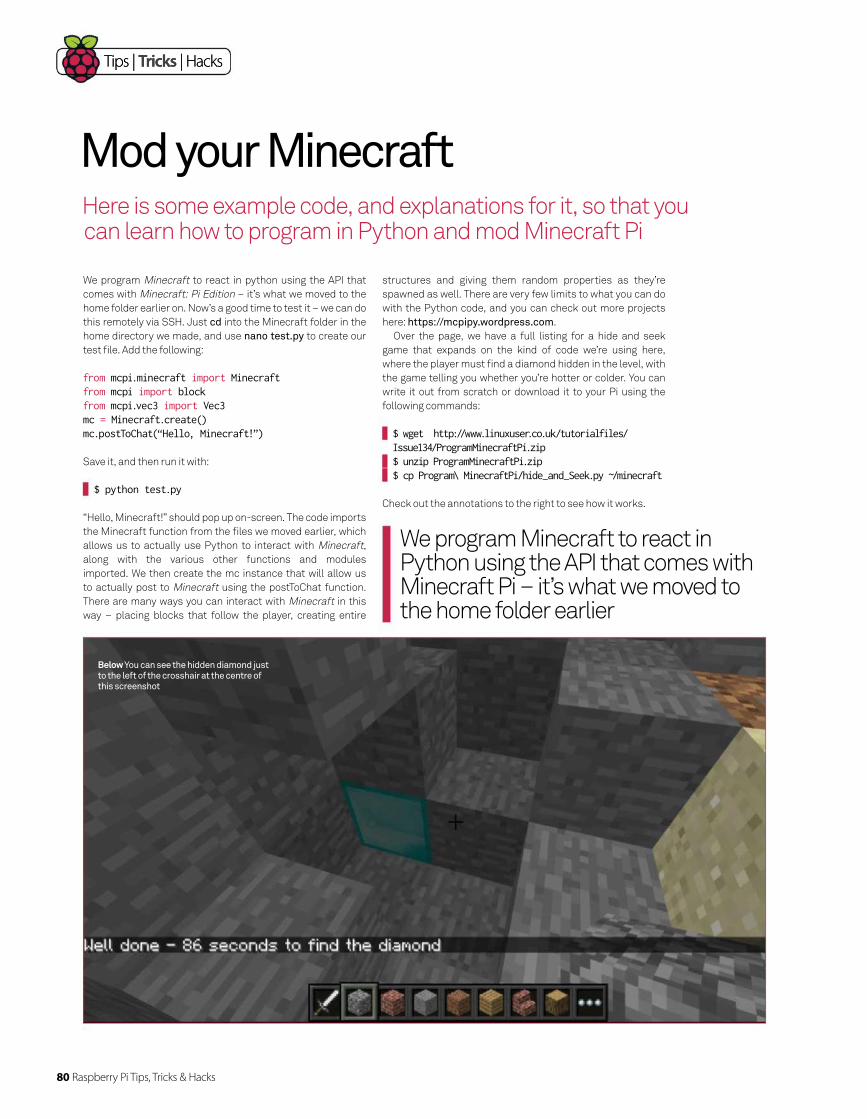
80 Raspberry Pi Tips, Tricks & Hacks
Tips | Tricks | Hacks Tips | Tricks | Hacks
We program Minecraft to react in Python using the API that comes with Minecraft Pi – it’s what we moved to the home folder earlier
Here is some example code, and explanations for it, so that you can learn how to program in Python and mod Minecraft Pi
Mod your Minecraft
We program Minecraft to react in python using the API that
comes with Minecraft: Pi Edition – it’s what we moved to the
home folder earlier on. Now’s a good time to test it – we can do
this remotely via SSH. Just cd into the Minecraft folder in the
home directory we made, and use nano test.py to create our
test file. Add the following:
from mcpi.minecraft import Minecraftfrom mcpi import blockfrom mcpi.vec3 import Vec3mc = Minecraft.create()mc.postToChat(“Hello, Minecraft!”)
Save it, and then run it with:
$ python test.py
“Hello, Minecraft!” should pop up on-screen. The code imports
the Minecraft function from the files we moved earlier, which
allows us to actually use Python to interact with Minecraft,
along with the various other functions and modules
imported. We then create the mc instance that will allow us
to actually post to Minecraft using the postToChat function.
There are many ways you can interact with Minecraft in this
way – placing blocks that follow the player, creating entire
structures and giving them random properties as they’re
spawned as well. There are very few limits to what you can do
with the Python code, and you can check out more projects
here: https://mcpipy.wordpress.com.
Over the page, we have a full listing for a hide and seek
game that expands on the kind of code we’re using here,
where the player must find a diamond hidden in the level, with
the game telling you whether you’re hotter or colder. You can
write it out from scratch or download it to your Pi using the
following commands:
$ wget http://www.linuxuser.co.uk/tutorialfiles/ Issue134/ProgramMinecraftPi.zip $ unzip ProgramMinecraftPi.zip $ cp Program\ MinecraftPi/hide_and_Seek.py ~/minecraft
Check out the annotations to the right to see how it works.
Below You can see the hidden diamond just to the left of the crosshair at the centre of this screenshot
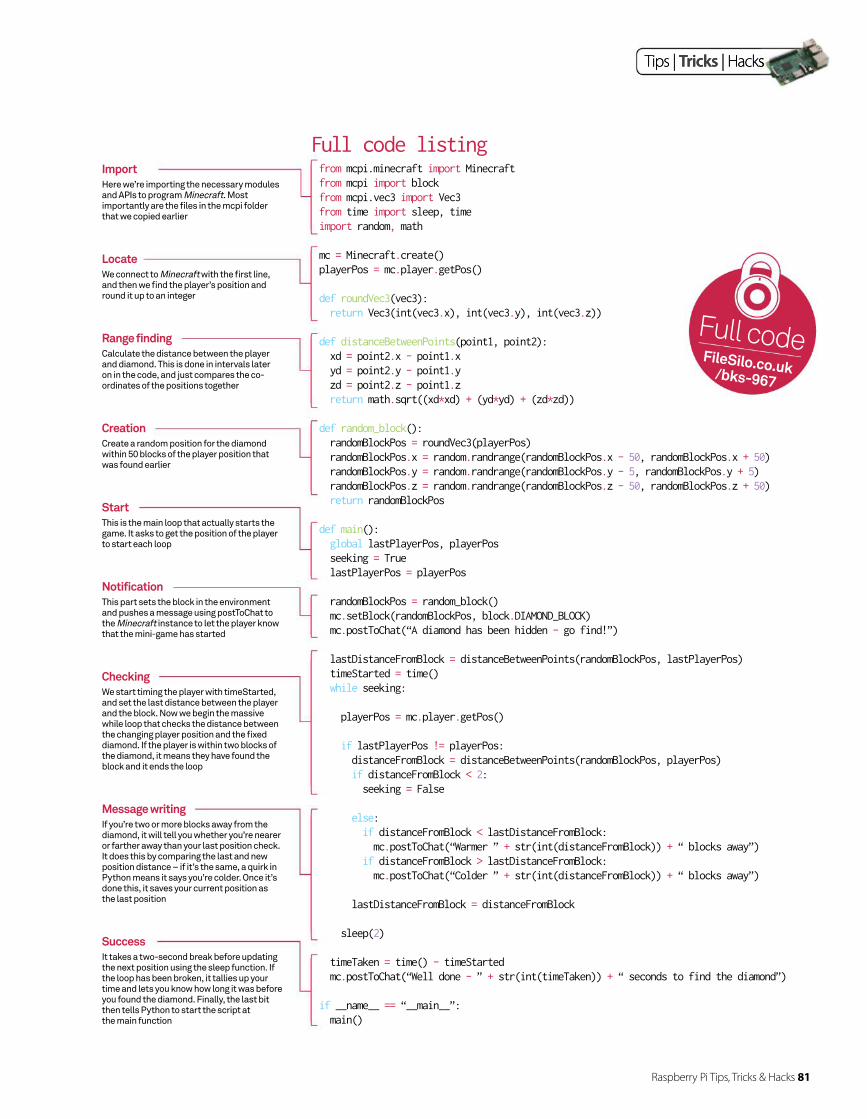
Raspberry Pi Tips, Tricks & Hacks 81
Tips | Tricks | Hacks Tips | Tricks | Hacks
Full codeFileSilo.co.uk/bks-967
from mcpi.minecraft import Minecraftfrom mcpi import blockfrom mcpi.vec3 import Vec3from time import sleep, timeimport random, math
mc = Minecraft.create()playerPos = mc.player.getPos()
def roundVec3(vec3): return Vec3(int(vec3.x), int(vec3.y), int(vec3.z))
def distanceBetweenPoints(point1, point2): xd = point2.x - point1.x yd = point2.y - point1.y zd = point2.z - point1.z return math.sqrt((xd*xd) + (yd*yd) + (zd*zd))
def random_block(): randomBlockPos = roundVec3(playerPos) randomBlockPos.x = random.randrange(randomBlockPos.x - 50, randomBlockPos.x + 50) randomBlockPos.y = random.randrange(randomBlockPos.y - 5, randomBlockPos.y + 5) randomBlockPos.z = random.randrange(randomBlockPos.z - 50, randomBlockPos.z + 50) return randomBlockPos
def main(): global lastPlayerPos, playerPos seeking = True lastPlayerPos = playerPos
randomBlockPos = random_block() mc.setBlock(randomBlockPos, block.DIAMOND_BLOCK) mc.postToChat(“A diamond has been hidden - go find!”) lastDistanceFromBlock = distanceBetweenPoints(randomBlockPos, lastPlayerPos) timeStarted = time() while seeking:
playerPos = mc.player.getPos()
if lastPlayerPos != playerPos: distanceFromBlock = distanceBetweenPoints(randomBlockPos, playerPos) if distanceFromBlock < 2: seeking = False
else: if distanceFromBlock < lastDistanceFromBlock: mc.postToChat(“Warmer ” + str(int(distanceFromBlock)) + “ blocks away”) if distanceFromBlock > lastDistanceFromBlock: mc.postToChat(“Colder ” + str(int(distanceFromBlock)) + “ blocks away”) lastDistanceFromBlock = distanceFromBlock sleep(2) timeTaken = time() - timeStarted mc.postToChat(“Well done - ” + str(int(timeTaken)) + “ seconds to find the diamond”)
if __name__ == “__main__”: main()
Full code listingImportHere we’re importing the necessary modules and APIs to program Minecraft. Most importantly are the fi les in the mcpi folder that we copied earlier
Locate We connect to Minecraft with the fi rst line, and then we fi nd the player’s position and round it up to an integer
Range finding Calculate the distance between the player and diamond. This is done in intervals later on in the code, and just compares the co-ordinates of the positions together
Creation Create a random position for the diamond within 50 blocks of the player position that was found earlier
Start This is the main loop that actually starts the game. It asks to get the position of the player to start each loop
Notification This part sets the block in the environment and pushes a message using postToChat to the Minecraft instance to let the player know that the mini-game has started
Checking We start timing the player with timeStarted, and set the last distance between the player and the block. Now we begin the massive while loop that checks the distance between the changing player position and the fi xed diamond. If the player is within two blocks of the diamond, it means they have found the block and it ends the loop
Message writing If you’re two or more blocks away from the diamond, it will tell you whether you’re nearer or farther away than your last position check. It does this by comparing the last and new position distance – if it’s the same, a quirk in Python means it says you’re colder. Once it’s done this, it saves your current position as the last position
Success It takes a two-second break before updating the next position using the sleep function. If the loop has been broken, it tallies up your time and lets you know how long it was before you found the diamond. Finally, the last bit then tells Python to start the script at the main function
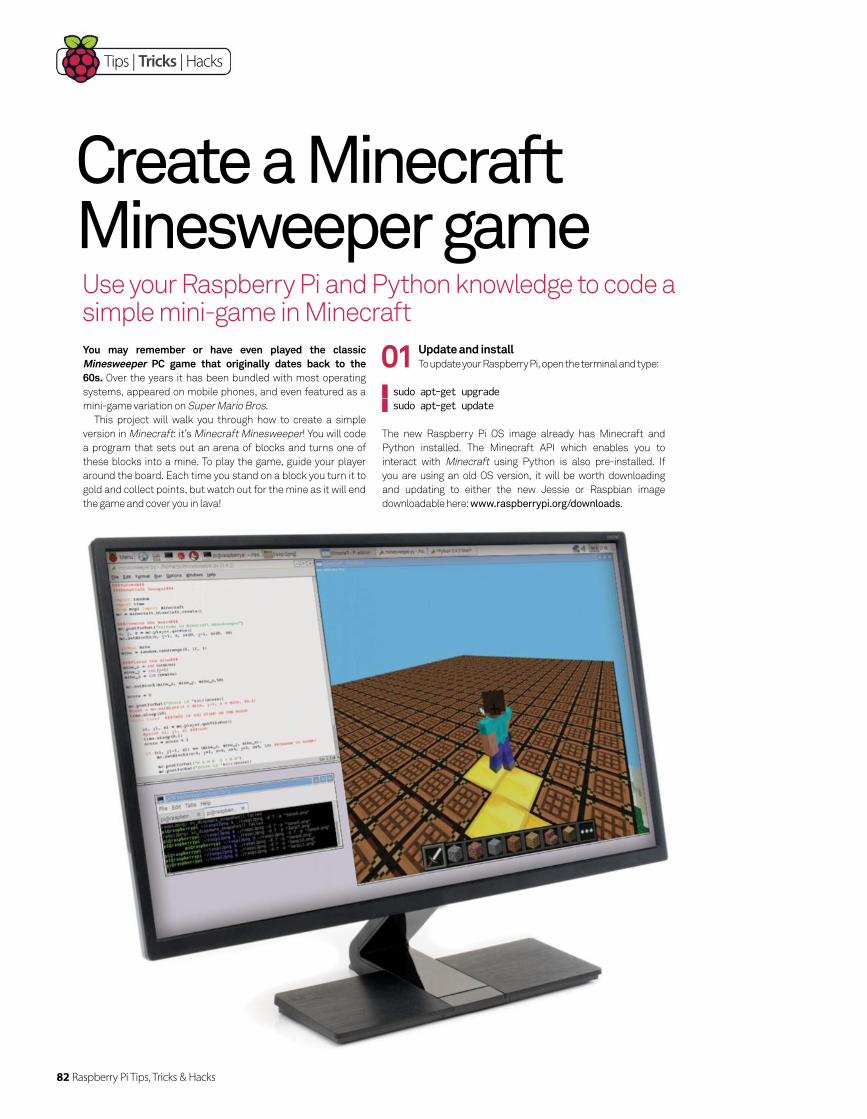
82 Raspberry Pi Tips, Tricks & Hacks
Tips | Tricks | Hacks
Use your Raspberry Pi and Python knowledge to code a simple mini-game in Minecraft
Create a Minecraft Minesweeper game
You may remember or have even played the classic Minesweeper PC game that originally dates back to the 60s. Over the years it has been bundled with most operating
systems, appeared on mobile phones, and even featured as a
mini-game variation on Super Mario Bros.
This project will walk you through how to create a simple
version in Minecraft: it’s Minecraft Minesweeper! You will code
a program that sets out an arena of blocks and turns one of
these blocks into a mine. To play the game, guide your player
around the board. Each time you stand on a block you turn it to
gold and collect points, but watch out for the mine as it will end
the game and cover you in lava!
01 Update and installTo update your Raspberry Pi, open the terminal and type:
sudo apt-get upgrade sudo apt-get update
The new Raspberry Pi OS image already has Minecraft and
Python installed. The Minecraft API which enables you to
interact with Minecraft using Python is also pre-installed. If
you are using an old OS version, it will be worth downloading
and updating to either the new Jessie or Raspbian image
downloadable here: www.raspberrypi.org/downloads.
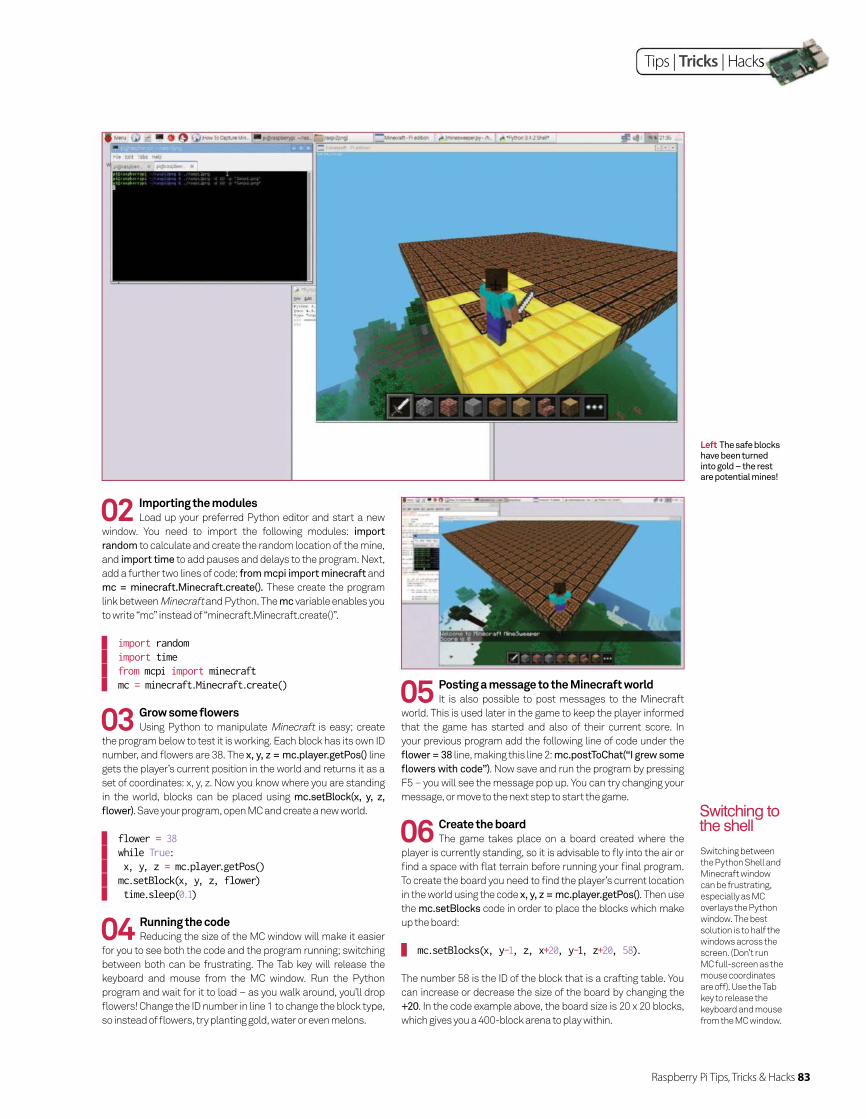
Raspberry Pi Tips, Tricks & Hacks 83
Tips | Tricks | Hacks
02 Importing the modulesLoad up your preferred Python editor and start a new
window. You need to import the following modules: import
random to calculate and create the random location of the mine,
and import time to add pauses and delays to the program. Next,
add a further two lines of code: from mcpi import minecraft and
mc = minecraft.Minecraft.create(). These create the program
link between Minecraft and Python. The mc variable enables you
to write “mc” instead of “minecraft.Minecraft.create()”.
import random import time from mcpi import minecraft mc = minecraft.Minecraft.create()
03 Grow some fl owersUsing Python to manipulate Minecraft is easy; create
the program below to test it is working. Each block has its own ID
number, and fl owers are 38. The x, y, z = mc.player.getPos() line
gets the player’s current position in the world and returns it as a
set of coordinates: x, y, z. Now you know where you are standing
in the world, blocks can be placed using mc.setBlock(x, y, z,
fl ower). Save your program, open MC and create a new world.
flower = 38 while True: x, y, z = mc.player.getPos() mc.setBlock(x, y, z, flower) time.sleep(0.1)
04 Running the codeReducing the size of the MC window will make it easier
for you to see both the code and the program running; switching
between both can be frustrating. The Tab key will release the
keyboard and mouse from the MC window. Run the Python
program and wait for it to load – as you walk around, you’ll drop
fl owers! Change the ID number in line 1 to change the block type,
so instead of fl owers, try planting gold, water or even melons.
05 Posting a message to the Minecraft worldIt is also possible to post messages to the Minecraft
world. This is used later in the game to keep the player informed
that the game has started and also of their current score. In
your previous program add the following line of code under the
fl ower = 38 line, making this line 2: mc.postToChat(“I grew some
fl owers with code”). Now save and run the program by pressing
F5 – you will see the message pop up. You can try changing your
message, or move to the next step to start the game.
06 Create the boardThe game takes place on a board created where the
player is currently standing, so it is advisable to fl y into the air or
fi nd a space with fl at terrain before running your fi nal program.
To create the board you need to fi nd the player’s current location
in the world using the code x, y, z = mc.player.getPos(). Then use
the mc.setBlocks code in order to place the blocks which make
up the board:
mc.setBlocks(x, y-1, z, x+20, y-1, z+20, 58).
The number 58 is the ID of the block that is a crafting table. You
can increase or decrease the size of the board by changing the
+20. In the code example above, the board size is 20 x 20 blocks,
which gives you a 400-block arena to play within.
Switching between
the Python Shell and
Minecraft window
can be frustrating,
especially as MC
overlays the Python
window. The best
solution is to half the
windows across the
screen. (Don’t run
MC full-screen as the
mouse coordinates
are off). Use the Tab
key to release the
keyboard and mouse
from the MC window.
Switching to the shell
Left The safe blocks have been turned into gold – the rest are potential mines!
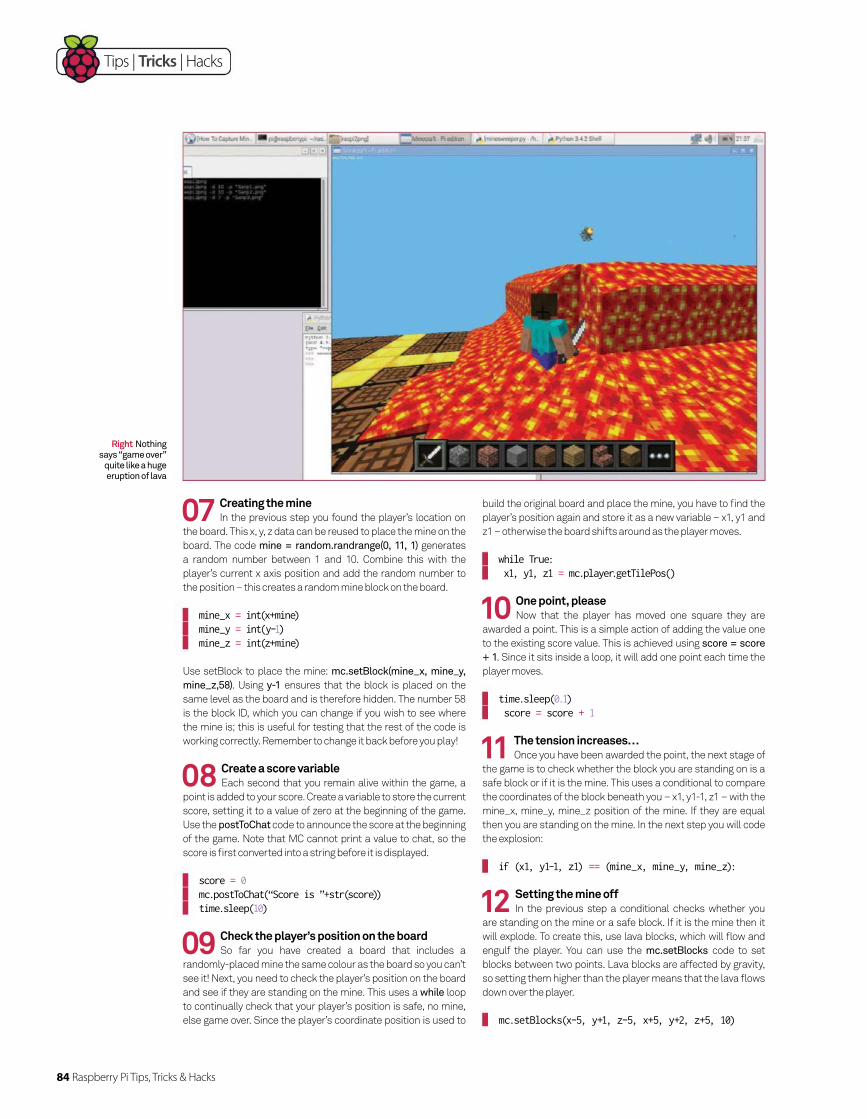
84 Raspberry Pi Tips, Tricks & Hacks
Tips | Tricks | Hacks
build the original board and place the mine, you have to find the
player’s position again and store it as a new variable – x1, y1 and
z1 – otherwise the board shifts around as the player moves.
while True: x1, y1, z1 = mc.player.getTilePos()
10 One point, pleaseNow that the player has moved one square they are
awarded a point. This is a simple action of adding the value one
to the existing score value. This is achieved using score = score
+ 1. Since it sits inside a loop, it will add one point each time the
player moves.
time.sleep(0.1) score = score + 1
11 The tension increases…Once you have been awarded the point, the next stage of
the game is to check whether the block you are standing on is a
safe block or if it is the mine. This uses a conditional to compare
the coordinates of the block beneath you – x1, y1-1, z1 – with the
mine_x, mine_y, mine_z position of the mine. If they are equal
then you are standing on the mine. In the next step you will code
the explosion:
if (x1, y1-1, z1) == (mine_x, mine_y, mine_z):
12 Setting the mine offIn the previous step a conditional checks whether you
are standing on the mine or a safe block. If it is the mine then it
will explode. To create this, use lava blocks, which will flow and
engulf the player. You can use the mc.setBlocks code to set
blocks between two points. Lava blocks are affected by gravity,
so setting them higher than the player means that the lava flows
down over the player.
mc.setBlocks(x-5, y+1, z-5, x+5, y+2, z+5, 10)
07 Creating the mineIn the previous step you found the player’s location on
the board. This x, y, z data can be reused to place the mine on the
board. The code mine = random.randrange(0, 11, 1) generates
a random number between 1 and 10. Combine this with the
player’s current x axis position and add the random number to
the position – this creates a random mine block on the board.
mine_x = int(x+mine) mine_y = int(y-1) mine_z = int(z+mine)
Use setBlock to place the mine: mc.setBlock(mine_x, mine_y,
mine_z,58). Using y-1 ensures that the block is placed on the
same level as the board and is therefore hidden. The number 58
is the block ID, which you can change if you wish to see where
the mine is; this is useful for testing that the rest of the code is
working correctly. Remember to change it back before you play!
08 Create a score variableEach second that you remain alive within the game, a
point is added to your score. Create a variable to store the current
score, setting it to a value of zero at the beginning of the game.
Use the postToChat code to announce the score at the beginning
of the game. Note that MC cannot print a value to chat, so the
score is first converted into a string before it is displayed.
score = 0 mc.postToChat(“Score is ”+str(score)) time.sleep(10)
09 Check the player’s position on the boardSo far you have created a board that includes a
randomly-placed mine the same colour as the board so you can’t
see it! Next, you need to check the player’s position on the board
and see if they are standing on the mine. This uses a while loop
to continually check that your player’s position is safe, no mine,
else game over. Since the player’s coordinate position is used to
Right Nothing says “game over”
quite like a huge eruption of lava
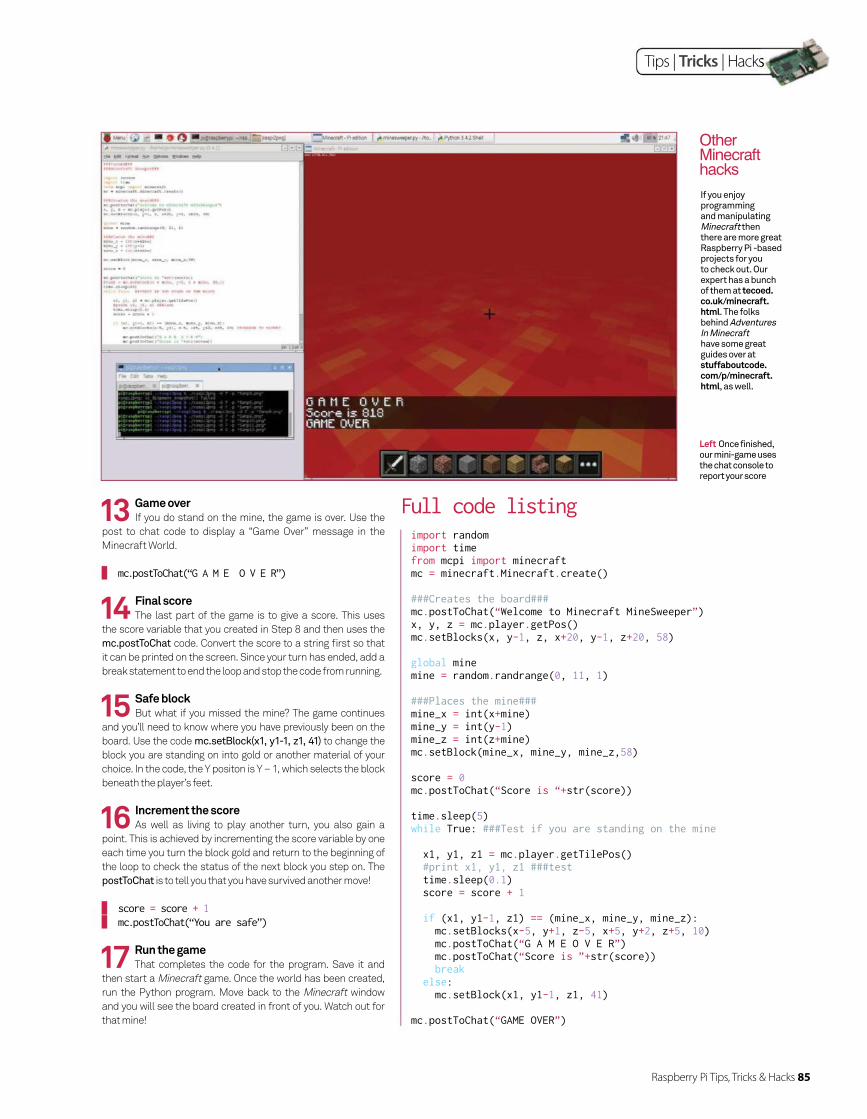
Raspberry Pi Tips, Tricks & Hacks 85
Tips | Tricks | Hacks
If you enjoy programming and manipulating Minecraft then there are more great Raspberry Pi -based projects for you to check out. Our expert has a bunch of them at tecoed.co.uk/minecraft.html. The folks behind Adventures In Minecraft have some great guides over at stuffaboutcode.com/p/minecraft.html, as well.
Other Minecraft hacks
13 Game overIf you do stand on the mine, the game is over. Use the
post to chat code to display a “Game Over” message in the
Minecraft World.
mc.postToChat(“G A M E O V E R”)
14 Final scoreThe last part of the game is to give a score. This uses
the score variable that you created in Step 8 and then uses the
mc.postToChat code. Convert the score to a string fi rst so that
it can be printed on the screen. Since your turn has ended, add a
break statement to end the loop and stop the code from running.
15 Safe blockBut what if you missed the mine? The game continues
and you’ll need to know where you have previously been on the
board. Use the code mc.setBlock(x1, y1-1, z1, 41) to change the
block you are standing on into gold or another material of your
choice. In the code, the Y positon is Y – 1, which selects the block
beneath the player’s feet.
16 Increment the scoreAs well as living to play another turn, you also gain a
point. This is achieved by incrementing the score variable by one
each time you turn the block gold and return to the beginning of
the loop to check the status of the next block you step on. The
postToChat is to tell you that you have survived another move!
score = score + 1 mc.postToChat(“You are safe”)
17 Run the gameThat completes the code for the program. Save it and
then start a Minecraft game. Once the world has been created,
run the Python program. Move back to the Minecraft window
and you will see the board created in front of you. Watch out for
that mine!
import randomimport timefrom mcpi import minecraftmc = minecraft.Minecraft.create()
###Creates the board###mc.postToChat(“Welcome to Minecraft MineSweeper”)x, y, z = mc.player.getPos()mc.setBlocks(x, y-1, z, x+20, y-1, z+20, 58)
global minemine = random.randrange(0, 11, 1)
###Places the mine###mine_x = int(x+mine)mine_y = int(y-1)mine_z = int(z+mine)mc.setBlock(mine_x, mine_y, mine_z,58)
score = 0mc.postToChat(“Score is “+str(score))
time.sleep(5)while True: ###Test if you are standing on the mine x1, y1, z1 = mc.player.getTilePos() #print x1, y1, z1 ###test time.sleep(0.1) score = score + 1 if (x1, y1-1, z1) == (mine_x, mine_y, mine_z): mc.setBlocks(x-5, y+1, z-5, x+5, y+2, z+5, 10) mc.postToChat(“G A M E O V E R”) mc.postToChat(“Score is ”+str(score)) break else: mc.setBlock(x1, y1-1, z1, 41) mc.postToChat(“GAME OVER”)
Full code listing
Left Once finished, our mini-game uses the chat console to report your score

Tips | Tricks | Hacks
The winter nights are getting longer; use Raspberry Pi and a mobile device to remotely control your lights
Control lights with your Pi
The folks at Energenie have created some genius plug sockets that can be turned on and off via your Raspberry Pi. You can
buy a starter kit which includes the RF transmitter add-on board
and two sockets to get you started. The add-on board connects
directly to the GPIO pins and is controlled with a Python library.
Once everything is installed and set up, your Raspberry Pi can
be used with the Pi-mote to control up to four Energenie sockets
using a simple program. This tutorial covers how to set up the
software, the sockets and how to adapt the program to run on
your mobile device.
sudo apt-get update sudo apt-get upgrade
Depending on which version of the OS you’re using, you may need
to install the Python GPIO libraries. (Raspbian Jessie comes with
this library pre-installed, so you can skip this step.) Type:
sudo apt-get install python-rpi.gpio
On completion, reboot your Pi. This will install the Python GPIO
libraries, meaning you can access and control the pins with
Python code.
Above Take control of your home
environment using your smartphone
01 Set upTo get started, boot up your Raspberry Pi and load the LX
Terminal, then update your software by typing:
What you’ll need Pi-Mote IR control board
with RC sockets bit.ly/1MdpFOU
Desk lamp
Accessories
Full code
FileSilo.co.uk
/bks-B38
86 Raspberry Pi Tips, Tricks & Hacks
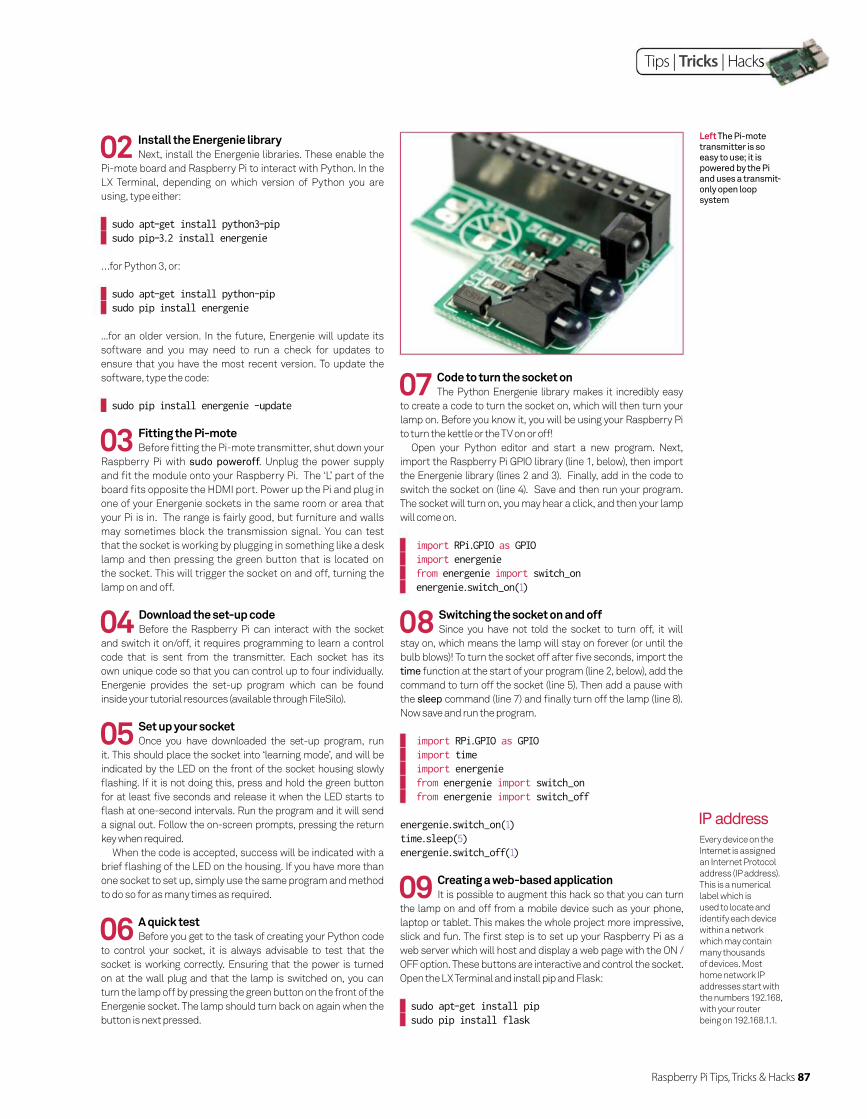
Raspberry Pi Tips, Tricks & Hacks 87
Tips | Tricks | Hacks
Left The Pi-mote transmitter is so easy to use; it is powered by the Pi and uses a transmit-only open loop system
02 Install the Energenie libraryNext, install the Energenie libraries. These enable the
Pi-mote board and Raspberry Pi to interact with Python. In the
LX Terminal, depending on which version of Python you are
using, type either:
sudo apt-get install python3-pip sudo pip-3.2 install energenie
…for Python 3, or:
sudo apt-get install python-pip sudo pip install energenie
...for an older version. In the future, Energenie will update its
software and you may need to run a check for updates to
ensure that you have the most recent version. To update the
software, type the code:
sudo pip install energenie -update
03 Fitting the Pi-moteBefore fi tting the Pi-mote transmitter, shut down your
Raspberry Pi with sudo poweroff. Unplug the power supply
and fi t the module onto your Raspberry Pi. The ‘L’ part of the
board fi ts opposite the HDMI port. Power up the Pi and plug in
one of your Energenie sockets in the same room or area that
your Pi is in. The range is fairly good, but furniture and walls
may sometimes block the transmission signal. You can test
that the socket is working by plugging in something like a desk
lamp and then pressing the green button that is located on
the socket. This will trigger the socket on and off, turning the
lamp on and off.
05 Set up your socketOnce you have downloaded the set-up program, run
it. This should place the socket into ‘learning mode’, and will be
indicated by the LED on the front of the socket housing slowly
fl ashing. If it is not doing this, press and hold the green button
for at least fi ve seconds and release it when the LED starts to
fl ash at one-second intervals. Run the program and it will send
a signal out. Follow the on-screen prompts, pressing the return
key when required.
When the code is accepted, success will be indicated with a
brief fl ashing of the LED on the housing. If you have more than
one socket to set up, simply use the same program and method
to do so for as many times as required.
04 Download the set-up codeBefore the Raspberry Pi can interact with the socket
and switch it on/off, it requires programming to learn a control
code that is sent from the transmitter. Each socket has its
own unique code so that you can control up to four individually.
Energenie provides the set-up program which can be found
inside your tutorial resources (available through FileSilo).
06 A quick testBefore you get to the task of creating your Python code
to control your socket, it is always advisable to test that the
socket is working correctly. Ensuring that the power is turned
on at the wall plug and that the lamp is switched on, you can
turn the lamp off by pressing the green button on the front of the
Energenie socket. The lamp should turn back on again when the
button is next pressed.
Every device on the
Internet is assigned
an Internet Protocol
address (IP address).
This is a numerical
label which is
used to locate and
identify each device
within a network
which may contain
many thousands
of devices. Most
home network IP
addresses start with
the numbers 192.168,
with your router
being on 192.168.1.1.
IP address
07 Code to turn the socket onThe Python Energenie library makes it incredibly easy
to create a code to turn the socket on, which will then turn your
lamp on. Before you know it, you will be using your Raspberry Pi
to turn the kettle or the TV on or off!
Open your Python editor and start a new program. Next,
import the Raspberry Pi GPIO library (line 1, below), then import
the Energenie library (lines 2 and 3). Finally, add in the code to
switch the socket on (line 4). Save and then run your program.
The socket will turn on, you may hear a click, and then your lamp
will come on.
import RPi.GPIO as GPIO import energenie from energenie import switch_on energenie.switch_on(1)
08 Switching the socket on and offSince you have not told the socket to turn off, it will
stay on, which means the lamp will stay on forever (or until the
bulb blows)! To turn the socket off after fi ve seconds, import the
time function at the start of your program (line 2, below), add the
command to turn off the socket (line 5). Then add a pause with
the sleep command (line 7) and fi nally turn off the lamp (line 8).
Now save and run the program.
import RPi.GPIO as GPIO import time import energenie from energenie import switch_on from energenie import switch_off
energenie.switch_on(1)time.sleep(5)energenie.switch_off(1)
09 Creating a web-based applicationIt is possible to augment this hack so that you can turn
the lamp on and off from a mobile device such as your phone,
laptop or tablet. This makes the whole project more impressive,
slick and fun. The fi rst step is to set up your Raspberry Pi as a
web server which will host and display a web page with the ON /
OFF option. These buttons are interactive and control the socket.
Open the LX Terminal and install pip and Flask:
sudo apt-get install pip sudo pip install flask
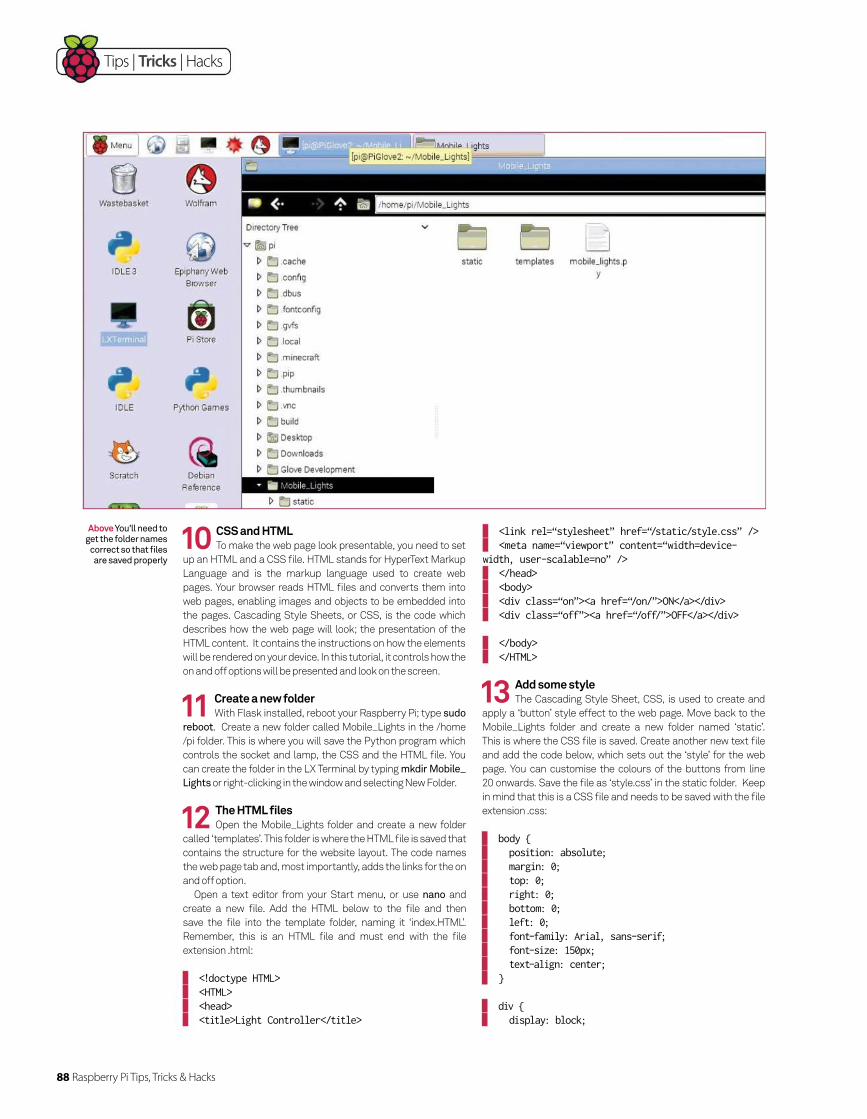
Tips | Tricks | Hacks
88 Raspberry Pi Tips, Tricks & Hacks
10 CSS and HTMLTo make the web page look presentable, you need to set
up an HTML and a CSS file. HTML stands for HyperText Markup
Language and is the markup language used to create web
pages. Your browser reads HTML files and converts them into
web pages, enabling images and objects to be embedded into
the pages. Cascading Style Sheets, or CSS, is the code which
describes how the web page will look; the presentation of the
HTML content. It contains the instructions on how the elements
will be rendered on your device. In this tutorial, it controls how the
on and off options will be presented and look on the screen.
11 Create a new folder With Flask installed, reboot your Raspberry Pi; type sudo
reboot. Create a new folder called Mobile_Lights in the /home
/pi folder. This is where you will save the Python program which
controls the socket and lamp, the CSS and the HTML file. You
can create the folder in the LX Terminal by typing mkdir Mobile_
Lights or right-clicking in the window and selecting New Folder.
<link rel=“stylesheet” href=“/static/style.css” /> <meta name=“viewport” content=“width=device-width, user-scalable=no” /> </head> <body> <div class=“on”><a href=“/on/”>ON</a></div> <div class=“off”><a href=“/off/”>OFF</a></div>
</body> </HTML>
Above You’ll need to get the folder names
correct so that files are saved properly
12 The HTML filesOpen the Mobile_Lights folder and create a new folder
called ‘templates’. This folder is where the HTML file is saved that
contains the structure for the website layout. The code names
the web page tab and, most importantly, adds the links for the on
and off option.
Open a text editor from your Start menu, or use nano and
create a new file. Add the HTML below to the file and then
save the file into the template folder, naming it ‘index.HTML’.
Remember, this is an HTML file and must end with the file
extension .html:
<!doctype HTML> <HTML> <head> <title>Light Controller</title>
13 Add some styleThe Cascading Style Sheet, CSS, is used to create and
apply a ‘button’ style effect to the web page. Move back to the
Mobile_Lights folder and create a new folder named ‘static’.
This is where the CSS file is saved. Create another new text file
and add the code below, which sets out the ‘style’ for the web
page. You can customise the colours of the buttons from line
20 onwards. Save the file as ‘style.css’ in the static folder. Keep
in mind that this is a CSS file and needs to be saved with the file
extension .css:
body { position: absolute; margin: 0; top: 0; right: 0; bottom: 0; left: 0; font-family: Arial, sans-serif; font-size: 150px; text-align: center; }
div { display: block;
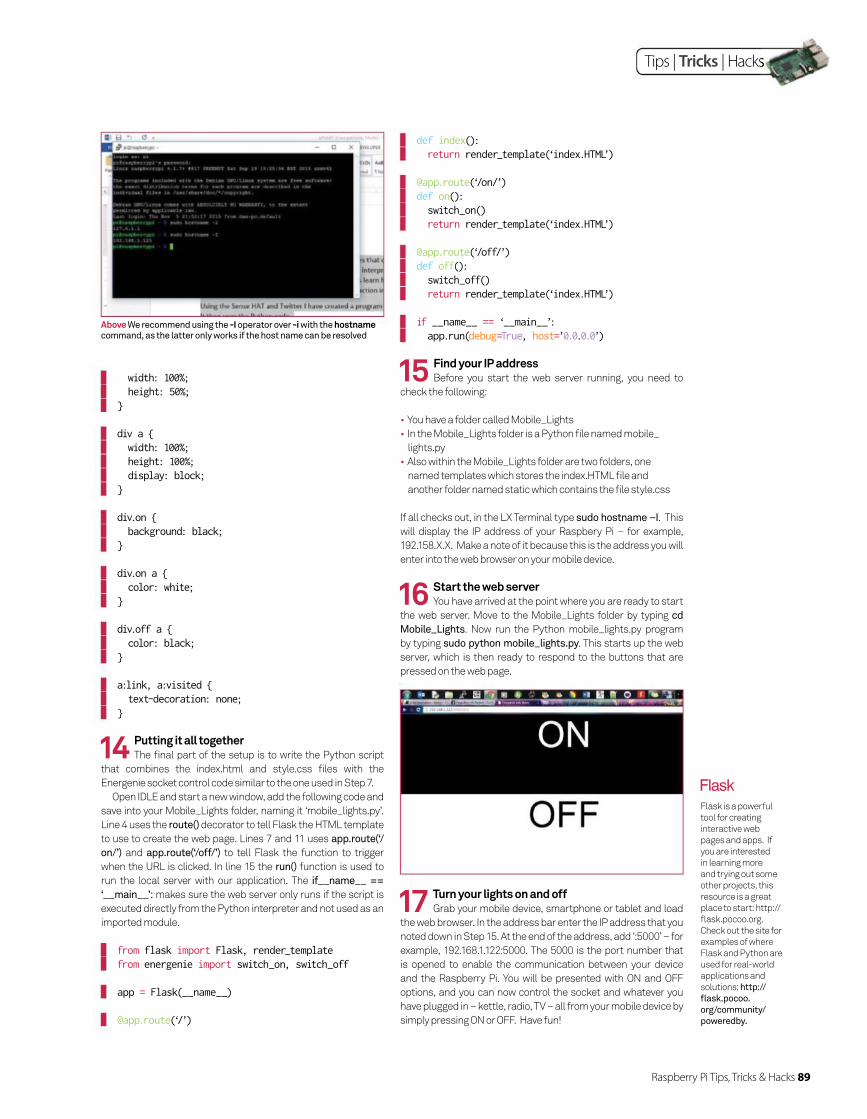
Raspberry Pi Tips, Tricks & Hacks 89
Tips | Tricks | Hacks
width: 100%; height: 50%; }
div a { width: 100%; height: 100%; display: block; }
div.on { background: black; }
div.on a { color: white; }
div.off a { color: black; }
a:link, a:visited { text-decoration: none; }
def index(): return render_template(‘index.HTML’)
@app.route(‘/on/’) def on(): switch_on() return render_template(‘index.HTML’)
@app.route(‘/off/’) def off(): switch_off() return render_template(‘index.HTML’)
if __name__ == ‘__main__’: app.run(debug=True, host=’0.0.0.0’)
15 Find your IP addressBefore you start the web server running, you need to
check the following:
• You have a folder called Mobile_Lights
• In the Mobile_Lights folder is a Python fi le named mobile_
lights.py
• Also within the Mobile_Lights folder are two folders, one
named templates which stores the index.HTML fi le and
another folder named static which contains the fi le style.css
If all checks out, in the LX Terminal type sudo hostname –I. This
will display the IP address of your Raspbery Pi – for example,
192.158.X.X. Make a note of it because this is the address you will
enter into the web browser on your mobile device.
17 Turn your lights on and offGrab your mobile device, smartphone or tablet and load
the web browser. In the address bar enter the IP address that you
noted down in Step 15. At the end of the address, add ‘:5000’ – for
example, 192.168.1.122:5000. The 5000 is the port number that
is opened to enable the communication between your device
and the Raspberry Pi. You will be presented with ON and OFF
options, and you can now control the socket and whatever you
have plugged in – kettle, radio, TV – all from your mobile device by
simply pressing ON or OFF. Have fun!
16 Start the web serverYou have arrived at the point where you are ready to start
the web server. Move to the Mobile_Lights folder by typing cd
Mobile_Lights. Now run the Python mobile_lights.py program
by typing sudo python mobile_lights.py. This starts up the web
server, which is then ready to respond to the buttons that are
pressed on the web page.
Flask is a powerful
tool for creating
interactive web
pages and apps. If
you are interested
in learning more
and trying out some
other projects, this
resource is a great
place to start: http://
fl ask.pocoo.org.
Check out the site for
examples of where
Flask and Python are
used for real-world
applications and
solutions: http://
fl ask.pocoo.
org/community/
poweredby.
Flask
Above We recommend using the -I operator over -i with the hostname command, as the latter only works if the host name can be resolved
14 Putting it all togetherThe fi nal part of the setup is to write the Python script
that combines the index.html and style.css fi les with the
Energenie socket control code similar to the one used in Step 7.
Open IDLE and start a new window, add the following code and
save into your Mobile_Lights folder, naming it ‘mobile_lights.py’.
Line 4 uses the route() decorator to tell Flask the HTML template
to use to create the web page. Lines 7 and 11 uses app.route(‘/
on/’) and app.route(‘/off/’) to tell Flask the function to trigger
when the URL is clicked. In line 15 the run() function is used to
run the local server with our application. The if__name__ ==
‘__main__’: makes sure the web server only runs if the script is
executed directly from the Python interpreter and not used as an
imported module.
from flask import Flask, render_template from energenie import switch_on, switch_off
app = Flask(__name__)
@app.route(‘/’)

90 Raspberry Pi Tips, Tricks & Hacks
Tips | Tricks | Hacks
Get your favourite shows and video podcasts streamed automatically to your TV with Miro
Stream internet TV to your Raspberry Pi
Finding the content you’re interested in viewing can take a while. Whether you’re looking for internet TV stations,
video podcasts, audio podcasts or shows syndicated online,
taking the time to fi nd and download them can be slow going,
particularly if you have a busy lifestyle. You might even have no
time to watch after you’ve waited for the download.
Thanks to the Miro media management software, we
can automate all of this, and with the software running on
a Raspberry Pi, you can easily build a compact system for
downloading and playing back shows that you have an interest
in. We’re talking targeted TV on demand, which makes this
project ideal for staying up to date with particular news and
trends on a certain topic.
01 Set up your Pi with RaspbianSadly, Miro cannot run on Raspbian Jessie, so make sure
you’re using Wheezy, available via raspberrypi.org/downloads
/raspbian. Ensure your Pi is connected to a TV or display via HDMI.
03 Set Miro to launch at startupMake sure Miro app is confi gured to launch at startup.
Open File>Preferences>General and check ‘Automatically run
Miro when I log in’ and ‘When starting up Miro remember what
screen I was on when I last quit’. Also set your Pi to boot into X
using the raspi-confi g utility.
What you’ll need Raspbian Wheezy
HDMI cable
Monitor/TV display
02 Install MiroWith Wheezy fl ashed to your SD card and your Pi
booted up, open Terminal and enter:
sudo apt-get install miro
Installation will take a few moments. Once complete, you’ll
fi nd Miro in Menu>Sound and Video. Click it to get started.
As Miro is a desktop application, you’ll need your mouse and
keyboard connected to confi gure it.

Raspberry Pi Tips, Tricks & Hacks 91
Tips | Tricks | Hacks
05 Confi gure playback settingsMove now to the Playback tab, and check Play media
in Miro. This limits reliance on other apps, which may drain
resources. You should also click the Play video and audio
items one after another radio button, and under Resume
Playback, check the fi rst and third items.
04 Check for contentSwitch to the Podcasts tab and place a check in
the box labelled ‘Show videos from podcasts in the Videos
section’. On the right-hand side of the window, set your
preferred frequency for checking for new content. Miro will
poll your favourite websites and feeds based on this setting.
Left You can subscribe to all sorts of content, from internet TV channels to news podcasts
The more links you add, the more regularly updated content will be downloaded to your media manager
06 Source videos and podcastsWith Miro set up to play back the video and audio
content you want to enjoy, it’s time to fi nd some! The best way
to do this is to just check the websites that you regularly use
for video and audio podcasts (preferably the former) and then
copy the XML link.
It is tempting to set
a regular frequency
for your content
checking in File>
Preferences>
Podcasts, but note
that checking too
regularly is going to
result in resources
being hogged
temporarily, which
may result in an
interruption if you
happen to be actually
watching something
when Miro checks for
new content. Limit
polling to hourly or
daily checks.
Checking for new content
09 Avoid YouTubeAs good a solution as Miro is to building a video
podcast streaming center, displaying material that you’re
interested in on demand, it’s sadly just no good for videos
on YouTube. This doesn’t really restrict you too much as
there are plenty of other media outlets to cover, but it’s
worth mentioning if you’re a frequent YouTube watcher. This
is a shame, but shouldn’t impact the way you use it – your
Raspberry Pi now downloads focused content on demand!
08 First time useRemember earlier when we instructed Miro to behave
a particular way upon launch? It’s time to set that behaviour
now, by opening the Videos view in the left-hand pane and
playing the fi rst video. Each time you boot your system, Miro
will jump to this view and begin playing.
07 Add podcast feedsIn Miro, open up File>Add Podcast and then paste the
podcast feed URL into the dialog that appears, clicking Create
Podcast when you’re done.
The more links you add, the more regularly updated content
will be downloaded to your Pi-powered Miro media manager,
ready to watch on demand.
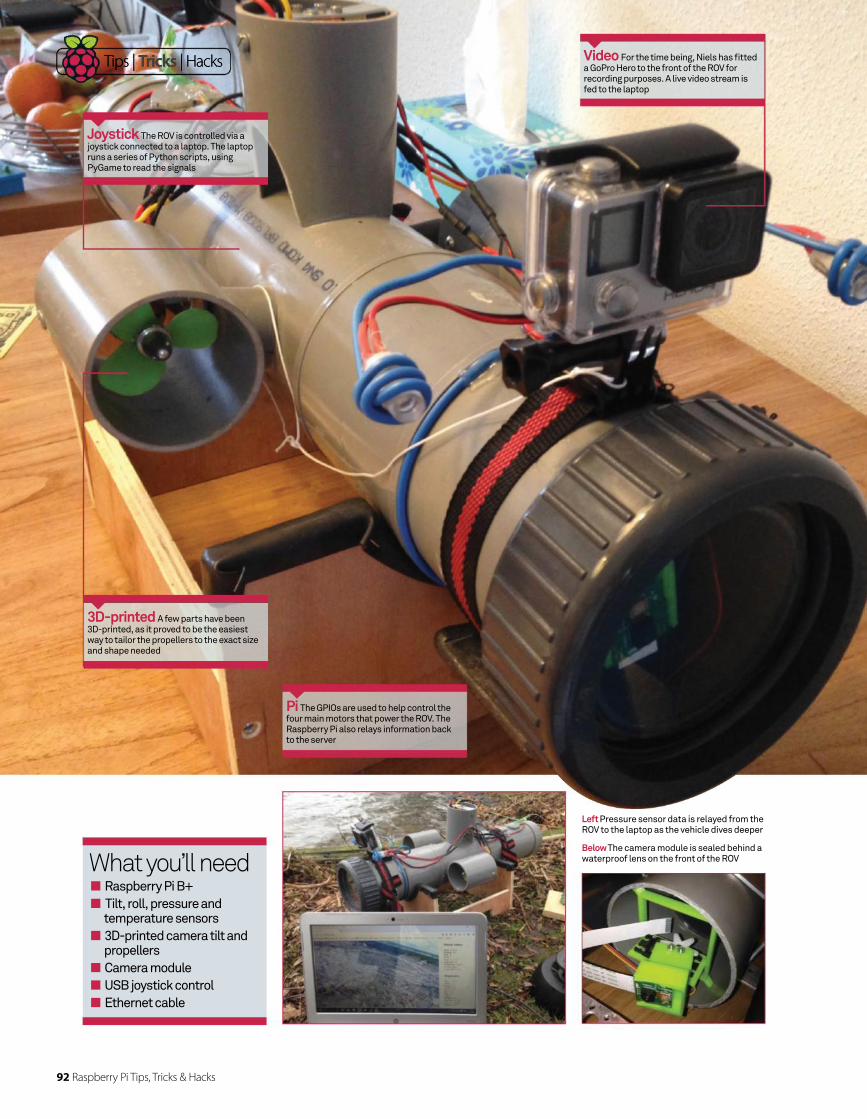
92 Raspberry Pi Tips, Tricks & Hacks
Tips | Tricks | Hacks
What you’ll need Raspberry Pi B+
Tilt, roll, pressure and temperature sensors
3D-printed camera tilt and propellers
Camera module
USB joystick control
Ethernet cable
Left Pressure sensor data is relayed from the ROV to the laptop as the vehicle dives deeper
Below The camera module is sealed behind a waterproof lens on the front of the ROV
Tips | Tricks | Hacks Video For the time being, Niels has fi tted a GoPro Hero to the front of the ROV for recording purposes. A live video stream is fed to the laptop
Joystick The ROV is controlled via a joystick connected to a laptop. The laptop runs a series of Python scripts, using PyGame to read the signals
3D-printed A few parts have been 3D-printed, as it proved to be the easiest way to tailor the propellers to the exact size and shape needed
Pi The GPIOs are used to help control the four main motors that power the ROV. The Raspberry Pi also relays information back to the server
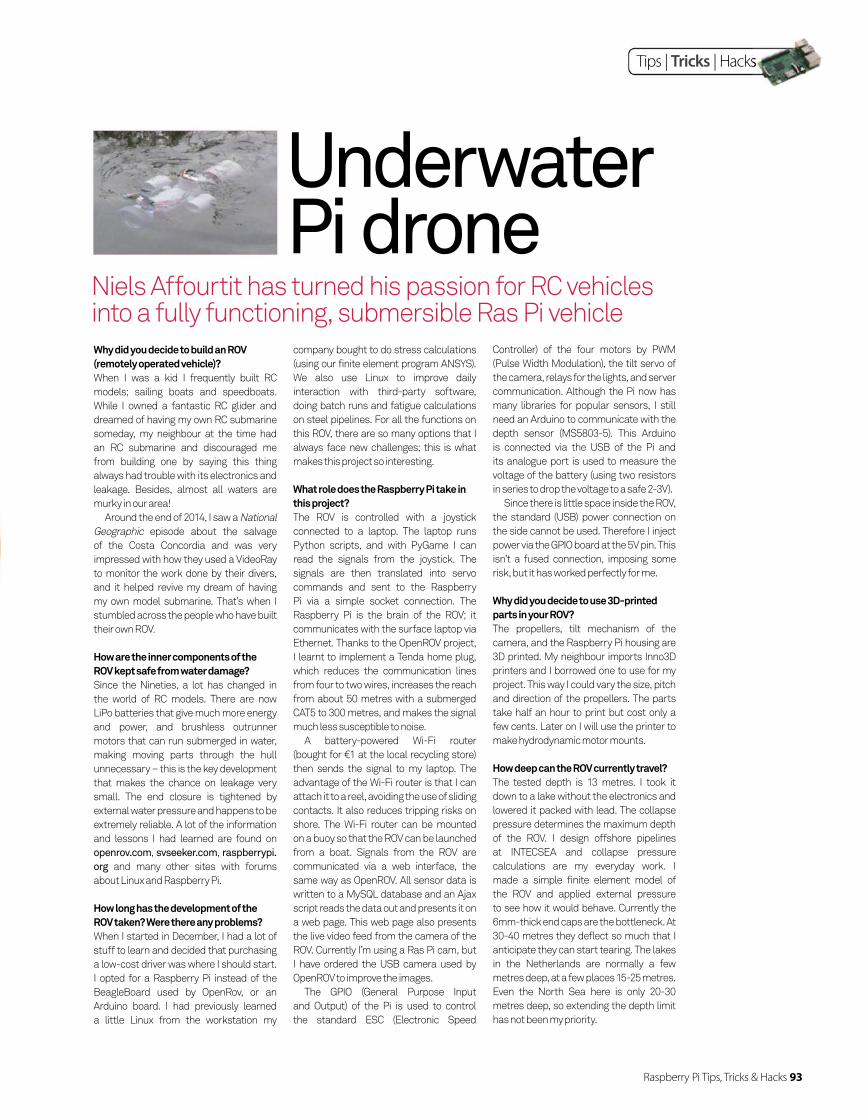
Raspberry Pi Tips, Tricks & Hacks 93
Tips | Tricks | Hacks
Underwater Pi drone
Niels Affourtit has turned his passion for RC vehicles into a fully functioning, submersible Ras Pi vehicle
Why did you decide to build an ROV (remotely operated vehicle)?When I was a kid I frequently built RC
models; sailing boats and speedboats.
While I owned a fantastic RC glider and
dreamed of having my own RC submarine
someday, my neighbour at the time had
an RC submarine and discouraged me
from building one by saying this thing
always had trouble with its electronics and
leakage. Besides, almost all waters are
murky in our area!
Around the end of 2014, I saw a National
Geographic episode about the salvage
of the Costa Concordia and was very
impressed with how they used a VideoRay
to monitor the work done by their divers,
and it helped revive my dream of having
my own model submarine. That’s when I
stumbled across the people who have built
their own ROV.
How are the inner components of the ROV kept safe from water damage? Since the Nineties, a lot has changed in
the world of RC models. There are now
LiPo batteries that give much more energy
and power, and brushless outrunner
motors that can run submerged in water,
making moving parts through the hull
unnecessary – this is the key development
that makes the chance on leakage very
small. The end closure is tightened by
external water pressure and happens to be
extremely reliable. A lot of the information
and lessons I had learned are found on
openrov.com, svseeker.com, raspberrypi.
org and many other sites with forums
about Linux and Raspberry Pi.
How long has the development of the ROV taken? Were there any problems?When I started in December, I had a lot of
stuff to learn and decided that purchasing
a low-cost driver was where I should start.
I opted for a Raspberry Pi instead of the
BeagleBoard used by OpenRov, or an
Arduino board. I had previously learned
a little Linux from the workstation my
company bought to do stress calculations
(using our finite element program ANSYS).
We also use Linux to improve daily
interaction with third-party software,
doing batch runs and fatigue calculations
on steel pipelines. For all the functions on
this ROV, there are so many options that I
always face new challenges; this is what
makes this project so interesting.
What role does the Raspberry Pi take in this project? The ROV is controlled with a joystick
connected to a laptop. The laptop runs
Python scripts, and with PyGame I can
read the signals from the joystick. The
signals are then translated into servo
commands and sent to the Raspberry
Pi via a simple socket connection. The
Raspberry Pi is the brain of the ROV; it
communicates with the surface laptop via
Ethernet. Thanks to the OpenROV project,
I learnt to implement a Tenda home plug,
which reduces the communication lines
from four to two wires, increases the reach
from about 50 metres with a submerged
CAT5 to 300 metres, and makes the signal
much less susceptible to noise.
A battery-powered Wi-Fi router
(bought for €1 at the local recycling store)
then sends the signal to my laptop. The
advantage of the Wi-Fi router is that I can
attach it to a reel, avoiding the use of sliding
contacts. It also reduces tripping risks on
shore. The Wi-Fi router can be mounted
on a buoy so that the ROV can be launched
from a boat. Signals from the ROV are
communicated via a web interface, the
same way as OpenROV. All sensor data is
written to a MySQL database and an Ajax
script reads the data out and presents it on
a web page. This web page also presents
the live video feed from the camera of the
ROV. Currently I’m using a Ras Pi cam, but
I have ordered the USB camera used by
OpenROV to improve the images.
The GPIO (General Purpose Input
and Output) of the Pi is used to control
the standard ESC (Electronic Speed
Controller) of the four motors by PWM
(Pulse Width Modulation), the tilt servo of
the camera, relays for the lights, and server
communication. Although the Pi now has
many libraries for popular sensors, I still
need an Arduino to communicate with the
depth sensor (MS5803-5). This Arduino
is connected via the USB of the Pi and
its analogue port is used to measure the
voltage of the battery (using two resistors
in series to drop the voltage to a safe 2-3V).
Since there is little space inside the ROV,
the standard (USB) power connection on
the side cannot be used. Therefore I inject
power via the GPIO board at the 5V pin. This
isn’t a fused connection, imposing some
risk, but it has worked perfectly for me.
Why did you decide to use 3D-printed parts in your ROV?The propellers, tilt mechanism of the
camera, and the Raspberry Pi housing are
3D printed. My neighbour imports Inno3D
printers and I borrowed one to use for my
project. This way I could vary the size, pitch
and direction of the propellers. The parts
take half an hour to print but cost only a
few cents. Later on I will use the printer to
make hydrodynamic motor mounts.
How deep can the ROV currently travel?The tested depth is 13 metres. I took it
down to a lake without the electronics and
lowered it packed with lead. The collapse
pressure determines the maximum depth
of the ROV. I design offshore pipelines
at INTECSEA and collapse pressure
calculations are my everyday work. I
made a simple finite element model of
the ROV and applied external pressure
to see how it would behave. Currently the
6mm-thick end caps are the bottleneck. At
30-40 metres they deflect so much that I
anticipate they can start tearing. The lakes
in the Netherlands are normally a few
metres deep, at a few places 15-25 metres.
Even the North Sea here is only 20-30
metres deep, so extending the depth limit
has not been my priority.
94 Raspberry Pi Tips, Tricks & Hacks
Tips | Tricks | Hacks
Use your Raspberry Pi as a wireless access point and route traffi c anonymously
Anonymise your web traffi c with a Pi Tor router
Are you concerned about your online privacy? Suspect that
the NSA or GCHQ are tracking you online? Or are you simply
anxious about advertising networks targeting their ads at you?
If this is the case, or you’re simply on the lookout for a new
project, then setting your Raspberry Pi up as an anonymising
Tor wireless access point is a good way to save time and effort
setting up Tor on all of your PCs and mobile devices.
If you’re unaware, Tor is free software that enables
anonymity online and routes internet traffi c through a
worldwide anonymising network of over 7000 relays. By doing
this, your location and website use can be concealed from
techniques such as traffi c analysis and network surveillance.
This is all about protecting your privacy by making your
visits to websites, instant messages, emails and more
diffi cult to trace, and can be set up on your Raspberry Pi with
a wireless dongle (or a Raspberry Pi 3), Ethernet cable, and a
bit of confi guration.
01 Connect everythingWith everything connected and switched on, you can
begin confi guring the Pi router. So begin by plugging one end of
the Ethernet cable into your Raspberry Pi and the other into a
spare port in your router.
If you’re using a pre-2016 model of the Raspberry Pi, connect
a wireless dongle to the computer. Raspberry Pi 3 owners don’t
need to do this as the computer has built-in wireless networking.
02 Remotely confi gure with SSHThe next step is to connect to your Raspberry Pi via
your PC, and you can do this simply using SSH. (If this isn’t an
option, however, continue the rest of the tutorial with a monitor
connected to your Raspberry Pi, with a mouse and keyboard.) To
use SSH, open a terminal and enter:
Left Once you’ve set your Tor router
up, you can browse anonymously from your smartphone if you connect to that
router’s Wi-Fi signal
What you’ll need Ethernet cable
Wireless router
USB WiFi adaptor or
Raspberry Pi 3
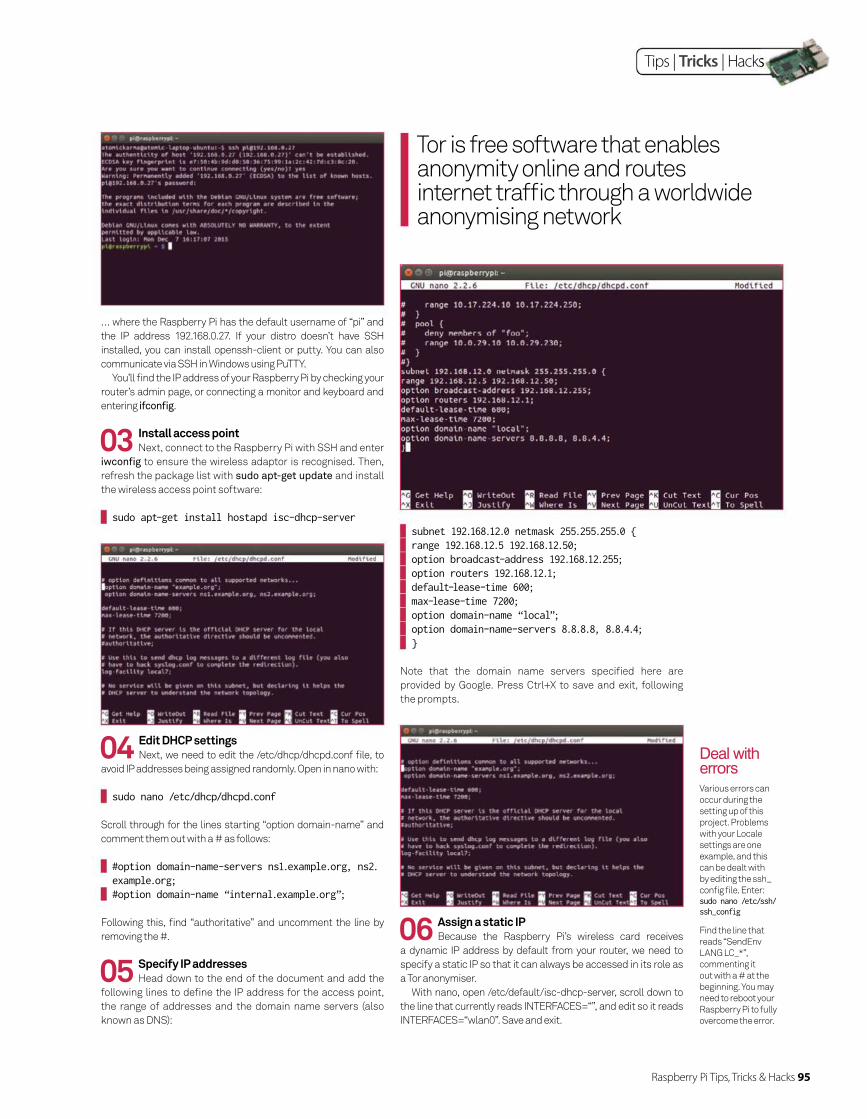
Raspberry Pi Tips, Tricks & Hacks 95
Tips | Tricks | Hacks
… where the Raspberry Pi has the default username of “pi” and
the IP address 192.168.0.27. If your distro doesn’t have SSH
installed, you can install openssh-client or putty. You can also
communicate via SSH in Windows using PuTTY.
You’ll fi nd the IP address of your Raspberry Pi by checking your
router’s admin page, or connecting a monitor and keyboard and
entering ifconfi g.
03 Install access pointNext, connect to the Raspberry Pi with SSH and enter
iwconfi g to ensure the wireless adaptor is recognised. Then,
refresh the package list with sudo apt-get update and install
the wireless access point software:
sudo apt-get install hostapd isc-dhcp-server
04 Edit DHCP settingsNext, we need to edit the /etc/dhcp/dhcpd.conf fi le, to
avoid IP addresses being assigned randomly. Open in nano with:
sudo nano /etc/dhcp/dhcpd.conf
Scroll through for the lines starting “option domain-name” and
comment them out with a # as follows:
#option domain-name-servers ns1.example.org, ns2.example.org;
#option domain-name “internal.example.org”;
Following this, fi nd “authoritative” and uncomment the line by
removing the #.
05 Specify IP addressesHead down to the end of the document and add the
following lines to defi ne the IP address for the access point,
the range of addresses and the domain name servers (also
known as DNS):
subnet 192.168.12.0 netmask 255.255.255.0 { range 192.168.12.5 192.168.12.50; option broadcast-address 192.168.12.255; option routers 192.168.12.1; default-lease-time 600; max-lease-time 7200; option domain-name “local”; option domain-name-servers 8.8.8.8, 8.8.4.4; }
Note that the domain name servers specifi ed here are
provided by Google. Press Ctrl+X to save and exit, following
the prompts.
06 Assign a static IPBecause the Raspberry Pi’s wireless card receives
a dynamic IP address by default from your router, we need to
specify a static IP so that it can always be accessed in its role as
a Tor anonymiser.
With nano, open /etc/default/isc-dhcp-server, scroll down to
the line that currently reads INTERFACES=“”, and edit so it reads
INTERFACES=“wlan0”. Save and exit.
Various errors can
occur during the
setting up of this
project. Problems
with your Locale
settings are one
example, and this
can be dealt with
by editing the ssh_
confi g fi le. Enter:sudo nano /etc/ssh/ssh_config
Find the line that
reads “SendEnv
LANG LC_*”,
commenting it
out with a # at the
beginning. You may
need to reboot your
Raspberry Pi to fully
overcome the error.
Deal with errors
Tor is free software that enables anonymity online and routes internet traffi c through a worldwide anonymising network
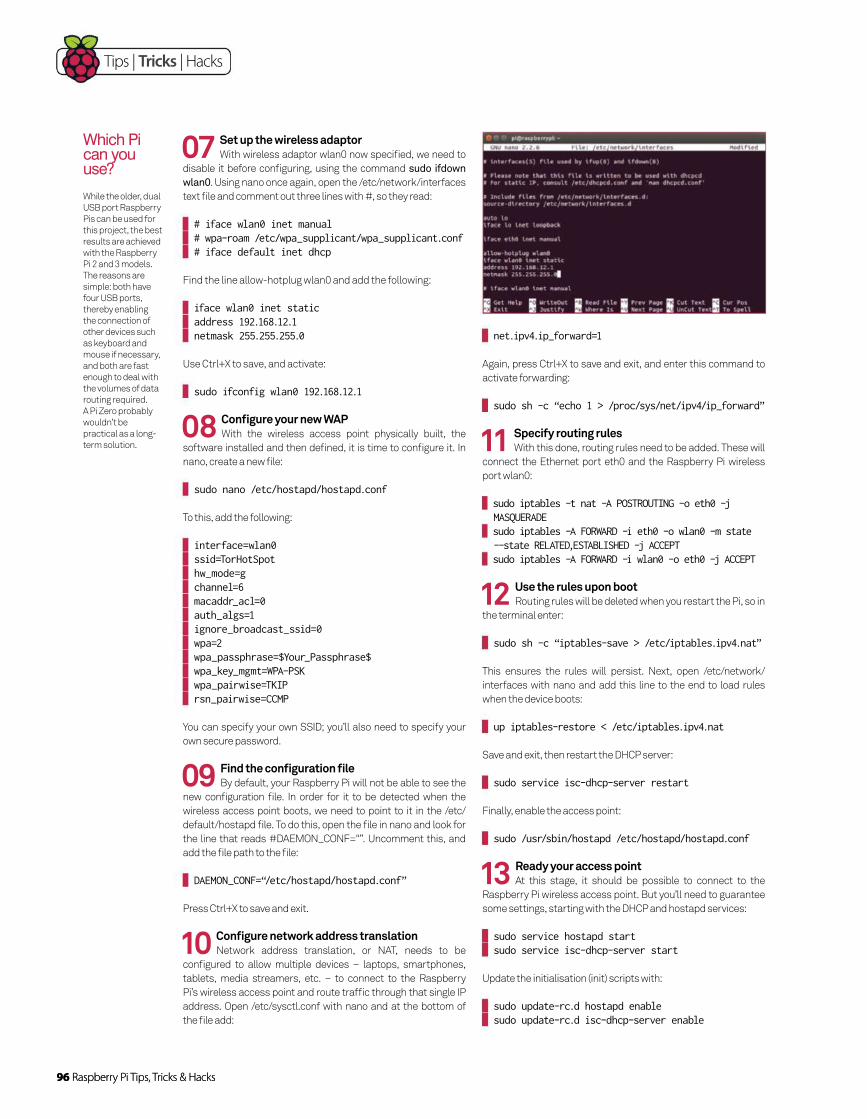
96 Raspberry Pi Tips, Tricks & Hacks
Tips | Tricks | Hacks
96 Raspberry Pi Tips, Tricks & Hacks
07 Set up the wireless adaptorWith wireless adaptor wlan0 now specifi ed, we need to
disable it before confi guring, using the command sudo ifdown
wlan0. Using nano once again, open the /etc/network/interfaces
text fi le and comment out three lines with #, so they read:
# iface wlan0 inet manual # wpa-roam /etc/wpa_supplicant/wpa_supplicant.conf # iface default inet dhcp
Find the line allow-hotplug wlan0 and add the following:
iface wlan0 inet static address 192.168.12.1 netmask 255.255.255.0
Use Ctrl+X to save, and activate:
sudo ifconfig wlan0 192.168.12.1
08 Confi gure your new WAPWith the wireless access point physically built, the
software installed and then defi ned, it is time to confi gure it. In
nano, create a new fi le:
sudo nano /etc/hostapd/hostapd.conf
To this, add the following:
interface=wlan0 ssid=TorHotSpot hw_mode=g channel=6 macaddr_acl=0 auth_algs=1 ignore_broadcast_ssid=0 wpa=2 wpa_passphrase=$Your_Passphrase$ wpa_key_mgmt=WPA-PSK wpa_pairwise=TKIP rsn_pairwise=CCMP
You can specify your own SSID; you’ll also need to specify your
own secure password.
09 Find the confi guration fi leBy default, your Raspberry Pi will not be able to see the
new confi guration fi le. In order for it to be detected when the
wireless access point boots, we need to point to it in the /etc/
default/hostapd fi le. To do this, open the fi le in nano and look for
the line that reads #DAEMON_CONF=“”. Uncomment this, and
add the fi le path to the fi le:
DAEMON_CONF=“/etc/hostapd/hostapd.conf”
Press Ctrl+X to save and exit.
10 Confi gure network address translationNetwork address translation, or NAT, needs to be
confi gured to allow multiple devices – laptops, smartphones,
tablets, media streamers, etc. – to connect to the Raspberry
Pi’s wireless access point and route traffi c through that single IP
address. Open /etc/sysctl.conf with nano and at the bottom of
the fi le add:
net.ipv4.ip_forward=1
Again, press Ctrl+X to save and exit, and enter this command to
activate forwarding:
sudo sh -c “echo 1 > /proc/sys/net/ipv4/ip_forward”
11 Specify routing rulesWith this done, routing rules need to be added. These will
connect the Ethernet port eth0 and the Raspberry Pi wireless
port wlan0:
sudo iptables -t nat -A POSTROUTING -o eth0 -j MASQUERADE
sudo iptables -A FORWARD -i eth0 -o wlan0 -m state --state RELATED,ESTABLISHED -j ACCEPT
sudo iptables -A FORWARD -i wlan0 -o eth0 -j ACCEPT
12 Use the rules upon bootRouting rules will be deleted when you restart the Pi, so in
the terminal enter:
sudo sh -c “iptables-save > /etc/iptables.ipv4.nat”
This ensures the rules will persist. Next, open /etc/network/
interfaces with nano and add this line to the end to load rules
when the device boots:
up iptables-restore < /etc/iptables.ipv4.nat
Save and exit, then restart the DHCP server:
sudo service isc-dhcp-server restart
Finally, enable the access point:
sudo /usr/sbin/hostapd /etc/hostapd/hostapd.conf
13 Ready your access pointAt this stage, it should be possible to connect to the
Raspberry Pi wireless access point. But you’ll need to guarantee
some settings, starting with the DHCP and hostapd services:
sudo service hostapd start sudo service isc-dhcp-server start
Update the initialisation (init) scripts with:
sudo update-rc.d hostapd enable sudo update-rc.d isc-dhcp-server enable
While the older, dual
USB port Raspberry
Pis can be used for
this project, the best
results are achieved
with the Raspberry
Pi 2 and 3 models.
The reasons are
simple: both have
four USB ports,
thereby enabling
the connection of
other devices such
as keyboard and
mouse if necessary,
and both are fast
enough to deal with
the volumes of data
routing required.
A Pi Zero probably
wouldn’t be
practical as a long-
term solution.
Which Pi can you use?
Raspberry Pi Tips, Tricks & Hacks 97
Tips | Tricks | Hacks
Above You could even use the Pi 3’s Bluetooth to control your smart home gadgets as well as route your web traffi c through Tor
Restart with sudo shutdown -r now, and retry the connection
from your mobile device.
14 Time to install TorAs things stand, the Raspberry Pi is a wireless access
point. But it is not anonymised yet. Reconnect via SSH and then
run sudo apt-get install tor, then open /etc/tor/torrc in nano
and add the following to instruct Tor to anonymise the wireless
access point:
Log notice file /var/log/tor/notices.log VirtualAddrNetwork 10.192.0.0/10 AutomapHostsSuffixes .onion,.exit AutomapHostsOnResolve 1 TransPort 9040 TransListenAddress 192.168.12.1 DNSPort 53 DNSListenAddress 192.168.12.1
15 Add SSH exceptionNext, fl ush the IP tables with:
sudo iptables -F sudo iptables -t nat -F
And follow this by adding an exception for SSH connections on
port 22:
sudo iptables -t nat -A PREROUTING -i wlan0 -p tcp --dport 22 -j REDIRECT --to-ports 22
These two rules enable DNS lookups and direct TCP traffi c to
Tor’s port 9040, respectively.
sudo iptables -t nat -A PREROUTING -i wlan0 -p udp --dport 53 -j REDIRECT --to-ports 53
sudo iptables -t nat -A PREROUTING -i wlan0 -p tcp --syn -j REDIRECT --to-ports 9040
Save to the NAT fi le with:
sudo sh -c “iptables-save > /etc/iptables.ipv4.nat”
16 Enable the Tor serviceAt this stage, you can enable the Tor service on your
wireless access point with:
sudo service tor start
Boot scripts can be enabled with:
sudo update-rc.d tor enable
Restart the Pi again with sudo shutdown -r now.
17 Verify Tor anonymityWith your Raspberry Pi wireless access point restarted,
it’s time to connect using a Wi-Fi enabled device, perhaps a
smartphone or laptop. As before, the connection should work
without any problems – but are you browsing anonymously?
You can fi nd out by heading to https://torproject.org from
two devices and comparing the IP addresses. If they’re different,
you’re anonymous!
NAT needs to be confi gured to allow devices to connect to the Raspberry Pi’s wireless access point
Tips | Tricks | Hacks
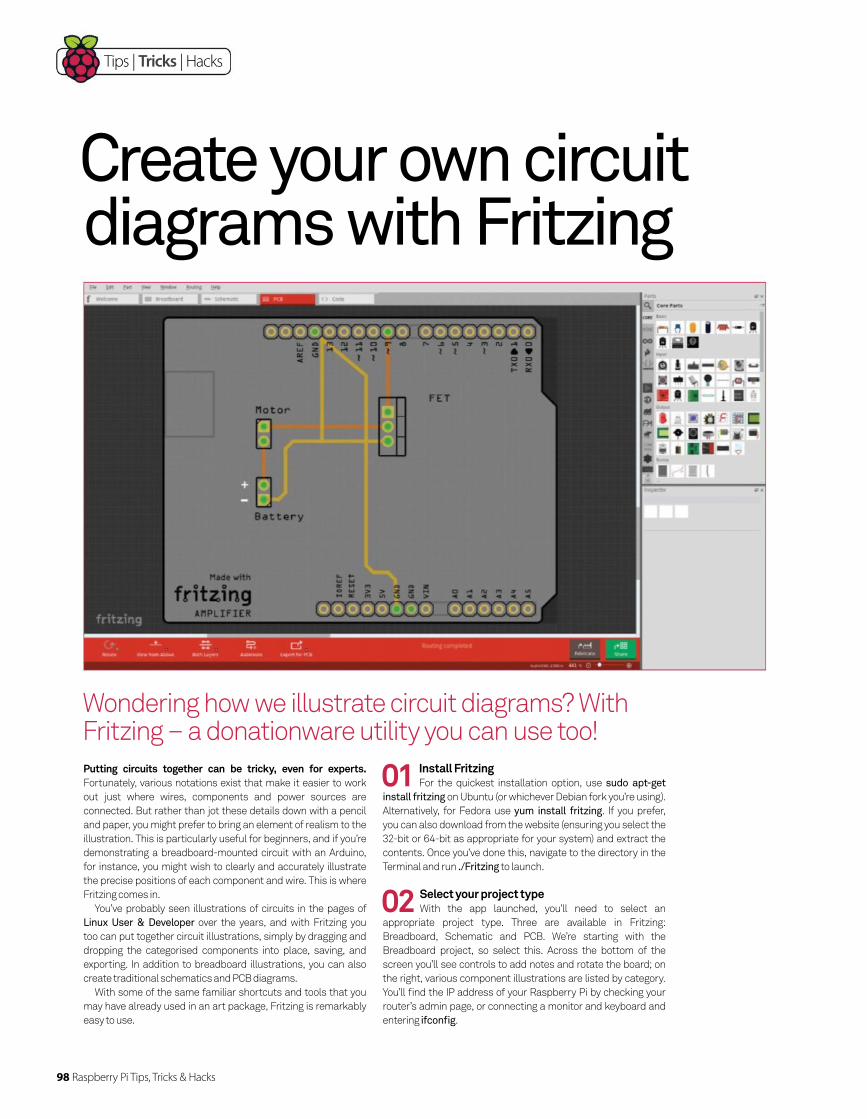
98 Raspberry Pi Tips, Tricks & Hacks
Tips | Tricks | Hacks
Wondering how we illustrate circuit diagrams? With Fritzing – a donationware utility you can use too!
Create your own circuit diagrams with Fritzing
Putting circuits together can be tricky, even for experts. Fortunately, various notations exist that make it easier to work
out just where wires, components and power sources are
connected. But rather than jot these details down with a pencil
and paper, you might prefer to bring an element of realism to the
illustration. This is particularly useful for beginners, and if you’re
demonstrating a breadboard-mounted circuit with an Arduino,
for instance, you might wish to clearly and accurately illustrate
the precise positions of each component and wire. This is where
Fritzing comes in.
You’ve probably seen illustrations of circuits in the pages of
Linux User & Developer over the years, and with Fritzing you
too can put together circuit illustrations, simply by dragging and
dropping the categorised components into place, saving, and
exporting. In addition to breadboard illustrations, you can also
create traditional schematics and PCB diagrams.
With some of the same familiar shortcuts and tools that you
may have already used in an art package, Fritzing is remarkably
easy to use.
01 Install FritzingFor the quickest installation option, use sudo apt-get
install fritzing on Ubuntu (or whichever Debian fork you’re using).
Alternatively, for Fedora use yum install fritzing. If you prefer,
you can also download from the website (ensuring you select the
32-bit or 64-bit as appropriate for your system) and extract the
contents. Once you’ve done this, navigate to the directory in the
Terminal and run ./Fritzing to launch.
02 Select your project typeWith the app launched, you’ll need to select an
appropriate project type. Three are available in Fritzing:
Breadboard, Schematic and PCB. We’re starting with the
Breadboard project, so select this. Across the bottom of the
screen you’ll see controls to add notes and rotate the board; on
the right, various component illustrations are listed by category.
You’ll find the IP address of your Raspberry Pi by checking your
router’s admin page, or connecting a monitor and keyboard and
entering ifconfig.
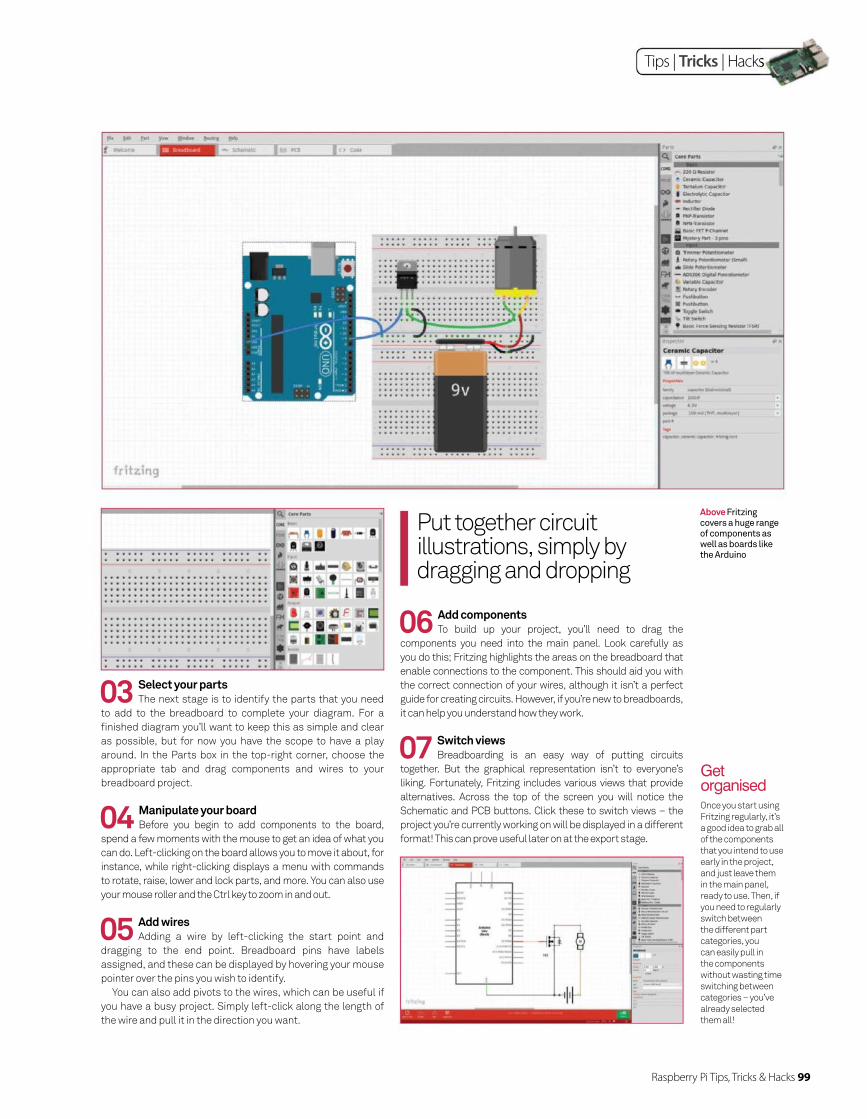
Raspberry Pi Tips, Tricks & Hacks 99
Tips | Tricks | Hacks
03 Select your partsThe next stage is to identify the parts that you need
to add to the breadboard to complete your diagram. For a
fi nished diagram you’ll want to keep this as simple and clear
as possible, but for now you have the scope to have a play
around. In the Parts box in the top-right corner, choose the
appropriate tab and drag components and wires to your
breadboard project.
04 Manipulate your boardBefore you begin to add components to the board,
spend a few moments with the mouse to get an idea of what you
can do. Left-clicking on the board allows you to move it about, for
instance, while right-clicking displays a menu with commands
to rotate, raise, lower and lock parts, and more. You can also use
your mouse roller and the Ctrl key to zoom in and out.
05 Add wiresAdding a wire by left-clicking the start point and
dragging to the end point. Breadboard pins have labels
assigned, and these can be displayed by hovering your mouse
pointer over the pins you wish to identify.
You can also add pivots to the wires, which can be useful if
you have a busy project. Simply left-click along the length of
the wire and pull it in the direction you want.
06 Add componentsTo build up your project, you’ll need to drag the
components you need into the main panel. Look carefully as
you do this; Fritzing highlights the areas on the breadboard that
enable connections to the component. This should aid you with
the correct connection of your wires, although it isn’t a perfect
guide for creating circuits. However, if you’re new to breadboards,
it can help you understand how they work.
07 Switch viewsBreadboarding is an easy way of putting circuits
together. But the graphical representation isn’t to everyone’s
liking. Fortunately, Fritzing includes various views that provide
alternatives. Across the top of the screen you will notice the
Schematic and PCB buttons. Click these to switch views – the
project you’re currently working on will be displayed in a different
format! This can prove useful later on at the export stage.
Once you start using
Fritzing regularly, it’s
a good idea to grab all
of the components
that you intend to use
early in the project,
and just leave them
in the main panel,
ready to use. Then, if
you need to regularly
switch between
the different part
categories, you
can easily pull in
the components
without wasting time
switching between
categories – you’ve
already selected
them all!
Get organised
Put together circuit illustrations, simply by dragging and dropping
Above Fritzing covers a huge range of components as well as boards like the Arduino

100 Raspberry Pi Tips, Tricks & Hacks
Tips | Tricks | Hacks
In the Parts panel the
second tab is empty
when you first run
Fritzing. Labelled
MINE, this is a place
where you can collect
the components
and boards you use
regularly. To add
preferred parts to
this list, ready for
instant access the
next time you create
a Fritzing diagram,
browse to the
relevant tab, find the
component you want,
and drag and drop it
onto the MINE tab.
Mine your parts
Right You can convert your
diagrams into proper schematics, too
08 Incorporate other boardsSo far we’ve been playing around with the breadboard
on its own. But what if you were developing a project with an
Arduino and a breadboard-based circuit?
The answer is in the Parts panel on the right. Select the
Arduino symbol (a ‘–’ and ‘+’ wrapped in a Möbius strip) and drag
the corresponding Arduino board into the main panel, alongside
your breadboard. A selection of Arduino shields is also included.
09 Familiarize yourself with PartsIn fact, there are so many parts that you can use in a
Fritzing diagram that it is quite easy to find yourself bewildered
by the choices available to you.
Use the tabs on the left column of the Parts panel to find the
items you’re looking for. You’ll find parts for Arduino, Intel Edison
and Galileo, SparkFun and many more.
As you mouseover or select each part, details are displayed in
the Inspector panel.
10 Manipulate other viewsAs you switch through to the alternative views
(Schematic and PCB) you’ll find that the options for moving
things around are limited, although still possible.
For instance, in the illustration above, while the rectangle
representing an Arduino can be moved around with a simple
left-click and drag, the circuit originally built on a breadboard
cannot. Instead, it is merely a collection of components that are
connected with wires.
11 Playing with the PCB viewSimilarly, the PCB view offers both a different visual
experience, and as such how you move things around also
changes. Rather than the Arduino and breadboard circuit being
presented as separate entities, in this view the circuit sits atop
of the Arduino.
Adjusting the position of components is trickier here, but
this presents a more intimate look at just how the parts on the
breadboard are connected to the Arduino.
12 Use the gridKeeping your project tidy is important, more so your
Fritzing diagram. To help here, enable the View > Align to Grid
and Show Grid options, which will assist with repositioning
your boards. How far the selected items move will depend
on which of the three views you are currently using, and your
zoom level. Repositioning is via the mouse, and fine-tuning
using the arrow keys.
Fritzing helps you to create diagrams; it can also inform you if there is a problem
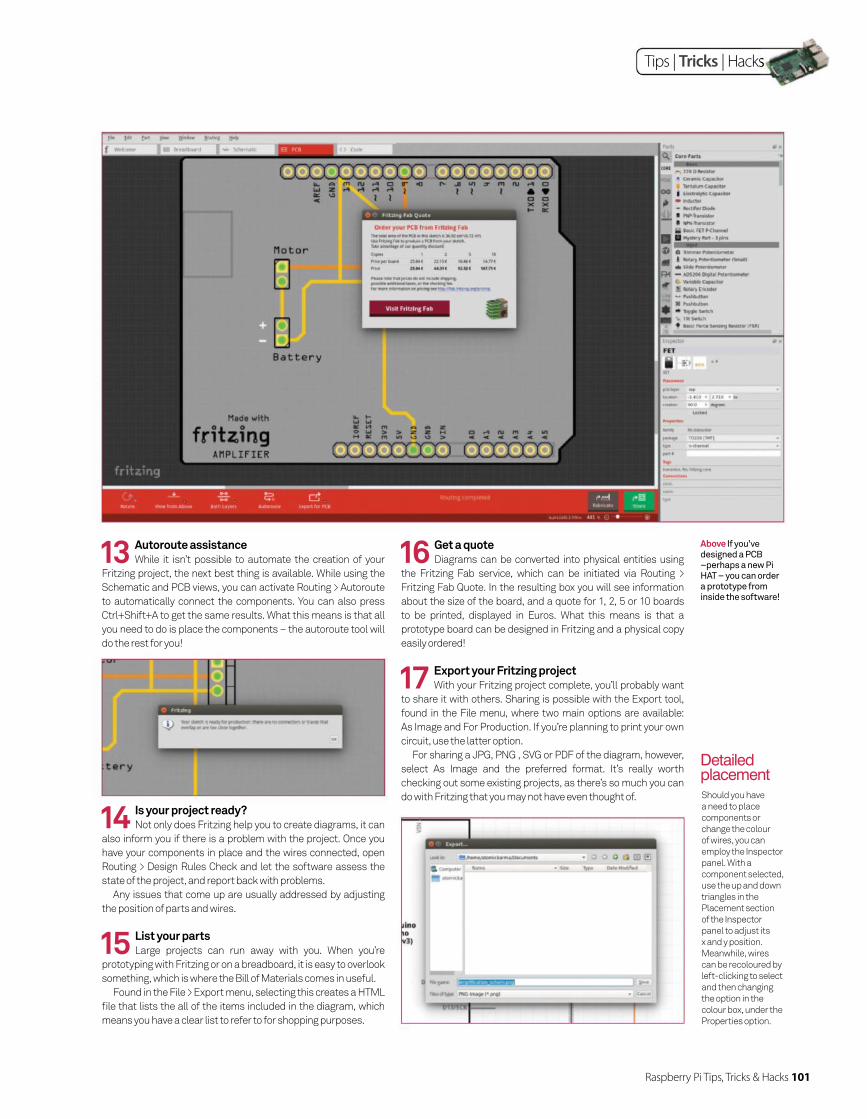
Raspberry Pi Tips, Tricks & Hacks 101
Tips | Tricks | Hacks
Should you have
a need to place
components or
change the colour
of wires, you can
employ the Inspector
panel. With a
component selected,
use the up and down
triangles in the
Placement section
of the Inspector
panel to adjust its
x and y position.
Meanwhile, wires
can be recoloured by
left-clicking to select
and then changing
the option in the
colour box, under the
Properties option.
Detailed placement
Above If you’ve designed a PCB –perhaps a new Pi HAT – you can order a prototype from inside the software!
13 Autoroute assistanceWhile it isn’t possible to automate the creation of your
Fritzing project, the next best thing is available. While using the
Schematic and PCB views, you can activate Routing > Autoroute
to automatically connect the components. You can also press
Ctrl+Shift+A to get the same results. What this means is that all
you need to do is place the components – the autoroute tool will
do the rest for you!
14 Is your project ready?Not only does Fritzing help you to create diagrams, it can
also inform you if there is a problem with the project. Once you
have your components in place and the wires connected, open
Routing > Design Rules Check and let the software assess the
state of the project, and report back with problems.
Any issues that come up are usually addressed by adjusting
the position of parts and wires.
15 List your partsLarge projects can run away with you. When you’re
prototyping with Fritzing or on a breadboard, it is easy to overlook
something, which is where the Bill of Materials comes in useful.
Found in the File > Export menu, selecting this creates a HTML
fi le that lists the all of the items included in the diagram, which
means you have a clear list to refer to for shopping purposes.
16 Get a quoteDiagrams can be converted into physical entities using
the Fritzing Fab service, which can be initiated via Routing >
Fritzing Fab Quote. In the resulting box you will see information
about the size of the board, and a quote for 1, 2, 5 or 10 boards
to be printed, displayed in Euros. What this means is that a
prototype board can be designed in Fritzing and a physical copy
easily ordered!
17 Export your Fritzing projectWith your Fritzing project complete, you’ll probably want
to share it with others. Sharing is possible with the Export tool,
found in the File menu, where two main options are available:
As Image and For Production. If you’re planning to print your own
circuit, use the latter option.
For sharing a JPG, PNG , SVG or PDF of the diagram, however,
select As Image and the preferred format. It’s really worth
checking out some existing projects, as there’s so much you can
do with Fritzing that you may not have even thought of.
102 Raspberry Pi Tips, Tricks & Hacks
Tips | Tricks | Hacks
Use your Raspberry Pi as a desktop replacement PC thanks to the increased power of the Raspberry Pi 2
Make a Pi 2 desktop PC
The Raspberry Pi 2’s increased power over its predecessor is well-documented by now. More CPU cores and more RAM
making it six times faster is an impressive number, and you
can see the actual changes that it makes to the experience.
This power actually enables you to conduct a very simple
project that was just out of reach for the original Raspberry Pi:
a Raspberry Pi desktop PC.
All the components for it were available, but the Pi was just
a little too slow to properly give a fl uid desktop experience.
Now with the improved resources, many of the restrictions
are gone – enough of them to be able to build a Pi desktop. So
grab a Pi 2 and we’ll get started.
01 Get RaspbianWe will be using Raspbian for our desktop Pi. Not only
is it simple to obtain and easy to use, but it is supported by the
Pi Foundation and community, which means it’s going to be
the most fl exible operating system with the most choices for a
desktop. Download it from: www.raspberrypi.org/downloads.
What you’ll need Raspberry Pi 2
Raspbian
raspberrypi.org/downloads
Keyboard
Mouse
Wireless dongle
Monitor
Case
Powered USB hub (optional)
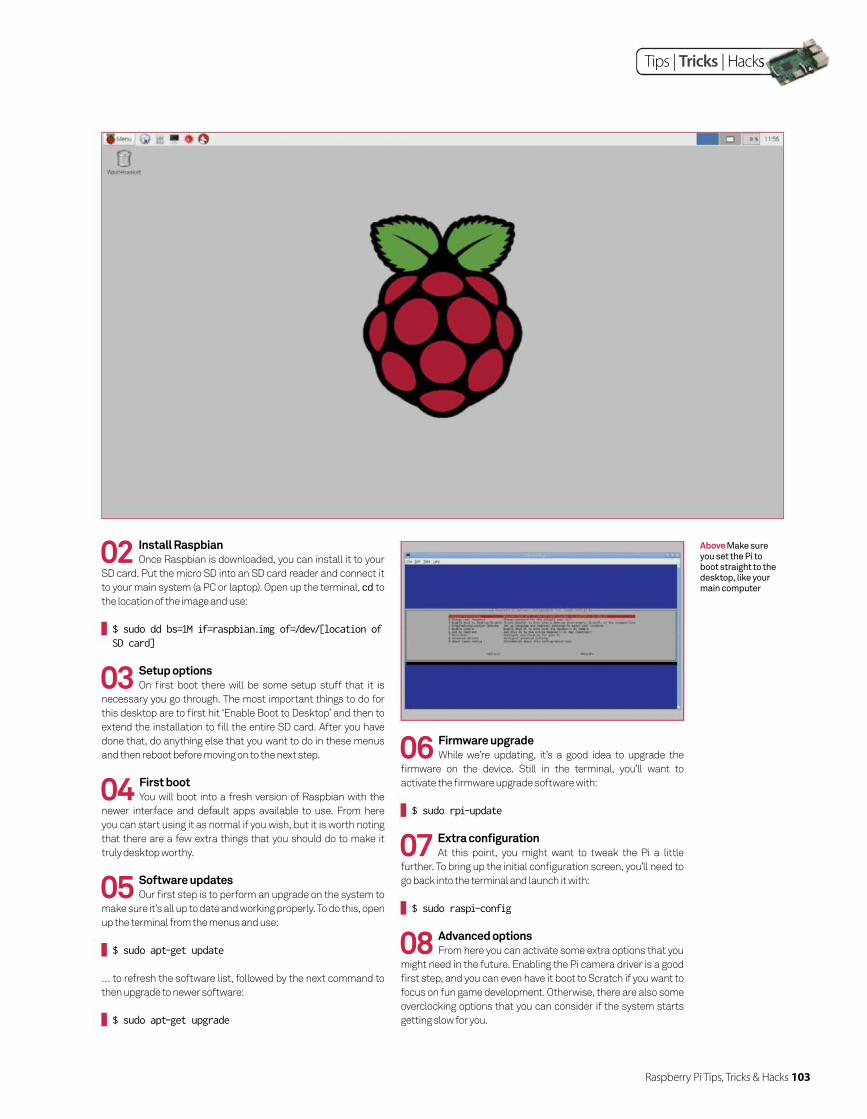
Raspberry Pi Tips, Tricks & Hacks 103
Tips | Tricks | Hacks
02 Install RaspbianOnce Raspbian is downloaded, you can install it to your
SD card. Put the micro SD into an SD card reader and connect it
to your main system (a PC or laptop). Open up the terminal, cd to
the location of the image and use:
$ sudo dd bs=1M if=raspbian.img of=/dev/[location of SD card]
05 Software updatesOur fi rst step is to perform an upgrade on the system to
make sure it’s all up to date and working properly. To do this, open
up the terminal from the menus and use:
$ sudo apt-get update
… to refresh the software list, followed by the next command to
then upgrade to newer software:
$ sudo apt-get upgrade
06 Firmware upgradeWhile we’re updating, it’s a good idea to upgrade the
fi rmware on the device. Still in the terminal, you’ll want to
activate the fi rmware upgrade software with:
$ sudo rpi-update
03 Setup optionsOn fi rst boot there will be some setup stuff that it is
necessary you go through. The most important things to do for
this desktop are to fi rst hit ‘Enable Boot to Desktop’ and then to
extend the installation to fi ll the entire SD card. After you have
done that, do anything else that you want to do in these menus
and then reboot before moving on to the next step.
04 First bootYou will boot into a fresh version of Raspbian with the
newer interface and default apps available to use. From here
you can start using it as normal if you wish, but it is worth noting
that there are a few extra things that you should do to make it
truly desktop worthy.
Above Make sure you set the Pi to boot straight to the desktop, like your main computer
07 Extra confi gurationAt this point, you might want to tweak the Pi a little
further. To bring up the initial confi guration screen, you’ll need to
go back into the terminal and launch it with:
$ sudo raspi-config
08 Advanced optionsFrom here you can activate some extra options that you
might need in the future. Enabling the Pi camera driver is a good
fi rst step, and you can even have it boot to Scratch if you want to
focus on fun game development. Otherwise, there are also some
overclocking options that you can consider if the system starts
getting slow for you.

Tips | Tricks | Hacks
09 Accessorise your PiJust setting up the operating system on the Raspberry
Pi is only a small part of the process – we also have to consider
the hardware surrounding it that will actually make it usable as
a desktop replacement.
10 Human input devicesStandard USB keyboards and mice are best suited for
this task, much more so than a lot of the wireless keyboard and
mouse combos that are popular among Pi users. However,
don’t try and save on USB ports by getting a keyboard with USB
connections of its own: the Pi cannot power USB hubs, even just
two on a keyboard.
11 Monitor to seeThe Pi can output a maximum of 1080p, which in normal
display terms is 1920 x 1080. While it only outputs in HDMI, a lot of
modern monitors do have an HDMI input. If you don’t want to get
a brand new monitor though, you can always get a HDMI to DVI or
HDMI to VGA adapter.
12 Case for protectionThe Pi is pretty sturdy and we’d be lying if we said
we didn’t regularly keep ours out of a case, however, it’s not
indestructible. While we’re doing a lot of different projects
involving accessing different components, a desktop Pi doesn’t
require this level of access. We like the Pimoroni Pibow cases, but
there are several other secure, protective alternatives.
13 Wireless for Internet While some people are fi ne using wired connections,
not everyone has that luxury. Wireless dongles are a perfect fi t
for the Pi, especially now they’re almost no larger than the USB
port themselves. However, not just any dongle will work and
you’ll have to check against this list to make sure that you get a
compatible one: http://elinux.org/RPi_USB_Wi-Fi_Adapters.
14 Anything else?Our standard desktop PC setup is complete, with
one USB port to spare. You can use that single port for USB
sticks or portable storage, or you can invest in a powered
USB hub to give yourself more connectivity options. Otherwise,
investing in a good, 2A power supply will make sure you’re never
short on power for anything.
Below You can run a pretty decent Minecraft server for a handful of your friends with the Pi 2 – great if you made the console in the previous issue!
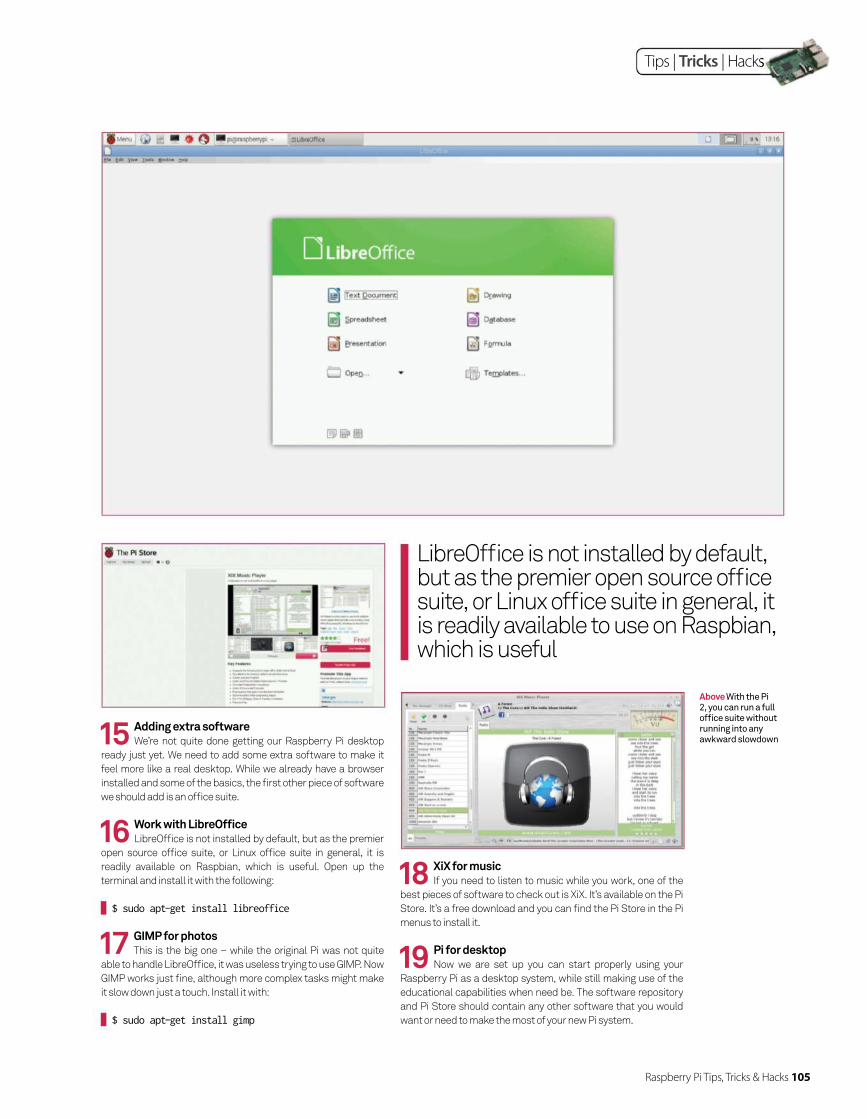
Raspberry Pi Tips, Tricks & Hacks 105
Tips | Tricks | Hacks
LibreOffi ce is not installed by default, but as the premier open source offi ce suite, or Linux offi ce suite in general, it is readily available to use on Raspbian, which is useful
Above With the Pi 2, you can run a full offi ce suite without running into any awkward slowdown15 Adding extra software
We’re not quite done getting our Raspberry Pi desktop
ready just yet. We need to add some extra software to make it
feel more like a real desktop. While we already have a browser
installed and some of the basics, the fi rst other piece of software
we should add is an offi ce suite.
18 XiX for musicIf you need to listen to music while you work, one of the
best pieces of software to check out is XiX. It’s available on the Pi
Store. It’s a free download and you can fi nd the Pi Store in the Pi
menus to install it.
19 Pi for desktopNow we are set up you can start properly using your
Raspberry Pi as a desktop system, while still making use of the
educational capabilities when need be. The software repository
and Pi Store should contain any other software that you would
want or need to make the most of your new Pi system.
17 GIMP for photosThis is the big one – while the original Pi was not quite
able to handle LibreOffi ce, it was useless trying to use GIMP. Now
GIMP works just fi ne, although more complex tasks might make
it slow down just a touch. Install it with:
$ sudo apt-get install gimp
16 Work with LibreOffi ceLibreOffi ce is not installed by default, but as the premier
open source offi ce suite, or Linux offi ce suite in general, it is
readily available on Raspbian, which is useful. Open up the
terminal and install it with the following:
$ sudo apt-get install libreoffice

Tips | Tricks | Hacks Tips | Tricks | Hacks
106 Raspberry Pi Tips, Tricks & Hacks
What you’ll need A Raspberry Pi for each
room you would like to play
music in (one of these can
act as a server or a sever
can be separate)
Ideally a USB sound card
for each Pi (a Behringer
UCA-202 is a great option)
Speaker amplifier and
speakers to plug the Pi into
A wired or wireless network
A USB Wi-Fi adapter for
each Pi you want to be
wireless (an Edimax EW-
7811UN works out of the box)
The possibilities of the Raspberry Pi are
seemingly endless – but it especially
lends itself to entertainment. In this
tutorial we are going to use Logitech’s
Squeezebox Media Server and the
squeezelite client to create a multi-room
audio system. The media server can
stream audio to each squeezelite client
and synchronise the playback between
multiple clients if desired. Logitech open-
sourced the Squeezebox software after
offi cially discontinuing the hardware line.
The media server can be controlled
from a web interface or various
smartphone applications. Unfortunately,
the Spotify plugin (specifi cally the third-
party Spotify plugin by Triode) was
partially broken at the time of writing.
Search isn’t working, likely because
the Spotify API has been updated since
the plugin was last updated. Instead,
the server can be pointed at a music
directory on the Pi. You can either put
music directly onto the SD card or
connect up a USB fl ash drive or hard
drive. As you can get a 64GB fl ash drive
for around £15 you should be able to fi t
plenty on there. We will set up a samba
server on the music server so you can
copy music to it over the network,
instead of needing to disconnect the
fl ash drive and disrupt playback.
We recommend that you use a Pi 2
or 3 for the server but an older Pi or a Pi
Zero should have enough power to be a
squeezelite client.
Raspberry Pi Tips, Tricks & Hacks 107
Use a Raspberry Pi running Logitech’s Squeezebox software to provide synchronised multi-room audio
Set up a multi-room sound system
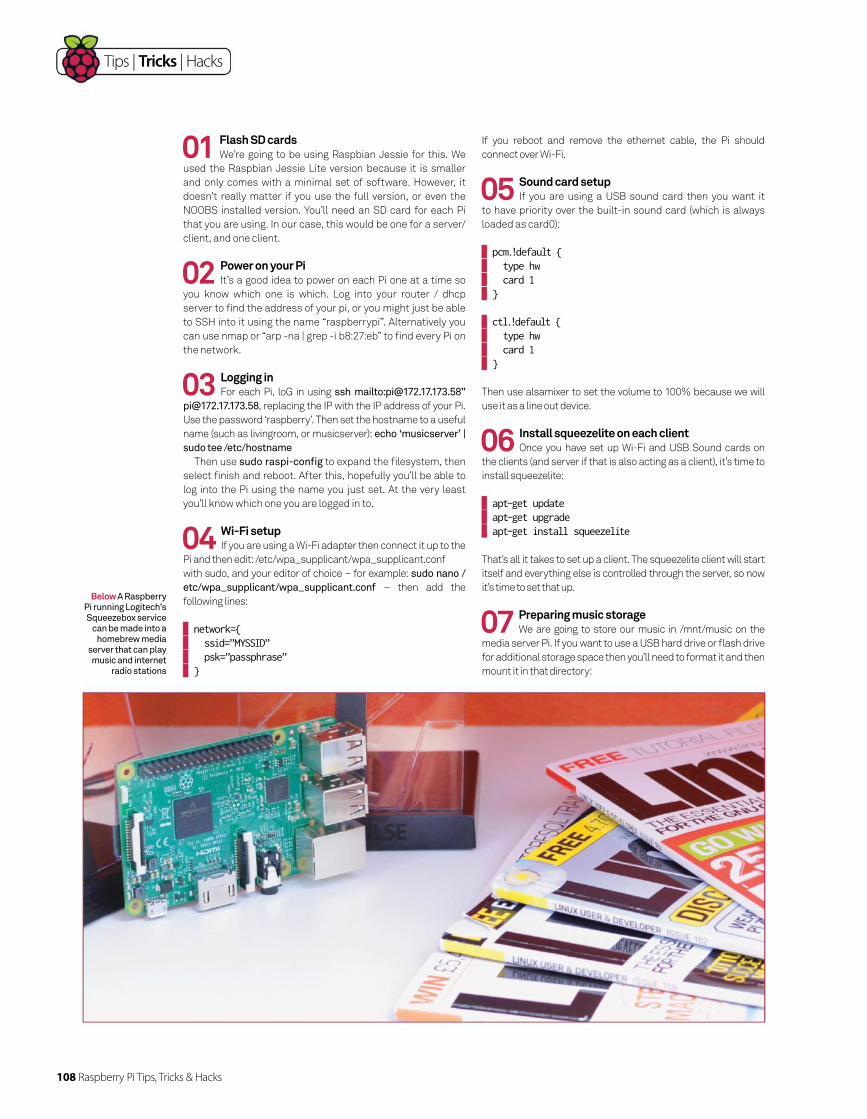
Tips | Tricks | Hacks
108 Raspberry Pi Tips, Tricks & Hacks108 Raspberry Pi Tips, Tricks & Hacks
01 Flash SD cardsWe’re going to be using Raspbian Jessie for this. We
used the Raspbian Jessie Lite version because it is smaller
and only comes with a minimal set of software. However, it
doesn’t really matter if you use the full version, or even the
NOOBS installed version. You’ll need an SD card for each Pi
that you are using. In our case, this would be one for a server/
client, and one client.
02 Power on your PiIt’s a good idea to power on each Pi one at a time so
you know which one is which. Log into your router / dhcp
server to find the address of your pi, or you might just be able
to SSH into it using the name “raspberrypi”. Alternatively you
can use nmap or “arp -na | grep -i b8:27:eb” to find every Pi on
the network.
03 Logging inFor each Pi, loG in using ssh mailto:[email protected]”
[email protected], replacing the IP with the IP address of your Pi.
Use the password ‘raspberry’. Then set the hostname to a useful
name (such as livingroom, or musicserver): echo ‘musicserver’ |
sudo tee /etc/hostname
Then use sudo raspi-config to expand the filesystem, then
select finish and reboot. After this, hopefully you’ll be able to
log into the Pi using the name you just set. At the very least
you’ll know which one you are logged in to.
04 Wi-Fi setupIf you are using a Wi-Fi adapter then connect it up to the
Pi and then edit: /etc/wpa_supplicant/wpa_supplicant.conf
with sudo, and your editor of choice – for example: sudo nano /
etc/wpa_supplicant/wpa_supplicant.conf – then add the
following lines:
network={ ssid=”MYSSID” psk=”passphrase” }
If you reboot and remove the ethernet cable, the Pi should
connect over Wi-Fi.
05 Sound card setupIf you are using a USB sound card then you want it
to have priority over the built-in sound card (which is always
loaded as card0):
pcm.!default { type hw card 1 }
ctl.!default { type hw card 1 }
Then use alsamixer to set the volume to 100% because we will
use it as a line out device.
06 Install squeezelite on each clientOnce you have set up Wi-Fi and USB Sound cards on
the clients (and server if that is also acting as a client), it’s time to
install squeezelite:
apt-get update apt-get upgrade apt-get install squeezelite
That’s all it takes to set up a client. The squeezelite client will start
itself and everything else is controlled through the server, so now
it’s time to set that up.
07 Preparing music storageWe are going to store our music in /mnt/music on the
media server Pi. If you want to use a USB hard drive or flash drive
for additional storage space then you’ll need to format it and then
mount it in that directory:
Below A Raspberry Pi running Logitech’s Squeezebox service
can be made into a homebrew media
server that can play music and internet
radio stations
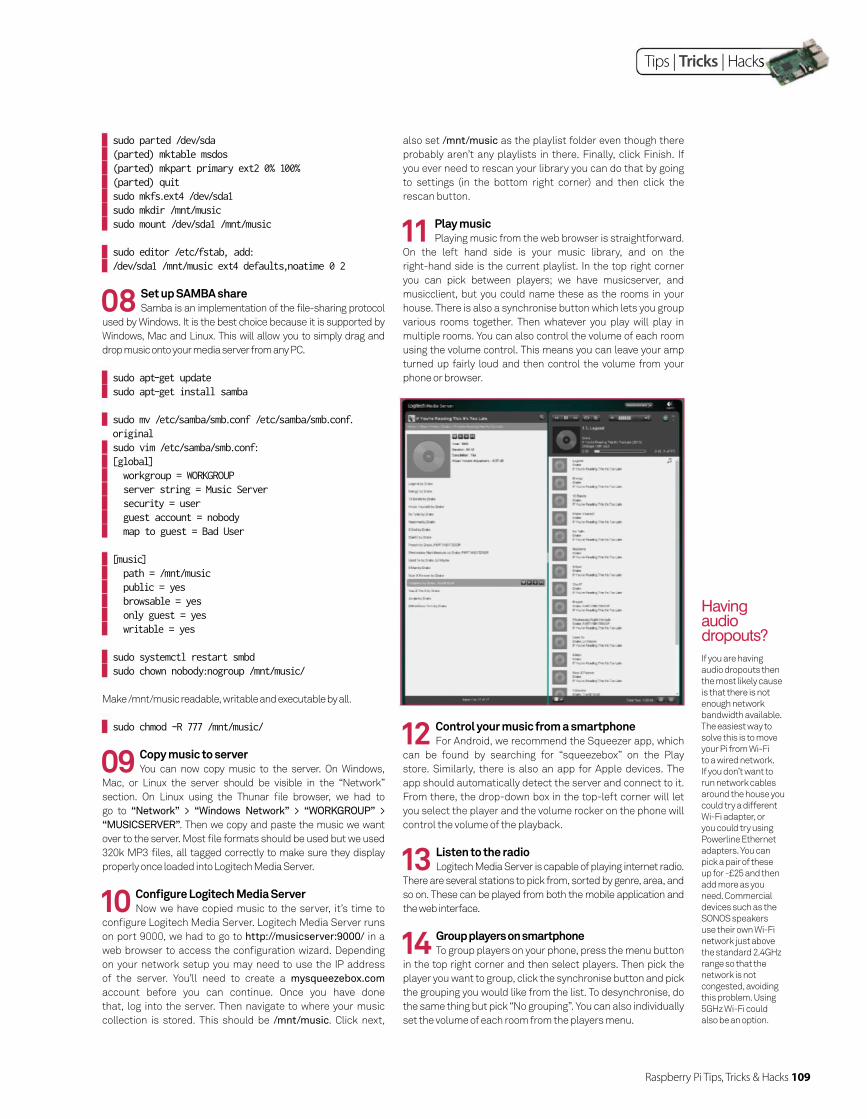
Raspberry Pi Tips, Tricks & Hacks 109
Tips | Tricks | Hacks
Raspberry Pi Tips, Tricks & Hacks 109
sudo parted /dev/sda (parted) mktable msdos (parted) mkpart primary ext2 0% 100% (parted) quit sudo mkfs.ext4 /dev/sda1 sudo mkdir /mnt/music sudo mount /dev/sda1 /mnt/music
sudo editor /etc/fstab, add: /dev/sda1 /mnt/music ext4 defaults,noatime 0 2
08 Set up SAMBA shareSamba is an implementation of the file-sharing protocol
used by Windows. It is the best choice because it is supported by
Windows, Mac and Linux. This will allow you to simply drag and
drop music onto your media server from any PC.
sudo apt-get update sudo apt-get install samba
sudo mv /etc/samba/smb.conf /etc/samba/smb.conf. original
sudo vim /etc/samba/smb.conf: [global] workgroup = WORKGROUP server string = Music Server security = user guest account = nobody map to guest = Bad User
[music] path = /mnt/music public = yes browsable = yes only guest = yes writable = yes
sudo systemctl restart smbd sudo chown nobody:nogroup /mnt/music/
Make /mnt/music readable, writable and executable by all.
sudo chmod -R 777 /mnt/music/
09 Copy music to serverYou can now copy music to the server. On Windows,
Mac, or Linux the server should be visible in the “Network”
section. On Linux using the Thunar fi le browser, we had to
go to “Network” > “Windows Network” > “WORKGROUP” >
“MUSICSERVER”. Then we copy and paste the music we want
over to the server. Most fi le formats should be used but we used
320k MP3 fi les, all tagged correctly to make sure they display
properly once loaded into Logitech Media Server.
10 Confi gure Logitech Media ServerNow we have copied music to the server, it’s time to
confi gure Logitech Media Server. Logitech Media Server runs
on port 9000, we had to go to http://musicserver:9000/ in a
web browser to access the confi guration wizard. Depending
on your network setup you may need to use the IP address
of the server. You’ll need to create a mysqueezebox.com
account before you can continue. Once you have done
that, log into the server. Then navigate to where your music
collection is stored. This should be /mnt/music. Click next,
If you are having
audio dropouts then
the most likely cause
is that there is not
enough network
bandwidth available.
The easiest way to
solve this is to move
your Pi from Wi-Fi
to a wired network.
If you don’t want to
run network cables
around the house you
could try a different
Wi-Fi adapter, or
you could try using
Powerline Ethernet
adapters. You can
pick a pair of these
up for -£25 and then
add more as you
need. Commercial
devices such as the
SONOS speakers
use their own Wi-Fi
network just above
the standard 2.4GHz
range so that the
network is not
congested, avoiding
this problem. Using
5GHz Wi-Fi could
also be an option.
Having audio dropouts?
also set /mnt/music as the playlist folder even though there
probably aren’t any playlists in there. Finally, click Finish. If
you ever need to rescan your library you can do that by going
to settings (in the bottom right corner) and then click the
rescan button.
11 Play musicPlaying music from the web browser is straightforward.
On the left hand side is your music library, and on the
right-hand side is the current playlist. In the top right corner
you can pick between players; we have musicserver, and
musicclient, but you could name these as the rooms in your
house. There is also a synchronise button which lets you group
various rooms together. Then whatever you play will play in
multiple rooms. You can also control the volume of each room
using the volume control. This means you can leave your amp
turned up fairly loud and then control the volume from your
phone or browser.
12 Control your music from a smartphoneFor Android, we recommend the Squeezer app, which
can be found by searching for “squeezebox” on the Play
store. Similarly, there is also an app for Apple devices. The
app should automatically detect the server and connect to it.
From there, the drop-down box in the top-left corner will let
you select the player and the volume rocker on the phone will
control the volume of the playback.
13 Listen to the radioLogitech Media Server is capable of playing internet radio.
There are several stations to pick from, sorted by genre, area, and
so on. These can be played from both the mobile application and
the web interface.
14 Group players on smartphoneTo group players on your phone, press the menu button
in the top right corner and then select players. Then pick the
player you want to group, click the synchronise button and pick
the grouping you would like from the list. To desynchronise, do
the same thing but pick “No grouping”. You can also individually
set the volume of each room from the players menu.
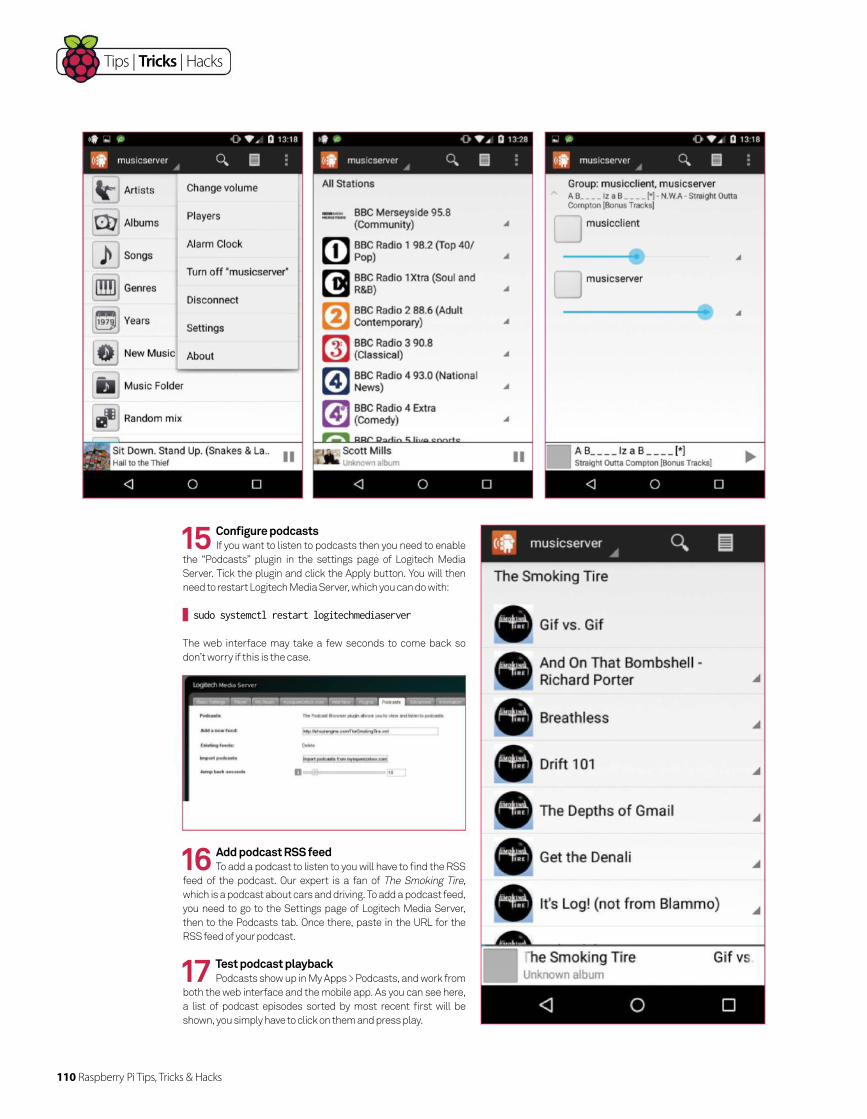
Tips | Tricks | Hacks
110 Raspberry Pi Tips, Tricks & Hacks110 Raspberry Pi Tips, Tricks & Hacks
15 Configure podcastsIf you want to listen to podcasts then you need to enable
the “Podcasts” plugin in the settings page of Logitech Media
Server. Tick the plugin and click the Apply button. You will then
need to restart Logitech Media Server, which you can do with:
sudo systemctl restart logitechmediaserver
The web interface may take a few seconds to come back so
don’t worry if this is the case.
16 Add podcast RSS feedTo add a podcast to listen to you will have to find the RSS
feed of the podcast. Our expert is a fan of The Smoking Tire,
which is a podcast about cars and driving. To add a podcast feed,
you need to go to the Settings page of Logitech Media Server,
then to the Podcasts tab. Once there, paste in the URL for the
RSS feed of your podcast.
17 Test podcast playbackPodcasts show up in My Apps > Podcasts, and work from
both the web interface and the mobile app. As you can see here,
a list of podcast episodes sorted by most recent first will be
shown, you simply have to click on them and press play.
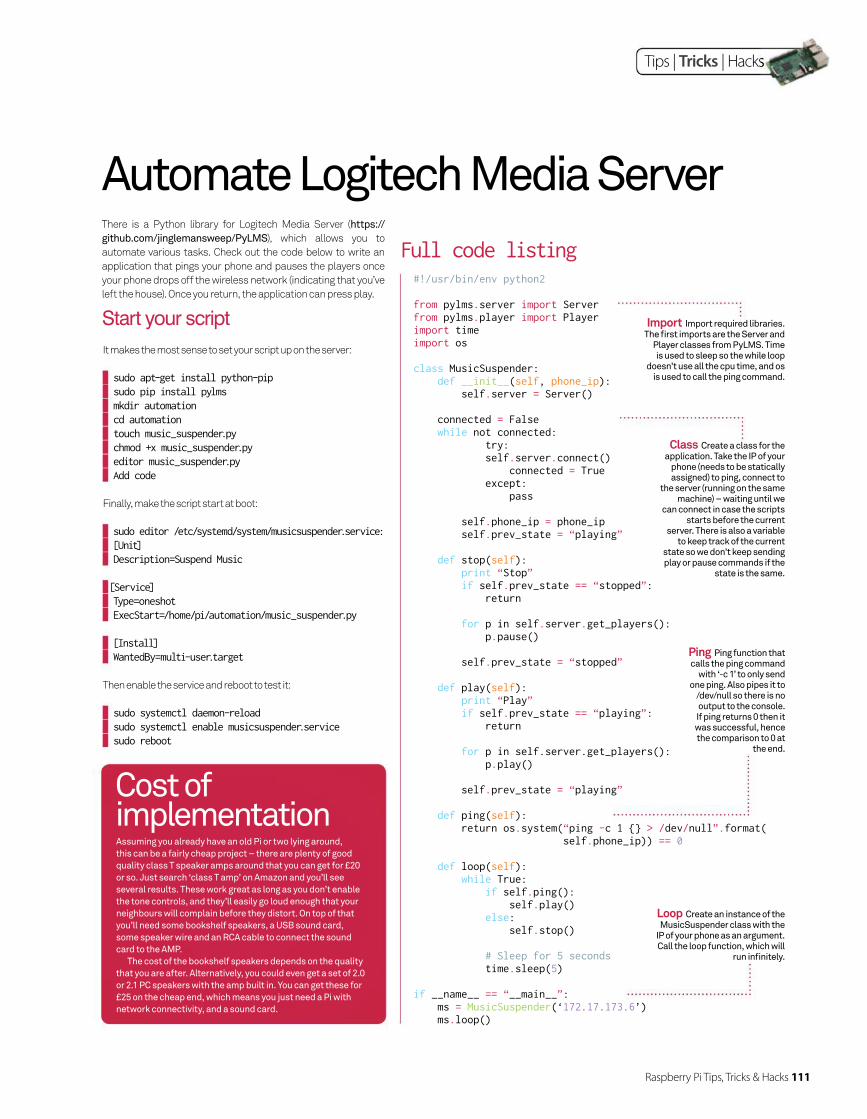
Raspberry Pi Tips, Tricks & Hacks 111
Tips | Tricks | Hacks
Raspberry Pi Tips, Tricks & Hacks 111
#!/usr/bin/env python2
from pylms.server import Serverfrom pylms.player import Playerimport timeimport os
class MusicSuspender: def __init__(self, phone_ip): self.server = Server()
connected = False while not connected: try: self.server.connect() connected = True except: pass
self.phone_ip = phone_ip self.prev_state = “playing” def stop(self): print “Stop” if self.prev_state == “stopped”: return for p in self.server.get_players(): p.pause()
self.prev_state = “stopped”
def play(self): print “Play” if self.prev_state == “playing”: return
for p in self.server.get_players(): p.play() self.prev_state = “playing”
def ping(self): return os.system(“ping -c 1 {} > /dev/null”.format( self.phone_ip)) == 0
def loop(self): while True: if self.ping(): self.play() else: self.stop() # Sleep for 5 seconds time.sleep(5)
if __name__ == “__main__”: ms = MusicSuspender(‘172.17.173.6’) ms.loop()
Full code listingThere is a Python library for Logitech Media Server (https://
github.com/jinglemansweep/PyLMS), which allows you to
automate various tasks. Check out the code below to write an
application that pings your phone and pauses the players once
your phone drops off the wireless network (indicating that you’ve
left the house). Once you return, the application can press play.
It makes the most sense to set your script up on the server:
sudo apt-get install python-pip sudo pip install pylms mkdir automation cd automation touch music_suspender.py chmod +x music_suspender.py editor music_suspender.py Add code
Finally, make the script start at boot:
sudo editor /etc/systemd/system/musicsuspender.service: [Unit] Description=Suspend Music
[Service] Type=oneshot ExecStart=/home/pi/automation/music_suspender.py
[Install] WantedBy=multi-user.target
Then enable the service and reboot to test it:
sudo systemctl daemon-reload sudo systemctl enable musicsuspender.service sudo reboot
Cost of implementationAssuming you already have an old Pi or two lying around,
this can be a fairly cheap project – there are plenty of good
quality class T speaker amps around that you can get for £20
or so. Just search ‘class T amp’ on Amazon and you’ll see
several results. These work great as long as you don’t enable
the tone controls, and they’ll easily go loud enough that your
neighbours will complain before they distort. On top of that
you’ll need some bookshelf speakers, a USB sound card,
some speaker wire and an RCA cable to connect the sound
card to the AMP.
The cost of the bookshelf speakers depends on the quality
that you are after. Alternatively, you could even get a set of 2.0
or 2.1 PC speakers with the amp built in. You can get these for
£25 on the cheap end, which means you just need a Pi with
network connectivity, and a sound card.
Import Import required libraries. The fi rst imports are the Server and
Player classes from PyLMS. Time is used to sleep so the while loop
doesn’t use all the cpu time, and os is used to call the ping command.
Class Create a class for the application. Take the IP of your
phone (needs to be statically assigned) to ping, connect to
the server (running on the same machine) – waiting until we
can connect in case the scripts starts before the current
server. There is also a variable to keep track of the current
state so we don’t keep sending play or pause commands if the
state is the same.
Ping Ping function that calls the ping command
with ‘-c 1’ to only send one ping. Also pipes it to
/dev/null so there is no output to the console. If ping returns 0 then it was successful, hence the comparison to 0 at
the end.
Loop Create an instance of the MusicSuspender class with the
IP of your phone as an argument. Call the loop function, which will
run infi nitely.
Automate Logitech Media Server
Start your script
Hacks114 50 Ways to Hack
your Raspberry Pi
140 Code a Tempest clone in
FUZE BASIC Part 1
144 Code a Tempest clone in
FUZE BASIC Part 2
148 Code a Tempest clone in
FUZE BASIC Part 3
152 Capture photos at night with the
NoIR Pi camera
156 Learn to locate phones by
using Bluetooth
• Check humidity
• Make an 8-bit theme tune
• Make a Minecraft Photo Booth
122 10 awesome Raspberry Pi upgrades
128 Hack a robot with Pi-mote
132 Self-driving RC car
136 Build a Pi cluster with Docker Swan
156
112 Raspberry Pi Tips, Tricks & Hacks
Buy incredible add-ons and
upgrades
Learn how to take photos
at night
122
152
Thirty years on and BASIC, or FUZE BASIC, presents a modernised version of the original classic
140
Recreate the classic game
Tempest
Hack a robot with your Pi
128
Raspberry Pi Tips, Tricks & Hacks 113
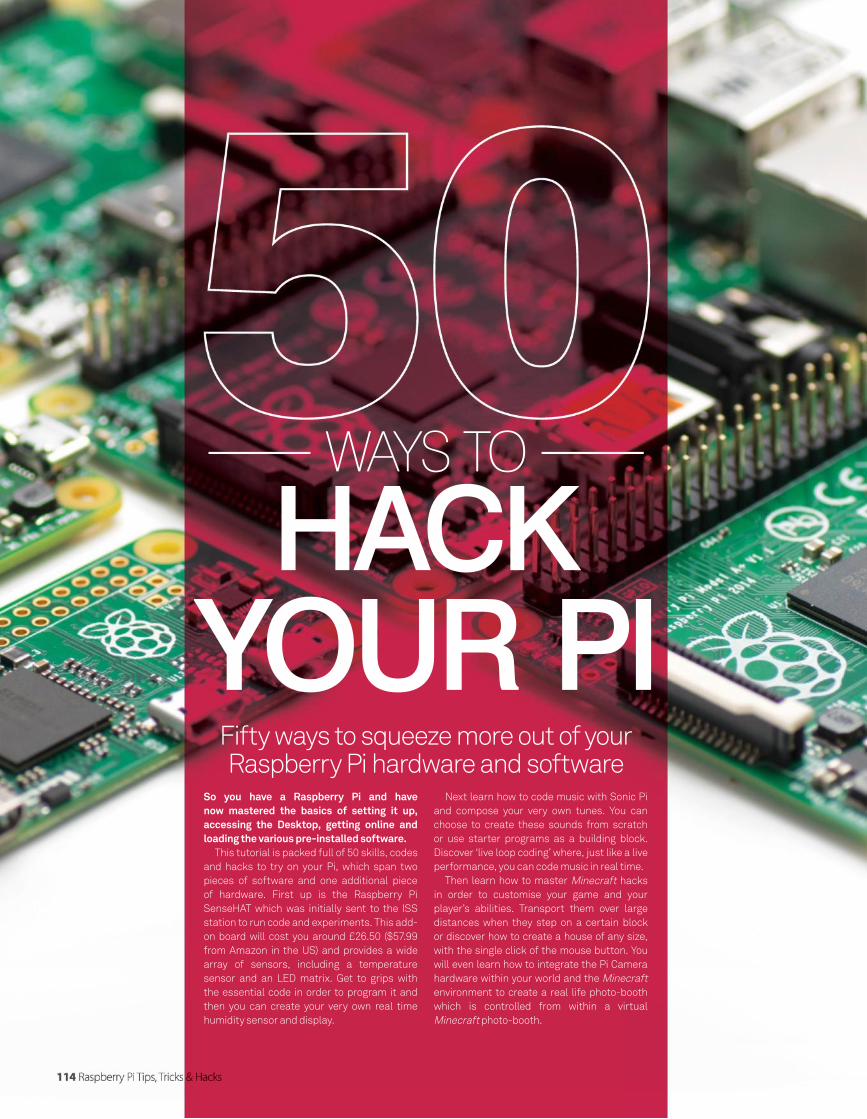
So you have a Raspberry Pi and have now mastered the basics of setting it up, accessing the Desktop, getting online and loading the various pre-installed software.
This tutorial is packed full of 50 skills, codes
and hacks to try on your Pi, which span two
pieces of software and one additional piece
of hardware. First up is the Raspberry Pi
SenseHAT which was initially sent to the ISS
station to run code and experiments. This add-
on board will cost you around £26.50 ($57.99
from Amazon in the US) and provides a wide
array of sensors, including a temperature
sensor and an LED matrix. Get to grips with
the essential code in order to program it and
then you can create your very own real time
humidity sensor and display.
Next learn how to code music with Sonic Pi
and compose your very own tunes. You can
choose to create these sounds from scratch
or use starter programs as a building block.
Discover ‘live loop coding’ where, just like a live
performance, you can code music in real time.
Then learn how to master Minecraft hacks
in order to customise your game and your
player’s abilities. Transport them over large
distances when they step on a certain block
or discover how to create a house of any size,
with the single click of the mouse button. You
will even learn how to integrate the Pi Camera
hardware within your world and the Minecraft
environment to create a real life photo-booth
which is controlled from within a virtual
Minecraft photo-booth.
HACKYOUR PI
WAYS TO
Fifty ways to squeeze more out of your Raspberry Pi hardware and software
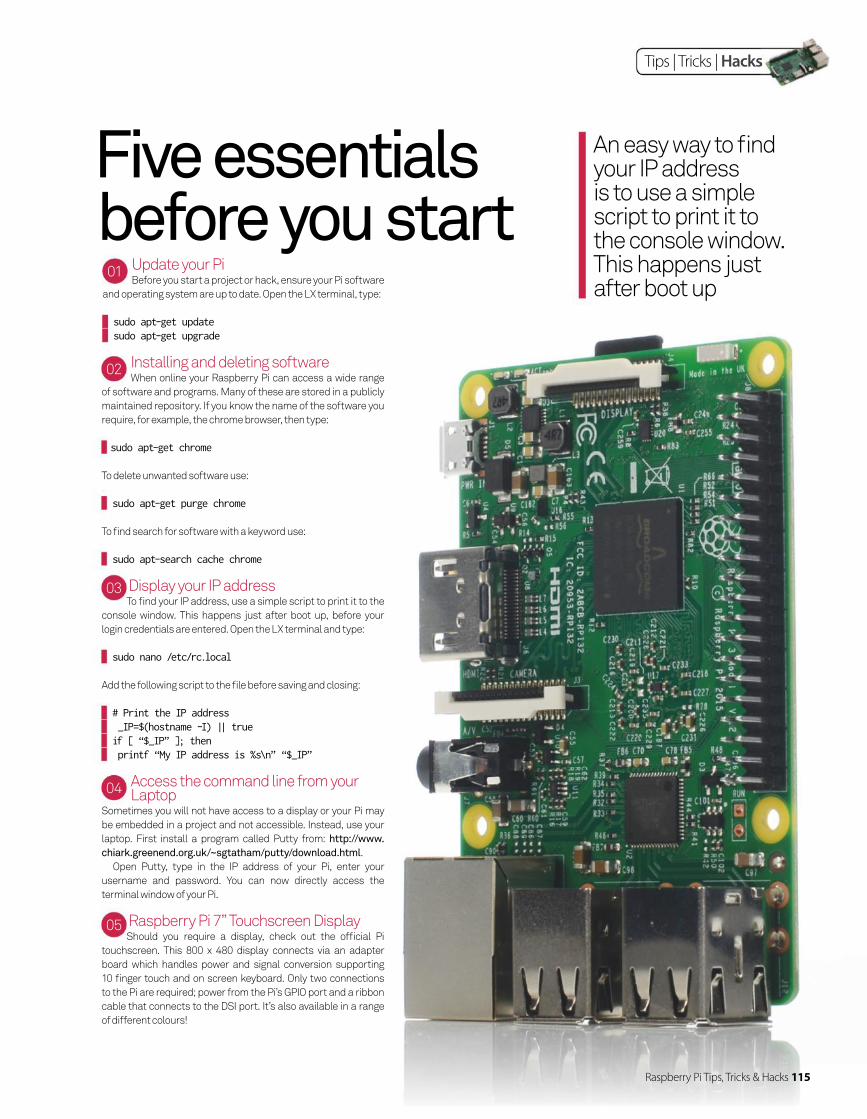
Tips | Tricks | Hacks
02 Installing and deleting softwareWhen online your Raspberry Pi can access a wide range
of software and programs. Many of these are stored in a publicly
maintained repository. If you know the name of the software you
require, for example, the chrome browser, then type:
sudo apt-get chrome
To delete unwanted software use:
sudo apt-get purge chrome
To fi nd search for software with a keyword use:
sudo apt-search cache chrome
03 Display your IP addressTo fi nd your IP address, use a simple script to print it to the
console window. This happens just after boot up, before your
login credentials are entered. Open the LX terminal and type:
sudo nano /etc/rc.local
Add the following script to the fi le before saving and closing:
# Print the IP address _IP=$(hostname -I) || true if [ “$_IP” ]; then printf “My IP address is %s\n” “$_IP”
04 Access the command line from your Laptop
Sometimes you will not have access to a display or your Pi may
be embedded in a project and not accessible. Instead, use your
laptop. First install a program called Putty from: http://www.
chiark.greenend.org.uk/~sgtatham/putty/download.html.
Open Putty, type in the IP address of your Pi, enter your
username and password. You can now directly access the
terminal window of your Pi.
05 Raspberry Pi 7” Touchscreen DisplayShould you require a display, check out the offi cial Pi
touchscreen. This 800 x 480 display connects via an adapter
board which handles power and signal conversion supporting
10 fi nger touch and on screen keyboard. Only two connections
to the Pi are required; power from the Pi’s GPIO port and a ribbon
cable that connects to the DSI port. It’s also available in a range
of different colours!
An easy way to fi nd your IP address is to use a simple script to print it to the console window. This happens just after boot up
Five essentials before you start
01 Update your PiBefore you start a project or hack, ensure your Pi software
and operating system are up to date. Open the LX terminal, type:
sudo apt-get update sudo apt-get upgrade
Raspberry Pi Tips, Tricks & Hacks 115
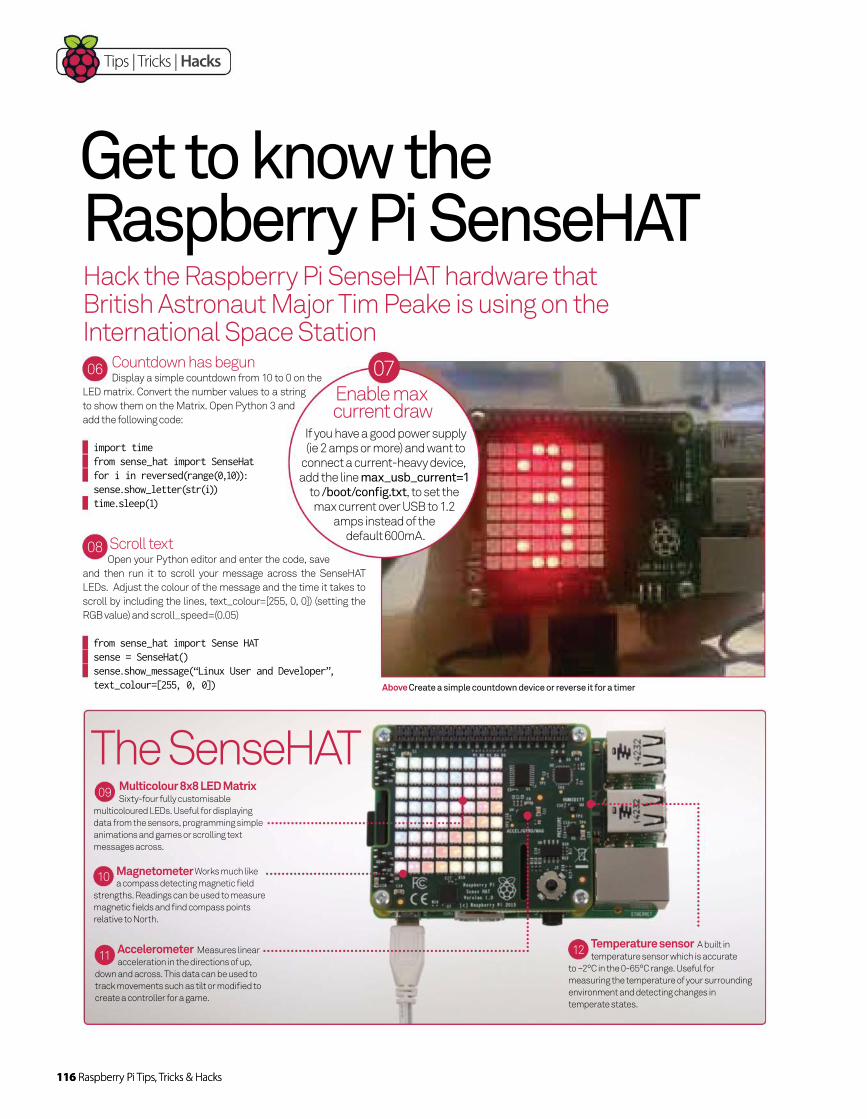
116 Raspberry Pi Tips, Tricks & Hacks
Tips | Tricks | Hacks
Hack the Raspberry Pi SenseHAT hardware that British Astronaut Major Tim Peake is using on the International Space Station
Get to know the Raspberry Pi SenseHAT
The SenseHAT
06 Countdown has begunDisplay a simple countdown from 10 to 0 on the
LED matrix. Convert the number values to a string
to show them on the Matrix. Open Python 3 and
add the following code:
import time from sense_hat import SenseHat for i in reversed(range(0,10)): sense.show_letter(str(i)) time.sleep(1)
08 Scroll textOpen your Python editor and enter the code, save
and then run it to scroll your message across the SenseHAT
LEDs. Adjust the colour of the message and the time it takes to
scroll by including the lines, text_colour=[255, 0, 0]) (setting the
RGB value) and scroll_speed=(0.05)
from sense_hat import Sense HAT sense = SenseHat() sense.show_message(“Linux User and Developer”, text_colour=[255, 0, 0])
09 Multicolour 8x8 LED Matrix Sixty-four fully customisable
multicoloured LEDs. Useful for displaying
data from the sensors, programming simple
animations and games or scrolling text
messages across.
11 Accelerometer Measures linear
acceleration in the directions of up,
down and across. This data can be used to
track movements such as tilt or modified to
create a controller for a game.
12 Temperature sensor A built in
temperature sensor which is accurate
to ~2°C in the 0-65°C range. Useful for
measuring the temperature of your surrounding
environment and detecting changes in
temperate states.
10 Magnetometer Works much like
a compass detecting magnetic field
strengths. Readings can be used to measure
magnetic fields and find compass points
relative to North.
Above Create a simple countdown device or reverse it for a timer
116 Raspberry Pi Tips, Tricks & Hacks
Enable max current draw
If you have a good power supply (ie 2 amps or more) and want to
connect a current-heavy device, add the line max_usb_current=1
to /boot/config.txt, to set the max current over USB to 1.2
amps instead of the default 600mA.
07

Raspberry Pi Tips, Tricks & Hacks 117
Tips | Tricks | Hacks
Raspberry Pi Tips, Tricks & Hacks 117
Tips | Tricks | Hacks
Display the humidity in real time on the LED matrix
Measure your environment with these SenseHAT sensors
Essential SenseHAT measurements
14 How humid is it?
13 Display an imageThe LED matrix can be used to
create simple images. Assign the colours
using RGB values and then create a
simple array of the image, for example a
question mark:
from sense_hat import SenseHat sense = SenseHat() X = [255, 0, 0] # Red O = [255, 255, 255] # White
question_mark = [ O, O, O, X, X, O, O, O, O, O, X, O, O, X, O, O, O, O, O, O, O, X, O, O, O, O, O, O, X, O, O, O, O, O, O, X, O, O, O, O, O, O, O, X, O, O, O, O, O, O, O, O, O, O, O, O, O, O, O, X, O, O, O, O ] sense.set_pixels(question_mark)
16 Under PressureAtmospheric pressure is the force the air has on
a surface, in this case the SenseHAT. Use the pressure
sensor for a reading of the atmospheric pressure. The
higher the reading the more force is being exerted:
from sense_hat import SenseHat sense = SenseHat() pressure = sense.get_pressure() print(“Pressure: %s Millibars” % pressure)
17 Take a temperature readingThe SenseHAT has a heat sensor which can read
and return the temperature. The sensor is fairly close
to the CPU and it may pick up some of the residual heat.
However, on the whole the reading is sound:
from sense_hat import SenseHat sense = SenseHat() temp = sense.get_temperature() print(“Temperature: %s C” % temp)
18 Where is North?Use the magnetometer to fi nd your position in
relation to North. Use a while loop to check the position,
rotate the senseHAT to see the compass reading change:
from sense_hat import SenseHat sense = SenseHat() import sleep while True: north = sense.get_compass() print(“North: %s” % north) time.sleep(1)
19 AccelerometerThe accelerometer is used to measure how your
SensHAT is moving and tilting, used in projects such as
the Apollo-soyuz where you can rotate a 3D model of the
soyuz rocket (www.github.com/astr-pi/apollo-soyuz)
from sense_hat import SenseHat sense = SenseHat() while True: accel_only = sense.get_accelerometer() print(“p: {pitch}, r: {roll}, y: {yaw}”.format(**accel_only))
21 Checking the humidityUse this simple code to return the humidity of the
environment. Test it by ‘huffi ng’ on the humidity sensor:
from sense_hat import SenseHat sense = SenseHat() humidity = sense.get_humidity() print(“Humidity: %s %%rH” % humidity)
Step one: Set up
This program takes a humidity reading
and displays the results on the LED
display. First import the SenseHat
Library and then create two variables,
one for the LEDs colour when they are
on and one for when they are off:
From sense_hat import SenseHat sense = SenseHat() sense.clear()t on_pix = [255,0,0] off_pix = [0,0,0]
Step two: Reading the Humidity
Now take a humidity reading and round
it to one decimal place. Then create a
list called ‘leds =[]’ to store the number
of LEDs that need to be turned on. Since
there are only 64 LEDs, divide the top
humidity of 100 by 64 to return a ratio:
while True: hum = sense.humidity hum = round(hum,1) if hum > 100: hum = 100 leds = [] ratio = 64 / 100.0
Step three: LEDs On or Off
For this step you need to use the
humidity reading to calculate the
number of LEDs to turn on. This uses
the code on_count = int (ratio*hum).
The number of LEDs which are turned
off is 64 – the number turned on:
on_count = int (ratio*hum) off_count = 64 - on_count
The three colour values used to refer the amount of Red, Green and Blue,
where 255 is the maximum value. White is [255,
255, 255]
20
Raspberry Pi Tips, Tricks & Hacks 117
Tips | Tricks | Hacks
Step four: Creating a list of LEDs
Now you have the total number of LEDs
that need turning on, extend the values
into the list created in step two. Do the
same for the LEDs that are required to
be turned off. Finally, set the pixels to
display on the LED matrix:
leds.extend([on_pix]*on_count) leds.extend([off_pix]*off_count) sense.set_pixels(leds)
Run the program and watch the LED
display. Try ‘huffi ng‘ onto the humidity
sensor, and see what happens.
sudo raspi-confi g can be used to change
several options, like enable the camera,
overclock the Pi, and change boot options.
15

118 Raspberry Pi Tips, Tricks & Hacks
Tips | Tricks | Hacks
Above Code musical notes either by number or letter
A live coding synth that features numerous samples, notes and sounds at your fingertips
Start coding music with Sonic Pi
28 Playing a noteMelodies or tunes are built out of individual notes. Sonic Pi
makes it very easy to play a note, well code a note, simply type ‘play
60’ into the coding window and press Run.
This note is C. Change the values of the number to change
the note, for example try ‘play 70’ or ‘play 60’. Then try some
of your own. Instead of using the note number you can also
write the name of the note that you want to play, for example,
‘play :C’, will play the same note C as ‘play 60. To make the note
higher add the octave number after the letter. For example to
play the 4th octave D, type, ‘play :D4’. You can shorten the length of
the note using the ‘release’ code. For example try, ‘play :C6, release:
0.2’. Increase the duration by increasing the number.
29 Playing notes togetherNotes can be combined and played together to create chords. This is simple, try
these two together:
play 60 play 62
The chord is an interesting drone like sound created by playing two similar tones at
the same time. If this is not your musical preference you can create a more traditional
The Sonic Pi Interface23
The coding window Musical
composition is easy with code, simply
write your own, follow a tutorial or copy over one
of the wide range of examples to get you started.
25 Samples, examples, synths and more Over 131 built-in samples, synths
and FXs; with more coming, to give you any sound
you want. Customise these further with fully code-
able options.
24 Record and Export Save and share
your compositions as code to allow others to
edit or, record them and export your audio in WAV
file format.
26 Learn more Sonic Pi holds a massive
selection of tutorials covering the basics
for beginners and more advanced skills for
seasoned pros.
Above Code chords by combining several notes or codes together
Why not try interacting with Minecraft, load both programs and in the Sonic Pi code window add mc_message “Hello Minecraft
from Sonic Pi!”, then click Run...
22
The sync command ensures
everything has been flushed to permanent
storage from the cache. It’s useful to run after updating packages,
for example.
27

Raspberry Pi Tips, Tricks & Hacks 119
Tips | Tricks | Hacks
Raspberry Pi Tips, Tricks & Hacks 119
Modify the instruments, alter sounds and add beats
Five tips to take your music coding further
33 Play and change the instrumentTo play a note use the code ‘play 90’. To change the
sound or instrument add the code ‘use_synth saw’ where
‘saw’ is the name the synth. (Other synths are listed
under the Synth tab.) This affects only the calls after
the line, the fi rst note remains the default sound:
34 SamplesWithin the samples tab are a wide range of
drum beats, riffs and ambient sounds. Scroll down to
‘sounds for looping’ and fi nd the sample named, ‘sample
:loop_mika’. In the coding window use the auto_complete
function which lists the samples and select one. Begin by
typing, sample :loop_ and select mika from the list. Press
Run to play, then try other samples too.
35 ExamplesSonic Pi is packed full of example codes to get you
started. Select your example then copy and paste it into the
coding window. Click Run and then you can play, modify or
tweak as you desire.
36 IterationsSamples and notes can be played a specifi c number of
times using iteration. From the samples select bd_haus, add
this and Run. Note that the beat only plays once. To make it
play a set number of times move to line one and add, ‘5.times
do’. Then indent line two, on line three add a short pause
using sleep 0.5. Finally add an ‘end’ on line four:
5.times do sample :bd_haus sleep 0.5 end
37 Live CodingLive coding enables you to code music in real time.
Create a simple beat and add it to the ‘live loop’. The music
starts and as you change the values in your code the music
changes in real time. Try the code below and change the rate,
try 0.5, 2 or even -1, press Run and the listen to the changes.
Edit the sleep time too:
live_loop :crazy_hiss do sample :vinyl_hiss, rate: 1 sleep 2 end
sounding chord, such as C Major. Look up
any chord structure or notes online. The
chord of C Major is built up of the single
notes, C, E and a G:
play :C, release: 1 play :E, release: 1 play :G, release: 1
Code a simple Live Loop reminiscent of 8 Bit games
32 8 bit Theme Tune
Step One: Set up the live loop
Set up a live loop called trance on
line one and add the bass trance
sample on line two. Code a short
delay using sleep 0.8 on line three,
then end the loop on line four, click
Run. Live looping enables you to
code as you listen so keep the loop
playing through the next steps.
Step Two: Speed up, add notes
On line three reduce the sleep time
to 0.2 to speed up the beat. Use the
‘play choose’ code on line four to
pick from a selection of notes. Play
around with the values until you have
some that complement the beat.
Change the instrument by adding the
line ‘use_synth’ on line fi ve. In this
example the chiplead synth provides
a nice nostalgic 8 bit feel. You may
want to now edit the notes in the
‘play choose’ line to complement the
melody and changes you have made.
Step Three: Flip for
the beat
Sonic Pi can pick between which
sample to play using the ‘if one_
in(2)’ code. This adds a sense of
randomness to the music and also
to when the samples are played.
Sonic Pi does this by selecting either
sample one or sample two. Add the
line and two samples of your choice
to complete your piece:
#8 bit music live_loop :trance do sample :bass_trance_c sleep 0.2 use_synth :chiplead play choose([40, 40, 60, 70,
73]) sample :elec_snare else sample :drum_tom_hi_hard end end
Raspberry Pi Tips, Tricks & Hacks 119
Code a full scale using play_pattern_timed
scale(:c3, :major, num_octaves: 3), 0.125, release: 0.1 where c3 is the starting
note, and num_octave is how many octaves to
play to.
31
Tips | Tricks | Hacks
30 Adding a pauseYou want to be able to play notes
individually as part of the melody. Use the
sleep function to add a pause between
notes. You can add a customisable pause
before the next note. To add a pause of one
second use:
play :C sleep 1 play :G
Depending on the length of the first note
the pause may sound shorter. Add a short
release to lengthen the delay and make the
first note more staccato. Default value for
the release option is one:
play :C, release: 0.2
sleep 1 play :G
Above Compose melodies or tunes by using delays to add rhythm
play 90 use_synth :piano play 80
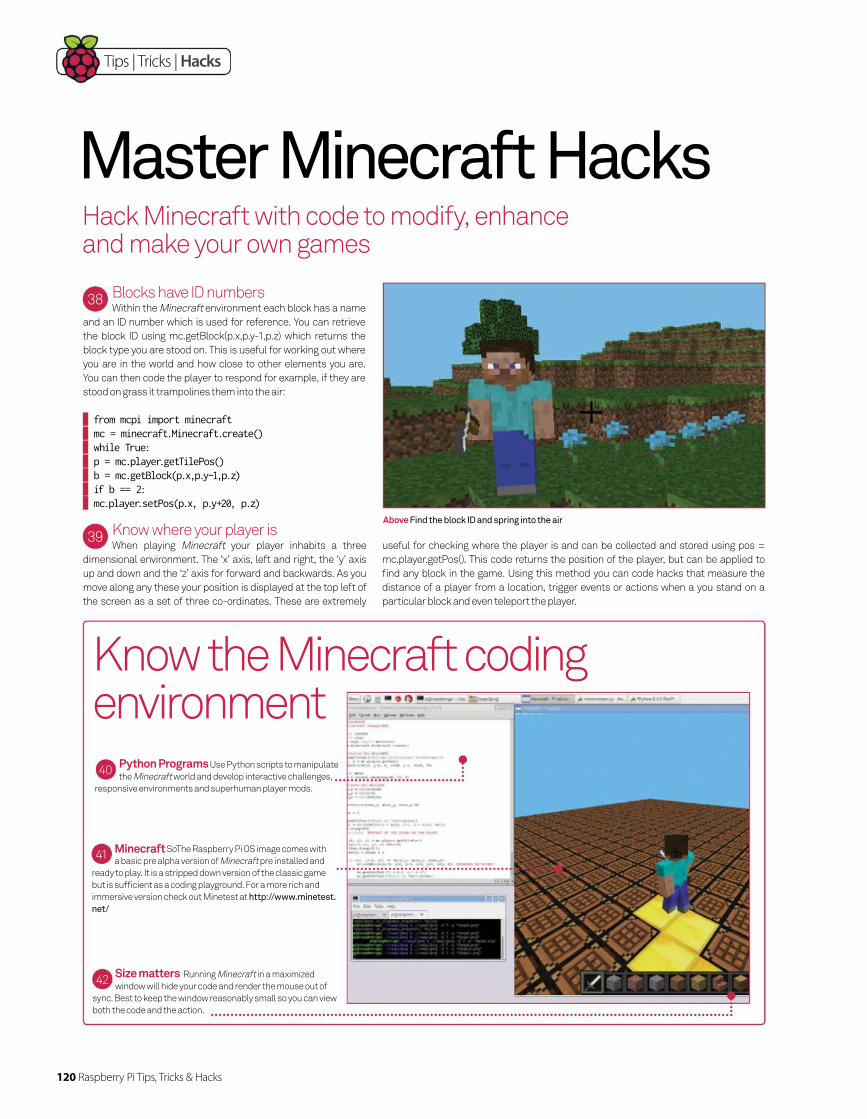
120 Raspberry Pi Tips, Tricks & Hacks
Tips | Tricks | Hacks
Hack Minecraft with code to modify, enhance and make your own games
Master Minecraft Hacks
Know the Minecraft coding environment
40 Python Programs Use Python scripts to manipulate
the Minecraft world and develop interactive challenges,
responsive environments and superhuman player mods.
42 Size matters Running Minecraft in a maximized
window will hide your code and render the mouse out of
sync. Best to keep the window reasonably small so you can view
both the code and the action.
41 Minecraft SoThe Raspberry Pi OS image comes with
a basic pre alpha version of Minecraft pre installed and
ready to play. It is a stripped down version of the classic game
but is suffi cient as a coding playground. For a more rich and
immersive version check out Minetest at http://www.minetest.
net/
38 Blocks have ID numbersWithin the Minecraft environment each block has a name
and an ID number which is used for reference. You can retrieve
the block ID using mc.getBlock(p.x,p.y-1,p.z) which returns the
block type you are stood on. This is useful for working out where
you are in the world and how close to other elements you are.
You can then code the player to respond for example, if they are
stood on grass it trampolines them into the air:
from mcpi import minecraft mc = minecraft.Minecraft.create() while True: p = mc.player.getTilePos() b = mc.getBlock(p.x,p.y-1,p.z) if b == 2: mc.player.setPos(p.x, p.y+20, p.z)
Above Find the block ID and spring into the air
39 Know where your player isWhen playing Minecraft your player inhabits a three
dimensional environment. The ‘x’ axis, left and right, the ‘y’ axis
up and down and the ‘z’ axis for forward and backwards. As you
move along any these your position is displayed at the top left of
the screen as a set of three co-ordinates. These are extremely
useful for checking where the player is and can be collected and stored using pos =
mc.player.getPos(). This code returns the position of the player, but can be applied to
fi nd any block in the game. Using this method you can code hacks that measure the
distance of a player from a location, trigger events or actions when a you stand on a
particular block and even teleport the player.

Tips | Tricks | Hacks
Essentials for hacking your Minecraft world
Five Minecraft hacks
46 Finding your LocationTo manipulate your environment, you fi rst need to
know where you are positioned. This uses the mc.player.
getPos() code to gather the X, Y, and Z value of your
location and prints the values of your position:
from mcpi import minecraft mc = minecraft.Minecraft.create() import time while True: time.sleep(1.0) pos = mc.player.getPos() print pos.x, pos.y, pos.z
47 Send a player to a positionNow you know your position you can automatically
move the player to another position using mc.player.
setPos. In the example below the player is transported
forward 100 blocks:
from mcpi import minecraft mc = minecraft.Minecraft.create() x, y, z = mc.player.getPos() mc.player.setPos(x, y+100, z)
48 Set a BlockYour player can place a single block using the
setBlock command. Find your position and then set the
block where you are stood. In this example 38 is the block ID
for fl owers:
while True: x, y, z = mc.player.getPos() mc.setBlock(x, y, z, 38) time.sleep(0.1)
49 Set BlocksYou may want to place more than one block at a time,
this uses the setBlocks code. Find your position, add the
position where the blocks will stop and include the ID of the
block you wish to use, in this example block number one
is stone:
x, y, z = mc.player.getPos() mc.setBlocks(x+1, y+1, z+1, x+11, y+11, z+11, 1)
Above Send messages from the Minecraft World or to another player
Use buttons to trigger the
hacks. Combine this with
a wearable like a glove for a
Minecraft Power Glove:
http://www.tecoed.co.uk/
piglove-minecraft-power-
up.html
43
50 Interact in another player’s worldIt is fun hacking your own world, but how about
hacking another player? In a networked game fi nd the IP
address of the other player using sudo ifconfi g, note down
their address. In your code add the IP address to the following
line, mc = minecraft.Minecraft.create(192.168.1.45) All your
hacks will now appear in the other player’s world.
Trigger Minecraft to take your picture with the PiCamera
45 Minecraft PhotoBooth
Step One: Create a booth
In Minecraft create a simple box as a
photobooth. Walk inside and note the x,
y and z co-ordinates displayed in the top
left of the screen. This is the block you
are stood on; this is the trigger block.
Open Python and add the code:
from mcpi.minecraft import Minecraft
from picamera import PiCamera from time import sleep mc = Minecraft.create() camera = PiCamera() mc.postToChat(“Find the photobooth”)
Step Two: Take the picture
Now add the code to check your current
location, if you are standing on the
trigger block then a ‘smile’ message is
displayed. The camera preview beings
and then the photo is taken. It is saved
in the /home/pi named as selfi e.jpg’.
Don’t forget to smile!
while True: x, y, z = mc.player.getPos() if x >= 10.5 and y == 9.0 and z == -44.3:
mc.postToChat(“You are in the photobooth!”)
sleep(1) camera.start_preview() sleep(2) camera.capture(‘/home/pi/selfie.jpg’)
camera.stop_preview() mc.postToChat(“Check out your picture”)
sleep(3)
44 Display a messageMessages can be displayed in the Minecraft
environment to keep players up to date with what is
happening. This uses the code,
mc.postToChat() where the message to be displayed is
placed in-between the two brackets:
from mcpi import minecraft mc = minecraft.Minecraft.create() mc.postToChat(“Hello world”)
Messages are also useful for relaying data back to the player, for example, your current
location or the block ID which you are stood on or how far away from a particular block
you are standing.
Raspberry Pi Tips, Tricks & Hacks 121
Tips | Tricks | Hacks

122 Raspberry Pi Tips, Tricks & Hacks
Tips | Tricks | Hacks
From solar power packs and ePaper displays to near-fi eld 3D gesture control, here are ten unmissable add-ons for your Pi
In its short life so far of just over three years, the Raspberry Pi has been an absolute game changer – not just as a piece of reduced price hardware, but for nurturing a community of like-minded individuals with a common goal: learning and making awesome stuff!
We can’t recall the number of times we’ve browsed over to
the Raspberry Pi blog and been blown away by the brilliance of
a new project. From sorting Portuguese mail to making bullet
time rigs, there are a lot of incredible projects out there – more
and more are surfacing every day. People often ask what they
can do with a Raspberry Pi and it is actually sometimes diffi cult
to articulate an answer to that question, as the use cases are so
broad that it is hard to do the Raspberry Pi justice.
When comparing the Raspberry Pi to your average off-the-
shelf computer or mobile device, the brilliance of the Raspberry
Pi comes down to its upgradeability and the amount of
customisation that is possible. With a smartphone or tablet you
can get a trendy case or some cool headphones to go with it, but
the customisation with the Raspberry Pi goes far further than
that – both in software and hardware. A lot of projects you look at
appear to actually be the real-life manifestations of a childhood
dream. That ability to turn what used to be dreams into reality is
what makes the Raspberry Pi so well loved.
Here we take a look at ten of our favourite Raspberry Pi
upgrades, which will help you bring your ideas to life and serve
as some inspiration for your next project!

Tips | Tricks | Hacks
Fully protect your Pi
The Raspberry Pi is a durable and reliable little
computer, especially when you consider that
it is just a populated circuit board with no real
protection. However, there may be times where you
want to give your Pi a nice shell. Maybe because you
want your Pi-based home theatre to look more sleek
next to all of your other electronics, or maybe you
just want to keep the dust off your tiny computer
when carrying it around in your pocket.
The Short Crust Plus is one of our favourite cases
for the Model B+ and 2B Raspberry Pis due to its
sleek, tidy design and well thought-out features.
It is also easy to use – the Pi itself snaps into place
inside the case and the lid also clicks into place.
Each case comes with a set of self-adhesive
rubber feet and a free extension that enables you
to increase the height of the case in order to accept
any add-on boards you might be using.
£8.99 / $15.95 Available from:bit.ly/1ICXbvw
Short Crust Plus
Portable & solar power
You can now get hold of an elegant little add-on board that lets you
take your projects off-grid and away from mains power sources.
PiJuice is compliant with the Raspberry Pi HAT (Hardware Attached
on Top) specifi cation and makes use of a slim, off-the-shelf mobile
phone battery, and some intelligent charging and power circuitry, to
make your Pi truly portable. There’s also a version called PiJuice Solar
that enables solar recharging and is even capable of taking inputs
from other renewable energy sources.
PiJuice also has a powerful ARM Cortex M0 processor that provides
deep sleep functionality, a real time clock, watchdog timers and plenty
of other very useful features.
The firmware and GUI (graphical user
interface) that comes with the PiJuice communicate
with the common ACPI (Advanced Configuration and Power
Interface) battery and power APIs for tight integration with Raspbian.
PiJuice only uses a I2C power sand one GPIO pin, so most of the GPIO pin
bank is left free for use with other projects. It comes as standard with a
stacking header to make it extremely simple to add other HATs or add-on
boards on top. PiJuice will enable you to make a variety of awesome
projects – check out the PiJuice Instructables page: bit.ly/1e2CoGE.
£25 / $39 Available from:bit.ly/1Fb1ywy
PiJuice
Raspberry Pi Tips, Tricks & Hacks 123
Tips | Tricks | Hacks
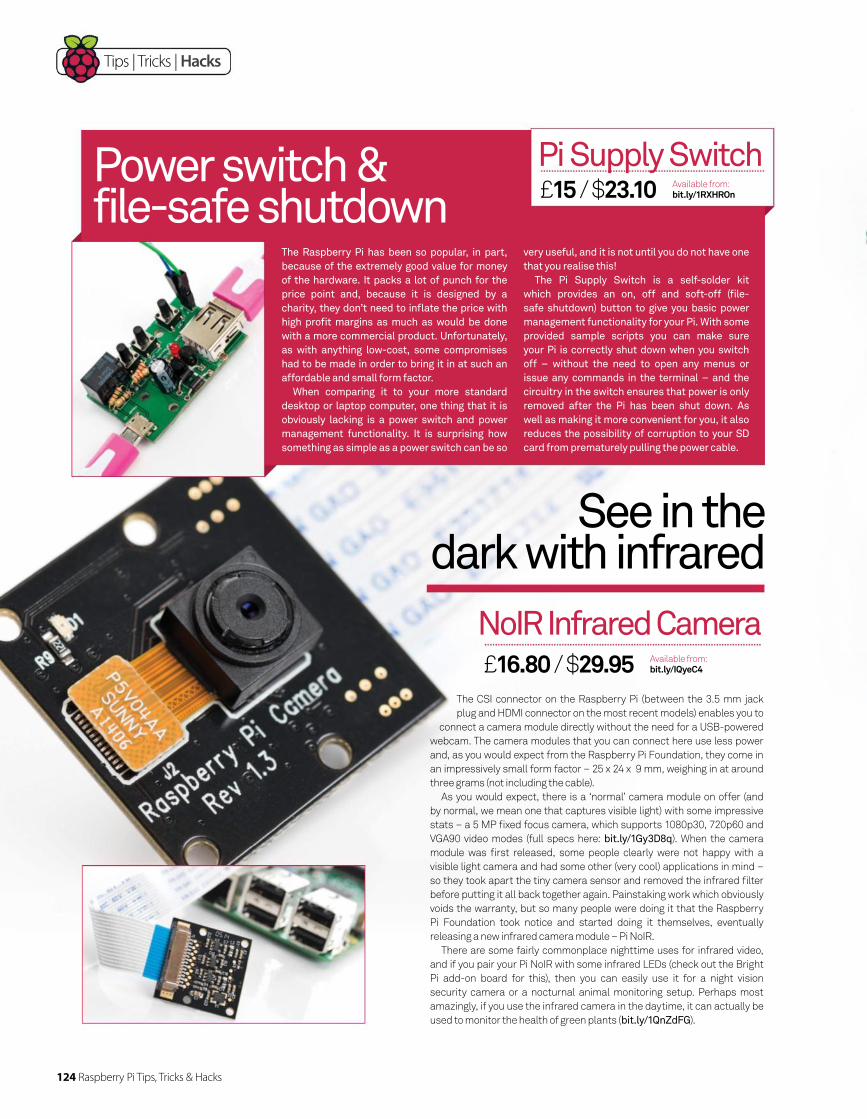
124 Raspberry Pi Tips, Tricks & Hacks
Tips | Tricks | Hacks
Power switch & file-safe shutdown
The Raspberry Pi has been so popular, in part,
because of the extremely good value for money
of the hardware. It packs a lot of punch for the
price point and, because it is designed by a
charity, they don’t need to infl ate the price with
high profi t margins as much as would be done
with a more commercial product. Unfortunately,
as with anything low-cost, some compromises
had to be made in order to bring it in at such an
affordable and small form factor.
When comparing it to your more standard
desktop or laptop computer, one thing that it is
obviously lacking is a power switch and power
management functionality. It is surprising how
something as simple as a power switch can be so
very useful, and it is not until you do not have one
that you realise this!
The Pi Supply Switch is a self-solder kit
which provides an on, off and soft-off (fi le-
safe shutdown) button to give you basic power
management functionality for your Pi. With some
provided sample scripts you can make sure
your Pi is correctly shut down when you switch
off – without the need to open any menus or
issue any commands in the terminal – and the
circuitry in the switch ensures that power is only
removed after the Pi has been shut down. As
well as making it more convenient for you, it also
reduces the possibility of corruption to your SD
card from prematurely pulling the power cable.
£15 / $23.10 Available from:bit.ly/1RXHROn
Pi Supply Switch
See in thedark with infrared
The CSI connector on the Raspberry Pi (between the 3.5 mm jack
plug and HDMI connector on the most recent models) enables you to
connect a camera module directly without the need for a USB-powered
webcam. The camera modules that you can connect here use less power
and, as you would expect from the Raspberry Pi Foundation, they come in
an impressively small form factor – 25 x 24 x 9 mm, weighing in at around
three grams (not including the cable).
As you would expect, there is a ‘normal’ camera module on offer (and
by normal, we mean one that captures visible light) with some impressive
stats – a 5 MP fi xed focus camera, which supports 1080p30, 720p60 and
VGA90 video modes (full specs here: bit.ly/1Gy3D8q). When the camera
module was fi rst released, some people clearly were not happy with a
visible light camera and had some other (very cool) applications in mind –
so they took apart the tiny camera sensor and removed the infrared fi lter
before putting it all back together again. Painstaking work which obviously
voids the warranty, but so many people were doing it that the Raspberry
Pi Foundation took notice and started doing it themselves, eventually
releasing a new infrared camera module – Pi NoIR.
There are some fairly commonplace nighttime uses for infrared video,
and if you pair your Pi NoIR with some infrared LEDs (check out the Bright
Pi add-on board for this), then you can easily use it for a night vision
security camera or a nocturnal animal monitoring setup. Perhaps most
amazingly, if you use the infrared camera in the daytime, it can actually be
used to monitor the health of green plants (bit.ly/1QnZdFG).
£16.80 / $29.95 Available from:bit.ly/IQyeC4
NoIR Infrared Camera

Tips | Tricks | Hacks Tips | Tricks | Hacks
Movement for your camera rig
The camera module and Pi NoIR we look at on the opposite
page are some pretty essential upgrades to have in your
Raspberry Pi toolbox, but what happens if you want to move
the camera around to get a different viewpoint? This would
be useful in a multitude of projects, such as a robot with a
movable camera or an Internet-connected webcam that you
can control via a web interface (many IP cameras used for
security applications already have a pan-tilt feature, in fact).
The Pi-Pan from Open Electrons is a pan-tilt mechanism
for the Raspberry Pi that enables you to articulate the camera
by an impressive amount – 110 degrees from top to bottom
and 180 degrees from left to right. The kit includes a well
considered array of hardware, including a servo driver board,
the servo motors required for the actuation and mounting
hardware for the camera and servos. On the software side,
there are libraries in Python and Scratch so it is easily fl exible
enough for most projects.
One of the most impressive applications you could use
this for is an OpenCV-based motion detection and face-
tracking camera. There is sample code available on the
openelectrons.com forum and it looks like a truly great
project to try (bit.ly/1JJpXLe).
£45.99 / $39.99 Available from:bit.ly/1dwpEr2
Pi-Pan Pan Tilt Mechanism
High quality audio for your Pi
As an educational tool, the Raspberry Pi is pretty much unparalleled due to
the support of the very large community that surrounds it. As a high quality
audio device, however, you may think it is lacking due to the fact it only has
a 3.5 mm stereo output that isn’t tuned for high fi delity.
Due to its low cost, small footprint and its ability to act as a home media
centre, music and video streaming server and much more, you have probably
dreamed of enhancing the audio and taking your setup to the next level. The
good news is that the clever folk at the Raspberry Pi Foundation, from the
second revision of the original Model B, have provided access to the I2S pins;
initially on the separate P5 header, and now on the A+, B+ and 2B models it is
available from the main 40-pin GPIO header.
I2S is a communications protocol designed specifi cally for audio devices
and has enabled a number of companies like HiFiBerry and IQaudIO to
create high quality audio add-ons for the Raspberry Pi. The HiFiBerry
DAC+, for example, is an add-on which brings a high resolution (192
kHz, 24-bit) Burr-Brown digital-to-analogue converter to your Pi. It has
hardware volume control using Alsamixer, among other features, and as it
is a HAT-compatible board. It works plug-and-play out of the box with the
latest Raspberry Pi fi rmwares, and it works with all the popular operating
systems for both standard use and media playback, such as Raspbian,
Arch Linux, OSMC, OpenELEC, Volumio, Pi MusicBox and many more. If
you are serious about your audio quality and want a high quality, low cost,
Internet-connected solution, then you no longer have any excuse – you can
build your own for under £100!
£30 / $34.90 Available from:bit.ly/1L1hh4T
HiFiBerry DAC+
Tips | Tricks | Hacks
Raspberry Pi Tips, Tricks & Hacks 125

Tips | Tricks | Hacks
High definition display & audio
Finding the right display for your project can often be a bit
of a pain. We have covered the HDMIPi in a previous issue
(146; bit.ly/1Gb9LNs), which is a fantastic 9-inch HD screen
for your Raspberry Pi, and it really was wildly successful on
Kickstarter (kck.st/1CuIjwd).
If you want to take things one step further, Adafruit have
a 10.1-inch offering that just can’t be missed. It features a
beautiful 1280 x 800 (so slightly higher than 720p) resolution
IPS display with a very wide viewing angle. It has mounting
tabs to enable you to easily fl ush-mount it within your project
and it can accept a number of different input methods –
HDMI, VGA and composite. Perhaps best of all, this display kit
also enables you to directly connect 2-, 4- or 8-Ohm speakers
without the need for a separate amplifi er or externally
powered speaker, which is very useful.
It is not the cheapest display around at $155 on the Adafruit
site, but if you need a high quality display in your project with
native audio capability then you should seriously consider
it. We are already daydreaming of a dedicated multiplayer
arcade emulator with built-in stereo audio, and we’re sure you
can come up with some cool applications too!
£110 / $154.95 Available from:bit.ly/1HrfR1s
Adafruit 10.1” Display & Audio
Super low-power displays
As computers of all sizes and powers are now being embedded into pretty
much everything, electronic parts have become even more commoditised
and, happily, this is fi ltering down to display technology as well. We now
have a wealth of offerings from your standard monochrome LCDs to TFT,
OLED and AMOLED offerings.
One of the most exciting and disruptive display technologies of recent
times is ePaper/eInk. You probably know it best as the screens that go into
e-readers like the Kindle and Kobo (fun fact: the Pebble watch is commonly
referred to as an ePaper watch, but it actually uses what is known as a
Memory LCD and a very clever marketing team). You may have wondered in
the past why your iPad barely lasts fi ve hours on a charge but your Kindle
lasts for over a week, and the answer is all to do with the display. ePaper
only uses power to update what is on the screen, which means that for a
large number of applications where you don’t need to change screen
contents particularly often, it saves a lot of battery power. It would be
pretty useless for playing videos, but for e-readers, monochrome graphical
info displays, digital price tags, bus and train station signage and many
more applications, it is by far the best choice.
PaPiRus brings the low power ePaper display technology you know and
love to the Raspberry Pi in a HAT-compatible format with screen sizes
ranging from 1.44 to 2.7 inches. The ePaper fi lm used in these screens is
actually identical to that in the popular e-readers mentioned above. You
can get your hands on one for around £35 and they come with a useful
Python and command line framework. They are worth trying out if you have
any display-driven projects!
£30-65 / $47-102 Available from:bit.ly/1f2Lzaj
PaPiRus ePaper/eInk HAT
Tips | Tricks | Hacks
126 Raspberry Pi Tips, Tricks & Hacks

Tips | Tricks | Hacks Tips | Tricks | Hacks Tips | Tricks | Hacks
Control your plug sockets
Home automation is all the rage at the moment – perhaps it is
because people are inherently lazy or maybe it’s just because
this tech is extremely fun to play with! Either way it doesn’t
really matter, as it can make our lives easier and quicker
and can automate tasks that would often be boring and
monotonous, like fi ddling with heating controls and turning
off the lights before you go to bed.
One thing that we are always told is to turn off devices
at the plug rather than leaving them on standby, as they
use a lot of electricity when not properly turned off. This is
sound advice but is not always a practical solution as the
socket is not easily accessible. This is where the Energenie
Pi-mote control starter kit comes in. It contains two remote-
controlled plug sockets which can be turned on and off with
an RF remote. What does this have to do with the Raspberry
Pi? Well you also get an add-on board to enable you to
control the sockets via software on the Raspberry Pi, which
unleashes whole new possibilities – you could set your lamps
to turn on and off automatically at specifi ed times when
you are away to avoid burglars, or create a basic web app to
control your plug sockets remotely using your smartphone.
They only come in UK and EU plug types, so if you use a
different plug then you may need to look for something else
(and maybe send Energenie a request to make more versions).
£19.99 / $31 Available from:bit.ly/1L1kYHU
Energenie Pi-mote Control Starter Kit
Gesture & touch control
For a lot of projects you undertake with the Raspberry Pi, you will want
some kind of user interaction. When using the desktop GUI this is normally
done with a keyboard and mouse, but these are not always the most
intuitive input methods when you aren’t using a full desktop environment
and when you don’t need to type anything.
The pirates over at Pimoroni have created a new HAT module called the
Skywriter that enables you to add near-fi eld 3D gesture and touch sensing
to your projects for a great price. There is a Python API provided that
provides full 3D position data and gesture information (swipes, taps and
so on). Play with this for a short while and you will realise that it is a really
nice input method with a lot of potential – Pimoroni even have a video of a
home-made Ras Pi-based theremin (vine.co/v/OrUWTdd0Hlg).
There is even a larger non-HAT version of the Skywriter that is more
than twice the size and boasts a sensing distance of around 15 cm,
which means that you can mount it inside your projects behind a sheet
of acrylic or other non-conductive material and it will still work. This is
especially good if you want to convince people that your projects are
simply pure magic.
£16 / $20.95 Available from:bit.ly/1IFt9cg
Pimoroni Skywriter HAT
Tips | Tricks | Hacks
Raspberry Pi Tips, Tricks & Hacks 127
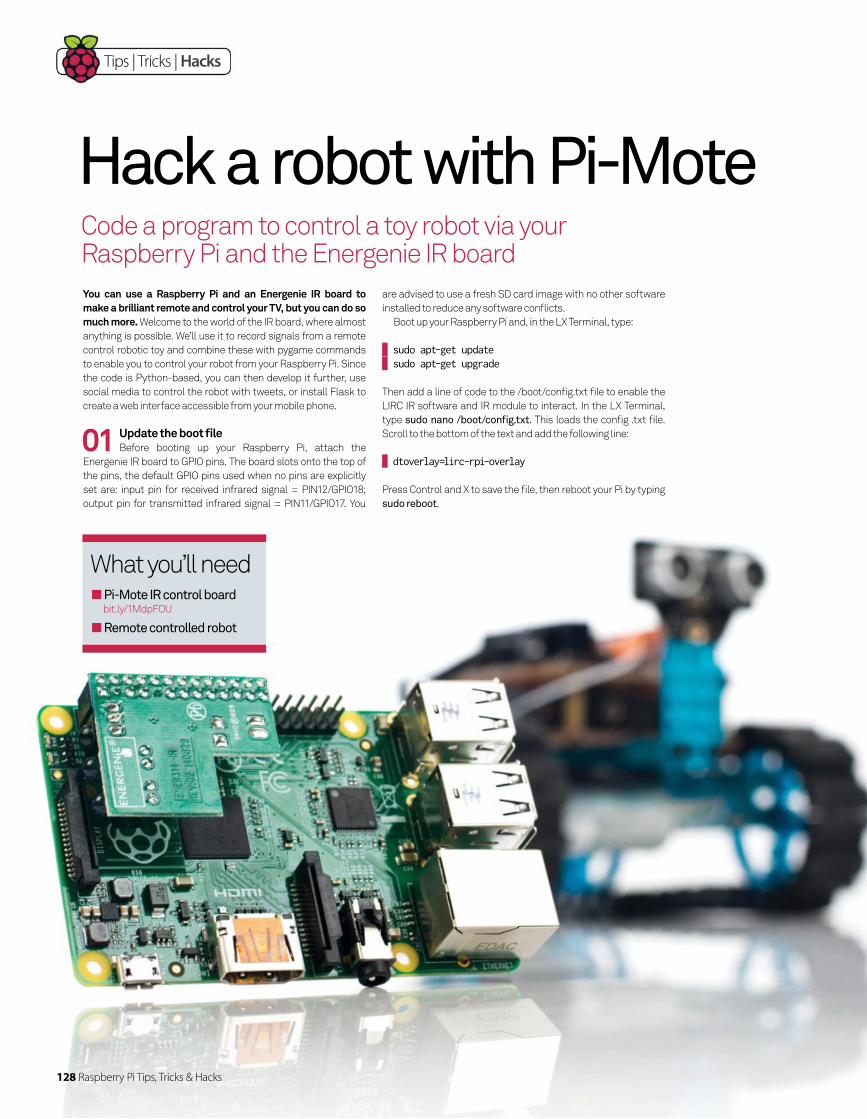
Tips | Tricks | Hacks
What you’ll need Pi-Mote IR control board bit.ly/1MdpFOU
Remote controlled robot
Code a program to control a toy robot via your Raspberry Pi and the Energenie IR board
Hack a robot with Pi-Mote
You can use a Raspberry Pi and an Energenie IR board to make a brilliant remote and control your TV, but you can do so much more. Welcome to the world of the IR board, where almost
anything is possible. We’ll use it to record signals from a remote
control robotic toy and combine these with pygame commands
to enable you to control your robot from your Raspberry Pi. Since
the code is Python-based, you can then develop it further, use
social media to control the robot with tweets, or install Flask to
create a web interface accessible from your mobile phone.
are advised to use a fresh SD card image with no other software
installed to reduce any software confl icts.
Boot up your Raspberry Pi and, in the LX Terminal, type:
sudo apt-get update sudo apt-get upgrade
Then add a line of code to the /boot/confi g.txt fi le to enable the
LIRC IR software and IR module to interact. In the LX Terminal,
type sudo nano /boot/confi g.txt. This loads the confi g .txt fi le.
Scroll to the bottom of the text and add the following line:
dtoverlay=lirc-rpi-overlay
Press Control and X to save the fi le, then reboot your Pi by typing
sudo reboot.
01 Update the boot fi leBefore booting up your Raspberry Pi, attach the
Energenie IR board to GPIO pins. The board slots onto the top of
the pins, the default GPIO pins used when no pins are explicitly
set are: input pin for received infrared signal = PIN12/GPIO18;
output pin for transmitted infrared signal = PIN11/GPIO17. You
128 Raspberry Pi Tips, Tricks & Hacks
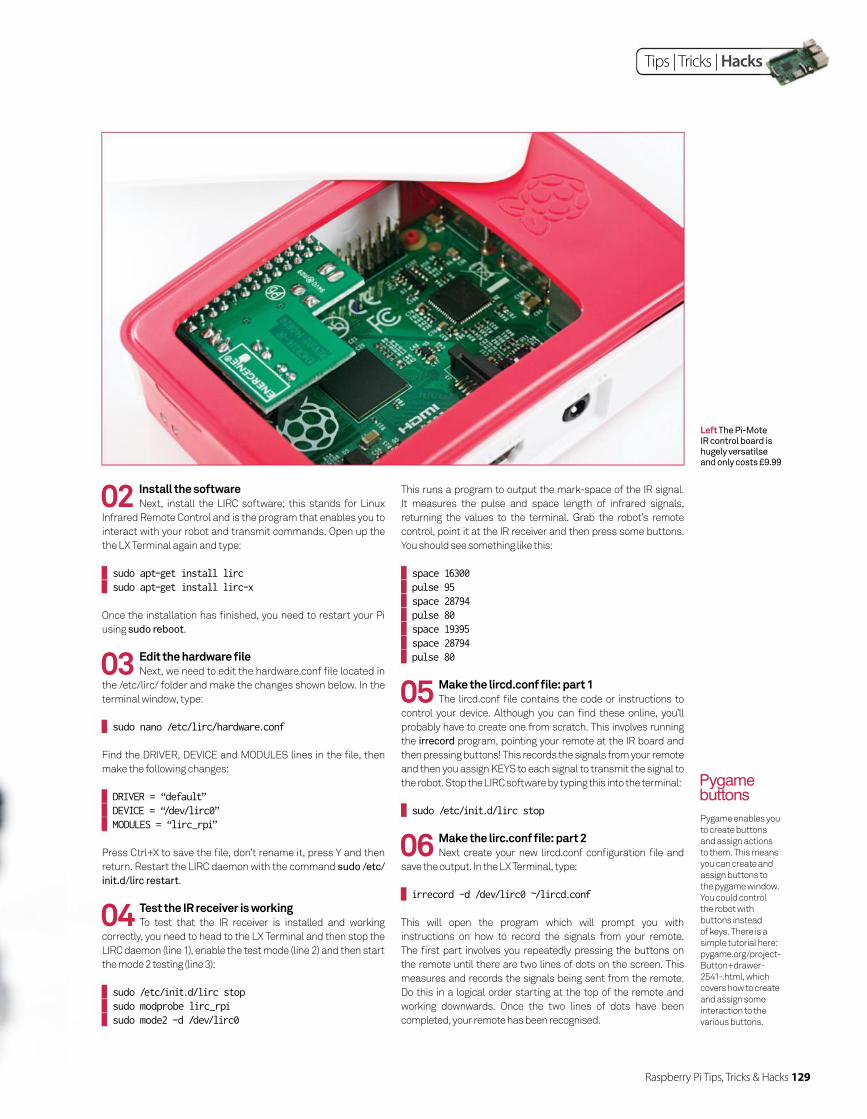
Raspberry Pi Tips, Tricks & Hacks 129
Tips | Tricks | Hacks
02 Install the softwareNext, install the LIRC software; this stands for Linux
Infrared Remote Control and is the program that enables you to
interact with your robot and transmit commands. Open up the
the LX Terminal again and type:
sudo apt-get install lirc sudo apt-get install lirc-x
Once the installation has fi nished, you need to restart your Pi
using sudo reboot.
03 Edit the hardware fi leNext, we need to edit the hardware.conf fi le located in
the /etc/lirc/ folder and make the changes shown below. In the
terminal window, type:
sudo nano /etc/lirc/hardware.conf
Find the DRIVER, DEVICE and MODULES lines in the fi le, then
make the following changes:
DRIVER = “default” DEVICE = “/dev/lirc0” MODULES = “lirc_rpi”
Press Ctrl+X to save the fi le, don’t rename it, press Y and then
return. Restart the LIRC daemon with the command sudo /etc/
init.d/lirc restart.
05 Make the lircd.conf fi le: part 1The lircd.conf fi le contains the code or instructions to
control your device. Although you can fi nd these online, you’ll
probably have to create one from scratch. This involves running
the irrecord program, pointing your remote at the IR board and
then pressing buttons! This records the signals from your remote
and then you assign KEYS to each signal to transmit the signal to
the robot. Stop the LIRC software by typing this into the terminal:
sudo /etc/init.d/lirc stop
04 Test the IR receiver is workingTo test that the IR receiver is installed and working
correctly, you need to head to the LX Terminal and then stop the
LIRC daemon (line 1), enable the test mode (line 2) and then start
the mode 2 testing (line 3):
sudo /etc/init.d/lirc stop sudo modprobe lirc_rpi sudo mode2 -d /dev/lirc0
Left The Pi-Mote IR control board is hugely versatilse and only costs £9.99
06 Make the lirc.conf fi le: part 2Next create your new lircd.conf confi guration fi le and
save the output. In the LX Terminal, type:
irrecord -d /dev/lirc0 ~/lircd.conf
This will open the program which will prompt you with
instructions on how to record the signals from your remote.
The fi rst part involves you repeatedly pressing the buttons on
the remote until there are two lines of dots on the screen. This
measures and records the signals being sent from the remote.
Do this in a logical order starting at the top of the remote and
working downwards. Once the two lines of dots have been
completed, your remote has been recognised.
Pygame enables you
to create buttons
and assign actions
to them. This means
you can create and
assign buttons to
the pygame window.
You could control
the robot with
buttons instead
of keys. There is a
simple tutorial here:
pygame.org/project-
Button+drawer-
2541-.html, which
covers how to create
and assign some
interaction to the
various buttons.
Pygame buttons
This runs a program to output the mark-space of the IR signal.
It measures the pulse and space length of infrared signals,
returning the values to the terminal. Grab the robot’s remote
control, point it at the IR receiver and then press some buttons.
You should see something like this:
space 16300 pulse 95 space 28794 pulse 80 space 19395 space 28794 pulse 80
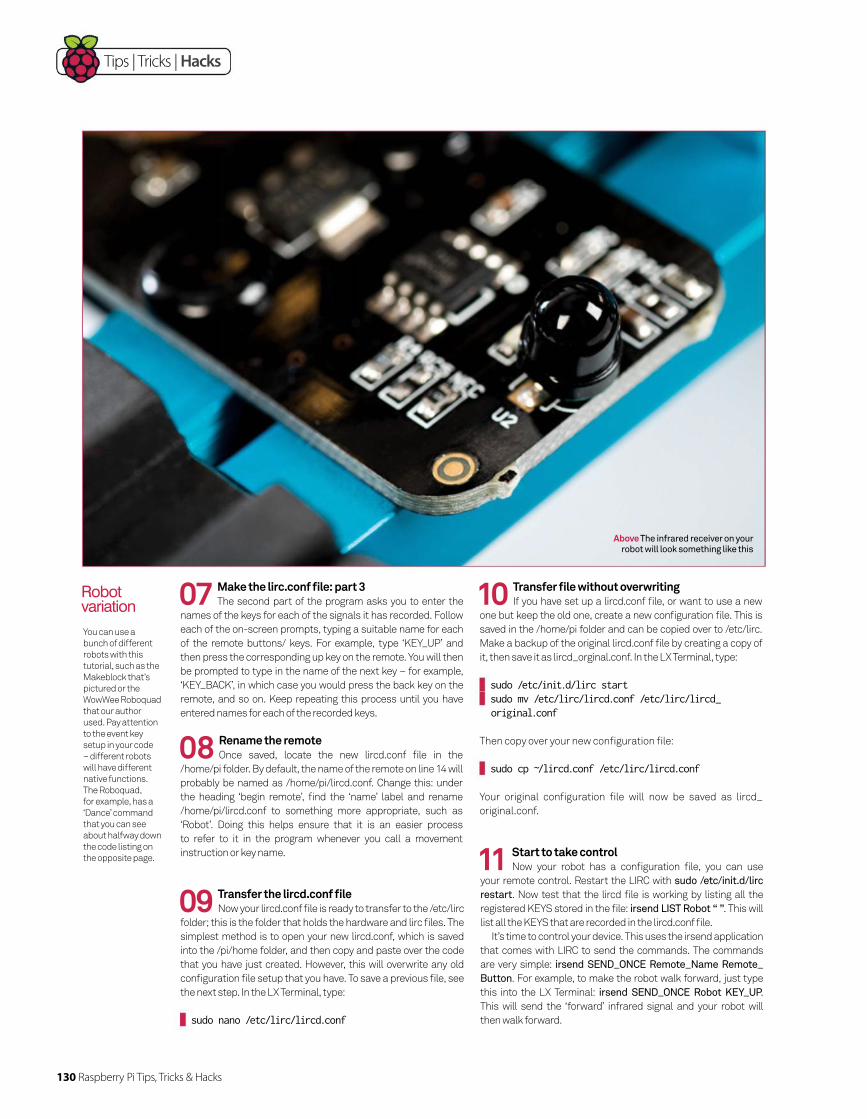
130 Raspberry Pi Tips, Tricks & Hacks
Tips | Tricks | Hacks
08 Rename the remote Once saved, locate the new lircd.conf fi le in the
/home/pi folder. By default, the name of the remote on line 14 will
probably be named as /home/pi/lircd.conf. Change this: under
the heading ‘begin remote’, fi nd the ‘name’ label and rename
/home/pi/lircd.conf to something more appropriate, such as
‘Robot’. Doing this helps ensure that it is an easier process
to refer to it in the program whenever you call a movement
instruction or key name.
10 Transfer fi le without overwritingIf you have set up a lircd.conf fi le, or want to use a new
one but keep the old one, create a new confi guration fi le. This is
saved in the /home/pi folder and can be copied over to /etc/lirc.
Make a backup of the original lircd.conf fi le by creating a copy of
it, then save it as lircd_orginal.conf. In the LX Terminal, type:
sudo /etc/init.d/lirc start sudo mv /etc/lirc/lircd.conf /etc/lirc/lircd_original.conf
Then copy over your new confi guration fi le:
sudo cp ~/lircd.conf /etc/lirc/lircd.conf
Your original confi guration fi le will now be saved as lircd_
original.conf.
11 Start to take control Now your robot has a confi guration fi le, you can use
your remote control. Restart the LIRC with sudo /etc/init.d/lirc
restart. Now test that the lircd fi le is working by listing all the
registered KEYS stored in the fi le: irsend LIST Robot “ ”. This will
list all the KEYS that are recorded in the lircd.conf fi le.
It’s time to control your device. This uses the irsend application
that comes with LIRC to send the commands. The commands
are very simple: irsend SEND_ONCE Remote_Name Remote_
Button. For example, to make the robot walk forward, just type
this into the LX Terminal: irsend SEND_ONCE Robot KEY_UP.
This will send the ‘forward’ infrared signal and your robot will
then walk forward.
07 Make the lirc.conf fi le: part 3The second part of the program asks you to enter the
names of the keys for each of the signals it has recorded. Follow
each of the on-screen prompts, typing a suitable name for each
of the remote buttons/ keys. For example, type ‘KEY_UP’ and
then press the corresponding up key on the remote. You will then
be prompted to type in the name of the next key – for example,
‘KEY_BACK’, in which case you would press the back key on the
remote, and so on. Keep repeating this process until you have
entered names for each of the recorded keys.
You can use a
bunch of different
robots with this
tutorial, such as the
Makeblock that’s
pictured or the
WowWee Roboquad
that our author
used. Pay attention
to the event key
setup in your code
– different robots
will have different
native functions.
The Roboquad,
for example, has a
‘Dance’ command
that you can see
about halfway down
the code listing on
the opposite page.
Robot variation
09 Transfer the lircd.conf fi leNow your lircd.conf fi le is ready to transfer to the /etc/lirc
folder; this is the folder that holds the hardware and lirc fi les. The
simplest method is to open your new lircd.conf, which is saved
into the /pi/home folder, and then copy and paste over the code
that you have just created. However, this will overwrite any old
confi guration fi le setup that you have. To save a previous fi le, see
the next step. In the LX Terminal, type:
sudo nano /etc/lirc/lircd.conf
Above The infrared receiver on your robot will look something like this
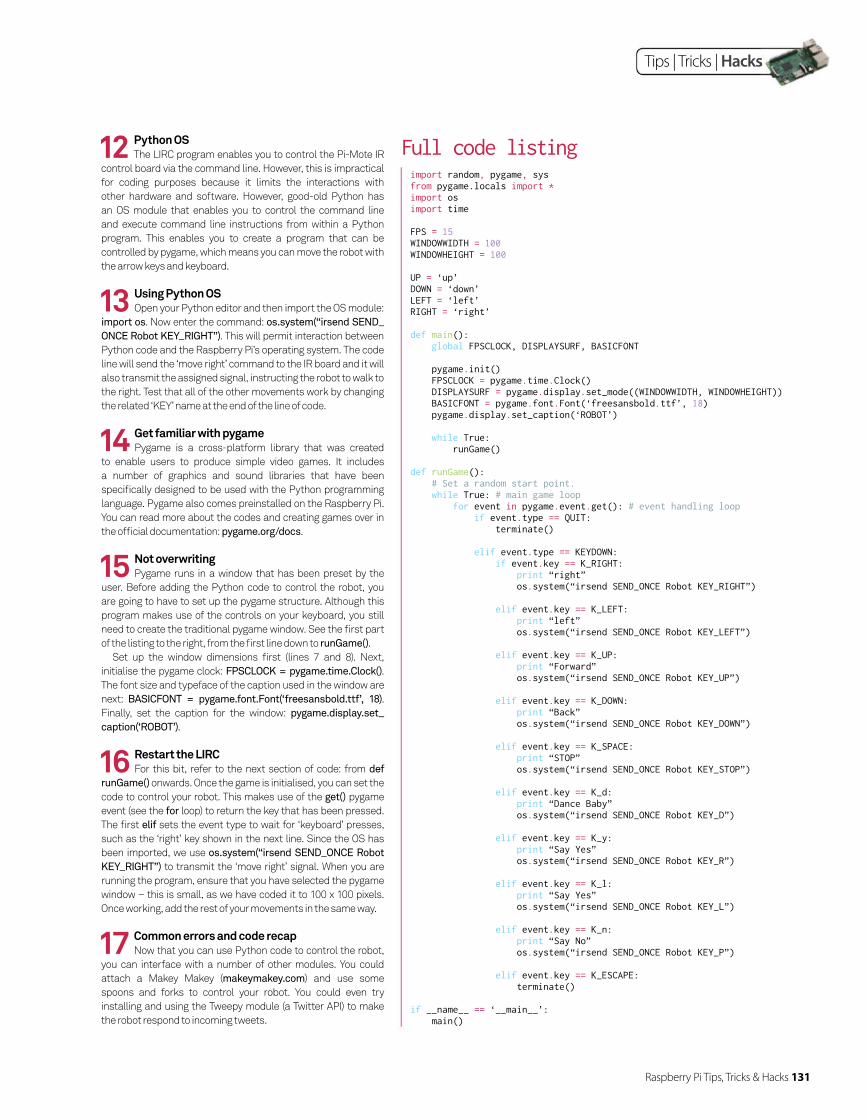
Raspberry Pi Tips, Tricks & Hacks 131
Tips | Tricks | Hacks
12 Python OSThe LIRC program enables you to control the Pi-Mote IR
control board via the command line. However, this is impractical
for coding purposes because it limits the interactions with
other hardware and software. However, good-old Python has
an OS module that enables you to control the command line
and execute command line instructions from within a Python
program. This enables you to create a program that can be
controlled by pygame, which means you can move the robot with
the arrow keys and keyboard.
13 Using Python OSOpen your Python editor and then import the OS module:
import os. Now enter the command: os.system(“irsend SEND_
ONCE Robot KEY_RIGHT”). This will permit interaction between
Python code and the Raspberry Pi’s operating system. The code
line will send the ‘move right’ command to the IR board and it will
also transmit the assigned signal, instructing the robot to walk to
the right. Test that all of the other movements work by changing
the related ‘KEY’ name at the end of the line of code.
14 Get familiar with pygamePygame is a cross-platform library that was created
to enable users to produce simple video games. It includes
a number of graphics and sound libraries that have been
specifi cally designed to be used with the Python programming
language. Pygame also comes preinstalled on the Raspberry Pi.
You can read more about the codes and creating games over in
the offi cial documentation: pygame.org/docs.
15 Not overwritingPygame runs in a window that has been preset by the
user. Before adding the Python code to control the robot, you
are going to have to set up the pygame structure. Although this
program makes use of the controls on your keyboard, you still
need to create the traditional pygame window. See the fi rst part
of the listing to the right, from the fi rst line down to runGame().
Set up the window dimensions fi rst (lines 7 and 8). Next,
initialise the pygame clock: FPSCLOCK = pygame.time.Clock().
The font size and typeface of the caption used in the window are
next: BASICFONT = pygame.font.Font(‘freesansbold.ttf’, 18).
Finally, set the caption for the window: pygame.display.set_
caption(‘ROBOT’).
17 Common errors and code recapNow that you can use Python code to control the robot,
you can interface with a number of other modules. You could
attach a Makey Makey (makeymakey.com) and use some
spoons and forks to control your robot. You could even try
installing and using the Tweepy module (a Twitter API) to make
the robot respond to incoming tweets.
16 Restart the LIRCFor this bit, refer to the next section of code: from def
runGame() onwards. Once the game is initialised, you can set the
code to control your robot. This makes use of the get() pygame
event (see the for loop) to return the key that has been pressed.
The fi rst elif sets the event type to wait for ‘keyboard’ presses,
such as the ‘right’ key shown in the next line. Since the OS has
been imported, we use os.system(“irsend SEND_ONCE Robot
KEY_RIGHT”) to transmit the ‘move right’ signal. When you are
running the program, ensure that you have selected the pygame
window – this is small, as we have coded it to 100 x 100 pixels.
Once working, add the rest of your movements in the same way.
import random, pygame, sysfrom pygame.locals import *import osimport time
FPS = 15WINDOWWIDTH = 100WINDOWHEIGHT = 100
UP = ‘up’DOWN = ‘down’LEFT = ‘left’RIGHT = ‘right’
def main(): global FPSCLOCK, DISPLAYSURF, BASICFONT
pygame.init() FPSCLOCK = pygame.time.Clock() DISPLAYSURF = pygame.display.set_mode((WINDOWWIDTH, WINDOWHEIGHT)) BASICFONT = pygame.font.Font(‘freesansbold.ttf’, 18) pygame.display.set_caption(‘ROBOT’)
while True: runGame() def runGame(): # Set a random start point. while True: # main game loop for event in pygame.event.get(): # event handling loop if event.type == QUIT: terminate() elif event.type == KEYDOWN: if event.key == K_RIGHT: print “right” os.system(“irsend SEND_ONCE Robot KEY_RIGHT”) elif event.key == K_LEFT: print “left” os.system(“irsend SEND_ONCE Robot KEY_LEFT”) elif event.key == K_UP: print “Forward” os.system(“irsend SEND_ONCE Robot KEY_UP”) elif event.key == K_DOWN: print “Back” os.system(“irsend SEND_ONCE Robot KEY_DOWN”)
elif event.key == K_SPACE: print “STOP” os.system(“irsend SEND_ONCE Robot KEY_STOP”)
elif event.key == K_d: print “Dance Baby” os.system(“irsend SEND_ONCE Robot KEY_D”)
elif event.key == K_y: print “Say Yes” os.system(“irsend SEND_ONCE Robot KEY_R”)
elif event.key == K_l: print “Say Yes” os.system(“irsend SEND_ONCE Robot KEY_L”)
elif event.key == K_n: print “Say No” os.system(“irsend SEND_ONCE Robot KEY_P”)
elif event.key == K_ESCAPE: terminate()
if __name__ == ‘__main__’: main()
Full code listing
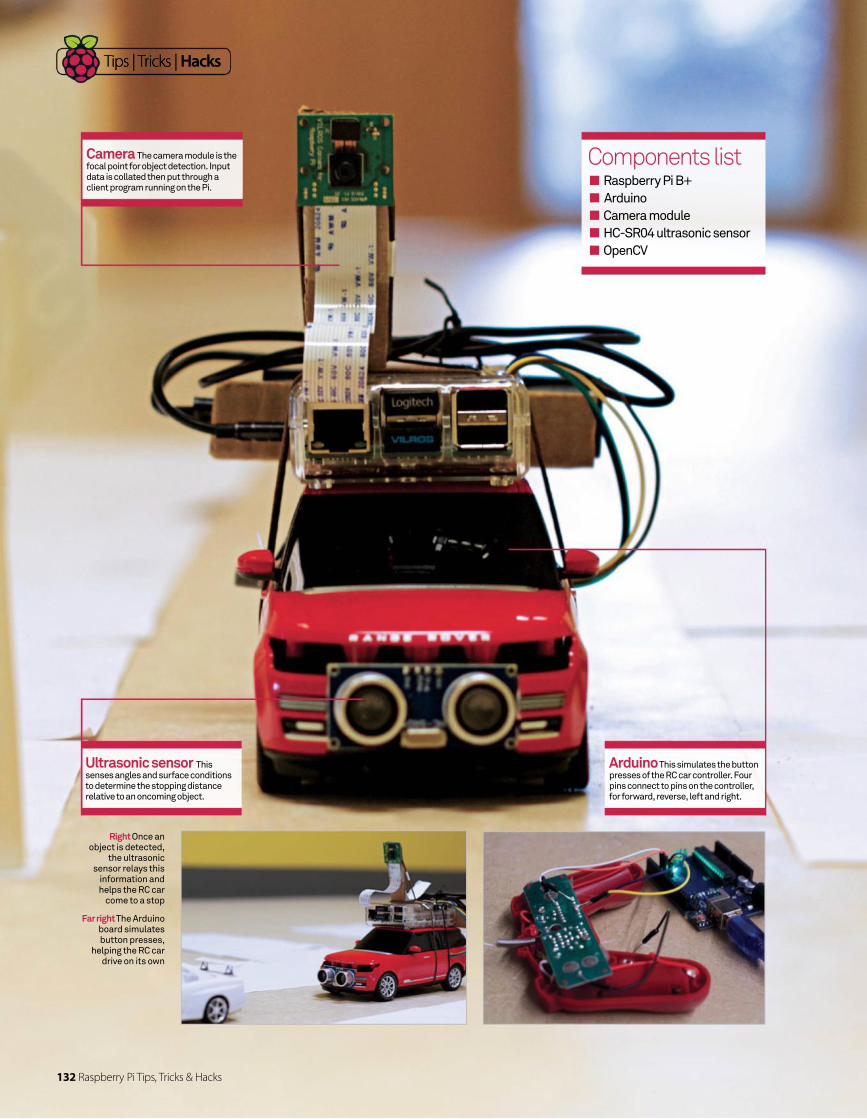
Tips | Tricks | Hacks
Camera The camera module is the focal point for object detection. Input data is collated then put through a client program running on the Pi.
Ultrasonic sensor This senses angles and surface conditions to determine the stopping distance relative to an oncoming object.
Arduino This simulates the button presses of the RC car controller. Four pins connect to pins on the controller, for forward, reverse, left and right.
Components list Raspberry Pi B+
Arduino
Camera module
HC-SR04 ultrasonic sensor
OpenCV
Right Once an object is detected,
the ultrasonic sensor relays this
information and helps the RC car
come to a stop
Far right The Arduino board simulates button presses,
helping the RC car drive on its own
Tips | Tricks | Hacks
132 Raspberry Pi Tips, Tricks & Hacks
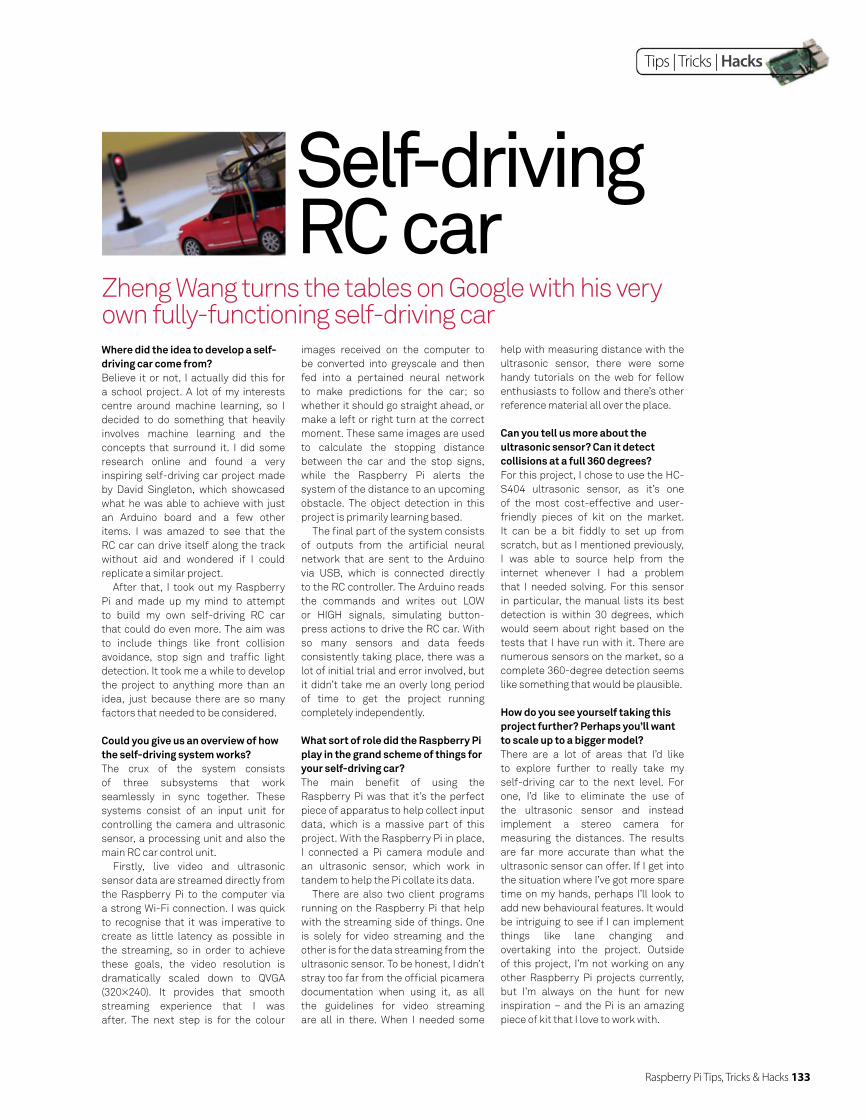
Tips | Tricks | Hacks
Self-driving RC car
Zheng Wang turns the tables on Google with his very own fully-functioning self-driving carWhere did the idea to develop a self-driving car come from?Believe it or not, I actually did this for
a school project. A lot of my interests
centre around machine learning, so I
decided to do something that heavily
involves machine learning and the
concepts that surround it. I did some
research online and found a very
inspiring self-driving car project made
by David Singleton, which showcased
what he was able to achieve with just
an Arduino board and a few other
items. I was amazed to see that the
RC car can drive itself along the track
without aid and wondered if I could
replicate a similar project.
After that, I took out my Raspberry
Pi and made up my mind to attempt
to build my own self-driving RC car
that could do even more. The aim was
to include things like front collision
avoidance, stop sign and traffi c light
detection. It took me a while to develop
the project to anything more than an
idea, just because there are so many
factors that needed to be considered.
Could you give us an overview of how the self-driving system works?The crux of the system consists
of three subsystems that work
seamlessly in sync together. These
systems consist of an input unit for
controlling the camera and ultrasonic
sensor, a processing unit and also the
main RC car control unit.
Firstly, live video and ultrasonic
sensor data are streamed directly from
the Raspberry Pi to the computer via
a strong Wi-Fi connection. I was quick
to recognise that it was imperative to
create as little latency as possible in
the streaming, so in order to achieve
these goals, the video resolution is
dramatically scaled down to QVGA
(320×240). It provides that smooth
streaming experience that I was
after. The next step is for the colour
images received on the computer to
be converted into greyscale and then
fed into a pertained neural network
to make predictions for the car; so
whether it should go straight ahead, or
make a left or right turn at the correct
moment. These same images are used
to calculate the stopping distance
between the car and the stop signs,
while the Raspberry Pi alerts the
system of the distance to an upcoming
obstacle. The object detection in this
project is primarily learning based.
The fi nal part of the system consists
of outputs from the artifi cial neural
network that are sent to the Arduino
via USB, which is connected directly
to the RC controller. The Arduino reads
the commands and writes out LOW
or HIGH signals, simulating button-
press actions to drive the RC car. With
so many sensors and data feeds
consistently taking place, there was a
lot of initial trial and error involved, but
it didn’t take me an overly long period
of time to get the project running
completely independently.
What sort of role did the Raspberry Pi play in the grand scheme of things for your self-driving car?The main benefi t of using the
Raspberry Pi was that it’s the perfect
piece of apparatus to help collect input
data, which is a massive part of this
project. With the Raspberry Pi in place,
I connected a Pi camera module and
an ultrasonic sensor, which work in
tandem to help the Pi collate its data.
There are also two client programs
running on the Raspberry Pi that help
with the streaming side of things. One
is solely for video streaming and the
other is for the data streaming from the
ultrasonic sensor. To be honest, I didn’t
stray too far from the offi cial picamera
documentation when using it, as all
the guidelines for video streaming
are all in there. When I needed some
help with measuring distance with the
ultrasonic sensor, there were some
handy tutorials on the web for fellow
enthusiasts to follow and there’s other
reference material all over the place.
Can you tell us more about the ultrasonic sensor? Can it detect collisions at a full 360 degrees?For this project, I chose to use the HC-
S404 ultrasonic sensor, as it’s one
of the most cost-effective and user-
friendly pieces of kit on the market.
It can be a bit fi ddly to set up from
scratch, but as I mentioned previously,
I was able to source help from the
internet whenever I had a problem
that I needed solving. For this sensor
in particular, the manual lists its best
detection is within 30 degrees, which
would seem about right based on the
tests that I have run with it. There are
numerous sensors on the market, so a
complete 360-degree detection seems
like something that would be plausible.
How do you see yourself taking this project further? Perhaps you’ll want to scale up to a bigger model?There are a lot of areas that I’d like
to explore further to really take my
self-driving car to the next level. For
one, I’d like to eliminate the use of
the ultrasonic sensor and instead
implement a stereo camera for
measuring the distances. The results
are far more accurate than what the
ultrasonic sensor can offer. If I get into
the situation where I’ve got more spare
time on my hands, perhaps I’ll look to
add new behavioural features. It would
be intriguing to see if I can implement
things like lane changing and
overtaking into the project. Outside
of this project, I’m not working on any
other Raspberry Pi projects currently,
but I’m always on the hunt for new
inspiration – and the Pi is an amazing
piece of kit that I love to work with.
Raspberry Pi Tips, Tricks & Hacks 133
Tips | Tricks | Hacks Tips | Tricks | Hacks
Motion tracking with your PiThis month, you will learn how to track motions with your Raspberry Pi, a camera and some Python code
In a previous article, we looked at how you can capture images using a camera and a Raspberry Pi. This let you include
image capture functionality within your
own Python program, but there is so
much more you can do once you add
vision to your code. This month, we will
look at how you can add motion detection
to your Python program.
This kind of advanced image processing
is extremely difficult to do, so we will
definitely be building on the hard work of
others. Specifically, we will be using the
excellent OpenCV Python package. This
package is constantly being improved,
with more functionality being added with
every update.
The first thing you will need to do is
install the various Python packages that
you will need to talk to the camera and
use OpenCV. Installing the packages can
be done with:
sudo apt-get install python-picamera python-opencv
This will also install all of the required
dependencies. This project will assume
that you will use the camera module for
the Raspberry Pi. Check out the boxout
to the right for other options if you want
to try using a USB webcam. To talk to
the camera module, you need to import
the PiCamera class from the picamera
Python module. You will also need the
PiRGBArray class so that you can store
the raw data from the camera. To talk
to the camera, you instantiate a new
instance of the PiCamera class. You can
then set the resolution and frame rate
before you start capturing images.
from picamera import PiCamera from picamera import PiRGBArray camera = PiCamera() camera.resolution = tuple([640,480])
camera.framerate = 16 rawImage = PiRGBArray(camera, tuple([640,480]))
You now have your camera ready, and
a memory buffer available to store the
captured images in. There are several
different methods that you can use to
do motion tracking. One of the simpler
ones is to try and notice when something
within the image field changes. There
is a Python module, called imutils, that
provides several basic image processing
functions that are useful in the pre-
processing steps. There is no package for
it within Raspbian, however, so you will
want to install it with:
sudo pip install imutils
To look at image changes, we need to
see what the background image looks
like. You can take a series of images and
look at the average of them to get an
idea of the general background. Then, if
a new image differs from the averaged
background, we know that something has
changed. This change is most probably
due to something moving within the field
of the image. To simplify the process, we
will greyscale the image and then blur
it slightly to get rid of any high-contrast
regions. You will then want to simply run
a continuous loop, pulling an image from
the camera and running this process:
import imutils import cv2 for f in camera.capture_ continuous(rawImage, format=‘bgr’,
use_video_port=True): frame = imutils.resize(f.array, width=500) gray = cv2.cvtColor(frame, cv2. COLOR_BGR2GRAY) gray = cv2.GaussianBlur(gray, (21, 21), 0)
Here we start using the OpenCV functions
to handle the image processing steps.
You may have noticed that we are actually
working with the array representation
of the raw image data for the captured
frame. There is no meta-data wrapping
this image information, so it is your
responsibility to remember what you
are working with. The next step within
the loop is to check whether we have an
averaged image yet, and to initialise it if
we don’t. So the first time through the
loop, the following code will execute
if avg is None: avg = gray.copy().astype(“float”) rawImage.truncate(0) continue
Now that we have an averaged image,
we can add every subsequent captured
image to the weighted average. We also
need to find how different the current
image is from this weighted average.
cv2.accumulateWeighted(gray, avg, 0.5)
imgDiff = cv2.absdiff(gray, cv2. convertScaleAbs(avg))
By using this weighted average, we should
be able to deal with false positive hits due
to environment changes like fluctuations
in the lighting. Now that you have what
is different from the average, what can
you do with it? How do you decide how
different it is from the average? We need
to set some threshold difference that
signifies a “real” difference in the image
from the average. If you then dilate
this thresholded image, you can apply
the findContours function to identify
the contours of the objects that are
different from the calculated averaged
background:
imgThresh = cv2.threshold(imgDiff, 5, 255, cv2.THRESH_BINARY)[1]
imgThresh = cv2.dilate(imgThresh, None, iterations=2) (conts, _) = cv2.findContours (imgThresh.copy(), cv2.RETR_EXTERNAL, cv2.CHAIN_APPROX_SIMPLE)
This dumps all of the contours from the
current image into the list ‘conts’. You
probably aren’t very interested in tiny
objects within the list of contours. These
might simply be artifacts within the image
data. You should loop through each of
these and ignore any that are below some
area limit. You probably want to highlight
any remaining object contours by placing
a bounding box around them. Luckily,
134 Raspberry Pi Tips, Tricks & Hacks
Tips | Tricks | Hacks
In the main article, we have been using the Raspberry
Pi module that plugs into the IO bus of the Pi. But what
if you don’t have easy access to one of these? Almost
everyone has an old webcam sitting around the house
somewhere, and the Raspberry Pi has a perfectly
useful USB port. The image quality and frame per
second count is not as good as what you can get with
the actual Pi Module. The key is getting the image data
off the camera in the format that the OpenCV image
analysis functions is expecting. The VideoCapture()
function can not only take a video fi le name to read
in, but can also take device IDs for cameras attached
to the Raspberry Pi. Assuming that you only have one
camera attached, you can connect to it with:
camera = cv2.VideoCapture(0)
Making sure that your USB webcam is correctly
connected and that Linux can properly talk to it is
always the place where you may run into issues. But,
if everything works the way it should, you can use all of
the ideas from the main body of the article to use it for
motion detection. While OpenCV has some capabilities
to interact with the user, you may want to use some
other framework to handle this. A good framework
that is also very fast is pygame. You can use OpenCV to
handle all of the image processing steps and build your
user interface with pygame.
The only issue is that the internal formats used by
OpenCV and pygame to store image data are different,
so you will need to do a translation back and forth.
You only really need to worry about translating from
OpenCV to pygame, since that is the direction that
information will fl ow. There are a few helper functions
that you can use to convert the OpenCV image to a
string format, and then a pygame function to import
this string into a pygame image. As an example, you
could use something like
pygameImg = pygame.image.frombuffer(cv2Img.tostring(), cv2Img.shape[1::-1], “RGB”)
This takes images from OpenCV (stored in cv2Img) into
a pygame format (stored in pygameImg). If you have to,
you can do a similar transformation using strings back
from pygame to OpenCV format.
What about webcams?
OpenCV provides a function that will give
the corner coordinates and the width and
height. You can then draw a box on the
image using this information:
for c in conts: if cv2.contourArea(c) < 5000: continue (x, y, w, h) = cv2.
boundingRect(c) cv2.rectangle(frame, (x, y),
(x+w, y+h), (0, 255, 0), 2)
You should now have an image with all
of the moving objects highlighted by red
bounding boxes. What can you do with
these annotated images, though? If you
have a graphical environment available,
you can display these results directly
on the screen. OpenCV includes several
functions to display the results of your
image analysis. The simplest is to use the
imshow(), which will pop up a window to
display the image and also add a title.
cv2.imshow(“Motion detected”, frame)
If you aren’t monitoring the results of your
motion detector in real time, you probably
still want to capture images when
something moves in the environment.
Luckily, OpenCV also includes a pretty
exhaustive list of IO functions. You will
probably want to timestamp these
images fi rst, though. Using the Python
module timestamp and the function
“putText()”, you can get the current time
and date and add it to the image itself with:
import timestamp ts = timestamp.strftime(“%A %d %B %Y %I:%M:%S%p”)
cv2.putText(frame, ts, (10, frame. shape[0] - 10), cv2.FONT_HERSHEY_SIMPLEX, 0.35, (0, 0, 255), 1)
Now you have an image with the current
time and date on it, and the parts of the
image that show up as having movement
bounded in red boxes. You can use the
OpenCV IO functions to write out these
images so that you can check them out
later. The following code is an example:
cv2.imwrite(“filename.jpg”, frame)The function imwrite() uses the fi le name
extension in order to fi gure out what
format to use when writing out the image.
It can handle JPEG, PNG, PBM, PGM, PPM
and TIFF. If the particular format you want
to use also takes options, you can include
them in the call to imwrite() as well. For
example, you can set the JPEG quality by
including CV_IMWRITE_JPEG_QUALITY
and then setting it to some value between
0 and 100.
Everything we have looked at has
been focused on the idea of analysing
the images in real time, and this is great if
you can put the Raspberry Pi in the same
location as the camera. If you can’t fi t it
in, though, you can still use the ideas here
to post-process the video recorded by
your micro-camera. You can use the
same OpenCV IO functions to load the
video fi le with:
camera = cv2. VideoCapture(“filename.avi”)
You can then run through the same
process to analyse each of the image
frames within the video fi le. The
VideoCapture() function can also read in
a series of image fi les if your camera is
simply grabbing a series of still images
rather than a video. Once your program
fi nishes, you need to remember to clean
up after yourself. You should release the
camera that you were using, and if you
had OpenCV display any images on the
desktop then you should take the time to
clean those up, too.
camera.release() cv2.destroyAllWindows()
You should have enough information
now to be able to add some basic motion
detection to your own Python programs. If
you explore the OpenCV documentation,
you will fi nd many other, more complex,
image processing and analysing tools
that are available to play with. Also, more
functionality is constantly being added to
the OpenCV project.
We will be using the OpenCV Python package, which is constantly being improved
Raspberry Pi Tips, Tricks & Hacks 135
Tips | Tricks | Hacks
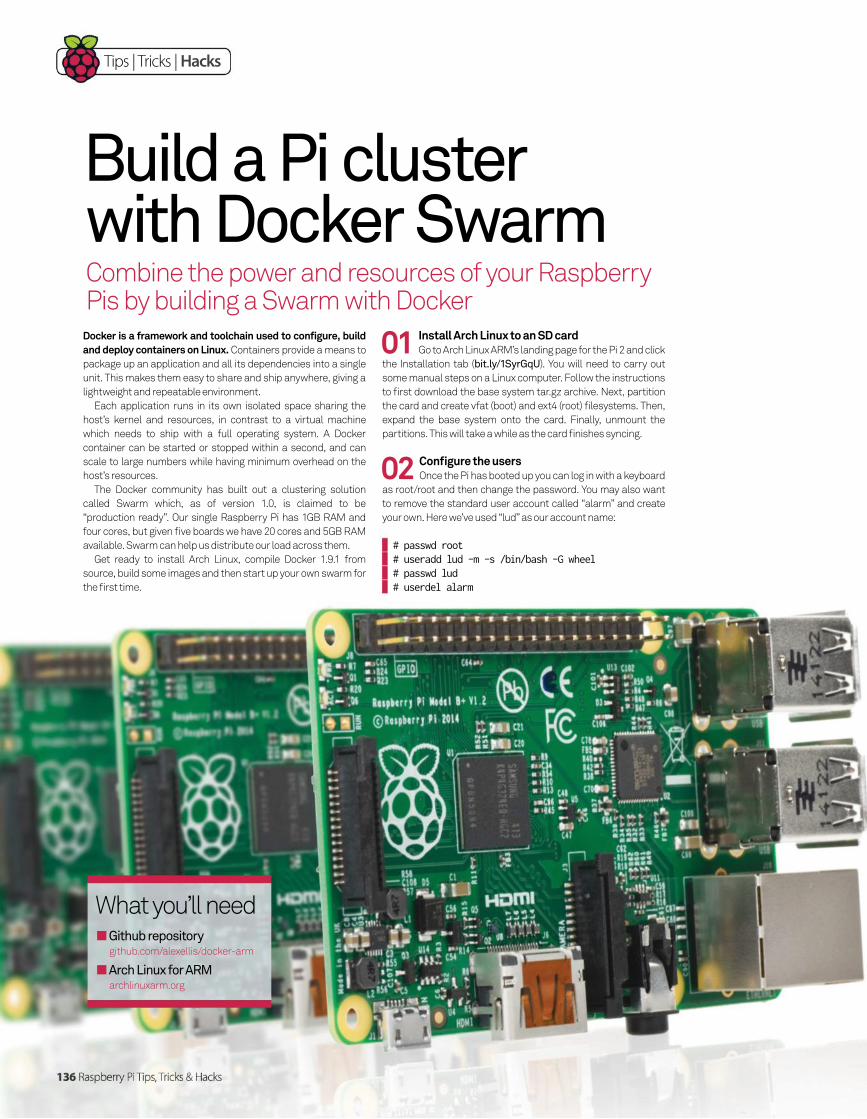
Tips | Tricks | Hacks
Combine the power and resources of your Raspberry Pis by building a Swarm with Docker
Build a Pi cluster with Docker Swarm
Docker is a framework and toolchain used to configure, build and deploy containers on Linux. Containers provide a means to
package up an application and all its dependencies into a single
unit. This makes them easy to share and ship anywhere, giving a
lightweight and repeatable environment.
Each application runs in its own isolated space sharing the
host’s kernel and resources, in contrast to a virtual machine
which needs to ship with a full operating system. A Docker
container can be started or stopped within a second, and can
scale to large numbers while having minimum overhead on the
host’s resources.
The Docker community has built out a clustering solution
called Swarm which, as of version 1.0, is claimed to be
“production ready”. Our single Raspberry Pi has 1GB RAM and
four cores, but given fi ve boards we have 20 cores and 5GB RAM
available. Swarm can help us distribute our load across them.
Get ready to install Arch Linux, compile Docker 1.9.1 from
source, build some images and then start up your own swarm for
the fi rst time.
01 Install Arch Linux to an SD card Go to Arch Linux ARM’s landing page for the Pi 2 and click
the Installation tab (bit.ly/1SyrGqU). You will need to carry out
some manual steps on a Linux computer. Follow the instructions
to fi rst download the base system tar.gz archive. Next, partition
the card and create vfat (boot) and ext4 (root) fi lesystems. Then,
expand the base system onto the card. Finally, unmount the
partitions. This will take a while as the card fi nishes syncing.
02 Confi gure the usersOnce the Pi has booted up you can log in with a keyboard
as root/root and then change the password. You may also want
to remove the standard user account called “alarm” and create
your own. Here we’ve used “lud” as our account name:
# passwd root # useradd lud -m -s /bin/bash -G wheel # passwd lud # userdel alarm
What you’ll need Github repositorygithub.com/alexellis/docker-arm
Arch Linux for ARMarchlinuxarm.org
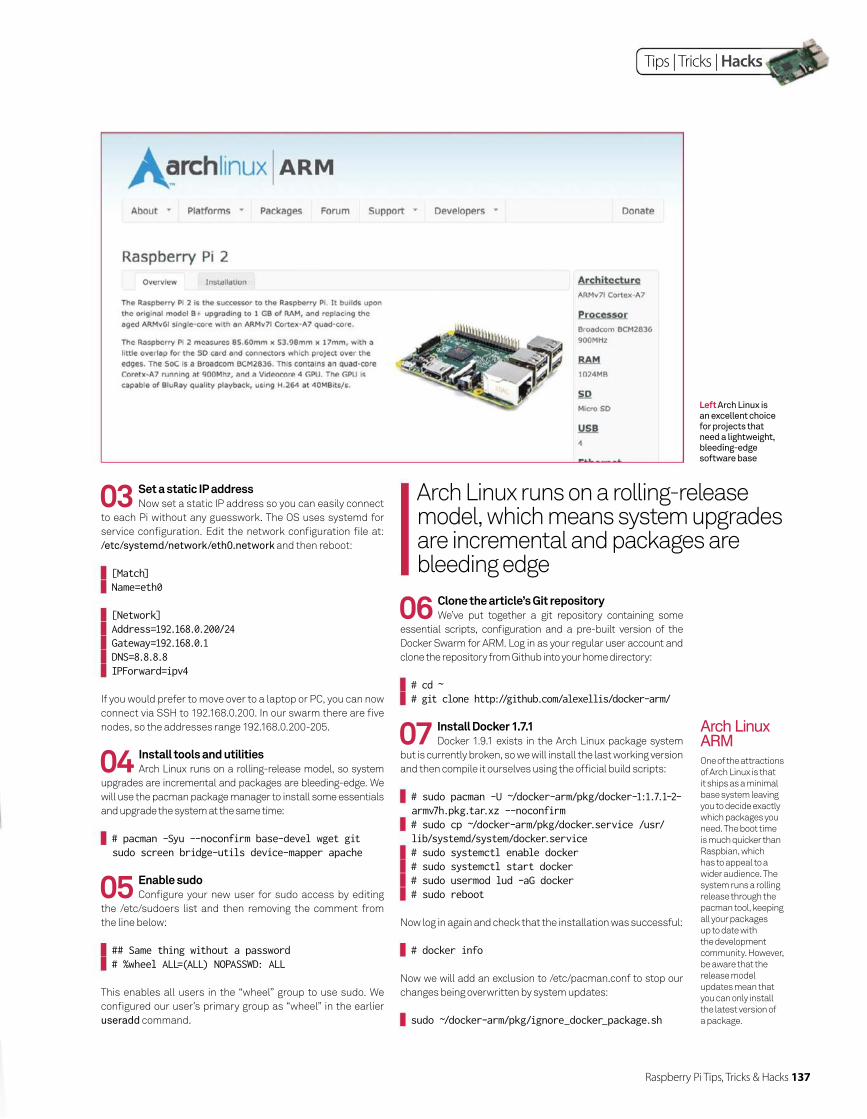
Raspberry Pi Tips, Tricks & Hacks 137
Tips | Tricks | Hacks
03 Set a static IP addressNow set a static IP address so you can easily connect
to each Pi without any guesswork. The OS uses systemd for
service confi guration. Edit the network confi guration fi le at:
/etc/systemd/network/eth0.network and then reboot:
[Match] Name=eth0
[Network] Address=192.168.0.200/24 Gateway=192.168.0.1 DNS=8.8.8.8 IPForward=ipv4
If you would prefer to move over to a laptop or PC, you can now
connect via SSH to 192.168.0.200. In our swarm there are fi ve
nodes, so the addresses range 192.168.0.200-205.
04 Install tools and utilitiesArch Linux runs on a rolling-release model, so system
upgrades are incremental and packages are bleeding-edge. We
will use the pacman package manager to install some essentials
and upgrade the system at the same time:
# pacman -Syu --noconfirm base-devel wget git sudo screen bridge-utils device-mapper apache
05 Enable sudoConfi gure your new user for sudo access by editing
the /etc/sudoers list and then removing the comment from
the line below:
## Same thing without a password # %wheel ALL=(ALL) NOPASSWD: ALL
This enables all users in the “wheel” group to use sudo. We
confi gured our user’s primary group as “wheel” in the earlier
useradd command.
06 Clone the article’s Git repositoryWe’ve put together a git repository containing some
essential scripts, confi guration and a pre-built version of the
Docker Swarm for ARM. Log in as your regular user account and
clone the repository from Github into your home directory:
# cd ~ # git clone http://github.com/alexellis/docker-arm/
07 Install Docker 1.7.1Docker 1.9.1 exists in the Arch Linux package system
but is currently broken, so we will install the last working version
and then compile it ourselves using the offi cial build scripts:
# sudo pacman -U ~/docker-arm/pkg/docker-1:1.7.1-2-armv7h.pkg.tar.xz --noconfirm
# sudo cp ~/docker-arm/pkg/docker.service /usr/lib/systemd/system/docker.service
# sudo systemctl enable docker # sudo systemctl start docker # sudo usermod lud -aG docker # sudo reboot
Now log in again and check that the installation was successful:
# docker info
Now we will add an exclusion to /etc/pacman.conf to stop our
changes being overwritten by system updates:
sudo ~/docker-arm/pkg/ignore_docker_package.sh
One of the attractions
of Arch Linux is that
it ships as a minimal
base system leaving
you to decide exactly
which packages you
need. The boot time
is much quicker than
Raspbian, which
has to appeal to a
wider audience. The
system runs a rolling
release through the
pacman tool, keeping
all your packages
up to date with
the development
community. However,
be aware that the
release model
updates mean that
you can only install
the latest version of
a package.
Arch Linux ARM
Arch Linux runs on a rolling-release model, which means system upgrades are incremental and packages are bleeding edge
Left Arch Linux is an excellent choice for projects that need a lightweight, bleeding-edge software base
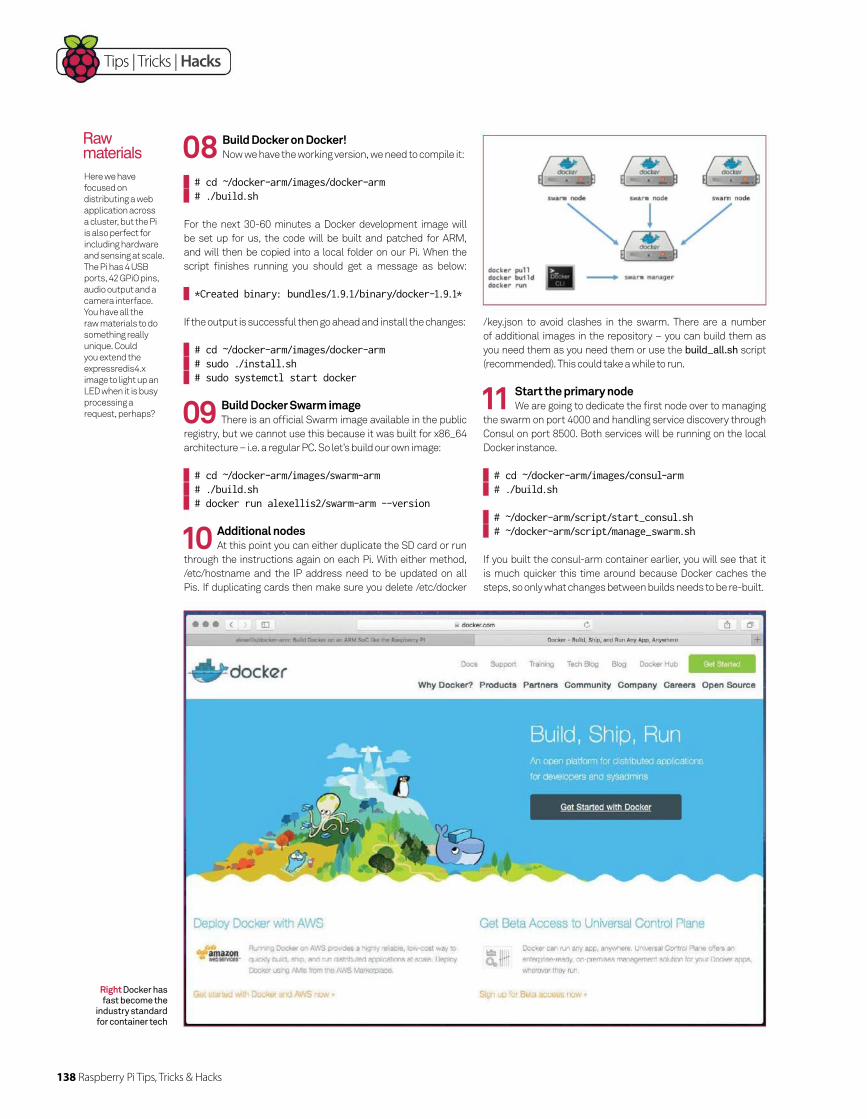
138 Raspberry Pi Tips, Tricks & Hacks
Tips | Tricks | Hacks
Here we have
focused on
distributing a web
application across
a cluster, but the Pi
is also perfect for
including hardware
and sensing at scale.
The Pi has 4 USB
ports, 42 GPiO pins,
audio output and a
camera interface.
You have all the
raw materials to do
something really
unique. Could
you extend the
expressredis4.x
image to light up an
LED when it is busy
processing a
request, perhaps?
Raw materials
Right Docker has fast become the
industry standard for container tech
08 Build Docker on Docker!Now we have the working version, we need to compile it:
# cd ~/docker-arm/images/docker-arm # ./build.sh
For the next 30-60 minutes a Docker development image will
be set up for us, the code will be built and patched for ARM,
and will then be copied into a local folder on our Pi. When the
script fi nishes running you should get a message as below:
*Created binary: bundles/1.9.1/binary/docker-1.9.1*
If the output is successful then go ahead and install the changes:
# cd ~/docker-arm/images/docker-arm # sudo ./install.sh # sudo systemctl start docker
09 Build Docker Swarm imageThere is an offi cial Swarm image available in the public
registry, but we cannot use this because it was built for x86_64
architecture – i.e. a regular PC. So let’s build our own image:
# cd ~/docker-arm/images/swarm-arm # ./build.sh # docker run alexellis2/swarm-arm --version
10 Additional nodesAt this point you can either duplicate the SD card or run
through the instructions again on each Pi. With either method,
/etc/hostname and the IP address need to be updated on all
Pis. If duplicating cards then make sure you delete /etc/docker
/key.json to avoid clashes in the swarm. There are a number
of additional images in the repository – you can build them as
you need them as you need them or use the build_all.sh script
(recommended). This could take a while to run.
11 Start the primary nodeWe are going to dedicate the fi rst node over to managing
the swarm on port 4000 and handling service discovery through
Consul on port 8500. Both services will be running on the local
Docker instance.
# cd ~/docker-arm/images/consul-arm # ./build.sh
# ~/docker-arm/script/start_consul.sh # ~/docker-arm/script/manage_swarm.sh
If you built the consul-arm container earlier, you will see that it
is much quicker this time around because Docker caches the
steps, so only what changes between builds needs to be re-built.
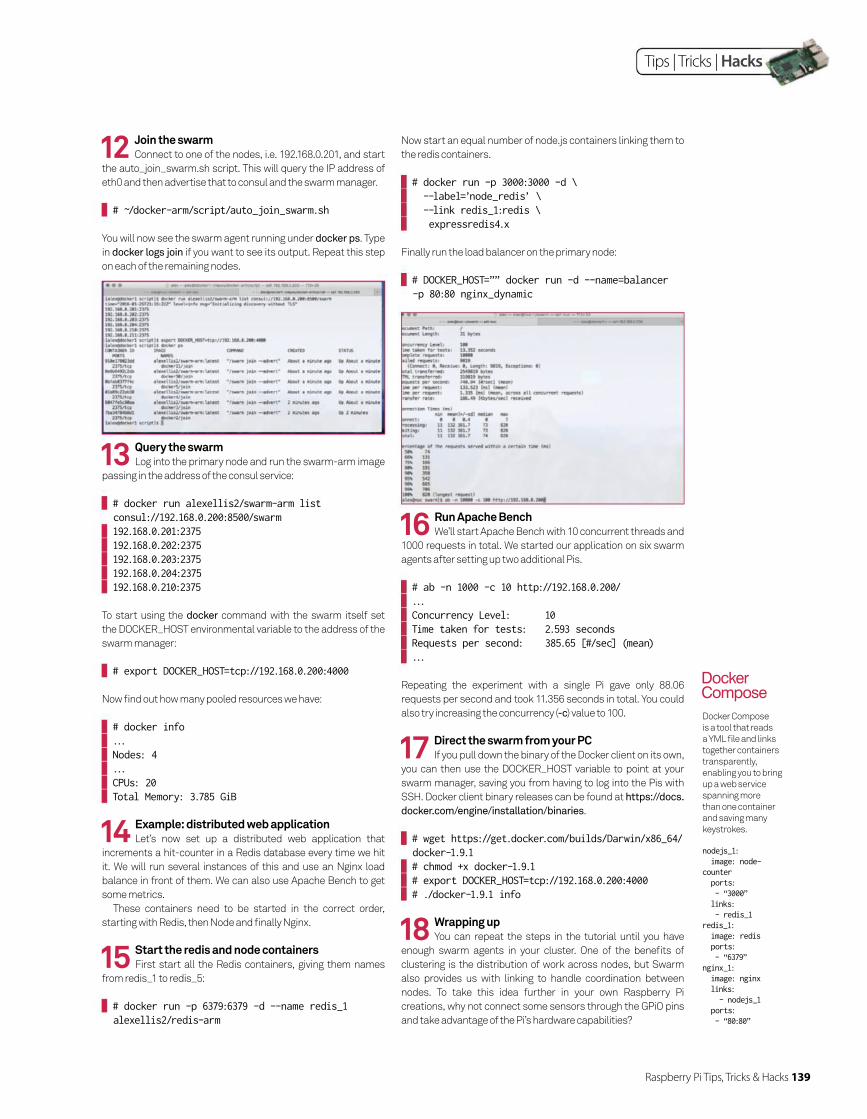
Raspberry Pi Tips, Tricks & Hacks 139
Tips | Tricks | Hacks
Docker Compose
is a tool that reads
a YML fi le and links
together containers
transparently,
enabling you to bring
up a web service
spanning more
than one container
and saving many
keystrokes.
nodejs_1: image: node-counter ports: - “3000” links: - redis_1redis_1: image: redis ports: - “6379”nginx_1: image: nginx links: - nodejs_1 ports: - “80:80”
Docker Compose
12 Join the swarmConnect to one of the nodes, i.e. 192.168.0.201, and start
the auto_join_swarm.sh script. This will query the IP address of
eth0 and then advertise that to consul and the swarm manager.
# ~/docker-arm/script/auto_join_swarm.sh
You will now see the swarm agent running under docker ps. Type
in docker logs join if you want to see its output. Repeat this step
on each of the remaining nodes.
13 Query the swarmLog into the primary node and run the swarm-arm image
passing in the address of the consul service:
# docker run alexellis2/swarm-arm list consul://192.168.0.200:8500/swarm
192.168.0.201:2375 192.168.0.202:2375 192.168.0.203:2375 192.168.0.204:2375 192.168.0.210:2375
To start using the docker command with the swarm itself set
the DOCKER_HOST environmental variable to the address of the
swarm manager:
# export DOCKER_HOST=tcp://192.168.0.200:4000
Now fi nd out how many pooled resources we have:
# docker info ... Nodes: 4 ... CPUs: 20 Total Memory: 3.785 GiB
14 Example: distributed web applicationLet’s now set up a distributed web application that
increments a hit-counter in a Redis database every time we hit
it. We will run several instances of this and use an Nginx load
balance in front of them. We can also use Apache Bench to get
some metrics.
These containers need to be started in the correct order,
starting with Redis, then Node and fi nally Nginx.
15 Start the redis and node containersFirst start all the Redis containers, giving them names
from redis_1 to redis_5:
# docker run -p 6379:6379 -d --name redis_1 alexellis2/redis-arm
Now start an equal number of node.js containers linking them to
the redis containers.
# docker run -p 3000:3000 -d \ --label=’node_redis’ \ --link redis_1:redis \ expressredis4.x
Finally run the load balancer on the primary node:
# DOCKER_HOST=”” docker run -d --name=balancer -p 80:80 nginx_dynamic
16 Run Apache BenchWe’ll start Apache Bench with 10 concurrent threads and
1000 requests in total. We started our application on six swarm
agents after setting up two additional Pis.
# ab -n 1000 -c 10 http://192.168.0.200/ ... Concurrency Level: 10 Time taken for tests: 2.593 seconds Requests per second: 385.65 [#/sec] (mean) ...
Repeating the experiment with a single Pi gave only 88.06
requests per second and took 11.356 seconds in total. You could
also try increasing the concurrency (-c) value to 100.
17 Direct the swarm from your PCIf you pull down the binary of the Docker client on its own,
you can then use the DOCKER_HOST variable to point at your
swarm manager, saving you from having to log into the Pis with
SSH. Docker client binary releases can be found at https://docs.
docker.com/engine/installation/binaries.
# wget https://get.docker.com/builds/Darwin/x86_64/docker-1.9.1
# chmod +x docker-1.9.1 # export DOCKER_HOST=tcp://192.168.0.200:4000 # ./docker-1.9.1 info
18 Wrapping upYou can repeat the steps in the tutorial until you have
enough swarm agents in your cluster. One of the benefi ts of
clustering is the distribution of work across nodes, but Swarm
also provides us with linking to handle coordination between
nodes. To take this idea further in your own Raspberry Pi
creations, why not connect some sensors through the GPiO pins
and take advantage of the Pi’s hardware capabilities?

140 Raspberry Pi Tips, Tricks & Hacks
Remake a classic game in FUZE BASIC and delve into the world of programmingWelcome to our latest FUZE BASIC tutorial. If you haven’t
already gotten hold of this programming language, FUZE BASIC
can be downloaded for free for both Linux and Raspberry Pi
users from fuze.co.uk/getfuzebasic.
So why should you bother to learn BASIC? Well, BASIC
(Beginner’s All-purpose Symbolic Instruction Code) was
instrumental in starting the computing revolution back in the
Seventies and Eighties. Thirty years on and BASIC, or in this
case FUZE BASIC, presents a modernised version of the original
classic. Now with updated commands for advanced sprite and
media handling, the removal of goto and gosub commands as
well as line numbers, and the fact that on modern hardware it
races along, it still remains one of the easiest introductions for
users wanting to jump into the world of programming.
To prove just how straightforward it is to use, in this tutorial
we’re going to be looking at programming a classic arcade game.
Then, over the next two issues we’ll take you from this basic
graphics engine to introduce enemies, fi ring and collisions, and
then fi nally refi nements such as an intro screen and hi-score
tables, plus some tidy-ups and optimisations.
Our game, ‘73MP357’, is a remake of a true classic – Dave
Theurer’s Tempest by Atari way back in 1981. We also couldn’t
resist paying tribute to the incredible remake by Jeff Minter for
the Atari Jaguar.
Code a Tempest clone in FUZE BASIC Part 1
Tips | Tricks | Hacks
Raspberry Pi Tips, Tricks & Hacks 141
Tips | Tricks | Hacks
What you’ll need FUZE BASIC V3 fuze.co.uk/getfuzebasic
73MP357PART1.fuze
01 Get the program listingAs this is a fairly large program, we won’t be typing it
line by line. Instead, you need to download the Part 1 code from
FileSilo.co.uk or fuze.co.uk/tutorials/73MP357PART1.fuze.
We will then look at each section and explain what is happening.
Open FUZE BASIC and either load (with F8) ‘73MP357’ or
copy and paste the code straight into the editor (F2 switches
between the editor and immediate mode).
02 Try the code Before we take a look at the code, let’s see what it does.
Run the program by pressing F3 or typing run in immediate
mode. You’ll be presented with three core events: the star fi eld,
the level and, of course, the player. You can move the player
around the level using left and right cursors.
Notice the playing fi eld view perspective changes as you
rotate around. This particular effect is from Tempest 2000 and
not the arcade original.
Right, now to the code. Press Escape to stop the program
and then F2 to bring up the editor.
03 System set upYou’ll see that the code is well commented, with each
section headlined with a single # and comment.
Our fi rst section sets up our system and variables. We set
the resolution and updatemode is set to zero so that nothing
updates the screen other than an update command. In FUZE
BASIC, if the mode is set to 1 or 2 then print statements will also
update the screen, which slows everything down.
Three variable arrays are set up to store the star angle, speed
and distance. These could be combined into one array but it is
easier to read when separated.
The while loop fi lls the star fi eld arrays with randomly
positioned points with random angles and speeds.
04 See to the displayNext up are the variables required for the playing fi eld
level display. The radius and radius2 variables defi ne the outer
and inner rings, and vertices sets up the number of sections
our level is divided into. The minimum is four for a square, with
a maximum of up to 13. The gap variable determines the step
distance around the circumference so the player will always be
positioned in the middle of each section.
###### settings #######xres = 840yres = 640updatemode = 0setmode( xres, yres ) # variables for the star field effectdim stars( 1000 )dim starsSpeed( 1000 )dim starsDist( 1000 )starNum = 0 # setup star field effectwhile starNum < 1000 cycle stars( starNum ) = rnd( 360 ) starsSpeed( starNum ) = rnd( 5 ) + 1 starsDist( starNum ) = rnd( gheight ) starNum = starNum + 1repeat # level drawing variablesx = 0y = 0x2 = 0y2 = 0oldX = 0oldY = 0oldX2 = 0oldY2 = 0angle = 0radius = gheight / 2 - 50 // outer radiusradius2 = gheight / 16 // inner radiusvertices = rnd( 9 ) + 4 // nothing less than a squaregap = 360 / vertices // angle between vertices # player variablespAngle = gap / 2pX = 0pY = 0pTurn = 0 # different centers for the parallax effectcenterX = gwidth / 2 // center of close objectscenterY = gheight / 2centerX2 = centerX // center of far objectscenterY2 = centerYstarsCenterX = centerX // fixed center for the starsstarsCenterY = centerY # movement variablesmoveDelay = int( 80 / vertices ) // delay after movingmoveCount = 0 loop cls2 # movement input if scankeyboard( scanright ) then if moveCount = 0 then pAngle = pAngle + gap moveCount = moveDelay if pAngle > 360 then pAngle = gap / 2 endif endif
Full code listingStep 03
Step 04
Step 05
Step 06
Full codeFileSilo.co.uk/bks-B38
142 Raspberry Pi Tips, Tricks & Hacks
Tips | Tricks | Hacks
05 Player variablesA few player variables are required to determine the
location on-screen and its position in relation to the level.
Three centre X and Y coordinates are used: two moving
ones for the level and a fixed one for the star field. The moving
centres will make sense a bit further on, but it is thanks to
these that we have the slick perspective effects.
A moveDelay variable (80 divided by the number of sections,
ie vertices) is used to keep player movement consistent
regardless of how many sections there are in the level.
06 Remove flicker Now we move onto the main loop. The cls2 statement
is critical and is very different to the more standard cls version:
cls2 wipes out the frame buffer memory; this is a separate
screen memory where everything is drawn first. When you
issue an update statement, the frame buffer is copied to the
main screen memory. The cls version just clears everything, so
it creates a lot of flicker. Both cls2 and update ensure flicker-
free updates, which is essential for games.
The player keyboard controls are checked next. If the right
cursor is pressed then the player angle is increased by the gap
amount (this is the distance to the centre of the next section).
The left cursor, of course, does the opposite.
07 Position the starsThen we calculate the star positions – that is each and
every one of them! The number of stars is adjusted depending
on the display resolution.
White is selected and a loop to count through the stars is
initiated. Each star is a position on the circumference of a
circle. The radius of the circle therefore determines the star’s
distance from the centre. We take the distance from the
centre, starsDist(starNum), and multiply it by the cosine of the
angle, stars(starNum). We then add this to the centre position,
starsCenterX, to give the new starX position. The starY position
is the same but uses the sine instead.
08 Check the star movementWe check to see if a star has left the display area and
if so, reset it back to the centre plus a small offset, as we don’t
them to all appear from the dead centre.
Finally, the star is drawn using plot(starX, starY) and the
while loop is repeated until all of the stars have been updated
and plotted on the star field.
09 Make the levelOn to the level itself. Each segment is drawn one at
a time. The first line of the first segment has inner and outer
X and Y coordinates. The next line along (again, from centre to
outer rim) is calculated and the two connecting lines are drawn
from the old positions to the new ones.
endif
if scankeyboard( scanleft ) then if moveCount = 0 then pAngle = pAngle - gap moveCount = moveDelay if pAngle < 0 then pAngle = 360 - ( gap / 2 ) endif endif endif # set max particle effects based on resolution maxStars = gheight / 5 colour = white while starNum < maxStars cycle # calculate star positions using expanding or # contracting circles starX = starsDist(starNum) * cos( stars(starNum) ) starX = starsCenterX + starX starY = starsDist(starNum) * sin( stars(starNum) ) starY = starsCenterY + starY starsDist(starNum) = starsDist(starNum) + starsSpeed(starNum) # reset position if offscreen if starX < 0 then starsDist( starNum ) = rnd( 15 ) + 5 endif if starX > gwidth then starsDist( starNum ) = rnd( 15 ) + 5 endif if starY < 0 then starsDist( starNum ) = rnd( 15 ) + 5 endif if starY > gheight then starsDist( starNum ) = rnd( 15 ) + 5 endif plot( starX, starY ) starNum = starNum + 1 repeat starNum = 0 # Draw the level by looping & drawing a segment at a time. colour = blue while angle < 360 cycle x = radius * cos( angle ) x = centerX + x y = radius * sin( angle ) y = centerY + y x2 = radius2 * cos( angle ) x2 = centerX2 + x2 y2 = radius2 * sin( angle ) y2 = centerY2 + y2 line( x, y, x2, y2 ) line( x, y, oldX, oldY ) line( x2, y2, oldX2, oldY2 ) oldX = x oldY = y oldX2 = x2 oldY2 = y2 angle = angle + gap repeat
Full code listingStep 06
Step 07
Step 08
Step 09
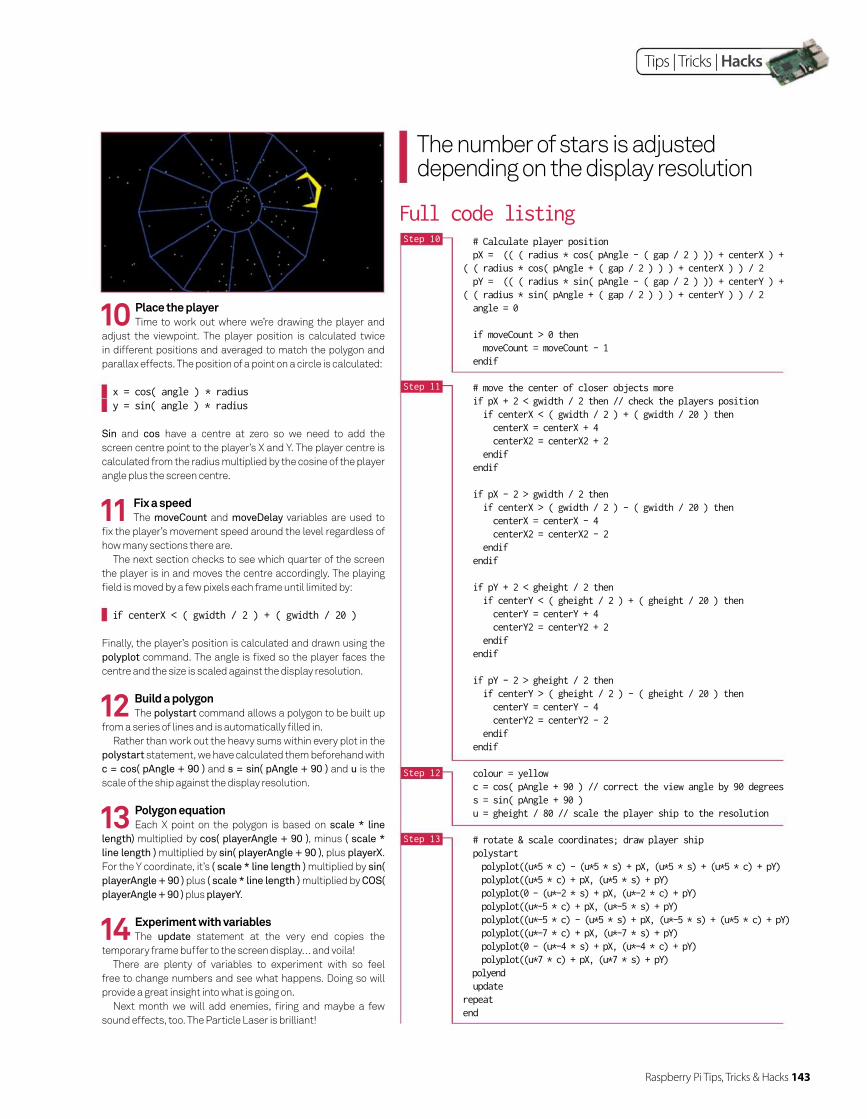
Raspberry Pi Tips, Tricks & Hacks 143
Tips | Tricks | Hacks
The number of stars is adjusted depending on the display resolution
10 Place the player Time to work out where we’re drawing the player and
adjust the viewpoint. The player position is calculated twice
in different positions and averaged to match the polygon and
parallax effects. The position of a point on a circle is calculated:
x = cos( angle ) * radius y = sin( angle ) * radius
Sin and cos have a centre at zero so we need to add the
screen centre point to the player’s X and Y. The player centre is
calculated from the radius multiplied by the cosine of the player
angle plus the screen centre.
11 Fix a speedThe moveCount and moveDelay variables are used to
fi x the player’s movement speed around the level regardless of
how many sections there are.
The next section checks to see which quarter of the screen
the player is in and moves the centre accordingly. The playing
fi eld is moved by a few pixels each frame until limited by:
if centerX < ( gwidth / 2 ) + ( gwidth / 20 )
Finally, the player’s position is calculated and drawn using the
polyplot command. The angle is fi xed so the player faces the
centre and the size is scaled against the display resolution.
12 Build a polygonThe polystart command allows a polygon to be built up
from a series of lines and is automatically fi lled in.
Rather than work out the heavy sums within every plot in the
polystart statement, we have calculated them beforehand with
c = cos( pAngle + 90 ) and s = sin( pAngle + 90 ) and u is the
scale of the ship against the display resolution.
13 Polygon equationEach X point on the polygon is based on scale * line
length) multiplied by cos( playerAngle + 90 ), minus ( scale *
line length ) multiplied by sin( playerAngle + 90 ), plus playerX.
For the Y coordinate, it’s ( scale * line length ) multiplied by sin(
playerAngle + 90 ) plus ( scale * line length ) multiplied by COS(
playerAngle + 90 ) plus playerY.
14 Experiment with variablesThe update statement at the very end copies the
temporary frame buffer to the screen display… and voila!
There are plenty of variables to experiment with so feel
free to change numbers and see what happens. Doing so will
provide a great insight into what is going on.
Next month we will add enemies, fi ring and maybe a few
sound effects, too. The Particle Laser is brilliant!
# Calculate player position pX = (( ( radius * cos( pAngle - ( gap / 2 ) )) + centerX ) + ( ( radius * cos( pAngle + ( gap / 2 ) ) ) + centerX ) ) / 2 pY = (( ( radius * sin( pAngle - ( gap / 2 ) )) + centerY ) + ( ( radius * sin( pAngle + ( gap / 2 ) ) ) + centerY ) ) / 2 angle = 0 if moveCount > 0 then moveCount = moveCount - 1 endif # move the center of closer objects more if pX + 2 < gwidth / 2 then // check the players position if centerX < ( gwidth / 2 ) + ( gwidth / 20 ) then centerX = centerX + 4 centerX2 = centerX2 + 2 endif endif if pX - 2 > gwidth / 2 then if centerX > ( gwidth / 2 ) - ( gwidth / 20 ) then centerX = centerX - 4 centerX2 = centerX2 - 2 endif endif if pY + 2 < gheight / 2 then if centerY < ( gheight / 2 ) + ( gheight / 20 ) then centerY = centerY + 4 centerY2 = centerY2 + 2 endif endif if pY - 2 > gheight / 2 then if centerY > ( gheight / 2 ) - ( gheight / 20 ) then centerY = centerY - 4 centerY2 = centerY2 - 2 endif endif colour = yellow c = cos( pAngle + 90 ) // correct the view angle by 90 degrees s = sin( pAngle + 90 ) u = gheight / 80 // scale the player ship to the resolution # rotate & scale coordinates; draw player ship polystart polyplot((u*5 * c) - (u*5 * s) + pX, (u*5 * s) + (u*5 * c) + pY) polyplot((u*5 * c) + pX, (u*5 * s) + pY) polyplot(0 - (u*-2 * s) + pX, (u*-2 * c) + pY) polyplot((u*-5 * c) + pX, (u*-5 * s) + pY) polyplot((u*-5 * c) - (u*5 * s) + pX, (u*-5 * s) + (u*5 * c) + pY) polyplot((u*-7 * c) + pX, (u*-7 * s) + pY) polyplot(0 - (u*-4 * s) + pX, (u*-4 * c) + pY) polyplot((u*7 * c) + pX, (u*7 * s) + pY) polyend updaterepeatend
Full code listingStep 10
Step 12
Step 13
Step 11

144 Raspberry Pi Tips, Tricks & Hacks
Tips | Tricks | Hacks
Remake a classic game in FUZE BASIC and delve into the world of programming
Code a Tempest clone in FUZE BASIC Part 2
What you’ll need FUZE BASIC V3 fuze.co.uk/getfuzebasic
73MP357PART2.fuze
Welcome to part two of our FUZE BASIC tutorial. You will need to FUZE BASIC
installed for this, and it can be downloaded
for free for Linux and Raspberry Pi users
from www.fuze.co.uk/getfuzebasic.
Don’t worry; it’s possible to skip part one
and just jump straight in here. However,
because this is a fairly large program, you
won’t be typing in off the page. Instead you
will need to download the program listing
from FileSilo or here: www.fuze.co.uk/
tutorials/73MP357PART2.fuze.
73MP357 is coded by Luke Mulcahy,
FUZE’s resident coder and, in the nicest
way possible, our very own human
supercomputer. This issue he tasks his
brain with developing the basic game
structure further, adding all sorts of
awesome trinkets to delight. These include
simple scoring, power-ups, enemies and
the all-important fire power. Gameplay is
also improved with smooth movement. In
short, all you need for a rudimental – but
definitely playable – game.
Full codeFileSilo.co.uk/bks-B38
Tips | Tricks | Hacks
Raspberry Pi Tips, Tricks & Hacks 145
Tips | Tricks | Hacks
01 Grab the Part 2 codeStart FUZE BASIC and either load (with F8)
73MP357PART2.fuze or copy and paste the code straight into
the editor (F2 switches between the editor and immediate
mode). If you followed the fi rst part last month then you’ll be
pleased to see things are coming along nicely. Run the program
by pressing F3 or typing RUN in immediate mode.
02 Test it out The fi rst thing you’ll notice is that we now have a score
displayed. Tap the space bar and move left and right. We have
fi re power; hold on for a second longer and we should also have
enemies and the all-important ‘Power Up’, which in this case
awards us with a Particle Laser. We also have basic collision so
enemies can be shot, but more importantly, if one touches you
then you die too! Have a play then bring up the editor; press Esc
to stop the program then F2. We’ll be brief on the sections we
covered last month and offer more detail on the new additions.
03 Set up environment (lines 001 - 027)
Our initial section sets up a few environment
variables. There are a number of variables used for screen
resolution and frames per second (targetfps, minfps and
maxfps). Luke has built in a very cool dynamic resolution
feature that automatically adjusts the screen resolution
to maintain a smooth frame rate. At the start of each game
you can see the screen size adjust until it fi nds its optimum
resolution to frame rate ratio. Once it reaches 60fps, a time
delay is used to keep it there. We’ll come back to this later but
throughout the code you will fi nd functions using the frame
rate to ensure everything happens in sync. The remaining
variables are straightforward.
04 Set up star fi eld (lines 028 - 042)
The star fi eld was covered last month but in brief this
creates three variable arrays to store the positions, speed
and angles of up to 1,000 stars. The arrays are populated with
random initial settings.
05 Laser variables (lines 043 - 058)
The good stuff. Again a few arrays are set up to store
the positional and movement information for each of the active
lasers. Notice also laserReload = INT (targetfps / 2) on line 53,
the fi rst use of a frame synced action. In this case there is a
counter so that the lasers can’t fi re too quickly but regardless of
the frame rate, they will reload at the same frequency.
09 Release the power-up (lines 138 - 156)
We begin the game armed with a single-shot laser.
We only release the power-up canister if we haven’t already
powered-up. This function is checked with IF particleLaser =
FALSE THEN, after which a new one is released and all of its
variables initialised.
keys) to move the player left and right, and then either the
space bar or return key for fi ring. The fi re button routine is fairly
complex as we have to check to see if we have a laser available
because we are restricted by maxLasers. We then check to see
if they have reached the centre (radius2). If we have particle
lasers enabled, we swap sides as each one is added so we have
the dual barrel machine gun effect (very nice indeed):
// Check if Right cursor or the D key is pressed IF scanKeyboard (scanRight) OR scanKeyboard (scanD) THEN
IF moveCount = 0 THEN oldPlayerAngle = playerAngle playerAngle = playerAngle + gap moveCount = moveDelay IF playerAngle > 360 THEN playerAngle = gap / 2 ENDIF ENDIF ENDIF // Check if Left cursor or the A key is pressed IF scanKeyboard (scanLeft) OR scanKeyboard (scanA) THEN
IF moveCount = 0 THEN oldPlayerAngle = playerAngle playerAngle = playerAngle - gap moveCount = moveDelay IF playerAngle < 0 THEN playerAngle = 360 - (gap / 2) ENDIF ENDIF ENDIF // Check if the Space bar or Return key is pressed IF scanKeyboard (scanSpace) OR scanKeyboard (scanReturn) THEN
IF laserCount = 0 THEN IF numLasers < maxLasers THEN FOR i = 0 TO maxLasers CYCLE IF laserDist(i) = radius2 THEN laserDist(i) = SQRT (((centerX - playerX) * (centerX - playerX)) + ((centerY - playerY) * (centerY - playerY)))
laserAngle(i) = playerAngle laserSide(i) = particleLaserSide IF particleLaserSide = 0 THEN particleLaserSide = 1 ELSE particleLaserSide = 0 ENDIF numLasers = numLasers + 1 laserCount = laserReload BREAK ENDIF REPEAT ENDIF ENDIF ENDIF
06 Enemy variables (lines 056 - 069)
There’s just no point in having great fi repower if we
can’t use it to exterminate a relentless supply of alien monsters
hell-bent on taking over the Earth. You should be noticing
something of a pattern by now. Again a few arrays are used
to store enemy angles, distance (from the centre) and speed
(enemyMove), however an additional variable (enemyHealth)
has been added so that we can have different results from
different weaponry.
07 Player and power-ups (lines 070 - 086)
Here we handle variables like the player angle, set
score fl ags and defi ne the power-up colour, fade and angle.
08 Main loop (lines 087 - 137)
This is where the meat is. To start with we’re checking
for key presses. We have it set to A and D (or the left and right
146 Raspberry Pi Tips, Tricks & Hacks
Tips | Tricks | Hacks
11 Get the power-up (lines 161 - 174)
Then if so, is it in the same place as the player
(playerAngle - gap / 2)? If it is then “Particle Laser!” is displayed
and particleLaser =TRUE.
12 Adjust shot speed (lines 175 - 184)
This determines shot release frequency. Particle
release (laserCount / 1.5) is significantly quicker than standard
shot release (laserCount / 1.05).
13 Top-up enemies (lines 185 - 207)
If we have fewer than the maximum number of enemies
on-screen (maxEnemies) and we are within the enemyCount
boundaries, then this if statement will introduce a new enemy.
// Check for enemies being present IF tempTime > 3000 THEN IF enemies = TRUE THEN IF enemyCount > 0 THEN enemyCount = enemyCount - 1 ELSE IF enemyCount = 0 THEN IF numEnemies < maxEnemies THEN FOR i = 0 TO maxEnemies CYCLE IF enemyDist(i) = radius THEN enemyDist(i) = radius2 enemyAngle(i) = (RND (vertices - 1) * gap) + (gap / 2)
enemyHealth(i) = 100 numEnemies = numEnemies + 1 enemyCount = enemyDelay BREAK ENDIF REPEAT ENDIF ENDIF ENDIF ENDIF ENDIF
14 Plot the stars (lines 208 - 231)
The star field routine runs through the maxStars
variable, increasing the distance from the centre (starsDist)
until it travels completely off the screen. At that point they’re
reset back to the middle with a random factor so they don’t all
appear dead in the centre. They are drawn with a simple PLOT
(starX, starY) command.
// Routine to plot the stars COLOUR = White WHILE starNum < maxStars CYCLE starX = starsDist(starNum) * COS (stars(starNum)) starX = starsCenterX + starX starY = starsDist(starNum) * SIN (stars(starNum)) starY = starsCenterY + starY starsDist(starNum) = starsDist(starNum) + starsSpeed(starNum)
IF starX < 0 THEN starsDist(starNum) = RND (15) + 5
15 Draw playing field (lines 232 - 251)
We explained this concept in detail last month and
very little has changed. Basically, the playing field is drawn in
segments around the circumference of a circle using just three
LINE statements.
// Draw the playing field COLOUR = Blue WHILE angle < 360 CYCLE x = radius * COS (angle) x = centerX + x y = radius * SIN (angle) y = centerY + y x2 = radius2 * COS (angle) x2 = centerX2 + x2 y2 = radius2 * SIN (angle) y2 = centerY2 + y2 LINE (x, y, x2, y2) LINE (x, y, oldX, oldY) LINE (x2, y2, oldX2, oldY2) oldX = x oldY = y oldX2 = x2 oldY2 = y2 angle = angle + gap REPEAT
16 Calculate and draw player (lines 252 - 267)
The player position is becoming more complex. The first
stage introduces a new function: DEF FN lerp(a,b,c). This is
going to be used a lot from now on, so:
DEF FN lerp(a, b, c) result = a + c * (b - a) = result
This takes two numbers, A and B, and interpolates between
them so that C can be used as a distance or angle, or even a
colour step. This enables us to work out a step in between two
points on the screen and calculate an equal step between.
This is then used to ensure smooth movement is made for
any object anywhere on the screen, regardless of its size or
location. Very clever indeed!
// Calculate the player position IF playerAngle - oldPlayerAngle < ((0 - 360) + gap) + 1 THEN
tmpPlayerAngle = FN lerp(playerAngle + 360, oldPlayerAngle, moveCount / moveDelay)
10 Move the power-up (lines 157 - 160)
Next it is moved outward towards the player with
powerupDist = powerupDist + (radius / 80) and then checked
to see if it has arrived at the outer edge (radius).
ENDIF IF starX > gWidth THEN starsDist(starNum) = RND (15) + 5 ENDIF IF starY < 0 THEN starsDist(starNum) = RND (15) + 5 ENDIF IF starY > gHeight THEN starsDist(starNum) = RND (15) + 5 ENDIF PLOT (starX, starY) starNum = starNum + 1 REPEAT starNum = 0
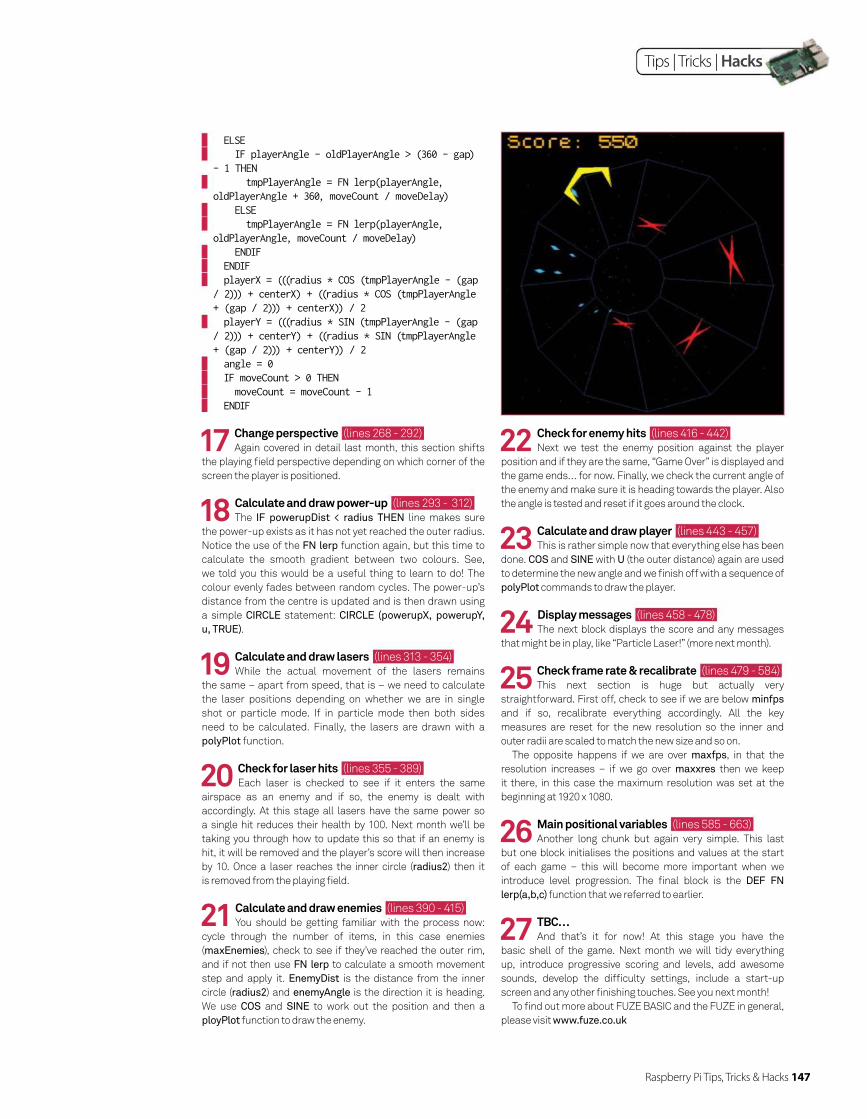
Raspberry Pi Tips, Tricks & Hacks 147
Tips | Tricks | Hacks
17 Change perspective (lines 268 - 292)
Again covered in detail last month, this section shifts
the playing fi eld perspective depending on which corner of the
screen the player is positioned.
18 Calculate and draw power-up (lines 293 - 312)
The IF powerupDist < radius THEN line makes sure
the power-up exists as it has not yet reached the outer radius.
Notice the use of the FN lerp function again, but this time to
calculate the smooth gradient between two colours. See,
we told you this would be a useful thing to learn to do! The
colour evenly fades between random cycles. The power-up’s
distance from the centre is updated and is then drawn using
a simple CIRCLE statement: CIRCLE (powerupX, powerupY,
u, TRUE).
19 Calculate and draw lasers (lines 313 - 354)
While the actual movement of the lasers remains
the same – apart from speed, that is – we need to calculate
the laser positions depending on whether we are in single
shot or particle mode. If in particle mode then both sides
need to be calculated. Finally, the lasers are drawn with a
polyPlot function.
20 Check for laser hits (lines 355 - 389)
Each laser is checked to see if it enters the same
airspace as an enemy and if so, the enemy is dealt with
accordingly. At this stage all lasers have the same power so
a single hit reduces their health by 100. Next month we’ll be
taking you through how to update this so that if an enemy is
hit, it will be removed and the player’s score will then increase
by 10. Once a laser reaches the inner circle (radius2) then it
is removed from the playing fi eld.
21 Calculate and draw enemies (lines 390 - 415)
You should be getting familiar with the process now:
cycle through the number of items, in this case enemies
(maxEnemies), check to see if they’ve reached the outer rim,
and if not then use FN lerp to calculate a smooth movement
step and apply it. EnemyDist is the distance from the inner
circle (radius2) and enemyAngle is the direction it is heading.
We use COS and SINE to work out the position and then a
ployPlot function to draw the enemy.
22 Check for enemy hits (lines 416 - 442)
Next we test the enemy position against the player
position and if they are the same, “Game Over” is displayed and
the game ends… for now. Finally, we check the current angle of
the enemy and make sure it is heading towards the player. Also
the angle is tested and reset if it goes around the clock.
23 Calculate and draw player (lines 443 - 457)
This is rather simple now that everything else has been
done. COS and SINE with U (the outer distance) again are used
to determine the new angle and we fi nish off with a sequence of
polyPlot commands to draw the player.
24 Display messages (lines 458 - 478)
The next block displays the score and any messages
that might be in play, like “Particle Laser!” (more next month).
25 Check frame rate & recalibrate (lines 479 - 584)
This next section is huge but actually very
straightforward. First off, check to see if we are below minfps
and if so, recalibrate everything accordingly. All the key
measures are reset for the new resolution so the inner and
outer radii are scaled to match the new size and so on.
The opposite happens if we are over maxfps, in that the
resolution increases – if we go over maxxres then we keep
it there, in this case the maximum resolution was set at the
beginning at 1920 x 1080.
26 Main positional variables (lines 585 - 663)
Another long chunk but again very simple. This last
but one block initialises the positions and values at the start
of each game – this will become more important when we
introduce level progression. The fi nal block is the DEF FN
lerp(a,b,c) function that we referred to earlier.
27 TBC…And that’s it for now! At this stage you have the
basic shell of the game. Next month we will tidy everything
up, introduce progressive scoring and levels, add awesome
sounds, develop the diffi culty settings, include a start-up
screen and any other fi nishing touches. See you next month!
To fi nd out more about FUZE BASIC and the FUZE in general,
please visit www.fuze.co.uk
ELSE IF playerAngle - oldPlayerAngle > (360 - gap) - 1 THEN
tmpPlayerAngle = FN lerp(playerAngle, oldPlayerAngle + 360, moveCount / moveDelay)
ELSE tmpPlayerAngle = FN lerp(playerAngle, oldPlayerAngle, moveCount / moveDelay)
ENDIF ENDIF playerX = (((radius * COS (tmpPlayerAngle - (gap / 2))) + centerX) + ((radius * COS (tmpPlayerAngle + (gap / 2))) + centerX)) / 2
playerY = (((radius * SIN (tmpPlayerAngle - (gap / 2))) + centerY) + ((radius * SIN (tmpPlayerAngle + (gap / 2))) + centerY)) / 2
angle = 0 IF moveCount > 0 THEN moveCount = moveCount - 1 ENDIF

148 Raspberry Pi Tips, Tricks & Hacks
Tips | Tricks | Hacks
Code a Tempest clone in FUZE BASIC Part 3
What you’ll need FUZE BASIC V3 fuze.co.uk/getfuzebasic
73MP357PART3.fuze
Add the fi nishing touches to your FUZE BASIC arcade gameWelcome to the fi nal episode of our FUZE
BASIC tutorial. Over the last two parts
we’ve built up a retro tunnel shooter game
inspired by the classic Tempest. This
month, we’re going to add in the last few
features and tighten up our code to make
this into a fully functional game.
At almost 900 lines, 73MP357 is now
a fairly signifi cant program. You will need
to download the full program as well as
a few sound effect and music fi les, all of
which are available to download from this
issue’s FileSilo page or from fuze.co.uk/
tutorials/73MP357.zip.
Download and decompress the fi les,
then save the resulting folder to your
FUZE BASIC folder. This fi nal version is
exactly that: the fi nished article. We now
have levels, enemies, explosions, music
and sound effects, scoring, collision and
an attract screen. One more thing: FUZE
BASIC has been updated somewhat since
the last tutorial and as such we highly
recommend you update it.
Full codeFileSilo.co.uk/bks-B38
Tips | Tricks | Hacks
Raspberry Pi Tips, Tricks & Hacks 149
Tips | Tricks | Hacks
01 Main loop (lines 001 - 034)
Start FUZE BASIC and either load (with F8) 73MP357.
fuze or copy and paste the code straight into the editor (F2
switches between the editor and immediate mode).
The fi rst thing you might notice is that we have tidied things
up signifi cantly compared to the previous versions. As much
as possible, we have compartmentalised each section so it
is easier to follow and debug. It is also far easier to add new
things. The main program now looks like this:
// 73MP357 by Luke Mulcahy - FUZE Technologies Ltd PROC initialise PROC attract CYCLE // start of the main loop frameStart = TIME // makes a note of the time so we can see how long a single frame takes
CLS2 IF speedCount > speedCounterMax THEN // only do anything once a certain time has passed
speedCount = 0 PROC keys PROC updatePowerUp PROC warp PROC lasers PROC enemies PROC updateStars PROC updatePlayer PROC drawPlayingfield PROC updatePerspective IF warp = FALSE THEN // we don’t update some things when the warp effect is active
PROC drawPowerUp PROC drawlasers PROC drawEnemies ENDIF IF destroyed = FALSE THEN PROC drawPlayer PROC checkProgress PROC updateDebris PROC updateGameInfo UPDATE // update and display the screen PROC speedLimit ENDIF speedCount = speedCount + 1 REPEAT // the end of the main loop END
02 Procedural languagesRather than go through the entire program line by line,
we’ll take on each individual procedure individually and explain
what is going on.
Firstly, though, FUZE BASIC is a procedural language, not an
object-orientated one. This means we include everything we
require in the one program rather than referencing ‘classes’ or
libraries of external functions.
While most modern languages are based around object
programming techniques, the original procedural-based style
is very easy to follow and understand for most people, but on
the downside it means we generally have to write everything in
the one program which can turn it into quite a beast, so make
sure to keep your work neat and organised.
Procedures therefore allow us to break the program up into
sections similar in some ways to objects but, most importantly,
into smaller and far neater segments of code that are much
easier to debug. So, to the fi rst PROCedure then!
03 Initialise game variables (lines 747 - 851)
The DEF PROC initialise section initialises the game
environment variables and loads the logo sprite, sound effects
and music fi les. You will see quite a few DIM statements
initialising variable arrays; DIM stands for Dimension. We
declare an array variable and specify its dimensions. Then
rather than using simple cellOne=1, cellTwo=5, cellThree=9, etc,
we can declare DIM cell(5), then cell(0)=1, cell(1)=5, cell(3)=9
and so on. These can easily be populated with a simple LOOP.
The difference is we now only need one variable to store any
number of values. You can even create multidimensional arrays
– chessBoard(8, 8), for example, could be used to hold the
positions of the pieces: chessboard(0, 0)=Castle, chessboard(0,
1)=Knight and so on. Arrays are widely used across programming
languages and are fundamental; it is worth getting to know them.
The reason we’re using so many arrays is that we need a lot of
variables to store all the information about the stars, the lasers
and even the debris from explosions. Every single star, bullet and
piece of debris has a set of coordinates, an angle and speed of
travel, etc. Sound effects and the main soundtrack are loaded
and given identifi ers, and we end by loading a high score fi le so
the main score can be recorded.
04 Make an attract screen (lines 728 - 744)
A feature of retro arcade machines, the attract screen
is a simple graphic and/or animation used to entice passers-
by into popping a pound into the slot to play. The DEF PROC
attract section of code displays the initial title logo along with
a starfi eld effect for good measure. The starfi eld is updating by
calling the updateStars process that we defi ned previously.
05 Control the game’s speed (lines 854 - 859)
Let’s take a look at the speed limiter function as it is
used for both the main loop and the attract routine. Just before
the end of the main loop, PROC speedLimit is called to check to
see if we should run the main loop again or not. If our speedCount
has not reached the speedCounterMax limit then it ignores the
main loop and goes round again until it does. Only then is the main
loop executed. This allows us to control the entire game speed with
a single speedLimit variable (set at the very end of the program).
frameStart = TIME CLS2 IF speedCount > speedCounterMax THEN ... (the main code) PROC speedLimit ENDIF speedCount = speedCount + 1 REPEAT
DEF PROC speedLimit frameEnd = TIME timeTaken = frameEnd - frameStart speedCounterMax = gameSpeed - timeTaken IF speedCounterMax < 0 THEN speedCounterMax = 0 ENDPROC
06 Check for keyboard input (lines 037 - 086)
The DEF PROC keys block is straightforward. The
routine checks to see if Z (or A), X (or D) or the Spacebar (or Enter)
have been pressed. If the rotation keys (Z and X) are pressed, the
player’s angle variables are adjusted accordingly, whereas the
Spacebar initiates a laser to be fired. Before firing it makes sure
there aren’t too many and which type, standard or particle, to fire.
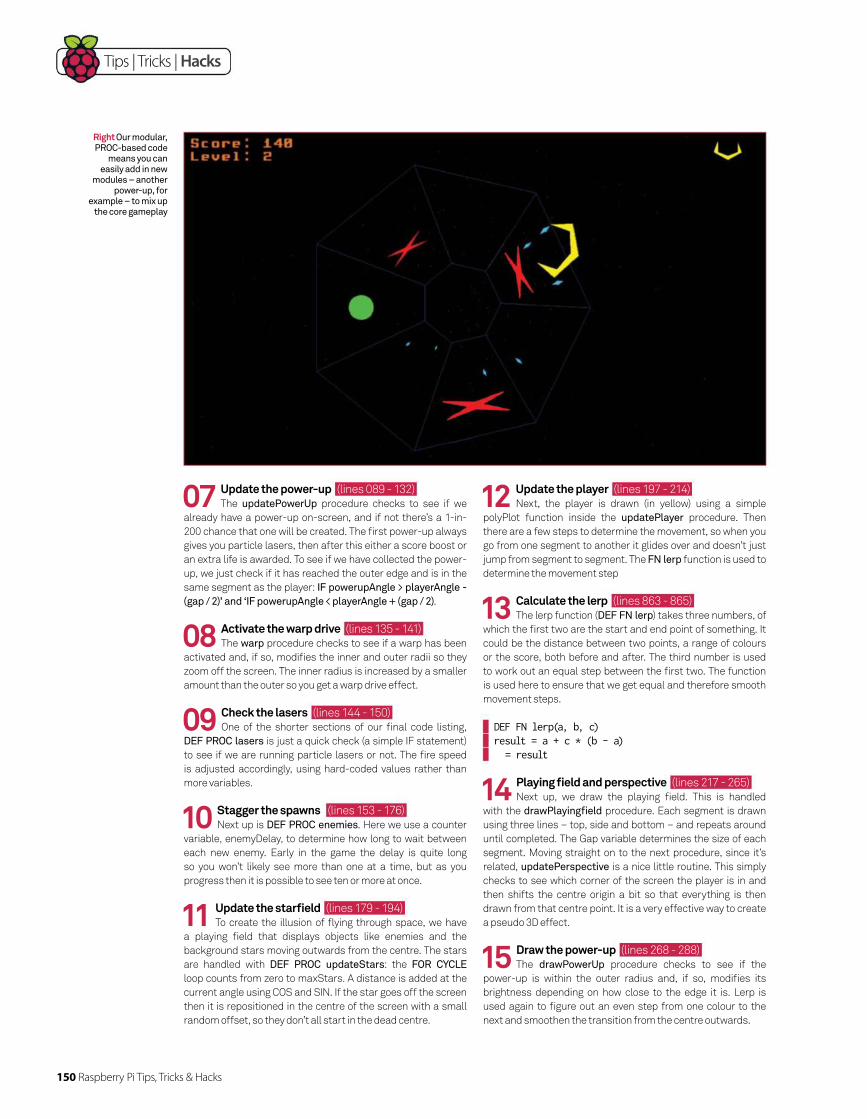
150 Raspberry Pi Tips, Tricks & Hacks
Tips | Tricks | Hacks
12 Update the player (lines 197 - 214)
Next, the player is drawn (in yellow) using a simple
polyPlot function inside the updatePlayer procedure. Then
there are a few steps to determine the movement, so when you
go from one segment to another it glides over and doesn’t just
jump from segment to segment. The FN lerp function is used to
determine the movement step
13 Calculate the lerp (lines 863 - 865)
The lerp function (DEF FN lerp) takes three numbers, of
which the fi rst two are the start and end point of something. It
could be the distance between two points, a range of colours
or the score, both before and after. The third number is used
to work out an equal step between the fi rst two. The function
is used here to ensure that we get equal and therefore smooth
movement steps.
DEF FN lerp(a, b, c) result = a + c * (b - a) = result
14 Playing fi eld and perspective (lines 217 - 265)
Next up, we draw the playing fi eld. This is handled
with the drawPlayingfi eld procedure. Each segment is drawn
using three lines – top, side and bottom – and repeats around
until completed. The Gap variable determines the size of each
segment. Moving straight on to the next procedure, since it’s
related, updatePerspective is a nice little routine. This simply
checks to see which corner of the screen the player is in and
then shifts the centre origin a bit so that everything is then
drawn from that centre point. It is a very effective way to create
a pseudo 3D effect.
15 Draw the power-up (lines 268 - 288)
The drawPowerUp procedure checks to see if the
power-up is within the outer radius and, if so, modifi es its
brightness depending on how close to the edge it is. Lerp is
used again to fi gure out an even step from one colour to the
next and smoothen the transition from the centre outwards.
07 Update the power-up (lines 089 - 132)
The updatePowerUp procedure checks to see if we
already have a power-up on-screen, and if not there’s a 1-in-
200 chance that one will be created. The fi rst power-up always
gives you particle lasers, then after this either a score boost or
an extra life is awarded. To see if we have collected the power-
up, we just check if it has reached the outer edge and is in the
same segment as the player: IF powerupAngle > playerAngle -
(gap / 2)’ and ‘IF powerupAngle < playerAngle + (gap / 2).
08 Activate the warp drive (lines 135 - 141)
The warp procedure checks to see if a warp has been
activated and, if so, modifi es the inner and outer radii so they
zoom off the screen. The inner radius is increased by a smaller
amount than the outer so you get a warp drive effect.
09 Check the lasers (lines 144 - 150)
One of the shorter sections of our fi nal code listing,
DEF PROC lasers is just a quick check (a simple IF statement)
to see if we are running particle lasers or not. The fi re speed
is adjusted accordingly, using hard-coded values rather than
more variables.
10 Stagger the spawns (lines 153 - 176)
Next up is DEF PROC enemies. Here we use a counter
variable, enemyDelay, to determine how long to wait between
each new enemy. Early in the game the delay is quite long
so you won’t likely see more than one at a time, but as you
progress then it is possible to see ten or more at once.
11 Update the starfi eld (lines 179 - 194)
To create the illusion of fl ying through space, we have
a playing fi eld that displays objects like enemies and the
background stars moving outwards from the centre. The stars
are handled with DEF PROC updateStars: the FOR CYCLE
loop counts from zero to maxStars. A distance is added at the
current angle using COS and SIN. If the star goes off the screen
then it is repositioned in the centre of the screen with a small
random offset, so they don’t all start in the dead centre.
Right Our modular, PROC-based code
means you can easily add in new
modules – another power-up, for
example – to mix up the core gameplay
Raspberry Pi Tips, Tricks & Hacks 151
Tips | Tricks | Hacks
17 Draw the enemies (lines 404 - 486)
Now for the enemies: DEF PROC drawEnemies. As you
will now be getting used to, the FN lerp is used to maintain
smooth movement steps. It really is a very cool little function,
that one. The position is calculated and then the enemy is
plotted. We then check to see if it comes into contact with the
player and again, if so, then debris fl ies about, the player’s lives
are reduced by one and we check to see if it is game over. If
we’re not out of lives then we warp the level off the screen and
start afresh.
18 Draw the player (lines 489 - 501)
Firstly, the c and s variables are used to store the
current COS and SIN results. This is so we don’t have to
use tmpPlayerAngle + 90 + playerTurn against every draw
calculation. The u variable is the distance from the centre of
the screen. The player is then drawn using a polyPlot function.
DEF PROC drawPlayer COLOUR = Yellow c = COS (tmpPlayerAngle + 90 + playerTurn) s = SIN (tmpPlayerAngle + 90 + playerTurn) u = gHeight / 80 polyStart polyPlot ((u * 5 * c) - (u * 5 * s) + playerX, (u * 5 * s) + (u * 5 * c) + playerY)
polyPlot ((u * 5 * c) - 0 + playerX, (u * 5 * s) + playerY)
polyPlot (0 - (u * -2 * s) + playerX, (u * -2 * c) + playerY)
polyPlot ((u * -5 * c) - 0 + playerX, (u * -5 * s) + playerY)
polyPlot ((u * -5 * c) - (u * 5 * s) + playerX, (u * -5 * s) + (u * 5 * c) + playerY)
polyPlot ((u * -7 * c) - 0 + playerX, (u * -7 * s) + playerY)
polyPlot (0 - (u * -4 * s) + playerX, (u * -4 * c) + playerY)
polyPlot ((u * 7 * c) - 0 + playerX, (u * 7 * s) + playerY)
polyEnd ENDPROC
19 Display remaining lives (lines 507 - 524)
Our next procedure, DEF PROC plotPlayerLives, helps
us to display the number of lives that the player has left at the
top-right of the screen. This routine positions the location just
below the top with GHEIGHT and then draws the lives from
left to right using polyPlot commands.
20 Check progress (lines 527 - 538)
Now we check to see how far we’ve got with the
checkProgress block. Every time we kill an enemy, the progress
variable is increased, and if we kill enough then we surpass the
advance variable, which warps us off to the next level. A score
bonus is also awarded.
DEF PROC checkProgress IF progress = advance THEN playSample (sfx(7), 4, 0) oldScore = score score = score + ((10 * scoreBoost) * level) scoreTime = 1 level = level + 1 warp = TRUE advance = advance + 1 enemyDelay = enemyDelay + 240 / targetfps ENDIF ENDPROC
21 Update the debris (lines 541 - 552)
Starfi elds need starjunk, so next we have a very simple
updateDebris procedure. Each piece of debris is updated with
its new position and then plotted in a random colour.
22 Update the scores (lines 555 - 569)
DEF PROC updateGameInfo is responsible for
displaying the current score and level. Would you believe it,
yet another use for FN lerp! This time it works out the value
required to equally increment the score each time any points
are awarded. This is how the score increases as if it is counting
up the numbers and not just adding a complete number each
time like a simple addition.
23 Start the game (lines 572 - 725)
The setup procedure is called every time you start
a new level, either from the attract screen or after a warp is
initiated. All level variables are reset – not the score or diffi culty,
but pretty much everything else is reset or cleared ready to
start again.
Then, about half way down, the WHILE intro < radius CYCLE
statement starts a loop in which the playing fi eld is zoomed into
the screen. The player is displayed, and score and lives plotted.
Lasers and enemies are reset and we’re off!
24 Take it to the next level And there you have it. There’s still plenty of scope for
improvement. It could include more enemies, a smart bomb,
more audio tracks, a jump feature and a proper end sequence
with a high score table, for example. We hope you have enjoyed
playing with 73MP357 and that you do go on to make many
improvements – we’d love to see them if you do, so please send
them in to us here at LU&D or straight to the FUZE website.
We also hope you’ve been intrigued by what can be achieved
with FUZE BASIC. We don’t expect you to keep using BASIC
forever, but if it has given you the programming bug and now
you want to climb the language ladder then we have done our
job. Our expert recommends starting with C++; it is still the
most widely-used coding language in the world and most other
languages stem from it or are at least similar. If you can code in
C++ then you’re pretty much set and will easily be able to adapt
to just about any other language. Good luck!
To fi nd out more about FUZE BASIC and the FUZE in general
please visit www.fuze.co.uk/bks-967.
16 Draw the lasers (lines 291 - 401)
DEF PROC drawlasers is huge, but actually there’s a
lot of repetition so it’s not as tough as it looks. The fi rst section
works out, depending on whether we’re using a standard or
particle laser, the position of each individual laser. We then
perform pretty much the same calculations on each instance.
Notice that, when working on the particle version, there are two
(left and right) to deal with.
Following this we check to see if any of the enemies have
come into contact with a laser. This is done by comparing the
laser distance and segment to that of each enemy – if they
match, then BOOM! The explosion takes place and debris goes
everywhere! The enemies are reduced by one, a score is added
and sound effects are played depending on laser type.
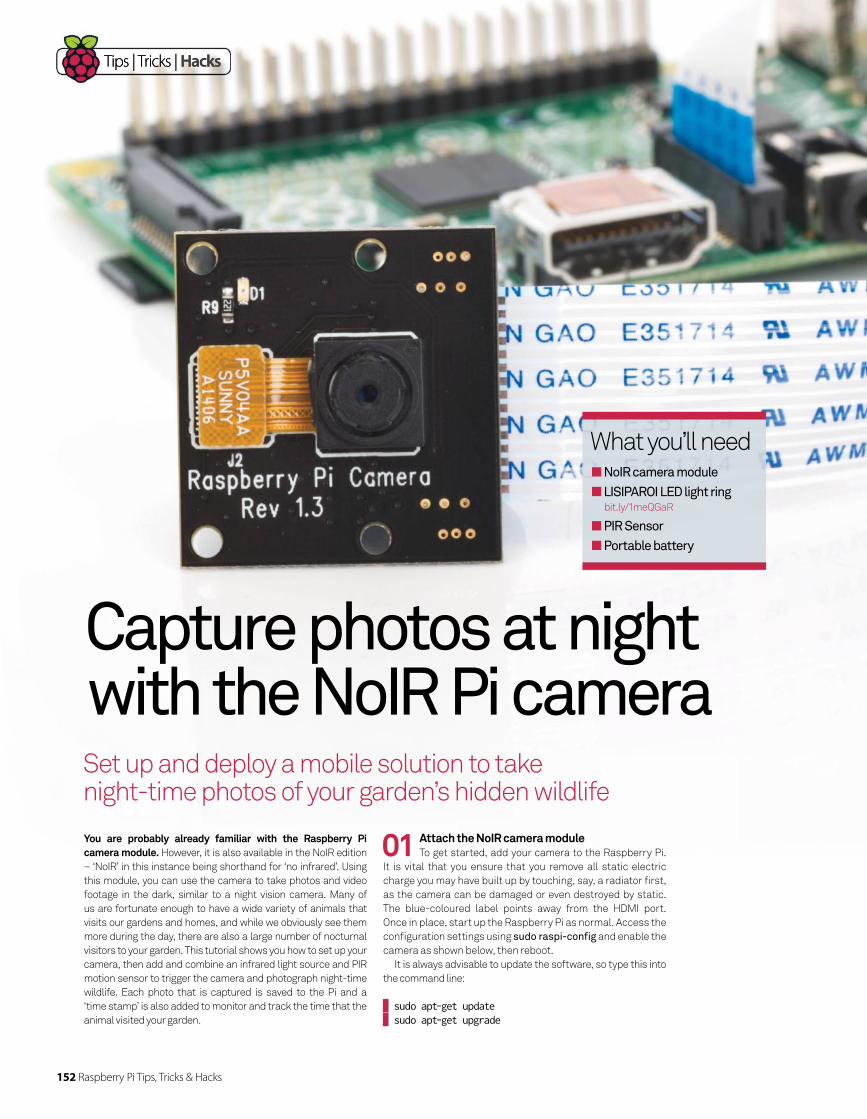
152 Raspberry Pi Tips, Tricks & Hacks
Tips | Tricks | Hacks
Set up and deploy a mobile solution to take night-time photos of your garden’s hidden wildlife
Capture photos at night with the NoIR Pi camera
You are probably already familiar with the Raspberry Pi camera module. However, it is also available in the NoIR edition
– ‘NoIR’ in this instance being shorthand for ‘no infrared’. Using
this module, you can use the camera to take photos and video
footage in the dark, similar to a night vision camera. Many of
us are fortunate enough to have a wide variety of animals that
visits our gardens and homes, and while we obviously see them
more during the day, there are also a large number of nocturnal
visitors to your garden. This tutorial shows you how to set up your
camera, then add and combine an infrared light source and PIR
motion sensor to trigger the camera and photograph night-time
wildlife. Each photo that is captured is saved to the Pi and a
‘time stamp’ is also added to monitor and track the time that the
animal visited your garden.
01 Attach the NoIR camera moduleTo get started, add your camera to the Raspberry Pi.
It is vital that you ensure that you remove all static electric
charge you may have built up by touching, say, a radiator fi rst,
as the camera can be damaged or even destroyed by static.
The blue-coloured label points away from the HDMI port.
Once in place, start up the Raspberry Pi as normal. Access the
confi guration settings using sudo raspi-confi g and enable the
camera as shown below, then reboot.
It is always advisable to update the software, so type this into
the command line:
sudo apt-get update sudo apt-get upgrade
What you’ll need NoIR camera module
LISIPAROI LED light ringbit.ly/1meQGaR
PIR Sensor
Portable battery
Tips | Tricks | Hacks
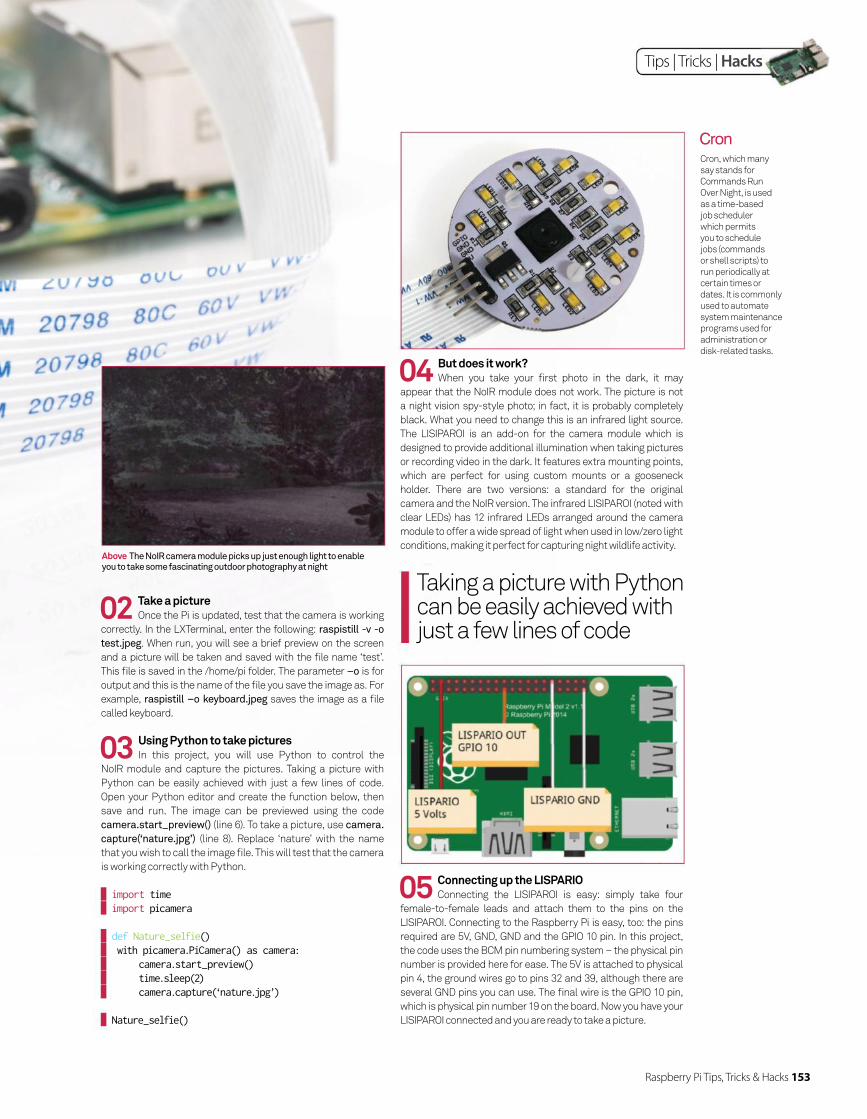
Raspberry Pi Tips, Tricks & Hacks 153
Tips | Tricks | Hacks
02 Take a pictureOnce the Pi is updated, test that the camera is working
correctly. In the LXTerminal, enter the following: raspistill -v -o
test.jpeg. When run, you will see a brief preview on the screen
and a picture will be taken and saved with the fi le name ‘test’.
This fi le is saved in the /home/pi folder. The parameter –o is for
output and this is the name of the fi le you save the image as. For
example, raspistill –o keyboard.jpeg saves the image as a fi le
called keyboard.
03 Using Python to take picturesIn this project, you will use Python to control the
NoIR module and capture the pictures. Taking a picture with
Python can be easily achieved with just a few lines of code.
Open your Python editor and create the function below, then
save and run. The image can be previewed using the code
camera.start_preview() (line 6). To take a picture, use camera.
capture(‘nature.jpg’) (line 8). Replace ‘nature’ with the name
that you wish to call the image fi le. This will test that the camera
is working correctly with Python.
import time import picamera
def Nature_selfie() with picamera.PiCamera() as camera: camera.start_preview() time.sleep(2) camera.capture(‘nature.jpg’)
Nature_selfie()
05 Connecting up the LISPARIOConnecting the LISIPAROI is easy: simply take four
female-to-female leads and attach them to the pins on the
LISIPAROI. Connecting to the Raspberry Pi is easy, too: the pins
required are 5V, GND, GND and the GPIO 10 pin. In this project,
the code uses the BCM pin numbering system – the physical pin
number is provided here for ease. The 5V is attached to physical
pin 4, the ground wires go to pins 32 and 39, although there are
several GND pins you can use. The fi nal wire is the GPIO 10 pin,
which is physical pin number 19 on the board. Now you have your
LISIPAROI connected and you are ready to take a picture.
04 But does it work?When you take your fi rst photo in the dark, it may
appear that the NoIR module does not work. The picture is not
a night vision spy-style photo; in fact, it is probably completely
black. What you need to change this is an infrared light source.
The LISIPAROI is an add-on for the camera module which is
designed to provide additional illumination when taking pictures
or recording video in the dark. It features extra mounting points,
which are perfect for using custom mounts or a gooseneck
holder. There are two versions: a standard for the original
camera and the NoIR version. The infrared LISIPAROI (noted with
clear LEDs) has 12 infrared LEDs arranged around the camera
module to offer a wide spread of light when used in low/zero light
conditions, making it perfect for capturing night wildlife activity.
Cron, which many
say stands for
Commands Run
Over Night, is used
as a time-based
job scheduler
which permits
you to schedule
jobs (commands
or shell scripts) to
run periodically at
certain times or
dates. It is commonly
used to automate
system maintenance
programs used for
administration or
disk-related tasks.
Cron
Taking a picture with Python can be easily achieved with just a few lines of code
Above The NoIR camera module picks up just enough light to enable you to take some fascinating outdoor photography at night
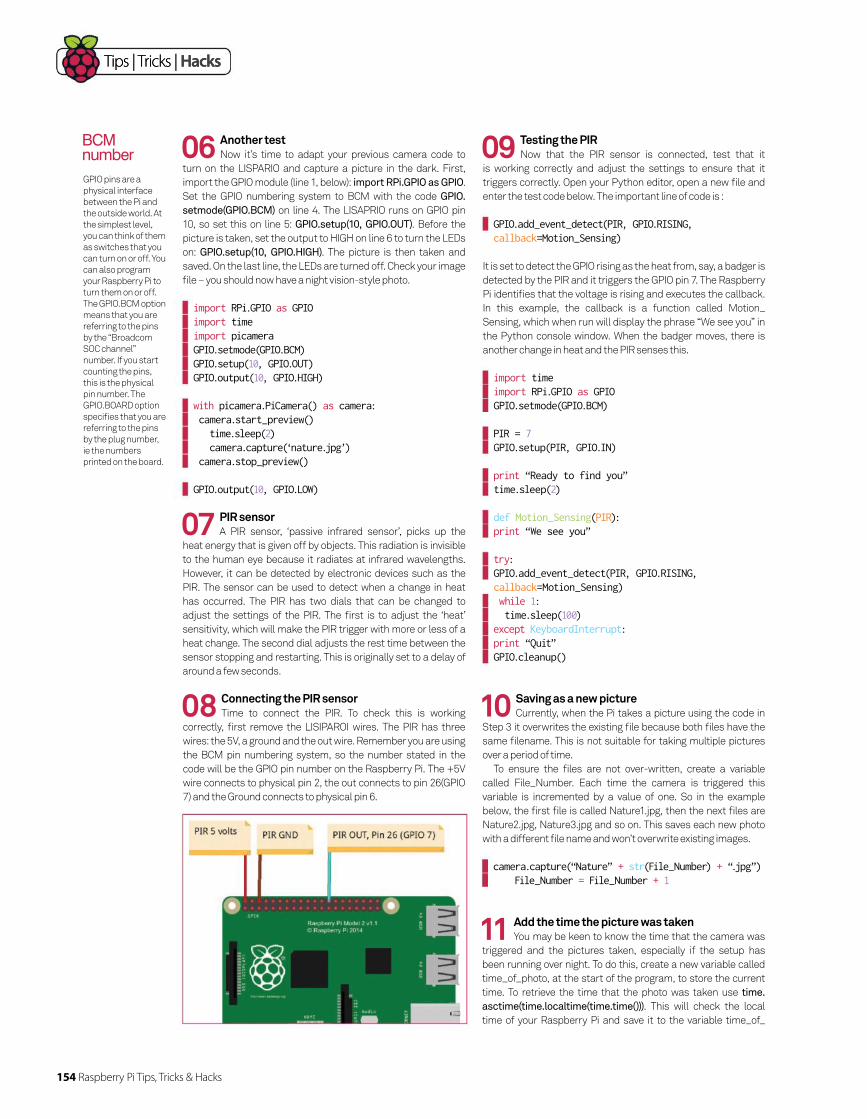
154 Raspberry Pi Tips, Tricks & Hacks
Tips | Tricks | Hacks Tips | Tricks | Hacks
10 Saving as a new pictureCurrently, when the Pi takes a picture using the code in
Step 3 it overwrites the existing file because both files have the
same filename. This is not suitable for taking multiple pictures
over a period of time.
To ensure the files are not over-written, create a variable
called File_Number. Each time the camera is triggered this
variable is incremented by a value of one. So in the example
below, the first file is called Nature1.jpg, then the next files are
Nature2.jpg, Nature3.jpg and so on. This saves each new photo
with a different file name and won’t overwrite existing images.
camera.capture(“Nature” + str(File_Number) + “.jpg”) File_Number = File_Number + 1
11 Add the time the picture was takenYou may be keen to know the time that the camera was
triggered and the pictures taken, especially if the setup has
been running over night. To do this, create a new variable called
time_of_photo, at the start of the program, to store the current
time. To retrieve the time that the photo was taken use time.
asctime(time.localtime(time.time())). This will check the local
time of your Raspberry Pi and save it to the variable time_of_
GPIO pins are a
physical interface
between the Pi and
the outside world. At
the simplest level,
you can think of them
as switches that you
can turn on or off. You
can also program
your Raspberry Pi to
turn them on or off.
The GPIO.BCM option
means that you are
referring to the pins
by the “Broadcom
SOC channel”
number. If you start
counting the pins,
this is the physical
pin number. The
GPIO.BOARD option
specifies that you are
referring to the pins
by the plug number,
ie the numbers
printed on the board.
BCM number
08 Connecting the PIR sensorTime to connect the PIR. To check this is working
correctly, first remove the LISIPAROI wires. The PIR has three
wires: the 5V, a ground and the out wire. Remember you are using
the BCM pin numbering system, so the number stated in the
code will be the GPIO pin number on the Raspberry Pi. The +5V
wire connects to physical pin 2, the out connects to pin 26(GPIO
7) and the Ground connects to physical pin 6.
09 Testing the PIRNow that the PIR sensor is connected, test that it
is working correctly and adjust the settings to ensure that it
triggers correctly. Open your Python editor, open a new file and
enter the test code below. The important line of code is :
GPIO.add_event_detect(PIR, GPIO.RISING, callback=Motion_Sensing)
It is set to detect the GPIO rising as the heat from, say, a badger is
detected by the PIR and it triggers the GPIO pin 7. The Raspberry
Pi identifies that the voltage is rising and executes the callback.
In this example, the callback is a function called Motion_
Sensing, which when run will display the phrase “We see you” in
the Python console window. When the badger moves, there is
another change in heat and the PIR senses this.
import time import RPi.GPIO as GPIO GPIO.setmode(GPIO.BCM)
PIR = 7 GPIO.setup(PIR, GPIO.IN)
print “Ready to find you” time.sleep(2)
def Motion_Sensing(PIR): print “We see you”
try: GPIO.add_event_detect(PIR, GPIO.RISING, callback=Motion_Sensing)
while 1: time.sleep(100) except KeyboardInterrupt: print “Quit” GPIO.cleanup()
07 PIR sensorA PIR sensor, ‘passive infrared sensor’, picks up the
heat energy that is given off by objects. This radiation is invisible
to the human eye because it radiates at infrared wavelengths.
However, it can be detected by electronic devices such as the
PIR. The sensor can be used to detect when a change in heat
has occurred. The PIR has two dials that can be changed to
adjust the settings of the PIR. The first is to adjust the ‘heat’
sensitivity, which will make the PIR trigger with more or less of a
heat change. The second dial adjusts the rest time between the
sensor stopping and restarting. This is originally set to a delay of
around a few seconds.
06 Another testNow it’s time to adapt your previous camera code to
turn on the LISPARIO and capture a picture in the dark. First,
import the GPIO module (line 1, below): import RPi.GPIO as GPIO.
Set the GPIO numbering system to BCM with the code GPIO.
setmode(GPIO.BCM) on line 4. The LISAPRIO runs on GPIO pin
10, so set this on line 5: GPIO.setup(10, GPIO.OUT). Before the
picture is taken, set the output to HIGH on line 6 to turn the LEDs
on: GPIO.setup(10, GPIO.HIGH). The picture is then taken and
saved. On the last line, the LEDs are turned off. Check your image
file – you should now have a night vision-style photo.
import RPi.GPIO as GPIO import time import picamera GPIO.setmode(GPIO.BCM) GPIO.setup(10, GPIO.OUT) GPIO.output(10, GPIO.HIGH)
with picamera.PiCamera() as camera: camera.start_preview() time.sleep(2) camera.capture(‘nature.jpg’) camera.stop_preview()
GPIO.output(10, GPIO.LOW)
Raspberry Pi Tips, Tricks & Hacks 155
Tips | Tricks | Hacks
15 Automatically start the programIf you deploy the project outside then you will probably
not have a monitor or screen attached, meaning that you cannot
see what the program is doing. To sort this, set the program to
start automatically when the external power supply is plugged in.
First, write down where you have saved the Night Box program –
for example, in the /home/pi folder, called Night_Box.py, in which
case you’d use /home/pi/Night_Box.py. Double-check you’ve got
the correct path by opening the LXTerminal and typing:
sudo cat /home/pi/name_of_your_script.py
If correct, this will display the contents of your Python code. The
next step is to create a Cron job by modifying the ‘crontab’. To edit
it, type sudo crontab –e (this will run the Cron task for all users)
Scroll to the bottom of the window and then add the following
line to the fi le:
@reboot python /home/pi/name_of_your_program.py &
The “&” at the end will run the code in the background and ensure
your Raspberry Pi will boot up as normal. Save the fi le by hitting
Ctrl+X followed by Y, and then reboot.
16 Deploy the Night BoxTo deploy the setup effectively you will want to create a
box or holder for the PIR, LISIPAROI, etc. This will protect them
from the weather, especially if it rains or snows. You may want to
consider a 3D-printed solution or even an old match box to hold
the components. In the previous step you scheduled a Cron task
to start the program automatically when the Raspberry Pi is fi rst
booted up. Find a suitable location and set up your box. Plug in
your portable power supply and the Raspberry Pi will boot up and
start the program. Check back the next day to see who visited
your garden the previous night!
14 Taking a video You may decide that you would prefer to take a video
when the PIR is triggered; you could adapt the program to trigger
and record videos of wildlife that may visit your garden or the
location where your camera is. Again, Python makes it simple to
record video using the code camera.start_recording(‘/home/
pi/Desktop/evidence.jpg’) to start the recording, which you can
save as a fi le called evidence. If you want to video for, say, 20
seconds then use time.sleep(20) before stopping the recording
with camera.stop_recording(‘/home/pi/Desktop/evidence.jpg’).
camera.start_preview() camera.start_recording(‘/home/pi/Desktop/evidence.h264’) time.sleep(20) camera.stop_recording( )
12 Add the time to the pictureRecording the time that the picture is taken is only
relevant if you are there watching and waiting for wildlife to
trigger the camera, and you can see the time value. A better
solution is to use the time to add a ‘time stamp’ to the picture.
This means that when you view each image you can see the time
that the pictures were taken at the top. The line of code required
is: camera.annotate_text = “time_of_photo”.
13 RecapBefore you fi nalise the project, a quick recap on the
features and setup: the NoIR camera module is attached to the
Pi to capture photos in the dark. This requires an infrared light
source, which is provided by the LISIPAROI. A PIR is attached
and used to sense changes in heat, which then turns the LEDs
on and triggers the camera to capture a picture. The current time
is added to the picture for future reference. The diagram on the
facing page shows the wiring solution for the LISIPAROI and PIR.
import timeimport osimport sysimport picameraimport subprocessimport RPi.GPIO as GPIO
GPIO.setmode(GPIO.BCM)###Set up the PIRPIR = 7GPIO.setup(PIR, GPIO.IN)###Set up the LISPARIOGPIO.setup(10, GPIO.OUT)
global File_Number ###number of photoglobal file_name ###name of photoFile_Number = 1 def Nature_selfie(): ###Takes a picture of the wee beastie### global File_Number global file_name ###Grabs current time### time_of_photo = time.asctime( time.localtime(time.time()) ) GPIO.output(10, GPIO.HIGH) with picamera.PiCamera() as camera: #camera.start_preview() time.sleep(0.5) camera.annotate_text = time_of_photo camera.capture(“Nature” + str(File_Number) + “.jpg”) file_name = “Nature” + str(File_Number) + “.jpg” print file_name File_Number = File_Number + 1 GPIO.output(10, GPIO.LOW) ###Turn off LISPARIO
def Motion_Sensing(PIR): ###Response to movement### print “We see you” Nature_selfie() ###Code to respond to a movement of the wee beastie### print “Ready to find you”time.sleep(2)
try: GPIO.add_event_detect(PIR, GPIO.RISING, callback=Motion_Sensing) while 1: time.sleep(100)except KeyboardInterrupt: print “Quit” GPIO.cleanup()
Full code listingphoto. Ensure that your Pi’s clock is set correctly before you
start your program.
time_of_photo = time.asctime( time.localtime(time.time()) )
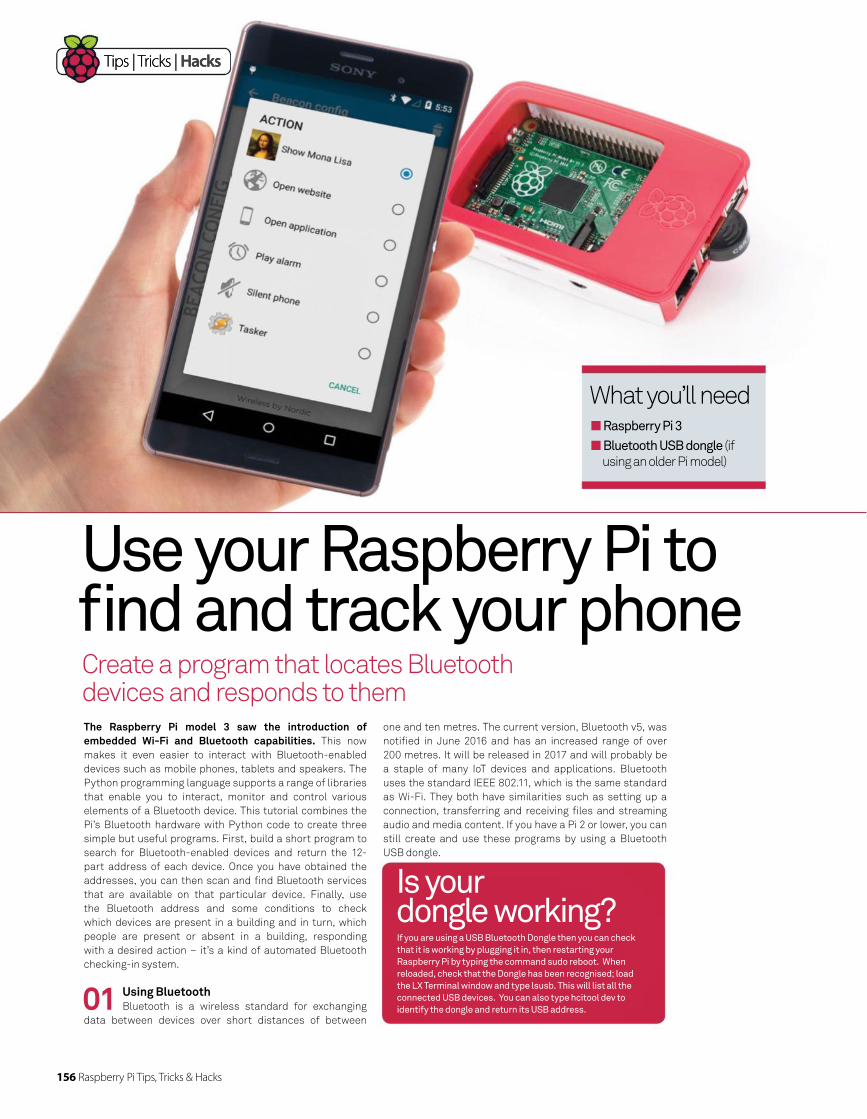
Tips | Tricks | Hacks
What you’ll need Raspberry Pi 3
Bluetooth USB dongle (if
using an older Pi model)
Create a program that locates Bluetooth devices and responds to them
Use your Raspberry Pi to fi nd and track your phone
The Raspberry Pi model 3 saw the introduction of embedded Wi-Fi and Bluetooth capabilities. This now
makes it even easier to interact with Bluetooth-enabled
devices such as mobile phones, tablets and speakers. The
Python programming language supports a range of libraries
that enable you to interact, monitor and control various
elements of a Bluetooth device. This tutorial combines the
Pi’s Bluetooth hardware with Python code to create three
simple but useful programs. First, build a short program to
search for Bluetooth-enabled devices and return the 12-
part address of each device. Once you have obtained the
addresses, you can then scan and fi nd Bluetooth services
that are available on that particular device. Finally, use
the Bluetooth address and some conditions to check
which devices are present in a building and in turn, which
people are present or absent in a building, responding
with a desired action – it’s a kind of automated Bluetooth
checking-in system.
01 Using Bluetooth Bluetooth is a wireless standard for exchanging
data between devices over short distances of between
one and ten metres. The current version, Bluetooth v5, was
notifi ed in June 2016 and has an increased range of over
200 metres. It will be released in 2017 and will probably be
a staple of many IoT devices and applications. Bluetooth
uses the standard IEEE 802.11, which is the same standard
as Wi-Fi. They both have similarities such as setting up a
connection, transferring and receiving fi les and streaming
audio and media content. If you have a Pi 2 or lower, you can
still create and use these programs by using a Bluetooth
USB dongle.
156 Raspberry Pi Tips, Tricks & Hacks
Tips | Tricks | Hacks
Is your dongle working?If you are using a USB Bluetooth Dongle then you can check
that it is working by plugging it in, then restarting your
Raspberry Pi by typing the command sudo reboot. When
reloaded, check that the Dongle has been recognised; load
the LX Terminal window and type lsusb. This will list all the
connected USB devices. You can also type hcitool dev to
identify the dongle and return its USB address.
156 Raspberry Pi Tips, Tricks & Hacks
Raspberry Pi Tips, Tricks & Hacks 157
Tips | Tricks | Hacks
02 Install the required librariesAlthough the Raspberry Pi OS image comes with
a Bluetooth library for interfacing with devices, for this
tutorial you will want to control the interface with Python
code. Load up your Pi and open the LX Terminal window.
Check for and update/upgrade the OS, typing in lines 1 and
2. Then install the Python development tools, line 3. Finally
install two further Bluetooth development libraries. Once
they have completed, restart your Pi by typing sudo halt.
sudo apt-get update sudo apt-get upgrade sudo apt-get install python-pip python-dev ipython sudo apt-get install bluetooth libbluetooth-dev sudo pip install pybluez
03 Load Python Load the LX Terminal and type sudo idle, this will
open the Python editor with super-user privileges, which
will give you access to the USB hardware via Python code.
Start a new Window and import the fi rst Bluetooth module,
line 1. Then add a short message to inform the user that the
program is searching for nearby devices.
import Bluetooth print(“Searching for device...”)
04 Search for the names of the devicesThe next line of your program searches for the
names of the Bluetooth enabled devices. Each device
must have Bluetooth enabled and be discoverable in order
to be found. On the next line down, create a variable called
nearby_devices to store the names and then use the
code bluetooth.discover_devices to look up the names of
the devices.
nearby_devices = bluetooth.discover_devices(lookup_names = True)
05 Print the total number of devices foundEach of the names of any discoverable devices are
now stored in a variable. Use the code len(nearby_devices)
to return the number of items stored in the variable, this
is the number of Bluetooth devices the program has
found. Then print out the total number of devices. Add the
following code after the previous line of your program.
print(“found %d devices” % len(nearby_devices))
06 The Bluetooth address (BD_ADDR)Each Bluetooth-enabled device has a Bluetooth
address that is a combination of 12 alphanumeric
characters; for example, 69:58:78:3A:CB:7F. The addresses
are hexadecimal, which means they can contain
import bluetooth
print(“Searching for devices....”)
nearby_devices = bluetooth.discover_devices(lookup_names = True)
print(“found %d devices” % len(nearby_devices))
for addr, name in nearby_devices: print(“ %s - %s” % (addr, name))
# [Find a list of services].py
#!/usr/bin/env pythonimport bluetoothfrom bluetooth import *
device_address = “98:44:98:3A:BB:7C”
#find services on the phoneservices = find_service(address=device_address)#print services
for i in services: print i, ‘\n’
# [Check to see who is in].py
#!/usr/bin/python### add a def and then a while statementimport bluetoothimport time
print “Blue-Who Finder”
#find the devices and the name of the devicedevices = bluetooth.discover_devices(lookup_names = True)
#print how many devcies are foundprint(“Found %d devices” % len(devices))
#print the devices and the namesfor addr, name in devices: print(“ %s - %s” % (addr, name))
time.sleep(2)print “Check to see who is in the building”print “Checking “ + time.strftime(“%a, %d %b %Y %H:%M:%S”, time.gmtime())time.sleep(1)if len (devices) == 0: print “No one is currently in the building”
#check the addresses against list to see who is nearfor person in devices: device = bluetooth.lookup_name(“68:88:98:3R:BB:7C”, timeout=5) if (device != None): print “TeCoEd is in” else:
Full code listing
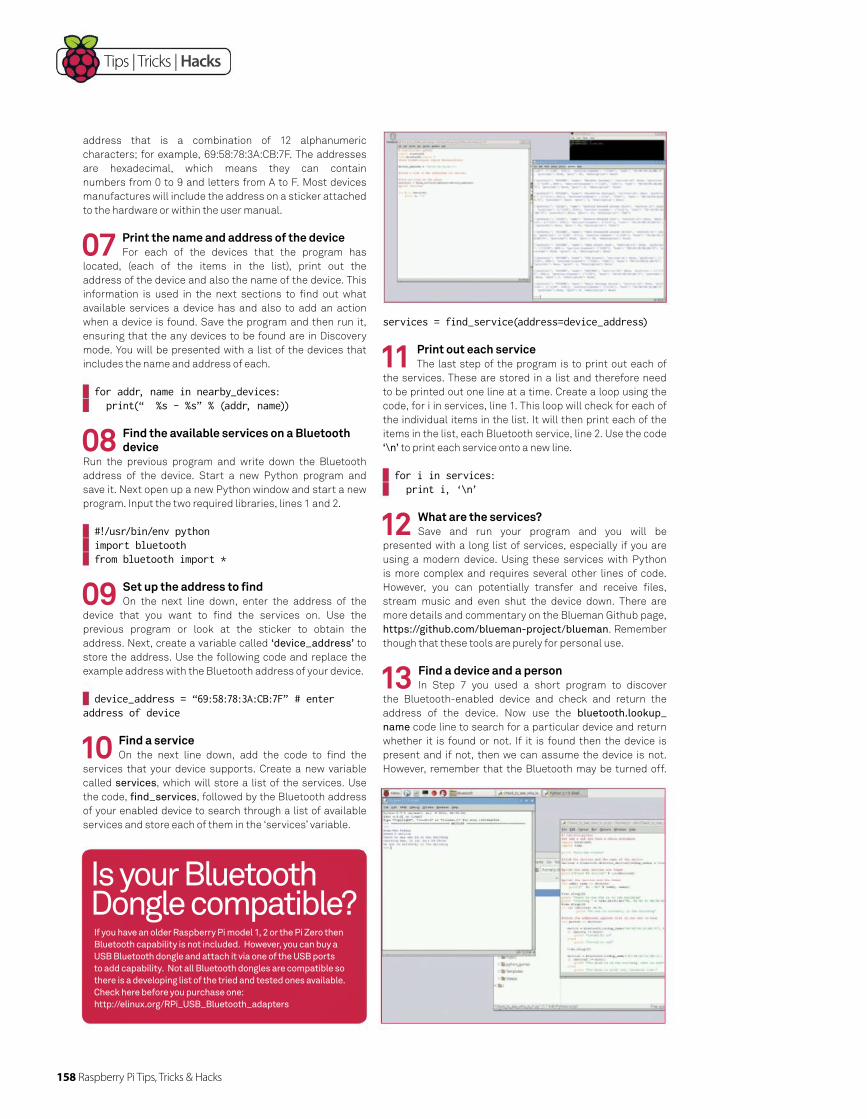
Tips | Tricks | Hacks
158 Raspberry Pi Tips, Tricks & Hacks
services = find_service(address=device_address)
11 Print out each serviceThe last step of the program is to print out each of
the services. These are stored in a list and therefore need
to be printed out one line at a time. Create a loop using the
code, for i in services, line 1. This loop will check for each of
the individual items in the list. It will then print each of the
items in the list, each Bluetooth service, line 2. Use the code
‘\n’ to print each service onto a new line.
for i in services: print i, ‘\n’
12 What are the services?Save and run your program and you will be
presented with a long list of services, especially if you are
using a modern device. Using these services with Python
is more complex and requires several other lines of code.
However, you can potentially transfer and receive fi les,
stream music and even shut the device down. There are
more details and commentary on the Blueman Github page,
https://github.com/blueman-project/blueman. Remember
though that these tools are purely for personal use.
13 Find a device and a personIn Step 7 you used a short program to discover
the Bluetooth-enabled device and check and return the
address of the device. Now use the bluetooth.lookup_
name code line to search for a particular device and return
whether it is found or not. If it is found then the device is
present and if not, then we can assume the device is not.
However, remember that the Bluetooth may be turned off.
address that is a combination of 12 alphanumeric
characters; for example, 69:58:78:3A:CB:7F. The addresses
are hexadecimal, which means they can contain
numbers from 0 to 9 and letters from A to F. Most devices
manufactures will include the address on a sticker attached
to the hardware or within the user manual.
07 Print the name and address of the deviceFor each of the devices that the program has
located, (each of the items in the list), print out the
address of the device and also the name of the device. This
information is used in the next sections to fi nd out what
available services a device has and also to add an action
when a device is found. Save the program and then run it,
ensuring that the any devices to be found are in Discovery
mode. You will be presented with a list of the devices that
includes the name and address of each.
for addr, name in nearby_devices: print(“ %s - %s” % (addr, name))
08 Find the available services on a Bluetooth device
Run the previous program and write down the Bluetooth
address of the device. Start a new Python program and
save it. Next open up a new Python window and start a new
program. Input the two required libraries, lines 1 and 2.
#!/usr/bin/env python import bluetooth from bluetooth import *
09 Set up the address to fi ndOn the next line down, enter the address of the
device that you want to fi nd the services on. Use the
previous program or look at the sticker to obtain the
address. Next, create a variable called ‘device_address’ to
store the address. Use the following code and replace the
example address with the Bluetooth address of your device.
device_address = “69:58:78:3A:CB:7F” # enter address of device
10 Find a serviceOn the next line down, add the code to fi nd the
services that your device supports. Create a new variable
called services, which will store a list of the services. Use
the code, fi nd_services, followed by the Bluetooth address
of your enabled device to search through a list of available
services and store each of them in the ‘services’ variable.
Is your Bluetooth Dongle compatible?If you have an older Raspberry Pi model 1, 2 or the Pi Zero then
Bluetooth capability is not included. However, you can buy a
USB Bluetooth dongle and attach it via one of the USB ports
to add capability. Not all Bluetooth dongles are compatible so
there is a developing list of the tried and tested ones available.
Check here before you purchase one:
http://elinux.org/RPi_USB_Bluetooth_adapters
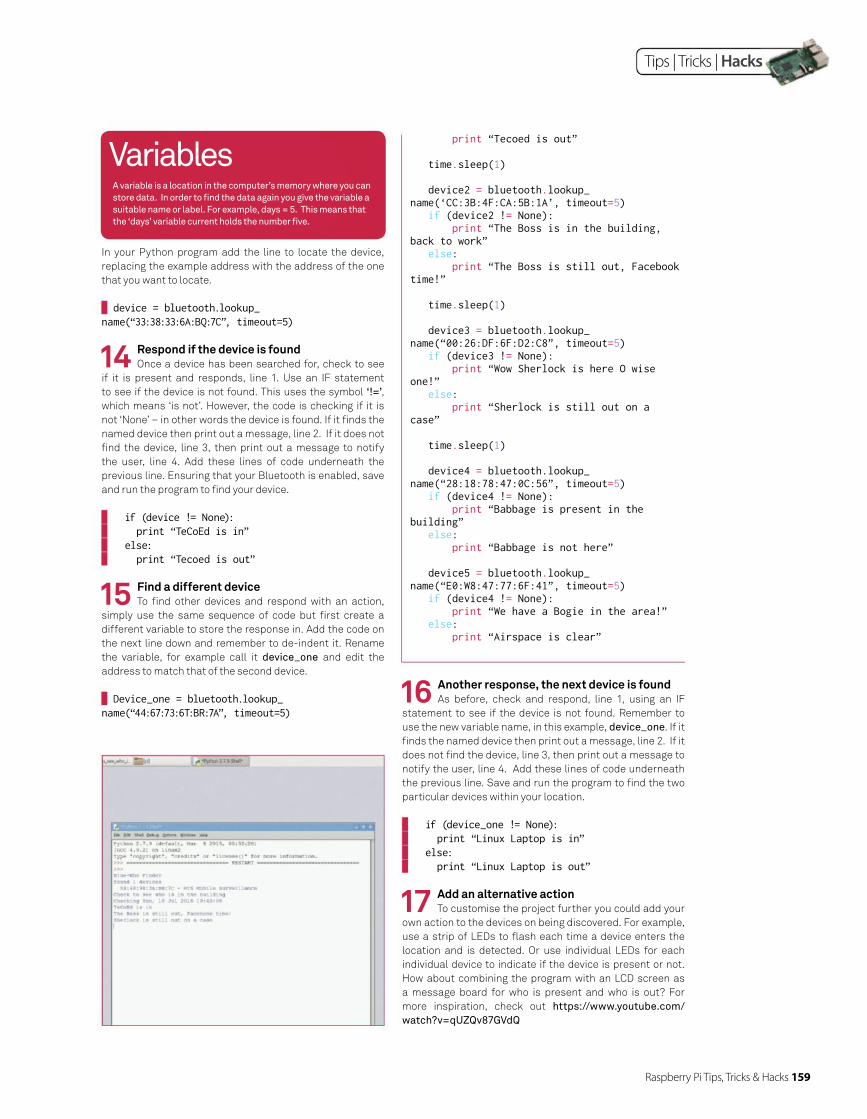
Tips | Tricks | Hacks
Raspberry Pi Tips, Tricks & Hacks 159
In your Python program add the line to locate the device,
replacing the example address with the address of the one
that you want to locate.
device = bluetooth.lookup_name(“33:38:33:6A:BQ:7C”, timeout=5)
14 Respond if the device is foundOnce a device has been searched for, check to see
if it is present and responds, line 1. Use an IF statement
to see if the device is not found. This uses the symbol ‘!=’,
which means ‘is not’. However, the code is checking if it is
not ‘None’ – in other words the device is found. If it fi nds the
named device then print out a message, line 2. If it does not
fi nd the device, line 3, then print out a message to notify
the user, line 4. Add these lines of code underneath the
previous line. Ensuring that your Bluetooth is enabled, save
and run the program to fi nd your device.
if (device != None): print “TeCoEd is in” else: print “Tecoed is out”
15 Find a different deviceTo fi nd other devices and respond with an action,
simply use the same sequence of code but fi rst create a
different variable to store the response in. Add the code on
the next line down and remember to de-indent it. Rename
the variable, for example call it device_one and edit the
address to match that of the second device.
Device_one = bluetooth.lookup_name(“44:67:73:6T:BR:7A”, timeout=5)
print “Tecoed is out”
time.sleep(1)
device2 = bluetooth.lookup_name(‘CC:3B:4F:CA:5B:1A’, timeout=5) if (device2 != None): print “The Boss is in the building, back to work” else: print “The Boss is still out, Facebook time!”
time.sleep(1)
device3 = bluetooth.lookup_name(“00:26:DF:6F:D2:C8”, timeout=5) if (device3 != None): print “Wow Sherlock is here O wise one!” else: print “Sherlock is still out on a case”
time.sleep(1)
device4 = bluetooth.lookup_name(“28:18:78:47:0C:56”, timeout=5) if (device4 != None): print “Babbage is present in the building” else: print “Babbage is not here”
device5 = bluetooth.lookup_name(“E0:W8:47:77:6F:41”, timeout=5) if (device4 != None): print “We have a Bogie in the area!” else: print “Airspace is clear”
16 Another response, the next device is foundAs before, check and respond, line 1, using an IF
statement to see if the device is not found. Remember to
use the new variable name, in this example, device_one. If it
fi nds the named device then print out a message, line 2. If it
does not fi nd the device, line 3, then print out a message to
notify the user, line 4. Add these lines of code underneath
the previous line. Save and run the program to fi nd the two
particular devices within your location.
if (device_one != None): print “Linux Laptop is in” else: print “Linux Laptop is out”
17 Add an alternative actionTo customise the project further you could add your
own action to the devices on being discovered. For example,
use a strip of LEDs to fl ash each time a device enters the
location and is detected. Or use individual LEDs for each
individual device to indicate if the device is present or not.
How about combining the program with an LCD screen as
a message board for who is present and who is out? For
more inspiration, check out https://www.youtube.com/
watch?v=qUZQv87GVdQ
VariablesA variable is a location in the computer’s memory where you can
store data. In order to fi nd the data again you give the variable a
suitable name or label. For example, days = 5. This means that
the ‘days’ variable current holds the number fi ve.

OF ANY OF THESE GRE AT MAG A ZINES
OR FROM JUS T $5 . 10 PER ISSUE IN THE US A**
Try 3 issuesTry 3 issuesTry 3 issuesfor only £5for only £5for only £5
*
The essential magazine for the GNU generation
Every issue of Linux User & Developer is
packed with tips, tricks and tutorials created
by professionals to help you do more with
your Linux system. Each issue features a
dedicated, practical Raspberry Pi section
packed with inspirational projects.
LINUX USER AND DEVELOPER
TRYTODAY

TRY3 ISSUES FOR £5
Order securely online www.imaginesubs.co.uk/book5Enter the promo code BOOK5 to get these great offers
*This offer entitles new UK Direct Debit subscribers to receive their fi rst 3 issues for £5, after these issues standard subscriptions pricing will apply. Standard pricing available online. Offer code BOOK5 must be quoted to receive this special subscriptions price. Your subscription will start with the next available issue. Subscribers can cancel this subscription at any time.
Details of the Direct Debit guarantee available on request. **Overseas pricing available online.
These offers will expire onSunday 31 December 2017
Please quote code BOOK5†Calls cost 7p per minute plus your telephone company’s access charge
Order from our customer service teamCall 0844 856 0644† from the UK
or +44 1795 592 869 from the USA
SAVE UP TO 40% ON THE NEWSSTAND PRICE
Never miss an issue
13 issues a year, and
as a subscriber you’ll
be sure to get every
single one
Delivered to your home
Free delivery of every
issue, direct to your
doorstep
Get the biggest savingsGet your favourite
magazine for less by
ordering direct

HOW TO USEEVERYTHING YOU NEED TO KNOW ABOUT ACCESSING YOUR NEW DIGITAL REPOSITORY
Having trouble with any of the techniques in this issue’s tutorials? Don’t know how to make the best use of your free resources? Want to have your work critiqued by those in the know? Then why not visit the Bookazines or Linux User & Developer Facebook page for all your questions, concerns and qualms. There is a friendly community of experts to help you out, as well as regular posts and updates from the bookazine team. Like us today and start chatting!
facebook.com/ImagineBookazinesfacebook.com/LinuxUserUK
NEED HELP WITHTHE TUTORIALS?
To access FileSilo, please visit http://www.filesilo.co.uk/bks-B38/
01 Follow the on-screen instructions to create
an account with our secure FileSilo system, or log in and unlock the issue by answering a simple question
about the edition you’ve just read. You can access the content for free with each edition released.
02Once you have logged in, you are free to
explore the wealth of content made available for free on FileSilo, from great video tutorials and online guides to superb downloadable resources. And the more bookazines you purchase, the more your instantly accessible collection of digital content will grow.
03 You can access FileSilo on any
desktop, tablet or smartphone device using any popular browser (such as Safari, Firefox or Google Chrome). However, we recommend that you use a desktop to download content, as you may not be able to download files to your phone or tablet.
04 If you have any problems with
accessing content on FileSilo, or with the registration process, take a look at the FAQs online or email [email protected].