Embed Size (px)
Citation preview

A PRACTICAL GUIDE TO IMPLEMENT ISO 27001STANDARDS
Abstract
Information security management plays a vital role instrategic development and long-term profitable existence ofall organizations. Since choosing securely appropriatesoftware is a crucial decision for developing informationsecurity management system (ISMS), this paper presentspractical guidelines to information security officers inconforming to ISO 27001 standards by using free software,Security Officer Best Friend Tool (SOBF Tool) as anexemplar. Taking into account organizational objectives,security officers can identify potential risks and takeprecautionary measures in an organization through the SOBFTool.
1. Introduction
Information security has come to play an extremely vitalrole in today's fast fragile business environment. Theimportance of this fact needs implementation of adequatemeasures against leakages of confidential information sothat management can securely direct and accomplishorganizational objectives. A company must protectstrategically valuable information against losses orcorruptions, modifications, and unauthorized accesses.Therefore, security officers are required to implementsuitable countermeasures to keep information confidential,integral, and available. However, the officers may faceproblems of assessing risks appropriately and takingrelative precautions while establishing information security
1
policies and complying with information security standards,ISO 27001 standards.
Security Officers can benefit from various informationsecurity management (ISM) tools provided by differentvendors. Major ISM tools may include Real ISMS, CallioToolkit and SOBF Tool. SOBF Tool is a freeware while RealISMS and Callio Toolkit are sharewares software tools. RealISMS manages and maintains ISO 27001 processes, whereasCallio Toolkit that meets requirements of standards such asISO 17799, BS7799, ISO27001, SOX and HIPAA. The freesoftware SOBF Tool, which is released by a non-profitorganization, SOMAP.org, provides both risk assessment andpreventive measures that protect information system againstundesirable and unexpected events including attacks,accidents, disasters, deliberate harms and so forth. Thesemeasures either eliminate available and potential risks ormitigate them to an acceptable level that a company managesto bear easily. Since main concerns of companies is to keepexpenses at the minimum level, this paper presents a usageguidance of free software SOBF Tool by which securityofficers can get rid of any possible incidents that mightjeopardize business activities. In other words, the presentpaper gives an overview a freeware, SOBF Tool, with the aimof guiding security officers in handling confidentialinformation.
2. A Guided Tour through SOBF Tool
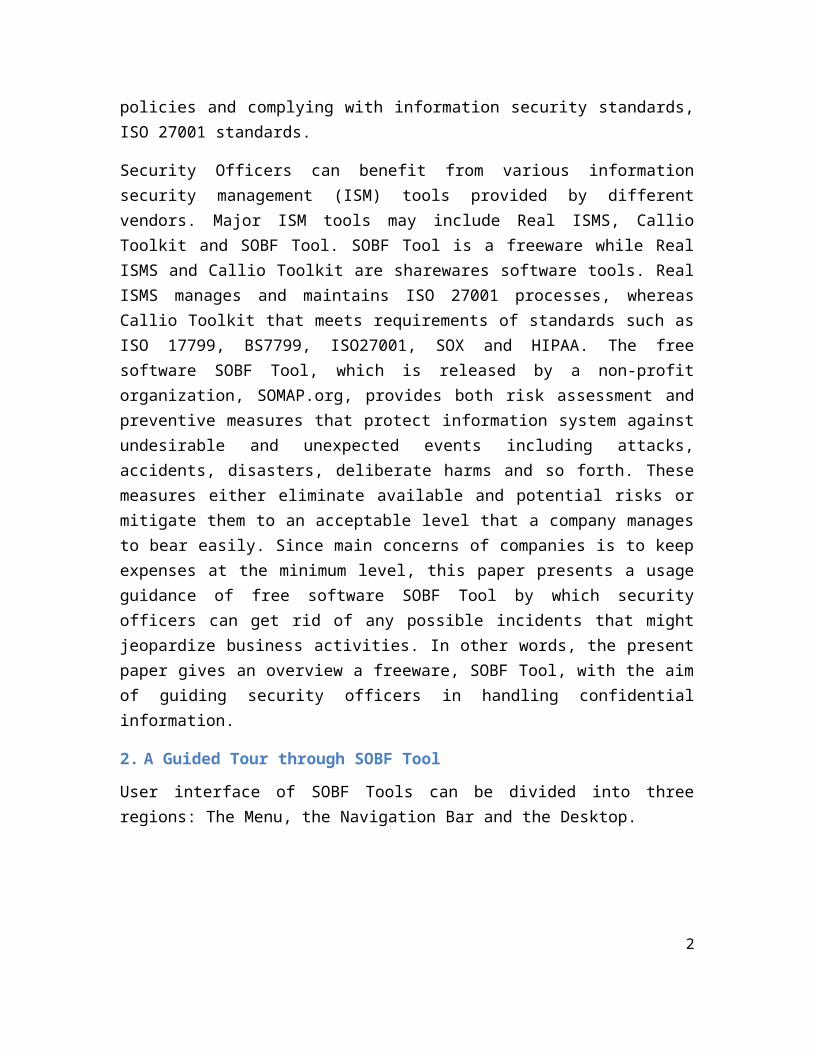
User interface of SOBF Tools can be divided into threeregions: The Menu, the Navigation Bar and the Desktop.
2
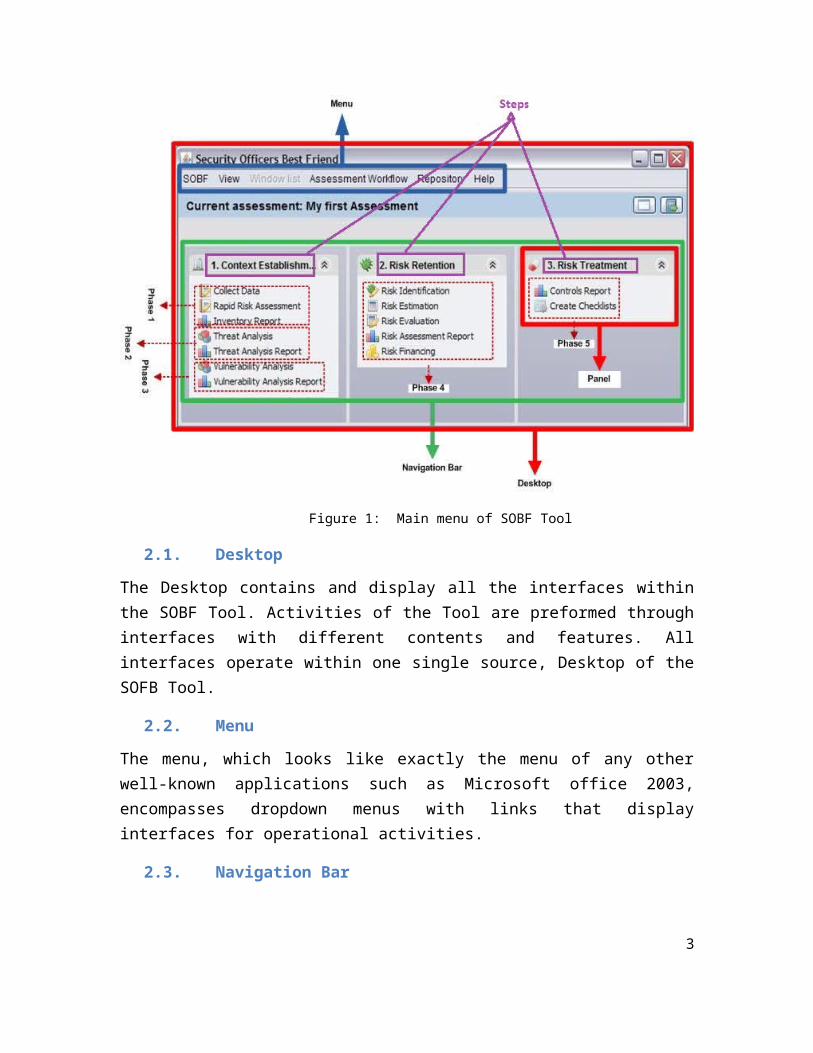
Figure 1: Main menu of SOBF Tool
2.1. Desktop
The Desktop contains and display all the interfaces withinthe SOBF Tool. Activities of the Tool are preformed throughinterfaces with different contents and features. Allinterfaces operate within one single source, Desktop of theSOFB Tool.
2.2. Menu
The menu, which looks like exactly the menu of any otherwell-known applications such as Microsoft office 2003,encompasses dropdown menus with links that displayinterfaces for operational activities.
2.3. Navigation Bar
3
The NavBar, which is short for navigation bar, guides usersthrough all actions within the SOBF Tool. Actions, which areplaced into collapsible panels, indicate functionalitiesprovided by SOBF Tool. An action can be single-clickedoperation that opens a window on the desktop foraccomplishment of related activities, execute functions andgenerate reports.
3. Context establishment
The context establishment is the first step of the SOBF Toolfor qualitative risk assessment. It is made up three phasesand seven operational activities that allow securityofficers to establish context of a company’s inventory itemsfor risk assessment. The context establishment panelsurrounded with red rectangle is showed on the followingfigure.
Figure 2: Context establishment panel of SOBF Tool
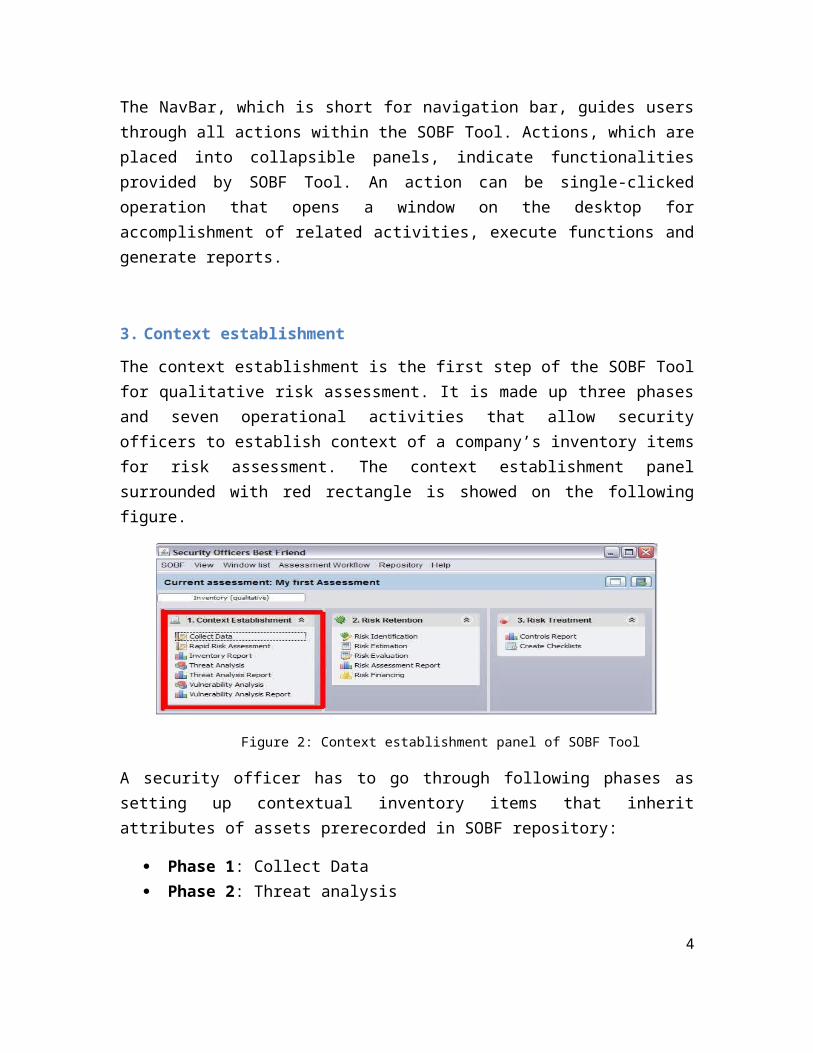
A security officer has to go through following phases assetting up contextual inventory items that inheritattributes of assets prerecorded in SOBF repository:
Phase 1: Collect Data Phase 2: Threat analysis
4
Phase 3: Vulnerability analysis
However, each phase of SOBF Tool comes up with some reportssuch as the followings that aid in analysis of inventoryitems.
Inventory Report Threat analysis Report Vulnerability analysis Report
As carrying out the risk assessment of an organization, onlyrequired activities are elaborated in this paper, not theoptional ones. Also, SOBF Tool has another activity calledRapid Risk Assessment that aims to make quick riskassessment through conducting an inventory survey. Thisactivity can be normally used when details in the inventoryare not required. Answers to questionnaires provided by SOBFTool gather information about organizational context ofinventory items. The results of a questionnaire are groupsof assets which can then be used to analyze the situation ona higher level. In such a scenario, the inventory does notinclude all assets in use but contain only one as anexemplar.
3.1. Collect data
5
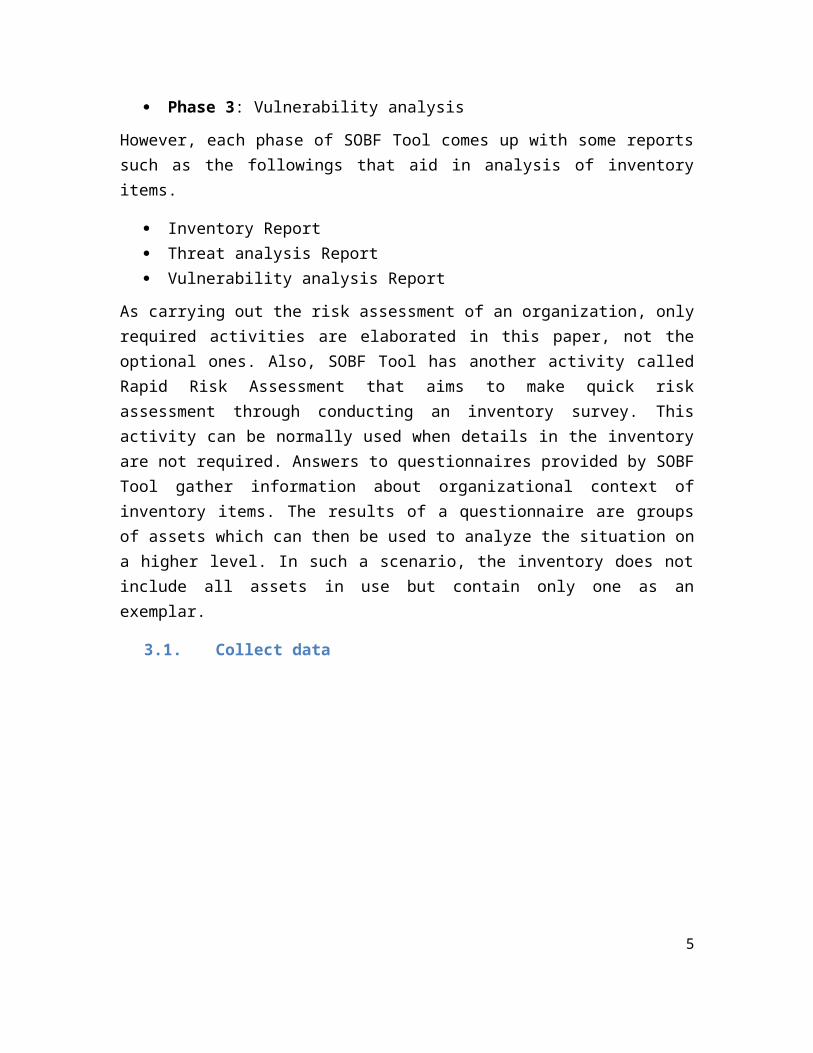
First of all, security officers should set up an inventorylist by either exploiting preexisting assets in SOBFrepository or adding new organizational assets into SOBFTool through Repository menu. If inventory items were basedon prerecorded assets in the repository, they inheritedattributes of them. The inventory list is established by
using Inventory (qualitative) interface shown below.
6
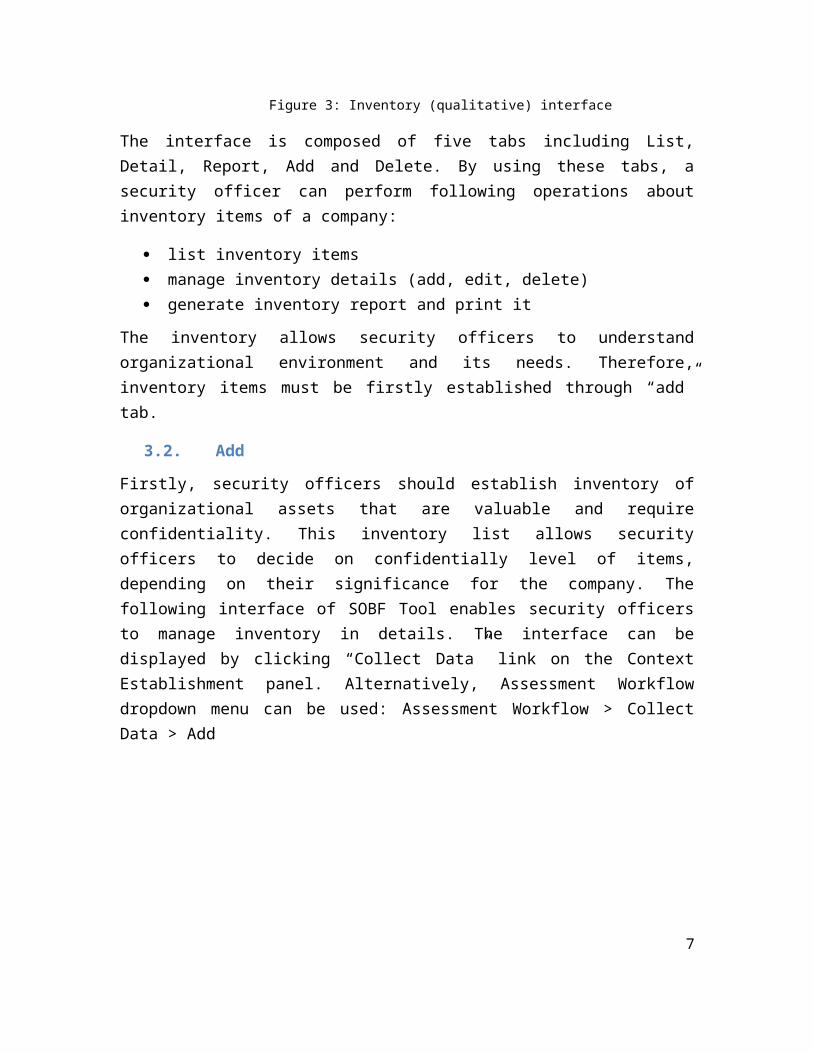
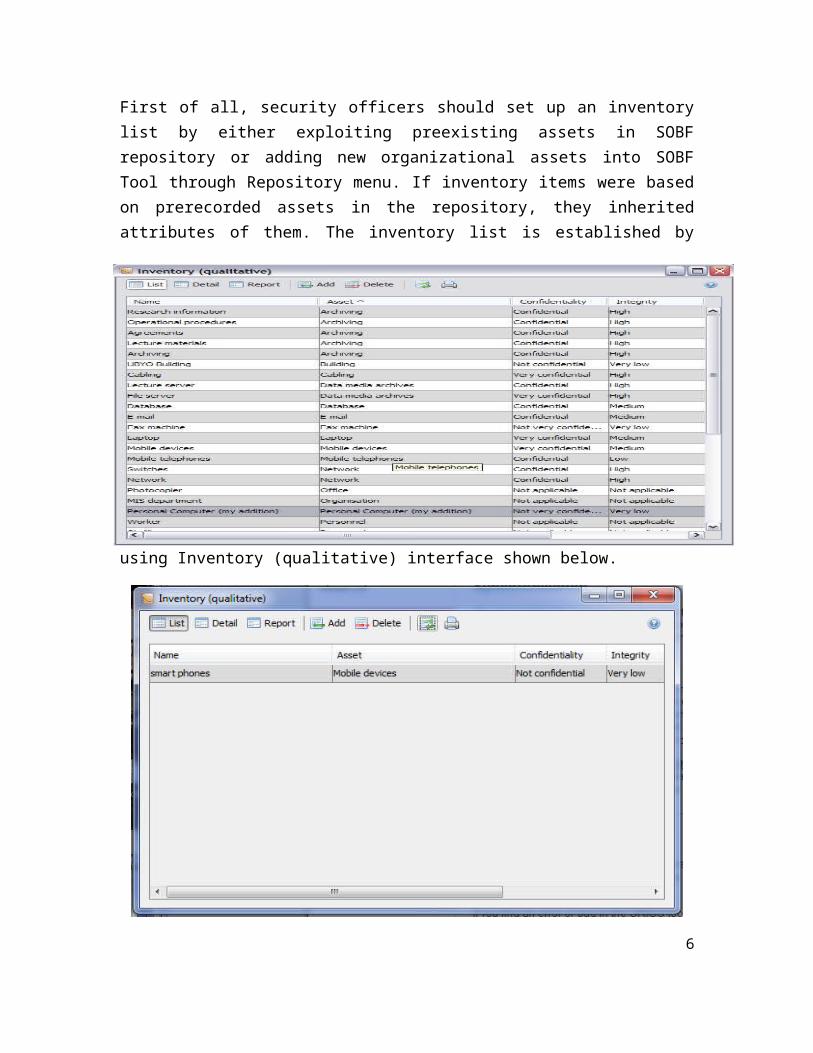
Figure 3: Inventory (qualitative) interface
The interface is composed of five tabs including List,Detail, Report, Add and Delete. By using these tabs, asecurity officer can perform following operations aboutinventory items of a company:
list inventory items manage inventory details (add, edit, delete) generate inventory report and print it
The inventory allows security officers to understandorganizational environment and its needs. Therefore,inventory items must be firstly established through “add”tab.
3.2. Add
Firstly, security officers should establish inventory oforganizational assets that are valuable and requireconfidentiality. This inventory list allows securityofficers to decide on confidentially level of items,depending on their significance for the company. Thefollowing interface of SOBF Tool enables security officersto manage inventory in details. The interface can bedisplayed by clicking “Collect Data” link on the ContextEstablishment panel. Alternatively, Assessment Workflowdropdown menu can be used: Assessment Workflow > CollectData > Add
7
Figure 4: Interface for addition of inventory item
Here are inventory items of a company can be recorded one byone. First of all, security officers must select asset byusing Asset button so that recorded items can inheritattributes of preexisting assets of the repository. If anasset is not included in the repository provided by“asset_qual” interface, it can be added by clickingRepository > “show asset” navigations. Description ofinventory items must be provided to the repository inaddition to their relative confidentiality, integrity andavailability values. Ranging from zero to five, these valuesmust be selected in a way that fits into organizationalcontext. Otherwise, the risk assessment does not correspondto appropriate risk level of the inventory items. Securityofficers can also set asset value of the item by inputting avalue that the item deserves. This value completely dependson its role in organizational operations. Finally, click“OK” button to record the item. Same activity must beperformed for every inventory item.
8
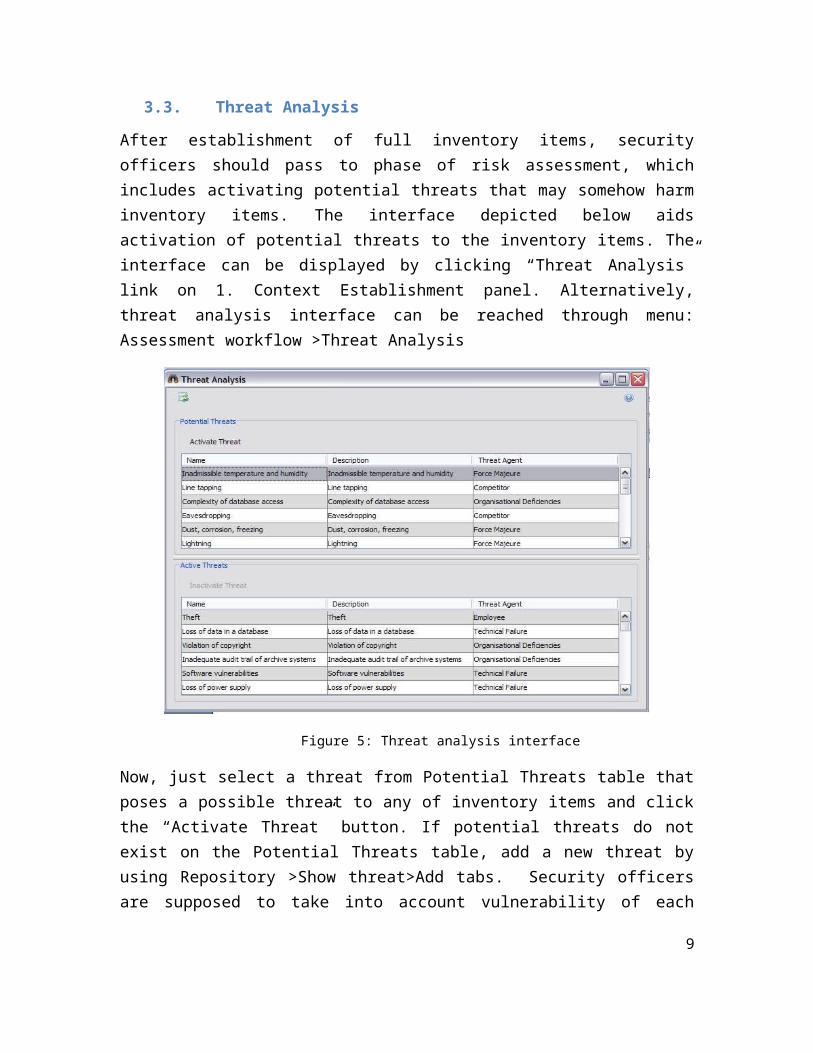
3.3. Threat Analysis
After establishment of full inventory items, securityofficers should pass to phase of risk assessment, whichincludes activating potential threats that may somehow harminventory items. The interface depicted below aidsactivation of potential threats to the inventory items. Theinterface can be displayed by clicking “Threat Analysis”link on 1. Context Establishment panel. Alternatively,threat analysis interface can be reached through menu:Assessment workflow >Threat Analysis
Figure 5: Threat analysis interface
Now, just select a threat from Potential Threats table thatposes a possible threat to any of inventory items and clickthe “Activate Threat” button. If potential threats do notexist on the Potential Threats table, add a new threat byusing Repository >Show threat>Add tabs. Security officersare supposed to take into account vulnerability of each
9
inventory item as activating these potential threats becausethis operation will provide a list of vulnerabilities foreach inventory item. Activating all treats from PotentialThreats table is recommended if vulnerabilities of inventoryitems and their possible threats cannot be identifiedproperly.
When threats are activated, the SOBF Tool implicitly insertsinventory items with their potential threat to vulnerabilitydata table in the database of the system. Technically put,the system adds primary keys of asset and threats datatables as foreign keys to vulnerability data table in thedata base of the system. Also, threats can be deactivatedby selecting a row from Active Threats table and clicking“Inactivate Threat” button successively.
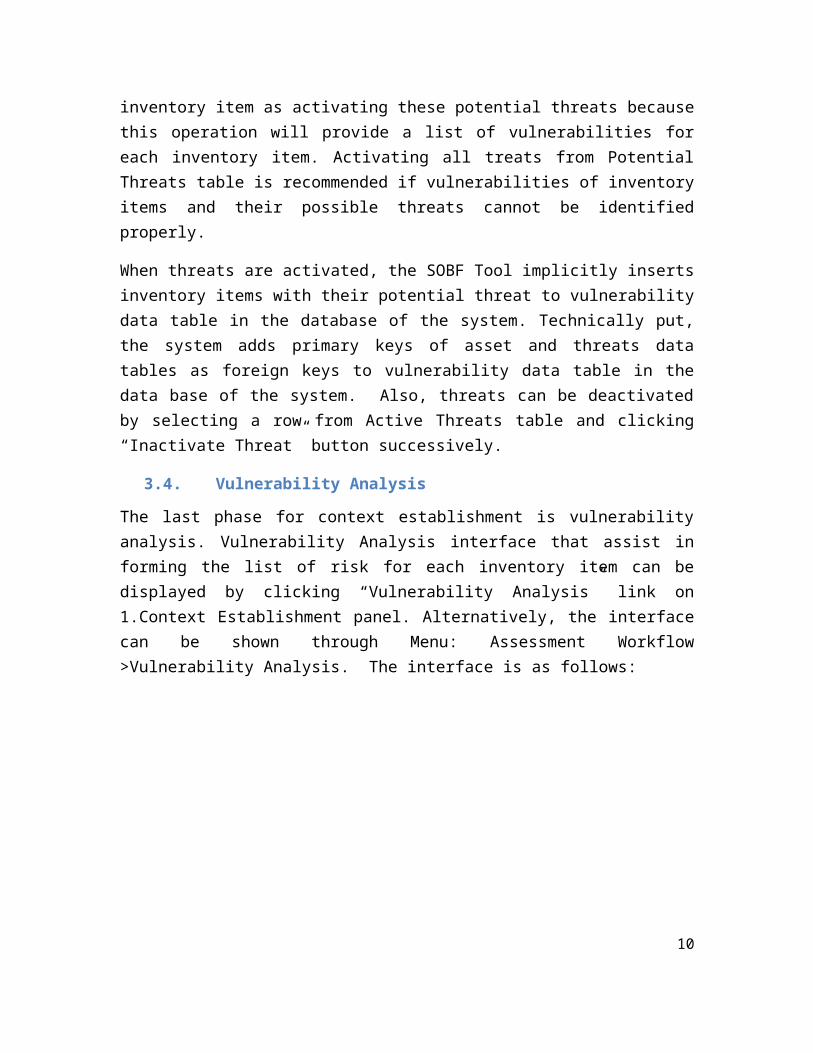
3.4. Vulnerability Analysis
The last phase for context establishment is vulnerabilityanalysis. Vulnerability Analysis interface that assist informing the list of risk for each inventory item can bedisplayed by clicking “Vulnerability Analysis” link on1.Context Establishment panel. Alternatively, the interfacecan be shown through Menu: Assessment Workflow>Vulnerability Analysis. The interface is as follows:
10
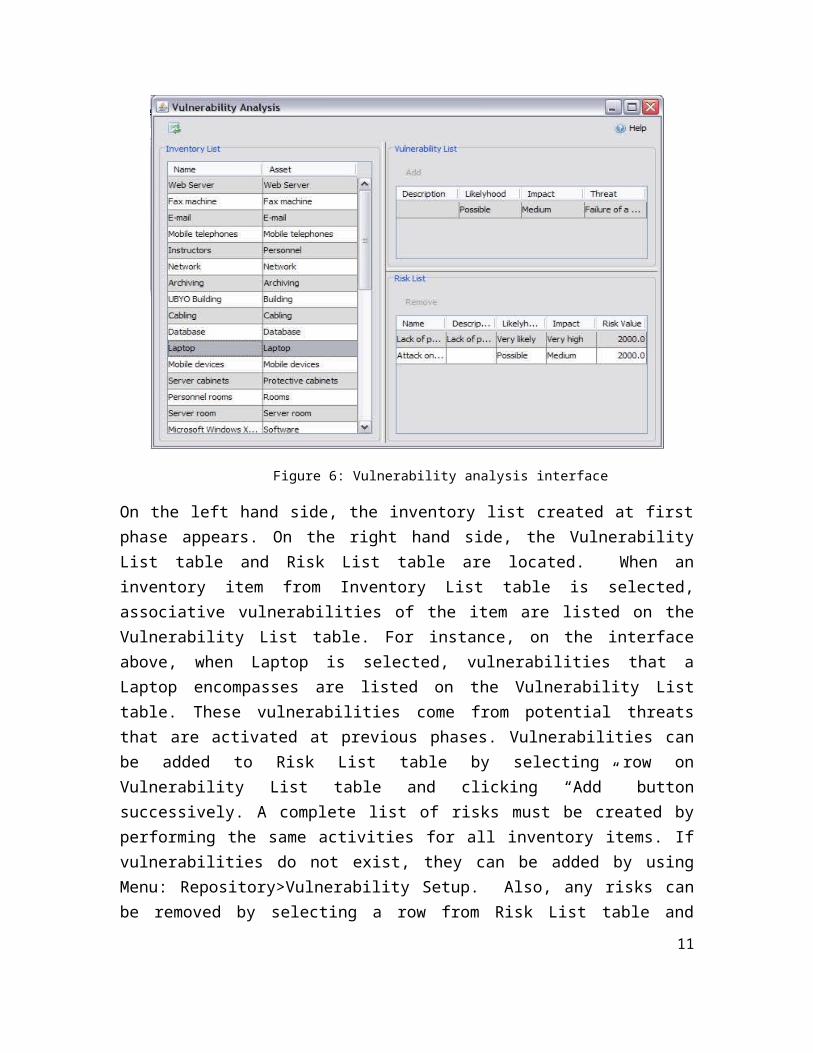
Figure 6: Vulnerability analysis interface
On the left hand side, the inventory list created at firstphase appears. On the right hand side, the VulnerabilityList table and Risk List table are located. When aninventory item from Inventory List table is selected,associative vulnerabilities of the item are listed on theVulnerability List table. For instance, on the interfaceabove, when Laptop is selected, vulnerabilities that aLaptop encompasses are listed on the Vulnerability Listtable. These vulnerabilities come from potential threatsthat are activated at previous phases. Vulnerabilities canbe added to Risk List table by selecting row onVulnerability List table and clicking “Add” buttonsuccessively. A complete list of risks must be created byperforming the same activities for all inventory items. Ifvulnerabilities do not exist, they can be added by usingMenu: Repository>Vulnerability Setup. Also, any risks canbe removed by selecting a row from Risk List table and
11
clicking “Remove” button successively. By the end of thisprocess, a risk list regarding each inventory item isestablished.
By the end of the final phase of context establishment step,inventory items are recorded, their vulnerabilities areassociated with potential risks and a risk list for eachinventory item is formed. Now it is time to switch to secondstep that includes only Risk Retention phase of SOBF Tool.
4. Risk Retention
The risk retention is the second step of the SOBF Tool forqualitative risk assessment. Risk Retention panel surroundedwith red rectangle on the following figure is made up fiveoperational activities a few of which can be used todetermine risk level of each inventory items. The mostimportant activities, here, are to define the biggest risks,decide what to do about those risks and accept the residualrisk.
Figure 7: Risk retention panel of SOBF Tool
4.1. Risk identification
The first activity of Risk Retention phase is to identifyrisk through Risk Identification interface. The RiskIdentification elaborates how to develop and implement
12
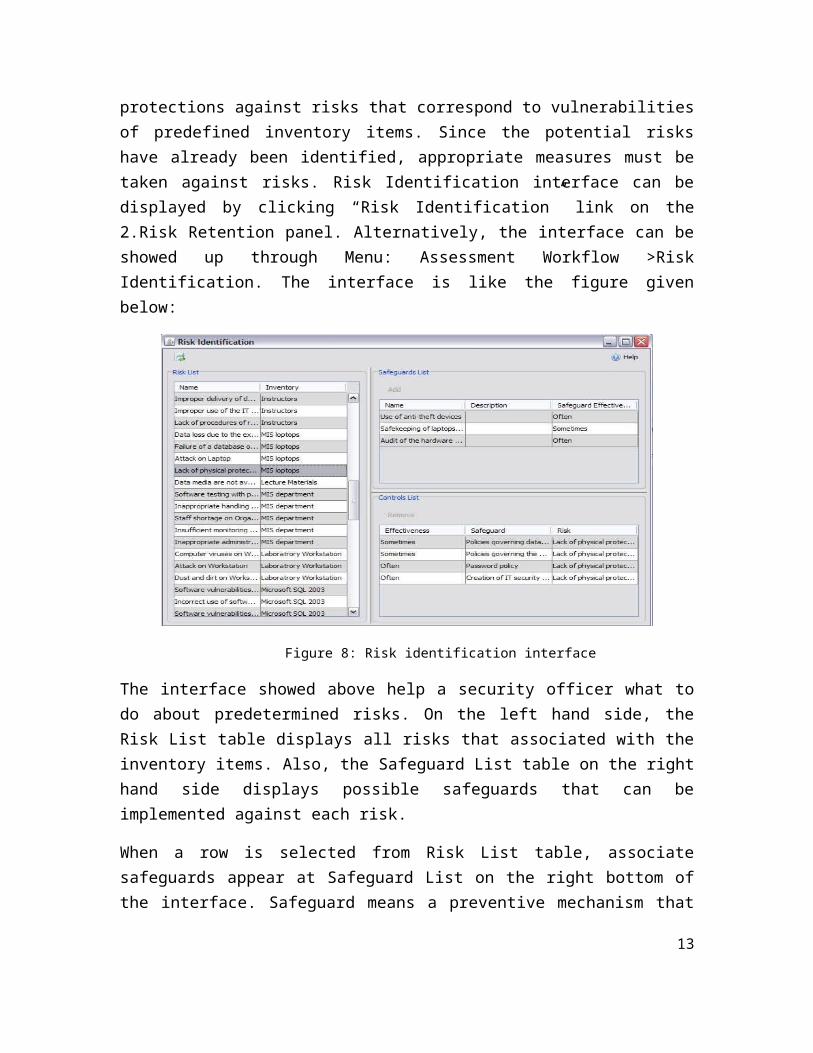
protections against risks that correspond to vulnerabilitiesof predefined inventory items. Since the potential riskshave already been identified, appropriate measures must betaken against risks. Risk Identification interface can bedisplayed by clicking “Risk Identification” link on the2.Risk Retention panel. Alternatively, the interface can beshowed up through Menu: Assessment Workflow >RiskIdentification. The interface is like the figure givenbelow:
Figure 8: Risk identification interface
The interface showed above help a security officer what todo about predetermined risks. On the left hand side, theRisk List table displays all risks that associated with theinventory items. Also, the Safeguard List table on the righthand side displays possible safeguards that can beimplemented against each risk.
When a row is selected from Risk List table, associatesafeguards appear at Safeguard List on the right bottom ofthe interface. Safeguard means a preventive mechanism that
13
protects an asset from any attacks to its vulnerabilities.Selecting a row from Safeguard List table and then clicking“Add” button result in an addition of selected row to theControl List table. That’s, the selected safeguard becomes acontrol against risks of related inventory items. Go overthe same process until controls are implemented against allrisks of the inventory items.
Also, a control can be removed when it loses itseffectiveness. Doing so, requires selecting a row fromControl List table and clicking “Remove” buttonsuccessively.
If a required safeguard is not existed on Safeguard List,Menu (Repository >Show safeguards) can be used to define newsafeguards. However, the SOBF Tool requires connectionsbetween risks and safeguards. So, newly defined safeguardsmust be associated through Menu (Repository >Show preventionsetup).
4.2. Risk Estimation
The second activity of Risk Retention phase is RiskEstimation which is made up of five segments namely List,Detail, Report, Add and Delete. Risk estimation interfacecan be displayed by clicking “Risk Estimation” link on2.Risk Retention panel. Alternatively, go through Menu(Assessment Workflow menu>Risk Estimation) to display Riskestimation interface.
14
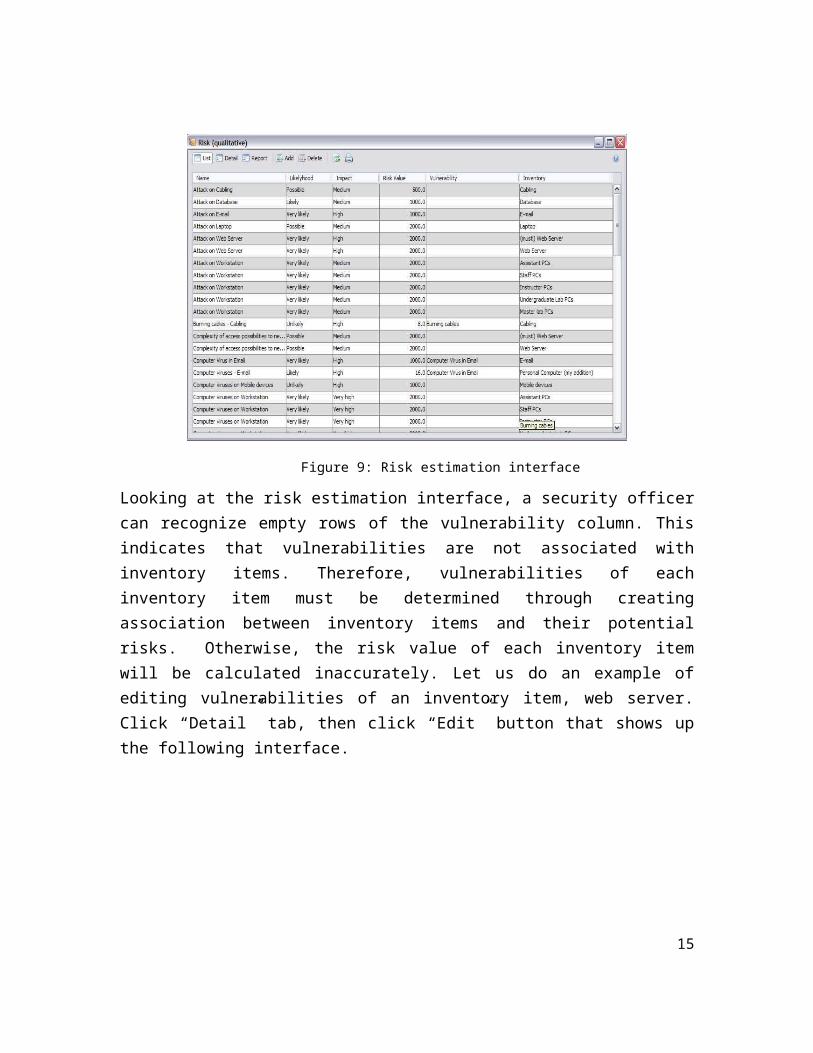
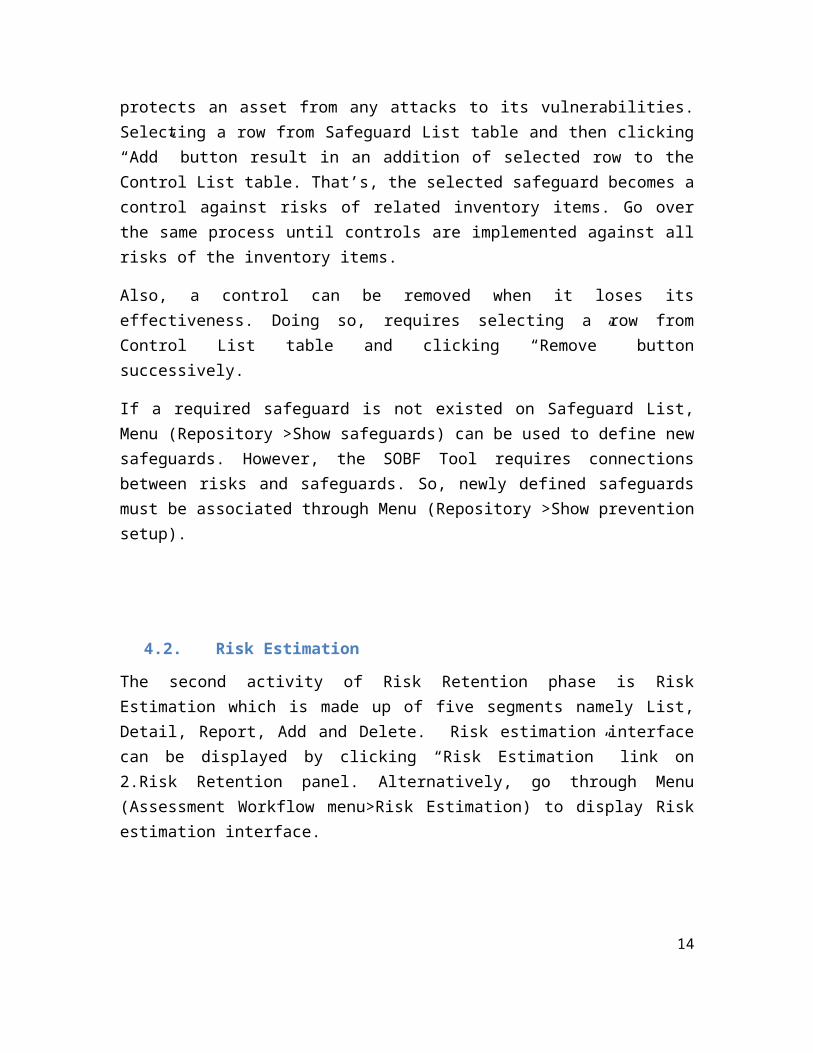
Figure 9: Risk estimation interface
Looking at the risk estimation interface, a security officercan recognize empty rows of the vulnerability column. Thisindicates that vulnerabilities are not associated withinventory items. Therefore, vulnerabilities of eachinventory item must be determined through creatingassociation between inventory items and their potentialrisks. Otherwise, the risk value of each inventory itemwill be calculated inaccurately. Let us do an example ofediting vulnerabilities of an inventory item, web server.Click “Detail” tab, then click “Edit” button that shows upthe following interface.
15
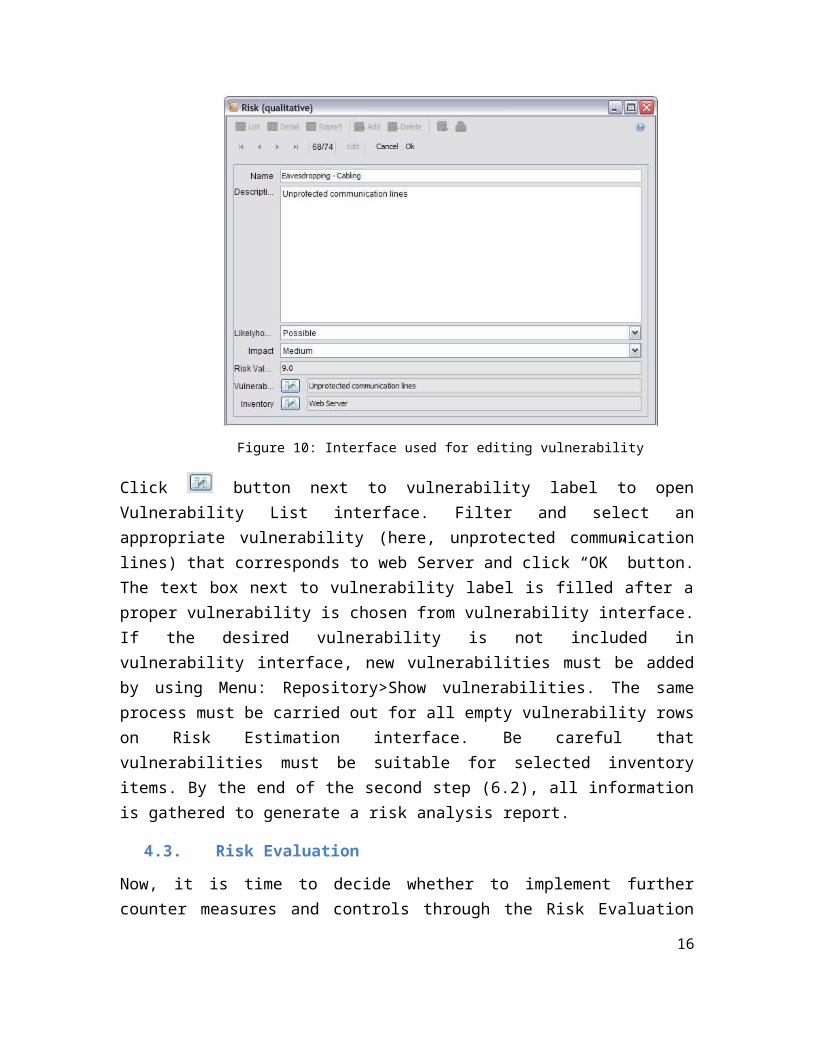
Figure 10: Interface used for editing vulnerability
Click button next to vulnerability label to openVulnerability List interface. Filter and select anappropriate vulnerability (here, unprotected communicationlines) that corresponds to web Server and click “OK” button.The text box next to vulnerability label is filled after aproper vulnerability is chosen from vulnerability interface.If the desired vulnerability is not included invulnerability interface, new vulnerabilities must be addedby using Menu: Repository>Show vulnerabilities. The sameprocess must be carried out for all empty vulnerability rowson Risk Estimation interface. Be careful thatvulnerabilities must be suitable for selected inventoryitems. By the end of the second step (6.2), all informationis gathered to generate a risk analysis report.
4.3. Risk Evaluation
Now, it is time to decide whether to implement furthercounter measures and controls through the Risk Evaluation
16

activity of Risk Retention phase. This activity actuallyperforms the same task as Risk Identification activity doesbut some particular risks may require implementation offurther safeguards, depending on interpretation of riskvalue provided by Risk Estimation activity andorganizational risk mitigation strategies. Therefore, RiskEstimation and Risk Evaluation activities should be executediteratively until risks are mitigated to an acceptablelevel.
Risk Evolution interface can be displayed by clicking “RiskEvaluation” link on the 2.Risk Retention panel.Alternatively, it can be displayed through Menu: AssessmentWorkflow >Risk Evaluation. The interface is as follows:
Figure 10: Risk evaluation interface
17
The interface above works exactly the same way as RiskIdentification interface does, so explanation about itsusage is omitted.
4.4. Risk assessment report
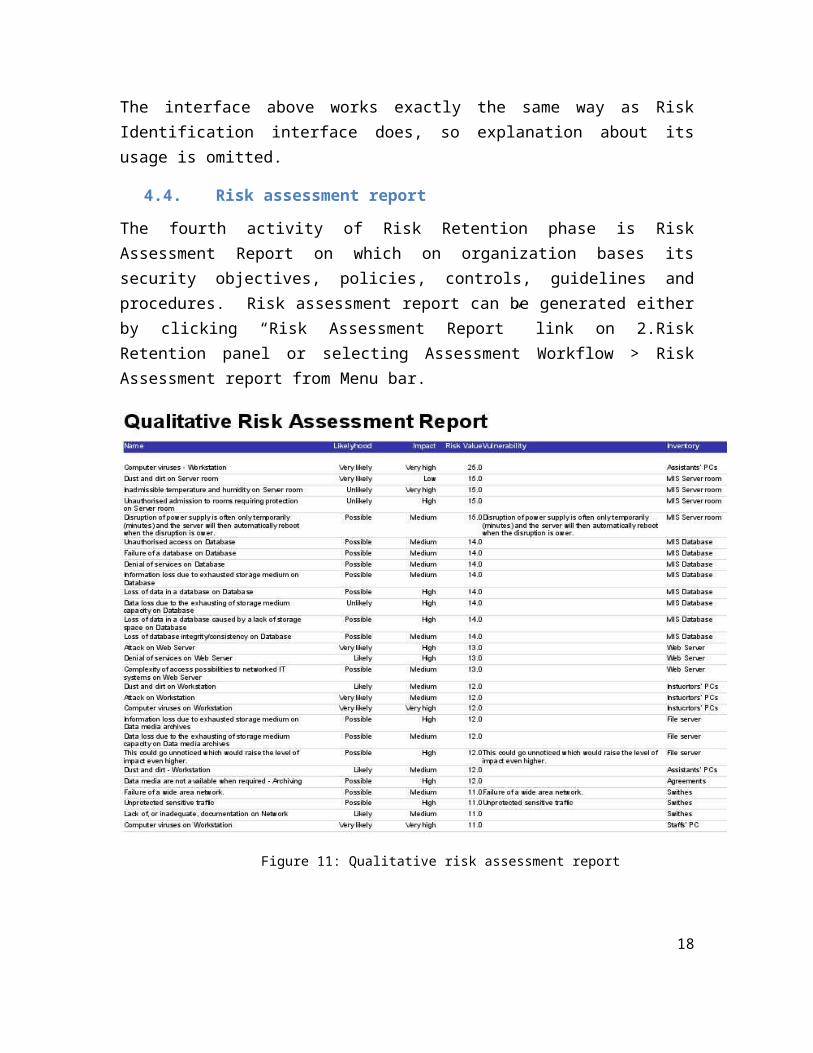
The fourth activity of Risk Retention phase is RiskAssessment Report on which on organization bases itssecurity objectives, policies, controls, guidelines andprocedures. Risk assessment report can be generated eitherby clicking “Risk Assessment Report” link on 2.RiskRetention panel or selecting Assessment Workflow > RiskAssessment report from Menu bar.
Figure 11: Qualitative risk assessment report
18
Risk value calculation of SOBF Tool is done when the riskvalue of inventory item exceeds its asset value. The reportshows that only four assets have high risk value greaterthan their asset value, which testifies to risk calculationof SOBF Tool.
4.5. Risk financing
Since SOMAP.org declares that Risk Financing step will beimplemented in later release of SOBF, it is not beneficialto explain this step. Here is declaration of SOMAP.org: “Thesecond last activity in the risk acceptance phase is to produce the final riskassessment report. The idea of this report is to have a paper containing all therelevant information concerning the inventory, the threat, the risk of anenvironment and which Controls either already are implemented or are plannedto be installed. The last activity in this phase will be the security officer showingthe risk assessment report to the upper management and have this paper signedby somebody of the upper management. Like that the security officer not onlyhas a mandate to do what is written in the risk assessment report but he alsohas proof of his findings and analysis.”
5. Risk treatment
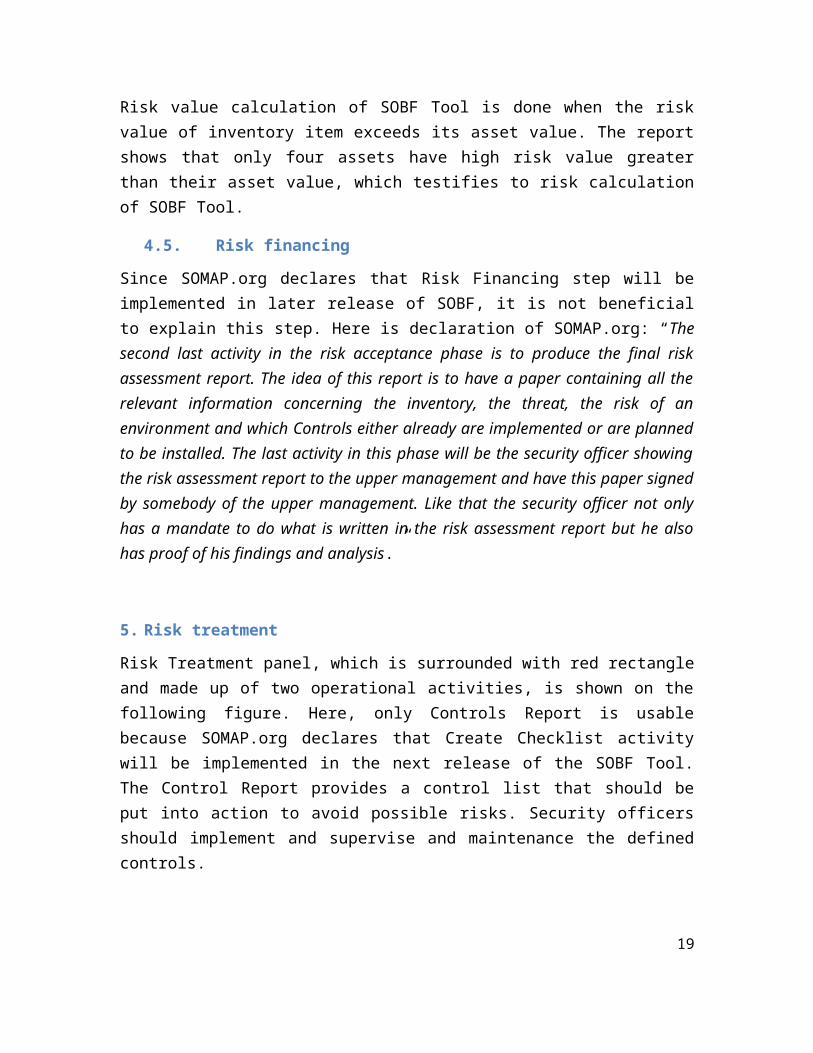
Risk Treatment panel, which is surrounded with red rectangleand made up of two operational activities, is shown on thefollowing figure. Here, only Controls Report is usablebecause SOMAP.org declares that Create Checklist activitywill be implemented in the next release of the SOBF Tool.The Control Report provides a control list that should beput into action to avoid possible risks. Security officersshould implement and supervise and maintenance the definedcontrols.
19
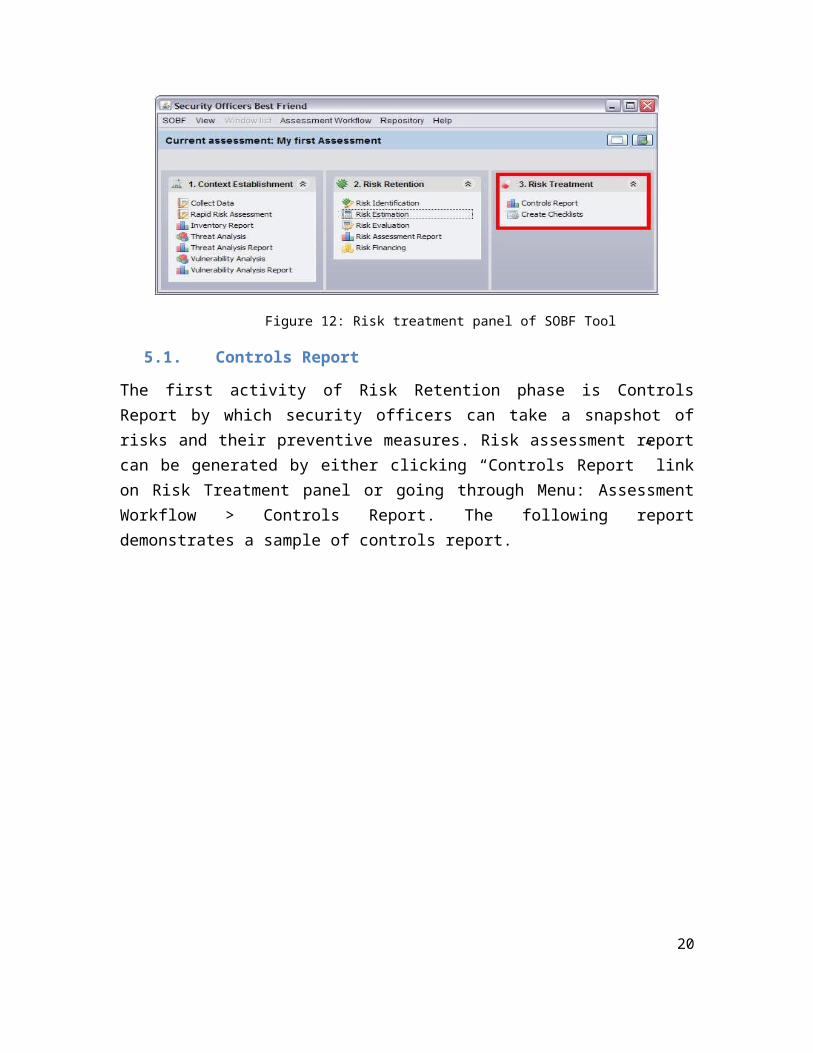
Figure 12: Risk treatment panel of SOBF Tool
5.1. Controls Report
The first activity of Risk Retention phase is ControlsReport by which security officers can take a snapshot ofrisks and their preventive measures. Risk assessment reportcan be generated by either clicking “Controls Report” linkon Risk Treatment panel or going through Menu: AssessmentWorkflow > Controls Report. The following reportdemonstrates a sample of controls report.
20
Figure 13: Controls report
6. Conclusion
A cost-free application of information security standards toan organization is possible through open-source softwarecalled Security Officer Best Friend Tool (SOBF Tool). TheSOBF Tool helps information security officers to identifypotential threats to available vulnerabilities, calculaterisks of the threats and take relevant precautions. As aresult, an information security officer can comply withinformation security standards, ISO 27001, at no cost to thecompany by tapping into SOBF Tool.
7. References1. Security Officers Best Friend (SOBF) Tool version 1.0b12. SOMAP.org, Security Officers Management & Analysis
Project, October 5, 2014, from, http://www.somap.org
21