Embed Size (px)
Citation preview

AccurioPro WideDirector 3.5
for Windows
Reference Guide

2 TRADEMARKS, COPYRIGHT AND EULA
AccurioPro Wide Director 3.5 Reference Guide
Konica Minolta and the Konica Minolta Logo are trademarks of Konica Minolta.
AccurioPro WideDirector is a trademark of Konica Minolta.
Those names and product names not mentioned here are trademarks or registered trademarks of their respective owners.
For more information about Konica Minolta, visit contact us at the following address:
Konica Minolta Business Solutions, U.S.A, Inc. 100 Williams Drive Ramsey, NJ 07446 (201) 825-4000
Date of Issue: September 2018
Copyright © 2018 Konica Minolta Business Solutions, U.S.A, Inc.
All software and hardware described in this document are subject to change without notice.

3
AccurioPro Wide Director 3.5 Reference Guide
End User License Agreement
1. IMPORTANT NOTICE This package includes one or more diskette(s), CD-ROM(s), and/or DVD(s) containing copies of AccurioPro WideDirector™ software programs and documentation relating thereto, and an associated dongle.
You should carefully read the following terms and conditions before accepting this License Agreement, and installing and using this Software (as defined below). This License Agreement ("Agreement") is a legal agreement between You and Konica Minolta Business Solutions, U.S.A, Inc. 100 Williams Drive Ramsey, NJ 07446 ("KONICA MINOLTA"), and describes the terms and conditions pursuant to which KONICA MINOLTA shall license to You this Software, provided however that in the event a hardcopy license agreement with respect to the Software is signed by or on behalf of both You and KONICA MINOLTA whose terms vary from this Agreement, then such signed hardcopy license agreement shall govern Your Use of the Software. In this License Agreement "You" means, and "Your" refers to, the corporation or other entity that obtains the Software and enters into this Agreement, including both the reader and any corporate licensee.
BY INSTALLING, COPYING OR OTHERWISE USING THE SOFTWARE, YOU ACCEPT, AND AGREE TO BE BOUND BY, THE TERMS AND CONDITIONS OF THIS LICENSE AGREEMENT. IF YOU DO NOT AGREE WITH THESE TERMS, DO NOT INSTALL, COPY OR OTHERWISE USE THE SOFTWARE, AND YOU MAY RETURN THE SOFTWARE, WITH PROOF OF PAYMENT, FOR A FULL REFUND TO THE PLACE OF PURCHASE WITHIN THIRTY (30) DAYS OF THE PURCHASE DATE.
You are licensed to use the Software on the following terms and conditions:
2. DEFINITIONS 2.1 "KONICA MINOLTA order form" means the electronic or hard copy order form by which you have ordered
the Software.
2.2 "Authorized Users" means the number of users who concurrently may have access to the Software at any one time, as specified in the KONICA MINOLTA order form that is incorporated and made part of this Agreement by reference.
2.3 "Confidential Information" means this Agreement, including all of its terms, and all its amendments and addenda, all Software listings, Documentation, information, data, tests, specifications, trade secrets, object code and machine-readable copies of the Software, and any other proprietary information supplied to You by KONICA MINOLTA, or by You to KONICA MINOLTA and clearly marked as "confidential information", including all items defined as "confidential information" in any other agreement between You and KONICA MINOLTA executed prior to the date of this Agreement.
2.4 "Designated Output Device" means an Output Device that has been designated by you to be managed by the Software.
2.5 "Documentation" means any instruction manuals, operating instructions, user manuals, online help, tutorials and specifications provided by KONICA MINOLTA which describe the use of the Software and which either accompany the Software or are provided to you at any time.
2.6 "Dongle" means a small hardware device that connects to a computer and acts as an authentication key for the licensed Software.
2.7 "Effective Date" means the date on which you have accepted to be bound by the terms of this Agreement by installing, copying or otherwise using the Software.
2.8 "Font Programs" means the digitally encoded, machine readable outline programs for certain typefaces.
2.9 "Modules" means the modules elected by you as being part of the Software, as listed in the KONICA MINOLTA order form that is incorporated and made part of this Agreement by reference.
2.10 "Output Device" means a device that is capable of outputting logical pages, such as, without limitation, a platesetter or imagesetter.
2.11 "Processor" means one (1) single processor core that forms part of a desktop computer or server, as the case may be, on which the Software is installed or executed. For those processors that have multiple execution cores, each such core shall be considered a distinct Processor.
2.12 "Software" means AccurioPro WideDirector™ computer software program, all or part of which are owned by KONICA MINOLTA or other parties whereby the license is owned by KONICA MINOLTA ("Other Owners"), consisting of any of the Modules elected by You, provided and licensed to You pursuant to this Agreement.
2.13 "Storage Device" means the diskette(s), CD-ROM(s), DVD(s) and/ or other device on which KONICA MINOLTA distributes copies of the Software.

AccurioPro Wide Director 3.5 Reference Guide
4
2.14 "System" means one or more Processors on which the Software is installed or run, and located at the System
Location. The number of Processors on which you are authorized to install or run the Software is set forth in the KONICA MINOLTA order form that is incorporated and made part of this Agreement by reference.
2.15 "System Location" means, with respect to the System and any part thereof, the address at which the System, and any part thereof, is physically located, as identified in the KONICA MINOLTA order form that is incorporated and made part of this Agreement by reference.
2.16 "Updates" shall mean updates, if any, to the Software as commercially released by KONICA MINOLTA at any given time, including, but not limited to, updates, small enhancements, additions, modifications, deletions, incorporation of patches, and/ or error corrections to any previously delivered version of the Software, as designated in KONICA MINOLTA's sole determination.
2.17 "Upgrades" shall mean a new and enhanced release of the Software as commercially released by KONICA MINOLTA at any given time and that, when made or added, materially changes its utility, efficiency, functional capability or application, as designated in KONICA MINOLTA's sole determination.
2.18 "Use" means loading, utilization, running, storage or display of the Software by Authorized Users on Your System in connection with a Designated Output Device only, and solely for your own internal business operations.
2.19 "Warranty Period" means the period ending ninety (90) days after the Effective Date during which the Software is covered by KONICA MINOLTA's warranty as set forth in this Agreement, provided however that in no event the Warranty Period shall exceed a period of one hundred and twenty (120) days after the date you have purchased the Software.
3. LICENSE AND COPIES 3.1 GRANT OF LICENSE. Subject to the terms and conditions of this Agreement, KONICA MINOLTA hereby grants
to you a perpetual, non-exclusive, non-sub licensable and non-transferable limited right and license to (a) Use the Software on the System, and (b) use the Documentation in connection with the Use of the Software. You acknowledge that the License Fee paid by you for the Use of Software is determined by the Designated Output Device. For each Output Device with which You Use the Software different from the Designated Output Device You will have to purchase a license upgrade for the Software or, with respect to additional Output Devices in connection with which You Use the Software, one or more additional licensed copies of the Software. In addition, specific terms and conditions shall apply to the use of Font Programs, as further set out in the about-box of the Software.
3.2 This license transfers to you neither title nor any proprietary or intellectual property rights to the Software, Documentation, or any copyrights, patents, or trademarks, embodied or used in connection therewith, except for the limited rights expressly granted herein. You acknowledge that the Software and any copies thereof are licensed and not sold, and all right, title and interest in and to the Software are and shall remain with KONICA MINOLTA and/ or the Other Owners.
3.3 COPIES. During the term of this Agreement, You will be entitled to make a reasonable number of machine- readable copies of the Software for backup or archival purposes only. You may not copy the Software, except as permitted by this Agreement. You shall maintain accurate and up-to-date records of the location of all copies of the Software and inform KONICA MINOLTA in writing of such location(s) upon KONICA MINOLTA's request. All copies of the Software will be subject to all terms and conditions of this Agreement. Whenever you are permitted to copy or reproduce all or any part of the Software, all titles, trademark symbols, copyright symbols and legends, and other proprietary markings must be reproduced.
4. LICENSE RESTRICTIONS You agree that you are granted a limited right to use only, and that you will not yourself, or through any parent, subsidiary, affiliate, agent or other third party:
(a) lease, license or sub-license the Software or the Documentation;
(b) sell or otherwise transfer the Software or Documentation, unless, subject to Article 9.4, You transfer your rights under this Agreement to a corporation or other entity and that at the time of transfer you pass the Software (and any and all copies in Your control) to such corporation or other entity and such corporation or other entity agrees to be bound by the terms and conditions of this Agreement;
(c) decompile, disassemble, or reverse engineer the Software, in whole or in part;
(d) modify the Software or any part thereof, except to the extent that the Software provides for user-modifiable components and such modification is necessary to Use the Software;
(e) write or develop any derivative software or any other software program based upon the Software or any part thereof, or any Confidential Information;

AccurioPro Wide Director 3.5 Reference Guide
5
(f) use the Software to provide software related services; or
(g) provide, disclose, divulge or make available to, or permit use of the Software by any unauthorized third party without KONICA MINOLTA's prior written consent.
(h) If the Software is used within a country of the European Community, nothing in this Agreement shall be construed as restricting or prejudicing any imperative rights available under the European Community Software Directive, O.J.Eur.Comm. (No.L.122/42, 1991).
5. LICENSE FEE 5.1 LICENSE FEE. You shall pay the license fees for the Software applicable at the time of purchase (the "License
Fee"). All fees hereunder exclude all applicable sales, use, value-added, property and other taxes, including duties and similar mandatory payments, and you will be responsible for payment of all such.
5.2 NO OFFSET. License Fees due from you under this Agreement may not be withheld or offset by you against other amounts due to you for any reason.
6. INSTALLATION - UPDATES - UPGRADES - MAINTENANCE AND
SUPPORT 6.1 You shall be responsible for the installation of the Software on the System, in accordance with the
Documentation.
6.2 As from the Effective Date, You may elect to purchase support and maintenance services in connection with the Software. In the event such maintenance and support agreement entitles you to Updates and Upgrades of the Software, if, and as from the date that, any such Update or Upgrade is installed on the System, it shall be an integral part of the Software. An Upgrade is covered by the warranty pursuant to paragraph 6.1 during a period of ninety (90) days as from the date of installation of the Upgrade, which in no event shall exceed a period of 120 days after the Upgrade has been shipped by KONICA MINOLTA.
6.3 Notwithstanding the foregoing, KONICA MINOLTA shall have no obligation to offer, or continue to offer, to You the opportunity to purchase such support and maintenance services with respect to a given release (Updates or Upgrades) of the Software for a period exceeding two (2) years from the date of such release.
7. LIMITED WARRANTY AND LIMITATION OF LIABILITY 7.1 LIMITED WARRANTY. KONICA MINOLTA warrants that during the Warranty Period (a) the Software will
perform in substantial accordance with the Documentation and (b) the Storage Device on which the Software is distributed will be free from defects in materials and workmanship under normal use. If during the Warranty Period the Software or the Storage Device on which it is distributed do not perform as warranted, KONICA MINOLTA at its sole and exclusive option shall use commercially reasonable efforts to correct such nonconformance of the Software or to provide a reasonable workaround, or replace the Storage Device free of charge, or, if neither of those remedies are commercially practicable, terminate this Agreement and repay to You the License Fee. The warranty set forth above is made to and for the benefit of you only. The warranty will apply only if: (a) the Software has been properly installed and used at all times and in accordance with the Documentation or other instructions for Use, and (b) no modification, alteration or addition has been made to the Software by persons other than KONICA MINOLTA or KONICA MINOLTA's authorized representative, except as authorized in writing by KONICA MINOLTA, and (c) the defect, error or problem does not result from any cause within the control of You. Any supplements or Updates to the Software, including without limitation, any service packs or hot fixes provided to you after the expiration of the Warranty Period are not covered by any warranty or condition, express, implied or statutory. KONICA MINOLTA warrants that it possesses all of the right, title, interest and authority to enter into this Agreement with You. KONICA MINOLTA also warrants that no lawsuit or claim concerning the Software is currently pending.
7.2 EXCEPT FOR THE ABOVE EXPRESS LIMITED WARRANTIES, KONICA MINOLTA MAKES NO WARRANTIES, WHETHER EXPRESS, IMPLIED, OR STATUTORY REGARDING OR RELATING TO THE SOFTWARE OR THE DOCUMENTATION, OR ANY MATERIALS OR SERVICES FURNISHED OR PROVIDED TO YOU UNDER THIS AGREEMENT. KONICA MINOLTA SPECIFICALLY DISCLAIMS ALL IMPLIED WARRANTIES OF MERCHANTABI- LITY AND FITNESS FOR A PARTICULAR PURPOSE WITH RESPECT TO THE SOFTWARE, DOCUMENTATION AND SAID OTHER MATERIALS AND SERVICES, AND WITH RESPECT TO THE USE OF ANY OF THE FOREGOING. WITHOUT LIMITING THE GENERALITY OF THE FOREGOING, KONICA MINOLTA DOES NOT WARRANT THAT OPERATION OF THE SOFTWARE WILL BE UNINTERRUPTED OR ERROR-FREE, OR THAT DATA WILL NOT BE LOST IF FOR ANY REASON OPERATIONS ARE INTERRUPTED.

AccurioPro Wide Director 3.5 Reference Guide
6
7.3 LIMITATION OF LIABILITY. TO THE MAXIMUM EXTENT PERMITTED BY LAW, IN NO EVENT WILL KONICA MINOLTA BE LIABLE FOR ANY COMMERCIAL LOSS, LOSS OF PROFITS, LOSS OF AN OPPORTUNITY, LOSS OF USE, BUSINESS INTERRUPTION, LOSS OF DATA, COST OF COVER OR INDIRECT, SPECIAL, INCIDENTAL OR CONSEQUENTIAL DAMAGES OF ANY KIND IN CONNECTION WITH OR ARISING OUT OF THE FURNISHING, PERFORMANCE OR USE OF THE SOFTWARE OR SERVICES PERFORMED HEREUNDER, WHETHER ALLEGED AS A BREACH OF CONTRACT OR TORTIOUS CONDUCT, INCLUDING NEGLIGENCE (BUT NOT GROSS NEGLIGENCE OR FRAUD), EVEN IF KONICA MINOLTA HAS BEEN ADVISED OF THE POSSIBILITY OF SUCH DAMAGES. IN ADDITION, KONICA MINOLTA WILL NOT BE LIABLE FOR ANY DAMAGES CAUSED BY DELAY IN DELIVERY OR FURNISHING THE SOFTWARE OR SAID SERVICES. KONICA MINOLTA'S LIABILITY UNDER THIS AGREEMENT FOR DIRECT, INDIRECT, SPECIAL, INCIDENTAL AND/OR CONSEQUENTIAL DAMAGES OF ANY KIND, INCLUDING, WITHOUT LIMITATION, RESTITUTION, WILL NOT, IN ANY EVENT, EXCEED THE LICENSE FEE PAID BY YOU TO KONICA MINOLTA UNDER THIS AGREEMENT.
7.4 ALLOCATION OF RISK. The provisions of this Section 6 allocate risks under this Agreement between You and KONICA MINOLTA. You acknowledge and recognize that KONICA MINOLTA's pricing reflects this allocation of risks and limitation of liability accordingly.
8. INDEMNIFICATION 8.1 INFRINGEMENT INDEMNITY. KONICA MINOLTA represents it has no reason to believe that the Software infringes
upon any copyright or any other intellectual property right of any third party. In the event of a claim that the Software infringes upon, or violates, a third party's copyright KONICA MINOLTA will indemnify and hold You harmless against any action brought against You based on a claim that the unmodified Software, when used in accordance with this Agreement, infringes a European copyright, patent or other proprietary rights, and KONICA MINOLTA shall pay all costs, settlements and damages finally awarded, except for consequential damages. However, KONICA MINOLTA will not be obligated to indemnify or hold You harmless from any such action unless You (i) notify KONICA MINOLTA in writing of any claim within 10 (ten) business days after You learn of such a claim, (ii) give KONICA MINOLTA sole control of the defense and settlement thereof, (iii) provide all reasonable assistance in connection with the defense and settlement thereof, and (iv) have not yet compromised or settled in any way any such losses, claims or damages for which indemnity is sought. If the Software is finally adjudged to so infringe, or in KONICA MINOLTA's opinion is likely to become the subject of such a claim, KONICA MINOLTA shall, at its sole option expense, either (1) apply its best efforts to procure for You the right to continue using the Software, or (2) apply its best efforts to modify or replace the Software to make it non-infringing, or, if neither (1) or (2) is commercially practicable (3) terminate this Agreement, and repay to You a portion of the License Fee equal to the amount paid by You less reasonable depreciation. KONICA MINOLTA shall have no liability regarding any infringement claim arising out of: (i) use of other than a current, unaltered release of the Software; (ii) Use of the Software in combination with non-KONICA MINOLTA software, data or equipment, if the infringement was caused by the Use of such combination; (iii) any modification or derivation of the Software not specifically authorized in writing by KONICA MINOLTA; or (iv) use of third party software.
8.2 EXCLUSIVE REMEDY. The foregoing states the entire liability of KONICA MINOLTA and the exclusive remedy for You with respect to infringement of any patent, copyright, trade secret or other proprietary right.
9. CONFIDENTIALITY 9.1 CONFIDENTIAL INFORMATION. Each party acknowledges that the Confidential Information constitutes valuable
trade secrets and each party agrees that it shall use Confidential Information solely in accordance with the provisions of this Agreement and will not disclose, or permit to be disclosed, the same, directly or indirectly, to any third party without the other party's prior written consent. Each party agrees to exercise due care in protecting the Confidential Information from unauthorized use and disclosure. However, neither party bears any responsibility for safeguarding information that (i) is publicly available, (ii) already in the other party's possession and not subject to a confidentiality obligation, (iii) obtained by the other party from third parties without restrictions on disclosure, (iv) independently developed by the other party without reference to Confidential Information, or (v) required to be disclosed by order of a court or other governmental entity.
9.2 INJUNCTIVE RELIEF. In the event of actual or threatened breach of the provisions of Section 8.1, the non- breaching party will have no adequate remedy at law and will be entitled to immediate and injunctive and other equitable relief, without bond and without the necessity of showing actual money damages.

AccurioPro Wide Director 3.5 Reference Guide
7
10. TERM AND TERMINATION 10.1 TERM. This Agreement will take effect on the Effective Date and will remain in force for as long as any
copyright in the Software exist, subject to termination in accordance with Article 9.2
10.2 TERMINATION. This Agreement may be terminated by KONICA MINOLTA upon written notice to You if (i) You fail to pay any undisputed amount due within thirty (30) days after You have been given written notice of such non-payment; (ii) You are in material breach of any non-monetary term, condition or provision of Agreement, which breach, if capable of being cured, is not cured within thirty (30) days after You have been given written notice of such breach; or (iii) KONICA MINOLTA elects to do so in accordance with Article 6.1 or 7.1. Except for a termination pursuant to Articles 6.1 or 7.1, no such termination will entitle you to a refund of any portion of the License Fee. You may terminate this Agreement at any time for any reason by submitting written notice to that effect to KONICA MINOLTA.
10.3 EFFECT OF TERMINATION. Upon expiration or termination of this Agreement, You shall promptly uninstall and return to KONICA MINOLTA the Software, any derivative works, all copies thereof, including computer memory or storage copies, the associated Dongle, all related Documentation and all copies thereof, and any other Confidential Information in Your possession. You shall furnish KONICA MINOLTA with a certificate signed by an executive officer verifying that the same has been done. Termination or Expiration will not affect the provisions regarding the treatment of Confidential Information, provisions relating to the payment of amounts due, or provisions limiting or disclaiming KONICA MINOLTA's liability, which provisions will survive termination of this Agreement.
10.4 NON-ASSIGNMENT. Neither this Agreement nor any rights under this Agreement may be assigned or otherwise transferred by You, in whole or in part, whether voluntary or by operation of law, including by way of sale of assets, merger or consolidation, without the prior written consent of KONICA MINOLTA, which consent will not be unreasonably withheld or delayed. Subject to the foregoing, this Agreement will be binding upon and will inure to the benefit of the parties and their respective successors and assigns.
11. MISCELLANEOUS 11.1 WAIVER. Any waiver of the provisions of this Agreement or of a party's rights or remedies under this Agreement must
be in writing to be effective. Failure, neglect, or delay by a party to enforce the provisions of this Agreement or its rights or remedies at any time, will not be construed and will not be deemed to be a waiver of such party's rights under this Agreement and will not in any way affect the validity of the whole or any part of this Agreement or prejudice such party's right to take subsequent action. Except as expressly stated in this Agreement, no exercise or enforcement by either party of any right or remedy under this Agreement will preclude the enforcement by such party of any other right or remedy under this Agreement or that such party is entitled by law to enforce.
11.2 SEVERABILITY. If any provision, or part of any provision, of this Agreement is invalidated by operation of law or otherwise, that provision or part will to that extent be deemed omitted and the remainder of this Agreement, or applicable attachment, will remain in full force and effect. In place of any such invalid provision or part thereof, the parties hereto undertake to agree on a similar but valid provision the effect of which is as close as possible to that of the invalid provision or part thereof. If the parties fail to agree on such an amendment, such invalid term, condition or provision will be severed from the remaining terms, conditions and provisions, which will continue to be valid and enforceable to the fullest extent permitted by law.
11.3 STANDARD TERMS. No terms, provisions or conditions of any purchase order, acknowledgement or other business form that you may use in connection with the licensing of the Software will have any effect on the rights, duties or obligations of the parties under, or otherwise modify, this Agreement, regardless of any failure of KONICA MINOLTA to object to such terms, provisions or conditions.
11.4 RIGHT TO AUDIT. KONICA MINOLTA shall have the right upon its expense to inspect compliance of you with this Agreement, upon a ten (10) working days prior written notice. Such audit shall not be more frequently than once per year, during normal business hours by an accounting firm designated by KONICA MINOLTA. In the event such audit should reveal a substantial non-compliance with this Agreement, You shall reimburse KONICA MINOLTA for the full out- of-pocket costs in respect of any professional charges incurred for such audit or inspection, in addition to any other right or remedy available to KONICA MINOLTA hereunder.
11.5 AMENDMENTS TO THIS AGREEMENT. This Agreement may not be amended, except by a writing signed by both parties.
11.6 HEADINGS: Headings to the sections of this Agreement are for convenience only and shall not affect the interpretation or construction of this Agreement. Use of the singular includes the plural and vice versa.
11.7 KONICA MINOLTA'S PRIOR CONSENT. Unless expressly provided otherwise in this Agreement, any prior consent of KONICA MINOLTA that is required before you may take an action may be granted or withheld in KONICA MINOLTA's sole and absolute discretion.
11.8 THIRD PARTY BENEFICIARY. If and insofar parts of the Software are supplied and licensed to KONICA MINOLTA by Other Owners, such Other Owners are third party beneficiaries of this Agreement and are with respect to such parts of the Software entitled to enforce directly against You the terms and conditions of this License Agreement.
11.9 APPLICABLE LAW. This Agreement is made in the United States of America and shall be governed by and construed in accordance with the laws of the United States of America, excluding its rules for choice of law.

AccurioPro Wide Director 3.5 Reference Guide
8
11.10 PUBLIC ANNOUNCEMENTS. You acknowledge that KONICA MINOLTA may desire to use your name in press releases, product brochures and financial reports indicating that you are a customer of KONICA MINOLTA, and you agree that KONICA MINOLTA may use your name in such a manner.
11.11 ENTIRE AGREEMENT. This Agreement (including any addenda hereto signed by both parties) contains the entire agreement of the parties with respect to the subject matter of this Agreement and supersedes all previous communications, representations, understandings and agreements, either oral or written, between the parties with respect to said subject matter.

AccurioPro Wide Director 3.5 Reference Guide
9

10
AccurioPro Wide Director 3.5 Reference Guide
Contents
About This Reference Guide .................................................. 15 Intended Audience ......................................................................... 16 Related Documentation...................................................................16 AccurioPro WideDirector Network and User Forum .........................16 Convention .................................................................................... 16 Keyboard and Mouse Conventions ..................................................17 Choosing Commands .....................................................................17
Chapter 1 Getting Started ........................................................... 19
Starting the Client ........................................................................... 20 Adding/Removing AccurioPro WideDirector Systems ....................21
The Management Windows..............................................................23 The Jobs Window .........................................................................23 The Hot Tickets Window ...............................................................23 The System Overview Window .................................................... 24
Work Area Commands and Indicators ..............................................25 Menus ........................................................................................ 25 Toolbar ...................................................................................... 33 Navigation Bar .............................................................................34 Message Indicator .......................................................................35 Tab Area .................................................................................... 35
Viewing Messages ..........................................................................36 Filtering Messages ..................................................................... 39 Critical Messages ........................................................................41
Customizing Your Work Area ...........................................................46
Chapter 2 Working with AccurioPro WideDirector...................... 47
Chapter 3 Layout Editor .............................................................. 49
Overview ....................................................................................... 50 Layout Editor Modes.....................................................................50 Open and Close the Layout Editor ................................................50
Image Panel .................................................................................. 53 Adding Images ........................................................................... 53 Organizing Images ......................................................................54 Managing/Editing Images ............................................................55 Inspecting Images .......................................................................56 Image Previews ...........................................................................57


AccurioPro Wide Director 3.5 Reference Guide
10
File Types ....................................................................................................................... 59 Layout Panel ........................................................................................................................ 60
Default Image Placement ........................................................................................ 61 Placing Images Interactively .................................................................................. 62 Working with Frames ................................................................................................ 67 Copy Count, Cropping, Scaling .............................................................................. 78 Duplicating Images .................................................................................................... 78 Step & Repeat .............................................................................................................. 79 Placing Images with Auto-Layout ......................................................................... 80 View Options Palette ................................................................................................. 82 Marks Palette ............................................................................................................... 84 Layout Toolbar .............................................................................................................. 86 Snag List ......................................................................................................................... 86 Inspectors ............................................................................................................................. 88
Job Set-Up Inspector ................................................................................................. 88 Image Inspector ........................................................................................................... 99 Colors Inspector .......................................................................................................... 100 Mark Sets Inspector (Sheet Layout mode only) ............................................... 102 Sheet Inspector ............................................................................................................ 103 Print Layout Inspector ............................................................................................... 104 Applying Changes and Submitting a Job .................................................................. 106
Applying Changes ....................................................................................................... 106 Submitting a Job ......................................................................................................... 106 DQS Indicator ............................................................................................................... 107 Sheet Layout Templates .................................................................................................. 108 Layout Hot Tickets ............................................................................................................. 115 QuickProof Images and Sheets .................................................................................... 118 Resources ............................................................................................................................. 120 Layout Editor Menus ......................................................................................................... 121
Main Menus .................................................................................................................. 121 Right Menus ............................................................................................................. 124
Chapter 4 Image Editor .............................................................. 127
Overview ...................................................................................... 128 Inspectors ................................................................................. 129 View Options Palette ..................................................................129 Toolbars ................................................................................... 131
Image Inspector ........................................................................... 132 Canvas Extensions and Grommets Inspector .................................136 Tiling Inspector ............................................................................. 140 Interactive Tiling ........................................................................... 146
Split Tool (Manual Tiling) ........................................................... 146 Selection Tool ............................................................................148 Omit Tiles ................................................................................. 149 Merge Tiles............................................................................... 149

9
11
Horizontal and Vertical Splitting ................................................. 150 Positioning Toolbar ................................................................... 152
Other Tiling Features .................................................................... 154 Tile Marks Dialog ...................................................................... 154 Tiling Preferences ..................................................................... 156
Presets ........................................................................................ 159 Tiles in the Layout Editor .............................................................. 163
Chapter 5 Managing Jobs ......................................................... 165
The Jobs Window ......................................................................... 166 The Output Device List ................................................................. 167 The Job List ................................................................................. 168
Job List Layout.......................................................................... 168 Organizing the Job List .............................................................. 169 Filtering the Job List .................................................................. 171 Job Notification Icons ................................................................ 175 Job Status Icons ....................................................................... 176 Job Icons .................................................................................. 178 Flow Icons ................................................................................ 180
Job and System Logging .............................................................. 186 Viewing the Results Tab ............................................................... 193
The Activity Pane ...................................................................... 193 The Job Layout Pane (Jobs Window) ......................................... 194
Working with Jobs in the Job List................................................... 202 Selecting Jobs .......................................................................... 202 Monitoring Jobs ........................................................................ 203 Holding/Resuming Jobs ............................................................ 204 Continuing Jobs ........................................................................ 205 Making Rush Jobs .................................................................... 208 Restarting Job Processing......................................................... 209 Duplicating Jobs ....................................................................... 209 Deleting Jobs ............................................................................ 210 Enabling/Disabling Input Channels ............................................ 212 Opening the Job and System Logs ............................................ 213 Archiving Jobs .......................................................................... 213 Dumping Jobs ........................................................................... 214 Merging Jobs ............................................................................ 215
Working with Jobs in the Results Tab ............................................ 217 Changing Viewing Options ........................................................ 217 Re-rendering Results ................................................................ 219 Re-imaging Results ................................................................... 220 Re-exporting Results................................................................. 221 Remaking Ink Drive Files .......................................................... 221 Re-printing Results ................................................................... 222 Viewing Job Results in the Results Tab ...................................... 222

AccurioPro Wide Director 3.5 Reference Guide
12
Rejecting Results .......................................................................223 Discarding Results .....................................................................225 Including Results .......................................................................226 Getting Information on PDF Data ................................................226
Chapter 6 Previewing Job Results ............................................ 233
Preview Window and Tools ............................................................234 Preview Window ........................................................................235 Navigator Palette .......................................................................235 Inks Palette............................................................................... 236 Light Table Slider .......................................................................237 Tools Palette ............................................................................ 238 Preview Menus ..........................................................................239
Opening/Closing Pages or Flats for Preview ...................................240 Browsing your Results ...................................................................242 Zooming Images .......................................................................... 244 Changing the Default View ............................................................246 Measuring Ink Coverage................................................................ 250 Measuring Screen Angles ..............................................................253 Measuring Line Frequency ............................................................ 255 Color-Managed Raster Preview .....................................................256 Saturation, Contrast and Channel Adjustments .............................. 257 Viewing/Editing Raster Preview Preferences ..................................260
Chapter 7 Task Processor Resources ...................................... 261
About Task Processor Resources ..................................................262 Alignment Pin Sets ....................................................................... 263 Apogee Preflight Action Lists .........................................................264 Binding Options ............................................................................ 267 Borders ........................................................................................ 271
Borders and Output Sizes ..........................................................276 Working with Borders and Border Marks .....................................277
Color Books ................................................................................. 279 Content Profiles ............................................................................ 286 Contrast Adjustments ....................................................................287 Curves Adjustments ..................................................................... 289 Device Link Profiles ...................................................................... 291 Finishing Hub ............................................................................... 292
Finishing Hub Overview .............................................................292 Fonts ........................................................................................... 297 Mark Engraver.............................................................................. 299
Mark Sets Overview ...................................................................299 Mark Types............................................................................... 304 Mark Attributes ..........................................................................305

9
13
Mark Position ............................................................................ 317 Mark Conflicts ........................................................................... 318 Mark Repeat ............................................................................. 319 Mark Special ............................................................................. 320 Mark Pens ................................................................................ 321 Mark Layers .............................................................................. 322 About Colors for Printing Marks ................................................. 323
Marks ........................................................................................... 325 Media Hub.................................................................................... 327
Media Hub Overview ................................................................. 328 Calibrated Printing Modes Details .............................................. 329 Media Details ............................................................................ 330 Other Media Hub Commands .................................................... 331
Output Sizes ................................................................................ 332 Print Modes .................................................................................. 337 Profiles ......................................................................................... 338 Quality ......................................................................................... 341 Sheet Layout Templates ............................................................... 342 Using Resource Auto-Select Maps .................................................343
Fallback .................................................................................... 345
Chapter 8 Monitoring and Configuring Your System ................ 347
System Overview Window ............................................................ 348 Hardware Pane ............................................................................ 349
Hardware System Scalability ..................................................... 349 Activity Monitoring ..................................................................... 350
Task Processor Pane ............................................................................ 351 Managing your Task Processors ............................................... 351 Monitoring your Task Processors............................................... 354 Grouping Task Processors for Load Balancing ........................... 360
Resources Pane ........................................................................... 361 Templates................................................................................. 361 Working with Template Categories ............................................ 362 Working with Ticket Templates .................................................. 363 Page Sizes ............................................................................... 365 Sheet Sizes .............................................................................. 366 Users ........................................................................................ 367 Configuring Your Task Processors ............................................ 371 Managing Parameter Sets ......................................................... 372 Managing Resources ................................................................ 375

AccurioPro Wide Director 3.5 Reference Guide
14
Chapter 9 Print Task Processors .............................................. 379
Generic SD (Sign and Display Printer) ........................................... 380 Generic SD Printer – Image Settings.......................................... 380
Generic SD Printer – Print Settings .............................................383
Appendix A Icons Overview ......................................................... 385
Appendix B Keyboard Shortcuts .................................................. 403
Layout Editor and Image Editor ..................................................404 Jobs Window .............................................................................407
Appendix C System Variables ..................................................... 411
Generic Variables ......................................................................... 412 Variable Syntax..........................................................................413 Date and Time Variable Formats ........................................................ 415
Mark Sets Variables ..................................................................... 418
Appendix D Right Menu Commands ........................................... 421
Job List Right Menu Commands ....................................................422 Job List Filter Right Menu Commands ............................................423 Layout Editor ................................................................................ 423 Image Editor - Presets ........................................................................... 424 Hot Ticket List Right Menu Commands ...........................................425 Job Layout Right Menu Commands ...................................................... 426
Flats ......................................................................................... 426 Pages ....................................................................................... 427
System Overview Right Menu Commands ..................................... 429 Task Processors ....................................................................... 429 AccurioPro WideDirector System ...............................................430
Activity Window Right Menu Commands ....................................... 430

15
About This Reference Guide This Reference Guide provides a description of the AccurioPro WideDirector user interface and general procedures to help you work efficiently.
Intended Audience .................................................................................................. 16 Related Documentation ............................................................................................ 16 AccurioPro WideDirectorNetwork and User Forum ............................................ 16 Convention ......................................................................................................................... 16 Keyboard and Mouse Conventions .................................................................... 17 Choosing Commands ............................................................................................ 17
NOTE: Visit the Tutorial page on the AccurioPro WideDirector Network for detailed procedures on working with AccurioPro WideDirector.

AccurioPro Wide Director 3.5 Reference Guide
16 INTENDED AUDIENCE
Intended Audience This document is designed for operators and administrators who will use the AccurioPro WideDirector Client to create and manage jobs, and configure and monitor the AccurioPro WideDirector System.
The AccurioPro WideDirector Client software should already been installed, licensed and configured as described in the AccurioPro WideDirector installation documentation.
Related Documentation The following documents can be referred to for further information:
AccurioPro WideDirector Tutorial: On the Help menu, choose AccurioPro
WideDirector Online > AccurioPro WideDirector Tutorial to open the Tutorial page on the AccurioPro WideDirector Network. This page provides detailed procedures for working with AccurioPro WideDirector.
AccurioPro WideDirector Quick Installation Guide: This document is provided
with your installation and also available on the Tutorial page on the AccurioPro WideDirector Network.
AccurioPro WideDirector Installation Guide: This document is provided
with your installation.
AccurioPro WideDirector Network and User Forum Please visit the AccurioPro WideDirector Network website or the community website for additional information.
Convention AccurioPro WideDirector can process documents as well as images. Where this documentation refers to images, this should be understood as meaning images or documents. See “File Types” on page 59 for more information.


AccurioPro Wide Director 3.5 Reference Guide
18 KEYBOARD AND MOUSE CONVENTIONS
Keyboard and Mouse Conventions All key names are shown in capital letters. For example, the Control key is shown as CTRL. Keys are frequently used in combinations or sequences as shortcut keys. For example, SHIFT+F3 means that you have to hold down the SHIFT key while pressing F3. The following mouse conventions are used: To... Do this...
Click Point to an item, and then quickly press and release the mouse button without moving the mouse.
Double-click Point to an item, and then quickly press and release the mouse button twice.
Right-click on Windows Click the right mouse button. Drag Point to an item. Press and hold down the mouse button as you
move the mouse to a new location, and then release the mouse button.
Choosing Commands Many of the AccurioPro WideDirector Client commands can be selected in several different ways, as described below. You should choose the method(s) which best suit your way of working. Throughout this Reference Guide, wherever possible we simply indicate which Menu item and/or Toolbar button you require.
Selecting a Menu item using the mouse
The AccurioPro WideDirector Menu bar is available in each of the Client windows, and is organized according to the commands you will need. In Windows, the menus or sub-menus change in accordance with the currently selected AccurioPro WideDirector window. Menu items are disabled when they are not applicable, and the menu item texts reflect the currently selected item.
Right-clicking an item
A right menu is often a subset of the global AccurioPro WideDirector menu items. It contains only those items that are applicable to the selection. The way you activate a right menu varies according to the platform you are working on (see “Keyboard and Mouse Conventions” on page 17). For a complete summary of all available right menus, refer to “Right Menu Commands” on page 421.
Clicking a Toolbar button
The AccurioPro WideDirector Toolbar also offers a subset of the Menu bar
17

15
commands. The Toolbar is defined per window to offer the most frequently used commands. It may also include disabled tools.
Entering a Shortcut key combination
Some commands can be selected by entering only a shortcut key combination. Where available, these items are displayed next to the commands in the menus.

20 KEYBOARD AND MOUSE CONVENTIONS
AccurioPro Wide Director 3.5 Reference Guide
1
Getting Started
This section guides you through the main work areas of AccurioPro WideDirector. It provides general information on the user interface and main windows.
Starting the Client .................................................................. 20 Adding/Removing AccurioPro WideDirector Systems ......... 21
The Management Windows .................................................... 23 Work Area Commands and Indicators ..................................... 25
Menus ................................................................................25 Toolbar...............................................................................33 Navigation Bar ....................................................................34 Message Indicator ..............................................................35 Tab Area ............................................................................35
Viewing Messages ..................................................................36 Filtering Messages .............................................................39 Critical Messages ...............................................................41
Customizing Your Work Area ................................................. 46


AccurioPro Wide Director 3.5 Reference Guide
20 STARTING THE CLIENT
Starting the Client
TIP: PC users can add the Client icon to the Windows taskbar to start the AccurioPro WideDirector Client even quicker.
To start the Client, you need to open a session with the AccurioPro WideDirector System. A session is a continuous series of user interactions between the Client application and the AccurioPro WideDirector System. You need to log in to a secured session before running certain portions of the application. Each successive interaction in the session is tracked and recorded by AccurioPro WideDirector.
To open a new AccurioPro WideDirector session
1 Do one of the following:
PC users: Choose Start > Programs > AccurioPro WideDirector > AccurioPro WideDirector Client.
Double-click the AccurioPro WideDirector Client icon on your desktop.
The AccurioPro WideDirector Logon dialog box appears.
2 Type your user name/password in the appropriate text boxes.
The user name must be a valid Windows account on the AccurioPro WideDirector server on your network. Add a domain prefix (e.g. domain\username) if the server name is different. User names cannot be configured in the AccurioPro WideDirector Client.
3 Select your AccurioPro WideDirector System from the list.
If you do not know to which system you should connect, ask your AccurioPro WideDirector administrator.
4 Select the ‘Connect to selected system at startup’ check box.
The next time you start the AccurioPro WideDirector Client, the Logon dialog box will be bypassed. You can reset this option in your Preferences. For more information, see “Logging On” on page 43.

1 GETTING STARTED 21
AccurioPro Wide Director 3.5 Reference Guide
NOTE: If you have a DNS server, you can connect using the server host name. This is recommended for complex networks such as multiple networks, VPN, etc. Click the cogwheel and select the option.
5 Click Log On.
The AccurioPro WideDirector Client is started, and a connection is made to the selected AccurioPro WideDirector System. The Jobs Window is then displayed.
To view network information
You can view network information to troubleshoot network issues when logging on.
1 Start the client and click the cogwheel in the Logon dialog.
2 Choose View Network Information.
The Network Information dialog is displayed.
3 Enter the server credentials and a client-server connection test is performed.
The information for the selected AccurioPro WideDirector System is displayed with warnings and errors if the connection fails.
4 Click OK to close the Network Information dialog.
Adding/Removing AccurioPro WideDirector Systems
Additional AccurioPro WideDirector Systems may be available on your network but may not be visible. This happens when the AccurioPro WideDirector Client and Server applications are not installed on the same network segment, but are connected via a router. In order to access these AccurioPro WideDirector Systems, you first need to manually add them to the list of systems displayed in the Logon dialog box. To do this, you must know the IP address of the AccurioPro WideDirector System you want to add.
To manually add an AccurioPro WideDirector System
1 Start the Client.

22 STARTING THE CLIENT
AccurioPro Wide Director 3.5 Reference Guide
NOTE: If the Client is already open, choose File > Log Off to access the Logon dialog box. You will have to close your current System connection.
2 From the AccurioPro WideDirector Logon dialog box, click the cogwheel button and choose Add System.
The Add System dialog box is displayed.
3 Enter the AccurioPro WideDirector System IP address or host name, and click Find.
The Client starts to search for the specified system on your network. When it is found, the system name is displayed in the dialog box.
4 Click Add to add this system to the list,
To remove an AccurioPro WideDirector System
1 Start the AccurioPro WideDirector Client.
NOTE: If the Client is already open, choose File > Log Off... to access the Log on dialog box. You will have to close your current System connection.
2 Select the AccurioPro WideDirector System you want to delete from the list, click the cogwheel button and choose Delete System.
NOTE: You can only remove Systems that were added manually, as described above.
3 Click OK to confirm this operation.
The selected system is removed from the list.

1 GETTING STARTED 23
AccurioPro Wide Director 3.5 Reference Guide
The Management Windows The AccurioPro WideDirector Client includes three management windows:
The Jobs Window, for viewing and managing jobs.
The Hot Tickets Window, for viewing and managing Hot Tickets.
The System Overview Window, for viewing and configuring the system
components (Task Processors and Resources), managing the AccurioPro WideDirector System, and managing individual Task Processor activities.
You can switch between these three windows using the Navigation Bar, which is located at the bottom of each window.
The Jobs Window The Jobs Window gives you a complete high-level overview of your workflow. In a single window, you can see the complete list and status of jobs in the system and the output devices that are available.
You can track the progress and activity of jobs, and view information about specific processing parameters. Powerful viewing features let you preview rasterized jobs. This allows you to check trapped, imposed, and screened bitmaps before imaging a proof, film, or plate. A Message Board keeps all users up to date about jobs that require attention.
You can also interact with the displayed information. By right-clicking jobs you can set priority handling for rush jobs, hold and resume jobs, approve or reject jobs, resubmit jobs, process quick remakes, or open the Ticket Editor.
The Hot Tickets Window
This is where you monitor, view, and manage the Hot Tickets that are created by the AccurioPro WideDirector System. Unlike Job Tickets, which appear in the Jobs Window together with the jobs they are used to create, Hot Tickets appear only in the Hot Tickets window.
Hot Tickets comprise only 3 tabs: Administration, Options, and Plan. There are no Pages or Results tabs.
There is no Pages tab because Hot Tickets do not require Run Lists to specify
which pages make up the job: The Run List is generated automatically, based on the number of pages in the input document.
There is no Results tab because Hot Tickets are never associated with the
results of a single job: Hot Tickets are used to generate multiple jobs.

AccurioPro Wide Director 3.5 Reference Guide
24 THE MANAGEMENT WINDOWS
Jobs created by Hot Tickets appear in the Jobs List, together with the jobs created by Job Tickets.
The System Overview Window
The System Overview provides centralized system management, allowing you to monitor key components and tasks.
Exactly what you will see in the System Overview window depends on your Access Level, as specified in your Preferences. However, all users can view and configure workflow and process settings, including input channels, normalizing, pre-flighting, screening, trapping, rendering, and output options.
If you have the necessary Access Level, you can also view and configure the following system elements for optimal performance:
Global system settings, such as archiving, logging and administration.
Any available processing resources, including fonts, screens, calibration
curves, imposition profiles, ICC profiles, and more.

AccurioPro Wide Director 3.5 Reference Guide
1 GETTING STARTED 25
Work Area Commands and Indicators The Client contains a number of global tools and indicators that are accessible in some or all of the main and editing windows.
Menus
Toolbar
Navigation Bar
Message Indicator
Tab Area
Preferences
Menus The AccurioPro WideDirector Menu-bar is available in each of the main Client windows. It includes the following menus:
File Menu
Edit Menu
Control Menu (Not available in System Overview)
Processor Menu (Available in System Overview only)
View Menu (Not available in System Overview)
View Menu for Raster Preview
Window Menu
Help Menu
NOTE: See “Layout Editor Menus” on page 121 for information on the Layout Editor menus.
Not all items included in these menus are available in every window. The active menu or sub-menu items vary according to the window you are working in. This is especially the case for the Apogee Impose module; see “Menus” on page 389.

AccurioPro Wide Director 3.5 Reference Guide
26 WORK AREA COMMANDS AND INDICATORS
TIP: Some of the menu options can be accessed more quickly by right-clicking on jobs in the Job List, and selecting an item from the right menu.
File Menu This menu provides commands that apply to sessions (logging in and out), and documents (job tickets and archives).
File Menu Item Description
New Layout Job/Hot Ticket
Opens the Layout Editor.
Create StoreFront Hot Ticket
To create a hot ticket for integration with the web-to-print application.
Save As Template Allows you to save the ticket as a Ticket Template. Close Closes the current window. Upload Document Allows you to add a file or a folder containing files to a job, Hot
Ticket or Public Page Store. When you upload a folder, AccurioPro WideDirector uploads all files and folders in that folder recursively. The uploaded folder appears as a subfolder in the Page Store.
Archive Job Allows you to choose a location and file name in order to archive the selected job.
Import Job Archive Allows you to select and restore a previously saved job archive (*.arch).
Export • <Selected item> From - Exports the item from a selected point in the flow (Latest, Run List, Normalize, etc.). Document - Saves a PDF document outside AccurioPro WideDirector, where the document can be edited, and then dragged back into AccurioPro WideDirector (Page Store PDF files only).
• Job Dump - Similar to Archive Job, but only accessible by administrators for troubleshooting purposes (only for jobs, not for Hot Tickets).
• Export Job Log - Exports the log file for the selected job. •
Log on / Log off Allows you to log on to an AccurioPro WideDirector System, or to log off from one. When logging on, the Connect to System dialog box is displayed. If you are already logged on to an AccurioPro WideDirector System, you are asked to confirm before proceeding. Note that Log on always ignores your “automatically log on” preference.
Quit / Exit Closes the AccurioPro WideDirector Client (Windows only).

AccurioPro Wide Director 3.5 Reference Guide
1 GETTING STARTED 27
Edit Menu This menu allows you to find, select, and edit job items. In Windows, you can also access the Preferences from here.
Edit Menu Item Description
Undo / Can’t Undo Undoes the last Cut, Copy, or Paste operation (only enabled when editing).
Cut Deletes the selected text, and copies it onto the clipboard. Copy Copies the selected text onto the clipboard. Paste Pastes the contents of the clipboard at the selected location. Clear Clears the current text selection (Macintosh only). Delete <selected item> Deletes the current selection. View Item From Displays the selected item using the default viewer. You cannot edit
the item. Edit <selected item> Displays the selected item using the default editor, where you can
modify the item. Duplicate Job Duplicates the selected job. Merge Jobs Merges the selected jobs. Rename Renames the selected item. Select • All - Selects all items in the current view.
• Even Positions - Selects all even placeholders/pages (Page Store Only).
• Odd Positions - Selects all odd placeholders/pages (Page Store Only).
• Empty Positions - Selects all empty placeholders (Page Store Only).
• Different from Expected - Selects all pages in the Run list which have a different size from the expected page size specified in the job.
• Fronts - Selects all front sides when the view is set to “Fronts and Backs” (Results tab only).
• Backs - Selects all back sides when the view is set to “Fronts and Backs” (Results tab only).
• Flat - Selects flat (both front and back sides). • Signature - Selects all sides in the signature when the view is set
to “Fronts and Backs” (Results tab only). Preferences Opens the Preferences (Windows only).
Control Menu This menu allows you to control the processing of jobs, results and Task Processors. These items are active only after you have selected a job in the Job List. This menu is not available for the System Overview.
AccurioPro Wide Director 3.5 Reference Guide
28 WORK AREA COMMANDS AND INDICATORS
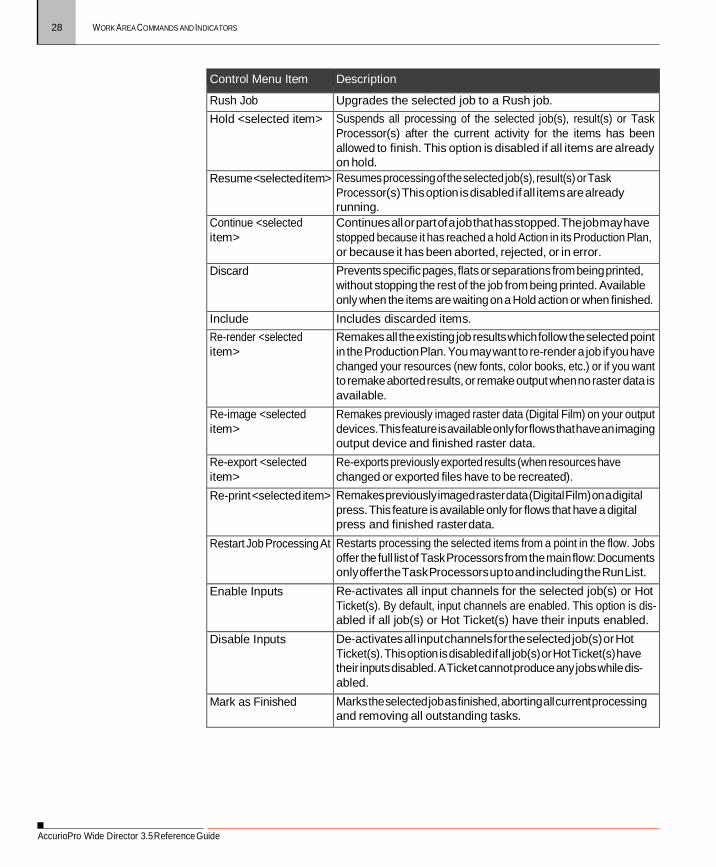
Control Menu Item Description
Rush Job Upgrades the selected job to a Rush job. Hold <selected item> Suspends all processing of the selected job(s), result(s) or Task
Processor(s) after the current activity for the items has been allowed to finish. This option is disabled if all items are already on hold.
Resume <selected item> Resumes processing of the selected job(s), result(s) or Task Processor(s) This option is disabled if all items are already running.
Continue <selected item>
Continues all or part of a job that has stopped. The job may have stopped because it has reached a hold Action in its Production Plan, or because it has been aborted, rejected, or in error.
Discard Prevents specific pages, flats or separations from being printed, without stopping the rest of the job from being printed. Available only when the items are waiting on a Hold action or when finished.
Include Includes discarded items. Re-render <selected item>
Remakes all the existing job results which follow the selected point in the Production Plan. You may want to re-render a job if you have changed your resources (new fonts, color books, etc.) or if you want to remake aborted results, or remake output when no raster data is available.
Re-image <selected item>
Remakes previously imaged raster data (Digital Film) on your output devices. This feature is available only for flows that have an imaging output device and finished raster data.
Re-export <selected item>
Re-exports previously exported results (when resources have changed or exported files have to be recreated).
Re-print <selected item> Remakes previously imaged raster data (Digital Film) on a digital press. This feature is available only for flows that have a digital press and finished raster data.
Restart Job Processing At Restarts processing the selected items from a point in the flow. Jobs offer the full list of Task Processors from the main flow: Documents only offer the Task Processors up to and including the Run List.
Enable Inputs Re-activates all input channels for the selected job(s) or Hot Ticket(s). By default, input channels are enabled. This option is dis- abled if all job(s) or Hot Ticket(s) have their inputs enabled.
Disable Inputs De-activates all input channels for the selected job(s) or Hot Ticket(s). This option is disabled if all job(s) or Hot Ticket(s) have their inputs disabled. A Ticket cannot produce any jobs while dis- abled.
Mark as Finished Marks the selected job as finished, aborting all current processing and removing all outstanding tasks.

AccurioPro Wide Director 3.5 Reference Guide
1 GETTING STARTED 29
Processor Menu This menu allows you to control the operation of Task Processors (System Overview only).
Processor Menu Item
Description
Start Starts the selected Task Processor(s). This option is disabled if all Task Processor(s) are active.
Stop Stops the selected Task Processor(s). This option is disabled if all Task Processor(s) are stopped.
Restart Restarts the selected Task Processor(s). Put Offline Disables the scheduling of tasks for the selected Output Task Processor.
This option is disabled if all Output Task Processors are offline.
Put Online Enables the scheduling of tasks for the selected Output Task Processor. This option is disabled if all Output Task Processors are online.
Exposure Test Submits an Exposure Test job for the selected plate setter. This command is available only for plate setters (e.g. Galileo, Palladio)
Configure Allows you to access the Configuration settings of the selected out- put device. Administrator access level required,
Resources Allows you to quickly access the resources of the selected Task Processor.
Flush Starts printing the collected output for ganging (proofer), or flushes the drum (imagesetter) and cuts the media.
View Menu This menu allows you to control what information is displayed and how it is displayed. This affects the look of the current window, but does not open or close windows. View Menu items are only active after you have selected the Results tab in the Jobs Window, or in the Ticket Editor.
View Menu Item Description
Flats Only Displays only the flat outlines in the Job Layout Pane. In this mode, you cannot select individual pages.
Thumbnails Displays thumbnail images of all pages in the Job Layout pane. Page Labels Displays/Hides the Page Label column in the Run List. Run List Indexes Displays/Hides the Run List indexes in the Run List. Extended Page Adjustments
Extends the Adj. column in the Run List to display extra icons (up to 4 icons) which indicate specific page adjustments in the job.
Extras Displays checked items from the Show menu. Highlight Unplaced Pages
Highlights against a green background the pages in the Page Store that have not been placed in the Run List.

AccurioPro Wide Director 3.5 Reference Guide
30 WORK AREA COMMANDS AND INDICATORS
View Menu Item Description
Show • Page number - Shows the position of the page in the Run List (Results tab only).
• Hold States - Shows pages and flats in blue when on hold (Results tab only).
Scale • Small - Displays small thumbnails (Results tab only). • Normal - Displays normal thumbnails (Results tab only). • Large - Displays large thumbnails (Results tab only). • Fit to Window - Scales the results in the Job Layout pane so that
they fit horizontally within the width of the pane - otherwise a fixed scaling is used (Results tab only).
In the Run List on the Pages tab, these commands scale the page labels for versioning jobs.
Columns • Front and Back - Displays two columns of pages/flats, and “front”, “back” and “signature” labels in the Job Layout pane.
• Fill Width - Displays as many columns of pages/flats as will fit in the width of the Job Layout pane.
• 1-10 - Displays the pages/flats over the specified number of columns in the Job Layout pane.
Flow • Results tab only. Selects the results from the selected flow for viewing.
Panes • Devices: Opens or closes the Device pane (Hot Ticket and Job Lists only).
• Job List: Opens or closes the Job List. • Flow Activity: Opens or closes the Activity pane (Job list/ Results
tab only). • Systems: Shows/hides the Hardware pane (System Overview
only). • Production Sets • Separations • Resources: Shows/hides the Resources pane (System Overview
only).
View Menu for Raster Preview The Raster Preview View menu groups all commands that relate to the Preview window. Most of these commands are also available as tools and/or keyboard shortcuts.

AccurioPro Wide Director 3.5 Reference Guide
1 GETTING STARTED 31
Preview Menu Item Description
Zoom In Zooms in on the image in the Preview window. Each time you click the Zoom In tool, the zoom factor is doubled, until you reach the maximum zoom-in level (32:1).
Zoom Out Zooms out on the image in the Preview window. Each time you click the Zoom Out tool, the zoom factor is halved, until you reach the maximum zoom-out level (1:128).
Size To Fit Selects a zoom level that fits the entire image in the Preview win- dow.
Actual Pixels Sets the zoom level to 1(each raster pixel is represented by a single display pixel).
Next Side Displays the next side in the job. Previous Side Displays the previous side in the job. First Side Displays the first side in the job. Last Side Displays the last side in the job. Turn Sheet Raster Preview always groups results which have 2 sides (front and
back). When viewing results, use this option to toggle the view (front or back).
Color Managed Displays the raster data using color management to convert the press color space to the monitor color space, based on ICC profiles.
Light Table Displays blended front/back viewing, allowing you to check the registration of the front and backs, or view whether you have problematic ink coverage.
Rule-Ups Displays the rule-ups you specified in the Rule-Ups floating palette. This allows you to display additional layers of information on top of the Raster Preview image. These include: Art Box, Trim Box, Crop Box, Bleed Box, Media Box.
Boxes Allows you to directly toggle on or off any of the following indicators which may be displayed over the raster data: • Art Box: • Trim Box: • Crop Box: • Bleed Box: • Media Box: • Expected Page Size: • Press Sheet Size:
Press Sheet Displays raster data as if it were a press sheet. Device Output Displays raster data as it would appear output from an imaging
device.

AccurioPro Wide Director 3.5 Reference Guide
32 WORK AREA COMMANDS AND INDICATORS
Preview Menu Item Description
Transform • Rotate 90 CW: Rotates the current view 90 degrees clockwise. • Rotate 90 CCW: Rotates the current view 90 degrees counter-
clockwise. • Flip Horizontal: Flips the current view horizontally. • Flip Vertical: Flips the current view vertically. • Invert: Inverts the current view (negative).
Rulers Toggles on or off the Ruler in the Preview window. Grid Toggles on or off the Grid in the Preview window.
Control Menu for Raster Preview
Preview Menu Item Description
QuickProof Opens the Quick Proof dialog box (only available for 1-bit screened data for CTP/CTF devices).
Window Menu This menu allows you to open, rearrange, and switch between the AccurioPro WideDirector windows. You can also hide or show any subsidiary windows, and bring any currently displayed window to the front. This menu also lists the titles of all open windows (in order of creation). The currently active window title has a checkmark.
Window Menu Item Description
New Window Opens a new Jobs or Raster Preview window. System Overview Opens or switches to the System Overview window. Jobs Opens or switches to the last Jobs window. Message Board Opens or switches to the Message Board. Activity for Task Processor Opens an Activity window for the selected Task Processor(s). You
can open multiple Activity windows. Log for <selected item> Opens a Log window for the selected item(s). You can open
multiple Log windows. Problem Report for <selected item>
Opens a Problem Report window for the selected item(s). You can open multiple Problem Report windows (PDF documents only).
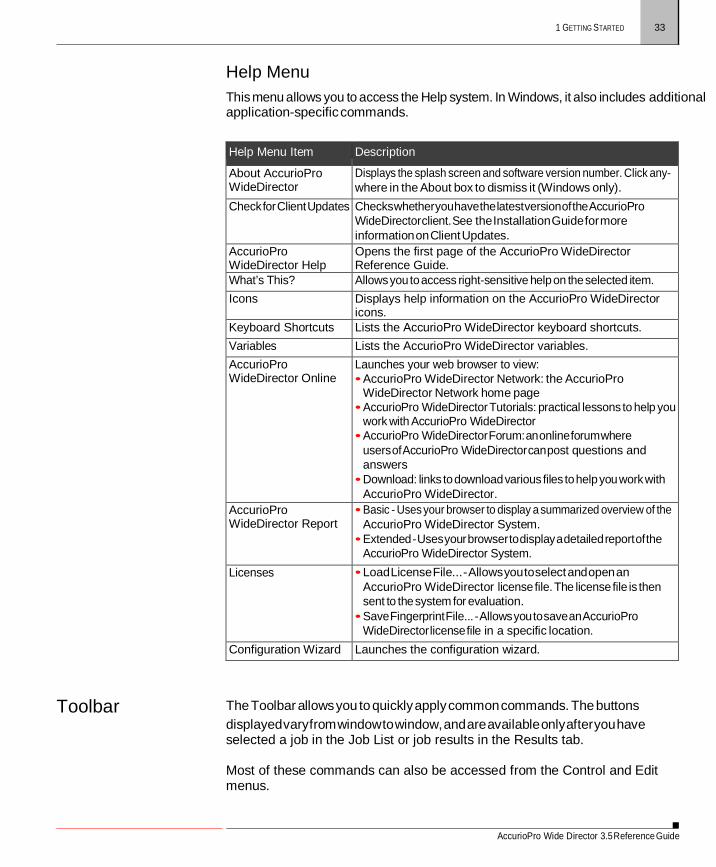
AccurioPro Wide Director 3.5 Reference Guide
1 GETTING STARTED 33
Help Menu This menu allows you to access the Help system. In Windows, it also includes additional application-specific commands.
Help Menu Item Description
About AccurioPro WideDirector
Displays the splash screen and software version number. Click any- where in the About box to dismiss it (Windows only).
Check for Client Updates Checks whether you have the latest version of the AccurioPro WideDirector client. See the Installation Guide for more information on Client Updates.
AccurioPro WideDirector Help
Opens the first page of the AccurioPro WideDirector Reference Guide.
What’s This? Allows you to access right-sensitive help on the selected item. Icons Displays help information on the AccurioPro WideDirector
icons. Keyboard Shortcuts Lists the AccurioPro WideDirector keyboard shortcuts. Variables Lists the AccurioPro WideDirector variables. AccurioPro WideDirector Online
Launches your web browser to view: • AccurioPro WideDirector Network: the AccurioPro
WideDirector Network home page • AccurioPro WideDirector Tutorials: practical lessons to help you
work with AccurioPro WideDirector • AccurioPro WideDirector Forum: an online forum where
users of AccurioPro WideDirector can post questions and answers
• Download: links to download various files to help you work with AccurioPro WideDirector.
AccurioPro WideDirector Report
• Basic - Uses your browser to display a summarized overview of the AccurioPro WideDirector System.
• Extended - Uses your browser to display a detailed report of the AccurioPro WideDirector System.
Licenses • Load License File... - Allows you to select and open an AccurioPro WideDirector license file. The license file is then sent to the system for evaluation.
• Save Fingerprint File... - Allows you to save an AccurioPro WideDirector license file in a specific location.
Configuration Wizard Launches the configuration wizard.
Toolbar The Toolbar allows you to quickly apply common commands. The buttons displayed vary from window to window, and are available only after you have selected a job in the Job List or job results in the Results tab.
Most of these commands can also be accessed from the Control and Edit menus.

AccurioPro Wide Director 3.5 Reference Guide
34 WORK AREA COMMANDS AND INDICATORS
Submit job or submit changes to a job.
Delete the selected item.
Edit Ticket.
View <selected item> (Job Ticket Editor only).
Make Blank (page in Run List - Job Ticket Editor only).
Hold job, or put device offline (System Overview).
Resume a job on hold, or put device online (System Overview).
Continue processing <selected item>.
Reprocess job from first.
Re-image <selected item>.
Enables the selected Hot Ticket (Hot Tickets window only).
Disables the selected Hot Ticket (Hot Tickets window only).
Display information about <selected item>.
Navigation Bar You can switch between the three management windows by clicking in the Navigation bar, which is located at the bottom of each window.
On the right-hand side of the Navigation bar, you will see the Activity Indicator. This indicator is visually active whenever the Client is busy retrieving data from the Server.

AccurioPro Wide Director 3.5 Reference Guide
1 GETTING STARTED 35
Message Indicator The Message Indicator flashes when one or more of the jobs or devices needs attention. You can click the Message Indicator to open the Message Board and find out what has caused the alarm. The Message Indicator will continue to flash until you acknowledge the event that caused the alarm.
If all the messages in the Message Board have been acknowledged, the Message Indicator stops flashing, but maintains a steady red glow. This is turned off when there are no messages to report.
Even when the Message Indicator is not flashing, you can click it to quickly access the Message Board.
If the AccurioPro WideDirector Client is minimized or hidden, your Operating System’s alert mechanism will notify you of any messages. This varies according to the platform you are using:
Windows: Flashing button in the Taskbar.
Mac OS X: Jumping dock icon.
Tab Area The Tab Area appears in the Jobs window, and in the Ticket Editor. In the right of the Tab Area are the tabs you can select to view or edit the selected job (Administration, Options, Plan, Pages, Results.). These tabs are active only after you have selected a job in the Job List.
In the left of the Tab Area you will see the name of the selected job.

AccurioPro Wide Director 3.5 Reference Guide
36 VIEWING MESSAGES
Viewing Messages The Message Board is your troubleshooting tool within AccurioPro WideDirector. It provides information on jobs, devices, or systems which need attention, and gives you a number of correction options. You can access the Message Board from anywhere in the AccurioPro WideDirector Client. You can also filter it based on a number of different criteria, and on combinations of criteria.
To open the Message Board
Do one of the following:
Click the Message Indicator in any of the management windows.
Choose Window > Message Board.
Message Board
The Message Board consists of a Filter pane, Message List, Acknowledge Pane, and Interaction pane.
The Filter and Message List work together: The messages displayed are
determined by the filter (if any) you apply.
The Acknowledge and Interaction panes work together: They display detailed information on the selected message, and let you decide how the alert should be handled.
Filter pane
The Filter pane allows you to specify which types of messages are displayed in the Message Board. For example, you may only want to see critical warnings, or be notified when user intervention is required. You apply a filter by clicking the Filter icon, and specifying your filter options.
The Filter pane also indicates how many messages have been generated, and how many of these messages have been selected, read, and acknowledged.
When a filter has been used, you will see the text:
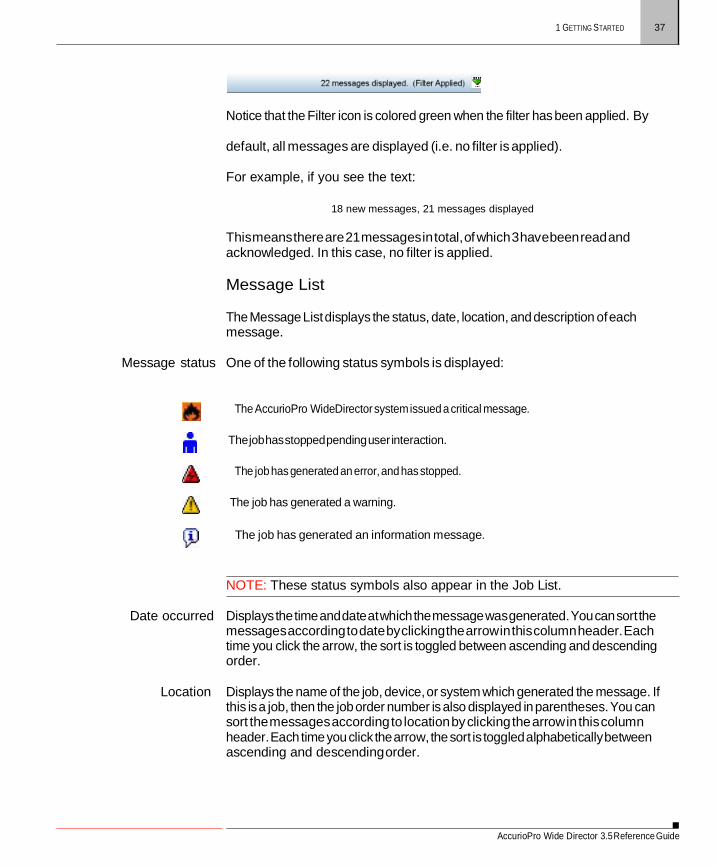
AccurioPro Wide Director 3.5 Reference Guide
1 GETTING STARTED 37
Notice that the Filter icon is colored green when the filter has been applied. By
default, all messages are displayed (i.e. no filter is applied).
For example, if you see the text:
18 new messages, 21 messages displayed
This means there are 21 messages in total, of which 3 have been read and acknowledged. In this case, no filter is applied.
Message List
The Message List displays the status, date, location, and description of each message.
Message status One of the following status symbols is displayed:
The AccurioPro WideDirector system issued a critical message.
The job has stopped pending user interaction.
The job has generated an error, and has stopped.
The job has generated a warning.
The job has generated an information message.
NOTE: These status symbols also appear in the Job List.
Date occurred Displays the time and date at which the message was generated. You can sort the messages according to date by clicking the arrow in this column header. Each time you click the arrow, the sort is toggled between ascending and descending order.
Location Displays the name of the job, device, or system which generated the message. If
this is a job, then the job order number is also displayed in parentheses. You can sort the messages according to location by clicking the arrow in this column header. Each time you click the arrow, the sort is toggled alphabetically between ascending and descending order.

AccurioPro Wide Director 3.5 Reference Guide
38 VIEWING MESSAGES
Description Displays an abbreviated version of the message. You can view the full message by selecting it. You can sort the messages according to description by clicking the arrow in this column header. Each time you click the arrow, the sort is toggled alphabetically between ascending and descending order.
Message background color Each message row has a colored background:
Pink: The message has not yet been acknowledged.
Yellow: This is the currently selected message.
Gray: The message has been
acknowledged. Acknowledge pane
The Acknowledge pane displays information and the acknowledgement status of the currently selected message in the Message List.
Message summary Displays the summarized message text from the Message List Description
column.
Reported by Indicates which Task Processor generated the message, and when, in the format “Reported by <Task Processor> at <time and date>”.
Acknowledgement status Indicates who (if anybody) first acknowledged the message, and when, in the
format “acknowledged by <user> at <time and date>”.
Acknowledgement button Click this button once you have read the message. Any Errors or Warnings that you acknowledge are removed from the Message List. User Interaction messages remain in the list until the required action has been taken.
Notification/Interaction pane
Notification message Displays a more detailed version of the message. Some messages are followed by a suggested course of action, such as:
“There is no location for exporting the system log. The default C:\Apogee
Prepress\SysLog\$DATE.log will be used”
Interactive dialog buttons. Some messages include interactive dialog buttons which allow you to correct the cause of the error or warning. For example, Retry, Abort Task, Update, Don’t Update, or Yes/No buttons.
The Edit Job button always appears for job notification messages. You can click this button to edit the job directly, and correct the problem. The Edit Job button is not available for System messages.

AccurioPro Wide Director 3.5 Reference Guide
1 GETTING STARTED 39
NOTE: If you select more than one message, you will see no specific message information, only “x messages selected”.
Filtering Messages You can filter the Message Board based on a number of different criteria, and on combinations of criteria.
To filter messages in the Message Board
Click the Filter icon.
The Message Board Filter dialog box is displayed.
Any filters you specify are cumulative. Only the messages which match all the specified criteria are displayed.
Message Board Filter
You can apply three types of filters. The options you select in each type are combined to produce a highly customizable filtering mechanism:
From: Shows only messages generated by the selected module(s).

AccurioPro Wide Director 3.5 Reference Guide
40 VIEWING MESSAGES
Level: Shows only messages of a specific level(s) of importance or urgency.
Date: Shows only messages from a specific time frame.
Filter On/Off Activate or deactivate the filter by clicking the Filter On or OFF radio button.
Unacknowledged messages only
Select this check box to display only the messages which have not yet been acknowledged.
From

AccurioPro Wide Director 3.5 Reference Guide
1 GETTING STARTED 41
Jobs To filter messages based on a particular operator or job name, select the Jobs check box, click the associated list box, and choose one of the following:
Operator name contains: This is the name of an operator as specified in the
Administration tab of one or more tickets. Enter the operator’s name here. When you apply the filter, all messages which relate to jobs belonging to this operator will be displayed.
Job name contains: This is the name of a job as specified in the Administration
tab of a ticket. Enter the job name here. When you apply the filter, all messages relating to this job will be displayed.
Device Administrator access level only!
To filter messages based on a particular output device, select the Devices check box, click the associated list box, and choose one of the available output devices (such as printers, imagesetters, proofers, etc.).
When you apply the filter, all messages which relate to the selected device will be displayed.
System Administrator access level only!
To filter messages based on those generated by the AccurioPro WideDirector System (such as Task Processors, AccurioPro WideDirector Client, etc.), select the System check box.
Level
To filter messages by type, select one or more of the Level filtering check boxes.
In Error Filter on jobs which have generated an error.
Warning Filter on jobs which have generated a warning.
User interaction, proofing Filter on jobs which require user intervention or proofing.
Informational Filter on jobs which have generated a message (information only).
Date
To filter messages by date, select the Date filtering check box, and use the three associated list boxes to choose a specific date or time window.
AccurioPro Wide Director 3.5 Reference Guide
42 VIEWING MESSAGES
Apply and OK
TIP: Simply clicking OK will both apply your changes and close the Message Board Filter.
Click Apply to save your settings. Click OK to close the Message Board Filter.
The filter is applied immediately. This is confirmed by the message “(Filter Applied)” in the Filter pane.
Critical Messages If the AccurioPro WideDirector system detects a situation that jeopardizes the proper functioning of the system (for example, low disk space), it issues a critical message.
A critical message is a high-priority message that cannot be filtered or acknowledged. Because these messages require immediate action, the client intercepts them and displays a special alert window. The client also checks the presence of critical messages at startup.
The Critical System Alert window is a floating window that can be moved but cannot be closed until the particular problem is resolved. This window does not prevent interaction with the client, but normal operation may be affected because of the critical condition of the server (slow response, processing on hold, etc.). The window lists the critical messages and corresponding timestamps. It also includes a ‘Review’ button which you can use to open the Message Board to view only the critical messages.
Preferences
Your Preferences are divided into the following categories:
General
Logging On
Viewers

AccurioPro Wide Director 3.5 Reference Guide
1 GETTING STARTED 43
Imposition Editor
General Display units Select: the unit of measurement that you want AccurioPro WideDirector to display.
millimeters
inches
Notifications Select the check box to hear a sound when critical system messages are generated.
User Interaction Enable double-clicking a job to Edit: Select the check box if you want to open a
job in the Job List by double-clicking it. The job will open in the Job Ticket Editor or the Layout Editor, depending on the type of job.
Open Image Editor when double-clicking an image: Select the check box to
open the Image Editor when you double-click an image in the Image panel of the Layout Editor (default). Clear the check box if you want the image to open in the Raster Preview module and automatically create a preview.
Language Lists all the languages in which the user interface is available. The available languages were selected when the AccurioPro WideDirector System was installed.
JDF Sheet Names Show MIS press sheet names when present: Select this option to display JDF
sheet names instead of AccurioPro WideDirector names, in the Results tab and main Apogee Impose windows.
Job Operator The job operator receives notifications that pertain to his/her jobs. This option
determines whether the operator field in a job can be edited at any time, or whether it is locked after a job has been submitted.
Lock operator name after submitting the job: The Operator field is locked and cannot be edited after the job has been submitted. This is the default setting.
Always allow changing the operator name: The Operator field remains editable at all times. Note that the operator field is always editable if it is empty or when it contains a ‘JDF’ string, regardless of the preference.
Create color-managed Previews
Select the check box to automatically create color-managed previews and calculate final output CMYK values when you add new images to a layout job, in the Layout Editor. It is recommended to leave this option off unless you always need color-managed previews in the Layout Editor.

AccurioPro Wide Director 3.5 Reference Guide
44 VIEWING MESSAGES
Logging On The Logging On tab defines your access rights, and allows you to specify how the Client selects and logs on to an AccurioPro WideDirector System.
User name Enter the name supplied to you by your AccurioPro WideDirector administrator.
Preferred system Enter the name of the system you want to connect to at startup. You can also
click the Browse button and select a system from the displayed list.
Password Enter the password supplied to you by your AccurioPro WideDirector administrator.
Automatically log on at Startup
Select this check box if you want to automatically log on to your preferred AccurioPro WideDirector System each time the Client is started.
Viewers
There are two viewers: PDF Viewer, for checking PDF job results and Raster Preview, for checking raster job results.
PDF viewer If you want to be able preview PDF job results in the Pages or Results tabs of the
Jobs window, you must specify where your Acrobat PDF viewing application is located.
NOTE: Acrobat Reader will always display the first page of the job. To directly view a specific page within the job, you need to use Acrobat Professional.
System default: AccurioPro WideDirector will search for your PDF viewer in your system’s default installation folder.
Other: If you have installed your PDF viewer in a different location, enter the pathname here.
Raster Preview These fields allow you to specify the settings that will be used by Raster Preview.
You can temporarily override any of these settings while you are previewing pages. However, this does not change the default settings.
Gridline every: Sets the default units of measurement of the grid (cms, inches, mms, picas, pixels, or points), and the distance between the major gridline divisions.
Subdivisions: The grid displays gridlines for every major and minor division of the ruler. Major divisions are drawn in solid blue, subdivisions in light blue. This parameter sets the distance between the gridline subdivisions.

AccurioPro Wide Director 3.5 Reference Guide
1 GETTING STARTED 45
When preview is color Managed
Auto-switch zoom factor: Select the switchover point from low resolution (contone) viewing to high resolution viewing when previewing a job (4x, 2x, 1, 1/2, 1/4, 1/8).
Display single separation in color: When you view a single separation (a single separation selected in the Raster preview Inks palette), it is by default displayed in grayscale. If you select this check box, it is displayed in color. If more than 1 separation is selected in the Raster Preview, these separations are always displayed in color.
You can choose from the following for color-managed previewed results:
Rendering Intent: The following Rendering Intents available, although not all profiles contain Look Up tables (LUTs) for each of them. In this case often a duplicate of one Look Up table is used for missing Render Intent LUT. The Rendering Intent defines the way the source colors are mapped to the destination space.
Relative Colorimetric: A colorimetric conversion, tries to maintain the exact
relationship (Smallest Delta E), between in-gamut colors, while out of gamut colors will be clipped. With Relative Colorimetric RI the white point from source color space is mapped to the white point of destination, this means that white stays white. No ink will be placed in white areas.
Absolute Colorimetric: Absolute Colorimetric rendering intent is similar to
Relative except that here the white point of the 2 profiles is preserved. White of source color space is simulated with CMYK values from the destination color space. The consequence is that every white object/area is covered with certain ink amounts.
Accurate Spot Color Mixing: In this enhanced mode, spot color visualization is superior to the standard color-managed mode. You can choose from the following:
Off
Max. 2 colors
Max. 3 colors
Use Press Paper White: Pantone\spot color inks are transparent and appear differently when printed on different substrates. Normally, you should select this option when creating a proof which will be used by the printer to print a spot color on the Press (when the simulated spot color on proof needs to resemble the final printed result). In this case, the paper white from the press profile is used in the color calculation.

AccurioPro Wide Director 3.5 Reference Guide
46 VIEWING MESSAGES
If this option is not selected, the measured paper white of the color book is used in the calculation of the spot colors. The option should therefore be deselected when the simulated spot colors on the proof are compared to the color book reference prints (with a measurement device, for example).
NOTE: A spectral press profile is required for this option.
When closing the Imposition Editor
Imposition Editor This tab is used to set your preferences for Apogee Impose.
Choose your preferred behavior for when you close the main Apogee Impose windows.
Assembly View Choose how you want the Product assembly to be viewed in the Assembly pane.
Apogee Impose Client License
Select ‘Make this an Apogee Impose editing station’ if you want an Apogee Impose license to be assigned to this particular user.
Auto Fit Enter the time in seconds to allow Apogee Impose to search for an Auto Fit rule in automatic imposition mode.
Validation These validation checks only performed for Apogee Impose jobs.
Product Intent Select the Warn when amount of Kept spot colors doesn’t match the
Part’s spot colors check box to generate warnings when the number of spot colors in the parts is not equal to the kept spot colors in the Separation operation.
Apogee Imposition Select the option to allow the job to be submitted with imposition errors. This
means that the press sheets must be inspected before further processing.
To open your Preferences
Choose Edit > Preferences.

AccurioPro Wide Director 3.5 Reference Guide
46 CUSTOMIZING YOUR WORK AREA
Customizing Your Work Area When you start the AccurioPro WideDirector Client, the Jobs window is automatically opened. From here, you can open the other Main windows (Hot Tickets and System Overview), and arrange all three windows on your desktop.
You can reposition and resize each window, and adjust the panes inside the windows. Most of these panes can be resized by dragging the pane borders. Some panes also have an expansion triangle. This is a small triangular icon in the center edge of the pane pointing either to the right or left. For example, the Job List pane in the Jobs window has an expansion triangle on the right edge. You can close the pane, and open it again by clicking on this expansion triangle.
When you quit the Client, any adjustments you have made to the positions and sizes of the windows and panes are saved. The next time you start the Client, The Jobs window will open with these new settings. When you open the other Main window, these too are restored with the last settings used (position and size).
To adjust the width of a pane
1 Select a pane, and position the mouse pointer over the one of the borders. If
the pointer changes to a two-headed arrow, you can adjust it.
2 Click and drag the pointer to the left or right, and release the mouse button.

CHAPTER
47
2
Working with AccurioPro WideDirector
NOTE: Visit the Tutorial page on the AccurioPro WideDirector Network for detailed procedures on working with AccurioPro WideDirector.

AccurioPro Wide Director 3.5 Reference Guide
48 WORKING WITH AccurioPro WideDirector 3.5

49
CHAPTER
3
Layout Editor
This section describes the Layout Editor, a dedicated workspace for setting up so called layout jobs which are printed on Sign & Display printing devices.
Overview .................................................................................................................... 50 Image Panel ............................................................................................................. 53 Layout Panel ............................................................................................................ 60 Inspectors ................................................................................................................. 88 Applying Changes and Submitting a Job ................................................... 106 Sheet Layout Templates ................................................................................... 108 Layout Hot Tickets .............................................................................................. 115 QuickProof Images and Sheets ...................................................................... 118 Resources ............................................................................................................... 120 Layout Editor Menus .......................................................................................... 121

AccurioPro Wide Director 3.5 Reference Guide
50 OVERVIEW
Overview
Layout Editor Modes
The Layout Editor has two modes:
Sheet Layout mode: for uploading, placing and arranging images on sheets
Print Layout mode: for organizing sheets on the print layout, i.e. the printer
bed or belt
Images that you want to print are first placed on one or more sheets in Sheet Layout mode, and these sheets are placed on print layouts that you can see if you switch to Print Layout mode. The print layout represents the printer bed (flat- bed devices) or the printer belt (roll-fed devices), which can accommodate multiple sheets and has the dimensions of the chosen device. A print layout is created automatically for each sheet that you prepare in Sheet Layout mode, with the sheet positioned by default in the printer’s home position. You only need to switch to Print Layout mode if you want to inspect how the sheet is arranged on the print layout, or if you need to combine multiple sheets on one or more print layouts.
The workspace is similar in both modes, except for a few tools and inspectors that are only relevant in the respective modes. To switch between Sheet Layout mode and Print Layout mode, click the Sheets or Print Layouts tabs respectively above the Image panel. You can also edit a placed sheet by double-clicking it on the print layout.
Open and Close the Layout Editor
The Layout Editor is opened when you create or edit a layout job. To open the Layout Editor from the Jobs window:
Choose File > New Layout Job.
The Layout Editor opens and a new layout job is created using the default template.
OR
Drop an image or document on a supported output device, or right-click a device and choose New Layout Job.
The Layout Editor opens and a new layout job is created using the default template for the device.
OR
Select a job in the Job List and click the Edit Job icon in the Jobs window toolbar or choose Edit Job in the right menu.

3 LAYOUT EDITOR 51
AccurioPro WideDirector 3.5 Reference Guide
The Layout Editor opens and a new layout job is created using the default template.
To exit the Layout Editor, submit the job and choose Delete Job (new job), or Discard (existing job). See “Applying Changes and Submitting a Job” on page 106 for more information.
Related topics: • Creating Templates for Layout Jobs on page 365
• Templates on page 361 • The Jobs Window on page 166. Figure 3.1: Sheet Layout mode with different images placed on a sheet
1 Image panel 2 Mode buttons and Sheet tabs 3 Sheet panel 4 Inspectors 5 Submit and Apply Changes buttons

52 OVERVIEW
AccurioPro WideDirector 3.5 Reference Guide
Figure 3.2: Print Layout mode with different sheets placed on a print layout
1 Sheet panel 2 Mode buttons and Layout tabs 3 Print Layout panel 4 Inspectors 5 Submit and Apply Changes buttons

3 LAYOUT EDITOR 53
AccurioPro WideDirector 3.5 Reference Guide
Image Panel
NOTE: Many of the features in the Image Panel only apply for the Sheet Layout mode. Remember that you have a Sheet Panel that contains all your sheets when working in Print Layout mode.
The Image panel displays thumbnails of the images that you upload and want to place on the sheet for printing.
Adding Images Use the following methods to add images to the image panel:
Drag and drop one or more images onto the image panel.
Drag and drop one or more images onto a sheet.
Drag and drop one or more images onto a printing device in the Jobs list.
Click the + button in the top right corner of the image panel and select one or more images from the location of your choice.
Choose File > Add Image and select one or more images from the location of
your choice.
If you add an image with the same file name, you are prompted to cancel, update or just add the new image:
Update: Adds the file as a revision of the previous one. This replaces all
placed images of the existing file with the new one.
Just Add: Adds the file to the job as a new file with the same file name but with a copy suffix.
Cancel: Cancels the action.
Thumbnails of the uploaded images are displayed in the image panel.
Image Processing Status While an uploaded image is being processed, you will see an image icon with a green background. When the processing is finished, you see a thumbnail with the file name and physical dimensions of the image.

AccurioPro WideDirector 3.5 Reference Guide
54 IMAGE PANEL
Organizing Images Click the cogwheel to display a menu for organizing and filtering the images you see in this panel.
1
2
3
4
5
6 7 8
1 Cogwheel menu 2 Add images button 3 Number of images displayed according to the chosen filter 4 Image status icons 5 Instances of an image on all the sheets of a job 6 Image details: file name and physical dimensions 7 Image preview status 8 Errors and warnings
The following commands are available on the cogwheel menu:
Show/hide:
Show All: shows all the images you have uploaded to the image panel
Show Placed: shows the images you have placed on any of the layouts
Show Placed on Current Print Layout: shows the images you have placed on the selected layout
Show Not Placed: shows the images you have not yet placed on any of the
layouts

AccurioPro WideDirector 3.5 Reference Guide
3 LAYOUT EDITOR 55
Sort:
by File Name
by Type
Thumbnails:
Small
Large
Fit to Largest: the widest thumbnail fits the width of the image panel and all the other thumbnails are scaled with the same scale factor
Fit Each: all thumbnails are scaled so they fit the width of the image panel
Image Details: show/hides the file name and dimension under the
thumbnails
Managing/Editing Images
In the image panel, right-click an image to display the following commands for this image:
Get Info: displays the Info dialog box with information about the original
image file organized in the General, Dimensions and Resources tabs; the Resources tab lists the fonts, images and spot colors used in the original image
Show Preflight Report: opens a PDF with a preflight report for the selected
image, if available
Export Original File: exports the original file to a location of your choice
Delete Image: deletes the selected images from the image panel, not from your disk
Duplicate Image: see “Duplicating Images” on page 78
Edit Externally:
Original Image: Creates a copy of the original file and opens this file in your
default image editing application. You can edit the image and then save it without changing the name. In the image panel, an edit icon is displayed next to the original image.

AccurioPro WideDirector 3.5 Reference Guide
56 IMAGE PANEL
Original Image with: The same as the first option but you can choose the image editing application.
Update after Edit (only for edited images indicated with the edit icon):
Picks up the edited image and replaces the original file in the image panel; a suffix [n] is appended to the file name and all instances of the image are updated on the layout.
Normalized PDF: Opens the pre-processed image in your default PDF
reader.
Edit with Preview: opens the image in Preview; this feature is useful for soft- proofing images which are color managed; you can perform color adjustments and contrast curve adjustment; see “Previewing Job Results” on page 233 for more information on working with Preview.
Fitting: Opens the Fitting Options dialog box where you can set the cropping; see
“Fitting Options dialog box” on page 70.
Revert Image Size: Reverts the size of the original image back to the size it initially had when you added it to the image panel.
Auto-Layout Images: Opens the Auto Layout dialog box; see “Placing Images
with Auto-Layout” on page 80.
Locate Image on Sheet: Highlights all the instances of an image/sheet on the current or first available sheet/print layout.
Image Status Icons
A cut path is present in the image or a path has been assigned as cut path.
The image is being edited.
Indicates that full-gamut color management is applied.
Indicates a preflight report has been generated for the image.
Image preview has been generated (gray) or is being processed (green).
Inspecting Images You can use the Image inspector to inspect one or more images in the Image panel before placing them on a layout. See “Image Inspector” on page 99 for more information.

AccurioPro WideDirector 3.5 Reference Guide
3 LAYOUT EDITOR 57
You can also use some of the tools in the positioning toolbar for an image selected in the Image panel: size, scale, mirror and rotate the image. See “Positioning and resizing images with the positioning toolbar” on page 65.
Changes you make to the original in the Image panel do not affect images that are already placed on the sheet and vice versa.
Image Previews When you upload images to the image panel, AccurioPro WideDirector does not process image previews automatically by default.
NOTE: You can change the default behavior and let the system create previews automatically when you add images to the image panel. See “Preferences” on page 41.
When images are added to the image panel, the Create Previews button appears in the bottom right corner of the Layout Editor. Click this button when you are ready to create the previews.
Images with a preview are indicated in the image panel with a magnifying glass icon. This icon is grey if the preview has been generated and green while the preview is being processed.
Create image previews If automatic image previews is not selected in your AccurioPro WideDirector client Preferences, you can create previews as required as you work in the Layout Editor.
Right-click one or more images in the Image panel and choose Edit with
Preview.
This creates a color-managed preview of the selected images and opens the preview immediately in the Raster Preview module when the processing is finished. The magnifier status icon in the Image panel changes from green to gray to indicate the previews are ready.

AccurioPro WideDirector 3.5 Reference Guide
58 IMAGE PANEL
OR
Click the Create Previews button in the bottom right corner to create image previews of all the images in the Image panel.
Previews of all the images in the Image panel are generated in the background. The magnifier status icon is gray when the previews are ready. The previews can be opened immediately in the Raster Preview module.
OR
Double-click an image in the Image panel.
You can change the default behavior so the Raster Preview module is opened and previews are created instead of opening the Image Editor. See “Preferences” on page 41.
If you change settings that modify the preview (for example, choose a different printer), the Create Preview button re-appears and you can choose whether you want to update the previews or not. See also “Applying Changes and Submitting a Job” on page 106.
Previewing white and special colors
The Raster Preview module has special features for previewing white ink and other special colors such as varnish and primer.
1 In the Raster Preview module, make sure the Inks palette is shown.
2 In the Ink table, ALT-click the eye icon next to the white ink.
The white ink is drawn in grayscale with 100% white drawn as 100% black. The other inks are hidden.
3 ALT-click the eye icon again to show all the colors.
Alternatively, you can choose to show white in a different color, as a mask.
1 Click the color patch for the white ink and in the Viewing Options dialog box, choose As Mask.

AccurioPro WideDirector 3.5 Reference Guide
3 LAYOUT EDITOR 59
2 Choose a color and opacity with the slider.
3 Click OK.
The white layer is drawn in the selected color and opacity on top of the other layers.
Related topics: • Previewing Job Results on page 233
File Types The following file types can be processed:
Image file types: TIFF, JPEG, PNG, BMP
Adobe PhotoShop (PSD) and Illustrator (AI)
PDF, PS, EPS
All file types are converted to an internal PDF file format in the background, but they keep their original name and file extension.
NOTE: If you upload a PDF document that consists of several pages, each page is displayed in the image panel as an individual image. The page no. is suffixed to the file name.

AccurioPro WideDirector 3.5 Reference Guide
60 LAYOUT PANEL
Layout Panel
NOTE: Most of the features in the Layout Panel apply for both the Sheet Layout mode as well as the Print Layout mode. Remember that you work with sheets on a print layout when in Print Layout mode.
The sheet layout panel consists of one or more sheet tabs where images are placed, positioning tools to position the images on the sheet, and palettes for inspecting the sheet in more detail.
Figure 3.3: The layout panel (Sheet Layout mode)
1 Positioning toolbar 2 Sheet with placed images 3 View Options palette 4 Marks palette 5 Layout toolbar

AccurioPro WideDirector 3.5 Reference Guide
3 LAYOUT EDITOR 61
Add a Sheet
Click the + button next to the Sheet 1 tab.
OR
Drag an image onto the + button
OR
Choose Sheet > New Empty Sheet.
NOTE: If sheet media is used, layouts are added automatically to accommodate images that you add to an existing layout that does not have sufficient space for the image.
Delete a Sheet
Right-click the Sheet tab you want to delete and choose Delete Current
Sheet.
OR
Select the Sheet Layout and choose Sheet > Delete Current Sheet.
Default Image Placement
Images are placed on the sheet by dragging and dropping. They are arranged automatically in a logical sequence. This initial placement of images is referred to as the default image placement or ganging.
Select one or more images in the image panel and drag them onto the sheet.
The first image is placed against the sheet lay, which is an indication of the leading edge of the printer. For AccurioWide printing devices, this is the bottom right corner of the sheet.
Subsequent images are ganged adjacent to the placed images, row by row. When the sheet is filled, a new sheet is added automatically.
Images are placed on the sheet at their native size and they are enclosed in a blue frame.
The resolution of an image is checked when you place it on a sheet. If the resolution is too low, a warning icon appears in the image panel. Click this warning icon to open the Snag List. See “Snag List” on page 86.

AccurioPro WideDirector 3.5 Reference Guide
62 LAYOUT PANEL
If you want to print several instances of the same image and you have set the copy count, you can fill the sheets while dragging the images onto the sheet.
Select one or more images in the image panel and press “n” or “N” while
dragging them onto the sheet to duplicate the images in accordance with the copy count.
The sheet is filled with the images in accordance with the copy count. Additional sheets are created if necessary to accommodate the copy count. If multiple images were selected, the sheets are first filled with the first image in the image panel and then with the second image, and so on, until the copy count for all the images is obtained.
NOTE: The default placement of sheets on the print layout can be specified in the Media Layout tab. See “Media Layout (Print Layout mode)” on page 93.
Placing Images Interactively
The default image placement can be modified extensively.
Moving Images
To move one or more images on the sheet, select them with the selection tool and drag them randomly on the sheet.
You can also restrain the dragging to a horizontal and vertical movement by pressing SHIFT as you drag. Snap guides can be activated to help you align images or bounding boxes with each other and with the edge of the sheet. See “Snapping to Margins or Edges” on page 63.
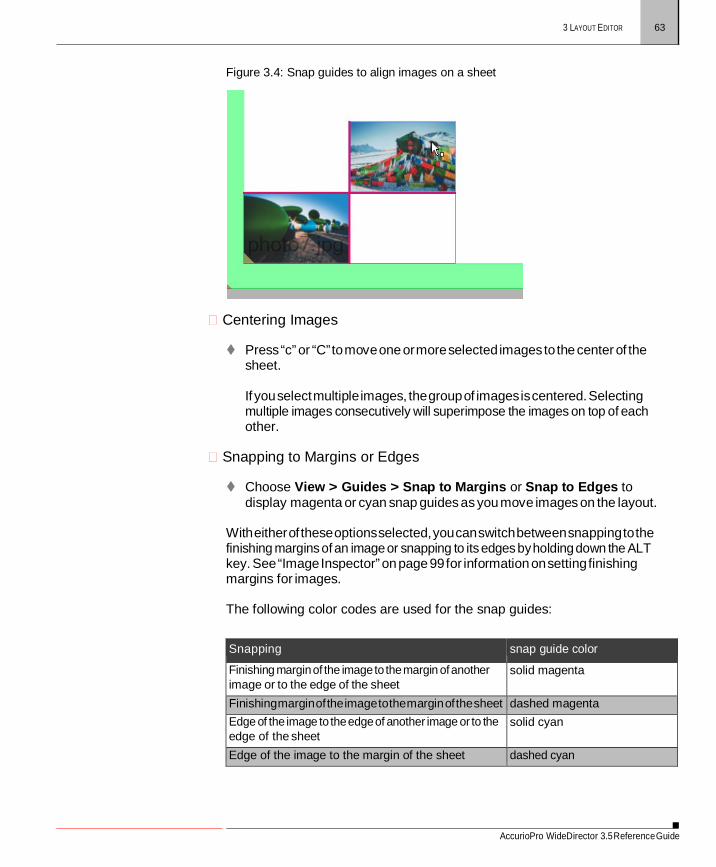
AccurioPro WideDirector 3.5 Reference Guide
3 LAYOUT EDITOR 63
Figure 3.4: Snap guides to align images on a sheet
Centering Images
Press “c” or “C” to move one or more selected images to the center of the
sheet.
If you select multiple images, the group of images is centered. Selecting multiple images consecutively will superimpose the images on top of each other.
Snapping to Margins or Edges
Choose View > Guides > Snap to Margins or Snap to Edges to
display magenta or cyan snap guides as you move images on the layout.
With either of these options selected, you can switch between snapping to the finishing margins of an image or snapping to its edges by holding down the ALT key. See “Image Inspector” on page 99 for information on setting finishing margins for images.
The following color codes are used for the snap guides:
Snapping snap guide color
Finishing margin of the image to the margin of another image or to the edge of the sheet
solid magenta
Finishing margin of the image to the margin of the sheet dashed magenta Edge of the image to the edge of another image or to the edge of the sheet
solid cyan
Edge of the image to the margin of the sheet dashed cyan

AccurioPro WideDirector 3.5 Reference Guide
64 LAYOUT PANEL
Figure 3.5: Snapping to image finishing margins (magenta snap guides)
Grouping images
You can select multiple images using conventional Windows key
combinations. Multiple, selected images are enclosed in a blue bounding box. To keep these images together, choose Arrange > Group.
The bounding box changes to black. The group of images can be moved on the layout interactively by dragging or with the positioning tools.
Rotating images
While placing or moving one or more images on the sheet, press the SPACE
bar once to rotate the image 90° counterclockwise, twice for 180° counter- clockwise, etc.
OR
Select a placed image and press the SPACE bar or use the rotation tool in the positioning toolbar.
Restoring the default placement
After moving images interactively, you may want to restore the default placement
of one or more images. Select the image you want to reset and choose Layout > Rearrange Frames.
The selected images are ganged according to the default placement.
Copy images to another sheet
1 Select one or more images on the active sheet and press CTRL+C to copy them
2 Go to another sheet and press CTRL+V to paste the copied images on this sheet.

AccurioPro WideDirector 3.5 Reference Guide
3 LAYOUT EDITOR 65
Removing Images
To remove one or more images from the sheet, select them with the selection tool and press the Delete button, or press CTRL+X.
The image or images are removed from the active sheet.
Removed images are not deleted from the image panel and can be placed again on the same or a different sheet.
Shortcuts for overriding the default image placement
Use the following keyboard shortcuts to override the default placement of the
images when dragging them onto the sheet or moving them once they are placed on the sheet:
NOTE: Most of these shortcuts can also be used for placing sheets on print layouts.
To Drag the image and:
Place one or more images without ganging them Hold SHIFT and release
Rotate one or more images 90° counterclockwise Press space bar once Cancel the image placement Press ESC Copy a placed image. Press CTRL Switch between snapping to margins (magenta snap guides) and snap- ping to edges (blue snap guides)
Press ALT
Restrain movement horizontally and vertically Hold SHIFT Move a placed image to the center of the sheet. Press C or c Duplicate a placed image to accommodate the copy count. Press N or n
Positioning and resizing images with the positioning toolbar The positioning toolbar provides tools for arranging and resizing images on the sheet interactively.
Select one or more images on the sheet to activate the tools.

AccurioPro WideDirector 3.5 Reference Guide
66 LAYOUT PANEL
1 Horizontal and vertical coordinates relative to the chosen reference point 2 Set size with aspect ratio lock; set Auto-fit option 3 Rotate/mirror one or more images on the sheet 4 Align in sheet 5 Align multiple images with each other 6 Set the gaps horizontally or vertically 7 Group/ungroup multiple images
Depending on whether you have one or more images selected, the positioning toolbar activates the relevant tools.
1 Select one image.
You can now either position the image by filling in a Horizontal and Vertical position (1)or you can choose one of the Align in Sheet options (4) to align along the top, left, right, bottom, center of the layout. If you select the Align to margins check box, the reference edges are the layout margins as set in the finishing inspector.
Select a rotation angle in the Rotation drop-down box (3) to rotate the selected image, or click the horizontal or vertical Mirror buttons (3) to mirror the image along its horizontal or vertical axis.
2 Select two or more images.
You can now Group the images (7) and align the group in the sheet (top, left, right, bottom, center) (4), or align the selected images with each other (5).
You can also use the Set Gaps tools (6) to distribute selected images vertically, horizontally, or both, so that the gaps between the elements are the same. If the gap size is not specified (Distribute), the outermost elements keep their positions and the elements in between move; if a gap size is specified (fixed), the left most or bottommost elements remain in position and the others move.
3 Select one or more images.
With the Size tool (2) you can set the size of the image frame. See “Inspecting Frames” on page 69 to read how you can fill a resized frame with the image. If you selected multiple images (i.e. image frames), all the images in the bounding box are modified accordingly.

AccurioPro WideDirector 3.5 Reference Guide
3 LAYOUT EDITOR 67
Figure 3.6: An image which is copied, mirrored and snapped to image edges (cyan
snap guides)
Using alignment pins
When placing sheets on a print layout, you can use alignment pins for certain printing devices to ensure the sheet aligns with the media.
1 In Print Layout mode, go to the Media Layout inspector.
2 In the Horizontally drop-down list, select the Alignment Pin Set that you want to use, at the bottom of the list.
3 In the second drop-down list, select the pin configuration you want to use. See “Alignment Pin Sets” on page 263 for creating alignment pin sets.
The alignment pins are shown on the print layout and you can now position your sheets against these pins with the snap feature.
Working with Frames
An image placed on a sheet is always enclosed in a frame and most actions you perform in the Layout Editor actually affect the frame, not the image. For placed images, the Auto-fit check box is selected by default in the Positioning toolbar to ensure that the image fits the frame. You can clear the Auto-fit check box if you want to manipulate the frame independently from the image, for example to crop the image disproportionately. The parts of the image that are outside the frame are not printed, except for the bleed.

AccurioPro WideDirector 3.5 Reference Guide
68 LAYOUT PANEL
Figure 3.7: A placed image with its frame highlighted for resizing
1
2
3
4
1 Image resize handle 2 Frame 3 Image icon 4 Image origin (indicates rotation/mirroring)
The frame and the image can be resized independently of each other, for example to crop an image.
Figure 3.8: A placed image selected and enlarged beyond its own frame
An image is selected within its frame by clicking the image icon. The cursor state changes when you do this, as follows:
Image frame is selected.
Image is selected.

AccurioPro WideDirector 3.5 Reference Guide
3 LAYOUT EDITOR 69
NOTE: Right-clicking an image within a frame provides access to the image- specific commands. See “Managing/Editing Images” on page 55.
Empty frames are frames without an image, which are the result of either deleting the image from the frame of a placed image or drawing a new frame on the sheet.
Figure 3.9: An empty frame
Empty frames can be arranged on a sheet interactively just like placed images, using the Positioning toolbar and commands such as Step and Repeat, Dupli- cate, etc., and snap guides for aligning. You can also set fitting options to control how images must fit in empty frames. Frames also give you more flexibility when creating sheet templates. There is no Auto-Layout feature for empty frames.
NOTE: Empty frames are saved with a job but they are not processed as content when you submit the job. So you will not see frame boxes, etc. in the output.
Related topics: • Sheet Layout Templates on page 108
• Fitting Options dialog box on page 70
Inspecting Frames
The following commands can be performed by right-clicking a frame:
Delete Frame: Removes the frame and its image from the sheet.
Clear Frame: Deletes the image from the frame.
Duplicate Frame on Sheet: See “Duplicating Images” on page 78.

AccurioPro WideDirector 3.5 Reference Guide
70 LAYOUT PANEL
Step and Repeat: See “Step & Repeat” on page 79.
Group/Ungroup: Groups or ungroups the selected frames.
Fitting: This sub-menu provides the following options:
Fit Image in Frame Proportionally: Resizes the image proportionally to fit within the frame.
Fill Frame With Image Proportionally: Scales the image proportionally to fill
the entire frame.
Fit Frame to Image: Resizes the frame to fit the image.
Fill Frame With Image: Scales the image to fill the entire frame, but not proportionally.
Center Image: Centers the image, in its current size, in the frame.
Reset Fitting: Sets the fitting options of the frame to those of the original
image in the image panel.
Fitting Options: see “Inspecting Frames” on page 69.
Size Frame to Sheet: Fills the sheet with the image; this may change the proportions.
Revert Frame: Reverts the frame and image to the size of the original image.
Scale for Bleed: Extends the image beyond the frame to accommodate the
specified bleed.
Rearrange Frame: Re-positions the frame to the default placement on the sheet and applies modified inspector settings.
Assign Content ID: Assigns a content ID to the selected frame or all frames if
none is selected. The frames must be filled.
Clear Content ID: Clears the content IDs of the selected frames or all frames if none are selected.
Fitting Options dialog box
The Fitting Options dialog box gives you more detailed control for fitting an image within the frame.

AccurioPro WideDirector 3.5 Reference Guide
3 LAYOUT EDITOR 71
With one or more image frames selected on the sheet, choose Arrange > Fitting > Fitting Options to open the Fitting Options dialog box. OR
Right-click a frame and choose Fitting > Fitting Options.
OR
Right-click an image in the Image panel and choose Fitting > Fitting Options.
NOTE: You can only set the crop values for images in the Image panel.
Cropping The values that you want to apply to images in the frame. If the image fits in the frame exactly, the four values are zero, for example when you drag an image onto a sheet. Positive values crop the image by shifting the image outside the frame. Negative values create more space, a border, between the image and the frame. Values in blue mean the Auto-fit settings have introduced extra cropping.
Fitting Here you specify the Auto-fit settings for fitting the image inside the frame.
Auto-fit Image to Frame Select this check box to choose a Scale and Orientation for fitting the image
automatically in the frame. The check box is selected by default for placed images (i.e. images that you dragged on the sheet).
Scale The following options are available to scale the image when Auto-fit is selected:
Fit Image to Frame: scales the image so it fits completely in the frame
which is not necessarily filled.
Fill Frame with Image: scales the image so it fills the frame and crops the image if necessary.
Fill Image to Frame Width: scales the image so its width fits that of the
frame.
Fill Image to Frame Height: scales the image so its height fits that of the frame.
Maintain proportions Keeps the width and height scale factors the same when scaling.
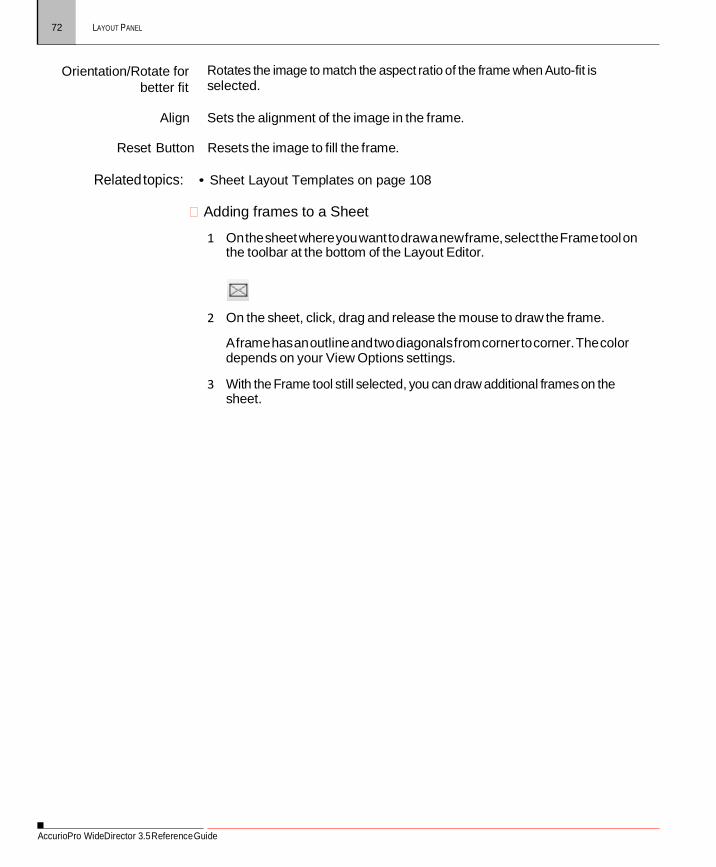
AccurioPro WideDirector 3.5 Reference Guide
72 LAYOUT PANEL
Orientation/Rotate for better fit
Rotates the image to match the aspect ratio of the frame when Auto-fit is selected.
Align Sets the alignment of the image in the frame.
Reset Button Resets the image to fill the frame.
Related topics: • Sheet Layout Templates on page 108
Adding frames to a Sheet
1 On the sheet where you want to draw a new frame, select the Frame tool on the toolbar at the bottom of the Layout Editor.
2 On the sheet, click, drag and release the mouse to draw the frame.
A frame has an outline and two diagonals from corner to corner. The color depends on your View Options settings.
3 With the Frame tool still selected, you can draw additional frames on the sheet.

AccurioPro WideDirector 3.5 Reference Guide
3 LAYOUT EDITOR 73
Figure 3.10: Unnamed frames inside the image block, on a sheet
The image block expands accordingly as you add more frames.
4 To position your frames, click the Selection tool in the toolbar and now you can select the frames.
The outline is thicker and has resizing handles.

AccurioPro WideDirector 3.5 Reference Guide
74 LAYOUT PANEL
5 Use the Positioning toolbar to arrange the frames just like you would do with images.
The same snap guides are available to help you align frames with edges and margins.
Related topics: • Placing Images Interactively on page 62
Rearrange frames
The Rearrange command reverts the placed images on a sheet to the default placement. Depending on the printing device, the images are ganged from left to right or right to left on the sheet. You cannot rearrange locked sheets.
1 Select the images or frames that you want to rearrange on the sheet.
2 Choose Layout > Rearrange Frames.

AccurioPro WideDirector 3.5 Reference Guide
3 LAYOUT EDITOR 75
The selected images or frames revert to the default placement. Some images may be placed on a new sheet if the current sheet cannot accommodate the rearranged images.
If no images or frames are selected, then everything on the sheet is rearranged.
Naming frames (content IDs) Frames that you draw on a sheet are initially so-called unnamed frames. Frames created by dragging images on the sheet are also unnamed. It is possible to assign content IDs ([A], [B], [C], etc.) to frames for automation purposes, and these frames are called named frames.
Named frames allow you to use the same image in multiple frames by simply dragging the image once onto the sheet. Each image is placed in the position and with the size, frame rotation, and fitting options specified for the different frames.
NOTE: Content IDs do not work across multiple sheets. For example, placing an image in a frame with Content ID [A] on Sheet 1 does not fill frames with the same ID on Sheet 2.
Named frames are extremely useful when creating sheet layout templates.
Related topics: • “Sheet Layout Templates” on page 108
Naming empty frames (interactively)
Empty frames on a sheet can only be named manually because they have no content.
1 Draw the frame on the sheet with the Frame tool.
2 Switch to the Selection tool and select one or more frames.
3 In the Image Inspector, enter an ID in the Content ID box.
4 Click outside the ID box, and the ID is displayed in the center of the frame.

AccurioPro WideDirector 3.5 Reference Guide
76 LAYOUT PANEL
If you selected multiple frames, the same ID is assigned to each frame.
You can edit the content ID as long as no images are placed on the sheet.
Naming filled frames If a sheet contains at least one image, you cannot use the Image Inspector to assign content IDs interactively. You would have to clear all the frames first.
However, there are two methods for naming filled frames automatically: by saving the sheet layout as a template (see “Sheet Layout Templates” on page 108), or by using the Assign Content IDs command. This command lets you assign IDs to filled frames without clearing all the images from the sheet.
1 Select the images you want to name on the sheet.
2 Choose Layout > Assign Content IDs.
The selected images are assigned unique IDs and instances of the same image have the same unique ID. If you didn’t select any images, then all the frames with images on the sheet are assigned IDs, and empty frames are not assigned IDs.

AccurioPro WideDirector 3.5 Reference Guide
3 LAYOUT EDITOR 77
The content ID is displayed under the image name if this is set to show in the View Options.
The content IDs are also displayed under the thumbnail of the original image in the Image panel.
In this example you can see that the image has been assigned to 4 frames with content ID [A].
NOTE: The same image can also be assigned to frames with different IDs, for example, [A, A, B, C, D, D].
3 You can repeat the Assign Content IDs command if you drag more images on
the sheet. New, unique IDs will be assigned and this is also the case if you add the same original image.
4 You can clear the IDs of selected images or all the IDs by choosing Layout > Clear Content IDs.
NOTE: If all of your frames have IDs, it’s not possible to re-assign IDs, for example when you have deleted an image from the sheet.
AccurioPro WideDirector 3.5 Reference Guide
78 LAYOUT PANEL
Copy Count, Cropping, Scaling
You can use the Image inspector to prepare images before placing them on the sheet. See “Image Inspector” on page 99 for more information.
With one or more images selected in the image panel, select the Image
inspector and set the Copies, Size, Bleed and Finishing operations as desired. Drag the images onto the sheet.
The selected images are placed on the sheet and modified accordingly.
Duplicating Images The Duplicate feature allows you to either create a copy of one or more images that you select in the image panel, or duplicate and/or fill a sheet with one or more images that you have selected on the sheet.
Select one image in the image panel and choose Edit > Duplicate Image.
OR
Right-click an image and choose Duplicate.
A copy of the selected image is added to the image panel and the Copy suffix is appended to the file name of the duplicated image.
Select one or more images or empty frames that have been placed on a sheet
and choose Edit > Duplicate Frames on Sheet.
OR
Right-click an image and choose Duplicate Frames on Sheet.
You can enter the number of copies you want to make on the sheet, or let AccurioPro WideDirector fill the sheet.
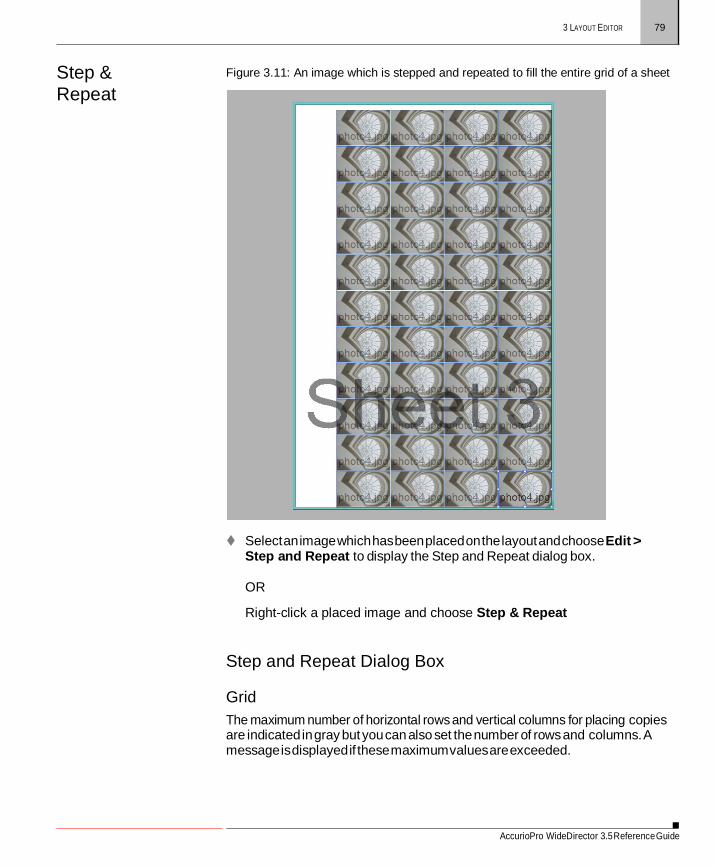
AccurioPro WideDirector 3.5 Reference Guide
3 LAYOUT EDITOR 79
Step & Repeat
Figure 3.11: An image which is stepped and repeated to fill the entire grid of a sheet
Select an image which has been placed on the layout and choose Edit >
Step and Repeat to display the Step and Repeat dialog box.
OR
Right-click a placed image and choose Step & Repeat
Step and Repeat Dialog Box
Grid The maximum number of horizontal rows and vertical columns for placing copies are indicated in gray but you can also set the number of rows and columns. A message is displayed if these maximum values are exceeded.

AccurioPro WideDirector 3.5 Reference Guide
80 LAYOUT PANEL
Horizontal Enter the number of copies you want to repeat horizontally. Click the revert button to reset the value to the maximum.
Vertical Enter the number of copies you want to repeat vertically. Click the revert button to
reset the value to the maximum.
Copies Enter the number of copies to fill the layout as required; the number of copies should not exceed the number of horizontal rows multiplied by the number of vertical columns; a message is displayed if you exceed this maximum.
Fill entire grid Choose this option to fill the grid you defined. The number of copies is entered
automatically (horizontal rows x vertical columns).
Fill Direction If you choose the option to enter the number of copies yourself; you can also choose how the grid is filled: horizontal rows first or vertical columns first.
The total number of copies is indicated in gray in the bottom right corner of the dialog box.
Gaps
Horizontal Enter a value for the horizontal gaps between repeated images.
Vertical Enter a value for the vertical gaps between repeated images.
Placing Images with Auto-Layout
The Auto-Layout feature places and arranges all the selected images automatically on the sheet according to the chosen layout strategy. The images are placed on all the sheets of the job, including locked sheets.
CAUTION: Images already placed on sheets are cleared, even if the sheet is locked.
Select one or more images in the image panel and open the Auto-Layout dialog box as follows:
Choose Sheet > Auto-Layout Images
OR
Right-click the selected images and choose Sheet > Auto-Layout Images.
NOTE: If no images are selected, AccurioPro WideDirector auto-layouts all the images in the image panel.

AccurioPro WideDirector 3.5 Reference Guide
3 LAYOUT EDITOR 81
Auto-Layout Dialog Box
Size Media size By default, the size of the media as defined in the job set-up. Choose a size from
the drop-down list or enter a custom size. You cannot change this if you have already placed images on a sheet.
Images
Copy Count Here you can set the number of copies you want to print of each placed image. AccurioPro WideDirector calculates the number of sheets that need to be printed to obtain the entered copy count. See “Sheet Inspector” on page 103.
Layout Here you specify the layout strategy.
Type Selecting a layout type shows options which are specific to each type.
True-Shape Nesting: to nest images more intricately based on the cutting path of each image.
Rectangular Nesting: to nest images in an intricate layout that may not be suitable for guillotine cutting.
Guillotine Cuts: to nest images in a sheet that is suitable for guillotine cutting.
Rotation It’s possible that more images can be arranged on the sheet by allowing AccurioPro
WideDirector to rotate them. Choose one of the following:
None: The orientation is left as shown in the image panel.
Any angle: Images are rotated at any angle.
90 or 270 degrees: Changes the orientation of rotated images.
0 or 180 degrees: Keeps the orientation of the rotated images.
Optimize for Choose whether you want the fitting strategy to reduce waste or reduce the number of sheets.
Allow Overrun % Allows you to set a percentage for the number of extra copy counts to achieve the
chosen fitting strategy.
Auto-stop AccurioPro WideDirector stops searching for the best arrangement once the specified waste level is obtained (default is 50%).

AccurioPro WideDirector 3.5 Reference Guide
82 LAYOUT PANEL
Finishing Margins In this panel you can change the default finishing margins, i.e. the spacing between images and the edges of the sheet, as defined in the job set-up. See “Finishing” on page 94.
Auto-Layout Progress This dialog box is displayed when you click the Auto-Layout button and it shows the progress of the auto-layout process. If the layout is complex and the system requires a lot of time to arrange the images, you can click the Use button to accept the Best solution so far. Otherwise, wait until the process is complete and the Auto-Layout Progress dialog box closes. The longer you wait, the better the proposed sheet.
Progress The diagram shows the total number of layouts found so far.
Best solution so far The proposed number of sheets and the total run length to accommodate the
fitting strategy and your copy count as best as possible.
Elapsed time The elapsed processing time to search for possible layouts.
View Options Palette
The View Options palette is used to show and hide the various components on the layout.
NOTE: Hiding content or marks with the View Options palette does not mean they will not be printed.
The following elements can be shown/hidden:
Preview
Images: the content of the images placed on the sheet
Marks: the cutting marks selected for finishing, or other marks
Sheets: the content of the sheets placed on the print layout
Sheet
Lay: triangle icon indicating the lay of the sheet
Image block: the bounding box enclosing all the images
Margins: the margin around the sheet as set in the Finishing inspector

AccurioPro WideDirector 3.5 Reference Guide
3 LAYOUT EDITOR 83
Background: the area of the sheet where no images are placed
Ink zone: the area on the print layout where printing will effectively occur (similar to the image bleed zone)
Image
Name: the file name of the image
Content ID: the frame ID
Size: the product size
Image scale: the scaling factor used on the original image to obtain the
product size
Bleed zone
Frame box: the bounding box around the individual image
Origin: gray and white icon with letter F indicating the original orientation of the image

AccurioPro WideDirector 3.5 Reference Guide
84 LAYOUT PANEL
Contours: path that sets the contours around an image, for example for cutting
Printer
Lay: the lay of the print layout that indicates the leading edge of the layout and
the home position of the printer shuttle.
Background: representation of the surface of the printer bed or belt and more specifically the area where no printer sheets are placed
Marks
Marks: the bounding box of the marks
Hidden Marks: marks that will not be printed due to conflicts; displayed in a
red, hatched box
In the View Options drop-down list you can select, create, rename or delete preference sets for the View Options.
To show/hide content, rule-ups and marks
1 Click the Show/hide View Options button in the toolbar or choose Window > View Options to show the View Options palette.
2 Click the individual or group eye icons to show or hide the various rule-ups and marks.
3 Click the colored boxes to open a color editor where you can change the color of the rule-ups and measurements.
4 Click in the drop-down list at the bottom of the View Options palette to choose, create, rename or delete preference sets for the View Options.
Marks Palette The Marks palette is used to place marks on an image or sheet interactively. In other words, these marks do not depend on the conditions of a Mark Set and they can be placed relative to any possible object on the image or sheet.
The palette contains the following marks categories:
Image: e.g. Text, Line, Grommet, Crop
Sheet: e.g. Text, Line, File

AccurioPro WideDirector 3.5 Reference Guide
3 LAYOUT EDITOR 85
The various mark types in these categories are managed in the Mark Engraver Resource of the Impose Task Processor. Refer to “Mark Engraver” on page 299 and “Mark Types” on page 304 for more information about the different types of marks and their settings.
CAUTION: Marks placed interactively may be positioned at unexpected locations and on other sheets than the sheet you are working on.
To place a mark interactively
1 Click the Marks button in the Toolbar or choose Window > Show Marks Palette to show the Marks palette.
The Marks palette is displayed.
2 Hover over the icons to see what kind of marks are available.
3 Drag the required mark onto the Press Sheet and release the mouse button at the location where you want to place the mark.
NOTE: It is not possible to move the mark once you have dragged it to a certain position.
If you select the Mark Inspector, you can see the default settings for the selected mark. See “Mark Inspector” on page 102.
4 Change the settings as required.
NOTE: Double-clicking a mark in the Marks palette also places the mark on the Press Sheet.

AccurioPro WideDirector 3.5 Reference Guide
86 LAYOUT PANEL
Layout Toolbar Some of the tools described here may only be available in the Image Editor. You can also use shortcuts to activate the tools and these shortcuts are case-insensitive and some only require a single key. For example, type Z or z to activate the Zoom tool and then type A or a to return to the Selection tool.
Selection tool: To select a component or area and display its properties. This is
the default tool.
Single Instance Selection tool: To select a single instance of marks which are placed at various locations, or part of a compound mark.
Shortcuts
A
D
Pan tool: To pan layouts in the Layout Editor. H
Zoom tool: To zoom into a specific area of a layout. Z
Frame tool: To draw empty frames on a sheet. F
View Options palette button: Shows/hides the View Options palette. CTRL SHIFT+E
Marks palette button: Shows/hides the Marks palette. CTRL+M
(Licensed feature) Presets: To open the Presets dialog box. CTRL
SHIFT+P
Crop image: Activates the crop mode to crop an image (Image inspector in the Image Editor).
Split tool: Activates the Split tool to split an image into tiles (Tiling inspector of the Image Editor).
Zoom slider with Zoom to fit and Zoom to maximum buttons, and drop-down list with zoom presets
K
K
CTRL +/-
Snag List The Snag List shows conflicts (errors and warnings) relating to the images in the image panel or the placement of images on the sheet. These conflicts should be checked before submitting a job.
The Snag List is opened by clicking a yellow warning icon or a red error icon
The Snag List contains the following information:
Left column - top pane: summary of all conflicts.

AccurioPro WideDirector 3.5 Reference Guide
3 LAYOUT EDITOR 87
Left column - bottom pane: conflict categories sorted by severity with errors at the top and OK at the bottom.
Right column: conflicts of the selected category; some conflicts can be
clicked to open a detailed report.

AccurioPro WideDirector 3.5 Reference Guide
88 INSPECTORS
Inspectors
NOTE: Most of the inspectors are available for both the Sheet Layout mode as well as the Print Layout mode, except where indicated otherwise.
The panel on the right of the Layout Editor consists of a number of tabs and sub- tabs which are referred to as inspectors.
1 Job Set-Up Inspector 2 Image Inspector 3 Colors Inspector 4 Mark Sets Inspector (Sheet Layout mode only) 5 Sheet Inspector/Print Layout Inspector
Job Set-Up Inspector
In the Job Set-Up tab, you define the job settings for all the sheets of a job.
Click the open book icon to display the Job Set-Up.
This tab consists of the following inspector panels:
Job Set-Up
Media Layout (Print Layout mode)
Finishing
Color Management
Preflight
Job Identification

AccurioPro WideDirector 3.5 Reference Guide
3 LAYOUT EDITOR 89
1 Printing Set-Up 2 Finishing 3 Color Management 4 Preflight 5 Job Identification
Job Set-Up
In the Job Set-Up inspector, you choose the media, printing quality and printing device for your job.
Media In the Media panel you choose the media you want to print the job on and set its size.
Media This drop-down list displays all the available media, i.e. media for which
Calibrated Printing Modes exist. See “Media Hub” on page 327. The media you used for the last submitted job is displayed when you create a new job.
Roll Media Select this check box if you want to use roll media. This disables the Height
setting for the Size of the media as this is defined by the printing device, and filters the sizes you see in the Size drop-down list. When you add images to a layout, the height increases accordingly.
Size A drop-down list with all available sheet sizes. The last item in the list, Manage
Sheet Sizes, is a shortcut to the Sheet Sizes resource. The width and height (W x H) of the sheet are displayed under the drop-down list. You can also edit these fields to create a custom sheet size and save this custom size by choosing Save As in the drop-down list. When you change the size, the preview in the Layout Editor zooms the new size to fit the available preview area. See “Sheet Sizes” on page 366.
NOTE: Only one size can be set for the different sheets of a job.

AccurioPro WideDirector 3.5 Reference Guide
90 INSPECTORS
NOTE: Choose a size which is smaller than the maximum size for the printing device to combine multiple sheets on a single print layout.
Thickness The thickness of the media. The default unit is micron; right-click in the box to change the unit: micron, mil, mm, and inch.
Quality You can select one of the following quality levels to suit the visual quality you
expect from the printed result:
Express
Production
Standard
High Quality
High Definition
Customer qualities
Quality levels have corresponding Calibrated Printing Modes. See “Media Hub” on page 327.
Application In the Application panel you choose how you want to handle printing with special colors: white ink, varnish and primer. The data for printing the special color can be generated by the printing device (on Printer) or by the system (AccurioPro WideDirector). If you let AccurioPro WideDirector do this, you can also set the opacity or have the ink choked or spread.
White Click the triangle to expand the panel. Select the check box if you are printing
with white and choose the method:
Fill (on Printer): The printing device fills the area of the image block (with bleed) with a solid layer of the special color.
Mask (on Printer): The printing device prints dots under the color dots; non- ink
zones in the image receive no ink. The density of the ink depends on the density of the color dots.
Fill Entire Image (AccurioPro WideDirector): AccurioPro WideDirector fills the
area of the image with the special color at a constant opacity. You can select the opacity.

AccurioPro WideDirector 3.5 Reference Guide
3 LAYOUT EDITOR 91
Solid Pixel Mask (AccurioPro WideDirector): AccurioPro WideDirector prints with a constant opacity under the dots inside the bleed path (or cut path/frame) of the image. Only areas with data are printed.
Solid Image Mask (AccurioPro WideDirector): AccurioPro WideDirector prints
with a constant opacity under the image which is defined by scanning for color dots at the edges of the bleed path (or cut path/frame).
Variable Pixel Mask (AccurioPro WideDirector): AccurioPro WideDirector
prints within the bleed path (or cut path/frame). The density of the mask depends on the lightness of the image and the given opacity. This option disables the Choke/Spread and Opacity options.
From Image (AccurioPro WideDirector): The content of the image (usually a
spot color) deter- mines where to print and the density. The Opacity value scales the opacity values in the content file.
Opacity The opacity of the special color. An opacity of 100% corresponds with the White density set in the CPM.
Apply Choke/Spread Choke and spread are deactivated by default.
Choke/Spread/Amount To change the direction and amount of choke or spread.
If one of the white printing modes is selected, you can also set how the white ink is applied:
Pre-white: White is to be printed underneath the image. You first print the
white on the media, then the image on top of the white. The most common application is to flood a non-white medium so the image can be printed on a white background.
Post-white: White is to be printed on top of the image. You first print the
image on the media, and then print the white on top of the image. The most common application is to print an image on clear (transparent) material, where the white serves as the white background.
Sandwich white: White is to be printed between a first and second print of
the same image.
Spot color names can be mapped to white ink in the Colors inspector. See “Colors Inspector” on page 100.
Print primer Click the triangle to expand the panel. This panel is only visible if the printing device has a primer ink in its inkset. The settings are similar to the settings for white ink. Primer is printed before other layers.
AccurioPro WideDirector 3.5 Reference Guide
92 INSPECTORS
Print varnish Click the triangle to expand the panel. This panel is only visible if the printing device has a varnish ink in its inkset. The settings are similar to the settings for white ink. Varnish is printed after other layers.
Printing In the Printing panel you select the printing device and the accompanying Calibrated Printing Mode for that device. The information is displayed at the bottom of the panel.
Device A list of the printing devices which are available in your printing environment. The
device you used for the last submitted job is displayed when you create a new job.
Calibrated Printing Mode A list of calibrated printing modes (CPM) filtered by printing device, so you only see
the modes which can be used with the specified device. Selecting a mode that has a different quality setting than what you specified in the Quality list, changes the Quality setting accordingly. See “Media Hub” on page 327 for more information about calibrated printing modes.
The following warnings in red are possible for this option:
[Multiple]: multiple modes are suitable for the selected combination of
printing device and quality, and the most suitable modes are displayed at the top of the list. Choose a mode.
[No suitable CPMs]: no suitable modes exist for the selected combination of
printing device and quality. Choose a mode and the quality and media will change accordingly.
Printer Parameters button This button is displayed when a printer and CPM are selected. Click the button to open the Printer Parameters for the selected printer:
Print Mode Parameters
Media Parameters You can set and change the parameters specifically for the current job.
NOTE: Only for printers that support AccurioPro WideDirector printer parameters.
Media Deformation Click the triangle to expand the panel. Select this check box to compensate for the stretching or shrinking of the media during printing and finishing. You must enter the percentage of stretching or shrinking and the system scales the image to compensate.

AccurioPro WideDirector 3.5 Reference Guide
3 LAYOUT EDITOR 93
X (Shuttle) Enter the percentage that the media stretches/shrinks in the shuttle direction.
Y (Feed) Enter the percentage that the media stretches/shrinks in the feed direction.
Media Layout (Print Layout mode)
In this inspector you can modify the default placement of sheets (also referred to as ganging) on the print layout.
Any changes you make in this inspector do not affect the arrangement of sheets that are already ganged on the print layout. However, you can apply new settings to placed sheets with the rearrange or remake commands.
It is possible to specify different setting while working on the same print layout, and these new settings apply for subsequent sheets you place on the print layout.
The ganging behavior is the result of combining the following horizontal and vertical settings:
Horizontally
Align to nearest stop You can specify a distance for horizontal stops starting from the print layout lay, and a minimum width for the gap between sheets; the edge of the sheets are placed at the nearest stop while respecting the minimum gap.
Fixed step distance You can specify a distance for horizontal steps starting from the print layout lay, and place the edge of the sheets at a fixed distance from each other.
Gap between sheets Allows you to specify a gap between layout sheets that are ganged horizontally.

AccurioPro WideDirector 3.5 Reference Guide
94 INSPECTORS
Single sheet per print layout
Forces a new print layout to be created for each sheet you drag onto a print layout. For example, if you drag 5 sheets onto a print layout, 5 new print layouts are created for each individual sheet.

AccurioPro WideDirector 3.5 Reference Guide
3 LAYOUT EDITOR 95
Alignment Pin Sets At the bottom of this list, you will see the available alignment pin sets. Selecting an
alignment pin set will display a second drop-down list with the pin configurations for the selected set. See “Alignment Pin Sets” on page 263.
Vertically
Align to nearest stop You can specify a distance for vertical stops starting from the print layout lay, and a minimum width for the gap between sheets; the edge of the sheets are placed at the nearest stop while respecting the minimum gap.
Fixed step distance You can specify a distance for vertical steps starting from the print layout lay, and
place the edge of the sheets at a fixed distance from each other.
Gap between sheets Allows you to specify a gap between layout sheets that are ganged vertically.
Single row Forces a new print layout to be created when the horizontal space is used.
Rearrange and remake the print layout The following commands are available on the cogwheel menu and Print Layout file menu:
Rearrange Sheets: Applies the current settings in the inspector to the
current layout.
Rearrange All Sheets in Job: Applies the current settings in the inspector to all layouts.
Remake All Print Layouts: Deletes all layouts and remakes the layouts
according to the inspector settings.
Finishing
In this inspector you can choose your cutting device, set margins and generate a cutting file for a digital cutting/routing device if required. See also “Finishing Hub” on page 292 for more information about finishing.
Cutter The drop-down list includes the cutting device brands (Fotoba, Zünd, etc.) installed with your resources. Depending on the type of cutter, AccurioPro WideDirector either draws the necessary cutting marks on the sheet, creates a cutting file with the cutting path, or both.

AccurioPro WideDirector 3.5 Reference Guide
96 INSPECTORS
Finishing Margins
Margins are indicated with magenta snap guides when you drag an image next to others images.
Click the gray arrow button to open the Finishing Margins dialog box and set a
custom value for margins on all sides or selected sides of all the images, or choose a preset from the drop-down list. The presets are created in the Finishing Hub. See “Finishing Hub” on page 292 for more information.
NOTE: Changing the margins value does not reposition images already placed on the sheet.
Bleed If your image has bleed, i.e. content that goes beyond the trim size; you can set the bleed that you want to render for this job. Click the link icon if you want to set specific values for Left, Right, Top or Bottom.
Generate Cutting File (button) Click this button to generate a cutting file which is used to route certain cutting devices. A 1-page PDF document is created for each sheet and contains registration marks and cutting lines or a cutting path, but not the actual content.
The cutting files are saved immediately in the Finishing Root folder in your system directory – before you actually submit the job. When you submit the job, you can choose to send the cutting file to the cutter.
Subsequent cutting files that you may create for a job are saved with an incre mental suffix.
NOTE: A cutting file is only generated for devices that require a separate file for registration and routing. For example, the Fotoba cutting lines are printed on the sheet so a cutting file with extra cutting marks is not necessary.
Color Management
Select one of the color management options to control how your images are rendered. This option is especially important for controlling the output of different kinds of images.
Full gamut Converts all input color values directly to the color space of the printing device,
skipping the output intent of the image.
Simulate Allows you to choose a standard output intent or use the output intent of the image. The Simulation drop-down list displays the available output intents.

AccurioPro WideDirector 3.5 Reference Guide
3 LAYOUT EDITOR 97
Decide per document This mode uses Full gamut when it’s safe to do so, and switches to Simulate when
it’s not safe.
No CMS No color management is applied.
Click the pencil icon to open the Input Tagging dialog box and edit the action list.
In this dialog box you can control how input color values are converted to produce the actual output with the default action list. If you change any of the settings, the action list is indicated with an asterisk in the inspector. Click the Revert arrow icon if you want to restore the values to those of the action list.
Preflight
Check image resolution Select this check box to check the resolution of placed images, taking into account the scaling and the expected quality. Warnings will be displayed when necessary.
Preflight Choose a Preflight parameter set from the drop-down list to display Action lists and
select/clear the action check boxes as required. Type in the search box to filter the Action List. Choose Manage Preflight Parameter Sets to edit or create parameter sets. See “Apogee Preflight Action Lists” on page 264. Click the arrow icon next to an action list to edit the action list for the current job. An asterisk indicates that the action list has been modified.
Job Identification
Name The order name identifies your job in the Jobs list. If you do not enter a name here, the job appears in the Jobs list as Untitled if no images have been uploaded for the job, or the name of the first file in your images list is re-used for the job name.
Order number An order number is optional but can be useful to group jobs that are assigned the
same number in the Jobs list.
Remarks Enter any special comments that apply to this job. This is a free-text entry field that is not used by AccurioPro WideDirector but can be useful for your own information.
Milestone This optional information can help you keep track of jobs. Selecting the check box activates the Due Date drop-down list with the following options:

AccurioPro WideDirector 3.5 Reference Guide
98 INSPECTORS
Today
Tomorrow
End of week
Beginning of next week
You can fine-tune the date by clicking the calendar icon, and also change the default time.
NOTE: Setting a due date does not affect the actual processing of a job by the AccurioPro WideDirector system.
When Job Finishes
Archive Select this check box to automatically archive this job when it has been success- fully completed. The archive location is set during installation.
Delete Select this check box to automatically delete this job when it has been success-
fully completed. You have the following options:
After 1 day (default value)
Immediately

AccurioPro WideDirector 3.5 Reference Guide
3 LAYOUT EDITOR 99
Save, Save As and Delete Job Set-Up
Click the black triangle to open a menu where you can save and delete a job set-up.
Job set-ups that you already saved appear at the top of the menu and can be applied to the current job.
Image Inspector The Image inspector displays the specifications of images selected in the image panel or on a layout, and allows you to modify them.
Click the image icon to display the image inspector.
NOTE: Modifications made in the inspector do not affect images already placed on a layout.
Content ID The frame content ID which is only active when an image or frame is selected on a sheet. If the frame contains an image, you cannot edit this box because the sheet is locked. In this case you will see the locked frame icon next to the box.
Copies Enter the total number of copies of the selected image that you want to print, i.e. the number of copies on all the layouts multiplied by the run length.
NOTE: This is not the number of images on the current sheet.
Size The dimensions of the original image. If the image has been edited in the Image Editor, the most recent product size is specified instead of the original image size.
Output resolution The output resolution and scale factor are visible if the image has been placed on a
sheet.
Edit image button Opens an image selected in the list of images in the Image Editor.
Fitting options Click the gray arrow next to the file name to open the Fitting Options where you can modify the cropping and fitting settings for an image selected on the sheet.

AccurioPro WideDirector 3.5 Reference Guide
100 INSPECTORS
Bleed The amount of bleed around the trim/cut path. Enter one value for all sides or click the link icon to enter values for bleed along the four sides as desired.
Finishing A list of finishing operations that apply for the image. The table shows how
Content Elements of the image (spot colors) are mapped to operations. Click the Add button to add operations, or click the cogwheel to open a menu where you can add, edit, delete, reapply finishing operations and open the Finishing Hub. See “Finishing Hub” on page 292 for more information.
Frame size The dimensions of the frame, product and canvas extensions as specified in the
Image Editor.
Image operations A summary of the image edits made in the Image Editor: canvas extensions, grommets and tiling.
Colors Inspector The Colors inspector displays the color settings for all the colors used in the job.
Click the color book icon to display the colors inspector.
Colors The colors in the Colors list are initially, i.e. before images are uploaded, the colors defined for the printing device – generally CMYK and White, Primer and Varnish for certain devices. Additional colors (e.g. spot colors) appear in the list as you upload images.
Additional colors can be mapped to output colors by choosing the color in the list, clicking the Print as check box and choosing a color from the drop-down list, or a new Color from Color Books.
The list may also contain one or more finishing colors which means that a spot color in the image has been identified for use as a finishing operation. See “Finishing Hub” on page 292 for more information about finishing operations, and the “Image Inspector” on page 99 to see how spot colors are mapped to finishing operations.
Colors inspector icons
The color will be printed/output (‘Print as’ check box selected).
The color will not be printed/output (‘Print as’ check box not selected).

AccurioPro WideDirector 3.5 Reference Guide
3 LAYOUT EDITOR 101
The color is a process color or will be printed as a process color.
The color is a spot color, varnish or white.
The color is mapped to a color from a color book.
The color is taken from the application.
The color is mapped to a finishing operation.
The color is mapped to a custom color.
The color is mapped automatically as defined for the colors of the device.
The color is mapped to and depends on another color in the list.
Color Definitions
This section specifies how and from where AccurioPro WideDirector will retrieve its color definitions. You have three search options:
Search books only AccurioPro WideDirector searches the specified books. The job will fail if the
color is not found in the any of the selected books.
Search books first, use application values
if not found
Same as above, but now AccurioPro WideDirector will also use the application values if the color is not found in the books.
Use application values when supplied,
else search books
AccurioPro WideDirector uses the application values, unless the application does not supply the values. AccurioPro WideDirector will then search the books.
NOTE: When this option is selected, the application might find a color in a different color space. In this case, there is a color space conflict.
Books Clicking the Books button displays the book selection window. The table shows all the available books that can be searched.
You can select or clear the check box next to the book’s name to either include the book in or exclude it from the search. You can also change the search order by using the up and down arrows or by dragging and dropping.

AccurioPro WideDirector 3.5 Reference Guide
102 INSPECTORS
Mark Sets Inspector (Sheet Layout mode only)
NOTE: The Mark Sets tab controls marks for the selected sheet and/or selected images, not for the entire job.
Click the marks icon to display the marks sets inspector.
This tab consists of the following inspector panels:
Mark Sets
Mark Inspector
Mark Sets
In the Mark Sets tab you can choose to place Image marks or Sheet marks on the selected images or current sheet.
Image Marks for selected images Select the check boxes to place sets of marks on the selected image.
for example, apply grommet marks along the sides of all the images on a
sheet
for example, place text marks on all the images on a sheet
Sheet marks for all layouts in job Select the check boxes to place sets of marks on the selected sheet.
for example, apply grommet marks along the sides of a sheet
for example, apply cutting marks for different cutting devices and override the
Finishing inspector
Select the Apply changes to all images/layouts in job if you want the selected marks to appear throughout the job.
Mark Inspector This tab shows the details of the selected mark. You can edit the settings for the selected mark. See “Mark Engraver” on page 299 for more information about the different types of marks and their settings.

AccurioPro WideDirector 3.5 Reference Guide
3 LAYOUT EDITOR 103
Click the cogwheel and select Manage Mark Sets to open the Mark Engraver. See “Mark Engraver” on page 299 for more information. The cogwheel also has a command to switch off all the mark sets.
Sheet Inspector Click the layout icon to display the layout inspector.
Sheet number and lock status
Sheet A sheet can be locked or unlocked as indicated by the black lock icon. Click the lock to change its status.
Copy Count The total number of sheets to be printed to accommodate the requested copy count of images.
Media, Thickness, Size As chosen in the job set-up. The height is not shown for roll media.
Image Area The width and height of the image box, i.e. the area to effectively be printed.
This area on the sheet is shown in a small diagram with the distance to the edges of the sheet. This is meant to give you an idea of the position of the print area on the sheet:
positive distance: the print area is inside the sheet
0: the area is exactly on the edge of the sheet
negative distance: the area is outside the sheet
If all the values are positive, the print area is yellow; if one of the values is negative, the area is magenta.
Finishing Operations
Operation The operations selected for the job, e.g. Crease, Through Cut.
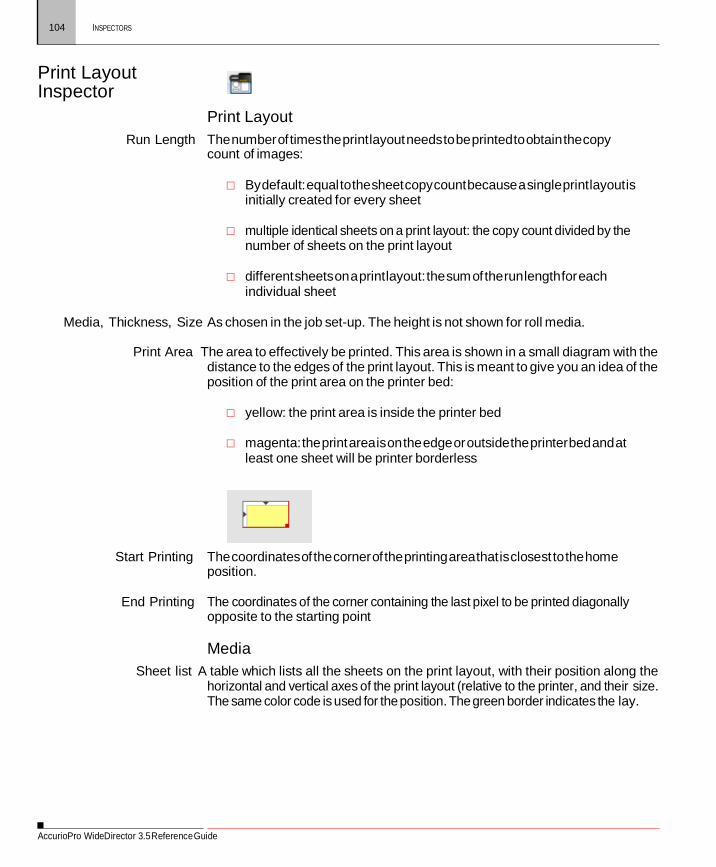
AccurioPro WideDirector 3.5 Reference Guide
104 INSPECTORS
Print Layout Inspector
Print Layout Run Length The number of times the print layout needs to be printed to obtain the copy
count of images:
By default: equal to the sheet copy count because a single print layout is initially created for every sheet
multiple identical sheets on a print layout: the copy count divided by the
number of sheets on the print layout
different sheets on a print layout: the sum of the run length for each individual sheet
Media, Thickness, Size As chosen in the job set-up. The height is not shown for roll media.
Print Area The area to effectively be printed. This area is shown in a small diagram with the
distance to the edges of the print layout. This is meant to give you an idea of the position of the print area on the printer bed:
yellow: the print area is inside the printer bed
magenta: the print area is on the edge or outside the printer bed and at
least one sheet will be printer borderless
Start Printing The coordinates of the corner of the printing area that is closest to the home position.
End Printing The coordinates of the corner containing the last pixel to be printed diagonally
opposite to the starting point
Media Sheet list A table which lists all the sheets on the print layout, with their position along the
horizontal and vertical axes of the print layout (relative to the printer, and their size. The same color code is used for the position. The green border indicates the lay.

AccurioPro WideDirector 3.5 Reference Guide
3 LAYOUT EDITOR 105

AccurioPro WideDirector 3.5 Reference Guide
106 APPLYING CHANGES AND SUBMITTING A JOB
Applying Changes and Submitting a Job
Applying Changes If you change settings that modify the color rendering of the images (e.g. preflight, calibrated printing mode), the Apply Changes button appears in the amber status box in the bottom right corner, and you can choose whether you want to apply your changes or not. Applying changes may take considerable time and interfere with your work.
NOTE: Applying changes does not create new previews. See “Image Previews” on page 57.
Submitting a Job After placing your images on the sheet, reviewing the print layout, and completing the job set-up, you can submit the job by clicking the Submit Job button in the bottom right corner. Submitting a job also creates previews if you chose not to generate previews while preparing the job.
The Submit Job dialog box is displayed where you can choose the following options:
Print Files
Hold The job appears in the Jobs list but no files are processed.
Make and Hold The files for the printing device are processed but not sent to the printing device.
Make and Send to the Printer
The files for the printing device are processed and sent to the printing device.
Cutter Files Hold The cutting files are not sent to the cutting device.
Make and Send to the Printer
The cutting files are processed and sent to the cutting device.
Submit button Click the Submit button to confirm your changes to the job. The Layout Editor closes and the actions you selected for the print files and cutter files are executed. The job is updated in the Jobs list.

AccurioPro WideDirector 3.5 Reference Guide
3 LAYOUT EDITOR 107
Discard/Delete Job button If the job has not yet been submitted you will see the Delete Job button. Clicking this button will delete the job. If the job has already been submitted and you were making additional changes to the job, you will see the Discard button. Clicking this button closes the Layout Editor without saving your changes to the job.
Cancel button Click the Cancel button to return to the Layout Editor without confirming your changes.
DQS Indicator The DQS indicator is visible in the bottom right corner if DQS, or Digital Quick Strip, is enabled. The indicator informs whether DQS is active and at what level (image or sheet). Hover over the indicator to see the status tooltip.
The DQS feature is enabled automatically if duplicate content is found in the job. If the same image is placed multiple times, it is quicker to render it once and then compose the raster data.
Click the DQS indicator to open the DQS menu and select a level to override
the automatic application of DQS:
Image DQS (green) This level of DQS renders the image once.
Sheet DQS (yellow) This level creates and renders a Print Layout as a collection of Sheet Layouts.
DQS not possible (white) DQS is enabled but not beneficial.
No DQS (red bar) DQS is switched off although it is available.
Automatic The system has determined that DQS should be enabled.
NOTE: The printer may also have a DQS option.

AccurioPro WideDirector 3.5 Reference Guide
108 SHEET LAYOUT TEMPLATES
Sheet Layout Templates Sheet layout templates help you apply a standard sheet layout to several sheets in the same job or to the sheets of different jobs. A template consists of empty frames that are used as placeholders for arranging images on the sheet.
A template applies the following settings to the current sheet:
Sheet size (media size)
All the settings of the individual frames, such as positioning, rotation, fitting
options
Image marks applied manually
The frame content ID: Templates with named frames, i.e. frames with content IDs, can further automate image placement. For example, the same image can be assigned to multiple frames with the same content IDs.
Related topics: • Working with Frames on page 67
• Naming frames (content IDs) on page 75 • Layout Panel on page 60 • Placing Images Interactively on page 62
Create a template from an existing sheet with placed images
You can create a sheet layout template by saving a sheet that you prepared for a particular job. This will probably be a layout with placed images. Saving as a template removes the images and creates a layout with just the frames.
1 Go to the sheet that you want to save as a template and select the Sheet Size.
Make sure all the settings for the individual frames are fine-tuned.
2 Choose Sheet > Save Sheet Layout Template.
3 In the dialog box, enter the following information:
Save as: type a descriptive name for the template
Assign Content IDs: Select this check box to name the frames on your template. If the frames of your layout contain images, each frame is assigned a unique content ID but frames that contain the same image are assigned the same ID.

AccurioPro WideDirector 3.5 Reference Guide
3 LAYOUT EDITOR 109
NOTE: If the layout contains a combination of named and unnamed frames, the IDs of the named frames are used for the named frames and the unnamed frames are not assigned an ID.
4 Click Save.
The dialog box closes and you can continue working in the Layout Editor. If you want to check that your template has been saved, follow the procedure to apply a template and you will see your new template in the list of templates. If you want to check that your template has the desired frames and content IDs, apply the template to a new layout sheet.
NOTE: Your sheet must have at least one image or frame, otherwise the template is not saved and will not appear in the list of templates.
Figure 3.12: A sheet with placed images saved as a template with content IDs
Apply a Sheet Layout Template
CAUTION: Applying a sheet layout template erases all the placed images and frames from the current sheet. In other words, the template is applied to the sheet, not to its content.
1 On the current sheet or a new sheet, choose Sheet > Apply Sheet Layout
Template.

AccurioPro WideDirector 3.5 Reference Guide
110 SHEET LAYOUT TEMPLATES
The left panel of the dialog box lists all the available templates, so it may be empty if you’re just starting. The size of the sheet and the number of frames on the sheet is specified for each template.
The right panel shows further details about the frames on the selected template:
Content ID: only specified for the named frames; here you can see the effect of saving a template with the Assign Content IDs option selected. Some frames may have the same ID which means that an image placed on one of these frames will be repeated in all the frames with the same ID.
Size: size of each frame; frames with the same ID can have different sizes.
Count
2 Select the template you want to use and click Apply or double-click it.
3 The sheet now has the size as specified in the template and all the frames are empty, except for image marks that you may have added.
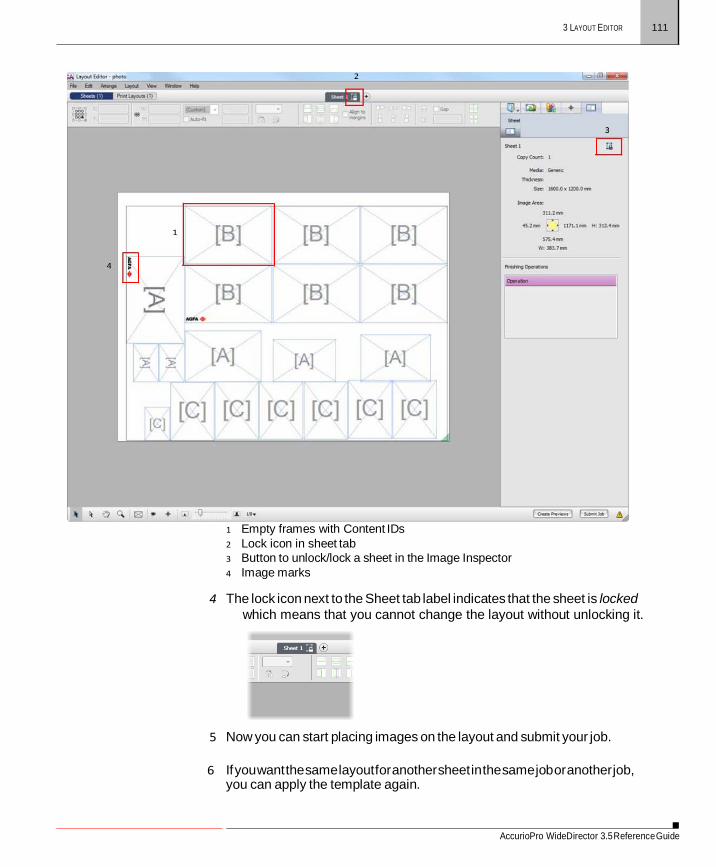
AccurioPro WideDirector 3.5 Reference Guide
3 LAYOUT EDITOR 111
1 Empty frames with Content IDs 2 Lock icon in sheet tab 3 Button to unlock/lock a sheet in the Image Inspector 4 Image marks
4 The lock icon next to the Sheet tab label indicates that the sheet is locked which means that you cannot change the layout without unlocking it.
5 Now you can start placing images on the layout and submit your job.
6 If you want the same layout for another sheet in the same job or another job, you can apply the template again.

AccurioPro WideDirector 3.5 Reference Guide
112 SHEET LAYOUT TEMPLATES
Create a sheet layout template from scratch You can create a sheet layout template from a sheet with empty frames. This involves drawing and naming frames, and setting their Fitting Options.
1 Go the sheet that you want to save or add a new sheet and select the Sheet
Size.
2 Draw your frames on the sheet with the Frame tool.
3 Depending on the automation effects that you want to achieve with the template, you can fine-tune the individual frames on the layout, for example:
Name the frames; assign the content IDs of your choice to the frames. You do
this interactively by entering IDs for each frame in the Image Inspector. If you want the same image to be used in different frames, enter the same ID for these frames.
Fitting options: Activate the Auto-fit option and set the fitting settings to
control how images will fit in the frame. For example, if you want to place a single image in frames with different sizes and orientation, choose the settings to fit the image in the frames.
4 When you have finished your layout, choose Sheet > Save Sheet Layout
Template.
5 In the dialog box, enter the following information:
Save as: type a descriptive name for the template
Assign Content IDs: This option is grayed out because there are no filled frames on the sheet.
6 Click Save.
The dialog box closes and you can continue working in the Layout Editor. If you want to check that your template has been saved, follow the procedure to apply a template and you will see your new template in the list of templates. If you want to check that your template has the desired frames and content IDs, apply the template to a new layout sheet.
NOTE: If the layout contains a combination of named and unnamed frames, the IDs of the named frames are used for the named frames and the unnamed frames are not assigned an ID.

AccurioPro WideDirector 3.5 Reference Guide
3 LAYOUT EDITOR 113
Edit/Rename a sheet layout template
1 Apply the template to a sheet.
2 Edit the sheet and save it with a different name or the same name.
Saving with the same name overwrites the existing template.
Delete a sheet layout template
1 In the Layout Editor, choose Sheet > Apply Sheet Layout Template.
2 Select the template you want to delete in the list of templates, and press the Delete key.
Locking/Unlocking a Sheet
When a sheet is locked, you cannot modify the number of frames on the sheet, the position of frames, or the size of the frames. It is possible to change the Fitting Options and the Content IDs.
Sheets created from a template are locked by default as indicated by the lock icon in the Sheet tab label.
1 On the sheet that you want to lock/unlock, go to the Sheet Inspector.
2 Click the lock icon the lock/unlock the sheet.

AccurioPro WideDirector 3.5 Reference Guide
114 SHEET LAYOUT TEMPLATES
Importing/exporting templates
Templates can be imported and exported through the resources in the System Overview.
Related topics: • Resources on page 120
AccurioPro WideDirector 3.5 Reference Guide
3 LAYOUT EDITOR 115
Layout Hot Tickets Layout hot tickets allow you to automate the creation of layout jobs. Files can be dropped in a hot folder or uploaded, and new layout jobs are created and submitted automatically.
For each image or document, the system creates an individual job that takes the file name as job name and the job name of the hot ticket as order number. Depending on whether the input is an image file or document, the processing is as follows:
Input file is an image: a layout job is created for each image and this job
consists of one sheet and one Print Layout.
Input file is a document: each page is assigned to a sheet in the same layout job; a layout hot ticket can only have one sheet, so additional sheets are replicated from this one sheet.
There are two options for the placement of the images on the sheet:
Sheet without frames: the image is placed in the default image placement
position, i.e. in one of the corners of the sheet, aligned with the lay of the printer.
Sheet with frames: the image is used to fill all the frames on the sheet; each
frame on this sheet can have a different size, fitting options, etc.
Layout hot tickets are managed in the Hot Tickets window.
Create a Layout Hot Ticket
NOTE: This option requires a special license.
1 Go to the Hot Tickets window.
2 Choose File > New Layout Hot Ticket
3 Choose the template you want to use in the Template list, enter a name for the hot ticket and choose a Printer.
4 Click Open.
The Layout Editor opens and you can set up the sheet just like you would do for a regular layout job. Leave the sheet empty if you want images to be placed in the default image placement position. Draw frames on the sheet if you want multiple instances of the same image on the sheet.

AccurioPro WideDirector 3.5 Reference Guide
116 LAYOUT HOT TICKETS
NOTE: Only create 1 sheet. Additional sheets will be discarded when you save the hot ticket.
5 Go to the Media Layout inspector, which is slightly different for hot tickets than for regular layout jobs. In the Layout Images panel, select the options as required:
Automatically place images on sheets: select this option if you want your
images to be placed automatically on sheets
When no frames, place: Single image per sheet or Multiple images per sheet
Optimize orientation: If you selected the first option to place images, you
can choose to automatically rotate images so they fit in the frames.
6 Click the Submit Job button to save your hot ticket and choose the Print Files and Cut Files option you want to use for all the jobs created from the hot ticket.
7 Click Submit to save your changes.
Create jobs from a Layout Hot Ticket
1 Go to the Hot Tickets window.
2 Right-click the hot ticket you want to use in the Hot Ticket list and choose Upload Document.
3 Browse to the images or documents you want to upload. Multiple images and documents can be uploaded.
4 Click Open.
The system creates one or more layout jobs in the background. Go to the Jobs window and you will see the new jobs appearing in the Job list. An individual job is created for each image and/or page in a document. For example, if you uploaded 20 images, the system creates 20 jobs.
5 Double-click a job to edit and fine-tune in the Layout Editor.
Make a Layout Hot Ticket template A Layout Hot Ticket is always created from a template. You can create your own templates from an existing Layout Hot Ticket.
1 Go to the Hot Tickets window.
2 Select the hot ticket you want to save as a template in the Hot Ticket list.

AccurioPro WideDirector 3.5 Reference Guide
3 LAYOUT EDITOR 117
3 Choose File > Save as Template.
4 Choose a template Category and click Save.
The template is added to the list of templates.
NOTE: To delete a template, go to the Templates resource. Read the section “Monitoring and Configuring Your System” on page 347.

AccurioPro WideDirector 3.5 Reference Guide
118 QUICKPROOF IMAGES AND SHEETS
QuickProof Images and Sheets
NOTE: This option requires a special license.
With the QuickProof feature you can send an image or a sheet immediately to a proofer from within the Layout Editor. The system creates a job in the background to print to the proofer and this job is deleted automatically after the job has been printed successfully.
An image proof includes all the image settings as set in the Layout Editor and Image Editor: bleed, scaling, mirroring, canvas extensions, etc. However, if an image has been tiled, you can only proof the master image, not the individual tiles.If you want to proof tiles, place them on a layout sheet first.
A layout sheet proof takes into account how the image is placed on the sheet and as such, the proof of a placed image can be different than the proof of the original image as a result of fitting and resizing for example.
Proof an image
In the Image panel (list of images) of the Layout Editor, right-click the image
you want to proof, and choose Proof Image.
OR
Choose File > Proof Image.
The QuickProof dialog box is displayed.
Proof a layout sheet
In the Sheets panel (list of layout sheets) of the Layout Editor, right-click the sheet you want to proof, and choose Proof Sheet.
OR
Choose File > Proof Sheet.
The QuickProof dialog box is displayed.
QuickProof Dialog Box These setting are remembered for the job.

AccurioPro WideDirector 3.5 Reference Guide
3 LAYOUT EDITOR 119
Finishing Operations Select the check box to print each finishing operation with a 1-point solid line in the
color that is associated with the color of the finishing operation in the selected cutter. When no cutter is selected, or when the finishing operation is not available in that cutter, the finishing operation is not printed. The finishing operations are printed on top of everything else, in the order as defined by the finishing operations.
White/Varnish Select the check box to print these special inks using the specified color and
opacity. These special colors are always printed on top of the other content. Proofer Choose a proofer from the drop-down list. You can only print the proof on a
proofer.
AccurioPro WideDirector 3.5 Reference Guide
120 RESOURCES
Resources
Resources are the settings used in the background to process jobs.
In the Layout Editor, you can open some of the AccurioPro WideDirector resources by choosing Window > Resources and selecting a resource, or via the inspectors.
See the following sections:
for task processor resources:
“Media Hub” on page 327
“Finishing Hub” on page 292
“Mark Engraver” on page 299
“Color Books” on page 279
“Alignment Pin Sets” on page 263
for system resources:
“Sheet Sizes” on page 366
“Sheet Layout Templates” on page 108
Administrator access level only! All AccurioPro WideDirector resources can be opened in System Overview, either as system resources or task processor resources.
AccurioPro WideDirector 3.5 Reference Guide
3 LAYOUT EDITOR 121
Layout Editor Menus
Main Menus The following menus are available on the top menu bar in the Layout Editor window.
File Menu
Menu Item Description
Add Image Opens a file browser to select images. Get Info Displays the Info dialog box with information about the original
image file organized in the General, Dimensions and Resources tabs.
Show Preflight Report Opens a PDF with a preflight report for the selected image – if available.
Export Original File Exports the original file to a location of your choice. Proof Images Send selected images to a proofer. See “QuickProof Images and
Sheets” on page 118. Proof Sheet Send selected sheet to a proofer. See “QuickProof Images and
Sheets” on page 118. Save as Template Saves the current job as a Layout Ticket template Submit Opens the Submit Job dialog box. See “Applying Changes and Sub-
mitting a Job” on page 106.
Edit Menu
Menu Item Description
Undo/Redo Undoes/Redoes the last operation. Cut, Copy, Paste Cuts, Copies, Pastes the current selection. Delete Frame Deletes the current frame. Clear Frame Deletes the image from a frame. Duplicate Image Makes a copy of the image in the image panel. Duplicate Frame on Sheet
Opens the Duplicate dialog box for duplicating the selected frame or frames on the sheet. See “Duplicating Images” on page 78.
Step and Repeat Opens the Step and Repeat dialog box – if one or more placed images are selected. See “Step & Repeat” on page 79.
Select All Selects all images in the image panel, or all images on a selected layout.
Select None Deselects all images in the image panel, or all images on a selected layout.

AccurioPro WideDirector 3.5 Reference Guide
122 LAYOUT EDITOR MENUS
Menu Item Description
Edit Externally See “Managing/Editing Images” on page 55. • Original Image • Original Image with • Update after Edit • Normalized PDF
Edit with Preview Opens the selected image in Preview. See “Previewing Job Results” on page 233.
Open in Image Editor Opens the selected image in the Image Editor. See “Image Editor” on page 127.
Edit Sheet With a sheet selected on a print layout in Print Layout mode, switches to the selected sheet in Sheet Layout mode.
Arrange Menu
Menu Item Description
Group/Ungroup Groups/ungroups the images selected on a layout. Fitting Options for fitting the image and frame, and to open the Fitting
Options dialog box. See “Inspecting Frames” on page 69. Size Frame to Sheet Fills the sheet with the selected image frame which can be empty
or filled. Revert Frame Reverts a filled frame to the size of the original image. Scale for Bleed Scales the image outside the frame to allow for the specified bleed
content. Revert Image Size Reverts the size of the original image back to the size it initially had
when you added it to the image panel.
Sheet Menu
Menu Item Description
Auto-Layout Image Opens the Auto-Layout dialog box. See “Placing Images with Auto- Layout” on page 80.
New Empty Sheet Creates a new, empty sheet for the job. Duplicate Sheet Creates a new sheet and duplicates the content. Delete Current Sheet Deletes the current sheet. Delete Sheets Opens a dialog box where you can choose to delete empty sheets or
all sheets. Rearrange Frames Rearranges the selected frames to their automatic placement. Rearrange All Frames in Job
Rearranges all the frames to their automatic placement on all the sheets.
Reapply All Mark Sets in Job
Removes all marks and reapplies the marks set rules.
Apply Sheet Layout Tem- plate
Opens a dialog box with the saved sheet layout templates which can be applied to the current sheet.

AccurioPro WideDirector 3.5 Reference Guide
3 LAYOUT EDITOR 123
Menu Item Description
Save Sheet Layout Tem- plate
Opens a dialog box to save the current sheet as a sheet layout tem- plate.
Assign Content IDs Assigns content IDs to the selected frames or all frames if none are selected. The frame must contain an image.
Clear Content IDs Clears the content IDs of the selected frames or all frames if none are selected.
Lock/Unlock Sheet Locks/unlocks the sheet to disable/enable editing.
Print Layout Menu
Menu Item Description
New Empty Print Layout Creates a new, empty print layout for the job. Duplicate Print Layout Creates a new Print Layout and duplicates the content. Delete Current Print Lay- out
Deletes the current Print Layout.
Delete Print Layouts Opens a dialog box where you can choose to delete empty Print Layouts or all layouts.
Rearrange Sheets Rearranges the selected sheets to their automatic placement. Rearrange All Sheets in Job
Rearranges all the sheets to their automatic placement on all the Print Layouts.
Remake all Print Layouts Repositions all sheets in accordance with modified sheet layout set- tings.
View Menu
Menu Item Description
Zoom In/Out Increases/decreases the zoom factor for viewing the layout. Zoom to Fit Fits the layout to the area between the image panel and the
inspectors. Guides • Don’t snap: no colored guides are displayed and images are not
snapped to align with adjacent images on the sheet. • Snap to margins: (default) magenta snap guides are displayed
when positioning images on the sheet, to help you align with the margins of the images.
• Snap to edges: cyan snap guides are displayed when positioning images on the sheet, to help you align with the edges of the images.
• Snap: guides are displayed when dragging sheets on the Print Lay- out.
Print Layout Editor Orientation
• Leading edge as on printer • Leading edge always on bottom/top of window

AccurioPro WideDirector 3.5 Reference Guide
124 LAYOUT EDITOR MENUS
Window Menu
Menu Item Description
System Overview Opens or switches to the System Overview window. Jobs Opens or switches to the last Jobs window. Resources • “Media Hub” on page 327
• “Finishing Hub” on page 292 • “Mark Engraver” on page 299 • “Color Books” on page 279 • “Sheet Sizes” on page 366 • “Sheet Layout Templates” on page 108 • “Alignment Pin Sets” on page 263
Show View Options Shows/hides the View Options palette. Show Snag List Shows/hides the Snag List. Panels • Show/Hide Inspector: shows/hides the panel on the right with
inspectors • Show/Hide Image Panel: shows/hides the panel on the left with
images Inspector • “Job Set-Up Inspector” on page 88
• “Image Inspector” on page 99 • “Colors Inspector” on page 100 • “Mark Sets Inspector (Sheet Layout mode only)” on page 102 • “Sheet Inspector” on page 103
Go to ProductionCenter Opens the ProductionCenter application in your internet browser.
Right Menus The following menus are available by right-clicking in the various panels or objects in the Layout Editor.
Sheet Layout Mode - Image in the Image Panel
See “Managing/Editing Images” on page 55.
Sheet Layout Mode - Image on a Sheet
See “Inspecting Frames” on page 69.
Print Layout Mode - Sheet in the Sheets Panel
Right Menu Item Description
Delete Sheet Deletes the selected sheet from the Sheets panel and removes it from the Print Layout.

AccurioPro WideDirector 3.5 Reference Guide
3 LAYOUT EDITOR 125
Right Menu Item Description
Duplicate Sheet Creates a copy of the sheet in the Sheets panel and creates a new Print Layout that contains the new sheet.
Edit Sheet Opens the selected sheet in Sheet Layout mode. Locate Sheet on Print Layout
Highlights the sheet on the current Print Layout.
Print Layout Mode - Sheet on a Print Layout
Right Menu Item Description
Delete Sheet Deletes the selected sheet from the Print Layout. Duplicate Sheet on Print Layout
Creates one or more copies of the sheet and places them on the current Print Layout or creates new Print Layouts if sufficient space is not available.
Edit Sheet Opens the selected sheet in Sheet Layout mode. Rearrange Sheet Rearranges the selected sheets to their automatic placement.

AccurioPro WideDirector 3.5 Reference Guide
126 LAYOUT EDITOR MENUS

127
4
Image Editor
This section describes the Image Editor, a dedicated workspace for editing the images you upload in the Layout Editor. The Image Editor includes comprehensive features for tiling.
Overview ................................................................................................................. 128 Image Inspector ................................................................................................... 132 Canvas Extensions and Grommets Inspector ........................................... 136 Tiling Inspector .................................................................................................... 140 Interactive Tiling ................................................................................................. 146 Other Tiling Features ......................................................................................... 154 Tile Marks Dialog ........................................................................................ 154 Tiling Preferences ....................................................................................... 156 Presets ..................................................................................................................... 159 Tiles in the Layout Editor ................................................................................. 163

AccurioPro WideDirector 3.5 Reference Guide
128 OVERVIEW
Overview
The Image Editor is a module of the Layout Editor that opens when you open an image that has been added to the list of images in the Image panel.
To open the Image Editor from the Layout Editor window:
Double-click an image or one of the tiles of a tiled image in the Image panel OR
Right-click an image in the Image panel and choose Open in Image Editor
OR
When an image is selected in the Image panel, click the Edit image button in the Image inspector.
Figure 4.13: A photo open in the Image Editor
1 Positioning tools 2 Image panel showing product size and bleed box 3 Inspectors 4 Editing toolbar 5 View Options palette

4 IMAGE EDITOR 129
AccurioPro WideDirector 3.5 Reference Guide
Inspectors The panel on the right consists of a number of tabs, which are referred to as inspectors, where the actual image editing is performed.
1 Image Inspector for basic edits to the image (product size, bleed, etc.) 2 Canvas Extensions and Grommets Inspector 3 Tiling Inspector to tile a large image into smaller tiles
The following sections discuss each inspector separately and how the various settings affect the image being edited. Note, however, that changes you make in one inspector may also affect what you specified in another inspector and vice versa. For example, you can specify bleed in the Image inspector, create canvas extensions and grommets in the second inspector, and then tile the resulting product into smaller tiles in the Tiling inspector. The tiling is applied to the entire product including the extensions, while the bleed you specified in the Image inspector is applied to the individual tiles created in the Tiling inspector.
View Options Palette
Open the View Options palette to choose the various boxes and non-printed information that you want to see while working in the Image Editor.
NOTE: Hiding content or marks with the View Options palette does not mean they will not be printed.

AccurioPro WideDirector 3.5 Reference Guide
130 OVERVIEW
Click the View Options button in the toolbar to show/hide the View Options dialog box.
The following components can be shown/hidden:
Image
Trim box: the original trim box of the image
Product Size: the box indicating the size of the product to be printed
Frame: the box around the image that includes canvas extensions but not the bleed
Bleed box: the box around the image that includes the bleed area, and the
canvas extensions if applicable
Contours: the path that sets the contours around an image, for example for cutting

AccurioPro WideDirector 3.5 Reference Guide
4 IMAGE EDITOR 131
Extra
Canvas Extensions: the box around the canvas extensions
Grommets: the marks representing the grommets to be printed as content with the image
Tiles
Number: the sequence number of the tiles
Visible size: the box indicating the visible size of the tiles
Total size: the box indicating the visible size plus overlapping edges and
bleed
Overlap: the overlapping edges of tiles as required for the tiling arrangement
Anchor: the black arrow icon indicating the anchor corner that depends on
the montage sequence
Preview
Image: the actual content of the image you are editing
In the View Options drop-down list you can select, create, rename or delete preference sets for the View Options.
Related topics: • View Options Palette on page 82
Toolbars The toolbar in the bottom left corner basically has the same tools as in the Layout Editor, except for the Crop and Split tools which are available in the Image Editor when the Image and Tiling inspectors are selected respectively. See “Interactive Tiling” on page 146.
Related topics: • Layout Toolbar on page 86
When using the Tiling inspector you will also see a positioning toolbar at the top of the image editing panel which is activated when you select a tile. See “Positioning Toolbar” on page 152.

AccurioPro WideDirector 3.5 Reference Guide
132 IMAGE INSPECTOR
Image Inspector
The product is initially the same size as the original image. The image inspector is where you can crop the original image, change the product size and specify how the image fits in the product, and specify the bleed.
Click the tab to display the image inspector.
Master Image
Copies Enter the total number of copies of the selected image that you want to print, i.e. the number of copies on all the layouts multiplied by the run length.
NOTE: This is not the number of images on the current sheet.
Size The original dimensions of the image.
Crop You can crop the image by specifying a single value for all four sides with the link icon closed, or by entering values for each side with the link icon open. These cropping values are applied to the original image dimensions, so before other modification such as fitting and bleed are applied.
Product Size
Size Here you can specify the size that you want for the finished product. When you open an image in the Image Editor the first time, the product size is equal to the image size. The product size is the same as the frame in the Layout Editor. Leave the link icon closed if you want to keep the aspect ratio of the original image. You can change the orientation of the product by clicking the swap dimensions button to the right of the size fields.
Use image size: The product size is identical to the image size and this size
can be scaled by entering a percentage.
Standard size from the list: Choose a size from the drop-down list and the scaling factors for the length and height are displayed to the left of the dimensions. You can edit the dimensions.
Custom: Lets you specify the length and width in your preferred size units.
Fitting Options If you chose a size in the list or defined a specific product size you can also set the fitting options. Otherwise the image fits in the product box.

AccurioPro WideDirector 3.5 Reference Guide
4 IMAGE EDITOR 133
Orientation: Selecting the Rotate for better fit check box rotates the image so the long edge of the product size aligns with the long side of the image.
Scaling: Select how you want to scale the image to fit in the product:
None: no scaling is applied to fit the image to the product; it takes up as
much space as required to accommodate its original size
Fill with image: scales the image so it fills the product and crops the image if necessary.
Fit image: scales the image so it fits completely in the product which is not
necessarily filled.
Fit image to width: scales the image so its width fits that of the product.
Fit image to height: scales the image so its height fits that of the product.
Maintain proportions Keeps the width and height scale factors the same when scaling. This means that some parts of the image may be clipped.
Alignment Choose a position (top left, top center, top right, etc.) for the cropped, scaled or
rotated image inside the product size.
Total frame size The product size + canvas extensions
When you apply your changes, the image appears in the images list of the Layout Editor with the new product size. If you edit the image again, you can start from the original image size. Any changes you make do not affect images which are already placed on sheets.
Bleed Bleed can be taken from the image file or created by the system. Specifying bleed does not affect the product size or crop.

AccurioPro WideDirector 3.5 Reference Guide
134 IMAGE INSPECTOR
Figure 4.14: Mirrored image content added as bleed (between black and red boxes)
Bleed types From the drop-list you can specify when bleed is created by the system or taken from the bleed area available in the image file. These options are mainly relevant for images which have a bleed area present in the image file. Only the first and the last options are relevant if the image has no bleed area.
None: Sets the maximum bleed to 0 even if bleed is provided in the image file.
The bleed box coincides with the canvas extension box or the product size.
From image, fixed size: The system uses the bleed in the image file for the maximum bleed you specified or only what is available if the bleed in the image is less than the specified bleed.
From image, disable if none: The system uses the bleed in the image file for
the maximum bleed or less if the bleed in this file is less. No bleed is created if the image file has no bleed.
From image, create if needed: The system uses the bleed in the image file if it is
equal or greater than the specified maximum bleed; if the image bleed is less than the specified bleed, the system creates the bleed and does not use the image bleed.
Always create bleed: The system creates the maximum bleed, effectively
replacing any bleed in the image file. Maximum bleed Specify the size of the bleed area you want around the image or canvas
extension. Bleed is created around the canvas extension if this is present, not around the image. Enter one value for all sides or open the link icon to enter values for bleed along the four sides as desired. Press Enter to apply the values.

AccurioPro WideDirector 3.5 Reference Guide
4 IMAGE EDITOR 135
Bleed Generator By default, the system mirrors the content along the edges of the image to create the specified bleed if no bleed area is provided in the image file. You can fine- tune or change this behavior by clicking the pencil icon next to the bleed types to open the Bleed Generator dialog box.
Method This is how the system will create the bleed content from the image content:
Mirror edge content: The bleed area is filled by mirroring the content
within the bleed range along the edges of the product box.
Scale entire content: The entire image is scaled proportionally to fill the bleed area.
Inset The bleed content is created, starting from the specified inset inside the product box
and on top of the existing content. This is useful if the image content does not extend to the product box.
Preserve existing bleed Select the Options check box to preserve the bleed content in the image file
underneath the bleed created by the system.
Rotate and Mirror (Positioning Tools) Use the Rotate drop-down list (0, 90°, 180° or 270°) to rotate and the Vertical or Horizontal Mirror buttons to mirror the image and its product box. The F symbol next to the buttons indicates the combined effect of the rotation and mirroring.
You only see the effect of rotating and mirroring when you place the image on a sheet in the Layout Editor where you can also perform the same rotating and mirroring actions. See “Positioning and resizing images with the positioning toolbar” on page 65. The fact that you have rotated or mirrored the image is indicated with a green F icon in the top left corner of the image.

AccurioPro WideDirector 3.5 Reference Guide
136 CANVAS EXTENSIONS AND GROMMETS INSPECTOR
Canvas Extensions and Grommets Inspector With canvas extensions you can add extra material to one or multiple edges of the image to create flaps. Grommets can be positioned in these extensions or in a product without extensions.
Figure 4.15: Mirrored image content added as extensions and bleed, corners not filled
• Canvas extension between the black product box (image) and yellow extension box • Bleed between the yellow extension box and red bleed box
Click the tab to display the canvas extensions and grommets inspector.
Canvas Extensions You can specify the size of canvas extension and whether they are filled with content created by the system or left empty. Any bleed you specified in the image inspector is added to these extensions.
Select the Canvas Extensions check box to enable the settings:
Size Specify the size that you want the canvas to extend beyond the product size.
Enter one value for all sides or open the link icon to enter different values for the four sides as desired. Press Enter to apply the values.

AccurioPro WideDirector 3.5 Reference Guide
4 IMAGE EDITOR 137
Fill Corners This check box has to be cleared to create open flaps; when selected, corners with adjacent flaps are filled.
Content Here you can choose how the system will create content to fill the extensions:
Scale image: The image is scaled proportionately so it fills the product
size plus the canvas extensions plus the bleed areas
Mirror image: The extensions are filled by mirroring the content within the extension range along the edges of the product box, optionally, starting from a specified inset inside the product box and on top of the existing content. This is useful if the image content does not extend to the product box. The bleed is a continuation of this mirrored content.
Image bleed: The extensions are filled with the bleed present in the image file
or the generated bleed that runs into the extensions. If you cropped the image, the cropped parts are used.
Color: Fills the extensions with a solid color (CMYK or RGB) that you can
choose with the color picker. Open the color picker by clicking the patch next to the Content drop-down list when this option is selected.
No ink: Leaves the extensions and bleed areas empty.
No-ink zone Enter a value for an area along the edges of the flaps where no ink is allowed.
Entering a value here automatically disables any bleed settings.
Print line marks You can use Print Line Marks to draw and print lines and create a printed box around the image and its extensions – without using mark sets. You can set the line thickness, color (open the color picker), and style (solid, dashed or dotted). The lines are centered on the extension borders.
NOTE: To see the line marks, apply the settings and place the image on a sheet.
On product size: The lines are printed along the edges between the image
and the extensions.
On extensions: The lines create a closed box around the edges of the extensions.
Only on edges with extensions: The lines are only printed on the edges of
the canvas that actually have extensions so the box may not be closed.

AccurioPro WideDirector 3.5 Reference Guide
138 CANVAS EXTENSIONS AND GROMMETS INSPECTOR
Grommets Figure 4.16: Grommets (circles with cross) in the extensions
Grommets are holes for reinforced eyelets which are generally placed along the edges of a product. Marks can be drawn on the product to indicate where these holes are to be made. These settings let you choose where the marks are drawn and what they will look like.
Position Click in the check boxes to position the grommet marks along the top, bottom, left
or right edges.
Type Four types of grommet marks are available:
Solid circle
Circle
Circle with cross
Cross
The marks can be drawn as an outline by selecting the Draw outlined check box.
Diameter The diameter of the circle.
Line thickness The thickness of all the mark lines.

AccurioPro WideDirector 3.5 Reference Guide
4 IMAGE EDITOR 139
Line length The length of the 2 lines of the cross.
Color The color of all the grommets. Click the variable button, and select one or more colors to change the color of the cutting lines:
See “To print tile marks” on page 154 for more information on using colors to print marks.
Draw in You can choose to place the grommet marks in the image or the extensions, and
specify the horizontal and vertical distance from either the outer edge of the image or the extensions. Close the link icon and re-enter a value if you want to use the same value for the horizontal and vertical distances.
Max. distance between marks
Enter the maximum distance between adjacent marks – horizontally and vertically. Close the link icon and re-enter a value if you want to use the same value for the horizontal and vertical distances. In the Mark Reference drop-down list you can choose from where the distance is calculated: the center of the mark or its circumference.

AccurioPro WideDirector 3.5 Reference Guide
140 TILING INSPECTOR
Tiling Inspector
Use the Tiling inspector to divide a master image into parts, i.e. tiles that can be printed independently of each other. After applying tiling, the tiles appear in the Image panel of the Layout Editor as individual images which can be placed on sheets for printing. The printed tiles are subsequently mounted to recreate the original master image.
The master image may have canvas extensions, and tiling is then applied to the total image area that consists of the image and the flaps.
Overlaps and non-content gaps In most cases, the individual tiles will need to have overlaps on one or more sides so they can be assembled on top of each other – for example, the various panels of a billboard. These overlaps are added to the visible size of the tiles. The total size of a tile is the visible size plus the overlap and bleed. However, in some cases, overlapping is not necessary or possible – for example if thicker materials are used. Other applications may require that gaps are created in the content between the tiles.
Click the tiling icon to display the tiling inspector.

AccurioPro WideDirector 3.5 Reference Guide
4 IMAGE EDITOR 141
Figure 4.17: Tiling inspector
Tiling check box Selecting the tiling check box enables the tiling settings in the inspector where you can set the parameters to let the system create tiles automatically. The check box is also selected and the inspector activated if you are creating your tiles manually. See “Interactive Tiling” on page 146.
NOTE: Clearing the Tiling check box will delete all interactive tiling actions you performed on the image.
Tiling menu Click the cogwheel to reveal a menu with the following commands:

AccurioPro WideDirector 3.5 Reference Guide
142 TILING INSPECTOR
Re-apply tiling set-up Resets the tiling arrangement according to the settings in the tiling inspector, undoing any interactive tiling actions.
Preferences Opens the Tiling Preferences dialog box with the settings for creating the
montage instructions. See “Tiling Preferences” on page 156.
Tiles At the top of the Tiles panel you can specify how you want to create your tiles: the number of columns and rows and whether you want the tiles to have the same visible size or the same total size. Alternatively, you can specify the desired dimensions for the tiles – again based on either the visible or total size – and the system will use these dimensions to split the image. In this case, the last row and column will probably have tiles with different sizes to accommodate the remaining content of the image.
No. To start tiling, enter the number of columns in the box with the horizontal arrow and
the number of rows in the box with the vertical arrow.
Total Size/Visible Size You can choose the total or visible size by clicking the black triangles to display the drop-down list:
Visible size: the area of the tile that will be visible after mounting
Total size: the visible size plus overlaps
Last The width of the last column and the height of the last row; only filled if you
specify a desired size for the tiles.
Tiling arrangement A tiling arrangement can be chosen depending on whether you need overlap- ping tiles, non-image gaps between tiles, or extensions to recreate the master image from the tiles:
Overlaps
Select the Overlaps arrangement if you need overlapping tiles. Enter a horizontal and vertical size for the overlaps. The overlaps are areas with duplicate image content so the tiles can be mounted on top of each other. Enter a non-

AccurioPro WideDirector 3.5 Reference Guide
4 IMAGE EDITOR 143
Gaps
Symmetrical
ink zone if you want part of the overlap to remain blank so the overlapping materials adhere better to each other.
Select the Gaps arrangement if you need content gaps between the tiles. The content gaps are not printed. Self-adhesive tiles for window panes are a typical application of gaps. Enter the gap size, for example the width of your window frame, and half of this size is deducted from adjacent tile edges to create the full gap. Enter extension sizes to create extra material with content to cater for size variations. Extensions are added to the sides opposite to the tile anchor, except along the outer edges of the image.

AccurioPro WideDirector 3.5 Reference Guide
144 TILING INSPECTOR
Similar to the Gaps arrangement but with extensions on all sides. Select the Add to outer edges check box to add extensions to the tiles along the outer edges of the image.
Montage Sequence Here you specify the order for mounting the printed tiles, how the tiles are numbered, and on which edges the overlaps or gaps are located. This is done by combining the First Tile and Proceed buttons that provide a total of 16 combinations.
First Tile Select the corner where you want to start the numbering of the tiles: top left, top
right, bottom left, and bottom right. The sequence numbering starts with the tile that is to be mounted first and the anchor symbol moves to the respective corner of each tile. The tile overlaps, gaps or extensions are created accordingly.
Proceed The logic of the sequence numbering is controlled by four buttons in the drop-
down list. These let you choose the horizontal and vertical direction in the grid. The default sequence is with the first tile in the top left corner. The numbering then proceeds horizontally along the first row (left to right) and then on the following row in the same direction (left to right). Depending on the selected first tile, the following combinations are possible:
NOTE: The drop-down list only shows the four sequences that are possible with the selected first tile.

AccurioPro WideDirector 3.5 Reference Guide
4 IMAGE EDITOR 145
Actual Total Sizes (including bleed)
The Smallest and Largest total tile widths (horizontal arrow) and tile heights (vertical arrow) – not necessarily the same two tiles.
Various
Print tile marks Prints tile-specific marks on the tiles. See “Tile Marks Dialog” on page 154.
Export montage instructions
Select the check box if you want the system to automatically create a PDF document with instructions for mounting the tiles when you submit the job. Click the Export and Open button without or with the check box selected to see the PDF with instructions immediately. See “Montage Instructions” on page 157.

AccurioPro WideDirector 3.5 Reference Guide
146 INTERACTIVE TILING
Interactive Tiling
Automatic tiling uses the settings in the Tiling inspector to create a grid where most of the tiles have the same size. However, you can use interactive tools to create a non-grid tiling arrangement from scratch or to modify the rows or columns of an existing arrangement.
Interactive tiling is indicated with a blue asterisk in the Tiling inspector header:
The following tools are available for interactive tiling:
Split Tool (Manual Tiling)
Selection Tool
Omit Tiles
Merge Tiles
Horizontal and Vertical Splitting
Positioning Toolbar
Split Tool (Manual Tiling)
You can use the Split tool to create tiles from a master image in free-style manner. The Split tool is visible in the tiling toolbar in the bottom left corner when you are in the Tiling inspector tab.
1 Open the image you want to tile in the Image Editor and go to the Tiling
inspector tab.
2 Click the Split tool in the toolbar, or press K, to activate the tool. Now you start to tile an untiled image from scratch or to fine-tune an existing tiling arrangement.

AccurioPro WideDirector 3.5 Reference Guide
4 IMAGE EDITOR 147
3 Hover over the image to start tiling.
If you are tiling an untiled image, the Tiling check box at the top of the Tiling inspector tab is activated from the moment you create your first tile. If you want overlaps, gaps or extensions, you need to specify them before you start splitting.
NOTE: Changing the basic tiling settings in the inspector will undo interactive edits. Changing overlap size preserves interactive edits.
The Split cursor (large cross) appears with a magenta line parallel to the shortest side of the image, and the width of the split tiles on either side of the split line.
4 Move the split line to the desired position and click to confirm the splitting.
You can change the splitting orientation (from parallel with the shortest side to parallel with the longest tile) by pressing and releasing the space bar or TAB key.
The orientation of the split line changes automatically if you move into a tile whose shortest side or longest side has a different orientation.

AccurioPro WideDirector 3.5 Reference Guide
148 INTERACTIVE TILING
You can extend the splitting in one tile across all the tiles of an image by holding down the SHIFT key.
Split Tool Shortcuts Activate the Split tool by pressing K with the Tiling inspector selected. To control the splitting of tiles selected with the Split tool, use the following shortcuts.
To Press
Change the splitting orientation (the magenta splitting line) Space bar or TAB key once
Extend the splitting action across all tiles Hold SHIFT Repeat the split. CTRL Cancel the image splitting ESC
Selection Tool If you created tiles interactively with the Split tool or automatically with the inspector, you can fine-tune them further with the selection tool. In this mode you can select tiles and change their size, merge the tiles, etc.
NOTE: You cannot create new split lines in this mode.
1 Select the Selection tool in the bottom toolbar.
2 Hover over the split lines to display the tile dimensions on either side of the line, and the resize arrow.
3 Click and drag a split line to edit the tile size.

AccurioPro WideDirector 3.5 Reference Guide
4 IMAGE EDITOR 149
Use standard shortcuts to select multiple tiles. Hold SHIFT to resize all the selected tiles.
Omit Tiles You may decide that a particular tile in your tiling scheme does not have to be printed.
Select the tile you want to omit with the Selection tool and clear the Print
check box in the Positioning toolbar or press the Delete key.
The tile in question is grayed out which means it will not be created. The tile numbering and the total number of tiles are modified accordingly. When you apply the changes, this tile is not added to the Image panel in the Layout Editor.
NOTE: You can revert the delete tile action by selecting the Print check box again, even after you applied the changes.
Merge Tiles Adjacent tiles can be merged along their common split line to create a new, merged tile. Settings for overlaps, gaps and extensions are applied to the newly created tile.
You can use the Merge Tiles command in the Positioning toolbar to merge selected tiles or drag the split line of a tile to append adjacent tiles.

AccurioPro WideDirector 3.5 Reference Guide
150 INTERACTIVE TILING
1 Select two or more tiles you want to merge with the Selection tool.
2 When the selected tiles form a rectangle, the system activates the Merge Tiles button in the Positioning toolbar.
3 Click the Merge Tiles button to merge the selected tiles.
OR
1 In Selection tool mode, hover over the common split line between the tiles you want to merge and drag the line to the opposite edge of the tile you want to append.
The split line snaps to the edge of the first tile.
2 Release the mouse button and the merged tile is created
The tile numbering and the total number of tiles are modified accordingly.
3 Now you can drag the split line to the edge of the following tile if you want to merge multiple tiles.
When you apply the changes, the merged tiles appear as a single tile in the Image panel in the Layout Editor.
NOTE: You cannot revert to the original tiles once you have applied the changes.
Horizontal and Vertical Splitting
Manual tiling with the Split tool is not ideal if you want equal splits across one or more tiles, or if you want to control overlaps, gaps and extensions. In these cases it is recommended to use the Split Tile buttons in the Positioning toolbar.
1 Select the tile you want to split with the Selection tool. If you want to apply the
same splitting to multiple tiles, select multiple tiles.
2 Click either the Horizontal or Vertical Split Tile button in the Positioning toolbar or press CTRL+U.
The Split Tile dialog box is displayed.

AccurioPro WideDirector 3.5 Reference Guide
4 IMAGE EDITOR 151
The Equal size panel is enabled by default with the cursor in the horizontal or vertical Number box. This depends on whether you clicked the Horizontal or Vertical Split Tile button. The Equal size panel is similar to the Tiles settings in the inspector (see “Tiles” on page 142) and you can enter the number of horizontal columns and/or vertical rows to create a grid of tiles which all have the same size. Alternatively, you can enter a size and all columns and/or rows will have this size, except the last.
You can choose the Arbitrary sizes option button if you want to specify multiple horizontal and/or vertical sizes for some or all the tiles. Enter a size in the first horizontal and/or vertical box. This will be the size for the tile starting from the anchor corner. Continue with values for up to 5 tiles. You can use and asterisk if you want the system to split the remaining distance into equal tiles. For example: 100, 200, *, 400, *, and splits a total distance of 1000 into tiles of 100, 200,150,400,150.
In the Overlaps/Extension/Gaps section you can choose how these settings are applied to the split tiles:
From Tiling Set-up: the inspector settings are applied
Same as selected tile: relevant if multiple tiles are selected for splitting; the
new tile inherits the settings of the parent tile
None: no overlaps or gaps are applied
3 Click Split to confirm your splitting settings.
Related topics: • Positioning Toolbar Shortcuts on page 152

AccurioPro WideDirector 3.5 Reference Guide
152 INTERACTIVE TILING
Positioning Toolbar The Positioning toolbar at the top of the Image Editor lets you inspect and edit each individual tile in the tiling scheme. Entering values in the boxes for Width, Height, Overlap, Gap and Extensions will override the values you see in the Tiling inspector and may also affect tiles which are arranged adjacent to the selected tiles. The measurement boxes you see in the toolbar depend on the tiling arrangement used to create the tiling scheme.
You also have tools for rotating and mirroring tiles when placed on the sheet, tools for splitting and merging tiles, and the Print check box that can be cleared if you want to omit a tile.
Related topics: • Rotate and Mirror (Positioning Tools) on page 135
• Horizontal and Vertical Splitting on page 150 • Merge Tiles on page 149 • Omit Tiles on page 149
Select one or more tiles to activate the tools.
1 Width and height of the tile (value is “mixed” if multiple tiles are selected) 2 Anchor direction 3 Overlap size or Extension/No-ink zone on the Left, and Top edges of the tile 4 Overlap size or Extension/No-ink zone on the Right, and Bottom edges of the tile 5 Gap size on the Left, Right, Top and Bottom edges of the tile 6 Rotation and mirror tools 7 Horizontal and vertical Split tools and Merge tool
Positioning Toolbar Shortcuts To control the Positioning toolbar when a tile is selected with Selection tool:
To
Open the Split Tile dialog box CTRL + U Mirror the tile vertically when placed on a sheet SHIFT + M Mirror the tile horizontally when placed on a sheet M Rotate the tile clockwise in steps of 90° SHIFT + R
AccurioPro WideDirector 3.5 Reference Guide
4 IMAGE EDITOR 153
To
Rotate the tile anticlockwise in steps of 90° R Merge the selected tiles CTRL+ G Place the cursor in the first Overlap box of the Positioning toolbar O Place the cursor in the first Gap box of the Positioning toolbar G Jump to next box in the Positioning toolbar TAB

AccurioPro WideDirector 3.5 Reference Guide
154 OTHER TILING FEATURES
Other Tiling Features This section discusses some extra tiling features:
How to print tile marks: see “Tile Marks Dialog” on page 154
How to create a PDF with montage instructions: see “Tiling Preferences” on
page 156
“Tiles in the Layout Editor” on page 163
Tile Marks Dialog You can print tile-specific marks on the tiles to help the person assembling the tiles arrange the tiles correctly. Two tile marks are possible: the tile name, which typically includes the sequence number, and overlap marks for aligning adjacent tiles.
Figure 4.18: An example of tile marks as shown when a tile is placed on a sheet in the Image Editor
You can only can see the marks after applying and placing the tiles on a sheet.
To print tile marks
1 You enable tile marks by selecting the Print tile marks check box in the Various panel at the bottom of the Tiling inspector.

AccurioPro WideDirector 3.5 Reference Guide
4 IMAGE EDITOR 155
2 Click the Edit button (pencil) to open the Tile Marks dialog box where you can specify the content and the appearance of the marks.
Tile name
Text Any combination of static text and variables can be entered in the box for the name which will typically include the sequence numbers. For example: Tile no. $image.tile_number/$image.total_tiles resolves to Tile no. n/total. Valid variables appear in a drop-down list as you type in the box.
Font The typeface and point size for printing the text mark.
Color Click the associated variable button, and select one or more options to determine on
which plate(s) the text mark will be printed:
Registration (all plates). When this option is selected, you will see an asterisk (*).
Process colors (CMYK)
Darkest color
Special colors
Spot colors
Outline Adds a 1-point white line in knockout around the type so it stands out better with
certain content.
Position Here you can specify where the tile name is printed on the tile by choosing one of the buttons:
Centered in overlap: the default position which places the tile name in the
center of the overlap or extension. For the tiles with no overlap, for example the last tiles, you can choose to omit the text, otherwise the tile name is printed in the visible area. You can change the default behavior as follows:
Prefer horizontal overlap (default): if possible, the text is printed in the
horizontal overlap or extension
Prefer vertical overlap: if possible, the text is printed in the vertical overlap or extension

AccurioPro WideDirector 3.5 Reference Guide
156 OTHER TILING FEATURES
In horizontal overlap only: forces the system to place the text in the horizontal overlap
In vertical overlap only: forces the system to place the text in the vertical
overlap
If the tiling scheme has no overlaps or extensions specified, the system prints the tile name along the horizontal edge of the tile, and possibly in the visible area.
Manual: Select this button if you want more control for placing the tile name
mark. Specify the horizontal (left, center, right) and vertical (bottom, center, top) alignment relative to the corners of the total size, the horizontal and vertical offset, and rotation of the text (0, 90, 180 or 270°).
Overlap The overlap marks are dashed, black and white lines that mark the border between the visible part of the tile and the overlap or extension. Tiles will have two, one or zero lines depending on their position in the montage, with small dashes for vertical lines and large dashes for horizontal lines.
Length This option controls the length of the dashed line:
Print in bleed only: This default setting prints a line in the bleed area only so
it’s the smallest of the marks.
Print into overlap: The line is printed in the bleed area and extends into the overlap or extensions.
Print across entire size: The dashed line is printed along the entire length of
the edges that have overlaps.
Thickness Enter the thickness of the dashed lines in points (pts).
Run into image area Enabled for the first two Length options: the length that the dashed line may extend into the image area.
Tiling Preferences This dialog box shows the settings for creating a PDF file with the montage instructions for the tiling arrangement at hand.

AccurioPro WideDirector 3.5 Reference Guide
4 IMAGE EDITOR 157
Figure 4.19: A PDF document with montage instructions
Open the cogwheel menu in the top right corner of the tiling inspector to open Tiling Preferences.
Montage Instructions Montage instructions explain how the tiling arrangement is organized so the tiles can be assembled to recreate the original image. The instructions mention the order and job reference and give a short summary of the tiling set-up (product size, number of tiles, etc.).
Page size Choose a size and orientation for the PDF you will export.
Include You can choose to include a:
List of tiles: A table with a list of all the tiles and the dimensions of the
individual tiles with their overlaps and gaps.
Montage overview: A diagram of the tiling arrangement as shown in the Image Editor. You can select a View Options preset to specify what will be printed exactly in the diagram.

AccurioPro WideDirector 3.5 Reference Guide
158 OTHER TILING FEATURES
File name Enter a file name with or without variables from the drop-down list or use the default name with variables ($DOCUMENTBASENAME_MI$TIME).
Export directory Enter a location for saving the file with or without variables from the drop-down list.
Conflict handling Indicate how you want subsequent export files to be handled.
Export a PDF with montage instructions
1 Open the tiled image in the Image Editor and go to the Tiling inspector tab.
2 If necessary, open the cogwheel menu and choose Tiling Preferences if you want to change the document set-up.
3 In the Various panel, select the Export montage instructions check box if you want the PDF to be created automatically when you submit the job.
OR
Click the Export and Open button to see the PDF immediately.
A PDF document with montage information and a tiling diagram is saved in the location specified in the Tiling Preferences and then opened in your default reader.

AccurioPro WideDirector 3.5 Reference Guide
4 IMAGE EDITOR 159
Presets
NOTE: This option requires a special license.
Presets let you apply the settings you define for a particular image to other images of the same job or other jobs.
In the Layout Editor or the Image Editor, open the Presets tool by clicking the
Presets button in the toolbar.
The Presets dialog is displayed with a list of job presets and image presets on the left which are organized in folders. The list is initially empty. If you select an existing preset or create a new one you will see an overview of the settings that can be included in a preset in the panel on the right:
These are the settings that you would normally have to specify in the image inspectors for a new image. To save time, you can include all or some of the settings in a preset which can subsequently be used for new images.
Presets toolbar The + button to add a new preset; the cogwheel menu button and a gray triangle to open/close the settings panel.
Cogwheel menu The following commands are available; the commands are also available by
right-clicking the preset in the list:
Apply: Applies the selected image preset to the open image

AccurioPro WideDirector 3.5 Reference Guide
160 PRESETS
Edit Preset: Unlocks the presets so you can edit them; in this edit mode you can clear or select the settings check boxes and update the preset to match the settings of the current image; any changes you make to a preset in edit mode are saved automatically
Rename Preset: Lets you edit the name of the selected preset
Edit Description: Places the cursor in the Description box of the selected
preset
New Folder: Creates a new folder where you can put new presets
New Job Preset: Creates a new job preset
Duplicate Preset: Duplicates the selected preset
Delete Preset: Deletes the selected preset
Import Preset: Opens a file browser where you can select a preset for importing
Export Preset: Opens a file browser where you can select a preset for
exporting
NOTE: You can only add an image preset using the + button in the toolbar.
Preset filter Enter a value in the box to search for a preset in the list; click the X button to show all presets.
Presets list In this list you can create folders for Image presets; the first folder is the default
folder and the only folder for all Job presets; image presets can be listed at the top level or one level lower in folders. Selecting an image preset displays the Image Settings of the preset in the panel on the right.
Image Settings Only displayed if you have selected an image preset in the list. The check boxes
refer to the settings you can specify for an image in the Image Editor inspectors, plus the Image Mark Sets.
Include None/Include All Buttons are enabled in edit mode. Use them to select all or none of the check
boxes and include or omit the settings as specified for the current image in the selected preset.
Update Changed Button enabled in edit mode. Click to update the selected preset to match any
changes made to the settings of the current image and which are included in your preset.

AccurioPro WideDirector 3.5 Reference Guide
4 IMAGE EDITOR 161
Create image presets
1 Open the image whose settings you want to save as a preset in the Image Editor. This can be an image with bleed, canvas extensions and grommets, tiling, etc. as specified in the inspectors.
2 Open the Presets tool.
3 Click the + button (Add Preset) in the Presets toolbar.
The presets are unlocked and a new image preset appears in the list at the highest level. If you want to create the preset in a folder, select the folder before clicking the + button.
4 Enter a name for your new image preset.
In the Image Settings panel on the right, select the check boxes for the settings you want to include in the preset. You can also use the Include All or Include None buttons.
5 Enter a short description for the preset in the Description panel under the list.
6 Click the Update Changed button to confirm your preset.
7 Close the Presets tool.
8 Apply the Preset to a new image to test your preset.
Apply image presets You can apply an image preset in the Image Editor or in the Layout Editor. An existing preset can also be applied in a Layout Hot Ticket.
1 In the Image Editor, open the image to which you want to apply a preset.
2 Open the Presets tool.
3 Select a preset and check the Image Settings in the panel on the right.
4 Open the cogwheel menu and choose Apply to apply the settings to the image.
The image settings (bleed, canvas extensions, tiling scheme, etc.) are applied to the image.
OR

AccurioPro WideDirector 3.5 Reference Guide
162 PRESETS
1 In the Layout Editor, select the image you want to apply the preset to in the Image panel.
2 Open the Presets tool.
3 Select a preset and check the Image Settings in the right panel.
4 Open the cogwheel menu and choose Apply to apply the settings to the image.
The settings are applied to the image without opening the Image Editor. You will see the result of tiling immediately in the Image panel and when you place the image on a sheet.
NOTE: If an image has already been edited in the Image Editor, the preset replaces these existing setting and adds settings which are not yet specified for the image.
Update a preset
1 Open the image which has the required settings in the Image Editor.
2 Open the Presets tool.
3 Select the preset you want to update and unlock the settings or choose Edit Preset on the cogwheel menu.
4 You can make further changes with the inspectors if you want and/or select or clear the check boxes in the Image Settings panel.
5 Click the Update Changed button to include the changes in the preset.
6 Apply the Preset to a new image to test your preset.

AccurioPro WideDirector 3.5 Reference Guide
4 IMAGE EDITOR 163
Tiles in the Layout Editor The tiles of a tiled image appear as individual images in the Image panel of the Layout Editor. They form a group of images enclosed in a light blue box together with the master image. Tiles can be placed on sheets just like other images by dragging and dropping, or using the Auto Layout feature. Selecting the master images automatically selects all the tiles and places them on the sheet.
1 2
3
4
1 Instances of an image on all the sheets of a job 2 Tile number: e.g. 6/15: tile number 6 of a total of 15 tiles 3 Position in the montage scheme: R2C1: Row 2; Column 1 4 Tile size
Expand or collapse a tiled image
1 To expand a tiled image and see the individual tiles in the Image panel, right-click the tiled image and choose Expand Tiles.
2 To collapse the tiles of a tiled image, right-click a tile or the master image and choose Collapse Tiles, or double-click the master image.

AccurioPro WideDirector 3.5 Reference Guide
164 TILES IN THE LAYOUT EDITOR
Figure 4.20: Tiles expanded in the Image panel of the Layout Editor

165
5
Managing Jobs
This section describes how you can monitor and manage jobs in the Jobs window.
The Jobs Window ................................................................................................ 166 The Output Device List ..................................................................................... 167 The Job List ............................................................................................................ 168 Job and System Logging .................................................................................. 186 Viewing the Results Tab ................................................................................... 193 Working with Jobs in the Job List ................................................................. 202 Working with Jobs in the Results Tab ......................................................... 217

AccurioPro WideDirector 3.5 Reference Guide
166 THE JOBS WINDOW
The Jobs Window
The main purpose of the Jobs window is to allow you to monitor, view, and manage the jobs that are created by the AccurioPro WideDirector System. Much of the information you need is displayed as icons in the Job List. This information, together with the six tabs of selected job details, gives you a full and detailed snapshot of the jobs in hand.
The main window is divided into 4 panes:
The Output Device List: On the left side of the window, you see a list of
currently configured output devices, e.g. Export, TIFF Imagesetter, etc.
The Job List: Next to the Output Device list, you see the Job List. This list displays the jobs that have been submitted to the AccurioPro WideDirector System.
NOTE: Only jobs associated with the device selected in the Output Device List are displayed.
Filters: Above the Job List, you can enter filter criteria directly into the Quick Filter
box. Below the Output Device List, you have custom job filters for filtering the Job List based on a variety of criteria.
Selected Job details: The pane on the right side of the window displays
information on the selected job:
The Results tab: Allows you to view the results of the selected job. This tab displays thumbnails of the Run List pages, and job separations (if any). See “Viewing the Results Tab” on page 193.
NOTE: The Job Manager provides a read-only view on jobs. For details on creating or editing jobs, see “Creating and Editing Tickets” on page 239

5 MANAGING JOBS 167
AccurioPro WideDirector 3.5 Reference Guide
The Output Device List The Output Device List displays all available Output and Print Task Processors. This pane is identical in both the Jobs Window and the Hot Tickets Window.
When you select an Output or Print Task Processor in the Jobs Window, the Job List is filtered to display only the jobs that include the selected Task Processor in their Production Plan.
NOTE: Depending on their software or hardware status, Task Processor icons may be displayed with different colors or with small icon overlays. For more information, see “Task Processor Component (Software) Status” on page 355 and “Output Task Processor Hardware Status” on page 354.
AccurioPro WideDirector 3.5 Reference Guide
168 THE JOB LIST
The Job List
The Job List displays the status of jobs that have been submitted to the AccurioPro WideDirector System. This includes jobs created using Job Tickets, as well as jobs created dynamically using Hot Tickets.
Job List Layout When you create and submit a job, it appears immediately in the Job List with its details displayed in columns. You may see a flat list of jobs or groups of jobs in expandable folders if you choose to group your jobs.
For each job, the Job List displays one or more icons which indicate its current status, and the type of processing that has been applied in this job. A job produced by a Hot Ticket is indistinguishable from any other manually submitted job.
The Job List is divided vertically into the following columns:
Notification: May display an icon which indicates an error, warning, or
remark.
Status: May display one or more icons (up to 4) which indicate the current or recent job states. These icons are sorted from the left according to priority. You can expand the width of this column to view the lower priority icons.
Job: Either the name of the job, or an expandable group folder which
contains all the jobs that are grouped by the selected property.
Order Number: The order number of a job.
Job Number: A unique ascending number assigned chronologically to each job.
Media: The media selected to print the job.
Flows: Displays one or more icons which correspond to the number and types of
flows specified in the Ticket.
Create Date: The dates and times when jobs were submitted. The date and time format adapts automatically to the width of the column.
Modified Date: The dates and times when jobs were modified. The date and
time format adapts automatically to the width of the column.
Company: The Company name of the customer.

AccurioPro WideDirector 3.5 Reference Guide
5 MANAGING JOBS 169
Device: The device selected to print the job.
Milestone: The due date you entered for the planning of the job.
These job details are displayed for each job in their respective column.
Organizing the Job List
By default, the Job List displays jobs in alphabetical (ascending) order with all the columns displayed. You can organize how the Job List is displayed as follows.
Sort Job List columns Job List columns can be sorted according to any of the column headers by clicking the relevant column header: Click once to sort alphabetically (ascending); click again (or Shift-click) to sort in reverse alphabetical order (descending).
The sort column is indicated with a darker header and an arrow indicates the ascending or descending sort order. You cannot sort on the Flows column.
Rearrange Job List columns
You can rearrange the columns by dragging the column headers horizontally, and adjust the width of the columns by dragging the left or right edges of the column headers.
Show/hide Job List columns
Right-click in any of the column headers to display a menu where you can show/hide the columns by selecting/clearing the appropriate check box.

AccurioPro WideDirector 3.5 Reference Guide
170 THE JOB LIST
TIP: You can also click the expand/collapse buttons to open and close job folders.
Group jobs in the Job List You can group jobs by clicking in the column header right-menu and selecting the Group by option. You can group by:
Order Number
Create Date
Modified Date
Device
Media
Company
For example, selecting Group by Order Number, groups the jobs with the same order number in an expandable folder. These expandable order number folders are shown in the Job column and the Order Number column is hidden.
If you double-click a job group in the Job List, the folder is expanded to reveal the individual jobs. The job will have no content until you or other users start inputting documents via the associated input channel.

AccurioPro WideDirector 3.5 Reference Guide
5 MANAGING JOBS 171
The # symbol you see on the folders indicates that the jobs in the Job List are grouped into folders.
Filtering the Job List
You can customize the layout and content of the Job List to suit your particular requirements, and to keep track of your jobs more easily. This becomes more important as the size of the Job List increases, while you want to keep track of specific orders and/or jobs.
AccurioPro WideDirector filters the Job List based on a combination of all the selected filters. When you apply the filter, only the jobs which match ALL the selected criteria will be displayed.
The following three filter types are available above and below the Output Device list on the left of the Job List:
Quick filter: a text entry box
Output Device filters to filter jobs by device (number of matching jobs to the
right of the device name)
Custom Job filters that allow users to specify custom sets of filter criteria (number of matching jobs to the right of the filter name)
You can apply the filters individually or combine them. Combining filters of the same type, e.g. two Output Device filters, displays the sum of the two filters. Combining filters of different types, e.g. Quick filter + Output Device + Custom Job filter, only displays the jobs that match all the criteria of the filters.
These filtering features also apply for Hot Tickets in the Hot Ticket List.
NOTE: An Administrator can also filter the Job List by user role to allow specified users to see only certain jobs. This filtering is not indicated in the Job List. See “Users” on page 367.

AccurioPro WideDirector 3.5 Reference Guide
172 THE JOB LIST
Figure 5.21: Job List Filters
1 Quick Filter 2 Show All Button 3 Output Device Filters 4 Custom Job Filters 5 Filter Panel
NOTE: The Output Devices pane must be set to show to see the Show All button and the Custom job filters panel. Choose View > Panes > Devices to show/hide the Output Devices pane.
Filter the Job or Hot Ticket List using Quick Filter
The Quick Filter can be used to search for text contained anywhere in the order number, job name or number, media name of jobs or Hot Tickets. The Quick Filter is always applied in addition to other selected filters.
1 Select the Jobs or Hot Tickets Window.
2 Click inside the Quick Filter text field.
3 Start to enter the text you want to search for.
As you type, the list is dynamically filtered.
For example, if you type the letter ‘j’, the Job List will start filtering for all jobs with fields that contain the letter ‘j’. If you extend the search text to ‘je’, the number of matches are further narrowed down accordingly.
4 Click the Clear button on the right of the Quick Filter text field to remove the Quick filter.
Filter the Job List with one or more custom job filters

AccurioPro WideDirector 3.5 Reference Guide
5 MANAGING JOBS 173
1 Select the Jobs Window.
2 Click one of the custom job filters under the output device pane.
The Job List now displays only the jobs which correspond to the selected filter criteria.
The selected Job List Filter icon is colored green to indicate that this particular filter is active, with an arrow pointing to the number of jobs displayed for this filter.
In the filter panel in the top right corner of the Job List, you can also see the total
number of jobs displayed in the Job List, with an indication that a filter is applied.
3 To switch off a job filter, click the filter once.
The Show All indicator is highlighted and all the jobs are displayed if no other filters are selected.
4 To apply multiple filters, hold the CTRL button and click the filters you want to combine. Click a selected filter again with the CTRL button pressed to deselect it. You can combine Custom Job filters with Output Device filters and Quick filter.

AccurioPro WideDirector 3.5 Reference Guide
174 THE JOB LIST
Combining filters of the same type, e.g. two Output Device filters, displays the sum of the two filters. Combining filters of different types, e.g. Quick filter + Output Device + Custom Job filter, only displays the jobs that match all the criteria of the filters.
Create a new custom job filter
The first new custom filter is created as a duplicate of the initial Custom Filter. Subsequently, you can also duplicate your newly created filters.
1 Hover over the initial Custom Filter and choose Save As in the cogwheel
drop-down list.
2 Enter the new name in the Save As box and click Save.
The new filter is added to the bottom of the list. This is a duplicate of the initial Custom Filter which always remains at the top of the list.
You may need to scroll through the list with the Up and Down arrows.
3 To move the filter in the list, hover over the filter and choose Move Up/Move Down in the cogwheel drop-down list. You can also insert a dividing line under a filter by choosing Insert Divider in the same drop-down list.
You can now edit this newly created filter.

AccurioPro WideDirector 3.5 Reference Guide
5 MANAGING JOBS 175
Edit a custom job filter
1 Hover over the filter you want to edit and choose Edit in the cogwheel drop- down list.
2 Specify your filter options, as described in “Job Filter Settings” on page 182.
3 Click Apply to see the effects of the filter on the number of jobs displayed in the Job List.
4 Click Save to confirm your changes and close the Job Filter dialog.
Rename/duplicate/delete a custom job filter
Hover over the filter name you want to rename/duplicate/delete and choose the action in the cogwheel drop-down list.
NOTE: You cannot rename/duplicate/delete/move the initial Custom Filter.
Filter the Job or Hot Ticket List on the selected output device
1 Select the Jobs or Hot Tickets Window.
The number of jobs using a particular output device is shown on the right of each device name in the Output Device list.
2 Select one of the devices in the Output Device list.
The Jobs/Hot Tickets List now displays only the jobs or tickets which use the selected output device.
In the filter pane in the top right corner of the Job List, you can see the total number of jobs or Hot Tickets that use the selected output device.
3 Click another output device or the Show All filter to remove the filter. Hold the CTRL button and click multiple output devices to display the jobs of all the selected devices.
Job Notification Icons
AccurioPro WideDirector displays Job Notification icons in the 1st column of the Job and Hot Ticket Lists. These icons indicate errors, warnings and remarks, and are sorted by priority; i.e. when a job has several notifications at the same time, AccurioPro WideDirector displays the highest priority icon.
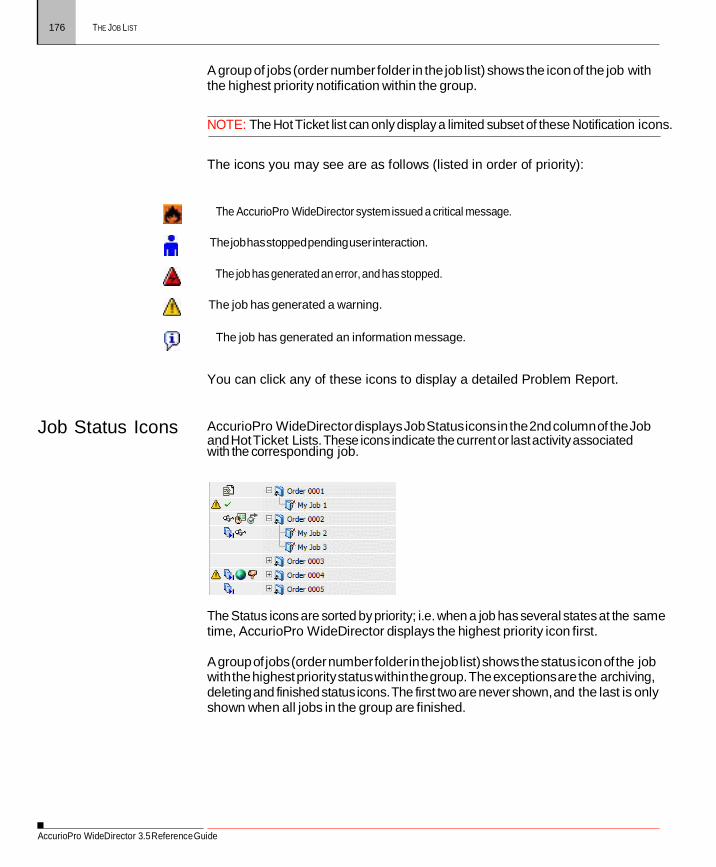
AccurioPro WideDirector 3.5 Reference Guide
176 THE JOB LIST
A group of jobs (order number folder in the job list) shows the icon of the job with the highest priority notification within the group.
NOTE: The Hot Ticket list can only display a limited subset of these Notification icons.
The icons you may see are as follows (listed in order of priority):
The AccurioPro WideDirector system issued a critical message.
The job has stopped pending user interaction.
The job has generated an error, and has stopped.
The job has generated a warning.
The job has generated an information message.
You can click any of these icons to display a detailed Problem Report.
Job Status Icons AccurioPro WideDirector displays Job Status icons in the 2nd column of the Job and Hot Ticket Lists. These icons indicate the current or last activity associated with the corresponding job.
The Status icons are sorted by priority; i.e. when a job has several states at the same time, AccurioPro WideDirector displays the highest priority icon first.
A group of jobs (order number folder in the job list) shows the status icon of the job with the highest priority status within the group. The exceptions are the archiving, deleting and finished status icons. The first two are never shown, and the last is only shown when all jobs in the group are finished.

AccurioPro WideDirector 3.5 Reference Guide
5 MANAGING JOBS 177
NOTE: The Hot Ticket list can only display a limited subset of these Status icons.
The icons you may see are as follows (listed in order of priority):
The job is being archived or dumped.
The job is being imported from archive.
The job is being deleted.
AccurioPro WideDirector is queuing all commands for this
job. You are editing the Run List.
The job is finished.
The job was broken during editing. You can remove this icon by opening the job for editing.
The job has been manually put on hold.
The job is waiting for a Task Processor (none currently available).
A group of results is complete, and is waiting to be printed (blue icon).
The result is waiting for a hard proof.
The job is waiting for a soft proof.
A task has been aborted.
The task has been manually put on hold.
New (unplaced) documents are available in the (Private) Page Store.
Not all the results of a group are yet available (green icon).
The job is waiting for After Hours processing.

AccurioPro WideDirector 3.5 Reference Guide
178 THE JOB LIST
Some results have been rejected by the user.
The layout/imposition is not yet defined.
The job has reached a Milestone: The Run List is not complete. T
The job has reached a Milestone: The job deadline has been reached.
The job has reached a Milestone: The result is not available in time.
A merged job
A merger job: The job resulting from the merging of two or more other jobs.
Job Icons AccurioPro WideDirector displays Job icons in the Job or Order No columns of the Job List. These icons indicate the type of job, as well as whether or not the Run List is complete.
With the exception of the Job folder icon, all the basic Job icons may be super- imposed with one or more additional icon indicators. These provide supplementary status information, and allow you to make a highly detailed visual assessment of your jobs by simply looking at the Job List.
These icon indicators may be combined, so that up to 4 additional items of information may be displayed for any of the Job icons (see “Job Icon Combinations (Commercial Jobs)” below).

AccurioPro WideDirector 3.5 Reference Guide
5 MANAGING JOBS 179
Job group.
Commercial job with incomplete Run List.
Commercial job with complete Run List.
Rush job (Commercial jobs only).
Commercial job with disabled input channel.
Commercial job is scheduled to be archived when it is finished.
Commercial job has been archived.
Commercial job is scheduled to be deleted when it is finished.
Commercial job has been deleted.
Commercial job is scheduled to be archived and deleted when it is finished.
Commercial job has been archived and deleted.
Job group (based on Order Number).
Commercial job with incomplete Run List.
NOTE: Only the Complete Run List icon is displayed in the Hot Tickets List.
Job Icon Combinations (Commercial Jobs)
The following table lists all the possible icon combinations you may see for Commercial jobs.

AccurioPro WideDirector 3.5 Reference Guide
180 THE JOB LIST
Job status normal deleting deleted archiving/ dumping
archived/ dumped
archiving & deleting
archived & deleting
archived & deleted
Incomplete Run List
Incomplete Run List disabled input
Incomplete Run List rushed job
Incomplete Run List disabled input+rushed job
Complete Run List
Complete Run List disabled input
Complete Run List rushed job
Complete Run List disabled input+rushed job
Flow Icons AccurioPro WideDirector displays Flow icons in the Job and Hot Ticket Lists. These icons correspond to the number and types of flows specified in the job or ticket:
When you create a Ticket, it appears in the Job/Hot Ticket List, together with one or more Flow icons in the Flows column.
The Flow icons display:
the type of flow, indicated by the icon image.
the status of the flow, indicated by the icon color.
The following icon types are available:

AccurioPro WideDirector 3.5 Reference Guide
5 MANAGING JOBS 181
Main Output to a high resolution output device.
Main Output to a Sign and Display output device.
Imposition Proof: An optional flow which may be added to the Main Output flow, and is used for output to an imposition proofing device.
Page Proof: An optional flow which may be added to the Main Output flow, and is used for output to a page proofing device.
Export: An optional or alternate flow to the Main Output flow, used for exporting job results to file in PDF or PostScript format.
Public Page Store: An optional or alternate flow to the Main Output flow, used for storing job results in a Public Page Store.
Display: An optional or alternate flow to the Main Output flow, used to create job results for high-resolution soft proofing.
Digital Quick Strip (DQS): An alternate mode of operation which supports the PrintDrive DQS mode of Apogee Series3. In this mode, AccurioPro WideDirector creates and renders the flat backgrounds and pages separately. These are then sent as separate items to PrintDrive. PrintDrive assembles the pages onto the backgrounds, and then outputs the results as an integral job.
The different flows associated with a job can also be monitored in The Activity Pane.
Up to three flow icons may be displayed for each job or ticket.
Flow Icon Color Coding
As a general rule throughout the AccurioPro WideDirector user interface, you will find that specific icon background colors are associated with specific conditions.
In the Job List, the background color of each flow icon indicates one of several states, as follows:

AccurioPro WideDirector 3.5 Reference Guide
182 THE JOB LIST
A white background color indicates that this flow is idle.
A green background color indicates that this flow is currently active.
A blue background color indicates that this flow is on hold.
A yellow background color indicates that this flow contains tasks which are queued and waiting to be processed.
A white background color with a green checkmark indicates that this flow has finished.
A red background color indicates that this flow has generated an error.
Job Filter Settings
The Job Filter allows you to filter the jobs displayed in the Job List according to job status, administration fields, media, or date.
Display the job filter settings by hovering over the filter name and clicking Edit
in the cogwheel drop-down list.
Status In Page Store To filter on Page Store criteria, select the In Page Store check box, click the
associated list, and choose one of the following options:

AccurioPro WideDirector 3.5 Reference Guide
5 MANAGING JOBS 183
New documents: Displays only jobs that contain new documents that have not yet been added to the Run List.
No new documents: Displays only jobs that have no new documents.
Pages To filter on Run List criteria, select the Pages check box, click the associated list, and choose one of the following options:
Has All: Display jobs that have a complete Run List.
Misses Some: Display jobs that have incomplete Run Lists.
For more information, see “The Run List (Ticket Editor)” on page 287.
On Hold To filter on jobs on hold, select the On Hold check box, click the associated list,
and choose one of the following options:
Is: Display jobs that are on hold.
Is Not: Display the jobs that are not on hold. In Error To filter on error criteria, select the In Error check box, click the associated list, and
choose one of the following options:
Is: Display jobs that are in error.
Is Not: Display the jobs that are not in error. Finished To filter on complete or incomplete jobs, select the Finished check box, click the
associated list, and choose one of the following options:
Is: Display jobs that are finished.
Is Not: Display the jobs that are not finished. Archived To filter on archived job criteria, select the Archived check box, click the associated
list, and choose one of the following options:
Is: Display jobs that have been archived.
Is Not: Display the jobs that have not been archived. Deleted To filter on deleted job criteria, select the Deleted check box, click the associated
list, and choose one of the following options:
Is: Display jobs that are deleted
Is Not: Display the jobs that are not deleted

AccurioPro WideDirector 3.5 Reference Guide
184 THE JOB LIST
Merged job To filter on merged jobs (i.e. jobs that have been merged into a merger job), select the check box, click the associated list, and choose one of the following options:
Is: Display jobs that are merged in merger jobs
Is Not: Display the jobs that are not merged in merger jobs
Merger job To filter on merger jobs (i.e. jobs that merge other jobs into a single job), select the check box, click the associated list, and choose one of the following options:
Is: Display jobs that are merger jobs
Is Not: Display the jobs that are not merger jobs
Layout job To filter by jobs set up in the Layout Editor.
Set up by printer/customer Allows you to filter on the status of WebApproval jobs: the job setup is Pending or Completed by the printer or customer.
Submitted by Select these check boxes to filter the jobs which have been:
submitted or not submitted by AccurioPro WideDirector
enabled or not enabled for WebApproval.
Administration Use the Administration filter to view jobs based on the criteria specified in the job’s Administration tab. You can filter on any combination of these fields; however the Job List will display only the jobs which pass through all of the filters. The following fields can be used to filter:
Job Name
Order Number
Operator Name
Company Name
Operator

AccurioPro WideDirector 3.5 Reference Guide
5 MANAGING JOBS 185
The following filter parameters can be chosen in the drop-down list:
Contains/Does not contain
Starts with/Does not start with
Ends with/Does not end with
Equals/Does not equal
Any/Current User (for Operator Name only)
Media Allows you to filter on the media used for the job, with the same filter parameters as for Administration.
Date Use the Date filter to view jobs that were submitted, modified, finished or due, before or after a specific date or within a specific time period. If you use the between argument, the first date to enter is the most recent date.

AccurioPro WideDirector 3.5 Reference Guide
186 JOB AND SYSTEM LOGGING
Job and System Logging Two types of log are available in AccurioPro WideDirector:
The Job Log: For logging events related to jobs.
The System Log: For logging events related to the AccurioPro WideDirector
System.
The Job Log
The Job Log is opened when you right-click on a job in the Jobs window, and select Log for Job from the right menu. The Job Log is used to keep track of completed jobs. It is also useful for accounting and troubleshooting.
NOTE: The Job Log does not list System events. These are recorded in the System Log (see “The System Log” on page 188).
The Job Log is automatically exported when the job completes. This allows an external MIS to pick up the log file and perform any required accounting. One or more logged items can also be copied as text using the Copy/Paste commands. However, the Job Log cannot be manually exported.
The Job Log lists all job events which take place within AccurioPro WideDirector. This is a plain, non-interactive event log.
The Job Log consists of a Filter pane, a chronological list of logged events, and an additional information pane.
The Job Log Filter and list of events work together: The events displayed are
determined by the filter (if any) you apply.
The lower pane displays more detailed information on the selected event.
List of Events
The list of events displays a date, source, event type and description for each event.
When Displays the time and date at which the event was logged.
From Displays the name of the job which generated the logged message.
Event Displays the type of the event that was logged.

AccurioPro WideDirector 3.5 Reference Guide
5 MANAGING JOBS 187
Description Displays an abbreviated version of the generated event. You can view the full message (in the lower pane) by selecting it.
You can sort the events on any of these Message fields by clicking the arrow in the column headers. Each time you click the arrow, the sort is toggled between ascending and descending order.
The Job Log Filter
You access the Job Log filter by clicking on the Filter icon in the Job Log:
Filter
Toggle filtering on or off.
Event Type
Choose one or more event groups for which the filter will be applied.
Life cycle events (created, started, finished): When a job is created, has started or is finished.
Error warning notifications: This includes the error status of Task Processors, device statuses such as error, online and offline and non-informative notifications with their reply.
Informative notifications: Important job-related actions such as job editing.
Proofing actions: Events related to the proofing result such as waiting, continue, approve, reject, resume.
User interactions: Job related events such as resume, rush, edit. Task Processor related events such as hold, resume, and rush. Result related events such as remake.
Media usage: Events related to the use of resources such as film and plate or proofing media.
Used resources: Events related to Resource selection such as screen types, profiles, calibration and linearization curves. Events related to Task Processor parameter sets.

AccurioPro WideDirector 3.5 Reference Guide
188 JOB AND SYSTEM LOGGING
Color Management: Events related to input document color management, press and proofing output color management and spot colors.
Event Details
Contains: Find a match on a specified text string (in any of the event’s fields). If you type several words, all words must occur. For example, “preflight red” only shows events that contain both the words “preflight” and “red”. Leave the field empty if you do not wish to filter on content. This filter is case insensitive.
Occurred Display only the events that were generated during a specific time period.
You apply the filter by toggling the Filter On, choosing or specifying your filtering options, and clicking Apply.
When the filter is in use, you will see the following type of message with an indication of the number of logged events:
NOTE: By default, all events are displayed (i.e. no filter is applied).
The System Log
The System log displays logging information on the selected item in the System Overview (the AccurioPro WideDirector System or a specific Task Processor). The main purpose of the System log is for troubleshooting. The log can be inspected interactively, or can be exported. The AccurioPro WideDirector System keeps logged events for a specified time period, after which they are removed. You can also manually clean up the System log.
System events are events that are not directly related to the processing of jobs (although they may affect job processing).
The System Log consists of a Filter pane, a chronological list of logged events, and an additional information pane.
The Job Log Filter and list of events work together: The events displayed are
determined by the filter (if any) you apply.
The lower pane displays more detailed information on the selected event.

AccurioPro WideDirector 3.5 Reference Guide
5 MANAGING JOBS 189
List of Events
The list of events displays a date, source, event type and description for each event.
When Displays the time and date at which the event was logged.
From Displays the name of the device or system which generated the logged message.
Event Displays the name of the type of event that was logged.
Description Displays an abbreviated version of the generated event. You can view the full
message (in the lower pane) by selecting it.
You can sort the events on any of these Message fields by clicking the arrow in the column headers. Each time you click the arrow, the sort is toggled between ascending and descending order.
The System Log Filter
You access the System Log filter by clicking on the Filter icon in the System Log:
Filter
Toggle filtering on or off.
Event Type
Choose one or more event groups for which the filter will be applied.
Major Task Processor events (start, stop): This includes the status such as boot or shutdown of Task Processors.
Error and warning notifications: This includes the error status of Task Processors, device statuses such as error, online and offline and non-informative notifications with their reply.
Informative notifications: Important job-related actions such as job editing.
Proofing actions: Events related to the proofing result such as waiting, continue, approve, reject, resume.

AccurioPro WideDirector 3.5 Reference Guide
190 JOB AND SYSTEM LOGGING
User interactions (start, stop, and restart): This includes Task Processor statuses such as start, shutdown, hold or resume.
Used resources: Events related to Resource selection such as screen types, profiles, calibration and linearization curves. Events related to Task Processor parameter sets.
Event Details
Contains: Find a match on a specified text string (in any of the event’s fields). If you type several words, all words must occur. For example, “preflight red” only shows events that contain both the words “preflight” and “red”. Leave the field empty if you do not wish to filter on content. This filter is case insensitive.
Occurred Display only the events that were generated during a specific time period.
You apply the filter by toggling the Filter On, choosing or specifying your filtering options, and clicking Apply.
When the filter is in use, you will see the following type of message with an indication of the number of logged events:
NOTE: By default, all events are displayed (i.e. no filter is applied).
Problem Report
The Problem Report displays all messages generated by the associated job. It is similar to the Message Board. The main difference is that the Problem Report gives an overview of all problems found during ticket editing in the Ticket Editor, or Run List editing in the Jobs window. The Problem Report is generated on the local Client, not on the AccurioPro WideDirector System.
A Problem Report is opened if you click one of the following status icons which may appear next to a job in the Job List:

AccurioPro WideDirector 3.5 Reference Guide
5 MANAGING JOBS 191
The AccurioPro WideDirector system issued a critical message.
The job has stopped pending user interaction.
The job has generated an error, and has stopped.
The job has generated a warning.
The job has generated an information message.
NOTE: In the Job List, do not click on the status icon of a collapsed group. You must first expand the group to reveal the job in error.
It is also opened if you click any of the same status icons which may appear in the Tab Area of the Ticket Editor:
The Problem Report consists of a Message List, Acknowledge Pane, and Interaction pane.
Message List
The Message List displays the status, date, type, and description of each message.
Status One of the four job status icons is displayed (see above).
Date occurred Displays the date and time that the problem occurred.
Location Displays the name of the job, device, or system where the message was generated. If this is a job, then the job order number is also displayed in parentheses. You can sort the messages according to location by clicking the arrow in this column header. Each time you click the arrow, the sort is toggled alphabetically between ascending and descending order.

AccurioPro WideDirector 3.5 Reference Guide
192 JOB AND SYSTEM LOGGING
Description Displays an abbreviated version of the message. You can view the full message by
selecting it. You can sort the messages according to description by clicking the arrow in this column header. Each time you click the arrow, the sort is toggled alphabetically between ascending and descending order.
Each message row has a colored background:
Pink: The message has not yet been Acknowledged.
Blue: This is the currently selected message.
Gray: The message has been
Acknowledged. Acknowledge pane
The Acknowledge pane displays information and the acknowledgement status of the currently selected message in the Message List.
Message summary Displays the summarized message text from the Message List Description
column.
Reported by Indicates which Task Processor generated the message, and when, in the format “Reported by <Task Processor> on <time and date>”.
Acknowledgement status Indicates who (if anybody) first acknowledged the message, and when, in the
format “acknowledged by <user> at <time and date>”.
Acknowledgement button This button appears if the selected message has not yet been acknowledged. Click this button once you have read the message. Any Errors or Warnings that you acknowledge are removed from the Message List. User Interaction messages remain in the list until the required action has been taken.
Notification/Interaction pane
Notification message Displays a more detailed version of the message. Some messages are followed by a suggested course of action, such as:
“There is no location for exporting the system log. The default
C:\ Prepress\SysLog\$DATE.log will be used”
Interactive dialog buttons. Some messages include interactive dialog buttons which allow you to correct the cause of the error or warning. For example, Edit Job or Resume Job.
NOTE: If you select more than one message, you will see no specific message information, only “x messages selected”.

AccurioPro WideDirector 3.5 Reference Guide
5 MANAGING JOBS 193
Viewing the Results Tab The Results tab allows you to view the results of the selected job. This tab displays thumbnails of the Run List pages, and job separations (if any).
NOTE: Double-clicking a job opens it in preview mode (see “Previewing Job Results” on page 233).
This tab is divided into the following panes:
The Activity Pane
The Job Layout Pane (Jobs Window)
The Activity Pane This pane allows you to monitor the current processing status of any of the selected job’s Processing and Output Task Processors.
The Activity pane includes the following:
Flow selection icons
You will see one or more Flow Identifier icons, corresponding to each flow in the selected job. When you click on any of these icons, the selected flow is displayed, and you will see the Task Processors and Actions that are active in this particular flow. This is the same as clicking the Flow Status icons in the Job List.
Selected flow components (active Task Processors and Actions).
You will see the Task Processors and Actions that are active in the selected flow. If you double-click on any of the Task Processors, you will see the Activity Window for that particular component.
Results tab display icons.
Click the first of these icons to show/hide the Activity pane.

AccurioPro WideDirector 3.5 Reference Guide
194 VIEWING THE RESULTS TAB
Click the second of these icons to show/hide the Production Sets table (Multi-part jobs only).
Click the third icon to show/hide the Separations pane.
NOTE: Input channel activity is not displayed in the Activity pane. If you want to check this, switch to the System Overview and double-click the Task Processor that you want to monitor. Any processing is then displayed in the Activity window. For more information, see “Monitoring your Task Processors” on page 354.
The Job Layout Pane (Jobs Window)
This pane displays thumbnails of the Run List pages of the selected job. Status icons, corner folds, and colored backgrounds provide additional information about the current status and orientation of each of the displayed thumbnails.
TIP: To improve the speed with which job results are displayed, you can disable thumbnail viewing from the View menu.
You can double-click any of the thumbnails to launch the appropriate viewer for this specific page (Acrobat for PDF documents or Raster Preview for TIFF files). If the job has not yet received all required pages, you will see only empty placeholders.
Page and Flat Thumbnails
You need to enable thumbnails (View > Thumbnails) in order to view a miniature representation of your job pages in the Job Layout pane.
If no imposition has been specified for the selected job, you will see a series of pages. The current status of each page is indicated by its background color.
A thumbnail view of this page is either not available, or is currently being retrieved from the AccurioPro WideDirector System (green background color).
Page has been processed successfully (no background color).

AccurioPro WideDirector 3.5 Reference Guide
5 MANAGING JOBS 195
Page has been processed successfully, and is on hold pending approval (blue background color).
Page has been processed with errors (red background color).
Page is managed by the PlateMaker Client, and is ready to plate (purple background color).
Page has been processed successfully, but has been rejected.
Page has been discarded.
An empty page in the Run List (white background with a cross).

AccurioPro WideDirector 3.5 Reference Guide
196 VIEWING THE RESULTS TAB
A blank page in the Run List (white background).
If an imposition scheme has been specified, you will see a series of flats. As with pages, the status of each flat is indicated by its background color.
Extra Thumbnail Information The following additional information is available for both pages and flats:
Action indicator
Separation indicator
Proofing data indicator
Raster data indicator
Corner fold indicator
Page number
Flat label
Signature


AccurioPro WideDirector 3.5 Reference Guide
200 VIEWING THE RESULTS TAB
Action Indicator
Each individual page or flat may have one or more Action indicators above it (corresponding to hold points in the Production Plan). These may be any of the following:
The job’s Production Plan contains an After Hours Action. When this point is reached, the job
results are held (written to disk) pending the specified time.
The job’s Production Plan contains a Soft Proof Action. When this point is reached, the job results are held (written to disk) pending approval/rejection of a Digital Film preview by the
user.
The job’s Production Plan contains a Hard Copy Proof Action. When this point is reached, the job results are held (written to disk) pending approval/ rejection of a hard copy proof by the
user.
The job’s Production Plan contains a Ready for Plating Action. When this point is reached, the
job results are taken over and managed by the PlateMaker Client (ready to plate).
The job’s Production Plan contains a Collect for Output Action. When this point is reached, the job results are held (written to disk) pending user intervention.
The job’s Production Plan contains a Waiting for Results Action. When this point is reached, the job results are held until the target flow or required pages are finished.
The job’s Production Plan contains a Discard Action. When this point is reached, the job results are held until the specified pages have been automatically discarded.
The job’s Production Plan contains a Web Proof Action. When this point is reached, the job results are held (written to disk) pending approval/rejection of a Digital Film preview by the
remote user.
These Action indicators can be in one of three states (as indicated below for the Soft Proof Action):
Action icon Statu
s
The page or flat has not yet reached this Action.
The page or flat has reached this Action (blue background).
The page or flat has passed this Action (dimmed icon).
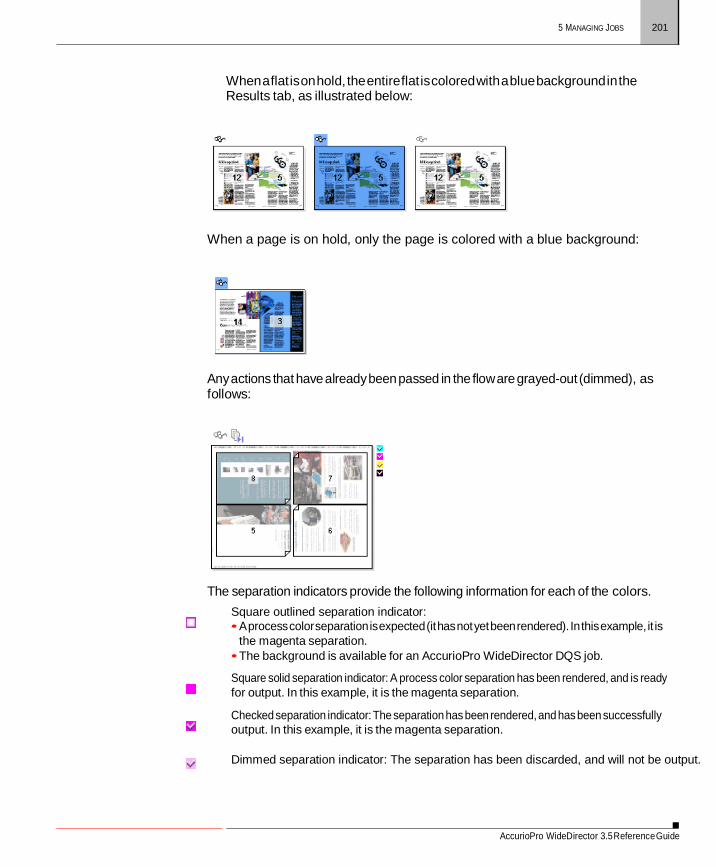
AccurioPro WideDirector 3.5 Reference Guide
5 MANAGING JOBS 201
When a flat is on hold, the entire flat is colored with a blue background in the Results tab, as illustrated below:
When a page is on hold, only the page is colored with a blue background:
Any actions that have already been passed in the flow are grayed-out (dimmed), as follows:
The separation indicators provide the following information for each of the colors. Square outlined separation indicator: • A process color separation is expected (it has not yet been rendered). In this example, it is
the magenta separation. • The background is available for an AccurioPro WideDirector DQS job.
Square solid separation indicator: A process color separation has been rendered, and is ready for output. In this example, it is the magenta separation.
Checked separation indicator: The separation has been rendered, and has been successfully output. In this example, it is the magenta separation.
Dimmed separation indicator: The separation has been discarded, and will not be output.

AccurioPro WideDirector 3.5 Reference Guide
202 VIEWING THE RESULTS TAB
Round outlined separation indicator: A spot color separation is expected (it has not yet been rendered). The outline color is the color of the expected spot color.
Round solid separation indicator: A spot color separation has been rendered, and is ready for output. The solid color is the spot color.
Checked separation indicator: The spot color separation has been rendered, and has been successfully output.
For example, the page below contains 8 separations: the four CMYK process colors plus four spot colors. All these separations have been rendered (as indicated by the solid separation indicators) and have been successfully output (as indicated by the associated checkmarks):
Proofing Data Indicator
Results may display a small, square multi-colored icon to their right. This is the Proofing Data indicator. It indicates that the page/flat belongs to a proofing workflow, and is a composite TIFF file (i.e., no separations).
A checkmark indicates that the page/flat has been successfully output.
The page/flat belongs to a proofing workflow or a layout job, and is a composite file (i.e., not a separation). The page/flat has been rendered, and is ready for output.
The page/flat belongs to a proofing workflow or a layout job, and is a composite file (i.e., not a separation). The checkmark indicates that it has been successfully printed.

AccurioPro WideDirector 3.5 Reference Guide
5 MANAGING JOBS 203
Raster Data Indicator
For DQS and native AccurioPro WideDirector DQS (Raster Impose) results, you can choose View > Show > Page Rendered. Results will then display a square gray-colored indicator in the lower right corner. This is the Raster Data indicator. It means that all separations in the page(s) have been fully rendered and are ready for previewing or output.
Corner Fold Indicator
Small corner folds in a corner of each page indicate a page’s orientation.
The orientation of a page may vary in an imposition layout. The position of the corner fold tells you where the top of the page is.
The orientation of a page may vary in an imposition layout. The position of the corner fold tells you where the top of the page is:

AccurioPro WideDirector 3.5 Reference Guide
204 VIEWING THE RESULTS TAB
Page Number
Page numbers indicate the position of pages in the Run List. If you are viewing a flat, you will see the position of the pages on the flat.
Flat Label
Below each flat you will see a label, which indicates which side of the signature you are looking at. You can click this label to quickly select the entire flat. This is useful if pages cover the entire surface of the flat, making it difficult to select the flat (and not a page) by clicking directly on it.
Signature
If Front and Back viewing has been enabled, you will see the complete signature for each page or flat in the job.
NOTE: In this example, the small checkmarks you can see indicates that all separations have been output.

AccurioPro WideDirector 3.5 Reference Guide
202 WORKING WITH JOBS IN THE JOB LIST
Working with Jobs in the Job List The Job List displays information on all jobs that have been submitted to the AccurioPro WideDirector System. From here you can monitor these jobs, and make a variety of changes to their current status:
“Selecting Jobs” on page 202
“Monitoring Jobs” on page 203
“Holding/Resuming Jobs” on page 204
“Continuing Jobs” on page 205
“Making Rush Jobs” on page 208
“Restarting Job Processing” on page 209
“Duplicating Jobs” on page 209
“Deleting Jobs” on page 210
“Enabling/Disabling Input Channels” on page 212
“Opening the Job and System Logs” on page 213
“Archiving Jobs” on page 213
“Dumping Jobs” on page 214
“Merging Jobs” on page 215
Selecting Jobs In the Job List and the Results tab, as in other areas of the AccurioPro WideDirector Client, you can use the following procedures to select and de-select multiple items (jobs, Hot Tickets, pages, flats, etc.).
NOTE: Jobs may be grouped in job folders as explained in “Organizing the Job List” on page 169.
To select a job
1 Select the Jobs Window.
2 Double-click a job folder in the Job List.

AccurioPro WideDirector 3.5 Reference Guide
5 MANAGING JOBS 203
The job folder is expanded to reveal the job contents. These are the documents that have been input via the input channel(s) associated with this particular ticket.
3 Select one of the jobs.
The job details are retrieved from the AccurioPro WideDirector System and displayed in the pane on the right. This information is arranged into 5 tabs - Administration, Options, Plan, Pages, and Results.
TIP: You can also click the expand/collapse buttons to open and close job folders.
To select or de-select multiple jobs or items
1 Select the Jobs Window.
2 Click the first item you want to select in the Job List.
3 While holding down the CTRL key (Windows) or COMMAND key (Macintosh), click each additional item you want to select.
4 To de-select an item, hold down the CTRL key (Windows) or COMMAND key (Macintosh), and then click the item.
5 To extend the selection over a block of contiguous items, click the first item and then hold down the SHIFT key while clicking the last item you want to select.
Monitoring Jobs You can quickly check the status of your jobs as follows:
To monitor a job
1 Select the Jobs Window.
2 Expand the folders in the Job List to view your jobs.
A series of icons indicate the current status of each job in the Job List. These include Job Notification Icons, Job Status Icons, Job Icons, and Flow Icons.
3 To view information on a job’s Run List, select the job and click the Pages tab.
The Run List is displayed in the pane on the right.
4 To view intermediate job results, select the job and click the Results tab.
If any page results are available, they are displayed in the pane on the right. Otherwise, you will see only empty page holders.
AccurioPro WideDirector 3.5 Reference Guide
204 WORKING WITH JOBS IN THE JOB LIST
5 To monitor any ongoing processing, expand the Activity pane in the Results tab.
For more information, see “The Activity Pane” on page 193.
Holding/Resuming Jobs
When you manually put a job on hold in the Jobs List, you suspend all processing tasks for the entire job (after the current activity has been allowed to finish). The job remains on hold until you resume it.

AccurioPro WideDirector 3.5 Reference Guide
5 MANAGING JOBS 205
NOTE: You cannot “continue” a job that is on hold: The Continue command will be disabled. In this case, you must use the “Resume” command.
To manually hold a job
1 Select the Jobs Window.
2 Right-click a job which has not yet finished processing in the Job List (or job results in the Job Layout pane), and choose Hold Job from the right menu.
3 You can also click the Hold button:
The Hold Job dialog box appears. Here you can choose to stop any ongoing processing, or allow it to finish before the job is put on hold.
4 If you want to stop processing, choose Stop and Hold.
This means that active tasks are stopped and rescheduled. The rescheduled tasks are then put on hold.
5 If you want to allow any ongoing processing to finish, choose Hold.
This means that all active tasks will be allowed to finish and all queued tasks will be put on hold.
The Hold icon appears in the Status column to the left of the job. Notice also that the background color of the associated Job Flow icon changes to blue.
All flats and pages that still need to be processed in the Pages and Results tabs will also be colored blue. Only results that were finished are not colored blue.
The job’s input channels will continue to receive and deliver documents to the Page Store, but no further processing will be done on them.
This means that although you may see new documents arrive in the Page Store, you cannot add these document pages to your Run List since they have not yet been processed by the Normalizer.
NOTE: Manually holding a job from the Jobs Window stops all processing tasks for the entire job. This is different from including an Action in the job’s Production Plan, where you can put any individual job item on hold at any time, whether it is a page, a flat or a separation.

AccurioPro WideDirector 3.5 Reference Guide
206 WORKING WITH JOBS IN THE JOB LIST
To resume a job on hold
1 Select the Jobs Window.
2 In the Job List, select a job which has been manually put on hold.
The following Status icon is attached to jobs which are on hold:
Additionally, the background color of the associated Job Flow icon will be blue.
3 Choose Control > Resume Job, or click the Resume button in the Toolbar.
The Hold icon disappears, and the background color of the associated Job Flow icon changes to green.
Resuming a job does not resume results and/or tasks that are waiting on an Action, or that are rejected or in error.
NOTE: Resuming a job resumes processing of the entire job which was manually put on hold. This is different from continuing an individual job item (page, flat or separation) which was automatically put on hold by an Action in the job’s Production Plan.
Continuing Jobs A job may be stopped because it has reached a hold Action in its Production Plan, or because it has been aborted, rejected, or in error. In all cases, you can continue all or part of the job manually.
NOTE: You cannot manually continue jobs that are waiting for a Task Processor: They will be continued automatically when a Task Processor becomes available.

AccurioPro WideDirector 3.5 Reference Guide
5 MANAGING JOBS 207
To continue results which are waiting on an Action
1 Select the Jobs Window.
2 In the Job List, select a job which has been stopped by AccurioPro WideDirector, and is waiting for user interaction.
Jobs which have been stopped due to a hold Action will be flagged with one of the following Status icons:
The job’s Production Plan contains an After Hours Action.
The job’s Production Plan contains a Soft Proof Action.
The job’s Production Plan contains a Hard Copy Proof Action.
The job’s Production Plan contains a Collect for Output Action.
The job’s Production Plan contains a Discard Action.
3 Select the Results tab.
In the Job Layout pane, you will see thumbnails of all the pages or flats in the selected job. Above each job item, you will see one or more Action icons. These correspond to the Actions included in the job’s Production Plan. The color of each icon indicates the current processing status of the selected page or flat within the job:
If the icon is displayed normally, the page/flat has not yet reached this
checkpoint in the Production Plan.
If the icon has a blue background, the page/flat has reached this check- point in the Production Plan, and is on hold. In this case, the page/flat itself is also colored blue. The exception to this are pages with the Collect for Output Action - these only turn blue when ALL the specified pages are available.
If the icon is dimmed (grayed out), the page/flat has already passed this
checkpoint in the Production Plan.
4 Select one or more pages or flats which are on hold (blue background).
5 Click Continue.

AccurioPro WideDirector 3.5 Reference Guide
208 WORKING WITH JOBS IN THE JOB LIST
The selected pages or flats resume processing, the blue color is removed, and the associated Action icon is dimmed.
NOTE: If you continue a job that is being collected (Collect for Output) but is not yet complete, only the currently available results will be output: AccurioPro WideDirector will automatically continue to collect the remaining results, but you will need to select them and again click Continue to output them.
To continue results which were aborted, rejected, or in error
1 Select the Jobs Window.
2 In the Job List, select a job which is flagged with one of the following Notification or Status icons:
aborted
rejected
warning
error
3 Select the Results tab.
In the Job Layout pane, you will see thumbnails of all the pages or flats in the selected job.
4 Select one or more pages or flats (with the aborted, rejected, warning or error status).
5 Click Continue.
A Continue confirmation dialog box is displayed.
6 If you wish, enter a comment explaining why you are continuing to process this result.
TIP: You can view this comment later by checking the Job Log (Log for Job).
7 Click Continue.
The selected pages or flats resume processing. However:

AccurioPro WideDirector 3.5 Reference Guide
5 MANAGING JOBS 209
In the Job List, the status of jobs with the rejected or warning condition does not change. Only aborted and error conditions are cleared.
In the Results tab, the status of results with the rejected, warning or error
condition does not change. Only the aborted condition is cleared.
To continue multiple results
1 Select a job in the Jobs window which is waiting on an Action, or is rejected, aborted or in error.
2 Select the Results tab, and choose the first item you want to continue.
3 Extend your selection, as described in “To select or de-select multiple jobs or items” on page 203. If the items are part of a flat, select the entire flat.
4 Click Continue.
NOTE: You can only continue multiple results provided they are all in the same waiting state. This button is disabled if one or more items have a different state, or are not waiting on an Action.
If one or more of the selected items contains rejected, aborted, or error results, a Continue confirmation dialog box is displayed.
5 If you wish, enter a comment explaining why you are continuing to process this result.
TIP: To view this comment later, click the Status icon next to the page in the Page Store or Run List.
6 Click Continue.
Making Rush Jobs You can upgrade any job in the Job List to a “rush” job. This puts the job to the top of the queue of jobs waiting to be processed by AccurioPro WideDirector. A rush job will be processed as soon as AccurioPro WideDirector has finished processing the current job.
To make a rush job
1 Select the Jobs Window.
2 In the Job List, select a job.
3 Choose Control > Rush Job, or click the Rush Job button in the Toolbar.

AccurioPro WideDirector 3.5 Reference Guide
210 WORKING WITH JOBS IN THE JOB LIST
The Job icon changes to a chequered background, indicating that this job will be given priority over the other jobs in the Job List.
Restarting Job Processing
You can remake all the existing job results which follow a selected point in the Production Plan. You may want to do this if you have changed your resources (new fonts, color books, etc.), or if you want to remake aborted results or remake output when no raster data is available.
To restart job processing
1 Select the Jobs window.
2 In the Job List, select a job and choose Control > Restart Job Processing At.
3 Select the Task Processor from which you want to restart processing.
AccurioPro WideDirector starts to re-render the job from the selected point in the Production Plan.
Duplicating Jobs AccurioPro WideDirector allows you to duplicate jobs. This is useful for applications which require nearly identical jobs (e.g. where only a single separation - usually black – needs to be changed across different jobs)
When you duplicate a job, AccurioPro WideDirector makes an exact copy of the job, ready for editing. The ‘source’ job is not affected.
To duplicate a job
1 Select the Jobs window.
2 In the Job List, select a job and choose Edit > Duplicate Job.
AccurioPro WideDirector duplicates the job, and opens the duplicate version in the Ticket Editor. Here, you can make any changes you require (e.g. change the job name).
Close the Ticket Editor.
The duplicate job is automatically submitted, and appears in the Job List.


AccurioPro WideDirector 3.5 Reference Guide
210 WORKING WITH JOBS IN THE JOB LIST
Deleting Jobs By default, jobs are not automatically deleted from the system. You must delete them manually. When you delete a job, all the job’s resources and results are erased, but the job still remains logged in the system and can still be seen in the Job List by the Administrator (these jobs have a strike-through). To permanently remove all traces of a deleted job, the Administrator needs to delete it a second time from the Job List. Alternatively, he can set up a schedule for automatically removing deleted jobs from the system.
NOTE: You can also delete a job together with all its logging information in a single step by purging it, as described below.
To delete a job from the Job List
1 Select the Jobs Window.
2 Select the job that you want to delete in the Job List.
3 Choose Edit > Delete Job, or press the Delete key.
NOTE: If you delete a Job created from a Hot Ticket, the Hot Ticket itself is not deleted.
You will see the message “The job <jobname> will be deleted. You cannot undo this”.
4 Click Delete.
The Job is deleted, together with the Job Ticket, and any intermediate job results. Only the job log remains. If you are logged in as an Operator, the job immediately disappears from the Job List. However, if you are logged in as an Administrator, you will still see the job in the Job List: The job has a strike- through and is grayed out:
To remove a job with a strike-through from the Job List (Administrators only), you need to select it and delete it a second time.
NOTE: If you delete a Job created from a Hot Ticket, the Hot Ticket itself is not deleted.

AccurioPro WideDirector 3.5 Reference Guide
5 MANAGING JOBS 211
To view/remove all ‘deleted’ jobs from the Job List
Administrator access level only!
Deleted jobs can still be seen in the Job List by Administrators: They have a strike-through and are grayed out.
1 Select the Jobs Window.
To quickly locate all deleted jobs, you can use the Custom Job Filter.
2 Edit the Custom Job Filter by hovering over the Custom Filter button and clicking Edit in the cogwheel menu to open the filter settings.
3 In the filter settings, select the ‘deleted’ Status check box, and choose ‘Is’ from the associated list options.
4 Click Apply to activate the filter, and then click OK.
5 Select the deleted job(s) that you want to permanently remove in the Job List.
6 Choose Edit > Delete Job, or press the Delete key.
The selected job(s) are permanently deleted. No trace of them remains on the system, in the Job List, or in the Job Log.
To purge a job from the Job List
1 Select the Jobs Window.
2 Select the job that you want to purge in the Job List.
3 Hold down the Shift key (Windows) or ALT/Options key (Macintosh) while pressing the Delete key.
You will see the message “The job <jobname> will be deleted immediately. You cannot undo this”.
4 Click Delete.
The job is permanently deleted. No trace of the job remains on the system, the Job List, or the Job Log.
AccurioPro WideDirector 3.5 Reference Guide
212 WORKING WITH JOBS IN THE JOB LIST
Enabling/Disabling Input Channels
By default, all input channels are enabled when they are first created. However, you may want to disable them from time to time - to prevent other users inputting documents, or to improve system performance.
You can enable or disable input channels from the Hot Tickets List (for Hot Tickets which will be used to create jobs) or from the Jobs List (for jobs which have already been created).
To disable an input channel
1 Select a Hot Ticket in the Hot Ticket List, or select a job in the Job List.
2 Choose Control > Disable Inputs.
The inputs for this job are closed. AccurioPro WideDirector will no longer accept document input on this channel. Any documents which are input will be queued up, pending reactivation of the channel.
You will see that the disabled job or Hot Ticket now has a “disabled input” job icon:
To enable an input channel
1 Select a disabled Hot Ticket in the Hot Ticket List, or a disabled job in the Job List.
Disabled jobs and Hot Tickets Have a “disabled input” job icon:
2 Choose Control > Enable Inputs.
The job icon changes to indicate that the inputs have been successfully opened.
To automatically enable or disable an input channel
1 Create a new Job Ticket/Hot Ticket, or right-click a job in the Job List and select Edit Job from the right menu.
2 Select the Options tab.
3 To disable an input channel, select the ‘Deactivate input when’ check box, then click open the associated list box and select one of the available options, as described in “Input Channels” on page 248.
4 To enable an input channel, clear the ‘Deactivate input when’ check box.

AccurioPro WideDirector 3.5 Reference Guide
5 MANAGING JOBS 213
Opening the Job and System Logs
The Job and System Logs list all job and system events which take place within AccurioPro WideDirector. They provide information on jobs, devices, or systems which need attention.
To open the Job Log
1 Select the Jobs Window.
2 Right-click on a job in the Job List, and select Log for Job from the right menu.
Make sure you right-click a job, and not the job folder. The Job
Log is displayed.
NOTE: The largest item you can select is a job. You cannot view the log for several jobs at once. If you select a flat, the log includes all separations of that flat, but not the pages that make it up.
To open the System Log
1 Select the System Overview Window.
2 Choose Window > Log for AccurioPro
WideDirector System. The System Log is
displayed.
Archiving Jobs When a job is processed by AccurioPro WideDirector, all the input files,
intermediate processing results, resources, profiles, etc. are by default automatically discarded. If you want to keep them (or part of them), you must archive them. There are three different ways of doing this. You can:
archive jobs manually in the Job List
include archiving “Actions” in the Jobs Production Plan
set up an automated job archiving schedule
To archive a job manually from the Job List
1 Select the Jobs Window.
2 Select a job in the Job List.
3 Choose File > Archive Job.
The following status icon appears next to the job name while the job is being archived:

AccurioPro WideDirector 3.5 Reference Guide
214 WORKING WITH JOBS IN THE JOB LIST
As soon as the job has been successfully archived, the Archiving status icon disappears (any previous status icon reappears), and the job icon displays a small “archived” indicator:
Job archive files are saved with the .arch file extension.
To import an archived job
1 Select the Jobs Window.
2 Choose File > Import Job Archive.
The Open dialog box appears.
3 Browse to the location where you save your archives.
Job archive files are saved with the .arch file extension.
4 Select an archive, and click Open.
The Importing Archive status icon appears briefly next to the job name while the archive is being imported:
As soon as the archive has been successfully imported, the Importing Archive status icon disappears (any previous status icon reappears), and the imported job appears in the Job List.
AccurioPro WideDirector validates the imported ticket against the current configuration of the system. Any ticket errors are reported via the Message Board, and can be corrected using the Ticket Editor.
Dumping Jobs Dumping a job is similar to archiving a job. However, this function is only available to administrators, and is used for troubleshooting purposes. Dumping a job saves the job, together with all its system resources. This information can then be delivered to your Konica Minolta Service Technician who can use it to reproduce the problem.
You can also make a dump of several jobs.
Administrator access level only!

AccurioPro WideDirector 3.5 Reference Guide
5 MANAGING JOBS 215
To dump a job
1 Select the Jobs Window.
2 Select one or more jobs in the Job List.
3 Choose File > Export > Job Dump.
4 In the Save As dialog, choose the location where you want to save the job dump. The file name is the job number with the .zip extension. You can change the name of the ZIP file if you want. If you selected more than one job, each job dump is saved in a separate ZIP file.
The following status icon appears next to the job name while the job is being dumped:
Make sure the location you chose has sufficient disk space to save the job and perform the compression.
As soon as the job has been successfully dumped, the dumping status icon disappears (any previous status icon reappears), and the job icon displays a small “dumped” indicator:
Merging Jobs AccurioPro WideDirector allows you to merge any number of jobs in the Job List into a single merger job. This is particularly useful for ganging several smaller jobs into a larger job. The Apogee Impose module can be used to place the documents of the different jobs on the press sheets of the merger job.
The following conditions must be met in order to merge jobs:
The jobs to be merged must be unbound jobs.
A job can be merged several times into different merger jobs but a merger job
cannot be used as one of the jobs to be merged.
Versioning jobs cannot be merged.
Otherwise you are free to combine jobs with different characteristics (presses, colors, and media) and the Merge Assistant helps you collect and merge suitable jobs.

AccurioPro WideDirector 3.5 Reference Guide
216 WORKING WITH JOBS IN THE JOB LIST
Merge jobs
1 In the Job List, select the jobs you want to merge into a single merger job. You can select job folders or individual jobs within a folder. If you select folders, all the jobs in the folder are included in your selection for merging.
2 Right-click in the blue, highlighted area and choose Merge Jobs. The
Merge Assistant is displayed.
The selected jobs are listed with their details. Jobs which cannot be merged (unsupported) are grayed out and the product type is displayed in red in the Product column. Unsupported jobs (e.g. bound products, versioning jobs) can be hidden in the list by selecting the Hide unsupported jobs check box.
3 If necessary, fine-tune the list of jobs you want include in the merger job. You can sort the jobs by column and choose the most appropriate jobs to be merged by Press, Stock, Media, etc.
You can select multiple jobs in the list and click one of the check boxes to clear them from the list.
4 In the Resulting job panel, you define the details for the new merger job.
By default, the first supported job ticket in the selected jobs list is used to create the new job. If you want to use a different job ticket, click the Change button and choose another job from the drop-down list.
OR
Click the Change button and select a Ticket Template. The Templates dialog is displayed and you can choose a job ticket template. Click Select to return to the Merge Assistant.
5 Enter the Order Number and Job Name for the new merger job.
6 Click Merge Jobs.
The Job Ticket Editor opens and you can complete the job set-up, including imposition with Apogee Impose. If the merged jobs had documents, these documents are added to the merger job. The Comments box in the Administration tab lists the jobs merged to create the merger job.
The Merge Assistant window remains open but the merged jobs are removed from the list.
7 Submit the new merger job.
The merger job is added to the Job List. The merged jobs and the merger job are indicated with a special status icon.
8 In the Merge Assistant, click Close to finish merging or repeat the merging procedure to merge another batch of jobs in a second merger job.

AccurioPro WideDirector 3.5 Reference Guide
5 MANAGING JOBS 217
Working with Jobs in the Results Tab The Results tab allows you to preview the results of the selected job, and monitor any ongoing activity in the job’s Production Plan:
“Changing Viewing Options” on page 217
“Re-rendering Results” on page 219
“Re-imaging Results” on page 220
“Re-exporting Results” on page 221
“Remaking InkDrive Files” on page 221
“Re-printing Results” on page 222
“Viewing Job Results in the Results Tab” on page 222
“Rejecting Results” on page 223
“Discarding Results” on page 225
“Including Results” on page 226
“Getting Information on PDF Data” on page 226
“Info Window (for PDF Files)” on page 228
“Info Window (for RGB/TIFF or Raster Files)” on page 230
Changing Viewing Options
By default, all the available viewing options are selected. However, you can always disable or re-enable specific viewing options from the Jobs window.
To show/hide thumbnails
1 Select the Jobs Window.
2 Select a job in the Job List.
3 Select the Results tab.
4 Choose View > Thumbnails to toggle thumbnails on or off for the results displayed in the Job Layout pane.

AccurioPro WideDirector 3.5 Reference Guide
218 WORKING WITH JOBS IN THE RESULTS TAB
TIP: Results are displayed faster when thumbnails are turned off.
When thumbnails are turned on, you will see a miniature image of how the selected results will look when printed. When thumbnails are turned off, you will see only a colored background instead of the image.
To show/hide extra information
1 Select the Jobs Window.
2 Select a job in the Job List.
3 Select the Results tab.
4 Choose View > Show, and set your Extra display options by toggling on or off any of the following:
Page Number: Shows the position of the page in the Run List.
Hold States: Shows pages or flats in blue when on hold.
5 Choose View > Extras.
This acts as a “master switch”, to toggle all your selected Extra display options on or off.
To select front and back sides
1 Select the Jobs Window.
2 In the Job List, select a job which uses imposition in the Production Plan.
3 Select the Results tab.
4 Choose View > Columns > Front and Back.
All the page signatures are displayed (the front and back of each page or flat). To scale the Results view
1 Select the Jobs Window.

AccurioPro WideDirector 3.5 Reference Guide
5 MANAGING JOBS 219
2 Select a job in the Job List.
3 Select the Results tab.
4 Choose View > Scale, and select one of the following:
Small: Provides the smallest thumbnail visualization of the selected results.
Normal: Provides the standard thumbnail visualization of the selected
results.
Large: Provides the most detailed thumbnail visualization of the selected results.
Fit to Window: All selected thumbnail viewing options are displayed,
scaled within the limits of the Job Layout pane. The results may be small, but you will not need to scroll to view them all.
To show/hide separations
1 Select the Jobs Window.
2 Select a separated job in the Job List.
3 Select the Results tab.
4 Select a page or flat in the Job Layout pane.
The individual separations which combine to make up this item are displayed in the Separations pane. Each separation represents a different color.
NOTE: Separations are not available for composite jobs.
Re-rendering Results
You can re-render individually selected results (non-imposed flats, pages, or separations). When you do so, only the results of the selected pages or flats are remade - not the entire job.
You may want to re-render results if you have changed your resources (new fonts, color books, etc.). This is also useful if you want to remake aborted results, or remake output when the raster data (Digital Film) is no longer available.
NOTE: You can also re-render the output when the raster data is still available.

AccurioPro WideDirector 3.5 Reference Guide
220 WORKING WITH JOBS IN THE RESULTS TAB
To re-render job results, the job must still have the original input documents (i.e. Keep Results Action on the input channel).
TIP: This is different from editing a job, where existing results are not affected by any changes you make.
What is the difference between Re-rendering and Re-imaging results?
When you select Re-render, AccurioPro WideDirector will re-render and output the selected job results. When you select Re-image, AccurioPro WideDirector will not render the results again: It will simply output the existing raster data to the selected output device. Re- rendering therefore completely regenerates the selected job results, but takes more time and uses more resources.
To re-render results
1 Select the Jobs window.
2 Select the Results tab.
3 In the Job Layout or Separations pane, select a flat, page, or separation that has already been successfully processed.
4 Choose Control > Re-render <item>.
All scheduled and active tasks after the selected point in the flow are aborted, and re-rendering is started. Any archives that were made on the first pass will be remade, and the old archives deleted.
To re-render backgrounds (AccurioPro WideDirector DQS)
1 Select the Jobs window.
2 Select the Results tab.
3 In the Job Layout or Separations pane, select a flat that has already been successfully processed using AccurioPro WideDirector DQS.
4 Choose Control > Re-render backgrounds.
Re-imaging Results Re-imaging is used to remake previously imaged raster data (Digital Film). This feature is available only for flows that have an imaging output device, and that have kept the finished raster data using the Keep Results Action.
What is the difference between Re-rendering and Re-imaging results?
When you select Re-render, AccurioPro WideDirector will re-render and output the selected job results. When you select Re-image, AccurioPro WideDirector will not render the results again: It will simply output the existing raster data to the selected output device. Re- imaging is therefore quicker and uses fewer resources.

AccurioPro WideDirector 3.5 Reference Guide
5 MANAGING JOBS 221
To re-image results
1 Select the Jobs window.
2 Select the Results tab.
3 In the Job Layout or Separations pane, select a flat, page, or separation that has already been successfully processed, and which has kept the finished raster data.
4 Choose Control > Re-image, or click the Re-image button in the Toolbar.
The selected items are automatically re-imaged, ignoring any proofing or After Hours actions. In fact, no manual intervention is required since in most cases you want to re-image a plate as soon as possible.
If you re-image a job, AccurioPro WideDirector re-images only the results of the main flow. If you want to re-image the results of another flow, you must select those results before re-imaging.
Re-exporting Results
You may want to re-export previously exported results if resources have changed, or when exported files have to be recreated.
To re-export results
1 Select the Jobs window.
2 Select the Results tab.
3 In the Job Layout or Separations pane, select a flat, page, or separation that has already been successfully exported, and which has kept the finished raster data.
4 Choose Control > Re-export.
The selected items are re-exported.
Remaking InkDrive Files
AccurioPro WideDirector allows you to remake InkDrive files for selected flats, pages, or separations. This may be necessary if the files are accidentally deleted or lost on the press side.
NOTE: The InkDrive license must be available, otherwise this option is disabled. Also, you can only remake InkDrive files when all selected results have the InkDrive data available.

AccurioPro WideDirector 3.5 Reference Guide
222 WORKING WITH JOBS IN THE RESULTS TAB
To remake InkDrive files
1 Select the Jobs window.
2 Select the Results tab.
3 In the Job Layout or Separations pane, right-click a flat, page, or separation that has already been successfully processed, and which has kept the finished raster data.
4 Choose Remake InkDrive for <item> from the right menu.
AccurioPro WideDirector sends the InkDrive file(s) for the selected results to the assigned location.
If you selected flats, AccurioPro WideDirector creates an InkDrive file per flat; If you selected separations, an InkDrive file is created per separation. The names of the created InkDrive files are based on the default file name template that matches your selection: flats or separations.
NOTE: If you select separations in a multi-version job, AccurioPro WideDirector creates InkDrive files for all selected separations.
Re-printing Results Re-printing is similar to Re-imaging, but is used specifically to print previously imaged raster data (Digital Film) on a digital press. This feature is available only for flows that have a digital press, and that have kept the finished raster data (using the Keep Results Action on the last processing Task Processor).
To re-print results
1 Select the Jobs window.
2 Select the Results tab.
3 In the Job Layout or Separations pane, select a flat, page, or separation that has already been successfully processed, and which has kept the finished raster data.
4 Choose Control > Re-print.
The selected items are re-printed on your digital press.
Viewing Job Results in the Results Tab
When you view results in the Results tab view, AccurioPro WideDirector provides a view on the rendered output results. This is different from viewing results in the Pages tab, where AccurioPro WideDirector provides a view on the job’s input results.

AccurioPro WideDirector 3.5 Reference Guide
5 MANAGING JOBS 223
To view job results in the Results tab
NOTE: To open PDF documents, you must have already specified where your PDF Reader application is located (see “Preferences” on page 41).
TIP: This feature is useful if you want to diagnose errors, by comparing results from different points in your Production Plan.
1 Select the Jobs Window.
2 Select a job in the Job List which has some rendered results.
3 Select the Results tab.
4 You can do either of the following:
Right-click a page or flat in the Job Layout pane, and select View Page/ Flat From.
Right-click a separation in the Separations pane, and select View
Separation From.
A submenu is displayed, listing the results which are still available at various stages in your Production plan. Provided you attached a Keep Results Action to your output device, you can view the latest rendered results. If any of the earlier Task Processors in the flow have Keep Results Actions attached to them, you can also choose to view these instead.
5 Select the results you want to view.
AccurioPro WideDirector automatically starts the viewing application that supports the selected document type. This is either:
A PDF Reader for PDF documents.
Raster Preview for documents which have already been rendered (Digital
Film).
If you select a document, the viewing application displays the first page of the selected document. The page or document is opened in read-only mode.
NOTE: You can also simply double-click a page or document to display the last available result in your Production Plan.
Rejecting Results There are two reasons why you would want to reject results:

AccurioPro WideDirector 3.5 Reference Guide
224 WORKING WITH JOBS IN THE RESULTS TAB
The content of the page/flat is wrong (incorrect information or typographical mistakes).
The processing is wrong (incorrect screening, traps are too small, etc.). In
this case, you can only reject results that are waiting on an Action that requires manual intervention (such as proofing or “collect for output”).
In both cases, in order to correct the problem you must re-submit the original document to the AccurioPro WideDirector System.
If you wish, you can later accept rejected results and continue processing using the Continue command (see “Continuing Jobs” on page 205).
NOTE: Rejected pages are not re-rendered if you later re-render the job.
To reject results
1 Select the Jobs window.
2 Select either the Pages or the Results tab.
3 Select a document, page, flat or separation.
4 Choose Control > Reject <item>, or click the Reject button in the Toolbar.
The Reject dialog box is displayed.
5 If you wish, add a comment explaining why you are rejecting the results.
This information can later be viewed in the Job Log.
6 Click Reject.
All processing for the selected item is aborted, and the job is marked with a rejected status icon.

AccurioPro WideDirector 3.5 Reference Guide
5 MANAGING JOBS 225
All flats that use the rejected page will be marked as rejected.
NOTE: In a multi-flow Production Plan, you can only reject the processing of a Main or Export flow, not of a Proofer flow.
To clear rejected results
1 Select the Jobs window.
2 Select either the Pages or the Results tab.
3 Select the rejected result(s).
4 Choose Control > Clear Rejected Status.
The rejected status is removed, and processing restarts.
Discarding Results You discard results in order to prevent specific documents, pages, flats or separations from being printed, without stopping the rest of the job from being printed. You can discard results interactively in the Results tab, or you can add a Discard Action to your Production Plan.
To discard results interactively
1 Select the Jobs window.
2 Select the Results tab.
3 Select a document, page, flat or separation.
4 Choose Control > Discard <item>.
NOTE: You can only discard results that are already output or that are waiting to be output. You cannot discard input files, or pages in an imposition workflow.
The thumbnail of the selected item is dimmed with diagonal stripes across it and the separation icons are dimmed and barred (see below left). If you are discarding a specific separation, only the separation icon is dimmed and

AccurioPro WideDirector 3.5 Reference Guide
226 WORKING WITH JOBS IN THE RESULTS TAB
barred in the Job Layout pane (see below right). However, the individual separation is barred in the Separations pane.
You can perform no further action on discarded results (delete, reject, etc.) until they are ‘included’ once more in the job.
Including Results You can ‘include’ discarded results in order to remove their discarded status, and to make the selected results part of the job again. Any status that the results had before they were discarded is once again taken into account (e.g., on hold, in error, etc.).
To include results
1 Select the Jobs window.
2 Select the Results tab.
3 Select a document, page, flat or separation that has been discarded.
The thumbnail of the selected item is dimmed with diagonal stripes across it.
4 Choose Control > Include <item>.
The thumbnail returns to normal, and the selected item is once more part of the job.
Getting Information on PDF Data
Get Info is a command that displays extensive information about a selected item (a page, a flat, or a job). The Info window uses an extensible mechanism to organize and display the attributes of the selected item(s).
If you select one or more documents in the Page Store (Pages tab), one Info
window is displayed per selected document. Each window describes a single document and it’s page details.
If you select one or more pages from a document, a single Info window is
displayed, describing the document and the selected page details. If you select one or more pages from the Run List, a single Info window is
displayed, describing the origins of the selected pages and the page details.

AccurioPro WideDirector 3.5 Reference Guide
5 MANAGING JOBS 227
TIP: This feature is useful if you want to view info on results from different points in your Production Plan.
If you select a single flat in the Results tab, a single Info window is displayed, describing the flat and the details of its pages.
If you select multiple flats, one Info window is displayed per flat.
To get info on an item
1 Select one or more items in the Pages tab or the Results tab.
These may be documents, pages, flats, or jobs.
2 Right-click a page or flat in the Job Layout pane, and select Info for <item> From.
A submenu is displayed, listing the results which are available at various stages in your Production plan.
For example:
3 Select the results you want to view information on.
4 You can also click the Info tool for information on the Latest results.
The Info dialog box is displayed. The content of the dialog box depends on the selected item(s):
If you choose to view result information from the Hot Folder or Normalize
Task Processors, you will see information on the PDF results (see “Info Window (for PDF Files)” on page 228).
If you choose to view result information from the Render Task Processor,
you will see information on the TIFF results (see “Info Window (for RGB/ TIFF or Raster Files)” on page 230).
NOTE: You can get information on a selection containing multiple items, if the items are of the same type. You cannot select multiple items of different types. For example, you can get information on several files in the Page Store, but not on a file and a page.

AccurioPro WideDirector 3.5 Reference Guide
228 WORKING WITH JOBS IN THE RESULTS TAB
Info Window (for PDF Files)
The Info window has a number of tabs which provide information on any PDF item you select.
General
The first section displays the name, title and author of the selected item, as well as the date it was created and the name of the person who created it.
The second section indicates how the document was received and converted into an acceptable working format (PDF or TIFF).
Producer The name and version of the Task Processor that converted the document into an
acceptable format (e.g. the Normalizer).
Page Store The path name of the document in the Page Store. You can right-click the field label or path name to reveal the physical location of the file. The label then changes to “Location”. If the document is stored as multiple files (e.g. split PDF, DCS, etc.), only the common part of the file name is shown. right-click again to display the Page Store location.
Size The physical size of the document on disk.
Nr of Pages The number of independent pages in the document. The word “Split” appears
when the document is stored as a single, independent file per page (this is one of the Normalize Settings).
NOTE: AccurioPro WideDirector displays a status icon if the document has any outstanding warnings or errors. Clicking the icon opens the job's problem report, filtered to show the current document's notifications.
The third section details modifications (if any) which may have been made to the document:
Format The name and version of the document’s format (e.g. Composite, PDF 1.5). This
can either be the format it was converted to or the original format of the document if this was already acceptable. Some format details may also be listed here.
Dimensions
This tab provides detailed information on the width and height of the selected pages.

AccurioPro WideDirector 3.5 Reference Guide
5 MANAGING JOBS 229
The first section lists all pages in the document, and a summary of the most important box dimensions:
Page Indicates the standard page size.
Trim Box Indicates the trimmed page size (the size of the paper in the desktop printer; the
size of the pages after folding/binding and cutting in a production house).
Bleed Box Indicates the bleed area specified in the layout application, or in the PostScript to PDF converter.
Crop Box Indicates the page size in Acrobat, and is also the default view (when this PDF file
is opened).
The second section displays additional box size information on the page selected in the first section.
Art Box Used to select an area of the page, such as clipping path, which you can import
into another application.
Media Box Contains all the other boxes, and is always the largest box.
Resources
The resource tab features a page list, resource category list, and a resource list in the top section, and a Resource Details pane in the lower section.
Page Lists the page(s) selected.
Category Lists all resource categories available for the selected page(s). A number after
the category name shows how many resources of that category exist for the item(s) selected. If there are no resources for a given category, no number is shown.
Resource Lists all resources available for the selected page(s) and category, sorted by
category name and resource name or occurrence.
Resource: Displays the name of the resource. Unnamed resources are given a name by concatenating the resource category and an occurrence number.
Position: Shows the positions in the Run List where each resource appears. It is empty if the resource is not used in the job.
Attributes: Displays a textual summary of the most important attributes of the resource.

AccurioPro WideDirector 3.5 Reference Guide
230 WORKING WITH JOBS IN THE RESULTS TAB
Selected Resource details The attributes of the selected resource are displayed in the lower section of the Resources tab.
Refer to “Task Processor Resources” on page 261 for details on the different resources and their attributes.
Info Window (for RGB/TIFF or Raster Files)
The Info window provides the following information on your RGB/TIFF or raster results.
Kind Provides the following information about the selected image type:
Monochrome
Grey
RGB Channels May indicate which color channels are available in the selected image:
R, G, B
C, M, Y, K
Physical Dimensions Width and height of the selected item, in the selected display units specified in your Preferences (mms or inches).
Dimensions Width and height of the selected item, in pixels.
Resolution Width and height of the selected item, in pixels-per-inch.
Rows/Strip Number of rows per strip.
Compression The type of image compression used, if any:
ASWC
CCIT
PackBits
Group 3 Fax
Group 3 Fax

AccurioPro WideDirector 3.5 Reference Guide
5 MANAGING JOBS 231
JPEG
LZW
None Orientation The orientation of the selected file:
Up
Down
Right
Left
# Separation number.
Separation Separation name.

AccurioPro WideDirector 3.5 Reference Guide
232 WORKING WITH JOBS IN THE RESULTS TAB

233
6
Previewing Job Results
This section describes how you can view and analyze job results.
Preview Window and Tools ............................................................................. 234 Preview Window .......................................................................................... 235 Navigator Palette ........................................................................................ 235 Inks Palette ................................................................................................... 236 Light Table Slider ........................................................................................ 237 Tools Palette ................................................................................................. 238 Preview Menus ............................................................................................. 239 Opening/Closing Pages or Flats for Preview ........................................... 240 Browsing your Results ....................................................................................... 242 Zooming Images ................................................................................................. 244 Changing the Default View ............................................................................. 246 Measuring Ink Coverage .................................................................................. 250 Measuring Screen Angles ................................................................................ 253 Measuring Line Frequency .............................................................................. 255 Color-Managed Raster Preview ..................................................................... 256 Saturation, Contrast and Channel Adjustments ...................................... 257 Viewing/Editing Raster Preview Preferences ........................................... 260

AccurioPro WideDirector 3.5 Reference Guide
234 PREVIEW WINDOW AND TOOLS
Preview Window and Tools When you select and open a page or flat for previewing, the Preview window is opened on your desktop. This window displays the selected raster data, and provides a set of tools and options for viewing and measuring the data.
At the bottom of the Preview window is the status bar.
NOTE: These palettes are hidden when the active window is not a raster Preview window.
The Preview status bar contains the following tools:
Zoom slider: You can drag the zoom slider left or right to change the zoom level. This zooms the image around the center of the Preview window.
Screen angle measurement results: Displays the results of any screen angle
measurements you perform.
Width and height measurement results: Displays the width and height of the box defined by the diagonal you draw with the Measurements tool.
Screen frequency results: Displays the results of any screen frequency
measurements you perform (only displayed when you zoom in to view the raster data).
Light table tool: Displays blended front and back views of your raster data.
This allows you to check the registration of the front and backs, or check if there are problems with the ink coverage.
Full screen display button: On the right is a button which switches the
Preview window to full screen (the shortcut key is ‘f”). You can return to normal view by pressing the Esc key.
You can also display a series of small palettes for the currently active Preview window:
Navigator Palette: Provides a snapshot of the entire page or flat, as a low
resolution continuous tone image. Using this palette, you can focus on the detail of one area of the selected page or flat. This view can be panned and zoomed over the entire area of the page.
Inks Palette: Allows you to view the different separations, and measures the ink
coverage within the selected area of the Preview window.
The Tools Palette: Provides quick access to common tasks and procedures.

6 PREVIEWING JOB RESULTS 235
AccurioPro WideDirector 3.5 Reference Guide
The Preview window and the Navigator and Inks palettes can be resized using the resize handle in the lower right corner. The location and size of all windows is remembered between sessions.
You can open several Preview windows, but only one Inks palette. These display information about the active Preview window. You can close or minimize each of the smaller palettes individually, or you can hide them all at once.
Preview Window The Preview window displays in detail the area of the image that is currently selected by the Navigator palette locator. The Preview window displays:
A Title bar: Shows the name of the job, followed by the page or signature
number and Task Processor name.
The selected raster data: When you open an item to preview, the selected raster data (page or flat) is initially shown as a low resolution continuous tone image. When you zoom in to approximately an 8x zoom factor, the continuous tone image is replaced with the high resolution raster data. This allows you to preview traps, halftone dots, etc. The way in which raster data is by default displayed can be customized, as described in “Preferences” on page 41.
Ruler and Grid (optional): Preview windows can display rulers in user-select-
able units of measurement (millimeters, centimeters, inches, pixels, or picas).
You can open as many Preview windows as your system resources allow. You can have several Preview windows showing the same raster data at different magnifications, or windows showing different raster data.
Navigator Palette The Navigator palette displays a snapshot of the entire page or flats as a low resolution continuous tone image. This palette can be switched on or off by selecting Window > Palettes > Show/Hide Navigator.

236 PREVIEW WINDOW AND TOOLS
AccurioPro WideDirector 3.5 Reference Guide
You can open a Navigator palette for every page that you preview.
The Navigator provides a view of the entire page or flat, at a low magnification: A red “locator” rectangle in the Navigator palette indicates which part of the page is enlarged in the Preview window. You can quickly preview different areas of the page by clicking the mouse pointer inside the locator and dragging it to another position. You can click outside the locator to center the view area on the clicked point.
Inks Palette The Inks palette automatically measures the ink coverage within the selected area of the Preview window. This palette can be switched on or off by selecting Window > Palettes > Show/Hide Inks.
The Inks palette contains a table which lists the separations in the selected page or flat.
The table has three columns:

6 PREVIEWING JOB RESULTS 237
AccurioPro WideDirector 3.5 Reference Guide
Visibility control (eye icon): You can click the eye icon to hide the associated separation. The eye icon then disappears. You can click the same icon to display the separation again.
Color well: Click here to open the system color picker, and select the color of
the associated box. For White, Primer or Varnish, you can also set the transparency.
Ink: The name of the separation. This may be a CMYK separation, or a spot
color. This can also be White, Primer or Varnish if these are included in the document.
Covers %: The ink coverage is expressed as a percentage, and is represented
both numerically and as a color bar. The bar shows the color of the separation. The ink coverage calculation is accurate to within 3 percent of the actual ink coverage.
Under the table there is a ‘Show ink coverage’ check box. By default, this option is unchecked, and Preview does not perform any ink coverage calculations. This avoids unwanted (and possibly lengthy) calculations each time you preview raster results. Click the Cursor/Selection or Entire image button to measure the ink coverage at the cursor point, for a selected area or the entire image.
NOTE: You can press the Alt key (Macintosh users press Option) and click on a hidden separation to show that separation, hiding all others.
The Inks palette can be resized using the resize handle in the lower right corner, and can be switched on or off by selecting Window > Palettes > Show/Hide Inks.
Light Table Slider The Light Table slider allows you to display blended front and back views of your raster data. This allows you to check the registration of the front and backs, or check if there are problems with the ink coverage.
NOTE: This feature only works on the front and backs of the same signature/ page. You cannot combine sides that belong to different signatures/flats.
You control this feature using the Light Table slider. This slider allows you to shift the opacity of the results from the front view to the back view. When you move the slider, a percentage of both sides (front and back) are blended in the results you are viewing.

238 PREVIEW WINDOW AND TOOLS
AccurioPro WideDirector 3.5 Reference Guide
NOTE: In Press sheet mode, the side that is in front (front or back) will always be right reading. Typically, the other side of the Light Table view that shines through will be wrong reading.
The preview takes longer to build when the Light Table option enabled in the View menu. The buildup of the preview will progressively show all separation colors from the front and backside. In most cases this means the load time will double when Light Table is active. Each time you slide the opacity slider the preview will rebuild.
The Light Table options are disabled if you are viewing one-sided results (pages with no imposition) or if this feature in not licensed.
Tools Palette The Tools palette provides quick access to common tasks and procedures.
Each of these tools is described below.
Marquee tool. Allows you to draw a rectangle in the Preview window by clicking and drag- ging. The ink values for the selected region are measured and displayed in the Inks palette.
For more information, see “To measure the ink coverage of a selected area” on page 250.
Hand tool. Pans the image, allowing you to view a page that exceeds the size of the Preview window. With this tool selected, click inside the Preview window and drag the image around.
Zoom tool. Zooms in to the next zoom level in the Preview window. You can zoom out by holding down the Alt key. Alternatively, you can click and drag to zoom into a specified area.
For more information, see “To zoom in on a point using the Zoom tool” on page 244.
Measure tool. Measures raster angles, and distances between the raster points. You can also use it to calculate the line ruling of a separation. For more information, see “To measure
screen angles” on page 253.

6 PREVIEWING JOB RESULTS 239
AccurioPro WideDirector 3.5 Reference Guide
Next tool: Displays the next side result (e.g. Cover Sig 1 Front > Cover Sig 1 Back > Cover Sig
2 Front > Cover Sig 2 Back etc.). If you hold down the ‘C’ key while clicking the tool, AccurioPro WideDirector
displays the next sheet result (e.g. Cover Sig 1 Back > Cover Sig 2 Back > Cover Sig 3 Back).
Previous tool: Displays the previous side result. If you hold down the ‘C’ key while clicking the tool, AccurioPro WideDirector displays the previous sheet result.
Turn Sheet tool. If your results have 2 sides (front and back), Raster Preview can switch between the two sides. Click this tool (CTRL+T) to toggle the view (front or back). This tool is
disabled if the result only contains one side.
Info tool. Display information about the selected item.
Light Table tool. Displays or hides blended front and back views of your raster data. This fea- ture only works on the front and backs of the same signature/page.
Rule-Ups tool. Displays or hides additional layers of information on top of the Raster Preview image. The Rule/ups palette contains a table which lists the layers you can display.
Rotate clockwise tool. Rotates the current view 90 degrees clockwise.
Rotate counterclockwise tool. Rotates the current view 90 degrees counterclockwise.
Flip vertical tool. Flips the current view vertically.
Flip horizontal tool. Flips the current view horizontally.
Invert tool. Inverts the current view (negative). For more information, see “To invert an image (negative)” on page 247.
Color Managed tool. Activates color-managed raster preview. This allows you to preview the rendered result using color management to convert the press color space to the monitor color
space (based on ICC profiles).
Show/Hide rulers tool. Shows/Hides ruler coordinates in the units set in your Preferences.
Show/Hide gridlines tool. Shows/Hides gridlines for every major and minor division of the ruler. The default setting is specified in your Preferences.
Preview Menus All the Preview settings and commands are grouped in the View, Control and Window menus.
•

AccurioPro WideDirector 3.5 Reference Guide
240 OPENING/CLOSING PAGES OR FLATS FOR PREVIEW
Opening/Closing Pages or Flats for Preview This section describes the different ways that you can open and close pages or flats in Preview mode.
To open pages or flats for preview
1 Select the Jobs Window.
2 Look in the Job List, and select a job that has a Soft Proof status icon.
NOTE: Do not select a folder: You need to expand folders in order to select jobs.
After a few seconds, the job data is retrieved.
3 Select the Results tab.
4 Look in the Job Layout pane.
You will see a graphical thumbnail representation of the selected job pages or flats.
A successfully rendered page or flat will have solid separation indicators.
5 Double-click one or more page or flat thumbnails that have been successfully rendered.
The first of the selected items is displayed in Preview mode. The default view is set to “Fit to window”, and the view settings display a positive, upright, right-reading image.
When opening pages for preview, the page is initially shown as a low resolution continuous tone image. When zooming in, if you have the Raster Preview option, the continuous tone image is replaced with the high resolution raster data (from approximately 1:8 zoom factor). This allows you to preview traps, halftone dots, etc. Only the full version of AccurioPro WideDirector allows you to preview high resolution raster data. The AccurioPro WideDirector Light version can be upgraded to include the Raster Preview option.

AccurioPro WideDirector 3.5 Reference Guide
6 PREVIEWING JOB RESULTS 241
NOTE: More than one Preview Window can be opened for a particular page, each with its own zoom factor. You can also open multiple different pages within a job, but you cannot simultaneously open and view pages from different jobs.
To open multiple views on a page
In addition to opening multiple pages, you can also open up multiple windows on the currently selected page to display detailed views on different areas of the image.
1 Open a page or flat, as described in “To open pages or flats for preview” on
page 240.
2 While your selected page is active, select Window > New Window.
Preview opens a new Preview window for the current page. Each of the windows you open can display a different part of the page with a different zoom factor.
NOTE: The maximum number of windows that you can have open at any given time depends largely on your system’s memory configuration. However, you can preview only one job at a time.
To close a preview window
1 Click the mouse inside the Preview window that you want to close.
This makes the window the active window.
2 Select File > Close, or directly click the close button in the Title bar.
3 The selected Preview window is closed.
If this is the only Preview window open, then the Navigator and any other associated Preview windows that may be open are also closed.

AccurioPro WideDirector 3.5 Reference Guide
242 BROWSING YOUR RESULTS
Browsing your Results To view your results you can select multiple results in the Results tab, and multiple raster preview windows will open. However, once Raster Preview is launched, it offers an alternative way to browse through your results within a single raster preview window. This way you can avoid switching back and forth between the Results tab and Raster Preview.
To view next and previous results
1 Double-click on a page in the middle of a set of results to launch Raster Preview.
2 Click the Next and Previous buttons to browse forwards and backwards through the results from front to back.
Raster Preview displays the next and previous side results (e.g. Cover Sig 1 Front < > Cover Sig 1 Back < > Cover Sig 2 Front < > Cover Sig 2 Back < > etc.).
3 Hold down the C key while clicking the Next and Previous buttons to browse forwards and backwards through the results from sheet to sheet.
Raster Preview displays the next and previous sheet results (e.g. Cover Sig 1 Back < > Cover Sig 2 Back < > Cover Sig 3 Back, etc.).
To view the first and last results
1 To display the first result, press the Home button.
2 To display the last result, press the End button.
NOTE: If a job consists of 10 signatures: Sig 1 Front is the first result and Sig 10 Back is the last result.
To turn a sheet
If your results have 2 sides (front and back), Raster Preview will always group these results.
1 Select both the front and back of one and the same sheet and double-click. A
single raster preview window will open.
2 Click the Turn Sheet tool (CTRL+T) to toggle the view (front or back).
Alternatively, you can click the Side Switcher in the Light Table palette.

AccurioPro WideDirector 3.5 Reference Guide
6 PREVIEWING JOB RESULTS 243
The Turn Sheet tool is disabled if the result only contains one side.
NOTE: The zoom factor, Navigator view and position and Inks separation selection remain the same when you turn a sheet

AccurioPro WideDirector 3.5 Reference Guide
244 ZOOMING IMAGES
Zooming Images
There are a number of different ways to zoom in and out, as described below.
The zoom level is always expressed in powers of 2. The available zoom factors are: 1:512 (1 screen pixel corresponds to 512 raster data pixels), 1:256, 1:128, 1:64, 1:32, 1:16, 1:8, 1:4, 1:2, 1:1, 2:1, and so on up to 32:1.
NOTE: When opening pages to preview, the page is initially shown as a low resolution continuous tone image. When zooming in, if you have the Raster Preview option, the continuous tone image is replaced with the high resolution raster data allowing for previewing traps, halftone dots, etc. Only the full version of AccurioPro WideDirector will allow for high resolution raster data previewing. Other versions of AccurioPro WideDirector can be upgraded to include the Raster Preview option.
To zoom the Preview window using the slider or menu option
1 In the Preview status bar, drag the zoom slider to the left to zoom out (up to 1/512), or to the right to zoom in (up to 32X).
To the left of the zoom slider, Raster Preview displays the current zoom factor. When zooming out, “1/” is displayed, followed by the zoom factor (1/ 2, 1/8, 1/128). When zooming in, the zoom factor is displayed, followed by a “X” (32X, 4X, 1X).
2 You can also select a zoom level from the View menu (View > Zoom In/Out). This zooms the image around the center of the preview pane. The View menu also includes the following options:
Size to Fit. This selects a zoom level that fits the entire image in the
Preview window.
Actual Pixels. This sets the zoom level to 1(i.e. each raster pixel is represented by a single display pixel).
To zoom in on a point using the Zoom tool
1 Click the Zoom tool.
2 Click a point in the Preview window to zoom in on that point in the image.
Preview calculates an appropriate zoom factor to fit the active Preview window on your screen. Each time you click the Zoom tool, the zoom factor is doubled, until you reach the maximum zoom-in level (32:1).

AccurioPro WideDirector 3.5 Reference Guide
6 PREVIEWING JOB RESULTS 245
To zoom out on a point using the Zoom tool
1 Click the Zoom tool.
2 Click a point in the Preview window while holding down the Alt key.
3 Preview zooms out on that point in the Preview window.
To zoom in on an area using the Zoom tool
1 Click the Zoom tool.
2 Click-and-drag in the Preview window to select a rectangular area of your choice.
The selected area is re-scaled to fill the current window size. The re-scaling is performed to the nearest zoom factor to the power of 2.
To zoom out on an area using the Zoom tool
1 Click the Zoom tool.
2 Click-and-drag in the Preview window to select a rectangular area of your choice while holding down the Alt key.
The selected area is re-scaled to fill the current window size. The re-scaling is performed to the nearest zoom factor to the power of 2.
NOTE: Each successive zoom operation that you start will interrupt any ongoing operation. This means that if you start a new operation, such as a zoom in, before an ongoing operation is completed, then the ongoing operation will be aborted.

AccurioPro WideDirector 3.5 Reference Guide
246 CHANGING THE DEFAULT VIEW
Changing the Default View This section explains how to manipulate the images you preview, and how to customize your viewing options. In addition to panning, rotating, flipping, and inverting images, you can also display raster data as if it were a press sheet (positive and gripper edge down), or as if it were output from an imaging device (with polarity, orientation, and reading set accordingly).
To pan an image
1 Select the Pan tool.
TIP: You can also pan an image by dragging the rectangular locator in the Navigator palette.
2 Click and hold down the mouse button on a point in the Preview window.
3 While still holding down the mouse button, pan the image by moving the mouse around the Preview window.
The image is updated when you release the mouse button.
To fit the image size to the screen size
1 Select View > Size to Fit.
This calculates an appropriate zoom factor to make the active Preview window fit on your screen. Image re-scaling is performed to the nearest zoom factor to the power of 2.
In this mode, any area that is not covered by the image is shown with a gray and white checkerboard pattern.
To rotate an image
1 Select the Preview window which contains the image you want to rotate.
2 Select View > Raster Display > ,Rotate 90 CW to rotate the image 90° clock- wise, or View > Raster Display > ,Rotate 90 CCW to rotate the image 90° counterclockwise. You can also use the Rotate tools:
3 Repeat the procedure to rotate an image through 180°, or 270°.
The thumbnail in the Navigator palette reflects the new orientation. The Navigator palette does not resize; the thumbnail does. The feed direction and punch indicators are also rotated.

AccurioPro WideDirector 3.5 Reference Guide
6 PREVIEWING JOB RESULTS 247
In “Size to Fit” mode the window size may need to grow to accommodate the new orientation and to keep the same zoom level. If this is not possible, the zoom level is adjusted to the “Size to Fit” mode. The window only grows if necessary; it never shrinks.
NOTE: Rotating an image does not change the raster data, or affect other views.
To flip an image
1 Select the Preview window which contains the image you want to flip.
2 Select View > Raster Display >, Flip Horizontal to flip the image on the horizontal axis (left-to-right).
3 Select View > Raster Display >, Flip Vertical to flip the image on the vertical axis (upside-down). You can also use the Flip tools:
The thumbnail in the Navigator palette reflects the new orientation. The feed direction and punch indicators are also flipped.
NOTE: Flipping an image does not change the raster data, or affect other views.
To invert an image (negative)
1 Select the Preview window which contains the image you want to invert.
2 Select View > Raster Display >, Invert, or click the Invert tool.
The image is inverted. The thumbnail in the Navigator palette also reflects the new state.
Inverting an image is useful for previewing negative separations. It trans- poses the solid areas of an image to transparent and transparent areas to solid, and is applied to each of the image separations.
For example, suppose an image is made up of 4 separations; cyan, magenta, yellow, and black. Each separation is actually made up of only 2 types of areas - solid areas (black) and transparent areas. When you select Invert, Preview reverses the display of these areas individually on each separation. This means that, on the cyan plate, all cyan areas are displayed as trans- parent, and all transparent areas are displayed as cyan. The same reversal is applied to the magenta, yellow, and black plates.

248 CHANGING THE DEFAULT VIEW
AccurioPro WideDirector 3.5 Reference Guide
NOTE: Inverting an image does not change the raster data, or affect other views.
To display a full-size image
1 Select the Preview window which contains the image you want to display.
2 Select View > Actual Pixels.
The image in the currently active Preview window is displayed full size, at the zoom factor of 1:1 (i.e. one raster data pixel is displayed using 1 screen pixel).
NOTE: Only the full version of AccurioPro WideDirector allows you to preview high resolution raster data (in order to check traps, halftone dots, etc.). Certain AccurioPro WideDirector versions can be upgraded to include the high resolution Raster Preview option.
To display/hide separations
1 Select the Preview window which contains the image you want to view.
2 Select the Inks palette.
This window allows you to toggle individual separations on or off.
3 Click the eye icon next to one or more of the ink names to toggle the separations on or off.
You can hold down the Alt key when you click on the eye icon. This hides all others separations, showing only the one you clicked on. Repeat this action to bring back all hidden separations. Alt-clicking on a hidden separation shows that separation, hiding all others.
All combinations of process and spot color separations can be selected.
To view raster data as a press sheet
1 Select the Preview window which contains the image you want to view.
2 Select View >, Press Sheet.
The raster data is displayed as a press sheet (positive and gripper edge down).
NOTE: This does not change the raster data or your Client Preference settings, and does not affect any other views.

6 PREVIEWING JOB RESULTS 249
AccurioPro WideDirector 3.5 Reference Guide
To view raster data as output from an imaging device
1 Select the Preview window which contains the image you want to view.
2 Select View >, Device Output.
The raster data is displayed as if it were the output of the imaging device (polarity, orientation, reading, and punch marks are set accordingly). In this view, the feed direction indicator in the Navigator palette always points up.
NOTE: This does not change the raster data or your Client Preference settings, and does not affect any other views.
To show / hide the Ruler
1 Select the Preview window.
2 Select View >, Rulers, or click the Rulers tool to toggle on or off the Ruler in the Preview window.
The Ruler is displayed along the edges of the Preview window, starting from the top left corner. The default unit of measurement is taken from your Preferences.
When the zoom level is sufficiently high, the ruler has the following marks:
Units Numbered marks Major marks Minor marks
cms Every cm Every 1/2 cm Every mm inches Every inch Every 1/2 inch Every 1/8 inch
You can display rulers for each of the Preview Windows.
To show / hide the Grid
1 Select the Preview window.
2 Select View >, Grid, or click the Grid tool to toggle on or off the Grid in the Preview window.
Gridlines are displayed for every major and minor division of the Ruler. Major divisions are drawn in dark blue, subdivisions in light blue.
NOTE: The gridlines do not necessarily match with the ruler divisions.

AccurioPro WideDirector 3.5 Reference Guide
250 MEASURING INK COVERAGE
Measuring Ink Coverage The Inks palette indicates the percentage of ink that is used in any given area of the currently active Preview window. This feature is used in conjunction with the Marquee tool.
To measure the ink coverage of a selected area
1 Select the Preview window which contains the image you want to measure.
2 Make sure the Inks palette is displayed and the Cursor/Selection button is selected.
3 Select the Marquee tool.
4 Click and drag the mouse to define a rectangular area in the Preview window.
The selected area is displayed with a dotted outline.
The Inks palette displays the ink coverage within the selected area. To indicate that it is not the global coverage, the total percentage is displayed in italics. If no area was selected, the ink coverage for the entire active Preview Window would be displayed, and the total percentage would be displayed in normal characters. The ink coverage percentage is displayed for each process color, and any spot
colors. This information is calculated on the basis of the real pixel data, and is accurate to within around 3%. When zoomed in at 1:1, the information is accurate to 1%.
NOTE: Calculating ink coverage might take a while. A dash is displayed until the result has been calculated. When you change the selection, Preview restarts the calculation; you do not have to wait for the calculation to finish.

6 PREVIEWING JOB RESULTS 251
AccurioPro WideDirector 3.5 Reference Guide
5 If you wish, you can select the rectangular area you defined in the Preview window, and drag it around to measure different areas of the image.
6 Click outside the rectangular area to cancel this selection.
When calculation is off, or in progress, the Covers % displays dashes (-).
NOTE: When the Inks palette is displayed, it is updated every time a new area is selected in the Preview Window. If an ink is deselected in the Inks palette, no Cover % for that ink will appear.
To measure the ink coverage at cursor point
1 Select the Preview window which contains the image you want to measure.
2 Make sure the Inks palette is displayed and the Cursor/Selection button is selected.
3 Click where you want to measure the ink coverage.
The Inks palette displays the ink coverage within the selected area. To indicate that it is not the global coverage, the total percentage is displayed in italics.
To measure the ink coverage of the whole page/image
1 Select the Preview window which contains the page or image you want to measure.
2 Make sure the Inks palette is displayed and the Image button is selected.
The Inks palette displays the ink coverage for the entire active Preview Window. To indicate that it is the global coverage, the percentages are displayed in normal characters (not in italics).

252 MEASURING INK COVERAGE
AccurioPro WideDirector 3.5 Reference Guide
The ink coverage percentage is displayed for each process color, and any spot colors. This information is calculated on the basis of the real pixel data, and is accurate to within around 3%. When zoomed in at 1:1, the information is accurate to 1%.
NOTE: Calculating ink coverage might take a while. A dash is displayed until the result has been calculated. When you change the selection, Preview restarts the calculation; you do not have to wait for the calculation to finish.
When calculation is off, or in progress, the Covers % displays dashes (-). If an ink is deselected in the Inks palette, no Cover % for that ink will appear.

6 PREVIEWING JOB RESULTS 253
AccurioPro WideDirector 3.5 Reference Guide
Measuring Screen Angles This section describes how to measure screen angles. This helps you to avoid unwanted moiré effects in your final output.
To measure screen angles
1 Select the Preview window which contains the image you want to measure.
2 Select the Measurement tool.
TIP: You need to select a good pattern to achieve useful results.
3 Click a reference point inside the Preview window and drag the mouse pointer to another position in the window.
As you move the mouse, Preview automatically calculates the distance and angle between the point where the mouse button was pressed and the current mouse position. Distances are measured in the units you have specified.
NOTE: If you press the Shift key (Macintosh: Option key) while dragging the mouse, the direction of the line you draw will be restricted to a horizontal, vertical, or diagonal direction.
A line connects the start and end reference points. The distance between the reference points and the angle of the line are displayed in the status bar.
The first of these two values indicates the actual distance between the two points, in the user-specified units.
The second value indicates the screen angle between the two points,
expressed in degrees.
The angle is measured counter clockwise from the zero angle reference axis through to the starting point (i.e. the point you started dragging the mouse). If the value is greater than or equal to 180, the read-out will be decremented by 180.
To the right of the displayed values in the status bar, you will see some additional measurements.

AccurioPro WideDirector 3.5 Reference Guide
254 MEASURING SCREEN ANGLES
The first of these two values indicates the horizontal distance between the two points, in the user-specified units.
The second value indicates the vertical distance between the two points, in
the user-specified units.
NOTE: By default the unit of measurement for the above fields is taken from your Preferences.

AccurioPro WideDirector 3.5 Reference Guide
6 PREVIEWING JOB RESULTS 255
Measuring Line Frequency This section describes how to measure the line frequency of a separation.
To measure the line frequency of a separation
1 Select the Preview window which contains the separation you want to measure.
2 Select the Measurement tool.
3 Zoom the image so that you can see the raster dots.
When you do this, you will see that
4 Select a dot, and drag the mouse pointer along the line of the raster to another dot.
As you move the mouse, Preview counts the number of dots along the line and automatically calculates the line frequency. The readout in the Status bar shows the number of dots found and the resulting frequency. The frequency is displayed in line per inch (lpi) or lines per cm (lpc), depending on the units you specified in your Preferences.

AccurioPro WideDirector 3.5 Reference Guide
256 COLOR-MANAGED RASTER PREVIEW
Color-Managed Raster Preview Color-managed raster preview is a preview of the rendered result using color management to convert the press color space to the monitor color space, based on ICC profiles. Contract proofing quality can be achieved, provided you have a calibrated monitor and correctly configured monitor profile.
NOTE: Color-managed raster preview is a licensed feature.
To activate color-managed raster preview
1 Select the Preview window which contains the image you want to preview.
2 Click the Color-managed Preview tool to activate the color-managed preview.
Selecting Color-managed mode will disable the ink display in the Inks palette.
To activate the enhanced visualization of overlapping spot colors, the following additional preview license is required:
accurate spot color mix preview
In this enhanced mode, spot color visualization is superior to the standard color-managed mode.

AccurioPro WideDirector 3.5 Reference Guide
6 PREVIEWING JOB RESULTS 257
Saturation, Contrast and Channel Adjustments The Adjustments palette has three panels with the following tools to adjust rendered results:
Saturation slider: The slider has a range from -100 to +100 with a default
value of 0 as the neutral setting. You can apply an adjustment by selecting the check box and dragging the slider, clicking in the slider path or entering a value. The Protect skin tones option lets you disable the saturation adjustment for skin tones.
Contrast adjustment curve: This adjustment controls the luminance of the
rendered result which can range from 0% (black) to 100% (white). The plot area consists of a horizontal In axis and a vertical Out axis, and a diagonal baseline where the In and Out values are the same. The baseline is black if no adjustments have been applied and changes to gray once you begin to make adjustments. Drag any point on the black baseline or curve to make adjustments. You can also choose an adjustment preset by clicking the cogwheel and selecting a preset you defined in the Contrast Adjustment resource for this particular device. Make sure the Contrast check box is displayed to see the effect on the sheet.
Channel adjustment curves: These curves control the CMYK ink coverage of
the device within a range of 0% (no ink) to 100% (full coverage). The plot area consists of a horizontal In axis and a vertical Out axis, and a diagonal baseline where the In and Out values are the same. Choose the channel that you want to adjust from the drop-down list (Cyan, Magenta, Yellow, and Black) to activate one of the four channel curves. Drag any point on the curve to make adjustments. You can also choose an adjustment preset by clicking the cogwheel and selecting a preset you defined in the Curve Adjustment resource for this particular device. Make sure the Curves check box is displayed to see the effect on the sheet.

AccurioPro WideDirector 3.5 Reference Guide
258 SATURATION, CONTRAST AND CHANNEL ADJUSTMENTS
Figure 6.22: Saturation slider, Contrast and Channel Adjustment curves in Raster Preview
You can revert to the initial values by clicking the revert button.
A warning icon is displayed when you make adjustments and these adjustments cannot be shown in the current preview mode.
Switch to Contone Preview using the zoom level menu to see the effect of the adjustments on the sheet.

AccurioPro WideDirector 3.5 Reference Guide
6 PREVIEWING JOB RESULTS 259

AccurioPro WideDirector 3.5 Reference Guide
260 VIEWING/EDITING RASTER PREVIEW PREFERENCES
Viewing/Editing Raster Preview Preferences A set of Raster Preview Preferences allow you to specify default viewing settings (units of measurement, etc.) that will be used each time you launch Raster Preview.
To open and edit your Raster Preview Preferences
1 From the Jobs window, choose Edit > Preferences...
2 Select the Viewers tab.
3 Edit the Raster Preview fields, as described in “Preferences” on page 41.

261
7
Task Processor Resources
This section provides information on the AccurioPro WideDirector Resources that are available for each Task Processor. Resources are collections of objects such as fonts, preflight profiles, or calibration curves that are required by the Task Processors.
About Task Processor Resources ................................................................... 262 Alignment Pin Sets ............................................................................................ 263 Apogee Preflight Action Lists ......................................................................... 264 Binding Options ................................................................................................... 267 Borders .................................................................................................................... 271 Borders and Output Sizes ......................................................................... 276 Working with Borders and Border Marks ........................................... 277 Color Books ........................................................................................................... 279 Content Profiles ................................................................................................... 286 Contrast Adjustments ........................................................................................ 287 Curves Adjustments ........................................................................................... 289 Device Link Profiles ........................................................................................... 291 Finishing Hub ........................................................................................................ 292 Fonts ........................................................................................................................ 297 Mark Engraver ...................................................................................................... 299 Mark Sets Overview .................................................................................... 299 Mark Types ..................................................................................................... 304 Mark Attributes ............................................................................................ 305 Mark Position ................................................................................................ 317 Mark Conflicts .............................................................................................. 318 Mark Repeat .................................................................................................. 319 Mark Special ................................................................................................. 320 Mark Pens ...................................................................................................... 321 Mark Layers ................................................................................................... 322 About Colors for Printing Marks ............................................................ 323 Marks ....................................................................................................................... 325 Media Hub ............................................................................................................. 327 Output Sizes .......................................................................................................... 332 Print Modes ........................................................................................................... 337 Profiles .................................................................................................................... 338 Quality ..................................................................................................................... 341 Sheet Layout Templates ................................................................................... 342 Using Resource Auto-Select Maps ............................................................... 343 Fallback ........................................................................................................... 345

AccurioPro WideDirector 3.5 Reference Guide
262 ABOUT TASK PROCESSOR RESOURCES
About Task Processor Resources Most Resources can be configured and customized in the System Overview, and you can create, edit, and delete Resources in the available Resource categories. The Resource pane displays the resource categories that are available for the currently selected item in the System Overview. The displayed resources will therefore vary in accordance with the selected item. The first icon in the list is the Parameter Sets icon, which allows you to create and manage Parameter Sets for the Task Processor (see “Managing Parameter Sets” on page 372).
Administrator access level only!

7 TASK PROCESSOR RESOURCES 263
AccurioPro WideDirector 3.5 Reference Guide
Alignment Pin Sets
Alignment pins represent a fixed set of alignment positions to which the media can be aligned on a print layout.
Administrator access level only!
Associated Task Processors The Alignment Pin Sets Resource category is available for:
Generic SD (Sign and Display Printer) and other SD printers
Overview
Name and Pin Width The name of the pin set and the width of the physical pins. Leave at 0 if the alignment positions take up no physical space on the bed.
Pin Configuration Several pin configurations can be specified in a set, e.g. Small, Medium and
Large, with different alignment positions.
Name The name of the pin configuration.
Machine ID Enter a string that you want to send to the Automatic Board Feeder (ABF) to activate the chosen pin configuration. Leave empty if not applicable.
Alignment Position All the individual alignment positions for the selected pin configuration are
shown in this list; for each position you can set the distance between the alignment pin and the printer’s default side lay, and whether to align left, right or against both sides of the pin.

AccurioPro WideDirector 3.5 Reference Guide
264 APOGEE PREFLIGHT ACTION LISTS
Apogee Preflight Action Lists
Action lists are useful for performing repetitious tasks either within a single PDF document or in multiple PDF documents.
An action list usually consists of several actions or checks and once you have created an action list, you can re-use it to perform these tasks in the predefined sequence.
Administrator access level only!
Associated Task Processors
The Apogee Preflight Action Lists Resource category is available for the following Task Processors:
Apogee Preflight
Apogee Preflight Action Lists Overview
The Apogee Preflight Action Lists overview lists all available Apogee Preflight action lists.
A set of action lists is provided by default with your system. Additional actions list can be obtained and imported. Some action lists, e.g. Hairline in the Standard category, can be duplicated and customized.
In the Production Plan, the available action lists are filtered depending on their position in the plan.
Category In this list you can select the action lists by category. For example:
Color Management
Standard
Apogee Preflight Action Lists
The Action Lists pane displays the action lists as selected in the Category list. Select an action list to see its settings in the pane below.

AccurioPro WideDirector 3.5 Reference Guide
7 TASK PROCESSOR RESOURCES 265
Name The name of the action list as it appears in this resource and the Apogee Preflight task processor.
Description A short description of what the action list does.
Tabs Depending on the type of action list, you will see Settings and/or Info tabs that
define the behavior of the action list:
Settings: in this tab you set the criteria and options for the preflight checks
Info: an explanation of what the action list does
NOTE: You can filter the list of action lists by typing keywords in the Search box at the top of the list.
To create a new Action List
Editable action lists can be customized or duplicated to create a new action list.
NOTE: An action list can be customized if it has a Settings tab and in this case the Duplicate option is available when clicking the cogwheel.
1 Unlock the Apogee Preflight Action Lists resource.
2 In the Apogee Preflight Action List, choose the action list that you want to duplicate, e.g. Hairline in the Standard category.
Enter ‘hairline’ in the search box to locate this action list.
3 Click the cogwheel and choose Duplicate.
A duplicate appears in the list with the same name and the - copy extension.
4 In the settings pane below, rename the action list and enter a Description.
5 Modify the Settings as required.
For example change the width.
NOTE: You cannot edit the Info tab.
6 Lock the resource.
The action list name is updated in the list. This new action list is now also visible in the Apogee Preflight task processor parameter settings.
AccurioPro WideDirector 3.5 Reference Guide
266 APOGEE PREFLIGHT ACTION LISTS
To edit an Action List
NOTE: An action list is editable if the Duplicate option is available when clicking the cogwheel.
1 Unlock the Apogee Preflight Action Lists resource.
2 In the Apogee Preflight Action List, choose the action list that you want to edit, e.g. Hairline in the Standard category.
Enter ‘hairline’ in the search box to locate this action list.
3 In the settings pane below, modify the Settings as required.
For example change the width.
NOTE: You can’t edit the Info tab.
4 Lock the resource.
The action list is locked with the new settings.
To import an Action List
1 In the Apogee Preflight Action Lists resource, click the cogwheel and choose Import.
2 Browse to the location where you saved your Action List files with extension .MIME, and click Open.
The imported action list is added to the list and the category is also added in Category list if this list does not yet exist.

AccurioPro WideDirector 3.5 Reference Guide
7 TASK PROCESSOR RESOURCES 267
Binding Options
The Binding Options resource defines the bindings that are available for a Product and its Parts. Binding is a key aspect of imposition and these resources provide the settings for a wide variety of stacked and nested assemblies of book signatures.
Double-click the Binding Options icon for an overview of the available rules in
the Binding Options dialog box.
Associated Task Processors
The Binding Options resource category is available for:
Impose

AccurioPro WideDirector 3.5 Reference Guide
268 BINDING OPTIONS
Raster Impose
Administrator access level only!
Binding Options Overview
The Binding Options dialog box lists all available Binding Options resources in the left column and the settings for each resource in the right column.
Assembly The assembly type is the top-level setting for binding and they apply for the entire product.
NOTE: In the Job Ticket Editor, the Assembly settings can only be viewed in the Product Editor and not in the Part Editor or the Inspector.
Stacked or Mixed This assembly type is chosen for perfect-bound jobs; the book signatures are stacked side-by-side and then glued together. Also choose this assembly type for mixed binding situations that combine stacked and nested assemblies.
Nested This assembly type is chosen for saddle-stitched jobs; the book signatures are
bound by stitching using a wire through the spine, or by stapling.
Number Up Binding Number-up binding (also referred to as N-up or multi-up binding) combines two or more book signatures on a single bindery signature which is subsequently cut to produce two or more book signatures.
Click the drop-down list to see the different multi-up binding options:
1-up is the default value and applies for regular jobs

AccurioPro WideDirector 3.5 Reference Guide
7 TASK PROCESSOR RESOURCES 269
2-up and 3-up: for regular multi-up jobs; two or three identical book signatures are produced with the same orientation
2-up and 3-up Come and Go: two different book signatures are produced and
the orientation of the book signatures is flipped
2-up Come and Go (reversed): the page order and orientation of the book signatures is reversed
NOTE: A so-called True Come and Go job is possible with a stacked assembly and a 2-up Come and Go binding or a 2-up Come and Go (reversed) binding.
Cut Margin This option is only enabled for multi-up bindings.
Apply page trim margins at cut: You can choose to apply or not to apply the page trim margins set below. This option can be disabled if the middle cut is good enough as a trim cut.
Extra gap: Enter a value here if you want extra gutter space between the Fold Sheets, for example to compensate for the width of the cutting blade.
For a so-called dead-cut, clear the check box and set the Extra gap to 0.
Fold Sheet These options control how pages are arranged on the Fold Sheet and also affect the multi-up arrangement.
Page arrangement Head to head: arranges pages in such a way that the head of the pages is on
the closed head of the book signature, suitable for jogging to the head
Foot to foot: arranges pages in such a way that the foot of the pages is on the closed head of the book signature, suitable for jogging to the foot
From folding scheme: the page arrangement set in the folding scheme is used
Overfold The overfold is a small area of the folded sheet that sticks out so it can be grabbed by a gripper.
None: no lip is provided
On lowest folio: creates a lip on the side of the folded book signature that contains the low folios; typically used for foot to foot folding schemes
On highest folio: creates a lip on the side of the folded book signature that contains the high folios; typically used for head to head folding schemes

AccurioPro WideDirector 3.5 Reference Guide
270 BINDING OPTIONS
Lip Size the default size of the overfold lip and a maximum for sheet fitting
Page Trim Margins These margins add extra paper to the four edges of a page to accommodate for bleed and the marks, and provide space for trimmers. The settings for these margins depend mainly on the binding style used. A maximum value can be entered to extend the margins for sheet fitting.
Spine: margin width at the spine edge of a page
Face: margin width at the face edge of a page
Head: margin width at the top of a page
Foot: margin width at the bottom of a page
Sheet Fitting Strategy These rules define how the overfold and page trim margins can be adjusted to make a Fold Sheet fit the size of the Press Sheet, and enable direct folding of the Press Sheet without trimming first. Sheet fitting can also be applied for Press Sheets with more than one Fold Sheet.
Sheet fitting also depends on the Positioning of Fold Sheets options in the Press Sheet Layout Rules to determine how a Fold Sheet is aligned.
NOTE: You cannot use sheet fitting if fixed offsets are specified in the Press Sheet Layout Rule.
Overfold, face, spine Here you choose how to enlarge the margins and overfold.
Overfold first, then face and spine: first adjusts the overfold and then the remaining space between face and the spine evenly
Face and spine first, then overfold
Overfold, face and spine evenly
Head, foot Here you choose the order for adjusting the head and foot margins.
Head first, then foot
Foot first, then head
Head and foot evenly

AccurioPro WideDirector 3.5 Reference Guide
7 TASK PROCESSOR RESOURCES 271
Borders
The Borders Resource category allows you to predefine border marks for specific job requirements. A Border is extra information that you can add to film or plate. This extra information can contain the order number, the print date or time, slug lines, separation names, registration marks, crop marks, etc.
A border can contain either of the two following mark types:
Text mark: Text marks are defined with variables in AccurioPro
WideDirector. You can also choose a font type and point size for the variable.
File mark: A file mark can be a special registration mark in the form of an EPS file
or a PDF document.
You define the borders in the Resources of your output device. If you have several platesetters, filmsetters or proofing devices, the borders Resource is shared amongst the same type of output device.
When should you use Borders?
You should use borders when you have to work with a PDF document that lacks some essential information that should have been added in the source application (e.g. QuarkXpress, Imposition Template Manager). This can be registration marks or separation names, for example. Registration marks are needed to assemble the different colors correctly on top of each other. Separation names give information on the colors used.
NOTE: If you are using Apogee Impose, text marks and file marks can also be applied with the Mark Engraver. See “Mark Engraver” on page 299 for more information.
Associated Task Processors
The Border Resource category is available for:
All Output Task Processors, except for Export and RPC.
All Print Task Processors, except for Generic Press.

AccurioPro WideDirector 3.5 Reference Guide
272 BORDERS
For information on creating, editing, importing, exporting and deleting borders, refer to “Managing Resources” on page 375.
Administrator access level only!
Borders Overview
The Borders overview lists the available borders. You can create, duplicate, edit, import and export borders.
Border Mark Editor
You can exactly define the Border Mark settings: the mark type and the exact location of the mark on the page or sheet.
Mark Type
Select the Mark type (for output devices only):
A Text Mark
A File Mark (EPS/PDF Mark) Text Mark Text: In the Text field, you can specify which text is to be used as a mark. You
have three options:
Type some text in the Text field.
Select a variable from the drop-down list. This list appears when you click the button next to the field.
Use a combination of text and one or more variables.
Font: Select a font and a point size for the text mark.
Color: Click the variable button, and select one or more options to determine on which plate(s) the mark will be printed:
Click the associated variable button, and select one or more options to determine on which plate(s) the text mark will be printed:

AccurioPro WideDirector 3.5 Reference Guide
7 TASK PROCESSOR RESOURCES 273
Registration (all plates). When this option is selected, you will see an asterisk (*).
Process Colors (CMYK)
Cyan
Magenta
Yellow
Black
Rotate: Specify the rotation angle for the mark (0, 90, 180, or 270 degrees).
Stripping Text Mark A stripping text mark serves as a placeholder for a StripMark. The main difference with the normal text mark is that the content of the stripping text mark is set by JDF. The JDF also specifies the stripping element to which the mark refers: The object whose edges are to be used as positioning references are set by JDF, but the offsets themselves are specified in the stripping text mark.
Crop Mark Crop marks indicate where to crop the page or image. A crop mark sets crop
marks around pages or around the image. They are dynamically imaged according to the specified properties.
Distance from image/page corner: Specifies the distance between the marks center and the images or pages corner.
Length of mark: Specifies the length of the mark.
Line width: Specify the width of the marks lines.
Print crop marks inside of imposition: Print crop marks that appear inside the imposed area (i.e. in between the pages). You should disable this option if you want the crop marks to appear only on the outside of the imposition (Imposition Borders only).
NOTE: Crop marks do not require the Position options.
Fold Mark Fold marks indicate where to fold the sheet. A fold mark sets several marks to indicate where the sheet is to be folded. They are dynamically imaged according to the specified settings.

AccurioPro WideDirector 3.5 Reference Guide
274 BORDERS
Distance from pages: Specifies the distance between the marks center and the page edges.
Length of mark: Specifies the length of the mark.
Line width: Specifies the width of the marks lines.
NOTE: Fold marks do not require the Position options.
Collation Mark Signature/Section Collation marks offer a way to quickly inspect the correct collation order of folded sheets.
Mark: The mark is the actual marking on the spine or fold. It is printed in black, and may optionally contain an index number.
Thickness: The thickness (or width) of the mark. Also sets the width of the
step area. The default is 3 mm.
Length: The length of the mark. Also sets the step size with which the mark is offset. Note that there is no gap between two adjacent marks. The default is 11 mm.
Step Area: The step area is the area in which the mark travels. The mark starts at the top (or bottom) of the step area, and advances one step with each section/ signature.
Offset from Edges: Insets the height of the step area in the available space.
The default is 0.
Step Area Length: Sets the length of the step area. When you enter a value, AccurioPro WideDirector calculates and displays the Number of steps.
Number of Steps: Sets the number of steps in the step area. When you enter a
value, AccurioPro WideDirector calculates and displays the Step Area Length.
Pattern: The pattern defines the position of the first mark, the direction in which the mark is stepped (normal or reverse), and what to do when arriving at the end of the step area (sawtooth or zigzag). AccurioPro WideDirector graphically represents the four possibilities. The default is to use normal direction with the sawtooth movement.
Index: Select whether to print the collation mark number (should correspond with the signature/section) inside the mark, and with which orientation (0, 90, 180 or 270). AccurioPro WideDirector graphically represents the five possibilities. The default is to print no index.
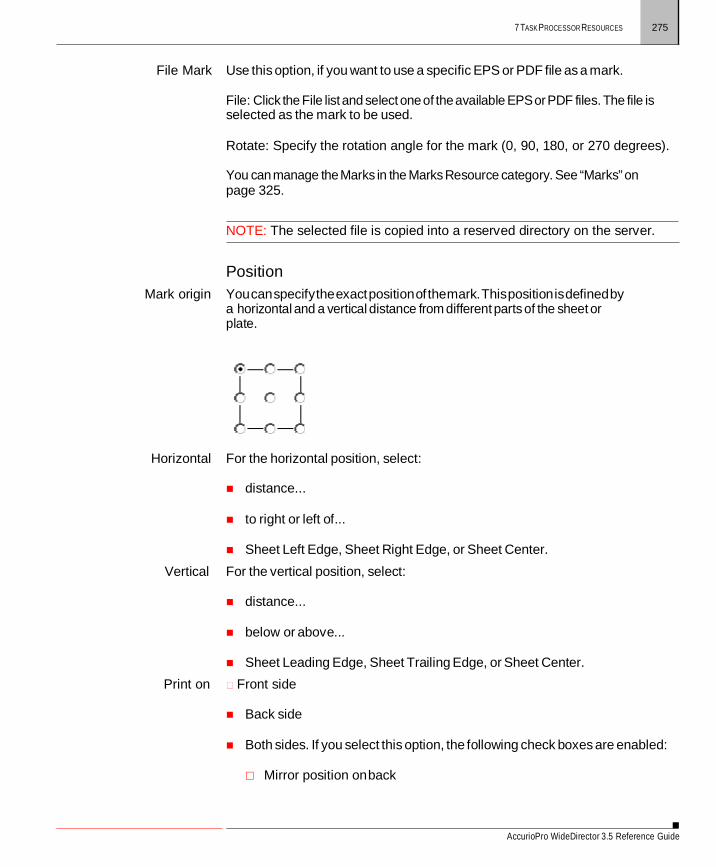
AccurioPro WideDirector 3.5 Reference Guide
7 TASK PROCESSOR RESOURCES 275
File Mark Use this option, if you want to use a specific EPS or PDF file as a mark.
File: Click the File list and select one of the available EPS or PDF files. The file is selected as the mark to be used.
Rotate: Specify the rotation angle for the mark (0, 90, 180, or 270 degrees).
You can manage the Marks in the Marks Resource category. See “Marks” on page 325.
NOTE: The selected file is copied into a reserved directory on the server.
Position
Mark origin You can specify the exact position of the mark. This position is defined by a horizontal and a vertical distance from different parts of the sheet or plate.
Horizontal For the horizontal position, select:
distance...
to right or left of...
Sheet Left Edge, Sheet Right Edge, or Sheet Center.
Vertical For the vertical position, select:
distance...
below or above...
Sheet Leading Edge, Sheet Trailing Edge, or Sheet Center. Print on Front side
Back side
Both sides. If you select this option, the following check boxes are enabled:
Mirror position on back

AccurioPro WideDirector 3.5 Reference Guide
276 BORDERS
Mirror content on back
Conflicts Notify when Mark runs: You can have AccurioPro WideDirector warn you if the Mark runs:
Into the sheet
Out of the sheet
Out of the Output Size
Into the Page Content (trim box)
For each option, there is a check box. AccurioPro WideDirector will send a message to the Message Board according to the selected options.
Do not print mark when it runs into the Page Content
Select this option if you want AccurioPro WideDirector to remove a mark when it would otherwise run into a pages content area. The default setting is not to print marks that run into a Page Content.
Borders and Output Sizes
On a medium, you can distinguish different areas, including the borders and the output sizes. The following graphic clearly shows the different areas:
1
2
3
4
5
1 Press sheet 2 Border 3 Image size 4 Output size 5 Medium

AccurioPro WideDirector 3.5 Reference Guide
7 TASK PROCESSOR RESOURCES 277
Working with Borders and Border Marks
You first need to create a border. However, a newly created Border does not contain any border marks sets: You need to select the new border and add border marks to it.
To create and manage border mark sets
1 In the System Overview Window, select the Output Task Processor for which you want to make changes in the Border Marks.
2 Double-click the Borders icon in the Resources pane.
The Borders window appears, containing a list of all the available Borders.
3 Select the Border for which you want to create, edit, duplicate or delete a Border Mark and click the Edit button.
The Border window appears, containing the available Border Marks for the selected Border.
4 Do one of the following:
Click the New button to create a new set of Border Marks. Enter any required information as described in “Border Mark Editor” on page 272 and click OK.
Select the Border Marks set that you want to edit and click the Edit button. Enter any required information as described in “Border Mark Editor” on page 272 and click OK.
Select the set of Border Marks that you want to duplicate and click the Duplicate button. A copy of the Border Mark Set will appear in the list.
Select the set of Border Marks that you want to delete and press Delete or click the Delete button.

AccurioPro WideDirector 3.5 Reference Guide
278 BORDERS
5 Click OK to close the Border window.
6 Close the Borders dialog box.
To quickly copy borders from one Task Processor to another
NOTE: This operation can be performed in Windows only.
1 In the System Overview Window, select the Output Task Processor from which you want to copy the Border.
2 Double-click the Borders icon in the Resources pane.
The Borders overview window appears, containing a list of all the available Borders.
3 Go back to the System Overview Window, and select the Output Task Processor to which you want to copy the Border.
4 Double-click the Borders icon in the Resources pane.
The Borders overview window appears.
5 Return to the first Borders overview window, select the border you want to copy, and drag and drop it in the second Border overview window.
The selected border is duplicated.

AccurioPro WideDirector 3.5 Reference Guide
7 TASK PROCESSOR RESOURCES 279
Color Books
AccurioPro WideDirector contains a database of colors that are organized in books. As each ink produces a slightly different color depending on the stock it is printed on, each book represents the colors as they appear on a specific paper type.
Associated Task Processors
The Color Books Resource category is available for all Press Task Processors and Proofers.
Color Books Overview
The Color Books overview consists of the books table and the colors table. You can create and partially edit color books, or individual colors within a specific book. You can also import color books, which can be useful if you want to have access to older Pantone colors.
You can click the International button to view translations of the color names in several languages.
NOTE: System Color Books are displayed in italics, and cannot be edited.
Color Books Editor
The Color Books Editor allows you to modify the attributes of the selected Color Book.
NOTE: You can only modify the dot gain values of the System Color Books. The names of the System Color Books are displayed in italics.
Name
Enter a name for the selected Color Book

AccurioPro WideDirector 3.5 Reference Guide
280 COLOR BOOKS
Suitable for printing on: Paper type Select one of the paper types that are available for the selected color book.
Dot gain Specifies the dot gain values for the selected Color Book.
Value Default is 15.
Highest at Default is 50.
Starting at Default is 0.
Ending at Default is 100.
Special Colors button Special colors are color names for unusual inks such as varnishes and die-cutting marks, glue zones, etc. These colors are organized in categories that determine their behavior.
Click the Special Colors button to open the Special Colors editor.
Category Two categories are provided:
Die line: never printed in main flows
Varnish: never printed in proofing flows
NOTE: Special Color categories are also used by Apogee Preflight action lists.
Colors Enter additional color names (for example in your language) or click the Colors button to choose colors that you want to add to this category.
International button Click the International button to open the International Color Names editor where you can add translations for the four process color names and ensure the correct mapping of these color names when they appear in the different languages.
Color Accuracy Select the Show color accuracy (deltaE) check box to expand the Color Accuracy panel.

AccurioPro WideDirector 3.5 Reference Guide
7 TASK PROCESSOR RESOURCES 281
Color Editor
The Color Editor allows you to modify the attributes of the selected color.
NOTE: You cannot modify colors that belong to one of the System Color Books. The names of the System Color Books are displayed in italics.
General
Color name This name should be unique within the Color Book.
Colorant type Select the ink type:
Normal
Opaque
Opaque Ignore
Transparent Color definition Define the color by its Lab color values.
Db (Neutral Density) The initial value is calculated from the color definition. These values are used by
trapping.
The Calculate button allows you to calculate the Neutral Density.
SID (Solid Ink Density) Specify the Solid Ink Density (SID).
Color Exceptions You can specify the color values to be used in case the conversion from Lab color does not produce the expected results. In that case, AccurioPro WideDirector will use your values instead of calculating them from the Lab values.
This table lists all of the exceptions that are defined for the print or proofing device that you selected.
To create or rename a color book
1 In the System Overview window, select the Press Task Processor for which you want to create a new Color Book.
2 Double-click the Color Book icon.

AccurioPro WideDirector 3.5 Reference Guide
282 COLOR BOOKS
The Color Book overview appears, containing the available Color Books in the left column and its respective colors in the right column.
3 To create or rename a Color Book, do one of the following:
Click on the New button underneath the left column to create a new Color Book.
Click the Edit button to rename the Color Book.
The Color Book editor appears.
4 Type a unique name for the book in the Name field and select a paper type from the drop-down list.
5 Specify the dot gain values for the color book.
Value: By default, this is set to 0.
Highest at: By default, this is set to 50.
Starting at: By default, this is set to 0.
Ending at: By default, this is set to 100.
For more information on dot gain values, refer to “What is Calibration?” on page 884.
6 Click OK.
CAUTION: The newly created Color Book does not contain any colors yet. You need to create these in the right column. For more information, see To manage your colors in a selected color book on page 283.
7 Close the Color Books overview.

AccurioPro WideDirector 3.5 Reference Guide
7 TASK PROCESSOR RESOURCES 283
To import a color book
1 In the System Overview window, select the Press Task Processor for which you want to import a Color Book.
2 Double-click the Color Book icon.
The Color Book overview appears, containing the available Color Books in the left column and its respective colors in the right column.
3 Click the Import button:
An Open file dialog box is displayed.
4 Browse to the location of the color book you want to import, select the color book file (*.MIME), and click Open.
The color book is imported, and is displayed in the list of color books.
To manage your colors in a selected color book
1 In the System Overview window, select the Press Task Processor for which you want to create, edit or delete a color.
2 Double-click the Color Books icon.
The Color Books overview appears, containing the available Color Books in the left column and its respective colors in the right column.
3 Select the Color Book in which you want to create, edit or delete a color in the left column or create a new book by clicking the New button. In the newly created book, you can then create new colors as described below.
You need to specify the Paper Type for the new book.
All of the book’s colors appear in the right column.
4 Do one of the following:
Click the New button underneath the right column to create a new color, define the color properties and click OK to save your settings.

AccurioPro WideDirector 3.5 Reference Guide
284 COLOR BOOKS
Click the Edit button to edit a color, define the color properties and click OK to save your changes.
Select the color that you want to delete in the right column and press Delete or click the Delete button. Confirm the deletion.
5 Close the Color Books overview.
To create or edit a color exception
1 In the System Overview window, select a Press Task Processor for which you want to create or edit a color exception.
2 Double-click the Color Books icon.
The Color Books overview appears, containing the available Color Books in the left column and its respective colors in the right column.
3 Select the Color Book in which you want to create or edit a color exception in the left column.
All of the book’s colors appear in the right column.
4 Click the Edit button under the right column to edit a color.
5 Expand the Color Exceptions section.
6 Do one of the following to either create or edit the exception.
Click the New button to create an exception.
Click the Edit button to edit an exception.
The Color Exception editor appears.

AccurioPro WideDirector 3.5 Reference Guide
7 TASK PROCESSOR RESOURCES 285
7 Select the ICC Profile that you want to use for this exception.
8 Specify the CMYK values for Lab to Process Color conversion.
9 Click OK to save your changes.
10 Click OK to close the Color Editor window and save the color exception.
NOTE: When you create an exception, standard CMYK values are calculated for the selected profile.
To delete a color exception
1 Edit a color.
2 Expand the Color Exceptions section.
3 Select the exception that you want to delete and click the Delete button.
4 Click Yes to confirm the deletion.
5 Click OK to close the Color Editor window and delete the color exception.
NOTE: If you click Cancel, all color exception changes are lost.
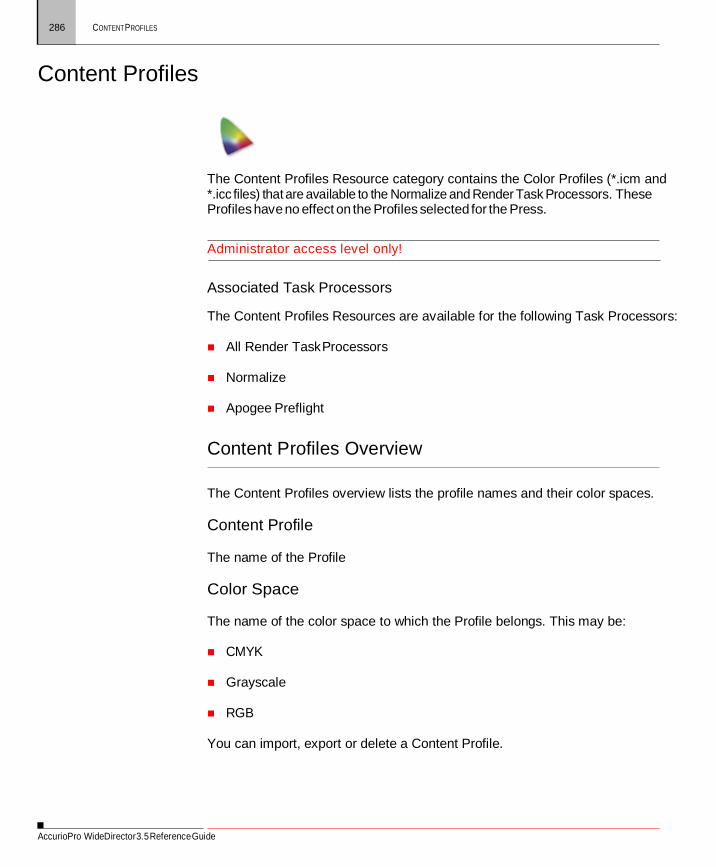
AccurioPro WideDirector 3.5 Reference Guide
286 CONTENT PROFILES
Content Profiles
The Content Profiles Resource category contains the Color Profiles (*.icm and *.icc files) that are available to the Normalize and Render Task Processors. These Profiles have no effect on the Profiles selected for the Press.
Administrator access level only!
Associated Task Processors
The Content Profiles Resources are available for the following Task Processors:
All Render Task Processors
Normalize
Apogee Preflight
Content Profiles Overview
The Content Profiles overview lists the profile names and their color spaces.
Content Profile
The name of the Profile
Color Space
The name of the color space to which the Profile belongs. This may be:
CMYK
Grayscale
RGB
You can import, export or delete a Content Profile.

AccurioPro WideDirector 3.5 Reference Guide
7 TASK PROCESSOR RESOURCES 287
Contrast Adjustments
This resource allows you to create adjustments for the contrast of rendered results. For more general information on Contrast Adjustments, see “Saturation, Contrast and Channel Adjustments” on page 257.
Administrator access level only!
Associated Task Processors The Contrast Adjustments Resource category is available for the following Task Processors:
Generic SD (Sign and Display Printer) and other SD printers
To create a new contrast adjustment curve
1 In the System Overview window, select the M-Press Task Processor for which you want to create a new Contrast Adjustment Curve.
2 Double-click the Contrast Adjustments icon in the Resources pane.
The Contrast Adjustments overview appears, containing all of the available Contrast Adjustments for the M-Press Task Processor.
3 Click the New button.
The curve editor is displayed.
4 Enter a name for your new curve, e.g. High Contrast, Low Contrast.
This is the name that appears in the presets list in Raster Preview.
5 Drag the curve to set the adjustments as desired.
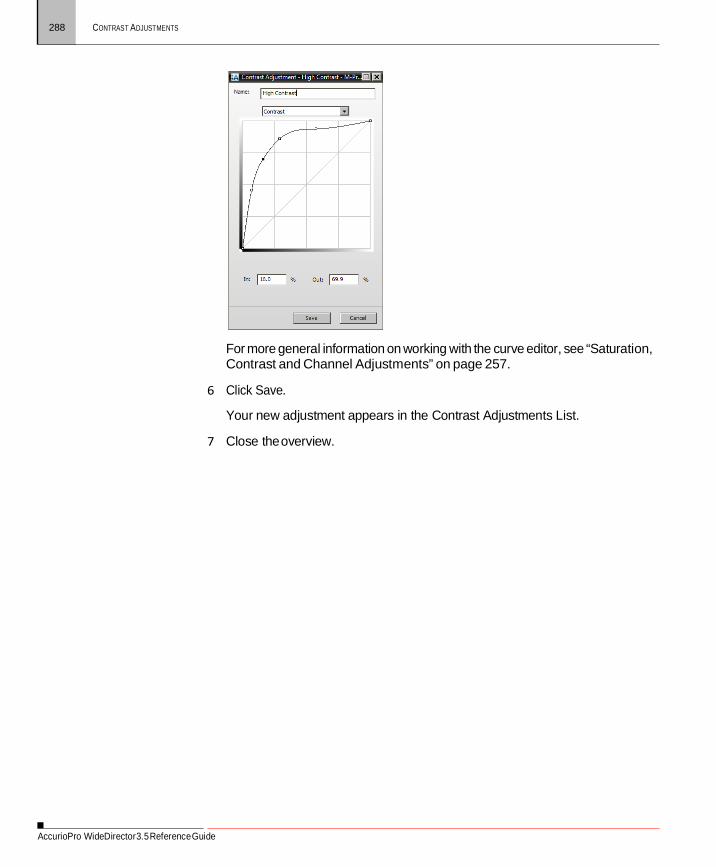
AccurioPro WideDirector 3.5 Reference Guide
288 CONTRAST ADJUSTMENTS
For more general information on working with the curve editor, see “Saturation, Contrast and Channel Adjustments” on page 257.
6 Click Save.
Your new adjustment appears in the Contrast Adjustments List.
7 Close the overview.

7 TASK PROCESSOR RESOURCES 289
AccurioPro WideDirector 3.5 Reference Guide
Curves Adjustments
This resource allows you to create adjustments for the CMYK channels of rendered results. For more general information on Curves Adjustments, see “Saturation, Contrast and Channel Adjustments” on page 257.
Administrator access level only!
Associated Task Processors The Curves Adjustments Resource category is available for the following Task Processors:
Generic SD (Sign and Display Printer) and other SD printers
To create a new curves adjustment
1 In the System Overview window, select the M-Press Task Processor for which you want to create a new Curves Adjustment Curve.
2 Double-click the Curves Adjustments icon in the Resources pane.
The Curves Adjustments overview appears, containing all of the available Contrast Adjustments for the M-Press Task Processor.
3 Click the New button.
The curve editor is displayed.
4 Enter a name for your new curve.
This is the name that appears in the presets list in Raster Preview.
5 Select a Cyan, Magenta, Yellow or Black channel in the drop-down list to activate the respective channel.
6 Drag the curve to set the adjustments as desired.

AccurioPro WideDirector 3.5 Reference Guide
290 CURVES ADJUSTMENTS
For more general information on working with the curve editor, see “Saturation, Contrast and Channel Adjustments” on page 257.
7 Click Save.
Your new adjustment appears in the Curves Adjustments List.
8 Close the overview.
AccurioPro WideDirector 3.5 Reference Guide
7 TASK PROCESSOR RESOURCES 291
Device Link Profiles
The Device Link Profiles Resource category contains the profiles (*.icm and *.icc files) that are available to the Normalize and Render Task Processors. These Profiles have no effect on the Profiles selected for the Press.
Administrator access level only!
Associated Task Processors
The Device Link Profiles Resources are available for the following Task Processors:
Generic SD (Sign and Display Printer) and other SD printers
Device Link Profiles Overview
By default, the Device Link Profiles overview list is empty. You can import, export or delete profiles.

AccurioPro WideDirector 3.5 Reference Guide
292 FINISHING HUB
Finishing Hub
The Finishing Hub is where you manage cutters, finishing operations and finishing margins. You can create new resources or edit existing ones using the File and Edit menus, or by right-clicking in the various lists.
Administrator access level only!
Associated Task Processors The Finishing Hub is available for the following Task Processors:
Generic SD (Sign and Display Printer) and other SD printers
Open the Finishing Hub
In the Layout Editor, choose Window > Resources and select Finishing Hub, or
go to System Overview.
Finishing Hub Overview

AccurioPro WideDirector 3.5 Reference Guide
7 TASK PROCESSOR RESOURCES 293
1 Cutters 2 Finishing operations 3 Finishing margins 4 Details of cutters, operations or margins 5 Mark Engraver button
Cutters This panel lists the cutting devices. The Type and Result Delivery tabs contain the details for each cutter.
Name The name given to the cutting device.
Type tab The type of cutting device:
X-Y cutter
Roll cutter
Guillotine
Result Delivery tab Here you can choose to create a cut file automatically for each sheet or not.
Create cut file: If the check box is selected, a cut file is generated and sent automatically to a directory as specified. If the check box is not selected, you can still send the file manually.
Export directory: The directory where the cut file is saved
File name: The name of the cut file. The directory and file name can be generated using variables.
Format: The file format of the cut file:
PDF: the default and most common format for a cut file
EPS: for large sheets
Acrobat compatibility for large sheets: Select for sheets larger than 200 inches or 5.08 m to process the file using User Units.
Conflict handling: Choose what you want to do if a cut file has the same name as an existing file: replace the existing file or keep the existing file and append a sequence number to the new file.
Rotate contents: The content of the cut file can be rotated 0°, 90°, 180° or 270° without having to rotate the sheet. The default is 0° so the cut file has the same orientation as the sheet.

AccurioPro WideDirector 3.5 Reference Guide
294 FINISHING HUB
Post-process files: After a cut file has been created, the system can run a script on this file, for example to change the file format:
Script: the full path to the script you want to run. It must be accessible by the
computer running AccurioPro WideDirector. Click browse to open a file explorer and select the location of the script.
Options: Optional arguments that can be passed to the script. They are
passed as entered; the options are not enclosed in quotes or double quotes, so the script can see them as individual arguments. The file name of the cut path is always the last argument.
Preview panel Here you can choose to create a preview of the cut file. This file is saved in the
same directory and with the same file name (except the extension) as the actual cut file. The following file formats are available:
PNG
BMP
Operation Mapping tab This tab provides a mapping table to define whether the available finishing
operations are selected for the cutter in question and how the generic names (left column) are mapped to cutter-specific names (right column).
Clear the check box next to an operation if it is not supported by the cutter.
The default operations and any operations you add in the Finishing Operation panel appear in this table with the generic name in the left column. To map an operation to a cutter-specific name, select the operation in the list and enter the cutter-specific name in the panel on the right. You can also set a Path Color for the cutting path in the cut file.
Finishing Operations The following finishing operations are provided by default:
Camera Registration
Crease
Kiss
Through Cut
In the details panel, you can specify one or more conditions for applying an existing or new operation to an image automatically. The conditions can be set

AccurioPro WideDirector 3.5 Reference Guide
7 TASK PROCESSOR RESOURCES 295
to check the following items in your images and map these items to a finishing operation:
Spot color name: If you select the spot color name as condition, you can
choose one of the following options for matching the value or values you enter in the comma-separated list of possible names:
equals
contains
begins with
ends with
Finishing Margins
Finishing margins can be defined in two ways as reflected by the settings of the Finishing Margins dialog:
Tool width (t)
Minimum Material Next to Cut (e)
OR
Minimum Distance between Images (g)
Minimum Distance between Images and Sheet Edges (m)
Click the link icon if you want to set specific values for Left, Right, Top or Bottom. Margins are relative to the frame which initially corresponds with the trim box of your image.

AccurioPro WideDirector 3.5 Reference Guide
296 FINISHING HUB
Open Mark Engraver Click this button to open the Mark Engraver. See “Mark Engraver” on page 299.

AccurioPro WideDirector 3.5 Reference Guide
7 TASK PROCESSOR RESOURCES 297
Fonts
The Fonts resource category contains the default fonts that were installed with the AccurioPro WideDirector software, together with any other fonts that have been imported.
Associated Task Processors
AccurioPro WideDirector is delivered with a font database comprising the most common PostScript fonts. There is one common font database for the following Task Processors:
PDF Render
Normalize
Font Overview
Displays a list of the currently installed fonts, and allows you to filter the list.
Display resources containing Any text entered here will dynamically filter the list of fonts to display only the font names which contain this text.
Font Displays the font name
Type Displays the font type, which may be any of the following:
PostScript
True Type (*.ttf)
Type 1 (*.pfb)
PostScript (*.pfa)
Open Type fonts (*.otf)

AccurioPro WideDirector 3.5 Reference Guide
298 FONTS
File Name Displays the name of the font file. This is normally the same as the font name.
Except for the filtering feature, the general procedures for managing resources apply also to fonts. You can also import ttf, pfb, pfa, and otf fonts into the AccurioPro WideDirector font database
To filter the fonts list
1 Select a Task Processor that uses the Fonts Resource, by clicking it.
The resources associated with the Task Processor appear in the Resources pane.
2 Double-click the Fonts icon in the Resources pane
The Fonts dialog box appears containing the available fonts for your system.
3 If necessary, filter the Fonts List by font name or part of the font name. For example, type the word “Arial” in the text field at the top of the dialog box and press Enter.
The dialog box lists only the Fonts containing the word Arial.
4 Close the Fonts dialog box.

AccurioPro WideDirector 3.5 Reference Guide
7 TASK PROCESSOR RESOURCES 299
Mark Engraver
Open the Mark Engraver
In the Layout Editor, choose Window > Resources and select Mark Engraver, or go to System Overview.
At the top of the Mark Engraver you have an overview of marks in the different categories.
The section under the overview shows the conditions for the selected Mark Set or the details of the individual Marks within each Mark Set. This section can be opened by clicking the grey triangle.
By default, the conditions and details are locked. You can unlock the conditions and details for editing by clicking the Lock icon in the bottom left corner.
Mark Sets Overview
The left column of the overview section displays the three Mark Sets categories and the number of Mark Sets in each category. The Mark Sets consist of marks which are brought together and placed according to the specified positioning and conditions.
The Mark Sets are organized in the following categories:
Image Marks: Text, File, Crop, Grommet, Line, Rectangle, Circle
Sheet Marks: Text, File, Cut, Registration, Fotoba, Cutter Registration,
Grommet, Line, Rectangle, Circle
The middle column lists all the Mark Sets for a particular category and the number of Marks in the selected Mark Set. The Name of the Mark Set is preceded by an icon that indicates the condition applied to the Mark Set.
The right column lists all the Marks of the selected Mark Set.
To add/edit a Mark Set
1 Unlock the Mark Engraver and click a Category
2 Click the new button above the Name column.

AccurioPro WideDirector 3.5 Reference Guide
300 MARK ENGRAVER
OR
Right-click in the middle column and choose New from the list.
A new Mark Set name appears in the list with a default name and 0 Marks. OR
Right-click an existing Mark Set and choose New or Edit from the list.
3 Set the conditions for this new Mark Set.
4 Lock the Mark Engraver.
To add a Mark
1 Unlock the Mark Engraver and click a Mark Set name.
2 Click the new button above the Marks column.
A drop-down is displayed with a list of the different Mark types.
OR
Right-click in the Marks column.

AccurioPro WideDirector 3.5 Reference Guide
7 TASK PROCESSOR RESOURCES 301
3 Select the Mark type you require.
The Mark is added to your Mark Set with a default name.
4 In the Details section, edit the settings for your new Mark.
5 Lock the Mark Engraver.
To duplicate a Mark/Mark Set
1 Unlock the Mark Engraver and right-click a Mark/Mark Set name. A
menu is displayed.
2 Select Duplicate to copy the Mark or Mark Set.
The new Mark Set contains the same Marks as the original and has the same conditions. The Marks have the same details.
3 Edit the settings for the new Mark Set/Mark as required.
To move/copy Marks between Sets
Drag a Mark from one Mark Set to another or press the Ctrl key while dragging to duplicate the Mark.
NOTE: You cannot move between categories.
To name/re-name a Mark/Mark Set
1 Unlock the Mark Engraver and right-click a Mark/Mark Set name. A
menu is displayed.

AccurioPro WideDirector 3.5 Reference Guide
302 MARK ENGRAVER
2 Select Edit to rename the Mark or Mark Set.
Mark Set Conditions
The Conditions section of the Mark Engraver is the same for the four categories of Mark Sets. By default you see one line where you can enter criteria. Criteria lines can be added, edited or deleted. The printing of the marks can also be limited to proofs.
Examples of conditions:
Apply when all criteria are met with criterion $product.name equals MyProduct.
Apply when some criteria are met with criterion $press_sheet.side.press.name equals Large Press.
Click a Mark Set category and then the Name of a Mark Set to display the
Conditions section.
Apply to “Split for Proof” results only Select this check box if you only want the mark set to appear on the proofs of a press sheet and not on the actual press sheet when it is printed. If you select this option, the proof-only marks do not appear in the Mark Sets inspector nor in Sheet View and no checks are performed for conflicts. Proofs always include the actual press sheet marks.
Apply
Always: the Mark Set is always applied and does not take the criteria into account.
Manually only: The Mark Set can only be placed manually.
When all criteria are met: The Mark Set is only applied when all the criteria lines
are true.
When some criteria are met: The Mark Set is applied when at least one of the criteria lines is true.
The selected condition is indicated with an icon in the Mark Sets list.

AccurioPro WideDirector 3.5 Reference Guide
7 TASK PROCESSOR RESOURCES 303
Mark Set is always applied
Mark Set is only applied manually
Mark set is applied when all/some criteria are met
Variable This drop-down lists the variables you can use for your criteria.
Expressions Depending on the variable you use for your criterion, you will see expressions that test against a string (e.g. the name of a Press or Product) or a number:
equals (string or number)
does not equal (string or number)
less than (number)
greater than (number)
less than or equal to (number)
greater than or equal to (number)
is even (number)
is odd (number)
contains (string)
does not contain (string)
Value In this field you enter the value you want to apply for the variable:
a string: e.g. your Product, your Press
a number with/without unit: e.g. 1000 mm
To create/edit a Mark Set condition
1 Click a Mark Set Category and then a Name to display the Conditions section.

AccurioPro WideDirector 3.5 Reference Guide
304 MARK ENGRAVER
2 Choose one of the options from the Apply drop-down list, e.g. When all criteria are met.
3 Click the New button next to the conditions line to create a new criteria line.
4 Choose a variable from the first drop-down list, e.g. $job.order, an expression from the middle list, and enter a value in the right field to complete the criterion.
Mark Types The different Mark types are indicated with a specific icon:
Circle Mark: draws a circle with or without fill color
Cut Mark: a horizontal and a vertical line in the corners of a Fold Sheet to indicate the boundaries of the Fold Sheet and where it is to be cut
File Mark: places a specific EPS or PDF file as a mark
Fotoba Mark: draws horizontal and vertical lines to enable cutting with a Fotoba cutting device.
Grommet Mark: draws sequential marks along the sides of an image or layout. These marks are printed on the layout and indicate where reinforced eyelets can be produced.
Cutter Registration Mark: draws reference dots to enable cutting with X/Y cutting devices.
Line Mark: draws a line
Crop Mark: a horizontal and a vertical line to indicate where the page has to be cropped
Rectangular Mark: draws a rectangle with or without fill color
Registration Mark: draws a series of marks which are used to check that the registration of the different printing colors is correct
Text Mark: prints the job name, order number, color name, etc. on the Press Sheet
Each Mark type has its own settings which are displayed in the Details section of the Mark Engraver. The Details section has a number of tabs depending on the Mark type:
“Mark Attributes” on page 305
“Mark Position” on page 317

AccurioPro WideDirector 3.5 Reference Guide
7 TASK PROCESSOR RESOURCES 305
“Mark Conflicts” on page 318
“Mark Repeat” on page 319
“Mark Special” on page 320
Mark Attributes The Attributes are explained for each Mark type.
“Circle Mark Details” on page 305
“Crop Mark Details” on page 306
“Cut Mark Details” on page 307
“File Mark Details” on page 308
“Fotoba Mark Details” on page 308
“Grommet Mark Details” on page 310
“Cutter Registration Mark Details” on page 311
“Line Mark Details” on page 313
“Rectangle Mark Details” on page 313
“Registration Mark Details” on page 314
“Text Mark Details” on page 315
Circle Mark Details
Mark Sets Categories: Pages, Fold Sheet, Press Sheet, Image, Sheet
The Circle Mark draws a rectangle with a border and fill color. This mark is always printed using knock-out.
Width Specifies the horizontal size of the mark. You can create oval shapes by
unlocking the link and entering different values for Width and Height.
Height Specifies the vertical size of the mark.

AccurioPro WideDirector 3.5 Reference Guide
306 MARK ENGRAVER
Border pen Choose a pen to draw the lines; lines have different thicknesses.
NOTE: The border is created on the inside of the bounding box.
Fill with color This option is selected by default.
Click the variable button, and select one or more options to determine on which plate(s) the mark will be printed:
See “About Colors for Printing Marks” on page 323 for more information on using colors to print marks.
NOTE:
Crop Mark Details
Mark Sets Category: Pages, Image
A Crop Mark is a horizontal and a vertical line to indicate where the page has to be cropped.
Type A drop-down list with 2 options for what the crop mark indicates:
Page Trim: the final size of the pages
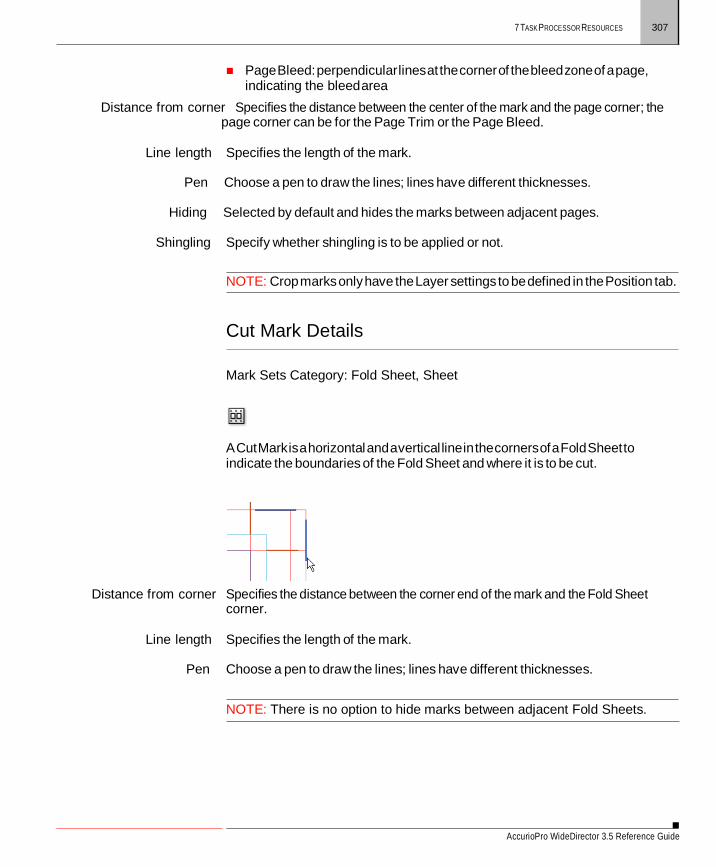
AccurioPro WideDirector 3.5 Reference Guide
7 TASK PROCESSOR RESOURCES 307
Page Bleed: perpendicular lines at the corner of the bleed zone of a page, indicating the bleed area
Distance from corner Specifies the distance between the center of the mark and the page corner; the page corner can be for the Page Trim or the Page Bleed.
Line length Specifies the length of the mark.
Pen Choose a pen to draw the lines; lines have different thicknesses.
Hiding Selected by default and hides the marks between adjacent pages.
Shingling Specify whether shingling is to be applied or not.
NOTE: Crop marks only have the Layer settings to be defined in the Position tab.
Cut Mark Details
Mark Sets Category: Fold Sheet, Sheet
A Cut Mark is a horizontal and a vertical line in the corners of a Fold Sheet to indicate the boundaries of the Fold Sheet and where it is to be cut.
Distance from corner Specifies the distance between the corner end of the mark and the Fold Sheet corner.
Line length Specifies the length of the mark.
Pen Choose a pen to draw the lines; lines have different thicknesses.
NOTE: There is no option to hide marks between adjacent Fold Sheets.

AccurioPro WideDirector 3.5 Reference Guide
308 MARK ENGRAVER
File Mark Details
Mark Sets Categories: Pages, Fold Sheet, Press Sheet, Image, Sheet
Use a File Mark, if you want to place a specific EPS or PDF file as a mark.
File Click the File list and select one of the available EPS or PDF files. The file is selected as the mark to be used and you see the size and number of colors used for the mark.
NOTE: You can open the Marks Resource by clicking the Open File Marks button, for example, to import a new mark.
Knock-out: Select to knock out the area under the mark. The knock-area is the
bounding box of the mark.
Extend: Extends the knock-out area of the mark; can be used for conflict checking.
When clipping Only enabled if the selected file has an internal cell structure. Select if you only want the mark to be clipped at the cell boundaries of the mark (e.g. color bars); clear if it is alright to clip the mark anywhere.
Rotate Specify the rotation angle for the mark (0, 90, 180, or 270 degrees).
NOTE: The selected file is copied into a reserved directory on the server.
Fotoba Mark Details
Mark Sets Category: Sheet

AccurioPro WideDirector 3.5 Reference Guide
7 TASK PROCESSOR RESOURCES 309
Fotoba marks consist of horizontal and vertical lines which are drawn on a layout to enable cutting with a Fotoba cutting device.
Type: Single mark, Double mark
Horizontal/Vertical Cut Marks Fotoba cut marks are drawn along the horizontal and vertical sides of the individual images on a layout. Horizontal lines are drawn by default and you can optionally specify vertical lines.
Draws single or a double line to indicate cutting.
Line thickness The thickness of each line.
Inner white The distance between the lines of a double mark.
Side Mark The side mark is a vertical line which is drawn in addition to the vertical cut mark.
Distance from image The distance from the image to the side mark.
Line thickness The thickness of the side mark line.
Color The color of all the cutting lines. Click the variable button, and select one or more colors to change the color of the cutting lines:

AccurioPro WideDirector 3.5 Reference Guide
310 MARK ENGRAVER
See “About Colors for Printing Marks” on page 323 for more information on using colors to print marks.
Grommet Mark Details
Mark Sets Category: Image, Sheet
Grommet marks are sequential marks which are placed along the sides of an image or layout. These marks are printed on the layout and indicate where reinforced eyelets (grommets) can be produced. The marks are not part of the cut file.
Mark First you specify the appearance of the marks.
Grommet type Three types of grommet marks are available:
Circle
Circle with cross
Cross
Diameter The diameter of the circle.
Line thickness The thickness of all the lines.
Line length The length of the 2 lines of the cross.

AccurioPro WideDirector 3.5 Reference Guide
7 TASK PROCESSOR RESOURCES 311
Color The color of all the cutting lines. Click the variable button, and select one or more colors to change the color of the cutting lines:
See “About Colors for Printing Marks” on page 323 for more information on using colors to print marks.
Placement In the placement panel, you specify where you want the grommet marks to appear.
Placement You can choose to place the grommet marks along all sides of the image or
layout, left and right, or top and bottom.
Distance from edge The distance of the grommet from the edge of the image or sheet.
Max. distance between marks
The maximum distance between adjacent marks.
Cutter Registration Mark Details
Mark Sets Category: Sheet
Cutter registration marks are reference dots which are drawn on a layout to enable cutting with X/Y cutting devices.
Type The following types of Cutter Registration marks are available:
Filled circle

AccurioPro WideDirector 3.5 Reference Guide
312 MARK ENGRAVER
Reversed circle
Filled rectangle
Reversed rectangle
Diameter/Width, Height The diameter/width and height of the circle/rectangle.
Outer size The diameter of the reversed circle.
Distance from images The distance of the dots from the edge of the image or image block.
Color/Reverse Color The colors of the filled circle and reversed circle can be specified separately. Click the variable button, and select one or more colors to change the color:
See “About Colors for Printing Marks” on page 323 for more information on using colors to print marks.
Location In the location panel, you specify where you want the dots to appear, and depending on the chosen location, the number of marks. The following options are available from the drop-down list:
Corners Dots are placed at the corners of the image block. 3, 4 or 5 dots can be placed to
indicate the lay of the cut block.
Individual Images Dots are placed along a cut path that takes into account the nested arrangement of all the images. Here you can choose between Few and Many.
Top/Bottom Dots are placed along the top and bottom of the image block, and you can set the
number of dots by specifying the distance between them.
Left/Right Dots are placed along the left and right side of the image block, and you can set the number of marks by specifying the distance between them.
All Sides Dots are placed along all sides of the image block, and you can set the number of
marks by specifying the distance between them.
Max. distance between marks
Set the distance between adjacent dots if you require more than the default number of dots.
Shift top/left marks The offset applied to the dots on the top or left side.

AccurioPro WideDirector 3.5 Reference Guide
7 TASK PROCESSOR RESOURCES 313
Line Mark Details
Mark Sets Categories: Pages, Fold Sheet, Press Sheet, Image, Sheet
The Line Mark draws a line that can be used for various purposes in production.
Length Specifies the length of the mark.
Pen Choose a pen to draw the lines; lines have different thicknesses.
Angle Specify the rotation angle for the mark (0, 90, 180, or 270 degrees).
Rectangle Mark Details
Mark Sets Categories: Pages, Fold Sheet, Press Sheet, Image, Sheet
The Rectangle Mark draws a rectangle with a border and fill color. This mark is always printed using knock-out.
Around Choose the reference for drawing the mark. Choose Custom to use all the options
on the Position tab, or choose a target object (Image block, sheet, etc.) if you want to draw the mark around an object. The available objects depend on the mark category.
Expand If you choose a target object for the around option, you can also set a distance
from the object where the mark will be drawn. Enter a positive value to draw a mark which is larger than the object (e.g. a rectangle around an image block), or a negative value for a mark which is smaller than the object.
Width Specifies the horizontal size of the mark.
Height Specifies the vertical size of the mark.
Border pen Choose a pen to draw the lines; lines have different thicknesses.
NOTE: The border is created inside the mark.
Fill with color This option is selected by default.

AccurioPro WideDirector 3.5 Reference Guide
314 MARK ENGRAVER
Click the variable button, and select one or more options to determine on which plate(s) the mark will be printed:
See “About Colors for Printing Marks” on page 323 for more information on using colors to print marks.
Registration Mark Details
Mark Sets Category: Press Sheet, Fold Sheet, Sheet
A Registration Mark draws a series of marks which are used to check that the registration of the different printing colors is correct.
Where Click in the diagram to specify where the mark is printed on the Press Sheet: in the four corners, the four center-side positions, or any other combination.
Offset from edges Distance between the center of the mark and the edges of the Press Sheet (including the lay).

AccurioPro WideDirector 3.5 Reference Guide
7 TASK PROCESSOR RESOURCES 315
File Click the File list and select one of the available EPS or PDF files. The file is selected as the mark to be used and you see the size and number of colors used for the mark.
The preview pane shows the selected mark.
NOTE: You can open the Marks Resource by clicking the Open File Marks button, for example, to import a new mark.
Rotate Specify the rotation angle for the mark (0, 90, 180, or 270 degrees).
Text Mark Details
Mark Sets Categories: Pages, Fold Sheet, Press Sheet, Image, Sheet
Text Marks are used to print text on a Press Sheet and identify Press Sheets by printing the job name, order number, color name, etc.
Text In the Text field, you can specify which text is to be used as a mark. You have
three options:
Type some text in the Text field.
Select a variable from the drop-down list. This list appears when you click in the Text field the button next to the field.
A combination of the two previous methods, e.g. some text followed by a
variable Font Select a font and a point size for the text mark.
Length If you want you can change the calculated length of the text mark which is based on
the amount of text, the point size and the variable. You can revert to the default, calculated length by clicking the revert arrow.

AccurioPro WideDirector 3.5 Reference Guide
316 MARK ENGRAVER
Script Select a Roman, Chinese, Hebrew or Japanese script for the text mark. Choosing Chinese or Japanese activates the Writing Direction option.
NOTE: If you choose Chinese or Japanese, don’t forget to select a relevant font for these languages in the Font drop-down list.
Writing Direction Horizontal is selected by default for Roman script (e.g. European languages) and can’t be changed; choosing Chinese or Japanese script activates the following options:
Horizontal: Select this option to place the text characters horizontally; the text is left-aligned in the text box.
NOTE: The anchor point in the Mark Position tab is also used for aligning a Text mark. For example, placing a Text mark in the top right position means the text will grow from right to left and it is right-aligned in the text box.
Vertical: Select this option to place the characters underneath each other (certain Asian languages).
Use Arabic Numerals: Select this option to use Arabic numerals in vertical text.

AccurioPro WideDirector 3.5 Reference Guide
7 TASK PROCESSOR RESOURCES 317
Color Click the variable button, and select one or more options to determine which plate(s) will print the mark:
See “About Colors for Printing Marks” on page 323 for more information on using colors to print marks.
Knock-out text box Knocks out the area under the text when selected.
Knock-out: Select to knock out the area under the mark. The knock-area is the
bounding box of the mark.
Extend: Extends the knock-out area of the mark; can be used for conflict checking.
Rotate Specify the rotation angle for the mark (0, 90, 180, or 270 degrees).
Mark Position The Position tab in the Details pane contains settings that apply for all of the Mark types. These settings are explained in this section for all Mark types.
Mark
Anchor Point You can specify the exact position of the mark. This position is defined by a horizontal and a vertical distance from different parts of the sheet or plate.
Target Reference The Marks with this setting need to be positioned relative to a reference. This
reference depends on the Mark type:
Image Marks
Image Frame
Image Trim box
Bleed
Sheet Marks

AccurioPro WideDirector 3.5 Reference Guide
318 MARK ENGRAVER
Sheet
Image Block
Horizontal For the horizontal position, select:
distance...
to right or left of...
Left Edge, Right Edge, or Center. Vertical For the vertical position, select:
distance...
below or above...
Top Edge, Bottom Edge, or Center.
Print on Front side
Back side
Both sides. If you select this option, the following check boxes are enabled:
Mirror position on back
Mirror content on back
Layer See “Mark Layers” on page 322 for information on how layers are used to arrange content:
Top Marks
Page Content
Bottom Marks
Mark Conflicts Conflicts may arise if a mark overlaps another mark, a mark runs into the page content or bleed zone, or a mark falls outside the area of interest or box. The areas of interest are the Pages, Gutters, Gripper, Press Sheet, etc. for each respective Mark type. For example, press sheet marks must fall inside the Press Sheet.

AccurioPro WideDirector 3.5 Reference Guide
7 TASK PROCESSOR RESOURCES 319
Clipped These are the possible actions if a mark falls outside the box or area where it is expected to be drawn (area of interest).
Print clipped: The mark is clipped to fit in the box and printed.
Do not Print: The mark is ignored.
Fail: The job will be aborted. The notify action is selected and an error is
displayed for the job.
NOTE: You can choose to be notified by selecting the Notify check box.
Overlaps These are the possible actions if a mark overlaps with Page Content (Trim), Page Bleed or another mark.
Print: The mark is printed even if it falls outside the box.
Do not Print: The mark is ignored.
Fail: The job will be aborted. The notify action is selected and an error is
displayed for the job.
NOTE: You can choose to be notified by selecting the Notify check box.
Include knock-out for conflict checking When selected, the knock-out area is included for conflict checking.
Mark Repeat In the Repeat tab of the Details section, you can choose to repeat a mark by selecting the Repeat mark check box. The fields are disabled if this check box is not selected.
NOTE: The Repeat tab is only available for File Marks and these settings are used to repeat color bars.
Step Area
The Step Area is the area where a Mark is repeated.

AccurioPro WideDirector 3.5 Reference Guide
320 MARK ENGRAVER
Orientation Choose Horizontal or Vertical to define the orientation for repeating the Mark.
Number of Steps You have the following options to define how many times the mark is repeated:
Fit within available space: the mark is repeated within the available space
Fit within fixed length: choosing this option enables an extra field where you can enter the length of the step area
Fixed: in the extra field that is displayed, enter the number of times (steps) you
want to repeat the mark
Stepping Direction If Horizontal orientation is chosen, then the direction is Left to right and Right to
left; if Vertical orientation is chosen, then the direction is Bottom to top or Top to bottom;
Inside/Out: positions the mark on each side of the center of the Step Area and
repeats the mark in both directions
Centered: positions the mark in the middle of the Step Area and repeats in both directions
Mirror mark around center Option to mirror the mark when repeating Inside/Out.
Center Gap The gap between the two center marks when repeating Inside/Out and the number of steps is even.
Spacing The gap between repeating marks; this option has no effect on Center Gap.
Partial last step This option defines what happens when the last step extends beyond the avail-
able area:
Draw clipped: the mark is clipped at the end of the available area
Omit: the mark is not drawn and consequently not clipped
Mark Special In the Special tab of the Details section, you can choose to apply special settings to the mark.
NOTE: The Apply Curves option is only available for File Marks.
Apply curves Linearization
Calibration

AccurioPro WideDirector 3.5 Reference Guide
7 TASK PROCESSOR RESOURCES 321
Simulation
NOTE: The Apply Curves option is only available for File Marks.
Finishing Include in cut file: Draws the mark in the cut file if applicable.
Do not print: The mark is not drawn on the printed sheet.
Mark Pens Pens are used to define a thickness and style for lines and borders used to draw certain Marks.
Width The width of the line in points.
Color Click the associated variable button, and select one or more options to determine on
which plate(s) the mark will be printed:
See “About Colors for Printing Marks” on page 323 for more information on using colors to print marks.
Knock-out around pen Select to knock out the area under the pen line.
Dashed line Select this check box for a pen with a dashed line. Enter the size in points of the
dash and the distance between the dashes. The default values are 12 pt for the dash and 6 pt for the gap.
To create/edit Mark pens
1 In the Mark Engraver, click the cogwheel in the top left corner and choose Manage Pens.
2 Click the New button and a new Pen appears in the list.

AccurioPro WideDirector 3.5 Reference Guide
322 MARK ENGRAVER
3 Enter a name in the Name field.
4 Complete the fields as required.
Mark Layers Layers are used to arrange marks in a certain order, with the highest layer having the highest priority.
Layers are controlled at the bottom of the Position tab. There are three default layers which cannot be deleted:
Top marks Marks to be printed on top of the Page content, e.g. crop marks
Middle (Page Content) The reference layer.
Bottom marks Contains marks to be printed below the page content, e.g. all marks except crop
marks.
Additional layers can be created and deleted.
To create Mark Layers in the Engraver
1 In the Mark Engraver, click the cog wheel in the top left corner and choose Manage Layers.
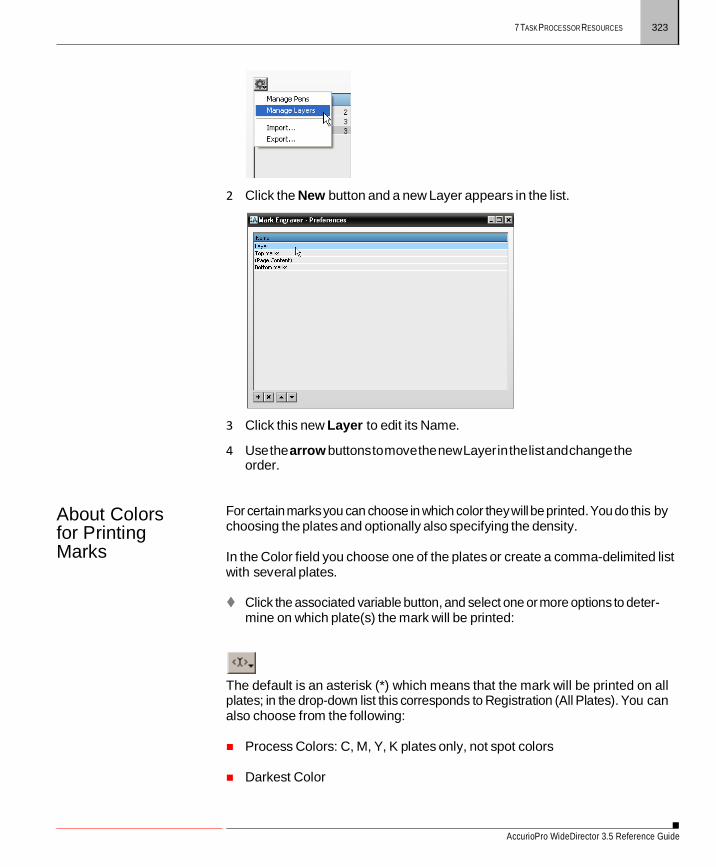
AccurioPro WideDirector 3.5 Reference Guide
7 TASK PROCESSOR RESOURCES 323
2 Click the New button and a new Layer appears in the list.
3 Click this new Layer to edit its Name.
4 Use the arrow buttons to move the new Layer in the list and change the order.
About Colors for Printing Marks
For certain marks you can choose in which color they will be printed. You do this by choosing the plates and optionally also specifying the density.
In the Color field you choose one of the plates or create a comma-delimited list with several plates.
Click the associated variable button, and select one or more options to deter-
mine on which plate(s) the mark will be printed:
The default is an asterisk (*) which means that the mark will be printed on all plates; in the drop-down list this corresponds to Registration (All Plates). You can also choose from the following:
Process Colors: C, M, Y, K plates only, not spot colors
Darkest Color

AccurioPro WideDirector 3.5 Reference Guide
324 MARK ENGRAVER
Cyan
Magenta
Yellow
Black
White, Varnish, Primer
Spot colors You can also specify the density for printing the mark and combine colors, for example:
*:50 means print on all plates at 50%
Cyan:40 means print on Cyan plate at 40%
Cyan:40, Magenta:50 means print on Cyan at 40% and Magenta at 50%

AccurioPro WideDirector 3.5 Reference Guide
7 TASK PROCESSOR RESOURCES 325
Marks
In the Marks Resource category, you can manage the file marks used in the Mark Engraver and Borders Resource categories.
The Marks can be EPS or PDF files. You import them or delete them.
Associated Task Processors
The Marks resource category is available for:
All Output Task Processors except for Export and RPC
All Print Task Processors except for the Generic Press.
Administrator access level only!
Marks Overview
The Marks overview lists all available marks. You
can import, export or delete marks.
Related topics: • To create, duplicate, edit, delete, import or export Resources on page 375
To import marks
1 In the System Overview Window, select the Output Task Processor for which you want to import the Mark.
2 Double-click the Marks icon in the Resources pane.
The Marks dialog box appears, containing an overview of all the available Marks.
3 Click the import button.

AccurioPro WideDirector 3.5 Reference Guide
326 MARKS
4 Locate the folder from which you want to import the marks, and click Open.
5 Close the Marks dialog box.
After adding a mark, AccurioPro WideDirector will try to calculate its bounding box. This will be displayed in the Dimensions column.

AccurioPro WideDirector 3.5 Reference Guide
7 TASK PROCESSOR RESOURCES 327
Media Hub
The Media Hub is where you manage Calibrated Printing Modes (CPMs). CPMs are presets that you can select in the Layout Editor to obtain the best possible printing results for the selected printing quality, press and media on the specified printing device.
Associated Task Processors The Finishing Hub is available for the following Task Processors:
Generic SD (Sign and Display Printer) and other SD printers
Open the Media Hub
In the Layout Editor, choose Window > Resources and select Media Hub.
Administrator access level only! Select a printing device in the System Overview and you will see that the Media Hub is a resource.
You can select a CPM in the list of Calibrated Printing Modes. You can use the filter box to filter the CPMs by printing device for example.
Create a CPM
New Calibrated Printing Modes are generally based on a default CPM, but you can also create them from scratch.
In the Media Hub, choose File > New Calibrated Print Mode.
The CPM Creation Wizard opens.
The wizard consists of 3 steps. Visit the Tutorial page on the AccurioPro WideDirector Network for a detailed procedure.

AccurioPro WideDirector 3.5 Reference Guide
328 MEDIA HUB
Media Hub Overview
1 Quality 2 Printer 3 Media Category and Media 4 List of Calibrated Printing Modes (CPMs) for the selected quality, printer and media 5 Details of the selected quality, media or CPM, or adjust Printer Parameters for category
A series of base or default CPMs are included with your system and new CPMs can be created based on these CPMs. You can see the default CPMs if you select All Qualities + All Printers + Generic Media (in the All Media or Generic Media).
When you start a job in the Layout Editor, you need to choose a Calibrated Printing Mode (CPM) that corresponds with the requirements of the job. A number of CPMs are available for each printing device (AccurioWide, etc.) to ensure optimum printing results on each device. The CPM settings take into account the following parameters:
Quality: The Quality parameter allows you to choose a desired quality level for
the printed product. The quality level you choose depends on the characteristics of the images to be printed, the desired color gamut, the viewing distance and the printing speed. The following quality levels are available:
Express
Production
Standard
High Quality
High Definition

AccurioPro WideDirector 3.5 Reference Guide
7 TASK PROCESSOR RESOURCES 329
Printer: A particular printing device cannot necessarily handle all quality levels. Only the quality levels that apply for the available printing devices are shown when you set up a job.
Media: The expected quality varies according to the chosen media.
Clear Selection: This button resets the selection to All Qualities, All Printers and
All Media.
Calibrated Printing Modes Details
General The name and properties of the Calibrated Printing Mode.
Color On Media The printing mode and color mode for printing the process color inks directly on the substrate, and the associated calibration and characterization resource. This applies when printing without white, or when printing with post-white, regard- less of the kind of white application.
Color On White The same set of properties for printing the process color inks on white ink.
White The print and screen properties for printing white.
CPM cogwheel menus
Click the cogwheel to open the CPM menu which has the following commands:
Calibrate: Opens the CPM Calibration Wizard.
Update G7 Calibration: Only active if the CPM includes a G7 calibration
step. Use this option to update this step.
Tune Profile: Opens the CPM Profile Tuning Wizard.
Edit Profile Settings: Opens the Edit Profile Settings dialog
Redo CPM Setup Wizard: Launches the wizard to redo the calibration wizard.
Revert Calibration: Opens the Revert Calibration dialog where you can
choose a calibration date to revert to.

AccurioPro WideDirector 3.5 Reference Guide
330 MEDIA HUB
Revert G7 Calibration Update: (Only active if the CPM includes a G7 calibration.)
Revert Profile: Opens the Revert Profile dialog where you can choose a
profile date to revert to.
Revert Edit Profile Settings
Revert Redo CPM Setup Wizard
Report: Opens the CPM Quality Report. You can save the report as a PDF or print it.
Export Profile: Exports the profile.
Print Mode Parameter: Opens the Edit Print Mode dialog.
NOTE: Visit the Tutorial page on the AccurioPro WideDirector Network for detailed procedures.
Media Details General Name How you want to call the media.
Sheet only The media can be used on flat-bed or hybrid printers.
Roll only The media can be used on roll-to-roll or hybrid printers.
Both The media can be used on any type of printer.
Categories One or more categories that the media belongs to. Select the categories from the
drop-down list.
Media Calibration Here you can choose whether the new media needs a dedicated CPM, or can use that of an existing media by choosing one from the drop-down list.
Create New Media
In the Media Hub, choose File > New Media.
A new media called Media is added to the list. You can edit the name and specify the settings in the Media details panel.

AccurioPro WideDirector 3.5 Reference Guide
7 TASK PROCESSOR RESOURCES 331
Other Media Hub Commands
Configure Printer
In the Media Hub, choose File > Configure Printer to open the configuration window for the selected printer.
NOTE: Depends on access level.
Manage Sheet Sizes
In the Media Hub, choose File > Manage Sheet Sizes.
The Sheet Size resource is displayed. See “Sheet Sizes” on page 366.
Import/Export CPMs
In the Media Hub, choose File > Import or Export.
The file browser is displayed.
NOTE: Many of the commands are available by right-clicking the appropriate item.
Adjust Printer Parameters
1 Select a category and click the Adjust button in the Printer Parameters panel on the right. Unlock the parameters first.
2 The Printer Parameters dialog box is displayed where you can specify device- specific settings. Click the cogwheel icon if you want to restore the settings.

AccurioPro WideDirector 3.5 Reference Guide
332 OUTPUT SIZES
Output Sizes
The Output Sizes Resource category defines the different available output sizes that can be used for printing the image on a particular imagesetter or platesetter. This also allows you to define a punch calibration, and link it to the used output device.
Punch Calibration defines how the sheet is being “punched” to ensure a correct sheet position. There are two punching methods supported by AccurioPro WideDirector: head punching and tail punching.
Associated Task Processors
The Output Sizes Resource category is available for the following Task Processors:
All of the Imagesetter, Platesetter, and Proofer Task Processors
Commercial digital Print Task Processors
Administrator access level only!
Output Sizes Overview
The Output Sizes overview lists the available Output Sizes. You can create, duplicate, edit, delete, import or export Output Sizes.
Output Sizes Editor
The Output Sizes Editor allows you to create or modify an Output Sizes. You can specify a height, width, orientation and punch calibration.
Punch Calibration Editor
In this window, you can specify the punch settings for the imagesetters or plate- setters and print a test page in order to measure the offsets.

AccurioPro WideDirector 3.5 Reference Guide
7 TASK PROCESSOR RESOURCES 333
Name
The name of the punch calibration. This field cannot be left empty.
Punch Location
The location of the Punch (virtual or real) on the test image. This can be the device punch or the transfer punch.
X Axis The distance between the center of the test image and the punch reference
(punch center for film and leading edge for plate).
Y Axis The offset between the center of the test image and the punch center for films. This option is disabled for platesetters.
Plate Exposure Unit Pin Bar (imagesetters only)
Specify the distance between the film punch and the edge of the plate when both the film and the plate are mounted on the pin bar. This option is disabled for platesetters. The initial value is the last entered value.
Test Page
You can print a test page in order to measure the offsets. Proceed as follows:
1 In the Punch Calibration dialog box, click the Test button.
The Punch Calibration Test Page dialog box is displayed.
2 Select the Output Size that you want to associate with the Punch Calibration.
3 Click the On list and select the media you want to print the test page on.
4 Select any Parameter Sets you may have created for the Image and Output operations.
5 Click Print.
A test job is composed and automatically submitted to the device, and a progress indicator appears. You are notified when the job has been success- fully submitted.
NOTE: The OK button is disabled if you have not selected a valid tray.

AccurioPro WideDirector 3.5 Reference Guide
334 OUTPUT SIZES
To create and edit an output size
1 In the System Overview, select the Output Task Processor for which you want to create or edit an Output Size.
2 Double-click the Output Sizes icon in the Resources pane.
The Output Sizes overview appears.
3 Do one of the following to create or edit an Output Size.
Click the New button to create a new Output Size.
Select the Output Size that you want to edit in the Output Size list in the upper pane and click the Edit button.
The Output Size editor appears.
4 Type the name for the Output Size and specify the width, height and orientation.
5 Select a punch calibration from the Punch Calibration list.
NOTE: You can select None, if you do not want to use a Punch Calibration. In that case, no offsets are applied.
6 Click OK.
Your settings are saved. The newly created Output Size appears in the list.
7 Close the Output Sizes dialog box.
To create and edit a new punch calibration
1 In the System Overview, select the Output Task Processor for which you want to create or edit a punch calibration.
2 Double-click the Output Sizes icon in the Resources pane.

AccurioPro WideDirector 3.5 Reference Guide
7 TASK PROCESSOR RESOURCES 335
The Output Sizes overview appears.
3 In the lower pane, do one of the following to create or edit a Punch Calibration.
Click the New button to create a new Punch Calibration.
Click the Edit button to edit a Punch Calibration.
The Punch Calibration editor appears.
4 Specify the Punch Calibration settings. See “Punch Calibration Editor” on page 332.
5 Click OK to save your settings.
The settings are saved. The newly created Punch Calibration appears in the lower pane. You can select the required Punch Calibration in the Output size dialog box when creating or editing an Output Size. See “To create and edit an output size” on page 334.
6 Close the Output Sizes dialog box.
To delete a punch calibration
1 In the System Overview, select the Output Task Processor for which you want to delete a punch calibration.
2 Double-click the Output Sizes icon in the Resources pane.
The Output Sizes dialog box appears.
3 In the lower pane, select the Punch Calibration that you want to delete and do one of the following:
Press Delete.

AccurioPro WideDirector 3.5 Reference Guide
336 OUTPUT SIZES
Click the Delete button.
4 Click Yes to confirm the deletion.
5 Click either Yes or No depending on whether you want to delete the linked Output Size.
The Punch Calibration is deleted and no longer appears in the lower pane.
6 Close the Output Sizes dialog box.

AccurioPro WideDirector 3.5 Reference Guide
7 TASK PROCESSOR RESOURCES 337
Print Modes
The Print Modes resource category is where set the following parameters:
Resolution width
Resolution height
Droplets per dot
Bits per pixel
Administrator access level only!
Associated Task Processors The Finishing Hub is available for the following Task Processors:
Generic SD (Sign and Display Printer) and other SD printers
AccurioPro WideDirector 3.5 Reference Guide
338 PROFILES
Profiles
ICC Profiles are standards for describing color characterizations of different output devices. AccurioPro WideDirector provides you with a set of standard ICC color profiles. You can import additional color profiles (*.icm or *.icc files), and delete profiles.
You can also import (and delete) color exceptions, in tab-delimited format (*.dat files) and in MIME format (*.mime files). The colors will then appear in the Color Exceptions table, together with their process value percentages.
You can create auto-select maps to make a profile available for automatic selection. For more information, see “Using Resource Auto-Select Maps” on page 343.
Administrator access level only!
Associated Task Processors
The ICC Profiles Resources are available for:
All Proofer Task Processors
All Print (Press) Task Processors
Apogee Preflight
Profile Selection Maps Editor (Press)
You can specify which job settings the automatic selection of the profile will depend on. For Press, these are as follows. For proofers, see “Profile Selection Maps Editor (Proofers)” on page 339.
Printing Stock
Paper Type Select the appropriate paper type from the drop-down list:
Gloss coated wood free
Matt coated wood free

AccurioPro WideDirector 3.5 Reference Guide
7 TASK PROCESSOR RESOURCES 339
Uncoated white Ink Set Select the ink set from the drop-down list. You can choose from the available Ink
Sets in the Ink Sets Resource category that have the same color space as the profile.
Workflow
Displays the polarity (for information only):
CTP or Positive CTF
Negative CTF
NOTE: Computer to Plate printing is always positive.
Halftone Screen
Specify the halftone screen settings:
Screen Select the screen type from the drop-down list.
ABS
Adobe Accurate
Rational Tangent
For more information on these screen types, see “PDF Render - Screen Settings” on page 611.
Resolution Specify the screen resolution from the drop-down list.
Frequency Select the line frequency (lpi) from the drop-down list.
Dot Shape Select the dot shape from the drop-down list.
Profile Selection Maps Editor (Proofers)
You can specify which job settings the automatic selection of the profile will depend on.

AccurioPro WideDirector 3.5 Reference Guide
340 PROFILES
Media Media Type Select the Media type from the drop-down list.
Output
Inkset The ink set corresponds to the Color Space of the Profile.
Quality Quality Select the required output quality from the drop-down list.

AccurioPro WideDirector 3.5 Reference Guide
7 TASK PROCESSOR RESOURCES 341
Quality
Administrator access level only!
Associated Task Processors
The Quality Resource category is available for the following Task Processors:
Generic Digital Press

AccurioPro WideDirector 3.5 Reference Guide
342 SHEET LAYOUT TEMPLATES
Sheet Layout Templates
This resource lists the sheet layout templates you create in the Layout Editor.
Double-click the Sheet Layout Templates icon for an overview of the avail- able templates.
You can only delete the templates you create in the Layout Editor. This resource cannot be used to create templates.
Associated Task Processors
The Sheet Layout Templates resource is available for the following Task Processors:
Impose
Administrator access level only!

AccurioPro WideDirector 3.5 Reference Guide
7 TASK PROCESSOR RESOURCES 343
Using Resource Auto-Select Maps When creating a Ticket, you can specify how the Task Processor will select the required Resources. There are two options:
Manually select the Resources to be used in the settings of the Task Processor.
Have the Task Processor itself automatically search for the required Resource
based on predefined look-up rules. Briefly, you create an ‘automatic look-up’ mechanism by mapping those rules in an ‘Auto-Select Map’. For more information on creating an Auto-Select Map, see “To create an auto-select map” on page 343.
For example, if you select a specific medium in the output settings of a Press Task Processor and activate the automatic selection for calibration, AccurioPro WideDirector will automatically look for the required Calibration Curve.
If AccurioPro WideDirector does not find a match, you can tell it what to do by clicking the Fallback button. For more information see Fallback on page 345.
Associated Task Processors
You can create Auto-Select Maps for the following Resource categories:
Calibration Curves
Linearization Curves
Profiles
To create an auto-select map
1 In the System Overview, select an Output or Print Task Processor.
2 Check that the Task Processor has one or more of the following Resource categories associated with it in the Resources pane:
Calibration Curves
Linearization Curves
Profiles
3 Double-click one of these associated Resource categories.
The Resources overview dialog box appears.

AccurioPro WideDirector 3.5 Reference Guide
344 USING RESOURCE AUTO-SELECT MAPS
4 Select a Resource that you want to use as a basis to create a look-up rule and click the Add Map button. You can also drag and drop a resource into one of the map overview lists
The Resource dialog box appears where you can change the settings.
5 Click OK.
The Resource appears in the Auto-Select Map or Profile Selection Map pane. It will function as a look-up rule.
6 Close the Resources dialog box.
NOTE: You can also drag and drop a profile onto the Profile Selection Maps table.
To edit and delete an auto-select map
1 In the System Overview, select an Output or Print Task Processor.
2 Check that the Task Processor has one or more of the following Resource categories associated with it in the Resources pane:
Calibration Curves
Linearization Curves
Profiles
3 Double-click one of these associated Resource categories.
The Resources overview dialog box appears.
4 Do one of the following to edit or delete an Auto-Select Map:
Select the Auto-Select Map that you want to edit in the Auto-Select Maps pane and click the Edit button. Click OK to save your changes.
Select the Auto-Select Map that you want to delete and press Delete or click the Delete button to delete it. Click Yes to confirm the deletion.
5 Close the Resources overview.

AccurioPro WideDirector 3.5 Reference Guide
7 TASK PROCESSOR RESOURCES 345
Fallback Click the Fallback button to specify what AccurioPro WideDirector should do if the automatic selection does not find a match.
NOTE: This function is available for Calibration, Linearization and Ink Tables. Check those Resource categories for the information on the Fallback settings.

AccurioPro WideDirector 3.5 Reference Guide
346 USING RESOURCE AUTO-SELECT MAPS

347
8
Monitoring and Configuring Your System
This section describes how you can monitor and configure the AccurioPro WideDirector System from the System Overview window.
System Overview Window .................................................... 348 Hardware Pane .....................................................................349
Hardware System Scalability.............................................349 Activity Monitoring ............................................................350
Task Processor Pane ................................................................... 351 Managing your Task Processors ...................................... 351 Monitoring your Task Processors ......................................354 Grouping Task Processors for Load Balancing................... 360
Resources Pane ...................................................................361 Templates ........................................................................361 Working with Template Categories ................................... 362 Working with Ticket Templates......................................... 363 Page Sizes .......................................................................365 Sheet Sizes ..................................................................... 366 Users ...............................................................................367 Configuring Your Task Processors ................................... 371 Managing Parameter Sets ................................................372 Managing Resources ........................................................375

AccurioPro WideDirector 3.5 Reference Guide
348 SYSTEM OVERVIEW WINDOW
System Overview Window The System Overview is one of the three main windows of the AccurioPro WideDirector Client. It provides an overview of the overall configuration of your AccurioPro WideDirector System and the Hardware System(s) running the system.
The System Overview is divided into 3 panes:
Hardware Pane
Task Processor Pane
Resources Pane
Use this window primarily for:
Configuring the Task Processors
Creating and editing Parameter Sets for the Task Processors.
Monitoring Task Processor activities
NOTE: Task Processor configuration is for service engineers only. However, the Press can be configured by an administrator.

8 MONITORING AND CONFIGURING YOUR SYSTEM 349
AccurioPro WideDirector 3.5 Reference Guide
Hardware Pane
This pane displays the AccurioPro WideDirector System icon and one or more Hardware System icons.
The AccurioPro WideDirector System stands for the entire software system
running on one or more Hardware Systems. When you click the AccurioPro WideDirector System icon, you will see all of the Task Processors available for
the entire AccurioPro WideDirector System.
Next to the System icon, AccurioPro WideDirector displays the Hardware System(s) running the AccurioPro WideDirector software. There is always at least one Hardware System icon which corresponds to the main Windows 2003/2008 server on which the AccurioPro WideDirector System was installed. If, during installation, the AccurioPro WideDirector System processes were distributed over additional “satellite” hardware systems, you will see the corresponding Hardware System icons (see Scalability 9).
Hardware System Scalability
To provide faster and more efficient use of tasks and resources, your AccurioPro WideDirector System processes may be distributed over 2 or more physical hardware systems. In this case, you will see additional “satellite” Hardware System icons in the Hardware pane, each one corresponding to a physical system. One of the Hardware Systems is highlighted in bold: This is the main Hardware System, which is running the “core” AccurioPro WideDirector System software.
If you select one of these icons, you will see the Task Processors that are available on the selected Hardware System. All the other Task Processors will appear faded out. By selecting each of the Hardware Systems in turn, you can see which Task Processors are installed on which systems.
Similarly, if you select a Task Processor, you will see to which Hardware System it belongs: The other Hardware Systems will appear faded out.
You may also see that some Task Processors (such as Normalize and Render) are duplicated on two or more Hardware Systems. This can reduce the processing burden on a single Hardware System, and greatly increase the speed with which jobs are handled by the AccurioPro WideDirector System.

AccurioPro WideDirector 3.5 Reference Guide
350 HARDWARE PANE
Activity Monitoring Your AccurioPro WideDirector System can run certain maintenance tasks, such as Job House- keeping, in the background. These tasks may slow down the processing of jobs. This kind of activity is indicated with a green border around the main or satellite icons in the hardware pane and implies that processing speed may be affected.
Double-click a hardware icon to open the Activity Monitor dialog and display a list of current tasks and components.

AccurioPro WideDirector 3.5 Reference Guide
8 MONITORING AND CONFIGURING YOUR SYSTEM 351
Task Processor Pane This pane displays all of the available Task Processors for the selected hardware system. You can also check the Task Processor’s activity by double-clicking its icon.
The Task Processors are divided into four categories:
Input Task Processors
Processing Task Processors
Output Task Processors
Print Task Processors
Managing your Task Processors
This section explains how you can manage your Task Processors from the System Overview window. You can start, stop and restart any Task Processor. Stopping a Task Processor (if you are not planning to use it) will improve system performance, since AccurioPro WideDirector will then require fewer system resources. Output Task Processors need to be restarted if you change the configuration of the associated output device.
Additionally, Task Processors associated with physical output devices can be put online and offline. You can also create a PostScript Printer Description file (PPD) containing all job-related information specific for your output environment.
TIP: In AccurioPro WideDirector, you can create PPD files for different PS Printer Drivers for Macintosh as well as PC. You can further specify some content-related options.
See also “Monitoring your Task Processors” on page 354.
To start a Task Processor
1 In the System Overview, locate the inactive Task Processor.
When a Task Processor is inactive, the icon will have static horizontal stripes running through it.
2 Right-click the Task Processor, and select Start from the right menu.

AccurioPro WideDirector 3.5 Reference Guide
352 TASK PROCESSOR PANE
To stop a Task Processor
1 In the System Overview, locate the active Task Processor.
2 Right-click the Task Processor, and select Stop from the right menu.
The Task Processor will stop after a few moments. When the Task Processor has stopped, the icon will have static horizontal stripes running through it.
You can re-activate it by right-clicking it and selecting Start from the right menu.
To restart a Task Processor
1 In the System Overview, locate the active Task Processor.
2 Right-click the Task Processor, and select Restart from the right menu.
While the Task Processor is restarting, the icon will have moving horizontal stripes running through it.
To put an Output Task Processor offline
1 In the System Overview, locate the active Output Task Processor.
2 Right-click the Task Processor, and select Put Offline from the right menu.
The Task Processor is colored blue to indicate that it is offline.
To put an Output Task Processor online
1 In the System Overview, locate the offline Output Task Processor.
Offline Task Processors are colored blue.

AccurioPro WideDirector 3.5 Reference Guide
8 MONITORING AND CONFIGURING YOUR SYSTEM 353
2 Right-click the Task Processor, and select Put Online from the right menu.
The Task Processor comes back online, and the blue shading is removed from the icon.
To print an exposure test page for platesetters (Windows only)
When you first start to use your platesetters, you should submit an Exposure Test job to check the output and to select the engine’s best exposure settings. You should continue periodically to submit Exposure Test jobs to make sure that the engine is still producing good quality output.
NOTE: This option is currently supported only for the Galileo and XCalibur platesetters.
1 Select the System Overview.
2 Select your platesetter.
3 Double-click the Linearization Curves icon in the Resources pane.
The Linearization Curves overview appears. In the upper pane, you see all of the available Linearization Curves for the selected platesetter.
4 Click the Exposure... button (only available for Galileo and XCalibur platesetters).
The Exposure Parameters dialog box is displayed. The name of the selected engine is displayed in the title bar of the dialog box.
You will see a list of resolutions at which you can print an exposure test. For each resolution, you will see default frequency and exposure settings. If you wish, you can change these default settings.
5 To change the frequency and exposure settings:
Select a resolution, and click the Edit button:
The Resolution Test Settings dialog box is displayed.
Click the Frequency list, and select one of the available frequencies.

AccurioPro WideDirector 3.5 Reference Guide
354 TASK PROCESSOR PANE
Enter an Exposure setting.
Click OK to return to the Exposure Test dialog box.
6 Use the check boxes in the Print column to select one or more of the available resolution settings.
7 Click the Print button.
The Exposure Test dialog box is closed, and test pages are printed out on the engine at the selected resolutions. The print date is automatically added to the test pages.
In the Job List, all exposure tests are grouped under the same order number called “Exposure Test”. The job name of the test file to be printed is called “<device name> Exposure Test”.
Monitoring your Task Processors
The current status of a Task Processor is indicated by the appearance of the Task Processor icon. The icon may be adapted with a series of different colors and overlays which indicate the hardware or component status of the Task Processor.
Output Task Processor Hardware Status The hardware status is the status reported by the physical output engine.
When a physical output device is not idle (i.e. able to communicate and process jobs), it will be in one of the following states:
Paused: The output engine is able to communicate, but cannot process any tasks. A user interaction has taken place on the device itself to trigger this status.
Disconnected: The output engine's cable has been unplugged.
Warning: The hardware engine requires attention (e.g. ink low), but can still receive tasks.
This platesetter is managed by the PlateMaker Client. The yellow ‘sun’ patch indicates that the device is in attended state (i.e. A user is logged in to the PlateMaker Client).
This platesetter is managed by the PlateMaker Client. The gray ‘moon’ patch indicates that the device is in unattended state (i.e. no one is logged in to the PlateMaker Client).
Error: The hardware engine requires attention - it cannot continue to receive and process tasks until the problem has been resolved (e.g. no ink).

AccurioPro WideDirector 3.5 Reference Guide
8 MONITORING AND CONFIGURING YOUR SYSTEM 355
In each of the above cases, the relevant status icon will appear as an overlay on the Output Task Processor.
NOTE: The hardware status is not the same as the component status. For example, the component status may be online and ready while the physical hardware engine is actually disconnected or paused.
Task Processor Component (Software) Status This reflects the status of the connection between the AccurioPro WideDirector System and the AccurioPro WideDirector Task Processor component. As such this is a software setting which has no relation to the actual physical status of the associated output device.
NOTE: The component status is not the same as the hardware status. For example, the component status may be online and ready while the physical hardware engine is actually disconnected or paused.
The Task Processor component status is indicated visually as described below.

AccurioPro WideDirector 3.5 Reference Guide
356 TASK PROCESSOR PANE
The Task Processor is ready, and is currently idle.
The Task Processor turns green when it is processing a task. For example, the Task Processor is busy processing a separation.
The Task Processor turns red if a processing error occurs. In this case an error notification is sent to the Message Board, explaining the nature of the error.
The Task Processor turns blue if it is offline.
When the Task Processor has been stopped (inactive), the icon will have horizontal stripes running through it. You can re-activate it by right-clicking on the icon and selecting Start from the right menu.
The Task Processor is starting up (moving horizontal stripes).
The Task Processor is locked, because you do not have a license to use it.
A purple arrow is attached to the Task Processor icon if: • You have a remote license. This means that this Task Processor is not
licensed to execute tasks: These tasks are processed remotely on another AccurioPro WideDirector System. However, you can use this Task Processor to specify the set- tings in the Production Plan.
• A remote proofer is installed (as specified in the installer). The remote proofer is combined with the Remote Proofer Controller Task Processor.
These status indicators can also be seen in the Output Device List, in the Job and Hot Ticket Managers.
Activity Window
The Activity window consists of two panes and a toolbar:
In the upper pane, you can see the selected Task Processor icon, and a brief summary of the Task Processor’s activity. This indicates how many tasks are being processed or are waiting to be processed, and the number of errors. The status of the Task Processor is indicated by the color of the icon. For more

AccurioPro WideDirector 3.5 Reference Guide
8 MONITORING AND CONFIGURING YOUR SYSTEM 357
information on icon color coding’s see “Task Processor Component (Software) Status” on page 355.
You can see which tasks are currently being processed by the selected Task Processor. The progress of the activity is shown by a progress indicator. If more Task Processors of the same type are installed on the AccurioPro WideDirector System (e.g., two Normalizers or two Renderers), then you will see the activity for all Task Processors of this type.
NOTE: If you are viewing the activity of an output Task Processor with ganging enabled (such as a Sherpa proofer), you will also see a Flush button. If you click this button, AccurioPro WideDirector will stop collecting input (ganging) and start printing the available pages (see “To flush job results” on page 359). AccurioPro WideDirector will also indicate which type of media is currently loaded.
In the lower pane, you can see the tasks that are waiting to be processed. This
information is displayed in three columns:
Status icon: Indicates the current status of the task (waiting for media, waiting for a soft proof, etc.). For a description of all these icons, see “Job Status Icons” on page 176.
Job: Lists the jobs, and the individual tasks within each job.
Destination/Media: Indicates to which output device the job will be sent. If
you are monitoring the activity of an output device, this column will display the type and size of the media that is being used.
By default, the tasks are sorted according to status. You can sort the list according to job name or job status, in ascending or descending order, by clicking the appropriate column title. You can also re-order the tasks by dragging and dropping.
On the left side of the window, you can see the Activity Toolbar.
Activity Toolbar
The Activity toolbar includes the following buttons that allow you to manage the activity of the selected Task Processor:
Continue processing a selected result that is on hold.
Put the selected activity on hold.

AccurioPro WideDirector 3.5 Reference Guide
358 TASK PROCESSOR PANE
NOTE: The buttons you actually see depend on the current status of the task you are viewing.
To check Task Processor activity
1 In the System Overview, locate the active Task Processor. It has changed color or is surrounded by a colored glow.
2 Double-click the Task Processor icon.
The Task Processor’s Activity window appears where you can monitor the activity of Task Processors. The Activity window shows:
The jobs that are currently being processed
The jobs that are waiting to be processed
Any errors that have occurred
To abort a task
1 In the System Overview, locate an active Task Processor.
An active Task Processor will have changed color, or is surrounded by a colored glow.
2 Double-click the Task Processor icon.
The Task Processor’s Activity window appears.
In the middle pane, you can see which jobs are currently being processed. The progress of the activity is shown by a progress indicator.
3 To abort the current task, click the Abort button to the right of the progress bar:
The selected task is immediately aborted.
To hold a task
1 In the System Overview, locate the Task Processor which has scheduled the task you want to put on hold.
2 Double-click the Task Processor icon.
The Task Processor’s Activity window appears.

AccurioPro WideDirector 3.5 Reference Guide
8 MONITORING AND CONFIGURING YOUR SYSTEM 359
3 Select the task you want to hold.
4 Click the Hold button.
The selected task is put on hold. You will see the following status icon next to the task name:
To resume a task that is on hold
1 In the System Overview, locate the Task Processor with a task on hold.
2 Double-click the Task Processor icon.
The Task Processor’s Activity window appears. Any tasks on hold will have the following status icon next to the task name:
3 Select the task on hold.
4 Click the Continue button.
The selected task resumes processing.
To flush job results
1 In the System Overview, locate an active output Task Processor.
NOTE: This must be a Proofer device.
An active output Task Processor will have changed color, or is surrounded by a colored glow.
2 Double-click the Task Processor icon.
The Task Processor’s Activity window appears. If you are viewing the activity of an output Task Processor with ganging enabled (such as a Sherpa proofer), you will see a Flush button.
3 Click Flush.
The selected Task Processor stops its current activity, and is forced to immediately output its collected results.

AccurioPro WideDirector 3.5 Reference Guide
360 TASK PROCESSOR PANE
Grouping Task Processors for Load Balancing
If you have several task processors of the same type, you can group these task processors and subsequently use this group in your production plans. AccurioPro WideDirector automatically chooses the task processor which is available and the most suitable for the job, effectively balancing the load applied to these task processors.
To group Task Processors
You need at least 2 identical task processors to create a group.
1 In the System Overview, right-click one of the identical task processors and choose New Group.
The Edit User Group is displayed.
2 Enter a Group Name. You can change this name later if you want.
3 Select the check boxes for the additional Task Processors that you want to add to the group.
4 Click OK.
The new Task Processor group is displayed with the group icon.
You can now use this group in your production plans. To delete/edit a Task Processor group
1 In the System Overview, right-click the Task Processor group you want to delete or edit.
The Edit User Group is displayed.
2 Choose Delete Group to ungroup the Task Processors and delete the group
OR
3 Choose Edit group to add or remove Task Processors in the group.
4 Click OK.

AccurioPro WideDirector 3.5 Reference Guide
8 MONITORING AND CONFIGURING YOUR SYSTEM 361
Resources Pane
The Resources pane displays the resources that are available for the currently selected System or Task Processor:
If the AccurioPro WideDirector System is selected in the Hardware pane, in the
Resources pane you will see the Configuration, Job Housekeeping, Logging, and Templates icons. If you have additional options installed, you may also see the Accounts, JDF Server, and JDF Stripping icons.
If a Hardware or “Satellite” System is selected in the Hardware pane, you will see
the Disk Storage icon in the Resources pane.
If a Task Processor is selected, you will see the available Resources for the selected Task Processor in the Resources pane. These will always include a Parameter Sets icon, which allows you to create predefined Task Processor settings.
NOTE: Most of these resources are intended for administrators, and are hidden to operators.
Templates
Administrator access level only!
If you select the AccurioPro WideDirector System in the Hardware pane, you will see the Templates icon in the Resources pane.
By double-clicking the Templates icon, you can access the Templates dialog box, which allows you to create, edit and manage the different types of templates (Job Tickets, Hot Tickets, Layout Tickets and Layout Hot Tickets). From here, you can edit an existing template and save it with a different name. This is very useful when you regularly need to create tickets for similar jobs. You can start from an existing template and make any necessary changes without having to create a completely new ticket from scratch. You can also create new templates from the Ticket Editor using the File > Save as Template command.
For more information on creating Tickets, see “Creating and Editing Tickets” on page 239. You can save the Ticket Templates in Template Folders. In this way,

AccurioPro WideDirector 3.5 Reference Guide
362 RESOURCES PANE
you can for instance group Ticket Templates that you use for a specific customer or print job.
Related topics: • Checking Hot Ticket and Ticket Template Consistency on page 236
Working with Template Categories
Template Categories are folders in which you can save your newly created Ticket Templates. You can group your Ticket Templates in different Template categories for specific types of jobs.
Administrator access level only!
To manage your template categories
1 In the System Overview, select the AccurioPro WideDirector System icon in the Hardware pane.
2 Double-click the Ticket Templates Resources icon in the Resources pane.
The Templates dialog box appears.
3 Select either the Job Tickets tab or the Hot Tickets tab depending on for which type of Ticket Template you want to create or edit a Template Category.
4 In the Category list, do one of the following:
Click the New button to create a new Template category, type the name of the new category and click OK.
Select a Template category and click the Edit button to edit it. Rename the Template category and click OK.
Select the Template category that you want to delete and press Delete or click the Delete button. Click ‘Yes’ to confirm the deletion.

AccurioPro WideDirector 3.5 Reference Guide
8 MONITORING AND CONFIGURING YOUR SYSTEM 363
5 Close the Ticket Templates dialog box.
Related topics: • Working with Ticket Templates on page 363
Working with Ticket Templates
In the Ticket Templates Resources category, you can edit, delete or set a Ticket Template as default.
Administrator access level only!
To manage your Ticket Templates
1 In the System Overview, select the AccurioPro WideDirector System icon in the Hardware pane.
2 Double-click the Templates Resources icon in the Resources pane.
The Templates dialog box appears.
3 Select either the Job Tickets tab or the Hot Tickets tab depending on which type of Ticket Template you want to edit.
4 To select the Ticket Template that you want to edit, delete or set as default, do one of the following:
Select the Ticket Template category in the Category list and select the
Ticket Template that you want to edit.
Select All in the Category list to view all of the Ticket Templates and select the Ticket Template that you want to edit.
5 Do one of the following:
Click the Edit button to edit the Template in the Ticket Editor. Choose File >
Save as Template and specify in which folder you want to save the Template. You can also save it under a new name. Click Save to save it.
Click the Default button to set the Template as default. It will appear in bold in the Ticket Template list.

AccurioPro WideDirector 3.5 Reference Guide
364 RESOURCES PANE
Delete the Template by pressing Delete or clicking the Delete button. Confirm the deletion.
6 Close the Ticket Template dialog box.
To export a Ticket Template You may want to export a template for use by another AccurioPro WideDirector System, or in order to have a temporary backup file.
NOTE: You can only import/export all ticket templates for a specific category.
1 In the Templates dialog box, select a template from the list and click the
Export button.
2 Locate the folder to which you want to export the template, and click OK.
The template is exported as a MIME format file (*.mime).
To import a Ticket Template
1 In the Templates dialog box, click the Import button.
2 Locate the folder which contains the template you want to import.
This will be a template that was previously exported. This file will be in MIME format (*.mime).
3 Click Open.
The imported template is displayed in the list.
Related topics: • Checking Hot Ticket and Ticket Template Consistency on page 236

AccurioPro WideDirector 3.5 Reference Guide
8 MONITORING AND CONFIGURING YOUR SYSTEM 365
Creating Templates for Layout Jobs When creating a template from a layout job, you have extra options to set the template as default for devices and for new jobs.
1 Create and set up and a layout job.
OR
Select an existing layout job in the Job List.
2 Choose Save As Template from the File menu or the right menu.
3 Enter a name for the template in the Name box and choose a category.
You can select the following options:
Use as default template for device: the new template will be used when creating layout jobs starting from a particular device (right-clicking a S&D device in the Jobs window or dropping files on the device).
Use as default template for new jobs: the new template will be used when
using the New Layout Job command on the File menu or right menu.
Make available to StoreFront
4 Click Save.
Page Sizes
Administrator access level only!
If you select the AccurioPro WideDirector System in the Hardware pane, you will see the Page Sizes icon in the Resources pane. By double-clicking this icon, you can access the Page Sizes settings. This allows you to specify page size resources for use in Multi-part jobs (as a property of a part).
Page Sizes Settings
Administrator access level only!

AccurioPro WideDirector 3.5 Reference Guide
366 RESOURCES PANE
Name The name with which this particular page size is known. If you leave it empty, the page size is shown using the dimensions (w x h).
Page Size
The width and height of the page (cannot be blank or 0).
You can specify units by entering them explicitly. AccurioPro WideDirector defaults to the standard units (mm) if you do not provide them.
You can create, edit or delete Page Sizes using the supplied buttons.
Sheet Sizes
The Sheet Sizes resource allows you to specify Press Sheet sizes for use with Apogee Impose, as a property of a Press Sheet.
Administrator access level only!
If you select the AccurioPro WideDirector System in the Hardware pane, you will see the Sheet Sizes icon in the Resources pane. By double-clicking this icon, you can access the Sheet Sizes settings.
Sheet Sizes Settings
Name The name with which this particular sheet size is known. If you leave it empty, the sheet size has no name so you must name it.
Sheet Size
The width and height of the page. For web production, leave the height blank or zero and these sizes will be picked up for web presses.
You can specify units by entering them explicitly. AccurioPro WideDirector defaults to the standard units (mm) if you do not provide them.
You can create, edit or delete Sheet Sizes in the usual way.

AccurioPro WideDirector 3.5 Reference Guide
8 MONITORING AND CONFIGURING YOUR SYSTEM 367
Users
Administrator access level only!
The Users resource is where users are granted rights to AccurioPro WideDirector. When a user logs on, the roles assigned to the user in this resource are automatically activated.
Select the AccurioPro WideDirector System in the Hardware pane to see the Users icon in the Resources pane. Double-click the Users icon to open the resource where you can create users and set their roles with detailed privileges.
User Settings
User list Administrators can add and delete users in this list. Select a user in the list to see personal details and the assigned roles in the details pane under this list. One or more roles can be assigned and these are also indicated with a green check mark in the Role list. Assigning more than one role to a user allows further flexibility for user management. The names of the users in the Users column correspond with the login names for your organization.

AccurioPro WideDirector 3.5 Reference Guide
368 RESOURCES PANE
Figure 8.23: User details
NOTE: A role indicated in red in the details pane means that the role was deleted while it was still assigned to a user.
Role list
Each role is a collection of privileges which are displayed in the Privileges tab. Several default roles are provided and these appear in the list in italics. These default roles each have a set of predefined privileges which are relevant for these specific roles. If necessary, these roles can be duplicated and the privileges fine- tuned, or new roles can be created from scratch.
The default roles are the following:
AccurioPro WideDirector/Prepress Operator You have access to the main job commands (except
Edit Imposition) and to selected Task Processor resources.
AccurioPro WideDirector/Prepress Administrator In addition to most job commands, you also have access to administration and system privileges; you can create and edit Task Processor Parameter Sets and ticket templates, and view and manage resources.

AccurioPro WideDirector 3.5 Reference Guide
8 MONITORING AND CONFIGURING YOUR SYSTEM 369
Privileges tab Selecting a role in the Role list displays a breakdown of privileges in the Privileges tab. Privileges are grouped in the following categories:
Job Operations Commands you can perform on tickets.
Prepress Administration Commands for managing Task Processors and licensing
System Resources Commands for managing system resources.
Task Processor Resources A list of all the Task Processors.
Client Display Options Use these options to show/hide specified windows or resources in the
AccurioPro WideDirector client.
Expand a category to display the privileges.
Edit Filter button Opens the Job Filter where you can fine-tune the privileges even further by specifying a filter to show/hide certain jobs in the Job List for the selected role. For example: user John has the role of Prepress Operator Plant A and can only see jobs whose Job Name contains ‘Plant A’. User Bill has the role of Prepress Operator Plant B and can only see jobs whose Job Name contains ‘Plant B’. See “Filtering the Job List” on page 171. This filter is set for a role so it can be re-used for all users with this role.
Delete Filter button To delete a filter you may have set on a role.
Figure 8.24: Privileges for a typical Administrator role

AccurioPro WideDirector 3.5 Reference Guide
370 RESOURCES PANE
Figure 8.25: Privileges for a typical Operator role
The listed privileges refer to the ability to perform tasks or access resources in AccurioPro WideDirector. Privileges can be selected individually within a category or at the category level. If all the privileges are selected within a category, the check mark is black, otherwise it’s gray.
User tab This tab is also used in combination with the Role list. Select a role in the Role list to see which users have been assigned this role.

AccurioPro WideDirector 3.5 Reference Guide
8 MONITORING AND CONFIGURING YOUR SYSTEM 371
Figure 8.26: Users displayed in the User list and User tab for a selected role
Configuring Your Task Processors
By double-clicking the configuration icon in the Resources pane for each selected Task Processor, you can access and edit the Configuration settings. For most Task Processors, this is only possible at service level.
Service access level only!
To work with Configurations
1 From the AccurioPro WideDirector Navigation Bar, select System Overview.
2 Select the Task Processor for which you want to access the Configuration.
The Resources associated with the Task Processor appear in the Resources pane.
3 Double-click the Configuration icon in the Resources pane.

AccurioPro WideDirector 3.5 Reference Guide
372 RESOURCES PANE
The Configuration dialog box appears.
4 Select the settings of your choice and/or enter any required information.
5 Click OK to close the Configuration dialog box.
The settings are immediately active.
Managing Parameter Sets
Parameter Sets are predefined Task Processor settings that you can use when creating a Production Plan in the Ticket Editor. You can access and manage your Parameter Sets from the System Overview by selecting a Task Processor, and then double-clicking the Parameter Sets icon in the Resources pane.
You can also create or edit Parameter Sets from the Settings pane in the Plan tab. For more information, see “Settings Pane (Ticket Editor)” on page 282.
To create, duplicate, edit, delete, import or export Parameter Sets
Administrator access level only!
1 From the System Overview, select the Task Processor Parameter Sets you want to work with.
The Resources associated with the Task Processor appear in the Resources pane.
2 Double-click the Parameter Sets icon in the Resources pane.
The Parameter Sets dialog box appears.
At the top of this dialog box, you will see one or more icons. These icons represent the operations of the selected Task Processor. For most Task Processors, there is a single operation. However, some Task Processors (such as Render or any Output Task Processor) have two or more operations. Each operation has its own individual Parameter Set(s).
Below this, you will see a list of available Parameter Sets for the selected Task Processor operation. Here, you will see at least an “initial” Parameter Set, as well as any additional Parameter Sets that may have been created.
You will also see a set of icons at the bottom of the dialog box.

AccurioPro WideDirector 3.5 Reference Guide
8 MONITORING AND CONFIGURING YOUR SYSTEM 373
You can use these icons to create, duplicate, edit, set as default, delete, import or export Parameter Sets for the selected Task Processor.
To create a new Parameter Set
1 In the Parameter Sets dialog box, select one of the Task Processor operation icons.
If there is only one operation, then this is selected by default.
2 Click the New button.
A new untitled dialog box is displayed
3 Enter a unique name for the new Parameter Set, and select your settings.
For detailed information about these settings, refer to the description of the selected Task Processor.
4 Click OK to save your settings.
The dialog box is closed. The new Parameter Set appears in the list.
To duplicate a Parameter Set
1 In the Parameter Sets dialog box, select a Parameter Set and click the Duplicate button:
A copy of the Parameter Set is added to the list. The new Parameter Set takes the name of the original Parameter Set, appended with the word copy.
To edit a Parameter Set
1 In the Parameter Sets dialog box, select a Parameter Set and double-click it or click the Edit button:
2 Make any changes you require, and click OK to save your settings.
To set a default Parameter Set
1 In the Parameter Sets dialog box, select a Parameter Set from the list and click the Default button:

AccurioPro WideDirector 3.5 Reference Guide
374 RESOURCES PANE
The default Parameter Set is highlighted in bold.
To delete a Parameter Set
1 In the Parameter Sets dialog box, select a Parameter Set from the list and Press Delete or click the Delete button:
2 Click Yes to confirm the deletion.
NOTE: For every Task Processor, there are predefined initial settings. You cannot delete these.
To import a Parameter Set
1 In the Parameter Sets dialog box, click the Import button.
2 Locate the folder which contains the Parameter Set you want to import.
This will be a Parameter Set that was previously exported. This file will be in MIME format (*.mime).
3 Click Open.
The imported Parameter Set is displayed in the list.
To export a Parameter Set You may want to export a Parameter Set for use by another AccurioPro WideDirector System, or in order to have a temporary backup file.
1 In the Parameter Sets dialog box, select a Parameter Set from the list and
click the Export button.
2 Locate the folder to which you want to export the Parameter Set, and click OK.
The Parameter Set is exported as a MIME format file (*.mime).

AccurioPro WideDirector 3.5 Reference Guide
8 MONITORING AND CONFIGURING YOUR SYSTEM 375
Managing Resources
For each Task Processor displayed in the System Overview window, you can access the associated Resource categories by selecting the Task Processor icon. Any Resource categories associated with the selected Task Processor are then displayed in the Resources Pane. For information on individual Resources, see “Task Processor Resources” on page 261.
To create, duplicate, edit, delete, import or export Resources
You can manage your Resources in a number of ways. These procedures are similar for most Resource categories.
1 From the System Overview window, select (single-click) the Task Processor
whose Resources you want to work with.
The Resource categories associated with the Task Processor appear in the Resources pane.
2 Double-click the Resource category of your choice.
The Resources that are available in this category are displayed in a new Resource category dialog box.
You will also see a set of icons at the bottom of the dialog box.
You can use these icons to create, duplicate, edit, and set as default, delete, import or export Resources within the selected Resource category.
NOTE: The icons and actions that are available vary from resource to resource.
To create a new Resource
1 In the selected Resource category dialog box, click the New button:
A new untitled Resource dialog box is displayed
2 Enter a name for the new Resource, and specify the Resource settings.
3 Click OK to save your settings.
The Resource dialog box is closed. The new resource appears in the list of Resources in the Resource category dialog box.

AccurioPro WideDirector 3.5 Reference Guide
376 RESOURCES PANE
To duplicate a Resource
1 In the selected Resource category dialog box, click the Duplicate button:
A copy of the Resource is added to the list. The new Resource takes the name of the original Resource, appended with the word copy.
To edit a Resource
1 In the selected Resource category dialog box, select a Resource from the
list and click the Edit button:
2 Make any changes you require, and click OK to save your settings.
The Resource dialog box is closed.
To set a default Resource
1 In the selected Resource category dialog box, select a Resource from the list and click the Default button:
The default Resource is highlighted in bold.
To delete a Resource
1 In the selected Resource category dialog box, select a Resource from the list and Press Delete or click the Delete button:
Click Yes to confirm the deletion.
NOTE: You cannot delete the standard system resources.
To import a new Resource to a Resource category
1 In the selected Resource category dialog box, click the Import from file button:
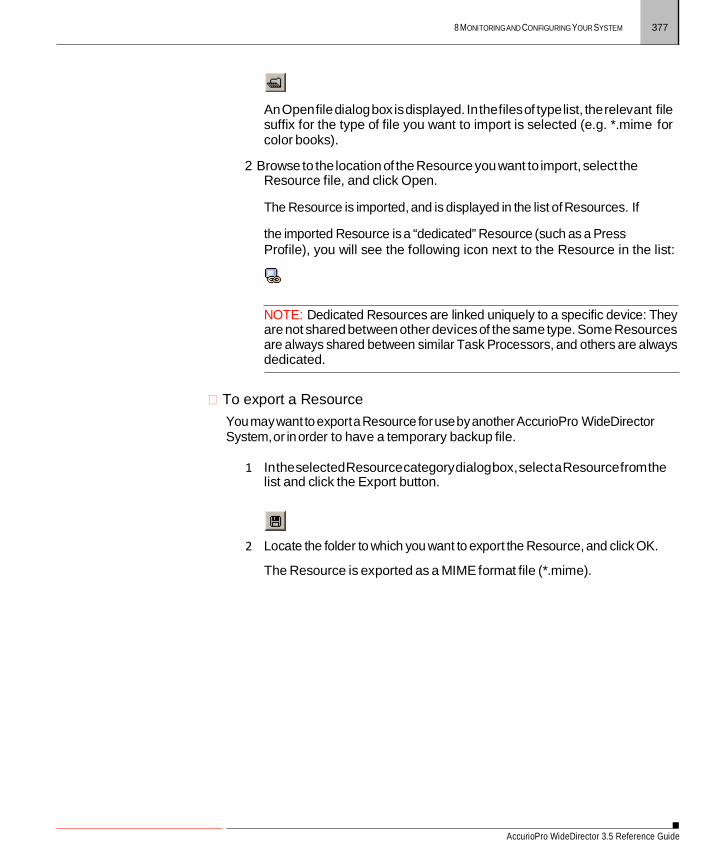
AccurioPro WideDirector 3.5 Reference Guide
8 MONITORING AND CONFIGURING YOUR SYSTEM 377
An Open file dialog box is displayed. In the files of type list, the relevant file suffix for the type of file you want to import is selected (e.g. *.mime for color books).
2 Browse to the location of the Resource you want to import, select the Resource file, and click Open.
The Resource is imported, and is displayed in the list of Resources. If
the imported Resource is a “dedicated” Resource (such as a Press Profile), you will see the following icon next to the Resource in the list:
NOTE: Dedicated Resources are linked uniquely to a specific device: They are not shared between other devices of the same type. Some Resources are always shared between similar Task Processors, and others are always dedicated.
To export a Resource
You may want to export a Resource for use by another AccurioPro WideDirector System, or in order to have a temporary backup file.
1 In the selected Resource category dialog box, select a Resource from the
list and click the Export button.
2 Locate the folder to which you want to export the Resource, and click OK.
The Resource is exported as a MIME format file (*.mime).

AccurioPro WideDirector 3.5 Reference Guide
378 RESOURCES PANE

379
9
Print Task Processors
Print Task Processors represent the printing devices on which you will print the output generated by AccurioPro WideDirector. Each printing device that you define at installation will be represented by a unique Print Task Processor.
The settings and resources for installed Print Task Processors can be derived from the following task processors:
“Generic SD (Sign and Display Printer)” on page 794 for Sign and Display
(SD) digital printing devices: AccurioWide, etc.

AccurioPro WideDirector 3.5 Reference Guide
380 GENERIC SD (SIGN AND DISPLAY PRINTER)
Generic SD (Sign and Display Printer)
The Generic SD Task Processor represents a generic Sign and Display digital printing device, for which you can define settings for specific job requirements.
Associated Resources
When you select the Generic SD Task Processor in the System Overview, the following associated resource categories are displayed in the Resources pane:
Alignment Pin Sets, Contrast Adjustments, Curves Adjustments, Color Books,
Finishing Hub, Marks, Media Hub, Profiles, Device Link Profiles, Print Modes
Generic SD Printer – Image Settings
The Image settings mainly control the rendering of the pages. You can access these settings:
When creating Parameter Sets (see “Managing Parameter Sets” on
page 516). Here, you will see a ‘Lock in Production Plan’ check box (selected by default). If this check box is selected, the settings will be initially locked in the Settings pane. If this check box is deselected, the settings can be edited in the Settings pane.
In the Settings pane, in the Plan tab of the Job Manager and the Ticket Editor. The
settings may be initially locked, as indicated by the Lock icon. If you edit the job, you can unlock them as described in “Settings Pane (Ticket Editor)” on page 288.
Name The name of the Parameter Set as it will appear in the Production Plan. When you create a Parameter Set, you should specify a Parameter Set name. You can always change this name later by editing the job, choosing the Parameter Set from the Task Processor in the Plan tab, and unlocking the settings in the Settings pane.
Separation Output and Order Specify which separations should be output, and in which order. The initial sort order places the process colors on top, in the same order as specified by the job’s color space. Spot colors come after the process colors, sorted alphabetically. You

9 PRINT TASK PROCESSORS 381
AccurioPro WideDirector 3.5 Reference Guide
can reorder the separation order with the Up and Down arrows or by dragging and dropping.
These check boxes are only accessible when the ‘Application Decides’ check box is deselected in the Separation settings (Hot Tickets only). If ‘Application Decides’ is selected, you can make no changes to the separation output and order: This is then controlled by the settings of the input document (as generated by a front end application, such as Quark).
NOTE: Process colors are not listed if there is no Press Task Processor in the Production Plan or if you are editing a Parameter Set.
Image
Reading You need to set the Reading because AccurioPro WideDirector does not know what media is used for the print job. The preview icon on the right dynamically reflects the chosen state.
Reading: Determines the mirror setting of the image to be output:
Right Reading
Wrong Reading
Orientation You can select one of the four standard orientations (0, 90, 180, 270). You can also select the Optimized option to have AccurioPro WideDirector select a specific orientation to avoid as much medium waste as possible. If you selected the “Select Automatically” check box, the Orientation is automatically set to “From Output Size”, and you will need to specify horizontal and vertical positioning.
Border You can select a predefined border from the drop-down list as defined in the
Border Resource category. Select: None if you do not want to have a border at all.
You can enter text as a comment in the Slug Lines section. If the selected border contains the comment marks, the text will be printed. If not, it will be ignored.
CAUTION: You cannot select a border containing border marks as the plate size is not known.
Output Size You can select a predefined output size. You either do this manually or have AccurioPro WideDirector do it for you according to the page or sheet size and the border.
If you choose to do it manually, select one of the available output sizes, or select <Manual from input> or <Manual from media> from the drop-down list.

382 GENERIC SD (SIGN AND DISPLAY PRINTER)
AccurioPro WideDirector 3.5 Reference Guide
Manual from input: The output size is calculated from the page/sheet size and selected border in the pages of the incoming documents. The resulting Output Size is not displayed in the list.
Manual from media: The output size is calculated from the media size. This is only relevant if a specific media is selected.
Select Automatically Select this check box to activate automatic selection. AccurioPro WideDirector
will then take the orientation from the predefined Output Size - you cannot change this.
Fallback Here, you can select a fallback output size in case the input has no output size
specified.
Position Image within Output Size
Horizontal: Choose Center, or specify an offset in mms.
Vertical: Choose Center, or specify an offset in mms.
Scale content Use scaling to scale the page content. This does not scale the border, but marks that are relative to the sheet are repositioned and not scaled.
From the drop-down list, you can turn scaling off, or you can do the scaling manually by selecting Manual. This activates the following settings:
Width and Height You can specify the scaling percentages for width and height scaling.
For pages, Width and Height have their starting point in the lower left corner.
Width goes along the bottom edge and Height along the left edge.
For imposed flats, Width is along the gripper edge and Height along the side edge.
Constrain proportions Select the Constrain Proportions option if you want to keep both values equal. Selecting this option will copy the horizontal scale value into the vertical scale field.
Clip This option specifies what will happen if the image is bigger than the output size.
Clip image: Any areas of the image that fall outside the output size are clipped.
Notify: The job will fail with a user interaction notification. The notification specifies the image and output sizes, and provides a 'Clip and Continue' option.
Base imaging on This option specifies how images will be clipped:
Trimbox: The image is clipped to the Trimbox size.
All content: The image is clipped to the Mediabox size.

9 PRINT TASK PROCESSORS 383
AccurioPro WideDirector 3.5 Reference Guide
Slug Lines In this pane you can enter up to four comments that can be part of a border. These comments are held in the variables $COMMENT1, $COMMENT2, $COMMENT3 and $COMMENT4.
Each comment can contain one or more variables such as $DATE or $COMPANY. The comment variables themselves, however, cannot be part of the comment.
For example: Comment 1: Printed by PrintRite on $DATE for $COMPANY.
Generic SD Printer – Print Settings
The Print settings define the media you will print on, the quality of printing, and various other options. These settings are specified when preparing the job in the Layout Editor. See “Layout Editor” on page 49.

384 GENERIC SD (SIGN AND DISPLAY PRINTER)
AccurioPro WideDirector 3.5 Reference Guide
385
A APPENDIX
Icons Overview
This section explains the icons you see in the AccurioPro WideDirector user interface.
Layout Editor – Image Status ......................................................................... 386 Layout Editor – Colors Inspector ................................................................... 386 Layout Editor and Image Editor - Tools ....................................................... 387 Sheet Layout ......................................................................................................... 387 Mark Types ............................................................................................................ 387 Mark Set Conditions .......................................................................................... 388 Job Notification Icons ......................................................................................... 388 Job Status Icons (including Page Store jobs) ........................................... 388 Job Status Icons in Tab Area (JTE only) ....................................................... 390 Job List Icons ........................................................................................................ 390 Hot List Icons ........................................................................................................ 391 Flow Icons .............................................................................................................. 391 Flow Icon Color Coding .................................................................................... 391 Filter Buttons ........................................................................................................ 392 Flow Control Actions ......................................................................................... 392 Result Actions ...................................................................................................... 392 Results - Job Layout Thumbnails .................................................................. 393 Results - Data Indicators ..................................................................................... 394 Results - Job Layout Action Icons ................................................................. 394 Results - Job Layout Action Icon Status ..................................................... 395 Results - Separation/Composite Indicators in a Normal job ............. 395 Results - Separation/Composite Indicators in a Versioning job ....... 396 Task Processor Color Coding ............................................................................. 396 Output Task Processor Hardware Status ................................................... 397 Resource Status Icons ....................................................................................... 398 AccurioPro WideDirector Archive Icons in Windows Explorer ...................... 398 AccurioPro WideDirector Ticket Icons in Windows Explorer ......................... 398 AccurioPro WideDirector Toolbar ................................................................................... 398 Preview Palette Tools ........................................................................................ 399 Other Buttons ....................................................................................................... 400 Customer Contact ............................................................................................... 401

AccurioPro WideDirector 3.5 Reference Guide
386 ICONS OVERVIEW
Layout Editor – Image Status
Layout Editor – Colors
Inspector
A cut path is present in the image or a path has been assigned as cut path.
The image is being edited.
Indicates that full-gamut color management is applied.
Indicates a preflight report has been generated for the image.
Image preview has been generated (gray) or is being processed (green).
The color will be printed/output (‘Print as’ check box selected).
The color will not be printed/output (‘Print as’ check box not selected).
The color is a process color or will be printed as a process color.
The color is a spot color, varnish or white.
The color is mapped to a color from a color book.
The color is taken from the application.
The color is mapped to a finishing operation.
The color is mapped to a custom color.
The color is mapped automatically as defined for the colors of the device.
The color is mapped to and depends on another color in the list.

ICONS OVERVIEW 387
AccurioPro WideDirector 3.5 Reference Guide
Layout Editor and Image Editor - Tools
Sheet Layout
Mark Types
Selection tool: To select a component or area and display its properties. This is the default tool.
Single Instance Selection tool: To select a single instance of marks which are placed at various locations, or part of a compound mark.
Pan tool: To pan layouts in the Layout Editor.
Zoom tool: To zoom into a specific area of a layout.
Frame tool: To draw empty frames on a sheet.
View Options palette button: Shows/hides the View Options palette.
Marks palette button: Shows/hides the Marks palette.
(Licensed feature) Presets: To open the Presets dialog box.
Crop image: Activates the crop mode to crop an image (Image inspector in the Image Editor).
Split tool: Activates the Split tool to split an image into tiles (Tiling inspector of the Image Editor).
Zoom slider with Zoom to fit and Zoom to maximum buttons, and drop-down list with zoom presets
Unlocked sheet layout/frame
Locked sheet layout/frame.
Circle Mark: draws a circle with or without fill color
Cut Mark: a horizontal and a vertical line in the corners of a Fold Sheet to indicate the boundaries of the Fold Sheet and where it is to be cut
File Mark: places a specific EPS or PDF file as a mark
Fotoba Mark: draws horizontal and vertical lines to enable cutting with a Fotoba cutting device.

388 ICONS OVERVIEW
AccurioPro WideDirector 3.5 Reference Guide
Mark Set Conditions
Job Notification Icons
Job Status Icons (including
Page Store jobs)
Grommet Mark: draws sequential marks along the sides of an image or layout. These marks are printed on the layout and indicate where reinforced eyelets can be produced.
Cutter Registration Mark: draws reference dots to enable cutting with X/Y cutting devices.
Line Mark: draws a line
Crop Mark: a horizontal and a vertical line to indicate where the page has to be cropped
Rectangular Mark: draws a rectangle with or without fill color
Registration Mark: draws a series of marks which are used to check that the registration of the different printing colors is correct
Text Mark: prints the job name, order number, color name, etc. on the Press Sheet
Mark Set is always applied
Mark Set is only applied manually
Mark set is applied when all/some criteria are met
The AccurioPro WideDirector system issued a critical
system message. The job has stopped pending
user interaction.
The job has generated an error, and has stopped.
The job has generated a warning.
The job has generated an information message.
The job is being archived or dumped.
The job is being imported from archive.

ICONS OVERVIEW 389
AccurioPro WideDirector 3.5 Reference Guide
The job is being deleted.
AccurioPro WideDirector is queuing all commands for this job.
You are editing the Run List.
The job is finished.
The job was broken during editing. You can remove this icon by opening the job for editing.
The job has been manually put on hold.
The job is waiting for a Task Processor (none currently available).
A group of results is complete, and is waiting to be printed (blue icon).
The result is waiting for a hard proof.
The job is waiting for a soft proof.
A task has been aborted.
The task has been manually put on hold.
New (unplaced) documents are available in the (Private) Page Store.
Not all the results of a group are yet available (green icon).
The job is waiting for After Hours processing.
Some results have been rejected by the user.
The layout/imposition is not yet defined.
The job has reached a Milestone: The Run List is not complete.
The job has reached a Milestone: The job deadline has been reached.
The job has reached a Milestone: The result is not available in time.

AccurioPro WideDirector 3.5 Reference Guide
390 ICONS OVERVIEW
Job Status Icons in Tab
Area (JTE only)
Job List Icons
A merged job
A merging job: The job resulting from the merging of two or more other jobs.
The job is being viewed by you or by another user (JTE only).
The job is being edited by another user.
You are editing the job.
The selected job was being edited by you or by another user, but the edit session was broken (Jobs window only). You can remove this icon by opening the job for editing.
Job group.
Commercial job with incomplete Run List.
Commercial job with complete Run List.
Rush job (Commercial jobs only).
Commercial job with disabled input channel.
Commercial job is scheduled to be archived when it is finished.
Commercial job has been archived.
Commercial job is scheduled to be deleted when it is finished.
Commercial job has been deleted.
Commercial job is scheduled to be archived and deleted when it is finished.
Commercial job has been archived and deleted.

ICONS OVERVIEW 391
AccurioPro WideDirector 3.5 Reference Guide
Hot List Icons
Flow Icons
Flow Icon Color Coding
Commercial Hot Ticket.
Commercial Hot Ticket with a disabled input channel.
Job that requires set-up by Printer (WebApproval jobs only)
Main Output to a high resolution output device.
Main Output to a Sign and Display output device.
Imposition Proof: An optional flow which may be added to the Main Output flow, and is used for output to an imposition proofing device.
Page Proof: An optional flow which may be added to the Main Output flow, and is used for output to a page proofing device.
Export: An optional or alternate flow to the Main Output flow, used for exporting job results to file in PDF or PostScript format.
Public Page Store: An optional or alternate flow to the Main Output flow, used for storing job results in a Public Page Store.
Display: An optional or alternate flow to the Main Output flow, used to create job results for high-resolution soft proofing.
Digital Quick Strip (DQS): An alternate mode of operation which supports the PrintDrive DQS mode of Apogee Series3. In this mode, AccurioPro WideDirector creates and renders the flat backgrounds and pages separately. These are then sent as separate items to PrintDrive. PrintDrive assembles the pages onto the backgrounds, and then outputs the results as an integral job.
A white background color indicates that this flow is idle.
A green background color indicates that this flow is currently active.
A blue background color indicates that this flow is on hold.
A yellow background color indicates that this flow contains tasks which are queued and waiting to be processed. A white background color with a green checkmark indicates that this flow has finished.
A red background color indicates that this flow has generated an error.

392 ICONS OVERVIEW
AccurioPro WideDirector 3.5 Reference Guide
Filter Buttons
Flow Control Actions
Result Actions
Job Filter not applied.
Job Filter applied.
Discard
Soft Proof
Collect for Output
Keep Result
Archive Result
Milestone

ICONS OVERVIEW 393
AccurioPro WideDirector 3.5 Reference Guide
Results - Job Layout Thumbnails
A thumbnail view of this page is either not available, or is currently being retrieved from the AccurioPro WideDirector System (green background color).
Page has been processed successfully (no background color).
Page has been processed successfully, and is on hold pending approval (blue background color).
Page has been processed with errors (red background color).
Page is managed by the PlateMaker Client, and is ready to plate (purple background color).
Page has been processed successfully, but has been rejected.

394 ICONS OVERVIEW
AccurioPro WideDirector 3.5 Reference Guide
Page has been discarded.
An empty page in the Run List (white background with a cross).
A blank page in the Run List (white background).
Results - Data Indicators
Results - Job Layout Action Icons
The page/flat belongs to a proofing workflow or a layout job, and is a composite file (i.e., not a separation). The page/flat has been rendered, and is ready for output.
The page/flat belongs to a proofing workflow or a layout job, and is a composite file (i.e., not a separation). The check mark indicates that it has been successfully printed.
A square gray-colored indicator in the lower right corner of the page indicates that all separations have been fully rendered and are ready for previewing or output. Visible for DQS and Raster Impose results when you choose View > Show > Page Rendered.
A small fold in a corner of a page indicates the orientation. The position of the fold tells you where the top of the page is. The orientation of a page may vary in an imposition layout.
The job or flow is finished.
The job’s Production Plan contains an After Hours Action. When this point is reached, the job results are held (written to disk) pending the specified time.
The job’s Production Plan contains a Soft Proof Action. When this point is reached, the job results are held (written to disk) pending approval/rejection of a Digital Film preview by the user.

ICONS OVERVIEW 395
AccurioPro WideDirector 3.5 Reference Guide
The job’s Production Plan contains a Hard Copy Proof Action. When this point is reached, the
job results are held (written to disk) pending approval/ rejection of a hard copy proof by the user.
The job’s Production Plan contains a Ready for Plating Action. When this point is reached, the
job results are taken over and managed by PlateRunner (ready to plate).
The job’s Production Plan contains a Collect for Output Action. When this point is reached, the job results are held (written to disk) pending user intervention.
The job’s Production Plan contains a Waiting for Results Action. When this point is reached, the job results are held until the target flow or required pages are finished.
The job’s Production Plan contains a Discard Action. When this point is reached, the job results are held until the specified pages have been automatically discarded.
The job’s Production Plan contains a Web Proof Action. When this point is reached, the job results are held (written to disk) pending approval/rejection of a Digital Film preview by the
remote user.
Results - Job Layout Action Icon Status
Results - Separation/ Composite Indicators in a
Normal job
The page or flat has not yet reached this Action.
The page or flat has reached this Action (blue background).
The page or flat has passed this Action (dimmed icon).
Square outlined separation indicator: • A process color separation is expected (it has not yet been rendered). In this example, it is
the magenta separation. • The background is available for an AccurioPro WideDirector DQS job.
Square solid separation indicator: A process color separation has been rendered, and is ready for output. In this example, it is the magenta separation.
Checked separation indicator: The separation has been rendered, and has been successfully output. In this example, it is the magenta separation.
Dimmed separation indicator: The separation has been discarded, and will not be output.
Round outlined separation indicator: A spot color separation is expected (it has not yet been rendered). The outline color is the color of the expected spot color.

396 ICONS OVERVIEW
AccurioPro WideDirector 3.5 Reference Guide
Round solid separation indicator: A spot color separation has been rendered, and is ready for output. The solid color is the spot color.
Checked separation indicator: The spot color separation has been rendered, and has been successfully output.
Results - Separation/
Composite Indicators in a Versioning job
Task Processor Color
Coding
Process colors known but not rendered (round separation indicators for spot colors).
Process color plates from this version to be output (round separation indicators for spot colors).
Process color plates from other version to be remade for this version (round separation indicators for spot colors).
Process color plates from other version reused, but not remade (round separation indicators for spot colors).
Process color plates from this version made (round separation indicators for spot colors).
Process color plates from reused (but not remade) version output (round separation indicators for spot colors).
The Task Processor is ready, and is currently idle.
The Task Processor turns green when it is processing a task. For example, the Task Processor is busy processing a separation.

ICONS OVERVIEW 397
AccurioPro WideDirector 3.5 Reference Guide
The Task Processor turns red if a processing error occurs. In this case an error notification is sent to the Message Board, explaining the nature of the error.
The Task Processor turns blue if it is offline.
When the Task Processor has been stopped (inactive), the icon will have horizontal stripes running through it. You can re-activate it by right-clicking on the icon and selecting Start from the right menu.
The Task Processor is starting up (moving horizontal stripes).
The Task Processor is locked, because you do not have a license to use it.
A purple arrow is attached to the Task Processor icon if: • You have a remote license. This means that this Task Processor is not licensed to execute
tasks: These tasks are processed remotely on another AccurioPro WideDirector System. However, you can use this Task Processor to specify the settings in the Production Plan.
• A remote proofer is installed (as specified in the installer). The remote proofer is combined with the Remote Proofer Controller Task Processor.
Output Task Processor
Hardware Status
Paused: The output engine is able to communicate, but cannot process any tasks. A user interaction has taken place on the device itself to trigger this status.
Disconnected: The output engine's cable has been unplugged.
Warning: The hardware engine requires attention (e.g. ink low), but can still receive tasks.
This platesetter is managed by PlateRunner. The yellow ‘sun’ patch indicates that the device is in attended state (i.e. A user is logged in to the PlateRunner application).
This platesetter is managed by PlateRunner. The gray ‘moon’ patch indicates that the device is in unattended state (i.e. no one is logged in to the PlateRunner application).
Error: The hardware engine requires attention - it cannot continue to receive and process tasks until the problem has been resolved (e.g. no ink).

398 ICONS OVERVIEW
AccurioPro WideDirector 3.5 Reference Guide
Resource Status Icons
APWD Archive Icons in
Windows Explorer
APWD Ticket Icons in
Windows Explorer
APWD Toolbar
Media: The icon is followed by a name: There is a cassette in the tray but it is not loaded (not active). However, it can be activated by AccurioPro WideDirector. If the name is in bold, the cassette is loaded (active).
Media: The icon is followed by a name: There is a cassette in the tray but it is not loaded (not active). However, it cannot be activated by AccurioPro WideDirector (manual intervention on the engine is required).
Media: There is no cassette in the tray.
Media: There is an unknown problem with the tray.
Dedicated Resource linked uniquely to a specific device: This Resource is not shared between other devices of the same type.
Archived Commercial job (.arch)
Archived Public Page Store job (.arch)
Saved Commercial Job Ticket(.ajt)
Saved Commercial Hot Ticket(.aht)
Submit job or submit changes to a job.
Delete the selected item.
Edit job.
View <selected item> (Job Ticket Editor only).
Make Blank (page in Run List - Job Ticket Editor only).
Hold job, or put device offline (System Overview).

ICONS OVERVIEW 399
AccurioPro WideDirector 3.5 Reference Guide
Preview Palette Tools
Resume a job on hold, or put device online (System Overview).
Continue processing <selected item>.
Reprocess job from first.
Re-image <selected item>.
Enables the selected Hot Ticket (Hot Tickets window only).
Disables the selected Hot Ticket (Hot Tickets window only).
Display information about <selected item>.
Marquee tool. Allows you to draw a rectangle in the Preview window by clicking and dragging. The ink values for the selected region are measured and displayed in the Inks palette.
Hand tool. Pans the image, allowing you to view a page that exceeds the size of the Preview window. With this tool selected, click inside the Preview window and drag the image around.
Zoom tool. Zooms in to the next zoom level in the Preview window. You can zoom out by holding down the Alt key. Alternatively, you can click and drag to zoom into a specified area.
Measure tool. Measures raster angles, and distances between the raster points. You can also use it to calculate the line ruling of a separation.
Next tool: Displays the next side result (e.g. Cover Sig 1 Front > Cover Sig 1 Back > Cover Sig 2 Front > Cover Sig 2 Back etc.). If you hold down the ‘C’ key while clicking the tool, AccurioPro WideDirector displays the next sheet result (e.g. Cover Sig 1 Back > Cover Sig 2 Back > Cover Sig 3 Back).
Previous tool: Displays the previous side result. If you hold down the ‘C’ key while clicking the tool, AccurioPro WideDirector displays the previous sheet result.
Turn Sheet tool. If your results have 2 sides (front and back), Raster Preview can switch between the two sides. Click this tool (Ctrl-T) to toggle the view (front or back). This tool is disabled if the result only contains one side.
Info tool. Display information about the selected item.
Light Table tool. Displays or hides blended front and back views of your raster data. This feature only works on the front and backs of the same signature/page.
Rule-Ups tool. Displays or hides additional layers of information on top of the Raster Preview image. The Rule/ups palette contains a table which lists the layers you can display.
Rotate clockwise tool. Rotates the current view 90 degrees clockwise.

AccurioPro WideDirector 3.5 Reference Guide
400 ICONS OVERVIEW
Other Buttons
Rotate counterclockwise tool. Rotates the current view 90 degrees counterclockwise.
Flip vertical tool. Flips the current view vertically.
Flip horizontal tool. Flips the current view horizontally.
Invert tool. Inverts the current view (negative).
Color Managed tool. Activates color-managed raster preview. This allows you to preview the rendered result using color management to convert the press color space to the monitor color space (based on ICC profiles).
Show/Hide rulers tool. Shows/Hides ruler coordinates in the units set in your Preferences.
Show/Hide grid lines tool. Shows/Hides grid lines for every major and minor division of the ruler. The default setting is specified in your Preferences.
Task Processor Settings lock.
Edit
Create New
Delete
Set as default
Duplicate
Export
Import
Auto-fill (Versioning): Automatically fills the version table either with the names of the PDF layers or the names of the documents in the Page Store.
Insert variable

AccurioPro WideDirector 3.5 Reference Guide
ICONS OVERVIEW 401
Customer Contact
Approver
Uploader
Candidate CSR (Customer Service Representative)
Preferred CSR (Customer Service Representative)

AccurioPro WideDirector 3.5 Reference Guide
402 ICONS OVERVIEW

403
B APPENDIX
Keyboard Shortcuts
This section lists the shortcuts.
Layout Editor and Image Editor ........................................ 404 Jobs Window ....................................................................407

AccurioPro WideDirector 3.5 Reference Guide
404 KEYBOARD SHORTCUTS
Layout Editor and Image Editor
Menu Shortcuts
To Press Add image CTRL + SHIFT + O Get Info CTRL + I Submit CTRL + SHIFT + G Copy CTRL + C Duplicate CTRL + D Step and Repeat CTRL + ALT + S Select All CTRL + A Select None CTRL + SHIFT + A Group CTRL + G Ungroup CTRL + U Auto-Layout images CTRL + N New Empty Sheet Layout/Printer Layout CTRL + SHIFT + N Rearrange frames on a sheet layout/sheet layouts on a printer layout CTRL + SHIFT + F Reapply marks CTRL + ALT + SHIFT +
M Zoom into layout CTRL + +
OR CTRL + mouse wheel
Zoom out of layout CTRL + - OR
CTRL + mouse wheel Zoom to fit layout in window CTRL + 0 (zero) Display the System Overview. CTRL + 1 Display the Jobs window. CTRL + 3 Open the Media Hub CTRL + ALT + 1 Open the Finishing Hub CTRL + ALT + 2 Open the Mark Engraver CTRL + ALT + 3 Open the Sheet Sizes CTRL + ALT + 4 Open the Page Sizes CTRL + ALT + 5 Open the Color Books CTRL + ALT + 6 Show preflight report CTRL + E Edit original image externally CTRL + Enter Edit Normalized PDF in Preview CTRL + SHIFT + Enter Update image after editing CTRL + SHIFT + U Show/hide Image Panel CTRL + ALT + I

KEYBOARD SHORTCUTS 405
AccurioPro WideDirector 3.5 Reference Guide
To Press Show/hide Inspector Panel CTRL + SHIFT + I Show/hide the Snag List CTRL + R Show/Hide View Options CTRL + SHIFT + E
Placing and arranging images on a sheet
NOTE: Some of these shortcuts can also be used for placing sheets on printer layouts.
To Drag the image and Place one or more images without ganging them Hold SHIFT and
release Rotate one or more images 90° counterclockwise Press space bar once Cancel the image placement Press ESC Copy a placed image. Press CTRL Switch between snapping to margins (magenta snap guides) and snap- ping to edges (blue snap guides) Press ALT
Restrain movement horizontally and vertically Hold SHIFT Move a placed image to the center of the sheet. Press C or c Duplicate a placed image to accommodate the copy count. Press N or n
Toolbar tools
Selection tool: To select a component or area and display its properties. This is the default tool. A
Single Instance Selection tool: To select a single instance of marks which are placed at various locations, or part of a compound mark. D
Pan tool: To pan layouts in the Layout Editor. H Zoom tool: To zoom into a specific area of a layout. Z Frame tool: To draw empty frames on a sheet. F View Options palette button: Shows/hides the View Options palette. CTRL SHIFT+E Marks palette button: Shows/hides the Marks palette. CTRL+M Presets (Licensed feature): To open the Presets dialog box. CTRL SHIFT+P

406 KEYBOARD SHORTCUTS
AccurioPro WideDirector 3.5 Reference Guide
Crop image: Activates the crop mode to crop an image (Image inspector in the Image Editor). K
Split tool: Activates the Split tool to split an image into tiles (Tiling inspector of the Image Editor). K
Zoom slider with Zoom to fit and Zoom to maximum buttons, and drop- down list with zoom presets CTRL +/-
Split Tool Shortcuts Activate the Split tool by pressing K with the Tiling inspector selected. To control the splitting of tiles selected with the Split tool, use the following shortcuts.
To Press Change the splitting orientation (the magenta splitting line) Space bar or TAB key
once Extend the splitting action across all tiles Hold SHIFT Repeat the split. CTRL Cancel the image splitting ESC
Positioning Toolbar Shortcuts To control the Positioning toolbar when a tile is selected with Selection tool:
To
Open the Split Tile dialog box CTRL + U Mirror the tile vertically when placed on a sheet SHIFT + M Mirror the tile horizontally when placed on a sheet M Rotate the tile clockwise in steps of 90° SHIFT + R Rotate the tile anticlockwise in steps of 90° R Merge the selected tiles CTRL+ G Place the cursor in the first Overlap box of the Positioning toolbar O Place the cursor in the first Gap box of the Positioning toolbar G Jump to next box in the Positioning toolbar TAB

KEYBOARD SHORTCUTS 407
AccurioPro WideDirector 3.5 Reference Guide
Jobs Window
AccurioPro WideDirector Menu Shortcuts The following AccurioPro WideDirector menu shortcut keys can be used.
To... Press (Windows) Press (Macintosh)
Quit the AccurioPro WideDirector Client. ALT + F4 Command + Q
Display Preferences. CTRL + , Command + ,
File Menu Shortcuts The following File menu shortcut keys can be used.
To... Press (Windows) Press (Macintosh)
Open a new print layout. CTRL + N Command + N Close the current window. Close all windows. ALT + F4 Command + W
Command + Option + W Save the current ticket (Ticket Editor only). CTRL + S Command + S
Log on to an AccurioPro WideDirector System, or to log off from one. CTRL + K Command + K
Quit the AccurioPro WideDirector Client. ALT + F4 Command + Q
Upload a document. CTRL + U Command + U
Edit Menu Shortcuts The following Edit menu shortcut keys can be used.
To... Press (Windows) Press (Macintosh)
Undo the last Cut, Copy, or Paste operation. CTRL + Z Command + Z
Delete the selected text, and copy it onto the clipboard. CTRL + X Command + X
Copy the selected text onto the clipboard. CTRL + C Command + C Paste the contents of the clipboard at the selected location. CTRL + V Command + V
Clear the current text selection. N/A Backspace Delete the current selection. Delete Command + Delete Edit the selected item. CTRL + ENTER Command + Enter Display the selected item using the default viewer. ENTER Enter
Rename the selected item. F2 Enter

408 KEYBOARD SHORTCUTS
AccurioPro WideDirector 3.5 Reference Guide
To... Press (Windows) Press (Macintosh)
Select all items in the current view. CTRL + A Command + A Deselect all items in the current view. CTRL + SHIFT + A Command + SHIFT+ A Put a blank page in the selected placeholder(s). CTRL + B Command + B
Find in Page Store. CTRL + ALT + F Command + Option + F Duplicate a job. CTRL + D Command + D Merge Jobs. CTRL + Y Command + Y Reverse Page Order CTRL + SHIFT + R Command + SHIFT+ R Preferences CTRL + , Command + ,
Control Menu Shortcuts The following Control menu shortcut keys can be used.
To... Press (Windows) Press (Macintosh)
Continue CTRL + G Command + G
View Menu Shortcuts The following View menu shortcut keys can be used.
To... Press (Windows) Press (Macintosh)
Display thumbnail images of all pages in the Job Layout pane. CTRL + SHIFT+ T Command + SHIFT + T
View Flats Only. CTRL + SHIFT + F Command + SHIFT + F View Extra information. CTRL + T Command + T Scale Small. CTRL + - Command + - Scale Normal. CTRL + O Command + O Scale Large. CTRL + + Command + + Scale Fit to Window. CTRL + ALT + O Command + = View Page Labels. CTRL + SHIFT + L Command + SHIFT + L View Extended Page Adjustments. CTRL + SHIFT + E Command + SHIFT + E Columns Front or Back N/A Command + “ Columns Fill Width N/A Command + ‘ Show/hide Devices pane CTRL + ALT + 1 Command + Option + 1 Show/hide Job List pane CTRL + ALT + 2 Command + Option + 2 Show/hide Flow Activity pane CTRL + ALT + 3 Command + Option + 3

KEYBOARD SHORTCUTS 409
AccurioPro WideDirector 3.5 Reference Guide
Raster Preview View Menu Shortcuts The following Raster Preview menu shortcut keys can be used.
To... Press (Windows) Press (Macintosh)
Zoom In. CTRL + + Command + + Zoom Out. CTRL + - Command + - Size to Fit. CTRL + O Command + O Show Actual Pixels. CTRL + ALT + O Command + = Show / Hide Rulers. N/A N/A Show Info. CTRL + I Command + I Show / Hide Grid. CTRL + ALT + ‘ Command + ‘ Invert Image. ALT + SHIFT + I SHIFT + Option + I Next Side. Right arrow Right arrow Previous Side. Left arrow Left arrow First Side. Home Home Last Side. End End Turn Sheet. CTRL + T Command + T Color-Managed. ALT + C Option + C Light Table. ALT + L Option + L Press Sheet. ALT + P Option + P Device Output. ALT + D Option + D Transform -> Rotate 90 CW. ALT + T Option + T Transform -> Rotate 90 CCW. ALT + SHIFT + T SHIFT + Option + T Transform -> Flip Horizontal. ALT + F Option + F Transform -> Flip Horizontal. ALT + SHIFT + F SHIFT + Option + F Invert ALT + SHIFT + I SHIFT + Option + I
Raster Preview Tool Toggle Shortcuts The following Raster Preview tool toggle shortcut keys can be used.
To... Press (Windows) Press (Macintosh) Toggle on/off the Marquee tool. M M Toggle on/off the Hand tool. H H Toggle on/off the Zoom tool. Z Z Toggle on/off the Measurement tool. I I

AccurioPro WideDirector 3.5 Reference Guide
410 KEYBOARD SHORTCUTS
Window Menu Shortcuts The following Window menu shortcut keys can be used.
To... Press (Windows) Press (Macintosh) Display the System Overview. CTRL + 1 Command + 1 Display the Jobs window. CTRL + 3 Command + 3 Display the Message Board. CTRL + 4 Command + 4 Display Info for <selected item>. CTRL + I Command + I Display Activity for <selected item>. CTRL + J Command + J Display Remarks CTRL + R Command + R Display Problem Report for selected job. CTRL + SHIFT + I Command + SHIFT + I Display Preflight Report for selected job. CTRL + E Command + E
Help Menu Shortcuts The following Help menu shortcut keys can be used.
To... Press (Windows) Press (Macintosh) Display the AccurioPro WideDirector Help. F1 Command + ?
Display the What’s This? Help. SHIFT + F1 Help

411
C APPENDIX
System Variables
This section provides a list of system variables.
Generic Variables .................................................................412 Mark Sets Variables ..............................................................418

ACCURIOPRO
412 GENERIC VARIABLES
Generic Variables
You can use variables in a number of different areas to replace parameter and resource settings. These variables are automatically replaced by a text string, or are assigned a text string.
Variable Description
$COMMENTS The “Remarks” field in the Administration tab.
$COMMENTS_1-10 The “n”-th paragraph of text in the Remarks field of the Administration tab. A paragraph is a single line of text, delimited by paragraph marks or by the start or end of the text.
$COMPANY The “Company” field in the Customer Contact information. $COMPUTER The name of the Hardware System on which the current Task Processor (or service) is running. $CONTACTFIRST The “First” field of the customer’s contact person. $CONTACTLAST The “Last” field of the customer’s contact person. $CPM The Calibrated Printing Mode used for the job. $CUTTER The name of the cutting device set for the job.
$DATE The current date (i.e. the date when the variable is resolved). Insert a space when combining this variable with other variables, e.g. \\$SYSTEMCOMPUTER\ArchiveRoot\$DATE:%Y%m \$JOB\
$DEVICE The name of the output device. $JOB The “Job name” field in the Administration tab. $JOBDATE The date when the job was submitted. $JOBID A unique job identifier (intended mainly for internal use). $JOBNR A unique job sequence number. $JOBTIME The time when the job was submitted. $PRINTLAYOUT The name of the print layout. $PRINTLAYOUTNR The number of the print layout. $MEDIANAME The name of the media. $MEDIATHICKNESS The thickness of the media used. $OPERATOR The “Operator” field in the Administration tab.
$ORDER The “Order number” field in the Administration tab. This is the “Name” field in the Hot Ticket Editor.
$OUTPUTSIZE The size of the rendered image for a sheet/plate. For DQS, the size of the bounding box of all rendered elements on that sheet.
$PRESS The name of the press. $PRINTDATE The date the job was printed. $PRINTTIME The time the job was printed. $PRINTMODE The print mode used for the job. $QUALITY The output quality as specified in the Layout Editor $RESOLUTION The resolution of the image.

SYSTEM VARIABLES 413
AccurioPro WideDirector 3.5 Reference Guide
Variabl
e Descriptio
n $RULINGMAP Name of the Ruling Map in case of Application screening, otherwise empty. $RUNLENGTH The run length of the job.
$SHEET Evaluates to $SIGNATURE for single or none web impositions. Evaluates to $SIGNATURE $WEB for multi-web impositions.
$SHEETVERSION The ̀ SV<n>' version number of a sheet version, with <n> being the $SHEETVERSIONINDEX. When used on a result that has the default single-version set-up, <n> is the same as the $VERSIONINDEX.
$SHEETVERSIONINDEX The index <n> of the sheet version in the sheet version table, starting at 1, per sheet. When used on a result that has the default single-version set-up, <n> is the same as the $VERSIONINDEX.
$SYSTEM The name of the AccurioPro WideDirector System. $SYSTEMCOMPUTER The name of the Hardware System. $TIME The current time (i.e. the time when the variable is resolved).
$WHITEMODE The white application mode (pre-white, post-white or sandwich-white) used to print the white on the sheet/layout. Empty if no white.
NOTE: You can use a drop-down menu in the various rights to see which variables are supported in which right.
You can also use system variables to automatically print information about a job, a template, or the part of a job that is being printed, since the information that prints varies from one sheet of media to the next.
Variable Syntax This section explains the variable syntax, and describes how variables are interpreted and replaced by AccurioPro WideDirector. Any variable that cannot be appropriately interpreted in a given right will be replaced by an empty string.
NOTE: Variables are case sensitive! For example, $system will not be recognized as the $SYSTEM variable: Instead, it will be interpreted as literal text.
Start and End Variables always start with a dollar sign ($), immediately followed by the variable name. Any non-alphanumerical character (including space or tab) marks the end of the name.
NOTE: The RLPAGE variables that are used in the Run List settings for automatic page placement do not use the dollar sign. They are delimited using the less than/greater than symbols. For example, <RLPAGE:n>. This is also the case when they are used in an input filename template (Open Connect, Hot Folder).

414 GENERIC VARIABLES
AccurioPro WideDirector 3.5 Reference Guide
Braces The variable name should be enclosed between braces { } when other alphabetical text immediately follows the variable name.
Width Modifier Variables can have a width modifier (a colon followed by a number, such as: 3 ). This causes the variable to be substituted with exactly the specified number of characters. If the content is longer than the specified width, AccurioPro WideDirector truncates it: If the content is shorter than the specified width, AccurioPro WideDirector pads the remainder with blanks. You can customize the padding by inserting a plus (+) or minus (-) sign before the width modifier:
Inserting a “+” before the width modifier specifies that the padding or
truncation will be at the end of the variable. Any character you enter after the + will be used as the padding character for the specified number of spaces. For example, +Y12 will result in a 12-character name, padded out at the end with Ys where necessary (e.g. Konica MinoltaYYYYYYYY).
Inserting a “-” before the width modifier specifies that the padding or truncation
will be at the beginning of the variable. Any character you enter after the + will be used as the padding character for the specified number of spaces. For example, -X12 will result in a 12-character name, padded out at the beginning with Xs where necessary (e.g XXXXXXXXKonica Minolta).
When omitted, AccurioPro WideDirector assumes "+” (plus, followed by a space), in which case the padding is done with the “?” wildcard character.
When the string following a $ is not recognized as a variable, it is printed as a literal (e.g. $SITE becomes "$SITE"). To overrule the meaning of the $ character when followed by a legal variable name, you need to prefix the $ with another $: For example, $$SIDE then becomes "$SIDE".
In the following examples, we assume that the job has the following attributes:
Order number ($ORDER) = 0106G0001
Customer contact ($CUSTOMER) = KONICA MINOLTA
Variable Example Substitution Result
$ORDER-P 0106G0001-P $CUSTOMER$ORDER KONICA MINOLTA0106G001 $CUSTOMER KONICA MINOLTA $CUSTOMER:3 KM $CUSTOMER:6 KONICA MINOLTA. $CUSTOMER:+ 6 KONICA MINOLTA??.

SYSTEM VARIABLES 415
AccurioPro WideDirector 3.5 Reference Guide
Variable Example Substitution
Result $CUSTOMER:+_6 KONICA MINOLTA $CUSTOMER:-_6 KONICA MINOLTA $RLPAGE:-03 001, 002, 003,... 010, ... (3 character #s, padded up front with 0s) $CUSTOMERX $CUSTOMERX ${CUSTOMER }P KONICA MINOLTAP $CUSTOMER|NO NAME| KONICA MINOLTA $CUSTOMER|NO NAME| NO NAME (when Customer contact is empty) $ORDER:>4 0001
Use NONE without the $ sign and between pipe characters to override the default behavior of generating no text if the specified variable is not used. Example: $COMPANY|NONE| generates NONE if the specified company variable is not used.
Date and Time Variable Formats
The date and time variables by default print the date and time according to the regional settings of the computer that evaluates the variable. However, in some cases you may want to have it printed differently.
NOTE: When you use format strings, the date and time variables (DATE/TIME and PRINTDATE/PRINTTIME) produce the same result: AccurioPro WideDirector only uses the format to see what has to be printed.
You can modify the behavior of some format codes by prefixing them with #.
Format Code Description
%#a, %#A, %#b, %#B, %#p,%#X, %#z, %#Z, %#%
# flag is ignored.
%#c Long date and time representation, appropriate for current locale. For example: Tuesday, August 05, 2008, 12:41:29.
%#x Long date representation, appropriate to current locale. For example: Tuesday, August 05, 2008.
%#d, %#H, %#I, %#j, %#m, %#M, %#S, %#U, %#w, %#W, %#y, %#Y
Remove leading zeros (if any).
When you specify no format string, $DATE and $TIME default to $DATE:%x and $TIME:%X.
You need to enclose the variable name and format string in braces if you want to print spaces (see examples below).

416 GENERIC VARIABLES
AccurioPro WideDirector 3.5 Reference Guide
When you specify an unknown format string, AccurioPro WideDirector prints it as a literal (without the %). A width modifier is therefore also printed literally.
Date and Time formatting options
%a Abbreviated weekday name (first 3 chars). %A Full weekday name. %b Abbreviated month name (first 3 chars). %B Full month name. %c Date and time representation appropriate for locale. %d Day of month as decimal number (01 - 31). %j Day of year as decimal number (001 - 366). %m Month as decimal number (01 - 12). %U Week of year as decimal number, with Sunday as first day of week (00 - 53). %w Weekday as decimal number (0 - 6; Sunday is 0). %W Week of year as decimal number, with Monday as first day of week (00 - 53). %x Date representation for current locale. %y Year without century, as decimal number (00 - 99). %Y Year with century, as decimal number.
%z, %Z Time-zone name or abbreviation; no characters if time zone is unknown. %c Date and time representation appropriate for locale. %H Hour in 24-hour format (00 - 23). %I Hour in 12-hour format (01 - 12).
%M Minute as decimal number (00 - 59). %p Current locales A.M. / P.M. indicator for 12-hour clock. %S Second as decimal number (00 - 59). %X Time representation for current locale.
%z, %Z Time-zone name or abbreviation; no characters if time zone is unknown.
%% Percent sign.
Other characters not prefixed with % are printed as literals.
NOTE: You can control the width of the replacement string by using the appropriate format codes. Most of them have a fixed width. Use %a and %b to retrieve the abbreviated day and month names, fixed to 3 characters wide.
Combinations with $DATE Insert a space when combining this variable with other variables, e.g. \\$SYSTEMCOMPUTER\ArchiveRoot\$DATE:%Y%m \$JOB\
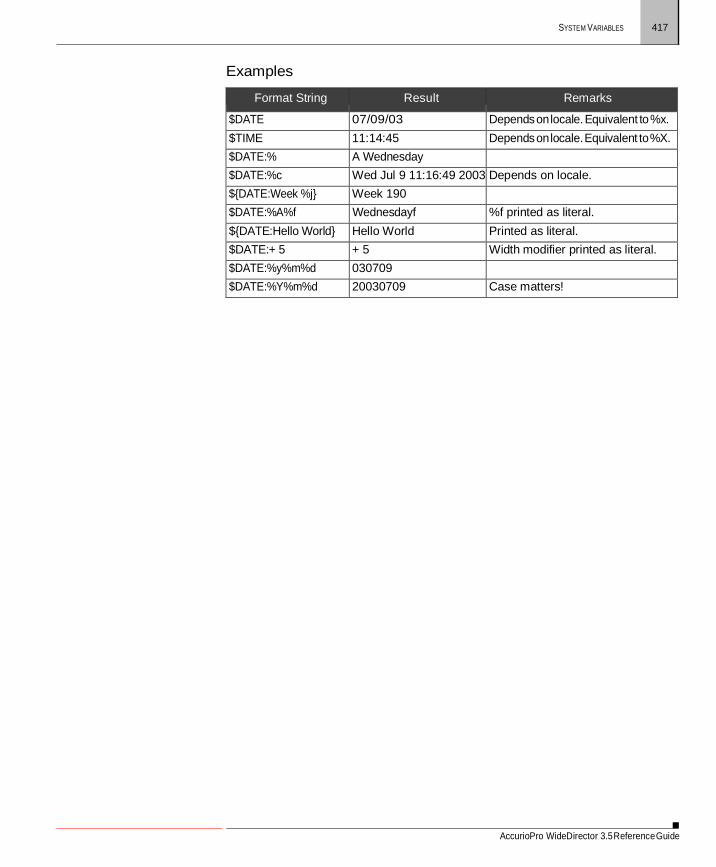
SYSTEM VARIABLES 417
AccurioPro WideDirector 3.5 Reference Guide
Examples
Format String Result Remarks
$DATE 07/09/03 Depends on locale. Equivalent to %x. $TIME 11:14:45 Depends on locale. Equivalent to %X. $DATE:% A Wednesday
$DATE:%c Wed Jul 9 11:16:49 2003 Depends on locale. ${DATE:Week %j} Week 190
$DATE:%A%f Wednesdayf %f printed as literal. ${DATE:Hello World} Hello World Printed as literal. $DATE:+ 5 + 5 Width modifier printed as literal. $DATE:%y%m%d 030709
$DATE:%Y%m%d 20030709 Case matters!
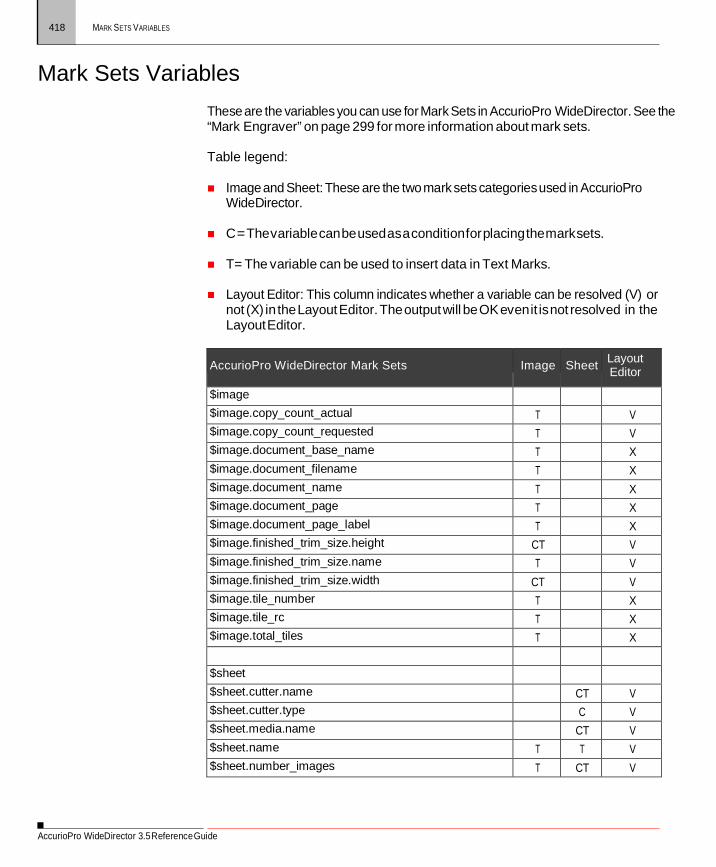
AccurioPro WideDirector 3.5 Reference Guide
418 MARK SETS VARIABLES
Mark Sets Variables These are the variables you can use for Mark Sets in AccurioPro WideDirector. See the “Mark Engraver” on page 299 for more information about mark sets.
Table legend:
Image and Sheet: These are the two mark sets categories used in AccurioPro
WideDirector.
C = The variable can be used as a condition for placing the mark sets.
T= The variable can be used to insert data in Text Marks.
Layout Editor: This column indicates whether a variable can be resolved (V) or not (X) in the Layout Editor. The output will be OK even it is not resolved in the Layout Editor.
AccurioPro WideDirector Mark Sets Image Sheet Layout Editor
$image $image.copy_count_actual T V $image.copy_count_requested T V $image.document_base_name T X $image.document_filename T X $image.document_name T X $image.document_page T X $image.document_page_label T X $image.finished_trim_size.height CT V $image.finished_trim_size.name T V $image.finished_trim_size.width CT V $image.tile_number T X $image.tile_rc T X $image.total_tiles T X $sheet $sheet.cutter.name CT V $sheet.cutter.type C V $sheet.media.name CT V $sheet.name T T V $sheet.number_images T CT V

AccurioPro WideDirector 3.5 Reference Guide
SYSTEM VARIABLES 419
AccurioPro WideDirector Mark Sets Image Sheet Layout Editor
$sheet.press.name T CT V $sheet.press.sidelay C V $sheet.run_length T T V $sheet.size.height T CT V $sheet.size.name T T V $sheet.size.width T CT V $output $output.cpm CT X $output.printdate T T X $output.printmode CT X $output.printtime T T X $output.quality T X $output.resolution T X $output.size.height T V $output.size.name T V $output.size.width T V $administration $administration.comments CT CT X $administration.comments_<i> CT CT X $administration.contact.email T T X $administration.contact.first T T X $administration.contact.last T T X $administration.contact.mobile T T X $administration.contact.phone T T X $administration.contact.title T T X $administration.customer.address T T X $administration.customer.city T T X $administration.customer.country T T X $administration.customer.name CT CT X $administration.customer.phone T T X $administration.customer.state T T X $administration.customer.zip T T X $administration.description CT CT X

AccurioPro WideDirector 3.5 Reference Guide
420 MARK SETS VARIABLES
AccurioPro WideDirector Mark Sets Image Sheet
Layout Editor
$system $system.date T T X $system.time T T X $job $job.date T T X $job.id T T X $job.name CT CT V $job.nr T T X $job.operator CT CT V $job.order CT CT V $job.time T T X $apogee $apogee.computer T T X $apogee.displayname T T X $apogee.name T T X $apogee.system T T X $apogee.systemcomputer T T X $apogee.vendor T T X $apogee.version T T X $apogee.version_major T T X $apogee.version_minor T T X

421
D APPENDIX
Right Menu Commands
This section lists the right menu commands.
Job List Right Menu Commands .............................................................. 422 Job List Filter Right Menu Commands ..................................................... 423 Layout Editor ............................................................................................................... 423 Image Editor - Presets .............................................................................. 424 Hot Ticket List Right Menu Commands .................................................. 425 Job Layout Right Menu Commands ........................................................ 426 System Overview Right Menu Commands .............................................. 429 Activity Window Right Menu Commands ............................................... 430

AccurioPro WideDirector 3.5 Reference Guide
422 JOB LIST CONTEXT MENU COMMANDS
Job List Right Menu Commands You can directly issue commands by right-clicking on items in the Job List. The following table lists the items that may be displayed when you right-click a Job Folder or Job.
Right Menu Item Description
Save As... Allows you to save the job with a different name Save As Template... Allows you the save the job as a Ticket Template. Submit Changes Submits the changes you have made to a job. Archive Job Saves the selected job items to file (.arch).
Export...
• Job Dump - Similar to Archive Job, but only accessible by adminisrators for troubleshooting purposes (only for jobs, not for Hot Tickets).
• Export Job Log - Exports the log file for the selected job. • InkDrive - Exports the InkDrive files for the selected job (only
available when the job has InkDrive files). • Imposition Layout - Exports the Imposition Layout and Marks files
for the selected job (only available when the job has received lay- out information 'from Input').
Open in WebApproval Opens the job in the WebApproval application. Delete Job Deletes the current job(s).
Edit Job Displays the selected job using the default editor (Job Ticket Editor or Layout Editor), where you can modify it.
Duplicate Job Duplicates the selected job.
Select • All - Selects all jobs in the current view. • None
Rush Job Upgrades the selected job to a Rush job.
Hold Job Suspends all processing of the selected job(s) after the current activity for the items has been allowed to finish. This option is dis- abled if all items are already on hold.
Resume Job Resumes processing of the selected job(s). This option is disabled if all items are already running.
Restart Job Processing At
Remakes all the existing job results which follow the selected point in the Production Plan. You may want to re-render a job if you have changed your resources (new fonts, color books, etc.) or if you want to remake aborted results, or remake output when no raster data is available

CONTEXT MENU COMMANDS 423
AccurioPro WideDirector 3.5 Reference Guide
Right Menu Item Description
Mark as Finished Marks the selected job as finished, aborting all current processing and removing all outstanding tasks.
Send Cut File Sends the cut file of a layout job to the cutter.
Log for Job Opens a Log window for the selected job(s). You can open multiple Log windows.
Problem Report for Job Opens a Problem Report window for the job. You can open multiple Problem Report windows (PDF documents only).
Help Opens right-sensitive help for the currently selected item. If no specific help is available for the selected item, then more general right help is displayed.
Job List Filter Right Menu Commands
Right Menu Item Description
Save As... Allows you to create a new custom job filter from the initial Custom Filter.
Edit Opens the Job Filter settings. Rename Allows you to rename the selected custom job filter. Duplicate Allows you to duplicate the selected custom job filter. Delete Deletes the selected custom job filter. Insert Divider Inserts a group divider under the last custom job filter. Move Up/Down Moves the selected filter up or down in the list.
Layout Editor
The right menu commands are explained in the relevant section about the Layout Editor: see “Right Menus” on page 124.

AccurioPro WideDirector 3.5 Reference Guide
424 IMAGE EDITOR - PRESETS
Image Editor - Presets The following commands are available in the Presets dialog by right-clicking a preset in the list:
Right Menu Item Description
Apply Applies the selected image preset to the open image
Edit Preset
Unlocks the presets so you can edit them; in this edit mode you can clear or select the settings check boxes and update the preset to match the settings of the current image; any changes you make to a preset in edit mode are saved automatically
Rename Preset Lets you edit the name of the selected preset Edit Description Places the cursor in the Description box of the selected preset New Folder Creates a new folder where you can put new presets New Job Preset Creates a new job preset Duplicate Preset Duplicates the selected preset Delete Preset Deletes the selected preset Import Preset Opens a file browser where you can select a preset for importing Edit Description Places the cursor in the Description box of the selected preset

AccurioPro WideDirector 3.5 Reference Guide
CONTEXT MENU COMMANDS 425
Hot Ticket List Right Menu Commands You can directly issue commands by right-clicking on Hot Tickets in the Hot Ticket List. The following table lists the items that may be displayed when you right-click a Hot Ticket.
Right Menu Item Description
Save As... Allows you to save the ticket with a different name. Save As Template... Allows you the save the ticket as a Ticket Template. Upload Document Allows you to add a file to a Hot Ticket. Delete Hot Ticket Deletes the selected Hot Ticket.
Edit Hot Ticket Displays the selected Hot Ticket using the default editor, where you can modify it.
Select • All - Selects all Hot Tickets in the current view. • None
Enable Inputs Re-activates all input channels for the selected Hot Ticket(s). By default, input channels are enabled. This option is disabled if all Hot Ticket(s) have their inputs enabled.
Disable Inputs De-activates all input channels for the selected Hot Ticket(s). This option is disabled if all Hot Ticket(s) have their inputs disabled. A Hot Ticket cannot produce any jobs while disabled.
Log for Hot Ticket Opens a Log window for the selected Hot Ticket.
Help Opens right-sensitive help for the currently selected item. If no specific help is available for the selected item, then more general right help is displayed.

AccurioPro WideDirector 3.5 Reference Guide
426 JOB LAYOUT CONTEXT MENU COMMANDS
Job Layout Right Menu Commands You can directly issue commands by right-clicking on items in the Job Layout pane. The commands that you will see in the right menu depend on the item you select (flat or page in flat).
Flats The following table lists the items that may be displayed when you right-click a Flat.
Right Menu Item Description
Export Flat From
• Latest <Task Processor name> - Exports the latest version of the selected flat.
• <Task Processor name> - Exports a previous version of the selected flat from a preceding Task Processor in the Production Plan.
View Flat From
• Latest <Task Processor name> - Displays the results of the selected flat from the last Task Processor which processed it.
• <Task Processor name> - Displays the results of the selected flat from a preceding Task Processor in the Plan.
The results are displayed using the default viewer. You cannot edit the flat.
Info for Flat From
• Latest <Task Processor name> - Opens an Info window for the selected flat(s) at the latest point in the Production Plan.
• <Task Processor name> - Opens an Info window for the selected flat(s) from a preceding Task Processor in the Production Plan.
You can open multiple Info windows.
Select
• Select All Flats - Selects all flats in the current view • None • Fronts - Selects all front sides when the view is set to “Fronts and
Backs”. • Backs - Selects all back sides when the view is set to “Fronts and
Backs”. • Signature - Selects all sides in the signature when the view is set
to “Fronts and Backs”.
Continue Flat Continues all or part of a flat that has stopped. The flat may have stopped because it has reached a hold Action in its Production Plan, or because it has been aborted, rejected, or in error.
Reject Flat... Rejects the selected flat(s). All processing will be stopped for the rejected flat(s).
Clear Rejected Status Removes the rejected status from a previously rejected flat, and restarts processing.
Discard Flat Prevents the selected flat(s) from being printed, without stopping the rest of the job from being printed. Available only when the items are waiting on a Hold action or when finished.

AccurioPro WideDirector 3.5 Reference Guide
CONTEXT MENU COMMANDS 427
Right Menu Item Description
Include Flat Includes a discarded flat.
Re-render Flat
Remakes all the existing job results which follow the selected point in the Production Plan. You may want to re-render a flat if you have changed your resources (new fonts, color books, etc.) or if you want to remake aborted results, or remake output when no raster data is available
Re-image Flat Remakes previously imaged raster data (Digital Film) on your output devices. This feature is available only for flows that have an imaging output device and finished raster data.
Re-export Flat Re-exports previously exported results (when resources have changed or exported files have to be recreated).
Remake InkDrive for Flat Remakes InkDrive files for the selected flats.
Re-print Flat Remakes previously imaged raster data (Digital Film) on a digital press. This feature is available only for flows that have a digital press and finished raster data.
Help Opens right-sensitive help for the currently selected item. If no specific help is available for the selected item, then more general right help is displayed.
Pages The following table lists the items that may be displayed when you right-click a
Page.
Right Menu Item Description
Export Page From
• Latest <Task Processor name> - Exports the latest version of the selected page.
• <Task Processor name> - Exports a previous version of the selected page from a preceding Task Processor in the Production Plan.
View Page From
• Latest <Task Processor name> - Displays the results of the selected page from the last Task Processor which processed it.
• <Task Processor name> - Displays the results of the selected page from a preceding Task Processor in the Plan.
The results are displayed using the default viewer. You cannot edit the page.
Info for Page From
• Latest <Task Processor name> - Opens an Info window for the selected page(s) at the latest point in the Production Plan.
• <Task Processor name> - Opens an Info window for the selected page(s) from a preceding Task Processor in the Production Plan.
You can open multiple Info windows. Delete Page (imposed pages only) Deletes the selected page.

AccurioPro WideDirector 3.5 Reference Guide
428 JOB LAYOUT CONTEXT MENU COMMANDS
Right Menu Item Description
Select
• Select All Pages- Selects all pages in the current view • None • Even Positions - Selects all even placeholders/pages • Odd Positions - Selects all odd placeholders/pages • Signature - Selects all sides in the signature when the view is set
to “Fronts and Backs”.
Page Adjustments (imposed pages only)
• Offset By... - Allows you to adjust the offset of the selected page(s). • Scale By... - Allows you to adjust the scale of the selected page(s) • Rotate By... - Allows you to adjust the rotation of the selected
page(s) • Edit/View - Opens the Adjustments dialog box for the selected
page(s). If you are not editing the job, the Adjustments dialog box is read-only.
• Clear - Clears all adjustments.
Find • Page in Page Store- Switches to the Page Store and highlights the corresponding page.
Placeholder • Make Blank - Puts a blank page in the selected placeholder(s).
Continue Page Continues all or part of a page that has stopped. The page may have stopped because it has reached a hold Action in its Production Plan, or because it has been aborted, rejected, or in error.
Reject Page Rejects the selected page(s). All processing will be stopped for the rejected page(s).
Clear Rejected Status Removes the rejected status from a previously rejected page, and restarts processing.
Discard Page Prevents the selected page(s) from being printed, without stopping the rest of the job from being printed. Available only when the items are waiting on a Hold action or when finished.
Include Page Includes a discarded page.
Re-render Page
Remakes all the existing job results which follow the selected point in the Production Plan. You may want to re-render a page if you have changed your resources (new fonts, color books, etc.) or if you want to remake aborted results, or remake output when no raster data is available.
Re-image Page Remakes previously imaged raster data (Digital Film) on your output devices. This feature is available only for flows that have an imaging output device and finished raster data.
Re-export Page Re-exports previously exported results (when resources have changed or exported files have to be recreated).
Remake InkDrive for Page Remakes InkDrive files for the selected pages.
Preflight Report Generates a Preflight Report.
Help Opens right-sensitive help for the currently selected item. If no specific help is available for the selected item, then more general right help is displayed.

AccurioPro WideDirector 3.5 Reference Guide
CONTEXT MENU COMMANDS 429
System Overview Right Menu Commands You can directly issue commands by right-clicking one of the Task Processors or the AccurioPro WideDirector System icon in the Hardware pane.
Task Processors The following table lists the items that may be displayed when you right-click a Task Processor in the System Overview.
Right Menu Item Description
Export Output Device PPD (Output Task Processors only)
Device PPD...- Creates a PPD file for the selected output device.
Start Start a Task Processor Stop Stops a Task Processor Restart Stops the Task Processor and starts it again.
Put Online (Output Task Processors only)
Enables the scheduling of tasks for the selected Output Task Processor. This option is disabled if all Output Task Processors are online.
Put Offline (Output Task Processors only)
Disables the scheduling of tasks for the selected Output Task Processor. This option is disabled if all Output Task Processors are offline.
Configure Allows you to access the Configuration settings of the selected output device. Administrator access level required,
Resources Allows you to quickly access the resources of the selected Task Processor.
Activity for <selected Task Processor>
Opens the Activity window for the selected Task Processor. For more information, see “Monitoring your Task Processors” on page 354.
Log for <selected Task Processor>
Opens a Log window for the selected Task Processor(s). You can open multiple Log windows.
Help Opens right-sensitive help for the currently selected item. If no specific help is available for the selected item, then more general right help is displayed.

AccurioPro WideDirector 3.5 Reference Guide
430 SYSTEM OVERVIEW CONTEXT MENU COMMANDS
AccurioPro WideDirector System
The following table lists the items that may be displayed when you right-click the AccurioPro WideDirector System icon in the Hardware pane of the System Overview.
Right Menu Item Description
Log for AccurioPro WideDirector System Opens a Log window for the AccurioPro WideDirector System.
Export System Log Exports the System Log.
Help Opens right-sensitive help for the currently selected item. If no specific help is available for the selected item, then more general right help is displayed.
Activity Window Right Menu Commands You can directly issue commands by right-clicking one of the tasks listed in the Activity window.
Right Menu Item Description
Continue Tasks
Continues all or part of a task that has stopped. The task may have stopped because it has reached a hold Action in its Production Plan, or because it has been aborted, rejected, or in error.
Hold Tasks Puts the selected task(s) on hold.
Help Opens right-sensitive help for the currently selected item. If no specific help is available for the selected item, then more general right help is displayed.

AccurioPro WideDirector 3.5 Reference Guide
431

Published by Konica Minolta
Version 3.5.2


