Embed Size (px)
Citation preview


CLASSROOM IN A BOOK® The official training workbook from AdobeBrie Gyncild and Lisa Fridsma
After Effects CCAdobe
2017 release

Adobe After Effects CC Classroom in a Book (2017 release)
© 2017 Adobe. All rights reserved.
If this guide is distributed with software that includes an end user license agreement, this guide, as well as the software described in it, is furnished under license and may be used or copied only in accordance with the terms of such license. Except as permitted by any such license, no part of this guide may be repro-duced, stored in a retrieval system, or transmitted, in any form or by any means, electronic, mechanical, recording, or otherwise, without the prior written permission of Adobe Systems Incorporated. Please note that the content in this guide is protected under copyright law even if it is not distributed with software that includes an end user license agreement.
The content of this guide is furnished for informational use only, is subject to change without notice, and should not be construed as a commitment by Adobe Systems Incorporated. Adobe Systems Incorporated assumes no responsibility or liability for any errors or inaccuracies that may appear in the informational content contained in this guide.
Please remember that existing artwork or images that you may want to include in your project may be protected under copyright law. The unauthorized incorporation of such material into your new work could be a violation of the rights of the copyright owner. Please be sure to obtain any permission required from the copyright owner.
Any references to company names in sample files are for demonstration purposes only and are not intended to refer to any actual organization.
Adobe, the Adobe logo, Adobe Media Encoder, Adobe Premiere, After Effects, Audition, Classroom in a Book, Creative Cloud, Illustrator, InDesign, Photoshop, and SpeedGrade are either registered trademarks or trademarks of Adobe Systems Incorporated in the United States and/or other countries. Adobe product screenshots reprinted with permission from Adobe Systems Incorporated.
Apple, Mac OS, and QuickTime are trademarks of Apple, registered in the U.S. and other countries. Microsoft and Windows are trademarks of Microsoft Corporation registered in the U.S. and/or other countries. All other trademarks are the property of their respective owners.
Adobe Systems Incorporated, 345 Park Avenue, San Jose, California 95110-2704, USA
Notice to U.S. Government End Users. The Software and Documentation are “Commercial Items,” as that term is defined at 48 C.F.R. §2.101, consisting of “Commercial Computer Software” and “Commercial Computer Software Documentation,” as such terms are used in 48 C.F.R. §12.212 or 48 C.F.R. §227.7202, as applicable. Consistent with 48 C.F.R. §12.212 or 48 C.F.R. §§227.7202-1 through 227.7202-4, as applica-ble, the Commercial Computer Software and Commercial Computer Software Documentation are being licensed to U.S. Government end users (a) only as Commercial Items and (b) with only those rights as are granted to all other end users pursuant to the terms and conditions herein. Unpublished-rights reserved under the copyright laws of the United States. Adobe Systems Incorporated, 345 Park Avenue, San Jose, CA 95110-2704, USA. For U.S. Government End Users, Adobe agrees to comply with all applicable equal opportunity laws including, if appropriate, the provisions of Executive Order 11246, as amended, Section 402 of the Vietnam Era Veterans Readjustment Assistance Act of 1974 (38 USC 4212), and Section 503 of the Rehabilitation Act of 1973, as amended, and the regulations at 41 CFR Parts 60-1 through 60-60, 60-250, and 60-741. The affirmative action clause and regulations contained in the preceding sentence shall be incorporated by reference.
Adobe Press books are published by Peachpit, a division of Pearson Education located in San Francisco, California. For the latest on Adobe Press books, go to www.adobepress.com. To report errors, please send a note to [email protected]. For information on getting permission for reprints and excerpts, contact [email protected].
Cover illustration: Alexey Romanowski (Ukraine), behance.net/romanovski
Printed and bound in the United States of America
ISBN-13: 978-0-13-466532-0 ISBN-10: 0-13-466532-5
9 8 7 6 5 4 3 2 1

CONTENTS
iv CONTENTS
GETTING STARTED 1
About Classroom in a Book . . . . . . . . . . . . . . . . . . . . . . . . . . . . . . . . . . 1
Prerequisites . . . . . . . . . . . . . . . . . . . . . . . . . . . . . . . . . . . . . . . . . . . . . . . . 1
Installing After Effects and Bridge . . . . . . . . . . . . . . . . . . . . . . . . . . . 2
Optimizing performance . . . . . . . . . . . . . . . . . . . . . . . . . . . . . . . . . . . . 2
Restoring default preferences . . . . . . . . . . . . . . . . . . . . . . . . . . . . . . . 2
Online content . . . . . . . . . . . . . . . . . . . . . . . . . . . . . . . . . . . . . . . . . . . . . 3
How to use these lessons . . . . . . . . . . . . . . . . . . . . . . . . . . . . . . . . . . . 5
Additional resources . . . . . . . . . . . . . . . . . . . . . . . . . . . . . . . . . . . . . . . . 5
Adobe Authorized Training Centers . . . . . . . . . . . . . . . . . . . . . . . . . . 6
1 GETTING TO KNOW THE WORKFLOW 8
About the After Effects work area . . . . . . . . . . . . . . . . . . . . . . . . . . . 10
Getting started . . . . . . . . . . . . . . . . . . . . . . . . . . . . . . . . . . . . . . . . . . . . 11
Creating a project and importing footage . . . . . . . . . . . . . . . . . . 11
Creating a composition and arranging layers . . . . . . . . . . . . . . . 15
About layers . . . . . . . . . . . . . . . . . . . . . . . . . . . . . . . . . . . . . . . . . . . . . . . 17
Adding effects and modifying layer properties . . . . . . . . . . . . . . 18
Animating the composition . . . . . . . . . . . . . . . . . . . . . . . . . . . . . . . . 22
About the Tools panel . . . . . . . . . . . . . . . . . . . . . . . . . . . . . . . . . . . . . . 24
About timecode and duration . . . . . . . . . . . . . . . . . . . . . . . . . . . . . . 26
About the Timeline panel . . . . . . . . . . . . . . . . . . . . . . . . . . . . . . . . . . 27
Previewing your work . . . . . . . . . . . . . . . . . . . . . . . . . . . . . . . . . . . . . . 30
Optimizing performance in After Effects . . . . . . . . . . . . . . . . . . . . 32
Rendering and exporting your composition . . . . . . . . . . . . . . . . 32
Customizing workspaces . . . . . . . . . . . . . . . . . . . . . . . . . . . . . . . . . . . 32
Controlling the brightness of the user interface . . . . . . . . . . . . 35
Finding resources for using After Effects . . . . . . . . . . . . . . . . . . . . 36
Review questions and answers . . . . . . . . . . . . . . . . . . . . . . . . . . . . . 37

ADOBE AFTER EFFECTS CC CLASSROOM IN A BOOK 2017 RELEASE v
2 CREATING A BASIC ANIMATION USING EFFECTS AND PRESETS 38
Getting started . . . . . . . . . . . . . . . . . . . . . . . . . . . . . . . . . . . . . . . . . . . . 40
Importing footage using Adobe Bridge . . . . . . . . . . . . . . . . . . . . . 41
Creating a new composition . . . . . . . . . . . . . . . . . . . . . . . . . . . . . . . 43
Working with imported Illustrator layers . . . . . . . . . . . . . . . . . . . . 46
Applying effects to a layer . . . . . . . . . . . . . . . . . . . . . . . . . . . . . . . . . . 47
Applying and controlling effects . . . . . . . . . . . . . . . . . . . . . . . . . . . 48
Applying an animation preset . . . . . . . . . . . . . . . . . . . . . . . . . . . . . . 50
Previewing the effects . . . . . . . . . . . . . . . . . . . . . . . . . . . . . . . . . . . . . 52
Adding transparency . . . . . . . . . . . . . . . . . . . . . . . . . . . . . . . . . . . . . . 53
Rendering the composition . . . . . . . . . . . . . . . . . . . . . . . . . . . . . . . . 54
Review questions and answers . . . . . . . . . . . . . . . . . . . . . . . . . . . . . 57
3 ANIMATING TEXT 58
Getting started . . . . . . . . . . . . . . . . . . . . . . . . . . . . . . . . . . . . . . . . . . . . 60
About text layers . . . . . . . . . . . . . . . . . . . . . . . . . . . . . . . . . . . . . . . . . . 62
Installing a font using Typekit . . . . . . . . . . . . . . . . . . . . . . . . . . . . . . 62
Creating and formatting point text . . . . . . . . . . . . . . . . . . . . . . . . . 65
Using a text animation preset . . . . . . . . . . . . . . . . . . . . . . . . . . . . . . 67
Animating with scale keyframes . . . . . . . . . . . . . . . . . . . . . . . . . . . . 70
Animating using parenting . . . . . . . . . . . . . . . . . . . . . . . . . . . . . . . . . 72
About parent and child layers . . . . . . . . . . . . . . . . . . . . . . . . . . . . . . 73
Animating imported Photoshop text . . . . . . . . . . . . . . . . . . . . . . . 74
Animating type tracking . . . . . . . . . . . . . . . . . . . . . . . . . . . . . . . . . . . 77
Animating text opacity . . . . . . . . . . . . . . . . . . . . . . . . . . . . . . . . . . . . . 79
Using a text animator group . . . . . . . . . . . . . . . . . . . . . . . . . . . . . . . 80
About text animator groups . . . . . . . . . . . . . . . . . . . . . . . . . . . . . . . . 81
Animating a layer’s position . . . . . . . . . . . . . . . . . . . . . . . . . . . . . . . . 83
Timing layer animations . . . . . . . . . . . . . . . . . . . . . . . . . . . . . . . . . . . . 85
Adding motion blur . . . . . . . . . . . . . . . . . . . . . . . . . . . . . . . . . . . . . . . . 86
Review questions and answers . . . . . . . . . . . . . . . . . . . . . . . . . . . . . 87
4 WORKING WITH SHAPE LAYERS 88
Getting started . . . . . . . . . . . . . . . . . . . . . . . . . . . . . . . . . . . . . . . . . . . . 90
Adding a shape layer . . . . . . . . . . . . . . . . . . . . . . . . . . . . . . . . . . . . . . . 92
Creating custom shapes. . . . . . . . . . . . . . . . . . . . . . . . . . . . . . . . . . . . 97
Duplicating shapes . . . . . . . . . . . . . . . . . . . . . . . . . . . . . . . . . . . . . . . . 99

Duplicating and modifying a composition . . . . . . . . . . . . . . . . . 102
Positioning layers with snapping . . . . . . . . . . . . . . . . . . . . . . . . . . 103
Adding compositions to a 3D project . . . . . . . . . . . . . . . . . . . . . . 106
Adding the finishing touches . . . . . . . . . . . . . . . . . . . . . . . . . . . . . . 110
Extra credit . . . . . . . . . . . . . . . . . . . . . . . . . . . . . . . . . . . . . . . . . . . . . . . 112
Review questions and answers . . . . . . . . . . . . . . . . . . . . . . . . . . . . 113
5 ANIMATING A MULTIMEDIA PRESENTATION 114
Getting started . . . . . . . . . . . . . . . . . . . . . . . . . . . . . . . . . . . . . . . . . . . 116
Using Creative Cloud Libraries in After Effects . . . . . . . . . . . . . . 117
Adjusting anchor points . . . . . . . . . . . . . . . . . . . . . . . . . . . . . . . . . . 119
Parenting layers . . . . . . . . . . . . . . . . . . . . . . . . . . . . . . . . . . . . . . . . . . 121
Precomposing layers . . . . . . . . . . . . . . . . . . . . . . . . . . . . . . . . . . . . . 122
Keyframing a motion path . . . . . . . . . . . . . . . . . . . . . . . . . . . . . . . . 125
Animating additional elements . . . . . . . . . . . . . . . . . . . . . . . . . . . . 129
Applying an effect . . . . . . . . . . . . . . . . . . . . . . . . . . . . . . . . . . . . . . . . 133
About solid-color layers . . . . . . . . . . . . . . . . . . . . . . . . . . . . . . . . . . . 134
Animating precomposed layers . . . . . . . . . . . . . . . . . . . . . . . . . . . 137
Animating the background . . . . . . . . . . . . . . . . . . . . . . . . . . . . . . . 139
Adding an audio track . . . . . . . . . . . . . . . . . . . . . . . . . . . . . . . . . . . . 140
Supported audio file formats . . . . . . . . . . . . . . . . . . . . . . . . . . . . . . 141
Editing audio files in Adobe Audition . . . . . . . . . . . . . . . . . . . . . . 142
Review questions and answers . . . . . . . . . . . . . . . . . . . . . . . . . . . . 143
6 ANIMATING LAYERS 144
Getting started . . . . . . . . . . . . . . . . . . . . . . . . . . . . . . . . . . . . . . . . . . . 146
Preparing layered Photoshop files . . . . . . . . . . . . . . . . . . . . . . . . . 148
About Photoshop layer styles . . . . . . . . . . . . . . . . . . . . . . . . . . . . . 149
Simulating lighting changes . . . . . . . . . . . . . . . . . . . . . . . . . . . . . . 150
Duplicating an animation using the pick whip . . . . . . . . . . . . . 152
About expressions . . . . . . . . . . . . . . . . . . . . . . . . . . . . . . . . . . . . . . . . 152
Animating movement in the scenery . . . . . . . . . . . . . . . . . . . . . . 154
Adjusting the layers and creating a track matte . . . . . . . . . . . . 158
About track mattes and traveling mattes . . . . . . . . . . . . . . . . . . 159
Animating the shadows . . . . . . . . . . . . . . . . . . . . . . . . . . . . . . . . . . . 162
vi CONTENTS

ADOBE AFTER EFFECTS CC CLASSROOM IN A BOOK 2017 RELEASE vii
Adding a lens flare effect . . . . . . . . . . . . . . . . . . . . . . . . . . . . . . . . . . 164
Adding a video animation . . . . . . . . . . . . . . . . . . . . . . . . . . . . . . . . . 166
Rendering the animation. . . . . . . . . . . . . . . . . . . . . . . . . . . . . . . . . . 167
Retiming the composition . . . . . . . . . . . . . . . . . . . . . . . . . . . . . . . . 168
Review questions and answers . . . . . . . . . . . . . . . . . . . . . . . . . . . . 175
7 WORKING WITH MASKS 176
About masks . . . . . . . . . . . . . . . . . . . . . . . . . . . . . . . . . . . . . . . . . . . . . 178
Getting started . . . . . . . . . . . . . . . . . . . . . . . . . . . . . . . . . . . . . . . . . . . 178
Creating a mask with the Pen tool . . . . . . . . . . . . . . . . . . . . . . . . . 179
Editing a mask . . . . . . . . . . . . . . . . . . . . . . . . . . . . . . . . . . . . . . . . . . . . 180
About mask modes . . . . . . . . . . . . . . . . . . . . . . . . . . . . . . . . . . . . . . . 181
Creating a Bezier mask . . . . . . . . . . . . . . . . . . . . . . . . . . . . . . . . . . . . 184
Feathering the edges of a mask . . . . . . . . . . . . . . . . . . . . . . . . . . . 184
Replacing the content of the mask . . . . . . . . . . . . . . . . . . . . . . . . 185
Zooming and panning by touch . . . . . . . . . . . . . . . . . . . . . . . . . . . 186
Adding a reflection . . . . . . . . . . . . . . . . . . . . . . . . . . . . . . . . . . . . . . . 188
Creating a vignette . . . . . . . . . . . . . . . . . . . . . . . . . . . . . . . . . . . . . . . 192
Using the Rectangle and Ellipse tools . . . . . . . . . . . . . . . . . . . . . . 194
Adjusting the timing . . . . . . . . . . . . . . . . . . . . . . . . . . . . . . . . . . . . . . 194
Tips for creating masks . . . . . . . . . . . . . . . . . . . . . . . . . . . . . . . . . . . . 195
Trimming the work area . . . . . . . . . . . . . . . . . . . . . . . . . . . . . . . . . . . 196
Review questions and answers . . . . . . . . . . . . . . . . . . . . . . . . . . . . 197
8 DISTORTING OBJECTS WITH THE PUPPET TOOLS 198
Getting started . . . . . . . . . . . . . . . . . . . . . . . . . . . . . . . . . . . . . . . . . . . 200
About the Puppet tools . . . . . . . . . . . . . . . . . . . . . . . . . . . . . . . . . . . 204
Adding Deform pins . . . . . . . . . . . . . . . . . . . . . . . . . . . . . . . . . . . . . . 204
Defining areas of overlap . . . . . . . . . . . . . . . . . . . . . . . . . . . . . . . . . . 206
Stiffening an area . . . . . . . . . . . . . . . . . . . . . . . . . . . . . . . . . . . . . . . . . 207
Animating pin positions. . . . . . . . . . . . . . . . . . . . . . . . . . . . . . . . . . . 208
Squash and stretch . . . . . . . . . . . . . . . . . . . . . . . . . . . . . . . . . . . . . . . 208
Recording animation. . . . . . . . . . . . . . . . . . . . . . . . . . . . . . . . . . . . . . 212
Act it out with Adobe Character Animator . . . . . . . . . . . . . . . . . 213
Review questions and answers . . . . . . . . . . . . . . . . . . . . . . . . . . . . 215

9 USING THE ROTO BRUSH TOOL 216
About rotoscoping . . . . . . . . . . . . . . . . . . . . . . . . . . . . . . . . . . . . . . . . 218
Getting started . . . . . . . . . . . . . . . . . . . . . . . . . . . . . . . . . . . . . . . . . . . 218
Creating a segmentation boundary . . . . . . . . . . . . . . . . . . . . . . . . 220
Using Adobe Premiere Pro with After Effects . . . . . . . . . . . . . . . 220
Fine-tuning the matte . . . . . . . . . . . . . . . . . . . . . . . . . . . . . . . . . . . . 227
Refine Soft Matte and Refine Hard Matte effects . . . . . . . . . . . 228
Freezing your Roto Brush tool results . . . . . . . . . . . . . . . . . . . . . . 229
Changing the background . . . . . . . . . . . . . . . . . . . . . . . . . . . . . . . . 230
Adding animated text . . . . . . . . . . . . . . . . . . . . . . . . . . . . . . . . . . . . . 232
Outputting your project. . . . . . . . . . . . . . . . . . . . . . . . . . . . . . . . . . . 234
Extra credit . . . . . . . . . . . . . . . . . . . . . . . . . . . . . . . . . . . . . . . . . . . . . . . 235
Review questions and answers . . . . . . . . . . . . . . . . . . . . . . . . . . . . 237
10 PERFORMING COLOR CORRECTION 238
Getting started . . . . . . . . . . . . . . . . . . . . . . . . . . . . . . . . . . . . . . . . . . . 240
Previewing your project on a video monitor . . . . . . . . . . . . . . . 242
Adjusting color balance with levels . . . . . . . . . . . . . . . . . . . . . . . . 243
Adjusting color balance with Color Finesse 3 . . . . . . . . . . . . . . . 245
Replacing the background . . . . . . . . . . . . . . . . . . . . . . . . . . . . . . . . 249
Color-correcting using Auto Levels . . . . . . . . . . . . . . . . . . . . . . . . 253
Motion tracking the clouds . . . . . . . . . . . . . . . . . . . . . . . . . . . . . . . . 254
Replacing the sky in the second clip . . . . . . . . . . . . . . . . . . . . . . . 255
Color grading . . . . . . . . . . . . . . . . . . . . . . . . . . . . . . . . . . . . . . . . . . . . . 259
Extra Credit . . . . . . . . . . . . . . . . . . . . . . . . . . . . . . . . . . . . . . . . . . . . . . 263
Review questions and answers . . . . . . . . . . . . . . . . . . . . . . . . . . . . 265
11 USING 3D FEATURES 266
Getting started . . . . . . . . . . . . . . . . . . . . . . . . . . . . . . . . . . . . . . . . . . . 268
Creating 3D text . . . . . . . . . . . . . . . . . . . . . . . . . . . . . . . . . . . . . . . . . . 269
Using 3D views . . . . . . . . . . . . . . . . . . . . . . . . . . . . . . . . . . . . . . . . . . . 271
Importing a background . . . . . . . . . . . . . . . . . . . . . . . . . . . . . . . . . . 273
Adding 3D lights . . . . . . . . . . . . . . . . . . . . . . . . . . . . . . . . . . . . . . . . . . 274
Adding a camera. . . . . . . . . . . . . . . . . . . . . . . . . . . . . . . . . . . . . . . . . . 279
Extruding text in After Effects . . . . . . . . . . . . . . . . . . . . . . . . . . . . . 282
viii CONTENTS

ADOBE AFTER EFFECTS CC CLASSROOM IN A BOOK 2017 RELEASE ix
Working with Cinema 4D Lite . . . . . . . . . . . . . . . . . . . . . . . . . . . . . 283
Integrating the C4D layer in After Effects . . . . . . . . . . . . . . . . . . . 290
Finishing the project . . . . . . . . . . . . . . . . . . . . . . . . . . . . . . . . . . . . . . 292
Review questions and answers . . . . . . . . . . . . . . . . . . . . . . . . . . . . 293
12 WORKING WITH THE 3D CAMERA TRACKER 294
About the 3D Camera Tracker effect . . . . . . . . . . . . . . . . . . . . . . . 296
Getting started . . . . . . . . . . . . . . . . . . . . . . . . . . . . . . . . . . . . . . . . . . . 296
Repairing rolling shutter distortions . . . . . . . . . . . . . . . . . . . . . . . 298
Tracking the footage . . . . . . . . . . . . . . . . . . . . . . . . . . . . . . . . . . . . . . 299
Creating a ground plane, a camera, and the initial text . . . . . 300
Creating realistic shadows. . . . . . . . . . . . . . . . . . . . . . . . . . . . . . . . . 305
Adding ambient light . . . . . . . . . . . . . . . . . . . . . . . . . . . . . . . . . . . . . 307
Creating additional text elements . . . . . . . . . . . . . . . . . . . . . . . . . 308
Locking a layer to a plane with a null object. . . . . . . . . . . . . . . . 310
Animating the text . . . . . . . . . . . . . . . . . . . . . . . . . . . . . . . . . . . . . . . . 312
Adjusting the camera’s depth of field . . . . . . . . . . . . . . . . . . . . . . 314
Rendering the composition . . . . . . . . . . . . . . . . . . . . . . . . . . . . . . . 316
Review questions and answers . . . . . . . . . . . . . . . . . . . . . . . . . . . . 317
13 ADVANCED EDITING TECHNIQUES 318
Getting started . . . . . . . . . . . . . . . . . . . . . . . . . . . . . . . . . . . . . . . . . . . 320
Using Warp Stabilizer VFX . . . . . . . . . . . . . . . . . . . . . . . . . . . . . . . . . 320
Bicubic scaling . . . . . . . . . . . . . . . . . . . . . . . . . . . . . . . . . . . . . . . . . . . . 321
Warp Stabilizer VFX settings . . . . . . . . . . . . . . . . . . . . . . . . . . . . . . . 323
Using single-point motion tracking . . . . . . . . . . . . . . . . . . . . . . . . 325
Checking for drift . . . . . . . . . . . . . . . . . . . . . . . . . . . . . . . . . . . . . . . . . 329
Moving and resizing the track points . . . . . . . . . . . . . . . . . . . . . . 330
Using multipoint tracking . . . . . . . . . . . . . . . . . . . . . . . . . . . . . . . . . 331
mocha for After Effects . . . . . . . . . . . . . . . . . . . . . . . . . . . . . . . . . . . . 335
Creating a particle simulation . . . . . . . . . . . . . . . . . . . . . . . . . . . . . 336
Understanding Particle Systems II properties . . . . . . . . . . . . . . 338
About high dynamic range (HDR) footage . . . . . . . . . . . . . . . . . 345
Review questions and answers . . . . . . . . . . . . . . . . . . . . . . . . . . . . 351
14 RENDERING AND OUTPUTTING 352
Getting started . . . . . . . . . . . . . . . . . . . . . . . . . . . . . . . . . . . . . . . . . . . 354
Creating templates for the Render Queue. . . . . . . . . . . . . . . . . . 355
About compression . . . . . . . . . . . . . . . . . . . . . . . . . . . . . . . . . . . . . . . 359
Exporting using the Render Queue . . . . . . . . . . . . . . . . . . . . . . . . 360
Preparing movies for mobile devices . . . . . . . . . . . . . . . . . . . . . . 362
Rendering movies with Adobe Media Encoder . . . . . . . . . . . . . 363
Preparing a movie for broadcast output . . . . . . . . . . . . . . . . . . . 370
Review questions and answers . . . . . . . . . . . . . . . . . . . . . . . . . . . . 371
APPENDIX: GENERAL KEYBOARD SHORTCUTS 373
INDEX 375
x CONTENTS

ADOBE AFTER EFFECTS CC CLASSROOM IN A BOOK 2017 RELEASE 1
Adobe After Effects CC provides a comprehensive set of 2D and 3D tools for compositing, animation, and effects that motion-graphics professionals, visual effects artists, web designers, and film and video professionals need. After Effects is widely used for digital post-production of film, video, DVD, and the web. You can composite layers in various ways, apply and combine sophisticated visual and audio effects, and animate both objects and effects.
About Classroom in a BookAdobe After Effects CC Classroom in a Book (2017 release) is part of the official training series for Adobe graphics and publishing software, developed with the support of Adobe product experts. �e lessons are designed to let you learn at your own pace. If you’re new to Adobe After Effects, you’ll learn the fundamental concepts and features you’ll need to master the program. And if you’ve been using Adobe After Effects for a while, you’ll find that Classroom in a Book teaches many advanced features, including tips and techniques for using the latest version.
Although each lesson provides step-by-step instructions for creating a specific project, there’s room for exploration and experimentation. You can follow the book from start to finish, or do only the lessons that match your interests and needs. Each lesson concludes with a review section summarizing what you’ve covered.
PrerequisitesBefore beginning to use Adobe After Effects CC Classroom in a Book (2017 release), make sure that your system is set up correctly and that you’ve installed the required software and hardware. You should have a working knowledge of your computer and operating system. You should know how to use the mouse and standard menus and commands, and also how to open, save, and close files. If you need to review these techniques, see the printed or online documentation included with your Microsoft® Windows® or Apple® Mac® OS software.
GETTING STARTED

2 GETTING STARTED
To complete the lessons in this book, you’ll need to have both Adobe After Effects CC (2017 release) and Adobe Bridge CC installed. The exercises in this book are based on After Effects CC (2017 release).
Installing After Effects and BridgeAdobe After Effects CC is not included with the book; you must purchase it sepa-rately from Adobe Creative Cloud. For system requirements and complete instruc-tions on installing the software, visit www.adobe.com/support. Note that After Effects CC requires a 64-bit operating system and OpenGL 3.3 support. To view QuickTime movies on Mac OS, you must also have Apple QuickTime 7.6.6 or later installed on your system.
Some of the lessons in this book use Adobe Bridge. After Effects and Bridge use separate installers. You must install these applications from Adobe Creative Cloud (adobe.com) onto your hard disk. Follow the onscreen instructions.
Optimizing performanceCreating movies is memory-intensive work for a desktop computer. After Effects CC (2017 release) requires a minimum of 4GB of RAM. The more RAM that is available to After Effects, the faster the application will work for you. For information about optimizing memory, cache, and other settings for After Effects, see “Improve performance” in After Effects Help.
Restoring default preferencesThe preferences files control the way the After Effects user interface appears on your screen. The instructions in this book assume that you see the default interface when they describe the appearance of tools, options, windows, panels, and so forth. Therefore, it’s a good idea to restore the default preferences, especially if you are new to After Effects.
Each time you quit After Effects, the panel positions and certain command settings are recorded in the preferences files. To restore the original default settings, press Ctrl+Alt+Shift (Windows) or Command+Option+Shift (Mac OS) while starting After Effects. (After Effects creates new preferences files if they don’t already exist the next time you start the program.)
Restoring the default preferences can be especially helpful if someone has already customized After Effects on your computer. If your copy of After Effects hasn’t been used yet, these files won’t exist, so this procedure is unnecessary.

ADOBE AFTER EFFECTS CC CLASSROOM IN A BOOK 2017 RELEASE 3
Important: If you want to save the current settings, you can rename a preferences file instead of deleting it. When you are ready to restore those settings, change the name back, and make sure that the file is located in the correct preferences folder.
1 Locate the After Effects preferences folder on your computer:
• For Windows: .../Users/<user name>/AppData/Roaming/Adobe/AfterEffects/14.0
• For Mac OS: .../Users/<user name>/Library/Preferences/Adobe/After Effects/14.0
2 Rename any preferences files you want to preserve, and then restart After Effects.
Online contentYour purchase of this Classroom in a Book includes online materials provided by way of your Account page on peachpit.com. �ese include:
Lesson filesTo work through the projects in this book, you will need to download the lesson files from peachpit.com. You can download the files for individual lessons or it may be possible to download them all in a single file.
Web Edition�e Web Edition is an online interactive version of the book providing an enhanced learning experience. Your Web Edition can be accessed from any device with a con-nection to the Internet and it contains:
• �e complete text of the book
• Hours of instructional video keyed to the text
• Interactive quizzes
In addition, the Web Edition may be updated when Adobe adds significant feature updates between major Creative Cloud releases. To accommodate the changes, sec-tions of the online book may be updated or new sections may be added.
Accessing the lesson files and Web EditionIf you purchased an eBook from peachpit.com or adobepress.com, your Web Edition will automatically appear under the Digital Purchases tab on your Account page. Click the Launch link to access the product. Continue reading to learn how to register your product to get access to the lesson files.
� Note: In Mac OS 10.7 and later, the user library folder is hidden by default. To see it, in the Finder, choose Go > Go To Folder. In the Go To Folder dialog box, type ~/Library, and then click Go.

4 GETTING STARTED
If you purchased an eBook from a different vendor or you bought a print book, you must register your purchase on peachpit.com in order to access the online content:
1 Go to www.peachpit.com/register.
2 Sign in or create a new account.
3 Enter ISBN: 9780134665320.
4 Answer the questions as proof of purchase.
5 �e Web Edition will appear under the Digital Purchases tab on your Account page. Click the Launch link to access the product.
�e Lesson Files can be accessed through the Registered Products tab on your Account page. Click the Access Bonus Content link below the title of your product to proceed to the download page. Click the lesson file links to download them to your computer.
Organizing the lesson files�e files are compressed into ZIP archives to speed download time and protect the contents from damage during transfer. You must uncompress (or “unzip”) the files to restore them to their original size and format before you use them with the book. Modern Mac and Windows systems are set up to open ZIP archives by simply double-clicking.
1 On your hard drive, create a new folder in a convenient location and give it the name “Lessons,” following the standard procedure for your operating system:
• In Windows, right-click, and choose New > Folder. �en enter the new name for your folder.
• In Mac OS, in the Finder, choose File > New Folder. Type the new name, and drag the folder to the location you want to use.
2 Drag the unzipped Lessons folder (which contains folders named Lesson01, Lesson02, and so on) that you downloaded onto your hard drive to your new Lessons folder. When you begin each lesson, navigate to the folder with that lesson number to access all the assets you need to complete the lesson.
About copying the sample movies and projectsYou will create and render one or more movies in some lessons in this book. �e files in the Sample_Movies folders are examples that you can use to see the end results of each lesson and to compare them with your own results.
� Note: If for any reason you need to download fresh copies of the lesson files, you can download them from your account again at any time.

ADOBE AFTER EFFECTS CC CLASSROOM IN A BOOK 2017 RELEASE 5
�e files in the End_Project_File folders are samples of the completed project for each lesson. Use these files for reference if you want to compare your work in prog-ress with the project files used to generate the sample movies. �ese end-project files vary in size from relatively small to a couple of megabytes, so you can either download them all now if you have ample storage space, or download just the end-project file for each lesson as needed, and then delete it when you finish that lesson.
How to use these lessonsEach lesson in this book provides step-by-step instructions for creating one or more specific elements of a real-world project. �e lessons build on each other in terms of concepts and skills, so the best way to learn from this book is to proceed through the lessons in sequential order. In this book, some techniques and processes are explained and described in detail only the first few times you perform them.
Many aspects of the After Effects application can be controlled by multiple tech-niques, such as a menu command, a button, dragging, and a keyboard shortcut. Only one or two of the methods are described in any given procedure, so that you can learn different ways of working even when the task is one you’ve done before.
�e organization of the lessons is also design-oriented rather than feature-oriented. �at means, for example, that you’ll work with layers and effects on real-world design projects over several lessons, rather than in just one lesson.
Additional resourcesAdobe After Effects CC Classroom in a Book (2017 release) is not meant to replace documentation that comes with the program or to be a comprehensive reference for every feature. Only the commands and options used in the lessons are explained in this book. For comprehensive information about program features and tutorials, refer to these resources:
• Adobe After Effects Learn & Support: helpx.adobe.com/after-effects.html is where you can find and browse tutorials, help, and support on Adobe.com.
• After Effects Forums: forums.adobe.com/community/aftereffects_general_discussion lets you tap into peer-to-peer discussions, and questions and answers about After Effects.
• Adobe Create Magazine: create.adobe.com offers thoughtful articles on design and design issues, a gallery showcasing the work of top-notch designers, tutorials, and more.

6 GETTING STARTED
• Resources for educators: www.adobe.com/education and edex.adobe.com offer a treasure trove of information for instructors who teach classes on Adobe software. Find solutions for education at all levels, including free curricula that use an integrated approach to teaching Adobe software and can be used to prepare for the Adobe Certified Associate exams.
Also check out these useful links:
• Adobe Add-ons: creative.adobe.com/addons is a central resource for finding tools, services, extensions, code samples, and more to supplement and extend your Adobe products.
• Adobe After Effects CC product home page: www.adobe.com/products/aftereffects
Adobe Authorized Training CentersAdobe Authorized Training Centers offer instructor-led courses and training on Adobe products. A directory of AATCs is available at training.adobe.com/trainingpartners.

This page intentionally left blank
88
WORKING WITH SHAPE LAYERS
Lesson overviewIn this lesson, you’ll learn how to do the following:
• Create custom shapes.
• Customize a shape’s fill and stroke.
• Use path operations to transform shapes.
• Animate shapes.
• Repeat shapes.
• Snap layers into alignment.
• Use an expression to animate properties in time with audio.
�is lesson will take approximately an hour to complete. Download the project files for this lesson, following the instructions in the Getting Started section under “Accessing the lesson files and Web Edition,” if you haven’t already done so. As you work on this lesson, you’ll preserve the start files. If you need to restore the start files, download them from your Account page.
4

89
Shape layers make it easy to create expressive backgrounds and intriguing results. You can animate shapes, apply animation presets, and add Repeaters to intensify their impact.
PROJECT: SEQUENCE FROM A MUSIC VIDEO

90 LESSON 4 Working with Shape Layers
Getting startedShape layers are created automatically when you draw a shape with any of the drawing tools. You can customize and transform an individual shape or its entire layer to create interesting results. In this lesson, you will use shape layers to build dynamic and whimsical designs on the street and driveways of a neighborhood.
First, you’ll preview the final movie and set up the project.
1 Make sure the following files are in the Lessons/Lesson04 folder on your hard disk, or download them from your Account page at www.peachpit.com now:
• In the Assets folder: Beat.aif, drop.aep, Melody.aif, tracking.aep, Tracking.mp4
• In the Sample_Movies folder: Lesson04.avi, Lesson04.mov
2 Open and play the Lesson04.avi sample movie in Windows Media Player or the Lesson04.mov sample movie in QuickTime Player to see what you will create in this lesson. When you are done, close Windows Media Player or QuickTime Player. You may delete the sample movies from your hard disk if you have limited storage space.
As you start After Effects, restore the default application settings. See “Restoring default preferences” on page 2.
3 Start After Effects, and then immediately hold down Ctrl+Alt+Shift (Windows) or Command+Option+Shift (Mac OS) to restore default preferences settings. When prompted, click OK to delete your preferences.
4 Close the Start window.
After Effects opens to display a blank, untitled project.
5 Choose File > Save As > Save As, and then navigate to the Lessons/Lesson04/Finished_Project folder.
6 Name the project Lesson04_Finished.aep, and then click Save.
Creating the compositionNext, you’ll import the files you need and create the composition. You’ll import two footage items and two saved project files.
1 Double-click an empty area of the Project panel to open the Import File dialog box.
2 Navigate to the Lessons/Lesson04/Assets folder on your hard disk, Ctrl-click (Windows) or Command-click (Mac OS) to select the Beat.aif and Melody.aif files, and then click Import or Open.
ADOBE AFTER EFFECTS CC CLASSROOM IN A BOOK 2017 RELEASE 91
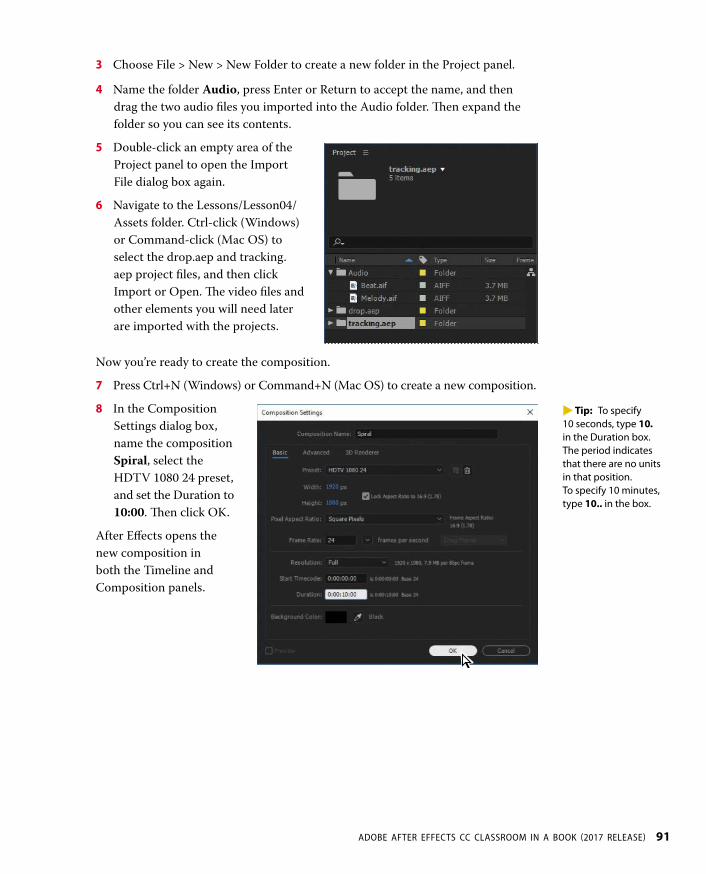
3 Choose File > New > New Folder to create a new folder in the Project panel.
4 Name the folder Audio, press Enter or Return to accept the name, and then drag the two audio files you imported into the Audio folder. �en expand the folder so you can see its contents.
5 Double-click an empty area of the Project panel to open the Import File dialog box again.
6 Navigate to the Lessons/Lesson04/Assets folder. Ctrl-click (Windows) or Command-click (Mac OS) to select the drop.aep and tracking.aep project files, and then click Import or Open. �e video files and other elements you will need later are imported with the projects.
Now you’re ready to create the composition.
7 Press Ctrl+N (Windows) or Command+N (Mac OS) to create a new composition.
8 In the Composition Settings dialog box, name the composition Spiral, select the HDTV 1080 24 preset, and set the Duration to 10:00. �en click OK.
After Effects opens the new composition in both the Timeline and Composition panels.
� Tip: To specify 10 seconds, type 10. in the Duration box. The period indicates that there are no units in that position. To specify 10 minutes, type 10.. in the box.

92 LESSON 4 Working with Shape Layers
Adding a shape layerAfter Effects includes five shape tools: Rectangle, Rounded Rectangle, Ellipse, Polygon, and Star. When you draw a shape directly in the Composition panel, After Effects adds a new shape layer to the composition. You can apply stroke and fill settings to a shape, modify its path, and apply animation presets. Shape attributes are all represented in the Timeline panel, and you can animate each setting over time.
�e same drawing tools can create both shapes and masks. Masks are applied to lay-ers to hide or reveal areas or as input into effects; shapes have their own layers. When you select a drawing tool, you can specify whether the tool draws a shape or a mask.
Drawing a shapeYou’ll begin by drawing a rectangle with a fill and stroke.
1 Select the Rectangle tool ( ).
2 Choose Fit from the Magnification Ratio pop-up menu at the bottom of the Composition panel so that you can see the entire composition.
3 Click the Info panel’s title bar to open it. Using the values in the Info panel to guide you, position the cursor at approximately 950, 540, which is near the center of the Composition panel. (You may need to widen the Info panel to see the X and Y coordinates.)
4 Drag down and to the right to create a rectangle. Again, watch the Info panel. �e bottom (B) value should be approximately 40 pixels and the right side (R) value should be about 400 pixels. �e shape appears in the Composition panel, and After Effects adds a shape layer named Shape Layer 1 to the Timeline panel.

ADOBE AFTER EFFECTS CC CLASSROOM IN A BOOK 2017 RELEASE 93
5 Select the Shape Layer 1 layer name, press Enter or Return, change the layer name to Spiral, and press Enter or Return to accept the change.
Applying a fill and strokeYou can change the color of a shape by modifying its Fill settings in the Tools panel. Clicking the word Fill opens the Fill Options dialog box, where you can select the kind of fill, its blending mode, and its opacity. Clicking the Fill Color box opens the Adobe Color Picker if the fill is solid, or the Gradient Editor if the fill is a gradient.
Similarly, you can change the stroke color and width of a shape by modifying its Stroke settings in the Tools panel. Click the word Stroke to open the Stroke Options dialog box; click the Stroke Color box to select a color.
1 Select Rectangle 1 in the Timeline panel.
2 Click the Fill Color box (next to Fill) to open the Shape Fill Color dialog box.
3 Change the color to a light blue (we used R=0, G=170, B=255), and click OK.
4 Click the Stroke Color box in the Tools panel, change the stroke color to the same light blue color, and then click OK.
5 Choose File > Save to save your work so far.

94 LESSON 4 Working with Shape Layers
Twisting a shape�e rectangle is fine, but it isn’t very exciting. In After Effects, you can easily modify a basic shape into something more complex and interesting. You’ll use the Twist path operation to transform this rectangle into a spiral shape.
As you work with the Twist path operation, keep in mind that it rotates a path more sharply in the center than at the edges. Positive values twist clockwise; negative values twist counterclockwise.
1 In the Timeline panel, open the Add pop-up menu next to Contents in the Spiral layer, and choose Twist.
2 Expand Twist 1.
3 Change the Angle to 220.
�e rectangle changes dramatically. Next, you’ll change the center point of the twist to create a larger spiral.

ADOBE AFTER EFFECTS CC CLASSROOM IN A BOOK 2017 RELEASE 95
4 In the Timeline panel, change the x-axis value for Center to –220.
�e spiral is a bit thin. You’ll change the stroke width to thicken it.
5 Select the Spiral layer in the Timeline panel, and then change the Stroke Width value in the Tools panel to 20 px.
�e center of the spiral has a rounded cap, but the end is square. You’ll change the end so that they match.
6 Expand Stroke 1 to see its properties.
7 Choose Round Join from the Line Join menu.
� Note: If the center of your spiral looks different from ours, you probably drew a slightly larger or smaller rectangle. You can delete what you have and start over with a fresh composition or try adjusting the x-axis value for Center.

96 LESSON 4 Working with Shape Layers
�e spiral looks great. Now you just need to center it, so that it looks natural when it rotates, and then you’ll set up its rotation and add motion blur.
8 Press A to reveal the Anchor Point property for the layer. �en adjust the x-axis and y-axis values until the anchor point is centered in the black center (negative space) of the spiral, just above the center end cap. (�e exact values will vary depending on how you created the initial shape.)
9 Make sure the current-time indicator is at the beginning of the timeline. �en press R to reveal the Rotation property for the layer. Click the stopwatch icon ( ) to create an initial keyframe.
10 Press the End key, or move the current-time indicator to the end of the timeline. Change the Rotation value to 1x+0.0°. With this setting, the shape will rotate once during its ten-second cycle.
11 Click the Motion Blur switch for the layer, and then click the Enable Motion Blur button ( ) at the top of the Timeline panel.
12 Press the spacebar to preview your animation, and press the spacebar again to stop the preview. Choose File > Save to save your work so far.

ADOBE AFTER EFFECTS CC CLASSROOM IN A BOOK 2017 RELEASE 97
Creating custom shapesYou can use the five shape tools to create a wide variety of shapes. However, the real power in using shape layers is that you can draw any shape and manipulate it in a myriad of ways.
Drawing a shape with the Pen toolYou’ll use the Pen tool to draw a shape that resembles a lightning bolt. In order to position it properly in the final project, you’ll create a separate composition for this shape.
1 Press Ctrl+N (Windows) or Command+N (Mac OS) to create a new composition.
2 In the Composition Settings dialog box, name the composition Bolt, select the HDTV 1080 24 preset, set the duration to 10:00, and then click OK.
3 Select the Pen tool ( ) in the Tools panel.
4 In the Composition panel, draw a shape that resembles a lightning bolt, as in the illustration. When you create the first vertex, After Effects automatically adds a shape layer to the Timeline panel.
5 Select Shape Layer 1, press Enter or Return, and change the layer’s name to Bolt. Press Enter or Return to accept the new name.
6 With the Bolt layer selected, click the Fill Color box in the Tools panel, and select a yellow color (we used R=255, G=237, B=0). �en click the Stroke Color box in the Tools panel, and select black (R=0, G=0, B=0).
� Tip: Your lightning bolt doesn’t need to look exactly like ours, but you can use the one in the illustration as a guide. Click an initial vertex at the bottom of the shape, and then click to create each additional point. If you’re not familiar with the Pen tool, you may find the display distracting, as the fill seems to jump around as you draw; ignore the preview until you’ve clicked each vertex and completed the shape.

98 LESSON 4 Working with Shape Layers
7 Change the Stroke Width to 10 px.
Creating a self-animating shapeWiggle Paths turns a smooth shape into a series of jagged peaks and valleys. You’ll use it to make the lightning bolt more electrifying. Because the operation is self-animating, you need to change only a few properties for the entire shape to move on its own.
1 Expand the Bolt layer in the Timeline panel, and choose Wiggle Paths from the Add pop-up menu.
2 Expand Wiggle Paths 1. �en change the Size to 15 and the Detail to 30.
3 Change Wiggles/Second to 24 to speed up the movement.
4 Click the Motion Blur switch for the layer, and then click the Enable Motion Blur button at the top of the Timeline panel. �en hide the layer properties.
5 Move the current-time indicator across the time ruler to see the shape move.

ADOBE AFTER EFFECTS CC CLASSROOM IN A BOOK 2017 RELEASE 99
Duplicating shapesYou could draw a shape multiple times, but it’s easier to duplicate the shape auto-matically. �e Repeater path operation lets you multiply a shape and transform its properties to achieve different results.
You’ll use the Repeater path operation to duplicate a shape that was created in Adobe Illustrator and then pasted into the Path property of a shape layer in the Drop.aep project file.
1 In the Project panel, expand the drop.aep folder, and then double-click the Drop composition to open it.
�e Drop composition opens in the Timeline panel and the Composition panel.
2 Expand the Drop layer and its Contents folder if its properties aren’t visible. �en select Shape 1, and choose Repeater from the Add pop-up menu.
You’re selecting Shape 1 because you want to add the Repeater to the individual shape, not the entire layer.
3 Expand Repeater 1.
4 Change the number of copies to 4.
� Note: Choose Fit from the Magnification Ratio pop-up menu in the Composition window if you don’t see the full shape.

100 LESSON 4 Working with Shape Layers
�e Repeater creates three copies of the shape, for a total of four. You’ll rotate the shapes and then reposition them to create a pinwheel.
5 Expand Transform: Repeater 1.
6 Change the Rotation to 90°.
Because you applied the rotation to the Repeater rather than to the shape, each drop rotates around the layer’s anchor point to a different degree. When you change the Transform properties for the Repeater, the change is multiplied by the number of cop-ies created. In this case, the first shape retains the original value of 0, the second shape rotates 90 degrees, the third shape rotates 180 degrees, and the fourth shape rotates 270 degrees. �e same concept applies to each of the Transform properties.
7 In the Transform: Repeater 1 properties, change the Position to 0, 0.
�e shapes overlap because the anchor point is located in the center of each shape.
8 Change the Anchor Point value to 15, 45.
�e shapes align to form a pinwheel. Now you’ll make the pinwheel rotate.
9 Make sure the current-time indicator is at the beginning of the time ruler. �en, expand the Transform: Shape 1 category, and click the stopwatch icon ( ) next to the Rotation value to create an initial keyframe.
� Note: There are multiple Transform properties in the Timeline panel, applying to different path operators. Make sure you’re selecting the appropriate Transform property for the object or layer you want to affect. In this case, you want to affect only the Repeater.

ADOBE AFTER EFFECTS CC CLASSROOM IN A BOOK 2017 RELEASE 101
10 Press the End key or move the current-time indicator to the end of the time ruler, and change the Rotation value to 2x+0.0°.
11 Drag the current-time indicator across the time ruler to see the pinwheel rotate.
You used the Repeater path operation to duplicate an individual shape. Now you’ll use it to copy all the contents of the layer, turning one pinwheel into eight.
12 In the Timeline panel, hide all the properties under Shape 1. �en select the Drop layer, and choose Repeater from the Add pop-up menu.
13 Expand the new Repeater 1 category, and change the number of copies to 4.
Because you applied the Repeater to the entire layer, the full pinwheel was copied.
14 Expand the Transform: Repeater 1 category, and change the Position values to 450, 0.
�ere are now four pinwheels across the top of the Composition window.

102 LESSON 4 Working with Shape Layers
15 Select the Drop layer, and choose Repeater from the Add pop-up menu again to create the Repeater 2 category.
16 Expand the Repeater 2 category, and change the number of copies to 2. �en expand the Transform: Repeater 2 category, and change the Position values to 0, 575.
By applying another Repeater to the entire layer, you copied the full row of pinwheels.
17 Hide all the properties for the layer.
18 Click the Motion Blur switch for the layer, and then click the Enable Motion Blur button ( ) at the top of the Timeline panel.
19 Press the spacebar to preview eight pinwheels rotating in unison; press the space-bar again to stop the preview. �en choose File > Save to save your work so far.
Duplicating and modifying a compositionYou’ll use the Drop composition as a starting point for a similar composition that uses different fill and stroke options.
1 In the Project panel, select the Drop composition, and choose Edit > Duplicate to create a copy of the composition.
2 Double-click the Drop 2 composition in the Project panel to open it. �en, in the Timeline panel, expand the Drop layer, and then the Contents category.
3 Select Shape 1, and then choose Fill from the Add pop-up menu.
4 Expand Fill 1, click the Color box, and choose any fill color you like.
5 Expand Stroke 1, click the Color box, and choose the stroke color you like.
6 Move the current-time indicator across the time ruler to preview the rotating pinwheels.
7 Hide all the properties for the layer.
8 Choose File > Save to save your work so far.

ADOBE AFTER EFFECTS CC CLASSROOM IN A BOOK 2017 RELEASE 103
Positioning layers with snappingYou’ve created and manipulated shapes in a variety of ways. Now you’ll create a checkerboard pattern. Positioning the layers will be easy with the snapping feature in After Effects.
Creating a new composition�is checkerboard background includes multiple layers, so you’ll create a new composition for it.
1 Press Ctrl+N (Windows) or Command+N (Mac OS) to create a new composition.
2 In the Composition Settings dialog box, name the composition Checkerboard, choose HDTV 1080 24 from the Preset menu, and type 10:00 for Duration. �en click OK.
After Effects opens the new Checkerboard composition in the Timeline and Composition panels. You’ll start by adding two solid layers—the building blocks of the checkerboard background.
3 Choose Layer > New > Solid to create a solid layer.
4 In the Solid Settings dialog box, do the following, and then click OK:
• Name the layer Dark Red.
• Change both the Width and Height to 200 px.
• Choose Square Pixels from the Pixel Aspect Ratio menu.
• Select a dark red color. (We used R=145, G=0, B=0.)
5 With the Dark Red layer selected in the Timeline panel, press R to display the Rotation property for the layer. �en change the Rotation to 45 degrees.

104 LESSON 4 Working with Shape Layers
6 Select the Selection tool ( ). �en, in the Composition panel, drag the layer up so that only the bottom half of the diamond appears in the composition.
7 Press Ctrl+Y (Windows) or Command+Y (Mac OS) to create another solid layer.
8 In the Solid Settings dialog box, name the layer Light Red, and change the color to a light red (we used R=180, G=75, B=75). �en click OK.
�e default width and height for the new solid layer match the settings you used previously, so the Light Red layer has the same dimensions as the Dark Red layer.
9 With the Light Red layer selected in the Timeline panel, press R to display the Rotation property. �en change the Rotation to 45 degrees.
Snapping layers into positionYou’ve created two layers, but they have no relationship to each other in the composition. You’ll use the Snapping option in After Effects to quickly align the layers. When the Snapping option is enabled, the layer feature that is closest to your pointer when you click becomes the snapping feature. As you drag the layer near other layers, features on other layers are highlighted, showing you where the snapping feature would snap if you released the mouse button.
� Note: You can snap two shape layers together, but not two shapes within a single layer. Also, a layer must be visible to snap to it. 2D layers can snap to 2D layers, and 3D layers can snap to 3D layers.

ADOBE AFTER EFFECTS CC CLASSROOM IN A BOOK 2017 RELEASE 105
1 Select Snapping in the options section of the Tools panel, if it’s not already selected.
2 Using the Selection tool, select the Light Red layer in the Composition panel.
When you select a layer in the Composition panel, After Effects displays the layer handles and anchor point. You can use any of these points as the snapping feature for a layer.
3 Click near the corner handle on the left side of the Light Red layer, and drag it near the lower right edge of the Dark Red layer until it snaps into place, with the sides abutted. Be careful not to drag the corner itself, or you’ll resize the layer.
As you drag the layer, a box appears around the left corner handle you selected, indicating that it is the snapping feature.
4 In the Timeline panel, select both of the layers, and press R to hide the Rotation property for both layers.
5 With both layers still selected, choose Edit > Duplicate to copy them.
6 In the Composition panel, drag the two new layers down to the left, and then down to the right, so that the new Dark Red layer abuts the original Light Red layer. Remember that the snapping feature is determined by where you initially click when you begin to drag.
� Tip: If the Snapping option isn’t selected, you can temporarily enable it: Click a layer and start dragging, and then press Ctrl (Windows) or Command (Mac OS) as you drag the layer.
� Tip: Instead of choosing Edit > Duplicate, you can press Ctrl+D (Windows) or Command+D (Mac OS) to duplicate layers.

106 LESSON 4 Working with Shape Layers
7 Repeat steps 5–6 until you have a column of diamonds filling the screen.
8 Choose Edit > Select All to select the layers in the Timeline panel.
9 Press Ctrl+D (Windows) or Command+D (Mac OS) to duplicate the layers. �en move them to the left in the Composition panel until they snap into place.
10 Repeat step 9 until the Composition panel is full. Pull the duplicate layers to the left or right as necessary. Remember to click near an appropriate snapping feature as you begin dragging each time.
11 Choose File > Save to save your work.
Adding compositions to a 3D projectYou’ve created several compositions, all of which need to stay in position as the camera moves through the scene. You’ll integrate the compositions using the 3D Camera Tracker effect, which lets you add 3D layers to a clip with the same move-ment and perspective changes as the original.
You’ll work extensively with the 3D Camera Tracker effect in Lesson 12. For this proj-ect, we’ve set up the effect so that all you need to do is to position layers and parent them to a null object to attach them to the 3D scene. A null object is an invisible layer that has all the properties of a visible layer, so that it can be a parent to any layer in the composition. In this case, the null object tracks the camera movement.
1 In the Project panel, expand the tracking.aep folder, and then double-click the Tracking composition to open it. Choose Fit from the Magnification Ratio pop-up menu at the bottom of the Composition panel so that you can see the entire composition.
� Tip: If you need to generate a checkerboard more quickly, use the Checkerboard effect. For more information, see After Effects Help.

ADOBE AFTER EFFECTS CC CLASSROOM IN A BOOK 2017 RELEASE 107
�e Tracking composition includes the background video you’ll use to place the shapes you’ve created.
2 Select the Spiral composition in the Timeline panel, and then select the 3D switch ( ) for the Spiral layer.
3 Select the Tracking composition in the Timeline panel again. �en drag the Spiral composition from the Project panel to the Timeline panel, placing it at the top of the layer stack.
4 Select the 3D switch for the Spiral layer, and then select the Collapse Transform-ations switch ( ) for the layer, too.
�e Collapse Transformations switch ensures that transformations in a nested composition aren’t flattened; instead, when the project is rendered, transformations in the nested composition will be performed at the same time transformations are performed for the containing composition.
5 In the Timeline panel, click the Parent pop-up menu for the Spiral layer, and choose 2. Track Null 1. �is sets the Track Null 1 layer as the parent of the Spiral layer, which in turn becomes the child layer.
6 With the Spiral layer selected, press P to reveal its Position property. Change the value to 0, 0, 0. �is moves the spiral to the same location as the Null object.
7 Move the current-time indicator to 5:00 so you can clearly see the Spiral layer’s position in the image. �en press Shift+R to reveal the Rotation properties, and change the Orientation values to 0, 0, 0.
�e spiral is almost in the right place, but you want to position it perfectly in the cul-de-sac. You’ll tweak its position.

108 LESSON 4 Working with Shape Layers
8 Change the Position for the layer to –35, –225, 0.
9 Press the spacebar to preview the spiral rotating in the cul-de-sac. Press the spacebar again to stop the preview. Hide the Spiral layer’s properties to keep the Timeline panel tidy.
You’ve placed the first composition. You’ll repeat the process to place the others.
10 Drag the Bolt composition from the Project panel to the top of the Timeline panel, and select the 3D switch ( ) for the Bolt layer.
11 Select 3. Track Null 1 from the Parent menu for the Bolt layer. �en press the P key, press Shift+R, and press Shift+S to reveal the Position, Rotation, and Scale properties for the layer.
Pressing the Shift key as you press keyboard shortcuts lets you view multiple layer properties at the same time.
12 Change the Position values to –650, –1200, 0. Change the Orientation to 0, 0, 345. Change the Scale to 85%. Finally, select the Motion Blur switch for the Bolt layer, and then hide the layer’s properties.
Next, you’ll use the same process to integrate the Drop composition.
� Note: You may need to adjust the Position, Orientation, and Scale values, depending on how you drew the lightning bolt.

ADOBE AFTER EFFECTS CC CLASSROOM IN A BOOK 2017 RELEASE 109
13 Go to 2:00 so you can see the driveway where this composition will be placed. Drag the Drop composition from the Project panel to the top of the stack in the Timeline panel, and select the 3D switch for the layer.
14 Select 4. Track Null 1 from the Parent menu for the Drop layer. �en press P, Shift+R, and Shift+S to reveal the Position, Rotation, and Scale properties.
15 Change the Position values to 730, 2275, 0; the Orientation values to 5, 8, 2; and the Scale to 45%. �en select the Motion Blur switch for the layer, and hide the layer’s properties.
You’ll place the Drop2 composition in the lower left driveway, visible as the camera begins to pan.
16 Go to the beginning of the time ruler. Drag the Drop2 composition from the Project panel to the top of the Timeline panel, select the 3D switch, and select 5. Track Null 1 from the Parent menu.
17 Press P, Shift+R, and Shift+S. Change the Position values to –1025, 3575, 0; the Orientation to 0, 352, 0; and the Scale to 35%. Select the Motion Blur switch for the layer, and hide the layer’s properties.
Finally, you’ll add the Checkerboard composition. You’ll need to scale it a little differently so that it fits into the driveway.

110 LESSON 4 Working with Shape Layers
18 Go to 4:00 in the time ruler. Drag the Checkerboard composition from the Project panel to the top of the Timeline panel, select its 3D switch, and choose 6. Track Null 1 from the Parent menu.
19 Press P, Shift+R, and Shift+S. Change the Position values to –922, 814, 10 and the Orientation to 1, 355, 2. �en click the link icon for the Scale property to unlink the values, and change the values to 42%, 35%, 42%. Select the Motion Blur switch for the layer, and hide the layer’s properties.
Adding the finishing touchesThe layers work pretty well with the underlying video, but they’ll blend more convincingly if you change the blending modes. You’ll also add the audio file.
1 Click the Toggle Switches/Modes button at the bottom of the Timeline panel.
2 Choose Multiply from the Mode menu for all the layers except the Checkerboard layer; choose Overlay for the Checkerboard layer. (You won’t be able to change the mode for the Spiral layer, because Collapse Transformations is selected.)

ADOBE AFTER EFFECTS CC CLASSROOM IN A BOOK 2017 RELEASE 111
3 Drag the Melody.aif clip from the Project panel to the bottom of the layer stack in the Timeline panel.
4 Press the spacebar to preview your creation! When you’re done previewing the project, save your work.
� Note: Sound may not play back in realtime the first time through the preview. After all the frames have been buffered, it should play more smoothly.
112 LESSON 4 Working with Shape Layers
Extra credit
Animating layers to match audio
Currently, the spiral shape turns in a slow circle. The movie will be more compelling if the size of the spiral is animated to match the beat of the music. You can scale the spiral in time with the amplitude of an audio file. First, you need to create keyframes from the audio information.
1 Select the Spiral composition in the Timeline panel. Drag the Beat.aif file from the Project panel into the Timeline panel, and place it beneath the Spiral layer.
2 Right-click or Control-click the Beat.aif layer, and choose Keyframe Assistant > Convert Audio To Keyframes.
After Effects adds the Audio Amplitude layer. The new layer is a null object layer, meaning it has no size or shape and won’t appear in a final render. Null objects let you parent layers or drive effects.
3 Select the Audio Amplitude layer, and press E to display the effects properties for the layer.
Three categories of effects properties are available for the layer: Left Channel, Right Channel, and Both Channels. You’ll work with the Both Channels category.
4 Expand the Both Channels category.
When you converted the audio to keyframes, After Effects created keyframes that specify the amplitude of the audio file in each frame of the layer. You’ll sync the scale of the spiral to those values.
5 Select the Spiral layer, and press S to reveal the Scale property for the layer.
6 Alt-click (Windows) or Option-click (Mac OS) the Scale stopwatch to add an expression. The words transform.scale appear in the time ruler for the layer.
7 With the transform.scale expression selected in the time ruler, click the pick whip icon ( ) on the Expression:Scale line, and drag it to the Slider property name in the Audio Amplitude layer.
When you release the mouse, the pick whip snaps, and the expression in the shape layer time ruler now reads temp = thisComp.layer(“Audio Amplitude”).effect(“Both Channels”)(“Slider”); [temp, temp, temp]. (You may need to click the expression to see the full thing.) This expression means that the Scale values for the shape layer will depend on the Slider values of the Audio Amplitude layer.
Note: You’ll learn more about expressions in Lesson 6.
8 Choose Edit > Deselect All to deselect the layers. Then move the current-time indicator through the time ruler to see the spiral resize with the audio’s amplitude.
The scale definitely changes, but sometimes the spiral disappears. You’ll modify the expression so that the spiral remains visible.
9 In the time ruler, click the expression to make it active. Click an insertion point at the end of the first line, between the closing parentheses and the semicolon. Type +90, and then click an empty area of the Timeline panel to accept the change.
10 Preview the composition, and watch the spiral pulse to the beat of the audio file.
11 Return to the Tracking composition in the Timeline panel. Then press the spacebar, and watch the spiral pulse as the camera moves through the scene. Save your work.

ADOBE AFTER EFFECTS CC CLASSROOM IN A BOOK 2017 RELEASE 113
Review questions1 What is a shape layer, and how do you create one?
2 How can you quickly create multiple copies of a shape?
3 How can you snap one layer to another?
4 What does the Twist path operation do?
Review answers1 A shape layer is simply a layer that contains a vector graphic called a shape. To create
a shape layer, draw a shape directly in the Composition panel using any of the drawing tools or the Pen tool.
2 To quickly duplicate a shape multiple times, apply a Repeater operation to the shape layer. �e Repeater path operation creates copies of all paths, strokes, and fills included in the layer.
3 To snap one layer to another in the Composition panel, select Snapping in the options section of the Tools panel. �en click next to the handle or point you want to use as a snapping feature, and drag the layer close to the point to which you want to align it. After Effects highlights the points to which it will align when you release the mouse button. Note that you cannot snap shape layers.
4 �e Twist path operation rotates a path more sharply in the center than it does at the edges. Entering a positive value twists clockwise; entering a negative value twists counterclockwise.

ADOBE AFTER EFFECTS CC CLASSROOM IN A BOOK 2017 RELEASE 375
INDEX
SYMBOLS
3D axis 271
3D camera layers 279
3D cameras 279–280adjusting depth of field 314point of interest 280
3D Camera Tracker effect 296–316
3D features 266–293
3D layerscreating in
Cinema 4D Lite 284–292Position properties 187rotating 187Rotation properties 271
3D Layer switch 271
3D lights 274–276casting shadows with 278point of interest 276
3D objects, positioning objects in Cinema 4D Lite 289
3D text 269–271extruding in
After Effects 281–283extruding in
Cinema 4D 286–287
3D textures 288
3D views 271–272
A
action-safe zones 24
Active Camera view 279
addingblur 260–261transitions 241vignettes 192, 262
Add mask mode 251
Add Or Remove Keyframe At Current Time button 209
adjustment layers 138, 260
Adobe After Effects CC applicationAfter Effects Help 36compositions 12installing 2optimizing performance in 2projects 12workflow 11workspace 10
Adobe After Effects CC Classroom in a Book (2017 release)
lesson files 3prerequisites 1
Adobe After Effects Help 36
Adobe Audition, editing audio files in 142

376 INDEX
Adobe Bridgeabout 41browsing animation presets in 68importing files with 41installing 2, 41navigating folders in 41opening 41previewing images in 42Preview panel 42workspaces 42
Adobe Character Animator 213–214
Adobe Illustrator files, importing 45
Adobe Media Encoder 363–368creating presets for 367encoding presets in 364
Adobe Photoshop filesimporting 148importing layer styles from 149importing text from 74layered 147
Adobe Premiere Pro, using with After Effects 220
Adobe Stock 117
Adobe Typekit 62–86
alpha track mattes 158. See also track mattes
ambient lights, adding 307
Analyze Forward button 328
anchor points, adjusting 119
animatingfacial expressions 213–214in time with audio 112layers 144, 147lighting 150, 161
motion 154on a path 126opacity 79precomposed layers 137Puppet tool pins 212scale 70shadows 161text 60–87, 74, 81, 232, 312using parenting 72using the Puppet tools 203walking cycles 208
animation presets 25–26applying 50, 78applying from Adobe Bridge 68browsing in Adobe Bridge 41, 68Bullet Train 50customizing 69Dissolve - Vapor 52Evaporate 68Fade Up Characters 76Fade Up Words 25Increase Tracking 78text 67
animationsabout 22copying to other elements 314creating with Character Animator
213–214duplicating using pick whips 152easing 71linking through expressions 152repeating 130Warp Stabilizer VFX 322
animator properties in text animator groups 81
application window 10

ADOBE AFTER EFFECTS CC CLASSROOM IN A BOOK 2017 RELEASE 377
audioadding tracks 140editing files in Adobe Audition 142file formats supported 141using amplitude to animate layers 112
Audio/Video Switches in the Timeline panel 27
Audition. See Adobe Audition
Auto Contrast effect 19–20
Auto Levels effect 253
B
background, replacing 249–253
background strokes, creating with the Roto Brush tool 222–223
base framesadding for the Roto Brush tool 225creating with the Roto Brush tool
220–221
beveling text in Cinema 4D Lite 287
Bezier curvesbreaking direction handles for 183in a motion path 128using to create masks 182
Bezier masks, creating 184
bicubic scaling 321
bilinear sampling 321
blending modesabout 191applying 191for masks 181, 250
blur, adding 260–261
Bridge. See Adobe Bridge
brightness, changing in the user interface 35
broadcast, preparing a movie for 370
Browse Presets command 68
Bullet Train animation preset 50
C
cached frames, using Rotobrush tool 224
cameras, adding to a 3D scene 279–280
Camera Settings 315
Casts Shadows property 278
CC Light Sweep effect 21–22
CC Particle Systems II effect 336properties 338
CC Toner 259–260
Channel Blur effect 28–29
Character Animator 213–214
Character panel 25, 47, 65, 270
checkerboard, generating 106
child layers 72about 73
Cinema 4D Lite 283–290creating a new layer in After Effects 284positioning objects in 289
Cineware effect 284, 290–291Renderer menu in 291
Clone tool 263
cloning an object 263
codecs 359
Collapse Transformations switch 107
coloradjusting color balance 243keying 218mapping 259–260
378 INDEX
color correction 238, 253about 240previewing accurately 242
Color Emboss effect 49
color grading 240, 259–260
Color Range effect 257
Composition Navigator bar 23
Composition panelabout 15splitting into multiple views 272typing in 65
compositionsabout 15adding footage items to 16creating 15, 43, 61defined 12fitting layers to 44importing 13nesting 16rendering 54, 316retiming 168
Composition Settings dialog box 43, 61
compression 359
Convert Audio To Keyframes 112
Convert To Editable Text command 24, 75
Convert Vertex tool 182–183
copyinganimation to other elements 314layers 125
Corner Pin effect 162
Create Text And Camera command 301
creatingCinema 4D layers 284compositions 15, 61
shape layers 88, 326text 46
Creative Cloud Libraries 117
current-time indicator 27
customizingbrightness of the user interface 35workspaces 33
custom shapes, drawing 97–98
Custom View 1, in 3D views 273
D
default preferences 2restoring in Windows 11
Deform pins 204–205
dependencies, finding missing 14
depth of field, adjusting 314
deselecting layers 18
Directional Blur effect 135
direction handles, breaking 183
Dissolve - Vapor animation preset 52
distortions, rolling shutter 298
docking panels 10
drawingcircles 342custom shapes 97ellipses 193rectangles 92shapes 92
drift, in motion tracking 329
Drop Shadow effect 48
drop zone 10

ADOBE AFTER EFFECTS CC CLASSROOM IN A BOOK 2017 RELEASE 379
duplicatinganimations 130animations using pick whips 152objects in a scene 263videos 132
duration 91about 26changing 196
E
Easy Easeadding 71adjusting 173in the Graph Editor 349
editingmasks 180Premiere Pro clips in After Effects 220segmentation boundaries 224text 25, 75
Effect Controls panel 20about 48hiding properties in 21
effectsabout 18applying 48applying to solid-color layers 133Auto Contrast 19–20Auto Levels 253CC Light Sweep 21–22CC Particle Systems II 336–350Channel Blur 28–29Color Emboss 49Color Range 257–258controlling 48Corner Pin 162Directional Blur 135Dissolve - Vapor animation preset 52–53
Drop Shadow 48Fade Up Words 26finding 19Fractal Noise 135Gaussian Blur 261, 341Glow 233Hue/Saturation 231Lens Flare 164, 344missing 14motion blur 86Ramp 343Refine Hard Matte 228Refine Soft Matte 228Timewarp 346Wave Warp 139
Effects & Presets panel 19, 26
Ellipse tool 193, 342using to create a mask 194
encoding presets in Adobe Media Encoder 364
end bracket, setting for the work area 69
Evaporate animation preset 68
exporting movies with Adobe Media Encoder 363
expressions 112, 152, 264
extruding textin After Effects 282–283in Cinema 4D Lite 286–287
F
face tracking 235
Fade Up Characters animation preset 76
Fade Up Words effect 26
feathering masks 189

380 INDEX
fills, gradient 93
filtering fonts in Typekit 63
finding missing footage, fonts, or effects 14
Fit To Comp command 44
Fit To Comp Width command 66
fontsfinding missing 14selecting 65
footageabout 13finding missing 14importing 12, 14, 60, 146importing using Adobe Bridge 41tracking 299
foreground strokes, creating with the Roto Brush tool 221–222
Fractal Noise effect 135
freezing Roto Brush tool results 229
G
Gaussian Blur effect 261, 341
Glow effect 233
gradient fills 93
Graph Editorabout 170in the Timeline panel 27using to remap time 171, 349
gridsdisplaying and hiding 47, 66hiding Cinema 4D grids in After Effect 291snapping to 66
ground planes, creating with 3D Camera Tracker effect 300
H
HDR (high dynamic range) footage 345
hiding properties 21
Home key 25
Horizontal Type tool 25, 46, 78
Hue/Saturation effect 231
I
importingfiles from Adobe Bridge 42footage 12, 14, 41, 60, 146multiple files 13Photoshop files 13, 74, 148text 74–75
Increase Tracking animation preset 78
Increment And Save command 232–233
Info panel 92
In point 27
installing After Effects 2
interpolation between keyframes 28
J
JavaScript in expressions 152
K
keyframesabout 29adding 125adding to current time 209creating from audio amplitude 112

ADOBE AFTER EFFECTS CC CLASSROOM IN A BOOK 2017 RELEASE 381
keying 218with Color Range effect 257with Keylight 1.2 effect 249
Keylight 1.2 effect 250–252
L
layer features, used when snapping 104
layersabout 15, 17adjustment 138animating 144, 147animating to match audio 112child 72, 73, 121converting to 3D layers 274copying 125creating Cinema 4D 284deselecting 18expanding in the Timeline panel 19fitting to compositions 44importing in Photoshop files 147light, 3D 274–276locking 202making visible in the Timeline panel 30naming in Photoshop 148naming text layers 47nesting 51null 310parenting 72, 73, 121precomposing 51, 122, 158, 260rearranging in the Timeline panel 18renaming 75scaling 202shape 88, 92snapping 103solid 103, 134soloing 151text 62
transforming properties 18trimming 139viewing multiple properties 211
layer styles 149
Layer switches in the Timeline panel 27
learning resources for Adobe After Effects CC 5
Lens Flare effect 164, 344
lesson files, downloading 3
Levels (Individual Controls) effect 243
Libraries panel 117
lighting, simulating changes in 150
lightning bolt, drawing 97–98
lightsadding to a 3D scene 274–276ambient 307point 306
Light Settings dialog box 275
linking animations through expressions 152
locking layers 202
M
Magnification Ratio pop-up menu 92, 106
Mask Expansion setting 251
Mask Feather tool 189
mask modes 250–251
masksabout 178creating Bezier 182, 84creating with the Pen tool 179curved 182drawing with shape tools 194editing 180

382 INDEX
feathering 189inverting 180modes for 181modifying with the
Convert Vertex tool 182properties, displaying 180replacing content of 185segments 178tips for creating 195tracking 249vertices 178working with 176
mask tracker 249–250, 255–256
Material Options properties 271, 278
mattesabout 218adjusting with the Refine Edge tool 228screen 252track 159traveling 159viewing against black 223viewing with red overlay 223
Maxon Cinema 4D Lite 283–290
meshesadjusting the Triangle value 206used with Puppet tools 204
missing fonts, effects, or footage 14
mobile devices, preparing compositions for 362
mocha for After Effects 335
modes, mask 181
motionanimating 154stabilization 320
motion blur, adding 86, 160
motion paths, customizing 126
Motion Source 328
Motion Target 328
motion tracking 254–255, 258–259analyzing and applying 328, 334managing drift when 329multipoint 331single-point 325
Move tool in Cinema 4D Lite 289
N
navigating folders in Adobe Bridge 41
nestingcompositions 16layers 51
NTSC D1 preset 43
null objects 310
O
opacityanimating 79modifying 53
Opacity property, displaying 29
optimizing performance in After Effects 2, 32
Out point 27
output modules in the Render Queue panel 55
outputting projects 352
overlap, defining areas of 206
Overlap pinsabout 204customizing 207
overscan, accounting for 24

ADOBE AFTER EFFECTS CC CLASSROOM IN A BOOK (2017 RELEASE) 383
P
Pan Behind tool 120
panelsdocking and arranging 10maximizing 12menus 27
panning with touch gestures 186
Paragraph panel 66
paragraph text 62
parallel corner-pinning 331
parenting 72, 121about 73object to null layer 311text in Cinema 4D
Lite 286
particle systems, creating 336–350
Pen tool 179
performance, optimizing 2, 32
perspective corner-pinning 331
Photoshop. See Adobe Photoshop files
pick whip 311using to duplicate animation 152
pixel aspect ratio 370
point light, creating 306
point of interestfor a 3D light 276for a camera layer 280
point text 65
Position propertydisplaying in the Timeline panel 19for a 3D layer 187
Pre-compose dialog box 51, 123
precomposed layers, animating 137
precomposing layers 51, 52, 122, 158, 260
preferenceslocation of files 3restoring defaults 2restoring defaults in Windows 11
Premiere Pro. See Adobe Premiere Pro
presetsbrowsing in Adobe Bridge 68creating for Adobe Media Encoder 367finding 19
previewingcompositions 30images in Adobe Bridge 42limiting to a range of frames 68manual 51
Preview panelin Adobe Bridge 42in After Effects 30
Project panel 14
projectsabout 12saving 15
propertiesdisplaying multiple 125hiding 21
Puppet Overlap toolabout 204using 206
Puppet Pin tool 204
Puppet Sketch tool 212
Puppet Starch toolabout 204using 207

384 INDEX
Puppet tools 198about 204customizing Overlap pins 207preparing artwork for use with 203recording animation with 212settings for Starch pins 207using the mesh 204
Q
QuickTime required version 2
R
Ramp effect 343
Rectangle tool 92, 194
red overlay in matte preview 223
Reduce Chatter value 228
Refine Edge tool 228–229
Refine Hard Matte effect 228
Refine Soft Matte effect 228
reflections, adding to video 188
remap-time marker in the Source Time ruler 169
Renderer options in the Cineware effect 291
rendering 316compositions 54for mobile devices 362movies 352templates 355test movies 360using compression in 359using the Render Queue panel 234, 361with Adobe Media Encoder 363–368
Render Queue panel 54, 168, 234, 355–362adding compositions to 54output modules 55
Render Settings options 55
render-settings templates 355
Repeater path operation 99–102
replacing content using a mask 185
resizing layers 202
resources for using After Effects 36
restoring default preferences 2, 11
retimingcompositions 168playback 346
rolling shutter distortions, repairing 298
Rotate tool in Cinema 4D Lite 290
rotating 3D layers 187
Roto Brush & Refine Edge effect 227
Roto Brush tool 216–237creating background strokes with 222–223creating foreground strokes with 221–222freezing results 229refining a segmentation boundary 224
rotoscoping 218
S
SA Color Finesse 3 effect 245–262
safe zones 24
sample text, using in Typekit 63
sampling algorithms 321
saving projects 15

ADOBE AFTER EFFECTS CC CLASSROOM IN A BOOK (2017 RELEASE) 385
Scale tool in Cinema 4D Lite 289
scaling layers 202
screen matte 252
segmentation boundaryabout 220creating 220–223refining 224
segments in a mask 178
selectors in text animator groups 81
Select View Layout pop-up menu 272
self-animating shapes 98
separating background from foreground 218–237
Sequence Layers option 241
shadow catcher 306
shadowsadding to a 3D scene 278creating with the
3D Camera Tracker effect 305
shape layersabout 88, 90adding 92applying gradient fills to 93creating 88–113, 326
shapescreating a spiral 92–96custom 97–98drawing 96, 97duplicating 99–102self-animating 98twisting 94
shortening layers 196
Shutter Angle 161
Shutter Phase 161
snappingabout 104features 105layers 103–107temporarily enabling 105
Snap to Grid command 66
solid layerscreating 103, 134using to create particle systems 337
soloing layers 151
sorting fonts in Typekit 63
Source Time ruler in time remapping 169
span, extending for Roto Brush tool 224
Specular Intensity 278
Specular Shininess 278
spiral, creating in After Effects 92–96
splitting the Composition panel into multiple views 272
squash and stretch animation 208
stabilizing motion 320
stacked panels 10
Starch pinsabout 204adding 207settings 207
Stock images in Libraries panel 117
Subdivision Surface icon in Cinema 4D Lite 286
Subtract mask mode 251
synchronizing audio with animation 112
Sync Selected Fonts 64

386 INDEX
T
templates for rendering 355
textanimating 60–87, 74, 76, 81, 232, 312animating tracking in 77animation presets for 25–26, 67beveling in Cinema 4D Lite 287centering 270converting to editable 75creating 46creating 3D 269–271editing 25, 75entering in the Composition panel 65extruding in After Effects 282–283extruding in Cinema 4D Lite 286formatting 65, 232formatting in Cinema 4D Lite 285imported from Photoshop 74layers 62naming layers 47point 65positioning 66text animator groups 80
Text tool in Cinema 4D Lite 285
texture in 3D objects 288
timecurrent-time field 27current-time indicator 27duration 26measuring 209specifying in the Duration box 91
timecode 26
time graph 27
time-lapse simulation, creating 168
Timeline panelabout 27expanding layers in 19renaming layers in 75viewing multiple layer properties in 211
Time Remap keyframes 171
Time Remapping 168
Time-Reverse Keyframes command 70
time ruler 27
Timewarp effect 346
title-safe zones 24
Toggle Alpha Boundary button 223
Toggle Alpha button 223
Toggle Alpha Overlay button 223
Toggle Transparency Grid button 230
toolsClone Stamp 263Mask Feather 189Pan Behind 120Puppet 204
Tools panel 24
touch gestures 186
Track Camera command 299
Tracker panel 250, 254
trackinganimating for text 77faces 235masks 255–256motion 258–259using mocha for After Effects 335
tracking motionmultipoint 331single-point 325using the 3D Camera Tracker 299

ADOBE AFTER EFFECTS CC CLASSROOM IN A BOOK (2017 RELEASE) 387
tracking presets 78
track mattes 158–159
Track Motion 254
track points 2543D Camera Tracker 299moving and resizing 330positioning 327, 333
Track Selected Masks Backward button 250
Transform properties 19
transitions, adding 241
transparency 53
traveling mattes 159
Triangle value for Puppet tools 206
trimminglayers 139the work area 196
twisting shapes 94
Twist path operation 94–96
type, editing 25
Typekit. See Adobe Typekit
U
undocking panels 10
User Interface Colors 35
user interface, introduction to 10
V
verticesconverting 182in a mask 178
video file, duplicating in a timeline 132
Video switch 30, 52
views, 3D 271
vignettes, adding 192, 262
W
walking cycle, animating 208
Warp Stabilizer VFX 320–325settings 323
Wave Warp effect 139
Wiggle Paths operation 98
work areabrackets 27, 69introduction to 10trimming in the Timeline panel 196
workflow 11
workspacescustomizing 10, 33in Adobe Bridge 42predefined 33
X
x axis in the 3D axis 271
Y
y axis in the 3D axis 271
Z
z axis 269in the 3D axis 271
zooming with touch gestures 186


