Embed Size (px)
Citation preview
GPS Precision Navigation
AgNav TrackerNav Configuration Guide
A G - N A V I N C .
TrackerNav Configuration Guide GPS Tracker Version 1.0
© Agnav Inc. 1228 Gorham Street • Suite 21
Newmarket, Ontario, Canada L3Y 8Z1
Phone 905-967-0909 • Fax 905-967-0808 Cell (Spanish): 416-434-1166
Cell (English): 647-236-3477 or 647-239-9477 Toll-Free: 1-800-99-AG-NAV (24-628)
Web: http://www.agnav.com
TrackerNav GPS Tracker Configuration i AG-NAV Inc.
Table of Contents1 Introduction ...................................................................... 2
1.1 Requirements ....................................................................... 2
2 New Modem Configuration............................................... 3
2.1 Installation and Connection .................................................. 3
2.2 SIM Card Installation ............................................................ 4
2.3 Modem Configuration ........................................................... 5
2.4 GPRS Settings ..................................................................... 7
2.5 GSM Settings ....................................................................... 8
2.6 Main Settings........................................................................ 8
2.7 Authorization Settings .......................................................... 8
2.8 SMS Headers ....................................................................... 9
2.9 Extended Settings ................................................................ 9
3 Test New Tracking Modem ............................................ 10
TrackerNav GPS Tracker Configuration 2 AG-NAV Inc.
1 Introduction
AgNav TrackerNav uses the GPS/GPRS modem VT310 to send aircraft/vehicle positions and application data to the TrackerNav server for real time application monitoring on internet. This modem is called a GPS Tracker.
Before use, the tracking modem needs to be configured to set up an internet connection and GPRS network for data communications.
Note
The term “vehicle” in this document refers to both ground vehicle and aircraft.
1.1 Requirements
Each tracking modem needs the following:
• A SIM card with subscription for GPRS data only. No voice calls or messages.
• GPRS information: APN (Access Point Network), APN name and APN password. This information should be available from the SIM card provider. If not, you can try to find it from internet.
To configure the modem, you need the following:
• A computer or laptop with Windows XP, Vista or 7.
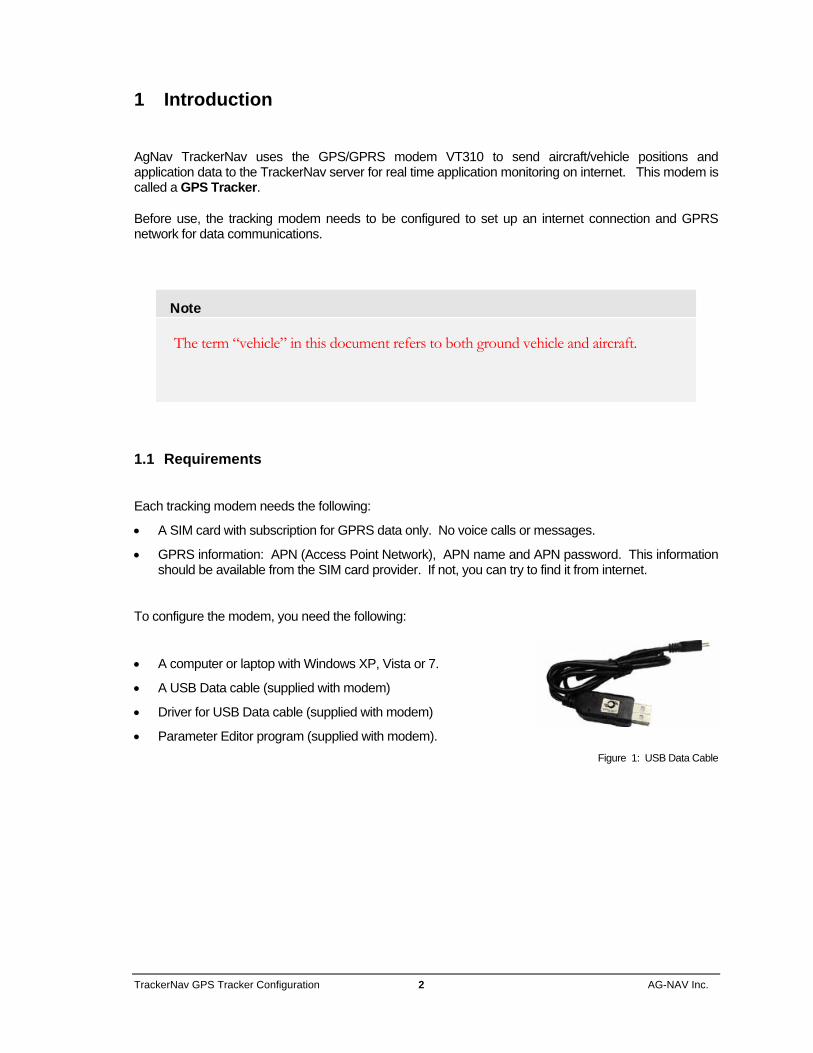
• A USB Data cable (supplied with modem)
• Driver for USB Data cable (supplied with modem)
• Parameter Editor program (supplied with modem). Figure 1: USB Data Cable
TrackerNav GPS Tracker Configuration 3 AG-NAV Inc.
2 New Modem Configuration
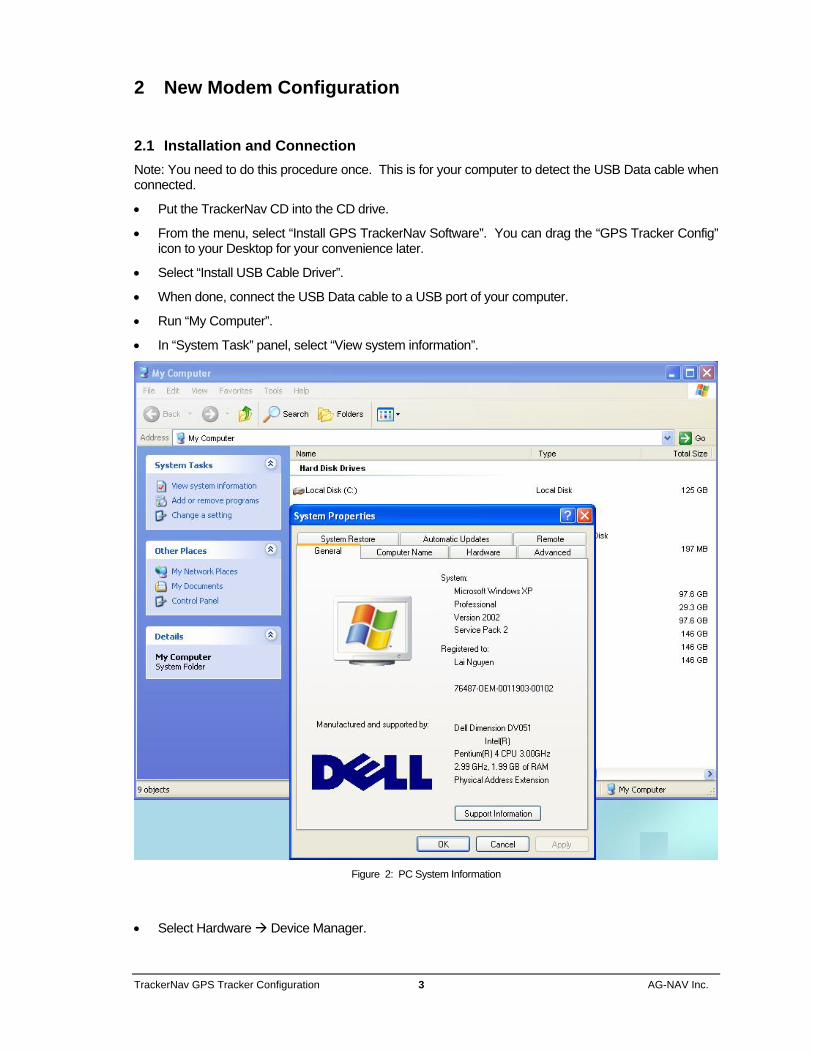
2.1 Installation and Connection Note: You need to do this procedure once. This is for your computer to detect the USB Data cable when connected.
• Put the TrackerNav CD into the CD drive.
• From the menu, select “Install GPS TrackerNav Software”. You can drag the “GPS Tracker Config” icon to your Desktop for your convenience later.
• Select “Install USB Cable Driver”.
• When done, connect the USB Data cable to a USB port of your computer.
• Run “My Computer”.
• In “System Task” panel, select “View system information”.
Figure 2: PC System Information
• Select Hardware Device Manager.
TrackerNav GPS Tracker Configuration 4 AG-NAV Inc.
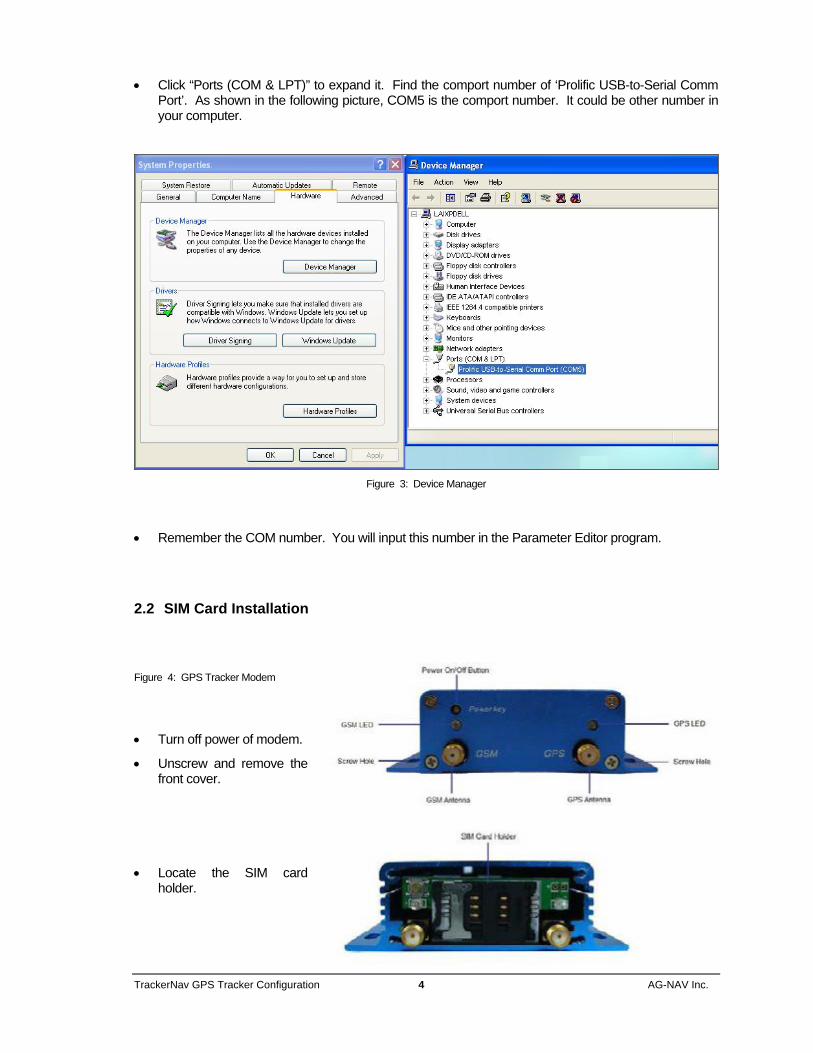
• Click “Ports (COM & LPT)” to expand it. Find the comport number of ‘Prolific USB-to-Serial Comm Port’. As shown in the following picture, COM5 is the comport number. It could be other number in your computer.
Figure 3: Device Manager
• Remember the COM number. You will input this number in the Parameter Editor program.
2.2 SIM Card Installation
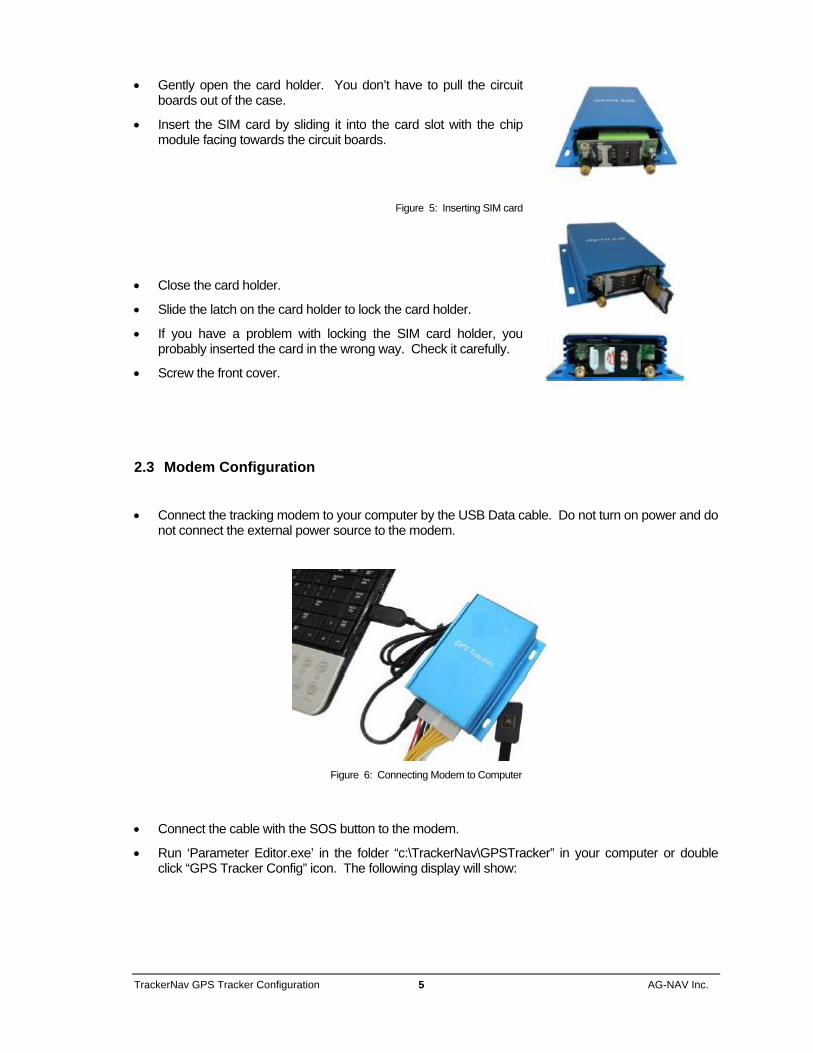
Figure 4: GPS Tracker Modem
• Turn off power of modem.
• Unscrew and remove the front cover.
• Locate the SIM card holder.
TrackerNav GPS Tracker Configuration 5 AG-NAV Inc.
• Gently open the card holder. You don’t have to pull the circuit boards out of the case.
• Insert the SIM card by sliding it into the card slot with the chip module facing towards the circuit boards.
Figure 5: Inserting SIM card
• Close the card holder.
• Slide the latch on the card holder to lock the card holder.
• If you have a problem with locking the SIM card holder, you probably inserted the card in the wrong way. Check it carefully.
• Screw the front cover.
2.3 Modem Configuration
• Connect the tracking modem to your computer by the USB Data cable. Do not turn on power and do not connect the external power source to the modem.
Figure 6: Connecting Modem to Computer
• Connect the cable with the SOS button to the modem.
• Run ‘Parameter Editor.exe’ in the folder “c:\TrackerNav\GPSTracker” in your computer or double click “GPS Tracker Config” icon. The following display will show:

TrackerNav GPS Tracker Configuration 6 AG-NAV Inc.
Figure 7: Modem Parameters
• Select the correct Com number.
• Select “VT310” for product name.
• Click the “Open Port” button. The button will change to “Close Port”.
• Press and hold the SOS button or switch and then turn on the modem. The 2 LEDs at the front panel will be on.
Figure 8: Power On Modem for Configuration
• If the LEDs are flashing, turn off modem and try again. If the LEDs are solid on, the modem is ready for configuration.
• Click “Read Settings” button to show the current settings of the modem.
TrackerNav GPS Tracker Configuration 7 AG-NAV Inc.
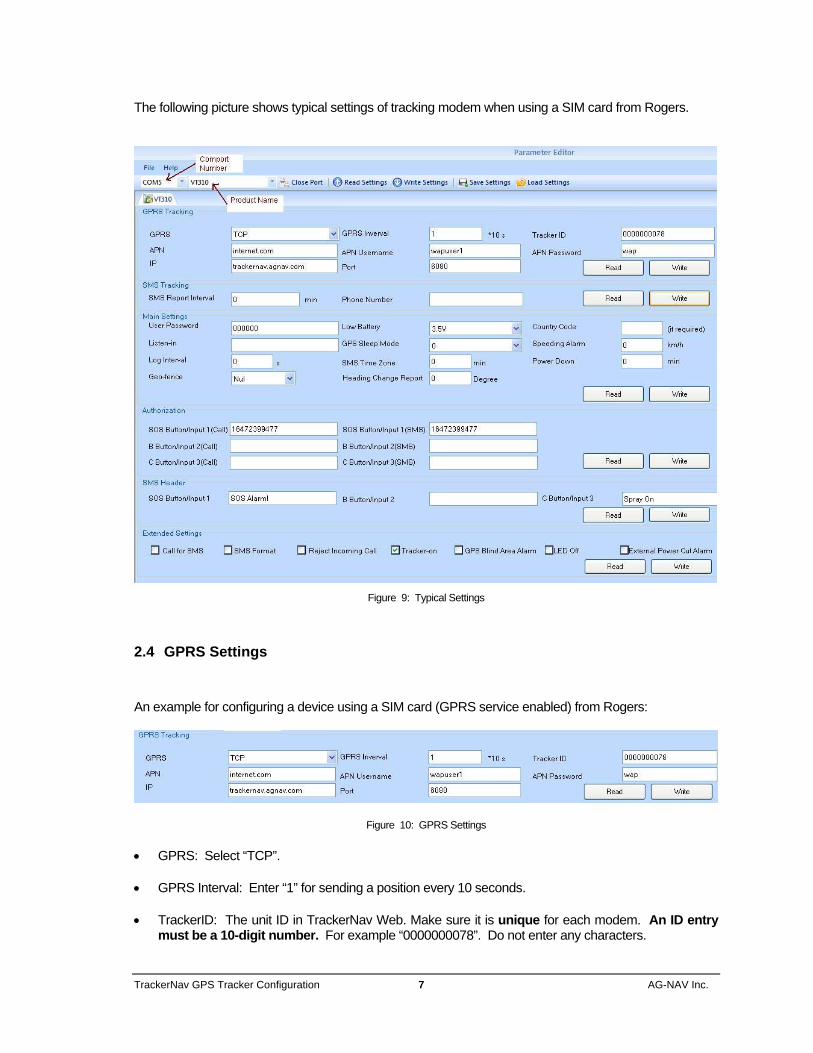
The following picture shows typical settings of tracking modem when using a SIM card from Rogers.
Figure 9: Typical Settings
2.4 GPRS Settings
An example for configuring a device using a SIM card (GPRS service enabled) from Rogers:
Figure 10: GPRS Settings
• GPRS: Select “TCP”.
• GPRS Interval: Enter “1” for sending a position every 10 seconds.
• TrackerID: The unit ID in TrackerNav Web. Make sure it is unique for each modem. An ID entry must be a 10-digit number. For example “0000000078”. Do not enter any characters.
TrackerNav GPS Tracker Configuration 8 AG-NAV Inc.
• APN: Enter the APN given by the SIM card provider. For Rogers, it’s “internet.com”. For AT&T in the US, enter “wap.cingular”.
• APN Username: Enter APN username given by the SIM card provider. If not required, leave blank. For Roger, it’s “wapuser1”. For AT&T, leave it blank.
• APN Password: Enter the APN password given by the SIM card provider. If not required, leave blank. For Roger, it’s “wap”. For AT&T, leave it blank.
• IP: Enter “trackernav.agnav.com”. If you own the TrackerNav server, enter the static IP address given by your internet service provider (ISP).
• Port: Enter “6080”.
• Click the “Write” button to save the settings.
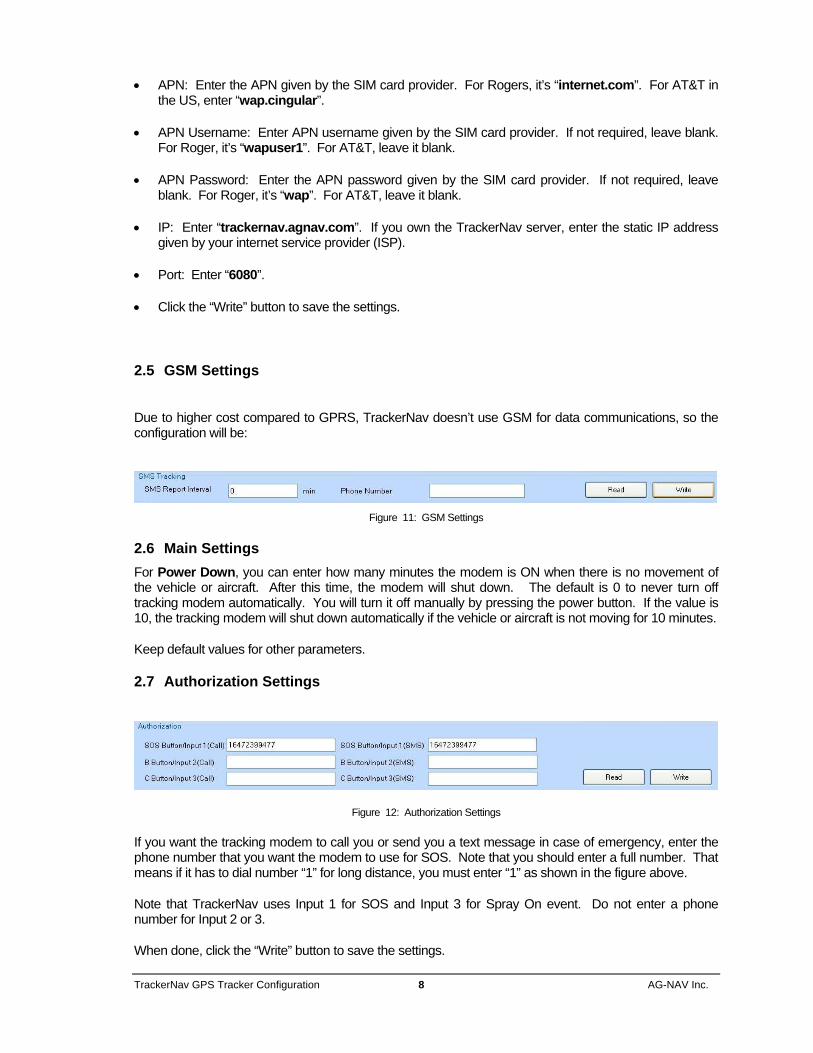
2.5 GSM Settings
Due to higher cost compared to GPRS, TrackerNav doesn’t use GSM for data communications, so the configuration will be:
Figure 11: GSM Settings
2.6 Main Settings For Power Down, you can enter how many minutes the modem is ON when there is no movement of the vehicle or aircraft. After this time, the modem will shut down. The default is 0 to never turn off tracking modem automatically. You will turn it off manually by pressing the power button. If the value is 10, the tracking modem will shut down automatically if the vehicle or aircraft is not moving for 10 minutes.
Keep default values for other parameters.
2.7 Authorization Settings
Figure 12: Authorization Settings
If you want the tracking modem to call you or send you a text message in case of emergency, enter the phone number that you want the modem to use for SOS. Note that you should enter a full number. That means if it has to dial number “1” for long distance, you must enter “1” as shown in the figure above.
Note that TrackerNav uses Input 1 for SOS and Input 3 for Spray On event. Do not enter a phone number for Input 2 or 3.
When done, click the “Write” button to save the settings.
TrackerNav GPS Tracker Configuration 9 AG-NAV Inc.
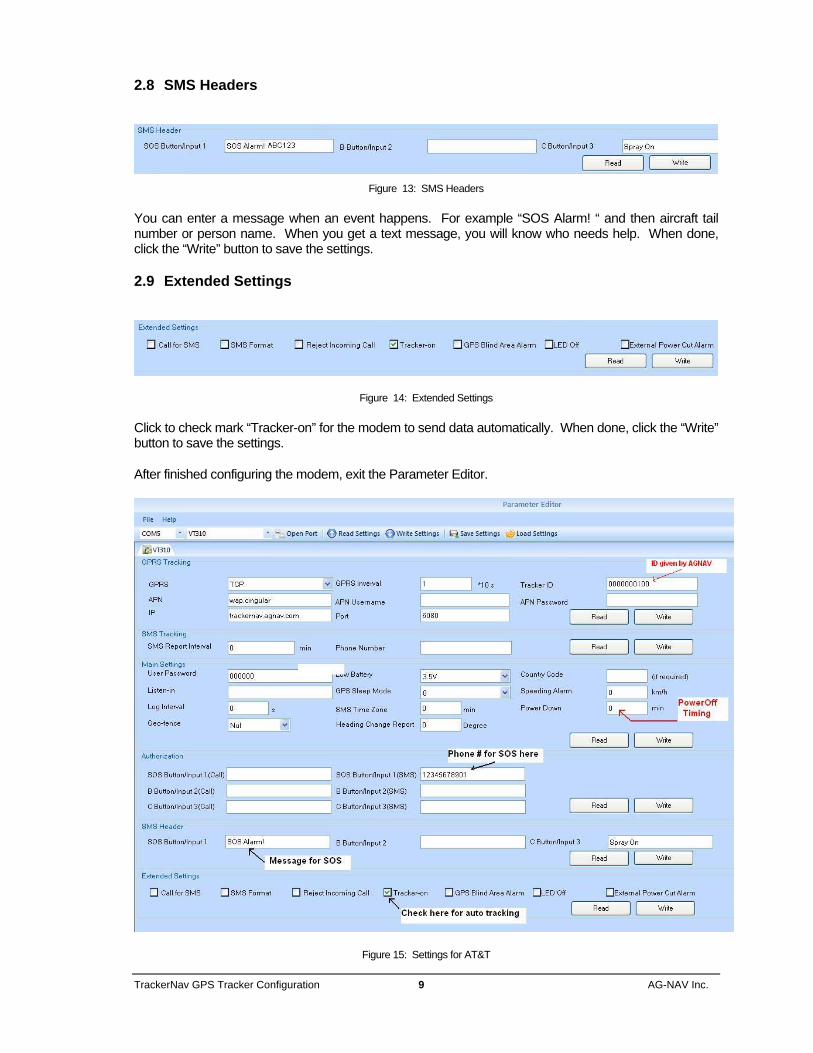
2.8 SMS Headers
Figure 13: SMS Headers
You can enter a message when an event happens. For example “SOS Alarm! “ and then aircraft tail number or person name. When you get a text message, you will know who needs help. When done, click the “Write” button to save the settings.
2.9 Extended Settings
Figure 14: Extended Settings
Click to check mark “Tracker-on” for the modem to send data automatically. When done, click the “Write” button to save the settings.
After finished configuring the modem, exit the Parameter Editor.
Figure 15: Settings for AT&T
TrackerNav GPS Tracker Configuration 10 AG-NAV Inc.
3 Test New Tracking Modem
After the modem has been configured to work on GPRS mode, to test whether it works normally with TrackerNav, we need to:
• Create a new vehicle in TrackerNav Web Application. Make sure the unit ID (Tracker ID in Parameter Editor program) be unique for each vehicle. Note that you must have the Admin priority to create a new vehicle in TrackerNav Web app. If you are a TrackerNav user and don’t have the Admin priority, call AG-NAV for help create a new vehicle for you. Give AG-NAV the new vehicle/aircraft name.
• Connect GPS and GSM antennas to modem.
• Bring modem outside and turn on modem.
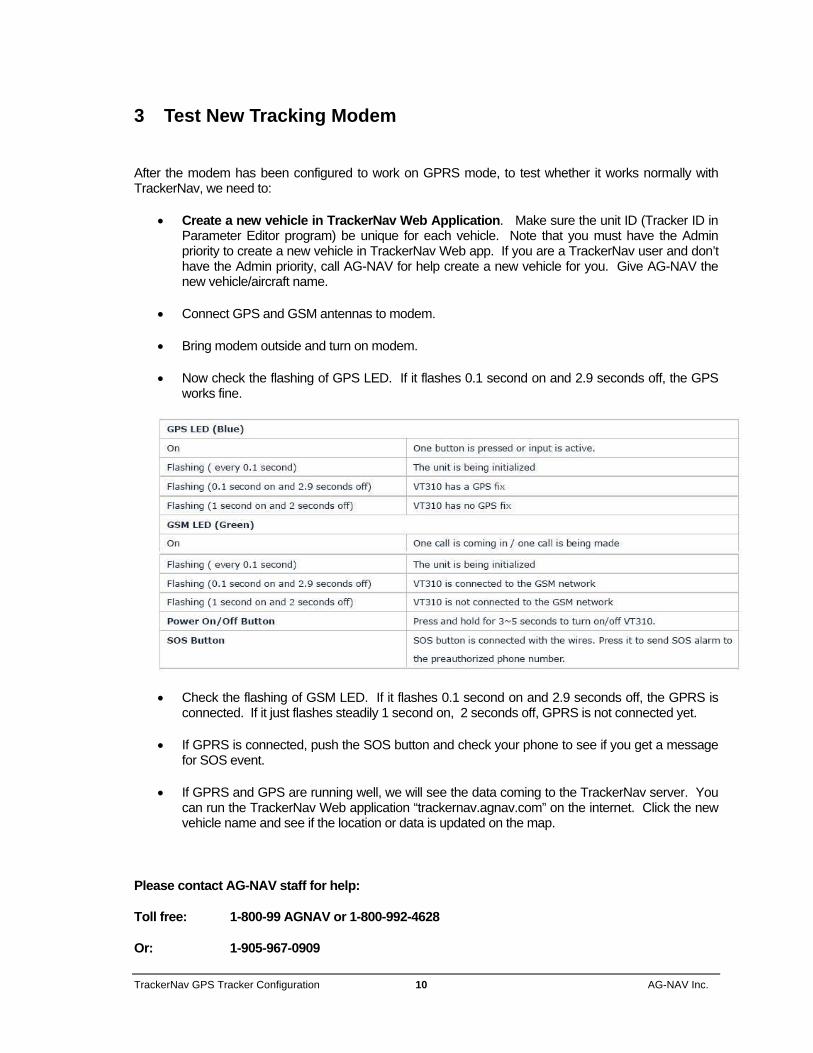
• Now check the flashing of GPS LED. If it flashes 0.1 second on and 2.9 seconds off, the GPS works fine.
• Check the flashing of GSM LED. If it flashes 0.1 second on and 2.9 seconds off, the GPRS is connected. If it just flashes steadily 1 second on, 2 seconds off, GPRS is not connected yet.
• If GPRS is connected, push the SOS button and check your phone to see if you get a message for SOS event.
• If GPRS and GPS are running well, we will see the data coming to the TrackerNav server. You can run the TrackerNav Web application “trackernav.agnav.com” on the internet. Click the new vehicle name and see if the location or data is updated on the map.
Please contact AG-NAV staff for help:
Toll free: 1-800-99 AGNAV or 1-800-992-4628
Or: 1-905-967-0909