Embed Size (px)
Citation preview
Novem
ber 2015 £5.99 Printed in the UK
YUBIKEY Two-factor authentication for the massesPICADE The Pi-powered arcade machine that fits on your deskSYNCTHING Share files and folders across machines without Dropbox
32 PAGES OF TUTORIALS
Discover the best eye candy known to mankind – and it’s all right here on your humble Linux machine
BEST LINUXDESKTOP
MATTHEW GARRETTFREE=SECURE
Meet the geneticist turned software guru keeping an eye on our digital freedoms
FREE GAMESLOAD NEW COMMANDER?
Waste time playing games without spending a single penny at the Steam store
2015
BLENDER CREATE 3D JENGA BLOCKS
SUSE STUDIO BUILD YOUR OWN DISTRO
WRITE A GAME WITH GODOT
INSIDE: 8 REASONS LIBREOFFICE ROCKS
November 2015 www.linuxvoice.com
PYTHON › RASPBERRY PI › HTTP › VULKAN & MORE! LV020 001 Cover.indd 1 03/09/2015 16:44

LV020 002 Inside Front Cover.indd 2 03/09/2015 11:11
WELCOME
www.linuxvoice.com
The November issue
Try something different
If you’re new to Linux, the idea that you need to decide which desktop to use before you can start using Linux must seem counterproductive. Most people want to dive in and start
clicking on things straight away. It’s also an idea that must appear completely alien to users of Apple’s OS X or Microsoft Windows, or even iPhones and Android. Computing has become a world where you have no choice, with even updates becoming mandatory. But what might appear an initial hurdle - choosing a desktop - is actually the perfect initiation. Choice is what makes Linux and Free Software so powerful.
The best antidote to feeling overwhelmed is to give something a try. Different desktops appeal to different kinds of people, just like different operating systems or styles of music. In a world where computing is becoming more homogenous than ever before, a world where we’re fighting for the ability to control our own hardware and our own data, open source means you will never again not have a choice, and that’s worth celebrating.
Graham MorrisonEditor, Linux Voice
What’s hot in LV#020
ANDREW GREGORY“LibreOffice is full of so many great features, it’s difficult to know which to highlight. Somehow, we managed it.” p30
“It’s been 25 years since Monkey Island. Ben’s ace tutorial on game design means you could be the next Ron Gilbert .” p84
A free software advocate and writer since the late 1990s, Graham is a lapsed KDE contributor and author of the Meeq MIDI step sequencer.
BEN EVERARD“Matthew Garrett’s responses to the challenges Free Software faces are full of insight and just a little urgency.” p40
MIKE SAUNDERS
GRAHAM MORRISON
3
Linux Voice is different. Linux Voice is special.Here’s why…
1 At the end of each financial year we’ll give 50% of our
profits to a selection of organisations that support free software, decided by a vote among our readers (that’s you).
2 No later than nine months after first publication, we will
relicense all of our content under the Creative Commons CC-BY-SA licence, so that old content can still be useful, and can live on even after the magazine has come off the shelves.
3 We’re a small company, so we don’t have a board of
directors or a bunch of shareholders in the City of London to keep happy. The only people that matter to us are the readers.
THE LINUX VOICE TEAMEditor Graham Morrison [email protected] editor Andrew Gregory [email protected] editor Ben Everard [email protected] at large Mike Saunders [email protected] editor Michel Loubet-Jambert [email protected] director Stacey Black [email protected] puppetmaster Nick Veitch [email protected] contributors: Mark Crutch, Andrew Conway, Juliet Kemp, Vincent Mealing, Travis ‘TT’ Mooney, Simon Phipps, Les Pounder, Mayank Sharma, Valentine Sinitsyn.
SUBSCRIBE ON PAGE 60
LV020 003 Welcome.indd 3 04/09/2015 13:59
www.linuxvoice.com4
CONTENTS
FAQ: VULKAN3D graphics drivers are getting a makeover and it’s nothing to do with Spock.
38
18
Nove
mbe
r LV0
20
Enhance your Linux experience with the best environment open source has to offer.
GAMES GALORE Like games but hate proprietary software? We check out the best games that respect your freedom.
32
SUBSCRIBE ON PAGE 60
It was a bright cold day in September, and the clocks were striking Thursday…
REGULARS
DISTRO CREATION Fed up with Fedora? Stymied by SUSE? Upset with Ubuntu? Spin your very own Linux the easy way!
26
40
Linux Voice chats CoreOS, security, ethics and philosophy.
Mathew Garrett: geek, hacker, good guy
Just like the News at Ten but with less doom-mongering and more Linux happenings.
News06
Quick! Grab the latest and greatest distro before it’s superseded by the next big thing.
Distrohopper08
Summer’s over. Prepare for the long, dark winter months with the latest Linux games.
Gaming10
Vent your spleen, share your opinions, let us know what you’ve been thinking.
Speak your brains12
Spreadsheets are for more than just tables and graphs. Find out how to unlock the full power of Calc.
Secrets of LibreOffice Calc30
We look beyond Linux and BSD into the wider world of free software operating systems and find some surprisingly good alternatives.
Group test54
Save money, get Linux Voice delivered to your door, and get access to every singe one of our back issues.
Subscribe!60
The free-est, freshest software on the internet, corralled into six pages of pure excellence.
FOSSpicks62
Matthew Garrett is the latest mega geek to show us inside their coding fortress of solitude.
My Linux desktop98
Linux, cloud computing and containers come together for three sleepless days in Seatle.
LinuxCon36
LV020 004 Contents.indd 4 04/09/2015 13:04

www.linuxvoice.com 5
Nove
mbe
r LV0
20
REVIEWS
Books Everthing the aspiring programmer needs to know inscribed on cellulose.
52
KDE Plasma 5.4 The latest shiny desktop from the KDE project is prettier than a puppy with a bow on its head, and twice as useful.
48
Xxxx xx xxx xxxxx xxxx xxxxxx xxxx
Xxxx xx xxx xxxxx xxxx xxxxxx xxxx
Xxxx xx xxx xxxxx xxxx xxxxxx xxxx
TUTORIALS
72 76
HTTP by handLearn to speak the protocol of the web so you can converse with browsers and servers.
88
Scan barcodes for virtual supremacy
3D physics and beautiful graphics in Blender
Share your files using Syncthing
Python + Raspberry Pi + camera = 90s-style entertainment.
Inflict the tyranny of gravity on your virtual worlds.
Keep your files up to date on all your computers without having to hand your data over to a spy agency or an advertising company.
Make games using the Godot enginePoint, click and type your way to an interactive masterpiece.
Upgrade your security with YubiKeyFrustrate hackers with easy two-factor security.
70
80 84
Cyberfox 40.0 Firefox isn’t the speedy, lean web browser it once was – so some developers have forked it to go back to its roots.
Picade A miniaturised arcade machine with a heart of Pi brings retro gaming joy to your desktop or kitchen table.
49
50
SmalltalkIdle chatter about the original general-purpose object orientated language.
90
LV020 004 Contents.indd 5 04/09/2015 13:04
ANALYSIS
www.linuxvoice.com6
The Linux Voice view on what’s going on in the world of Free Software.NEWSANALYSIS
Simon Phipps is ex-president of the Open Source Initiative and a board member of the Open Rights Group and of Open Source for America.
What happens when a software company is acquired by a corporate behemoth that doesn’t
actually need their software? It happens all the time, and when the software that’s involved is proprietary there’s no recourse for anyone (apart maybe from a lawsuit). But when the software is open source, things are different. I learned this from personal experience. When Oracle acquired Sun Microsystems, it simply walked away from a number of projects they didn’t think would be profitable. But in many cases, the fact the code was out in public under an OSI-approved licence meant that it endured. The identity middleware products were picked up very successfully by ForgeRock; the code in OpenSolaris lives on in products from Nexenta, Joyent and others, co-ordinated through the Illumos project; OpenOffice.org has flourished at The Document Foundation as LibreOffice.
There are more examples, some showing good practice and some bad. Good practice was demonstrated around Etherpad. Google didn’t need the Etherpad project to continue when it acquired the team behind it to work on Google Drive, but graciously enabled the community to carry on. As for bad practice,
database startup FoundationDB mysteriously vanished at the start of the year (www.infoworld.com/article/2901704/database/whats-behind-nosql-maker-foundationdbs-disappearing-act.html), with the downloads of its proprietary database and its open source projects disappearing. Apparently, Apple bought the technology for internal use. When Forbes initially discussed the purchase (www.forbes.com/sites/benkepes/2015/03/25/a-cautionary-open-source-tale-apple-buys-and-shutters-foundationdb) it made a mistake because it thought FoundationDB was all open source. It was an easy mistake to make; the company used the language of developer communities in many places, and many of us assume “open” when we hear “community”, because open source is so much the default these days.
Quasi-openBut the only open source code it offered, as is clear from its (now deleted) FAQ, was helper code mainly intended to draw you into the FoundationDB sphere of influence. If you used that code for your own project, you can carry on doing so as long as you kept a copy, but the central repository is gone.
This is all by way of explaining why “open-washing” is a problem. It happens when companies offer things like “free versions”, “gradual opening”, “community projects” and “open source parts” but don’t actually deliver open source code for the whole offering. All these practices have their defenders. Businesses have to make money, after all. “It’s their code, they can do what they want”, people add.
That’s true; they can. They have the liberty to choose a business model that denies you yours. But if you care about the flexibility of your business, you’ll also want to protect your liberty. Open source does not inherently need monetising; choosing to do so is only one of the options open to developers. It is possible to release substantial open source code in full without reserving special privileges. Facebook and Twitter do it all the time, for example.
The lesson to draw, in my view, is that companies like FoundationDB that “wrap themselves in the flag” but actually have no intention of delivering the four freedoms should be avoided at all costs. It’s really important to check that the liberties that deliver customer flexibility are actually present, every time. By contrast, genuinely open source code — even when delivered questionably — can always be forked and sustained, like Forgerock did with Sun’s identity middleware. It’s good for it to additionally be managed by an independent community entity – a “Foundation” – but what matters first is having the full source code to the entire project under an OSI-approved copyright licence.
Semi-openWhile I remain a proponent of anchoring open source communities in not-for-profit, community-accountable entities, it’s not a Foundation that protects code; it’s being fully, genuinely open source. The role of a Foundation is then to sustain the protection under the direction of the community benefiting from it. When Apple walked away, we found that FoundationDB was not flawed because it was in a for-profit entity; it was flawed because it delivered at best partial software freedom. And as it turns out, software freedom is your best guarantee of business value.
Opinion
On the software that masquerades as FreeGood intentions are all very well, but the only way to protect software is to make it open source.
“Google didn’t need the Etherpad project, but it graciously enabled the community to carry on.”
LV020 006 News.indd 6 04/09/2015 09:40
ANALYSIS
www.linuxvoice.com 7
Kernel • Online privacy • LLVM • Systemd • Ubuntu • Firefox
Summarised: the biggest news stories from the last monthCATCHUP
Linux kernel 4.2 released with bags of goodies Some kernel versions are
rather boring, with little more than bugfixes and driver tweaks, but Linux 4.2 brings loads to the table. Many new ARM boards and system-on-chips are supported, there’s a new random number generator based on CPU execution time jitter, the AMDGPU DRM driver is now included, and per-file encryption has been added to the F2FS flash filesystem. For a detailed list of the changes, see Linux Kernel Newbies:http://kernelnewbies.org/Linux_4.2.
1EFF’s Privacy Badger takes on spying websitesAdvertising on the web may
be a necessary evil so that we can all continue to enjoy “free” content, but the amount of tracking that ad companies do is alarming. So the Electronic Frontier Foundation has launched Privacy Badger, a browser extension that “stops advertisers and other third-party trackers from secretly tracking where you go and what pages you look at on the web”. It’s similar to Ghostery, Disconnect, and related extensions.www.eff.org/privacybadger
2LLVM/Clang 3.7 is here Competition for GCC: new features include OpenMP 3.1
support, an On Request Compilation JIT API, control flow integrity checks, and more optimisations. www.llvm.org
3
Ubuntu by far the most popular cloud OSAccording to a report by
Cloud Market, which looks at operating system usage on Amazon’s EC2 (Elastic Computer Cloud) platform, Ubuntu has an enormous lead. Currently there are around 135,000 instances of Ubuntu on EC2, followed by 54,000 for Amazon’s own Linux distro, then Windows with 17,500 and CentOS with 8,500. Canonical has been pushing Ubuntu in the cloud for the last few years, so it looks like the investment has really paid off.
4Systemd gets new “su”-like functionalitySystemd, the init and base
system attempting to replace the “bag of bits” in the lower levels of Linux, now has its own “su”-like feature. Using the machinectl shell command, users can create a privileged session that’s fully isolated from the original session. Systemd developer Lennart Poettering describes “su” as a “broken concept”, in that it starts a session with an ill-defined mixture of old and new execution context parameters (UID, ENV, cgroup etc). http://tinyurl.com/ot2b9zk.
5Lilo bootloader says farewell to the worldLilo, the “Linux Loader” and
for many years the default bootloader in Linux distributions, has done a stellar job. We have fond memories of hacking its config files to set up dual-boot systems back in the days of Red Hat Linux 5.2. But Grub is pretty much ubiquitous now, so Lilo’s lead developer has said that he’ll be handing in the towel at the end of the year, unless another developer steps up and decides to keep hacking on the code.http://lilo.alioth.debian.org
6
Former Mozillians fork Firefox OS into H5OS Well, that didn’t take long.
While Firefox OS is struggling to get established in the smartphone market, a bunch of ex-Mozilla employees have set up a new company, Acadine, to develop a fork called H5OS. Very little is known about the fork yet, but Acadine has managed to secure a healthy $100 million in funding from Tsinghua Unigroup International, a Chinese state-controlled company that’s based in Hong Kong.www.acadine.com/en-US/index.html
7Firefox 42 and later to require signed extensions Upcoming versions of Firefox
will require that all extensions are signed via AMO (addons.mozilla.org), with no way to disable this feature. The goal? To stop users from installing rogue extensions from other sources that contain spyware, malware or other nefarious code. We understand the intention, but it all sounds rather Apple-esque “walled garden”, especially with no option to switch it off…https://wiki.mozilla.org/Addons/Extension_Signing
8
LV020 006 News.indd 7 04/09/2015 09:40

DISTROHOPPER
www.linuxvoice.com8
Ubuntu 15.10 Beta 1October is coming…
We don’t normally cover in-development and beta releases in Distrohopper, but with Ubuntu
and its various respins still being the most prominent distributions out there, we thought we’d look at what’s to come in Ubuntu 15.10.
Kubuntu features the Plasma 5.4 beta desktop, along with KDE Applications 15.05 and some non-KDE programs including LibreOffice 4.4 and Firefox 38. We can expect LibreOffice 5.0 to be included in the final release of Kubuntu 15.10, however.
Ubuntu Gnome includes Gnome Shell 3.16 and most of the Gnome 3.16 release; Gnome Music is now included and Shotwell has been replaced by Gnome Photos. Over in the Ubuntu Mate world, their 15.10 beta includes the Mate 1.10 desktop, better multi-monitor support, an extension manager for the Caja file manager, and many bugfixes and plugs for memory leaks. Of all the Ubuntu flavours in beta, this one is making the most rapid progress.
Finally, the biggest change in Xubuntu is the replacement of Gnumeric and AbiWord with LibreOffice Calc and Writer. The next
Quirky 7.1Mini distro puts on weight to support Android app developers.
Remember Puppy Linux? It was a lightweight distro geared towards older machines, but with enough
useful software to make it suitable for daily computing. Quirky is a spin-off of Puppy, a “plaything” and avenue to try out new ideas, as its developer puts it. Starting with version 7.0, Quirky releases are known as the “April” series, and now we have “Appril 7.1” [sic].
This release is targeted at Android app developers, and to this end it includes the Android SDK, Android Studio, App Inventor, Oracle JDK and LiveCode out of the box. This has increased the size of the distro
enormously, so that it’s now a 1GB download, but the goal is to have an all-encompassing Android development platform that requires no extra packages.
And it’s designed for all kinds of developers, from beginners to long-time hackers. App Inventor lets non-coders create apps using visual building blocks, whereas those who prefer to get their hands dirty in real source code can fire up Android Studio and start hacking. An image is available for 16GB SD cards or USB sticks, while it’s also possible to install to a drive or partition using the installquirky.x86 executable.
Mate, the continuation of the Gnome 2 codebase, is coming on in leaps and bounds.
What’s hot and happening in the world of Linux distros (and BSD!).
DISTROHOPPER
Get started with Android app development with Quirky 7.1 “Appril”.
beta for these distros is due on 24 September, with a release candidate following on 15 October.
Appril is a great idea and we’d like to see more distros focused on a particular developer audience. For more information and download links, visit the blog of Barry Kauler, the lead developer of Quirky (and Puppy) at www.bkhome.org.news/?viewDetailed=00236.
LV020 008 DistroHopper.indd 8 03/09/2015 13:39
DISTROHOPPER
www.linuxvoice.com 9
News from the *BSD campsWhat’s going on in the world of FreeBSD, NetBSD and OpenBSD.
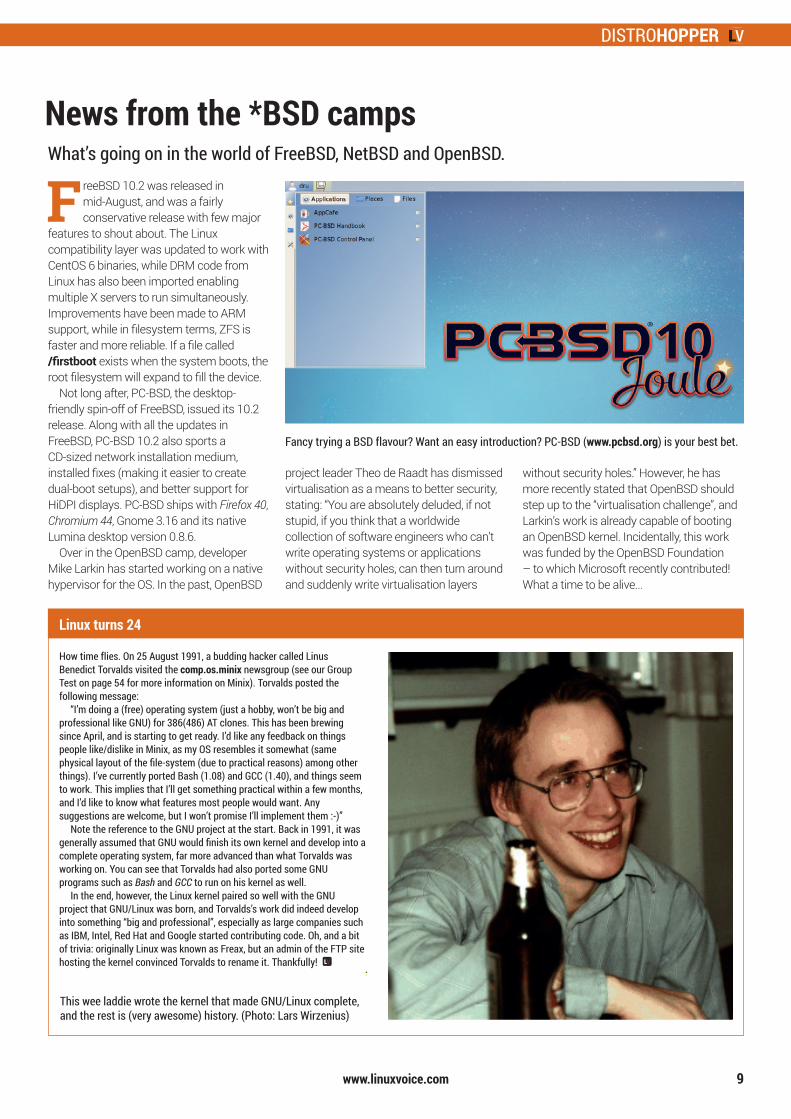
F reeBSD 10.2 was released in mid-August, and was a fairly conservative release with few major
features to shout about. The Linux compatibility layer was updated to work with CentOS 6 binaries, while DRM code from Linux has also been imported enabling multiple X servers to run simultaneously. Improvements have been made to ARM support, while in filesystem terms, ZFS is faster and more reliable. If a file called /firstboot exists when the system boots, the root filesystem will expand to fill the device.
Not long after, PC-BSD, the desktop-friendly spin-off of FreeBSD, issued its 10.2 release. Along with all the updates in FreeBSD, PC-BSD 10.2 also sports a CD-sized network installation medium, installed fixes (making it easier to create dual-boot setups), and better support for HiDPI displays. PC-BSD ships with Firefox 40, Chromium 44, Gnome 3.16 and its native Lumina desktop version 0.8.6.
Over in the OpenBSD camp, developer Mike Larkin has started working on a native hypervisor for the OS. In the past, OpenBSD
project leader Theo de Raadt has dismissed virtualisation as a means to better security, stating: “You are absolutely deluded, if not stupid, if you think that a worldwide collection of software engineers who can’t write operating systems or applications without security holes, can then turn around and suddenly write virtualisation layers
DISTROHOPPER
Fancy trying a BSD flavour? Want an easy introduction? PC-BSD (www.pcbsd.org) is your best bet.
Linux turns 24
How time flies. On 25 August 1991, a budding hacker called Linus Benedict Torvalds visited the comp.os.minix newsgroup (see our Group Test on page 54 for more information on Minix). Torvalds posted the following message:
“I’m doing a (free) operating system (just a hobby, won’t be big and professional like GNU) for 386(486) AT clones. This has been brewing since April, and is starting to get ready. I’d like any feedback on things people like/dislike in Minix, as my OS resembles it somewhat (same physical layout of the file-system (due to practical reasons) among other things). I’ve currently ported Bash (1.08) and GCC (1.40), and things seem to work. This implies that I’ll get something practical within a few months, and I’d like to know what features most people would want. Any suggestions are welcome, but I won’t promise I’ll implement them :-)”
Note the reference to the GNU project at the start. Back in 1991, it was generally assumed that GNU would finish its own kernel and develop into a complete operating system, far more advanced than what Torvalds was working on. You can see that Torvalds had also ported some GNU programs such as Bash and GCC to run on his kernel as well.
In the end, however, the Linux kernel paired so well with the GNU project that GNU/Linux was born, and Torvalds’s work did indeed develop into something “big and professional”, especially as large companies such as IBM, Intel, Red Hat and Google started contributing code. Oh, and a bit of trivia: originally Linux was known as Freax, but an admin of the FTP site hosting the kernel convinced Torvalds to rename it. Thankfully!
without security holes.” However, he has more recently stated that OpenBSD should step up to the “virtualisation challenge”, and Larkin’s work is already capable of booting an OpenBSD kernel. Incidentally, this work was funded by the OpenBSD Foundation – to which Microsoft recently contributed! What a time to be alive...
This wee laddie wrote the kernel that made GNU/Linux complete, and the rest is (very awesome) history. (Photo: Lars Wirzenius)
LV020 008 DistroHopper.indd 9 03/09/2015 13:39
GAMING ON LINUX
www.linuxvoice.com10
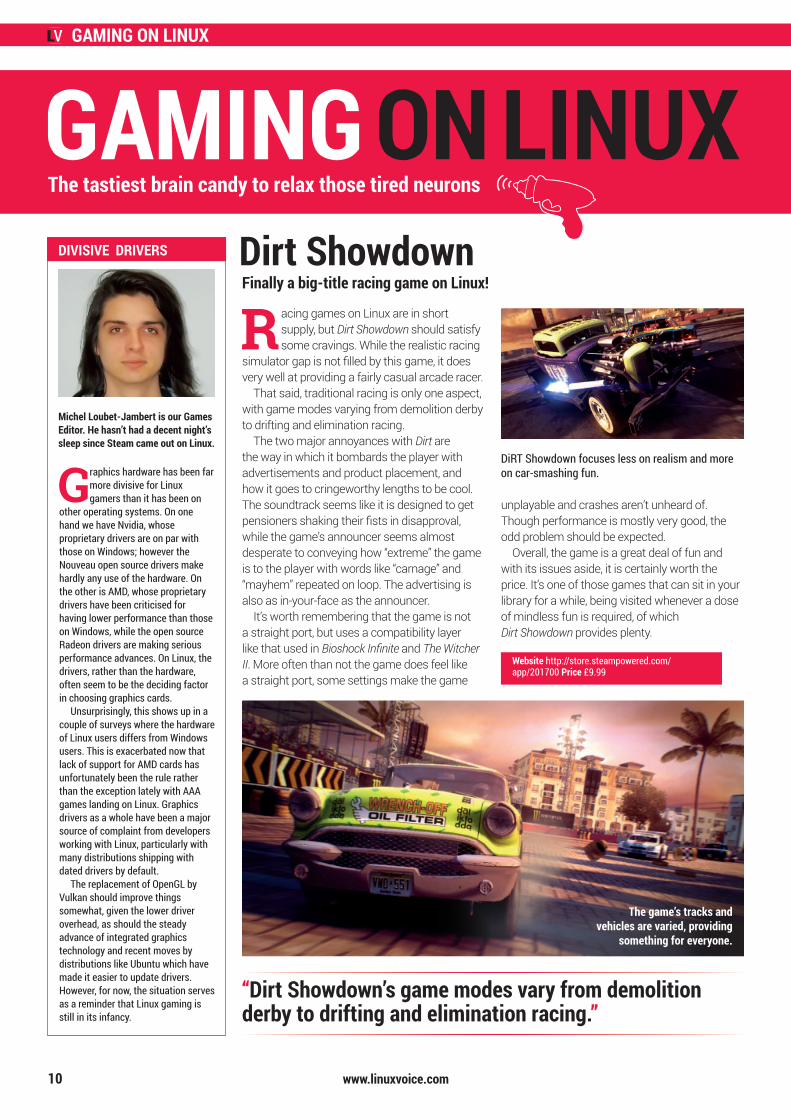
Dirt ShowdownFinally a big-title racing game on Linux!
The tastiest brain candy to relax those tired neurons
Racing games on Linux are in short supply, but Dirt Showdown should satisfy some cravings. While the realistic racing
simulator gap is not filled by this game, it does very well at providing a fairly casual arcade racer.
That said, traditional racing is only one aspect, with game modes varying from demolition derby to drifting and elimination racing.
The two major annoyances with Dirt are the way in which it bombards the player with advertisements and product placement, and how it goes to cringeworthy lengths to be cool. The soundtrack seems like it is designed to get pensioners shaking their fists in disapproval, while the game’s announcer seems almost desperate to conveying how “extreme” the game is to the player with words like “carnage” and “mayhem” repeated on loop. The advertising is also as in-your-face as the announcer.
It’s worth remembering that the game is not a straight port, but uses a compatibility layer like that used in Bioshock Infinite and The Witcher II. More often than not the game does feel like a straight port, some settings make the game
GAMING ON LINUXDIVISIVE DRIVERS
Graphics hardware has been far more divisive for Linux gamers than it has been on
other operating systems. On one hand we have Nvidia, whose proprietary drivers are on par with those on Windows; however the Nouveau open source drivers make hardly any use of the hardware. On the other is AMD, whose proprietary drivers have been criticised for having lower performance than those on Windows, while the open source Radeon drivers are making serious performance advances. On Linux, the drivers, rather than the hardware, often seem to be the deciding factor in choosing graphics cards.
Unsurprisingly, this shows up in a couple of surveys where the hardware of Linux users differs from Windows users. This is exacerbated now that lack of support for AMD cards has unfortunately been the rule rather than the exception lately with AAA games landing on Linux. Graphics drivers as a whole have been a major source of complaint from developers working with Linux, particularly with many distributions shipping with dated drivers by default.
The replacement of OpenGL by Vulkan should improve things somewhat, given the lower driver overhead, as should the steady advance of integrated graphics technology and recent moves by distributions like Ubuntu which have made it easier to update drivers. However, for now, the situation serves as a reminder that Linux gaming is still in its infancy.
Michel Loubet-Jambert is our Games Editor. He hasn’t had a decent night’s sleep since Steam came out on Linux.
unplayable and crashes aren’t unheard of. Though performance is mostly very good, the odd problem should be expected.
Overall, the game is a great deal of fun and with its issues aside, it is certainly worth the price. It’s one of those games that can sit in your library for a while, being visited whenever a dose of mindless fun is required, of which Dirt Showdown provides plenty.
Website http://store.steampowered.com/app/201700 Price £9.99
The game’s tracks and vehicles are varied, providing
something for everyone.
DiRT Showdown focuses less on realism and more on car-smashing fun.
“Dirt Showdown’s game modes vary from demolition derby to drifting and elimination racing.”
LV020 010 Gaming.indd 10 03/09/2015 10:15
GAMING ON LINUX
www.linuxvoice.com 11
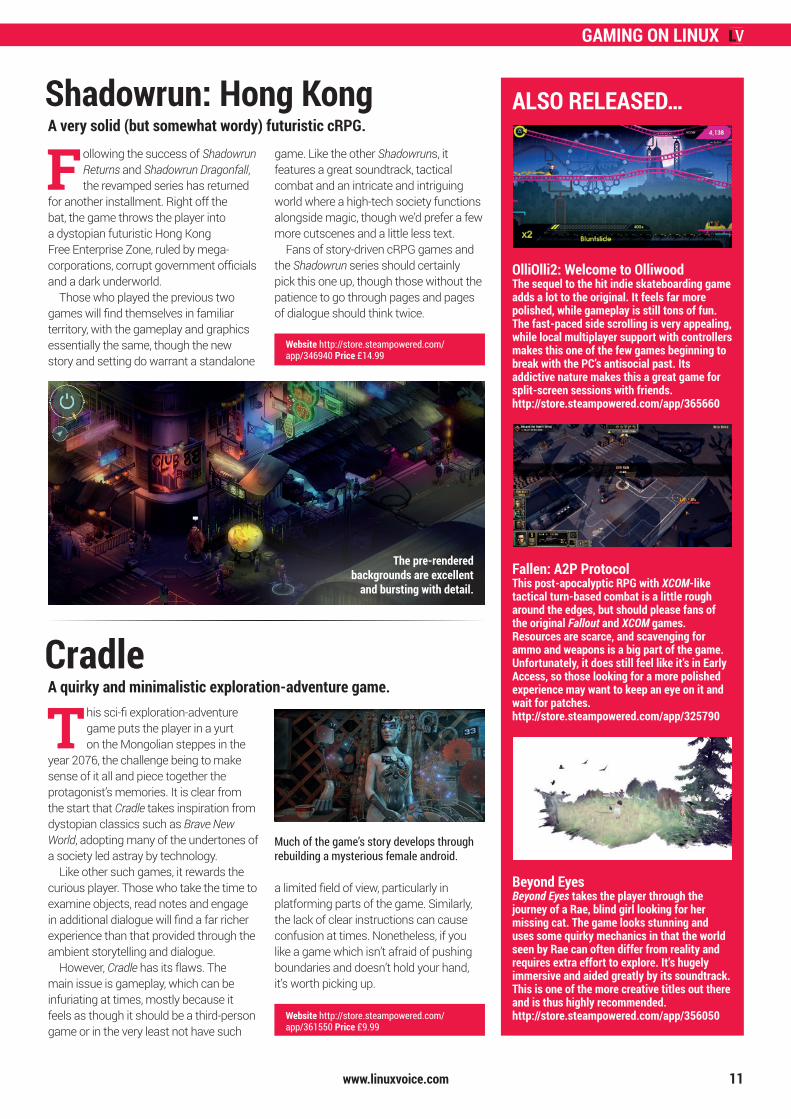
OlliOlli2: Welcome to OlliwoodThe sequel to the hit indie skateboarding game adds a lot to the original. It feels far more polished, while gameplay is still tons of fun. The fast-paced side scrolling is very appealing, while local multiplayer support with controllers makes this one of the few games beginning to break with the PC’s antisocial past. Its addictive nature makes this a great game for split-screen sessions with friends.http://store.steampowered.com/app/365660
ALSO RELEASED…
CradleA quirky and minimalistic exploration-adventure game.
This sci-fi exploration-adventure game puts the player in a yurt on the Mongolian steppes in the
year 2076, the challenge being to make sense of it all and piece together the protagonist’s memories. It is clear from the start that Cradle takes inspiration from dystopian classics such as Brave New World, adopting many of the undertones of a society led astray by technology.
Like other such games, it rewards the curious player. Those who take the time to examine objects, read notes and engage in additional dialogue will find a far richer experience than that provided through the ambient storytelling and dialogue.
However, Cradle has its flaws. The main issue is gameplay, which can be infuriating at times, mostly because it feels as though it should be a third-person game or in the very least not have such
a limited field of view, particularly in platforming parts of the game. Similarly, the lack of clear instructions can cause confusion at times. Nonetheless, if you like a game which isn’t afraid of pushing boundaries and doesn’t hold your hand, it’s worth picking up.
Shadowrun: Hong KongA very solid (but somewhat wordy) futuristic cRPG.
Following the success of Shadowrun Returns and Shadowrun Dragonfall, the revamped series has returned
for another installment. Right off the bat, the game throws the player into a dystopian futuristic Hong Kong Free Enterprise Zone, ruled by mega-corporations, corrupt government officials and a dark underworld.
Those who played the previous two games will find themselves in familiar territory, with the gameplay and graphics essentially the same, though the new story and setting do warrant a standalone
game. Like the other Shadowruns, it features a great soundtrack, tactical combat and an intricate and intriguing world where a high-tech society functions alongside magic, though we’d prefer a few more cutscenes and a little less text.
Fans of story-driven cRPG games and the Shadowrun series should certainly pick this one up, though those without the patience to go through pages and pages of dialogue should think twice.
Fallen: A2P ProtocolThis post-apocalyptic RPG with XCOM-like tactical turn-based combat is a little rough around the edges, but should please fans of the original Fallout and XCOM games. Resources are scarce, and scavenging for ammo and weapons is a big part of the game. Unfortunately, it does still feel like it’s in Early Access, so those looking for a more polished experience may want to keep an eye on it and wait for patches.http://store.steampowered.com/app/325790
Beyond EyesBeyond Eyes takes the player through the journey of a Rae, blind girl looking for her missing cat. The game looks stunning and uses some quirky mechanics in that the world seen by Rae can often differ from reality and requires extra effort to explore. It’s hugely immersive and aided greatly by its soundtrack. This is one of the more creative titles out there and is thus highly recommended.http://store.steampowered.com/app/356050
Website http://store.steampowered.com/app/346940 Price £14.99
Website http://store.steampowered.com/app/361550 Price £9.99
The pre-rendered backgrounds are excellent
and bursting with detail.
Much of the game’s story develops through rebuilding a mysterious female android.
LV020 010 Gaming.indd 11 03/09/2015 10:15
www.linuxvoice.com12
WINDOWS 10
Got something to say? An idea for a new magazine feature? Or a great discovery? Email us: [email protected]
YOUR LETTERS
Now that Windows 10 is out and rolling I have to wonder how many of those who upgraded are having problems with their dual boot systems? I also wonder if there is any experience on how to dual boot Windows 10 and Linux? I know this is compounded with UEFI and Secure Boot, which adds more to solve. I abandoned two installs of Linux because of these problems and am giving Windows 10 a shot. I think we are headed towards only getting Linux if you build or buy a specific computer for that purpose. As an additional thought, what good is
a secure distro like Tails when it will not boot on the newer UEFI and Secure Boot systems?Steve Cox
Graham says: This is a very good question, and it’s one that Matthew Garrett partly tackles in this issue’s interview (see page 40), Our experience is that you can still disable Secure Boot and even bypass UEFI if you need to, and we’ve had no problem dual/triple/quad booting alongside Windows 10 (really!). But we have heard from a couple of readers who have had problems, so we’re currently investigating.
LINUX VOICE STAR LETTER
Microsoft isn’t going out of its way to make things easier for Linux users; however, we should be grateful that it’s getting easier to buy a PC without Windows pre-installed.
Before I retired I worked for a manufacturing company, where we talked a lot about getting to the root cause of a problem, about cause and effect, and about critical paths. To me the internet is just another tool: if there is a job to do, you use the most effective or convenient tool available; if this tool is not available you use the next most effective or convenient tool, and so on. The important bottom line being that human ingenuity will always ensure that the job is done no matter what tools are or are not available. So why is David Cameron (and others) getting so fixated on the internet? As far as terrorism is concerned the IRA managed quite well without the internet, as did
many other terrorist groups. One further thought: there are now a very large number of people engaged in gathering information about others. Never again will someone who has arranged for an incriminating email to go missing, be sure that a copy will not re-surface. And whose information is worth the most, David Cameron’s and other people in the public eye of course. David, you have created a monster and you are nearest to its teeth.John Bourne
Andrew says: Fair points all, though I do think that files are always going to be much easier to reproduce than physical discs. One of the things that struck me about the Edward
DIGITAL PANIC!!! For too long, we have been a passively tolerant society, saying to our citizens: as long as you obey the law, we will leave you alone…
Snowden leaks was that it would have been impossible to steal/liberate that amount of data if it were stored on paper files like in the olden days, so digital files’ ease of duplication is already having the effect you describe. It’ll only take a couple of generations of politicians before they cotton on to this!
LV020 012 Mail.indd 12 04/09/2015 09:43
www.linuxvoice.com 1313
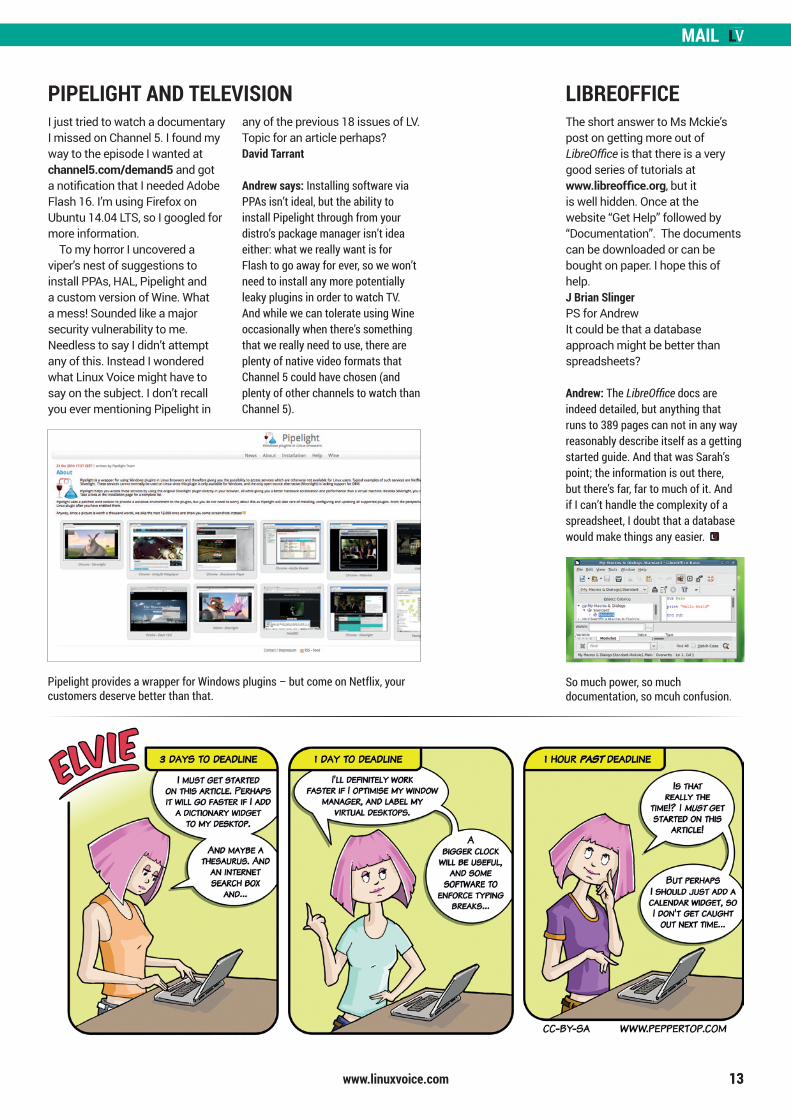
Pipelight provides a wrapper for Windows plugins – but come on Netflix, your customers deserve better than that.
So much power, so much documentation, so mcuh confusion.
I just tried to watch a documentary I missed on Channel 5. I found my way to the episode I wanted at channel5.com/demand5 and got a notification that I needed Adobe Flash 16. I’m using Firefox on Ubuntu 14.04 LTS, so I googled for more information.
To my horror I uncovered a viper’s nest of suggestions to install PPAs, HAL, Pipelight and a custom version of Wine. What a mess! Sounded like a major security vulnerability to me. Needless to say I didn’t attempt any of this. Instead I wondered what Linux Voice might have to say on the subject. I don’t recall you ever mentioning Pipelight in
any of the previous 18 issues of LV. Topic for an article perhaps?David Tarrant
Andrew says: Installing software via PPAs isn’t ideal, but the ability to install Pipelight through from your distro’s package manager isn’t idea either: what we really want is for Flash to go away for ever, so we won’t need to install any more potentially leaky plugins in order to watch TV. And while we can tolerate using Wine occasionally when there’s something that we really need to use, there are plenty of native video formats that Channel 5 could have chosen (and plenty of other channels to watch than Channel 5).
PIPELIGHT AND TELEVISIONThe short answer to Ms Mckie’s post on getting more out of LibreOffice is that there is a very good series of tutorials at www.libreoffice.org, but it is well hidden. Once at the website “Get Help” followed by “Documentation”. The documents can be downloaded or can be bought on paper. I hope this of help. J Brian SlingerPS for AndrewIt could be that a database approach might be better than spreadsheets?
Andrew: The LibreOffice docs are indeed detailed, but anything that runs to 389 pages can not in any way reasonably describe itself as a getting started guide. And that was Sarah’s point; the information is out there, but there’s far, far to much of it. And if I can’t handle the complexity of a spreadsheet, I doubt that a database would make things any easier.
LIBREOFFICE
LV020 012 Mail.indd 13 04/09/2015 09:43

www.linuxvoice.com
SUBSCRIBE
14
SUBSCRIBE
shop.linuxvoice.comSUBSCRIBE
Get many pages of tutorials,
features, interviews and reviews every month
Access our rapidly growing
back-issues archive – all DRM-free and ready to download
Save money on the shop price
and get each issue delivered to your door
Payment is in Pounds Sterling. 12-month subscribers will receive 12 issues of Linux Voice a year. 7-month subscribers will receive 7 issue of Linux Voice. If you are dissatisfied in any way you can write to us to cancel your
subscription at [email protected] and we will refund you for all unmailed issues.
SUBSCRIBE TO
TODAY!
Gives 50% of its profits back to Free Software
Get your regular dose of Linux Voice, the magazine that:
1-year print & digital: £9512-month digital only: £38
Licenses its content CC-BY-SA within 9 months
US/Canada subs prices
LV020 014 Subs US.indd 14 04/09/2015 12:04

SUBSCRIBE
www.linuxvoice.com
All subscribers get access to every single digital back issue – that’s about 1,000,000 words of tutorials, reviews and free software hackery at your fingertips
Overseas subs prices12-month print & digital:Europe: £85US/Canada: £95 Rest of world: £99
15
DIGITAL SUBSCRIPTION*
ONLY £38*WHEREVER IN THE WORLD YOU ARE – IT’S DIGITAL, SO THERE ARE
NO POSTAGE COSTS
LV020 014 Subs US.indd 15 04/09/2015 12:05
www.linuxvoice.com
LINUX CONFERENCE
16
L inux wouldn’t be possible without the internet. The ability of tens of thousands of developers to work together on free software, without
having to be in the same room, has made the world of desktops, distros and software repositories a reality. But still, sometimes it’s good to put faces to names, meet up with other Linux users and developers, learn about upcoming trends and technologies, and grab a beer at the end of the day. That’s why Linux and open source conferences are mightily useful for the software we all use.
SUSE, the creator of SUSE Enterprise Linux, OpenSUSE, Yast and other well-known software, is gearing up to hold its yearly conference. This year, it will take place from 2–6 November in Amsterdam. SUSE describes the event as “the annual global technical conference for SUSE customers, partners and community enthusiasts, geared to the needs of the enterprise IT consumer”. It’s a place for the SUSE team to show off its latest
work – and for customers, partners and the press to delve deeper into the latest developments. Linux Voice will be there, of course, and you can join too by registering at www.susecon.com. You even have a chance to attend for free by winning a conference pass – but more on that in a moment!
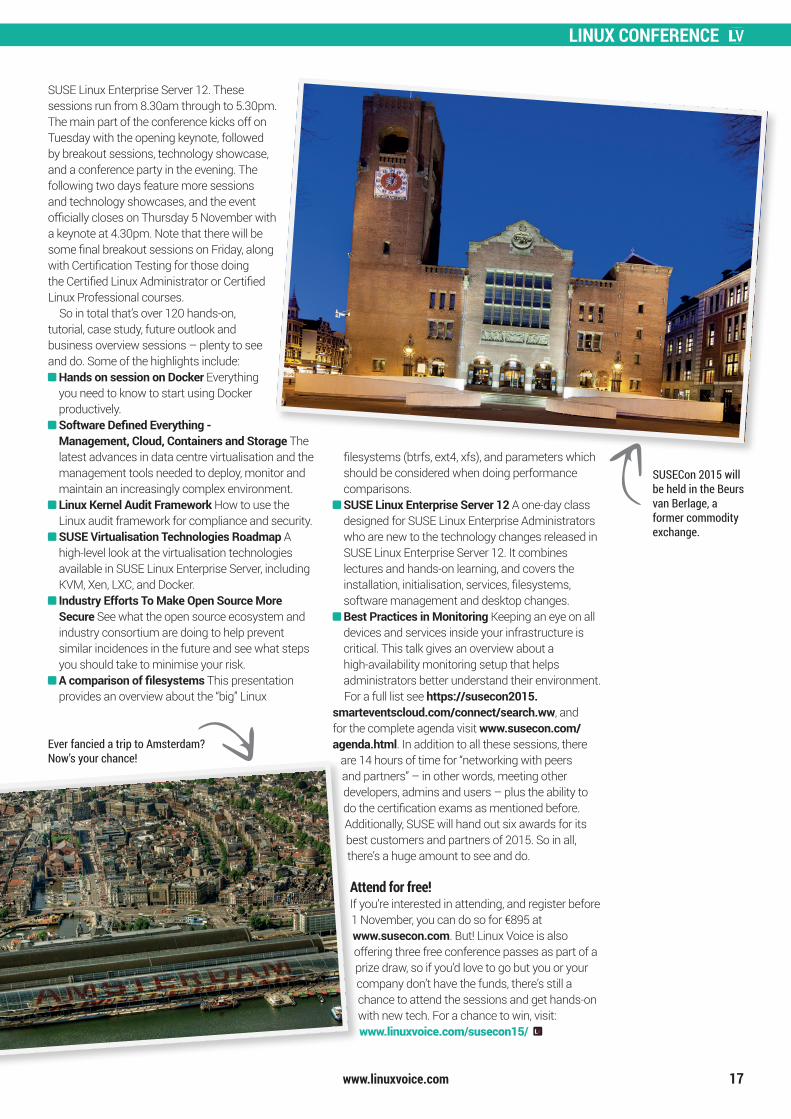
Location and scheduleSUSECon 2015 will be held in the Beurs van Berlage building (www.beursvanberlage.nl/en), an imposing
former commodity exchange just a few hundred meters from Amsterdam’s central train station, so it’s easy to get to the event from the city’s main airport
(Schiphol). If you’re looking for accommodation, the Beurs van Berlage staff provides assistance via this page: www.bvbroomkit.nl/susecon15.
If you arrive on Monday 2 November, you can register and attend some of the pre-conference workshops looking at SUSE OpenStack Cloud and
“It’s good to put faces to names, learn about upcoming trends and grab a beer at the end of the day.”
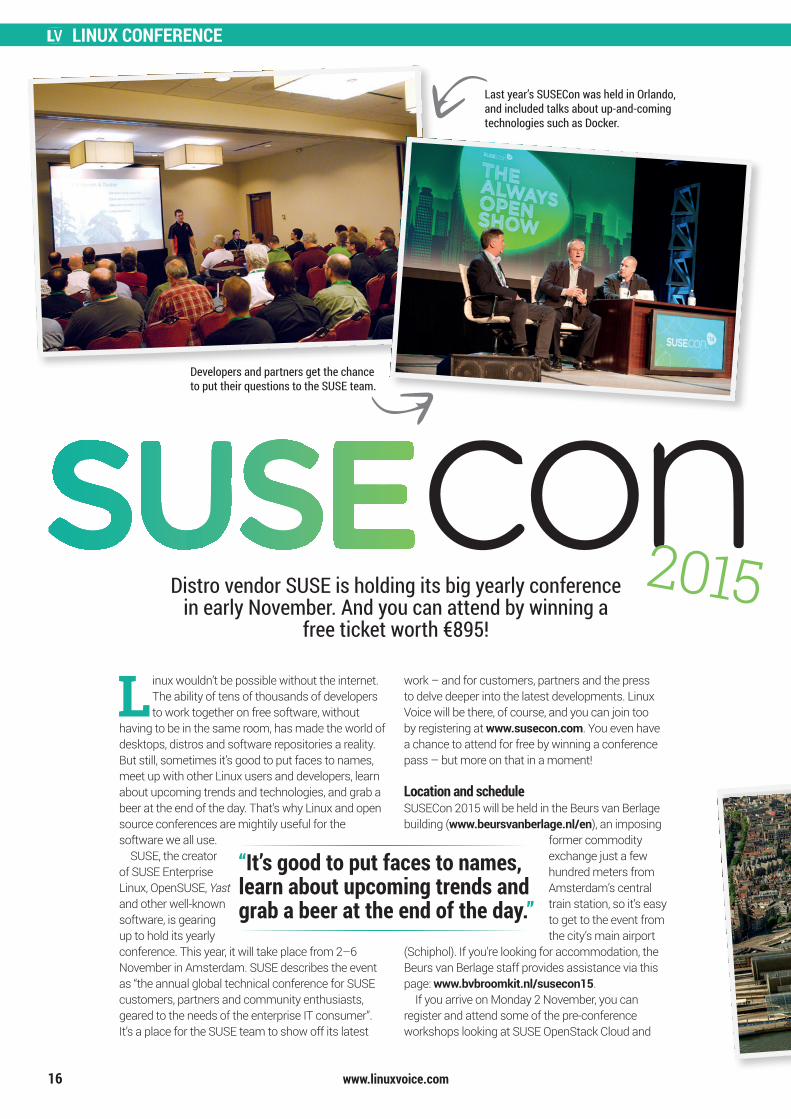
Last year’s SUSECon was held in Orlando, and included talks about up-and-coming technologies such as Docker.
Developers and partners get the chance to put their questions to the SUSE team.
Distro vendor SUSE is holding its big yearly conference in early November. And you can attend by winning a
free ticket worth €895!
2015
LV020 016 Feature SUSE.indd 16 03/09/2015 10:17
LINUX CONFERENCE
www.linuxvoice.com 17
SUSE Linux Enterprise Server 12. These sessions run from 8.30am through to 5.30pm. The main part of the conference kicks off on Tuesday with the opening keynote, followed by breakout sessions, technology showcase, and a conference party in the evening. The following two days feature more sessions and technology showcases, and the event officially closes on Thursday 5 November with a keynote at 4.30pm. Note that there will be some final breakout sessions on Friday, along with Certification Testing for those doing the Certified Linux Administrator or Certified Linux Professional courses.
So in total that’s over 120 hands-on, tutorial, case study, future outlook and business overview sessions – plenty to see and do. Some of the highlights include:
Hands on session on Docker Everything you need to know to start using Docker productively. Software Defined Everything - Management, Cloud, Containers and Storage The latest advances in data centre virtualisation and the management tools needed to deploy, monitor and maintain an increasingly complex environment. Linux Kernel Audit Framework How to use the Linux audit framework for compliance and security. SUSE Virtualisation Technologies Roadmap A high-level look at the virtualisation technologies available in SUSE Linux Enterprise Server, including KVM, Xen, LXC, and Docker. Industry Efforts To Make Open Source More Secure See what the open source ecosystem and industry consortium are doing to help prevent similar incidences in the future and see what steps you should take to minimise your risk. A comparison of filesystems This presentation provides an overview about the “big” Linux
filesystems (btrfs, ext4, xfs), and parameters which should be considered when doing performance comparisons. SUSE Linux Enterprise Server 12 A one-day class designed for SUSE Linux Enterprise Administrators who are new to the technology changes released in SUSE Linux Enterprise Server 12. It combines lectures and hands-on learning, and covers the installation, initialisation, services, filesystems, software management and desktop changes. Best Practices in Monitoring Keeping an eye on all devices and services inside your infrastructure is critical. This talk gives an overview about a high-availability monitoring setup that helps administrators better understand their environment.For a full list see https://susecon2015.
smarteventscloud.com/connect/search.ww, and for the complete agenda visit www.susecon.com/agenda.html. In addition to all these sessions, there
are 14 hours of time for “networking with peers and partners” – in other words, meeting other developers, admins and users – plus the ability to do the certification exams as mentioned before. Additionally, SUSE will hand out six awards for its best customers and partners of 2015. So in all, there’s a huge amount to see and do.
Attend for free!If you’re interested in attending, and register before 1 November, you can do so for €895 at www.susecon.com. But! Linux Voice is also offering three free conference passes as part of a prize draw, so if you’d love to go but you or your company don’t have the funds, there’s still a chance to attend the sessions and get hands-on with new tech. For a chance to win, visit:www.linuxvoice.com/susecon15/
SUSECon 2015 will be held in the Beurs van Berlage, a former commodity exchange.
Ever fancied a trip to Amsterdam? Now’s your chance!
2015
LV020 016 Feature SUSE.indd 17 03/09/2015 10:17
THE BEST DESKTOP 2015
www.linuxvoice.com18 www.linuxvoice.com
THE BEST DESKTOP 2015
Desktop environments provide the bridge between our soft, fleshy minds and
the cold, hard logic of the computer. It’s the difference of these two processing units that makes them hard to design well: our gooey brains like elegant graphics, and can struggle to remember complex operations; the silicon brain inside the computer, on the other hand, don’t care a jot for this and just want to be told what to do.
A good desktop environment should appease both sides. They shouldn’t overly tax our minds and should help to keep us calm and relaxed even after an eight-hour day of staring at confusing symbols on a bright LCD screen,
yet at the same time it shouldn’t overly tax the limited capacity of the CPU in the box.
Back to the futureThis seemingly intractable contradiction isn’t as dire as it may seem, though. It’s been almost 50 years since Douglas Engelbart revealed mouse-driven window-based computing to the world in a presentation at the Fall Joint Computer Conference that’s become known as The Mother Of All Demos. While we may still operate in the same graphical paradigm almost half a century later, we’ve refined the system immeasurably. The software and hardware is now better suited to the tasks, and we’re all
more familiar with the concepts involved. For most computer users, moving a mouse is as familiar as moving a pen across a piece of paper.
Despite all these advances, it’s still not completely clear how the perfect desktop environment should operate. Some people like a keyboard-driven interface, others prefer to use the mouse; some people like big, chunky icons, others smaller unobtrusive ones; some people like graphical effects, others prefer simplicity.
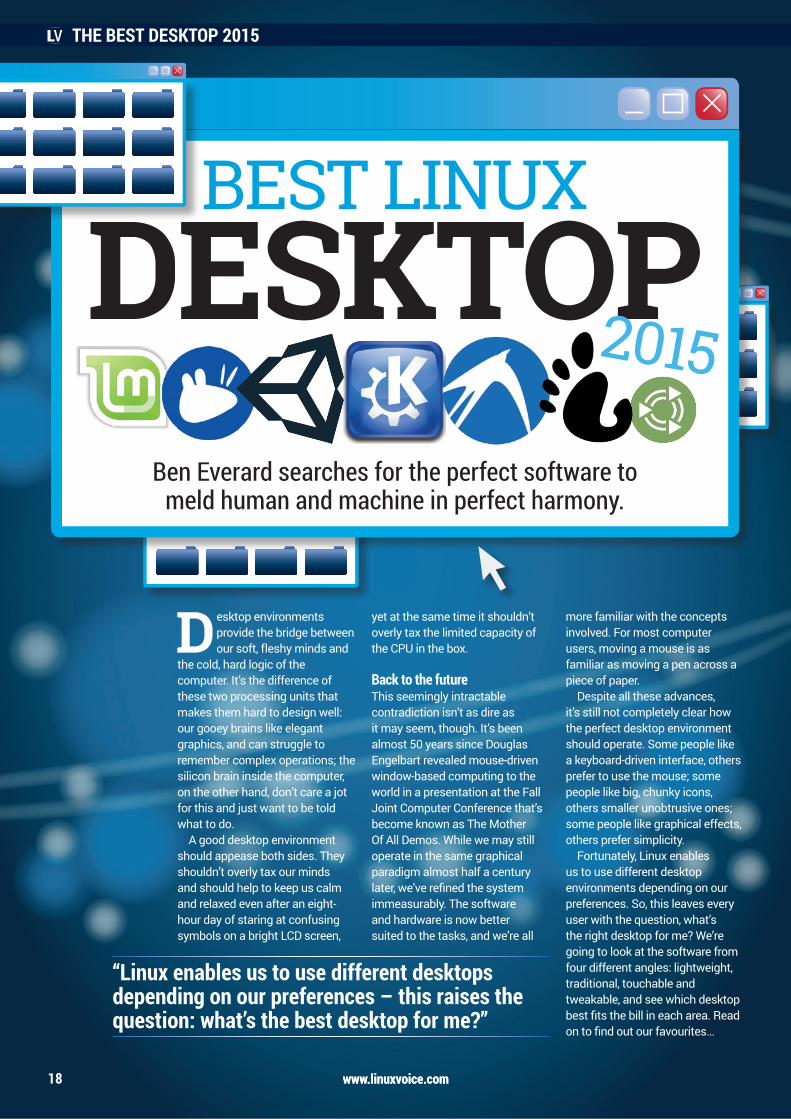
Fortunately, Linux enables us to use different desktop environments depending on our preferences. So, this leaves every user with the question, what’s the right desktop for me? We’re going to look at the software from four different angles: lightweight, traditional, touchable and tweakable, and see which desktop best fits the bill in each area. Read on to find out our favourites…
“Linux enables us to use different desktops depending on our preferences – this raises the question: what’s the best desktop for me?”
BEST LINUXDESKTOP2015
Ben Everard searches for the perfect software to meld human and machine in perfect harmony.
LV020 018 Cover Feature.indd 18 04/09/2015 09:48
THE BEST DESKTOP 2015
www.linuxvoice.com 19
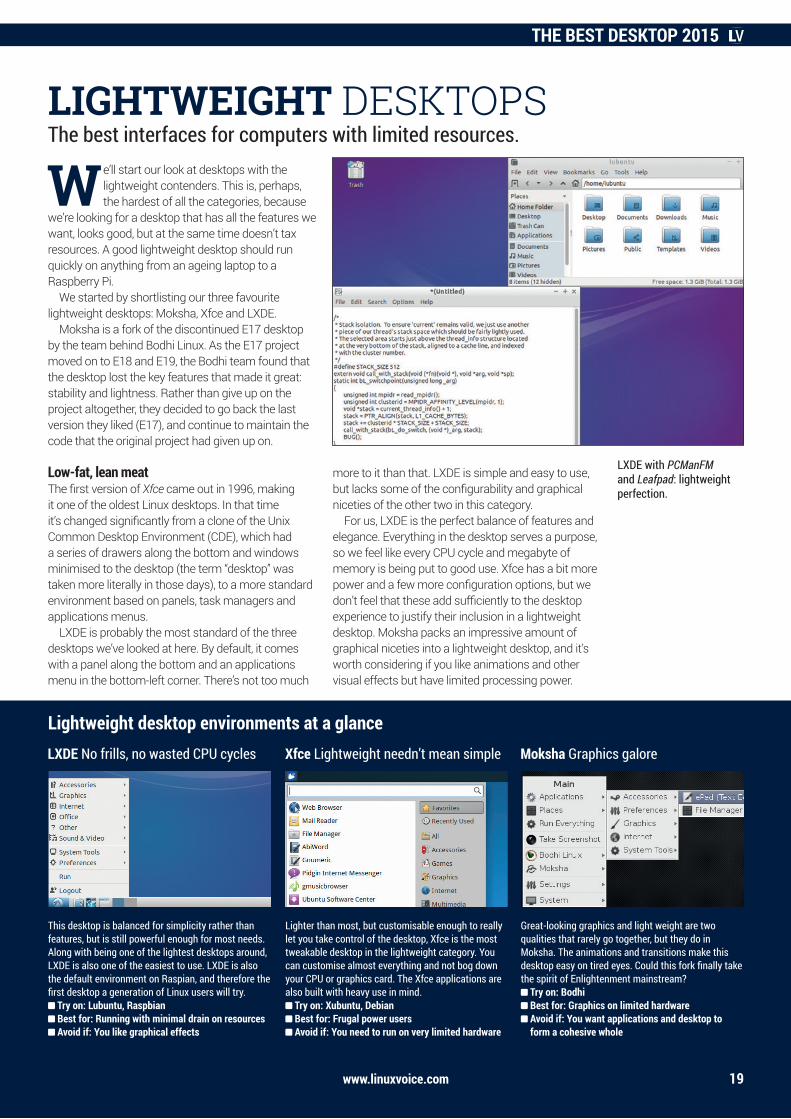
We’ll start our look at desktops with the lightweight contenders. This is, perhaps, the hardest of all the categories, because
we’re looking for a desktop that has all the features we want, looks good, but at the same time doesn’t tax resources. A good lightweight desktop should run quickly on anything from an ageing laptop to a Raspberry Pi.
We started by shortlisting our three favourite lightweight desktops: Moksha, Xfce and LXDE.
Moksha is a fork of the discontinued E17 desktop by the team behind Bodhi Linux. As the E17 project moved on to E18 and E19, the Bodhi team found that the desktop lost the key features that made it great: stability and lightness. Rather than give up on the project altogether, they decided to go back the last version they liked (E17), and continue to maintain the code that the original project had given up on.
Low-fat, lean meatThe first version of Xfce came out in 1996, making it one of the oldest Linux desktops. In that time it’s changed significantly from a clone of the Unix Common Desktop Environment (CDE), which had a series of drawers along the bottom and windows minimised to the desktop (the term “desktop” was taken more literally in those days), to a more standard environment based on panels, task managers and applications menus.
LXDE is probably the most standard of the three desktops we’ve looked at here. By default, it comes with a panel along the bottom and an applications menu in the bottom-left corner. There’s not too much
more to it than that. LXDE is simple and easy to use, but lacks some of the configurability and graphical niceties of the other two in this category.
For us, LXDE is the perfect balance of features and elegance. Everything in the desktop serves a purpose, so we feel like every CPU cycle and megabyte of memory is being put to good use. Xfce has a bit more power and a few more configuration options, but we don’t feel that these add sufficiently to the desktop experience to justify their inclusion in a lightweight desktop. Moksha packs an impressive amount of graphical niceties into a lightweight desktop, and it’s worth considering if you like animations and other visual effects but have limited processing power.
LXDE with PCManFM and Leafpad: lightweight perfection.
LIGHTWEIGHT DESKTOPSThe best interfaces for computers with limited resources.
This desktop is balanced for simplicity rather than features, but is still powerful enough for most needs. Along with being one of the lightest desktops around, LXDE is also one of the easiest to use. LXDE is also the default environment on Raspian, and therefore the first desktop a generation of Linux users will try.
Try on: Lubuntu, Raspbian Best for: Running with minimal drain on resources Avoid if: You like graphical effects
Lightweight desktop environments at a glance
19www.linuxvoice.com
Lighter than most, but customisable enough to really let you take control of the desktop, Xfce is the most tweakable desktop in the lightweight category. You can customise almost everything and not bog down your CPU or graphics card. The Xfce applications are also built with heavy use in mind.
Try on: Xubuntu, Debian Best for: Frugal power users Avoid if: You need to run on very limited hardware
Xfce Lightweight needn’t mean simple
Great-looking graphics and light weight are two qualities that rarely go together, but they do in Moksha. The animations and transitions make this desktop easy on tired eyes. Could this fork finally take the spirit of Enlightenment mainstream?
Try on: Bodhi Best for: Graphics on limited hardware Avoid if: You want applications and desktop to form a cohesive whole
Moksha Graphics galoreLXDE No frills, no wasted CPU cycles
LV020 018 Cover Feature.indd 19 04/09/2015 09:48
20 www.linuxvoice.com
THE BEST DESKTOP 2015
www.linuxvoice.com20
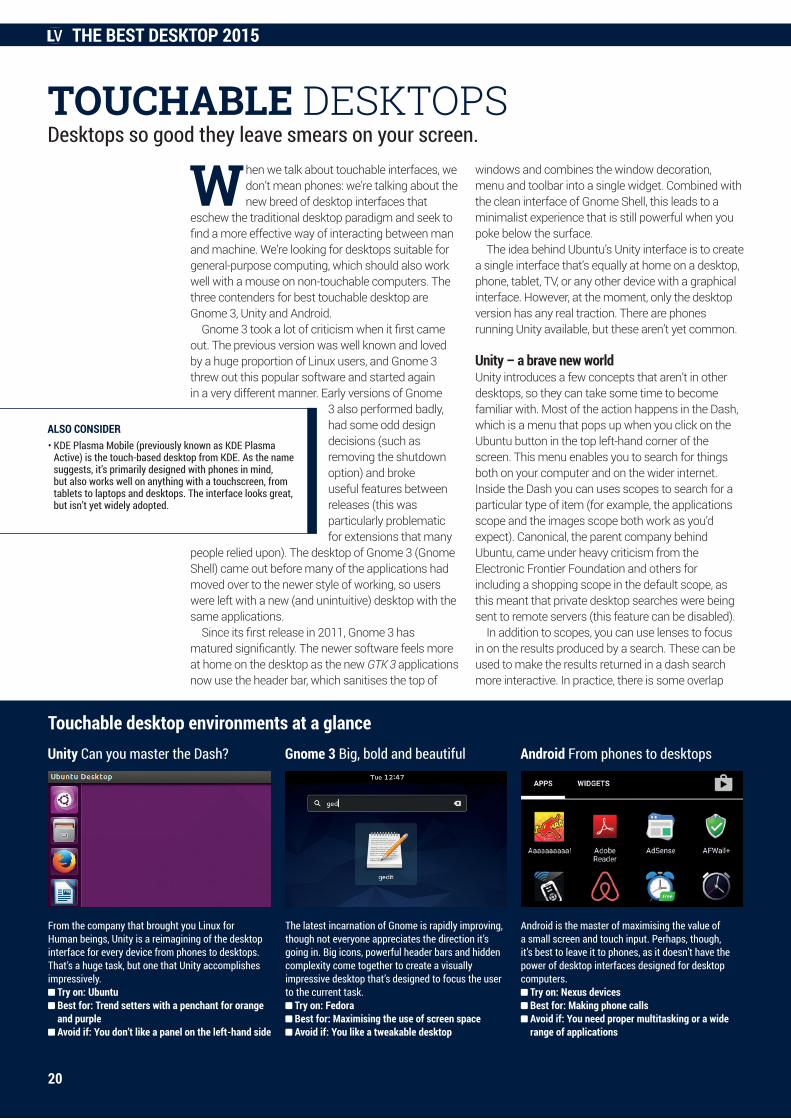
When we talk about touchable interfaces, we don’t mean phones: we’re talking about the new breed of desktop interfaces that
eschew the traditional desktop paradigm and seek to find a more effective way of interacting between man and machine. We’re looking for desktops suitable for general-purpose computing, which should also work well with a mouse on non-touchable computers. The three contenders for best touchable desktop are Gnome 3, Unity and Android.
Gnome 3 took a lot of criticism when it first came out. The previous version was well known and loved by a huge proportion of Linux users, and Gnome 3 threw out this popular software and started again in a very different manner. Early versions of Gnome
3 also performed badly, had some odd design decisions (such as removing the shutdown option) and broke useful features between releases (this was particularly problematic for extensions that many
people relied upon). The desktop of Gnome 3 (Gnome Shell) came out before many of the applications had moved over to the newer style of working, so users were left with a new (and unintuitive) desktop with the same applications.
Since its first release in 2011, Gnome 3 has matured significantly. The newer software feels more at home on the desktop as the new GTK 3 applications now use the header bar, which sanitises the top of
windows and combines the window decoration, menu and toolbar into a single widget. Combined with the clean interface of Gnome Shell, this leads to a minimalist experience that is still powerful when you poke below the surface.
The idea behind Ubuntu’s Unity interface is to create a single interface that’s equally at home on a desktop, phone, tablet, TV, or any other device with a graphical interface. However, at the moment, only the desktop version has any real traction. There are phones running Unity available, but these aren’t yet common.
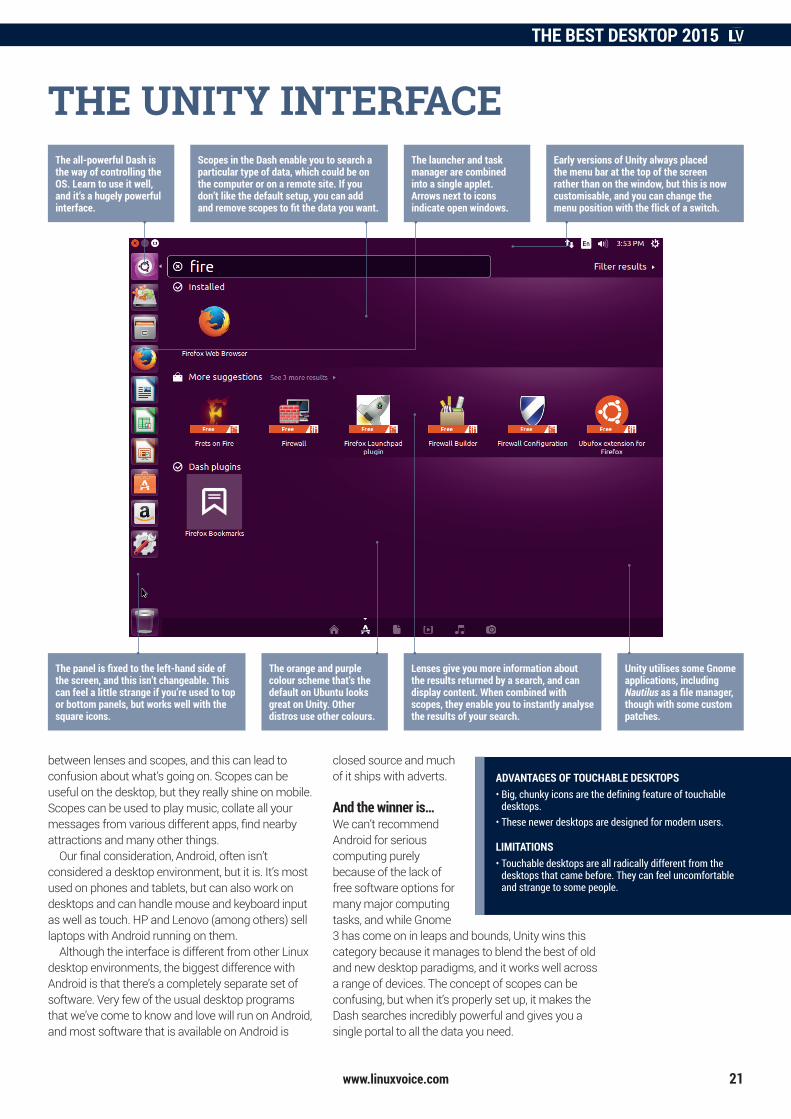
Unity – a brave new worldUnity introduces a few concepts that aren’t in other desktops, so they can take some time to become familiar with. Most of the action happens in the Dash, which is a menu that pops up when you click on the Ubuntu button in the top left-hand corner of the screen. This menu enables you to search for things both on your computer and on the wider internet. Inside the Dash you can uses scopes to search for a particular type of item (for example, the applications scope and the images scope both work as you’d expect). Canonical, the parent company behind Ubuntu, came under heavy criticism from the Electronic Frontier Foundation and others for including a shopping scope in the default scope, as this meant that private desktop searches were being sent to remote servers (this feature can be disabled).
In addition to scopes, you can use lenses to focus in on the results produced by a search. These can be used to make the results returned in a dash search more interactive. In practice, there is some overlap
TOUCHABLE DESKTOPSDesktops so good they leave smears on your screen.
From the company that brought you Linux for Human beings, Unity is a reimagining of the desktop interface for every device from phones to desktops. That’s a huge task, but one that Unity accomplishes impressively.
Try on: Ubuntu Best for: Trend setters with a penchant for orange and purple Avoid if: You don’t like a panel on the left-hand side
Touchable desktop environments at a glance
The latest incarnation of Gnome is rapidly improving, though not everyone appreciates the direction it’s going in. Big icons, powerful header bars and hidden complexity come together to create a visually impressive desktop that’s designed to focus the user to the current task.
Try on: Fedora Best for: Maximising the use of screen space
Avoid if: You like a tweakable desktop
Android is the master of maximising the value of a small screen and touch input. Perhaps, though, it’s best to leave it to phones, as it doesn’t have the power of desktop interfaces designed for desktop computers.
Try on: Nexus devices Best for: Making phone calls Avoid if: You need proper multitasking or a wide range of applications
ALSO CONSIDER• KDE Plasma Mobile (previously known as KDE Plasma
Active) is the touch-based desktop from KDE. As the name suggests, it’s primarily designed with phones in mind, but also works well on anything with a touchscreen, from tablets to laptops and desktops. The interface looks great, but isn’t yet widely adopted.
Unity Can you master the Dash? Gnome 3 Big, bold and beautiful Android From phones to desktops
20
LV020 018 Cover Feature.indd 20 04/09/2015 09:48
21
THE BEST DESKTOP 2015
www.linuxvoice.com
closed source and much of it ships with adverts.
And the winner is…We can’t recommend Android for serious computing purely because of the lack of free software options for many major computing tasks, and while Gnome 3 has come on in leaps and bounds, Unity wins this category because it manages to blend the best of old and new desktop paradigms, and it works well across a range of devices. The concept of scopes can be confusing, but when it’s properly set up, it makes the Dash searches incredibly powerful and gives you a single portal to all the data you need.
THE UNITY INTERFACE
between lenses and scopes, and this can lead to confusion about what’s going on. Scopes can be useful on the desktop, but they really shine on mobile. Scopes can be used to play music, collate all your messages from various different apps, find nearby attractions and many other things.
Our final consideration, Android, often isn’t considered a desktop environment, but it is. It’s most used on phones and tablets, but can also work on desktops and can handle mouse and keyboard input as well as touch. HP and Lenovo (among others) sell laptops with Android running on them.
Although the interface is different from other Linux desktop environments, the biggest difference with Android is that there’s a completely separate set of software. Very few of the usual desktop programs that we’ve come to know and love will run on Android, and most software that is available on Android is
The all-powerful Dash is the way of controlling the OS. Learn to use it well, and it’s a hugely powerful interface.
Scopes in the Dash enable you to search a particular type of data, which could be on the computer or on a remote site. If you don’t like the default setup, you can add and remove scopes to fit the data you want.
The launcher and task manager are combined into a single applet. Arrows next to icons indicate open windows.
Early versions of Unity always placed the menu bar at the top of the screen rather than on the window, but this is now customisable, and you can change the menu position with the flick of a switch.
The orange and purple colour scheme that’s the default on Ubuntu looks great on Unity. Other distros use other colours.
The panel is fixed to the left-hand side of the screen, and this isn’t changeable. This can feel a little strange if you’re used to top or bottom panels, but works well with the square icons.
Unity utilises some Gnome applications, including Nautilus as a file manager, though with some custom patches.
Lenses give you more information about the results returned by a search, and can display content. When combined with scopes, they enable you to instantly analyse the results of your search.
ADVANTAGES OF TOUCHABLE DESKTOPS• Big, chunky icons are the defining feature of touchable
desktops.• These newer desktops are designed for modern users.
LIMITATIONS• Touchable desktops are all radically different from the
desktops that came before. They can feel uncomfortable and strange to some people.
LV020 018 Cover Feature.indd 21 04/09/2015 09:48
20 www.linuxvoice.com
THE BEST DESKTOP 2015
O f all the desktops here, the entries in the traditional category are the strongest. This is largely because this style of desktop has
matured for longer than the others. The current style of bottom panel was first popularised in Windows 95, though even this borrows heavily from earlier environments such as RISC OS. A desktop in this category should be instantly familiar to just about any computer user.
When Gnome 3 came out and shifted away from the traditional desktop, the Linux Mint project developed a set of extensions known as the Mint Gnome Shell Extensions. These were designed to convert the desktop back to a more familiar layout. Over time, the required changes became too big for
extensions, and the Linux Mint team forked Gnome 3 to create Cinnamon. This desktop environment used all the newer technologies of Gnome 3 that created great graphical effects, but with a more traditional desktop
layout. This good-looking but familiar desktop helped make Linux Mint the go-to distro for people seeking respite from the new world of desktops pushed forward by Unity and Gnome 3.
The Mate project is a continuation of Gnome 2. The Gnome project moved on to version 3, but the source code for version 2 remained available. Despite developers moving on, Gnome 2 remained popular and many people weren’t yet ready to let it go. A group
of users took the code, rebranded it Mate (pronounced Mah-tay), and kept the spirit of Gnome 2 alive. The change in developers has injected new life into the Mate/Gnome 2 project and although the bulk of the code is the same, the newer graphics give the project a modern look. The new project has not just maintained the old code, but continues to improve it. By version 1.10, Mate could be built against both GTK 2 and 3, so the project will be able to incorporate features from newer versions of the GTK tookit.
The outsider in this category is the Budgie desktop. It’s built specifically for SolusOS, which has had a tricky few years. The original developer of the project, Ikey Doherty, left the project and shut down SolusOS in October 2013. Ikey then started a new distro named Evolve OS in December of the same year. This point also marked the start of development of the Budgie desktop. The distro then rebranded to SolusOS in May 2015, and it’s this new SolusOS that is the basis for our testing of Budgie.
Enter, stranger…Out of the three desktops in this category, Budgie is definitely the least traditional. There are elements of Gnome 3 (such as the window styling with header bars) and Unity (the abundant use of square icons with rounded corners). Despite these modern touches, Budgie is ultimately still a traditional interface with a panel and an application menu. Budgie is far younger than the others in this category, but this is as much of an advantage as a disadvantage: the modern look will appeal to many people too young to remember the origins of the traditional desktop.
TRADITIONAL DESKTOPSWe haven’t changed, so why should our desktops?
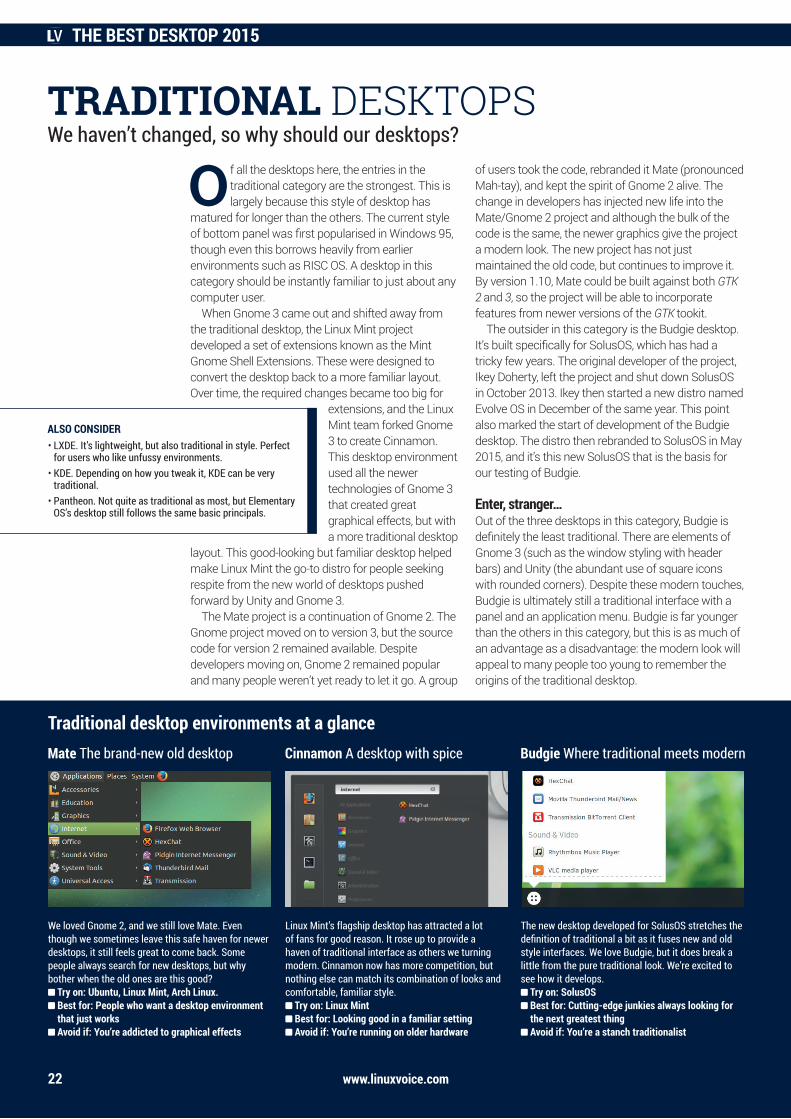
We loved Gnome 2, and we still love Mate. Even though we sometimes leave this safe haven for newer desktops, it still feels great to come back. Some people always search for new desktops, but why bother when the old ones are this good?
Try on: Ubuntu, Linux Mint, Arch Linux. Best for: People who want a desktop environment that just works Avoid if: You’re addicted to graphical effects
Traditional desktop environments at a glance
Linux Mint’s flagship desktop has attracted a lot of fans for good reason. It rose up to provide a haven of traditional interface as others we turning modern. Cinnamon now has more competition, but nothing else can match its combination of looks and comfortable, familiar style.
Try on: Linux Mint Best for: Looking good in a familiar setting Avoid if: You’re running on older hardware
The new desktop developed for SolusOS stretches the definition of traditional a bit as it fuses new and old style interfaces. We love Budgie, but it does break a little from the pure traditional look. We’re excited to see how it develops.
Try on: SolusOS Best for: Cutting-edge junkies always looking for the next greatest thing Avoid if: You’re a stanch traditionalist
ALSO CONSIDER• LXDE. It’s lightweight, but also traditional in style. Perfect
for users who like unfussy environments.• KDE. Depending on how you tweak it, KDE can be very
traditional.• Pantheon. Not quite as traditional as most, but Elementary
OS’s desktop still follows the same basic principals.
www.linuxvoice.com22
Mate The brand-new old desktop Cinnamon A desktop with spice Budgie Where traditional meets modern
LV020 018 Cover Feature.indd 22 04/09/2015 09:48
23
THE BEST DESKTOP 2015
www.linuxvoice.com
can leave a little to be desired. That said, it should run without problems on any machine from the past five years or so.
Budgie is shaping up to be a really good-looking desktop. At this stage, it’s still a little hard to say exactly how it will pan out, but our early impressions are that it will be best suited to light and moderate computer users; power users may be better served by one of the other options. The clean, well-thought-out desktop means that Budgie could seriously contend with Mate for the top spot in this category in a few years’ time.
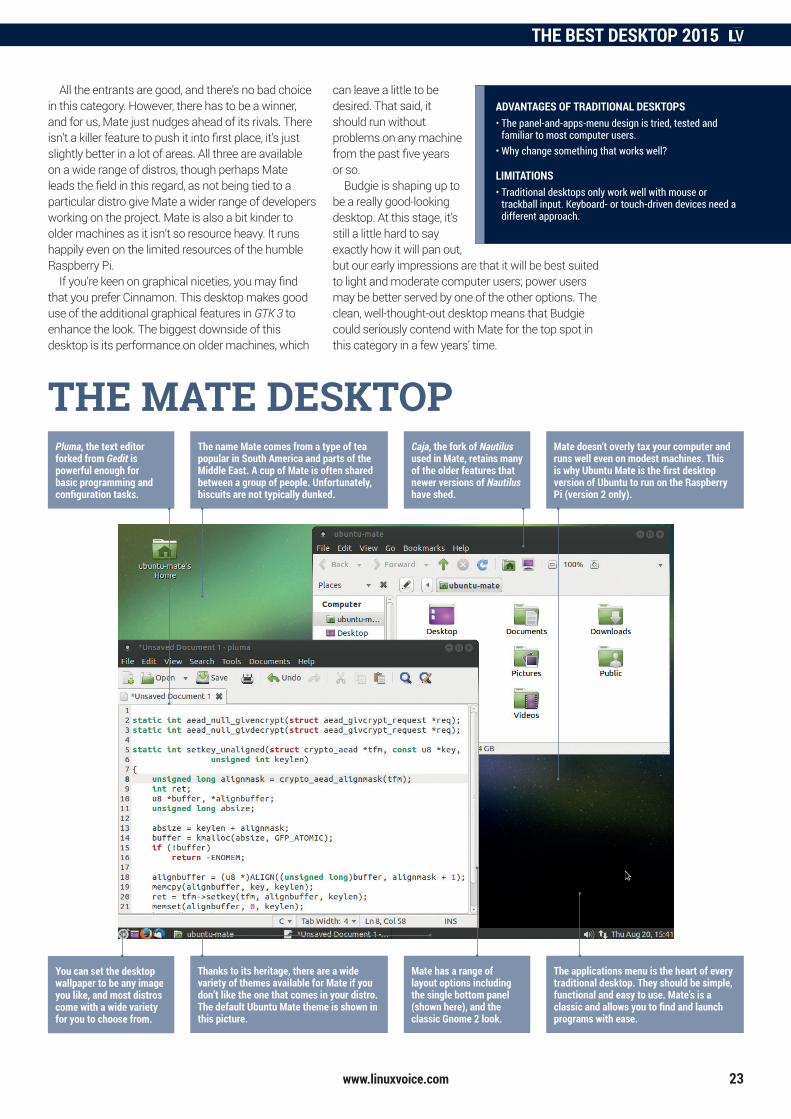
THE MATE DESKTOPPluma, the text editor forked from Gedit is powerful enough for basic programming and configuration tasks.
The name Mate comes from a type of tea popular in South America and parts of the Middle East. A cup of Mate is often shared between a group of people. Unfortunately, biscuits are not typically dunked.
Caja, the fork of Nautilus used in Mate, retains many of the older features that newer versions of Nautilus have shed.
Mate doesn’t overly tax your computer and runs well even on modest machines. This is why Ubuntu Mate is the first desktop version of Ubuntu to run on the Raspberry Pi (version 2 only).
Mate has a range of layout options including the single bottom panel (shown here), and the classic Gnome 2 look.
The applications menu is the heart of every traditional desktop. They should be simple, functional and easy to use. Mate’s is a classic and allows you to find and launch programs with ease.
You can set the desktop wallpaper to be any image you like, and most distros come with a wide variety for you to choose from.
Thanks to its heritage, there are a wide variety of themes available for Mate if you don’t like the one that comes in your distro. The default Ubuntu Mate theme is shown in this picture.
All the entrants are good, and there’s no bad choice in this category. However, there has to be a winner, and for us, Mate just nudges ahead of its rivals. There isn’t a killer feature to push it into first place, it’s just slightly better in a lot of areas. All three are available on a wide range of distros, though perhaps Mate leads the field in this regard, as not being tied to a particular distro give Mate a wider range of developers working on the project. Mate is also a bit kinder to older machines as it isn’t so resource heavy. It runs happily even on the limited resources of the humble Raspberry Pi.
If you’re keen on graphical niceties, you may find that you prefer Cinnamon. This desktop makes good use of the additional graphical features in GTK 3 to enhance the look. The biggest downside of this desktop is its performance on older machines, which
ADVANTAGES OF TRADITIONAL DESKTOPS• The panel-and-apps-menu design is tried, tested and
familiar to most computer users.• Why change something that works well?
LIMITATIONS• Traditional desktops only work well with mouse or
trackball input. Keyboard- or touch-driven devices need a different approach.
LV020 018 Cover Feature.indd 23 04/09/2015 09:48
20 www.linuxvoice.com
THE BEST DESKTOP 2015
This is the category for people who want ultimate control over their desktop. The options are all a little different.
KDE is quite close to a traditional desktop, however it’s far more configurable than any of the other desktops in the traditional category. For the purposes of this competition, we’re looking at KDE 5 rather than version 4 despite the fact that not all distros have upgraded to this latest version yet.
We’ve always felt that while KDE can create a wonderful desktop, the default settings leave quite a lot to be desired. The newest version does a lot to improve that, and now KDE looks good out of the box in most instances.
Depending on your point of view, the range of configuration options in KDE could be described as comprehensive or excessive. There are a lot of possibilities that we can’t imagine anyone ever wanting, such as using
your mouse wheel to change the opacity of a window. Still, this range of options is the point of KDE. It’s the desktop that doesn’t try to force you into a particular way of working; instead, it adapts to your processes.
Some people may argue that Openbox on its own isn’t a desktop environment, but a window manager. It doesn’t have all the extra bits that run alongside it to make it as powerful as some of the entrants here. You can run Openbox inside one of the other desktops here (this is especially popular in LXDE), but you can
also run it on its own. After all, what is a window manager if not an extremely customisable desktop environment?
Starting from scratch with just a window manager like Openbox can take quite a bit of effort to reach a usable desktop, so another option (at least initially) is to use a distro that comes with Openbox pre-configured. Traditionally, the best choice for this is CrunchBang, but development of this distro has come to an end. The spirit of CrunchBang, however, lives on in other distros. CrunchBang++, ArchBang, and the soon-to-be-released product of the CrunchBang community, Bunsen. All of these feature a minimal Openbox-based desktop with lightweight apps pilfered from other desktop environments.
Like Openbox, i3 is a window manager, though i3 is a little more complete than Openbox in that you can install it and run it without any additional configuration. While Openbox is probably run more frequently as part of a larger desktop environment, i3 is almost solely run as a standalone desktop. The one thing that really distinguishes i3 from the other desktops we’ve looked at here is that it’s a tiling window manager that’s primarily keyboard driven. It is also highly customisable, hence its inclusion in this category.
And the winner isGiven how different the entrants in this category are, it may seem a little churlish to pick a winner. They’re all great options, but very different, and will suit different people. However, the category is Tweakable, so we used that to guide our decision. We’re going with KDE
TWEAKABLE DESKTOPSThe desktop environments that put you in control
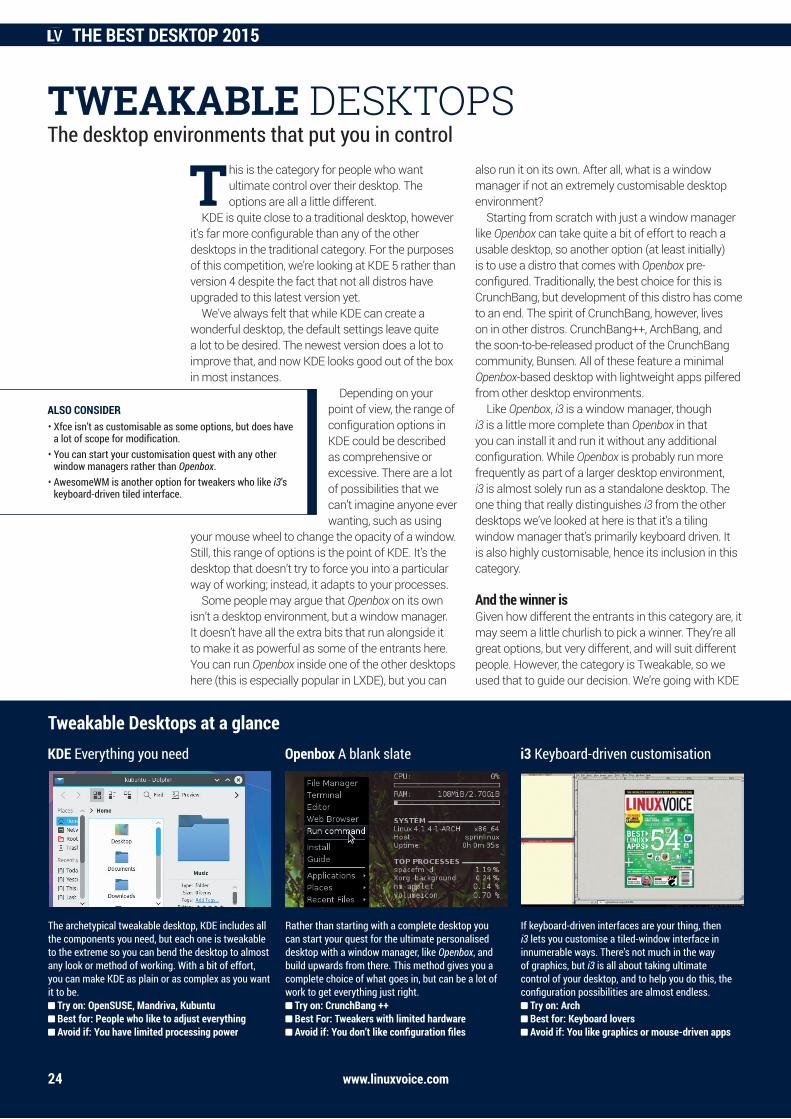
The archetypical tweakable desktop, KDE includes all the components you need, but each one is tweakable to the extreme so you can bend the desktop to almost any look or method of working. With a bit of effort, you can make KDE as plain or as complex as you want it to be.
Try on: OpenSUSE, Mandriva, Kubuntu Best for: People who like to adjust everything Avoid if: You have limited processing power
Tweakable Desktops at a glance
Rather than starting with a complete desktop you can start your quest for the ultimate personalised desktop with a window manager, like Openbox, and build upwards from there. This method gives you a complete choice of what goes in, but can be a lot of work to get everything just right.
Try on: CrunchBang ++ Best For: Tweakers with limited hardware Avoid if: You don’t like configuration files
If keyboard-driven interfaces are your thing, then i3 lets you customise a tiled-window interface in innumerable ways. There’s not much in the way of graphics, but i3 is all about taking ultimate control of your desktop, and to help you do this, the configuration possibilities are almost endless.
Try on: Arch Best for: Keyboard lovers Avoid if: You like graphics or mouse-driven apps
ALSO CONSIDER• Xfce isn’t as customisable as some options, but does have
a lot of scope for modification.• You can start your customisation quest with any other
window managers rather than Openbox.• AwesomeWM is another option for tweakers who like i3’s
keyboard-driven tiled interface.
www.linuxvoice.com24
KDE Everything you need Openbox A blank slate i3 Keyboard-driven customisation
LV020 018 Cover Feature.indd 24 04/09/2015 09:48
25
THE BEST DESKTOP 2015
www.linuxvoice.com
mouse with i3 , though if that’s your preferred way of working, you’re probably better off with a different desktop. The reliance on the keyboard means that i3 is most efficient for people who mostly use keyboard-driven apps. Sysadmins running tasks over SSH and programmers using Vim are the most likely contenders here.
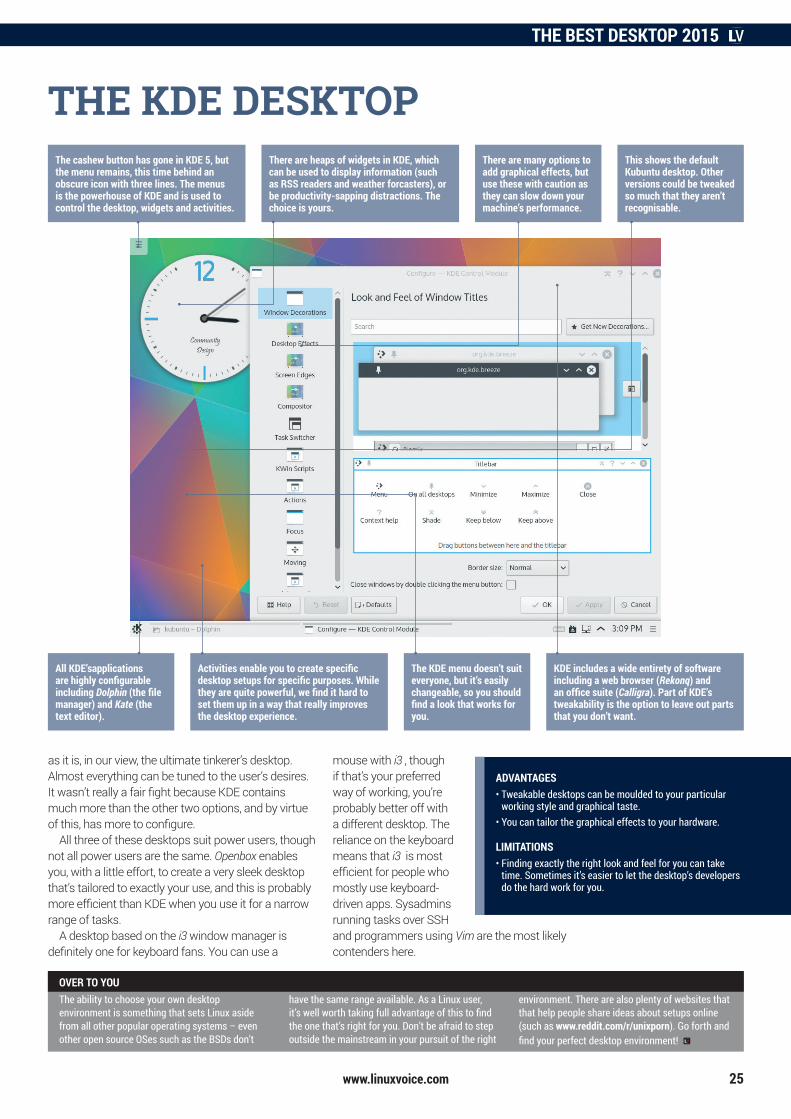
THE KDE DESKTOPThe cashew button has gone in KDE 5, but the menu remains, this time behind an obscure icon with three lines. The menus is the powerhouse of KDE and is used to control the desktop, widgets and activities.
The KDE menu doesn’t suit everyone, but it’s easily changeable, so you should find a look that works for you.
KDE includes a wide entirety of software including a web browser (Rekonq) and an office suite (Calligra). Part of KDE’s tweakability is the option to leave out parts that you don’t want.
All KDE’sapplications are highly configurable including Dolphin (the file manager) and Kate (the text editor).
Activities enable you to create specific desktop setups for specific purposes. While they are quite powerful, we find it hard to set them up in a way that really improves the desktop experience.
as it is, in our view, the ultimate tinkerer’s desktop. Almost everything can be tuned to the user’s desires. It wasn’t really a fair fight because KDE contains much more than the other two options, and by virtue of this, has more to configure.
All three of these desktops suit power users, though not all power users are the same. Openbox enables you, with a little effort, to create a very sleek desktop that’s tailored to exactly your use, and this is probably more efficient than KDE when you use it for a narrow range of tasks.
A desktop based on the i3 window manager is definitely one for keyboard fans. You can use a
ADVANTAGES• Tweakable desktops can be moulded to your particular
working style and graphical taste.• You can tailor the graphical effects to your hardware.
LIMITATIONS• Finding exactly the right look and feel for you can take
time. Sometimes it’s easier to let the desktop’s developers do the hard work for you.
The ability to choose your own desktop environment is something that sets Linux aside from all other popular operating systems – even other open source OSes such as the BSDs don’t
have the same range available. As a Linux user, it’s well worth taking full advantage of this to find the one that’s right for you. Don’t be afraid to step outside the mainstream in your pursuit of the right
environment. There are also plenty of websites that that help people share ideas about setups online (such as www.reddit.com/r/unixporn). Go forth and find your perfect desktop environment!
There are many options to add graphical effects, but use these with caution as they can slow down your machine’s performance.
This shows the default Kubuntu desktop. Other versions could be tweaked so much that they aren’t recognisable.
There are heaps of widgets in KDE, which can be used to display information (such as RSS readers and weather forcasters), or be productivity-sapping distractions. The choice is yours.
OVER TO YOU
LV020 018 Cover Feature.indd 25 04/09/2015 09:48
FEATURE BUILD YOUR OWN DISTRO
www.linuxvoice.com26
Greenhorns rejoice! Mayank Sharma has found a way for you to spin your very own distro without much fuss.
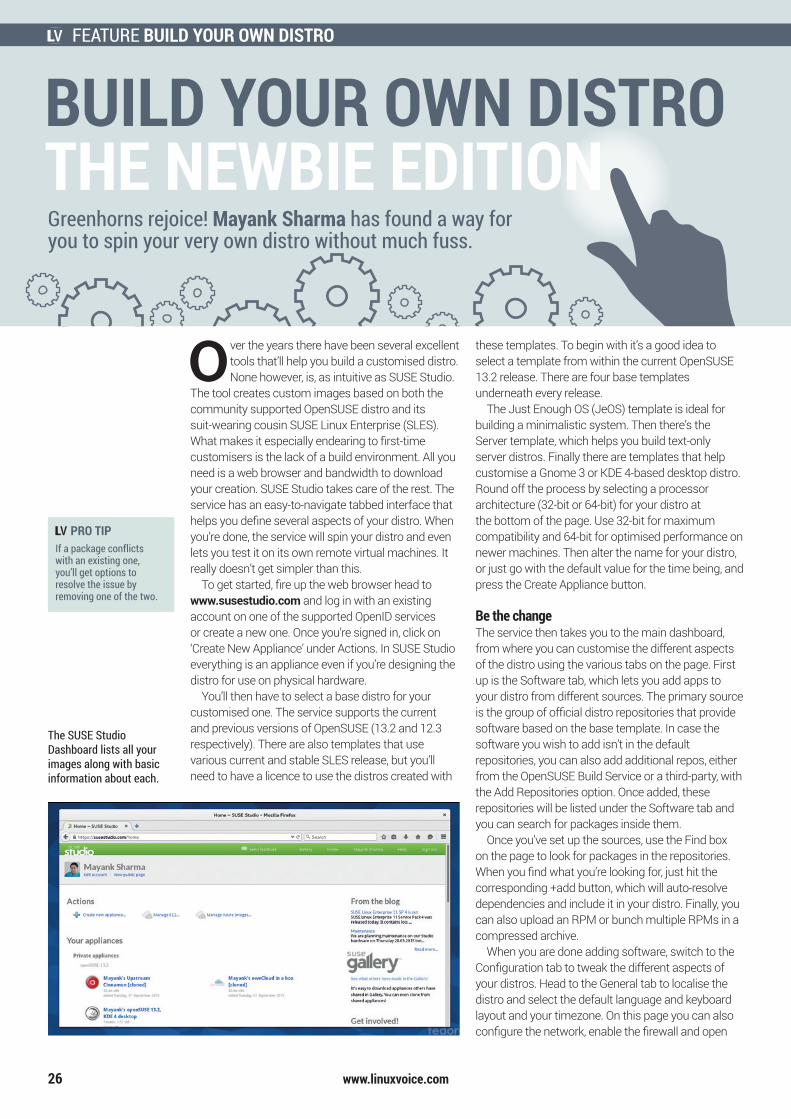
The SUSE Studio Dashboard lists all your images along with basic information about each.
PRO TIPIf a package conflicts with an existing one, you’ll get options to resolve the issue by removing one of the two.
BUILD YOUR OWN DISTROTHE NEWBIE EDITION
Over the years there have been several excellent tools that’ll help you build a customised distro. None however, is, as intuitive as SUSE Studio.
The tool creates custom images based on both the community supported OpenSUSE distro and its suit-wearing cousin SUSE Linux Enterprise (SLES). What makes it especially endearing to first-time customisers is the lack of a build environment. All you need is a web browser and bandwidth to download your creation. SUSE Studio takes care of the rest. The service has an easy-to-navigate tabbed interface that helps you define several aspects of your distro. When you’re done, the service will spin your distro and even lets you test it on its own remote virtual machines. It really doesn’t get simpler than this.
To get started, fire up the web browser head to www.susestudio.com and log in with an existing account on one of the supported OpenID services or create a new one. Once you’re signed in, click on ‘Create New Appliance’ under Actions. In SUSE Studio everything is an appliance even if you’re designing the distro for use on physical hardware.
You’ll then have to select a base distro for your customised one. The service supports the current and previous versions of OpenSUSE (13.2 and 12.3 respectively). There are also templates that use various current and stable SLES release, but you’ll need to have a licence to use the distros created with
these templates. To begin with it’s a good idea to select a template from within the current OpenSUSE 13.2 release. There are four base templates underneath every release.
The Just Enough OS (JeOS) template is ideal for building a minimalistic system. Then there’s the Server template, which helps you build text-only server distros. Finally there are templates that help customise a Gnome 3 or KDE 4-based desktop distro. Round off the process by selecting a processor architecture (32-bit or 64-bit) for your distro at the bottom of the page. Use 32-bit for maximum compatibility and 64-bit for optimised performance on newer machines. Then alter the name for your distro, or just go with the default value for the time being, and press the Create Appliance button.
Be the changeThe service then takes you to the main dashboard, from where you can customise the different aspects of the distro using the various tabs on the page. First up is the Software tab, which lets you add apps to your distro from different sources. The primary source is the group of official distro repositories that provide software based on the base template. In case the software you wish to add isn’t in the default repositories, you can also add additional repos, either from the OpenSUSE Build Service or a third-party, with the Add Repositories option. Once added, these repositories will be listed under the Software tab and you can search for packages inside them.
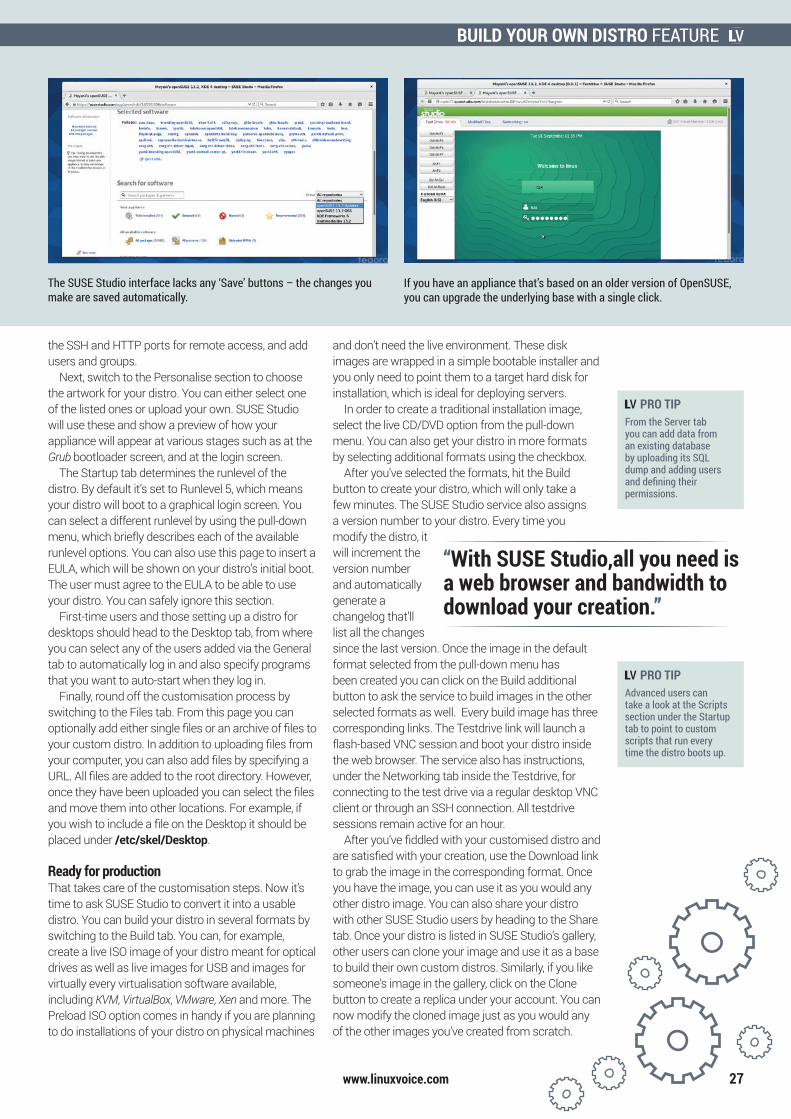
Once you’ve set up the sources, use the Find box on the page to look for packages in the repositories. When you find what you’re looking for, just hit the corresponding +add button, which will auto-resolve dependencies and include it in your distro. Finally, you can also upload an RPM or bunch multiple RPMs in a compressed archive.
When you are done adding software, switch to the Configuration tab to tweak the different aspects of your distros. Head to the General tab to localise the distro and select the default language and keyboard layout and your timezone. On this page you can also configure the network, enable the firewall and open
LV020 026 Feature Distros.indd 26 04/09/2015 09:53
BUILD YOUR OWN DISTRO FEATURE
www.linuxvoice.com 27
the SSH and HTTP ports for remote access, and add users and groups.
Next, switch to the Personalise section to choose the artwork for your distro. You can either select one of the listed ones or upload your own. SUSE Studio will use these and show a preview of how your appliance will appear at various stages such as at the Grub bootloader screen, and at the login screen.
The Startup tab determines the runlevel of the distro. By default it’s set to Runlevel 5, which means your distro will boot to a graphical login screen. You can select a different runlevel by using the pull-down menu, which briefly describes each of the available runlevel options. You can also use this page to insert a EULA, which will be shown on your distro’s initial boot. The user must agree to the EULA to be able to use your distro. You can safely ignore this section.
First-time users and those setting up a distro for desktops should head to the Desktop tab, from where you can select any of the users added via the General tab to automatically log in and also specify programs that you want to auto-start when they log in.
Finally, round off the customisation process by switching to the Files tab. From this page you can optionally add either single files or an archive of files to your custom distro. In addition to uploading files from your computer, you can also add files by specifying a URL. All files are added to the root directory. However, once they have been uploaded you can select the files and move them into other locations. For example, if you wish to include a file on the Desktop it should be placed under /etc/skel/Desktop.
Ready for productionThat takes care of the customisation steps. Now it’s time to ask SUSE Studio to convert it into a usable distro. You can build your distro in several formats by switching to the Build tab. You can, for example, create a live ISO image of your distro meant for optical drives as well as live images for USB and images for virtually every virtualisation software available, including KVM, VirtualBox, VMware, Xen and more. The Preload ISO option comes in handy if you are planning to do installations of your distro on physical machines
and don’t need the live environment. These disk images are wrapped in a simple bootable installer and you only need to point them to a target hard disk for installation, which is ideal for deploying servers.
In order to create a traditional installation image, select the live CD/DVD option from the pull-down menu. You can also get your distro in more formats by selecting additional formats using the checkbox.
After you’ve selected the formats, hit the Build button to create your distro, which will only take a few minutes. The SUSE Studio service also assigns a version number to your distro. Every time you modify the distro, it will increment the version number and automatically generate a changelog that’ll list all the changes since the last version. Once the image in the default format selected from the pull-down menu has been created you can click on the Build additional button to ask the service to build images in the other selected formats as well. Every build image has three corresponding links. The Testdrive link will launch a flash-based VNC session and boot your distro inside the web browser. The service also has instructions, under the Networking tab inside the Testdrive, for connecting to the test drive via a regular desktop VNC client or through an SSH connection. All testdrive sessions remain active for an hour.
After you’ve fiddled with your customised distro and are satisfied with your creation, use the Download link to grab the image in the corresponding format. Once you have the image, you can use it as you would any other distro image. You can also share your distro with other SUSE Studio users by heading to the Share tab. Once your distro is listed in SUSE Studio’s gallery, other users can clone your image and use it as a base to build their own custom distros. Similarly, if you like someone’s image in the gallery, click on the Clone button to create a replica under your account. You can now modify the cloned image just as you would any of the other images you’ve created from scratch.
The SUSE Studio interface lacks any ‘Save’ buttons – the changes you make are saved automatically.
If you have an appliance that’s based on an older version of OpenSUSE, you can upgrade the underlying base with a single click.
PRO TIPFrom the Server tab you can add data from an existing database by uploading its SQL dump and adding users and defining their permissions.
PRO TIPAdvanced users can take a look at the Scripts section under the Startup tab to point to custom scripts that run every time the distro boots up.
BUILD YOUR OWN DISTROTHE NEWBIE EDITION
“With SUSE Studio,all you need is a web browser and bandwidth to download your creation.”
LV020 026 Feature Distros.indd 27 04/09/2015 09:53
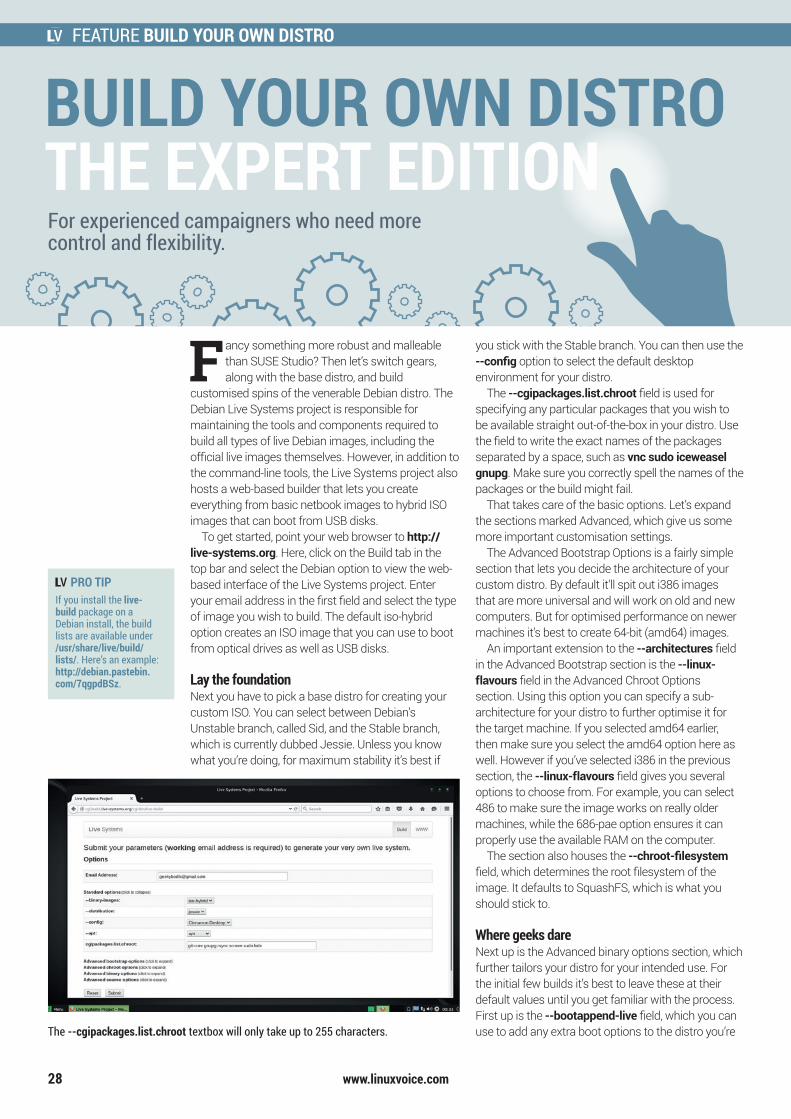
FEATURE BUILD YOUR OWN DISTRO
www.linuxvoice.com
For experienced campaigners who need more control and flexibility.
PRO TIPIf you install the live-build package on a Debian install, the build lists are available under /usr/share/live/build/lists/. Here’s an example: http://debian.pastebin.com/7qgpdBSz.
BUILD YOUR OWN DISTROTHE EXPERT EDITION
28
FEATURE BUILD YOUR OWN DISTRO
Fancy something more robust and malleable than SUSE Studio? Then let’s switch gears, along with the base distro, and build
customised spins of the venerable Debian distro. The Debian Live Systems project is responsible for maintaining the tools and components required to build all types of live Debian images, including the official live images themselves. However, in addition to the command-line tools, the Live Systems project also hosts a web-based builder that lets you create everything from basic netbook images to hybrid ISO images that can boot from USB disks.
To get started, point your web browser to http://live-systems.org. Here, click on the Build tab in the top bar and select the Debian option to view the web-based interface of the Live Systems project. Enter your email address in the first field and select the type of image you wish to build. The default iso-hybrid option creates an ISO image that you can use to boot from optical drives as well as USB disks.
Lay the foundationNext you have to pick a base distro for creating your custom ISO. You can select between Debian’s Unstable branch, called Sid, and the Stable branch, which is currently dubbed Jessie. Unless you know what you’re doing, for maximum stability it’s best if
you stick with the Stable branch. You can then use the --config option to select the default desktop environment for your distro.
The --cgipackages.list.chroot field is used for specifying any particular packages that you wish to be available straight out-of-the-box in your distro. Use the field to write the exact names of the packages separated by a space, such as vnc sudo iceweasel gnupg. Make sure you correctly spell the names of the packages or the build might fail.
That takes care of the basic options. Let’s expand the sections marked Advanced, which give us some more important customisation settings.
The Advanced Bootstrap Options is a fairly simple section that lets you decide the architecture of your custom distro. By default it’ll spit out i386 images that are more universal and will work on old and new computers. But for optimised performance on newer machines it’s best to create 64-bit (amd64) images.
An important extension to the --architectures field in the Advanced Bootstrap section is the --linux-flavours field in the Advanced Chroot Options section. Using this option you can specify a sub-architecture for your distro to further optimise it for the target machine. If you selected amd64 earlier, then make sure you select the amd64 option here as well. However if you’ve selected i386 in the previous section, the --linux-flavours field gives you several options to choose from. For example, you can select 486 to make sure the image works on really older machines, while the 686-pae option ensures it can properly use the available RAM on the computer.
The section also houses the --chroot-filesystem field, which determines the root filesystem of the image. It defaults to SquashFS, which is what you should stick to.
Where geeks dareNext up is the Advanced binary options section, which further tailors your distro for your intended use. For the initial few builds it’s best to leave these at their default values until you get familiar with the process. First up is the --bootappend-live field, which you can use to add any extra boot options to the distro you’re The --cgipackages.list.chroot textbox will only take up to 255 characters.
LV020 026 Feature Distros.indd 28 04/09/2015 09:53
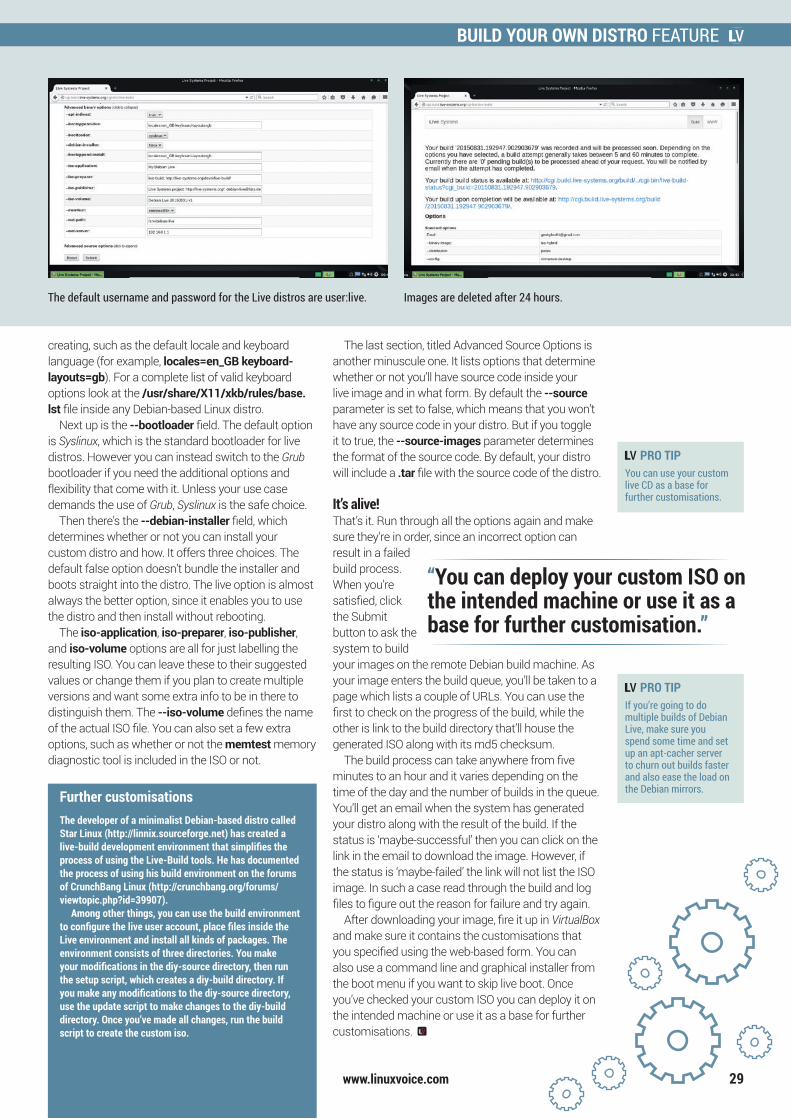
BUILD YOUR OWN DISTRO FEATURE
www.linuxvoice.com
creating, such as the default locale and keyboard language (for example, locales=en_GB keyboard-layouts=gb). For a complete list of valid keyboard options look at the /usr/share/X11/xkb/rules/base.lst file inside any Debian-based Linux distro.
Next up is the --bootloader field. The default option is Syslinux, which is the standard bootloader for live distros. However you can instead switch to the Grub bootloader if you need the additional options and flexibility that come with it. Unless your use case demands the use of Grub, Syslinux is the safe choice.
Then there’s the --debian-installer field, which determines whether or not you can install your custom distro and how. It offers three choices. The default false option doesn’t bundle the installer and boots straight into the distro. The live option is almost always the better option, since it enables you to use the distro and then install without rebooting.
The iso-application, iso-preparer, iso-publisher, and iso-volume options are all for just labelling the resulting ISO. You can leave these to their suggested values or change them if you plan to create multiple versions and want some extra info to be in there to distinguish them. The --iso-volume defines the name of the actual ISO file. You can also set a few extra options, such as whether or not the memtest memory diagnostic tool is included in the ISO or not.
The last section, titled Advanced Source Options is another minuscule one. It lists options that determine whether or not you’ll have source code inside your live image and in what form. By default the --source parameter is set to false, which means that you won’t have any source code in your distro. But if you toggle it to true, the --source-images parameter determines the format of the source code. By default, your distro will include a .tar file with the source code of the distro.
It’s alive!That’s it. Run through all the options again and make sure they’re in order, since an incorrect option can result in a failed build process. When you’re satisfied, click the Submit button to ask the system to build your images on the remote Debian build machine. As your image enters the build queue, you’ll be taken to a page which lists a couple of URLs. You can use the first to check on the progress of the build, while the other is link to the build directory that’ll house the generated ISO along with its md5 checksum.
The build process can take anywhere from five minutes to an hour and it varies depending on the time of the day and the number of builds in the queue. You’ll get an email when the system has generated your distro along with the result of the build. If the status is ‘maybe-successful’ then you can click on the link in the email to download the image. However, if the status is ‘maybe-failed’ the link will not list the ISO image. In such a case read through the build and log files to figure out the reason for failure and try again.
After downloading your image, fire it up in VirtualBox and make sure it contains the customisations that you specified using the web-based form. You can also use a command line and graphical installer from the boot menu if you want to skip live boot. Once you’ve checked your custom ISO you can deploy it on the intended machine or use it as a base for further customisations.
The default username and password for the Live distros are user:live. Images are deleted after 24 hours.
PRO TIPYou can use your custom live CD as a base for further customisations.
PRO TIPIf you’re going to do multiple builds of Debian Live, make sure you spend some time and set up an apt-cacher server to churn out builds faster and also ease the load on the Debian mirrors.
BUILD YOUR OWN DISTROTHE EXPERT EDITION
Further customisationsThe developer of a minimalist Debian-based distro called Star Linux (http://linnix.sourceforge.net) has created a live-build development environment that simplifies the process of using the Live-Build tools. He has documented the process of using his build environment on the forums of CrunchBang Linux (http://crunchbang.org/forums/viewtopic.php?id=39907).
Among other things, you can use the build environment to configure the live user account, place files inside the Live environment and install all kinds of packages. The environment consists of three directories. You make your modifications in the diy-source directory, then run the setup script, which creates a diy-build directory. If you make any modifications to the diy-source directory, use the update script to make changes to the diy-build directory. Once you’ve made all changes, run the build script to create the custom iso.
29
BUILD YOUR OWN DISTRO FEATURE
“You can deploy your custom ISO on the intended machine or use it as a base for further customisation.”
LV020 026 Feature Distros.indd 29 04/09/2015 09:53
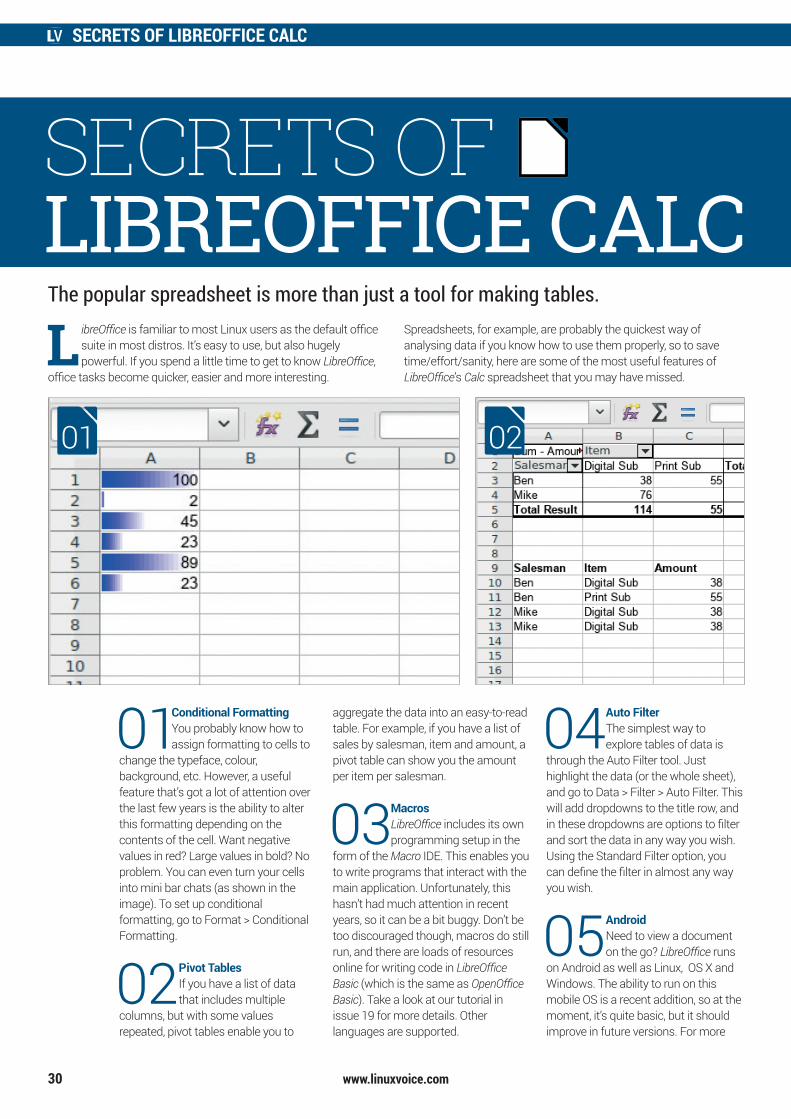
SECRETS OF LIBREOFFICE CALC
34 www.linuxvoice.com
01 Conditional Formatting You probably know how to assign formatting to cells to
change the typeface, colour, background, etc. However, a useful feature that’s got a lot of attention over the last few years is the ability to alter this formatting depending on the contents of the cell. Want negative values in red? Large values in bold? No problem. You can even turn your cells into mini bar chats (as shown in the image). To set up conditional formatting, go to Format > Conditional Formatting.
02 Pivot Tables If you have a list of data that includes multiple
columns, but with some values repeated, pivot tables enable you to
The popular spreadsheet is more than just a tool for making tables.
L ibreOffice is familiar to most Linux users as the default office suite in most distros. It’s easy to use, but also hugely powerful. If you spend a little time to get to know LibreOffice,
office tasks become quicker, easier and more interesting.
Spreadsheets, for example, are probably the quickest way of analysing data if you know how to use them properly, so to save time/effort/sanity, here are some of the most useful features of LibreOffice’s Calc spreadsheet that you may have missed.
SECRETS OF LIBREOFFICE CALC
30 www.linuxvoice.com
aggregate the data into an easy-to-read table. For example, if you have a list of sales by salesman, item and amount, a pivot table can show you the amount per item per salesman.
03 Macros LibreOffice includes its own programming setup in the
form of the Macro IDE. This enables you to write programs that interact with the main application. Unfortunately, this hasn’t had much attention in recent years, so it can be a bit buggy. Don’t be too discouraged though, macros do still run, and there are loads of resources online for writing code in LibreOffice Basic (which is the same as OpenOffice Basic). Take a look at our tutorial in issue 19 for more details. Other languages are supported.
01 02
04 Auto Filter The simplest way to explore tables of data is
through the Auto Filter tool. Just highlight the data (or the whole sheet), and go to Data > Filter > Auto Filter. This will add dropdowns to the title row, and in these dropdowns are options to filter and sort the data in any way you wish. Using the Standard Filter option, you can define the filter in almost any way you wish.
05 Android Need to view a document on the go? LibreOffice runs
on Android as well as Linux, OS X and Windows. The ability to run on this mobile OS is a recent addition, so at the moment, it’s quite basic, but it should improve in future versions. For more
LV020 030 Feature Secrets.indd 30 03/09/2015 10:19
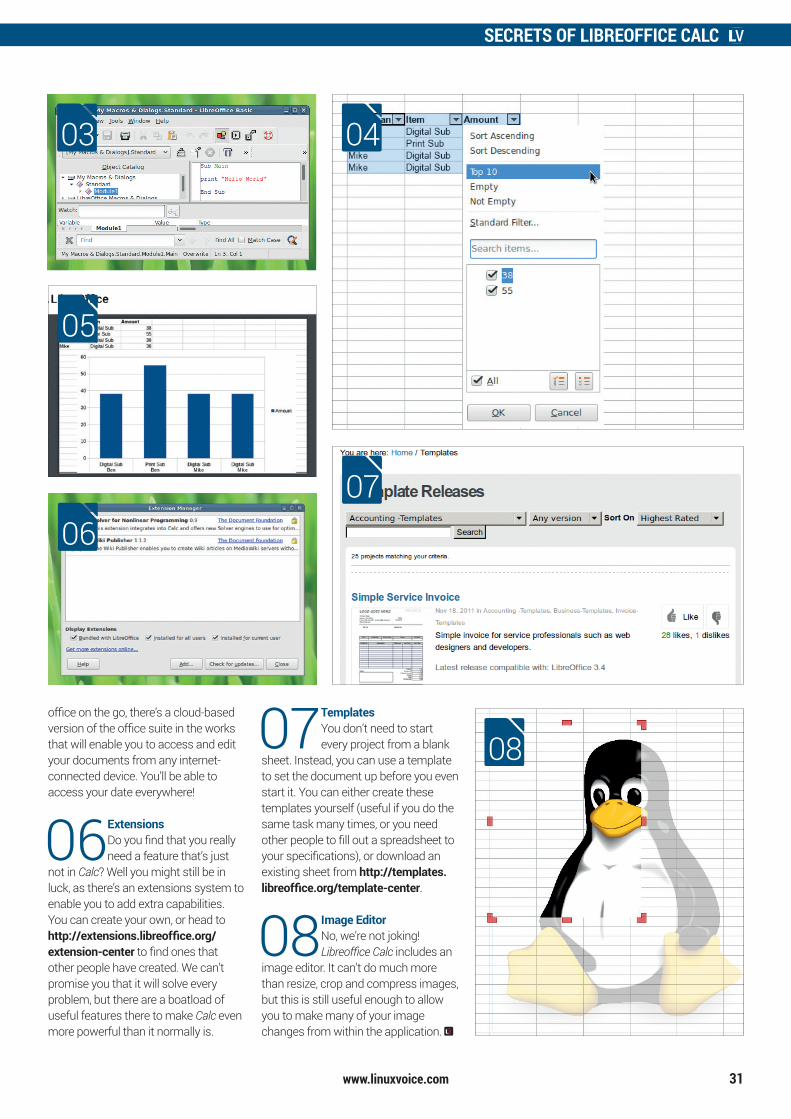
SECRETS OF LIBREOFFICE CALC
www.linuxvoice.com 31
SECRETS OF LIBREOFFICE CALC
0607
08
03 04
office on the go, there’s a cloud-based version of the office suite in the works that will enable you to access and edit your documents from any internet-connected device. You’ll be able to access your date everywhere!
06 Extensions Do you find that you really need a feature that’s just
not in Calc? Well you might still be in luck, as there’s an extensions system to enable you to add extra capabilities. You can create your own, or head to http://extensions.libreoffice.org/extension-center to find ones that other people have created. We can’t promise you that it will solve every problem, but there are a boatload of useful features there to make Calc even more powerful than it normally is.
07 Templates You don’t need to start every project from a blank
sheet. Instead, you can use a template to set the document up before you even start it. You can either create these templates yourself (useful if you do the same task many times, or you need other people to fill out a spreadsheet to your specifications), or download an existing sheet from http://templates.libreoffice.org/template-center.
08 Image EditorNo, we’re not joking! Libreoffice Calc includes an
image editor. It can’t do much more than resize, crop and compress images, but this is still useful enough to allow you to make many of your image changes from within the application.
05
LV020 030 Feature Secrets.indd 31 03/09/2015 10:19
FEATURE FOSS FUN
www.linuxvoice.com32
Thought gaming on Linux was all about Steam? Think again – there are many great FOSS gems, as Mike Saunders discovers.
In the space of a few years, Linux’s image in the gaming world has been completely transformed. Beforehand, it was seen as a geeky operating
system with a few quirky text-mode adventure games, and the possibility to run some “real” titles with the Wine emulator. Today – and largely thanks to Steam – Linux is an excellent platform for gaming, and arguably better than Windows. After all, it’s easier to customise (so you can
remove cruft you don’t want), it’s secure, and it’s not leaking
everything you do to a giant corporation.We’ve covered a lot of games
provided through Steam in our regular Gaming on Linux section, but we’ve also had requests from readers to cover purely free software and open
source alternatives as well. And there are some absolute gems out there; sure, they’re often not quite as polished as their commercial counterparts, but what they may lack in spit-shine, they make up in depth, challenge and replayability.
We thought we’d gather a compilation of the best FOSS games and show you why they’re worth trying out. If you’re a hard-core gamer, you’ll find plenty here to whet your appetite – many
of the puzzles and strategy games may interest you. And then there are some fantastic remakes of old classics that will get a tear of nostalgia rolling down your cheek… By and large, these games are available in the package repositories of most major distros, so you should be able to download them quickly and easily.
“There are some old classics that will get a tear of nostalgia rolling down your cheek.”
LV020 032 Feature Games.indd 32 04/09/2015 09:56
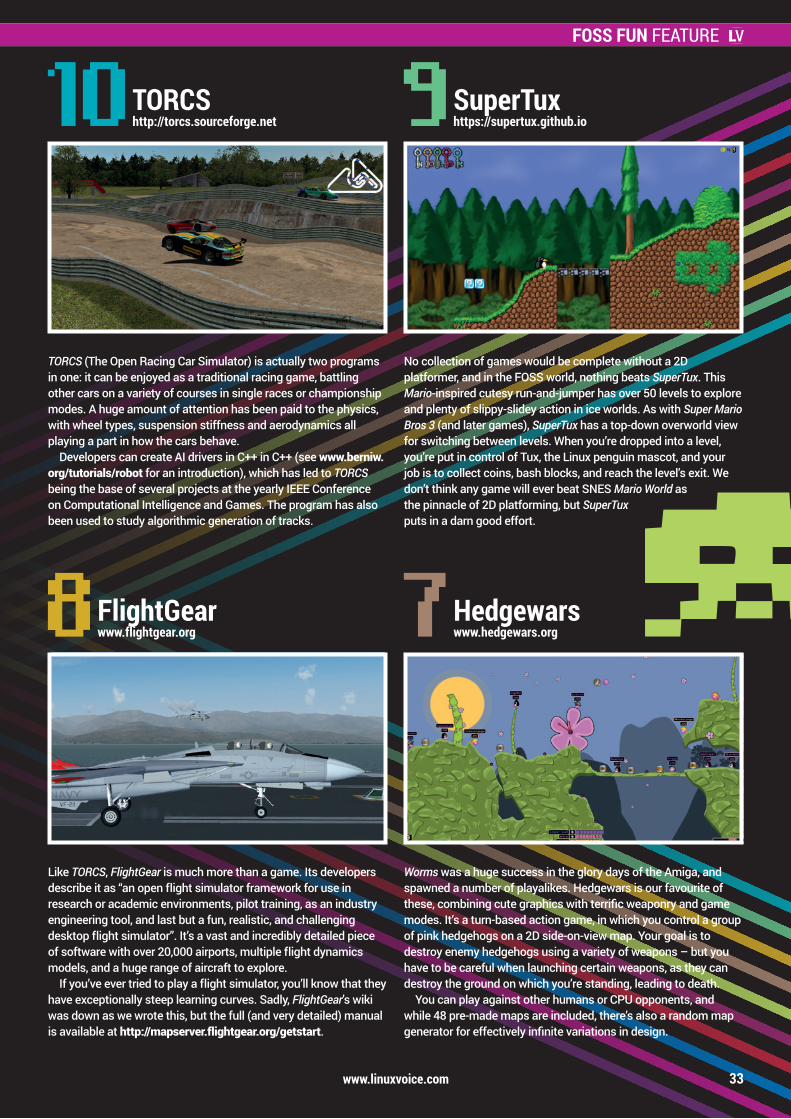
No collection of games would be complete without a 2D platformer, and in the FOSS world, nothing beats SuperTux. This Mario-inspired cutesy run-and-jumper has over 50 levels to explore and plenty of slippy-slidey action in ice worlds. As with Super Mario Bros 3 (and later games), SuperTux has a top-down overworld view for switching between levels. When you’re dropped into a level, you’re put in control of Tux, the Linux penguin mascot, and your job is to collect coins, bash blocks, and reach the level’s exit. We don’t think any game will ever beat SNES Mario World as the pinnacle of 2D platforming, but SuperTux puts in a darn good effort.
SuperTuxhttps://supertux.github.io
Worms was a huge success in the glory days of the Amiga, and spawned a number of playalikes. Hedgewars is our favourite of these, combining cute graphics with terrific weaponry and game modes. It’s a turn-based action game, in which you control a group of pink hedgehogs on a 2D side-on-view map. Your goal is to destroy enemy hedgehogs using a variety of weapons – but you have to be careful when launching certain weapons, as they can destroy the ground on which you’re standing, leading to death.
You can play against other humans or CPU opponents, and while 48 pre-made maps are included, there’s also a random map generator for effectively infinite variations in design.
Hedgewarswww.hedgewars.org
FOSS FUN FEATURE
www.linuxvoice.com 33
TORCS (The Open Racing Car Simulator) is actually two programs in one: it can be enjoyed as a traditional racing game, battling other cars on a variety of courses in single races or championship modes. A huge amount of attention has been paid to the physics, with wheel types, suspension stiffness and aerodynamics all playing a part in how the cars behave.
Developers can create AI drivers in C++ in C++ (see www.berniw.org/tutorials/robot for an introduction), which has led to TORCS being the base of several projects at the yearly IEEE Conference on Computational Intelligence and Games. The program has also been used to study algorithmic generation of tracks.
TORCShttp://torcs.sourceforge.net
Like TORCS, FlightGear is much more than a game. Its developers describe it as “an open flight simulator framework for use in research or academic environments, pilot training, as an industry engineering tool, and last but a fun, realistic, and challenging desktop flight simulator”. It’s a vast and incredibly detailed piece of software with over 20,000 airports, multiple flight dynamics models, and a huge range of aircraft to explore.
If you’ve ever tried to play a flight simulator, you’ll know that they have exceptionally steep learning curves. Sadly, FlightGear’s wiki was down as we wrote this, but the full (and very detailed) manual is available at http://mapserver.flightgear.org/getstart.
FlightGearwww.flightgear.org
LV020 032 Feature Games.indd 33 04/09/2015 09:56
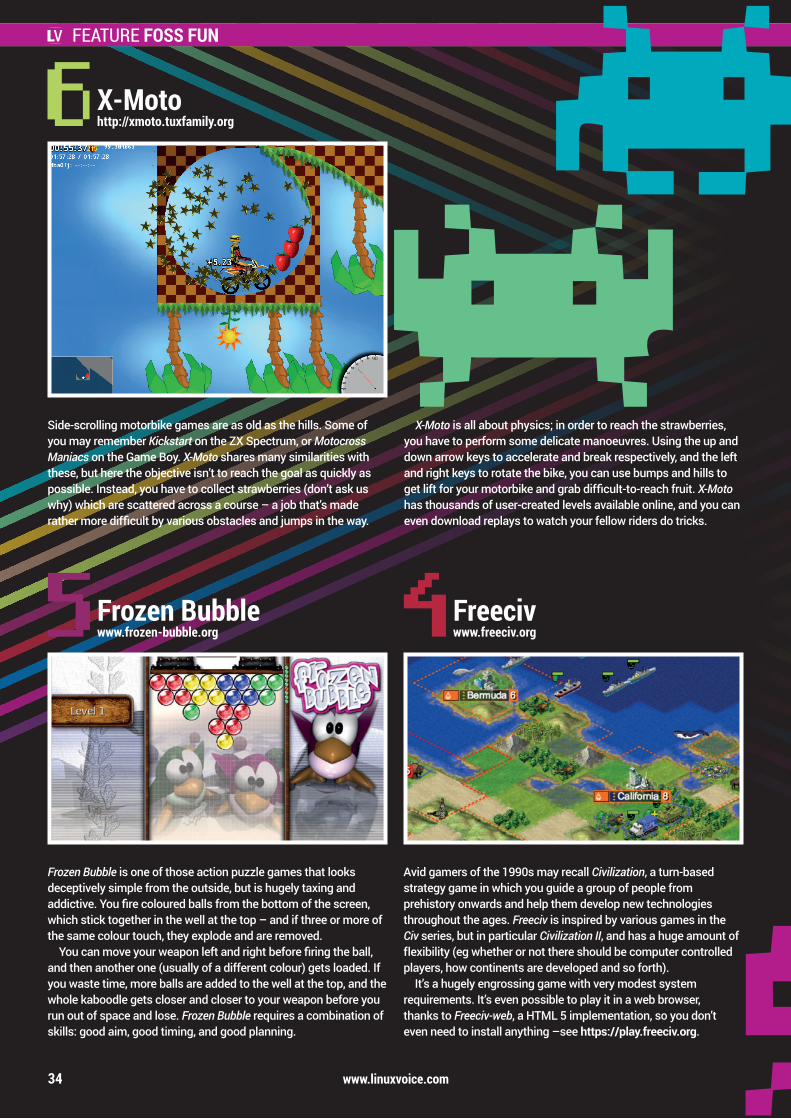
Side-scrolling motorbike games are as old as the hills. Some of you may remember Kickstart on the ZX Spectrum, or Motocross Maniacs on the Game Boy. X-Moto shares many similarities with these, but here the objective isn’t to reach the goal as quickly as possible. Instead, you have to collect strawberries (don’t ask us why) which are scattered across a course – a job that’s made rather more difficult by various obstacles and jumps in the way.
X-Motohttp://xmoto.tuxfamily.org
Avid gamers of the 1990s may recall Civilization, a turn-based strategy game in which you guide a group of people from prehistory onwards and help them develop new technologies throughout the ages. Freeciv is inspired by various games in the Civ series, but in particular Civilization II, and has a huge amount of flexibility (eg whether or not there should be computer controlled players, how continents are developed and so forth).
It’s a hugely engrossing game with very modest system requirements. It’s even possible to play it in a web browser, thanks to Freeciv-web, a HTML 5 implementation, so you don’t even need to install anything –see https://play.freeciv.org.
Freecivwww.freeciv.org
Frozen Bubble is one of those action puzzle games that looks deceptively simple from the outside, but is hugely taxing and addictive. You fire coloured balls from the bottom of the screen, which stick together in the well at the top – and if three or more of the same colour touch, they explode and are removed.
You can move your weapon left and right before firing the ball, and then another one (usually of a different colour) gets loaded. If you waste time, more balls are added to the well at the top, and the whole kaboodle gets closer and closer to your weapon before you run out of space and lose. Frozen Bubble requires a combination of skills: good aim, good timing, and good planning.
Frozen Bubblewww.frozen-bubble.org
X-Moto is all about physics; in order to reach the strawberries, you have to perform some delicate manoeuvres. Using the up and down arrow keys to accelerate and break respectively, and the left and right keys to rotate the bike, you can use bumps and hills to get lift for your motorbike and grab difficult-to-reach fruit. X-Moto has thousands of user-created levels available online, and you can even download replays to watch your fellow riders do tricks.
FEATURE FOSS FUN
www.linuxvoice.com34
LV020 032 Feature Games.indd 34 04/09/2015 09:56
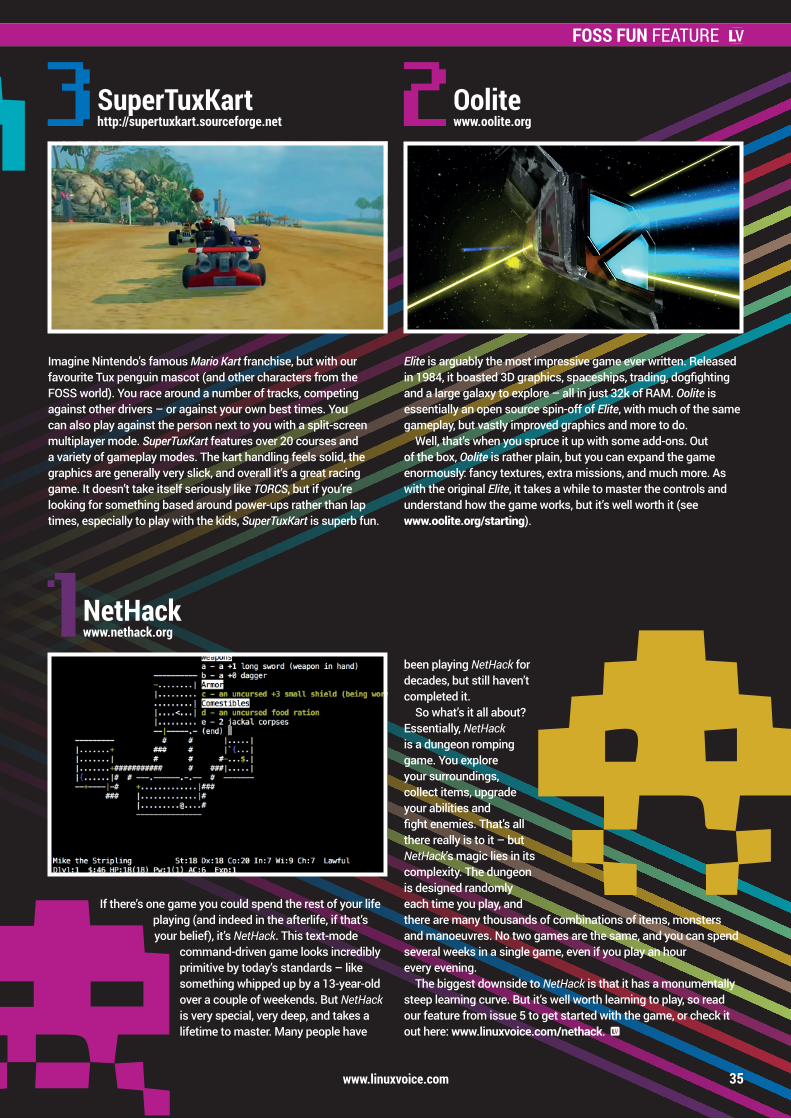
Elite is arguably the most impressive game ever written. Released in 1984, it boasted 3D graphics, spaceships, trading, dogfighting and a large galaxy to explore – all in just 32k of RAM. Oolite is essentially an open source spin-off of Elite, with much of the same gameplay, but vastly improved graphics and more to do.
Well, that’s when you spruce it up with some add-ons. Out of the box, Oolite is rather plain, but you can expand the game enormously: fancy textures, extra missions, and much more. As with the original Elite, it takes a while to master the controls and understand how the game works, but it’s well worth it (see www.oolite.org/starting).
Oolitewww.oolite.org
Imagine Nintendo’s famous Mario Kart franchise, but with our favourite Tux penguin mascot (and other characters from the FOSS world). You race around a number of tracks, competing against other drivers – or against your own best times. You can also play against the person next to you with a split-screen multiplayer mode. SuperTuxKart features over 20 courses and a variety of gameplay modes. The kart handling feels solid, the graphics are generally very slick, and overall it’s a great racing game. It doesn’t take itself seriously like TORCS, but if you’re looking for something based around power-ups rather than lap times, especially to play with the kids, SuperTuxKart is superb fun.
SuperTuxKarthttp://supertuxkart.sourceforge.net
If there’s one game you could spend the rest of your life playing (and indeed in the afterlife, if that’s your belief), it’s NetHack. This text-mode
command-driven game looks incredibly primitive by today’s standards – like something whipped up by a 13-year-old over a couple of weekends. But NetHack is very special, very deep, and takes a lifetime to master. Many people have
NetHackwww.nethack.org
been playing NetHack for decades, but still haven’t completed it.
So what’s it all about? Essentially, NetHack is a dungeon romping game. You explore your surroundings, collect items, upgrade your abilities and fight enemies. That’s all there really is to it – but NetHack’s magic lies in its complexity. The dungeon is designed randomly each time you play, and there are many thousands of combinations of items, monsters and manoeuvres. No two games are the same, and you can spend several weeks in a single game, even if you play an hour every evening.
The biggest downside to NetHack is that it has a monumentally steep learning curve. But it’s well worth learning to play, so read our feature from issue 5 to get started with the game, or check it out here: www.linuxvoice.com/nethack.
FOSS FUN FEATURE
www.linuxvoice.com 35
LV020 032 Feature Games.indd 35 04/09/2015 09:56

www.linuxvoice.com
SHOW REPORT LINUXCON
L inuxCon, combined with CloudOpen and ContainerCon, took over the Seattle Sheraton on 16–19 August 2015. Home of grunge,
Starbucks, and the fish-throwing fishmongers of Pike Place Market, the Emerald City is a hub of technology, with Amazon occupying more than 13% of the city’s total office space, Microsoft just up the road in Redmond, and O’Reilly and the Linux Foundation not far south in Portland.
From 10,000 to 19 million lines of code, the Linux kernel is a complex software project, which isn’t made easier by the fact that more than 4,000 developers
have contributed to the kernel recently. Unless that is exactly the reason it’s easier. As Linux Foundation head honcho Jim Zemlin pointed out in his keynote address, the real story behind Linux (and the Foundation) could be that it’s the first collaborative development project at scale. And, with 23 projects currently under the banner of the Linux Foundation, and 400 member organisations, he is probably allowed an opinion along those lines.
Attendees in search of a pure Linux conference weren’t going to find it here. Like Cerberus, the conference was three-headed: Linux, the Cloud, and
36
Travis ‘TT’ Mooney packs his plaid shirt and Singles soundtrack for this year’s North American Linux Conference.
For those that couldn’t make it to Seattle, there are slides available at http://events.linuxfoundation.org/events/linuxcon-north-america/program/slides.
LinuxCon (and CloudOpen, and
ContainerCon)
The next LinuxCon event is LinuxCon Europe in Dublin, Ireland, 6–7 October 2015 (http://events.linuxfoundation.org/events/linuxcon-europe).
LV020 036 Feature LinuxCon.indd 36 03/09/2015 15:10

www.linuxvoice.com
LINUXCON SHOW REPORT
37
Containers all shared top billing. With a marked lack of Linus Torvalds on days one and two, a one-on-one in place of the regular kernel panel, and a programme that added a full schedule of container talks, some attendees felt that Linux was under-represented at its own show.
But they needn’t have feared. IBM, a stalwart of the Linux world, came through with a new hardware offering to spice things up: Linux-only mainframes in the form of LinuxOne systems. Adding LinuxOne to OpenPower, IBM is continuing to reduce its reliance on internal proprietary operating systems in zOS and AIX, respectively, while harnessing the power of systems that scale beyond x86. And while OpenPower was a pure-play open specification from last-year’s LinuxCon, which is already in products you can buy, the mainframe will take longer to unravel, and will be done by the Open Mainframe Project, which as you might have guessed will be administered by the Linux Foundation.
Digging a little turned up some other hardware topics, from Red Hat talking about the enterprise-isation of ARM Linux (coming soon, really), to a clean-room (and patent-free) open hardware project that is cloning the SuperH processor (they have the sh2 working, as found in the Sega Saturn, and next year will tackle the sh4, which was featured in the Dreamcast), and an discussion of what exactly we can use our idle TPM modules for (the answer: lots of keying and hardware encryption). With Linux powering so much of the infrastructure that makes up the cloud, there was also plenty on the devops side, including extensive coverage of OpenStack and Containers (Docker, Docker, seems to be everywhere). There were also talks on Mesosphere, Packer, Container security, and a run-down of the Sony hack by security specialist Bruce Schneier — supporting the Core Infrastructure Initiative’s new security badge programme.
There was lots of important non-Linux stuff, too. The Core Infrastructure Initiative — founded in the aftermath of the Heartbleed OpenSSL bug — is all
New members supporting the Linux Foundation include Alibaba, DCHQ Inc, MediaTek Inc, PayPal and Wuhan Deepin Technology Co. Ltd.
about funding projects that are important, but perhaps not quite sexy enough to attract direct funding. In addition to the new security badge programme, it announced support for the network time protocol daemon. And it’s a measure of the
maturity of the Linux Foundation that it is able to do so, with other grants to OpenSSL, Frama-C, OpenSSH, GnuPG and Debian
Reproducible Builds, and the Fuzzing Project.
Where was Linus?Dogs, like some technology aficionados, have a limited concept of persistence, and don’t understand that when people aren’t right in front of them. When I come home, perhaps from LinuxCon, my dog jumps and carries on like she hasn’t seen me for years. And when Linus showed up on day three of the conference there was a similar whooping and hollering from a crowd of devotees. From his one-on-one session with Jim Zemlin, we learned that containers, currently the hotness of the devops world, don’t really interest Linus all that much. They’re neat, but he is really only concerned about the kernel. Along with recent comments he’s publicly made about being a manager, not a coder, and how Linux will survive him, it’s fair to say that although Linux was an amazing effort by one man, Linux is not Linus, nor vice-versa, anymore.
The Linux Foundation announced a new project, IO Visor, designed to help developers enable a new way to innovate, develop and share IO and networking functions.
“We learned that containers, currently the hotness of the devops world, don’t really interest Linus.”
Imag
es c
ourte
sy o
f Lin
ux F
ound
atio
n.
LV020 036 Feature LinuxCon.indd 37 03/09/2015 15:10
FAQ VULKAN
www.linuxvoice.com
VulkanThe final frontier of computer graphics APIs.
I know this one! It’s the name of a planet and the alien race
from there are emotionless beings who follow only logic and reason.
Hang on, that’s Vulcan. Vulkan is the new graphics API from
Khronos (the people behind OpenGL).
Ah. My years as a trekkie haven’t taught me much about
this. What’s an API, and why do I want one for graphics?
API stands for Application Programmer’s Interface. The idea
behind an API is that it allows people writing software to easily perform complex actions by calling pre-existing functions rather than having to do everything from scratch. For example, suppose you wanted to draw a triangle on the screen. To do this from scratch, you’d have to find the piece of memory that stores the data that’s sent to the
screen, work out which bits of it correspond to the triangle you wish to draw, then set them to the value you want them to be. A graphics API may give you the ability to just call a single function with the details of the triangle, and the API will take care of everything else for you.
Isn’t that what my graphics card does?Sort of. Your graphics card driver implements a standard API. At
the moment, this is probably OpenGL, but in the future it will be Vulkan. The specific implementation in the driver is designed to do as much of the processing as possible on the graphics card and do as little as possible on the CPU. This means that the person writing the software can just program using this standard API and the software will work on whatever graphics hardware the user has.
So, what’s special about Vulkan?From a user’s perspective, there’s not much different between
OpenGL and Vulkan. You’ll still be able to use a graphics card to generate 2D or 3D graphics without putting much load on your CPU. Hopefully, Vulkan will enable you to create better graphics
from the same hardware, but otherwise it will work more or less the same. The exact improvement in Vulkan will depend a lot on the specific load.
From the developer’s perspective, things are very different. Each graphics card contains many processing units that are very efficient at processing the sort of data that you get in 3D models. When you write a program using OpenGL, you also have to write a program that runs on these processors so that the data you send to the card is handled correctly. These programs are called shaders. When you write your program, you don’t know what hardware it’s going to run on, and different graphics cards have different architectures. This means you can’t compile the shaders. Instead, the shaders are written in GL Shader Language (GLSL), and the source code to the shader is included along with the program. When you first start a program that uses OpenGL, the graphics driver compiles this shader for the particular graphics hardware being used.
Vulkan works in a different way. Instead of specifying a language that shaders have to be written in, it specifies a binary format that the shaders have to be compiled to when the program is written. This is known as
38
“Vulkan will enable developers to create better graphics from the same hardware.”
BEN EVERARD
LV020 038 FAQ.indd 38 03/09/2015 10:20
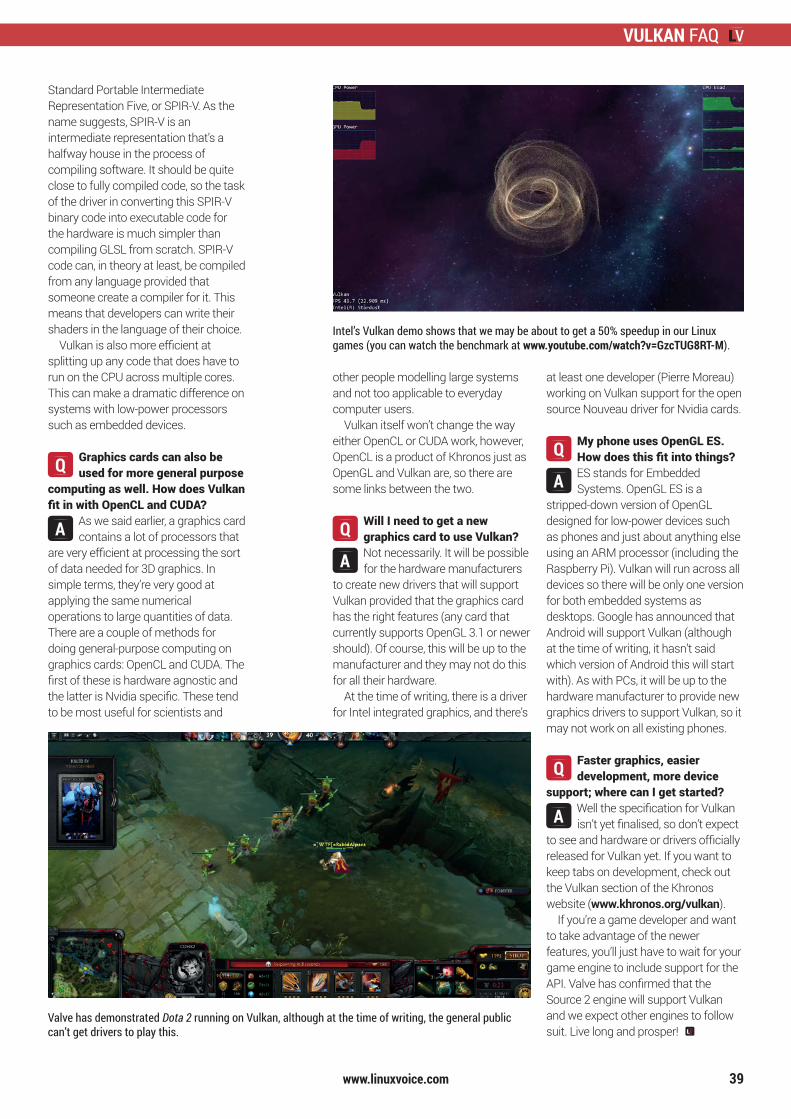
VULKAN FAQ
www.linuxvoice.com
Standard Portable Intermediate Representation Five, or SPIR-V. As the name suggests, SPIR-V is an intermediate representation that’s a halfway house in the process of compiling software. It should be quite close to fully compiled code, so the task of the driver in converting this SPIR-V binary code into executable code for the hardware is much simpler than compiling GLSL from scratch. SPIR-V code can, in theory at least, be compiled from any language provided that someone create a compiler for it. This means that developers can write their shaders in the language of their choice.
Vulkan is also more efficient at splitting up any code that does have to run on the CPU across multiple cores. This can make a dramatic difference on systems with low-power processors such as embedded devices.
Graphics cards can also be used for more general purpose
computing as well. How does Vulkan fit in with OpenCL and CUDA?
As we said earlier, a graphics card contains a lot of processors that
are very efficient at processing the sort of data needed for 3D graphics. In simple terms, they’re very good at applying the same numerical operations to large quantities of data. There are a couple of methods for doing general-purpose computing on graphics cards: OpenCL and CUDA. The first of these is hardware agnostic and the latter is Nvidia specific. These tend to be most useful for scientists and
other people modelling large systems and not too applicable to everyday computer users.
Vulkan itself won’t change the way either OpenCL or CUDA work, however, OpenCL is a product of Khronos just as OpenGL and Vulkan are, so there are some links between the two.
Will I need to get a new graphics card to use Vulkan?Not necessarily. It will be possible for the hardware manufacturers
to create new drivers that will support Vulkan provided that the graphics card has the right features (any card that currently supports OpenGL 3.1 or newer should). Of course, this will be up to the manufacturer and they may not do this for all their hardware.
At the time of writing, there is a driver for Intel integrated graphics, and there’s
at least one developer (Pierre Moreau) working on Vulkan support for the open source Nouveau driver for Nvidia cards.
My phone uses OpenGL ES. How does this fit into things?ES stands for Embedded Systems. OpenGL ES is a
stripped-down version of OpenGL designed for low-power devices such as phones and just about anything else using an ARM processor (including the Raspberry Pi). Vulkan will run across all devices so there will be only one version for both embedded systems as desktops. Google has announced that Android will support Vulkan (although at the time of writing, it hasn’t said which version of Android this will start with). As with PCs, it will be up to the hardware manufacturer to provide new graphics drivers to support Vulkan, so it may not work on all existing phones.
Faster graphics, easier development, more device
support; where can I get started?Well the specification for Vulkan isn’t yet finalised, so don’t expect
to see and hardware or drivers officially released for Vulkan yet. If you want to keep tabs on development, check out the Vulkan section of the Khronos website (www.khronos.org/vulkan).
If you’re a game developer and want to take advantage of the newer features, you’ll just have to wait for your game engine to include support for the API. Valve has confirmed that the Source 2 engine will support Vulkan and we expect other engines to follow suit. Live long and prosper!
39
Intel’s Vulkan demo shows that we may be about to get a 50% speedup in our Linux games (you can watch the benchmark at www.youtube.com/watch?v=GzcTUG8RT-M).
Valve has demonstrated Dota 2 running on Vulkan, although at the time of writing, the general public can’t get drivers to play this.
LV020 038 FAQ.indd 39 03/09/2015 10:20
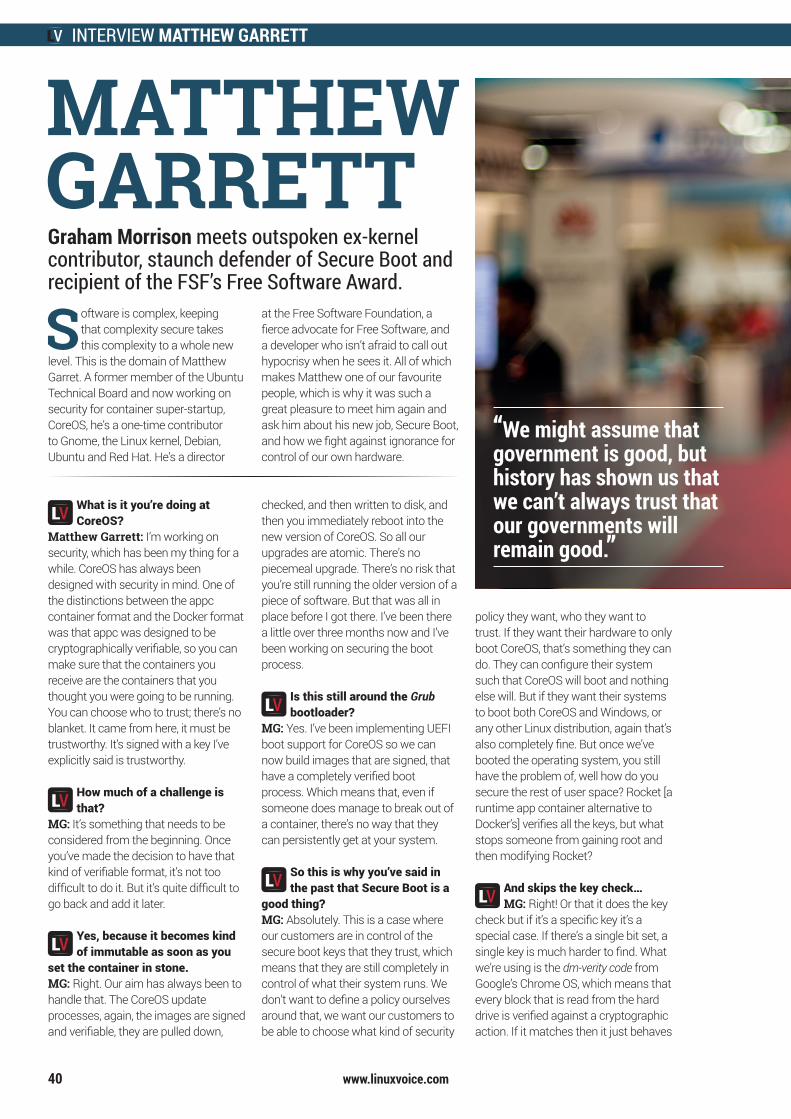
MATTHEW GARRETT INTERVIEWINTERVIEW MATTHEW GARRETT
www.linuxvoice.com40
Software is complex, keeping that complexity secure takes this complexity to a whole new
level. This is the domain of Matthew Garret. A former member of the Ubuntu Technical Board and now working on security for container super-startup, CoreOS, he’s a one-time contributor to Gnome, the Linux kernel, Debian, Ubuntu and Red Hat. He’s a director
at the Free Software Foundation, a fierce advocate for Free Software, and a developer who isn’t afraid to call out hypocrisy when he sees it. All of which makes Matthew one of our favourite people, which is why it was such a great pleasure to meet him again and ask him about his new job, Secure Boot, and how we fight against ignorance for control of our own hardware.
What is it you’re doing at CoreOS?
Matthew Garrett: I’m working on security, which has been my thing for a while. CoreOS has always been designed with security in mind. One of the distinctions between the appc container format and the Docker format was that appc was designed to be cryptographically verifiable, so you can make sure that the containers you receive are the containers that you thought you were going to be running. You can choose who to trust; there’s no blanket. It came from here, it must be trustworthy. It’s signed with a key I’ve explicitly said is trustworthy.
How much of a challenge is that?
MG: It’s something that needs to be considered from the beginning. Once you’ve made the decision to have that kind of verifiable format, it’s not too difficult to do it. But it’s quite difficult to go back and add it later.
Yes, because it becomes kind of immutable as soon as you
set the container in stone.MG: Right. Our aim has always been to handle that. The CoreOS update processes, again, the images are signed and verifiable, they are pulled down,
checked, and then written to disk, and then you immediately reboot into the new version of CoreOS. So all our upgrades are atomic. There’s no piecemeal upgrade. There’s no risk that you’re still running the older version of a piece of software. But that was all in place before I got there. I’ve been there a little over three months now and I’ve been working on securing the boot process.
Is this still around the Grub bootloader?
MG: Yes. I’ve been implementing UEFI boot support for CoreOS so we can now build images that are signed, that have a completely verified boot process. Which means that, even if someone does manage to break out of a container, there’s no way that they can persistently get at your system.
So this is why you’ve said in the past that Secure Boot is a
good thing?MG: Absolutely. This is a case where our customers are in control of the secure boot keys that they trust, which means that they are still completely in control of what their system runs. We don’t want to define a policy ourselves around that, we want our customers to be able to choose what kind of security
policy they want, who they want to trust. If they want their hardware to only boot CoreOS, that’s something they can do. They can configure their system such that CoreOS will boot and nothing else will. But if they want their systems to boot both CoreOS and Windows, or any other Linux distribution, again that’s also completely fine. But once we’ve booted the operating system, you still have the problem of, well how do you secure the rest of user space? Rocket [a runtime app container alternative to Docker’s] verifies all the keys, but what stops someone from gaining root and then modifying Rocket?
And skips the key check…MG: Right! Or that it does the key
check but if it’s a specific key it’s a special case. If there’s a single bit set, a single key is much harder to find. What we’re using is the dm-verity code from Google’s Chrome OS, which means that every block that is read from the hard drive is verified against a cryptographic action. If it matches then it just behaves
Graham Morrison meets outspoken ex-kernel contributor, staunch defender of Secure Boot and recipient of the FSF’s Free Software Award.
“We might assume that government is good, but history has shown us that we can’t always trust that our governments will remain good.”
MATTHEW GARRETT
LV020 040 Interview.indd 40 04/09/2015 13:07
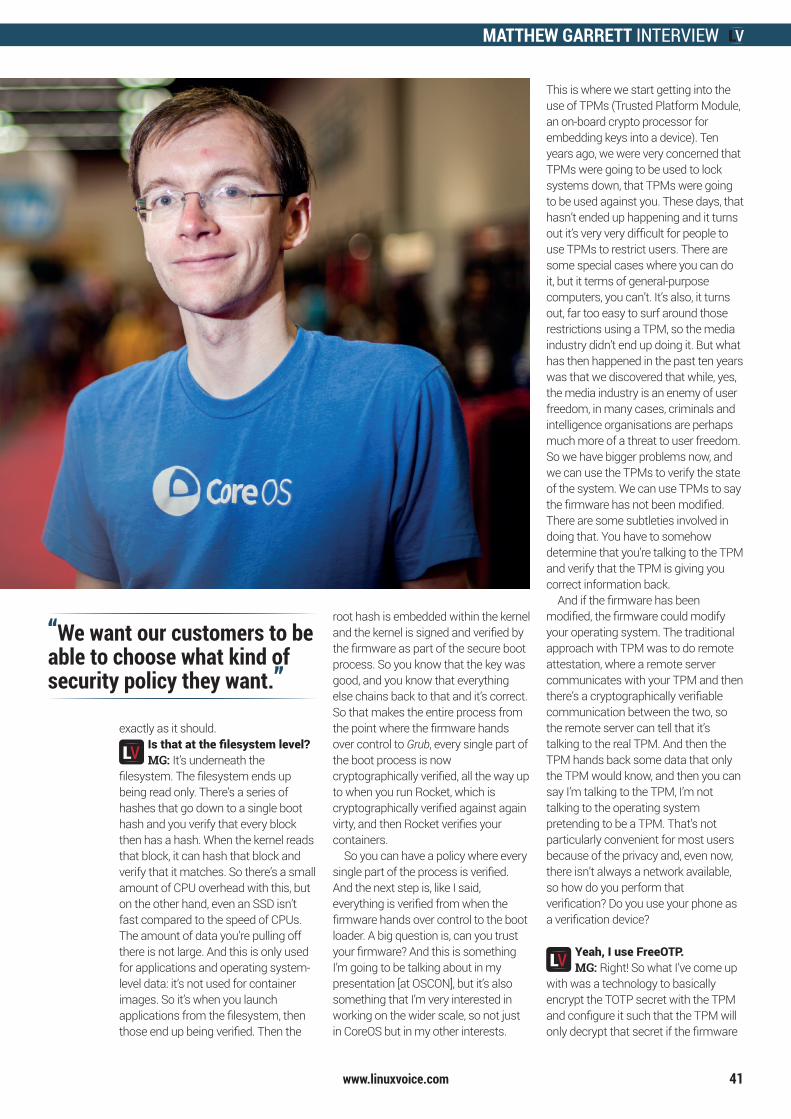
MATTHEW GARRETT INTERVIEWINTERVIEW MATTHEW GARRETT
www.linuxvoice.com 41
exactly as it should.Is that at the filesystem level?MG: It’s underneath the
filesystem. The filesystem ends up being read only. There’s a series of hashes that go down to a single boot hash and you verify that every block then has a hash. When the kernel reads that block, it can hash that block and verify that it matches. So there’s a small amount of CPU overhead with this, but on the other hand, even an SSD isn’t fast compared to the speed of CPUs. The amount of data you’re pulling off there is not large. And this is only used for applications and operating system-level data: it’s not used for container images. So it’s when you launch applications from the filesystem, then those end up being verified. Then the
root hash is embedded within the kernel and the kernel is signed and verified by the firmware as part of the secure boot process. So you know that the key was good, and you know that everything else chains back to that and it’s correct. So that makes the entire process from the point where the firmware hands over control to Grub, every single part of the boot process is now cryptographically verified, all the way up to when you run Rocket, which is cryptographically verified against again virty, and then Rocket verifies your containers.
So you can have a policy where every single part of the process is verified. And the next step is, like I said, everything is verified from when the firmware hands over control to the boot loader. A big question is, can you trust your firmware? And this is something I’m going to be talking about in my presentation [at OSCON], but it’s also something that I’m very interested in working on the wider scale, so not just in CoreOS but in my other interests.
This is where we start getting into the use of TPMs (Trusted Platform Module, an on-board crypto processor for embedding keys into a device). Ten years ago, we were very concerned that TPMs were going to be used to lock systems down, that TPMs were going to be used against you. These days, that hasn’t ended up happening and it turns out it’s very very difficult for people to use TPMs to restrict users. There are some special cases where you can do it, but it terms of general-purpose computers, you can’t. It’s also, it turns out, far too easy to surf around those restrictions using a TPM, so the media industry didn’t end up doing it. But what has then happened in the past ten years was that we discovered that while, yes, the media industry is an enemy of user freedom, in many cases, criminals and intelligence organisations are perhaps much more of a threat to user freedom. So we have bigger problems now, and we can use the TPMs to verify the state of the system. We can use TPMs to say the firmware has not been modified. There are some subtleties involved in doing that. You have to somehow determine that you’re talking to the TPM and verify that the TPM is giving you correct information back.
And if the firmware has been modified, the firmware could modify your operating system. The traditional approach with TPM was to do remote attestation, where a remote server communicates with your TPM and then there’s a cryptographically verifiable communication between the two, so the remote server can tell that it’s talking to the real TPM. And then the TPM hands back some data that only the TPM would know, and then you can say I’m talking to the TPM, I’m not talking to the operating system pretending to be a TPM. That’s not particularly convenient for most users because of the privacy and, even now, there isn’t always a network available, so how do you perform that verification? Do you use your phone as a verification device?
Yeah, I use FreeOTP.MG: Right! So what I’ve come up
with was a technology to basically encrypt the TOTP secret with the TPM and configure it such that the TPM will only decrypt that secret if the firmware
“We want our customers to be able to choose what kind of security policy they want.”
LV020 040 Interview.indd 41 04/09/2015 13:07
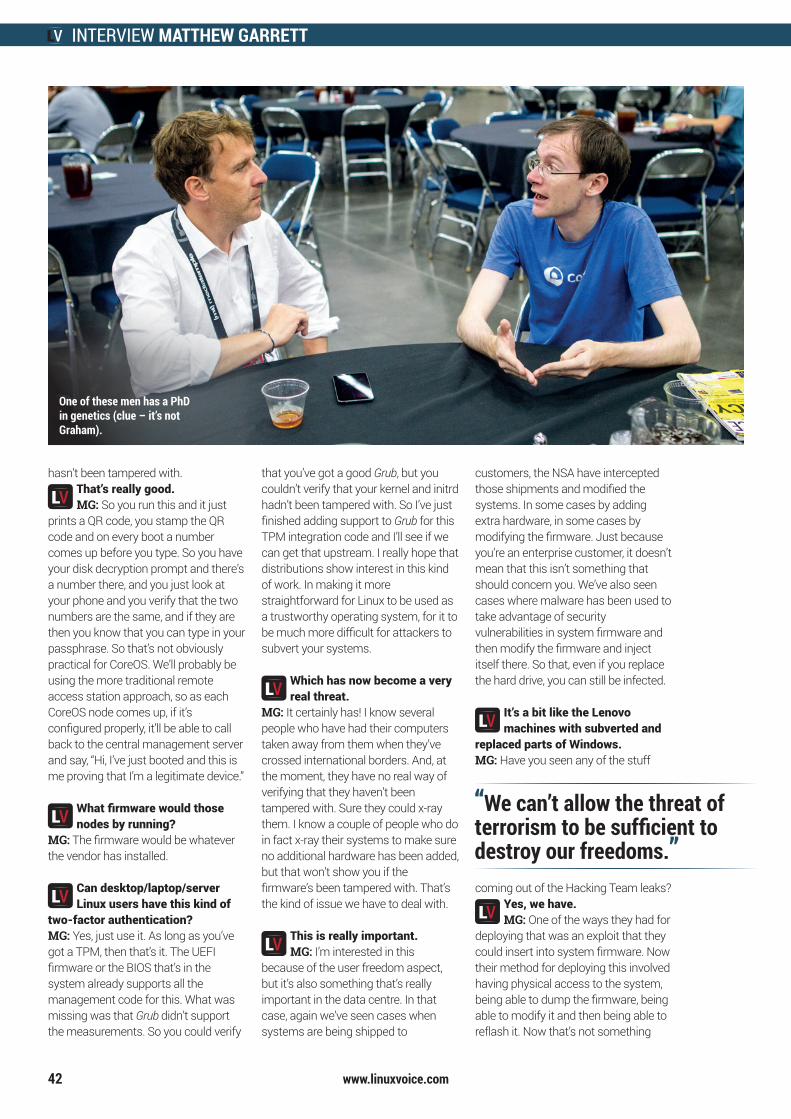
MATTHEW GARRETT INTERVIEWINTERVIEW MATTHEW GARRETT
www.linuxvoice.com42
hasn’t been tampered with.That’s really good.MG: So you run this and it just
prints a QR code, you stamp the QR code and on every boot a number comes up before you type. So you have your disk decryption prompt and there’s a number there, and you just look at your phone and you verify that the two numbers are the same, and if they are then you know that you can type in your passphrase. So that’s not obviously practical for CoreOS. We’ll probably be using the more traditional remote access station approach, so as each CoreOS node comes up, if it’s configured properly, it’ll be able to call back to the central management server and say, “Hi, I’ve just booted and this is me proving that I’m a legitimate device.”
What firmware would those nodes by running?
MG: The firmware would be whatever the vendor has installed.
Can desktop/laptop/server Linux users have this kind of
two-factor authentication?MG: Yes, just use it. As long as you’ve got a TPM, then that’s it. The UEFI firmware or the BIOS that’s in the system already supports all the management code for this. What was missing was that Grub didn’t support the measurements. So you could verify
that you’ve got a good Grub, but you couldn’t verify that your kernel and initrd hadn’t been tampered with. So I’ve just finished adding support to Grub for this TPM integration code and I’ll see if we can get that upstream. I really hope that distributions show interest in this kind of work. In making it more straightforward for Linux to be used as a trustworthy operating system, for it to be much more difficult for attackers to subvert your systems.
Which has now become a very real threat.
MG: It certainly has! I know several people who have had their computers taken away from them when they’ve crossed international borders. And, at the moment, they have no real way of verifying that they haven’t been tampered with. Sure they could x-ray them. I know a couple of people who do in fact x-ray their systems to make sure no additional hardware has been added, but that won’t show you if the firmware’s been tampered with. That’s the kind of issue we have to deal with.
This is really important.MG: I’m interested in this
because of the user freedom aspect, but it’s also something that’s really important in the data centre. In that case, again we’ve seen cases when systems are being shipped to
customers, the NSA have intercepted those shipments and modified the systems. In some cases by adding extra hardware, in some cases by modifying the firmware. Just because you’re an enterprise customer, it doesn’t mean that this isn’t something that should concern you. We’ve also seen cases where malware has been used to take advantage of security vulnerabilities in system firmware and then modify the firmware and inject itself there. So that, even if you replace the hard drive, you can still be infected.
It’s a bit like the Lenovo machines with subverted and
replaced parts of Windows.MG: Have you seen any of the stuff
coming out of the Hacking Team leaks? Yes, we have.MG: One of the ways they had for
deploying that was an exploit that they could insert into system firmware. Now their method for deploying this involved having physical access to the system, being able to dump the firmware, being able to modify it and then being able to reflash it. Now that’s not something
One of these men has a PhD in genetics (clue – it’s not Graham).
“We can’t allow the threat of terrorism to be sufficient to destroy our freedoms.”
LV020 040 Interview.indd 42 04/09/2015 13:07
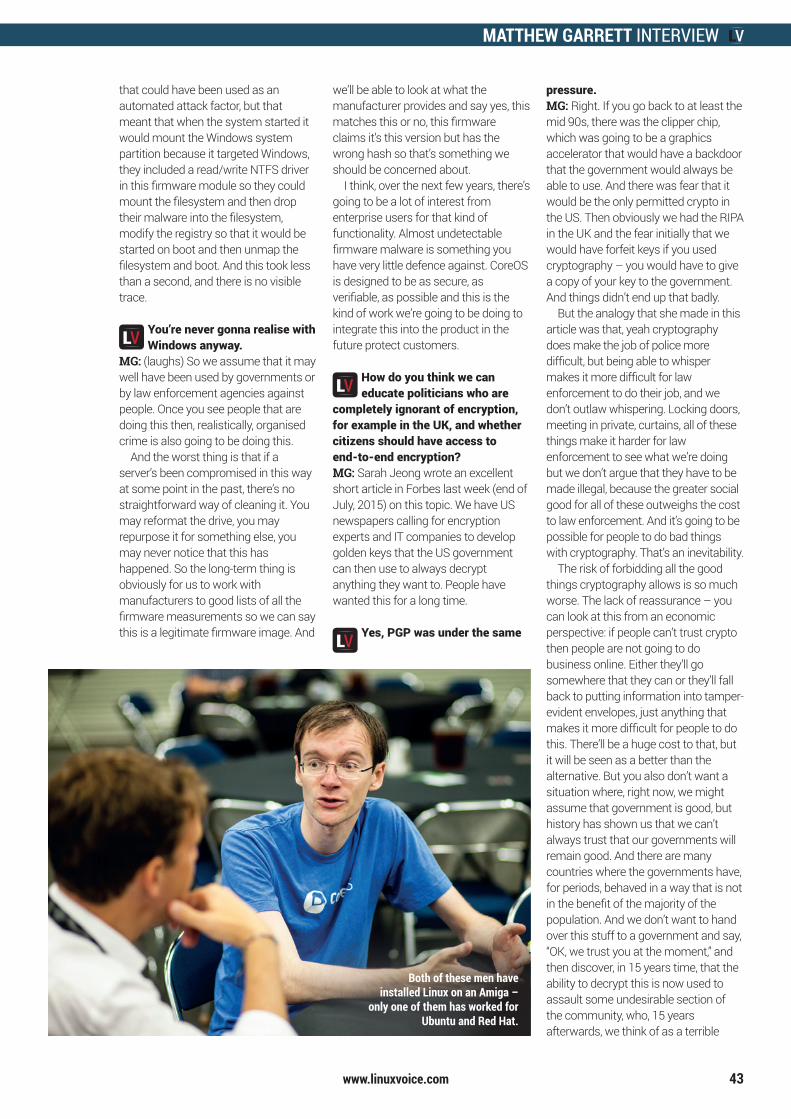
MATTHEW GARRETT INTERVIEWINTERVIEW MATTHEW GARRETT
www.linuxvoice.com 43
that could have been used as an automated attack factor, but that meant that when the system started it would mount the Windows system partition because it targeted Windows, they included a read/write NTFS driver in this firmware module so they could mount the filesystem and then drop their malware into the filesystem, modify the registry so that it would be started on boot and then unmap the filesystem and boot. And this took less than a second, and there is no visible trace.
You’re never gonna realise with Windows anyway.
MG: (laughs) So we assume that it may well have been used by governments or by law enforcement agencies against people. Once you see people that are doing this then, realistically, organised crime is also going to be doing this.
And the worst thing is that if a server’s been compromised in this way at some point in the past, there’s no straightforward way of cleaning it. You may reformat the drive, you may repurpose it for something else, you may never notice that this has happened. So the long-term thing is obviously for us to work with manufacturers to good lists of all the firmware measurements so we can say this is a legitimate firmware image. And
we’ll be able to look at what the manufacturer provides and say yes, this matches this or no, this firmware claims it’s this version but has the wrong hash so that’s something we should be concerned about.
I think, over the next few years, there’s going to be a lot of interest from enterprise users for that kind of functionality. Almost undetectable firmware malware is something you have very little defence against. CoreOS is designed to be as secure, as verifiable, as possible and this is the kind of work we’re going to be doing to integrate this into the product in the future protect customers.
How do you think we can educate politicians who are
completely ignorant of encryption, for example in the UK, and whether citizens should have access to end-to-end encryption?MG: Sarah Jeong wrote an excellent short article in Forbes last week (end of July, 2015) on this topic. We have US newspapers calling for encryption experts and IT companies to develop golden keys that the US government can then use to always decrypt anything they want to. People have wanted this for a long time.
Yes, PGP was under the same
pressure.MG: Right. If you go back to at least the mid 90s, there was the clipper chip, which was going to be a graphics accelerator that would have a backdoor that the government would always be able to use. And there was fear that it would be the only permitted crypto in the US. Then obviously we had the RIPA in the UK and the fear initially that we would have forfeit keys if you used cryptography – you would have to give a copy of your key to the government. And things didn’t end up that badly.
But the analogy that she made in this article was that, yeah cryptography does make the job of police more difficult, but being able to whisper makes it more difficult for law enforcement to do their job, and we don’t outlaw whispering. Locking doors, meeting in private, curtains, all of these things make it harder for law enforcement to see what we’re doing but we don’t argue that they have to be made illegal, because the greater social good for all of these outweighs the cost to law enforcement. And it’s going to be possible for people to do bad things with cryptography. That’s an inevitability.
The risk of forbidding all the good things cryptography allows is so much worse. The lack of reassurance – you can look at this from an economic perspective: if people can’t trust crypto then people are not going to do business online. Either they’ll go somewhere that they can or they’ll fall back to putting information into tamper-evident envelopes, just anything that makes it more difficult for people to do this. There’ll be a huge cost to that, but it will be seen as a better than the alternative. But you also don’t want a situation where, right now, we might assume that government is good, but history has shown us that we can’t always trust that our governments will remain good. And there are many countries where the governments have, for periods, behaved in a way that is not in the benefit of the majority of the population. And we don’t want to hand over this stuff to a government and say, “OK, we trust you at the moment,” and then discover, in 15 years time, that the ability to decrypt this is now used to assault some undesirable section of the community, who, 15 years afterwards, we think of as a terrible
Both of these men have installed Linux on an Amiga –
only one of them has worked for Ubuntu and Red Hat.
LV020 040 Interview.indd 43 04/09/2015 13:07
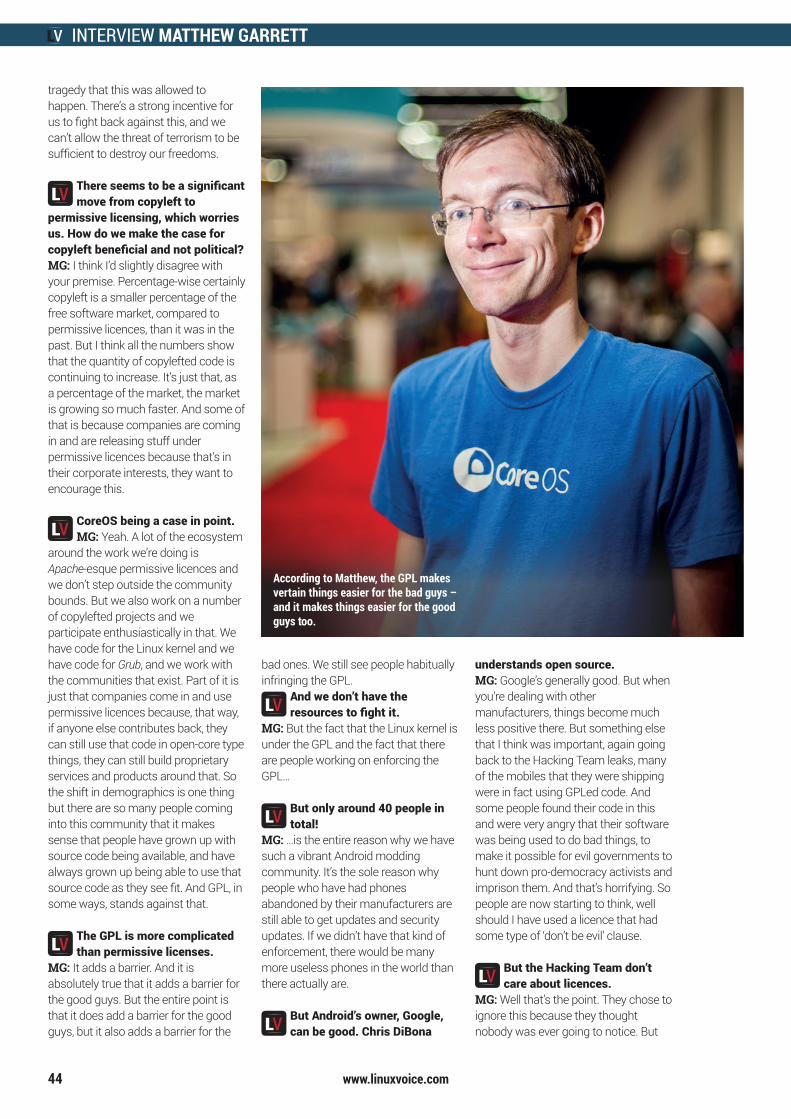
MATTHEW GARRETT INTERVIEWINTERVIEW MATTHEW GARRETT
www.linuxvoice.com44
tragedy that this was allowed to happen. There’s a strong incentive for us to fight back against this, and we can’t allow the threat of terrorism to be sufficient to destroy our freedoms.
There seems to be a significant move from copyleft to
permissive licensing, which worries us. How do we make the case for copyleft beneficial and not political?MG: I think I’d slightly disagree with your premise. Percentage-wise certainly copyleft is a smaller percentage of the free software market, compared to permissive licences, than it was in the past. But I think all the numbers show that the quantity of copylefted code is continuing to increase. It’s just that, as a percentage of the market, the market is growing so much faster. And some of that is because companies are coming in and are releasing stuff under permissive licences because that’s in their corporate interests, they want to encourage this.
CoreOS being a case in point.MG: Yeah. A lot of the ecosystem
around the work we’re doing is Apache-esque permissive licences and we don’t step outside the community bounds. But we also work on a number of copylefted projects and we participate enthusiastically in that. We have code for the Linux kernel and we have code for Grub, and we work with the communities that exist. Part of it is just that companies come in and use permissive licences because, that way, if anyone else contributes back, they can still use that code in open-core type things, they can still build proprietary services and products around that. So the shift in demographics is one thing but there are so many people coming into this community that it makes sense that people have grown up with source code being available, and have always grown up being able to use that source code as they see fit. And GPL, in some ways, stands against that.
The GPL is more complicated than permissive licenses.
MG: It adds a barrier. And it is absolutely true that it adds a barrier for the good guys. But the entire point is that it does add a barrier for the good guys, but it also adds a barrier for the
bad ones. We still see people habitually infringing the GPL.
And we don’t have the resources to fight it.
MG: But the fact that the Linux kernel is under the GPL and the fact that there are people working on enforcing the GPL…
But only around 40 people in total!
MG: …is the entire reason why we have such a vibrant Android modding community. It’s the sole reason why people who have had phones abandoned by their manufacturers are still able to get updates and security updates. If we didn’t have that kind of enforcement, there would be many more useless phones in the world than there actually are.
But Android’s owner, Google, can be good. Chris DiBona
understands open source.MG: Google’s generally good. But when you’re dealing with other manufacturers, things become much less positive there. But something else that I think was important, again going back to the Hacking Team leaks, many of the mobiles that they were shipping were in fact using GPLed code. And some people found their code in this and were very angry that their software was being used to do bad things, to make it possible for evil governments to hunt down pro-democracy activists and imprison them. And that’s horrifying. So people are now starting to think, well should I have used a licence that had some type of ‘don’t be evil’ clause.
But the Hacking Team don’t care about licences.
MG: Well that’s the point. They chose to ignore this because they thought nobody was ever going to notice. But
According to Matthew, the GPL makes vertain things easier for the bad guys – and it makes things easier for the good guys too.
LV020 040 Interview.indd 44 04/09/2015 13:07
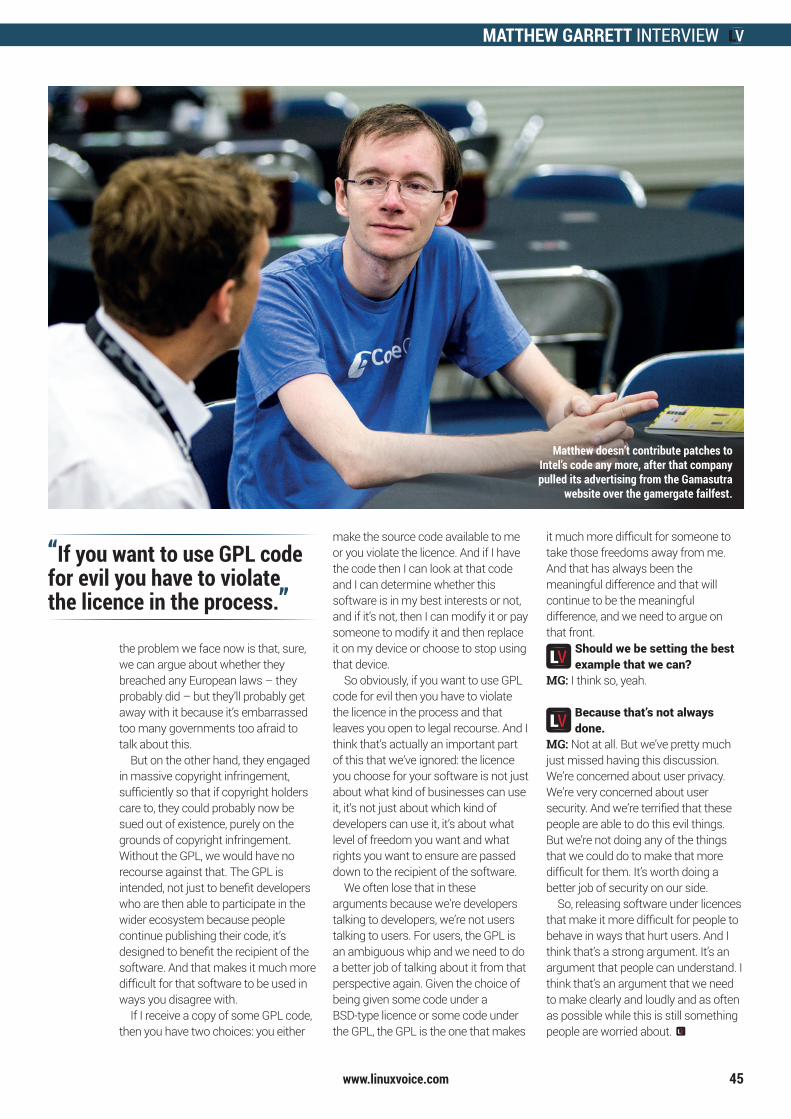
MATTHEW GARRETT INTERVIEWINTERVIEW MATTHEW GARRETT
www.linuxvoice.com 45
the problem we face now is that, sure, we can argue about whether they breached any European laws – they probably did – but they’ll probably get away with it because it’s embarrassed too many governments too afraid to talk about this.
But on the other hand, they engaged in massive copyright infringement, sufficiently so that if copyright holders care to, they could probably now be sued out of existence, purely on the grounds of copyright infringement. Without the GPL, we would have no recourse against that. The GPL is intended, not just to benefit developers who are then able to participate in the wider ecosystem because people continue publishing their code, it’s designed to benefit the recipient of the software. And that makes it much more difficult for that software to be used in ways you disagree with.
If I receive a copy of some GPL code, then you have two choices: you either
make the source code available to me or you violate the licence. And if I have the code then I can look at that code and I can determine whether this software is in my best interests or not, and if it’s not, then I can modify it or pay someone to modify it and then replace it on my device or choose to stop using that device.
So obviously, if you want to use GPL code for evil then you have to violate the licence in the process and that leaves you open to legal recourse. And I think that’s actually an important part of this that we’ve ignored: the licence you choose for your software is not just about what kind of businesses can use it, it’s not just about which kind of developers can use it, it’s about what level of freedom you want and what rights you want to ensure are passed down to the recipient of the software.
We often lose that in these arguments because we’re developers talking to developers, we’re not users talking to users. For users, the GPL is an ambiguous whip and we need to do a better job of talking about it from that perspective again. Given the choice of being given some code under a BSD-type licence or some code under the GPL, the GPL is the one that makes
it much more difficult for someone to take those freedoms away from me. And that has always been the meaningful difference and that will continue to be the meaningful difference, and we need to argue on that front.
Should we be setting the best example that we can?
MG: I think so, yeah.
Because that’s not always done.
MG: Not at all. But we’ve pretty much just missed having this discussion. We’re concerned about user privacy. We’re very concerned about user security. And we’re terrified that these people are able to do this evil things. But we’re not doing any of the things that we could do to make that more difficult for them. It’s worth doing a better job of security on our side.
So, releasing software under licences that make it more difficult for people to behave in ways that hurt users. And I think that’s a strong argument. It’s an argument that people can understand. I think that’s an argument that we need to make clearly and loudly and as often as possible while this is still something people are worried about.
Matthew doesn’t contribute patches to Intel’s code any more, after that company pulled its advertising from the Gamasutra
website over the gamergate failfest.
“If you want to use GPL code for evil you have to violate the licence in the process.”
LV020 040 Interview.indd 45 04/09/2015 13:07

LISTEN TO THE PODCAST
WWW.LINUXVOICE.COM
BUY MUGS AND T-SHIRTS!
shop.linuxvoice.comLV020 046 Ad Merchandise.indd 46 03/09/2015 10:36
INTRO REVIEWS
www.linuxvoice.com 47
The latest software and hardware for your Linux box, reviewed and rated by the most experienced writers in the business
REVIEWS
Andrew GregoryWise man say, done is better than perfect. But I bet Keats never had that defeatist attitude.
As we were working on this issue, Linux passed its 24th birthday. Since 25 August 1991
it’s gone from a student project to an enabler of an enormous ecosystem of free software, the way that coral provides a substrate for the rest of the little fishies that live on the reef. Well done to Mr Torvalds, and well done to anyone who’s ever submitted a bug, introduced a friend to Linux, developed software that runs on Linux, or just chooses to use it. We’ve all played our part, however small.
With maturity comes great usefulness. Linux is everywhere, quietly and modestly, powering phones, routers, televisions – everything except the vast majority of home PCs, which still overwhelmingly use some version of Windows.
Tomorrow belongs to us! It’s been a couple of years since I saw the words “Will 20XX be the year of Linux on the desktop” written in anything other than jest, probably because we just don’t care any more. But the more people get used to Android in their pockets, the more alien Windows will appear on their desktop. It’s inevitable, and when it happens, the masses will wonder why they resisted the true path for so long. [email protected]
On test this issue...
BOOKS AND GROUP TESTMonocultures are unhealthy, so let’s cross-fertilise the gene pool of Linux development with a bit of inspiration derived from some of the other free software desktops out there on the internet. We can all learn from the OSes in this Group test – or maybe you just want to be able to boast that you use an industrial-strength OS written for medical hardware powering your bog-standard Dell box?
In a similar vein, why not implant some new ideas into your soft squidgy brain? We find a good way to do this is by reading books, so we’ve reviewed some on page 52.
KDE Plasma 5.4We’ve devoted eight pages to desktops this issue, but Graham Morrison reckons there is only one: the beautiful KDE 5.4.
49
Cyberfox 40.0Tired of the cruft that Firefox keeps accumulating, Mike Saunders tries a stripped-down alternative.
48
Pimoroni PicadeLes Pounder isn’t allowed to get a full-sized arcade cabinet, so it’s lucky for him that this tiny alternative exists for authentic 80s thrills.
50
LV020 047 Reviews Intro.indd 47 04/09/2015 13:18
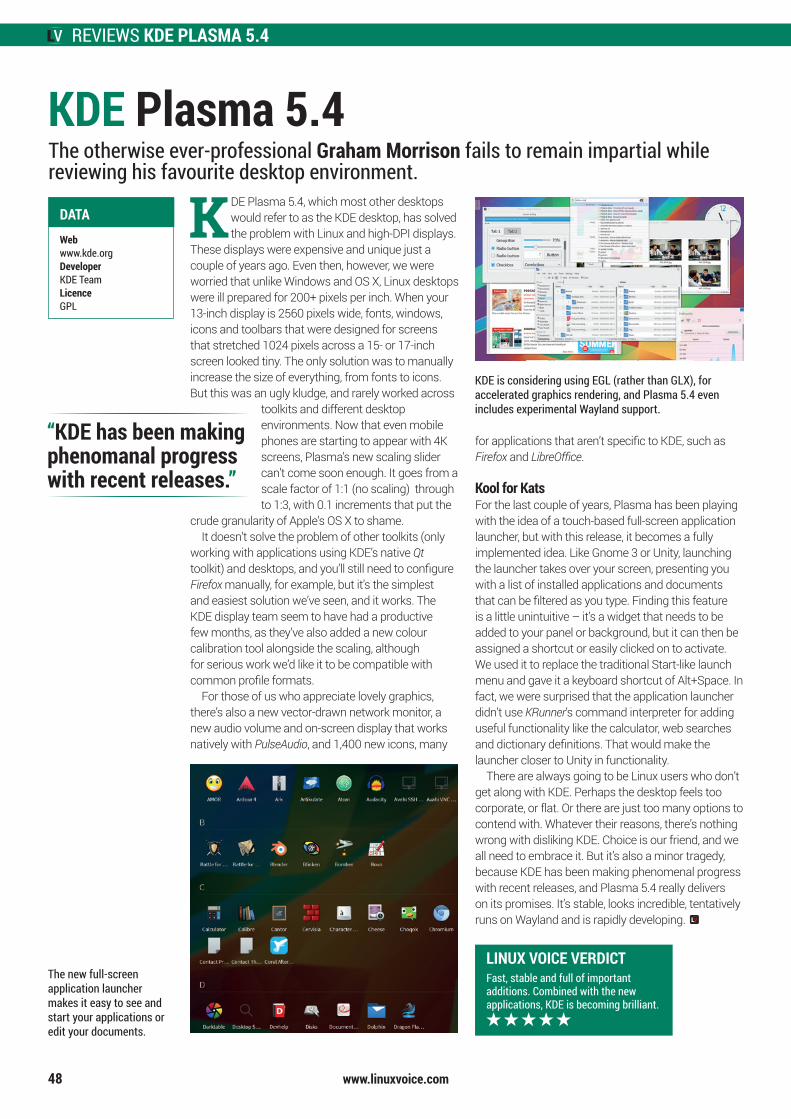
REVIEWS KDE PLASMA 5.4
48
KDE Plasma 5.4The otherwise ever-professional Graham Morrison fails to remain impartial while reviewing his favourite desktop environment.
The new full-screen application launcher makes it easy to see and start your applications or edit your documents.
KDE is considering using EGL (rather than GLX), for accelerated graphics rendering, and Plasma 5.4 even includes experimental Wayland support.
LINUX VOICE VERDICTFast, stable and full of important additions. Combined with the new applications, KDE is becoming brilliant.
DATAWebwww.kde.orgDeveloperKDE TeamLicence GPL
www.linuxvoice.com
KDE Plasma 5.4, which most other desktops would refer to as the KDE desktop, has solved the problem with Linux and high-DPI displays.
These displays were expensive and unique just a couple of years ago. Even then, however, we were worried that unlike Windows and OS X, Linux desktops were ill prepared for 200+ pixels per inch. When your 13-inch display is 2560 pixels wide, fonts, windows, icons and toolbars that were designed for screens that stretched 1024 pixels across a 15- or 17-inch screen looked tiny. The only solution was to manually increase the size of everything, from fonts to icons. But this was an ugly kludge, and rarely worked across
toolkits and different desktop environments. Now that even mobile phones are starting to appear with 4K screens, Plasma’s new scaling slider can’t come soon enough. It goes from a scale factor of 1:1 (no scaling) through to 1:3, with 0.1 increments that put the
crude granularity of Apple’s OS X to shame. It doesn’t solve the problem of other toolkits (only
working with applications using KDE’s native Qt toolkit) and desktops, and you’ll still need to configure Firefox manually, for example, but it’s the simplest and easiest solution we’ve seen, and it works. The KDE display team seem to have had a productive few months, as they’ve also added a new colour calibration tool alongside the scaling, although for serious work we’d like it to be compatible with common profile formats.
For those of us who appreciate lovely graphics, there’s also a new vector-drawn network monitor, a new audio volume and on-screen display that works natively with PulseAudio, and 1,400 new icons, many
for applications that aren’t specific to KDE, such as Firefox and LibreOffice.
Kool for KatsFor the last couple of years, Plasma has been playing with the idea of a touch-based full-screen application launcher, but with this release, it becomes a fully implemented idea. Like Gnome 3 or Unity, launching the launcher takes over your screen, presenting you with a list of installed applications and documents that can be filtered as you type. Finding this feature is a little unintuitive – it’s a widget that needs to be added to your panel or background, but it can then be assigned a shortcut or easily clicked on to activate. We used it to replace the traditional Start-like launch menu and gave it a keyboard shortcut of Alt+Space. In fact, we were surprised that the application launcher didn’t use KRunner’s command interpreter for adding useful functionality like the calculator, web searches and dictionary definitions. That would make the launcher closer to Unity in functionality.
There are always going to be Linux users who don’t get along with KDE. Perhaps the desktop feels too corporate, or flat. Or there are just too many options to contend with. Whatever their reasons, there’s nothing wrong with disliking KDE. Choice is our friend, and we all need to embrace it. But it’s also a minor tragedy, because KDE has been making phenomenal progress with recent releases, and Plasma 5.4 really delivers on its promises. It’s stable, looks incredible, tentatively runs on Wayland and is rapidly developing.
“KDE has been making phenomanal progress with recent releases.”
LV020 048 Review Plasma.indd 48 04/09/2015 13:10
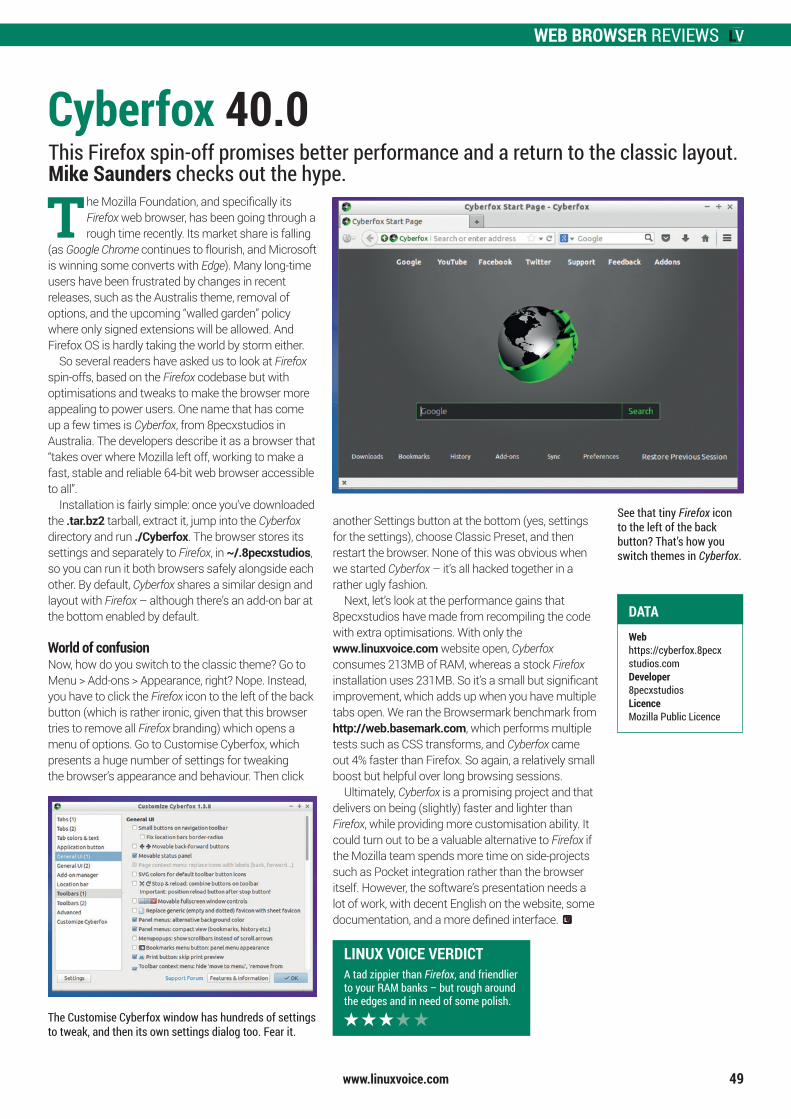
WEB BROWSER REVIEWSREVIEWS GOOGLE CARDBOARD
www.linuxvoice.com 49
Cyberfox 40.0This Firefox spin-off promises better performance and a return to the classic layout. Mike Saunders checks out the hype.
The Customise Cyberfox window has hundreds of settings to tweak, and then its own settings dialog too. Fear it.
See that tiny Firefox icon to the left of the back button? That’s how you switch themes in Cyberfox.
The Mozilla Foundation, and specifically its Firefox web browser, has been going through a rough time recently. Its market share is falling
(as Google Chrome continues to flourish, and Microsoft is winning some converts with Edge). Many long-time users have been frustrated by changes in recent releases, such as the Australis theme, removal of options, and the upcoming “walled garden” policy where only signed extensions will be allowed. And Firefox OS is hardly taking the world by storm either.
So several readers have asked us to look at Firefox spin-offs, based on the Firefox codebase but with optimisations and tweaks to make the browser more appealing to power users. One name that has come up a few times is Cyberfox, from 8pecxstudios in Australia. The developers describe it as a browser that “takes over where Mozilla left off, working to make a fast, stable and reliable 64-bit web browser accessible to all”.
Installation is fairly simple: once you’ve downloaded the .tar.bz2 tarball, extract it, jump into the Cyberfox directory and run ./Cyberfox. The browser stores its settings and separately to Firefox, in ~/.8pecxstudios, so you can run it both browsers safely alongside each other. By default, Cyberfox shares a similar design and layout with Firefox – although there’s an add-on bar at the bottom enabled by default.
World of confusionNow, how do you switch to the classic theme? Go to Menu > Add-ons > Appearance, right? Nope. Instead, you have to click the Firefox icon to the left of the back button (which is rather ironic, given that this browser tries to remove all Firefox branding) which opens a menu of options. Go to Customise Cyberfox, which presents a huge number of settings for tweaking the browser’s appearance and behaviour. Then click
another Settings button at the bottom (yes, settings for the settings), choose Classic Preset, and then restart the browser. None of this was obvious when we started Cyberfox – it’s all hacked together in a rather ugly fashion.
Next, let’s look at the performance gains that 8pecxstudios have made from recompiling the code with extra optimisations. With only the www.linuxvoice.com website open, Cyberfox consumes 213MB of RAM, whereas a stock Firefox installation uses 231MB. So it’s a small but significant improvement, which adds up when you have multiple tabs open. We ran the Browsermark benchmark from http://web.basemark.com, which performs multiple tests such as CSS transforms, and Cyberfox came out 4% faster than Firefox. So again, a relatively small boost but helpful over long browsing sessions.
Ultimately, Cyberfox is a promising project and that delivers on being (slightly) faster and lighter than Firefox, while providing more customisation ability. It could turn out to be a valuable alternative to Firefox if the Mozilla team spends more time on side-projects such as Pocket integration rather than the browser itself. However, the software’s presentation needs a lot of work, with decent English on the website, some documentation, and a more defined interface.
LINUX VOICE VERDICTA tad zippier than Firefox, and friendlier to your RAM banks – but rough around the edges and in need of some polish.
DATAWebhttps://cyberfox.8pecx studios.comDeveloper8pecxstudiosLicence Mozilla Public Licence
LV020 049 Review Cyberfox.indd 49 04/09/2015 13:11
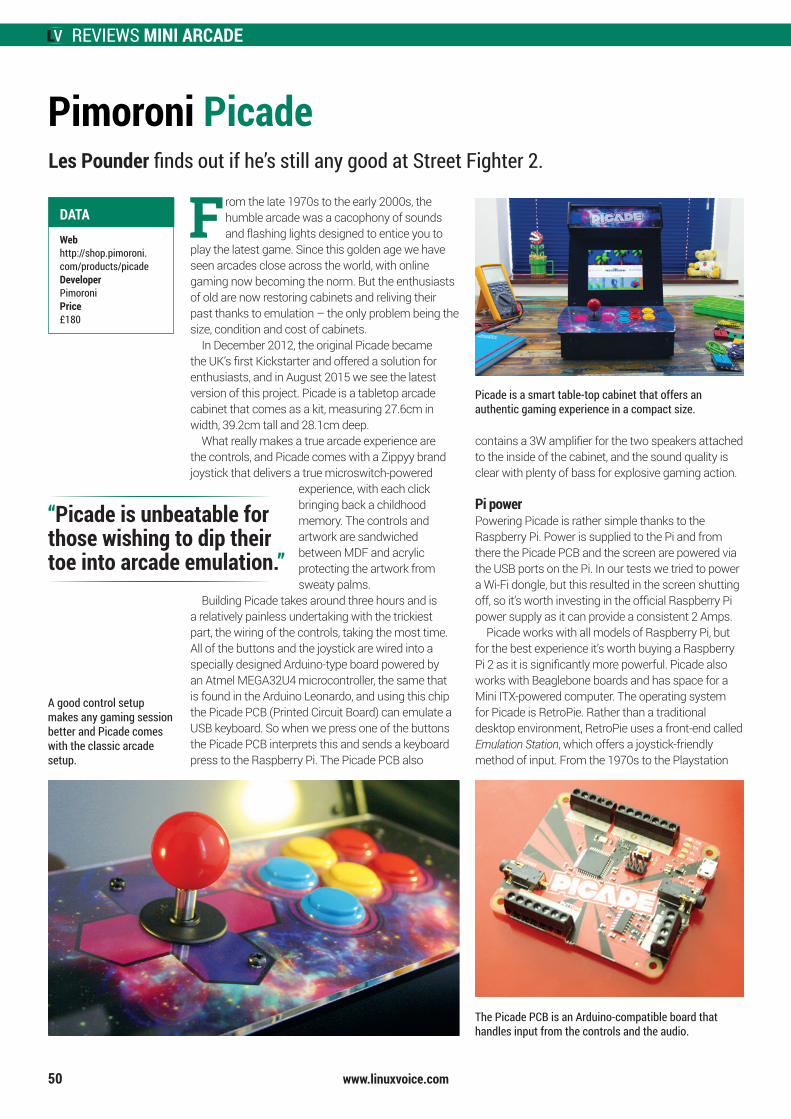
MINI ARCADE REVIEWSREVIEWS MINI ARCADE
www.linuxvoice.com50
Pimoroni PicadeLes Pounder finds out if he’s still any good at Street Fighter 2.
F rom the late 1970s to the early 2000s, the humble arcade was a cacophony of sounds and flashing lights designed to entice you to
play the latest game. Since this golden age we have seen arcades close across the world, with online gaming now becoming the norm. But the enthusiasts of old are now restoring cabinets and reliving their past thanks to emulation – the only problem being the size, condition and cost of cabinets.
In December 2012, the original Picade became the UK’s first Kickstarter and offered a solution for enthusiasts, and in August 2015 we see the latest version of this project. Picade is a tabletop arcade cabinet that comes as a kit, measuring 27.6cm in width, 39.2cm tall and 28.1cm deep.
What really makes a true arcade experience are the controls, and Picade comes with a Zippyy brand joystick that delivers a true microswitch-powered
experience, with each click bringing back a childhood memory. The controls and artwork are sandwiched between MDF and acrylic protecting the artwork from sweaty palms.
Building Picade takes around three hours and is a relatively painless undertaking with the trickiest part, the wiring of the controls, taking the most time. All of the buttons and the joystick are wired into a specially designed Arduino-type board powered by an Atmel MEGA32U4 microcontroller, the same that is found in the Arduino Leonardo, and using this chip the Picade PCB (Printed Circuit Board) can emulate a USB keyboard. So when we press one of the buttons the Picade PCB interprets this and sends a keyboard press to the Raspberry Pi. The Picade PCB also
contains a 3W amplifier for the two speakers attached to the inside of the cabinet, and the sound quality is clear with plenty of bass for explosive gaming action.
Pi powerPowering Picade is rather simple thanks to the Raspberry Pi. Power is supplied to the Pi and from there the Picade PCB and the screen are powered via the USB ports on the Pi. In our tests we tried to power a Wi-Fi dongle, but this resulted in the screen shutting off, so it’s worth investing in the official Raspberry Pi power supply as it can provide a consistent 2 Amps.
Picade works with all models of Raspberry Pi, but for the best experience it’s worth buying a Raspberry Pi 2 as it is significantly more powerful. Picade also works with Beaglebone boards and has space for a Mini ITX-powered computer. The operating system for Picade is RetroPie. Rather than a traditional desktop environment, RetroPie uses a front-end called Emulation Station, which offers a joystick-friendly method of input. From the 1970s to the Playstation
DATAWebhttp://shop.pimoroni.com/products/picadeDeveloperPimoroniPrice £180
A good control setup makes any gaming session better and Picade comes with the classic arcade setup.
Picade is a smart table-top cabinet that offers an authentic gaming experience in a compact size.
“Picade is unbeatable for those wishing to dip their toe into arcade emulation.”
The Picade PCB is an Arduino-compatible board that handles input from the controls and the audio.
LV020 050 Review Picade.indd 50 04/09/2015 10:00
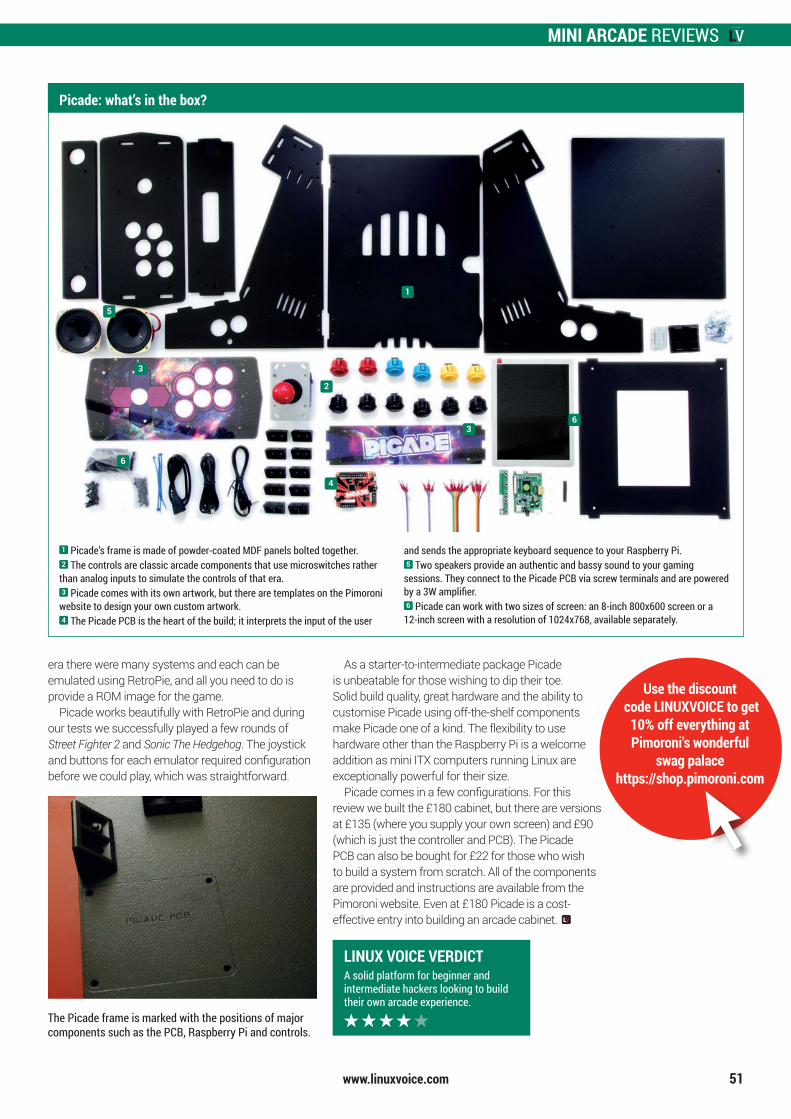
MINI ARCADE REVIEWS
www.linuxvoice.com 51
LINUX VOICE VERDICT
era there were many systems and each can be emulated using RetroPie, and all you need to do is provide a ROM image for the game.
Picade works beautifully with RetroPie and during our tests we successfully played a few rounds of Street Fighter 2 and Sonic The Hedgehog. The joystick and buttons for each emulator required configuration before we could play, which was straightforward.
As a starter-to-intermediate package Picade is unbeatable for those wishing to dip their toe. Solid build quality, great hardware and the ability to customise Picade using off-the-shelf components make Picade one of a kind. The flexibility to use hardware other than the Raspberry Pi is a welcome addition as mini ITX computers running Linux are exceptionally powerful for their size.
Picade comes in a few configurations. For this review we built the £180 cabinet, but there are versions at £135 (where you supply your own screen) and £90 (which is just the controller and PCB). The Picade PCB can also be bought for £22 for those who wish to build a system from scratch. All of the components are provided and instructions are available from the Pimoroni website. Even at £180 Picade is a cost-effective entry into building an arcade cabinet.
A solid platform for beginner and intermediate hackers looking to build their own arcade experience.
The Picade frame is marked with the positions of major components such as the PCB, Raspberry Pi and controls.
Picade: what’s in the box?
1 Picade’s frame is made of powder-coated MDF panels bolted together.2 The controls are classic arcade components that use microswitches rather
than analog inputs to simulate the controls of that era.3 Picade comes with its own artwork, but there are templates on the Pimoroni
website to design your own custom artwork.4 The Picade PCB is the heart of the build; it interprets the input of the user
and sends the appropriate keyboard sequence to your Raspberry Pi.5 Two speakers provide an authentic and bassy sound to your gaming
sessions. They connect to the Picade PCB via screw terminals and are powered by a 3W amplifier.6 Picade can work with two sizes of screen: an 8-inch 800x600 screen or a
12-inch screen with a resolution of 1024x768, available separately.
2
3
3
4
6
5
1
6
Use the discount code LINUXVOICE to get
10% off everything at Pimoroni’s wonderful
swag palace https://shop.pimoroni.com
LV020 050 Review Picade.indd 51 04/09/2015 10:00
REVIEWS BOOKS
www.linuxvoice.com52
Ben Everard now knows how to store anything, but has nothing to store.
Struggling to fill your CV? Add seven bullet points in under two months.
Over the last decade there’s been an explosion in options for storing data driven by both demand for big data
solutions and websites needing data stores that can cope with very high demand. Where as once databases were synonymous with SQL, newer databases have eschewed the traditional relational approach and are adhering to new approaches collectively known as noSQL.
Thanks in part to the mobile/tablet and smartphone revolution, noSQL is now probably used in more places than those databases of old. That means that even if you’re not planning to implement a database under the new regime, understanding what it’s capable of is still a good strategy. noSQL Seven Databases in Seven Weeks goes through all of the popular database styles (relational, key-value, document, graph and columnar) and looks at how they differ. The book is structured into seven sections each one is designed to take three days so it can
be completed over a long weekend (the authors don’t offer advice on how a reader is supposed to get seven long weekends).
Though you don’t need to be an expert to use this book, the reader is expected to be familiar with the basic concept of a database and be able to program. The information is tightly packed in, but there are plenty of exercises you can use to practise your new-found knowledge. If you make it to the end, you’ll have a good knowledge of how to best store your data and use modern software to its best effect.
This book is an excellent introduction to the current state of database technology, but don’t expect to become an expert in each one.
LINUX VOICE VERDICTAuthor Eric Redmond and Jim R WilsonPublisher Pragmatic BookshelfPrice £23.50ISBN 978-1934356920
Effective Modern C++Graham Morrison finds an antidote to his worst programming habit: he writes C++ code just like it’s verbose C.
We suspect that many of us are C and C++ programmers because that’s what you had to do to write
applications at a certain time. For us, this started with C in the late 80s and became C++ when the idea of object orientation took hold. It has meant that while we’ve used many of the newer features to be found in C++, such as threading in C++11, we’ve never properly re-studied what C++ has become and its best practices for modern usage.
Effective Modern C++ is pitched exactly right for us, going into exhaustive detail and providing examples for many of the newer aspects to be found in C++, aspects that we’ve avoided or glossed over for the last ten years. There’s a great chapter on smart pointers, for example, and another on the concurrency API. And we finally learnt how to use constexpr.
You’ll get the most out of this book if
you’re already an experienced C++ programmer. While the text is often lighthearted and the examples short, the book deals with the finer nuances of a language that many beginners will find confusing, and may perhaps (rightly?) put them off programming C++ for life.
For us, though, this book is an excellent primer for the new bits of C++ we’ve been ignoring, and while it may not change our style or approach, we feel better for being properly informed.
In a world where Python is becoming the default, C++ is still reassuringly complicated.
Seven Databases in Seven Weeks
If you write C++ code for a living, we’re sure you’ve already got this book.
LINUX VOICE VERDICTAuthor Scott Meyers Publisher O’Reilly Price £33.50ISBN 978-1491903995
LV020 052 Reviews Books.indd 52 04/09/2015 14:19
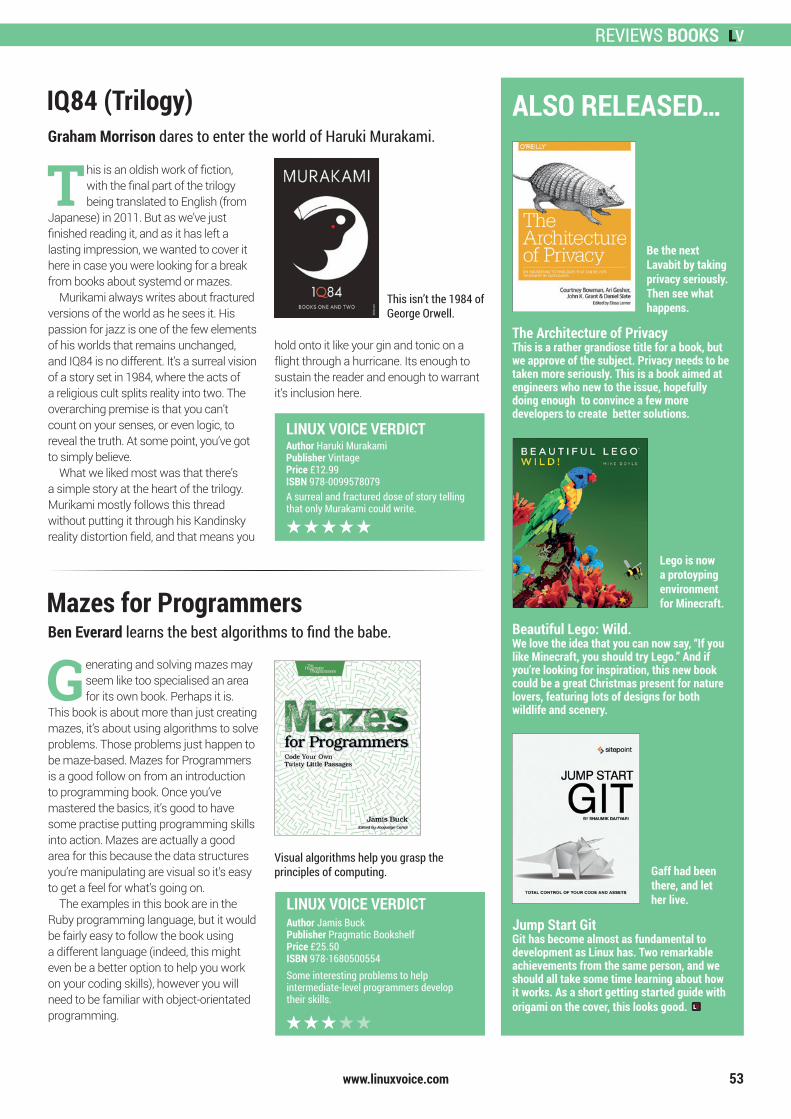
REVIEWS BOOKS
www.linuxvoice.com 53
Visual algorithms help you grasp the principles of computing.
Generating and solving mazes may seem like too specialised an area for its own book. Perhaps it is.
This book is about more than just creating mazes, it’s about using algorithms to solve problems. Those problems just happen to be maze-based. Mazes for Programmers is a good follow on from an introduction to programming book. Once you’ve mastered the basics, it’s good to have some practise putting programming skills into action. Mazes are actually a good area for this because the data structures you’re manipulating are visual so it’s easy to get a feel for what’s going on.
The examples in this book are in the Ruby programming language, but it would be fairly easy to follow the book using a different language (indeed, this might even be a better option to help you work on your coding skills), however you will need to be familiar with object-orientated programming.
Some interesting problems to help intermediate-level programmers develop their skills.
LINUX VOICE VERDICTAuthor Jamis BuckPublisher Pragmatic BookshelfPrice £25.50ISBN 978-1680500554
Ben Everard learns the best algorithms to find the babe. Mazes for Programmers
The Architecture of PrivacyThis is a rather grandiose title for a book, but we approve of the subject. Privacy needs to be taken more seriously. This is a book aimed at engineers who new to the issue, hopefully doing enough to convince a few more developers to create better solutions.
ALSO RELEASED…
Be the next Lavabit by taking privacy seriously. Then see what happens.
Beautiful Lego: Wild.We love the idea that you can now say, “If you like Minecraft, you should try Lego.” And if you’re looking for inspiration, this new book could be a great Christmas present for nature lovers, featuring lots of designs for both wildlife and scenery.
Lego is now a protoyping environment for Minecraft.
Jump Start GitGit has become almost as fundamental to development as Linux has. Two remarkable achievements from the same person, and we should all take some time learning about how it works. As a short getting started guide with origami on the cover, this looks good.
IQ84 (Trilogy)Graham Morrison dares to enter the world of Haruki Murakami.
This isn’t the 1984 of George Orwell.
This is an oldish work of fiction, with the final part of the trilogy being translated to English (from
Japanese) in 2011. But as we’ve just finished reading it, and as it has left a lasting impression, we wanted to cover it here in case you were looking for a break from books about systemd or mazes.
Murikami always writes about fractured versions of the world as he sees it. His passion for jazz is one of the few elements of his worlds that remains unchanged, and IQ84 is no different. It’s a surreal vision of a story set in 1984, where the acts of a religious cult splits reality into two. The overarching premise is that you can’t count on your senses, or even logic, to reveal the truth. At some point, you’ve got to simply believe.
What we liked most was that there’s a simple story at the heart of the trilogy. Murikami mostly follows this thread without putting it through his Kandinsky reality distortion field, and that means you
hold onto it like your gin and tonic on a flight through a hurricane. Its enough to sustain the reader and enough to warrant it’s inclusion here.
A surreal and fractured dose of story telling that only Murakami could write.
LINUX VOICE VERDICTAuthor Haruki Murakami Publisher VintagePrice £12.99ISBN 978-0099578079
Gaff had been there, and let her live.
LV020 052 Reviews Books.indd 53 04/09/2015 14:19
GROUP TEST ALTERNATIVE OPERATING SYSTEMS
www.linuxvoice.com
GNU/Linux is our bread and butter. It runs on our desktops, our servers, and
on our phones. It’s by far the most successful open source operating system out there, and we’d even argue that it’s the most important software project in the world.
But it’s just one of many OSes in development. While we tend to focus on Linux distributions in this magazine (which is hardly surprising, given the name), we do keep a canny eye on other free software operating systems as well. Some of them share a lot of code with Linux, especially when it comes to drivers, while others have been written completely from scratch, and take radically different approaches to design and implementation than the Unix way we’re all used to.
So for this month’s Group Test, we thought we’d look at some of the most promising up-and-coming open source operating systems
that aren’t based on Linux. It’s somewhat hard to compare these head-to-head, as they all have different goals and target users, but one way we can judge them is how ready they are for daily usage. Compared to Linux, the operating systems we’re examining here have very small development teams, so we accept that development moves more slowly and the of features are often limited in comparison.
On the other hand, some of these OSes offer features and benefits that could be useful in Linux as well. And while we’re very happy to see Linux flourish as the dominant FOSS platform for years to come, monocultures are best avoided, so it’s good if other operating systems develop interest and support. So we’ve chosen six OSes with unique backgrounds and featuresets – and you can download them and try them out straight away. So, without further ado, let’s boot up the first and see what it can do!
We all love Linux, but there’s plenty going on with other free software operating systems. Mike Saunders checks them out.
GROUP TESTALTERNATIVE OPERATING
SYSTEMS
“We’ve chosen six operating systems with unique backgrounds and featuresets.”
54
Alternative OSes
Where are the BSDs?You may have noticed that we haven’t included any of the BSD flavours in this month’s Group Test. We don’t have anything against them: FreeBSD is a great alternative to GNU/Linux, especially on servers, while OpenBSD excels with its security features and NetBSD is ideal for running on your toaster. Then there’s DragonFly BSD, the FreeBSD spin-off created by ace former-Amiga-coder Matt Dillon.
But ultimately, they’re all rather similar to Linux due to their Unix heritage. In this Group Test, we wanted to look further afield at open source operating systems with unique designs and histories – OSes which take different approaches and have their own sets of strengths and weaknesses. After all, nobody’s perfect and maybe we in the Linux world can learn something from them too.
On testURL www.haiku-os.orgLICENCE MITLATEST RELEASE Alpha 4Snappy and lightweight desktop OS originally inspired by the BeOS.
Haiku
URL www.kolibrios.orgLICENCE GPLLATEST RELEASE Daily buildsWritten entirely in assembly language, this OS is tiny and blazingly fast.
KolibriOS
URL http://plan9.bell-labs.com/plan9LICENCE Lucent Public LicenceLATEST RELEASE Fourth editionThe successor to Unix, with unique features and an adorable bunny mascot.
Plan 9
URL www.riscosopen.orgLICENCE Shared SourceLATEST RELEASE 5.22Originally written for Acorn machines, now sort-of open and runs on the Pi.
RISC OS
URL http://aros.sourceforge.netLICENCE AROS Public LicenceLATEST RELEASE 1.2 (Icaros)The Amiga lives! Well, sort of. AROS is like a modern version of AmigaOS for PCs.
AROS
URL www.minix3.orgLICENCE BSDLATEST RELEASE 3.3.0Microkernel-based OS, used by Linus Torvalds in the development of Linux.
Minix
LV020 054 Group Test.indd 54 04/09/2015 13:14
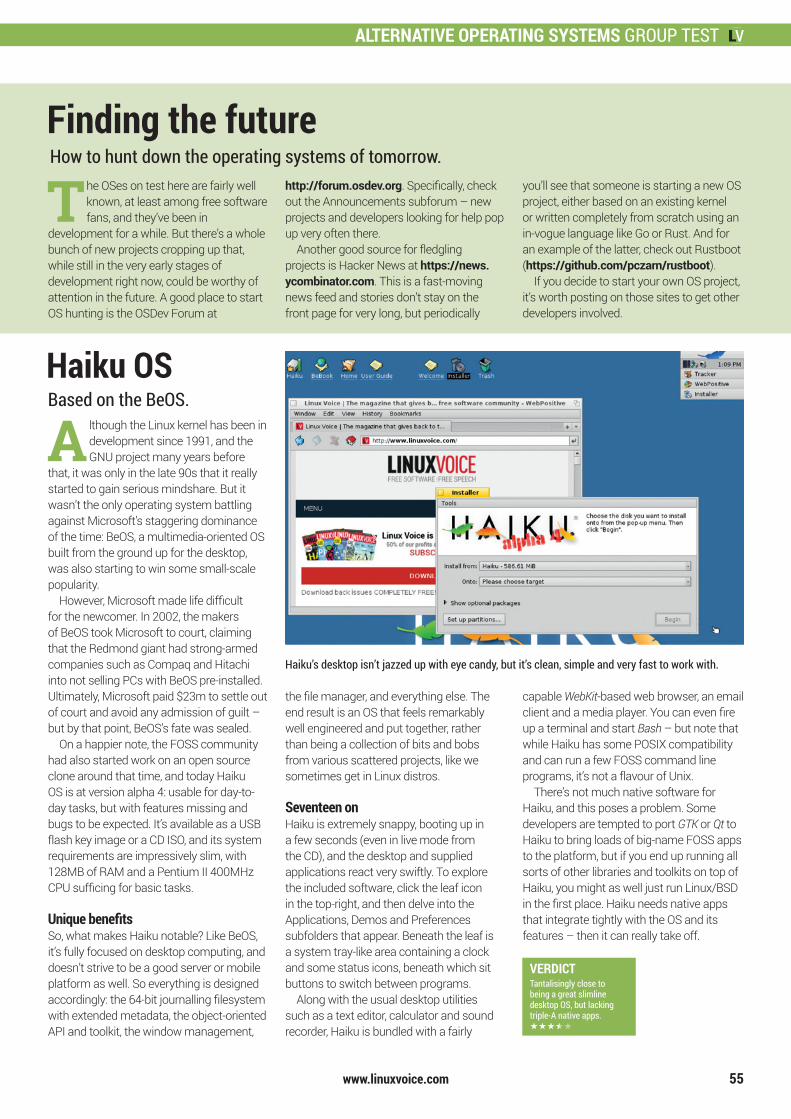
ALTERNATIVE OPERATING SYSTEMS GROUP TEST
www.linuxvoice.com
A lthough the Linux kernel has been in development since 1991, and the GNU project many years before
that, it was only in the late 90s that it really started to gain serious mindshare. But it wasn’t the only operating system battling against Microsoft’s staggering dominance of the time: BeOS, a multimedia-oriented OS built from the ground up for the desktop, was also starting to win some small-scale popularity.
However, Microsoft made life difficult for the newcomer. In 2002, the makers of BeOS took Microsoft to court, claiming that the Redmond giant had strong-armed companies such as Compaq and Hitachi into not selling PCs with BeOS pre-installed. Ultimately, Microsoft paid $23m to settle out of court and avoid any admission of guilt – but by that point, BeOS’s fate was sealed.
On a happier note, the FOSS community had also started work on an open source clone around that time, and today Haiku OS is at version alpha 4: usable for day-to-day tasks, but with features missing and bugs to be expected. It’s available as a USB flash key image or a CD ISO, and its system requirements are impressively slim, with 128MB of RAM and a Pentium II 400MHz CPU sufficing for basic tasks.
Unique benefitsSo, what makes Haiku notable? Like BeOS, it’s fully focused on desktop computing, and doesn’t strive to be a good server or mobile platform as well. So everything is designed accordingly: the 64-bit journalling filesystem with extended metadata, the object-oriented API and toolkit, the window management,
The OSes on test here are fairly well known, at least among free software fans, and they’ve been in
development for a while. But there’s a whole bunch of new projects cropping up that, while still in the very early stages of development right now, could be worthy of attention in the future. A good place to start OS hunting is the OSDev Forum at
Haiku OSBased on the BeOS.
55
Finding the futureHow to hunt down the operating systems of tomorrow.
VERDICTTantalisingly close to being a great slimline desktop OS, but lacking triple-A native apps.
the file manager, and everything else. The end result is an OS that feels remarkably well engineered and put together, rather than being a collection of bits and bobs from various scattered projects, like we sometimes get in Linux distros.
Seventeen onHaiku is extremely snappy, booting up in a few seconds (even in live mode from the CD), and the desktop and supplied applications react very swiftly. To explore the included software, click the leaf icon in the top-right, and then delve into the Applications, Demos and Preferences subfolders that appear. Beneath the leaf is a system tray-like area containing a clock and some status icons, beneath which sit buttons to switch between programs.
Along with the usual desktop utilities such as a text editor, calculator and sound recorder, Haiku is bundled with a fairly
capable WebKit-based web browser, an email client and a media player. You can even fire up a terminal and start Bash – but note that while Haiku has some POSIX compatibility and can run a few FOSS command line programs, it’s not a flavour of Unix.
There’s not much native software for Haiku, and this poses a problem. Some developers are tempted to port GTK or Qt to Haiku to bring loads of big-name FOSS apps to the platform, but if you end up running all sorts of other libraries and toolkits on top of Haiku, you might as well just run Linux/BSD in the first place. Haiku needs native apps that integrate tightly with the OS and its features – then it can really take off.
http://forum.osdev.org. Specifically, check out the Announcements subforum – new projects and developers looking for help pop up very often there.
Another good source for fledgling projects is Hacker News at https://news.ycombinator.com. This is a fast-moving news feed and stories don’t stay on the front page for very long, but periodically
you’ll see that someone is starting a new OS project, either based on an existing kernel or written completely from scratch using an in-vogue language like Go or Rust. And for an example of the latter, check out Rustboot (https://github.com/pczarn/rustboot).
If you decide to start your own OS project, it’s worth posting on those sites to get other developers involved.
Haiku’s desktop isn’t jazzed up with eye candy, but it’s clean, simple and very fast to work with.
LV020 054 Group Test.indd 55 04/09/2015 13:14
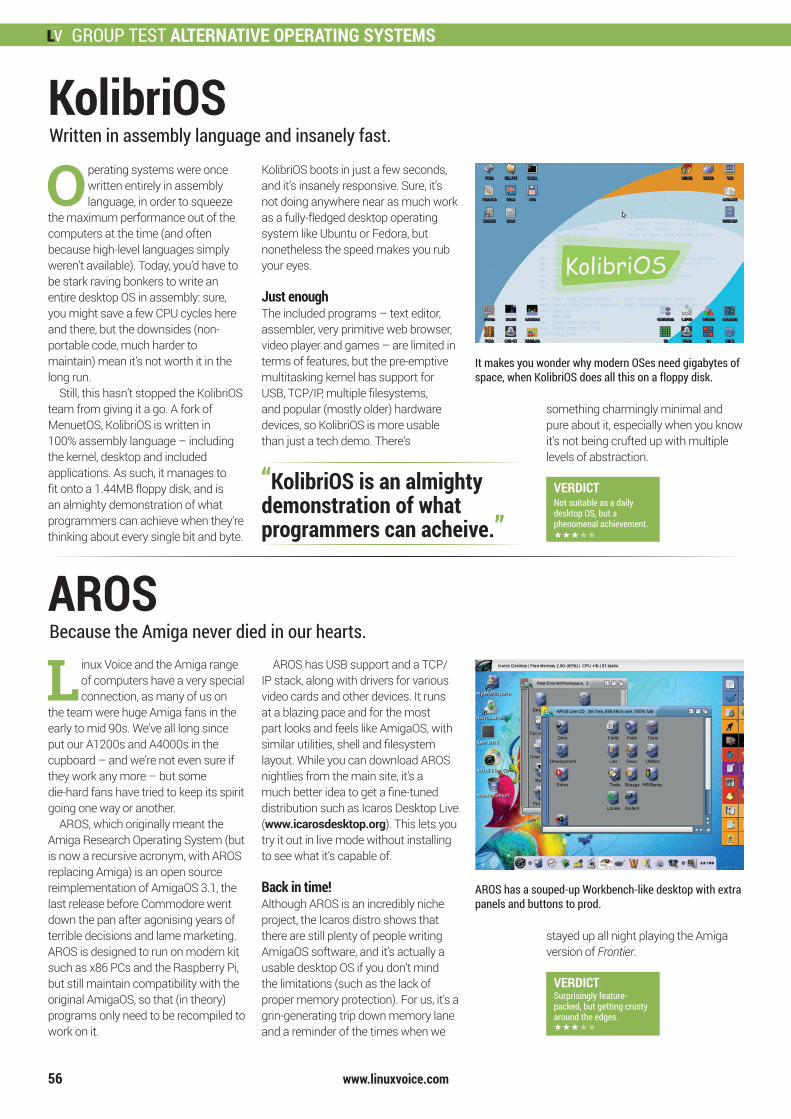
GROUP TEST ALTERNATIVE OPERATING SYSTEMS
www.linuxvoice.com56
Operating systems were once written entirely in assembly language, in order to squeeze
the maximum performance out of the computers at the time (and often because high-level languages simply weren’t available). Today, you’d have to be stark raving bonkers to write an entire desktop OS in assembly: sure, you might save a few CPU cycles here and there, but the downsides (non-portable code, much harder to maintain) mean it’s not worth it in the long run.
Still, this hasn’t stopped the KolibriOS team from giving it a go. A fork of MenuetOS, KolibriOS is written in 100% assembly language – including the kernel, desktop and included applications. As such, it manages to fit onto a 1.44MB floppy disk, and is an almighty demonstration of what programmers can achieve when they’re thinking about every single bit and byte.
KolibriOSWritten in assembly language and insanely fast.
KolibriOS boots in just a few seconds, and it’s insanely responsive. Sure, it’s not doing anywhere near as much work as a fully-fledged desktop operating system like Ubuntu or Fedora, but nonetheless the speed makes you rub your eyes.
Just enough The included programs – text editor, assembler, very primitive web browser, video player and games – are limited in terms of features, but the pre-emptive multitasking kernel has support for USB, TCP/IP, multiple filesystems, and popular (mostly older) hardware devices, so KolibriOS is more usable than just a tech demo. There’s
something charmingly minimal and pure about it, especially when you know it’s not being crufted up with multiple levels of abstraction.
It makes you wonder why modern OSes need gigabytes of space, when KolibriOS does all this on a floppy disk.
“KolibriOS is an almighty demonstration of what programmers can acheive.”
AROS has a souped-up Workbench-like desktop with extra panels and buttons to prod.
L inux Voice and the Amiga range of computers have a very special connection, as many of us on
the team were huge Amiga fans in the early to mid 90s. We’ve all long since put our A1200s and A4000s in the cupboard – and we’re not even sure if they work any more – but some die-hard fans have tried to keep its spirit going one way or another.
AROS, which originally meant the Amiga Research Operating System (but is now a recursive acronym, with AROS replacing Amiga) is an open source reimplementation of AmigaOS 3.1, the last release before Commodore went down the pan after agonising years of terrible decisions and lame marketing. AROS is designed to run on modern kit such as x86 PCs and the Raspberry Pi, but still maintain compatibility with the original AmigaOS, so that (in theory) programs only need to be recompiled to work on it.
AROSBecause the Amiga never died in our hearts.
AROS has USB support and a TCP/IP stack, along with drivers for various video cards and other devices. It runs at a blazing pace and for the most part looks and feels like AmigaOS, with similar utilities, shell and filesystem layout. While you can download AROS nightlies from the main site, it’s a much better idea to get a fine-tuned distribution such as Icaros Desktop Live (www.icarosdesktop.org). This lets you try it out in live mode without installing to see what it’s capable of.
Back in time!Although AROS is an incredibly niche project, the Icaros distro shows that there are still plenty of people writing AmigaOS software, and it’s actually a usable desktop OS if you don’t mind the limitations (such as the lack of proper memory protection). For us, it’s a grin-generating trip down memory lane and a reminder of the times when we
stayed up all night playing the Amiga version of Frontier.
VERDICTSurprisingly feature-packed, but getting crusty around the edges.
VERDICTNot suitable as a daily desktop OS, but a phenomenal achievement.
LV020 054 Group Test.indd 56 04/09/2015 13:14
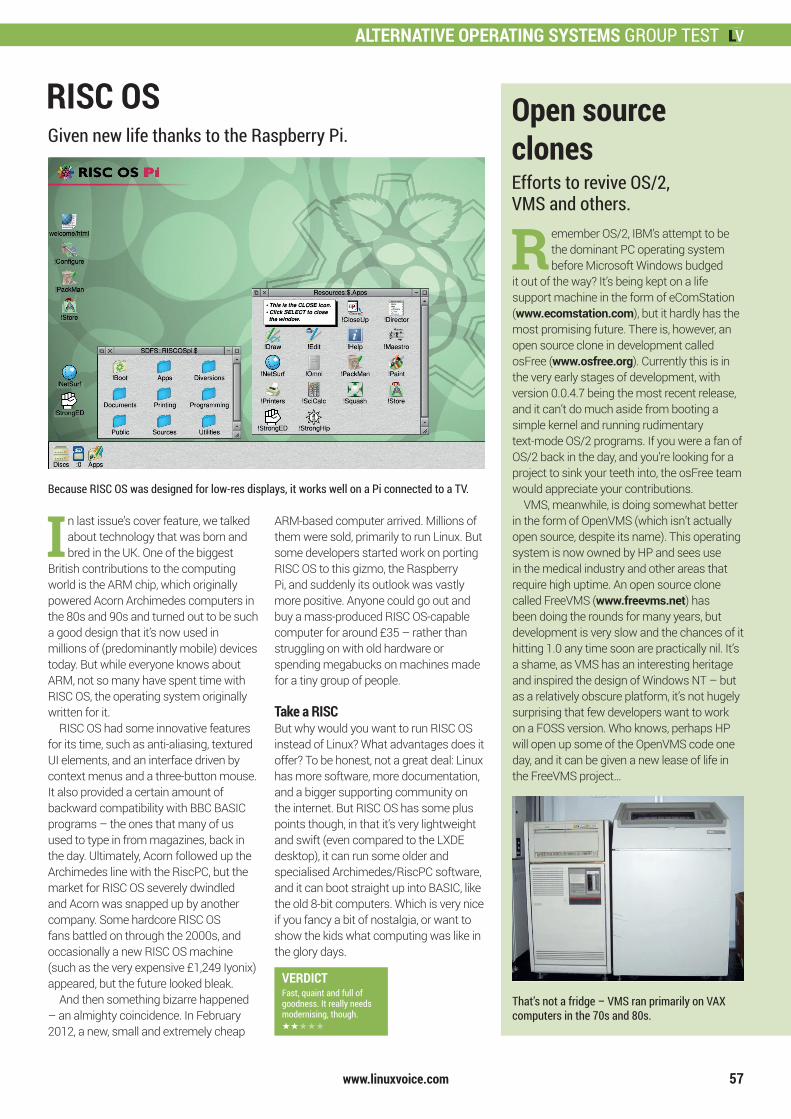
ALTERNATIVE OPERATING SYSTEMS GROUP TEST
www.linuxvoice.com 57
Remember OS/2, IBM’s attempt to be the dominant PC operating system before Microsoft Windows budged
it out of the way? It’s being kept on a life support machine in the form of eComStation (www.ecomstation.com), but it hardly has the most promising future. There is, however, an open source clone in development called osFree (www.osfree.org). Currently this is in the very early stages of development, with version 0.0.4.7 being the most recent release, and it can’t do much aside from booting a simple kernel and running rudimentary text-mode OS/2 programs. If you were a fan of OS/2 back in the day, and you’re looking for a project to sink your teeth into, the osFree team would appreciate your contributions.
VMS, meanwhile, is doing somewhat better in the form of OpenVMS (which isn’t actually open source, despite its name). This operating system is now owned by HP and sees use in the medical industry and other areas that require high uptime. An open source clone called FreeVMS (www.freevms.net) has been doing the rounds for many years, but development is very slow and the chances of it hitting 1.0 any time soon are practically nil. It’s a shame, as VMS has an interesting heritage and inspired the design of Windows NT – but as a relatively obscure platform, it’s not hugely surprising that few developers want to work on a FOSS version. Who knows, perhaps HP will open up some of the OpenVMS code one day, and it can be given a new lease of life in the FreeVMS project…
Open source clones
That’s not a fridge – VMS ran primarily on VAX computers in the 70s and 80s.
Because RISC OS was designed for low-res displays, it works well on a Pi connected to a TV.
In last issue’s cover feature, we talked about technology that was born and bred in the UK. One of the biggest
British contributions to the computing world is the ARM chip, which originally powered Acorn Archimedes computers in the 80s and 90s and turned out to be such a good design that it’s now used in millions of (predominantly mobile) devices today. But while everyone knows about ARM, not so many have spent time with RISC OS, the operating system originally written for it.
RISC OS had some innovative features for its time, such as anti-aliasing, textured UI elements, and an interface driven by context menus and a three-button mouse. It also provided a certain amount of backward compatibility with BBC BASIC programs – the ones that many of us used to type in from magazines, back in the day. Ultimately, Acorn followed up the Archimedes line with the RiscPC, but the market for RISC OS severely dwindled and Acorn was snapped up by another company. Some hardcore RISC OS fans battled on through the 2000s, and occasionally a new RISC OS machine (such as the very expensive £1,249 Iyonix) appeared, but the future looked bleak.
And then something bizarre happened – an almighty coincidence. In February 2012, a new, small and extremely cheap
RISC OSGiven new life thanks to the Raspberry Pi.
ARM-based computer arrived. Millions of them were sold, primarily to run Linux. But some developers started work on porting RISC OS to this gizmo, the Raspberry Pi, and suddenly its outlook was vastly more positive. Anyone could go out and buy a mass-produced RISC OS-capable computer for around £35 – rather than struggling on with old hardware or spending megabucks on machines made for a tiny group of people.
Take a RISCBut why would you want to run RISC OS instead of Linux? What advantages does it offer? To be honest, not a great deal: Linux has more software, more documentation, and a bigger supporting community on the internet. But RISC OS has some plus points though, in that it’s very lightweight and swift (even compared to the LXDE desktop), it can run some older and specialised Archimedes/RiscPC software, and it can boot straight up into BASIC, like the old 8-bit computers. Which is very nice if you fancy a bit of nostalgia, or want to show the kids what computing was like in the glory days.
Efforts to revive OS/2, VMS and others.
VERDICTFast, quaint and full of goodness. It really needs modernising, though.
LV020 054 Group Test.indd 57 04/09/2015 13:14
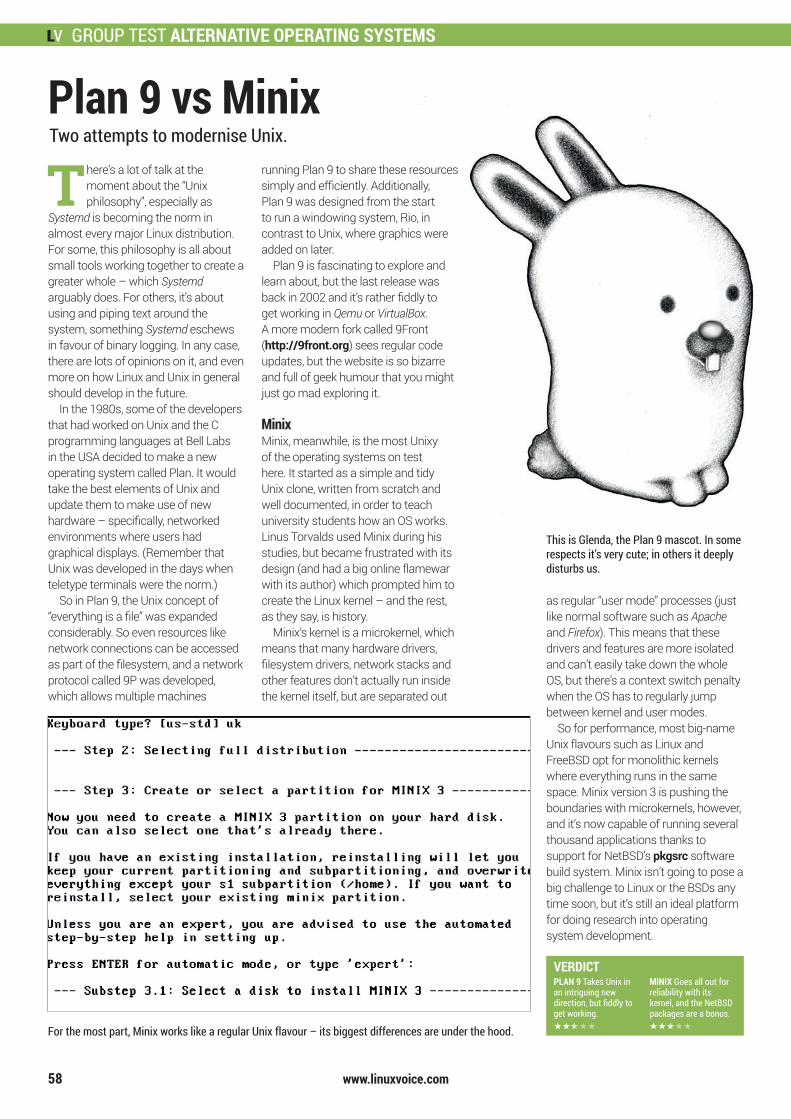
GROUP TEST ALTERNATIVE OPERATING SYSTEMS
www.linuxvoice.com58
There’s a lot of talk at the moment about the “Unix philosophy”, especially as
Systemd is becoming the norm in almost every major Linux distribution. For some, this philosophy is all about small tools working together to create a greater whole – which Systemd arguably does. For others, it’s about using and piping text around the system, something Systemd eschews in favour of binary logging. In any case, there are lots of opinions on it, and even more on how Linux and Unix in general should develop in the future.
In the 1980s, some of the developers that had worked on Unix and the C programming languages at Bell Labs in the USA decided to make a new operating system called Plan. It would take the best elements of Unix and update them to make use of new hardware – specifically, networked environments where users had graphical displays. (Remember that Unix was developed in the days when teletype terminals were the norm.)
So in Plan 9, the Unix concept of “everything is a file” was expanded considerably. So even resources like network connections can be accessed as part of the filesystem, and a network protocol called 9P was developed, which allows multiple machines
Plan 9 vs MinixTwo attempts to modernise Unix.
running Plan 9 to share these resources simply and efficiently. Additionally, Plan 9 was designed from the start to run a windowing system, Rio, in contrast to Unix, where graphics were added on later.
Plan 9 is fascinating to explore and learn about, but the last release was back in 2002 and it’s rather fiddly to get working in Qemu or VirtualBox. A more modern fork called 9Front (http://9front.org) sees regular code updates, but the website is so bizarre and full of geek humour that you might just go mad exploring it.
MinixMinix, meanwhile, is the most Unixy of the operating systems on test here. It started as a simple and tidy Unix clone, written from scratch and well documented, in order to teach university students how an OS works. Linus Torvalds used Minix during his studies, but became frustrated with its design (and had a big online flamewar with its author) which prompted him to create the Linux kernel – and the rest, as they say, is history.
Minix’s kernel is a microkernel, which means that many hardware drivers, filesystem drivers, network stacks and other features don’t actually run inside the kernel itself, but are separated out
as regular “user mode” processes (just like normal software such as Apache and Firefox). This means that these drivers and features are more isolated and can’t easily take down the whole OS, but there’s a context switch penalty when the OS has to regularly jump between kernel and user modes.
So for performance, most big-name Unix flavours such as Linux and FreeBSD opt for monolithic kernels where everything runs in the same space. Minix version 3 is pushing the boundaries with microkernels, however, and it’s now capable of running several thousand applications thanks to support for NetBSD’s pkgsrc software build system. Minix isn’t going to pose a big challenge to Linux or the BSDs any time soon, but it’s still an ideal platform for doing research into operating system development.
This is Glenda, the Plan 9 mascot. In some respects it’s very cute; in others it deeply disturbs us.
For the most part, Minix works like a regular Unix flavour – its biggest differences are under the hood.
VERDICTMINIX Goes all out for reliability with its kernel, and the NetBSD packages are a bonus.
PLAN 9 Takes Unix in an intriguing new direction, but fiddly to get working.
LV020 054 Group Test.indd 58 04/09/2015 13:14
ALTERNATIVE OPERATING SYSTEMS GROUP TEST
www.linuxvoice.com
and design, along with developing new features.
Then we have RISC OS, which suffers from setbacks in its cooperative multitasking and lack of full memory protection, but still has plenty of apps and a highly loyal userbase. AROS is very similar in that it’s not bleeding-edge tech, and provides some retro respite for those of us who remember the 90s, while KolibriOS shows what’s possible when you master the art of assembly language.
Finally there’s Plan 9, an intriguing project that’s worthy of a lot more attention, but falls down the list here simply due to the lack of
development activity.Kudos to the Haiku team for
inching ever closer to the first release, and to the developers of the other open source OSes. Even if you don’t have many users, drivers or apps, you’re still contributing something back to the FOSS ecosystem and giving us plenty of variety and innovation to explore.
So, what have we learnt from looking at these operating systems? One thing is clear:
they all lag behind Linux when it comes to daily usability.
But while these OSes may not be bursting with features, they’ve all carved out their own little niches and are well worth exploring. We’re putting Haiku in first place this month as it’s the project with the most potential to provide a first-rate alternative to Linux on the desktop. It needs some polish, more drivers, and above all more native applications, but when it’s ready it will be a finely-tuned and well engineered platform especially
suited to low-spec machines.Minix is a lot more mature than
Haiku, and its microkernel approach makes it stand out among the usual crowd of Unix-like OSes, even if it doesn’t have the oomph and long-term support to battle the likes of Debian and CentOS. It gets second place for being an OS that’s ideal for studying its source code
59
“Haiku has the most potential to provide a first-rate alternative to Linux.”
1st HaikuKiller feature: desktop simplicity
www.haiku-os.orgWe look forward to reviving our old netbooks with this when it (finally) hits R1.
2nd MinixKiller feature: maximum reliability
www.minix3.orgWe’re still not sure if microkernels are the future, but Minix is a great technology demo.
3rd RISC OSKiller feature: booting to BASIC
www.riscosopen.orgOld tech meets an insanely popular £35 computer and brings back memories of typing in code.
4th AROSKiller feature: tears of nostalgic joy
http://aros.sourceforge.netEverything we loved (and hated) about the Amiga, rewritten to work on modern PCs.
5th KolibriOSKiller feature: crazy performance
www.kolibrios.orgIn a world of bloatware and wasted CPU cycles, KolibriOS is refreshingly minimal and to-the-point.
6th Plan 9Killer feature: fixing up Unix
http://plan9.bell-labs.com/plan9Hasn’t been updated in donkeys’ years, but packed with features that Linux could consider borrowing.
Haiku still has a long way to go, but it’s on the right track. We hope the team can get R1, the first proper release, out of the door some time next year.
OUR VERDICTAlternative OSes
Windows and DOSWe’ve covered ReactOS (www.reactos.org) a few times in Linux Voice already so we didn’t want to give it a full page here, but it’s worth giving it a quick mention for those who’ve never heard of it. This is a free software clone of Windows, so it’s much more than just Wine: it has its own bootloader and kernel, and aims to be compatible with Windows drivers as well as applications. Currently it’s at version 0.3.17, and can run an impressive range of older Windows programs, although it’s not stable enough for daily use. There are some legal questions in its future too – it’s not big enough to be on Microsoft’s radar yet, but who knows if it gets closer to 1.0 and companies consider it for
running legacy applications instead of “real” Windows?
We in the FOSS world also have an open source MS-DOS clone in the form of FreeDOS (www.freedos.org). This is very mature at version 1.1, but that’s not surprising given that cloning DOS is a much easier job than Windows or BeOS. FreeDOS is useful for running old DOS applications and games, and it’s often used by PC vendors to install BIOS and firmware updates. If you’re looking for the quickest way to play some classic DOS games, however, we recommend DOSBox (www.dosbox.com). You can mount any directory in your Linux installation as the C: drive, switch to it in DOSBox, and launch your games.
LV020 054 Group Test.indd 59 04/09/2015 13:14

www.linuxvoice.com
SUBSCRIBE
shop.linuxvoice.comSUBSCRIBE
60
Get many pages of tutorials,
features, interviews and reviews every month
Access our rapidly growing
back-issues archive – all DRM-free and ready to download
Save money on the shop price
and get each issue delivered to your door
Payment is in Pounds Sterling. 12-month subscribers will receive 12 issues of Linux Voice a year. 7-month subscribers will receive 7 issue of Linux Voice. If you are dissatisfied in any way you can write to us to cancel your
subscription at [email protected] and we will refund you for all unmailed issues.
Gives 50% of its profits back to Free Software
Introducing Linux Voice, the magazine that:
Licenses its content CC-BY-SA within 9 months
12-month subs pricesUK – £55Europe – £85US/Canada – £95ROW – £99
7-month subs pricesUK – £38Europe – £53US/Canada – £57ROW – £60
DIGITAL SUBSCRIPTIONONLY £38
LV020 060 Subs UK.indd 60 04/09/2015 12:11
NEXT MONTH
www.linuxvoice.com
NEXT MONTH IN
LINUX VOICE IS BROUGHT TO YOU BY
EVEN MORE AWESOME!
Prepare your mind for a tale of linguistics, the flow of language, threats to software freedom and her new job as the president of the OSI.
Allison Randal
Editor Graham Morrison [email protected] editor Andrew Gregory [email protected] editor Ben Everard [email protected] at large Mike Saunders [email protected] director Stacey Black [email protected]
Editorial consultant Nick Veitch [email protected]
All code printed in this magazine is licensed under the GNU GPLv3
Printed in the UK by Acorn Web Offset Ltd
Disclaimer We accept no liability for any loss of data or damage to your hardware
through the use of advice in this magazine. Experiment with Linux at your own risk!Distributed by Marketforce (UK) Ltd, 2nd Floor, 5 Churchill Place, Canary Wharf, London, E14 5HU Tel: +44 (0) 20 3148 3300
Circulation Marketing by Intermedia Brand Marketing Ltd, registered office North Quay House, Sutton Harbour, Plymouth PL4 0RATel: 01737 852166
Copyright Linux is a trademark of Linus Torvalds, and is used with permission. Anything in this magazine may not be reproduced without permission of the editor, until June 2016 when all content (including our images) is re-licensed CC-BY-SA.©Linux Voice Ltd 2015ISSN 2054-3778
Subscribe: shop.linuxvoice.com [email protected]
Freedom means control, and control means you can give a laptop to your kids without fear that they’ll stumble upon the horrors of the Daily Mail website.
Software for kids
Find bugs, report them properly, get them fixed. It’s the circle of life, and it’s how free software gets better. Here’s how you join in and help heal the world.
Bug hunting
Purge your PC of proprietary software! Get complete privacy and security!Be free as Richard Stallman intended!
TOTAL FREEDOM
ON SALE THURSDAY
22 OCTOBER
LV020 060 Subs UK.indd 61 04/09/2015 12:11
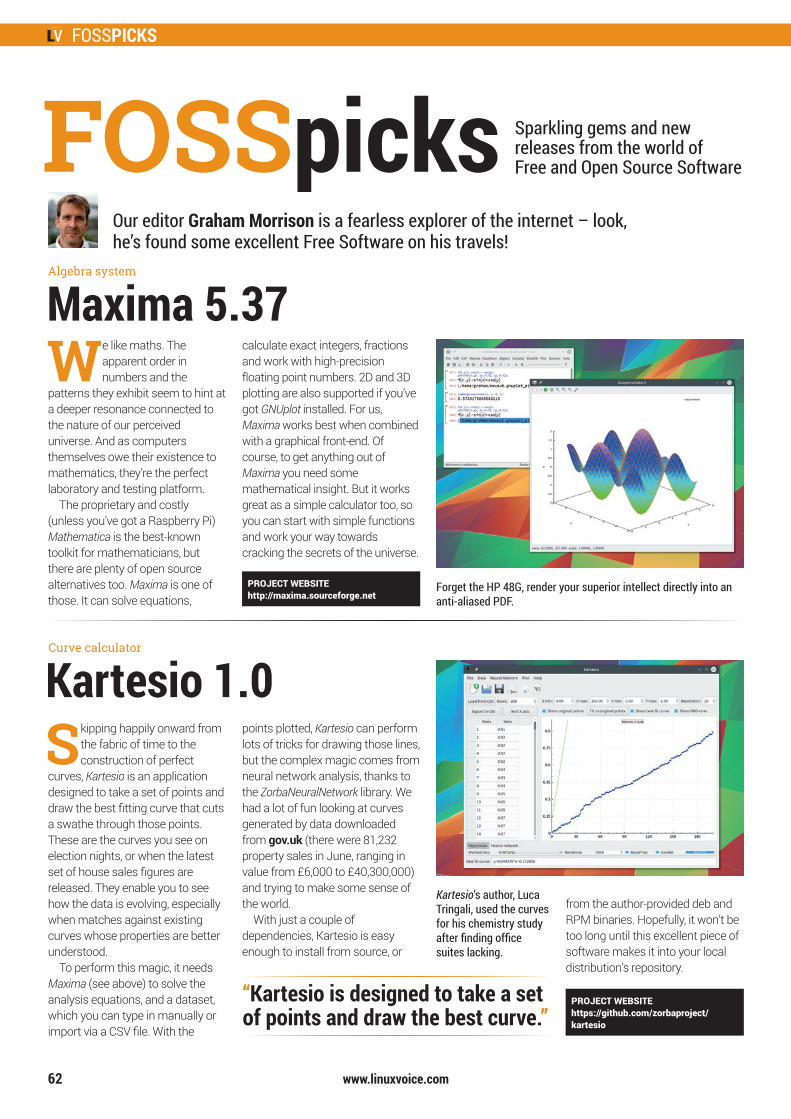
FOSSPICKS
www.linuxvoice.com62
Forget the HP 48G, render your superior intellect directly into an anti-aliased PDF.
Sparkling gems and new releases from the world of Free and Open Source Software
Our editor Graham Morrison is a fearless explorer of the internet – look, he’s found some excellent Free Software on his travels!
We like maths. The apparent order in numbers and the
patterns they exhibit seem to hint at a deeper resonance connected to the nature of our perceived universe. And as computers themselves owe their existence to mathematics, they’re the perfect laboratory and testing platform.
The proprietary and costly (unless you’ve got a Raspberry Pi) Mathematica is the best-known toolkit for mathematicians, but there are plenty of open source alternatives too. Maxima is one of those. It can solve equations,
FOSSpicks
calculate exact integers, fractions and work with high-precision floating point numbers. 2D and 3D plotting are also supported if you’ve got GNUplot installed. For us, Maxima works best when combined with a graphical front-end. Of course, to get anything out of Maxima you need some mathematical insight. But it works great as a simple calculator too, so you can start with simple functions and work your way towards cracking the secrets of the universe.
Maxima 5.37Algebra system
PROJECT WEBSITEhttp://maxima.sourceforge.net
Kartesio’s author, Luca Tringali, used the curves for his chemistry study after finding office suites lacking.
Skipping happily onward from the fabric of time to the construction of perfect
curves, Kartesio is an application designed to take a set of points and draw the best fitting curve that cuts a swathe through those points. These are the curves you see on election nights, or when the latest set of house sales figures are released. They enable you to see how the data is evolving, especially when matches against existing curves whose properties are better understood.
To perform this magic, it needs Maxima (see above) to solve the analysis equations, and a dataset, which you can type in manually or import via a CSV file. With the
points plotted, Kartesio can perform lots of tricks for drawing those lines, but the complex magic comes from neural network analysis, thanks to the ZorbaNeuralNetwork library. We had a lot of fun looking at curves generated by data downloaded from gov.uk (there were 81,232 property sales in June, ranging in value from £6,000 to £40,300,000) and trying to make some sense of the world.
With just a couple of dependencies, Kartesio is easy enough to install from source, or
from the author-provided deb and RPM binaries. Hopefully, it won’t be too long until this excellent piece of software makes it into your local distribution’s repository.
Kartesio 1.0Curve calculator
PROJECT WEBSITEhttps://github.com/zorbaproject/kartesio
“Kartesio is designed to take a set of points and draw the best curve.”
LV0120 062 Fosspicks.indd 62 03/09/2015 10:34
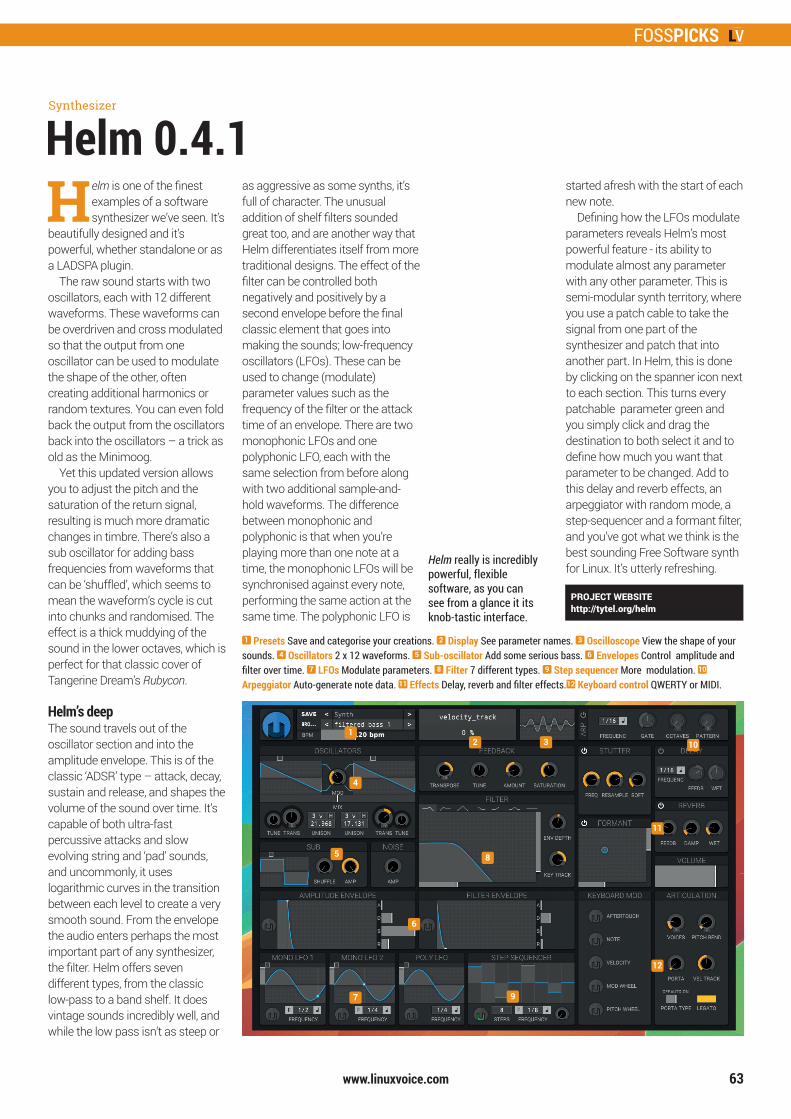
FOSSPICKS
www.linuxvoice.com 63
Helm really is incredibly powerful, flexible software, as you can see from a glance it its knob-tastic interface.
Helm is one of the finest examples of a software synthesizer we’ve seen. It’s
beautifully designed and it’s powerful, whether standalone or as a LADSPA plugin.
The raw sound starts with two oscillators, each with 12 different waveforms. These waveforms can be overdriven and cross modulated so that the output from one oscillator can be used to modulate the shape of the other, often creating additional harmonics or random textures. You can even fold back the output from the oscillators back into the oscillators – a trick as old as the Minimoog.
Yet this updated version allows you to adjust the pitch and the saturation of the return signal, resulting is much more dramatic changes in timbre. There’s also a sub oscillator for adding bass frequencies from waveforms that can be ‘shuffled’, which seems to mean the waveform’s cycle is cut into chunks and randomised. The effect is a thick muddying of the sound in the lower octaves, which is perfect for that classic cover of Tangerine Dream’s Rubycon.
Helm’s deepThe sound travels out of the oscillator section and into the amplitude envelope. This is of the classic ‘ADSR’ type – attack, decay, sustain and release, and shapes the volume of the sound over time. It’s capable of both ultra-fast percussive attacks and slow evolving string and ‘pad’ sounds, and uncommonly, it uses logarithmic curves in the transition between each level to create a very smooth sound. From the envelope the audio enters perhaps the most important part of any synthesizer, the filter. Helm offers seven different types, from the classic low-pass to a band shelf. It does vintage sounds incredibly well, and while the low pass isn’t as steep or
as aggressive as some synths, it’s full of character. The unusual addition of shelf filters sounded great too, and are another way that Helm differentiates itself from more traditional designs. The effect of the filter can be controlled both negatively and positively by a second envelope before the final classic element that goes into making the sounds; low-frequency oscillators (LFOs). These can be used to change (modulate) parameter values such as the frequency of the filter or the attack time of an envelope. There are two monophonic LFOs and one polyphonic LFO, each with the same selection from before along with two additional sample-and-hold waveforms. The difference between monophonic and polyphonic is that when you’re playing more than one note at a time, the monophonic LFOs will be synchronised against every note, performing the same action at the same time. The polyphonic LFO is
started afresh with the start of each new note.
Defining how the LFOs modulate parameters reveals Helm’s most powerful feature - its ability to modulate almost any parameter with any other parameter. This is semi-modular synth territory, where you use a patch cable to take the signal from one part of the synthesizer and patch that into another part. In Helm, this is done by clicking on the spanner icon next to each section. This turns every patchable parameter green and you simply click and drag the destination to both select it and to define how much you want that parameter to be changed. Add to this delay and reverb effects, an arpeggiator with random mode, a step-sequencer and a formant filter, and you’ve got what we think is the best sounding Free Software synth for Linux. It’s utterly refreshing.
Helm 0.4.1Synthesizer
PROJECT WEBSITEhttp://tytel.org/helm
1 Presets Save and categorise your creations. 2 Display See parameter names. 3 Oscilloscope View the shape of your sounds. 4 Oscillators 2 x 12 waveforms. 5 Sub-oscillator Add some serious bass. 6 Envelopes Control amplitude and filter over time. 7 LFOs Modulate parameters. 8 Filter 7 different types. 9 Step sequencer More modulation. 10 Arpeggiator Auto-generate note data. 11 Effects Delay, reverb and filter effects.12 Keyboard control QWERTY or MIDI.
12 3 10
4
8
11
12
5
6
7 9
LV0120 062 Fosspicks.indd 63 03/09/2015 10:34
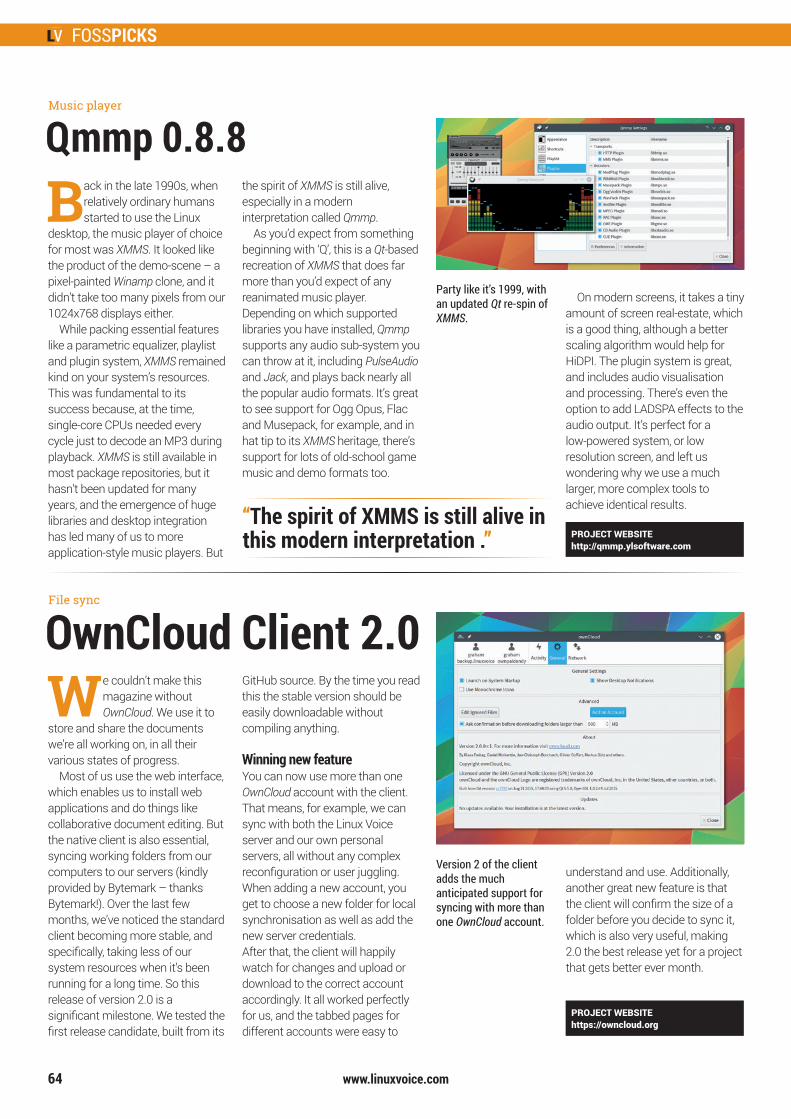
FOSSPICKS
www.linuxvoice.com64
Party like it’s 1999, with an updated Qt re-spin of XMMS.
Back in the late 1990s, when relatively ordinary humans started to use the Linux
desktop, the music player of choice for most was XMMS. It looked like the product of the demo-scene – a pixel-painted Winamp clone, and it didn’t take too many pixels from our 1024x768 displays either.
While packing essential features like a parametric equalizer, playlist and plugin system, XMMS remained kind on your system’s resources. This was fundamental to its success because, at the time, single-core CPUs needed every cycle just to decode an MP3 during playback. XMMS is still available in most package repositories, but it hasn’t been updated for many years, and the emergence of huge libraries and desktop integration has led many of us to more application-style music players. But
the spirit of XMMS is still alive, especially in a modern interpretation called Qmmp.
As you’d expect from something beginning with ‘Q’, this is a Qt-based recreation of XMMS that does far more than you’d expect of any reanimated music player. Depending on which supported libraries you have installed, Qmmp supports any audio sub-system you can throw at it, including PulseAudio and Jack, and plays back nearly all the popular audio formats. It’s great to see support for Ogg Opus, Flac and Musepack, for example, and in hat tip to its XMMS heritage, there’s support for lots of old-school game music and demo formats too.
On modern screens, it takes a tiny amount of screen real-estate, which is a good thing, although a better scaling algorithm would help for HiDPI. The plugin system is great, and includes audio visualisation and processing. There’s even the option to add LADSPA effects to the audio output. It’s perfect for a low-powered system, or low resolution screen, and left us wondering why we use a much larger, more complex tools to achieve identical results.
Qmmp 0.8.8Music player
Version 2 of the client adds the much anticipated support for syncing with more than one OwnCloud account.
We couldn’t make this magazine without OwnCloud. We use it to
store and share the documents we’re all working on, in all their various states of progress.
Most of us use the web interface, which enables us to install web applications and do things like collaborative document editing. But the native client is also essential, syncing working folders from our computers to our servers (kindly provided by Bytemark – thanks Bytemark!). Over the last few months, we’ve noticed the standard client becoming more stable, and specifically, taking less of our system resources when it’s been running for a long time. So this release of version 2.0 is a significant milestone. We tested the first release candidate, built from its
GitHub source. By the time you read this the stable version should be easily downloadable without compiling anything.
Winning new featureYou can now use more than one OwnCloud account with the client. That means, for example, we can sync with both the Linux Voice server and our own personal servers, all without any complex reconfiguration or user juggling. When adding a new account, you get to choose a new folder for local synchronisation as well as add the new server credentials. After that, the client will happily watch for changes and upload or download to the correct account accordingly. It all worked perfectly for us, and the tabbed pages for different accounts were easy to
understand and use. Additionally, another great new feature is that the client will confirm the size of a folder before you decide to sync it, which is also very useful, making 2.0 the best release yet for a project that gets better ever month.
OwnCloud Client 2.0File sync
PROJECT WEBSITEhttp://qmmp.ylsoftware.com
PROJECT WEBSITEhttps://owncloud.org
“The spirit of XMMS is still alive in this modern interpretation .”
LV0120 062 Fosspicks.indd 64 03/09/2015 10:34
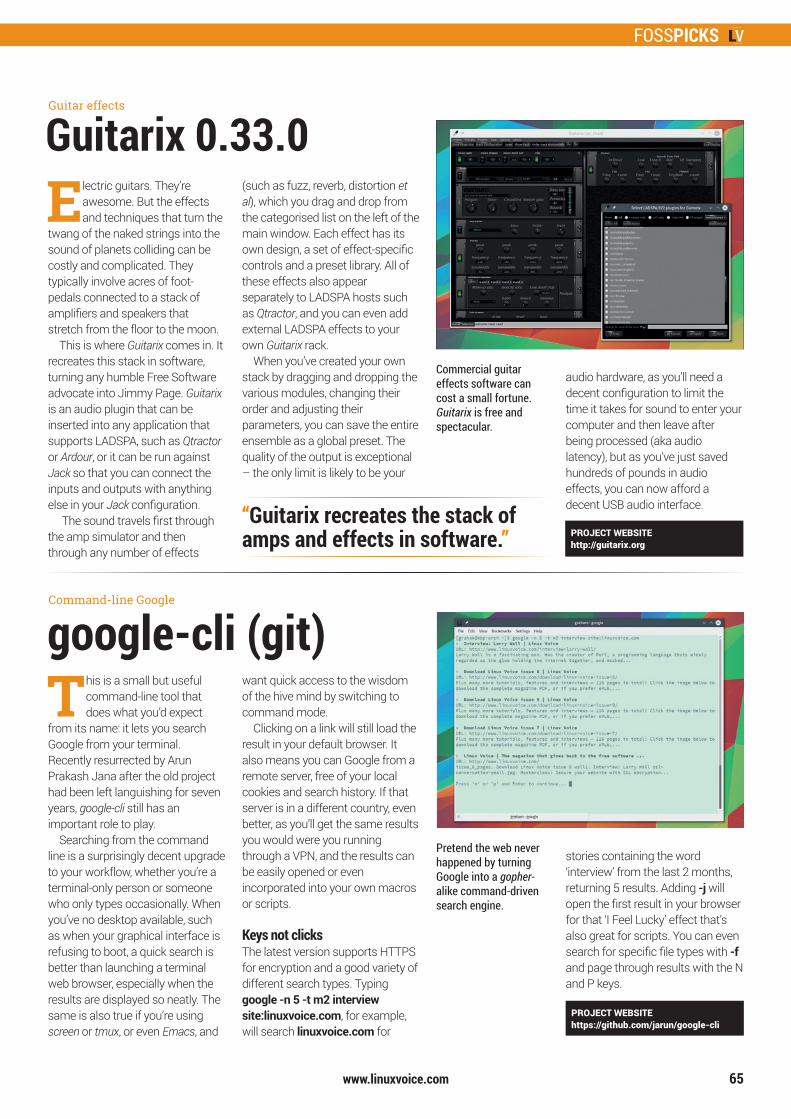
FOSSPICKS
www.linuxvoice.com 65
Commercial guitar effects software can cost a small fortune. Guitarix is free and spectacular.
Electric guitars. They’re awesome. But the effects and techniques that turn the
twang of the naked strings into the sound of planets colliding can be costly and complicated. They typically involve acres of foot-pedals connected to a stack of amplifiers and speakers that stretch from the floor to the moon.
This is where Guitarix comes in. It recreates this stack in software, turning any humble Free Software advocate into Jimmy Page. Guitarix is an audio plugin that can be inserted into any application that supports LADSPA, such as Qtractor or Ardour, or it can be run against Jack so that you can connect the inputs and outputs with anything else in your Jack configuration.
The sound travels first through the amp simulator and then through any number of effects
(such as fuzz, reverb, distortion et al), which you drag and drop from the categorised list on the left of the main window. Each effect has its own design, a set of effect-specific controls and a preset library. All of these effects also appear separately to LADSPA hosts such as Qtractor, and you can even add external LADSPA effects to your own Guitarix rack.
When you’ve created your own stack by dragging and dropping the various modules, changing their order and adjusting their parameters, you can save the entire ensemble as a global preset. The quality of the output is exceptional – the only limit is likely to be your
audio hardware, as you’ll need a decent configuration to limit the time it takes for sound to enter your computer and then leave after being processed (aka audio latency), but as you’ve just saved hundreds of pounds in audio effects, you can now afford a decent USB audio interface.
Guitarix 0.33.0
“Guitarix recreates the stack of amps and effects in software.”
Pretend the web never happened by turning Google into a gopher-alike command-driven search engine.
This is a small but useful command-line tool that does what you’d expect
from its name: it lets you search Google from your terminal. Recently resurrected by Arun Prakash Jana after the old project had been left languishing for seven years, google-cli still has an important role to play.
Searching from the command line is a surprisingly decent upgrade to your workflow, whether you’re a terminal-only person or someone who only types occasionally. When you’ve no desktop available, such as when your graphical interface is refusing to boot, a quick search is better than launching a terminal web browser, especially when the results are displayed so neatly. The same is also true if you’re using screen or tmux, or even Emacs, and
want quick access to the wisdom of the hive mind by switching to command mode.
Clicking on a link will still load the result in your default browser. It also means you can Google from a remote server, free of your local cookies and search history. If that server is in a different country, even better, as you’ll get the same results you would were you running through a VPN, and the results can be easily opened or even incorporated into your own macros or scripts.
Keys not clicksThe latest version supports HTTPS for encryption and a good variety of different search types. Typing google -n 5 -t m2 interview site:linuxvoice.com, for example, will search linuxvoice.com for
stories containing the word ‘interview’ from the last 2 months, returning 5 results. Adding -j will open the first result in your browser for that ‘I Feel Lucky’ effect that’s also great for scripts. You can even search for specific file types with -f and page through results with the N and P keys.
google-cli (git)Command-line Google
PROJECT WEBSITEhttp://guitarix.org
PROJECT WEBSITEhttps://github.com/jarun/google-cli
Guitar effects
LV0120 062 Fosspicks.indd 65 03/09/2015 10:34
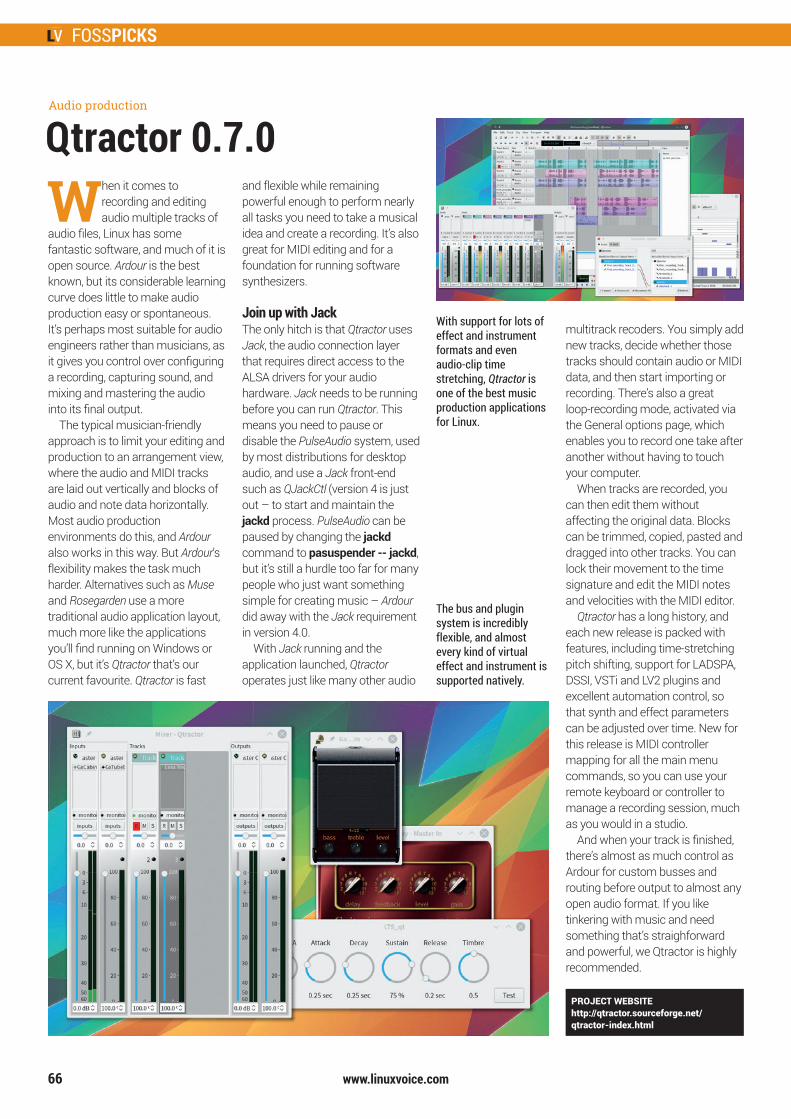
FOSSPICKS
www.linuxvoice.com66
With support for lots of effect and instrument formats and even audio-clip time stretching, Qtractor is one of the best music production applications for Linux.
When it comes to recording and editing audio multiple tracks of
audio files, Linux has some fantastic software, and much of it is open source. Ardour is the best known, but its considerable learning curve does little to make audio production easy or spontaneous. It’s perhaps most suitable for audio engineers rather than musicians, as it gives you control over configuring a recording, capturing sound, and mixing and mastering the audio into its final output.
The typical musician-friendly approach is to limit your editing and production to an arrangement view, where the audio and MIDI tracks are laid out vertically and blocks of audio and note data horizontally. Most audio production environments do this, and Ardour also works in this way. But Ardour’s flexibility makes the task much harder. Alternatives such as Muse and Rosegarden use a more traditional audio application layout, much more like the applications you’ll find running on Windows or OS X, but it’s Qtractor that’s our current favourite. Qtractor is fast
and flexible while remaining powerful enough to perform nearly all tasks you need to take a musical idea and create a recording. It’s also great for MIDI editing and for a foundation for running software synthesizers.
Join up with JackThe only hitch is that Qtractor uses Jack, the audio connection layer that requires direct access to the ALSA drivers for your audio hardware. Jack needs to be running before you can run Qtractor. This means you need to pause or disable the PulseAudio system, used by most distributions for desktop audio, and use a Jack front-end such as QJackCtl (version 4 is just out – to start and maintain the jackd process. PulseAudio can be paused by changing the jackd command to pasuspender -- jackd, but it’s still a hurdle too far for many people who just want something simple for creating music – Ardour did away with the Jack requirement in version 4.0.
With Jack running and the application launched, Qtractor operates just like many other audio
multitrack recoders. You simply add new tracks, decide whether those tracks should contain audio or MIDI data, and then start importing or recording. There’s also a great loop-recording mode, activated via the General options page, which enables you to record one take after another without having to touch your computer.
When tracks are recorded, you can then edit them without affecting the original data. Blocks can be trimmed, copied, pasted and dragged into other tracks. You can lock their movement to the time signature and edit the MIDI notes and velocities with the MIDI editor.
Qtractor has a long history, and each new release is packed with features, including time-stretching pitch shifting, support for LADSPA, DSSI, VSTi and LV2 plugins and excellent automation control, so that synth and effect parameters can be adjusted over time. New for this release is MIDI controller mapping for all the main menu commands, so you can use your remote keyboard or controller to manage a recording session, much as you would in a studio.
And when your track is finished, there’s almost as much control as Ardour for custom busses and routing before output to almost any open audio format. If you like tinkering with music and need something that’s straighforward and powerful, we Qtractor is highly recommended.
Qtractor 0.7.0Audio production
PROJECT WEBSITEhttp://qtractor.sourceforge.net/qtractor-index.html
The bus and plugin system is incredibly flexible, and almost every kind of virtual effect and instrument is supported natively.
LV0120 062 Fosspicks.indd 66 03/09/2015 10:34

FOSSPICKS
www.linuxvoice.com 67
https://launchpad.net/pybik/
PROJECT WEBSITEhttp://pcsx2.net
We have to thank Ioangogo on our IRC channel (#linuxvoice
Freenode) for this discovery. They let us know about this brilliant game when we asked for ‘Finds’ for series 3, episode 13 of our podcast. Space Nerds in Space is a remarkable labour of love for its developer, Stephen Cameron, and it’s a game quite unlike any other.
It’s a multiplayer starship simulator where you and a few friends can live out your Star Trek fantasies. It does this by simulating the computers for each station on the bridge of a single ship, such as navigation, weapons or engineering, and linking those stations to a central server for managing the outside universe. The idea is that each friend runs a different station on
their own computer and views another shared screen or desktop that acts as the management interface view of the ship.
It is possible to run all the stations and the server on a single machine, but the game only really makes sense with a group of people. One can even act like a Dungeon Master, injecting new threats and objects into the gaming environment. The vector-style used by each station gives a lovely retro feeling to the game, from the globules of data in the science module to the vector text of the communications station. The outside views look fabulous too, with 3D semi-realistic rendering of the galaxy, local planets and the various effects, such as the warp drive or the twinkle of the background stars. The latest
update even adds the ability to mine asteroids using the ship’s little autonomous robots. If you’ve got a few friends who have perhaps enjoyed Kerbal Space Program and want to try something equally geeky but cooperative, Space Nerds in Space is definitely worth the compilation time.
FOSSPICKS Brain Relaxers
Argh. I’m givin’ her all she’s got, Captain!
Space Nerds in Space
Sony’s Playstation 2 became the biggest selling games console of all time,
pushing more than 155 million units. The 3D graphics looked fabulous at the time, often enhanced by digital surround sound and the RGB video output.
The passage of time means we can now emulate what was once cutting-edge with an everyday GPU. Even better, in an era when old classics are being remade and sold as reincarnated ‘HD’ versions, modern GPUs are often capable of upgrading old resolutions and textures, making those classic games look far better than they did on the original console. That’s exactly what PCSX2 does – emulating old Playstation 2 components
and allowing you to ramp up the quality of the graphics output.
As with most emulators, copyright governs what you can and cannot do. Helpfully, if you’ve still got a PS2 stuck in the attic, PCSX2 provides a tool for ripping the BIOS out of your own console, rather than having to resort to legally dubious sources. You’ll need access to the original games too, and while PCSX2 can read an optical drive directly (PS2 games came on normal CDs and DVDs), you get far better results by creating an ISO of the game with something like Brasero first.
It’s worth using a USB adaptor to connect a controller, and defining its buttons in the pad module. After that, browse to your disc image and select the fast reboot. The game will load much quicker than it did on the old console, and look much better. Welcome to PS2 heaven!
Modern shaders and resolutions can transform old PS2 games – even without a costly HD remake!
PCSX2 1.3.1 (git)Playstation 2 emulator
“We can emulate what was once cutting-edge with an everyday GPU.”
PROJECT WEBSITEhttps://smcameron.github.io/space-nerds-in-space/
Starship simulator
LV0120 062 Fosspicks.indd 67 03/09/2015 10:34
LV020 068 Ad Code Club.indd 68 03/09/2015 10:36
TUTORIALS INTRO
www.linuxvoice.com 69
PROGRAMMING
Dip your toe into a pool full of Linux knowledge with seven tutorials lovingly crafted to expand your Linux consciousness
TUTORIALS
Ben EverardIs on a misson to find a new mascot to replace that blasted penguin.
As we prepared this issue, tech giant Google revealed to the world a new logo. This new logo
featured sans-serif type that, to my eyes, looked like something from Toys ’r’ Us. My dislike of the new logo isn’t something that I want to focus on here though. Companies change their logo from time to time. This occasional refreshing of the image helps a brand feel modern and relevant
Open Source projects, however, very rarely change their logo. Whatever image first became associated with a project usually stays regardless of whether it’s any good. Tux, for example, has stirred a debate on our letters page with may people thinking that an overweight penguin is no longer the best image for Linux.
I’m firmly in the anti-Tux camp. He’s cute and loveable but comes from a time when Linux was a small project. He doesn’t represent what makes Linux great today. We need an icon to emphasise community cooperation, technical superiority and ethical purity. Something that manufacturers are proud to put on their machines and software vendors want to showcase on their websites.
It’s time to re-brand Linux, but let’s not make it look like a child’s plaything in the process. [email protected]
In this issue…
HTTP by hand88
The web is the most popular communication medium that’s ever been created. We do
business on it, watch TV on it, chat with friends on it, even get magazines from it. Surely, then, it must be underpinned by a complex protocol to handle all these different use cases? Nope. HTTP, the protocol behind it all, is simple and text-based. Discover just how simple it is by writing raw HTTP by hand on the fly, and do so by talking directly with web servers and browsers.
Barcode BattlesLes Pounder brings together a Raspberry Pi a camera and some Python code to create a 90s-influenced game for fighting using supermarket produce.
Godot GamesLearn to program the fun way by making games you can play. Ben Everard wastes time productively with Godot.
84
SyncthingGraham Morrison protects his privacy and his data, and you should too. Share files between computers without handing them to third parties using Syncthing.
Blender JengaFollow Graham Morrison as he delves into the world of ridged body physics using Blender 3D models. Games and movies await!
YubiKeyOn a quest for ever greater security? Mark Crutch shows you how to add two-factor authentication using additional hardware.
80
7270
76
Smalltalk90
Journey back in time to see the language that created modern programming. Smalltalk was
the first general-purpose object-orientated language, and the first to feature an Integrated Development Environment (IDE). These two things are now so heavily ingrained in programming that it’s hard to imagine a time before they existed. Not only is Smalltalk historically important, it’s still being used today. One of its modern incarnations, Squeak, still attracts developers and keeps moving forward.
LV020 069 Tutorials Intro.indd 69 04/09/2015 12:13
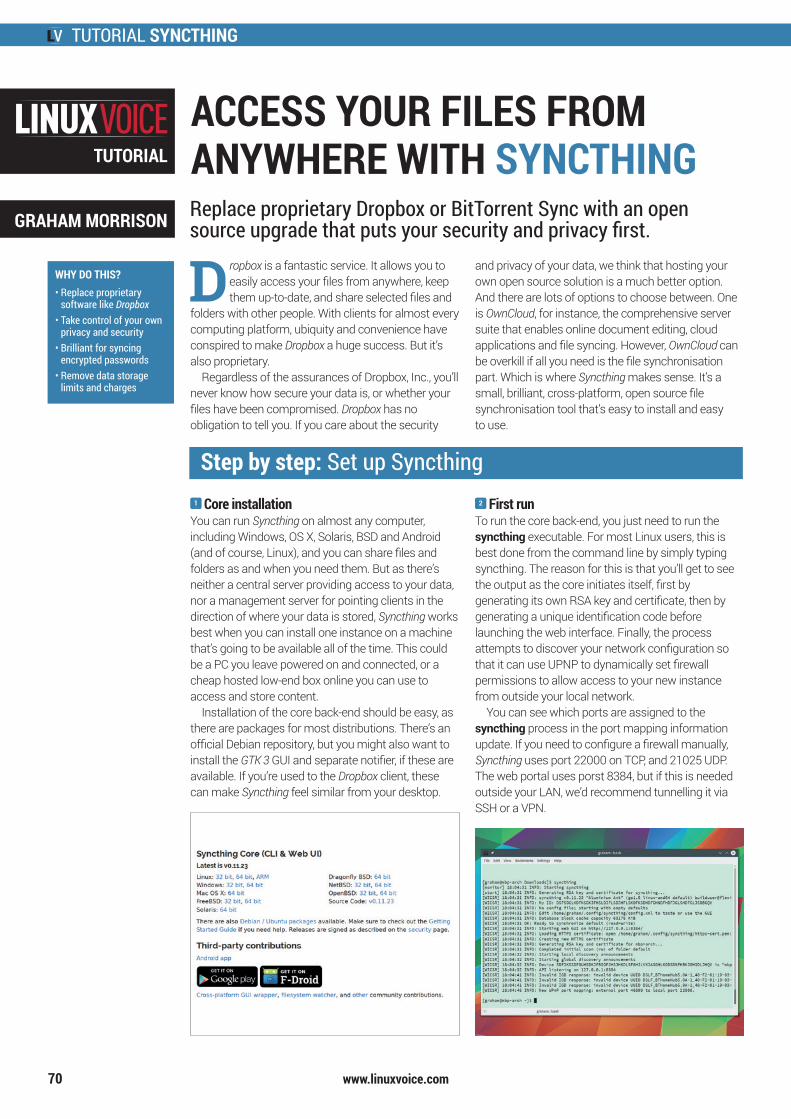
TUTORIAL SYNCTHING
www.linuxvoice.com
WHY DO THIS?• Replace proprietary
software like Dropbox• Take control of your own
privacy and security• Brilliant for syncing
encrypted passwords • Remove data storage
limits and charges
D ropbox is a fantastic service. It allows you to easily access your files from anywhere, keep them up-to-date, and share selected files and
folders with other people. With clients for almost every computing platform, ubiquity and convenience have conspired to make Dropbox a huge success. But it’s also proprietary.
Regardless of the assurances of Dropbox, Inc., you’ll never know how secure your data is, or whether your files have been compromised. Dropbox has no obligation to tell you. If you care about the security
ACCESS YOUR FILES FROM ANYWHERE WITH SYNCTHINGReplace proprietary Dropbox or BitTorrent Sync with an open source upgrade that puts your security and privacy first.
TUTORIAL
70
GRAHAM MORRISON
1 Core installationYou can run Syncthing on almost any computer, including Windows, OS X, Solaris, BSD and Android (and of course, Linux), and you can share files and folders as and when you need them. But as there’s neither a central server providing access to your data, nor a management server for pointing clients in the direction of where your data is stored, Syncthing works best when you can install one instance on a machine that’s going to be available all of the time. This could be a PC you leave powered on and connected, or a cheap hosted low-end box online you can use to access and store content.
Installation of the core back-end should be easy, as there are packages for most distributions. There’s an official Debian repository, but you might also want to install the GTK 3 GUI and separate notifier, if these are available. If you’re used to the Dropbox client, these can make Syncthing feel similar from your desktop.
Step by step: Set up Syncthing2 First run
To run the core back-end, you just need to run the syncthing executable. For most Linux users, this is best done from the command line by simply typing syncthing. The reason for this is that you’ll get to see the output as the core initiates itself, first by generating its own RSA key and certificate, then by generating a unique identification code before launching the web interface. Finally, the process attempts to discover your network configuration so that it can use UPNP to dynamically set firewall permissions to allow access to your new instance from outside your local network.
You can see which ports are assigned to the syncthing process in the port mapping information update. If you need to configure a firewall manually, Syncthing uses port 22000 on TCP, and 21025 UDP. The web portal uses porst 8384, but if this is needed outside your LAN, we’d recommend tunnelling it via SSH or a VPN.
and privacy of your data, we think that hosting your own open source solution is a much better option. And there are lots of options to choose between. One is OwnCloud, for instance, the comprehensive server suite that enables online document editing, cloud applications and file syncing. However, OwnCloud can be overkill if all you need is the file synchronisation part. Which is where Syncthing makes sense. It’s a small, brilliant, cross-platform, open source file synchronisation tool that’s easy to install and easy to use.
LV020 070 Tutorial Syncthing.indd 70 03/09/2015 13:43
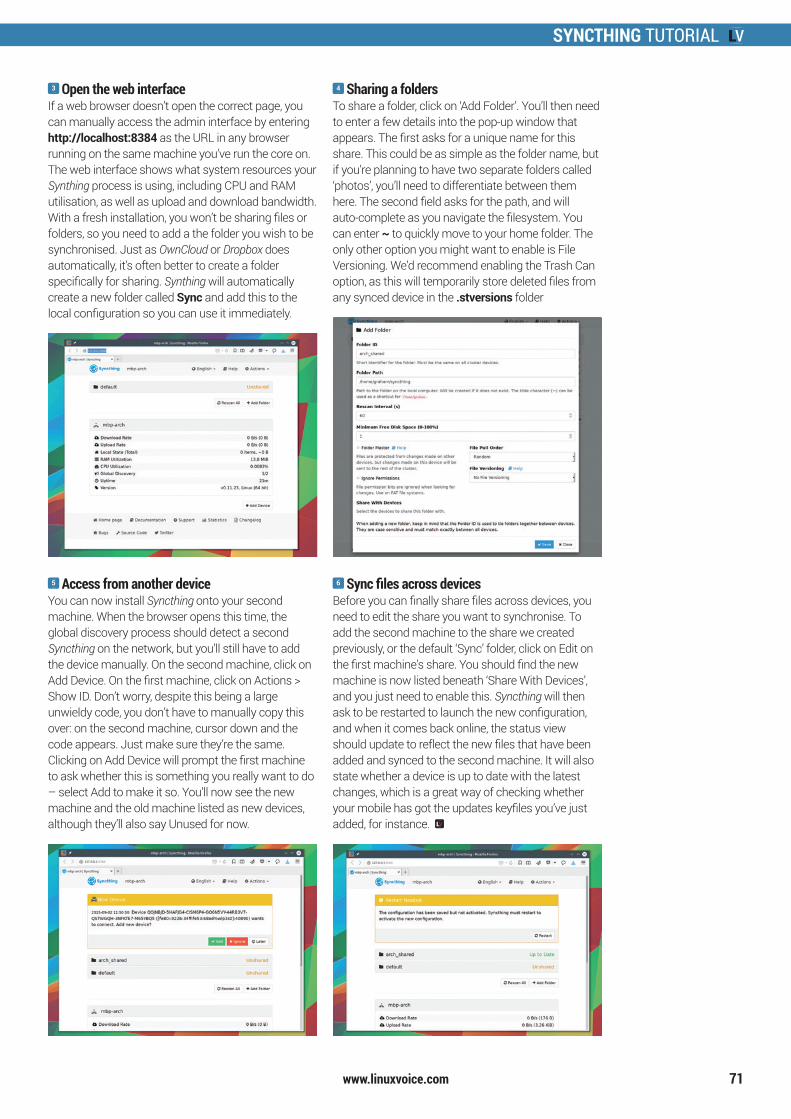
SYNCTHING TUTORIAL
www.linuxvoice.com 71
6 Sync files across devicesBefore you can finally share files across devices, you need to edit the share you want to synchronise. To add the second machine to the share we created previously, or the default ‘Sync’ folder, click on Edit on the first machine’s share. You should find the new machine is now listed beneath ‘Share With Devices’, and you just need to enable this. Syncthing will then ask to be restarted to launch the new configuration, and when it comes back online, the status view should update to reflect the new files that have been added and synced to the second machine. It will also state whether a device is up to date with the latest changes, which is a great way of checking whether your mobile has got the updates keyfiles you’ve just added, for instance.
5 Access from another deviceYou can now install Syncthing onto your second machine. When the browser opens this time, the global discovery process should detect a second Syncthing on the network, but you’ll still have to add the device manually. On the second machine, click on Add Device. On the first machine, click on Actions > Show ID. Don’t worry, despite this being a large unwieldy code, you don’t have to manually copy this over: on the second machine, cursor down and the code appears. Just make sure they’re the same. Clicking on Add Device will prompt the first machine to ask whether this is something you really want to do – select Add to make it so. You’ll now see the new machine and the old machine listed as new devices, although they’ll also say Unused for now.
3 Open the web interfaceIf a web browser doesn’t open the correct page, you can manually access the admin interface by entering http://localhost:8384 as the URL in any browser running on the same machine you’ve run the core on. The web interface shows what system resources your Synthing process is using, including CPU and RAM utilisation, as well as upload and download bandwidth. With a fresh installation, you won’t be sharing files or folders, so you need to add a the folder you wish to be synchronised. Just as OwnCloud or Dropbox does automatically, it’s often better to create a folder specifically for sharing. Synthing will automatically create a new folder called Sync and add this to the local configuration so you can use it immediately.
4 Sharing a foldersTo share a folder, click on ‘Add Folder’. You’ll then need to enter a few details into the pop-up window that appears. The first asks for a unique name for this share. This could be as simple as the folder name, but if you’re planning to have two separate folders called ‘photos’, you’ll need to differentiate between them here. The second field asks for the path, and will auto-complete as you navigate the filesystem. You can enter ~ to quickly move to your home folder. The only other option you might want to enable is File Versioning. We’d recommend enabling the Trash Can option, as this will temporarily store deleted files from any synced device in the .stversions folder
LV020 070 Tutorial Syncthing.indd 71 03/09/2015 13:43
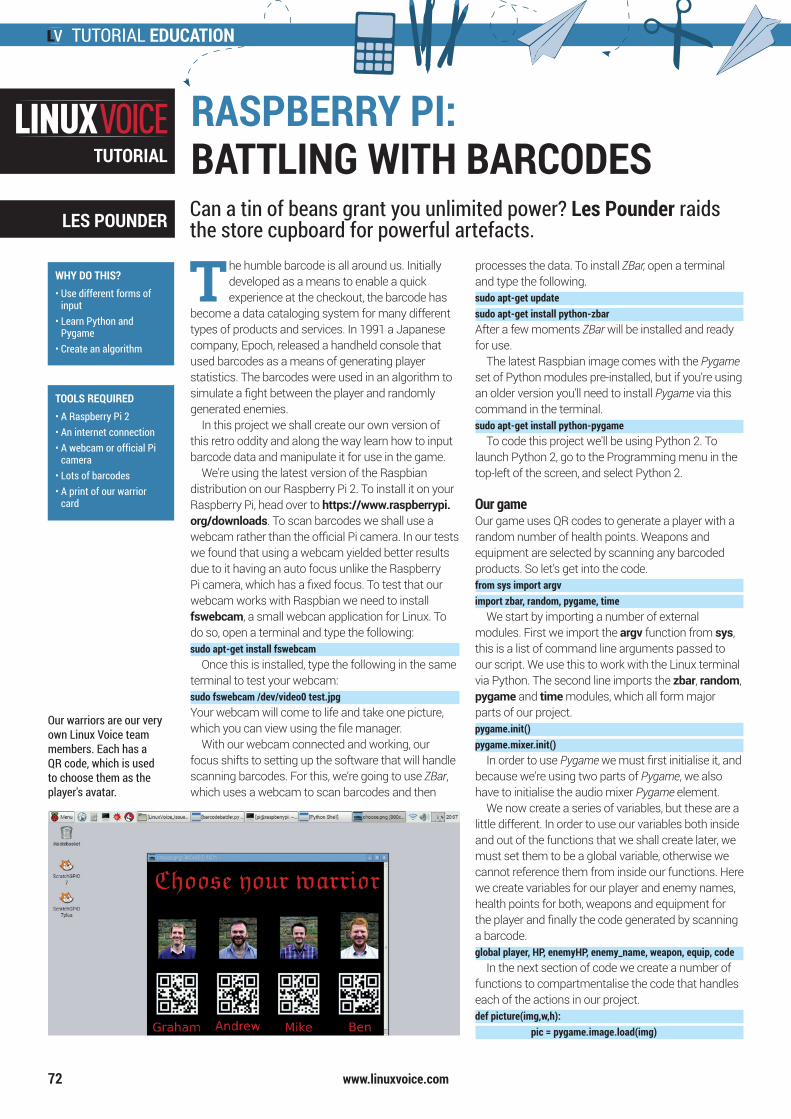
TUTORIAL EDUCATION
www.linuxvoice.com
The humble barcode is all around us. Initially developed as a means to enable a quick experience at the checkout, the barcode has
become a data cataloging system for many different types of products and services. In 1991 a Japanese company, Epoch, released a handheld console that used barcodes as a means of generating player statistics. The barcodes were used in an algorithm to simulate a fight between the player and randomly generated enemies.
In this project we shall create our own version of this retro oddity and along the way learn how to input barcode data and manipulate it for use in the game.
We're using the latest version of the Raspbian distribution on our Raspberry Pi 2. To install it on your Raspberry Pi, head over to https://www.raspberrypi.org/downloads. To scan barcodes we shall use a webcam rather than the official Pi camera. In our tests we found that using a webcam yielded better results due to it having an auto focus unlike the Raspberry Pi camera, which has a fixed focus. To test that our webcam works with Raspbian we need to install fswebcam, a small webcan application for Linux. To do so, open a terminal and type the following:sudo apt-get install fswebcam
Once this is installed, type the following in the same terminal to test your webcam:sudo fswebcam /dev/video0 test.jpgYour webcam will come to life and take one picture, which you can view using the file manager.
With our webcam connected and working, our focus shifts to setting up the software that will handle scanning barcodes. For this, we're going to use ZBar, which uses a webcam to scan barcodes and then
processes the data. To install ZBar, open a terminal and type the following.sudo apt-get updatesudo apt-get install python-zbarAfter a few moments ZBar will be installed and ready for use.
The latest Raspbian image comes with the Pygame set of Python modules pre-installed, but if you're using an older version you'll need to install Pygame via this command in the terminal.sudo apt-get install python-pygame
To code this project we'll be using Python 2. To launch Python 2, go to the Programming menu in the top-left of the screen, and select Python 2.
Our gameOur game uses QR codes to generate a player with a random number of health points. Weapons and equipment are selected by scanning any barcoded products. So let’s get into the code. from sys import argvimport zbar, random, pygame, time
We start by importing a number of external modules. First we import the argv function from sys, this is a list of command line arguments passed to our script. We use this to work with the Linux terminal via Python. The second line imports the zbar, random, pygame and time modules, which all form major parts of our project.pygame.init()pygame.mixer.init()
In order to use Pygame we must first initialise it, and because we're using two parts of Pygame, we also have to initialise the audio mixer Pygame element.
We now create a series of variables, but these are a little different. In order to use our variables both inside and out of the functions that we shall create later, we must set them to be a global variable, otherwise we cannot reference them from inside our functions. Here we create variables for our player and enemy names, health points for both, weapons and equipment for the player and finally the code generated by scanning a barcode.global player, HP, enemyHP, enemy_name, weapon, equip, code
In the next section of code we create a number of functions to compartmentalise the code that handles each of the actions in our project.def picture(img,w,h): pic = pygame.image.load(img)
Our warriors are our very own Linux Voice team members. Each has a QR code, which is used to choose them as the player's avatar.
RASPBERRY PI: BATTLING WITH BARCODESCan a tin of beans grant you unlimited power? Les Pounder raids the store cupboard for powerful artefacts.
TUTORIAL
LES POUNDER
72
WHY DO THIS?• Use different forms of
input• Learn Python and
Pygame• Create an algorithm
TOOLS REQUIRED• A Raspberry Pi 2• An internet connection• A webcam or official Pi
camera• Lots of barcodes• A print of our warrior
card
LV020 072 Tutorial Education.indd 72 03/09/2015 10:23
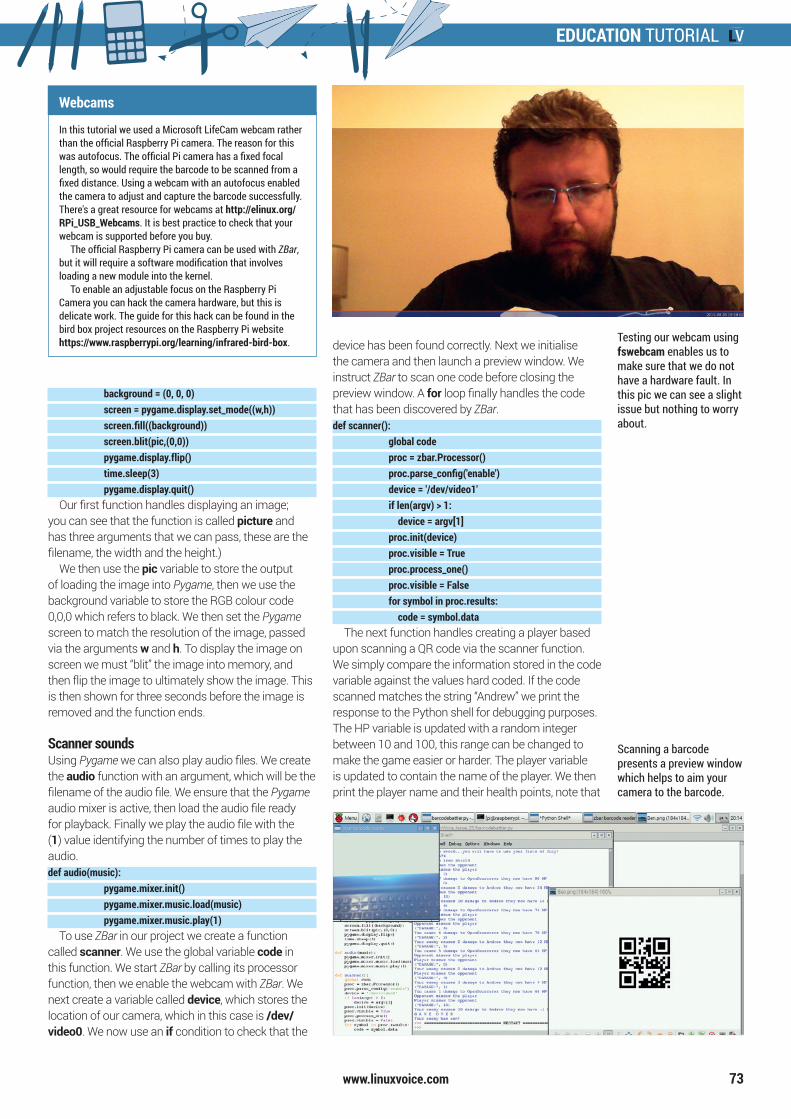
EDUCATION TUTORIAL
www.linuxvoice.com 73
background = (0, 0, 0) screen = pygame.display.set_mode((w,h)) screen.fill((background)) screen.blit(pic,(0,0)) pygame.display.flip() time.sleep(3) pygame.display.quit()
Our first function handles displaying an image; you can see that the function is called picture and has three arguments that we can pass, these are the filename, the width and the height.)
We then use the pic variable to store the output of loading the image into Pygame, then we use the background variable to store the RGB colour code 0,0,0 which refers to black. We then set the Pygame screen to match the resolution of the image, passed via the arguments w and h. To display the image on screen we must “blit” the image into memory, and then flip the image to ultimately show the image. This is then shown for three seconds before the image is removed and the function ends.
Scanner soundsUsing Pygame we can also play audio files. We create the audio function with an argument, which will be the filename of the audio file. We ensure that the Pygame audio mixer is active, then load the audio file ready for playback. Finally we play the audio file with the (1) value identifying the number of times to play the audio.def audio(music): pygame.mixer.init() pygame.mixer.music.load(music) pygame.mixer.music.play(1)
To use ZBar in our project we create a function called scanner. We use the global variable code in this function. We start ZBar by calling its processor function, then we enable the webcam with ZBar. We next create a variable called device, which stores the location of our camera, which in this case is /dev/video0. We now use an if condition to check that the
device has been found correctly. Next we initialise the camera and then launch a preview window. We instruct ZBar to scan one code before closing the preview window. A for loop finally handles the code that has been discovered by ZBar.def scanner(): global code proc = zbar.Processor() proc.parse_config('enable') device = '/dev/video1' if len(argv) > 1: device = argv[1] proc.init(device) proc.visible = True proc.process_one() proc.visible = False for symbol in proc.results: code = symbol.data
The next function handles creating a player based upon scanning a QR code via the scanner function. We simply compare the information stored in the code variable against the values hard coded. If the code scanned matches the string “Andrew” we print the response to the Python shell for debugging purposes. The HP variable is updated with a random integer between 10 and 100, this range can be changed to make the game easier or harder. The player variable is updated to contain the name of the player. We then print the player name and their health points, note that
Scanning a barcode presents a preview window which helps to aim your camera to the barcode.
Webcams
In this tutorial we used a Microsoft LifeCam webcam rather than the official Raspberry Pi camera. The reason for this was autofocus. The official Pi camera has a fixed focal length, so would require the barcode to be scanned from a fixed distance. Using a webcam with an autofocus enabled the camera to adjust and capture the barcode successfully. There's a great resource for webcams at http://elinux.org/RPi_USB_Webcams. It is best practice to check that your webcam is supported before you buy.
The official Raspberry Pi camera can be used with ZBar, but it will require a software modification that involves loading a new module into the kernel.
To enable an adjustable focus on the Raspberry Pi Camera you can hack the camera hardware, but this is delicate work. The guide for this hack can be found in the bird box project resources on the Raspberry Pi website https://www.raspberrypi.org/learning/infrared-bird-box. Testing our webcam using
fswebcam enables us to make sure that we do not have a hardware fault. In this pic we can see a slight issue but nothing to worry about.
LV020 072 Tutorial Education.indd 73 03/09/2015 10:23
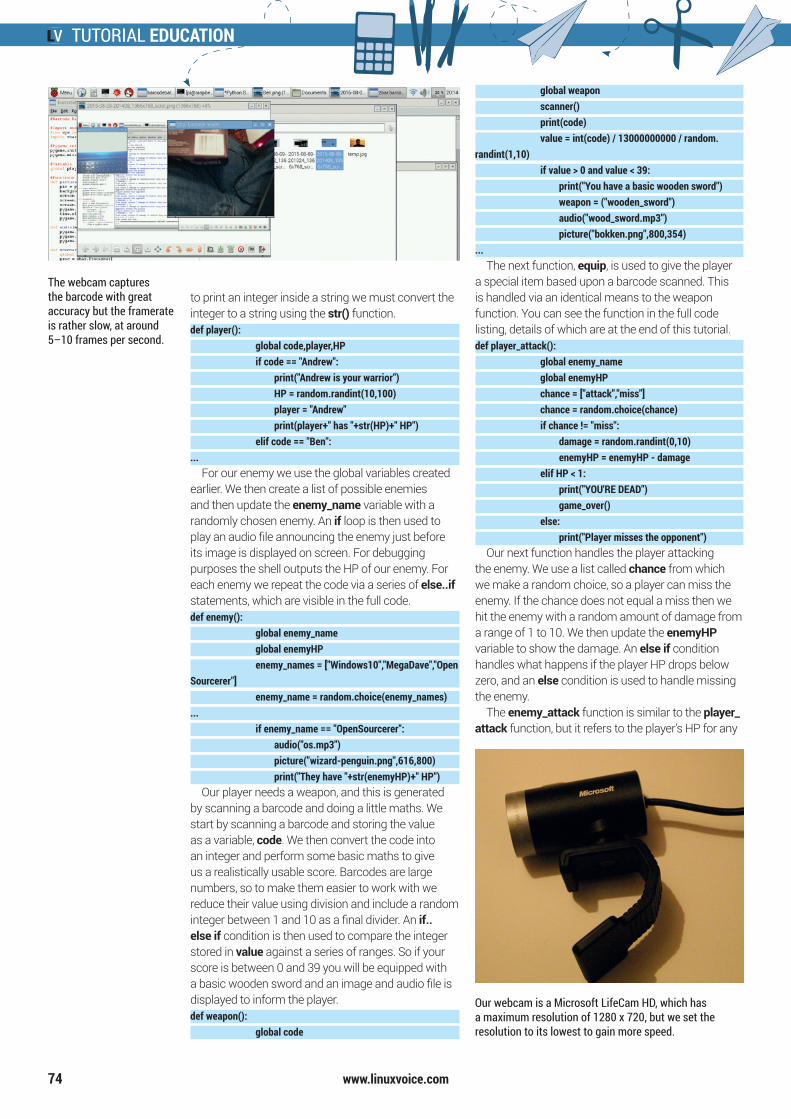
TUTORIAL EDUCATION
www.linuxvoice.com74
to print an integer inside a string we must convert the integer to a string using the str() function.def player(): global code,player,HP if code == "Andrew": print("Andrew is your warrior") HP = random.randint(10,100) player = "Andrew" print(player+" has "+str(HP)+" HP") elif code == "Ben":...
For our enemy we use the global variables created earlier. We then create a list of possible enemies and then update the enemy_name variable with a randomly chosen enemy. An if loop is then used to play an audio file announcing the enemy just before its image is displayed on screen. For debugging purposes the shell outputs the HP of our enemy. For each enemy we repeat the code via a series of else..if statements, which are visible in the full code.def enemy(): global enemy_name global enemyHP enemy_names = ["Windows10","MegaDave","OpenSourcerer"] enemy_name = random.choice(enemy_names)... if enemy_name == "OpenSourcerer": audio("os.mp3") picture("wizard-penguin.png",616,800) print("They have "+str(enemyHP)+" HP")
Our player needs a weapon, and this is generated by scanning a barcode and doing a little maths. We start by scanning a barcode and storing the value as a variable, code. We then convert the code into an integer and perform some basic maths to give us a realistically usable score. Barcodes are large numbers, so to make them easier to work with we reduce their value using division and include a random integer between 1 and 10 as a final divider. An if..else if condition is then used to compare the integer stored in value against a series of ranges. So if your score is between 0 and 39 you will be equipped with a basic wooden sword and an image and audio file is displayed to inform the player. def weapon(): global code
global weapon scanner() print(code) value = int(code) / 13000000000 / random.randint(1,10) if value > 0 and value < 39: print("You have a basic wooden sword") weapon = ("wooden_sword") audio("wood_sword.mp3") picture("bokken.png",800,354)...
The next function, equip, is used to give the player a special item based upon a barcode scanned. This is handled via an identical means to the weapon function. You can see the function in the full code listing, details of which are at the end of this tutorial.def player_attack(): global enemy_name global enemyHP chance = ["attack","miss"] chance = random.choice(chance) if chance != "miss": damage = random.randint(0,10) enemyHP = enemyHP - damage elif HP < 1: print("YOU'RE DEAD") game_over() else: print("Player misses the opponent")
Our next function handles the player attacking the enemy. We use a list called chance from which we make a random choice, so a player can miss the enemy. If the chance does not equal a miss then we hit the enemy with a random amount of damage from a range of 1 to 10. We then update the enemyHP variable to show the damage. An else if condition handles what happens if the player HP drops below zero, and an else condition is used to handle missing the enemy.
The enemy_attack function is similar to the player_attack function, but it refers to the player's HP for any
The webcam captures the barcode with great accuracy but the framerate is rather slow, at around 5–10 frames per second.
Our webcam is a Microsoft LifeCam HD, which has a maximum resolution of 1280 x 720, but we set the resolution to its lowest to gain more speed.
LV020 072 Tutorial Education.indd 74 03/09/2015 10:23
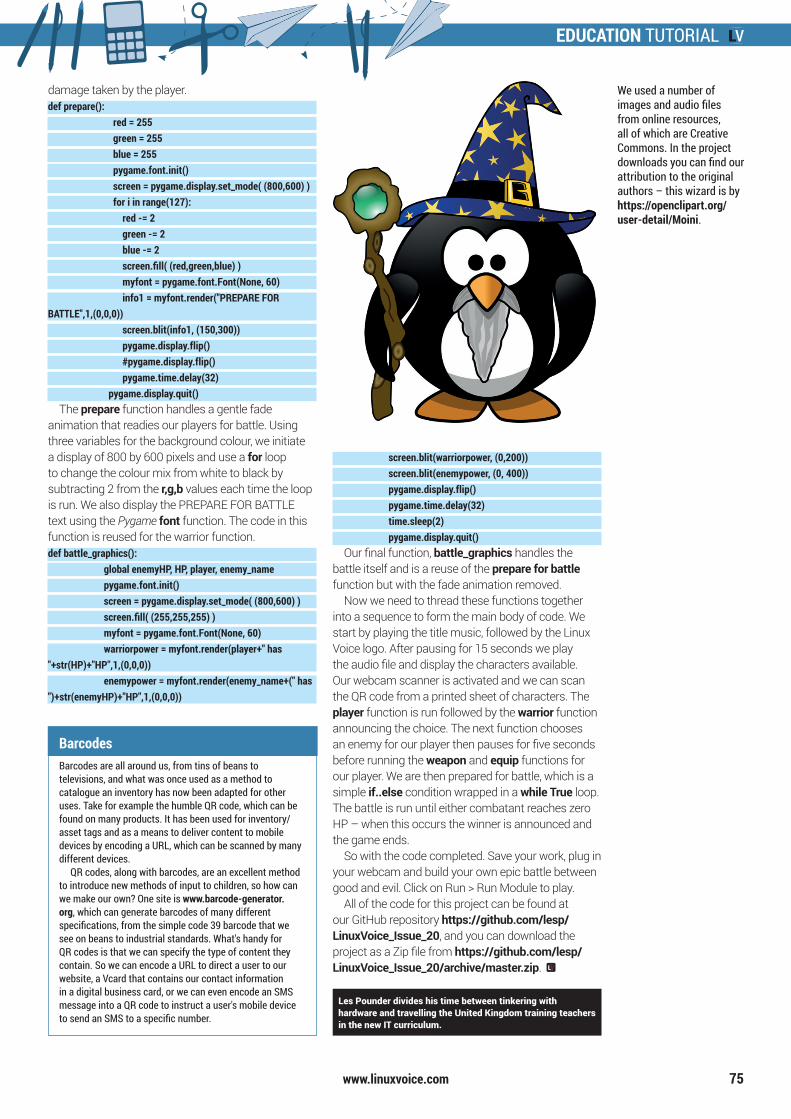
EDUCATION TUTORIAL
www.linuxvoice.com 75
Les Pounder divides his time between tinkering with hardware and travelling the United Kingdom training teachers in the new IT curriculum.
damage taken by the player.def prepare(): red = 255 green = 255 blue = 255 pygame.font.init() screen = pygame.display.set_mode( (800,600) ) for i in range(127): red -= 2 green -= 2 blue -= 2 screen.fill( (red,green,blue) ) myfont = pygame.font.Font(None, 60) info1 = myfont.render("PREPARE FOR BATTLE",1,(0,0,0)) screen.blit(info1, (150,300)) pygame.display.flip() #pygame.display.flip() pygame.time.delay(32) pygame.display.quit()
The prepare function handles a gentle fade animation that readies our players for battle. Using three variables for the background colour, we initiate a display of 800 by 600 pixels and use a for loop to change the colour mix from white to black by subtracting 2 from the r,g,b values each time the loop is run. We also display the PREPARE FOR BATTLE text using the Pygame font function. The code in this function is reused for the warrior function.def battle_graphics(): global enemyHP, HP, player, enemy_name pygame.font.init() screen = pygame.display.set_mode( (800,600) ) screen.fill( (255,255,255) ) myfont = pygame.font.Font(None, 60) warriorpower = myfont.render(player+" has "+str(HP)+"HP",1,(0,0,0)) enemypower = myfont.render(enemy_name+(" has ")+str(enemyHP)+"HP",1,(0,0,0))
screen.blit(warriorpower, (0,200)) screen.blit(enemypower, (0, 400)) pygame.display.flip() pygame.time.delay(32) time.sleep(2) pygame.display.quit()
Our final function, battle_graphics handles the battle itself and is a reuse of the prepare for battle function but with the fade animation removed.
Now we need to thread these functions together into a sequence to form the main body of code. We start by playing the title music, followed by the Linux Voice logo. After pausing for 15 seconds we play the audio file and display the characters available. Our webcam scanner is activated and we can scan the QR code from a printed sheet of characters. The player function is run followed by the warrior function announcing the choice. The next function chooses an enemy for our player then pauses for five seconds before running the weapon and equip functions for our player. We are then prepared for battle, which is a simple if..else condition wrapped in a while True loop. The battle is run until either combatant reaches zero HP – when this occurs the winner is announced and the game ends.
So with the code completed. Save your work, plug in your webcam and build your own epic battle between good and evil. Click on Run > Run Module to play.
All of the code for this project can be found at our GitHub repository https://github.com/lesp/LinuxVoice_Issue_20, and you can download the project as a Zip file from https://github.com/lesp/LinuxVoice_Issue_20/archive/master.zip.
BarcodesBarcodes are all around us, from tins of beans to televisions, and what was once used as a method to catalogue an inventory has now been adapted for other uses. Take for example the humble QR code, which can be found on many products. It has been used for inventory/asset tags and as a means to deliver content to mobile devices by encoding a URL, which can be scanned by many different devices.
QR codes, along with barcodes, are an excellent method to introduce new methods of input to children, so how can we make our own? One site is www.barcode-generator.org, which can generate barcodes of many different specifications, from the simple code 39 barcode that we see on beans to industrial standards. What's handy for QR codes is that we can specify the type of content they contain. So we can encode a URL to direct a user to our website, a Vcard that contains our contact information in a digital business card, or we can even encode an SMS message into a QR code to instruct a user's mobile device to send an SMS to a specific number.
We used a number of images and audio files from online resources, all of which are Creative Commons. In the project downloads you can find our attribution to the original authors – this wizard is by https://openclipart.org/user-detail/Moini.
LV020 072 Tutorial Education.indd 75 03/09/2015 10:23
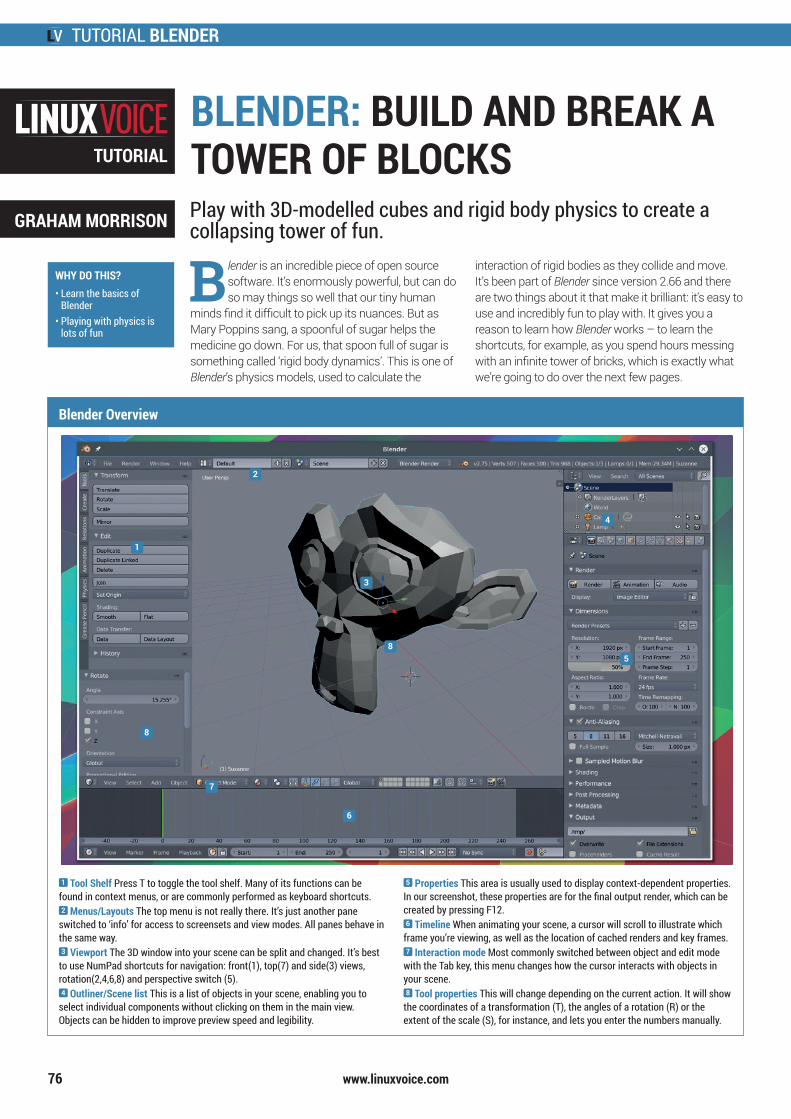
TUTORIAL BLENDER
www.linuxvoice.com
B lender is an incredible piece of open source software. It’s enormously powerful, but can do so may things so well that our tiny human
minds find it difficult to pick up its nuances. But as Mary Poppins sang, a spoonful of sugar helps the medicine go down. For us, that spoon full of sugar is something called ‘rigid body dynamics’. This is one of Blender’s physics models, used to calculate the
interaction of rigid bodies as they collide and move. It’s been part of Blender since version 2.66 and there are two things about it that make it brilliant: it’s easy to use and incredibly fun to play with. It gives you a reason to learn how Blender works – to learn the shortcuts, for example, as you spend hours messing with an infinite tower of bricks, which is exactly what we’re going to do over the next few pages.
BLENDER: BUILD AND BREAK A TOWER OF BLOCKSPlay with 3D-modelled cubes and rigid body physics to create a collapsing tower of fun.
TUTORIAL
76
GRAHAM MORRISON
WHY DO THIS?• Learn the basics of
Blender• Playing with physics is
lots of fun
Blender Overview
1 Tool Shelf Press T to toggle the tool shelf. Many of its functions can be found in context menus, or are commonly performed as keyboard shortcuts.2 Menus/Layouts The top menu is not really there. It’s just another pane
switched to ‘info’ for access to screensets and view modes. All panes behave in the same way. 3 Viewport The 3D window into your scene can be split and changed. It’s best
to use NumPad shortcuts for navigation: front(1), top(7) and side(3) views, rotation(2,4,6,8) and perspective switch (5).4 Outliner/Scene list This is a list of objects in your scene, enabling you to
select individual components without clicking on them in the main view. Objects can be hidden to improve preview speed and legibility.
5 Properties This area is usually used to display context-dependent properties. In our screenshot, these properties are for the final output render, which can be created by pressing F12.6 Timeline When animating your scene, a cursor will scroll to illustrate which
frame you’re viewing, as well as the location of cached renders and key frames.7 Interaction mode Most commonly switched between object and edit mode
with the Tab key, this menu changes how the cursor interacts with objects in your scene.8 Tool properties This will change depending on the current action. It will show
the coordinates of a transformation (T), the angles of a rotation (R) or the extent of the scale (S), for instance, and lets you enter the numbers manually.
2
3
8
7
8
4
6
5
1
LV020 076 Tutorial Blender.indd 76 04/09/2015 12:53
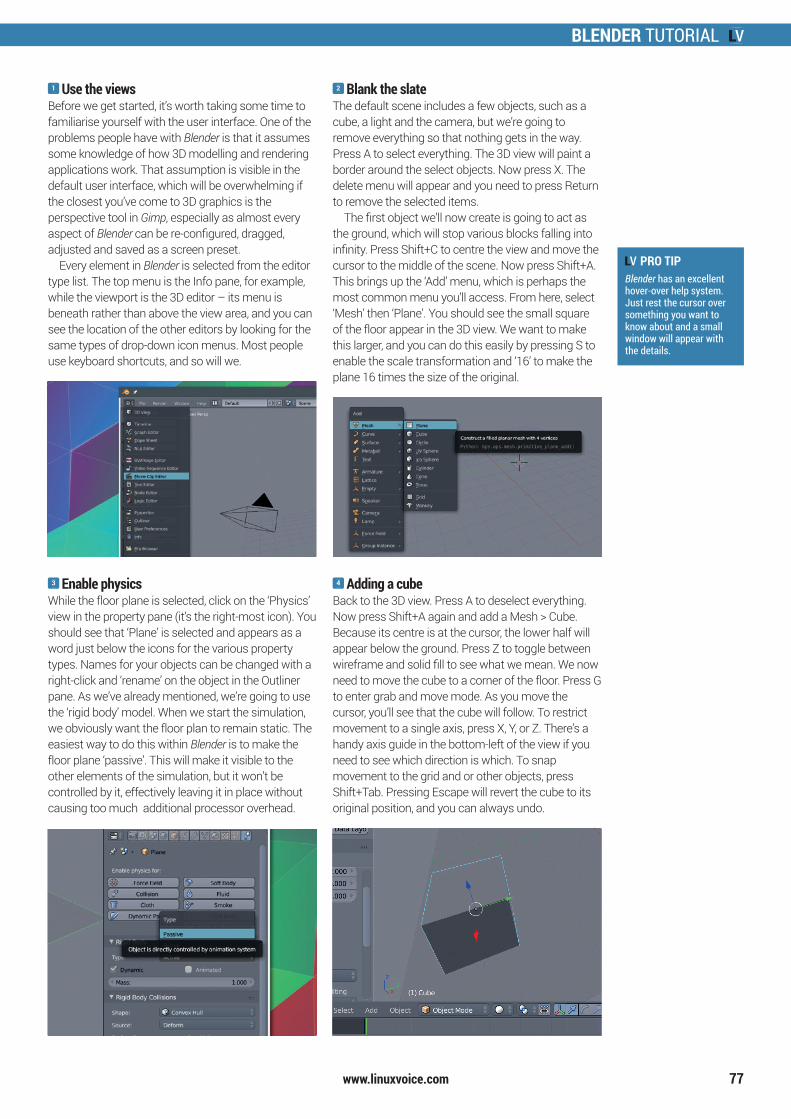
BLENDER TUTORIAL
www.linuxvoice.com 77
PRO TIPBlender has an excellent hover-over help system. Just rest the cursor over something you want to know about and a small window will appear with the details.
1 Use the viewsBefore we get started, it’s worth taking some time to familiarise yourself with the user interface. One of the problems people have with Blender is that it assumes some knowledge of how 3D modelling and rendering applications work. That assumption is visible in the default user interface, which will be overwhelming if the closest you’ve come to 3D graphics is the perspective tool in Gimp, especially as almost every aspect of Blender can be re-configured, dragged, adjusted and saved as a screen preset.
Every element in Blender is selected from the editor type list. The top menu is the Info pane, for example, while the viewport is the 3D editor – its menu is beneath rather than above the view area, and you can see the location of the other editors by looking for the same types of drop-down icon menus. Most people use keyboard shortcuts, and so will we.
2 Blank the slateThe default scene includes a few objects, such as a cube, a light and the camera, but we’re going to remove everything so that nothing gets in the way. Press A to select everything. The 3D view will paint a border around the select objects. Now press X. The delete menu will appear and you need to press Return to remove the selected items.
The first object we’ll now create is going to act as the ground, which will stop various blocks falling into infinity. Press Shift+C to centre the view and move the cursor to the middle of the scene. Now press Shift+A. This brings up the ‘Add’ menu, which is perhaps the most common menu you’ll access. From here, select ‘Mesh’ then ‘Plane’. You should see the small square of the floor appear in the 3D view. We want to make this larger, and you can do this easily by pressing S to enable the scale transformation and ‘16’ to make the plane 16 times the size of the original.
3 Enable physicsWhile the floor plane is selected, click on the ‘Physics’ view in the property pane (it’s the right-most icon). You should see that ‘Plane’ is selected and appears as a word just below the icons for the various property types. Names for your objects can be changed with a right-click and ‘rename’ on the object in the Outliner pane. As we’ve already mentioned, we’re going to use the ‘rigid body’ model. When we start the simulation, we obviously want the floor plan to remain static. The easiest way to do this within Blender is to make the floor plane ‘passive’. This will make it visible to the other elements of the simulation, but it won’t be controlled by it, effectively leaving it in place without causing too much additional processor overhead.
4 Adding a cubeBack to the 3D view. Press A to deselect everything. Now press Shift+A again and add a Mesh > Cube. Because its centre is at the cursor, the lower half will appear below the ground. Press Z to toggle between wireframe and solid fill to see what we mean. We now need to move the cube to a corner of the floor. Press G to enter grab and move mode. As you move the cursor, you’ll see that the cube will follow. To restrict movement to a single axis, press X, Y, or Z. There’s a handy axis guide in the bottom-left of the view if you need to see which direction is which. To snap movement to the grid and or other objects, press Shift+Tab. Pressing Escape will revert the cube to its original position, and you can always undo.
LV020 076 Tutorial Blender.indd 77 04/09/2015 12:53
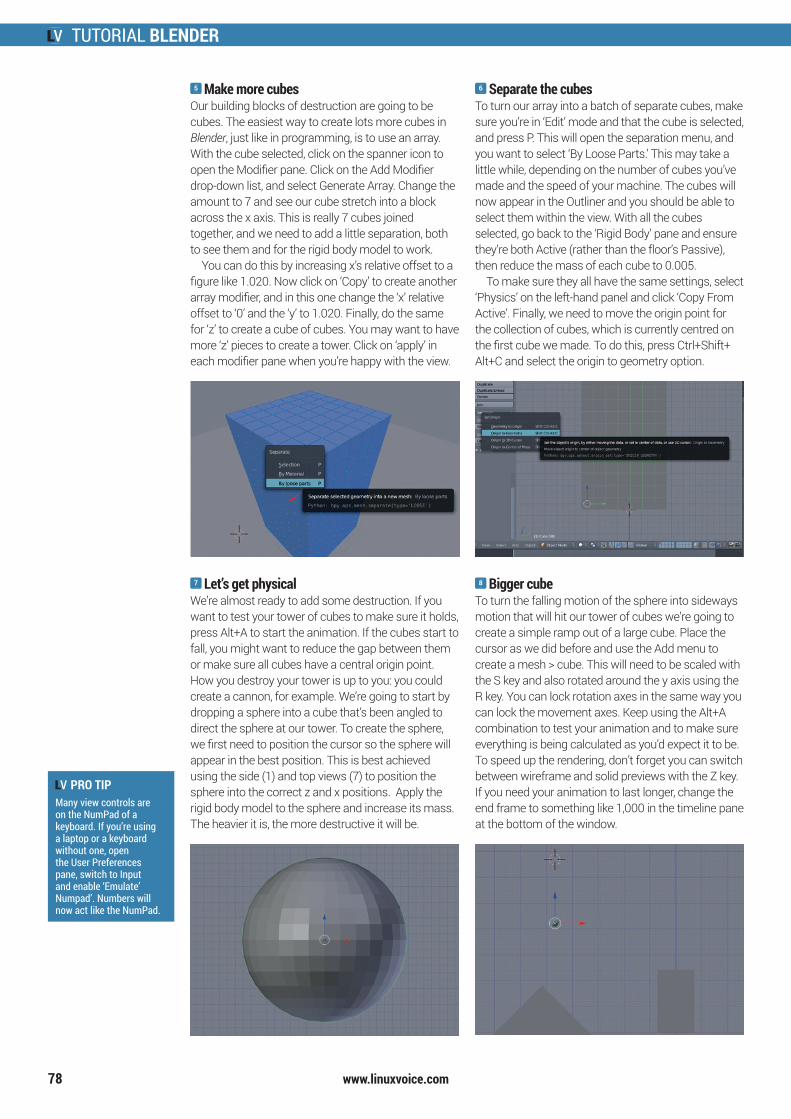
TUTORIAL BLENDER
www.linuxvoice.com78
PRO TIPMany view controls are on the NumPad of a keyboard. If you’re using a laptop or a keyboard without one, open the User Preferences pane, switch to Input and enable ‘Emulate’ Numpad’. Numbers will now act like the NumPad.
5 Make more cubesOur building blocks of destruction are going to be cubes. The easiest way to create lots more cubes in Blender, just like in programming, is to use an array. With the cube selected, click on the spanner icon to open the Modifier pane. Click on the Add Modifier drop-down list, and select Generate Array. Change the amount to 7 and see our cube stretch into a block across the x axis. This is really 7 cubes joined together, and we need to add a little separation, both to see them and for the rigid body model to work.
You can do this by increasing x’s relative offset to a figure like 1.020. Now click on ‘Copy’ to create another array modifier, and in this one change the ‘x’ relative offset to ‘0’ and the ‘y’ to 1.020. Finally, do the same for ‘z’ to create a cube of cubes. You may want to have more ‘z’ pieces to create a tower. Click on ‘apply’ in each modifier pane when you’re happy with the view.
6 Separate the cubesTo turn our array into a batch of separate cubes, make sure you’re in ‘Edit’ mode and that the cube is selected, and press P. This will open the separation menu, and you want to select ‘By Loose Parts.’ This may take a little while, depending on the number of cubes you’ve made and the speed of your machine. The cubes will now appear in the Outliner and you should be able to select them within the view. With all the cubes selected, go back to the ‘Rigid Body’ pane and ensure they’re both Active (rather than the floor’s Passive), then reduce the mass of each cube to 0.005.
To make sure they all have the same settings, select ‘Physics’ on the left-hand panel and click ‘Copy From Active’. Finally, we need to move the origin point for the collection of cubes, which is currently centred on the first cube we made. To do this, press Ctrl+Shift+ Alt+C and select the origin to geometry option.
7 Let’s get physicalWe’re almost ready to add some destruction. If you want to test your tower of cubes to make sure it holds, press Alt+A to start the animation. If the cubes start to fall, you might want to reduce the gap between them or make sure all cubes have a central origin point. How you destroy your tower is up to you: you could create a cannon, for example. We’re going to start by dropping a sphere into a cube that’s been angled to direct the sphere at our tower. To create the sphere, we first need to position the cursor so the sphere will appear in the best position. This is best achieved using the side (1) and top views (7) to position the sphere into the correct z and x positions. Apply the rigid body model to the sphere and increase its mass. The heavier it is, the more destructive it will be.
8 Bigger cubeTo turn the falling motion of the sphere into sideways motion that will hit our tower of cubes we’re going to create a simple ramp out of a large cube. Place the cursor as we did before and use the Add menu to create a mesh > cube. This will need to be scaled with the S key and also rotated around the y axis using the R key. You can lock rotation axes in the same way you can lock the movement axes. Keep using the Alt+A combination to test your animation and to make sure everything is being calculated as you’d expect it to be. To speed up the rendering, don’t forget you can switch between wireframe and solid previews with the Z key. If you need your animation to last longer, change the end frame to something like 1,000 in the timeline pane at the bottom of the window.
LV020 076 Tutorial Blender.indd 78 04/09/2015 12:53
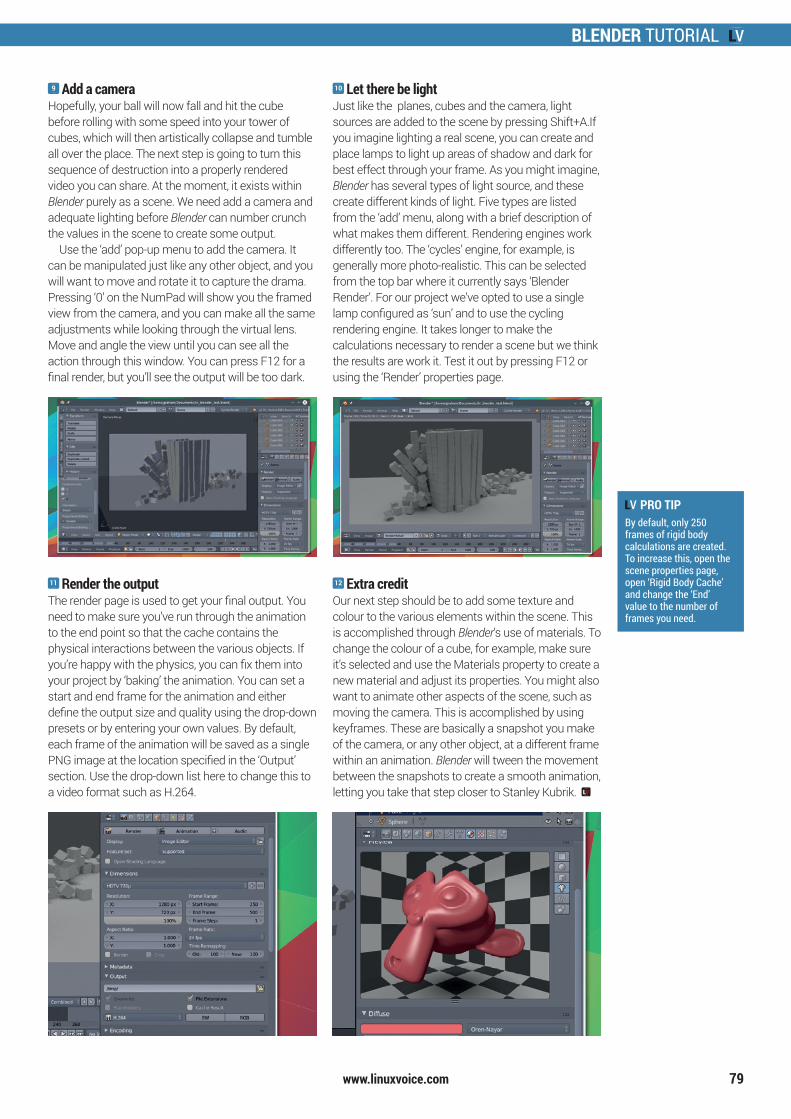
BLENDER TUTORIAL
www.linuxvoice.com 79
PRO TIPBy default, only 250 frames of rigid body calculations are created. To increase this, open the scene properties page, open ‘Rigid Body Cache’ and change the ‘End’ value to the number of frames you need.
9 Add a cameraHopefully, your ball will now fall and hit the cube before rolling with some speed into your tower of cubes, which will then artistically collapse and tumble all over the place. The next step is going to turn this sequence of destruction into a properly rendered video you can share. At the moment, it exists within Blender purely as a scene. We need add a camera and adequate lighting before Blender can number crunch the values in the scene to create some output.
Use the ‘add’ pop-up menu to add the camera. It can be manipulated just like any other object, and you will want to move and rotate it to capture the drama. Pressing ‘0’ on the NumPad will show you the framed view from the camera, and you can make all the same adjustments while looking through the virtual lens. Move and angle the view until you can see all the action through this window. You can press F12 for a final render, but you’ll see the output will be too dark.
10 Let there be lightJust like the planes, cubes and the camera, light sources are added to the scene by pressing Shift+A.If you imagine lighting a real scene, you can create and place lamps to light up areas of shadow and dark for best effect through your frame. As you might imagine, Blender has several types of light source, and these create different kinds of light. Five types are listed from the ‘add’ menu, along with a brief description of what makes them different. Rendering engines work differently too. The ‘cycles’ engine, for example, is generally more photo-realistic. This can be selected from the top bar where it currently says ‘Blender Render’. For our project we’ve opted to use a single lamp configured as ‘sun’ and to use the cycling rendering engine. It takes longer to make the calculations necessary to render a scene but we think the results are work it. Test it out by pressing F12 or using the ‘Render’ properties page.
11 Render the outputThe render page is used to get your final output. You need to make sure you’ve run through the animation to the end point so that the cache contains the physical interactions between the various objects. If you’re happy with the physics, you can fix them into your project by ‘baking’ the animation. You can set a start and end frame for the animation and either define the output size and quality using the drop-down presets or by entering your own values. By default, each frame of the animation will be saved as a single PNG image at the location specified in the ‘Output’ section. Use the drop-down list here to change this to a video format such as H.264.
12 Extra creditOur next step should be to add some texture and colour to the various elements within the scene. This is accomplished through Blender’s use of materials. To change the colour of a cube, for example, make sure it’s selected and use the Materials property to create a new material and adjust its properties. You might also want to animate other aspects of the scene, such as moving the camera. This is accomplished by using keyframes. These are basically a snapshot you make of the camera, or any other object, at a different frame within an animation. Blender will tween the movement between the snapshots to create a smooth animation, letting you take that step closer to Stanley Kubrik.
LV020 076 Tutorial Blender.indd 79 04/09/2015 12:53
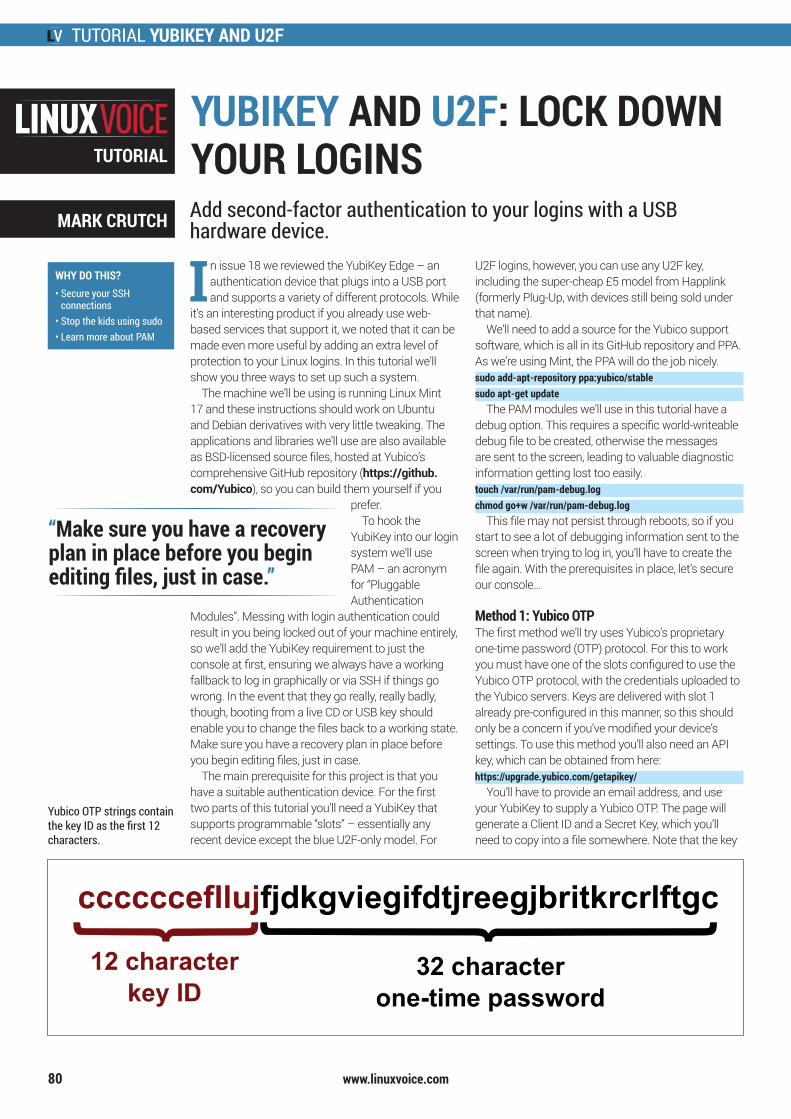
TUTORIAL YUBIKEY AND U2F
www.linuxvoice.com
In issue 18 we reviewed the YubiKey Edge – an authentication device that plugs into a USB port and supports a variety of different protocols. While
it’s an interesting product if you already use web-based services that support it, we noted that it can be made even more useful by adding an extra level of protection to your Linux logins. In this tutorial we’ll show you three ways to set up such a system.
The machine we’ll be using is running Linux Mint 17 and these instructions should work on Ubuntu and Debian derivatives with very little tweaking. The applications and libraries we’ll use are also available as BSD-licensed source files, hosted at Yubico’s comprehensive GitHub repository (https://github.com/Yubico), so you can build them yourself if you
prefer.To hook the
YubiKey into our login system we’ll use PAM – an acronym for “Pluggable Authentication
Modules”. Messing with login authentication could result in you being locked out of your machine entirely, so we’ll add the YubiKey requirement to just the console at first, ensuring we always have a working fallback to log in graphically or via SSH if things go wrong. In the event that they go really, really badly, though, booting from a live CD or USB key should enable you to change the files back to a working state. Make sure you have a recovery plan in place before you begin editing files, just in case.
The main prerequisite for this project is that you have a suitable authentication device. For the first two parts of this tutorial you’ll need a YubiKey that supports programmable “slots” – essentially any recent device except the blue U2F-only model. For
U2F logins, however, you can use any U2F key, including the super-cheap £5 model from Happlink (formerly Plug-Up, with devices still being sold under that name).
We’ll need to add a source for the Yubico support software, which is all in its GitHub repository and PPA. As we’re using Mint, the PPA will do the job nicely.sudo add-apt-repository ppa:yubico/stablesudo apt-get update
The PAM modules we’ll use in this tutorial have a debug option. This requires a specific world-writeable debug file to be created, otherwise the messages are sent to the screen, leading to valuable diagnostic information getting lost too easily.touch /var/run/pam-debug.logchmod go+w /var/run/pam-debug.log
This file may not persist through reboots, so if you start to see a lot of debugging information sent to the screen when trying to log in, you’ll have to create the file again. With the prerequisites in place, let’s secure our console…
Method 1: Yubico OTPThe first method we’ll try uses Yubico’s proprietary one-time password (OTP) protocol. For this to work you must have one of the slots configured to use the Yubico OTP protocol, with the credentials uploaded to the Yubico servers. Keys are delivered with slot 1 already pre-configured in this manner, so this should only be a concern if you’ve modified your device’s settings. To use this method you’ll also need an API key, which can be obtained from here:https://upgrade.yubico.com/getapikey/
You’ll have to provide an email address, and use your YubiKey to supply a Yubico OTP. The page will generate a Client ID and a Secret Key, which you’ll need to copy into a file somewhere. Note that the key
YUBIKEY AND U2F: LOCK DOWN YOUR LOGINSAdd second-factor authentication to your logins with a USB hardware device.
TUTORIAL
80
MARK CRUTCH
WHY DO THIS?• Secure your SSH
connections• Stop the kids using sudo• Learn more about PAM
Yubico OTP strings contain the key ID as the first 12 characters.
“Make sure you have a recovery plan in place before you begin editing files, just in case.”
LV020 080 Tutorial Yubikey.indd 80 04/09/2015 12:50
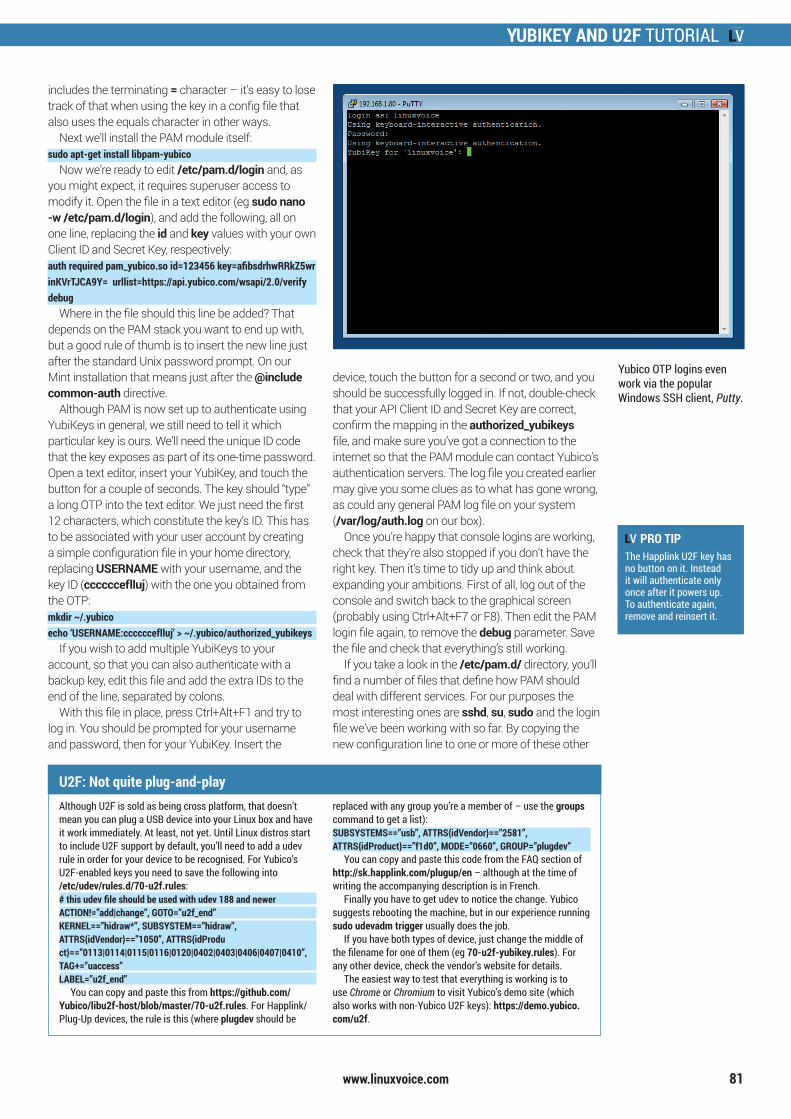
YUBIKEY AND U2F TUTORIAL
www.linuxvoice.com
includes the terminating = character – it’s easy to lose track of that when using the key in a config file that also uses the equals character in other ways.
Next we’ll install the PAM module itself:sudo apt-get install libpam-yubico
Now we’re ready to edit /etc/pam.d/login and, as you might expect, it requires superuser access to modify it. Open the file in a text editor (eg sudo nano -w /etc/pam.d/login), and add the following, all on one line, replacing the id and key values with your own Client ID and Secret Key, respectively:auth required pam_yubico.so id=123456 key=afibsdrhwRRkZ5wrinKVrTJCA9Y= urllist=https://api.yubico.com/wsapi/2.0/verify debug
Where in the file should this line be added? That depends on the PAM stack you want to end up with, but a good rule of thumb is to insert the new line just after the standard Unix password prompt. On our Mint installation that means just after the @include common-auth directive.
Although PAM is now set up to authenticate using YubiKeys in general, we still need to tell it which particular key is ours. We’ll need the unique ID code that the key exposes as part of its one-time password. Open a text editor, insert your YubiKey, and touch the button for a couple of seconds. The key should “type” a long OTP into the text editor. We just need the first 12 characters, which constitute the key’s ID. This has to be associated with your user account by creating a simple configuration file in your home directory, replacing USERNAME with your username, and the key ID (cccccceflluj) with the one you obtained from the OTP:mkdir ~/.yubicoecho ‘USERNAME:cccccceflluj’ > ~/.yubico/authorized_yubikeys
If you wish to add multiple YubiKeys to your account, so that you can also authenticate with a backup key, edit this file and add the extra IDs to the end of the line, separated by colons.
With this file in place, press Ctrl+Alt+F1 and try to log in. You should be prompted for your username and password, then for your YubiKey. Insert the
device, touch the button for a second or two, and you should be successfully logged in. If not, double-check that your API Client ID and Secret Key are correct, confirm the mapping in the authorized_yubikeys file, and make sure you’ve got a connection to the internet so that the PAM module can contact Yubico’s authentication servers. The log file you created earlier may give you some clues as to what has gone wrong, as could any general PAM log file on your system (/var/log/auth.log on our box).
Once you’re happy that console logins are working, check that they’re also stopped if you don’t have the right key. Then it’s time to tidy up and think about expanding your ambitions. First of all, log out of the console and switch back to the graphical screen (probably using Ctrl+Alt+F7 or F8). Then edit the PAM login file again, to remove the debug parameter. Save the file and check that everything’s still working.
If you take a look in the /etc/pam.d/ directory, you’ll find a number of files that define how PAM should deal with different services. For our purposes the most interesting ones are sshd, su, sudo and the login file we’ve been working with so far. By copying the new configuration line to one or more of these other
81
Yubico OTP logins even work via the popular Windows SSH client, Putty.
U2F: Not quite plug-and-playAlthough U2F is sold as being cross platform, that doesn’t mean you can plug a USB device into your Linux box and have it work immediately. At least, not yet. Until Linux distros start to include U2F support by default, you’ll need to add a udev rule in order for your device to be recognised. For Yubico’s U2F-enabled keys you need to save the following into /etc/udev/rules.d/70-u2f.rules:# this udev file should be used with udev 188 and newer ACTION!=”add|change”, GOTO=”u2f_end” KERNEL==”hidraw*”, SUBSYSTEM==”hidraw”, ATTRS{idVendor}==”1050”, ATTRS{idProduct}==”0113|0114|0115|0116|0120|0402|0403|0406|0407|0410”, TAG+=”uaccess” LABEL=”u2f_end”
You can copy and paste this from https://github.com/Yubico/libu2f-host/blob/master/70-u2f.rules. For Happlink/Plug-Up devices, the rule is this (where plugdev should be
replaced with any group you’re a member of – use the groups command to get a list):SUBSYSTEMS==”usb”, ATTRS{idVendor}==”2581”, ATTRS{idProduct}==”f1d0”, MODE=”0660”, GROUP=”plugdev”
You can copy and paste this code from the FAQ section of http://sk.happlink.com/plugup/en – although at the time of writing the accompanying description is in French.
Finally you have to get udev to notice the change. Yubico suggests rebooting the machine, but in our experience running sudo udevadm trigger usually does the job.
If you have both types of device, just change the middle of the filename for one of them (eg 70-u2f-yubikey.rules). For any other device, check the vendor’s website for details.
The easiest way to test that everything is working is to use Chrome or Chromium to visit Yubico’s demo site (which also works with non-Yubico U2F keys): https://demo.yubico.com/u2f.
PRO TIPThe Happlink U2F key has no button on it. Instead it will authenticate only once after it powers up. To authenticate again, remove and reinsert it.
LV020 080 Tutorial Yubikey.indd 81 04/09/2015 12:50

TUTORIAL YUBIKEY AND U2F
www.linuxvoice.com82
files you can ensure that a hardware key is required to make an ssh connection, or to gain superuser rights. If you want to add YubiKey support to your graphical login the file you’ll need to modify will depend on the X display manager you use, but will likely be gdm,
kdm, mdm, lightdm – or some other file ending in “dm”.
To get this working with the OpenSSH server, you’ll also need to
modify your /etc/ssh/sshd_config file, setting the ChallengeResponseAuthentication parameter to yes. While changes to the PAM files don’t require anything to be restarted, modifying sshd_config won’t have any effect until you restart the SSH daemon. Once it’s set up, however, the great thing about Yubico’s OTP implementation is that the YubiKey just acts like a keyboard. There are no drivers to install, regardless of OS, and it even works with “foreign” SSH clients, such as PuTTY on Windows.
Method 2: Challenge–responseUnfortunately there’s a rather large elephant in the room. Once you enable Yubico OTP, every time you log in using your YubiKey a request is sent to Yubico’s servers to authenticate you. This means that they know when you logged in, and the public-facing IP address of the machine you logged into. They can’t tell why you’re authenticating: it could be an SSH connection, a local login, or even a WordPress installation that has nothing to do with PAM. They also can’t tell the IP address of the client machine you’re using SSH on. Nevertheless, many of our readers will be rightly concerned about leaking any additional information to a third party. You can run your own private authentication server to avoid this,
but it’s a rather involved process if all you want to do is stop the kids using sudo.
An associated issue is the requirement for an internet connection to make the authentication request. What happens if your network goes down, or you’re using a laptop without a network connection? Finding yourself unable to log in without a working network is an obvious limitation to this approach.
As an alternative, you can use the YubiKey in challenge-response mode. In this case the computer sends a random string to the key, which responds by encrypting it and returning the result. If the response matches the one that the computer is expecting, the authentication succeeds. There are no other machines involved, and no need for a network connection.
To use this method, we’ll activate challenge-response mode on slot 2 of the YubiKey. This is done via a configuration tool that allows you to control a wide variety of options on your key. There are both graphical and command-line versions in the PPA we added previously. We’ll install both, but you can just use one or the other if you prefer.sudo apt-get install yubikey-personalization yubikey-personalization-gui
If you use the GUI, launch the application then insert your YubiKey and wait for its details to appear in the right of the window. Select Challenge-Response from the top of the application, then click the HMAC-SHA1 button. Choose Slot 2 and leave the Require User Input option unchecked. Click the Generate button to create a secret key for your device. Finally, click on the Write Configuration button. If you prefer to use the command line, this will do the same job:ykpersonalize -2 -ochal-resp -ochal-hmac -ohmac-lt64 -oserial-api-visible
Now you can record an initial random challenge, and the response that the key should produce. If you already have a .yubico directory from trying Method 1, you can skip the first line.mkdir ~/.yubicoykpamcfg -2 -v
A file will be created called challenge-0123456 where the numbers correspond to the serial number of your YubiKey. If you’ve configured your key to hide its serial number, or you want to use a system-wide directory for storing the challenge-response files (required if your home directory is encrypted), things are slightly different. Take a look at the docs on GitHub, or the ykpamcfg man page, for more details.
It’s time to edit /etc/pam.d/login once again. Comment out your line from Method 1, if you have one, by putting a # in front of it, then add this below it:auth required pam_yubico.so mode=challenge-response debug
Switch to the console, insert your YubiKey, and log in. You shouldn’t see any additional YubiKey prompt this time, as the challenge-response communication all happens in the background, with the PAM module talking directly to your key. In fact it talks to the key twice – first to confirm the current challenge-response, then once it knows the device is the
You can use the GUI Personalisation Tool to configure challenge-response mode on a YubiKey.
“A small amount of information leakage is worth the trade-off for the extra security it adds.”
PRO TIPYou can make a cheap U2F key feel less flimsy by using Sugru to mould a more robust body.
LV020 080 Tutorial Yubikey.indd 82 04/09/2015 12:50
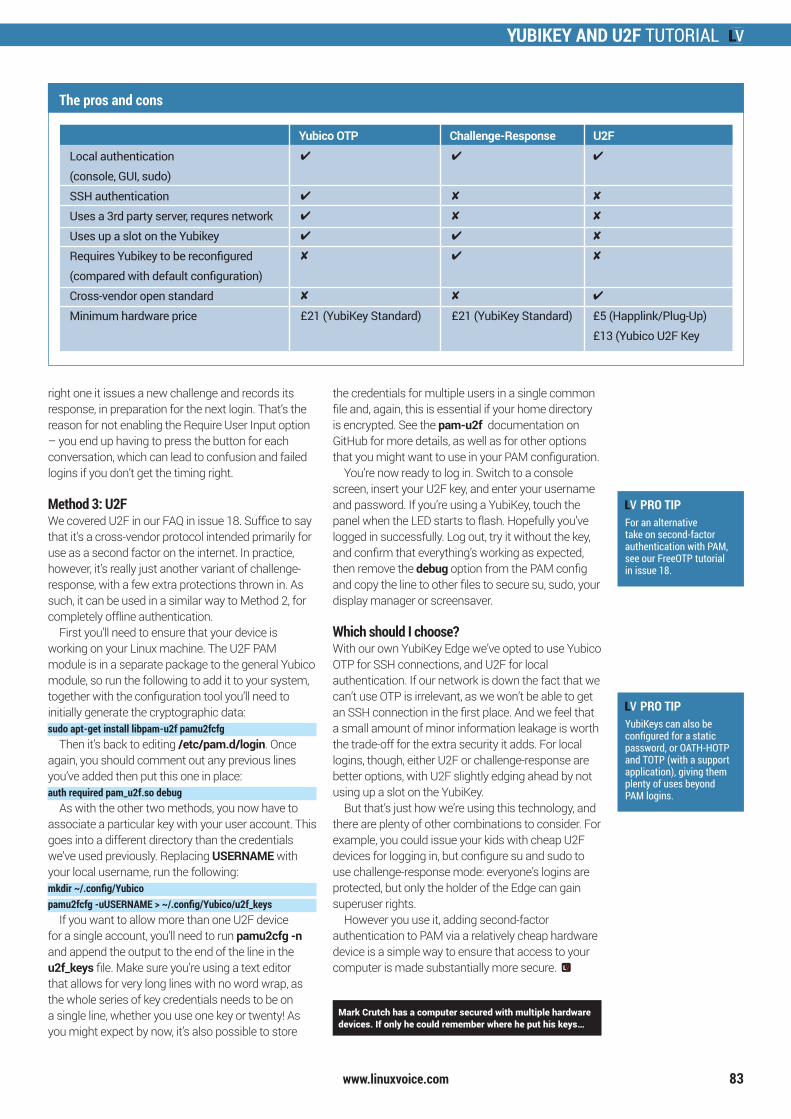
YUBIKEY AND U2F TUTORIAL
www.linuxvoice.com 83
right one it issues a new challenge and records its response, in preparation for the next login. That’s the reason for not enabling the Require User Input option – you end up having to press the button for each conversation, which can lead to confusion and failed logins if you don’t get the timing right.
Method 3: U2FWe covered U2F in our FAQ in issue 18. Suffice to say that it’s a cross-vendor protocol intended primarily for use as a second factor on the internet. In practice, however, it’s really just another variant of challenge-response, with a few extra protections thrown in. As such, it can be used in a similar way to Method 2, for completely offline authentication.
First you’ll need to ensure that your device is working on your Linux machine. The U2F PAM module is in a separate package to the general Yubico module, so run the following to add it to your system, together with the configuration tool you’ll need to initially generate the cryptographic data:sudo apt-get install libpam-u2f pamu2fcfg
Then it’s back to editing /etc/pam.d/login. Once again, you should comment out any previous lines you’ve added then put this one in place:auth required pam_u2f.so debug
As with the other two methods, you now have to associate a particular key with your user account. This goes into a different directory than the credentials we’ve used previously. Replacing USERNAME with your local username, run the following:mkdir ~/.config/Yubicopamu2fcfg -uUSERNAME > ~/.config/Yubico/u2f_keys
If you want to allow more than one U2F device for a single account, you’ll need to run pamu2cfg -n and append the output to the end of the line in the u2f_keys file. Make sure you’re using a text editor that allows for very long lines with no word wrap, as the whole series of key credentials needs to be on a single line, whether you use one key or twenty! As you might expect by now, it’s also possible to store
the credentials for multiple users in a single common file and, again, this is essential if your home directory is encrypted. See the pam-u2f documentation on GitHub for more details, as well as for other options that you might want to use in your PAM configuration.
You’re now ready to log in. Switch to a console screen, insert your U2F key, and enter your username and password. If you’re using a YubiKey, touch the panel when the LED starts to flash. Hopefully you’ve logged in successfully. Log out, try it without the key, and confirm that everything’s working as expected, then remove the debug option from the PAM config and copy the line to other files to secure su, sudo, your display manager or screensaver.
Which should I choose?With our own YubiKey Edge we’ve opted to use Yubico OTP for SSH connections, and U2F for local authentication. If our network is down the fact that we can’t use OTP is irrelevant, as we won’t be able to get an SSH connection in the first place. And we feel that a small amount of minor information leakage is worth the trade-off for the extra security it adds. For local logins, though, either U2F or challenge-response are better options, with U2F slightly edging ahead by not using up a slot on the YubiKey.
But that’s just how we’re using this technology, and there are plenty of other combinations to consider. For example, you could issue your kids with cheap U2F devices for logging in, but configure su and sudo to use challenge-response mode: everyone’s logins are protected, but only the holder of the Edge can gain superuser rights.
However you use it, adding second-factor authentication to PAM via a relatively cheap hardware device is a simple way to ensure that access to your computer is made substantially more secure.
Mark Crutch has a computer secured with multiple hardware devices. If only he could remember where he put his keys…
The pros and cons
PRO TIPFor an alternative take on second-factor authentication with PAM, see our FreeOTP tutorial in issue 18.
PRO TIPYubiKeys can also be configured for a static password, or OATH-HOTP and TOTP (with a support application), giving them plenty of uses beyond PAM logins.
Local authentication
(console, GUI, sudo)
SSH authentication
Uses a 3rd party server, requres network
Uses up a slot on the Yubikey
Requires Yubikey to be reconfigured
(compared with default configuration)
Cross-vendor open standard
Minimum hardware price
Yubico OTP Challenge-Response U2F✔
✔
✔
✔
✘
✘
£21 (YubiKey Standard)
✔
✘
✘
✔
✔
✘
£21 (YubiKey Standard)
✔
✘
✘
✘
✘
✔
£5 (Happlink/Plug-Up)
£13 (Yubico U2F Key
LV020 080 Tutorial Yubikey.indd 83 04/09/2015 12:50
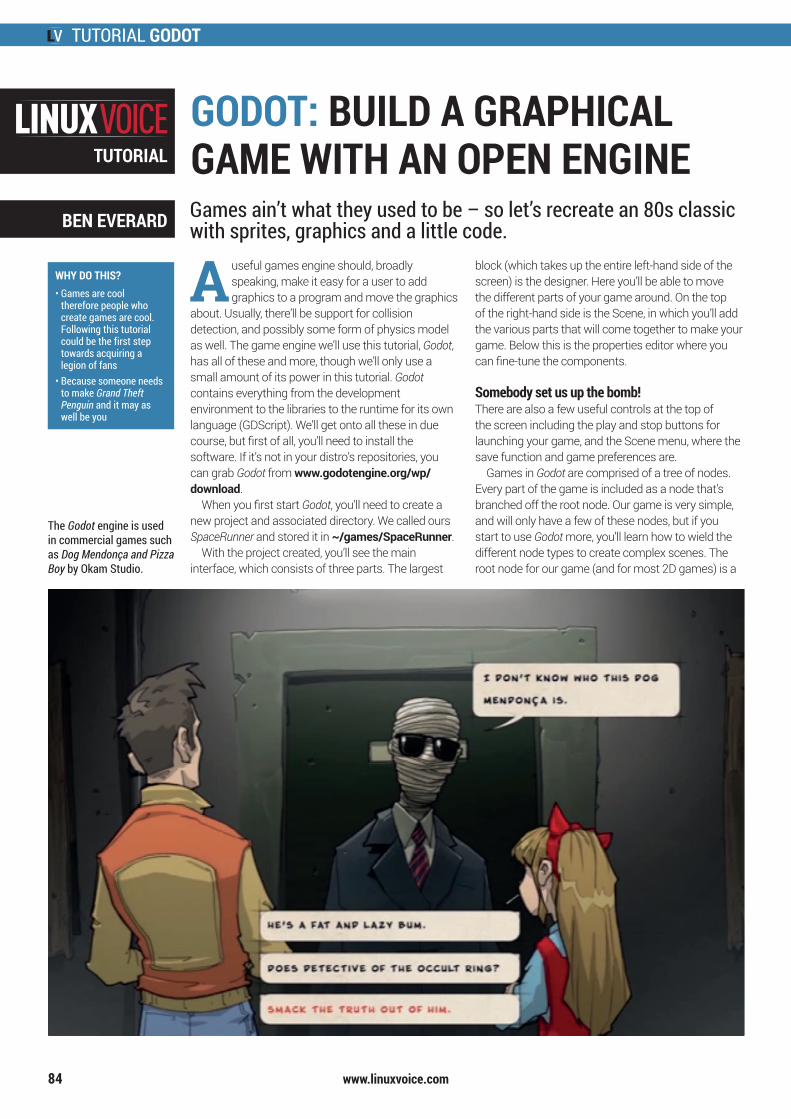
TUTORIAL GODOT
www.linuxvoice.com
Auseful games engine should, broadly speaking, make it easy for a user to add graphics to a program and move the graphics
about. Usually, there’ll be support for collision detection, and possibly some form of physics model as well. The game engine we’ll use this tutorial, Godot, has all of these and more, though we’ll only use a small amount of its power in this tutorial. Godot contains everything from the development environment to the libraries to the runtime for its own language (GDScript). We’ll get onto all these in due course, but first of all, you’ll need to install the software. If it’s not in your distro’s repositories, you can grab Godot from www.godotengine.org/wp/download.
When you first start Godot, you’ll need to create a new project and associated directory. We called ours SpaceRunner and stored it in ~/games/SpaceRunner.
With the project created, you’ll see the main interface, which consists of three parts. The largest
block (which takes up the entire left-hand side of the screen) is the designer. Here you’ll be able to move the different parts of your game around. On the top of the right-hand side is the Scene, in which you’ll add the various parts that will come together to make your game. Below this is the properties editor where you can fine-tune the components.
Somebody set us up the bomb!There are also a few useful controls at the top of the screen including the play and stop buttons for launching your game, and the Scene menu, where the save function and game preferences are.
Games in Godot are comprised of a tree of nodes. Every part of the game is included as a node that’s branched off the root node. Our game is very simple, and will only have a few of these nodes, but if you start to use Godot more, you’ll learn how to wield the different node types to create complex scenes. The root node for our game (and for most 2D games) is a
GODOT: BUILD A GRAPHICAL GAME WITH AN OPEN ENGINE Games ain’t what they used to be – so let’s recreate an 80s classic with sprites, graphics and a little code.
TUTORIAL
84
BEN EVERARD
WHY DO THIS?• Games are cool
therefore people who create games are cool. Following this tutorial could be the first step towards acquiring a legion of fans
• Because someone needs to make Grand Theft Penguin and it may as well be you
The Godot engine is used in commercial games such as Dog Mendonça and Pizza Boy by Okam Studio.
LV020 084 Tutorial Godot.indd 84 03/09/2015 12:51
GODOT TUTORIAL
www.linuxvoice.com
Node2D. To add this to game, go to the Scene tab at the top right-hand side of the screen and click the Add button (with the rectangular icon). In the popup, you will find Node2D in the list; highlight it and click Create.
This will add the node to the scene list and the design pane. We want this node to take up the whole of the screen, so in the design pane, resize it so that it fills the blue rectangle. You can change the name of nodes by double clicking on their entry in the scene list. You should change them to something more memorable than the generic names they’re given. The Node2D is the container for the whole game, so we called ours wholeGame.
Now you have the main game node, you need to add sub nodes for the items in the game. Different nodes have different properties that you can use. We’ll keep things simple and just add sprites that are used to display images on the screen.
The game we’re going to create is a simple space flight game. The aim is to pilot a spaceship through a field of asteroids without hitting any of them. The longer you go without hitting any, the faster the asteroids will come at you and the harder it will get. Therefore we’ll need sprites for the ship and the asteroids. For now, we’ll just add one asteroid but we’ll clone this later to create more.
These sprites need to be created directly under the main Node2D node, so with that highlighted, click on the Add Node icon again and select Sprite. You’ll need to do this twice to create both sprites. If you’ve done this correctly, the wholeGame node will now have an arrow next to it to collapse and expand the list. If any of the other nodes have arrows next to them, then you’ve added a node at the wrong level and you’ll have to delete it and start again, making sure that the wholeGame node is highlighted before you click on the Add Node icon. Once you’re created the sprites, rename them Ship and Asteroid0.
The main property the sprites need is the images they’ll display (we need one to have a spaceship icon and one to have an asteroid icon). You could create these yourself if you’re handy with digital drawing
tools, but we prefer to grab open source artwork from opengameart.org. There’s a load of graphics on there if you want to search for your own, but we went with the yellow spaceship from http://opengameart.org/content/spaceship-fighter-ipod1, and the asteroid from http://opengameart.org/content/asteroids. The latter of those links downloads a Zip file, and we used the image medium/a0001.png, though you could use others if you wish.
For great justice…These images need to be copied into the game folder that you selected when you first created the project. Once they’re there, you can add them to the sprite. First highlight the sprite in the Scene list, then in the Properties pane, use the dropdown on the Textures property to select Load File. This will open a dialog box where you can select the appropriate image. Once you’ve done this for both sprites, resize them in the design pane to the appropriate size for the game. You can also add
85
Figure 1. This is how your game should look with the asteroids and spaceship laid out. You can change the sizes to make the game harder or easier.
“The aim is to pilot a spaceship through a field of asteroids without hitting any of them.”
Features of Godot Everything you need to create a AAA masterpieceWhen you’ve created your first project, you can go a little deeper into the Godot game engine. There are a wide variety of features that we haven’t covered here, including:
Animated Sprites The simplest way to give your images a little more interest is to make them move. Parallax backgrounds Move the background at different speeds to give the illusion of depth in 2D games. Physics engine Our game has an incredibly simple physics rule where everything just gets faster until you hit something. Most games will need a more complex approach, and Godot has everything you need built in. Import Blender models You can bring in assets from most popular 3D tools.
Skeleton deforms Give your 3D models realistic movements by building them around an interconnected rigid structure. User interface builder Help your users get the best out of your games with a custom-made GUI.
You can download a set of demos from the Godot website that demonstrate the features of the engine.
LV020 084 Tutorial Godot.indd 85 03/09/2015 12:51
TUTORIAL GODOT
www.linuxvoice.com86
more asteroids by highlighting the asteroid sprite and pressing Ctrl+D. You should spread the asteroids out across the scene, and place the spaceship sprite near the bottom edge. It should all look like figure 1.
As well as controlling graphics, a game engine should usually help you get input from the user. In Godot this is done with named controls. This enables you to create a specific action that you want the user to be able to perform, then easily link it to different input methods such as a keypress or joystick movement. Our simple game has just two controls: left and right spaceship movements. To create these
controls go to Scene > Project Setting > Input Map. In the action box, enter move_left, then click Add. This will add an entry to the actions
list. Click on the plus icon next to the new action, select key input and then press the key you want to use to move the ship left. Once this is set up, repeat the procedure to create the move_right action.
All your sprites are belong to usThis is everything set up for our game. We just need to write the code to bring everything together.
GDScript is a dynamically-typed interpreted language loosely based on Python. You can use it to create scripts attached to nodes that run as callbacks when things happen, which means that the typical game will be made up of many small scripts rather than one large one. Our game, though, is so basic that it’ll just be a single simple script, attached to the Node2D node called wholeGame. To create it, highlight the wholeGame node in the scene list and click on the script icon (the stylised S on the right-hand side of the toolbar). In the popup, you’ll need to enter a path (this can be the same as the game directory) then click on Create.
The script editor is a text editor with syntax highlighting and code completion. The blank script will extend the Node2D class and have a function called _ready(). The structure of our code will be:extends Node2D#setup variablesfunc _ready(): #initialise datafunc _process(delta): #move ship #for each asteroid #move asteroid #check if asteroid has hit ship. #speed up
Each of the comment lines (which start with a hash) will be replaced in our final program with a block of code. Like Python, GDScript uses indentation levels to determine which block a particular line of code is in, so it’s important to keep consistent in your use of tabs or spaces when following this tutorial.
First we need to set up the variables. In GDScript, variables need to be declared using the var keyword, but only global variables need to be declared at the start. Local variables (as you will see) can be declared as and when they’re needed. To define the global variables we’ll use, change the #setup variables line to:var ship_sizevar ship_speed = 20var rock_speed = 20
The two speed variables can be tweaked to change the gameplay if you like. The ship_size variable holds the size of the ship, and we’ll use it later on when working out the interactions with the asteroids. It’s calculated in the _ready function, which is also used to start the _process running. Once this is set, Godot will continue to loop through the function until it’s stopped. The ready function is:func _ready(): ship_size = get_node(“ship”).get_texture().get_size() * get_node(“ship”).get_scale() set_process(true)
As you can see, GDScript can interact with the nodes in the game using functions and methods to get particular pieces of information. This can be used to grab any of the properties of the node. In this case, we just need the size and scale of the ship sprite.
The last bit of our code is the _process function. Each time this runs, it gets passed a single parameter, which is the time it took to run the previous iteration of the loop. We call this delta, and it’s used to calculate how far to move the sprites. By using this value, we can ensure that we keep moving at a fixed speed (in terms of pixels per second) regardless of how fast the particular computer runs at.
The _process function will hold most of our game logic, but let’s just start with moving the ship. All we do in this bit of code is get the current position of the code, check that the ship isn’t on the edge of the screen and that the input button is pressed (based on the actions we set up earlier). If this is the case, then
Godot is well documented on the project’s GitHub wiki at https://github.com/okamstudio/godot/wiki.
“Like Python, GDScript uses indentation levels to determine which block a line of code is in.”
LV020 084 Tutorial Godot.indd 86 03/09/2015 12:51
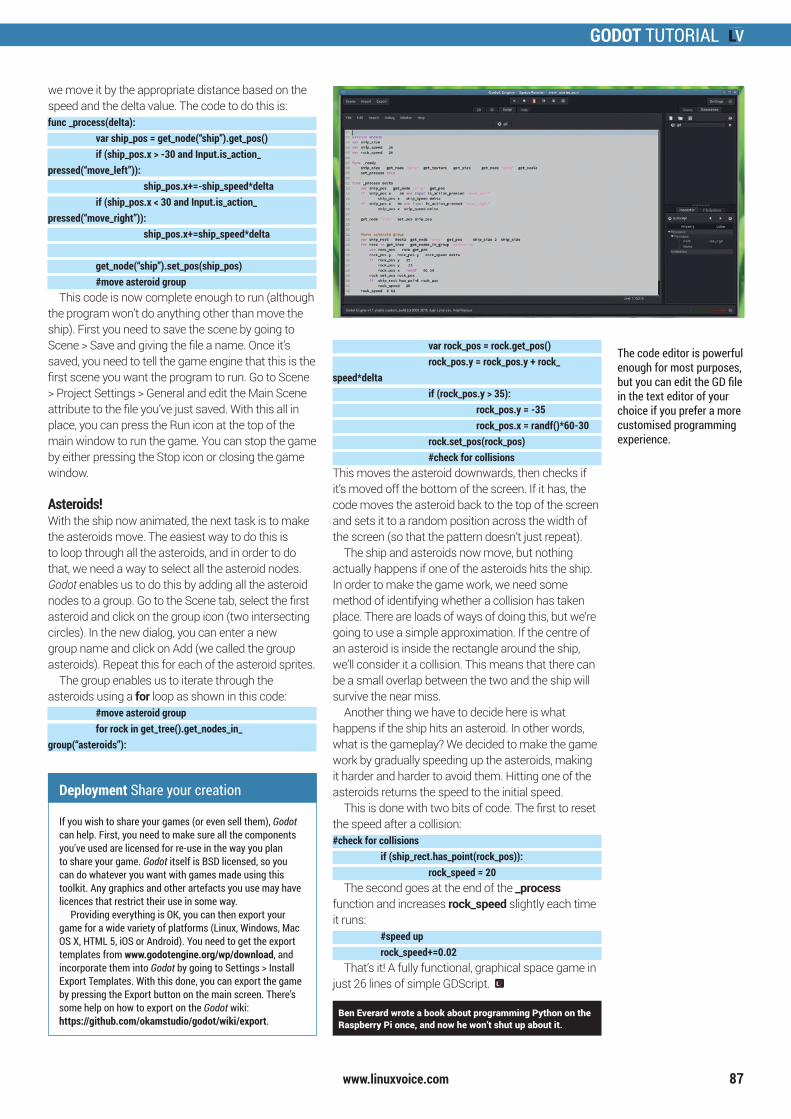
GODOT TUTORIAL
www.linuxvoice.com 87
we move it by the appropriate distance based on the speed and the delta value. The code to do this is:func _process(delta): var ship_pos = get_node(“ship”).get_pos() if (ship_pos.x > -30 and Input.is_action_pressed(“move_left”)): ship_pos.x+=-ship_speed*delta if (ship_pos.x < 30 and Input.is_action_pressed(“move_right”)): ship_pos.x+=ship_speed*delta
get_node(“ship”).set_pos(ship_pos) #move asteroid group
This code is now complete enough to run (although the program won’t do anything other than move the ship). First you need to save the scene by going to Scene > Save and giving the file a name. Once it’s saved, you need to tell the game engine that this is the first scene you want the program to run. Go to Scene > Project Settings > General and edit the Main Scene attribute to the file you’ve just saved. With this all in place, you can press the Run icon at the top of the main window to run the game. You can stop the game by either pressing the Stop icon or closing the game window.
Asteroids!With the ship now animated, the next task is to make the asteroids move. The easiest way to do this is to loop through all the asteroids, and in order to do that, we need a way to select all the asteroid nodes. Godot enables us to do this by adding all the asteroid nodes to a group. Go to the Scene tab, select the first asteroid and click on the group icon (two intersecting circles). In the new dialog, you can enter a new group name and click on Add (we called the group asteroids). Repeat this for each of the asteroid sprites.
The group enables us to iterate through the asteroids using a for loop as shown in this code: #move asteroid group for rock in get_tree().get_nodes_in_group(“asteroids”):
var rock_pos = rock.get_pos() rock_pos.y = rock_pos.y + rock_speed*delta if (rock_pos.y > 35): rock_pos.y = -35 rock_pos.x = randf()*60-30 rock.set_pos(rock_pos) #check for collisionsThis moves the asteroid downwards, then checks if it’s moved off the bottom of the screen. If it has, the code moves the asteroid back to the top of the screen and sets it to a random position across the width of the screen (so that the pattern doesn’t just repeat).
The ship and asteroids now move, but nothing actually happens if one of the asteroids hits the ship. In order to make the game work, we need some method of identifying whether a collision has taken place. There are loads of ways of doing this, but we’re going to use a simple approximation. If the centre of an asteroid is inside the rectangle around the ship, we’ll consider it a collision. This means that there can be a small overlap between the two and the ship will survive the near miss.
Another thing we have to decide here is what happens if the ship hits an asteroid. In other words, what is the gameplay? We decided to make the game work by gradually speeding up the asteroids, making it harder and harder to avoid them. Hitting one of the asteroids returns the speed to the initial speed.
This is done with two bits of code. The first to reset the speed after a collision:#check for collisions if (ship_rect.has_point(rock_pos)): rock_speed = 20
The second goes at the end of the _process function and increases rock_speed slightly each time it runs: #speed up rock_speed+=0.02
That’s it! A fully functional, graphical space game in just 26 lines of simple GDScript.
Ben Everard wrote a book about programming Python on the Raspberry Pi once, and now he won’t shut up about it.
Deployment Share your creation
If you wish to share your games (or even sell them), Godot can help. First, you need to make sure all the components you’ve used are licensed for re-use in the way you plan to share your game. Godot itself is BSD licensed, so you can do whatever you want with games made using this toolkit. Any graphics and other artefacts you use may have licences that restrict their use in some way.
Providing everything is OK, you can then export your game for a wide variety of platforms (Linux, Windows, Mac OS X, HTML 5, iOS or Android). You need to get the export templates from www.godotengine.org/wp/download, and incorporate them into Godot by going to Settings > Install Export Templates. With this done, you can export the game by pressing the Export button on the main screen. There’s some help on how to export on the Godot wiki: https://github.com/okamstudio/godot/wiki/export.
The code editor is powerful enough for most purposes, but you can edit the GD file in the text editor of your choice if you prefer a more customised programming experience.
LV020 084 Tutorial Godot.indd 87 03/09/2015 12:51
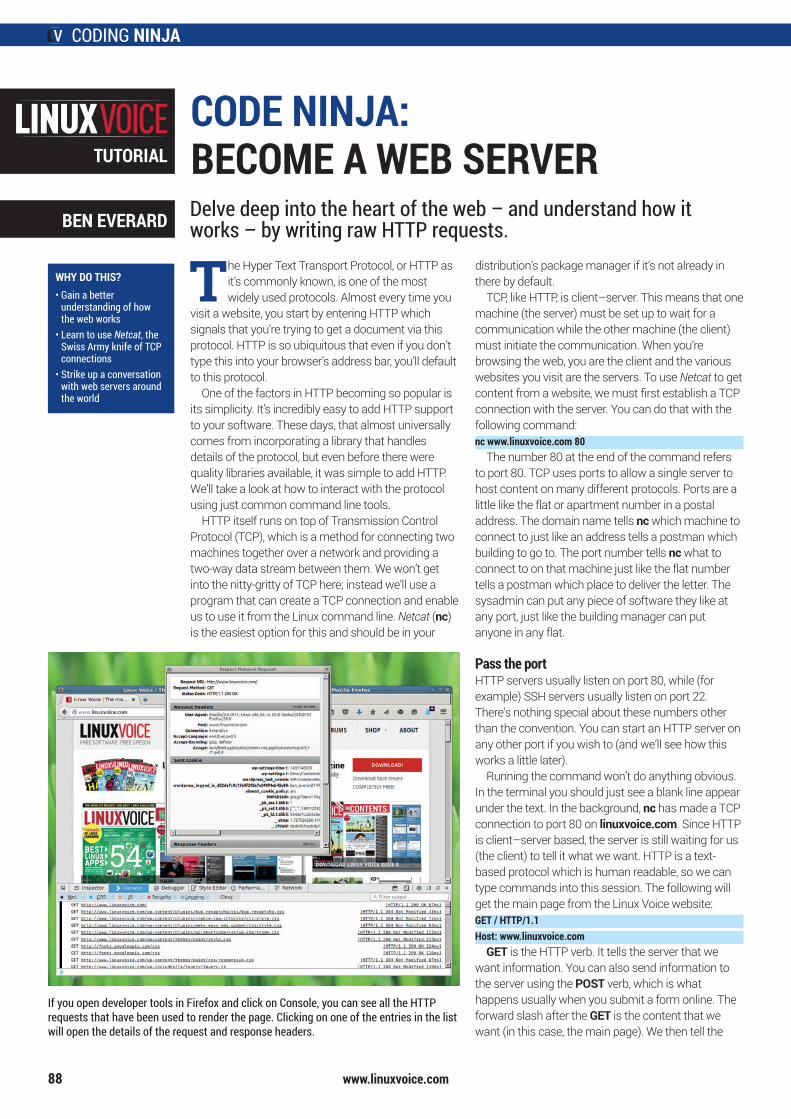
CODING NINJA
www.linuxvoice.com
WHY DO THIS?• Gain a better
understanding of how the web works
• Learn to use Netcat, the Swiss Army knife of TCP connections
• Strike up a conversation with web servers around the world
The Hyper Text Transport Protocol, or HTTP as it’s commonly known, is one of the most widely used protocols. Almost every time you
visit a website, you start by entering HTTP which signals that you’re trying to get a document via this protocol. HTTP is so ubiquitous that even if you don’t type this into your browser’s address bar, you’ll default to this protocol.
One of the factors in HTTP becoming so popular is its simplicity. It’s incredibly easy to add HTTP support to your software. These days, that almost universally comes from incorporating a library that handles details of the protocol, but even before there were quality libraries available, it was simple to add HTTP. We’ll take a look at how to interact with the protocol using just common command line tools.
HTTP itself runs on top of Transmission Control Protocol (TCP), which is a method for connecting two machines together over a network and providing a two-way data stream between them. We won’t get into the nitty-gritty of TCP here; instead we’ll use a program that can create a TCP connection and enable us to use it from the Linux command line. Netcat (nc) is the easiest option for this and should be in your
distribution’s package manager if it’s not already in there by default.
TCP, like HTTP, is client–server. This means that one machine (the server) must be set up to wait for a communication while the other machine (the client) must initiate the communication. When you’re browsing the web, you are the client and the various websites you visit are the servers. To use Netcat to get content from a website, we must first establish a TCP connection with the server. You can do that with the following command:nc www.linuxvoice.com 80
The number 80 at the end of the command refers to port 80. TCP uses ports to allow a single server to host content on many different protocols. Ports are a little like the flat or apartment number in a postal address. The domain name tells nc which machine to connect to just like an address tells a postman which building to go to. The port number tells nc what to connect to on that machine just like the flat number tells a postman which place to deliver the letter. The sysadmin can put any piece of software they like at any port, just like the building manager can put anyone in any flat.
Pass the portHTTP servers usually listen on port 80, while (for example) SSH servers usually listen on port 22. There’s nothing special about these numbers other than the convention. You can start an HTTP server on any other port if you wish to (and we’ll see how this works a little later).
Running the command won’t do anything obvious. In the terminal you should just see a blank line appear under the text. In the background, nc has made a TCP connection to port 80 on linuxvoice.com. Since HTTP is client–server based, the server is still waiting for us (the client) to tell it what we want. HTTP is a text-based protocol which is human readable, so we can type commands into this session. The following will get the main page from the Linux Voice website:GET / HTTP/1.1Host: www.linuxvoice.com
GET is the HTTP verb. It tells the server that we want information. You can also send information to the server using the POST verb, which is what happens usually when you submit a form online. The forward slash after the GET is the content that we want (in this case, the main page). We then tell the
CODE NINJA: BECOME A WEB SERVERDelve deep into the heart of the web – and understand how it works – by writing raw HTTP requests.
TUTORIAL
88
BEN EVERARD
If you open developer tools in Firefox and click on Console, you can see all the HTTP requests that have been used to render the page. Clicking on one of the entries in the list will open the details of the request and response headers.
LV020 088 Coding Ninja.indd 88 03/09/2015 13:44
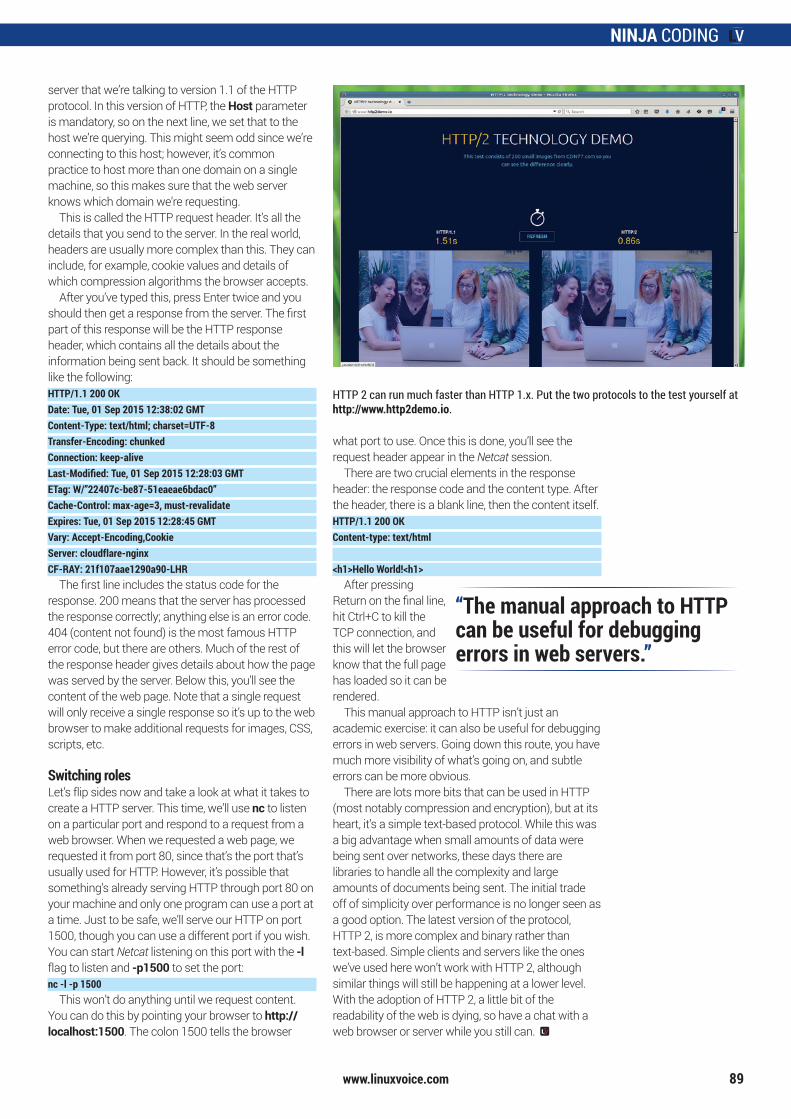
NINJA CODING
www.linuxvoice.com 89
server that we’re talking to version 1.1 of the HTTP protocol. In this version of HTTP, the Host parameter is mandatory, so on the next line, we set that to the host we’re querying. This might seem odd since we’re connecting to this host; however, it’s common practice to host more than one domain on a single machine, so this makes sure that the web server knows which domain we’re requesting.
This is called the HTTP request header. It’s all the details that you send to the server. In the real world, headers are usually more complex than this. They can include, for example, cookie values and details of which compression algorithms the browser accepts.
After you’ve typed this, press Enter twice and you should then get a response from the server. The first part of this response will be the HTTP response header, which contains all the details about the information being sent back. It should be something like the following:HTTP/1.1 200 OKDate: Tue, 01 Sep 2015 12:38:02 GMTContent-Type: text/html; charset=UTF-8Transfer-Encoding: chunkedConnection: keep-aliveLast-Modified: Tue, 01 Sep 2015 12:28:03 GMTETag: W/”22407c-be87-51eaeae6bdac0”Cache-Control: max-age=3, must-revalidateExpires: Tue, 01 Sep 2015 12:28:45 GMTVary: Accept-Encoding,CookieServer: cloudflare-nginxCF-RAY: 21f107aae1290a90-LHR
The first line includes the status code for the response. 200 means that the server has processed the response correctly; anything else is an error code. 404 (content not found) is the most famous HTTP error code, but there are others. Much of the rest of the response header gives details about how the page was served by the server. Below this, you’ll see the content of the web page. Note that a single request will only receive a single response so it’s up to the web browser to make additional requests for images, CSS, scripts, etc.
Switching rolesLet’s flip sides now and take a look at what it takes to create a HTTP server. This time, we’ll use nc to listen on a particular port and respond to a request from a web browser. When we requested a web page, we requested it from port 80, since that’s the port that’s usually used for HTTP. However, it’s possible that something’s already serving HTTP through port 80 on your machine and only one program can use a port at a time. Just to be safe, we’ll serve our HTTP on port 1500, though you can use a different port if you wish. You can start Netcat listening on this port with the -l flag to listen and -p1500 to set the port:nc -l -p 1500
This won’t do anything until we request content. You can do this by pointing your browser to http://localhost:1500. The colon 1500 tells the browser
what port to use. Once this is done, you’ll see the request header appear in the Netcat session.
There are two crucial elements in the response header: the response code and the content type. After the header, there is a blank line, then the content itself. HTTP/1.1 200 OKContent-type: text/html
<h1>Hello World!<h1>After pressing
Return on the final line, hit Ctrl+C to kill the TCP connection, and this will let the browser know that the full page has loaded so it can be rendered.
This manual approach to HTTP isn’t just an academic exercise: it can also be useful for debugging errors in web servers. Going down this route, you have much more visibility of what’s going on, and subtle errors can be more obvious.
There are lots more bits that can be used in HTTP (most notably compression and encryption), but at its heart, it’s a simple text-based protocol. While this was a big advantage when small amounts of data were being sent over networks, these days there are libraries to handle all the complexity and large amounts of documents being sent. The initial trade off of simplicity over performance is no longer seen as a good option. The latest version of the protocol, HTTP 2, is more complex and binary rather than text-based. Simple clients and servers like the ones we’ve used here won’t work with HTTP 2, although similar things will still be happening at a lower level. With the adoption of HTTP 2, a little bit of the readability of the web is dying, so have a chat with a web browser or server while you still can.
HTTP 2 can run much faster than HTTP 1.x. Put the two protocols to the test yourself at http://www.http2demo.io.
“The manual approach to HTTP can be useful for debugging errors in web servers.”
LV020 088 Coding Ninja.indd 89 03/09/2015 13:44
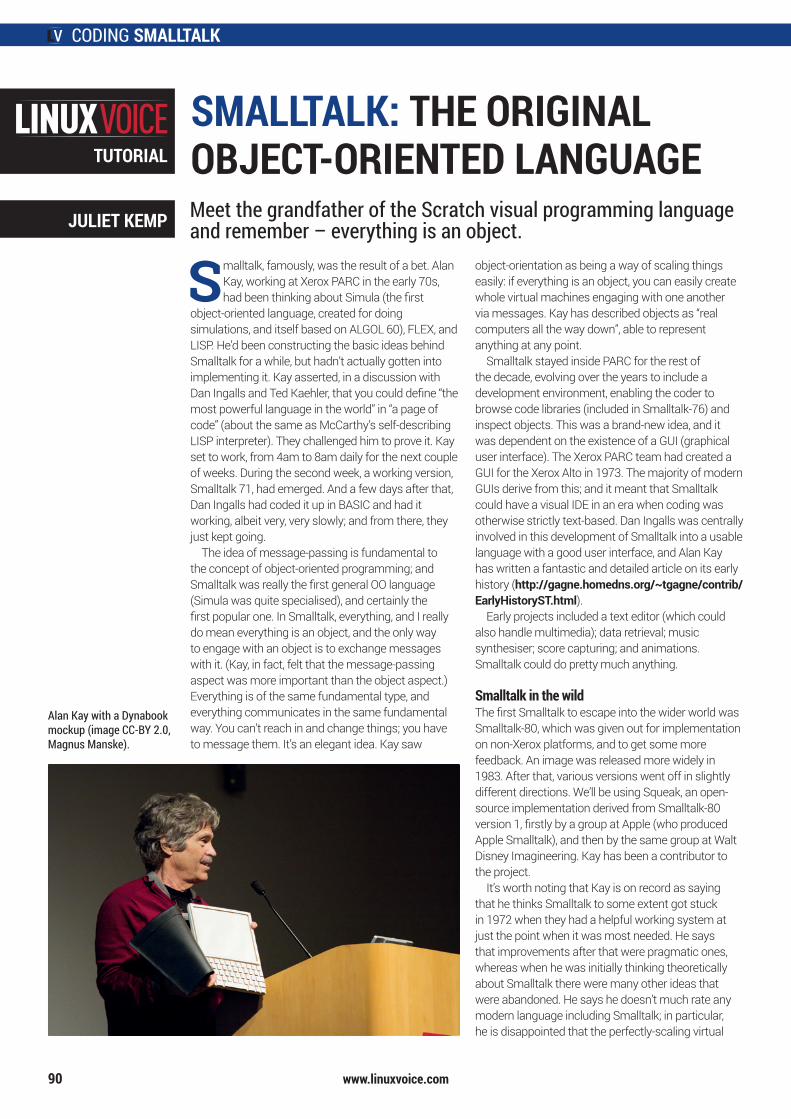
CODING SMALLTALK
www.linuxvoice.com
Smalltalk, famously, was the result of a bet. Alan Kay, working at Xerox PARC in the early 70s, had been thinking about Simula (the first
object-oriented language, created for doing simulations, and itself based on ALGOL 60), FLEX, and LISP. He’d been constructing the basic ideas behind Smalltalk for a while, but hadn’t actually gotten into implementing it. Kay asserted, in a discussion with Dan Ingalls and Ted Kaehler, that you could define “the most powerful language in the world” in “a page of code” (about the same as McCarthy’s self-describing LISP interpreter). They challenged him to prove it. Kay set to work, from 4am to 8am daily for the next couple of weeks. During the second week, a working version, Smalltalk 71, had emerged. And a few days after that, Dan Ingalls had coded it up in BASIC and had it working, albeit very, very slowly; and from there, they just kept going.
The idea of message-passing is fundamental to the concept of object-oriented programming; and Smalltalk was really the first general OO language (Simula was quite specialised), and certainly the first popular one. In Smalltalk, everything, and I really do mean everything is an object, and the only way to engage with an object is to exchange messages with it. (Kay, in fact, felt that the message-passing aspect was more important than the object aspect.) Everything is of the same fundamental type, and everything communicates in the same fundamental way. You can’t reach in and change things; you have to message them. It’s an elegant idea. Kay saw
object-orientation as being a way of scaling things easily: if everything is an object, you can easily create whole virtual machines engaging with one another via messages. Kay has described objects as “real computers all the way down”, able to represent anything at any point.
Smalltalk stayed inside PARC for the rest of the decade, evolving over the years to include a development environment, enabling the coder to browse code libraries (included in Smalltalk-76) and inspect objects. This was a brand-new idea, and it was dependent on the existence of a GUI (graphical user interface). The Xerox PARC team had created a GUI for the Xerox Alto in 1973. The majority of modern GUIs derive from this; and it meant that Smalltalk could have a visual IDE in an era when coding was otherwise strictly text-based. Dan Ingalls was centrally involved in this development of Smalltalk into a usable language with a good user interface, and Alan Kay has written a fantastic and detailed article on its early history (http://gagne.homedns.org/~tgagne/contrib/EarlyHistoryST.html).
Early projects included a text editor (which could also handle multimedia); data retrieval; music synthesiser; score capturing; and animations. Smalltalk could do pretty much anything.
Smalltalk in the wildThe first Smalltalk to escape into the wider world was Smalltalk-80, which was given out for implementation on non-Xerox platforms, and to get some more feedback. An image was released more widely in 1983. After that, various versions went off in slightly different directions. We’ll be using Squeak, an open-source implementation derived from Smalltalk-80 version 1, firstly by a group at Apple (who produced Apple Smalltalk), and then by the same group at Walt Disney Imagineering. Kay has been a contributor to the project.
It’s worth noting that Kay is on record as saying that he thinks Smalltalk to some extent got stuck in 1972 when they had a helpful working system at just the point when it was most needed. He says that improvements after that were pragmatic ones, whereas when he was initially thinking theoretically about Smalltalk there were many other ideas that were abandoned. He says he doesn’t much rate any modern language including Smalltalk; in particular, he is disappointed that the perfectly-scaling virtual
SMALLTALK: THE ORIGINAL OBJECT-ORIENTED LANGUAGEMeet the grandfather of the Scratch visual programming language and remember – everything is an object.
TUTORIAL
90
JULIET KEMP
Alan Kay with a Dynabook mockup (image CC-BY 2.0, Magnus Manske).
LV020 090 Tutorial Olde Code.indd 90 03/09/2015 10:27
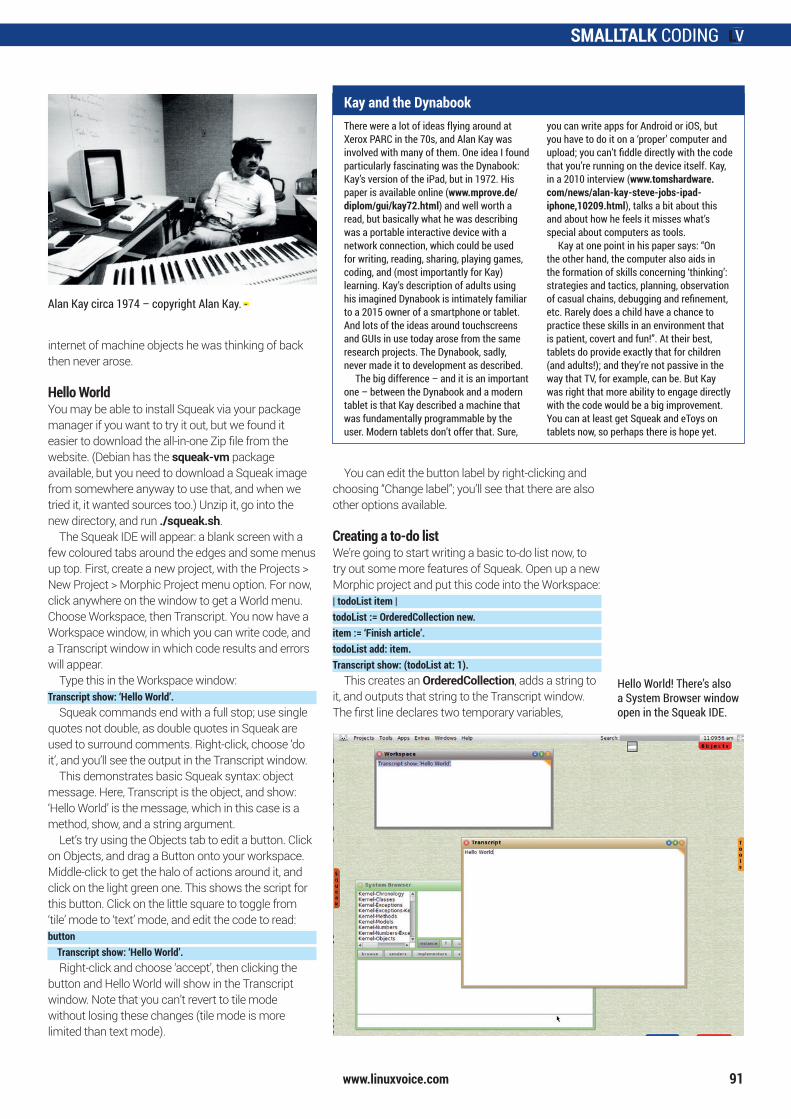
SMALLTALK CODING
www.linuxvoice.com
internet of machine objects he was thinking of back then never arose.
Hello WorldYou may be able to install Squeak via your package manager if you want to try it out, but we found it easier to download the all-in-one Zip file from the website. (Debian has the squeak-vm package available, but you need to download a Squeak image from somewhere anyway to use that, and when we tried it, it wanted sources too.) Unzip it, go into the new directory, and run ./squeak.sh.
The Squeak IDE will appear: a blank screen with a few coloured tabs around the edges and some menus up top. First, create a new project, with the Projects > New Project > Morphic Project menu option. For now, click anywhere on the window to get a World menu. Choose Workspace, then Transcript. You now have a Workspace window, in which you can write code, and a Transcript window in which code results and errors will appear.
Type this in the Workspace window:Transcript show: ‘Hello World’.
Squeak commands end with a full stop; use single quotes not double, as double quotes in Squeak are used to surround comments. Right-click, choose ‘do it’, and you’ll see the output in the Transcript window.
This demonstrates basic Squeak syntax: object message. Here, Transcript is the object, and show: ‘Hello World’ is the message, which in this case is a method, show, and a string argument.
Let’s try using the Objects tab to edit a button. Click on Objects, and drag a Button onto your workspace. Middle-click to get the halo of actions around it, and click on the light green one. This shows the script for this button. Click on the little square to toggle from ‘tile’ mode to ‘text’ mode, and edit the code to read:button Transcript show: ‘Hello World’.
Right-click and choose ‘accept’, then clicking the button and Hello World will show in the Transcript window. Note that you can’t revert to tile mode without losing these changes (tile mode is more limited than text mode).
You can edit the button label by right-clicking and choosing “Change label”; you’ll see that there are also other options available.
Creating a to-do listWe’re going to start writing a basic to-do list now, to try out some more features of Squeak. Open up a new Morphic project and put this code into the Workspace:| todoList item |todoList := OrderedCollection new.item := ‘Finish article’.todoList add: item.Transcript show: (todoList at: 1).
This creates an OrderedCollection, adds a string to it, and outputs that string to the Transcript window. The first line declares two temporary variables,
91
Alan Kay circa 1974 – copyright Alan Kay. -
Hello World! There’s also a System Browser window open in the Squeak IDE.
Kay and the DynabookThere were a lot of ideas flying around at Xerox PARC in the 70s, and Alan Kay was involved with many of them. One idea I found particularly fascinating was the Dynabook: Kay’s version of the iPad, but in 1972. His paper is available online (www.mprove.de/diplom/gui/kay72.html) and well worth a read, but basically what he was describing was a portable interactive device with a network connection, which could be used for writing, reading, sharing, playing games, coding, and (most importantly for Kay) learning. Kay’s description of adults using his imagined Dynabook is intimately familiar to a 2015 owner of a smartphone or tablet. And lots of the ideas around touchscreens and GUIs in use today arose from the same research projects. The Dynabook, sadly, never made it to development as described.
The big difference – and it is an important one – between the Dynabook and a modern tablet is that Kay described a machine that was fundamentally programmable by the user. Modern tablets don’t offer that. Sure,
you can write apps for Android or iOS, but you have to do it on a ‘proper’ computer and upload; you can’t fiddle directly with the code that you’re running on the device itself. Kay, in a 2010 interview (www.tomshardware.com/news/alan-kay-steve-jobs-ipad-iphone,10209.html), talks a bit about this and about how he feels it misses what’s special about computers as tools.
Kay at one point in his paper says: “On the other hand, the computer also aids in the formation of skills concerning ‘thinking’: strategies and tactics, planning, observation of casual chains, debugging and refinement, etc. Rarely does a child have a chance to practice these skills in an environment that is patient, covert and fun!”. At their best, tablets do provide exactly that for children (and adults!); and they’re not passive in the way that TV, for example, can be. But Kay was right that more ability to engage directly with the code would be a big improvement. You can at least get Squeak and eToys on tablets now, so perhaps there is hope yet.
LV020 090 Tutorial Olde Code.indd 91 03/09/2015 10:27
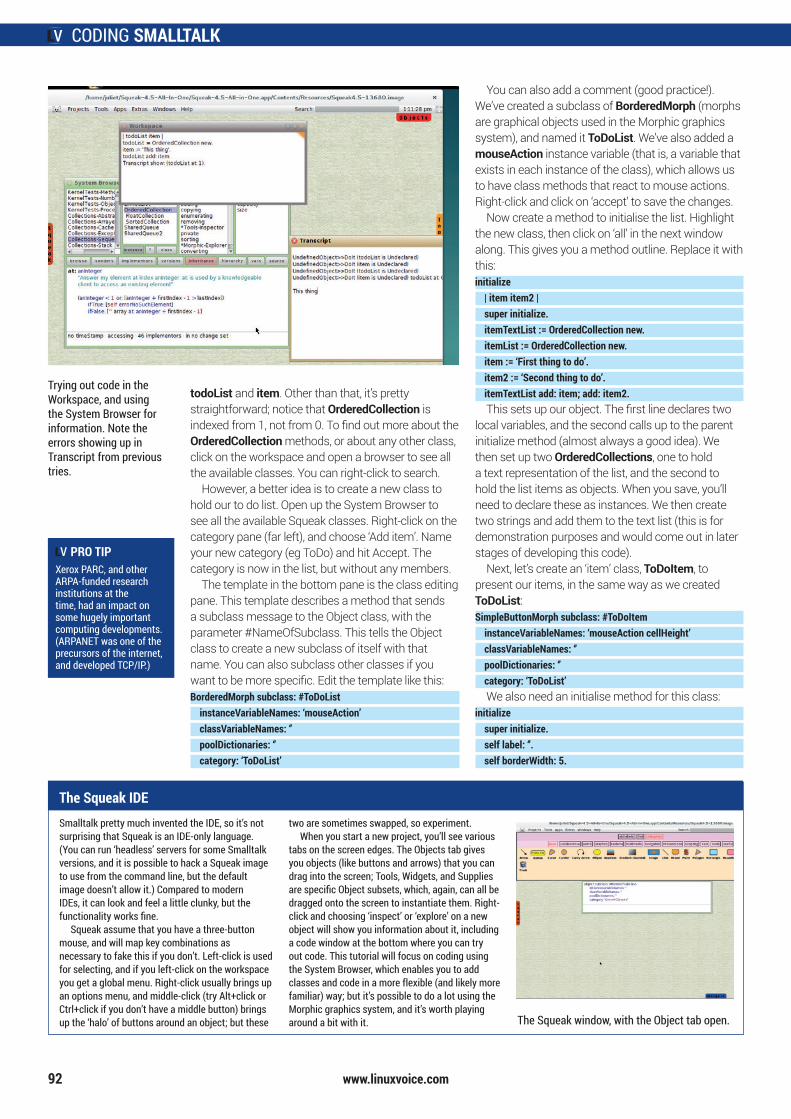
CODING SMALLTALK
www.linuxvoice.com92
todoList and item. Other than that, it’s pretty straightforward; notice that OrderedCollection is indexed from 1, not from 0. To find out more about the OrderedCollection methods, or about any other class, click on the workspace and open a browser to see all the available classes. You can right-click to search.
However, a better idea is to create a new class to hold our to do list. Open up the System Browser to see all the available Squeak classes. Right-click on the category pane (far left), and choose ‘Add item’. Name your new category (eg ToDo) and hit Accept. The category is now in the list, but without any members.
The template in the bottom pane is the class editing pane. This template describes a method that sends a subclass message to the Object class, with the parameter #NameOfSubclass. This tells the Object class to create a new subclass of itself with that name. You can also subclass other classes if you want to be more specific. Edit the template like this:BorderedMorph subclass: #ToDoList instanceVariableNames: ‘mouseAction’ classVariableNames: ‘’ poolDictionaries: ‘’ category: ‘ToDoList’
You can also add a comment (good practice!). We’ve created a subclass of BorderedMorph (morphs are graphical objects used in the Morphic graphics system), and named it ToDoList. We’ve also added a mouseAction instance variable (that is, a variable that exists in each instance of the class), which allows us to have class methods that react to mouse actions. Right-click and click on ‘accept’ to save the changes.
Now create a method to initialise the list. Highlight the new class, then click on ‘all’ in the next window along. This gives you a method outline. Replace it with this:initialize | item item2 | super initialize. itemTextList := OrderedCollection new. itemList := OrderedCollection new. item := ‘First thing to do’. item2 := ‘Second thing to do’. itemTextList add: item; add: item2.
This sets up our object. The first line declares two local variables, and the second calls up to the parent initialize method (almost always a good idea). We then set up two OrderedCollections, one to hold a text representation of the list, and the second to hold the list items as objects. When you save, you’ll need to declare these as instances. We then create two strings and add them to the text list (this is for demonstration purposes and would come out in later stages of developing this code).
Next, let’s create an ‘item’ class, ToDoItem, to present our items, in the same way as we created ToDoList:SimpleButtonMorph subclass: #ToDoItem instanceVariableNames: ‘mouseAction cellHeight’ classVariableNames: ‘’ poolDictionaries: ‘’ category: ‘ToDoList’
We also need an initialise method for this class:initialize super initialize. self label: ‘’. self borderWidth: 5.
Trying out code in the Workspace, and using the System Browser for information. Note the errors showing up in Transcript from previous tries.
The Squeak IDESmalltalk pretty much invented the IDE, so it’s not surprising that Squeak is an IDE-only language. (You can run ‘headless’ servers for some Smalltalk versions, and it is possible to hack a Squeak image to use from the command line, but the default image doesn’t allow it.) Compared to modern IDEs, it can look and feel a little clunky, but the functionality works fine.
Squeak assume that you have a three-button mouse, and will map key combinations as necessary to fake this if you don’t. Left-click is used for selecting, and if you left-click on the workspace you get a global menu. Right-click usually brings up an options menu, and middle-click (try Alt+click or Ctrl+click if you don’t have a middle button) brings up the ‘halo’ of buttons around an object; but these
two are sometimes swapped, so experiment.When you start a new project, you’ll see various
tabs on the screen edges. The Objects tab gives you objects (like buttons and arrows) that you can drag into the screen; Tools, Widgets, and Supplies are specific Object subsets, which, again, can all be dragged onto the screen to instantiate them. Right-click and choosing ‘inspect’ or ‘explore’ on a new object will show you information about it, including a code window at the bottom where you can try out code. This tutorial will focus on coding using the System Browser, which enables you to add classes and code in a more flexible (and likely more familiar) way; but it’s possible to do a lot using the Morphic graphics system, and it’s worth playing around a bit with it. The Squeak window, with the Object tab open.
PRO TIPXerox PARC, and other ARPA-funded research institutions at the time, had an impact on some hugely important computing developments. (ARPANET was one of the precursors of the internet, and developed TCP/IP.)
LV020 090 Tutorial Olde Code.indd 92 03/09/2015 10:27
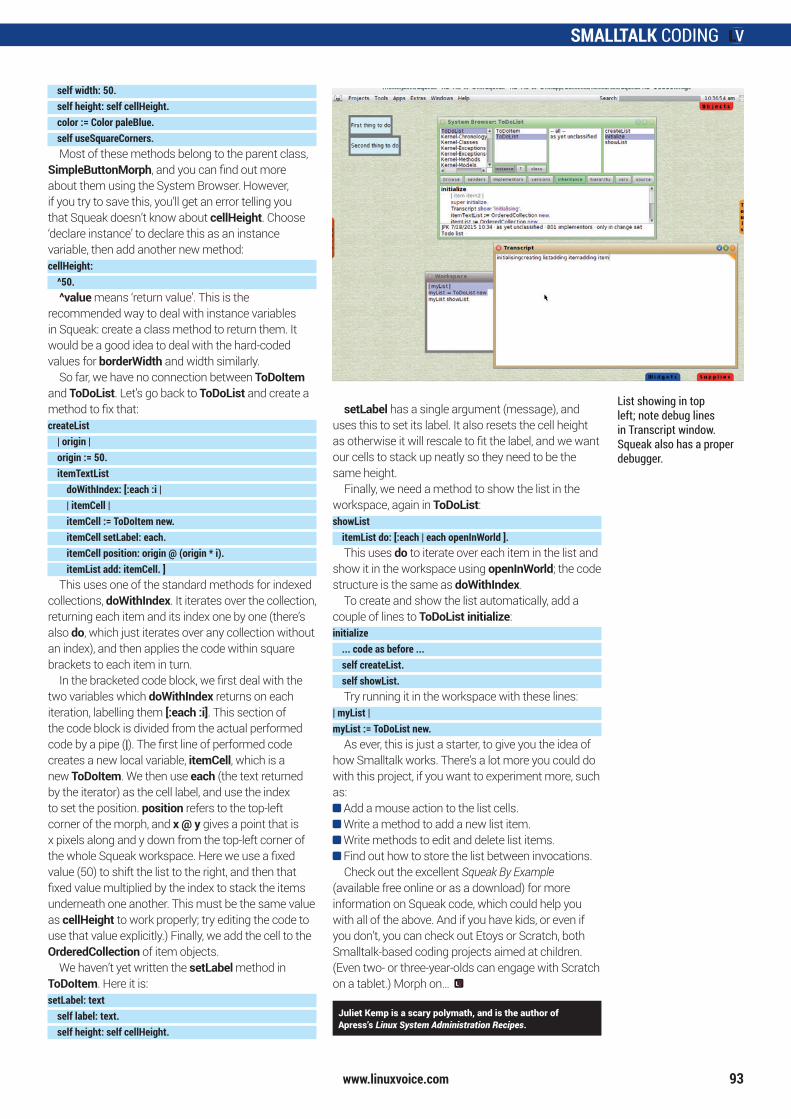
SMALLTALK CODING
www.linuxvoice.com 93
self width: 50. self height: self cellHeight. color := Color paleBlue. self useSquareCorners.
Most of these methods belong to the parent class, SimpleButtonMorph, and you can find out more about them using the System Browser. However, if you try to save this, you’ll get an error telling you that Squeak doesn’t know about cellHeight. Choose ‘declare instance’ to declare this as an instance variable, then add another new method:cellHeight: ^50.
^value means ‘return value’. This is the recommended way to deal with instance variables in Squeak: create a class method to return them. It would be a good idea to deal with the hard-coded values for borderWidth and width similarly.
So far, we have no connection between ToDoItem and ToDoList. Let’s go back to ToDoList and create a method to fix that:createList | origin | origin := 50. itemTextList doWithIndex: [:each :i | | itemCell | itemCell := ToDoItem new. itemCell setLabel: each. itemCell position: origin @ (origin * i). itemList add: itemCell. ]
This uses one of the standard methods for indexed collections, doWithIndex. It iterates over the collection, returning each item and its index one by one (there’s also do, which just iterates over any collection without an index), and then applies the code within square brackets to each item in turn.
In the bracketed code block, we first deal with the two variables which doWithIndex returns on each iteration, labelling them [:each :i]. This section of the code block is divided from the actual performed code by a pipe (|). The first line of performed code creates a new local variable, itemCell, which is a new ToDoItem. We then use each (the text returned by the iterator) as the cell label, and use the index to set the position. position refers to the top-left corner of the morph, and x @ y gives a point that is x pixels along and y down from the top-left corner of the whole Squeak workspace. Here we use a fixed value (50) to shift the list to the right, and then that fixed value multiplied by the index to stack the items underneath one another. This must be the same value as cellHeight to work properly; try editing the code to use that value explicitly.) Finally, we add the cell to the OrderedCollection of item objects.
We haven’t yet written the setLabel method in ToDoItem. Here it is:setLabel: text self label: text. self height: self cellHeight.
setLabel has a single argument (message), and uses this to set its label. It also resets the cell height as otherwise it will rescale to fit the label, and we want our cells to stack up neatly so they need to be the same height.
Finally, we need a method to show the list in the workspace, again in ToDoList:showList itemList do: [:each | each openInWorld ].
This uses do to iterate over each item in the list and show it in the workspace using openInWorld; the code structure is the same as doWithIndex.
To create and show the list automatically, add a couple of lines to ToDoList initialize:initialize ... code as before ... self createList. self showList.
Try running it in the workspace with these lines:| myList |myList := ToDoList new.
As ever, this is just a starter, to give you the idea of how Smalltalk works. There’s a lot more you could do with this project, if you want to experiment more, such as:
Add a mouse action to the list cells. Write a method to add a new list item. Write methods to edit and delete list items. Find out how to store the list between invocations.Check out the excellent Squeak By Example
(available free online or as a download) for more information on Squeak code, which could help you with all of the above. And if you have kids, or even if you don’t, you can check out Etoys or Scratch, both Smalltalk-based coding projects aimed at children. (Even two- or three-year-olds can engage with Scratch on a tablet.) Morph on…
Juliet Kemp is a scary polymath, and is the author of Apress’s Linux System Administration Recipes.
List showing in top left; note debug lines in Transcript window. Squeak also has a proper debugger.
LV020 090 Tutorial Olde Code.indd 93 03/09/2015 10:27
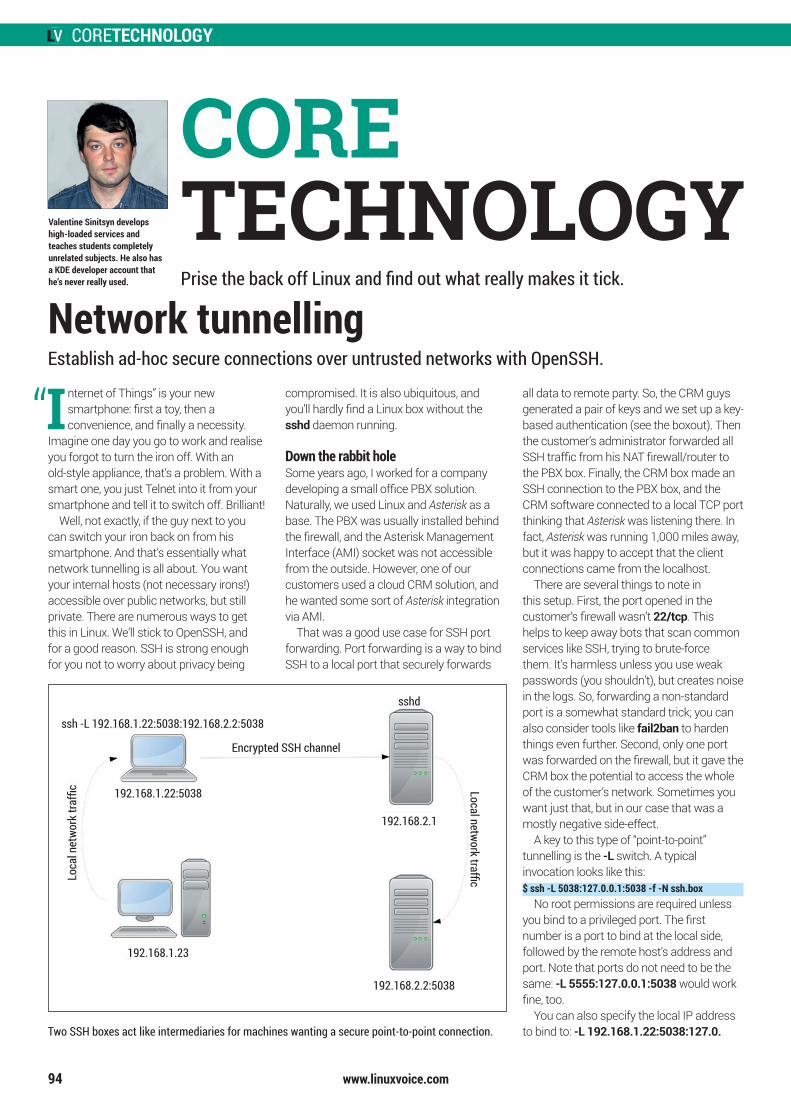
CORETECHNOLOGY
www.linuxvoice.com94
Internet of Things” is your new smartphone: first a toy, then a convenience, and finally a necessity.
Imagine one day you go to work and realise you forgot to turn the iron off. With an old-style appliance, that’s a problem. With a smart one, you just Telnet into it from your smartphone and tell it to switch off. Brilliant!
Well, not exactly, if the guy next to you can switch your iron back on from his smartphone. And that’s essentially what network tunnelling is all about. You want your internal hosts (not necessary irons!) accessible over public networks, but still private. There are numerous ways to get this in Linux. We’ll stick to OpenSSH, and for a good reason. SSH is strong enough for you not to worry about privacy being
compromised. It is also ubiquitous, and you’ll hardly find a Linux box without the sshd daemon running.
Down the rabbit holeSome years ago, I worked for a company developing a small office PBX solution. Naturally, we used Linux and Asterisk as a base. The PBX was usually installed behind the firewall, and the Asterisk Management Interface (AMI) socket was not accessible from the outside. However, one of our customers used a cloud CRM solution, and he wanted some sort of Asterisk integration via AMI.
That was a good use case for SSH port forwarding. Port forwarding is a way to bind SSH to a local port that securely forwards
Network tunnellingEstablish ad-hoc secure connections over untrusted networks with OpenSSH.
all data to remote party. So, the CRM guys generated a pair of keys and we set up a key-based authentication (see the boxout). Then the customer’s administrator forwarded all SSH traffic from his NAT firewall/router to the PBX box. Finally, the CRM box made an SSH connection to the PBX box, and the CRM software connected to a local TCP port thinking that Asterisk was listening there. In fact, Asterisk was running 1,000 miles away, but it was happy to accept that the client connections came from the localhost.
There are several things to note in this setup. First, the port opened in the customer’s firewall wasn’t 22/tcp. This helps to keep away bots that scan common services like SSH, trying to brute-force them. It’s harmless unless you use weak passwords (you shouldn’t), but creates noise in the logs. So, forwarding a non-standard port is a somewhat standard trick; you can also consider tools like fail2ban to harden things even further. Second, only one port was forwarded on the firewall, but it gave the CRM box the potential to access the whole of the customer’s network. Sometimes you want just that, but in our case that was a mostly negative side-effect.
A key to this type of “point-to-point” tunnelling is the -L switch. A typical invocation looks like this:$ ssh -L 5038:127.0.0.1:5038 -f -N ssh.box
No root permissions are required unless you bind to a privileged port. The first number is a port to bind at the local side, followed by the remote host’s address and port. Note that ports do not need to be the same: -L 5555:127.0.0.1:5038 would work fine, too.
You can also specify the local IP address to bind to: -L 192.168.1.22:5038:127.0.Two SSH boxes act like intermediaries for machines wanting a secure point-to-point connection.
CORETECHNOLOGYValentine Sinitsyn develops
high-loaded services and teaches students completely unrelated subjects. He also has a KDE developer account that he’s never really used. Prise the back off Linux and find out what really makes it tick.
Encrypted SSH channel
Loca
l net
work
traf
fic
192.168.1.23
“
Local network traffic
192.168.1.22:5038
192.168.2.1
192.168.2.2:5038
sshd
ssh -L 192.168.1.22:5038:192.168.2.2:5038
LV020 094 CoreTech.indd 94 03/09/2015 10:28
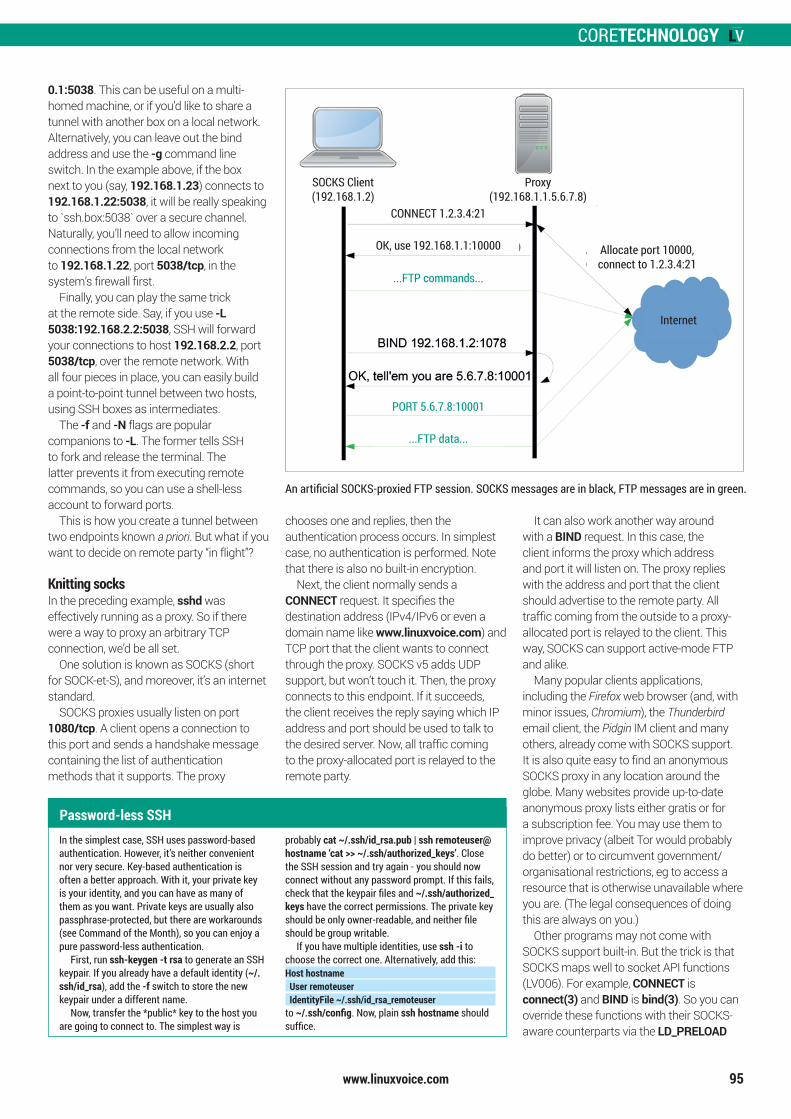
CORETECHNOLOGY
www.linuxvoice.com 95
0.1:5038. This can be useful on a multi-homed machine, or if you’d like to share a tunnel with another box on a local network. Alternatively, you can leave out the bind address and use the -g command line switch. In the example above, if the box next to you (say, 192.168.1.23) connects to 192.168.1.22:5038, it will be really speaking to `ssh.box:5038` over a secure channel. Naturally, you’ll need to allow incoming connections from the local network to 192.168.1.22, port 5038/tcp, in the system’s firewall first.
Finally, you can play the same trick at the remote side. Say, if you use -L 5038:192.168.2.2:5038, SSH will forward your connections to host 192.168.2.2, port 5038/tcp, over the remote network. With all four pieces in place, you can easily build a point-to-point tunnel between two hosts, using SSH boxes as intermediates.
The -f and -N flags are popular companions to -L. The former tells SSH to fork and release the terminal. The latter prevents it from executing remote commands, so you can use a shell-less account to forward ports.
This is how you create a tunnel between two endpoints known a priori. But what if you want to decide on remote party “in flight”?
Knitting socksIn the preceding example, sshd was effectively running as a proxy. So if there were a way to proxy an arbitrary TCP connection, we’d be all set.
One solution is known as SOCKS (short for SOCK-et-S), and moreover, it’s an internet standard.
SOCKS proxies usually listen on port 1080/tcp. A client opens a connection to this port and sends a handshake message containing the list of authentication methods that it supports. The proxy
chooses one and replies, then the authentication process occurs. In simplest case, no authentication is performed. Note that there is also no built-in encryption.
Next, the client normally sends a CONNECT request. It specifies the destination address (IPv4/IPv6 or even a domain name like www.linuxvoice.com) and TCP port that the client wants to connect through the proxy. SOCKS v5 adds UDP support, but won’t touch it. Then, the proxy connects to this endpoint. If it succeeds, the client receives the reply saying which IP address and port should be used to talk to the desired server. Now, all traffic coming to the proxy-allocated port is relayed to the remote party.
It can also work another way around with a BIND request. In this case, the client informs the proxy which address and port it will listen on. The proxy replies with the address and port that the client should advertise to the remote party. All traffic coming from the outside to a proxy-allocated port is relayed to the client. This way, SOCKS can support active-mode FTP and alike.
Many popular clients applications, including the Firefox web browser (and, with minor issues, Chromium), the Thunderbird email client, the Pidgin IM client and many others, already come with SOCKS support. It is also quite easy to find an anonymous SOCKS proxy in any location around the globe. Many websites provide up-to-date anonymous proxy lists either gratis or for a subscription fee. You may use them to improve privacy (albeit Tor would probably do better) or to circumvent government/organisational restrictions, eg to access a resource that is otherwise unavailable where you are. (The legal consequences of doing this are always on you.)
Other programs may not come with SOCKS support built-in. But the trick is that SOCKS maps well to socket API functions (LV006). For example, CONNECT is connect(3) and BIND is bind(3). So you can override these functions with their SOCKS-aware counterparts via the LD_PRELOAD
An artificial SOCKS-proxied FTP session. SOCKS messages are in black, FTP messages are in green.
Password-less SSHIn the simplest case, SSH uses password-based authentication. However, it’s neither convenient nor very secure. Key-based authentication is often a better approach. With it, your private key is your identity, and you can have as many of them as you want. Private keys are usually also passphrase-protected, but there are workarounds (see Command of the Month), so you can enjoy a pure password-less authentication.
First, run ssh-keygen -t rsa to generate an SSH keypair. If you already have a default identity (~/.ssh/id_rsa), add the -f switch to store the new keypair under a different name.
Now, transfer the *public* key to the host you are going to connect to. The simplest way is
probably cat ~/.ssh/id_rsa.pub | ssh remoteuser@hostname ‘cat >> ~/.ssh/authorized_keys’. Close the SSH session and try again - you should now connect without any password prompt. If this fails, check that the keypair files and ~/.ssh/authorized_keys have the correct permissions. The private key should be only owner-readable, and neither file should be group writable.
If you have multiple identities, use ssh -i to choose the correct one. Alternatively, add this:Host hostname User remoteuser IdentityFile ~/.ssh/id_rsa_remoteuserto ~/.ssh/config. Now, plain ssh hostname should suffice.
SOCKS Client(192.168.1.2)
Proxy(192.168.1.1.5.6.7.8)
CONNECT 1.2.3.4:21
OK, use 192.168.1.1:10000 Allocate port 10000, connect to 1.2.3.4:21
Internet
...FTP commands...
PORT 5.6.7.8:10001
...FTP data...
LV020 094 CoreTech.indd 95 03/09/2015 10:28
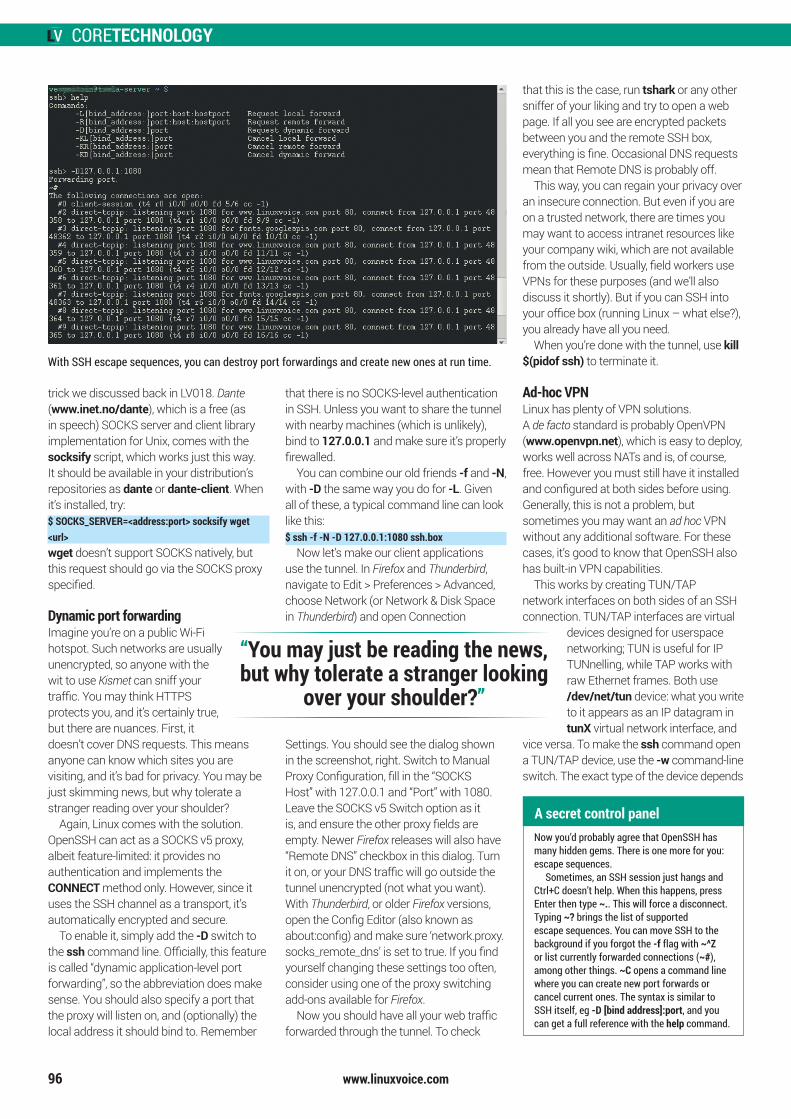
CORETECHNOLOGY
www.linuxvoice.com96
trick we discussed back in LV018. Dante (www.inet.no/dante), which is a free (as in speech) SOCKS server and client library implementation for Unix, comes with the socksify script, which works just this way. It should be available in your distribution’s repositories as dante or dante-client. When it’s installed, try:$ SOCKS_SERVER=<address:port> socksify wget <url>wget doesn’t support SOCKS natively, but this request should go via the SOCKS proxy specified.
Dynamic port forwardingImagine you’re on a public Wi-Fi hotspot. Such networks are usually unencrypted, so anyone with the wit to use Kismet can sniff your traffic. You may think HTTPS protects you, and it’s certainly true, but there are nuances. First, it doesn’t cover DNS requests. This means anyone can know which sites you are visiting, and it’s bad for privacy. You may be just skimming news, but why tolerate a stranger reading over your shoulder?
Again, Linux comes with the solution. OpenSSH can act as a SOCKS v5 proxy, albeit feature-limited: it provides no authentication and implements the CONNECT method only. However, since it uses the SSH channel as a transport, it’s automatically encrypted and secure.
To enable it, simply add the -D switch to the ssh command line. Officially, this feature is called “dynamic application-level port forwarding”, so the abbreviation does make sense. You should also specify a port that the proxy will listen on, and (optionally) the local address it should bind to. Remember
that there is no SOCKS-level authentication in SSH. Unless you want to share the tunnel with nearby machines (which is unlikely), bind to 127.0.0.1 and make sure it’s properly firewalled.
You can combine our old friends -f and -N, with -D the same way you do for -L. Given all of these, a typical command line can look like this:$ ssh -f -N -D 127.0.0.1:1080 ssh.box
Now let’s make our client applications use the tunnel. In Firefox and Thunderbird, navigate to Edit > Preferences > Advanced, choose Network (or Network & Disk Space in Thunderbird) and open Connection
Settings. You should see the dialog shown in the screenshot, right. Switch to Manual Proxy Configuration, fill in the “SOCKS Host” with 127.0.0.1 and “Port” with 1080. Leave the SOCKS v5 Switch option as it is, and ensure the other proxy fields are empty. Newer Firefox releases will also have “Remote DNS” checkbox in this dialog. Turn it on, or your DNS traffic will go outside the tunnel unencrypted (not what you want). With Thunderbird, or older Firefox versions, open the Config Editor (also known as about:config) and make sure ‘network.proxy.socks_remote_dns’ is set to true. If you find yourself changing these settings too often, consider using one of the proxy switching add-ons available for Firefox.
Now you should have all your web traffic forwarded through the tunnel. To check
that this is the case, run tshark or any other sniffer of your liking and try to open a web page. If all you see are encrypted packets between you and the remote SSH box, everything is fine. Occasional DNS requests mean that Remote DNS is probably off.
This way, you can regain your privacy over an insecure connection. But even if you are on a trusted network, there are times you may want to access intranet resources like your company wiki, which are not available from the outside. Usually, field workers use VPNs for these purposes (and we’ll also discuss it shortly). But if you can SSH into your office box (running Linux – what else?), you already have all you need.
When you’re done with the tunnel, use kill $(pidof ssh) to terminate it.
Ad-hoc VPNLinux has plenty of VPN solutions. A de facto standard is probably OpenVPN (www.openvpn.net), which is easy to deploy, works well across NATs and is, of course, free. However you must still have it installed and configured at both sides before using. Generally, this is not a problem, but sometimes you may want an ad hoc VPN without any additional software. For these cases, it’s good to know that OpenSSH also has built-in VPN capabilities.
This works by creating TUN/TAP network interfaces on both sides of an SSH connection. TUN/TAP interfaces are virtual
devices designed for userspace networking; TUN is useful for IP TUNnelling, while TAP works with raw Ethernet frames. Both use /dev/net/tun device: what you write to it appears as an IP datagram in tunX virtual network interface, and
vice versa. To make the ssh command open a TUN/TAP device, use the -w command-line switch. The exact type of the device depends
A secret control panelNow you’d probably agree that OpenSSH has many hidden gems. There is one more for you: escape sequences.
Sometimes, an SSH session just hangs and Ctrl+C doesn’t help. When this happens, press Enter then type ~.. This will force a disconnect. Typing ~? brings the list of supported escape sequences. You can move SSH to the background if you forgot the -f flag with ~^Z or list currently forwarded connections (~#), among other things. ~C opens a command line where you can create new port forwards or cancel current ones. The syntax is similar to SSH itself, eg -D [bind address]:port, and you can get a full reference with the help command.
“You may just be reading the news, but why tolerate a stranger looking
over your shoulder?”
With SSH escape sequences, you can destroy port forwardings and create new ones at run time.
LV020 094 CoreTech.indd 96 03/09/2015 10:28
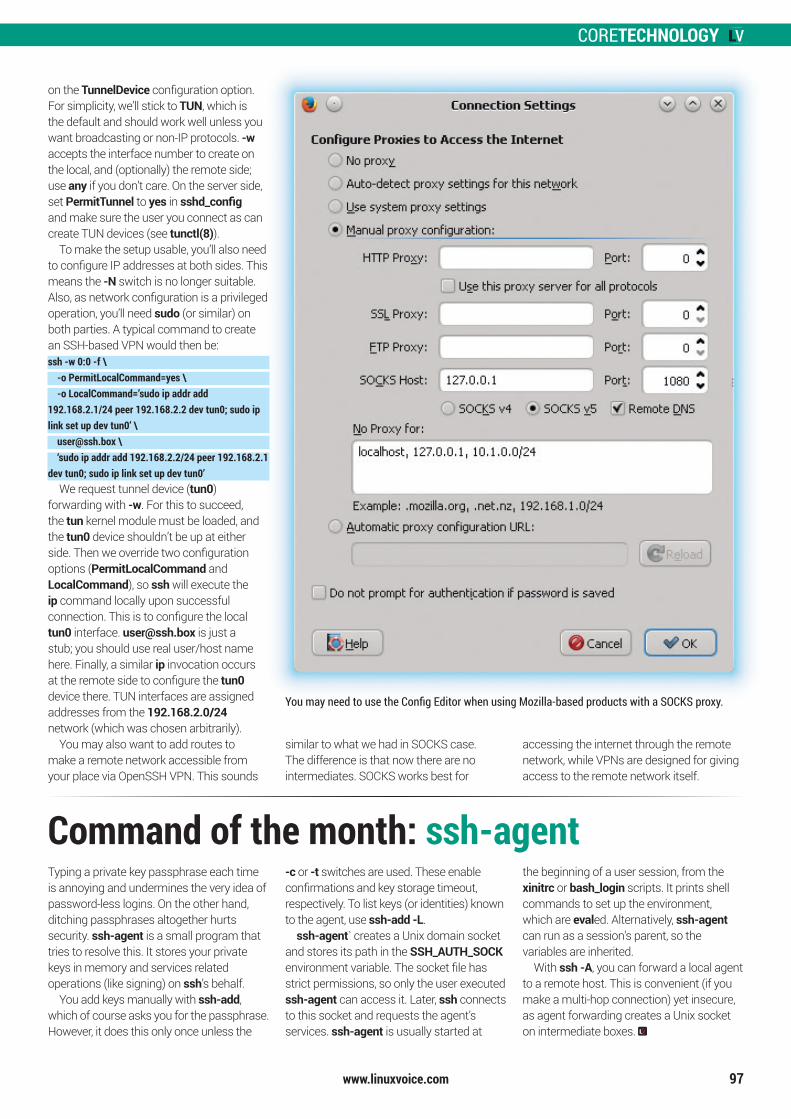
CORETECHNOLOGY
www.linuxvoice.com 97
on the TunnelDevice configuration option. For simplicity, we’ll stick to TUN, which is the default and should work well unless you want broadcasting or non-IP protocols. -w accepts the interface number to create on the local, and (optionally) the remote side; use any if you don’t care. On the server side, set PermitTunnel to yes in sshd_config and make sure the user you connect as can create TUN devices (see tunctl(8)).
To make the setup usable, you’ll also need to configure IP addresses at both sides. This means the -N switch is no longer suitable. Also, as network configuration is a privileged operation, you’ll need sudo (or similar) on both parties. A typical command to create an SSH-based VPN would then be:ssh -w 0:0 -f \ -o PermitLocalCommand=yes \ -o LocalCommand=’sudo ip addr add 192.168.2.1/24 peer 192.168.2.2 dev tun0; sudo ip link set up dev tun0’ \ [email protected] \ ‘sudo ip addr add 192.168.2.2/24 peer 192.168.2.1 dev tun0; sudo ip link set up dev tun0’
We request tunnel device (tun0) forwarding with -w. For this to succeed, the tun kernel module must be loaded, and the tun0 device shouldn’t be up at either side. Then we override two configuration options (PermitLocalCommand and LocalCommand), so ssh will execute the ip command locally upon successful connection. This is to configure the local tun0 interface. [email protected] is just a stub; you should use real user/host name here. Finally, a similar ip invocation occurs at the remote side to configure the tun0 device there. TUN interfaces are assigned addresses from the 192.168.2.0/24 network (which was chosen arbitrarily).
You may also want to add routes to make a remote network accessible from your place via OpenSSH VPN. This sounds
similar to what we had in SOCKS case. The difference is that now there are no intermediates. SOCKS works best for
accessing the internet through the remote network, while VPNs are designed for giving access to the remote network itself.
You may need to use the Config Editor when using Mozilla-based products with a SOCKS proxy.
Typing a private key passphrase each time is annoying and undermines the very idea of password-less logins. On the other hand, ditching passphrases altogether hurts security. ssh-agent is a small program that tries to resolve this. It stores your private keys in memory and services related operations (like signing) on ssh’s behalf.
You add keys manually with ssh-add, which of course asks you for the passphrase. However, it does this only once unless the
-c or -t switches are used. These enable confirmations and key storage timeout, respectively. To list keys (or identities) known to the agent, use ssh-add -L.
ssh-agent` creates a Unix domain socket and stores its path in the SSH_AUTH_SOCK environment variable. The socket file has strict permissions, so only the user executed ssh-agent can access it. Later, ssh connects to this socket and requests the agent’s services. ssh-agent is usually started at
the beginning of a user session, from the xinitrc or bash_login scripts. It prints shell commands to set up the environment, which are evaled. Alternatively, ssh-agent can run as a session’s parent, so the variables are inherited.
With ssh -A, you can forward a local agent to a remote host. This is convenient (if you make a multi-hop connection) yet insecure, as agent forwarding creates a Unix socket on intermediate boxes.
Command of the month: ssh-agent
LV020 094 CoreTech.indd 97 03/09/2015 10:28
www.linuxvoice.com
/DEV/RANDOM/
Final thoughts, musings and reflections
My Linux Setup Matthew Garrett
98
Which is more popular – Opera or Firefox? It seems like a dumb question. Opera all but disappeared
from the discerning desktop quite some time ago after all, and Firefox is the browser app of choice on the desktop of the cognoscenti. Well, apart from those who use Chrome. And possibly excepting the people who run something other than Linux on their desktop. In fact, our Linux-centric world view is at odds with the rest of humanity.
But it turns out that actually, our desktop-centric world view is at odds with humanity. Mobile phones are the number one method by which people access the web – in many parts of the world, the cellphone network is much more reliable and a whole lot cheaper than the alternatives. Google recently revealed that it serves up more search results to mobile users than desktop users. Now you aren’t so confident in your assumptions, are you…
But never mind. it probably doesn’t matter. As it turns out, thanks to the popularity of mobile usage, the world wide web isn’t as relevant anyway. Who wants to browse eBay or Facebook or Amazon in the browser when there is a special (faster) app to do it? The internet may be more relevant than ever, but web browsers are not. Does it matter? Maybe. And probably to more folks than the ones working at Mozilla and Opera. At least the WWW is a fairly transparent, open and easily examinable protocol; who knows what those apps are really doing?
[Firefox is still way ahead of Opera by a factor of at least five, but due to better mobile exposure (there are other choices than Android or iPhone!) the latter is doing a lot better than you may think, depending on what statistics you ingest (about twice as well as it was doing 5 years ago).]
Nick Veitch was the original editor of Linux Format, a role he played until he got bored and went to work at Canonical instead. Splitter!
CoreOS employee, security expert and FSF board member, now internet famous in Linux Voice.
Company branded pint glass (US pint)
Dell XPS 13
A pile of TPMs for Grub development work
A Minnowboard Max for firmware development
What version of Linux are you currently using?Fedora 22. I’ve been using Fedora since shortly before I started
working at Red Hat: it’s still not annoyed me enough to switch.
And what desktop do you currently use?Stock Gnome 3.16.
What was the first Linux setup you ever used?Suse 5.2, in the middle of 1998. It lasted until Halloween when it got
replaced with the then just-frozen Debian Slink, and everything went downhill after that.
What Free Software/open source can’t you live without?Tough one. Let’s say GCC, because we couldn’t have the rest without it
What do other people love but you can’t get on with?Tiling window managers. Ugh..
LV020 098 Geek Desktop.indd 98 04/09/2015 10:04
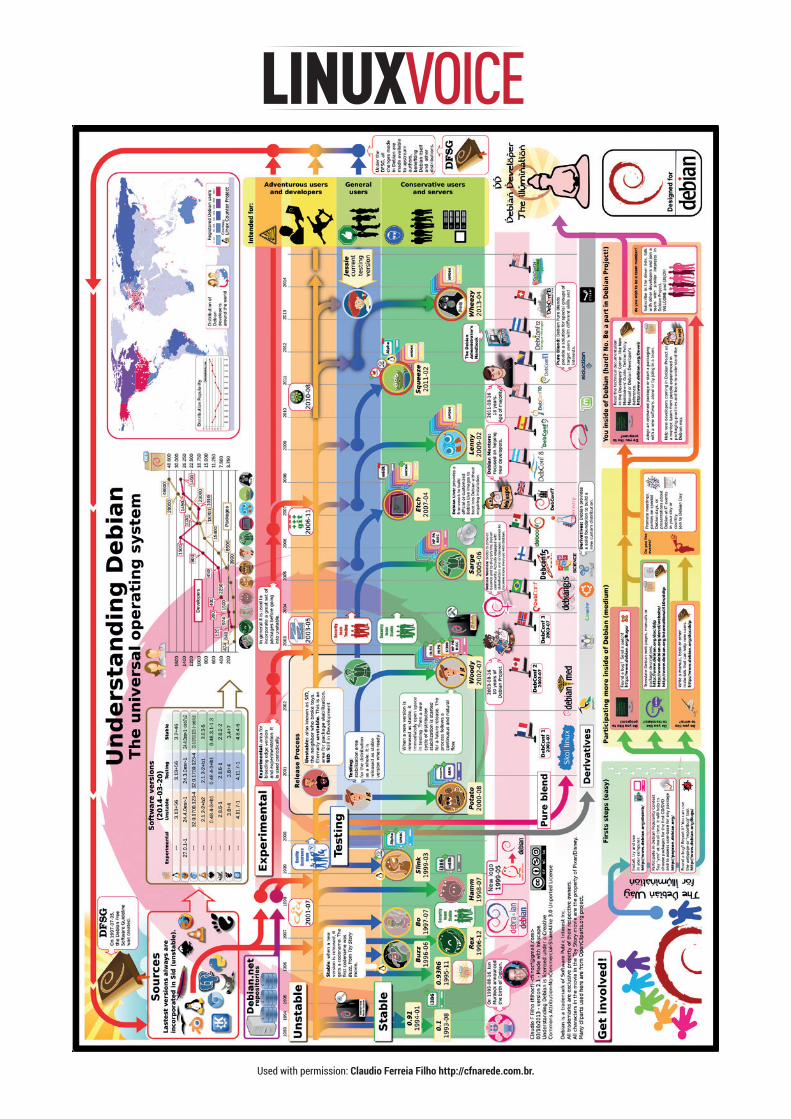
Used with permission: Claudio Ferreia Filho http://cfnarede.com.br.
LV020 099 Inside Back Cover.indd 99 03/09/2015 15:31

LV020 100 Back Cover.indd 100 03/09/2015 10:55


