Embed Size (px)
Citation preview
DE Diagnosewaage Gebrauchsanweisung ......................... 2 EN Diagnostic bathroom scale Instructions for use ........................... 19 FR Pèse-personne impédancemètre Mode d´emploi .................................. 36 ES Báscula de diagnóstico Instrucciones de uso ......................... 53
IT Báscula de diagnóstico Istruzioni per l’uso ............................. 69 TR Diyagnoz terazisi Kullanım kılavuzu .............................. 86 RU Диагностические весы Инструкция по применению ........... 102PL Waga diagnostyczna Instrukcja obsługi ............................ 120
BF 105Body Complete
2
DEUTSCH
1. Zum Kennenlernen .................................................22. Zeichenerklärung ....................................................33. Warn- und Sicherheitshinweise ..............................44. Information .............................................................55. Gerätebeschreibung ...............................................66. Inbetriebnahme ......................................................67. Einrichtung mit App ................................................88. Einrichtung ohne App .............................................89. Messung durchführen ..........................................10
10. Ergebnisse bewerten ..........................................1211. Messwerte übertragen ........................................1412. Weitere Informationen ........................................1413. Gerät reinigen und pflegen .................................1514. Entsorgung .........................................................1515. Was tun bei Problemen? ....................................1516. Technische Angaben ..........................................1717. Garantie / Service ................................................17
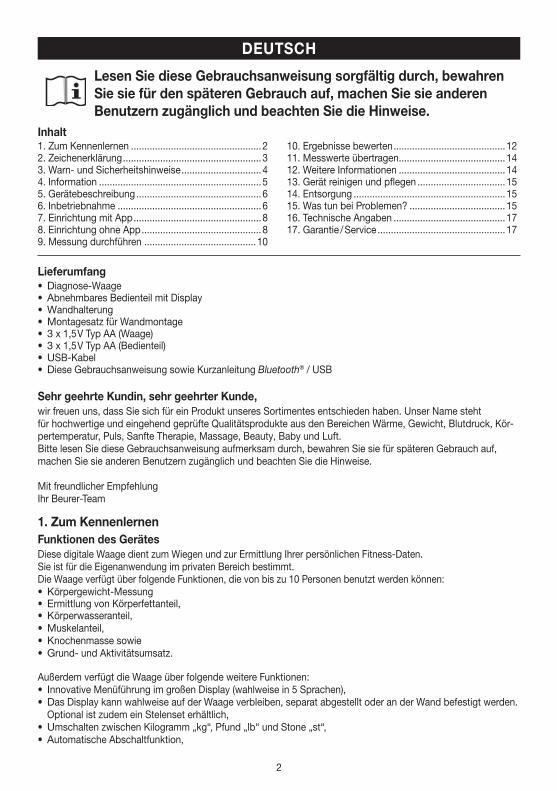
Lieferumfang• Diagnose-Waage• Abnehmbares Bedienteil mit Display• Wandhalterung• Montagesatz für Wandmontage• 3 x 1,5 V Typ AA (Waage)• 3 x 1,5 V Typ AA (Bedienteil)• USB-Kabel• Diese Gebrauchsanweisung sowie Kurzanleitung Bluetooth® / USB
Sehr geehrte Kundin, sehr geehrter Kunde,wir freuen uns, dass Sie sich für ein Produkt unseres Sortimentes entschieden haben. Unser Name stehtfür hochwertige und eingehend geprüfte Qualitätsprodukte aus den Bereichen Wärme, Gewicht, Blutdruck, Kör-pertemperatur, Puls, Sanfte Therapie, Massage, Beauty, Baby und Luft.Bitte lesen Sie diese Gebrauchsanweisung aufmerksam durch, bewahren Sie sie für späteren Gebrauch auf, machen Sie sie anderen Benutzern zugänglich und beachten Sie die Hinweise.
Mit freundlicher EmpfehlungIhr Beurer-Team
1. Zum KennenlernenFunktionen des GerätesDiese digitale Waage dient zum Wiegen und zur Ermittlung Ihrer persönlichen Fitness-Daten.Sie ist für die Eigenanwendung im privaten Bereich bestimmt.Die Waage verfügt über folgende Funktionen, die von bis zu 10 Personen benutzt werden können:• Körpergewicht-Messung• Ermittlung von Körperfettanteil,• Körperwasseranteil,• Muskelanteil,• Knochenmasse sowie• Grund- und Aktivitätsumsatz.
Außerdem verfügt die Waage über folgende weitere Funktionen:• Innovative Menüführung im großen Display (wahlweise in 5 Sprachen),• Das Display kann wahlweise auf der Waage verbleiben, separat abgestellt oder an der Wand befestigt werden.
Optional ist zudem ein Stelenset erhältlich,• Umschalten zwischen Kilogramm „kg“, Pfund „lb“ und Stone „st“,• Automatische Abschaltfunktion,
Lesen Sie diese Gebrauchsanweisung sorgfältig durch, bewahren Sie sie für den späteren Gebrauch auf, machen Sie sie anderen Benutzern zugänglich und beachten Sie die Hinweise.
Inhalt
3
• Batteriewechsel-Anzeige bei schwachen Batterien,• Automatische Benutzererkennung,• Speicherung der letzten 30 Messungen für 10 Personen, wenn zur App nicht übertragen werden kann.
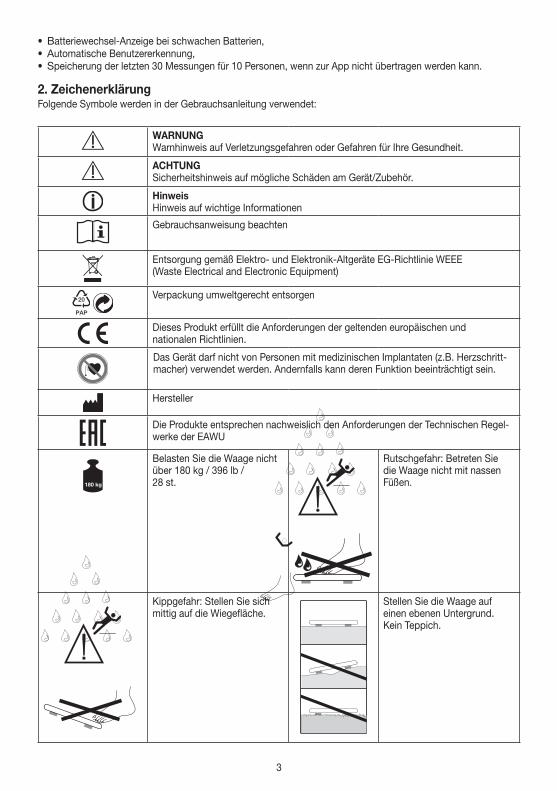
2. ZeichenerklärungFolgende Symbole werden in der Gebrauchsanleitung verwendet:
WARNUNGWarnhinweis auf Verletzungsgefahren oder Gefahren für Ihre Gesundheit.
ACHTUNG Sicherheitshinweis auf mögliche Schäden am Gerät/Zubehör.
HinweisHinweis auf wichtige Informationen
Gebrauchsanweisung beachten
Entsorgung gemäß Elektro- und Elektronik-Altgeräte EG-Richtlinie WEEE (Waste Electrical and Electronic Equipment)
20
PAP
Verpackung umweltgerecht entsorgen
Dieses Produkt erfüllt die Anforderungen der geltenden europäischen und nationalen Richtlinien.
Das Gerät darf nicht von Personen mit medizinischen Implantaten (z.B. Herzschritt-macher) verwendet werden. Andernfalls kann deren Funktion beeinträchtigt sein.
Hersteller
Die Produkte entsprechen nachweislich den Anforderungen der Technischen Regel-werke der EAWU
Belasten Sie die Waage nicht über 180 kg / 396 lb / 28 st.
317306_SGWI 180_2019-05-03_02_WarningSticker_Lidl
max.
180 kg396 lb28 st
317306_SGWI 180_2019-05-03_02_WarningSticker_Lidl
max.
180 kg396 lb28 st
Rutschgefahr: Betreten Sie die Waage nicht mit nassen Füßen.
Kippgefahr: Stellen Sie sich mittig auf die Wiegefläche.
Stellen Sie die Waage auf einen ebenen Untergrund. Kein Teppich.
317306_SGWI 180_2019-05-03_02_WarningSticker_Lidl
max.
180 kg396 lb28 st
317306_SGWI 180_2019-05-03_02_WarningSticker_Lidl
max.
180 kg396 lb28 st
4
3. Warn- und Sicherheitshinweise
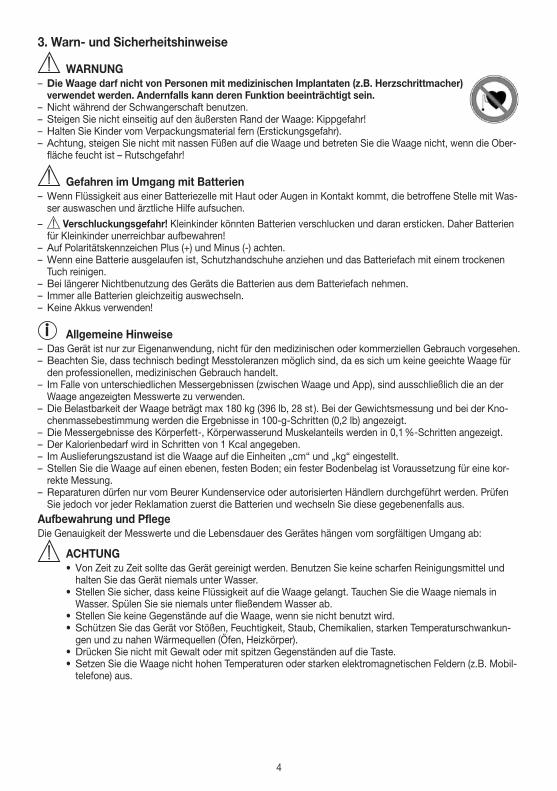
WARNUNG – Die Waage darf nicht von Personen mit medizinischen Implantaten (z.B. Herzschrittmacher) verwendet werden. Andernfalls kann deren Funktion beeinträchtigt sein.
– Nicht während der Schwangerschaft benutzen. – Steigen Sie nicht einseitig auf den äußersten Rand der Waage: Kippgefahr! – Halten Sie Kinder vom Verpackungsmaterial fern (Erstickungsgefahr). – Achtung, steigen Sie nicht mit nassen Füßen auf die Waage und betreten Sie die Waage nicht, wenn die Ober-fläche feucht ist – Rutschgefahr!
Gefahren im Umgang mit Batterien – Wenn Flüssigkeit aus einer Batteriezelle mit Haut oder Augen in Kontakt kommt, die betroffene Stelle mit Was-ser auswaschen und ärztliche Hilfe aufsuchen.
– Verschluckungsgefahr! Kleinkinder könnten Batterien verschlucken und daran ersticken. Daher Batterien für Kleinkinder unerreichbar aufbewahren!
– Auf Polaritätskennzeichen Plus (+) und Minus (-) achten. – Wenn eine Batterie ausgelaufen ist, Schutzhandschuhe anziehen und das Batteriefach mit einem trockenen Tuch reinigen.
– Bei längerer Nichtbenutzung des Geräts die Batterien aus dem Batteriefach nehmen. – Immer alle Batterien gleichzeitig auswechseln. – Keine Akkus verwenden!
Allgemeine Hinweise – Das Gerät ist nur zur Eigenanwendung, nicht für den medizinischen oder kommerziellen Gebrauch vorgesehen. – Beachten Sie, dass technisch bedingt Messtoleranzen möglich sind, da es sich um keine geeichte Waage für den professionellen, medizinischen Gebrauch handelt.
– Im Falle von unterschiedlichen Messergebnissen (zwischen Waage und App), sind ausschließlich die an der Waage angezeigten Messwerte zu verwenden.
– Die Belastbarkeit der Waage beträgt max 180 kg (396 lb, 28 st ). Bei der Gewichtsmessung und bei der Kno-chenmassebestimmung werden die Ergebnisse in 100-g-Schritten (0,2 lb) angezeigt.
– Die Messergebnisse des Körperfett-, Körperwasserund Muskelanteils werden in 0,1 %-Schritten angezeigt. – Der Kalorienbedarf wird in Schritten von 1 Kcal angegeben. – Im Auslieferungszustand ist die Waage auf die Einheiten „cm“ und „kg“ eingestellt. – Stellen Sie die Waage auf einen ebenen, festen Boden; ein fester Bodenbelag ist Voraussetzung für eine kor-rekte Messung.
– Reparaturen dürfen nur vom Beurer Kundenservice oder autorisierten Händlern durchgeführt werden. Prüfen Sie jedoch vor jeder Reklamation zuerst die Batterien und wechseln Sie diese gegebenenfalls aus.
Aufbewahrung und PflegeDie Genauigkeit der Messwerte und die Lebensdauer des Gerätes hängen vom sorgfältigen Umgang ab:
ACHTUNG• Von Zeit zu Zeit sollte das Gerät gereinigt werden. Benutzen Sie keine scharfen Reinigungsmittel und
halten Sie das Gerät niemals unter Wasser.• Stellen Sie sicher, dass keine Flüssigkeit auf die Waage gelangt. Tauchen Sie die Waage niemals in
Wasser. Spülen Sie sie niemals unter fließendem Wasser ab.• Stellen Sie keine Gegenstände auf die Waage, wenn sie nicht benutzt wird.• Schützen Sie das Gerät vor Stößen, Feuchtigkeit, Staub, Chemikalien, starken Temperaturschwankun-
gen und zu nahen Wärmequellen (Öfen, Heizkörper).• Drücken Sie nicht mit Gewalt oder mit spitzen Gegenständen auf die Taste.• Setzen Sie die Waage nicht hohen Temperaturen oder starken elektromagnetischen Feldern (z.B. Mobil-
telefone) aus.
5
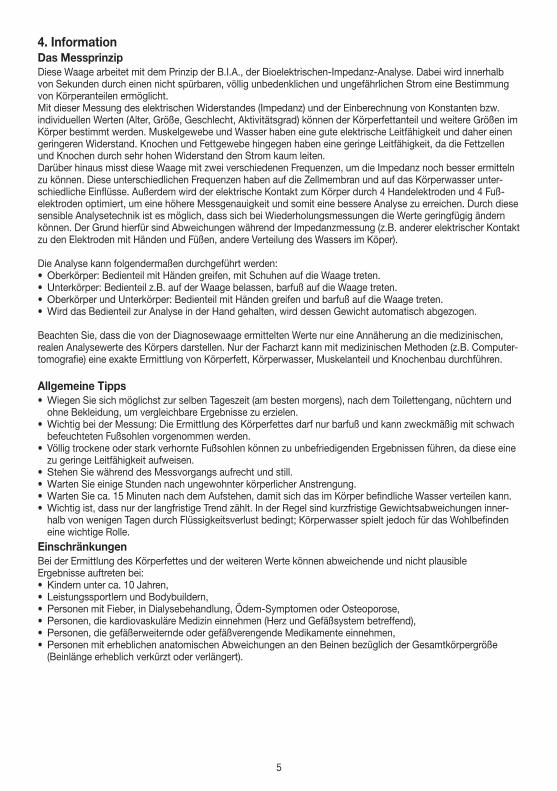
4. InformationDas MessprinzipDiese Waage arbeitet mit dem Prinzip der B.I.A., der Bioelektrischen-Impedanz-Analyse. Dabei wird innerhalb von Sekunden durch einen nicht spürbaren, völlig unbedenklichen und ungefährlichen Strom eine Bestimmung von Körperanteilen ermöglicht. Mit dieser Messung des elektrischen Widerstandes (Impedanz) und der Einberechnung von Konstanten bzw. individuellen Werten (Alter, Größe, Geschlecht, Aktivitätsgrad) können der Körperfettanteil und weitere Größen im Körper bestimmt werden. Muskelgewebe und Wasser haben eine gute elektrische Leit fähig keit und daher einen geringeren Widerstand. Knochen und Fettgewebe hingegen haben eine geringe Leitfähigkeit, da die Fettzellen und Knochen durch sehr hohen Widerstand den Strom kaum leiten.Darüber hinaus misst diese Waage mit zwei verschiedenen Frequenzen, um die Impedanz noch besser ermitteln zu können. Diese unterschiedlichen Frequenzen haben auf die Zellmembran und auf das Körperwasser unter-schiedliche Einflüsse. Außerdem wird der elektrische Kontakt zum Körper durch 4 Handelektroden und 4 Fuß-elektroden optimiert, um eine höhere Messgenauigkeit und somit eine bessere Analyse zu erreichen. Durch diese sensible Analysetechnik ist es möglich, dass sich bei Wiederholungsmessungen die Werte geringfügig ändern können. Der Grund hierfür sind Abweichungen während der Impedanzmessung (z.B. anderer elektrischer Kontakt zu den Elektroden mit Händen und Füßen, andere Verteilung des Wassers im Köper).
Die Analyse kann folgendermaßen durchgeführt werden:• Oberkörper: Bedienteil mit Händen greifen, mit Schuhen auf die Waage treten.• Unterkörper: Bedienteil z.B. auf der Waage belassen, barfuß auf die Waage treten.• Oberkörper und Unterkörper: Bedienteil mit Händen greifen und barfuß auf die Waage treten.• Wird das Bedienteil zur Analyse in der Hand gehalten, wird dessen Gewicht automatisch abgezogen.
Beachten Sie, dass die von der Diagnosewaage ermittelten Werte nur eine Annäherung an die medizinischen, realen Analysewerte des Körpers darstellen. Nur der Facharzt kann mit medizinischen Methoden (z.B. Computer-tomografie) eine exakte Ermittlung von Körperfett, Körperwasser, Muskelanteil und Knochen bau durchführen.
Allgemeine Tipps• Wiegen Sie sich möglichst zur selben Tageszeit (am besten morgens), nach dem Toilettengang, nüchtern und
ohne Bekleidung, um vergleichbare Ergebnisse zu erzielen.• Wichtig bei der Messung: Die Ermittlung des Körperfettes darf nur barfuß und kann zweckmäßig mit schwach
befeuchteten Fußsohlen vorgenommen werden.• Völlig trockene oder stark verhornte Fußsohlen können zu unbefriedigenden Ergebnissen führen, da diese eine
zu geringe Leitfähigkeit aufweisen.• Stehen Sie während des Messvorgangs aufrecht und still.• Warten Sie einige Stunden nach ungewohnter körperlicher Anstrengung.• Warten Sie ca. 15 Minuten nach dem Aufstehen, damit sich das im Körper befindliche Wasser verteilen kann.• Wichtig ist, dass nur der langfristige Trend zählt. In der Regel sind kurzfristige Gewichtsabweichungen inner-
halb von wenigen Tagen durch Flüssigkeitsverlust bedingt; Körperwasser spielt jedoch für das Wohlbefinden eine wichtige Rolle.
EinschränkungenBei der Ermittlung des Körperfettes und der weiteren Werte können abweichende und nicht plausible Ergebnisse auftreten bei:• Kindern unter ca. 10 Jahren,• Leistungssportlern und Bodybuildern,• Personen mit Fieber, in Dialysebehandlung, Ödem-Symptomen oder Osteoporose,• Personen, die kardiovaskuläre Medizin einnehmen (Herz und Gefäßsystem betreffend),• Personen, die gefäßerweiternde oder gefäßverengende Medikamente einnehmen,• Personen mit erheblichen anatomischen Abweichungen an den Beinen bezüglich der Gesamtkörpergröße
(Beinlänge erheblich verkürzt oder verlängert).
6
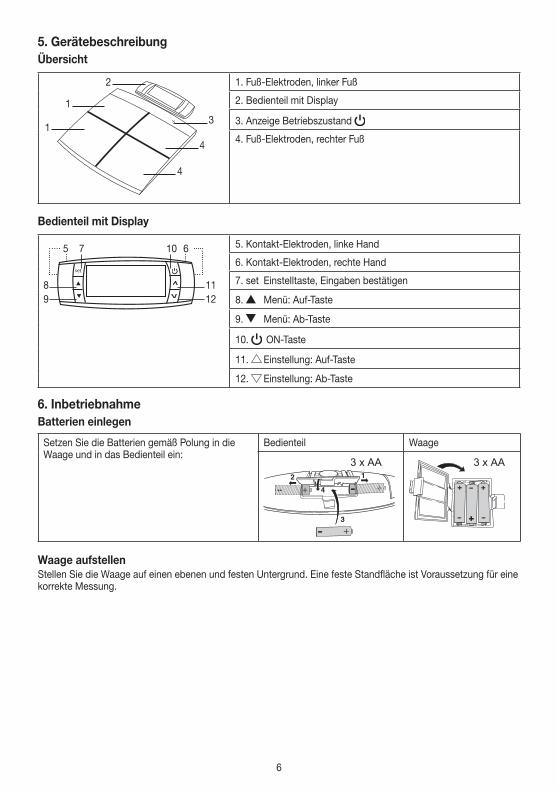
5. GerätebeschreibungÜbersicht
3
4
1
1
4
2 1. Fuß-Elektroden, linker Fuß
2. Bedienteil mit Display
3. Anzeige Betriebszustand
4. Fuß-Elektroden, rechter Fuß
Bedienteil mit Display
set
5 7 10
8 119 12
6 5. Kontakt-Elektroden, linke Hand
6. Kontakt-Elektroden, rechte Hand
7. set Einstelltaste, Eingaben bestätigen
8. Menü: Auf-Taste
9. Menü: Ab-Taste
10. ON-Taste
11. Einstellung: Auf-Taste
12. Einstellung: Ab-Taste
6. InbetriebnahmeBatterien einlegen
Setzen Sie die Batterien gemäß Polung in die Waage und in das Bedienteil ein:
Bedienteil Waage
3 x AA 3 x AA
Waage aufstellenStellen Sie die Waage auf einen ebenen und festen Untergrund. Eine feste Standfläche ist Voraussetzung für eine korrekte Messung.
7
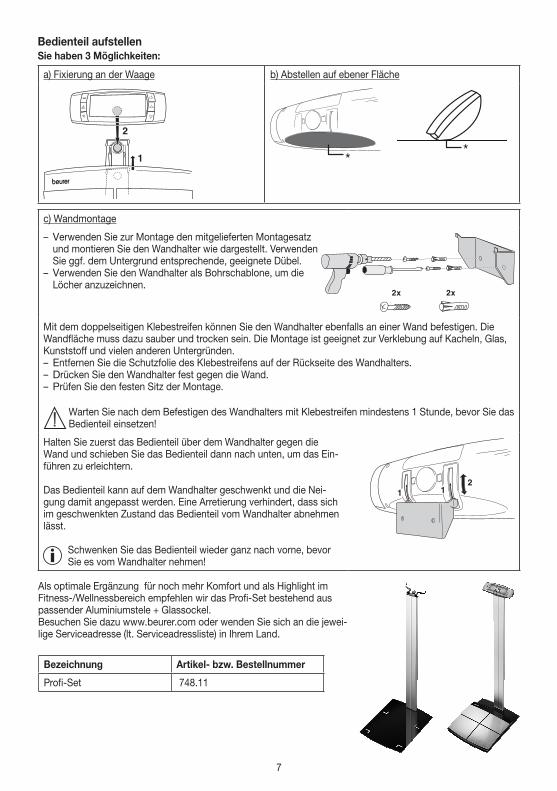
Bedienteil aufstellenSie haben 3 Möglichkeiten:
a) Fixierung an der Waage b) Abstellen auf ebener Fläche
**
c) Wandmontage
– Verwenden Sie zur Montage den mitgelieferten Montagesatz und montieren Sie den Wandhalter wie dargestellt. Verwenden Sie ggf. dem Untergrund entsprechende, geeignete Dübel.
– Verwenden Sie den Wandhalter als Bohrschablone, um die Löcher anzuzeichnen.
Mit dem doppelseitigen Klebestreifen können Sie den Wandhalter ebenfalls an einer Wand befestigen. Die Wandfläche muss dazu sauber und trocken sein. Die Montage ist geeignet zur Verklebung auf Kacheln, Glas, Kunststoff und vielen anderen Untergründen. – Entfernen Sie die Schutzfolie des Klebestreifens auf der Rückseite des Wandhalters. – Drücken Sie den Wandhalter fest gegen die Wand. – Prüfen Sie den festen Sitz der Montage.
Warten Sie nach dem Befestigen des Wandhalters mit Klebestreifen mindestens 1 Stunde, bevor Sie das Bedienteil einsetzen!
Halten Sie zuerst das Bedienteil über dem Wandhalter gegen die Wand und schieben Sie das Bedienteil dann nach unten, um das Ein-führen zu erleichtern.
Das Bedienteil kann auf dem Wandhalter geschwenkt und die Nei-gung damit angepasst werden. Eine Arretierung verhindert, dass sich im geschwenkten Zustand das Bedienteil vom Wandhalter abnehmen lässt.
Schwenken Sie das Bedienteil wieder ganz nach vorne, bevor Sie es vom Wandhalter nehmen!
Als optimale Ergänzung für noch mehr Komfort und als Highlight im Fitness-/Wellnessbereich empfehlen wir das Profi-Set bestehend aus passender Aluminiumstele + Glassockel.Besuchen Sie dazu www.beurer.com oder wenden Sie sich an die jewei-lige Serviceadresse (lt. Serviceadressliste) in Ihrem Land.
Bezeichnung Artikel- bzw. Bestellnummer
Profi-Set 748.11
8
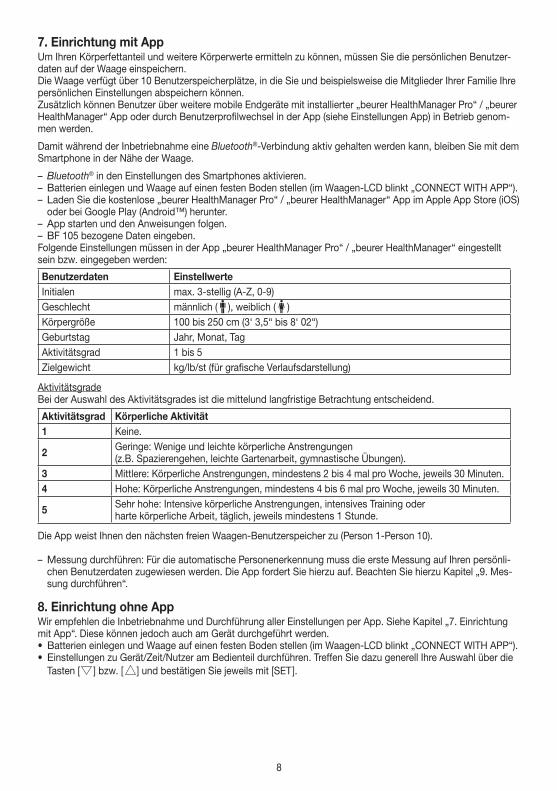
7. Einrichtung mit AppUm Ihren Körperfettanteil und weitere Körperwerte ermitteln zu können, müssen Sie die persönlichen Benutzer-daten auf der Waage einspeichern.Die Waage verfügt über 10 Benutzerspeicherplätze, in die Sie und beispielsweise die Mitglieder Ihrer Familie Ihre persönlichen Einstellungen abspeichern können.Zusätzlich können Benutzer über weitere mobile Endgeräte mit installierter „beurer HealthManager Pro“ / „beurer HealthManager“ App oder durch Benutzerprofilwechsel in der App (siehe Einstellungen App) in Betrieb genom-men werden.
Damit während der Inbetriebnahme eine Bluetooth®-Verbindung aktiv gehalten werden kann, bleiben Sie mit dem Smartphone in der Nähe der Waage.
– Bluetooth® in den Einstellungen des Smartphones aktivieren. – Batterien einlegen und Waage auf einen festen Boden stellen (im Waagen-LCD blinkt „CONNECT WITH APP“). – Laden Sie die kostenlose „beurer HealthManager Pro“ / „beurer HealthManager“ App im Apple App Store (iOS) oder bei Google Play (Android™) herunter.
– App starten und den Anweisungen folgen. – BF 105 bezogene Daten eingeben.
Folgende Einstellungen müssen in der App „beurer HealthManager Pro“ / „beurer HealthManager“ eingestellt sein bzw. eingegeben werden:
Benutzerdaten EinstellwerteInitialen max. 3-stellig (A-Z, 0-9)Geschlecht männlich ( ), weiblich ( )Körpergröße 100 bis 250 cm (3‘ 3,5“ bis 8‘ 02“)Geburtstag Jahr, Monat, TagAktivitätsgrad 1 bis 5Zielgewicht kg/lb/st (für grafische Verlaufsdarstellung)
AktivitätsgradeBei der Auswahl des Aktivitätsgrades ist die mittelund langfristige Betrachtung entscheidend.
Aktivitätsgrad Körperliche Aktivität1 Keine.
2 Geringe: Wenige und leichte körperliche Anstrengungen (z.B. Spazierengehen, leichte Gartenarbeit, gymnastische Übungen).
3 Mittlere: Körperliche Anstrengungen, mindestens 2 bis 4 mal pro Woche, jeweils 30 Minuten.4 Hohe: Körperliche Anstrengungen, mindestens 4 bis 6 mal pro Woche, jeweils 30 Minuten.
5 Sehr hohe: Intensive körperliche Anstrengungen, intensives Training oder harte körperliche Arbeit, täglich, jeweils mindestens 1 Stunde.
Die App weist Ihnen den nächsten freien Waagen-Benutzerspeicher zu (Person 1-Person 10).
– Messung durchführen: Für die automatische Personenerkennung muss die erste Messung auf Ihren persönli-chen Benutzerdaten zugewiesen werden. Die App fordert Sie hierzu auf. Beachten Sie hierzu Kapitel „9. Mes-sung durchführen“.
8. Einrichtung ohne AppWir empfehlen die Inbetriebnahme und Durchführung aller Einstellungen per App. Siehe Kapitel „7. Einrichtung mit App“. Diese können jedoch auch am Gerät durchgeführt werden.• Batterien einlegen und Waage auf einen festen Boden stellen (im Waagen-LCD blinkt „CONNECT WITH APP“).• Einstellungen zu Gerät/Zeit/Nutzer am Bedienteil durchführen. Treffen Sie dazu generell Ihre Auswahl über die
Tasten [ ] bzw. [ ] und bestätigen Sie jeweils mit [SET ].
9
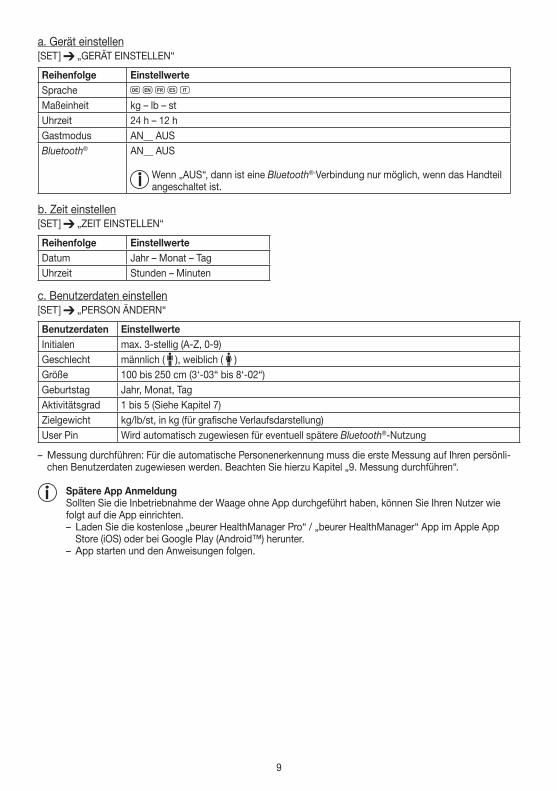
a. Gerät einstellen[SET ] „GERÄT EINSTELLEN“
Reihenfolge EinstellwerteSprache D G F E IMaßeinheit kg – lb – stUhrzeit 24 h – 12 hGastmodus AN__ AUSBluetooth® AN__ AUS
Wenn „AUS“, dann ist eine Bluetooth®-Verbindung nur möglich, wenn das Handteil angeschaltet ist.
b. Zeit einstellen[SET ] „ZEIT EINSTELLEN“
Reihenfolge EinstellwerteDatum Jahr – Monat – TagUhrzeit Stunden – Minuten
c. Benutzerdaten einstellen[SET ] „PERSON ÄNDERN“
Benutzerdaten EinstellwerteInitialen max. 3-stellig (A-Z, 0-9)Geschlecht männlich ( ), weiblich ( )Größe 100 bis 250 cm (3‘-03“ bis 8‘-02“)Geburtstag Jahr, Monat, TagAktivitätsgrad 1 bis 5 (Siehe Kapitel 7)Zielgewicht kg/lb/st, in kg (für gra fische Verlaufsdarstellung)User Pin Wird automatisch zugewiesen für eventuell spätere Bluetooth®-Nutzung
– Messung durchführen: Für die automatische Personenerkennung muss die erste Messung auf Ihren persönli-chen Benutzerdaten zugewiesen werden. Beachten Sie hierzu Kapitel „9. Messung durchführen“.
Spätere App Anmeldung Sollten Sie die Inbetriebnahme der Waage ohne App durchgeführt haben, können Sie Ihren Nutzer wie folgt auf die App einrichten. – Laden Sie die kostenlose „beurer HealthManager Pro“ / „beurer HealthManager“ App im Apple App Store (iOS) oder bei Google Play (Android™) herunter.
– App starten und den Anweisungen folgen.
10
9. Messung durchführen Waage einschalten/Gewicht messen
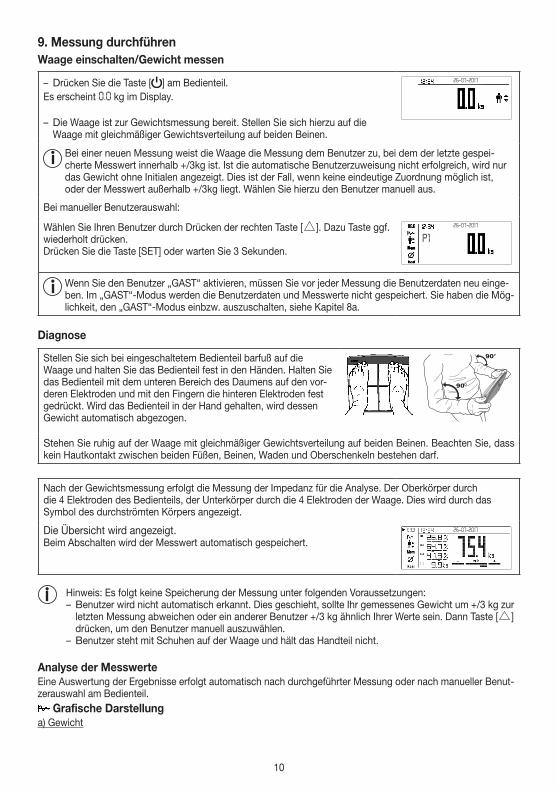
– Drücken Sie die Taste [ ] am Bedienteil.Es erscheint 0.0 kg im Display.
– Die Waage ist zur Gewichtsmessung bereit. Stellen Sie sich hierzu auf die Waage mit gleichmäßiger Gewichtsverteilung auf beiden Beinen.
26-07-2017
Bei einer neuen Messung weist die Waage die Messung dem Benutzer zu, bei dem der letzte gespei-cherte Messwert innerhalb +/3kg ist. Ist die automatische Benutzerzuweisung nicht erfolgreich, wird nur das Gewicht ohne Initialen angezeigt. Dies ist der Fall, wenn keine eindeutige Zuordnung möglich ist, oder der Messwert außerhalb +/3kg liegt. Wählen Sie hierzu den Benutzer manuell aus.
Bei manueller Benutzerauswahl:
Wählen Sie Ihren Benutzer durch Drücken der rechten Taste [ ]. Dazu Taste ggf. wiederholt drücken.Drücken Sie die Taste [SET] oder warten Sie 3 Sekunden.
26-07-2017
P1
Wenn Sie den Benutzer „GAST“ aktivieren, müssen Sie vor jeder Messung die Benutzerdaten neu einge-ben. Im „GAST“-Modus werden die Benutzerdaten und Messwerte nicht gespeichert. Sie haben die Mög-lichkeit, den „GAST“-Modus einbzw. auszuschalten, siehe Kapitel 8a.
Diagnose
Stellen Sie sich bei eingeschaltetem Bedienteil barfuß auf die Waage und halten Sie das Bedienteil fest in den Händen. Halten Sie das Bedienteil mit dem unteren Bereich des Daumens auf den vor-deren Elektroden und mit den Fingern die hinteren Elektroden fest gedrückt. Wird das Bedienteil in der Hand gehalten, wird dessen Gewicht automatisch abgezogen.
Stehen Sie ruhig auf der Waage mit gleichmäßiger Gewichtsverteilung auf beiden Beinen. Beachten Sie, dass kein Hautkontakt zwischen beiden Füßen, Beinen, Waden und Oberschenkeln bestehen darf.
Nach der Gewichtsmessung erfolgt die Messung der Impedanz für die Analyse. Der Oberkörper durch die 4 Elektroden des Bedienteils, der Unterkörper durch die 4 Elektroden der Waage. Dies wird durch das Symbol des durchströmten Körpers angezeigt.
Die Übersicht wird angezeigt.Beim Abschalten wird der Messwert automatisch gespeichert.
26-07-2017
Hinweis: Es folgt keine Speicherung der Messung unter folgenden Voraussetzungen: – Benutzer wird nicht automatisch erkannt. Dies geschieht, sollte Ihr gemessenes Gewicht um +/3 kg zur letzten Messung abweichen oder ein anderer Benutzer +/3 kg ähnlich Ihrer Werte sein. Dann Taste [ ] drücken, um den Benutzer manuell auszuwählen.
– Benutzer steht mit Schuhen auf der Waage und hält das Handteil nicht.
Analyse der MesswerteEine Auswertung der Ergebnisse erfolgt automatisch nach durchgeführter Messung oder nach manueller Benut-zerauswahl am Bedienteil.
Grafische Darstellunga) Gewicht
11
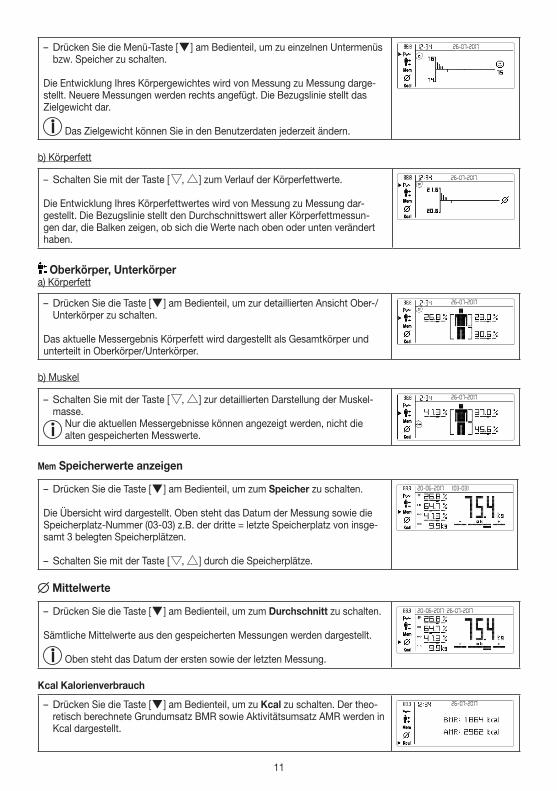
– Drücken Sie die Menü-Taste [ ] am Bedienteil, um zu einzelnen Untermenüs bzw. Speicher zu schalten.
Die Entwicklung Ihres Körpergewichtes wird von Messung zu Messung darge-stellt. Neuere Messungen werden rechts angefügt. Die Bezugslinie stellt das Zielgewicht dar.
Das Zielgewicht können Sie in den Benutzerdaten jederzeit ändern.
26-07-2017
b) Körperfett
– Schalten Sie mit der Taste [ , ] zum Verlauf der Körperfettwerte.
Die Entwicklung Ihres Körperfettwertes wird von Messung zu Messung dar-gestellt. Die Bezugslinie stellt den Durchschnittswert aller Körperfettmessun-gen dar, die Balken zeigen, ob sich die Werte nach oben oder unten verändert haben.
26-07-2017
Oberkörper, Unterkörpera) Körperfett
– Drücken Sie die Taste [ ] am Bedienteil, um zur detaillierten Ansicht Ober-/Unterkörper zu schalten.
Das aktuelle Messergebnis Körperfett wird dargestellt als Gesamtkörper und unterteilt in Oberkörper/Unterkörper.
26-07-2017
b) Muskel
– Schalten Sie mit der Taste [ , ] zur detaillierten Darstellung der Muskel-masse.
Nur die aktuellen Messergebnisse können angezeigt werden, nicht die alten gespeicherten Messwerte.
26-07-2017
Mem Speicherwerte anzeigen
– Drücken Sie die Taste [ ] am Bedienteil, um zum Speicher zu schalten.
Die Übersicht wird dargestellt. Oben steht das Datum der Messung sowie die Speicherplatz-Nummer (03-03) z.B. der dritte = letzte Speicherplatz von insge-samt 3 belegten Speicherplätzen.
– Schalten Sie mit der Taste [ , ] durch die Speicherplätze.
(03-03)20-06-2017
Mittelwerte
– Drücken Sie die Taste [ ] am Bedienteil, um zum Durchschnitt zu schalten.
Sämtliche Mittelwerte aus den gespeicherten Messungen werden dargestellt.
Oben steht das Datum der ersten sowie der letzten Messung.
20-06-2017 26-07-2017
Kcal Kalorienverbrauch
– Drücken Sie die Taste [ ] am Bedienteil, um zu Kcal zu schalten. Der theo-retisch berechnete Grundumsatz BMR sowie Aktivitätsumsatz AMR werden in Kcal dargestellt.
26-07-2017
12
Waage ausschalten (Standby-Modus) – Warten Sie, bis sich das Display selbstständig ausschaltet oder drücken Sie die Taste [ ] am Bedienteil, um das Display manuell auszuschalten.
Datum und Uhrzeit bleiben sichtbar.
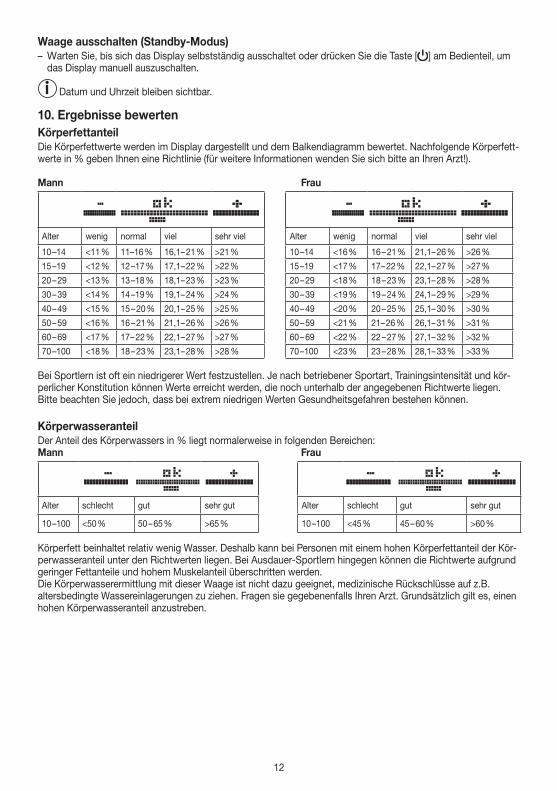
10. Ergebnisse bewertenKörperfettanteilDie Körperfettwerte werden im Display dargestellt und dem Balkendiagramm bewertet. Nachfolgende Körperfett-werte in % geben Ihnen eine Richtlinie (für weitere Informationen wenden Sie sich bitte an Ihren Arzt!).
Mann Frau
Alter wenig normal viel sehr viel Alter wenig normal viel sehr viel
10 –14 <11 % 11–16 % 16,1– 21 % >21 % 10 –14 <16 % 16 – 21 % 21,1– 26 % >26 %15 –19 <12 % 12 –17 % 17,1– 22 % >22 % 15 –19 <17 % 17 – 22 % 22,1– 27 % >27 %20 – 29 <13 % 13 –18 % 18,1– 23 % >23 % 20 – 29 <18 % 18 – 23 % 23,1– 28 % >28 %30 – 39 <14 % 14 –19 % 19,1– 24 % >24 % 30 – 39 <19 % 19 – 24 % 24,1– 29 % >29 %40 – 49 <15 % 15 – 20 % 20,1– 25 % >25 % 40 – 49 <20 % 20 – 25 % 25,1– 30 % >30 %50 – 59 <16 % 16 – 21 % 21,1– 26 % >26 % 50 – 59 <21 % 21– 26 % 26,1– 31 % >31 %60 – 69 <17 % 17 – 22 % 22,1– 27 % >27 % 60 – 69 <22 % 22 – 27 % 27,1– 32 % >32 %70 –100 <18 % 18 – 23 % 23,1– 28 % >28 % 70 –100 <23 % 23 – 28 % 28,1– 33 % >33 %
Bei Sportlern ist oft ein niedrigerer Wert festzustellen. Je nach betriebener Sportart, Trainingsintensität und kör-perlicher Konstitution können Werte erreicht werden, die noch unterhalb der angegebenen Richtwerte liegen. Bitte beachten Sie jedoch, dass bei extrem niedrigen Werten Gesundheitsgefahren bestehen können.
KörperwasseranteilDer Anteil des Körperwassers in % liegt normalerweise in folgenden Bereichen:Mann Frau
Alter schlecht gut sehr gut Alter schlecht gut sehr gut
10 –100 <50 % 50 – 65 % >65 % 10 –100 <45 % 45 – 60 % >60 %
Körperfett beinhaltet relativ wenig Wasser. Deshalb kann bei Personen mit einem hohen Körperfettanteil der Kör-perwasseranteil unter den Richtwerten liegen. Bei Ausdauer-Sportlern hingegen können die Richtwerte aufgrund geringer Fettanteile und hohem Muskelanteil überschritten werden.Die Körperwasserermittlung mit dieser Waage ist nicht dazu geeignet, medizinische Rückschlüsse auf z.B. altersbedingte Wassereinlagerungen zu ziehen. Fragen sie gegebenenfalls Ihren Arzt. Grundsätzlich gilt es, einen hohen Körperwasseranteil anzustreben.
13
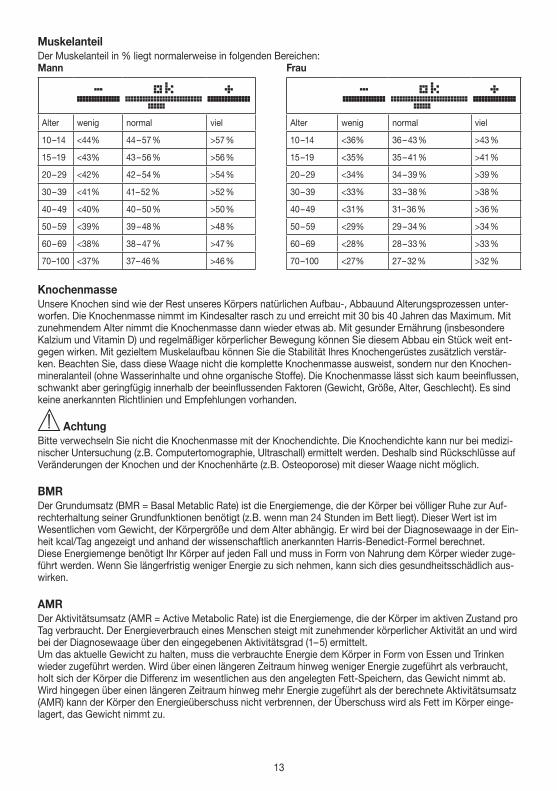
MuskelanteilDer Muskelanteil in % liegt normalerweise in folgenden Bereichen:Mann Frau
Alter wenig normal viel Alter wenig normal viel
10 –14 <44% 44 – 57 % >57 % 10 –14 <36% 36 – 43 % >43 %
15 –19 <43% 43 – 56 % >56 % 15 –19 <35% 35 – 41 % >41 %
20 – 29 <42% 42 – 54 % >54 % 20 – 29 <34% 34 – 39 % >39 %
30 – 39 <41% 41– 52 % >52 % 30 – 39 <33% 33 – 38 % >38 %
40 – 49 <40% 40 – 50 % >50 % 40 – 49 <31% 31– 36 % >36 %
50 – 59 <39% 39 – 48 % >48 % 50 – 59 <29% 29 – 34 % >34 %
60 – 69 <38% 38 – 47 % >47 % 60 – 69 <28% 28 – 33 % >33 %
70 –100 <37% 37 – 46 % >46 % 70 –100 <27% 27 – 32 % >32 %
KnochenmasseUnsere Knochen sind wie der Rest unseres Körpers natürlichen Aufbau-, Abbauund Alterungsprozessen unter-worfen. Die Knochenmasse nimmt im Kindesalter rasch zu und erreicht mit 30 bis 40 Jahren das Maximum. Mit zunehmendem Alter nimmt die Knochenmasse dann wieder etwas ab. Mit gesunder Ernährung (insbesondere Kalzium und Vitamin D) und regelmäßiger körperlicher Bewegung können Sie diesem Abbau ein Stück weit ent-gegen wirken. Mit gezieltem Muskelaufbau können Sie die Stabilität Ihres Knochengerüstes zusätzlich verstär-ken. Beachten Sie, dass diese Waage nicht die komplette Knochenmasse ausweist, sondern nur den Knochen-mineralanteil (ohne Wasserinhalte und ohne organische Stoffe). Die Knochenmasse lässt sich kaum beeinflussen, schwankt aber geringfügig innerhalb der beeinflussenden Faktoren (Gewicht, Größe, Alter, Geschlecht). Es sind keine anerkannten Richtlinien und Empfehlungen vorhanden.
AchtungBitte verwechseln Sie nicht die Knochenmasse mit der Knochendichte. Die Knochendichte kann nur bei medizi-nischer Untersuchung (z.B. Computertomographie, Ultraschall) ermittelt werden. Deshalb sind Rückschlüsse auf Veränderungen der Knochen und der Knochenhärte (z.B. Osteoporose) mit dieser Waage nicht möglich.
BMRDer Grundumsatz (BMR = Basal Metablic Rate) ist die Energiemenge, die der Körper bei völliger Ruhe zur Auf-rechterhaltung seiner Grundfunktionen benötigt (z.B. wenn man 24 Stunden im Bett liegt). Dieser Wert ist im Wesentlichen vom Gewicht, der Körpergröße und dem Alter abhängig. Er wird bei der Diagnosewaage in der Ein-heit kcal/Tag angezeigt und anhand der wissenschaftlich anerkannten Harris-Benedict-Formel berechnet.Diese Energiemenge benötigt Ihr Körper auf jeden Fall und muss in Form von Nahrung dem Körper wieder zuge-führt werden. Wenn Sie längerfristig weniger Energie zu sich nehmen, kann sich dies gesundheitsschädlich aus-wirken.
AMRDer Aktivitätsumsatz (AMR = Active Metabolic Rate) ist die Energiemenge, die der Körper im aktiven Zustand pro Tag verbraucht. Der Energieverbrauch eines Menschen steigt mit zunehmender körperlicher Aktivität an und wird bei der Diagnosewaage über den eingegebenen Aktivitätsgrad (1– 5) ermittelt.Um das aktuelle Gewicht zu halten, muss die verbrauchte Energie dem Körper in Form von Essen und Trinken wieder zugeführt werden. Wird über einen längeren Zeitraum hinweg weniger Energie zugeführt als verbraucht, holt sich der Körper die Differenz im wesentlichen aus den angelegten Fett-Speichern, das Gewicht nimmt ab. Wird hingegen über einen längeren Zeitraum hinweg mehr Energie zugeführt als der berechnete Aktivitätsumsatz (AMR) kann der Körper den Energieüberschuss nicht verbrennen, der Überschuss wird als Fett im Körper einge-lagert, das Gewicht nimmt zu.

14
Zeitlicher Zusammenhang der Ergebnisse
Beachten Sie, dass nur der langfristige Trend von Bedeutung ist. Kurzfristige Gewichtsabweichungen inner-halb von wenigen Tagen sind in der Regel durch Flüssigkeitsverlust bedingt.
Die Deutung der Ergebnisse richtet sich nach den Veränderungen des Gesamtgewichts und der prozentualen Körperfett-, Körperwasserund Muskelanteile, sowie nach der Zeitdauer mit welcher diese Änderungenerfolgen. Rasche Veränderungen im Bereich von Tagen sind von mittelfristigen Änderungen (im Bereich von Wochen) und langfristigen Änderungen (Monaten) zu unterscheiden.Als Grundregel kann gelten, dass kurzfristige Veränderungen des Gewichts fast ausschließlich Änderungen des Wassergehalts darstellen, während mittelund langfristige Veränderungen auch den Fettund Muskelanteil betreffen können.• Wenn kurzfristig das Gewicht sinkt, jedoch der Körperfettanteil steigt oder gleich bleibt, haben Sie ledig-
lich Wasser verloren – z.B. nach einem Training, Saunagang oder einer nur auf schnellen Gewichtsverlust beschränkten Diät.
• Wenn das Gewicht mittelfristig steigt, der Körperfettanteil sinkt oder gleich bleibt, könnten Sie hingegen wert-volle Muskelmasse aufgebaut haben.
• Wenn Gewicht und Körperfettanteil gleichzeitig sinken, funktioniert Ihre Diät – Sie verlieren Fettmasse.• Idealerweise unterstützen Sie Ihre Diät mit körperlicher Aktivität, Fitnessoder Krafttraining. Damit können Sie
mittelfristig Ihren Muskelanteil erhöhen.• Körperfett, Körperwasser oder Muskelanteile dürfen nicht addiert werden (Muskelgewebe enthält auch
Bestandteile aus Körperwasser).
11. Messwerte übertragena) Per AppFalls die App nicht geöffnet ist, werden neu zugewiesene Messungen in der Waage gespeichert. Maximal 30 Messungen pro Benutzer können in der Waage gespeichert werden. Die gespeicherten Messwerte werden auto-matisch zur App übertragen, wenn Sie die App innerhalb der Bluetooth®reichweite öffnen. Eine automatische Übertragung im ausgeschalteten Zustand der Waage ist möglich.
b) Per USB• Download und Installation der Beurer Software finden Sie im Downloadbereich unter http://www.beurer.com• Bei der Installation der Software folgen Sie den Anweisungen.• USB-Verbindung herstellen.
12. Weitere InformationenWaagendaten löschena) Benutzer mit allen Einstellungen und Speicherwerten löschen• Wählen Sie nach dem Einschalten Ihren Benutzer durch Drücken der Taste [ ]. Dazu Taste ggf. wiederholt
drücken und mit [SET] bestätigen.• Drücken Sie wenn die Anzeige 0.0 erscheint die Taste [SET] 10 Sekunden lang, um den Benutzer zu löschen.• Wählen Sie mit den Tasten [ , ] „JA“ und bestätigen Sie die Abfrage mit der Taste [SET]. Falls Sie den
Benutzer nicht löschen möchten, bestätigen Sie „NEIN“ mit der Taste [SET].
Alle gespeicherten Werte und Einstellungen dieses Benutzers werden gelöscht.
b) Einzelnen Speicherwert eines Benutzers löschen• Wählen Sie im Messwertspeicher „Mem“ einen Messwert und drücken Sie die Taste [SET] am Bedienteil kurz,
um den angezeigten Speicherwert zu löschen.• Dies können Sie auch direkt nach der Messung durchführen.• Wählen Sie mit den Tasten [ , ] „JA“ und bestätigen Sie die Abfrage mit der Taste [SET]. Falls Sie den Wert
nicht löschen möchten, bestätigen Sie „NEIN“ mit der Taste [SET].c) Alle Speicherwerte eines Benutzers löschen• Rufen Sie den Messwertspeicher „Mem“ auf und drücken Sie die Taste [SET] am Bedienteil für ca. 5 Sekun-
den, um alle Werte zu löschen.• Wählen Sie mit den Tasten [ , ] „JA“ und bestätigen Sie die Abfrage mit der Taste [SET]. Falls Sie nichts
löschen möchten, bestätigen Sie „NEIN“ mit der Taste [SET].
15
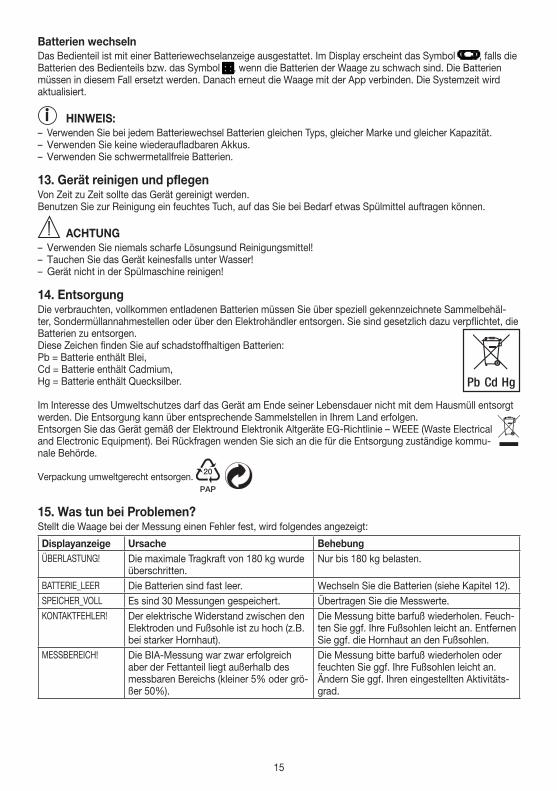
Batterien wechselnDas Bedienteil ist mit einer Batteriewechselanzeige ausgestattet. Im Display erscheint das Symbol , falls die Batterien des Bedienteils bzw. das Symbol , wenn die Batterien der Waage zu schwach sind. Die Batterien müssen in diesem Fall ersetzt werden. Danach erneut die Waage mit der App verbinden. Die Systemzeit wird aktualisiert.
HINWEIS: – Verwenden Sie bei jedem Batteriewechsel Batterien gleichen Typs, gleicher Marke und gleicher Kapazität. – Verwenden Sie keine wiederaufladbaren Akkus. – Verwenden Sie schwermetallfreie Batterien.
13. Gerät reinigen und pflegenVon Zeit zu Zeit sollte das Gerät gereinigt werden.Benutzen Sie zur Reinigung ein feuchtes Tuch, auf das Sie bei Bedarf etwas Spülmittel auftragen können.
ACHTUNG – Verwenden Sie niemals scharfe Lösungsund Reinigungsmittel! – Tauchen Sie das Gerät keinesfalls unter Wasser! – Gerät nicht in der Spülmaschine reinigen!
14. EntsorgungDie verbrauchten, vollkommen entladenen Batterien müssen Sie über speziell gekennzeichnete Sammelbehäl-ter, Sondermüllannahmestellen oder über den Elektrohändler entsorgen. Sie sind gesetzlich dazu verpflichtet, die Batterien zu entsorgen.Diese Zeichen finden Sie auf schadstoffhaltigen Batterien: Pb = Batterie enthält Blei,Cd = Batterie enthält Cadmium, Hg = Batterie enthält Quecksilber.
Im Interesse des Umweltschutzes darf das Gerät am Ende seiner Lebensdauer nicht mit dem Hausmüll entsorgt werden. Die Entsorgung kann über entsprechende Sammelstellen in Ihrem Land erfolgen. Entsorgen Sie das Gerät gemäß der Elektround Elektronik Altgeräte EG-Richtlinie – WEEE (Waste Electrical and Electronic Equipment). Bei Rückfragen wenden Sie sich an die für die Entsorgung zuständige kommu-nale Behörde.
Verpackung umweltgerecht entsorgen. 20
PAP
15. Was tun bei Problemen?Stellt die Waage bei der Messung einen Fehler fest, wird folgendes angezeigt:
Displayanzeige Ursache BehebungÜBERLASTUNG! Die maximale Tragkraft von 180 kg wurde
überschritten.Nur bis 180 kg belasten.
BATTERIE_LEER Die Batterien sind fast leer. Wechseln Sie die Batterien (siehe Kapitel 12).SPEICHER_VOLL Es sind 30 Messungen gespeichert. Übertragen Sie die Mess werte.KONTAKT FEHLER! Der elektrische Widerstand zwischen den
Elektroden und Fußsohle ist zu hoch (z.B. bei starker Hornhaut).
Die Messung bitte barfuß wiederholen. Feuch-ten Sie ggf. Ihre Fußsohlen leicht an. Entfernen Sie ggf. die Hornhaut an den Fußsohlen.
MESSBEREICH! Die BIA-Messung war zwar erfolgreich aber der Fettanteil liegt außerhalb des messbaren Bereichs (kleiner 5% oder grö-ßer 50%).
Die Messung bitte barfuß wiederholen oder feuchten Sie ggf. Ihre Fußsohlen leicht an. Ändern Sie ggf. Ihren eingestellten Aktivitäts-grad.
16
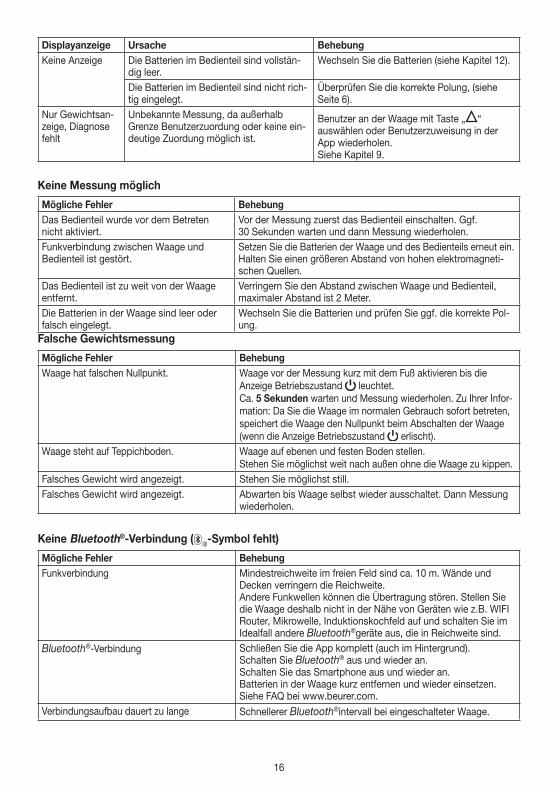
Displayanzeige Ursache BehebungKeine Anzeige Die Batterien im Bedienteil sind vollstän-
dig leer.Wechseln Sie die Batterien (siehe Kapitel 12).
Die Batterien im Bedienteil sind nicht rich-tig eingelegt.
Überprüfen Sie die korrekte Polung, (siehe Seite 6).
Nur Gewichtsan-zeige, Diagnose fehlt
Unbekannte Messung, da außerhalb Grenze Benutzerzuordung oder keine ein-deutige Zuordung möglich ist.
Benutzer an der Waage mit Taste „ “ auswählen oder Benutzerzuweisung in der App wiederholen.Siehe Kapitel 9.
Keine Messung möglich
Mögliche Fehler BehebungDas Bedienteil wurde vor dem Betreten nicht aktiviert.
Vor der Messung zuerst das Bedienteil einschalten. Ggf. 30 Sekunden warten und dann Messung wiederholen.
Funkverbindung zwischen Waage und Bedienteil ist gestört.
Setzen Sie die Batterien der Waage und des Bedienteils erneut ein.Halten Sie einen größeren Abstand von hohen elektromagneti-schen Quellen.
Das Bedienteil ist zu weit von der Waage entfernt.
Verringern Sie den Abstand zwischen Waage und Bedienteil, maximaler Abstand ist 2 Meter.
Die Batterien in der Waage sind leer oder falsch eingelegt.
Wechseln Sie die Batterien und prüfen Sie ggf. die korrekte Pol-ung.
Falsche Gewichtsmessung
Mögliche Fehler BehebungWaage hat falschen Nullpunkt. Waage vor der Messung kurz mit dem Fuß aktivieren bis die
Anzeige Betriebszustand leuchtet.Ca. 5 Sekunden warten und Messung wiederholen. Zu Ihrer Infor-mation: Da Sie die Waage im normalen Gebrauch sofort betreten, speichert die Waage den Nullpunkt beim Abschalten der Waage (wenn die Anzeige Betriebszustand erlischt).
Waage steht auf Teppichboden. Waage auf ebenen und festen Boden stellen.Stehen Sie möglichst weit nach außen ohne die Waage zu kippen.
Falsches Gewicht wird angezeigt. Stehen Sie möglichst still.Falsches Gewicht wird angezeigt. Abwarten bis Waage selbst wieder ausschaltet. Dann Messung
wieder holen.
Keine Bluetooth®-Verbindung ( ®-Symbol fehlt)
Mögliche Fehler BehebungFunkverbindung Mindestreichweite im freien Feld sind ca. 10 m. Wände und
Decken verringern die Reichweite.Andere Funkwellen können die Übertragung stören. Stellen Sie die Waage deshalb nicht in der Nähe von Geräten wie z.B. WIFI Router, Mikrowelle, Induktionskochfeld auf und schalten Sie im Idealfall andere Bluetooth®geräte aus, die in Reichweite sind.
Bluetooth®-Verbindung Schließen Sie die App komplett (auch im Hintergrund).Schalten Sie Bluetooth® aus und wieder an.Schalten Sie das Smartphone aus und wieder an.Batterien in der Waage kurz entfernen und wieder einsetzen.Siehe FAQ bei www.beurer.com.
Verbindungsaufbau dauert zu lange Schnellerer Bluetooth®intervall bei eingeschalteter Waage.
17
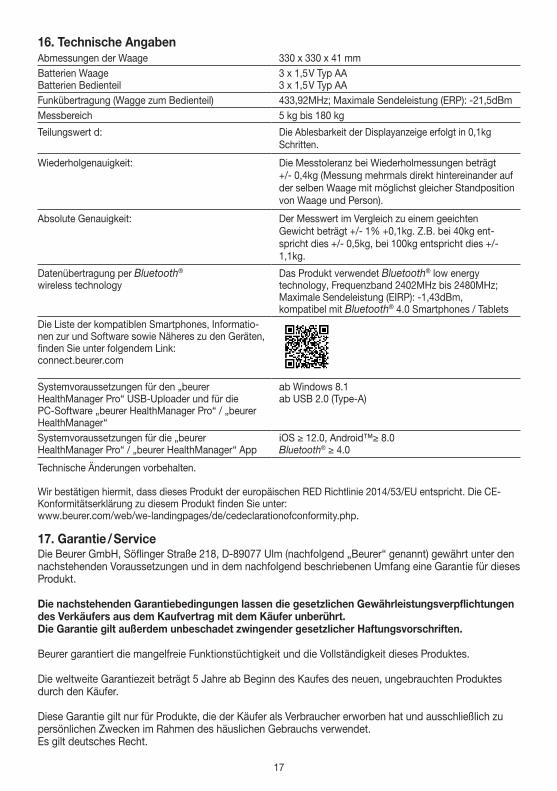
16. Technische AngabenAbmessungen der Waage 330 x 330 x 41 mmBatterien Waage Batterien Bedienteil
3 x 1,5 V Typ AA 3 x 1,5 V Typ AA
Funkübertragung (Wagge zum Bedienteil) 433,92MHz; Maximale Sendeleistung (ERP): -21,5dBmMessbereich 5 kg bis 180 kg
Teilungswert d: Die Ablesbarkeit der Displayanzeige erfolgt in 0,1kg Schritten.
Wiederholgenauigkeit: Die Messtoleranz bei Wiederholmessungen beträgt +/- 0,4kg (Messung mehrmals direkt hintereinander auf der selben Waage mit möglichst gleicher Standposition von Waage und Person).
Absolute Genauigkeit: Der Messwert im Vergleich zu einem geeichten Gewicht beträgt +/- 1% +0,1kg. Z.B. bei 40kg ent-spricht dies +/- 0,5kg, bei 100kg entspricht dies +/- 1,1kg.
Datenübertragung per Bluetooth®
wireless technologyDas Produkt verwendet Bluetooth® low energytechnology, Frequenzband 2402MHz bis 2480MHz; Maximale Sendeleistung (EIRP): -1,43dBm, kompatibel mit Bluetooth® 4.0 Smartphones / Tablets
Die Liste der kompatiblen Smartphones, Informatio-nen zur und Software sowie Näheres zu den Geräten, finden Sie unter folgendem Link:connect.beurer.com
Systemvoraussetzungen für den „beurer HealthManager Pro“ USB-Uploader und für die PC-Software „beurer HealthManager Pro“ / „beurer HealthManager“
ab Windows 8.1ab USB 2.0 (Type-A)
Systemvoraussetzungen für die „beurer HealthManager Pro“ / „beurer HealthManager“ App
iOS ≥ 12.0, Android™≥ 8.0Bluetooth® ≥ 4.0
Technische Änderungen vorbehalten.
Wir bestätigen hiermit, dass dieses Produkt der europäischen RED Richtlinie 2014/53/EU entspricht. Die CE-Konformitätserklärung zu diesem Produkt finden Sie unter: www.beurer.com/web/we-landingpages/de/cedeclarationofconformity.php.
17. Garantie / ServiceDie Beurer GmbH, Söflinger Straße 218, D-89077 Ulm (nachfolgend „Beurer“ genannt) gewährt unter den nachstehenden Voraussetzungen und in dem nachfolgend beschriebenen Umfang eine Garantie für dieses Produkt.
Die nachstehenden Garantiebedingungen lassen die gesetzlichen Gewährleistungsverpflichtungen des Verkäufers aus dem Kaufvertrag mit dem Käufer unberührt.Die Garantie gilt außerdem unbeschadet zwingender gesetzlicher Haftungsvorschriften.
Beurer garantiert die mangelfreie Funktionstüchtigkeit und die Vollständigkeit dieses Produktes.
Die weltweite Garantiezeit beträgt 5 Jahre ab Beginn des Kaufes des neuen, ungebrauchten Produktes durch den Käufer.
Diese Garantie gilt nur für Produkte, die der Käufer als Verbraucher erworben hat und ausschließlich zu persönlichen Zwecken im Rahmen des häuslichen Gebrauchs verwendet.Es gilt deutsches Recht.
18
Falls sich dieses Produkt während der Garantiezeit als unvollständig oder in der Funktionstüchtigkeit als mangelhaft gemäß der nachfolgenden Bestimmungen erweist, wird Beurer gemäß diesen Garantiebedin-gungen eine kostenfreie Ersatzlieferung oder Reparatur durchführen.
Wenn der Käufer einen Garantiefall melden möchte, wendet er sich zunächst an den Beurer Kun-denservice:Beurer GmbH, ServicecenterTel: +49 731 3989-144Für eine zügige Bearbeitung nutzen Sie bitte unser Kontaktformular auf der Homepage www.beurer.com unter der Rubrik ‚Service‘.
Der Käufer erhält dann nähere Informationen zur Abwicklung des Garantiefalls, z.B. wohin er das Produkt kostenfrei senden kann und welche Unterlagen erforderlich sind.Eine Inanspruchnahme der Garantie kommt nur in Betracht, wenn der Käufer- eine Rechnungskopie/Kaufquittung und- das Original-ProduktBeurer oder einem autorisierten Beurer Partner vorlegen kann.
Ausdrücklich ausgenommen von dieser Garantie sind- Verschleiß, der auf normalem Gebrauch oder Verbrauch des Produktes beruht;- zu diesem Produkt mitgelieferte Zubehörteile, die sich bei sachgemäßen Gebrauch abnutzen bzw.
verbraucht werden (z.B. Batterien, Akkus, Manschetten, Dichtungen, Elektroden, Leuchtmittel, Aufsätze, Inhalatorzubehör);
- Produkte, die unsachgemäß und/oder entgegen der Bestimmungen der Bedienungsanleitung verwendet, gereinigt, gelagert oder gewartet wurden sowie Produkte, die vom Käufer oder einem nicht von Beurer autorisierten Servicecenter geöffnet, repariert oder umgebaut wurden;
- Schäden, die auf dem Transportweg zwischen Hersteller und Kunde bzw. zwischen Servicecenter und Kunde entstehen;
- Produkte, die als 2.Wahl-Artikel oder als gebrauchte Artikel gekauft wurden;- Folgeschäden, welche auf einem Mangel dieses Produktes beruhen (es können für diesen Fall jedoch
Ansprüche aus Produkthaftung oder aus anderen zwingenden gesetzlichen Haftungsbestimmungen bestehen).
Reparaturen oder ein Komplettaustausch verlängern in keinem Fall die Garantiezeit.
Irrtu
m u
nd Ä
nder
unge
n vo
rbeh
alte
n
19
ENGLISH
1. Getting to know your device ................................192. Signs and symbols ...............................................203. Warnings and safety notes ...................................214. Information ...........................................................225. Unit description ....................................................236. Initial use ..............................................................237. Set-up with app ....................................................248. Set-up without app ...............................................259. Taking measurement ............................................26
10. Evaluating the results .........................................2911. Transferring measurements ................................3112. More information ................................................3113. Cleaning and maintaining the device .................3214. Disposal ..............................................................3215. What if there are problems? ...............................3216. Technical specifications .....................................3317. Warranty / service ................................................34
Included in delivery• Diagnostic scale• Removable operating unit with display• Wall bracket• Mounting kit for wall fastening• 3 x 1.5 V type AA (scale)• 3 x 1.5 V type AA (operating unit)• USB cable• These instructions for use and Bluetooth®/USB quick guide
Dear customer,Thank you for choosing one of our products. Our name stands for high-quality, thoroughly tested products for applications in the areas of heat, weight, blood pressure, body temperature, pulse, gentle therapy, massage, beauty, baby and air.Please read these instructions for use carefully and keep them for later use. Be sure to make them accessible to other users and observe the information they contain.
With kind regards,Your Beurer team
1. Getting to know your deviceFunctions of the deviceThe purpose of this digital scale is weighing and calculating your personal fitness data.It is intended for private use.The scale is equipped with the following functions, which can be used by up to 10 different people:• Body weight measurement• Calculating body fat percentage,• Body water content,• Muscle percentage,• Bone mass and• Basal metabolic rate and active metabolic rate.
The scale also includes the following additional features:• Innovative menu navigation on large display (in 5 languages),• The display can be left on the scale, positioned separately or mounted on the wall. A stand kit is optionally
available,• Switch between kilograms “kg”, pounds “lb” and stones “st”,• Automatic switch-off function,
Read these instructions for use carefully and keep them for later use, be sure to make them accessible to other users and observe the information they contain.
Contents
20
• Low battery indicator,• Automatic user recognition,• Storage of the last 30 measurements for 10 users if the data cannot be transferred to the app.
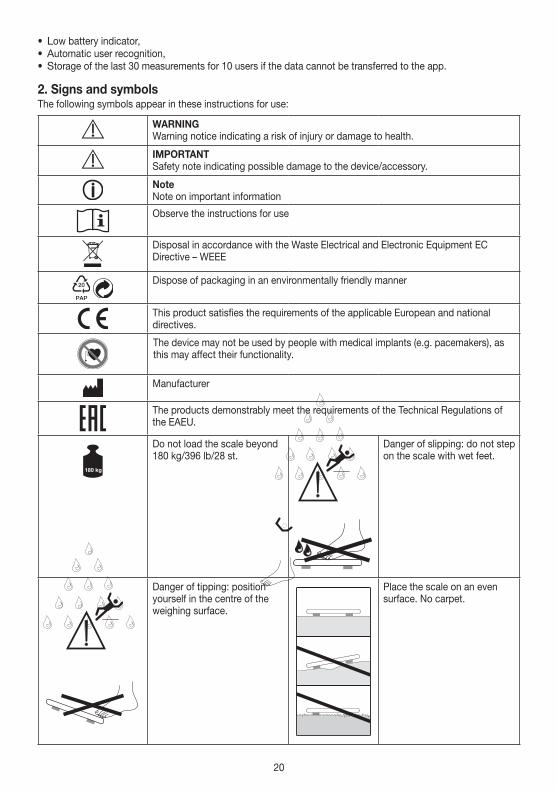
2. Signs and symbolsThe following symbols appear in these instructions for use:
WARNINGWarning notice indicating a risk of injury or damage to health.
IMPORTANT Safety note indicating possible damage to the device/accessory.
NoteNote on important information
Observe the instructions for use
Disposal in accordance with the Waste Electrical and Electronic Equipment EC Directive – WEEE
20
PAP
Dispose of packaging in an environmentally friendly manner
This product satisfies the requirements of the applicable European and national directives.
The device may not be used by people with medical implants (e.g. pacemakers), as this may affect their functionality.
Manufacturer
The products demonstrably meet the requirements of the Technical Regulations of the EAEU.
Do not load the scale beyond 180 kg/396 lb/28 st.
317306_SGWI 180_2019-05-03_02_WarningSticker_Lidl
max.
180 kg396 lb28 st
317306_SGWI 180_2019-05-03_02_WarningSticker_Lidl
max.
180 kg396 lb28 st
Danger of slipping: do not step on the scale with wet feet.
Danger of tipping: position yourself in the centre of the weighing surface.
Place the scale on an even surface. No carpet.
317306_SGWI 180_2019-05-03_02_WarningSticker_Lidl
max.
180 kg396 lb28 st
317306_SGWI 180_2019-05-03_02_WarningSticker_Lidl
max.
180 kg396 lb28 st
21
3. Warnings and safety notes
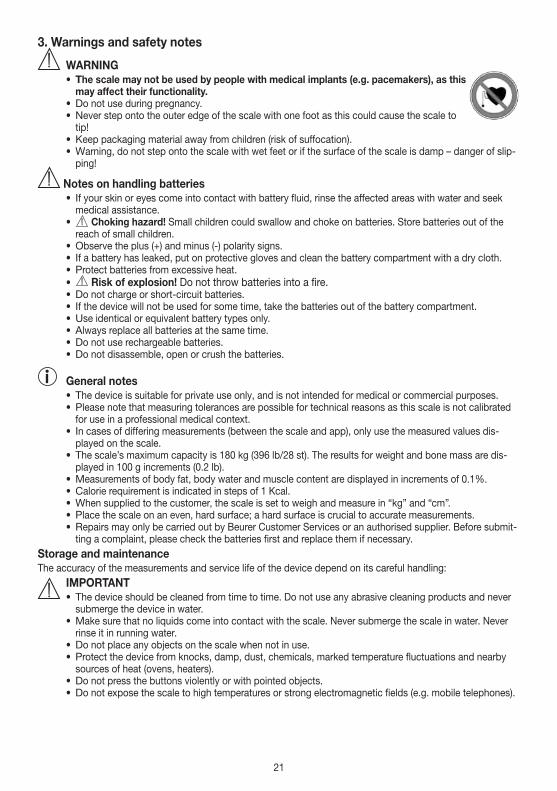
WARNING• The scale may not be used by people with medical implants (e.g. pacemakers), as this
may affect their functionality.• Do not use during pregnancy. • Never step onto the outer edge of the scale with one foot as this could cause the scale to
tip!• Keep packaging material away from children (risk of suffocation).• Warning, do not step onto the scale with wet feet or if the surface of the scale is damp – danger of slip-
ping!
Notes on handling batteries• If your skin or eyes come into contact with battery fluid, rinse the affected areas with water and seek
medical assistance.• Choking hazard! Small children could swallow and choke on batteries. Store batteries out of the
reach of small children.• Observe the plus (+) and minus (-) polarity signs.• If a battery has leaked, put on protective gloves and clean the battery compartment with a dry cloth.• Protect batteries from excessive heat.• Risk of explosion! Do not throw batteries into a fire.• Do not charge or short-circuit batteries.• If the device will not be used for some time, take the batteries out of the battery compartment.• Use identical or equivalent battery types only. • Always replace all batteries at the same time.• Do not use rechargeable batteries.• Do not disassemble, open or crush the batteries.
General notes • The device is suitable for private use only, and is not intended for medical or commercial purposes. • Please note that measuring tolerances are possible for technical reasons as this scale is not calibrated
for use in a professional medical context.• In cases of differing measurements (between the scale and app), only use the measured values dis-
played on the scale.• The scale’s maximum capacity is 180 kg (396 lb/28 st). The results for weight and bone mass are dis-
played in 100 g increments (0.2 lb).• Measurements of body fat, body water and muscle content are displayed in increments of 0.1%.• Calorie requirement is indicated in steps of 1 Kcal.• When supplied to the customer, the scale is set to weigh and measure in “kg” and “cm”. • Place the scale on an even, hard surface; a hard surface is crucial to accurate measurements.• Repairs may only be carried out by Beurer Customer Services or an authorised supplier. Before submit-
ting a complaint, please check the batteries first and replace them if necessary.Storage and maintenanceThe accuracy of the measurements and service life of the device depend on its careful handling:
IMPORTANT• The device should be cleaned from time to time. Do not use any abrasive cleaning products and never
submerge the device in water.• Make sure that no liquids come into contact with the scale. Never submerge the scale in water. Never
rinse it in running water.• Do not place any objects on the scale when not in use.• Protect the device from knocks, damp, dust, chemicals, marked temperature fluctuations and nearby
sources of heat (ovens, heaters).• Do not press the buttons violently or with pointed objects.• Do not expose the scale to high temperatures or strong electromagnetic fields (e.g. mobile telephones).
22
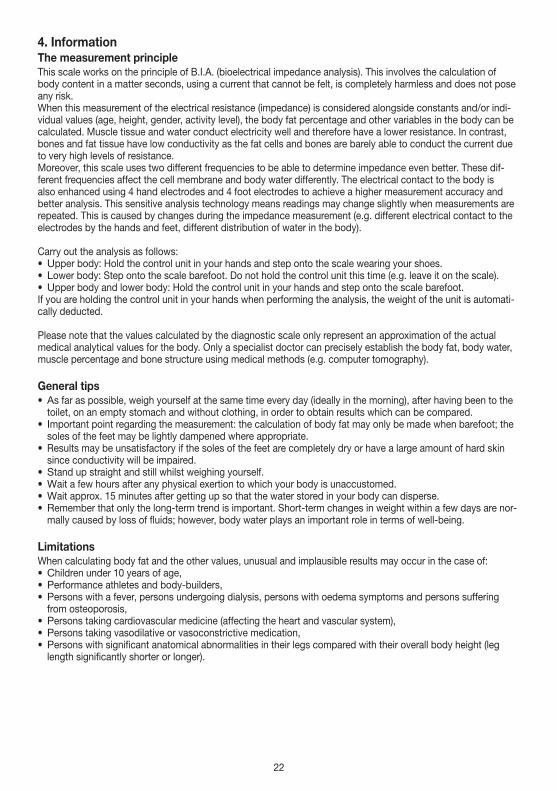
4. InformationThe measurement principleThis scale works on the principle of B.I.A. (bioelectrical impedance analysis). This involves the calculation of body content in a matter seconds, using a current that cannot be felt, is completely harmless and does not pose any risk. When this measurement of the electrical resistance (impedance) is considered alongside constants and/or indi-vidual values (age, height, gender, activity level), the body fat percentage and other variables in the body can be calculated. Muscle tissue and water conduct electricity well and therefore have a lower resistance. In contrast, bones and fat tissue have low conductivity as the fat cells and bones are barely able to conduct the current due to very high levels of resistance.Moreover, this scale uses two different frequencies to be able to determine impedance even better. These dif-ferent frequencies affect the cell membrane and body water differently. The electrical contact to the body is also enhanced using 4 hand electrodes and 4 foot electrodes to achieve a higher measurement accuracy and better analysis. This sensitive analysis technology means readings may change slightly when measurements are repeated. This is caused by changes during the impedance measurement (e.g. different electrical contact to the electrodes by the hands and feet, different distribution of water in the body).
Carry out the analysis as follows:• Upper body: Hold the control unit in your hands and step onto the scale wearing your shoes.• Lower body: Step onto the scale barefoot. Do not hold the control unit this time (e.g. leave it on the scale).• Upper body and lower body: Hold the control unit in your hands and step onto the scale barefoot.If you are holding the control unit in your hands when performing the analysis, the weight of the unit is automati-cally deducted.
Please note that the values calculated by the diagnostic scale only represent an approximation of the actual medical analytical values for the body. Only a specialist doctor can precisely establish the body fat, body water, muscle percentage and bone structure using medical methods (e.g. computer tomography).
General tips• As far as possible, weigh yourself at the same time every day (ideally in the morning), after having been to the
toilet, on an empty stomach and without clothing, in order to obtain results which can be compared.• Important point regarding the measurement: the calculation of body fat may only be made when barefoot; the
soles of the feet may be lightly dampened where appropriate.• Results may be unsatisfactory if the soles of the feet are completely dry or have a large amount of hard skin
since conductivity will be impaired.• Stand up straight and still whilst weighing yourself.• Wait a few hours after any physical exertion to which your body is unaccustomed.• Wait approx. 15 minutes after getting up so that the water stored in your body can disperse.• Remember that only the long-term trend is important. Short-term changes in weight within a few days are nor-
mally caused by loss of fluids; however, body water plays an important role in terms of well-being.
LimitationsWhen calculating body fat and the other values, unusual and implausible results may occur in the case of:• Children under 10 years of age,• Performance athletes and body-builders,• Persons with a fever, persons undergoing dialysis, persons with oedema symptoms and persons suffering
from osteoporosis,• Persons taking cardiovascular medicine (affecting the heart and vascular system),• Persons taking vasodilative or vasoconstrictive medication,• Persons with significant anatomical abnormalities in their legs compared with their overall body height (leg
length significantly shorter or longer).

23
5. Unit descriptionOverview
3
4
1
1
4
2 1. Foot electrodes, left foot
2. Control unit with display
3. Operating status display
4. Foot electrodes, right foot
Control unit with display
set
5 7 10
8 119 12
6 5. Contact electrodes, left hand
6. Contact electrodes, right hand
7. set Set button, confirm the entry
8. Menu: up button
9. Menu: down button
10. ON button
11. Setting: up button
12. Setting: down button
6. Initial useInserting the batteries
Insert the batteries into the scale and the control unit the correct way round:
Control unit Scale
3 x AA 3 x AA
Positioning the scalePlace the scale on a flat and stable surface. A solid surface is a prerequisite for a precise measurement. Setting up the control unitYou have three options:
a) Attach to scale b) Set down on a flat surface
**
24
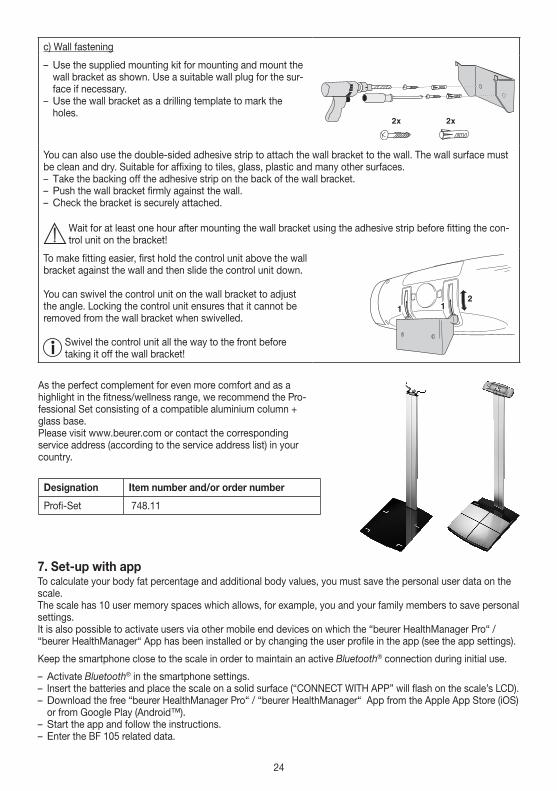
c) Wall fastening
– Use the supplied mounting kit for mounting and mount the wall bracket as shown. Use a suitable wall plug for the sur-face if necessary.
– Use the wall bracket as a drilling template to mark the holes.
You can also use the double-sided adhesive strip to attach the wall bracket to the wall. The wall surface must be clean and dry. Suitable for affixing to tiles, glass, plastic and many other surfaces. – Take the backing off the adhesive strip on the back of the wall bracket. – Push the wall bracket firmly against the wall. – Check the bracket is securely attached.
Wait for at least one hour after mounting the wall bracket using the adhesive strip before fitting the con-trol unit on the bracket!
To make fitting easier, first hold the control unit above the wall bracket against the wall and then slide the control unit down.
You can swivel the control unit on the wall bracket to adjust the angle. Locking the control unit ensures that it cannot be removed from the wall bracket when swivelled.
Swivel the control unit all the way to the front before taking it off the wall bracket!
As the perfect complement for even more comfort and as a highlight in the fitness/wellness range, we recommend the Pro-fessional Set consisting of a compatible aluminium column + glass base.Please visit www.beurer.com or contact the corresponding service address (according to the service address list) in your country.
Designation Item number and/or order number
Profi-Set 748.11
7. Set-up with appTo calculate your body fat percentage and additional body values, you must save the personal user data on the scale.The scale has 10 user memory spaces which allows, for example, you and your family members to save personal settings.It is also possible to activate users via other mobile end devices on which the “beurer HealthManager Pro“ / “beurer HealthManager“ App has been installed or by changing the user profile in the app (see the app settings).
Keep the smartphone close to the scale in order to maintain an active Bluetooth® connection during initial use.
– Activate Bluetooth® in the smartphone settings. – Insert the batteries and place the scale on a solid surface (“CONNECT WITH APP” will flash on the scale’s LCD). – Download the free “beurer HealthManager Pro“ / “beurer HealthManager“ App from the Apple App Store (iOS) or from Google Play (Android™).
– Start the app and follow the instructions. – Enter the BF 105 related data.
25
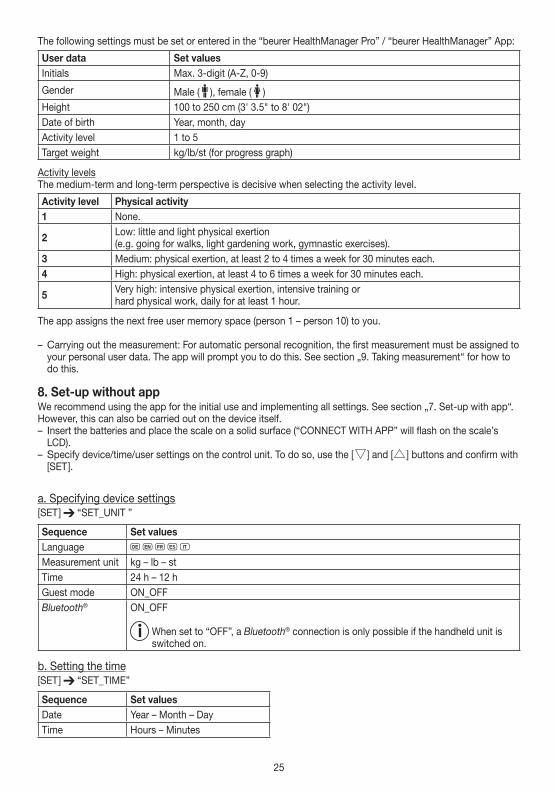
The following settings must be set or entered in the “beurer HealthManager Pro” / “beurer HealthManager” App:
User data Set valuesInitials Max. 3-digit (A-Z, 0-9)
Gender Male ( ), female ( )Height 100 to 250 cm (3' 3.5" to 8' 02")Date of birth Year, month, dayActivity level 1 to 5Target weight kg/lb/st (for progress graph)
Activity levelsThe medium-term and long-term perspective is decisive when selecting the activity level.
Activity level Physical activity1 None.
2 Low: little and light physical exertion (e.g. going for walks, light gardening work, gymnastic exercises).
3 Medium: physical exertion, at least 2 to 4 times a week for 30 minutes each.4 High: physical exertion, at least 4 to 6 times a week for 30 minutes each.
5 Very high: intensive physical exertion, intensive training or hard physical work, daily for at least 1 hour.
The app assigns the next free user memory space (person 1 – person 10) to you.
– Carrying out the measurement: For automatic personal recognition, the first measurement must be assigned to your personal user data. The app will prompt you to do this. See section „9. Taking measurement“ for how to do this.
8. Set-up without appWe recommend using the app for the initial use and implementing all settings. See section „7. Set-up with app“. However, this can also be carried out on the device itself. – Insert the batteries and place the scale on a solid surface (“CONNECT WITH APP” will flash on the scale’s LCD).
– Specify device/time/user settings on the control unit. To do so, use the [ ] and [ ] buttons and confirm with [SET ].
a. Specifying device settings[SET ] “SET_UNIT ”
Sequence Set valuesLanguage D G F E IMeasurement unit kg – lb – stTime 24 h – 12 hGuest mode ON_OFF Bluetooth® ON_OFF
When set to “OFF”, a Bluetooth® connection is only possible if the handheld unit is switched on.
b. Setting the time[SET ] “SET_TIME”
Sequence Set valuesDate Year – Month – DayTime Hours – Minutes
26
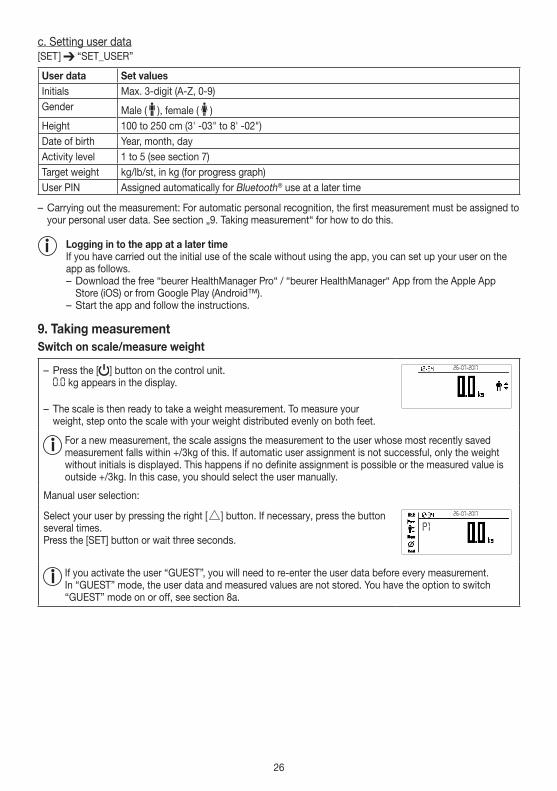
c. Setting user data[SET ] “SET_USER”
User data Set valuesInitials Max. 3-digit (A-Z, 0-9)Gender Male ( ), female ( )Height 100 to 250 cm (3' -03" to 8' -02")Date of birth Year, month, dayActivity level 1 to 5 (see section 7)Target weight kg/lb/st, in kg (for progress graph)User PIN Assigned automatically for Bluetooth® use at a later time
– Carrying out the measurement: For automatic personal recognition, the first measurement must be assigned to your personal user data. See section „9. Taking measurement“ for how to do this.
Logging in to the app at a later timeIf you have carried out the initial use of the scale without using the app, you can set up your user on the app as follows. – Download the free “beurer HealthManager Pro“ / “beurer HealthManager“ App from the Apple App Store (iOS) or from Google Play (Android™).
– Start the app and follow the instructions.
9. Taking measurement Switch on scale/measure weight
– Press the [ ] button on the control unit. 0.0 kg appears in the display.
– The scale is then ready to take a weight measurement. To measure your weight, step onto the scale with your weight distributed evenly on both feet.
26-07-2017
For a new measurement, the scale assigns the measurement to the user whose most recently saved measurement falls within +/3kg of this. If automatic user assignment is not successful, only the weight without initials is displayed. This happens if no definite assignment is possible or the measured value is outside +/3kg. In this case, you should select the user manually.
Manual user selection:
Select your user by pressing the right [ ] button. If necessary, press the button several times.Press the [SET] button or wait three seconds.
26-07-2017
P1
If you activate the user “GUEST”, you will need to re-enter the user data before every measurement. In “GUEST” mode, the user data and measured values are not stored. You have the option to switch “GUEST” mode on or off, see section 8a.
27
Diagnosis
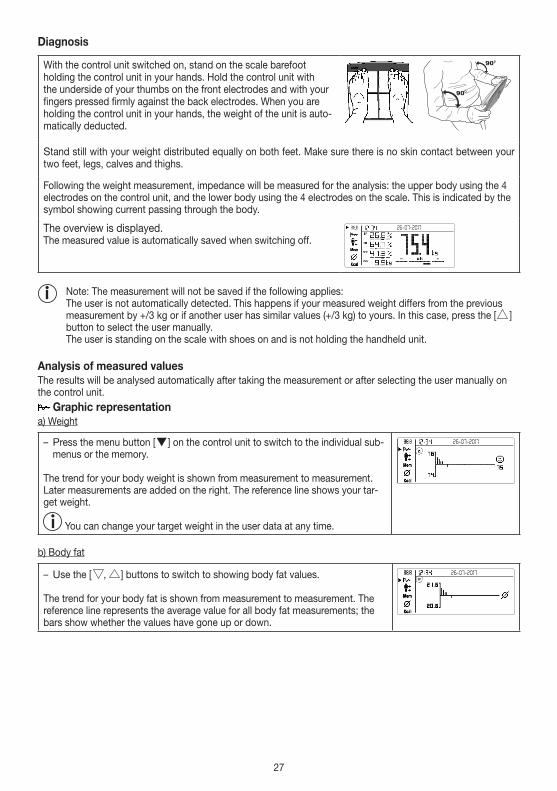
With the control unit switched on, stand on the scale barefoot holding the control unit in your hands. Hold the control unit with the underside of your thumbs on the front electrodes and with your fingers pressed firmly against the back electrodes. When you are holding the control unit in your hands, the weight of the unit is auto-matically deducted.
Stand still with your weight distributed equally on both feet. Make sure there is no skin contact between your two feet, legs, calves and thighs.
Following the weight measurement, impedance will be measured for the analysis: the upper body using the 4 electrodes on the control unit, and the lower body using the 4 electrodes on the scale. This is indicated by the symbol showing current passing through the body.
The overview is displayed.The measured value is automatically saved when switching off.
26-07-2017
Note: The measurement will not be saved if the following applies: The user is not automatically detected. This happens if your measured weight differs from the previous
measurement by +/3 kg or if another user has similar values (+/3 kg) to yours. In this case, press the [ ] button to select the user manually.
The user is standing on the scale with shoes on and is not holding the handheld unit.
Analysis of measured valuesThe results will be analysed automatically after taking the measurement or after selecting the user manually on the control unit.
Graphic representationa) Weight
– Press the menu button [ ] on the control unit to switch to the individual sub-menus or the memory.
The trend for your body weight is shown from measurement to measurement. Later measurements are added on the right. The reference line shows your tar-get weight.
You can change your target weight in the user data at any time.
26-07-2017
b) Body fat
– Use the [ , ] buttons to switch to showing body fat values.
The trend for your body fat is shown from measurement to measurement. The reference line represents the average value for all body fat measurements; the bars show whether the values have gone up or down.
26-07-2017
28
Upper body, lower bodya) Body fat
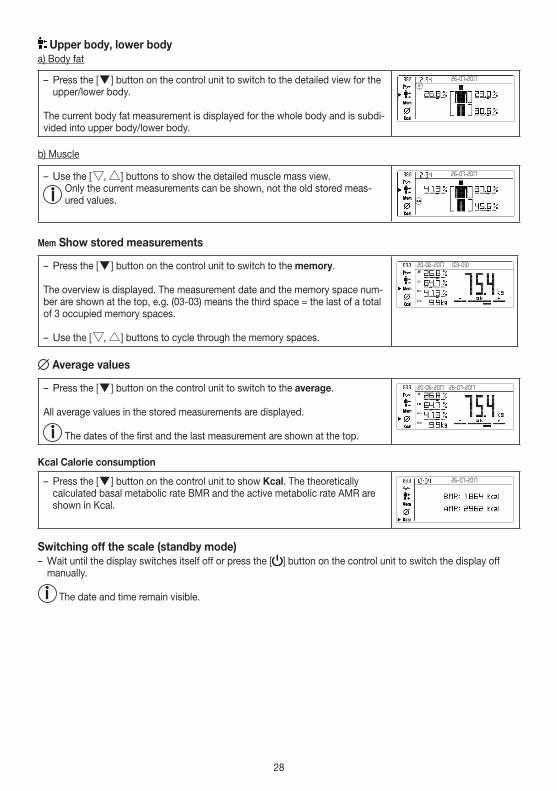
– Press the [ ] button on the control unit to switch to the detailed view for the upper/lower body.
The current body fat measurement is displayed for the whole body and is subdi-vided into upper body/lower body.
26-07-2017
b) Muscle
– Use the [ , ] buttons to show the detailed muscle mass view. Only the current measurements can be shown, not the old stored meas-ured values.
26-07-2017
Mem Show stored measurements
– Press the [ ] button on the control unit to switch to the memory.
The overview is displayed. The measurement date and the memory space num-ber are shown at the top, e.g. (03-03) means the third space = the last of a total of 3 occupied memory spaces.
– Use the [ , ] buttons to cycle through the memory spaces.
(03-03)20-06-2017
Average values
– Press the [ ] button on the control unit to switch to the average.
All average values in the stored measurements are displayed.
The dates of the first and the last measurement are shown at the top.
20-06-2017 26-07-2017
Kcal Calorie consumption
– Press the [ ] button on the control unit to show Kcal. The theoretically calculated basal metabolic rate BMR and the active metabolic rate AMR are shown in Kcal.
26-07-2017
Switching off the scale (standby mode) – Wait until the display switches itself off or press the [ ] button on the control unit to switch the display off manually.
The date and time remain visible.
29
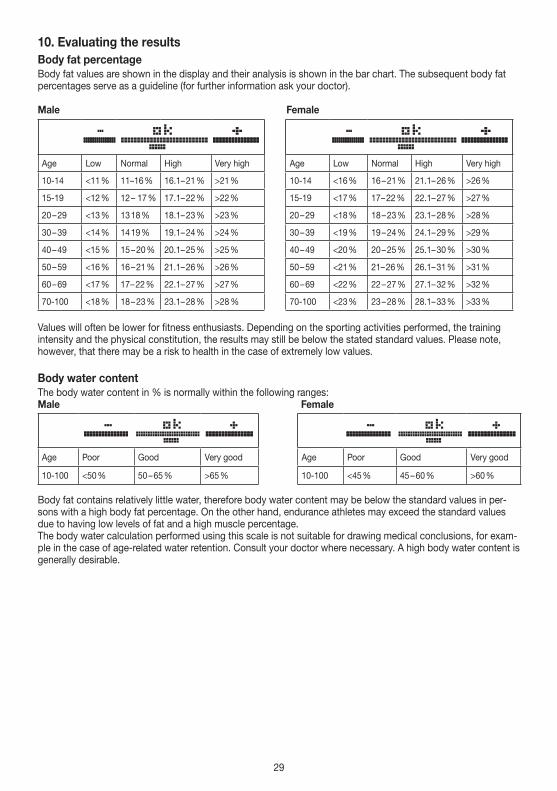
10. Evaluating the resultsBody fat percentageBody fat values are shown in the display and their analysis is shown in the bar chart. The subsequent body fat percentages serve as a guideline (for further information ask your doctor).
Male Female
Age Low Normal High Very high Age Low Normal High Very high
10-14 <11 % 11–16 % 16.1– 21 % >21 % 10-14 <16 % 16 – 21 % 21.1– 26 % >26 %
15-19 <12 % 12 – 17 % 17.1– 22 % >22 % 15-19 <17 % 17 – 22 % 22.1– 27 % >27 %
20 – 29 <13 % 13 18 % 18.1– 23 % >23 % 20 – 29 <18 % 18 – 23 % 23.1– 28 % >28 %
30 – 39 <14 % 14 19 % 19.1– 24 % >24 % 30 – 39 <19 % 19 – 24 % 24.1– 29 % >29 %
40 – 49 <15 % 15 – 20 % 20.1– 25 % >25 % 40 – 49 <20 % 20 – 25 % 25.1– 30 % >30 %
50 – 59 <16 % 16 – 21 % 21.1– 26 % >26 % 50 – 59 <21 % 21– 26 % 26.1– 31 % >31 %
60 – 69 <17 % 17 – 22 % 22.1– 27 % >27 % 60 – 69 <22 % 22 – 27 % 27.1– 32 % >32 %
70-100 <18 % 18 – 23 % 23.1– 28 % >28 % 70-100 <23 % 23 – 28 % 28.1– 33 % >33 %
Values will often be lower for fitness enthusiasts. Depending on the sporting activities performed, the training intensity and the physical constitution, the results may still be below the stated standard values. Please note, however, that there may be a risk to health in the case of extremely low values.
Body water contentThe body water content in % is normally within the following ranges:Male Female
Age Poor Good Very good Age Poor Good Very good
10-100 <50 % 50 – 65 % >65 % 10-100 <45 % 45 – 60 % >60 %
Body fat contains relatively little water, therefore body water content may be below the standard values in per-sons with a high body fat percentage. On the other hand, endurance athletes may exceed the standard values due to having low levels of fat and a high muscle percentage.The body water calculation performed using this scale is not suitable for drawing medical conclusions, for exam-ple in the case of age-related water retention. Consult your doctor where necessary. A high body water content is generally desirable.
30
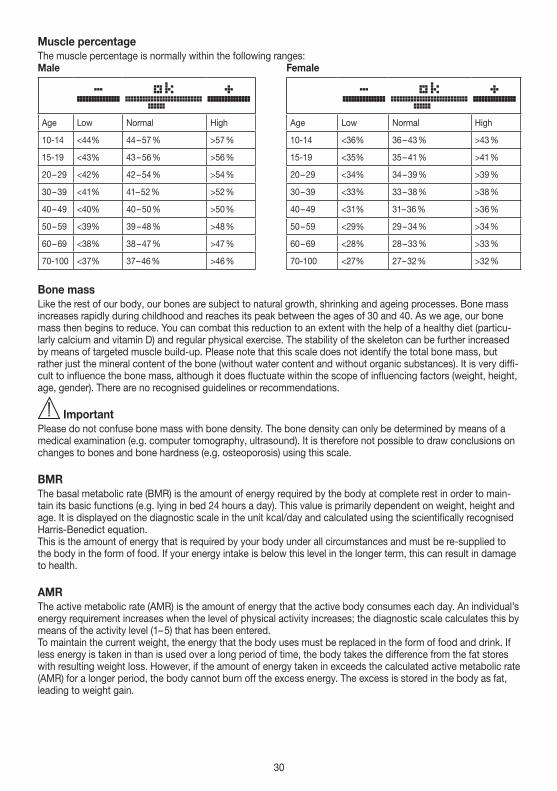
Muscle percentageThe muscle percentage is normally within the following ranges:Male Female
Age Low Normal High Age Low Normal High
10-14 <44% 44 – 57 % >57 % 10-14 <36% 36 – 43 % >43 %
15-19 <43% 43 – 56 % >56 % 15-19 <35% 35 – 41 % >41 %
20 – 29 <42% 42 – 54 % >54 % 20 – 29 <34% 34 – 39 % >39 %
30 – 39 <41% 41– 52 % >52 % 30 – 39 <33% 33 – 38 % >38 %
40 – 49 <40% 40 – 50 % >50 % 40 – 49 <31% 31– 36 % >36 %
50 – 59 <39% 39 – 48 % >48 % 50 – 59 <29% 29 – 34 % >34 %
60 – 69 <38% 38 – 47 % >47 % 60 – 69 <28% 28 – 33 % >33 %
70-100 <37% 37 – 46 % >46 % 70-100 <27% 27 – 32 % >32 %
Bone massLike the rest of our body, our bones are subject to natural growth, shrinking and ageing processes. Bone mass increases rapidly during childhood and reaches its peak between the ages of 30 and 40. As we age, our bone mass then begins to reduce. You can combat this reduction to an extent with the help of a healthy diet (particu-larly calcium and vitamin D) and regular physical exercise. The stability of the skeleton can be further increased by means of targeted muscle build-up. Please note that this scale does not identify the total bone mass, but rather just the mineral content of the bone (without water content and without organic substances). It is very diffi-cult to influence the bone mass, although it does fluctuate within the scope of influencing factors (weight, height, age, gender). There are no recognised guidelines or recommendations.
ImportantPlease do not confuse bone mass with bone density. The bone density can only be determined by means of a medical examination (e.g. computer tomography, ultrasound). It is therefore not possible to draw conclusions on changes to bones and bone hardness (e.g. osteoporosis) using this scale.
BMRThe basal metabolic rate (BMR) is the amount of energy required by the body at complete rest in order to main-tain its basic functions (e.g. lying in bed 24 hours a day). This value is primarily dependent on weight, height and age. It is displayed on the diagnostic scale in the unit kcal/day and calculated using the scientifically recognised Harris-Benedict equation.This is the amount of energy that is required by your body under all circumstances and must be re-supplied to the body in the form of food. If your energy intake is below this level in the longer term, this can result in damage to health.
AMRThe active metabolic rate (AMR) is the amount of energy that the active body consumes each day. An individual’s energy requirement increases when the level of physical activity increases; the diagnostic scale calculates this by means of the activity level (1– 5) that has been entered.To maintain the current weight, the energy that the body uses must be replaced in the form of food and drink. If less energy is taken in than is used over a long period of time, the body takes the difference from the fat stores with resulting weight loss. However, if the amount of energy taken in exceeds the calculated active metabolic rate (AMR) for a longer period, the body cannot burn off the excess energy. The excess is stored in the body as fat, leading to weight gain.
31
Temporal context of the results
Please note that only the long-term trend is significant. Brief deviations in weight within a few days are nor-mally caused by loss of fluids.
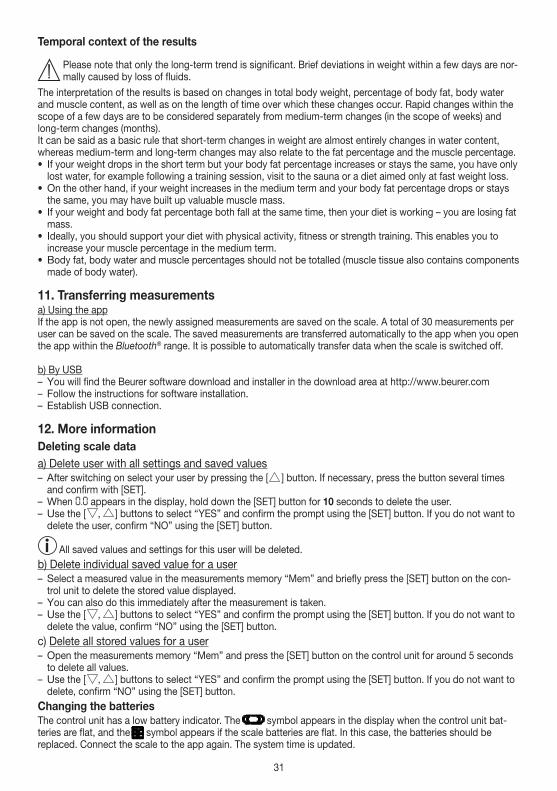
The interpretation of the results is based on changes in total body weight, percentage of body fat, body water and muscle content, as well as on the length of time over which these changes occur. Rapid changes within the scope of a few days are to be considered separately from medium-term changes (in the scope of weeks) and long-term changes (months).It can be said as a basic rule that short-term changes in weight are almost entirely changes in water content, whereas medium-term and long-term changes may also relate to the fat percentage and the muscle percentage.• If your weight drops in the short term but your body fat percentage increases or stays the same, you have only
lost water, for example following a training session, visit to the sauna or a diet aimed only at fast weight loss.• On the other hand, if your weight increases in the medium term and your body fat percentage drops or stays
the same, you may have built up valuable muscle mass.• If your weight and body fat percentage both fall at the same time, then your diet is working – you are losing fat
mass.• Ideally, you should support your diet with physical activity, fitness or strength training. This enables you to
increase your muscle percentage in the medium term.• Body fat, body water and muscle percentages should not be totalled (muscle tissue also contains components
made of body water).
11. Transferring measurementsa) Using the appIf the app is not open, the newly assigned measurements are saved on the scale. A total of 30 measurements per user can be saved on the scale. The saved measurements are transferred automatically to the app when you open the app within the Bluetooth® range. It is possible to automatically transfer data when the scale is switched off.
b) By USB – You will find the Beurer software download and installer in the download area at http://www.beurer.com – Follow the instructions for software installation. – Establish USB connection.
12. More informationDeleting scale dataa) Delete user with all settings and saved values – After switching on select your user by pressing the [ ] button. If necessary, press the button several times and confirm with [SET].
– When 0.0 appears in the display, hold down the [SET] button for 10 seconds to delete the user. – Use the [ , ] buttons to select “YES” and confirm the prompt using the [SET] button. If you do not want to delete the user, confirm “NO” using the [SET] button.
All saved values and settings for this user will be deleted.b) Delete individual saved value for a user – Select a measured value in the measurements memory “Mem” and briefly press the [SET] button on the con-trol unit to delete the stored value displayed.
– You can also do this immediately after the measurement is taken. – Use the [ , ] buttons to select “YES” and confirm the prompt using the [SET] button. If you do not want to delete the value, confirm “NO” using the [SET] button.
c) Delete all stored values for a user – Open the measurements memory “Mem” and press the [SET] button on the control unit for around 5 seconds to delete all values.
– Use the [ , ] buttons to select “YES” and confirm the prompt using the [SET] button. If you do not want to delete, confirm “NO” using the [SET] button.
Changing the batteriesThe control unit has a low battery indicator. The symbol appears in the display when the control unit bat-teries are flat, and the symbol appears if the scale batteries are flat. In this case, the batteries should be replaced. Connect the scale to the app again. The system time is updated.
32
NOTE:• When changing the batteries, use batteries of the same type, make and capacity.• Do not use rechargeable batteries.• Use batteries free from heavy metals.
13. Cleaning and maintaining the deviceThe device should be cleaned from time to time.This should be done using a damp cloth and, if necessary, a small amount of detergent.
IMPORTANT• Never use abrasive solvents or cleaning products!• Never submerge the device in water!• Do not clean the device in a dishwasher.
14. DisposalEmpty, completely flat batteries must be disposed of through specially designated collection boxes, recycling points or electronics retailers. You are legally required to dispose of batteries.The codes below are printed on batteries containing harmful substances.Pb = Battery contains leadCd = Battery contains cadmium Hg = Battery contains mercury
For environmental reasons, do not dispose of the device in the household waste at the end of its service life. Dispose of the device at a suitable local collection or recycling point in your country. Dispose of the device in accordance with EC Directive – WEEE (Waste Electrical and Electronic Equip-ment). If you have any questions, please contact the local authorities responsible for waste disposal.
Dispose of packaging in an environmentally friendly manner. 20
PAP
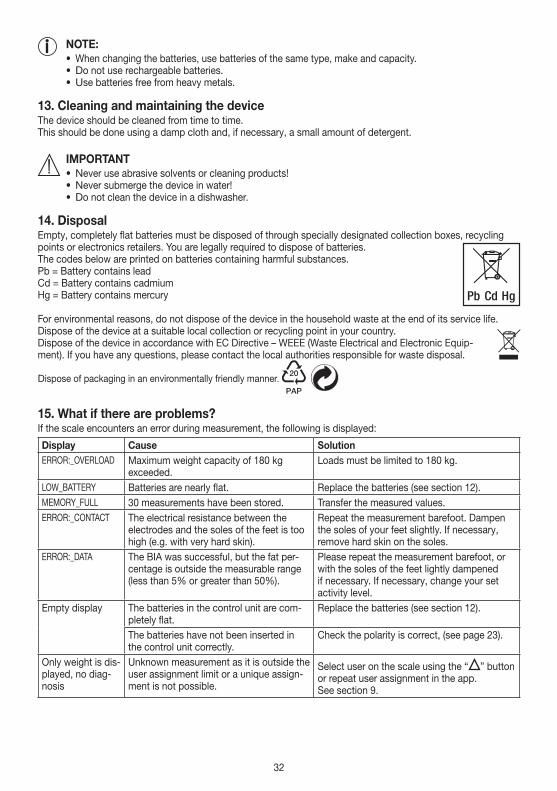
15. What if there are problems?If the scale encounters an error during measurement, the following is displayed:
Display Cause SolutionERROR:_OVERLOAD Maximum weight capacity of 180 kg
exceeded.Loads must be limited to 180 kg.
LOW_BATTERY Batteries are nearly flat. Replace the batteries (see section 12).MEMORY_FULL 30 measurements have been stored. Transfer the measured values.ERROR:_CONTACT The electrical resistance between the
electrodes and the soles of the feet is too high (e.g. with very hard skin).
Repeat the measurement barefoot. Dampen the soles of your feet slightly. If necessary, remove hard skin on the soles.
ERROR:_DATA The BIA was successful, but the fat per-centage is outside the measurable range (less than 5% or greater than 50%).
Please repeat the measurement barefoot, or with the soles of the feet lightly dampened if necessary. If necessary, change your set activity level.
Empty display The batteries in the control unit are com-pletely flat.
Replace the batteries (see section 12).
The batteries have not been inserted in the control unit correctly.
Check the polarity is correct, (see page 23).
Only weight is dis-played, no diag-nosis
Unknown measurement as it is outside the user assignment limit or a unique assign-ment is not possible.
Select user on the scale using the “ ” button or repeat user assignment in the app.See section 9.
33
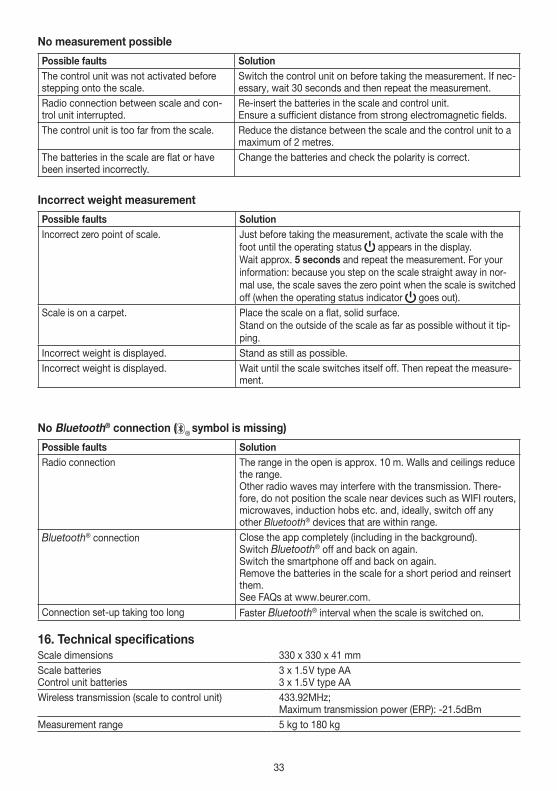
No measurement possible
Possible faults SolutionThe control unit was not activated before stepping onto the scale.
Switch the control unit on before taking the measurement. If nec-essary, wait 30 seconds and then repeat the measurement.
Radio connection between scale and con-trol unit interrupted.
Re-insert the batteries in the scale and control unit.Ensure a sufficient distance from strong electromagnetic fields.
The control unit is too far from the scale. Reduce the distance between the scale and the control unit to a maximum of 2 metres.
The batteries in the scale are flat or have been inserted incorrectly.
Change the batteries and check the polarity is correct.
Incorrect weight measurement
Possible faults SolutionIncorrect zero point of scale. Just before taking the measurement, activate the scale with the
foot until the operating status appears in the display.Wait approx. 5 seconds and repeat the measurement. For your information: because you step on the scale straight away in nor-mal use, the scale saves the zero point when the scale is switched off (when the operating status indicator goes out).
Scale is on a carpet. Place the scale on a flat, solid surface.Stand on the outside of the scale as far as possible without it tip-ping.
Incorrect weight is displayed. Stand as still as possible.Incorrect weight is displayed. Wait until the scale switches itself off. Then repeat the measure-
ment.
No Bluetooth® connection ( ® symbol is missing)
Possible faults SolutionRadio connection The range in the open is approx. 10 m. Walls and ceilings reduce
the range.Other radio waves may interfere with the transmission. There-fore, do not position the scale near devices such as WIFI routers, microwaves, induction hobs etc. and, ideally, switch off any other Bluetooth® devices that are within range.
Bluetooth® connection Close the app completely (including in the background).Switch Bluetooth® off and back on again.Switch the smartphone off and back on again.Remove the batteries in the scale for a short period and reinsert them.See FAQs at www.beurer.com.
Connection set-up taking too long Faster Bluetooth® interval when the scale is switched on.
16. Technical specificationsScale dimensions 330 x 330 x 41 mmScale batteriesControl unit batteries
3 x 1.5 V type AA3 x 1.5 V type AA
Wireless transmission (scale to control unit) 433.92MHz; Maximum transmission power (ERP): -21.5dBm
Measurement range 5 kg to 180 kg

34
Scale interval d: The display can be read in increments of 0.1 kg.
Repetition accuracy: The measuring tolerance for repeated measurements is +/- 0.4 kg (several measurements in direct succession on the same scale with position of scale and person the same as far as possible).
Absolute precision: In comparison with a calibrated weight, the measured value is +/-1% +0.1 kg. E.g. at 40 kg this corresponds to +/- 0.5 kg; at 100 kg this corresponds to +/-1.1 kg.
Data transfer via Bluetooth® wireless technology This product uses Bluetooth® low energy technology, frequency band 2.402 – 2.480 GHz, transmission power max. 0 dBm, compatible with Bluetooth® 4.0 smart-phones/tablets
A list of compatible smartphones, plus information and software for the devices can be found at the following link:connect.beurer.com
System requirements for the “beurer HealthManager Pro” USB uploader and for the “beurer HealthManager” PC software
Windows 8.1 and aboveUSB 2.0 (type A) and above
System requirements for the “beurer HealthManager Pro“ / “beurer HealthManager“ App
iOS ≥ 12.0, Android™≥ 8.0Bluetooth® ≥ 4.0
Subject to technical changes.
We hereby confirm that this product complies with the European RED Directive 2014/53/EU. The CE Declaration of Conformity for this product can be found under: www.beurer.com/web/we-landingpages/de/cedeclarationofconformity.php.
17. Warranty / serviceBeurer GmbH, Söflinger Straße 218, 89077 Ulm, Germany (hereinafter referred to as “Beurer”) provides a war-ranty for this product, subject to the requirements below and to the extent described as follows. The warranty conditions below shall not affect the seller’s statutory warranty obligations which ensue from the sales agreement with the buyer. The warranty shall apply without prejudice to any mandatory statutory provisions on liability.
Beurer guarantees the perfect functionality and completeness of this product.
The worldwide warranty period is 5 years, commencing from the purchase of the new, unused product from the seller.The warranty only applies to products purchased by the buyer as a consumer and used exclusively for personal purposes in the context of domestic use.German law shall apply.
During the warranty period, should this product prove to be incomplete or defective in functionality in accordance with the following provisions, Beurer shall carry out a repair or a replacement delivery free of charge, in accordance with these warranty conditions.
If the buyer wishes to make a warranty claim, they should approach their local retailer in the first instance: see the attached “International Service” list of service addresses.
The buyer will then receive further information about the processing of the warranty claim, e.g. where they can send the product and what documentation is required.
35
A warranty claim shall only be considered if the buyer can provide Beurer, or an authorised Beurer partner, with – a copy of the invoice/purchase receipt, and – the original product. –
The following are explicitly excluded from this warranty: – deterioration due to normal use or consumption of the product; – accessories supplied with this product which are worn out or used up through proper use (e.g. batteries,
rechargeable batteries, cuffs, seals, electrodes, light sources, attachments and nebuliser accessories); – products that are used, cleaned, stored or maintained improperly and/or contrary to the provisions of the inst-
ructions for use, as well as products that have been opened, repaired or modified by the buyer or by a service centre not authorised by Beurer;
– damage that arises during transport between manufacturer and customer, or between service centre and cus-tomer;
– products purchased as seconds or as used goods; – consequential damage arising from a fault in this product (however, in this case, claims may exist arising from
product liability or other compulsory statutory liability provisions).
Repairs or an exchange in full do not extend the warranty period under any circumstances.
Subj
ect t
o er
rors
and
cha
nges
36
FRANÇAIS
1. Familiarisation avec l’appareil ..............................362. Symboles utilisés ..................................................373. Consignes d’avertissement et de mise en garde ...384. Information ...........................................................395. Description de l’appareil .......................................406. Mise en service .....................................................407. Installation avec l’application ...............................428. Installation sans l’application ...............................439. Mesure .................................................................44
10. Évaluation des résultats .....................................4611. Transfert des mesures ........................................4812. Plus d’informations .............................................4813. Nettoyage et entretien de l’appareil ...................4914. Élimination ..........................................................4915. Que faire en cas de problèmes ?........................4916. Caractéristiques techniques ...............................5117. Garantie / Maintenance .......................................51
Contenu• Pèse-personne impédancemètre• Élément de commande amovible avec écran• Fixation murale• Kit de montage pour fixation murale• 3 piles AA 1,5 V (pèse-personne)• 3 piles AA 1,5 V (unité de commande)• Câble USB• Le présent mode d´emploi et un manuel abrégé Bluetooth®/USB
Chère cliente, cher client,Nous vous remercions d’avoir choisi l’un de nos produits. Notre société est réputée pour l’excellence de ses pro-duits et les contrôles de qualité auxquels ils sont soumis. Nos produits couvrent les domaines de la chaleur, du poids, de la pression sanguine, de la température corporelle, de la thérapie douce, des massages, de la beauté, des soins pour bébé et de l’amélioration de l’air.Lisez attentivement ce mode d’emploi, conservez-le pour un usage ultérieur, mettez-le à disposition des autres utilisateurs et suivez les consignes qui y figurent.
Sincères salutations,Votre équipe Beurer
1. Familiarisation avec l’appareilFonctions de l’appareilCe pèse-personne impédancemètre numérique sert à la fois à vous peser et à calculer vos données personnelles de fitness.Il est conçu pour être utilisé dans un cercle privé.Le pèse-personne dispose des fonctions suivantes pouvant être utilisées par un maximum de 10 personnes :• mesure du poids,• mesure du taux de graisse corporelle,• taux d’eau corporelle,• taux de masse musculaire,• masse osseuse,• volume de base et volume d’activité.
Le pèse-personne dispose en outre des fonctionnalités suivantes :• Guidage par menus innovant sur grand écran (disponible en 5 langues),• L’écran peut rester sur le pèse-personne, être placé de façon indépendante ou être fixé au mur. Un kit de
dalles est également disponible en option,
Lisez attentivement ce mode d’emploi, conservez-le pour un usage ultérieur, mettez-le à disposition des autres utilisateurs et suivez les consignes qui y figurent.
Sommaire
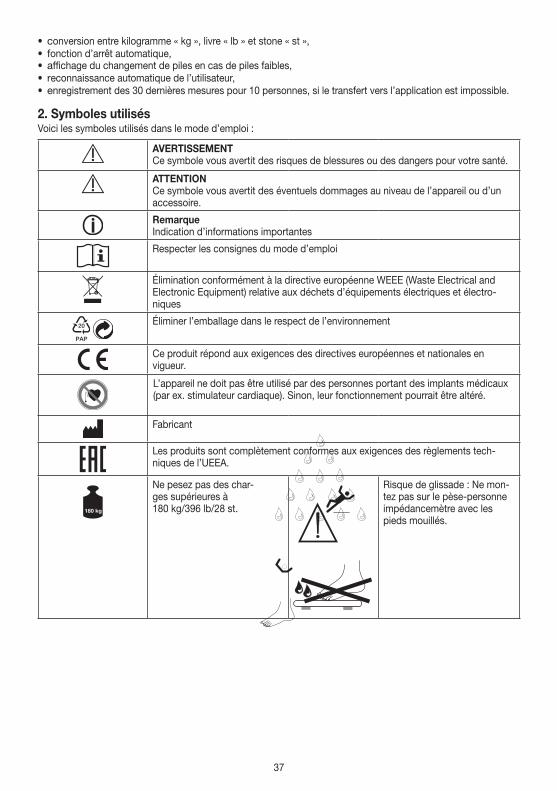
37
• conversion entre kilogramme « kg », livre « lb » et stone « st »,• fonction d’arrêt automatique,• affichage du changement de piles en cas de piles faibles,• reconnaissance automatique de l’utilisateur,• enregistrement des 30 dernières mesures pour 10 personnes, si le transfert vers l’application est impossible.
2. Symboles utilisésVoici les symboles utilisés dans le mode d’emploi :
AVERTISSEMENTCe symbole vous avertit des risques de blessures ou des dangers pour votre santé.
ATTENTION Ce symbole vous avertit des éventuels dommages au niveau de l’appareil ou d’un accessoire.
RemarqueIndication d’informations importantes
Respecter les consignes du mode d’emploi
Élimination conformément à la directive européenne WEEE (Waste Electrical and Electronic Equipment) relative aux déchets d’équipements électriques et électro-niques
20
PAP
Éliminer l’emballage dans le respect de l’environnement
Ce produit répond aux exigences des directives européennes et nationales en vigueur.
L’appareil ne doit pas être utilisé par des personnes portant des implants médicaux (par ex. stimulateur cardiaque). Sinon, leur fonctionnement pourrait être altéré.
Fabricant
Les produits sont complètement conformes aux exigences des règlements tech-niques de l’UEEA.
Ne pesez pas des char-ges supérieures à 180 kg/396 lb/28 st.
317306_SGWI 180_2019-05-03_02_WarningSticker_Lidl
max.
180 kg396 lb28 st
317306_SGWI 180_2019-05-03_02_WarningSticker_Lidl
max.
180 kg396 lb28 st
Risque de glissade : Ne mon-tez pas sur le pèse-personne impédancemètre avec les pieds mouillés.
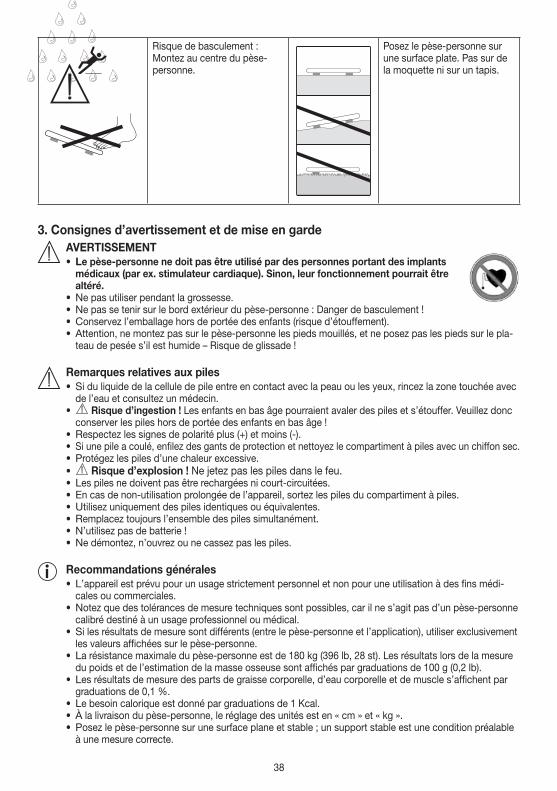
38
317306_SGWI 180_2019-05-03_02_WarningSticker_Lidl
max.
180 kg396 lb28 st
317306_SGWI 180_2019-05-03_02_WarningSticker_Lidl
max.
180 kg396 lb28 st
Risque de basculement : Montez au centre du pèse-personne.
Posez le pèse-personne sur une surface plate. Pas sur de la moquette ni sur un tapis.
3. Consignes d’avertissement et de mise en garde AVERTISSEMENT
• Le pèse-personne ne doit pas être utilisé par des personnes portant des implants médicaux (par ex. stimulateur cardiaque). Sinon, leur fonctionnement pourrait être altéré.
• Ne pas utiliser pendant la grossesse. • Ne pas se tenir sur le bord extérieur du pèse-personne : Danger de basculement !• Conservez l’emballage hors de portée des enfants (risque d’étouffement).• Attention, ne montez pas sur le pèse-personne les pieds mouillés, et ne posez pas les pieds sur le pla-
teau de pesée s’il est humide – Risque de glissade !
Remarques relatives aux piles• Si du liquide de la cellule de pile entre en contact avec la peau ou les yeux, rincez la zone touchée avec
de l’eau et consultez un médecin.• Risque d’ingestion ! Les enfants en bas âge pourraient avaler des piles et s’étouffer. Veuillez donc
conserver les piles hors de portée des enfants en bas âge !• Respectez les signes de polarité plus (+) et moins (-).• Si une pile a coulé, enfilez des gants de protection et nettoyez le compartiment à piles avec un chiffon sec.• Protégez les piles d’une chaleur excessive.• Risque d’explosion ! Ne jetez pas les piles dans le feu.• Les piles ne doivent pas être rechargées ni court-circuitées.• En cas de non-utilisation prolongée de l’appareil, sortez les piles du compartiment à piles.• Utilisez uniquement des piles identiques ou équivalentes. • Remplacez toujours l’ensemble des piles simultanément.• N’utilisez pas de batterie !• Ne démontez, n’ouvrez ou ne cassez pas les piles.
Recommandations générales • L’appareil est prévu pour un usage strictement personnel et non pour une utilisation à des fins médi-
cales ou commerciales. • Notez que des tolérances de mesure techniques sont possibles, car il ne s’agit pas d’un pèse-personne
calibré destiné à un usage professionnel ou médical.• Si les résultats de mesure sont différents (entre le pèse-personne et l’application), utiliser exclusivement
les valeurs affichées sur le pèse-personne.• La résistance maximale du pèse-personne est de 180 kg (396 lb, 28 st). Les résultats lors de la mesure
du poids et de l’estimation de la masse osseuse sont affichés par graduations de 100 g (0,2 lb).• Les résultats de mesure des parts de graisse corporelle, d’eau corporelle et de muscle s’affichent par
graduations de 0,1 %.• Le besoin calorique est donné par graduations de 1 Kcal.• À la livraison du pèse-personne, le réglage des unités est en « cm » et « kg ». • Posez le pèse-personne sur une surface plane et stable ; un support stable est une condition préalable
à une mesure correcte.
39
• Seul le service client Beurer ou un opérateur autorisé peut procéder à une réparation. Cependant, avant toute réclamation, veuillez contrôler au préalable l’état des piles et les remplacer le cas échéant.
Rangement et entretienLa précision des valeurs mesurées et la durée de vie de l’appareil dépendent d’un maniement soigné :
ATTENTION• De temps à autre, nettoyez l’appareil. N’utilisez pas de produit de nettoyage agressif et ne mettez
jamais l’appareil sous l’eau.• Assurez-vous qu’aucun liquide ne pénètre à l’intérieur du pèse-personne. N’immergez jamais le
pèse-personne. Ne rincez jamais sous l’eau courante.• Quand le pèse-personne est inutilisé, aucun objet ne doit être posé sur le plateau.• Protégez l’appareil contre les coups, l’humidité, la poussière, les produits chimiques, les fortes varia-
tions de température et les sources de chaleur trop proches (four, radiateur).• N’appuyez pas sur les touches violemment ou avec des objets pointus.• N’exposez pas votre pèse-personne aux températures élevées ou à de forts champs électromagné-
tiques (comme ceux par exemple d’un téléphone mobile).
4. InformationPrincipe de mesureCe pèse-personne fonctionne selon le principe de la B.I.A., l’analyse bioélectrique de l’impédance. À cet effet, un courant imperceptible, absolument sans risque et sans danger, permet de connaître en quelques secondes le taux des éléments corporels. La mesure de la résistance électrique (impédance) ainsi que la prise en compte de constantes ou de données individuelles (âge, taille, sexe, activité physique) permettent de définir le taux de graisse corporelle et d’autres paramètres physiques. Le tissu musculaire et l’eau ont une bonne conductibilité électrique et présentent donc une faible résistance. Par contre, les os et le tissu adipeux ont une faible conductibilité, car les os et les cellules adipeuses sont très peu conducteurs en raison de leur résistance très élevée.Par ailleurs, le pèse-personne utilise deux fréquences distinctes pour déterminer l’impédance de manière encore plus précise. Ces fréquences distinctes ont des influences différentes sur la membrane cellulaire et la masse hydrique. De plus, le contact électrique avec le corps est optimisé au moyen de 4 électrodes « main » et de 4 électrodes « pied », afin d’obtenir une meilleure précision de mesure et donc une meilleure analyse. En raison de la sensibilité de la technique d’analyse, il est possible que les valeurs se modifient légèrement lors de mesures répétées. Cela s’explique par les écarts lors de la mesure de l’impédance (p. ex. contact électrique différent par rapport aux électrodes avec les mains et les pieds, autre répartition de la masse hydrique dans le corps).
L’analyse peut être réalisée comme suit :• Partie supérieure du corps : saisir l’unité de commande avec les mains, monter avec les chaussures sur le
pèse-personne.• Partie inférieure du corps : laisser par exemple l’unité de commande sur le pèse-personne, monter pieds nus
sur le pèse-personne.• Partie supérieure et partie inférieure du corps : saisir l’unité de commande avec les mains et monter pieds nus
sur le pèse-personne.Si vous tenez l’unité de commande dans la main lors de l’analyse, son poids est automatiquement déduit.
Notez que les valeurs déterminées par le pèse-personne impédancemètre ne représentent que des approxi-mations par rapport aux analyses physiques effectives d’ordre médical. Seul un spécialiste équipé de matériel médical (par exemple un tomodensitomètre) est en mesure de déterminer précisément la graisse corporelle, l’eau corporelle, la masse musculaire et la masse osseuse.
Conseils généraux• Pesez-vous, si possible, à la même heure (de préférence le matin), après être passé aux toilettes, à jeun et
nu(e) afin d’obtenir des résultats comparables.• Important lors de la mesure : La détermination de la graisse corporelle doit toujours être faite pieds nus ; si
nécessaire, elle peut s‘effectuer la plante des pieds légèrement humide.• Il se peut que les mesures effectuées avec les pieds complètement secs ne conduisent pas à des résultats
satisfaisants, car leur conductibilité est trop faible.• Tenez-vous droit et ne bougez pas pendant la mesure.• Attendez quelques heures après un effort physique inhabituel.
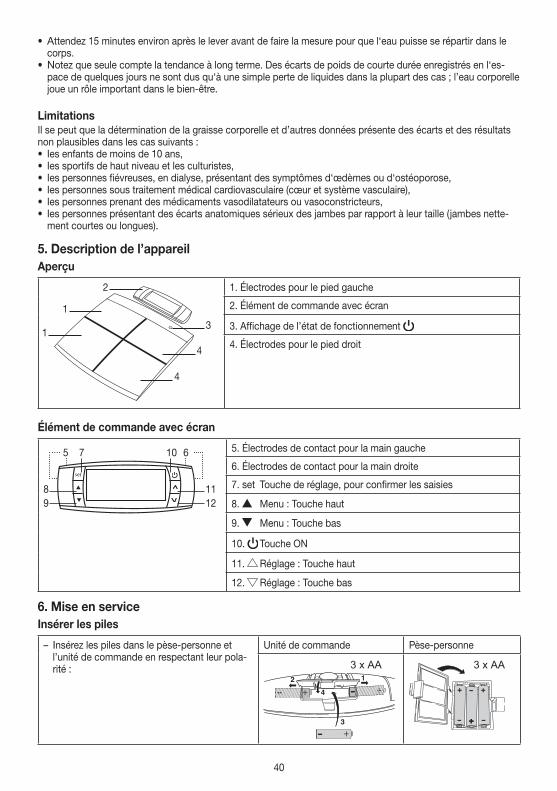
40
• Attendez 15 minutes environ après le lever avant de faire la mesure pour que l‘eau puisse se répartir dans le corps.
• Notez que seule compte la tendance à long terme. Des écarts de poids de courte durée enregistrés en l‘es-pace de quelques jours ne sont dus qu‘à une simple perte de liquides dans la plupart des cas ; l’eau corporelle joue un rôle important dans le bien-être.
LimitationsIl se peut que la détermination de la graisse corporelle et d’autres données présente des écarts et des résultats non plausibles dans les cas suivants :• les enfants de moins de 10 ans,• les sportifs de haut niveau et les culturistes,• les personnes fiévreuses, en dialyse, présentant des symptômes d‘œdèmes ou d‘ostéoporose,• les personnes sous traitement médical cardiovasculaire (cœur et système vasculaire),• les personnes prenant des médicaments vasodilatateurs ou vasoconstricteurs,• les personnes présentant des écarts anatomiques sérieux des jambes par rapport à leur taille (jambes nette-
ment courtes ou longues).
5. Description de l’appareilAperçu
3
4
1
1
4
2 1. Électrodes pour le pied gauche
2. Élément de commande avec écran
3. Affichage de l’état de fonctionnement
4. Électrodes pour le pied droit
Élément de commande avec écran
set
5 7 10
8 119 12
6 5. Électrodes de contact pour la main gauche
6. Électrodes de contact pour la main droite
7. set Touche de réglage, pour confirmer les saisies
8. Menu : Touche haut
9. Menu : Touche bas
10. Touche ON
11. Réglage : Touche haut
12. Réglage : Touche bas
6. Mise en serviceInsérer les piles
– Insérez les piles dans le pèse-personne et l’unité de commande en respectant leur pola-rité :
Unité de commande Pèse-personne
3 x AA 3 x AA
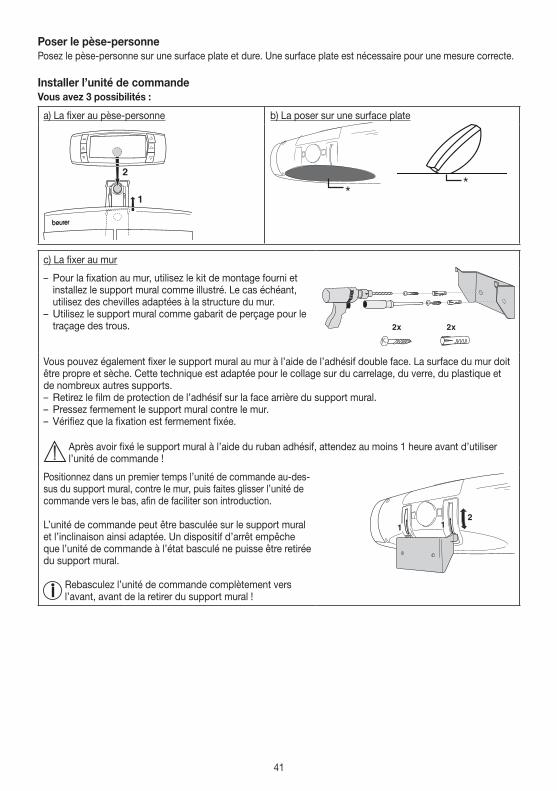
41
Poser le pèse-personnePosez le pèse-personne sur une surface plate et dure. Une surface plate est nécessaire pour une mesure correcte.
Installer l’unité de commandeVous avez 3 possibilités :
a) La fixer au pèse-personne b) La poser sur une surface plate
**
c) La fixer au mur
– Pour la fixation au mur, utilisez le kit de montage fourni et installez le support mural comme illustré. Le cas échéant, utilisez des chevilles adaptées à la structure du mur.
– Utilisez le support mural comme gabarit de perçage pour le traçage des trous.
Vous pouvez également fixer le support mural au mur à l’aide de l’adhésif double face. La surface du mur doit être propre et sèche. Cette technique est adaptée pour le collage sur du carrelage, du verre, du plastique et de nombreux autres supports. – Retirez le film de protection de l’adhésif sur la face arrière du support mural. – Pressez fermement le support mural contre le mur. – Vérifiez que la fixation est fermement fixée.
Après avoir fixé le support mural à l’aide du ruban adhésif, attendez au moins 1 heure avant d’utiliser l’unité de commande !
Positionnez dans un premier temps l’unité de commande au-des-sus du support mural, contre le mur, puis faites glisser l’unité de commande vers le bas, afin de faciliter son introduction.
L’unité de commande peut être basculée sur le support mural et l’inclinaison ainsi adaptée. Un dispositif d’arrêt empêche que l’unité de commande à l’état basculé ne puisse être retirée du support mural.
Rebasculez l’unité de commande complètement vers l’avant, avant de la retirer du support mural !

42
Pour plus de confort et pour une mise en forme optimale, nous recommandons le set professionnel composé d’une stèle en alu-minium et d’un socle en verre.Veuillez consulter le site www.beurer.com ou contacter le service après-vente concerné dans votre pays (cf. la liste des adresses du service après-vente).
Désignation Numéro d’article ou référence
Profi-Set 748.11
7. Installation avec l’applicationPour déterminer le taux de graisse corporelle et les autres paramètres, vous devez enregistrer les données indivi-duelles de l‘utilisateur sur le pèse-personne.Le pèse-personne dispose de 10 emplacements de sauvegarde utilisateur dans lesquels vous et les membres de votre famille pouvez, par exemple, enregistrer vos paramètres personnels.De plus, d’autres utilisateurs peuvent être affectés depuis des terminaux mobiles où l’application « beurer HealthManager Pro » / « beurer HealthManager » App est installée, ou par le choix du profil utilisateur dans l’ap-plication (voir Paramètres de l’application).
Durant la mise en service, laissez le smartphone à proximité du pèse-personne pour que la connexion Bluetooth® puisse rester active.
– Activer la fonction Bluetooth® dans les paramètres du smartphone. – Insérer les piles et placer le pèse-personne sur une surface solide (« CONNECT WITH APP » (Connecter avec l’application) clignote sur l’écran LCD du pèse-personne).
– Télécharger l’application gratuite « beurer HealthManager Pro » / « beurer HealthManager » App sur l’Apple App Store(iOS) ou sur Google Play (Android™).
– Démarrer l’application et suivre les instructions. – Saisir les données du BF 105.
Les réglages suivants doivent être effectués ou entrés dans l’application « beurer HealthManager Pro »/ « beurer HealthManager » :
Données utilisateur Valeurs de réglageInitiales 3 caractères max. (A-Z, 0-9)
Sexe homme ( ), femme ( )Taille 100 à 250 cm (3‘3,5“ à 8‘02“)Date de naissance Année, mois, jourNiveau d’activité 1 à 5Poids cible kg/lb/st (pour représentation de la courbe graphique)
Niveaux d’activitéLe niveau d’activité sera sélectionné en fonction des perspectives à moyen et à long terme.
Niveau d’activité Activité corporelle1 Aucune.
2 Faible : peu d’efforts physiques et efforts physiques légers (par ex. : promenades, jardinage simple, exercices de gymnastique).
3 Moyenne : efforts physiques, au moins 30 minutes, 2 à 4 fois par semaine.4 Élevée : efforts physiques, au moins 30 minutes, 4 à 6 fois par semaine.
5 Très élevée : efforts physiques intenses, entraînement intensif ou travail physique difficile, au moins pendant 1 heure.
L’application vous attribue la prochaine mémoire utilisateur libre (Personne 1 – Personne 10).
43
– Effectuer la mesure : Pour la reconnaissance automatique des utilisateurs, leur première mesure doit être affectée à leurs données d’utilisateur personnelles. Pour cela, suivez les instructions de l’application. Repor-tez-vous pour cela au chapitre „9. Mesure“.
8. Installation sans l’applicationNous recommandons de faire la mise en service et le réglage de tous les paramètres depuis l’application. Voir le chapitre „7. Installation avec l’application“. Il est également possible de les effectuer depuis l’appareil. – Insérer les piles et placer le pèse-personne sur une surface solide (« CONNECT WITH APP » (Connecter avec l’application) clignote sur l’écran LCD du pèse-personne).
– Effectuer les réglages de l’appareil, de l’heure et de l’utilisateur sur l’unité de commande. En général, il vous suffit de faire votre choix à l’aide des touches [ ] ou [ ] et de confirmer à l’aide de la touche [SET].
–a. Réglage de l’appareil[SET] « REGLER_APPAREIL »
Séquence Valeurs de réglageLangue D G F E IUnité de mesure kg – lb – stHeure 24 h – 12 hMode invité ACTIVE_DESACT.Bluetooth® ACTIVE_DESACT.
Si la fonction ne propose que «DESACT. », cela signifie qu’une connexion Blue-tooth® n’est possible que si la poignée est allumée.
b. Réglage de l’heure[SET] « REGLER_HEURE »
Séquence Valeurs de réglageDate Année – Mois – JourHeure Heures – Minutes
c. Réglage des données de l’utilisateur[SET ] « CHANGER_UTILIS. »
Données utili-sateur
Valeurs de réglage
Initiales 3 caractères max. (A-Z, 0-9)Sexe homme ( ), femme ( )Taille 100 à 250 cm (3‘03“ à 8‘02“)Date de nais-sance
Année, mois, jour
Niveau d’activité 1 à 5 (cf. chapitre 7)Poids cible kg/lb/st, en kg (pour représentation de la courbe graphique)Code utilisateur Attribué automatiquement pour la prochaine utilisation éventuelle de la fonction Bluetooth®
– Effectuer la mesure : Pour la reconnaissance automatique des utilisateurs, leur première mesure doit être affectée à leurs données d’utilisateur personnelles. Reportez-vous pour cela au chapitre „9. Mesure“.
Inscription ultérieure à l’applicationSi vous souhaitez mettre en service le pèse-personne sans l’application, vous pouvez créer un utilisateur sur l’application comme suit : – Téléchargez l’application gratuite « beurer HealthManager Pro » / « beurer HealthManager » App sur l’Apple App Store (iOS) ou sur Google Play (Android™).
– Démarrez l’application et suivez les instructions.
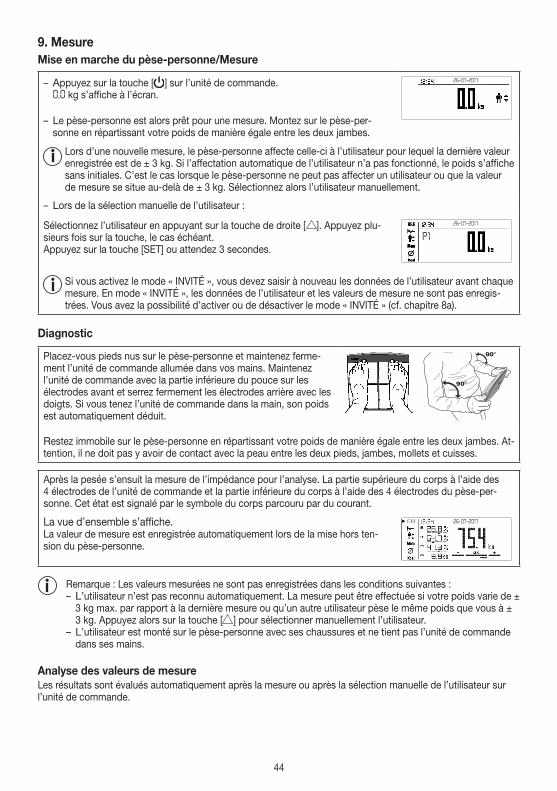
44
9. Mesure Mise en marche du pèse-personne/Mesure
– Appuyez sur la touche [ ] sur l’unité de commande. 0,0 kg s’affiche à l’écran.
– Le pèse-personne est alors prêt pour une mesure. Montez sur le pèse-per-sonne en répartissant votre poids de manière égale entre les deux jambes.
26-07-2017
Lors d’une nouvelle mesure, le pèse-personne affecte celle-ci à l’utilisateur pour lequel la dernière valeur enregistrée est de ± 3 kg. Si l’affectation automatique de l’utilisateur n’a pas fonctionné, le poids s’affiche sans initiales. C’est le cas lorsque le pèse-personne ne peut pas affecter un utilisateur ou que la valeur de mesure se situe au-delà de ± 3 kg. Sélectionnez alors l’utilisateur manuellement.
– Lors de la sélection manuelle de l’utilisateur :
Sélectionnez l’utilisateur en appuyant sur la touche de droite [ ]. Appuyez plu-sieurs fois sur la touche, le cas échéant.Appuyez sur la touche [SET] ou attendez 3 secondes.
26-07-2017
P1
Si vous activez le mode « INVITÉ », vous devez saisir à nouveau les données de l’utilisateur avant chaque mesure. En mode « INVITÉ », les données de l’utilisateur et les valeurs de mesure ne sont pas enregis-trées. Vous avez la possibilité d’activer ou de désactiver le mode « INVITÉ » (cf. chapitre 8a).
Diagnostic
Placez-vous pieds nus sur le pèse-personne et maintenez ferme-ment l’unité de commande allumée dans vos mains. Maintenez l’unité de commande avec la partie inférieure du pouce sur les électrodes avant et serrez fermement les électrodes arrière avec les doigts. Si vous tenez l’unité de commande dans la main, son poids est automatiquement déduit.
Restez immobile sur le pèse-personne en répartissant votre poids de manière égale entre les deux jambes. At-tention, il ne doit pas y avoir de contact avec la peau entre les deux pieds, jambes, mollets et cuisses.
Après la pesée s’ensuit la mesure de l’impédance pour l’analyse. La partie supérieure du corps à l’aide des 4 électrodes de l’unité de commande et la partie inférieure du corps à l’aide des 4 électrodes du pèse-per-sonne. Cet état est signalé par le symbole du corps parcouru par du courant.
La vue d’ensemble s’affiche.La valeur de mesure est enregistrée automatiquement lors de la mise hors ten-sion du pèse-personne.
26-07-2017
Remarque : Les valeurs mesurées ne sont pas enregistrées dans les conditions suivantes : – L’utilisateur n’est pas reconnu automatiquement. La mesure peut être effectuée si votre poids varie de ± 3 kg max. par rapport à la dernière mesure ou qu’un autre utilisateur pèse le même poids que vous à ± 3 kg. Appuyez alors sur la touche [ ] pour sélectionner manuellement l’utilisateur.
– L’utilisateur est monté sur le pèse-personne avec ses chaussures et ne tient pas l’unité de commande dans ses mains.
Analyse des valeurs de mesureLes résultats sont évalués automatiquement après la mesure ou après la sélection manuelle de l’utilisateur sur l’unité de commande.
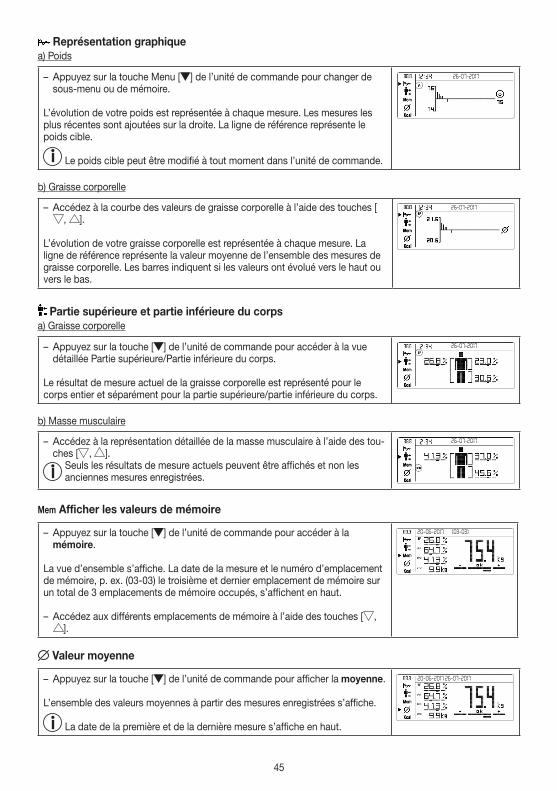
45
Représentation graphiquea) Poids
– Appuyez sur la touche Menu [ ] de l’unité de commande pour changer de sous-menu ou de mémoire.
L’évolution de votre poids est représentée à chaque mesure. Les mesures les plus récentes sont ajoutées sur la droite. La ligne de référence représente le poids cible.
Le poids cible peut être modifié à tout moment dans l’unité de commande.
26-07-2017
b) Graisse corporelle
– Accédez à la courbe des valeurs de graisse corporelle à l’aide des touches [, ].
L’évolution de votre graisse corporelle est représentée à chaque mesure. La ligne de référence représente la valeur moyenne de l’ensemble des mesures de graisse corporelle. Les barres indiquent si les valeurs ont évolué vers le haut ou vers le bas.
26-07-2017
Partie supérieure et partie inférieure du corpsa) Graisse corporelle
– Appuyez sur la touche [ ] de l’unité de commande pour accéder à la vue détaillée Partie supérieure/Partie inférieure du corps.
Le résultat de mesure actuel de la graisse corporelle est représenté pour le corps entier et séparément pour la partie supérieure/partie inférieure du corps.
26-07-2017
b) Masse musculaire
– Accédez à la représentation détaillée de la masse musculaire à l’aide des tou-ches [ , ].
Seuls les résultats de mesure actuels peuvent être affichés et non les anciennes mesures enregistrées.
26-07-2017
Mem Afficher les valeurs de mémoire
– Appuyez sur la touche [ ] de l’unité de commande pour accéder à la mémoire.
La vue d’ensemble s’affiche. La date de la mesure et le numéro d’emplacement de mémoire, p. ex. (03-03) le troisième et dernier emplacement de mémoire sur un total de 3 emplacements de mémoire occupés, s’affichent en haut.
– Accédez aux différents emplacements de mémoire à l’aide des touches [ , ].
(03-03)20-06-2017
Valeur moyenne
– Appuyez sur la touche [ ] de l’unité de commande pour afficher la moyenne.
L’ensemble des valeurs moyennes à partir des mesures enregistrées s’affiche.
La date de la première et de la dernière mesure s’affiche en haut.
20-06-2017 26-07-2017
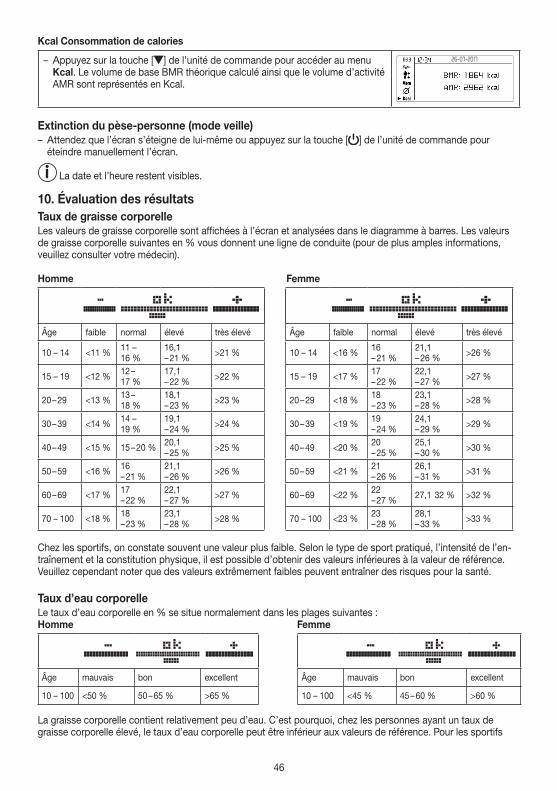
46
Kcal Consommation de calories
– Appuyez sur la touche [ ] de l’unité de commande pour accéder au menu Kcal. Le volume de base BMR théorique calculé ainsi que le volume d’activité AMR sont représentés en Kcal.
26-07-2017
Extinction du pèse-personne (mode veille) – Attendez que l’écran s’éteigne de lui-même ou appuyez sur la touche [ ] de l’unité de commande pour éteindre manuellement l’écran.
La date et l’heure restent visibles.
10. Évaluation des résultatsTaux de graisse corporelleLes valeurs de graisse corporelle sont affichées à l’écran et analysées dans le diagramme à barres. Les valeurs de graisse corporelle suivantes en % vous donnent une ligne de conduite (pour de plus amples informations, veuillez consulter votre médecin).
Homme Femme
Âge faible normal élevé très élevé Âge faible normal élevé très élevé
10 – 14 <11 % 11 – 16 %
16,1 – 21 % >21 % 10 – 14 <16 % 16
– 21 %21,1 – 26 % >26 %
15 – 19 <12 % 12 – 17 %
17,1 – 22 % >22 % 15 – 19 <17 % 17
– 22 %22,1 – 27 % >27 %
20 – 29 <13 % 13 – 18 %
18,1 – 23 % >23 % 20 – 29 <18 % 18
– 23 %23,1 – 28 % >28 %
30 – 39 <14 % 14 – 19 %
19,1 – 24 % >24 % 30 – 39 <19 % 19
– 24 %24,1 – 29 % >29 %
40 – 49 <15 % 15 – 20 % 20,1 – 25 % >25 % 40 – 49 <20 % 20
– 25 %25,1 – 30 % >30 %
50 – 59 <16 % 16 – 21 %
21,1 – 26 % >26 % 50 – 59 <21 % 21
– 26 %26,1 – 31 % >31 %
60 – 69 <17 % 17 – 22 %
22,1 – 27 % >27 % 60 – 69 <22 % 22
– 27 % 27,1 32 % >32 %
70 – 100 <18 % 18 – 23 %
23,1 – 28 % >28 % 70 – 100 <23 % 23
– 28 %28,1 – 33 % >33 %
Chez les sportifs, on constate souvent une valeur plus faible. Selon le type de sport pratiqué, l’intensité de l’en-traînement et la constitution physique, il est possible d’obtenir des valeurs inférieures à la valeur de référence. Veuillez cependant noter que des valeurs extrêmement faibles peuvent entraîner des risques pour la santé.
Taux d’eau corporelleLe taux d’eau corporelle en % se situe normalement dans les plages suivantes :Homme Femme
Âge mauvais bon excellent Âge mauvais bon excellent
10 – 100 <50 % 50 – 65 % >65 % 10 – 100 <45 % 45 – 60 % >60 %
La graisse corporelle contient relativement peu d’eau. C’est pourquoi, chez les personnes ayant un taux de graisse corporelle élevé, le taux d’eau corporelle peut être inférieur aux valeurs de référence. Pour les sportifs
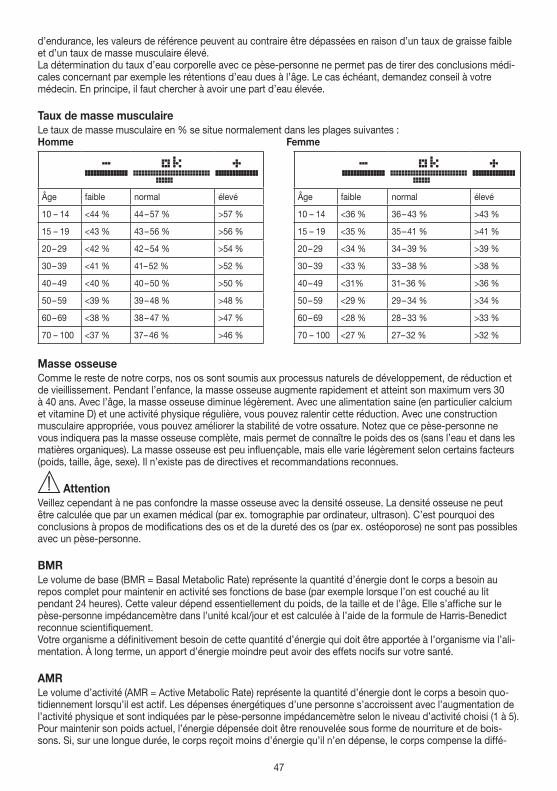
47
d’endurance, les valeurs de référence peuvent au contraire être dépassées en raison d’un taux de graisse faible et d’un taux de masse musculaire élevé.La détermination du taux d’eau corporelle avec ce pèse-personne ne permet pas de tirer des conclusions médi-cales concernant par exemple les rétentions d’eau dues à l’âge. Le cas échéant, demandez conseil à votre médecin. En principe, il faut chercher à avoir une part d’eau élevée.
Taux de masse musculaireLe taux de masse musculaire en % se situe normalement dans les plages suivantes :Homme Femme
Âge faible normal élevé Âge faible normal élevé
10 – 14 <44 % 44 – 57 % >57 % 10 – 14 <36 % 36 – 43 % >43 %
15 – 19 <43 % 43 – 56 % >56 % 15 – 19 <35 % 35 – 41 % >41 %
20 – 29 <42 % 42 – 54 % >54 % 20 – 29 <34 % 34 – 39 % >39 %
30 – 39 <41 % 41– 52 % >52 % 30 – 39 <33 % 33 – 38 % >38 %
40 – 49 <40 % 40 – 50 % >50 % 40 – 49 <31% 31– 36 % >36 %
50 – 59 <39 % 39 – 48 % >48 % 50 – 59 <29 % 29 – 34 % >34 %
60 – 69 <38 % 38 – 47 % >47 % 60 – 69 <28 % 28 – 33 % >33 %
70 – 100 <37 % 37 – 46 % >46 % 70 – 100 <27 % 27– 32 % >32 %
Masse osseuseComme le reste de notre corps, nos os sont soumis aux processus naturels de développement, de réduction et de vieillissement. Pendant l’enfance, la masse osseuse augmente rapidement et atteint son maximum vers 30 à 40 ans. Avec l’âge, la masse osseuse diminue légèrement. Avec une alimentation saine (en particulier calcium et vitamine D) et une activité physique régulière, vous pouvez ralentir cette réduction. Avec une construction musculaire appropriée, vous pouvez améliorer la stabilité de votre ossature. Notez que ce pèse-personne ne vous indiquera pas la masse osseuse complète, mais permet de connaître le poids des os (sans l’eau et dans les matières organiques). La masse osseuse est peu influençable, mais elle varie légèrement selon certains facteurs (poids, taille, âge, sexe). Il n’existe pas de directives et recommandations reconnues.
AttentionVeillez cependant à ne pas confondre la masse osseuse avec la densité osseuse. La densité osseuse ne peut être calculée que par un examen médical (par ex. tomographie par ordinateur, ultrason). C’est pourquoi des conclusions à propos de modifications des os et de la dureté des os (par ex. ostéoporose) ne sont pas possibles avec un pèse-personne.
BMRLe volume de base (BMR = Basal Metabolic Rate) représente la quantité d’énergie dont le corps a besoin au repos complet pour maintenir en activité ses fonctions de base (par exemple lorsque l’on est couché au lit pendant 24 heures). Cette valeur dépend essentiellement du poids, de la taille et de l’âge. Elle s’affiche sur le pèse-personne impédancemètre dans l’unité kcal/jour et est calculée à l’aide de la formule de Harris-Benedict reconnue scientifiquement.Votre organisme a définitivement besoin de cette quantité d’énergie qui doit être apportée à l’organisme via l’ali-mentation. À long terme, un apport d’énergie moindre peut avoir des effets nocifs sur votre santé.
AMRLe volume d’activité (AMR = Active Metabolic Rate) représente la quantité d’énergie dont le corps a besoin quo-tidiennement lorsqu’il est actif. Les dépenses énergétiques d’une personne s’accroissent avec l’augmentation de l’activité physique et sont indiquées par le pèse-personne impédancemètre selon le niveau d’activité choisi (1 à 5).Pour maintenir son poids actuel, l’énergie dépensée doit être renouvelée sous forme de nourriture et de bois-sons. Si, sur une longue durée, le corps reçoit moins d’énergie qu’il n’en dépense, le corps compense la diffé-
48
rence en utilisant essentiellement la graisse stockée et le poids diminue. Si au contraire, pendant une longue période de temps, le corps reçoit une quantité d’énergie supérieure au volume d’activité calculé (AMR), il ne peut pas brûler l’excédent énergétique, qui est alors stocké sous forme de graisse et le poids augmente.
Corrélation des résultats dans le temps
Notez que seule compte la tendance à long terme. Des écarts de poids de courte durée enregistrés en l‘es-pace de quelques jours ne sont dus qu‘à une simple perte de liquides dans la plupart des cas.
L’interprétation des résultats se fait en fonction des modifications du poids global et des taux de graisse et d’eau corporelles et de masse musculaire ainsi qu’en fonction de la durée selon laquelle ces modifications se produisent. Il faut distinguer les modifications rapides (de l‘ordre de quelques jours) des modifications à moyen terme (de l‘ordre de quelques semaines) et à long terme (plusieurs mois).La règle générale peut être la suivante : les modifications de poids à court terme représentent presque exclusive-ment des changements de la teneur en eau, alors que les modifications à moyen et à long terme peuvent aussi concerner le taux de graisse et de masse musculaire.• Si votre poids diminue à court terme, alors que le taux de graisse corporelle augmente ou reste stable, vous
n‘avez perdu que de l‘eau, par exemple suite à un entraînement, une séance de sauna ou un régime visant uni-quement à une perte de poids rapide.
• Si votre poids augmente à moyen terme, alors que le taux de graisse corporelle diminue ou reste stable, il se pourrait au contraire que vous ayez augmenté la masse musculaire.
• Si votre poids et votre taux de graisse corporelle diminuent simultanément, cela signifie que votre régime fonc-tionne : vous perdez de la graisse.
• L‘activité physique, les séances de mise en forme ou de musculation seront les compléments parfaits de votre régime. Ils vous permettent d‘augmenter votre taux de masse musculaire à moyen terme.
• Il ne faut pas additionner la graisse corporelle, le taux d’eau corporelle et la masse musculaire (le tissu muscu-laire contient aussi des constituants de l’eau corporelle).
11. Transfert des mesuresa) Via l’applicationSi l’application n’est pas ouverte, les nouvelles mesures affectées sont enregistrées sur le pèse-personne. Un maximum de 30 mesures par utilisateur peuvent être enregistrées sur le pèse-personne. Quand vous ouvrez l’application à portée du Bluetooth®, les valeurs enregistrées lui sont automatiquement transférées. Un transfert automatique est possible quand le pèse-personne est éteint.
b) Via USB – Vous trouverez les informations de téléchargement et d’installation dans la rubrique Téléchargement du site http://www.beurer.com
– Veuillez suivre les consignes lors de l’installation du logiciel. – Établissez la connexion USB
12. Plus d’informationsSupprimer les données du pèse-personnea) Supprimer un utilisateur avec tous les paramètres et toutes les valeurs – Allumez le pèse-personne, puis sélectionnez l’utilisateur à supprimer en appuyant que la touche [ ]. Appuyez plusieurs fois sur la touche, le cas échéant, puis confirmez à l’aide de la touche [SET].
– Lorsque 0,0 s’affiche à l’écran, appuyez sur la touche [SET] pendant 10 secondes pour supprimer l’utilisateur. – À l’aide des touches [ , ], sélectionnez « OUI », puis confirmez en appuyant sur la touche [SET]. Si vous ne souhaitez pas supprimer l’utilisateur, sélectionnez « NON », puis confirmez en appuyant sur la touche [SET].
Toutes les valeurs et tous les paramètres enregistrés pour cet utilisateur sont supprimés.
b) Supprimer une seule valeur d’un utilisateur – Dans la mémoire des valeurs mesurées « Mem », sélectionnez une valeur, puis appuyez brièvement sur la touche [SET] de l’unité de commande pour supprimer la valeur affichée. Vous pouvez également effectuer cette opération directement après la mesure.
– À l’aide des touches [ , ], sélectionnez « OUI », puis confirmez en appuyant sur la touche [SET]. Si vous ne souhaitez pas supprimer la valeur, sélectionnez « NON », puis confirmez en appuyant sur la touche [SET].
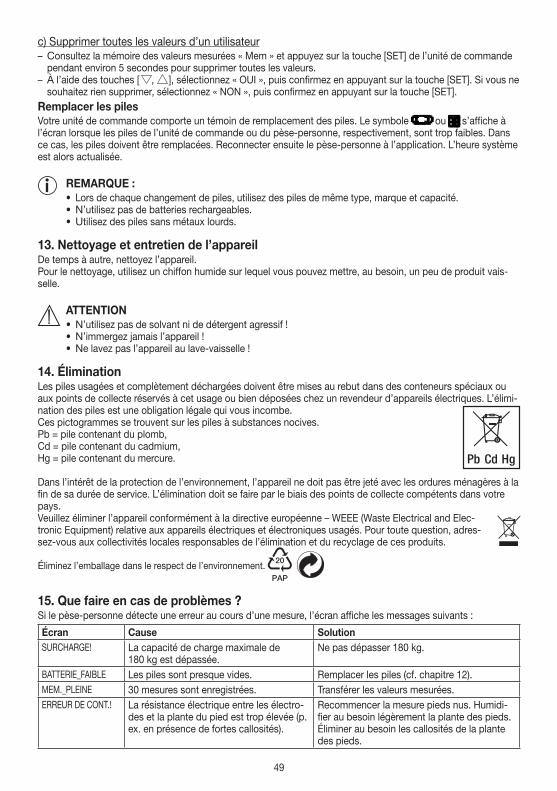
49
c) Supprimer toutes les valeurs d’un utilisateur – Consultez la mémoire des valeurs mesurées « Mem » et appuyez sur la touche [SET] de l’unité de commande pendant environ 5 secondes pour supprimer toutes les valeurs.
– À l’aide des touches [ , ], sélectionnez « OUI », puis confirmez en appuyant sur la touche [SET]. Si vous ne souhaitez rien supprimer, sélectionnez « NON », puis confirmez en appuyant sur la touche [SET].
Remplacer les pilesVotre unité de commande comporte un témoin de remplacement des piles. Le symbole ou s’affiche à l’écran lorsque les piles de l’unité de commande ou du pèse-personne, respectivement, sont trop faibles. Dans ce cas, les piles doivent être remplacées. Reconnecter ensuite le pèse-personne à l’application. L’heure système est alors actualisée.
REMARQUE :• Lors de chaque changement de piles, utilisez des piles de même type, marque et capacité.• N’utilisez pas de batteries rechargeables.• Utilisez des piles sans métaux lourds.
13. Nettoyage et entretien de l’appareilDe temps à autre, nettoyez l’appareil.Pour le nettoyage, utilisez un chiffon humide sur lequel vous pouvez mettre, au besoin, un peu de produit vais-selle.
ATTENTION• N’utilisez pas de solvant ni de détergent agressif !• N’immergez jamais l’appareil !• Ne lavez pas l’appareil au lave-vaisselle !
14. ÉliminationLes piles usagées et complètement déchargées doivent être mises au rebut dans des conteneurs spéciaux ou aux points de collecte réservés à cet usage ou bien déposées chez un revendeur d’appareils électriques. L’élimi-nation des piles est une obligation légale qui vous incombe.Ces pictogrammes se trouvent sur les piles à substances nocives.Pb = pile contenant du plomb,Cd = pile contenant du cadmium, Hg = pile contenant du mercure.
Dans l’intérêt de la protection de l’environnement, l’appareil ne doit pas être jeté avec les ordures ménagères à la fin de sa durée de service. L’élimination doit se faire par le biais des points de collecte compétents dans votre pays. Veuillez éliminer l’appareil conformément à la directive européenne – WEEE (Waste Electrical and Elec-tronic Equipment) relative aux appareils électriques et électroniques usagés. Pour toute question, adres-sez-vous aux collectivités locales responsables de l’élimination et du recyclage de ces produits.
Éliminez l’emballage dans le respect de l’environnement. 20
PAP
15. Que faire en cas de problèmes ?Si le pèse-personne détecte une erreur au cours d’une mesure, l’écran affiche les messages suivants :
Écran Cause SolutionSURCHARGE! La capacité de charge maximale de
180 kg est dépassée.Ne pas dépasser 180 kg.
BATTERIE_FAIBLE Les piles sont presque vides. Remplacer les piles (cf. chapitre 12).MEM._PLEINE 30 mesures sont enregistrées. Transférer les valeurs mesurées.ERREUR DE CONT.! La résistance électrique entre les électro-
des et la plante du pied est trop élevée (p. ex. en présence de fortes callosités).
Recommencer la mesure pieds nus. Humidi-fier au besoin légèrement la plante des pieds. Éliminer au besoin les callosités de la plante des pieds.

50
Écran Cause SolutionPLAGE DE MESURE! La mesure BIA a fonctionné mais le taux
de graisse dépasse les limites de la plage mesurable (inférieur à 5 % ou supérieur à 50 %).
Recommencer la mesure pieds nus ou humi-difier légèrement la plante des pieds. Modifier éventuellement le niveau d’activité sélec-tionné.
Aucun affichage Les piles de l’unité de commande sont vides.
Remplacer les piles (cf. chapitre 12).
Les piles de l’unité de commande ne sont pas correctement insérées.
Vérifier que la polarité est correcte (cf. page 40).
Affichage du poids unique-ment, pas de dia-gnostic
Mesure inconnue car elle se situe hors de la limite d’affectation utilisateur ou bien aucune affectation unique n’est possible.
Sélectionner l’utilisateur sur le pèse-personne à l’aide de la touche « » ou répéter l’affec-tation utilisateur dans l’application.Voir le chapitre 9.
Aucune mesure possible
Causes possibles d’erreur SolutionL’unité de commande n’a pas été activée avant de monter sur le pèse-personne.
Activer l’unité de commande avant la mesure. Attendre 30 secondes, le cas échéant, puis recommencer la mesure.
La liaison radio entre le pèse-personne et l’unité de commande est indisponible.
Réinsérer les piles dans le pèse-personne et dans l’unité de com-mande.S’éloigner davantage des sources électromagnétiques fortes.
L’unité de commande est trop éloignée du pèse-personne.
Réduire la distance entre le pèse-personne et l’unité de com-mande. La distance maximale est de 2 mètres.
Les piles du pèse-personne sont vides ou mal insérées.
Remplacer les piles et vérifier la polarité, le cas échéant.
Mesure erronée
Causes possibles d’erreur SolutionLa position 0 du pèse-personne est fausse. Avant la mesure, activer brièvement le pèse-personne au pied,
jusqu’à ce que l’affichage de l’état de fonctionnement indique .Attendre environ 5 secondes, puis recommencer la mesure. Pour information : En utilisation normale, comme vous montez immé-diatement sur le pèse-personne, celui-ci mémorise le zéro lors de son extinction (lorsque l’affichage de l’état de fonctionnement disparaît).
Le pèse-personne est posé sur un tapis ou de la moquette.
Poser le pèse-personne sur un sol plat et dur.Placer les jambes le plus possible vers l’extérieur, sans faire bas-culer le pèse-personne.
Un poids incorrect s’affiche. Si possible, ne pas bouger.Un poids incorrect s’affiche. Attendre que le pèse-personne s’éteigne de nouveau. Répéter
la mesure.
Aucune connexion Bluetooth® (le symbole ® ne s’affiche pas).
Causes possibles d’erreur SolutionLiaison radio Dans un espace dégagé, la portée est d’environ 10 m. Les murs
et les plafonds diminuent la portée.D’autres ondes radio peuvent perturber la transmission. Par conséquent, ne pas placer le pèse-personne à proximité d’appa-reils tels qu’un routeur sans fil, un micro-ondes, des plaques de cuisson à induction et, idéalement, éteindre les autres appareils Bluetooth® qui se trouvent à portée.
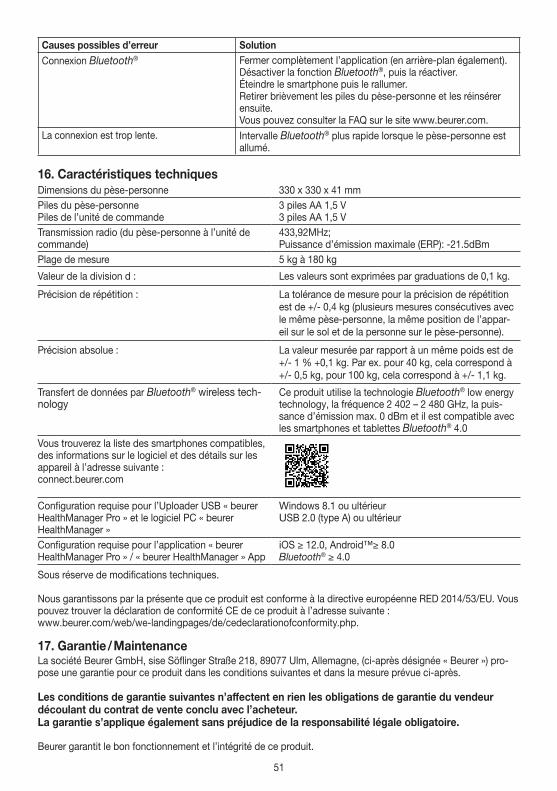
51
Causes possibles d’erreur SolutionConnexion Bluetooth® Fermer complètement l’application (en arrière-plan également).
Désactiver la fonction Bluetooth®, puis la réactiver.Éteindre le smartphone puis le rallumer.Retirer brièvement les piles du pèse-personne et les réinsérer ensuite.Vous pouvez consulter la FAQ sur le site www.beurer.com.
La connexion est trop lente. Intervalle Bluetooth® plus rapide lorsque le pèse-personne est allumé.
16. Caractéristiques techniquesDimensions du pèse-personne 330 x 330 x 41 mmPiles du pèse-personnePiles de l’unité de commande
3 piles AA 1,5 V3 piles AA 1,5 V
Transmission radio (du pèse-personne à l’unité de commande)
433,92MHz; Puissance d’émission maximale (ERP): -21.5dBm
Plage de mesure 5 kg à 180 kg
Valeur de la division d : Les valeurs sont exprimées par graduations de 0,1 kg.
Précision de répétition : La tolérance de mesure pour la précision de répétition est de +/- 0,4 kg (plusieurs mesures consécutives avec le même pèse-personne, la même position de l’appar-eil sur le sol et de la personne sur le pèse-personne).
Précision absolue : La valeur mesurée par rapport à un même poids est de +/- 1 % +0,1 kg. Par ex. pour 40 kg, cela correspond à +/- 0,5 kg, pour 100 kg, cela correspond à +/- 1,1 kg.
Transfert de données par Bluetooth® wireless tech-nology
Ce produit utilise la technologie Bluetooth® low energy technology, la fréquence 2 402 – 2 480 GHz, la puis-sance d’émission max. 0 dBm et il est compatible avec les smartphones et tablettes Bluetooth® 4.0
Vous trouverez la liste des smartphones compatibles, des informations sur le logiciel et des détails sur les appareil à l’adresse suivante :connect.beurer.com
Configuration requise pour l’Uploader USB « beurer HealthManager Pro » et le logiciel PC « beurer HealthManager »
Windows 8.1 ou ultérieurUSB 2.0 (type A) ou ultérieur
Configuration requise pour l’application « beurer HealthManager Pro » / « beurer HealthManager » App
iOS ≥ 12.0, Android™≥ 8.0Bluetooth® ≥ 4.0
Sous réserve de modifications techniques.
Nous garantissons par la présente que ce produit est conforme à la directive européenne RED 2014/53/EU. Vous pouvez trouver la déclaration de conformité CE de ce produit à l’adresse suivante : www.beurer.com/web/we-landingpages/de/cedeclarationofconformity.php.
17. Garantie / MaintenanceLa société Beurer GmbH, sise Söflinger Straße 218, 89077 Ulm, Allemagne, (ci-après désignée « Beurer ») pro-pose une garantie pour ce produit dans les conditions suivantes et dans la mesure prévue ci-après. Les conditions de garantie suivantes n’affectent en rien les obligations de garantie du vendeur découlant du contrat de vente conclu avec l’acheteur. La garantie s’applique également sans préjudice de la responsabilité légale obligatoire.
Beurer garantit le bon fonctionnement et l’intégrité de ce produit.
52
Sous
rése
rve
d’er
reur
s et
de
mod
ifica
tions
La période de garantie mondiale est de 5 ans à compter de la date d’achat par l’acheteur du produit neuf et non utilisé.
Cette garantie ne s’applique qu’aux produits achetés par l’acheteur en tant que consommateur et utilisés uni-quement à des fins personnelles dans le cadre d’une utilisation domestique.Le droit allemand s’applique.
Si, au cours de la période de garantie, ce produit s’avère incomplet ou défectueux conformément aux disposi-tions suivantes, Beurer s’engage à proposer gratuitement un remplacement ou une réparation conformément aux présentes Conditions de garantie.
Si l’acheteur souhaite faire valoir la garantie, il doit d’abord s’adresser au revendeur local : cf. liste « Service client à l’international » ci-jointe pour connaître les adresses du service après-vente.
L’acheteur recevra ensuite des informations complémentaires concernant le déroulement de la demande de garantie, par exemple, l’adresse à laquelle envoyer le produit et les documents requis.
Une demande de garantie ne peut être prise en compte que si l’acheteur présente – une copie de la facture/du reçu et – le produit d’origine
à Beurer ou à un partenaire autorisé de Beurer.
La présente Garantie exclut expressément – toute usure découlant de l’utilisation ou de la consommation normale du produit ; – les accessoires fournis avec le produit qui s’usent ou qui sont consommés dans le cadre d’une utilisation nor-
male du produit (par exemple, piles, piles rechargeables, manchettes, joints, électrodes, ampoules, embouts et accessoires pour inhalateur) ;
– les produits utilisés, nettoyés, stockés ou entretenus de manière inappropriée et/ou contraire aux conditions d’utilisation, ainsi que les produits ouverts, réparés ou modifiés par l’acheteur ou par un service client non agréé par Beurer ;
– les dommages survenus lors du transport entre le fabricant et le client ou entre le service client et le client ; – les produits achetés en tant qu’article de second choix ou d’occasion ; – les dommages consécutifs qui résultent d’une défaillance du produit (dans ce cas, toutefois, des réclamations
peuvent être soulevées relatives à la responsabilité du fait des produits ou à d’autres dispositions légales obli-gatoires relatives à la responsabilité).
Les réparations ou le remplacement complet ne prolongent en aucun cas la période de garantie.
53
ESPAÑOL
1. Información general ..............................................532. Símbolos...............................................................543. Indicaciones de advertencia y de seguridad ........554. Información...........................................................565. Descripción del aparato .......................................576. Puesta en funcionamiento ....................................577. Configuración con app .........................................588. Configuración sin app ..........................................599. Realizar la medición .............................................60
10. Evaluación de los resultados ..............................6211. Transferir valores medidos .................................6412. Más información .................................................6413. Limpieza y cuidado del aparato .........................6514. Eliminación .........................................................6515. Solución de problemas .......................................6616. Datos técnicos ....................................................6717. Garantía / Asistencia ...........................................68
Artículos suministrados• Báscula de diagnóstico• Mando extraíble con pantalla• Soporte mural• Juego para montaje mural• 3 x 1,5 V tipo AA (báscula)• 3 x 1,5 V tipo AA (mando)• Cable USB• Estas instrucciones de uso y una guía rápida Bluetooth®/USB
Estimada clienta, estimado cliente:Nos alegramos de que haya elegido un producto de nuestra colección. Nuestro nombre es sinónimo de produc-tos de alta y comprobada calidad en el ámbito de aplicación de calor, peso, presión arterial, temperatura corpo-ral, pulso, tratamiento suave, masaje, belleza, bebés y aire.Lea detenidamente estas instrucciones de uso, consérvelas para su futura utilización, asegúrese de que estén accesibles para otros usuarios y respete las indicaciones.
Atentamente,El equipo de Beurer
1. Información generalFunciones del aparatoEsta báscula digital sirve para pesar y para determinar sus datos personales de forma física.Está concebida para el uso particular en el ámbito privado.La báscula dispone de las siguientes funciones, que pueden usar un máximo de 10 personas:• Medición del peso corporal• Determinación del porcentaje de grasa corporal• Porcentaje de agua corporal• Porcentaje de masa muscular• Masa ósea• Metabolismo basal y activo
Además, la báscula dispone de las siguientes funciones:• Innovadora guía de menús en la pantalla de gran tamaño (disponible en 5 idiomas)• La pantalla puede dejarse si se desea sobre la báscula, colocarse en otro lugar o sujetarse en la pared. Opcio-
nalmente está disponible un juego de pedestal• Conmutación entre kilogramo “kg”, libra “lb” y stone “st”• Función de desconexión automática
Lea atentamente estas instrucciones de uso, consérvelas para su futura utilización, póngalas a disposición de otros usuarios y respete las indicaciones.
Índice
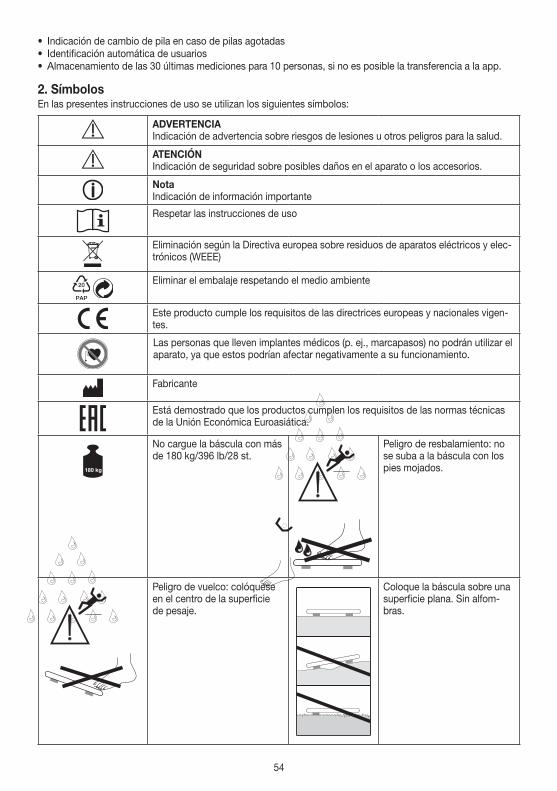
54
• Indicación de cambio de pila en caso de pilas agotadas• Identificación automática de usuarios• Almacenamiento de las 30 últimas mediciones para 10 personas, si no es posible la transferencia a la app.
2. SímbolosEn las presentes instrucciones de uso se utilizan los siguientes símbolos:
ADVERTENCIAIndicación de advertencia sobre riesgos de lesiones u otros peligros para la salud.
ATENCIÓN Indicación de seguridad sobre posibles daños en el aparato o los accesorios.
NotaIndicación de información importante
Respetar las instrucciones de uso
Eliminación según la Directiva europea sobre residuos de aparatos eléctricos y elec-trónicos (WEEE)
20
PAP
Eliminar el embalaje respetando el medio ambiente
Este producto cumple los requisitos de las directrices europeas y nacionales vigen-tes.
Las personas que lleven implantes médicos (p. ej., marcapasos) no podrán utilizar el aparato, ya que estos podrían afectar negativamente a su funcionamiento.
Fabricante
Está demostrado que los productos cumplen los requisitos de las normas técnicas de la Unión Económica Euroasiática.
No cargue la báscula con más de 180 kg/396 lb/28 st.
317306_SGWI 180_2019-05-03_02_WarningSticker_Lidl
max.
180 kg396 lb28 st
317306_SGWI 180_2019-05-03_02_WarningSticker_Lidl
max.
180 kg396 lb28 st
Peligro de resbalamiento: no se suba a la báscula con los pies mojados.
317306_SGWI 180_2019-05-03_02_WarningSticker_Lidl
max.
180 kg396 lb28 st
317306_SGWI 180_2019-05-03_02_WarningSticker_Lidl
max.
180 kg396 lb28 st
Peligro de vuelco: colóquese en el centro de la superficie de pesaje.
Coloque la báscula sobre una superficie plana. Sin alfom-bras.
55
3. Indicaciones de advertencia y de seguridad ADVERTENCIA
• Las personas que lleven implantes médicos (p. ej. marcapasos) no podrán utilizar la báscula, ya que estos podrían afectar negativamente a su funcionamiento.
• No debe utilizarse durante el embarazo. • Nunca suba por un solo lado sobre el borde exterior de la báscula: ¡Peligro de vuelco!• Mantenga a los niños alejados del material de embalaje (peligro de asfixia).• Atención, nunca se suba con los pies húmedos a la báscula y no pise la báscula cuando la superficie
esté húmeda ¡Peligro de resbalamiento!
Indicaciones para la manipulación de pilas• En caso de que el líquido de una pila entre en contacto con la piel o los ojos, lave la zona afectada con
agua y busque asistencia médica.• ¡Peligro de asfixia! Los niños pequeños podrían tragarse las pilas y asfixiarse. Guarde las pilas
fuera del alcance de los niños.• Respete los símbolos más (+) y menos (-) que indican la polaridad.• Si se derrama el líquido de una pila, póngase guantes protectores y limpie el compartimento de las pilas
con un paño seco.• Proteja las pilas de un calor excesivo.• ¡Peligro de explosión! No arroje las pilas al fuego.• Las pilas no se pueden cargar ni cortocircuitar.• Si no va a utilizar el aparato durante un periodo de tiempo prolongado, retire las pilas del comparti-
mento.• Utilice únicamente el mismo tipo de pila o un tipo equivalente. • Cambie siempre todas las pilas a la vez.• No utilice baterías.• No despiece, abra ni triture las pilas.
Indicaciones generales • El aparato está concebido únicamente para el uso propio, no para el uso médico o comercial • Tenga en cuenta que es posible que haya tolerancias de medición condicionadas técnicamente, puesto
que no se trata de una báscula calibrada para uso médico profesional.• En caso de resultados de medición distintos (entre la báscula y la aplicación), deberán utilizarse exclusi-
vamente los valores indicados en la báscula.• La capacidad de carga de la báscula es de 180 kg (396 lb, 28 st) como máximo. Durante la medición
del peso y la determinación de la masa ósea los resultados se muestran en intervalos de 100 g (0,2 lb).• Los resultados de medición de la proporción de grasa corporal, agua corporal y masa muscular se
muestran en intervalos de 0,1 %.• La necesidad de calorías se indica en intervalos de 1 Kcal.• En el estado de suministro, en la báscula están ajustadas las unidades “cm” y “kg”. • Coloque la báscula en un suelo estable y liso; un revestimiento estable del suelo es el requisito para una
correcta medición.• Las reparaciones quedan reservadas exclusivamente al servicio de atención al cliente de Beurer o a
distribuidores autorizados. Antes de realizar cualquier reclamación, compruebe el estado de las pilas y sustitúyalas si es necesario.
Conservación y cuidadoLa precisión de los valores de medición y la vida útil del aparato dependen de su correcta utilización:
ATENCIÓN• El aparato debe limpiarse de vez en cuando. No utilice productos de limpieza corrosivos y no sumerja
nunca el aparato en agua.• Asegúrese de que no cae ningún líquido sobre la báscula. No sumerja nunca la báscula en agua. No la
lave nunca debajo del grifo.• No coloque ningún objeto sobre la báscula cuando no se utilice.• Proteja el aparato de golpes, humedad, polvo, sustancias químicas, fuertes cambios de temperatura y
de la cercanía de fuentes de calor (hornos o radiadores).• No pulse el botón con mucha fuerza ni con objetos afilados.• No someta la báscula a altas temperaturas o campos electromagnéticos intensos (p. ej., teléfonos
móviles).
56
4. InformaciónEl principio de mediciónEsta báscula funciona según el principio del análisis de impedancia bioeléctrica. De este modo, es posible deter-minar en cuestión de segundos los porcentajes corporales a través de una corriente no perceptible, inocua y segura. Con esta medición de la resistencia eléctrica (impedancia) y el cálculo de las constantes o valores individuales (edad, estatura, sexo, grado de actividad) pueden determinarse los porcentajes corporales y otros parámetros corporales. El tejido muscular y el agua poseen una buena conductividad eléctrica y, por tanto, una resistencia menor. Por el contrario, los huesos y los tejidos grasos poseen una menor conductividad, ya que las células gra-sas y los huesos apenas conducen la electricidad debido a una resistencia muy elevada.Además, esta báscula mide con dos frecuencias distintas para poder determinar aún mejor la impedancia. Estas distintas frecuencias afectan de diferente manera a la membrana celular y al agua corporal. Además, el contacto eléctrico con el cuerpo se optimiza mediante 4 electrodos de mano y 4 electrodos de pie para conseguir una mayor precisión en la medición y, por tanto, un mejor análisis. Esta sensible técnica de análisis permite que los valores apenas puedan modificarse en mediciones repetidas. El motivo son divergencias durante la medición de impedancia (p. ej. otro contacto eléctrico con los electrodos con manos y pies, una distribución distinta del agua en el cuerpo).
El análisis puede realizarse del siguiente modo:• Parte superior del cuerpo: sujetar el mando con las manos, subirse a la báscula con zapatos.• Parte inferior del cuerpo: dejar el mando p. ej. sobre la báscula, subirse a la báscula descalzo.• Parte superior e inferior del cuerpo: sujetar el mando con las manos y subirse a la báscula descalzo.Cuando el mando para el análisis se sujeta en la mano, su peso se resta automáticamente.
Tenga en cuenta que los valores calculados por la báscula de diagnóstico solo representan una aproximación a los valores obtenidos mediante análisis médicos reales del cuerpo. Solo un médico especialista puede estable-cer las proporciones exactas de grasa corporal, agua corporal, masa muscular y estructura ósea recurriendo a métodos profesionales (p. ej., mediante tomografía computarizada).
Consejos generales• Pésese a ser posible a la misma hora del día (lo ideal es por la mañana) después de ir al baño, en ayunas y sin
ropa para lograr resultados comparables.• Importante a la hora de medir: el cálculo de la grasa corporal solo puede realizarse estando descalzo y es útil
tener las plantas de los pies ligeramente húmedas.• Unas plantas totalmente secas o queratinizadas pueden producir errores en los resultados, ya que presentan
una conductividad demasiado baja.• Durante el proceso de medición permanezca quieto y en posición recta.• Espere unas horas después de hacer algún esfuerzo físico no habitual.• Espere unos 15 minutos después de levantarse, para que pueda distribuirse el agua existente en el cuerpo.• Es importante que solo considere la tendencia a largo plazo. Por lo general, las diferencias de peso rápidas
en un plazo de pocos días son debidas a la pérdida de líquidos; sin embargo, el agua corporal desempeña un papel importante en el bienestar.
RestriccionesAl calcular la grasa corporal y el resto de valores, pueden obtenerse valores divergentes y no satisfactorios en el caso de:• niños menores de 10 años,• deportistas de alto rendimiento y culturistas,• personas con fiebre, en tratamiento de diálisis, síntomas de edemas u osteoporosis,• personas que toman medicamentos para enfermedades cardiovasculares,• personas que toman medicamentos vasodilatadores o vasoconstrictores,• personas con desviaciones anatómicas considerables en las piernas con respecto al tamaño corporal general
(piernas considerablemente largas o cortas).
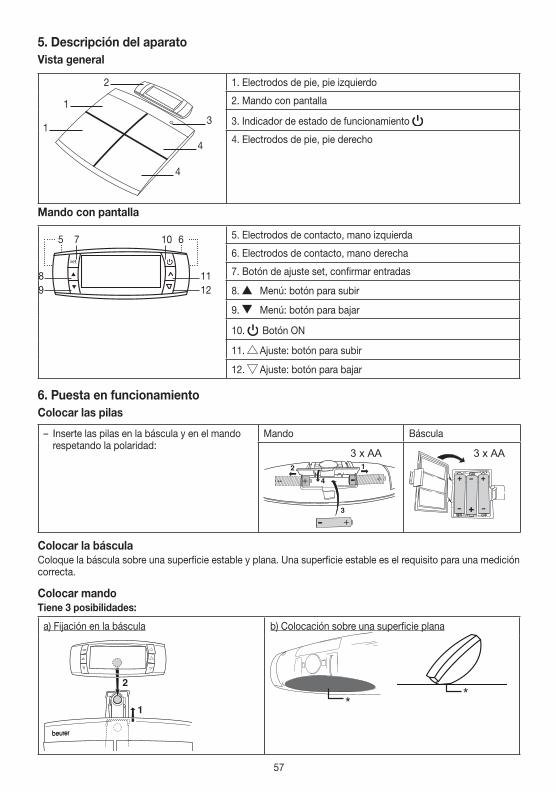
57
5. Descripción del aparatoVista general
3
4
1
1
4
2 1. Electrodos de pie, pie izquierdo
2. Mando con pantalla
3. Indicador de estado de funcionamiento
4. Electrodos de pie, pie derecho
Mando con pantalla
set
5 7 10
8 119 12
6 5. Electrodos de contacto, mano izquierda
6. Electrodos de contacto, mano derecha
7. Botón de ajuste set, confirmar entradas
8. Menú: botón para subir
9. Menú: botón para bajar
10. Botón ON
11. Ajuste: botón para subir
12. Ajuste: botón para bajar
6. Puesta en funcionamientoColocar las pilas
– Inserte las pilas en la báscula y en el mando respetando la polaridad:
Mando Báscula
3 x AA 3 x AA
Colocar la básculaColoque la báscula sobre una superficie estable y plana. Una superficie estable es el requisito para una medición correcta.
Colocar mandoTiene 3 posibilidades:
a) Fijación en la báscula b) Colocación sobre una superficie plana
**
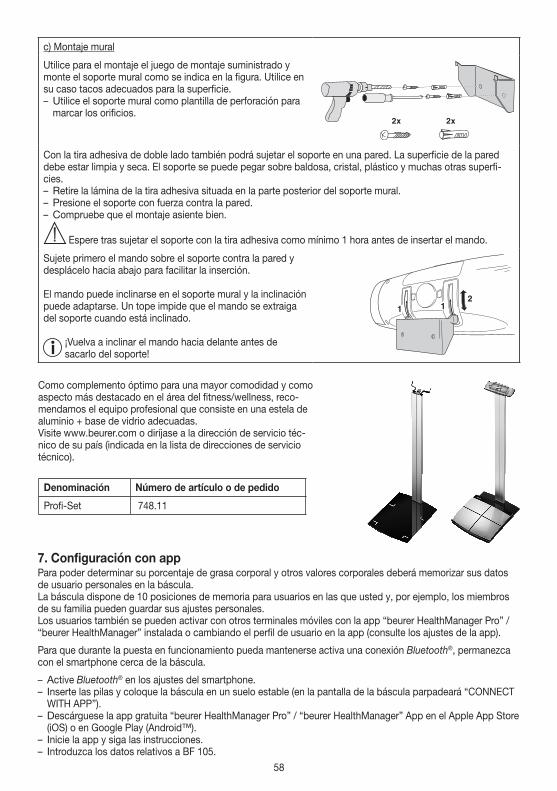
58
c) Montaje mural
Utilice para el montaje el juego de montaje suministrado y monte el soporte mural como se indica en la figura. Utilice en su caso tacos adecuados para la superficie. – Utilice el soporte mural como plantilla de perforación para marcar los orificios.
Con la tira adhesiva de doble lado también podrá sujetar el soporte en una pared. La superficie de la pared debe estar limpia y seca. El soporte se puede pegar sobre baldosa, cristal, plástico y muchas otras superfi-cies. – Retire la lámina de la tira adhesiva situada en la parte posterior del soporte mural. – Presione el soporte con fuerza contra la pared. – Compruebe que el montaje asiente bien.
Espere tras sujetar el soporte con la tira adhesiva como mínimo 1 hora antes de insertar el mando.
Sujete primero el mando sobre el soporte contra la pared y desplácelo hacia abajo para facilitar la inserción.
El mando puede inclinarse en el soporte mural y la inclinación puede adaptarse. Un tope impide que el mando se extraiga del soporte cuando está inclinado.
¡Vuelva a inclinar el mando hacia delante antes de sacarlo del soporte!
Como complemento óptimo para una mayor comodidad y como aspecto más destacado en el área del fitness/wellness, reco-mendamos el equipo profesional que consiste en una estela de aluminio + base de vidrio adecuadas.Visite www.beurer.com o diríjase a la dirección de servicio téc-nico de su país (indicada en la lista de direcciones de servicio técnico).
Denominación Número de artículo o de pedido
Profi-Set 748.11
7. Configuración con appPara poder determinar su porcentaje de grasa corporal y otros valores corporales deberá memorizar sus datos de usuario personales en la báscula.La báscula dispone de 10 posiciones de memoria para usuarios en las que usted y, por ejemplo, los miembros de su familia pueden guardar sus ajustes personales.Los usuarios también se pueden activar con otros terminales móviles con la app “beurer HealthManager Pro” / “beurer HealthManager” instalada o cambiando el perfil de usuario en la app (consulte los ajustes de la app).
Para que durante la puesta en funcionamiento pueda mantenerse activa una conexión Bluetooth®, permanezca con el smartphone cerca de la báscula.
– Active Bluetooth® en los ajustes del smartphone. – Inserte las pilas y coloque la báscula en un suelo estable (en la pantalla de la báscula parpadeará “CONNECT WITH APP”).
– Descárguese la app gratuita “beurer HealthManager Pro” / “beurer HealthManager” App en el Apple App Store (iOS) o en Google Play (Android™).
– Inicie la app y siga las instrucciones. – Introduzca los datos relativos a BF 105.
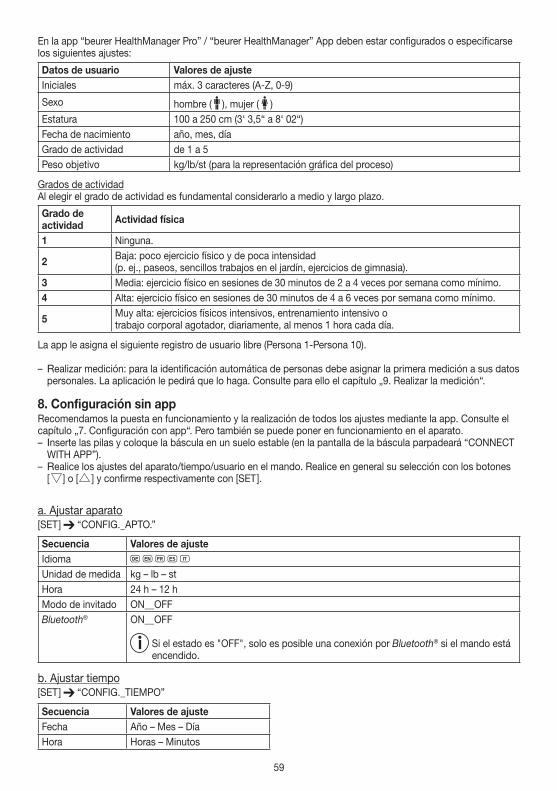
59
En la app “beurer HealthManager Pro” / “beurer HealthManager” App deben estar configurados o especificarse los siguientes ajustes:
Datos de usuario Valores de ajusteIniciales máx. 3 caracteres (A-Z, 0-9)
Sexo hombre ( ), mujer ( )Estatura 100 a 250 cm (3‘ 3,5“ a 8‘ 02“)Fecha de nacimiento año, mes, díaGrado de actividad de 1 a 5Peso objetivo kg/lb/st (para la representación gráfica del proceso)
Grados de actividadAl elegir el grado de actividad es fundamental considerarlo a medio y largo plazo.
Grado de actividad Actividad física
1 Ninguna.
2 Baja: poco ejercicio físico y de poca intensidad (p. ej., paseos, sencillos trabajos en el jardín, ejercicios de gimnasia).
3 Media: ejercicio físico en sesiones de 30 minutos de 2 a 4 veces por semana como mínimo.4 Alta: ejercicio físico en sesiones de 30 minutos de 4 a 6 veces por semana como mínimo.
5 Muy alta: ejercicios físicos intensivos, entrenamiento intensivo o trabajo corporal agotador, diariamente, al menos 1 hora cada día.
La app le asigna el siguiente registro de usuario libre (Persona 1-Persona 10).
– Realizar medición: para la identificación automática de personas debe asignar la primera medición a sus datos personales. La aplicación le pedirá que lo haga. Consulte para ello el capítulo „9. Realizar la medición“.
8. Configuración sin appRecomendamos la puesta en funcionamiento y la realización de todos los ajustes mediante la app. Consulte el capítulo „7. Configuración con app“. Pero también se puede poner en funcionamiento en el aparato. – Inserte las pilas y coloque la báscula en un suelo estable (en la pantalla de la báscula parpadeará “CONNECT WITH APP”).
– Realice los ajustes del aparato/tiempo/usuario en el mando. Realice en general su selección con los botones [ ] o [ ] y confirme respectivamente con [SET ].
a. Ajustar aparato[SET ] “CONFIG._APTO.”
Secuencia Valores de ajusteIdioma D G F E IUnidad de medida kg – lb – stHora 24 h – 12 hModo de invitado ON__OFFBluetooth® ON__OFF
Si el estado es "OFF", solo es posible una conexión por Bluetooth® si el mando está encendido.
b. Ajustar tiempo[SET ] “CONFIG._TIEMPO”
Secuencia Valores de ajusteFecha Año – Mes – DíaHora Horas – Minutos
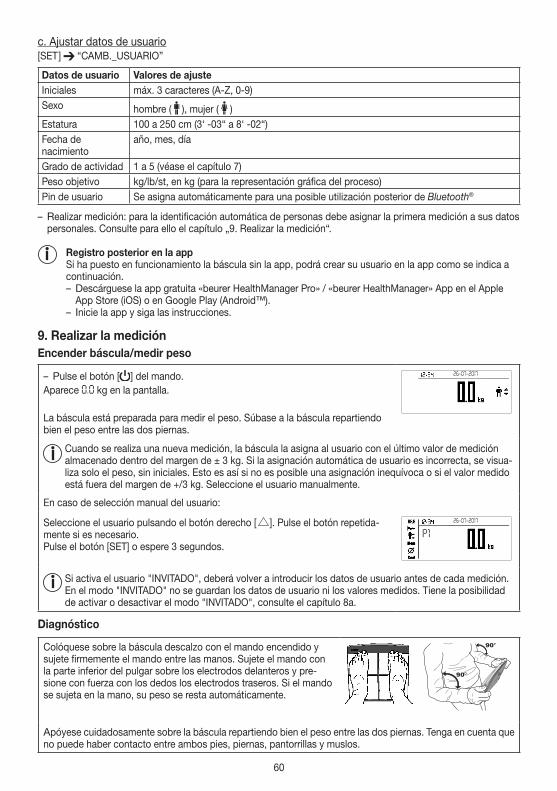
60
c. Ajustar datos de usuario[SET ] “CAMB._USUARIO”
Datos de usuario Valores de ajusteIniciales máx. 3 caracteres (A-Z, 0-9)Sexo hombre ( ), mujer ( )Estatura 100 a 250 cm (3‘ -03“ a 8‘ -02“)Fecha de nacimiento
año, mes, día
Grado de actividad 1 a 5 (véase el capítulo 7)Peso objetivo kg/lb/st, en kg (para la representación gráfica del proceso)Pin de usuario Se asigna automáticamente para una posible utilización posterior de Bluetooth®
– Realizar medición: para la identificación automática de personas debe asignar la primera medición a sus datos personales. Consulte para ello el capítulo „9. Realizar la medición“.
Registro posterior en la appSi ha puesto en funcionamiento la báscula sin la app, podrá crear su usuario en la app como se indica a continuación. – Descárguese la app gratuita «beurer HealthManager Pro» / «beurer HealthManager» App en el Apple App Store (iOS) o en Google Play (Android™).
– Inicie la app y siga las instrucciones.
9. Realizar la medición Encender báscula/medir peso
– Pulse el botón [ ] del mando.Aparece 0.0 kg en la pantalla.
La báscula está preparada para medir el peso. Súbase a la báscula repartiendo bien el peso entre las dos piernas.
26-07-2017
Cuando se realiza una nueva medición, la báscula la asigna al usuario con el último valor de medición almacenado dentro del margen de ± 3 kg. Si la asignación automática de usuario es incorrecta, se visua-liza solo el peso, sin iniciales. Esto es así si no es posible una asignación inequívoca o si el valor medido está fuera del margen de +/3 kg. Seleccione el usuario manualmente.
En caso de selección manual del usuario:
Seleccione el usuario pulsando el botón derecho [ ]. Pulse el botón repetida-mente si es necesario.Pulse el botón [SET] o espere 3 segundos.
26-07-2017
P1
Si activa el usuario "INVITADO", deberá volver a introducir los datos de usuario antes de cada medición. En el modo "INVITADO" no se guardan los datos de usuario ni los valores medidos. Tiene la posibilidad de activar o desactivar el modo "INVITADO", consulte el capítulo 8a.
Diagnóstico
Colóquese sobre la báscula descalzo con el mando encendido y sujete firmemente el mando entre las manos. Sujete el mando con la parte inferior del pulgar sobre los electrodos delanteros y pre-sione con fuerza con los dedos los electrodos traseros. Si el mando se sujeta en la mano, su peso se resta automáticamente.
Apóyese cuidadosamente sobre la báscula repartiendo bien el peso entre las dos piernas. Tenga en cuenta que no puede haber contacto entre ambos pies, piernas, pantorrillas y muslos.
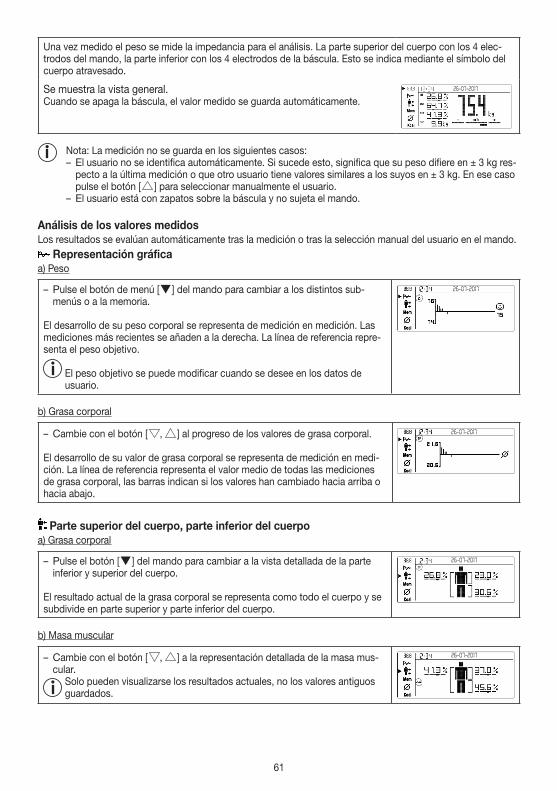
61
Una vez medido el peso se mide la impedancia para el análisis. La parte superior del cuerpo con los 4 elec-trodos del mando, la parte inferior con los 4 electrodos de la báscula. Esto se indica mediante el símbolo del cuerpo atravesado.
Se muestra la vista general.Cuando se apaga la báscula, el valor medido se guarda automáticamente.
26-07-2017
Nota: La medición no se guarda en los siguientes casos: – El usuario no se identifica automáticamente. Si sucede esto, significa que su peso difiere en ± 3 kg res-pecto a la última medición o que otro usuario tiene valores similares a los suyos en ± 3 kg. En ese caso pulse el botón [ ] para seleccionar manualmente el usuario.
– El usuario está con zapatos sobre la báscula y no sujeta el mando.
Análisis de los valores medidosLos resultados se evalúan automáticamente tras la medición o tras la selección manual del usuario en el mando.
Representación gráficaa) Peso
– Pulse el botón de menú [ ] del mando para cambiar a los distintos sub-menús o a la memoria.
El desarrollo de su peso corporal se representa de medición en medición. Las mediciones más recientes se añaden a la derecha. La línea de referencia repre-senta el peso objetivo.
El peso objetivo se puede modificar cuando se desee en los datos de usuario.
26-07-2017
b) Grasa corporal
– Cambie con el botón [ , ] al progreso de los valores de grasa corporal.
El desarrollo de su valor de grasa corporal se representa de medición en medi-ción. La línea de referencia representa el valor medio de todas las mediciones de grasa corporal, las barras indican si los valores han cambiado hacia arriba o hacia abajo.
26-07-2017
Parte superior del cuerpo, parte inferior del cuerpoa) Grasa corporal
– Pulse el botón [ ] del mando para cambiar a la vista detallada de la parte inferior y superior del cuerpo.
El resultado actual de la grasa corporal se representa como todo el cuerpo y se subdivide en parte superior y parte inferior del cuerpo.
26-07-2017
b) Masa muscular
– Cambie con el botón [ , ] a la representación detallada de la masa mus-cular.
Solo pueden visualizarse los resultados actuales, no los valores antiguos guardados.
26-07-2017
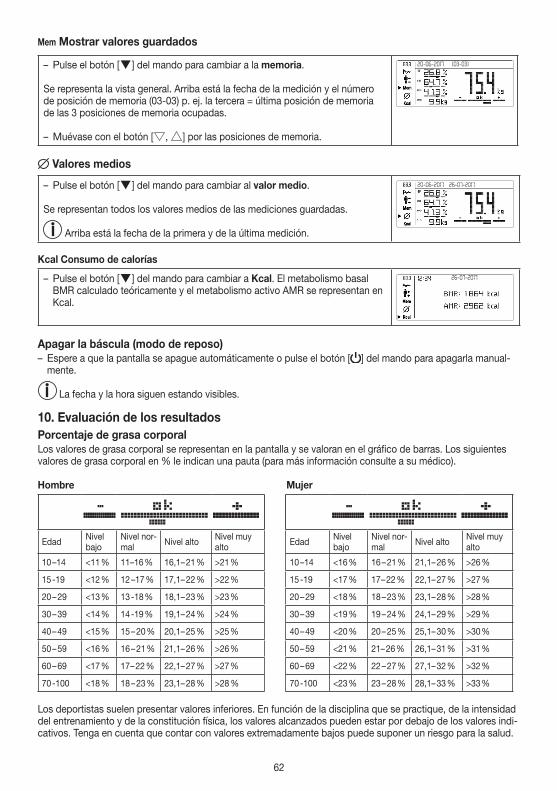
62
Mem Mostrar valores guardados
– Pulse el botón [ ] del mando para cambiar a la memoria.
Se representa la vista general. Arriba está la fecha de la medición y el número de posición de memoria (03-03) p. ej. la tercera = última posición de memoria de las 3 posiciones de memoria ocupadas.
– Muévase con el botón [ , ] por las posiciones de memoria.
(03-03)20-06-2017
Valores medios
– Pulse el botón [ ] del mando para cambiar al valor medio.
Se representan todos los valores medios de las mediciones guardadas.
Arriba está la fecha de la primera y de la última medición.
20-06-2017 26-07-2017
Kcal Consumo de calorías
– Pulse el botón [ ] del mando para cambiar a Kcal. El metabolismo basal BMR calculado teóricamente y el metabolismo activo AMR se representan en Kcal.
26-07-2017
Apagar la báscula (modo de reposo) – Espere a que la pantalla se apague automáticamente o pulse el botón [ ] del mando para apagarla manual-mente.
La fecha y la hora siguen estando visibles.
10. Evaluación de los resultadosPorcentaje de grasa corporalLos valores de grasa corporal se representan en la pantalla y se valoran en el gráfico de barras. Los siguientes valores de grasa corporal en % le indican una pauta (para más información consulte a su médico).
Hombre Mujer
Edad Nivel bajo
Nivel nor-mal Nivel alto Nivel muy
alto Edad Nivel bajo
Nivel nor-mal Nivel alto Nivel muy
alto
10 –14 <11 % 11–16 % 16,1– 21 % >21 % 10 –14 <16 % 16 – 21 % 21,1– 26 % >26 %
15 -19 <12 % 12 –17 % 17,1– 22 % >22 % 15 -19 <17 % 17 – 22 % 22,1– 27 % >27 %
20 – 29 <13 % 13 -18 % 18,1– 23 % >23 % 20 – 29 <18 % 18 – 23 % 23,1– 28 % >28 %
30 – 39 <14 % 14 -19 % 19,1– 24 % >24 % 30 – 39 <19 % 19 – 24 % 24,1– 29 % >29 %
40 – 49 <15 % 15 – 20 % 20,1– 25 % >25 % 40 – 49 <20 % 20 – 25 % 25,1– 30 % >30 %
50 – 59 <16 % 16 – 21 % 21,1– 26 % >26 % 50 – 59 <21 % 21– 26 % 26,1– 31 % >31 %
60 – 69 <17 % 17 – 22 % 22,1– 27 % >27 % 60 – 69 <22 % 22 – 27 % 27,1– 32 % >32 %
70 -100 <18 % 18 – 23 % 23,1– 28 % >28 % 70 -100 <23 % 23 – 28 % 28,1– 33 % >33 %
Los deportistas suelen presentar valores inferiores. En función de la disciplina que se practique, de la intensidad del entrenamiento y de la constitución física, los valores alcanzados pueden estar por debajo de los valores indi-cativos. Tenga en cuenta que contar con valores extremadamente bajos puede suponer un riesgo para la salud.
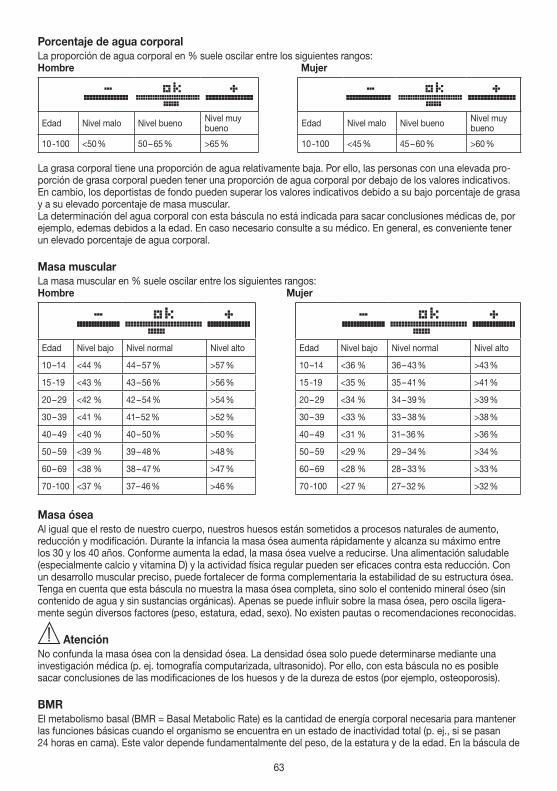
63
Porcentaje de agua corporalLa proporción de agua corporal en % suele oscilar entre los siguientes rangos:Hombre Mujer
Edad Nivel malo Nivel bueno Nivel muy bueno Edad Nivel malo Nivel bueno Nivel muy
bueno
10 -100 <50 % 50 – 65 % >65 % 10 -100 <45 % 45 – 60 % >60 %
La grasa corporal tiene una proporción de agua relativamente baja. Por ello, las personas con una elevada pro-porción de grasa corporal pueden tener una proporción de agua corporal por debajo de los valores indicativos. En cambio, los deportistas de fondo pueden superar los valores indicativos debido a su bajo porcentaje de grasa y a su elevado porcentaje de masa muscular.La determinación del agua corporal con esta báscula no está indicada para sacar conclusiones médicas de, por ejemplo, edemas debidos a la edad. En caso necesario consulte a su médico. En general, es conveniente tener un elevado porcentaje de agua corporal.
Masa muscularLa masa muscular en % suele oscilar entre los siguientes rangos:Hombre Mujer
Edad Nivel bajo Nivel normal Nivel alto Edad Nivel bajo Nivel normal Nivel alto
10 –14 <44 % 44 – 57 % >57 % 10 –14 <36 % 36 – 43 % >43 %
15 -19 <43 % 43 – 56 % >56 % 15 -19 <35 % 35 – 41 % >41 %
20 – 29 <42 % 42 – 54 % >54 % 20 – 29 <34 % 34 – 39 % >39 %
30 – 39 <41 % 41– 52 % >52 % 30 – 39 <33 % 33 – 38 % >38 %
40 – 49 <40 % 40 – 50 % >50 % 40 – 49 <31 % 31– 36 % >36 %
50 – 59 <39 % 39 – 48 % >48 % 50 – 59 <29 % 29 – 34 % >34 %
60 – 69 <38 % 38 – 47 % >47 % 60 – 69 <28 % 28 – 33 % >33 %
70 -100 <37 % 37 – 46 % >46 % 70 -100 <27 % 27 – 32 % >32 %
Masa óseaAl igual que el resto de nuestro cuerpo, nuestros huesos están sometidos a procesos naturales de aumento, reducción y modificación. Durante la infancia la masa ósea aumenta rápidamente y alcanza su máximo entre los 30 y los 40 años. Conforme aumenta la edad, la masa ósea vuelve a reducirse. Una alimentación saludable (especialmente calcio y vitamina D) y la actividad física regular pueden ser eficaces contra esta reducción. Con un desarrollo muscular preciso, puede fortalecer de forma complementaria la estabilidad de su estructura ósea. Tenga en cuenta que esta báscula no muestra la masa ósea completa, sino solo el contenido mineral óseo (sin contenido de agua y sin sustancias orgánicas). Apenas se puede influir sobre la masa ósea, pero oscila ligera-mente según diversos factores (peso, estatura, edad, sexo). No existen pautas o recomendaciones reconocidas.
AtenciónNo confunda la masa ósea con la densidad ósea. La densidad ósea solo puede determinarse mediante una investigación médica (p. ej. tomografía computarizada, ultrasonido). Por ello, con esta báscula no es posible sacar conclusiones de las modificaciones de los huesos y de la dureza de estos (por ejemplo, osteoporosis).
BMREl metabolismo basal (BMR = Basal Metabolic Rate) es la cantidad de energía corporal necesaria para mantener las funciones básicas cuando el organismo se encuentra en un estado de inactividad total (p. ej., si se pasan 24 horas en cama). Este valor depende fundamentalmente del peso, de la estatura y de la edad. En la báscula de
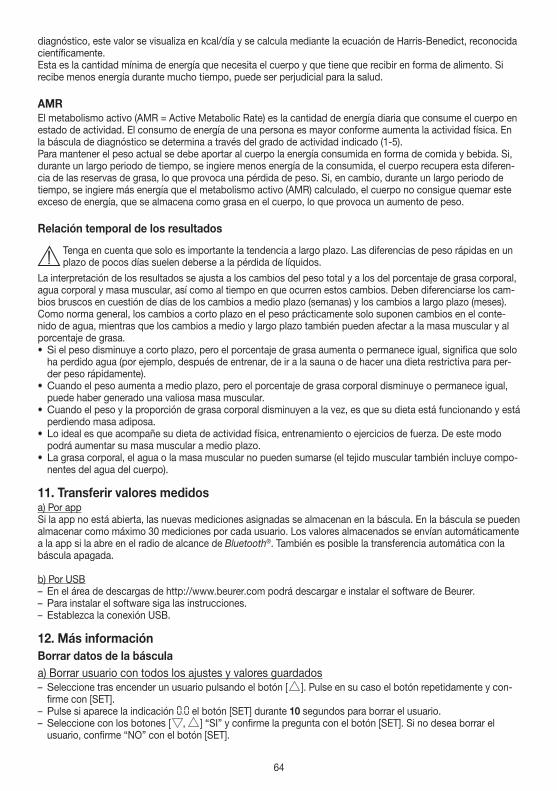
64
diagnóstico, este valor se visualiza en kcal/día y se calcula mediante la ecuación de Harris-Benedict, reconocida científicamente.Esta es la cantidad mínima de energía que necesita el cuerpo y que tiene que recibir en forma de alimento. Si recibe menos energía durante mucho tiempo, puede ser perjudicial para la salud.
AMREl metabolismo activo (AMR = Active Metabolic Rate) es la cantidad de energía diaria que consume el cuerpo en estado de actividad. El consumo de energía de una persona es mayor conforme aumenta la actividad física. En la báscula de diagnóstico se determina a través del grado de actividad indicado (1-5).Para mantener el peso actual se debe aportar al cuerpo la energía consumida en forma de comida y bebida. Si, durante un largo periodo de tiempo, se ingiere menos energía de la consumida, el cuerpo recupera esta diferen-cia de las reservas de grasa, lo que provoca una pérdida de peso. Si, en cambio, durante un largo periodo de tiempo, se ingiere más energía que el metabolismo activo (AMR) calculado, el cuerpo no consigue quemar este exceso de energía, que se almacena como grasa en el cuerpo, lo que provoca un aumento de peso.
Relación temporal de los resultados
Tenga en cuenta que solo es importante la tendencia a largo plazo. Las diferencias de peso rápidas en un plazo de pocos días suelen deberse a la pérdida de líquidos.
La interpretación de los resultados se ajusta a los cambios del peso total y a los del porcentaje de grasa corporal, agua corporal y masa muscular, así como al tiempo en que ocurren estos cambios. Deben diferenciarse los cam-bios bruscos en cuestión de días de los cambios a medio plazo (semanas) y los cambios a largo plazo (meses).Como norma general, los cambios a corto plazo en el peso prácticamente solo suponen cambios en el conte-nido de agua, mientras que los cambios a medio y largo plazo también pueden afectar a la masa muscular y al porcentaje de grasa.• Si el peso disminuye a corto plazo, pero el porcentaje de grasa aumenta o permanece igual, significa que solo
ha perdido agua (por ejemplo, después de entrenar, de ir a la sauna o de hacer una dieta restrictiva para per-der peso rápidamente).
• Cuando el peso aumenta a medio plazo, pero el porcentaje de grasa corporal disminuye o permanece igual, puede haber generado una valiosa masa muscular.
• Cuando el peso y la proporción de grasa corporal disminuyen a la vez, es que su dieta está funcionando y está perdiendo masa adiposa.
• Lo ideal es que acompañe su dieta de actividad física, entrenamiento o ejercicios de fuerza. De este modo podrá aumentar su masa muscular a medio plazo.
• La grasa corporal, el agua o la masa muscular no pueden sumarse (el tejido muscular también incluye compo-nentes del agua del cuerpo).
11. Transferir valores medidosa) Por appSi la app no está abierta, las nuevas mediciones asignadas se almacenan en la báscula. En la báscula se pueden almacenar como máximo 30 mediciones por cada usuario. Los valores almacenados se envían automáticamente a la app si la abre en el radio de alcance de Bluetooth®. También es posible la transferencia automática con la báscula apagada.
b) Por USB – En el área de descargas de http://www.beurer.com podrá descargar e instalar el software de Beurer. – Para instalar el software siga las instrucciones. – Establezca la conexión USB.
12. Más informaciónBorrar datos de la básculaa) Borrar usuario con todos los ajustes y valores guardados – Seleccione tras encender un usuario pulsando el botón [ ]. Pulse en su caso el botón repetidamente y con-firme con [SET].
– Pulse si aparece la indicación 0.0 el botón [SET] durante 10 segundos para borrar el usuario. – Seleccione con los botones [ , ] “SI” y confirme la pregunta con el botón [SET]. Si no desea borrar el usuario, confirme “NO” con el botón [SET].
65
Se borran todos los ajustes y valores guardados de este usuario.
b) Borrar un valor guardado de un usuario – Seleccione en la memoria de valores medidos “Mem” un valor y pulse el botón [SET] del mando brevemente para borrar el valor visualizado. Esto se puede hacer también inmediatamente después de la medición.
– Seleccione con los botones [ , ] “SI” y confirme la pregunta con el botón [SET]. Si no desea borrar el valor, confirme “NO” con el botón [SET].
c) Borrar todos los valores guardados de un usuario – Acceda a la memoria de valores medidos “Mem” y pulse el botón [SET] del mando durante aprox. 5 segundos para borrar todos los valores.
– Seleccione con los botones [ , ] “SI” y confirme la pregunta con el botón [SET]. Si no desea borrar nada, confirme “NO” con el botón [SET].
Cambiar las pilasEl mando está equipado con un indicador de cambio de pilas. En la pantalla aparece el símbolo si las pilas del mando se están agotando o el símbolo si lo están haciendo las pilas de la báscula. En este caso, deben sustituirse las pilas. Después, vuelva a conectar la báscula con la app. La hora del sistema se actualiza.
NOTA:• Cada vez que tenga que cambiar las pilas, hágalo por unas del mismo tipo y de la misma marca y capa-
cidad.• No utilice baterías recargables.• Utilice pilas sin metales pesados.
13. Limpieza y cuidado del aparatoEl aparato debe limpiarse de vez en cuando.Para la limpieza use un paño húmedo, al que puede echar un poco de lavavajillas en caso necesario.
ATENCIÓN• ¡No utilice nunca limpiadores ni disolventes agresivos!• ¡No sumerja nunca el aparato en agua!• ¡No meta el aparato en el lavavajillas!
14. EliminaciónLas pilas usadas, completamente descargadas, deben eliminarse a través de contenedores de recogida señala-dos de forma especial, los puntos de recogida de residuos especiales o a través de los distribuidores de equipos electrónicos. Los usuarios están obligados por ley a eliminar las pilas correctamente.Estos símbolos se encuentran en pilas que contienen sustancias tóxicas.Pb: la pila contiene plomo.Cd: la pila contiene cadmio. Hg: la pila contiene mercurio.
A fin de preservar el medio ambiente, cuando el aparato llegue al final de su vida útil no lo deseche con la basura doméstica. Se puede desechar en los puntos de recogida adecuados disponibles en su zona. Deseche el aparato según la Directiva europea sobre residuos de aparatos eléctricos y electrónicos (RAEE). Para más información, póngase en contacto con la autoridad municipal competente en materia de eliminación de residuos.
Eliminar el embalaje respetando el medioambiente. 20
PAP
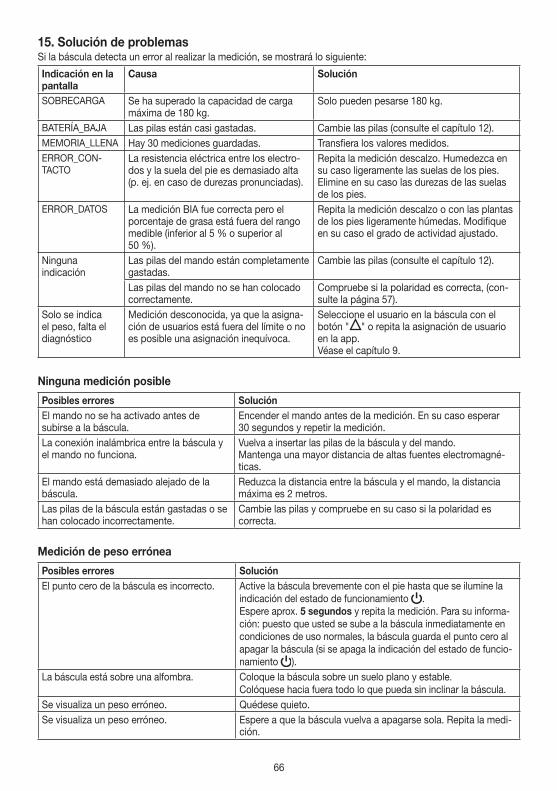
66
15. Solución de problemasSi la báscula detecta un error al realizar la medición, se mostrará lo siguiente:
Indicación en la pantalla
Causa Solución
SOBRECARGA Se ha superado la capacidad de carga máxima de 180 kg.
Solo pueden pesarse 180 kg.
BATERÍA_BAJA Las pilas están casi gastadas. Cambie las pilas (consulte el capítulo 12).MEMORIA_LLENA Hay 30 mediciones guardadas. Transfiera los valores medidos.ERROR_CON-TACTO
La resistencia eléctrica entre los electro-dos y la suela del pie es demasiado alta (p. ej. en caso de durezas pronunciadas).
Repita la medición descalzo. Humedezca en su caso ligeramente las suelas de los pies. Elimine en su caso las durezas de las suelas de los pies.
ERROR_DATOS La medición BIA fue correcta pero el porcentaje de grasa está fuera del rango medible (inferior al 5 % o superior al 50 %).
Repita la medición descalzo o con las plantas de los pies ligeramente húmedas. Modifique en su caso el grado de actividad ajustado.
Ninguna indicación
Las pilas del mando están completamente gastadas.
Cambie las pilas (consulte el capítulo 12).
Las pilas del mando no se han colocado correctamente.
Compruebe si la polaridad es correcta, (con-sulte la página 57).
Solo se indica el peso, falta el diagnóstico
Medición desconocida, ya que la asigna-ción de usuarios está fuera del límite o no es posible una asignación inequívoca.
Seleccione el usuario en la báscula con el botón " " o repita la asignación de usuario en la app.Véase el capítulo 9.
Ninguna medición posible
Posibles errores SoluciónEl mando no se ha activado antes de subirse a la báscula.
Encender el mando antes de la medición. En su caso esperar 30 segundos y repetir la medición.
La conexión inalámbrica entre la báscula y el mando no funciona.
Vuelva a insertar las pilas de la báscula y del mando.Mantenga una mayor distancia de altas fuentes electromagné-ticas.
El mando está demasiado alejado de la báscula.
Reduzca la distancia entre la báscula y el mando, la distancia máxima es 2 metros.
Las pilas de la báscula están gastadas o se han colocado incorrectamente.
Cambie las pilas y compruebe en su caso si la polaridad es correcta.
Medición de peso errónea
Posibles errores SoluciónEl punto cero de la báscula es incorrecto. Active la báscula brevemente con el pie hasta que se ilumine la
indicación del estado de funcionamiento .Espere aprox. 5 segundos y repita la medición. Para su informa-ción: puesto que usted se sube a la báscula inmediatamente en condiciones de uso normales, la báscula guarda el punto cero al apagar la báscula (si se apaga la indicación del estado de funcio-namiento ).
La báscula está sobre una alfombra. Coloque la báscula sobre un suelo plano y estable.Colóquese hacia fuera todo lo que pueda sin inclinar la báscula.
Se visualiza un peso erróneo. Quédese quieto.Se visualiza un peso erróneo. Espere a que la báscula vuelva a apagarse sola. Repita la medi-
ción.
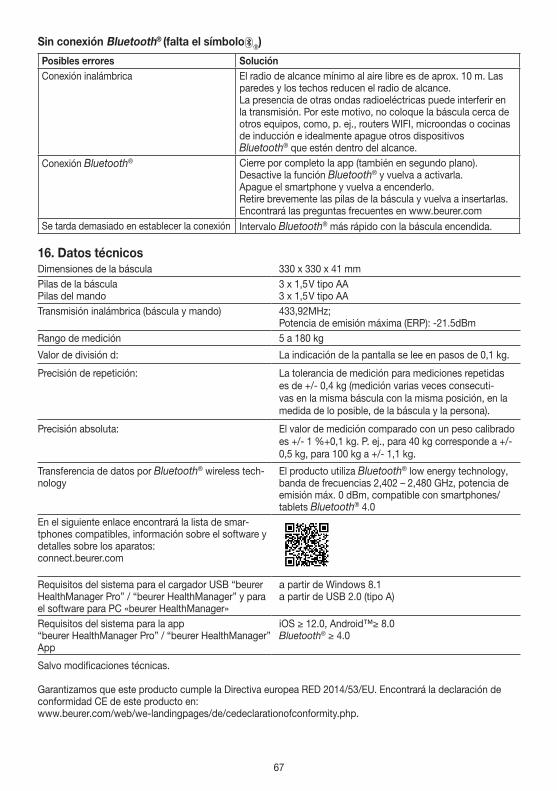
67
Sin conexión Bluetooth® (falta el símbolo ®)
Posibles errores SoluciónConexión inalámbrica El radio de alcance mínimo al aire libre es de aprox. 10 m. Las
paredes y los techos reducen el radio de alcance.La presencia de otras ondas radioeléctricas puede interferir en la transmisión. Por este motivo, no coloque la báscula cerca de otros equipos, como, p. ej., routers WIFI, microondas o cocinas de inducción e idealmente apague otros dispositivos Bluetooth® que estén dentro del alcance.
Conexión Bluetooth® Cierre por completo la app (también en segundo plano).Desactive la función Bluetooth® y vuelva a activarla.Apague el smartphone y vuelva a encenderlo.Retire brevemente las pilas de la báscula y vuelva a insertarlas.Encontrará las preguntas frecuentes en www.beurer.com
Se tarda demasiado en establecer la conexión Intervalo Bluetooth® más rápido con la báscula encendida.
16. Datos técnicosDimensiones de la báscula 330 x 330 x 41 mmPilas de la básculaPilas del mando
3 x 1,5 V tipo AA3 x 1,5 V tipo AA
Transmisión inalámbrica (báscula y mando) 433,92MHz; Potencia de emisión máxima (ERP): -21.5dBm
Rango de medición 5 a 180 kg
Valor de división d: La indicación de la pantalla se lee en pasos de 0,1 kg.
Precisión de repetición: La tolerancia de medición para mediciones repetidas es de +/- 0,4 kg (medición varias veces consecuti-vas en la misma báscula con la misma posición, en la medida de lo posible, de la báscula y la persona).
Precisión absoluta: El valor de medición comparado con un peso calibrado es +/- 1 %+0,1 kg. P. ej., para 40 kg corresponde a +/- 0,5 kg, para 100 kg a +/- 1,1 kg.
Transferencia de datos por Bluetooth® wireless tech-nology
El producto utiliza Bluetooth® low energy technology, banda de frecuencias 2,402 – 2,480 GHz, potencia de emisión máx. 0 dBm, compatible con smartphones/tablets Bluetooth® 4.0
En el siguiente enlace encontrará la lista de smar-tphones compatibles, información sobre el software y detalles sobre los aparatos:connect.beurer.com
Requisitos del sistema para el cargador USB “beurer HealthManager Pro” / “beurer HealthManager” y para el software para PC «beurer HealthManager»
a partir de Windows 8.1a partir de USB 2.0 (tipo A)
Requisitos del sistema para la app “beurer HealthManager Pro” / “beurer HealthManager” App
iOS ≥ 12.0, Android™≥ 8.0Bluetooth® ≥ 4.0
Salvo modificaciones técnicas.
Garantizamos que este producto cumple la Directiva europea RED 2014/53/EU. Encontrará la declaración de conformidad CE de este producto en: www.beurer.com/web/we-landingpages/de/cedeclarationofconformity.php.
68
Salv
o er
rore
s y
mod
ifica
cion
es
17. Garantía / AsistenciaBeurer GmbH, Söflinger Straße 218, D-89077 Ulm (en lo sucesivo, «Beurer») concede una garantía para este pro-ducto. La garantía está sujeta a las siguientes condiciones y el alcance de la misma se describe a continuación. Las siguientes condiciones de garantía no afectan a las obligaciones de garantía que la ley pre-scribe para el vendedor y que emanan del contrato de compra celebrado con el comprador. La garantía se aplicará además sin perjuicio de las normas legales preceptivas.
Beurer garantiza el perfecto funcionamiento y la integralidad de este producto.
La garantía mundial tiene una validez de 5 años a partir de la fecha de compra del producto nuevo y sin utilizar por parte del comprador.
Esta garantía se ofrece solo para productos que el comprador haya adquirido en tanto que consumidor con fines exclusivamente personales en el marco de una utilización privada en el hogar.Se aplica la legislación alemana.
En el caso de que, durante el periodo de garantía, este producto resultara estar incompleto o no funcionara correctamente conforme a lo dispuesto en las siguientes disposiciones, Beurer se compromete a sustituir el pro-ducto o a repararlo según las presentes condiciones de garantía.Cuando el comprador desee recurrir a la garantía lo hará dirigiéndose en primera instancia al dis-tribuidor local: véase la lista adjunta «Servicio internacional» que contiene las distintas direcciones de servicio técnico.
A continuación, el comprador recibirá información pormenorizada sobre la tramitación de la garantía, como el lugar al que debe enviar el producto y qué documentos deberá adjuntar.
El comprador solo podrá invocar la garantía cuando pueda presentar: – una copia de la factura o del recibo de compra y – el producto original
a Beurer o a un socio autorizado por Beurer.
Quedan excluidos explícitamente de la presente garantía – el desgaste que se produce por el uso o el consumo normal del producto; – los accesorios suministrados con el producto que se desgastan o consumen durante un uso normal (p. ej.,
pilas, baterías, brazaletes, juntas, electrodos, luminarias, cabezales y accesorios de inhalación); – productos cuyo uso, limpieza, almacenamiento o mantenimiento sea indebido o vaya contra lo dispuesto en
las instrucciones de uso, así como productos que hayan sido abiertos, reparados o modificados por el com-prador o por un centro de servicio técnico no autorizado por Beurer;
– daños que se hayan producido durante el transporte entre las instalaciones del fabricante y las del cliente o bien entre el centro de servicio técnico y el cliente;
– productos que se hayan adquirido como productos de calidad inferior o de segunda mano; – daños derivados que resulten de una falta del producto. En este caso, podrían invocarse eventualmente
derechos derivados de la normativa de responsabilidad de productos o de otras disposiciones de responsa-bilidad legal preceptiva.
Las reparaciones o la sustitución del producto no prolongarán en ningún caso el periodo de garantía.
69
ITALIANO
1. Introduzione ..........................................................692. Spiegazione dei simboli ........................................703. Segnalazioni di rischi e indicazioni di sicurezza ...714. Informazioni ..........................................................725. Descrizione dell‘apparecchio ...............................736. Messa in servizio ..................................................737. Configurazione con l‘app .....................................748. Configurazione senza app ....................................759. Esecuzione della misurazione ..............................76
10. Valutazione dei risultati .......................................7911. Trasmissione dei valori misurati ..........................8112. Ulteriori informazioni ...........................................8113. Pulizia e cura dell‘apparecchio ...........................8214. Smaltimento .......................................................8215. Che cosa fare in caso di problemi? ....................8316. Dati tecnici ..........................................................8417. Garanzia / Assistenza ..........................................85
Fornitura• Bilancia diagnostica• Dispositivo di comando rimovibile con display• Supporto a parete• Kit di montaggio per il montaggio a parete• 3 batterie da 1,5 V tipo AA (bilancia)• 3 batterie da 1,5 V tipo AA (dispositivo di comando)• Cavo USB• Le presenti istruzioni per l’uso e la guida rapida Bluetooth®/USB
Gentile cliente,siamo lieti che Lei abbia scelto un prodotto del nostro assortimento. Il nostro marchio è garanzia di prodotti di elevata qualità, controllati nei dettagli, relativi ai settori calore, peso, pressione, temperatura corporea, pulsazioni, terapia dolce, massaggio, Beauty, Baby e aria.Leggere attentamente le presenti istruzioni per l’uso, conservarle per impieghi futuri, renderle accessibili ad altri utenti e attenersi alle indicazioni.
Cordiali salutiIl team Beurer
1. IntroduzioneFunzioni dell‘apparecchioQuesta bilancia digitale consente di pesarsi e di rilevare i dati relativi alla forma fisica dell’utente.L’apparecchio è destinato all’uso privato.La bilancia dispone delle seguenti funzioni, utilizzabili da un massimo di 10 persone:• Calcolo del peso• Calcolo della massa grassa,• Percentuale di acqua corporea,• Percentuale di massa muscolare,• Massa ossea nonché• Tasso metabolico basale e tasso metabolico di attività.
La bilancia dispone inoltre delle seguenti funzioni:• Innovativa guida sotto forma di menu su ampio display (disponibile in 5 lingue),• Il display può essere lasciato sulla bilancia, posizionato separatamente oppure fissato alla parete. Opzional-
mente è disponibile anche un set a colonna,• Commutazione tra chilogrammi “kg”, libbre “lb” e Stone “st”,• Funzione di spegnimento automatico,
Leggere attentamente le presenti istruzioni per l'uso, conser-varle per impieghi futuri, renderle accessibili ad altri utenti e attenersi alle indicazioni.
Contenuto
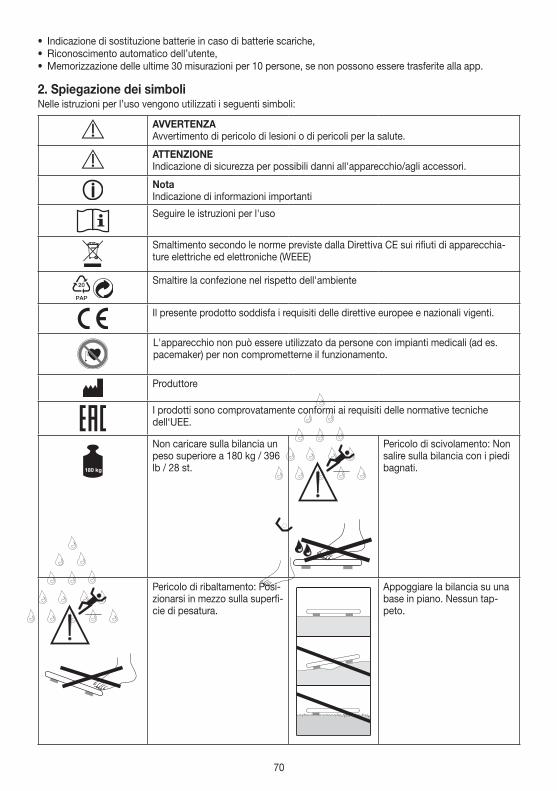
70
• Indicazione di sostituzione batterie in caso di batterie scariche,• Riconoscimento automatico dell’utente,• Memorizzazione delle ultime 30 misurazioni per 10 persone, se non possono essere trasferite alla app.
2. Spiegazione dei simboliNelle istruzioni per l’uso vengono utilizzati i seguenti simboli:
AVVERTENZAAvvertimento di pericolo di lesioni o di pericoli per la salute.
ATTENZIONE Indicazione di sicurezza per possibili danni all'apparecchio/agli accessori.
NotaIndicazione di informazioni importanti
Seguire le istruzioni per l'uso
Smaltimento secondo le norme previste dalla Direttiva CE sui rifiuti di apparecchia-ture elettriche ed elettroniche (WEEE)
20
PAP
Smaltire la confezione nel rispetto dell'ambiente
Il presente prodotto soddisfa i requisiti delle direttive europee e nazionali vigenti.
L'apparecchio non può essere utilizzato da persone con impianti medicali (ad es. pacemaker) per non comprometterne il funzionamento.
Produttore
I prodotti sono comprovatamente conformi ai requisiti delle normative tecniche dell‘UEE.
Non caricare sulla bilancia un peso superiore a 180 kg / 396 lb / 28 st.
317306_SGWI 180_2019-05-03_02_WarningSticker_Lidl
max.
180 kg396 lb28 st
317306_SGWI 180_2019-05-03_02_WarningSticker_Lidl
max.
180 kg396 lb28 st
Pericolo di scivolamento: Non salire sulla bilancia con i piedi bagnati.
317306_SGWI 180_2019-05-03_02_WarningSticker_Lidl
max.
180 kg396 lb28 st
317306_SGWI 180_2019-05-03_02_WarningSticker_Lidl
max.
180 kg396 lb28 st
Pericolo di ribaltamento: Posi-zionarsi in mezzo sulla superfi-cie di pesatura.
Appoggiare la bilancia su una base in piano. Nessun tap-peto.
71
3. Segnalazioni di rischi e indicazioni di sicurezza AVVERTENZA
• La bilancia non può essere utilizzata da persone con impianti medicali (ad es. pace-maker) per non comprometterne il funzionamento.
• Non utilizzare durante la gravidanza. • Non salire sul bordo esterno della bilancia e solo su un lato: pericolo di ribaltamento!• Tenere lontani i bambini dal materiale d’imballaggio (pericolo di soffocamento).• Attenzione: non salire sulla bilancia con i piedi bagnati, se la superficie è umida. Pericolo di scivola-
mento!
Avvertenze sull‘uso delle batterie• Se il liquido della batteria viene a contatto con la pelle e con gli occhi, sciacquare le parti interessate
con acqua e consultare il medico.• Pericolo d’ingestione! I bambini possono ingerire le batterie e soffocare. Tenere quindi le batterie
lontano dalla portata dei bambini!• Prestare attenzione alla polarità positiva (+) e negativa (-).• In caso di fuoriuscita di liquido dalla batteria, indossare guanti protettivi e pulire il vano batterie con un
panno asciutto.• Proteggere le batterie dal caldo eccessivo.• Rischio di esplosione! Non gettare le batterie nel fuoco.• Le batterie non devono essere ricaricate o mandate in cortocircuito.• Qualora l’apparecchio non dovesse essere utilizzato per un periodo prolungato, rimuovere le batterie dal
vano batterie.• Utilizzare solo tipologie di batterie uguali o equivalenti. • Sostituire sempre tutte le batterie contemporaneamente.• Non utilizzare batterie ricaricabili!• Non smontare, aprire o frantumare le batterie.
Indicazioni generali • L’apparecchio è destinato esclusivamente all’uso personale e non è previsto un suo utilizzo medico o
commerciale • Tenere presente che sono possibili tolleranze di misurazione poiché non si tratta di una bilancia cali-
brata per utilizzo medico professionale.• In caso di risultati di misurazione diversi (tra bilancia e app), è necessario utilizzare esclusivamente i
valori visualizzati sulla bilancia.• Il carico massimo della bilancia è 180 kg (396 lb, 28 st). Le misurazioni di peso e massa ossea vengono
visualizzate in intervalli di 100 g (0,2 lb).• I risultati relativi a massa grassa, percentuale di acqua e massa muscolare vengono visualizzati in inter-
valli di 0,1%.• Il fabbisogno calorico viene indicato in intervalli di 1 Kcal.• Al momento della consegna la bilancia è impostata sulle unità “cm” e “kg”. • Posizionare la bilancia su un fondo piano e solido; un piano solido è il presupposto per una misurazione
corretta.• Le riparazioni possono essere effettuate solo dal Servizio clienti di Beurer o da rivenditori autorizzati.
Tuttavia prima di inoltrare eventuali reclami, testare le batterie e se necessario sostituirle.Conservazione e curaLa precisione dei valori misurati e la durata dell’apparecchio dipendono da un utilizzo attento e scrupoloso:
ATTENZIONE• Di tanto in tanto è opportuno pulire l’apparecchio. Non utilizzare detergenti aggressivi e non immergere
mai l’apparecchio in acqua.• Accertarsi che non vi sia del liquido sulla bilancia. Non immergere mai la bilancia in acqua. Non sciac-
quare mai sotto l’acqua corrente.• Non posizionare alcun oggetto sulla bilancia quando non viene utilizzata.• Non esporre l’apparecchio a urti, umidità, polvere, prodotti chimici, forti sbalzi di temperatura e fonti di
calore troppo vicine (forni, caloriferi).• Non azionare i pulsanti bruscamente o con oggetti appuntiti.• Non esporre la bilancia a temperature elevate o a forti campi elettromagnetici (ad esempio vicino a tele-
foni cellulari).
72
4. InformazioniPrincipio di misurazioneQuesta bilancia utilizza il principio di misurazione B.I.A., l’analisi dell’impedenza bioelettrica. Nel giro di pochi secondi, una corrente impercettibile, assolutamente innocua e non pericolosa, determina le diverse percentuali corporee. Grazie alla misurazione della resistenza elettrica (impedenza) e prendendo in considerazione costanti e/o valori individuali (età, statura, sesso, livello di attività) è possibile determinare la percentuale di massa grassa e altre caratteristiche corporee. I tessuti muscolari e l’acqua presentano una buona conducibilità elettrica e di conse-guenza una resistenza più bassa. Le ossa e i tessuti adiposi sono invece caratterizzati da una scarsa conduci-bilità in quando le cellule adipose e le ossa presentano un’elevata resistenza che ostacola la conduzione della corrente.Inoltre, la bilancia misura con due diverse frequenza per calcolare ancora meglio l’impedenza. Queste diverse frequenze hanno diversi influssi sulle membrane cellulari e sull’acqua corporea. Inoltre, il contatto elettrico con il corpo attraverso i 4 elettrodi per le mani e i 4 elettrodi per i piedi viene ottimizzato per ottenere una precisione di misurazione più elevata e pertanto un’analisi migliore. Con questa tecnica di analisi sensibile è possibile che in caso di misurazioni ripetute si ottengano valori leggermente diversi. Il motivo risiede nelle differenze durante la misurazione dell’impedenza (ad es. un diverso contatto elettrico tra elettrodi e mani e piedi, una diversa distribu-zione dell’acqua nel corpo).
L’analisi può essere effettuata nel modo seguente:• Parte superiore del corpo: afferrare il dispositivo di comando con le mani, salire sulla bilancia con le scarpe.• Parte inferiore del corpo: lasciare ad esempio il dispositivo di comando sulla bilancia, salire sulla bilancia a
piedi nudi.• Parte superiore e inferiore del corpo: afferrare il dispositivo di comando con le mani e salire sulla bilancia a
piedi nudi.Se il dispositivo di comando viene tenuto in mano per l’analisi, il relativo peso viene dedotto automaticamente.
I valori rilevati dalla bilancia diagnostica si avvicinano solo ai valori reali ottenuti con analisi mediche. Solo uno specialista è in grado di eseguire il calcolo esatto di massa grassa, percentuale di acqua, massa muscolare e massa ossea attraverso metodi medici (ad es. la TAC).
Suggerimenti generali• Per ottenere risultati confrontabili, è consigliabile pesarsi possibilmente sempre alla stessa ora (preferibilmente
al mattino), a digiuno e senza vestiti.• Importante durante la misurazione: Il calcolo della massa grassa può essere eseguito solo a piedi nudi ed
eventualmente inumidendo leggermente le piante dei piedi.• Le piante dei piedi completamente asciutte o callose possono produrre risultati insoddisfacenti in quanto pre-
sentano una conducibilità insufficiente.• Restare dritti e fermi durante il processo di pesatura.• Attendere alcune ore dopo uno sforzo fisico inusuale.• Attendere circa 15 minuti dopo essersi alzati in modo che l’acqua all’interno del corpo possa distribuirsi.• Viene considerata solo la tendenza a lungo termine. Generalmente le variazioni di peso a breve termine
nell’arco di pochi giorni dipendono da una perdita di liquidi; tuttavia la percentuale di acqua nel corpo è un fat-tore importante per il benessere.
LimitazioniDurante il calcolo della massa grassa e di altri valori possono presentarsi risultati difformi e non plausibili in:• Bambini al di sotto dei 10 anni circa,• Soggetti molto allenati e soggetti che praticano bodybuilding,• Persone con febbre, in dialisi, che presentano sintomi di edema o affette da osteoporosi,• Persone che assumono farmaci cardiovascolari (per il sistema cardiocircolatorio),• Persone che assumono vasodilatatori o vasocostrittori,• Persone che presentano anomalie anatomiche alle gambe che si ripercuotono sulla statura (gambe significati-
vamente più lunghe o più corte).
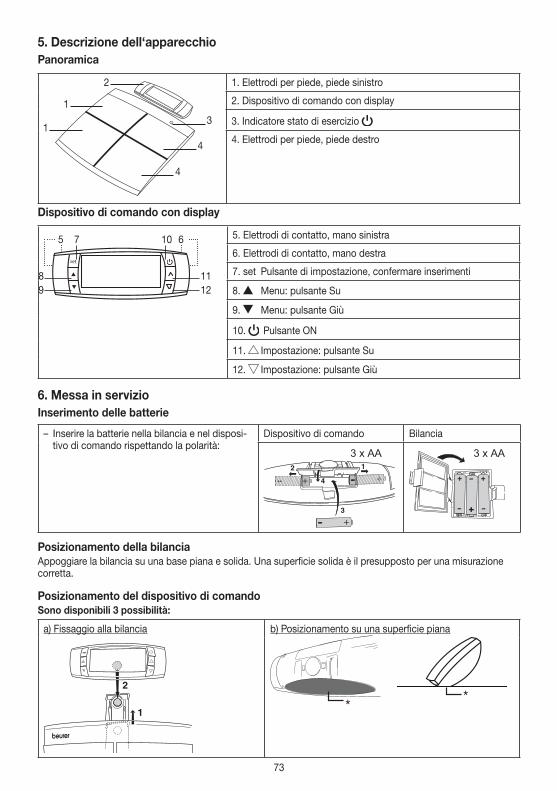
73
5. Descrizione dell‘apparecchioPanoramica
3
4
1
1
4
2 1. Elettrodi per piede, piede sinistro
2. Dispositivo di comando con display
3. Indicatore stato di esercizio
4. Elettrodi per piede, piede destro
Dispositivo di comando con display
set
5 7 10
8 119 12
6 5. Elettrodi di contatto, mano sinistra
6. Elettrodi di contatto, mano destra
7. set Pulsante di impostazione, confermare inserimenti
8. Menu: pulsante Su
9. Menu: pulsante Giù
10. Pulsante ON
11. Impostazione: pulsante Su
12. Impostazione: pulsante Giù
6. Messa in servizioInserimento delle batterie
– Inserire la batterie nella bilancia e nel disposi-tivo di comando rispettando la polarità:
Dispositivo di comando Bilancia
3 x AA 3 x AA
Posizionamento della bilanciaAppoggiare la bilancia su una base piana e solida. Una superficie solida è il presupposto per una misurazione corretta.
Posizionamento del dispositivo di comandoSono disponibili 3 possibilità:
a) Fissaggio alla bilancia b) Posizionamento su una superficie piana
**
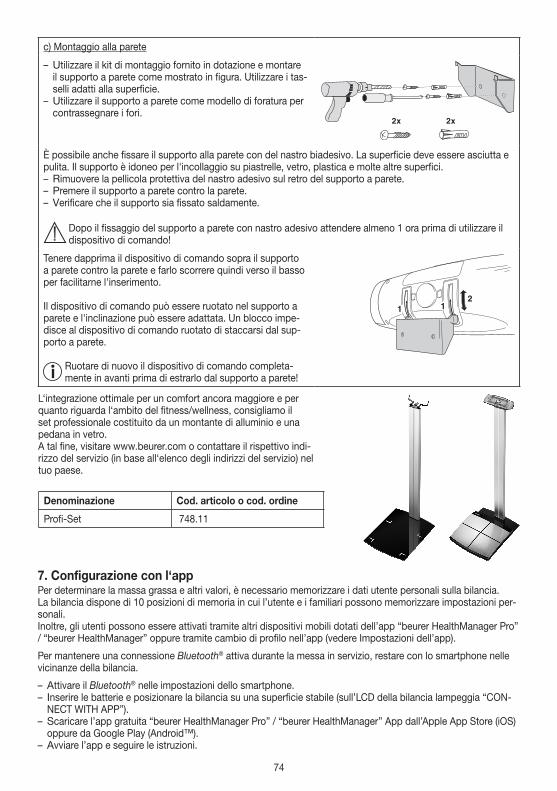
74
c) Montaggio alla parete
– Utilizzare il kit di montaggio fornito in dotazione e montare il supporto a parete come mostrato in figura. Utilizzare i tas-selli adatti alla superficie.
– Utilizzare il supporto a parete come modello di foratura per contrassegnare i fori.
È possibile anche fissare il supporto alla parete con del nastro biadesivo. La superficie deve essere asciutta e pulita. Il supporto è idoneo per l'incollaggio su piastrelle, vetro, plastica e molte altre superfici. – Rimuovere la pellicola protettiva del nastro adesivo sul retro del supporto a parete. – Premere il supporto a parete contro la parete. – Verificare che il supporto sia fissato saldamente.
Dopo il fissaggio del supporto a parete con nastro adesivo attendere almeno 1 ora prima di utilizzare il dispositivo di comando!
Tenere dapprima il dispositivo di comando sopra il supporto a parete contro la parete e farlo scorrere quindi verso il basso per facilitarne l'inserimento.
Il dispositivo di comando può essere ruotato nel supporto a parete e l'inclinazione può essere adattata. Un blocco impe-disce al dispositivo di comando ruotato di staccarsi dal sup-porto a parete.
Ruotare di nuovo il dispositivo di comando completa-mente in avanti prima di estrarlo dal supporto a parete!
L‘integrazione ottimale per un comfort ancora maggiore e per quanto riguarda l‘ambito del fitness/wellness, consigliamo il set professionale costituito da un montante di alluminio e una pedana in vetro.A tal fine, visitare www.beurer.com o contattare il rispettivo indi-rizzo del servizio (in base all‘elenco degli indirizzi del servizio) nel tuo paese.
Denominazione Cod. articolo o cod. ordine
Profi-Set 748.11
7. Configurazione con l‘appPer determinare la massa grassa e altri valori, è necessario memorizzare i dati utente personali sulla bilancia.La bilancia dispone di 10 posizioni di memoria in cui l’utente e i familiari possono memorizzare impostazioni per-sonali.Inoltre, gli utenti possono essere attivati tramite altri dispositivi mobili dotati dell’app “beurer HealthManager Pro” / “beurer HealthManager” oppure tramite cambio di profilo nell’app (vedere Impostazioni dell’app).
Per mantenere una connessione Bluetooth® attiva durante la messa in servizio, restare con lo smartphone nelle vicinanze della bilancia.
– Attivare il Bluetooth® nelle impostazioni dello smartphone. – Inserire le batterie e posizionare la bilancia su una superficie stabile (sull’LCD della bilancia lampeggia “CON-NECT WITH APP”).
– Scaricare l’app gratuita “beurer HealthManager Pro” / “beurer HealthManager” App dall’Apple App Store (iOS) oppure da Google Play (Android™).
– Avviare l’app e seguire le istruzioni.
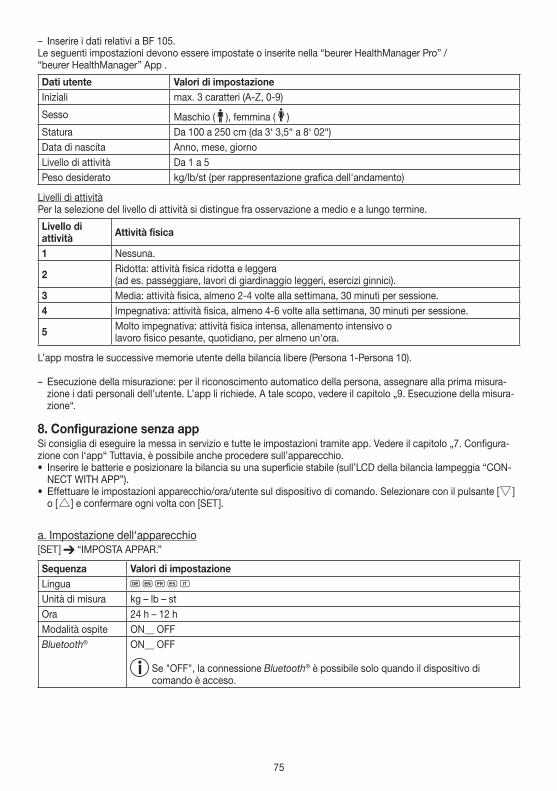
75
– Inserire i dati relativi a BF 105.Le seguenti impostazioni devono essere impostate o inserite nella “beurer HealthManager Pro” / “beurer HealthManager” App .
Dati utente Valori di impostazioneIniziali max. 3 caratteri (A-Z, 0-9)
Sesso Maschio ( ), femmina ( )Statura Da 100 a 250 cm (da 3‘ 3,5“ a 8‘ 02“)Data di nascita Anno, mese, giornoLivello di attività Da 1 a 5Peso desiderato kg/lb/st (per rappresentazione grafica dell'andamento)
Livelli di attivitàPer la selezione del livello di attività si distingue fra osservazione a medio e a lungo termine.
Livello di attività Attività fisica
1 Nessuna.
2 Ridotta: attività fisica ridotta e leggera (ad es. passeggiare, lavori di giardinaggio leggeri, esercizi ginnici).
3 Media: attività fisica, almeno 2-4 volte alla settimana, 30 minuti per sessione.4 Impegnativa: attività fisica, almeno 4-6 volte alla settimana, 30 minuti per sessione.
5 Molto impegnativa: attività fisica intensa, allenamento intensivo o lavoro fisico pesante, quotidiano, per almeno un'ora.
L’app mostra le successive memorie utente della bilancia libere (Persona 1-Persona 10).
– Esecuzione della misurazione: per il riconoscimento automatico della persona, assegnare alla prima misura-zione i dati personali dell’utente. L’app li richiede. A tale scopo, vedere il capitolo „9. Esecuzione della misura-zione“.
8. Configurazione senza appSi consiglia di eseguire la messa in servizio e tutte le impostazioni tramite app. Vedere il capitolo „7. Configura-zione con l‘app“ Tuttavia, è possibile anche procedere sull’apparecchio.• Inserire le batterie e posizionare la bilancia su una superficie stabile (sull’LCD della bilancia lampeggia “CON-
NECT WITH APP”).• Effettuare le impostazioni apparecchio/ora/utente sul dispositivo di comando. Selezionare con il pulsante [ ]
o [ ] e confermare ogni volta con [SET ].
a. Impostazione dell‘apparecchio[SET ] “IMPOSTA APPAR.”
Sequenza Valori di impostazioneLingua D G F E IUnità di misura kg – lb – stOra 24 h – 12 hModalità ospite ON__ OFFBluetooth® ON__ OFF
Se "OFF", la connessione Bluetooth® è possibile solo quando il dispositivo di comando è acceso.
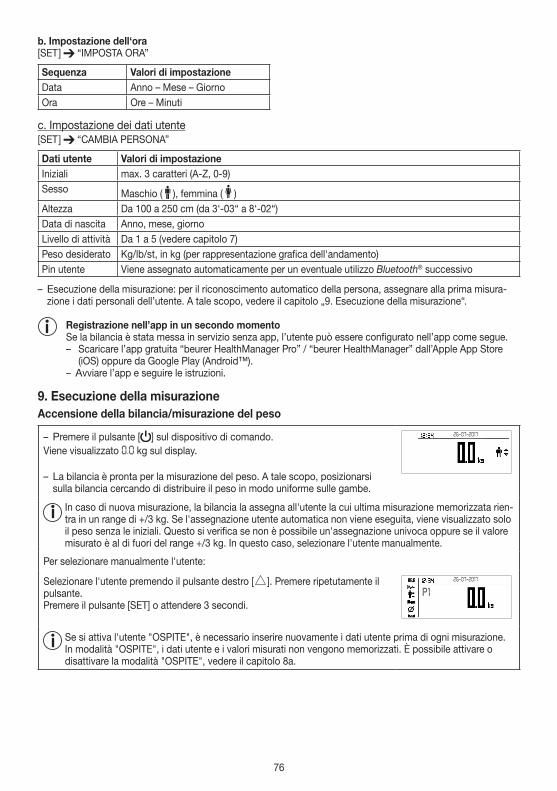
76
b. Impostazione dell‘ora[SET ] “IMPOSTA ORA”
Sequenza Valori di impostazioneData Anno – Mese – GiornoOra Ore – Minuti
c. Impostazione dei dati utente[SET ] “CAMBIA PERSONA”
Dati utente Valori di impostazioneIniziali max. 3 caratteri (A-Z, 0-9)Sesso Maschio ( ), femmina ( )Altezza Da 100 a 250 cm (da 3‘-03“ a 8‘-02“)Data di nascita Anno, mese, giornoLivello di attività Da 1 a 5 (vedere capitolo 7)Peso desiderato Kg/lb/st, in kg (per rappresentazione grafica dell'andamento)Pin utente Viene assegnato automaticamente per un eventuale utilizzo Bluetooth® successivo
– Esecuzione della misurazione: per il riconoscimento automatico della persona, assegnare alla prima misura-zione i dati personali dell’utente. A tale scopo, vedere il capitolo „9. Esecuzione della misurazione“.
Registrazione nell’app in un secondo momentoSe la bilancia è stata messa in servizio senza app, l’utente può essere configurato nell’app come segue. – Scaricare l’app gratuita “beurer HealthManager Pro” / “beurer HealthManager” dall’Apple App Store
(iOS) oppure da Google Play (Android™). – Avviare l’app e seguire le istruzioni.
9. Esecuzione della misurazione Accensione della bilancia/misurazione del peso
– Premere il pulsante [ ] sul dispositivo di comando.Viene visualizzato 0.0 kg sul display.
– La bilancia è pronta per la misurazione del peso. A tale scopo, posizionarsi sulla bilancia cercando di distribuire il peso in modo uniforme sulle gambe.
26-07-2017
In caso di nuova misurazione, la bilancia la assegna all'utente la cui ultima misurazione memorizzata rien-tra in un range di +/3 kg. Se l'assegnazione utente automatica non viene eseguita, viene visualizzato solo il peso senza le iniziali. Questo si verifica se non è possibile un'assegnazione univoca oppure se il valore misurato è al di fuori del range +/3 kg. In questo caso, selezionare l'utente manualmente.
Per selezionare manualmente l'utente:
Selezionare l'utente premendo il pulsante destro [ ]. Premere ripetutamente il pulsante.Premere il pulsante [SET] o attendere 3 secondi.
26-07-2017
P1
Se si attiva l'utente "OSPITE", è necessario inserire nuovamente i dati utente prima di ogni misurazione. In modalità "OSPITE", i dati utente e i valori misurati non vengono memorizzati. È possibile attivare o disattivare la modalità "OSPITE", vedere il capitolo 8a.
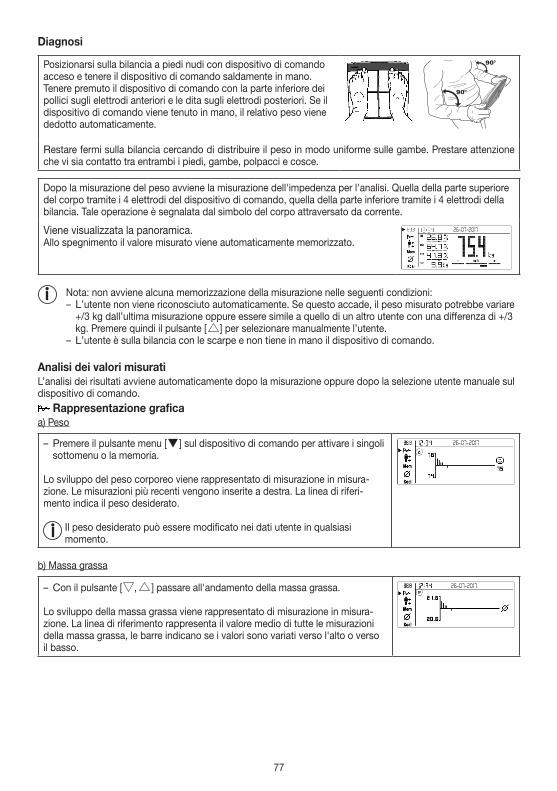
77
Diagnosi
Posizionarsi sulla bilancia a piedi nudi con dispositivo di comando acceso e tenere il dispositivo di comando saldamente in mano. Tenere premuto il dispositivo di comando con la parte inferiore dei pollici sugli elettrodi anteriori e le dita sugli elettrodi posteriori. Se il dispositivo di comando viene tenuto in mano, il relativo peso viene dedotto automaticamente.
Restare fermi sulla bilancia cercando di distribuire il peso in modo uniforme sulle gambe. Prestare attenzione che vi sia contatto tra entrambi i piedi, gambe, polpacci e cosce.
Dopo la misurazione del peso avviene la misurazione dell'impedenza per l'analisi. Quella della parte superiore del corpo tramite i 4 elettrodi del dispositivo di comando, quella della parte inferiore tramite i 4 elettrodi della bilancia. Tale operazione è segnalata dal simbolo del corpo attraversato da corrente.
Viene visualizzata la panoramica.Allo spegnimento il valore misurato viene automaticamente memorizzato.
26-07-2017
Nota: non avviene alcuna memorizzazione della misurazione nelle seguenti condizioni: – L’utente non viene riconosciuto automaticamente. Se questo accade, il peso misurato potrebbe variare +/3 kg dall’ultima misurazione oppure essere simile a quello di un altro utente con una differenza di +/3 kg. Premere quindi il pulsante [ ] per selezionare manualmente l’utente.
– L’utente è sulla bilancia con le scarpe e non tiene in mano il dispositivo di comando.
Analisi dei valori misuratiL’analisi dei risultati avviene automaticamente dopo la misurazione oppure dopo la selezione utente manuale sul dispositivo di comando.
Rappresentazione graficaa) Peso
– Premere il pulsante menu [ ] sul dispositivo di comando per attivare i singoli sottomenu o la memoria.
Lo sviluppo del peso corporeo viene rappresentato di misurazione in misura-zione. Le misurazioni più recenti vengono inserite a destra. La linea di riferi-mento indica il peso desiderato.
Il peso desiderato può essere modificato nei dati utente in qualsiasi momento.
26-07-2017
b) Massa grassa
– Con il pulsante [ , ] passare all'andamento della massa grassa.
Lo sviluppo della massa grassa viene rappresentato di misurazione in misura-zione. La linea di riferimento rappresenta il valore medio di tutte le misurazioni della massa grassa, le barre indicano se i valori sono variati verso l'alto o verso il basso.
26-07-2017
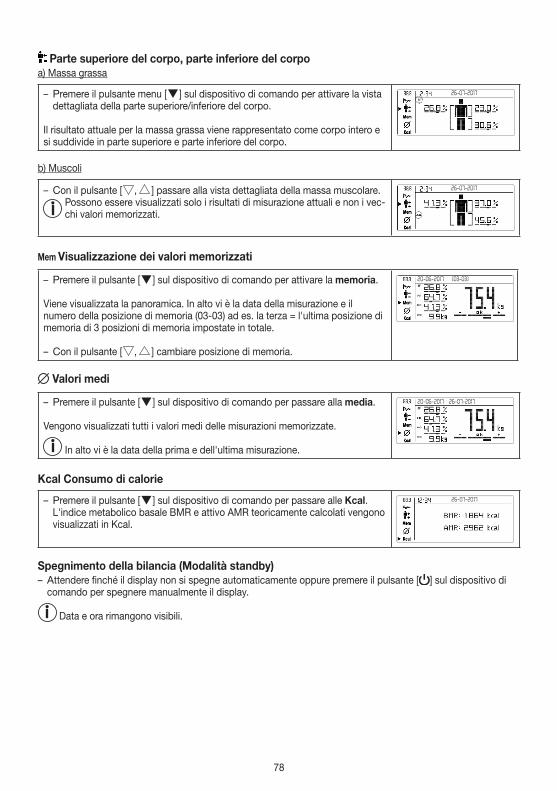
78
Parte superiore del corpo, parte inferiore del corpoa) Massa grassa
– Premere il pulsante menu [ ] sul dispositivo di comando per attivare la vista dettagliata della parte superiore/inferiore del corpo.
Il risultato attuale per la massa grassa viene rappresentato come corpo intero e si suddivide in parte superiore e parte inferiore del corpo.
26-07-2017
b) Muscoli
– Con il pulsante [ , ] passare alla vista dettagliata della massa muscolare. Possono essere visualizzati solo i risultati di misurazione attuali e non i vec-chi valori memorizzati.
26-07-2017
Mem Visualizzazione dei valori memorizzati
– Premere il pulsante [ ] sul dispositivo di comando per attivare la memoria.
Viene visualizzata la panoramica. In alto vi è la data della misurazione e il numero della posizione di memoria (03-03) ad es. la terza = l'ultima posizione di memoria di 3 posizioni di memoria impostate in totale.
– Con il pulsante [ , ] cambiare posizione di memoria.
(03-03)20-06-2017
Valori medi
– Premere il pulsante [ ] sul dispositivo di comando per passare alla media.
Vengono visualizzati tutti i valori medi delle misurazioni memorizzate.
In alto vi è la data della prima e dell'ultima misurazione.
20-06-2017 26-07-2017
Kcal Consumo di calorie
– Premere il pulsante [ ] sul dispositivo di comando per passare alle Kcal. L'indice metabolico basale BMR e attivo AMR teoricamente calcolati vengono visualizzati in Kcal.
26-07-2017
Spegnimento della bilancia (Modalità standby) – Attendere finché il display non si spegne automaticamente oppure premere il pulsante [ ] sul dispositivo di comando per spegnere manualmente il display.
Data e ora rimangono visibili.
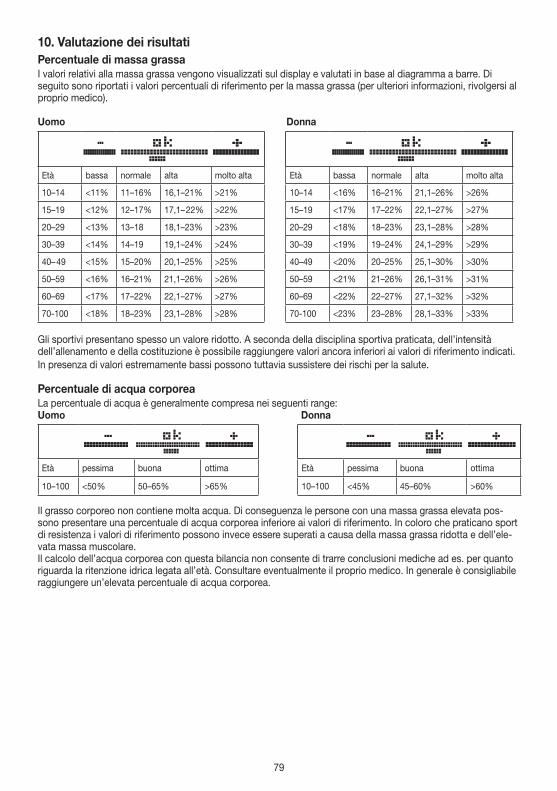
79
10. Valutazione dei risultatiPercentuale di massa grassaI valori relativi alla massa grassa vengono visualizzati sul display e valutati in base al diagramma a barre. Di seguito sono riportati i valori percentuali di riferimento per la massa grassa (per ulteriori informazioni, rivolgersi al proprio medico).
Uomo Donna
Età bassa normale alta molto alta Età bassa normale alta molto alta
10–14 <11% 11–16% 16,1–21% >21% 10–14 <16% 16–21% 21,1–26% >26%
15–19 <12% 12–17% 17,1– 22% >22% 15–19 <17% 17–22% 22,1–27% >27%
20–29 <13% 13–18 18,1–23% >23% 20–29 <18% 18–23% 23,1–28% >28%
30–39 <14% 14–19 19,1–24% >24% 30–39 <19% 19–24% 24,1–29% >29%
40– 49 <15% 15–20% 20,1–25% >25% 40–49 <20% 20–25% 25,1–30% >30%
50–59 <16% 16–21% 21,1–26% >26% 50–59 <21% 21–26% 26,1–31% >31%
60–69 <17% 17–22% 22,1–27% >27% 60–69 <22% 22–27% 27,1–32% >32%
70-100 <18% 18–23% 23,1–28% >28% 70-100 <23% 23–28% 28,1–33% >33%
Gli sportivi presentano spesso un valore ridotto. A seconda della disciplina sportiva praticata, dell’intensità dell’allenamento e della costituzione è possibile raggiungere valori ancora inferiori ai valori di riferimento indicati. In presenza di valori estremamente bassi possono tuttavia sussistere dei rischi per la salute.
Percentuale di acqua corporeaLa percentuale di acqua è generalmente compresa nei seguenti range:Uomo Donna
Età pessima buona ottima Età pessima buona ottima
10–100 <50 % 50–65% >65 % 10–100 <45% 45–60% >60%
Il grasso corporeo non contiene molta acqua. Di conseguenza le persone con una massa grassa elevata pos-sono presentare una percentuale di acqua corporea inferiore ai valori di riferimento. In coloro che praticano sport di resistenza i valori di riferimento possono invece essere superati a causa della massa grassa ridotta e dell’ele-vata massa muscolare.Il calcolo dell’acqua corporea con questa bilancia non consente di trarre conclusioni mediche ad es. per quanto riguarda la ritenzione idrica legata all’età. Consultare eventualmente il proprio medico. In generale è consigliabile raggiungere un’elevata percentuale di acqua corporea.
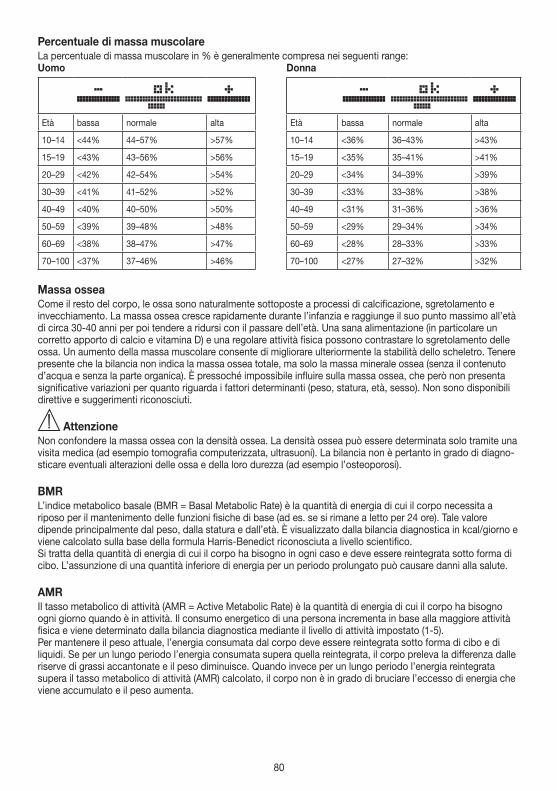
80
Percentuale di massa muscolareLa percentuale di massa muscolare in % è generalmente compresa nei seguenti range:Uomo Donna
Età bassa normale alta Età bassa normale alta
10–14 <44% 44–57% >57% 10–14 <36% 36–43% >43%
15–19 <43% 43–56% >56% 15–19 <35% 35–41% >41%
20–29 <42% 42–54% >54% 20–29 <34% 34–39% >39%
30–39 <41% 41–52% >52 % 30–39 <33% 33–38% >38%
40–49 <40% 40–50% >50% 40–49 <31% 31–36% >36 %
50–59 <39% 39–48 % >48% 50–59 <29% 29–34% >34%
60–69 <38% 38–47% >47% 60–69 <28% 28–33% >33%
70–100 <37% 37–46% >46% 70–100 <27% 27–32% >32%
Massa osseaCome il resto del corpo, le ossa sono naturalmente sottoposte a processi di calcificazione, sgretolamento e invecchiamento. La massa ossea cresce rapidamente durante l’infanzia e raggiunge il suo punto massimo all’età di circa 30-40 anni per poi tendere a ridursi con il passare dell’età. Una sana alimentazione (in particolare un corretto apporto di calcio e vitamina D) e una regolare attività fisica possono contrastare lo sgretolamento delle ossa. Un aumento della massa muscolare consente di migliorare ulteriormente la stabilità dello scheletro. Tenere presente che la bilancia non indica la massa ossea totale, ma solo la massa minerale ossea (senza il contenuto d’acqua e senza la parte organica). È pressoché impossibile influire sulla massa ossea, che però non presenta significative variazioni per quanto riguarda i fattori determinanti (peso, statura, età, sesso). Non sono disponibili direttive e suggerimenti riconosciuti.
AttenzioneNon confondere la massa ossea con la densità ossea. La densità ossea può essere determinata solo tramite una visita medica (ad esempio tomografia computerizzata, ultrasuoni). La bilancia non è pertanto in grado di diagno-sticare eventuali alterazioni delle ossa e della loro durezza (ad esempio l’osteoporosi).
BMRL’indice metabolico basale (BMR = Basal Metabolic Rate) è la quantità di energia di cui il corpo necessita a riposo per il mantenimento delle funzioni fisiche di base (ad es. se si rimane a letto per 24 ore). Tale valore dipende principalmente dal peso, dalla statura e dall’età. È visualizzato dalla bilancia diagnostica in kcal/giorno e viene calcolato sulla base della formula Harris-Benedict riconosciuta a livello scientifico.Si tratta della quantità di energia di cui il corpo ha bisogno in ogni caso e deve essere reintegrata sotto forma di cibo. L’assunzione di una quantità inferiore di energia per un periodo prolungato può causare danni alla salute.
AMRIl tasso metabolico di attività (AMR = Active Metabolic Rate) è la quantità di energia di cui il corpo ha bisogno ogni giorno quando è in attività. Il consumo energetico di una persona incrementa in base alla maggiore attività fisica e viene determinato dalla bilancia diagnostica mediante il livello di attività impostato (1-5).Per mantenere il peso attuale, l’energia consumata dal corpo deve essere reintegrata sotto forma di cibo e di liquidi. Se per un lungo periodo l’energia consumata supera quella reintegrata, il corpo preleva la differenza dalle riserve di grassi accantonate e il peso diminuisce. Quando invece per un lungo periodo l’energia reintegrata supera il tasso metabolico di attività (AMR) calcolato, il corpo non è in grado di bruciare l’eccesso di energia che viene accumulato e il peso aumenta.
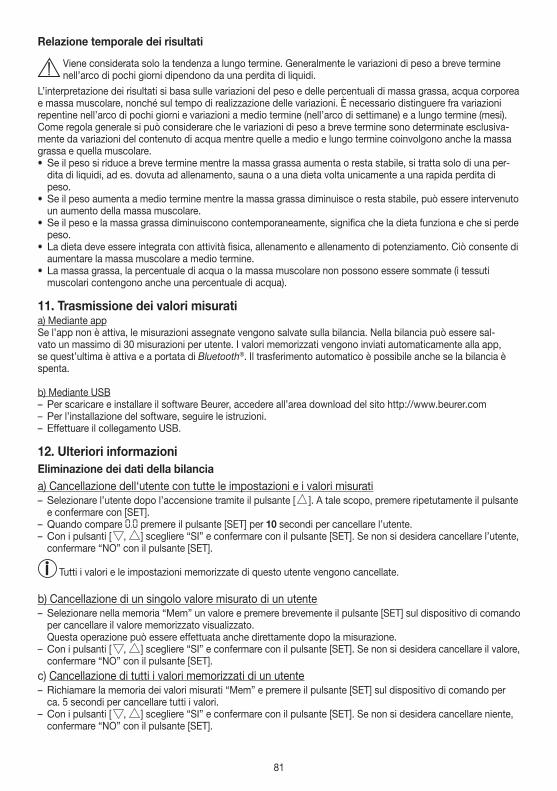
81
Relazione temporale dei risultati
Viene considerata solo la tendenza a lungo termine. Generalmente le variazioni di peso a breve termine nell’arco di pochi giorni dipendono da una perdita di liquidi.
L’interpretazione dei risultati si basa sulle variazioni del peso e delle percentuali di massa grassa, acqua corporea e massa muscolare, nonché sul tempo di realizzazione delle variazioni. È necessario distinguere fra variazioni repentine nell’arco di pochi giorni e variazioni a medio termine (nell’arco di settimane) e a lungo termine (mesi).Come regola generale si può considerare che le variazioni di peso a breve termine sono determinate esclusiva-mente da variazioni del contenuto di acqua mentre quelle a medio e lungo termine coinvolgono anche la massa grassa e quella muscolare.• Se il peso si riduce a breve termine mentre la massa grassa aumenta o resta stabile, si tratta solo di una per-
dita di liquidi, ad es. dovuta ad allenamento, sauna o a una dieta volta unicamente a una rapida perdita di peso.
• Se il peso aumenta a medio termine mentre la massa grassa diminuisce o resta stabile, può essere intervenuto un aumento della massa muscolare.
• Se il peso e la massa grassa diminuiscono contemporaneamente, significa che la dieta funziona e che si perde peso.
• La dieta deve essere integrata con attività fisica, allenamento e allenamento di potenziamento. Ciò consente di aumentare la massa muscolare a medio termine.
• La massa grassa, la percentuale di acqua o la massa muscolare non possono essere sommate (i tessuti muscolari contengono anche una percentuale di acqua).
11. Trasmissione dei valori misuratia) Mediante appSe l’app non è attiva, le misurazioni assegnate vengono salvate sulla bilancia. Nella bilancia può essere sal-vato un massimo di 30 misurazioni per utente. I valori memorizzati vengono inviati automaticamente alla app, se quest’ultima è attiva e a portata di Bluetooth®. Il trasferimento automatico è possibile anche se la bilancia è spenta.
b) Mediante USB – Per scaricare e installare il software Beurer, accedere all’area download del sito http://www.beurer.com – Per l’installazione del software, seguire le istruzioni. – Effettuare il collegamento USB.
12. Ulteriori informazioniEliminazione dei dati della bilanciaa) Cancellazione dell‘utente con tutte le impostazioni e i valori misurati – Selezionare l’utente dopo l’accensione tramite il pulsante [ ]. A tale scopo, premere ripetutamente il pulsante e confermare con [SET].
– Quando compare 0.0 premere il pulsante [SET] per 10 secondi per cancellare l’utente. – Con i pulsanti [ , ] scegliere “SI” e confermare con il pulsante [SET]. Se non si desidera cancellare l’utente, confermare “NO” con il pulsante [SET].
Tutti i valori e le impostazioni memorizzate di questo utente vengono cancellate.
b) Cancellazione di un singolo valore misurato di un utente – Selezionare nella memoria “Mem” un valore e premere brevemente il pulsante [SET] sul dispositivo di comando per cancellare il valore memorizzato visualizzato. Questa operazione può essere effettuata anche direttamente dopo la misurazione.
– Con i pulsanti [ , ] scegliere “SI” e confermare con il pulsante [SET]. Se non si desidera cancellare il valore, confermare “NO” con il pulsante [SET].
c) Cancellazione di tutti i valori memorizzati di un utente – Richiamare la memoria dei valori misurati “Mem” e premere il pulsante [SET] sul dispositivo di comando per ca. 5 secondi per cancellare tutti i valori.
– Con i pulsanti [ , ] scegliere “SI” e confermare con il pulsante [SET]. Se non si desidera cancellare niente, confermare “NO” con il pulsante [SET].
82
Sostituzione delle batterieIl dispositivo di comando è dotato di un’icona di sostituzione delle batterie. Sul display compare il simbolo , se le batterie del dispositivo di comando sono scariche o il simbolo per le batterie della bilancia. In questo caso è necessario sostituire le batterie. Collegare quindi di nuovo la bilancia con l’app. L’ora del sistema viene aggiornata.
NOTA:• A ogni sostituzione delle batterie, utilizzare batterie dello stesso tipo, della stessa marca e della stessa
capacità.• Non utilizzare batterie ricaricabili.• Utilizzare preferibilmente batterie prive di metalli pesanti.
13. Pulizia e cura dell‘apparecchioDi tanto in tanto è opportuno pulire l’apparecchio.Per la pulizia utilizzare un panno leggermente inumidito e, se necessario, un po’ di detergente.
ATTENZIONE• Non utilizzare mai detergenti o solventi aggressivi!• Non immergere mai l’apparecchio in acqua!• Non lavare l’apparecchio in lavastoviglie!
14. SmaltimentoSmaltire le batterie esauste e completamente scariche negli appositi punti di raccolta, nei punti di raccolta per rifiuti tossici o presso i negozi di elettronica. Lo smaltimento delle batterie è un obbligo di legge.I simboli riportati di seguito indicano che le batterie contengono sostanze tossiche: Pb = batteria contenente piomboCd = batteria contenente cadmio Hg = batteria contenente mercurio
Per motivi ecologici, l’apparecchio non deve essere smaltito tra i normali rifiuti quando viene buttato via. Lo smaltimento va effettuato negli appositi centri di raccolta. Smaltire l’apparecchio secondo la direttiva europea sui rifiuti di apparecchiature elettriche ed elettroniche (RAEE). Per eventuali chiarimenti, rivolgersi alle autorità comunali competenti per lo smaltimento.
Smaltire la confezione nel rispetto dell‘ambiente. 20
PAP
83
15. Che cosa fare in caso di problemi?Se durante la misurazione la bilancia riscontra un errore, vengono visualizzate le seguenti indicazioni:
Display Causa SoluzioneSOVRACCARICO! È stata superata la portata massima di
180 kg.Non caricare sulla bilancia pesi superiori a 180 kg.
BATT. SCARICA Batterie quasi esaurite. Sostituire le batterie (vedere il capitolo 12).MEMORIA PIENA Sono memorizzate 30 misurazioni. Trasmettere i valori misurati.ERR. CONTATTO! La resistenza elettrica tra gli elettrodi e
la pianta dei piedi è troppo alta (ad es. in caso di calli molto spessi).
Ripetere la misurazione a piedi nudi. Inumidire leggermente le piante dei piedi. Rimuovere eventuali calli dalle piante dei piedi.
CAMPO MISURA! La misurazione dell'impedenza bioelettrica (BIA) è stata effettuata ma la percentuale di grasso è al di fuori dell'intervallo misu-rabile (inferiore al 5% o superiore al 50%).
Ripetere la misurazione a piedi nudi o even-tualmente inumidire leggermente le piante dei piedi. Modificare eventualmente il livello di attività impostato.
Nessuna indicazione
Le batterie del dispositivo di comando sono completamente scariche.
Sostituire le batterie (vedere il capitolo 12).
Le batterie del dispositivo di comando non sono inserite correttamente.
Verificare la polarità corretta, (vedere pagina 73).
Solo indicazione del peso, manca la diagnosi
Misurazione sconosciuta, in quanto al di fuori del limite di assegnazione utente oppure non è possibile un'assegnazione chiara.
Selezionare l'utente sulla bilancia con il pul-sante " " oppure ripetere l'assegnazione utente nell'app.Vedere il capitolo 9.
Misurazioni non possibili
Possibile errore SoluzioneIl dispositivo di comando non è stato atti-vato prima di salire sulla bilancia.
Prima della misurazione accendere il dispositivo di comando. Se necessario, attendere 30 secondi, quindi ripetere la misurazione.
Il collegamento radio tra bilancia e disposi-tivo di comando è interrotto.
Inserire di nuovo le batterie della bilancia e del dispositivo di comando.Tenere una distanza maggiore da forti fonti elettromagnetiche.
Il dispositivo di comando è troppo lontano dalla bilancia.
Ridurre la distanza tra la bilancia e il dispositivo di comando, tenendo presente che la distanza massima è pari a 2 metri.
Le batterie della bilancia sono scariche o inserite in modo errato.
Sostituire le batterie e verificare la polarità corretta.
Misurazione del peso errata
Possibile errore SoluzioneLa bilancia presenta un valore di base diverso da 0.0.
Prima della misurazione attivare brevemente con il piede la bilan-cia finché l'indicatore stato di esercizio non si accende.Se necessario, attendere 5 secondi, quindi ripetere la misura-zione. Per informazione: Poiché durante il normale utilizzo si sale subito sulla bilancia, la bilancia memorizza il valore 0.0 allo spe-gnimento (quando l'indicatore stato di esercizio si spegne).
La bilancia si trova su un tappeto. Posizionare la bilancia su un fondo piano e solido.Posizionarsi il più possibile all'esterno senza far ribaltare la bilan-cia.
Viene visualizzato il peso errato. Restare fermi il più possibile.Viene visualizzato il peso errato. Attendere che la bilancia si spenga da sola. Ripetere quindi la
misurazione.
84
Nessuna connessione Bluetooth® ( il simbolo ® non è visualizzato).
Possibile errore SoluzioneCollegamento radio La portata minima in campo libero è di ca. 10 m. Pareti e soffitti
riducono la portata.Altre onde radio possono disturbare la trasmissione. Non posi-zionare quindi la bilancia nelle vicinanze di apparecchi come rou-ter WIFI, microonde o piani di cottura a induzione e disattivare idealmente altri dispositivi Bluetooth® che si trovano nel raggio d’azione.
Connessione Bluetooth® Chiudere l'app completamente (anche in background).Disattivare e riattivare il Bluetooth®.Spegnere lo smartphone e riaccenderlo.Rimuovere brevemente le batterie dalla bilancia e reinserirle.Vedere le FAQ sul sito www.beurer.com.
La creazione della connessione dura troppo a lungo.
Intervallo Bluetooth® più rapido a bilancia accesa.
16. Dati tecniciDimensioni della bilancia 330 x 330 x 41 mmBatterie bilanciaBatterie dispositivo di comando
3 batterie da 1,5 V tipo AA3 batterie da 1,5 V tipo AA
Trasmissione radio (da bilancia a dispositivo di comando)
433,92MHz; Potenza di trasmissione massima (ERP): -21.5dBm
Range di misurazione Da 5 kg a 180 kg
Valore di divisione d: L’unità minima di leggibilità dei valori sul display è di 0,1 kg.
Precisione di ripetibilità: La tolleranza di misurazione relativa a misurazioni rip-etute è di +/- 0,4 kg (misurazione ripetuta più volte consecutivamente sulla stessa bilancia, mantenendo il più possibile invariata la posizione della bilancia e della persona).
Precisione assoluta: Il valore della misurazione confrontato con un peso cali-brato è di +/- 1% +0,1kg. Ad es. per 40 kg corrisponde a +/- 0,5 kg, per 100 kg corrisponde a +/- 1,1 kg.
Trasmissione dei dati tramite Bluetooth® wireless technology
Il prodotto utilizza Bluetooth® low energy technology, banda di frequenza 2,402 – 2,480 GHz, potenza di tra-smissione max. 0 dBm, compatibile con smartphone Bluetooth® 4.0/tablet
L'elenco degli smartphone compatibili, le informazioni e il software così come maggiori dettagli sugli appa-recchi sono disponibili al seguente link:connect.beurer.com
Requisiti di sistema per l’uploader USB “beurer HealthManager Pro” e per il software per PC “beurer HealthManager”
Da Windows 8.1Da USB 2.0 (Type-A)
Requisiti di sistema per l'app “beurer HealthManager Pro” / “beurer HealthManager” App
iOS ≥ 12.0, Android™≥ 8.0Bluetooth® ≥ 4.0
Salvo modifiche tecniche.
Con la presente confermiamo che il prodotto è conforme alla direttiva europea RED 2014/53/EU. La Dichiara-zione di Conformità relativa al presente prodotto è reperibile su: www.beurer.com/web/we-landingpages/de/cedeclarationofconformity.php.
85
17. Garanzia / AssistenzaBeurer GmbH, Söflinger Strasse 218, D-89077 Ulm (di seguito denominata “Beurer”) offre una garanzia per questo prodotto, nel rispetto delle seguenti condizioni e nella misura descritta di seguito. Le seguenti condizioni di garanzia lasciano invariati gli obblighi di garanzia di legge del venditore stabiliti nel contratto di acquisto con l’acquirente. La garanzia si applica inoltre fatte salve le prescrizioni di legge obbligatorie in materia di respons-abilità.
Beurer garantisce la perfetta funzionalità e la completezza di questo prodotto.
La garanzia mondiale è di 5 anni a partire dall’acquisto del prodotto nuovo, non usato, da parte dell’acquirente.
Questa garanzia copre solo i prodotti che l’acquirente ha acquistato come consumatore e che utilizza esclusiva-mente a scopo personale, in ambito domestico.Vale il diritto tedesco.
Nel caso in cui il prodotto, durante il periodo di garanzia, si dimostrasse incompleto o presentasse difetti di funzi-onamento in linea con le seguenti disposizioni, Beurer provvederà a sostituire o riparare gratuitamente il prodotto in base alle presenti condizioni di garanzia.
Per segnalare un caso di garanzia, l’acquirente deve rivolgersi innanzitutto al proprio rivenditore lo-cale: vedere l’elenco “Service International” in cui sono riportati gli indirizzi dei centri di assistenza.
L’acquirente riceverà quindi informazioni più dettagliate sulla gestione del caso di garanzia, ad esempio dove deve inviare il prodotto e quali documenti sono necessari.
L’attivazione della garanzia viene presa in considerazione solo se l’acquirente può presentare – una copia della fattura/prova d’acquisto e – il prodotto originale
a Beurer o a un partner Beurer autorizzato.
Sono espressamente esclusi dalla presente garanzia – l’usura dovuta al normale utilizzo o al consumo del prodotto; – gli accessori forniti assieme a questo prodotto che, in caso di utilizzo conforme, si consumano o si esau-
riscono (ad es. batterie, batterie ricaricabili, manicotti, guarnizioni, elettrodi, lampadine, accessori e accessori per inalatore);
– i prodotti che sono stati utilizzati, puliti, conservati o sottoposti a manutenzione in modo improprio e/o senza rispettare le disposizioni riportate nelle istruzioni per l’uso, nonché i prodotti che sono stati aperti, riparati o smontati e rimontati dall’acquirente o da un centro di assistenza non autorizzato da Beurer;
– i danni occorsi nel trasporto dal produttore al cliente o tra il centro di assistenza e il cliente; – i prodotti acquistati come articoli di seconda scelta o usati; – i danni conseguenti che dipendono da un difetto del prodotto (in questo caso possono tuttavia esistere diritti
derivanti dalla responsabilità per i prodotti o da altre disposizioni di legge obbligatorie in materia di responsa-bilità).
Le riparazioni o la sostituzione completa non prolungano in alcun caso il periodo di garanzia.
Salv
o er
rori
e m
odifi
che
86
TÜRKÇE
1. Ürün özellikleri ......................................................862. İşaretlerin açıklaması ............................................873. Uyarılar ve güvenlik yönergeleri ............................884. Bilgi .......................................................................895. Cihaz açıklaması ...................................................906. İlk çalıştırma ..........................................................907. Uygulama ile kurulum ...........................................918. Uygulama olmadan kurulum .................................929. Ölçümün yapılması ...............................................93
10. Sonuçların değerlendirilmesi ..............................9511. Ölçüm değerlerinin aktarılması ...........................9712. Diğer bilgiler........................................................9713. Cihazın temizliği ve bakımı .................................9814. Bertaraf etme ......................................................9815. Sorunların giderilmesi .........................................9916. Teknik veriler .....................................................10017. Garanti / Servis ..................................................100
Teslimat kapsamı• Diyagnoz terazisi• Çıkarılabilir ekranlı kumanda paneli• Duvar tutucusu• Duvara montaj için montaj seti• 3 x 1,5 V tip AA (terazi)• 3 x 1,5 V tip AA (kumanda paneli)• USB kablosu• Bu kullanım kılavuzu ve Bluetooth® / USB için kısa kılavuz
Sayın müşterimiz,Ürünlerimizden birini seçtiğiniz için teşekkür ederiz. Isı, ağırlık, kan basıncı, vücut sıcaklığı, nabız, yumuşak terapi, masaj, güzellik, bebek ve hava konularında değerli ve titizlikle test edilmiş kaliteli ürünlerimiz, dünyanın her tara-fında tercih edilmektedir.Lütfen bu kullanım kılavuzunu dikkatle okuyun, ileride gerekebileceği için saklayın, diğer kullanıcıların erişebilme-sini sağlayın ve içindeki yönergelere uyun.
Yeni cihazınızı iyi günlerde kullanmanızı dileriz.Beurer Ekibiniz
1. Ürün özellikleriCihazın işlevleriBu dijital terazi, kilonuzu ölçmeye ve kişisel kondisyon verilerinizi tespit etmeye olanak verir.Kişisel kullanım için tasarlanmıştır.Terazi, 10 farklı kişi tarafından kullanılabilen aşağıdaki işlevleri içerir:• Vücut ağırlığı ölçümü• Vücut yağ oranı,• Vücut suyu oranı,• Kas oranı,• Kemik kütlesi ve• Bazal ve aktif metabolizma hızı tespiti.
Terazi ayrıca aşağıdaki işlevleri sunar:• Büyük ekranlı yenilikçi menü yapısı (5 dil seçeneği),• Ekran istenirse terazi üzerinde bırakılabilir, ayrı tutulabilir veya duvara sabitlenebilir. İsteğe bağlı olarak ayrıca
satılan stand mevcuttur,• Kilogram “kg”, Pound “lb” ve Stone “st” ölçü birimleri arasında geçiş yapılabilir,• Otomatik kapanma işlevi,
Lütfen bu kullanım kılavuzunu dikkatle okuyun, ileride kullan-mak üzere saklayın, diğer kullanıcıların erişebilmesini sağlayın ve içindeki yönergelere uyun.
İçindekiler
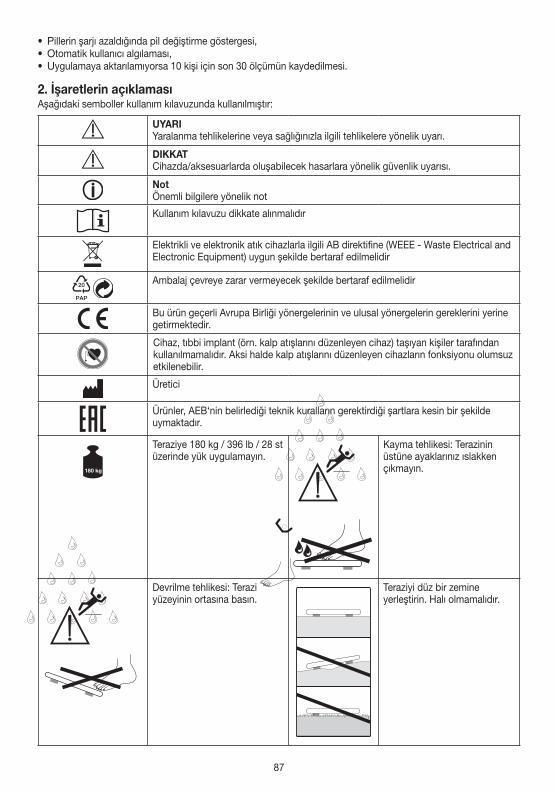
87
• Pillerin şarjı azaldığında pil değiştirme göstergesi,• Otomatik kullanıcı algılaması,• Uygulamaya aktarılamıyorsa 10 kişi için son 30 ölçümün kaydedilmesi.
2. İşaretlerin açıklamasıAşağıdaki semboller kullanım kılavuzunda kullanılmıştır:
UYARIYaralanma tehlikelerine veya sağlığınızla ilgili tehlikelere yönelik uyarı.
DIKKAT Cihazda/aksesuarlarda oluşabilecek hasarlara yönelik güvenlik uyarısı.
NotÖnemli bilgilere yönelik not
Kullanım kılavuzu dikkate alınmalıdır
Elektrikli ve elektronik atık cihazlarla ilgili AB direktifine (WEEE - Waste Electrical and Electronic Equipment) uygun şekilde bertaraf edilmelidir
20
PAP
Ambalaj çevreye zarar vermeyecek şekilde bertaraf edilmelidir
Bu ürün geçerli Avrupa Birliği yönergelerinin ve ulusal yönergelerin gereklerini yerine getirmektedir.
Cihaz, tıbbi implant (örn. kalp atışlarını düzenleyen cihaz) taşıyan kişiler tarafından kullanılmamalıdır. Aksi halde kalp atışlarını düzenleyen cihazların fonksiyonu olumsuz etkilenebilir.
Üretici
Ürünler, AEB‘nin belirlediği teknik kuralların gerektirdiği şartlara kesin bir şekilde uymaktadır.
Teraziye 180 kg / 396 lb / 28 st üzerinde yük uygulamayın.
317306_SGWI 180_2019-05-03_02_WarningSticker_Lidl
max.
180 kg396 lb28 st
317306_SGWI 180_2019-05-03_02_WarningSticker_Lidl
max.
180 kg396 lb28 st
Kayma tehlikesi: Terazinin üstüne ayaklarınız ıslakken çıkmayın.
317306_SGWI 180_2019-05-03_02_WarningSticker_Lidl
max.
180 kg396 lb28 st
317306_SGWI 180_2019-05-03_02_WarningSticker_Lidl
max.
180 kg396 lb28 st
Devrilme tehlikesi: Terazi yüzeyinin ortasına basın.
Teraziyi düz bir zemine yerleştirin. Halı olmamalıdır.
88
3. Uyarılar ve güvenlik yönergeleri UYARI
• Terazi, tıbbi implant (örn. kalp atışlarını düzenleyen cihaz) taşıyan kişiler tarafından kullanılmamalıdır. Aksi takdirde kalp atışlarını düzenleyen cihazların çalışması olum-suz etkilenebilir.
• Hamilelik sırasında kullanmayın. • Asla terazinin üzerine bir tarafının en dış kenarından çıkmayın: Devrilme tehlikesi!• Çocukları ambalaj malzemesinden uzak tutun (boğulma tehlikesi).• Dikkat, teraziye ayaklarınız ıslakken çıkmayın ve yüzeyi nemliyken terazinin üzerine basmayın – Kayma
tehlikesi!
Pillerin kullanımıyla ilgili yönergeler• Pilden sızan cilt veya gözlerle temas ettiğinde, ilgili yeri suyla yıkayın ve bir doktora başvurun.• Yutma tehlikesi! Küçük çocuklar pilleri yutabilir ve bunun sonucunda boğulabilir. Bu nedenle pilleri
küçük çocukların erişemeyeceği yerlerde saklayın!• Artı (+) ve eksi (-) kutup işaretlerine dikkat edin.• Bir pil aktığında koruyucu eldiven giyin ve pil bölmesini kuru bir bezle temizleyin.• Pilleri aşırı ısıya karşı koruyun.• Patlama tehlikesi! Pilleri ateşe atmayın.• Piller şarj edilmemeli veya kısa devre yaptırılmamalıdır.• Cihazı uzun süre kullanmayacağınız durumlarda pilleri pil bölmesinden çıkarın.• Sadece aynı tip veya eşdeğer tip piller kullanın. • Her zaman tüm pilleri aynı anda değiştirin.• Şarj edilebilir pil kullanmayın!• Pilleri parçalarına ayırmayın, açmayın veya parçalamayın.
Genel açıklamalar • Cihaz kişisel kullanım içindir; tıbbi veya ticari kullanıma uygun değildir. • Profesyonel, tıbbi kullanım için kalibre edilmemiş bir terazi olduğundan teknik özelliklere bağlı ölçüm
toleransları söz konusu olabileceğini göz önünde bulundurun.• Farklı ölçme sonuçları alınması durumunda (terazi ve uygulama arasında), yalnızca terazide gösterilen
ölçüm değerleri kullanılmalıdır.• Terazinin yük kapasitesi maks. 180 kg’dır (396 lb, 28 st). Ağırlık ölçümünde ve kemik kütlesi tespitinde
sonuçlar 100 gramlık artışlarla (0,2 lb) gösterilir.• Vücut yağı, vücut suyu ve kas oranı için ölçüm sonuçları %0,1’lik artışlarla gösterilir.• Kalori ihtiyacı 1 Kcal’lik artışlarla gösterilir.• Fabrika çıkışında terazi “cm” ve “kg” birimlerine ayarlanmıştır. • Teraziyi düz ve sert bir zemine yerleştirin; doğru ölçüm için sert bir zemin kaplaması şarttır.• Onarım işlemleri yalnızca Beurer müşteri servisi veya yetkili satıcılar tarafından yapılabilir. Ancak, her
şikayet öncesinde öncelikle pilleri kontrol edin ve gerekirse değiştirin.
Saklama ve bakımÖlçüm değerlerinin hassasiyeti ve cihazın kullanım ömrü itinalı kullanıma bağlıdır:
DİKKAT• Cihaz belirli aralıklarla temizlenmelidir. Aşındırıcı temizlik malzemeleri kullanmayın ve cihazı asla suyun
altına tutmayın.• Terazinin üzerine sıvı gelmemesini sağlayın. Teraziyi kesinlikle suya daldırmayın. Kesinlikle akan suyun
altında yıkamayın.• Kullanılmadığında terazinin üzerine herhangi bir nesne koymayın.• Cihazı darbelerden, nemden, tozdan, kimyasallardan, aşırı sıcaklık değişikliklerinden ve çok yakın ısı
kaynaklarından (soba, kalorifer radyatörü) koruyun.• Tuşa aşırı kuvvetli bir şekilde veya sivri nesnelerle basmayın.• Teraziyi yüksek sıcaklıklara ve kuvvetli elektromanyetik alanlara maruz bırakmayın (örn. cep telefonları).
89
4. BilgiÖlçüm prensibiBu terazi B.I.A. (biyoelektrik empedans analizi) prensibiyle çalışır. Bu prensipte hissedilemeyen, tamamen sakın-casız ve tehlikesiz bir akım sayesinde saniyeler içinde vücut oranlarının tayin edilmesi sağlanır. Bu elektrik direnci (empedans) ölçümüyle ve sabit ya da bireysel değerlerin (yaş, boy, cinsiyet, etkinlik derecesi) hesaplanmasıyla vücut yağ oranı ve vücudun diğer özellikleri tayin edilebilir. Kas dokusu ve su iyi bir elektrik ilet-kenliğine sahiptir ve bu nedenle daha düşük bir dirence sahiptir. Bunlara karşın kemik ve yağ dokusu daha düşük iletkenliğe sahiptir, çünkü yağ hücreleri ve kemikler dirençlerinin çok yüksek olması nedeniyle neredeyse hiç akım iletmez.Ayrıca empedansın daha iyi ölçülebilmesi için, bu terazide iki farklı frekans ile ölçüm gerçekleştirilir. Bu farklı fre-kanslar, hücre membranı ve vücut suyu üzerinde farklı etkilere sahiptir. Ayrıca 4 el elektrodu ve 4 ayak elektrodu ile gövdeye olan elektrik teması optimize edilerek daha kesin ölçümler ve daha iyi analiz sonuçları elde edilir. Bu hassas analiz teknolojisi sayesinde, tekrar edilen ölçümler arasındaki farkların son derece düşük olması sağlana-bilir. Bunun nedeni, empedans ölçümü sırasında farklılıkların olmasıdır (örn. elektrotlar ile eller ve ayaklar arasında farklı elektrik temasının olması, suyun vücutta farklı dağılması).
Analiz aşağıdaki şekilde gerçekleştirilebilir:• Üst gövde: Kumanda panelini ellerinizle kavrayın, ayakkabılarınızla terazinin üzerine çıkın.• Alt gövde: Kumanda panelini örn. terazinin üzerinde bırakın, çıplak ayakla terazinin üzerine çıkın.• Üst gövde ve alt gövde: Kumanda panelini ellerinizle kavrayın ve çıplak ayakla terazinin üzerine çıkın.• Kumanda paneli analiz için elde tutulurken, kumanda panelinin ağırlığı ölçülen değerlerden otomatik olarak
çıkarılır.
Diyagnoz terazisi tarafından saptanan değerlerin yalnızca vücudun gerçek, tıbbi analiz değerlerine yakın değerleri ifade ettiklerini göz önünde bulundurun. Yalnızca uzman doktorlar tıbbi yöntemlerle (örn. bilgisayar tomografisi) vücut yağını, vücut suyunu, kas oranını ve kemik yapısı tam olarak belirleyebilir.
Genel öneriler• Karşılaştırılabilir sonuçlar elde etmek için mümkün olduğunca günün aynı saatlerinde (en iyisi sabahları), tuva-
lete çıktıktan sonra, aç karnına ve çıplak olarak tartılın.• Ölçüm sırasında önemlidir: Vücut yağ oranı tespiti yalnızca çıplak ayaklar ile ve tercihen ayak tabanları hafifçe
nemliyken yapılmalıdır.• Ayak tabanlarının tamamen kuru veya nasırlı olması tatmin edici olmayan sonuçlara neden olabilir, çünkü bu
durumda iletkenliği çok düşüktür.• Tartılma esnasında dik ve hareketsiz durun.• Alışılmadık bedensel efor harcadıktan sonra birkaç saat bekleyin.• Yataktan kalktıktan sonra vücudunuzdaki suyun dağılabilmesi için yakl. 15 dakika bekleyin.• Sadece uzun vadeli eğilimin geçerli olması önemlidir. Birkaç gün içindeki kısa süreli ağırlık değişiklikleri genelde
sıvı kaybından kaynaklanır; ancak vücuttaki su, rahatlığınız için önemli bir rol oynar.
KısıtlamalarVücut yağ oranının ve diğer değerlerin saptanması sırasında aşağıdaki durumlarda farklı ve tutarsız sonuçlar ortaya çıkabilir:• Yakl. 10 yaşından küçük olan çocuklarda,• Profesyonel sporcularda ve vücut geliştiricilerde,• Ateşi olan, diyalize giren, ödem belirtileri veya osteoporoz olan kişilerde,• Kardiyovasküler (kalp ve damarlarla ilgili) ilaçlar alan kişilerde,• Damarları genişleten veya damarları daraltan ilaçlar alan kişilerde,• Bacaklarında vücutlarının tamamına oranla büyük anatomik farklılıklar (bacakları çok kısa veya çok uzun) olan
kişilerde.
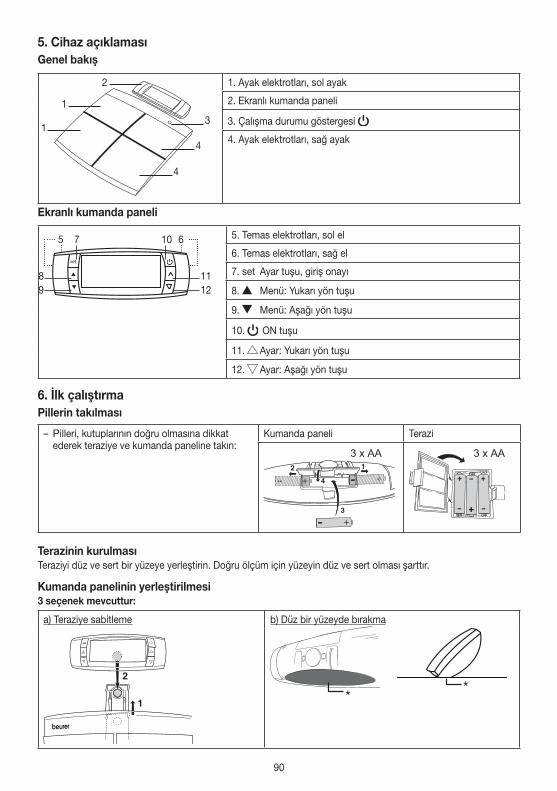
90
5. Cihaz açıklamasıGenel bakış
3
4
1
1
4
2 1. Ayak elektrotları, sol ayak
2. Ekranlı kumanda paneli
3. Çalışma durumu göstergesi
4. Ayak elektrotları, sağ ayak
Ekranlı kumanda paneli
set
5 7 10
8 119 12
6 5. Temas elektrotları, sol el
6. Temas elektrotları, sağ el
7. set Ayar tuşu, giriş onayı
8. Menü: Yukarı yön tuşu
9. Menü: Aşağı yön tuşu
10. ON tuşu
11. Ayar: Yukarı yön tuşu
12. Ayar: Aşağı yön tuşu
6. İlk çalıştırmaPillerin takılması
– Pilleri, kutuplarının doğru olmasına dikkat ederek teraziye ve kumanda paneline takın:
Kumanda paneli Terazi
3 x AA 3 x AA
Terazinin kurulmasıTeraziyi düz ve sert bir yüzeye yerleştirin. Doğru ölçüm için yüzeyin düz ve sert olması şarttır.
Kumanda panelinin yerleştirilmesi3 seçenek mevcuttur:
a) Teraziye sabitleme b) Düz bir yüzeyde bırakma
**
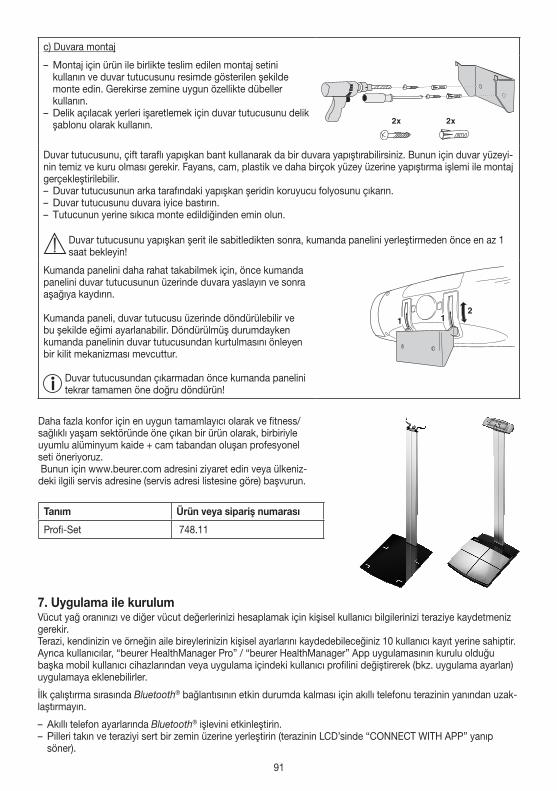
91
c) Duvara montaj
– Montaj için ürün ile birlikte teslim edilen montaj setini kullanın ve duvar tutucusunu resimde gösterilen şekilde monte edin. Gerekirse zemine uygun özellikte dübeller kullanın.
– Delik açılacak yerleri işaretlemek için duvar tutucusunu delik şablonu olarak kullanın.
Duvar tutucusunu, çift taraflı yapışkan bant kullanarak da bir duvara yapıştırabilirsiniz. Bunun için duvar yüzeyi-nin temiz ve kuru olması gerekir. Fayans, cam, plastik ve daha birçok yüzey üzerine yapıştırma işlemi ile montaj gerçekleştirilebilir. – Duvar tutucusunun arka tarafındaki yapışkan şeridin koruyucu folyosunu çıkarın. – Duvar tutucusunu duvara iyice bastırın. – Tutucunun yerine sıkıca monte edildiğinden emin olun.
Duvar tutucusunu yapışkan şerit ile sabitledikten sonra, kumanda panelini yerleştirmeden önce en az 1 saat bekleyin!
Kumanda panelini daha rahat takabilmek için, önce kumanda panelini duvar tutucusunun üzerinde duvara yaslayın ve sonra aşağıya kaydırın.
Kumanda paneli, duvar tutucusu üzerinde döndürülebilir ve bu şekilde eğimi ayarlanabilir. Döndürülmüş durumdayken kumanda panelinin duvar tutucusundan kurtulmasını önleyen bir kilit mekanizması mevcuttur.
Duvar tutucusundan çıkarmadan önce kumanda panelini tekrar tamamen öne doğru döndürün!
Daha fazla konfor için en uygun tamamlayıcı olarak ve fitness/sağlıklı yaşam sektöründe öne çıkan bir ürün olarak, birbiriyle uyumlu alüminyum kaide + cam tabandan oluşan profesyonel seti öneriyoruz. Bunun için www.beurer.com adresini ziyaret edin veya ülkeniz-deki ilgili servis adresine (servis adresi listesine göre) başvurun.
Tanım Ürün veya sipariş numarası
Profi-Set 748.11
7. Uygulama ile kurulumVücut yağ oranınızı ve diğer vücut değerlerinizi hesaplamak için kişisel kullanıcı bilgilerinizi teraziye kaydetmeniz gerekir.Terazi, kendinizin ve örneğin aile bireylerinizin kişisel ayarlarını kaydedebileceğiniz 10 kullanıcı kayıt yerine sahiptir.Ayrıca kullanıcılar, “beurer HealthManager Pro” / “beurer HealthManager” App uygulamasının kurulu olduğu başka mobil kullanıcı cihazlarından veya uygulama içindeki kullanıcı profilini değiştirerek (bkz. uygulama ayarları) uygulamaya eklenebilirler.
İlk çalıştırma sırasında Bluetooth® bağlantısının etkin durumda kalması için akıllı telefonu terazinin yanından uzak-laştırmayın.
– Akıllı telefon ayarlarında Bluetooth® işlevini etkinleştirin. – Pilleri takın ve teraziyi sert bir zemin üzerine yerleştirin (terazinin LCD’sinde “CONNECT WITH APP” yanıp söner).
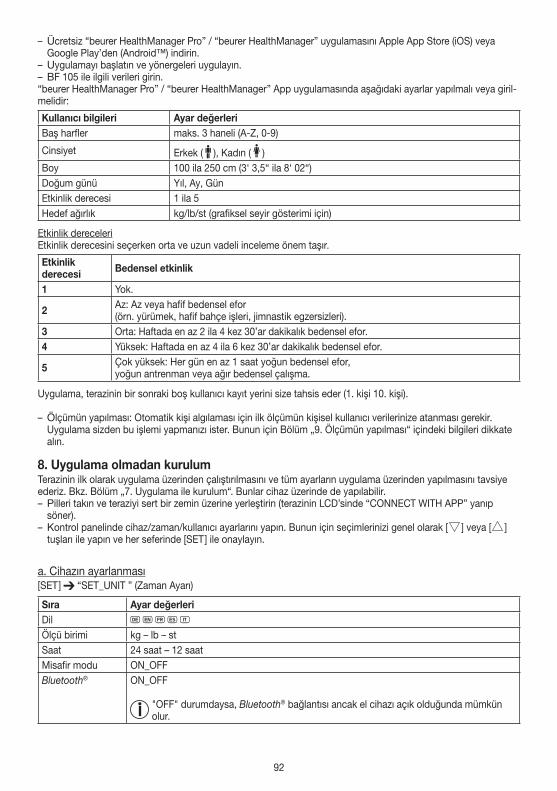
92
– Ücretsiz “beurer HealthManager Pro” / “beurer HealthManager” uygulamasını Apple App Store (iOS) veya Google Play’den (Android™) indirin.
– Uygulamayı başlatın ve yönergeleri uygulayın. – BF 105 ile ilgili verileri girin.
“beurer HealthManager Pro” / “beurer HealthManager” App uygulamasında aşağıdaki ayarlar yapılmalı veya giril-melidir:
Kullanıcı bilgileri Ayar değerleriBaş harfler maks. 3 haneli (A-Z, 0-9)
Cinsiyet Erkek ( ), Kadın ( )Boy 100 ila 250 cm (3‘ 3,5“ ila 8‘ 02“)Doğum günü Yıl, Ay, GünEtkinlik derecesi 1 ila 5Hedef ağırlık kg/lb/st (grafiksel seyir gösterimi için)
Etkinlik dereceleriEtkinlik derecesini seçerken orta ve uzun vadeli inceleme önem taşır.
Etkinlik derecesi Bedensel etkinlik
1 Yok.
2 Az: Az veya hafif bedensel efor (örn. yürümek, hafif bahçe işleri, jimnastik egzersizleri).
3 Orta: Haftada en az 2 ila 4 kez 30’ar dakikalık bedensel efor.4 Yüksek: Haftada en az 4 ila 6 kez 30’ar dakikalık bedensel efor.
5 Çok yüksek: Her gün en az 1 saat yoğun bedensel efor, yoğun antrenman veya ağır bedensel çalışma.
Uygulama, terazinin bir sonraki boş kullanıcı kayıt yerini size tahsis eder (1. kişi 10. kişi).
– Ölçümün yapılması: Otomatik kişi algılaması için ilk ölçümün kişisel kullanıcı verilerinize atanması gerekir. Uygulama sizden bu işlemi yapmanızı ister. Bunun için Bölüm „9. Ölçümün yapılması“ içindeki bilgileri dikkate alın.
8. Uygulama olmadan kurulumTerazinin ilk olarak uygulama üzerinden çalıştırılmasını ve tüm ayarların uygulama üzerinden yapılmasını tavsiye ederiz. Bkz. Bölüm „7. Uygulama ile kurulum“. Bunlar cihaz üzerinde de yapılabilir. – Pilleri takın ve teraziyi sert bir zemin üzerine yerleştirin (terazinin LCD’sinde “CONNECT WITH APP” yanıp söner).
– Kontrol panelinde cihaz/zaman/kullanıcı ayarlarını yapın. Bunun için seçimlerinizi genel olarak [ ] veya [ ] tuşları ile yapın ve her seferinde [SET ] ile onaylayın.
a. Cihazın ayarlanması[SET ] “SET_UNIT ” (Zaman Ayarı)
Sıra Ayar değerleriDil D G F E IÖlçü birimi kg – lb – stSaat 24 saat – 12 saatMisafir modu ON_OFFBluetooth® ON_OFF
"OFF" durumdaysa, Bluetooth® bağlantısı ancak el cihazı açık olduğunda mümkün olur.
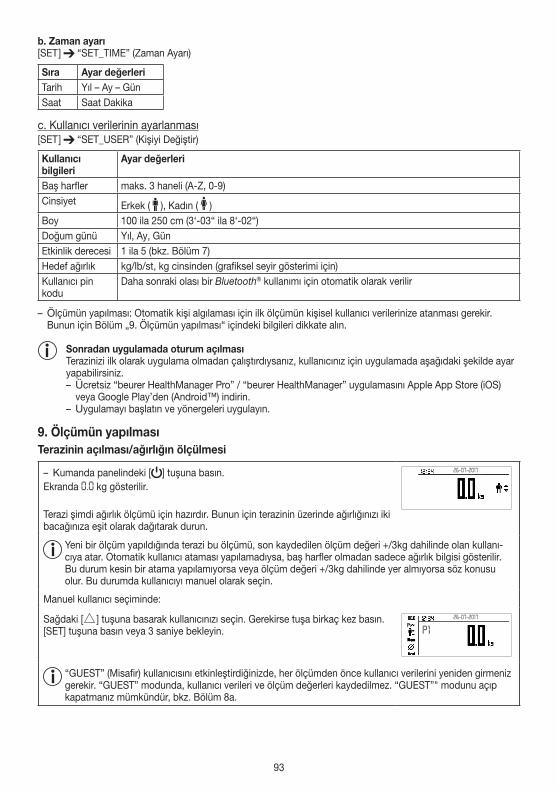
93
b. Zaman ayarı[SET ] “SET_TIME” (Zaman Ayarı)
Sıra Ayar değerleriTarih Yıl – Ay – GünSaat Saat Dakika
c. Kullanıcı verilerinin ayarlanması[SET ] “SET_USER” (Kişiyi Değiştir)
Kullanıcı bilgileri
Ayar değerleri
Baş harfler maks. 3 haneli (A-Z, 0-9)Cinsiyet Erkek ( ), Kadın ( )Boy 100 ila 250 cm (3‘-03“ ila 8‘-02“)Doğum günü Yıl, Ay, GünEtkinlik derecesi 1 ila 5 (bkz. Bölüm 7)Hedef ağırlık kg/lb/st, kg cinsinden (grafiksel seyir gösterimi için)Kullanıcı pin kodu
Daha sonraki olası bir Bluetooth® kullanımı için otomatik olarak verilir
– Ölçümün yapılması: Otomatik kişi algılaması için ilk ölçümün kişisel kullanıcı verilerinize atanması gerekir. Bunun için Bölüm „9. Ölçümün yapılması“ içindeki bilgileri dikkate alın.
Sonradan uygulamada oturum açılmasıTerazinizi ilk olarak uygulama olmadan çalıştırdıysanız, kullanıcınız için uygulamada aşağıdaki şekilde ayar yapabilirsiniz. – Ücretsiz “beurer HealthManager Pro” / “beurer HealthManager” uygulamasını Apple App Store (iOS) veya Google Play’den (Android™) indirin.
– Uygulamayı başlatın ve yönergeleri uygulayın.
9. Ölçümün yapılması Terazinin açılması/ağırlığın ölçülmesi
– Kumanda panelindeki [ ] tuşuna basın.Ekranda 0.0 kg gösterilir.
Terazi şimdi ağırlık ölçümü için hazırdır. Bunun için terazinin üzerinde ağırlığınızı iki bacağınıza eşit olarak dağıtarak durun.
26-07-2017
Yeni bir ölçüm yapıldığında terazi bu ölçümü, son kaydedilen ölçüm değeri +/3kg dahilinde olan kullanı-cıya atar. Otomatik kullanıcı ataması yapılamadıysa, baş harfler olmadan sadece ağırlık bilgisi gösterilir. Bu durum kesin bir atama yapılamıyorsa veya ölçüm değeri +/3kg dahilinde yer almıyorsa söz konusu olur. Bu durumda kullanıcıyı manuel olarak seçin.
Manuel kullanıcı seçiminde:
Sağdaki [ ] tuşuna basarak kullanıcınızı seçin. Gerekirse tuşa birkaç kez basın.[SET] tuşuna basın veya 3 saniye bekleyin.
26-07-2017
P1
“GUEST” (Misafir) kullanıcısını etkinleştirdiğinizde, her ölçümden önce kullanıcı verilerini yeniden girmeniz gerekir. “GUEST” modunda, kullanıcı verileri ve ölçüm değerleri kaydedilmez. “GUEST”" modunu açıp kapatmanız mümkündür, bkz. Bölüm 8a.
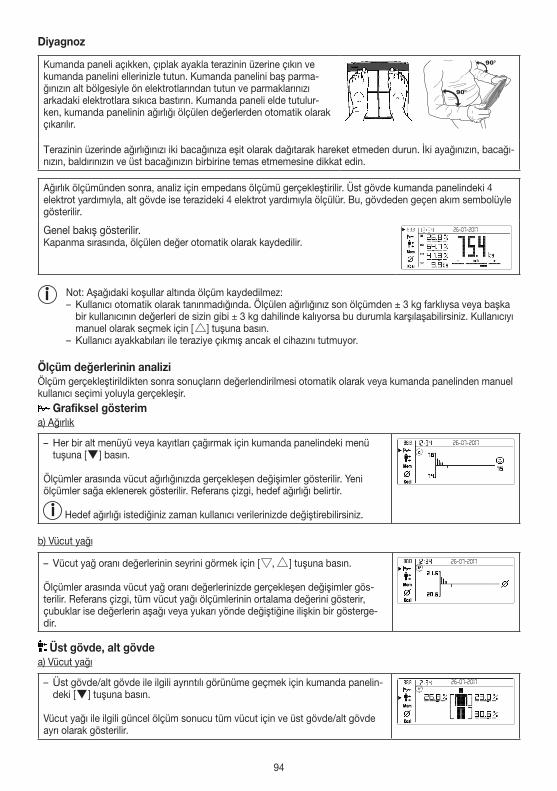
94
Diyagnoz
Kumanda paneli açıkken, çıplak ayakla terazinin üzerine çıkın ve kumanda panelini ellerinizle tutun. Kumanda panelini baş parma-ğınızın alt bölgesiyle ön elektrotlarından tutun ve parmaklarınızı arkadaki elektrotlara sıkıca bastırın. Kumanda paneli elde tutulur-ken, kumanda panelinin ağırlığı ölçülen değerlerden otomatik olarak çıkarılır.
Terazinin üzerinde ağırlığınızı iki bacağınıza eşit olarak dağıtarak hareket etmeden durun. İki ayağınızın, bacağı-nızın, baldırınızın ve üst bacağınızın birbirine temas etmemesine dikkat edin.
Ağırlık ölçümünden sonra, analiz için empedans ölçümü gerçekleştirilir. Üst gövde kumanda panelindeki 4 elektrot yardımıyla, alt gövde ise terazideki 4 elektrot yardımıyla ölçülür. Bu, gövdeden geçen akım sembolüyle gösterilir.
Genel bakış gösterilir.Kapanma sırasında, ölçülen değer otomatik olarak kaydedilir.
26-07-2017
Not: Aşağıdaki koşullar altında ölçüm kaydedilmez: – Kullanıcı otomatik olarak tanınmadığında. Ölçülen ağırlığınız son ölçümden ± 3 kg farklıysa veya başka bir kullanıcının değerleri de sizin gibi ± 3 kg dahilinde kalıyorsa bu durumla karşılaşabilirsiniz. Kullanıcıyı manuel olarak seçmek için [ ] tuşuna basın.
– Kullanıcı ayakkabıları ile teraziye çıkmış ancak el cihazını tutmuyor.
Ölçüm değerlerinin analiziÖlçüm gerçekleştirildikten sonra sonuçların değerlendirilmesi otomatik olarak veya kumanda panelinden manuel kullanıcı seçimi yoluyla gerçekleşir.
Grafiksel gösterima) Ağırlık
– Her bir alt menüyü veya kayıtları çağırmak için kumanda panelindeki menü tuşuna [ ] basın.
Ölçümler arasında vücut ağırlığınızda gerçekleşen değişimler gösterilir. Yeni ölçümler sağa eklenerek gösterilir. Referans çizgi, hedef ağırlığı belirtir.
Hedef ağırlığı istediğiniz zaman kullanıcı verilerinizde değiştirebilirsiniz.
26-07-2017
b) Vücut yağı
– Vücut yağ oranı değerlerinin seyrini görmek için [ , ] tuşuna basın.
Ölçümler arasında vücut yağ oranı değerlerinizde gerçekleşen değişimler gös-terilir. Referans çizgi, tüm vücut yağı ölçümlerinin ortalama değerini gösterir, çubuklar ise değerlerin aşağı veya yukarı yönde değiştiğine ilişkin bir gösterge-dir.
26-07-2017
Üst gövde, alt gövdea) Vücut yağı
– Üst gövde/alt gövde ile ilgili ayrıntılı görünüme geçmek için kumanda panelin-deki [ ] tuşuna basın.
Vücut yağı ile ilgili güncel ölçüm sonucu tüm vücut için ve üst gövde/alt gövde ayrı olarak gösterilir.
26-07-2017
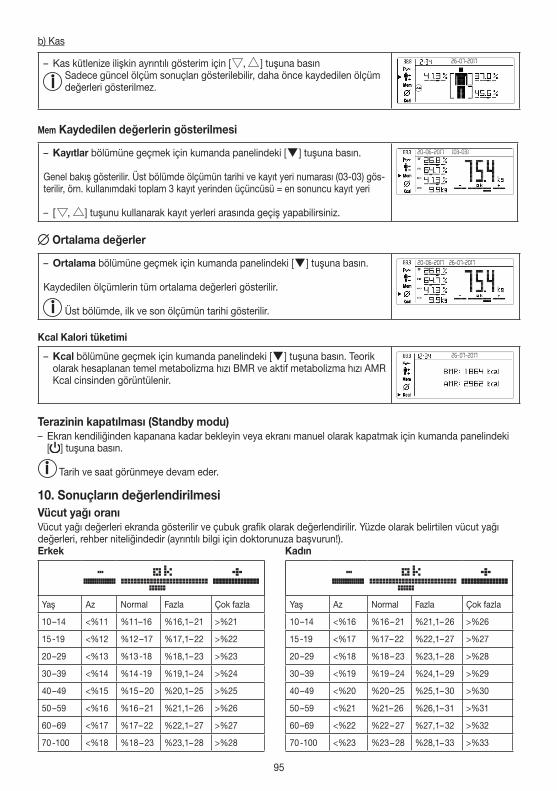
95
b) Kas
– Kas kütlenize ilişkin ayrıntılı gösterim için [ , ] tuşuna basın Sadece güncel ölçüm sonuçları gösterilebilir, daha önce kaydedilen ölçüm değerleri gösterilmez.
26-07-2017
Mem Kaydedilen değerlerin gösterilmesi
– Kayıtlar bölümüne geçmek için kumanda panelindeki [ ] tuşuna basın.
Genel bakış gösterilir. Üst bölümde ölçümün tarihi ve kayıt yeri numarası (03-03) gös-terilir, örn. kullanımdaki toplam 3 kayıt yerinden üçüncüsü = en sonuncu kayıt yeri
– [ , ] tuşunu kullanarak kayıt yerleri arasında geçiş yapabilirsiniz.
(03-03)20-06-2017
Ortalama değerler
– Ortalama bölümüne geçmek için kumanda panelindeki [ ] tuşuna basın.
Kaydedilen ölçümlerin tüm ortalama değerleri gösterilir.
Üst bölümde, ilk ve son ölçümün tarihi gösterilir.
20-06-2017 26-07-2017
Kcal Kalori tüketimi
– Kcal bölümüne geçmek için kumanda panelindeki [ ] tuşuna basın. Teorik olarak hesaplanan temel metabolizma hızı BMR ve aktif metabolizma hızı AMR Kcal cinsinden görüntülenir.
26-07-2017
Terazinin kapatılması (Standby modu) – Ekran kendiliğinden kapanana kadar bekleyin veya ekranı manuel olarak kapatmak için kumanda panelindeki [ ] tuşuna basın.
Tarih ve saat görünmeye devam eder.
10. Sonuçların değerlendirilmesiVücut yağı oranıVücut yağı değerleri ekranda gösterilir ve çubuk grafik olarak değerlendirilir. Yüzde olarak belirtilen vücut yağı değerleri, rehber niteliğindedir (ayrıntılı bilgi için doktorunuza başvurun!).Erkek Kadın
Yaş Az Normal Fazla Çok fazla Yaş Az Normal Fazla Çok fazla
10 –14 <%11 %11–16 %16,1– 21 >%21 10 –14 <%16 %16 – 21 %21,1– 26 >%26
15 -19 <%12 %12 –17 %17,1– 22 >%22 15 -19 <%17 %17 – 22 %22,1– 27 >%27
20 – 29 <%13 %13 -18 %18,1– 23 >%23 20 – 29 <%18 %18 – 23 %23,1– 28 >%28
30 – 39 <%14 %14 -19 %19,1– 24 >%24 30 – 39 <%19 %19 – 24 %24,1– 29 >%29
40 – 49 <%15 %15 – 20 %20,1– 25 >%25 40 – 49 <%20 %20 – 25 %25,1– 30 >%30
50 – 59 <%16 %16 – 21 %21,1– 26 >%26 50 – 59 <%21 %21– 26 %26,1– 31 >%31
60 – 69 <%17 %17 – 22 %22,1– 27 >%27 60 – 69 <%22 %22 – 27 %27,1– 32 >%32
70 -100 <%18 %18 – 23 %23,1– 28 >%28 70 -100 <%23 %23 – 28 %28,1– 33 >%33
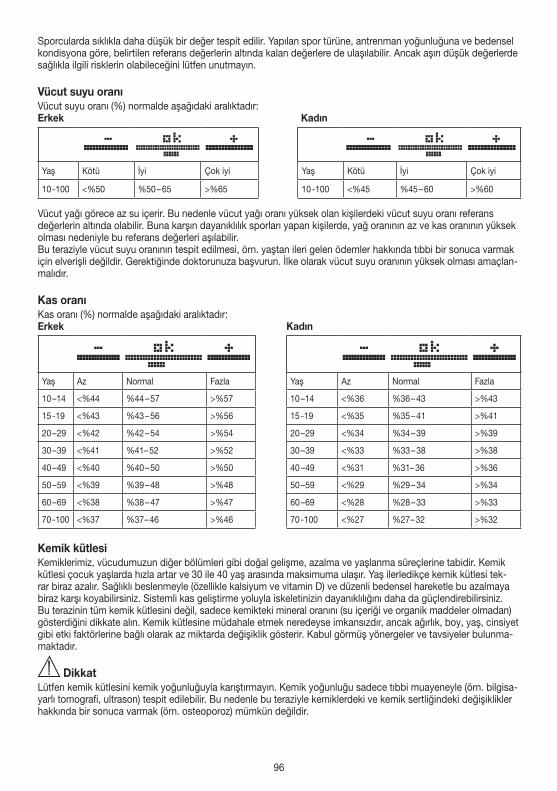
96
Sporcularda sıklıkla daha düşük bir değer tespit edilir. Yapılan spor türüne, antrenman yoğunluğuna ve bedensel kondisyona göre, belirtilen referans değerlerin altında kalan değerlere de ulaşılabilir. Ancak aşırı düşük değerlerde sağlıkla ilgili risklerin olabileceğini lütfen unutmayın.
Vücut suyu oranıVücut suyu oranı (%) normalde aşağıdaki aralıktadır:Erkek Kadın
Yaş Kötü İyi Çok iyi Yaş Kötü İyi Çok iyi
10 -100 <%50 %50 – 65 >%65 10 -100 <%45 %45 – 60 >%60
Vücut yağı görece az su içerir. Bu nedenle vücut yağı oranı yüksek olan kişilerdeki vücut suyu oranı referans değerlerin altında olabilir. Buna karşın dayanıklılık sporları yapan kişilerde, yağ oranının az ve kas oranının yüksek olması nedeniyle bu referans değerleri aşılabilir.Bu teraziyle vücut suyu oranının tespit edilmesi, örn. yaştan ileri gelen ödemler hakkında tıbbi bir sonuca varmak için elverişli değildir. Gerektiğinde doktorunuza başvurun. İlke olarak vücut suyu oranının yüksek olması amaçlan-malıdır.
Kas oranıKas oranı (%) normalde aşağıdaki aralıktadır:Erkek Kadın
Yaş Az Normal Fazla Yaş Az Normal Fazla
10 –14 <%44 %44 – 57 >%57 10 –14 <%36 %36 – 43 >%43
15 -19 <%43 %43 – 56 >%56 15 -19 <%35 %35 – 41 >%41
20 – 29 <%42 %42 – 54 >%54 20 – 29 <%34 %34 – 39 >%39
30 – 39 <%41 %41– 52 >%52 30 – 39 <%33 %33 – 38 >%38
40 – 49 <%40 %40 – 50 >%50 40 – 49 <%31 %31– 36 >%36
50 – 59 <%39 %39 – 48 >%48 50 – 59 <%29 %29 – 34 >%34
60 – 69 <%38 %38 – 47 >%47 60 – 69 <%28 %28 – 33 >%33
70 -100 <%37 %37 – 46 >%46 70 -100 <%27 %27 – 32 >%32
Kemik kütlesiKemiklerimiz, vücudumuzun diğer bölümleri gibi doğal gelişme, azalma ve yaşlanma süreçlerine tabidir. Kemik kütlesi çocuk yaşlarda hızla artar ve 30 ile 40 yaş arasında maksimuma ulaşır. Yaş ilerledikçe kemik kütlesi tek-rar biraz azalır. Sağlıklı beslenmeyle (özellikle kalsiyum ve vitamin D) ve düzenli bedensel hareketle bu azalmaya biraz karşı koyabilirsiniz. Sistemli kas geliştirme yoluyla iskeletinizin dayanıklılığını daha da güçlendirebilirsiniz.Bu terazinin tüm kemik kütlesini değil, sadece kemikteki mineral oranını (su içeriği ve organik maddeler olmadan) gösterdiğini dikkate alın. Kemik kütlesine müdahale etmek neredeyse imkansızdır, ancak ağırlık, boy, yaş, cinsiyet gibi etki faktörlerine bağlı olarak az miktarda değişiklik gösterir. Kabul görmüş yönergeler ve tavsiyeler bulunma-maktadır.
DikkatLütfen kemik kütlesini kemik yoğunluğuyla karıştırmayın. Kemik yoğunluğu sadece tıbbi muayeneyle (örn. bilgisa-yarlı tomografi, ultrason) tespit edilebilir. Bu nedenle bu teraziyle kemiklerdeki ve kemik sertliğindeki değişiklikler hakkında bir sonuca varmak (örn. osteoporoz) mümkün değildir.
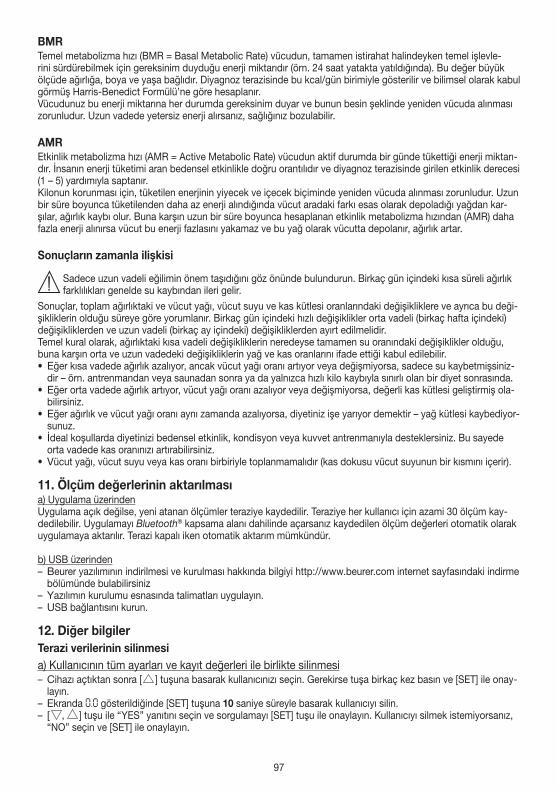
97
BMRTemel metabolizma hızı (BMR = Basal Metabolic Rate) vücudun, tamamen istirahat halindeyken temel işlevle-rini sürdürebilmek için gereksinim duyduğu enerji miktarıdır (örn. 24 saat yatakta yatıldığında). Bu değer büyük ölçüde ağırlığa, boya ve yaşa bağlıdır. Diyagnoz terazisinde bu kcal/gün birimiyle gösterilir ve bilimsel olarak kabul görmüş Harris-Benedict Formülü’ne göre hesaplanır.Vücudunuz bu enerji miktarına her durumda gereksinim duyar ve bunun besin şeklinde yeniden vücuda alınması zorunludur. Uzun vadede yetersiz enerji alırsanız, sağlığınız bozulabilir.
AMREtkinlik metabolizma hızı (AMR = Active Metabolic Rate) vücudun aktif durumda bir günde tükettiği enerji miktarı-dır. İnsanın enerji tüketimi aran bedensel etkinlikle doğru orantılıdır ve diyagnoz terazisinde girilen etkinlik derecesi (1 – 5) yardımıyla saptanır.Kilonun korunması için, tüketilen enerjinin yiyecek ve içecek biçiminde yeniden vücuda alınması zorunludur. Uzun bir süre boyunca tüketilenden daha az enerji alındığında vücut aradaki farkı esas olarak depoladığı yağdan kar-şılar, ağırlık kaybı olur. Buna karşın uzun bir süre boyunca hesaplanan etkinlik metabolizma hızından (AMR) daha fazla enerji alınırsa vücut bu enerji fazlasını yakamaz ve bu yağ olarak vücutta depolanır, ağırlık artar.
Sonuçların zamanla ilişkisi
Sadece uzun vadeli eğilimin önem taşıdığını göz önünde bulundurun. Birkaç gün içindeki kısa süreli ağırlık farklılıkları genelde su kaybından ileri gelir.
Sonuçlar, toplam ağırlıktaki ve vücut yağı, vücut suyu ve kas kütlesi oranlarındaki değişikliklere ve ayrıca bu deği-şikliklerin olduğu süreye göre yorumlanır. Birkaç gün içindeki hızlı değişiklikler orta vadeli (birkaç hafta içindeki) değişikliklerden ve uzun vadeli (birkaç ay içindeki) değişikliklerden ayırt edilmelidir.Temel kural olarak, ağırlıktaki kısa vadeli değişikliklerin neredeyse tamamen su oranındaki değişiklikler olduğu, buna karşın orta ve uzun vadedeki değişikliklerin yağ ve kas oranlarını ifade ettiği kabul edilebilir.• Eğer kısa vadede ağırlık azalıyor, ancak vücut yağı oranı artıyor veya değişmiyorsa, sadece su kaybetmişsiniz-
dir – örn. antrenmandan veya saunadan sonra ya da yalnızca hızlı kilo kaybıyla sınırlı olan bir diyet sonrasında.• Eğer orta vadede ağırlık artıyor, vücut yağı oranı azalıyor veya değişmiyorsa, değerli kas kütlesi geliştirmiş ola-
bilirsiniz.• Eğer ağırlık ve vücut yağı oranı aynı zamanda azalıyorsa, diyetiniz işe yarıyor demektir – yağ kütlesi kaybediyor-
sunuz.• İdeal koşullarda diyetinizi bedensel etkinlik, kondisyon veya kuvvet antrenmanıyla desteklersiniz. Bu sayede
orta vadede kas oranınızı artırabilirsiniz.• Vücut yağı, vücut suyu veya kas oranı birbiriyle toplanmamalıdır (kas dokusu vücut suyunun bir kısmını içerir).
11. Ölçüm değerlerinin aktarılmasıa) Uygulama üzerindenUygulama açık değilse, yeni atanan ölçümler teraziye kaydedilir. Teraziye her kullanıcı için azami 30 ölçüm kay-dedilebilir. Uygulamayı Bluetooth® kapsama alanı dahilinde açarsanız kaydedilen ölçüm değerleri otomatik olarak uygulamaya aktarılır. Terazi kapalı iken otomatik aktarım mümkündür.
b) USB üzerinden – Beurer yazılımının indirilmesi ve kurulması hakkında bilgiyi http://www.beurer.com internet sayfasındaki indirme bölümünde bulabilirsiniz
– Yazılımın kurulumu esnasında talimatları uygulayın. – USB bağlantısını kurun.
12. Diğer bilgilerTerazi verilerinin silinmesia) Kullanıcının tüm ayarları ve kayıt değerleri ile birlikte silinmesi – Cihazı açtıktan sonra [ ] tuşuna basarak kullanıcınızı seçin. Gerekirse tuşa birkaç kez basın ve [SET] ile onay-layın.
– Ekranda 0.0 gösterildiğinde [SET] tuşuna 10 saniye süreyle basarak kullanıcıyı silin. – [ , ] tuşu ile “YES” yanıtını seçin ve sorgulamayı [SET] tuşu ile onaylayın. Kullanıcıyı silmek istemiyorsanız, “NO” seçin ve [SET] ile onaylayın.
98
Bu kullanıcının kaydedilmiş tüm değerleri ve ayarları silinir.
b) Bir kullanıcının bazı kayıtlı değerlerinin silinmesi – “Mem” ölçüm değerleri kayıtlarından bir ölçüm değeri seçin ve kumanda panelindeki [SET] tuşuna kısaca basa-rak gösterilen kayıtlı değeri silin.
– Bunu doğrudan ölçümden sonra da yapabilirsiniz. – -[ , ] tuşu ile “YES” yanıtını seçin ve sorgulamayı [SET] tuşu ile onaylayın. Değeri silmek istemiyorsanız “NO“ yanıtını seçin ve [SET] ile onaylayın.
c) Bir kullanıcının tüm kayıtlı değerlerinin silinmesi – “Mem” ölçüm değerleri kayıtlarını çağırın ve kumanda panelindeki [SET] tuşuna yakl. 5 saniye süreyle basarak tüm değerleri silin.
– [ , ] tuşu ile “YES” yanıtını seçin ve sorgulamayı [SET] tuşu ile onaylayın. Hiçbir şey silmek istemiyorsanız, “NO“ yanıtını seçin ve [SET] ile onaylayın.
Pillerin değiştirilmesiKumanda panelinde bir pil değiştirme göstergesi bulunur. Kumanda panelinin pilleri zayıfladığından ekranda sembolü, terazinin pilleri zayıfladığında sembolü görüntülenir. Bu durumda piller değiştirilmelidir. Bunun ardın-dan teraziyi tekrar uygulamaya bağlayın. Sistem zamanı güncellenir.
NOT:• Her pil değişiminde aynı tip, aynı marka ve kapasiteye sahip piller kullanın.• Şarj edilebilir piller kullanmayın.• Ağır metal içermeyen piller kullanın.
13. Cihazın temizliği ve bakımıCihaz belirli aralıklarla temizlenmelidir.Temizlik için, gerektiğinde üzerine biraz sıvı bulaşık deterjanı dökebileceğiniz nemli bir bez kullanın.
DİKKAT• Hiçbir zaman aşındırıcı çözücü maddeler veya temizlik maddeleri kullanmayın!• Cihazı kesinlikle suya daldırmayın!• Cihazı bulaşık makinesinde yıkamayın!
14. Bertaraf etmeKullanılmış, tamamen boşalmış piller özel işaretli toplama kutularına atılarak, özel atık toplama yerlerine veya elektrikli cihaz satıcılarına teslim edilerek bertaraf edilmelidir. Pillerin bertaraf edilmesi, yasal olarak sizin sorumlu-luğunuzdadır.Bu işaretler, zararlı madde içeren pillerin üzerinde bulunur: Pb = Pil kurşun içerir,Cd = Pil kadmiyum içerir, Hg = Pil cıva içerir.
Çevreyi korumak için, kullanım ömrü dolan cihazı evsel atıklarla beraber bertaraf etmeyin. Cihaz, ülkenizdeki uygun atık toplama merkezleri aracılığıyla bertaraf edilmelidir. Cihazı, elektrikli ve elektronik hurda cihazlarla ilgili AB direktifine (WEEE Waste Electrical and Electronic Equipment) uygun şekilde bertaraf edin. Bertaraf etme ile ilgili sorularınızı, ilgili yerel makamlara iletebilirsi-niz.
Ambalaj çevreye zarar vermeyecek şekilde bertaraf edilmelidir. 20
PAP
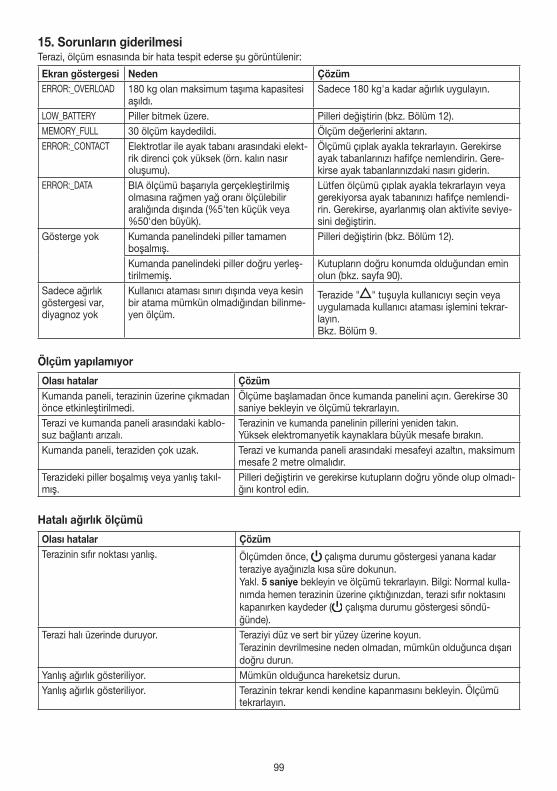
99
15. Sorunların giderilmesiTerazi, ölçüm esnasında bir hata tespit ederse şu görüntülenir:
Ekran göstergesi Neden ÇözümERROR:_OVERLOAD 180 kg olan maksimum taşıma kapasitesi
aşıldı.Sadece 180 kg'a kadar ağırlık uygulayın.
LOW_BATTERY Piller bitmek üzere. Pilleri değiştirin (bkz. Bölüm 12).MEMORY_FULL 30 ölçüm kaydedildi. Ölçüm değerlerini aktarın.ERROR:_CONTACT Elektrotlar ile ayak tabanı arasındaki elekt-
rik direnci çok yüksek (örn. kalın nasır oluşumu).
Ölçümü çıplak ayakla tekrarlayın. Gerekirse ayak tabanlarınızı hafifçe nemlendirin. Gere-kirse ayak tabanlarınızdaki nasırı giderin.
ERROR:_DATA BIA ölçümü başarıyla gerçekleştirilmiş olmasına rağmen yağ oranı ölçülebilir aralığında dışında (%5'ten küçük veya %50'den büyük).
Lütfen ölçümü çıplak ayakla tekrarlayın veya gerekiyorsa ayak tabanınızı hafifçe nemlendi-rin. Gerekirse, ayarlanmış olan aktivite seviye-sini değiştirin.
Gösterge yok Kumanda panelindeki piller tamamen boşalmış.
Pilleri değiştirin (bkz. Bölüm 12).
Kumanda panelindeki piller doğru yerleş-tirilmemiş.
Kutupların doğru konumda olduğundan emin olun (bkz. sayfa 90).
Sadece ağırlık göstergesi var, diyagnoz yok
Kullanıcı ataması sınırı dışında veya kesin bir atama mümkün olmadığından bilinme-yen ölçüm.
Terazide " " tuşuyla kullanıcıyı seçin veya uygulamada kullanıcı ataması işlemini tekrar-layın.Bkz. Bölüm 9.
Ölçüm yapılamıyor
Olası hatalar ÇözümKumanda paneli, terazinin üzerine çıkmadan önce etkinleştirilmedi.
Ölçüme başlamadan önce kumanda panelini açın. Gerekirse 30 saniye bekleyin ve ölçümü tekrarlayın.
Terazi ve kumanda paneli arasındaki kablo-suz bağlantı arızalı.
Terazinin ve kumanda panelinin pillerini yeniden takın.Yüksek elektromanyetik kaynaklara büyük mesafe bırakın.
Kumanda paneli, teraziden çok uzak. Terazi ve kumanda paneli arasındaki mesafeyi azaltın, maksimum mesafe 2 metre olmalıdır.
Terazideki piller boşalmış veya yanlış takıl-mış.
Pilleri değiştirin ve gerekirse kutupların doğru yönde olup olmadı-ğını kontrol edin.
Hatalı ağırlık ölçümü
Olası hatalar ÇözümTerazinin sıfır noktası yanlış. Ölçümden önce, çalışma durumu göstergesi yanana kadar
teraziye ayağınızla kısa süre dokunun.Yakl. 5 saniye bekleyin ve ölçümü tekrarlayın. Bilgi: Normal kulla-nımda hemen terazinin üzerine çıktığınızdan, terazi sıfır noktasını kapanırken kaydeder ( çalışma durumu göstergesi söndü-ğünde).
Terazi halı üzerinde duruyor. Teraziyi düz ve sert bir yüzey üzerine koyun.Terazinin devrilmesine neden olmadan, mümkün olduğunca dışarı doğru durun.
Yanlış ağırlık gösteriliyor. Mümkün olduğunca hareketsiz durun.Yanlış ağırlık gösteriliyor. Terazinin tekrar kendi kendine kapanmasını bekleyin. Ölçümü
tekrarlayın.
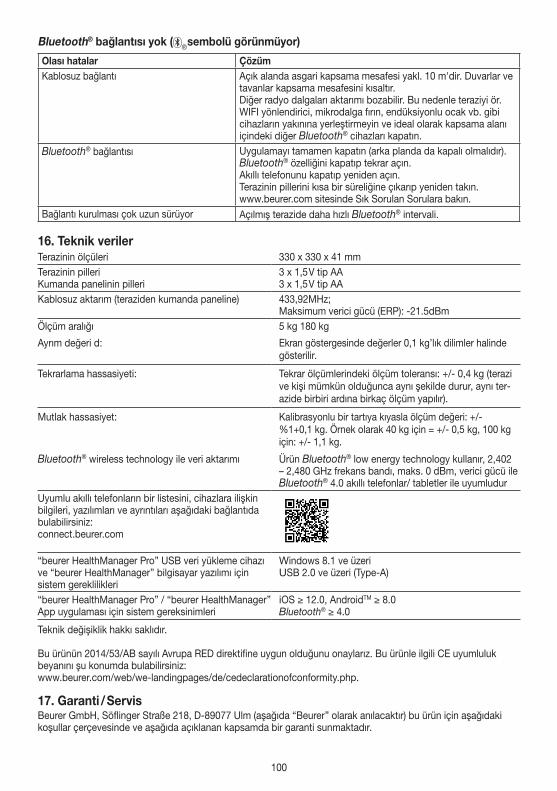
100
Bluetooth® bağlantısı yok ( ® sembolü görünmüyor)
Olası hatalar ÇözümKablosuz bağlantı Açık alanda asgari kapsama mesafesi yakl. 10 m'dir. Duvarlar ve
tavanlar kapsama mesafesini kısaltır.Diğer radyo dalgaları aktarımı bozabilir. Bu nedenle teraziyi ör. WIFI yönlendirici, mikrodalga fırın, endüksiyonlu ocak vb. gibi cihazların yakınına yerleştirmeyin ve ideal olarak kapsama alanı içindeki diğer Bluetooth® cihazları kapatın.
Bluetooth® bağlantısı Uygulamayı tamamen kapatın (arka planda da kapalı olmalıdır).Bluetooth® özelliğini kapatıp tekrar açın.Akıllı telefonunu kapatıp yeniden açın.Terazinin pillerini kısa bir süreliğine çıkarıp yeniden takın.www.beurer.com sitesinde Sık Sorulan Sorulara bakın.
Bağlantı kurulması çok uzun sürüyor Açılmış terazide daha hızlı Bluetooth® intervali.
16. Teknik verilerTerazinin ölçüleri 330 x 330 x 41 mmTerazinin pilleriKumanda panelinin pilleri
3 x 1,5 V tip AA3 x 1,5 V tip AA
Kablosuz aktarım (teraziden kumanda paneline) 433,92MHz; Maksimum verici gücü (ERP): -21.5dBm
Ölçüm aralığı 5 kg 180 kg
Ayrım değeri d: Ekran göstergesinde değerler 0,1 kg’lık dilimler halinde gösterilir.
Tekrarlama hassasiyeti: Tekrar ölçümlerindeki ölçüm toleransı: +/- 0,4 kg (terazi ve kişi mümkün olduğunca aynı şekilde durur, aynı ter-azide birbiri ardına birkaç ölçüm yapılır).
Mutlak hassasiyet: Kalibrasyonlu bir tartıya kıyasla ölçüm değeri: +/- %1+0,1 kg. Örnek olarak 40 kg için = +/- 0,5 kg, 100 kg için: +/- 1,1 kg.
Bluetooth® wireless technology ile veri aktarımı Ürün Bluetooth® low energy technology kullanır, 2,402 – 2,480 GHz frekans bandı, maks. 0 dBm, verici gücü ile Bluetooth® 4.0 akıllı telefonlar/ tabletler ile uyumludur
Uyumlu akıllı telefonların bir listesini, cihazlara ilişkin bilgileri, yazılımları ve ayrıntıları aşağıdaki bağlantıda bulabilirsiniz:connect.beurer.com
“beurer HealthManager Pro” USB veri yükleme cihazı ve “beurer HealthManager” bilgisayar yazılımı için sistem gereklilikleri
Windows 8.1 ve üzeriUSB 2.0 ve üzeri (Type-A)
“beurer HealthManager Pro” / “beurer HealthManager” App uygulaması için sistem gereksinimleri
iOS ≥ 12.0, AndroidTM ≥ 8.0Bluetooth® ≥ 4.0
Teknik değişiklik hakkı saklıdır.
Bu ürünün 2014/53/AB sayılı Avrupa RED direktifine uygun olduğunu onaylarız. Bu ürünle ilgili CE uyumluluk beyanını şu konumda bulabilirsiniz: www.beurer.com/web/we-landingpages/de/cedeclarationofconformity.php.
17. Garanti / ServisBeurer GmbH, Söflinger Straße 218, D-89077 Ulm (aşağıda “Beurer” olarak anılacaktır) bu ürün için aşağıdaki koşullar çerçevesinde ve aşağıda açıklanan kapsamda bir garanti sunmaktadır.
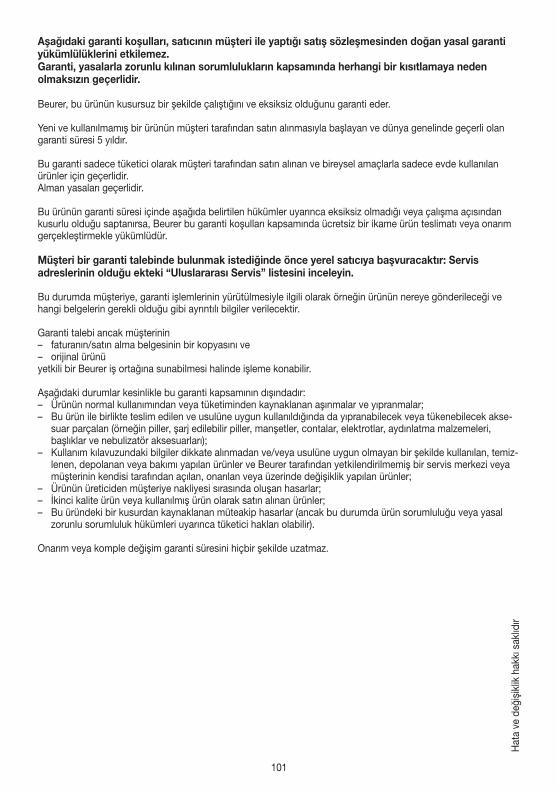
101
Hat
a ve
değ
işik
lik h
akkı
sak
lıdır
Aşağıdaki garanti koşulları, satıcının müşteri ile yaptığı satış sözleşmesinden doğan yasal garanti yükümlülüklerini etkilemez. Garanti, yasalarla zorunlu kılınan sorumlulukların kapsamında herhangi bir kısıtlamaya neden olmaksızın geçerlidir.
Beurer, bu ürünün kusursuz bir şekilde çalıştığını ve eksiksiz olduğunu garanti eder.
Yeni ve kullanılmamış bir ürünün müşteri tarafından satın alınmasıyla başlayan ve dünya genelinde geçerli olan garanti süresi 5 yıldır.
Bu garanti sadece tüketici olarak müşteri tarafından satın alınan ve bireysel amaçlarla sadece evde kullanılan ürünler için geçerlidir.Alman yasaları geçerlidir.
Bu ürünün garanti süresi içinde aşağıda belirtilen hükümler uyarınca eksiksiz olmadığı veya çalışma açısından kusurlu olduğu saptanırsa, Beurer bu garanti koşulları kapsamında ücretsiz bir ikame ürün teslimatı veya onarım gerçekleştirmekle yükümlüdür.
Müşteri bir garanti talebinde bulunmak istediğinde önce yerel satıcıya başvuracaktır: Servis adreslerinin olduğu ekteki “Uluslararası Servis” listesini inceleyin.
Bu durumda müşteriye, garanti işlemlerinin yürütülmesiyle ilgili olarak örneğin ürünün nereye gönderileceği ve hangi belgelerin gerekli olduğu gibi ayrıntılı bilgiler verilecektir.
Garanti talebi ancak müşterinin – faturanın/satın alma belgesinin bir kopyasını ve – orijinal ürünü
yetkili bir Beurer iş ortağına sunabilmesi halinde işleme konabilir.
Aşağıdaki durumlar kesinlikle bu garanti kapsamının dışındadır: – Ürünün normal kullanımından veya tüketiminden kaynaklanan aşınmalar ve yıpranmalar; – Bu ürün ile birlikte teslim edilen ve usulüne uygun kullanıldığında da yıpranabilecek veya tükenebilecek akse-
suar parçaları (örneğin piller, şarj edilebilir piller, manşetler, contalar, elektrotlar, aydınlatma malzemeleri, başlıklar ve nebulizatör aksesuarları);
– Kullanım kılavuzundaki bilgiler dikkate alınmadan ve/veya usulüne uygun olmayan bir şekilde kullanılan, temiz-lenen, depolanan veya bakımı yapılan ürünler ve Beurer tarafından yetkilendirilmemiş bir servis merkezi veya müşterinin kendisi tarafından açılan, onarılan veya üzerinde değişiklik yapılan ürünler;
– Ürünün üreticiden müşteriye nakliyesi sırasında oluşan hasarlar; – İkinci kalite ürün veya kullanılmış ürün olarak satın alınan ürünler; – Bu üründeki bir kusurdan kaynaklanan müteakip hasarlar (ancak bu durumda ürün sorumluluğu veya yasal
zorunlu sorumluluk hükümleri uyarınca tüketici hakları olabilir).
Onarım veya komple değişim garanti süresini hiçbir şekilde uzatmaz.
102
РУССКИЙ
1. Для ознакомления ............................................1022. Пояснения к символам .....................................1033. Предостережения и указания по технике безопасности ........................................................1044. Информация......................................................1055. Описание прибора ............................................1066. Подготовка к работе .........................................1077. Настройка с помощью приложения ................1088. Настройка без приложения .............................109
9. Проведение измерения ....................................11010. Оценка результатов ........................................11311. Выгрузка измеренных значений ...................11512. Дополнительная информация .......................11513. Очистка прибора и уход за ним ....................11614. Утилизация ......................................................11615. Что делать при возникновении проблем? ....11616. Технические данные .......................................11817. Гарантия / сервисное обслуживание .............119
Комплект поставки• Диагностические весы• Съемный блок управления с дисплеем• Настенный крепеж• Набор для настенного монтажа• 3 батарейки 1,5 В типа AA (весы)• 3 батарейки 1,5 В типа AA (блок управления)• USB-кабель• Данная инструкция по применению и краткое руководство по Bluetooth®/USB
Уважаемый покупатель!Благодарим Вас за выбор продукции нашей фирмы. Мы производим современные, тщательно проте-стированные, высококачественные изделия для обогрева, измерения массы, кровяного давления, тем-пературы тела, пульса, для легкой терапии, массажа, косметического ухода, ухода за детьми и очистки воздуха.Внимательно прочтите данную инструкцию по применению, сохраните ее для последующего использова-ния, храните ее в доступном для других пользователей месте и следуйте ее указаниям.
С наилучшими пожеланиями,компания Beurer
1. Для ознакомленияФункции прибораДанные электронные весы используются для взвешивания и определения Ваших фитнес-параметров.Они предназначены для домашнего пользования.Весы имеют следующие функции, которыми могут пользоваться до 10 человек:• измерение массы тела;• определение доли жировой массы;• доли тканевой жидкости;• доли мышц;• массы костей;• значений основного обмена веществ и обмена веществ с учетом физической активности.
Кроме того, доступны следующие функции.• Инновационная навигация по меню на большом дисплее (на одном из 5 языков).• Дисплей может оставаться на весах, закрепляться на стене или использоваться отдельно. В качестве
опции в комплект поставки входит подставка.
Внимательно прочтите инструкцию по применению, сохраните ее для последующего использования, храните ее в доступном для других пользователей месте и сле-дуйте ее указаниям.
Оглавление
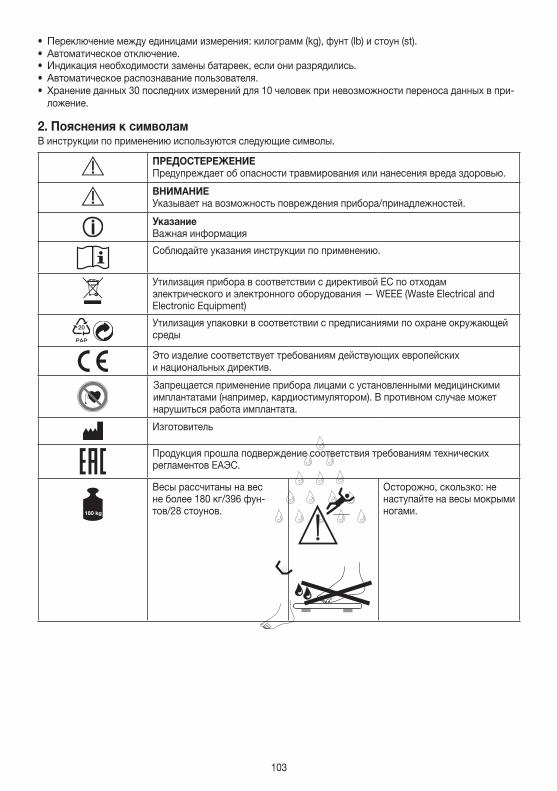
103
• Переключение между единицами измерения: килограмм (kg), фунт (lb) и стоун (st).• Автоматическое отключение.• Индикация необходимости замены батареек, если они разрядились.• Автоматическое распознавание пользователя.• Хранение данных 30 последних измерений для 10 человек при невозможности переноса данных в при-
ложение.
2. Пояснения к символамВ инструкции по применению используются следующие символы.
ПРЕДОСТЕРЕЖЕНИЕПредупреждает об опасности травмирования или нанесения вреда здоровью.
ВНИМАНИЕ Указывает на возможность повреждения прибора/принадлежностей.
УказаниеВажная информация
Соблюдайте указания инструкции по применению.
Утилизация прибора в соответствии с директивой ЕС по отходам электрического и электронного оборудования — WEEE (Waste Electrical and Electronic Equipment)
20
PAP
Утилизация упаковки в соответствии с предписаниями по охране окружающей среды
Это изделие соответствует требованиям действующих европейских и национальных директив.
Запрещается применение прибора лицами c установленными медицинскими имплантатами (например, кардиостимулятором). В противном случае может нарушиться работа имплантата.
Изготовитель
Πродyкция прошла подверждение соответствия требованиям технических регламентов ЕАЭС.
Весы рассчитаны на вес не более 180 кг/396 фун-тов/28 стоунов.
317306_SGWI 180_2019-05-03_02_WarningSticker_Lidl
max.
180 kg396 lb28 st
317306_SGWI 180_2019-05-03_02_WarningSticker_Lidl
max.
180 kg396 lb28 st
Осторожно, скользко: не наступайте на весы мокрыми ногами.
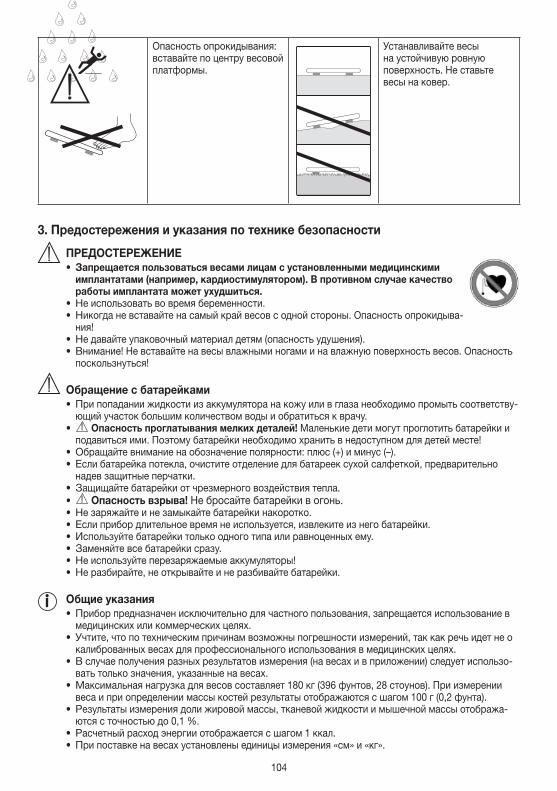
104
317306_SGWI 180_2019-05-03_02_WarningSticker_Lidl
max.
180 kg396 lb28 st
317306_SGWI 180_2019-05-03_02_WarningSticker_Lidl
max.
180 kg396 lb28 st
Опасность опрокидывания: вставайте по центру весовой платформы.
Устанавливайте весы на устойчивую ровную поверхность. Не ставьте весы на ковер.
3. Предостережения и указания по технике безопасности
ПРЕДОСТЕРЕЖЕНИЕ• Запрещается пользоваться весами лицам с установленными медицинскими
имплантатами (например, кардиостимулятором). В противном случае качество работы имплантата может ухудшиться.
• Не использовать во время беременности. • Никогда не вставайте на самый край весов с одной стороны. Опасность опрокидыва-
ния!• Не давайте упаковочный материал детям (опасность удушения).• Внимание! Не вставайте на весы влажными ногами и на влажную поверхность весов. Опасность
поскользнуться!
Обращение с батарейками• При попадании жидкости из аккумулятора на кожу или в глаза необходимо промыть соответству-
ющий участок большим количеством воды и обратиться к врачу.• Опасность проглатывания мелких деталей! Маленькие дети могут проглотить батарейки и
подавиться ими. Поэтому батарейки необходимо хранить в недоступном для детей месте!• Обращайте внимание на обозначение полярности: плюс (+) и минус (–).• Если батарейка потекла, очистите отделение для батареек сухой салфеткой, предварительно
надев защитные перчатки.• Защищайте батарейки от чрезмерного воздействия тепла.• Опасность взрыва! Не бросайте батарейки в огонь.• Не заряжайте и не замыкайте батарейки накоротко.• Если прибор длительное время не используется, извлеките из него батарейки.• Используйте батарейки только одного типа или равноценных ему. • Заменяйте все батарейки сразу.• Не используйте перезаряжаемые аккумуляторы!• Не разбирайте, не открывайте и не разбивайте батарейки.
Общие указания • Прибор предназначен исключительно для частного пользования, запрещается использование в
медицинских или коммерческих целях. • Учтите, что по техническим причинам возможны погрешности измерений, так как речь идет не о
калиброванных весах для профессионального использования в медицинских целях.• В случае получения разных результатов измерения (на весах и в приложении) следует использо-
вать только значения, указанные на весах.• Максимальная нагрузка для весов составляет 180 кг (396 фунтов, 28 стоунов). При измерении
веса и при определении массы костей результаты отображаются с шагом 100 г (0,2 фунта).• Результаты измерения доли жировой массы, тканевой жидкости и мышечной массы отобража-
ются с точностью до 0,1 %.• Расчетный расход энергии отображается с шагом 1 ккал.• При поставке на весах установлены единицы измерения «см» и «кг».

105
• Установите весы на ровную твердую поверхность. Твердая поверхность является необходимым условием для точного измерения.
• Ремонтные работы должны производиться только сервисной службой компании Beurer или авто-ризованными торговыми представителями. Перед предъявлением претензий проверьте и при необходимости замените батарейки.
Хранение и уходТочность измерений и срок службы прибора зависят от бережного обращения с ним.
ВНИМАНИЕ• Время от времени прибор необходимо очищать. Не используйте едкие чистящие средства и ни в
коем случае не погружайте прибор в воду.• Убедитесь, что на весы не попадает никакая жидкость. Никогда не погружайте весы в воду. Не
промывайте их под проточной водой.• Не ставьте никакие предметы на весы, когда они не используются.• Прибор следует предохранять от ударов, влажности, пыли, воздействия химикатов, сильных
колебаний температуры и не устанавливать их вблизи источников тепла (печей, радиаторов ото-пления).
• Не нажимайте кнопку слишком сильно и не используйте для этого острые предметы.• Не подвергайте весы воздействию высоких температур или сильных электромагнитных полей
(например, со стороны мобильных телефонов).
4. ИнформацияПринцип измеренияДанные весы работают по принципу BIA (биоимпедансометрия). За считанные секунды с помощью неза-метного, абсолютно безопасного электрического тока определяется состав тела человека. Посредством измерения электрического сопротивления (импеданса) с учетом постоянных величин или индивидуальных параметров (возраст, рост, степень активности) можно определить долю жировой массы или других веществ в организме. Мышечная ткань и вода имеют хорошую электрическую проводимость, поэтому уровень сопротивления здесь невелик. Кости и жировая ткань, наоборот, имеют небольшую электрическую проводимость, так как жировые клетки и кости из-за очень высокого сопротивления прак-тически не проводят ток.Поэтому эти весы производят измерения на двух различных частотах, что позволяет лучше измерить сопротивление. Разные частоты оказывают различное влияние на клеточную мембрану и на тканевую жидкость. Кроме того, оптимизирован электрический контакт с телом при помощи 4 ручных и 4 ножных электродов, что повышает точность измерений и диагностики. Благодаря такой чувствительности измери-тельной техники при повторных измерениях значения могут незначительно различаться. Причиной этого являются отклонения во время измерения сопротивления (например, изменение электрического контакта рук и ног с электродами, иное распределение жидкости в теле).
Измерение может проводиться следующим образом.• Верхняя часть тела: возьмите в руки блок управления и встаньте в обуви на весы.• Нижняя часть тела: оставьте пульт управления, например, на весах, встаньте босыми ногами на весы.• Верхняя и нижняя части тела: возьмите в руки блок управления и встаньте босыми ногами на весы.Если во время измерения блок управления находится в руках, его вес автоматически вычитается из общей суммы.
Учитывайте, что значения, определенные диагностическими весами, являются лишь приближенными к реальным медицинским значениям, полученным в результате анализа. Долю жировой массы, тканевой жидкости, мышечной массы и строение костей может определить только врач, используя медицинские методы (например, компьютерную томографию).
Общие советы• Для получения сопоставимых результатов по возможности взвешивайтесь в одно и то же время суток
(лучше всего утром), после того, как сходите в туалет, на голодный желудок и без одежды.• Важно при измерении: определение доли жировой массы может осуществляться только без обуви, при
этом подошвы стопы должны быть слегка увлажнены.• Абсолютно сухие подошвы ступней или подошвы ступней с сильно ороговевшими участками кожи
имеют слишком низкую проводимость, что может привести к неудовлетворительным результатам изме-рения.
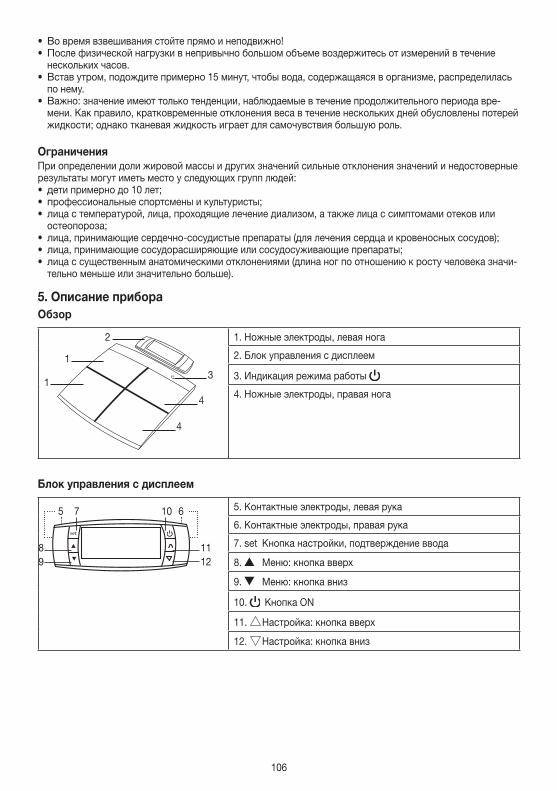
106
• Во время взвешивания стойте прямо и неподвижно!• После физической нагрузки в непривычно большом объеме воздержитесь от измерений в течение
нескольких часов.• Встав утром, подождите примерно 15 минут, чтобы вода, содержащаяся в организме, распределилась
по нему.• Важно: значение имеют только тенденции, наблюдаемые в течение продолжительного периода вре-
мени. Как правило, кратковременные отклонения веса в течение нескольких дней обусловлены потерей жидкости; однако тканевая жидкость играет для самочувствия большую роль.
ОграниченияПри определении доли жировой массы и других значений сильные отклонения значений и недостоверные результаты могут иметь место у следующих групп людей:• дети примерно до 10 лет;• профессиональные спортсмены и культуристы;• лица с температурой, лица, проходящие лечение диализом, а также лица с симптомами отеков или
остеопороза;• лица, принимающие сердечно-сосудистые препараты (для лечения сердца и кровеносных сосудов);• лица, принимающие сосудорасширяющие или сосудосуживающие препараты;• лица с существенным анатомическими отклонениями (длина ног по отношению к росту человека значи-
тельно меньше или значительно больше).
5. Описание прибораОбзор
3
4
1
1
4
2 1. Ножные электроды, левая нога
2. Блок управления с дисплеем
3. Индикация режима работы
4. Ножные электроды, правая нога
Блок управления с дисплеем
set
5 7 10
8 119 12
6 5. Контактные электроды, левая рука
6. Контактные электроды, правая рука
7. set Кнопка настройки, подтверждение ввода
8. Меню: кнопка вверх
9. Меню: кнопка вниз
10. Кнопка ON
11. Настройка: кнопка вверх
12. Настройка: кнопка вниз
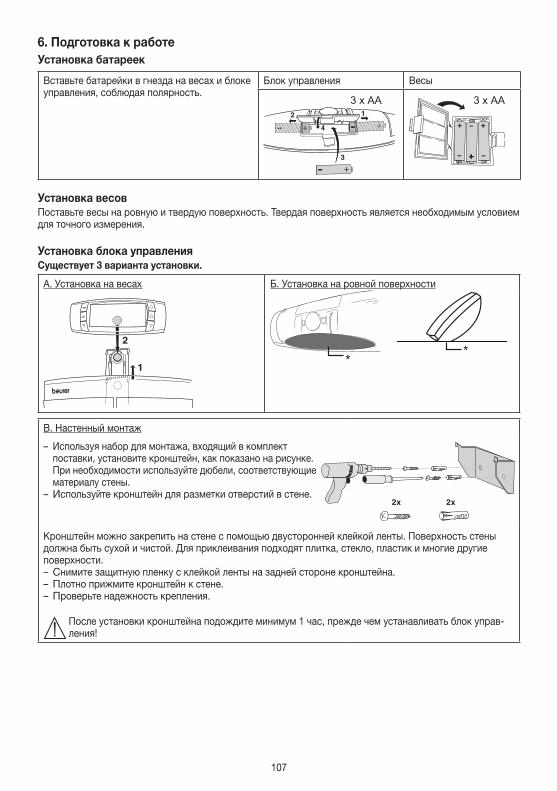
107
6. Подготовка к работеУстановка батареек
Вставьте батарейки в гнезда на весах и блоке управления, соблюдая полярность.
Блок управления Весы
3 x AA 3 x AA
Установка весовПоставьте весы на ровную и твердую поверхность. Твердая поверхность является необходимым условием для точного измерения.
Установка блока управленияСуществует 3 варианта установки.
А. Установка на весах Б. Установка на ровной поверхности
**
В. Настенный монтаж
– Используя набор для монтажа, входящий в комплект поставки, установите кронштейн, как показано на рисунке. При необходимости используйте дюбели, соответствующие материалу стены.
– Используйте кронштейн для разметки отверстий в стене.
Кронштейн можно закрепить на стене с помощью двусторонней клейкой ленты. Поверхность стены должна быть сухой и чистой. Для приклеивания подходят плитка, стекло, пластик и многие другие поверхности. – Снимите защитную пленку с клейкой ленты на задней стороне кронштейна. – Плотно прижмите кронштейн к стене. – Проверьте надежность крепления.
После установки кронштейна подождите минимум 1 час, прежде чем устанавливать блок управ-ления!
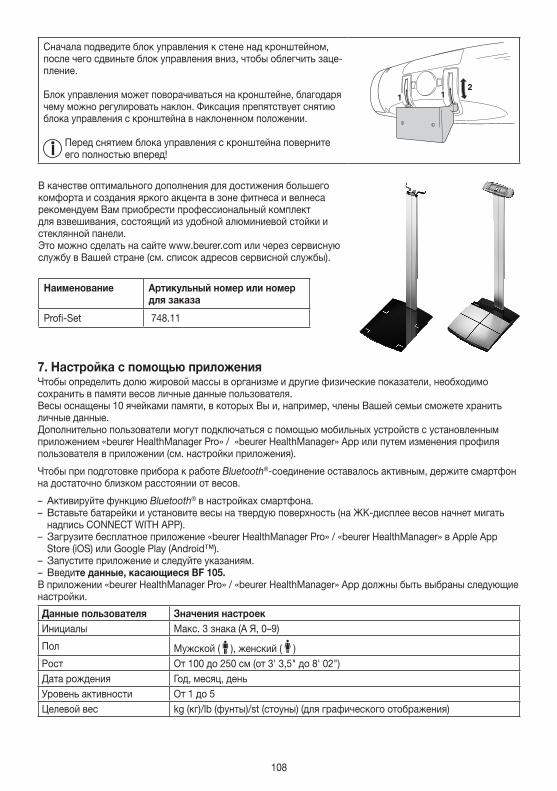
108
Сначала подведите блок управления к стене над кронштейном, после чего сдвиньте блок управления вниз, чтобы облегчить заце-пление.
Блок управления может поворачиваться на кронштейне, благодаря чему можно регулировать наклон. Фиксация препятствует снятию блока управления с кронштейна в наклоненном положении.
Перед снятием блока управления с кронштейна поверните его полностью вперед!
В качестве оптимального дополнения для достижения большего комфорта и создания яркого акцента в зоне фитнеса и велнеса рекомендуем Вам приобрести профессиональный комплект для взвешивания, состоящий из удобной алюминиевой стойки и стеклянной панели.Это можно сделать на сайте www.beurer.com или через сервисную службу в Вашей стране (см. список адресов сервисной службы).
Наименование Артикульный номер или номер для заказа
Profi-Set 748.11
7. Настройка с помощью приложенияЧтобы определить долю жировой массы в организме и другие физические показатели, необходимо сохранить в памяти весов личные данные пользователя.Весы оснащены 10 ячейками памяти, в которых Вы и, например, члены Вашей семьи сможете хранить личные данные.Дополнительно пользователи могут подключаться с помощью мобильных устройств с установленным приложением «beurer HealthManager Pro» / «beurer HealthManager» App или путем изменения профиля пользователя в приложении (см. настройки приложения).
Чтобы при подготовке прибора к работе Bluetooth®-соединение оставалось активным, держите смартфон на достаточно близком расстоянии от весов.
– Активируйте функцию Bluetooth® в настройках смартфона. – Вставьте батарейки и установите весы на твердую поверхность (на ЖК-дисплее весов начнет мигать надпись CONNECT WITH APP).
– Загрузите бесплатное приложение «beurer HealthManager Pro» / «beurer HealthManager» в Apple App Store (iOS) или Google Play (Android™).
– Запустите приложение и следуйте указаниям. – Введите данные, касающиеся BF 105.
В приложении «beurer HealthManager Pro» / «beurer HealthManager» App должны быть выбраны следующие настройки.
Данные пользователя Значения настроекИнициалы Макс. 3 знака (А Я, 0–9)
Пол Мужской ( ), женский ( )Рост От 100 до 250 см (от 3' 3,5" до 8' 02")Дата рождения Год, месяц, деньУровень активности От 1 до 5Целевой вес kg (кг)/lb (фунты)/st (стоуны) (для графического отображения)
109
Уровни активностиПри выборе уровня активности решающим является средне- или долгосрочное наблюдение.
Уровень активности Физическая активность
1 Отсутствует.
2 Малая: малые или легкие физические нагрузки (например, прогулки, простая работа в саду, гимнастические упражнения).
3 Средняя: физические нагрузки не менее 2–4 раз в неделю, ежедневно по 30 минут.4 Высокая: физические нагрузки не менее 4–6 раз в неделю, ежедневно по 30 минут.
5 Очень высокая: интенсивные физические нагрузки, интенсивные тренировки или тяжелый физический труд, ежедневно не менее 1 часа.
Приложение присвоит Вам следующую свободную ячейку пользовательской памяти (P01-P10).
– Выполнение измерения: для автоматического распознавания пользователя при первом измерении необходимо ввести свои данные. Следуйте инструкциям в приложении. Внимательно изучите раз-дел «„9. Проведение измерения“».
8. Настройка без приложенияМы рекомендуем подготовку к работе и настройку весов через приложение. См. раздел «„7. Настройка с помощью приложения“ ». Настройка весов может также выполняться непосредственно на приборе. – Вставьте батарейки и установите весы на твердую поверхность (на ЖК-дисплее весов начнет мигать надпись CONNECT WITH APP).
– Настройте прибор/время/пользователя на блоке управления. Для выбора используйте кнопки [ ] и [ ], подтвердите выбор кнопкой [SET].
А. Настройка прибора[SET] «SET_UNIT »
Последовательность Значения настроекЯзык D G F E IЕдиница измерения кг (kg), фунты (lb), стоуны (st)Время 24 ч/12 чГостевой режим ON_OFFBluetooth® ON_OFF
Если «OFF», соединение по Bluetooth® возможно только при включенном блоке управления.
Б. Настройка времени[SET] «SET_TIME»
Последовательность Значения настроекДата Год, месяц, деньВремя Часы, минуты
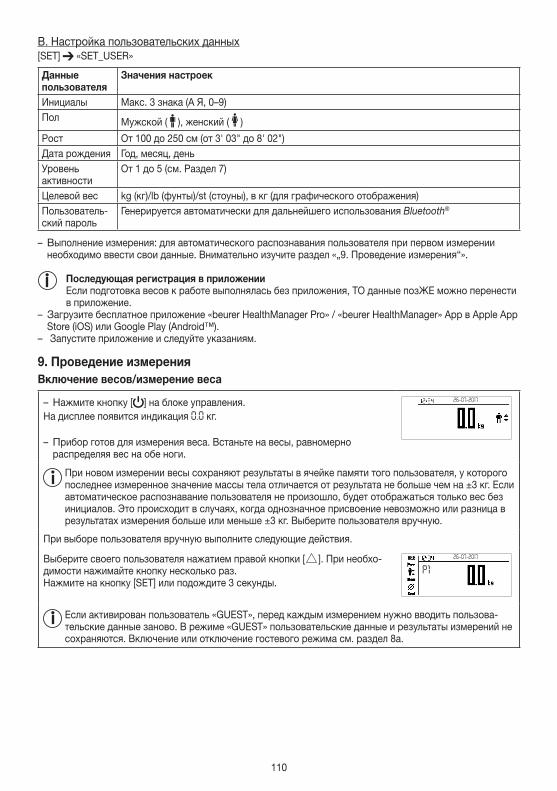
110
В. Настройка пользовательских данных[SET] «SET_USER»
Данные пользователя
Значения настроек
Инициалы Макс. 3 знака (А Я, 0–9)Пол Мужской ( ), женский ( )
Рост От 100 до 250 см (от 3' 03" до 8' 02")Дата рождения Год, месяц, деньУровень активности
От 1 до 5 (см. Раздел 7)
Целевой вес kg (кг)/lb (фунты)/st (стоуны), в кг (для графического отображения)Пользователь-ский пароль
Генерируется автоматически для дальнейшего использования Bluetooth®
– Выполнение измерения: для автоматического распознавания пользователя при первом измерении необходимо ввести свои данные. Внимательно изучите раздел «„9. Проведение измерения“».
Последующая регистрация в приложенииЕсли подготовка весов к работе выполнялась без приложения, ТО данные позЖЕ можно перенести в приложение.
– Загрузите бесплатное приложение «beurer HealthManager Pro» / «beurer HealthManager» App в Apple App Store (iOS) или Google Play (Android™).
– Запустите приложение и следуйте указаниям.
9. Проведение измерения Включение весов/измерение веса
– Нажмите кнопку [ ] на блоке управления.На дисплее появится индикация 0.0 кг.
– Прибор готов для измерения веса. Встаньте на весы, равномерно распределяя вес на обе ноги.
26-07-2017
При новом измерении весы сохраняют результаты в ячейке памяти того пользователя, у которого последнее измеренное значение массы тела отличается от результата не больше чем на ±3 кг. Если автоматическое распознавание пользователя не произошло, будет отображаться только вес без инициалов. Это происходит в случаях, когда однозначное присвоение невозможно или разница в результатах измерения больше или меньше ±3 кг. Выберите пользователя вручную.
При выборе пользователя вручную выполните следующие действия.
Выберите своего пользователя нажатием правой кнопки [ ]. При необхо-димости нажимайте кнопку несколько раз.Нажмите на кнопку [SET] или подождите 3 секунды.
26-07-2017
P1
Если активирован пользователь «GUEST», перед каждым измерением нужно вводить пользова-тельские данные заново. В режиме «GUEST» пользовательские данные и результаты измерений не сохраняются. Включение или отключение гостевого режима см. раздел 8а.
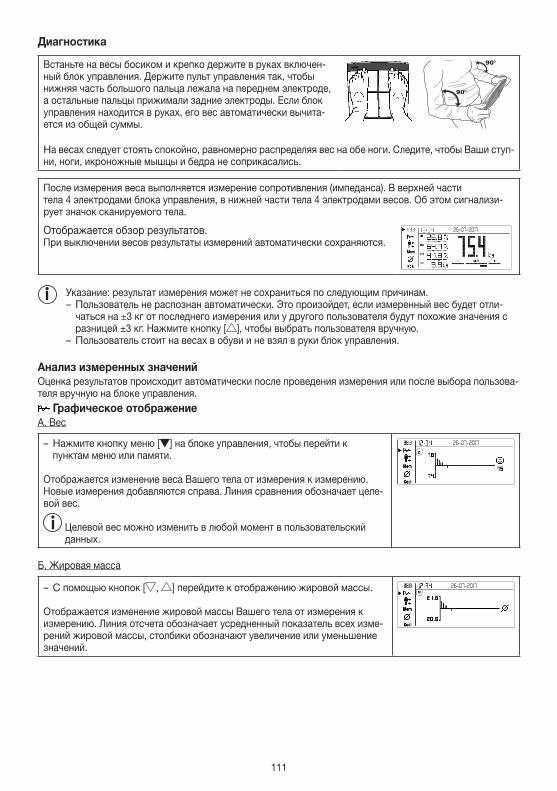
111
Диагностика
Встаньте на весы босиком и крепко держите в руках включен-ный блок управления. Держите пульт управления так, чтобы нижняя часть большого пальца лежала на переднем электроде, а остальные пальцы прижимали задние электроды. Если блок управления находится в руках, его вес автоматически вычита-ется из общей суммы.
На весах следует стоять спокойно, равномерно распределяя вес на обе ноги. Следите, чтобы Ваши ступ-ни, ноги, икроножные мышцы и бедра не соприкасались.
После измерения веса выполняется измерение сопротивления (импеданса). В верхней части тела 4 электродами блока управления, в нижней части тела 4 электродами весов. Об этом сигнализи-рует значок сканируемого тела.
Отображается обзор результатов.При выключении весов результаты измерений автоматически сохраняются.
26-07-2017
Указание: результат измерения может не сохраниться по следующим причинам. – Пользователь не распознан автоматически. Это произойдет, если измеренный вес будет отли-чаться на ±3 кг от последнего измерения или у другого пользователя будут похожие значения с разницей ±3 кг. Нажмите кнопку [ ], чтобы выбрать пользователя вручную.
– Пользователь стоит на весах в обуви и не взял в руки блок управления.
Анализ измеренных значенийОценка результатов происходит автоматически после проведения измерения или после выбора пользова-теля вручную на блоке управления.
Графическое отображениеА. Вес
– Нажмите кнопку меню [ ] на блоке управления, чтобы перейти к пунктам меню или памяти.
Отображается изменение веса Вашего тела от измерения к измерению. Новые измерения добавляются справа. Линия сравнения обозначает целе-вой вес.
Целевой вес можно изменить в любой момент в пользовательский данных.
26-07-2017
Б. Жировая масса
– С помощью кнопок [ , ] перейдите к отображению жировой массы.
Отображается изменение жировой массы Вашего тела от измерения к измерению. Линия отсчета обозначает усредненный показатель всех изме-рений жировой массы, столбики обозначают увеличение или уменьшение значений.
26-07-2017
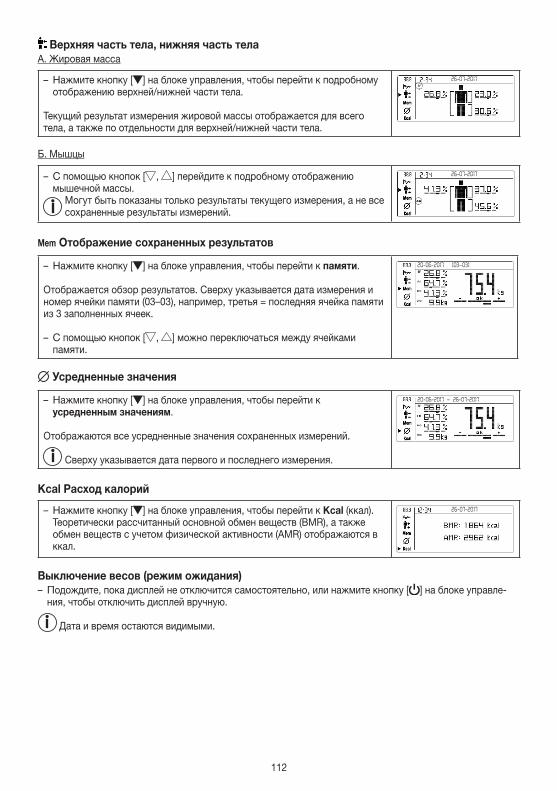
112
Верхняя часть тела, нижняя часть телаА. Жировая масса
– Нажмите кнопку [ ] на блоке управления, чтобы перейти к подробному отображению верхней/нижней части тела.
Текущий результат измерения жировой массы отображается для всего тела, а также по отдельности для верхней/нижней части тела.
26-07-2017
Б. Мышцы
– С помощью кнопок [ , ] перейдите к подробному отображению мышечной массы.
Могут быть показаны только результаты текущего измерения, а не все сохраненные результаты измерений.
26-07-2017
Mem Отображение сохраненных результатов
– Нажмите кнопку [ ] на блоке управления, чтобы перейти к памяти.
Отображается обзор результатов. Сверху указывается дата измерения и номер ячейки памяти (03–03), например, третья = последняя ячейка памяти из 3 заполненных ячеек.
– С помощью кнопок [ , ] можно переключаться между ячейками памяти.
(03–03)20-06-2017
Усредненные значения
– Нажмите кнопку [ ] на блоке управления, чтобы перейти к усредненным значениям.
Отображаются все усредненные значения сохраненных измерений.
Сверху указывается дата первого и последнего измерения.
20-06-2017 – 26-07-2017
Kcal Расход калорий
– Нажмите кнопку [ ] на блоке управления, чтобы перейти к Kcal (ккал). Теоретически рассчитанный основной обмен веществ (BMR), а также обмен веществ с учетом физической активности (AMR) отображаются в ккал.
26-07-2017
Выключение весов (режим ожидания) – Подождите, пока дисплей не отключится самостоятельно, или нажмите кнопку [ ] на блоке управле-ния, чтобы отключить дисплей вручную.
Дата и время остаются видимыми.
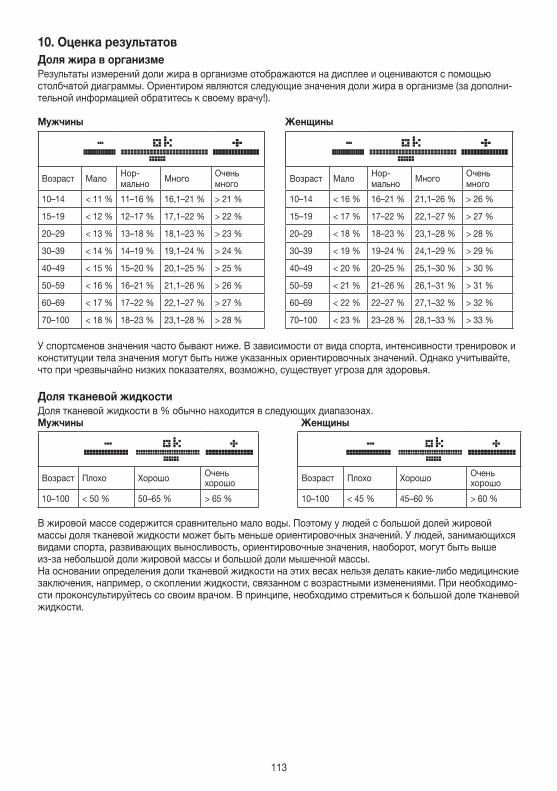
113
10. Оценка результатовДоля жира в организмеРезультаты измерений доли жира в организме отображаются на дисплее и оцениваются с помощью столбчатой диаграммы. Ориентиром являются следующие значения доли жира в организме (за дополни-тельной информацией обратитесь к своему врачу!).
Мужчины Женщины
Возраст Мало Нор-мально Много Очень
много Возраст Мало Нор-мально Много Очень
много
10–14 < 11 % 11–16 % 16,1–21 % > 21 % 10–14 < 16 % 16–21 % 21,1–26 % > 26 %
15–19 < 12 % 12–17 % 17,1–22 % > 22 % 15–19 < 17 % 17–22 % 22,1–27 % > 27 %
20–29 < 13 % 13–18 % 18,1–23 % > 23 % 20–29 < 18 % 18–23 % 23,1–28 % > 28 %
30–39 < 14 % 14–19 % 19,1–24 % > 24 % 30–39 < 19 % 19–24 % 24,1–29 % > 29 %
40–49 < 15 % 15–20 % 20,1–25 % > 25 % 40–49 < 20 % 20–25 % 25,1–30 % > 30 %
50–59 < 16 % 16–21 % 21,1–26 % > 26 % 50–59 < 21 % 21–26 % 26,1–31 % > 31 %
60–69 < 17 % 17–22 % 22,1–27 % > 27 % 60–69 < 22 % 22–27 % 27,1–32 % > 32 %
70–100 < 18 % 18–23 % 23,1–28 % > 28 % 70–100 < 23 % 23–28 % 28,1–33 % > 33 %
У спортсменов значения часто бывают ниже. В зависимости от вида спорта, интенсивности тренировок и конституции тела значения могут быть ниже указанных ориентировочных значений. Однако учитывайте, что при чрезвычайно низких показателях, возможно, существует угроза для здоровья.
Доля тканевой жидкостиДоля тканевой жидкости в % обычно находится в следующих диапазонах.Мужчины Женщины
Возраст Плохо Хорошо Очень хорошо Возраст Плохо Хорошо Очень
хорошо
10–100 < 50 % 50–65 % > 65 % 10–100 < 45 % 45–60 % > 60 %
В жировой массе содержится сравнительно мало воды. Поэтому у людей с большой долей жировой массы доля тканевой жидкости может быть меньше ориентировочных значений. У людей, занимающихся видами спорта, развивающих выносливость, ориентировочные значения, наоборот, могут быть выше из-за небольшой доли жировой массы и большой доли мышечной массы.На основании определения доли тканевой жидкости на этих весах нельзя делать какие-либо медицинские заключения, например, о скоплении жидкости, связанном с возрастными изменениями. При необходимо-сти проконсультируйтесь со своим врачом. В принципе, необходимо стремиться к большой доле тканевой жидкости.
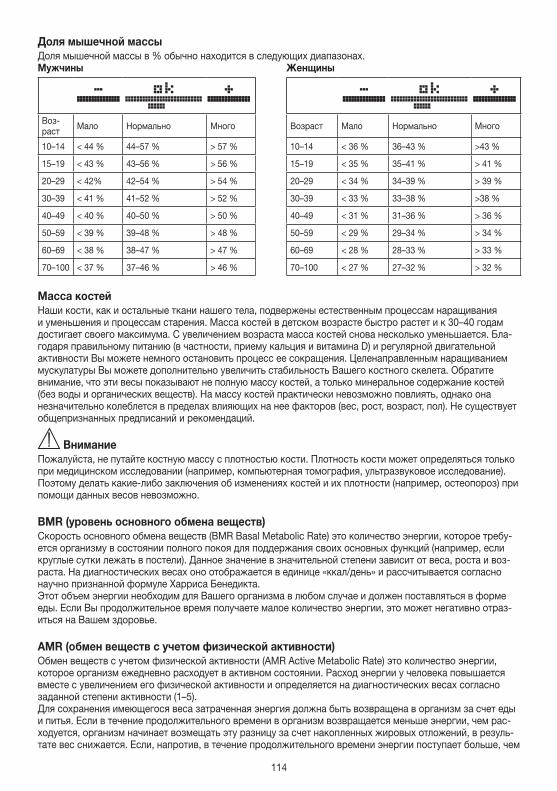
114
Доля мышечной массыДоля мышечной массы в % обычно находится в следующих диапазонах.Мужчины Женщины
Воз-раст Мало Нормально Много Возраст Мало Нормально Много
10–14 < 44 % 44–57 % > 57 % 10–14 < 36 % 36–43 % >43 %
15–19 < 43 % 43–56 % > 56 % 15–19 < 35 % 35–41 % > 41 %
20–29 < 42% 42–54 % > 54 % 20–29 < 34 % 34–39 % > 39 %
30–39 < 41 % 41–52 % > 52 % 30–39 < 33 % 33–38 % >38 %
40–49 < 40 % 40–50 % > 50 % 40–49 < 31 % 31–36 % > 36 %
50–59 < 39 % 39–48 % > 48 % 50–59 < 29 % 29–34 % > 34 %
60–69 < 38 % 38–47 % > 47 % 60–69 < 28 % 28–33 % > 33 %
70–100 < 37 % 37–46 % > 46 % 70–100 < 27 % 27–32 % > 32 %
Масса костейНаши кости, как и остальные ткани нашего тела, подвержены естественным процессам наращивания и уменьшения и процессам старения. Масса костей в детском возрасте быстро растет и к 30–40 годам достигает своего максимума. С увеличением возраста масса костей снова несколько уменьшается. Бла-годаря правильному питанию (в частности, приему кальция и витамина D) и регулярной двигательной активности Вы можете немного остановить процесс ее сокращения. Целенаправленным наращиванием мускулатуры Вы можете дополнительно увеличить стабильность Вашего костного скелета. Обратите внимание, что эти весы показывают не полную массу костей, а только минеральное содержание костей (без воды и органических веществ). На массу костей практически невозможно повлиять, однако она незначительно колеблется в пределах влияющих на нее факторов (вес, рост, возраст, пол). Не существует общепризнанных предписаний и рекомендаций.
ВниманиеПожалуйста, не путайте костную массу с плотностью кости. Плотность кости может определяться только при медицинском исследовании (например, компьютерная томография, ультразвуковое исследование). Поэтому делать какие-либо заключения об изменениях костей и их плотности (например, остеопороз) при помощи данных весов невозможно.
BMR (уровень основного обмена веществ)Скорость основного обмена веществ (BMR Basal Metabolic Rate) это количество энергии, которое требу-ется организму в состоянии полного покоя для поддержания своих основных функций (например, если круглые сутки лежать в постели). Данное значение в значительной степени зависит от веса, роста и воз-раста. На диагностических весах оно отображается в единице «ккал/день» и рассчитывается согласно научно признанной формуле Харриса Бенедикта.Этот объем энергии необходим для Вашего организма в любом случае и должен поставляться в форме еды. Если Вы продолжительное время получаете малое количество энергии, это может негативно отраз-иться на Вашем здоровье.
AMR (обмен веществ с учетом физической активности)Обмен веществ с учетом физической активности (AMR Active Metabolic Rate) это количество энергии, которое организм ежедневно расходует в активном состоянии. Расход энергии у человека повышается вместе с увеличением его физической активности и определяется на диагностических весах согласно заданной степени активности (1–5).Для сохранения имеющегося веса затраченная энергия должна быть возвращена в организм за счет еды и питья. Если в течение продолжительного времени в организм возвращается меньше энергии, чем рас-ходуется, организм начинает возмещать эту разницу за счет накопленных жировых отложений, в резуль-тате вес снижается. Если, напротив, в течение продолжительного времени энергии поступает больше, чем
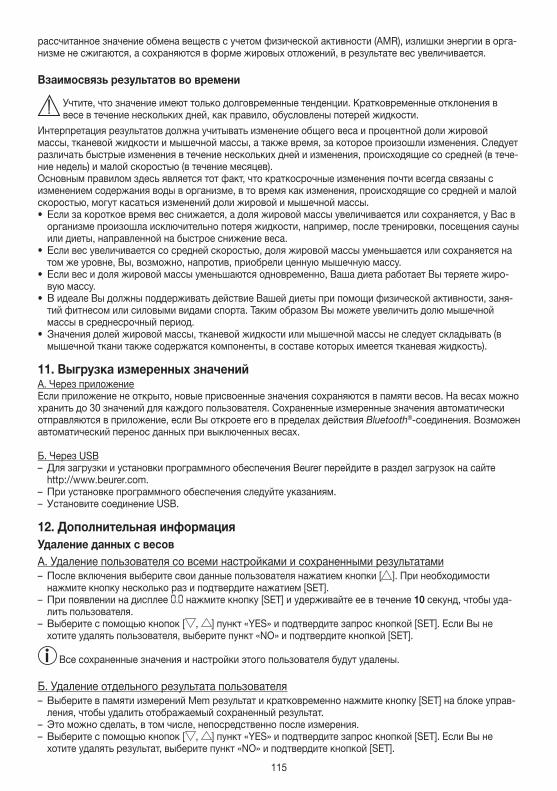
115
рассчитанное значение обмена веществ с учетом физической активности (AMR), излишки энергии в орга-низме не сжигаются, а сохраняются в форме жировых отложений, в результате вес увеличивается.
Взаимосвязь результатов во времени
Учтите, что значение имеют только долговременные тенденции. Кратковременные отклонения в весе в течение нескольких дней, как правило, обусловлены потерей жидкости.
Интерпретация результатов должна учитывать изменение общего веса и процентной доли жировой массы, тканевой жидкости и мышечной массы, а также время, за которое произошли изменения. Следует различать быстрые изменения в течение нескольких дней и изменения, происходящие со средней (в тече-ние недель) и малой скоростью (в течение месяцев).Основным правилом здесь является тот факт, что краткосрочные изменения почти всегда связаны с изменением содержания воды в организме, в то время как изменения, происходящие со средней и малой скоростью, могут касаться изменений доли жировой и мышечной массы.• Если за короткое время вес снижается, а доля жировой массы увеличивается или сохраняется, у Вас в
организме произошла исключительно потеря жидкости, например, после тренировки, посещения сауны или диеты, направленной на быстрое снижение веса.
• Если вес увеличивается со средней скоростью, доля жировой массы уменьшается или сохраняется на том же уровне, Вы, возможно, напротив, приобрели ценную мышечную массу.
• Если вес и доля жировой массы уменьшаются одновременно, Ваша диета работает Вы теряете жиро-вую массу.
• В идеале Вы должны поддерживать действие Вашей диеты при помощи физической активности, заня-тий фитнесом или силовыми видами спорта. Таким образом Вы можете увеличить долю мышечной массы в среднесрочный период.
• Значения долей жировой массы, тканевой жидкости или мышечной массы не следует складывать (в мышечной ткани также содержатся компоненты, в составе которых имеется тканевая жидкость).
11. Выгрузка измеренных значенийА. Через приложениеЕсли приложение не открыто, новые присвоенные значения сохраняются в памяти весов. На весах можно хранить до 30 значений для каждого пользователя. Сохраненные измеренные значения автоматически отправляются в приложение, если Вы откроете его в пределах действия Bluetooth®-соединения. Возможен автоматический перенос данных при выключенных весах.
Б. Через USB – Для загрузки и установки программного обеспечения Beurer перейдите в раздел загрузок на сайте http://www.beurer.com.
– При установке программного обеспечения следуйте указаниям. – Установите соединение USB.
12. Дополнительная информацияУдаление данных с весовА. Удаление пользователя со всеми настройками и сохраненными результатами – После включения выберите свои данные пользователя нажатием кнопки [ ]. При необходимости нажмите кнопку несколько раз и подтвердите нажатием [SET].
– При появлении на дисплее 0.0 нажмите кнопку [SET] и удерживайте ее в течение 10 секунд, чтобы уда-лить пользователя.
– Выберите с помощью кнопок [ , ] пункт «YES» и подтвердите запрос кнопкой [SET]. Если Вы не хотите удалять пользователя, выберите пункт «NO» и подтвердите кнопкой [SET].
Все сохраненные значения и настройки этого пользователя будут удалены.
Б. Удаление отдельного результата пользователя – Выберите в памяти измерений Mem результат и кратковременно нажмите кнопку [SET] на блоке управ-ления, чтобы удалить отображаемый сохраненный результат.
– Это можно сделать, в том числе, непосредственно после измерения. – Выберите с помощью кнопок [ , ] пункт «YES» и подтвердите запрос кнопкой [SET]. Если Вы не хотите удалять результат, выберите пункт «NO» и подтвердите кнопкой [SET].
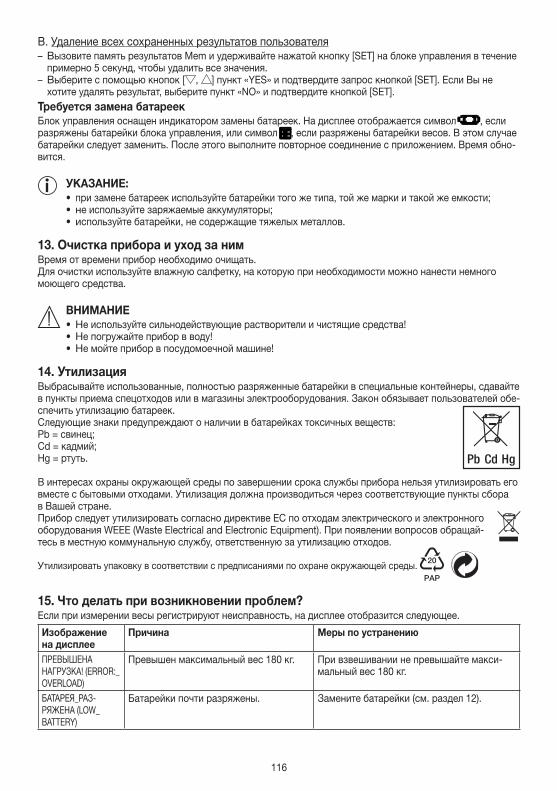
116
В. Удаление всех сохраненных результатов пользователя – Вызовите память результатов Mem и удерживайте нажатой кнопку [SET] на блоке управления в течение примерно 5 секунд, чтобы удалить все значения.
– Выберите с помощью кнопок [ , ] пункт «YES» и подтвердите запрос кнопкой [SET]. Если Вы не хотите удалять результат, выберите пункт «NO» и подтвердите кнопкой [SET].
Требуется замена батареекБлок управления оснащен индикатором замены батареек. На дисплее отображается символ , если разряжены батарейки блока управления, или символ , если разряжены батарейки весов. В этом случае батарейки следует заменить. После этого выполните повторное соединение с приложением. Время обно-вится.
УКАЗАНИЕ:• при замене батареек используйте батарейки того же типа, той же марки и такой же емкости;• не используйте заряжаемые аккумуляторы;• используйте батарейки, не содержащие тяжелых металлов.
13. Очистка прибора и уход за нимВремя от времени прибор необходимо очищать.Для очистки используйте влажную салфетку, на которую при необходимости можно нанести немного моющего средства.
ВНИМАНИЕ• Не используйте сильнодействующие растворители и чистящие средства!• Не погружайте прибор в воду!• Не мойте прибор в посудомоечной машине!
14. УтилизацияВыбрасывайте использованные, полностью разряженные батарейки в специальные контейнеры, сдавайте в пункты приема спецотходов или в магазины электрооборудования. Закон обязывает пользователей обе-спечить утилизацию батареек.Следующие знаки предупреждают о наличии в батарейках токсичных веществ: Pb = свинец;Cd = кадмий; Hg = ртуть.
В интересах охраны окружающей среды по завершении срока службы прибора нельзя утилизировать его вместе с бытовыми отходами. Утилизация должна производиться через соответствующие пункты сбора в Вашей стране. Прибор следует утилизировать согласно директиве ЕС по отходам электрического и электронного оборудования WEEE (Waste Electrical and Electronic Equipment). При появлении вопросов обращай-тесь в местную коммунальную службу, ответственную за утилизацию отходов.
Утилизировать упаковку в соответствии с предписаниями по охране окружающей среды. 20
PAP
15. Что делать при возникновении проблем?Если при измерении весы регистрируют неисправность, на дисплее отобразится следующее.
Изображение на дисплее
Причина Меры по устранению
ПРЕВЫШЕНА НАГРУЗКА! (ERROR:_OVERLOAD)
Превышен максимальный вес 180 кг. При взвешивании не превышайте макси-мальный вес 180 кг.
БАТАРЕЯ_РАЗ-РЯЖЕНА (LOW_BATTERY)
Батарейки почти разряжены. Замените батарейки (см. раздел 12).
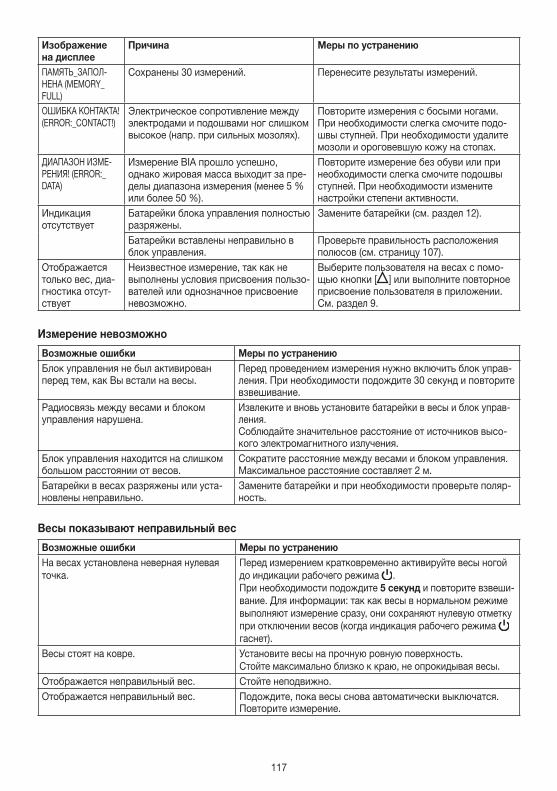
117
Изображение на дисплее
Причина Меры по устранению
ПАМЯТЬ_ЗАПОЛ-НЕНА (MEMORY_FULL)
Сохранены 30 измерений. Перенесите результаты измерений.
ОШИБКА КОНТАКТА! (ERROR:_CONTACT!)
Электрическое сопротивление между электродами и подошвами ног слишком высокое (напр. при сильных мозолях).
Повторите измерения с босыми ногами. При необходимости слегка смочите подо-швы ступней. При необходимости удалите мозоли и ороговевшую кожу на стопах.
ДИАПАЗОН ИЗМЕ-РЕНИЯ! (ERROR:_DATA)
Измерение BIA прошло успешно, однако жировая масса выходит за пре-делы диапазона измерения (менее 5 % или более 50 %).
Повторите измерение без обуви или при необходимости слегка смочите подошвы ступней. При необходимости измените настройки степени активности.
Индикация отсутствует
Батарейки блока управления полностью разряжены.
Замените батарейки (см. раздел 12).
Батарейки вставлены неправильно в блок управления.
Проверьте правильность расположения полюсов (см. страницу 107).
Отображается только вес, диа-гностика отсут-ствует
Неизвестное измерение, так как не выполнены условия присвоения пользо-вателей или однозначное присвоение невозможно.
Выберите пользователя на весах с помо-щью кнопки [ ] или выполните повторное присвоение пользователя в приложении.См. раздел 9.
Измерение невозможно
Возможные ошибки Меры по устранениюБлок управления не был активирован перед тем, как Вы встали на весы.
Перед проведением измерения нужно включить блок управ-ления. При необходимости подождите 30 секунд и повторите взвешивание.
Радиосвязь между весами и блоком управления нарушена.
Извлеките и вновь установите батарейки в весы и блок управ-ления.Соблюдайте значительное расстояние от источников высо-кого электромагнитного излучения.
Блок управления находится на слишком большом расстоянии от весов.
Сократите расстояние между весами и блоком управления. Максимальное расстояние составляет 2 м.
Батарейки в весах разряжены или уста-новлены неправильно.
Замените батарейки и при необходимости проверьте поляр-ность.
Весы показывают неправильный вес
Возможные ошибки Меры по устранениюНа весах установлена неверная нулевая точка.
Перед измерением кратковременно активируйте весы ногой до индикации рабочего режима .При необходимости подождите 5 секунд и повторите взвеши-вание. Для информации: так как весы в нормальном режиме выполняют измерение сразу, они сохраняют нулевую отметку при отключении весов (когда индикация рабочего режима гаснет).
Весы стоят на ковре. Установите весы на прочную ровную поверхность.Стойте максимально близко к краю, не опрокидывая весы.
Отображается неправильный вес. Стойте неподвижно.Отображается неправильный вес. Подождите, пока весы снова автоматически выключатся.
Повторите измерение.
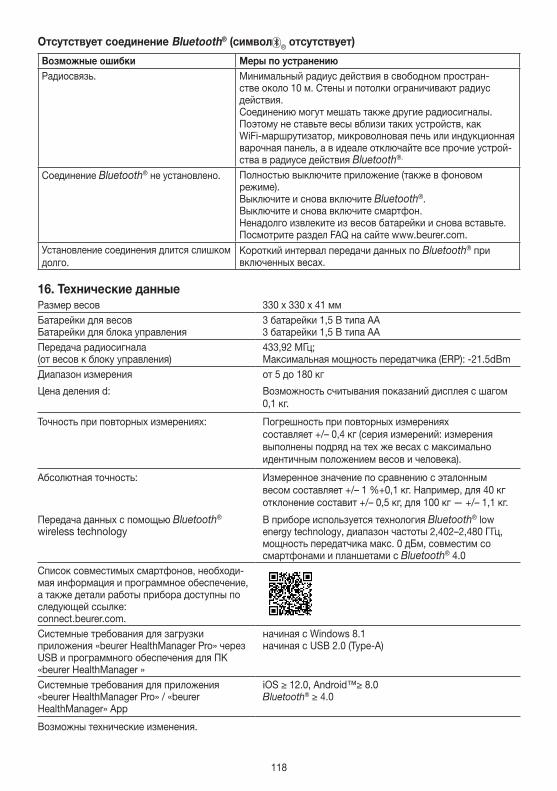
118
Отсутствует соединение Bluetooth® (символ ® отсутствует)
Возможные ошибки Меры по устранениюРадиосвязь. Минимальный радиус действия в свободном простран-
стве около 10 м. Стены и потолки ограничивают радиус действия.Соединению могут мешать также другие радиосигналы. Поэтому не ставьте весы вблизи таких устройств, как WiFi-маршрутизатор, микроволновая печь или индукционная варочная панель, а в идеале отключайте все прочие устрой-ства в радиусе действия Bluetooth®.
Соединение Bluetooth® не установлено. Полностью выключите приложение (также в фоновом режиме).Выключите и снова включите Bluetooth®.Выключите и снова включите смартфон.Ненадолго извлеките из весов батарейки и снова вставьте.Посмотрите раздел FAQ на сайте www.beurer.com.
Установление соединения длится слишком долго.
Короткий интервал передачи данных по Bluetooth® при включенных весах.
16. Технические данныеРазмер весов 330 x 330 x 41 ммБатарейки для весовБатарейки для блока управления
3 батарейки 1,5 В типа AA3 батарейки 1,5 В типа AA
Передача радиосигнала (от весов к блоку управления)
433,92 МГц; Максимальная мощность передатчика (ERP): -21.5dBm
Диапазон измерения от 5 до 180 кг
Цена деления d: Возможность считывания показаний дисплея с шагом 0,1 кг.
Точность при повторных измерениях: Погрешность при повторных измерениях составляет +/– 0,4 кг (серия измерений: измерения выполнены подряд на тех же весах с максимально идентичным положением весов и человека).
Абсолютная точность: Измеренное значение по сравнению с эталонным весом составляет +/– 1 %+0,1 кг. Например, для 40 кг отклонение составит +/– 0,5 кг, для 100 кг — +/– 1,1 кг.
Передача данных с помощью Bluetooth®
wireless technologyВ приборе используется технология Bluetooth® low energy technology, диапазон частоты 2,402–2,480 ГГц, мощность передатчика макс. 0 дБм, совместим со смартфонами и планшетами с Bluetooth® 4.0
Список совместимых смартфонов, необходи-мая информация и программное обеспечение, а также детали работы прибора доступны по следующей ссылке:connect.beurer.com.Системные требования для загрузки приложения «beurer HealthManager Pro» через USB и программного обеспечения для ПК «beurer HealthManager »
начиная с Windows 8.1начиная с USB 2.0 (Type-A)
Системные требования для приложения «beurer HealthManager Pro» / «beurer HealthManager» App
iOS ≥ 12.0, Android™≥ 8.0Bluetooth® ≥ 4.0
Возможны технические изменения.
119
Настоящим подтверждаем, что данное изделие соответствует требованиям европейской директивы RED 2014/53/EU. С декларацией о соответствии директивам ЕС для данного устройства можно ознакомиться, перейдя по ссылке: www.beurer.com/web/we-landingpages/de/cedeclarationofconformity.php.
17. Гарантия / сервисное обслуживаниеБолее подробная информация по гарантии/сервису находится в гарантийном/сервисном талоне, который входит в комплект поставки.
120
POLSKI
1. Informacje ogólne ...............................................1202. Objaśnienie symboli ...........................................1213. Ostrzeżenia i wskazówki dotyczące
bezpieczeństwa ..................................................1224. Informacje ...........................................................1235. Opis urządzenia ..................................................1246. Uruchomienie .....................................................1247. Konfiguracja przy użyciu aplikacji ......................1268. Konfiguracja bez aplikacji ...................................126
9. Wykonanie pomiaru ............................................12710. Ocena wyników ................................................13011. Przesłanie wyników pomiarów .........................13212. Dodatkowe informacje .....................................13213. Czyszczenie i dbałość o urządzenie .................13314. Utylizacja ..........................................................13315. Co należy zrobić w przypadku problemów? ....13316. Dane techniczne ...............................................13417. Gwarancja / serwis ............................................135
Zawartość opakowania• Waga diagnostyczna• Zdejmowany panel sterowania z wyświetlaczem• Uchwyt ścienny• Zestaw montażowy do montażu na ścianie• 3× 1,5 V typ AA (waga)• 3× 1,5 V typ AA (element obsługowy)• Kabel USB• Ta instrukcja obsługi i skrócona instrukcja Bluetooth® / USB
Drodzy Klienci,cieszymy się, że zdecydowali się Państwo na zakup naszego produktu. Firma Beurer oferuje dokładnie przetesto-wane, wysokiej jakości produkty przeznaczone do pomiaru wagi, ciśnienia krwi, temperatury ciała i tętna, a także przyrządy do nawilżania powietrza, łagodnej terapii, masażu i ogrzewania oraz urządzenia służące do pielęgnacji urody i ułatwiające opiekę nad dziećmi.Należy dokładnie przeczytać i zachować niniejszą instrukcję obsługi, przechowywać ją w miejscu dostępnym dla innych użytkowników i przestrzegać zawartych w niej wskazówek.
Z pozdrowieniamiZespół Beurer
1. Informacje ogólneFunkcje urządzeniaCyfrowa waga służy do pomiaru masy ciała oraz określania innych czynników wpływających na zdrowie i kondycję.Jest przeznaczona do użytku osobistego.Waga oferuje następujące funkcje, z których może korzystać nawet 10 osób:• pomiar masy ciała,• określenie tkanki tłuszczowej,• zawartość wody w organizmie,• tkanka mięśniowa,• tkanka kostna oraz• podstawowa i czynna wymiana materii.
Ponadto waga posiada następujące dodatkowe funkcje:• innowacyjne menu na dużym wyświetlaczu (do wyboru w 5 językach);• wyświetlacz może pozostać na wadze, można ustawiać go oddzielnie lub mocować na ścianie. Opcjonalnie
dostępny jest zestaw do ustawienia,• przełączanie między kilogramami „kg”, funtami „lb” i kamieniami „st”;
Należy dokładnie przeczytać i zachować niniejszą instrukcję obsługi, przechowywać ją w miejscu dostępnym dla innych użytkowników i przestrzegać zawartych w niej wskazówek.
Spis treści
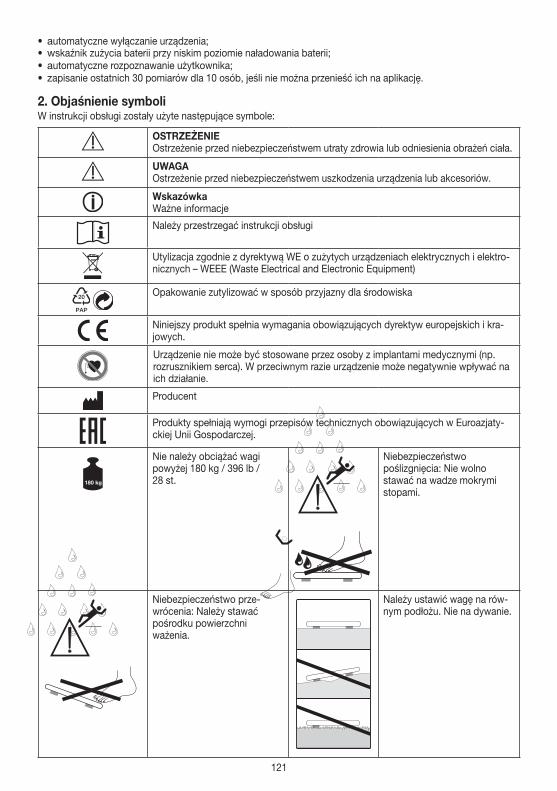
121
• automatyczne wyłączanie urządzenia;• wskaźnik zużycia baterii przy niskim poziomie naładowania baterii;• automatyczne rozpoznawanie użytkownika;• zapisanie ostatnich 30 pomiarów dla 10 osób, jeśli nie można przenieść ich na aplikację.
2. Objaśnienie symboliW instrukcji obsługi zostały użyte następujące symbole:
OSTRZEŻENIEOstrzeżenie przed niebezpieczeństwem utraty zdrowia lub odniesienia obrażeń ciała.
UWAGA Ostrzeżenie przed niebezpieczeństwem uszkodzenia urządzenia lub akcesoriów.
WskazówkaWażne informacje
Należy przestrzegać instrukcji obsługi
Utylizacja zgodnie z dyrektywą WE o zużytych urządzeniach elektrycznych i elektro-nicznych – WEEE (Waste Electrical and Electronic Equipment)
20
PAP
Opakowanie zutylizować w sposób przyjazny dla środowiska
Niniejszy produkt spełnia wymagania obowiązujących dyrektyw europejskich i kra-jowych.
Urządzenie nie może być stosowane przez osoby z implantami medycznymi (np. rozrusznikiem serca). W przeciwnym razie urządzenie może negatywnie wpływać na ich działanie.
Producent
Produkty spełniają wymogi przepisów technicznych obowiązujących w Euroazjaty-ckiej Unii Gospodarczej.
Nie należy obciążać wagi powyżej 180 kg / 396 lb / 28 st.
317306_SGWI 180_2019-05-03_02_WarningSticker_Lidl
max.
180 kg396 lb28 st
317306_SGWI 180_2019-05-03_02_WarningSticker_Lidl
max.
180 kg396 lb28 st
Niebezpieczeństwo poślizgnięcia: Nie wolno stawać na wadze mokrymi stopami.
317306_SGWI 180_2019-05-03_02_WarningSticker_Lidl
max.
180 kg396 lb28 st
317306_SGWI 180_2019-05-03_02_WarningSticker_Lidl
max.
180 kg396 lb28 st
Niebezpieczeństwo prze-wrócenia: Należy stawać pośrodku powierzchni ważenia.
Należy ustawić wagę na rów-nym podłożu. Nie na dywanie.
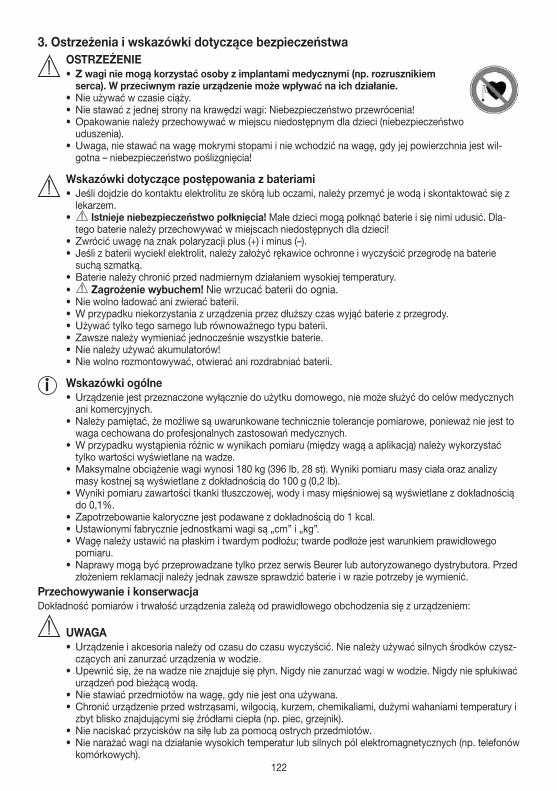
122
3. Ostrzeżenia i wskazówki dotyczące bezpieczeństwa OSTRZEŻENIE
• Z wagi nie mogą korzystać osoby z implantami medycznymi (np. rozrusznikiem serca). W przeciwnym razie urządzenie może wpływać na ich działanie.
• Nie używać w czasie ciąży. • Nie stawać z jednej strony na krawędzi wagi: Niebezpieczeństwo przewrócenia!• Opakowanie należy przechowywać w miejscu niedostępnym dla dzieci (niebezpieczeństwo
uduszenia).• Uwaga, nie stawać na wagę mokrymi stopami i nie wchodzić na wagę, gdy jej powierzchnia jest wil-
gotna – niebezpieczeństwo poślizgnięcia!
Wskazówki dotyczące postępowania z bateriami• Jeśli dojdzie do kontaktu elektrolitu ze skórą lub oczami, należy przemyć je wodą i skontaktować się z
lekarzem.• Istnieje niebezpieczeństwo połknięcia! Małe dzieci mogą połknąć baterie i się nimi udusić. Dla-
tego baterie należy przechowywać w miejscach niedostępnych dla dzieci!• Zwrócić uwagę na znak polaryzacji plus (+) i minus (–).• Jeśli z baterii wyciekł elektrolit, należy założyć rękawice ochronne i wyczyścić przegrodę na baterie
suchą szmatką.• Baterie należy chronić przed nadmiernym działaniem wysokiej temperatury.• Zagrożenie wybuchem! Nie wrzucać baterii do ognia.• Nie wolno ładować ani zwierać baterii.• W przypadku niekorzystania z urządzenia przez dłuższy czas wyjąć baterie z przegrody.• Używać tylko tego samego lub równoważnego typu baterii. • Zawsze należy wymieniać jednocześnie wszystkie baterie.• Nie należy używać akumulatorów!• Nie wolno rozmontowywać, otwierać ani rozdrabniać baterii.
Wskazówki ogólne • Urządzenie jest przeznaczone wyłącznie do użytku domowego, nie może służyć do celów medycznych
ani komercyjnych. • Należy pamiętać, że możliwe są uwarunkowane technicznie tolerancje pomiarowe, ponieważ nie jest to
waga cechowana do profesjonalnych zastosowań medycznych.• W przypadku wystąpienia różnic w wynikach pomiaru (między wagą a aplikacją) należy wykorzystać
tylko wartości wyświetlane na wadze.• Maksymalne obciążenie wagi wynosi 180 kg (396 lb, 28 st). Wyniki pomiaru masy ciała oraz analizy
masy kostnej są wyświetlane z dokładnością do 100 g (0,2 lb).• Wyniki pomiaru zawartości tkanki tłuszczowej, wody i masy mięśniowej są wyświetlane z dokładnością
do 0,1%.• Zapotrzebowanie kaloryczne jest podawane z dokładnością do 1 kcal.• Ustawionymi fabrycznie jednostkami wagi są „cm” i „kg”. • Wagę należy ustawić na płaskim i twardym podłożu; twarde podłoże jest warunkiem prawidłowego
pomiaru.• Naprawy mogą być przeprowadzane tylko przez serwis Beurer lub autoryzowanego dystrybutora. Przed
złożeniem reklamacji należy jednak zawsze sprawdzić baterie i w razie potrzeby je wymienić.Przechowywanie i konserwacjaDokładność pomiarów i trwałość urządzenia zależą od prawidłowego obchodzenia się z urządzeniem:
UWAGA• Urządzenie i akcesoria należy od czasu do czasu wyczyścić. Nie należy używać silnych środków czysz-
czących ani zanurzać urządzenia w wodzie.• Upewnić się, że na wadze nie znajduje się płyn. Nigdy nie zanurzać wagi w wodzie. Nigdy nie spłukiwać
urządzeń pod bieżącą wodą.• Nie stawiać przedmiotów na wagę, gdy nie jest ona używana.• Chronić urządzenie przed wstrząsami, wilgocią, kurzem, chemikaliami, dużymi wahaniami temperatury i
zbyt blisko znajdującymi się źródłami ciepła (np. piec, grzejnik).• Nie naciskać przycisków na siłę lub za pomocą ostrych przedmiotów.• Nie narażać wagi na działanie wysokich temperatur lub silnych pól elektromagnetycznych (np. telefonów
komórkowych).
123
4. InformacjeZasada pomiaruWaga działa zgodnie z zasadą analizy B.I.A., czyli impedancji bioelektrycznej, która w ciągu kilku sekund umożli-wia pomiar składników masy ciała przez nieodczuwalny i całkowicie nieszkodliwy przepływ prądu. Za pomocą pomiaru oporu elektrycznego (impedancji) i przy uwzględnieniu podczas pomiaru stałych lub indy-widualnych wartości (wiek, wzrost, płeć, stopień aktywności) można określić ilość tkanki tłuszczowej oraz inne wskaźniki ciała. Tkanka mięśniowa i woda mają dobre przewodnictwo elektryczne, a tym samym mniejszy opór. Natomiast kości i tkanka tłuszczowa mają małą przewodność, ponieważ komórki tłuszczowe i kości praktycznie nie przewodzą prądu ze względu na wysoką oporność.Oprócz tego waga mierzy z dwoma różnymi częstotliwościami, aby możliwe było jeszcze lepsze określenie impe-dancji. Takie różne częstotliwości mają różny wpływ na błonę komórkową i płyny ustrojowe. Kontakt elektryczny z ciałem jest dodatkowo optymalizowany przez 4 elektrody rąk i 4 elektrody stóp, aby osiągnąć większą dokład-ność pomiaru, a tym samym lepszą analizę. Ze względu na tę czułą technikę analizy, przy powtórnych pomiarach wartości mogą się w niewielkim stopniu zmieniać. Powodem są odchylenia podczas pomiaru impedancji (np. inny kontakt elektryczny elektrod z rękami i stopami, inny rozkład wody w organizmie).
Analizę można przeprowadzać w następujący sposób:Górna część ciała: Chwycić element obsługowy rękami, stanąć w butach na wadze.Dolna część ciała: Pozostawić element obsługowy np. na wadze, wejść boso na wagę.Górna i dolna część ciała: Chwycić element obsługowy rękami, stanąć boso na wadze.Jeśli element obsługowy do analizy trzyma się w ręku, jego waga jest automatycznie odliczana.
Należy pamiętać, że wartości uzyskane za pomocą wagi diagnostycznej stanowią jedynie przybliżenie rzeczywi-stych, analitycznych parametrów medycznych ciała. Jedynie lekarz może przeprowadzić dokładny pomiar tkanki tłuszczowej, wody w organizmie, tkanki mięśniowej i struktury kości, posługując się metodami medycznymi (np. tomografią komputerową).
Ogólne wskazówki• Aby zapewnić porównywalne wyniki, należy w miarę możliwości ważyć się o tej samej porze dnia (najlepiej
rano), po wizycie w toalecie, na czczo i bez ubrania.• Ważne informacje podczas pomiaru: Pomiar tkanki tłuszczowej należy wykonywać tylko boso, a także celowo
przy nieco wilgotnych podeszwach stóp.• Całkowicie suche lub pokryte odciskami podeszwy mogą negatywnie wpływać na wyniki, ponieważ mają zbyt
niską przewodność.• W trakcie pomiaru należy stać w pozycji pionowej i bez ruchu.• Należy odczekać kilka godzin po niestandardowym wysiłku fizycznym.• Zaczekać około 15 minut po przebudzeniu, aby woda znajdująca się w organizmie została rozprowadzona.• Ważne jest, że pod uwagę brana jest tylko tendencja długoterminowa. Zazwyczaj krótkoterminowe wahania
masy ciała w ciągu kilku dni są spowodowane utratą płynów; woda w organizmie ma duży wpływ na dobre samopoczucie.
OgraniczeniaPrzy pomiarze tkanki tłuszczowej i innych wartości mogą wystąpić odbiegające od rzeczywistych wyniki u:• dzieci poniżej ok. 10 lat;• sportowców wyczynowych i kulturystów;• osób z gorączką, osób dializowanych, z objawami obrzęku lub osteoporozy;• osób zażywających leki sercowo-naczyniowe (na układ sercowo-naczyniowy);• osób zażywających leki rozszerzające naczynia krwionośne;• osób o znacznych różnicach anatomicznych w długości nóg w stosunku do całkowitej wielkości ciała (długość
nóg znacznie skrócona lub wydłużona).
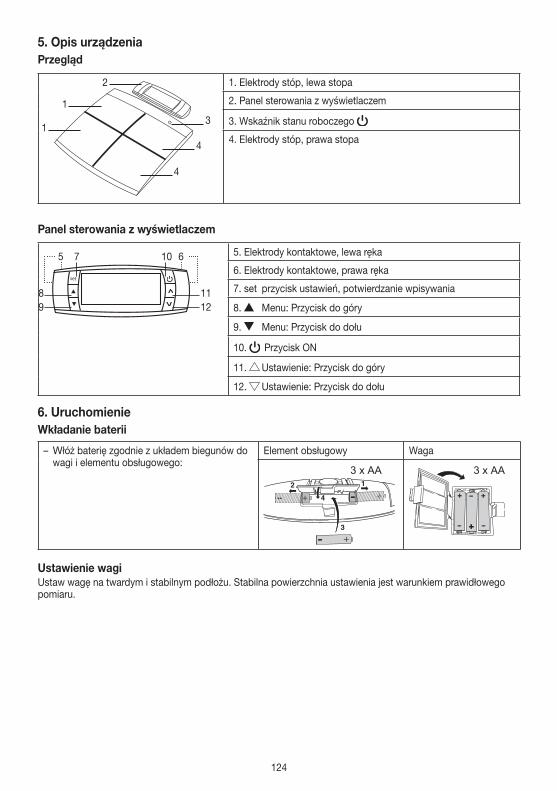
124
5. Opis urządzeniaPrzegląd
3
4
1
1
4
2 1. Elektrody stóp, lewa stopa
2. Panel sterowania z wyświetlaczem
3. Wskaźnik stanu roboczego
4. Elektrody stóp, prawa stopa
Panel sterowania z wyświetlaczem
set
5 7 10
8 119 12
6 5. Elektrody kontaktowe, lewa ręka
6. Elektrody kontaktowe, prawa ręka
7. set przycisk ustawień, potwierdzanie wpisywania
8. Menu: Przycisk do góry
9. Menu: Przycisk do dołu
10. Przycisk ON
11. Ustawienie: Przycisk do góry
12. Ustawienie: Przycisk do dołu
6. UruchomienieWkładanie baterii
– Włóż baterię zgodnie z układem biegunów do wagi i elementu obsługowego:
Element obsługowy Waga
3 x AA 3 x AA
Ustawienie wagiUstaw wagę na twardym i stabilnym podłożu. Stabilna powierzchnia ustawienia jest warunkiem prawidłowego pomiaru.
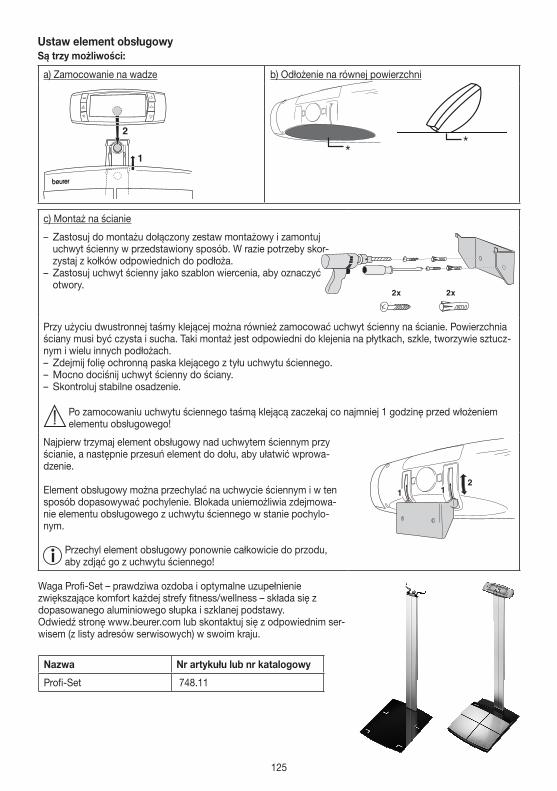
125
Ustaw element obsługowySą trzy możliwości:
a) Zamocowanie na wadze b) Odłożenie na równej powierzchni
**
c) Montaż na ścianie
– Zastosuj do montażu dołączony zestaw montażowy i zamontuj uchwyt ścienny w przedstawiony sposób. W razie potrzeby skor-zystaj z kołków odpowiednich do podłoża.
– Zastosuj uchwyt ścienny jako szablon wiercenia, aby oznaczyć otwory.
Przy użyciu dwustronnej taśmy klejącej można również zamocować uchwyt ścienny na ścianie. Powierzchnia ściany musi być czysta i sucha. Taki montaż jest odpowiedni do klejenia na płytkach, szkle, tworzywie sztucz-nym i wielu innych podłożach. – Zdejmij folię ochronną paska klejącego z tyłu uchwytu ściennego. – Mocno dociśnij uchwyt ścienny do ściany. – Skontroluj stabilne osadzenie.
Po zamocowaniu uchwytu ściennego taśmą klejącą zaczekaj co najmniej 1 godzinę przed włożeniem elementu obsługowego!
Najpierw trzymaj element obsługowy nad uchwytem ściennym przy ścianie, a następnie przesuń element do dołu, aby ułatwić wprowa-dzenie.
Element obsługowy można przechylać na uchwycie ściennym i w ten sposób dopasowywać pochylenie. Blokada uniemożliwia zdejmowa-nie elementu obsługowego z uchwytu ściennego w stanie pochylo-nym.
Przechyl element obsługowy ponownie całkowicie do przodu, aby zdjąć go z uchwytu ściennego!
Waga Profi-Set – prawdziwa ozdoba i optymalne uzupełnienie zwiększające komfort każdej strefy fitness/wellness – składa się z dopasowanego aluminiowego słupka i szklanej podstawy.Odwiedź stronę www.beurer.com lub skontaktuj się z odpowiednim ser-wisem (z listy adresów serwisowych) w swoim kraju.
Nazwa Nr artykułu lub nr katalogowy
Profi-Set 748.11
126
7. Konfiguracja przy użyciu aplikacjiAby zmierzyć ilość tkanki tłuszczowej i inne parametry ciała, należy zapisać dane użytkownika w wadze.W pamięci wagi można zapisać dane 10 użytkowników. Miejsca w pamięci można przypisać poszczególnym członkom rodziny w celu umożliwienia zapisywania indywidualnych ustawień.Ponadto konta użytkowników można włączać za pomocą innych mobilnych urządzeń końcowych z zainstalo-waną aplikacją „beurer HealthManager Pro“ / „beurer HealthManager“ lub przez zmianę profilu użytkownika w aplikacji (patrz ustawienia aplikacji).
Aby podczas uruchomienia połączenie Bluetooth® pozostało aktywne, nie należy oddalać się ze smartfonem od wagi.
– Włącz funkcję Bluetooth® w ustawieniach smartfona. – Włóż baterie i ustaw wagę na twardym podłożu (na wyświetlaczu wagi miga „CONNECT WITH APP”). – Pobierz bezpłatną aplikację „beurer HealthManager Pro“ / „beurer HealthManager“ App ze sklepu Apple App Store (iOS) lub Google Play (Android™).
– Uruchom aplikację i postępuj zgodnie ze wskazówkami. – Wprowadź dane dotyczące BF 105.
W aplikacji „beurer HealthManager Pro“ / „beurer HealthManager“ App należy ustawić lub wprowadzić następu-jące ustawienia:
Dane użytkownika Wartości nastawczeInicjały maks. 3 znaki (A–Z, 0–9)
Płeć mężczyzna ( ), kobieta ( )
Wzrost od 100 do 250 cm (od 3’ 3,5” do 8’ 02”)Data urodzenia Rok, miesiąc, dzieńStopień aktywności od 1 do 5Masa docelowa kg/lb/st (do graficznego przedstawiania przebiegu)
Stopnie aktywnościPrzy wyborze stopnia aktywności decydujące jest uwzględnienie średniego i długiego okresu.
Stopień aktywności Aktywność fizyczna
1 Brak.
2 Mała intensywność: Niewielki i lekki wysiłek fizyczny (np. spacery, lekkie prace ogrodowe, ćwiczenia gimnastyczne).
3 Średnia: Wysiłek fizyczny co najmniej 2 do 4 razy w tygodniu po 30 minut.4 Wysoka: Wysiłek fizyczny co najmniej 4 do 6 razy w tygodniu po 30 minut.
5 Bardzo wysoka: Intensywny wysiłek fizyczny, intensywny trening lub ciężka praca fizyczna, codziennie przez co najmniej 1 godzinę.
Aplikacja przypisuje do użytkownika następną wolną pamięć wagi (osoba 1 – osoba 10).
– Wykonanie pomiaru: Aby było możliwe automatyczne rozpoznawanie osób, pierwszy pomiar należy przypisać do osobistych danych użytkownika. Aplikacja Cię o to poprosi. Postępuj przy tym zgodnie z rozdziałem „9. Wykonanie pomiaru“.
8. Konfiguracja bez aplikacjiZalecamy uruchomienie i wykonanie wszystkich ustawień za pomocą aplikacji. Patrz rozdział„7. Konfiguracja przy użyciu aplikacji“. Można to jednak wykonać również na urządzeniu.• Włóż baterie i ustaw wagę na twardym podłożu (na wyświetlaczu wagi miga „CONNECT WITH APP”).• Zdefiniuj ustawienia urządzenia/czasu/użytkownika na elemencie obsługowym. Zasadniczo dokonuj wyboru
przy użyciu przycisków [ ] lub [ ] i potwierdzaj przyciskiem [SET ].

127
a. Ustawianie urządzenia[SET ] „SET_UNIT ”
Kolejność Wartości nastawczeJęzyk D G F E IJednostka pomiaru
kg – lb – st
Godzina 24 h – 12 hTryb gościa ON_OFFBluetooth® ON_OFF
W przypadku opcji „OFF” połączenie Bluetooth® jest możliwe tylko wtedy, gdy podłą-czona jest część ręczna.
b. Ustawianie czasu[SET ] „SET_TIME ”
Kolejność Wartości nastawczeData Rok – miesiąc – dzieńGodzina Godziny – minuty
c. Ustawianie danych użytkownika[SET ] „SET_USER”
Dane użytkownika Wartości nastawczeInicjały maks. 3 znaki (A–Z, 0–9)Płeć mężczyzna ( ), kobieta ( )
Wzrost od 100 do 250 cm (od 3’-03” do 8’-02”)Data urodzenia Rok, miesiąc, dzieńStopień aktywności od 1 do 5 (patrz rozdział 7)Masa docelowa kg/lb/st, w kg (do graficznego przedstawiania przebiegu)Pin użytkownika Jest nadawany automatycznie do ewentualnego późniejszego korzystania z Bluetooth®
– Wykonanie pomiaru: Aby było możliwe automatyczne rozpoznawanie osób, pierwszy pomiar należy przypisać do osobistych danych użytkownika. Postępuj przy tym zgodnie z rozdziałem „9. Wykonanie pomiaru“.
Późniejsze logowanie do aplikacjiJeśli waga jest uruchamiana bez aplikacji, można skonfigurować użytkownika w aplikacji w niżej opisany sposób. – Pobierz bezpłatną aplikację „beurer HealthManager Pro“ / „beurer HealthManager“ App ze sklepu Apple App Store (iOS) lub Google Play (Android™).
– Uruchom aplikację i postępuj zgodnie ze wskazówkami.
9. Wykonanie pomiaru Włączanie wagi / mierzenie masy
– Naciśnij przycisk [ ] na elemencie obsługowym.Na wyświetlaczu pojawi się wskazanie 0.0 kg.
Waga jest przygotowana do pomiaru masy ciała. Stań na wadze, rozkładając cię-żar ciała równomiernie na obie nogi.
26-07-2017
Przy nowym pomiarze waga przypisuje pomiar do użytkownika, którego ostatni pomiar różnił się od obecnego najwyżej o +/3 kg. Jeśli automatyczne przyporządkowanie użytkownika zakończyło się niepo-wodzeniem, wyświetlana jest masa bez inicjałów. Dzieje się tak, gdy nie jest możliwe jednoznaczne przy-porządkowanie lub wartość pomiarowa wykracza poza zakres +/3 kg. W tym celu wybierz użytkownika ręcznie.
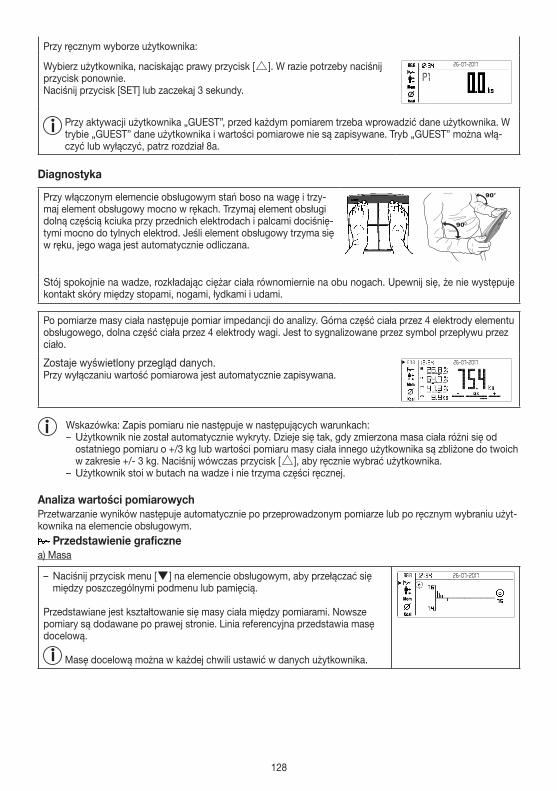
128
Przy ręcznym wyborze użytkownika:
Wybierz użytkownika, naciskając prawy przycisk [ ]. W razie potrzeby naciśnij przycisk ponownie.Naciśnij przycisk [SET] lub zaczekaj 3 sekundy.
26-07-2017
P1
Przy aktywacji użytkownika „GUEST”, przed każdym pomiarem trzeba wprowadzić dane użytkownika. W trybie „GUEST” dane użytkownika i wartości pomiarowe nie są zapisywane. Tryb „GUEST” można włą-czyć lub wyłączyć, patrz rozdział 8a.
Diagnostyka
Przy włączonym elemencie obsługowym stań boso na wagę i trzy-maj element obsługowy mocno w rękach. Trzymaj element obsługi dolną częścią kciuka przy przednich elektrodach i palcami dociśnię-tymi mocno do tylnych elektrod. Jeśli element obsługowy trzyma się w ręku, jego waga jest automatycznie odliczana.
Stój spokojnie na wadze, rozkładając ciężar ciała równomiernie na obu nogach. Upewnij się, że nie występuje kontakt skóry między stopami, nogami, łydkami i udami.
Po pomiarze masy ciała następuje pomiar impedancji do analizy. Górna część ciała przez 4 elektrody elementu obsługowego, dolna część ciała przez 4 elektrody wagi. Jest to sygnalizowane przez symbol przepływu przez ciało.
Zostaje wyświetlony przegląd danych.Przy wyłączaniu wartość pomiarowa jest automatycznie zapisywana.
26-07-2017
Wskazówka: Zapis pomiaru nie następuje w następujących warunkach: – Użytkownik nie został automatycznie wykryty. Dzieje się tak, gdy zmierzona masa ciała różni się od ostatniego pomiaru o +/3 kg lub wartości pomiaru masy ciała innego użytkownika są zbliżone do twoich w zakresie +/- 3 kg. Naciśnij wówczas przycisk [ ], aby ręcznie wybrać użytkownika.
– Użytkownik stoi w butach na wadze i nie trzyma części ręcznej.
Analiza wartości pomiarowychPrzetwarzanie wyników następuje automatycznie po przeprowadzonym pomiarze lub po ręcznym wybraniu użyt-kownika na elemencie obsługowym.
Przedstawienie graficznea) Masa
– Naciśnij przycisk menu [ ] na elemencie obsługowym, aby przełączać się między poszczególnymi podmenu lub pamięcią.
Przedstawiane jest kształtowanie się masy ciała między pomiarami. Nowsze pomiary są dodawane po prawej stronie. Linia referencyjna przedstawia masę docelową.
Masę docelową można w każdej chwili ustawić w danych użytkownika.
26-07-2017
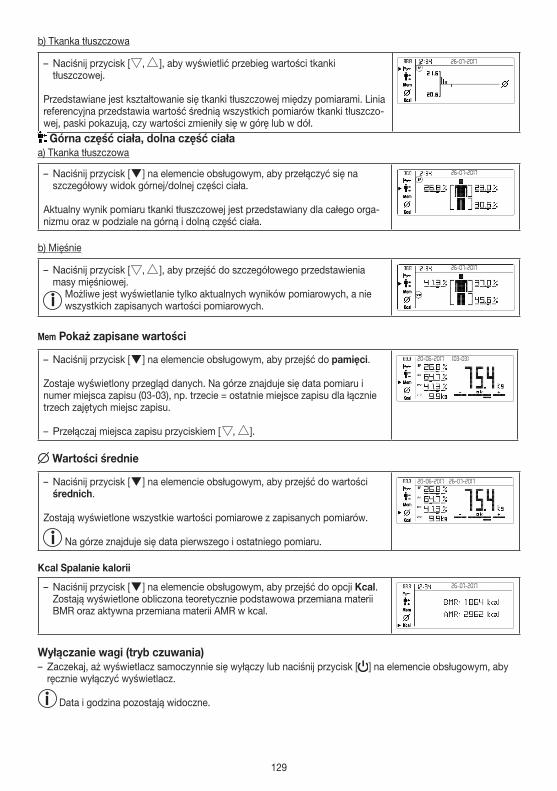
129
b) Tkanka tłuszczowa
– Naciśnij przycisk [ , ], aby wyświetlić przebieg wartości tkanki tłuszczowej.
Przedstawiane jest kształtowanie się tkanki tłuszczowej między pomiarami. Linia referencyjna przedstawia wartość średnią wszystkich pomiarów tkanki tłuszczo-wej, paski pokazują, czy wartości zmieniły się w górę lub w dół.
26-07-2017
Górna część ciała, dolna część ciałaa) Tkanka tłuszczowa
– Naciśnij przycisk [ ] na elemencie obsługowym, aby przełączyć się na szczegółowy widok górnej/dolnej części ciała.
Aktualny wynik pomiaru tkanki tłuszczowej jest przedstawiany dla całego orga-nizmu oraz w podziale na górną i dolną część ciała.
26-07-2017
b) Mięśnie
– Naciśnij przycisk [ , ], aby przejść do szczegółowego przedstawienia masy mięśniowej.
Możliwe jest wyświetlanie tylko aktualnych wyników pomiarowych, a nie wszystkich zapisanych wartości pomiarowych.
26-07-2017
Mem Pokaż zapisane wartości
– Naciśnij przycisk [ ] na elemencie obsługowym, aby przejść do pamięci.
Zostaje wyświetlony przegląd danych. Na górze znajduje się data pomiaru i numer miejsca zapisu (03-03), np. trzecie = ostatnie miejsce zapisu dla łącznie trzech zajętych miejsc zapisu.
– Przełączaj miejsca zapisu przyciskiem [ , ].
(03-03)20-06-2017
Wartości średnie
– Naciśnij przycisk [ ] na elemencie obsługowym, aby przejść do wartości średnich.
Zostają wyświetlone wszystkie wartości pomiarowe z zapisanych pomiarów.
Na górze znajduje się data pierwszego i ostatniego pomiaru.
20-06-2017 26-07-2017
Kcal Spalanie kalorii
– Naciśnij przycisk [ ] na elemencie obsługowym, aby przejść do opcji Kcal. Zostają wyświetlone obliczona teoretycznie podstawowa przemiana materii BMR oraz aktywna przemiana materii AMR w kcal.
26-07-2017
Wyłączanie wagi (tryb czuwania) – Zaczekaj, aż wyświetlacz samoczynnie się wyłączy lub naciśnij przycisk [ ] na elemencie obsługowym, aby ręcznie wyłączyć wyświetlacz.
Data i godzina pozostają widoczne.
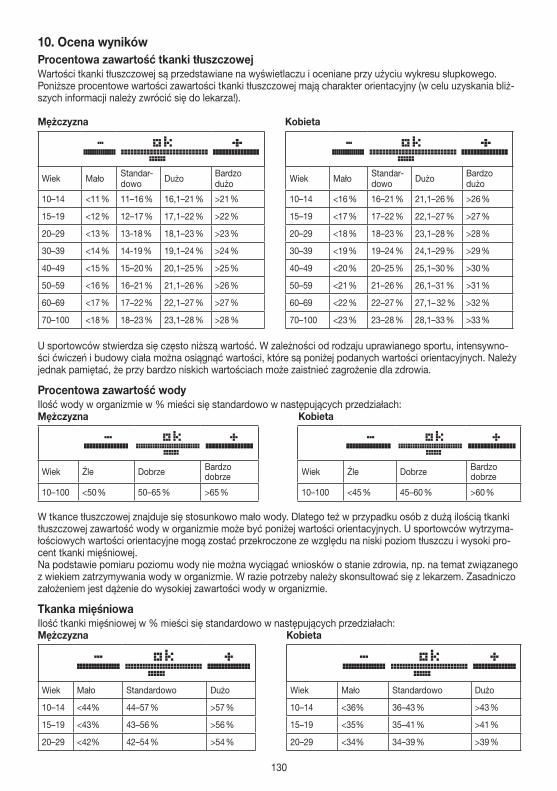
130
10. Ocena wynikówProcentowa zawartość tkanki tłuszczowejWartości tkanki tłuszczowej są przedstawiane na wyświetlaczu i oceniane przy użyciu wykresu słupkowego. Poniższe procentowe wartości zawartości tkanki tłuszczowej mają charakter orientacyjny (w celu uzyskania bliż-szych informacji należy zwrócić się do lekarza!).
Mężczyzna Kobieta
Wiek Mało Standar-dowo Dużo Bardzo
dużo Wiek Mało Standar-dowo Dużo Bardzo
dużo
10–14 <11 % 11–16 % 16,1–21 % >21 % 10–14 <16 % 16–21 % 21,1–26 % >26 %
15–19 <12 % 12–17 % 17,1–22 % >22 % 15–19 <17 % 17–22 % 22,1–27 % >27 %
20–29 <13 % 13-18 % 18,1–23 % >23 % 20–29 <18 % 18–23 % 23,1–28 % >28 %
30–39 <14 % 14-19 % 19,1–24 % >24 % 30–39 <19 % 19–24 % 24,1–29 % >29 %
40–49 <15 % 15–20 % 20,1–25 % >25 % 40–49 <20 % 20–25 % 25,1–30 % >30 %
50–59 <16 % 16–21 % 21,1–26 % >26 % 50–59 <21 % 21–26 % 26,1–31 % >31 %
60–69 <17 % 17–22 % 22,1–27 % >27 % 60–69 <22 % 22–27 % 27,1– 32 % >32 %
70–100 <18 % 18–23 % 23,1–28 % >28 % 70–100 <23 % 23–28 % 28,1–33 % >33 %
U sportowców stwierdza się często niższą wartość. W zależności od rodzaju uprawianego sportu, intensywno-ści ćwiczeń i budowy ciała można osiągnąć wartości, które są poniżej podanych wartości orientacyjnych. Należy jednak pamiętać, że przy bardzo niskich wartościach może zaistnieć zagrożenie dla zdrowia.
Procentowa zawartość wodyIlość wody w organizmie w % mieści się standardowo w następujących przedziałach:Mężczyzna Kobieta
Wiek Źle Dobrze Bardzo dobrze Wiek Źle Dobrze Bardzo
dobrze
10–100 <50 % 50–65 % >65 % 10–100 <45 % 45–60 % >60 %
W tkance tłuszczowej znajduje się stosunkowo mało wody. Dlatego też w przypadku osób z dużą ilością tkanki tłuszczowej zawartość wody w organizmie może być poniżej wartości orientacyjnych. U sportowców wytrzyma-łościowych wartości orientacyjne mogą zostać przekroczone ze względu na niski poziom tłuszczu i wysoki pro-cent tkanki mięśniowej.Na podstawie pomiaru poziomu wody nie można wyciągać wniosków o stanie zdrowia, np. na temat związanego z wiekiem zatrzymywania wody w organizmie. W razie potrzeby należy skonsultować się z lekarzem. Zasadniczo założeniem jest dążenie do wysokiej zawartości wody w organizmie.
Tkanka mięśniowaIlość tkanki mięśniowej w % mieści się standardowo w następujących przedziałach:Mężczyzna Kobieta
Wiek Mało Standardowo Dużo Wiek Mało Standardowo Dużo
10–14 <44% 44–57 % >57 % 10–14 <36% 36–43 % >43 %
15–19 <43% 43–56 % >56 % 15–19 <35% 35–41 % >41 %
20–29 <42% 42–54 % >54 % 20–29 <34% 34–39 % >39 %
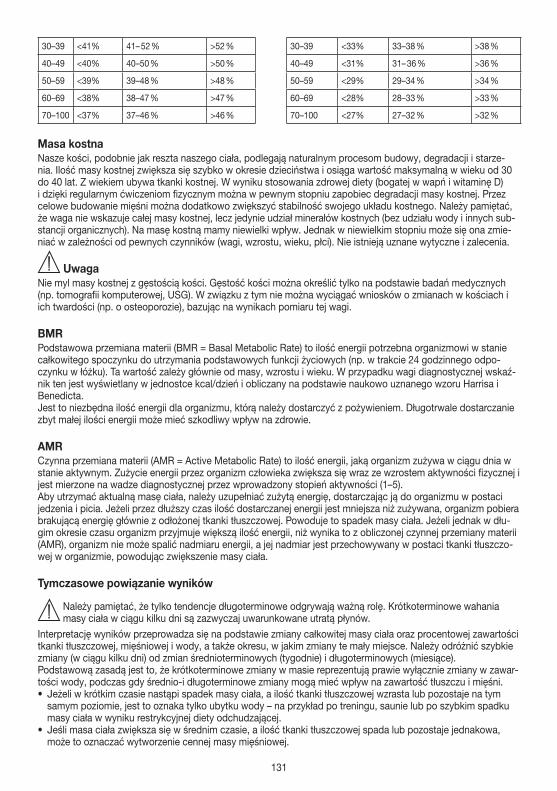
131
30–39 <41% 41– 52 % >52 % 30–39 <33% 33–38 % >38 %
40–49 <40% 40–50 % >50 % 40–49 <31% 31– 36 % >36 %
50–59 <39% 39–48 % >48 % 50–59 <29% 29–34 % >34 %
60–69 <38% 38–47 % >47 % 60–69 <28% 28–33 % >33 %
70–100 <37% 37–46 % >46 % 70–100 <27% 27–32 % >32 %
Masa kostnaNasze kości, podobnie jak reszta naszego ciała, podlegają naturalnym procesom budowy, degradacji i starze-nia. Ilość masy kostnej zwiększa się szybko w okresie dzieciństwa i osiąga wartość maksymalną w wieku od 30 do 40 lat. Z wiekiem ubywa tkanki kostnej. W wyniku stosowania zdrowej diety (bogatej w wapń i witaminę D) i dzięki regularnym ćwiczeniom fizycznym można w pewnym stopniu zapobiec degradacji masy kostnej. Przez celowe budowanie mięśni można dodatkowo zwiększyć stabilność swojego układu kostnego. Należy pamiętać, że waga nie wskazuje całej masy kostnej, lecz jedynie udział minerałów kostnych (bez udziału wody i innych sub-stancji organicznych). Na masę kostną mamy niewielki wpływ. Jednak w niewielkim stopniu może się ona zmie-niać w zależności od pewnych czynników (wagi, wzrostu, wieku, płci). Nie istnieją uznane wytyczne i zalecenia.
UwagaNie myl masy kostnej z gęstością kości. Gęstość kości można określić tylko na podstawie badań medycznych (np. tomografii komputerowej, USG). W związku z tym nie można wyciągać wniosków o zmianach w kościach i ich twardości (np. o osteoporozie), bazując na wynikach pomiaru tej wagi.
BMRPodstawowa przemiana materii (BMR = Basal Metabolic Rate) to ilość energii potrzebna organizmowi w stanie całkowitego spoczynku do utrzymania podstawowych funkcji życiowych (np. w trakcie 24 godzinnego odpo-czynku w łóżku). Ta wartość zależy głównie od masy, wzrostu i wieku. W przypadku wagi diagnostycznej wskaź-nik ten jest wyświetlany w jednostce kcal/dzień i obliczany na podstawie naukowo uznanego wzoru Harrisa i Benedicta.Jest to niezbędna ilość energii dla organizmu, którą należy dostarczyć z pożywieniem. Długotrwale dostarczanie zbyt małej ilości energii może mieć szkodliwy wpływ na zdrowie.
AMRCzynna przemiana materii (AMR = Active Metabolic Rate) to ilość energii, jaką organizm zużywa w ciągu dnia w stanie aktywnym. Zużycie energii przez organizm człowieka zwiększa się wraz ze wzrostem aktywności fizycznej i jest mierzone na wadze diagnostycznej przez wprowadzony stopień aktywności (1–5).Aby utrzymać aktualną masę ciała, należy uzupełniać zużytą energię, dostarczając ją do organizmu w postaci jedzenia i picia. Jeżeli przez dłuższy czas ilość dostarczanej energii jest mniejsza niż zużywana, organizm pobiera brakującą energię głównie z odłożonej tkanki tłuszczowej. Powoduje to spadek masy ciała. Jeżeli jednak w dłu-gim okresie czasu organizm przyjmuje większą ilość energii, niż wynika to z obliczonej czynnej przemiany materii (AMR), organizm nie może spalić nadmiaru energii, a jej nadmiar jest przechowywany w postaci tkanki tłuszczo-wej w organizmie, powodując zwiększenie masy ciała.
Tymczasowe powiązanie wyników
Należy pamiętać, że tylko tendencje długoterminowe odgrywają ważną rolę. Krótkoterminowe wahania masy ciała w ciągu kilku dni są zazwyczaj uwarunkowane utratą płynów.
Interpretację wyników przeprowadza się na podstawie zmiany całkowitej masy ciała oraz procentowej zawartości tkanki tłuszczowej, mięśniowej i wody, a także okresu, w jakim zmiany te mały miejsce. Należy odróżnić szybkie zmiany (w ciągu kilku dni) od zmian średnioterminowych (tygodnie) i długoterminowych (miesiące).Podstawową zasadą jest to, że krótkoterminowe zmiany w masie reprezentują prawie wyłącznie zmiany w zawar-tości wody, podczas gdy średnio-i długoterminowe zmiany mogą mieć wpływ na zawartość tłuszczu i mięśni.• Jeżeli w krótkim czasie nastąpi spadek masy ciała, a ilość tkanki tłuszczowej wzrasta lub pozostaje na tym
samym poziomie, jest to oznaka tylko ubytku wody – na przykład po treningu, saunie lub po szybkim spadku masy ciała w wyniku restrykcyjnej diety odchudzającej.
• Jeśli masa ciała zwiększa się w średnim czasie, a ilość tkanki tłuszczowej spada lub pozostaje jednakowa, może to oznaczać wytworzenie cennej masy mięśniowej.

132
• Jeśli następuje jednoczesny spadek masy ciała i ilości tkanki tłuszczowej, oznacza to, że dieta jest skuteczna i następuje utrata masy tkanki tłuszczowej.
• Idealnym rozwiązaniem jest wspomaganie skuteczności diety aktywnością fizyczną, treningiem aerobowym i siłowym. Pozwala to w średnim czasie na zwiększenie masy mięśniowej.
• Nie można dodawać ilości tkanki tłuszczowej, wody zawartej w organizmie lub tkanki mięśniowej (tkanka mię-śniowa zawiera również składniki pochodzące z wody zawartej w organizmie).
11. Przesłanie wyników pomiarówa) Przez aplikacjęJeśli aplikacja nie jest włączona, nowo przyporządkowane pomiary zostaną zapisane w pamięci wagi. W pamięci wagi można zapisać maksymalnie 30 pomiarów na użytkownika. Zapisane wartości są automatycznie przeno-szone do aplikacji, gdy urządzenie z aplikacją znajduje się w zasięgu połączenia Bluetooth®. Możliwe jest auto-matyczne przeniesienie danych w przypadku wyłączonej wagi.
b) Przez USB – Pliki do pobrania i instalacji oprogramowania firmy Beurer znajdują się w sekcji pobierania na stronie http://www.beurer.com.
– Podczas instalacji oprogramowania należy przestrzegać zaleceń. – Należy utworzyć połączenie USB.
12. Dodatkowe informacjeUsuwanie danych zapisanych w pamięci wagia) Usuwanie użytkownika ze wszystkimi ustawieniami i wartościami zapisu – Po włączeniu wybierz użytkownika, naciskając przycisk [ ]. W razie potrzeby ponownie naciśnij przycisk i potwierdź przy użyciu [SET].
– Po wyświetleniu wskazania 0.0 naciśnij przycisk [SET] i przytrzymaj go przez 10 sekund, aby usunąć użytkow-nika.
– Wybierz przyciskami [ , ] opcję „YES” i potwierdź zapytanie przyciskiem [SET]. Aby nie usuwać użytkow-nika, potwierdź, wybierając „NO” przyciskiem [SET].
Wszystkie zapisane wartości i ustawienia tego użytkownika zostaną usunięte.
b) Usuwanie pojedynczej wartości zapisu użytkownika – W pamięci wartości pomiarowych „Mem” wybierz wartość pomiarową i naciśnij krótko przycisk [SET] na ele-mencie obsługowym, aby usunąć wyświetlaną wartość.
– Można to wykonać także bezpośrednio po pomiarze. – Wybierz przyciskami [ , ] opcję „YES” i potwierdź zapytanie przyciskiem [SET]. Aby nie usuwać wartości, potwierdź, wybierając „NO” przyciskiem [SET].
c) Usuwanie wszystkich wartości zapisu użytkownika – Otwórz pamięć wartości pomiarowych „Mem”, naciśnij przycisk [SET] na elemencie obsługowym i przytrzymaj go przez ok. 5 sekund, aby usunąć wszystkie wartości.
– Wybierz przyciskami [ , ] opcję „YES” i potwierdź zapytanie przyciskiem [SET]. Aby nic nie usuwać, potwierdź, wybierając „NO” przyciskiem [SET].
–Wymiana bateriiElement obsługowy jest wyposażony we wskaźnik naładowania baterii. Na wyświetlaczu pojawia się symbol
, jeśli baterie elementu obsługowego są zbyt słabe, lub symbol , jeśli baterie wagi są zbyt słabe. Należy wówczas wymienić baterie. Następnie waga ponownie łączy się z aplikacją. Zostaje zaktualizowany czas syste-mowy.
WSKAZÓWKA:• Do wymiany należy używać baterii tego samego typu, marki i o identycznej pojemności.• Nie używać akumulatorów do wielokrotnego ładowania.• Należy stosować baterie niezawierające metali ciężkich.
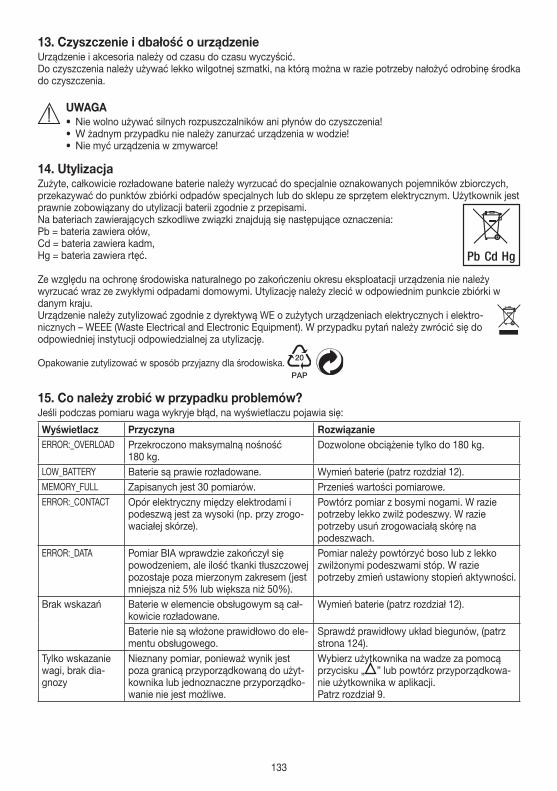
133
13. Czyszczenie i dbałość o urządzenieUrządzenie i akcesoria należy od czasu do czasu wyczyścić.Do czyszczenia należy używać lekko wilgotnej szmatki, na którą można w razie potrzeby nałożyć odrobinę środka do czyszczenia.
UWAGA• Nie wolno używać silnych rozpuszczalników ani płynów do czyszczenia!• W żadnym przypadku nie należy zanurzać urządzenia w wodzie!• Nie myć urządzenia w zmywarce!
14. UtylizacjaZużyte, całkowicie rozładowane baterie należy wyrzucać do specjalnie oznakowanych pojemników zbiorczych, przekazywać do punktów zbiórki odpadów specjalnych lub do sklepu ze sprzętem elektrycznym. Użytkownik jest prawnie zobowiązany do utylizacji baterii zgodnie z przepisami.Na bateriach zawierających szkodliwe związki znajdują się następujące oznaczenia: Pb = bateria zawiera ołów,Cd = bateria zawiera kadm, Hg = bateria zawiera rtęć.
Ze względu na ochronę środowiska naturalnego po zakończeniu okresu eksploatacji urządzenia nie należy wyrzucać wraz ze zwykłymi odpadami domowymi. Utylizację należy zlecić w odpowiednim punkcie zbiórki w danym kraju. Urządzenie należy zutylizować zgodnie z dyrektywą WE o zużytych urządzeniach elektrycznych i elektro-nicznych – WEEE (Waste Electrical and Electronic Equipment). W przypadku pytań należy zwrócić się do odpowiedniej instytucji odpowiedzialnej za utylizację.
Opakowanie zutylizować w sposób przyjazny dla środowiska. 20
PAP
15. Co należy zrobić w przypadku problemów?Jeśli podczas pomiaru waga wykryje błąd, na wyświetlaczu pojawia się:
Wyświetlacz Przyczyna RozwiązanieERROR:_OVERLOAD Przekroczono maksymalną nośność
180 kg.Dozwolone obciążenie tylko do 180 kg.
LOW_BATTERY Baterie są prawie rozładowane. Wymień baterie (patrz rozdział 12).MEMORY_FULL Zapisanych jest 30 pomiarów. Przenieś wartości pomiarowe.ERROR:_CONTACT Opór elektryczny między elektrodami i
podeszwą jest za wysoki (np. przy zrogo-waciałej skórze).
Powtórz pomiar z bosymi nogami. W razie potrzeby lekko zwilż podeszwy. W razie potrzeby usuń zrogowaciałą skórę na podeszwach.
ERROR:_DATA Pomiar BIA wprawdzie zakończył się powodzeniem, ale ilość tkanki tłuszczowej pozostaje poza mierzonym zakresem (jest mniejsza niż 5% lub większa niż 50%).
Pomiar należy powtórzyć boso lub z lekko zwilżonymi podeszwami stóp. W razie potrzeby zmień ustawiony stopień aktywności.
Brak wskazań Baterie w elemencie obsługowym są cał-kowicie rozładowane.
Wymień baterie (patrz rozdział 12).
Baterie nie są włożone prawidłowo do ele-mentu obsługowego.
Sprawdź prawidłowy układ biegunów, (patrz strona 124).
Tylko wskazanie wagi, brak dia-gnozy
Nieznany pomiar, ponieważ wynik jest poza granicą przyporządkowaną do użyt-kownika lub jednoznaczne przyporządko-wanie nie jest możliwe.
Wybierz użytkownika na wadze za pomocą przycisku „ ” lub powtórz przyporządkowa-nie użytkownika w aplikacji.Patrz rozdział 9.
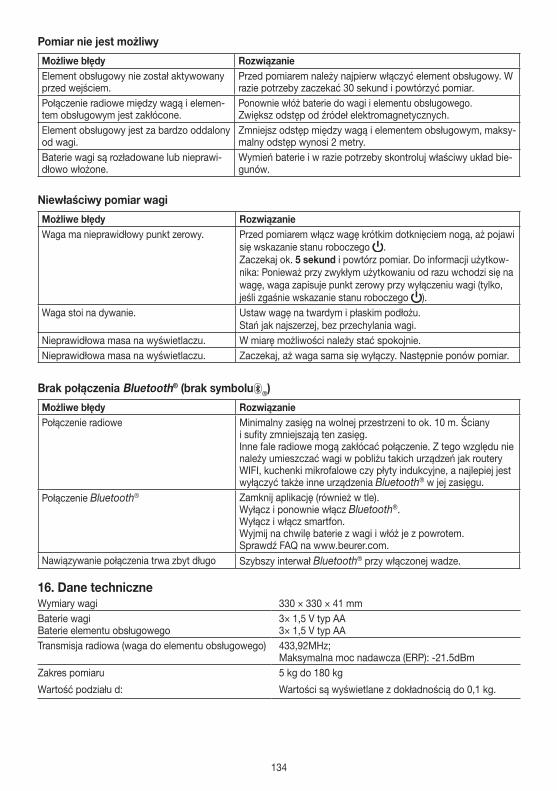
134
Pomiar nie jest możliwy
Możliwe błędy RozwiązanieElement obsługowy nie został aktywowany przed wejściem.
Przed pomiarem należy najpierw włączyć element obsługowy. W razie potrzeby zaczekać 30 sekund i powtórzyć pomiar.
Połączenie radiowe między wagą i elemen-tem obsługowym jest zakłócone.
Ponownie włóż baterie do wagi i elementu obsługowego.Zwiększ odstęp od źródeł elektromagnetycznych.
Element obsługowy jest za bardzo oddalony od wagi.
Zmniejsz odstęp między wagą i elementem obsługowym, maksy-malny odstęp wynosi 2 metry.
Baterie wagi są rozładowane lub nieprawi-dłowo włożone.
Wymień baterie i w razie potrzeby skontroluj właściwy układ bie-gunów.
Niewłaściwy pomiar wagi
Możliwe błędy RozwiązanieWaga ma nieprawidłowy punkt zerowy. Przed pomiarem włącz wagę krótkim dotknięciem nogą, aż pojawi
się wskazanie stanu roboczego .Zaczekaj ok. 5 sekund i powtórz pomiar. Do informacji użytkow-nika: Ponieważ przy zwykłym użytkowaniu od razu wchodzi się na wagę, waga zapisuje punkt zerowy przy wyłączeniu wagi (tylko, jeśli zgaśnie wskazanie stanu roboczego ).
Waga stoi na dywanie. Ustaw wagę na twardym i płaskim podłożu.Stań jak najszerzej, bez przechylania wagi.
Nieprawidłowa masa na wyświetlaczu. W miarę możliwości należy stać spokojnie.Nieprawidłowa masa na wyświetlaczu. Zaczekaj, aż waga sama się wyłączy. Następnie ponów pomiar.
Brak połączenia Bluetooth® (brak symbolu ®)
Możliwe błędy RozwiązaniePołączenie radiowe Minimalny zasięg na wolnej przestrzeni to ok. 10 m. Ściany
i sufity zmniejszają ten zasięg.Inne fale radiowe mogą zakłócać połączenie. Z tego względu nie należy umieszczać wagi w pobliżu takich urządzeń jak routery WIFI, kuchenki mikrofalowe czy płyty indukcyjne, a najlepiej jest wyłączyć także inne urządzenia Bluetooth® w jej zasięgu.
Połączenie Bluetooth® Zamknij aplikację (również w tle).Wyłącz i ponownie włącz Bluetooth®.Wyłącz i włącz smartfon.Wyjmij na chwilę baterie z wagi i włóż je z powrotem.Sprawdź FAQ na www.beurer.com.
Nawiązywanie połączenia trwa zbyt długo Szybszy interwał Bluetooth® przy włączonej wadze.
16. Dane techniczneWymiary wagi 330 × 330 × 41 mmBaterie wagiBaterie elementu obsługowego
3× 1,5 V typ AA3× 1,5 V typ AA
Transmisja radiowa (waga do elementu obsługowego) 433,92MHz; Maksymalna moc nadawcza (ERP): -21.5dBm
Zakres pomiaru 5 kg do 180 kg
Wartość podziału d: Wartości są wyświetlane z dokładnością do 0,1 kg.
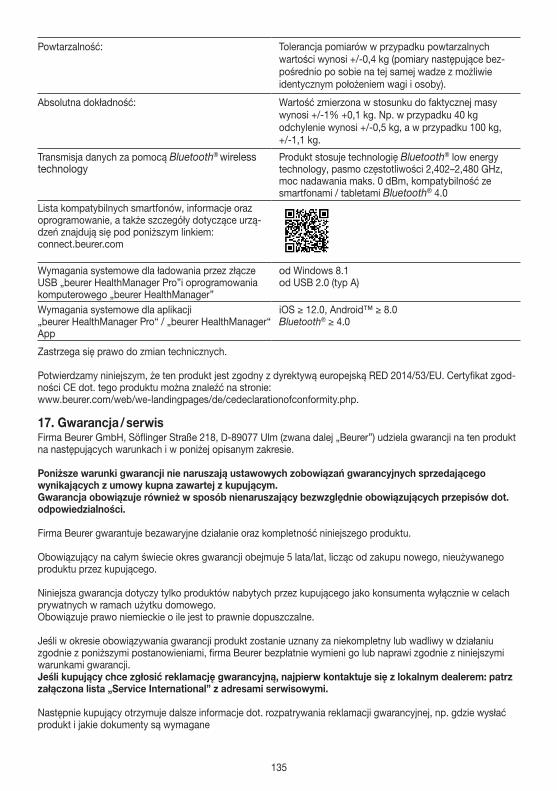
135
Powtarzalność: Tolerancja pomiarów w przypadku powtarzalnych wartości wynosi +/-0,4 kg (pomiary następujące bez-pośrednio po sobie na tej samej wadze z możliwie identycznym położeniem wagi i osoby).
Absolutna dokładność: Wartość zmierzona w stosunku do faktycznej masy wynosi +/-1% +0,1 kg. Np. w przypadku 40 kg odchylenie wynosi +/-0,5 kg, a w przypadku 100 kg, +/-1,1 kg.
Transmisja danych za pomocą Bluetooth® wireless technology
Produkt stosuje technologię Bluetooth® low energy technology, pasmo częstotliwości 2,402–2,480 GHz, moc nadawania maks. 0 dBm, kompatybilność ze smartfonami / tabletami Bluetooth® 4.0
Lista kompatybilnych smartfonów, informacje oraz oprogramowanie, a także szczegóły dotyczące urzą-dzeń znajdują się pod poniższym linkiem:connect.beurer.com
Wymagania systemowe dla ładowania przez złącze USB „beurer HealthManager Pro”i oprogramowania komputerowego „beurer HealthManager”
od Windows 8.1od USB 2.0 (typ A)
Wymagania systemowe dla aplikacji „beurer HealthManager Pro“ / „beurer HealthManager“ App
iOS ≥ 12.0, Android™ ≥ 8.0Bluetooth® ≥ 4.0
Zastrzega się prawo do zmian technicznych.
Potwierdzamy niniejszym, że ten produkt jest zgodny z dyrektywą europejską RED 2014/53/EU. Certyfikat zgod-ności CE dot. tego produktu można znaleźć na stronie: www.beurer.com/web/we-landingpages/de/cedeclarationofconformity.php.
17. Gwarancja / serwisFirma Beurer GmbH, Söflinger Straße 218, D-89077 Ulm (zwana dalej „Beurer”) udziela gwarancji na ten produkt na następujących warunkach i w poniżej opisanym zakresie. Poniższe warunki gwarancji nie naruszają ustawowych zobowiązań gwarancyjnych sprzedającego wynikających z umowy kupna zawartej z kupującym. Gwarancja obowiązuje również w sposób nienaruszający bezwzględnie obowiązujących przepisów dot. odpowiedzialności.
Firma Beurer gwarantuje bezawaryjne działanie oraz kompletność niniejszego produktu.
Obowiązujący na całym świecie okres gwarancji obejmuje 5 lata/lat, licząc od zakupu nowego, nieużywanego produktu przez kupującego.
Niniejsza gwarancja dotyczy tylko produktów nabytych przez kupującego jako konsumenta wyłącznie w celach prywatnych w ramach użytku domowego.Obowiązuje prawo niemieckie o ile jest to prawnie dopuszczalne.
Jeśli w okresie obowiązywania gwarancji produkt zostanie uznany za niekompletny lub wadliwy w działaniu zgodnie z poniższymi postanowieniami, firma Beurer bezpłatnie wymieni go lub naprawi zgodnie z niniejszymi warunkami gwarancji.Jeśli kupujący chce zgłosić reklamację gwarancyjną, najpierw kontaktuje się z lokalnym dealerem: patrz załączona lista „Service International” z adresami serwisowymi.
Następnie kupujący otrzymuje dalsze informacje dot. rozpatrywania reklamacji gwarancyjnej, np. gdzie wysłać produkt i jakie dokumenty są wymagane
136
Roszczenie z tytułu gwarancji będzie rozpatrywane tylko wtedy, gdy kupujący może przedłożyć – kopię faktury/paragon zakupu oraz – oryginalny produkt
firmie Beurer lub autoryzowanemu partnerowi firmy Beurer.
Niniejsza gwarancja wyraźnie nie obejmuje: – zużycia wynikającego z normalnego użytkowania lub zużywania się produktu; – dostarczanych z tym produktem akcesoriów, które zużywają się lub ulegają zużyciu podczas prawidłowego
użytkowania (np. baterii, akumulatorów, mankietów, uszczelek, elektrod, źródeł światła, nakładek i akcesoriów inhalatora);
– produktów, które były używane, czyszczone, przechowywane lub konserwowane w niewłaściwy sposób i/lub niezgodnie z treścią instrukcji obsługi, a także produktów, które zostały otwarte, naprawione lub zmodyfiko-wane przez kupującego lub centrum serwisowe nieautoryzowane przez firmę Beurer;
– uszkodzeń powstałych podczas transportu między producentem a klientem lub między centrum serwisowym a klientem;
– produktów, które zostały zakupione jako artykuły grupy B („B-Ware”) lub jako artykuły używane; – szkód następczych, które wynikają z wady tego produktu (w tym przypadku mogą jednak istnieć roszczenia z
tytułu odpowiedzialności za produkt lub wynikające z innych bezwzględnie obowiązujących przepisów prawa dot. odpowiedzialności).
Naprawy lub całkowita wymiana w żadnym wypadku nie przedłużają okresu gwarancji.
Zast
rzeg
a si
ę pr
awo
do p
omył
ek i
zmia
n74
8.12
_BF1
05_2
020-
09-2
4_03
_IM
1-B
EU
Beurer GmbH • Söflinger Str. 218 • 89077 Ulm (Germany) • www.beurer.comwww.beurer-gesundheitsratgeber.com • www.beurer-healthguide.com
The Bluetooth® word mark and logos are registered trademarks owned by Bluetooth SIG, Inc. and any use of such marks by Beurer GmbH is under license. Other trademarks and trade names are those of their respective owners.
Apple and the Apple logo are trademarks of Apple Inc., registered in the U.S. and other countries. App Store is a service mark of Apple Inc., registered in the U.S. and other countries.
Google Play and the Google Play logo are trademarks of Google LLC.
Android™ is a trademark of Google LLC.


![cf}}Bf]]lus ;DklQ a ''n]]l^g](https://img.pdfslide.net/doc/110x75/63266832051fac18490dbd92/cfbflus-dklq-a-nlg-1678863336.jpg)


