Embed Size (px)
Citation preview
Product Guide Release 11.6
CA XCOM™ Data Transport® Gateway
This Documentation, which includes embedded help systems and electronically distributed materials, (hereinafter referred to as the “Documentation”) is for your informational purposes only and is subject to change or withdrawal by CA at any time.
This Documentation may not be copied, transferred, reproduced, disclosed, modified or duplicated, in whole or in part, without the prior written consent of CA. This Documentation is confidential and proprietary information of CA and may not be disclosed by you or used for any purpose other than as may be permitted in (i) a separate agreement between you and CA governing your use of the CA software to which the Documentation relates; or (ii) a separate confidentiality agreement between you and CA.
Notwithstanding the foregoing, if you are a licensed user of the software product(s) addressed in the Documentation, you may print or otherwise make available a reasonable number of copies of the Documentation for internal use by you and your employees in connection with that software, provided that all CA copyright notices and legends are affixed to each reproduced copy.
The right to print or otherwise make available copies of the Documentation is limited to the period during which the applicable license for such software remains in full force and effect. Should the license terminate for any reason, it is your responsibility to certify in writing to CA that all copies and partial copies of the Documentation have been returned to CA or destroyed.
TO THE EXTENT PERMITTED BY APPLICABLE LAW, CA PROVIDES THIS DOCUMENTATION “AS IS” WITHOUT WARRANTY OF ANY KIND, INCLUDING WITHOUT LIMITATION, ANY IMPLIED WARRANTIES OF MERCHANTABILITY, FITNESS FOR A PARTICULAR PURPOSE, OR NONINFRINGEMENT. IN NO EVENT WILL CA BE LIABLE TO YOU OR ANY THIRD PARTY FOR ANY LOSS OR DAMAGE, DIRECT OR INDIRECT, FROM THE USE OF THIS DOCUMENTATION, INCLUDING WITHOUT LIMITATION, LOST PROFITS, LOST INVESTMENT, BUSINESS INTERRUPTION, GOODWILL, OR LOST DATA, EVEN IF CA IS EXPRESSLY ADVISED IN ADVANCE OF THE POSSIBILITY OF SUCH LOSS OR DAMAGE.
The use of any software product referenced in the Documentation is governed by the applicable license agreement and such license agreement is not modified in any way by the terms of this notice.
The manufacturer of this Documentation is CA.
Provided with “Restricted Rights.” Use, duplication or disclosure by the United States Government is subject to the restrictions set forth in FAR Sections 12.212, 52.227-14, and 52.227-19(c)(1) - (2) and DFARS Section 252.227-7014(b)(3), as applicable, or their successors.
Copyright © 2013 CA. All rights reserved. All trademarks, trade names, service marks, and logos referenced herein belong to their respective companies.
CA Technologies Product References
This document references the following CA Technologies products:
■ CA XCOM™ Data Transport® (CA XCOM Data Transport)
■ CA XCOM™ Data Transport® Gateway (CA XCOM Gateway)
■ CA XCOM™ Data Transport® Management Center (CA XCOM Management Center)
Contact CA Technologies
Contact CA Support
For your convenience, CA Technologies provides one site where you can access the information that you need for your Home Office, Small Business, and Enterprise CA Technologies products. At http://ca.com/support, you can access the following resources:
■ Online and telephone contact information for technical assistance and customer services
■ Information about user communities and forums
■ Product and documentation downloads
■ CA Support policies and guidelines
■ Other helpful resources appropriate for your product
Providing Feedback About Product Documentation
If you have comments or questions about CA Technologies product documentation, you can send a message to [email protected].
To provide feedback about CA Technologies product documentation, complete our short customer survey which is available on the CA Support website at http://ca.com/docs.

Contents 5
Contents
Chapter 1: Introduction 11
CA XCOM Gateway ..................................................................................................................................................... 11
CA XCOM Gateway Communication and Management ............................................................................................. 12
Chapter 2: System Requirements and Setup 15
System Requirements ................................................................................................................................................ 15
Operating Systems .............................................................................................................................................. 15
Software .............................................................................................................................................................. 15
Databases ............................................................................................................................................................ 16
Browsers ............................................................................................................................................................. 16
64-Bit Considerations .......................................................................................................................................... 16
Hardware Requirements ............................................................................................................................................ 16
Pre-Installation Considerations .................................................................................................................................. 16
Relational Database Tables ................................................................................................................................. 16
Administrator User .............................................................................................................................................. 17
Installation Prerequisites ........................................................................................................................................... 18
Compatibility Issues ............................................................................................................................................ 20
Chapter 3: Installing and Uninstalling 21
Install the Product ...................................................................................................................................................... 22
Installer Dialogs .......................................................................................................................................................... 23
Step 1: Accept License Agreement ...................................................................................................................... 23
Step 2: Select the Components to Install ............................................................................................................ 25
Step 3: Specify Destination Folder for CA XCOM Data Transport for Gateway .................................................. 33
Step 4: Define the Database for the XCOM Gateway and Interface Server ....................................................... 34
Step 5: Specify Information for CA EEM .............................................................................................................. 40
Step 6: (Gateway) Specify Keystore Information ................................................................................................ 42
Step 7: Specify Samba Client Library for Gateway .............................................................................................. 43
Step 8: Review Specified Installation Options ..................................................................................................... 44
Custom Step: Specify Gateway Ports for Gateway Tomcat and FTP Server ....................................................... 47
Custom Step: Specify Ports for Interface Server Tomcat .................................................................................... 49
Custom Step: Remote Interface Server Details ................................................................................................... 50
Install the Product in Console Mode .......................................................................................................................... 51
Silent Installation ........................................................................................................................................................ 54
Check the Log Files .............................................................................................................................................. 55
Features To Be Installed ...................................................................................................................................... 55
6 Product Guide
Variables Used in the Installer Response File ..................................................................................................... 56
Sample Response File .......................................................................................................................................... 63
Uninstall the Product ................................................................................................................................................. 64
Uninstall Modes .................................................................................................................................................. 65
Uninstall CA XCOM Gateway ............................................................................................................................... 66
Uninstall the CA XCOM Interface Server ............................................................................................................. 67
Remove Database Objects .................................................................................................................................. 67
Chapter 4: Post-Installation and Startup 69
Configure CA Embedded Entitlements Manager (EEM) ............................................................................................. 70
Check SSL Mode for Application Server ..................................................................................................................... 70
Check Library Path for CA Licensing ........................................................................................................................... 71
Adding Samba Support ............................................................................................................................................... 71
Start CA XCOM Gateway ............................................................................................................................................ 72
Stop CA XCOM Gateway ............................................................................................................................................. 74
Configure SSL Communication ................................................................................................................................... 75
Internet Connections to CA XCOM Gateway....................................................................................................... 76
User Connections to CA XCOM Gateway ............................................................................................................ 78
Communication between the CA Interface Server and CA XCOM Data Transport Servers ................................ 80
Initial Login ................................................................................................................................................................. 82
Chapter 5: CA XCOM Gateway Overview 83
Login ........................................................................................................................................................................... 83
CA XCOM Gateway Website ....................................................................................................................................... 85
Overview Tab ............................................................................................................................................................. 86
Recent Uploads from Last Login.......................................................................................................................... 86
Files that Expire Shortly ...................................................................................................................................... 87
Help ..................................................................................................................................................................... 88
Log Out ................................................................................................................................................................ 89
Chapter 6: CA XCOM Gateway Administration 91
Configure CA XCOM Gateway .................................................................................................................................... 92
Manage Users............................................................................................................................................................. 93
Display Users ....................................................................................................................................................... 94
Filter Users .......................................................................................................................................................... 95
Add Users ............................................................................................................................................................ 95
Update User ........................................................................................................................................................ 97
Copy User ............................................................................................................................................................ 98
Delete Users ........................................................................................................................................................ 99
Manage Notifications - Add, edit, delete ............................................................................................................ 99
Contents 7
View Notifications ............................................................................................................................................. 100
View Permitted Policies .................................................................................................................................... 100
Display Stored Files Created by a Specific User ................................................................................................ 101
Manage Policies ....................................................................................................................................................... 101
Display Policies .................................................................................................................................................. 102
Filter Policies ..................................................................................................................................................... 103
Add Policies ....................................................................................................................................................... 104
Edit Policies ....................................................................................................................................................... 106
Copy Policies ..................................................................................................................................................... 107
Delete Policies ................................................................................................................................................... 108
Show File Limits ................................................................................................................................................. 109
Display Stored Files Associated with a Specific Policy....................................................................................... 110
Start/Stop Watcher ........................................................................................................................................... 111
Policy Configuration Wizard .............................................................................................................................. 111
Manage Realms ........................................................................................................................................................ 128
Display Realms .................................................................................................................................................. 129
Filter Realms...................................................................................................................................................... 130
Add Realms ....................................................................................................................................................... 130
Update Realms .................................................................................................................................................. 132
Copy Realms ...................................................................................................................................................... 132
Delete Realms ................................................................................................................................................... 133
Show File Limits ................................................................................................................................................. 134
Display Stored Files in a Specific Realm ............................................................................................................ 135
Manage Servers ........................................................................................................................................................ 136
Display Servers .................................................................................................................................................. 136
Filter Servers ..................................................................................................................................................... 138
Add Servers ....................................................................................................................................................... 139
Update Servers .................................................................................................................................................. 142
Copy Servers ...................................................................................................................................................... 142
Delete Servers ................................................................................................................................................... 143
Restore Metadata .................................................................................................................................................... 143
Import Metadata ............................................................................................................................................... 143
Restoring/Importing Metadata Records ........................................................................................................... 144
Backup Metadata ..................................................................................................................................................... 145
Export Filter ....................................................................................................................................................... 145
Backup/Export Configurations .......................................................................................................................... 146
Error Messages .................................................................................................................................................. 146
Configure Global Parameters Offline ....................................................................................................................... 147
Add a New CA XCOM Gateway X509 Certificate ............................................................................................... 148
Set Up CA XCOM Data Transport Client Authentication ................................................................................... 150
Update the Global Parameters File .......................................................................................................................... 152
Gateway UI Parameters .................................................................................................................................... 153
8 Product Guide
Gateway Control Server Parameters................................................................................................................. 155
Gateway Certificate Parameters ....................................................................................................................... 160
FTP Parameters ................................................................................................................................................. 163
SFTP Parameters ............................................................................................................................................... 163
Database Password Encryption ......................................................................................................................... 164
Log Parameters ................................................................................................................................................. 165
Configuration for UNC .............................................................................................................................................. 165
Inclusion of JAR in Product Installation ............................................................................................................. 166
Chapter 7: Configuring Policies for Onward File Transfer 167
Prerequisites ............................................................................................................................................................ 167
Policy Configuration ................................................................................................................................................. 168
Policy Transfer XML .................................................................................................................................................. 169
Policy Transfer XML Schema .................................................................................................................................... 170
How Files Are Distributed ................................................................................................................................. 171
Using Symbolic Variables for Unique File Names .............................................................................................. 172
Using the Import Facility ................................................................................................................................... 172
Sample Policy Transfer XML ..................................................................................................................................... 173
Build Policy Transfer XML Using the CA XCOM Data Transport GUI ........................................................................ 175
Add Local Authentication .................................................................................................................................. 177
Build Policy Transfer XML Using CA XCOM Management Center ............................................................................ 179
Copy and Import Policy Transfer XML ...................................................................................................................... 181
Test Policy Transfer XML .......................................................................................................................................... 181
Upload to a Policy ............................................................................................................................................. 182
Test the Onward Transfer ................................................................................................................................. 183
CA XCOM Data Transport Gateway Schedule Parameters ....................................................................................... 184
Chapter 8: File Transfer Through Command Line Utility 185
Using the utility for file transfer ............................................................................................................................... 186
Configuration for Transfer ........................................................................................................................................ 187
Gateway Properties........................................................................................................................................... 187
External Server Properties ................................................................................................................................ 188
Chapter 9: Using CA XCOM Gateway Through the Internet 189
Quick Upload ............................................................................................................................................................ 190
Quick Download ....................................................................................................................................................... 192
Open Policy in New Tab ........................................................................................................................................... 194
HTTP File Upload ............................................................................................................................................... 195
Import Files from External FTP/SFTP Server ..................................................................................................... 197
Staged Files ....................................................................................................................................................... 199
Contents 9
Filters in Staged Files ......................................................................................................................................... 200
HTTP File Download .......................................................................................................................................... 202
Export Files to External FTP/SFTP Server .......................................................................................................... 204
Invalidate Files .................................................................................................................................................. 206
Revalidate Files ................................................................................................................................................. 206
Mark File for Deletion ....................................................................................................................................... 207
Chapter 10: Transfer Diagnostics 209
Transfer Diagnostic User Interface ........................................................................................................................... 209
Reschedule a transfer ............................................................................................................................................... 214
Chapter 11: How to Configure the CA XCOM Gateway SSH Server 215
Access the CA XCOM Gateway SSH Server Configuration UI ................................................................................... 217
How to Configure the CA XCOM Gateway SSH Server ............................................................................................. 217
Configure the CA XCOM Gateway SSH Server Configuration UI ....................................................................... 218
Configure the JCE Provider ................................................................................................................................ 220
Configure the Cipher Factory ............................................................................................................................ 222
Configure the Compression Factory .................................................................................................................. 223
Configure the Port ............................................................................................................................................. 223
Configure the Maximum Concurrent Sessions per User ................................................................................... 223
Configure the Maximum Open Handles per Session ........................................................................................ 224
Configure the Maximum Authentication Requests ........................................................................................... 224
Configure the Authentication Timeout ............................................................................................................. 224
Save the Configurations .................................................................................................................................... 225
Chapter 12: Using CA XCOM Gateway FTP 227
FTP Clients ................................................................................................................................................................ 228
Connect to the CA XCOM Gateway FTP Server ........................................................................................................ 228
Login ......................................................................................................................................................................... 229
List and Select Available Policies .............................................................................................................................. 230
Download Files ......................................................................................................................................................... 232
Upload Files .............................................................................................................................................................. 234
Disconnect from the FTP Server ............................................................................................................................... 235
Chapter 13: Using CA XCOM Gateway SSH Server 237
SFTP Clients .............................................................................................................................................................. 238
Connect to the CA XCOM Gateway SFTP Server ...................................................................................................... 238
Login ......................................................................................................................................................................... 239
Unsupported Commands ......................................................................................................................................... 239
10 Product Guide
List and Select Available Policies .............................................................................................................................. 241
Download Files ......................................................................................................................................................... 242
Upload Files .............................................................................................................................................................. 244
Disconnect from the sFTP Server ............................................................................................................................. 246
Appendix A: Configuration XML Formats 247
Define Global Parameters ........................................................................................................................................ 247
Attributes .......................................................................................................................................................... 248
Appendix B: File Size Conversion 259
Index 261
Chapter 1: Introduction 11
Chapter 1: Introduction
This section contains the following topics:
CA XCOM Gateway (see page 11) CA XCOM Gateway Communication and Management (see page 12)
CA XCOM Gateway
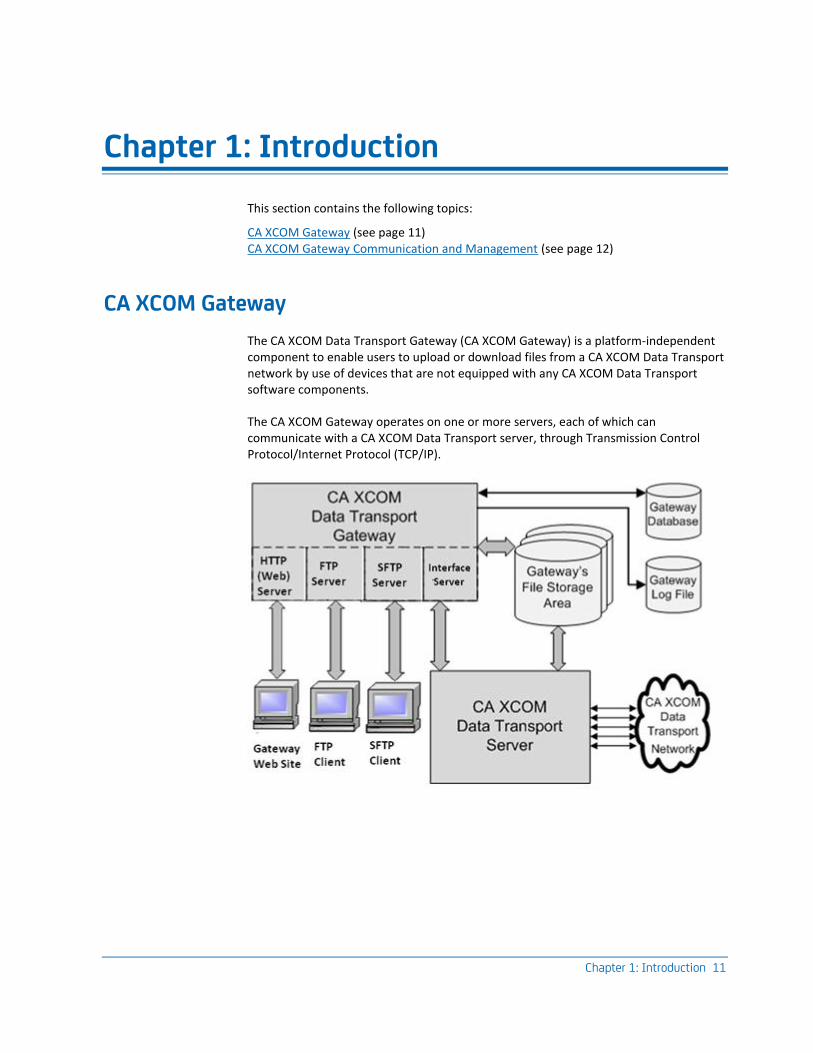
The CA XCOM Data Transport Gateway (CA XCOM Gateway) is a platform-independent component to enable users to upload or download files from a CA XCOM Data Transport network by use of devices that are not equipped with any CA XCOM Data Transport software components.
The CA XCOM Gateway operates on one or more servers, each of which can communicate with a CA XCOM Data Transport server, through Transmission Control Protocol/Internet Protocol (TCP/IP).

CA XCOM Gateway Communication and Management
12 Product Guide
CA XCOM Gateway Communication and Management
In order to upload or download files to or from CA XCOM Gateway storage area, the users can communicate with CA XCOM Gateway using the CA XCOM Gateway website or an FTP or SFTP client. Files can also be transferred into and out of this storage area using the CA XCOM Data Transport network. Users can also upload/download files by writing FTP or SFTP client programs using API.
The CA XCOM Gateway Server contains the following parts:
■ CA XCOM Gateway Control Server
■ HTTP Server
■ FTP Server
■ SFTP Server
■ CA XCOM Interface Server
CA XCOM Gateway Control Server Component
The CA XCOM Gateway Control Server has access to and manages a single CA XCOM Gateway Control Database. This component has the following functions:
■ Accesses and manages customer configured disk staging areas that are located either locally or remotely by arranging files for the import and export, and by deleting stored files when they expire, as determined by your configured retention periods.
■ Employs the CA XCOM Interface Server to initiate the outbound transfer of stored files using the CA XCOM Data Transport network.
■ Registers the arrival of uploaded files using the HTTP, SFTP, and FTP interfaces.
■ Can import/export files from external servers using the FTP and SFTP protocols.
■ Import and registers files by watching a directory that is located locally or remotely.
■ Creates a log file that provides an audit trail of key events. This log file includes a record of configuration activity, file importation, exportation, and error situations.
■ Provides the notification of relevant events to the users, as dictated by customer configuration. Currently, this is done using email.
HTTP Server Component
The HTTP server component hosts the CA XCOM Gateway web site. The server enables the uploading and downloading files to and from the CA XCOM Gateway environment. The web site also provides configuration capability for the system administration.
CA XCOM Gateway Communication and Management
Chapter 1: Introduction 13
FTP Server Component
The FTP server component enables the uploading and downloading files to and from the CA XCOM Gateway environment, using FTP client software or using FTP client API.
SFTP Server Component
The SFTP server component enables the uploading and downloading files to and from the CA XCOM Gateway environment, using SFTP client software or using SFTP client API.
There are other components that do not come with Gateway Control Server but are needed for certain Gateway features, such as Onward Delivery.
■ CA XCOM Interface Server
■ CA XCOM Data Transport Server
CA XCOM Interface Server
The CA XCOM Interface Server performs the following services:
■ Schedules the transfers for CA XCOM Data Transport processing.
■ Acts as a bridge providing communication and connectivity between CA XCOM Gateway and a local CA XCOM Data Transport server.
CA XCOM Data Transport Server
Performs the file transfer between CA XCOM Gateway’s file storage area and other machines in the CA XCOM Data Transport network.
CA XCOM Gateway File Storage Area
CA XCOM Gateway’s file storage area is physical disk storage space. The space can be divided into one or more realms, and is used to hold files that have been imported to the CA XCOM Gateway environment, either by file upload or by transfer using the CA XCOM Data Transport. Depending on the configuration, the stored files are made available for downloading by CA XCOM Gateway users, and/or transferred to other machines using CA XCOM Data Transport. The CA XCOM Gateway file storage area must be accessible, using a path, by both the CA XCOM Gateway Server and the local CA XCOM Data Transport server. The storage area can be on any system and is reachable through the UNC path and appropriate permissions are granted.

Chapter 2: System Requirements and Setup 15
Chapter 2: System Requirements and Setup
This section contains the following topics:
System Requirements (see page 15) Hardware Requirements (see page 16) Pre-Installation Considerations (see page 16) Installation Prerequisites (see page 18)
System Requirements
The system requirements for CA XCOM Gateway are as follows:
■ CA XCOM Data Transport r11.6
■ JRE (Version 6) [64 bit] or Java JDK 6 [64 bit] on Windows and Linux x86-64
■ JRE (Version 6) [32 bit] or Java JDK 6 [32 bit] on Linux x86
■ MySQL® version 5 or DB2 UDB version 9
■ IE 8.0 or 9.0, or Firefox 3.5
Operating Systems
CA XCOM Gateway runs on the following operating systems.
■ Windows 2008 r2 64 bit
■ SuSE Linux Enterprise 10.n and 11.n (X86 and X86-64)
■ Redhat Enterprise Linux 5.n and 6.n (X86 and X86-64)
■ Oracle Linux (X86 and X86-64)
Software
The following software is required.
■ CA XCOM Data Transport r11.6 server
■ JRE (Version 6) [64 bit] or Java JDK 6 [64 bit] on Windows and Linux x86-64
■ JRE (Version 6) [32 bit] or Java JDK 6 [32 bit] on Linux x86
Hardware Requirements
16 Product Guide
Databases
The following databases are supported by CA XCOM Gateway:
■ MySQL version 5
■ DB2 UDB version 9
Browsers
The following browsers are supported by CA XCOM Gateway:
■ IE 8.0 and 9.0
■ Firefox 3.5 and above
64-Bit Considerations
CA XCOM Gateway must run as a 64-bit application on a 64-bit operating system.
To run CA XCOM Gateway as a 64-bit application, install a 64-bit version of the JRE 6 or Java JDK 6.
Hardware Requirements
The hardware requirements for CA XCOM Gateway are in line with vendor-recommended hardware to support platforms as defined in Software above.
Pre-Installation Considerations
Relational Database Tables
CA XCOM Gateway uses a set of relational database tables for its operation. These database tables are defined by the installer at the time of installation.
Pre-Installation Considerations
Chapter 2: System Requirements and Setup 17
Administrator User
The Administration attribute is used to identify which users defined to CA XCOM Gateway are granted the authority to change the CA XCOM Gateway configuration. Users who do not possess this attribute are entitled to make use of non-administrative facilities (for example, file uploading and downloading), but cannot make configuration changes.
The Administration attribute can be set for individual users by using the online User Configuration facility, a facility which itself can be accessed only by existing Administrator users. For more information about User Configuration, see Configure Authorized Users in the chapter "Configuring and Administering CA XCOM Gateway."
Important! When CA XCOM Gateway is initially installed and no authorized users have been defined for this CA XCOM Gateway, the first user who successfully logs on is automatically defined as an Administrator user for this CA XCOM Gateway.
Installation Prerequisites
18 Product Guide
Installation Prerequisites
Before you install the product, check the following prerequisites:
■ Privileges required
In order to install CA XCOM Gateway on Microsoft Windows, you must log on to Microsoft Windows as a user with administrator privileges. On UNIX or Linux, you must log on as a user with root privileges.
■ System Libraries for Linux
The CA Embedded Entitlements Manager (EEM) installation requires the library libstdc++.so.6 to exist in the usr/lib directory. This library can be installed from rpm libstdc++ if it has not been previously installed as part of your operating system.
■ Database preparation
CA XCOM Gateway needs access to a DB2 or MySQL database server; the product installer automatically creates the required database tables within a designated database.
Note:
– For MySQL, the installer can either create a database or use an existing one.
– For DB2, the installer will not create a database. To create a database, it must be done using DB2 administration tools before installing CA XCOM Gateway.
– For DB2, the installer will not create a database table schema owner. To create a database table schema owner, it must be done using DB2 administration tools before installing CA XCOM Gateway.
To enable the creation of tables (and optionally, for MySQL only, the creation of a database), the installer requests the following items:
– The user ID and related password for a database administration user account that has the necessary create and drop structure privileges.
To enable the database access by CA XCOM Gateway, the installer requires a copy of the JDBC connector/driver for the appropriate database system. Using DB2, a copy of the JDBC Driver License is also needed.
– Database Engine Considerations:
■ The default engine for MySQL is InnoDB and it cannot be changed to any other engine.
■ Other engines like MyISAM do not support foreign key constraints, as well as not supporting transactions.
■ MyISAM (unlike InnoDB) tables can become corrupt when there is a server crash.
■ MyISAM cannot be used when the data integrity is a priority, according to recommendation from various sources.
Reference:
Installation Prerequisites
Chapter 2: System Requirements and Setup 19
http://dev.mysql.com/doc/refman/5.6/en/storage-engines.html
■ Samba Support/ UNC Path Support
The CA XCOM Gateway installer requires a copy of samba support java library, to support file transfers to and from UNC paths. This is an optional step in installation process. Samba support can be added after installation.
■ Free disk space
Approximately 1 GB of disk space is required for the software files that a full CA XCOM Gateway product installation creates. In addition, disk space is required for the CA XCOM Gateway database, logs, and trace files, and for the CA XCOM Gateway staging area that CA XCOM Gateway stores uploaded files. The amount of space that is needed varies depending on:
■ The size of the database
■ The number and size of uploaded files
■ The configured retention periods
Installation Prerequisites
20 Product Guide
Compatibility Issues
CA XCOM Gateway requires the environment variable JAVA_HOME to be set to the JRE or JDK (Java Development Kit) directory.
If JRE (Java Runtime Environment) is installed, the environment variable JAVA_HOME must be pointing to the JRE parent directory. As an example, the folder JAVA_HOME is pointing to must have ‘bin’ directory.
If JDK is installed, the environment variable JAVA_HOME must be pointing to the JDK parent directory. As an example, the folder JAVA_HOME is pointing to must have a bin directory and inside the bin directory, the file javac.exe must be present.
To find out which directory JAVA_HOME is set to:
1. Navigate to the bin directory immediately beneath the directory that is set in JAVA_HOME.
2. Look for a member called javac.exe.
This file exists only in the JDK bin directory. If the file is not there, then your JAVA_HOME environment variable is set to the JRE directory.
If the JAVA_HOME variable is set to a JRE directory or a private JVM and it cannot be changed, then use the following procedure:
To install CA XCOM Gateway:
1. Open a Windows command line window.
2. Navigate to where the CA XCOM Gateway install.exe file is located.
3. Setting JAVA_HOME variable:
■ If JDK is installed, point JAVA_HOME to the JDK location where the bin directory is located and the bin directory has file javac.exe.
■ If JRE is installed, point JAVA_HOME to the JRE location.
4. To execute the installer, type install and press Enter.
Chapter 3: Installing and Uninstalling 21
Chapter 3: Installing and Uninstalling
This section contains the following topics:
Install the Product (see page 22) Installer Dialogs (see page 23) Install the Product in Console Mode (see page 51) Silent Installation (see page 54) Uninstall the Product (see page 64)
Install the Product
22 Product Guide
Install the Product
The installation procedure that is provided for CA XCOM Gateway Release 11.6 can be used to install any combination of the following components:
■ CA XCOM Gateway
■ CA XCOM Interface Server—a required component that enables CA XCOM Gateway to interact with CA XCOM Data Transport to permit the distribution of gateway files across the CA XCOM Data Transport network
■ CA Embedded Entitlements Manager (EEM)—a required component that enables CA XCOM Gateway to perform the user authentication during the user login processing
To install CA XCOM Gateway.
1. To use a DB2 or MySQL database, ensure that you have a copy of the appropriate JDBC connector driver according to whether you want the installed product components.
Note: For MySQL, you require MySQL Connector/J, the official JDBC driver for MySQL. You can download the .jar file from the MySQL website at www.MySQL.com.
2. (Optional) Have a copy of the samba support java library file to add UNC support to the CA XCOM Gateway. You can find the library in another disc that is provided with the product or it can be downloaded from the CA Support website.
3. Ensure that you have administrator privileges on your computer.
4. Depending on the operating system, take one of the following actions to launch the installer:
a. (Windows) Double-click the Install.exe file.
This file is contained on the product CD or can be downloaded from the CA Support website.
b. (UNIX and Linux) Issue the command sh install.bin.
5. Follow the dialogs referencing the additional information and complete the installation process.
The product is installed.
6. Start Gateway Server Launcher.
7. Access the CA XCOM Gateway website and review the global parameters. If necessary, update the values.
Installer Dialogs
Chapter 3: Installing and Uninstalling 23
Installer Dialogs
The installer presents a series of dialogs that prompt you for information. These dialogs are described in the following section.
Note: We recommend that you close down other programs running on your computer before initiating the installation.
Step 1: Accept License Agreement
The installer starts with an Introduction dialog followed by a License Agreement dialog.
To accept the license agreement
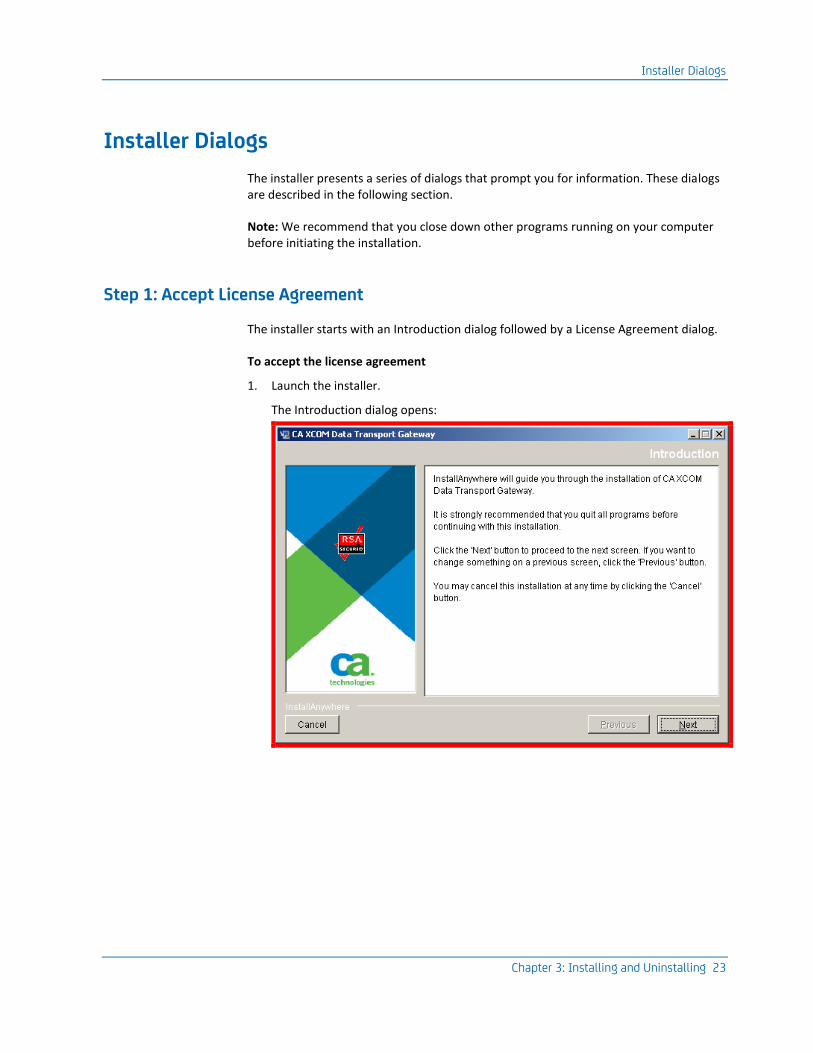
1. Launch the installer.
The Introduction dialog opens:
Installer Dialogs
24 Product Guide
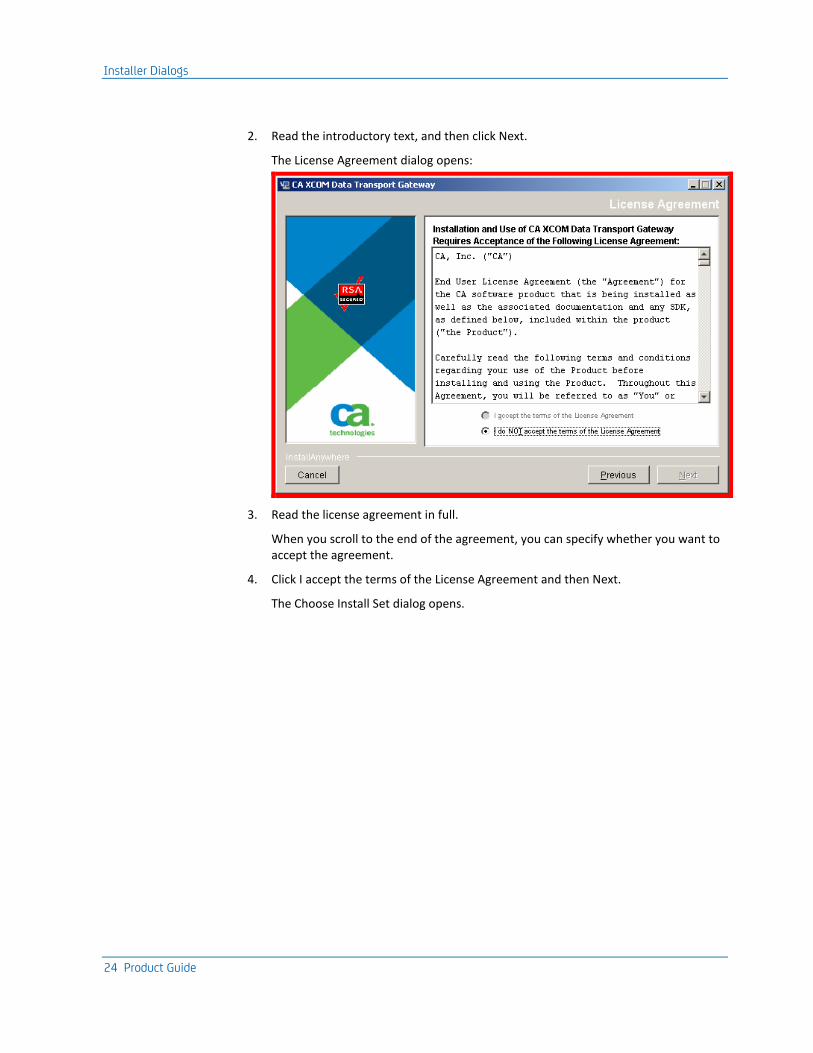
2. Read the introductory text, and then click Next.
The License Agreement dialog opens:
3. Read the license agreement in full.
When you scroll to the end of the agreement, you can specify whether you want to accept the agreement.
4. Click I accept the terms of the License Agreement and then Next.
The Choose Install Set dialog opens.
Installer Dialogs
Chapter 3: Installing and Uninstalling 25
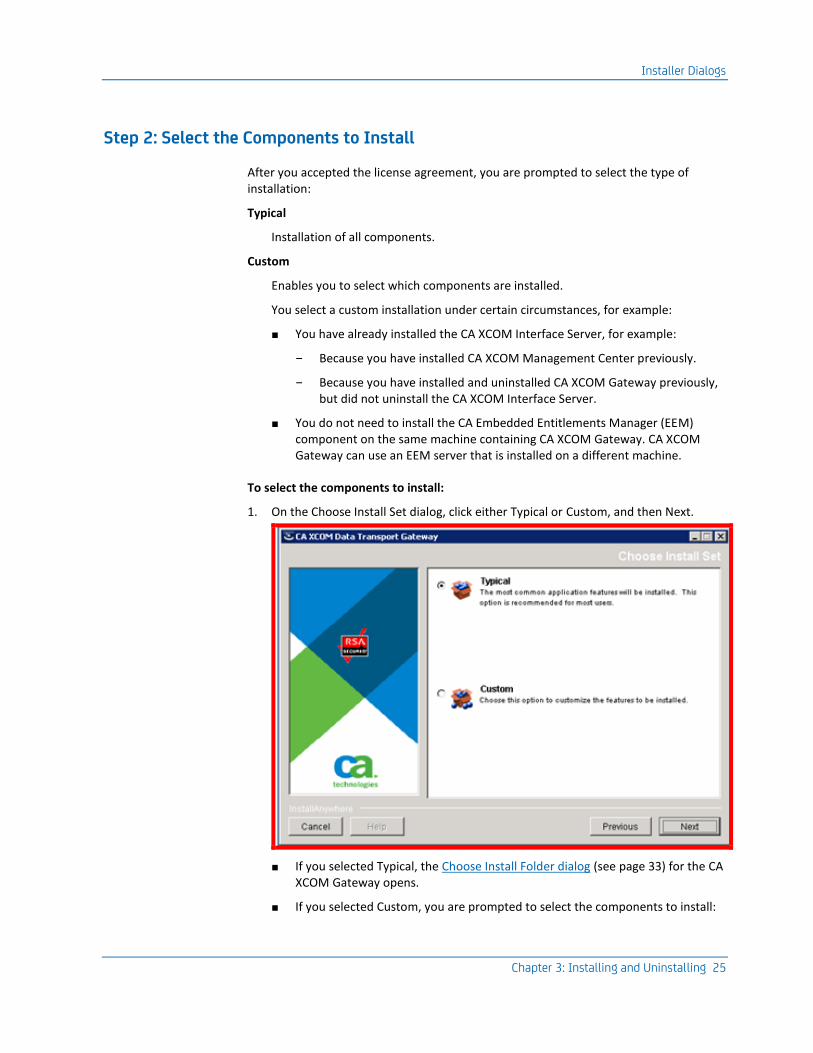
Step 2: Select the Components to Install
After you accepted the license agreement, you are prompted to select the type of installation:
Typical
Installation of all components.
Custom
Enables you to select which components are installed.
You select a custom installation under certain circumstances, for example:
■ You have already installed the CA XCOM Interface Server, for example:
– Because you have installed CA XCOM Management Center previously.
– Because you have installed and uninstalled CA XCOM Gateway previously, but did not uninstall the CA XCOM Interface Server.
■ You do not need to install the CA Embedded Entitlements Manager (EEM) component on the same machine containing CA XCOM Gateway. CA XCOM Gateway can use an EEM server that is installed on a different machine.
To select the components to install:
1. On the Choose Install Set dialog, click either Typical or Custom, and then Next.
■ If you selected Typical, the Choose Install Folder dialog (see page 33) for the CA XCOM Gateway opens.
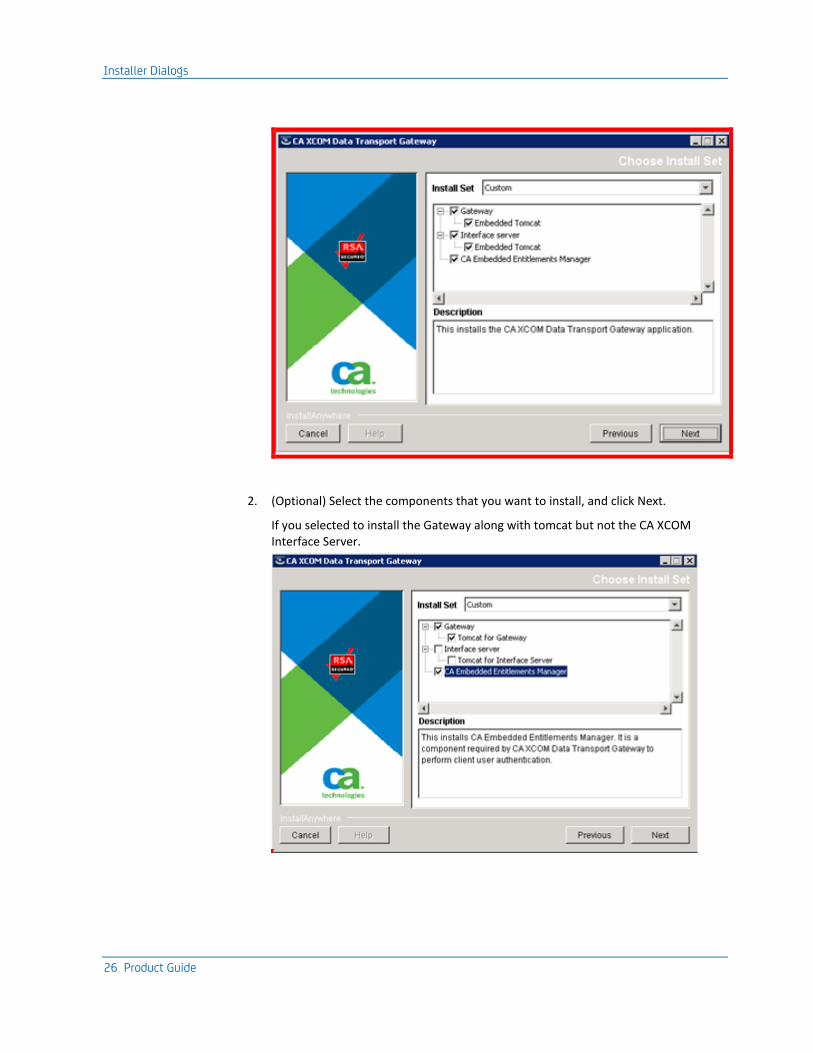
■ If you selected Custom, you are prompted to select the components to install:
Installer Dialogs
26 Product Guide
2. (Optional) Select the components that you want to install, and click Next.
If you selected to install the Gateway along with tomcat but not the CA XCOM Interface Server.
Installer Dialogs
Chapter 3: Installing and Uninstalling 27
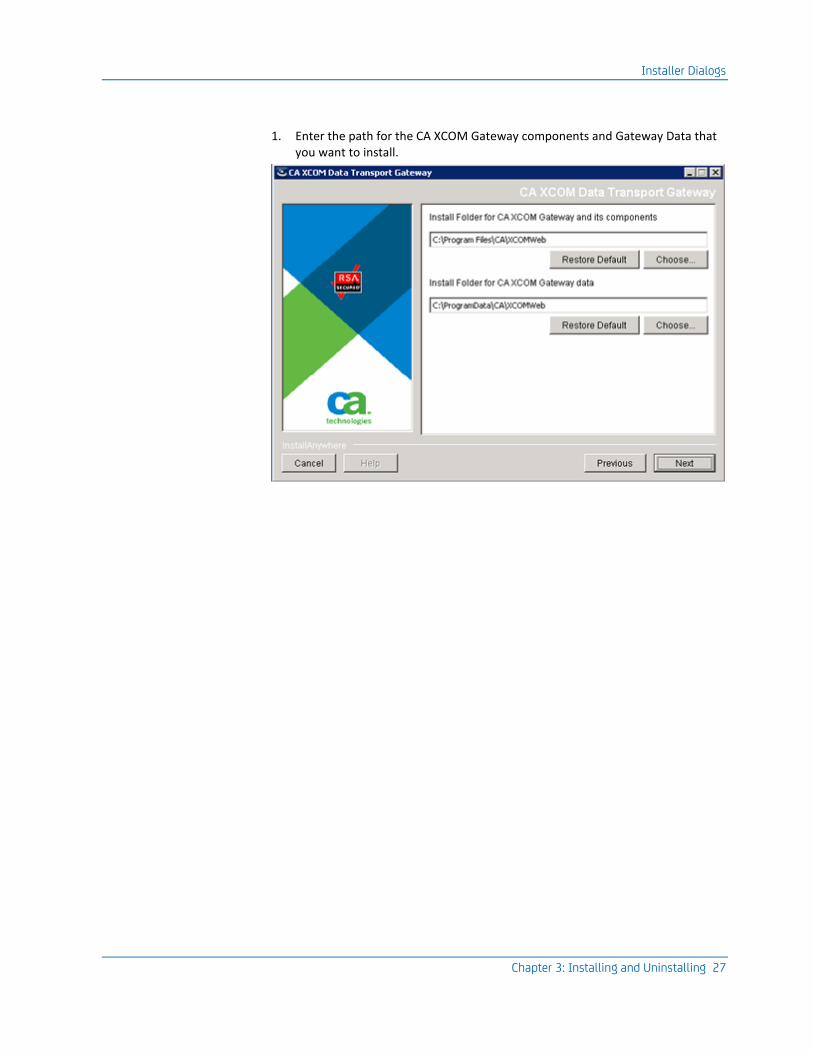
1. Enter the path for the CA XCOM Gateway components and Gateway Data that you want to install.
Installer Dialogs
28 Product Guide
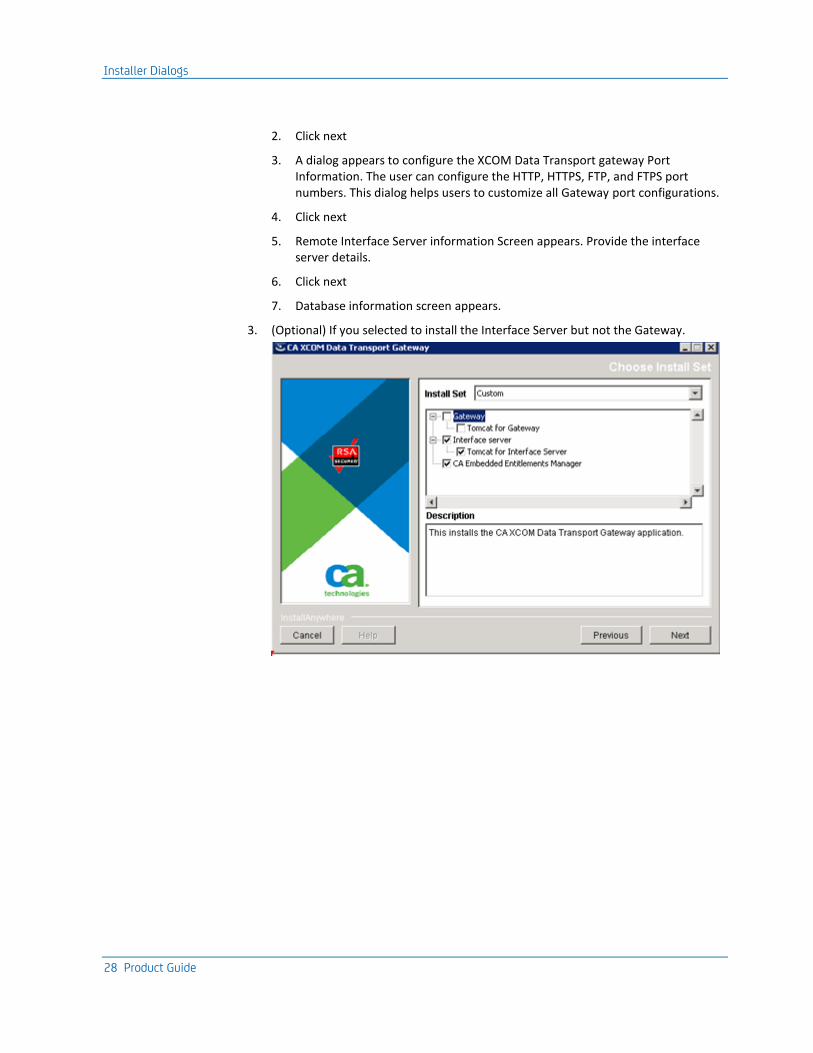
2. Click next
3. A dialog appears to configure the XCOM Data Transport gateway Port Information. The user can configure the HTTP, HTTPS, FTP, and FTPS port numbers. This dialog helps users to customize all Gateway port configurations.
4. Click next
5. Remote Interface Server information Screen appears. Provide the interface server details.
6. Click next
7. Database information screen appears.
3. (Optional) If you selected to install the Interface Server but not the Gateway.
Installer Dialogs
Chapter 3: Installing and Uninstalling 29
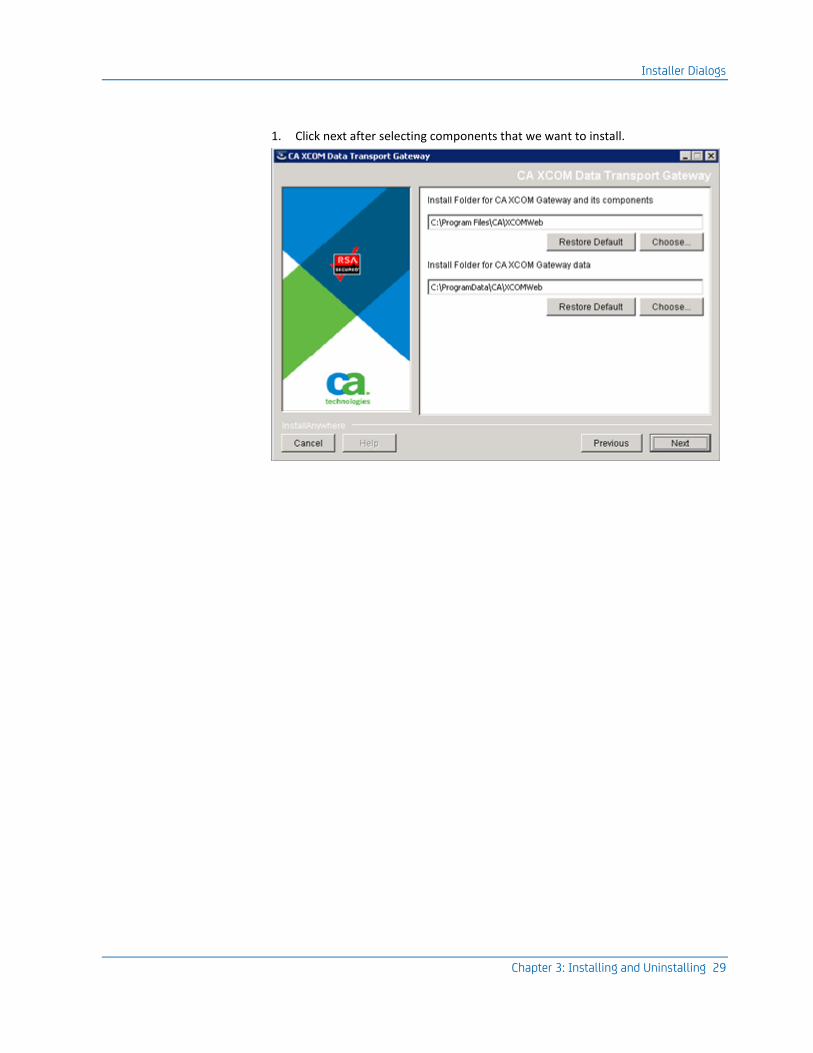
1. Click next after selecting components that we want to install.
Installer Dialogs
30 Product Guide
2. Enter the path for the CA XCOM Gateway components and Gateway Data that you want to install.
3. Click next.
4. The Interface Server ports information dialog appears. Enter the values for the HTTP port and HTPS port. This dialog allows the users to customize the port numbers for HTTP and HTTPS. These values are written to the xcom-globals.xml file.
5. Click next.
The DB information dialog appears
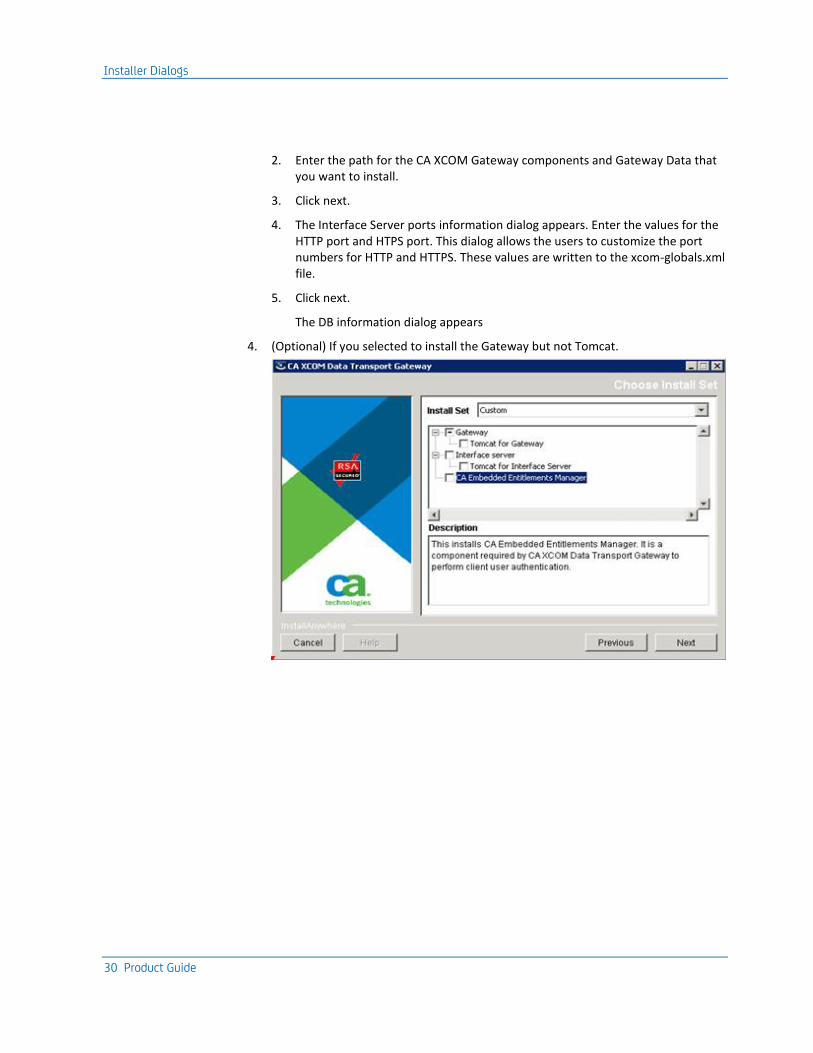
4. (Optional) If you selected to install the Gateway but not Tomcat.
Installer Dialogs
Chapter 3: Installing and Uninstalling 31
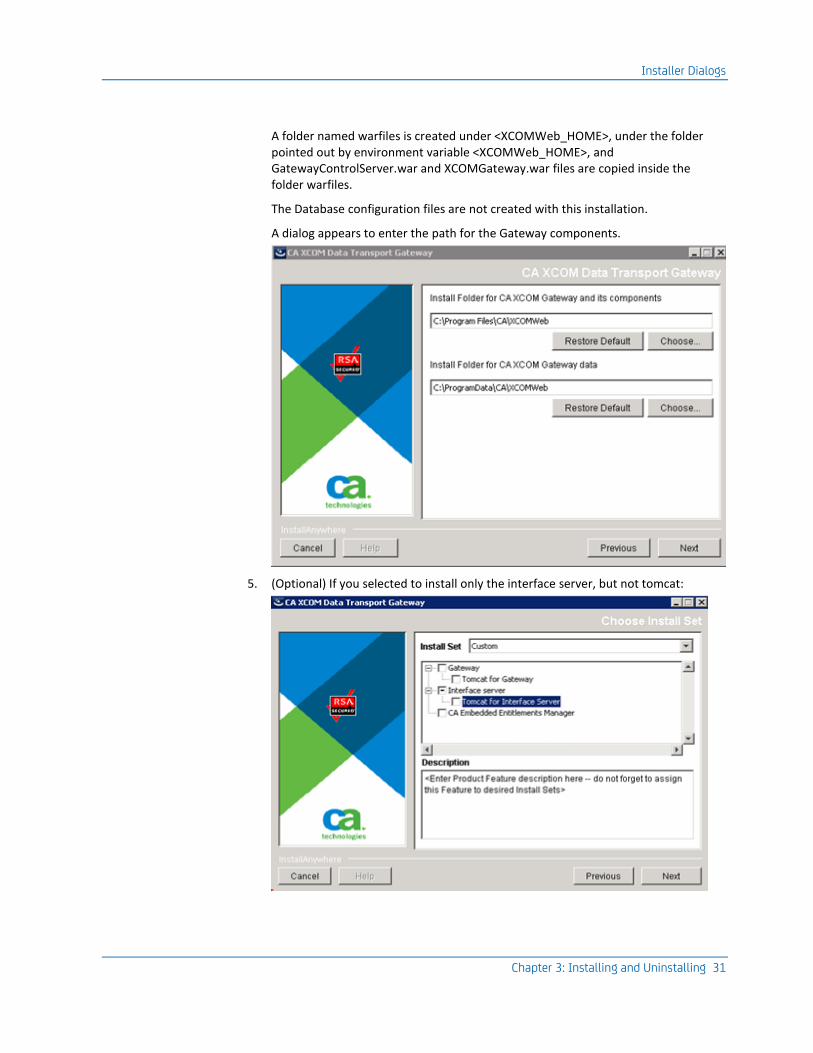
A folder named warfiles is created under <XCOMWeb_HOME>, under the folder pointed out by environment variable <XCOMWeb_HOME>, and GatewayControlServer.war and XCOMGateway.war files are copied inside the folder warfiles.
The Database configuration files are not created with this installation.
A dialog appears to enter the path for the Gateway components.
5. (Optional) If you selected to install only the interface server, but not tomcat:
Installer Dialogs
32 Product Guide
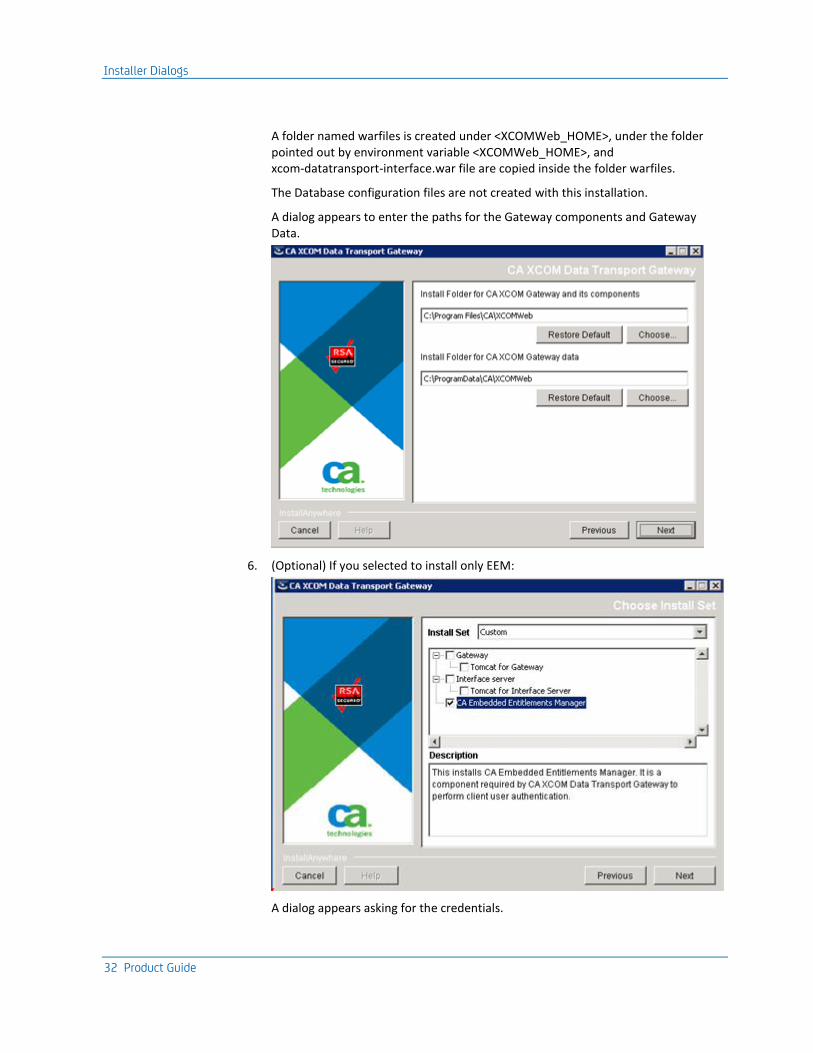
A folder named warfiles is created under <XCOMWeb_HOME>, under the folder pointed out by environment variable <XCOMWeb_HOME>, and xcom-datatransport-interface.war file are copied inside the folder warfiles.
The Database configuration files are not created with this installation.
A dialog appears to enter the paths for the Gateway components and Gateway Data.
6. (Optional) If you selected to install only EEM:
A dialog appears asking for the credentials.
Installer Dialogs
Chapter 3: Installing and Uninstalling 33
Step 3: Specify Destination Folder for CA XCOM Data Transport for Gateway
To specify a destination folder for installing the CA XCOM Data Transport for Gateway.
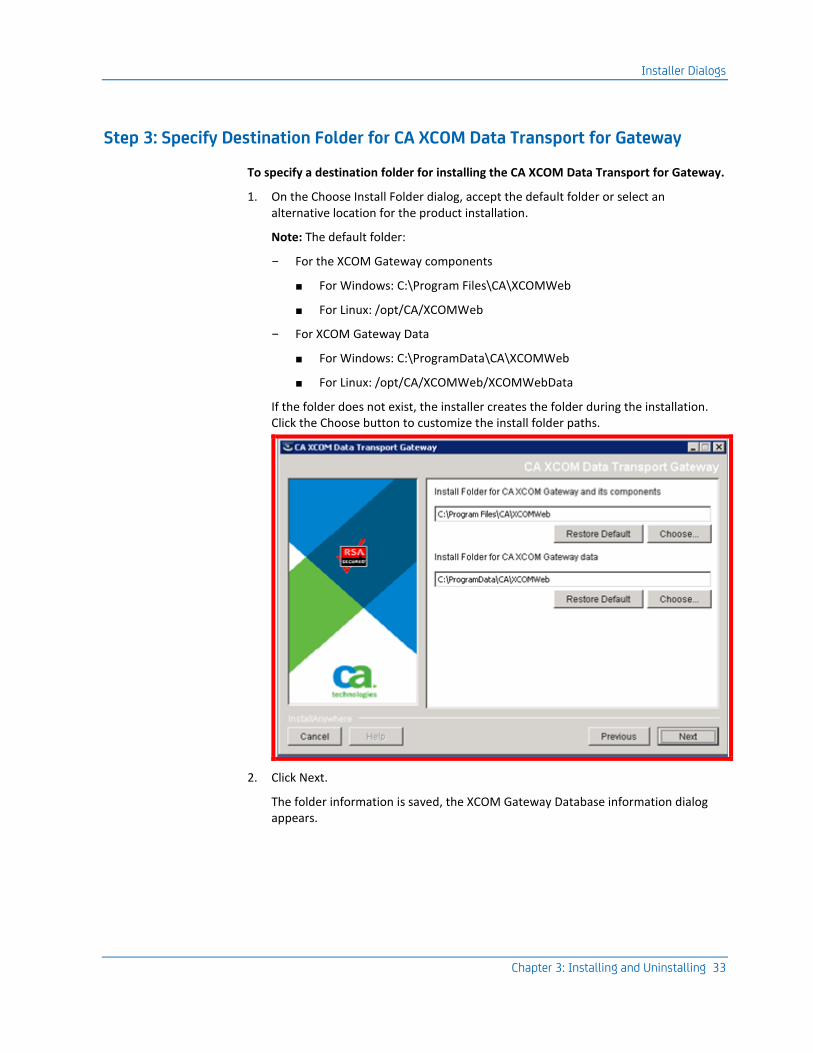
1. On the Choose Install Folder dialog, accept the default folder or select an alternative location for the product installation.
Note: The default folder:
– For the XCOM Gateway components
■ For Windows: C:\Program Files\CA\XCOMWeb
■ For Linux: /opt/CA/XCOMWeb
– For XCOM Gateway Data
■ For Windows: C:\ProgramData\CA\XCOMWeb
■ For Linux: /opt/CA/XCOMWeb/XCOMWebData
If the folder does not exist, the installer creates the folder during the installation. Click the Choose button to customize the install folder paths.
2. Click Next.
The folder information is saved, the XCOM Gateway Database information dialog appears.
Installer Dialogs
34 Product Guide
Step 4: Define the Database for the XCOM Gateway and Interface Server
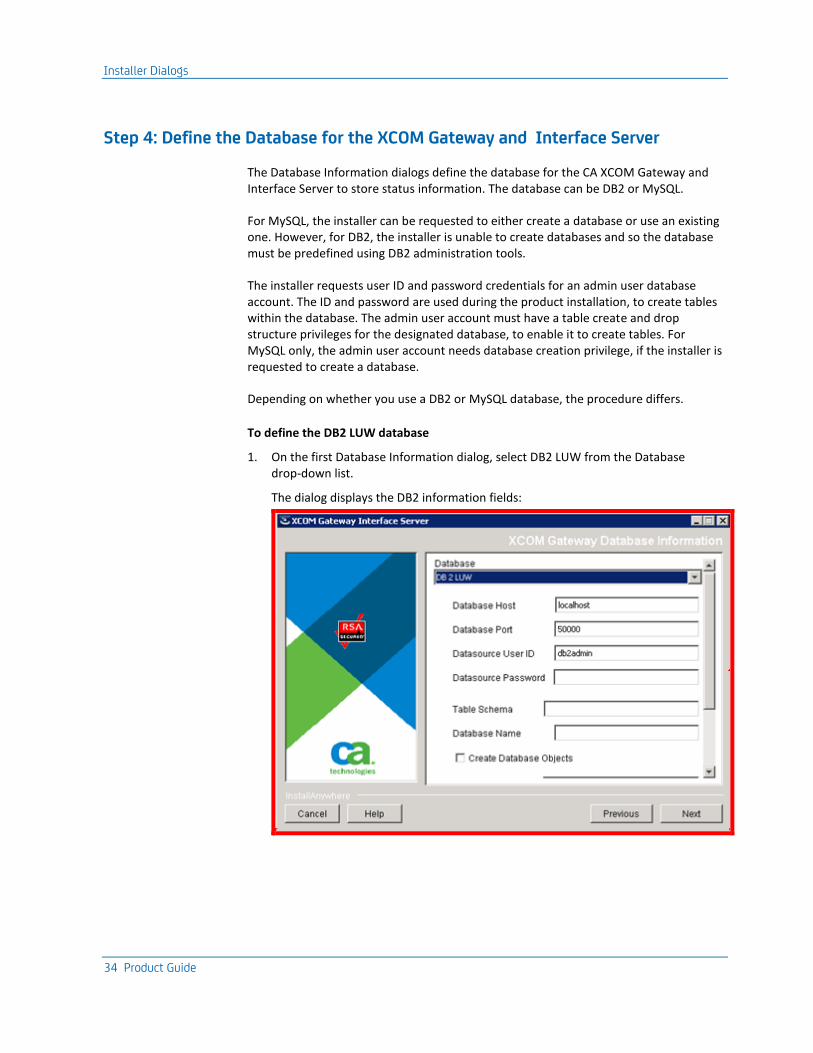
The Database Information dialogs define the database for the CA XCOM Gateway and Interface Server to store status information. The database can be DB2 or MySQL.
For MySQL, the installer can be requested to either create a database or use an existing one. However, for DB2, the installer is unable to create databases and so the database must be predefined using DB2 administration tools.
The installer requests user ID and password credentials for an admin user database account. The ID and password are used during the product installation, to create tables within the database. The admin user account must have a table create and drop structure privileges for the designated database, to enable it to create tables. For MySQL only, the admin user account needs database creation privilege, if the installer is requested to create a database.
Depending on whether you use a DB2 or MySQL database, the procedure differs.
To define the DB2 LUW database
1. On the first Database Information dialog, select DB2 LUW from the Database drop-down list.
The dialog displays the DB2 information fields:
Installer Dialogs
Chapter 3: Installing and Uninstalling 35
2. Complete the fields:
■ Specify the Database host, port number, User ID, and password of a previously defined DB2 LUW user, Table Schema together with the name of an existing database.
If a suitable user does not exist, you can use your operating system tools to create a user account for connection and access to the database tables.
■ Specify the ID and password for an administrative user account which has been granted the ability to create database tables.
During installation, the installer connects the database server as this user to create the required database tables.
■ Specify the file locations where the installer can locate the DB2 JDBC Type 4 drivers and license files.
■ To communicate with the DB2 database server, you do not need the DB2 client running on the system. XCOM Gateway supports JDBC type-4 drivers. Only the pure Java driver is supported with Gateway.
Installer Dialogs
36 Product Guide
3. Click Next.
The installer connects to the specified database server to verify the validity of the specified information. The EEM Information dialog opens.
Note: Tables are not created at this stage. They are created later after you review your installation choices and request the installation to proceed.
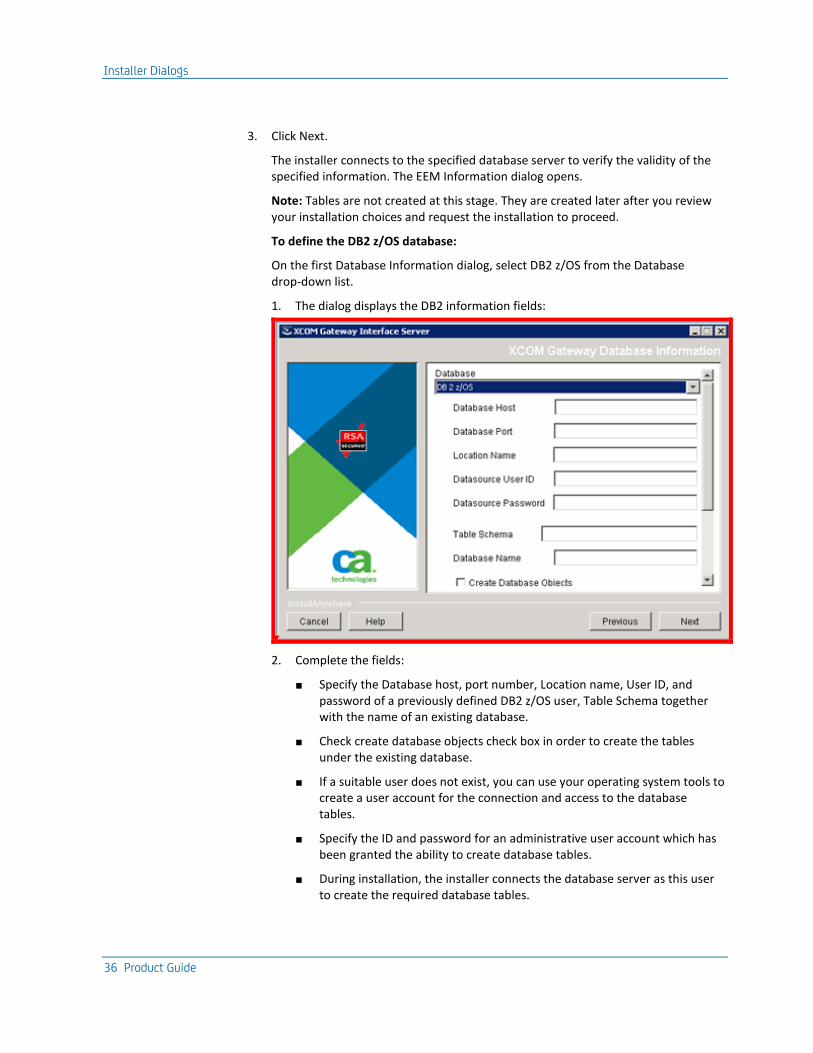
To define the DB2 z/OS database:
On the first Database Information dialog, select DB2 z/OS from the Database drop-down list.
1. The dialog displays the DB2 information fields:
2. Complete the fields:
■ Specify the Database host, port number, Location name, User ID, and password of a previously defined DB2 z/OS user, Table Schema together with the name of an existing database.
■ Check create database objects check box in order to create the tables under the existing database.
■ If a suitable user does not exist, you can use your operating system tools to create a user account for the connection and access to the database tables.
■ Specify the ID and password for an administrative user account which has been granted the ability to create database tables.
■ During installation, the installer connects the database server as this user to create the required database tables.
Installer Dialogs
Chapter 3: Installing and Uninstalling 37
■ Specify the file folder locations where the installer can locate the DB2 JDBC Type 4 drivers and license files.
■ To communicate with the DB2 database server, you do not need the DB2 client running on the system, as XCOM Gateway supports JDBC type-4 drivers. Only the pure Java driver is supported with Gateway.
3. Click Next.
The installer connects to the specified database server to verify the validity of the specified information. The EEM Information dialog opens.
Note: Tables are not created at this stage. They are created later after you review your installation choices and request the installation to proceed.
Installer Dialogs
38 Product Guide
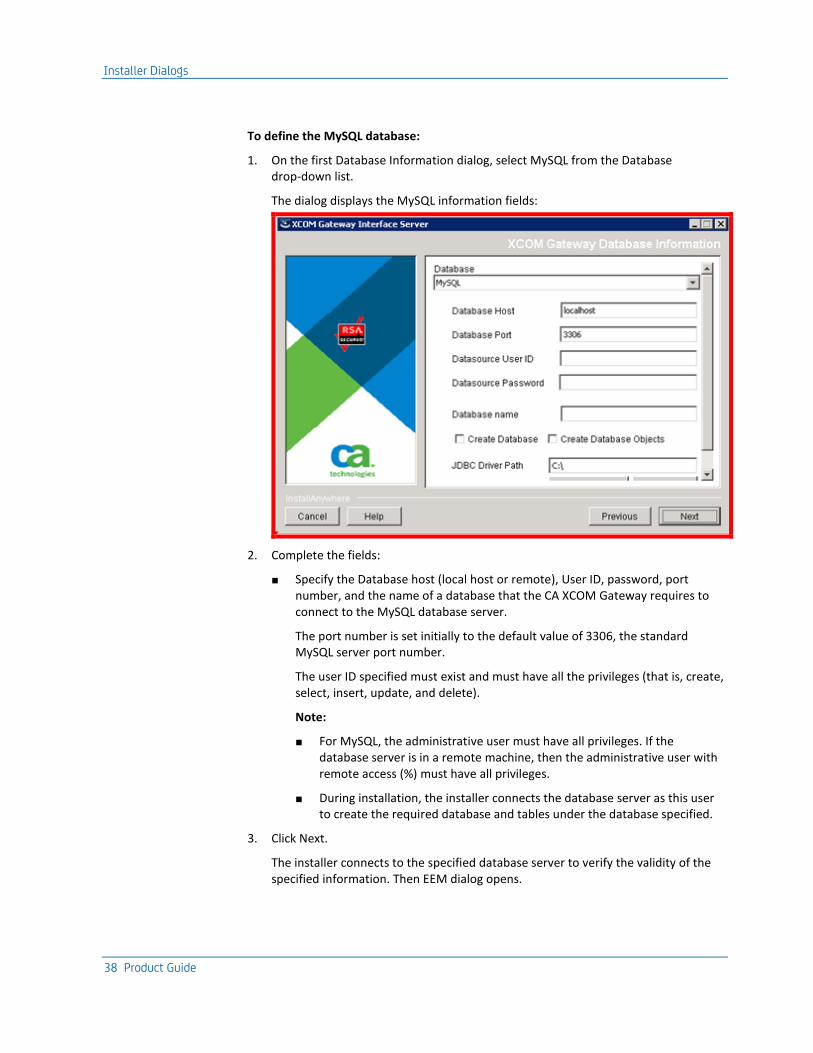
To define the MySQL database:
1. On the first Database Information dialog, select MySQL from the Database drop-down list.
The dialog displays the MySQL information fields:
2. Complete the fields:
■ Specify the Database host (local host or remote), User ID, password, port number, and the name of a database that the CA XCOM Gateway requires to connect to the MySQL database server.
The port number is set initially to the default value of 3306, the standard MySQL server port number.
The user ID specified must exist and must have all the privileges (that is, create, select, insert, update, and delete).
Note:
■ For MySQL, the administrative user must have all privileges. If the database server is in a remote machine, then the administrative user with remote access (%) must have all privileges.
■ During installation, the installer connects the database server as this user to create the required database and tables under the database specified.
3. Click Next.
The installer connects to the specified database server to verify the validity of the specified information. Then EEM dialog opens.
Installer Dialogs
Chapter 3: Installing and Uninstalling 39
Note: Tables are not created at this stage. They are created later after you review your installation choices and request the installation to proceed.
Installer Dialogs
40 Product Guide
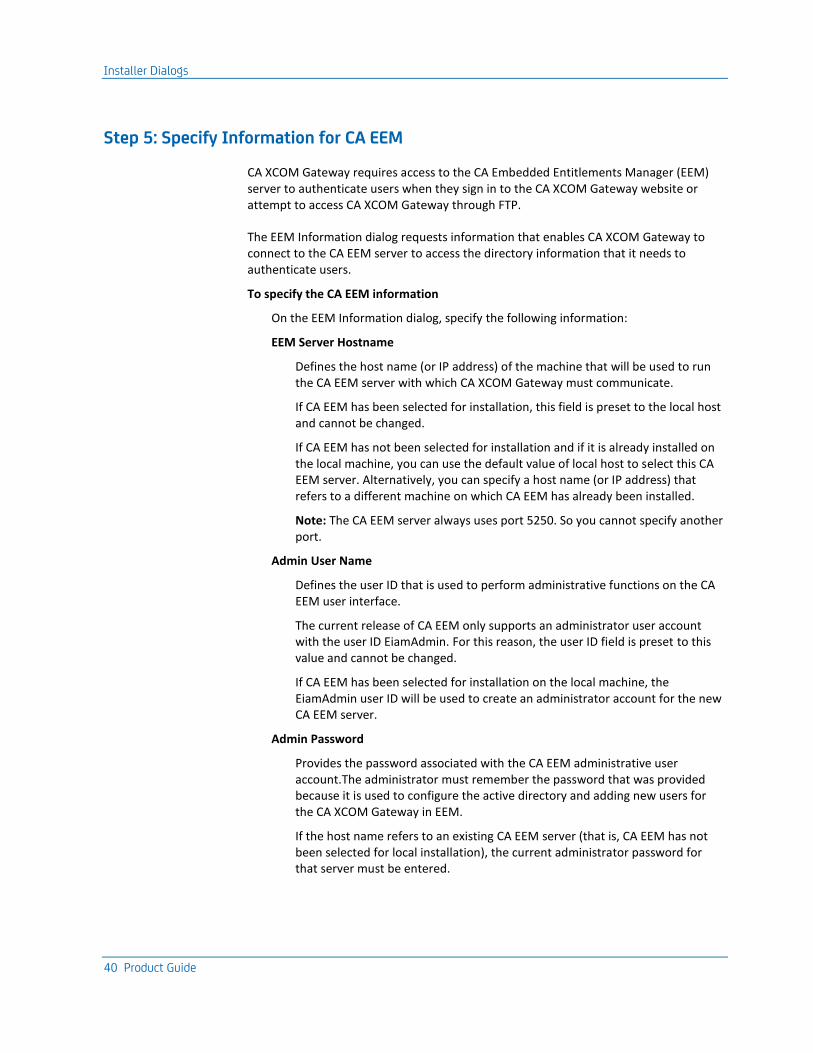
Step 5: Specify Information for CA EEM
CA XCOM Gateway requires access to the CA Embedded Entitlements Manager (EEM) server to authenticate users when they sign in to the CA XCOM Gateway website or attempt to access CA XCOM Gateway through FTP.
The EEM Information dialog requests information that enables CA XCOM Gateway to connect to the CA EEM server to access the directory information that it needs to authenticate users.
To specify the CA EEM information
On the EEM Information dialog, specify the following information:
EEM Server Hostname
Defines the host name (or IP address) of the machine that will be used to run the CA EEM server with which CA XCOM Gateway must communicate.
If CA EEM has been selected for installation, this field is preset to the local host and cannot be changed.
If CA EEM has not been selected for installation and if it is already installed on the local machine, you can use the default value of local host to select this CA EEM server. Alternatively, you can specify a host name (or IP address) that refers to a different machine on which CA EEM has already been installed.
Note: The CA EEM server always uses port 5250. So you cannot specify another port.
Admin User Name
Defines the user ID that is used to perform administrative functions on the CA EEM user interface.
The current release of CA EEM only supports an administrator user account with the user ID EiamAdmin. For this reason, the user ID field is preset to this value and cannot be changed.
If CA EEM has been selected for installation on the local machine, the EiamAdmin user ID will be used to create an administrator account for the new CA EEM server.
Admin Password
Provides the password associated with the CA EEM administrative user account.The administrator must remember the password that was provided because it is used to configure the active directory and adding new users for the CA XCOM Gateway in EEM.
If the host name refers to an existing CA EEM server (that is, CA EEM has not been selected for local installation), the current administrator password for that server must be entered.
Installer Dialogs
Chapter 3: Installing and Uninstalling 41
Alternatively, if CA EEM has been selected for installation on the local machine, the specified password will be assigned to the EEM administrator account created when that component is installed. Subsequently, this password will need to be used to gain access to the CA EEM User Interface to perform administrative functions.
Confirm Password
When CA EEM has been selected for installation on the local machine, this prompt will appear, requesting you to re-enter the password specified in the preceding password field. This is to ensure that the password has been correctly typed, so that the new EEM administrator account can be created correctly with the intended password.
Note: If the host name refers to an existing CA EEM server (that is, CA EEM has not been selected for local installation), the Confirm Password prompt will not appear.
If EEM has not been selected for installation, the installer will check that it can successfully communicate with an EEM server on the specified host machine, using the supplied administrator user ID and password.
If verification is successful, the Keystore information dialog opens.
If verification fails, an error dialog opens. Click OK on the error dialog to return to the EEM Information dialog. You can then correct the specified information.
Installer Dialogs
42 Product Guide
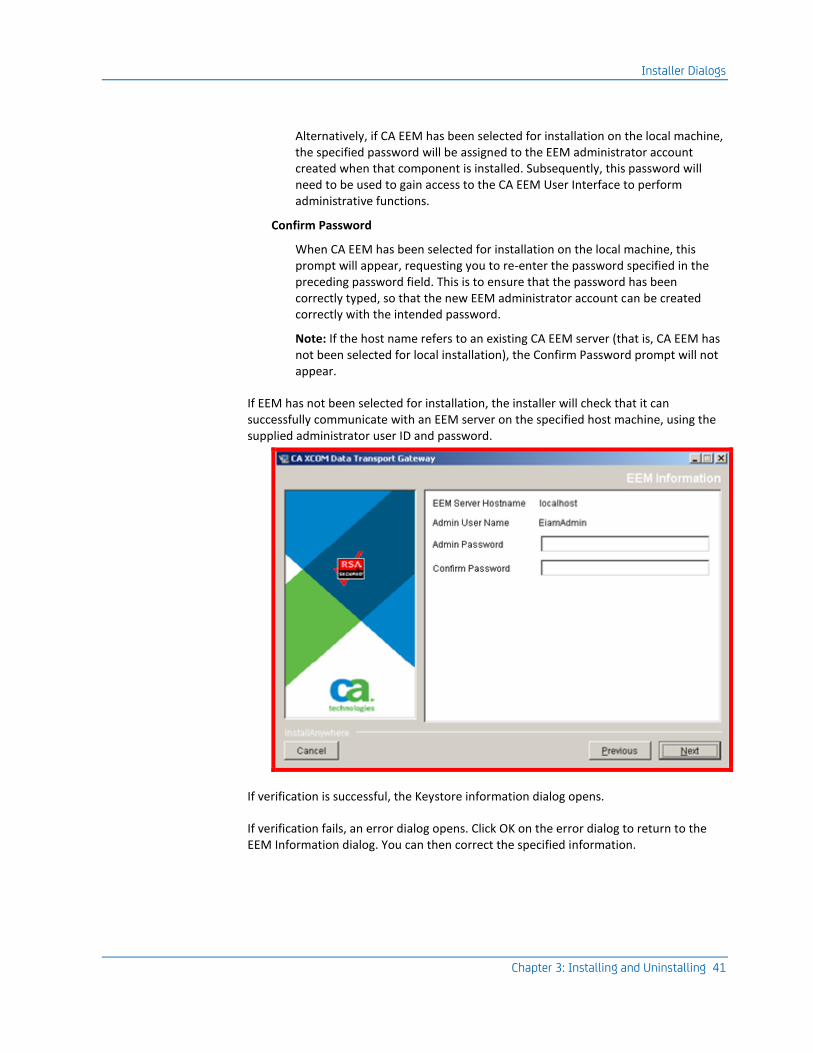
Step 6: (Gateway) Specify Keystore Information
The security keystore information dialog gathers the information about the keystore file so that the files that are being transferred should be encrypted.
Enter the password for keystore file. The keystore path can be found in xcom-globals.xml along with the password in encrypted format that we specified.
Click Next.
The Support Library paths screen appears which shows the list of items that we are selected to install and the components along with the install path.
Installer Dialogs
Chapter 3: Installing and Uninstalling 43
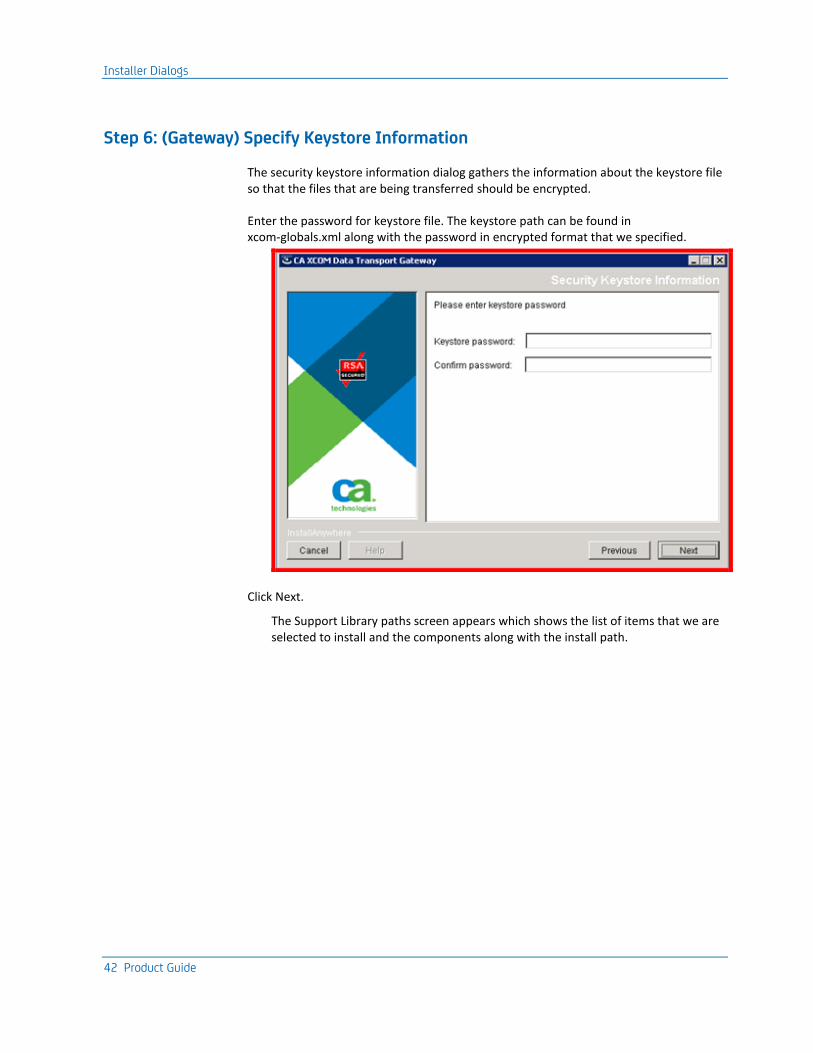
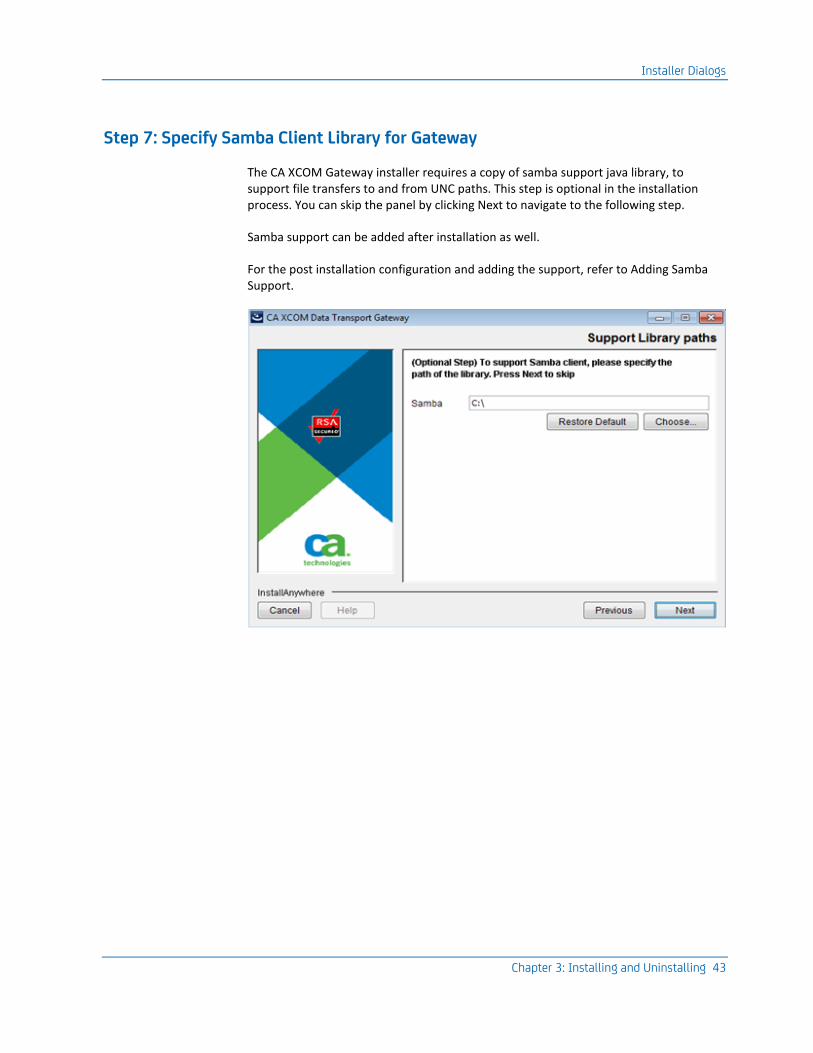
Step 7: Specify Samba Client Library for Gateway
The CA XCOM Gateway installer requires a copy of samba support java library, to support file transfers to and from UNC paths. This step is optional in the installation process. You can skip the panel by clicking Next to navigate to the following step.
Samba support can be added after installation as well.
For the post installation configuration and adding the support, refer to Adding Samba Support.
Installer Dialogs
44 Product Guide
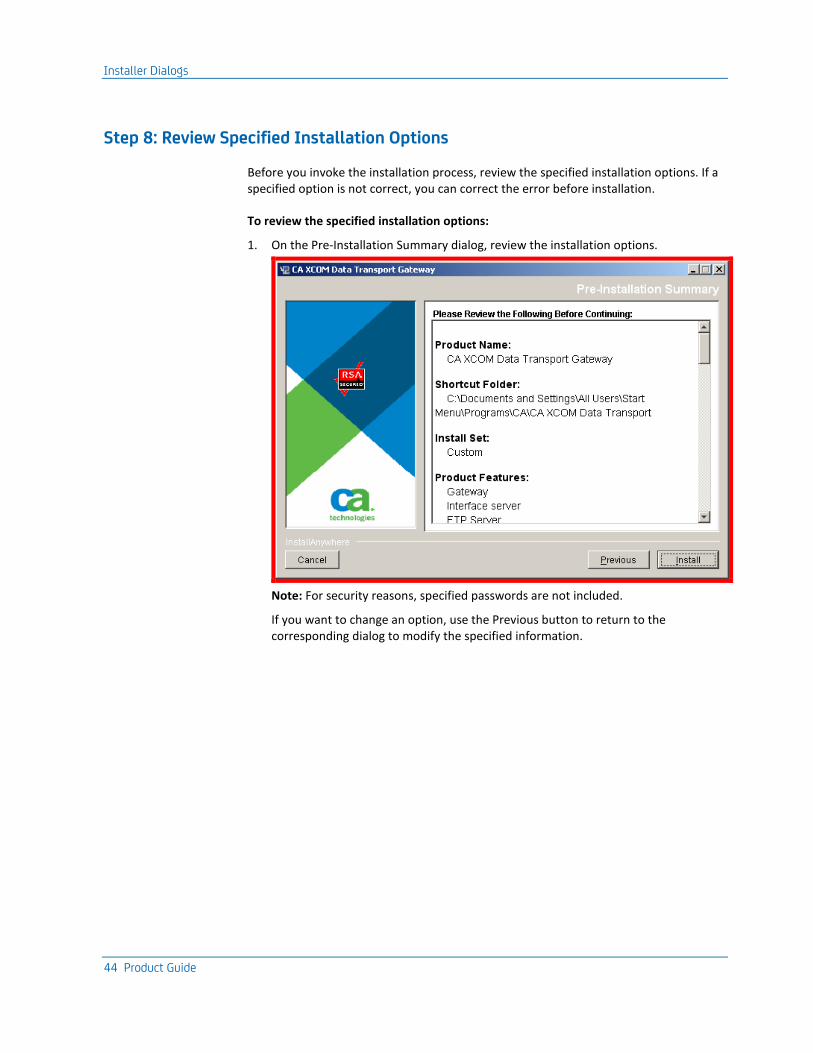
Step 8: Review Specified Installation Options
Before you invoke the installation process, review the specified installation options. If a specified option is not correct, you can correct the error before installation.
To review the specified installation options:
1. On the Pre-Installation Summary dialog, review the installation options.
Note: For security reasons, specified passwords are not included.
If you want to change an option, use the Previous button to return to the corresponding dialog to modify the specified information.
Installer Dialogs
Chapter 3: Installing and Uninstalling 45
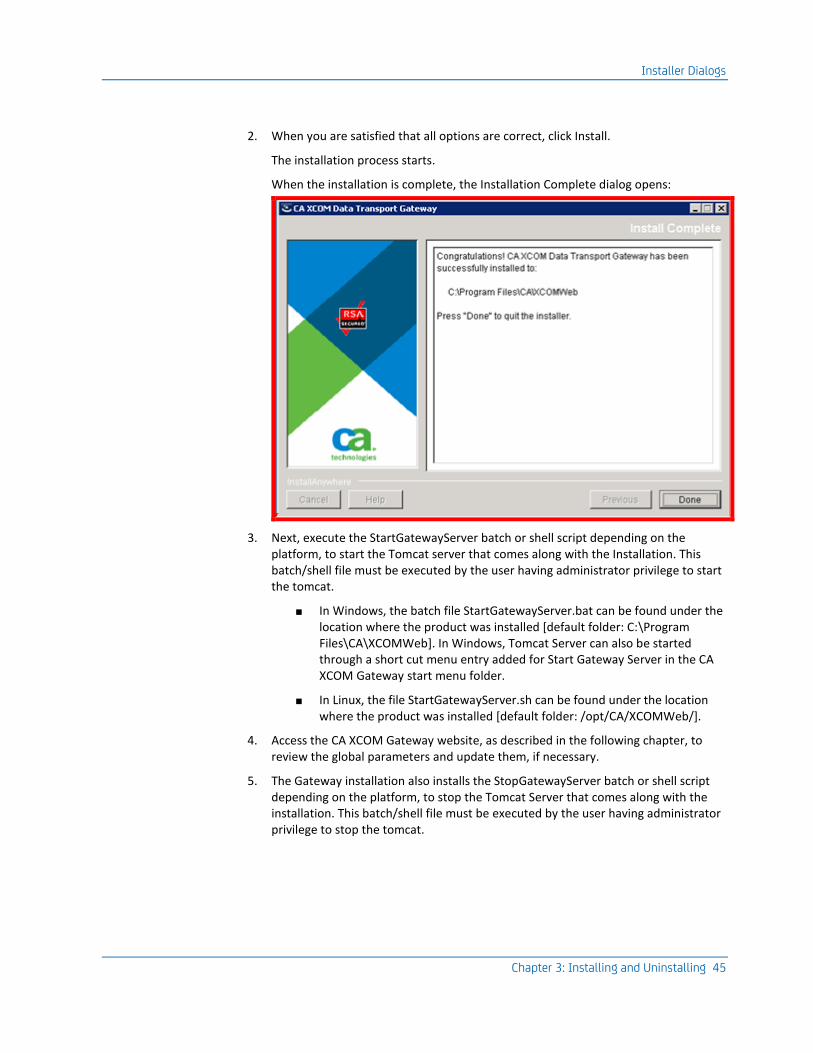
2. When you are satisfied that all options are correct, click Install.
The installation process starts.
When the installation is complete, the Installation Complete dialog opens:
3. Next, execute the StartGatewayServer batch or shell script depending on the platform, to start the Tomcat server that comes along with the Installation. This batch/shell file must be executed by the user having administrator privilege to start the tomcat.
■ In Windows, the batch file StartGatewayServer.bat can be found under the location where the product was installed [default folder: C:\Program Files\CA\XCOMWeb]. In Windows, Tomcat Server can also be started through a short cut menu entry added for Start Gateway Server in the CA XCOM Gateway start menu folder.
■ In Linux, the file StartGatewayServer.sh can be found under the location where the product was installed [default folder: /opt/CA/XCOMWeb/].
4. Access the CA XCOM Gateway website, as described in the following chapter, to review the global parameters and update them, if necessary.
5. The Gateway installation also installs the StopGatewayServer batch or shell script depending on the platform, to stop the Tomcat Server that comes along with the installation. This batch/shell file must be executed by the user having administrator privilege to stop the tomcat.
Installer Dialogs
46 Product Guide
■ In Windows, the batch file StopGatewayServer.bat could be found under the location where the product was installed [default folder: C:\Program Files\CA\XCOMWeb]. In Windows, Tomcat Server can also be stopped through a short cut menu entry added for Stop Gateway Server in the CA XCOM Gateway start menu folder.
■ In Linux, the StopGatewayServer.sh file can be found under the location where the product was installed [default folder: /opt/CA/XCOMWeb/].
Note: Starting and stopping Tomcat using the StartGatewayServer and StopGatewayServer is considered as the preferred approach, as the script sets up the appropriate heap and stack the size that the Tomcat Server requires. The Start and Stop of tomcat must be done by the user who has administrator privilege.
Installer Dialogs
Chapter 3: Installing and Uninstalling 47
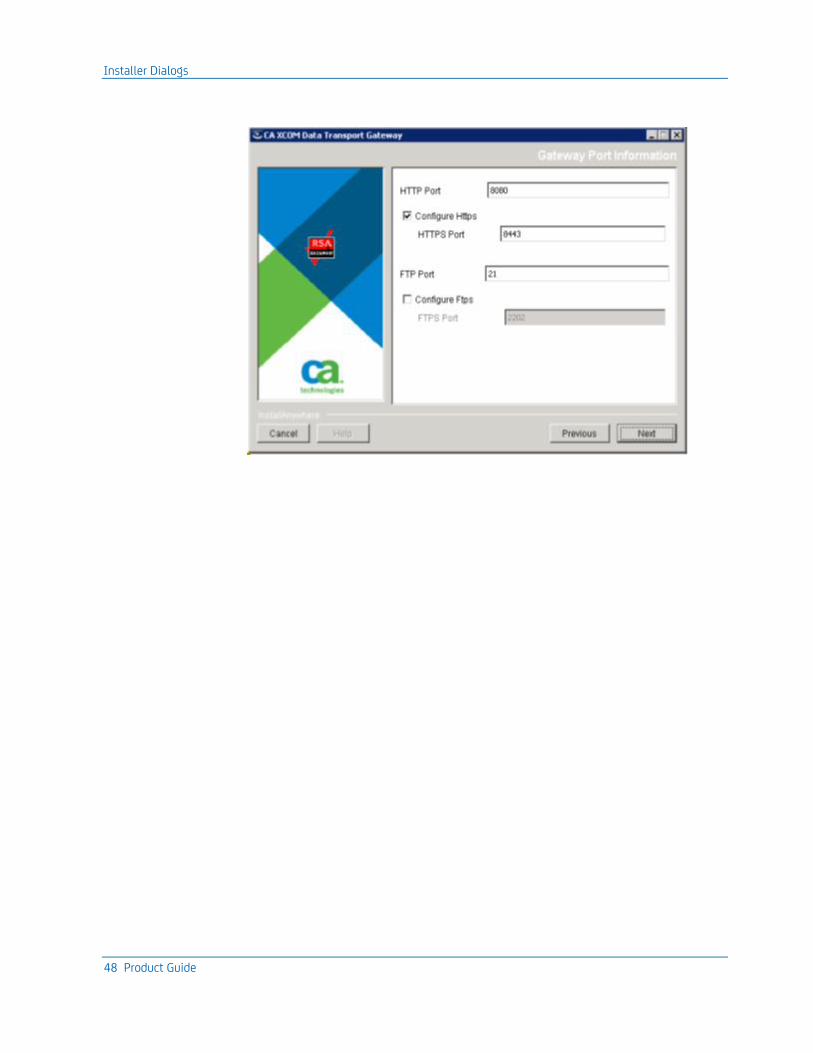
Custom Step: Specify Gateway Ports for Gateway Tomcat and FTP Server
The CA XCOM Gateway installer gathers the port numbers that are configured for the Tomcat Gateway Components and the CA XCOM Gateway FTP Server port numbers.
To specify the Tomcat and FTP/FTPS port information:
On the Gateway port Information dialog, specify the following information:
HTTP port
By default the port number value is 8080. You can provide your desired port number. The port number that is provided is configured as the Tomcat HTTP port. The same is updated in the Gateway control server URL in the xcom globals file. The HTTP mode is always enabled in the Gateway Tomcat.
Configure HTTPS
Configure HTTPS provides the option to enable the HTTPS mode in the Gateway Tomcat server. By default the HTTPS is enabled. If the configure HTTPS is selected, then the required configurations for the Apache Tomcat server are automatically done. The Apache Tomcat server can run in HTTP and HTTPS modes. To run the Apache Tomcat Server in HTTPS only mode, manually configure the Apache Tomcat server.xml file.
HTTPS port
By default the port number value is 8443. You can provide your desired port number. The port number that is provided is configured as the Tomcat HTTPS port. The same is updated in the HTTPS tag in the Gateway UI section in the xcom globals file. This field is enabled only if the configure HTTPS is selected.
FTP port
By default the port number value is 21. You can provide your desired port number. The CA XCOM Gateway FTP server will be using this port number after installation.
Configure FTPS
Configure FTPS provides the option to enable the FTPS mode in the CA XCOM Gateway FTP server. By default the FTPS is disabled. If the Configure FTPS is selected, then the required configurations for the CA XCOM Gateway FTPS server are automatically done. The CA XCOM Gateway FTP server can run in FTP and FTPS modes.
FTPS port
By default the port number value is 2202. You can provide your desired port number. The CA XCOM Gateway FTPS server will be using this port number after installation. By default the FTPS port field is disabled. The port field is enabled only if the Configure FTPS is selected.
Installer Dialogs
48 Product Guide
Installer Dialogs
Chapter 3: Installing and Uninstalling 49
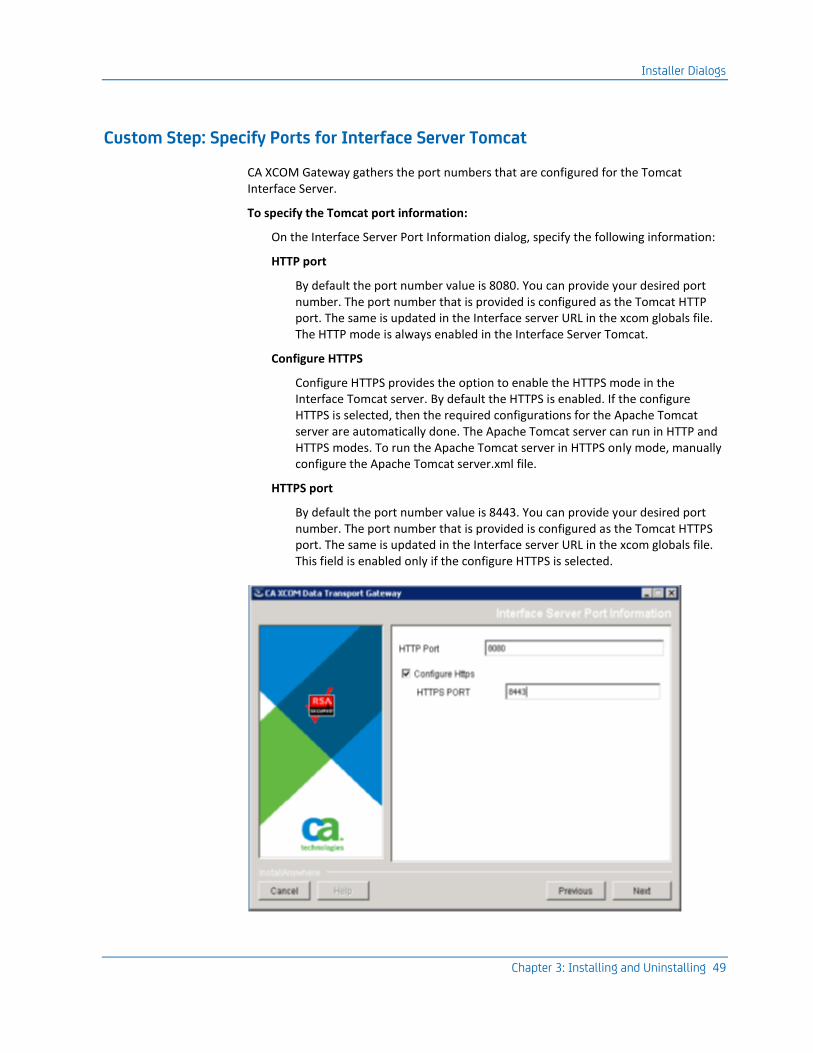
Custom Step: Specify Ports for Interface Server Tomcat
CA XCOM Gateway gathers the port numbers that are configured for the Tomcat Interface Server.
To specify the Tomcat port information:
On the Interface Server Port Information dialog, specify the following information:
HTTP port
By default the port number value is 8080. You can provide your desired port number. The port number that is provided is configured as the Tomcat HTTP port. The same is updated in the Interface server URL in the xcom globals file. The HTTP mode is always enabled in the Interface Server Tomcat.
Configure HTTPS
Configure HTTPS provides the option to enable the HTTPS mode in the Interface Tomcat server. By default the HTTPS is enabled. If the configure HTTPS is selected, then the required configurations for the Apache Tomcat server are automatically done. The Apache Tomcat server can run in HTTP and HTTPS modes. To run the Apache Tomcat server in HTTPS only mode, manually configure the Apache Tomcat server.xml file.
HTTPS port
By default the port number value is 8443. You can provide your desired port number. The port number that is provided is configured as the Tomcat HTTPS port. The same is updated in the Interface server URL in the xcom globals file. This field is enabled only if the configure HTTPS is selected.
Installer Dialogs
50 Product Guide
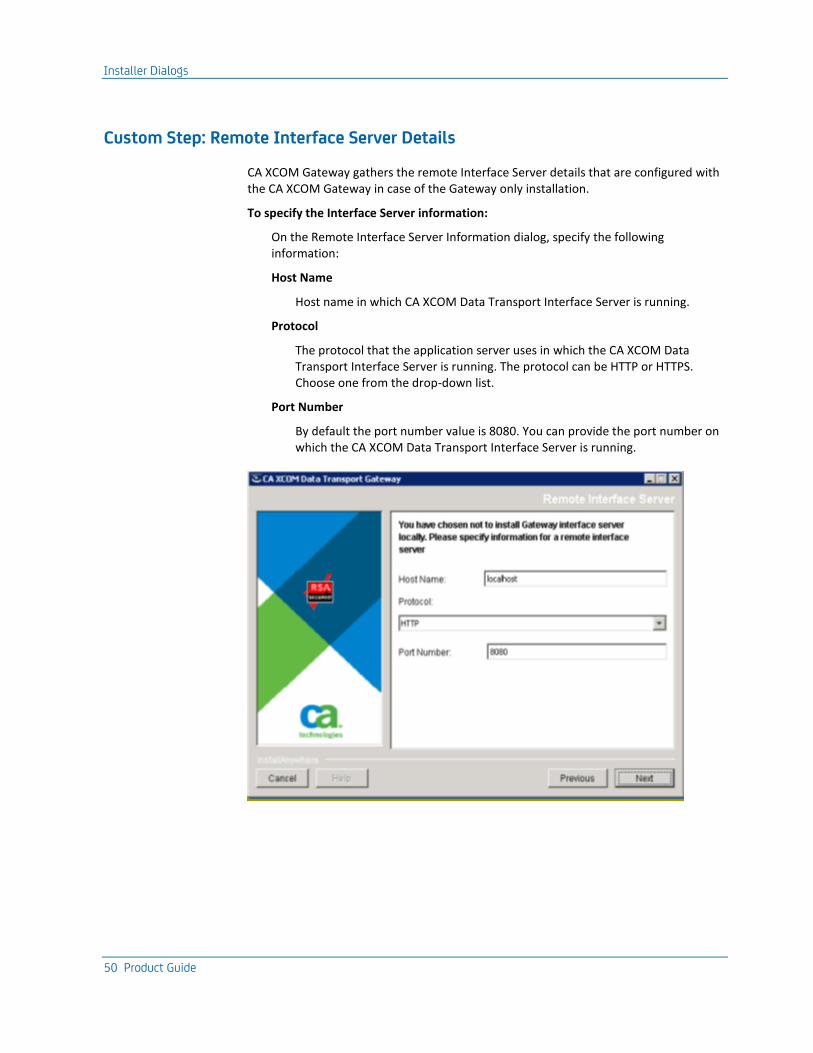
Custom Step: Remote Interface Server Details
CA XCOM Gateway gathers the remote Interface Server details that are configured with the CA XCOM Gateway in case of the Gateway only installation.
To specify the Interface Server information:
On the Remote Interface Server Information dialog, specify the following information:
Host Name
Host name in which CA XCOM Data Transport Interface Server is running.
Protocol
The protocol that the application server uses in which the CA XCOM Data Transport Interface Server is running. The protocol can be HTTP or HTTPS. Choose one from the drop-down list.
Port Number
By default the port number value is 8080. You can provide the port number on which the CA XCOM Data Transport Interface Server is running.
Install the Product in Console Mode
Chapter 3: Installing and Uninstalling 51
Install the Product in Console Mode
For Linux only, you can also choose to install the product in console mode.
To install CA XCOM Gateway in console mode:
1. Enter the following command at the command prompt:
sh %FilePath_where_installer_is_saved% -i console
The command launches the installer and the introduction dialog opens.
2. Press Enter.
The EULA dialog opens.
Note: Because there is no scroll option on the console, press Enter to scroll to the end of this page.
Install the Product in Console Mode
52 Product Guide
3. To accept the terms of the license agreement, type Y and press Enter.
The console prompts you for the following details.
Install set
If you select for a typical installation, go to step (ii). Otherwise if you select for a custom installation follow these steps. You can cancel the installation at any time by typing quit. Press <enter> to go down the screen.
■ By default all the components {Interface Server, Gateway, and EEM} are selected. Each component is associated with a number. Type the numbers to toggle the selection. Press <enter>.
– The installation path for the CA XCOM Gateway appears. Press <enter> to accept the default.
– Configure the port numbers. Press ‘1’ to configure for the HTTPs port number too.
– Configure the FTP and FTPS also in the same way. Press OK to continue the installation screen. Follow from step III.
■ If you select to install Only Gateway and the Interface server.
– The installation path for the CA XCOM Gateway appears. Press <enter> to accept the default.
– Configure the HTTP port number. Press ‘1’ to configure for the HTTPs port number too.
– Configure the FTP and FTPS also in the same way. Press OK to continue the installation screen. Follow from step III.
■ If you select to install only EEM, type the path for the installed EEM and press <enter>.
Configure for the EEM password. Follow the steps from VI for the keystore information screen.
■ If you selected to install only Gateway with no Interface server,
Type the path for the installation.
Configure for HTTP, HTTPs, FTP, and FTPS port numbers.
For the DB configuration screen, continue from step III.
■ If you selected to install only Interface Server with no Gateway,
Type the path for the installation.
Configure for HTTP, HTTPs port numbers.
For the DB configuration screen, continue form step III.
■ If you selected to install only Gateway with no Tomcat,
type the path for the installation.
For the DB information screen, follow from III.
Install the Product in Console Mode
Chapter 3: Installing and Uninstalling 53
■ If you selected to install only the Interface server but no Tomcat,
type the path for the installation.
For the DB information screen, follow from III.
■ II. The Install path for the CA XCOM Gateway Components
■ III. The Database details (hostname, port number, Database name, Table Schema).
■ Specify DB2 JDBC Type 4 drivers and license jar files paths. If you choose to install using DB2 LUW and DB2 z\OS, type the license jar file paths. If you choose to install DB2 z/OS, type the Database Location name.
■ IV. Database administrator details
■ V. The CA EEM details
■ VI. Keystore information. Click next after entering the keystore password.
■ VII. (Optional) The Samba Client library
4. Complete the required information on each page and then press Enter to move to the next page.
When you have finished, the console displays the information that you have entered.
5. To confirm the displayed information, press Enter.
6. In case of any DB creation failure, a message console appears with the DB install log file path and instructions to create DB, press Enter.
7. The Install Complete console appears, displaying details of the installation.
Note: To navigate in console mode screens, do the following:
■ To go to the next input screen, press Enter.
■ To go to the previous input screen, type back and press Enter.
■ To quit or cancel the installation, type quit and press Enter.
8. Press Enter to close the installation process.
Silent Installation
54 Product Guide
Silent Installation
In silent mode, the installer has no end-user interaction, and runs by providing a response file from which the installer retrieves the values for various installer variables used to control the install.
Important! Before you run the installer in silent mode, you need to manually create the response file (with .properties as the extension) for the installer to use. For more information, see Variables Used in the Installer Response File.
To run the installer in silent mode
Important! The installer cannot be executed in silent mode from a mapped network drive; the command has to be run on your local machine.
1. Open the command prompt.
2. Navigate to the directory containing install.exe.
3. Enter the following command at the command prompt:
For Windows
install.exe -i silent -f <<fully qualified path of response file>>
For Linux
sh install.bin -i silent -f <<fully qualified path of response file>>
Note: The words 'install' and ‘silent’ must be in lowercase.
The response to this command varies, depending on your operating system, as follows:
On Windows
■ The command runs immediately. It does not show progress or a completion message.
■ Check the Processes tab in the Task Manager for install.exe, because this process represents the silent installer. When this process is removed from Processes tab, installation is complete.
On Linux
■ The command runs immediately. It does not show progress or a completion message.
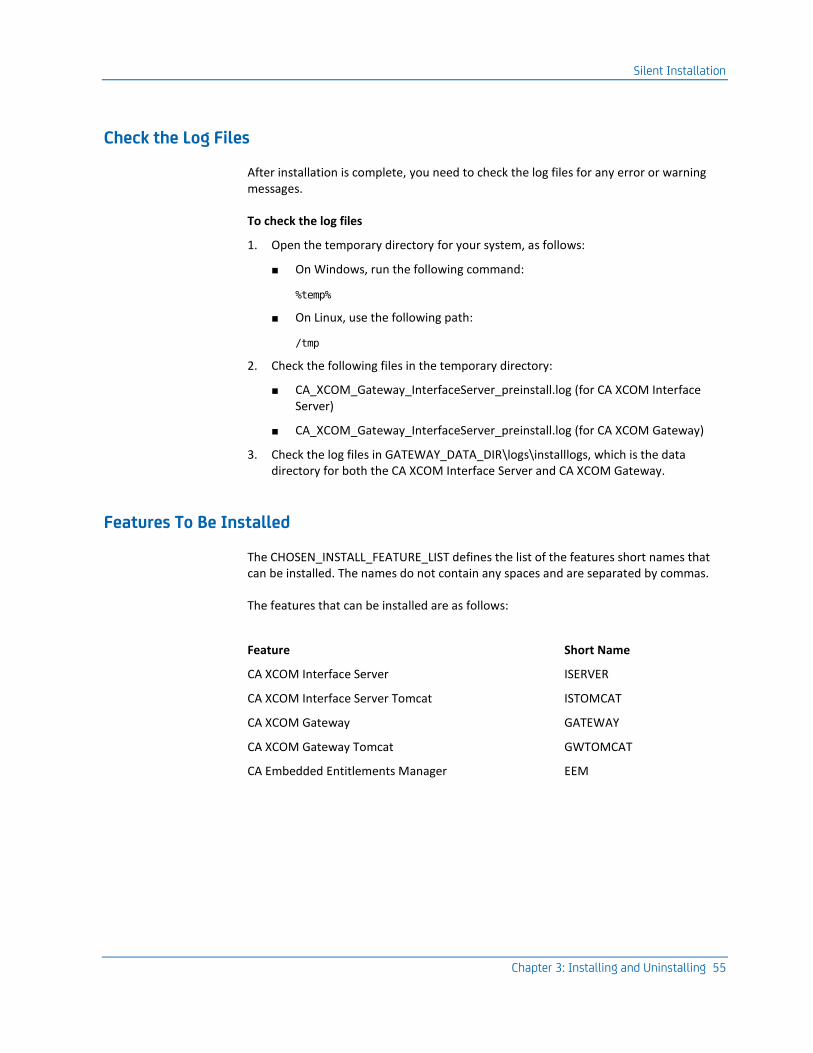
Silent Installation
Chapter 3: Installing and Uninstalling 55
Check the Log Files
After installation is complete, you need to check the log files for any error or warning messages.
To check the log files
1. Open the temporary directory for your system, as follows:
■ On Windows, run the following command:
%temp%
■ On Linux, use the following path:
/tmp
2. Check the following files in the temporary directory:
■ CA_XCOM_Gateway_InterfaceServer_preinstall.log (for CA XCOM Interface Server)
■ CA_XCOM_Gateway_InterfaceServer_preinstall.log (for CA XCOM Gateway)
3. Check the log files in GATEWAY_DATA_DIR\logs\installlogs, which is the data directory for both the CA XCOM Interface Server and CA XCOM Gateway.
Features To Be Installed
The CHOSEN_INSTALL_FEATURE_LIST defines the list of the features short names that can be installed. The names do not contain any spaces and are separated by commas.
The features that can be installed are as follows:
Feature Short Name
CA XCOM Interface Server ISERVER
CA XCOM Interface Server Tomcat ISTOMCAT
CA XCOM Gateway GATEWAY
CA XCOM Gateway Tomcat GWTOMCAT
CA Embedded Entitlements Manager EEM
Silent Installation
56 Product Guide
The CHOSEN_INSTALL_SET specifies if the installation would be TYPICAL or CUSTOM. If the value of this variable is given as TYPICAL, all the features are installed and the value of the variable CHOSEN_INSTALL_FEATURE_LIST is ignored. If the value is given as CUSTOM, the features that are installed would be picked from the feature list that is given in the variable CHOSEN_INSTALL_FEATURE_LIST.
Example:
CHOSEN_INSTALL_SET=TYPICAL
This list installs all five features.
CHOSEN_INSTALL_SET=CUSTOM
CHOSEN_INSTALL_FEATURE_LIST=GATEWAY,GWTOMCAT
This installation installs only Gateway and Tomcat.
Variables Used in the Installer Response File
You define variables in your installer response file. Different sets of variables are required, depending on which features you are installing.
The prefixes of the variables are as follows:
IS_
Settings for the CA XCOM Interface Server
GW_
Settings for CA XCOM Gateway
FTP_
Settings for the Apache FTP Server
Note:
■ For Windows, specify two backslashes (\\) in the path values; for example:
C:\\Program Files\\CA\\XCOMIF
■ For Linux, specify a single forward slash (/) in the path values; for example:
/opt/CA/XCOMIF
Silent Installation
Chapter 3: Installing and Uninstalling 57
Variables to Install CA XCOM Gateway Without the CA XCOM Interface Server
The following variables are required if you choose to install CA XCOM Gateway and not to install the CA XCOM Interface Server. These variables are used to configure an existing CA XCOM Interface Server.
IS_HOST_NAME
The host name where the CA XCOM Interface Server is running (either local or remote host).
IS_HTTP_PORT
The HTTP port number where CA XCOM Interface Server is configured.
IS_HTTP_SSL_MODE
It takes the value 0 or 1 based on the SSl mode of the server running interface server.
Silent Installation
58 Product Guide
Variables to Install the CA XCOM Interface Server
The following variables are required if you choose to install the CA XCOM Interface Server.
CHOSEN_INSTALL_SET=CUSTOM
CHOSEN_INSTALL_FEATURE_LIST= ISERVER,ISTOMCAT
This installation installs only Interface Server and tomcat.
GATEWAY_DATA_DIR
The data directory for CA XCOM Interface Server.
USER_INSTALL_DIR
The installation directory for the CA XCOM Interface Server.
DB_DBTYPE
The database type DB2 or MYSQL.
Permitted Values are:
■ MYSQL or
■ DB2_LUW or
■ DB2_ZOS [in this case, specify DB2_LOCATION variable].
DB2_LOCATION
The Database subsystem name. This variable must only be used when value of variable DB_DBTYPE is DB2_ZOS.
DB_DBNAME
The database name.
DB_CREATE_DB
1 creates a database; 0 to use an existing database.
If DB_DBTYPE is DB2_LUW or DB2_ZOS, it cannot be 1.
DB_XCOM_USER
The database user name
DB_XCOM_PWD
The database user's password
DB_CREATE_OBJS
1 to create the database Objects; 0 to use the existing Objects.
DB_DRIVER_PATH1
The fully qualified path of the database driver file for MYSQL or DB2.
DB_DRIVER_PATH2
Silent Installation
Chapter 3: Installing and Uninstalling 59
The fully qualified path of the database driver license file for DB2.
Not required if DB_DBTYPE is MYSQL.
DB_HOST_NAME
The host where the database server (MYSQL or DB2) is installed.
DB_PORT_NO
The port of the database server.
DB_SCHEMA_OWNER
The Database schema owner name
If DB_DBTYPE is MYSQL, not required.
Note: The Table Schema name and Database name are case-sensitive in DB2_LUW and DB2_z/OS. Provide them in appropriate case.
IS_HTTP_PORT
The HTTP port where the Interface server tomcat is running on the local host.
IS_HTTP_SSL_MODE
1 to configure for HTTPS mode; 0 do not configure for HTTPS mode.
IS_HTTPS_PORT
The HTTPS port where the Interface server tomcat is running on the local host.
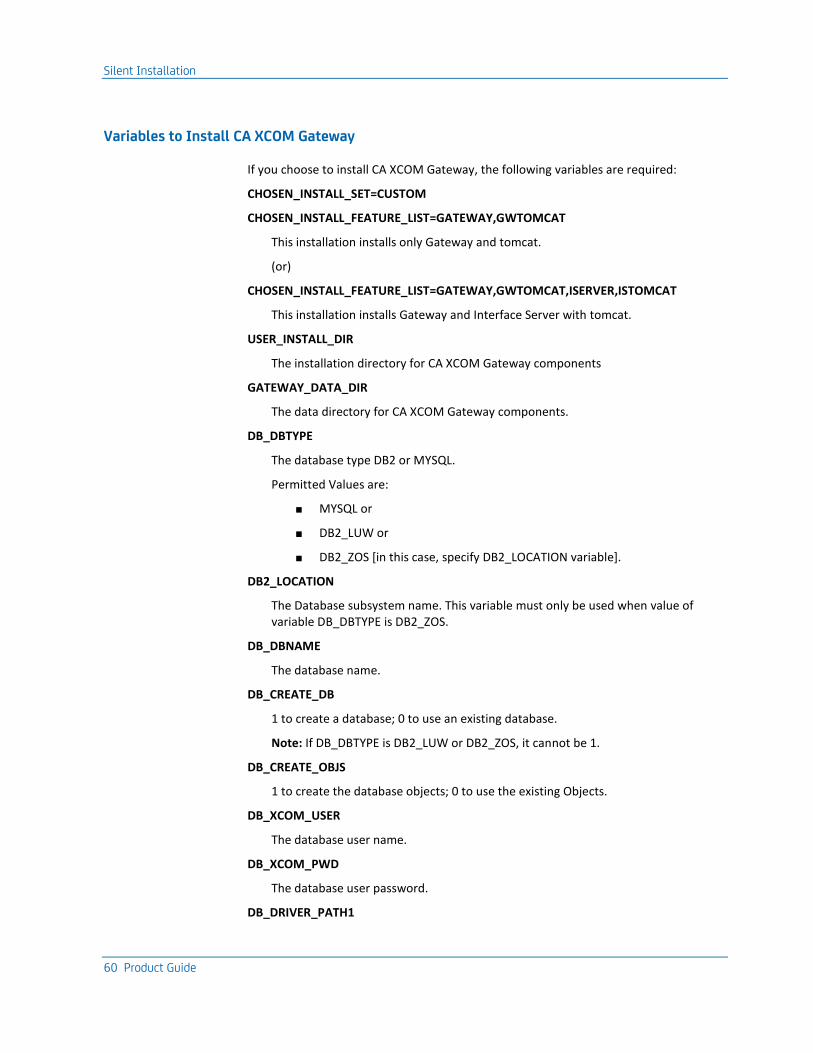
Silent Installation
60 Product Guide
Variables to Install CA XCOM Gateway
If you choose to install CA XCOM Gateway, the following variables are required:
CHOSEN_INSTALL_SET=CUSTOM
CHOSEN_INSTALL_FEATURE_LIST=GATEWAY,GWTOMCAT
This installation installs only Gateway and tomcat.
(or)
CHOSEN_INSTALL_FEATURE_LIST=GATEWAY,GWTOMCAT,ISERVER,ISTOMCAT
This installation installs Gateway and Interface Server with tomcat.
USER_INSTALL_DIR
The installation directory for CA XCOM Gateway components
GATEWAY_DATA_DIR
The data directory for CA XCOM Gateway components.
DB_DBTYPE
The database type DB2 or MYSQL.
Permitted Values are:
■ MYSQL or
■ DB2_LUW or
■ DB2_ZOS [in this case, specify DB2_LOCATION variable].
DB2_LOCATION
The Database subsystem name. This variable must only be used when value of variable DB_DBTYPE is DB2_ZOS.
DB_DBNAME
The database name.
DB_CREATE_DB
1 to create a database; 0 to use an existing database.
Note: If DB_DBTYPE is DB2_LUW or DB2_ZOS, it cannot be 1.
DB_CREATE_OBJS
1 to create the database objects; 0 to use the existing Objects.
DB_XCOM_USER
The database user name.
DB_XCOM_PWD
The database user password.
DB_DRIVER_PATH1
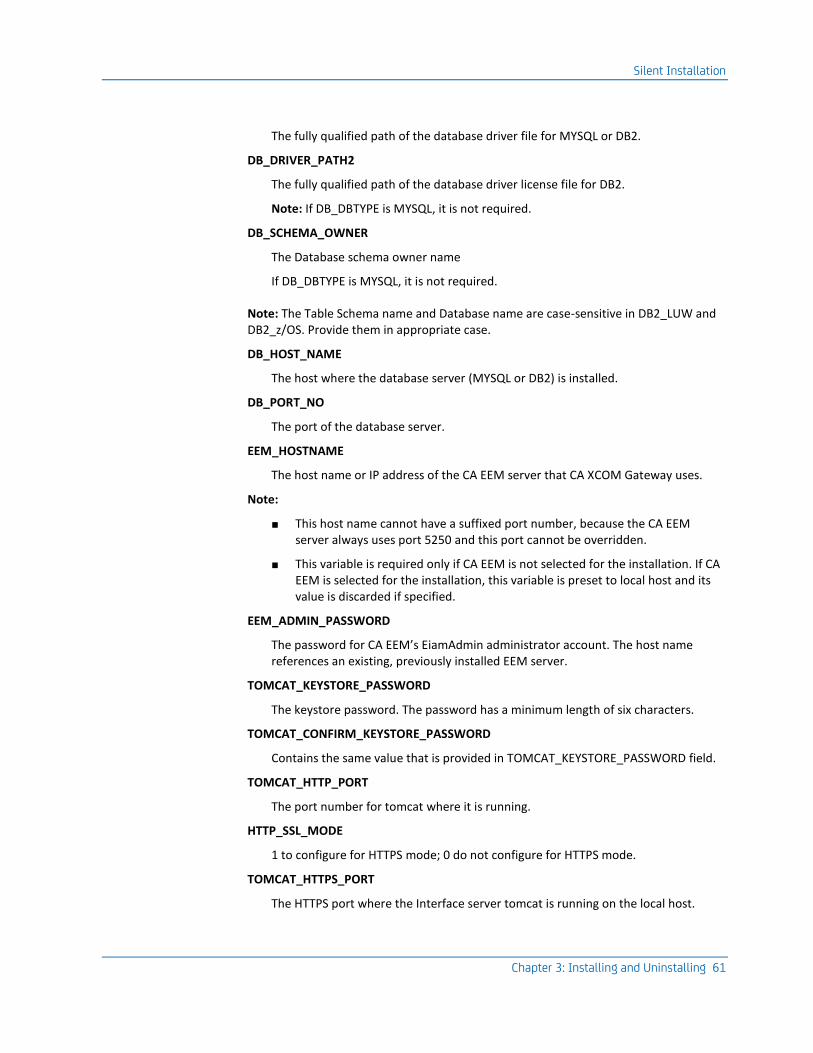
Silent Installation
Chapter 3: Installing and Uninstalling 61
The fully qualified path of the database driver file for MYSQL or DB2.
DB_DRIVER_PATH2
The fully qualified path of the database driver license file for DB2.
Note: If DB_DBTYPE is MYSQL, it is not required.
DB_SCHEMA_OWNER
The Database schema owner name
If DB_DBTYPE is MYSQL, it is not required.
Note: The Table Schema name and Database name are case-sensitive in DB2_LUW and DB2_z/OS. Provide them in appropriate case.
DB_HOST_NAME
The host where the database server (MYSQL or DB2) is installed.
DB_PORT_NO
The port of the database server.
EEM_HOSTNAME
The host name or IP address of the CA EEM server that CA XCOM Gateway uses.
Note:
■ This host name cannot have a suffixed port number, because the CA EEM server always uses port 5250 and this port cannot be overridden.
■ This variable is required only if CA EEM is not selected for the installation. If CA EEM is selected for the installation, this variable is preset to local host and its value is discarded if specified.
EEM_ADMIN_PASSWORD
The password for CA EEM’s EiamAdmin administrator account. The host name references an existing, previously installed EEM server.
TOMCAT_KEYSTORE_PASSWORD
The keystore password. The password has a minimum length of six characters.
TOMCAT_CONFIRM_KEYSTORE_PASSWORD
Contains the same value that is provided in TOMCAT_KEYSTORE_PASSWORD field.
TOMCAT_HTTP_PORT
The port number for tomcat where it is running.
HTTP_SSL_MODE
1 to configure for HTTPS mode; 0 do not configure for HTTPS mode.
TOMCAT_HTTPS_PORT
The HTTPS port where the Interface server tomcat is running on the local host.
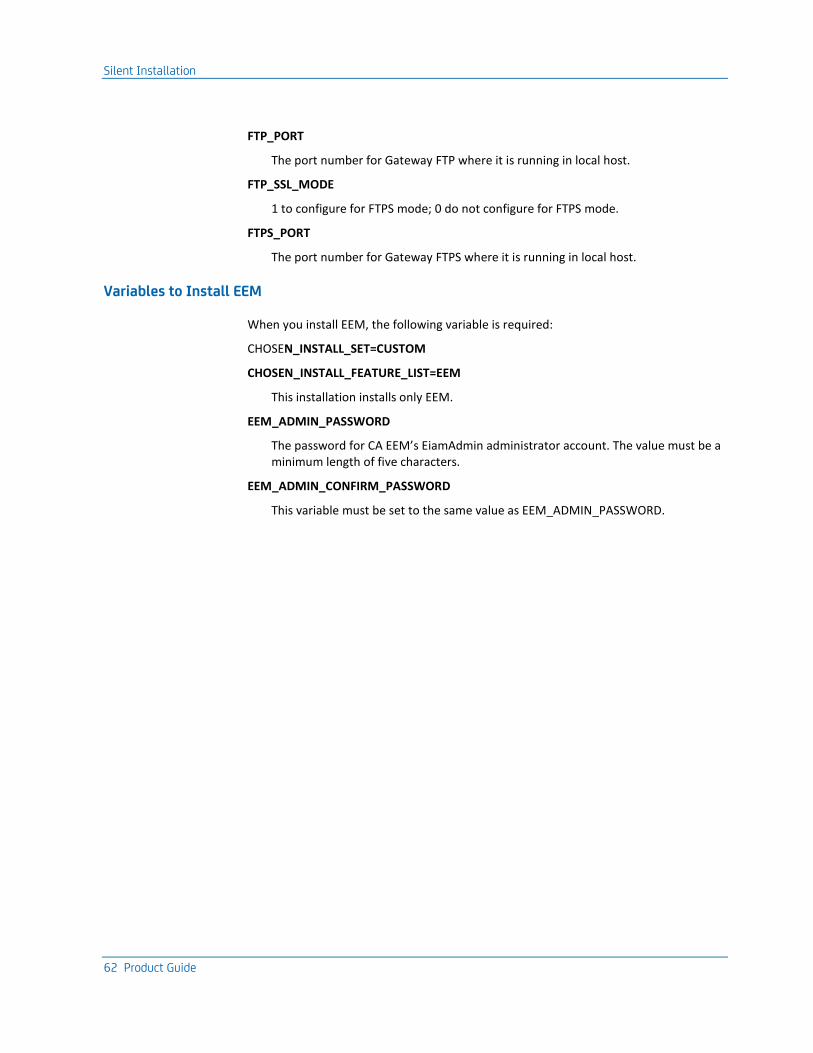
Silent Installation
62 Product Guide
FTP_PORT
The port number for Gateway FTP where it is running in local host.
FTP_SSL_MODE
1 to configure for FTPS mode; 0 do not configure for FTPS mode.
FTPS_PORT
The port number for Gateway FTPS where it is running in local host.
Variables to Install EEM
When you install EEM, the following variable is required:
CHOSEN_INSTALL_SET=CUSTOM
CHOSEN_INSTALL_FEATURE_LIST=EEM
This installation installs only EEM.
EEM_ADMIN_PASSWORD
The password for CA EEM’s EiamAdmin administrator account. The value must be a minimum length of five characters.
EEM_ADMIN_CONFIRM_PASSWORD
This variable must be set to the same value as EEM_ADMIN_PASSWORD.
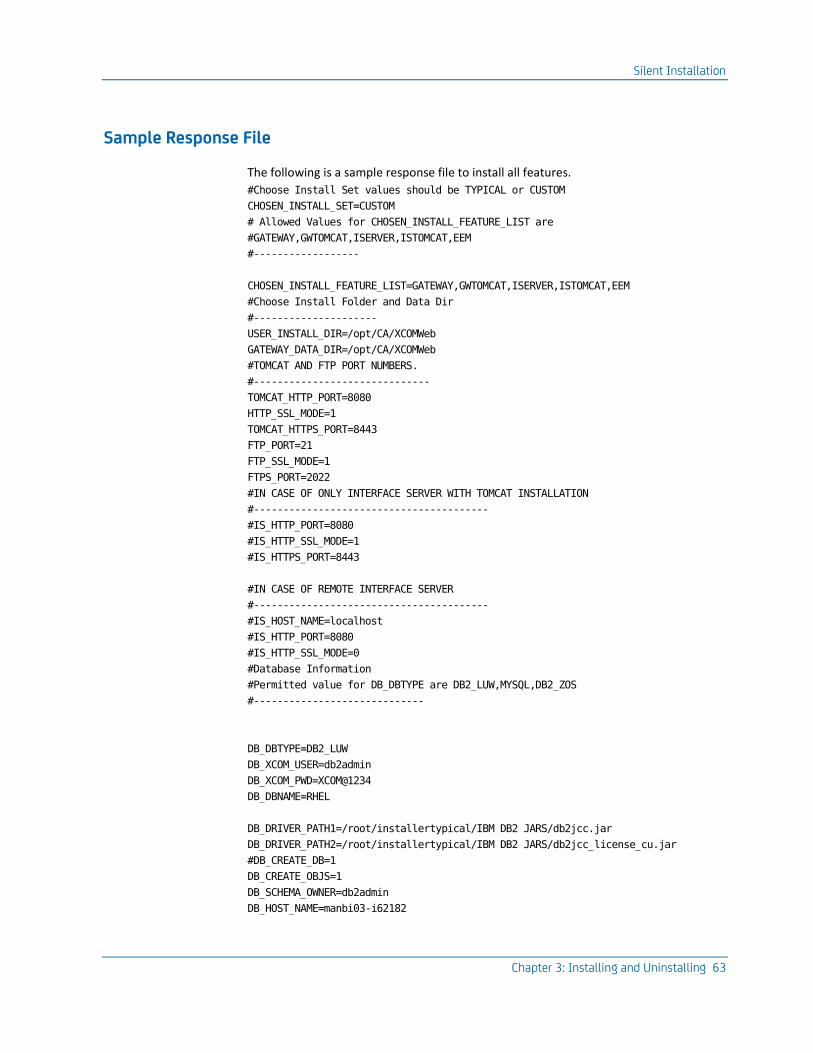
Silent Installation
Chapter 3: Installing and Uninstalling 63
Sample Response File
The following is a sample response file to install all features.
#Choose Install Set values should be TYPICAL or CUSTOM
CHOSEN_INSTALL_SET=CUSTOM
# Allowed Values for CHOSEN_INSTALL_FEATURE_LIST are
#GATEWAY,GWTOMCAT,ISERVER,ISTOMCAT,EEM
#------------------
CHOSEN_INSTALL_FEATURE_LIST=GATEWAY,GWTOMCAT,ISERVER,ISTOMCAT,EEM
#Choose Install Folder and Data Dir
#---------------------
USER_INSTALL_DIR=/opt/CA/XCOMWeb
GATEWAY_DATA_DIR=/opt/CA/XCOMWeb
#TOMCAT AND FTP PORT NUMBERS.
#------------------------------
TOMCAT_HTTP_PORT=8080
HTTP_SSL_MODE=1
TOMCAT_HTTPS_PORT=8443
FTP_PORT=21
FTP_SSL_MODE=1
FTPS_PORT=2022
#IN CASE OF ONLY INTERFACE SERVER WITH TOMCAT INSTALLATION
#----------------------------------------
#IS_HTTP_PORT=8080
#IS_HTTP_SSL_MODE=1
#IS_HTTPS_PORT=8443
#IN CASE OF REMOTE INTERFACE SERVER
#----------------------------------------
#IS_HOST_NAME=localhost
#IS_HTTP_PORT=8080
#IS_HTTP_SSL_MODE=0
#Database Information
#Permitted value for DB_DBTYPE are DB2_LUW,MYSQL,DB2_ZOS
#-----------------------------
DB_DBTYPE=DB2_LUW
DB_XCOM_USER=db2admin
DB_XCOM_PWD=XCOM@1234
DB_DBNAME=RHEL
DB_DRIVER_PATH1=/root/installertypical/IBM DB2 JARS/db2jcc.jar
DB_DRIVER_PATH2=/root/installertypical/IBM DB2 JARS/db2jcc_license_cu.jar
#DB_CREATE_DB=1
DB_CREATE_OBJS=1
DB_SCHEMA_OWNER=db2admin
DB_HOST_NAME=manbi03-i62182
Uninstall the Product
64 Product Guide
DB_PORT_NO=50000
#CA Embedded Entitlements Manager (EEM) Server Information
#---------------------------------------------------------
#EEM_HOSTNAME=localhost
EEM_ADMIN=EiamAdmin
EEM_ADMIN_PASSWORD=adminq
EEM_ADMIN_CONFIRM_PASSWORD=adminq
#Keystore Information
#--------------------
CREATE_KEYSTORE=1
TOMCAT_KEYSTORE_PASSWORD=caadmin
TOMCAT_CONFIRM_KEYSTORE_PASSWORD=caadmin
#Samba Support Library Path
#-------------------------------------------------
SAMBA_LIB_PATH=/root/installertypical/SAMBA JAR/jcifs-1.2.25.jar
Uninstall the Product For Windows
The programs can be uninstalled component-by-component by using Control Panel, Add or Remove Programs.
For Linux
Enter the following command:
sh %INSTALLDIR%/Uninstall_XCOMGW/Uninstall\ XCOMGW
Note: After you uninstall the components, you can remove the database objects.
Uninstall the Product
Chapter 3: Installing and Uninstalling 65
Uninstall Modes
By default, the uninstall mode is the same as the install mode. For example, if CA XCOM Gateway was installed in the silent mode, by default it is uninstalled in the silent mode. To set uninstall mode explicitly, run the uninstaller with the -i switch.
Examples for Windows:
■ To uninstall CA XCOM Gateway in GUI mode, open the command prompt and navigate to Uninstall_XCOMGW directory inside the XCOMWeb directory. Then run the following command:
"Uninstall XCOMGW.exe" -i swing
■ To uninstall CA XCOM Gateway in silent mode, open the command prompt and navigate to Uninstall_XCOMGW directory inside the XCOMWeb directory. Then run the following command:
"Uninstall XCOMGW.exe" -i silent
■ To uninstall the CA XCOM Interface Server in GUI mode, open the command prompt and navigate to Uninstall_XCOMIF directory inside the XCOMWeb directory. Then run the following command:
"Uninstall XCOMIF.exe" -i swing
■ To uninstall the CA XCOM Interface Server in silent mode, open the command prompt and navigate to Uninstall_XCOMIF directory inside the XCOMWeb directory. Then run the following command:
"Uninstall XCOMIF.exe" -i silent
Similarly, you can use -i console to uninstall in console mode.
Examples for Linux:
■ To uninstall CA XCOM Gateway in the GUI mode, enter the following command:
sh %INSTALLDIR%/Uninstall_XCOMGW/Uninstall\ XCOMGW -i swing
■ To uninstall CA XCOM Gateway in the console mode, enter the following command:
sh %INSTALLDIR%/Uninstall_XCOMGW/Uninstall\ XCOMGW -i console
■ To uninstall CA XCOM Gateway in the silent mode, enter the following command:
sh %INSTALLDIR%/Uninstall_XCOMGW/Uninstall\ XCOMGW -i silent
■ To uninstall CA XCOM Interface Server in the silent mode, enter the following command:
sh %INSTALLDIR%/Uninstall_XCOMIF/Uninstall\ XCOMIF -i silent
■ To uninstall CA XCOM Interface Server in the GUI mode, enter the following command:
sh %INSTALLDIR%/Uninstall_XCOMIF/Uninstall\ XCOMIF -i swing
Uninstall the Product
66 Product Guide
■ To uninstall CA XCOM Interface Server in the console mode, enter the following command:
sh %INSTALLDIR%/Uninstall_XCOMIF/Uninstall\ XCOMIF -i console
Uninstall CA XCOM Gateway
Before you uninstall CA XCOM Gateway, stop the Apache FTP Server and Apache Tomcat.
To uninstall CA XCOM Gateway
1. Stop Tomcat server.
2. In Windows, do the following:
a. Open the Control Panel, Add or Remove Programs window, and select CA XCOM Data Transport Gateway.
b. Click Change/Remove, and follow the prompts to uninstall CA XCOM Gateway.
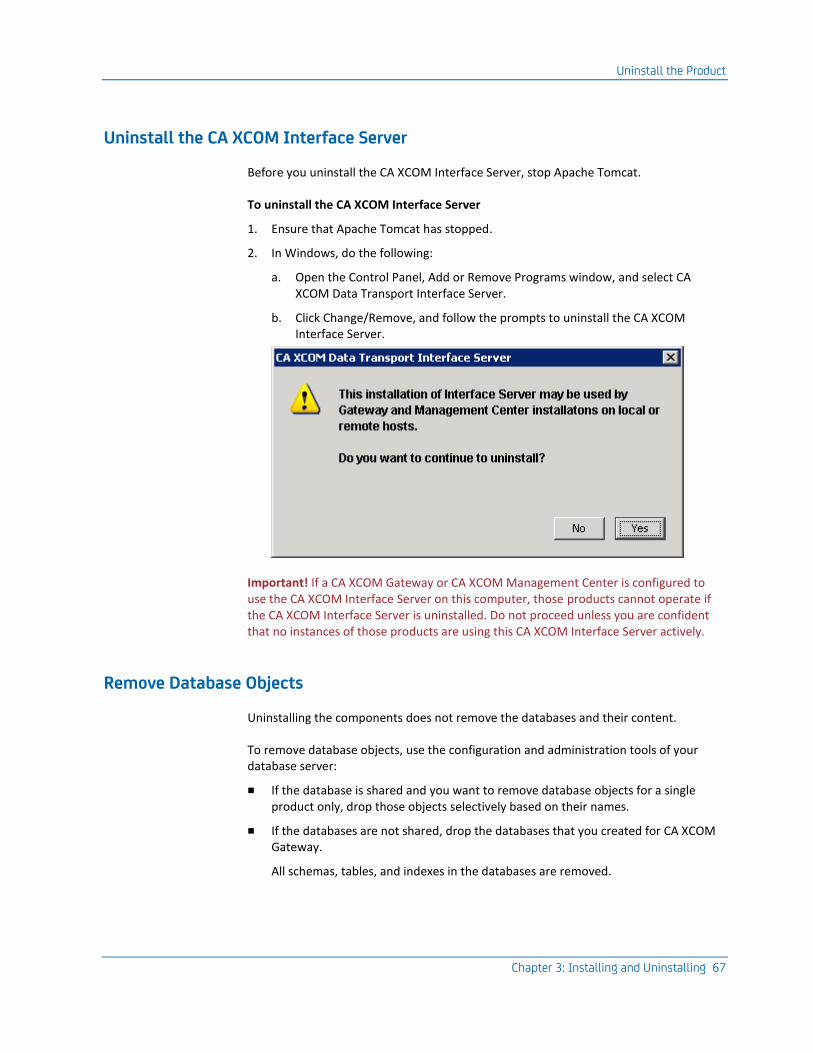
Uninstall the Product
Chapter 3: Installing and Uninstalling 67
Uninstall the CA XCOM Interface Server
Before you uninstall the CA XCOM Interface Server, stop Apache Tomcat.
To uninstall the CA XCOM Interface Server
1. Ensure that Apache Tomcat has stopped.
2. In Windows, do the following:
a. Open the Control Panel, Add or Remove Programs window, and select CA XCOM Data Transport Interface Server.
b. Click Change/Remove, and follow the prompts to uninstall the CA XCOM Interface Server.
Important! If a CA XCOM Gateway or CA XCOM Management Center is configured to use the CA XCOM Interface Server on this computer, those products cannot operate if the CA XCOM Interface Server is uninstalled. Do not proceed unless you are confident that no instances of those products are using this CA XCOM Interface Server actively.
Remove Database Objects
Uninstalling the components does not remove the databases and their content.
To remove database objects, use the configuration and administration tools of your database server:
■ If the database is shared and you want to remove database objects for a single product only, drop those objects selectively based on their names.
■ If the databases are not shared, drop the databases that you created for CA XCOM Gateway.
All schemas, tables, and indexes in the databases are removed.

Chapter 4: Post-Installation and Startup 69
Chapter 4: Post-Installation and Startup
This section contains the following topics:
Configure CA Embedded Entitlements Manager (EEM) (see page 70) Check SSL Mode for Application Server (see page 70) Check Library Path for CA Licensing (see page 71) Adding Samba Support (see page 71) Start CA XCOM Gateway (see page 72) Stop CA XCOM Gateway (see page 74) Configure SSL Communication (see page 75) Initial Login (see page 82)
Configure CA Embedded Entitlements Manager (EEM)
70 Product Guide
Configure CA Embedded Entitlements Manager (EEM)
If, during installation, you installed CA Embedded Entitlements Manager (EEM) and indicated that CA XCOM Gateway is to use this newly installed CA EEM server on the same machine, you need to use the CA EEM User Interface to configure CA EEM before its first use.
Note:
■ The installation of CA EEM automatically creates a start menu item, which you can use to access the user interface. To locate this start menu item, select Programs, CA, Embedded Entitlements Manager, and EEM UI.
■ To configure the active directory or create a new user in EEM, the user EiamAdmin, configured during installation, can only be used.
To configure CA EEM
1. On the CA EEM login screen, select the application ‘<global>’ and enter the EEM administrator user ID and password that were provided during the installation (see Step 10: (Gateway) Specify Information for CA EEM).
The CA EEM user interface appears.
2. Select the Configure tab, then the ‘EEM Server’ link beneath the tab bar, and finally the ‘Global Users/Global Groups’ item from the menu pane on the left of the screen.
3. Use the displayed screen to configure CA EEM to identify how your directory of users is to be stored and accessed:
■ Stored internally by CA EEM
■ Accessible using LDAP as an external directory
■ Accessible using CA Site Minder
For more information about configuring CA EEM, see the online help screens of the CA EEM User Interface, together with the CA EEM documentation that can be found, after install, in the following directory:
C:\Program Files\CA\SharedComponents\Embedded IAM\Doc
Check SSL Mode for Application Server
Note: SSL mode for Application Server must be enabled for all of the platforms.
Verify that the SSL mode is enabled to deploy the CA XCOM Gateway application.
Check Library Path for CA Licensing
Chapter 4: Post-Installation and Startup 71
Check Library Path for CA Licensing
Note: This applies to Linux only.
The License environment variable $CALIB must be included in the system library environment LD_LIBRARY_PATH before CA XCOM Gateway can be started.
The CA XCOM Gateway installation silently installs the License software if it is not already installed.
The License install creates the $CALIB variable and adds it to the system library environment variable if it is not already there. However, it will not be visible to the user until the next time the user logs on.
Adding Samba Support
You can add Samba support manually by copying the Samba support java library to these locations.
■ <<GATEWAY_INSTALL_DIR>>/apache-tomcat-7.0.32/lib
■ <<GATEWAY_INSTALL_DIR>>/FTP/common/lib
■ <<GATEWAY_INSTALL_DIR>>/SFTP/lib
■ <<GATEWAY_INSTALL_DIR>>/CommandLineUtils/ExportImportFileLauncherApplication/repo
Note: <<GATEWAY_INSTALL_DIR>> is the path where Gateway is installed on the machine.
You can find the jar file on the additional disc that was provided with the product. The jar file can also be downloaded from the CA Support website.
Start CA XCOM Gateway
72 Product Guide
Start CA XCOM Gateway
To start CA XCOM Gateway, you need to ensure that all of the following are running:
■ The CA XCOM Data Transport server
■ EEM
■ Apache Tomcat
■ The FTP server
■ The SFTP server
Note: You must have administrator privileges to start the Gateway.
To start CA XCOM Gateway on Windows
1. To start the CA XCOM Data Transport server, enter the following command:
net start xcomdsrv
2. To start EEM, enter the following command:
net start iGateway
3. To start Apache Tomcat 7.0.32, enter the following command:
cd <<GATEWAY_INSTALL_DIR>>
StartGatewayServer.bat
4. To start the FTP server, enter the following command:
net start xcomf116
5. To start the SFTP server, enter the following command:
net start xcoms116
Note: xcomdsrv, igateway, xcoms116 and xcomf116 are installed as services. They are started from the services window.
To start CA XCOM Gateway on Linux
1. To start the CA XCOM Data Transport server, enter the following command:
$XCOM_HOME/sbin/xcomdsrv
2. To start EEM, enter the following command:
$IGW_LOC/S99igateway start
3. To start Apache Tomcat 7.0.32, enter the following command:
cd <<GATEWAY_INSTALL_DIR>>
sh StartGatewayServer.sh
4. To start the FTP server, enter the following command:
cd <<GATEWAY_INSTALL_DIR>>/FTP/bin
Start CA XCOM Gateway
Chapter 4: Post-Installation and Startup 73
sh StartXCOMFTP.sh
5. To start the SFTP server, enter the following command:
cd <<GATEWAY_INSTALL_DIR>>/SFTP/bin
sh StartXCOMSFTP.sh

Stop CA XCOM Gateway
74 Product Guide
Stop CA XCOM Gateway
To stop CA XCOM Gateway, you need to stop all of the following:
■ The CA XCOM Data Transport server
■ EEM
■ Apache Tomcat
■ The FTP server
■ The SFTP server
Note: You must have administrator privileges to stop the Gateway
To stop CA XCOM Gateway on Windows
1. To stop the CA XCOM Data Transport server, enter the following command:
net stop xcomdsrv
2. To stop EEM, enter the following command:
net stop iGateway
3. To stop the Apache Tomcat server, enter the following command:
cd <GATEWAY_INSTALL_DIR>
StopGatewayServer.bat
4. To stop the FTP server, enter the following command:
net stop xcomf116
5. To stop the SFTP server, enter the following command:
net stop xcoms116
Note: xcomdsrv, igateway, xcoms116 and xcomf116 are installed as services. They can be stopped from the services window.
To stop CA XCOM Gateway on Linux
1. To stop the CA XCOM Data Transport server, enter the following command:
$XCOM_HOME/sbin/xcomdsrv –s
2. To stop EEM, enter the following command:
$IGW_LOC/S99igateway stop
3. To stop the Apache Tomcat server, enter the following command:
cd <GATEWAY_INSTALL_DIR>
sh StopGatewayServer.sh
4. To stop the FTP server, enter the following command:
cd <<GATEWAY_INSTALL_DIR>>/FTP/bin
Configure SSL Communication
Chapter 4: Post-Installation and Startup 75
sh StopXCOMFTP.sh
5. To stop the SFTP server, enter the following command:
cd <<GATEWAY_INSTALL_DIR>>/SFTP/bin
sh StopXCOMSFTP.sh
Configure SSL Communication
Data exchanged between CA XCOM Gateway users, CA XCOM Gateway’s software components, and CA XCOM Data Transport servers can be transmitted securely, in encrypted form, by means of secure sockets layer (SSL) communication. This can be selected individually for each of the following forms of communication:
■ Internet connections to CA XCOM Gateway
■ User connections to CA XCOM Gateway using FTP
■ User connections to CA XCOM Gateway using SSH
■ Communication between the CA XCOM Gateway Server and the CA XCOM Interface Server
■ Communication between the CA XCOM Interface Server and CA XCOM Data Transport servers

Configure SSL Communication
76 Product Guide
Internet Connections to CA XCOM Gateway
CA XCOM Gateway users can request the secure communication with CA XCOM Gateway by using a modified internet address to access the CA XCOM Gateway web site. This address must commence with https, in place of http, and must specify the appropriate https port number, as outlined in the chapter Using CA XCOM Gateway through the Internet. Components within the CA XCOM Gateway server that use web services to communicate with each other can also be configured to use the secure https communication.
The default installation of CA XCOM Gateway and custom installation when the https option is selected, creates a separate keystore for the https configuration. The installer updates the xcom-globals.xml file that is located in the <XCOMWeb_HOME>/conf directory.
To enable the use of the https protocol for the communication with the CA XCOM Gateway server manually.
1. Configure Apache Tomcat to support SSL.
Enabling support for SSL by the Tomcat server requires:
■ Installation of an X509 certificate within a keystore
■ Revision of the Tomcat configuration to turn on SSL, referencing the related keystore and certificate
Detailed information about the Tomcat SSL self-signed certificate creation and setup can be found on the http://tomcat.apache.org website and by searching the Internet using the keywords tomcat SSL configuration.
2. Configure the CA XCOM Gateway Server to use SSL.
After the installation of CA XCOM Gateway, the APPSERVER_CERT xml element of xcom-globals.xml can be updated with the KEYSTORE and TRUSTSTORE information of the Tomcat SSL certificate.
The https protocol can be configured by updating the Global Parameters offline, by changing the GATEWAYURL attribute within the WEBSERVICES xml element and GCS_URL element within GATEWAYUI, FTP and SFTP xml elements, so that it specifies the https protocol with the appropriate port number. These values are set and configured online by logging-in as an administrator in the Global Parameters Tab also.
The xcom-globals.xml, which has to be configured with the above mentioned values, is located at <XCOMWeb_HOME>/conf directory.
3. Choose the SSL Mode for Gateway.
After the installation of XCOM Gateway, the https protocol can be enabled for the gateway in two modes:
■ Use SSL only for login – In this mode, only the user login uses SSL the based authentication. For enabling this mode, set the IS_LOGIN_HTTPS xml element value to true.
Configure SSL Communication
Chapter 4: Post-Installation and Startup 77
■ The entire session in SSL mode – In this mode, the user session is entirely run on SSL mode. For enabling this mode, set the IS_SESSION_HTTPS xml element value to true.

Configure SSL Communication
78 Product Guide
User Connections to CA XCOM Gateway
CA XCOM Gateway FTP users can request secure communication by using FTP client software that is capable of using the FTPS protocol and selecting that protocol, in place of FTP, when connecting to the CA XCOM Gateway FTP server. For more information, see the chapter Using CA XCOM Gateway FTP.
The default installation of the CA XCOM Gateway and custom installation when ftps option is selected, creates a separate keystore for ftps configuration. The installer updates the ftpd-gateway.xml file that is located in the res/conf directory.
To enable the use of the ftps and ftp protocols manually.
1. Create a keystore or make one available for use by the Apache FTP Server.
If preferred, the Tomcat keystore referenced in the preceding section can be shared by both Tomcat and the Apache FTP Server.
2. After Apache FTP Server installation, update the FTPD-Gateway.xml file within the res/conf subdirectory of the Apache FTP Server installation folder.
■ To enable use of both the FTPS protocol and the FTP protocol, append the following two XML elements to the content of the FTPD-Gateway.xml file, setting the port number, file, and password attributes to the appropriate values:
Note: The two listener names must be different; one of them must be xcomftp and you can specify any name for the other one (in this example, xcomftps is the other name).
<listeners>
<nio-listener name="xcomftp" port="21"/>
<nio-listener name="xcomftps" port="22" implicit-ssl="true">
<ssl>
<keystore file="C:/keystore.jks" password="changeit"/>
<truststore file="C:/keystore.jks" password="changeit"/>
</ssl>
</nio-listener>
</listeners>
■ To enable the use of only one of FTPS and FTP, append only one of these XML elements to the content of the FTPD-Gateway.xml file, using default as the listener name:
<listeners>
<nio-listener name="default" port="port number" implicit-ssl="true">
<!-- Uncomment the section from here to configure explicit SSL support-->
<!--<ssl>
<keystore file="C:/keystore.jks" password="changeit"/>
<truststore file="C:/keystore.jks" password="changeit"/>
</ssl>
<!-- Uncomment till here to configure explicit SSL support-->
</nio-listener>
Configure SSL Communication
Chapter 4: Post-Installation and Startup 79
</listeners>
Configure SSL Communication
80 Product Guide
Communication between the CA Interface Server and CA XCOM Data Transport Servers
The CA XCOM Interface Server communicates with the local CA XCOM Data Transport server, using web services, in order to schedule transfers on behalf of CA XCOM Gateway and to monitor their progress. For enhanced security, SSL (Secure Sockets Layer) protocol can be requested for this control communication between the two server components.
When SSL communication is required, it can be requested using the SSL=”YES” attribute within the TRANSFERCONTAINER xml that is configured for CA XCOM Gateway’s policies. The CA XCOM Interface Server and the allied CA XCOM Data Transport server are installed on the same machine and secure communication between these servers might not be deemed necessary. However, secure SSL communication is always recommended if the CA XCOM Interface Server and its local CA XCOM Data Transport server are to reside on separate server machines.
To use SSL communication between the CA XCOM Interface Server and the local CA XCOM Data Transport server, it is first necessary to configure the CA XCOM Interface Server to give it access to the client certificate of the local CA XCOM Data Transport server. The following steps outline the procedure to do this:
1. Generate an SSL client certificate for the CA XCOM Data Transport server, as described in the CA XCOM Data Transport Administration Guide.
2. Establish a keystore for the CA XCOM Interface Server to use on the same machine where this server is located.
During the installation of CA XCOM Gateway, a keystore for CA XCOM Gateway’s use has already been created or defined. It is acceptable for CA XCOM Interface Server to share the use of the same keystore, and this is the recommended approach when CA XCOM Gateway and the CA XCOM Interface Server reside on the same machine.
However, if a separate keystore is designated for use solely by the CA XCOM Interface Server, a new keystore cannot be created. Both CA XCOM Interface server and CA XCOM Gateway will always share the same certificate. For CA XCOM Interface Server to be aligned with the SSL certificate of CA XCOM Data Transport server, the CA XCOM Gateway’s certificate will also be modified.
Import the SSL client certificate into the designated keystore, using the keytool utility.
Note: The facilities offered by the keytool utility program are fully documented on the http://java.sun.com web site (http://java.sun.com/docs/books/tutorial/security/toolsign/step3.html).
To run the keytool utility, open the command prompt (Start->run->cmd), and execute the keytool utility by entering a command in the following format:
Configure SSL Communication
Chapter 4: Post-Installation and Startup 81
"{JAVA_HOME }\jre\bin\keytool.exe" -import -trustcacerts -alias {alias id}
-keystore “{keystore path/file}” –storepass “{keystore password}” -file
"{certificate path/file}"
{alias id}
A unique alias ID that you want to assign to the SSL certificate. This can be any ID that is different from that of any existing certificate within the same keystore.
{keystore path/file}
The directory path for the keystore location and keystore file name.
If the CA XCOM Interface Server is to share use of CA XCOM Gateway’s existing keystore, you can find the location of that keystore by viewing the xcom-globals.xml file, and locating the <KEYSTORE PATH=”…”> attribute.
If a separate keystore is to be designated for use by the CA XCOM Interface Server, you can specify the path and name of a file that does not presently exist, in which case keytool creates the new keystore.
{keystore password}
The current password of the existing keystore, or the password to be assigned to a new keystore.
{certificate path/file}
The directory path and file name of the CA XCOM Data Transport client certificate that you want to import; for example, “C:\Program Files\CA\XCOM\Ssl\cassl.pem”.
3. Lastly, the xcom-globals.xml file must be updated to specify the location of the keystore to be used by the CA XCOM Gateway and CA XCOM Interface Server.
If a new keystore has been created for the CA XCOM Interface Server, different from the CA XCOM Gateway keystore, do the following:
– Modify the <KEYSTORE> element to the <GATEWAYCERT> section of the xcom-globals.xml file and within this element include only a PATH= attribute, identifying the location of the new keystore.
Example:
<GLOBALPARAMETERS>
…..
<GATEWAYCERT>
<CERTIFICATE ACTIVEID="XCOM" AUTHENTICATE="NO">
<KEYSTORE PATH="C:\Program Files (x86)\CA\XCOMGW\keystoreFile.keystore" PASSWORD="0C7C96C6D67280AEDC" KEY="82171A5E"/>
<TRANSPORTDOMAIN DN="*"/>
Initial Login
82 Product Guide
</CERTIFICATE>
</GATEWAYCERT>
…..
</GLOBALPARAMETERS>
Use the CA XCOM Gateway UI to generate the encrypted password and the key for the keystore password. The encrypted key and password can be generated by using the Encrypt Password utility in the Administration > Manage Policies> Add/Edit Policy> User Delivery Script Info.
Save the updated xcom-globals.xml file with the keystore details and the encrypted password details.
Important! After saving the updated xcom-globals.xml file, you need to restart the CA XCOM Interface Server for the change to become effective.
Initial Login
When CA XCOM Gateway is initially installed and no authorized users have been defined for this CA XCOM Gateway, the first user to log in is automatically added as an Administrator user.
Note: The user is defined in CA EEM otherwise login fails.
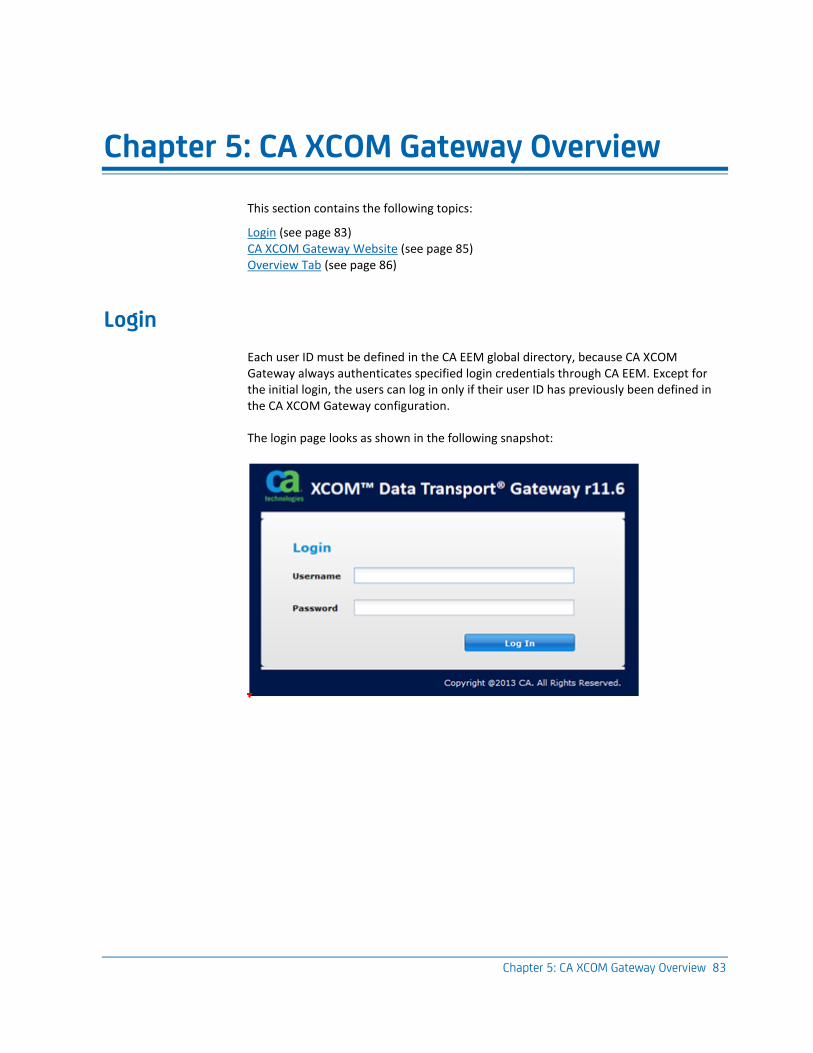
Chapter 5: CA XCOM Gateway Overview 83
Chapter 5: CA XCOM Gateway Overview
This section contains the following topics:
Login (see page 83) CA XCOM Gateway Website (see page 85) Overview Tab (see page 86)
Login
Each user ID must be defined in the CA EEM global directory, because CA XCOM Gateway always authenticates specified login credentials through CA EEM. Except for the initial login, the users can log in only if their user ID has previously been defined in the CA XCOM Gateway configuration.
The login page looks as shown in the following snapshot:

Login
84 Product Guide
Note: The password that is entered on the login page is encrypted.
To log in to CA XCOM Gateway
1. To access the CA XCOM Gateway website, use your web browser as follows:
http://<servername>:PortNo/XCOMGateway/ OR
https://<servername>:PortNo2/XCOMGateway/
Example:
http//myserver:8080/XCOMGateway/
<servername>
Specifies the host name or IP address of the machine on which the Gateway Server has been installed.
PortNo
Specifies the http port number for the application server used (usually 8080).
PortNo2
Specifies the https port number for the application server used (usually 8443).
Note:
■ To verify the SSL mode configuration, browse the https://<servername>:ssl port that is configured.
■ To communicate with the server through a secure channel, you are forced to log in through a secure mode (HTTPS). Irrespective of the mode of communication (HTTP or HTTPS), the login page appears in secure mode (HTTPS). To log in, accept the security certificate.
To verify the mode, check the URL in the address bar. The URL starts with https.
For example:
https://<host>:CA Portal/XCOMGateway
The CA XCOM Gateway login screen appears.
2. Enter your credentials and click Log In.
The Overview page appears.
Note: If you do not enter a user name and password, an error message prompts you to enter the credentials as shown in the display. If the authentication fails for some other reason, an appropriate error message is displayed.
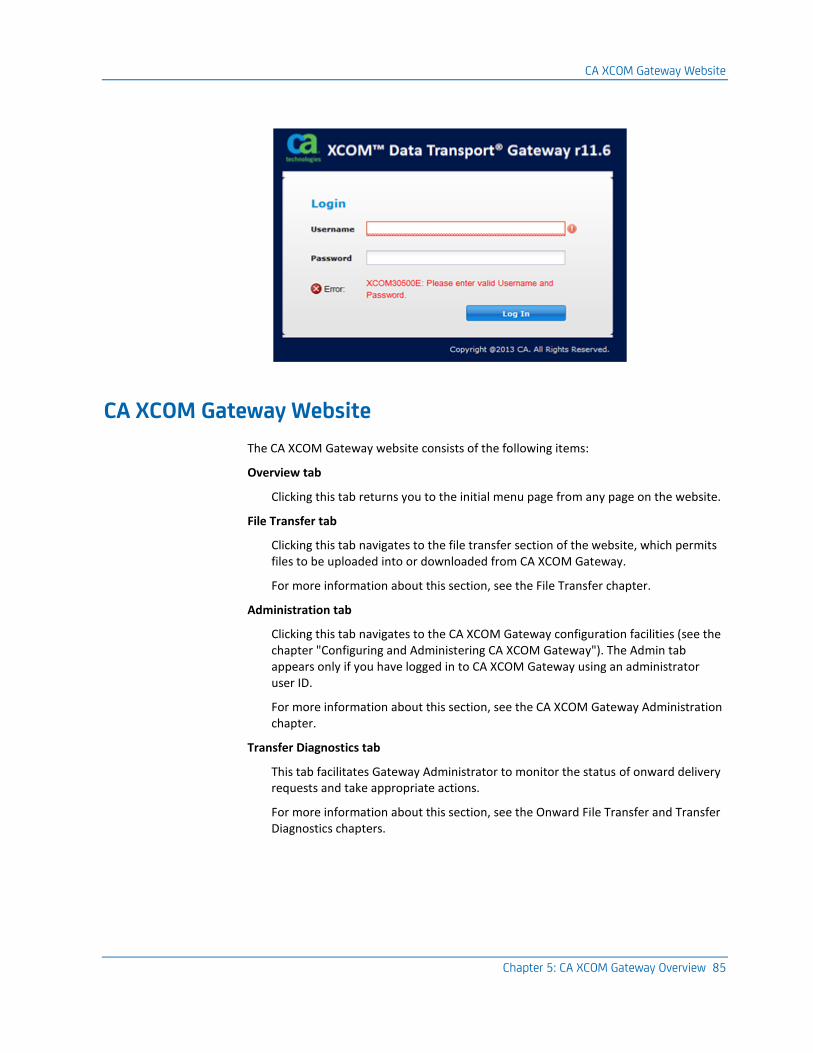
CA XCOM Gateway Website
Chapter 5: CA XCOM Gateway Overview 85
CA XCOM Gateway Website
The CA XCOM Gateway website consists of the following items:
Overview tab
Clicking this tab returns you to the initial menu page from any page on the website.
File Transfer tab
Clicking this tab navigates to the file transfer section of the website, which permits files to be uploaded into or downloaded from CA XCOM Gateway.
For more information about this section, see the File Transfer chapter.
Administration tab
Clicking this tab navigates to the CA XCOM Gateway configuration facilities (see the chapter "Configuring and Administering CA XCOM Gateway"). The Admin tab appears only if you have logged in to CA XCOM Gateway using an administrator user ID.
For more information about this section, see the CA XCOM Gateway Administration chapter.
Transfer Diagnostics tab
This tab facilitates Gateway Administrator to monitor the status of onward delivery requests and take appropriate actions.
For more information about this section, see the Onward File Transfer and Transfer Diagnostics chapters.
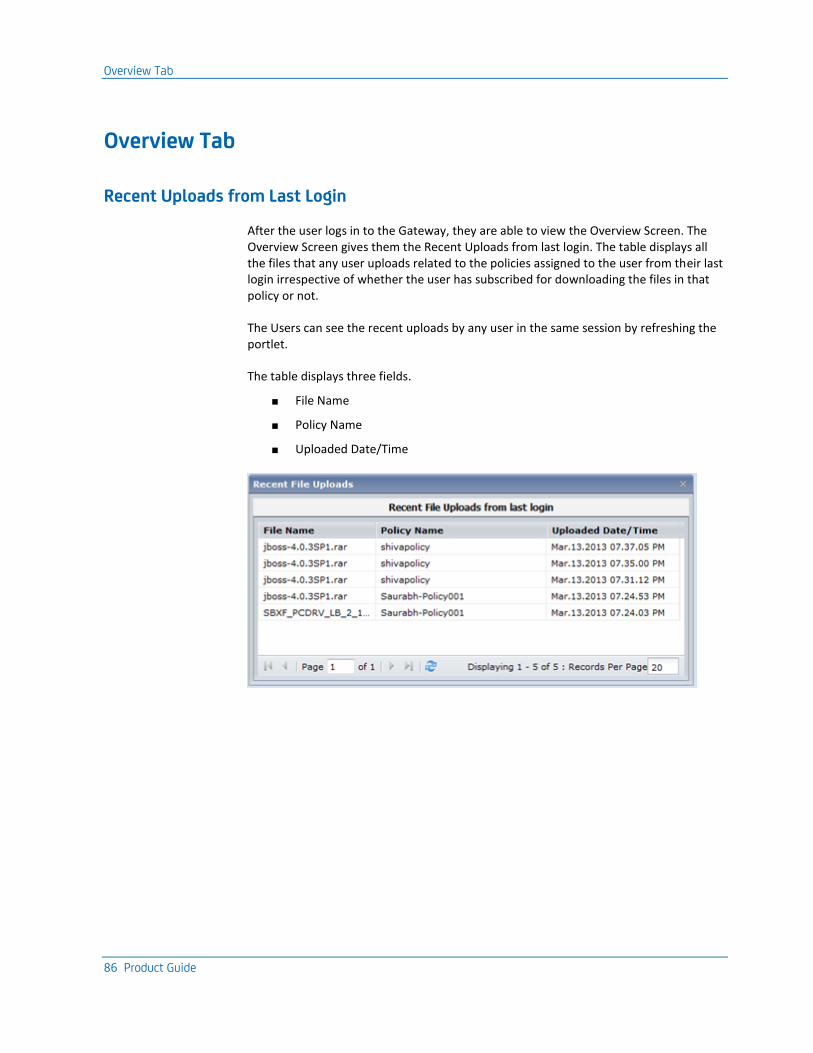
Overview Tab
86 Product Guide
Overview Tab
Recent Uploads from Last Login
After the user logs in to the Gateway, they are able to view the Overview Screen. The Overview Screen gives them the Recent Uploads from last login. The table displays all the files that any user uploads related to the policies assigned to the user from their last login irrespective of whether the user has subscribed for downloading the files in that policy or not.
The Users can see the recent uploads by any user in the same session by refreshing the portlet.
The table displays three fields.
■ File Name
■ Policy Name
■ Uploaded Date/Time
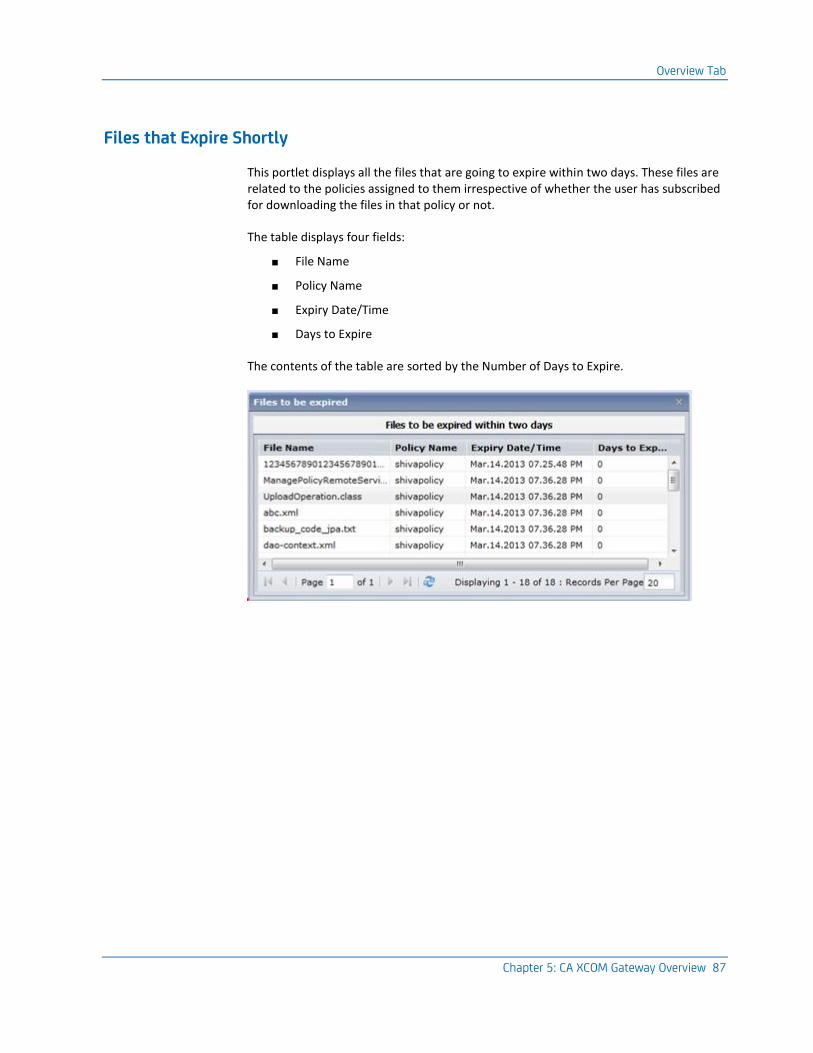
Overview Tab
Chapter 5: CA XCOM Gateway Overview 87
Files that Expire Shortly
This portlet displays all the files that are going to expire within two days. These files are related to the policies assigned to them irrespective of whether the user has subscribed for downloading the files in that policy or not.
The table displays four fields:
■ File Name
■ Policy Name
■ Expiry Date/Time
■ Days to Expire
The contents of the table are sorted by the Number of Days to Expire.
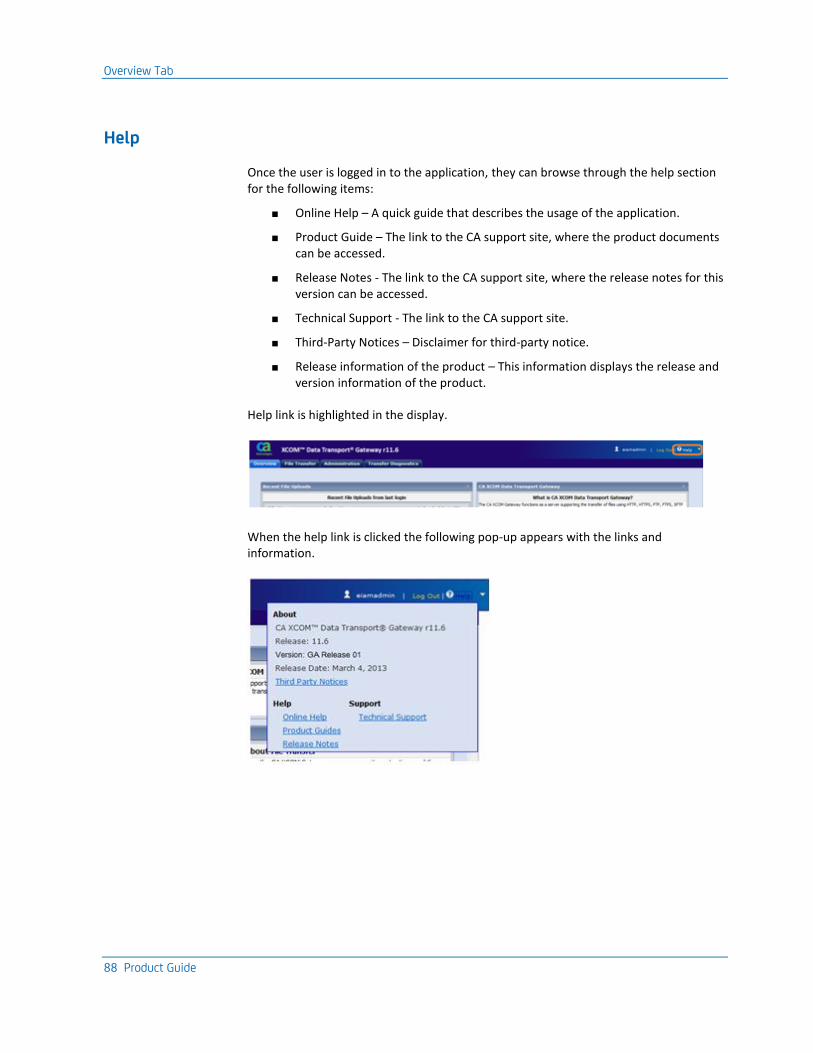
Overview Tab
88 Product Guide
Help
Once the user is logged in to the application, they can browse through the help section for the following items:
■ Online Help – A quick guide that describes the usage of the application.
■ Product Guide – The link to the CA support site, where the product documents can be accessed.
■ Release Notes - The link to the CA support site, where the release notes for this version can be accessed.
■ Technical Support - The link to the CA support site.
■ Third-Party Notices – Disclaimer for third-party notice.
■ Release information of the product – This information displays the release and version information of the product.
Help link is highlighted in the display.
When the help link is clicked the following pop-up appears with the links and information.
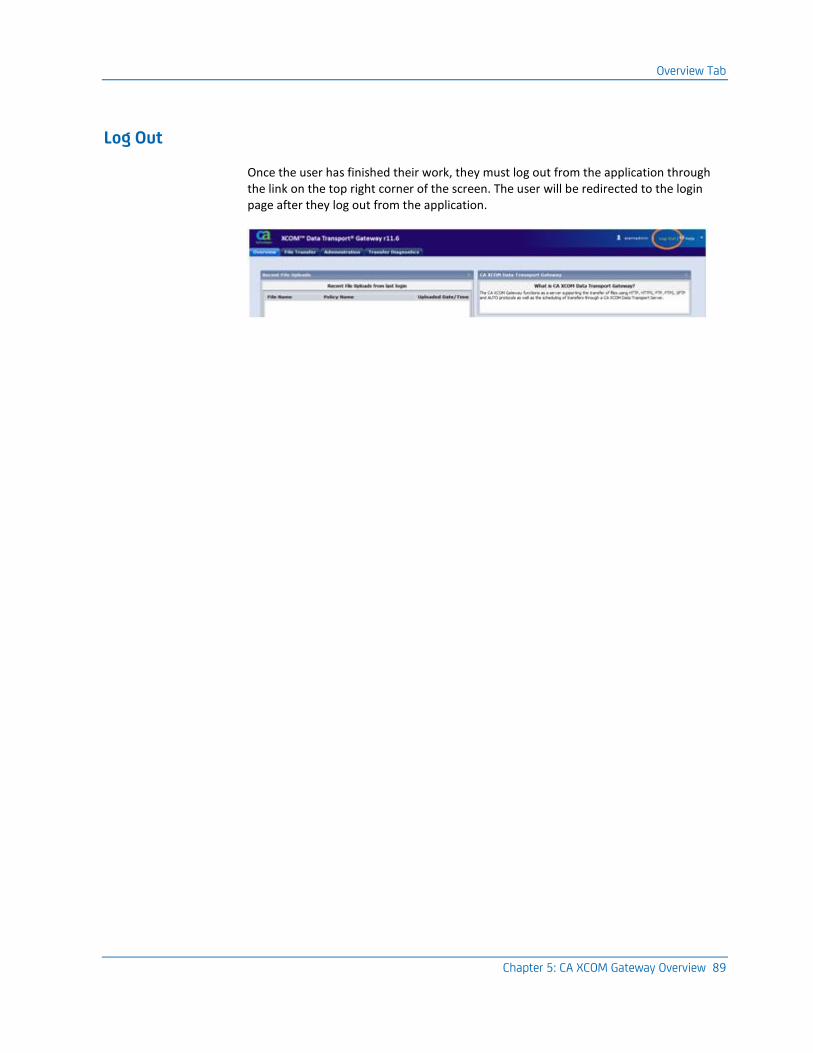
Overview Tab
Chapter 5: CA XCOM Gateway Overview 89
Log Out
Once the user has finished their work, they must log out from the application through the link on the top right corner of the screen. The user will be redirected to the login page after they log out from the application.

Chapter 6: CA XCOM Gateway Administration 91
Chapter 6: CA XCOM Gateway Administration
This section contains the following topics:
Configure CA XCOM Gateway (see page 92) Manage Users (see page 93) Manage Policies (see page 101) Manage Realms (see page 128) Manage Servers (see page 136) Restore Metadata (see page 143) Backup Metadata (see page 145) Configure Global Parameters Offline (see page 147) Update the Global Parameters File (see page 152) Configuration for UNC (see page 165)
Configure CA XCOM Gateway
92 Product Guide
Configure CA XCOM Gateway
Admin authority is required for all high-level administration tasks to configure and manage CA XCOM Gateway. With Admin credentials, the bar at the top of each page includes an Administration tab. The Administration tab allows you to perform the following tasks:
■ Manage users
■ Manage policies
■ Manage realms
■ Manage servers
■ Restore metadata
■ Backup metadata
■ Modify global parameters
Note:
■ You must have Admin authority on the CA XCOM Gateway to view the Administration tab.
■ Most of the Data under the Administration tab are shown in tabular form [Grid Form]. These tables offer certain generic behaviors for the user to have better data viewing experience through its header menus.
■ Sort Ascending: There are various actions that can be taken for a better data experience. Click the downward arrow and select the desired columns.
Column resizes are done by dragging the column borders with the mouse.
■ Sorting can be done by clicking the arrow icon at the right corner of each column and then selecting either Sort Ascending or Sort Descending.
Manage Users
Chapter 6: CA XCOM Gateway Administration 93
Manage Users
The CA XCOM Gateway configuration must include details for the users who are allowed to log in to the CA XCOM Gateway website, or to access CA XCOM Gateway by using FTP or SFTP.
Use the Manage Users page on the website to manage your user configuration in the following ways:
■ Add users
■ Filter users
■ Edit users
■ Copy users
■ Delete users
■ Manage Notifications i.e. Add, edit, delete
■ View Notifications
■ View Permitted Policies
■ Display Stored files created by user
Important! You must have Admin authority to perform these actions.
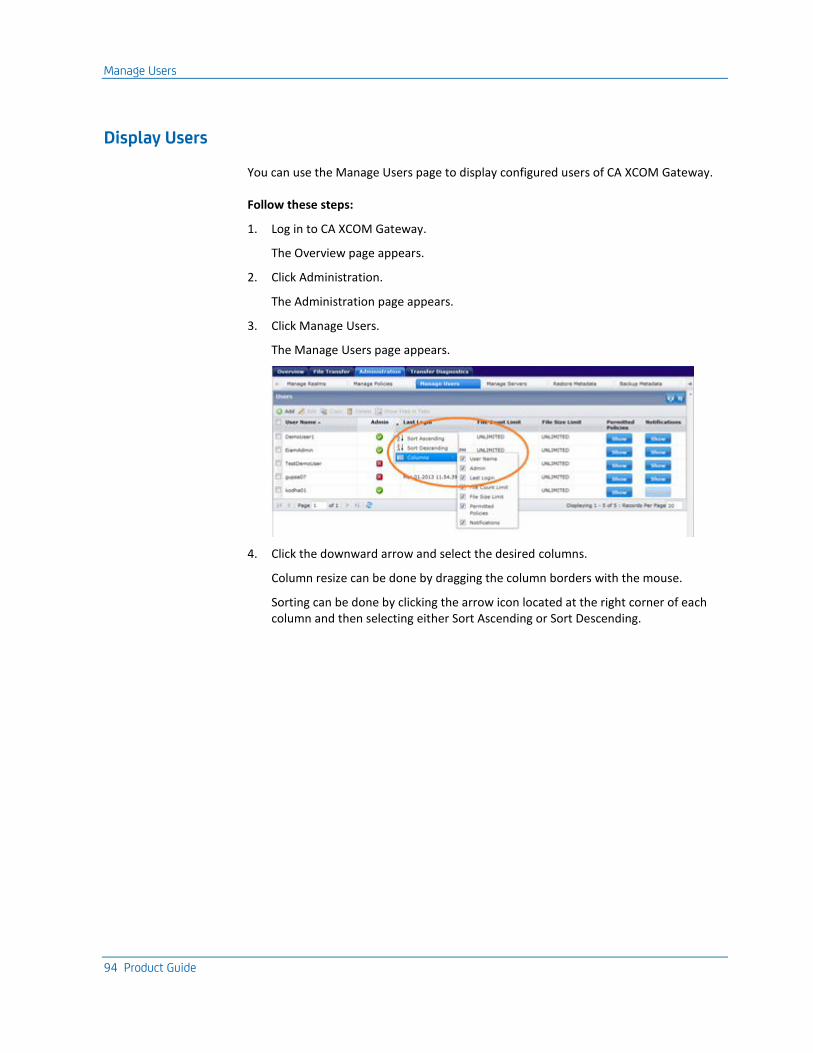
Manage Users
94 Product Guide
Display Users
You can use the Manage Users page to display configured users of CA XCOM Gateway.
Follow these steps:
1. Log in to CA XCOM Gateway.
The Overview page appears.
2. Click Administration.
The Administration page appears.
3. Click Manage Users.
The Manage Users page appears.
4. Click the downward arrow and select the desired columns.
Column resize can be done by dragging the column borders with the mouse.
Sorting can be done by clicking the arrow icon located at the right corner of each column and then selecting either Sort Ascending or Sort Descending.
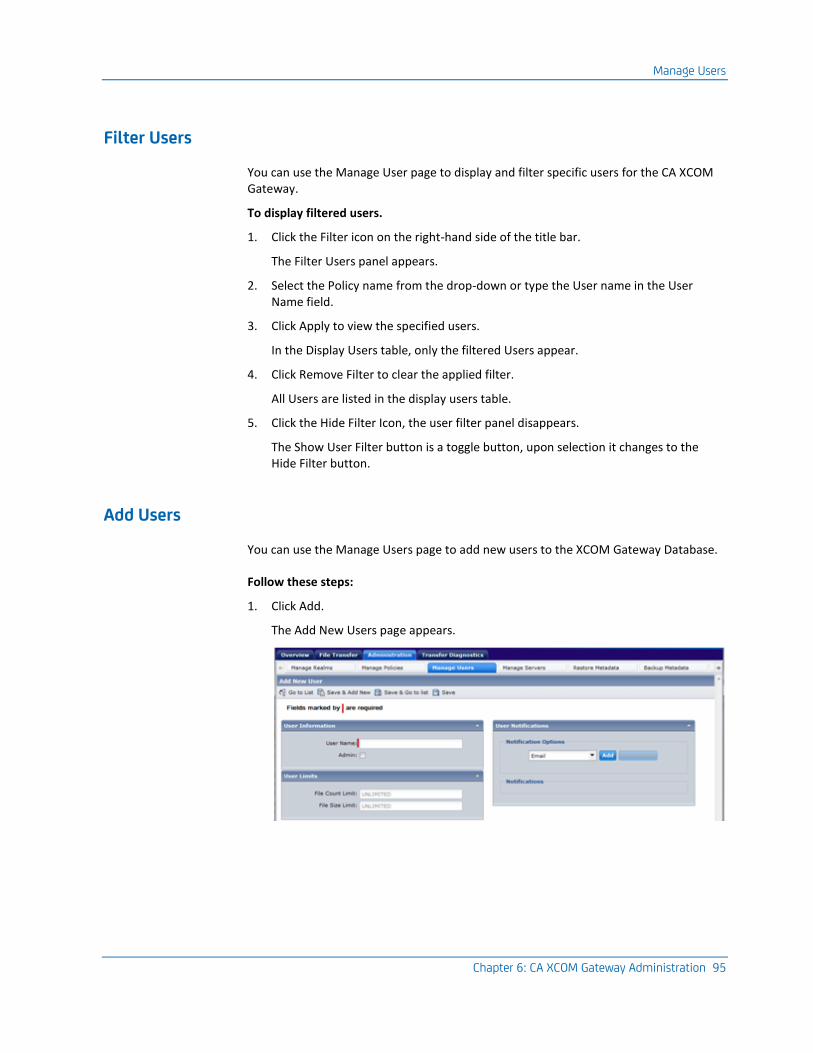
Manage Users
Chapter 6: CA XCOM Gateway Administration 95
Filter Users
You can use the Manage User page to display and filter specific users for the CA XCOM Gateway.
To display filtered users.
1. Click the Filter icon on the right-hand side of the title bar.
The Filter Users panel appears.
2. Select the Policy name from the drop-down or type the User name in the User Name field.
3. Click Apply to view the specified users.
In the Display Users table, only the filtered Users appear.
4. Click Remove Filter to clear the applied filter.
All Users are listed in the display users table.
5. Click the Hide Filter Icon, the user filter panel disappears.
The Show User Filter button is a toggle button, upon selection it changes to the Hide Filter button.
Add Users
You can use the Manage Users page to add new users to the XCOM Gateway Database.
Follow these steps:
1. Click Add.
The Add New Users page appears.
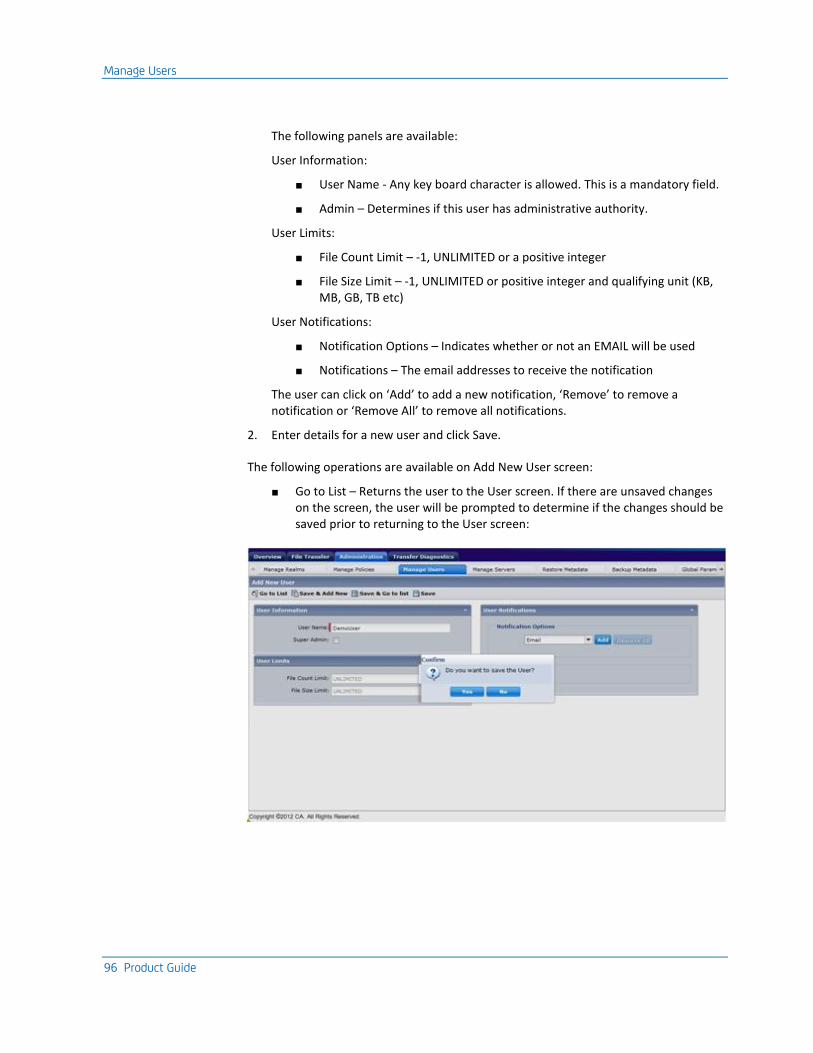
Manage Users
96 Product Guide
The following panels are available:
User Information:
■ User Name - Any key board character is allowed. This is a mandatory field.
■ Admin – Determines if this user has administrative authority.
User Limits:
■ File Count Limit – -1, UNLIMITED or a positive integer
■ File Size Limit – -1, UNLIMITED or positive integer and qualifying unit (KB, MB, GB, TB etc)
User Notifications:
■ Notification Options – Indicates whether or not an EMAIL will be used
■ Notifications – The email addresses to receive the notification
The user can click on ‘Add’ to add a new notification, ‘Remove’ to remove a notification or ‘Remove All’ to remove all notifications.
2. Enter details for a new user and click Save.
The following operations are available on Add New User screen:
■ Go to List – Returns the user to the User screen. If there are unsaved changes on the screen, the user will be prompted to determine if the changes should be saved prior to returning to the User screen:
Manage Users
Chapter 6: CA XCOM Gateway Administration 97
■ Save and add new – This will add the new user and will present a refreshed Add New User screen.
■ Save and go to list – Save the new user and return to the User screen.
■ Save – Save the user and remain on the Add New User screen.
Messages will be displayed on the screen during the operations. In case of Save and Go to List, the message will be shown on user listing page.
Note: The new user should exist in the EEM server; or the login with new user fails.
Update User
You can use the Manage Users page to update existing users. To update a user, Admin authority is required.
To update a user:
1. Select one or more users from the Manage Users page.
2. Click Edit.
3. Update the user attributes.
Note: If Editing, the User name is unmodifiable.
4. Click Save.
The User details are saved and a confirmation message appears. If a failure is encountered, an error message is displayed with the error code and cause.
Note: When Editing, if the currently logged in user attempts to make himself a non-Admin, an error message is displayed and the edit action is canceled.
Manage Users
98 Product Guide
Copy User
You can also create a User by using the Copy function. The Admin authority is required to copy a user.
To copy a user:
1. Select one or more users in the manage users page.
2. Click the Copy button on the tool bar.
The copy user page appears. The user name is displayed as acopy of the selected user name.
Note: By default the User name is prefixed with the string Copy.
If no other user exists with that name, it takes the following prefix sequence. As an example, Copy of (n), where n is the next available number of an already existing user with the prefix Copy of to Copy of (n-1).
3. Edit the user details.
By default the user fields are displayed with the selected user value. Edit the desired values. If you want to revert the changes that were made to the user details use the Restore button.
4. Click Save in the toolbar.
A new User is added to the Gateway.
Note:
■ When Copying, the new user has to exist in the EEM server; or the login with the new user fails.
■ If a user exists with the specified name, an error message is displayed.
Manage Users
Chapter 6: CA XCOM Gateway Administration 99
Delete Users
You can use the Manage Users page to delete users from the Gateway.
A user can only be deleted if the user is not being used in any policy for the automatic file insertion or on the global parameters tab as Auto Insertion User. In order to delete the users, first remove them as an auto insertion user from the policy/global parameters tab or an error message is displayed and the delete action is canceled.
Follow these steps:
1. Select the users to delete.
Note: You can delete one or more users at a time.
2. Click Delete.
A Delete Users confirmation dialog opens.
3. Click Yes.
The selected users are deleted from the XCOM Gateway.
Note: If an Admin user attempts to delete their own user account, an error message is displayed and the delete action is canceled.
Manage Notifications - Add, edit, delete
You can use the Manage Users page to manage notifications for a user.
1. Select one or more users, the edit is highlighted.
2. Click edit, the Edit Users page is displayed with the user notifications panel on the right side.
The user can click Add to add a notification, Remove to remove a notification or Remove All to remove all notifications. To edit a destination, the user can change the existing destination address.
3. Click Save, the notifications is updated for the user.
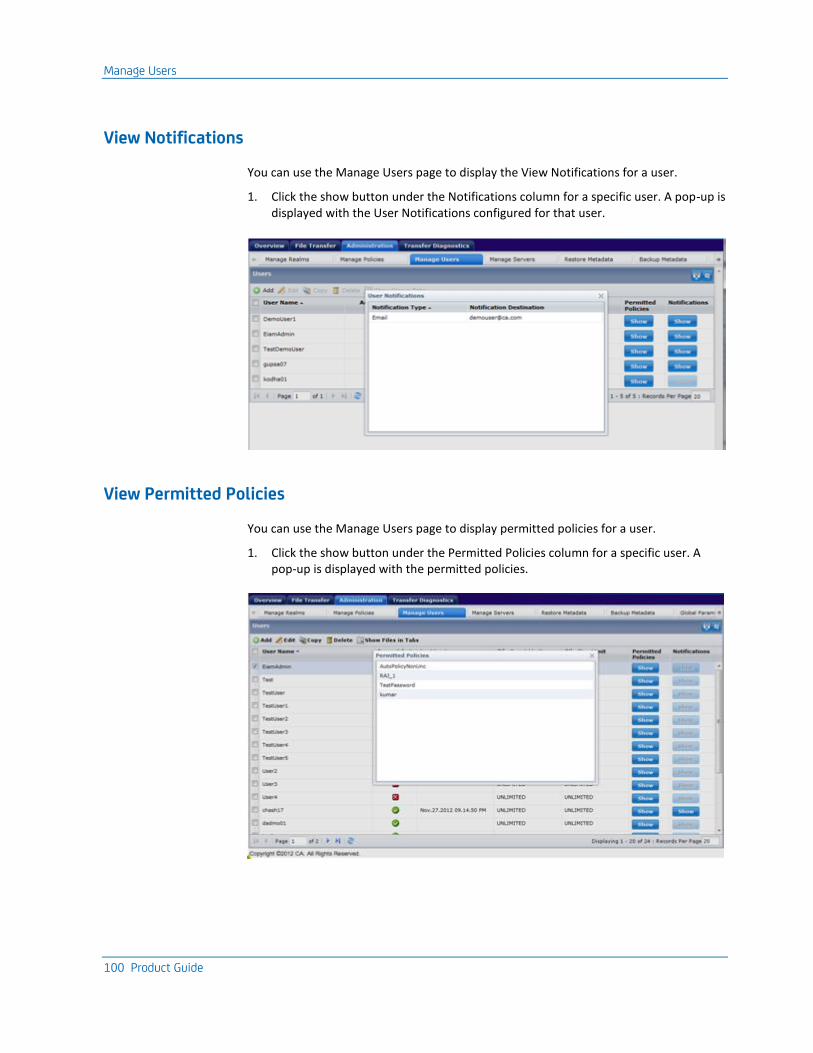
Manage Users
100 Product Guide
View Notifications
You can use the Manage Users page to display the View Notifications for a user.
1. Click the show button under the Notifications column for a specific user. A pop-up is displayed with the User Notifications configured for that user.
View Permitted Policies
You can use the Manage Users page to display permitted policies for a user.
1. Click the show button under the Permitted Policies column for a specific user. A pop-up is displayed with the permitted policies.
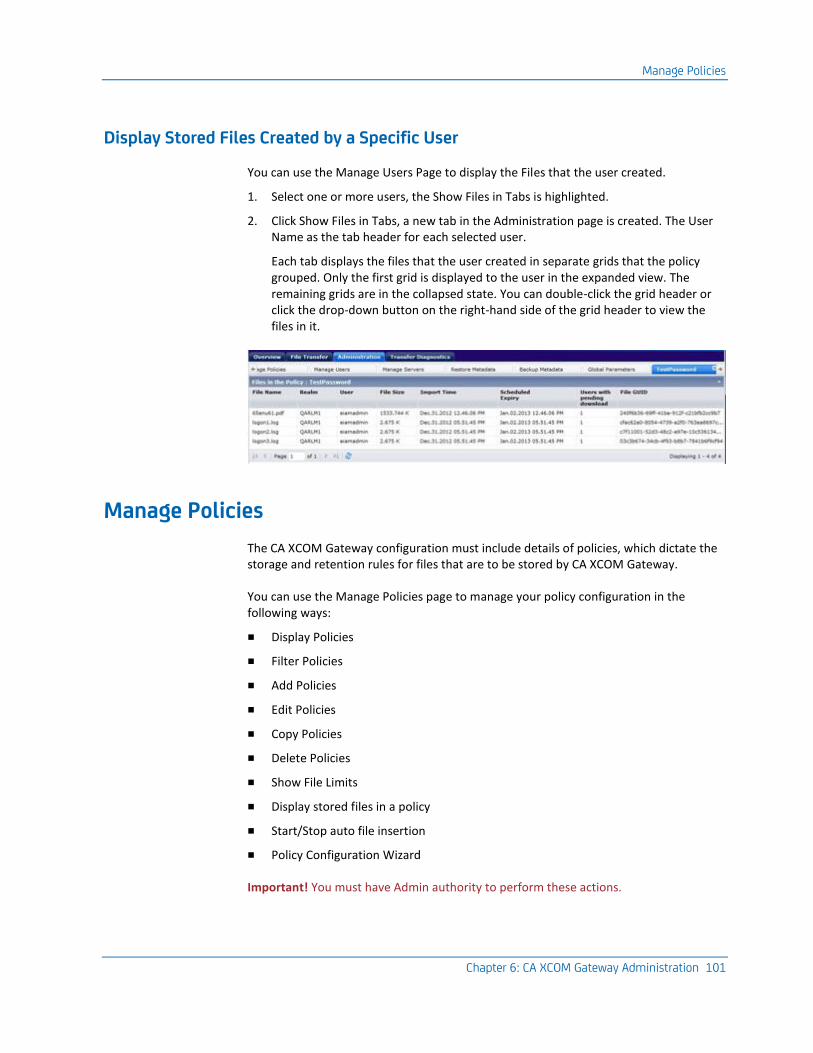
Manage Policies
Chapter 6: CA XCOM Gateway Administration 101
Display Stored Files Created by a Specific User
You can use the Manage Users Page to display the Files that the user created.
1. Select one or more users, the Show Files in Tabs is highlighted.
2. Click Show Files in Tabs, a new tab in the Administration page is created. The User Name as the tab header for each selected user.
Each tab displays the files that the user created in separate grids that the policy grouped. Only the first grid is displayed to the user in the expanded view. The remaining grids are in the collapsed state. You can double-click the grid header or click the drop-down button on the right-hand side of the grid header to view the files in it.
Manage Policies
The CA XCOM Gateway configuration must include details of policies, which dictate the storage and retention rules for files that are to be stored by CA XCOM Gateway.
You can use the Manage Policies page to manage your policy configuration in the following ways:
■ Display Policies
■ Filter Policies
■ Add Policies
■ Edit Policies
■ Copy Policies
■ Delete Policies
■ Show File Limits
■ Display stored files in a policy
■ Start/Stop auto file insertion
■ Policy Configuration Wizard
Important! You must have Admin authority to perform these actions.
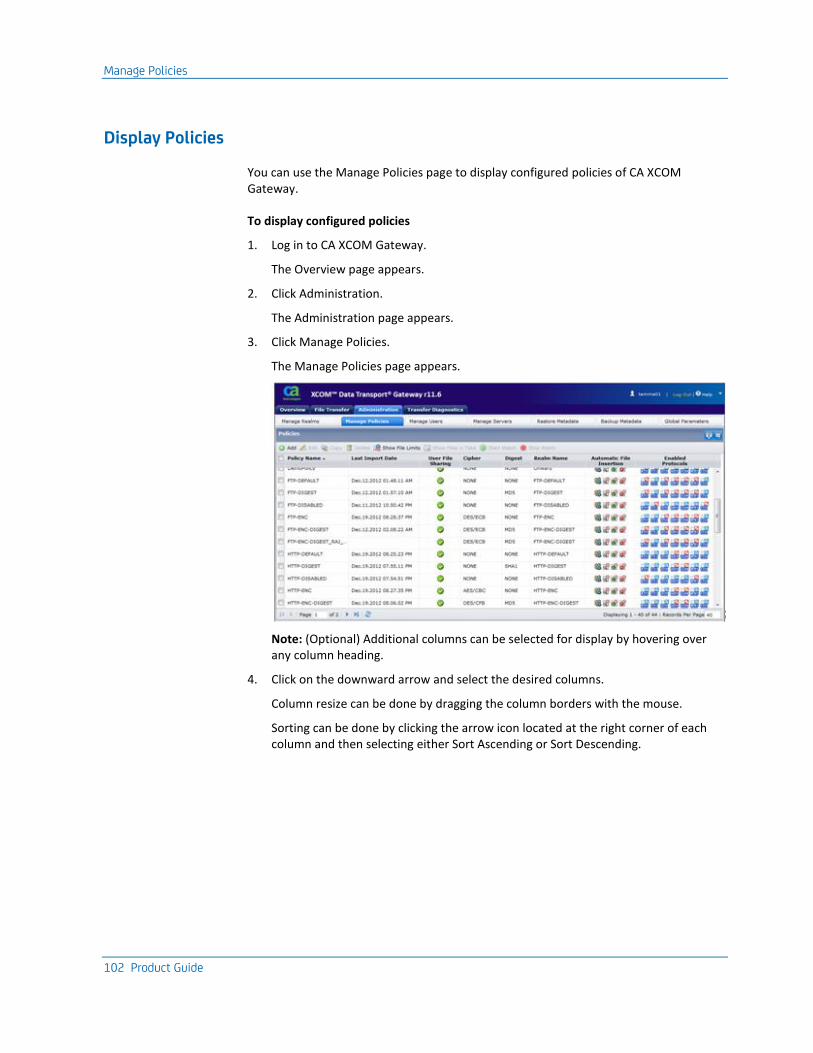
Manage Policies
102 Product Guide
Display Policies
You can use the Manage Policies page to display configured policies of CA XCOM Gateway.
To display configured policies
1. Log in to CA XCOM Gateway.
The Overview page appears.
2. Click Administration.
The Administration page appears.
3. Click Manage Policies.
The Manage Policies page appears.
Note: (Optional) Additional columns can be selected for display by hovering over any column heading.
4. Click on the downward arrow and select the desired columns.
Column resize can be done by dragging the column borders with the mouse.
Sorting can be done by clicking the arrow icon located at the right corner of each column and then selecting either Sort Ascending or Sort Descending.
Manage Policies
Chapter 6: CA XCOM Gateway Administration 103
Filter Policies
You can use the Manage Policies page to display specific configured policies of the CA XCOM Gateway.
To display filtered policies.
1. Log in to CA XCOM Gateway.
The Overview page appears.
2. Click Administration.
The Administration page appears.
3. Click Manage Policies.
The Manage Policies page appears.
4. Click the Filter icon in the right-hand side of the title bar.
The Filter Policies panel appears.
5. Select the Realm name from the drop-down or type the policy name in the Policy Name field.
6. Click Apply, to view the specified Policies.
In the Display Policies table, only the filtered policies appear.
7. Click Remove Filter to clear the applied filter.
All policies are listed in the display policies table.
8. Click the Hide Filter Icon, the policy filter panel disappears.
The Show Policy Filter button is a toggle button, upon selection it changes to the Hide Filter button.
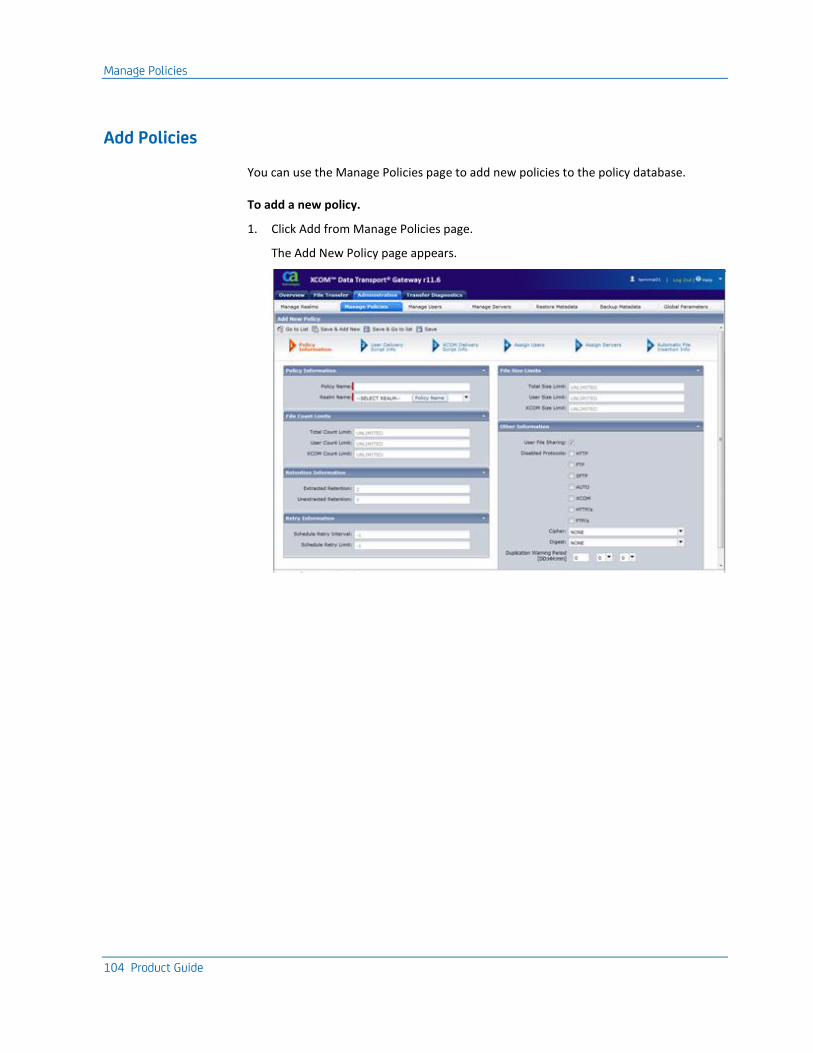
Manage Policies
104 Product Guide
Add Policies
You can use the Manage Policies page to add new policies to the policy database.
To add a new policy.
1. Click Add from Manage Policies page.
The Add New Policy page appears.
Manage Policies
Chapter 6: CA XCOM Gateway Administration 105
The add policy screen shows following options, all except Policy Information are optional.
Policy Information:
This section contains basic policy details like policy name, realm name and other parameters. Policy name and realm selection are mandatory fields for a policy.
User Delivery Script Info:
You can configure the onward transfers for a policy. You can add the transfer container xml, which will be executed whenever the user inserts a file to this policy. These are optional parameters.
XCOM Delivery Script Info:
You can configure the onward transfers for a policy. You can add the transfer container xml, which will be executed whenever XCOM inserts a file to this policy. These are optional parameters.
Assign Users
You can assign the users and their respective permissions against this policy. These are optional parameters.
Assign Servers
You can assign the external servers (FTP, FTPS or SFTP) to this policy. These are optional parameters.
Automatic File insertion
You can configure the Automatic File insertion or directory watching feature for this policy. These are optional parameters.
For more details on the Policy parameters refer to the Policy Configuration Settings section.
2. Enter details for a new policy and click Save.
The new policy is added to the policy database and a confirmation message is displayed.
Note: If the policy exists in the policy database, an error message is displayed.
3. To add more policies, click Save and Add New to display a new Add Policy page.
4. Repeat Steps 1 and 2 for each new policy.
5. Click Save and Go To List to save the current policy and move to the Display Policies Page.
Manage Policies
106 Product Guide
Edit Policies
You can use the Manage Policies page to modify the attributes of existing policies.
To update a policy.
The Administrator of the Gateway can edit existing policies by selecting one or more policies and then click the Edit button. A page is displayed to edit the policy details. The user cannot change the policy name.
Operations available on the Edit Policies page:
Previous
Visible only when the admin has selected more than one policy to edit. Initially it is disabled, once user starts navigating, it is enabled. Use to navigate backwards.
Next
Visible only when the admin has selected more than one one policy to edit. Initially it is enabled, once the user reaches the end of selected policies, this button is disabled. Use to navigate forward.
Save
This operation only updates the policy with changes.
Restore
This operation reverts to the earlier saved changes.
Go to List
This operation navigates the user back to the policy listing.
Confirmation/Error Messages:
‘Save’, ‘Restore’ and ‘Go to List’ provides proper confirmation and error messages.
The following validations are being performed:
■ The mandatory fields are populated
■ The size field is validated for allowable characters (only number and data storage metrics, as an example, k, K, k, KB, Kb, kb, and similar cases for MB, GB, TB). See Appendix C File Size Conversion
■ Prompt the user for any unsaved changes, if the user tries to navigate elsewhere
If multiple policies are selected, user can navigate back and forth by using Next and previous buttons.
Manage Policies
Chapter 6: CA XCOM Gateway Administration 107
Copy Policies
You can use the Manage Policies page to copy an existing policy attributes to create policy.
To copy a policy, and create a policy with the same attributes.
1. Select a policy from the Manage Policies page.
2. Click Copy.
The Copy Policies page appears, showing the attributes of the selected policy.
Change the Policy Name of the copied policy to the Policy Name of the new policy.
Note: By default the policy name will be prefixed with “Copy of” string.
In case if no other policy exists with the that name; otherwise it will take the following prefix sequence i.e. “Copy of (n)”, where n is the next available number of already existing policies with prefix “Copy of ” to “Copy of (n-1)”
3. You can also modify any desired attributes and you can use the Restore button to restore the original values at any time.
4. When you are satisfied with the values on the screen, click Save.
Note: For a copy policy, the servers and users are assigned to a new Policy only if the user visits the Assign Server and Assign users and reviews and confirm the list. The user is shown the notification for the action while trying to copy a policy.
Operations available on Copy Policies page:
Previous
Visible only when admin has selected more than one policy to copy. Initially it will be disabled, once user starts navigating, it will be enabled. Use to navigate backwards.
Next
Visible only when admin has selected more than one policy to copy. Initially it will be enabled, once user reaches end of selected policies, this button will be disabled. Use to navigate forward.
Save
This operation will only save the policy with changes
Restore
This operation will revert back to the values of copied policy
Go to List
This operation will navigate user back to policy listing
Confirmation/Error Messages:
‘Save’, ‘Restore’ and ‘Go to List’ will provide proper confirmation and error messages.
Manage Policies
108 Product Guide
Following validations are being performed:
■ Mandatory fields should be populated
■ Policy name will be validated for existing policy with same name
■ Size field will be validated for allowable characters (only number and data storage metrics i.e. k, K, k , KB, Kb, kb and similar cases for MB, GB, TB)
Refer to Appendix C File Size Conversion
■ Prompt user for any unsaved changes, if user tries to navigate elsewhere.
Delete Policies
You can use the Manage Policies page to delete policies from the policy database.
A policy can be deleted only if it has no stored files. If a policy has associated files, change both of the policy retention periods to a low value (for example, 0 day). After this time period has elapsed, all of the policy stored files will have expired and therefore they will have been deleted. The administrator can mark files for the deletion within the policy, which removes these files.
To delete a policy.
1. Select the policies for the deletion from the Manage Policies page.
Note: You can delete one or more policies at a time.
2. Click Delete.
A Delete Policies confirmation dialog opens.
3. Click OK.
The selected policies are deleted from the policy database.
NOTE: Deleting a policy does not delete the servers that are associated with it. Deleting a policy just deletes the policy instance and all the associations with existing associated servers.
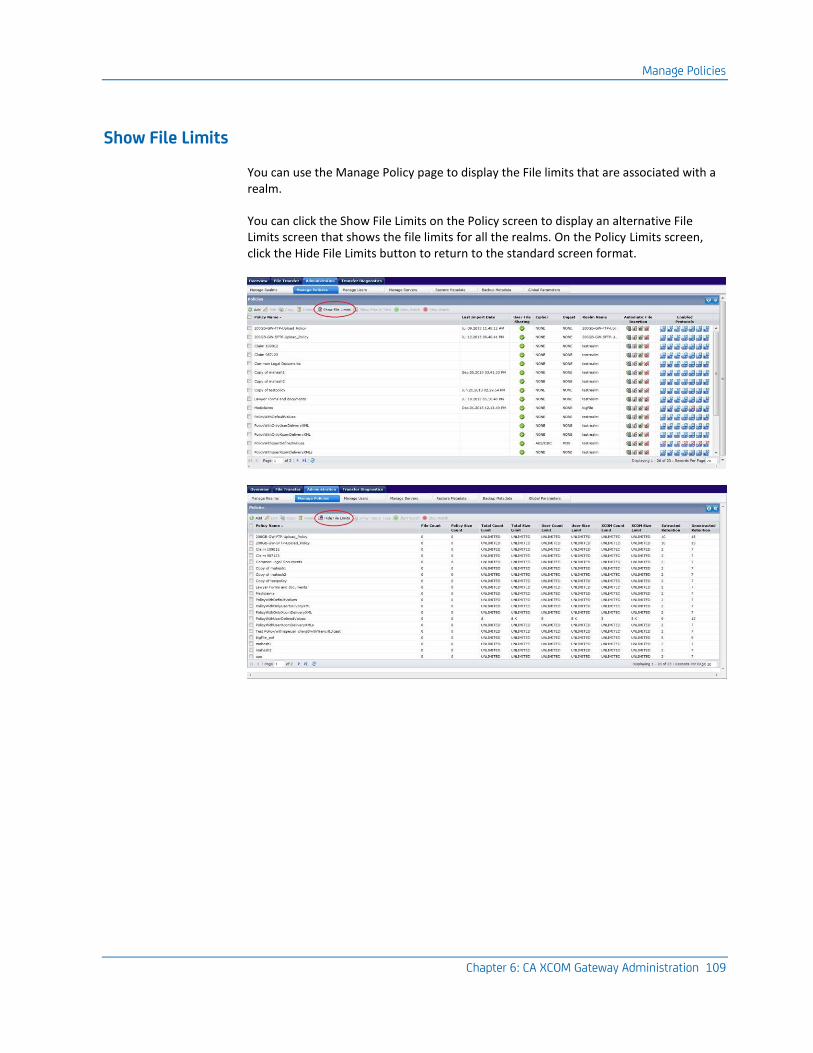
Manage Policies
Chapter 6: CA XCOM Gateway Administration 109
Show File Limits
You can use the Manage Policy page to display the File limits that are associated with a realm.
You can click the Show File Limits on the Policy screen to display an alternative File Limits screen that shows the file limits for all the realms. On the Policy Limits screen, click the Hide File Limits button to return to the standard screen format.
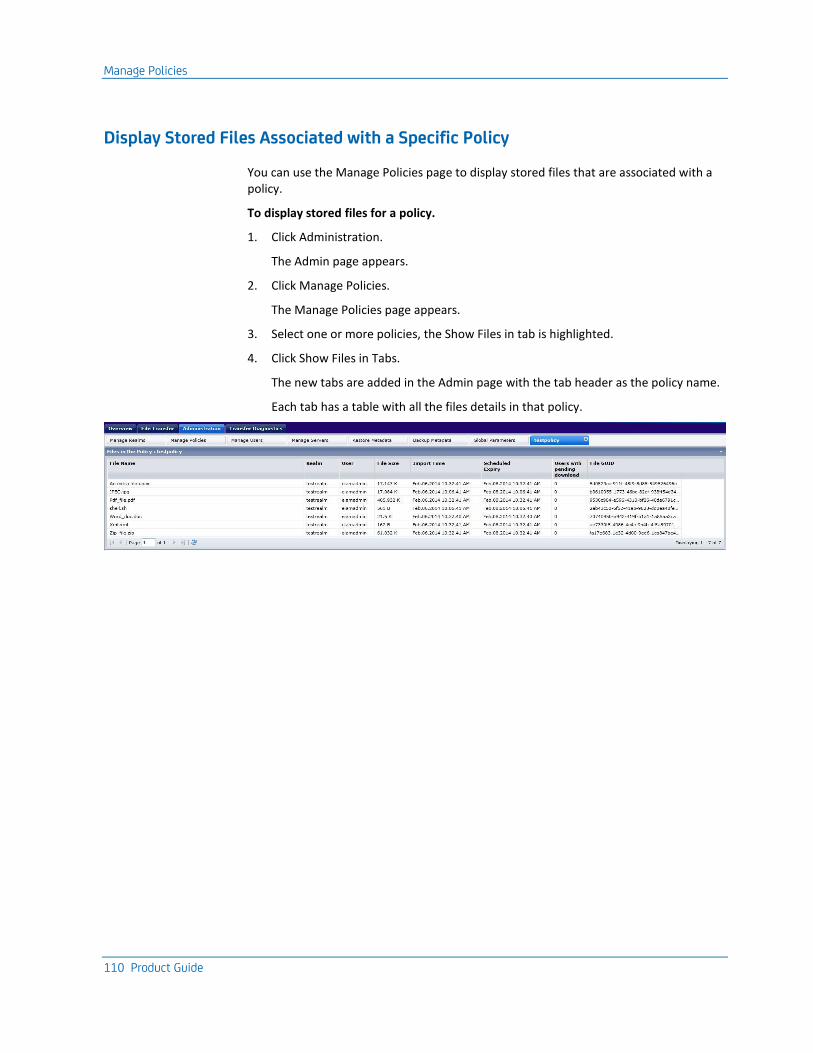
Manage Policies
110 Product Guide
Display Stored Files Associated with a Specific Policy
You can use the Manage Policies page to display stored files that are associated with a policy.
To display stored files for a policy.
1. Click Administration.
The Admin page appears.
2. Click Manage Policies.
The Manage Policies page appears.
3. Select one or more policies, the Show Files in tab is highlighted.
4. Click Show Files in Tabs.
The new tabs are added in the Admin page with the tab header as the policy name.
Each tab has a table with all the files details in that policy.
Manage Policies
Chapter 6: CA XCOM Gateway Administration 111
Start/Stop Watcher
You can use the Manage Policies page to start or stop directory watchers that are associated with a policy. When the CA XCOM Gateway is started, any watcher policy that was running at the time the Gateway was stopped is automatically started. This process ensures continued directory watcher processing.
To Start/Stop Watchers for a policy
1. Click Administration.
The Admin page appears.
2. Click Manage Policies.
The Manage Policies page appears.
3. Select one or more policies, the Start Watcher, and Stoop Watcher is highlighted.
4. Click Start Watcher to start the directory Watcher for the selected policies.
A confirmation dialog appears; select yes to start the directory watching.
The error messages appear in case of failure or invalid operations.
or
5. Click Stop Watcher to stop the directory Watcher for the selected policies.
A confirmation dialog appears; select yes to stop the directory watching.
The error messages appear in case of failure or invalid operations.
Note: To start a policy, it must be configured with at least one watcher folder. A policy cannot be started for watch if it has an auto-insertion user configured, that is not assigned to the policy.
Policy Configuration Wizard
A wizard screen displays add, edit, and copy policy operations.
Note: The policy name and realm selection are mandatory fields for a policy. All other information is optional.
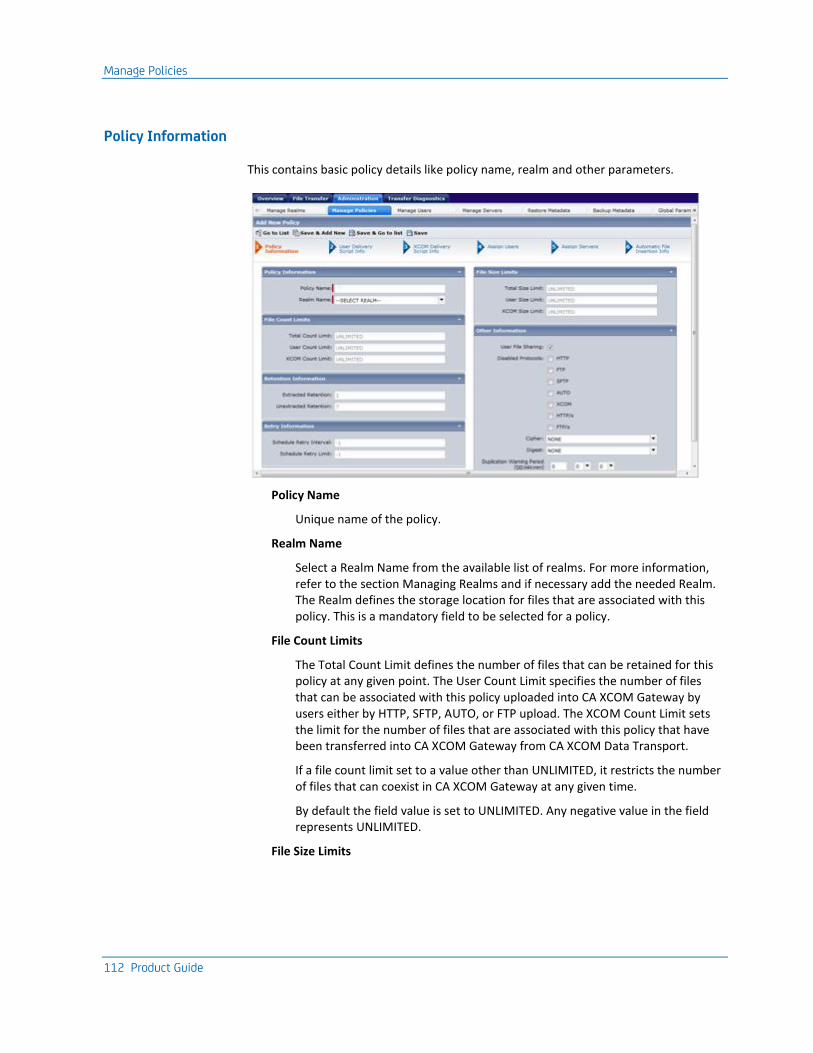
Manage Policies
112 Product Guide
Policy Information
This contains basic policy details like policy name, realm and other parameters.
Policy Name
Unique name of the policy.
Realm Name
Select a Realm Name from the available list of realms. For more information, refer to the section Managing Realms and if necessary add the needed Realm. The Realm defines the storage location for files that are associated with this policy. This is a mandatory field to be selected for a policy.
File Count Limits
The Total Count Limit defines the number of files that can be retained for this policy at any given point. The User Count Limit specifies the number of files that can be associated with this policy uploaded into CA XCOM Gateway by users either by HTTP, SFTP, AUTO, or FTP upload. The XCOM Count Limit sets the limit for the number of files that are associated with this policy that have been transferred into CA XCOM Gateway from CA XCOM Data Transport.
If a file count limit set to a value other than UNLIMITED, it restricts the number of files that can coexist in CA XCOM Gateway at any given time.
By default the field value is set to UNLIMITED. Any negative value in the field represents UNLIMITED.
File Size Limits
Manage Policies
Chapter 6: CA XCOM Gateway Administration 113
The Total Size Limit defines the combined size of all files that can be retained for this policy at any given point. The User Size Limit specifies the combined size of the files that are associated with this policy that have been uploaded into CA XCOM Gateway by registered users either by HTTP, SFTP, AUTO, or FTP upload. The XCOM Size Limit sets the limit for the combined size of the files that are associated with this policy that have been transferred into CA XCOM Gateway from CA XCOM Data Transport.
If a size limit is set to a value other than UNLIMITED, it restricts the total size of the files that can coexist in CA XCOM Gateway at the same time. Size limits can be specified in kilobytes (K), megabytes (M), gigabytes (G), or terabytes (T).
By default the field value is set to UNLIMITED. Any negative value in the field represents UNLIMITED.
More Information:
See Appendix C: File Size Conversion
Retention
The two retention periods define a number of days for which stored files that are associated with this policy retained by CA XCOM Gateway. The Extracted Retention period applies to files once they are downloaded by all of the subscribed users of the policy. The Unextracted Retention period applies to files prior to being downloaded by any of the subscribed users of the policy. For more information about user subscription, see Assign Permission.
Retry
The Schedule Retry Interval and Schedule Retry Limit determine the action when CA XCOM Gateway schedules a data transfer to distribute a file across the CA XCOM Data Transport server network. If CA XCOM Gateway is unable to contact the local CA XCOM Data Transport server to schedule a transfer, it retries repeatedly at the specified interval (in seconds), up to the number of times that are specified by the Retry Limit value. If either or both of these values are omitted, the corresponding value defined in the global parameters is used by default.
OTHER INFORMATION
User File Sharing
User File Sharing specifies whether files that a user uploads for this policy will be made available for the download by other users who are authorized to download files for the policy. If User File Sharing is set to No, user-uploaded files are eligible for data transfer using CA XCOM Data Transport, but are not available for other users to download including the owner.
Disabled protocols
Administrator can disable any specific protocol for a policy by selecting check-boxes. At least one protocol must remain enabled.
Cipher
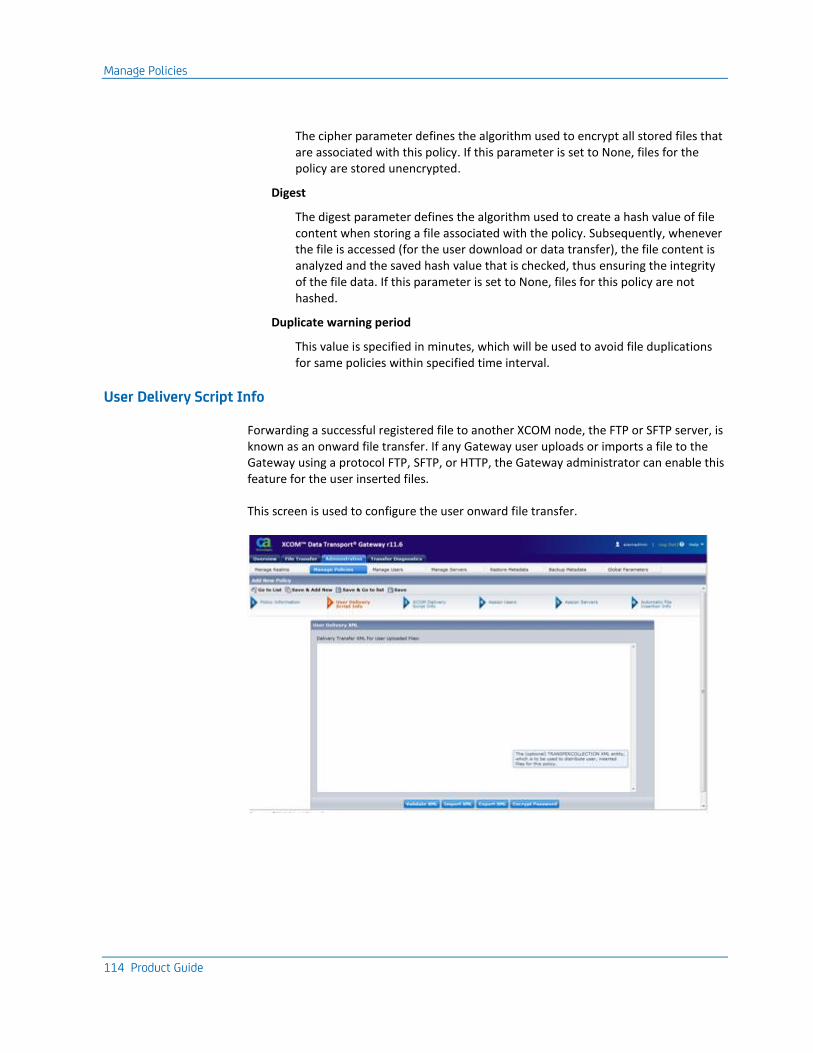
Manage Policies
114 Product Guide
The cipher parameter defines the algorithm used to encrypt all stored files that are associated with this policy. If this parameter is set to None, files for the policy are stored unencrypted.
Digest
The digest parameter defines the algorithm used to create a hash value of file content when storing a file associated with the policy. Subsequently, whenever the file is accessed (for the user download or data transfer), the file content is analyzed and the saved hash value that is checked, thus ensuring the integrity of the file data. If this parameter is set to None, files for this policy are not hashed.
Duplicate warning period
This value is specified in minutes, which will be used to avoid file duplications for same policies within specified time interval.
User Delivery Script Info
Forwarding a successful registered file to another XCOM node, the FTP or SFTP server, is known as an onward file transfer. If any Gateway user uploads or imports a file to the Gateway using a protocol FTP, SFTP, or HTTP, the Gateway administrator can enable this feature for the user inserted files.
This screen is used to configure the user onward file transfer.
Manage Policies
Chapter 6: CA XCOM Gateway Administration 115
Delivery Transfer XML for User Uploaded Files
The users can directly type import or copy &paste a transfer xml into this field. For more information on the transfer XML files, refer to the chapter, Configuring Policies for Onward File Transfer.
Validate XML
When the administrators use to save the XML, it was saved in same format as it was written. Now when the Validate button is selected, the XML is formatted and can be easily read.
Import XML
The administrator can now import the XML, rather than copy-paste or manual typing.
When the Import XML is selected, the administrator is presented with the Import dialog box, asking the user to select a file to import by clicking the Browse button. After selecting the file, the administrator can click the Import to import the file or click Cancel to cancel the file selection.
Export XML
The administrator can now export the XML, rather than copying and reusing.
When the Export XML is selected, the administrator is presented with the File save dialog. They can save or cancel the export process.
Note: Pop-up must be enabled in the web browser. If pop-up is enabled and you are unable to export the file, press the Export XML button and hold the CTRL key.
Encrypt Password
When the password is provided in the Transfer XML, the user can use the Encrypt Password to generate the KEY and PASSWORD fields in the XML. The Encrypt Password pops up a dialog with two fields, Password and Confirm Password. The user has to provide these mandatory fields. Press the Encrypt Password button at the bottom of the dialog. Two new fields KEY & PASSWORD are populated with the HEX values. Copy these values and paste them in the respective fields in the XML.
Note: Pop-up must be enabled in the web browser.
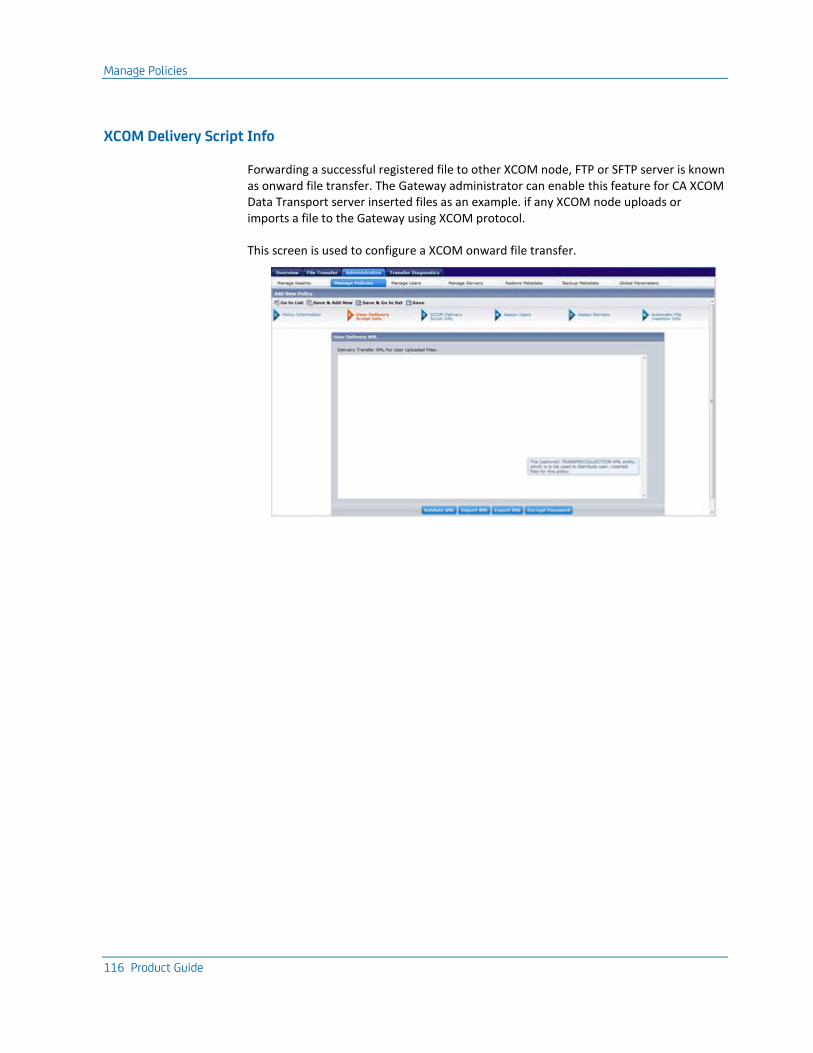
Manage Policies
116 Product Guide
XCOM Delivery Script Info
Forwarding a successful registered file to other XCOM node, FTP or SFTP server is known as onward file transfer. The Gateway administrator can enable this feature for CA XCOM Data Transport server inserted files as an example. if any XCOM node uploads or imports a file to the Gateway using XCOM protocol.
This screen is used to configure a XCOM onward file transfer.
Manage Policies
Chapter 6: CA XCOM Gateway Administration 117
Delivery Transfer XML for XCOM Uploaded Files
Users can directly type, import, copy &paste a transfer xml into this field. For more information on transferring the XML files, see the chapter: Configuring Policies for Onward File Transfer.
Validate XML
When the administrators use to save the XML, it was saved in same format as it was written. Now click the Validate button, the XML is formatted and can be easily read.
Import XML
Administrator can now import the XML, rather than copy-paste or manual typing.
When the Import XML is selected, the administrator is presented with the Import dialog box, asking user to select a file to import by clicking the Browse button. After selecting the file, the administrator can click Import to import the file or click Cancel to cancel the file selection.
Export XML
Administrator can now export the XML, rather than copying and reusing.
When the Export XML is selected, the administrator is presented with the File save dialog. They can save or cancel the export process.
Note: Pop-up must be enabled in the web browser. If pop-up is enabled and you are unable to export a file, press the Export XML button and hold the CTRL key.
Encrypt Password
When the password is provided in the Transfer XML, the user can use the Encrypt Password to generate the KEY and PASSWORD fields in the XML. Encrypt Password will pop up a dialog with two fields Password and Confirm Password. User has to provide these mandatory fields. Press the Encrypt Password button at the bottom of the dialog. Two new fields KEY & PASSWORD are populated with the HEX values. Copy these values and paste them in the respective fields in XML.
Note: Pop-up must be enabled in the web browser.
Configure User
Refer to Configure User and Permissions for a Policy section.
Configure Servers
Refer to Assign Servers to Policy section.
Automatic File Insertion Info
Refer to the Configure Automatic File Insertion/Directory Watching section.
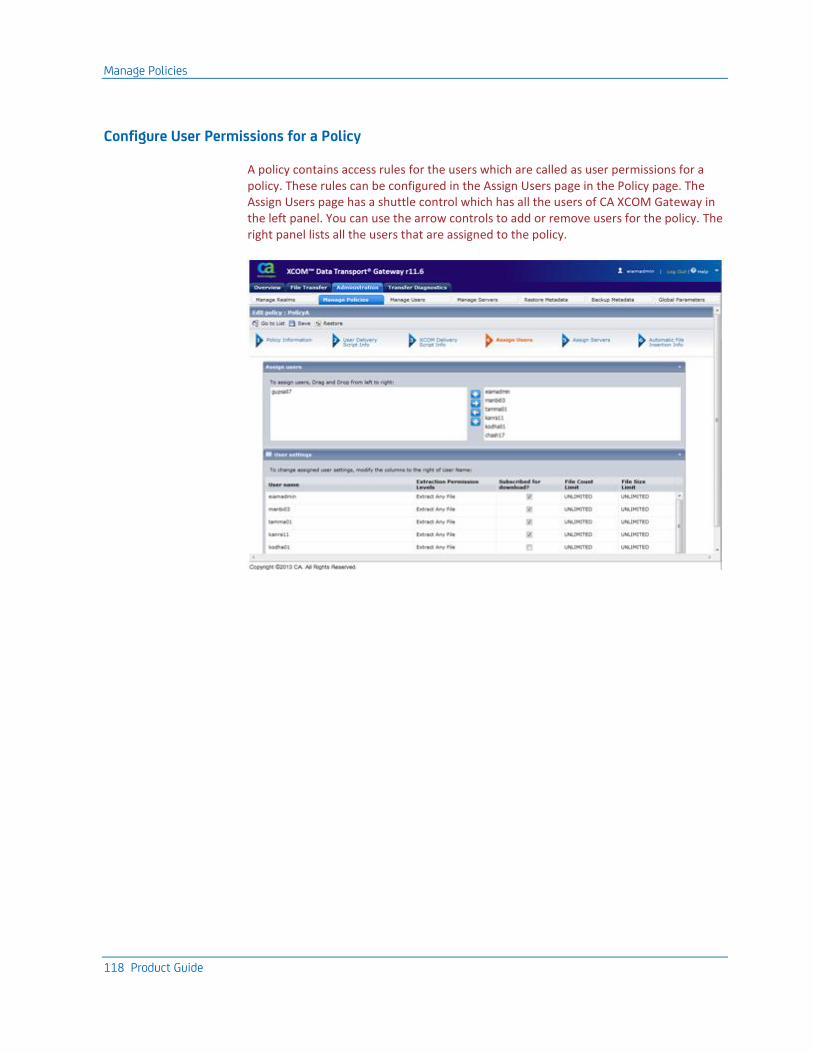
Manage Policies
118 Product Guide
Configure User Permissions for a Policy
A policy contains access rules for the users which are called as user permissions for a policy. These rules can be configured in the Assign Users page in the Policy page. The Assign Users page has a shuttle control which has all the users of CA XCOM Gateway in the left panel. You can use the arrow controls to add or remove users for the policy. The right panel lists all the users that are assigned to the policy.
Manage Policies
Chapter 6: CA XCOM Gateway Administration 119
The table below the shuttle control lists all the assigned users and their permissions on the policy. Four parameters that describe the permissions of the user for the policy are:
Extraction Permission Levels
This field specifies the download permissions of the users for this policy. Three types of download permissions that are defined for a user. They are:
■ Extract None – No permission for download files.
■ Extract Own Files – Downloads files that this user only uploaded.
■ Extract Any File – Downloads any valid file from the policy.
Subscribed For Download?
If any new file is registered in the policy, notifications are sent to the user.
Note: Notifications are sent only if the Notification destinations are defined for the user.
File Count Limit
You can define the no of files a user can import/register in this policy. By default the value is UNLIMITED. If a file count limit set to a value other than UNLIMITED, it restricts the number of files that the user can import into this policy at any given time.
If the File Count Limit value is set to zero, user cannot import any file to this policy.
Note: The user file count limit value that is defined for the policy supersedes this value.
File Size Limit
The File Size Limit defines the combined size of all files that a user in this policy imported at any given point. Size limits can be specified in kilobytes (K), megabytes (M), gigabytes (G), or terabytes (T). By default the value is UNLIMITED. Any negative value in the field represents UNLIMITED. If a file size limit set to a value other than UNLIMITED, it restricts the size of all files that the user can import into this policy at any given time.
If the File Size Limit value is set to zero, user cannot import any file to this policy.
More Information:
See Appendix A: File Size Conversion
Note: The user file size limit value that is defined for the policy supersedes this value.
Assign new User to a policy:
Follow these steps:
1. Select policy/s where the user is assigned from Manage Policies page.
Note: You can assign users to one or more policies at a time.
2. Click Edit.
Manage Policies
120 Product Guide
The policy edit screen is displayed.
If multiple policies are selected, the next and previous buttons are shown.
3. Click Assign Users.
4. Select the user in the left panel and click the left arrow in the shuttle control.
The new user is displayed in the right panel of the shuttle control. A new row is added to the user permission table.
5. You can assign the required privileges like Enable Extraction, subscribe download and user file limits.
6. Click Save.
Modify User Permissions for a policy:
Follow these steps:
1. Select policy/s where the user is assigned from Manage Policies page.
Note: You can assign users to one or more policies at a time.
2. Click Edit.
The policy edit screen is displayed.
If multiple policies are selected, the next and previous buttons are shown.
3. Click Assign Users.
4. Update the user permission by editing values in the user permission table.
5. Click Save.
A confirmation or error message is displayed.
Delete User Permissions for a policy:
Follow these steps:
1. Select policy/s where the user is assigned from Manage Policies page.
Note: You can delete users from one or more policies at a time.
2. Click Edit.
The policy edit screen is displayed.
If multiple policies are selected, the next and previous buttons are shown.
3. Click Assign Users.
4. Move the user from the assigned user to the available user list in the shuttle control.
5. Click Save
A confirmation or error message is displayed.
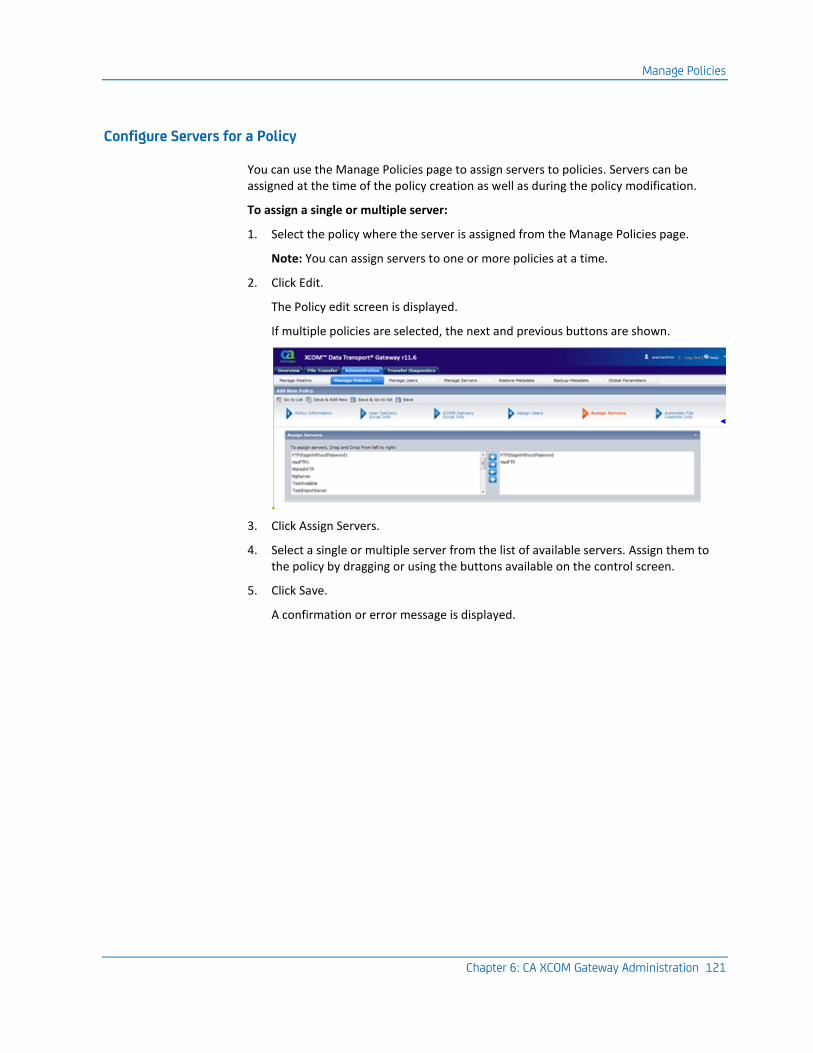
Manage Policies
Chapter 6: CA XCOM Gateway Administration 121
Configure Servers for a Policy
You can use the Manage Policies page to assign servers to policies. Servers can be assigned at the time of the policy creation as well as during the policy modification.
To assign a single or multiple server:
1. Select the policy where the server is assigned from the Manage Policies page.
Note: You can assign servers to one or more policies at a time.
2. Click Edit.
The Policy edit screen is displayed.
If multiple policies are selected, the next and previous buttons are shown.
3. Click Assign Servers.
4. Select a single or multiple server from the list of available servers. Assign them to the policy by dragging or using the buttons available on the control screen.
5. Click Save.
A confirmation or error message is displayed.
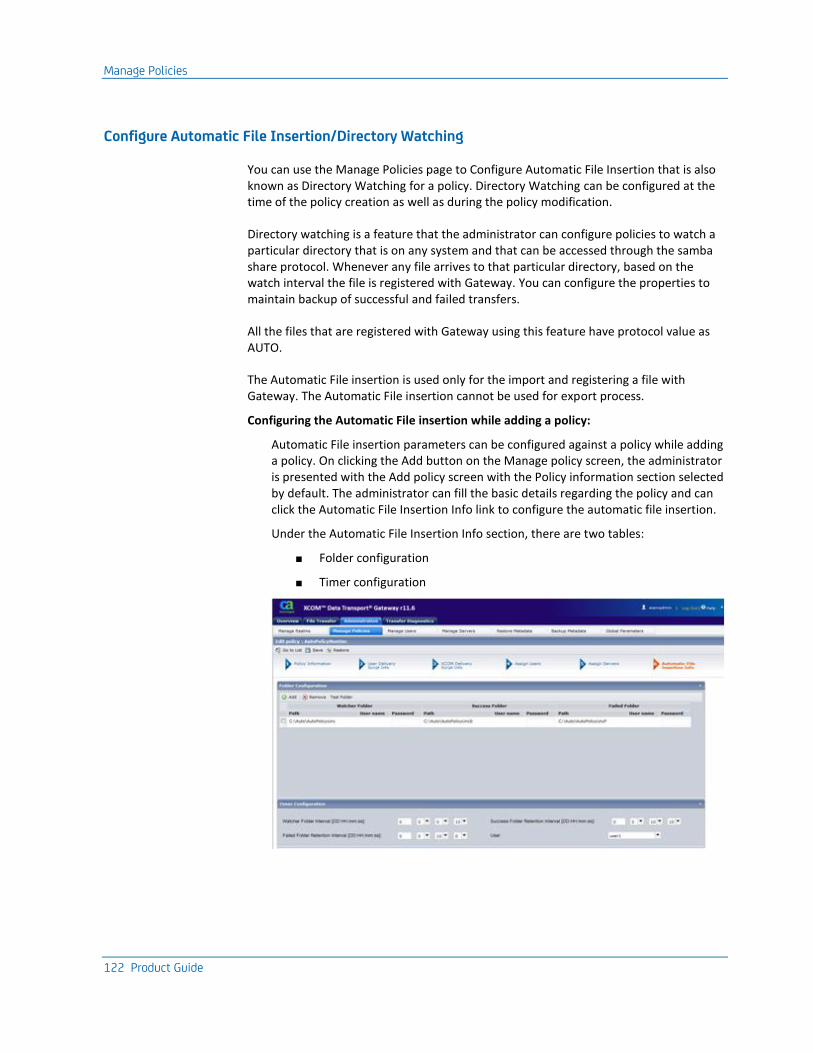
Manage Policies
122 Product Guide
Configure Automatic File Insertion/Directory Watching
You can use the Manage Policies page to Configure Automatic File Insertion that is also known as Directory Watching for a policy. Directory Watching can be configured at the time of the policy creation as well as during the policy modification.
Directory watching is a feature that the administrator can configure policies to watch a particular directory that is on any system and that can be accessed through the samba share protocol. Whenever any file arrives to that particular directory, based on the watch interval the file is registered with Gateway. You can configure the properties to maintain backup of successful and failed transfers.
All the files that are registered with Gateway using this feature have protocol value as AUTO.
The Automatic File insertion is used only for the import and registering a file with Gateway. The Automatic File insertion cannot be used for export process.
Configuring the Automatic File insertion while adding a policy:
Automatic File insertion parameters can be configured against a policy while adding a policy. On clicking the Add button on the Manage policy screen, the administrator is presented with the Add policy screen with the Policy information section selected by default. The administrator can fill the basic details regarding the policy and can click the Automatic File Insertion Info link to configure the automatic file insertion.
Under the Automatic File Insertion Info section, there are two tables:
■ Folder configuration
■ Timer configuration
Manage Policies
Chapter 6: CA XCOM Gateway Administration 123
Folder configuration
The folder configuration is displayed as a table containing the following columns:
■ Watcher Folder path
■ Watcher Folder Username
■ Watcher Folder Password
■ Success Folder path
■ Success Folder Username
■ Success Folder Password
■ Failed Folder path
■ Failed Folder Username
■ Failed Folder Password
Watcher Folder
You can configure the policy with a watch folder for the automatic file insertion/directory watching and then Gateway keeps monitoring the configured location or watcher folder at a regular interval for the arrival of new files. If any new files are available from the last monitor interval, gateway will register those files against the policy after verifying the permissions. Each policy can be configured for one or more watcher folders. To access the watcher folder from the gateway, the administrator has to provide the credentials, that are persisted to the database in an encrypted format.
The watcher folder is required for any table row of folders being added.
Watcher Folder Path
The watcher folder path specifies the path name of the watched folder, or monitored folder, for new files. The watcher folders can be on a homogeneous platform or a heterogeneous platform where the Gateway control server is running. Currently, gateway only supports the samba protocol to access shared locations on heterogeneous as well as homogeneous platforms.
Watcher Folder User Name
The watcher folder User Name specifies the logon name of user that has appropriate access to the specified watcher folder path.
Note:
■ If the watcher folder path is a local path, a user name is not required. If not specified, the user name that is used to access the local watcher folder path is the administrator or user that has started the CA XCOM Gateway server.
Manage Policies
124 Product Guide
■ If the watcher folder is a local path and the administrator wants to use other users on the local machine for accessing the path, the administrator must make sure that the user used in user name has write access to that location. The administrator might have to add the user in certain groups that has such permissions.
■ If the user is not the local user and belongs to a domain, the user must provide the domain information in the user name field. The format to provide the information in the user name field would be <domain name>\<user name>.
■ The administrator must give the complete credential <user name> and <password>. The administrator is not allowed to save the policy with only one of these credentials for any configured path in the auto folder configuration.
Watcher Folder Password
The watcher folder Password specifies the password for the specified watcher logon name of user that has the appropriate access to the specified watcher folder path.
Success and Failed Folder
You can optionally also configure the success and failed folders, that contain the copy of the file depending on the outcome of the file transfer. If the file cannot be registered with a policy due to some errors or insufficient permissions, the file is moved to a specified failed folder. If the file can be registered with the policy, it is moved to a specified success folder. Each policy can be configured for one or more success/failed folders. The Success/Failed folders can be on a homogeneous platform or heterogeneous platform where the Gateway control server is running. Currently, the gateway only supports the samba protocol to access shared locations on heterogeneous as well as homogeneous platforms. If a file cannot be moved to the success or failed folder, the file remains in the watch folder. Attempts to transfer the file no longer takes place.
To access the success and failure folder from the gateway, the administrator has to provide the credentials, that are persisted in an encrypted format to the database.
The Gateway administrator can perform the following tasks:
■ Add
■ Remove
■ Test Folder
To add the automatic file insertion configuration, click the Add button, a new row is added to the table, you can fill the values and click the Save button at the top header to save the changes to the policy. You can click the Restore button at the top header to discard the changes since your last save. To remove the automatic file insertion configuration, select the rows from the configuration table and click the remove button that is on the header of the folder configuration table.
To verify whether the configured folders are accessible with write permissions, you can click the Test Folder button.
Manage Policies
Chapter 6: CA XCOM Gateway Administration 125
Once the administrator is satisfied with the configurations for the automatic file insertion, he has to click the Save button to save them permanently.
Note:
■ The administrator must not have the watcher folder, success folder and failed folder pointing to the same location. All the folders (across all the policies) must point to different locations. Though application tries to notify the administrator for duplicate paths being configured, yet there may be situations where same path can be configured in two different ways. In such cases, the application does not check the duplication. The application checks the duplication only through the text duplication.
For example:
■ A folder on the local machine can be shared and the path of this folder can be \\hostname\folder. If the GCS is installed on the same machine and this folder can be configured in three ways: as a local path, as a shared path, as a UNC path. In such case the application will not check for the duplication.
The administrator may experience unpredictable behavior if this constraint is not being considered while configuring the folder configurations. A wrong configuration may lead to confusion and inconsistencies throughout the realm and the wrong notification.
■ There can be a delay in executing the files for inserting into the gateway from the watcher folders or while deleting the files from the success/failure folders as the process is sequential and the execution depends on the server resource availability. Gateway supports the UNC paths for the configuration of automatic file insertion for its watcher success and failed folders. If the administrator gives the username and password for the configuration of any of these folders, SAMBA supporting library (jcifs jar) must be present.
Timer configuration
This panel is displayed with the following fields:
■ Watcher Folder interval
■ Success Folder retention interval
■ Failed Folder retention interval
■ User name
Watcher Folder interval
The watcher folder interval accepts days, hours, minutes, and seconds. The watcher folder internal is the interval that gateway looks for new files in the watcher folders. The default value is zero for days, hours, minutes, and seconds, and indicates that there is no delay in watching. However, setting the watcher folder watcher interval to zero can affect the performance of the server.
Each policy can have multiple sets of folders to watch, but there is a single watcher folder interval for all watcher folders under a policy.
Manage Policies
126 Product Guide
Note:
■ The maximum value in the number of days can only be 9999.
■ The watcher folder interval has to have some value greater than 0, if at least one Watcher Folder Path is configured.
Success Folder retention interval
The success retention period accepts days, hours, minutes, and seconds. After this period, files will be removed from the success folders.
Note:
■ The maximum value in the number of days can only be 9999.
■ The success folder interval has to have some value greater than 0, if at least one Success Folder Path is configured.
Failed Folder retention interval
The failed folder retention interval accepts days, hours, minutes, and seconds. After this period, files will be removed from the failed folders. The default value is zero for days, hours, minutes, and seconds, and indicates that there is no delay in deleting. However, setting the interval to zero can affect the performance of the server.
Each policy can have multiple sets of failed folders, but there is a single failed folder retention period for all failed folders under a policy.
Note:
■ The maximum value in the number of days can only be 9999.
■ The failed folder interval has to have some value greater than 0, if at least one Failed Folder Path is configured.
User Name
The administrator can choose the user from the user name drop-down box. This user is the owner of the file that is inserted into a policy through the AUTO protocol. The administrator has to select a user, whose id is used as the insertion user id while registering a file with the gateway.
Note:
■ If the watcher folders are configured for this policy, then it is mandatory to select the user name.
■ The user name which is selected for the automatic file insertion must have the permission in this policy. To set the user permission, refer to the assign permission section.
Configuring Automatic File insertion while editing a policy:
Manage Policies
Chapter 6: CA XCOM Gateway Administration 127
The Automatic File insertion can be configured for existing policies by selecting a policy and clicking the Edit button, you are presented with the Edit Policy screen and the Policy Information section is selected by default. The administrator has to click the Automatic File insertion info to configure the automatic file insertion for the selected policy.
To edit the existing automatic file insertion configuration, click on the required rows’s column textbox. The administrator can update any of the values in the row.
To remove the automatic file insertion configuration, the administrator has to select the rows from the configuration table and click the remove button that is on the header of the folder configuration table. The administrator has to click the Save button, that is on the top of the header, to save the changes to the policy. Alternatively, the administrator can click the Restore button on the top header to discard changes since your last save.
Configuring Automatic File insertion while copying policy:
The administrator can select one or more policies and can click the Copy button, to replicate the policies. If an existing policy has the automatic file insertion configurations that are assigned to it, it can also be copied for the new copied policy. The administrator can click the Automatic File insertion info link to add, update, or remove the configurations as described in the previous sections.
Manage Realms
128 Product Guide
Manage Realms
The CA XCOM Gateway configuration has to include realms. Realms define physical storage areas that are utilized for holding files that are associated with a group of policies. The storage area can be located on any system and should be accessed to Gateway control server through Samba share. Appropriate privileges should be assigned to realm folders.
You can use the Manage Realms to manage your realm configuration in the following ways:
■ Display realms
■ Filter realms
■ Add realms
■ Copy realms
■ Delete realms
■ Update realms
■ Show/Hide File Limits for realms
■ Show files stored in realms
■ Display related policies for a realm
Important! Admin authority is required to perform these actions.
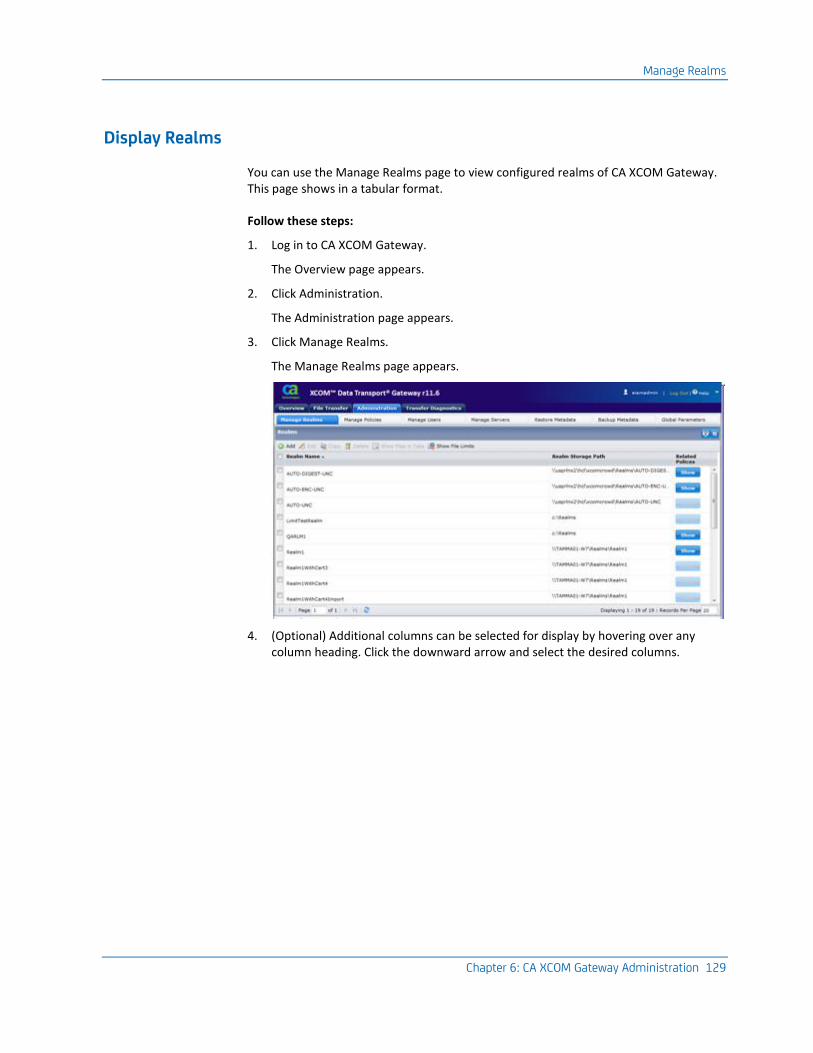
Manage Realms
Chapter 6: CA XCOM Gateway Administration 129
Display Realms
You can use the Manage Realms page to view configured realms of CA XCOM Gateway. This page shows in a tabular format.
Follow these steps:
1. Log in to CA XCOM Gateway.
The Overview page appears.
2. Click Administration.
The Administration page appears.
3. Click Manage Realms.
The Manage Realms page appears.
4. (Optional) Additional columns can be selected for display by hovering over any column heading. Click the downward arrow and select the desired columns.
Manage Realms
130 Product Guide
Filter Realms
You can use the Manage Realms page to display specific realms of CA XCOM Gateway.
To display filtered realms.
1. Log in to CA XCOM Gateway.
The Overview page appears.
2. Click Administration.
The Administration page appears.
3. Click Manage Realms.
The Manage Realm page appears.
4. Click the Filter icon in the right-hand side of the title bar.
The Filter Realms panel appears.
5. Select the Policy name from the drop-down or type the realm name in the Realm Name field.
6. Click Apply, to view the specified realms.
In the Display Realms table, only the filtered realms appear.
7. Click Remove Filter to clear the applied filter.
All realms are listed in the display realms table.
8. Click the Hide Filter Icon, the realm filter panel disappears.
The Show Realm Filter button is a toggle button, upon selection it changes to the Hide Filter button.
Add Realms
You can use the Manage Realms page to add new realms to CA XCOM Gateway.
Follow these steps:
1. Click the Add button on Manage Realms page.
The Add New Realms page appears.
Manage Realms
Chapter 6: CA XCOM Gateway Administration 131
2. Enter details for a new realm.
Realm Name
The unique name for the realm. This is a mandatory field.
Storage Path
The storage path must define the path of a folder that is accessed by the CA XCOM Gateway Control server and in which files associated with this realm are to be stored. This can be a folder in a local system where CA XCOM Gateway Control server is running or on a remote machine. In case of folder in remote machine the path should be provided in UNC format. For UNC paths on the samba share protocol is supported. In Windows UNC folders are by default are shared via samba share protocols. In UNIX or LINUX the folder should be shared using samba shared protocol.
Note: The specified folder is not created by the CA XCOM Gateway and must therefore be created manually before defining the realm.
Realm Credentials
In case of UNC path provide the user credentials required to access the remote path. The user provided should have the write permissions on the UNC path. The password will be saved in encrypted format.
Note:
If Realm credentials are provided in the Realm Credentials Panel, the Realm path will be considered as samba shared.
In Linux, the realm path should be explicitly samba shared.
In Windows, the paths are implicitly samba enabled, if the path is shared and has the write permissions for the Auto User configured in the policy.
File Limits
The total file limits define limits which apply to stored files of all types that are associated with this realm. In contrast, user file limits define limits for files that are associated with this realm that have been uploaded into CA XCOM Gateway by registered users by means of either HTTP(S) or FTP(S) upload, and XCOM file limits define limits for files associated with this realm that have been transferred into CA XCOM Gateway from CA XCOM Data Transport.
When a file limit is set to a value other than UNLIMITED, it restricts the number of files that can coexist in the Realm at any given time. When a size limit is set to a value other than UNLIMITED, it restricts the total size of the files that can coexist in this Realm at the same time. Size limits can be specified in kilobytes (K), megabytes (M), gigabytes (G), or terabytes (T).
The new realm is added to CA XCOM Gateway and a confirmation message is displayed.
Note: If a realm exists with the specified name, an error message is displayed.
Manage Realms
132 Product Guide
Update Realms
You can use the Manage Realms page to update existing realms.
Important! You must have Admin authority to update a realm.
To update a realm.
1. Select one or more realms from the Manage Realms page.
2. Click Edit.
3. Update the realms attributes.
4. Click Save.
The Manage Realms page displays showing the updated realm attributes.
5. Click Next to view the next selected realm.
6. Go to List will take you back to realm listing.
7. Restore is to restore the previous stored values.
Copy Realms
To create a realm by copying, use the Manage Realms page to copy an existing realm attributes.
Important! You must have Admin authority to copy a realm.
Follow these steps:
1. Select one or more realms from the Manage Realms page.
2. Click Copy.
The Copy Realms page appears, showing the attributes of the selected realm.
3. Change the Realm Name of the copied realm to the Realm Name of the new realm.
4. Click Save.
Note:
■ To view the next selected Realm, click Next.
■ Go to List to cancel the operation and navigate to Manage Realm page.
■ Restore will restore the previous stored values.
Manage Realms
Chapter 6: CA XCOM Gateway Administration 133
Delete Realms
You can use the Manage Realms page to delete realms from CA XCOM Gateway.
A realm can be deleted only if both of the following conditions apply:
■ It has no policies associated with it.
■ The realm’s storage area contains no files.
So before deleting a realm, you need to change the retention periods to a low value (for example, 1 day), for every policy that is associated with the realm. After this time period has elapsed, all files will have expired and therefore they will have been deleted from the realm’s storage area. Each of the policies associated with the realm will need to be assigned to a different realm or will need to be deleted. The administrator can invalidate the file and ultimately remove it by using invalidate and mark for the deletion features.
Important! You must have Admin authority to delete a realm.
Follow these steps:
1. Select realms for deletion from the Manage Realms page.
Note: You can delete one or more realms at a time.
2. Click Delete.
A Delete Realms confirmation dialog opens.
3. Click OK.
The selected realms are deleted from CA XCOM Gateway.
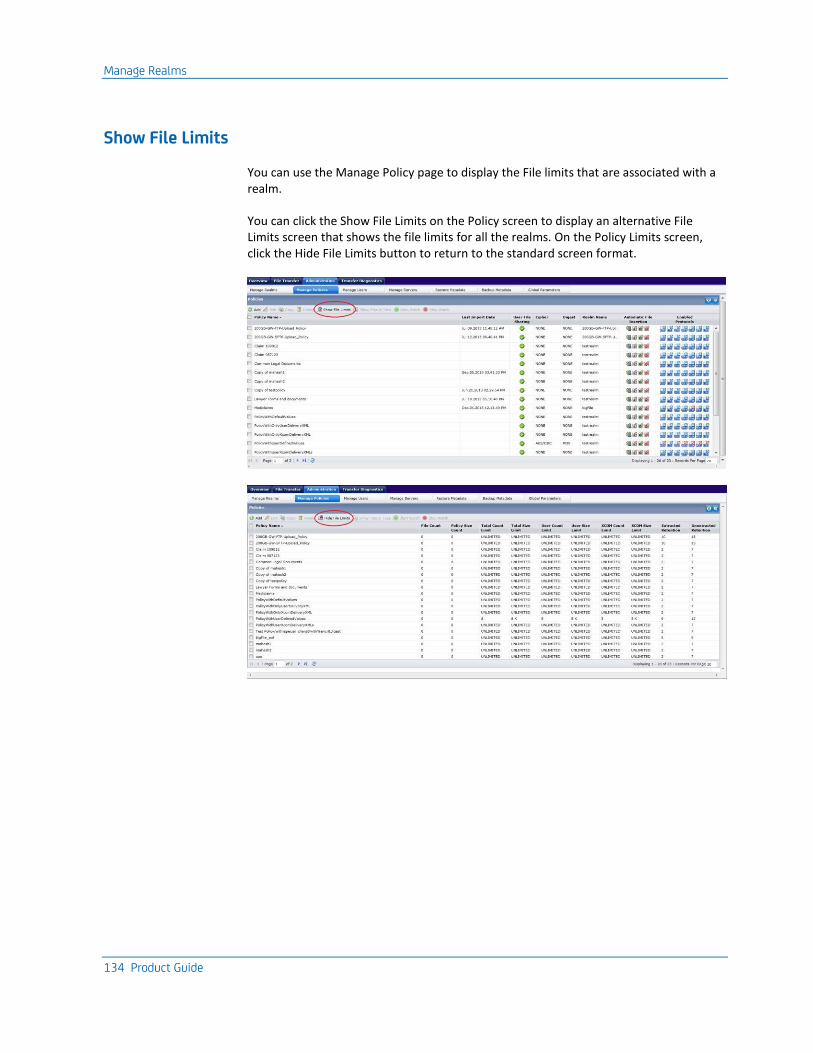
Manage Realms
134 Product Guide
Show File Limits
You can use the Manage Policy page to display the File limits that are associated with a realm.
You can click the Show File Limits on the Policy screen to display an alternative File Limits screen that shows the file limits for all the realms. On the Policy Limits screen, click the Hide File Limits button to return to the standard screen format.
Manage Realms
Chapter 6: CA XCOM Gateway Administration 135
Display Stored Files in a Specific Realm
To display stored files in a realm you can use the Manage Realms page
Follow these steps:
1. Select one or more realms from the Manage Realms page.
2. Click Show Files in Tab.
Selected realms will open in their respective tabs
A single realm can have multiple policies associated with it and similarly there might be lot of files related to each of these policies.
It allows administrator to select multiple realms at a time and all will be opened up in seperte tabs, which provide administrator to navigate between realm list page and show files tab for individual realm.
Each tab will have individual table for each policy. If a realm is associated with 10 policies then 10 tables will be displayed under realm tab.
If a policy doesn’t contain any files, that policy table will not be displayed.
By default, the first table corresponding to a policy will be in the expanded form and the rest of them will be in the collapsed state. The user has to manually click on the expand icon or double click the table header to view the table.
The benefit of this approach is that administrator can view files depending on the policy and get better picture of space utilization and tabs provide better navigation alternative.
Files related to realm will be displayed as a table containing following columns:
■ File Name
■ User
■ File Size
■ Import Time
■ Scheduled Expiry
■ Users with pending download
■ File GUID
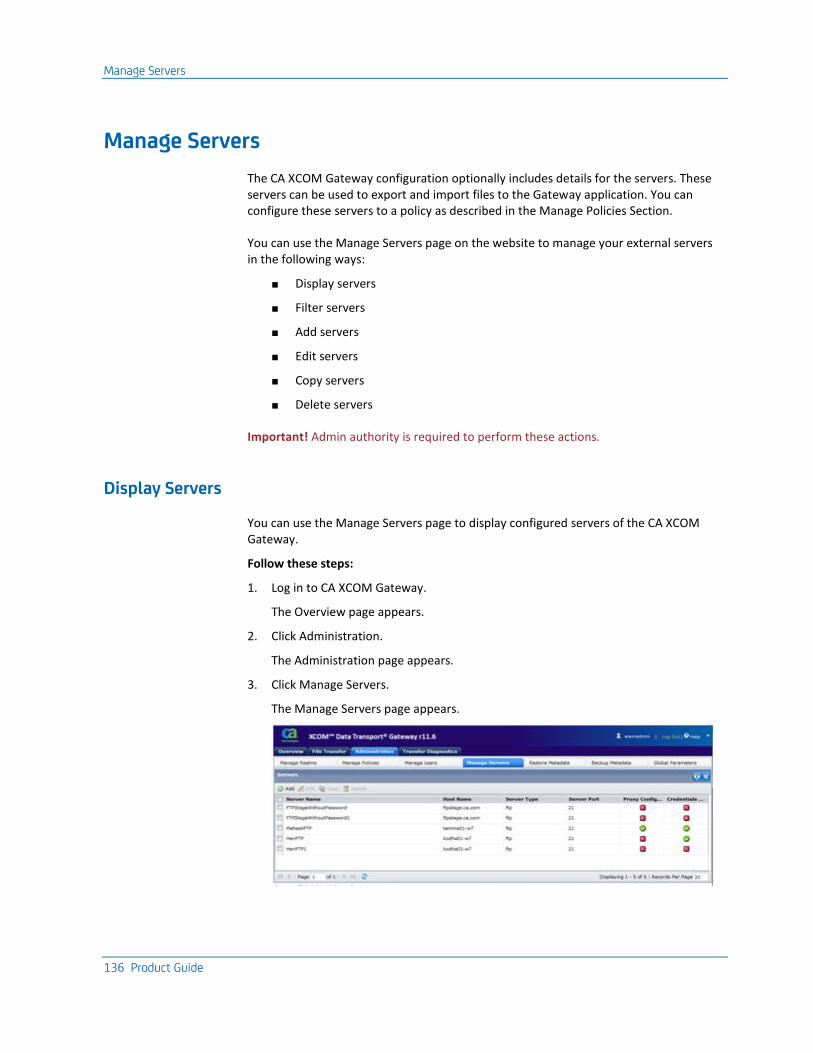
Manage Servers
136 Product Guide
Manage Servers
The CA XCOM Gateway configuration optionally includes details for the servers. These servers can be used to export and import files to the Gateway application. You can configure these servers to a policy as described in the Manage Policies Section.
You can use the Manage Servers page on the website to manage your external servers in the following ways:
■ Display servers
■ Filter servers
■ Add servers
■ Edit servers
■ Copy servers
■ Delete servers
Important! Admin authority is required to perform these actions.
Display Servers
You can use the Manage Servers page to display configured servers of the CA XCOM Gateway.
Follow these steps:
1. Log in to CA XCOM Gateway.
The Overview page appears.
2. Click Administration.
The Administration page appears.
3. Click Manage Servers.
The Manage Servers page appears.
Manage Servers
Chapter 6: CA XCOM Gateway Administration 137
4. Click the downward arrow and select the desired columns.
Column resize is done by dragging the column borders with the mouse.
Sorting can be done by clicking the arrow icon that is at the right corner of each column. Then selecting either Sort Ascending or Sort Descending.
The Display servers table has six columns visible.
Server name
The name of the server that administrator wants to provide.
Host name
The machine name of the external server
Server type
One of the three: FTP, SFTP, or FTPS
Proxy configuration
Indicate whether the proxy is configured and/or credentials are provided.
Credentials Available
Indicates whether the User credentials for the server are provided or not.
In the toolbar, user can see four actions (Add, Edit, Copy and Delete) on single/multiple servers.
Manage Servers
138 Product Guide
Filter Servers
You can use the Manage Servers page to display specific servers added to the CA XCOM Gateway.
To display filtered Servers.
1. Log in to CA XCOM Gateway.
The Overview page appears.
2. Click Administration.
The Administration page appears.
3. Click Manage Servers.
The Manage Server page appears.
4. Click The Filter icon in the right-hand side of the title bar.
The Filter Servers panel appears.
5. Type the Server name in the Server Name field.
6. Click Apply, to view the specified servers.
In the Display Servers table, only the filtered Servers appear.
7. Click Remove Filter to clear the applied filter.
All Servers are listed in the display servers table.
8. Click Hide Filter Icon, the user filter panel disappears.
The Show Server Filter button is a toggle button, upon selection it changes to the Hide Filter button.
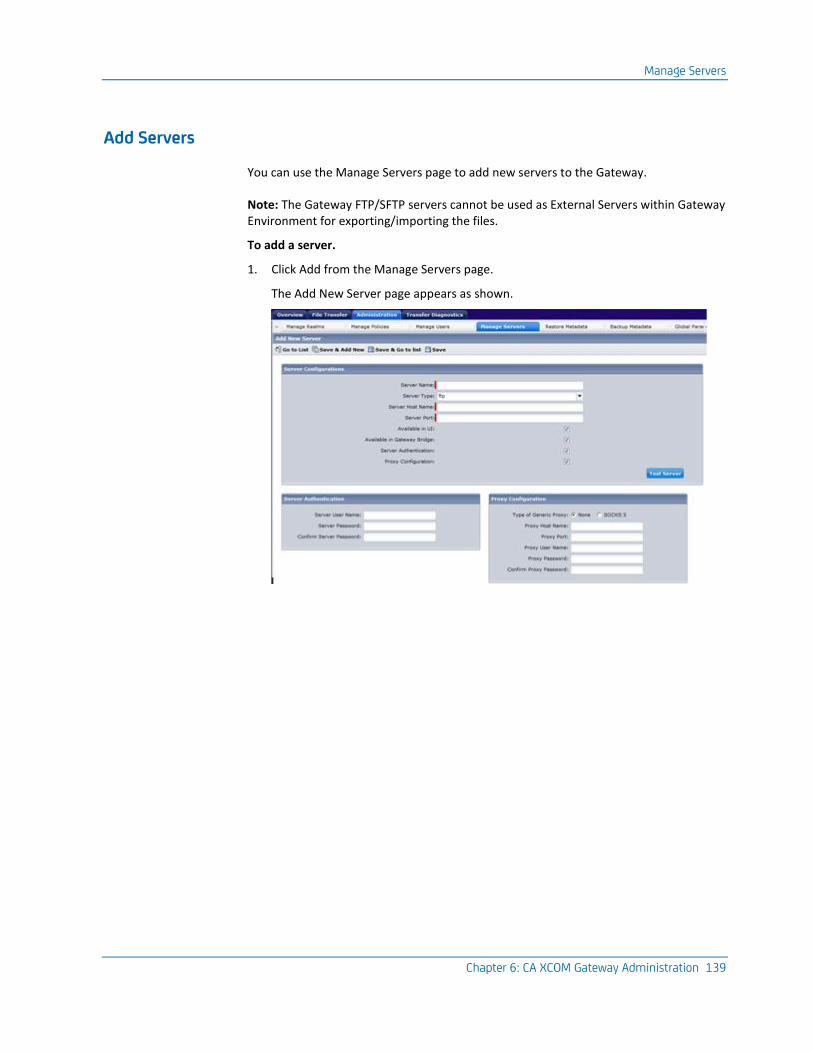
Manage Servers
Chapter 6: CA XCOM Gateway Administration 139
Add Servers
You can use the Manage Servers page to add new servers to the Gateway.
Note: The Gateway FTP/SFTP servers cannot be used as External Servers within Gateway Environment for exporting/importing the files.
To add a server.
1. Click Add from the Manage Servers page.
The Add New Server page appears as shown.
Manage Servers
140 Product Guide
2. Enter the server details in the page.
Server Name
The unique name for the server. Maximum allowed length is 64 alpha-numeric characters. The Server Name is a mandatory field for saving the server.
Server Host Name
The Server Host Name is the representational name of the Server being added. [Ex: COMPUTERNAME in the windows environment variable]. The Server Host Name mandatory field for saving the server.
Server Port
Port for the server being added at which it would be contacted. The Server Port is mandatory field for saving the server.
Server Type
The Server Type could be one from the list [FTP, SFTP, FTPs].
Available in Gateway Bridge
If selected, the server can be used in the Gateway Bridge, otherwise it cannot be used.
Available in UI
If selected, the server is displayed on the file transfer tab; otherwise it is not listed.
Server Authentication
This section has fields that are related to server credentials that are to be used while it is being contacted.
Server User Name
The user name credential that is used for the current server.
Server Password
The password credential that is used for the current server.
Confirm Server Password
This field is to avoid any mis-typing by the user. Enter the same password that was entered in the Server Password field.
Proxy Configuration
The user can configure the proxy for the current server. This section has all the proxy server fields.
Type of Generic Proxy
There are various types of proxy that could be configured for the server. Currently there are only two options for the user. Out of these 2 values, only one can be selected. By this selection, the fields are enabled or disabled in this section.
Manage Servers
Chapter 6: CA XCOM Gateway Administration 141
None
The user can select this option, when they do not want to configure any proxy for the current server. None is the default option that is selected when Add Server is taken.
SOCKS 5
Socks is an internet protocol that handles network packets through the proxy server. Socks-5 provides the additional authentication facility, so that only permitted users can access the server.
Proxy Host Name
Host name of the proxy server.
Proxy Port
Port number for the proxy server.
Proxy User Name
The user name credential that is used for the proxy server.
Proxy Password
The password credential that is used for the proxy server.
Confirm Proxy Password
Field is to avoid any mis-typing by the user. The user can enter the same password as they entered in the Proxy Password field.
3. Click Save to save the server details.
4. Click Save & Add New to save the current server and add a server.
5. Click Save & Go to List to save the server and move to the Display server page.
6. Click Go to List to move to the Display server page. Confirmation dialog is display to save the changes.
Manage Servers
142 Product Guide
Update Servers
You can use the Manage Servers page to edit servers in the Gateway.
To edit a server.
1. Select one or more servers in the Manage Servers page.
2. Click Edit from the Manage Policies page.
The Edit Server page appears. This page is similar to the Add server page except the fields is populated with the server details.
3. Modify the Server details.
4. Click Save to save the server details.
5. Click Restore to restore the server to the previous stored values.
6. Click Next or Previous to view the respective selected Server. Next and Previous is enabled only if more than one server is selected for editing.
7. Click Go to List to move to the Display servers page. The confirmation dialog is displayed to save the changes.
Copy Servers
You can use the Manage Servers page to make a copy of exisiting servers in the Gateway and make desired changes.
To copy a server.
1. Select one or more servers in the Manage Servers page.
2. Click Copy from the Manage Policies page.
The Copy Server page appears. This page is similar to the Add server page except the fields are populated with the copied server details. The Server Name field is displayed as Copy of <server name>.
3. Modify the Server details.
4. Click Save to save the server details.
5. Click Restore to restore the previous stored values.
6. Click Next or Previous to view the respective selected Server. Next and Previous is enabled only if more than one server is selected for editing.
7. Click Go to List to move to the Display servers page. A confirmation dialog is displayed to save the changes.
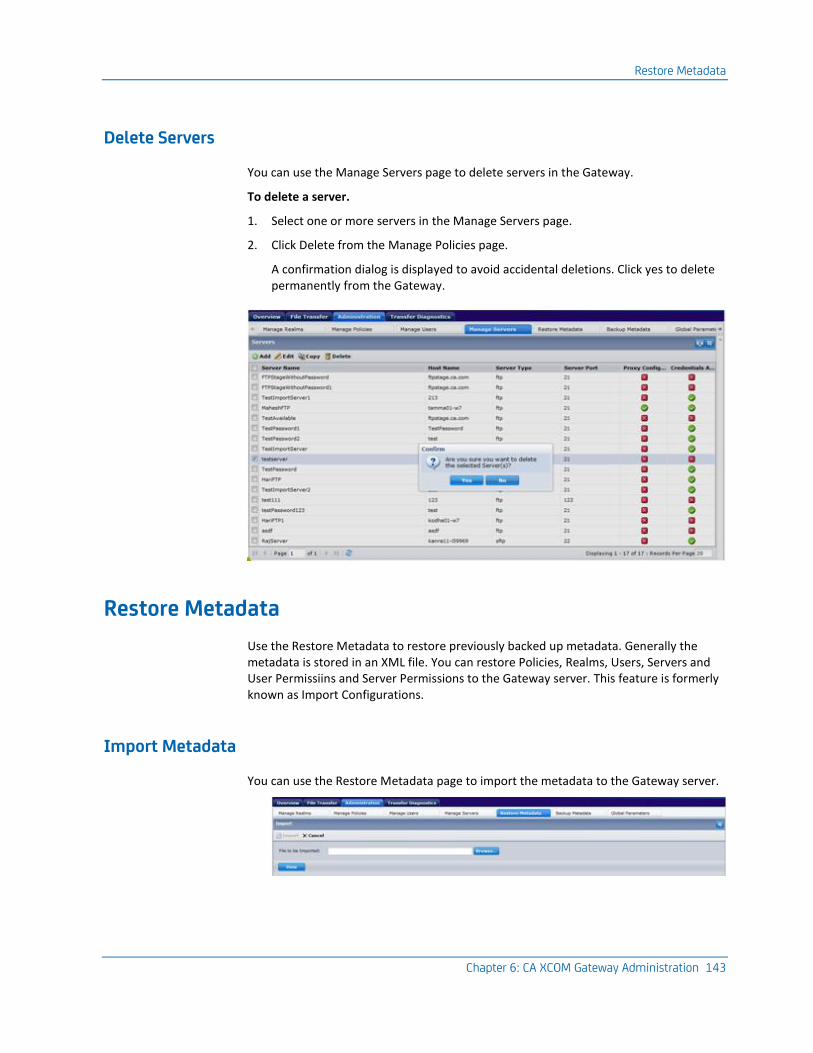
Restore Metadata
Chapter 6: CA XCOM Gateway Administration 143
Delete Servers
You can use the Manage Servers page to delete servers in the Gateway.
To delete a server.
1. Select one or more servers in the Manage Servers page.
2. Click Delete from the Manage Policies page.
A confirmation dialog is displayed to avoid accidental deletions. Click yes to delete permanently from the Gateway.
Restore Metadata
Use the Restore Metadata to restore previously backed up metadata. Generally the metadata is stored in an XML file. You can restore Policies, Realms, Users, Servers and User Permissiins and Server Permissions to the Gateway server. This feature is formerly known as Import Configurations.
Import Metadata
You can use the Restore Metadata page to import the metadata to the Gateway server.
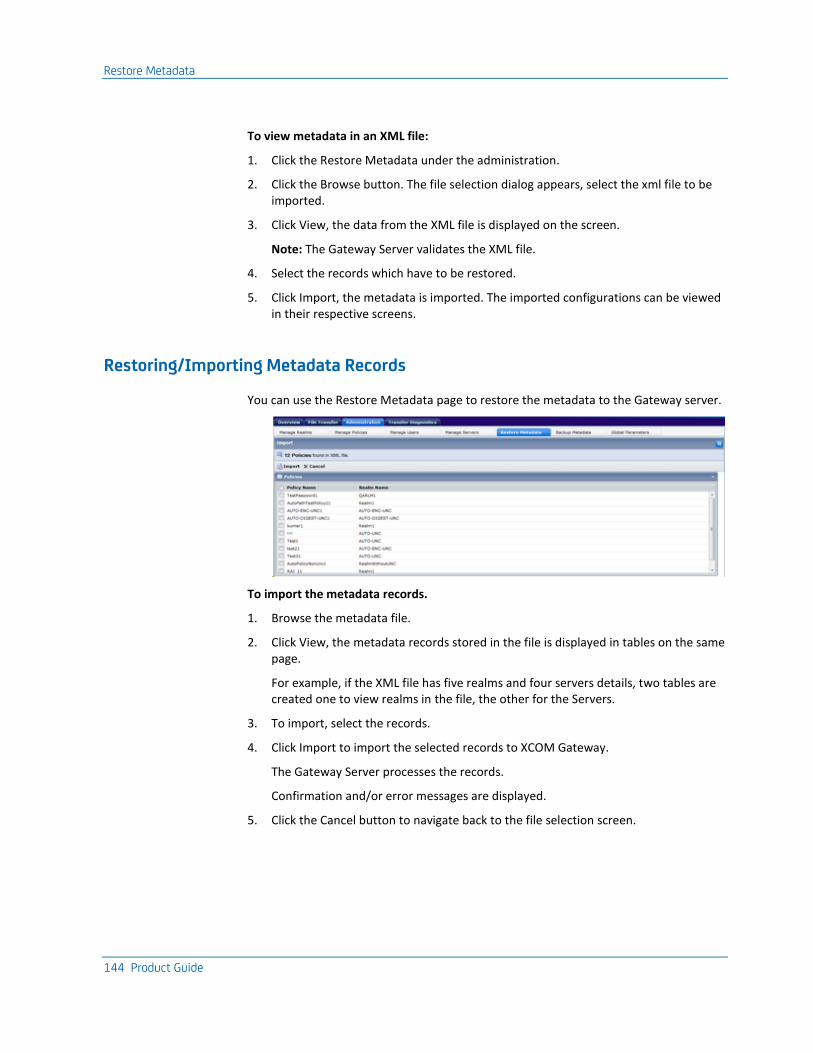
Restore Metadata
144 Product Guide
To view metadata in an XML file:
1. Click the Restore Metadata under the administration.
2. Click the Browse button. The file selection dialog appears, select the xml file to be imported.
3. Click View, the data from the XML file is displayed on the screen.
Note: The Gateway Server validates the XML file.
4. Select the records which have to be restored.
5. Click Import, the metadata is imported. The imported configurations can be viewed in their respective screens.
Restoring/Importing Metadata Records
You can use the Restore Metadata page to restore the metadata to the Gateway server.
To import the metadata records.
1. Browse the metadata file.
2. Click View, the metadata records stored in the file is displayed in tables on the same page.
For example, if the XML file has five realms and four servers details, two tables are created one to view realms in the file, the other for the Servers.
3. To import, select the records.
4. Click Import to import the selected records to XCOM Gateway.
The Gateway Server processes the records.
Confirmation and/or error messages are displayed.
5. Click the Cancel button to navigate back to the file selection screen.
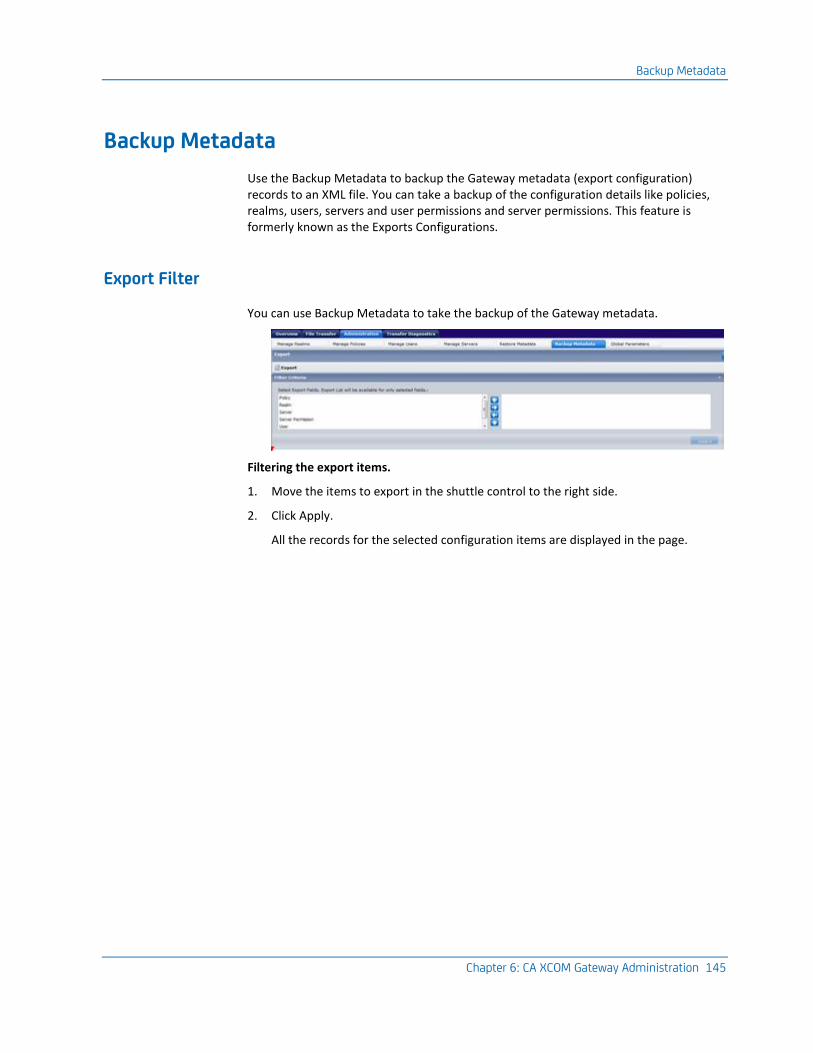
Backup Metadata
Chapter 6: CA XCOM Gateway Administration 145
Backup Metadata
Use the Backup Metadata to backup the Gateway metadata (export configuration) records to an XML file. You can take a backup of the configuration details like policies, realms, users, servers and user permissions and server permissions. This feature is formerly known as the Exports Configurations.
Export Filter
You can use Backup Metadata to take the backup of the Gateway metadata.
Filtering the export items.
1. Move the items to export in the shuttle control to the right side.
2. Click Apply.
All the records for the selected configuration items are displayed in the page.
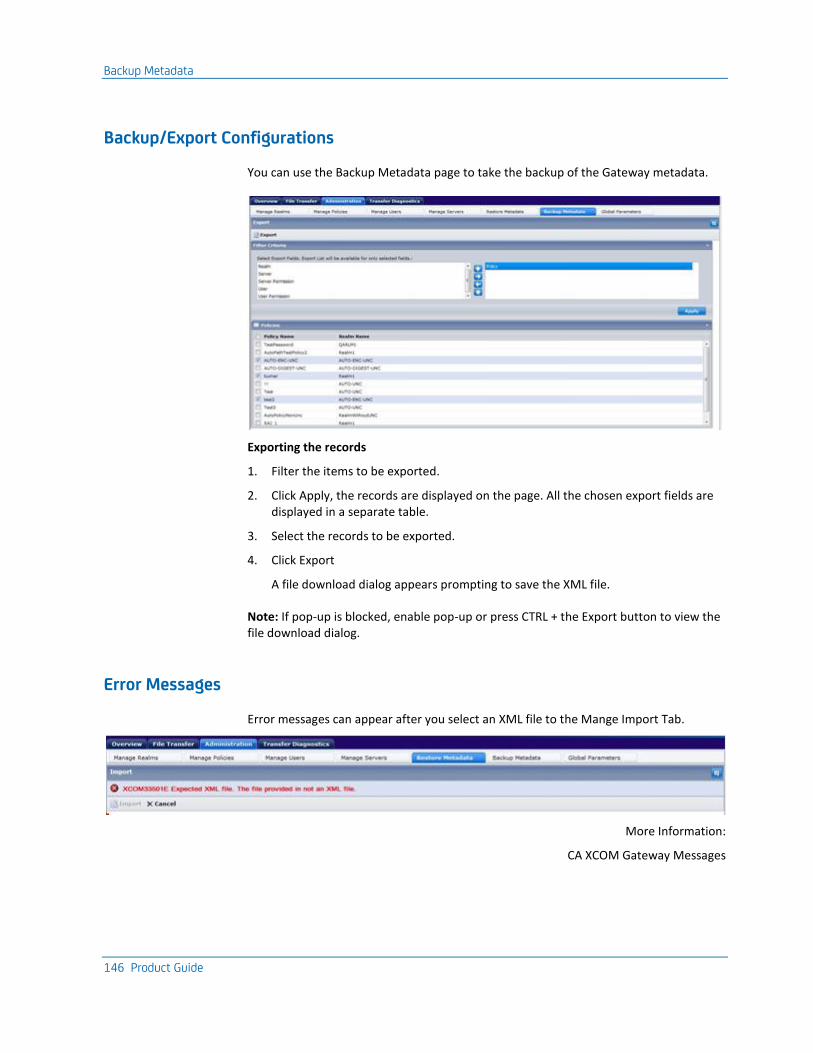
Backup Metadata
146 Product Guide
Backup/Export Configurations
You can use the Backup Metadata page to take the backup of the Gateway metadata.
Exporting the records
1. Filter the items to be exported.
2. Click Apply, the records are displayed on the page. All the chosen export fields are displayed in a separate table.
3. Select the records to be exported.
4. Click Export
A file download dialog appears prompting to save the XML file.
Note: If pop-up is blocked, enable pop-up or press CTRL + the Export button to view the file download dialog.
Error Messages
Error messages can appear after you select an XML file to the Mange Import Tab.
More Information:
CA XCOM Gateway Messages
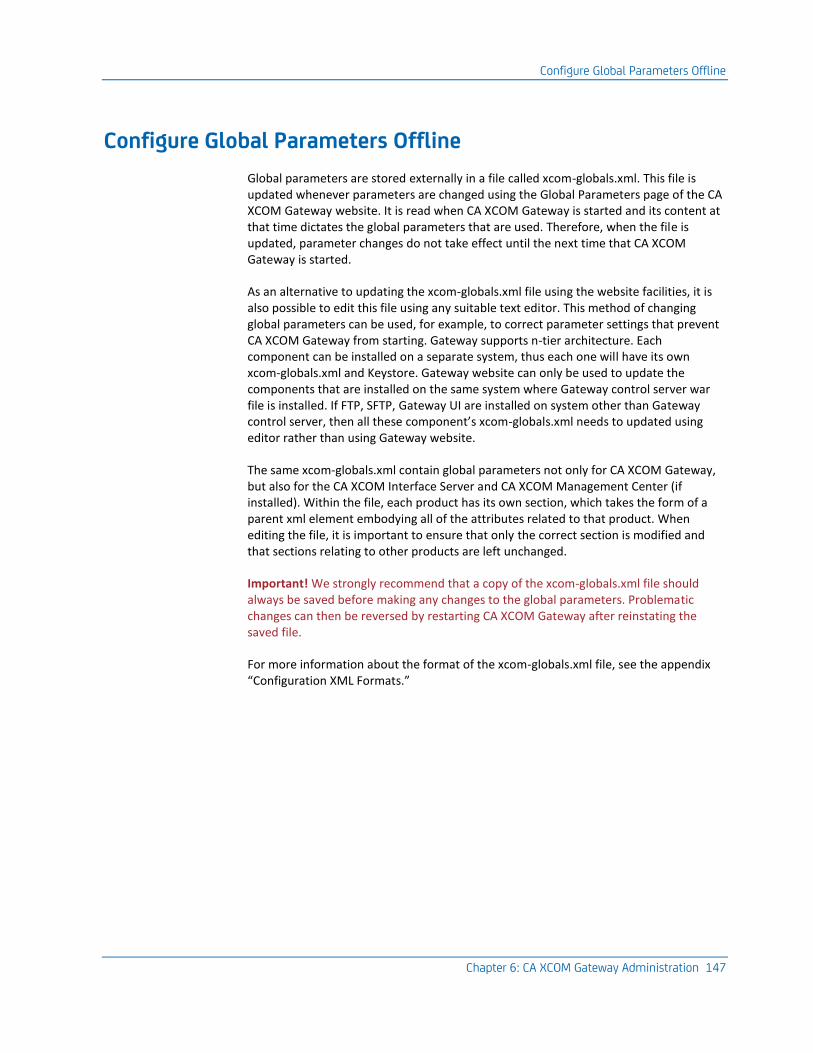
Configure Global Parameters Offline
Chapter 6: CA XCOM Gateway Administration 147
Configure Global Parameters Offline
Global parameters are stored externally in a file called xcom-globals.xml. This file is updated whenever parameters are changed using the Global Parameters page of the CA XCOM Gateway website. It is read when CA XCOM Gateway is started and its content at that time dictates the global parameters that are used. Therefore, when the file is updated, parameter changes do not take effect until the next time that CA XCOM Gateway is started.
As an alternative to updating the xcom-globals.xml file using the website facilities, it is also possible to edit this file using any suitable text editor. This method of changing global parameters can be used, for example, to correct parameter settings that prevent CA XCOM Gateway from starting. Gateway supports n-tier architecture. Each component can be installed on a separate system, thus each one will have its own xcom-globals.xml and Keystore. Gateway website can only be used to update the components that are installed on the same system where Gateway control server war file is installed. If FTP, SFTP, Gateway UI are installed on system other than Gateway control server, then all these component’s xcom-globals.xml needs to updated using editor rather than using Gateway website.
The same xcom-globals.xml contain global parameters not only for CA XCOM Gateway, but also for the CA XCOM Interface Server and CA XCOM Management Center (if installed). Within the file, each product has its own section, which takes the form of a parent xml element embodying all of the attributes related to that product. When editing the file, it is important to ensure that only the correct section is modified and that sections relating to other products are left unchanged.
Important! We strongly recommend that a copy of the xcom-globals.xml file should always be saved before making any changes to the global parameters. Problematic changes can then be reversed by restarting CA XCOM Gateway after reinstating the saved file.
For more information about the format of the xcom-globals.xml file, see the appendix “Configuration XML Formats.”
Configure Global Parameters Offline
148 Product Guide
Add a New CA XCOM Gateway X509 Certificate
The installer (see the chapter “Prerequisites, Installing, and Uninstalling”) automatically establishes a CA XCOM Gateway keystore and creates, or imports into it, an initial CA XCOM Gateway certificate. It also defines this initial certificate as the active certificate that CA XCOM Gateway is to use for encrypting stored files. However, it might subsequently become necessary to introduce a new certificate; for example, when the active certificate expires.
In order to retain the ability to access previously stored and encrypted files, it is essential that the certificate that was used for their encryption must remain available within the CA XCOM Gateway keystore. Therefore, when a new certificate is to be introduced, the new certificate can be added to the keystore and set as the active certificate. This causes CA XCOM Gateway to use the new certificate to encrypt files that arrive later. However, any expired certificates must remain in the keystore and must not be deleted. If Gateway components are installed on different systems, then if user changes one certificate, then all components should be upgraded to use same certificate.
It follows that the CA XCOM Gateway keystore may contain any number of certificates, each with a unique alias ID. However, at any one time only one certificate can be active, and the alias ID of the currently active certificate must be specified in CA XCOM Gateway’s global parameters, so that CA XCOM Gateway knows which certificate to use when storing new files.
To add a new certificate to the keystore, you need to use the standard Java keytool utility. The facilities offered by the keytool utility program are fully documented on the http://java.sun.com web site (http://java.sun.com/docs/books/tutorial/security/toolsign/step3.html).
To run the keytool utility, open the command prompt (Start->run->cmd), and execute the keytool utility by entering a command in the format:
"{JavaInstalledDirectory(jdk)}\bin\keytool.exe" -import -trustcacerts -alias {alias
id} -keystore "{keystore path/file}" -file "{certificate path/file}"
"{JavaInstalledDirectory}
The path for the folder into which the Java was Installed; for example, c:\Program Files\ Java\jdk1.6.0_45.
{alias id}
The unique alias ID that you want to assign to the new certificate. This ID must be different from that of any existing certificate and will subsequently be specified in CA XCOM Gateway’s global parameters to identify this particular certificate as the currently active certificate (see below).
Configure Global Parameters Offline
Chapter 6: CA XCOM Gateway Administration 149
(keystore path/file)
The directory path for the keystore location and keystore file name. You can determine the path/file for CA XCOM Gateway’s existing keystore by viewing the xcom-globals.xml file, and locating the <KEYSTORE PATH=”…”> attribute.
{Certificate path/file}
The directory path and file name of the certificate that you want to import; for example, “\caissuedcertificates\mygatewaycertificate.pem”.
After you have added the new certificate by using the keytool utility, the xcom-globals.xml file must be updated to set the new certificate as the active certificate that CA XCOM Gateway is to use for encrypting new files. Within the <GATEWAYSERVER> section of the xcom-globals.xml file, locate the <CERTIFICATE ACTIVEID=”..”> attribute and change the value of this attribute to the alias ID of the new certificate. After saving the updated file, you need to restart CA XCOM Gateway for the change to become effective.
Configure Global Parameters Offline
150 Product Guide
Set Up CA XCOM Data Transport Client Authentication
When CA XCOM Data Transport needs to transfer files into or out of CA XCOM Gateway, the local CA XCOM Data Transport server connects to the Gateway Server and uses web service requests to request access to CA XCOM Gateway’s file storage area and to access existing CA XCOM Gateway files or import new ones.
To ensure data security, it is important to prevent software, other than your own CA XCOM Data Transport servers, from connecting to CA XCOM Gateway and acting as if it were a valid CA XCOM Data Transport server in order to illicitly gain access to files that are stored in CA XCOM Gateway.
One way to provide this protection is by configuring your firewall, to allow incoming connections to CA XCOM Gateway only from machines within your local network, which need access to CA XCOM Gateway.
However, for more rigorous protection, CA XCOM Gateway can be configured to validate client connections from CA XCOM Data Transport to ensure the authenticity of the connecting software.
To activate this authentication
1. Identify the CA XCOM Data Transport servers that need to transfer files into or out of CA XCOM Gateway; for example, CA XCOM Data Transport servers that will be specified as the local machine within policy defined TRANSFERCONTAINER xml.
Note: In a straightforward configuration, only a single CA XCOM Data Transport Server needs to access CA XCOM Gateway files and this normally runs on the same machine as the CA XCOM Gateway server.
2. Ensure that each of the CA XCOM Data Transport servers identified above has been configured with a Gateway Client Certificate, which has been obtained from a trusted certificate authority (that is, these certificates must not be self-signed). Further, when requesting these certificates from the certificate authority, you must specify a CN= (common name) value of the subject distinguished name that is a domain name which will be resolved (by DNS or by the hosts file) to the IP address of the machine on which the CA XCOM Data Transport server will run.
For more information about configuration of the Gateway Client Certificate, see the CA XCOM Data Transport Administration Guide.
3. Update the xcom-globals.xml file to add a <TRANSPORTDOMAIN DN=”…”/> element within the <CERTIFICATE> element, for each identified CA XCOM Data Transport server. The DN= value must specify the same domain name that is contained in that CA XCOM Data Transport server’s Gateway Client Certificate. Also change the <CERTIFICATE AUTHENTICATE=”NO”> attribute value to “YES”.
When client authentication has been enabled, the following validation occurs whenever a CA XCOM Data Transport server connects to the CA XCOM Gateway server:
■ The CA XCOM Data Transport server presents its Gateway Client Certificate to CA XCOM Gateway.
Configure Global Parameters Offline
Chapter 6: CA XCOM Gateway Administration 151
■ CA XCOM Gateway authenticates the validity of this certificate by ensuring that all certificates have been signed, in the chain of certificates back to the trusted certificate authority.
■ CA XCOM Gateway extracts the domain name from the certificate’s CN= attribute and ensures that this domain name is defined by a <TRANSPORTDOMAIN DN=”..”> element within the global parameters.
■ CA XCOM Gateway performs a DNS lookup on the domain name and ensures that the client is connecting either from this domain’s IP address or from the local machine (that is, IP address 127.0.0.1).
■ If any of the above checks fail, the client connection is refused.
Update the Global Parameters File
152 Product Guide
Update the Global Parameters File
CA XCOM Gateway administrators with Admin authority can use the Global Parameters page to display or change the values of global parameters. However, the changes made to the global parameters take effect only when CA XCOM Gateway is restarted.
Note: Following the installation of CA XCOM Gateway, the following global parameters may need to be changed, if the installer sets them to fixed values that may not be appropriate:
SMTP Parameters
These parameters need to be changed if you intend to configure CA XCOM Gateway to provide email notifications to users. The parameters identify your SMTP sever and the “from” address to be used for all notification emails.
Log Parameters
These parameters may need to be changed. They control the destination, date format, and reporting level for log messages generated by CA XCOM Gateway.
CA XCOM Parameters
These parameters may need to be changed. They specify retry and monitoring intervals relating to CA XCOM Gateway’s interface with CA XCOM Data Transport.
Global parameters are stored in an xml file called xcom-globals.xml. This file is updated whenever parameters are changed using the Global Parameters page of CA XCOM Gateway. For more information about the format of the xcom-globals.xml file, see the appendix “Configuration XML Formats.”
Important! Because incorrect global parameter changes can render CA XCOM Gateway inoperable and the CA XCOM Gateway website inaccessible, we strongly recommend that you save a copy of xcom-globals.xml before making offline changes to the global parameters. Problematic changes can then be reversed by restarting CA XCOM Gateway after reinstating the saved file.
Note: When global parameters are changed through the Gateway Web UI, a backup of a previous file is taken automatically. The backup files are stored in the same location as the xcom-globals.xml.
To update global parameters
1. Log in to CA XCOM Gateway.
The Home page appears.
2. Click Administration.
The Administration page appears.
Note: If there is no Admin tab on the web page, it means that your login ID does not have the Admin privilege.
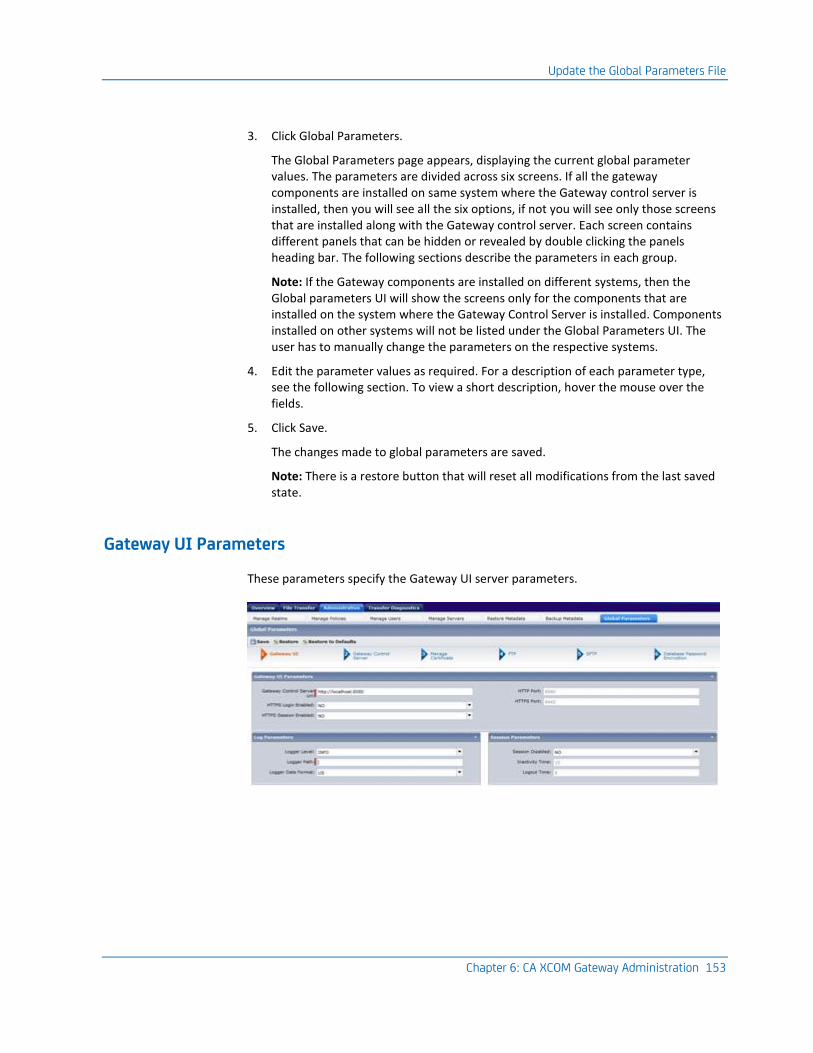
Update the Global Parameters File
Chapter 6: CA XCOM Gateway Administration 153
3. Click Global Parameters.
The Global Parameters page appears, displaying the current global parameter values. The parameters are divided across six screens. If all the gateway components are installed on same system where the Gateway control server is installed, then you will see all the six options, if not you will see only those screens that are installed along with the Gateway control server. Each screen contains different panels that can be hidden or revealed by double clicking the panels heading bar. The following sections describe the parameters in each group.
Note: If the Gateway components are installed on different systems, then the Global parameters UI will show the screens only for the components that are installed on the system where the Gateway Control Server is installed. Components installed on other systems will not be listed under the Global Parameters UI. The user has to manually change the parameters on the respective systems.
4. Edit the parameter values as required. For a description of each parameter type, see the following section. To view a short description, hover the mouse over the fields.
5. Click Save.
The changes made to global parameters are saved.
Note: There is a restore button that will reset all modifications from the last saved state.
Gateway UI Parameters
These parameters specify the Gateway UI server parameters.
Update the Global Parameters File
154 Product Guide
Gateway UI Parameters
Gateway Control Server Url
The Gateway Control Server Url specifies the url of the gateway control server.
HTTPS Login Enabled
Determines whether the HTTPS protocol is used for the login page. The network communication for the login activity happens through the HTTPS protocol if set to Yes.
HTTPS Session Enabled
Specifies whether HTTPS is used for the entire session. All network communication happens in HTTPS if set to Yes.
HTTP Port
Specifies the port that is used for the HTTP communication.
HTTPS Port
HTTPS Port specifies the port that is used for the HTTPS communication.
Log Parameters
View the Log parameters in the following section.
Session Parameters
Session Disabled
Specifies if the session timeout is disabled. If the session timeout is disabled, no session timeout occurs.
Inactivity Time
If there is no user activity, in minutes, this parameter determines the length of time a CA XCOM Gateway website session is inactive for the popup to be displayed.
Logout Time
Determines the time after which, the user is logged out after displaying inactivity popup. After the logout, the user has to log in once again before being permitted to continue.
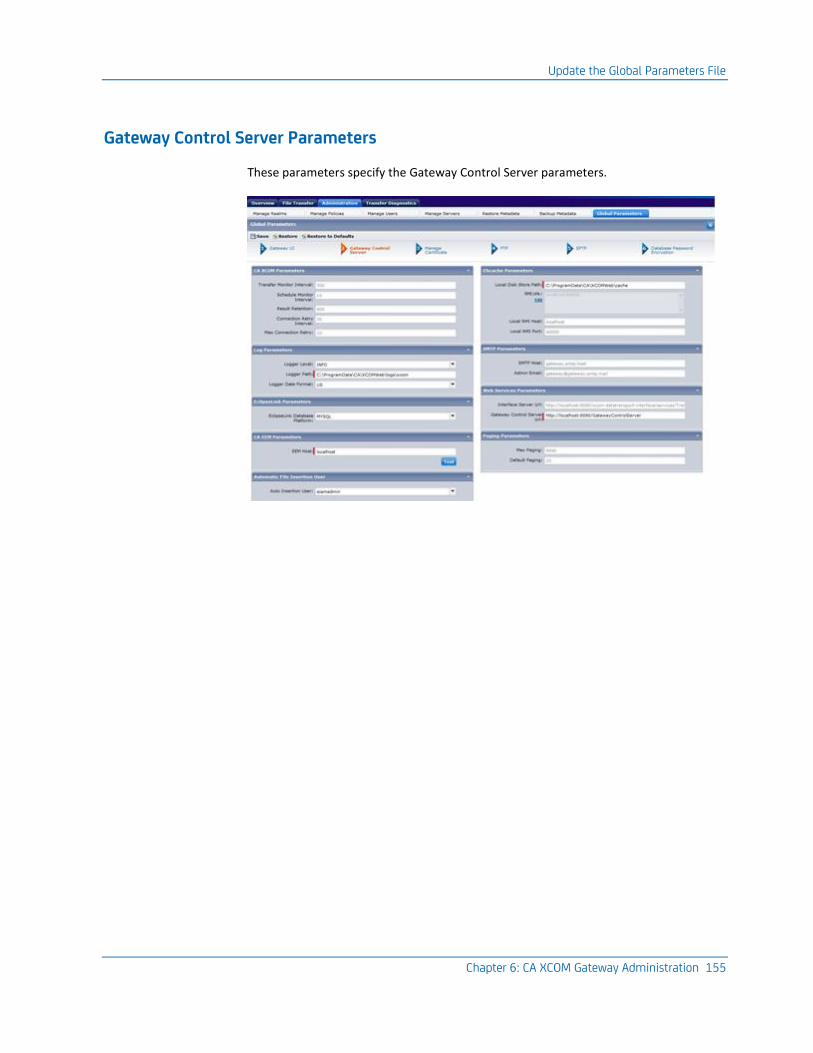
Update the Global Parameters File
Chapter 6: CA XCOM Gateway Administration 155
Gateway Control Server Parameters
These parameters specify the Gateway Control Server parameters.
Update the Global Parameters File
156 Product Guide
CA XCOM Parameters
Parameters in this group influence the way in which CA XCOM Gateway interacts with CA XCOM Data Transport when files stored by CA XCOM Gateway are to be distributed to other machines within a CA XCOM Data Transport server network.
Max Connection Retry
The maximum connection retry parameter specifies the number of attempts that should be made to connect with the local CA XCOM Data Transport server in order to initiate a transfer. After this number of attempts, the transfer is deemed to have failed. Initially, this parameter has the default value of 10.
Connection Retry Interval
The connection retry interval specifies the desired interval, in seconds, between connection attempts. Initially, this parameter has the default value of 30 seconds.
Result Retention
The result retention period specifies the time, in seconds, for which transfer scheduling status information is to be retained by CA XCOM Gateway, after it has initiated the scheduling of transfers relating to the distribution of a particular file. This time interval needs to be large enough to permit the completion of all transfer scheduling activity for all destinations. The time required depends on the number of destinations to which a file is to be sent. By default, this parameter is set to 600 seconds, which should be more than enough, unless files are to be distributed to a large number of destinations.
Schedule Monitor Interval
The schedule monitor interval specifies the interval, in seconds, at which CA XCOM Gateway should check the status of transfer scheduling requests that it has made to CA XCOM Data Transport. Initially, this parameter is set to the default value of 10 seconds. Scheduling of transfers is usually an almost instantaneous operation, so it is recommended that a small value should be used. Specifying a higher value does not impact the reliability of file transfers, but causes CA XCOM Gateway’s reporting of current transfer status to be delayed.
Transfer Monitor Interval
The transfer monitor interval specifies the interval, in seconds, at which CA XCOM Gateway should check the outcome of scheduled transfers that are either queued for processing by CA XCOM Data Transport, or that are currently active. Initially, this parameter is set to the default value of 300 seconds. The time taken to complete scheduled transfers depends on file size and the workload to which CA XCOM Data Transport servers are subjected.
Note:
■ Specifying a higher value does not impact the reliability of file transfers, but causes CA XCOM Gateway’s reporting of transfer outcomes to be delayed.
Update the Global Parameters File
Chapter 6: CA XCOM Gateway Administration 157
■ In contrast, a lower value leads to more immediate reporting of transfer outcomes, but reduces the performance of CA XCOM Gateway while transfers are pending or active, because of its need to perform more intensive monitoring.
Log Parameters
View The Log parameters in the following section.
EclipseLink Parameters
EclipseLink Database Platform
This value takes the dialect that the Gateway control server uses.
Dialect is an API that the JPA provider like EclipseLink internally invokes to interact with a specific database platform. To find the exact dialect for the database, check the following URL. By default XCOM Gateway is configured with MySQL and the following value of dialect:
The JPA dialect for MySQL: org.eclipse.persistence.platform.database.MySQLPlatform
http://www.eclipse.org/eclipselink/api/1.0/org/eclipse/persistence/platform/database/package-summary.html
CA EEM Parameters
CA XCOM Gateway requires access to a CA EEM server to authenticate users when they log in to the CA XCOM Gateway website, or attempt to access CA XCOM Gateway by using FTP or SFTP. The CA EEM parameters are used to define the CA EEM server.
The CA XCOM Gateway installer sets the CA EEM parameters initially, according to values entered during product installation. The installer can (optionally) also verify the parameters by ensuring the ability to connect to the designated server.
EEM Host
The CA EEM host name identifies the host machine of the CA EEM server that is to be used by CA XCOM Gateway.
The administrator can use the Test button to verify whether EEM is reachable. When the Test button is pressed a pop-up will be displayed showing the status.
Note: The CA EEM server always uses port 5250. So you cannot specify another port.
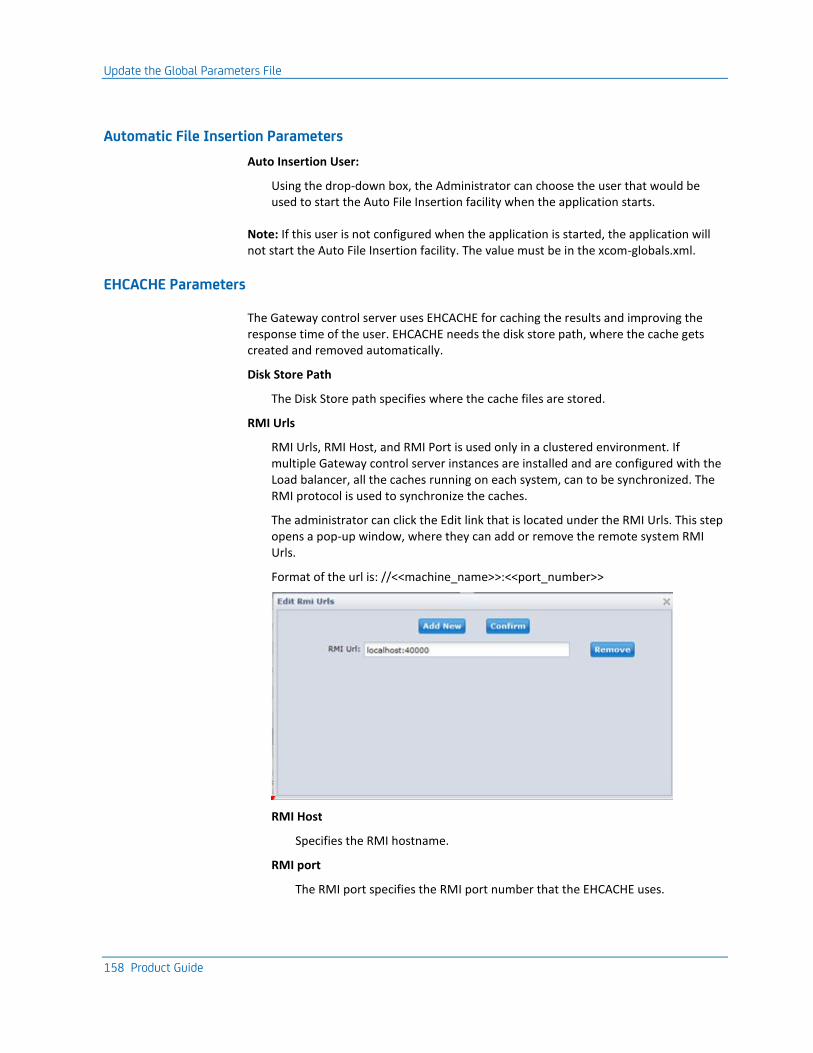
Update the Global Parameters File
158 Product Guide
Automatic File Insertion Parameters
Auto Insertion User:
Using the drop-down box, the Administrator can choose the user that would be used to start the Auto File Insertion facility when the application starts.
Note: If this user is not configured when the application is started, the application will not start the Auto File Insertion facility. The value must be in the xcom-globals.xml.
EHCACHE Parameters
The Gateway control server uses EHCACHE for caching the results and improving the response time of the user. EHCACHE needs the disk store path, where the cache gets created and removed automatically.
Disk Store Path
The Disk Store path specifies where the cache files are stored.
RMI Urls
RMI Urls, RMI Host, and RMI Port is used only in a clustered environment. If multiple Gateway control server instances are installed and are configured with the Load balancer, all the caches running on each system, can to be synchronized. The RMI protocol is used to synchronize the caches.
The administrator can click the Edit link that is located under the RMI Urls. This step opens a pop-up window, where they can add or remove the remote system RMI Urls.
Format of the url is: //<<machine_name>>:<<port_number>>
RMI Host
Specifies the RMI hostname.
RMI port
The RMI port specifies the RMI port number that the EHCACHE uses.
Update the Global Parameters File
Chapter 6: CA XCOM Gateway Administration 159
SMTP Parameters
The SMTP parameters provide values that are required when CA XCOM Gateway communicates with your SMTP server in order to deliver event notification emails to users.
SMTP Host
The SMTP host parameter specifies the host name or IP address of the machine on which the SMTP server is running. It can also, optionally, be suffixed by a colon followed by a port number, to indicate the number of the port on which the server accepts connections. If the port number is omitted, the default SMTP port (25) is assumed.
Admin Email
The admin email parameter specifies an email address to be used as the “From” email address included in all notification emails that are sent by CA XCOM Gateway. If users reply to the CA XCOM Gateway notification emails that they receive, their replies are delivered to this address.
Web Services Parameters
Interfase Server Url
This URL holds the value of the interface server web services url. This url is used for onward file delivery.
Gateway Control Server URL
This URL always points to itself. This URL is required for encrypted files, the certificate container object stores the gateway information that has encrypted the file.
Paging Parameters
Default Paging
The default number of records per page which are loaded. The default value can be set between 1 to 200.
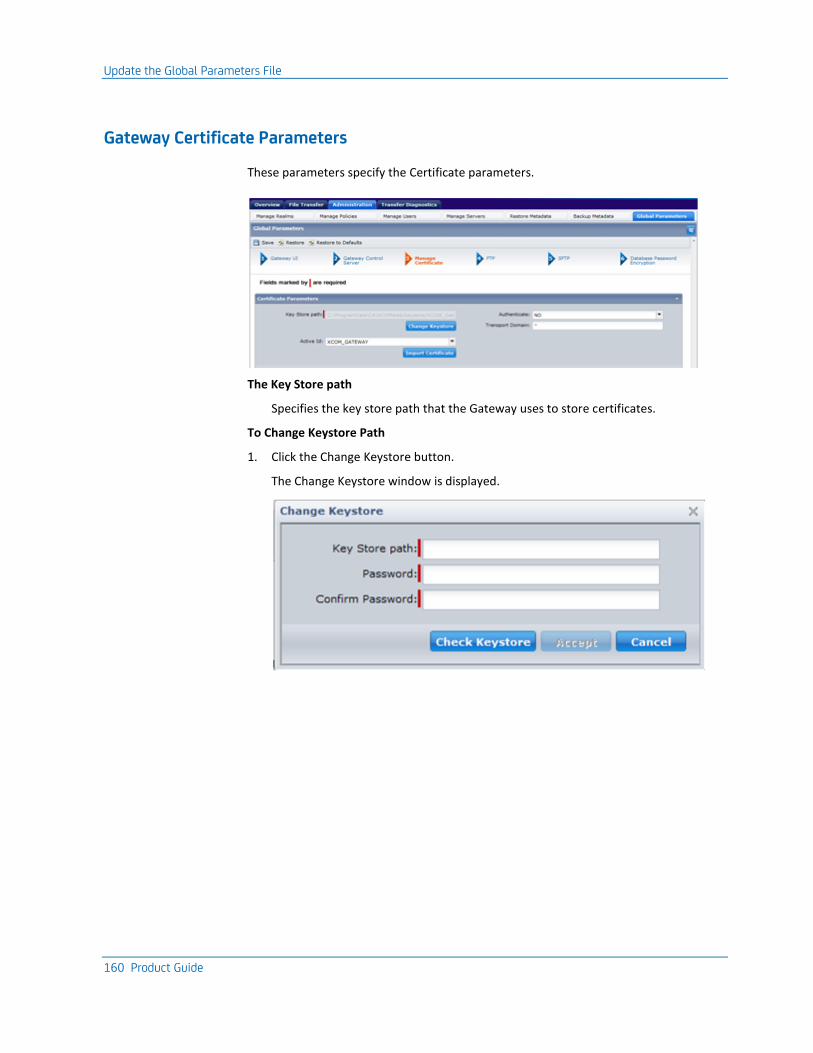
Update the Global Parameters File
160 Product Guide
Gateway Certificate Parameters
These parameters specify the Certificate parameters.
The Key Store path
Specifies the key store path that the Gateway uses to store certificates.
To Change Keystore Path
1. Click the Change Keystore button.
The Change Keystore window is displayed.
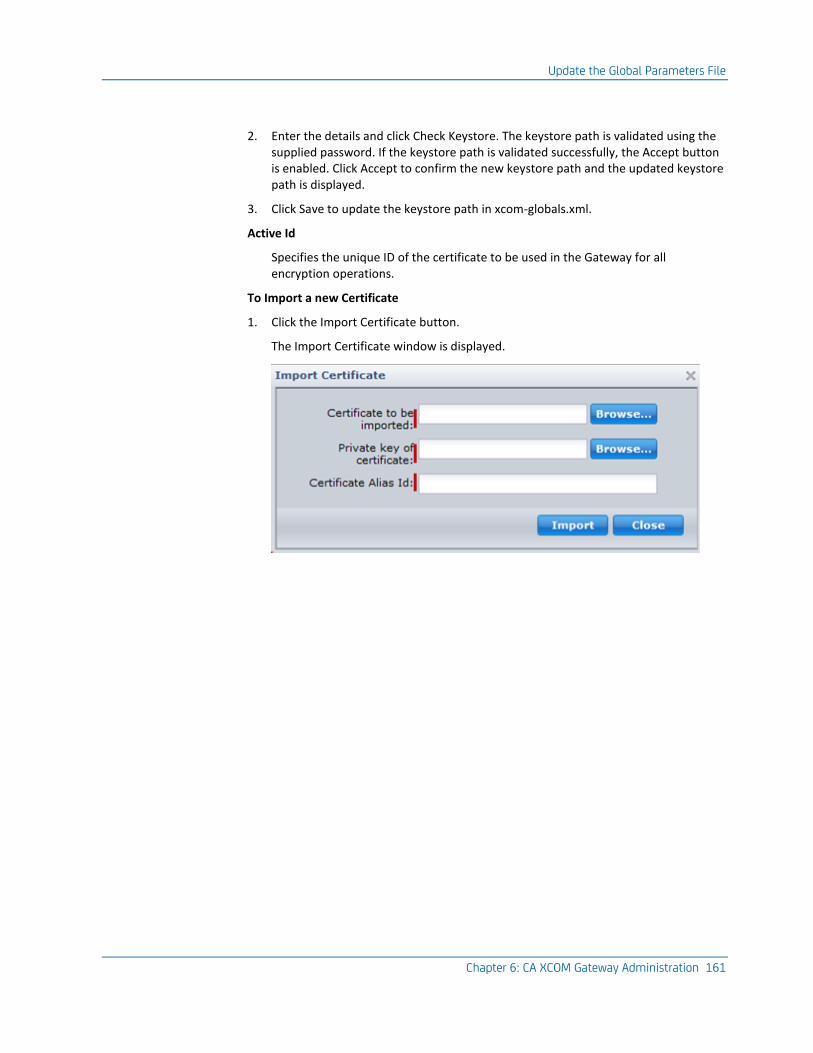
Update the Global Parameters File
Chapter 6: CA XCOM Gateway Administration 161
2. Enter the details and click Check Keystore. The keystore path is validated using the supplied password. If the keystore path is validated successfully, the Accept button is enabled. Click Accept to confirm the new keystore path and the updated keystore path is displayed.
3. Click Save to update the keystore path in xcom-globals.xml.
Active Id
Specifies the unique ID of the certificate to be used in the Gateway for all encryption operations.
To Import a new Certificate
1. Click the Import Certificate button.
The Import Certificate window is displayed.
Update the Global Parameters File
162 Product Guide
Certificate File to be Imported.
Specifies the certificate file with public key to be imported. To traverse to the file, use the browse button. The certificate file must be in PEM format.
The Private key of Certificate
Specifies the private key corresponding to the certificate. To traverse to the file, use the browse button. The private key file must be in PKCS#8 DER encoding.
Certificate Alias Id
Specify the Unique id for the certificate.
1. Select the certificate file and private key file. Enter the value for the alias id.
2. To import the certificate, click the Import button. If the import is successful, a confirmation message is displayed and the certificate id is added to the active Id list. If an error, the error message is displayed.
Note:
■ If a duplicate ID, an error message is displayed.
■ If the private key is in PEM format. The private key is converted to DER format before importing using the openssl utility. The command to change from PEM to DER format is:
openssl pkcs8 -topk8 -inform PEM -outform DER -in <path to .pem file> -out <absolute path for .der file> -nocrypt
Example:
openssl pkcs8 -topk8 -inform PEM -outform DER -in c:\private\privateKey.pem -out c:\private\privateKey.der -nocrypt
Authenticate
Specifies whether the certificate can be used for authenticating with CA XCOM Data Transport during onward transfers or not. Yes specifies the active certificate is used for the authentication.
Transfer Domain
Specifies the domain name of the identified CA XCOM Data Transport Server. The domain name that is mentioned here must match with the domain name mentioned in the active certificate.
For more information on the Certificate parameters see:
Set Up CA XCOM Data Transport Client Authentication.
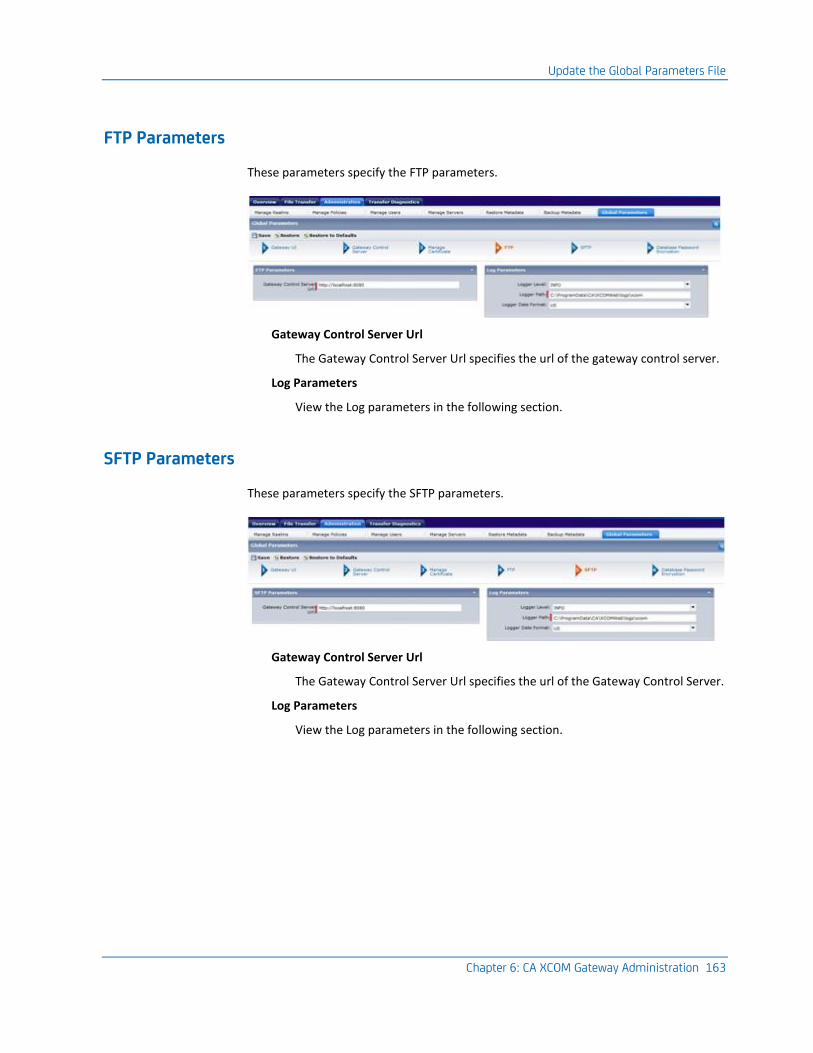
Update the Global Parameters File
Chapter 6: CA XCOM Gateway Administration 163
FTP Parameters
These parameters specify the FTP parameters.
Gateway Control Server Url
The Gateway Control Server Url specifies the url of the gateway control server.
Log Parameters
View the Log parameters in the following section.
SFTP Parameters
These parameters specify the SFTP parameters.
Gateway Control Server Url
The Gateway Control Server Url specifies the url of the Gateway Control Server.
Log Parameters
View the Log parameters in the following section.
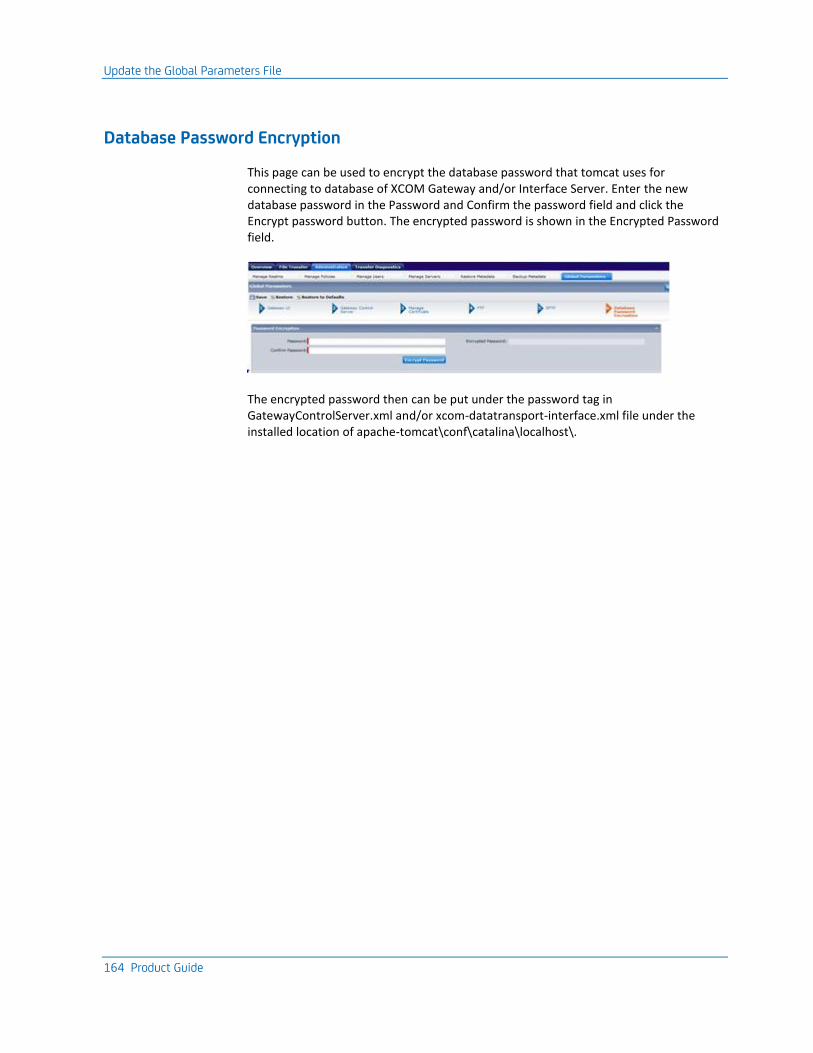
Update the Global Parameters File
164 Product Guide
Database Password Encryption
This page can be used to encrypt the database password that tomcat uses for connecting to database of XCOM Gateway and/or Interface Server. Enter the new database password in the Password and Confirm the password field and click the Encrypt password button. The encrypted password is shown in the Encrypted Password field.
The encrypted password then can be put under the password tag in GatewayControlServer.xml and/or xcom-datatransport-interface.xml file under the installed location of apache-tomcat\conf\catalina\localhost\.
Configuration for UNC
Chapter 6: CA XCOM Gateway Administration 165
Log Parameters
The log file parameter specifies the destination path of the log file that CA XCOM Gateway creates. CA XCOM Gateway creates a log file every day and the old logfile is appended with the date on which the logs were created.
The log level parameter specifies the level of information that CA XCOM Gateway is to record in the log file. Initially this parameter is set to the default value of Informational.
Debug
Log messages are recorded for all categories, as an example, debug, informational, and error messages.
Informational
Log messages are recorded for informational and error messages.
Error
Only error messages are recorded in the log.
The log date format parameter determines the format of the date that is included as the start of each message that is written to the log file. This parameter is set initially to the US default value.
US
Log messages start with the date, MM-dd-yyyy/HH:mm:ss.SSS/zzz format.
European
Log messages start with the date, yyyy-MM-dd/HH:mm:ss.SSS/zzz format.
If the date format is not mentioned, then the default of yyyy-MM-dd hh:mm is taken.
Configuration for UNC
If UNC support is not added during the installation, the administrator can do it manually later.
The product supports the jcifs jar version of 1.3.3 or later.
The jar can be downloaded from the JCIFS site http://jcifs.samba.org/.
Configuration for UNC
166 Product Guide
Inclusion of JAR in Product Installation
Four places that are updated for enabling the support for UNC.
Once these places have the jcifs jars, the product component could be restarted to have the changes take effect.
For Gateway:
Location to put the jcifs jar is:
Note: If the product has tomcat installed as an application server, then the jcifs jar is updated at the following location:
$<Product installed Location>\apache-tomcat-7.0.32\lib
If the product has any other application server, then jar is updated along with the other libraries of the application server. The server must be restarted to have this new library picked up.
For FTP:
Location to put the jcifs jar is:
$<Product installed Location>\FTP\common\lib
For SFTP:
Location to put the jcifs jar is:
$<Product installed Location>\SFTP\lib
For Export/Import Application:
Location to put the jcifs jar is:
$<Product installed Location>\CommandLineUtils\ExportImportFileLauncherApplication\repo
Chapter 7: Configuring Policies for Onward File Transfer 167
Chapter 7: Configuring Policies for Onward File Transfer
CA XCOM Gateway can retransmit the files uploaded into a policy. To enable CA XCOM Gateway to do this, you need to configure Policy Transfer XML in the policy.
This section explains how to configure Policy Transfer XML in a CA XCOM Gateway policy for automatic onward transfers.
This section contains the following topics:
Prerequisites (see page 167) Policy Configuration (see page 168) Policy Transfer XML (see page 169) Policy Transfer XML Schema (see page 170) Sample Policy Transfer XML (see page 173) Build Policy Transfer XML Using the CA XCOM Data Transport GUI (see page 175) Build Policy Transfer XML Using CA XCOM Management Center (see page 179) Copy and Import Policy Transfer XML (see page 181) Test Policy Transfer XML (see page 181) CA XCOM Data Transport Gateway Schedule Parameters (see page 184)
Prerequisites
To configure policies for onward transfers, you need to have the following software installed:
■ CA XCOM Gateway
■ CA XCOM Data Transport
■ CA XCOM Management Center (optional)

Policy Configuration
168 Product Guide
Policy Configuration
You can use the Manage Policies page to add policies to gateway.
Note: You need to have Admin authority.
To add new policies
1. Log in to CA XCOM Gateway.
The Home page appears.
2. Click Administration.
The Administration page appears.
3. Click Manage Policies.
The Manage Policies page appears.
4. Click Add New Policies.
The Add New Policy page appears.
Policy Transfer XML
Two sets of TRANSFERCONTAINER xml can be configured for a policy, to define transfers to be initiated on arrival of a new file into associated policy of CA XCOM Gateway:
■ User Delivery Script Info Tab contains the User Delivery XML which is used for files that have been uploaded by a registered user by using any supported non-XCOM protocol.
■ XCOM Delivery Script Info Tab contains the XCOM Delivery XML which is used for files that have been transferred into Gateway by using CA XCOM Data Transport.
In each case, the xml is optional and can be omitted if there is no requirement for onward data transfer of files by using the CA XCOM Data Transport. You can use the export/save facility of the CA XCOM Data Transport GUI to generate TRANSFERCONTAINER xml, after defining transfer requirements by using the GUI. The file created by this export facility can then be copied and pasted or imported into the panel on the User/XCOM Delivery Script Info step of policy configuration.
Note: The TRANSFERCONTAINER xml that is generated by the XCOM Data Transport GUI will not have LOCAL LOGON details. They need to be updated by the Gateway User manually. The Encrypt Password utility available on the Delivery XML step can be used to get the Encrypted value of Password and Key used to encrypt password. Please refer to Build Policy Transfer XML Using the CA XCOM Data Transport GUI section for details.
For more information about Policy Transfer XML, see the Policy Transfer XML section.
Policy Transfer XML
Chapter 7: Configuring Policies for Onward File Transfer 169
For more information about Policy Transfer XML fields, see the Policy Transfer XML Schema.
5. Click Save.
The new policy is added to gateway and a confirmation message is displayed.
Policy Transfer XML
When you upload a file into CA XCOM Gateway, it can be automatically distributed by using the CA XCOM Data Transport network. Every uploaded file is associated with a specific policy and CA XCOM Gateway retransmits the file according to the distribution requirements configured for that policy’s Policy Transfer XML (also known as Delivery XML). File distribution is achieved using the local CA XCOM Data Transport server, which can send the file to one or more remote server locations.
Files in CA XCOM Gateway can come from two sources, as follows:
■ They can be uploaded into CA XCOM Gateway by a gateway user, using the Web interface, Automatic File Insertion, external server, or FTP/SFTP clients.
■ They can be transferred into CA XCOM Gateway from a CA XCOM Data Transport server.
You may have different onward delivery requirements, depending on the source.
Example
You may want to distribute files that a user uploads but not forward files if they originate from CA XCOM Data Transport.
To enable this, you can configure separate Policy XML to deal with each case, as shown below. In each case, the XML is optional and can be omitted if there is no requirement for onward transfer of files by using CA XCOM Data Transport.
Delivery Transfer XML for user uploaded files
If you upload a file into CA XCOM Gateway by using the HTTP interface or external server or Automatic File Insertion or FTP/SFTP clients, then this XML will be used by CA XCOM Gateway to distribute the file.
Delivery Transfer XML for CA XCOM Data Transport uploaded files
If you transfer a file into CA XCOM Gateway by using the CA XCOM Data Transport server, then this XML will be used CA XCOM Gateway to distribute the file.
Policy Transfer XML Schema
170 Product Guide
Policy Transfer XML Schema
The Policy Transfer XML is a CA XCOM Data Transport configuration file containing the TRANSFERCONTAINER XML entity. TRANSFERCONTAINER XML is normally created using the CA XCOM Data Transport GUI or CA XCOM Management Center and does not usually need to be authored manually.
TRANSFERCONTAINER XML
The TRANSFERCONTAINER XML contains one or more TRANSFERITEMs, with each TRANSFERITEM defining all of the attributes associated with a transfer to a single destination. By including multiple TRANSFERITEMs within the TRANSFERCONTAINER you can request that a file should be distributed from CA XCOM Gateway to several locations.
The TRANSFERCONTAINER XML element contains a subelement defining a local machine. This can be any machine on which CA XCOM Data Transport is installed but, because it identifies the CA XCOM Data Transport server that will initiate the file transfer, it is usual to specify the local machine, that is, the same machine on which the CA XCOM Gateway server is running.
TRANSFERITEM XML
The TRANSFERITEM XML element contains an ACTION attribute and elements defining a local file, together with a remote file and machine. Usually, the SENDFILE action is specified, which indicates that the file is to be transferred from the local machine to the remote machine. However, it is also possible to specify a SENDJOB or SENDREPORT action, or even a RECEIVEFILE action to request the receiving of a file from the local machine to the remote machine. For more information about these actions, see the CA XCOM Data Transport User Guide.
Policy Transfer XML Schema
Chapter 7: Configuring Policies for Onward File Transfer 171
How Files Are Distributed
For Policy Transfer XML, files are always sent from the CA XCOM Gateway environment. So, for a SENDFILE, SENDJOB, or SENDREPORT action, CA XCOM Gateway always overrides the local file to identify the file within the CA XCOM Gateway environment that is to be distributed. Any local file specification within the configured Policy Transfer XML is therefore disregarded, but the configured remote machine and remote file name determine the destination of the distributed file. Similarly, for a RECEIVEFILE action, CA XCOM Gateway always overrides the remote file specification within the configured Policy Transfer XML, and the local machine and file name determine the destination of the distributed file.
To enable successful distribution, the CA XCOM Data Transport server that will be transmitting a file needs to be able to access the file from the CA XCOM Gateway realm storage area. So, for the SENDFILE, SENDJOB, and SENDREPORT actions, the local machine defined for the TRANSFERCONTAINER must specify one of the following:
■ The localhost machine (that is, the same machine that is running CA XCOM Gateway)
■ A machine whose file system can access the CA XCOM Gateway realm storage area by using network access
When using the RECEIVEFILE action, this same rule applies to the remote machine defined for the TRANSFERITEM.
Policy Transfer XML Schema
172 Product Guide
Using Symbolic Variables for Unique File Names
The remote file name (for SENDFILE, SENDJOB, or SENDREPORT) or local file name (for RECEIVEFILE) specifies the directory path and name that will be assigned to the distributed file at its destination. However, if a fixed value is specified, all files distributed for a particular policy are placed in the same directory with the same name, each replacing its predecessor. To enable each distributed file to be assigned a different name at its destination, within the Policy Transfer XML, the destination file name can include symbolic variables which CA XCOM Gateway will substitute immediately before scheduling each transfer.
Note: All Symbolic variables supported by Base XCOM can be used in the either type of the deliver XMLs. In addition to those Symbolic Variables, Gateway supports two additional symbolic variables. Refer to Base XCOM product guide for all the supported symbolic variables by Base XCOM.
&GUFILE
This is Gateway Symbolic Variable which will be replaced with the name of the file registered in Gateway Policy while scheduling the transfer to Interface Server.
&GXSUSER
This is Gateway Symbolic Variable which will indicate that Credentials of External Server are registered with Gateway and same credentials that are stored in Gateway Database will be used to connect to External Server to Export the file from Gateway Policy.
Using the Import Facility
You can use the export facility of the CA XCOM Data Transport GUI or of CA XCOM Management Center to generate TRANSFERCONTAINER XML to be used as Policy XML, after defining transfer requirements. You can then Import the XML created by this export facility into the Policy Transfer XML sections on the policy configuration screen.
Note: TRANSFERCONTAINER xml generated by XCOM Data Transport GUI will not have LOCAL LOGON details. They need to be updated by Gateway User manually. Encrypt Password utility available on the Delivery XML Tab can be used to get the Encrypted value of Password and Key used to encrypt password. Please refer to Build Policy Transfer XML Using the CA XCOM Data Transport GUI section for details.
For more information, see the following sections:
■ Build Policy Transfer XML Using the CA XCOM Data Transport GUI
■ Build Policy Transfer XML Using CA XCOM Management Center
Sample Policy Transfer XML
Chapter 7: Configuring Policies for Onward File Transfer 173
Sample Policy Transfer XML
Sample 1: Using onward delivery to deliver file to another XCOM Server.
The following is an example of Policy Transfer XML, with a TRANSFERCONTAINER containing a single TRANSFERITEM to achieve distribution to a single destination, using the SENDFILE action. Within the TRANSFERITEM, the REMOTE IPADDRESS defines the destination and, in this particular example, the target destination is the local system. Transferring a file in this way, to the local system, is termed a local-loop, because the local CA XCOM Data Transport server sends the file to itself. This provides a useful means by which additional copies of a file uploaded to CA XCOM Gateway can be created on the CA XCOM Gateway server but outside the CA XCOM Gateway environment.
<TRANSFERCONTAINER>
<DESCRIPTION>policyname</DESCRIPTION>
<LOCAL SSL="N" PORT="8044" IPADDRESS="localhost" CPUTYPE="WINDOWSNT"/>
<TRANSFERITEM ID="Item1" ACTION="SENDFILE" START="00001000000">
<DESCRIPTION>Item1</DESCRIPTION>
<LOCAL>
<FILE NAME="?"><DCB BLKSIZE="0"/></FILE>
<LOGON KEY="0E6D3C62"
PASSWORD="E148A3DA681DD20013905E882280537415725F8434814F7920744185309350"
USER="username"/>
</LOCAL>
<REMOTE PORT="8044" IPADDRESS="localhost">
<FILE NAME="c:\&GUFILE” OPTION="REPLACE"/>
<LOGON KEY="0E6D3C62"
PASSWORD="E148A3DA681DD20013905E882280537415725F8434814F7920744185309350"
USER="username"/>
</REMOTE>
</TRANSFERITEM>
</TRANSFERCONTAINER>
Note: &GUFILE is Gateway Symbolic Variable which will be replaced with the name of the file registered in Gateway Policy while scheduling the transfer to Interface Server.
Sample 2: Using Onward delivery to deliver file to External FTP/SFTP/FTPS server
Sample Policy Transfer XML
174 Product Guide
The following is an example of Policy Transfer XML, with a TRANSFERCONTAINER containing a single TRANSFERITEM to achieve distribution to External Server which is registered with Gateway and assigned to the policy, using the SENDFILE action. Within the TRANSFERITEM, the REMOTE IPADDRESS defines that External Server Name as registered with Gateway. REMOTE PROTOCOL defines the type of Server Type (FTP/SFTP/FTPS). REMOTE FILE determines the Directory path on External Server to which the File will be exported. This provides a useful means by which additional copies of a file uploaded to CA XCOM Gateway can be created on the External FTP/SFTP/FTPS Server.
<TRANSFERCONTAINER>
<DESCRIPTION>policyname</DESCRIPTION>
<LOCAL CPUTYPE="WINDOWSNT" IPADDRESS="localhost" PORT="8044" SSL="N"/>
<TRANSFERITEM ACTION="SENDFILE" ID="Item1" START="00001000000">
<DESCRIPTION>Item1</DESCRIPTION>
<LOCAL>
<FILE NAME="?">
<DCB BLKSIZE="0"/>
</FILE>
<LOGON KEY="0E6D3C62"
PASSWORD="E148A3DA681DD20013905E882280537415725F8434814F7920744185309350"
USER="username"/>
</LOCAL>
<REMOTE IPADDRESS="ESSERVER" PORT="8044" PROTOCOL="FTP">
<FILE NAME="/MyBackup/&GUFILE" OPTION="REPLACE"/>
<LOGON KEY="0E6D3C62"
PASSWORD="64E60A5A13DBF64D05E7066C14D7FB5807C9076826D8F75D12CBE96922EAF8"
USER="&GXSUSER"/>
</REMOTE>
</TRANSFERITEM>
</TRANSFERCONTAINER>
Note: &GXSUSER is Gateway Symbolic Variable which will indicate that Credentials of External Server are registered with Gateway and same credentials that are stored in Gateway Database will be used to connect to External Server to Export the file from Gateway Policy.
For a complete policy with Policy Transfer XML, see <Gateway installed dir>\Samples\policy.xml.
Build Policy Transfer XML Using the CA XCOM Data Transport GUI
Chapter 7: Configuring Policies for Onward File Transfer 175
Build Policy Transfer XML Using the CA XCOM Data Transport GUI
This section explains how to build the Policy Transfer XML using the CA XCOM Data Transport GUI.
Notes:
■ Although you can use the RECEIVEFILE action, we strongly recommend that you always use SENDFILE, SENDJOB, or SENDREPORT instead. This and subsequent sections of this chapter therefore assume the use of the SENDxxxx actions. The RECEIVEFILE action reverses the roles of the local and remote machines. When using RECEIVEFILE, all information provided below that relates to the local machine will instead apply to the remote machine and vice versa.
■ In the Policy Transfer XML, the CA XCOM Data Transport server that is used by CA XCOM Gateway to transmit the files must have access to the CA XCOM Gateway realm storage area. Typically it is the CA XCOM Gateway-allied CA XCOM Data Transport server, but it can be another CA XCOM Data Transport server that has networked file access to the realm storage area. For SENDFILE, SENDJOB, and SENDREPORT actions, this will be the local machine.
■ For SENDFILE, SENDJOB, and SENDREPORT actions, the CA XCOM Data Transport server where you want to deliver the files becomes the remote machine.
To build the Policy Transfer XML
1. Start the CA XCOM Data Transport GUI (Programs, CA, CA XCOM Data Transport, GUI)
2. Click the Schedule Transfer Tab.
The Schedule Transfer page appears. This page allows you to build transfers.
3. Click the Edit Transfer Record link.
The Edit Transfer Record page appears.
4. Select the Send File, Send Report, or Send Job action.
You need to enter the mandatory fields, such as Local File Name, Remote System, and Remote File Name.
5. (Mandatory) In the Local System Parameters for Server section, complete the following field:
File Name
CA XCOM Gateway automatically overrides this field with the name of the file uploaded, whenever it initiates the distribution of a file. You can therefore provide any value here. Typically it is set to ANY.
6. (Mandatory) In the Remote System Identification and Parameters section, complete the following fields:
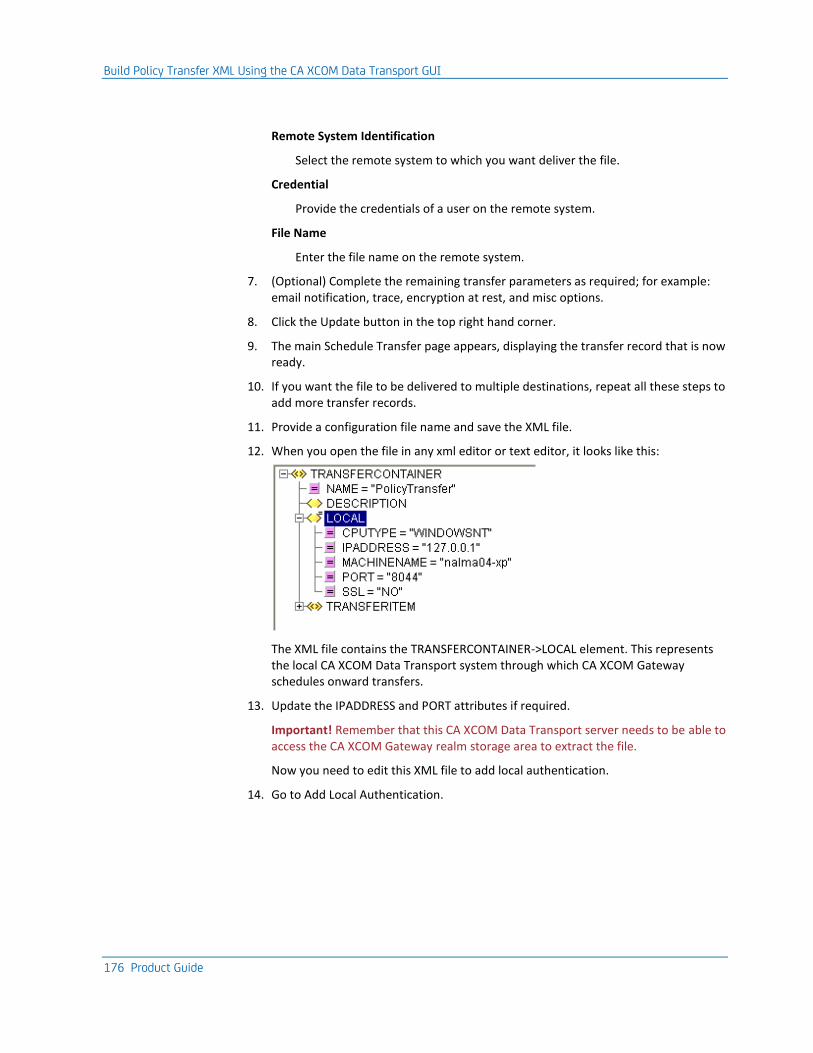
Build Policy Transfer XML Using the CA XCOM Data Transport GUI
176 Product Guide
Remote System Identification
Select the remote system to which you want deliver the file.
Credential
Provide the credentials of a user on the remote system.
File Name
Enter the file name on the remote system.
7. (Optional) Complete the remaining transfer parameters as required; for example: email notification, trace, encryption at rest, and misc options.
8. Click the Update button in the top right hand corner.
9. The main Schedule Transfer page appears, displaying the transfer record that is now ready.
10. If you want the file to be delivered to multiple destinations, repeat all these steps to add more transfer records.
11. Provide a configuration file name and save the XML file.
12. When you open the file in any xml editor or text editor, it looks like this:
The XML file contains the TRANSFERCONTAINER->LOCAL element. This represents the local CA XCOM Data Transport system through which CA XCOM Gateway schedules onward transfers.
13. Update the IPADDRESS and PORT attributes if required.
Important! Remember that this CA XCOM Data Transport server needs to be able to access the CA XCOM Gateway realm storage area to extract the file.
Now you need to edit this XML file to add local authentication.
14. Go to Add Local Authentication.
Build Policy Transfer XML Using the CA XCOM Data Transport GUI
Chapter 7: Configuring Policies for Onward File Transfer 177
Add Local Authentication
When CA XCOM Gateway schedules the onward transfer using the local CA XCOM Data Transport system, the transfer needs to be authenticated on the local CA XCOM Data Transport system before it can run. So you need to edit the Policy Transfer XML file to add local authentication, using the LOGON element.
The LOGON element needs to be inserted within the LOCAL element, and includes the attributes shown below:
<TRANSFERITEM>
<LOCAL>
<LOGON
DOMAIN="domainname" (Max 15 characters)
KEY="key" (8 hex digits)
PASSWORD="password" (62 hex digits)
PLAINPASSWORD="password" (Max 31 characters)
USER="userid"/> (Max 12 characters)
...
</LOCAL>
</TRANSFERITEM>
Notes:
■ So that the local CA XCOM Data Transport system will authenticate the transfer, you need to specify USER, PASSWORD, and DOMAIN.
■ If you set the KEY attribute, then it indicates that the password is encrypted and represented in HEX format. You can specify a plain password (unencrypted) with the attribute PLAINPASSWORD=<your plain password>. If you do not want to use a plain password, then create one more dummy transfer record in the CA XCOM Data Transport GUI, putting your USERID and PASSWORD in the remote system parameters. When you save the configuration file to a separate XML file, the CA XCOM Data Transport GUI encrypts the password and saves it to that XML file. You can then copy the KEY and PASSWORD from the dummy XML to the Policy Transfer XML.
■ You can also use the Encrypt Password option provided in the Manage Policies, User Delivery Script Info page or XCOM Delivery Script Info page. Click the Encrypt Password button provided in the bottom of the page. A new dialog will pop-up with password and confirm password field. Enter the values and click Encrypt button. The Key and Password filed will be displayed with the HEX values. Copy them and paste in the KEY and PASSWORD fields in the Policy Transfer XML.
Example
Before you add the logon element for authentication, the <LOCAL> element is as follows:
<LOCAL>
<FILE NAME="ANY"><ENCRYPTION CIPHER="NONE" HASH="NONE"/></FILE>
Build Policy Transfer XML Using the CA XCOM Data Transport GUI
178 Product Guide
<LOGON USER=""/>
</LOCAL>
After you add the logon element for authentication, the <LOCAL> element is as follows:
<LOCAL>
<FILE NAME="ANY"><ENCRYPTION CIPHER="NONE" HASH="NONE"/></FILE>
<LOGON USER="user04" DOMAIN=”dom-a01” KEY="ED2C27B5"
PASSWORD="A2A4A011419A9D15A201FC8C013F3EC7F4314AD713403ACCFF332CD80F523B"/>
</LOCAL>
Important! The user added in the LOGON element must have the privilege to extract the file from the CA XCOM Gateway policy.
Now you can copy and import the Policy Transfer XML that you have created.
Go to Copy and Import Policy Transfer XML.
Build Policy Transfer XML Using CA XCOM Management Center
Chapter 7: Configuring Policies for Onward File Transfer 179
Build Policy Transfer XML Using CA XCOM Management Center
This section explains how to build the Policy Transfer XML using CA XCOM Management Center.
Notes:
■ Although you can use the RECEIVEFILE action, we strongly recommend that you always use SENDFILE, SENDJOB, or SENDREPORT instead. This and subsequent sections of this chapter therefore assume the use of the SENDxxxx actions. The RECEIVEFILE action reverses the roles of the local and remote machines, so that the file is sent from the remote machine to the local machine. When using RECEIVEFILE, all information provided below that relates to the local machine will instead apply to the remote machine and vice versa.
■ In the Policy Transfer XML, the CA XCOM Data Transport server that is used by CA XCOM Gateway to transmit the files must have access to the CA XCOM Gateway realm storage area. Typically it is the CA XCOM Gateway-allied CA XCOM Data Transport server, but it can be another CA XCOM Data Transport server that has networked file access to the realm storage area. For SENDFILE, SENDJOB, and SENDREPORT actions, this will be the local machine.
■ For SENDFILE, SENDJOB, and SENDREPORT actions, the CA XCOM Data Transport server where you want to deliver the files becomes the remote machine.
■ You need to add the local CA XCOM Data Transport server and the remote CA XCOM Data Transport server to CA XCOM Management Center. It is assumed that you have already added users, groups, and servers, and have set users and servers to their respective groups. For more information about these admin functions, see the CA XCOM Data Transport Management Center Product Guide.
To build the Policy Transfer XML
1. Log in to CA XCOM Management Center (Programs, CA, CA XCOM Data Transport, Management Center).
2. Go to Schedule Transfer tab.
3. Click Add to add new transfer record.
The Process Transfer Records page appears.
4. Fill in the required information as follows:
Local Server Name
This is the name of the local CA XCOM Data Transport system that will be used by CA XCOM Gateway to initiate onward transfers. This system should have access to the CA XCOM Gateway storage area.
IP Name
Use the IP address of the local CA XCOM Data Transport server.
5. Click the Edit Transfer Record link.
Build Policy Transfer XML Using CA XCOM Management Center
180 Product Guide
The Edit Transfer Record page appears.
6. Select the Send File, Send Job, or Send Report action.
You need to enter the mandatory fields, such as Local File Name, Remote System, and Remote File Name.
7. (Mandatory) In the Local System Parameters section, complete the following fields:
Credential
Provide the credentials of a user on the local system.
Important! This user must have the appropriate privilege to extract files from CA XCOM Gateway policies.
File Name
CA XCOM Gateway automatically overrides this field with the name of the file uploaded, whenever it initiates the distribution of a file. You can therefore provide any value here. Typically it is set to ANY.
8. (Mandatory) In the Remote System Identification and Parameters section, complete the following fields:
Remote System Identification
Select the remote system to which you want deliver the file.
Credential
Provide the credentials of a user on the remote system.
File Name
Enter the file name on the remote system.
9. (Optional) Complete the remaining transfer parameters as required.
10. Click the Update button in the top right hand corner.
11. The main Schedule Transfer page appears, displaying the transfer record that is now ready.
12. If you want the file to be delivered to multiple destinations, repeat all these steps to add more transfer records.
13. Save the configuration file and export it.
Now you can copy and import the Policy Transfer XML that you have created.
14. Go to Copy and Import Policy Transfer XML.
Copy and Import Policy Transfer XML
Chapter 7: Configuring Policies for Onward File Transfer 181
Copy and Import Policy Transfer XML
When you have created and edited your Policy Transfer XML, you need to copy and import it.
To copy and import your Policy Transfer XML
1. Log on to CA XCOM Gateway with Admin authority.
2. Under the Admin tab, click Manage Policies.
The Manage Policies page appears.
3. Select the policy and click Edit Policy.
The Edit Policy page appears.
4. Import your Policy Transfer XML into the Policy Transfer XML sections on the policy configuration screen.
5. If the passwords are changed use the Encrypt password option provided at the bottom of the screen and update the KEY and PASSWORD values in Transfer XML.
6. Save the Policy.
Your CA XCOM Gateway Delivery Transfer XML is now configured.
Test Policy Transfer XML
To test the Policy Transfer XML, you need to do both of the following:
■ Upload a file into the CA XCOM Gateway policy, as follows:
– If Delivery Transfer XML for User Uploaded Files is set, upload the file using the Web interface or the FTP interface.
– Otherwise, use the CA XCOM Data Transport server.
In the example, the Delivery Transfer XML is set for user uploaded files, so we will upload the file using the Web interface.
■ Check the onward transfer from CA XCOM Gateway.
The following sections describe these steps.
Test Policy Transfer XML
182 Product Guide
Upload to a Policy
To upload a file to CA XCOM Gateway
Refer the individual sections to upload a file into the policy.
■ For FTP: Using CA XCOM Gateway FTP.
■ For SFTP: Using CA XCOM Gateway SSH Server.
■ For HTTP Quick Upload: Quick Upload.
■ For HTTP Regular Upload: HTTP File Upload.
■ For External Server: Import Files from External FTP/SFTP Server.
■ For Auto File Insertion: Start the watcher and drop files in Watch folder.
When you upload the file to the policy, CA XCOM Gateway automatically triggers a CA XCOM Data Transport onward transfer using Delivery Transfer XML.
Test Policy Transfer XML
Chapter 7: Configuring Policies for Onward File Transfer 183
Test the Onward Transfer
To check the CA XCOM Gateway onward transfer
1. Set up SMTP notification in the CA XCOM Gateway policy and in the Delivery Transfer XML.
You will receive email notification about the CA XCOM Gateway upload and the CA XCOM Data Transport delivery status.
2. Verify the delivery.
If you are the Gateway Administrator, navigate to the Transfer Diagnostics Tab. It will list the details of onward delivery transfer.
The easiest way is to check if file is delivered. Check the location shown as the file name under Remote System Parameters.
In our example, this is C:\delivered.txt.
3. Verify the Files Pending Download status of the policy.
When a file is uploaded, CA XCOM Gateway increments the Files Pending Download count.
4. On the local system mentioned in the Delivery Transfer XML, do the following:
a. Open the CA XCOM Data Transport GUI.
b. Go to the Get History tab.
c. Change the End Date Time to the current time and click Submit.
Some records appear, as follows:
Note:
■ CA XCOM Gateway takes some time to retransmit the file. Retry history retrieval again after some time. If you do not receive any record, verify your Delivery Transfer XML file.
■ In the example, the local CA XCOM Data Transport system and the remote CA XCOM Data Transport system both are same; so there are two records listed. If the remote CA XCOM Data Transport system is a different system, you will have only one record (SENDFILE).
d. Click the Req. No. (SENDFILE) to get the detailed history record.
e. Check the sending side details.
Note the file name, which is set by CA XCOM Gateway. While configuring the Policy Transfer XML, we had set this to ANY.
5. On the remote system mentioned in the Delivery Transfer XML, do the following:
a. Open the CA XCOM Data Transport GUI.
b. Go to the Get History tab.
c. Change the End Date Time to the current time and click Submit.
CA XCOM Data Transport Gateway Schedule Parameters
184 Product Guide
Some records appear, as follows:
Note:
■ CA XCOM Gateway takes some time to retransmit the file. Retry history retrieval again after some time. If you do not receive any record, verify your Delivery Transfer XML file.
■ In the example, the local CA XCOM Data Transport system and the remote CA XCOM Data Transport system both are same; so there are two records listed. If the local CA XCOM Data Transport system is a different system, you will have only one record (RECEIVEFILE).
d. Click the Req. No., on the row showing a transfer type of RECEIVEFILE, to get the detailed history record.
e. Check the receiving side details.
Note the file name that is delivered by CA XCOM Gateway.
CA XCOM Data Transport Gateway Schedule Parameters
The Schedule Retry Interval and Schedule Retry Limit values influence the action to be taken when CA XCOM Gateway needs to schedule a data transfer to distribute a file across the CA XCOM Data Transport server network. If CA XCOM Gateway cannot contact the local CA XCOM Data Transport server, then, in order to schedule a transfer, it retries repeatedly at the specified interval (in seconds), up to the number of times specified by the limit value. If either or both of these values are omitted, the corresponding value defined in the global parameters is used by default.
For more information about global parameters, see Global Parameters on the CA XCOM Gateway Website.
Chapter 8: File Transfer Through Command Line Utility 185
Chapter 8: File Transfer Through Command Line Utility
CA XCOM Gateway offers facility to import or export the files from gateway to external server through batch/shell script files. These external servers could be FTP/SFTP/FTPS servers.
This section explains how to configure properties file used.
This section contains the following topics:
Using the utility for file transfer (see page 186) Configuration for Transfer (see page 187)
Using the utility for file transfer
186 Product Guide
Using the utility for file transfer
CA XCOM Gateway can transfer the files through the batch/shell script that is installed with the product. The following combinations are possible through a command-line transfer.
■ From Gateway to an external server
■ From an external server to Gateway
These external servers could be an FTP, SFTP, or FTPS server, that are defined in the Gateway list of Servers by the administrator.
A place holder for all the command-line utilities in the installation is under the %INSTALL_DIR%/CommandLineUtils folder. The file transfer utility is kept under the %INSTALL_DIR%/CommandLineUtils/ExportImportFileLauncherApplication directory.
The batch/shell script files are kept in a bin folder. These script files are:
■ ExportFileLauncher:
The ExportFileLauncher is used to export a file from the gateway to an external server.
■ ImportFileLauncher
The ImportFileLauncher is used to import a file to the gateway from an external server.
These script files use the configuration file %INSTALL_DIR%/CommandLineUtils/ExportImportFileLauncherApplication/conf/serverConfiguration.properties for its inputs. The description of individual parameters that are used in this configuration file is mentioned in this chapter in later sections. A brief description is also included in the property file before each parameter.
The script files are available for both the platforms, Windows [.bat files] and Linux [.sh files]. These files can be used accordingly.
It is not necessary for these script files to connect to the local Gateway. These script files can also connect to a remote Gateway through the inputs that are provided in the configuration file.
Configuration for Transfer
Chapter 8: File Transfer Through Command Line Utility 187
Configuration for Transfer
The import/export Script files for file transfer use: %INSTALL_DIR%/CommandLineUtils/ExportImportFileLauncherApplication/conf/serverConfiguration.properties file for its inputs.
Two kinds of properties that are defined in this property file are:
■ Gateway Properties
■ External Server Properties
Gateway Properties
GATEWAY_USERNAME
Username that is used for connecting to Gateway.
GATEWAY_PASSWORD
Password of the user that is defined in the GATEWAY_USERNAME for connecting to Gateway.
FILE_NAME
The file name to Import/Export
FILE_GUID
This file GUID used only while exporting the file from Gateway.
POLICY_NAME
The policy name to Import to.
or
The policy name to Export from.
TRANSFER_PROTOCOL
The transfer protocol that is used for Import/Export.
GCS_URL
The GCS URL to connect to. If the value is null, it tries to fetch the GCS URL from the local system.
Configuration for Transfer
188 Product Guide
External Server Properties
SERVER_NAME
The name of the external server that is defined in Gateway.
SERVER_PORT
The port number for the external server that is used with variable SERVER_NAME.
USE_SERVER_CREDENTIAL_FROM_GATEWAY
This property can have two possible values.
YES - if server credentials must be used from Gateway.
NO - if server credentials must not be used from Gateway.
SERVER_USERNAME
The username that is used to connect to the external server defined in the variable SERVER_NAME.
SERVER_PASSWORD
The password of the user defined in the SERVER_USERNAME for connecting to external server that is defined in SERVER_NAME.
SERVER_FILEPATH
The path of the parent directory in the external server
To import the file from.
or
To export the file to.
Note: Path should always be terminated with a /.
Example: /gateway/
The sample property file is deployed with the installation.

Chapter 9: Using CA XCOM Gateway Through the Internet 189
Chapter 9: Using CA XCOM Gateway Through the Internet
This chapter describes how the File transfer tab can be used to do import/export to/from Gateway through the external server through HTTP or HTTPs protocol. HTTPS allows data to be transferred in encrypted form.
Select a policy before you transfer a file.
You can upload files by transferring them to the staging area. Files in this area are staged files. These staged files are available for transfer downloading.
Note:
■ You can select multiple policies for file transfer.
■ You can import a maximum of ten files at a time while importing through the HTTP protocol.
This section contains the following topics:
Quick Upload (see page 190) Quick Download (see page 192) Open Policy in New Tab (see page 194)
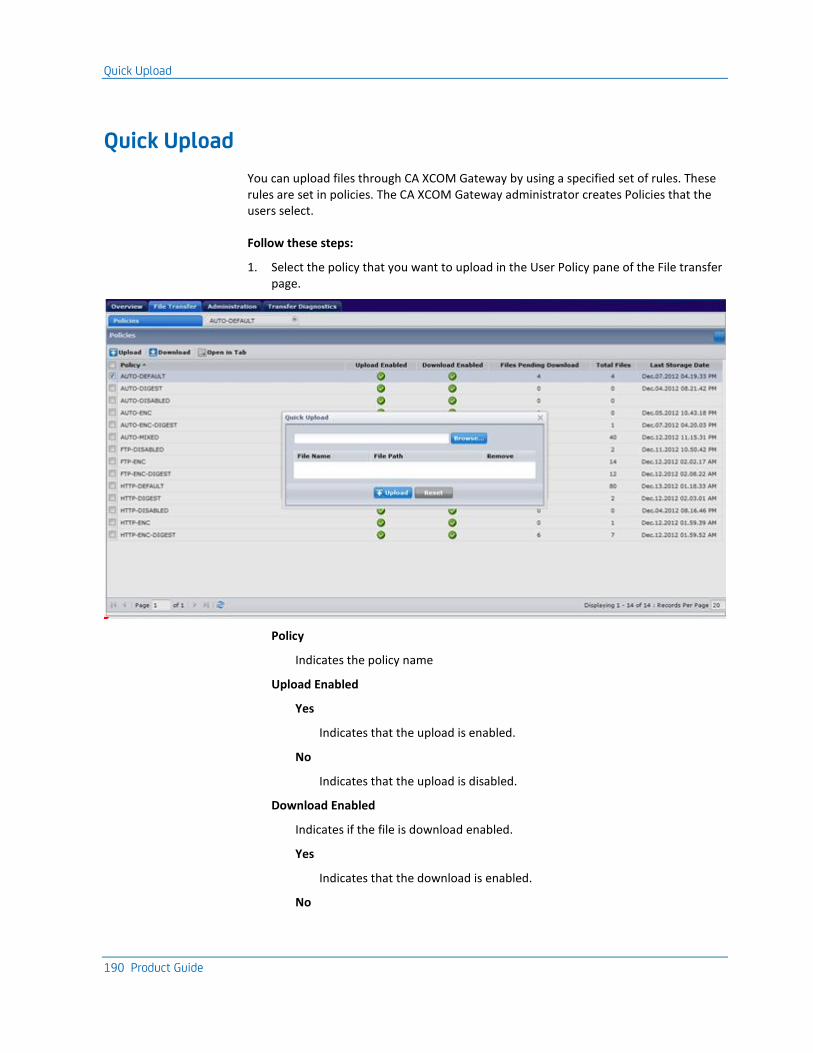
Quick Upload
190 Product Guide
Quick Upload
You can upload files through CA XCOM Gateway by using a specified set of rules. These rules are set in policies. The CA XCOM Gateway administrator creates Policies that the users select.
Follow these steps:
1. Select the policy that you want to upload in the User Policy pane of the File transfer page.
Policy
Indicates the policy name
Upload Enabled
Yes
Indicates that the upload is enabled.
No
Indicates that the upload is disabled.
Download Enabled
Indicates if the file is download enabled.
Yes
Indicates that the download is enabled.
No

Quick Upload
Chapter 9: Using CA XCOM Gateway Through the Internet 191
Indicates that the download is disabled.
Files Pending Download
Displays the number of files that are pending for download in the respective policy for the user logged.
Total Files
Displays the total number of files available for download in the policy.
Last Storage Date
Displays the date that the file was last stored in the staging area.
2. Click the Upload button.
The Quick Upload file to the CA XCOM Gateway window appears.
3. In the Upload File, click Browse and select a file. The selected file is displayed in a grid.
4. Click the Upload button.
An information message displays the status of the upload in the Uload Manager, as follows:
■ For a successful upload, a confirmation message appears:
■ For an unsuccessful upload, an error message appears.
■ The progress of the uploads is also displayed in the Import Manager.
Note:
■ The Upload Enabled field must be set to Yes before you use it to upload a file. If the Upload Enabled field is set to No, contact your CA XCOM Gateway administrator.
■ You can click Cancel at any time to cancel this procedure.
■ Using the HTTP quick upload, the user can upload only five files at a time for a policy. The following alert message will be shown to the user in case of a violation.
■
More Information:
CA XCOM Gateway Messages

Quick Download
192 Product Guide
Quick Download
You can download files through CA XCOM Gateway by using a specified set of rules. These rules are set in policies. Policies are created by your CA XCOM Gateway administrator and can be selected by users.
Follow these steps:
Note: A policy must be download enabled before it can be used for downloading a file. If the Download Enabled field is set to No, contact your CA XCOM Gateway administrator.
1. Click Check Box next to the policy that will facilitate the downloading of your file.
Policy
Indicates the Policy Name
Upload Enabled
Yes
Indicates that the upload is enabled.
No
Indicates that the upload is disabled.
Download Enabled
Indicates if the file is Download Enabled.
Yes
Indicates that the download is enabled.
No
Indicates that the download is disabled.
Files Pending Download
Displays the number of files that are pending for download in the policy for the user logged in.
Total Files
Displays the total number of files available for download in the policy.
Last Storage Date
Displays the date that the file was last stored in the staging area.
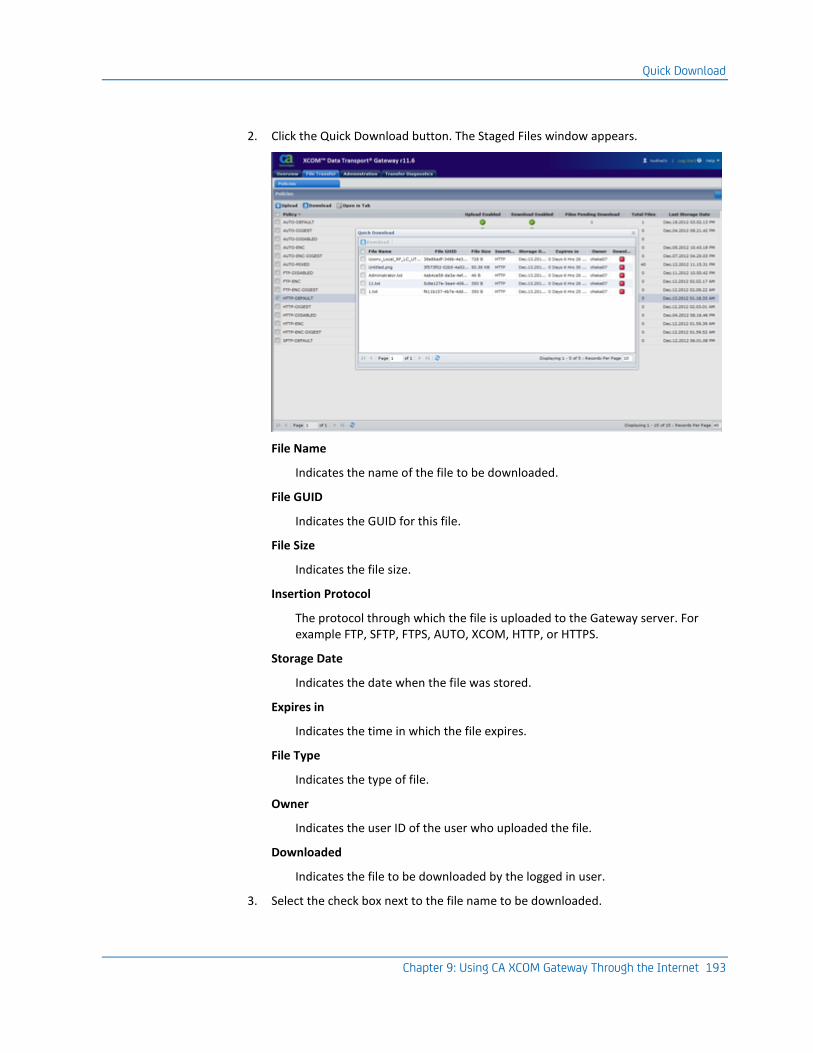
Quick Download
Chapter 9: Using CA XCOM Gateway Through the Internet 193
2. Click the Quick Download button. The Staged Files window appears.
File Name
Indicates the name of the file to be downloaded.
File GUID
Indicates the GUID for this file.
File Size
Indicates the file size.
Insertion Protocol
The protocol through which the file is uploaded to the Gateway server. For example FTP, SFTP, FTPS, AUTO, XCOM, HTTP, or HTTPS.
Storage Date
Indicates the date when the file was stored.
Expires in
Indicates the time in which the file expires.
File Type
Indicates the type of file.
Owner
Indicates the user ID of the user who uploaded the file.
Downloaded
Indicates the file to be downloaded by the logged in user.
3. Select the check box next to the file name to be downloaded.
Open Policy in New Tab
194 Product Guide
4. Click the Download icon.
The File Download window appears.
5. Click Save.
Note:
■ After the download is complete, returning to the File Transfer page shows that the value for the Files Pending Download has been reduced by one.
More Information:
CA XCOM Gateway Messages
Open Policy in New Tab
On the file transfer page, you can view the policy details in a separate tab.
To open the policy in a new tab, double-click the policy or check mark a policy. Then click Open in the Tab button in the toolbar.
Each policy page has three sections:
■ File upload using HTTP (Upload File from the local system)
■ View assigned FTP/SFTP servers (The import files from the external server)
■ View staged files in the policy (Staged Files).
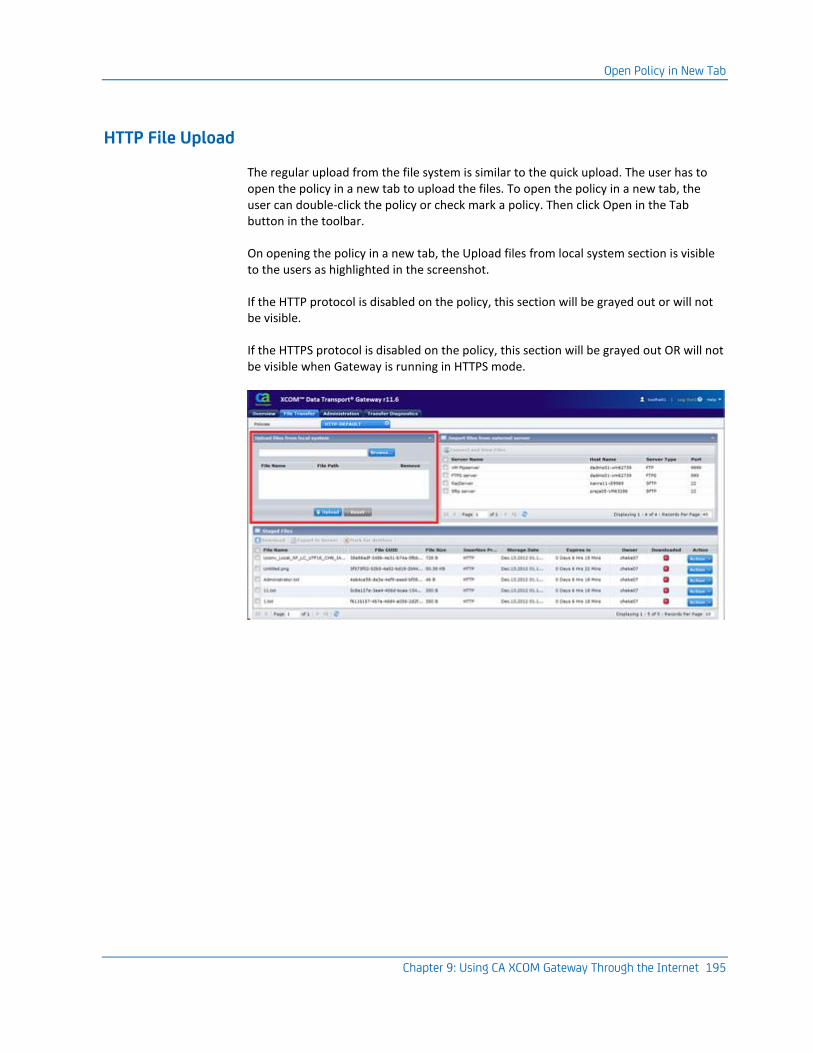
Open Policy in New Tab
Chapter 9: Using CA XCOM Gateway Through the Internet 195
HTTP File Upload
The regular upload from the file system is similar to the quick upload. The user has to open the policy in a new tab to upload the files. To open the policy in a new tab, the user can double-click the policy or check mark a policy. Then click Open in the Tab button in the toolbar.
On opening the policy in a new tab, the Upload files from local system section is visible to the users as highlighted in the screenshot.
If the HTTP protocol is disabled on the policy, this section will be grayed out or will not be visible.
If the HTTPS protocol is disabled on the policy, this section will be grayed out OR will not be visible when Gateway is running in HTTPS mode.
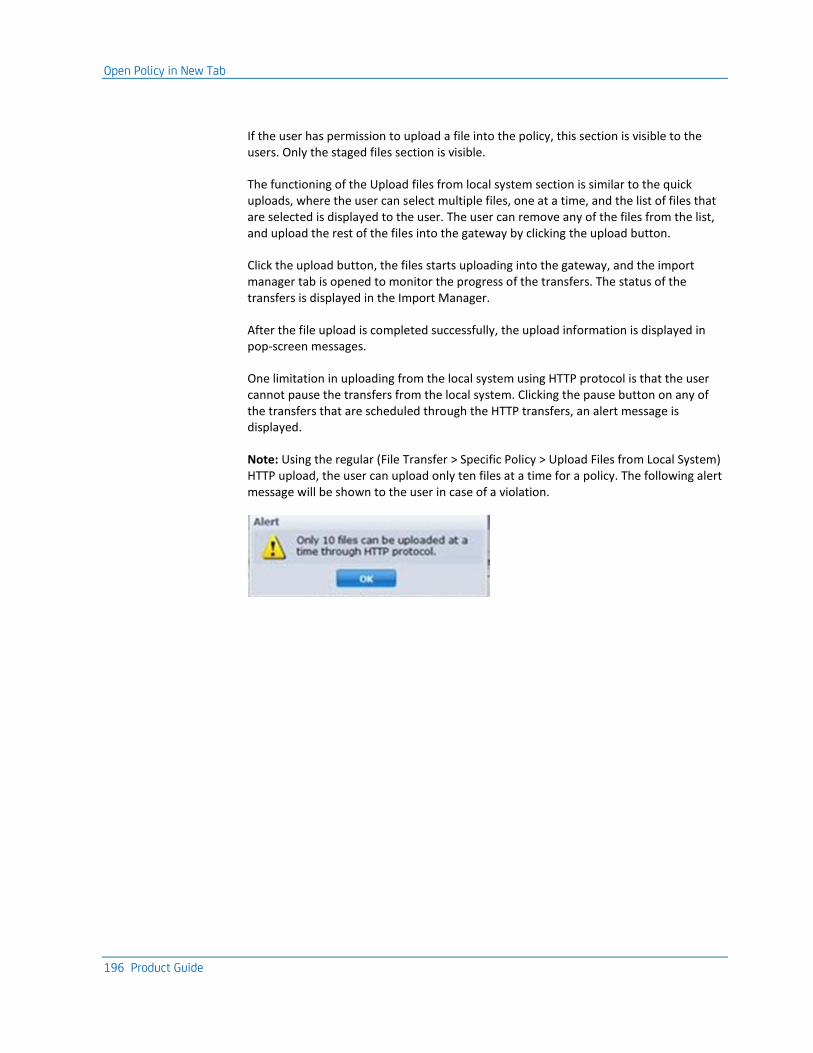
Open Policy in New Tab
196 Product Guide
If the user has permission to upload a file into the policy, this section is visible to the users. Only the staged files section is visible.
The functioning of the Upload files from local system section is similar to the quick uploads, where the user can select multiple files, one at a time, and the list of files that are selected is displayed to the user. The user can remove any of the files from the list, and upload the rest of the files into the gateway by clicking the upload button.
Click the upload button, the files starts uploading into the gateway, and the import manager tab is opened to monitor the progress of the transfers. The status of the transfers is displayed in the Import Manager.
After the file upload is completed successfully, the upload information is displayed in pop-screen messages.
One limitation in uploading from the local system using HTTP protocol is that the user cannot pause the transfers from the local system. Clicking the pause button on any of the transfers that are scheduled through the HTTP transfers, an alert message is displayed.
Note: Using the regular (File Transfer > Specific Policy > Upload Files from Local System) HTTP upload, the user can upload only ten files at a time for a policy. The following alert message will be shown to the user in case of a violation.
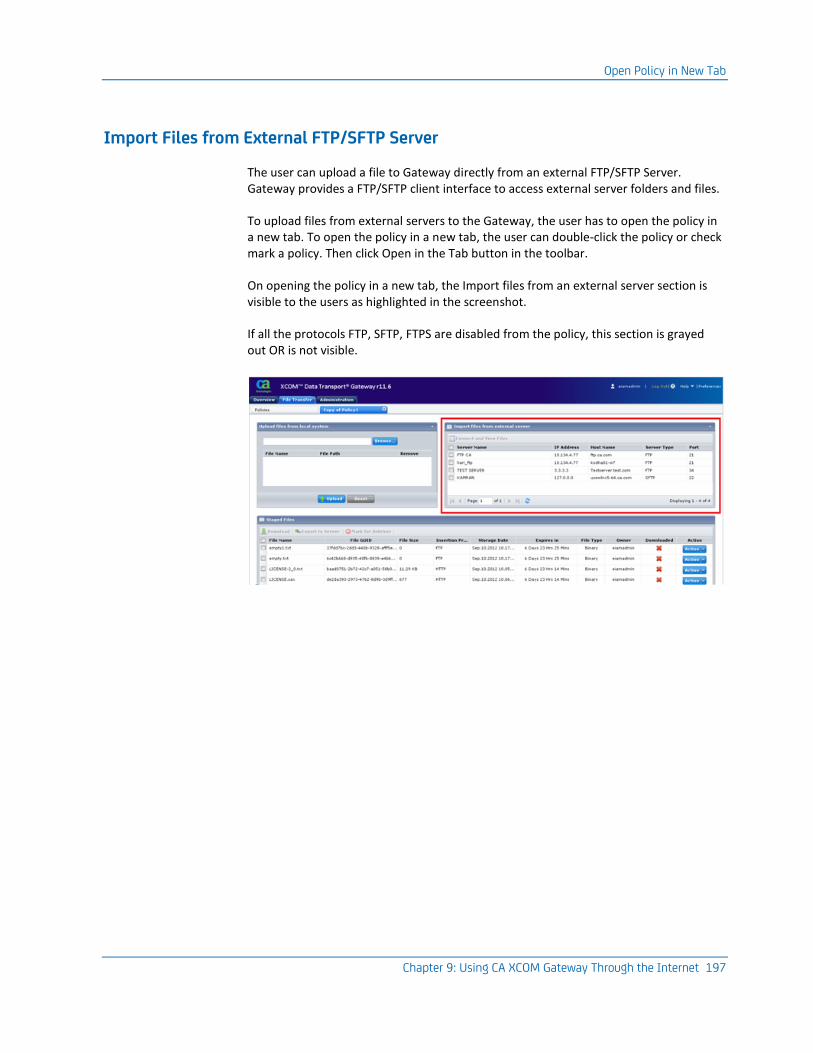
Open Policy in New Tab
Chapter 9: Using CA XCOM Gateway Through the Internet 197
Import Files from External FTP/SFTP Server
The user can upload a file to Gateway directly from an external FTP/SFTP Server. Gateway provides a FTP/SFTP client interface to access external server folders and files.
To upload files from external servers to the Gateway, the user has to open the policy in a new tab. To open the policy in a new tab, the user can double-click the policy or check mark a policy. Then click Open in the Tab button in the toolbar.
On opening the policy in a new tab, the Import files from an external server section is visible to the users as highlighted in the screenshot.
If all the protocols FTP, SFTP, FTPS are disabled from the policy, this section is grayed out OR is not visible.

Open Policy in New Tab
198 Product Guide
Note: If the user has permission to upload a file into the policy, this section is visible to the users. Else only the staged files section is visible.
Server Name
Indicates the name of the external server.
Host Name
Indicates the name of the machine hosting the external server.
Server Type
Indicates the Protocol of the external server.
Port No
Indicates the Port No of the external server.
1. Select the check box next to the external server name from which file has to be imported.
2. Click the Connect and View files toolbar button.
3. If the server is preconfigured with the user credentials, then the Listing Files Window appears as shown.
4. If the external server is not preconfigured with the user credentials, a login window appears to the user as shown.
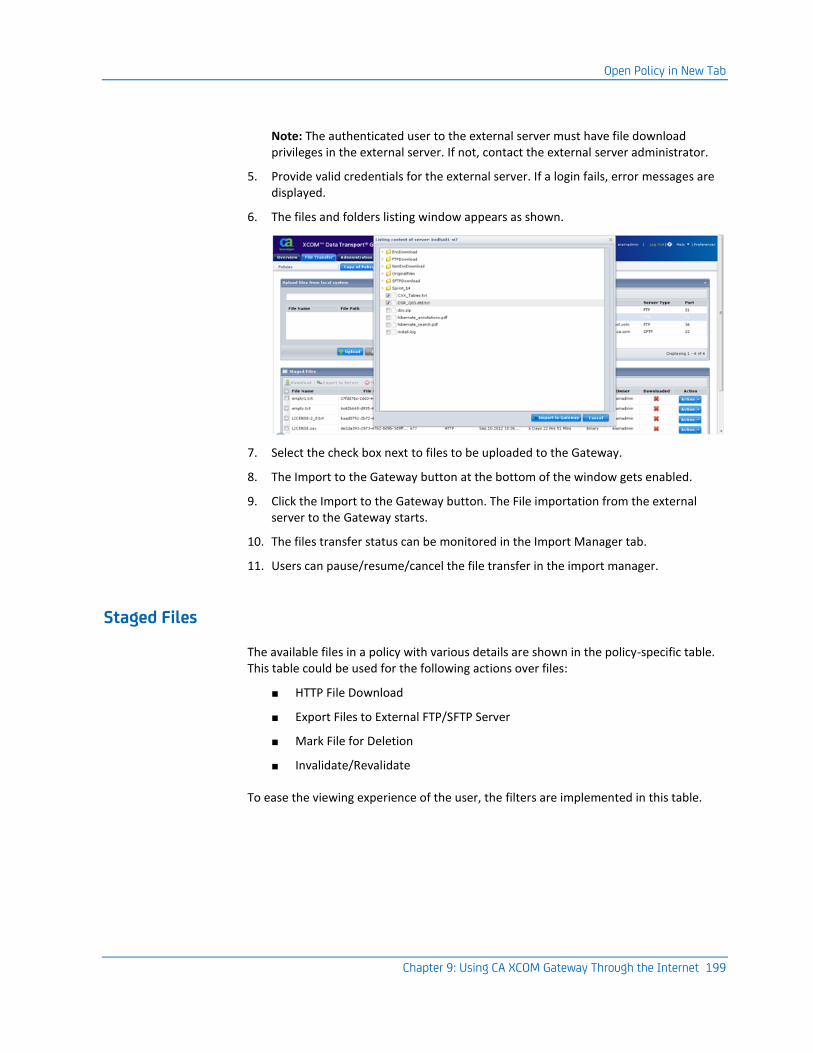
Open Policy in New Tab
Chapter 9: Using CA XCOM Gateway Through the Internet 199
Note: The authenticated user to the external server must have file download privileges in the external server. If not, contact the external server administrator.
5. Provide valid credentials for the external server. If a login fails, error messages are displayed.
6. The files and folders listing window appears as shown.
7. Select the check box next to files to be uploaded to the Gateway.
8. The Import to the Gateway button at the bottom of the window gets enabled.
9. Click the Import to the Gateway button. The File importation from the external server to the Gateway starts.
10. The files transfer status can be monitored in the Import Manager tab.
11. Users can pause/resume/cancel the file transfer in the import manager.
Staged Files
The available files in a policy with various details are shown in the policy-specific table. This table could be used for the following actions over files:
■ HTTP File Download
■ Export Files to External FTP/SFTP Server
■ Mark File for Deletion
■ Invalidate/Revalidate
To ease the viewing experience of the user, the filters are implemented in this table.

Open Policy in New Tab
200 Product Guide
Filters in Staged Files
Staged Files and the Transfer diagnostics are only two features in Gateway, which support the Filter facility.
Filters allow the end user to filter the records depending on some particular conditions, not all fields can be filtered out. To figure out the columns that support filters, the users can click the top right corner of each column to verify if the Filters option is listed in the context menu. If the Filters option is visible, then depending on the column data type, the user is shown either:
■ Text Filter
■ The user must input the characters to filter the records depending on the value that is entered for the specific column.
■ Date Filter
■ The date filter will display before, on and after options.
■ List Filter
■ The user cannot enter any value. They have to select value from a fixed set of values.
To remove a filter, the user can unselect the Filters checkbox.
The user can use multiple filters at a time.
The column headers are displayed in italics, where the Filters are currently applied.
The following columns are shown in this table and few of those have filtering facility.
■ File Name [Filter available]
■ File GUID [Filter available]
■ File Size
■ Insertion Protocol [Filter available]
■ Storage Date [Filter available]
■ Expires in [Filter available]
■ File Type
■ Owner [Filter available]
■ Downloaded
■ Action
All those columns where filters are available could be used to reduce the number of records shown. The snapshot for using the filters is shown.
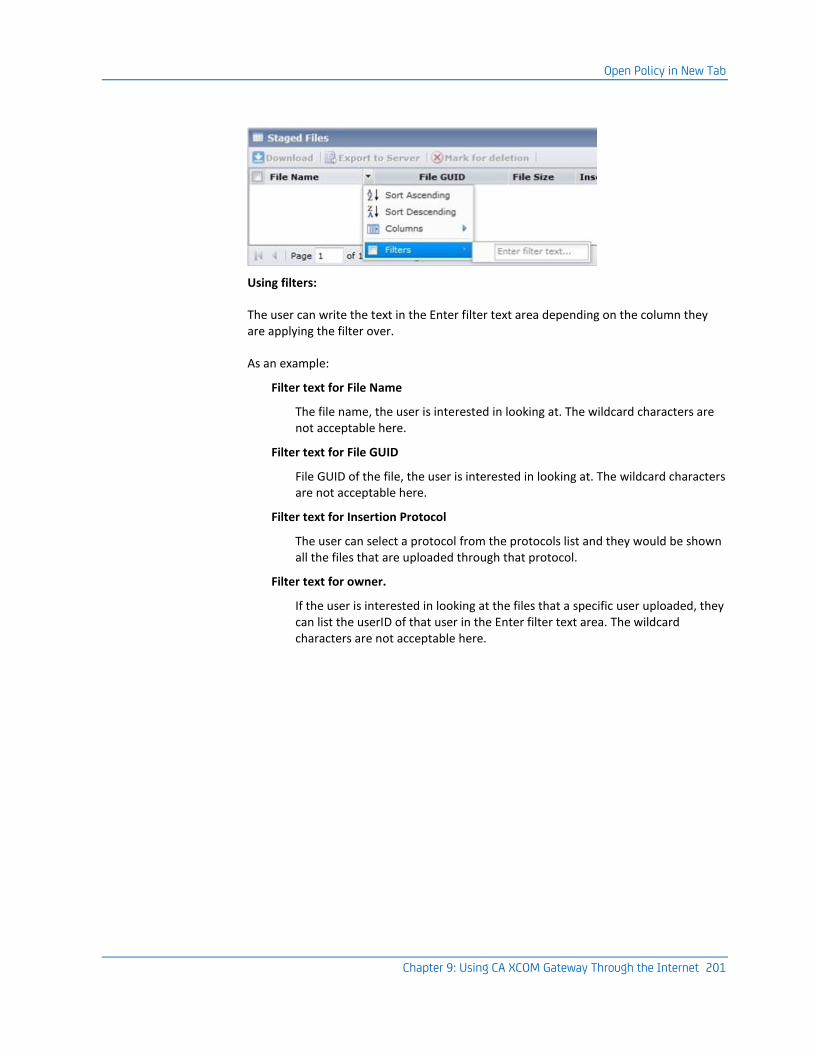
Open Policy in New Tab
Chapter 9: Using CA XCOM Gateway Through the Internet 201
Using filters:
The user can write the text in the Enter filter text area depending on the column they are applying the filter over.
As an example:
Filter text for File Name
The file name, the user is interested in looking at. The wildcard characters are not acceptable here.
Filter text for File GUID
File GUID of the file, the user is interested in looking at. The wildcard characters are not acceptable here.
Filter text for Insertion Protocol
The user can select a protocol from the protocols list and they would be shown all the files that are uploaded through that protocol.
Filter text for owner.
If the user is interested in looking at the files that a specific user uploaded, they can list the userID of that user in the Enter filter text area. The wildcard characters are not acceptable here.
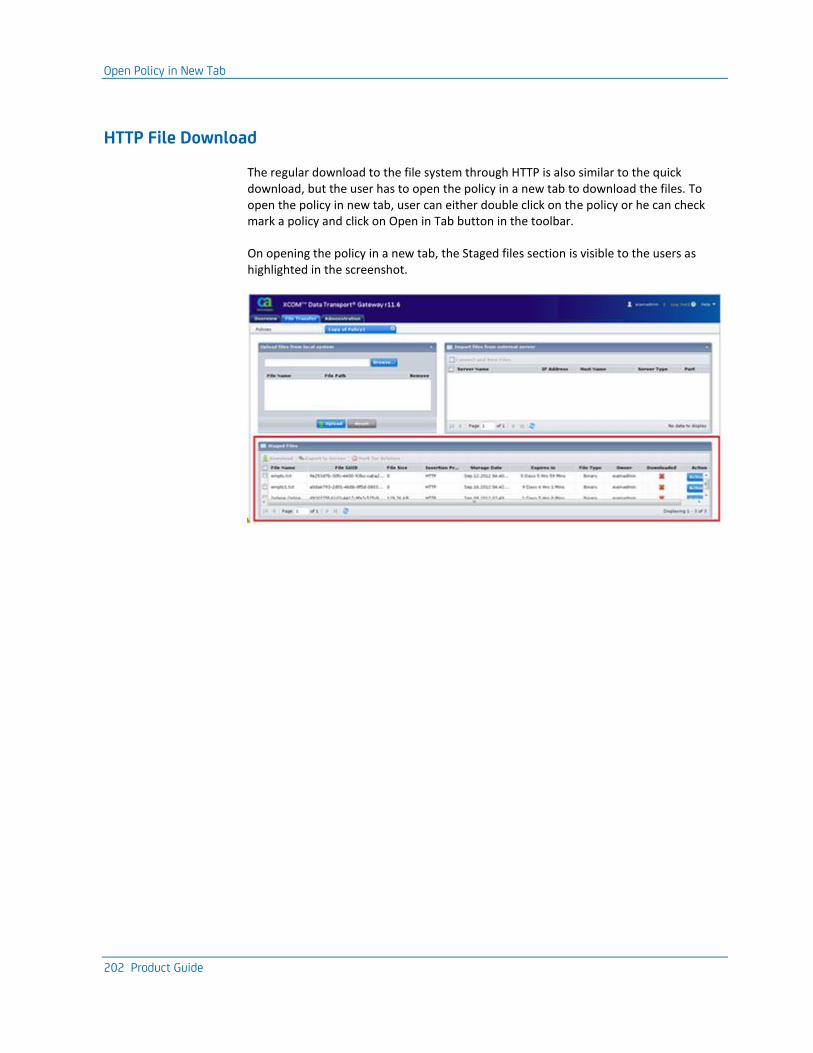
Open Policy in New Tab
202 Product Guide
HTTP File Download
The regular download to the file system through HTTP is also similar to the quick download, but the user has to open the policy in a new tab to download the files. To open the policy in new tab, user can either double click on the policy or he can check mark a policy and click on Open in Tab button in the toolbar.
On opening the policy in a new tab, the Staged files section is visible to the users as highlighted in the screenshot.
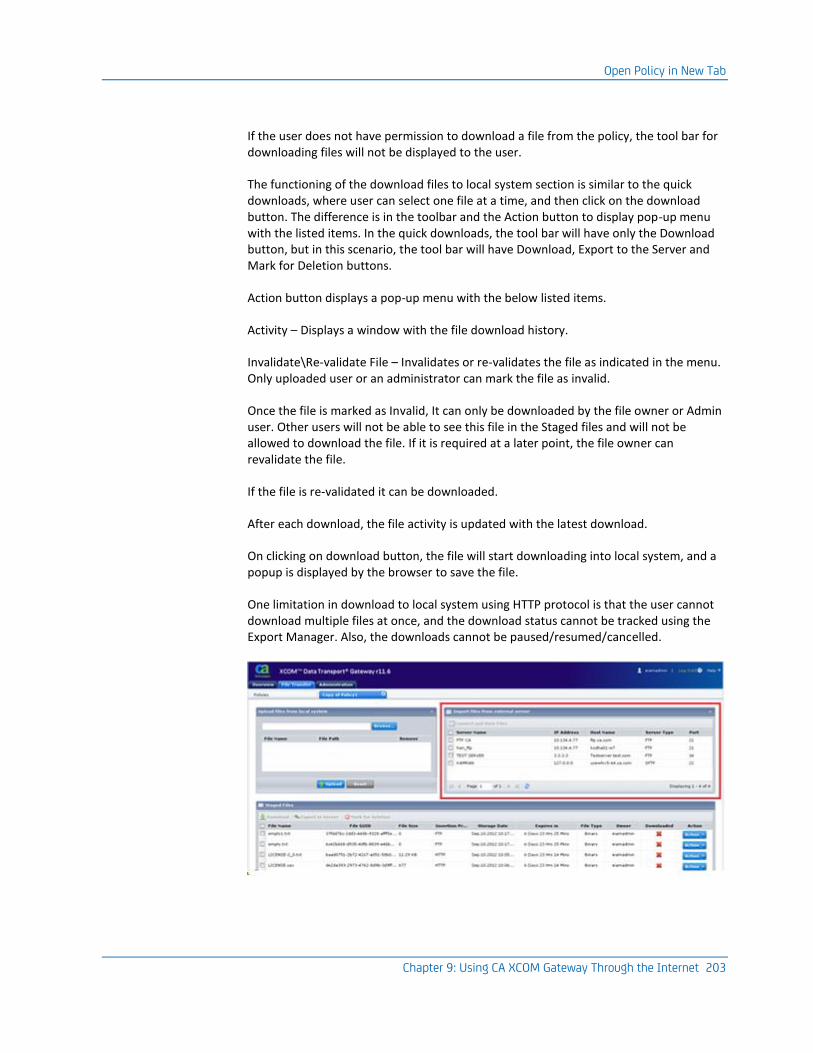
Open Policy in New Tab
Chapter 9: Using CA XCOM Gateway Through the Internet 203
If the user does not have permission to download a file from the policy, the tool bar for downloading files will not be displayed to the user.
The functioning of the download files to local system section is similar to the quick downloads, where user can select one file at a time, and then click on the download button. The difference is in the toolbar and the Action button to display pop-up menu with the listed items. In the quick downloads, the tool bar will have only the Download button, but in this scenario, the tool bar will have Download, Export to the Server and Mark for Deletion buttons.
Action button displays a pop-up menu with the below listed items.
Activity – Displays a window with the file download history.
Invalidate\Re-validate File – Invalidates or re-validates the file as indicated in the menu. Only uploaded user or an administrator can mark the file as invalid.
Once the file is marked as Invalid, It can only be downloaded by the file owner or Admin user. Other users will not be able to see this file in the Staged files and will not be allowed to download the file. If it is required at a later point, the file owner can revalidate the file.
If the file is re-validated it can be downloaded.
After each download, the file activity is updated with the latest download.
On clicking on download button, the file will start downloading into local system, and a popup is displayed by the browser to save the file.
One limitation in download to local system using HTTP protocol is that the user cannot download multiple files at once, and the download status cannot be tracked using the Export Manager. Also, the downloads cannot be paused/resumed/cancelled.
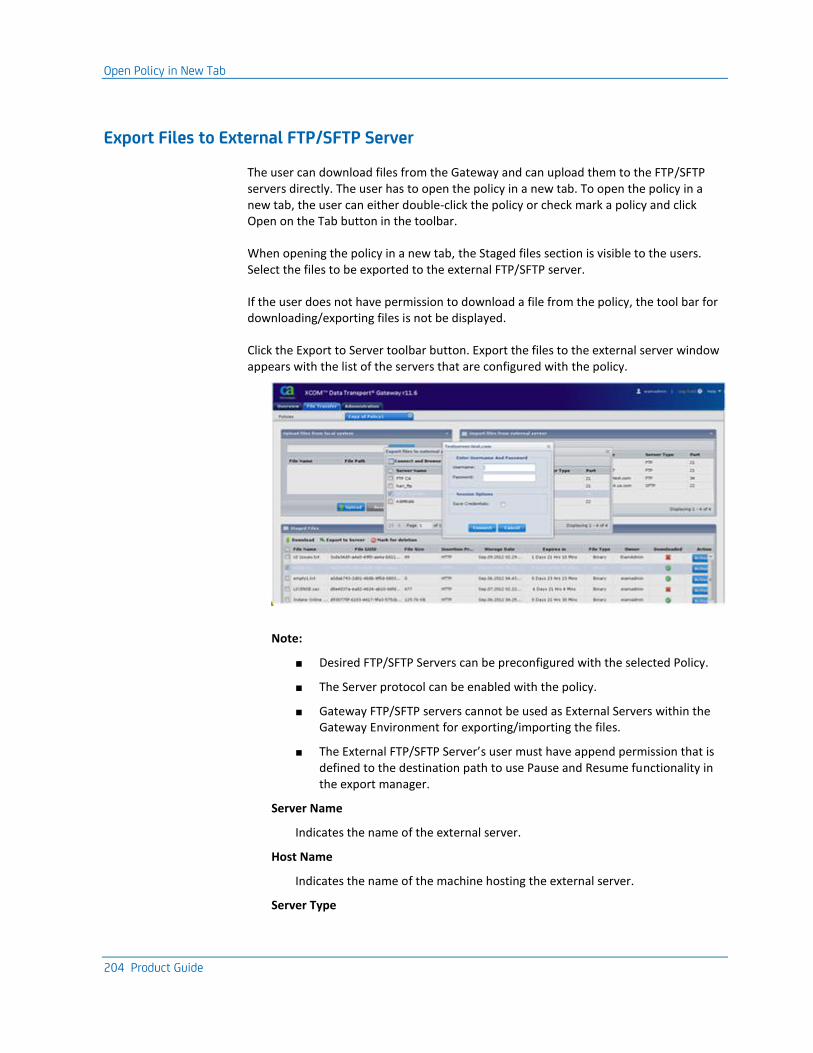
Open Policy in New Tab
204 Product Guide
Export Files to External FTP/SFTP Server
The user can download files from the Gateway and can upload them to the FTP/SFTP servers directly. The user has to open the policy in a new tab. To open the policy in a new tab, the user can either double-click the policy or check mark a policy and click Open on the Tab button in the toolbar.
When opening the policy in a new tab, the Staged files section is visible to the users. Select the files to be exported to the external FTP/SFTP server.
If the user does not have permission to download a file from the policy, the tool bar for downloading/exporting files is not be displayed.
Click the Export to Server toolbar button. Export the files to the external server window appears with the list of the servers that are configured with the policy.
Note:
■ Desired FTP/SFTP Servers can be preconfigured with the selected Policy.
■ The Server protocol can be enabled with the policy.
■ Gateway FTP/SFTP servers cannot be used as External Servers within the Gateway Environment for exporting/importing the files.
■ The External FTP/SFTP Server’s user must have append permission that is defined to the destination path to use Pause and Resume functionality in the export manager.
Server Name
Indicates the name of the external server.
Host Name
Indicates the name of the machine hosting the external server.
Server Type
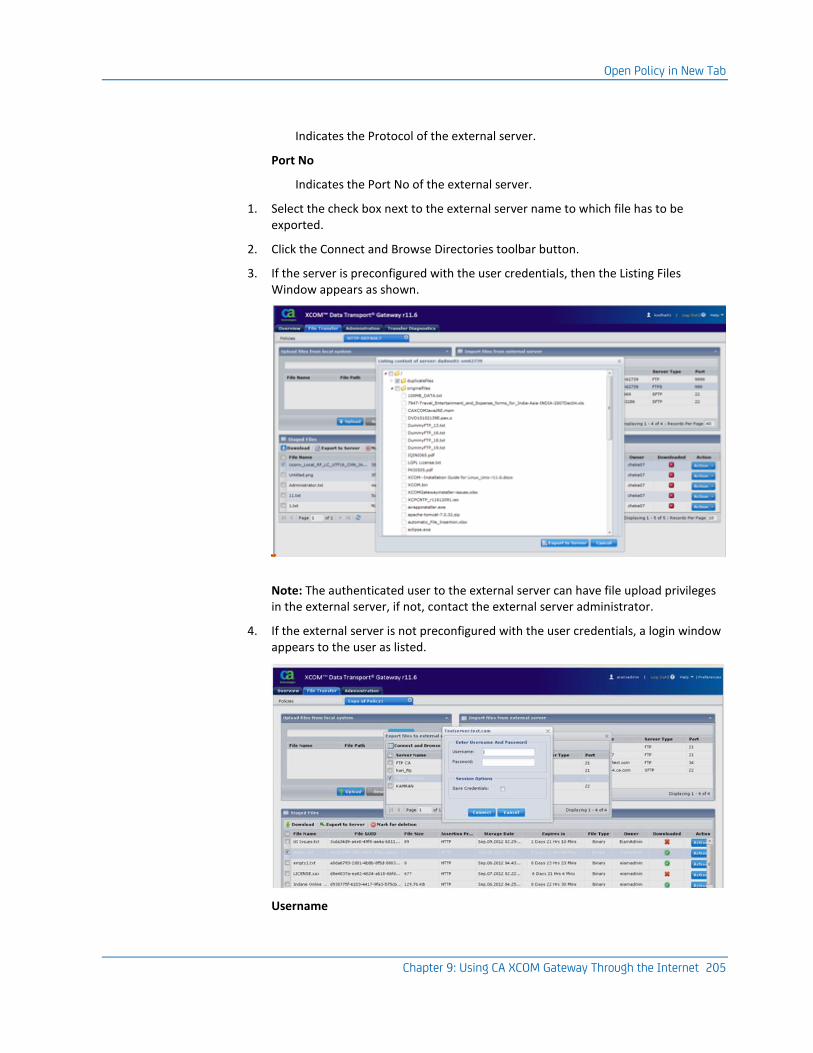
Open Policy in New Tab
Chapter 9: Using CA XCOM Gateway Through the Internet 205
Indicates the Protocol of the external server.
Port No
Indicates the Port No of the external server.
1. Select the check box next to the external server name to which file has to be exported.
2. Click the Connect and Browse Directories toolbar button.
3. If the server is preconfigured with the user credentials, then the Listing Files Window appears as shown.
Note: The authenticated user to the external server can have file upload privileges in the external server, if not, contact the external server administrator.
4. If the external server is not preconfigured with the user credentials, a login window appears to the user as listed.
Username
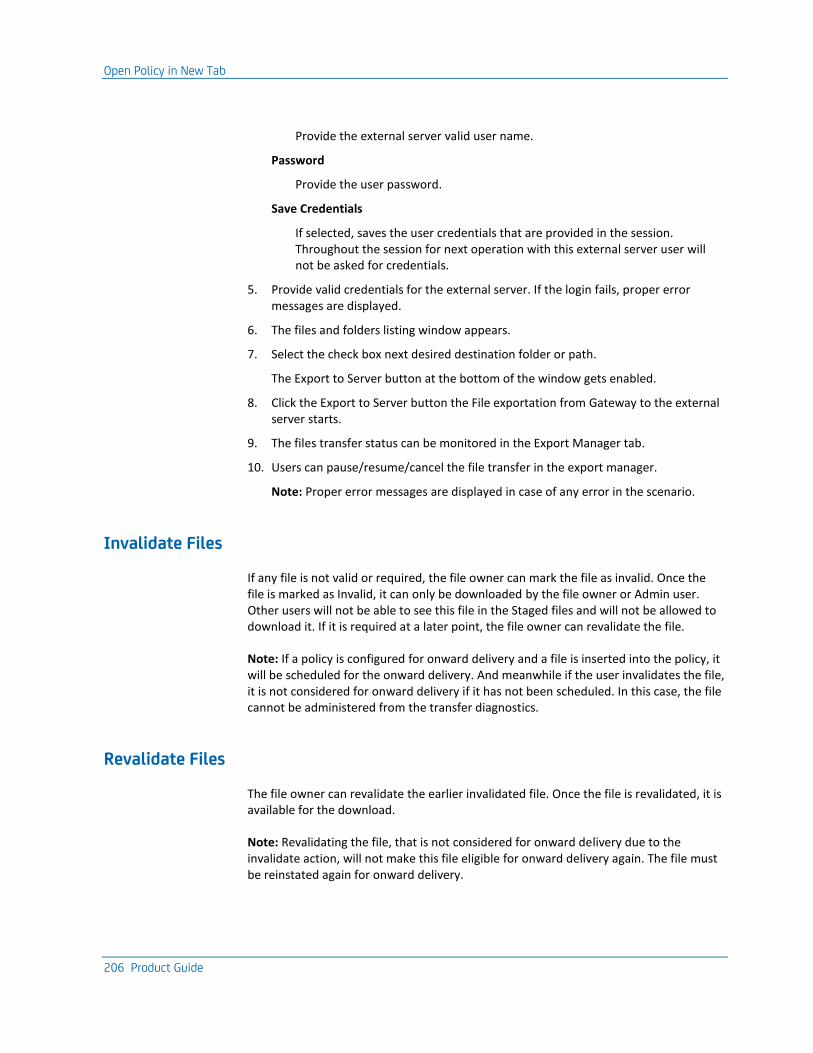
Open Policy in New Tab
206 Product Guide
Provide the external server valid user name.
Password
Provide the user password.
Save Credentials
If selected, saves the user credentials that are provided in the session. Throughout the session for next operation with this external server user will not be asked for credentials.
5. Provide valid credentials for the external server. If the login fails, proper error messages are displayed.
6. The files and folders listing window appears.
7. Select the check box next desired destination folder or path.
The Export to Server button at the bottom of the window gets enabled.
8. Click the Export to Server button the File exportation from Gateway to the external server starts.
9. The files transfer status can be monitored in the Export Manager tab.
10. Users can pause/resume/cancel the file transfer in the export manager.
Note: Proper error messages are displayed in case of any error in the scenario.
Invalidate Files
If any file is not valid or required, the file owner can mark the file as invalid. Once the file is marked as Invalid, it can only be downloaded by the file owner or Admin user. Other users will not be able to see this file in the Staged files and will not be allowed to download it. If it is required at a later point, the file owner can revalidate the file.
Note: If a policy is configured for onward delivery and a file is inserted into the policy, it will be scheduled for the onward delivery. And meanwhile if the user invalidates the file, it is not considered for onward delivery if it has not been scheduled. In this case, the file cannot be administered from the transfer diagnostics.
Revalidate Files
The file owner can revalidate the earlier invalidated file. Once the file is revalidated, it is available for the download.
Note: Revalidating the file, that is not considered for onward delivery due to the invalidate action, will not make this file eligible for onward delivery again. The file must be reinstated again for onward delivery.
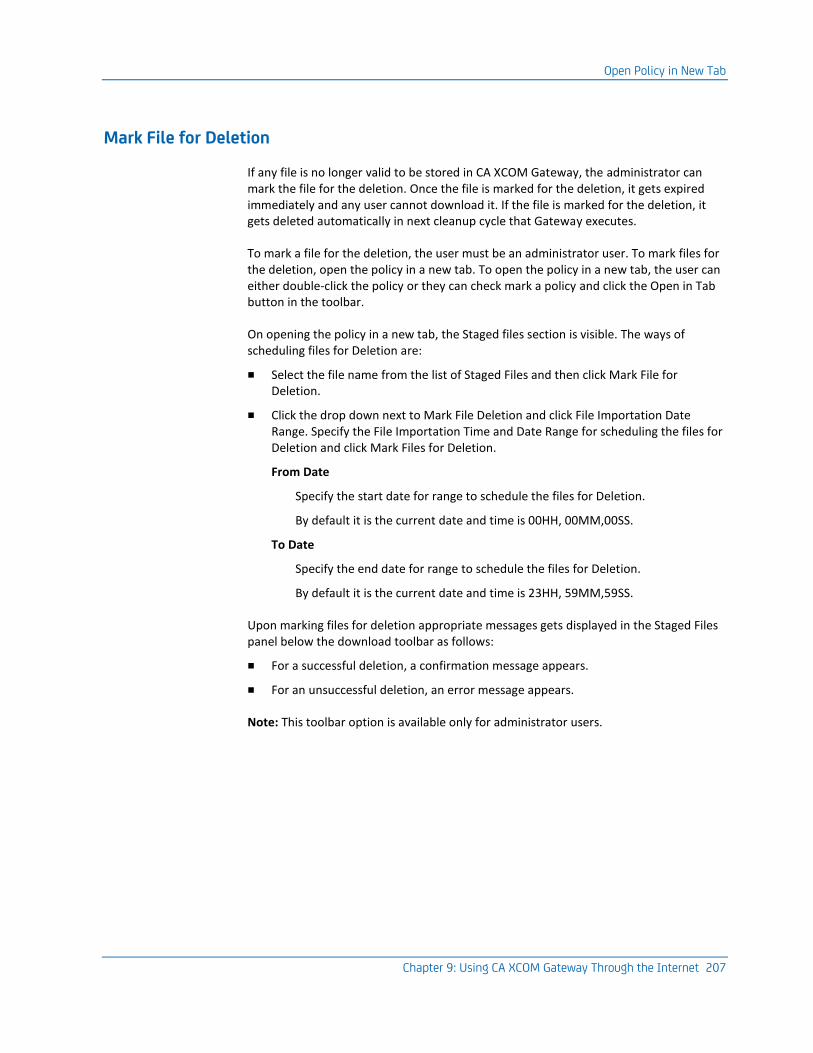
Open Policy in New Tab
Chapter 9: Using CA XCOM Gateway Through the Internet 207
Mark File for Deletion
If any file is no longer valid to be stored in CA XCOM Gateway, the administrator can mark the file for the deletion. Once the file is marked for the deletion, it gets expired immediately and any user cannot download it. If the file is marked for the deletion, it gets deleted automatically in next cleanup cycle that Gateway executes.
To mark a file for the deletion, the user must be an administrator user. To mark files for the deletion, open the policy in a new tab. To open the policy in a new tab, the user can either double-click the policy or they can check mark a policy and click the Open in Tab button in the toolbar.
On opening the policy in a new tab, the Staged files section is visible. The ways of scheduling files for Deletion are:
■ Select the file name from the list of Staged Files and then click Mark File for Deletion.
■ Click the drop down next to Mark File Deletion and click File Importation Date Range. Specify the File Importation Time and Date Range for scheduling the files for Deletion and click Mark Files for Deletion.
From Date
Specify the start date for range to schedule the files for Deletion.
By default it is the current date and time is 00HH, 00MM,00SS.
To Date
Specify the end date for range to schedule the files for Deletion.
By default it is the current date and time is 23HH, 59MM,59SS.
Upon marking files for deletion appropriate messages gets displayed in the Staged Files panel below the download toolbar as follows:
■ For a successful deletion, a confirmation message appears.
■ For an unsuccessful deletion, an error message appears.
Note: This toolbar option is available only for administrator users.

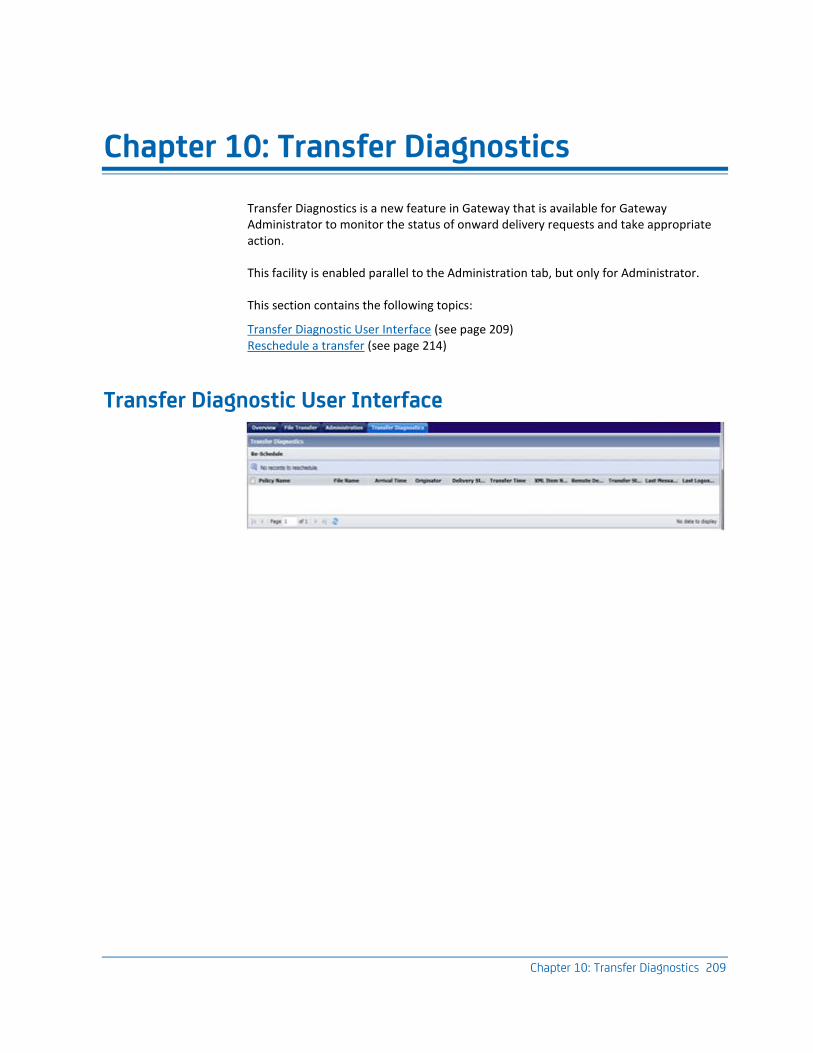
Chapter 10: Transfer Diagnostics 209
Chapter 10: Transfer Diagnostics
Transfer Diagnostics is a new feature in Gateway that is available for Gateway Administrator to monitor the status of onward delivery requests and take appropriate action.
This facility is enabled parallel to the Administration tab, but only for Administrator.
This section contains the following topics:
Transfer Diagnostic User Interface (see page 209) Reschedule a transfer (see page 214)
Transfer Diagnostic User Interface
Transfer Diagnostic User Interface
210 Product Guide
Transfer diagnostic is displayed as a grid which displays some of the columns by default and rest can be displayed depending on the administrator’s choice. Details of columns that are displayed as the default are mentioned in the following section. The grid has filters functionality which allows the administrator to manage the data depending on their requirements. Filters allow the end user to filter the records depending on some particular conditions, not all fields can be filtered out. The following section contains the information which column offer filter functionality. To figure out which columns support filters, the users can click the top right corner of each column to verify if the Filters option is listed in the context menu. If the Filters option is visible, then depending on the column data type, the user is shown either:
■ Text Filter
■ The user must enter the characters to filter the records depending on the value that is entered for the specific column.
■ Date Filter
■ The date filter will display before, on and after options.
■ List Filter
■ The user cannot enter any values, they have to select a value from a fixed set of values.
To remove the filter, user can unselect the Filters checkbox.
The user can use multiple filters at a time.
The column headers are displayed in italics, where Filters are currently applied.
The various fields on the table are:
Policy Name
The policy name that the delivery XML is configured.
Visibility: Default
Filter available/type: Yes/Text Filter
File Name
The file that is being transferred from the Gateway to the destination configured in the delivery XML. The name of the file that is registered with the Gateway Policy.
Visibility: Default
Filter available/type: Yes/Text Filter
Arrival Time
The time the file is imported into the policy.
Visibility: Default
Filter available/type: Yes/Date Filter
Transfer Diagnostic User Interface
Chapter 10: Transfer Diagnostics 211
Originator
The user who inserted the file into the policy.
Visibility: Default
Filter available/type: Yes/Text Filter
Delivery Status
The status of the transfer container that is specified under delivery XML.
The following items are the possible values of the status:
■ Scheduling
■ Completed
■ Active
■ Failed
Visibility: Hidden
Filter available/type: Yes/List Filter
Transfer Time
The transfer time of each transfer item that is specified under the transfer container.
Visibility: Default
Filter available/type: Yes/Date Filter
XML Item Number
The transfer Item number within the transfer container of the delivery XML.
Visibility: Default
Filter available/type: Yes/Text Filter
Remote Destination
The IP Address, Host name, or External Server name that is used within the transfer.
Visibility: Default
Filter available/type: Yes/Text Filter
Transfer Status
Status of the individual transfer Item contained under the transfer container.
The following items are the possible values of the status:
■ Active
■ Inactive
■ Suspended
■ Remote Suspended

Transfer Diagnostic User Interface
212 Product Guide
■ Remote Held
■ Queued
■ Complete
■ VTAM Error
■ Logic Error
■ Local File Error
■ Terminated
■ Other Error
■ Query History Failure
■ Interface Schedule Error
■ Canceled
■ Purged
■ Held on Date
■ Held on Time
■ Validation Error
Visibility: Default
Filter available/type: Yes/List Filter
Last Message
The last transfer status message that was received from XCOM.
Visibility: Default
Filter available/type: Yes/Text Filter
File Guid
Gateway GUID of the file that is registered with the Local Gateway.
Visibility: Hidden
Filter available/type: No/NA
File Size
The size of the file in scope.
Visibility: Hidden
Filter available/type: No/NA
Delivery Start Time
Represents the submission time to the interface server.
Visibility: Hidden
Filter available/type: No/NA
Transfer Diagnostic User Interface
Chapter 10: Transfer Diagnostics 213
Last Activity Time
Represents the latest time when the transfer status is updated.
Visibility: Hidden
Filter available/type: No/NA
Transfer Number
Represents the transfer ID given by the interface server.
Visibility: Hidden
Filter available/type: No/NA
Transfer MICR
The MICR provided by the Base XCOM.
Visibility: Hidden
Filter available/type: No/NA
Last Logon User
The local user that is used in the transfer container for onward delivery transfer XML.
Visibility: Default
Filter available/type: Yes/Text Filter
Local XCOM Host
The Local XCOM Host is the Base XCOM that is aligned with the local Gateway.
Visibility: Hidden
Filter available/type: No/NA
Local XCOM SSL
Represents the Base XCOM that is enabled for the SSL.
Visibility: Hidden
Filter available/type: No/NA
Reschedule a transfer
214 Product Guide
Reschedule a transfer
The administrator can reschedule a transfer from the Transfer Diagnostics tab after a successful or failed transfer.
Gateway executes the rescheduled transfers immediately. Once the transfer is executed, its status can be viewed from the Transfer Diagnostics tab. Click the refresh button that is at the bottom of the grid.
If the transfer fails for any reason, such as aligned XCOM is down or partner XCOM is down or External Server is down. The administrator can reschedule the transfer by selecting the transfer and clicking the reschedule button available on the Transfer Diagnostics tab.
Note:
■ XML used at the time of submission is used for rescheduling any changes that are made to the policy delivery XML after submission of onward delivery is not picked up by the scheduler for rescheduling the transfer.
■ Reschedule is not allowed for transfers with status as ACTIVE, PENDING, VALIDATIONERROR, or INACTIVE.
■ If a particular transfer item of a transfer container is failed more than once, then it is displayed multiple times in the transfer diagnostic grid view. If the administrator selects the same transfer item more than once for reschedule, then only the first transfer item is picked for rescheduling. A pop-up message with a file name and transfer item number is displayed to the administrator stating the reason.
■ By default 200 records are displayed per page.
Chapter 11: How to Configure the CA XCOM Gateway SSH Server 215
Chapter 11: How to Configure the CA XCOM Gateway SSH Server
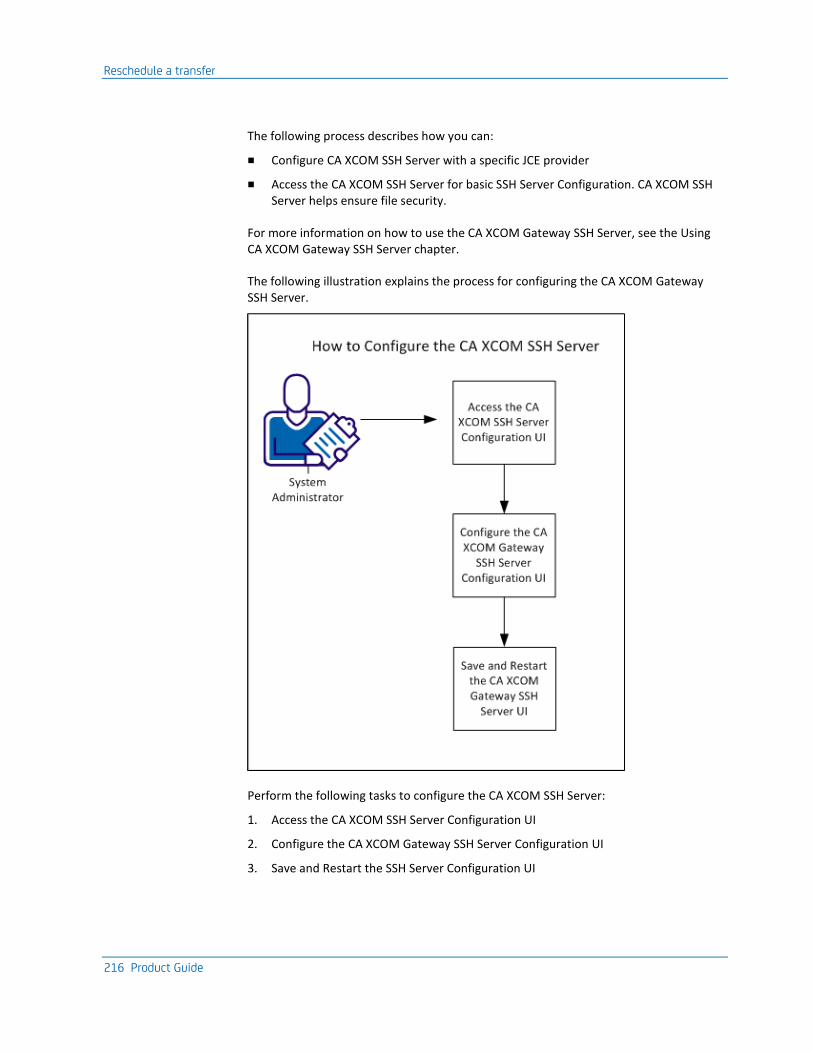
Reschedule a transfer
216 Product Guide
The following process describes how you can:
■ Configure CA XCOM SSH Server with a specific JCE provider
■ Access the CA XCOM SSH Server for basic SSH Server Configuration. CA XCOM SSH Server helps ensure file security.
For more information on how to use the CA XCOM Gateway SSH Server, see the Using CA XCOM Gateway SSH Server chapter.
The following illustration explains the process for configuring the CA XCOM Gateway SSH Server.
Perform the following tasks to configure the CA XCOM SSH Server:
1. Access the CA XCOM SSH Server Configuration UI
2. Configure the CA XCOM Gateway SSH Server Configuration UI
3. Save and Restart the SSH Server Configuration UI
Access the CA XCOM Gateway SSH Server Configuration UI
Chapter 11: How to Configure the CA XCOM Gateway SSH Server 217
Access the CA XCOM Gateway SSH Server Configuration UI
To configure and manage CA XCOM Secure Shell (SSH) Server with a specific Java Cryptography Extension (JCE) provider and for basic SSH Server Configuration, access the CA XCOM Gateway SSH Server Configuration UI.
Note: The user must log on to Microsoft Windows as a user with administrator privileges. On UNIX or Linux, the user must log on as a user with root privileges to administer or change the values for the attributes in the Configuration UI.
Follow these steps for Windows:
1. Go to "%INSTALL_DIR%"\SFTP\bin".
2. Run the "StartSSHConfigUI.bat" file.
The configuration UI window appears.
Follow these steps for Linux:
1. Go to "%INSTALL_DIR%"/SFTP/bin".
2. Run the "StartSSHConfigUI.sh" file.
The configuration UI window appears.
How to Configure the CA XCOM Gateway SSH Server
Perform the following configuration procedures to configure and manage the CA XCOM Gateway SSH Server.
■ Configure the CA XCOM Gateway SSH Server Configuration UI
■ Configure the JCE Provider
■ Configure the Cipher Factory
■ Configure the Compression Factory
■ Configure the Port
■ Configure the maximum concurrent sessions per user
■ Configure the maximum open handles per session
■ Configure the maximum authentication requests
■ Configure the authentication timeout
How to Configure the CA XCOM Gateway SSH Server
218 Product Guide
Configure the CA XCOM Gateway SSH Server Configuration UI
Configure the SSH User Interface using the CA XCOM Gateway SSH Server Configuration UI. The Configuration UI requires JDK 6 and above.
Note: Set JAVA_HOME and the PATH variable.
To configure the CA XCOM SSH Server configuration UI, enter the fields that are provided in the UI.
Important! If you do not provide any values in the required field, the server starts with the default values.
To configure the CA XCOM Gateway SSH Server Configuration UI, set the following parameters:
JCE Provider
Provides a framework and implementations for encryption, key generation and key agreement, and the Message Authentication Code algorithms. The CA XCOM Gateway SSH Server supports the following JCE providers:
■ Bouncy Castle
■ RSA Jsafe JCE
Default: Bouncy Castle
Cipher Factory
Defines an algorithm for encryption and decryption. The CA XCOM Gateway SSH server supports the following Ciphers:
■ AES128CBC
■ BlowFishCBC
■ TripleDESCBC
■ AES192CBC
■ AES256CBC
Default: AES128CBC, BlowFishCBC and, TripleDESCBC
Note: You can select BLOWFISHCBC, only when you select BOUNCY Castle as the JCE provider. RSA JSafe JCE does not provide its implementation.
How to Configure the CA XCOM Gateway SSH Server
Chapter 11: How to Configure the CA XCOM Gateway SSH Server 219
Compression Factory
Defines data stream compression. The CA XCOM Gateway SSH server supports the following compression mechanisms:
■ None
■ ZLIB: (Implementation by JCraft Zstream)
Default: None
Port
Defines an application-specific or process-specific software construct serving as a communications endpoint.
Limits: 22 and [1024 through 65535]
Default: 2222
Maximum Concurrent Session per User
Defines maximum concurrent open session count per username.
Limits: 1 to 2147483647
Default: None
Maximum Open Handles per Session
Defines the number of handles that are opened at a time.
Limits: 1 to 2147483647
Maximum Authentication Request
Defines the closure of connection, if the number of failed authentication requests exceed the value being set.
Limits: 1 to 2147483647
Authentication timeout
Defines the closure of the session if the time exceeds the value of idle timeout.
Limits: 1-35791
Note: If the login request exceeds the maximum response time, the request is discarded.
How to Configure the CA XCOM Gateway SSH Server
220 Product Guide
Configure the JCE Provider
The JCE provider provides a framework and implementations for encryption, key generation and key agreement, and Message Authentication Code algorithms.
The CA XCOM SSH Server supports the following JCE providers:
■ Bouncy Castle
■ RSA Jsafe JCE
Default: Bouncy Castle
Note: To use RSA Jsafe JCE provider, update the path in the java.security file.
Important! You must have administrative permissions to configure the JCE parameter.

How to Configure the CA XCOM Gateway SSH Server
Chapter 11: How to Configure the CA XCOM Gateway SSH Server 221
Follow these steps:
1. Access the file from the following path:
%JAVA_HOME%\jre\lib\security\
For example:
# There must be at least one provider specification in java.security.
# There is a default provider that comes standard with the JDK. It
# is called the "SUN" provider, and its Provider subclass
# named Sun appears in the sun.security.provider package. Thus, the
#"SUN" provider is registered via the following:
#
# security.provider.1=sun.security.provider.Sun
#
# (The number 1 is used for the default provider.)
#
# Note: Providers can be dynamically registered instead by calls to
# either the addProvider or insertProviderAT method in the Security
# class.
#
# List of providers and their preference orders (see above):
#
#security.provider.1=org.bouncycastle.jce.provider.BouncyCastleProvider
security.provider.1=sun.security.provider.Sun
security.provider.2=sun.security.rsa.SunRsaSign
security.provider.3=com.sun.net.ssl.internal.ssl.Provider
security.provider.4=com.sun.crypto.provider.SunJCE
security.provider.5=sun.security.jgss.SunProvider
security.provider.6=com.sun.security.sasl.Provider
security.provider.7=org.jcp.xml.dsig.internal.dom.XMLDSigRI
security.provider.8=sun.security.smartcardio.SunPCSC
security.provider.9=sun.security.mscapi.SunMSCAPI
security.provider.10=com.rsa.jsafe.provider.JsafeJCE
2. Set the JsafeJCE.jar file on class path.
3. Launch the UI again.
The JCE provider is configured. You must see the configured value in the JCE Provider drop-down list.
How to Configure the CA XCOM Gateway SSH Server
222 Product Guide
Configure the Cipher Factory
The Cipher Factory is an algorithm for encryption and decryption. The CA XCOM SSH server supports the following Ciphers.
■ AES128CBC
■ BLOWFISHCBC
Note: You can select BLOWFISHCBC, only when you select BOUNCY Castle as the JCE provider. RSA JSafe JCE does not provide its implementation.
■ TRIPLEDESCBC
■ AES192CBC
■ AES256CBC
Default: AES128CBC, BlowFishCBC or, TripleDESCBC
Note: AES192CBC and AES256CBC are only provided if unlimited strength jar files are placed in %JAVA_HOME% \jre\lib\security.
More information:
Configuring the JCE Unlimited Strength Jurisdiction Policy Files (see page 222)
Configuring the JCE Unlimited Strength Jurisdiction Policy Files
Ciphers with key size 192 or 256 are conditional. Select these ciphers if you have installed the libraries for the support of Unlimited Strength. If you select these ciphers without installing the libraries, an error message appears while saving the configuration.
For more information about configuring the cipher factory, see Configure the Cipher Factory (see page 222).
Note: You can download the support libraries from the Oracle website (http://www.oracle.com).
How to Configure the CA XCOM Gateway SSH Server
Chapter 11: How to Configure the CA XCOM Gateway SSH Server 223
Configure the Compression Factory
The Compression Factory defines the data stream compression of the data being transmitted. SSH supports the data stream compression between the client and the server. For slow connections, compression can increase the performance but for faster connections the CPU overhead of compressing and decompressing can result in a slower transfer rate. Large text files have greater benefit from the compression than binary files.
Values: The CA XCOM Gateway SSH server supports the following compression mechanisms:
■ None
■ ZLIB : Implementation by JCraft Zstream
Default: None
Configure the Port
The Port is an application-specific or process-specific software construct serving as a communications endpoint. An administrator can configure the port number.
Default: 2222
Range: 22 to 65535
Note: Verify that the port is free and is not used by any other process.
Configure the Maximum Concurrent Sessions per User
The Maximum Concurrent Sessions per User defines the maximum concurrent open session count for each username.
Default: None
Range: 1 to 2147483647
How to Configure the CA XCOM Gateway SSH Server
224 Product Guide
Configure the Maximum Open Handles per Session
In the case of SFTP protocol, when a user accesses any directory or file, the server opens the handle, and registers it at the server side. These handles will be removed only at the close request. By default, the server does not put any upper limit on the number of handles that can be opened at a time. However, an administrator can restrict the number of handles opened at a time by setting this property to a definite value. After the number of open handles exceeds the defined value, new handles cannot be opened by the server unless the existing handles are released.
Default: None
Limit: 10 to 2147483647
Configure the Maximum Authentication Requests
Configure Maximum Authentication Requests is used by the server to close the connection if number of failed authentication requests exceeds the value being set.
For Example: If the value is set to 3, the connection is closed for more than three failed authentication requests.
Defaults: 20
Limits: 1-2147483647
Configure the Authentication Timeout
The authentication timeout defines the closure of the session if the time exceeds the value of idle timeout.
Default: 10(in minutes)
Limit: 1 to 35791
Note: When the login request exceeds the maximum response time, the request is discarded.

How to Configure the CA XCOM Gateway SSH Server
Chapter 11: How to Configure the CA XCOM Gateway SSH Server 225
Save the Configurations
An administrator can save the set values on the configuration UI. The configuration is saved in an encrypted file format and is named server-settings.txt. It resides in the res sub-directory of the SFTP application installation folder.
Notes:
■ The Configuration UI requires JDK 6 and or above. You must set JAVA_HOME and PATH environment variable.
■ If you do not provide custom values, the server starts with the default values.
■ If the file with custom server settings is not found at its location, the server starts with its default values.
■ The Server with the default values is shown in the previous illustration.

Chapter 12: Using CA XCOM Gateway FTP 227
Chapter 12: Using CA XCOM Gateway FTP
There are a number of ways that you can transfer files from your system to or from CA XCOM Gateway by using FTP, as follows:
■ You can use a command line program called FTP, which is provided by many operating systems.
■ You can use one of many FTP client products with a graphical user interface.
■ You can select the FTP protocol on your web browser.
This guide cannot provide detailed information for each of these methods, so you will also need to consult operating system, web browser, or ftp client product documentation if you are not familiar with ftp.
Irrespective of the method used, transferring a file by using FTP involves several stages, which are outlined in this section.
How to Start XCOM FTP Server
1. In Windows, do the following:
■ Open the Services and start the ‘XCOMGWFTP CA XCOM Gateway FTP Server r11.6’ service.
2. In Linux, do the following:
■ Open the Terminal and start the FTP server, enter the following command: sh %INSTALLDIR%/ FTP/bin/ StartXCOMFTP.sh
This section contains the following topics:
FTP Clients (see page 228) Connect to the CA XCOM Gateway FTP Server (see page 228) Login (see page 229) List and Select Available Policies (see page 230) Download Files (see page 232) Upload Files (see page 234) Disconnect from the FTP Server (see page 235)
FTP Clients
228 Product Guide
FTP Clients
The following FTP clients are recommended:
■ FileZilla [3.5.0]
■ WinSCP [5.1.0]
The higher version of these clients can also be used, but are not certified by the product. Other clients can also be used to connect to the CA XCOM Gateway FTP server.
Connect to the CA XCOM Gateway FTP Server
In order to perform FTP transfers it is first necessary to connect to the CA XCOM Gateway FTP server. This has a unique host name and port number, established when CA XCOM Gateway was installed and configured. Usually the port number for FTP is 21.
Note: For improved performance only latest 200 uploaded files are listed in the policy list if you are connected to Gateway as FTP server from any client.
If you are using the ftp command line utility
1. To start the utility, enter the following command:
ftp
2. To establish the connection with the server, enter the following FTP command:
open hostname portnumber
Note: If the port number is 21, you can omit it from the command.
If you are using your web browser
To connect to the CA XCOM Gateway FTP server, enter the following command into your web browser's address bar:
ftp://hostname:portnumber
Notes:
■ You can enter ftps instead of ftp, to achieve a secure connection using SSL.
■ If the port number is 21, you can omit :portnumber.
If you are using an FTP client program
For information about how to establish the connection to the server, see the documentation for the FTP client program that you are using.
For many such products, this involves selecting a Connect menu option or toolbar button. You are then asked to identify the host name and the port number of the server.
Login
Chapter 12: Using CA XCOM Gateway FTP 229
Login
Immediately after successful connection, enter valid Gateway user ID and password for login.
If you are using the FTP command line utility
1. When prompted, enter your user ID.
2. When prompted, enter your password.
If you are using your web browser
When an Authentication required dialog box appears, enter your user ID and password.
If you are using an FTP client program
For information about how to log in, see the documentation for the FTP client program that you are using.
For many such products, you can set up a profile for each FTP server and have login occur automatically after connection, using a saved user ID and password.
List and Select Available Policies
230 Product Guide
List and Select Available Policies
After a successful FTP login, the 'root directory' of the FTP server is automatically selected and you can enter commands to select different sub-directories.
For CA XCOM Gateway, the server's root directory is actually a list of policies, with each policy appearing as a subdirectory. This list includes all configured policies for which you are permitted to upload or download files.
Whenever you upload a file, that file needs to be associated with a single policy. To establish this association, upload the file into the subdirectory for the appropriate policy. In other words, you must first change the server's current directory to select the appropriate policy subdirectory before initiating the file upload.
Likewise, all files stored in CA XCOM Gateway are associated with a policy. To download a file from CA XCOM Gateway, you must again first change the server's current directory to select the appropriate policy subdirectory in order to download files associated with that policy.
If you are using the FTP command line utility
1. To list the contents of the currently selected server directory, enter one of the following FTP commands:
■ dir
■ ls
When the current directory is the root directory (for example, immediately after login), this command returns a list of policies, which look like subdirectories.
2. To change directory so that you can select a policy, enter the following FTP command :
cd
3. To return to the root directory (list of policies) at any time, enter the following FTP command:
cd \
If you are using your web browser
After you successfully log in, the content of the root directory is displayed on the screen automatically, showing the list of policies as subdirectories.
1. To select a policy, click a policy name in order in the list.
2. To return to the root directory (list of policies) at any time, click the parent directory link.
List and Select Available Policies
Chapter 12: Using CA XCOM Gateway FTP 231
If you are using an FTP client program
The directory structure of the FTP server is usually represented in tree format with nodes for each directory. The highest level nodes show the policy subdirectories.
To select a policy, click the appropriate node of the tree.
Download Files
232 Product Guide
Download Files
After selecting a policy subdirectory on the server, you can view the contents of that subdirectory to see all of the files that are available for download for the selected policy. You can then select those files for download.
Note: If there are non-unique file names listed, the display inserts a date/time stamp in between the file name and the file extension to provide uniqueness. The file name itself is not altered.
Example:
If there are two instances of the file Test1.txt, they may appear in the display list as Test1-20110103111523.txt and Test1-20110102100515.txt, indicating that the first instance was created on January 3, 2011 at 11:15:23 and the second on January 2, 2011 at 10:05:15.
If you are using the FTP command line utility
1. To list the files in the policy subdirectory, enter one of the following FTP commands:
■ dir
■ ls
2. To initiate a file download, enter the following FTP command:
get filename
The downloaded file is placed in the current directory on your system, that is, the directory that you were in when you launched the FTP program.
Note: On Windows, the command prompt window opens in one of the following directories:
■ c:\Documents and Settings\username (for Windows 2000 and XP)
■ c:\User\username (for Vista or Windows 7)
So you need to do one of the following:
■ Access your downloaded files by using this directory.
■ Select a different directory before starting FTP.
If you are using an FTP client program
Most programs display a list of server files within a subdirectory as soon as you click on the policy subdirectory to select it. They also usually do the following:
■ Enable you to select a local directory on your PC in a different section of the screen.
■ Provide a download menu command to initiate a download from the currently selected server directory to the selected destination.
Download Files
Chapter 12: Using CA XCOM Gateway FTP 233
In some cases, you can simply drag the file name across the separate sections of the screen.
If you are using your web browser
When you select a policy, a screen is displayed, listing all the files that are available for download for the selected policy.
To initiate a download, click the required file.
Upload Files
234 Product Guide
Upload Files
After selecting a policy subdirectory on the server, you can upload a file from your PC to CA XCOM Gateway and, within CA XCOM Gateway, that file is automatically assigned to the selected policy.
Note: If there are non-unique file names listed, the display inserts a date/time stamp in between the file name and the file extension to provide uniqueness. The file name itself is not altered.
Example:
If there are two instances of the file Test1.txt, they may appear in the display list as Test1-20110103111523.txt and Test1-20110102100515.txt, indicating that the first instance was created on January 3, 2011 at 11:15:23 and the second on January 2, 2011 at 10:05:15.
If you are using the FTP command line utility
To initiate an upload, enter the following FPT' command:
put filename
Your PC looks for the specified file in the current directory, that is, the directory that you were in when you launched the FTP program.
Note: On Windows, the command prompt window opens in one of the following directories:
■ c:\Documents and Settings\username (for Windows 2000 and XP)
■ c:\User\username (for Vista or Windows 7)
So you need to do one of the following:
■ Move the files you want to upload into this directory.
■ Select a different directory before starting FTP.
If you are using an FTP client program
Most programs do the following:
■ Enable you to select a local file in a different section of the screen.
■ Provide an upload menu command to initiate an upload into the currently selected server directory.
If you are using your web browser
Note: Most current web browsers do not support FTP upload, so you need to use the FTP command line utility or an FTP client program if you want to upload files.
Disconnect from the FTP Server
Chapter 12: Using CA XCOM Gateway FTP 235
Disconnect from the FTP Server If you are using the FTP command line utility
To end your connection to the CA XCOM Gateway FTP server, enter the following command:
close
If you are using your web browser
To terminate the connection, close the browser window.
If you are using an FTP client program
To terminate the connection, do one of the following, depending on your FTP client program:
■ Close the program.
■ Select the disconnect menu option.
Note:
Client connection to FTP server could be reset repeatedly because:
■ firewall settings
■ FTP client settings
■ network connection reset
As the stated reasons are generic, this could happen with both Gateway acting as a client and Gateway FTP Server.

Chapter 13: Using CA XCOM Gateway SSH Server 237
Chapter 13: Using CA XCOM Gateway SSH Server
You can transfer files between your computer to CA XCOM Gateway using the SSH Server and conversely. To transfer the files, we recommend the following SFTP clients:
■ Command line SFTP client products (Putty SFTP) available for free downloads.
■ SFTP client products with a graphical user interface.
■ For Example: Filezilla and WinSCP.
Note:
■ For more information about SFTP, see SFTP client product documentation.
■ To configure the CA XCOM Gateway SSH Server, see the How to Configure the CA XCOM Gateway SSH Server chapter.
How to Start XCOM SFTP Server
1. In Windows, do the following:
■ Open the Services and start the ‘XCOMGWSSHD CA XCOM Gateway SSHD Server v12.0’ service.
2. In Linux, do the following:
■ Open the Terminal start the SFTP server, enter the following command: sh %INSTALLDIR%/ SFTP/bin/ StartSSHServer.sh.
This section contains the following topics:
SFTP Clients (see page 238) Connect to the CA XCOM Gateway SFTP Server (see page 238) Login (see page 239) Unsupported Commands (see page 239) List and Select Available Policies (see page 241) Download Files (see page 242) Upload Files (see page 244) Disconnect from the sFTP Server (see page 246)
SFTP Clients
238 Product Guide
SFTP Clients
The following SFTP clients are recommended:
■ FileZilla [3.5.0]
■ WinSCP [5.1.0]
The higher version of these clients can also be used, but are not certified by the product. Other clients can also be used to connect to the CA XCOM Gateway SFTP server.
Connect to the CA XCOM Gateway SFTP Server
To perform SFTP transfers, first connect to the CA XCOM Gateway SFTP server. This has a unique host name and port number, established when CA XCOM Gateway was installed and configured. Usually the port number for SFTP is 22. If the port is configured with some value other than 22 through the configuration UI and server is started with that value, you must use the configured port value to connect to the server.
Note: For improved performance only latest 200 uploaded files are listed in the policy list if you are connected to Gateway as SFTP server from any client.
If you are using the SFTP command line utility [For Example: PSFTP]
1. To start the utility, enter the following command:
psftp [in case of psftp.exe]
<executable file name> [in case of other command line tools]
2. To establish the connection with the server, enter the following FTP command:
open hostname portnumber
Note: If the port number is 22, you can omit it from the command.
If you are using an SFTP client program
Note: For information about how to establish the connection to the server, see the documentation for the SFTP client program that you are using.
For many such products, this involves selecting a Connect menu option or toolbar button. You are then asked to identify the host name and the port number of the server.
Login
Chapter 13: Using CA XCOM Gateway SSH Server 239
Login
Immediately after successful connection, the CA XCOM Gateway prompts you for a user ID and password for login. Here, you should enter the same user ID and password that you use when logging in to the CA XCOM Gateway website. For more information, see the chapter Using CA XCOM Gateway Through the Internet. (see page 189)
If you are using the SFTP command line utility
1. Enter your user ID.
2. Enter your password.
If you are using an SFTP client program
Note: For information about how to log in, see the documentation for the SFTP client program that you are using.
More information:
Connect to the CA XCOM Gateway SFTP Server (see page 238)
Unsupported Commands
The following commands are not supported with SSH Server in Gateway:
exit (or quit or bye)
Quits sftp
lls
Displays local directory listing of either path or current directory if path is not specified
chmod mod path
Changes permissions of file path to mode
chown own path
Changes owner of file path to own. Own must be a numeric UID.
help (or ?)
Displays help text.
Unsupported Commands
240 Product Guide
lcd
Changes local directory to path.
lmkdir
Creates local directory specified by path.
ln (or symlink)
Creates a symbolic link from oldpath to newpath.
Ipwd
Prints local working directory.
lumask
Sets local umask to umask
rm
Deletes remote file specified by path.
!
Escapes to local shell.
chgrp
Changes group of file path to group. Group must be a numeric GID.
! command
Executes command in local shell.
rename
Renames remote file from oldpath to newpath
mkdir
Creates remote directory specified by path.

List and Select Available Policies
Chapter 13: Using CA XCOM Gateway SSH Server 241
List and Select Available Policies
After a successful login to the SFTP Server, the root directory of the SFTP server is automatically selected and you can enter commands to select different sub-directories.
For the CA XCOM Gateway, the server's root directory is actually a list of policies, with each policy appearing as a subdirectory. This list includes all configured policies for which you are permitted to upload or download files.
Whenever you upload a file, that file needs to be associated with a single policy. To establish this association, upload the file into the subdirectory for the appropriate policy. In other words, you must first change the server's current directory to select the appropriate policy subdirectory before initiating the file upload.
Likewise, all files stored in CA XCOM Gateway are associated with a policy. To download a file from CA XCOM Gateway, you must again first change the server's current directory to select the appropriate policy subdirectory to download files associated with that policy.
If you are using the SFTP command line utility
1. To list the contents of the currently selected server directory, enter one of the following SFTP commands:
■ dir
■ ls
When the current directory is the root directory (for example, immediately after login), this command returns a list of policies, which look like subdirectories.
2. To change the directory, enter the following SFTP command so that you can select a policy :
cd
3. To return to the root directory (list of policies) at any time, enter the following SFTP command:
cd \
4. To return to the parent directory, enter the following command :
cd ..
If you are using an SFTP client program
After you successfully log in, the content of the root directory is displayed on the screen automatically, showing the list of policies as subdirectories.
1. To select a policy, click a policy name in order in the list.
2. To return to the root directory (list of policies) at any time, click the parent directory link.
Download Files
242 Product Guide
Download Files
After selecting a policy subdirectory on the server, you can view the contents of that subdirectory to see all of the files that are available for the download for the selected policy. You can then select those files for the download.
Note: If nonunique file names are listed, the display inserts a date or time stamp in between the file name and the file extension to provide uniqueness. The file name itself is not altered.
Example:
If there are two instances of the file Test1.txt, they can appear in the display list as Test1-20110103111523.txt and Test1-20110102100515.txt, indicating that the first instance was created on January 3, 2011 at 11:15:23 and the second on January 2, 2011 at 10:05:15.
If you are using the SFTP command-line utility:
1. To list the files in the policy subdirectory, enter one of the following SFTP commands:
■ dir
■ ls
2. To initiate a file download, enter the following SFTP command:
■ get filename
The downloaded file is placed in the current directory on your computer, the directory that you were in when you launched the SFTP program.
■ mget filenames
If you have multiple files to download, use the mget command.
For Example: mget test*.txt
All the files that start with the text ‘test’ and have the extension ‘.txt’ are downloaded in the current directory on your system, the directory that you were in when you launched the SFTP program.
Note: On Windows, the command prompt window opens in one of the following directories:
■ c:\Documents and Settings\username (for Windows 2003 and XP)
■ c:\User\username (for Windows 2008 and Windows 7)
Download Files
Chapter 13: Using CA XCOM Gateway SSH Server 243
Perform one of the following tasks:
■ Access your downloaded files by using the previously mentioned directory.
■ Select a different directory before starting SFTP.
If you are using an SFTP client program:
Most programs display a list of server files within a subdirectory as soon as you click the policy subdirectory to select it. They also do the following steps:
■ Enable you to select a local directory on your PC in a different section of the screen.
■ Provide a download menu command to initiate a download from the currently selected server directory to the selected destination.
In some cases, you can simply drag the file name across the separate sections of the screen.
Upload Files
244 Product Guide
Upload Files
After selecting a policy subdirectory on the server, you can upload a file from your computer to the CA XCOM Gateway and within the CA XCOM Gateway, that file is automatically assigned to the selected policy.
Note: If there are non-unique file names listed, the display inserts a date/time stamp in between the file name and the file extension to provide uniqueness. The file name itself is not altered.
Example:
If there are two instances of the file Test1.txt, they may appear in the display list as Test1-20110103111523.txt and Test1-20110102100515.txt, indicating that the first instance was created on January 3, 2011 at 11:15:23 and the second on January 2, 2011 at 10:05:15.
If you are using the SFTP command line utility
To initiate an upload, enter the following SFTP command:
■ put filename
Your computer looks for the specified file in the current directory, that is, the directory that you were in when you launched the SFTP program.
■ mput filenames
If you have multiple files to upload, mget command should be preferred.
For Example: mput test*.txt
All the files that starts with text ‘test’ and has the extension ‘.txt’ will be uploaded/copied in the remote directory in XCOM Gateway from the directory that you were in when you launched the SFTP program.
Note: On Windows, the command prompt window opens in one of the following directories:
■ c:\Documents and Settings\username (for Windows 2003 and XP)
■ c:\User\username (for Windows 2008 or Windows 7)
Perform one of the following:
■ Move the files you want to upload into this directory.
■ Select a different directory before starting SFTP.

Upload Files
Chapter 13: Using CA XCOM Gateway SSH Server 245
Note: There are some unsupported commands on the CA XCOM Gateway file system. It is necessary that the supported commands do not use the unsupported commands internally.
For Example:
The SFTP Client WinSCP uses the chmod own path (unsupported) command internally while uploading a file to gateway server. You must select the Ignore permissions error checkbox to upload without any errors.
If you are using an SFTP client program
Most programs:
■ Let you to select a local file in a different section of the screen.
■ Provide an upload menu command to initiate an upload into the currently selected server directory.
Disconnect from the sFTP Server
246 Product Guide
Disconnect from the sFTP Server
If you are using the SFTP command-line utility:
To end your connection to the CA XCOM Gateway SFTP server, enter any of the following commands:
bye
exit
quit
If you are using an SFTP client program:
To terminate the connection, do one of the following steps, depending on your SFTP client program:
■ Close the program
■ Select the disconnect menu option
Note:
The client connection to the sFTP server could be reset repeatedly because:
■ Firewall settings
■ FTP client settings
■ The network connection reset
As the stated reasons are generic, the reset could happen with both Gateway acting as a client and Gateway sFTP Server.
Appendix A: Configuration XML Formats 247
Appendix A: Configuration XML Formats
CA XCOM Gateway administration consists of customer configuration .XML structures that can be combined into .xml files. The different types of configuration structures are:
This section contains the following topics:
Define Global Parameters (see page 247)
Define Global Parameters
A global parameter XML file is set up during installation of CA XCOM Gateway. It is named xcom-globals.xml.
The CA XCOM Gateway server requires this global parameters .xml file. The CA XCOM Gateway server uses this file to set up and direct CA XCOM Gateway services.
Global parameters are read into memory during CA XCOM Gateway server initialization. Subsequently, most of the parameters can be modified by using the online configuration facilities (see the chapter “CA XCOM Gateway Administration”.
It is also possible to change global parameters by editing the xcom-globals.xml file. However, when changes are made by this method, CA XCOM Gateway server needs to be restarted to make the changes effective.
Important! Because incorrect global parameter changes can render CA XCOM Gateway inoperable and the CA XCOM Gateway website inaccessible, we strongly recommend that you save a copy of xcom-globals.xml before making offline changes to the global parameters. Problematic changes can then be reversed by restarting CA XCOM Gateway after reinstating the saved file.
Define Global Parameters
248 Product Guide
Attributes
The global parameter attributes are defined by the following structure:
< GLOBALPARAMETERS >
This is the global parameter structure container. This container has main structures embedded in it, as follows:
■ GATEWAYUI
■ GATEWAYCERT
■ APPSERVER_CERT
■ FTP
■ SFTP
■ GATEWAYCONTROLSERVER
■ INTERFACESERVER
There are few common XML tags that are embedded into few of the above. Those are:
■ LOG
■ GCS_URL
■ CERTIFICATE
GATEWAYUI Structure
This structure contains following common XML tags.
■ GCS_URL
■ LOG
These embedded xml tags that are described in the common XML tags structure.
Other embedded XML tags are:
IS_LOGIN_HTTPS
This value determines if the communication between browser and the Gateway UI Server is on HTTPS mode. This value is used only at the time the user is logging in to the application.
Default: false
Define Global Parameters
Appendix A: Configuration XML Formats 249
IS_SESSION_HTTPS
This value determines if the communication between browser and the Gateway UI Server is on HTTPS mode. If this value is set to true, the GCS_URL must have url with https.
Default: false
HTTP_PORT
This value determines the port number for HTTP mode of Gateway UI.
Default: 8080
HTTPS_PORT
This value determines the port number for HTTPS mode of Gateway UI.
Default: 8443
SESSION_PARAMETERS
SESSION_TIMEOUT_DISABLED
Value of this tag determines if the session timeout is disabled. If the session timeout is set to false then session timeout does not occur.
Default: false
SESSION_INACTIVITY_TIME
If there is no user activity, this parameter determines the duration of time a CA XCOM Gateway waits to pop up a message for inactivity of the session. The value that is specified with this tag is considered in minutes.
Default: 15
SESSION_LOGOUT_TIME
The value of this tag determines the time [in minutes] after displaying the popup for Session Inactivity. The user must be logged out after the time is consumed. After the logout, the user will have to log in once again before any action is taken.
Default: 5
Define Global Parameters
250 Product Guide
GATEWAYCERT Structure
This structure contains only one XML tag that is the CERTIFICATE tag that is described in the common XML tags structure.
The attributes for the embedded CERTIFICATE XML tag are as follows:
ACTIVEID="gatewayActivecert"
The JCA key store alias ID for the currently active certificate.
AUTHENTICATE="YES|NO"
Indicates whether transport certificates presented by the Web Service calls are to be authenticated.
YES
The Web Service calls are to be authenticated.
NO
The Web Service calls are not to be authenticated.
TRANSPORTDOMAIN Structure
The attributes for the TRANSPORTDOMAIN are as follows:
TRANSPORTDOMAIN
Multiple TRANSPORTDOMAINs are allowed. If none are specified, all domain names are accepted during the certificate validation.
DN="domainname"
A transport certificate subject domain name, that can commence with an asterisk (*) wildcard character.
Define Global Parameters
Appendix A: Configuration XML Formats 251
APPSERVER_CERT Structure
This structure is for the GCS communication with its client.
This structure contains only one XML tag that is, CERTIFICATE tag that is described in the common XML tags structure. In case of APPSERVER_CERT structure, CERTIFICATE tag has one more tag called TRUSTSTORE. All of its attributes are similar to KEYSTORE which is explained in common XML tags structure.
The attributes for the embedded CERTIFICATE XML tag are as follows:
GCS_HOST=hostname of the Gateway Control Server
This tag denotes the hostname of the Gateway Control Server.
ALIAS=ID of the certificate
The JCA key store alias ID for the currently active certificate.
Note: By default the tomcat is being used as the application server. If any other application server is being used, the Administrator has to use the same details that were used for the application server certificate.
FTP Structure
This structure contains the following XML tags.
■ GCS_URL
■ LOG
These embedded xml tags are described in the common XML tags structure.
SFTP Structure
This structure contains the following XML tags.
■ GCS_URL
■ LOG
These embedded xml tags are described in the common XML tags structure.

Define Global Parameters
252 Product Guide
GATEWAY CONTROL SERVER Structure
The attributes of this XML tag are:
DEFAULTPAGEROWS
The product has data being shown through grids/tabular form at multiple places. This variable determines the number of items that will be shown on one page. The following places have Records Per Page facility in the product.
■ Recent Uploads on Overview Page
■ File to be expired shortly on Overview Page
■ Policy listing on File Transfer
■ Quick Download page in File Transfer Page
■ Import Files from external server on policy specific tab page in File Transfer Tab.
■ Staged Files on policy specific tab page in File Transfer Tab.
■ Realm Listing in Manage Realms Tab.
■ Policies Listing in Manage Policies Tab.
■ Users Listing in Manage Users Tab.
■ Server Listing in Manage Servers Tab.
Default: 20
WEBSERVICES Structure
The attributes for the WEBSERVICES structure are as follows:
GATEWAYURL="url"
CA XCOM Gateway Control Server URL
Default: http://localhost:8080/GatewayControlServer
INTERFACEURL="url"
Interface Server URL.
Default: http://localhost:8080/xcom-datatransport-interface/services/TransportInterfaceService
Define Global Parameters
Appendix A: Configuration XML Formats 253
CA EEM Structure
The CA EEM parameters set the host name for the EEM server to be used by CA XCOM Gateway.
HOST NAME
The host name or IP address of the machine on which the CA EEM server is located.
Default: “localhost” (if omitted)
SMTP Structure
The attributes for the SMTP structure are as follows:
HOST="hostname"
The host name and optional port for the SMTP server
Default: “gateway.smtp.host” (if the port alone is omitted)
ADMINEMAIL=”email@address”
The administrator's email address. All notifications will be sent from this address.
Default: "[email protected]"
XCOM Structure
The attributes for the XCOM structure are as follows:
CONNECTMAXRETRY="n"
The number of times a failed attempt to contact the local system should be retried, before deeming any remaining unscheduled transfers as failed.
Default: 10
Note: This value is used only if there is no value specified at policy level, that is, the corresponding policy attribute has a negative value.
CONNECTRETRYINTERVAL="n"
A period of time (in seconds) after which a failed attempt to contact the local system should be retried.
Default: 30
Note: This value is used only if there is no value specified at policy level, that is, the corresponding policy attribute has a negative value.
RESULTRETENTION="n"
A period of time in seconds, for which the CA XCOM Interface Server should retain scheduling results and status related to this request, after all requested transfers have either been scheduled or failed.
Default: 600
Define Global Parameters
254 Product Guide
SCHEDULEMONITORINTERVAL="n"
A time interval in seconds, defining the frequency of status checks to be made on the status of CA XCOM Data Transport transfer scheduling requests.
Default: 10
TRANSFERMONITORINTERVAL="n"
A time interval in seconds, defining the frequency of status checks to be made on the progress of scheduled XCOM transfers.
Default: 300
START_ONWARD_SERVICE=”YES || NO”
This attribute will be used to determine if the onward service should be started in the deployment where these Global parameters are being used. This attribute is very important in the cluster environment where more than one Gateway Control Server configured. There could be only one instance of Gateway Control Server among all the Gateway Control Server configured under cluster that should be configured with value as YES. Rest of the Gateway Control Server should be configured with value as NO.
Default: YES
ECLIPSELINK Structure
DATABASE_PLATFORM
This value determines the protocol that EclipseLink uses to access the platform-specific behavior. This is an API that the JPA provider like EclipseLink internally invokes to interact with a specific database platform. To find the exact dialect for the database, check the following URL. By default XCOM Gateway is configured with MySQL and the following value of dialect:
The JPA dialect for MySQL: org.eclipse.persistence.platform.database.MySQLPlatform
The JPA dialect for DB2: org.eclipse.persistence.platform.database.DB2Platform
Reference for the available Dialects: http://www.eclipse.org/eclipselink/api/1.0/org/eclipse/persistence/platform/database/package-summary.html
Define Global Parameters
Appendix A: Configuration XML Formats 255
EHCACHE Structure
The Gateway control server uses EHCACHE for caching the results and improving the response time of the user. EHCACHE needs the disk store path, where the cache gets created and removed automatically.
DISK_STORE
The Disk Store path specifies where the cache files are stored.
RMI_URLS
The RMI Urls are used only in a clustered environment. If multiple Gateway control server instances are installed and are configured with a Load balancer, all the caches running on each system, can be synchronized. The RMI protocol is used to synchronize the caches.
Format of the url is: //<<machine_name>>:<<port_number>>
RMI_LISTENER
HOST and PORT are used only in a clustered environment. If multiple Gateway control server instances are installed and are configured with a Load balancer, all the caches running on each system, can be synchronized. The RMI protocol is used to synchronize the caches.
HOST
Specifies the RMI hostname.
PORT
PORT specifies the RMI port number EHCACHE uses.
INTERFACESERVER Structure
This structure contains only one XML tag LOG, described in common XML tags structures structure.
The attribute for the INTERFACESERVER structure is as follows:
QUERYCOUNT="n"
The number of HISTORYITEMS the QUERYHISTORY inquiry returns.
Define Global Parameters
256 Product Guide
AUTOMATIC_FILE_INSERTION Structure
USERNAME:
Administrator can mention the user that would be used to start the Auto File Insertion facility when the application starts.
START_SERVICE
The Start Service attribute is used to determine whether the autofile insertion Directory watcher service can be started in the deployment where these Global parameters are being used. This attribute is important in the cluster environment where more than one Gateway Control Server is configured. There could be only one instance of the Gateway Control Server among all the Gateway Control Servers that are configured under the cluster that can be configured with value of YES. The rest of the Gateway Control Servers can be configured with the value of NO.
Default: YES
LOCALE_LANGUAGE
This attribute specifies the locale language to be used while sending an email notification from the Gateway Control Server.
Note: If this user is not configured when the application is started (the value is not found in the xcom-globals.xml) the application will not start the Auto File Insertion facility.
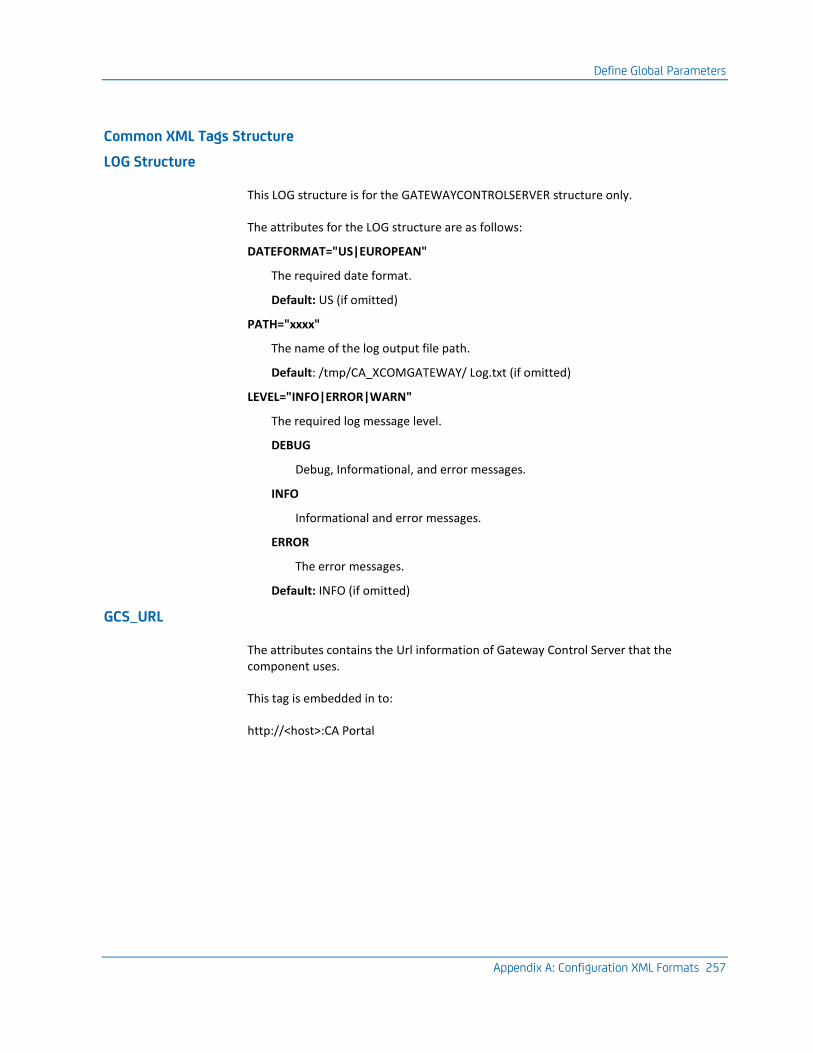
Define Global Parameters
Appendix A: Configuration XML Formats 257
Common XML Tags Structure
LOG Structure
This LOG structure is for the GATEWAYCONTROLSERVER structure only.
The attributes for the LOG structure are as follows:
DATEFORMAT="US|EUROPEAN"
The required date format.
Default: US (if omitted)
PATH="xxxx"
The name of the log output file path.
Default: /tmp/CA_XCOMGATEWAY/ Log.txt (if omitted)
LEVEL="INFO|ERROR|WARN"
The required log message level.
DEBUG
Debug, Informational, and error messages.
INFO
Informational and error messages.
ERROR
The error messages.
Default: INFO (if omitted)
GCS_URL
The attributes contains the Url information of Gateway Control Server that the component uses.
This tag is embedded in to:
http://<host>:CA Portal
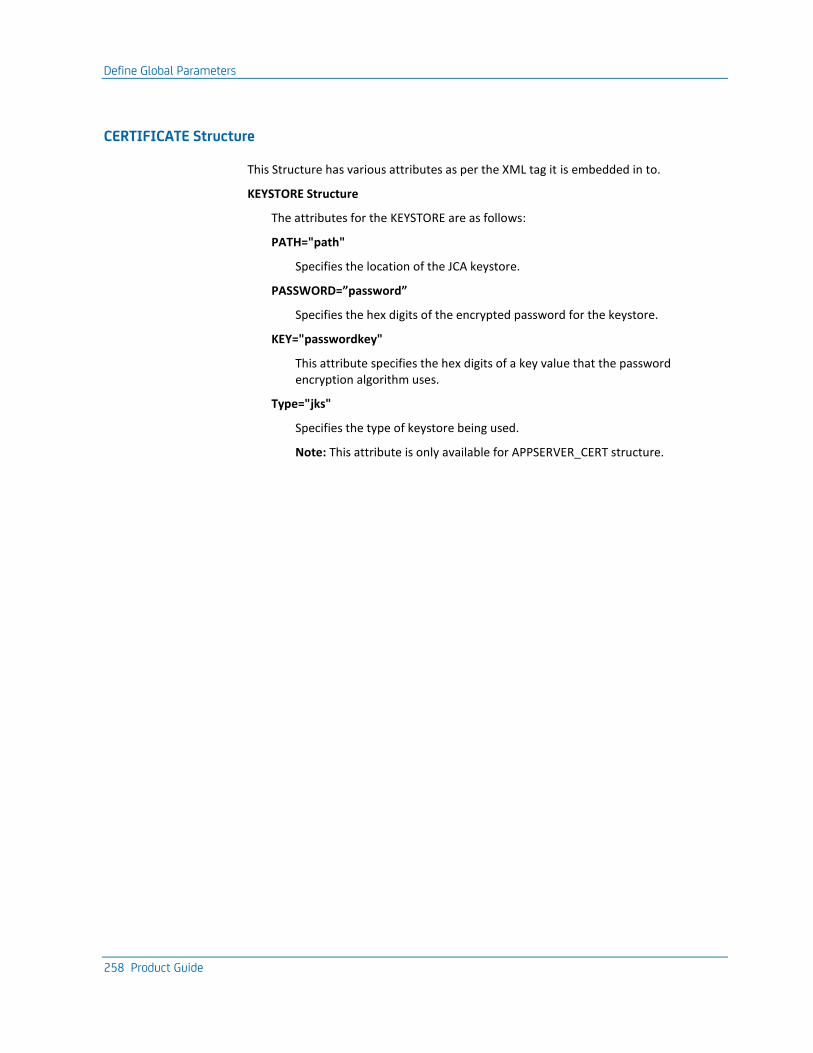
Define Global Parameters
258 Product Guide
CERTIFICATE Structure
This Structure has various attributes as per the XML tag it is embedded in to.
KEYSTORE Structure
The attributes for the KEYSTORE are as follows:
PATH="path"
Specifies the location of the JCA keystore.
PASSWORD=”password”
Specifies the hex digits of the encrypted password for the keystore.
KEY="passwordkey"
This attribute specifies the hex digits of a key value that the password encryption algorithm uses.
Type="jks"
Specifies the type of keystore being used.
Note: This attribute is only available for APPSERVER_CERT structure.
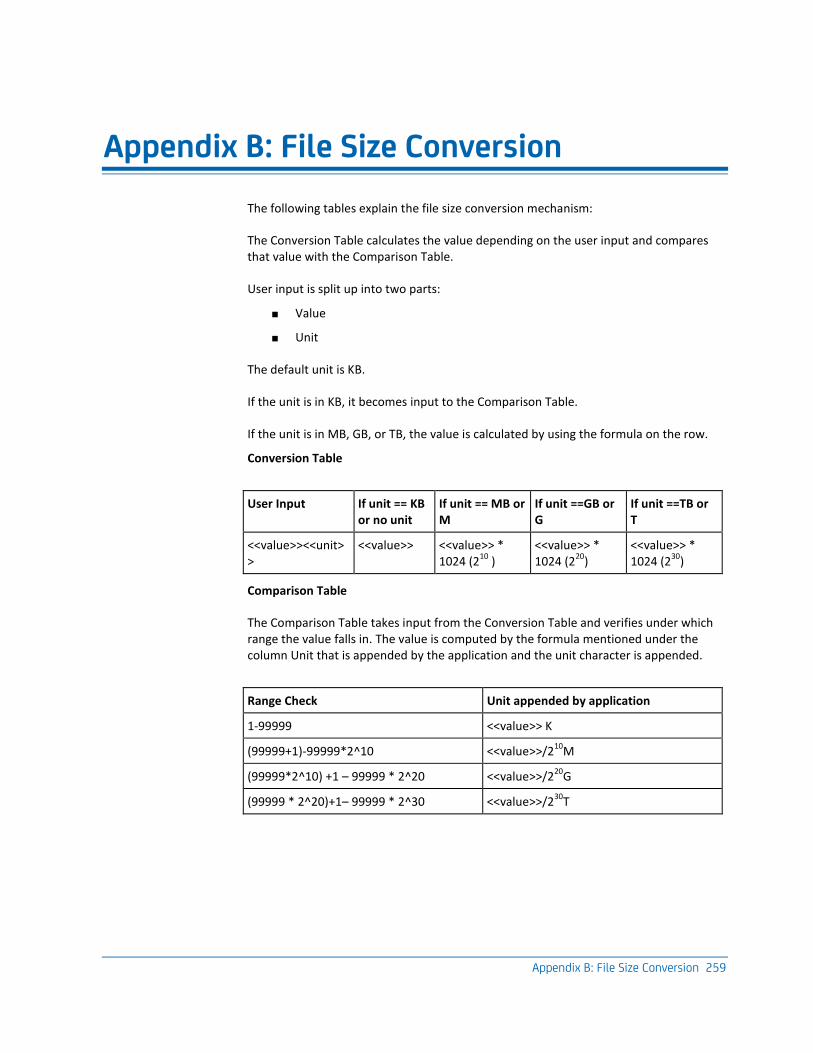
Appendix B: File Size Conversion 259
Appendix B: File Size Conversion
The following tables explain the file size conversion mechanism:
The Conversion Table calculates the value depending on the user input and compares that value with the Comparison Table.
User input is split up into two parts:
■ Value
■ Unit
The default unit is KB.
If the unit is in KB, it becomes input to the Comparison Table.
If the unit is in MB, GB, or TB, the value is calculated by using the formula on the row.
Conversion Table
User Input If unit == KB or no unit
If unit == MB or M
If unit ==GB or G
If unit ==TB or T
<<value>><<unit>>
<<value>> <<value>> * 1024 (2
10 )
<<value>> * 1024 (2
20)
<<value>> * 1024 (2
30)
Comparison Table
The Comparison Table takes input from the Conversion Table and verifies under which range the value falls in. The value is computed by the formula mentioned under the column Unit that is appended by the application and the unit character is appended.
Range Check Unit appended by application
1-99999 <<value>> K
(99999+1)-99999*2^10 <<value>>/210
M
(99999*2^10) +1 – 99999 * 2^20 <<value>>/220
G
(99999 * 2^20)+1– 99999 * 2^30 <<value>>/230
T

Index 261
Index
A
add policies • 104 realms • 130 users • 95
attributes • 248
B
browsers • 16
C
CA EEM • 157, 253 starting • 72 stopping • 74
CA XCOM Gateway • 11 administration • 91 communication • 12 configuration • 91 FTP • 227 management • 12 starting • 72 stopping • 74 through the internet • 189
components • 25 configuration
Gateway • 92 global parameters • 147 user permissions for a policy • 118 XML formats • 247
console mode installation • 51 uninstall • 65
copy policies • 107 realms • 132
D
database objects, removal • 67 database tables, relational • 16 database user • 34 databases • 16 delete
policies • 108 realms • 133
users • 99 destination folders • 33 downloads • 192, 232
E
EEM • 157, 253 error messages • 146
F
file upload • 234 FTP server • 228, 235
starting • 72 stopping • 74
G
Gateway administration • 91 communication • 12 configuration • 91 configuring • 92 FTP • 227 management • 12 starting • 72 stopping • 74 through the internet • 189
GATEWAYSERVER structure • 252 global parameters • 152
configuring offline • 147 defining • 247
H
hardware requirements • 16
I
installation components • 25 dialogs • 23 log files • 55 options • 44
interface server • 33, 34, 40 INTERFACESERVER structure • 255
J
JBoss
262 Product Guide
configuration information • 40
L
license agreement • 23 log files • 55 login • 229 login, initial • 82
M
messages error • 146
O
onward transfers • 175 configuring policies • 167 local authentication • 177 schedule parameters • 184 testing • 183
operating systems • 15
P
parameters global • 247
policies • 101, 106, 108, 230 policy transfer XML • 169
building using CA XCOM Management Center • 179
importing • 181 sample • 173 schema • 170 testing • 181
pre-installation considerations • 16 prerequisites
installation • 18, 21 process
policies • 101 realms • 128 users • 93
R
realms • 128, 132, 133 relational database tables • 16 requirements
hardware • 16 system • 15
S
schedule parameters • 184 silent installation • 54, 56, 63 silent uninstall • 65 SMTP
structure • 253 system requirements • 15 system setup • 15
T
testing onward transfers • 183 policy transfer XML • 181
U
uninstall CA XCOM Gateway • 64, 66 interface server • 67 modes • 65
upload • 190, 234 user permissions for a policy • 118 users • 93, 99
W
WEBSERVICES structure • 252
X
XCOM structure • 253


