Embed Size (px)
Citation preview
Chess Strategy
Edward Lasker - translated by J. Du Mont
The Project Gutenberg EBook of Chess Strategy, by Edward Lasker#2 in our series by Edward Lasker
Copyright laws are changing all over the world. Be sure to check thecopyright laws for your country before downloading or redistributingthis or any other Project Gutenberg eBook.
This header should be the first thing seen when viewing this ProjectGutenberg file. Please do not remove it. Do not change or edit theheader without written permission.
Please read the "legal small print," and other information about theeBook and Project Gutenberg at the bottom of this file. Included isimportant information about your specific rights and restrictions inhow the file may be used. You can also find out about how to make adonation to Project Gutenberg, and how to get involved.
**Welcome To The World of Free Plain Vanilla Electronic Texts**
**eBooks Readable By Both Humans and By Computers, Since 1971**
*****These eBooks Were Prepared By Thousands of Volunteers!*****
Title: Chess Strategy
Author: Edward Lasker translated by J. Du Mont
Release Date: May, 2004 [EBook #5614][Yes, we are more than one year ahead of schedule][This file was first posted on July 22, 2002]
Edition: 10
Language: English
Character set encoding: ASCII
*** START OF THE PROJECT GUTENBERG EBOOK CHESS STRATEGY ***
Produced by John Mamoun <[email protected]>, Charles Franks,and the Online Distributed Proofreaders website.

Livros Grátis
http://www.livrosgratis.com.br
Milhares de livros grátis para download.
INFORMATION ABOUT THIS E-TEXT EDITION
The following is an e-text of "Chess Strategy," second edition, (1915)by Edward Lasker, translated by J. Du Mont.
This e-text contains the 167 chess and checkers board gamediagrams appearing in the original book, all in the form ofASCII line drawings. The following is a key to the diagrams:
For chess pieces,
R = Rook Kt = Knight B = Bishop Q = Queen K = King P = Pawn
Black pieces have a # symbol to the left of them, whilewhite pieces have a ^ symbol to the left of them. For example,#B is the Black bishop, while ^B is the white bishop. #Kt isthe black knight, while ^Kt is the white knight. This willlet the reader instantly tell by sight which pieces in theASCII chess diagrams are black and which are white. Thosewho find these diagrams hard to read should feel freeto set up them up on a game board using the actual pieces.
CONTENTS
TRANSLATOR'S PREFACEAUTHOR'S PREFACE
PART I
I. INTRODUCTORY
I. Rules of the Game II. Notation
II. HINTS FOR BEGINNERS
Elementary Combinations Simple Calculation Complications
III. GENERAL PRINCIPLES OF CHESS STRATEGY
Introductory Balance of Attack and Defence Mobility
IV. THE OPENING
Development of the Pieces On Losing Moves Examples of Practical Play Pawn Play Pawn Skeleton The Centre A. King's Pawn Games B. Queen's Pawn Games C. Irregular Openings
V. THE END-GAME
End-games with Pieces Pawn Endings Mixed Endings
END-GAMES FROM MASTER-PLAY
Teichmann-Blackburne (Berlin, 1897) Ed. Lasker-Rotlewi (Hamburg, 1910) Blackburne-Schlechter (Vienna, 1898) Bird-Janowski (Hastings, 1895) Steiner-Forgacz (Szekesfehervar, 1907) Charousek-Heinrichsen (Cologne, 1898)
VI. THE MIDDLE GAME
General Remarks Evolution of the Pawn Skeleton Objects of Attack "Backward" Pawns On Fixing a Weakness Weaknesses in a Pawn Position Breaking up the King's Side Doubled Pawns Illustrations-- v. Scheve-Teichmann (Berlin, 1907) Marshall-Burn (Ostend, 1907) Manoeuvres of the Pieces Open Files and Diagonals Example-- Fred. Lazard-Ed. Lasker (Paris, 1914)
PART II
ILLUSTRATIVE GAMES FROM MASTER TOURNAMENTS
1. Tartakower-Burn (Carlsbad, 1911) 2. Leonhardt-Marshall (San Sebastian, 1911) 3. Spielmann-Prokes (Prag, 1908) 4. Tarrasch-Capablanca (San Sebastian, 1911) 4a. Howell-Michell (Cable Match, 1907) 4b. X. v. Y 5. Griffith-Gunston (London, 1902) 6. Mason-Gunsberg (New York, 1889) 7. Marshall-Tarrasch (Hamburg, 1910) 8. Blackburne-Em. Lasker (Petrograd, 1914) 9. Salwe-Marshall (Vienna, 1908)
10. Teichmann-Amateurs (Glasgow, 1902) 11. Schlechter-Janowski (Paris, 1900) 12. Teichmann-Rubinstein (Carlsbad, 1911) 13. Teichmann-Schlechter (Carlsbad, 1911) 14. Spielmann-Tarrasch (San Sebastian, 1912) 15. Aljechin-Niemzowitsch (Petrograd, 1914) 16. Yates-Gunsberg (Chester, 1914) 17. Berlin-Riga (1908-1909) 17a. Maroczy-Berger (Vienna, 1908) 18. Em. Lasker-Capablanca (Petrograd, 1914) 19. Ed. Lasker-Janowski (Scheveningen, 1913) 20. Ed. Lasker-Englund (Scheveningen, 1913) 21. Ed. Lasker-Aljechin (Scheveningen, 1913) 22. Forgacz-Tartakower (Petrograd, 1909) 23. Yates-Esser (Anglo-Dutch Match, 1914) 24. Atkins-Barry (Cable Match, 1910) 25. Em. Lasker-Tarrasch (Munich, 1908) 26. Capablanca-Blanco (Havanna, 1913) 27. Niemzowitsch-Tarrasch (San Sebastian, 1912) 28. Alapin-Rubinstein (Wilna, 1912) 29. Teichmann-Spielmann (Leipzig, 1914) 30. Tarrasch-Spielmann (Mannheim, 1914) 31. John-Janowski (Mannheim, 1914) 32. Ed. Laskcr-Mieses (Scheveningen, 1913) 33. Barasz-Mieses (Breslau, 1012) 34. Em. Lasker-Niemzowitsch (Petrograd, 1914) 35. Reti-Tartakower (Vienna, 1910) 36. Forgacz-E. Cohn (Petrograd, 1909) 37. Marshall-Capablanca (New York, 1909) 38. Rotlewi-Teichmann (Carlsbad, 1911) 38a. Rubinstein-Teichmann (Vienna, 1908) 39. Rotlewi-Rubinstein (Lodz, 1907) 40. Rubinstein-Capablanca (San Sebastian, 1911) 41. Niemzowitsch-Tarrasch (Petrograd, 1914) 41a. Em. Lasker-Bauer (Amsterdam, 1889) 42. Capablanca-Aljechin (Petrograd, 1913) 43. Capablanca-Bernstein (Petrograd, 1914) 44. Dus Chotimirski-Vidmar (Carlsbad, 1911) 45. Rubinstein-Spielmann (Pistyan, 1912) 46. Thomas-Ed. Lasker (London, 1912) 47. Tartakower-Asztalos (Budapest, 1913) 47a. Tartakower-Spielmann (Vienna, 1913) 47b. X v. Y 48. Blackburne-Niemzowitsch (Petrograd, 1914)
TABLE OF OPENINGS
A. King's Pawn Games B. Queen's Pawn Games C. Irregular Openings
TRANSLATOR'S PREFACE
As the first edition of Edward Laskcr's CHESS STRATEGY wasexhausted within a comparatively short time of its appearance,
the author set himself the task of altering and improving thework to such an extent that it became to all intents and purposesa new book. I had the privilege of co-operating with him to aslight degree on that second edition, and was in consequence ableto appreciate the tremendous amount of work he voluntarily tookupon himself to do; I say voluntarily, because his publishers,anxious to supply the strong demand for the book, wished toreprint it as it stood.
A little later I undertook to translate this second edition intoEnglish for Messrs. Bell & Sons. Only a few months had elapsed,the tournaments at Petrograd, Chester, and Mannheim had takenplace, several new discoveries had been made, and it is thegreatest testimony to Edward Lasker's indefatigable devotion tothe Art of Chess that I am able to say that this is not atranslation of the second edition, but of what is practically anew book. It contains a new preface, a chapter for beginners, anew introduction, new variations. Furthermore, a large number ofnew games have taken the place of old ones.
I have no doubt that any chess player who will take the troubleto study CHESS STRATEGY will spend many a pleasurable hour.Incidentally new vistas will be opened to him, and his playingstrength increased to a surprising degree.
The author says in his preface that he appeals to theintelligence and not the memory of his readers. In my opinion,too, the student should above all try to improve his judgment ofposition.
Than the playing over of games contested by experts I can hardlyimagine a greater or purer form of enjoyment. Yet I must at theoutset sound a note of warning against its being donesuperficially, and with a feverish expectation of somethinghappening. Every move or combination of moves should be carefullyweighed, and the student should draw his own conclusions andcompare them with what actually happens in the game underexamination.
This applies particularly to some of the critical positions setout in diagrams in the course of the exposition of the severalgames.
The reader would derive the greatest possible benefit from aprolonged study of such positions before seeking to know how thegames proceed. After having formed his own opinion about themerits of a particular position, he should compare the resultwith the sequel in the game in question, and thus find out wherehis judgment has been at fault.
The deeper study of the theory of the openings is of course anecessity to the student who wishes to become an expert, but thedevelopment of his judgment must precede it. To him Griffith &White's admirable book, Modem Chess Openings, will be a perfectmine of information. There are thousands of variations, and inmost of them the actual game in which they were first tried bymasters is named, thus adding to the interest and value of thework.
I must not omit to mention the invaluable help afforded me by myfriend Mr. John Hart, to whom my warmest thanks are due.
JULIUS DU MONT.
AUTHOR'S PREFACE
THE large majority of chess players who would like to improvetheir game, have not the necessary opportunity of pittingthemselves against players of master-strength, or at least ofobtaining the desired instruction from personal intercourse withthem. It is for such players that the present work is intended.The books on which the learner has to rely hardly ever serve hispurpose, being mostly little more than a disjointed tabulation ofnumberless opening variations, which cannot be understood withoutpreliminary studies, and consequently only make for confusion. Inthe end the connection between the various lines of play maybecome clear, after the student has made an exhaustive study ofthe subject, but very few would have either the time or theinclination for such prolonged labour.
Therefore another shorter and less empirical way must be found inwhich to acquire the understanding of sound play. My system ofteaching differs from the usual ones, in that it sets down at theoutset definite elementary principles of chess strategy by whichany move can be gauged at its true value, thus enabling thelearner to form his own judgment as to the manoeuvres underconsideration. In my opinion it is absolutely ESSENTIAL to followsuch strategical principles, and I go so far as to assert thatsuch principles are in themselves SUFFICIENT for the developmentand conduct of a correct game of chess.
Even though instruction in chess is possible on very generallines alone, yet I think it advisable and indeed necessary toexplain the application of such principles to the various phasesof each game of chess. Otherwise the learner might unduly delayhis progress, and lose valuable time in finding out for himselfcertain essentials that could more profitably be pointed out tohim.
With regard to the way in which I have arranged my subject andthe form of its exposition in detail, I have thought out thefollowing plan.
After discussing at length the leading principles underlyingsound play, I have first treated of the OPENINGS, in which suchprinciples are of even more deciding influence than in any otherstage of the game, as far as could be done on broad lines withouthaving to pay attention to middle and end-game considerations.
I proceeded as follows, by taking as my starting-point the "pawnskeleton" which is formed in the opening, and round which thepieces should group themselves in logical fashion. As aconsequence of the pawns having so little mobility, this "pawn
skeleton" often preserves its shape right into the end-game.Applying the general strategical principles to the formation ofthe pawn skeleton, the learner acquires the understanding of theleading idea underlying each opening without having to burden hismemory. Not only that, he will also be able to find a correctplan of development when confronted with unusual forms ofopening.
The most important result of this system of teaching is that thelearner does not lose his way in a maze of detail, but has inview at the very outset, the goal which the many possiblevariations of the openings are intended to reach.
Before I could proceed to the discussion of the middle game, Ifound it necessary to treat of the principles governing the END-GAME. For in most cases play in the middle game is influenced byend-game considerations. Here also it has been my endeavour asfar as possible to reduce my subject to such principles as aregenerally applicable.
Finally, as regards the MIDDLE GAME, to which the whole of PartII is devoted, I have again made the handling of pawns, thehardest of all problems of strategy, the starting-point for mydeliberations. I have shown at length how the various plansinitiated by the various openings should be developed further. Toensure a thorough understanding of the middle game, I have givena large number of games taken from master play, with numerous andextensive notes. Thus the student has not to rely only onexamples taken haphazard from their context, but he will at thesame time see how middle-game positions, which give opportunitiesfor special forms of attack, are evolved from the opening.
It has been my desire to make the subject easily understandableand at the same time entertaining, and to appeal less to thememory of my readers than to their common sense and intelligence.I hope in that way not to have strayed too far from the ideal Ihad in mind when writing this book, namely, to apply to chess theonly method of teaching which has proved productive in allbranches of science and art, that is, the education of individualthought.
If I have succeeded in this, I shall have the satisfaction ofhaving contributed a little to the furthering, in the widecircles in which it is played, of the game which undoubtedlymakes the strongest appeal to the intellect.
EDWARD LASKER.
PART I
CHAPTER I
INTRODUCTORY
I. RULES OF THE GAME
A GAME of chess is played by two opponents on a square boardconsisting of sixty-four White and Black squares arrangedalternately. The forces on each side comprise sixteen units,namely a King, a Queen, two Rooks, two Bishops, two Knights, andeight Pawns. All units move according to different laws, and thedifference in their mobility is the criterion of their relativevalue and of the fighting power they contribute towards achievingthe ultimate aim, namely, the capture of the opposing King.Before I can explain what is meant by the capture of the King, Imust set out the rules of the game in full.
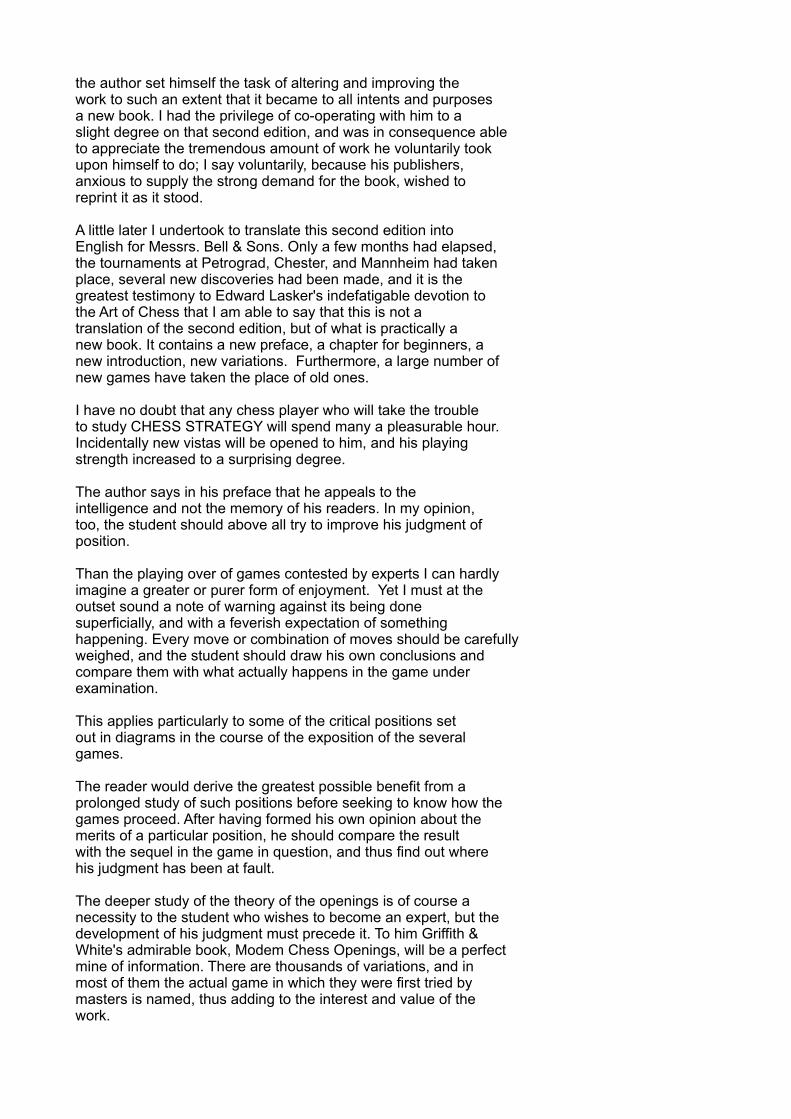
Diagram 1 shows the position the forces take up for the contest.The board is so placed that there is a white square at the topleft-hand corner. The Rooks take up their positions at the cornersquares, and next to them the Knights. Next to those again arethe Bishops, and in the centre the King and Queen, the WhiteQueen on a White square, and the Black Queen on a Black square.The eight pawns occupy the ranks immediately in front of thepieces. From this initial position, White begins the game inwhich the players must move alternately.
The pieces move in the following way: The Rook can move from anysquare it happens to be on, to any other square which it canreach in a straight line, either perpendicularly or horizontally,unless there is another piece of the same colour in the way, inwhich case it can only move as far as the square immediately infront of that piece. If it is an opposing piece which blocks theway, he can move on to the square that piece occupies, therebycapturing it. The piece thus captured is removed from the board.The Bishop can operate along either of the diagonals of which thesquare on which he is standing forms part. A Bishop on a Whitesquare can there fore never get on to a Black one.
--------------------------------------- 8 | #R | #Kt| #B | #Q | #K | #B | #Kt| #R | |---------------------------------------| 7 | #P | #P | #P | #P | #P | #P | #P | #P | |---------------------------------------| 6 | | | | | | | | | |---------------------------------------| 5 | | | | | | | | | |---------------------------------------| 4 | | | | | | | | | |---------------------------------------| 3 | | | | | | | | | |---------------------------------------| 2 | ^P | ^P | ^P | ^P | ^P | ^P | ^P | ^P | |---------------------------------------| 1 | ^R | ^Kt| ^B | ^Q | ^K | ^B | ^Kt| ^R | --------------------------------------- a b c d e f g h
DIAG. 1.
The Queen commands both the straight and the oblique lines which
start from the square she stands on, and therefore unites thepower of both Rook and Bishop in her movements.
The King has similar powers to the Queen, but curtailed, inasmuchas he can only move one step at a time. He therefore onlycontrols one neighbouring square in any direction.
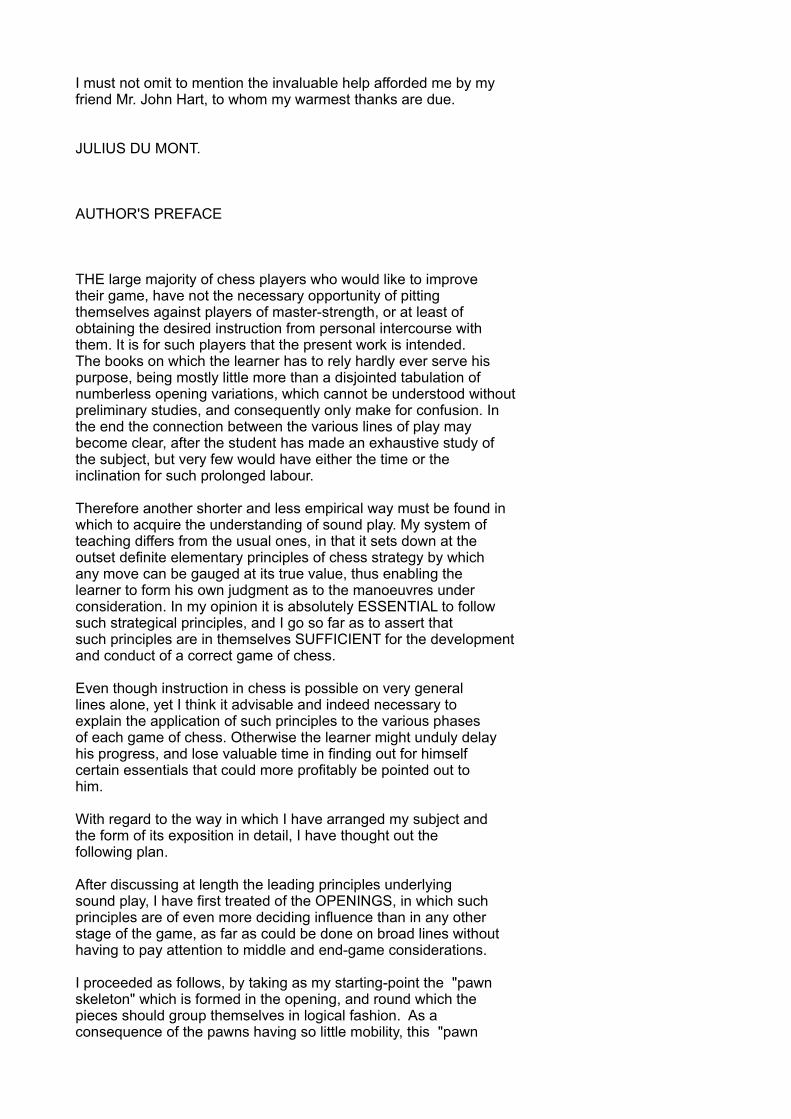
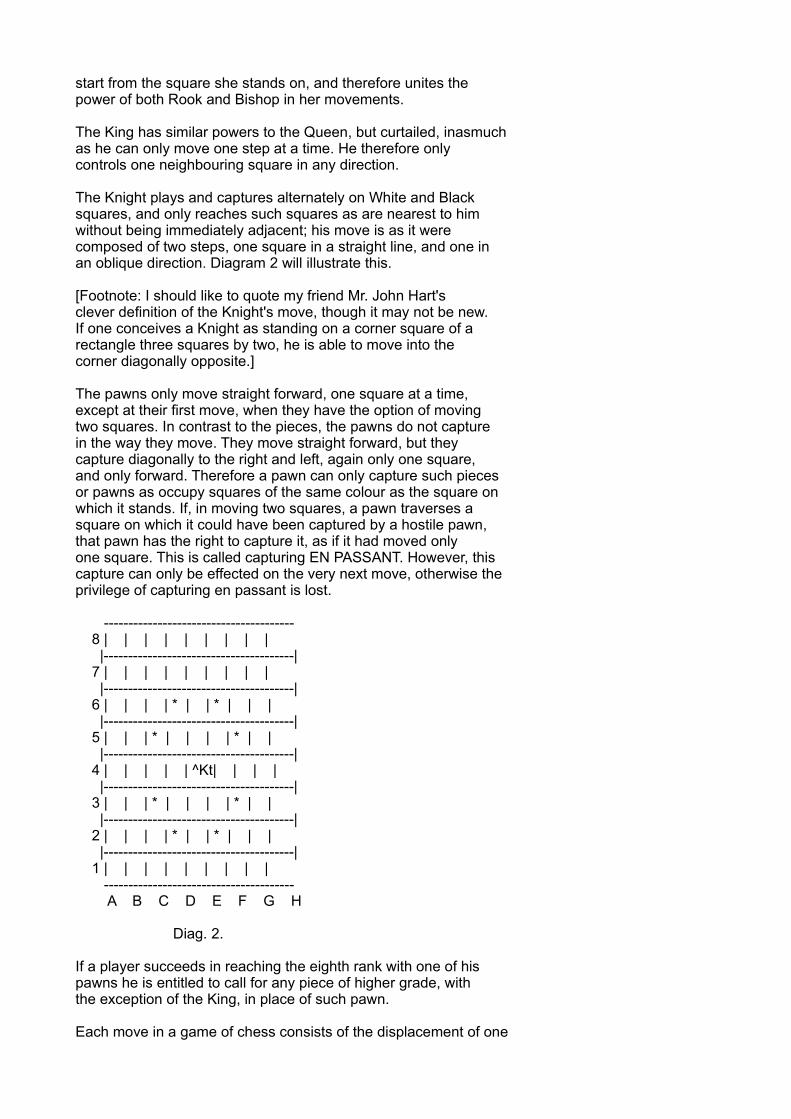
The Knight plays and captures alternately on White and Blacksquares, and only reaches such squares as are nearest to himwithout being immediately adjacent; his move is as it werecomposed of two steps, one square in a straight line, and one inan oblique direction. Diagram 2 will illustrate this.
[Footnote: I should like to quote my friend Mr. John Hart'sclever definition of the Knight's move, though it may not be new.If one conceives a Knight as standing on a corner square of arectangle three squares by two, he is able to move into thecorner diagonally opposite.]
The pawns only move straight forward, one square at a time,except at their first move, when they have the option of movingtwo squares. In contrast to the pieces, the pawns do not capturein the way they move. They move straight forward, but theycapture diagonally to the right and left, again only one square,and only forward. Therefore a pawn can only capture such piecesor pawns as occupy squares of the same colour as the square onwhich it stands. If, in moving two squares, a pawn traverses asquare on which it could have been captured by a hostile pawn,that pawn has the right to capture it, as if it had moved onlyone square. This is called capturing EN PASSANT. However, thiscapture can only be effected on the very next move, otherwise theprivilege of capturing en passant is lost.
--------------------------------------- 8 | | | | | | | | | |---------------------------------------| 7 | | | | | | | | | |---------------------------------------| 6 | | | | * | | * | | | |---------------------------------------| 5 | | | * | | | | * | | |---------------------------------------| 4 | | | | | ^Kt| | | | |---------------------------------------| 3 | | | * | | | | * | | |---------------------------------------| 2 | | | | * | | * | | | |---------------------------------------| 1 | | | | | | | | | --------------------------------------- A B C D E F G H
Diag. 2.
If a player succeeds in reaching the eighth rank with one of hispawns he is entitled to call for any piece of higher grade, withthe exception of the King, in place of such pawn.
Each move in a game of chess consists of the displacement of one
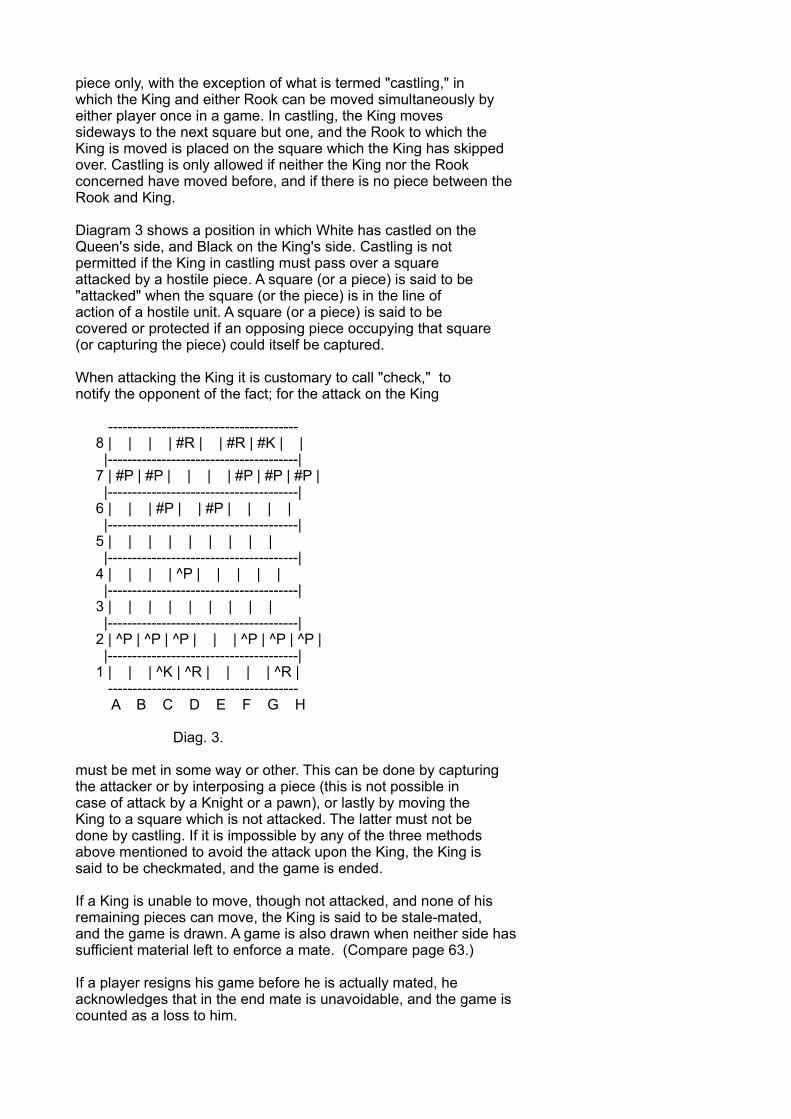
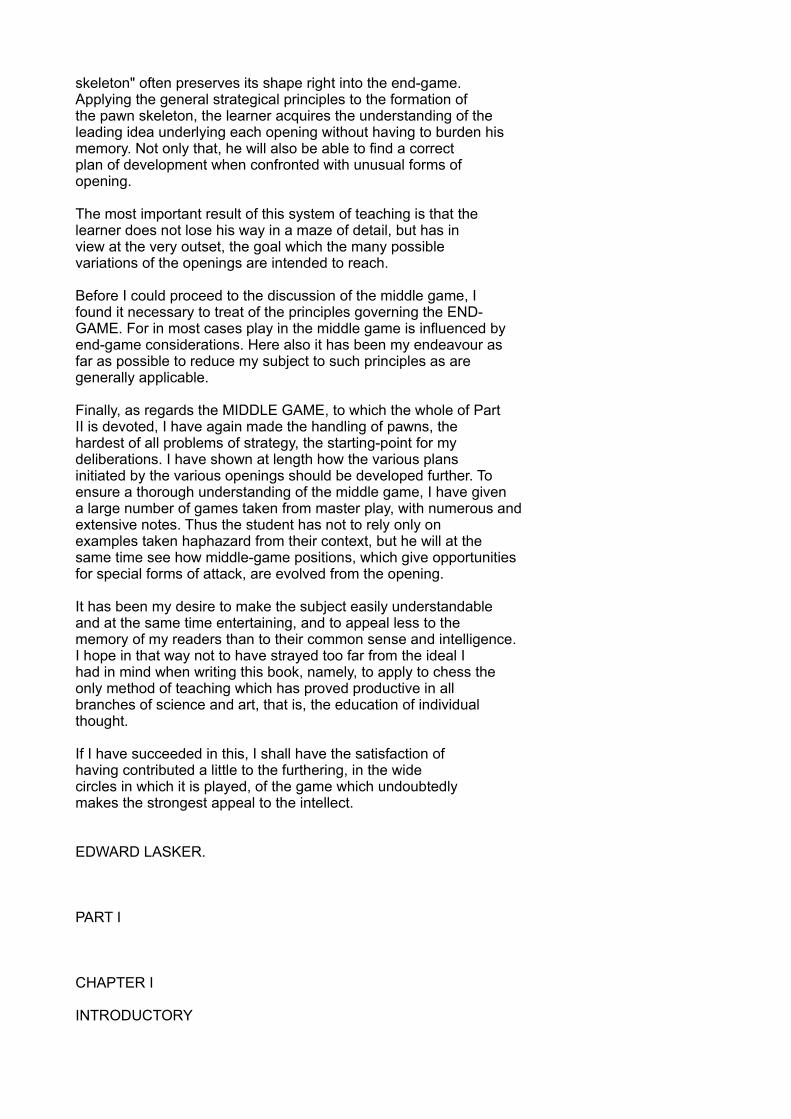
piece only, with the exception of what is termed "castling," inwhich the King and either Rook can be moved simultaneously byeither player once in a game. In castling, the King movessideways to the next square but one, and the Rook to which theKing is moved is placed on the square which the King has skippedover. Castling is only allowed if neither the King nor the Rookconcerned have moved before, and if there is no piece between theRook and King.
Diagram 3 shows a position in which White has castled on theQueen's side, and Black on the King's side. Castling is notpermitted if the King in castling must pass over a squareattacked by a hostile piece. A square (or a piece) is said to be"attacked" when the square (or the piece) is in the line ofaction of a hostile unit. A square (or a piece) is said to becovered or protected if an opposing piece occupying that square(or capturing the piece) could itself be captured.
When attacking the King it is customary to call "check," tonotify the opponent of the fact; for the attack on the King
--------------------------------------- 8 | | | | #R | | #R | #K | | |---------------------------------------| 7 | #P | #P | | | | #P | #P | #P | |---------------------------------------| 6 | | | #P | | #P | | | | |---------------------------------------| 5 | | | | | | | | | |---------------------------------------| 4 | | | | ^P | | | | | |---------------------------------------| 3 | | | | | | | | | |---------------------------------------| 2 | ^P | ^P | ^P | | | ^P | ^P | ^P | |---------------------------------------| 1 | | | ^K | ^R | | | | ^R | --------------------------------------- A B C D E F G H
Diag. 3.
must be met in some way or other. This can be done by capturingthe attacker or by interposing a piece (this is not possible incase of attack by a Knight or a pawn), or lastly by moving theKing to a square which is not attacked. The latter must not bedone by castling. If it is impossible by any of the three methodsabove mentioned to avoid the attack upon the King, the King issaid to be checkmated, and the game is ended.
If a King is unable to move, though not attacked, and none of hisremaining pieces can move, the King is said to be stale-mated,and the game is drawn. A game is also drawn when neither side hassufficient material left to enforce a mate. (Compare page 63.)
If a player resigns his game before he is actually mated, heacknowledges that in the end mate is unavoidable, and the game iscounted as a loss to him.
A game is null and void if it is shown that a mistake was made insetting the board or men. The same applies when in the course ofthe game the position and number of pieces have been altered in amanner not in accordance with the proper course of play, and thelatter cannot be re-constructed from the point where the errorwas made.
If a player having the move touches one of his pieces he is undercompulsion to move it; if he touches a hostile piece he mustcapture it, provided that the piece can be properly moved orcaptured in either case. This rule is of no effect if the pieceso touched cannot be moved or captured, as the case may be. Solong as the hand has not left the piece to be moved, the lattercan be placed on any accessible square. If a player touches apiece with the sole object of adjusting its position, he mustapprise his opponent of his intention by saying "J'adoube"beforehand. It is best to move the King first when castling. Ifthe Rook is moved first, and unless the King is played almostsimultaneously, a doubt might arise whether castling or a Rook'smove only was intended.
If a player has castled illegally, Rook and King must be movedback, and the King must make another move, if there is a legalone. If not, any other move can be played. A player who makes anillegal move with a piece must retract that move, and makeanother one if possible with the same piece. If the mistake isonly noticed later on, the game should be restarted from theposition in which the error occurred.
II. NOTATION
A special notation has been adopted to make the study of gamesand positions possible, and it is necessary for students of thegame to become thoroughly conversant with it. The original andearliest notation is still in use in English, French, and Spanishspeaking countries. It is derived from the original position inthe game, in that the squares take the names of the pieces whichoccupy them. Thus the corner squares are called R 1 (Rook'ssquare or Rook's first), and to distinguish them from one anotherQR1 or KR 1 (Queen's or King's Rook's square). The squaresimmediately in front are called QR2 or KR2. A distinction is madebetween White and Black, and White's R 1 is Black's R 8, Black'sR 2 is White's R 7, White's K B 3 is Black's KB6, and so on. Kstands for King; Q for Queen; B for Bishop; Kt for Knight; R forRook; and P for Pawn. In describing a capture, only the capturingand the captured pieces are mentioned, and not the squares.
When confusion is possible, it is customary to add whether King'sside or Queen's side pieces are concerned, e.g. KRx Q Kt. Inthis notation it is necessary to bear in mind which Kt is the QKt, which R is the KR. This becomes increasingly difficult as thegame goes on and pieces change their places. Many sets ofchessmen have one Rook and one Knight stamped with a specialsign, to show they are King's side pieces. This is not necessaryin the case of Bishops: a white KBis always on white squares, awhite QBon black squares.
A more modern notation is the algebraic notation, which has beenadopted in most countries. It has the advantage of beingunmistakably clear, and also more concise. Here the perpendicularlines of squares (called files) are named with the letters a-h,from left to right, always from the point of view of White, andthe horizontal lines of squares (called ranks) with numbers 1-8as before, only with the distinction that the rank on which theWhite pieces stand is always called the first; thus the square wenamed White's QB2 or Black's QB7 is now called c2 in both cases.Black's QB2 (White's QB7) is always c7. In capturing, the squareon which the capture takes place and not the piece captured isnoted, for the sake of uniformity. In the case of pawn moves, thesquares only are noted.
O--O stands for castles on the King's side; O--O--O stands forcastles on the Queen's side; : or x stands for captures; + forcheck.
In the following opening moves, both notations are used for thepurpose of comparison:
1. P-Q 4 P-Q4 1. d4 d5 2. P-QB4 P-K3 2. c4 e6 3. Kt-QB3 P-QB4 3. Ktc3 c5 4. PxQP KPxP 4. cd: ed: 5. P-K4 QPxP 5. e4 de: 6. P-Q5 Kt-KB3 6. d5 Ktf6 7. B--KKt5 B-K2 7. Bg5 Be7 8. K Kt-K2 Castles 8. Ktge2 O--O
In most books in which the algebraic notation is used, bothsquares of a move are written out for the benefit of the student.The moves above would then look like this:
1. d2-d4 d7-d5 2. c2-c4 e7-e6 3. Ktb1-c3 c7-c5 4. C4 x d5 e6xd5 5. e2-e4 d5xe4 6. d4-d5 Ktg8-f6 7. Bc1-g5 Bf8-e 7 8. Ktg1-e2 O--O
To conclude: I will give the denomination of the pieces invarious languages:
English .............. K Q R B Kt P CastlesFrench .............. R D T F C P RoqSpanish .............. R D T A C P EnrogGerman and Austrian .. K D T L S O-O (O)Italian .............. R D T A C O-O (O)Russian .............. KP F L C K O-O (O)Dutch ................ K D T L P O-O (O)Scandinavian ......... K D T L S O-O (O)Bohemian ............. K D V S J O-O (O)Hungarian ............ K V B F H O-O (O)
CHAPTER II
HINTS FOR BEGINNERS--ELEMENTARY COMBINATIONS
THE mental development of the chess player is a gradual strugglefrom a state of chaos to a clear conception of the game. Theperiod required for such development largely depends upon thespecial gifts the learner may possess, but in the main thequestion of methods predominates. Most beginners do not troublevery much about any particular plan in their study of chess, butas soon as they have learnt the moves, rush into the turmoil ofpractical play. It is self-evident that their prospects undersuch conditions cannot be very bright. The play of a beginner isplanless, because he has too many plans, and the capacity forsubordinating all his combinations to one leading idea is non-existent. Yet it cannot be denied upon investigation that acertain kind of method is to be found in the play of allbeginners, and seems to come to them quite naturally. At firstthe pawns are pushed forward frantically, because there is noappreciation of the power and value of the pieces. Conscious ofthe inferiority of the pawns, the beginner does not conclude thatit must be advantageous to employ the greater power of thepieces, but is chiefly concerned with attacking the opposingpieces with his pawns in the hope of capturing them. His aim isnot to develop his own forces, but to weaken those of hisopponent. His combinations are made in the hope that hisadversary may not see through them, nor does he trouble muchabout his opponent's intentions. When most of his pawns are gone,then only do his pieces get their chance. He has a great likingfor the Queen and the Knight, the former because of hertremendous mobility, the latter on account of his peculiar step,which seems particularly adapted to take the enemy by surprise.When watching beginners you will frequently observe numberlessmoves by a peripatetic Queen, reckless incursions by a Knightinto the enemy's camp, and when the other pieces join in thefray, combination follows combination in bewildering sequence andfantastic chaos. Captures of pieces are planned, mating nets arewoven, perhaps with two pieces, against a King's position, wherefive pieces are available for defence. This unsteadiness in thefirst childish stages of development makes it very difficult forthe beginner to get a general view of the board. Yet thesurprises which each move brings afford him great enjoyment.
A few dozen such games are by no means wasted. After certainparticular dispositions of pieces have proved his undoing, thebeginner will develop the perception of threats. He sees dangersone or two moves ahead, and thereby reaches the second stage inhis development.
His combinations will become more and more sound, he will learnto value his forces more correctly, and therefore to husband hispieces and even his pawns with greater care. In this second stagehis strength will increase steadily, but, and this is thedrawback, only as far as his power of combination is concerned.Unless a player be exceptionally gifted, he will only learn afteryears of practice, if at all, what may be termed "positionalplay." For that, it is necessary to know how to open a game so as
to lay the foundation for a favourable middle game, and how totreat a middle game, without losing sight of the possibilities ofthe end-game. It is hopeless to try to memorise the variousopenings which analysis have proved correct, for this empiricalmethod fails as soon as the opponent swerves from the recognisedlines of play. One must learn to recognise the characteristics ofsound play. They apply to all and any position, and theunderlying principles must be propounded in a manner generallyapplicable. And this brings me to the substance of my subject,round which I will endeavour to build up a system compatible withcommon sense and logic.
Before I proceed to develop my theme, I shall set down a numberof elementary rules which will facilitate the understanding ofsuch simple combinations as occur at every step in chess.
If we ignore the comparatively small proportion of games in whichthe mating of the opponent's King is accomplished on a fullboard, we can describe a normal, average game of chess in thefollowing way. Both sides will employ their available forces moreor less advantageously to execute attacking and defensivemanoeuvres which should gradually lead to exchanges. If one sideor the other emerges from the conflict with some material gain,it will generally be possible to force a mate in the end-game,whilst if both sides have succeeded by careful play to preserveequality of material, a draw will generally ensue.
It will be found a little later that a single pawn may suffice,with some few exceptions, to achieve a victory, and we shalladopt the following leading principle for all combinations, viz.loss of material must be avoided, even if only a pawn. It is agood habit to look upon every pawn as a prospective Queen. Thishas a sobering influence on premature and impetuous plans ofattack.
On the other hand, victory is often brought about by a timelysacrifice of material.
But in such cases the sacrificing of material has itscompensation in some particular advantage of position. Asprinciples of position are difficult for beginners to grasp, Ipropose to defer their consideration for the present and todevote my attention first to such combinations as involvequestions of material. Let us master a simple device that makesmost combinations easy both for attack and defence. It amountsmerely to a matter of elementary arithmetic, and if the beginnerneglects it, he will soon be at a material disadvantage.
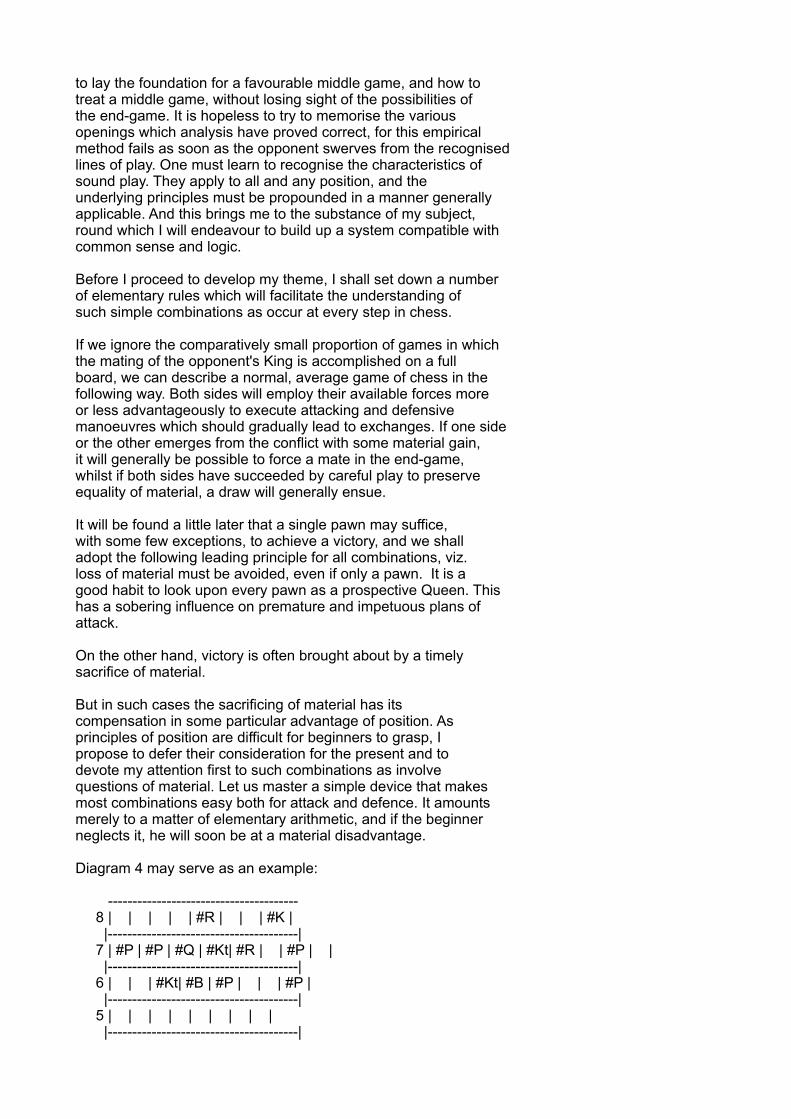
Diagram 4 may serve as an example:
--------------------------------------- 8 | | | | | #R | | | #K | |---------------------------------------| 7 | #P | #P | #Q | #Kt| #R | | #P | | |---------------------------------------| 6 | | | #Kt| #B | #P | | | #P | |---------------------------------------| 5 | | | | | | | | | |---------------------------------------|
4 | | | | | | ^P | | | |---------------------------------------| 3 | | ^P | | ^Kt| | ^Kt| | | |---------------------------------------| 2 | ^P | ^B | | ^Q | ^R | | ^P | ^P | |---------------------------------------| 1 | | | | | ^R | | ^K | | --------------------------------------- A B C D E F G H
Diag. 4.
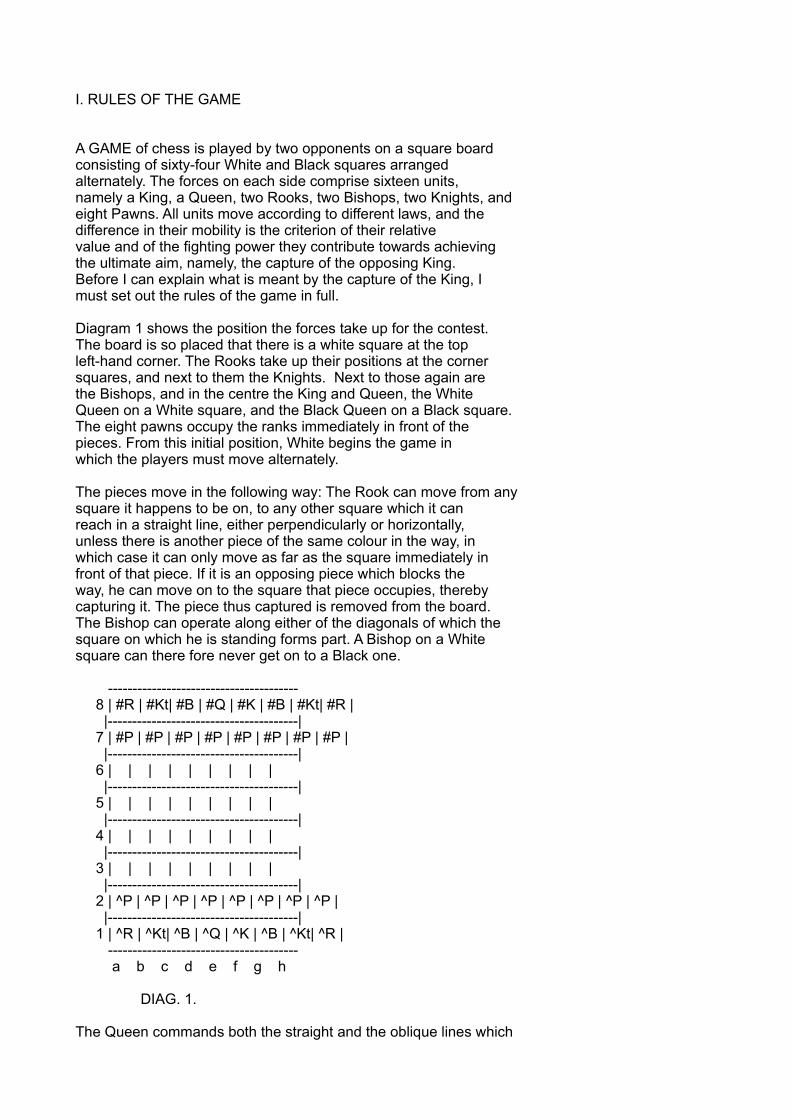
It is Black's move, and we will suppose he wishes to play P-K4. Abeginner will probably calculate thus: I push on my pawn, hetakes with his pawn, my Knight takes, so does his, then my Bishoptakes, and so on. This is quite wrong, and means waste of timeand energy.
When the beginner considers a third or fourth move in such acombination, he will already have forgotten which pieces heintended to play in the first moves. The calculation is perfectlysimple upon the following lines: I play P-K4, then my pawn isattacked by a pawn and two Knights, a Bishop and two Rooks, sixtimes in all. It is supported by a Bishop, two Knights, two Rooksand a Queen, six times in all. Therefore I can play P-K4,provided the six units captured at K4 are not of greater valuethan the six white units which are recaptured. In the presentinstance both sides lose a pawn, two Knights, two Rooks, and aBishop, and there is no material loss. This established, he canembark on the advance of the KP without any fear.
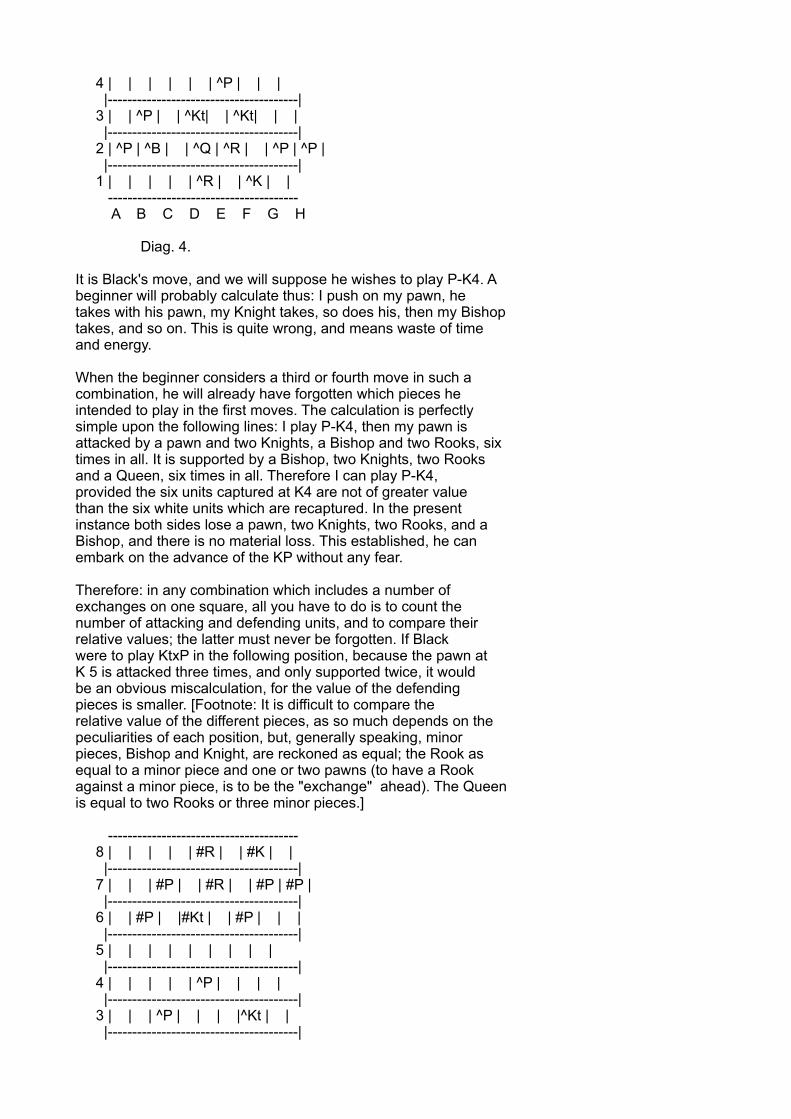
Therefore: in any combination which includes a number ofexchanges on one square, all you have to do is to count thenumber of attacking and defending units, and to compare theirrelative values; the latter must never be forgotten. If Blackwere to play KtxP in the following position, because the pawn atK 5 is attacked three times, and only supported twice, it wouldbe an obvious miscalculation, for the value of the defendingpieces is smaller. [Footnote: It is difficult to compare therelative value of the different pieces, as so much depends on thepeculiarities of each position, but, generally speaking, minorpieces, Bishop and Knight, are reckoned as equal; the Rook asequal to a minor piece and one or two pawns (to have a Rookagainst a minor piece, is to be the "exchange" ahead). The Queenis equal to two Rooks or three minor pieces.]
--------------------------------------- 8 | | | | | #R | | #K | | |---------------------------------------| 7 | | | #P | | #R | | #P | #P | |---------------------------------------| 6 | | #P | |#Kt | | #P | | | |---------------------------------------| 5 | | | | | | | | | |---------------------------------------| 4 | | | | | ^P | | | | |---------------------------------------| 3 | | | ^P | | | |^Kt | | |---------------------------------------|
2 | ^P | ^P | ^B | | | | ^P | ^P | |---------------------------------------| 1 | | | | ^R | | ^K | | | --------------------------------------- A B C D E F G H
Diag. 5.
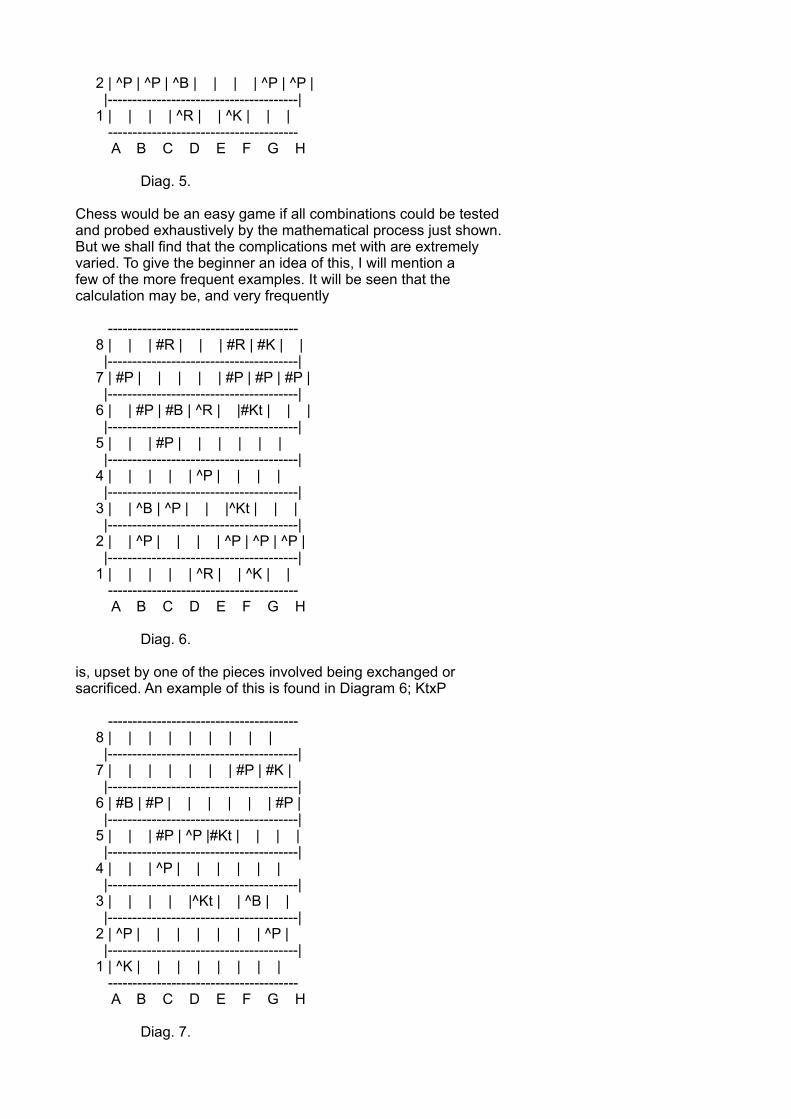
Chess would be an easy game if all combinations could be testedand probed exhaustively by the mathematical process just shown.But we shall find that the complications met with are extremelyvaried. To give the beginner an idea of this, I will mention afew of the more frequent examples. It will be seen that thecalculation may be, and very frequently
--------------------------------------- 8 | | | #R | | | #R | #K | | |---------------------------------------| 7 | #P | | | | | #P | #P | #P | |---------------------------------------| 6 | | #P | #B | ^R | |#Kt | | | |---------------------------------------| 5 | | | #P | | | | | | |---------------------------------------| 4 | | | | | ^P | | | | |---------------------------------------| 3 | | ^B | ^P | | |^Kt | | | |---------------------------------------| 2 | | ^P | | | | ^P | ^P | ^P | |---------------------------------------| 1 | | | | | ^R | | ^K | | --------------------------------------- A B C D E F G H
Diag. 6.
is, upset by one of the pieces involved being exchanged orsacrificed. An example of this is found in Diagram 6; KtxP
--------------------------------------- 8 | | | | | | | | | |---------------------------------------| 7 | | | | | | | #P | #K | |---------------------------------------| 6 | #B | #P | | | | | | #P | |---------------------------------------| 5 | | | #P | ^P |#Kt | | | | |---------------------------------------| 4 | | | ^P | | | | | | |---------------------------------------| 3 | | | | |^Kt | | ^B | | |---------------------------------------| 2 | ^P | | | | | | | ^P | |---------------------------------------| 1 | ^K | | | | | | | | --------------------------------------- A B C D E F G H
Diag. 7.
fails on account of R X B; this leaves the Knight unprotected,and White wins two pieces for his Rook. Neither can the Bishopcapture on K5 because of R X Kt. leaving the Bishop unprotected,after which BxKt does not retrieve the situation because the Rookrecaptures from B6.
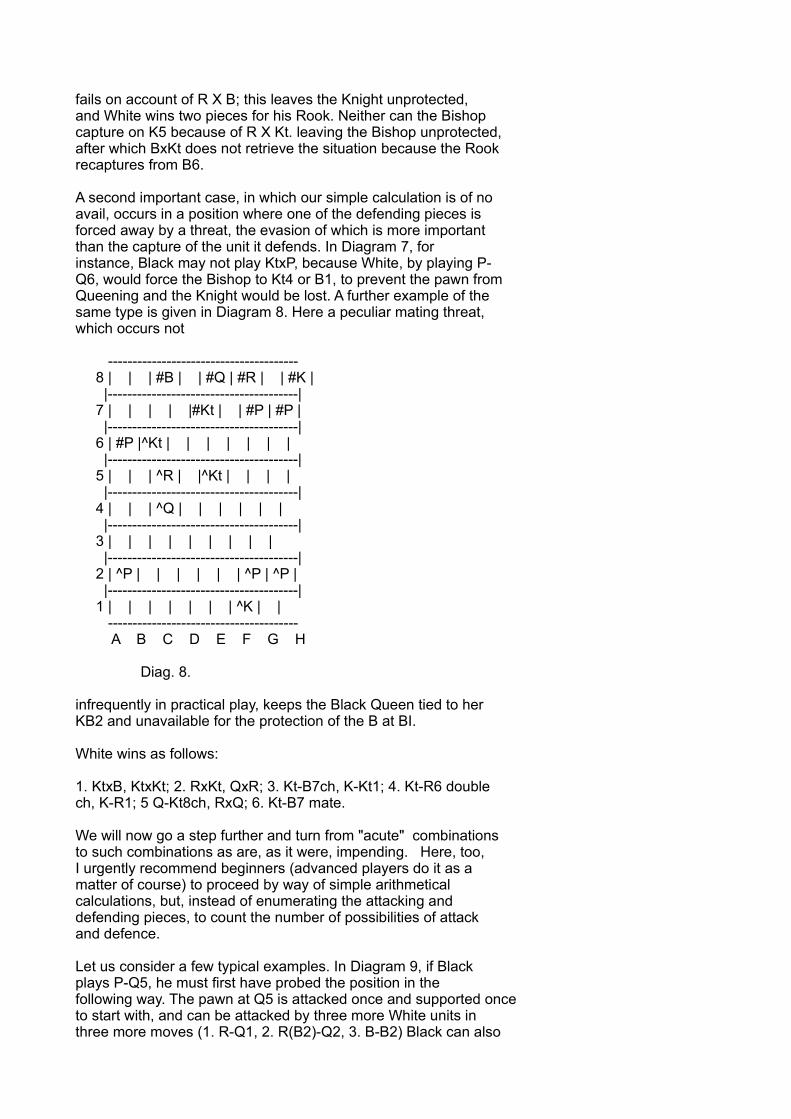
A second important case, in which our simple calculation is of noavail, occurs in a position where one of the defending pieces isforced away by a threat, the evasion of which is more importantthan the capture of the unit it defends. In Diagram 7, forinstance, Black may not play KtxP, because White, by playing P-Q6, would force the Bishop to Kt4 or B1, to prevent the pawn fromQueening and the Knight would be lost. A further example of thesame type is given in Diagram 8. Here a peculiar mating threat,which occurs not
--------------------------------------- 8 | | | #B | | #Q | #R | | #K | |---------------------------------------| 7 | | | | |#Kt | | #P | #P | |---------------------------------------| 6 | #P |^Kt | | | | | | | |---------------------------------------| 5 | | | ^R | |^Kt | | | | |---------------------------------------| 4 | | | ^Q | | | | | | |---------------------------------------| 3 | | | | | | | | | |---------------------------------------| 2 | ^P | | | | | | ^P | ^P | |---------------------------------------| 1 | | | | | | | ^K | | --------------------------------------- A B C D E F G H
Diag. 8.
infrequently in practical play, keeps the Black Queen tied to herKB2 and unavailable for the protection of the B at BI.
White wins as follows:
1. KtxB, KtxKt; 2. RxKt, QxR; 3. Kt-B7ch, K-Kt1; 4. Kt-R6 doublech, K-R1; 5 Q-Kt8ch, RxQ; 6. Kt-B7 mate.
We will now go a step further and turn from "acute" combinationsto such combinations as are, as it were, impending. Here, too,I urgently recommend beginners (advanced players do it as amatter of course) to proceed by way of simple arithmeticalcalculations, but, instead of enumerating the attacking anddefending pieces, to count the number of possibilities of attackand defence.
Let us consider a few typical examples. In Diagram 9, if Blackplays P-Q5, he must first have probed the position in thefollowing way. The pawn at Q5 is attacked once and supported onceto start with, and can be attacked by three more White units inthree more moves (1. R-Q1, 2. R(B2)-Q2, 3. B-B2) Black can also
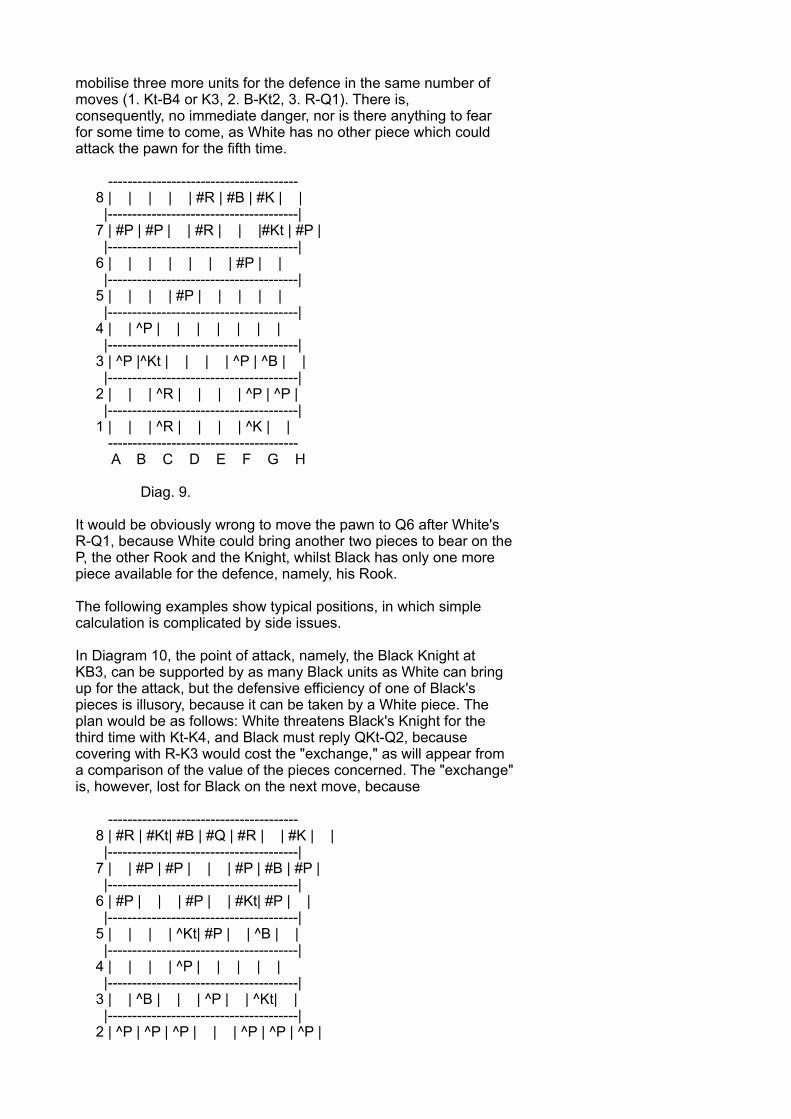
mobilise three more units for the defence in the same number ofmoves (1. Kt-B4 or K3, 2. B-Kt2, 3. R-Q1). There is,consequently, no immediate danger, nor is there anything to fearfor some time to come, as White has no other piece which couldattack the pawn for the fifth time.
--------------------------------------- 8 | | | | | #R | #B | #K | | |---------------------------------------| 7 | #P | #P | | #R | | |#Kt | #P | |---------------------------------------| 6 | | | | | | | #P | | |---------------------------------------| 5 | | | | #P | | | | | |---------------------------------------| 4 | | ^P | | | | | | | |---------------------------------------| 3 | ^P |^Kt | | | | ^P | ^B | | |---------------------------------------| 2 | | | ^R | | | | ^P | ^P | |---------------------------------------| 1 | | | ^R | | | | ^K | | --------------------------------------- A B C D E F G H
Diag. 9.
It would be obviously wrong to move the pawn to Q6 after White'sR-Q1, because White could bring another two pieces to bear on theP, the other Rook and the Knight, whilst Black has only one morepiece available for the defence, namely, his Rook.
The following examples show typical positions, in which simplecalculation is complicated by side issues.
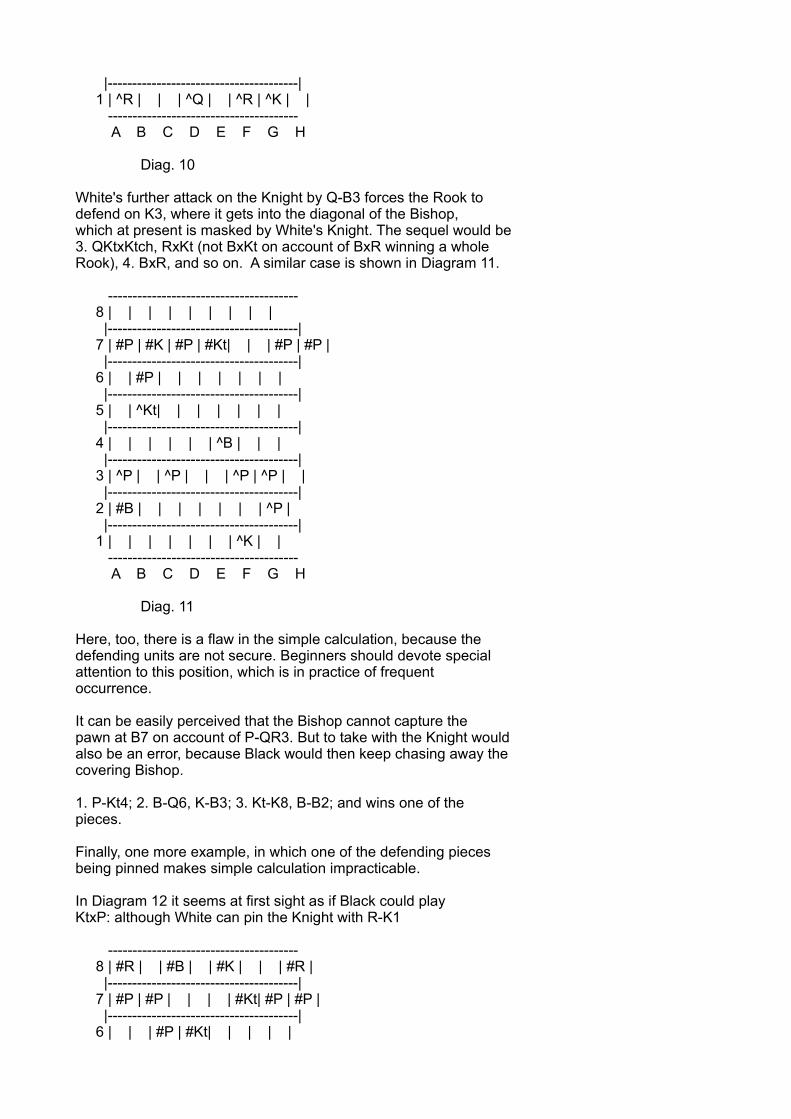
In Diagram 10, the point of attack, namely, the Black Knight atKB3, can be supported by as many Black units as White can bringup for the attack, but the defensive efficiency of one of Black'spieces is illusory, because it can be taken by a White piece. Theplan would be as follows: White threatens Black's Knight for thethird time with Kt-K4, and Black must reply QKt-Q2, becausecovering with R-K3 would cost the "exchange," as will appear froma comparison of the value of the pieces concerned. The "exchange"is, however, lost for Black on the next move, because
--------------------------------------- 8 | #R | #Kt| #B | #Q | #R | | #K | | |---------------------------------------| 7 | | #P | #P | | | #P | #B | #P | |---------------------------------------| 6 | #P | | | #P | | #Kt| #P | | |---------------------------------------| 5 | | | | ^Kt| #P | | ^B | | |---------------------------------------| 4 | | | | ^P | | | | | |---------------------------------------| 3 | | ^B | | | ^P | | ^Kt| | |---------------------------------------| 2 | ^P | ^P | ^P | | | ^P | ^P | ^P |
|---------------------------------------| 1 | ^R | | | ^Q | | ^R | ^K | | --------------------------------------- A B C D E F G H
Diag. 10
White's further attack on the Knight by Q-B3 forces the Rook todefend on K3, where it gets into the diagonal of the Bishop,which at present is masked by White's Knight. The sequel would be3. QKtxKtch, RxKt (not BxKt on account of BxR winning a wholeRook), 4. BxR, and so on. A similar case is shown in Diagram 11.
--------------------------------------- 8 | | | | | | | | | |---------------------------------------| 7 | #P | #K | #P | #Kt| | | #P | #P | |---------------------------------------| 6 | | #P | | | | | | | |---------------------------------------| 5 | | ^Kt| | | | | | | |---------------------------------------| 4 | | | | | | ^B | | | |---------------------------------------| 3 | ^P | | ^P | | | ^P | ^P | | |---------------------------------------| 2 | #B | | | | | | | ^P | |---------------------------------------| 1 | | | | | | | ^K | | --------------------------------------- A B C D E F G H
Diag. 11
Here, too, there is a flaw in the simple calculation, because thedefending units are not secure. Beginners should devote specialattention to this position, which is in practice of frequentoccurrence.
It can be easily perceived that the Bishop cannot capture thepawn at B7 on account of P-QR3. But to take with the Knight wouldalso be an error, because Black would then keep chasing away thecovering Bishop.
1. P-Kt4; 2. B-Q6, K-B3; 3. Kt-K8, B-B2; and wins one of thepieces.
Finally, one more example, in which one of the defending piecesbeing pinned makes simple calculation impracticable.
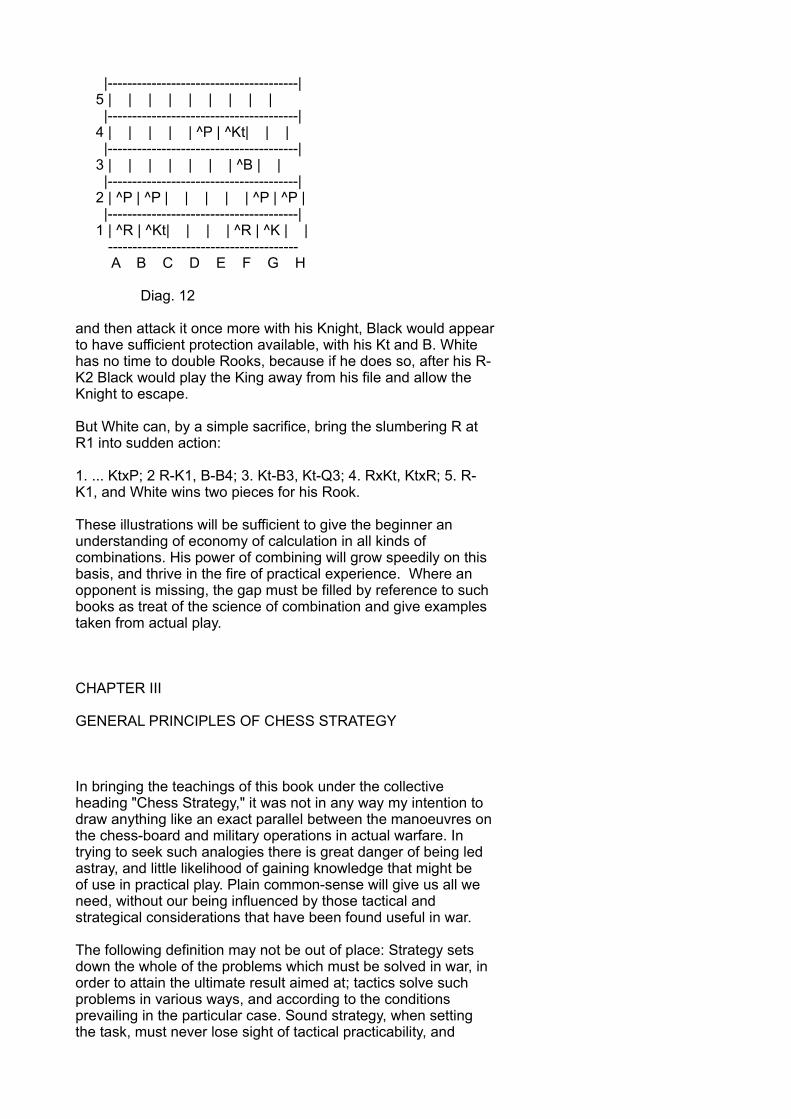
In Diagram 12 it seems at first sight as if Black could playKtxP: although White can pin the Knight with R-K1
--------------------------------------- 8 | #R | | #B | | #K | | | #R | |---------------------------------------| 7 | #P | #P | | | | #Kt| #P | #P | |---------------------------------------| 6 | | | #P | #Kt| | | | |
|---------------------------------------| 5 | | | | | | | | | |---------------------------------------| 4 | | | | | ^P | ^Kt| | | |---------------------------------------| 3 | | | | | | | ^B | | |---------------------------------------| 2 | ^P | ^P | | | | | ^P | ^P | |---------------------------------------| 1 | ^R | ^Kt| | | | ^R | ^K | | --------------------------------------- A B C D E F G H
Diag. 12
and then attack it once more with his Knight, Black would appearto have sufficient protection available, with his Kt and B. Whitehas no time to double Rooks, because if he does so, after his R-K2 Black would play the King away from his file and allow theKnight to escape.
But White can, by a simple sacrifice, bring the slumbering R atR1 into sudden action:
1. ... KtxP; 2 R-K1, B-B4; 3. Kt-B3, Kt-Q3; 4. RxKt, KtxR; 5. R-K1, and White wins two pieces for his Rook.
These illustrations will be sufficient to give the beginner anunderstanding of economy of calculation in all kinds ofcombinations. His power of combining will grow speedily on thisbasis, and thrive in the fire of practical experience. Where anopponent is missing, the gap must be filled by reference to suchbooks as treat of the science of combination and give examplestaken from actual play.
CHAPTER III
GENERAL PRINCIPLES OF CHESS STRATEGY
In bringing the teachings of this book under the collectiveheading "Chess Strategy," it was not in any way my intention todraw anything like an exact parallel between the manoeuvres onthe chess-board and military operations in actual warfare. Intrying to seek such analogies there is great danger of being ledastray, and little likelihood of gaining knowledge that might beof use in practical play. Plain common-sense will give us all weneed, without our being influenced by those tactical andstrategical considerations that have been found useful in war.
The following definition may not be out of place: Strategy setsdown the whole of the problems which must be solved in war, inorder to attain the ultimate result aimed at; tactics solve suchproblems in various ways, and according to the conditionsprevailing in the particular case. Sound strategy, when settingthe task, must never lose sight of tactical practicability, and
only a thorough knowledge of tactical resources makes correctstrategy possible.
Now we shall not under any circumstances, as unfortunately evengreat chess masters have done, seek in outward similaritiesjustification for transferring to chess the teachings of thestrategy and tactics of war. It sounds pretty enough to say:Chess is a game of war--the various pieces represent the variouskinds of forces: the pawns represent the infantry, the Knightstake the place of cavalry, the Rooks do the work of heavyartillery, sweeping broad lines; the different ways in which thepieces move find a parallel in the topography of the theatre ofwar, in that the various battle-fields are more or less easy ofaccess. But it is quite unjustifiable to assign to the Knightsthe functions of scouts, and to say that Rooks should stay in thebackground, as heavy artillery, and so on. Such pronouncementswould not have the slightest practical value. What we take fromthe science of warfare is merely the definition. In each game thestrategy of chess should set us the tasks which must beaccomplished (in order to mate the opponent's King), and tacticspoint the way in which it is possible to solve such problems.Correct chess strategy will only set such tasks as are tacticallypossible, and, if we wish to expound the principles of chessstrategy, we cannot exclude chess tactics from the field of ourobservations. If here and there the results of our deliberationsbear some analogy to actual warfare, we may certainly give way toa kind of aesthetic satisfaction in that our own occupation hassome parallel in real life, but we must never fashion ourprinciples in accordance with such fortuitous circumstances.
Having surveyed the problems we have to solve, we can now plungeinto our subject.
In the first chapter, when considering special cases inelementary combinations, we have already noticed the importantpart played in each skirmish by the balance between the attackingand defending units. Speaking quite generally, common-sense willtell us that, in all operations on the chess-board, the mainconsideration for the defence will be to maintain that balance,and that there is only justification for an attack when it ispossible to concentrate more forces on the strategic point thancan be mustered by the defence. However, one very important pointmust not be neglected, though I did not touch upon it whendiscussing elementary combinations for fear of complicatingmatters for beginners: the balance between the contending forcesis by no means established by their numerical equality. Aparamount factor is the mobility of such forces, and as soon asit is no longer one of the elementary cases of capture andrecapture described previously, this factor must be taken intoaccount in order to decide, on a general survey, whether there isa sufficient defence to an impending attack, or whether one's ownintended attack is likely to prevail. That mobility is the firstand foremost consideration should be self-evident, since therelative value of the pieces can only make itself felt by theirgreater or lesser mobility.
Except in certain positions, which are brought about by someparticular array of the pieces, the intrinsic value of a Rook isgreater than that of a Bishop, because it can command all the
squares on the board, whilst a Bishop is tied to its own colour;Knight and Bishop are considered equivalent, because the Knight'sadvantage in being able to act on all the squares of eithercolour is balanced by the fact that the Bishop can sweep longdiagonals. Two Bishops are, generally speaking, of greater valuethan two Knights, because together they also act on all thesquares, and their command of long diagonals is a clearadvantage. The whole of this valuation, however, comes to noughtwhen the pieces are hindered in their mobility by the peculiarityof any particular position.
We will consider one instance from end-game play, and one fromthe openings.
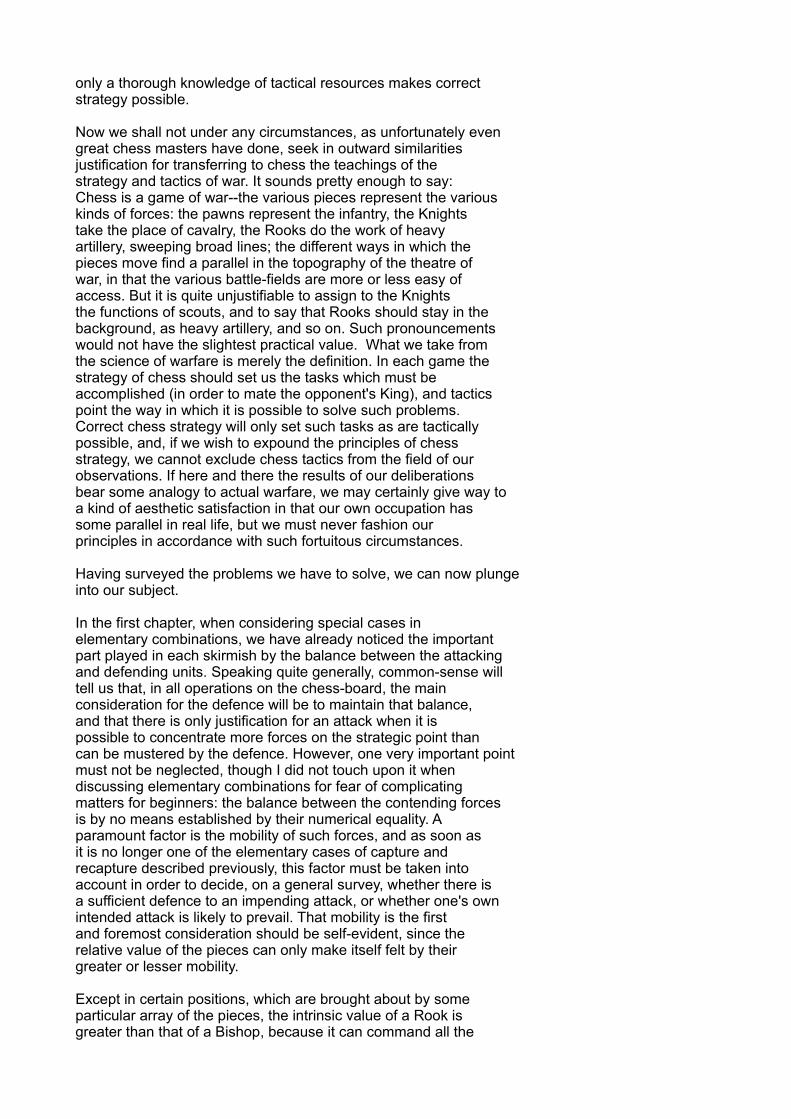
In Diagram 13, White derives no advantage from being
--------------------------------------- 8 | | | | | | | | | |---------------------------------------| 7 | | | | | | | #K | | |---------------------------------------| 6 | | #P | | | | #P | | | |---------------------------------------| 5 | #P | | #P | | #P | ^P | #P | | |---------------------------------------| 4 | ^P | | ^P | #Kt| ^P | | | | |---------------------------------------| 3 | | ^P | | ^R | | | ^P | ^K | |---------------------------------------| 2 | | | | | | | | | |---------------------------------------| 1 | | | | | | | | | --------------------------------------- A B C D E F G H
Diag. 13
the exchange to the good, for the Rook has no file which could beused to break into the Black camp.
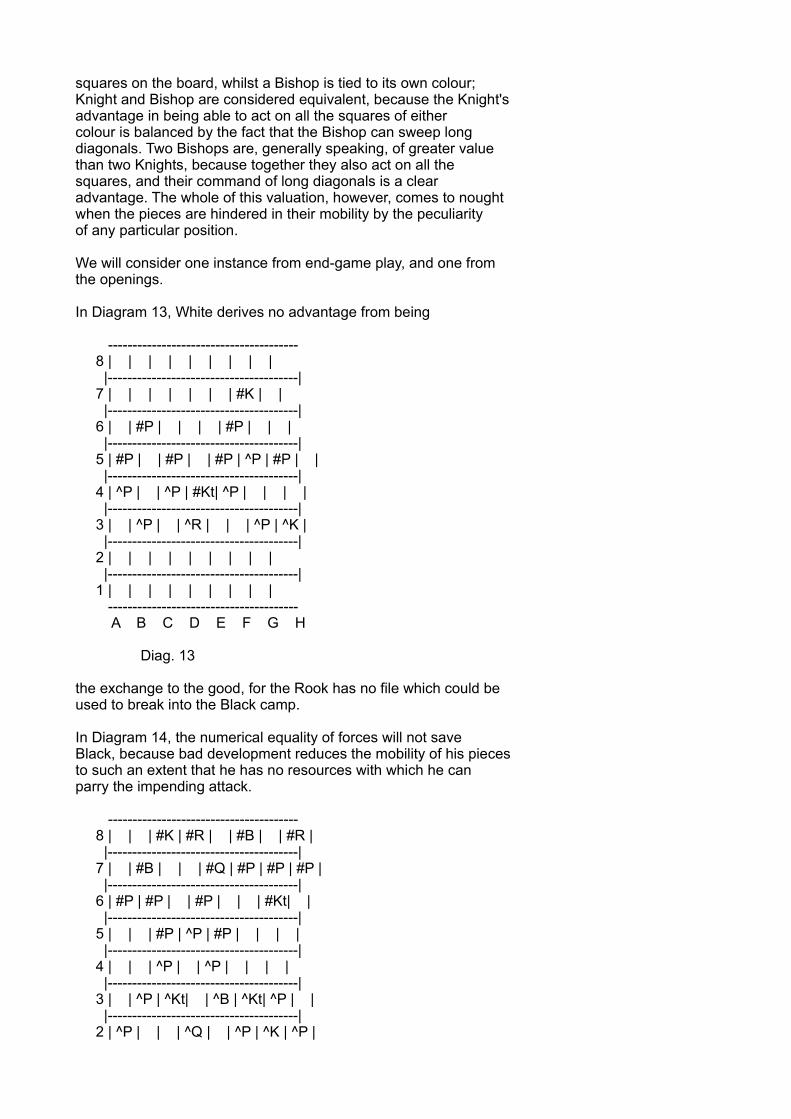
In Diagram 14, the numerical equality of forces will not saveBlack, because bad development reduces the mobility of his piecesto such an extent that he has no resources with which he canparry the impending attack.
--------------------------------------- 8 | | | #K | #R | | #B | | #R | |---------------------------------------| 7 | | #B | | | #Q | #P | #P | #P | |---------------------------------------| 6 | #P | #P | | #P | | | #Kt| | |---------------------------------------| 5 | | | #P | ^P | #P | | | | |---------------------------------------| 4 | | | ^P | | ^P | | | | |---------------------------------------| 3 | | ^P | ^Kt| | ^B | ^Kt| ^P | | |---------------------------------------| 2 | ^P | | | ^Q | | ^P | ^K | ^P |
|---------------------------------------| 1 | ^R | | | | ^R | | | | --------------------------------------- A B C D E F G H
Diag. 14
White will assail the Black King's position on the Queen side,and Black is unable to concentrate his forces quickly enough forthe defence of the jeopardised entrenchments. Let us thereforebear in mind that the mobility of the pieces is the decidingfactor of their efficiency, and that mobility is the highestcriterion by which to judge the merits (or demerits) of theiroperations.
We will now consider this principle in its application to thethree stages of play, namely, the opening, the middle-game, andthe ending.
CHAPTER IV
THE OPENING
The only pieces available on the first move are the Knights. Inorder to develop other pieces as well, it is necessary to movepawns first, and such pawn moves will be best as give an outletto as many pieces as possible. For quick development is of theutmost importance, and he who succeeds first in placing all hispieces, from their initial awkward positions, to such places asgive them command of the greatest possible number of squares, hasthe better chance of concentrating a superior force on someimportant point.
It follows that White, having the first move, is, so to speak,always morally justified in attacking, whilst Black should assumethe defensive. It is a step in the right direction, to appreciatethe truth of this proposition. Unfortunately most beginners failto realise it, and so pave the way, from the first, to the lossof the game.
There are not many developing pawn moves to choose from.Apparently from the point of view of quick development only P-K4and P-Q4 need be considered, since they free both Bishop andQueen, whilst other pawn moves liberate one piece only. Generallyspeaking it is only required to move two or three pawns to allowall pieces to be developed, and it is good, on principle, to makeonly such pawn moves in the opening, which are necessary for thedevelopment of pieces. To play other pawns really means the lossof a move. To "lose a move" means to make a move which is notessential to the attainment of a desired position. Thus the "lossof a move" results also from playing a piece to a given square inmore moves than necessary.
I shall now give a few games showing the far-reachingconsequences of losing moves. The first one is a typical though
glaring example, which is very instructive and came to my noticesome time ago:
1. P-K4 P-K4 2. P-Q4 PxP 3. QxP Kt-QB3 4. Q-K3 Kt-B3 5. P-KR3?
I will not discuss the system of development adopted by White inhis first four moves. The last move, however, can at once berecognised as faulty. It is the loss of a move such as occurs inthe vast majority of games played by beginners. It wasunnecessary to prevent KKt-Kt5, since the Knight could not holdthat square permanently. In any case B-K2 would have had the sameeffect, and developed a piece at the same time.
5. ... B-K2 6. P-QR3??
This, of course, is very bad. The consequences of this loss of asecond move are swift and deadly.
6. ... Castles 7. B-B4
At last a developing move.
7. ... R-K1 8. Q-QKt3
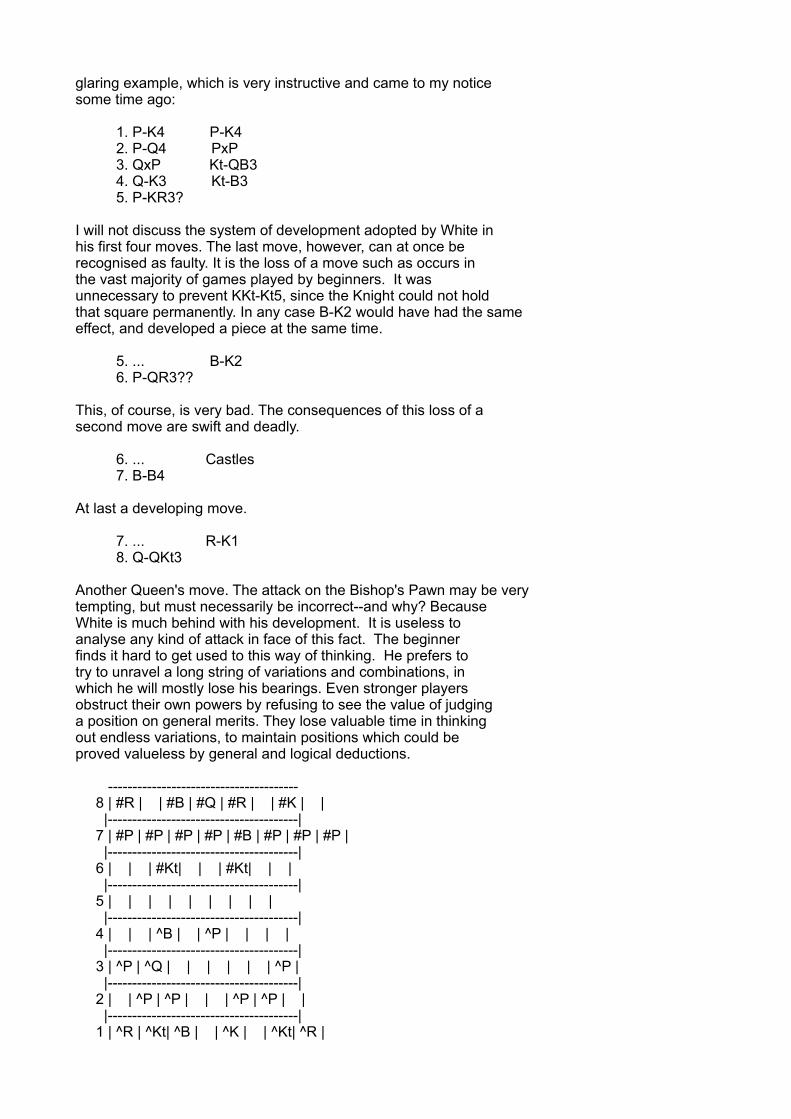
Another Queen's move. The attack on the Bishop's Pawn may be verytempting, but must necessarily be incorrect--and why? BecauseWhite is much behind with his development. It is useless toanalyse any kind of attack in face of this fact. The beginnerfinds it hard to get used to this way of thinking. He prefers totry to unravel a long string of variations and combinations, inwhich he will mostly lose his bearings. Even stronger playersobstruct their own powers by refusing to see the value of judginga position on general merits. They lose valuable time in thinkingout endless variations, to maintain positions which could beproved valueless by general and logical deductions.
--------------------------------------- 8 | #R | | #B | #Q | #R | | #K | | |---------------------------------------| 7 | #P | #P | #P | #P | #B | #P | #P | #P | |---------------------------------------| 6 | | | #Kt| | | #Kt| | | |---------------------------------------| 5 | | | | | | | | | |---------------------------------------| 4 | | | ^B | | ^P | | | | |---------------------------------------| 3 | ^P | ^Q | | | | | | ^P | |---------------------------------------| 2 | | ^P | ^P | | | ^P | ^P | | |---------------------------------------| 1 | ^R | ^Kt| ^B | | ^K | | ^Kt| ^R |
--------------------------------------- A B C D E F G H
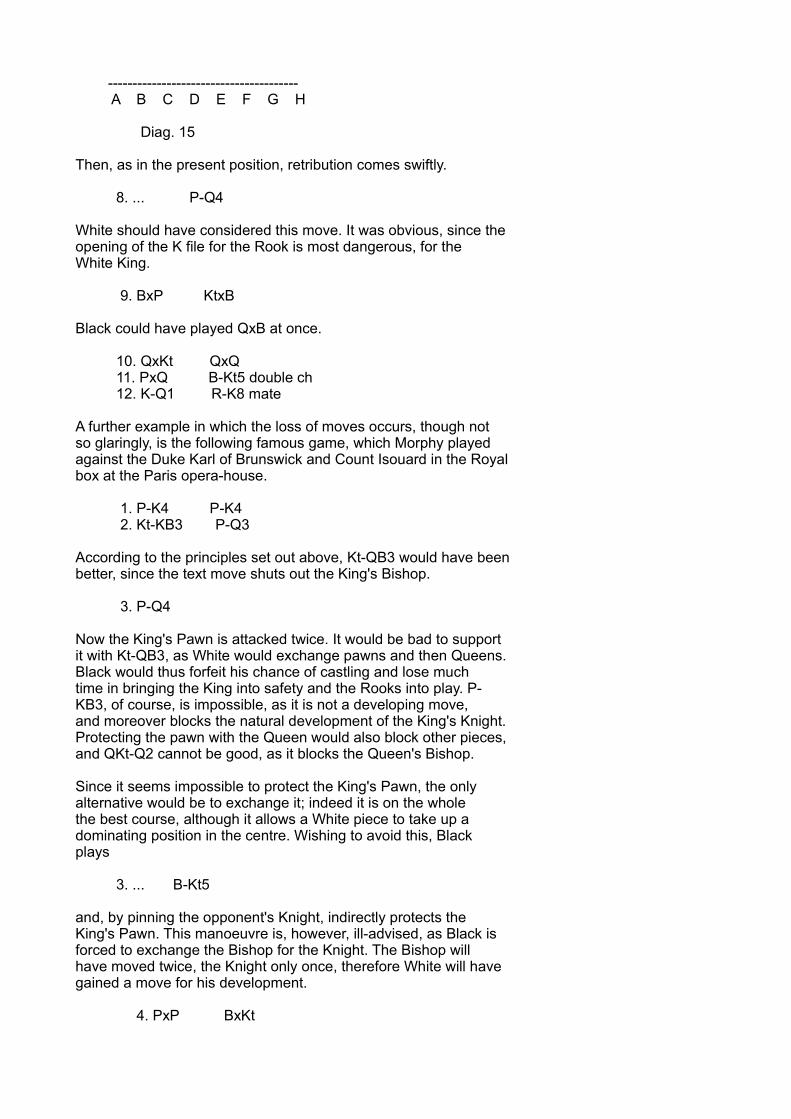
Diag. 15
Then, as in the present position, retribution comes swiftly.
8. ... P-Q4
White should have considered this move. It was obvious, since theopening of the K file for the Rook is most dangerous, for theWhite King.
9. BxP KtxB
Black could have played QxB at once.
10. QxKt QxQ 11. PxQ B-Kt5 double ch 12. K-Q1 R-K8 mate
A further example in which the loss of moves occurs, though notso glaringly, is the following famous game, which Morphy playedagainst the Duke Karl of Brunswick and Count Isouard in the Royalbox at the Paris opera-house.
1. P-K4 P-K4 2. Kt-KB3 P-Q3
According to the principles set out above, Kt-QB3 would have beenbetter, since the text move shuts out the King's Bishop.
3. P-Q4
Now the King's Pawn is attacked twice. It would be bad to supportit with Kt-QB3, as White would exchange pawns and then Queens.Black would thus forfeit his chance of castling and lose muchtime in bringing the King into safety and the Rooks into play. P-KB3, of course, is impossible, as it is not a developing move,and moreover blocks the natural development of the King's Knight.Protecting the pawn with the Queen would also block other pieces,and QKt-Q2 cannot be good, as it blocks the Queen's Bishop.
Since it seems impossible to protect the King's Pawn, the onlyalternative would be to exchange it; indeed it is on the wholethe best course, although it allows a White piece to take up adominating position in the centre. Wishing to avoid this, Blackplays
3. ... B-Kt5
and, by pinning the opponent's Knight, indirectly protects theKing's Pawn. This manoeuvre is, however, ill-advised, as Black isforced to exchange the Bishop for the Knight. The Bishop willhave moved twice, the Knight only once, therefore White will havegained a move for his development.
4. PxP BxKt
Should Black play PxP at once, White would exchange Queens,release the pin, and win the pawn.
5. QxB PxP 6. B-QB4
White has now two pieces more in play than Black, instead of onlyone, and the mobility of the White Queen, which Black himself hasbrought out, begins to have a threatening effect on Black's game.
6. ... Kt-KB3 7. Q-QKt3 Q-K2
Black cannot cover his King's Bishop's Pawn with Q-Q2 because 8.QxP wins the Rook, whilst now Black could play 8. ... Q-Kt5ch inreply, forcing the exchange of Queens. The text move, which isforced, blocks the Bishop, and at the same time prevents thedevelopment of the King's Rook, all of which is the directconsequence of the loss of one move.
8. Kt-B3
White rightly disdains the gain of the Knight's Pawn, butprevents the exchange of Queens in developing a piece. He provesthe superiority of his position much more convincingly in thatway. Black must now lose yet another move to protect his Knight'sPawn.
8. ... P-B3 9. B-KKt5 P-Kt4
Black must try to develop his Queen's Knight at last. He cannotplay QKt-Q2 at once, since his Knight's Pawn would again beunprotected; therefore he plays the move in the text, probablythinking that now White also must lose a move to withdraw hisBishop. But in view of the fact that Black's game is whollyundeveloped, and that he plays practically several pieces down,White sacrifices his Knight for two pawns: he foresees theposition which occurs a few moves later, when Black is hemmed inon all sides.
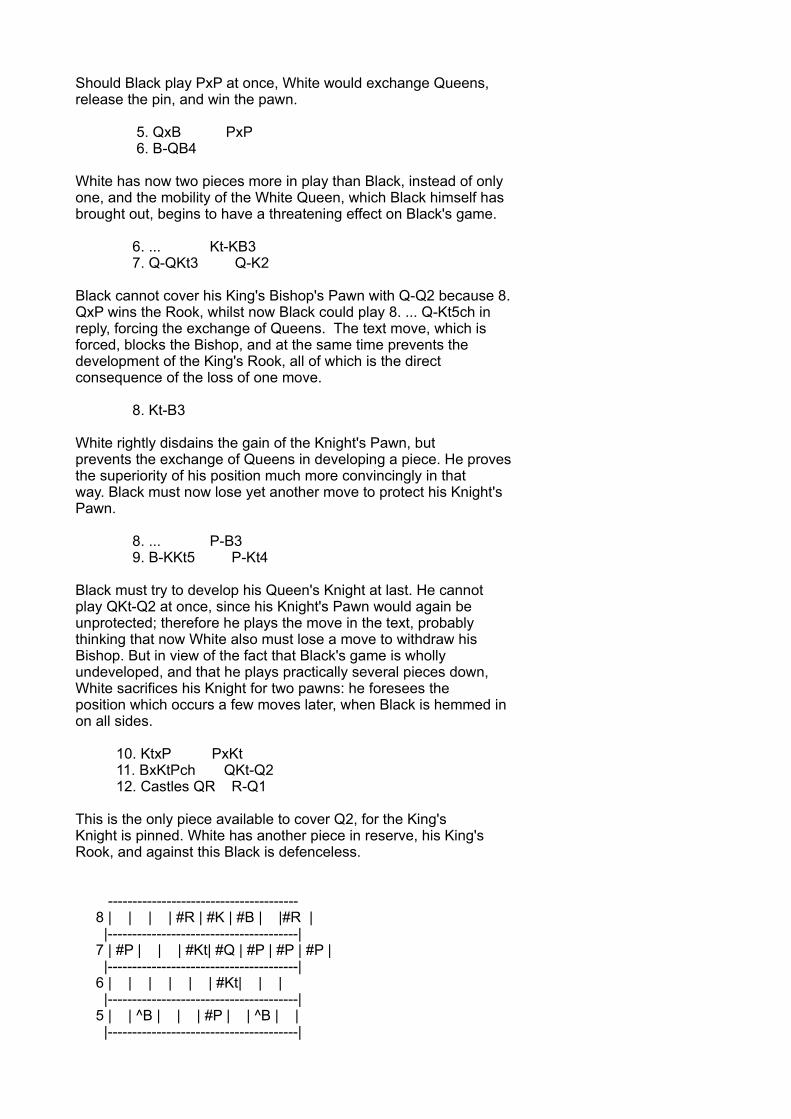
10. KtxP PxKt 11. BxKtPch QKt-Q2 12. Castles QR R-Q1
This is the only piece available to cover Q2, for the King'sKnight is pinned. White has another piece in reserve, his King'sRook, and against this Black is defenceless.
--------------------------------------- 8 | | | | #R | #K | #B | |#R | |---------------------------------------| 7 | #P | | | #Kt| #Q | #P | #P | #P | |---------------------------------------| 6 | | | | | | #Kt| | | |---------------------------------------| 5 | | ^B | | | #P | | ^B | | |---------------------------------------|

4 | | | | | ^P | | | | |---------------------------------------| 3 | | ^Q | | | | | | | |---------------------------------------| 2 | ^P | ^P | ^P | | | ^P | ^P | ^P | |---------------------------------------| 1 | | | ^K | ^R | | | | ^R | --------------------------------------- A B C D E F G H
Diag. 16
13. RxKt
compare Diag. 12.
13. ... RxR 14. R-Q1 Q-K3
This releases the King's Knight. Now White could win by playingBxKt and BxRch, but he prefers to end up with a magnificentsacrifice.
15. BxRch KtxB 16. Q-Kt8ch!! KtxQ 17. R-Q8 mate
The final position shows in a striking manner how a few well-developed pieces can be worth more than many undeveloped ones,and the whole game is an example of the fatal consequences whichcan follow the loss of a move, since it often leads to thecompulsory loss of further moves in the course of the game.
"This is the curse of every evil deed That propagating still itbrings forth evil."
The logical sequence of the moves in this game, as pointed out inthe commentaries to it, is borne out by the curious coincidencethat I once had the opportunity of playing a game in exactly thesame sequence of moves, against a player to whom Morphy's"brilliancy" was unknown.
--------------------------
The leading principle of all opening moves is made clear by theforegoing pages, namely, rapid development of pieces, andconsequently the avoidance of the loss of a move in any shape orform.
Before treating of the various systems of openings, I will say afew words on the principles of PAWN PLAY.
Each opening is characterised by a well-defined pawn formation,and concurrently a certain method in the development of thepieces. Naturally the formation of a pawn skeleton is not anindependent factor, but must be evolved with a view tofacilitating the favourable development of pieces. But whenconsidering the form of a pawn position and that of the pieces,
we cannot shut our eyes to the fact that pawn formation mustnecessarily be the dominant consideration in our mind. Pawnformation is of a more permanent character than that of thepieces, in consequence of the latter's greater mobility. When wehave made a rash move with a piece, to which our attackingdisposition may have tempted us, we may still have a chance ofretrieving the position by timely retreat. Once a pawn has movedit cannot turn back, and only after the greatest deliberationshould we embark on changes in our pawn formation in order not todisturb the balance of this "static element" of the game. But weshall see that the pawn skeleton which was formed in the openingoften weathers the storm and stress of the middle game, andfrequently preserves its character right up to the end-game. Iwill therefore make pawn formation my starting-point in anattempt to show the way through the maze of the openings on thebasis of general strategical principles.
If our pawn skeleton is to promote the freedom of all the pieces,we must not build it up with the narrow view of developing minorpieces only, but must consider from the very first in which wayit will enable the Rooks to get into action. We can unite thesetendencies in making the CENTRE OF THE BOARD the main field ofaction for all our forces. This means for both sides K4 and Q4,and also in a lesser degree QB4 and KB4. We shall get a clearinsight into the positional advantage of having command of thecentre later on, when discussing the middle game. At present Iwill only touch the subject in a general way, explaining it in anelementary form, which will be sufficient to develop anunderstanding for pawn strategy in the opening. In the course offurther deductions, after the grasp of this difficult stage ofthe game has become stronger, I will go into details which willallow the subject to be stated in a more precise form.
Placing the pieces in the centre is of value, because there theyhave more mobility than near the edge, which, of course, limitstheir range of action, and also because from the centre aconcentration of forces on a given point can generally beeffected in the quickest way.
In most cases two centre squares become inaccessible at once,through the opponent placing one of his pawns in the centre;therefore it would seem a good plan to lure that pawn away, andthis is rendered feasible by playing P-K4 or P-QB4 when theopponent has a pawn on his Q4, and P-Q4 or P-KB4 when he has apawn on K4. In the following we will consider such manoeuvres ascould apply either to White or Black, from the point of view ofWhite, to whom the initiative is, as pointed out above, a sort ofbirth-right. Naturally, should White lose a move, as, forinstance, 1. P-K4, P-K4; 2. Kt-KB3, Kt-QB3; 3. P-QR3? theposition is reversed, and Black is bound to obtain the initiativewhich is White's birthright.
The pawn moves mentioned above also have the tendency of givingthe Rooks an opportunity for action. A Rook standing behind anadvanced pawn may support its further advance, or, if the pawnshould be exchanged, might get an open file.
The damage we wish to inflict on our opponent we must, of course,try to avoid ourselves. Thus we will not easily give up a centre
pawn unless we can obtain some other advantage in doing so. Thisadvantage may be, that in exchanging the centre pawn we open uplines of attack for our pieces, or that we are able to place oneof our pieces in a commanding position in the centre of theboard.
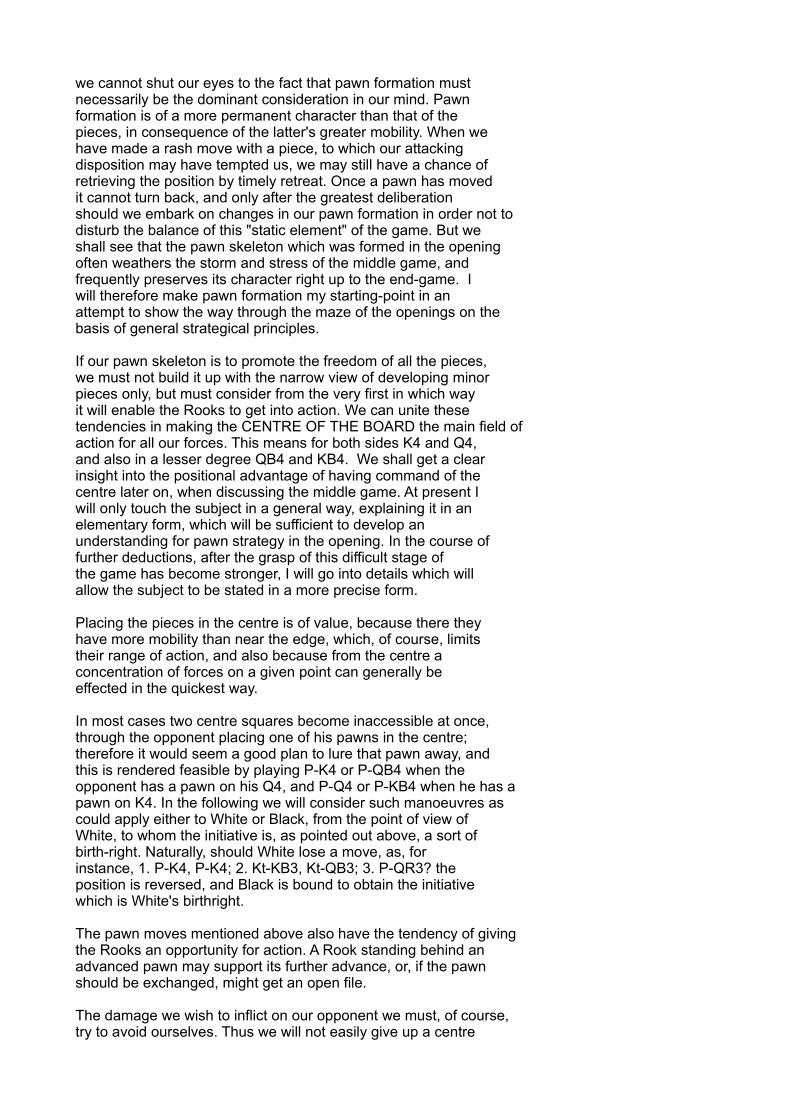
The following example may serve as an illustration. SupposingWhite plays after
1. P-Q4 P-Q4 2. P-QB4
His aim is to tempt Black's centre pawn away and to make his QB4and K4 accessible for his own forces. Black might be justified intaking the pawn, if he really could hold the pawn thus gained. Weshall show later on that this is not so, and that White can winit back easily and advantageously. Therefore Black is morelikely to play 2. P-K3. Not 2. ... Kt-KB3; for after 3. PxP,KtxP; 4. P-K4 would open White's game and drive the Knight awayat once, gaining a move. Supposing, however, Black plays 2. ...B-B4; should White now think mechanically, "I will take hiscentre pawn and consequently have the better game," his deductionwould be wrong. For after exchanging his Bishop for the Knight,which otherwise would drive his Queen away, Black brings thelatter into a dominating square in the centre.
--------------------------------------- 8 | #R | #Kt| | #Q | #K | #B | #Kt| #R | |---------------------------------------| 7 | #P | #P | #P | | #P | #P | #P | #P | |---------------------------------------| 6 | | | | | | | | | |---------------------------------------| 5 | | | | #P | | #B | | | |---------------------------------------| 4 | | | ^P | ^P | | | | | |---------------------------------------| 3 | | | | | | | | | |---------------------------------------| 2 | ^P | ^P | | | ^P | ^P | ^P | ^P | |---------------------------------------| 1 | ^R | ^Kt| ^B | ^Q | ^K | ^B | ^Kt| ^R | --------------------------------------- A B C D E F G H
Diag. 17.
3. PxP BxKt 4. RxB QxP
Black's Queen cannot easily be driven away from her commandingposition, particularly as White must lose a move to save his QRP.Meanwhile Black gains time for concentrating his forces for anattack which wins the Queen's Pawn.
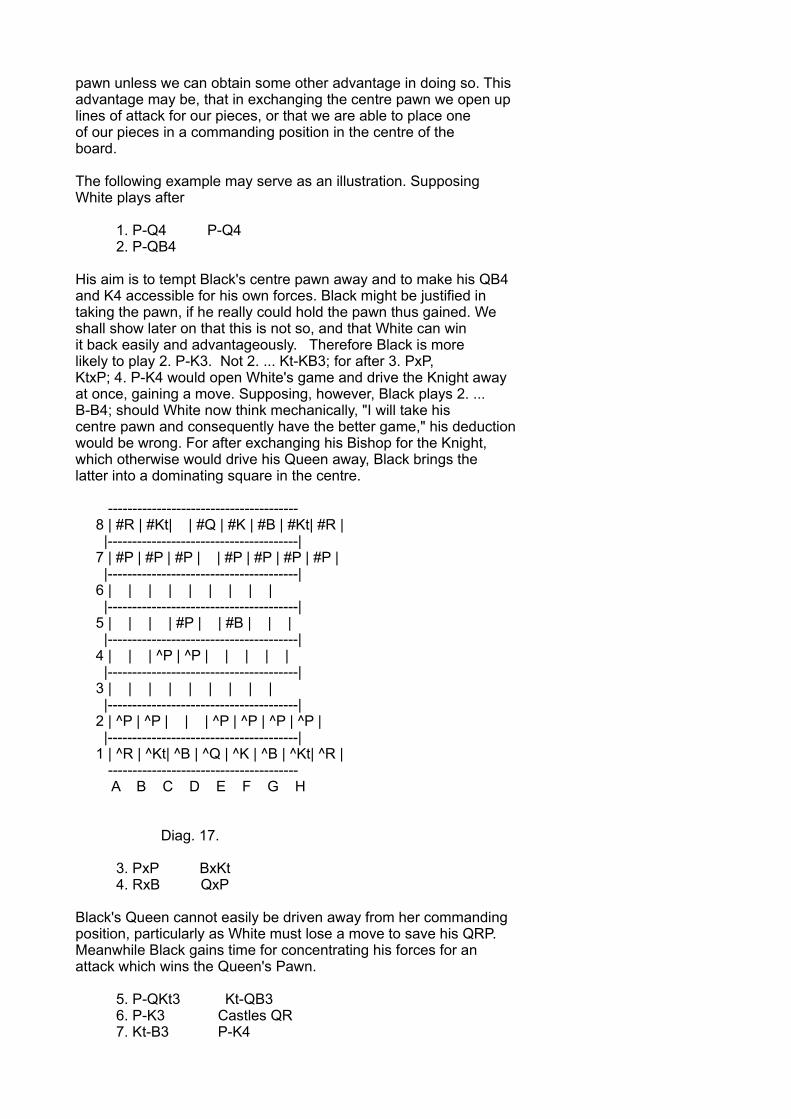
5. P-QKt3 Kt-QB3 6. P-K3 Castles QR 7. Kt-B3 P-K4
and wins the QP, or
5. P-QR3 Kt-QB3 6. P-K3 Castles QR
and P-K4 is again a threat hard for white to meet.
This position shows, that to bring one's opponent's centre pawnaway and to keep one's own, does not under all circumstances meanthe command of the centre, but that the opening up of files anddiagonals for one's pieces towards the centre is an importantmoment in the fight for positional advantage.
Considerations of this kind will help to improve our judgment inmany of the various openings treated in the following pages.
We will class the openings in this way:
A. White 1. P-K4.
(a) Black 1. P-K4 (b) Black 1. Any other move
B. White 1. P-Q4.
(a) Black 1. P-Q4 (b) Black 1. Any other move
C. White 1. Any other move
We shall find that openings classed under C generally lead topositions treated under A and B.
A. We have already come to the conclusion that after 1. P-K4, P-K4 White does well to try to force the exchange of Black's centrepawn on Q4 or KB4, and that Black will try to counteract this,unless by allowing the exchange he gets a chance of exertingpressure in the centre by means of his pieces.
We will first see what happens when White undertakes the advancein question on his second move. Superficially the differencebetween 2. PQ4 and 2. P-KB4 is that in the first case the pawnthus advanced is covered, while in the second it is not. Anopening in which a pawn sacrifice is offered, is called a"gambit"; 2. P-KB4 is therefore a gambit.
2. P-Q4 is only a gambit if after 2. ... PxP White does notrecapture the pawn. Nevertheless this opening has been called the"centre gambit," and though the denomination is not correct wewill adhere to it, as it is in general use.
A very considerable difference between the centre gambit and theKing's gambit lies in the fact that in the former acceptance iscompulsory, whilst in the second it may be declined.
For: 2. P-Q4 threatens to take the King's Pawn. To defend it bymeans of 2. ... P-Q3 is unwise, since White exchanges pawns andthen Queens, by which Black loses his chance of castling and
impedes the development of his Rooks. 2. ... Kt-QB3 is also bad,since after 3. PxP, KtxP; 4 P-KB4, White drives the Knight away,gaining a strong hold on the centre, and Black has nocompensation for giving up his centre pawn. It may be mentionedhere that after 2. ... Kt-QB3, 3. P-Q5 would be a useless move,as to begin with it would be inconsequent, since P-Q4 was playedin order to clear the centre, and moreover it would block up adiagonal which could be most useful to the King's Bishop.
We conclude now that Black cannot hold his pawn at K4. He mustrelinquish the centre by 2. ... PxP. He will now either attemptto bring away White's King's Pawn by advancing his own QP to Q4,or try to utilise the King's file, which was opened by his secondmove, and operate against White's KP. The Rooks are indicated forthis task. We shall refer to the execution of these plans lateron.
In the King's gambit, White's attempt to bring away Black'sKing's Pawn may be safely ignored.
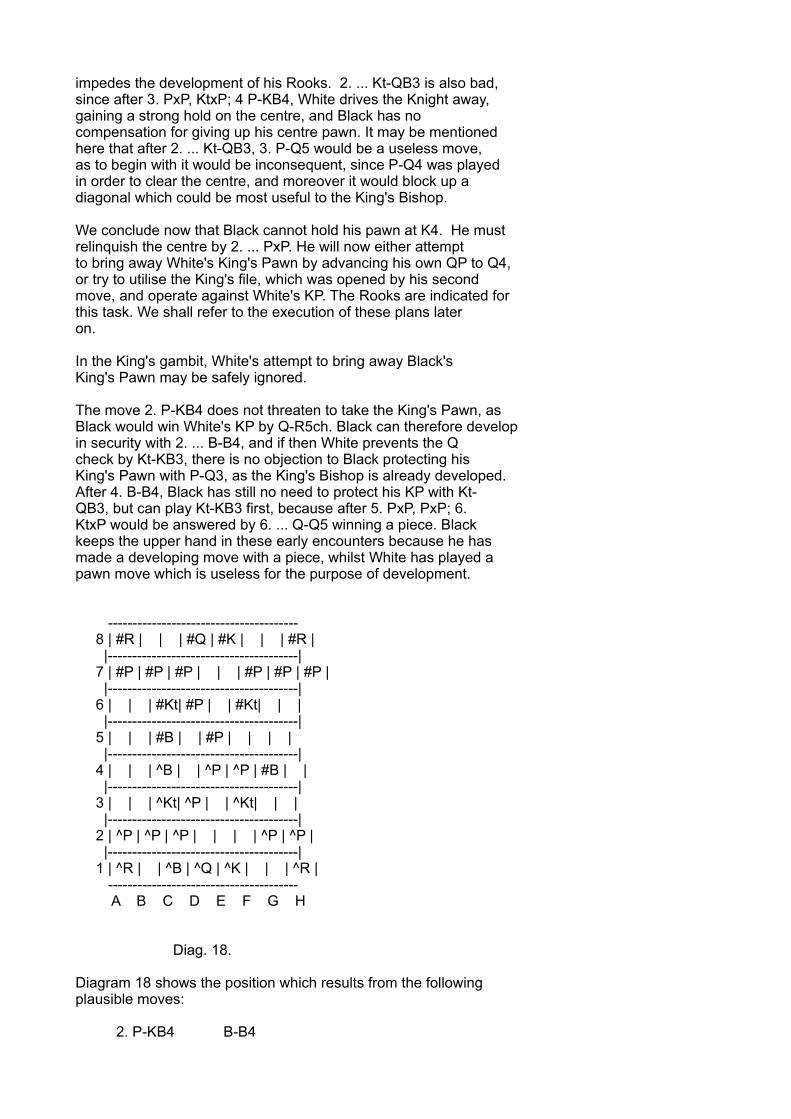
The move 2. P-KB4 does not threaten to take the King's Pawn, asBlack would win White's KP by Q-R5ch. Black can therefore developin security with 2. ... B-B4, and if then White prevents the Qcheck by Kt-KB3, there is no objection to Black protecting hisKing's Pawn with P-Q3, as the King's Bishop is already developed.After 4. B-B4, Black has still no need to protect his KP with Kt-QB3, but can play Kt-KB3 first, because after 5. PxP, PxP; 6.KtxP would be answered by 6. ... Q-Q5 winning a piece. Blackkeeps the upper hand in these early encounters because he hasmade a developing move with a piece, whilst White has played apawn move which is useless for the purpose of development.
--------------------------------------- 8 | #R | | | #Q | #K | | | #R | |---------------------------------------| 7 | #P | #P | #P | | | #P | #P | #P | |---------------------------------------| 6 | | | #Kt| #P | | #Kt| | | |---------------------------------------| 5 | | | #B | | #P | | | | |---------------------------------------| 4 | | | ^B | | ^P | ^P | #B | | |---------------------------------------| 3 | | | ^Kt| ^P | | ^Kt| | | |---------------------------------------| 2 | ^P | ^P | ^P | | | | ^P | ^P | |---------------------------------------| 1 | ^R | | ^B | ^Q | ^K | | | ^R | --------------------------------------- A B C D E F G H
Diag. 18.
Diagram 18 shows the position which results from the followingplausible moves:
2. P-KB4 B-B4
3. Kt-KB3 P-Q3 4. B-B4 Kt-KB3 5. P-Q3 Kt-B3 6. Kt-B3 B-KKt5
If White wishes to castle on the K side, which must have been hisintention when playing 2. P-KB4, he will have to play Kt-QR4 andKtxB.
Though this is of no disadvantage to Black, he could avoid theexchange of his KB by playing 2. ... P-QR3 instead of B-KKt5. Ifthen White plays P-B5 in order to hinder the development ofBlack's QB and to bring out his own, the pressure on Black's KPis relieved permanently, and sooner or later Black will breakthrough on the Q file, as his QP is no longer needed at Q3 forthe support of the centre pawn.
A different pawn formation is the result if White enforces theexchange of Black's centre pawn at once. This he can do byplaying P-Q4, e.g.:
2. P-KB4 B-B4 or 4. P-B3 Kt-KB3 3. Kt-KB3 P-Q3 5. P-Q4 PxQP 4. P-Q4 PxQP 6. PxP B-Kt3 5. KtxP
Here Black can get an early advantage by attacking White's KP,taking possession of the K file after castling on the K side.
All things considered, the student should in my opinion declinethe gambit, as in doing so he can get an easy and satisfactorydevelopment. The treatment of the "King's Gambit accepted," whichaims at holding the gambit pawn, is most difficult and leadsearly in the game to such complications as none but an expert canhope to master.
[Footnote: As an example of the difficult play which ensues whenBlack defends the pawn in the King's Gambit, I give the latestvariation of an attack introduced by Professor I. L. Rice, andcalled the "Rice Gambit":
1. P-K4, P-K4; 2. P-KB4, PxP; 3. Kt-KB3, P-KKt4; 4. P-KR4, P-Kt5;5. Kt-K5, Kt-KB3; 6. B-B4, P-Q4; 7. PxP, B-Q3; 8. Castles! BxKt;9. R-K1, Q-K2; 10. P-B3, Kt-R4; 11. P-Q4, Kt-Q2; 12. PxB, KtxP;13. P-QKt3, Castles; 14. B-R3, Kt-B6ch!; 15. PxKt, QxP; 16. R-K5!B-B4!!; 17. Kt-Q2! Q-Kt6ch; 18. K-B1, Q-R7; 19. BxR, P-Kt6; 20.B-B5, P-Kt7ch; 21. K-K1, Q-R5ch; 22. K-K2, Kt-Kt6ch; 23. K-B2,Kt-K5ch; 24. KxP, B-R6ch; 25. K-R1, K-R1; 26. KtxKt, R-KKt1; 27.R-Kt5, with interesting possibilities.
Numberless interesting variations are possible, but theirdiscussion does not lie within the scope of this work. They willbe found in books treating of the analysis of the openings.]
It is therefore unwise for the beginner to accept the gambit,unless there be a chance of compensation for the disappearance ofhis centre pawn, by forcing the exchange of White's centre pawnas well. The following line of play would fulfil this condition:
1. P-K4, P-K4; 2. P-KB4, PxP; 3. Kt-KB3, Kt-KB3; 4. Kt-B3, P-Q4!Black thereby abandons the gambit pawn.
On principle, and when he has the choice, the beginner shouldgive preference to simple and clear development in the opening,rather than to the gain of a pawn, when this involves difficultand intricate play. This principle must also guide us in otheropenings.
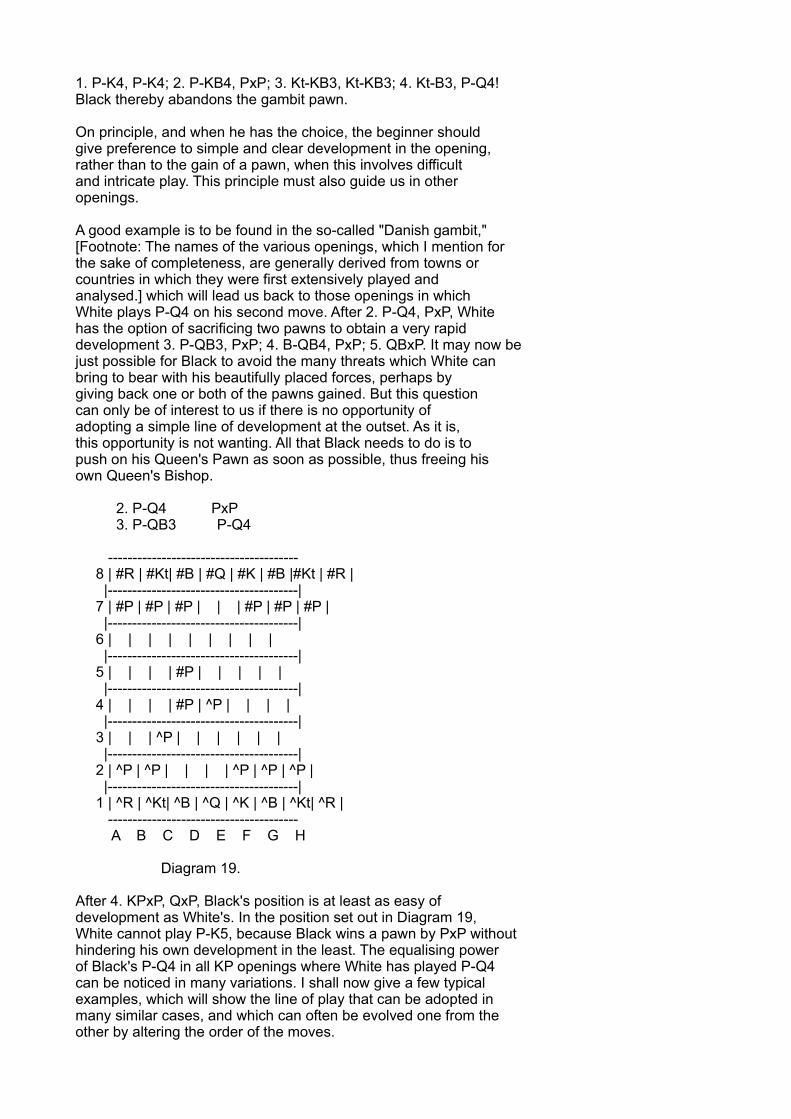
A good example is to be found in the so-called "Danish gambit,"[Footnote: The names of the various openings, which I mention forthe sake of completeness, are generally derived from towns orcountries in which they were first extensively played andanalysed.] which will lead us back to those openings in whichWhite plays P-Q4 on his second move. After 2. P-Q4, PxP, Whitehas the option of sacrificing two pawns to obtain a very rapiddevelopment 3. P-QB3, PxP; 4. B-QB4, PxP; 5. QBxP. It may now bejust possible for Black to avoid the many threats which White canbring to bear with his beautifully placed forces, perhaps bygiving back one or both of the pawns gained. But this questioncan only be of interest to us if there is no opportunity ofadopting a simple line of development at the outset. As it is,this opportunity is not wanting. All that Black needs to do is topush on his Queen's Pawn as soon as possible, thus freeing hisown Queen's Bishop.
2. P-Q4 PxP 3. P-QB3 P-Q4
--------------------------------------- 8 | #R | #Kt| #B | #Q | #K | #B |#Kt | #R | |---------------------------------------| 7 | #P | #P | #P | | | #P | #P | #P | |---------------------------------------| 6 | | | | | | | | | |---------------------------------------| 5 | | | | #P | | | | | |---------------------------------------| 4 | | | | #P | ^P | | | | |---------------------------------------| 3 | | | ^P | | | | | | |---------------------------------------| 2 | ^P | ^P | | | | ^P | ^P | ^P | |---------------------------------------| 1 | ^R | ^Kt| ^B | ^Q | ^K | ^B | ^Kt| ^R | --------------------------------------- A B C D E F G H
Diagram 19.
After 4. KPxP, QxP, Black's position is at least as easy ofdevelopment as White's. In the position set out in Diagram 19,White cannot play P-K5, because Black wins a pawn by PxP withouthindering his own development in the least. The equalising powerof Black's P-Q4 in all KP openings where White has played P-Q4can be noticed in many variations. I shall now give a few typicalexamples, which will show the line of play that can be adopted inmany similar cases, and which can often be evolved one from theother by altering the order of the moves.
I. CENTRE GAMBIT
2. P-Q4 PxP 3. QxP Kt-QB3 4. Q-K3 Kt-B3 5. Kt-QB3 B-K2 6. B-Q2 P-Q4!
II. KING'S BISHOP'S OPENING
2. P-Q4 PxP 3. B-QB4 Kt-KB3 4. P-K5 P-Q4!
III. SCOTCH GAMBIT
2. Kt-KB3 Kt-QB3 3. P-Q4 PxP 4. B-B4 Kt-B3 4. P-B3 P-Q4! 5. P-K5 P-Q4!
IV. SCOTCH GAME
2. Kt-KB3 Kt-QB3 3. P-Q4 PxP 4. KtxP Kt-B3 5. Kt-QB3 B-Kt5 6. KtxKt KtPxKt 7. B-Q3 P-Q4!
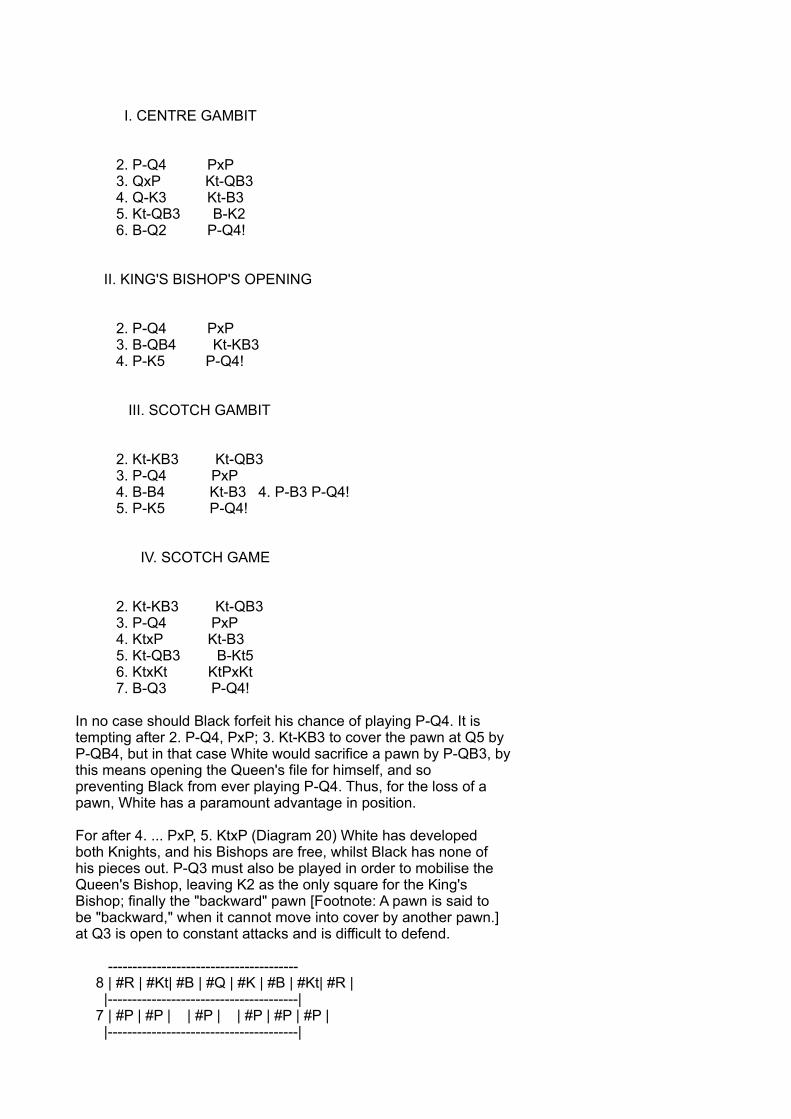
In no case should Black forfeit his chance of playing P-Q4. It istempting after 2. P-Q4, PxP; 3. Kt-KB3 to cover the pawn at Q5 byP-QB4, but in that case White would sacrifice a pawn by P-QB3, bythis means opening the Queen's file for himself, and sopreventing Black from ever playing P-Q4. Thus, for the loss of apawn, White has a paramount advantage in position.
For after 4. ... PxP, 5. KtxP (Diagram 20) White has developedboth Knights, and his Bishops are free, whilst Black has none ofhis pieces out. P-Q3 must also be played in order to mobilise theQueen's Bishop, leaving K2 as the only square for the King'sBishop; finally the "backward" pawn [Footnote: A pawn is said tobe "backward," when it cannot move into cover by another pawn.]at Q3 is open to constant attacks and is difficult to defend.
--------------------------------------- 8 | #R | #Kt| #B | #Q | #K | #B | #Kt| #R | |---------------------------------------| 7 | #P | #P | | #P | | #P | #P | #P | |---------------------------------------|
6 | | | | | | | | | |---------------------------------------| 5 | | | #P | | | | | | |---------------------------------------| 4 | | | | | ^P | | | | |---------------------------------------| 3 | | | ^Kt| | | ^Kt| | | |---------------------------------------| 2 | ^P | ^P | | | | ^P | ^P | ^P | |---------------------------------------| 1 | ^R | | ^B | ^Q | ^K | ^B | | ^R | --------------------------------------- A B C D E F G H
Diag. 20
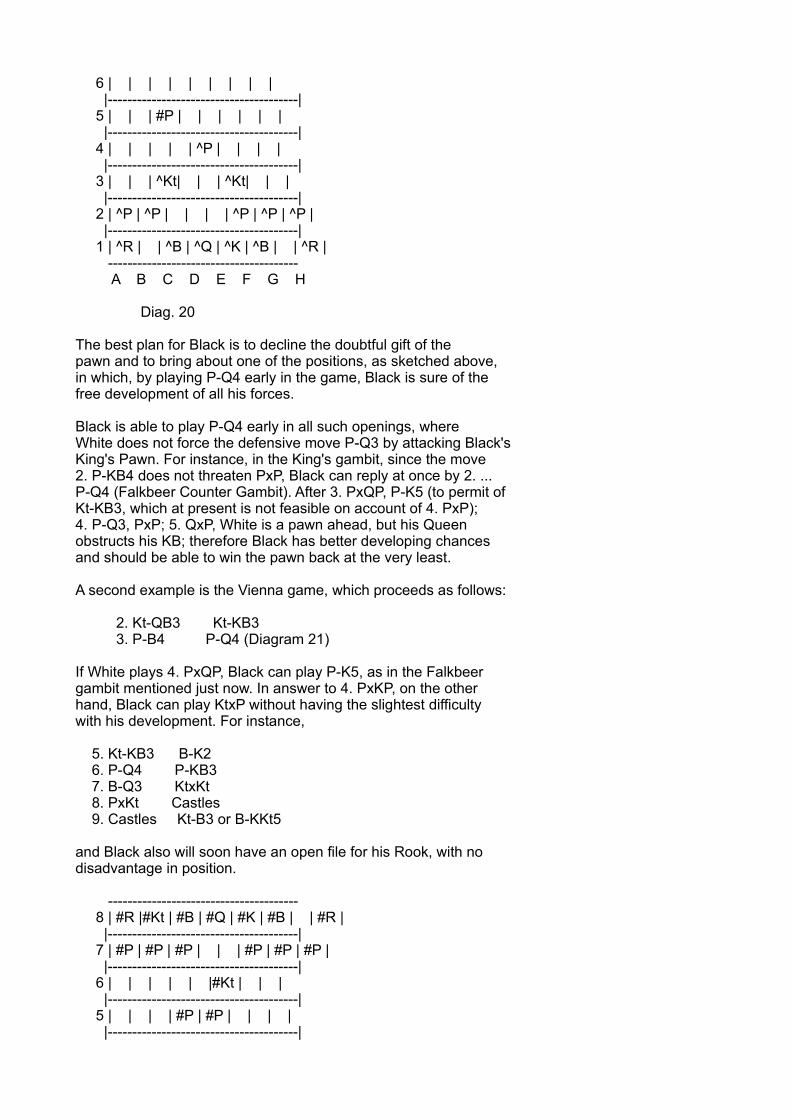
The best plan for Black is to decline the doubtful gift of thepawn and to bring about one of the positions, as sketched above,in which, by playing P-Q4 early in the game, Black is sure of thefree development of all his forces.
Black is able to play P-Q4 early in all such openings, whereWhite does not force the defensive move P-Q3 by attacking Black'sKing's Pawn. For instance, in the King's gambit, since the move2. P-KB4 does not threaten PxP, Black can reply at once by 2. ...P-Q4 (Falkbeer Counter Gambit). After 3. PxQP, P-K5 (to permit ofKt-KB3, which at present is not feasible on account of 4. PxP);4. P-Q3, PxP; 5. QxP, White is a pawn ahead, but his Queenobstructs his KB; therefore Black has better developing chancesand should be able to win the pawn back at the very least.
A second example is the Vienna game, which proceeds as follows:
2. Kt-QB3 Kt-KB3 3. P-B4 P-Q4 (Diagram 21)
If White plays 4. PxQP, Black can play P-K5, as in the Falkbeergambit mentioned just now. In answer to 4. PxKP, on the otherhand, Black can play KtxP without having the slightest difficultywith his development. For instance,
5. Kt-KB3 B-K2 6. P-Q4 P-KB3 7. B-Q3 KtxKt 8. PxKt Castles 9. Castles Kt-B3 or B-KKt5
and Black also will soon have an open file for his Rook, with nodisadvantage in position.
--------------------------------------- 8 | #R |#Kt | #B | #Q | #K | #B | | #R | |---------------------------------------| 7 | #P | #P | #P | | | #P | #P | #P | |---------------------------------------| 6 | | | | | |#Kt | | | |---------------------------------------| 5 | | | | #P | #P | | | | |---------------------------------------|
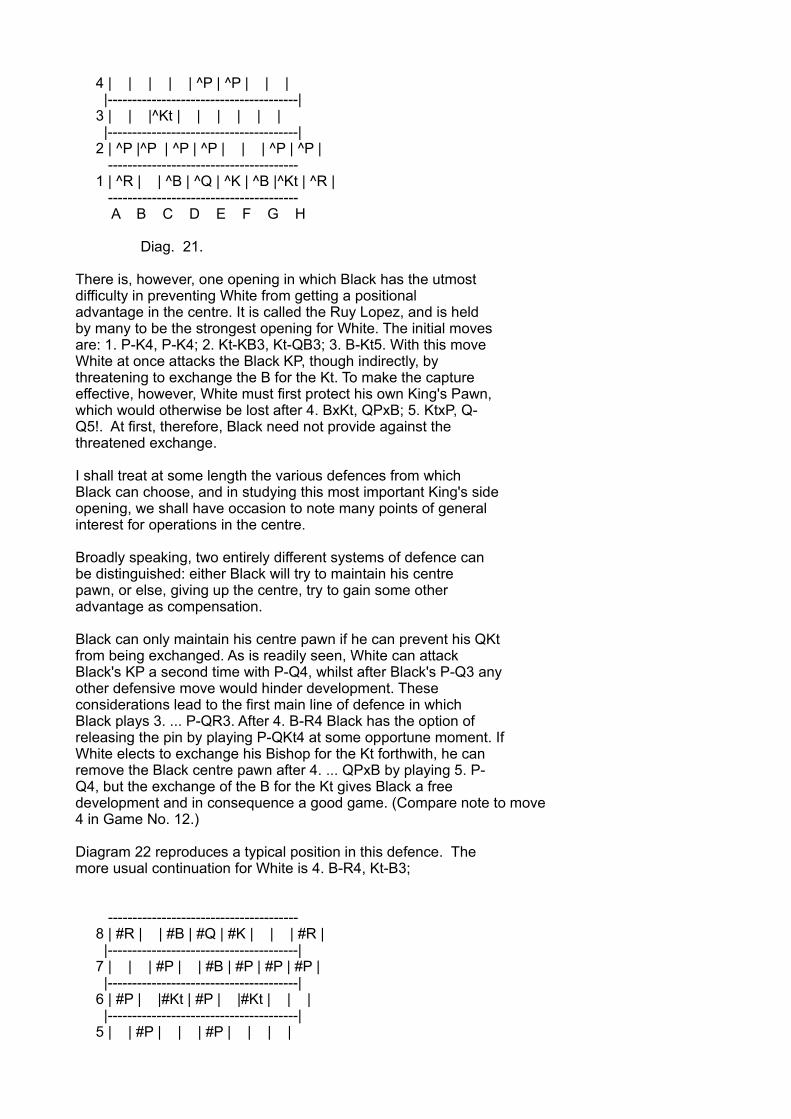
4 | | | | | ^P | ^P | | | |---------------------------------------| 3 | | |^Kt | | | | | | |---------------------------------------| 2 | ^P |^P | ^P | ^P | | | ^P | ^P | --------------------------------------- 1 | ^R | | ^B | ^Q | ^K | ^B |^Kt | ^R | --------------------------------------- A B C D E F G H
Diag. 21.
There is, however, one opening in which Black has the utmostdifficulty in preventing White from getting a positionaladvantage in the centre. It is called the Ruy Lopez, and is heldby many to be the strongest opening for White. The initial movesare: 1. P-K4, P-K4; 2. Kt-KB3, Kt-QB3; 3. B-Kt5. With this moveWhite at once attacks the Black KP, though indirectly, bythreatening to exchange the B for the Kt. To make the captureeffective, however, White must first protect his own King's Pawn,which would otherwise be lost after 4. BxKt, QPxB; 5. KtxP, Q-Q5!. At first, therefore, Black need not provide against thethreatened exchange.
I shall treat at some length the various defences from whichBlack can choose, and in studying this most important King's sideopening, we shall have occasion to note many points of generalinterest for operations in the centre.
Broadly speaking, two entirely different systems of defence canbe distinguished: either Black will try to maintain his centrepawn, or else, giving up the centre, try to gain some otheradvantage as compensation.
Black can only maintain his centre pawn if he can prevent his QKtfrom being exchanged. As is readily seen, White can attackBlack's KP a second time with P-Q4, whilst after Black's P-Q3 anyother defensive move would hinder development. Theseconsiderations lead to the first main line of defence in whichBlack plays 3. ... P-QR3. After 4. B-R4 Black has the option ofreleasing the pin by playing P-QKt4 at some opportune moment. IfWhite elects to exchange his Bishop for the Kt forthwith, he canremove the Black centre pawn after 4. ... QPxB by playing 5. P-Q4, but the exchange of the B for the Kt gives Black a freedevelopment and in consequence a good game. (Compare note to move4 in Game No. 12.)
Diagram 22 reproduces a typical position in this defence. Themore usual continuation for White is 4. B-R4, Kt-B3;
--------------------------------------- 8 | #R | | #B | #Q | #K | | | #R | |---------------------------------------| 7 | | | #P | | #B | #P | #P | #P | |---------------------------------------| 6 | #P | |#Kt | #P | |#Kt | | | |---------------------------------------| 5 | | #P | | | #P | | | |
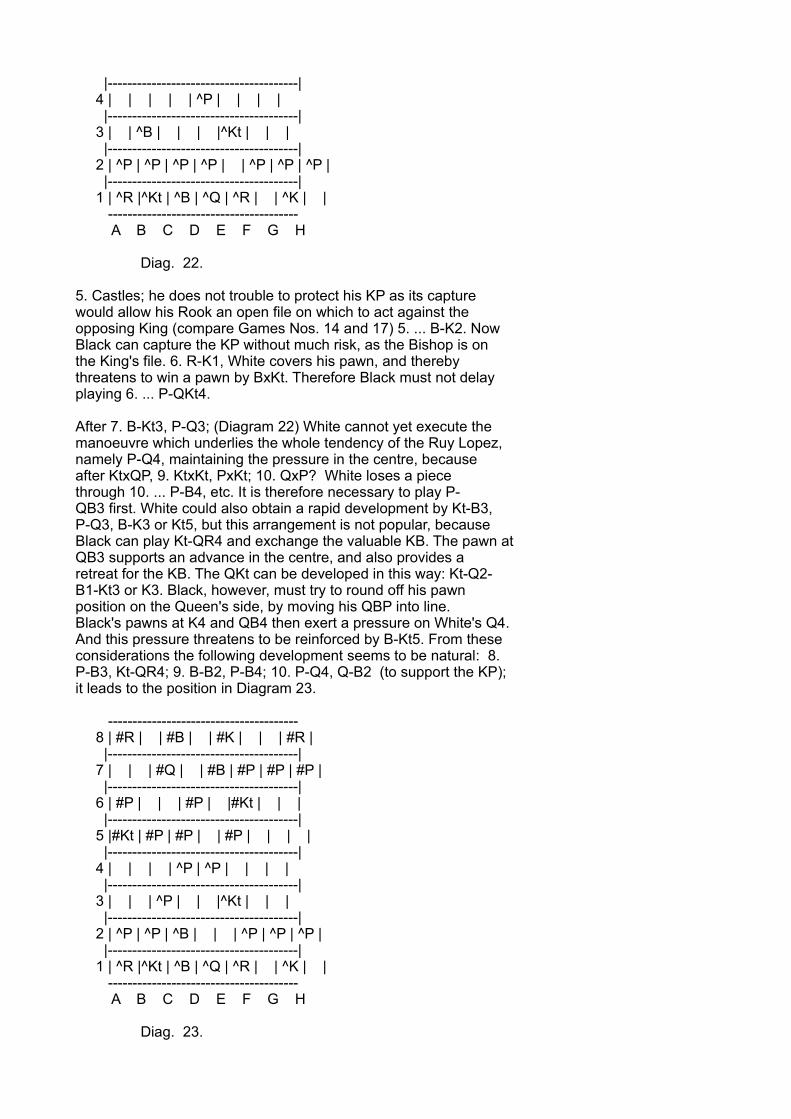
|---------------------------------------| 4 | | | | | ^P | | | | |---------------------------------------| 3 | | ^B | | | |^Kt | | | |---------------------------------------| 2 | ^P | ^P | ^P | ^P | | ^P | ^P | ^P | |---------------------------------------| 1 | ^R |^Kt | ^B | ^Q | ^R | | ^K | | --------------------------------------- A B C D E F G H
Diag. 22.
5. Castles; he does not trouble to protect his KP as its capturewould allow his Rook an open file on which to act against theopposing King (compare Games Nos. 14 and 17) 5. ... B-K2. NowBlack can capture the KP without much risk, as the Bishop is onthe King's file. 6. R-K1, White covers his pawn, and therebythreatens to win a pawn by BxKt. Therefore Black must not delayplaying 6. ... P-QKt4.
After 7. B-Kt3, P-Q3; (Diagram 22) White cannot yet execute themanoeuvre which underlies the whole tendency of the Ruy Lopez,namely P-Q4, maintaining the pressure in the centre, becauseafter KtxQP, 9. KtxKt, PxKt; 10. QxP? White loses a piecethrough 10. ... P-B4, etc. It is therefore necessary to play P-QB3 first. White could also obtain a rapid development by Kt-B3,P-Q3, B-K3 or Kt5, but this arrangement is not popular, becauseBlack can play Kt-QR4 and exchange the valuable KB. The pawn atQB3 supports an advance in the centre, and also provides aretreat for the KB. The QKt can be developed in this way: Kt-Q2-B1-Kt3 or K3. Black, however, must try to round off his pawnposition on the Queen's side, by moving his QBP into line.Black's pawns at K4 and QB4 then exert a pressure on White's Q4.And this pressure threatens to be reinforced by B-Kt5. From theseconsiderations the following development seems to be natural: 8.P-B3, Kt-QR4; 9. B-B2, P-B4; 10. P-Q4, Q-B2 (to support the KP);it leads to the position in Diagram 23.
--------------------------------------- 8 | #R | | #B | | #K | | | #R | |---------------------------------------| 7 | | | #Q | | #B | #P | #P | #P | |---------------------------------------| 6 | #P | | | #P | |#Kt | | | |---------------------------------------| 5 |#Kt | #P | #P | | #P | | | | |---------------------------------------| 4 | | | | ^P | ^P | | | | |---------------------------------------| 3 | | | ^P | | |^Kt | | | |---------------------------------------| 2 | ^P | ^P | ^B | | | ^P | ^P | ^P | |---------------------------------------| 1 | ^R |^Kt | ^B | ^Q | ^R | | ^K | | --------------------------------------- A B C D E F G H
Diag. 23.
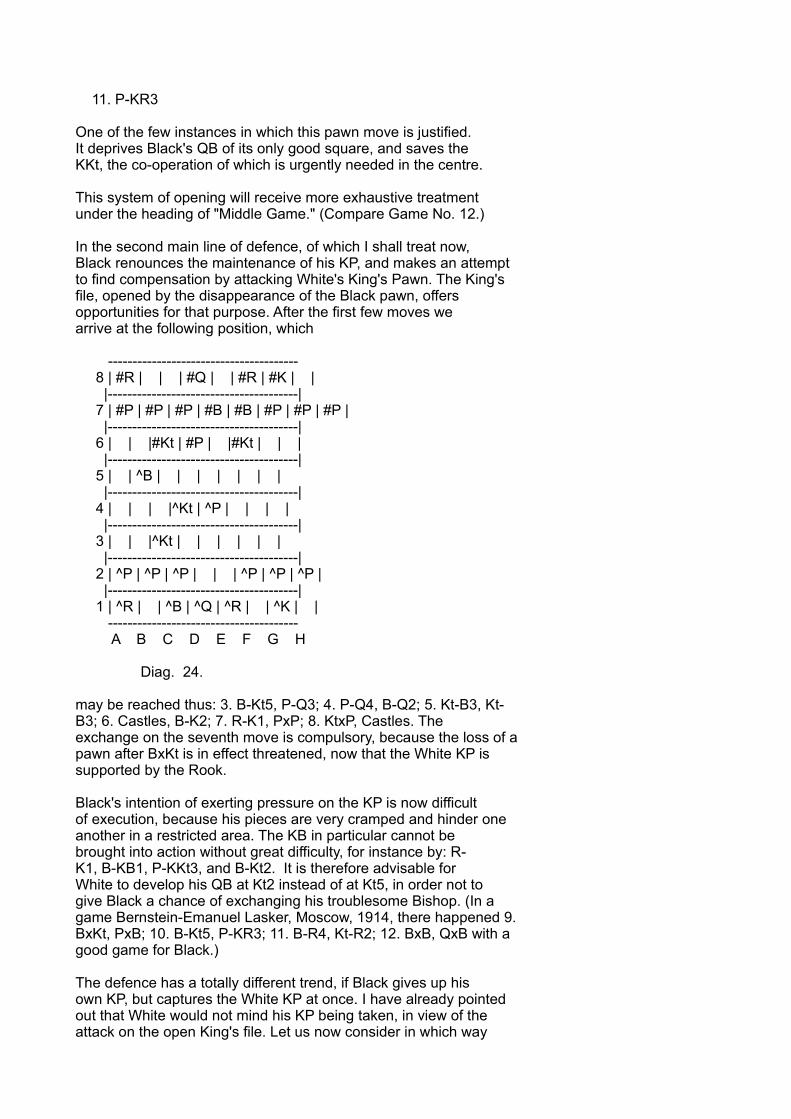
11. P-KR3
One of the few instances in which this pawn move is justified.It deprives Black's QB of its only good square, and saves theKKt, the co-operation of which is urgently needed in the centre.
This system of opening will receive more exhaustive treatmentunder the heading of "Middle Game." (Compare Game No. 12.)
In the second main line of defence, of which I shall treat now,Black renounces the maintenance of his KP, and makes an attemptto find compensation by attacking White's King's Pawn. The King'sfile, opened by the disappearance of the Black pawn, offersopportunities for that purpose. After the first few moves wearrive at the following position, which
--------------------------------------- 8 | #R | | | #Q | | #R | #K | | |---------------------------------------| 7 | #P | #P | #P | #B | #B | #P | #P | #P | |---------------------------------------| 6 | | |#Kt | #P | |#Kt | | | |---------------------------------------| 5 | | ^B | | | | | | | |---------------------------------------| 4 | | | |^Kt | ^P | | | | |---------------------------------------| 3 | | |^Kt | | | | | | |---------------------------------------| 2 | ^P | ^P | ^P | | | ^P | ^P | ^P | |---------------------------------------| 1 | ^R | | ^B | ^Q | ^R | | ^K | | --------------------------------------- A B C D E F G H
Diag. 24.
may be reached thus: 3. B-Kt5, P-Q3; 4. P-Q4, B-Q2; 5. Kt-B3, Kt-B3; 6. Castles, B-K2; 7. R-K1, PxP; 8. KtxP, Castles. Theexchange on the seventh move is compulsory, because the loss of apawn after BxKt is in effect threatened, now that the White KP issupported by the Rook.
Black's intention of exerting pressure on the KP is now difficultof execution, because his pieces are very cramped and hinder oneanother in a restricted area. The KB in particular cannot bebrought into action without great difficulty, for instance by: R-K1, B-KB1, P-KKt3, and B-Kt2. It is therefore advisable forWhite to develop his QB at Kt2 instead of at Kt5, in order not togive Black a chance of exchanging his troublesome Bishop. (In agame Bernstein-Emanuel Lasker, Moscow, 1914, there happened 9.BxKt, PxB; 10. B-Kt5, P-KR3; 11. B-R4, Kt-R2; 12. BxB, QxB with agood game for Black.)
The defence has a totally different trend, if Black gives up hisown KP, but captures the White KP at once. I have already pointedout that White would not mind his KP being taken, in view of theattack on the open King's file. Let us now consider in which way
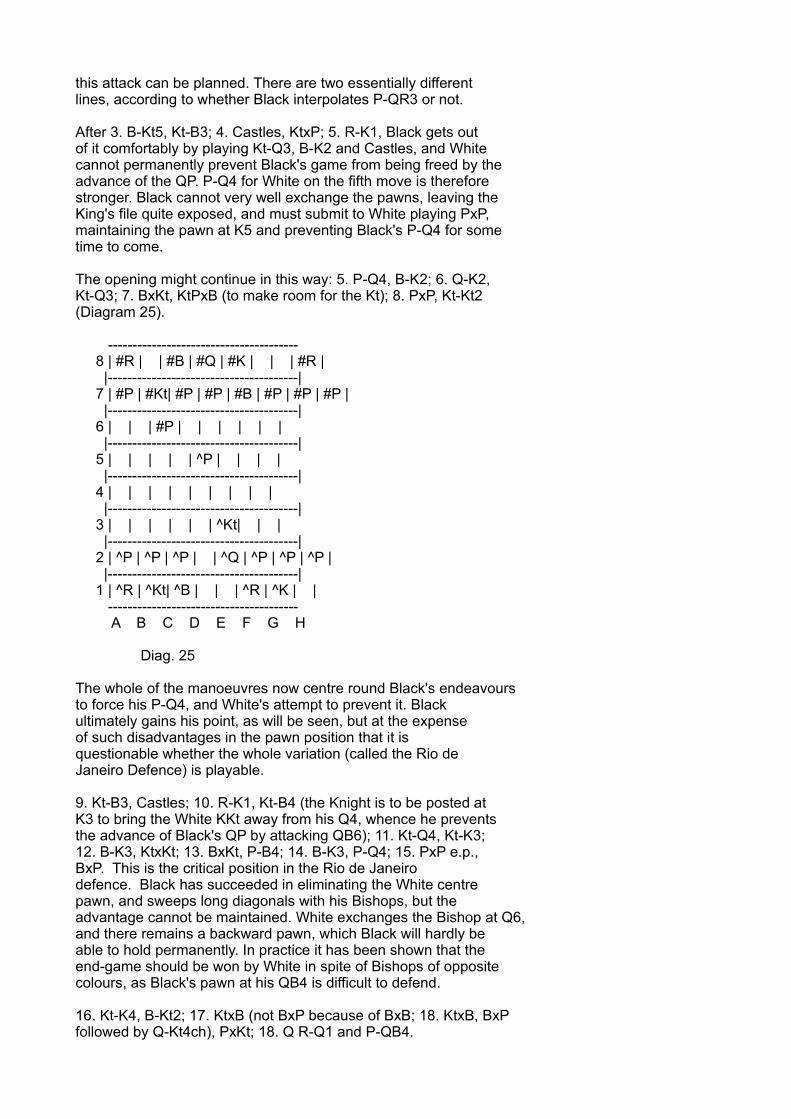
this attack can be planned. There are two essentially differentlines, according to whether Black interpolates P-QR3 or not.
After 3. B-Kt5, Kt-B3; 4. Castles, KtxP; 5. R-K1, Black gets outof it comfortably by playing Kt-Q3, B-K2 and Castles, and Whitecannot permanently prevent Black's game from being freed by theadvance of the QP. P-Q4 for White on the fifth move is thereforestronger. Black cannot very well exchange the pawns, leaving theKing's file quite exposed, and must submit to White playing PxP,maintaining the pawn at K5 and preventing Black's P-Q4 for sometime to come.
The opening might continue in this way: 5. P-Q4, B-K2; 6. Q-K2,Kt-Q3; 7. BxKt, KtPxB (to make room for the Kt); 8. PxP, Kt-Kt2(Diagram 25).
--------------------------------------- 8 | #R | | #B | #Q | #K | | | #R | |---------------------------------------| 7 | #P | #Kt| #P | #P | #B | #P | #P | #P | |---------------------------------------| 6 | | | #P | | | | | | |---------------------------------------| 5 | | | | | ^P | | | | |---------------------------------------| 4 | | | | | | | | | |---------------------------------------| 3 | | | | | | ^Kt| | | |---------------------------------------| 2 | ^P | ^P | ^P | | ^Q | ^P | ^P | ^P | |---------------------------------------| 1 | ^R | ^Kt| ^B | | | ^R | ^K | | --------------------------------------- A B C D E F G H
Diag. 25
The whole of the manoeuvres now centre round Black's endeavoursto force his P-Q4, and White's attempt to prevent it. Blackultimately gains his point, as will be seen, but at the expenseof such disadvantages in the pawn position that it isquestionable whether the whole variation (called the Rio deJaneiro Defence) is playable.
9. Kt-B3, Castles; 10. R-K1, Kt-B4 (the Knight is to be posted atK3 to bring the White KKt away from his Q4, whence he preventsthe advance of Black's QP by attacking QB6); 11. Kt-Q4, Kt-K3;12. B-K3, KtxKt; 13. BxKt, P-B4; 14. B-K3, P-Q4; 15. PxP e.p.,BxP. This is the critical position in the Rio de Janeirodefence. Black has succeeded in eliminating the White centrepawn, and sweeps long diagonals with his Bishops, but theadvantage cannot be maintained. White exchanges the Bishop at Q6,and there remains a backward pawn, which Black will hardly beable to hold permanently. In practice it has been shown that theend-game should be won by White in spite of Bishops of oppositecolours, as Black's pawn at his QB4 is difficult to defend.
16. Kt-K4, B-Kt2; 17. KtxB (not BxP because of BxB; 18. KtxB, BxPfollowed by Q-Kt4ch), PxKt; 18. Q R-Q1 and P-QB4.
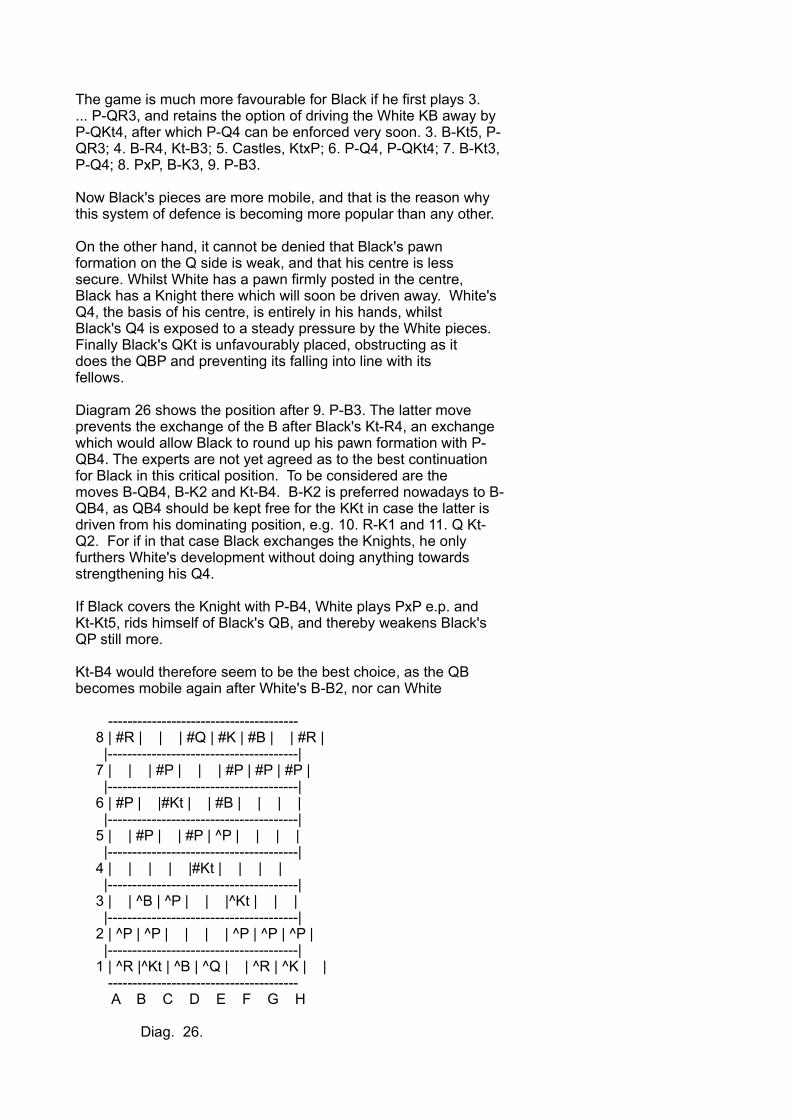
The game is much more favourable for Black if he first plays 3.... P-QR3, and retains the option of driving the White KB away byP-QKt4, after which P-Q4 can be enforced very soon. 3. B-Kt5, P-QR3; 4. B-R4, Kt-B3; 5. Castles, KtxP; 6. P-Q4, P-QKt4; 7. B-Kt3,P-Q4; 8. PxP, B-K3, 9. P-B3.
Now Black's pieces are more mobile, and that is the reason whythis system of defence is becoming more popular than any other.
On the other hand, it cannot be denied that Black's pawnformation on the Q side is weak, and that his centre is lesssecure. Whilst White has a pawn firmly posted in the centre,Black has a Knight there which will soon be driven away. White'sQ4, the basis of his centre, is entirely in his hands, whilstBlack's Q4 is exposed to a steady pressure by the White pieces.Finally Black's QKt is unfavourably placed, obstructing as itdoes the QBP and preventing its falling into line with itsfellows.
Diagram 26 shows the position after 9. P-B3. The latter moveprevents the exchange of the B after Black's Kt-R4, an exchangewhich would allow Black to round up his pawn formation with P-QB4. The experts are not yet agreed as to the best continuationfor Black in this critical position. To be considered are themoves B-QB4, B-K2 and Kt-B4. B-K2 is preferred nowadays to B-QB4, as QB4 should be kept free for the KKt in case the latter isdriven from his dominating position, e.g. 10. R-K1 and 11. Q Kt-Q2. For if in that case Black exchanges the Knights, he onlyfurthers White's development without doing anything towardsstrengthening his Q4.
If Black covers the Knight with P-B4, White plays PxP e.p. andKt-Kt5, rids himself of Black's QB, and thereby weakens Black'sQP still more.
Kt-B4 would therefore seem to be the best choice, as the QBbecomes mobile again after White's B-B2, nor can White
--------------------------------------- 8 | #R | | | #Q | #K | #B | | #R | |---------------------------------------| 7 | | | #P | | | #P | #P | #P | |---------------------------------------| 6 | #P | |#Kt | | #B | | | | |---------------------------------------| 5 | | #P | | #P | ^P | | | | |---------------------------------------| 4 | | | | |#Kt | | | | |---------------------------------------| 3 | | ^B | ^P | | |^Kt | | | |---------------------------------------| 2 | ^P | ^P | | | | ^P | ^P | ^P | |---------------------------------------| 1 | ^R |^Kt | ^B | ^Q | | ^R | ^K | | --------------------------------------- A B C D E F G H
Diag. 26.

play P-Q4 as yet. The position in the diagram therefore leads tothe following variations:
A. 9. ... B-K2; 10. R-K1, Castles; 11. QKt-Q2, Kt-B4; 12. B-B2,B-KKt5. This manoeuvre was introduced by Em. Lasker (Petrograd,1909. For further particulars see Game No. 15).
B. 9. ... Kt-B4; 10. QKt-Q2, P-Q5 (Capablanca-Em. Lasker,Petrograd, 1914); or 9. ... B-K2; 10. R-K1, Castles; 11. QKt-Q2,Kt-B4; 12. B-B2, P-Q5 (Em. Lasker-Tarrasch, Petrograd, 1914).
Capablanca believes that the early advance of P-Q5 can be refutedby Kt-K4, e.g. 9. ... B-K2; 10. QKt-Q2, Kt-B4; 11. B-B2, P-Q5;12. Kt-K4, PxP; 13. KtxKt, BxKt; 14. B-K4, Q-Q2; 15. Q-B2 or PxP.
The openings as sketched out up to this point give a sufficientlyclear idea of the possibilities of combining sound developmentwith an attempt to capture the centre after the opening moves 1.P-K4, P-K4. In most cases, Black's centre pawn being open toattack by White's P-Q4, we find an early break-up of the centre,and concurrently the opening of the Ks or Qs file for the Rooks.That is why games opened in this fashion have been classed verygenerally as "open," whilst all the other openings are called"close games." Lately the distinction has been abandoned, andvery rightly, since in the latter openings, too, the centre canbe cleared occasionally. We attain typical close positions whenBlack does not play 1. ... P-K4 in answer to 1. P-K4, butrelinquishes all claim on his K4 and takes possession of his Q4instead, leaving White the option of interlocking the pawns inthe centre with P-K5.
On principle it does not seem advisable for Black to play P-Q4 onthe first move in reply to 1. P-K4. Although White's centre pawndisappears after 2. PxP, QxP, Black loses a move through 3. Kt-QB3, and his Queen has no place from which it cannot be drivenaway very soon, unless it be at Q1. This, however, would amountto an admission of the inferiority of the whole of Black's plan.
There are two moves which deserve consideration as a preliminaryto P-Q4, namely, 1. ... P-K3 (French Defence)
--------------------------------------- 8 | #R |#Kt |#B | #Q | #K | #B |#Kt | #R | |---------------------------------------| 7 | #P | #P | #P | | | #P | #P | #P | |---------------------------------------| 6 | | | | | #P | | | | |---------------------------------------| 5 | | | | #P | | | | | |---------------------------------------| 4 | | | | ^P | ^P | | | | |---------------------------------------| 3 | | | | | | | | | |---------------------------------------| 2 | ^P | ^P | ^P | | | ^P | ^P |^P | |---------------------------------------| 1 | ^R |^Kt | ^B | ^Q | ^K | ^B |^Kt |^R | ---------------------------------------
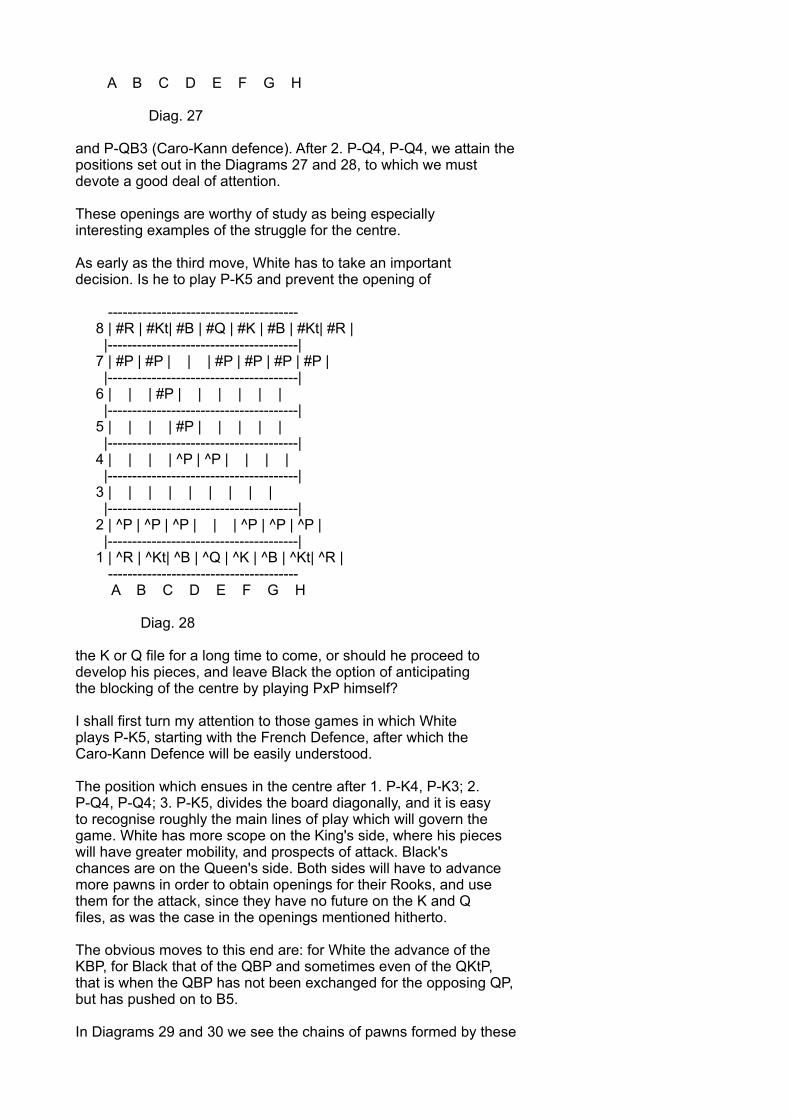
A B C D E F G H
Diag. 27
and P-QB3 (Caro-Kann defence). After 2. P-Q4, P-Q4, we attain thepositions set out in the Diagrams 27 and 28, to which we mustdevote a good deal of attention.
These openings are worthy of study as being especiallyinteresting examples of the struggle for the centre.
As early as the third move, White has to take an importantdecision. Is he to play P-K5 and prevent the opening of
--------------------------------------- 8 | #R | #Kt| #B | #Q | #K | #B | #Kt| #R | |---------------------------------------| 7 | #P | #P | | | #P | #P | #P | #P | |---------------------------------------| 6 | | | #P | | | | | | |---------------------------------------| 5 | | | | #P | | | | | |---------------------------------------| 4 | | | | ^P | ^P | | | | |---------------------------------------| 3 | | | | | | | | | |---------------------------------------| 2 | ^P | ^P | ^P | | | ^P | ^P | ^P | |---------------------------------------| 1 | ^R | ^Kt| ^B | ^Q | ^K | ^B | ^Kt| ^R | --------------------------------------- A B C D E F G H
Diag. 28
the K or Q file for a long time to come, or should he proceed todevelop his pieces, and leave Black the option of anticipatingthe blocking of the centre by playing PxP himself?
I shall first turn my attention to those games in which Whiteplays P-K5, starting with the French Defence, after which theCaro-Kann Defence will be easily understood.
The position which ensues in the centre after 1. P-K4, P-K3; 2.P-Q4, P-Q4; 3. P-K5, divides the board diagonally, and it is easyto recognise roughly the main lines of play which will govern thegame. White has more scope on the King's side, where his pieceswill have greater mobility, and prospects of attack. Black'schances are on the Queen's side. Both sides will have to advancemore pawns in order to obtain openings for their Rooks, and usethem for the attack, since they have no future on the K and Qfiles, as was the case in the openings mentioned hitherto.
The obvious moves to this end are: for White the advance of theKBP, for Black that of the QBP and sometimes even of the QKtP,that is when the QBP has not been exchanged for the opposing QP,but has pushed on to B5.
In Diagrams 29 and 30 we see the chains of pawns formed by these
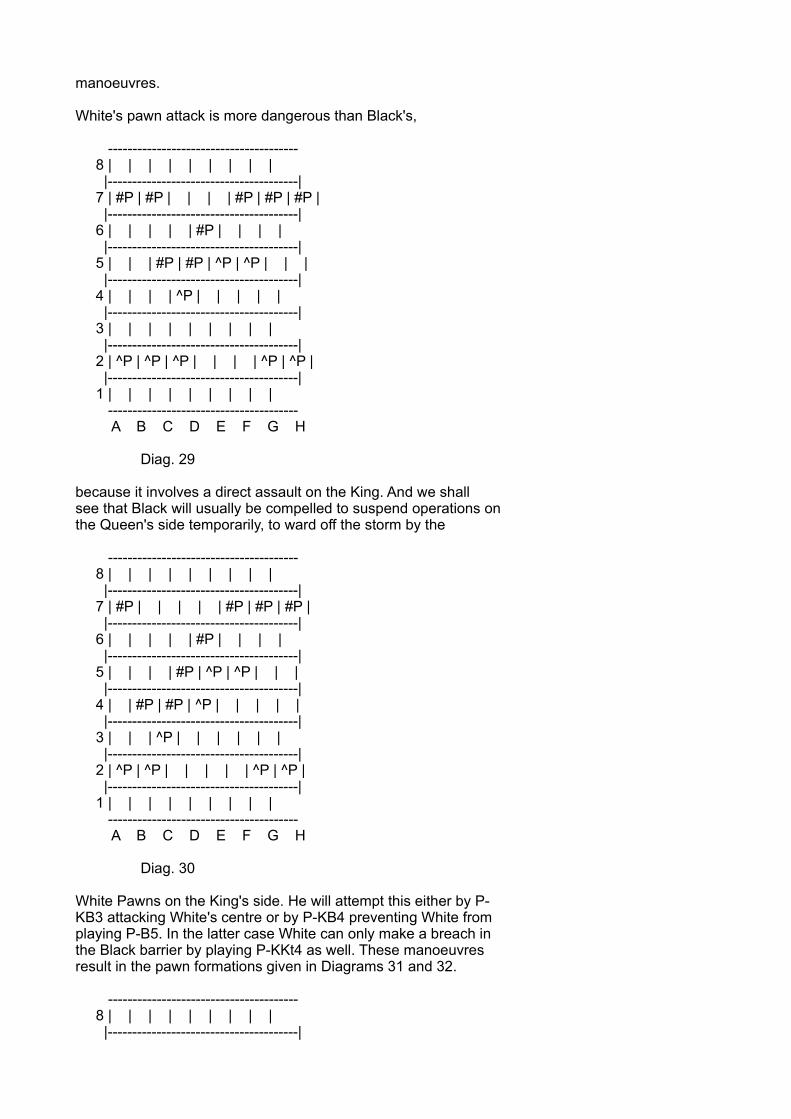
manoeuvres.
White's pawn attack is more dangerous than Black's,
--------------------------------------- 8 | | | | | | | | | |---------------------------------------| 7 | #P | #P | | | | #P | #P | #P | |---------------------------------------| 6 | | | | | #P | | | | |---------------------------------------| 5 | | | #P | #P | ^P | ^P | | | |---------------------------------------| 4 | | | | ^P | | | | | |---------------------------------------| 3 | | | | | | | | | |---------------------------------------| 2 | ^P | ^P | ^P | | | | ^P | ^P | |---------------------------------------| 1 | | | | | | | | | --------------------------------------- A B C D E F G H
Diag. 29
because it involves a direct assault on the King. And we shallsee that Black will usually be compelled to suspend operations onthe Queen's side temporarily, to ward off the storm by the
--------------------------------------- 8 | | | | | | | | | |---------------------------------------| 7 | #P | | | | | #P | #P | #P | |---------------------------------------| 6 | | | | | #P | | | | |---------------------------------------| 5 | | | | #P | ^P | ^P | | | |---------------------------------------| 4 | | #P | #P | ^P | | | | | |---------------------------------------| 3 | | | ^P | | | | | | |---------------------------------------| 2 | ^P | ^P | | | | | ^P | ^P | |---------------------------------------| 1 | | | | | | | | | --------------------------------------- A B C D E F G H
Diag. 30
White Pawns on the King's side. He will attempt this either by P-KB3 attacking White's centre or by P-KB4 preventing White fromplaying P-B5. In the latter case White can only make a breach inthe Black barrier by playing P-KKt4 as well. These manoeuvresresult in the pawn formations given in Diagrams 31 and 32.
--------------------------------------- 8 | | | | | | | | | |---------------------------------------|
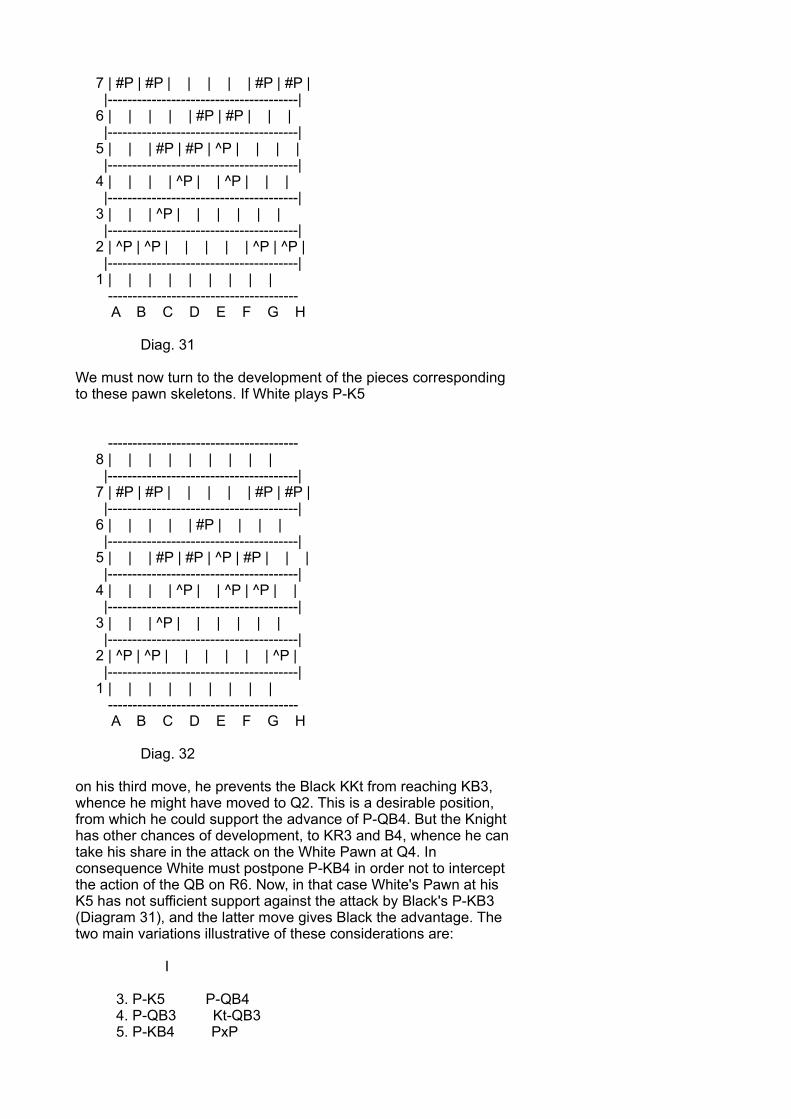
7 | #P | #P | | | | | #P | #P | |---------------------------------------| 6 | | | | | #P | #P | | | |---------------------------------------| 5 | | | #P | #P | ^P | | | | |---------------------------------------| 4 | | | | ^P | | ^P | | | |---------------------------------------| 3 | | | ^P | | | | | | |---------------------------------------| 2 | ^P | ^P | | | | | ^P | ^P | |---------------------------------------| 1 | | | | | | | | | --------------------------------------- A B C D E F G H
Diag. 31
We must now turn to the development of the pieces correspondingto these pawn skeletons. If White plays P-K5
--------------------------------------- 8 | | | | | | | | | |---------------------------------------| 7 | #P | #P | | | | | #P | #P | |---------------------------------------| 6 | | | | | #P | | | | |---------------------------------------| 5 | | | #P | #P | ^P | #P | | | |---------------------------------------| 4 | | | | ^P | | ^P | ^P | | |---------------------------------------| 3 | | | ^P | | | | | | |---------------------------------------| 2 | ^P | ^P | | | | | | ^P | |---------------------------------------| 1 | | | | | | | | | --------------------------------------- A B C D E F G H
Diag. 32
on his third move, he prevents the Black KKt from reaching KB3,whence he might have moved to Q2. This is a desirable position,from which he could support the advance of P-QB4. But the Knighthas other chances of development, to KR3 and B4, whence he cantake his share in the attack on the White Pawn at Q4. Inconsequence White must postpone P-KB4 in order not to interceptthe action of the QB on R6. Now, in that case White's Pawn at hisK5 has not sufficient support against the attack by Black's P-KB3(Diagram 31), and the latter move gives Black the advantage. Thetwo main variations illustrative of these considerations are:
I
3. P-K5 P-QB4 4. P-QB3 Kt-QB3 5. P-KB4 PxP
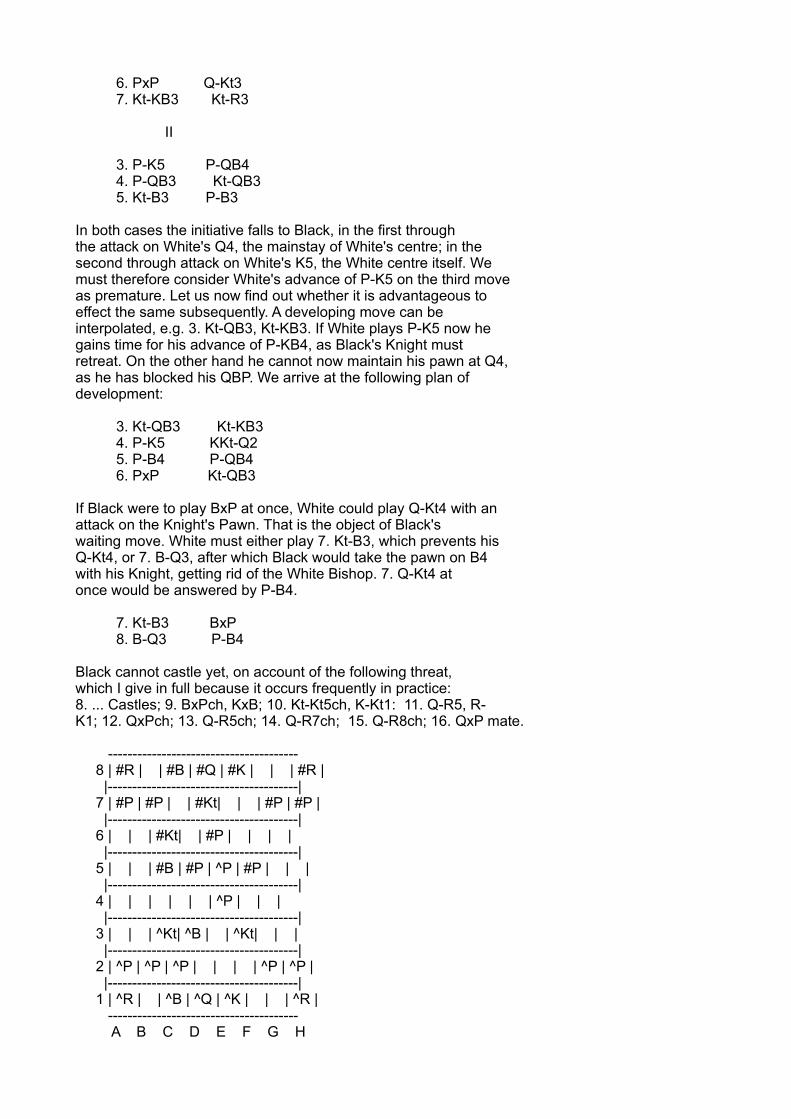
6. PxP Q-Kt3 7. Kt-KB3 Kt-R3
II
3. P-K5 P-QB4 4. P-QB3 Kt-QB3 5. Kt-B3 P-B3
In both cases the initiative falls to Black, in the first throughthe attack on White's Q4, the mainstay of White's centre; in thesecond through attack on White's K5, the White centre itself. Wemust therefore consider White's advance of P-K5 on the third moveas premature. Let us now find out whether it is advantageous toeffect the same subsequently. A developing move can beinterpolated, e.g. 3. Kt-QB3, Kt-KB3. If White plays P-K5 now hegains time for his advance of P-KB4, as Black's Knight mustretreat. On the other hand he cannot now maintain his pawn at Q4,as he has blocked his QBP. We arrive at the following plan ofdevelopment:
3. Kt-QB3 Kt-KB3 4. P-K5 KKt-Q2 5. P-B4 P-QB4 6. PxP Kt-QB3
If Black were to play BxP at once, White could play Q-Kt4 with anattack on the Knight's Pawn. That is the object of Black'swaiting move. White must either play 7. Kt-B3, which prevents hisQ-Kt4, or 7. B-Q3, after which Black would take the pawn on B4with his Knight, getting rid of the White Bishop. 7. Q-Kt4 atonce would be answered by P-B4.
7. Kt-B3 BxP 8. B-Q3 P-B4
Black cannot castle yet, on account of the following threat,which I give in full because it occurs frequently in practice:8. ... Castles; 9. BxPch, KxB; 10. Kt-Kt5ch, K-Kt1: 11. Q-R5, R-K1; 12. QxPch; 13. Q-R5ch; 14. Q-R7ch; 15. Q-R8ch; 16. QxP mate.
--------------------------------------- 8 | #R | | #B | #Q | #K | | | #R | |---------------------------------------| 7 | #P | #P | | #Kt| | | #P | #P | |---------------------------------------| 6 | | | #Kt| | #P | | | | |---------------------------------------| 5 | | | #B | #P | ^P | #P | | | |---------------------------------------| 4 | | | | | | ^P | | | |---------------------------------------| 3 | | | ^Kt| ^B | | ^Kt| | | |---------------------------------------| 2 | ^P | ^P | ^P | | | | ^P | ^P | |---------------------------------------| 1 | ^R | | ^B | ^Q | ^K | | | ^R | --------------------------------------- A B C D E F G H
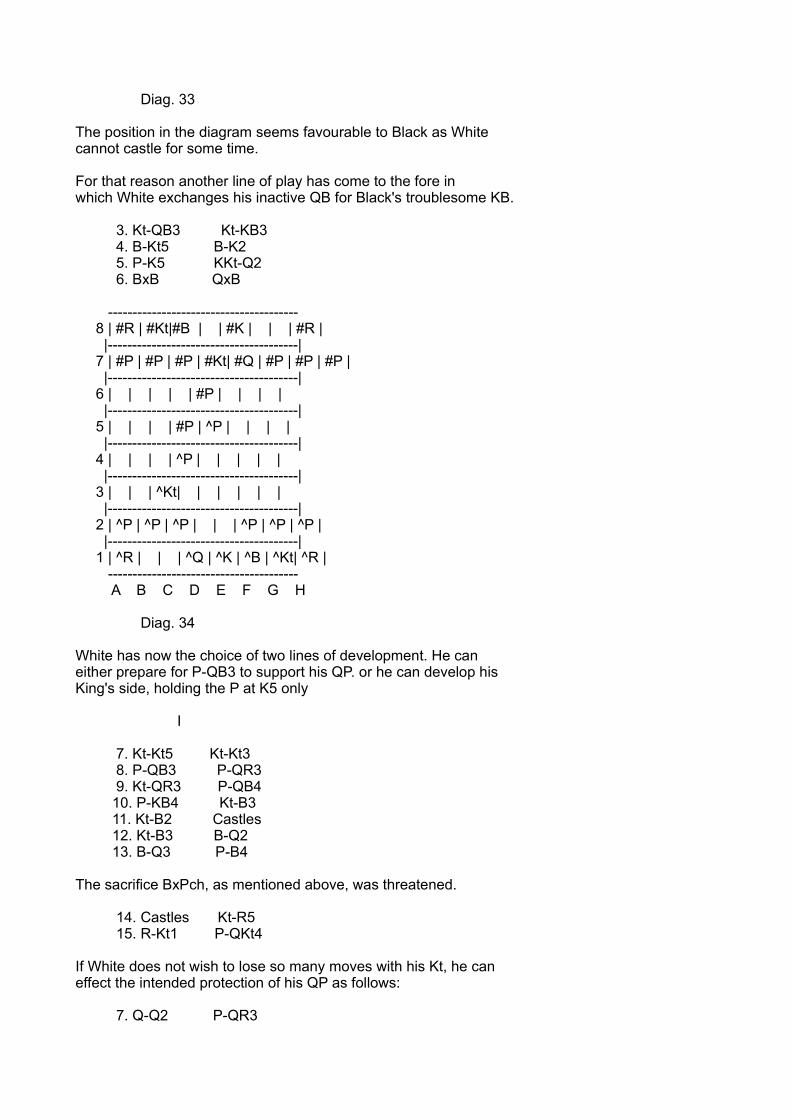
Diag. 33
The position in the diagram seems favourable to Black as Whitecannot castle for some time.
For that reason another line of play has come to the fore inwhich White exchanges his inactive QB for Black's troublesome KB.
3. Kt-QB3 Kt-KB3 4. B-Kt5 B-K2 5. P-K5 KKt-Q2 6. BxB QxB
--------------------------------------- 8 | #R | #Kt|#B | | #K | | | #R | |---------------------------------------| 7 | #P | #P | #P | #Kt| #Q | #P | #P | #P | |---------------------------------------| 6 | | | | | #P | | | | |---------------------------------------| 5 | | | | #P | ^P | | | | |---------------------------------------| 4 | | | | ^P | | | | | |---------------------------------------| 3 | | | ^Kt| | | | | | |---------------------------------------| 2 | ^P | ^P | ^P | | | ^P | ^P | ^P | |---------------------------------------| 1 | ^R | | | ^Q | ^K | ^B | ^Kt| ^R | --------------------------------------- A B C D E F G H
Diag. 34
White has now the choice of two lines of development. He caneither prepare for P-QB3 to support his QP. or he can develop hisKing's side, holding the P at K5 only
I
7. Kt-Kt5 Kt-Kt3 8. P-QB3 P-QR3 9. Kt-QR3 P-QB4 10. P-KB4 Kt-B3 11. Kt-B2 Castles 12. Kt-B3 B-Q2 13. B-Q3 P-B4
The sacrifice BxPch, as mentioned above, was threatened.
14. Castles Kt-R5 15. R-Kt1 P-QKt4
If White does not wish to lose so many moves with his Kt, he caneffect the intended protection of his QP as follows:
7. Q-Q2 P-QR3
not P-QB4 at once, because of Kt-Kt5.
8. Kt-Q1 P-QB4 9. P-QB3
II
7. P-B4 Castles 8. Kt-B3 P-QB4 9. B-Q3 P-B4 10. Castles Kt-QB3
and so on.
In both cases White has an easy development, whilst Black has noconvenient square for his Queen's Bishop.
To avoid this drawback Rubinstein has evolved the followingvariation, in which provision is made from the first for thefreedom of action of the Queen's Bishop:
3. Kt-QB3 Kt-KB3 4. B-Kt5 PxP
to open the diagonal for the Bishop at QKt2, e.g.:
5. KtxP QKt-Q2 6. Kt-KB3 B-K2
followed by P-QKt3 and B-Kt2.
We will now leave the French defence and turn our attention tothe Caro-Kann, of which the initial position was shown in Diagram28. Here also we find two essentially different systems ofdevelopment, according to whether White plays P-K5 or gives Blackthe option of exchanging pawns by 3. Kt-QB3. In the first case avery noticeable difference from the French defence is, that Blackcan bring out his Queen's Bishop. Here the process of developmentmay be:
3. P-K5 B-B4 4. B-Q3 BxB
Not B-Kt3, because White could play P-K6! and paralyse the wholeof Black's game by preventing his playing the King's Pawn.
5. QxB P-K3 6. Kt-K2 or KR3
Through this the move P-KB4, which fits into this pawn formation,is kept in reserve.
While White's development is easy and natural, Black hasdifficulty in finding good places for his King's side pieces.The game can proceed generally speaking on the lines of theFrench defence. Only Black can hardly attack White's centre withP-B3, since the Pawn at K3 would be weak in the absence of theQueen's Bishop. On the other hand, Black would be a move behindwith an attack on the Queen's side, since to reach QB4 his pawn
would have made two moves instead of one as in the Frenchdefence. A certain compensation lies in the fact that White'sattacking King's Bishop has been exchanged.
In practical play it has nevertheless been shown that White'sattack is more likely to succeed, and for this reason a variationintroduced by Niemzowitsch has been tried several times; it aimsat the exchange of Queens in order to weaken and retard White'sthreatened attack, and to gain time for Queen's side operations.
6. ... Q-Kt3 7. Castles Q-R3 or Kt4
But after 8. Kt-B4, QxQ; 9. KtxQ, White is so much ahead with hisdevelopment that Black's chance of equalising the game would seemquestionable.
If White plays Kt-KR3 on his sixth move, he foils at once Black'sattempt of forcing an exchange of Queens, as he could play 8. Q-KKt3.
On the whole we can conclude that in the Caro-Kann defence Whiteobtains a good game by 3. P-K5.
A line of play which used to be in vogue, namely, 3. Kt-QB3, PxP;4. KtxP, Kt-B3; 5. KtxKtch, KPxKt or KtPxKt, gives Black an evenchance, for although he loses his centre pawn he obtains a gooddevelopment, and later in the game he has opportunities ofexercising pressure on White's QP through his open Q file.
Except the French defence and the Caro-Kann, there is no game inwhich an irregular reply to White's 1. P-K4 necessitates anyspecial considerations either in development of pieces or pawnformation. In all such cases it is sufficient to maintain thepawn centre and to occupy such squares with the pieces, whencethey cannot be driven away with the loss of a move. Just oneexample: If Black plays 1. ... P-QB4 (Sicilian defence), Whitewill not play his King's Bishop to B4, because Black can reply P-K3, and gain a move by P-Q4.
B. Let us now consider the openings in which the first move is 1.P-Q4 on either side. Here the centre cannot be cleared as earlyas in the openings beginning with 1. P-K4, P-K4. The advance ofa second centre pawn, which there led to a clearance, is notfeasible in this case. White does not command his K4, and forsome time to come he will be unable to advance the K pawn beyondK3. In consequence the K file does not seem a likely opening forthe Rooks, and another file must be found for them. Theconclusions arrived at for Black in the French defence hold goodfor both sides in the opening now under consideration, andaccordingly the QB file is that most advantageous for the Rooks.The advance of the QBP strikes at the opposing centre, and, thatbeing of paramount importance, the Queen's Knight must not bedeveloped at B3 before the QBP has been pushed on. Anotherdevelopment might be conceivable for the Rooks; viz. on the KBfile, and also the KKt or KR file; here, as we shall see, anoccasion may arise for storming the opposing King's side by apawn attack. But in this case, too, although it seems unnecessaryto play the QBP, it is advisable to develop the Knight via Q2, as
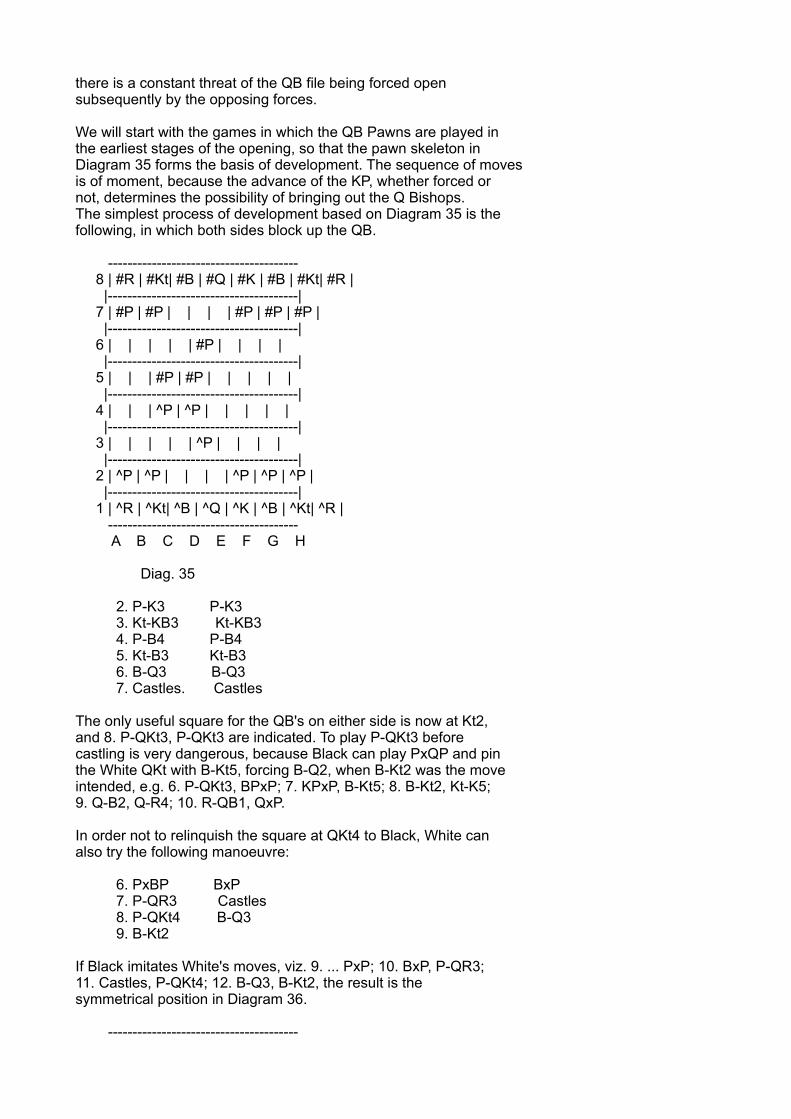
there is a constant threat of the QB file being forced opensubsequently by the opposing forces.
We will start with the games in which the QB Pawns are played inthe earliest stages of the opening, so that the pawn skeleton inDiagram 35 forms the basis of development. The sequence of movesis of moment, because the advance of the KP, whether forced ornot, determines the possibility of bringing out the Q Bishops.The simplest process of development based on Diagram 35 is thefollowing, in which both sides block up the QB.
--------------------------------------- 8 | #R | #Kt| #B | #Q | #K | #B | #Kt| #R | |---------------------------------------| 7 | #P | #P | | | | #P | #P | #P | |---------------------------------------| 6 | | | | | #P | | | | |---------------------------------------| 5 | | | #P | #P | | | | | |---------------------------------------| 4 | | | ^P | ^P | | | | | |---------------------------------------| 3 | | | | | ^P | | | | |---------------------------------------| 2 | ^P | ^P | | | | ^P | ^P | ^P | |---------------------------------------| 1 | ^R | ^Kt| ^B | ^Q | ^K | ^B | ^Kt| ^R | --------------------------------------- A B C D E F G H
Diag. 35
2. P-K3 P-K3 3. Kt-KB3 Kt-KB3 4. P-B4 P-B4 5. Kt-B3 Kt-B3 6. B-Q3 B-Q3 7. Castles. Castles
The only useful square for the QB's on either side is now at Kt2,and 8. P-QKt3, P-QKt3 are indicated. To play P-QKt3 beforecastling is very dangerous, because Black can play PxQP and pinthe White QKt with B-Kt5, forcing B-Q2, when B-Kt2 was the moveintended, e.g. 6. P-QKt3, BPxP; 7. KPxP, B-Kt5; 8. B-Kt2, Kt-K5;9. Q-B2, Q-R4; 10. R-QB1, QxP.
In order not to relinquish the square at QKt4 to Black, White canalso try the following manoeuvre:
6. PxBP BxP 7. P-QR3 Castles 8. P-QKt4 B-Q3 9. B-Kt2
If Black imitates White's moves, viz. 9. ... PxP; 10. BxP, P-QR3;11. Castles, P-QKt4; 12. B-Q3, B-Kt2, the result is thesymmetrical position in Diagram 36.
---------------------------------------
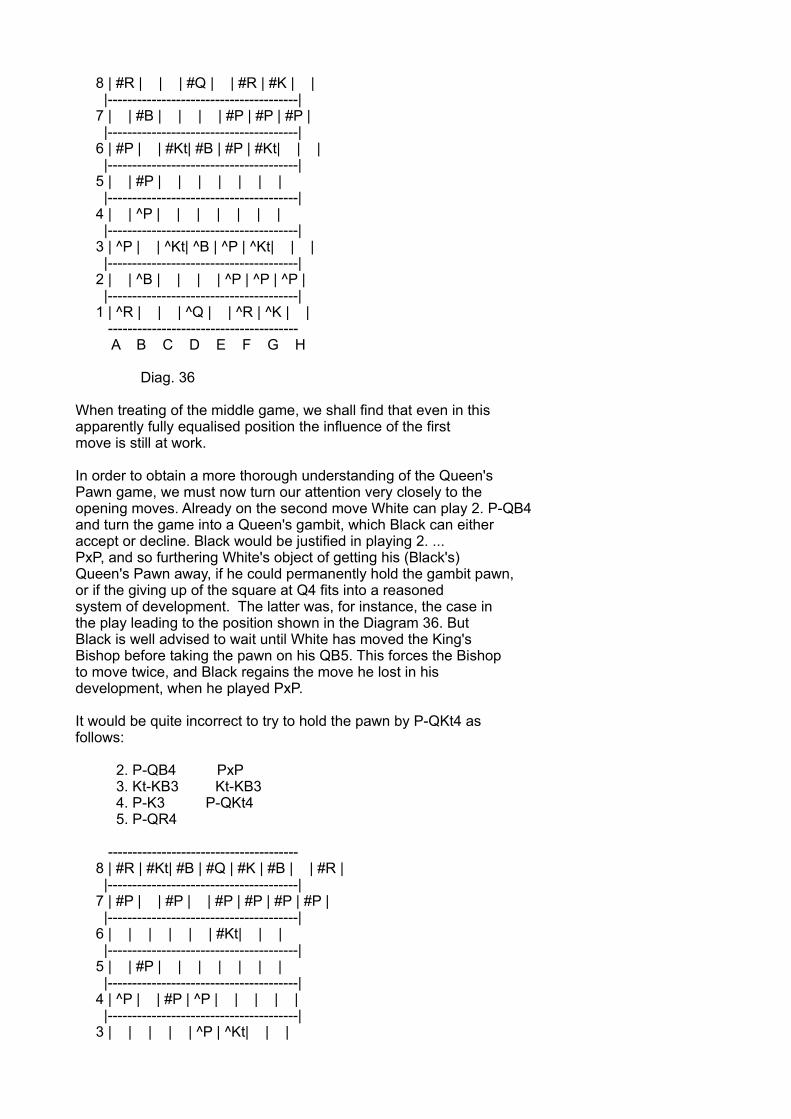
8 | #R | | | #Q | | #R | #K | | |---------------------------------------| 7 | | #B | | | | #P | #P | #P | |---------------------------------------| 6 | #P | | #Kt| #B | #P | #Kt| | | |---------------------------------------| 5 | | #P | | | | | | | |---------------------------------------| 4 | | ^P | | | | | | | |---------------------------------------| 3 | ^P | | ^Kt| ^B | ^P | ^Kt| | | |---------------------------------------| 2 | | ^B | | | | ^P | ^P | ^P | |---------------------------------------| 1 | ^R | | | ^Q | | ^R | ^K | | --------------------------------------- A B C D E F G H
Diag. 36
When treating of the middle game, we shall find that even in thisapparently fully equalised position the influence of the firstmove is still at work.
In order to obtain a more thorough understanding of the Queen'sPawn game, we must now turn our attention very closely to theopening moves. Already on the second move White can play 2. P-QB4and turn the game into a Queen's gambit, which Black can eitheraccept or decline. Black would be justified in playing 2. ...PxP, and so furthering White's object of getting his (Black's)Queen's Pawn away, if he could permanently hold the gambit pawn,or if the giving up of the square at Q4 fits into a reasonedsystem of development. The latter was, for instance, the case inthe play leading to the position shown in the Diagram 36. ButBlack is well advised to wait until White has moved the King'sBishop before taking the pawn on his QB5. This forces the Bishopto move twice, and Black regains the move he lost in hisdevelopment, when he played PxP.
It would be quite incorrect to try to hold the pawn by P-QKt4 asfollows:
2. P-QB4 PxP 3. Kt-KB3 Kt-KB3 4. P-K3 P-QKt4 5. P-QR4
--------------------------------------- 8 | #R | #Kt| #B | #Q | #K | #B | | #R | |---------------------------------------| 7 | #P | | #P | | #P | #P | #P | #P | |---------------------------------------| 6 | | | | | | #Kt| | | |---------------------------------------| 5 | | #P | | | | | | | |---------------------------------------| 4 | ^P | | #P | ^P | | | | | |---------------------------------------| 3 | | | | | ^P | ^Kt| | |
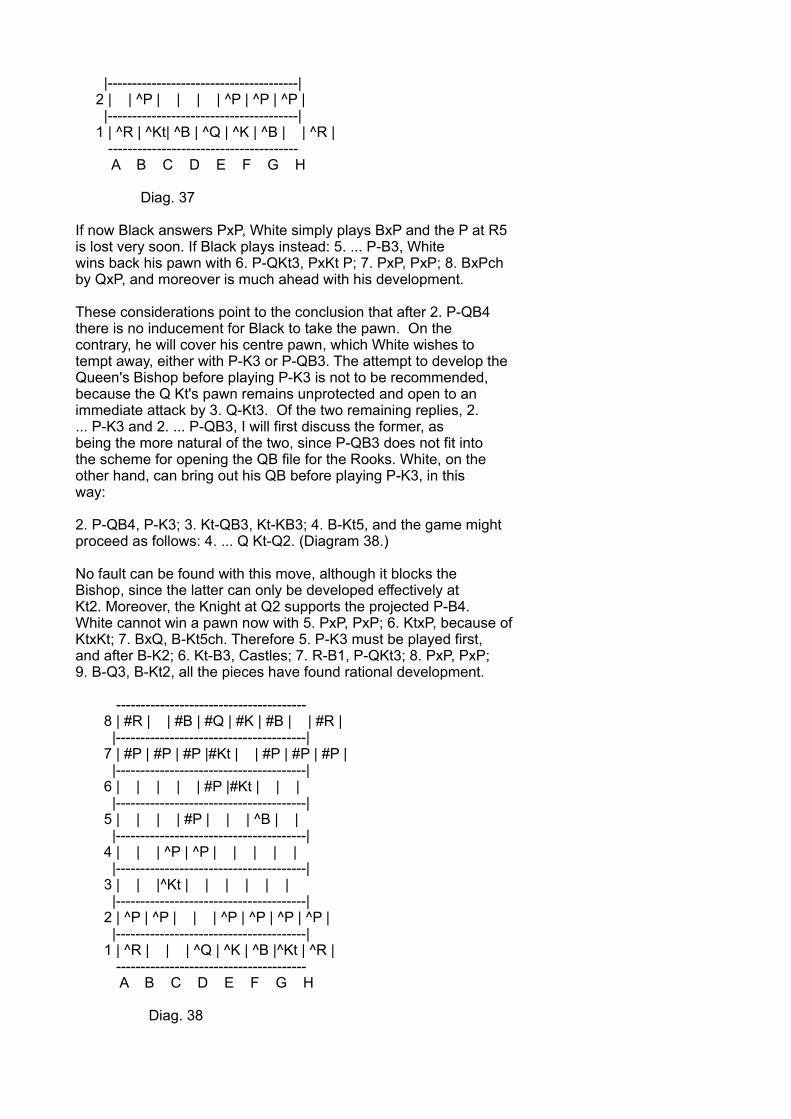
|---------------------------------------| 2 | | ^P | | | | ^P | ^P | ^P | |---------------------------------------| 1 | ^R | ^Kt| ^B | ^Q | ^K | ^B | | ^R | --------------------------------------- A B C D E F G H
Diag. 37
If now Black answers PxP, White simply plays BxP and the P at R5is lost very soon. If Black plays instead: 5. ... P-B3, Whitewins back his pawn with 6. P-QKt3, PxKt P; 7. PxP, PxP; 8. BxPchby QxP, and moreover is much ahead with his development.
These considerations point to the conclusion that after 2. P-QB4there is no inducement for Black to take the pawn. On thecontrary, he will cover his centre pawn, which White wishes totempt away, either with P-K3 or P-QB3. The attempt to develop theQueen's Bishop before playing P-K3 is not to be recommended,because the Q Kt's pawn remains unprotected and open to animmediate attack by 3. Q-Kt3. Of the two remaining replies, 2.... P-K3 and 2. ... P-QB3, I will first discuss the former, asbeing the more natural of the two, since P-QB3 does not fit intothe scheme for opening the QB file for the Rooks. White, on theother hand, can bring out his QB before playing P-K3, in thisway:
2. P-QB4, P-K3; 3. Kt-QB3, Kt-KB3; 4. B-Kt5, and the game mightproceed as follows: 4. ... Q Kt-Q2. (Diagram 38.)
No fault can be found with this move, although it blocks theBishop, since the latter can only be developed effectively atKt2. Moreover, the Knight at Q2 supports the projected P-B4.White cannot win a pawn now with 5. PxP, PxP; 6. KtxP, because ofKtxKt; 7. BxQ, B-Kt5ch. Therefore 5. P-K3 must be played first,and after B-K2; 6. Kt-B3, Castles; 7. R-B1, P-QKt3; 8. PxP, PxP;9. B-Q3, B-Kt2, all the pieces have found rational development.
--------------------------------------- 8 | #R | | #B | #Q | #K | #B | | #R | |---------------------------------------| 7 | #P | #P | #P |#Kt | | #P | #P | #P | |---------------------------------------| 6 | | | | | #P |#Kt | | | |---------------------------------------| 5 | | | | #P | | | ^B | | |---------------------------------------| 4 | | | ^P | ^P | | | | | |---------------------------------------| 3 | | |^Kt | | | | | | |---------------------------------------| 2 | ^P | ^P | | | ^P | ^P | ^P | ^P | |---------------------------------------| 1 | ^R | | | ^Q | ^K | ^B |^Kt | ^R | --------------------------------------- A B C D E F G H
Diag. 38
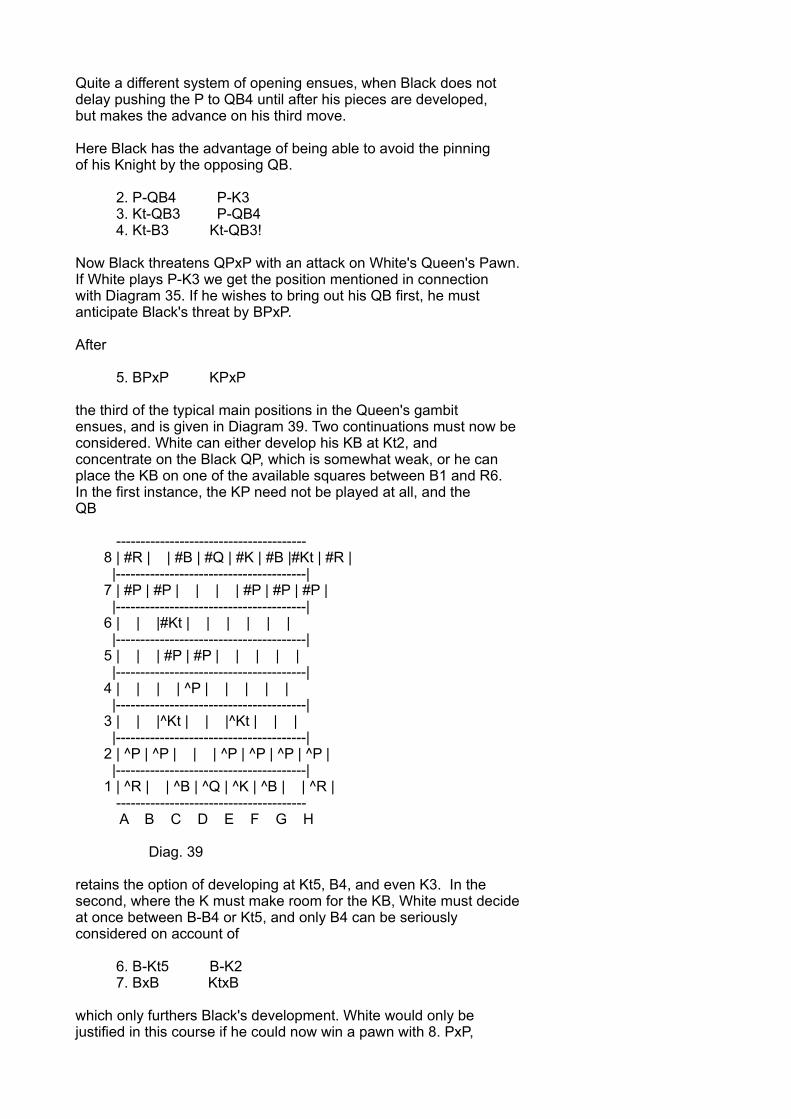
Quite a different system of opening ensues, when Black does notdelay pushing the P to QB4 until after his pieces are developed,but makes the advance on his third move.
Here Black has the advantage of being able to avoid the pinningof his Knight by the opposing QB.
2. P-QB4 P-K3 3. Kt-QB3 P-QB4 4. Kt-B3 Kt-QB3!
Now Black threatens QPxP with an attack on White's Queen's Pawn.If White plays P-K3 we get the position mentioned in connectionwith Diagram 35. If he wishes to bring out his QB first, he mustanticipate Black's threat by BPxP.
After
5. BPxP KPxP
the third of the typical main positions in the Queen's gambitensues, and is given in Diagram 39. Two continuations must now beconsidered. White can either develop his KB at Kt2, andconcentrate on the Black QP, which is somewhat weak, or he canplace the KB on one of the available squares between B1 and R6.In the first instance, the KP need not be played at all, and theQB
--------------------------------------- 8 | #R | | #B | #Q | #K | #B |#Kt | #R | |---------------------------------------| 7 | #P | #P | | | | #P | #P | #P | |---------------------------------------| 6 | | |#Kt | | | | | | |---------------------------------------| 5 | | | #P | #P | | | | | |---------------------------------------| 4 | | | | ^P | | | | | |---------------------------------------| 3 | | |^Kt | | |^Kt | | | |---------------------------------------| 2 | ^P | ^P | | | ^P | ^P | ^P | ^P | |---------------------------------------| 1 | ^R | | ^B | ^Q | ^K | ^B | | ^R | --------------------------------------- A B C D E F G H
Diag. 39
retains the option of developing at Kt5, B4, and even K3. In thesecond, where the K must make room for the KB, White must decideat once between B-B4 or Kt5, and only B4 can be seriouslyconsidered on account of
6. B-Kt5 B-K2 7. BxB KtxB
which only furthers Black's development. White would only bejustified in this course if he could now win a pawn with 8. PxP,
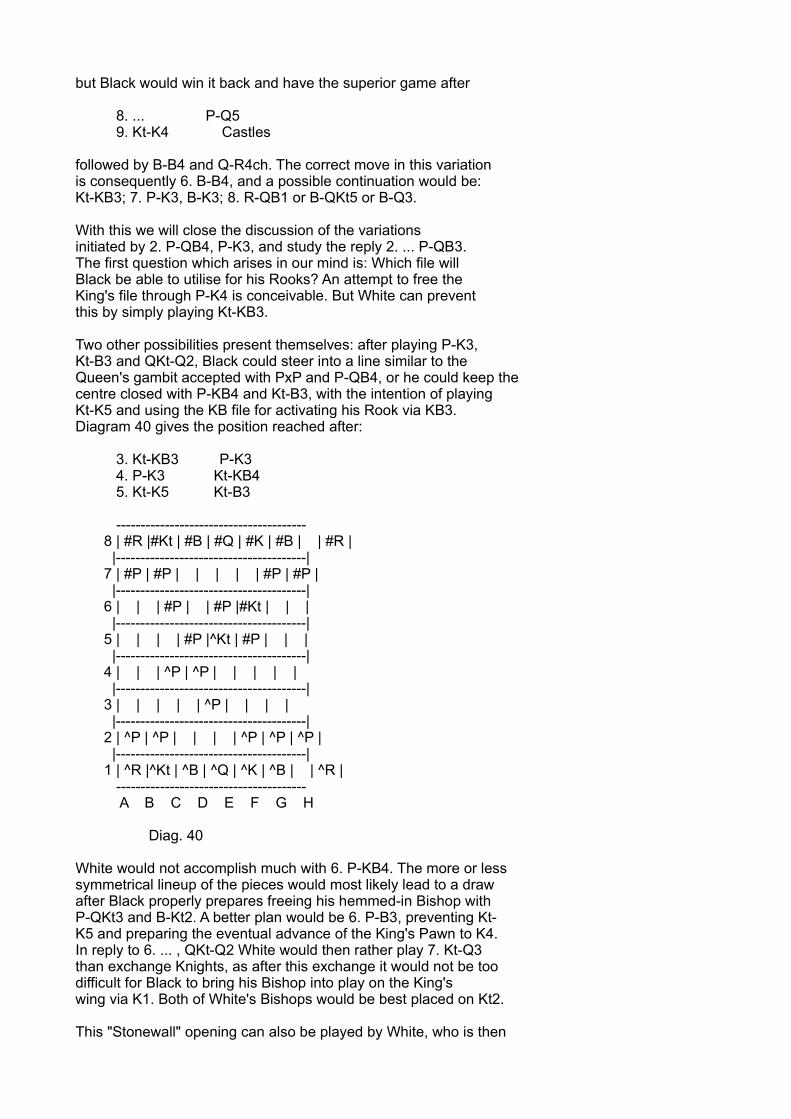
but Black would win it back and have the superior game after
8. ... P-Q5 9. Kt-K4 Castles
followed by B-B4 and Q-R4ch. The correct move in this variationis consequently 6. B-B4, and a possible continuation would be:Kt-KB3; 7. P-K3, B-K3; 8. R-QB1 or B-QKt5 or B-Q3.
With this we will close the discussion of the variationsinitiated by 2. P-QB4, P-K3, and study the reply 2. ... P-QB3.The first question which arises in our mind is: Which file willBlack be able to utilise for his Rooks? An attempt to free theKing's file through P-K4 is conceivable. But White can preventthis by simply playing Kt-KB3.
Two other possibilities present themselves: after playing P-K3,Kt-B3 and QKt-Q2, Black could steer into a line similar to theQueen's gambit accepted with PxP and P-QB4, or he could keep thecentre closed with P-KB4 and Kt-B3, with the intention of playingKt-K5 and using the KB file for activating his Rook via KB3.Diagram 40 gives the position reached after:
3. Kt-KB3 P-K3 4. P-K3 Kt-KB4 5. Kt-K5 Kt-B3
--------------------------------------- 8 | #R |#Kt | #B | #Q | #K | #B | | #R | |---------------------------------------| 7 | #P | #P | | | | | #P | #P | |---------------------------------------| 6 | | | #P | | #P |#Kt | | | |---------------------------------------| 5 | | | | #P |^Kt | #P | | | |---------------------------------------| 4 | | | ^P | ^P | | | | | |---------------------------------------| 3 | | | | | ^P | | | | |---------------------------------------| 2 | ^P | ^P | | | | ^P | ^P | ^P | |---------------------------------------| 1 | ^R |^Kt | ^B | ^Q | ^K | ^B | | ^R | --------------------------------------- A B C D E F G H
Diag. 40
White would not accomplish much with 6. P-KB4. The more or lesssymmetrical lineup of the pieces would most likely lead to a drawafter Black properly prepares freeing his hemmed-in Bishop withP-QKt3 and B-Kt2. A better plan would be 6. P-B3, preventing Kt-K5 and preparing the eventual advance of the King's Pawn to K4.In reply to 6. ... , QKt-Q2 White would then rather play 7. Kt-Q3than exchange Knights, as after this exchange it would not be toodifficult for Black to bring his Bishop into play on the King'swing via K1. Both of White's Bishops would be best placed on Kt2.
This "Stonewall" opening can also be played by White, who is then
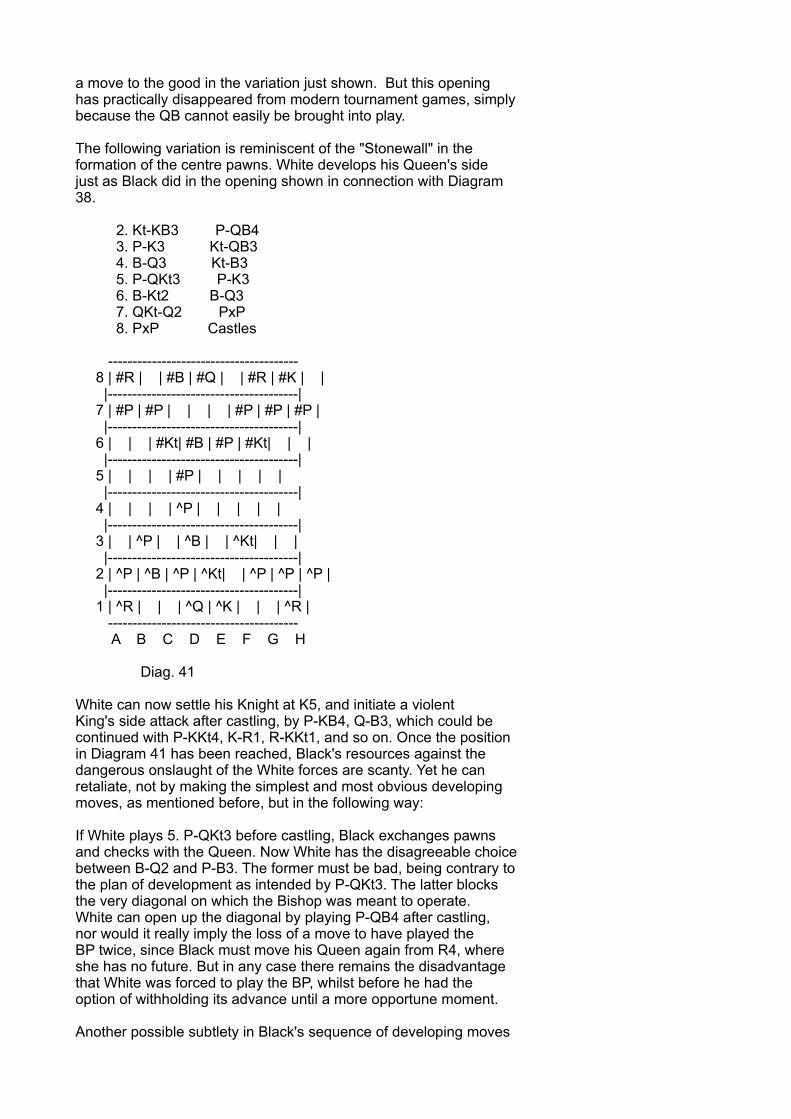
a move to the good in the variation just shown. But this openinghas practically disappeared from modern tournament games, simplybecause the QB cannot easily be brought into play.
The following variation is reminiscent of the "Stonewall" in theformation of the centre pawns. White develops his Queen's sidejust as Black did in the opening shown in connection with Diagram38.
2. Kt-KB3 P-QB4 3. P-K3 Kt-QB3 4. B-Q3 Kt-B3 5. P-QKt3 P-K3 6. B-Kt2 B-Q3 7. QKt-Q2 PxP 8. PxP Castles
--------------------------------------- 8 | #R | | #B | #Q | | #R | #K | | |---------------------------------------| 7 | #P | #P | | | | #P | #P | #P | |---------------------------------------| 6 | | | #Kt| #B | #P | #Kt| | | |---------------------------------------| 5 | | | | #P | | | | | |---------------------------------------| 4 | | | | ^P | | | | | |---------------------------------------| 3 | | ^P | | ^B | | ^Kt| | | |---------------------------------------| 2 | ^P | ^B | ^P | ^Kt| | ^P | ^P | ^P | |---------------------------------------| 1 | ^R | | | ^Q | ^K | | | ^R | --------------------------------------- A B C D E F G H
Diag. 41
White can now settle his Knight at K5, and initiate a violentKing's side attack after castling, by P-KB4, Q-B3, which could becontinued with P-KKt4, K-R1, R-KKt1, and so on. Once the positionin Diagram 41 has been reached, Black's resources against thedangerous onslaught of the White forces are scanty. Yet he canretaliate, not by making the simplest and most obvious developingmoves, as mentioned before, but in the following way:
If White plays 5. P-QKt3 before castling, Black exchanges pawnsand checks with the Queen. Now White has the disagreeable choicebetween B-Q2 and P-B3. The former must be bad, being contrary tothe plan of development as intended by P-QKt3. The latter blocksthe very diagonal on which the Bishop was meant to operate.White can open up the diagonal by playing P-QB4 after castling,nor would it really imply the loss of a move to have played theBP twice, since Black must move his Queen again from R4, whereshe has no future. But in any case there remains the disadvantagethat White was forced to play the BP, whilst before he had theoption of withholding its advance until a more opportune moment.
Another possible subtlety in Black's sequence of developing moves
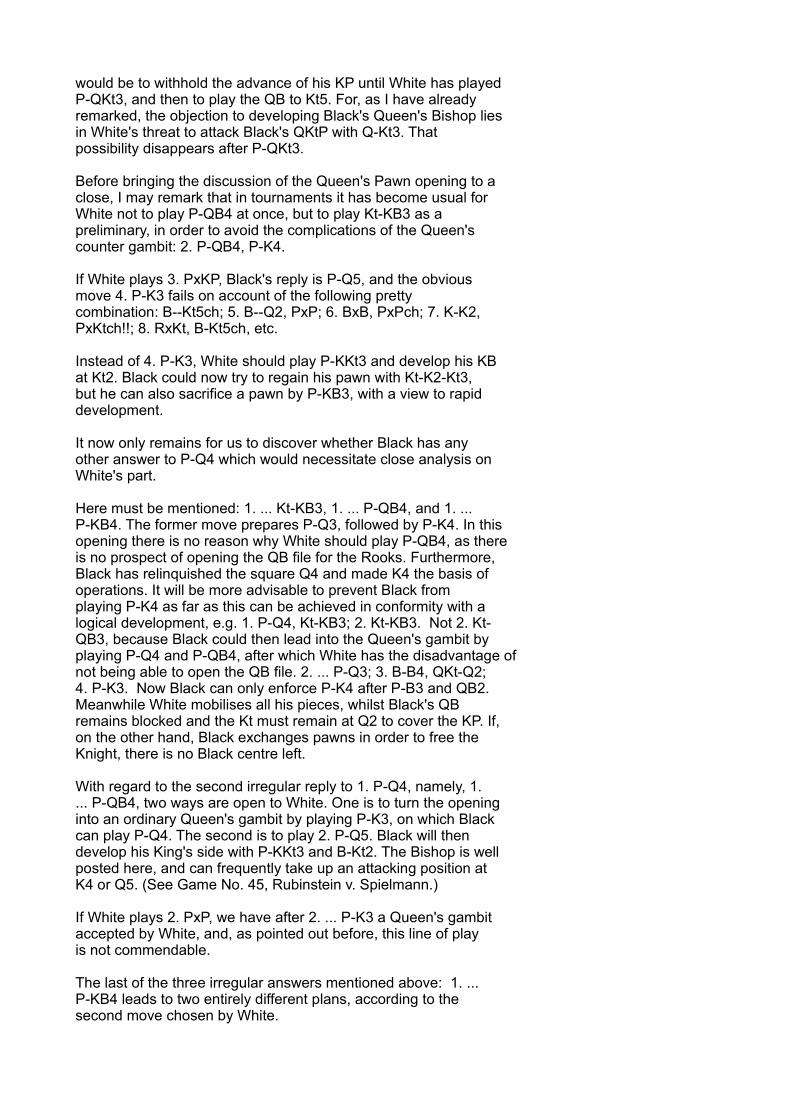
would be to withhold the advance of his KP until White has playedP-QKt3, and then to play the QB to Kt5. For, as I have alreadyremarked, the objection to developing Black's Queen's Bishop liesin White's threat to attack Black's QKtP with Q-Kt3. Thatpossibility disappears after P-QKt3.
Before bringing the discussion of the Queen's Pawn opening to aclose, I may remark that in tournaments it has become usual forWhite not to play P-QB4 at once, but to play Kt-KB3 as apreliminary, in order to avoid the complications of the Queen'scounter gambit: 2. P-QB4, P-K4.
If White plays 3. PxKP, Black's reply is P-Q5, and the obviousmove 4. P-K3 fails on account of the following prettycombination: B--Kt5ch; 5. B--Q2, PxP; 6. BxB, PxPch; 7. K-K2,PxKtch!!; 8. RxKt, B-Kt5ch, etc.
Instead of 4. P-K3, White should play P-KKt3 and develop his KBat Kt2. Black could now try to regain his pawn with Kt-K2-Kt3,but he can also sacrifice a pawn by P-KB3, with a view to rapiddevelopment.
It now only remains for us to discover whether Black has anyother answer to P-Q4 which would necessitate close analysis onWhite's part.
Here must be mentioned: 1. ... Kt-KB3, 1. ... P-QB4, and 1. ...P-KB4. The former move prepares P-Q3, followed by P-K4. In thisopening there is no reason why White should play P-QB4, as thereis no prospect of opening the QB file for the Rooks. Furthermore,Black has relinquished the square Q4 and made K4 the basis ofoperations. It will be more advisable to prevent Black fromplaying P-K4 as far as this can be achieved in conformity with alogical development, e.g. 1. P-Q4, Kt-KB3; 2. Kt-KB3. Not 2. Kt-QB3, because Black could then lead into the Queen's gambit byplaying P-Q4 and P-QB4, after which White has the disadvantage ofnot being able to open the QB file. 2. ... P-Q3; 3. B-B4, QKt-Q2;4. P-K3. Now Black can only enforce P-K4 after P-B3 and QB2.Meanwhile White mobilises all his pieces, whilst Black's QBremains blocked and the Kt must remain at Q2 to cover the KP. If,on the other hand, Black exchanges pawns in order to free theKnight, there is no Black centre left.
With regard to the second irregular reply to 1. P-Q4, namely, 1.... P-QB4, two ways are open to White. One is to turn the openinginto an ordinary Queen's gambit by playing P-K3, on which Blackcan play P-Q4. The second is to play 2. P-Q5. Black will thendevelop his King's side with P-KKt3 and B-Kt2. The Bishop is wellposted here, and can frequently take up an attacking position atK4 or Q5. (See Game No. 45, Rubinstein v. Spielmann.)
If White plays 2. PxP, we have after 2. ... P-K3 a Queen's gambitaccepted by White, and, as pointed out before, this line of playis not commendable.
The last of the three irregular answers mentioned above: 1. ...P-KB4 leads to two entirely different plans, according to thesecond move chosen by White.
White can confine himself to a simple development such as: Kt-KB3, B-Kt5, P-K3, QKt-Q2 (Kt-B3 would only be good if preceded byP-B4, because Black would again lead into a Queen's gambit withP-Q4 and P-QB4). The other possibility is the following: in viewof the fact that 1. ... P-KB4 does absolutely nothing to aiddevelopment, White can initiate a violent attack by giving up hisKing's Pawn (P-K4) and thus accelerate his own development. Theplay might be as follows: 2. ... PxP; 3. Kt-QB3, Kt-KB3; 4. B-KKt5, P-B3 (P-Q4? 5. BxKt followed by Q-R5ch); 5. P-B3. If Blacktakes the pawn he lays himself open to an attack hard to meet. Itseems best to play 5. ... P-K6, which calls back the White QB andleaves White's BP as a hindrance to the development of the KKt.
IRREGULAR OPENINGS
Many openings in which neither P-K4 nor P-Q4 is the first movelead to well-known positions by a simple transposition of moves.For instance, a Queen's gambit may well have the followingopening moves: 1. P-QB4, Kt-KB3; 2. Kt-KB3, P-K3; 3. Kt-B3, P-B4;4. P-K3, P-Q4; 5. P-Q4, or a French defence these: 1. Kt-QB3, P-Q4; 2. P-Q4, Kt-KB3; 3. B-Kt5, P-K3; 4. P-K4.
There are, of course, systems of opening which deviate absolutelyfrom those which have been proved sound and are in general use,and it is those openings that puzzle the beginner most of all. Hesays: What is the good of learning correct openings, if myopponent plays incorrectly and wins all the same? This line ofthought is wrong from its inception. The student is not supposedto "learn" openings by heart, but to UNDERSTAND how the generalprinciples of Chess Strategy are applied to any opening. Suchknowledge can never be obtained from a tabulated analysis, butcan only be arrived at by the application of common sense. If aplayer succeeds in winning in spite of an inferior opening, itonly proves that subsequently he has played a stronger game thanhis opponent, who, after playing the opening according to thebook, did not know how to proceed further. And herein lies theweakness, and not in the absence of knowledge of the analysis ofopenings. The latter is rated far too highly. Any player willhold his own in the opening, as soon as he has grasped the realmeaning of those principles which I cannot repeat often enough,viz.: 1st, quick development of pieces and avoidance of lostmoves; 2nd, the maintenance of a pawn centre, hampering thedevelopment of the opposing forces, and the avoidance of pawnmoves that do not contribute to the development of pieces.
How to conduct the middle game and end-game is not entirely amatter of deduction from such general rules. In order to play theend-game correctly, one must know certain things and positionswhich arise from and may be said to be peculiar to the purelyarbitrary rules of chess. The same applies to the middle game, asin most cases it must be played with a view to the end-game whichensues, unless there be a chance of mating the opponent before.The student should have, therefore, a knowledge of the end-gamebefore he can hope to be able to conduct the middle gameefficiently. For this reason I have decided to treat of the end-
game first.
CHAPTER V
THE END-GAME
JUST as it is difficult to state the exact point at which anopening ends, so is it equally difficult to say where the end-game may be said to commence. One of the main characteristics ofend-games is the active part taken by the King. Clearly the Kingcannot venture out into the field of operations until there hasbeen an exchange of the majority of the pieces, so that there canbe no danger of his being mated. As soon as a player has attainedsome advantage in material which ensures the victory in the end-game, he will try to bring about the end-game by exchangingpieces, for there the lines on which to push home his advantageare clearly set out.
It is first necessary to know what surplus of forces is theminimum required in order to force a mate. The positions in whichthe mate can be forced may be shown by a few typical examples.But I shall lay stress mainly on one point. That is the abilityto judge whether an end-game which could be brought about byexchanges is won or not; in other words, whether it can bereduced to one of the typical positions referred to above.
It is obvious that the end-game is the particular demesne of pawnstrategy. Nearly always one or more pawns survive the exchange ofpieces, and the knowledge of the end-game will be invaluable forgauging the consequences of pawn moves in the course of themiddle game. The latter represents probably the most difficultaspect of the strategy of chess.
In order to enable beginners to grasp the following chapters, Imust again point out a few elementary considerations.
Simple end-games, that is, end-games without pawns, arecomparatively easy to understand. Let us first consider the case of a King denuded of all his troops. In order to force the mateit is necessary to obtain command of four squares, namely, thosefour squares which he controls after he has been driven into acorner. Supposing the Black King has been driven to QR1, theWhite King can prevent him from reaching two squares of differentcolour, namely, QR2 and QKt2. Therefore it is necessary for Whitestill to have such forces as can command two more squares ofdifferent colour, namely, QR1 and QKt1. As can readily be seen,it will be essential to have at least the Queen or a Rook or twoBishops, or a Knight and Bishop, or two Knights. [Footnote: Howthe King can be driven into a corner will be shown subsequently.]
We shall see that in the latter case it is impossible to drivethe King into a corner without bringing about a stalemate. Themates by a Queen or Rook are so simple that I only give anexample of each for the sake of completeness.
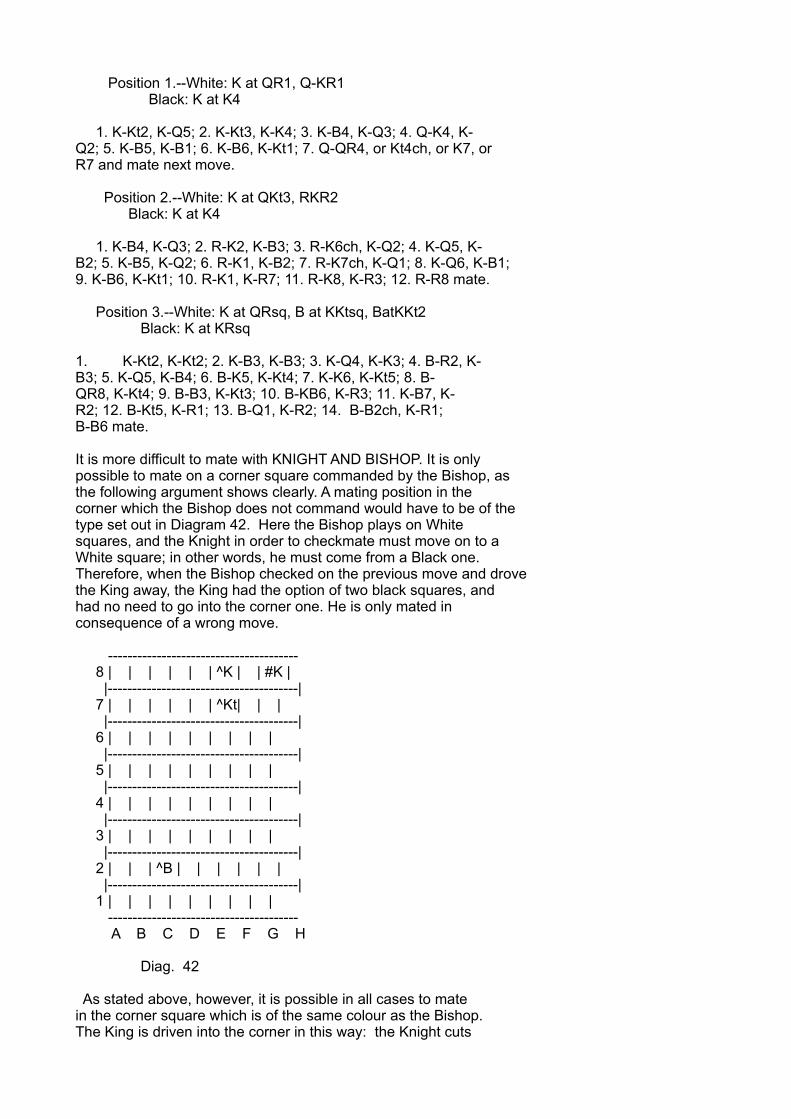
Position 1.--White: K at QR1, Q-KR1 Black: K at K4
1. K-Kt2, K-Q5; 2. K-Kt3, K-K4; 3. K-B4, K-Q3; 4. Q-K4, K-Q2; 5. K-B5, K-B1; 6. K-B6, K-Kt1; 7. Q-QR4, or Kt4ch, or K7, orR7 and mate next move.
Position 2.--White: K at QKt3, RKR2 Black: K at K4
1. K-B4, K-Q3; 2. R-K2, K-B3; 3. R-K6ch, K-Q2; 4. K-Q5, K-B2; 5. K-B5, K-Q2; 6. R-K1, K-B2; 7. R-K7ch, K-Q1; 8. K-Q6, K-B1;9. K-B6, K-Kt1; 10. R-K1, K-R7; 11. R-K8, K-R3; 12. R-R8 mate.
Position 3.--White: K at QRsq, B at KKtsq, BatKKt2 Black: K at KRsq
1. K-Kt2, K-Kt2; 2. K-B3, K-B3; 3. K-Q4, K-K3; 4. B-R2, K-B3; 5. K-Q5, K-B4; 6. B-K5, K-Kt4; 7. K-K6, K-Kt5; 8. B-QR8, K-Kt4; 9. B-B3, K-Kt3; 10. B-KB6, K-R3; 11. K-B7, K-R2; 12. B-Kt5, K-R1; 13. B-Q1, K-R2; 14. B-B2ch, K-R1;B-B6 mate.
It is more difficult to mate with KNIGHT AND BISHOP. It is onlypossible to mate on a corner square commanded by the Bishop, asthe following argument shows clearly. A mating position in thecorner which the Bishop does not command would have to be of thetype set out in Diagram 42. Here the Bishop plays on Whitesquares, and the Knight in order to checkmate must move on to aWhite square; in other words, he must come from a Black one.Therefore, when the Bishop checked on the previous move and drovethe King away, the King had the option of two black squares, andhad no need to go into the corner one. He is only mated inconsequence of a wrong move.
--------------------------------------- 8 | | | | | | ^K | | #K | |---------------------------------------| 7 | | | | | | ^Kt| | | |---------------------------------------| 6 | | | | | | | | | |---------------------------------------| 5 | | | | | | | | | |---------------------------------------| 4 | | | | | | | | | |---------------------------------------| 3 | | | | | | | | | |---------------------------------------| 2 | | | ^B | | | | | | |---------------------------------------| 1 | | | | | | | | | --------------------------------------- A B C D E F G H
Diag. 42
As stated above, however, it is possible in all cases to matein the corner square which is of the same colour as the Bishop.The King is driven into the corner in this way: the Knight cuts
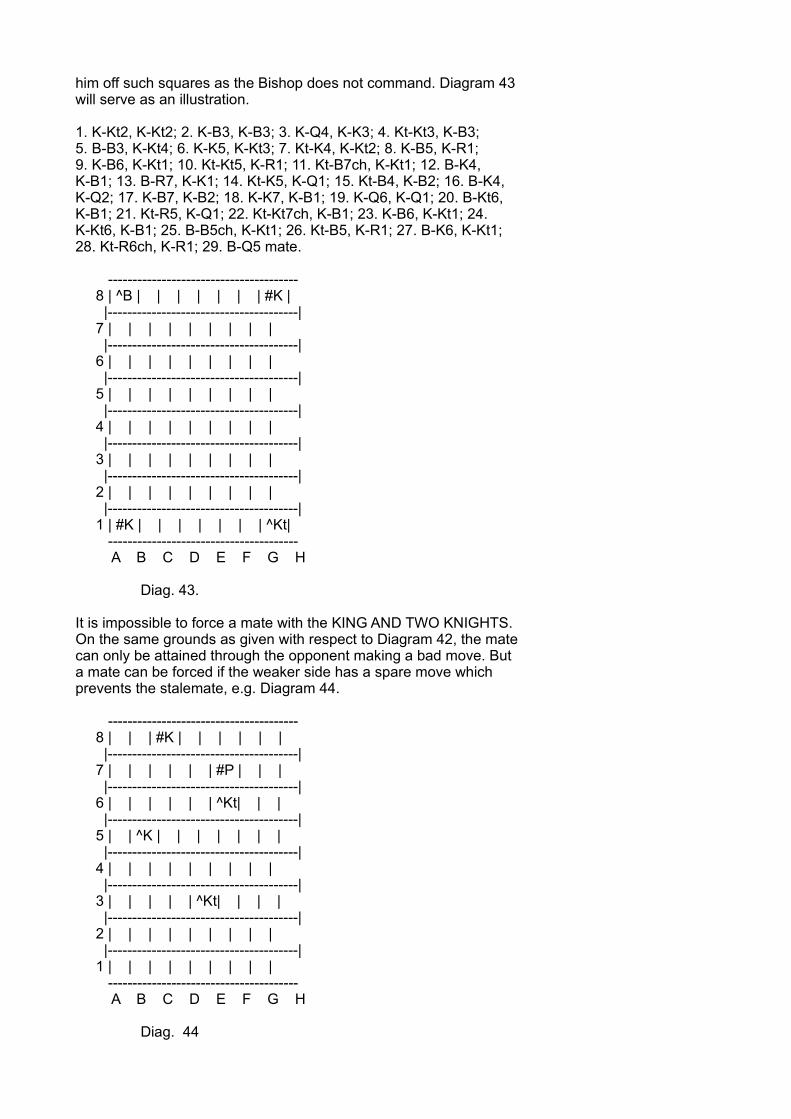
him off such squares as the Bishop does not command. Diagram 43will serve as an illustration.
1. K-Kt2, K-Kt2; 2. K-B3, K-B3; 3. K-Q4, K-K3; 4. Kt-Kt3, K-B3;5. B-B3, K-Kt4; 6. K-K5, K-Kt3; 7. Kt-K4, K-Kt2; 8. K-B5, K-R1;9. K-B6, K-Kt1; 10. Kt-Kt5, K-R1; 11. Kt-B7ch, K-Kt1; 12. B-K4,K-B1; 13. B-R7, K-K1; 14. Kt-K5, K-Q1; 15. Kt-B4, K-B2; 16. B-K4,K-Q2; 17. K-B7, K-B2; 18. K-K7, K-B1; 19. K-Q6, K-Q1; 20. B-Kt6,K-B1; 21. Kt-R5, K-Q1; 22. Kt-Kt7ch, K-B1; 23. K-B6, K-Kt1; 24.K-Kt6, K-B1; 25. B-B5ch, K-Kt1; 26. Kt-B5, K-R1; 27. B-K6, K-Kt1;28. Kt-R6ch, K-R1; 29. B-Q5 mate.
--------------------------------------- 8 | ^B | | | | | | | #K | |---------------------------------------| 7 | | | | | | | | | |---------------------------------------| 6 | | | | | | | | | |---------------------------------------| 5 | | | | | | | | | |---------------------------------------| 4 | | | | | | | | | |---------------------------------------| 3 | | | | | | | | | |---------------------------------------| 2 | | | | | | | | | |---------------------------------------| 1 | #K | | | | | | | ^Kt| --------------------------------------- A B C D E F G H
Diag. 43.
It is impossible to force a mate with the KING AND TWO KNIGHTS.On the same grounds as given with respect to Diagram 42, the matecan only be attained through the opponent making a bad move. Buta mate can be forced if the weaker side has a spare move whichprevents the stalemate, e.g. Diagram 44.
--------------------------------------- 8 | | | #K | | | | | | |---------------------------------------| 7 | | | | | | #P | | | |---------------------------------------| 6 | | | | | | ^Kt| | | |---------------------------------------| 5 | | ^K | | | | | | | |---------------------------------------| 4 | | | | | | | | | |---------------------------------------| 3 | | | | | ^Kt| | | | |---------------------------------------| 2 | | | | | | | | | |---------------------------------------| 1 | | | | | | | | | --------------------------------------- A B C D E F G H
Diag. 44
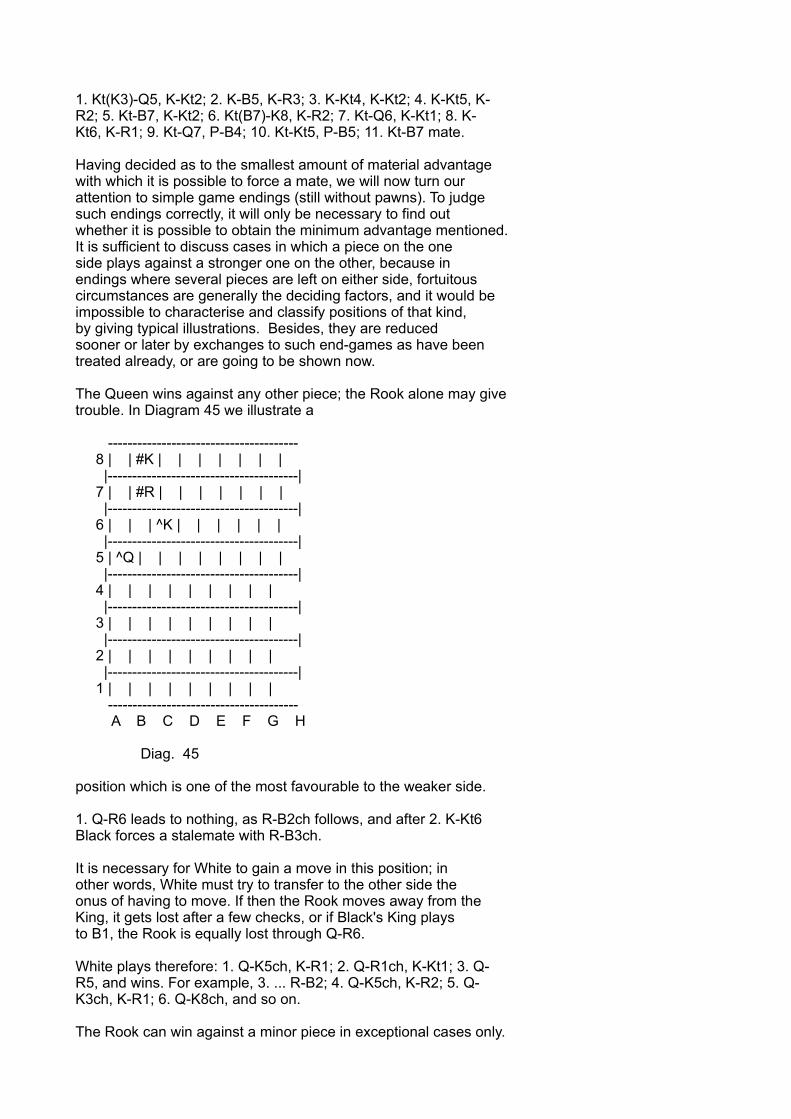
1. Kt(K3)-Q5, K-Kt2; 2. K-B5, K-R3; 3. K-Kt4, K-Kt2; 4. K-Kt5, K-R2; 5. Kt-B7, K-Kt2; 6. Kt(B7)-K8, K-R2; 7. Kt-Q6, K-Kt1; 8. K-Kt6, K-R1; 9. Kt-Q7, P-B4; 10. Kt-Kt5, P-B5; 11. Kt-B7 mate.
Having decided as to the smallest amount of material advantagewith which it is possible to force a mate, we will now turn ourattention to simple game endings (still without pawns). To judgesuch endings correctly, it will only be necessary to find outwhether it is possible to obtain the minimum advantage mentioned.It is sufficient to discuss cases in which a piece on the oneside plays against a stronger one on the other, because inendings where several pieces are left on either side, fortuitouscircumstances are generally the deciding factors, and it would beimpossible to characterise and classify positions of that kind,by giving typical illustrations. Besides, they are reducedsooner or later by exchanges to such end-games as have beentreated already, or are going to be shown now.
The Queen wins against any other piece; the Rook alone may givetrouble. In Diagram 45 we illustrate a
--------------------------------------- 8 | | #K | | | | | | | |---------------------------------------| 7 | | #R | | | | | | | |---------------------------------------| 6 | | | ^K | | | | | | |---------------------------------------| 5 | ^Q | | | | | | | | |---------------------------------------| 4 | | | | | | | | | |---------------------------------------| 3 | | | | | | | | | |---------------------------------------| 2 | | | | | | | | | |---------------------------------------| 1 | | | | | | | | | --------------------------------------- A B C D E F G H
Diag. 45
position which is one of the most favourable to the weaker side.
1. Q-R6 leads to nothing, as R-B2ch follows, and after 2. K-Kt6Black forces a stalemate with R-B3ch.
It is necessary for White to gain a move in this position; inother words, White must try to transfer to the other side theonus of having to move. If then the Rook moves away from theKing, it gets lost after a few checks, or if Black's King playsto B1, the Rook is equally lost through Q-R6.
White plays therefore: 1. Q-K5ch, K-R1; 2. Q-R1ch, K-Kt1; 3. Q-R5, and wins. For example, 3. ... R-B2; 4. Q-K5ch, K-R2; 5. Q-K3ch, K-R1; 6. Q-K8ch, and so on.
The Rook can win against a minor piece in exceptional cases only.
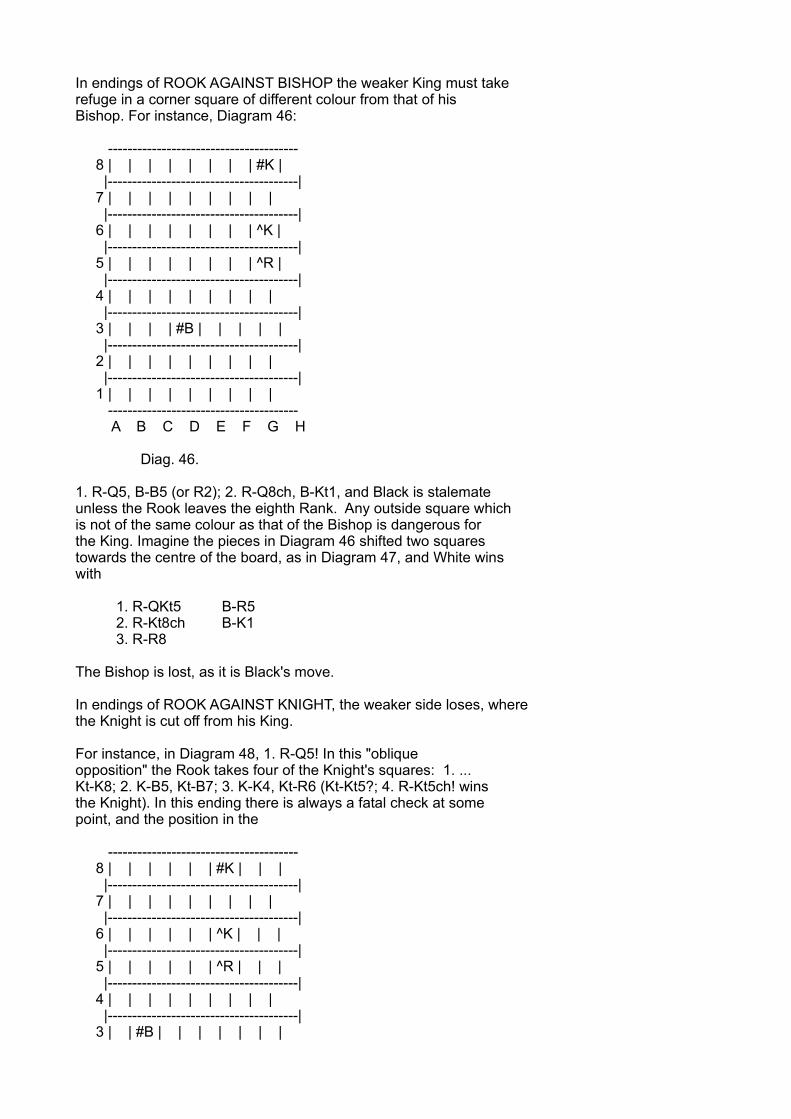
In endings of ROOK AGAINST BISHOP the weaker King must takerefuge in a corner square of different colour from that of hisBishop. For instance, Diagram 46:
--------------------------------------- 8 | | | | | | | | #K | |---------------------------------------| 7 | | | | | | | | | |---------------------------------------| 6 | | | | | | | | ^K | |---------------------------------------| 5 | | | | | | | | ^R | |---------------------------------------| 4 | | | | | | | | | |---------------------------------------| 3 | | | | #B | | | | | |---------------------------------------| 2 | | | | | | | | | |---------------------------------------| 1 | | | | | | | | | --------------------------------------- A B C D E F G H
Diag. 46.
1. R-Q5, B-B5 (or R2); 2. R-Q8ch, B-Kt1, and Black is stalemateunless the Rook leaves the eighth Rank. Any outside square whichis not of the same colour as that of the Bishop is dangerous forthe King. Imagine the pieces in Diagram 46 shifted two squarestowards the centre of the board, as in Diagram 47, and White winswith
1. R-QKt5 B-R5 2. R-Kt8ch B-K1 3. R-R8
The Bishop is lost, as it is Black's move.
In endings of ROOK AGAINST KNIGHT, the weaker side loses, wherethe Knight is cut off from his King.
For instance, in Diagram 48, 1. R-Q5! In this "obliqueopposition" the Rook takes four of the Knight's squares: 1. ...Kt-K8; 2. K-B5, Kt-B7; 3. K-K4, Kt-R6 (Kt-Kt5?; 4. R-Kt5ch! winsthe Knight). In this ending there is always a fatal check at somepoint, and the position in the
--------------------------------------- 8 | | | | | | #K | | | |---------------------------------------| 7 | | | | | | | | | |---------------------------------------| 6 | | | | | | ^K | | | |---------------------------------------| 5 | | | | | | ^R | | | |---------------------------------------| 4 | | | | | | | | | |---------------------------------------| 3 | | #B | | | | | | |
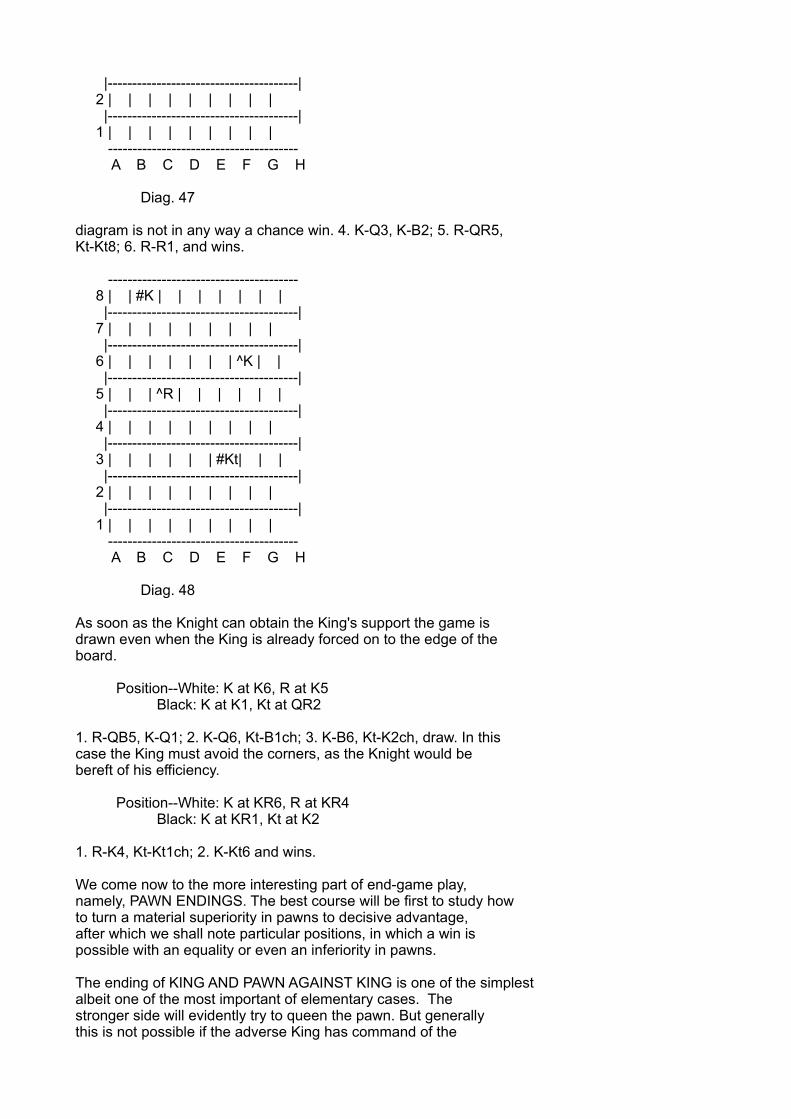
|---------------------------------------| 2 | | | | | | | | | |---------------------------------------| 1 | | | | | | | | | --------------------------------------- A B C D E F G H
Diag. 47
diagram is not in any way a chance win. 4. K-Q3, K-B2; 5. R-QR5,Kt-Kt8; 6. R-R1, and wins.
--------------------------------------- 8 | | #K | | | | | | | |---------------------------------------| 7 | | | | | | | | | |---------------------------------------| 6 | | | | | | | ^K | | |---------------------------------------| 5 | | | ^R | | | | | | |---------------------------------------| 4 | | | | | | | | | |---------------------------------------| 3 | | | | | | #Kt| | | |---------------------------------------| 2 | | | | | | | | | |---------------------------------------| 1 | | | | | | | | | --------------------------------------- A B C D E F G H
Diag. 48
As soon as the Knight can obtain the King's support the game isdrawn even when the King is already forced on to the edge of theboard.
Position--White: K at K6, R at K5 Black: K at K1, Kt at QR2
1. R-QB5, K-Q1; 2. K-Q6, Kt-B1ch; 3. K-B6, Kt-K2ch, draw. In thiscase the King must avoid the corners, as the Knight would bebereft of his efficiency.
Position--White: K at KR6, R at KR4 Black: K at KR1, Kt at K2
1. R-K4, Kt-Kt1ch; 2. K-Kt6 and wins.
We come now to the more interesting part of end-game play,namely, PAWN ENDINGS. The best course will be first to study howto turn a material superiority in pawns to decisive advantage,after which we shall note particular positions, in which a win ispossible with an equality or even an inferiority in pawns.
The ending of KING AND PAWN AGAINST KING is one of the simplestalbeit one of the most important of elementary cases. Thestronger side will evidently try to queen the pawn. But generallythis is not possible if the adverse King has command of the
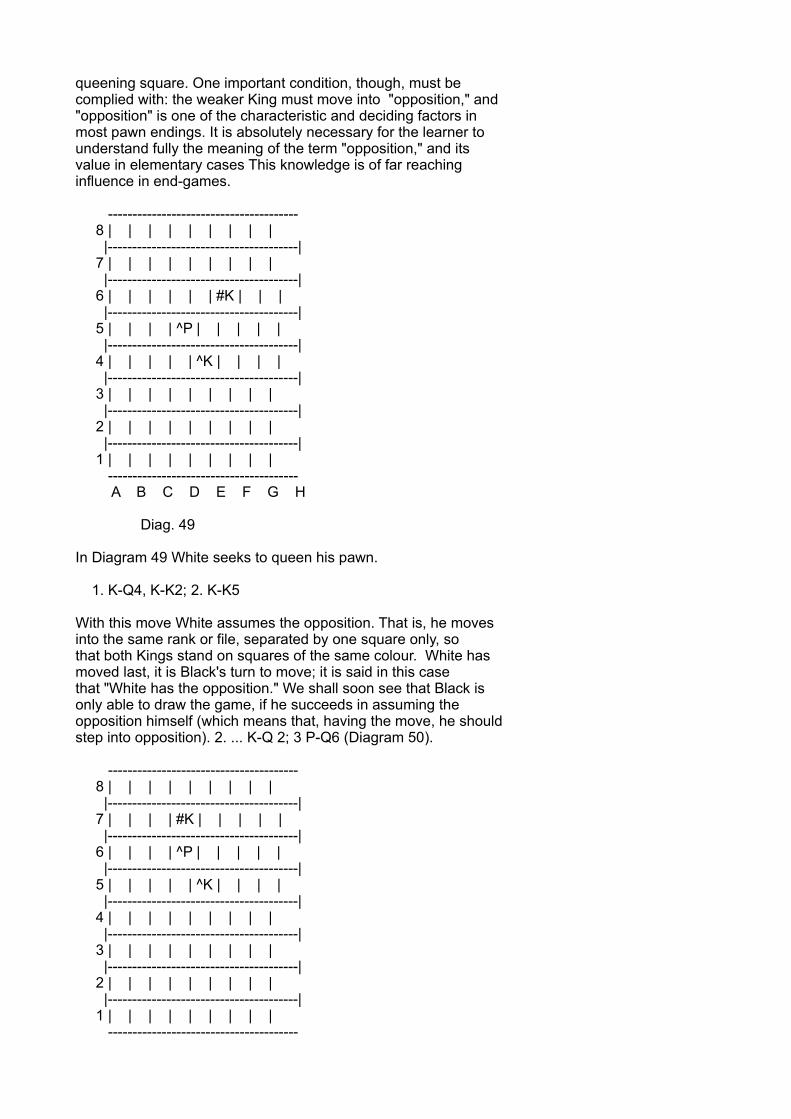
queening square. One important condition, though, must becomplied with: the weaker King must move into "opposition," and"opposition" is one of the characteristic and deciding factors inmost pawn endings. It is absolutely necessary for the learner tounderstand fully the meaning of the term "opposition," and itsvalue in elementary cases This knowledge is of far reachinginfluence in end-games.
--------------------------------------- 8 | | | | | | | | | |---------------------------------------| 7 | | | | | | | | | |---------------------------------------| 6 | | | | | | #K | | | |---------------------------------------| 5 | | | | ^P | | | | | |---------------------------------------| 4 | | | | | ^K | | | | |---------------------------------------| 3 | | | | | | | | | |---------------------------------------| 2 | | | | | | | | | |---------------------------------------| 1 | | | | | | | | | --------------------------------------- A B C D E F G H
Diag. 49
In Diagram 49 White seeks to queen his pawn.
1. K-Q4, K-K2; 2. K-K5
With this move White assumes the opposition. That is, he movesinto the same rank or file, separated by one square only, sothat both Kings stand on squares of the same colour. White hasmoved last, it is Black's turn to move; it is said in this casethat "White has the opposition." We shall soon see that Black isonly able to draw the game, if he succeeds in assuming theopposition himself (which means that, having the move, he shouldstep into opposition). 2. ... K-Q 2; 3 P-Q6 (Diagram 50).
--------------------------------------- 8 | | | | | | | | | |---------------------------------------| 7 | | | | #K | | | | | |---------------------------------------| 6 | | | | ^P | | | | | |---------------------------------------| 5 | | | | | ^K | | | | |---------------------------------------| 4 | | | | | | | | | |---------------------------------------| 3 | | | | | | | | | |---------------------------------------| 2 | | | | | | | | | |---------------------------------------| 1 | | | | | | | | | ---------------------------------------
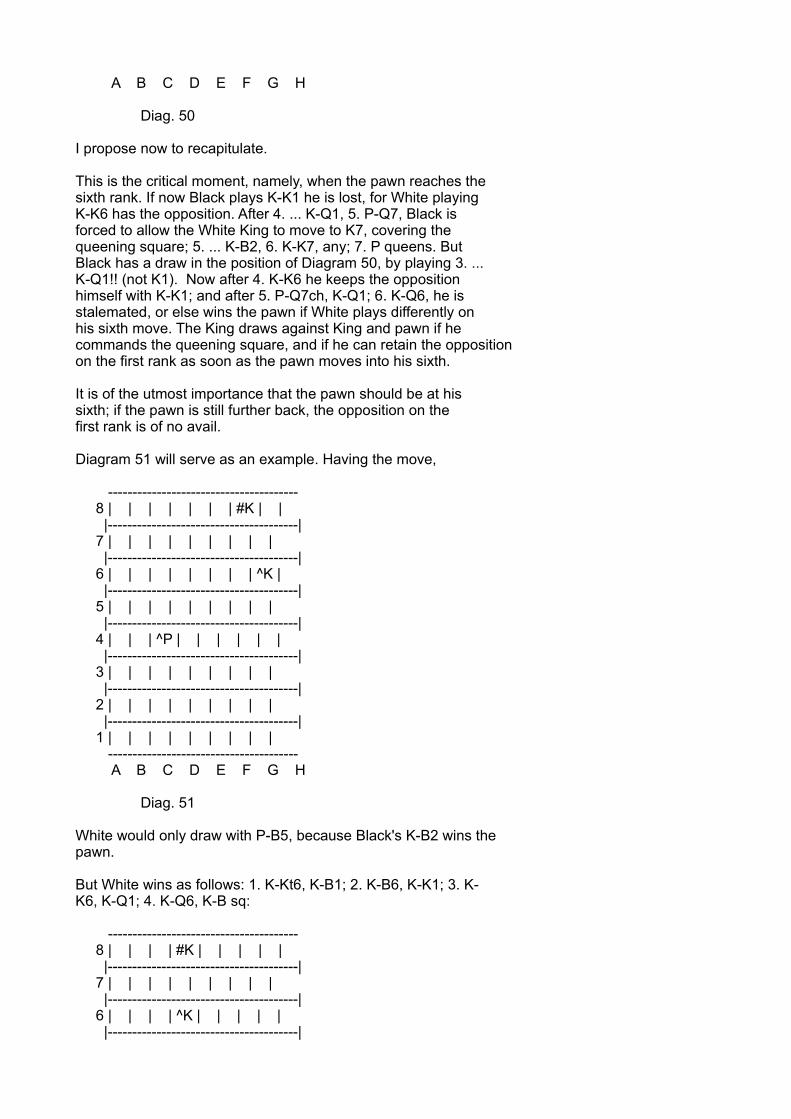
A B C D E F G H
Diag. 50
I propose now to recapitulate.
This is the critical moment, namely, when the pawn reaches thesixth rank. If now Black plays K-K1 he is lost, for White playingK-K6 has the opposition. After 4. ... K-Q1, 5. P-Q7, Black isforced to allow the White King to move to K7, covering thequeening square; 5. ... K-B2, 6. K-K7, any; 7. P queens. ButBlack has a draw in the position of Diagram 50, by playing 3. ...K-Q1!! (not K1). Now after 4. K-K6 he keeps the oppositionhimself with K-K1; and after 5. P-Q7ch, K-Q1; 6. K-Q6, he isstalemated, or else wins the pawn if White plays differently onhis sixth move. The King draws against King and pawn if hecommands the queening square, and if he can retain the oppositionon the first rank as soon as the pawn moves into his sixth.
It is of the utmost importance that the pawn should be at hissixth; if the pawn is still further back, the opposition on thefirst rank is of no avail.
Diagram 51 will serve as an example. Having the move,
--------------------------------------- 8 | | | | | | | #K | | |---------------------------------------| 7 | | | | | | | | | |---------------------------------------| 6 | | | | | | | | ^K | |---------------------------------------| 5 | | | | | | | | | |---------------------------------------| 4 | | | ^P | | | | | | |---------------------------------------| 3 | | | | | | | | | |---------------------------------------| 2 | | | | | | | | | |---------------------------------------| 1 | | | | | | | | | --------------------------------------- A B C D E F G H
Diag. 51
White would only draw with P-B5, because Black's K-B2 wins thepawn.
But White wins as follows: 1. K-Kt6, K-B1; 2. K-B6, K-K1; 3. K-K6, K-Q1; 4. K-Q6, K-B sq:
--------------------------------------- 8 | | | | #K | | | | | |---------------------------------------| 7 | | | | | | | | | |---------------------------------------| 6 | | | | ^K | | | | | |---------------------------------------|
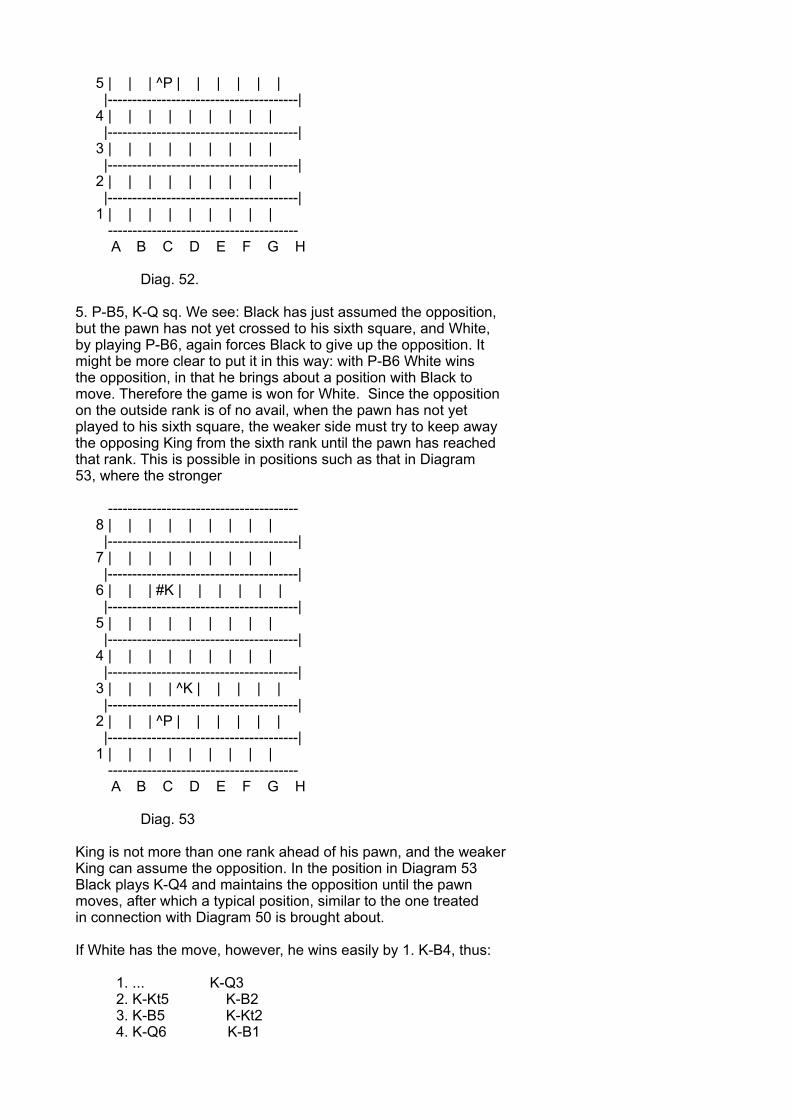
5 | | | ^P | | | | | | |---------------------------------------| 4 | | | | | | | | | |---------------------------------------| 3 | | | | | | | | | |---------------------------------------| 2 | | | | | | | | | |---------------------------------------| 1 | | | | | | | | | --------------------------------------- A B C D E F G H
Diag. 52.
5. P-B5, K-Q sq. We see: Black has just assumed the opposition,but the pawn has not yet crossed to his sixth square, and White,by playing P-B6, again forces Black to give up the opposition. Itmight be more clear to put it in this way: with P-B6 White winsthe opposition, in that he brings about a position with Black tomove. Therefore the game is won for White. Since the oppositionon the outside rank is of no avail, when the pawn has not yetplayed to his sixth square, the weaker side must try to keep awaythe opposing King from the sixth rank until the pawn has reachedthat rank. This is possible in positions such as that in Diagram53, where the stronger
--------------------------------------- 8 | | | | | | | | | |---------------------------------------| 7 | | | | | | | | | |---------------------------------------| 6 | | | #K | | | | | | |---------------------------------------| 5 | | | | | | | | | |---------------------------------------| 4 | | | | | | | | | |---------------------------------------| 3 | | | | ^K | | | | | |---------------------------------------| 2 | | | ^P | | | | | | |---------------------------------------| 1 | | | | | | | | | --------------------------------------- A B C D E F G H
Diag. 53
King is not more than one rank ahead of his pawn, and the weakerKing can assume the opposition. In the position in Diagram 53Black plays K-Q4 and maintains the opposition until the pawnmoves, after which a typical position, similar to the one treatedin connection with Diagram 50 is brought about.
If White has the move, however, he wins easily by 1. K-B4, thus:
1. ... K-Q3 2. K-Kt5 K-B2 3. K-B5 K-Kt2 4. K-Q6 K-B1
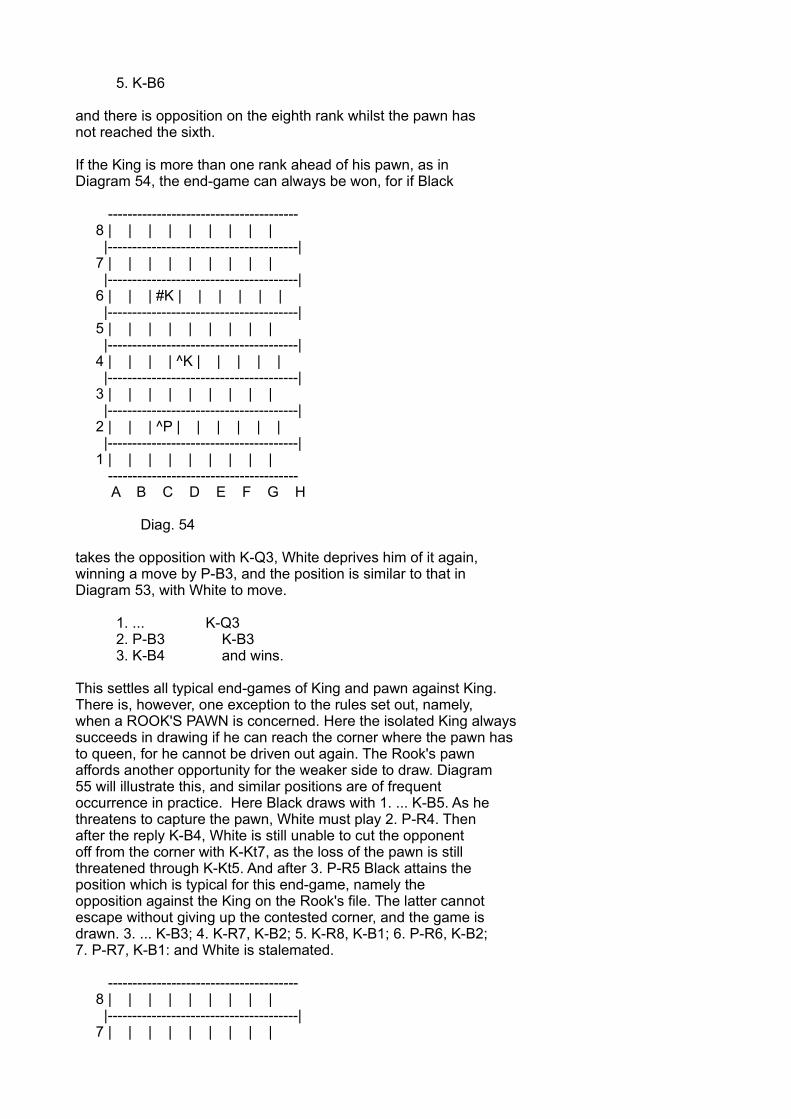
5. K-B6
and there is opposition on the eighth rank whilst the pawn hasnot reached the sixth.
If the King is more than one rank ahead of his pawn, as inDiagram 54, the end-game can always be won, for if Black
--------------------------------------- 8 | | | | | | | | | |---------------------------------------| 7 | | | | | | | | | |---------------------------------------| 6 | | | #K | | | | | | |---------------------------------------| 5 | | | | | | | | | |---------------------------------------| 4 | | | | ^K | | | | | |---------------------------------------| 3 | | | | | | | | | |---------------------------------------| 2 | | | ^P | | | | | | |---------------------------------------| 1 | | | | | | | | | --------------------------------------- A B C D E F G H
Diag. 54
takes the opposition with K-Q3, White deprives him of it again,winning a move by P-B3, and the position is similar to that inDiagram 53, with White to move.
1. ... K-Q3 2. P-B3 K-B3 3. K-B4 and wins.
This settles all typical end-games of King and pawn against King.There is, however, one exception to the rules set out, namely,when a ROOK'S PAWN is concerned. Here the isolated King alwayssucceeds in drawing if he can reach the corner where the pawn hasto queen, for he cannot be driven out again. The Rook's pawnaffords another opportunity for the weaker side to draw. Diagram55 will illustrate this, and similar positions are of frequentoccurrence in practice. Here Black draws with 1. ... K-B5. As hethreatens to capture the pawn, White must play 2. P-R4. Thenafter the reply K-B4, White is still unable to cut the opponentoff from the corner with K-Kt7, as the loss of the pawn is stillthreatened through K-Kt5. And after 3. P-R5 Black attains theposition which is typical for this end-game, namely theopposition against the King on the Rook's file. The latter cannotescape without giving up the contested corner, and the game isdrawn. 3. ... K-B3; 4. K-R7, K-B2; 5. K-R8, K-B1; 6. P-R6, K-B2;7. P-R7, K-B1: and White is stalemated.
--------------------------------------- 8 | | | | | | | | | |---------------------------------------| 7 | | | | | | | | |
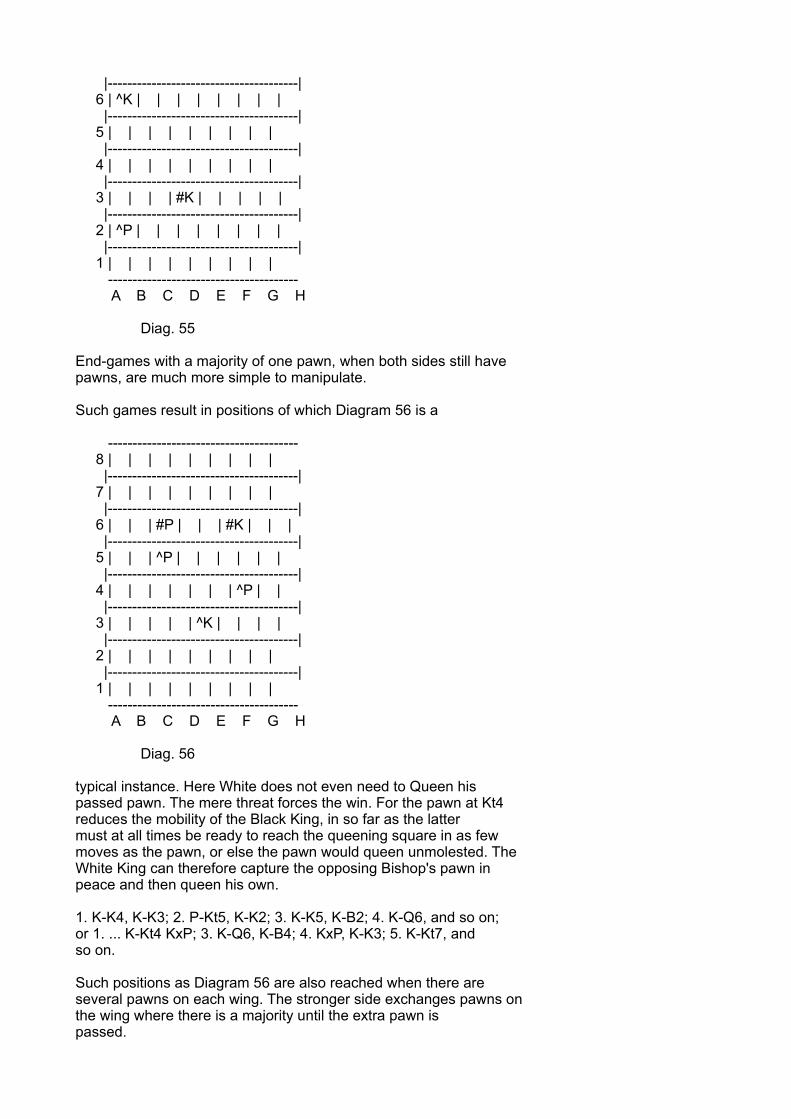
|---------------------------------------| 6 | ^K | | | | | | | | |---------------------------------------| 5 | | | | | | | | | |---------------------------------------| 4 | | | | | | | | | |---------------------------------------| 3 | | | | #K | | | | | |---------------------------------------| 2 | ^P | | | | | | | | |---------------------------------------| 1 | | | | | | | | | --------------------------------------- A B C D E F G H
Diag. 55
End-games with a majority of one pawn, when both sides still havepawns, are much more simple to manipulate.
Such games result in positions of which Diagram 56 is a
--------------------------------------- 8 | | | | | | | | | |---------------------------------------| 7 | | | | | | | | | |---------------------------------------| 6 | | | #P | | | #K | | | |---------------------------------------| 5 | | | ^P | | | | | | |---------------------------------------| 4 | | | | | | | ^P | | |---------------------------------------| 3 | | | | | ^K | | | | |---------------------------------------| 2 | | | | | | | | | |---------------------------------------| 1 | | | | | | | | | --------------------------------------- A B C D E F G H
Diag. 56
typical instance. Here White does not even need to Queen hispassed pawn. The mere threat forces the win. For the pawn at Kt4reduces the mobility of the Black King, in so far as the lattermust at all times be ready to reach the queening square in as fewmoves as the pawn, or else the pawn would queen unmolested. TheWhite King can therefore capture the opposing Bishop's pawn inpeace and then queen his own.
1. K-K4, K-K3; 2. P-Kt5, K-K2; 3. K-K5, K-B2; 4. K-Q6, and so on;or 1. ... K-Kt4 KxP; 3. K-Q6, K-B4; 4. KxP, K-K3; 5. K-Kt7, andso on.
Such positions as Diagram 56 are also reached when there areseveral pawns on each wing. The stronger side exchanges pawns onthe wing where there is a majority until the extra pawn ispassed.
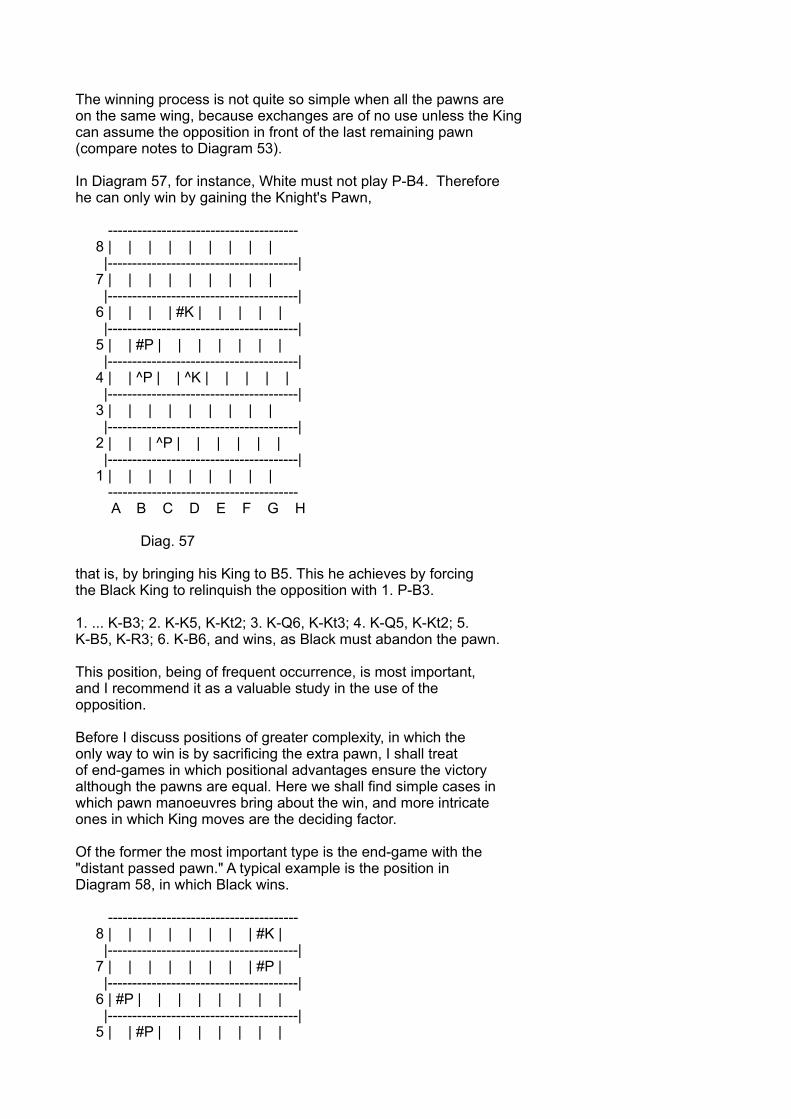
The winning process is not quite so simple when all the pawns areon the same wing, because exchanges are of no use unless the Kingcan assume the opposition in front of the last remaining pawn(compare notes to Diagram 53).
In Diagram 57, for instance, White must not play P-B4. Thereforehe can only win by gaining the Knight's Pawn,
--------------------------------------- 8 | | | | | | | | | |---------------------------------------| 7 | | | | | | | | | |---------------------------------------| 6 | | | | #K | | | | | |---------------------------------------| 5 | | #P | | | | | | | |---------------------------------------| 4 | | ^P | | ^K | | | | | |---------------------------------------| 3 | | | | | | | | | |---------------------------------------| 2 | | | ^P | | | | | | |---------------------------------------| 1 | | | | | | | | | --------------------------------------- A B C D E F G H
Diag. 57
that is, by bringing his King to B5. This he achieves by forcingthe Black King to relinquish the opposition with 1. P-B3.
1. ... K-B3; 2. K-K5, K-Kt2; 3. K-Q6, K-Kt3; 4. K-Q5, K-Kt2; 5.K-B5, K-R3; 6. K-B6, and wins, as Black must abandon the pawn.
This position, being of frequent occurrence, is most important,and I recommend it as a valuable study in the use of theopposition.
Before I discuss positions of greater complexity, in which theonly way to win is by sacrificing the extra pawn, I shall treatof end-games in which positional advantages ensure the victoryalthough the pawns are equal. Here we shall find simple cases inwhich pawn manoeuvres bring about the win, and more intricateones in which King moves are the deciding factor.
Of the former the most important type is the end-game with the"distant passed pawn." A typical example is the position inDiagram 58, in which Black wins.
--------------------------------------- 8 | | | | | | | | #K | |---------------------------------------| 7 | | | | | | | | #P | |---------------------------------------| 6 | #P | | | | | | | | |---------------------------------------| 5 | | #P | | | | | | |
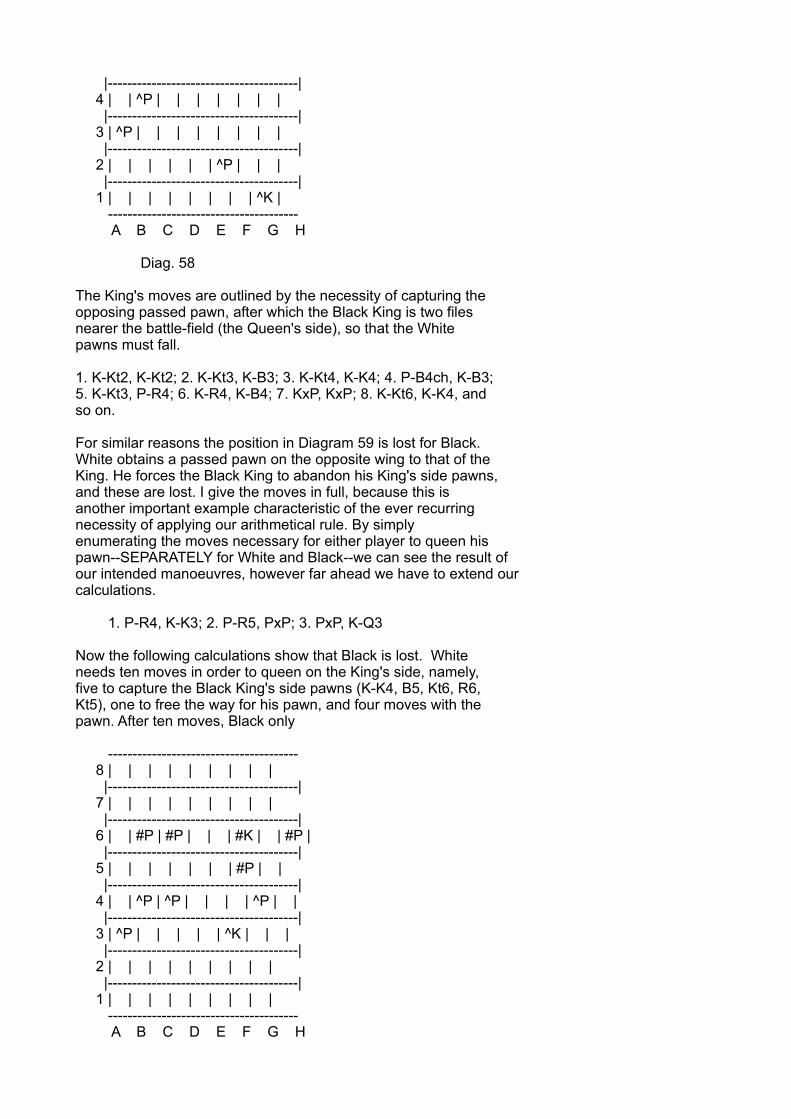
|---------------------------------------| 4 | | ^P | | | | | | | |---------------------------------------| 3 | ^P | | | | | | | | |---------------------------------------| 2 | | | | | | ^P | | | |---------------------------------------| 1 | | | | | | | | ^K | --------------------------------------- A B C D E F G H
Diag. 58
The King's moves are outlined by the necessity of capturing theopposing passed pawn, after which the Black King is two filesnearer the battle-field (the Queen's side), so that the Whitepawns must fall.
1. K-Kt2, K-Kt2; 2. K-Kt3, K-B3; 3. K-Kt4, K-K4; 4. P-B4ch, K-B3;5. K-Kt3, P-R4; 6. K-R4, K-B4; 7. KxP, KxP; 8. K-Kt6, K-K4, andso on.
For similar reasons the position in Diagram 59 is lost for Black.White obtains a passed pawn on the opposite wing to that of theKing. He forces the Black King to abandon his King's side pawns,and these are lost. I give the moves in full, because this isanother important example characteristic of the ever recurringnecessity of applying our arithmetical rule. By simplyenumerating the moves necessary for either player to queen hispawn--SEPARATELY for White and Black--we can see the result ofour intended manoeuvres, however far ahead we have to extend ourcalculations.
1. P-R4, K-K3; 2. P-R5, PxP; 3. PxP, K-Q3
Now the following calculations show that Black is lost. Whiteneeds ten moves in order to queen on the King's side, namely,five to capture the Black King's side pawns (K-K4, B5, Kt6, R6,Kt5), one to free the way for his pawn, and four moves with thepawn. After ten moves, Black only
--------------------------------------- 8 | | | | | | | | | |---------------------------------------| 7 | | | | | | | | | |---------------------------------------| 6 | | #P | #P | | | #K | | #P | |---------------------------------------| 5 | | | | | | | #P | | |---------------------------------------| 4 | | ^P | ^P | | | | ^P | | |---------------------------------------| 3 | ^P | | | | | ^K | | | |---------------------------------------| 2 | | | | | | | | | |---------------------------------------| 1 | | | | | | | | | --------------------------------------- A B C D E F G H
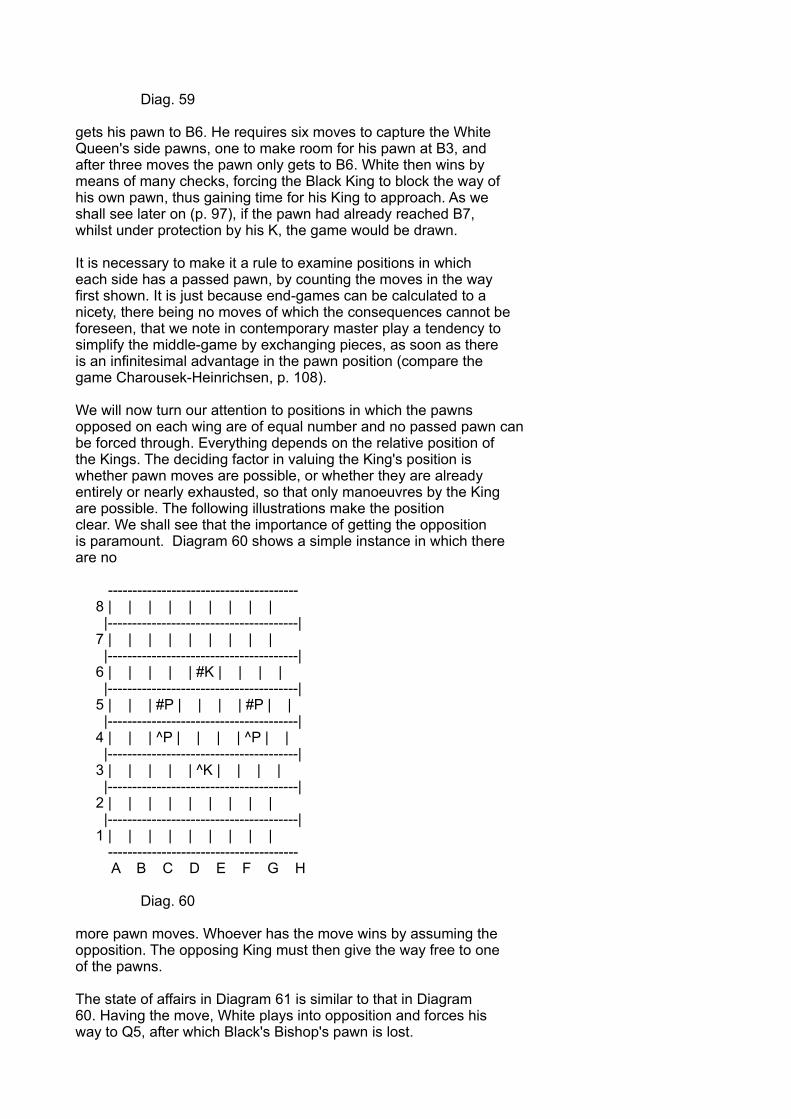
Diag. 59
gets his pawn to B6. He requires six moves to capture the WhiteQueen's side pawns, one to make room for his pawn at B3, andafter three moves the pawn only gets to B6. White then wins bymeans of many checks, forcing the Black King to block the way ofhis own pawn, thus gaining time for his King to approach. As weshall see later on (p. 97), if the pawn had already reached B7,whilst under protection by his K, the game would be drawn.
It is necessary to make it a rule to examine positions in whicheach side has a passed pawn, by counting the moves in the wayfirst shown. It is just because end-games can be calculated to anicety, there being no moves of which the consequences cannot beforeseen, that we note in contemporary master play a tendency tosimplify the middle-game by exchanging pieces, as soon as thereis an infinitesimal advantage in the pawn position (compare thegame Charousek-Heinrichsen, p. 108).
We will now turn our attention to positions in which the pawnsopposed on each wing are of equal number and no passed pawn canbe forced through. Everything depends on the relative position ofthe Kings. The deciding factor in valuing the King's position iswhether pawn moves are possible, or whether they are alreadyentirely or nearly exhausted, so that only manoeuvres by the Kingare possible. The following illustrations make the positionclear. We shall see that the importance of getting the oppositionis paramount. Diagram 60 shows a simple instance in which thereare no
--------------------------------------- 8 | | | | | | | | | |---------------------------------------| 7 | | | | | | | | | |---------------------------------------| 6 | | | | | #K | | | | |---------------------------------------| 5 | | | #P | | | | #P | | |---------------------------------------| 4 | | | ^P | | | | ^P | | |---------------------------------------| 3 | | | | | ^K | | | | |---------------------------------------| 2 | | | | | | | | | |---------------------------------------| 1 | | | | | | | | | --------------------------------------- A B C D E F G H
Diag. 60
more pawn moves. Whoever has the move wins by assuming theopposition. The opposing King must then give the way free to oneof the pawns.
The state of affairs in Diagram 61 is similar to that in Diagram60. Having the move, White plays into opposition and forces hisway to Q5, after which Black's Bishop's pawn is lost.
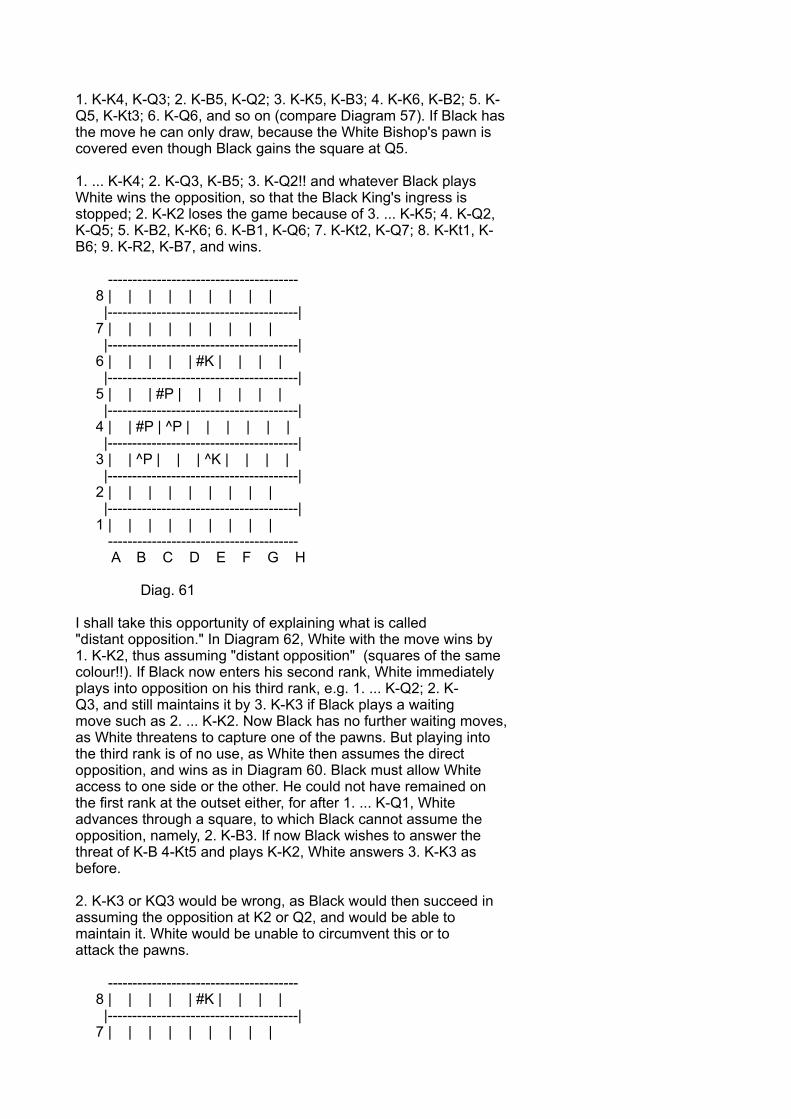
1. K-K4, K-Q3; 2. K-B5, K-Q2; 3. K-K5, K-B3; 4. K-K6, K-B2; 5. K-Q5, K-Kt3; 6. K-Q6, and so on (compare Diagram 57). If Black hasthe move he can only draw, because the White Bishop's pawn iscovered even though Black gains the square at Q5.
1. ... K-K4; 2. K-Q3, K-B5; 3. K-Q2!! and whatever Black playsWhite wins the opposition, so that the Black King's ingress isstopped; 2. K-K2 loses the game because of 3. ... K-K5; 4. K-Q2,K-Q5; 5. K-B2, K-K6; 6. K-B1, K-Q6; 7. K-Kt2, K-Q7; 8. K-Kt1, K-B6; 9. K-R2, K-B7, and wins.
--------------------------------------- 8 | | | | | | | | | |---------------------------------------| 7 | | | | | | | | | |---------------------------------------| 6 | | | | | #K | | | | |---------------------------------------| 5 | | | #P | | | | | | |---------------------------------------| 4 | | #P | ^P | | | | | | |---------------------------------------| 3 | | ^P | | | ^K | | | | |---------------------------------------| 2 | | | | | | | | | |---------------------------------------| 1 | | | | | | | | | --------------------------------------- A B C D E F G H
Diag. 61
I shall take this opportunity of explaining what is called"distant opposition." In Diagram 62, White with the move wins by1. K-K2, thus assuming "distant opposition" (squares of the samecolour!!). If Black now enters his second rank, White immediatelyplays into opposition on his third rank, e.g. 1. ... K-Q2; 2. K-Q3, and still maintains it by 3. K-K3 if Black plays a waitingmove such as 2. ... K-K2. Now Black has no further waiting moves,as White threatens to capture one of the pawns. But playing intothe third rank is of no use, as White then assumes the directopposition, and wins as in Diagram 60. Black must allow Whiteaccess to one side or the other. He could not have remained onthe first rank at the outset either, for after 1. ... K-Q1, Whiteadvances through a square, to which Black cannot assume theopposition, namely, 2. K-B3. If now Black wishes to answer thethreat of K-B 4-Kt5 and plays K-K2, White answers 3. K-K3 asbefore.
2. K-K3 or KQ3 would be wrong, as Black would then succeed inassuming the opposition at K2 or Q2, and would be able tomaintain it. White would be unable to circumvent this or toattack the pawns.
--------------------------------------- 8 | | | | | #K | | | | |---------------------------------------| 7 | | | | | | | | |
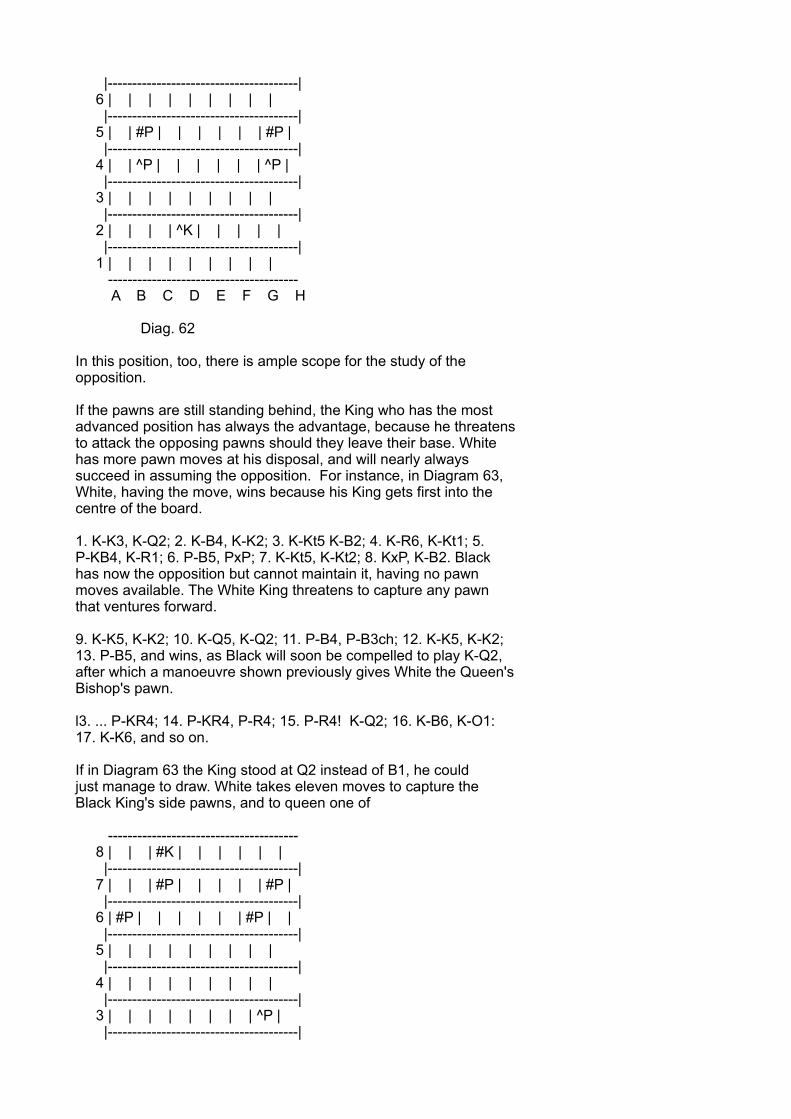
|---------------------------------------| 6 | | | | | | | | | |---------------------------------------| 5 | | #P | | | | | | #P | |---------------------------------------| 4 | | ^P | | | | | | ^P | |---------------------------------------| 3 | | | | | | | | | |---------------------------------------| 2 | | | | ^K | | | | | |---------------------------------------| 1 | | | | | | | | | --------------------------------------- A B C D E F G H
Diag. 62
In this position, too, there is ample scope for the study of theopposition.
If the pawns are still standing behind, the King who has the mostadvanced position has always the advantage, because he threatensto attack the opposing pawns should they leave their base. Whitehas more pawn moves at his disposal, and will nearly alwayssucceed in assuming the opposition. For instance, in Diagram 63,White, having the move, wins because his King gets first into thecentre of the board.
1. K-K3, K-Q2; 2. K-B4, K-K2; 3. K-Kt5 K-B2; 4. K-R6, K-Kt1; 5.P-KB4, K-R1; 6. P-B5, PxP; 7. K-Kt5, K-Kt2; 8. KxP, K-B2. Blackhas now the opposition but cannot maintain it, having no pawnmoves available. The White King threatens to capture any pawnthat ventures forward.
9. K-K5, K-K2; 10. K-Q5, K-Q2; 11. P-B4, P-B3ch; 12. K-K5, K-K2;13. P-B5, and wins, as Black will soon be compelled to play K-Q2,after which a manoeuvre shown previously gives White the Queen'sBishop's pawn.
l3. ... P-KR4; 14. P-KR4, P-R4; 15. P-R4! K-Q2; 16. K-B6, K-O1:17. K-K6, and so on.
If in Diagram 63 the King stood at Q2 instead of B1, he couldjust manage to draw. White takes eleven moves to capture theBlack King's side pawns, and to queen one of
--------------------------------------- 8 | | | #K | | | | | | |---------------------------------------| 7 | | | #P | | | | | #P | |---------------------------------------| 6 | #P | | | | | | #P | | |---------------------------------------| 5 | | | | | | | | | |---------------------------------------| 4 | | | | | | | | | |---------------------------------------| 3 | | | | | | | | ^P | |---------------------------------------|
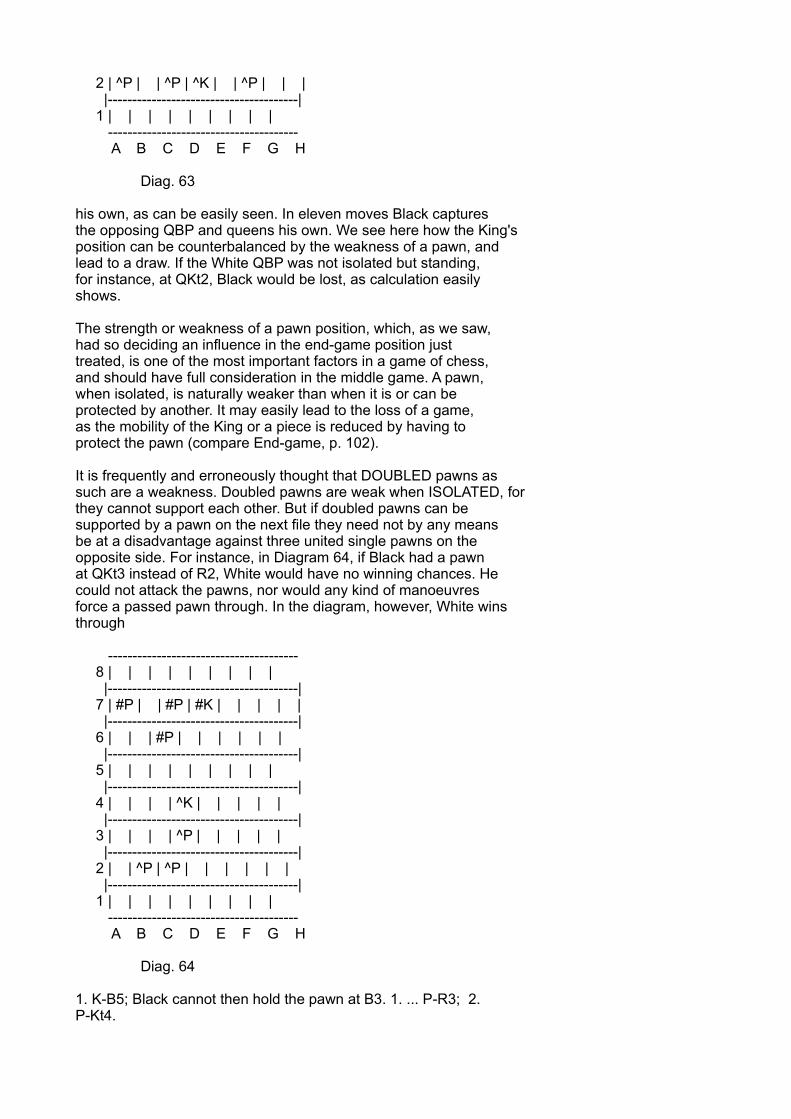
2 | ^P | | ^P | ^K | | ^P | | | |---------------------------------------| 1 | | | | | | | | | --------------------------------------- A B C D E F G H
Diag. 63
his own, as can be easily seen. In eleven moves Black capturesthe opposing QBP and queens his own. We see here how the King'sposition can be counterbalanced by the weakness of a pawn, andlead to a draw. If the White QBP was not isolated but standing,for instance, at QKt2, Black would be lost, as calculation easilyshows.
The strength or weakness of a pawn position, which, as we saw,had so deciding an influence in the end-game position justtreated, is one of the most important factors in a game of chess,and should have full consideration in the middle game. A pawn,when isolated, is naturally weaker than when it is or can beprotected by another. It may easily lead to the loss of a game,as the mobility of the King or a piece is reduced by having toprotect the pawn (compare End-game, p. 102).
It is frequently and erroneously thought that DOUBLED pawns assuch are a weakness. Doubled pawns are weak when ISOLATED, forthey cannot support each other. But if doubled pawns can besupported by a pawn on the next file they need not by any meansbe at a disadvantage against three united single pawns on theopposite side. For instance, in Diagram 64, if Black had a pawnat QKt3 instead of R2, White would have no winning chances. Hecould not attack the pawns, nor would any kind of manoeuvresforce a passed pawn through. In the diagram, however, White winsthrough
--------------------------------------- 8 | | | | | | | | | |---------------------------------------| 7 | #P | | #P | #K | | | | | |---------------------------------------| 6 | | | #P | | | | | | |---------------------------------------| 5 | | | | | | | | | |---------------------------------------| 4 | | | | ^K | | | | | |---------------------------------------| 3 | | | | ^P | | | | | |---------------------------------------| 2 | | ^P | ^P | | | | | | |---------------------------------------| 1 | | | | | | | | | --------------------------------------- A B C D E F G H
Diag. 64
1. K-B5; Black cannot then hold the pawn at B3. 1. ... P-R3; 2.P-Kt4.
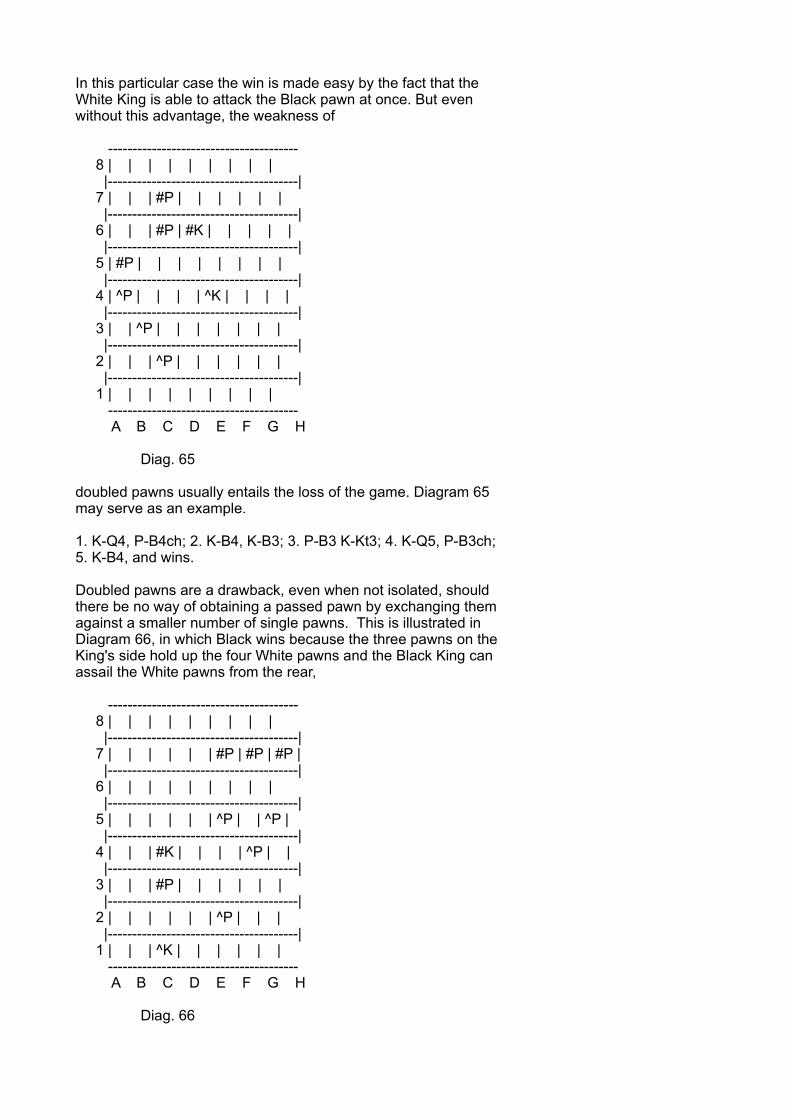
In this particular case the win is made easy by the fact that theWhite King is able to attack the Black pawn at once. But evenwithout this advantage, the weakness of
--------------------------------------- 8 | | | | | | | | | |---------------------------------------| 7 | | | #P | | | | | | |---------------------------------------| 6 | | | #P | #K | | | | | |---------------------------------------| 5 | #P | | | | | | | | |---------------------------------------| 4 | ^P | | | | ^K | | | | |---------------------------------------| 3 | | ^P | | | | | | | |---------------------------------------| 2 | | | ^P | | | | | | |---------------------------------------| 1 | | | | | | | | | --------------------------------------- A B C D E F G H
Diag. 65
doubled pawns usually entails the loss of the game. Diagram 65may serve as an example.
1. K-Q4, P-B4ch; 2. K-B4, K-B3; 3. P-B3 K-Kt3; 4. K-Q5, P-B3ch;5. K-B4, and wins.
Doubled pawns are a drawback, even when not isolated, shouldthere be no way of obtaining a passed pawn by exchanging themagainst a smaller number of single pawns. This is illustrated inDiagram 66, in which Black wins because the three pawns on theKing's side hold up the four White pawns and the Black King canassail the White pawns from the rear,
--------------------------------------- 8 | | | | | | | | | |---------------------------------------| 7 | | | | | | #P | #P | #P | |---------------------------------------| 6 | | | | | | | | | |---------------------------------------| 5 | | | | | | ^P | | ^P | |---------------------------------------| 4 | | | #K | | | | ^P | | |---------------------------------------| 3 | | | #P | | | | | | |---------------------------------------| 2 | | | | | | ^P | | | |---------------------------------------| 1 | | | ^K | | | | | | --------------------------------------- A B C D E F G H
Diag. 66
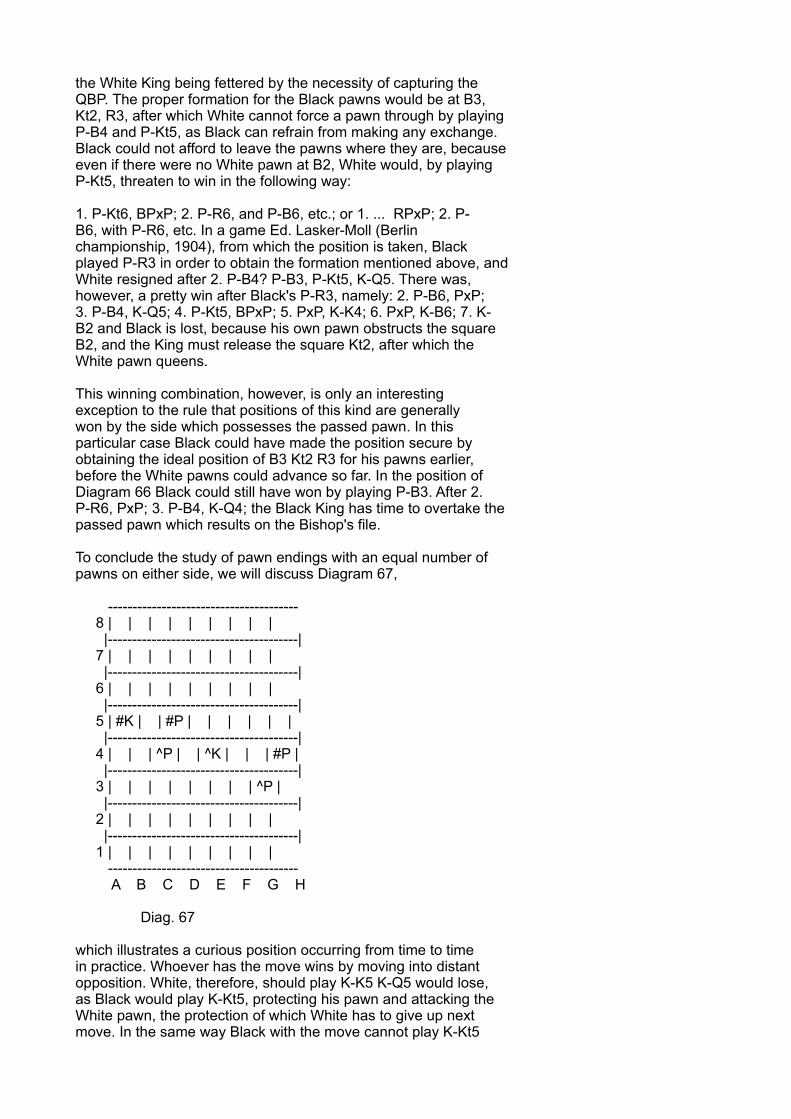
the White King being fettered by the necessity of capturing theQBP. The proper formation for the Black pawns would be at B3,Kt2, R3, after which White cannot force a pawn through by playingP-B4 and P-Kt5, as Black can refrain from making any exchange.Black could not afford to leave the pawns where they are, becauseeven if there were no White pawn at B2, White would, by playingP-Kt5, threaten to win in the following way:
1. P-Kt6, BPxP; 2. P-R6, and P-B6, etc.; or 1. ... RPxP; 2. P-B6, with P-R6, etc. In a game Ed. Lasker-Moll (Berlinchampionship, 1904), from which the position is taken, Blackplayed P-R3 in order to obtain the formation mentioned above, andWhite resigned after 2. P-B4? P-B3, P-Kt5, K-Q5. There was,however, a pretty win after Black's P-R3, namely: 2. P-B6, PxP;3. P-B4, K-Q5; 4. P-Kt5, BPxP; 5. PxP, K-K4; 6. PxP, K-B6; 7. K-B2 and Black is lost, because his own pawn obstructs the squareB2, and the King must release the square Kt2, after which theWhite pawn queens.
This winning combination, however, is only an interestingexception to the rule that positions of this kind are generallywon by the side which possesses the passed pawn. In thisparticular case Black could have made the position secure byobtaining the ideal position of B3 Kt2 R3 for his pawns earlier,before the White pawns could advance so far. In the position ofDiagram 66 Black could still have won by playing P-B3. After 2.P-R6, PxP; 3. P-B4, K-Q4; the Black King has time to overtake thepassed pawn which results on the Bishop's file.
To conclude the study of pawn endings with an equal number ofpawns on either side, we will discuss Diagram 67,
--------------------------------------- 8 | | | | | | | | | |---------------------------------------| 7 | | | | | | | | | |---------------------------------------| 6 | | | | | | | | | |---------------------------------------| 5 | #K | | #P | | | | | | |---------------------------------------| 4 | | | ^P | | ^K | | | #P | |---------------------------------------| 3 | | | | | | | | ^P | |---------------------------------------| 2 | | | | | | | | | |---------------------------------------| 1 | | | | | | | | | --------------------------------------- A B C D E F G H
Diag. 67
which illustrates a curious position occurring from time to timein practice. Whoever has the move wins by moving into distantopposition. White, therefore, should play K-K5 K-Q5 would lose,as Black would play K-Kt5, protecting his pawn and attacking theWhite pawn, the protection of which White has to give up nextmove. In the same way Black with the move cannot play K-Kt5

because White wins the pawn with K-Q5. After 1. K-K5 Black cannotavoid the loss of the game, e.g. K-R3; 2. K-Q5, K-Kt3; 3. K-Q6,and so on. Black with the move wins similarly with K-R5.
We have still to consider end-games in which a draw results inspite of a majority of pawns, or where a win can only be achievedby the sacrifice of an extra pawn.
Diagram 68 shows the latter case. Here White can only win in thefollowing manner: 1. P-Kt4ch, PxPch; 2. K-Kt3, K any; 3. KxP, andwins. Any other way would allow
--------------------------------------- 8 | | | | | | | | | |---------------------------------------| 7 | | | | | | | | | |---------------------------------------| 6 | | | | | | | | | |---------------------------------------| 5 | #P | | #K | | | | #P | | |---------------------------------------| 4 | ^P | | | | | | ^P | | |---------------------------------------| 3 | | ^P | ^K | | | | | | |---------------------------------------| 2 | | | | | | | | | |---------------------------------------| 1 | | | | | | | | | --------------------------------------- A B C D E F G H
Diag. 68
Black to assume the opposition and to force the draw, e.g. 1. K-B2, K-B3! 2. K-Q3, K-Q4, etc.
Not 1. K-B2, K-Kt5? 2. K-Kt2, K-B4, 3. K-B3, etc., as in Diagram57.
--------------------------------------- 8 | | | | | | | | | |---------------------------------------| 7 | | | | | | | | | |---------------------------------------| 6 | | | | | #K | #P | | | |---------------------------------------| 5 | | | | | | | | | |---------------------------------------| 4 | | | | | | ^P | ^P | | |---------------------------------------| 3 | | | | | ^K | | | | |---------------------------------------| 2 | | | | | | | | | |---------------------------------------| 1 | | | | | | | | | --------------------------------------- A B C D E F G H
Diag. 69
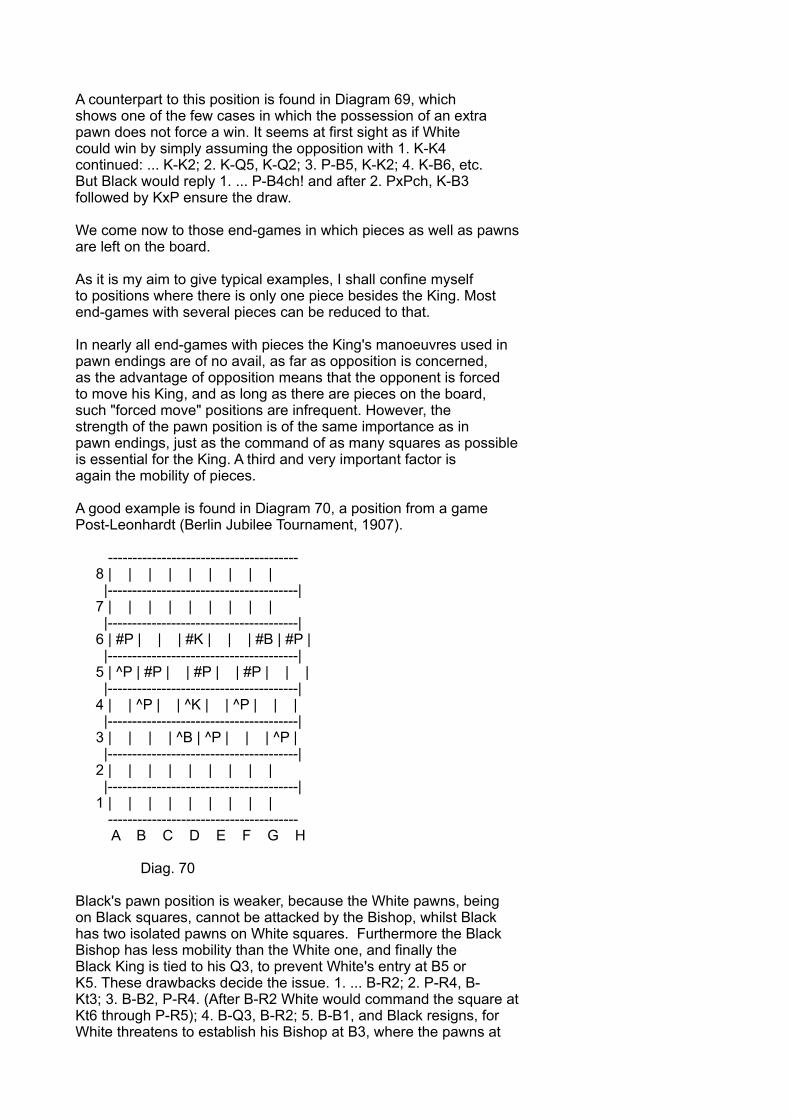
A counterpart to this position is found in Diagram 69, whichshows one of the few cases in which the possession of an extrapawn does not force a win. It seems at first sight as if Whitecould win by simply assuming the opposition with 1. K-K4continued: ... K-K2; 2. K-Q5, K-Q2; 3. P-B5, K-K2; 4. K-B6, etc.But Black would reply 1. ... P-B4ch! and after 2. PxPch, K-B3followed by KxP ensure the draw.
We come now to those end-games in which pieces as well as pawnsare left on the board.
As it is my aim to give typical examples, I shall confine myselfto positions where there is only one piece besides the King. Mostend-games with several pieces can be reduced to that.
In nearly all end-games with pieces the King's manoeuvres used inpawn endings are of no avail, as far as opposition is concerned,as the advantage of opposition means that the opponent is forcedto move his King, and as long as there are pieces on the board,such "forced move" positions are infrequent. However, thestrength of the pawn position is of the same importance as inpawn endings, just as the command of as many squares as possibleis essential for the King. A third and very important factor isagain the mobility of pieces.
A good example is found in Diagram 70, a position from a gamePost-Leonhardt (Berlin Jubilee Tournament, 1907).
--------------------------------------- 8 | | | | | | | | | |---------------------------------------| 7 | | | | | | | | | |---------------------------------------| 6 | #P | | | #K | | | #B | #P | |---------------------------------------| 5 | ^P | #P | | #P | | #P | | | |---------------------------------------| 4 | | ^P | | ^K | | ^P | | | |---------------------------------------| 3 | | | | ^B | ^P | | | ^P | |---------------------------------------| 2 | | | | | | | | | |---------------------------------------| 1 | | | | | | | | | --------------------------------------- A B C D E F G H
Diag. 70
Black's pawn position is weaker, because the White pawns, beingon Black squares, cannot be attacked by the Bishop, whilst Blackhas two isolated pawns on White squares. Furthermore the BlackBishop has less mobility than the White one, and finally theBlack King is tied to his Q3, to prevent White's entry at B5 orK5. These drawbacks decide the issue. 1. ... B-R2; 2. P-R4, B-Kt3; 3. B-B2, P-R4. (After B-R2 White would command the square atKt6 through P-R5); 4. B-Q3, B-R2; 5. B-B1, and Black resigns, forWhite threatens to establish his Bishop at B3, where the pawns at
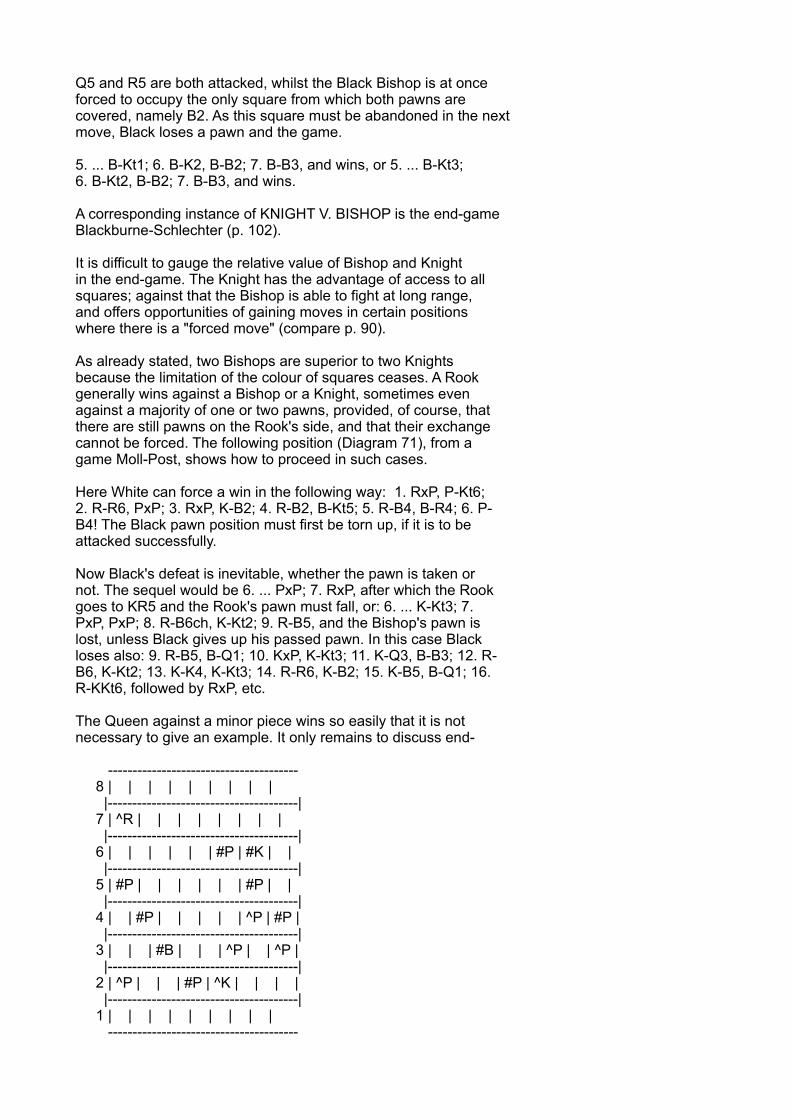
Q5 and R5 are both attacked, whilst the Black Bishop is at onceforced to occupy the only square from which both pawns arecovered, namely B2. As this square must be abandoned in the nextmove, Black loses a pawn and the game.
5. ... B-Kt1; 6. B-K2, B-B2; 7. B-B3, and wins, or 5. ... B-Kt3;6. B-Kt2, B-B2; 7. B-B3, and wins.
A corresponding instance of KNIGHT V. BISHOP is the end-gameBlackburne-Schlechter (p. 102).
It is difficult to gauge the relative value of Bishop and Knightin the end-game. The Knight has the advantage of access to allsquares; against that the Bishop is able to fight at long range,and offers opportunities of gaining moves in certain positionswhere there is a "forced move" (compare p. 90).
As already stated, two Bishops are superior to two Knightsbecause the limitation of the colour of squares ceases. A Rookgenerally wins against a Bishop or a Knight, sometimes evenagainst a majority of one or two pawns, provided, of course, thatthere are still pawns on the Rook's side, and that their exchangecannot be forced. The following position (Diagram 71), from agame Moll-Post, shows how to proceed in such cases.
Here White can force a win in the following way: 1. RxP, P-Kt6;2. R-R6, PxP; 3. RxP, K-B2; 4. R-B2, B-Kt5; 5. R-B4, B-R4; 6. P-B4! The Black pawn position must first be torn up, if it is to beattacked successfully.
Now Black's defeat is inevitable, whether the pawn is taken ornot. The sequel would be 6. ... PxP; 7. RxP, after which the Rookgoes to KR5 and the Rook's pawn must fall, or: 6. ... K-Kt3; 7.PxP, PxP; 8. R-B6ch, K-Kt2; 9. R-B5, and the Bishop's pawn islost, unless Black gives up his passed pawn. In this case Blackloses also: 9. R-B5, B-Q1; 10. KxP, K-Kt3; 11. K-Q3, B-B3; 12. R-B6, K-Kt2; 13. K-K4, K-Kt3; 14. R-R6, K-B2; 15. K-B5, B-Q1; 16.R-KKt6, followed by RxP, etc.
The Queen against a minor piece wins so easily that it is notnecessary to give an example. It only remains to discuss end-
--------------------------------------- 8 | | | | | | | | | |---------------------------------------| 7 | ^R | | | | | | | | |---------------------------------------| 6 | | | | | | #P | #K | | |---------------------------------------| 5 | #P | | | | | | #P | | |---------------------------------------| 4 | | #P | | | | | ^P | #P | |---------------------------------------| 3 | | | #B | | | ^P | | ^P | |---------------------------------------| 2 | ^P | | | #P | ^K | | | | |---------------------------------------| 1 | | | | | | | | | ---------------------------------------
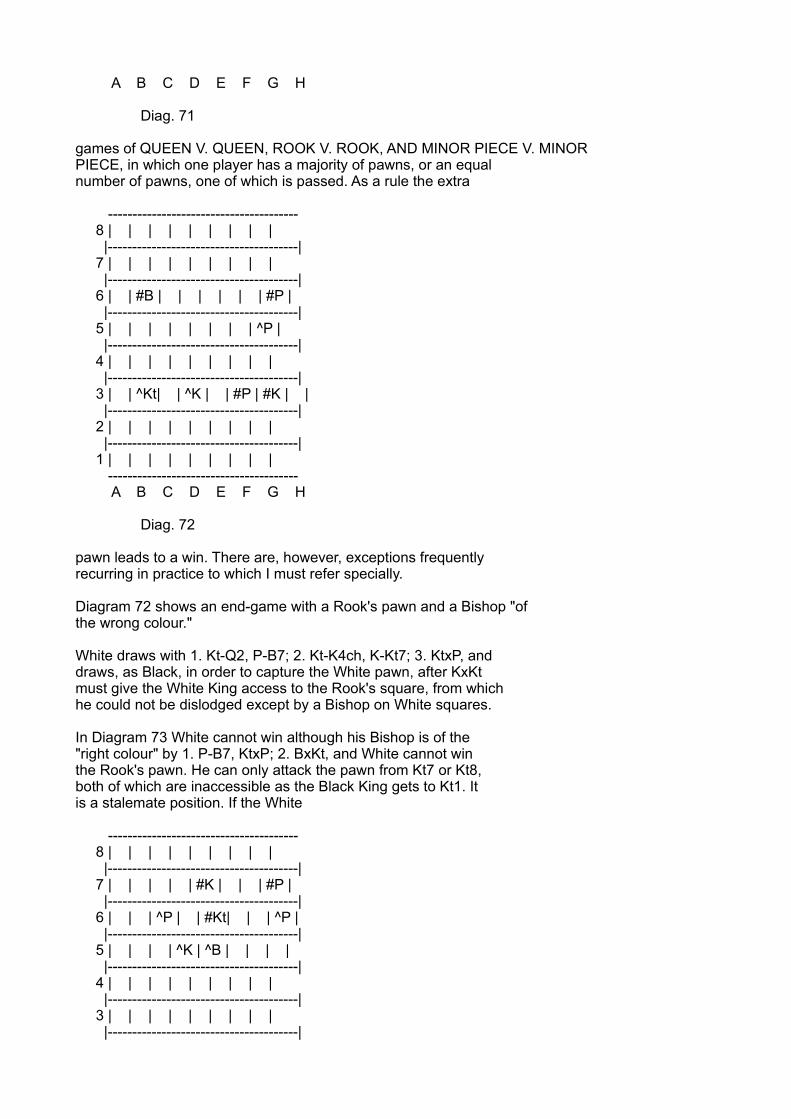
A B C D E F G H
Diag. 71
games of QUEEN V. QUEEN, ROOK V. ROOK, AND MINOR PIECE V. MINORPIECE, in which one player has a majority of pawns, or an equalnumber of pawns, one of which is passed. As a rule the extra
--------------------------------------- 8 | | | | | | | | | |---------------------------------------| 7 | | | | | | | | | |---------------------------------------| 6 | | #B | | | | | | #P | |---------------------------------------| 5 | | | | | | | | ^P | |---------------------------------------| 4 | | | | | | | | | |---------------------------------------| 3 | | ^Kt| | ^K | | #P | #K | | |---------------------------------------| 2 | | | | | | | | | |---------------------------------------| 1 | | | | | | | | | --------------------------------------- A B C D E F G H
Diag. 72
pawn leads to a win. There are, however, exceptions frequentlyrecurring in practice to which I must refer specially.
Diagram 72 shows an end-game with a Rook's pawn and a Bishop "ofthe wrong colour."
White draws with 1. Kt-Q2, P-B7; 2. Kt-K4ch, K-Kt7; 3. KtxP, anddraws, as Black, in order to capture the White pawn, after KxKtmust give the White King access to the Rook's square, from whichhe could not be dislodged except by a Bishop on White squares.
In Diagram 73 White cannot win although his Bishop is of the"right colour" by 1. P-B7, KtxP; 2. BxKt, and White cannot winthe Rook's pawn. He can only attack the pawn from Kt7 or Kt8,both of which are inaccessible as the Black King gets to Kt1. Itis a stalemate position. If the White
--------------------------------------- 8 | | | | | | | | | |---------------------------------------| 7 | | | | | #K | | | #P | |---------------------------------------| 6 | | | ^P | | #Kt| | | ^P | |---------------------------------------| 5 | | | | ^K | ^B | | | | |---------------------------------------| 4 | | | | | | | | | |---------------------------------------| 3 | | | | | | | | | |---------------------------------------|
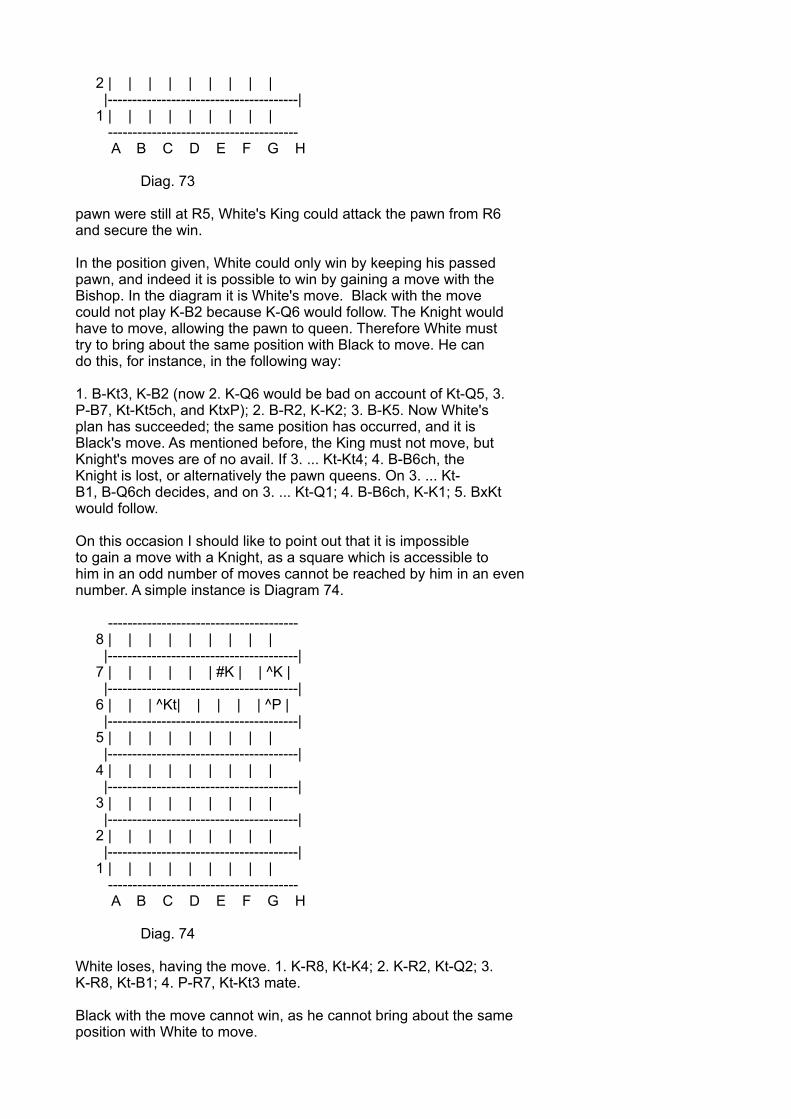
2 | | | | | | | | | |---------------------------------------| 1 | | | | | | | | | --------------------------------------- A B C D E F G H
Diag. 73
pawn were still at R5, White's King could attack the pawn from R6and secure the win.
In the position given, White could only win by keeping his passedpawn, and indeed it is possible to win by gaining a move with theBishop. In the diagram it is White's move. Black with the movecould not play K-B2 because K-Q6 would follow. The Knight wouldhave to move, allowing the pawn to queen. Therefore White musttry to bring about the same position with Black to move. He cando this, for instance, in the following way:
1. B-Kt3, K-B2 (now 2. K-Q6 would be bad on account of Kt-Q5, 3.P-B7, Kt-Kt5ch, and KtxP); 2. B-R2, K-K2; 3. B-K5. Now White'splan has succeeded; the same position has occurred, and it isBlack's move. As mentioned before, the King must not move, butKnight's moves are of no avail. If 3. ... Kt-Kt4; 4. B-B6ch, theKnight is lost, or alternatively the pawn queens. On 3. ... Kt-B1, B-Q6ch decides, and on 3. ... Kt-Q1; 4. B-B6ch, K-K1; 5. BxKtwould follow.
On this occasion I should like to point out that it is impossibleto gain a move with a Knight, as a square which is accessible tohim in an odd number of moves cannot be reached by him in an evennumber. A simple instance is Diagram 74.
--------------------------------------- 8 | | | | | | | | | |---------------------------------------| 7 | | | | | | #K | | ^K | |---------------------------------------| 6 | | | ^Kt| | | | | ^P | |---------------------------------------| 5 | | | | | | | | | |---------------------------------------| 4 | | | | | | | | | |---------------------------------------| 3 | | | | | | | | | |---------------------------------------| 2 | | | | | | | | | |---------------------------------------| 1 | | | | | | | | | --------------------------------------- A B C D E F G H
Diag. 74
White loses, having the move. 1. K-R8, Kt-K4; 2. K-R2, Kt-Q2; 3.K-R8, Kt-B1; 4. P-R7, Kt-Kt3 mate.
Black with the move cannot win, as he cannot bring about the sameposition with White to move.

In end-games of BISHOP V. BISHOP, of which we have already had anexample in Diagram 70, an extra pawn wins in most cases if theBishops are of the same colour. It is generally possible to forcean exchange of Bishops and obtain one of the well-known pawnendings.
On the other hand an ending with Bishops of different colourleads mostly to a draw, frequently even against a majority of twopawns. The position in Diagram 75 is a draw, because it isimpossible for the White King to get round his Kt pawn to driveoff the Bishop.
--------------------------------------- 8 | | | | | | | | | |---------------------------------------| 7 | | | | | | | | | |---------------------------------------| 6 | | | | | | | #B | | |---------------------------------------| 5 | | #P | | #K | | | ^P | | |---------------------------------------| 4 | | | | ^P | | | ^K | | |---------------------------------------| 3 | | | ^P | | | | | | |---------------------------------------| 2 | | | | ^B | | | | | |---------------------------------------| 1 | | | | | | | | | --------------------------------------- A B C D E F G H
Diag. 75
With two passed pawns distant from each other, a win cangenerally be forced, as in the following position (Diagram 76).
--------------------------------------- 8 | | | | #B | | | | | |---------------------------------------| 7 | | | | | | | | | |---------------------------------------| 6 | | | | | | #K | | | |---------------------------------------| 5 | | ^P | | | | ^P | | | |---------------------------------------| 4 | | | | | | ^K | | | |---------------------------------------| 3 | | | | ^B | | | | | |---------------------------------------| 2 | | | | | | | | | |---------------------------------------| 1 | | | | | | | | | --------------------------------------- A B C D E F G H
Diag. 76
The King moves up to the pawn, the progress of which is barred by
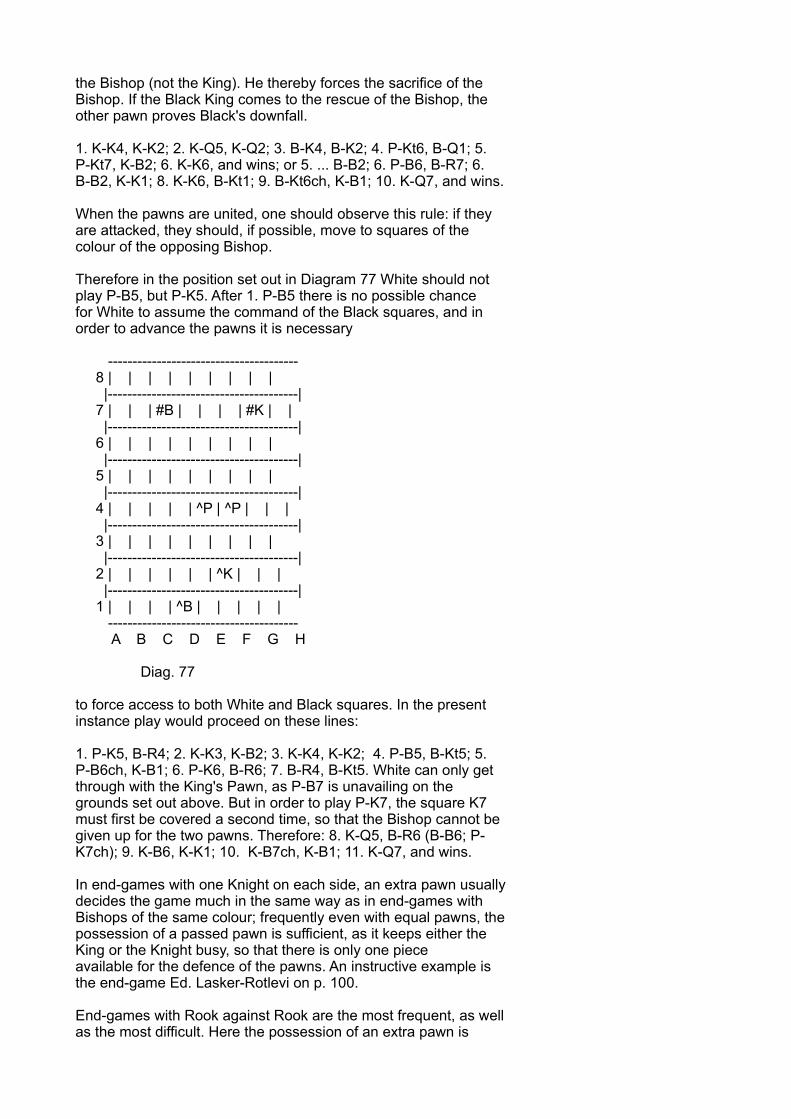
the Bishop (not the King). He thereby forces the sacrifice of theBishop. If the Black King comes to the rescue of the Bishop, theother pawn proves Black's downfall.
1. K-K4, K-K2; 2. K-Q5, K-Q2; 3. B-K4, B-K2; 4. P-Kt6, B-Q1; 5.P-Kt7, K-B2; 6. K-K6, and wins; or 5. ... B-B2; 6. P-B6, B-R7; 6.B-B2, K-K1; 8. K-K6, B-Kt1; 9. B-Kt6ch, K-B1; 10. K-Q7, and wins.
When the pawns are united, one should observe this rule: if theyare attacked, they should, if possible, move to squares of thecolour of the opposing Bishop.
Therefore in the position set out in Diagram 77 White should notplay P-B5, but P-K5. After 1. P-B5 there is no possible chancefor White to assume the command of the Black squares, and inorder to advance the pawns it is necessary
--------------------------------------- 8 | | | | | | | | | |---------------------------------------| 7 | | | #B | | | | #K | | |---------------------------------------| 6 | | | | | | | | | |---------------------------------------| 5 | | | | | | | | | |---------------------------------------| 4 | | | | | ^P | ^P | | | |---------------------------------------| 3 | | | | | | | | | |---------------------------------------| 2 | | | | | | ^K | | | |---------------------------------------| 1 | | | | ^B | | | | | --------------------------------------- A B C D E F G H
Diag. 77
to force access to both White and Black squares. In the presentinstance play would proceed on these lines:
1. P-K5, B-R4; 2. K-K3, K-B2; 3. K-K4, K-K2; 4. P-B5, B-Kt5; 5.P-B6ch, K-B1; 6. P-K6, B-R6; 7. B-R4, B-Kt5. White can only getthrough with the King's Pawn, as P-B7 is unavailing on thegrounds set out above. But in order to play P-K7, the square K7must first be covered a second time, so that the Bishop cannot begiven up for the two pawns. Therefore: 8. K-Q5, B-R6 (B-B6; P-K7ch); 9. K-B6, K-K1; 10. K-B7ch, K-B1; 11. K-Q7, and wins.
In end-games with one Knight on each side, an extra pawn usuallydecides the game much in the same way as in end-games withBishops of the same colour; frequently even with equal pawns, thepossession of a passed pawn is sufficient, as it keeps either theKing or the Knight busy, so that there is only one pieceavailable for the defence of the pawns. An instructive example isthe end-game Ed. Lasker-Rotlevi on p. 100.
End-games with Rook against Rook are the most frequent, as wellas the most difficult. Here the possession of an extra pawn is
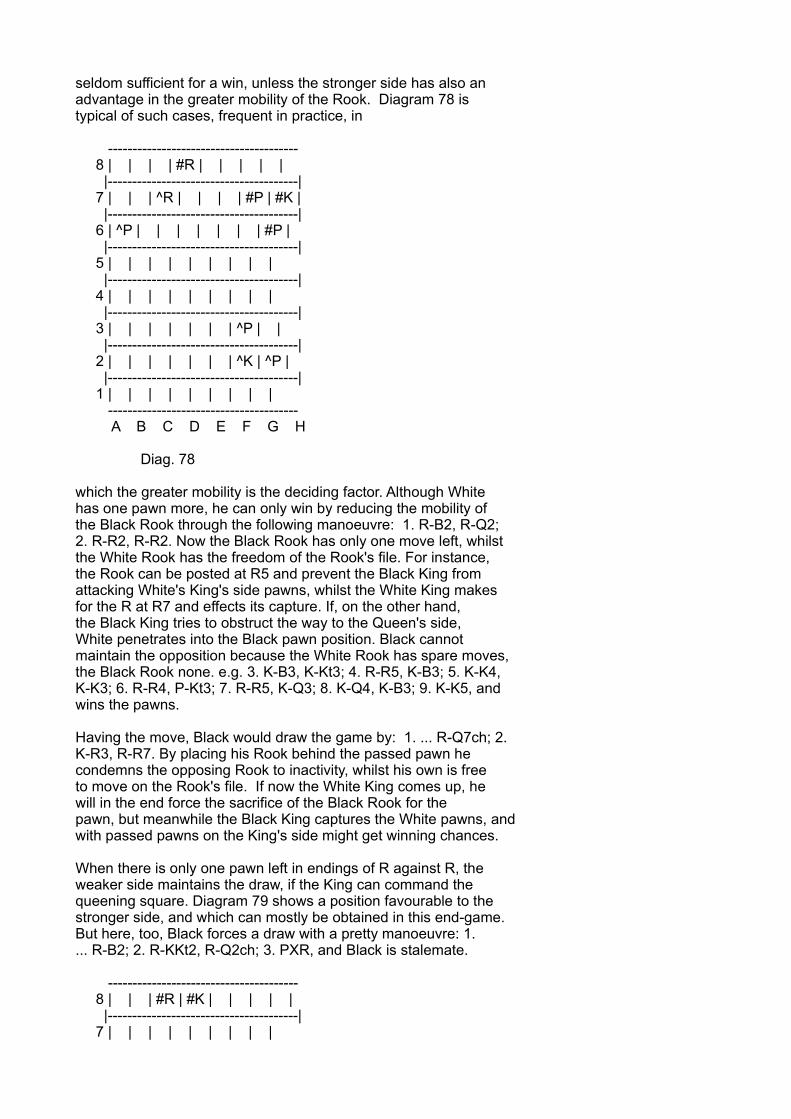
seldom sufficient for a win, unless the stronger side has also anadvantage in the greater mobility of the Rook. Diagram 78 istypical of such cases, frequent in practice, in
--------------------------------------- 8 | | | | #R | | | | | |---------------------------------------| 7 | | | ^R | | | | #P | #K | |---------------------------------------| 6 | ^P | | | | | | | #P | |---------------------------------------| 5 | | | | | | | | | |---------------------------------------| 4 | | | | | | | | | |---------------------------------------| 3 | | | | | | | ^P | | |---------------------------------------| 2 | | | | | | | ^K | ^P | |---------------------------------------| 1 | | | | | | | | | --------------------------------------- A B C D E F G H
Diag. 78
which the greater mobility is the deciding factor. Although Whitehas one pawn more, he can only win by reducing the mobility ofthe Black Rook through the following manoeuvre: 1. R-B2, R-Q2;2. R-R2, R-R2. Now the Black Rook has only one move left, whilstthe White Rook has the freedom of the Rook's file. For instance,the Rook can be posted at R5 and prevent the Black King fromattacking White's King's side pawns, whilst the White King makesfor the R at R7 and effects its capture. If, on the other hand,the Black King tries to obstruct the way to the Queen's side,White penetrates into the Black pawn position. Black cannotmaintain the opposition because the White Rook has spare moves,the Black Rook none. e.g. 3. K-B3, K-Kt3; 4. R-R5, K-B3; 5. K-K4,K-K3; 6. R-R4, P-Kt3; 7. R-R5, K-Q3; 8. K-Q4, K-B3; 9. K-K5, andwins the pawns.
Having the move, Black would draw the game by: 1. ... R-Q7ch; 2.K-R3, R-R7. By placing his Rook behind the passed pawn hecondemns the opposing Rook to inactivity, whilst his own is freeto move on the Rook's file. If now the White King comes up, hewill in the end force the sacrifice of the Black Rook for thepawn, but meanwhile the Black King captures the White pawns, andwith passed pawns on the King's side might get winning chances.
When there is only one pawn left in endings of R against R, theweaker side maintains the draw, if the King can command thequeening square. Diagram 79 shows a position favourable to thestronger side, and which can mostly be obtained in this end-game.But here, too, Black forces a draw with a pretty manoeuvre: 1.... R-B2; 2. R-KKt2, R-Q2ch; 3. PXR, and Black is stalemate.
--------------------------------------- 8 | | | #R | #K | | | | | |---------------------------------------| 7 | | | | | | | | |
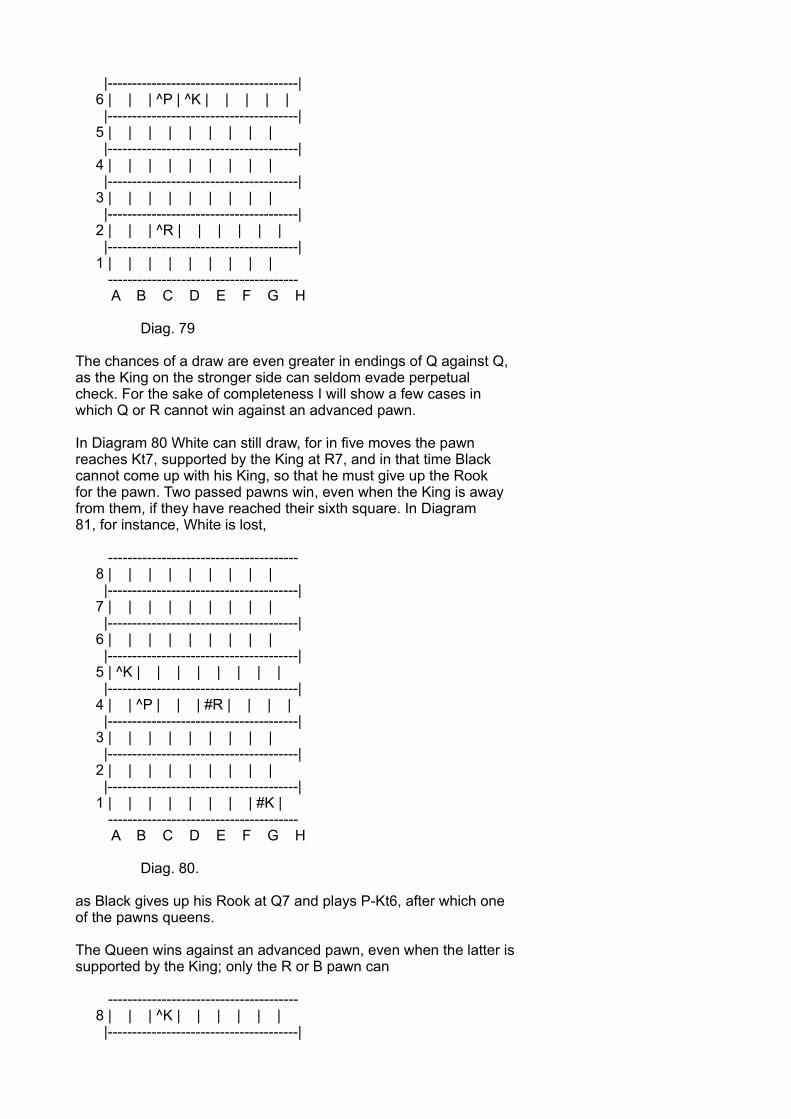
|---------------------------------------| 6 | | | ^P | ^K | | | | | |---------------------------------------| 5 | | | | | | | | | |---------------------------------------| 4 | | | | | | | | | |---------------------------------------| 3 | | | | | | | | | |---------------------------------------| 2 | | | ^R | | | | | | |---------------------------------------| 1 | | | | | | | | | --------------------------------------- A B C D E F G H
Diag. 79
The chances of a draw are even greater in endings of Q against Q,as the King on the stronger side can seldom evade perpetualcheck. For the sake of completeness I will show a few cases inwhich Q or R cannot win against an advanced pawn.
In Diagram 80 White can still draw, for in five moves the pawnreaches Kt7, supported by the King at R7, and in that time Blackcannot come up with his King, so that he must give up the Rookfor the pawn. Two passed pawns win, even when the King is awayfrom them, if they have reached their sixth square. In Diagram81, for instance, White is lost,
--------------------------------------- 8 | | | | | | | | | |---------------------------------------| 7 | | | | | | | | | |---------------------------------------| 6 | | | | | | | | | |---------------------------------------| 5 | ^K | | | | | | | | |---------------------------------------| 4 | | ^P | | | #R | | | | |---------------------------------------| 3 | | | | | | | | | |---------------------------------------| 2 | | | | | | | | | |---------------------------------------| 1 | | | | | | | | #K | --------------------------------------- A B C D E F G H
Diag. 80.
as Black gives up his Rook at Q7 and plays P-Kt6, after which oneof the pawns queens.
The Queen wins against an advanced pawn, even when the latter issupported by the King; only the R or B pawn can
--------------------------------------- 8 | | | ^K | | | | | | |---------------------------------------|

7 | | | | ^P | | | | ^R | |---------------------------------------| 6 | | | #K | | | | | | |---------------------------------------| 5 | | | | #R | | | | | |---------------------------------------| 4 | | | | | | | #P | | |---------------------------------------| 3 | | | | | | | | #P | |---------------------------------------| 2 | | | | | | | | | |---------------------------------------| 1 | | | | | | | | | --------------------------------------- A B C D E F G H
Diag. 81.
draw sometimes, when the pawn is on the seventh supported by theKing, and the opposing Q cannot move to the queening square.
The following illustrates the three principal cases:
A. Position--White: K at QKt8, P at QR7 Black: K at QR8, Q at QB3
Black must stop the pawn and plays Q-Kt3ch. White answers with K-R sq and is stalemate unless White lets the Kt's file free again.This end-game can only be won if the stronger King can assume theopposition in two moves. Therefore, if in the above example theBlack King was standing at Q5, Black would win as follows: 1. ...Q-K1ch; 2. K-Kt7, Q-K2ch; 3. K-Kt8, K-B4; 4. P-R8 = Q, K-Kt3. andWhite cannot cover the mate.
B. Position--White: K at QKt8, P at QB7 Black: K at Q5, Q at QB3
White draws: 1. ... Q-Kt3ch; 2. K-R8, QxP stalemate.
C. Position--White: K at QKt8, P at QKt7 Black: K at Q5, Q at QB3 White loses.
1. K-R7, Q-R5ch; 2. K-Kt6, Q-Kt5ch; 3. K-B7, Q-B4ch; 4. K-Q8, Q-Q3ch; 5. K-B8, Q-B3ch; 6. K-Kt8, K-B4; 7. K-R7, Q-R5ch; 8. K-Kt8,K-B3; 9. K-B8, Q-R3, etc.
END-GAMES FROM MASTER PLAY
In the following pages I give some instructive examples takenfrom tournament play. Step by step we will find how veryimportant is the knowledge of the simple endings treated in thelast chapter. We shall see that it is often necessary to considermany moves ahead to find the correct line, but that it is nearlyalways possible to foresee every consequence with unfailingcertainty. Moreover, because of the reduction of forces there is
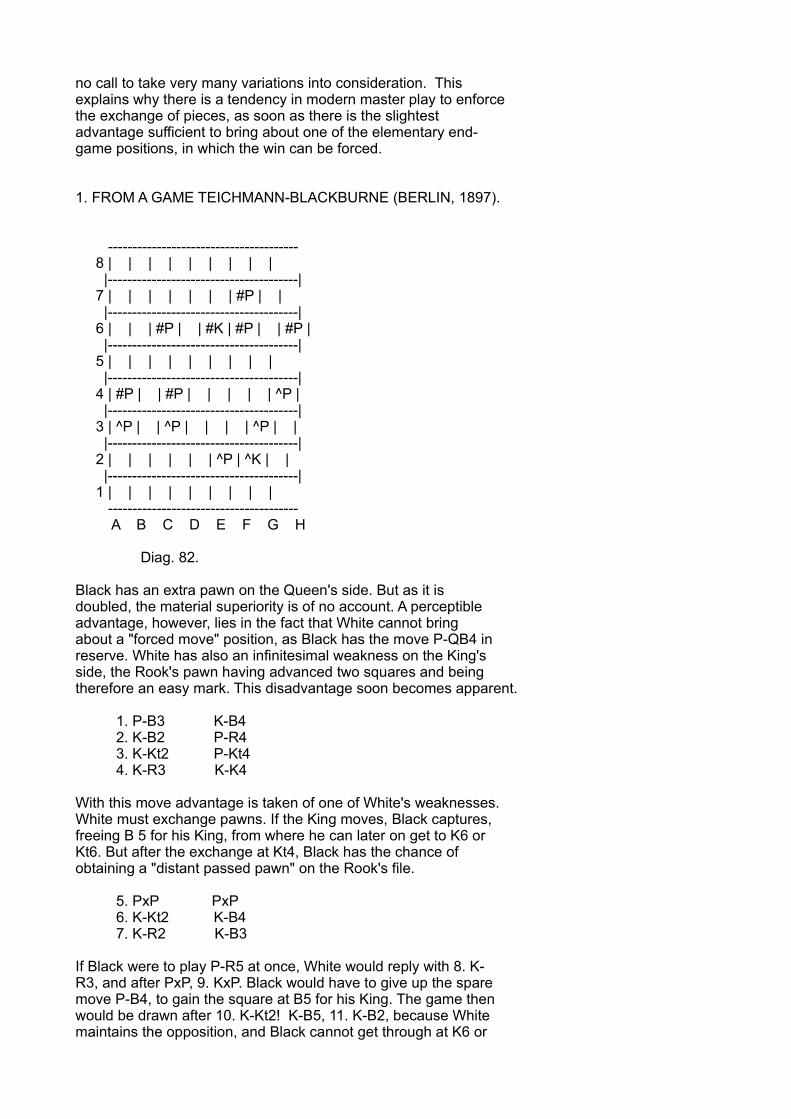
no call to take very many variations into consideration. Thisexplains why there is a tendency in modern master play to enforcethe exchange of pieces, as soon as there is the slightestadvantage sufficient to bring about one of the elementary end-game positions, in which the win can be forced.
1. FROM A GAME TEICHMANN-BLACKBURNE (BERLIN, 1897).
--------------------------------------- 8 | | | | | | | | | |---------------------------------------| 7 | | | | | | | #P | | |---------------------------------------| 6 | | | #P | | #K | #P | | #P | |---------------------------------------| 5 | | | | | | | | | |---------------------------------------| 4 | #P | | #P | | | | | ^P | |---------------------------------------| 3 | ^P | | ^P | | | | ^P | | |---------------------------------------| 2 | | | | | | ^P | ^K | | |---------------------------------------| 1 | | | | | | | | | --------------------------------------- A B C D E F G H
Diag. 82.
Black has an extra pawn on the Queen's side. But as it isdoubled, the material superiority is of no account. A perceptibleadvantage, however, lies in the fact that White cannot bringabout a "forced move" position, as Black has the move P-QB4 inreserve. White has also an infinitesimal weakness on the King'sside, the Rook's pawn having advanced two squares and beingtherefore an easy mark. This disadvantage soon becomes apparent.
1. P-B3 K-B4 2. K-B2 P-R4 3. K-Kt2 P-Kt4 4. K-R3 K-K4
With this move advantage is taken of one of White's weaknesses.White must exchange pawns. If the King moves, Black captures,freeing B 5 for his King, from where he can later on get to K6 orKt6. But after the exchange at Kt4, Black has the chance ofobtaining a "distant passed pawn" on the Rook's file.
5. PxP PxP 6. K-Kt2 K-B4 7. K-R2 K-B3
If Black were to play P-R5 at once, White would reply with 8. K-R3, and after PxP, 9. KxP. Black would have to give up the sparemove P-B4, to gain the square at B5 for his King. The game thenwould be drawn after 10. K-Kt2! K-B5, 11. K-B2, because Whitemaintains the opposition, and Black cannot get through at K6 or
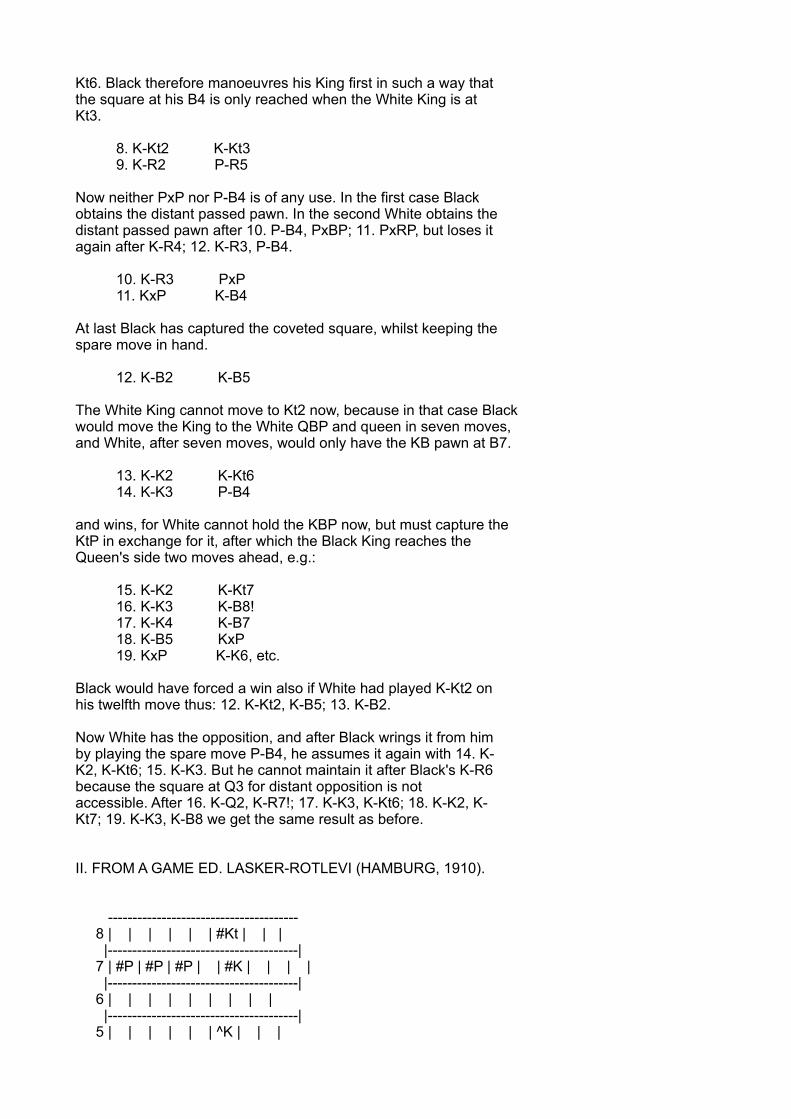
Kt6. Black therefore manoeuvres his King first in such a way thatthe square at his B4 is only reached when the White King is atKt3.
8. K-Kt2 K-Kt3 9. K-R2 P-R5
Now neither PxP nor P-B4 is of any use. In the first case Blackobtains the distant passed pawn. In the second White obtains thedistant passed pawn after 10. P-B4, PxBP; 11. PxRP, but loses itagain after K-R4; 12. K-R3, P-B4.
10. K-R3 PxP 11. KxP K-B4
At last Black has captured the coveted square, whilst keeping thespare move in hand.
12. K-B2 K-B5
The White King cannot move to Kt2 now, because in that case Blackwould move the King to the White QBP and queen in seven moves,and White, after seven moves, would only have the KB pawn at B7.
13. K-K2 K-Kt6 14. K-K3 P-B4
and wins, for White cannot hold the KBP now, but must capture theKtP in exchange for it, after which the Black King reaches theQueen's side two moves ahead, e.g.:
15. K-K2 K-Kt7 16. K-K3 K-B8! 17. K-K4 K-B7 18. K-B5 KxP 19. KxP K-K6, etc.
Black would have forced a win also if White had played K-Kt2 onhis twelfth move thus: 12. K-Kt2, K-B5; 13. K-B2.
Now White has the opposition, and after Black wrings it from himby playing the spare move P-B4, he assumes it again with 14. K-K2, K-Kt6; 15. K-K3. But he cannot maintain it after Black's K-R6because the square at Q3 for distant opposition is notaccessible. After 16. K-Q2, K-R7!; 17. K-K3, K-Kt6; 18. K-K2, K-Kt7; 19. K-K3, K-B8 we get the same result as before.
II. FROM A GAME ED. LASKER-ROTLEVI (HAMBURG, 1910).
--------------------------------------- 8 | | | | | | #Kt | | | |---------------------------------------| 7 | #P | #P | #P | | #K | | | | |---------------------------------------| 6 | | | | | | | | | |---------------------------------------| 5 | | | | | | ^K | | |
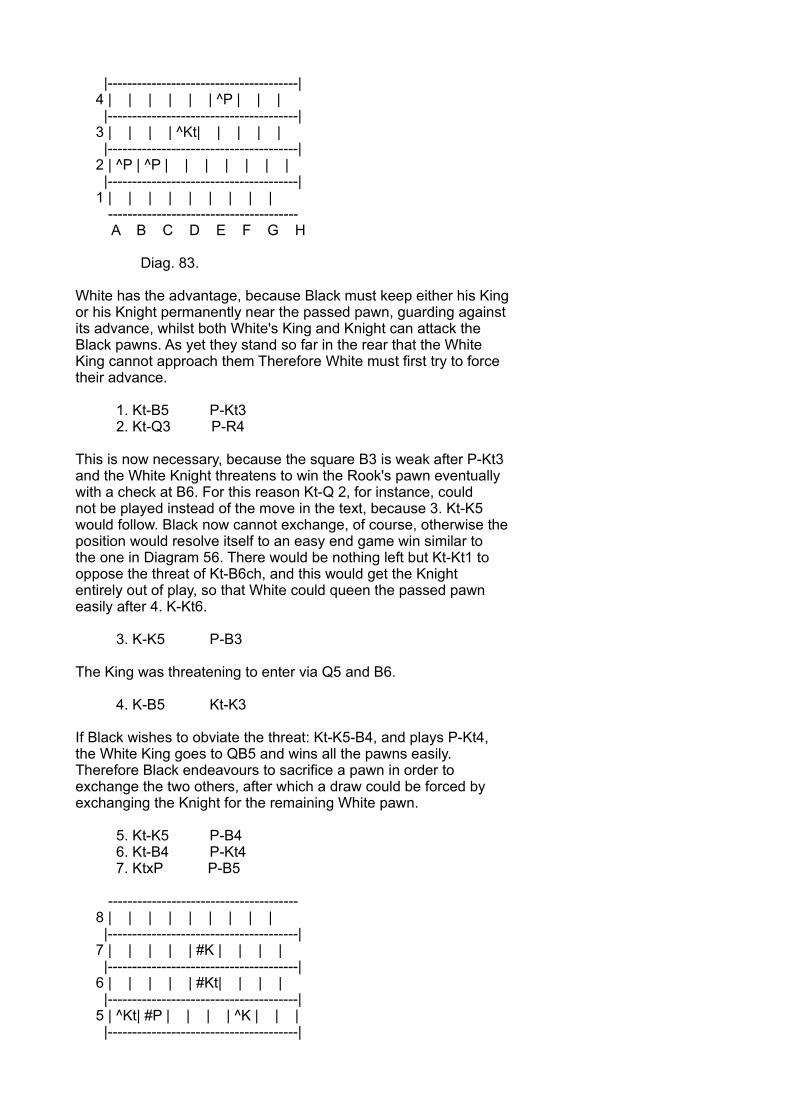
|---------------------------------------| 4 | | | | | | ^P | | | |---------------------------------------| 3 | | | | ^Kt| | | | | |---------------------------------------| 2 | ^P | ^P | | | | | | | |---------------------------------------| 1 | | | | | | | | | --------------------------------------- A B C D E F G H
Diag. 83.
White has the advantage, because Black must keep either his Kingor his Knight permanently near the passed pawn, guarding againstits advance, whilst both White's King and Knight can attack theBlack pawns. As yet they stand so far in the rear that the WhiteKing cannot approach them Therefore White must first try to forcetheir advance.
1. Kt-B5 P-Kt3 2. Kt-Q3 P-R4
This is now necessary, because the square B3 is weak after P-Kt3and the White Knight threatens to win the Rook's pawn eventuallywith a check at B6. For this reason Kt-Q 2, for instance, couldnot be played instead of the move in the text, because 3. Kt-K5would follow. Black now cannot exchange, of course, otherwise theposition would resolve itself to an easy end game win similar tothe one in Diagram 56. There would be nothing left but Kt-Kt1 tooppose the threat of Kt-B6ch, and this would get the Knightentirely out of play, so that White could queen the passed pawneasily after 4. K-Kt6.
3. K-K5 P-B3
The King was threatening to enter via Q5 and B6.
4. K-B5 Kt-K3
If Black wishes to obviate the threat: Kt-K5-B4, and plays P-Kt4,the White King goes to QB5 and wins all the pawns easily.Therefore Black endeavours to sacrifice a pawn in order toexchange the two others, after which a draw could be forced byexchanging the Knight for the remaining White pawn.
5. Kt-K5 P-B4 6. Kt-B4 P-Kt4 7. KtxP P-B5
--------------------------------------- 8 | | | | | | | | | |---------------------------------------| 7 | | | | | #K | | | | |---------------------------------------| 6 | | | | | #Kt| | | | |---------------------------------------| 5 | ^Kt| #P | | | | ^K | | | |---------------------------------------|

4 | | | #P | | | ^P | | | |---------------------------------------| 3 | | | | | | | | | |---------------------------------------| 2 | ^P | ^P | | | | | | | |---------------------------------------| 1 | | | | | | | | | --------------------------------------- A B C D E F G H
Diag. 84.
8. K-K5 Kt-B4 9. Kt-B6ch K-B1!
Not K-B2, because of 10. K-Q4, Kt-Q6; 11. Kt-K5ch.
10. Kt-R7
Here White had only considered the following answer:
Kt-Q6ch; 11. K-Q4, KtxKtP; 12. KtxP, Kt-Q6; 13. P-B5, Kt-Kt5; 14.Kt-B3, Kt-B7ch: 15. KxP, Kt-K6ch; 16. K-B5, KtxP; 17. P-R4, Kt-K2; 18. Kt-Q5, Kt-B1; 19. K-B6, K-K1; 20. K-B7, Kt-R7; 21. K-Kt7,and wins the Knight.
Black however draws, through a pretty combination:
10. ... P-Kt5 11. K-Q4 P-B6 12. K-B4 PxP 13. KxP KtxP
and White cannot prevent the ultimate exchange of Kt for P. Thelast winning chance would have been: 10. K-Q4!, Kt-Q; 11. K-B3.This is in any case the more plausible line, because now Whitecan attack the pawns with both King and Knight, as both the Blackpieces are away from the field of operations. The sequel couldbe: 11. KtxBP; 12. P-R3 (Kt-R7 would only draw: Kt-K7ch; 13. K-Kt4, Kt-B8 14. P-R3, Kt-R7ch; 15. KxP, P-B6); 12. Kt-Q4ch 13. K-Q4, Kt-B5; 14. K-K4 (Kt-R7 ?, Kt-K7ch!!; 15 K-K3, P-B6), Kt-Q6;15. P-Kt4, Kt-Kt7 16 Kt-Q4, and wins
III. From a game Blackburne-Schlechter (Vienna, 1898).
--------------------------------------- 8 | #R | | | | #R | | | | |---------------------------------------| 7 | #P | #P | #K | #B | | #P | #P | #P | |---------------------------------------| 6 | | | | #P | | | | | |---------------------------------------| 5 | | | | ^P | | | | #Q | |---------------------------------------| 4 | | | ^P | | | ^Q | | | |---------------------------------------| 3 | | | | | | ^Kt| | |
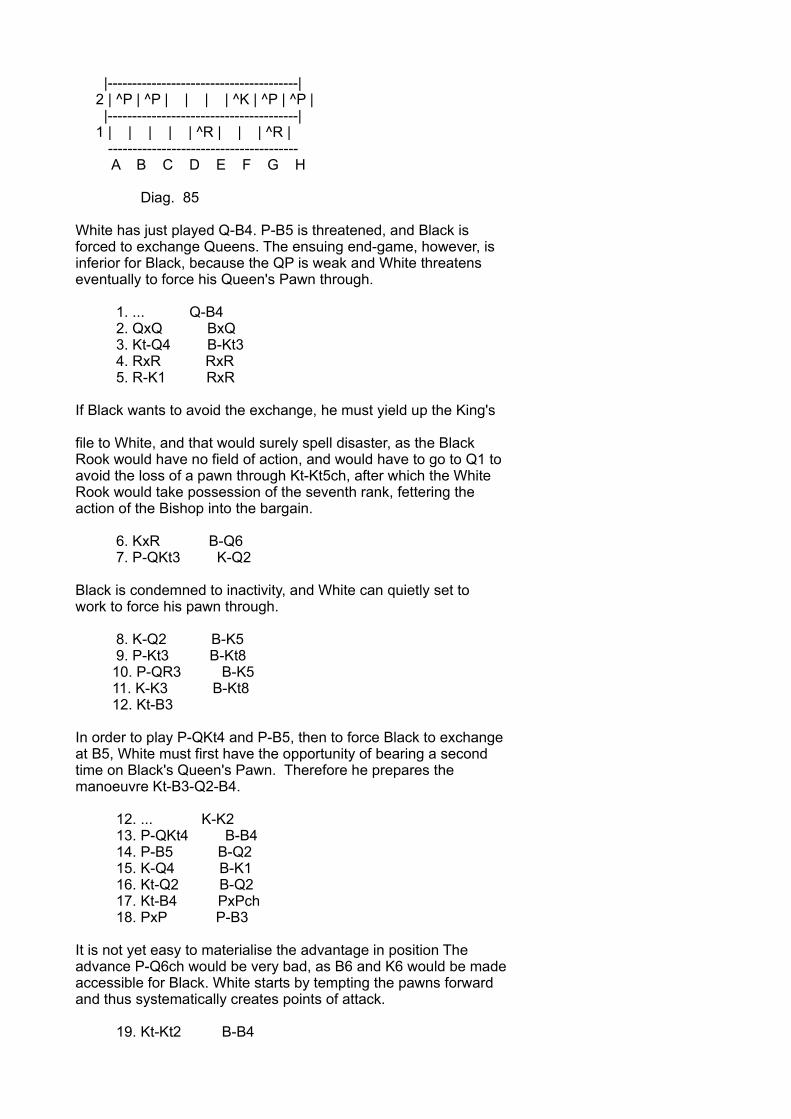
|---------------------------------------| 2 | ^P | ^P | | | | ^K | ^P | ^P | |---------------------------------------| 1 | | | | | ^R | | | ^R | --------------------------------------- A B C D E F G H
Diag. 85
White has just played Q-B4. P-B5 is threatened, and Black isforced to exchange Queens. The ensuing end-game, however, isinferior for Black, because the QP is weak and White threatenseventually to force his Queen's Pawn through.
1. ... Q-B4 2. QxQ BxQ 3. Kt-Q4 B-Kt3 4. RxR RxR 5. R-K1 RxR
If Black wants to avoid the exchange, he must yield up the King's
file to White, and that would surely spell disaster, as the BlackRook would have no field of action, and would have to go to Q1 toavoid the loss of a pawn through Kt-Kt5ch, after which the WhiteRook would take possession of the seventh rank, fettering theaction of the Bishop into the bargain.
6. KxR B-Q6 7. P-QKt3 K-Q2
Black is condemned to inactivity, and White can quietly set towork to force his pawn through.
8. K-Q2 B-K5 9. P-Kt3 B-Kt8 10. P-QR3 B-K5 11. K-K3 B-Kt8 12. Kt-B3
In order to play P-QKt4 and P-B5, then to force Black to exchangeat B5, White must first have the opportunity of bearing a secondtime on Black's Queen's Pawn. Therefore he prepares themanoeuvre Kt-B3-Q2-B4.
12. ... K-K2 13. P-QKt4 B-B4 14. P-B5 B-Q2 15. K-Q4 B-K1 16. Kt-Q2 B-Q2 17. Kt-B4 PxPch 18. PxP P-B3
It is not yet easy to materialise the advantage in position Theadvance P-Q6ch would be very bad, as B6 and K6 would be madeaccessible for Black. White starts by tempting the pawns forwardand thus systematically creates points of attack.
19. Kt-Kt2 B-B4
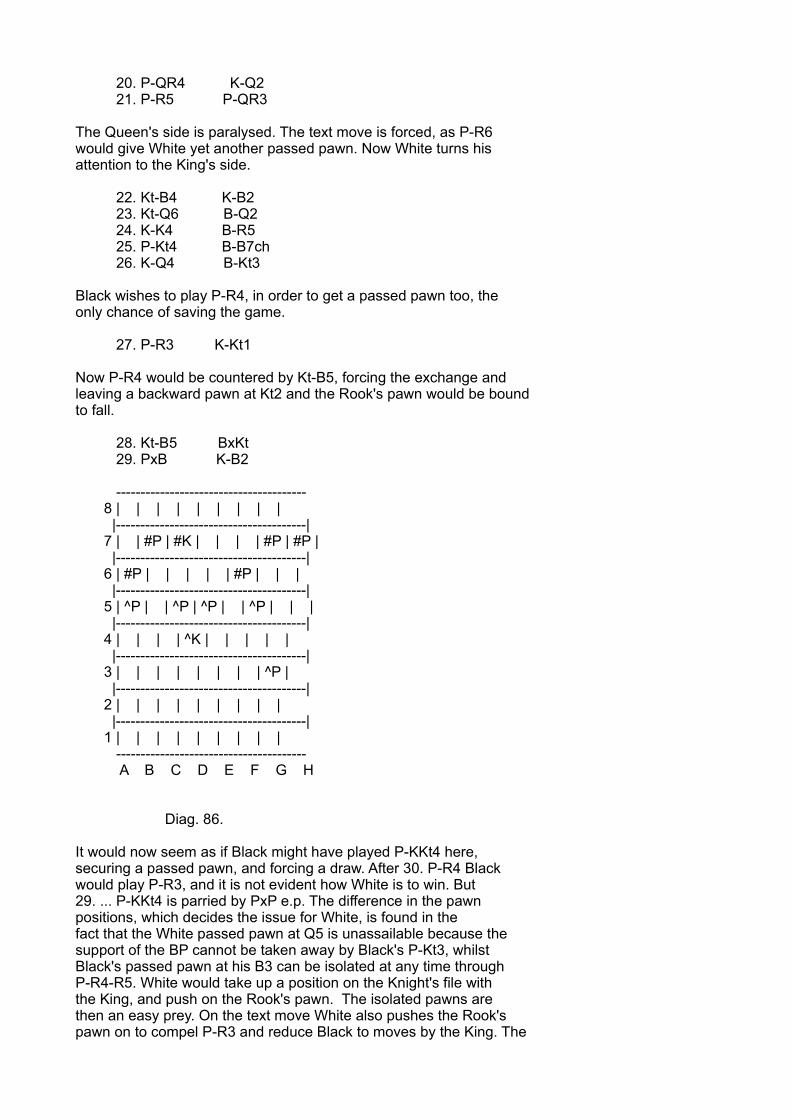
20. P-QR4 K-Q2 21. P-R5 P-QR3
The Queen's side is paralysed. The text move is forced, as P-R6would give White yet another passed pawn. Now White turns hisattention to the King's side.
22. Kt-B4 K-B2 23. Kt-Q6 B-Q2 24. K-K4 B-R5 25. P-Kt4 B-B7ch 26. K-Q4 B-Kt3
Black wishes to play P-R4, in order to get a passed pawn too, theonly chance of saving the game.
27. P-R3 K-Kt1
Now P-R4 would be countered by Kt-B5, forcing the exchange andleaving a backward pawn at Kt2 and the Rook's pawn would be boundto fall.
28. Kt-B5 BxKt 29. PxB K-B2
--------------------------------------- 8 | | | | | | | | | |---------------------------------------| 7 | | #P | #K | | | | #P | #P | |---------------------------------------| 6 | #P | | | | | #P | | | |---------------------------------------| 5 | ^P | | ^P | ^P | | ^P | | | |---------------------------------------| 4 | | | | ^K | | | | | |---------------------------------------| 3 | | | | | | | | ^P | |---------------------------------------| 2 | | | | | | | | | |---------------------------------------| 1 | | | | | | | | | --------------------------------------- A B C D E F G H
Diag. 86.
It would now seem as if Black might have played P-KKt4 here,securing a passed pawn, and forcing a draw. After 30. P-R4 Blackwould play P-R3, and it is not evident how White is to win. But29. ... P-KKt4 is parried by PxP e.p. The difference in the pawnpositions, which decides the issue for White, is found in thefact that the White passed pawn at Q5 is unassailable because thesupport of the BP cannot be taken away by Black's P-Kt3, whilstBlack's passed pawn at his B3 can be isolated at any time throughP-R4-R5. White would take up a position on the Knight's file withthe King, and push on the Rook's pawn. The isolated pawns arethen an easy prey. On the text move White also pushes the Rook'spawn on to compel P-R3 and reduce Black to moves by the King. The

passed Queen's pawn decides the game.
30. K-K4 K-Q2 31. K-B4 K-K2 32. K-Kt4 K-Q2 33. P-R4 K-B1 34. P-R5 P-R3
Otherwise there follows: P-R6, K-R5, etc.
35. K-B4 K-Q2 36. K-K4 K-B2 37. P-Q6ch K-B1 38. K-Q5 K-Q2 39. P-B6ch PxPch
(compare Diagram 68)
40. K-B5 Resigns
IV. FROM A GAME BIRD-JANOWSKI.
--------------------------------------- 8 | | | | | | | #K | | |---------------------------------------| 7 | #P | | ^B | | | | | #P | |---------------------------------------| 6 | | | | | | | | | |---------------------------------------| 5 | ^P | | | | | #P | | | |---------------------------------------| 4 | | ^P | | | #P | | | | |---------------------------------------| 3 | | | ^P | | | | ^P | | |---------------------------------------| 2 | | | | | ^K | | | ^P | |---------------------------------------| 1 | #R | | | | | | | | --------------------------------------- A B C D E F G H
Diag. 87
In spite of the preponderance of material, the win is not an easyone for Black, because of White's alarming pawn array on theQueen's side. The King must first make use of his great power asan end-game piece.
1. ... K-B2 2. P-Kt5 K-K3 3. P-Kt6 PxP 4. PxP K-Q2 5. B-K5
threatens P-Kt7. But as White must first move his Bishop to coverhis pawn, the Rook's pawn is lost, and the manoeuvre thereforeunsound. P-R3 was indicated; it threatens the break-up of the
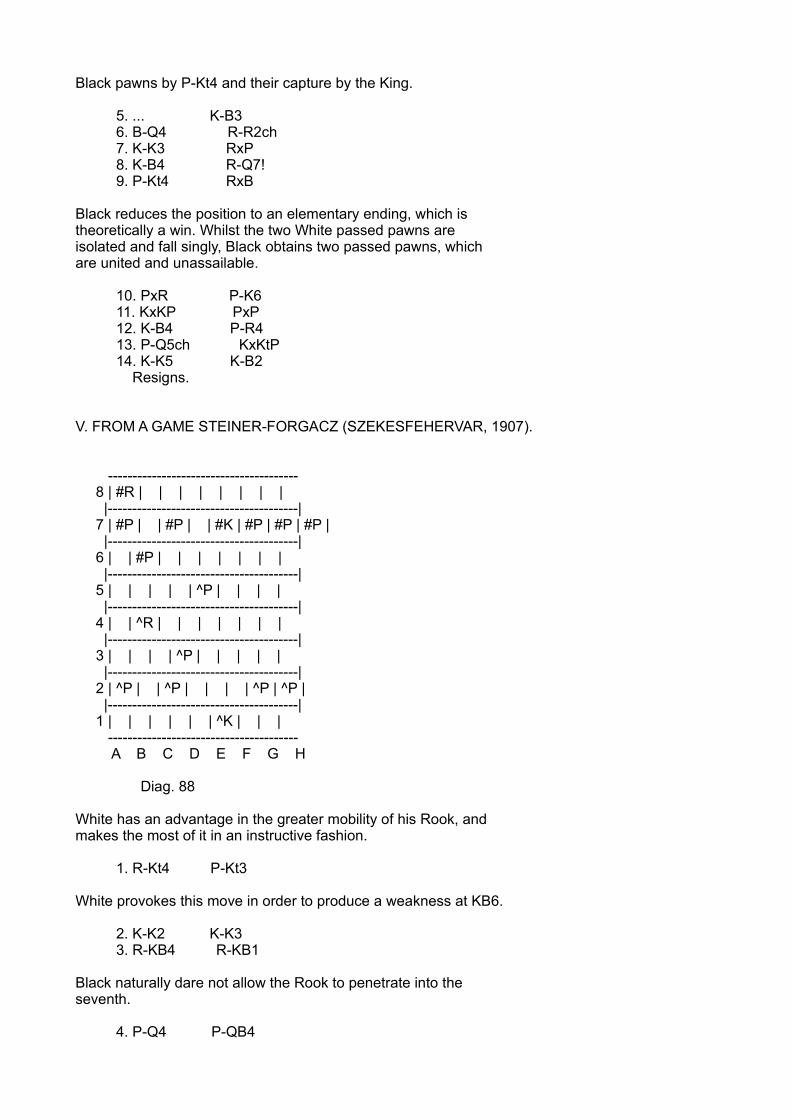
Black pawns by P-Kt4 and their capture by the King.
5. ... K-B3 6. B-Q4 R-R2ch 7. K-K3 RxP 8. K-B4 R-Q7! 9. P-Kt4 RxB
Black reduces the position to an elementary ending, which istheoretically a win. Whilst the two White passed pawns areisolated and fall singly, Black obtains two passed pawns, whichare united and unassailable.
10. PxR P-K6 11. KxKP PxP 12. K-B4 P-R4 13. P-Q5ch KxKtP 14. K-K5 K-B2 Resigns.
V. FROM A GAME STEINER-FORGACZ (SZEKESFEHERVAR, 1907).
--------------------------------------- 8 | #R | | | | | | | | |---------------------------------------| 7 | #P | | #P | | #K | #P | #P | #P | |---------------------------------------| 6 | | #P | | | | | | | |---------------------------------------| 5 | | | | | ^P | | | | |---------------------------------------| 4 | | ^R | | | | | | | |---------------------------------------| 3 | | | | ^P | | | | | |---------------------------------------| 2 | ^P | | ^P | | | | ^P | ^P | |---------------------------------------| 1 | | | | | | ^K | | | --------------------------------------- A B C D E F G H
Diag. 88
White has an advantage in the greater mobility of his Rook, andmakes the most of it in an instructive fashion.
1. R-Kt4 P-Kt3
White provokes this move in order to produce a weakness at KB6.
2. K-K2 K-K3 3. R-KB4 R-KB1
Black naturally dare not allow the Rook to penetrate into theseventh.
4. P-Q4 P-QB4
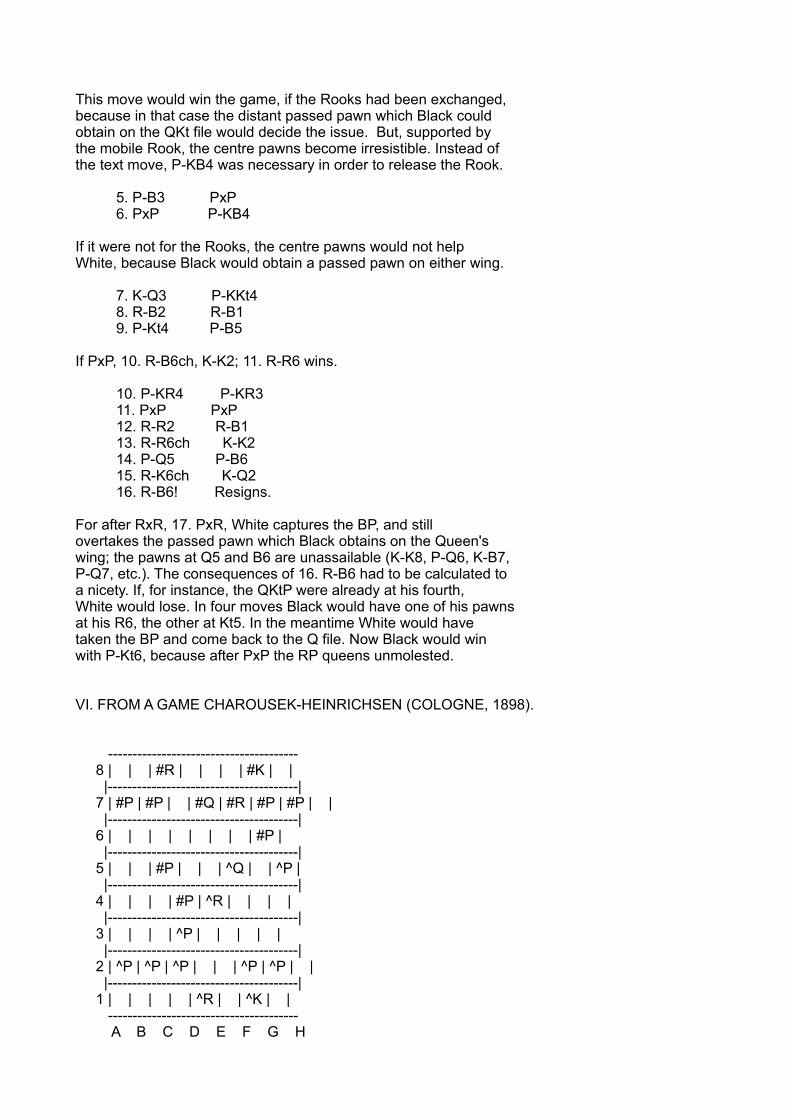
This move would win the game, if the Rooks had been exchanged,because in that case the distant passed pawn which Black couldobtain on the QKt file would decide the issue. But, supported bythe mobile Rook, the centre pawns become irresistible. Instead ofthe text move, P-KB4 was necessary in order to release the Rook.
5. P-B3 PxP 6. PxP P-KB4
If it were not for the Rooks, the centre pawns would not helpWhite, because Black would obtain a passed pawn on either wing.
7. K-Q3 P-KKt4 8. R-B2 R-B1 9. P-Kt4 P-B5
If PxP, 10. R-B6ch, K-K2; 11. R-R6 wins.
10. P-KR4 P-KR3 11. PxP PxP 12. R-R2 R-B1 13. R-R6ch K-K2 14. P-Q5 P-B6 15. R-K6ch K-Q2 16. R-B6! Resigns.
For after RxR, 17. PxR, White captures the BP, and stillovertakes the passed pawn which Black obtains on the Queen'swing; the pawns at Q5 and B6 are unassailable (K-K8, P-Q6, K-B7,P-Q7, etc.). The consequences of 16. R-B6 had to be calculated toa nicety. If, for instance, the QKtP were already at his fourth,White would lose. In four moves Black would have one of his pawnsat his R6, the other at Kt5. In the meantime White would havetaken the BP and come back to the Q file. Now Black would winwith P-Kt6, because after PxP the RP queens unmolested.
VI. FROM A GAME CHAROUSEK-HEINRICHSEN (COLOGNE, 1898).
--------------------------------------- 8 | | | #R | | | | #K | | |---------------------------------------| 7 | #P | #P | | #Q | #R | #P | #P | | |---------------------------------------| 6 | | | | | | | | #P | |---------------------------------------| 5 | | | #P | | | ^Q | | ^P | |---------------------------------------| 4 | | | | #P | ^R | | | | |---------------------------------------| 3 | | | | ^P | | | | | |---------------------------------------| 2 | ^P | ^P | ^P | | | ^P | ^P | | |---------------------------------------| 1 | | | | | ^R | | ^K | | --------------------------------------- A B C D E F G H
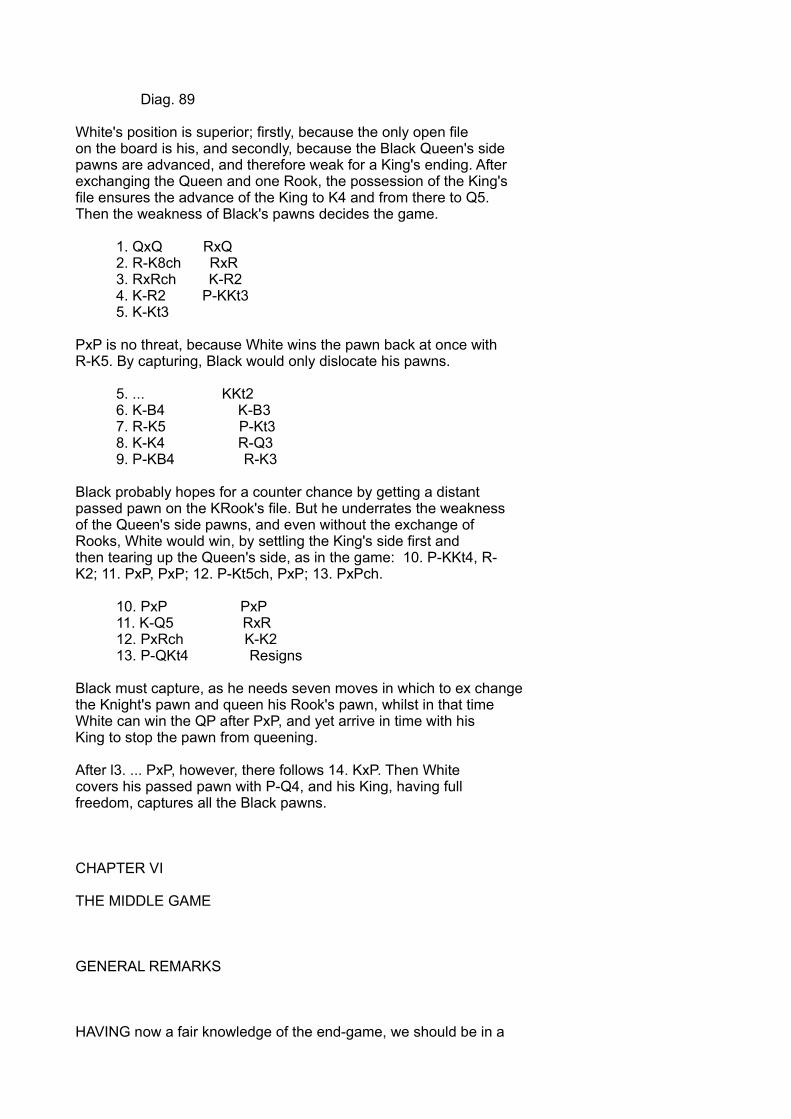
Diag. 89
White's position is superior; firstly, because the only open fileon the board is his, and secondly, because the Black Queen's sidepawns are advanced, and therefore weak for a King's ending. Afterexchanging the Queen and one Rook, the possession of the King'sfile ensures the advance of the King to K4 and from there to Q5.Then the weakness of Black's pawns decides the game.
1. QxQ RxQ 2. R-K8ch RxR 3. RxRch K-R2 4. K-R2 P-KKt3 5. K-Kt3
PxP is no threat, because White wins the pawn back at once withR-K5. By capturing, Black would only dislocate his pawns.
5. ... KKt2 6. K-B4 K-B3 7. R-K5 P-Kt3 8. K-K4 R-Q3 9. P-KB4 R-K3
Black probably hopes for a counter chance by getting a distantpassed pawn on the KRook's file. But he underrates the weaknessof the Queen's side pawns, and even without the exchange ofRooks, White would win, by settling the King's side first andthen tearing up the Queen's side, as in the game: 10. P-KKt4, R-K2; 11. PxP, PxP; 12. P-Kt5ch, PxP; 13. PxPch.
10. PxP PxP 11. K-Q5 RxR 12. PxRch K-K2 13. P-QKt4 Resigns
Black must capture, as he needs seven moves in which to ex changethe Knight's pawn and queen his Rook's pawn, whilst in that timeWhite can win the QP after PxP, and yet arrive in time with hisKing to stop the pawn from queening.
After l3. ... PxP, however, there follows 14. KxP. Then Whitecovers his passed pawn with P-Q4, and his King, having fullfreedom, captures all the Black pawns.
CHAPTER VI
THE MIDDLE GAME
GENERAL REMARKS
HAVING now a fair knowledge of the end-game, we should be in a
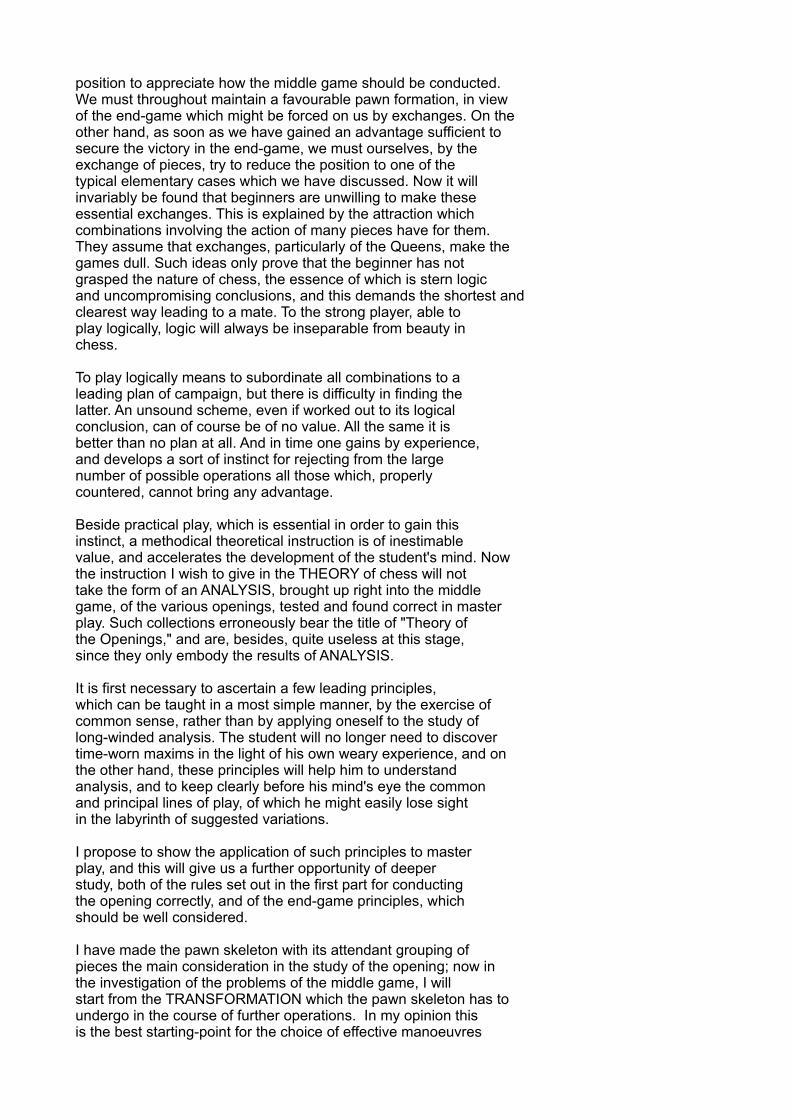
position to appreciate how the middle game should be conducted.We must throughout maintain a favourable pawn formation, in viewof the end-game which might be forced on us by exchanges. On theother hand, as soon as we have gained an advantage sufficient tosecure the victory in the end-game, we must ourselves, by theexchange of pieces, try to reduce the position to one of thetypical elementary cases which we have discussed. Now it willinvariably be found that beginners are unwilling to make theseessential exchanges. This is explained by the attraction whichcombinations involving the action of many pieces have for them.They assume that exchanges, particularly of the Queens, make thegames dull. Such ideas only prove that the beginner has notgrasped the nature of chess, the essence of which is stern logicand uncompromising conclusions, and this demands the shortest andclearest way leading to a mate. To the strong player, able toplay logically, logic will always be inseparable from beauty inchess.
To play logically means to subordinate all combinations to aleading plan of campaign, but there is difficulty in finding thelatter. An unsound scheme, even if worked out to its logicalconclusion, can of course be of no value. All the same it isbetter than no plan at all. And in time one gains by experience,and develops a sort of instinct for rejecting from the largenumber of possible operations all those which, properlycountered, cannot bring any advantage.
Beside practical play, which is essential in order to gain thisinstinct, a methodical theoretical instruction is of inestimablevalue, and accelerates the development of the student's mind. Nowthe instruction I wish to give in the THEORY of chess will nottake the form of an ANALYSIS, brought up right into the middlegame, of the various openings, tested and found correct in masterplay. Such collections erroneously bear the title of "Theory ofthe Openings," and are, besides, quite useless at this stage,since they only embody the results of ANALYSIS.
It is first necessary to ascertain a few leading principles,which can be taught in a most simple manner, by the exercise ofcommon sense, rather than by applying oneself to the study oflong-winded analysis. The student will no longer need to discovertime-worn maxims in the light of his own weary experience, and onthe other hand, these principles will help him to understandanalysis, and to keep clearly before his mind's eye the commonand principal lines of play, of which he might easily lose sightin the labyrinth of suggested variations.
I propose to show the application of such principles to masterplay, and this will give us a further opportunity of deeperstudy, both of the rules set out in the first part for conductingthe opening correctly, and of the end-game principles, whichshould be well considered.
I have made the pawn skeleton with its attendant grouping ofpieces the main consideration in the study of the opening; now inthe investigation of the problems of the middle game, I willstart from the TRANSFORMATION which the pawn skeleton has toundergo in the course of further operations. In my opinion thisis the best starting-point for the choice of effective manoeuvres
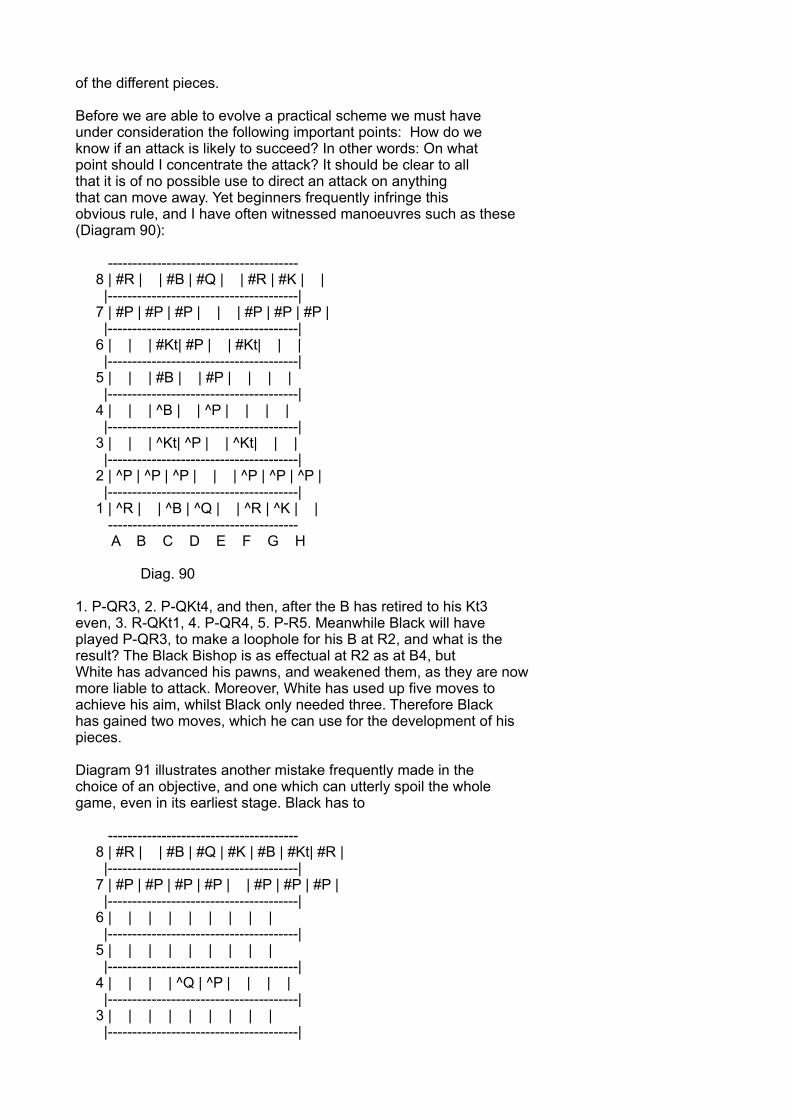
of the different pieces.
Before we are able to evolve a practical scheme we must haveunder consideration the following important points: How do weknow if an attack is likely to succeed? In other words: On whatpoint should I concentrate the attack? It should be clear to allthat it is of no possible use to direct an attack on anythingthat can move away. Yet beginners frequently infringe thisobvious rule, and I have often witnessed manoeuvres such as these(Diagram 90):
--------------------------------------- 8 | #R | | #B | #Q | | #R | #K | | |---------------------------------------| 7 | #P | #P | #P | | | #P | #P | #P | |---------------------------------------| 6 | | | #Kt| #P | | #Kt| | | |---------------------------------------| 5 | | | #B | | #P | | | | |---------------------------------------| 4 | | | ^B | | ^P | | | | |---------------------------------------| 3 | | | ^Kt| ^P | | ^Kt| | | |---------------------------------------| 2 | ^P | ^P | ^P | | | ^P | ^P | ^P | |---------------------------------------| 1 | ^R | | ^B | ^Q | | ^R | ^K | | --------------------------------------- A B C D E F G H
Diag. 90
1. P-QR3, 2. P-QKt4, and then, after the B has retired to his Kt3even, 3. R-QKt1, 4. P-QR4, 5. P-R5. Meanwhile Black will haveplayed P-QR3, to make a loophole for his B at R2, and what is theresult? The Black Bishop is as effectual at R2 as at B4, butWhite has advanced his pawns, and weakened them, as they are nowmore liable to attack. Moreover, White has used up five moves toachieve his aim, whilst Black only needed three. Therefore Blackhas gained two moves, which he can use for the development of hispieces.
Diagram 91 illustrates another mistake frequently made in thechoice of an objective, and one which can utterly spoil the wholegame, even in its earliest stage. Black has to
--------------------------------------- 8 | #R | | #B | #Q | #K | #B | #Kt| #R | |---------------------------------------| 7 | #P | #P | #P | #P | | #P | #P | #P | |---------------------------------------| 6 | | | | | | | | | |---------------------------------------| 5 | | | | | | | | | |---------------------------------------| 4 | | | | ^Q | ^P | | | | |---------------------------------------| 3 | | | | | | | | | |---------------------------------------|
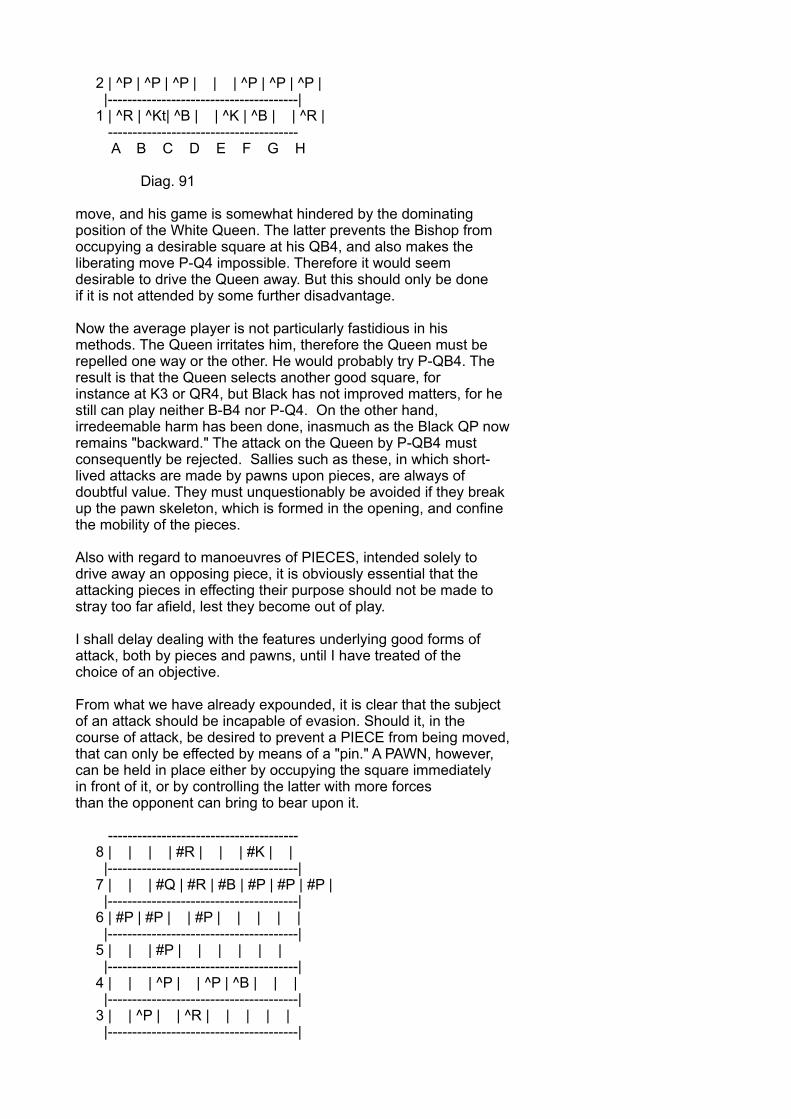
2 | ^P | ^P | ^P | | | ^P | ^P | ^P | |---------------------------------------| 1 | ^R | ^Kt| ^B | | ^K | ^B | | ^R | --------------------------------------- A B C D E F G H
Diag. 91
move, and his game is somewhat hindered by the dominatingposition of the White Queen. The latter prevents the Bishop fromoccupying a desirable square at his QB4, and also makes theliberating move P-Q4 impossible. Therefore it would seemdesirable to drive the Queen away. But this should only be doneif it is not attended by some further disadvantage.
Now the average player is not particularly fastidious in hismethods. The Queen irritates him, therefore the Queen must berepelled one way or the other. He would probably try P-QB4. Theresult is that the Queen selects another good square, forinstance at K3 or QR4, but Black has not improved matters, for hestill can play neither B-B4 nor P-Q4. On the other hand,irredeemable harm has been done, inasmuch as the Black QP nowremains "backward." The attack on the Queen by P-QB4 mustconsequently be rejected. Sallies such as these, in which short-lived attacks are made by pawns upon pieces, are always ofdoubtful value. They must unquestionably be avoided if they breakup the pawn skeleton, which is formed in the opening, and confinethe mobility of the pieces.
Also with regard to manoeuvres of PIECES, intended solely todrive away an opposing piece, it is obviously essential that theattacking pieces in effecting their purpose should not be made tostray too far afield, lest they become out of play.
I shall delay dealing with the features underlying good forms ofattack, both by pieces and pawns, until I have treated of thechoice of an objective.
From what we have already expounded, it is clear that the subjectof an attack should be incapable of evasion. Should it, in thecourse of attack, be desired to prevent a PIECE from being moved,that can only be effected by means of a "pin." A PAWN, however,can be held in place either by occupying the square immediatelyin front of it, or by controlling the latter with more forcesthan the opponent can bring to bear upon it.
--------------------------------------- 8 | | | | #R | | | #K | | |---------------------------------------| 7 | | | #Q | #R | #B | #P | #P | #P | |---------------------------------------| 6 | #P | #P | | #P | | | | | |---------------------------------------| 5 | | | #P | | | | | | |---------------------------------------| 4 | | | ^P | | ^P | ^B | | | |---------------------------------------| 3 | | ^P | | ^R | | | | | |---------------------------------------|
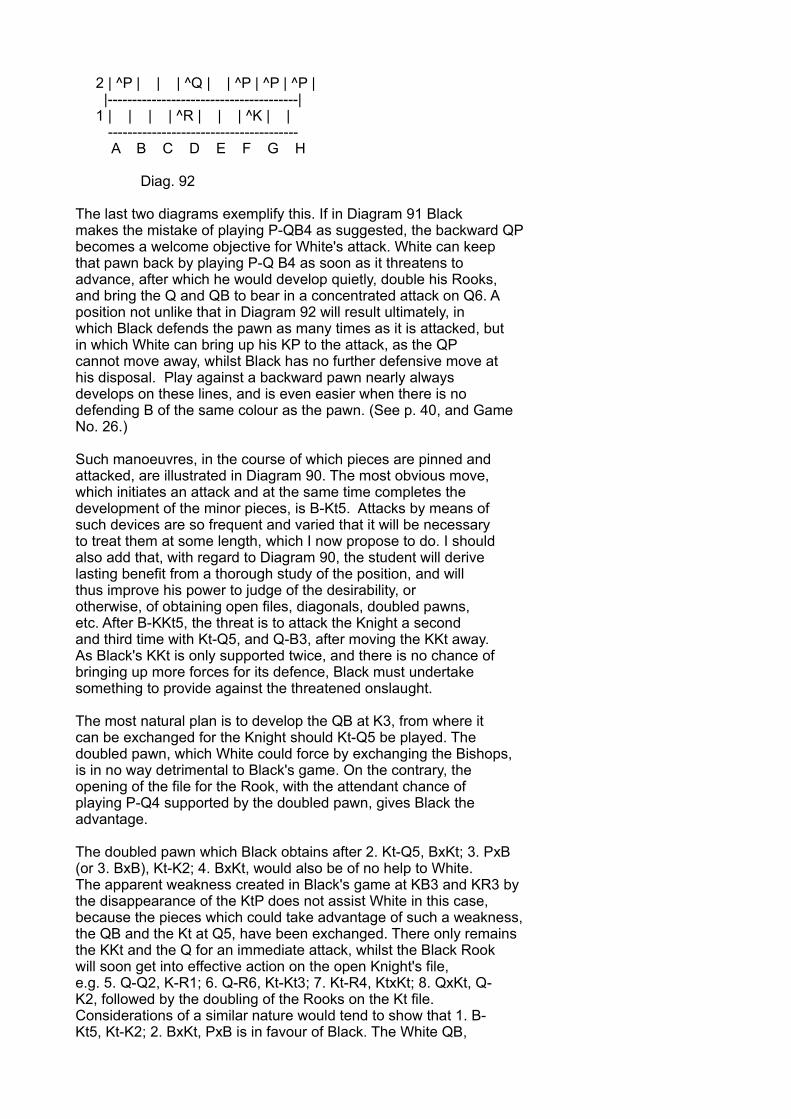
2 | ^P | | | ^Q | | ^P | ^P | ^P | |---------------------------------------| 1 | | | | ^R | | | ^K | | --------------------------------------- A B C D E F G H
Diag. 92
The last two diagrams exemplify this. If in Diagram 91 Blackmakes the mistake of playing P-QB4 as suggested, the backward QPbecomes a welcome objective for White's attack. White can keepthat pawn back by playing P-Q B4 as soon as it threatens toadvance, after which he would develop quietly, double his Rooks,and bring the Q and QB to bear in a concentrated attack on Q6. Aposition not unlike that in Diagram 92 will result ultimately, inwhich Black defends the pawn as many times as it is attacked, butin which White can bring up his KP to the attack, as the QPcannot move away, whilst Black has no further defensive move athis disposal. Play against a backward pawn nearly alwaysdevelops on these lines, and is even easier when there is nodefending B of the same colour as the pawn. (See p. 40, and GameNo. 26.)
Such manoeuvres, in the course of which pieces are pinned andattacked, are illustrated in Diagram 90. The most obvious move,which initiates an attack and at the same time completes thedevelopment of the minor pieces, is B-Kt5. Attacks by means ofsuch devices are so frequent and varied that it will be necessaryto treat them at some length, which I now propose to do. I shouldalso add that, with regard to Diagram 90, the student will derivelasting benefit from a thorough study of the position, and willthus improve his power to judge of the desirability, orotherwise, of obtaining open files, diagonals, doubled pawns,etc. After B-KKt5, the threat is to attack the Knight a secondand third time with Kt-Q5, and Q-B3, after moving the KKt away.As Black's KKt is only supported twice, and there is no chance ofbringing up more forces for its defence, Black must undertakesomething to provide against the threatened onslaught.
The most natural plan is to develop the QB at K3, from where itcan be exchanged for the Knight should Kt-Q5 be played. Thedoubled pawn, which White could force by exchanging the Bishops,is in no way detrimental to Black's game. On the contrary, theopening of the file for the Rook, with the attendant chance ofplaying P-Q4 supported by the doubled pawn, gives Black theadvantage.
The doubled pawn which Black obtains after 2. Kt-Q5, BxKt; 3. PxB(or 3. BxB), Kt-K2; 4. BxKt, would also be of no help to White.The apparent weakness created in Black's game at KB3 and KR3 bythe disappearance of the KtP does not assist White in this case,because the pieces which could take advantage of such a weakness,the QB and the Kt at Q5, have been exchanged. There only remainsthe KKt and the Q for an immediate attack, whilst the Black Rookwill soon get into effective action on the open Knight's file,e.g. 5. Q-Q2, K-R1; 6. Q-R6, Kt-Kt3; 7. Kt-R4, KtxKt; 8. QxKt, Q-K2, followed by the doubling of the Rooks on the Kt file.Considerations of a similar nature would tend to show that 1. B-Kt5, Kt-K2; 2. BxKt, PxB is in favour of Black. The White QB,
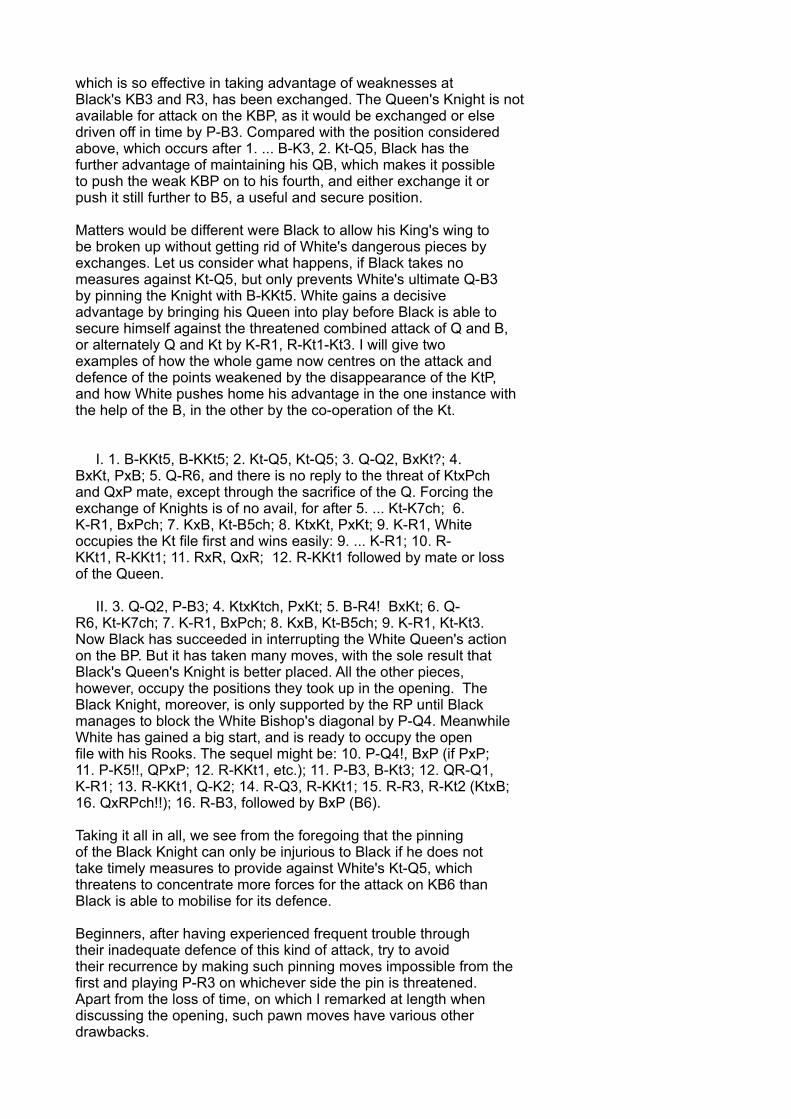
which is so effective in taking advantage of weaknesses atBlack's KB3 and R3, has been exchanged. The Queen's Knight is notavailable for attack on the KBP, as it would be exchanged or elsedriven off in time by P-B3. Compared with the position consideredabove, which occurs after 1. ... B-K3, 2. Kt-Q5, Black has thefurther advantage of maintaining his QB, which makes it possibleto push the weak KBP on to his fourth, and either exchange it orpush it still further to B5, a useful and secure position.
Matters would be different were Black to allow his King's wing tobe broken up without getting rid of White's dangerous pieces byexchanges. Let us consider what happens, if Black takes nomeasures against Kt-Q5, but only prevents White's ultimate Q-B3by pinning the Knight with B-KKt5. White gains a decisiveadvantage by bringing his Queen into play before Black is able tosecure himself against the threatened combined attack of Q and B,or alternately Q and Kt by K-R1, R-Kt1-Kt3. I will give twoexamples of how the whole game now centres on the attack anddefence of the points weakened by the disappearance of the KtP,and how White pushes home his advantage in the one instance withthe help of the B, in the other by the co-operation of the Kt.
I. 1. B-KKt5, B-KKt5; 2. Kt-Q5, Kt-Q5; 3. Q-Q2, BxKt?; 4.BxKt, PxB; 5. Q-R6, and there is no reply to the threat of KtxPchand QxP mate, except through the sacrifice of the Q. Forcing theexchange of Knights is of no avail, for after 5. ... Kt-K7ch; 6.K-R1, BxPch; 7. KxB, Kt-B5ch; 8. KtxKt, PxKt; 9. K-R1, Whiteoccupies the Kt file first and wins easily: 9. ... K-R1; 10. R-KKt1, R-KKt1; 11. RxR, QxR; 12. R-KKt1 followed by mate or lossof the Queen.
II. 3. Q-Q2, P-B3; 4. KtxKtch, PxKt; 5. B-R4! BxKt; 6. Q-R6, Kt-K7ch; 7. K-R1, BxPch; 8. KxB, Kt-B5ch; 9. K-R1, Kt-Kt3.Now Black has succeeded in interrupting the White Queen's actionon the BP. But it has taken many moves, with the sole result thatBlack's Queen's Knight is better placed. All the other pieces,however, occupy the positions they took up in the opening. TheBlack Knight, moreover, is only supported by the RP until Blackmanages to block the White Bishop's diagonal by P-Q4. MeanwhileWhite has gained a big start, and is ready to occupy the openfile with his Rooks. The sequel might be: 10. P-Q4!, BxP (if PxP;11. P-K5!!, QPxP; 12. R-KKt1, etc.); 11. P-B3, B-Kt3; 12. QR-Q1,K-R1; 13. R-KKt1, Q-K2; 14. R-Q3, R-KKt1; 15. R-R3, R-Kt2 (KtxB;16. QxRPch!!); 16. R-B3, followed by BxP (B6).
Taking it all in all, we see from the foregoing that the pinningof the Black Knight can only be injurious to Black if he does nottake timely measures to provide against White's Kt-Q5, whichthreatens to concentrate more forces for the attack on KB6 thanBlack is able to mobilise for its defence.
Beginners, after having experienced frequent trouble throughtheir inadequate defence of this kind of attack, try to avoidtheir recurrence by making such pinning moves impossible from thefirst and playing P-R3 on whichever side the pin is threatened.Apart from the loss of time, on which I remarked at length whendiscussing the opening, such pawn moves have various otherdrawbacks.

With every pawn move it should be considered whether the squaresprotected by the pawn before it has moved may not need thesupport of that pawn at a later stage. This is particularly thecase with regard to squares in front of the castled King. If oneof those pawns pushes on, the squares which have lost itsprotection frequently offer an opening for a direct attack by theenemy's pieces on the King.
A second consideration is the fact that the advancing pawn itselfbecomes a target for an assault in which the opponent, moving upa pawn on the next file, brings his Rooks into play, or in whichhe sacrifices a piece for the advanced pawn and the one thatprotects it, thus robbing the King of the protection he sought toobtain in castling.
The following examples will contribute much to the understandingof this most important subject, the grasp of which will mean agreat step forward for the student.
The position in Diagram 93 is from a game v. Scheve-Teichmann(Berlin, 1907). White played 1. P-R3 in order to avoid thepinning of his Knight through B-Kt5. The move is not unjustified,as the Knight is required for the support of the square at Q4.The pawn move, however, has the drawbacks enumerated above, andWhite must think of keeping a sufficiency of pieces for the fighton the King's wing, in order to prevent Black from utilising theweakness thus created for a combined assault by superior forces.
--------------------------------------- 8 | #R | | #B | | #K | | #Kt| #R | |---------------------------------------| 7 | #B | #P | #P | | #Q | #P | #P | #P | |---------------------------------------| 6 | #P | | #Kt| #P | | | | | |---------------------------------------| 5 | ^P | | | | #P | | | | |---------------------------------------| 4 | | | ^B | ^P | ^P | | | | |---------------------------------------| 3 | | | ^P | | | ^Kt| | | |---------------------------------------| 2 | | ^P | | | | ^P | ^P | ^P | |---------------------------------------| 1 | ^R | ^Kt| ^B | ^Q | | ^R | ^K | | --------------------------------------- A B C D E F G H
Diag. 93
In this case White does not take precautionary measures, andsuccumbs in a surprisingly short time.
1. ... Kt-B3; 2. PxP? With this move White opens the diagonal forBlack's KB for no apparent reason. 2. ... QKtxP; 3. KtxKt?Instead of providing for the defence of his King's wing, Whiteexchanges one of the King's side pieces, 3. ... QxKt; 4. Kt-Q2,BxP! White has provoked this sacrifice by his last two moves. TheKBP is pinned, and the Q enters by way of her Kt6, the protection
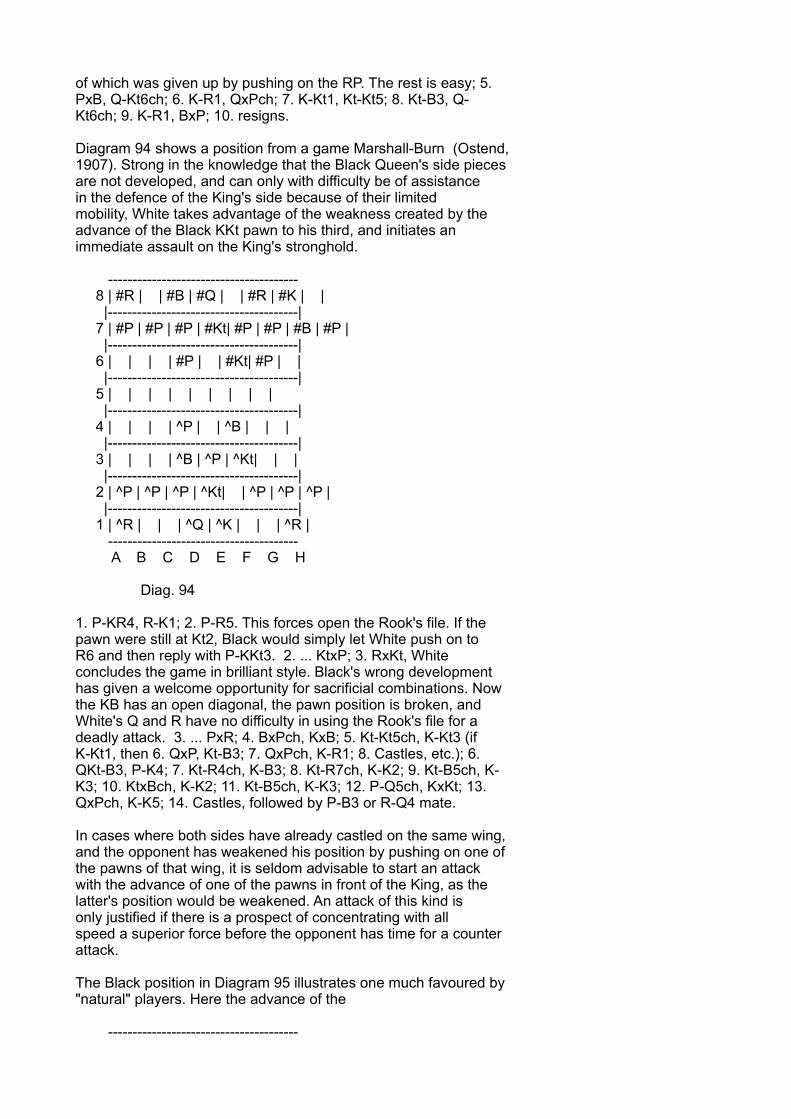
of which was given up by pushing on the RP. The rest is easy; 5.PxB, Q-Kt6ch; 6. K-R1, QxPch; 7. K-Kt1, Kt-Kt5; 8. Kt-B3, Q-Kt6ch; 9. K-R1, BxP; 10. resigns.
Diagram 94 shows a position from a game Marshall-Burn (Ostend,1907). Strong in the knowledge that the Black Queen's side piecesare not developed, and can only with difficulty be of assistancein the defence of the King's side because of their limitedmobility, White takes advantage of the weakness created by theadvance of the Black KKt pawn to his third, and initiates animmediate assault on the King's stronghold.
--------------------------------------- 8 | #R | | #B | #Q | | #R | #K | | |---------------------------------------| 7 | #P | #P | #P | #Kt| #P | #P | #B | #P | |---------------------------------------| 6 | | | | #P | | #Kt| #P | | |---------------------------------------| 5 | | | | | | | | | |---------------------------------------| 4 | | | | ^P | | ^B | | | |---------------------------------------| 3 | | | | ^B | ^P | ^Kt| | | |---------------------------------------| 2 | ^P | ^P | ^P | ^Kt| | ^P | ^P | ^P | |---------------------------------------| 1 | ^R | | | ^Q | ^K | | | ^R | --------------------------------------- A B C D E F G H
Diag. 94
1. P-KR4, R-K1; 2. P-R5. This forces open the Rook's file. If thepawn were still at Kt2, Black would simply let White push on toR6 and then reply with P-KKt3. 2. ... KtxP; 3. RxKt, Whiteconcludes the game in brilliant style. Black's wrong developmenthas given a welcome opportunity for sacrificial combinations. Nowthe KB has an open diagonal, the pawn position is broken, andWhite's Q and R have no difficulty in using the Rook's file for adeadly attack. 3. ... PxR; 4. BxPch, KxB; 5. Kt-Kt5ch, K-Kt3 (ifK-Kt1, then 6. QxP, Kt-B3; 7. QxPch, K-R1; 8. Castles, etc.); 6.QKt-B3, P-K4; 7. Kt-R4ch, K-B3; 8. Kt-R7ch, K-K2; 9. Kt-B5ch, K-K3; 10. KtxBch, K-K2; 11. Kt-B5ch, K-K3; 12. P-Q5ch, KxKt; 13.QxPch, K-K5; 14. Castles, followed by P-B3 or R-Q4 mate.
In cases where both sides have already castled on the same wing,and the opponent has weakened his position by pushing on one ofthe pawns of that wing, it is seldom advisable to start an attackwith the advance of one of the pawns in front of the King, as thelatter's position would be weakened. An attack of this kind isonly justified if there is a prospect of concentrating with allspeed a superior force before the opponent has time for a counterattack.
The Black position in Diagram 95 illustrates one much favoured by"natural" players. Here the advance of the
---------------------------------------
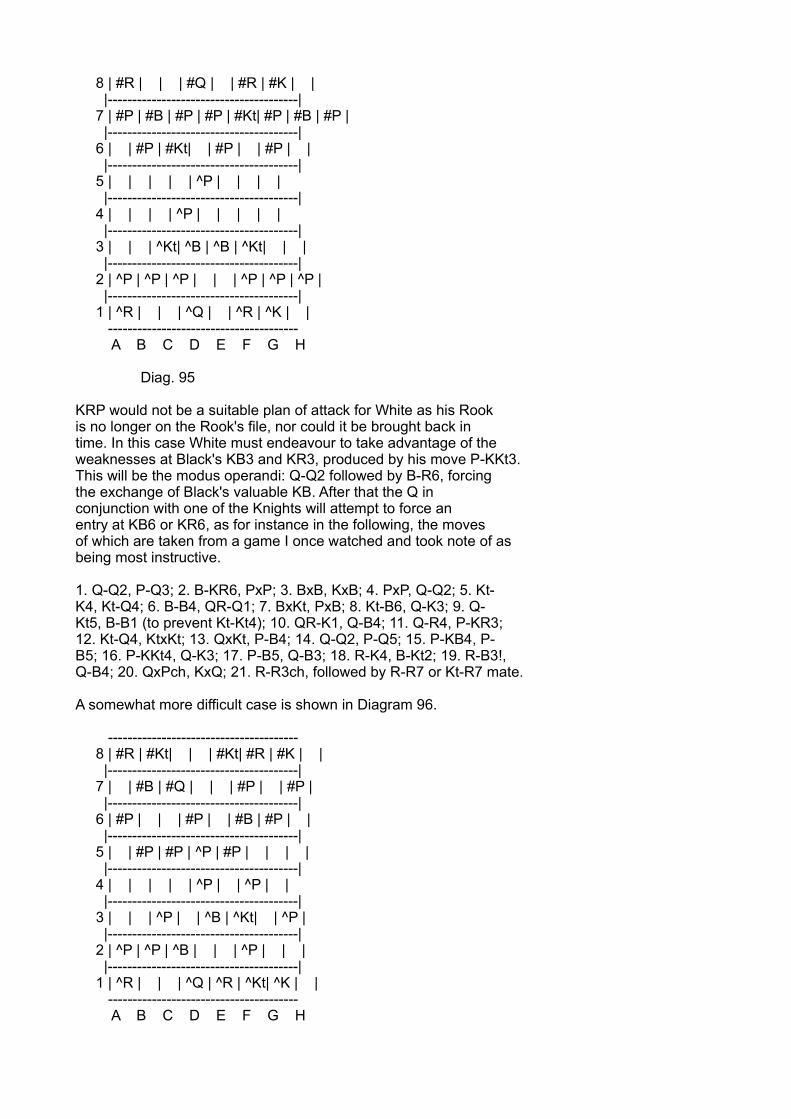
8 | #R | | | #Q | | #R | #K | | |---------------------------------------| 7 | #P | #B | #P | #P | #Kt| #P | #B | #P | |---------------------------------------| 6 | | #P | #Kt| | #P | | #P | | |---------------------------------------| 5 | | | | | ^P | | | | |---------------------------------------| 4 | | | | ^P | | | | | |---------------------------------------| 3 | | | ^Kt| ^B | ^B | ^Kt| | | |---------------------------------------| 2 | ^P | ^P | ^P | | | ^P | ^P | ^P | |---------------------------------------| 1 | ^R | | | ^Q | | ^R | ^K | | --------------------------------------- A B C D E F G H
Diag. 95
KRP would not be a suitable plan of attack for White as his Rookis no longer on the Rook's file, nor could it be brought back intime. In this case White must endeavour to take advantage of theweaknesses at Black's KB3 and KR3, produced by his move P-KKt3.This will be the modus operandi: Q-Q2 followed by B-R6, forcingthe exchange of Black's valuable KB. After that the Q inconjunction with one of the Knights will attempt to force anentry at KB6 or KR6, as for instance in the following, the movesof which are taken from a game I once watched and took note of asbeing most instructive.
1. Q-Q2, P-Q3; 2. B-KR6, PxP; 3. BxB, KxB; 4. PxP, Q-Q2; 5. Kt-K4, Kt-Q4; 6. B-B4, QR-Q1; 7. BxKt, PxB; 8. Kt-B6, Q-K3; 9. Q-Kt5, B-B1 (to prevent Kt-Kt4); 10. QR-K1, Q-B4; 11. Q-R4, P-KR3;12. Kt-Q4, KtxKt; 13. QxKt, P-B4; 14. Q-Q2, P-Q5; 15. P-KB4, P-B5; 16. P-KKt4, Q-K3; 17. P-B5, Q-B3; 18. R-K4, B-Kt2; 19. R-B3!,Q-B4; 20. QxPch, KxQ; 21. R-R3ch, followed by R-R7 or Kt-R7 mate.
A somewhat more difficult case is shown in Diagram 96.
--------------------------------------- 8 | #R | #Kt| | | #Kt| #R | #K | | |---------------------------------------| 7 | | #B | #Q | | | #P | | #P | |---------------------------------------| 6 | #P | | | #P | | #B | #P | | |---------------------------------------| 5 | | #P | #P | ^P | #P | | | | |---------------------------------------| 4 | | | | | ^P | | ^P | | |---------------------------------------| 3 | | | ^P | | ^B | ^Kt| | ^P | |---------------------------------------| 2 | ^P | ^P | ^B | | | ^P | | | |---------------------------------------| 1 | ^R | | | ^Q | ^R | ^Kt| ^K | | --------------------------------------- A B C D E F G H

Diag. 96
Here the advance of the White King's side pawns has undeniablyproduced weaknesses in the pawn skeleton, and these would befatal had the Black pieces as much mobility as the White ones.But the congestion of Black's pieces on the Queen's side makeshis defence unwieldy, and White has no difficulty in accumulatinghis forces on the King's side for the final assault. Theprospects are that White will be able to bring home his attack,before Black has a chance of forcing exchanges and of bringingabout the end-game, which through the weakness of the White pawnswould probably turn to his advantage. The play (E. Cohn-Ed.Lasker match, Berlin, 1909) is instructive, and shows how theattack should be conducted in such positions. 1. Kt-Kt3, B-Kt2;2. K-R2, P-B3; 3. R-KKt1, Kt-Q2; 4. Kt-R4, K-B2. Theconcentration of the White pieces has become alarming, andthreatens to be continued by Q-Q2, R-Kt2. QR-KKt1, and Kt-B5. Sothe Black King decides on flight, but he finds no peace on the Qside either, because there his advanced pawns soon allow White tomake a breach in the Black position.
5. Kt-Kt2, K-K2; 6. Q-K2, Kt-Kt3; 7. KR-KB1, B-B1. It is Black'sintention to play P-B4 as soon as practicable, and to make anattempt at a counter demonstration on the King's side, 8. P-K B4,K-Q1? (Black should have kept to his original intention andplayed P-B4); 9. PxP, QPxP; 10. Q-B2, Kt-Q2; 11. P-QR4; B-Kt2;12. PxP, PxP; 13. RxR, BxR. Now White has achieved what he setout to do. He has opened up avenues of attack on the Queen'sside, and is ready to utilise the weakness of Black's QBP byplaying P-Kt4, on which Black must submit to opening the file forthe White KR or the diagonal for the White QB. In either caseWhite brings vastly superior forces to bear on the Black King'sposition, and Black should lose. In this game Black escaped onlythrough a mistake on the part of his opponent.
In the foregoing positions it was seen how fatal weaknesses canbe, which are produced by the premature advance of the pawns infront of the King, on whom the opposing pieces can force theirattack. When the pawns concerned are on the opposite wing totheir King, the disadvantages of a premature advance are felt ina different way. The weakness concerns the pawns themselves andnot the forces behind them, and is apt to cause the loss of theend-game, particularly of Rook end-games. Let us compare thepositions in Diagrams 97
--------------------------------------- 8 | #R | | #B | #Q | | #R | #K | | |---------------------------------------| 7 | #P | #P | #P | |#Kt | #P | | #P | |---------------------------------------| 6 | | | | #P | | #P | | | |---------------------------------------| 5 | | ^B | | | #P | | | | |---------------------------------------| 4 | | #B | | | ^P | | | | |---------------------------------------| 3 | | |^Kt | ^P | |^Kt | | | |---------------------------------------| 2 | ^P | ^P | ^P | | | ^P | ^P | ^P |
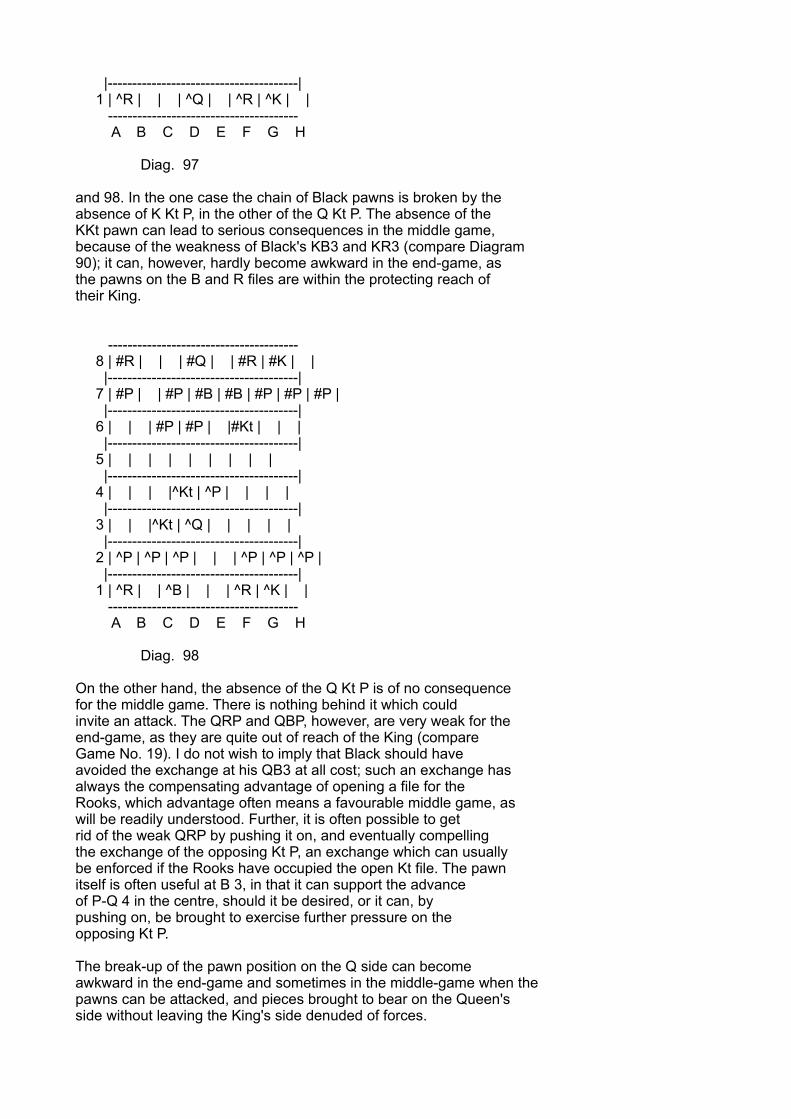
|---------------------------------------| 1 | ^R | | | ^Q | | ^R | ^K | | --------------------------------------- A B C D E F G H
Diag. 97
and 98. In the one case the chain of Black pawns is broken by theabsence of K Kt P, in the other of the Q Kt P. The absence of theKKt pawn can lead to serious consequences in the middle game,because of the weakness of Black's KB3 and KR3 (compare Diagram90); it can, however, hardly become awkward in the end-game, asthe pawns on the B and R files are within the protecting reach oftheir King.
--------------------------------------- 8 | #R | | | #Q | | #R | #K | | |---------------------------------------| 7 | #P | | #P | #B | #B | #P | #P | #P | |---------------------------------------| 6 | | | #P | #P | |#Kt | | | |---------------------------------------| 5 | | | | | | | | | |---------------------------------------| 4 | | | |^Kt | ^P | | | | |---------------------------------------| 3 | | |^Kt | ^Q | | | | | |---------------------------------------| 2 | ^P | ^P | ^P | | | ^P | ^P | ^P | |---------------------------------------| 1 | ^R | | ^B | | | ^R | ^K | | --------------------------------------- A B C D E F G H
Diag. 98
On the other hand, the absence of the Q Kt P is of no consequencefor the middle game. There is nothing behind it which couldinvite an attack. The QRP and QBP, however, are very weak for theend-game, as they are quite out of reach of the King (compareGame No. 19). I do not wish to imply that Black should haveavoided the exchange at his QB3 at all cost; such an exchange hasalways the compensating advantage of opening a file for theRooks, which advantage often means a favourable middle game, aswill be readily understood. Further, it is often possible to getrid of the weak QRP by pushing it on, and eventually compellingthe exchange of the opposing Kt P, an exchange which can usuallybe enforced if the Rooks have occupied the open Kt file. The pawnitself is often useful at B 3, in that it can support the advanceof P-Q 4 in the centre, should it be desired, or it can, bypushing on, be brought to exercise further pressure on theopposing Kt P.
The break-up of the pawn position on the Q side can becomeawkward in the end-game and sometimes in the middle-game when thepawns can be attacked, and pieces brought to bear on the Queen'sside without leaving the King's side denuded of forces.
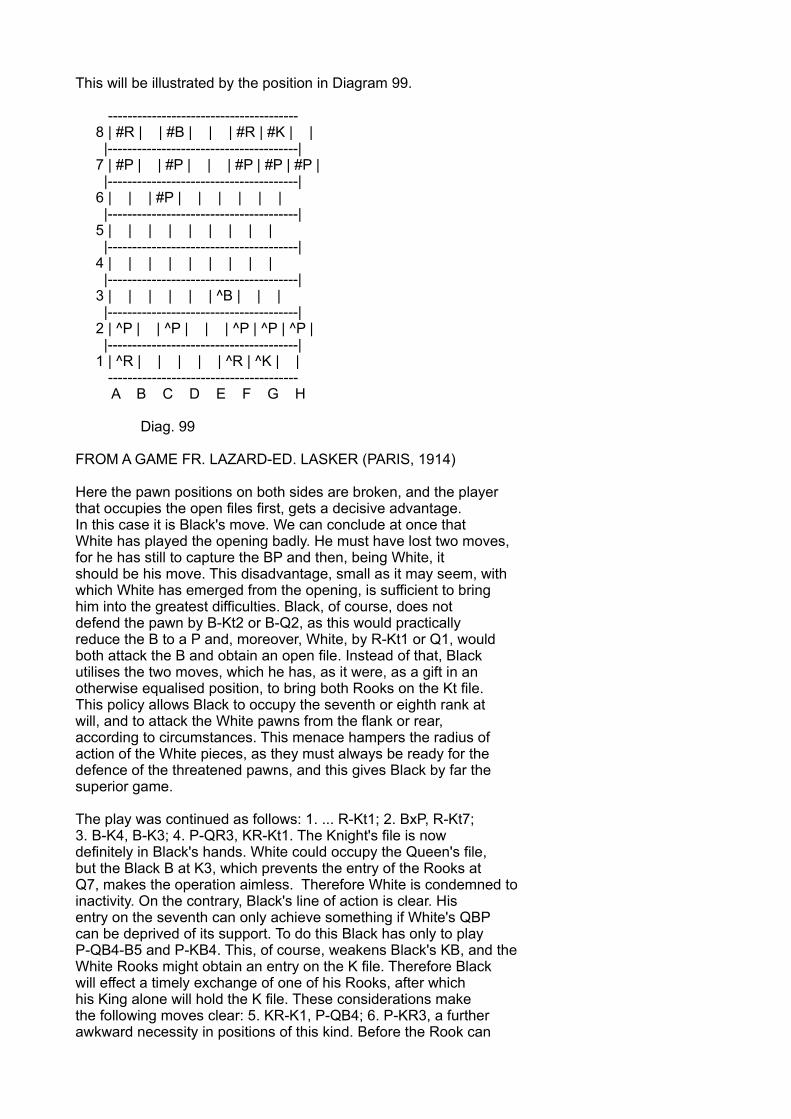
This will be illustrated by the position in Diagram 99.
--------------------------------------- 8 | #R | | #B | | | #R | #K | | |---------------------------------------| 7 | #P | | #P | | | #P | #P | #P | |---------------------------------------| 6 | | | #P | | | | | | |---------------------------------------| 5 | | | | | | | | | |---------------------------------------| 4 | | | | | | | | | |---------------------------------------| 3 | | | | | | ^B | | | |---------------------------------------| 2 | ^P | | ^P | | | ^P | ^P | ^P | |---------------------------------------| 1 | ^R | | | | | ^R | ^K | | --------------------------------------- A B C D E F G H
Diag. 99
FROM A GAME FR. LAZARD-ED. LASKER (PARIS, 1914)
Here the pawn positions on both sides are broken, and the playerthat occupies the open files first, gets a decisive advantage.In this case it is Black's move. We can conclude at once thatWhite has played the opening badly. He must have lost two moves,for he has still to capture the BP and then, being White, itshould be his move. This disadvantage, small as it may seem, withwhich White has emerged from the opening, is sufficient to bringhim into the greatest difficulties. Black, of course, does notdefend the pawn by B-Kt2 or B-Q2, as this would practicallyreduce the B to a P and, moreover, White, by R-Kt1 or Q1, wouldboth attack the B and obtain an open file. Instead of that, Blackutilises the two moves, which he has, as it were, as a gift in anotherwise equalised position, to bring both Rooks on the Kt file.This policy allows Black to occupy the seventh or eighth rank atwill, and to attack the White pawns from the flank or rear,according to circumstances. This menace hampers the radius ofaction of the White pieces, as they must always be ready for thedefence of the threatened pawns, and this gives Black by far thesuperior game.
The play was continued as follows: 1. ... R-Kt1; 2. BxP, R-Kt7;3. B-K4, B-K3; 4. P-QR3, KR-Kt1. The Knight's file is nowdefinitely in Black's hands. White could occupy the Queen's file,but the Black B at K3, which prevents the entry of the Rooks atQ7, makes the operation aimless. Therefore White is condemned toinactivity. On the contrary, Black's line of action is clear. Hisentry on the seventh can only achieve something if White's QBPcan be deprived of its support. To do this Black has only to playP-QB4-B5 and P-KB4. This, of course, weakens Black's KB, and theWhite Rooks might obtain an entry on the K file. Therefore Blackwill effect a timely exchange of one of his Rooks, after whichhis King alone will hold the K file. These considerations makethe following moves clear: 5. KR-K1, P-QB4; 6. P-KR3, a furtherawkward necessity in positions of this kind. Before the Rook can
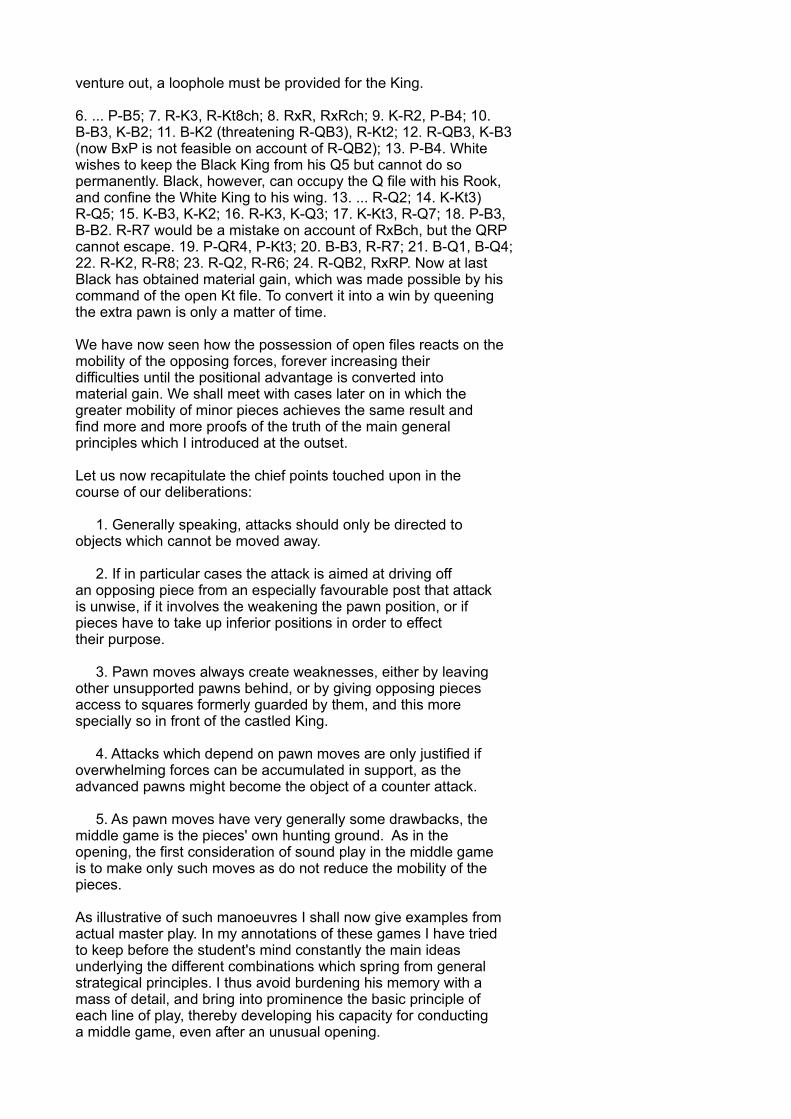
venture out, a loophole must be provided for the King.
6. ... P-B5; 7. R-K3, R-Kt8ch; 8. RxR, RxRch; 9. K-R2, P-B4; 10.B-B3, K-B2; 11. B-K2 (threatening R-QB3), R-Kt2; 12. R-QB3, K-B3(now BxP is not feasible on account of R-QB2); 13. P-B4. Whitewishes to keep the Black King from his Q5 but cannot do sopermanently. Black, however, can occupy the Q file with his Rook,and confine the White King to his wing. 13. ... R-Q2; 14. K-Kt3)R-Q5; 15. K-B3, K-K2; 16. R-K3, K-Q3; 17. K-Kt3, R-Q7; 18. P-B3,B-B2. R-R7 would be a mistake on account of RxBch, but the QRPcannot escape. 19. P-QR4, P-Kt3; 20. B-B3, R-R7; 21. B-Q1, B-Q4;22. R-K2, R-R8; 23. R-Q2, R-R6; 24. R-QB2, RxRP. Now at lastBlack has obtained material gain, which was made possible by hiscommand of the open Kt file. To convert it into a win by queeningthe extra pawn is only a matter of time.
We have now seen how the possession of open files reacts on themobility of the opposing forces, forever increasing theirdifficulties until the positional advantage is converted intomaterial gain. We shall meet with cases later on in which thegreater mobility of minor pieces achieves the same result andfind more and more proofs of the truth of the main generalprinciples which I introduced at the outset.
Let us now recapitulate the chief points touched upon in thecourse of our deliberations:
1. Generally speaking, attacks should only be directed toobjects which cannot be moved away.
2. If in particular cases the attack is aimed at driving offan opposing piece from an especially favourable post that attackis unwise, if it involves the weakening the pawn position, or ifpieces have to take up inferior positions in order to effecttheir purpose.
3. Pawn moves always create weaknesses, either by leavingother unsupported pawns behind, or by giving opposing piecesaccess to squares formerly guarded by them, and this morespecially so in front of the castled King.
4. Attacks which depend on pawn moves are only justified ifoverwhelming forces can be accumulated in support, as theadvanced pawns might become the object of a counter attack.
5. As pawn moves have very generally some drawbacks, themiddle game is the pieces' own hunting ground. As in theopening, the first consideration of sound play in the middle gameis to make only such moves as do not reduce the mobility of thepieces.
As illustrative of such manoeuvres I shall now give examples fromactual master play. In my annotations of these games I have triedto keep before the student's mind constantly the main ideasunderlying the different combinations which spring from generalstrategical principles. I thus avoid burdening his memory with amass of detail, and bring into prominence the basic principle ofeach line of play, thereby developing his capacity for conductinga middle game, even after an unusual opening.
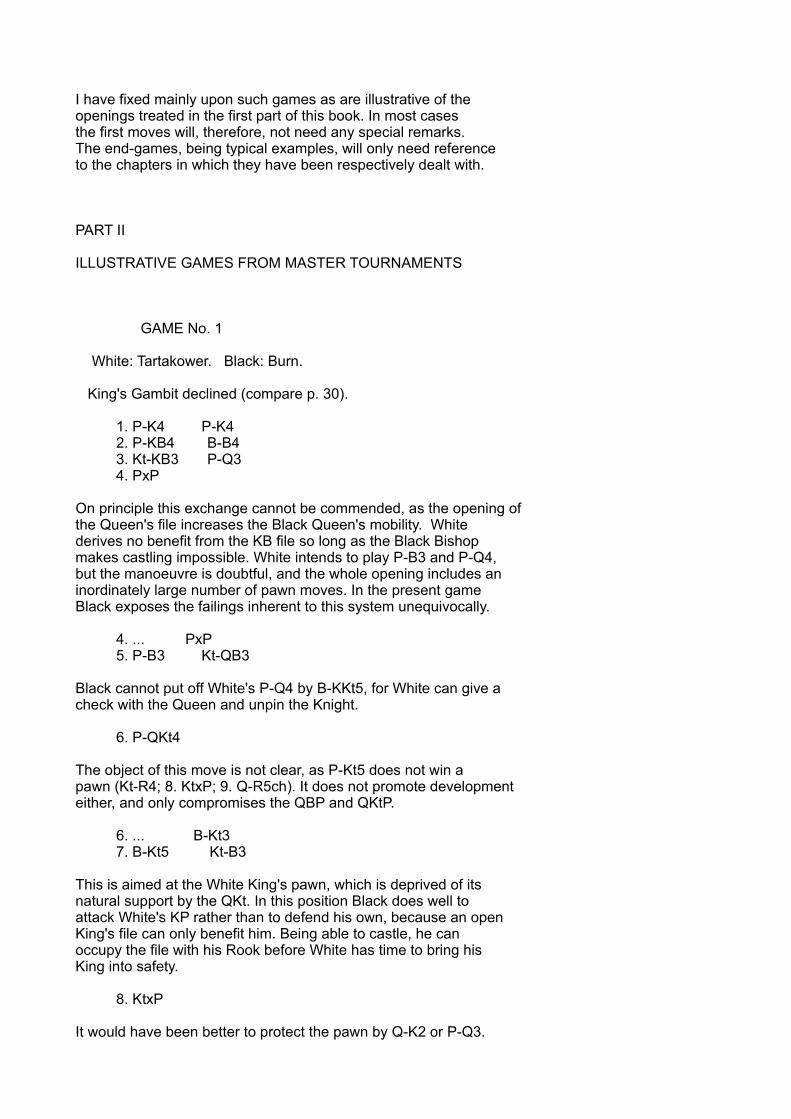
I have fixed mainly upon such games as are illustrative of theopenings treated in the first part of this book. In most casesthe first moves will, therefore, not need any special remarks.The end-games, being typical examples, will only need referenceto the chapters in which they have been respectively dealt with.
PART II
ILLUSTRATIVE GAMES FROM MASTER TOURNAMENTS
GAME No. 1
White: Tartakower. Black: Burn.
King's Gambit declined (compare p. 30).
1. P-K4 P-K4 2. P-KB4 B-B4 3. Kt-KB3 P-Q3 4. PxP
On principle this exchange cannot be commended, as the opening ofthe Queen's file increases the Black Queen's mobility. Whitederives no benefit from the KB file so long as the Black Bishopmakes castling impossible. White intends to play P-B3 and P-Q4,but the manoeuvre is doubtful, and the whole opening includes aninordinately large number of pawn moves. In the present gameBlack exposes the failings inherent to this system unequivocally.
4. ... PxP 5. P-B3 Kt-QB3
Black cannot put off White's P-Q4 by B-KKt5, for White can give acheck with the Queen and unpin the Knight.
6. P-QKt4
The object of this move is not clear, as P-Kt5 does not win apawn (Kt-R4; 8. KtxP; 9. Q-R5ch). It does not promote developmenteither, and only compromises the QBP and QKtP.
6. ... B-Kt3 7. B-Kt5 Kt-B3
This is aimed at the White King's pawn, which is deprived of itsnatural support by the QKt. In this position Black does well toattack White's KP rather than to defend his own, because an openKing's file can only benefit him. Being able to castle, he canoccupy the file with his Rook before White has time to bring hisKing into safety.
8. KtxP
It would have been better to protect the pawn by Q-K2 or P-Q3.
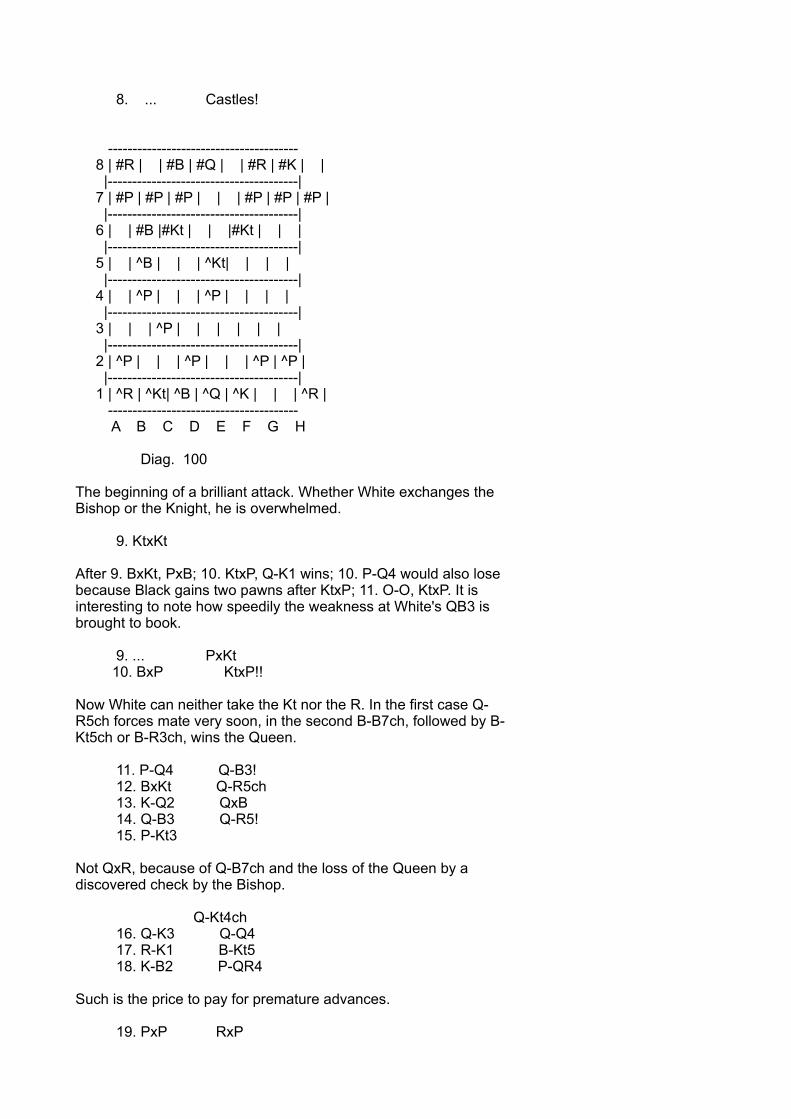
8. ... Castles!
--------------------------------------- 8 | #R | | #B | #Q | | #R | #K | | |---------------------------------------| 7 | #P | #P | #P | | | #P | #P | #P | |---------------------------------------| 6 | | #B |#Kt | | |#Kt | | | |---------------------------------------| 5 | | ^B | | | ^Kt| | | | |---------------------------------------| 4 | | ^P | | | ^P | | | | |---------------------------------------| 3 | | | ^P | | | | | | |---------------------------------------| 2 | ^P | | | ^P | | | ^P | ^P | |---------------------------------------| 1 | ^R | ^Kt| ^B | ^Q | ^K | | | ^R | --------------------------------------- A B C D E F G H
Diag. 100
The beginning of a brilliant attack. Whether White exchanges theBishop or the Knight, he is overwhelmed.
9. KtxKt
After 9. BxKt, PxB; 10. KtxP, Q-K1 wins; 10. P-Q4 would also losebecause Black gains two pawns after KtxP; 11. O-O, KtxP. It isinteresting to note how speedily the weakness at White's QB3 isbrought to book.
9. ... PxKt 10. BxP KtxP!!
Now White can neither take the Kt nor the R. In the first case Q-R5ch forces mate very soon, in the second B-B7ch, followed by B-Kt5ch or B-R3ch, wins the Queen.
11. P-Q4 Q-B3! 12. BxKt Q-R5ch 13. K-Q2 QxB 14. Q-B3 Q-R5! 15. P-Kt3
Not QxR, because of Q-B7ch and the loss of the Queen by adiscovered check by the Bishop.
Q-Kt4ch 16. Q-K3 Q-Q4 17. R-K1 B-Kt5 18. K-B2 P-QR4
Such is the price to pay for premature advances.
19. PxP RxP
20. B-R3 P-QB4
Black shatters White's pawn position, and his Bishops and Rookshave full play along open files and diagonals.
21. PxP RxB! 22. KtxR
or PxB, RxRPch; 23. RxR,QxRch; 24. K-Bl,B-B4.
22. ... BxP
The rest speaks for itself.
23. Q-K5 B-B4ch 24. K-Kt2 Q-Kt2ch 25. K-B1 BxKtch 26. K-Q2 R-Q1ch 27. K-K3 R-Q6ch 28. K-B2 Q-B6ch 29. K-Kt1 R-Q7 30. Q-Kt8ch B-KB1 Resigns.
GAME No. 2
White: Leonhardt. Black: Marshall.
Falkbeer Counter Gambit (compare p. 35).
1. P-K4 P-K4 2. P-KB4 P-Q4 3. PxQP P-K5 4. P-Q3 PxP 5. QxP Kt-KB3 6. Kt-QB3
It would be quite bad to play P-B4 and try to hold the extra pawnat the expense of development. Black would very soon occupy theKing's file with his Rook and there would be no time for White tobring his King into safety, e.g. 6. P-B4, B-QB4; 7. Kt-KB3,Castles; 8. B-K2, R-K1, and already now there are threats of Kt-K5 or Kt-Kt5 followed by B-B7ch or Kt-B7.
6. ... B-QB4 7. B-Q2
White would of course like to continue with B-K3 in order to makea fight for the possession of the diagonal. He would, however,lose his chance of castling through Black's Q-K2. This isdetrimental in all such cases where the lines in the centre areopen or likely to be forced open at any time.
7. ... Castles 8. Castles QKt-Q2 9. B-K2 Kt-Kt3 10. B-B3 B-KKt5 11. B-K3?
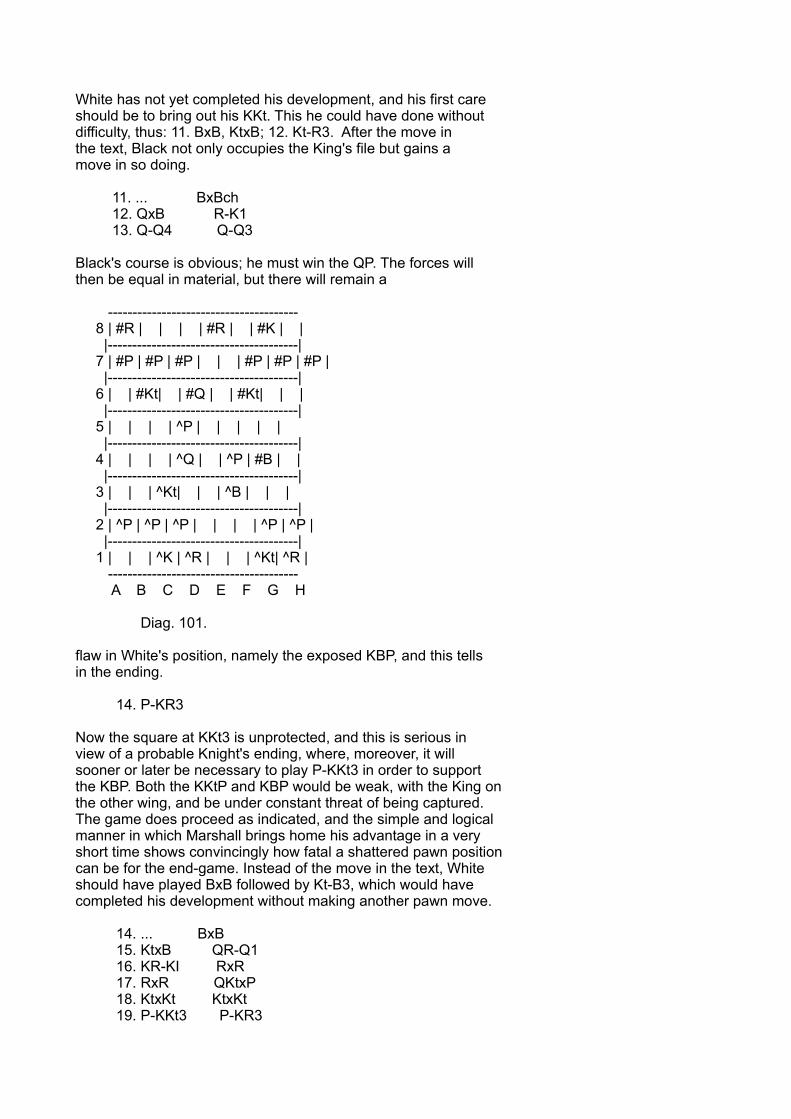
White has not yet completed his development, and his first careshould be to bring out his KKt. This he could have done withoutdifficulty, thus: 11. BxB, KtxB; 12. Kt-R3. After the move inthe text, Black not only occupies the King's file but gains amove in so doing.
11. ... BxBch 12. QxB R-K1 13. Q-Q4 Q-Q3
Black's course is obvious; he must win the QP. The forces willthen be equal in material, but there will remain a
--------------------------------------- 8 | #R | | | | #R | | #K | | |---------------------------------------| 7 | #P | #P | #P | | | #P | #P | #P | |---------------------------------------| 6 | | #Kt| | #Q | | #Kt| | | |---------------------------------------| 5 | | | | ^P | | | | | |---------------------------------------| 4 | | | | ^Q | | ^P | #B | | |---------------------------------------| 3 | | | ^Kt| | | ^B | | | |---------------------------------------| 2 | ^P | ^P | ^P | | | | ^P | ^P | |---------------------------------------| 1 | | | ^K | ^R | | | ^Kt| ^R | --------------------------------------- A B C D E F G H
Diag. 101.
flaw in White's position, namely the exposed KBP, and this tellsin the ending.
14. P-KR3
Now the square at KKt3 is unprotected, and this is serious inview of a probable Knight's ending, where, moreover, it willsooner or later be necessary to play P-KKt3 in order to supportthe KBP. Both the KKtP and KBP would be weak, with the King onthe other wing, and be under constant threat of being captured.The game does proceed as indicated, and the simple and logicalmanner in which Marshall brings home his advantage in a veryshort time shows convincingly how fatal a shattered pawn positioncan be for the end-game. Instead of the move in the text, Whiteshould have played BxB followed by Kt-B3, which would havecompleted his development without making another pawn move.
14. ... BxB 15. KtxB QR-Q1 16. KR-KI RxR 17. RxR QKtxP 18. KtxKt KtxKt 19. P-KKt3 P-KR3
making a loophole for the King. In this case the move is correct,as the threat of mate ties the Black Rook to his rank. It iswrong to make a loophole, as weak players are fond of doing, asearly as possible "in case," before it is shown that there willbe a need for it, or that there will be a Rook ending.
20. P-R3
White is afraid of playing 20. QxP on account of Kt-Kt5, whichthreatens KtxBP followed by Q-QB3. 21. QxP would not be asufficient defence because of Q-B4 threatening mate, and on theother hand 21. Q-R4 would conjure up a dangerous attack,beginning with P-QKt4. When the players castle on differentwings, there is always the danger of the opponent sacrificingpawns and opening up files for his Rooks and Q against thecastled King. The game then assumes a wild character, and asmatters are generally settled one way or another in the middle-game, end-game considerations, both with regard to number andposition of pawns, can be disregarded. Experience has shown thatthe player who develops his attack first is likely to win, andthat it is of little use to submit tamely to an assault of thiskind without attempting a counter attack.
Such games are very difficult for the beginner to understand.There is about them something violent and difficult to estimate,and years of practice are necessary in order to gain the judgmentrequired for weighing up the possibilities of attack and counterattack, where the Kings have castled on opposite wings.
20. ... P-R3 21. R-Q1 Kt-B3 22. QxQ RxQ 23. RxR PxR 24. Kt-Q4 Kt-K5 25. Kt-K2 K-B1
The Black King now pushes forward irresistibly, and attacks theweakened pawns on the King's wing. The White King cannot get anynearer, as a check by the Black Kt would win a pawn at once. Theend is easy.
26. P-B3 K-K2 27. K-B2 K-K3 28. P-Kt3 Kt-B7 29. Kt-Q4ch K-B3 30. P-KR4 P-KR4
Now the P at Kt3 is "backward" and therefore lost.
31. P-B4 Kt-K5 32. Kt-K2 K-B4 33. K-Q3 Kt-B7ch 34. K-B3 K-Kt5 35. P-Kt4 Kt-K5ch 36. K-Q4 KtxP Resigns.
GAME No. 3
White: Spielmann. Black: Prokes.
Vienna Game (compare p. 35).
1. P-K4 P-K4 2. Kt-QB3 Kt-KB3 3. P-B4 P-Q4 4. PxKP KtxP 5. Q-B3
It is contrary to the principles governing sound play to bringout the Queen early in the game. The opponent frequently has anopportunity of gaining a move by driving off the Queen,developing a minor piece at the same time. In the present caseBlack might have gained the advantage in the following way: 5.... Q Kt-B3. Now if: 6 KtxKt then Kt-Q5!; 7 Q-Q3?, PxKt; 8 QxP?,B-KB4. If, however, 6 B-Kt5, Black obtains the better game byplaying 6. ... KtxKt; 7 KtPxKt, Q-R5ch; 8 P-Kt3, Q-K5ch; 9 QxQ,PxQ; 10 BxKtch, PxB, with two Bishops on open diagonals. There isno harm in the doubled pawn, as White cannot attack it. Black'simmediate threat is B-R3 or KB4, which exerts pressure at Q6, andWhite will find it difficult to advance his QP.
5. ... P-KB4
This move is open to discussion, as the Kt which it means tosupport can be driven away by P-Q3. On the other hand, if Whitedoes play his QP to Q3, Black can prevent its further advance byP-Q5, after which the White KP is insecure and the KB somewhatshut in.
6. P-Q3 KtxKt 7. PxKt P-Q5 8. Q-B2!
White offers his QBP in order to be able to strengthen his centreby P-Q4, and to free his pieces. To protect his QBP would beinferior, e.g. 8 Kt-K2, Kt-B3 or 8 B-Kt2?, PxP; 9 BxP, B-Kt5!; 10BxB, QxR5ch; 11 Q-B2, QxBch; 12 Q-Q2, Q-Q5.
8. ... PxP?
It would have been better, of course, to continue developing withKt-B3, which at the same time maintains the pressure on Q5.
9. P-Q4 B-K3 10. Kt-R3
Intending Kt-B4 with a view to exchanging the Bishop. Afterthat, Black's position on White squares is weak specially on thediagonal QR7, KKt1, which was opened by Black's fifth move, andon which the White Bishop can soon operate. The game isinstructive in showing the development of that idea.
10. ... B-K2 11. Kt-B4 Q-Q2 12. KtxB QxKt 13. B-Q3 P-KKt3
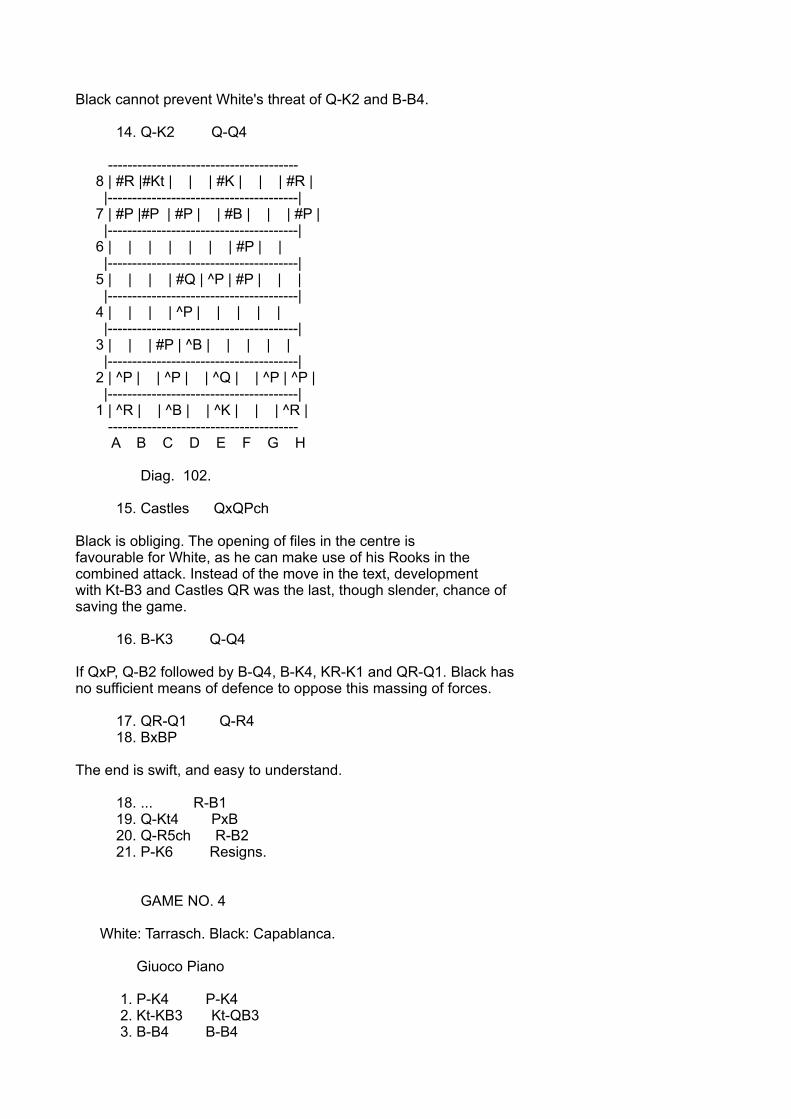
Black cannot prevent White's threat of Q-K2 and B-B4.
14. Q-K2 Q-Q4
--------------------------------------- 8 | #R |#Kt | | | #K | | | #R | |---------------------------------------| 7 | #P |#P | #P | | #B | | | #P | |---------------------------------------| 6 | | | | | | | #P | | |---------------------------------------| 5 | | | | #Q | ^P | #P | | | |---------------------------------------| 4 | | | | ^P | | | | | |---------------------------------------| 3 | | | #P | ^B | | | | | |---------------------------------------| 2 | ^P | | ^P | | ^Q | | ^P | ^P | |---------------------------------------| 1 | ^R | | ^B | | ^K | | | ^R | --------------------------------------- A B C D E F G H
Diag. 102.
15. Castles QxQPch
Black is obliging. The opening of files in the centre isfavourable for White, as he can make use of his Rooks in thecombined attack. Instead of the move in the text, developmentwith Kt-B3 and Castles QR was the last, though slender, chance ofsaving the game.
16. B-K3 Q-Q4
If QxP, Q-B2 followed by B-Q4, B-K4, KR-K1 and QR-Q1. Black hasno sufficient means of defence to oppose this massing of forces.
17. QR-Q1 Q-R4 18. BxBP
The end is swift, and easy to understand.
18. ... R-B1 19. Q-Kt4 PxB 20. Q-R5ch R-B2 21. P-K6 Resigns.
GAME NO. 4
White: Tarrasch. Black: Capablanca.
Giuoco Piano
1. P-K4 P-K4 2. Kt-KB3 Kt-QB3 3. B-B4 B-B4
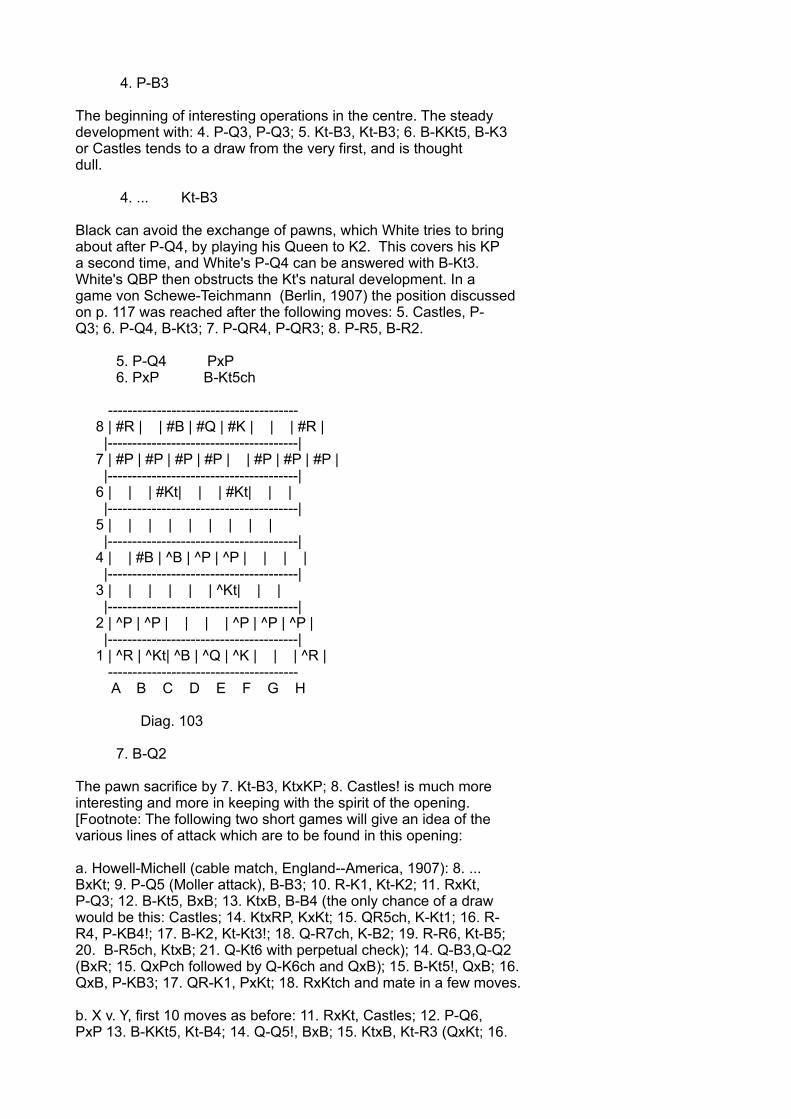
4. P-B3
The beginning of interesting operations in the centre. The steadydevelopment with: 4. P-Q3, P-Q3; 5. Kt-B3, Kt-B3; 6. B-KKt5, B-K3or Castles tends to a draw from the very first, and is thoughtdull.
4. ... Kt-B3
Black can avoid the exchange of pawns, which White tries to bringabout after P-Q4, by playing his Queen to K2. This covers his KPa second time, and White's P-Q4 can be answered with B-Kt3.White's QBP then obstructs the Kt's natural development. In agame von Schewe-Teichmann (Berlin, 1907) the position discussedon p. 117 was reached after the following moves: 5. Castles, P-Q3; 6. P-Q4, B-Kt3; 7. P-QR4, P-QR3; 8. P-R5, B-R2.
5. P-Q4 PxP 6. PxP B-Kt5ch
--------------------------------------- 8 | #R | | #B | #Q | #K | | | #R | |---------------------------------------| 7 | #P | #P | #P | #P | | #P | #P | #P | |---------------------------------------| 6 | | | #Kt| | | #Kt| | | |---------------------------------------| 5 | | | | | | | | | |---------------------------------------| 4 | | #B | ^B | ^P | ^P | | | | |---------------------------------------| 3 | | | | | | ^Kt| | | |---------------------------------------| 2 | ^P | ^P | | | | ^P | ^P | ^P | |---------------------------------------| 1 | ^R | ^Kt| ^B | ^Q | ^K | | | ^R | --------------------------------------- A B C D E F G H
Diag. 103
7. B-Q2
The pawn sacrifice by 7. Kt-B3, KtxKP; 8. Castles! is much moreinteresting and more in keeping with the spirit of the opening.[Footnote: The following two short games will give an idea of thevarious lines of attack which are to be found in this opening:
a. Howell-Michell (cable match, England--America, 1907): 8. ...BxKt; 9. P-Q5 (Moller attack), B-B3; 10. R-K1, Kt-K2; 11. RxKt,P-Q3; 12. B-Kt5, BxB; 13. KtxB, B-B4 (the only chance of a drawwould be this: Castles; 14. KtxRP, KxKt; 15. QR5ch, K-Kt1; 16. R-R4, P-KB4!; 17. B-K2, Kt-Kt3!; 18. Q-R7ch, K-B2; 19. R-R6, Kt-B5;20. B-R5ch, KtxB; 21. Q-Kt6 with perpetual check); 14. Q-B3,Q-Q2(BxR; 15. QxPch followed by Q-K6ch and QxB); 15. B-Kt5!, QxB; 16.QxB, P-KB3; 17. QR-K1, PxKt; 18. RxKtch and mate in a few moves.
b. X v. Y, first 10 moves as before: 11. RxKt, Castles; 12. P-Q6,PxP 13. B-KKt5, Kt-B4; 14. Q-Q5!, BxB; 15. KtxB, Kt-R3 (QxKt; 16.
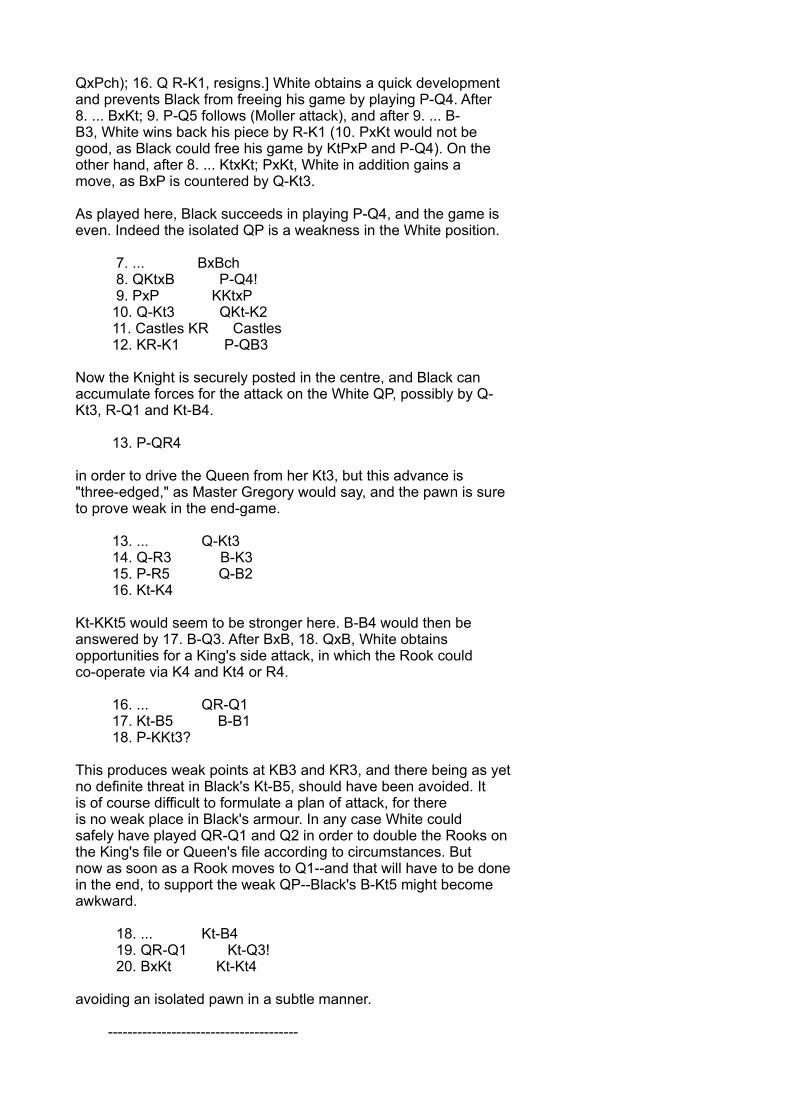
QxPch); 16. Q R-K1, resigns.] White obtains a quick developmentand prevents Black from freeing his game by playing P-Q4. After8. ... BxKt; 9. P-Q5 follows (Moller attack), and after 9. ... B-B3, White wins back his piece by R-K1 (10. PxKt would not begood, as Black could free his game by KtPxP and P-Q4). On theother hand, after 8. ... KtxKt; PxKt, White in addition gains amove, as BxP is countered by Q-Kt3.
As played here, Black succeeds in playing P-Q4, and the game iseven. Indeed the isolated QP is a weakness in the White position.
7. ... BxBch 8. QKtxB P-Q4! 9. PxP KKtxP 10. Q-Kt3 QKt-K2 11. Castles KR Castles 12. KR-K1 P-QB3
Now the Knight is securely posted in the centre, and Black canaccumulate forces for the attack on the White QP, possibly by Q-Kt3, R-Q1 and Kt-B4.
13. P-QR4
in order to drive the Queen from her Kt3, but this advance is"three-edged," as Master Gregory would say, and the pawn is sureto prove weak in the end-game.
13. ... Q-Kt3 14. Q-R3 B-K3 15. P-R5 Q-B2 16. Kt-K4
Kt-KKt5 would seem to be stronger here. B-B4 would then beanswered by 17. B-Q3. After BxB, 18. QxB, White obtainsopportunities for a King's side attack, in which the Rook couldco-operate via K4 and Kt4 or R4.
16. ... QR-Q1 17. Kt-B5 B-B1 18. P-KKt3?
This produces weak points at KB3 and KR3, and there being as yetno definite threat in Black's Kt-B5, should have been avoided. Itis of course difficult to formulate a plan of attack, for thereis no weak place in Black's armour. In any case White couldsafely have played QR-Q1 and Q2 in order to double the Rooks onthe King's file or Queen's file according to circumstances. Butnow as soon as a Rook moves to Q1--and that will have to be donein the end, to support the weak QP--Black's B-Kt5 might becomeawkward.
18. ... Kt-B4 19. QR-Q1 Kt-Q3! 20. BxKt Kt-Kt4
avoiding an isolated pawn in a subtle manner.
---------------------------------------
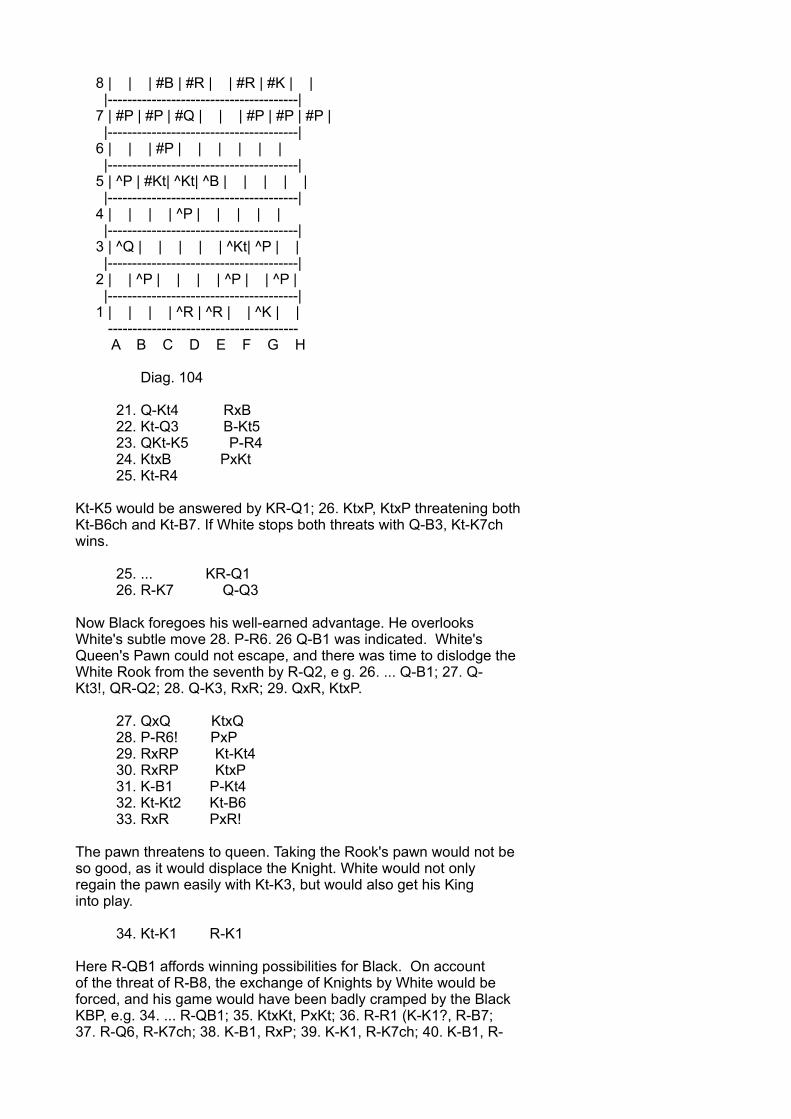
8 | | | #B | #R | | #R | #K | | |---------------------------------------| 7 | #P | #P | #Q | | | #P | #P | #P | |---------------------------------------| 6 | | | #P | | | | | | |---------------------------------------| 5 | ^P | #Kt| ^Kt| ^B | | | | | |---------------------------------------| 4 | | | | ^P | | | | | |---------------------------------------| 3 | ^Q | | | | | ^Kt| ^P | | |---------------------------------------| 2 | | ^P | | | | ^P | | ^P | |---------------------------------------| 1 | | | | ^R | ^R | | ^K | | --------------------------------------- A B C D E F G H
Diag. 104
21. Q-Kt4 RxB 22. Kt-Q3 B-Kt5 23. QKt-K5 P-R4 24. KtxB PxKt 25. Kt-R4
Kt-K5 would be answered by KR-Q1; 26. KtxP, KtxP threatening bothKt-B6ch and Kt-B7. If White stops both threats with Q-B3, Kt-K7chwins.
25. ... KR-Q1 26. R-K7 Q-Q3
Now Black foregoes his well-earned advantage. He overlooksWhite's subtle move 28. P-R6. 26 Q-B1 was indicated. White'sQueen's Pawn could not escape, and there was time to dislodge theWhite Rook from the seventh by R-Q2, e g. 26. ... Q-B1; 27. Q-Kt3!, QR-Q2; 28. Q-K3, RxR; 29. QxR, KtxP.
27. QxQ KtxQ 28. P-R6! PxP 29. RxRP Kt-Kt4 30. RxRP KtxP 31. K-B1 P-Kt4 32. Kt-Kt2 Kt-B6 33. RxR PxR!
The pawn threatens to queen. Taking the Rook's pawn would not beso good, as it would displace the Knight. White would not onlyregain the pawn easily with Kt-K3, but would also get his Kinginto play.
34. Kt-K1 R-K1
Here R-QB1 affords winning possibilities for Black. On accountof the threat of R-B8, the exchange of Knights by White would beforced, and his game would have been badly cramped by the BlackKBP, e.g. 34. ... R-QB1; 35. KtxKt, PxKt; 36. R-R1 (K-K1?, R-B7;37. R-Q6, R-K7ch; 38. K-B1, RxP; 39. K-K1, R-K7ch; 40. K-B1, R-
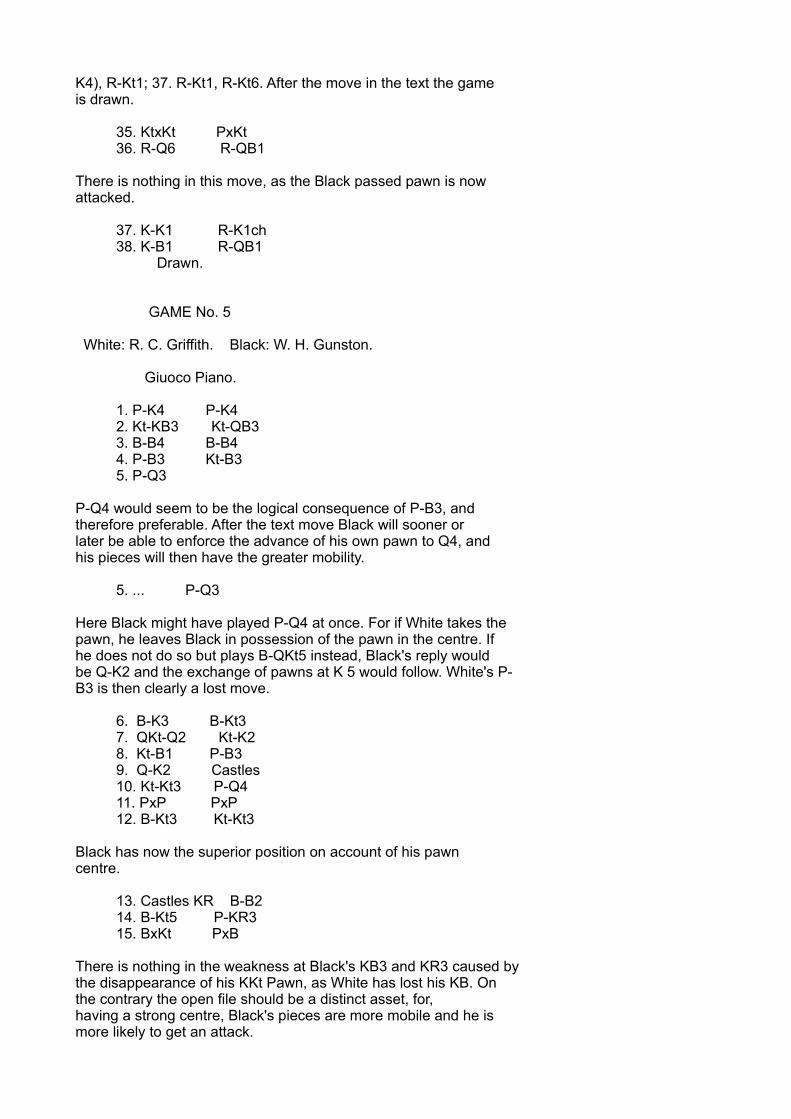
K4), R-Kt1; 37. R-Kt1, R-Kt6. After the move in the text the gameis drawn.
35. KtxKt PxKt 36. R-Q6 R-QB1
There is nothing in this move, as the Black passed pawn is nowattacked.
37. K-K1 R-K1ch 38. K-B1 R-QB1 Drawn.
GAME No. 5
White: R. C. Griffith. Black: W. H. Gunston.
Giuoco Piano.
1. P-K4 P-K4 2. Kt-KB3 Kt-QB3 3. B-B4 B-B4 4. P-B3 Kt-B3 5. P-Q3
P-Q4 would seem to be the logical consequence of P-B3, andtherefore preferable. After the text move Black will sooner orlater be able to enforce the advance of his own pawn to Q4, andhis pieces will then have the greater mobility.
5. ... P-Q3
Here Black might have played P-Q4 at once. For if White takes thepawn, he leaves Black in possession of the pawn in the centre. Ifhe does not do so but plays B-QKt5 instead, Black's reply wouldbe Q-K2 and the exchange of pawns at K 5 would follow. White's P-B3 is then clearly a lost move.
6. B-K3 B-Kt3 7. QKt-Q2 Kt-K2 8. Kt-B1 P-B3 9. Q-K2 Castles 10. Kt-Kt3 P-Q4 11. PxP PxP 12. B-Kt3 Kt-Kt3
Black has now the superior position on account of his pawncentre.
13. Castles KR B-B2 14. B-Kt5 P-KR3 15. BxKt PxB
There is nothing in the weakness at Black's KB3 and KR3 caused bythe disappearance of his KKt Pawn, as White has lost his KB. Onthe contrary the open file should be a distinct asset, for,having a strong centre, Black's pieces are more mobile and he ismore likely to get an attack.
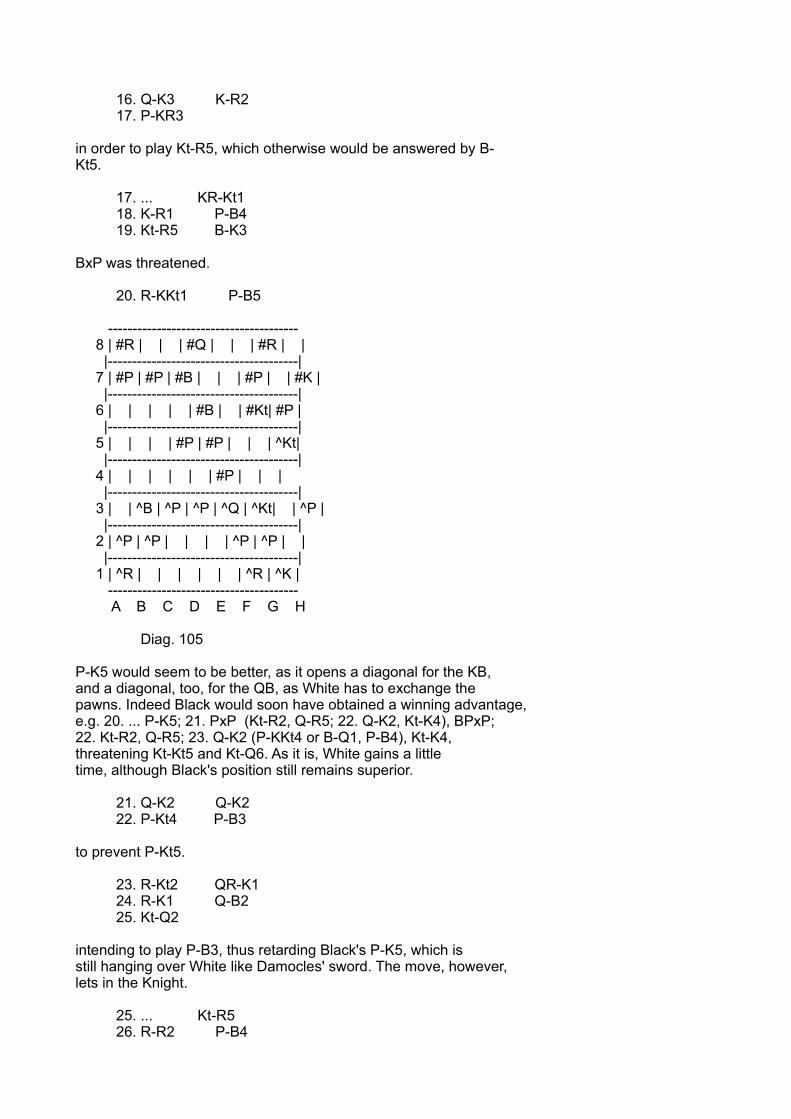
16. Q-K3 K-R2 17. P-KR3
in order to play Kt-R5, which otherwise would be answered by B-Kt5.
17. ... KR-Kt1 18. K-R1 P-B4 19. Kt-R5 B-K3
BxP was threatened.
20. R-KKt1 P-B5
--------------------------------------- 8 | #R | | | #Q | | | #R | | |---------------------------------------| 7 | #P | #P | #B | | | #P | | #K | |---------------------------------------| 6 | | | | | #B | | #Kt| #P | |---------------------------------------| 5 | | | | #P | #P | | | ^Kt| |---------------------------------------| 4 | | | | | | #P | | | |---------------------------------------| 3 | | ^B | ^P | ^P | ^Q | ^Kt| | ^P | |---------------------------------------| 2 | ^P | ^P | | | | ^P | ^P | | |---------------------------------------| 1 | ^R | | | | | | ^R | ^K | --------------------------------------- A B C D E F G H
Diag. 105
P-K5 would seem to be better, as it opens a diagonal for the KB,and a diagonal, too, for the QB, as White has to exchange thepawns. Indeed Black would soon have obtained a winning advantage,e.g. 20. ... P-K5; 21. PxP (Kt-R2, Q-R5; 22. Q-K2, Kt-K4), BPxP;22. Kt-R2, Q-R5; 23. Q-K2 (P-KKt4 or B-Q1, P-B4), Kt-K4,threatening Kt-Kt5 and Kt-Q6. As it is, White gains a littletime, although Black's position still remains superior.
21. Q-K2 Q-K2 22. P-Kt4 P-B3
to prevent P-Kt5.
23. R-Kt2 QR-K1 24. R-K1 Q-B2 25. Kt-Q2
intending to play P-B3, thus retarding Black's P-K5, which isstill hanging over White like Damocles' sword. The move, however,lets in the Knight.
25. ... Kt-R5 26. R-R2 P-B4
27. P-B3 P-K5
Now this move is no longer feasible, as White's brilliantsacrifice demonstrates. To make the move possible, longpreparations would have been necessary, such as: R-Kt3, B-Q2-B3,etc.
28. QPxP QPxP 29. KtxKP PxKt 30. QxPch R-Kt3 31. R(R2)-K2
The scene has changed with startling suddenness. White has openfiles and diagonals for all his forces, whilst Black's pieces areimmobilised. Whatever he plays, Black must lose the piece he hasgained.
31. ... B-Q3 32. Q-Q3 BxB 33. RxR Q-B5
He cannot play B-Q4 on account of Q-Q4.
34. Kt-B6ch K-Kt2 35. QR-K7ch BxR 36. RxBch KxKt 37. Q-Q6ch Resigns.
GAME No. 6
White: Mason. Black: Gunsberg.
Giuoco Piano.
1. P-K4 P-K4 2. Kt-KB3 Kt-QB3 3. B-B4 B-B4 4. P-Q3 P-Q3 5. B-K3 B-Kt3 6. P-B3 Kt-B3 7. QKt-Q2 Q-K2 8. P-QR4
A lost move. The logical continuation is Kt-B1-Kt3 and Castles.
8. ... B-K3 9. B-QKt5 BxB
Generally speaking, exchanges such as this are doubtful.However, in the present case, although it opens the B file forWhite, White cannot prevent Black from obtaining the sameadvantage.
10. PxB P-QR3
Black gives up the move he has gained. There is no justificationfor this, as nothing prevents him from proceeding with hisdevelopment at once with 10. ... Castles.
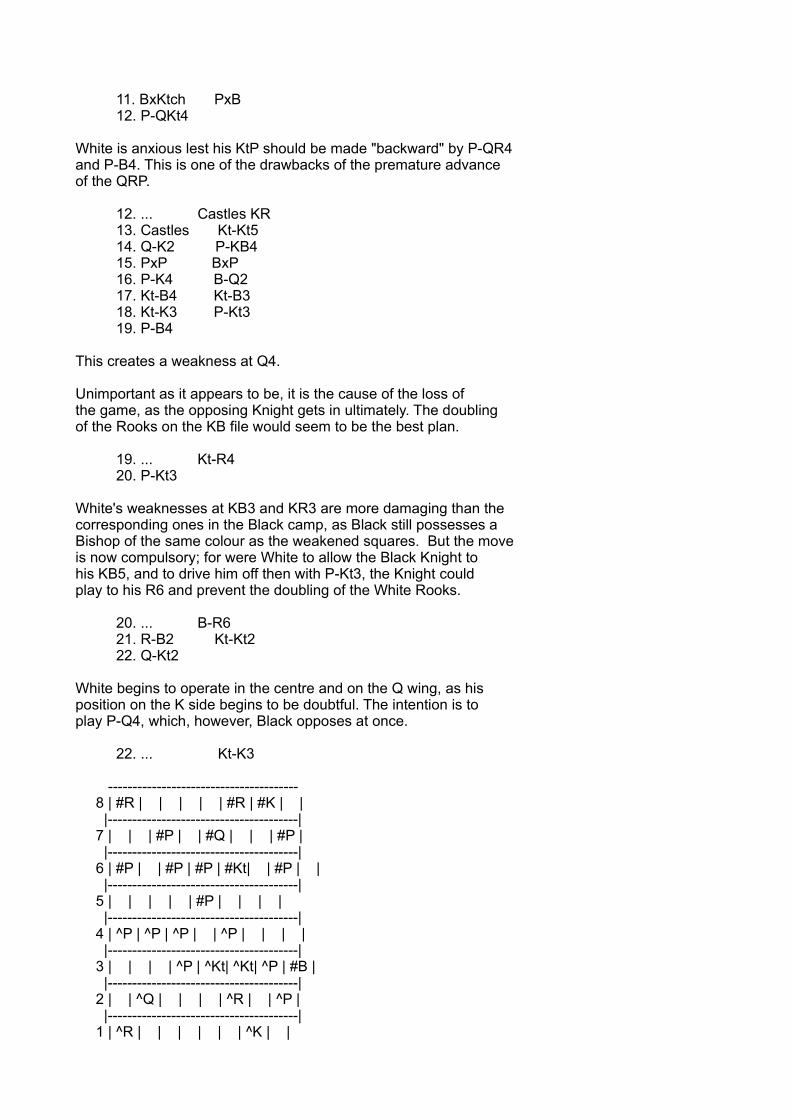
11. BxKtch PxB 12. P-QKt4
White is anxious lest his KtP should be made "backward" by P-QR4and P-B4. This is one of the drawbacks of the premature advanceof the QRP.
12. ... Castles KR 13. Castles Kt-Kt5 14. Q-K2 P-KB4 15. PxP BxP 16. P-K4 B-Q2 17. Kt-B4 Kt-B3 18. Kt-K3 P-Kt3 19. P-B4
This creates a weakness at Q4.
Unimportant as it appears to be, it is the cause of the loss ofthe game, as the opposing Knight gets in ultimately. The doublingof the Rooks on the KB file would seem to be the best plan.
19. ... Kt-R4 20. P-Kt3
White's weaknesses at KB3 and KR3 are more damaging than thecorresponding ones in the Black camp, as Black still possesses aBishop of the same colour as the weakened squares. But the moveis now compulsory; for were White to allow the Black Knight tohis KB5, and to drive him off then with P-Kt3, the Knight couldplay to his R6 and prevent the doubling of the White Rooks.
20. ... B-R6 21. R-B2 Kt-Kt2 22. Q-Kt2
White begins to operate in the centre and on the Q wing, as hisposition on the K side begins to be doubtful. The intention is toplay P-Q4, which, however, Black opposes at once.
22. ... Kt-K3
--------------------------------------- 8 | #R | | | | | #R | #K | | |---------------------------------------| 7 | | | #P | | #Q | | | #P | |---------------------------------------| 6 | #P | | #P | #P | #Kt| | #P | | |---------------------------------------| 5 | | | | | #P | | | | |---------------------------------------| 4 | ^P | ^P | ^P | | ^P | | | | |---------------------------------------| 3 | | | | ^P | ^Kt| ^Kt| ^P | #B | |---------------------------------------| 2 | | ^Q | | | | ^R | | ^P | |---------------------------------------| 1 | ^R | | | | | | ^K | |

--------------------------------------- A B C D E F G H
Diag. 106
If now White plays P-Q4, he loses a piece by PxP; 24. KtxP?, RxR;25. KxR, Q-B3ch.
23. R-K1
The Rook has no future here, and R-Q1, in order to play P-Q4, ismore logical. But as Black obviously threatens to double hisRooks on the KB file, it would be advisable to play for anexchange of Rooks, with: Kt-Kt2, QR-B1 and Kt-K1.
23. ... R-B2 24. QR-K2 QR-KB1 25. Kt-K1 Kt-Q5 26. R-Q2 Q-Kt4 27. Kt(K3)-Kt2 BxKt 28. KxB
KtxB is frustrated by Kt-B6ch.
28. ... Q-K6
All the Black forces are now in action, and White has no defence,as his pieces can hardly move.
29. K-B1 Kt-Kt6! Resigns.
If R-K2 or B2, there follows RxRch; 31. RxR, Kt-Q7ch; 32. QxKt,QxQ.
GAME NO. 7
White: Marshall. Black: Tarrasch.
Max Lange Attack.
1. P-K4 P-K4 2. P-Q4 PxP 3. Kt-KB3 Kt-QB3 4. B-QB4 B-B4 5. Castles Kt-B3
Black can avoid the complications of the Max Lange attack by 5.... P-Q3. In that case White cannot recover the pawn, and inorder to develop his QKt effectively, would have to play P-B3,aiming at rapid development in return, after 6. ... PxP; 7. KtxP.But Black can frustrate this plan either by pushing his pawn toQ6, so that the QKt is barred from the square B3, or by playingB-KKt5 with this probable continuation: 7. Q-Kt3, BxKt; 8. BxPch,K-B1; 9. PxB, Kt-B3, and Black has the better game, for White'sKing's side is broken up and his pieces undeveloped, while Blackhas prospects of attack on the open KB file.
6. P-K5 P-Q4
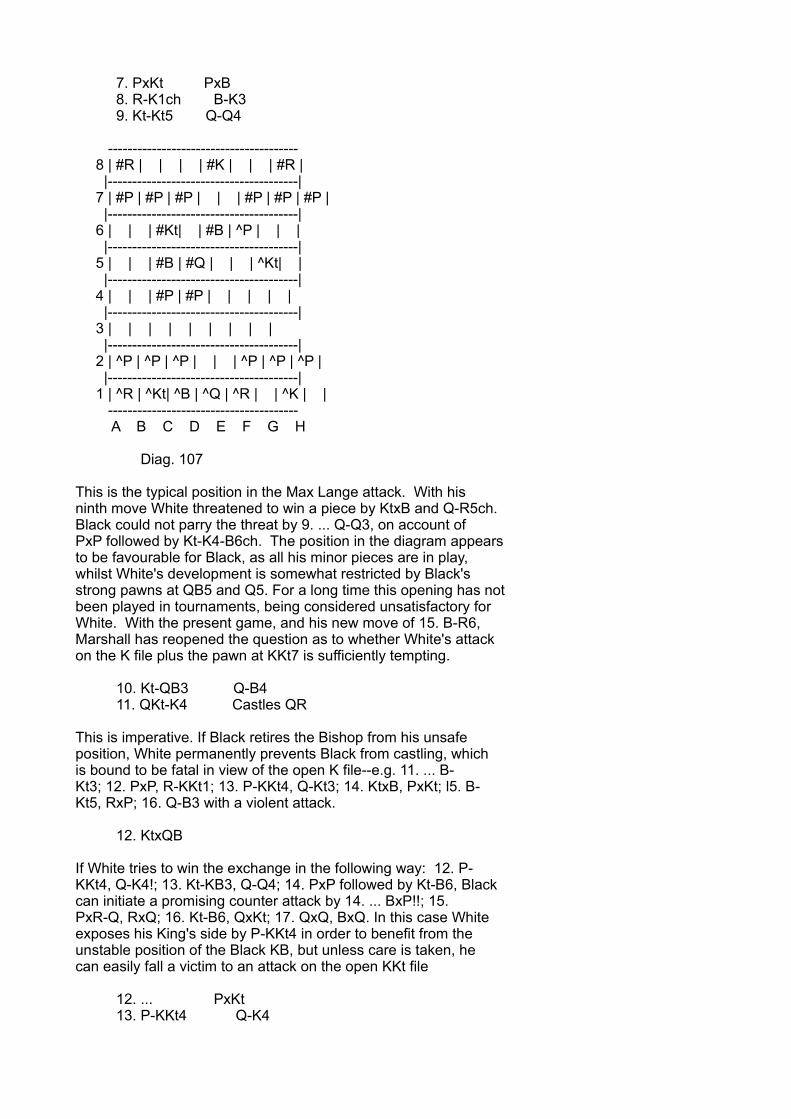
7. PxKt PxB 8. R-K1ch B-K3 9. Kt-Kt5 Q-Q4
--------------------------------------- 8 | #R | | | | #K | | | #R | |---------------------------------------| 7 | #P | #P | #P | | | #P | #P | #P | |---------------------------------------| 6 | | | #Kt| | #B | ^P | | | |---------------------------------------| 5 | | | #B | #Q | | | ^Kt| | |---------------------------------------| 4 | | | #P | #P | | | | | |---------------------------------------| 3 | | | | | | | | | |---------------------------------------| 2 | ^P | ^P | ^P | | | ^P | ^P | ^P | |---------------------------------------| 1 | ^R | ^Kt| ^B | ^Q | ^R | | ^K | | --------------------------------------- A B C D E F G H
Diag. 107
This is the typical position in the Max Lange attack. With hisninth move White threatened to win a piece by KtxB and Q-R5ch.Black could not parry the threat by 9. ... Q-Q3, on account ofPxP followed by Kt-K4-B6ch. The position in the diagram appearsto be favourable for Black, as all his minor pieces are in play,whilst White's development is somewhat restricted by Black'sstrong pawns at QB5 and Q5. For a long time this opening has notbeen played in tournaments, being considered unsatisfactory forWhite. With the present game, and his new move of 15. B-R6,Marshall has reopened the question as to whether White's attackon the K file plus the pawn at KKt7 is sufficiently tempting.
10. Kt-QB3 Q-B4 11. QKt-K4 Castles QR
This is imperative. If Black retires the Bishop from his unsafeposition, White permanently prevents Black from castling, whichis bound to be fatal in view of the open K file--e.g. 11. ... B-Kt3; 12. PxP, R-KKt1; 13. P-KKt4, Q-Kt3; 14. KtxB, PxKt; l5. B-Kt5, RxP; 16. Q-B3 with a violent attack.
12. KtxQB
If White tries to win the exchange in the following way: 12. P-KKt4, Q-K4!; 13. Kt-KB3, Q-Q4; 14. PxP followed by Kt-B6, Blackcan initiate a promising counter attack by 14. ... BxP!!; 15.PxR-Q, RxQ; 16. Kt-B6, QxKt; 17. QxQ, BxQ. In this case Whiteexposes his King's side by P-KKt4 in order to benefit from theunstable position of the Black KB, but unless care is taken, hecan easily fall a victim to an attack on the open KKt file
12. ... PxKt 13. P-KKt4 Q-K4
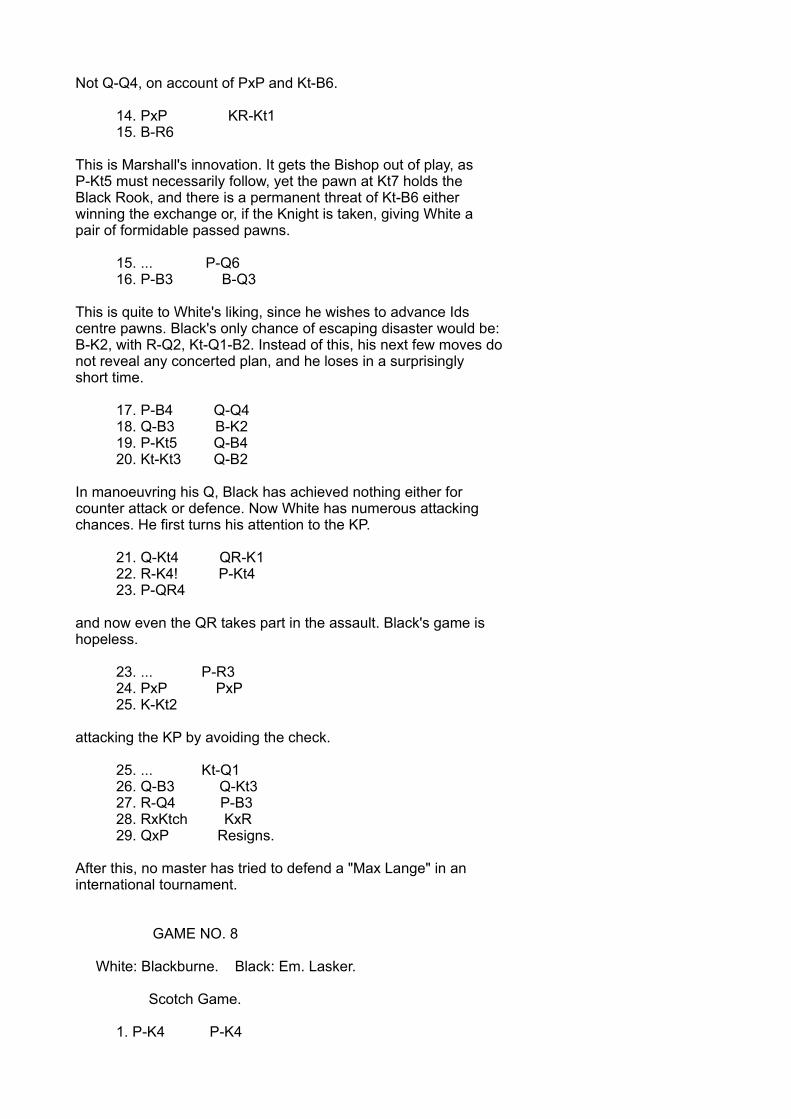
Not Q-Q4, on account of PxP and Kt-B6.
14. PxP KR-Kt1 15. B-R6
This is Marshall's innovation. It gets the Bishop out of play, asP-Kt5 must necessarily follow, yet the pawn at Kt7 holds theBlack Rook, and there is a permanent threat of Kt-B6 eitherwinning the exchange or, if the Knight is taken, giving White apair of formidable passed pawns.
15. ... P-Q6 16. P-B3 B-Q3
This is quite to White's liking, since he wishes to advance Idscentre pawns. Black's only chance of escaping disaster would be:B-K2, with R-Q2, Kt-Q1-B2. Instead of this, his next few moves donot reveal any concerted plan, and he loses in a surprisinglyshort time.
17. P-B4 Q-Q4 18. Q-B3 B-K2 19. P-Kt5 Q-B4 20. Kt-Kt3 Q-B2
In manoeuvring his Q, Black has achieved nothing either forcounter attack or defence. Now White has numerous attackingchances. He first turns his attention to the KP.
21. Q-Kt4 QR-K1 22. R-K4! P-Kt4 23. P-QR4
and now even the QR takes part in the assault. Black's game ishopeless.
23. ... P-R3 24. PxP PxP 25. K-Kt2
attacking the KP by avoiding the check.
25. ... Kt-Q1 26. Q-B3 Q-Kt3 27. R-Q4 P-B3 28. RxKtch KxR 29. QxP Resigns.
After this, no master has tried to defend a "Max Lange" in aninternational tournament.
GAME NO. 8
White: Blackburne. Black: Em. Lasker.
Scotch Game.
1. P-K4 P-K4
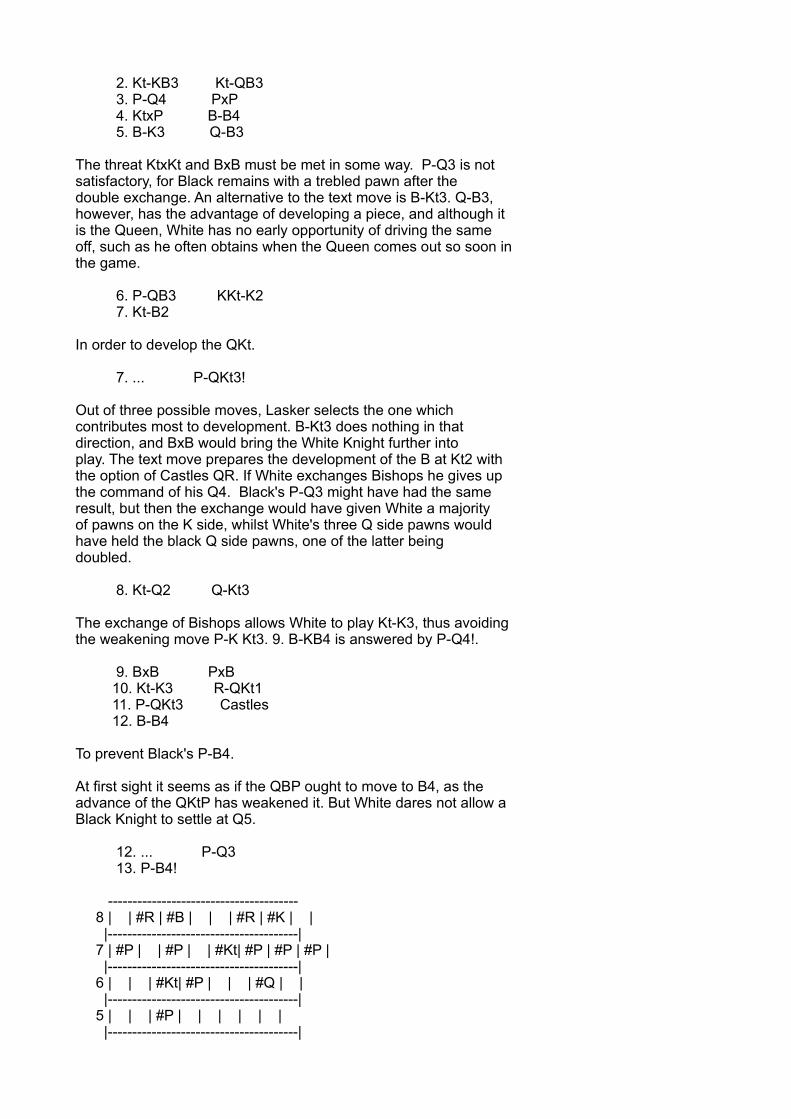
2. Kt-KB3 Kt-QB3 3. P-Q4 PxP 4. KtxP B-B4 5. B-K3 Q-B3
The threat KtxKt and BxB must be met in some way. P-Q3 is notsatisfactory, for Black remains with a trebled pawn after thedouble exchange. An alternative to the text move is B-Kt3. Q-B3,however, has the advantage of developing a piece, and although itis the Queen, White has no early opportunity of driving the sameoff, such as he often obtains when the Queen comes out so soon inthe game.
6. P-QB3 KKt-K2 7. Kt-B2
In order to develop the QKt.
7. ... P-QKt3!
Out of three possible moves, Lasker selects the one whichcontributes most to development. B-Kt3 does nothing in thatdirection, and BxB would bring the White Knight further intoplay. The text move prepares the development of the B at Kt2 withthe option of Castles QR. If White exchanges Bishops he gives upthe command of his Q4. Black's P-Q3 might have had the sameresult, but then the exchange would have given White a majorityof pawns on the K side, whilst White's three Q side pawns wouldhave held the black Q side pawns, one of the latter beingdoubled.
8. Kt-Q2 Q-Kt3
The exchange of Bishops allows White to play Kt-K3, thus avoidingthe weakening move P-K Kt3. 9. B-KB4 is answered by P-Q4!.
9. BxB PxB 10. Kt-K3 R-QKt1 11. P-QKt3 Castles 12. B-B4
To prevent Black's P-B4.
At first sight it seems as if the QBP ought to move to B4, as theadvance of the QKtP has weakened it. But White dares not allow aBlack Knight to settle at Q5.
12. ... P-Q3 13. P-B4!
--------------------------------------- 8 | | #R | #B | | | #R | #K | | |---------------------------------------| 7 | #P | | #P | | #Kt| #P | #P | #P | |---------------------------------------| 6 | | | #Kt| #P | | | #Q | | |---------------------------------------| 5 | | | #P | | | | | | |---------------------------------------|
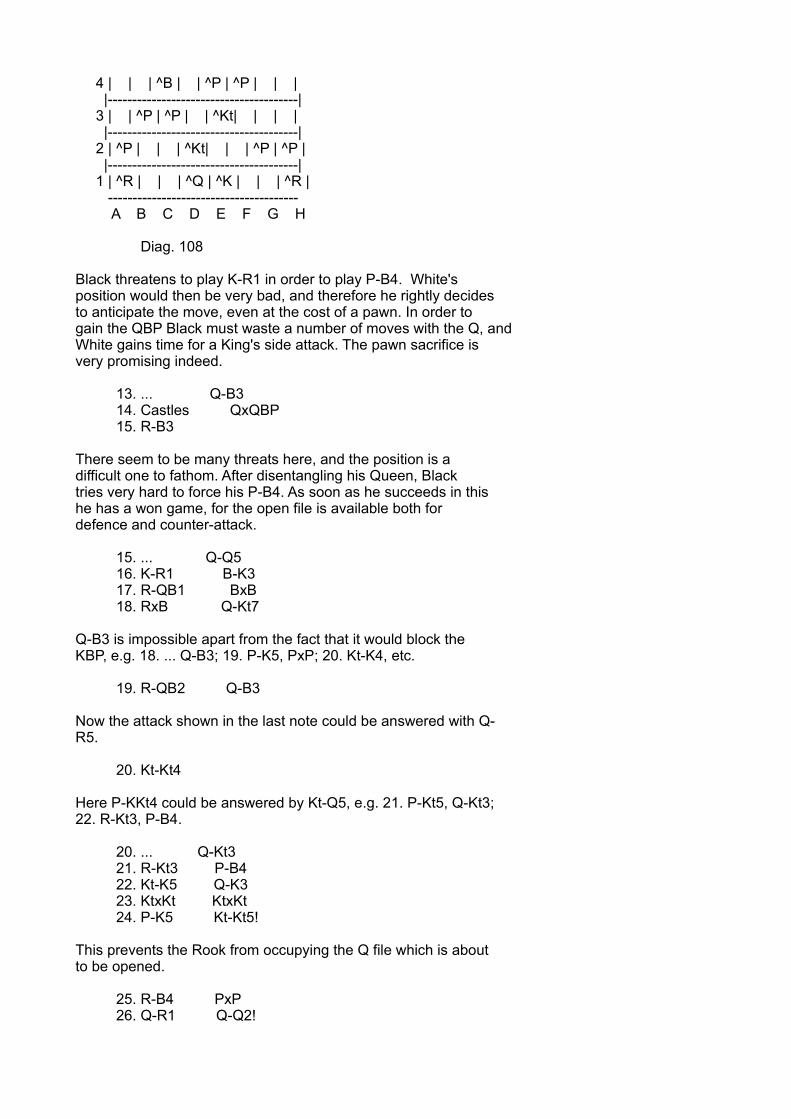
4 | | | ^B | | ^P | ^P | | | |---------------------------------------| 3 | | ^P | ^P | | ^Kt| | | | |---------------------------------------| 2 | ^P | | | ^Kt| | | ^P | ^P | |---------------------------------------| 1 | ^R | | | ^Q | ^K | | | ^R | --------------------------------------- A B C D E F G H
Diag. 108
Black threatens to play K-R1 in order to play P-B4. White'sposition would then be very bad, and therefore he rightly decidesto anticipate the move, even at the cost of a pawn. In order togain the QBP Black must waste a number of moves with the Q, andWhite gains time for a King's side attack. The pawn sacrifice isvery promising indeed.
13. ... Q-B3 14. Castles QxQBP 15. R-B3
There seem to be many threats here, and the position is adifficult one to fathom. After disentangling his Queen, Blacktries very hard to force his P-B4. As soon as he succeeds in thishe has a won game, for the open file is available both fordefence and counter-attack.
15. ... Q-Q5 16. K-R1 B-K3 17. R-QB1 BxB 18. RxB Q-Kt7
Q-B3 is impossible apart from the fact that it would block theKBP, e.g. 18. ... Q-B3; 19. P-K5, PxP; 20. Kt-K4, etc.
19. R-QB2 Q-B3
Now the attack shown in the last note could be answered with Q-R5.
20. Kt-Kt4
Here P-KKt4 could be answered by Kt-Q5, e.g. 21. P-Kt5, Q-Kt3;22. R-Kt3, P-B4.
20. ... Q-Kt3 21. R-Kt3 P-B4 22. Kt-K5 Q-K3 23. KtxKt KtxKt 24. P-K5 Kt-Kt5!
This prevents the Rook from occupying the Q file which is aboutto be opened.
25. R-B4 PxP 26. Q-R1 Q-Q2!

If now QxP, Black plays R-B2 with unanswerable threats of R-K1 orQ1.
27. Kt-B3 PxP 28. Kt-K5 Q-K2 29. RxKBP QR-K1 30. Kt-B4 Q-K8ch 31. R-B1 QxQ 32. RxQ KtxP 33. P-R3 P-B5 34. R-Q3 Kt-Kt5 35. R-Q7 P-B6! 36. PxP RxP 37. RxRP Kt-Q6
threatens mate in six.
38. R-R1 Kt-K8
mate is again threatened.
39. Kt-Q2 RxPch 40. K-Kt1 R-Kt6ch 41. K-R2 R-Q6! 42. RxKt RxKtch 43. RxR RxR 44. R-Q7 R-K6 45. RxP RxP 46. RxP P-R3 47. R-B6
A few more moves "for fun."
47. ... K-R2 48. K-Kt2 P-R4 49. R-R6 P-Kt3 50. R-R4 K-R3 51. R-QB4 R-Kt7ch 52. K-Kt3 K-Kt4 53. R-B3 P-R5ch 54. K-R3 K-R4 55. R-B4 R-Kt6ch 56. K-R2 P-Kt4 57. R-R4 R-Kt7ch 58. K-Rsq P-R6 59. R-QB4 P-Kt5 60. K-Ktsq P-Kt6 61. R-B5ch K-Kt3 62. R-Bsq K-B4 63. R-Rsq R-Q7 64. R-Ksq K-B5 65. R-Rsq K-K6 66. R-R3ch R-Q6 67. R-Rsq K-K7 Resigns.
GAME No. 9
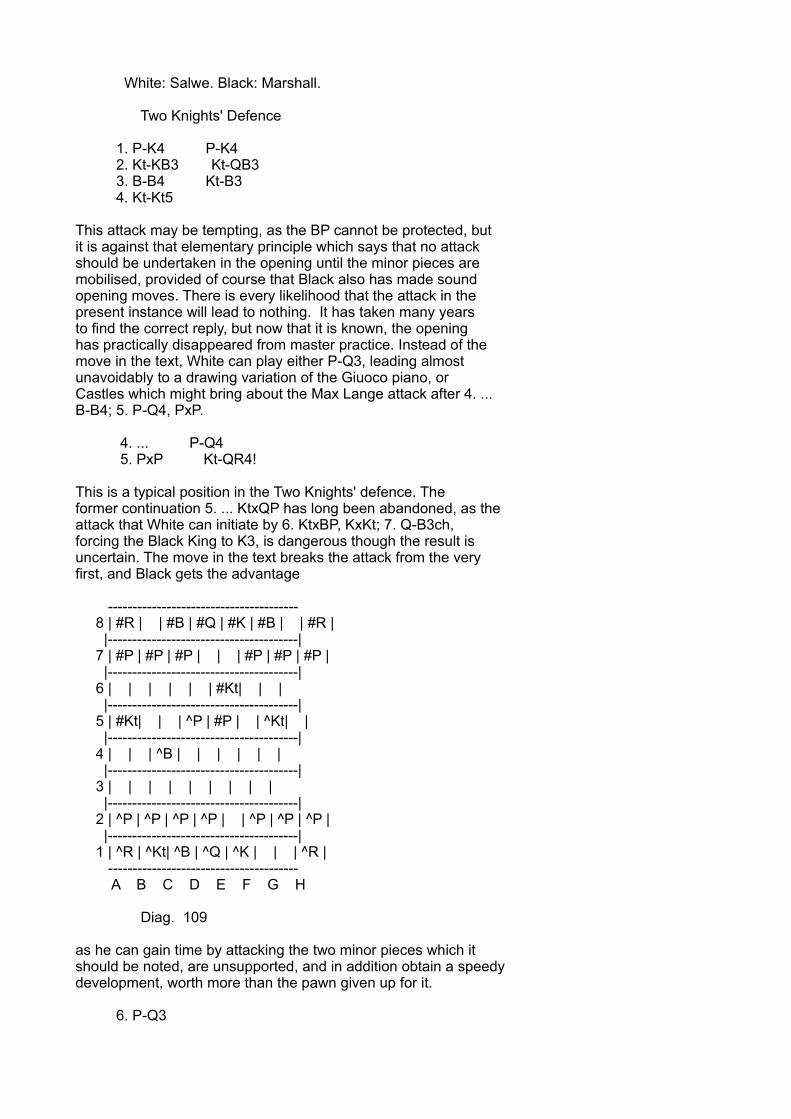
White: Salwe. Black: Marshall.
Two Knights' Defence
1. P-K4 P-K4 2. Kt-KB3 Kt-QB3 3. B-B4 Kt-B3 4. Kt-Kt5
This attack may be tempting, as the BP cannot be protected, butit is against that elementary principle which says that no attackshould be undertaken in the opening until the minor pieces aremobilised, provided of course that Black also has made soundopening moves. There is every likelihood that the attack in thepresent instance will lead to nothing. It has taken many yearsto find the correct reply, but now that it is known, the openinghas practically disappeared from master practice. Instead of themove in the text, White can play either P-Q3, leading almostunavoidably to a drawing variation of the Giuoco piano, orCastles which might bring about the Max Lange attack after 4. ...B-B4; 5. P-Q4, PxP.
4. ... P-Q4 5. PxP Kt-QR4!
This is a typical position in the Two Knights' defence. Theformer continuation 5. ... KtxQP has long been abandoned, as theattack that White can initiate by 6. KtxBP, KxKt; 7. Q-B3ch,forcing the Black King to K3, is dangerous though the result isuncertain. The move in the text breaks the attack from the veryfirst, and Black gets the advantage
--------------------------------------- 8 | #R | | #B | #Q | #K | #B | | #R | |---------------------------------------| 7 | #P | #P | #P | | | #P | #P | #P | |---------------------------------------| 6 | | | | | | #Kt| | | |---------------------------------------| 5 | #Kt| | | ^P | #P | | ^Kt| | |---------------------------------------| 4 | | | ^B | | | | | | |---------------------------------------| 3 | | | | | | | | | |---------------------------------------| 2 | ^P | ^P | ^P | ^P | | ^P | ^P | ^P | |---------------------------------------| 1 | ^R | ^Kt| ^B | ^Q | ^K | | | ^R | --------------------------------------- A B C D E F G H
Diag. 109
as he can gain time by attacking the two minor pieces which itshould be noted, are unsupported, and in addition obtain a speedydevelopment, worth more than the pawn given up for it.
6. P-Q3
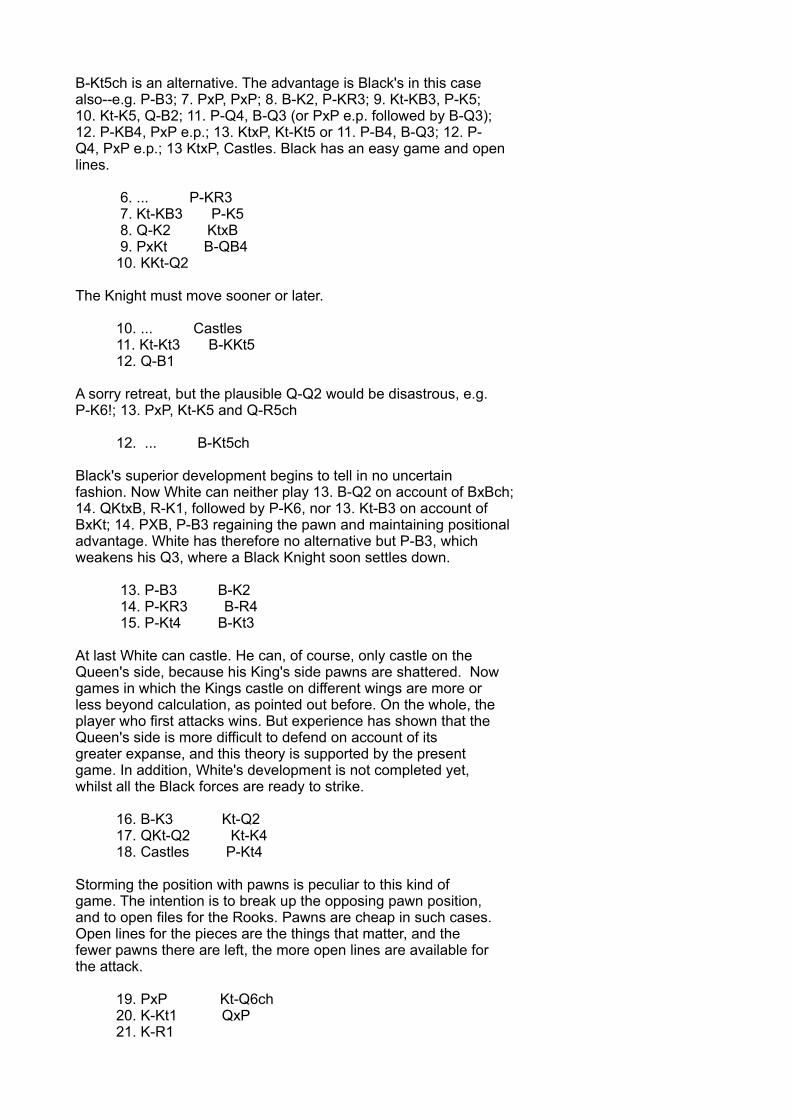
B-Kt5ch is an alternative. The advantage is Black's in this casealso--e.g. P-B3; 7. PxP, PxP; 8. B-K2, P-KR3; 9. Kt-KB3, P-K5;10. Kt-K5, Q-B2; 11. P-Q4, B-Q3 (or PxP e.p. followed by B-Q3);12. P-KB4, PxP e.p.; 13. KtxP, Kt-Kt5 or 11. P-B4, B-Q3; 12. P-Q4, PxP e.p.; 13 KtxP, Castles. Black has an easy game and openlines.
6. ... P-KR3 7. Kt-KB3 P-K5 8. Q-K2 KtxB 9. PxKt B-QB4 10. KKt-Q2
The Knight must move sooner or later.
10. ... Castles 11. Kt-Kt3 B-KKt5 12. Q-B1
A sorry retreat, but the plausible Q-Q2 would be disastrous, e.g.P-K6!; 13. PxP, Kt-K5 and Q-R5ch
12. ... B-Kt5ch
Black's superior development begins to tell in no uncertainfashion. Now White can neither play 13. B-Q2 on account of BxBch;14. QKtxB, R-K1, followed by P-K6, nor 13. Kt-B3 on account ofBxKt; 14. PXB, P-B3 regaining the pawn and maintaining positionaladvantage. White has therefore no alternative but P-B3, whichweakens his Q3, where a Black Knight soon settles down.
13. P-B3 B-K2 14. P-KR3 B-R4 15. P-Kt4 B-Kt3
At last White can castle. He can, of course, only castle on theQueen's side, because his King's side pawns are shattered. Nowgames in which the Kings castle on different wings are more orless beyond calculation, as pointed out before. On the whole, theplayer who first attacks wins. But experience has shown that theQueen's side is more difficult to defend on account of itsgreater expanse, and this theory is supported by the presentgame. In addition, White's development is not completed yet,whilst all the Black forces are ready to strike.
16. B-K3 Kt-Q2 17. QKt-Q2 Kt-K4 18. Castles P-Kt4
Storming the position with pawns is peculiar to this kind ofgame. The intention is to break up the opposing pawn position,and to open files for the Rooks. Pawns are cheap in such cases.Open lines for the pieces are the things that matter, and thefewer pawns there are left, the more open lines are available forthe attack.
19. PxP Kt-Q6ch 20. K-Kt1 QxP 21. K-R1
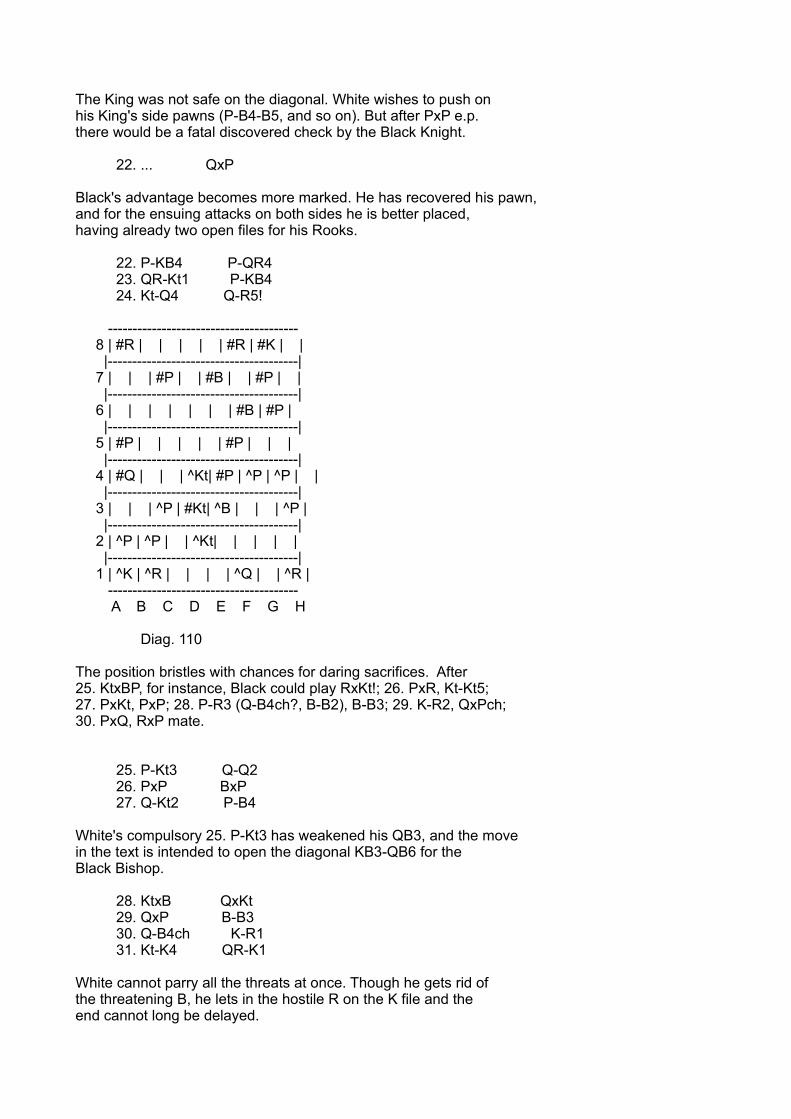
The King was not safe on the diagonal. White wishes to push onhis King's side pawns (P-B4-B5, and so on). But after PxP e.p.there would be a fatal discovered check by the Black Knight.
22. ... QxP
Black's advantage becomes more marked. He has recovered his pawn,and for the ensuing attacks on both sides he is better placed,having already two open files for his Rooks.
22. P-KB4 P-QR4 23. QR-Kt1 P-KB4 24. Kt-Q4 Q-R5!
--------------------------------------- 8 | #R | | | | | #R | #K | | |---------------------------------------| 7 | | | #P | | #B | | #P | | |---------------------------------------| 6 | | | | | | | #B | #P | |---------------------------------------| 5 | #P | | | | | #P | | | |---------------------------------------| 4 | #Q | | | ^Kt| #P | ^P | ^P | | |---------------------------------------| 3 | | | ^P | #Kt| ^B | | | ^P | |---------------------------------------| 2 | ^P | ^P | | ^Kt| | | | | |---------------------------------------| 1 | ^K | ^R | | | | ^Q | | ^R | --------------------------------------- A B C D E F G H
Diag. 110
The position bristles with chances for daring sacrifices. After25. KtxBP, for instance, Black could play RxKt!; 26. PxR, Kt-Kt5;27. PxKt, PxP; 28. P-R3 (Q-B4ch?, B-B2), B-B3; 29. K-R2, QxPch;30. PxQ, RxP mate.
25. P-Kt3 Q-Q2 26. PxP BxP 27. Q-Kt2 P-B4
White's compulsory 25. P-Kt3 has weakened his QB3, and the movein the text is intended to open the diagonal KB3-QB6 for theBlack Bishop.
28. KtxB QxKt 29. QxP B-B3 30. Q-B4ch K-R1 31. Kt-K4 QR-K1
White cannot parry all the threats at once. Though he gets rid ofthe threatening B, he lets in the hostile R on the K file and theend cannot long be delayed.
32. KtxB RxKt 33. B-B1 KR-K3 34. B-R3 R-K7 35. KR-Q1 Kt-K8 36. BxP Kt-B7ch 37. K-Kt2 Kt-Kt5ch
and mate at R7 or B7.
GAME No. 10
White: Teichmann. Black: Amateurs in consultation.
Two Knights' Defence.
1. P-K4 P-K4 2. Kt-KB3 Kt-QB3 3. B-B4 Kt-B3 4. Castles
--------------------------------------- 8 | #R | | #B | #Q | #K | #B | | #R | |---------------------------------------| 7 | #P | #P | #P | #P | | #P | #P | #P | |---------------------------------------| 6 | | | #Kt| | | #Kt| | | |---------------------------------------| 5 | | | | | #P | | | | |---------------------------------------| 4 | | | ^B | | ^P | | | | |---------------------------------------| 3 | | | | | | ^Kt| | | |---------------------------------------| 2 | ^P | ^P | ^P | ^P | | ^P | ^P | ^P | |---------------------------------------| 1 | ^R | ^Kt| ^B | ^Q | ^K | | | ^R | --------------------------------------- A B C D E F G H
Diag. 111
The idea underlying this pawn sacrifice is to open the K file forthe Rook. It will be seen that, with correct play, Black managesto castle just in time, and White, though winning back his pawn,has no advantage in position. The opening is seldom played bymodern masters.
Instead of the move in the text, White can hardly defend the KPwith Kt-B3, as Black simply captures the pawn and recovers hispiece by P-Q4, with a satisfactory position. It is even betterfor Black if White plays 6. BxPch in reply to 5. ... KtxP. Thecapture of White's KP is far more important than that of theBlack KBP, particularly as the White Bishop, which could bedangerous on the diagonal QR2-KKt8, is exchanged, e.g. 6. ...KxB; 7. KtxKt, P-Q4; 8. Kt-Kt5ch, K-Kt1! Black continues P-KR3,K-R2, R-B1 and has open lines for Rooks and Bishops.
4. ... KtxP
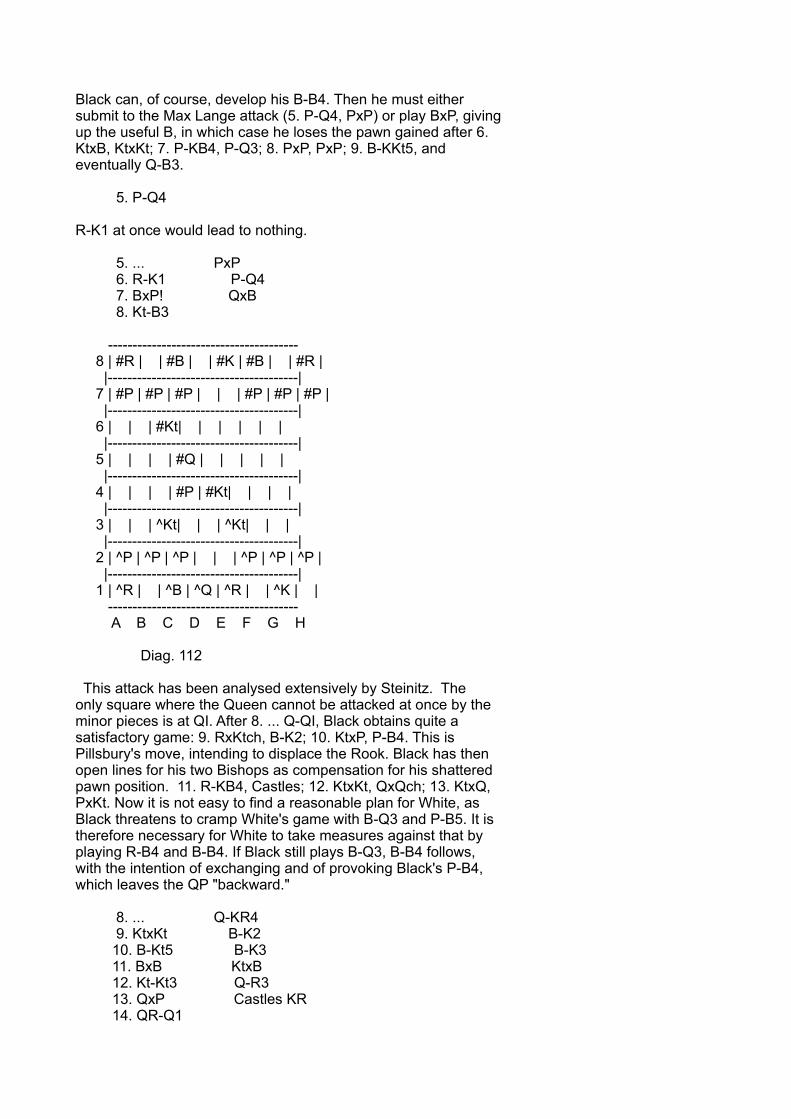
Black can, of course, develop his B-B4. Then he must eithersubmit to the Max Lange attack (5. P-Q4, PxP) or play BxP, givingup the useful B, in which case he loses the pawn gained after 6.KtxB, KtxKt; 7. P-KB4, P-Q3; 8. PxP, PxP; 9. B-KKt5, andeventually Q-B3.
5. P-Q4
R-K1 at once would lead to nothing.
5. ... PxP 6. R-K1 P-Q4 7. BxP! QxB 8. Kt-B3
--------------------------------------- 8 | #R | | #B | | #K | #B | | #R | |---------------------------------------| 7 | #P | #P | #P | | | #P | #P | #P | |---------------------------------------| 6 | | | #Kt| | | | | | |---------------------------------------| 5 | | | | #Q | | | | | |---------------------------------------| 4 | | | | #P | #Kt| | | | |---------------------------------------| 3 | | | ^Kt| | | ^Kt| | | |---------------------------------------| 2 | ^P | ^P | ^P | | | ^P | ^P | ^P | |---------------------------------------| 1 | ^R | | ^B | ^Q | ^R | | ^K | | --------------------------------------- A B C D E F G H
Diag. 112
This attack has been analysed extensively by Steinitz. Theonly square where the Queen cannot be attacked at once by theminor pieces is at QI. After 8. ... Q-QI, Black obtains quite asatisfactory game: 9. RxKtch, B-K2; 10. KtxP, P-B4. This isPillsbury's move, intending to displace the Rook. Black has thenopen lines for his two Bishops as compensation for his shatteredpawn position. 11. R-KB4, Castles; 12. KtxKt, QxQch; 13. KtxQ,PxKt. Now it is not easy to find a reasonable plan for White, asBlack threatens to cramp White's game with B-Q3 and P-B5. It istherefore necessary for White to take measures against that byplaying R-B4 and B-B4. If Black still plays B-Q3, B-B4 follows,with the intention of exchanging and of provoking Black's P-B4,which leaves the QP "backward."
8. ... Q-KR4 9. KtxKt B-K2 10. B-Kt5 B-K3 11. BxB KtxB 12. Kt-Kt3 Q-R3 13. QxP Castles KR 14. QR-Q1
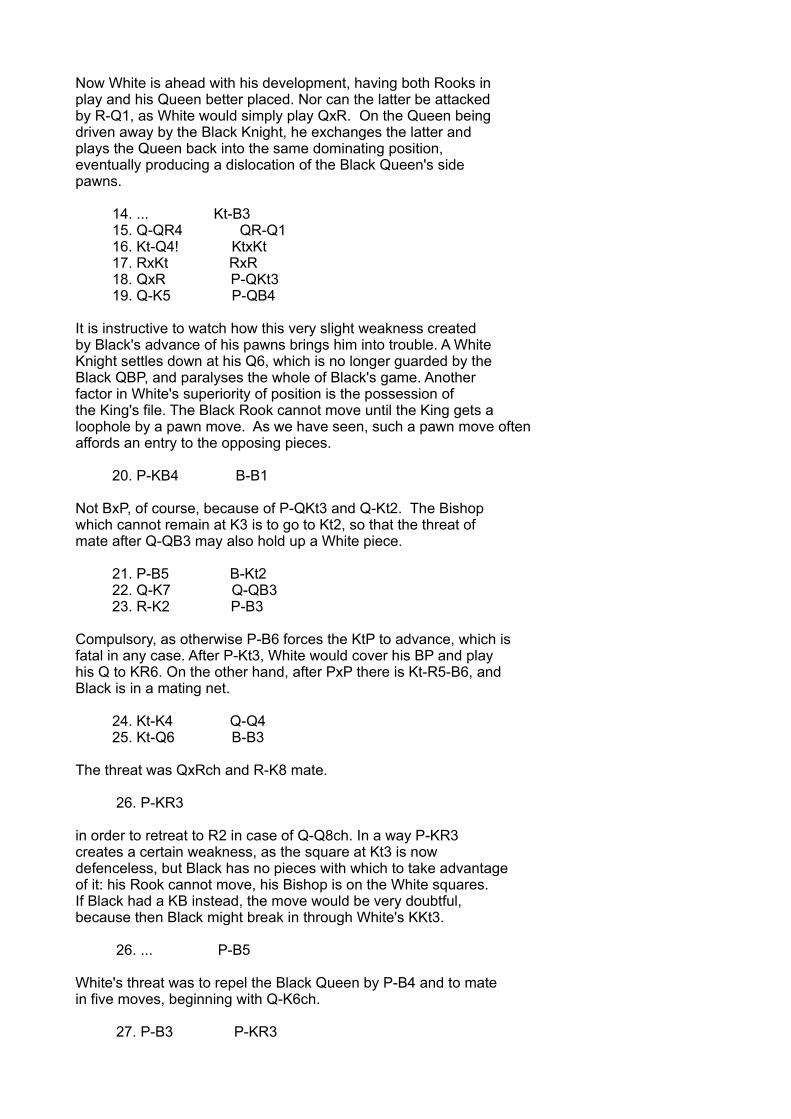
Now White is ahead with his development, having both Rooks inplay and his Queen better placed. Nor can the latter be attackedby R-Q1, as White would simply play QxR. On the Queen beingdriven away by the Black Knight, he exchanges the latter andplays the Queen back into the same dominating position,eventually producing a dislocation of the Black Queen's sidepawns.
14. ... Kt-B3 15. Q-QR4 QR-Q1 16. Kt-Q4! KtxKt 17. RxKt RxR 18. QxR P-QKt3 19. Q-K5 P-QB4
It is instructive to watch how this very slight weakness createdby Black's advance of his pawns brings him into trouble. A WhiteKnight settles down at his Q6, which is no longer guarded by theBlack QBP, and paralyses the whole of Black's game. Anotherfactor in White's superiority of position is the possession ofthe King's file. The Black Rook cannot move until the King gets aloophole by a pawn move. As we have seen, such a pawn move oftenaffords an entry to the opposing pieces.
20. P-KB4 B-B1
Not BxP, of course, because of P-QKt3 and Q-Kt2. The Bishopwhich cannot remain at K3 is to go to Kt2, so that the threat ofmate after Q-QB3 may also hold up a White piece.
21. P-B5 B-Kt2 22. Q-K7 Q-QB3 23. R-K2 P-B3
Compulsory, as otherwise P-B6 forces the KtP to advance, which isfatal in any case. After P-Kt3, White would cover his BP and playhis Q to KR6. On the other hand, after PxP there is Kt-R5-B6, andBlack is in a mating net.
24. Kt-K4 Q-Q4 25. Kt-Q6 B-B3
The threat was QxRch and R-K8 mate.
26. P-KR3
in order to retreat to R2 in case of Q-Q8ch. In a way P-KR3creates a certain weakness, as the square at Kt3 is nowdefenceless, but Black has no pieces with which to take advantageof it: his Rook cannot move, his Bishop is on the White squares.If Black had a KB instead, the move would be very doubtful,because then Black might break in through White's KKt3.
26. ... P-B5
White's threat was to repel the Black Queen by P-B4 and to matein five moves, beginning with Q-K6ch.
27. P-B3 P-KR3
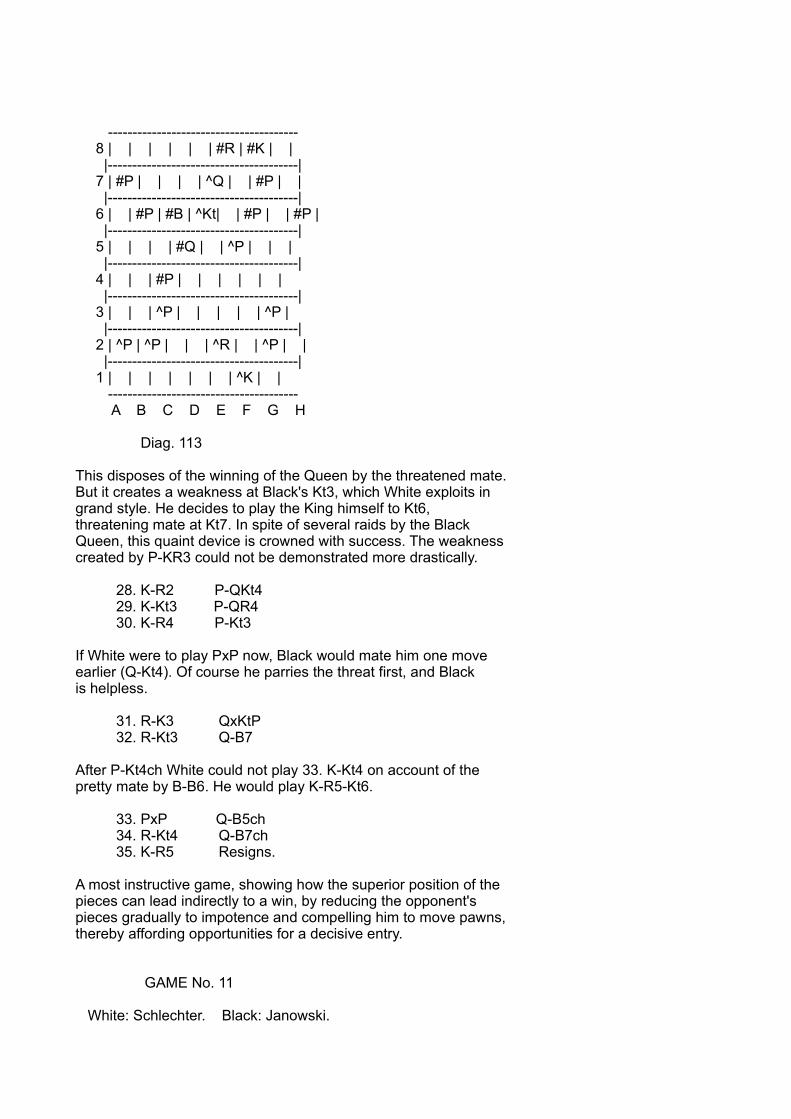
--------------------------------------- 8 | | | | | | #R | #K | | |---------------------------------------| 7 | #P | | | | ^Q | | #P | | |---------------------------------------| 6 | | #P | #B | ^Kt| | #P | | #P | |---------------------------------------| 5 | | | | #Q | | ^P | | | |---------------------------------------| 4 | | | #P | | | | | | |---------------------------------------| 3 | | | ^P | | | | | ^P | |---------------------------------------| 2 | ^P | ^P | | | ^R | | ^P | | |---------------------------------------| 1 | | | | | | | ^K | | --------------------------------------- A B C D E F G H
Diag. 113
This disposes of the winning of the Queen by the threatened mate.But it creates a weakness at Black's Kt3, which White exploits ingrand style. He decides to play the King himself to Kt6,threatening mate at Kt7. In spite of several raids by the BlackQueen, this quaint device is crowned with success. The weaknesscreated by P-KR3 could not be demonstrated more drastically.
28. K-R2 P-QKt4 29. K-Kt3 P-QR4 30. K-R4 P-Kt3
If White were to play PxP now, Black would mate him one moveearlier (Q-Kt4). Of course he parries the threat first, and Blackis helpless.
31. R-K3 QxKtP 32. R-Kt3 Q-B7
After P-Kt4ch White could not play 33. K-Kt4 on account of thepretty mate by B-B6. He would play K-R5-Kt6.
33. PxP Q-B5ch 34. R-Kt4 Q-B7ch 35. K-R5 Resigns.
A most instructive game, showing how the superior position of thepieces can lead indirectly to a win, by reducing the opponent'spieces gradually to impotence and compelling him to move pawns,thereby affording opportunities for a decisive entry.
GAME No. 11
White: Schlechter. Black: Janowski.
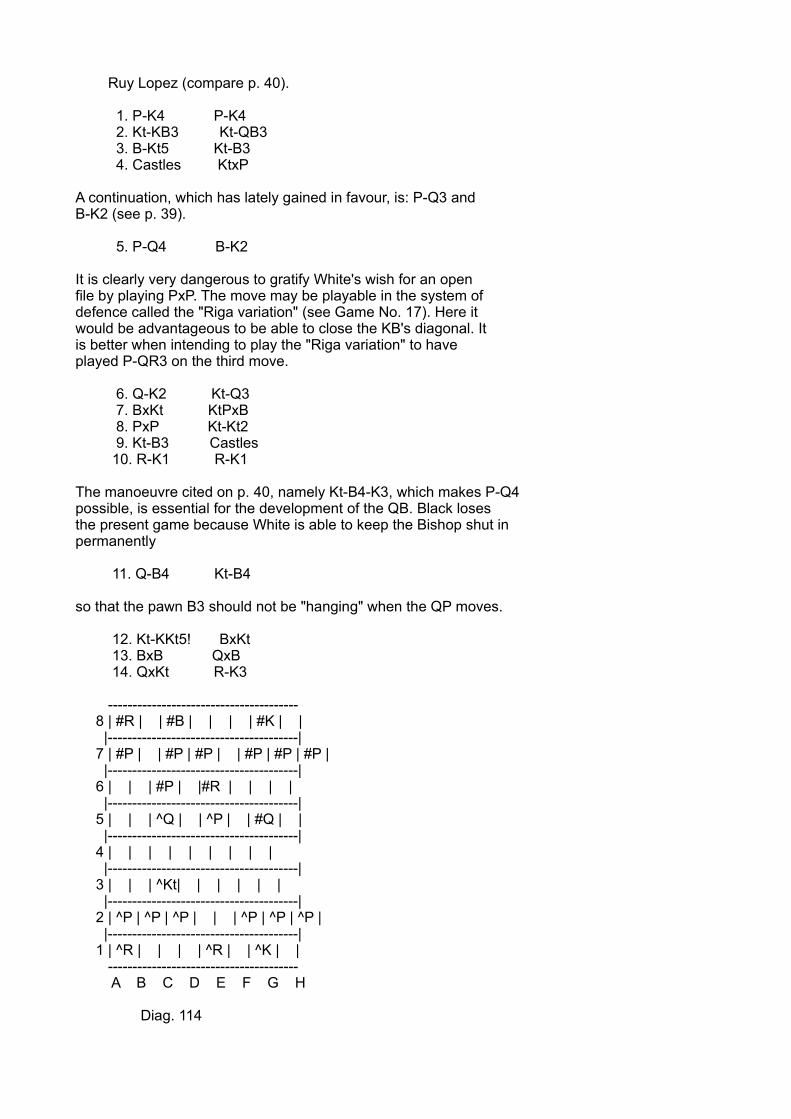
Ruy Lopez (compare p. 40).
1. P-K4 P-K4 2. Kt-KB3 Kt-QB3 3. B-Kt5 Kt-B3 4. Castles KtxP
A continuation, which has lately gained in favour, is: P-Q3 andB-K2 (see p. 39).
5. P-Q4 B-K2
It is clearly very dangerous to gratify White's wish for an openfile by playing PxP. The move may be playable in the system ofdefence called the "Riga variation" (see Game No. 17). Here itwould be advantageous to be able to close the KB's diagonal. Itis better when intending to play the "Riga variation" to haveplayed P-QR3 on the third move.
6. Q-K2 Kt-Q3 7. BxKt KtPxB 8. PxP Kt-Kt2 9. Kt-B3 Castles 10. R-K1 R-K1
The manoeuvre cited on p. 40, namely Kt-B4-K3, which makes P-Q4possible, is essential for the development of the QB. Black losesthe present game because White is able to keep the Bishop shut inpermanently
11. Q-B4 Kt-B4
so that the pawn B3 should not be "hanging" when the QP moves.
12. Kt-KKt5! BxKt 13. BxB QxB 14. QxKt R-K3
--------------------------------------- 8 | #R | | #B | | | | #K | | |---------------------------------------| 7 | #P | | #P | #P | | #P | #P | #P | |---------------------------------------| 6 | | | #P | |#R | | | | |---------------------------------------| 5 | | | ^Q | | ^P | | #Q | | |---------------------------------------| 4 | | | | | | | | | |---------------------------------------| 3 | | | ^Kt| | | | | | |---------------------------------------| 2 | ^P | ^P | ^P | | | ^P | ^P | ^P | |---------------------------------------| 1 | ^R | | | | ^R | | ^K | | --------------------------------------- A B C D E F G H
Diag. 114
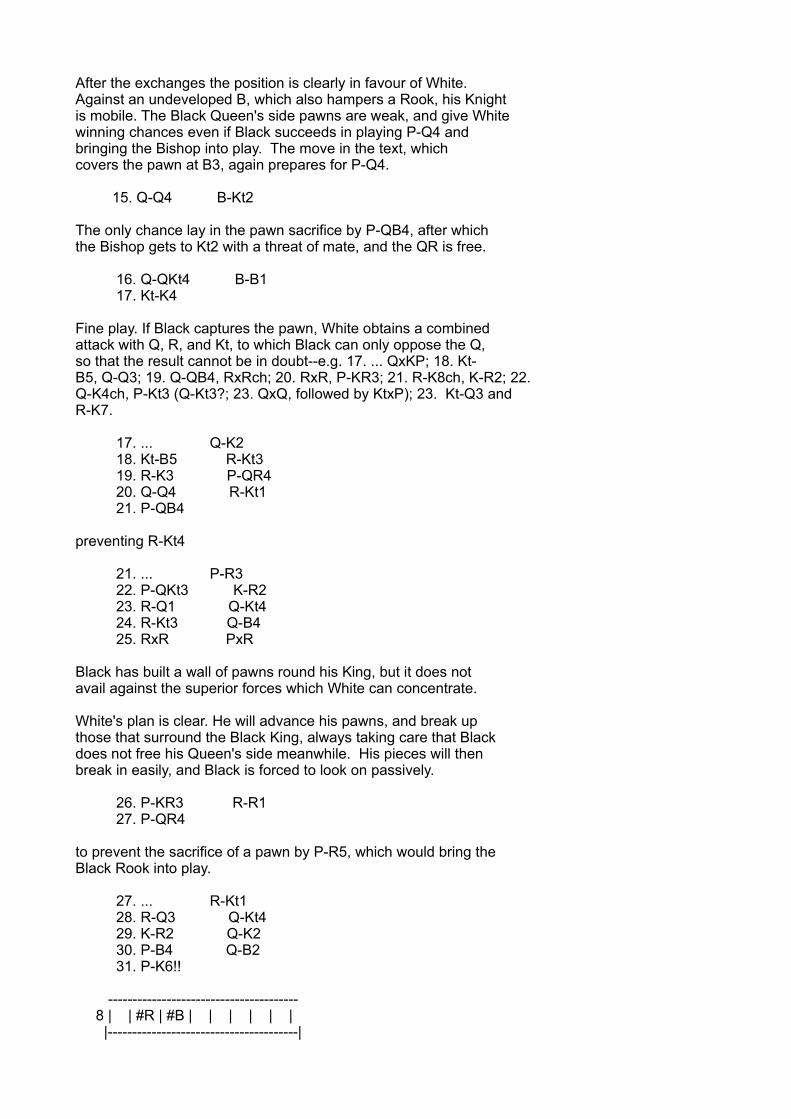
After the exchanges the position is clearly in favour of White.Against an undeveloped B, which also hampers a Rook, his Knightis mobile. The Black Queen's side pawns are weak, and give Whitewinning chances even if Black succeeds in playing P-Q4 andbringing the Bishop into play. The move in the text, whichcovers the pawn at B3, again prepares for P-Q4.
15. Q-Q4 B-Kt2
The only chance lay in the pawn sacrifice by P-QB4, after whichthe Bishop gets to Kt2 with a threat of mate, and the QR is free.
16. Q-QKt4 B-B1 17. Kt-K4
Fine play. If Black captures the pawn, White obtains a combinedattack with Q, R, and Kt, to which Black can only oppose the Q,so that the result cannot be in doubt--e.g. 17. ... QxKP; 18. Kt-B5, Q-Q3; 19. Q-QB4, RxRch; 20. RxR, P-KR3; 21. R-K8ch, K-R2; 22.Q-K4ch, P-Kt3 (Q-Kt3?; 23. QxQ, followed by KtxP); 23. Kt-Q3 andR-K7.
17. ... Q-K2 18. Kt-B5 R-Kt3 19. R-K3 P-QR4 20. Q-Q4 R-Kt1 21. P-QB4
preventing R-Kt4
21. ... P-R3 22. P-QKt3 K-R2 23. R-Q1 Q-Kt4 24. R-Kt3 Q-B4 25. RxR PxR
Black has built a wall of pawns round his King, but it does notavail against the superior forces which White can concentrate.
White's plan is clear. He will advance his pawns, and break upthose that surround the Black King, always taking care that Blackdoes not free his Queen's side meanwhile. His pieces will thenbreak in easily, and Black is forced to look on passively.
26. P-KR3 R-R1 27. P-QR4
to prevent the sacrifice of a pawn by P-R5, which would bring theBlack Rook into play.
27. ... R-Kt1 28. R-Q3 Q-Kt4 29. K-R2 Q-K2 30. P-B4 Q-B2 31. P-K6!!
--------------------------------------- 8 | | #R | #B | | | | | | |---------------------------------------|
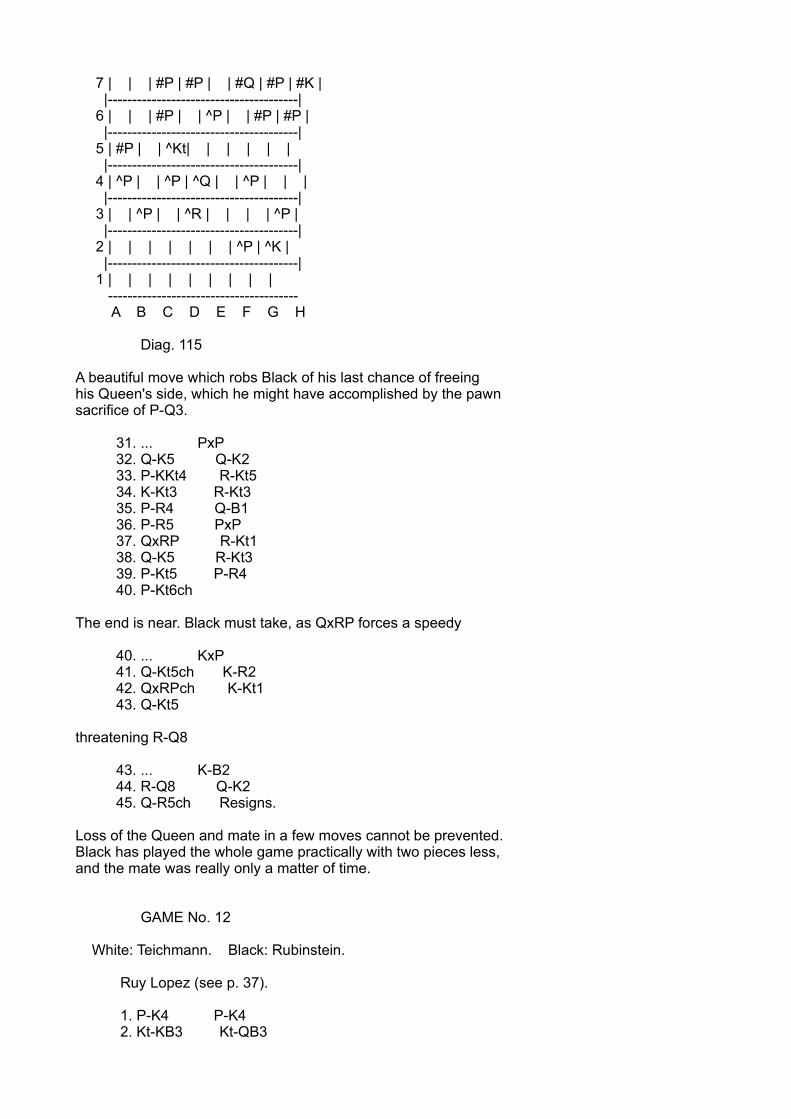
7 | | | #P | #P | | #Q | #P | #K | |---------------------------------------| 6 | | | #P | | ^P | | #P | #P | |---------------------------------------| 5 | #P | | ^Kt| | | | | | |---------------------------------------| 4 | ^P | | ^P | ^Q | | ^P | | | |---------------------------------------| 3 | | ^P | | ^R | | | | ^P | |---------------------------------------| 2 | | | | | | | ^P | ^K | |---------------------------------------| 1 | | | | | | | | | --------------------------------------- A B C D E F G H
Diag. 115
A beautiful move which robs Black of his last chance of freeinghis Queen's side, which he might have accomplished by the pawnsacrifice of P-Q3.
31. ... PxP 32. Q-K5 Q-K2 33. P-KKt4 R-Kt5 34. K-Kt3 R-Kt3 35. P-R4 Q-B1 36. P-R5 PxP 37. QxRP R-Kt1 38. Q-K5 R-Kt3 39. P-Kt5 P-R4 40. P-Kt6ch
The end is near. Black must take, as QxRP forces a speedy
40. ... KxP 41. Q-Kt5ch K-R2 42. QxRPch K-Kt1 43. Q-Kt5
threatening R-Q8
43. ... K-B2 44. R-Q8 Q-K2 45. Q-R5ch Resigns.
Loss of the Queen and mate in a few moves cannot be prevented.Black has played the whole game practically with two pieces less,and the mate was really only a matter of time.
GAME No. 12
White: Teichmann. Black: Rubinstein.
Ruy Lopez (see p. 37).
1. P-K4 P-K4 2. Kt-KB3 Kt-QB3
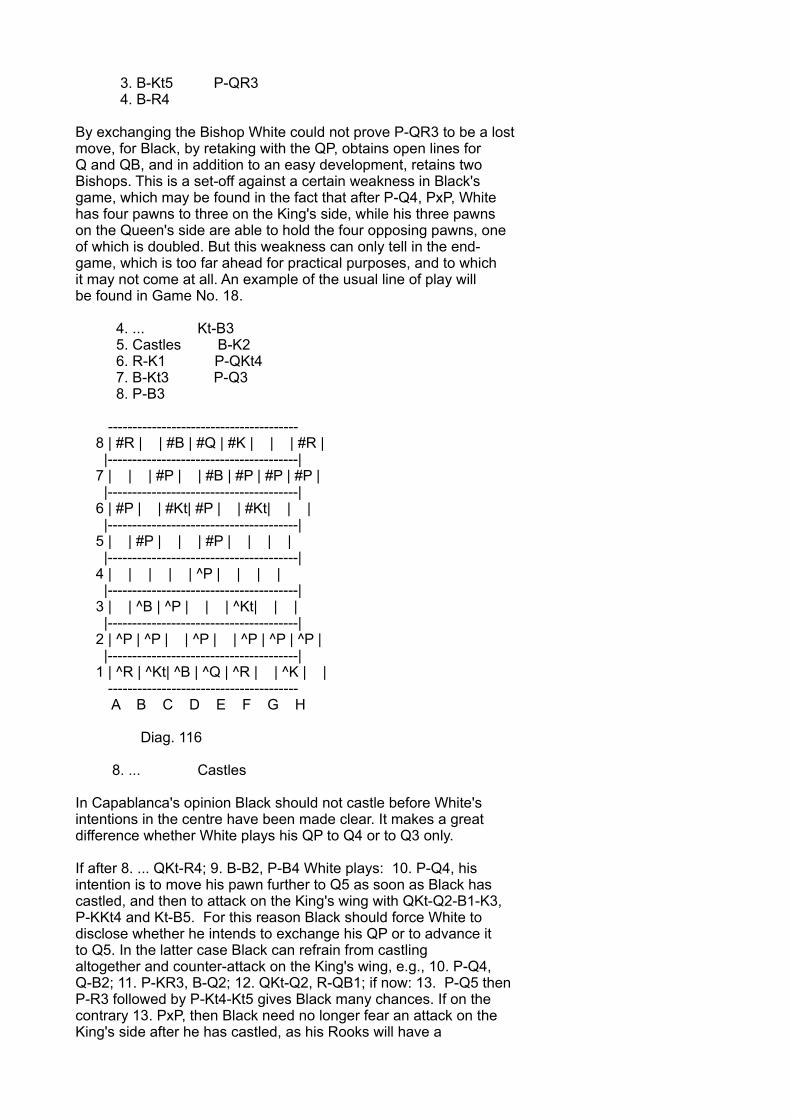
3. B-Kt5 P-QR3 4. B-R4
By exchanging the Bishop White could not prove P-QR3 to be a lostmove, for Black, by retaking with the QP, obtains open lines forQ and QB, and in addition to an easy development, retains twoBishops. This is a set-off against a certain weakness in Black'sgame, which may be found in the fact that after P-Q4, PxP, Whitehas four pawns to three on the King's side, while his three pawnson the Queen's side are able to hold the four opposing pawns, oneof which is doubled. But this weakness can only tell in the end-game, which is too far ahead for practical purposes, and to whichit may not come at all. An example of the usual line of play willbe found in Game No. 18.
4. ... Kt-B3 5. Castles B-K2 6. R-K1 P-QKt4 7. B-Kt3 P-Q3 8. P-B3
--------------------------------------- 8 | #R | | #B | #Q | #K | | | #R | |---------------------------------------| 7 | | | #P | | #B | #P | #P | #P | |---------------------------------------| 6 | #P | | #Kt| #P | | #Kt| | | |---------------------------------------| 5 | | #P | | | #P | | | | |---------------------------------------| 4 | | | | | ^P | | | | |---------------------------------------| 3 | | ^B | ^P | | | ^Kt| | | |---------------------------------------| 2 | ^P | ^P | | ^P | | ^P | ^P | ^P | |---------------------------------------| 1 | ^R | ^Kt| ^B | ^Q | ^R | | ^K | | --------------------------------------- A B C D E F G H
Diag. 116
8. ... Castles
In Capablanca's opinion Black should not castle before White'sintentions in the centre have been made clear. It makes a greatdifference whether White plays his QP to Q4 or to Q3 only.
If after 8. ... QKt-R4; 9. B-B2, P-B4 White plays: 10. P-Q4, hisintention is to move his pawn further to Q5 as soon as Black hascastled, and then to attack on the King's wing with QKt-Q2-B1-K3,P-KKt4 and Kt-B5. For this reason Black should force White todisclose whether he intends to exchange his QP or to advance itto Q5. In the latter case Black can refrain from castlingaltogether and counter-attack on the King's wing, e.g., 10. P-Q4,Q-B2; 11. P-KR3, B-Q2; 12. QKt-Q2, R-QB1; if now: 13. P-Q5 thenP-R3 followed by P-Kt4-Kt5 gives Black many chances. If on thecontrary 13. PxP, then Black need no longer fear an attack on theKing's side after he has castled, as his Rooks will have a
favourable opportunity for operating on the open Queen's file.However, there is still the disadvantage for Black of havingadvanced Queen's side pawns, which are liable to attack (P-QR4).
The game takes a different course when Black exchanges the pawnsin the centre. The continuation would then be: 11. ... Kt-B3;12. Q Kt-Q2, B-Q2; 13. Kt-B1, PxP; 14. PxP, PxP; 15. B-Kt5, Q-Kt3. It is difficult to decide which side has the advantage.Black has an extra pawn, but White has the initiative.
If in Diag. 116, after 8. ... Castles White plays 9. P-Q4 atonce, Black has an opportunity for the following interestingattack: 9. P-Q4, B-Kt5; 10. B-K3, KtxKP; 11. B-Q5, Q-Q2; 12.BxKKt, P-Q4; 13. B-B2, P-K5 14. P-KR3, B-R4; 15. Kt-K5, BxQ; 16.KtxQ, BxB; 17. KtxR, RxKt. White cannot take advantage of hisRooks, as there is no open file, whilst Black threatens toinitiate a strong attack with P-B4.
Aljechin has analysed a variation of this line of play, which hethinks leads finally to White's advantage: 12. PxP, Kt-Kt4; 13.BxKt, BxB; 14. P-KR3, BxKt; 15. QxB, KtxP; 16. RxKt, PxR; 17.BxR, B-B8; 18. Kt-R3, Q-Q7. I doubt that White can win this game.
9. P-Q3
In this less aggressive continuation, in which nothing isimmediately attempted against Black's centre, White preparesgradually for a King's side attack, as in this game with Kt-Q2-B1-Kt3. But Black should obtain time for operations in thecentre.
9. ... Kt-QR4 10. B-B2 P-B4 11. QKt-Q2 Kt-B3 12. P-QR4
In many variations of the Ruy Lopez, this advance is always good,if Black cannot avoid exchanging the pawn, because the WhiteQueen's Rook, which only gets into play with difficulty, caneither be exchanged or hold the Rook's file. In any case theBlack Knight's pawn is weak for the end-game. If, as in thepresent game. Black can play P-Kt5, P-R4 is useless and evendoubtful, as the Rook's pawn itself may become weak in the end-game.
12. ... B-Kt2
This causes the loss of the game. In the Ruy Lopez the Bishop isnearly always needed on the diagonal QB1-KR6, to prevent a Knightfrom settling at White's KB5, which otherwise cannot be repelledexcept by P-KKt3, a most undesirable consummation. The propercontinuation would have been P-Kt5, B-K3, Q-B2 and P-Q4,capturing the Queen's file. Compare note to move 13 in the nextgame.
13. Kt-B1 Q-B2 14. Kt-Kt3 P-Kt3
---------------------------------------
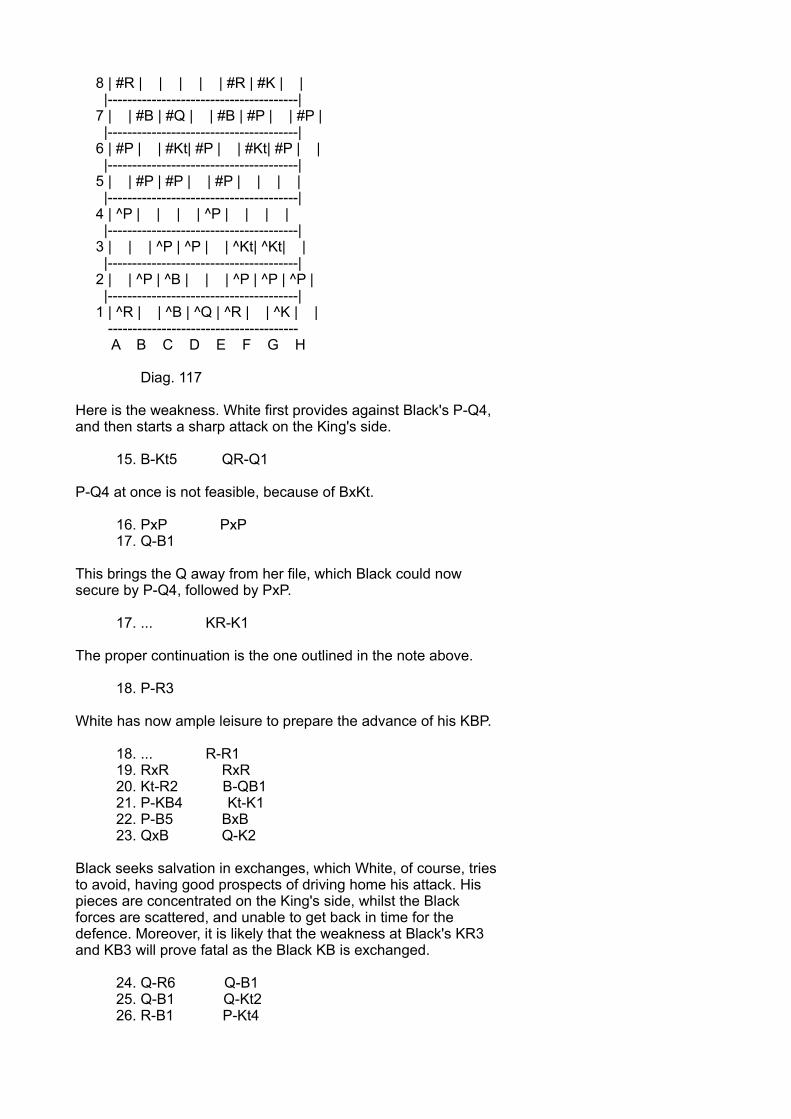
8 | #R | | | | | #R | #K | | |---------------------------------------| 7 | | #B | #Q | | #B | #P | | #P | |---------------------------------------| 6 | #P | | #Kt| #P | | #Kt| #P | | |---------------------------------------| 5 | | #P | #P | | #P | | | | |---------------------------------------| 4 | ^P | | | | ^P | | | | |---------------------------------------| 3 | | | ^P | ^P | | ^Kt| ^Kt| | |---------------------------------------| 2 | | ^P | ^B | | | ^P | ^P | ^P | |---------------------------------------| 1 | ^R | | ^B | ^Q | ^R | | ^K | | --------------------------------------- A B C D E F G H
Diag. 117
Here is the weakness. White first provides against Black's P-Q4,and then starts a sharp attack on the King's side.
15. B-Kt5 QR-Q1
P-Q4 at once is not feasible, because of BxKt.
16. PxP PxP 17. Q-B1
This brings the Q away from her file, which Black could nowsecure by P-Q4, followed by PxP.
17. ... KR-K1
The proper continuation is the one outlined in the note above.
18. P-R3
White has now ample leisure to prepare the advance of his KBP.
18. ... R-R1 19. RxR RxR 20. Kt-R2 B-QB1 21. P-KB4 Kt-K1 22. P-B5 BxB 23. QxB Q-K2
Black seeks salvation in exchanges, which White, of course, triesto avoid, having good prospects of driving home his attack. Hispieces are concentrated on the King's side, whilst the Blackforces are scattered, and unable to get back in time for thedefence. Moreover, it is likely that the weakness at Black's KR3and KB3 will prove fatal as the Black KB is exchanged.
24. Q-R6 Q-B1 25. Q-B1 Q-Kt2 26. R-B1 P-Kt4

White was threatening to play Kt-Kt4 with PxP and Kt-R6.
27. Kt-Kt4 Kt-B3 28. KtxKtch QxKt
One of the attacking Knights is eliminated. But there is another,which forces the entry at KB6 and KKt6.
29. P-R4
to gain access for the White Queen at KR6. If Black, capturesthere follows: 30. Kt-R5, Q-Q1; 31. Q-R6, Q-B1; 32. Kt-B6ch, aninstructive example of the weakness created by P-KKt3.
29. ... P-R3 30. Kt-R5 Q-Q1 31. P-B6
All this is easy to understand.
31. ... K-R2 32. PxP B-Kt5 33. Kt-Kt7 K-Kt3 34. B-Q1 Q-Q2 35. Kt-B5 BxKt 36. PxBch Resigns.
The conclusion might be: K-R2; 37. B-R5, PxP; 38. QxP, R-KKt1;39. B-Kt6ch, PxB; 40. Q-R4 mate.
GAME No. 13
White: Teichmann. Black: Schlechter.
Ruy Lopez (see p. 37).
Move 1-8 as in Game No. 12.
--------------------------------------- 8 | #R | | #B | #Q | | #R | #K | | |---------------------------------------| 7 | | | #P | | #B | #P | #P | #P | |---------------------------------------| 6 | #P | | #Kt| #P | | #Kt| | | |---------------------------------------| 5 | | #P | | | #P | | | | |---------------------------------------| 4 | | | | | ^P | | | | |---------------------------------------| 3 | | ^B | ^P | | | ^Kt| | | |---------------------------------------| 2 | ^P | ^P | | ^P | | ^P | ^P | ^P | |---------------------------------------| 1 | ^R | ^Kt| ^B | ^Q | ^R | | ^K | | --------------------------------------- A B C D E F G H
Diag. 118
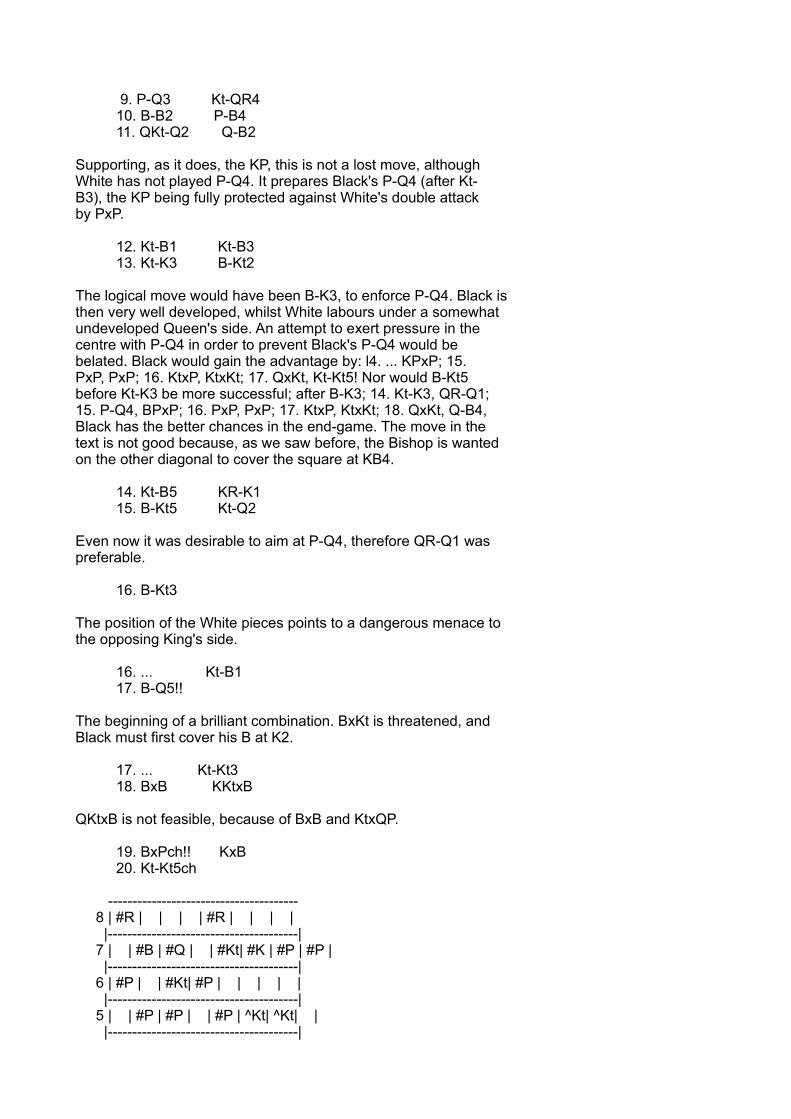
9. P-Q3 Kt-QR4 10. B-B2 P-B4 11. QKt-Q2 Q-B2
Supporting, as it does, the KP, this is not a lost move, althoughWhite has not played P-Q4. It prepares Black's P-Q4 (after Kt-B3), the KP being fully protected against White's double attackby PxP.
12. Kt-B1 Kt-B3 13. Kt-K3 B-Kt2
The logical move would have been B-K3, to enforce P-Q4. Black isthen very well developed, whilst White labours under a somewhatundeveloped Queen's side. An attempt to exert pressure in thecentre with P-Q4 in order to prevent Black's P-Q4 would bebelated. Black would gain the advantage by: l4. ... KPxP; 15.PxP, PxP; 16. KtxP, KtxKt; 17. QxKt, Kt-Kt5! Nor would B-Kt5before Kt-K3 be more successful; after B-K3; 14. Kt-K3, QR-Q1;15. P-Q4, BPxP; 16. PxP, PxP; 17. KtxP, KtxKt; 18. QxKt, Q-B4,Black has the better chances in the end-game. The move in thetext is not good because, as we saw before, the Bishop is wantedon the other diagonal to cover the square at KB4.
14. Kt-B5 KR-K1 15. B-Kt5 Kt-Q2
Even now it was desirable to aim at P-Q4, therefore QR-Q1 waspreferable.
16. B-Kt3
The position of the White pieces points to a dangerous menace tothe opposing King's side.
16. ... Kt-B1 17. B-Q5!!
The beginning of a brilliant combination. BxKt is threatened, andBlack must first cover his B at K2.
17. ... Kt-Kt3 18. BxB KKtxB
QKtxB is not feasible, because of BxB and KtxQP.
19. BxPch!! KxB 20. Kt-Kt5ch
--------------------------------------- 8 | #R | | | | #R | | | | |---------------------------------------| 7 | | #B | #Q | | #Kt| #K | #P | #P | |---------------------------------------| 6 | #P | | #Kt| #P | | | | | |---------------------------------------| 5 | | #P | #P | | #P | ^Kt| ^Kt| | |---------------------------------------|
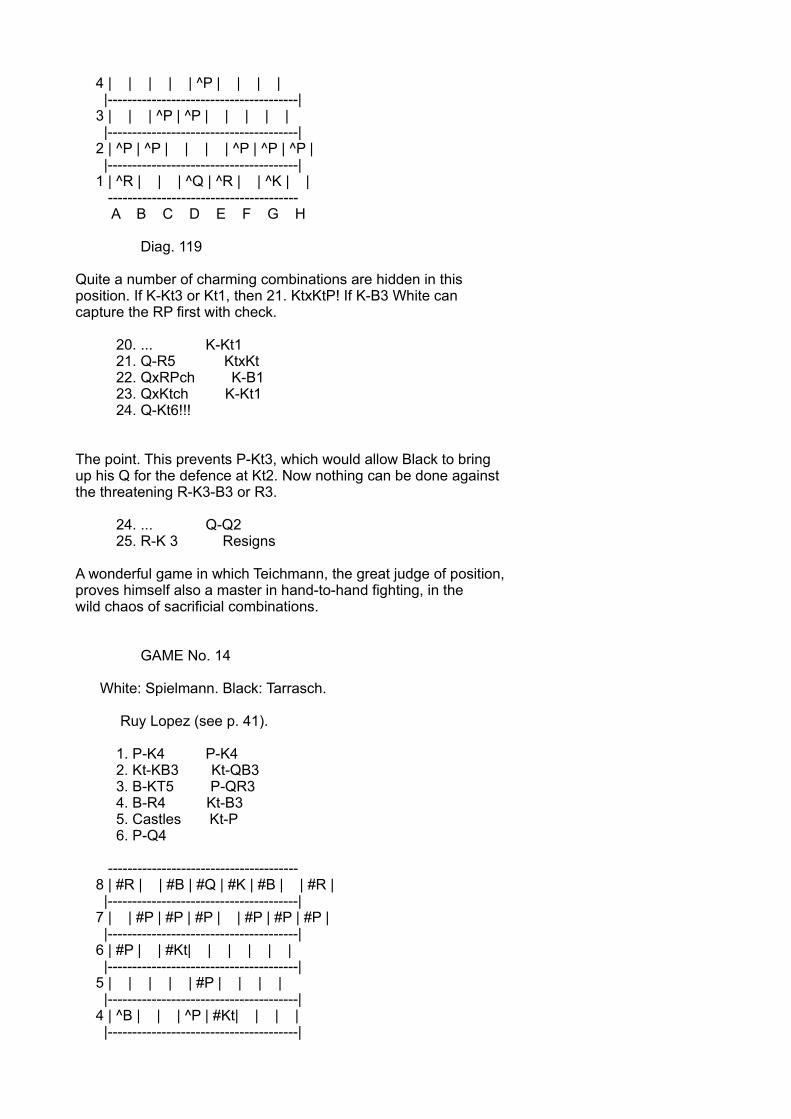
4 | | | | | ^P | | | | |---------------------------------------| 3 | | | ^P | ^P | | | | | |---------------------------------------| 2 | ^P | ^P | | | | ^P | ^P | ^P | |---------------------------------------| 1 | ^R | | | ^Q | ^R | | ^K | | --------------------------------------- A B C D E F G H
Diag. 119
Quite a number of charming combinations are hidden in thisposition. If K-Kt3 or Kt1, then 21. KtxKtP! If K-B3 White cancapture the RP first with check.
20. ... K-Kt1 21. Q-R5 KtxKt 22. QxRPch K-B1 23. QxKtch K-Kt1 24. Q-Kt6!!!
The point. This prevents P-Kt3, which would allow Black to bringup his Q for the defence at Kt2. Now nothing can be done againstthe threatening R-K3-B3 or R3.
24. ... Q-Q2 25. R-K 3 Resigns
A wonderful game in which Teichmann, the great judge of position,proves himself also a master in hand-to-hand fighting, in thewild chaos of sacrificial combinations.
GAME No. 14
White: Spielmann. Black: Tarrasch.
Ruy Lopez (see p. 41).
1. P-K4 P-K4 2. Kt-KB3 Kt-QB3 3. B-KT5 P-QR3 4. B-R4 Kt-B3 5. Castles Kt-P 6. P-Q4
--------------------------------------- 8 | #R | | #B | #Q | #K | #B | | #R | |---------------------------------------| 7 | | #P | #P | #P | | #P | #P | #P | |---------------------------------------| 6 | #P | | #Kt| | | | | | |---------------------------------------| 5 | | | | | #P | | | | |---------------------------------------| 4 | ^B | | | ^P | #Kt| | | | |---------------------------------------|
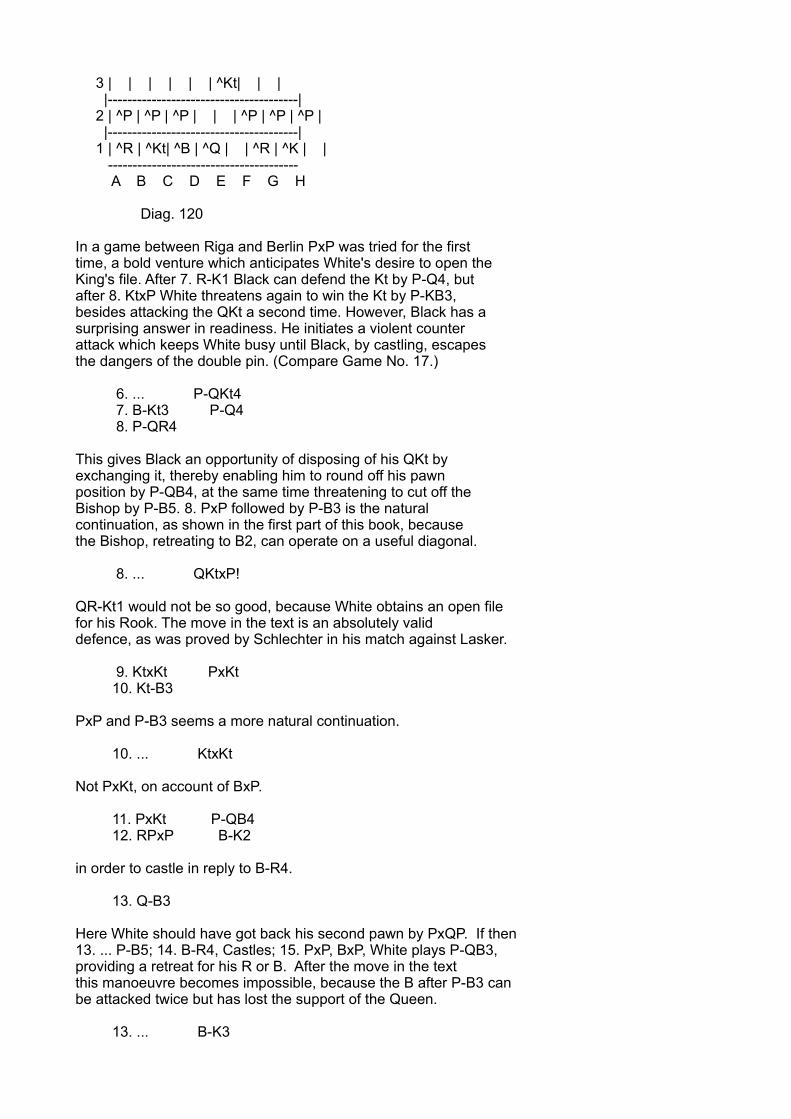
3 | | | | | | ^Kt| | | |---------------------------------------| 2 | ^P | ^P | ^P | | | ^P | ^P | ^P | |---------------------------------------| 1 | ^R | ^Kt| ^B | ^Q | | ^R | ^K | | --------------------------------------- A B C D E F G H
Diag. 120
In a game between Riga and Berlin PxP was tried for the firsttime, a bold venture which anticipates White's desire to open theKing's file. After 7. R-K1 Black can defend the Kt by P-Q4, butafter 8. KtxP White threatens again to win the Kt by P-KB3,besides attacking the QKt a second time. However, Black has asurprising answer in readiness. He initiates a violent counterattack which keeps White busy until Black, by castling, escapesthe dangers of the double pin. (Compare Game No. 17.)
6. ... P-QKt4 7. B-Kt3 P-Q4 8. P-QR4
This gives Black an opportunity of disposing of his QKt byexchanging it, thereby enabling him to round off his pawnposition by P-QB4, at the same time threatening to cut off theBishop by P-B5. 8. PxP followed by P-B3 is the naturalcontinuation, as shown in the first part of this book, becausethe Bishop, retreating to B2, can operate on a useful diagonal.
8. ... QKtxP!
QR-Kt1 would not be so good, because White obtains an open filefor his Rook. The move in the text is an absolutely validdefence, as was proved by Schlechter in his match against Lasker.
9. KtxKt PxKt 10. Kt-B3
PxP and P-B3 seems a more natural continuation.
10. ... KtxKt
Not PxKt, on account of BxP.
11. PxKt P-QB4 12. RPxP B-K2
in order to castle in reply to B-R4.
13. Q-B3
Here White should have got back his second pawn by PxQP. If then13. ... P-B5; 14. B-R4, Castles; 15. PxP, BxP, White plays P-QB3,providing a retreat for his R or B. After the move in the textthis manoeuvre becomes impossible, because the B after P-B3 canbe attacked twice but has lost the support of the Queen.
13. ... B-K3
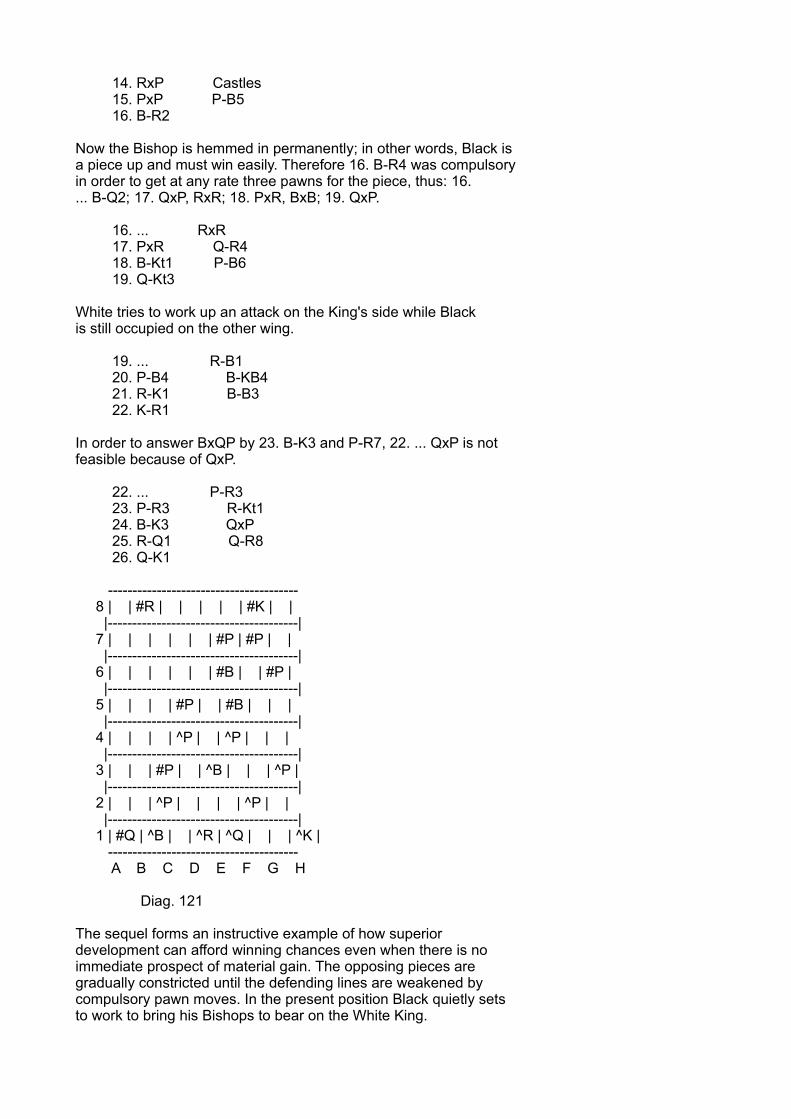
14. RxP Castles 15. PxP P-B5 16. B-R2
Now the Bishop is hemmed in permanently; in other words, Black isa piece up and must win easily. Therefore 16. B-R4 was compulsoryin order to get at any rate three pawns for the piece, thus: 16.... B-Q2; 17. QxP, RxR; 18. PxR, BxB; 19. QxP.
16. ... RxR 17. PxR Q-R4 18. B-Kt1 P-B6 19. Q-Kt3
White tries to work up an attack on the King's side while Blackis still occupied on the other wing.
19. ... R-B1 20. P-B4 B-KB4 21. R-K1 B-B3 22. K-R1
In order to answer BxQP by 23. B-K3 and P-R7, 22. ... QxP is notfeasible because of QxP.
22. ... P-R3 23. P-R3 R-Kt1 24. B-K3 QxP 25. R-Q1 Q-R8 26. Q-K1
--------------------------------------- 8 | | #R | | | | | #K | | |---------------------------------------| 7 | | | | | | #P | #P | | |---------------------------------------| 6 | | | | | | #B | | #P | |---------------------------------------| 5 | | | | #P | | #B | | | |---------------------------------------| 4 | | | | ^P | | ^P | | | |---------------------------------------| 3 | | | #P | | ^B | | | ^P | |---------------------------------------| 2 | | | ^P | | | | ^P | | |---------------------------------------| 1 | #Q | ^B | | ^R | ^Q | | | ^K | --------------------------------------- A B C D E F G H
Diag. 121
The sequel forms an instructive example of how superiordevelopment can afford winning chances even when there is noimmediate prospect of material gain. The opposing pieces aregradually constricted until the defending lines are weakened bycompulsory pawn moves. In the present position Black quietly setsto work to bring his Bishops to bear on the White King.
26. ... B-K5 27. K-R2 B-K2 28. Q-B1
to free his game somewhat with P-B5, which Black prevents atonce.
28. ... P-B4 29. R-K1 B-R5
Being probably short of time, Black makes a few irrelevant moves.If his aim was not the opening of the KKt file but the subsequentsacrifice of the Queen, he might have played Q-Kt7 at once,followed by Q-Kt4.
30. P-Kt3 B-K2 31. B-B2 B-Q3 32. R-B1 K-R2 33. R-K1 R-Kt3 34. R-B1 B-R6 35. R-K1 Q-Kt7 36. Q-K2 R-Kt5 37. R-Kt1 R-Kt3
Otherwise White might embark upon a counter attack, beginningwith P-Kt4. Now this is impossible on account of R-Kt3.
38. R-K1 Q-Kt4 39. Q-R5
After the exchange of Queens, Black would win easily by R-Kt7.39. B-R2 also fails on account of QxQ; 40. RxQ, R-Kt7; 41. B-Kt3,B-Q6!; 42. R-K5, BxP, and the passed pawn costs a Rook. With thetext move, White provokes the sacrifice of the Queen at Kt 8,apparently not seeing the fine continuation at Black's disposalon the forty-first move.
39. ... QxB! 40. RxQ RxR 41. P-Kt4
Compulsory. B-Kt1 would be followed by R-QB8, etc.
41. ... B-B8!! Resigns.
There might follow 42. K-Kt3, P-Kt3; 43. Q-R4, BxPch; 44. KxB, P-Kt4ch, and so on. 4l. ... B-Q3 would have given White a littlerespite, though his game would still have been hopeless after PxPand R-K8.
GAME No. 15
White: Aljechin. Black: Niemzowitsch.
Ruy Lopez (see p. 41).
1. P-K4 P-K4
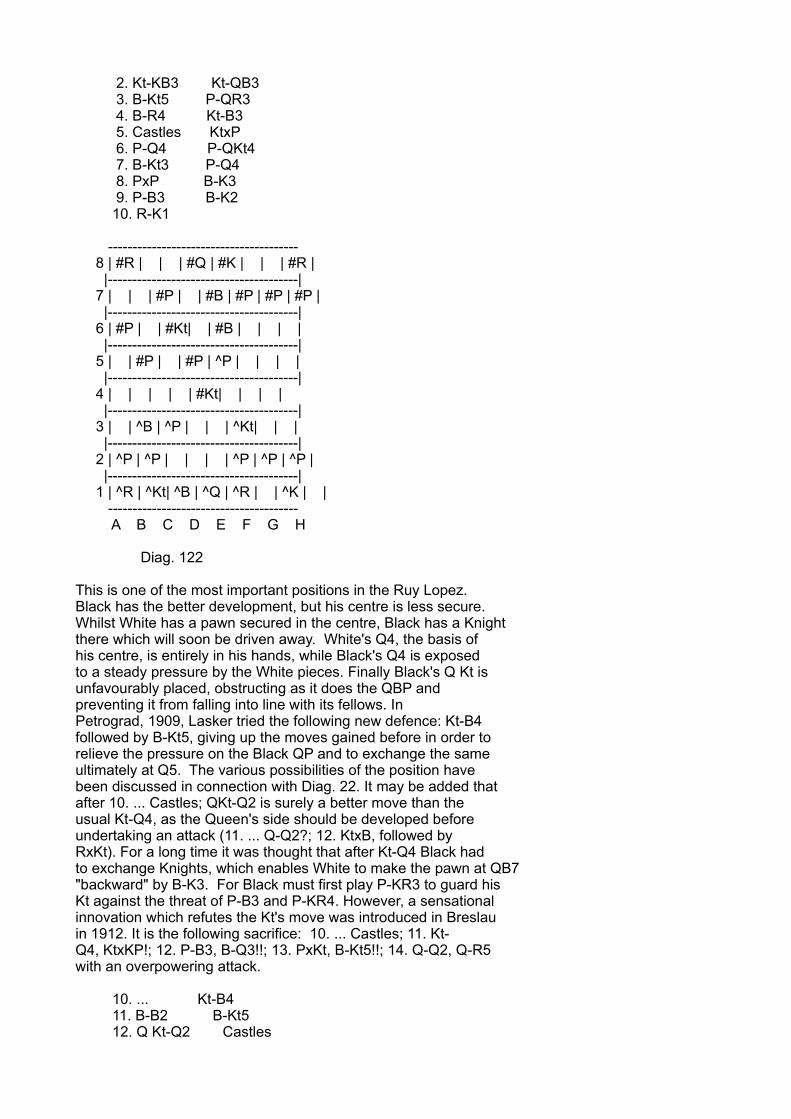
2. Kt-KB3 Kt-QB3 3. B-Kt5 P-QR3 4. B-R4 Kt-B3 5. Castles KtxP 6. P-Q4 P-QKt4 7. B-Kt3 P-Q4 8. PxP B-K3 9. P-B3 B-K2 10. R-K1
--------------------------------------- 8 | #R | | | #Q | #K | | | #R | |---------------------------------------| 7 | | | #P | | #B | #P | #P | #P | |---------------------------------------| 6 | #P | | #Kt| | #B | | | | |---------------------------------------| 5 | | #P | | #P | ^P | | | | |---------------------------------------| 4 | | | | | #Kt| | | | |---------------------------------------| 3 | | ^B | ^P | | | ^Kt| | | |---------------------------------------| 2 | ^P | ^P | | | | ^P | ^P | ^P | |---------------------------------------| 1 | ^R | ^Kt| ^B | ^Q | ^R | | ^K | | --------------------------------------- A B C D E F G H
Diag. 122
This is one of the most important positions in the Ruy Lopez.Black has the better development, but his centre is less secure.Whilst White has a pawn secured in the centre, Black has a Knightthere which will soon be driven away. White's Q4, the basis ofhis centre, is entirely in his hands, while Black's Q4 is exposedto a steady pressure by the White pieces. Finally Black's Q Kt isunfavourably placed, obstructing as it does the QBP andpreventing it from falling into line with its fellows. InPetrograd, 1909, Lasker tried the following new defence: Kt-B4followed by B-Kt5, giving up the moves gained before in order torelieve the pressure on the Black QP and to exchange the sameultimately at Q5. The various possibilities of the position havebeen discussed in connection with Diag. 22. It may be added thatafter 10. ... Castles; QKt-Q2 is surely a better move than theusual Kt-Q4, as the Queen's side should be developed beforeundertaking an attack (11. ... Q-Q2?; 12. KtxB, followed byRxKt). For a long time it was thought that after Kt-Q4 Black hadto exchange Knights, which enables White to make the pawn at QB7"backward" by B-K3. For Black must first play P-KR3 to guard hisKt against the threat of P-B3 and P-KR4. However, a sensationalinnovation which refutes the Kt's move was introduced in Breslauin 1912. It is the following sacrifice: 10. ... Castles; 11. Kt-Q4, KtxKP!; 12. P-B3, B-Q3!!; 13. PxKt, B-Kt5!!; 14. Q-Q2, Q-R5with an overpowering attack.
10. ... Kt-B4 11. B-B2 B-Kt5 12. Q Kt-Q2 Castles

13. Kt-Kt3 Kt-K5
Here Lasker played Kt-K3 against Janowski (Paris, 1912), but itproved to be inferior, because 14. Q-Q3 disorganises Black'sKing's side forcibly.
The move in the text is not really a pawn sacrifice. After 14.BxKt, PxB; 15. QxQ, QRxQ; 16. KKt-Q4, KtxKt; 17. KtxKt, R-Q4,White cannot play 18. RxP, because of P-QB4; 19. Kt-B2, B-B4 or19. Kt-B3, R-Q8ch; 20. Kt-K1, B-B4; 21. R-K2, B-Q6; 22. R-K3, B-Kt4.
14. B-B4 P-B4 15. PxP e.p. KtxP(B3) 16. Q-Q3 Kt-K5?
This loses the QBP, and weakens the QP. Black might have triedBxKt; 17. QxB, B-Q3. It would then have been possible to supportthe QP by P-B3 after moving the Kt away. If Black was anxious topreserve his two Bishops he would even have risked P-Kt3. After17. B-R6, R-B2, the Bishop could have been driven away again bythe KKt from Kt1 or Kt5. The open file offered some compensationand chances of counter attack.
17. BxP Q-Q2
Not QxB because of QxPch.
18. Kt-K5 KtxKt 19. BxKt B-R5
RxP is bad because of 20. RxKt, B-KB4; 21. Q-Kt3.
20. B-Kt3 BxB 21. RPxB B-B4
Now RxP! was feasible with a level game after: 22. RxKt, B-B4!23. KxR, BxR; 24. Q any, Q-B4ch, followed by BxB. After missingthis chance, Black soon loses the game.
22. Q-Q4 KR-Q1 23. QR-Q1 Q-QB2 24. Kt-Q2 KtxKBP
A last and desperate attempt. Black obtains Rook and pawn againsttwo minor pieces, but has no time to initiate an attack with theRooks. The wisest plan was to give up the P, with a view toeffecting the exchange of the minor pieces, because an endingwith Queen and Rooks generally produces a draw. Black could notplay KtxKtP instead of the move in the text because of 25. B-Kt3!.
25. BxB KtxR 26. RxKt QxKtP 27. B-K6ch K-R1 28. BxP QR-B1 29. Kt-K4 Q-R5 30. P-QKt3 R-B3
White now obtains a passed pawn, and a speedy win.
31. Q-B2 Q-R4 32. Q-B3 QxQ 33. PxQ P-Kt3 34. R-Q2 R-Kt3 35. P-QB4 PxP 36. PxP R-Kt8ch 37. K-B2 P-QR4 38. P-B5 R-QB8 39. P-B6 K-Kt2 40. B-B4! RxB 41. RxR RxP 42. R-Q7ch K-R3 43. K-Kt3 R-B5 44. Kt-B2 K-Kt4
Mate was threatened by: 45. Kt-Kt4ch, K-R4; 46. R-Q5ch, P-Kt4;47. R-Q6 and R-R6 mate (or if RxKtch, PxR mate).
45. R-Q5ch K-B3 46. RxP Resigns
GAME No. 16
White: Yates. Black: Gunsberg.
Ruy Lopez.
1. P-K4 P-K4 2. Kt-KB3 Kt-QB3 3. B-Kt5 P-QR3 4. B-R4 Kt-B3 5. Castles KtxP 6. P-Q4 P-QKt4 7. B-Kt3 P-Q4 8. PxP B-K3 9. P-QB3 B-K2 10. B-K3
in order to exchange the Black Knight if played to B4.
10. ... Castles 11. QKt-Q2
If Q-Q3, then Kt-R4; 12. QKt-Q2, P-QB4.
11. ... KtxKt
This furthers White's development, and should not be playedunless there is no other move available. To be considered are P-B4 and B-KKt5. An argument against P-B4 is that White can depriveBlack's weak centre pawn of one protecting piece (12. PxP e.p.,KtxP (B3); 13. Kt-Kt5), and experience has shown that Whiteobtains the superior game.
12. QxKt Kt-R4 13. B-B2 Kt-B5
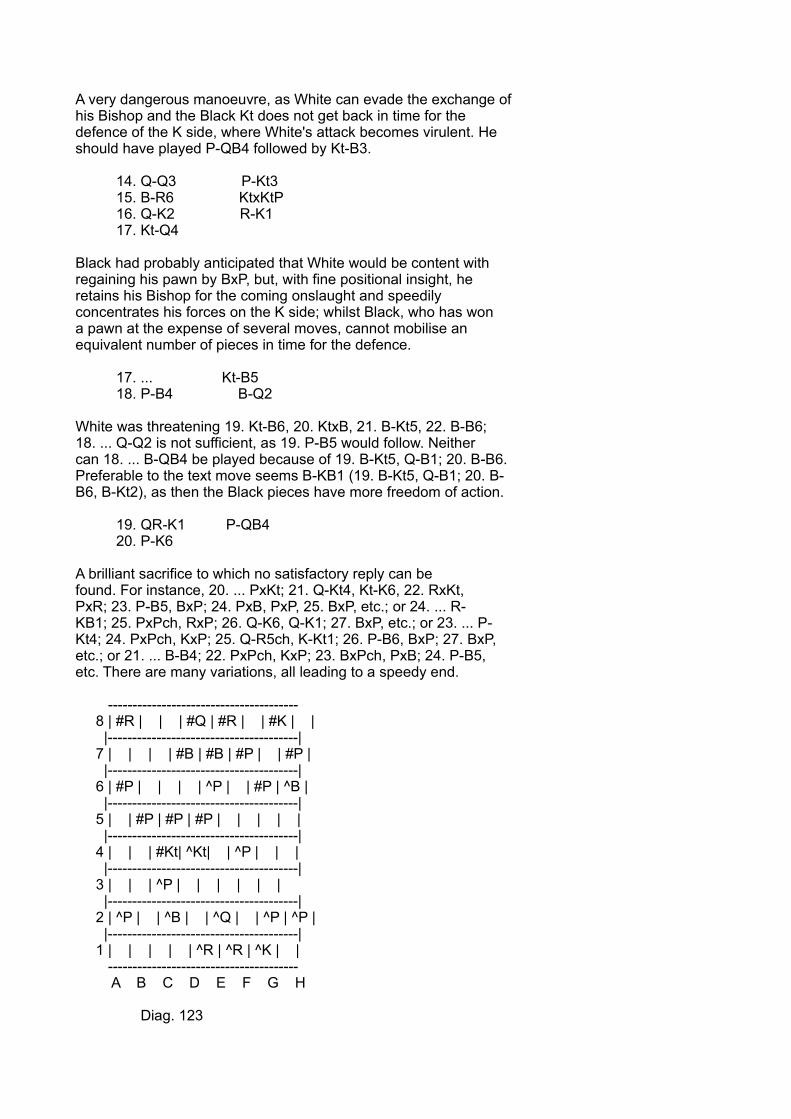
A very dangerous manoeuvre, as White can evade the exchange ofhis Bishop and the Black Kt does not get back in time for thedefence of the K side, where White's attack becomes virulent. Heshould have played P-QB4 followed by Kt-B3.
14. Q-Q3 P-Kt3 15. B-R6 KtxKtP 16. Q-K2 R-K1 17. Kt-Q4
Black had probably anticipated that White would be content withregaining his pawn by BxP, but, with fine positional insight, heretains his Bishop for the coming onslaught and speedilyconcentrates his forces on the K side; whilst Black, who has wona pawn at the expense of several moves, cannot mobilise anequivalent number of pieces in time for the defence.
17. ... Kt-B5 18. P-B4 B-Q2
White was threatening 19. Kt-B6, 20. KtxB, 21. B-Kt5, 22. B-B6;18. ... Q-Q2 is not sufficient, as 19. P-B5 would follow. Neithercan 18. ... B-QB4 be played because of 19. B-Kt5, Q-B1; 20. B-B6.Preferable to the text move seems B-KB1 (19. B-Kt5, Q-B1; 20. B-B6, B-Kt2), as then the Black pieces have more freedom of action.
19. QR-K1 P-QB4 20. P-K6
A brilliant sacrifice to which no satisfactory reply can befound. For instance, 20. ... PxKt; 21. Q-Kt4, Kt-K6, 22. RxKt,PxR; 23. P-B5, BxP; 24. PxB, PxP, 25. BxP, etc.; or 24. ... R-KB1; 25. PxPch, RxP; 26. Q-K6, Q-K1; 27. BxP, etc.; or 23. ... P-Kt4; 24. PxPch, KxP; 25. Q-R5ch, K-Kt1; 26. P-B6, BxP; 27. BxP,etc.; or 21. ... B-B4; 22. PxPch, KxP; 23. BxPch, PxB; 24. P-B5,etc. There are many variations, all leading to a speedy end.
--------------------------------------- 8 | #R | | | #Q | #R | | #K | | |---------------------------------------| 7 | | | | #B | #B | #P | | #P | |---------------------------------------| 6 | #P | | | | ^P | | #P | ^B | |---------------------------------------| 5 | | #P | #P | #P | | | | | |---------------------------------------| 4 | | | #Kt| ^Kt| | ^P | | | |---------------------------------------| 3 | | | ^P | | | | | | |---------------------------------------| 2 | ^P | | ^B | | ^Q | | ^P | ^P | |---------------------------------------| 1 | | | | | ^R | ^R | ^K | | --------------------------------------- A B C D E F G H
Diag. 123

20. ... B-KB3 21. P-Kt4 P-Kt 22. P-B5 P-Q6 23. BxP BxKP
If PxKP then 24. PxKtP, Kt-K4; 25. RxKt, BxR; 26. Q-R5, Q-B3; 27.RxQ, BxR; 28. PxPch, K-R1; 29. Q-B7, etc.; or 26. ... BxP; 27. B-B8, etc.
24. PxB Q-Kt3ch 25. K-R1 Resigns
GAME No. 17
White: Berlin. Black: Riga.
Ruy Lopez.
Move 1-6 as in Game No. 16.
--------------------------------------- 8 | #R | | #B | #Q | #K | #B | | #R | |---------------------------------------| 7 | | #P | #P | #P | | #P | #P | #P | |---------------------------------------| 6 | #P | | #Kt| | | | | | |---------------------------------------| 5 | | | | | #P | | | | |---------------------------------------| 4 | ^B | | | ^P | #Kt| | | | |---------------------------------------| 3 | | | | | | ^Kt| | | |---------------------------------------| 2 | ^P | ^P | ^P | | | ^P | ^P | ^P | |---------------------------------------| 1 | ^R | ^Kt| ^B | ^Q | | ^R | ^K | | --------------------------------------- A B C D E F G H
Diag. 124
6. ... PxP
Compare note to move No. 6 in Game 14.
7. R-K1 P-Q4 8. KtxP B-Q3
This is the key to the variation. Black threatens to obtain adraw by perpetual check through BxPch, followed by Q-R5ch andQxPch. This is not good enough against a weaker opponent in atournament, and a strong player cannot afford to play the Rigadefence. But that is not a point against the variation. To proveit unsound, White has to find a win.
9. KtxKt BxPch 10. K-R1!
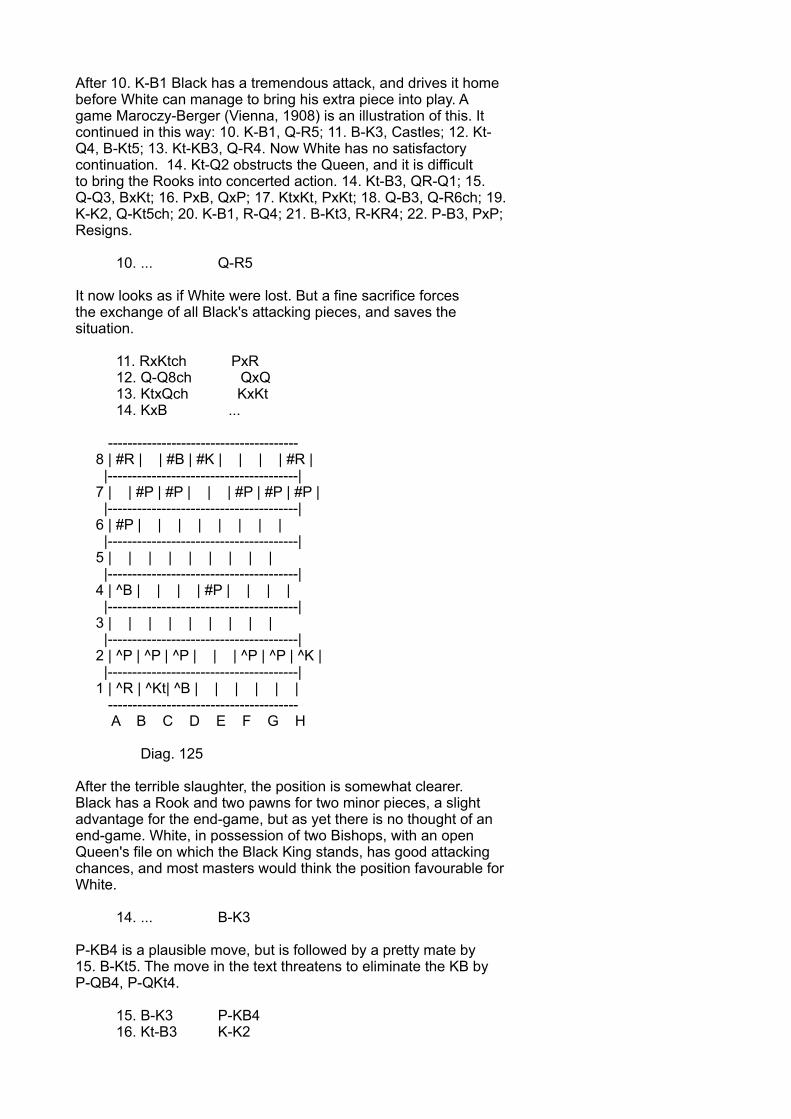
After 10. K-B1 Black has a tremendous attack, and drives it homebefore White can manage to bring his extra piece into play. Agame Maroczy-Berger (Vienna, 1908) is an illustration of this. Itcontinued in this way: 10. K-B1, Q-R5; 11. B-K3, Castles; 12. Kt-Q4, B-Kt5; 13. Kt-KB3, Q-R4. Now White has no satisfactorycontinuation. 14. Kt-Q2 obstructs the Queen, and it is difficultto bring the Rooks into concerted action. 14. Kt-B3, QR-Q1; 15.Q-Q3, BxKt; 16. PxB, QxP; 17. KtxKt, PxKt; 18. Q-B3, Q-R6ch; 19.K-K2, Q-Kt5ch; 20. K-B1, R-Q4; 21. B-Kt3, R-KR4; 22. P-B3, PxP;Resigns.
10. ... Q-R5
It now looks as if White were lost. But a fine sacrifice forcesthe exchange of all Black's attacking pieces, and saves thesituation.
11. RxKtch PxR 12. Q-Q8ch QxQ 13. KtxQch KxKt 14. KxB ...
--------------------------------------- 8 | #R | | #B | #K | | | | #R | |---------------------------------------| 7 | | #P | #P | | | #P | #P | #P | |---------------------------------------| 6 | #P | | | | | | | | |---------------------------------------| 5 | | | | | | | | | |---------------------------------------| 4 | ^B | | | | #P | | | | |---------------------------------------| 3 | | | | | | | | | |---------------------------------------| 2 | ^P | ^P | ^P | | | ^P | ^P | ^K | |---------------------------------------| 1 | ^R | ^Kt| ^B | | | | | | --------------------------------------- A B C D E F G H
Diag. 125
After the terrible slaughter, the position is somewhat clearer.Black has a Rook and two pawns for two minor pieces, a slightadvantage for the end-game, but as yet there is no thought of anend-game. White, in possession of two Bishops, with an openQueen's file on which the Black King stands, has good attackingchances, and most masters would think the position favourable forWhite.
14. ... B-K3
P-KB4 is a plausible move, but is followed by a pretty mate by15. B-Kt5. The move in the text threatens to eliminate the KB byP-QB4, P-QKt4.
15. B-K3 P-KB4 16. Kt-B3 K-K2
17. P-KKt4
Tarrasch recommends 17. R-Q1, threatening Kt-Q5ch. If P-B3,White could play 18. B-Kt6, thereby permanently preventing Blackfrom contesting the Queen's file, and then try to exchangeBlack's B by Kt-K2-Q4. With two Bishops, White would then havewinning chances.
A subtle idea underlies White's move of P-KKt4. He wishes to takeadvantage of the fact that Black has exchanged the KB by playingP-Kt5, thus holding all the four pawns on the King's side. ButBlack finds a surprising reply, which seems to refute White'splan.
Capablanca played against Ed. Lasker (New York, 1915), 17. P-KKt4, P-KKt3; 18. K-Kt3, P-KR4; 19. PxBP, P-R5ch; 20. K-R2, PxP;21. Kt-K2, P-Kt4; 22. B-Kt3, BxB; 23. RPxB, KR-KKt1; 24. R-Q1,QR-Q1; 25. RxR, KxR; 26. Kt-K4, winning a pawn.
17. ... P-KKt3 18. P-Kt5 QR-KKt1!!
Black offers the exchange in order to get rid of White's QB. IfWhite accepts the sacrifice, he loses his KKtP, and Black retainsthree passed pawns for the piece, at least an equivalent for theend-game. White should decline the doubtful gift and meet thethreat of P-R3 and P-KKt4 with 19. R-KKt1.
19. B-Q4 P-R3 20. B-B6ch K-B2 21. BxR RxB 22. R-Q1
in order to play 23. B-Q7 in answer to P-B4. This explainsWhite's check at move 20.
22. ... PxPch 23. K-Kt2 K-B3!
If now 24. Kt-Q5ch, Black would assail the White King with K-K4;25. KtxP, B-B5-K7-B6. The Black phalanx of pawns becomesmenacing.
24. B-Kt3 BxB 25. RPxB K-K3 26. P-Kt4 R-R2
Black need no longer fear to exchange Rooks, for he would thenthreaten the Queen's side pawns with his King whilst the passedpawns kept the White forces occupied.
27. Kt-K2 R-Q2 28. Kt-Q4ch K-B3 29. P-QB3 P-B3
The aim of this move is not clear. Black should adopt a forwardpolicy with P-Kt5, P-B5, R-R2, etc.
30. R-KR1 P-Kt5
31. R-R8
Now none of the pawns can advance: P-B5 would be answered by 32.R-K8, R-K2; 33. RxR, KxR; 34. Kt-Kt3 and one of the pawns islost.
31. ... R-K2 32. Kt-K2 R-Q2 33. Kt-Q4 R-K2 34. R-B8ch K-Kt2 35. R-Q8 P-B5 36. R-Q6 K-B2 37. Kt-B2 R-K3 38. R-Q7ch R-K2 39. R-Q6 R-K3 40. R-Q1
White tries to win at all costs--and loses. By a forcible advanceon the Queen's side, he creates new chances, but also newweaknesses.
40. ... K-B3 41. P-B4 R-K2 42. R-Q4 K-Kt4 43. R-Q6 P-K6! 44. P-B3
PxP fails on account of P-B6ch and R-R2.
44. ... P-K7 45. Kt-K1 P-Kt6 46. P-Kt5
Too late.
46. ... R-R2 47. PxBP PxP 48. R-K6 R-R7ch 49. K-Kt1 R-B7 50. Kt-B2 RxP 51. RxKP R-Q6 52. Kt-K1 R-Kt6 53. R-Q2 P-B6 54. Kt-Q3 P-R4 Resigns
The RP cannot be prevented from pushing on to R6, after which amate is threatened by the BlacKRon the eighth rank. R-Q1 wouldthen be compulsory. But that lets the Black Rook in on theseventh (KR-R7, followed by P-B7ch).
GAME No. 18.
Emanuel Lasker. Capablanca.
Ruy Lopez (see p. 37)
1. P-K4 P-K4
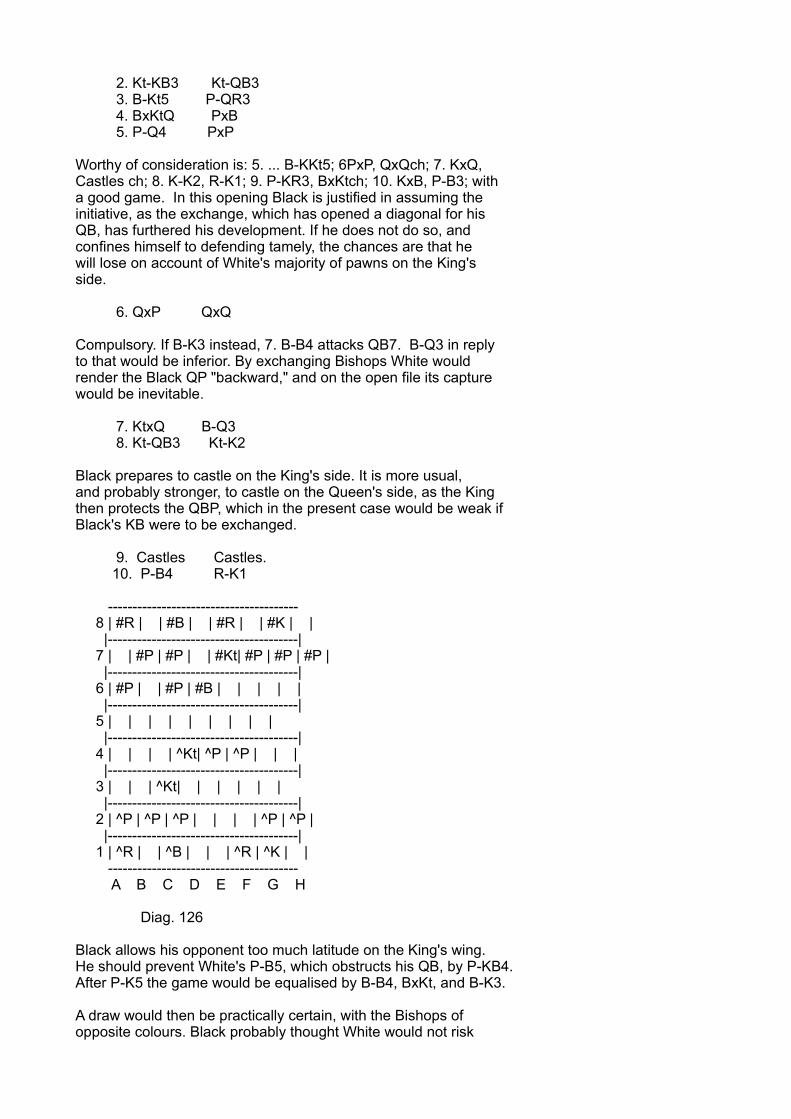
2. Kt-KB3 Kt-QB3 3. B-Kt5 P-QR3 4. BxKtQ PxB 5. P-Q4 PxP
Worthy of consideration is: 5. ... B-KKt5; 6PxP, QxQch; 7. KxQ,Castles ch; 8. K-K2, R-K1; 9. P-KR3, BxKtch; 10. KxB, P-B3; witha good game. In this opening Black is justified in assuming theinitiative, as the exchange, which has opened a diagonal for hisQB, has furthered his development. If he does not do so, andconfines himself to defending tamely, the chances are that hewill lose on account of White's majority of pawns on the King'sside.
6. QxP QxQ
Compulsory. If B-K3 instead, 7. B-B4 attacks QB7. B-Q3 in replyto that would be inferior. By exchanging Bishops White wouldrender the Black QP "backward," and on the open file its capturewould be inevitable.
7. KtxQ B-Q3 8. Kt-QB3 Kt-K2
Black prepares to castle on the King's side. It is more usual,and probably stronger, to castle on the Queen's side, as the Kingthen protects the QBP, which in the present case would be weak ifBlack's KB were to be exchanged.
9. Castles Castles. 10. P-B4 R-K1
--------------------------------------- 8 | #R | | #B | | #R | | #K | | |---------------------------------------| 7 | | #P | #P | | #Kt| #P | #P | #P | |---------------------------------------| 6 | #P | | #P | #B | | | | | |---------------------------------------| 5 | | | | | | | | | |---------------------------------------| 4 | | | | ^Kt| ^P | ^P | | | |---------------------------------------| 3 | | | ^Kt| | | | | | |---------------------------------------| 2 | ^P | ^P | ^P | | | | ^P | ^P | |---------------------------------------| 1 | ^R | | ^B | | | ^R | ^K | | --------------------------------------- A B C D E F G H
Diag. 126
Black allows his opponent too much latitude on the King's wing.He should prevent White's P-B5, which obstructs his QB, by P-KB4.After P-K5 the game would be equalised by B-B4, BxKt, and B-K3.
A draw would then be practically certain, with the Bishops ofopposite colours. Black probably thought White would not risk

weakening his KP by P-B5. But with unfailing judgment Laskerforesees that, in consequence of the greater mobility of hispieces, his attack will be successful before a counter attack onthe weak KP can be instituted.
11. Kt-Kt3 P-B3
Even now P-KB4 was imperative, though it would keep the Bishopfrom that square. The continuation could have been 12. P-K5, B-Kt5; 13. Kt-K2 (or R4), Kt-Q4, and the Bishop is safe.
12. P-B5!!
This move has a twofold aim. It shuts in the Bishop, and allowsB-B4, exchanging the Black QB.
12. ... P-QKt3
The diagonal QR1-KR8 is the only one in which the Bishop has anyprospects of action. However, as soon as he relinquishes hispresent diagonal, a White Knight settles at K6 and the BlackRooks are very much hampered.
13. B-B4 B-Kt2
Black should have exchanged the Bishops. Now he gets a weak pawnat Q3. Before playing B-Kt2, P-B4 should be played to prevent theKnight getting from Kt3-Q4-K6.
14. BxB PxB 15. Kt-Q4 QR-Q1 16. Kt-K6 R-Q2 17. QR-Q1 Kt-B1 18. R-B2 P-QKt4 19. KR-Q2
This holds Black's Kt at B1. White's next move prevents theBishop getting into action by P-B4. After depriving all the Blackpieces of their mobility, White turns his attention to adetermined assault on the Black King.
19. ... QR-K2 20. P-QKt4 K-B2 21. P-QR3 B-R1 22. K-B2 R-R2 23. P-Kt4 P-R3 24. R-Q3 P-QR4 25. P-KR4 PxP 26. PxP R(R2)-K2
There are no prospects on the Rook's file, and Black isrestricted to keeping his pieces mutually protected. He cannotprevent White from penetrating the King's side.
27. K-B3 R-Kt1 28. K-B4 P-Kt3 29. R-Kt3 P-Kt4ch 30. K-B3
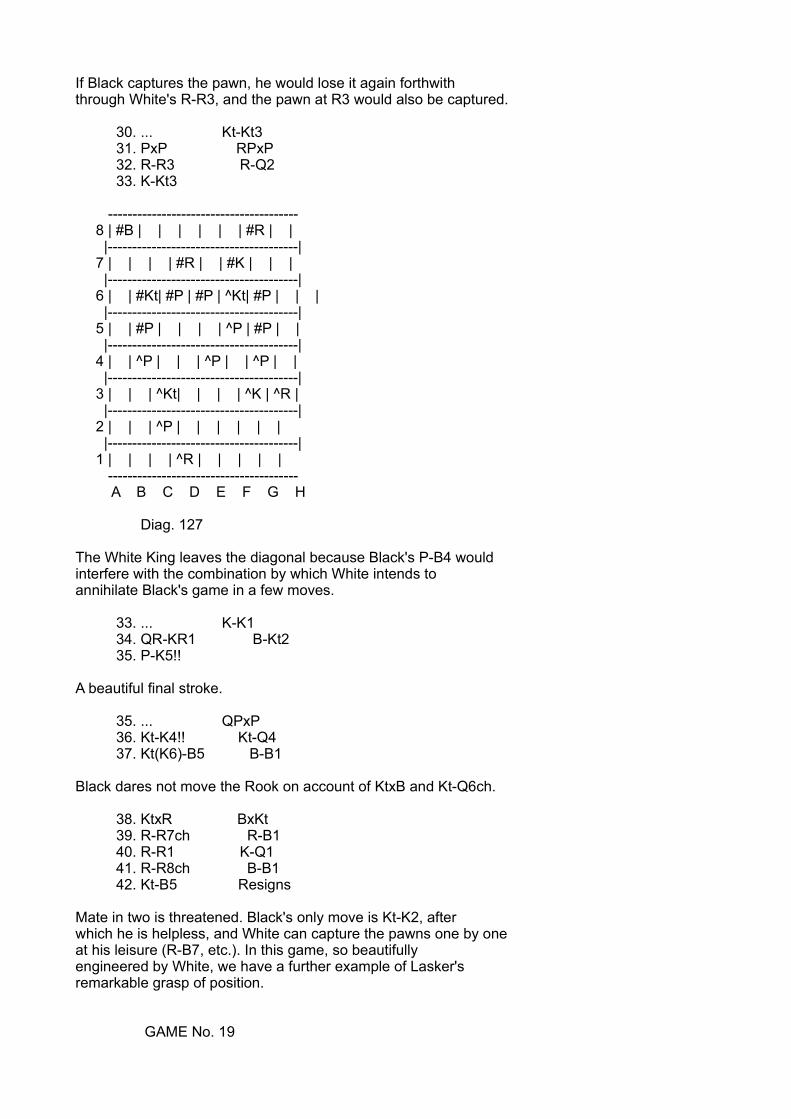
If Black captures the pawn, he would lose it again forthwiththrough White's R-R3, and the pawn at R3 would also be captured.
30. ... Kt-Kt3 31. PxP RPxP 32. R-R3 R-Q2 33. K-Kt3
--------------------------------------- 8 | #B | | | | | | #R | | |---------------------------------------| 7 | | | | #R | | #K | | | |---------------------------------------| 6 | | #Kt| #P | #P | ^Kt| #P | | | |---------------------------------------| 5 | | #P | | | | ^P | #P | | |---------------------------------------| 4 | | ^P | | | ^P | | ^P | | |---------------------------------------| 3 | | | ^Kt| | | | ^K | ^R | |---------------------------------------| 2 | | | ^P | | | | | | |---------------------------------------| 1 | | | | ^R | | | | | --------------------------------------- A B C D E F G H
Diag. 127
The White King leaves the diagonal because Black's P-B4 wouldinterfere with the combination by which White intends toannihilate Black's game in a few moves.
33. ... K-K1 34. QR-KR1 B-Kt2 35. P-K5!!
A beautiful final stroke.
35. ... QPxP 36. Kt-K4!! Kt-Q4 37. Kt(K6)-B5 B-B1
Black dares not move the Rook on account of KtxB and Kt-Q6ch.
38. KtxR BxKt 39. R-R7ch R-B1 40. R-R1 K-Q1 41. R-R8ch B-B1 42. Kt-B5 Resigns
Mate in two is threatened. Black's only move is Kt-K2, afterwhich he is helpless, and White can capture the pawns one by oneat his leisure (R-B7, etc.). In this game, so beautifullyengineered by White, we have a further example of Lasker'sremarkable grasp of position.
GAME No. 19
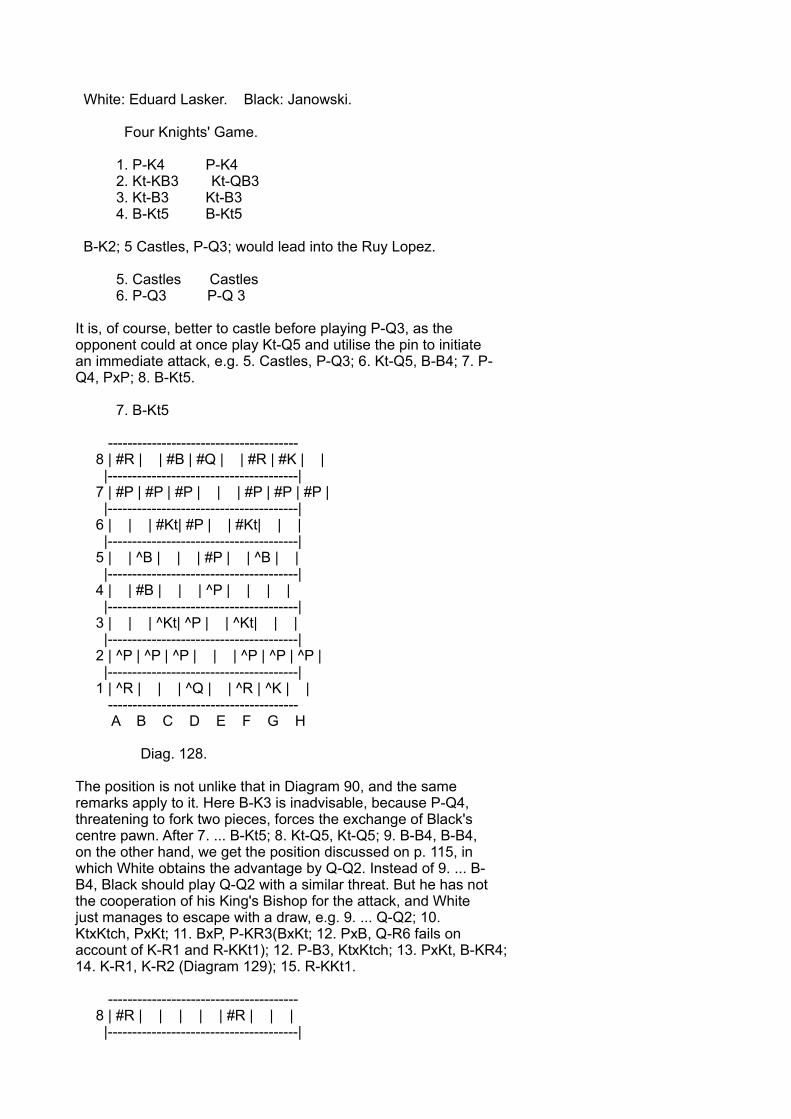
White: Eduard Lasker. Black: Janowski.
Four Knights' Game.
1. P-K4 P-K4 2. Kt-KB3 Kt-QB3 3. Kt-B3 Kt-B3 4. B-Kt5 B-Kt5
B-K2; 5 Castles, P-Q3; would lead into the Ruy Lopez.
5. Castles Castles 6. P-Q3 P-Q 3
It is, of course, better to castle before playing P-Q3, as theopponent could at once play Kt-Q5 and utilise the pin to initiatean immediate attack, e.g. 5. Castles, P-Q3; 6. Kt-Q5, B-B4; 7. P-Q4, PxP; 8. B-Kt5.
7. B-Kt5
--------------------------------------- 8 | #R | | #B | #Q | | #R | #K | | |---------------------------------------| 7 | #P | #P | #P | | | #P | #P | #P | |---------------------------------------| 6 | | | #Kt| #P | | #Kt| | | |---------------------------------------| 5 | | ^B | | | #P | | ^B | | |---------------------------------------| 4 | | #B | | | ^P | | | | |---------------------------------------| 3 | | | ^Kt| ^P | | ^Kt| | | |---------------------------------------| 2 | ^P | ^P | ^P | | | ^P | ^P | ^P | |---------------------------------------| 1 | ^R | | | ^Q | | ^R | ^K | | --------------------------------------- A B C D E F G H
Diag. 128.
The position is not unlike that in Diagram 90, and the sameremarks apply to it. Here B-K3 is inadvisable, because P-Q4,threatening to fork two pieces, forces the exchange of Black'scentre pawn. After 7. ... B-Kt5; 8. Kt-Q5, Kt-Q5; 9. B-B4, B-B4,on the other hand, we get the position discussed on p. 115, inwhich White obtains the advantage by Q-Q2. Instead of 9. ... B-B4, Black should play Q-Q2 with a similar threat. But he has notthe cooperation of his King's Bishop for the attack, and Whitejust manages to escape with a draw, e.g. 9. ... Q-Q2; 10.KtxKtch, PxKt; 11. BxP, P-KR3(BxKt; 12. PxB, Q-R6 fails onaccount of K-R1 and R-KKt1); 12. P-B3, KtxKtch; 13. PxKt, B-KR4;14. K-R1, K-R2 (Diagram 129); 15. R-KKt1.
--------------------------------------- 8 | #R | | | | | #R | | | |---------------------------------------|
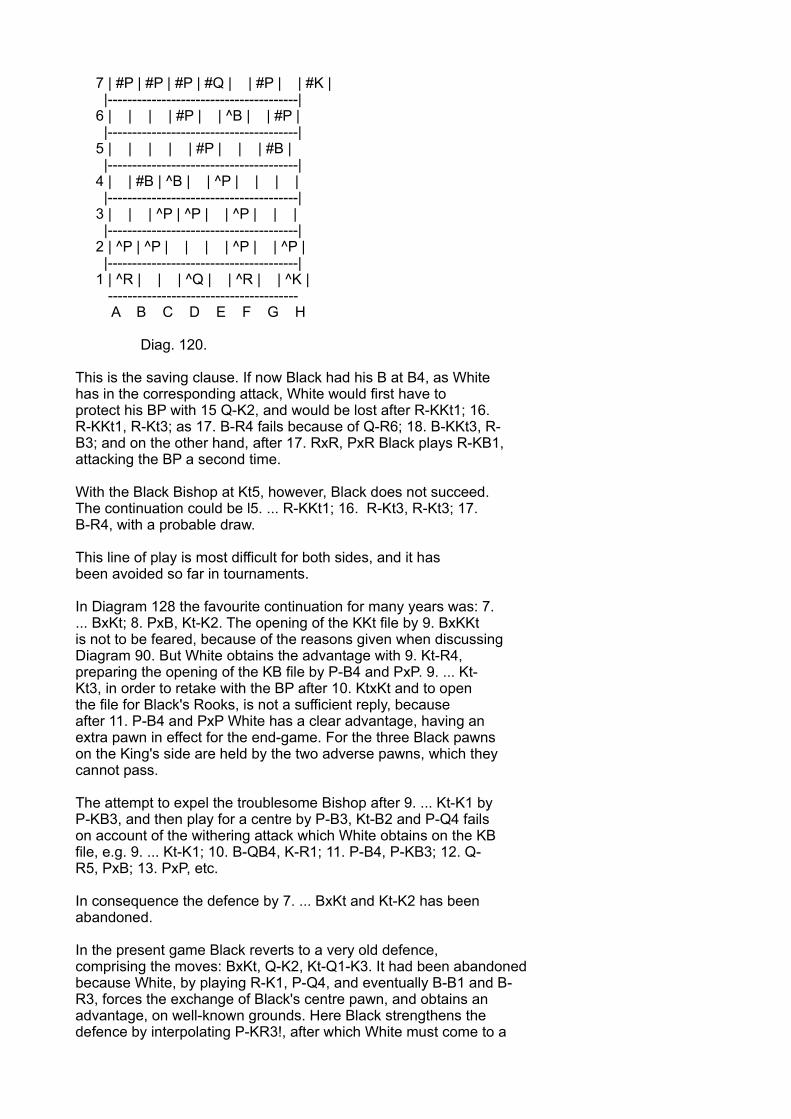
7 | #P | #P | #P | #Q | | #P | | #K | |---------------------------------------| 6 | | | | #P | | ^B | | #P | |---------------------------------------| 5 | | | | | #P | | | #B | |---------------------------------------| 4 | | #B | ^B | | ^P | | | | |---------------------------------------| 3 | | | ^P | ^P | | ^P | | | |---------------------------------------| 2 | ^P | ^P | | | | ^P | | ^P | |---------------------------------------| 1 | ^R | | | ^Q | | ^R | | ^K | --------------------------------------- A B C D E F G H
Diag. 120.
This is the saving clause. If now Black had his B at B4, as Whitehas in the corresponding attack, White would first have toprotect his BP with 15 Q-K2, and would be lost after R-KKt1; 16.R-KKt1, R-Kt3; as 17. B-R4 fails because of Q-R6; 18. B-KKt3, R-B3; and on the other hand, after 17. RxR, PxR Black plays R-KB1,attacking the BP a second time.
With the Black Bishop at Kt5, however, Black does not succeed.The continuation could be l5. ... R-KKt1; 16. R-Kt3, R-Kt3; 17.B-R4, with a probable draw.
This line of play is most difficult for both sides, and it hasbeen avoided so far in tournaments.
In Diagram 128 the favourite continuation for many years was: 7.... BxKt; 8. PxB, Kt-K2. The opening of the KKt file by 9. BxKKtis not to be feared, because of the reasons given when discussingDiagram 90. But White obtains the advantage with 9. Kt-R4,preparing the opening of the KB file by P-B4 and PxP. 9. ... Kt-Kt3, in order to retake with the BP after 10. KtxKt and to openthe file for Black's Rooks, is not a sufficient reply, becauseafter 11. P-B4 and PxP White has a clear advantage, having anextra pawn in effect for the end-game. For the three Black pawnson the King's side are held by the two adverse pawns, which theycannot pass.
The attempt to expel the troublesome Bishop after 9. ... Kt-K1 byP-KB3, and then play for a centre by P-B3, Kt-B2 and P-Q4 failson account of the withering attack which White obtains on the KBfile, e.g. 9. ... Kt-K1; 10. B-QB4, K-R1; 11. P-B4, P-KB3; 12. Q-R5, PxB; 13. PxP, etc.
In consequence the defence by 7. ... BxKt and Kt-K2 has beenabandoned.
In the present game Black reverts to a very old defence,comprising the moves: BxKt, Q-K2, Kt-Q1-K3. It had been abandonedbecause White, by playing R-K1, P-Q4, and eventually B-B1 and B-R3, forces the exchange of Black's centre pawn, and obtains anadvantage, on well-known grounds. Here Black strengthens thedefence by interpolating P-KR3!, after which White must come to a
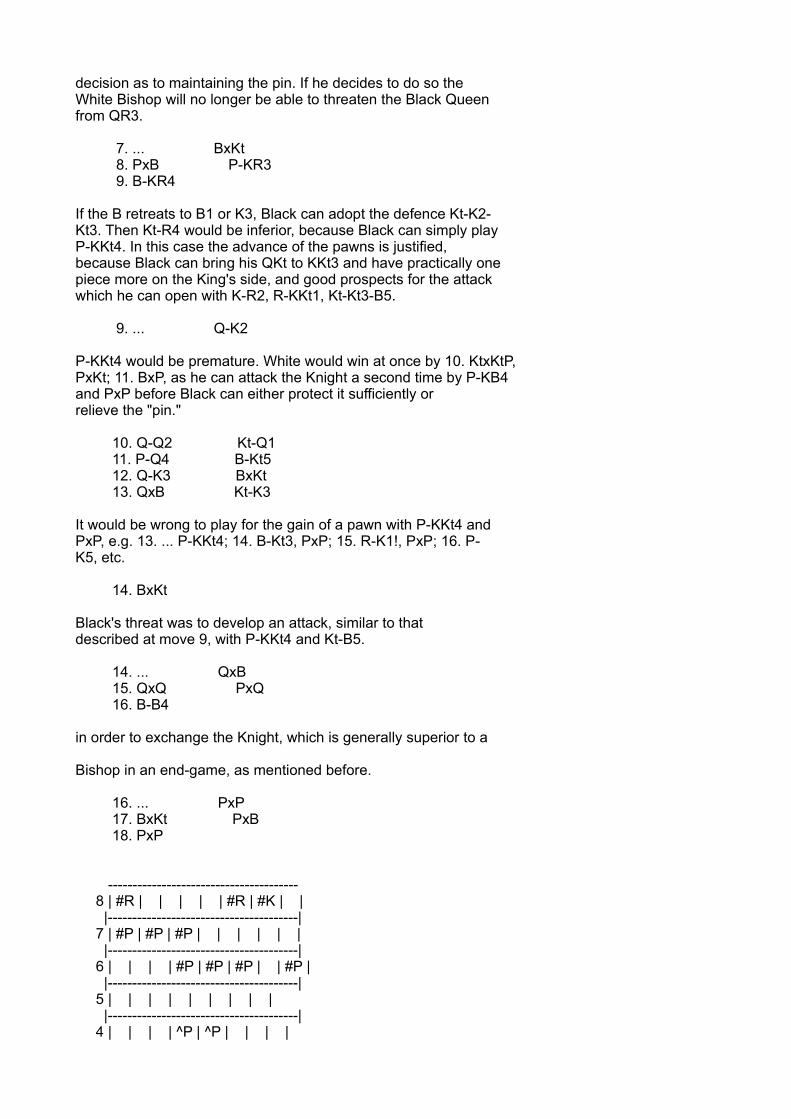
decision as to maintaining the pin. If he decides to do so theWhite Bishop will no longer be able to threaten the Black Queenfrom QR3.
7. ... BxKt 8. PxB P-KR3 9. B-KR4
If the B retreats to B1 or K3, Black can adopt the defence Kt-K2-Kt3. Then Kt-R4 would be inferior, because Black can simply playP-KKt4. In this case the advance of the pawns is justified,because Black can bring his QKt to KKt3 and have practically onepiece more on the King's side, and good prospects for the attackwhich he can open with K-R2, R-KKt1, Kt-Kt3-B5.
9. ... Q-K2
P-KKt4 would be premature. White would win at once by 10. KtxKtP,PxKt; 11. BxP, as he can attack the Knight a second time by P-KB4and PxP before Black can either protect it sufficiently orrelieve the "pin."
10. Q-Q2 Kt-Q1 11. P-Q4 B-Kt5 12. Q-K3 BxKt 13. QxB Kt-K3
It would be wrong to play for the gain of a pawn with P-KKt4 andPxP, e.g. 13. ... P-KKt4; 14. B-Kt3, PxP; 15. R-K1!, PxP; 16. P-K5, etc.
14. BxKt
Black's threat was to develop an attack, similar to thatdescribed at move 9, with P-KKt4 and Kt-B5.
14. ... QxB 15. QxQ PxQ 16. B-B4
in order to exchange the Knight, which is generally superior to a
Bishop in an end-game, as mentioned before.
16. ... PxP 17. BxKt PxB 18. PxP
--------------------------------------- 8 | #R | | | | | #R | #K | | |---------------------------------------| 7 | #P | #P | #P | | | | | | |---------------------------------------| 6 | | | | #P | #P | #P | | #P | |---------------------------------------| 5 | | | | | | | | | |---------------------------------------| 4 | | | | ^P | ^P | | | |
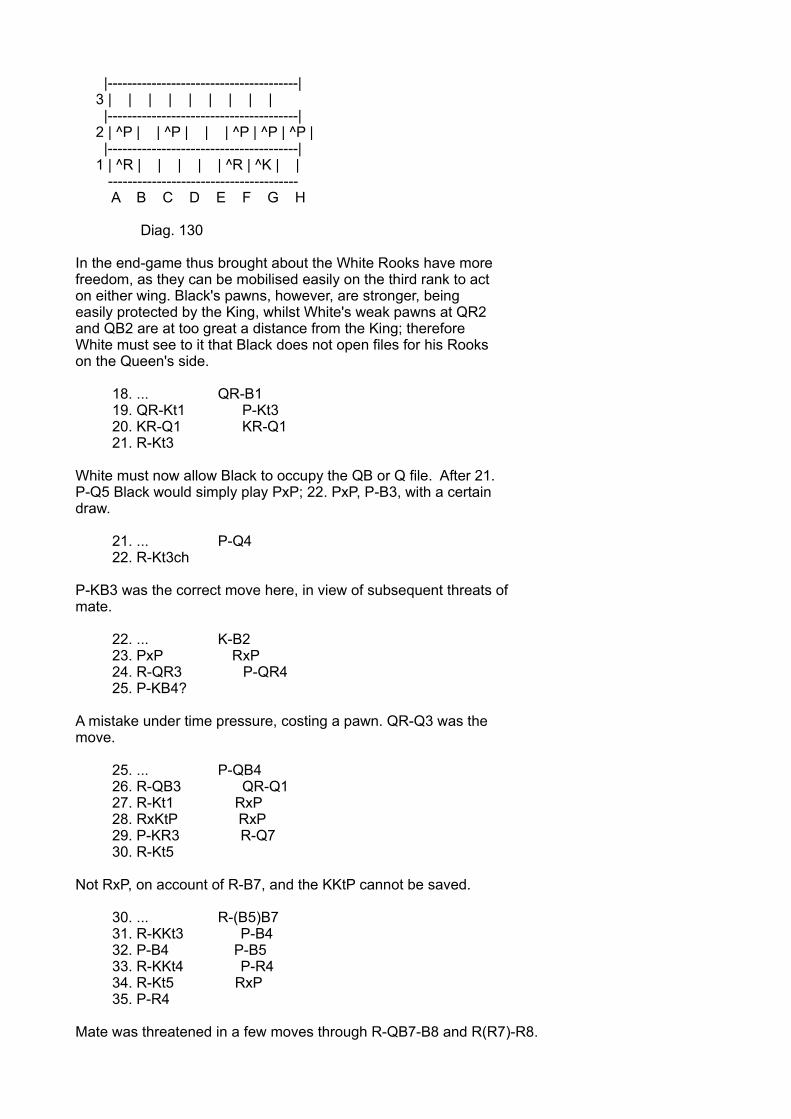
|---------------------------------------| 3 | | | | | | | | | |---------------------------------------| 2 | ^P | | ^P | | | ^P | ^P | ^P | |---------------------------------------| 1 | ^R | | | | | ^R | ^K | | --------------------------------------- A B C D E F G H
Diag. 130
In the end-game thus brought about the White Rooks have morefreedom, as they can be mobilised easily on the third rank to acton either wing. Black's pawns, however, are stronger, beingeasily protected by the King, whilst White's weak pawns at QR2and QB2 are at too great a distance from the King; thereforeWhite must see to it that Black does not open files for his Rookson the Queen's side.
18. ... QR-B1 19. QR-Kt1 P-Kt3 20. KR-Q1 KR-Q1 21. R-Kt3
White must now allow Black to occupy the QB or Q file. After 21.P-Q5 Black would simply play PxP; 22. PxP, P-B3, with a certaindraw.
21. ... P-Q4 22. R-Kt3ch
P-KB3 was the correct move here, in view of subsequent threats ofmate.
22. ... K-B2 23. PxP RxP 24. R-QR3 P-QR4 25. P-KB4?
A mistake under time pressure, costing a pawn. QR-Q3 was themove.
25. ... P-QB4 26. R-QB3 QR-Q1 27. R-Kt1 RxP 28. RxKtP RxP 29. P-KR3 R-Q7 30. R-Kt5
Not RxP, on account of R-B7, and the KKtP cannot be saved.
30. ... R-(B5)B7 31. R-KKt3 P-B4 32. P-B4 P-B5 33. R-KKt4 P-R4 34. R-Kt5 RxP 35. P-R4
Mate was threatened in a few moves through R-QB7-B8 and R(R7)-R8.
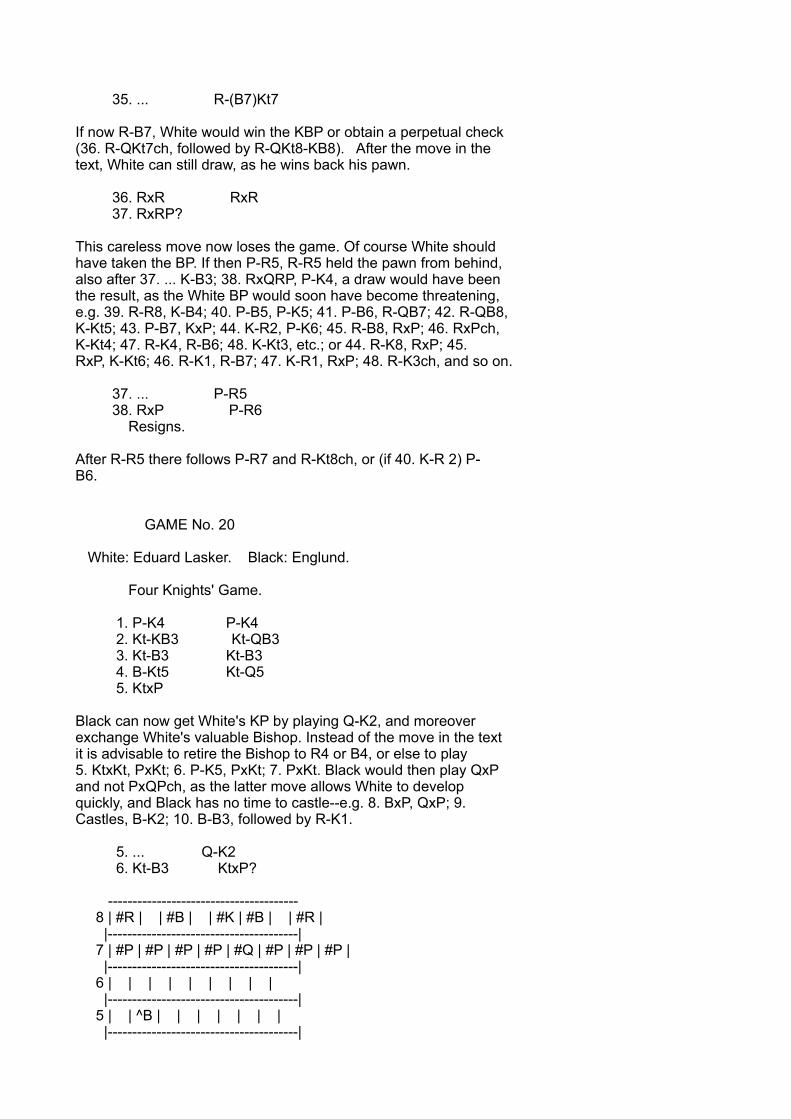
35. ... R-(B7)Kt7
If now R-B7, White would win the KBP or obtain a perpetual check(36. R-QKt7ch, followed by R-QKt8-KB8). After the move in thetext, White can still draw, as he wins back his pawn.
36. RxR RxR 37. RxRP?
This careless move now loses the game. Of course White shouldhave taken the BP. If then P-R5, R-R5 held the pawn from behind,also after 37. ... K-B3; 38. RxQRP, P-K4, a draw would have beenthe result, as the White BP would soon have become threatening,e.g. 39. R-R8, K-B4; 40. P-B5, P-K5; 41. P-B6, R-QB7; 42. R-QB8,K-Kt5; 43. P-B7, KxP; 44. K-R2, P-K6; 45. R-B8, RxP; 46. RxPch,K-Kt4; 47. R-K4, R-B6; 48. K-Kt3, etc.; or 44. R-K8, RxP; 45.RxP, K-Kt6; 46. R-K1, R-B7; 47. K-R1, RxP; 48. R-K3ch, and so on.
37. ... P-R5 38. RxP P-R6 Resigns.
After R-R5 there follows P-R7 and R-Kt8ch, or (if 40. K-R 2) P-B6.
GAME No. 20
White: Eduard Lasker. Black: Englund.
Four Knights' Game.
1. P-K4 P-K4 2. Kt-KB3 Kt-QB3 3. Kt-B3 Kt-B3 4. B-Kt5 Kt-Q5 5. KtxP
Black can now get White's KP by playing Q-K2, and moreoverexchange White's valuable Bishop. Instead of the move in the textit is advisable to retire the Bishop to R4 or B4, or else to play5. KtxKt, PxKt; 6. P-K5, PxKt; 7. PxKt. Black would then play QxPand not PxQPch, as the latter move allows White to developquickly, and Black has no time to castle--e.g. 8. BxP, QxP; 9.Castles, B-K2; 10. B-B3, followed by R-K1.
5. ... Q-K2 6. Kt-B3 KtxP?
--------------------------------------- 8 | #R | | #B | | #K | #B | | #R | |---------------------------------------| 7 | #P | #P | #P | #P | #Q | #P | #P | #P | |---------------------------------------| 6 | | | | | | | | | |---------------------------------------| 5 | | ^B | | | | | | | |---------------------------------------|
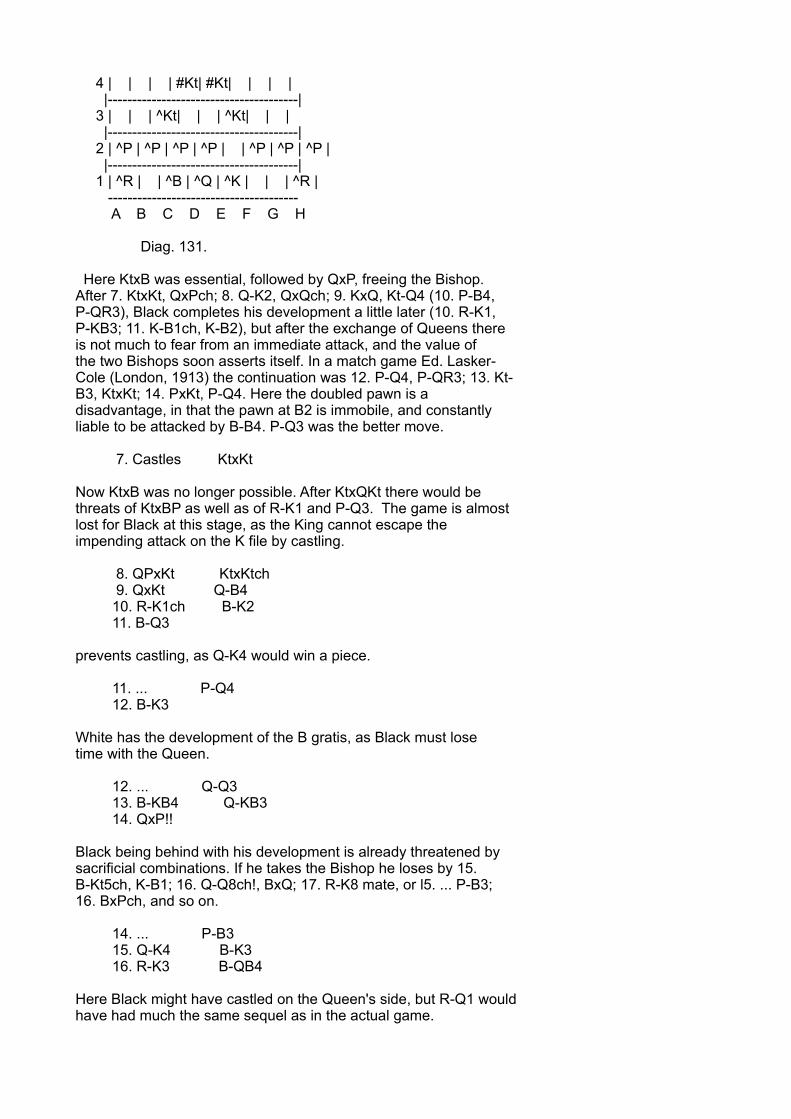
4 | | | | #Kt| #Kt| | | | |---------------------------------------| 3 | | | ^Kt| | | ^Kt| | | |---------------------------------------| 2 | ^P | ^P | ^P | ^P | | ^P | ^P | ^P | |---------------------------------------| 1 | ^R | | ^B | ^Q | ^K | | | ^R | --------------------------------------- A B C D E F G H
Diag. 131.
Here KtxB was essential, followed by QxP, freeing the Bishop.After 7. KtxKt, QxPch; 8. Q-K2, QxQch; 9. KxQ, Kt-Q4 (10. P-B4,P-QR3), Black completes his development a little later (10. R-K1,P-KB3; 11. K-B1ch, K-B2), but after the exchange of Queens thereis not much to fear from an immediate attack, and the value ofthe two Bishops soon asserts itself. In a match game Ed. Lasker-Cole (London, 1913) the continuation was 12. P-Q4, P-QR3; 13. Kt-B3, KtxKt; 14. PxKt, P-Q4. Here the doubled pawn is adisadvantage, in that the pawn at B2 is immobile, and constantlyliable to be attacked by B-B4. P-Q3 was the better move.
7. Castles KtxKt
Now KtxB was no longer possible. After KtxQKt there would bethreats of KtxBP as well as of R-K1 and P-Q3. The game is almostlost for Black at this stage, as the King cannot escape theimpending attack on the K file by castling.
8. QPxKt KtxKtch 9. QxKt Q-B4 10. R-K1ch B-K2 11. B-Q3
prevents castling, as Q-K4 would win a piece.
11. ... P-Q4 12. B-K3
White has the development of the B gratis, as Black must losetime with the Queen.
12. ... Q-Q3 13. B-KB4 Q-KB3 14. QxP!!
Black being behind with his development is already threatened bysacrificial combinations. If he takes the Bishop he loses by 15.B-Kt5ch, K-B1; 16. Q-Q8ch!, BxQ; 17. R-K8 mate, or l5. ... P-B3;16. BxPch, and so on.
14. ... P-B3 15. Q-K4 B-K3 16. R-K3 B-QB4
Here Black might have castled on the Queen's side, but R-Q1 wouldhave had much the same sequel as in the actual game.
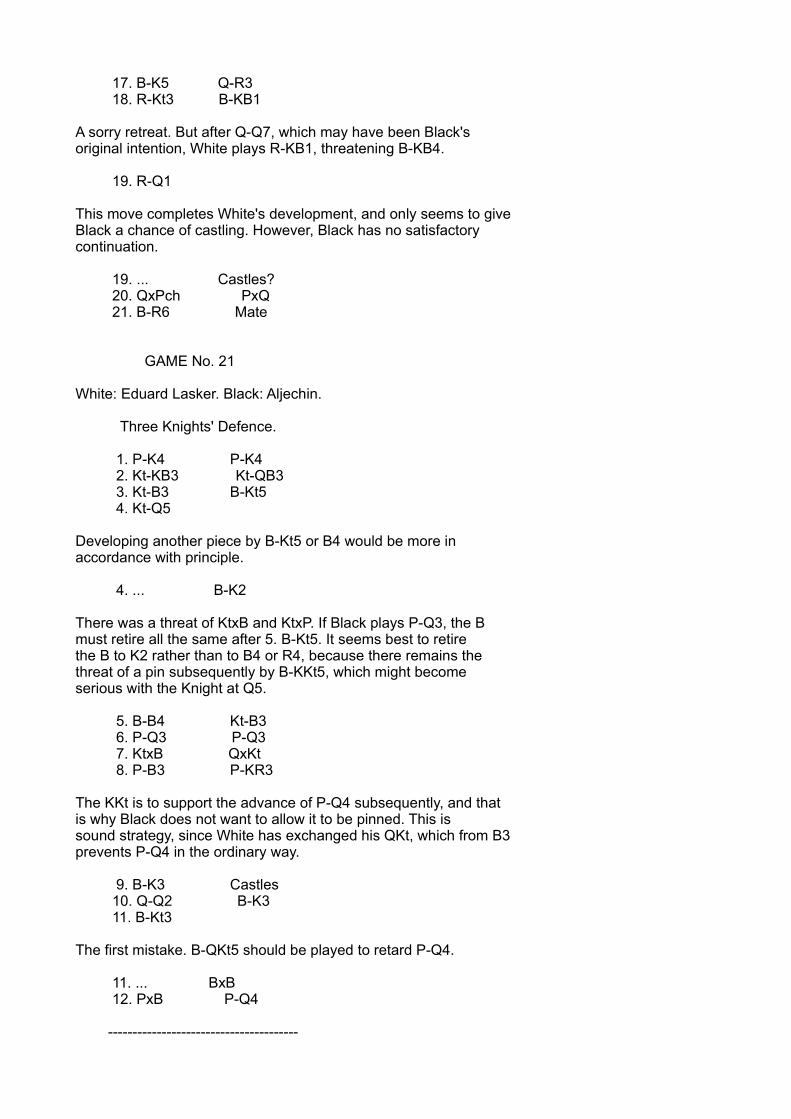
17. B-K5 Q-R3 18. R-Kt3 B-KB1
A sorry retreat. But after Q-Q7, which may have been Black'soriginal intention, White plays R-KB1, threatening B-KB4.
19. R-Q1
This move completes White's development, and only seems to giveBlack a chance of castling. However, Black has no satisfactorycontinuation.
19. ... Castles? 20. QxPch PxQ 21. B-R6 Mate
GAME No. 21
White: Eduard Lasker. Black: Aljechin.
Three Knights' Defence.
1. P-K4 P-K4 2. Kt-KB3 Kt-QB3 3. Kt-B3 B-Kt5 4. Kt-Q5
Developing another piece by B-Kt5 or B4 would be more inaccordance with principle.
4. ... B-K2
There was a threat of KtxB and KtxP. If Black plays P-Q3, the Bmust retire all the same after 5. B-Kt5. It seems best to retirethe B to K2 rather than to B4 or R4, because there remains thethreat of a pin subsequently by B-KKt5, which might becomeserious with the Knight at Q5.
5. B-B4 Kt-B3 6. P-Q3 P-Q3 7. KtxB QxKt 8. P-B3 P-KR3
The KKt is to support the advance of P-Q4 subsequently, and thatis why Black does not want to allow it to be pinned. This issound strategy, since White has exchanged his QKt, which from B3prevents P-Q4 in the ordinary way.
9. B-K3 Castles 10. Q-Q2 B-K3 11. B-Kt3
The first mistake. B-QKt5 should be played to retard P-Q4.
11. ... BxB 12. PxB P-Q4
---------------------------------------
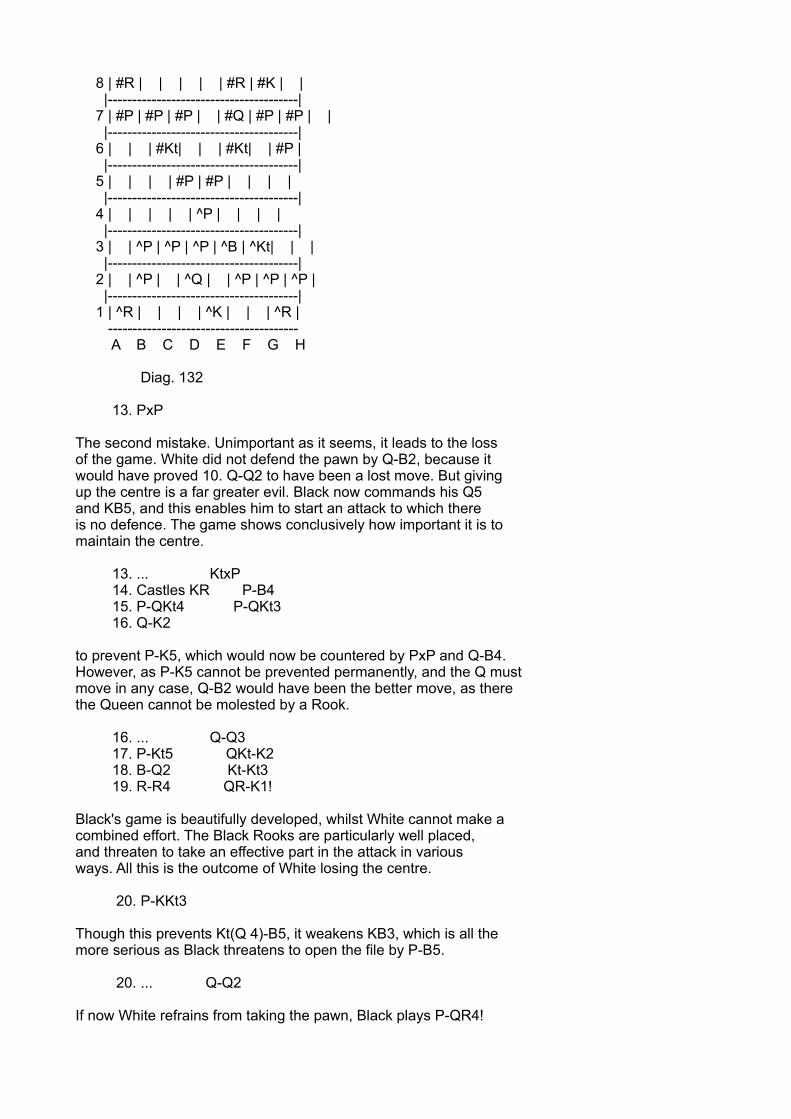
8 | #R | | | | | #R | #K | | |---------------------------------------| 7 | #P | #P | #P | | #Q | #P | #P | | |---------------------------------------| 6 | | | #Kt| | | #Kt| | #P | |---------------------------------------| 5 | | | | #P | #P | | | | |---------------------------------------| 4 | | | | | ^P | | | | |---------------------------------------| 3 | | ^P | ^P | ^P | ^B | ^Kt| | | |---------------------------------------| 2 | | ^P | | ^Q | | ^P | ^P | ^P | |---------------------------------------| 1 | ^R | | | | ^K | | | ^R | --------------------------------------- A B C D E F G H
Diag. 132
13. PxP
The second mistake. Unimportant as it seems, it leads to the lossof the game. White did not defend the pawn by Q-B2, because itwould have proved 10. Q-Q2 to have been a lost move. But givingup the centre is a far greater evil. Black now commands his Q5and KB5, and this enables him to start an attack to which thereis no defence. The game shows conclusively how important it is tomaintain the centre.
13. ... KtxP 14. Castles KR P-B4 15. P-QKt4 P-QKt3 16. Q-K2
to prevent P-K5, which would now be countered by PxP and Q-B4.However, as P-K5 cannot be prevented permanently, and the Q mustmove in any case, Q-B2 would have been the better move, as therethe Queen cannot be molested by a Rook.
16. ... Q-Q3 17. P-Kt5 QKt-K2 18. B-Q2 Kt-Kt3 19. R-R4 QR-K1!
Black's game is beautifully developed, whilst White cannot make acombined effort. The Black Rooks are particularly well placed,and threaten to take an effective part in the attack in variousways. All this is the outcome of White losing the centre.
20. P-KKt3
Though this prevents Kt(Q 4)-B5, it weakens KB3, which is all themore serious as Black threatens to open the file by P-B5.
20. ... Q-Q2
If now White refrains from taking the pawn, Black plays P-QR4!
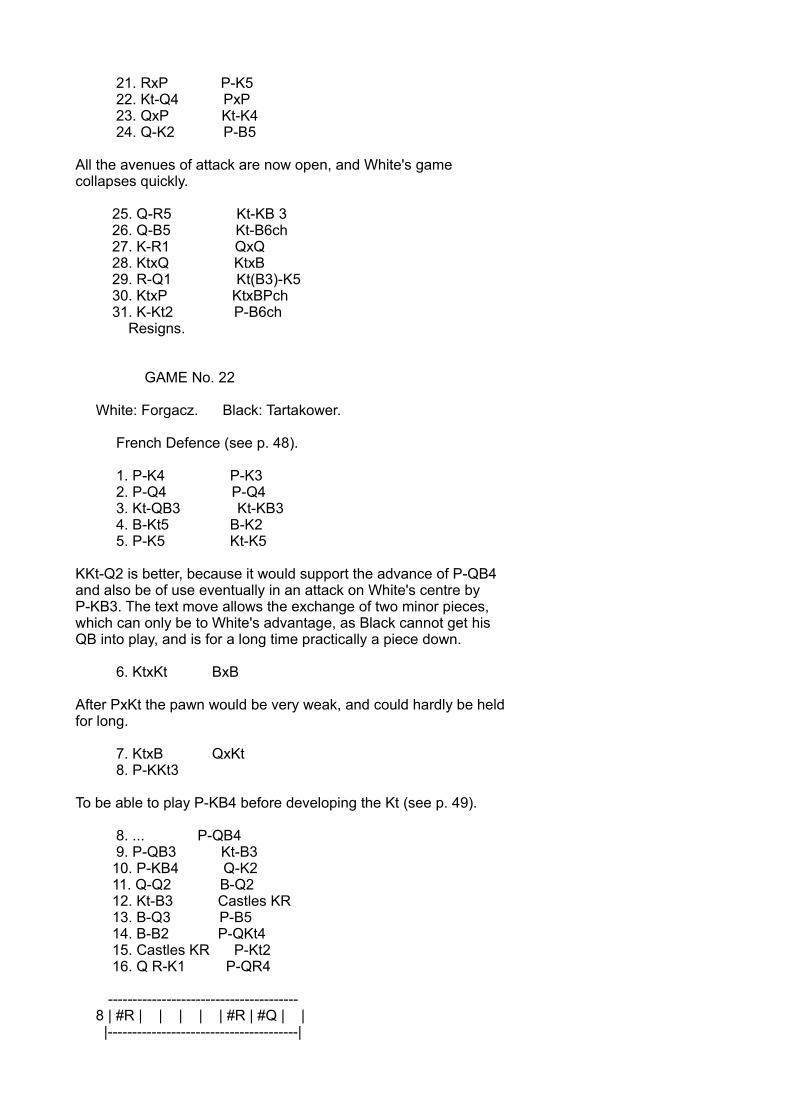
21. RxP P-K5 22. Kt-Q4 PxP 23. QxP Kt-K4 24. Q-K2 P-B5
All the avenues of attack are now open, and White's gamecollapses quickly.
25. Q-R5 Kt-KB 3 26. Q-B5 Kt-B6ch 27. K-R1 QxQ 28. KtxQ KtxB 29. R-Q1 Kt(B3)-K5 30. KtxP KtxBPch 31. K-Kt2 P-B6ch Resigns.
GAME No. 22
White: Forgacz. Black: Tartakower.
French Defence (see p. 48).
1. P-K4 P-K3 2. P-Q4 P-Q4 3. Kt-QB3 Kt-KB3 4. B-Kt5 B-K2 5. P-K5 Kt-K5
KKt-Q2 is better, because it would support the advance of P-QB4and also be of use eventually in an attack on White's centre byP-KB3. The text move allows the exchange of two minor pieces,which can only be to White's advantage, as Black cannot get hisQB into play, and is for a long time practically a piece down.
6. KtxKt BxB
After PxKt the pawn would be very weak, and could hardly be heldfor long.
7. KtxB QxKt 8. P-KKt3
To be able to play P-KB4 before developing the Kt (see p. 49).
8. ... P-QB4 9. P-QB3 Kt-B3 10. P-KB4 Q-K2 11. Q-Q2 B-Q2 12. Kt-B3 Castles KR 13. B-Q3 P-B5 14. B-B2 P-QKt4 15. Castles KR P-Kt2 16. Q R-K1 P-QR4
--------------------------------------- 8 | #R | | | | | #R | #Q | | |---------------------------------------|
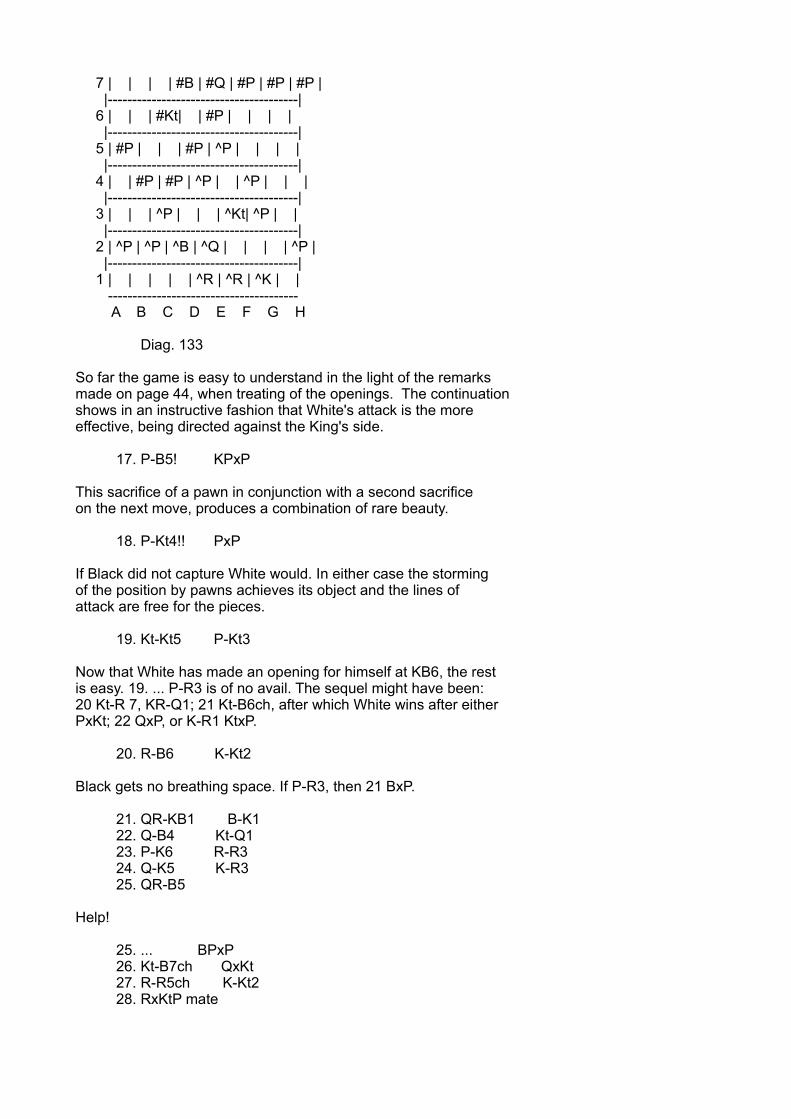
7 | | | | #B | #Q | #P | #P | #P | |---------------------------------------| 6 | | | #Kt| | #P | | | | |---------------------------------------| 5 | #P | | | #P | ^P | | | | |---------------------------------------| 4 | | #P | #P | ^P | | ^P | | | |---------------------------------------| 3 | | | ^P | | | ^Kt| ^P | | |---------------------------------------| 2 | ^P | ^P | ^B | ^Q | | | | ^P | |---------------------------------------| 1 | | | | | ^R | ^R | ^K | | --------------------------------------- A B C D E F G H
Diag. 133
So far the game is easy to understand in the light of the remarksmade on page 44, when treating of the openings. The continuationshows in an instructive fashion that White's attack is the moreeffective, being directed against the King's side.
17. P-B5! KPxP
This sacrifice of a pawn in conjunction with a second sacrificeon the next move, produces a combination of rare beauty.
18. P-Kt4!! PxP
If Black did not capture White would. In either case the stormingof the position by pawns achieves its object and the lines ofattack are free for the pieces.
19. Kt-Kt5 P-Kt3
Now that White has made an opening for himself at KB6, the restis easy. 19. ... P-R3 is of no avail. The sequel might have been:20 Kt-R 7, KR-Q1; 21 Kt-B6ch, after which White wins after eitherPxKt; 22 QxP, or K-R1 KtxP.
20. R-B6 K-Kt2
Black gets no breathing space. If P-R3, then 21 BxP.
21. QR-KB1 B-K1 22. Q-B4 Kt-Q1 23. P-K6 R-R3 24. Q-K5 K-R3 25. QR-B5
Help!
25. ... BPxP 26. Kt-B7ch QxKt 27. R-R5ch K-Kt2 28. RxKtP mate
GAME No. 23
White: Yates. Black: Esser.
French Defence.
1. P-K4 P-K3 2. P-Q4 P-Q4 3. Kt-QB3 Kt-KB3 4. B-Kt5 PxP 5. BxKt PxB
If the Queen recaptures, White obtains too great an advantage indevelopment, and therefore Black submits to the doubling of hispawns. It is doubtful if this means a handicap, although theKing's side gets broken up. For Black keeps his two Bishops, apowerful weapon, unless White succeeds in developing swiftly anattack on the King's side. The present game is instructive andshows the chances afforded to both sides by the position broughtabout by the exchange at KB6.
6. KtxP P-KB4
As the KB obtains a long diagonal at Kt2, this advance isjustified. Otherwise there would be strong objections to it, asthe pawn is likely to be subjected to attack, and apart fromthat, it gives up command of Black's K4.
7. Kt-QB3
Kt-Kt3 would seem more natural, firstly, because Black hasweaknesses on the K side, and White will need his pieces forattack in that quarter, and secondly, because the QP ought to besupported by P-B3, as Black will attack it by B-Kt2.
7. ... B-Kt2 8. Kt-B3 Castles 9. B-B4
If now the Knight were at Kt3, White could play P-B3 and BQ3.This is the proper place for the B, which might obtain an opendiagonal after P-KKt4.
9. ... Kt-B3 10. Kt-K2 Kt-R4 11. B-Q3 P-B4 12. P-B3 P-QB5
P-Kt3 seems preferable, as the text move releases the hold onWhite's Q4. The isolated pawn resulting after 13. PxP is not tobe feared, as the B at Kt2 would have greater efficiency (QR-Kt1), and White would not be so firmly established in the centre.
13. B-B2 P-Kt4 14. Q-Q2
There now ensues an interesting struggle. White builds up anattack with Q and both Knights and eventually the B (P-KKt4). If
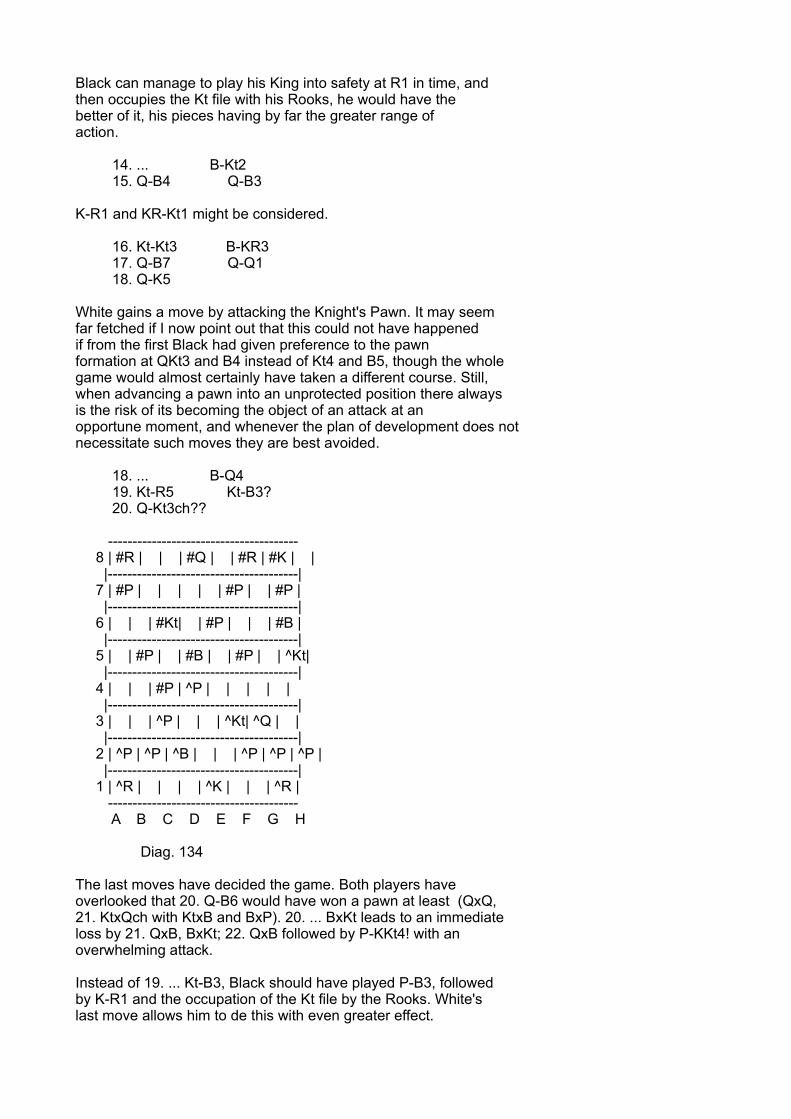
Black can manage to play his King into safety at R1 in time, andthen occupies the Kt file with his Rooks, he would have thebetter of it, his pieces having by far the greater range ofaction.
14. ... B-Kt2 15. Q-B4 Q-B3
K-R1 and KR-Kt1 might be considered.
16. Kt-Kt3 B-KR3 17. Q-B7 Q-Q1 18. Q-K5
White gains a move by attacking the Knight's Pawn. It may seemfar fetched if I now point out that this could not have happenedif from the first Black had given preference to the pawnformation at QKt3 and B4 instead of Kt4 and B5, though the wholegame would almost certainly have taken a different course. Still,when advancing a pawn into an unprotected position there alwaysis the risk of its becoming the object of an attack at anopportune moment, and whenever the plan of development does notnecessitate such moves they are best avoided.
18. ... B-Q4 19. Kt-R5 Kt-B3? 20. Q-Kt3ch??
--------------------------------------- 8 | #R | | | #Q | | #R | #K | | |---------------------------------------| 7 | #P | | | | | #P | | #P | |---------------------------------------| 6 | | | #Kt| | #P | | | #B | |---------------------------------------| 5 | | #P | | #B | | #P | | ^Kt| |---------------------------------------| 4 | | | #P | ^P | | | | | |---------------------------------------| 3 | | | ^P | | | ^Kt| ^Q | | |---------------------------------------| 2 | ^P | ^P | ^B | | | ^P | ^P | ^P | |---------------------------------------| 1 | ^R | | | | ^K | | | ^R | --------------------------------------- A B C D E F G H
Diag. 134
The last moves have decided the game. Both players haveoverlooked that 20. Q-B6 would have won a pawn at least (QxQ,21. KtxQch with KtxB and BxP). 20. ... BxKt leads to an immediateloss by 21. QxB, BxKt; 22. QxB followed by P-KKt4! with anoverwhelming attack.
Instead of 19. ... Kt-B3, Black should have played P-B3, followedby K-R1 and the occupation of the Kt file by the Rooks. White'slast move allows him to de this with even greater effect.
20. ... K-R1 21. Q-R3 R-KKt1
Black has now a preponderance of material on the field of battle,and it can be concluded off-hand that White, not being able tobring his Rooks into play, must lose.
22. Kt-Kt3 Q-B3 23. K-B1
K-K2 is a shade better. But there is no longer any adequatedefence.
23. ... R-Kt5 24. R-K1 QR-KKt1 25. Kt-K5
Black was threatening BxKt, followed by R-R5 and P-B5
25. ... KtxKt 26. PxKt Q-Kt4 27. Q-R5 BxPch 28. K-Kt1 RxKt?
QxQ and B-K5ch was simple and effective.
29. RPxR BxR 30. QxQ BxQ 31. KxB R-Q1 32. P-B4
R-Q1 is much more promising, although it means the loss of a pawn(RxR and B-B8, etc.). With Bishops of different colour the gameis not easy to win even now.
32. ... R-Q7 33. PxB RxB 34. R-Q1 RxKtP 35. R-Q7 K-Kt2 36. RxRP R-QB7
He could have played P-Kt5 at once.
37. R-R5 R-QKt7 38. P-R4
R-R3 would only have drawn out the agony a little longer.
38. ... P-Kt5 Resigns.
GAME No. 24
White: Atkins. Black: Barry.
French Defence.
1. P-K4 P-K3

2. P-Q4 P-Q4 3. Kt-QB3 Kt-KB3 4. B-Kt5 B-K2 5. P-K5 KKt-Q2 6. BxB QxB
--------------------------------------- 8 | #R | #Kt| #B | | #K | | | #R | |---------------------------------------| 7 | #P | #P | #P | #Kt| #Q | #P | #P | #P | |---------------------------------------| 6 | | | | | #P | | | | |---------------------------------------| 5 | | | | #P | ^P | | | | |---------------------------------------| 4 | | | | ^P | | | | | |---------------------------------------| 3 | | | ^Kt| | | | | | |---------------------------------------| 2 | ^P | ^P | ^P | | | ^P | ^P | ^P | |---------------------------------------| 1 | ^R | | | ^Q | ^K | ^B | ^Kt| ^R | --------------------------------------- A B C D E F G H
Diag. 135.
7. Kt-Kt5
The intention is to strengthen the centre by P-QB3. Though ittakes a number of moves to bring the Knight into play again, yetmost of the tournament games in this variation have been won byWhite, mostly through a King's side attack on the lines set outin the notes to Game No. 22. Investigations by Alapin tend toshow that this is due to the fact that Black in all cases devotedhis attention to Queen's side operations (just as in Game No. 22)when he could have utilised White's backward development, byhimself starting a counter attack on the King's side. He can theneither aim at the White centre at once with P-KB3, or else playP-KB4 and prepare the advance of the KKtP by Kt-B3-Q1-B2. Thesevarious lines of play are still under discussion. Simpledevelopment is probably preferable to the move in the text, e.g.7. B-Q3, Castles; 8. P-B4, P-QB4; 9. Kt-B3.
7. ... K-Q1
There can be no advantage in forfeiting the option of castlingunless there be no other way of getting the King into safety andof bringing the Rooks into concerted action. It is obvious thatotherwise the free development of pieces is hindered, and theKing is in appreciable danger, for it is easier to open files inthe centre than on the wings where the pawns have not advancedyet. Therefore Kt-Kt3 is the only move worth considering.
8. P-QB3 P-KB3 9. PxP
With the Black King remaining in the centre, White has no furtherinterest in the maintenance of his pawn at K5. On the contrary he
will try to clear the centre.
9. ... PxP 10. Q-Q2 P-B3 11. Kt-QR3 Kt-B1
At this early stage it is clear that Black will have to contendwith difficulties in trying to complete his development. Theusual way (P-QB4) is barred on account of the dangers to Black'sKing with which a clearance in the centre is fraught.
12. Kt-B3 B-Q2 13. P-KKt3!
As Black can force this advance at any time by playing R-KKt1,White decides to develop his KB at Kt2, thereby covering his KB3and KR3. The weakness of the latter squares would not be of anygreat moment if White were to castle on the Queen's wing. But asP-QB4 is necessary in order to break up the centre, castling KRis the right course.
13. ... B-K1 14. B-Kt2 QKt-Q2 15. P-B4 PxP 16. KtxP Kt-QKt3 17. KtxKt PxKt 18. Castles KR Kt-Kt3 19. KR-K1 B-Q2 20. Q-B3 R-K1 21. Kt-Q2 Q-B1 22. P-QR4!
White wishes to get rid of the pawn at Black's Kt3, in order tobreak in with his Knight at B5. Black has no means of preventingthis, and soon succumbs to the overwhelming array of Whiteforces.
22. ... Kt-K2 23. P-R5 P-QKt4 24. Kt-Kt3 Kt-Q4 25. BxKt KPxB 26. RxRch BxR 27. Kt-B5 Q-B2 28. R-K1 K-B2 29. Q-K3 B-Q2 30. Q-B4ch Resigns.
If K-Q1, 31. KtxPch followed by Kt-Q6ch. If K-B1 White wins by31. Q-Q6 and R-K7.
GAME NO. 25
White: Emanuel Lasker. Black: Tarrasch.
French Defence.
1. P-K4 P-K3 2. P-Q4 P-Q4
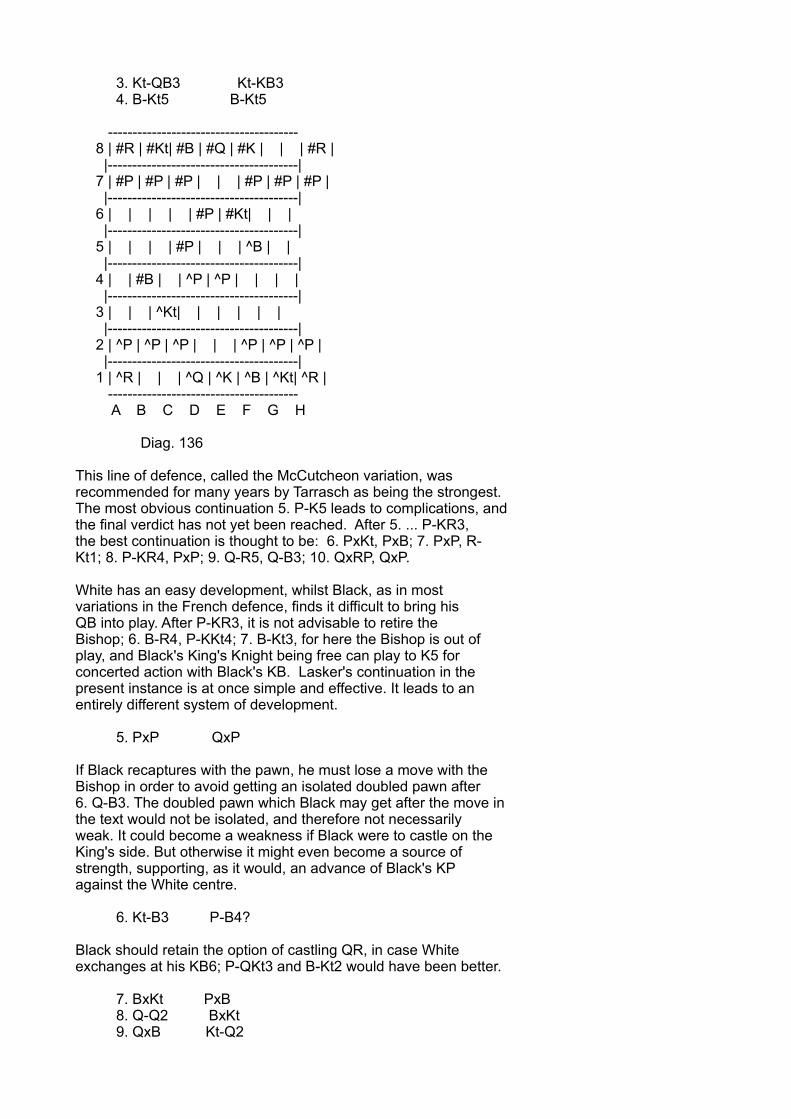
3. Kt-QB3 Kt-KB3 4. B-Kt5 B-Kt5
--------------------------------------- 8 | #R | #Kt| #B | #Q | #K | | | #R | |---------------------------------------| 7 | #P | #P | #P | | | #P | #P | #P | |---------------------------------------| 6 | | | | | #P | #Kt| | | |---------------------------------------| 5 | | | | #P | | | ^B | | |---------------------------------------| 4 | | #B | | ^P | ^P | | | | |---------------------------------------| 3 | | | ^Kt| | | | | | |---------------------------------------| 2 | ^P | ^P | ^P | | | ^P | ^P | ^P | |---------------------------------------| 1 | ^R | | | ^Q | ^K | ^B | ^Kt| ^R | --------------------------------------- A B C D E F G H
Diag. 136
This line of defence, called the McCutcheon variation, wasrecommended for many years by Tarrasch as being the strongest.The most obvious continuation 5. P-K5 leads to complications, andthe final verdict has not yet been reached. After 5. ... P-KR3,the best continuation is thought to be: 6. PxKt, PxB; 7. PxP, R-Kt1; 8. P-KR4, PxP; 9. Q-R5, Q-B3; 10. QxRP, QxP.
White has an easy development, whilst Black, as in mostvariations in the French defence, finds it difficult to bring hisQB into play. After P-KR3, it is not advisable to retire theBishop; 6. B-R4, P-KKt4; 7. B-Kt3, for here the Bishop is out ofplay, and Black's King's Knight being free can play to K5 forconcerted action with Black's KB. Lasker's continuation in thepresent instance is at once simple and effective. It leads to anentirely different system of development.
5. PxP QxP
If Black recaptures with the pawn, he must lose a move with theBishop in order to avoid getting an isolated doubled pawn after6. Q-B3. The doubled pawn which Black may get after the move inthe text would not be isolated, and therefore not necessarilyweak. It could become a weakness if Black were to castle on theKing's side. But otherwise it might even become a source ofstrength, supporting, as it would, an advance of Black's KPagainst the White centre.
6. Kt-B3 P-B4?
Black should retain the option of castling QR, in case Whiteexchanges at his KB6; P-QKt3 and B-Kt2 would have been better.
7. BxKt PxB 8. Q-Q2 BxKt 9. QxB Kt-Q2

10. R-Q1 R-KKt1 11. PxP QxP 12. Q-Q2 Q-Kt3
guarding against the mate at Q1 before moving the Kt. But thiswould have been better effected by Q-K2. After Q-Kt3 the Knightcannot move yet because of B-Kt5ch.
--------------------------------------- 8 | #R | | #B | | #K | | #R | | |---------------------------------------| 7 | #P | #P | | #Kt| | #P | | #P | |---------------------------------------| 6 | | #Q | | | #P | #P | | | |---------------------------------------| 5 | | | | | | | | | |---------------------------------------| 4 | | | | | | | | | |---------------------------------------| 3 | | | | | | ^Kt| | | |---------------------------------------| 2 | ^P | ^P | ^P | ^Q | | ^P | ^P | ^P | |---------------------------------------| 1 | | | | ^R | ^K | ^B | | ^R | --------------------------------------- A B C D E F G H
Diag. 137
13. P-B3 P-QR3 14. Q-B2 P-B4 15. P-KKt3 Kt-B4 16. B-Kt2 Q-B2
Black wishes to push on the KP. White, however, prevents this atonce.
17. Q-K2 P-Kt4 18. Castles B-Kt2
The Black position has any number of weaknesses. The King cannotcastle into safety; the pawn position is full of holes, and opento attack. White takes full advantage of this and wins inmasterly fashion with a few strokes.
19. P-B4 P-Kt5 20. Q-Q2 R-Kt1
Now White cannot capture the KtP because of BxKt. But he doesnot want the pawn, he wants the King.
21. Q-R6 BxKt 22. BxB Q-K4 23. KR-K1 QxP 24. Q-B4 QR-B1 25. Q-Q6 P-B3
Mate in two was threatened (B-B6ch, etc.).

26. B-R5ch R-Kt3 27. BxRch PxB 28. RxPch Resigns.
GAME No. 26
White: Capablanca. Black: Blanco
French Defence.
1. P-K4 P-K3 2. P-Q4 P-Q4 3. Kt-QB3 PxP 4. KtxP Kt-Q2 5. Kt-KB3 KKt-B3 6. KtxKtch KtxKt 7. Kt-K5
This crosses Black's plan of developing the QB at Kt2.
7. ... B-Q3 8. Q-B3 P-B3
9. B-Kt5ch, P-B3; 10. KtxP was threatened.
9. P-B3 Castles 10. B-KKt5 B-K2 11. B-Q3
Whatever Black plays now, he must create some weakness in orderto provide against White's Q-R3, BxKt, QxRP, and White's attackmust succeed. The whole of Black's plan is thus frustrated, asthe only reason for abandoning the centre by PxP was theoccupation of the long diagonal by the QB. Now the Queen's sidepieces cannot get into play without much difficulty, and by thetime they have succeeded it is too late.
--------------------------------------- 8 | #R | | #B | #Q | | #R | #K | | |---------------------------------------| 7 | #P | #P | | | #B | #P | #P | #P | |---------------------------------------| 6 | | | #P | | #P | #Kt| | | |---------------------------------------| 5 | | | | | ^Kt| | ^B | | |---------------------------------------| 4 | | | | ^P | | | | | |---------------------------------------| 3 | | | ^P | ^B | | ^Q | | | |---------------------------------------| 2 | ^P | ^P | | | | ^P | ^P | ^P | |---------------------------------------| 1 | ^R | | | | ^K | | | ^R | --------------------------------------- A B C D E F G H
Diag. 138.
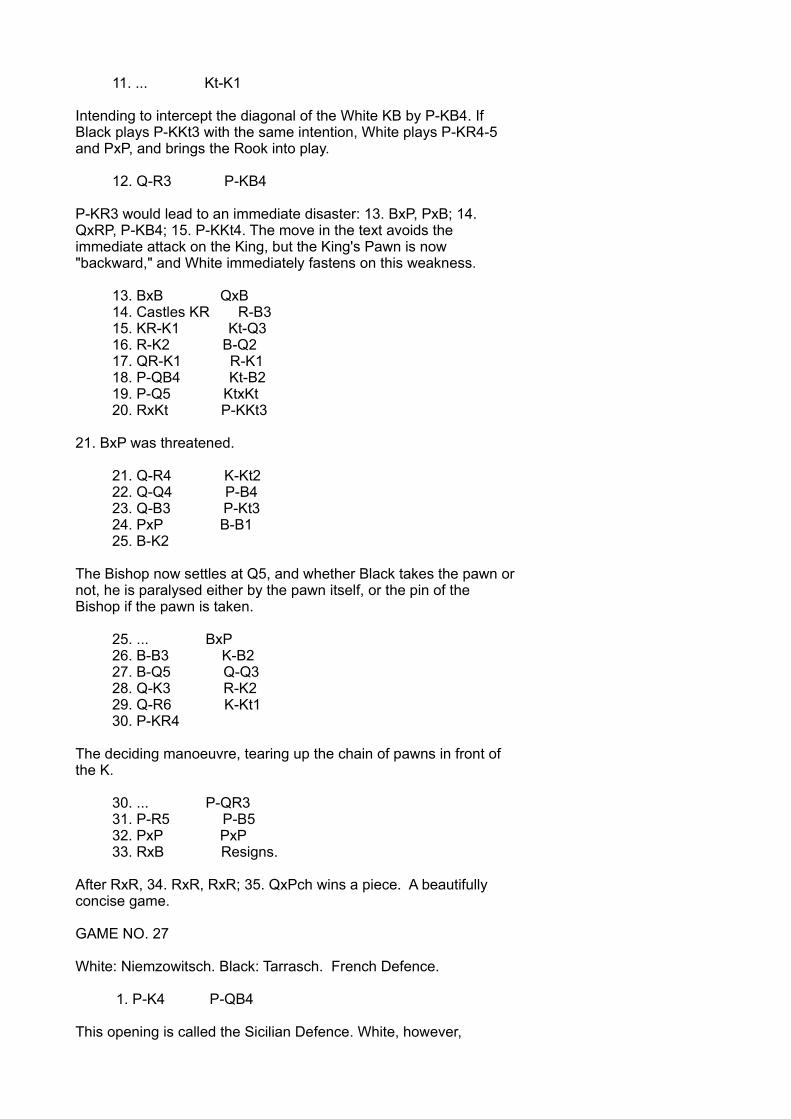
11. ... Kt-K1
Intending to intercept the diagonal of the White KB by P-KB4. IfBlack plays P-KKt3 with the same intention, White plays P-KR4-5and PxP, and brings the Rook into play.
12. Q-R3 P-KB4
P-KR3 would lead to an immediate disaster: 13. BxP, PxB; 14.QxRP, P-KB4; 15. P-KKt4. The move in the text avoids theimmediate attack on the King, but the King's Pawn is now"backward," and White immediately fastens on this weakness.
13. BxB QxB 14. Castles KR R-B3 15. KR-K1 Kt-Q3 16. R-K2 B-Q2 17. QR-K1 R-K1 18. P-QB4 Kt-B2 19. P-Q5 KtxKt 20. RxKt P-KKt3
21. BxP was threatened.
21. Q-R4 K-Kt2 22. Q-Q4 P-B4 23. Q-B3 P-Kt3 24. PxP B-B1 25. B-K2
The Bishop now settles at Q5, and whether Black takes the pawn ornot, he is paralysed either by the pawn itself, or the pin of theBishop if the pawn is taken.
25. ... BxP 26. B-B3 K-B2 27. B-Q5 Q-Q3 28. Q-K3 R-K2 29. Q-R6 K-Kt1 30. P-KR4
The deciding manoeuvre, tearing up the chain of pawns in front ofthe K.
30. ... P-QR3 31. P-R5 P-B5 32. PxP PxP 33. RxB Resigns.
After RxR, 34. RxR, RxR; 35. QxPch wins a piece. A beautifullyconcise game.
GAME NO. 27
White: Niemzowitsch. Black: Tarrasch. French Defence.
1. P-K4 P-QB4
This opening is called the Sicilian Defence. White, however,
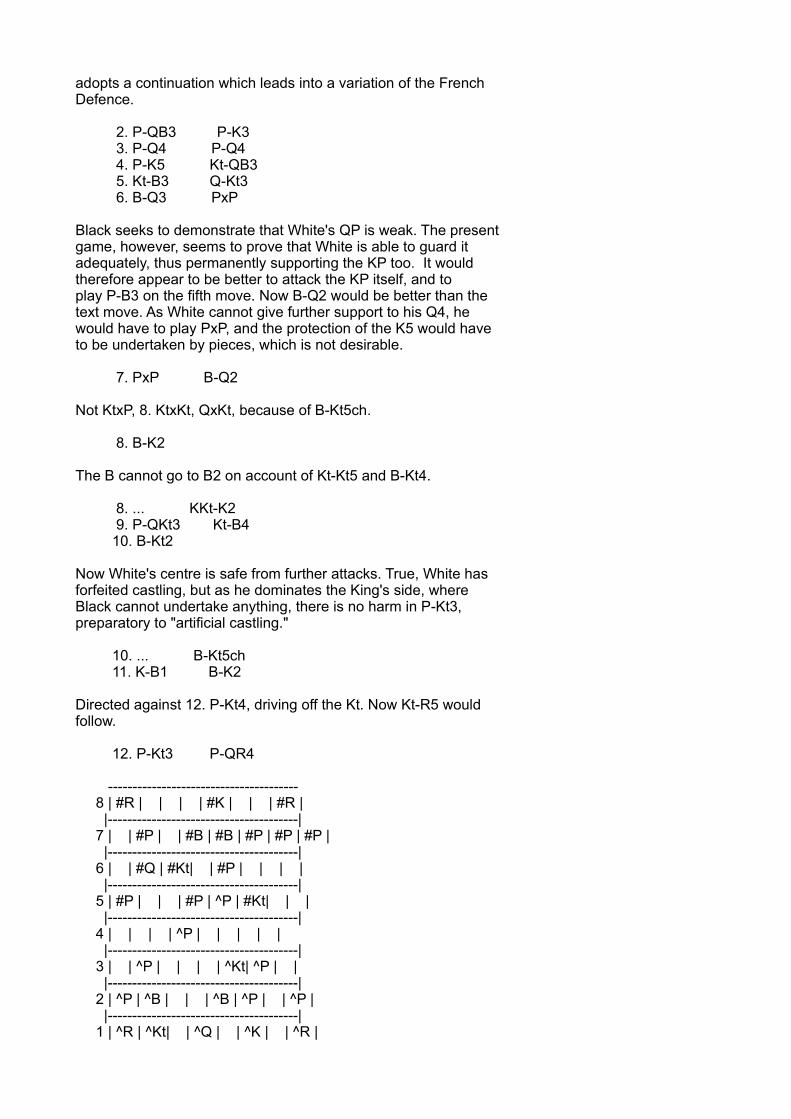
adopts a continuation which leads into a variation of the FrenchDefence.
2. P-QB3 P-K3 3. P-Q4 P-Q4 4. P-K5 Kt-QB3 5. Kt-B3 Q-Kt3 6. B-Q3 PxP
Black seeks to demonstrate that White's QP is weak. The presentgame, however, seems to prove that White is able to guard itadequately, thus permanently supporting the KP too. It wouldtherefore appear to be better to attack the KP itself, and toplay P-B3 on the fifth move. Now B-Q2 would be better than thetext move. As White cannot give further support to his Q4, hewould have to play PxP, and the protection of the K5 would haveto be undertaken by pieces, which is not desirable.
7. PxP B-Q2
Not KtxP, 8. KtxKt, QxKt, because of B-Kt5ch.
8. B-K2
The B cannot go to B2 on account of Kt-Kt5 and B-Kt4.
8. ... KKt-K2 9. P-QKt3 Kt-B4 10. B-Kt2
Now White's centre is safe from further attacks. True, White hasforfeited castling, but as he dominates the King's side, whereBlack cannot undertake anything, there is no harm in P-Kt3,preparatory to "artificial castling."
10. ... B-Kt5ch 11. K-B1 B-K2
Directed against 12. P-Kt4, driving off the Kt. Now Kt-R5 wouldfollow.
12. P-Kt3 P-QR4
--------------------------------------- 8 | #R | | | | #K | | | #R | |---------------------------------------| 7 | | #P | | #B | #B | #P | #P | #P | |---------------------------------------| 6 | | #Q | #Kt| | #P | | | | |---------------------------------------| 5 | #P | | | #P | ^P | #Kt| | | |---------------------------------------| 4 | | | | ^P | | | | | |---------------------------------------| 3 | | ^P | | | | ^Kt| ^P | | |---------------------------------------| 2 | ^P | ^B | | | ^B | ^P | | ^P | |---------------------------------------| 1 | ^R | ^Kt| | ^Q | | ^K | | ^R |
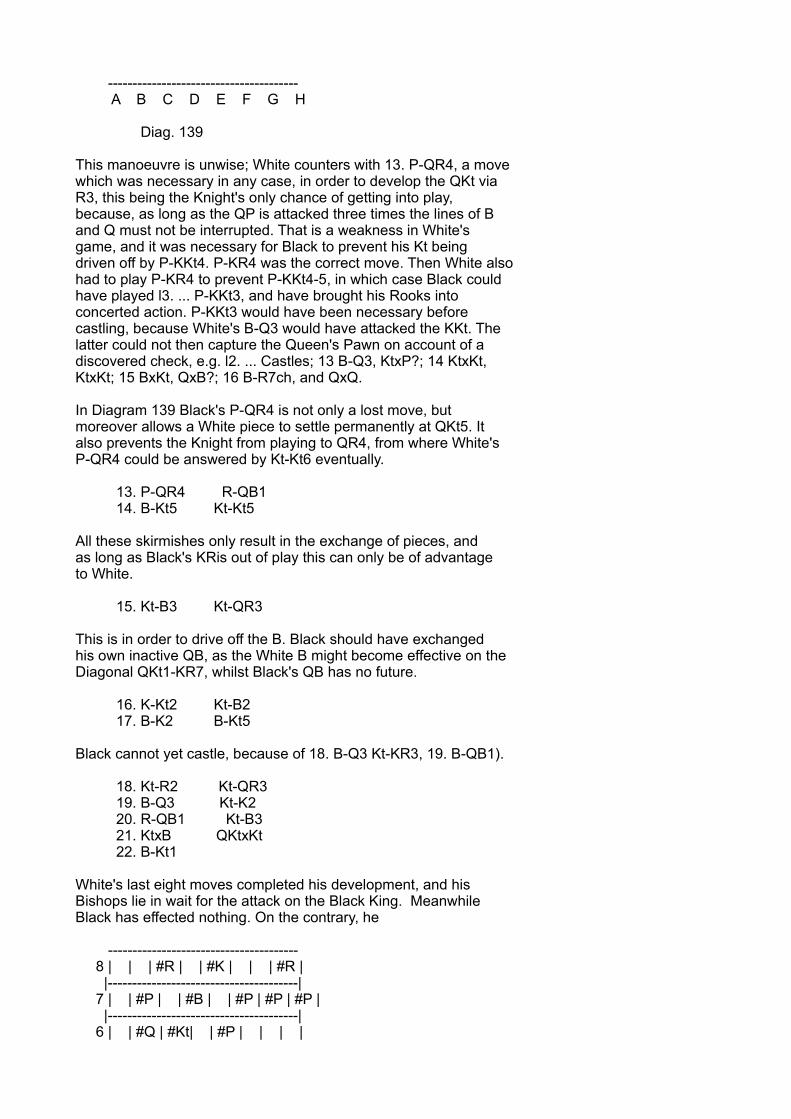
--------------------------------------- A B C D E F G H
Diag. 139
This manoeuvre is unwise; White counters with 13. P-QR4, a movewhich was necessary in any case, in order to develop the QKt viaR3, this being the Knight's only chance of getting into play,because, as long as the QP is attacked three times the lines of Band Q must not be interrupted. That is a weakness in White'sgame, and it was necessary for Black to prevent his Kt beingdriven off by P-KKt4. P-KR4 was the correct move. Then White alsohad to play P-KR4 to prevent P-KKt4-5, in which case Black couldhave played l3. ... P-KKt3, and have brought his Rooks intoconcerted action. P-KKt3 would have been necessary beforecastling, because White's B-Q3 would have attacked the KKt. Thelatter could not then capture the Queen's Pawn on account of adiscovered check, e.g. l2. ... Castles; 13 B-Q3, KtxP?; 14 KtxKt,KtxKt; 15 BxKt, QxB?; 16 B-R7ch, and QxQ.
In Diagram 139 Black's P-QR4 is not only a lost move, butmoreover allows a White piece to settle permanently at QKt5. Italso prevents the Knight from playing to QR4, from where White'sP-QR4 could be answered by Kt-Kt6 eventually.
13. P-QR4 R-QB1 14. B-Kt5 Kt-Kt5
All these skirmishes only result in the exchange of pieces, andas long as Black's KRis out of play this can only be of advantageto White.
15. Kt-B3 Kt-QR3
This is in order to drive off the B. Black should have exchangedhis own inactive QB, as the White B might become effective on theDiagonal QKt1-KR7, whilst Black's QB has no future.
16. K-Kt2 Kt-B2 17. B-K2 B-Kt5
Black cannot yet castle, because of 18. B-Q3 Kt-KR3, 19. B-QB1).
18. Kt-R2 Kt-QR3 19. B-Q3 Kt-K2 20. R-QB1 Kt-B3 21. KtxB QKtxKt 22. B-Kt1
White's last eight moves completed his development, and hisBishops lie in wait for the attack on the Black King. MeanwhileBlack has effected nothing. On the contrary, he
--------------------------------------- 8 | | | #R | | #K | | | #R | |---------------------------------------| 7 | | #P | | #B | | #P | #P | #P | |---------------------------------------| 6 | | #Q | #Kt| | #P | | | |
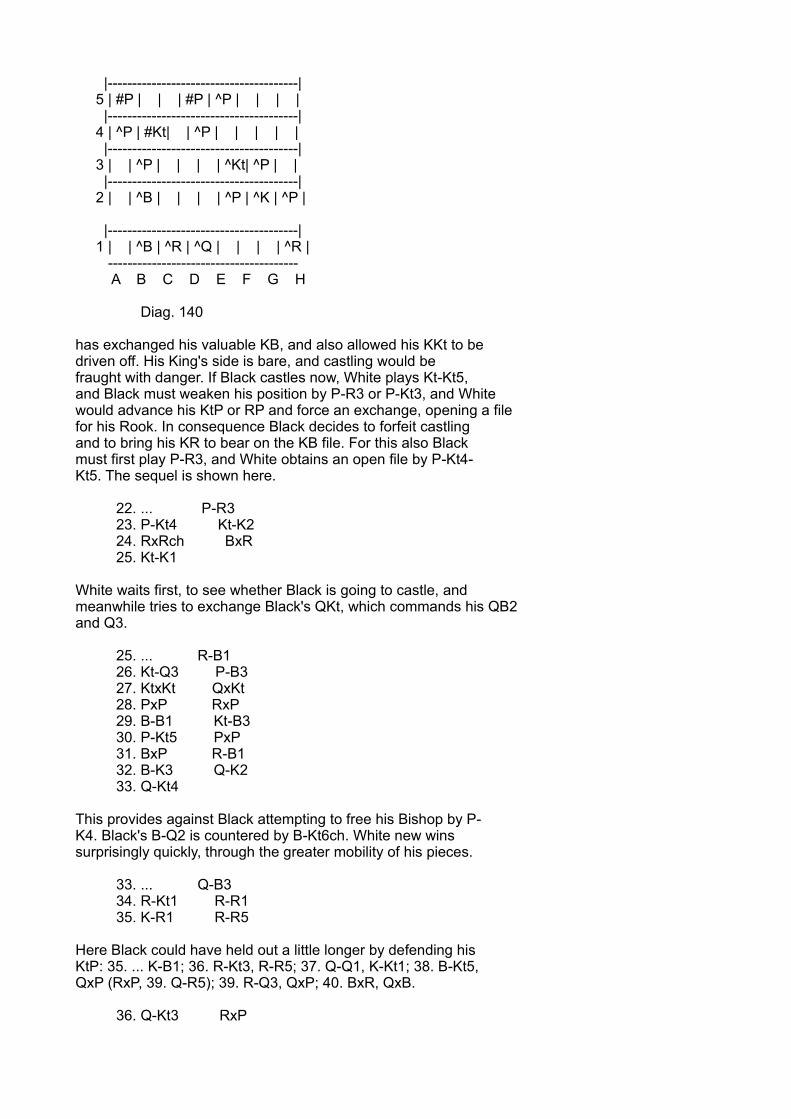
|---------------------------------------| 5 | #P | | | #P | ^P | | | | |---------------------------------------| 4 | ^P | #Kt| | ^P | | | | | |---------------------------------------| 3 | | ^P | | | | ^Kt| ^P | | |---------------------------------------| 2 | | ^B | | | | ^P | ^K | ^P |
|---------------------------------------| 1 | | ^B | ^R | ^Q | | | | ^R | --------------------------------------- A B C D E F G H
Diag. 140
has exchanged his valuable KB, and also allowed his KKt to bedriven off. His King's side is bare, and castling would befraught with danger. If Black castles now, White plays Kt-Kt5,and Black must weaken his position by P-R3 or P-Kt3, and Whitewould advance his KtP or RP and force an exchange, opening a filefor his Rook. In consequence Black decides to forfeit castlingand to bring his KR to bear on the KB file. For this also Blackmust first play P-R3, and White obtains an open file by P-Kt4-Kt5. The sequel is shown here.
22. ... P-R3 23. P-Kt4 Kt-K2 24. RxRch BxR 25. Kt-K1
White waits first, to see whether Black is going to castle, andmeanwhile tries to exchange Black's QKt, which commands his QB2and Q3.
25. ... R-B1 26. Kt-Q3 P-B3 27. KtxKt QxKt 28. PxP RxP 29. B-B1 Kt-B3 30. P-Kt5 PxP 31. BxP R-B1 32. B-K3 Q-K2 33. Q-Kt4
This provides against Black attempting to free his Bishop by P-K4. Black's B-Q2 is countered by B-Kt6ch. White new winssurprisingly quickly, through the greater mobility of his pieces.
33. ... Q-B3 34. R-Kt1 R-R1 35. K-R1 R-R5
Here Black could have held out a little longer by defending hisKtP: 35. ... K-B1; 36. R-Kt3, R-R5; 37. Q-Q1, K-Kt1; 38. B-Kt5,QxP (RxP, 39. Q-R5); 39. R-Q3, QxP; 40. BxR, QxB.
36. Q-Kt3 RxP
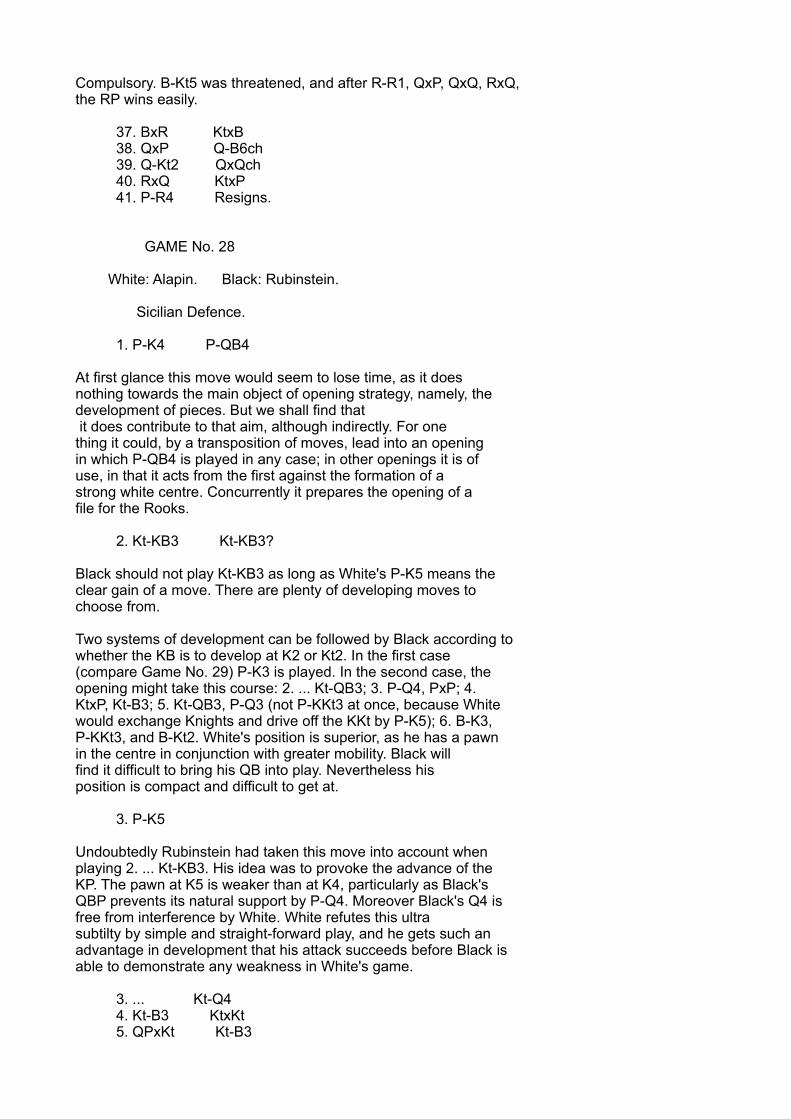
Compulsory. B-Kt5 was threatened, and after R-R1, QxP, QxQ, RxQ,the RP wins easily.
37. BxR KtxB 38. QxP Q-B6ch 39. Q-Kt2 QxQch 40. RxQ KtxP 41. P-R4 Resigns.
GAME No. 28
White: Alapin. Black: Rubinstein.
Sicilian Defence.
1. P-K4 P-QB4
At first glance this move would seem to lose time, as it doesnothing towards the main object of opening strategy, namely, thedevelopment of pieces. But we shall find that it does contribute to that aim, although indirectly. For onething it could, by a transposition of moves, lead into an openingin which P-QB4 is played in any case; in other openings it is ofuse, in that it acts from the first against the formation of astrong white centre. Concurrently it prepares the opening of afile for the Rooks.
2. Kt-KB3 Kt-KB3?
Black should not play Kt-KB3 as long as White's P-K5 means theclear gain of a move. There are plenty of developing moves tochoose from.
Two systems of development can be followed by Black according towhether the KB is to develop at K2 or Kt2. In the first case(compare Game No. 29) P-K3 is played. In the second case, theopening might take this course: 2. ... Kt-QB3; 3. P-Q4, PxP; 4.KtxP, Kt-B3; 5. Kt-QB3, P-Q3 (not P-KKt3 at once, because Whitewould exchange Knights and drive off the KKt by P-K5); 6. B-K3,P-KKt3, and B-Kt2. White's position is superior, as he has a pawnin the centre in conjunction with greater mobility. Black willfind it difficult to bring his QB into play. Nevertheless hisposition is compact and difficult to get at.
3. P-K5
Undoubtedly Rubinstein had taken this move into account whenplaying 2. ... Kt-KB3. His idea was to provoke the advance of theKP. The pawn at K5 is weaker than at K4, particularly as Black'sQBP prevents its natural support by P-Q4. Moreover Black's Q4 isfree from interference by White. White refutes this ultrasubtilty by simple and straight-forward play, and he gets such anadvantage in development that his attack succeeds before Black isable to demonstrate any weakness in White's game.
3. ... Kt-Q4 4. Kt-B3 KtxKt 5. QPxKt Kt-B3
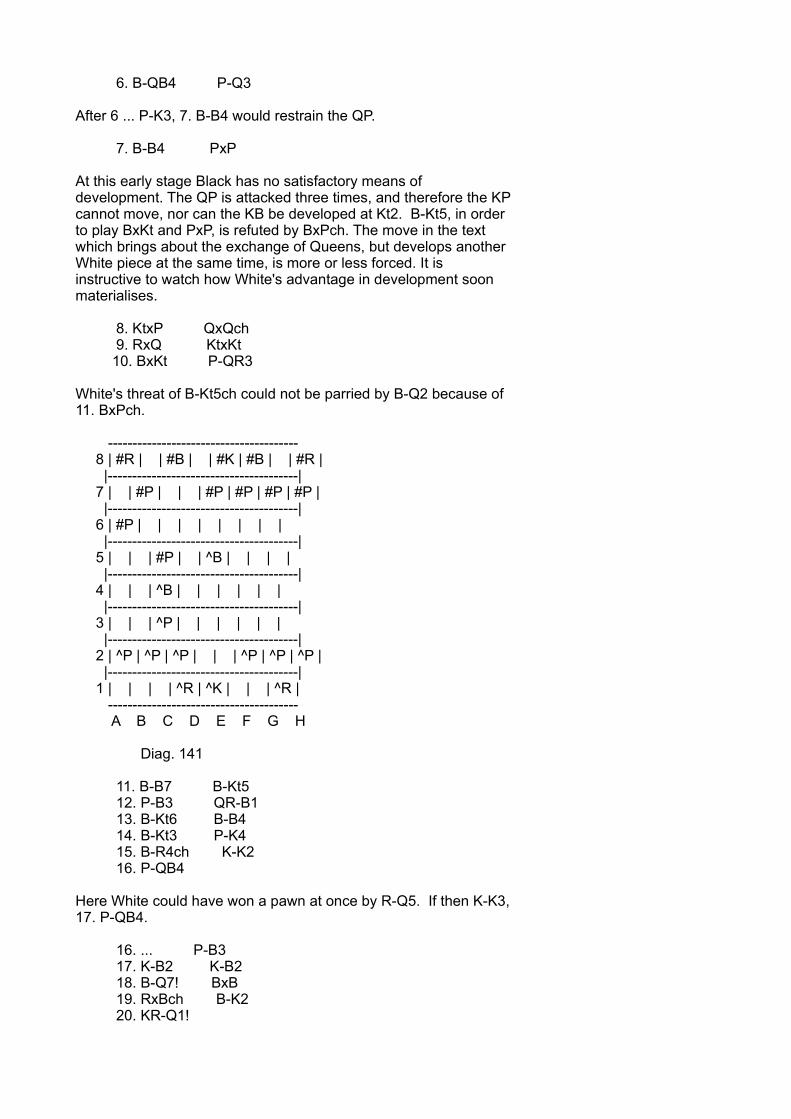
6. B-QB4 P-Q3
After 6 ... P-K3, 7. B-B4 would restrain the QP.
7. B-B4 PxP
At this early stage Black has no satisfactory means ofdevelopment. The QP is attacked three times, and therefore the KPcannot move, nor can the KB be developed at Kt2. B-Kt5, in orderto play BxKt and PxP, is refuted by BxPch. The move in the textwhich brings about the exchange of Queens, but develops anotherWhite piece at the same time, is more or less forced. It isinstructive to watch how White's advantage in development soonmaterialises.
8. KtxP QxQch 9. RxQ KtxKt 10. BxKt P-QR3
White's threat of B-Kt5ch could not be parried by B-Q2 because of11. BxPch.
--------------------------------------- 8 | #R | | #B | | #K | #B | | #R | |---------------------------------------| 7 | | #P | | | #P | #P | #P | #P | |---------------------------------------| 6 | #P | | | | | | | | |---------------------------------------| 5 | | | #P | | ^B | | | | |---------------------------------------| 4 | | | ^B | | | | | | |---------------------------------------| 3 | | | ^P | | | | | | |---------------------------------------| 2 | ^P | ^P | ^P | | | ^P | ^P | ^P | |---------------------------------------| 1 | | | | ^R | ^K | | | ^R | --------------------------------------- A B C D E F G H
Diag. 141
11. B-B7 B-Kt5 12. P-B3 QR-B1 13. B-Kt6 B-B4 14. B-Kt3 P-K4 15. B-R4ch K-K2 16. P-QB4
Here White could have won a pawn at once by R-Q5. If then K-K3,17. P-QB4.
16. ... P-B3 17. K-B2 K-B2 18. B-Q7! BxB 19. RxBch B-K2 20. KR-Q1!
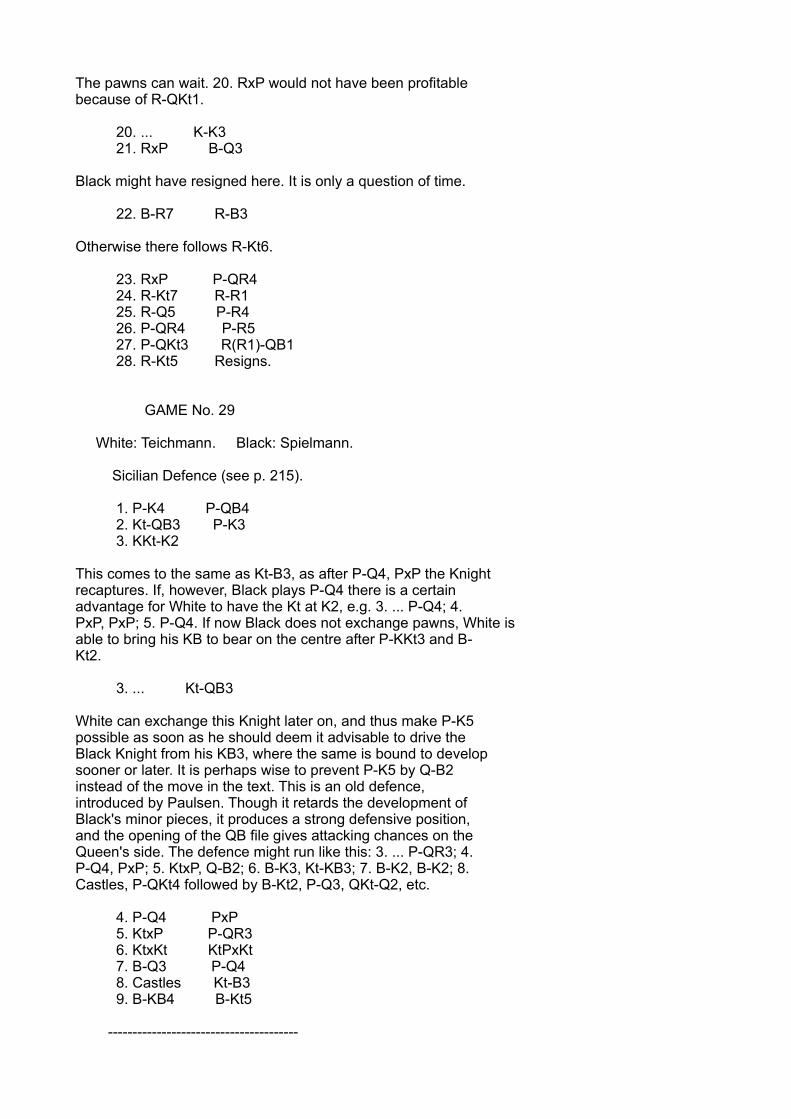
The pawns can wait. 20. RxP would not have been profitablebecause of R-QKt1.
20. ... K-K3 21. RxP B-Q3
Black might have resigned here. It is only a question of time.
22. B-R7 R-B3
Otherwise there follows R-Kt6.
23. RxP P-QR4 24. R-Kt7 R-R1 25. R-Q5 P-R4 26. P-QR4 P-R5 27. P-QKt3 R(R1)-QB1 28. R-Kt5 Resigns.
GAME No. 29
White: Teichmann. Black: Spielmann.
Sicilian Defence (see p. 215).
1. P-K4 P-QB4 2. Kt-QB3 P-K3 3. KKt-K2
This comes to the same as Kt-B3, as after P-Q4, PxP the Knightrecaptures. If, however, Black plays P-Q4 there is a certainadvantage for White to have the Kt at K2, e.g. 3. ... P-Q4; 4.PxP, PxP; 5. P-Q4. If now Black does not exchange pawns, White isable to bring his KB to bear on the centre after P-KKt3 and B-Kt2.
3. ... Kt-QB3
White can exchange this Knight later on, and thus make P-K5possible as soon as he should deem it advisable to drive theBlack Knight from his KB3, where the same is bound to developsooner or later. It is perhaps wise to prevent P-K5 by Q-B2instead of the move in the text. This is an old defence,introduced by Paulsen. Though it retards the development ofBlack's minor pieces, it produces a strong defensive position,and the opening of the QB file gives attacking chances on theQueen's side. The defence might run like this: 3. ... P-QR3; 4.P-Q4, PxP; 5. KtxP, Q-B2; 6. B-K3, Kt-KB3; 7. B-K2, B-K2; 8.Castles, P-QKt4 followed by B-Kt2, P-Q3, QKt-Q2, etc.
4. P-Q4 PxP 5. KtxP P-QR3 6. KtxKt KtPxKt 7. B-Q3 P-Q4 8. Castles Kt-B3 9. B-KB4 B-Kt5
---------------------------------------
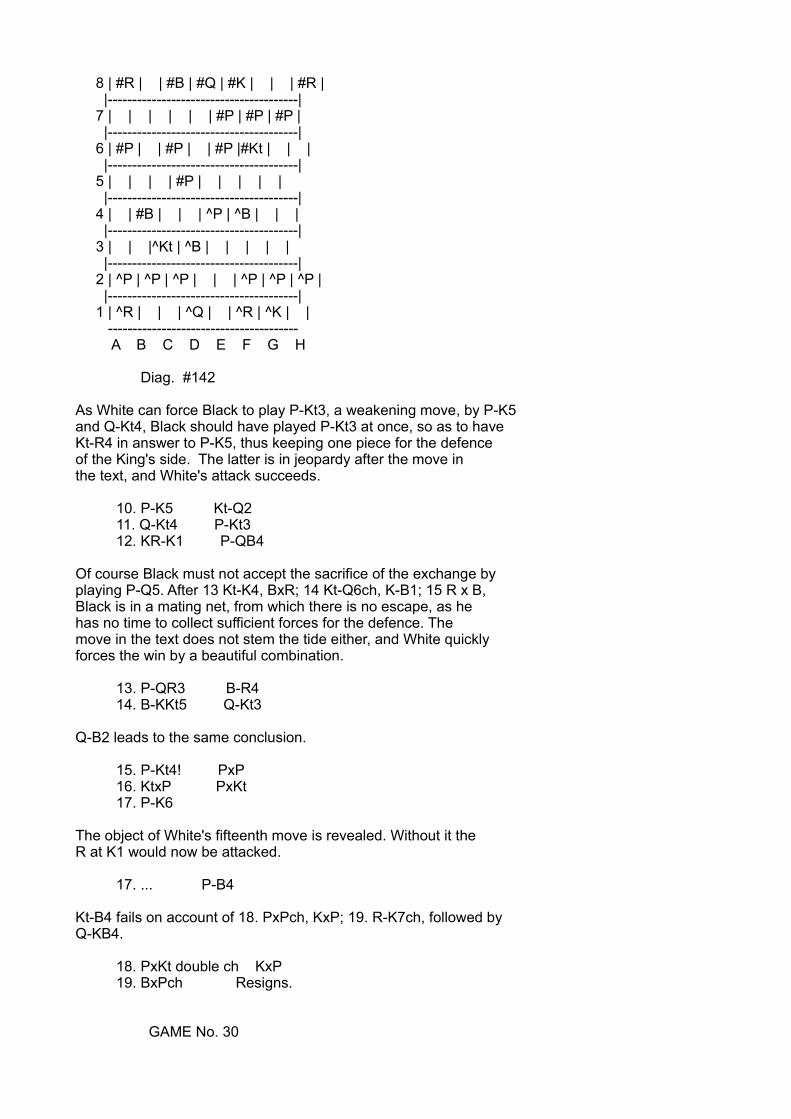
8 | #R | | #B | #Q | #K | | | #R | |---------------------------------------| 7 | | | | | | #P | #P | #P | |---------------------------------------| 6 | #P | | #P | | #P |#Kt | | | |---------------------------------------| 5 | | | | #P | | | | | |---------------------------------------| 4 | | #B | | | ^P | ^B | | | |---------------------------------------| 3 | | |^Kt | ^B | | | | | |---------------------------------------| 2 | ^P | ^P | ^P | | | ^P | ^P | ^P | |---------------------------------------| 1 | ^R | | | ^Q | | ^R | ^K | | --------------------------------------- A B C D E F G H
Diag. #142
As White can force Black to play P-Kt3, a weakening move, by P-K5and Q-Kt4, Black should have played P-Kt3 at once, so as to haveKt-R4 in answer to P-K5, thus keeping one piece for the defenceof the King's side. The latter is in jeopardy after the move inthe text, and White's attack succeeds.
10. P-K5 Kt-Q2 11. Q-Kt4 P-Kt3 12. KR-K1 P-QB4
Of course Black must not accept the sacrifice of the exchange byplaying P-Q5. After 13 Kt-K4, BxR; 14 Kt-Q6ch, K-B1; 15 R x B,Black is in a mating net, from which there is no escape, as hehas no time to collect sufficient forces for the defence. Themove in the text does not stem the tide either, and White quicklyforces the win by a beautiful combination.
13. P-QR3 B-R4 14. B-KKt5 Q-Kt3
Q-B2 leads to the same conclusion.
15. P-Kt4! PxP 16. KtxP PxKt 17. P-K6
The object of White's fifteenth move is revealed. Without it theR at K1 would now be attacked.
17. ... P-B4
Kt-B4 fails on account of 18. PxPch, KxP; 19. R-K7ch, followed byQ-KB4.
18. PxKt double ch KxP 19. BxPch Resigns.
GAME No. 30
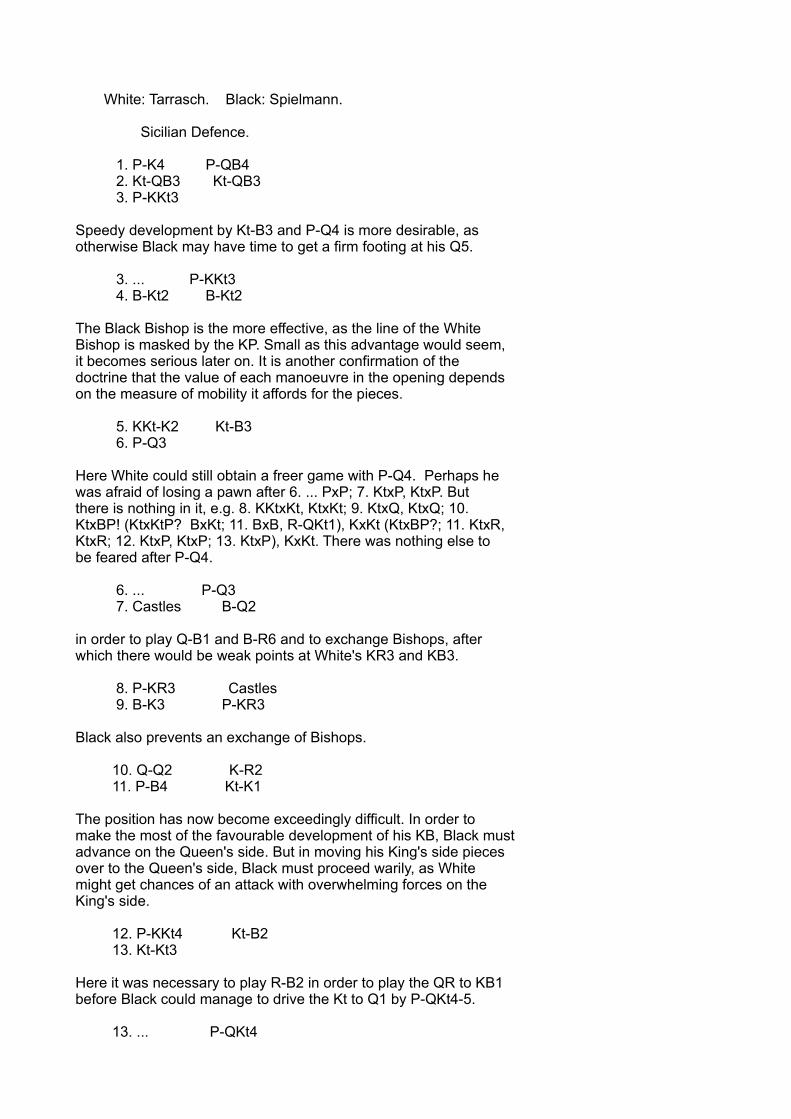
White: Tarrasch. Black: Spielmann.
Sicilian Defence.
1. P-K4 P-QB4 2. Kt-QB3 Kt-QB3 3. P-KKt3
Speedy development by Kt-B3 and P-Q4 is more desirable, asotherwise Black may have time to get a firm footing at his Q5.
3. ... P-KKt3 4. B-Kt2 B-Kt2
The Black Bishop is the more effective, as the line of the WhiteBishop is masked by the KP. Small as this advantage would seem,it becomes serious later on. It is another confirmation of thedoctrine that the value of each manoeuvre in the opening dependson the measure of mobility it affords for the pieces.
5. KKt-K2 Kt-B3 6. P-Q3
Here White could still obtain a freer game with P-Q4. Perhaps hewas afraid of losing a pawn after 6. ... PxP; 7. KtxP, KtxP. Butthere is nothing in it, e.g. 8. KKtxKt, KtxKt; 9. KtxQ, KtxQ; 10.KtxBP! (KtxKtP? BxKt; 11. BxB, R-QKt1), KxKt (KtxBP?; 11. KtxR,KtxR; 12. KtxP, KtxP; 13. KtxP), KxKt. There was nothing else tobe feared after P-Q4.
6. ... P-Q3 7. Castles B-Q2
in order to play Q-B1 and B-R6 and to exchange Bishops, afterwhich there would be weak points at White's KR3 and KB3.
8. P-KR3 Castles 9. B-K3 P-KR3
Black also prevents an exchange of Bishops.
10. Q-Q2 K-R2 11. P-B4 Kt-K1
The position has now become exceedingly difficult. In order tomake the most of the favourable development of his KB, Black mustadvance on the Queen's side. But in moving his King's side piecesover to the Queen's side, Black must proceed warily, as Whitemight get chances of an attack with overwhelming forces on theKing's side.
12. P-KKt4 Kt-B2 13. Kt-Kt3
Here it was necessary to play R-B2 in order to play the QR to KB1before Black could manage to drive the Kt to Q1 by P-QKt4-5.
13. ... P-QKt4
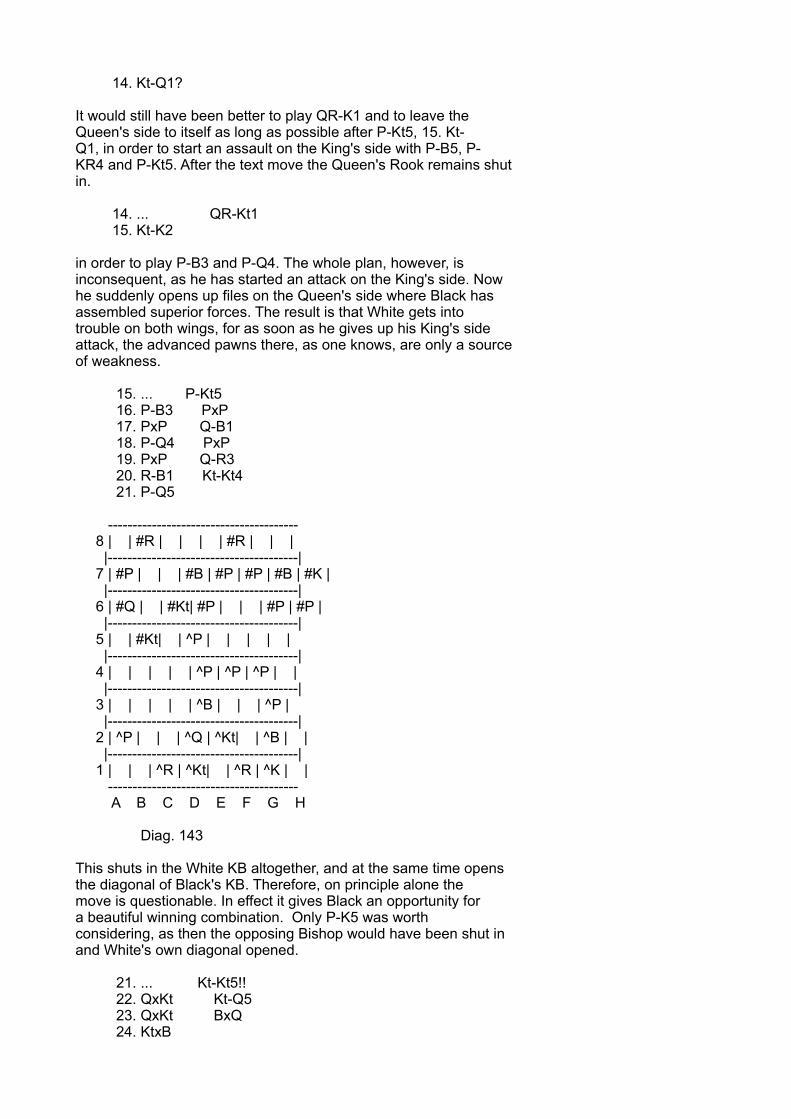
14. Kt-Q1?
It would still have been better to play QR-K1 and to leave theQueen's side to itself as long as possible after P-Kt5, 15. Kt-Q1, in order to start an assault on the King's side with P-B5, P-KR4 and P-Kt5. After the text move the Queen's Rook remains shutin.
14. ... QR-Kt1 15. Kt-K2
in order to play P-B3 and P-Q4. The whole plan, however, isinconsequent, as he has started an attack on the King's side. Nowhe suddenly opens up files on the Queen's side where Black hasassembled superior forces. The result is that White gets intotrouble on both wings, for as soon as he gives up his King's sideattack, the advanced pawns there, as one knows, are only a sourceof weakness.
15. ... P-Kt5 16. P-B3 PxP 17. PxP Q-B1 18. P-Q4 PxP 19. PxP Q-R3 20. R-B1 Kt-Kt4 21. P-Q5
--------------------------------------- 8 | | #R | | | | #R | | | |---------------------------------------| 7 | #P | | | #B | #P | #P | #B | #K | |---------------------------------------| 6 | #Q | | #Kt| #P | | | #P | #P | |---------------------------------------| 5 | | #Kt| | ^P | | | | | |---------------------------------------| 4 | | | | | ^P | ^P | ^P | | |---------------------------------------| 3 | | | | | ^B | | | ^P | |---------------------------------------| 2 | ^P | | | ^Q | ^Kt| | ^B | | |---------------------------------------| 1 | | | ^R | ^Kt| | ^R | ^K | | --------------------------------------- A B C D E F G H
Diag. 143
This shuts in the White KB altogether, and at the same time opensthe diagonal of Black's KB. Therefore, on principle alone themove is questionable. In effect it gives Black an opportunity fora beautiful winning combination. Only P-K5 was worthconsidering, as then the opposing Bishop would have been shut inand White's own diagonal opened.
21. ... Kt-Kt5!! 22. QxKt Kt-Q5 23. QxKt BxQ 24. KtxB
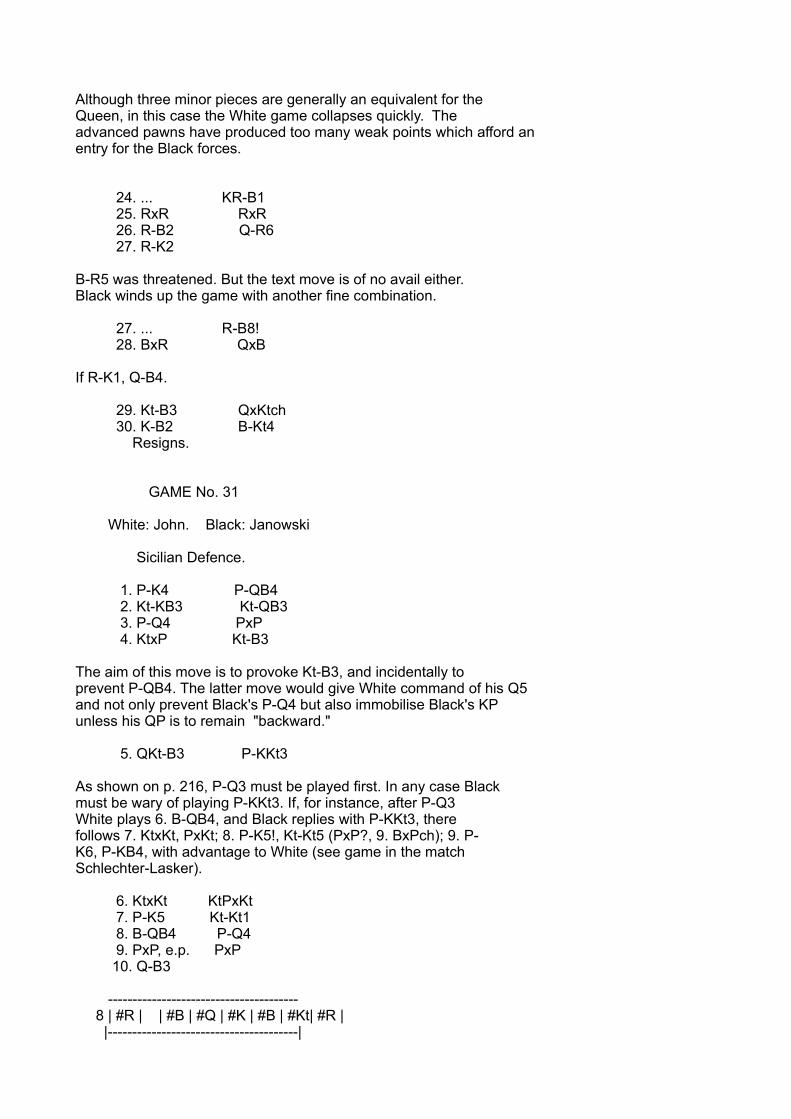
Although three minor pieces are generally an equivalent for theQueen, in this case the White game collapses quickly. Theadvanced pawns have produced too many weak points which afford anentry for the Black forces.
24. ... KR-B1 25. RxR RxR 26. R-B2 Q-R6 27. R-K2
B-R5 was threatened. But the text move is of no avail either.Black winds up the game with another fine combination.
27. ... R-B8! 28. BxR QxB
If R-K1, Q-B4.
29. Kt-B3 QxKtch 30. K-B2 B-Kt4 Resigns.
GAME No. 31
White: John. Black: Janowski
Sicilian Defence.
1. P-K4 P-QB4 2. Kt-KB3 Kt-QB3 3. P-Q4 PxP 4. KtxP Kt-B3
The aim of this move is to provoke Kt-B3, and incidentally toprevent P-QB4. The latter move would give White command of his Q5and not only prevent Black's P-Q4 but also immobilise Black's KPunless his QP is to remain "backward."
5. QKt-B3 P-KKt3
As shown on p. 216, P-Q3 must be played first. In any case Blackmust be wary of playing P-KKt3. If, for instance, after P-Q3White plays 6. B-QB4, and Black replies with P-KKt3, therefollows 7. KtxKt, PxKt; 8. P-K5!, Kt-Kt5 (PxP?, 9. BxPch); 9. P-K6, P-KB4, with advantage to White (see game in the matchSchlechter-Lasker).
6. KtxKt KtPxKt 7. P-K5 Kt-Kt1 8. B-QB4 P-Q4 9. PxP, e.p. PxP 10. Q-B3
--------------------------------------- 8 | #R | | #B | #Q | #K | #B | #Kt| #R | |---------------------------------------|

7 | #P | | | | | #P | | #P | |---------------------------------------| 6 | | | #P | #P | | | #P | | |---------------------------------------| 5 | | | | | | | | | |---------------------------------------| 4 | | | ^B | | | | | | |---------------------------------------| 3 | | | ^Kt| | | ^Q | | | |---------------------------------------| 2 | ^P | ^P | ^P | | | ^P | ^P | ^P | |---------------------------------------| 1 | ^R | | ^B | | ^K | | | ^R | --------------------------------------- A B C D E F G H
Diag. 144
White has now three pieces in action and Black none. Black'sgame is hopeless already; his B2 cannot be covered by Q-Q2because of: 11. BxPch, QxB; 12. QxPch, and after Q-K2ch therefollows: 11. B-K3, B-Kt2; 12. Castles QR, and 13. KR-K1, with anoverwhelming attack.
10. ... Q-Q2 11. Kt-Q5
In view of the fact that his game is so much more developed, andthat the opposing King will hardly be able to escape from thecentre of the board, White decides to sacrifice a Knight in orderto open the files in the centre for his Rooks, instead offollowing the simple line indicated in the previous note.
11. ... PxKt 12. BxP Q-K2ch 13. B-K3 R-Kt1 14. Castles KR
Castles QR is stronger still, as the QR gets into action at once.
14. ... B-KKt2 15. B-KB4 R-Kt3 16. B-B6ch RxB
If B-Q2, the continuation might have been: 17. BxB, QxB; 18. QR-Q1, Q-Kt2; 19. KR-K1ch, Kt-K2; 20. RxKtch, KxR; 21. BxPch, etc.;or 18. ... Q-B1; 19. BxP, etc.
After 17. R-K1 Black could have held out a little longer with B-B3. After the text move, however, Black's game collapses quicklybefore the concentrated onslaught of the White forces.
17. QxRch Q-Q2 18. Q R-K1ch Kt-K2 19. RxKtch! KxR 20. R-K1ch K-B1 21. BxPch K-Kt1 22. R-K8ch B-B1 23. RxBch K-Kt2
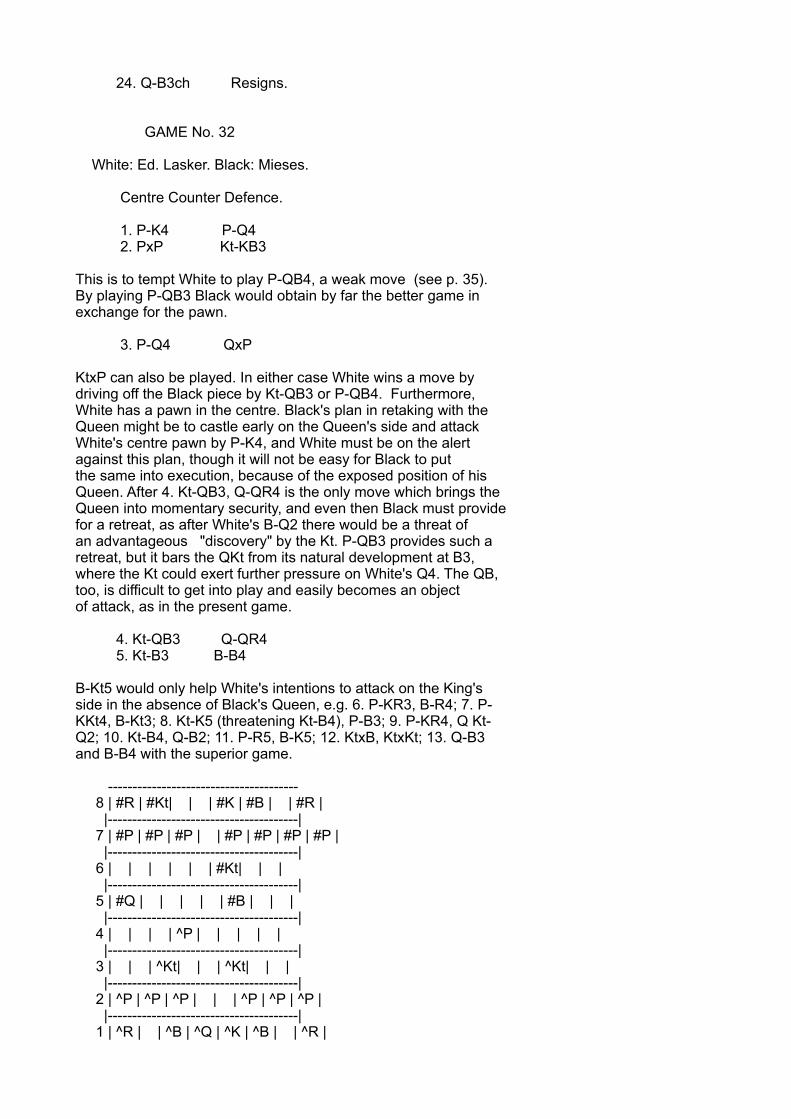
24. Q-B3ch Resigns.
GAME No. 32
White: Ed. Lasker. Black: Mieses.
Centre Counter Defence.
1. P-K4 P-Q4 2. PxP Kt-KB3
This is to tempt White to play P-QB4, a weak move (see p. 35).By playing P-QB3 Black would obtain by far the better game inexchange for the pawn.
3. P-Q4 QxP
KtxP can also be played. In either case White wins a move bydriving off the Black piece by Kt-QB3 or P-QB4. Furthermore,White has a pawn in the centre. Black's plan in retaking with theQueen might be to castle early on the Queen's side and attackWhite's centre pawn by P-K4, and White must be on the alertagainst this plan, though it will not be easy for Black to putthe same into execution, because of the exposed position of hisQueen. After 4. Kt-QB3, Q-QR4 is the only move which brings theQueen into momentary security, and even then Black must providefor a retreat, as after White's B-Q2 there would be a threat ofan advantageous "discovery" by the Kt. P-QB3 provides such aretreat, but it bars the QKt from its natural development at B3,where the Kt could exert further pressure on White's Q4. The QB,too, is difficult to get into play and easily becomes an objectof attack, as in the present game.
4. Kt-QB3 Q-QR4 5. Kt-B3 B-B4
B-Kt5 would only help White's intentions to attack on the King'sside in the absence of Black's Queen, e.g. 6. P-KR3, B-R4; 7. P-KKt4, B-Kt3; 8. Kt-K5 (threatening Kt-B4), P-B3; 9. P-KR4, Q Kt-Q2; 10. Kt-B4, Q-B2; 11. P-R5, B-K5; 12. KtxB, KtxKt; 13. Q-B3and B-B4 with the superior game.
--------------------------------------- 8 | #R | #Kt| | | #K | #B | | #R | |---------------------------------------| 7 | #P | #P | #P | | #P | #P | #P | #P | |---------------------------------------| 6 | | | | | | #Kt| | | |---------------------------------------| 5 | #Q | | | | | #B | | | |---------------------------------------| 4 | | | | ^P | | | | | |---------------------------------------| 3 | | | ^Kt| | | ^Kt| | | |---------------------------------------| 2 | ^P | ^P | ^P | | | ^P | ^P | ^P | |---------------------------------------| 1 | ^R | | ^B | ^Q | ^K | ^B | | ^R |
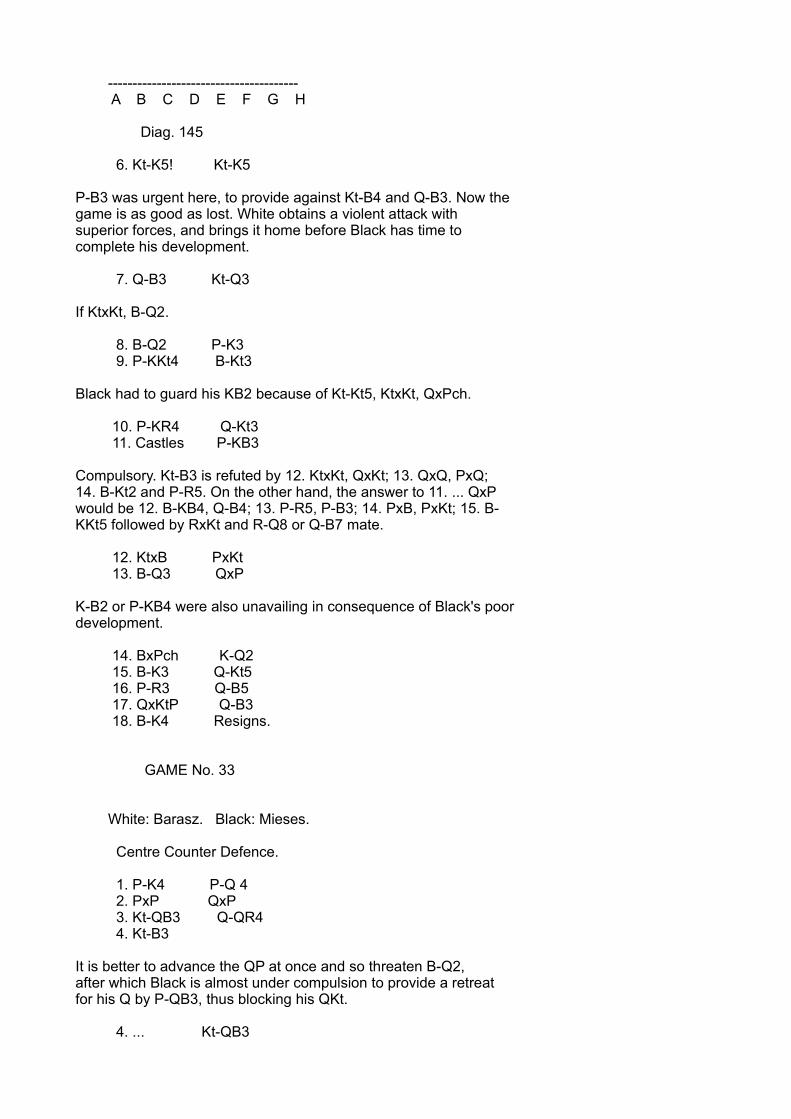
--------------------------------------- A B C D E F G H
Diag. 145
6. Kt-K5! Kt-K5
P-B3 was urgent here, to provide against Kt-B4 and Q-B3. Now thegame is as good as lost. White obtains a violent attack withsuperior forces, and brings it home before Black has time tocomplete his development.
7. Q-B3 Kt-Q3
If KtxKt, B-Q2.
8. B-Q2 P-K3 9. P-KKt4 B-Kt3
Black had to guard his KB2 because of Kt-Kt5, KtxKt, QxPch.
10. P-KR4 Q-Kt3 11. Castles P-KB3
Compulsory. Kt-B3 is refuted by 12. KtxKt, QxKt; 13. QxQ, PxQ;14. B-Kt2 and P-R5. On the other hand, the answer to 11. ... QxPwould be 12. B-KB4, Q-B4; 13. P-R5, P-B3; 14. PxB, PxKt; 15. B-KKt5 followed by RxKt and R-Q8 or Q-B7 mate.
12. KtxB PxKt 13. B-Q3 QxP
K-B2 or P-KB4 were also unavailing in consequence of Black's poordevelopment.
14. BxPch K-Q2 15. B-K3 Q-Kt5 16. P-R3 Q-B5 17. QxKtP Q-B3 18. B-K4 Resigns.
GAME No. 33
White: Barasz. Black: Mieses.
Centre Counter Defence.
1. P-K4 P-Q 4 2. PxP QxP 3. Kt-QB3 Q-QR4 4. Kt-B3
It is better to advance the QP at once and so threaten B-Q2,after which Black is almost under compulsion to provide a retreatfor his Q by P-QB3, thus blocking his QKt.
4. ... Kt-QB3
5. B-K2 B-B4 6. P-Q3
Already now the mistake of having allowed Black to develop hisQueen's side unmolested is apparent. P-Q4 is now impossible, forBlack would castle on the Queen's side and keep the initiative byexerting a permanent pressure on White's QP by P-K4. White mustyield up the centre to Black.
6. ... P-K4 7. B-Q2 Castles 8. P-QR3 Q-B4
The Queen must escape from White's threat of P-QKt4.
9. Castles Kt-B3 10. P-QKt4 Q-K2 11. P-Kt5
This advance is somewhat purposeless, as the White pieces are notready for an attack on Black's King. It is difficult, though, tofind a sensible plan, as the White pieces have so littlemobility. It would perhaps be best to play R-K1, B-B1, and Kt-K4.
11. ... Kt-Q5 12. R-K1 Q-B4 13. B-KB1 B-Q3 14. Q-Kt1?
--------------------------------------- 8 | | | #K | #R | | | | #R | |---------------------------------------| 7 | #P | #P | #P | | | #P | #P | #P | |---------------------------------------| 6 | | | | #B | | #Kt| | | |---------------------------------------| 5 | | ^P | #Q | | #P | #B | | | |---------------------------------------| 4 | | | | #Kt| | | | | |---------------------------------------| 3 | ^P | | ^Kt| ^P | | ^Kt| | | |---------------------------------------| 2 | | | ^P | ^B | | ^P | ^P | ^P | |---------------------------------------| 1 | ^R | ^Q | | | ^R | ^B | ^K | | --------------------------------------- A B C D E F G H
Diag. 146
The purpose of this move is not clear. The advance of the KtPcould only be condoned by a desire to obtain an open file, and itseems illogical to protect it now. If White wanted to escape thepinning of his KKt he need not have moved the Queen. KtxKt wouldhave effected this and prevented the King's side from being laidbare.
White's game would still have been bad, particularly as theexchange at Q4 opens the diagonal for the Black KB, but the move
in the text has even a worse effect. Mieses concludes the gamewith an elegant sacrifice.
14. ... KtxKtch 15. PxKt P-K5! 16. QPxP BxPch 17. KxB QxPch 18. B-Kt2 RxB 19. R-K2 RxR 20. KtxR QxKt 21. PxB Q-K4ch 22. K-R1 R-K1
Black has wrought fearful havoc in the White ranks, and thedefenceless King cannot withstand the onslaught of the threeWhite pieces for long.
23. P-QB4 Kt-R4 24. K-Kt1 Q-Q5ch 25. K-R2 R-K7
threatening Q-R5ch, Q-B7ch, and mate at Kt7 or R7.
26. Q-R1 Q-K4ch 27. P-B4 QxPch 28. K-Kt1 Q-Q5ch Resigns.
GAME NO. 34
White: Em. Lasker. Black: Niemzowitsch.
Caro-Kann Defence (compare p. 50).
1. P-K4 P-QB3 2. P-Q4 P-Q4 3. Kt-QB3 PxP 4. KtxP Kt-B3 5. KtxKt KtPxKt 6. B-K2 B-B4 7. B-B3 Q-R4ch 8. P-B3 P-KR4!
A deep conception. If White accepts the proffered sacrifice of apawn, he loses time, as he must retire his B before bringing outhis Kt, and, moreover, the KR file being open, he can only castleon the Q side. But there the Black Queen is ready for the attack.If he refuses the sacrifice, the text move is still of value, aseven then it is hardly advisable for White to castle on the Kside, whilst Black can play B-R3 as soon as it might be desirableto exchange White's QB.
9. BxP Kt-Q2 10. B-Kt4 BxB 11. QxB Castles 12. Kt-K2 P-K3 13. B-B4 Q-QKt4!
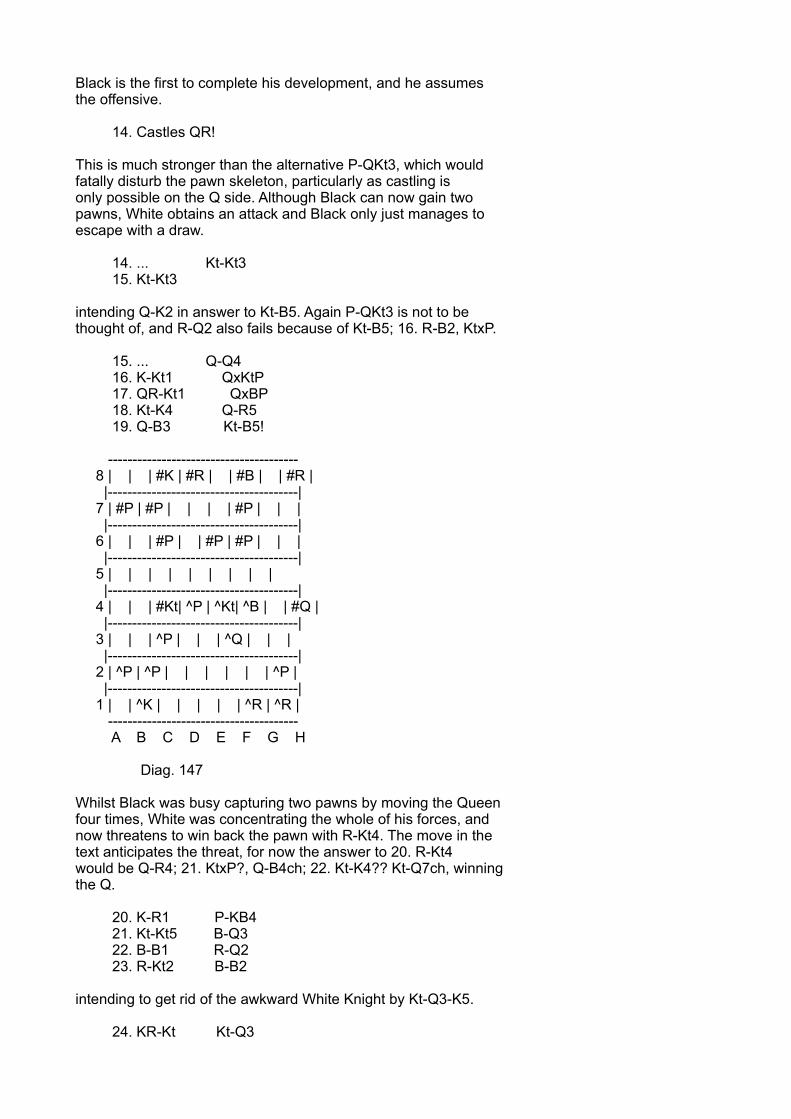
Black is the first to complete his development, and he assumesthe offensive.
14. Castles QR!
This is much stronger than the alternative P-QKt3, which wouldfatally disturb the pawn skeleton, particularly as castling isonly possible on the Q side. Although Black can now gain twopawns, White obtains an attack and Black only just manages toescape with a draw.
14. ... Kt-Kt3 15. Kt-Kt3
intending Q-K2 in answer to Kt-B5. Again P-QKt3 is not to bethought of, and R-Q2 also fails because of Kt-B5; 16. R-B2, KtxP.
15. ... Q-Q4 16. K-Kt1 QxKtP 17. QR-Kt1 QxBP 18. Kt-K4 Q-R5 19. Q-B3 Kt-B5!
--------------------------------------- 8 | | | #K | #R | | #B | | #R | |---------------------------------------| 7 | #P | #P | | | | #P | | | |---------------------------------------| 6 | | | #P | | #P | #P | | | |---------------------------------------| 5 | | | | | | | | | |---------------------------------------| 4 | | | #Kt| ^P | ^Kt| ^B | | #Q | |---------------------------------------| 3 | | | ^P | | | ^Q | | | |---------------------------------------| 2 | ^P | ^P | | | | | | ^P | |---------------------------------------| 1 | | ^K | | | | | ^R | ^R | --------------------------------------- A B C D E F G H
Diag. 147
Whilst Black was busy capturing two pawns by moving the Queenfour times, White was concentrating the whole of his forces, andnow threatens to win back the pawn with R-Kt4. The move in thetext anticipates the threat, for now the answer to 20. R-Kt4would be Q-R4; 21. KtxP?, Q-B4ch; 22. Kt-K4?? Kt-Q7ch, winningthe Q.
20. K-R1 P-KB4 21. Kt-Kt5 B-Q3 22. B-B1 R-Q2 23. R-Kt2 B-B2
intending to get rid of the awkward White Knight by Kt-Q3-K5.
24. KR-Kt Kt-Q3
25. Q-K2 Kt-K5 26. Kt-B3 Q-R6 27. P-R3
White appears to be in "time" difficulties, or else he remainspassive, in order to give Black an opportunity for making therisky attempt to hold the extra pawn by P-B3 and P-K4.
27. ... P-R3 28. B-K3 KR-Q1 29. K-R2 R-R1
If Black wants to play for a win, he must play P-B3. In view ofthe favourable position of the White pieces, he prefers to risknothing and to avoid the weakening of position which follows uponpractically every pawn move.
30. K-R1 KR-Q1 31. K-R2 R-K1 32. R-Kt8 RxR 33. RxRch R-Q1 34. R-Kt7 R-Q2 35. R-Kt8ch
As long as Black plays steadily, White cannot hope for more thana draw.
35. ... R-Q1 36. R-Kt7 R-B1 37. P-B4 Kt-B3
In order to drive off the Rook; White now enforces the draw by afine combination.
38. B-Kt5! Kt-R4 39. RxP! RxR 40. QxPch R-Q2
Not K-Kt1 on account of 41. Q-K8ch, K-R2; 42. QxR, QxKt; 43. QxB,threatening B-K7.
41. Kt-K5! Draw.
For after BxKt there follows 42. Q-K8ch, K-B2; 43. QxBch, withperpetual check.
Both players have shown a deep positional insight, and the gameshows in an interesting manner how a preponderance of materialcan be counterbalanced by the greater mobility of the pieces.
GAME NO. 35
White: Reti. Black: Tartakower.
Caro-Kann Defence.
1. P-K4 P-QB3 2. P-Q4 P-Q4
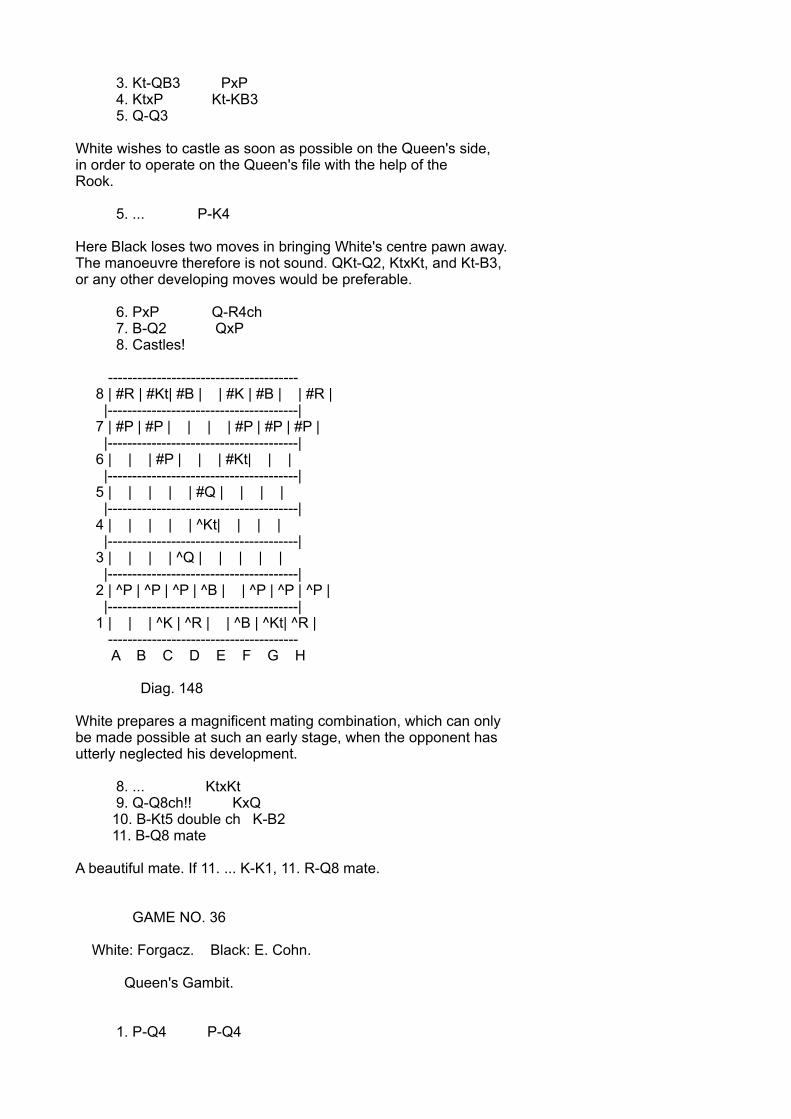
3. Kt-QB3 PxP 4. KtxP Kt-KB3 5. Q-Q3
White wishes to castle as soon as possible on the Queen's side,in order to operate on the Queen's file with the help of theRook.
5. ... P-K4
Here Black loses two moves in bringing White's centre pawn away.The manoeuvre therefore is not sound. QKt-Q2, KtxKt, and Kt-B3,or any other developing moves would be preferable.
6. PxP Q-R4ch 7. B-Q2 QxP 8. Castles!
--------------------------------------- 8 | #R | #Kt| #B | | #K | #B | | #R | |---------------------------------------| 7 | #P | #P | | | | #P | #P | #P | |---------------------------------------| 6 | | | #P | | | #Kt| | | |---------------------------------------| 5 | | | | | #Q | | | | |---------------------------------------| 4 | | | | | ^Kt| | | | |---------------------------------------| 3 | | | | ^Q | | | | | |---------------------------------------| 2 | ^P | ^P | ^P | ^B | | ^P | ^P | ^P | |---------------------------------------| 1 | | | ^K | ^R | | ^B | ^Kt| ^R | --------------------------------------- A B C D E F G H
Diag. 148
White prepares a magnificent mating combination, which can onlybe made possible at such an early stage, when the opponent hasutterly neglected his development.
8. ... KtxKt 9. Q-Q8ch!! KxQ 10. B-Kt5 double ch K-B2 11. B-Q8 mate
A beautiful mate. If 11. ... K-K1, 11. R-Q8 mate.
GAME NO. 36
White: Forgacz. Black: E. Cohn.
Queen's Gambit.
1. P-Q4 P-Q4
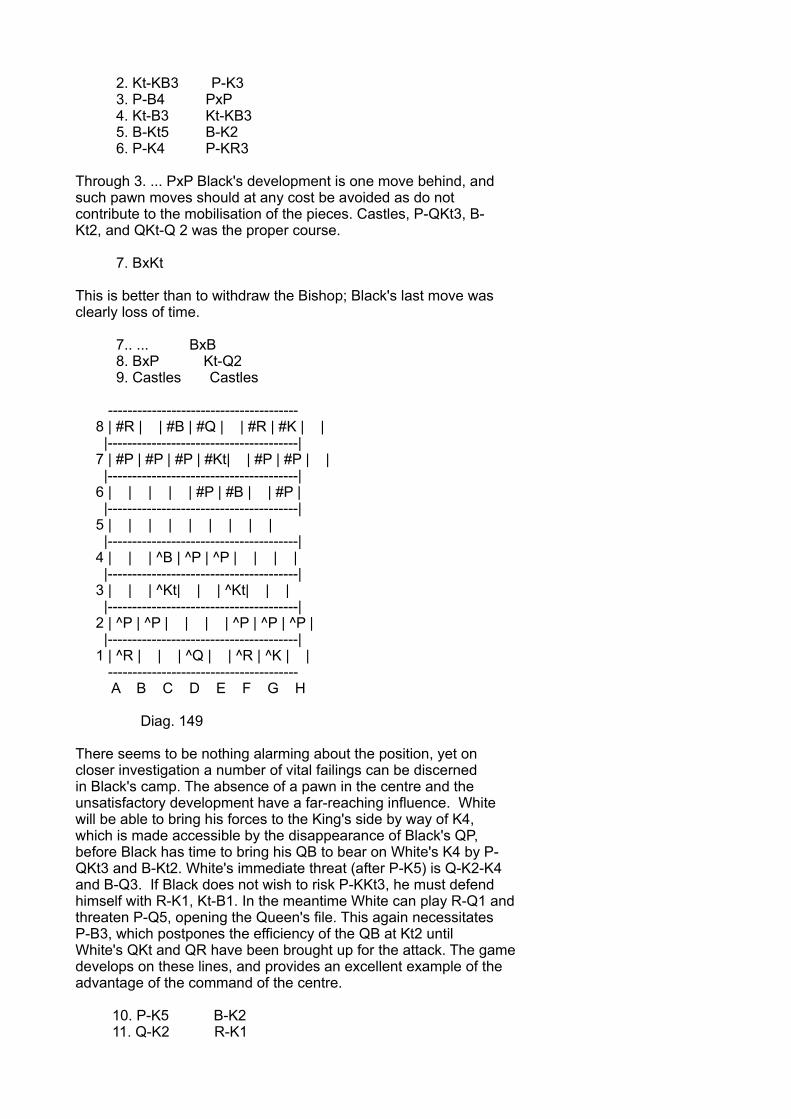
2. Kt-KB3 P-K3 3. P-B4 PxP 4. Kt-B3 Kt-KB3 5. B-Kt5 B-K2 6. P-K4 P-KR3
Through 3. ... PxP Black's development is one move behind, andsuch pawn moves should at any cost be avoided as do notcontribute to the mobilisation of the pieces. Castles, P-QKt3, B-Kt2, and QKt-Q 2 was the proper course.
7. BxKt
This is better than to withdraw the Bishop; Black's last move wasclearly loss of time.
7.. ... BxB 8. BxP Kt-Q2 9. Castles Castles
--------------------------------------- 8 | #R | | #B | #Q | | #R | #K | | |---------------------------------------| 7 | #P | #P | #P | #Kt| | #P | #P | | |---------------------------------------| 6 | | | | | #P | #B | | #P | |---------------------------------------| 5 | | | | | | | | | |---------------------------------------| 4 | | | ^B | ^P | ^P | | | | |---------------------------------------| 3 | | | ^Kt| | | ^Kt| | | |---------------------------------------| 2 | ^P | ^P | | | | ^P | ^P | ^P | |---------------------------------------| 1 | ^R | | | ^Q | | ^R | ^K | | --------------------------------------- A B C D E F G H
Diag. 149
There seems to be nothing alarming about the position, yet oncloser investigation a number of vital failings can be discernedin Black's camp. The absence of a pawn in the centre and theunsatisfactory development have a far-reaching influence. Whitewill be able to bring his forces to the King's side by way of K4,which is made accessible by the disappearance of Black's QP,before Black has time to bring his QB to bear on White's K4 by P-QKt3 and B-Kt2. White's immediate threat (after P-K5) is Q-K2-K4and B-Q3. If Black does not wish to risk P-KKt3, he must defendhimself with R-K1, Kt-B1. In the meantime White can play R-Q1 andthreaten P-Q5, opening the Queen's file. This again necessitatesP-B3, which postpones the efficiency of the QB at Kt2 untilWhite's QKt and QR have been brought up for the attack. The gamedevelops on these lines, and provides an excellent example of theadvantage of the command of the centre.
10. P-K5 B-K2 11. Q-K2 R-K1
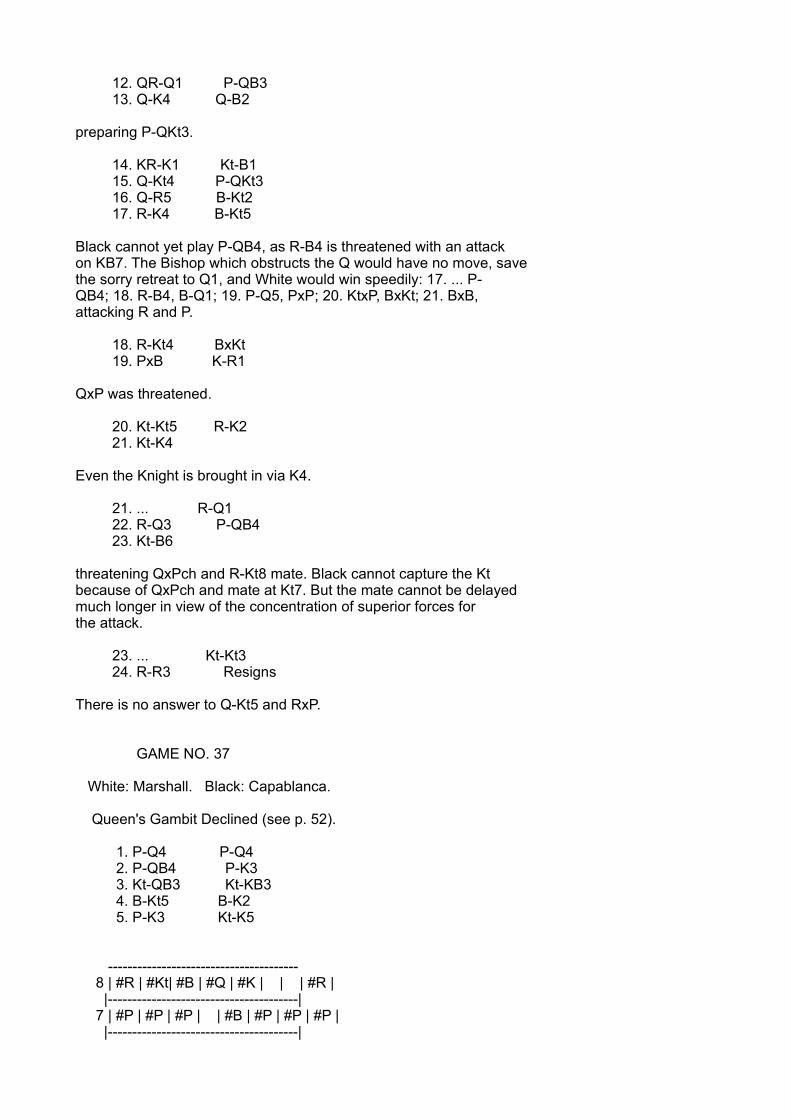
12. QR-Q1 P-QB3 13. Q-K4 Q-B2
preparing P-QKt3.
14. KR-K1 Kt-B1 15. Q-Kt4 P-QKt3 16. Q-R5 B-Kt2 17. R-K4 B-Kt5
Black cannot yet play P-QB4, as R-B4 is threatened with an attackon KB7. The Bishop which obstructs the Q would have no move, savethe sorry retreat to Q1, and White would win speedily: 17. ... P-QB4; 18. R-B4, B-Q1; 19. P-Q5, PxP; 20. KtxP, BxKt; 21. BxB,attacking R and P.
18. R-Kt4 BxKt 19. PxB K-R1
QxP was threatened.
20. Kt-Kt5 R-K2 21. Kt-K4
Even the Knight is brought in via K4.
21. ... R-Q1 22. R-Q3 P-QB4 23. Kt-B6
threatening QxPch and R-Kt8 mate. Black cannot capture the Ktbecause of QxPch and mate at Kt7. But the mate cannot be delayedmuch longer in view of the concentration of superior forces forthe attack.
23. ... Kt-Kt3 24. R-R3 Resigns
There is no answer to Q-Kt5 and RxP.
GAME NO. 37
White: Marshall. Black: Capablanca.
Queen's Gambit Declined (see p. 52).
1. P-Q4 P-Q4 2. P-QB4 P-K3 3. Kt-QB3 Kt-KB3 4. B-Kt5 B-K2 5. P-K3 Kt-K5
--------------------------------------- 8 | #R | #Kt| #B | #Q | #K | | | #R | |---------------------------------------| 7 | #P | #P | #P | | #B | #P | #P | #P | |---------------------------------------|
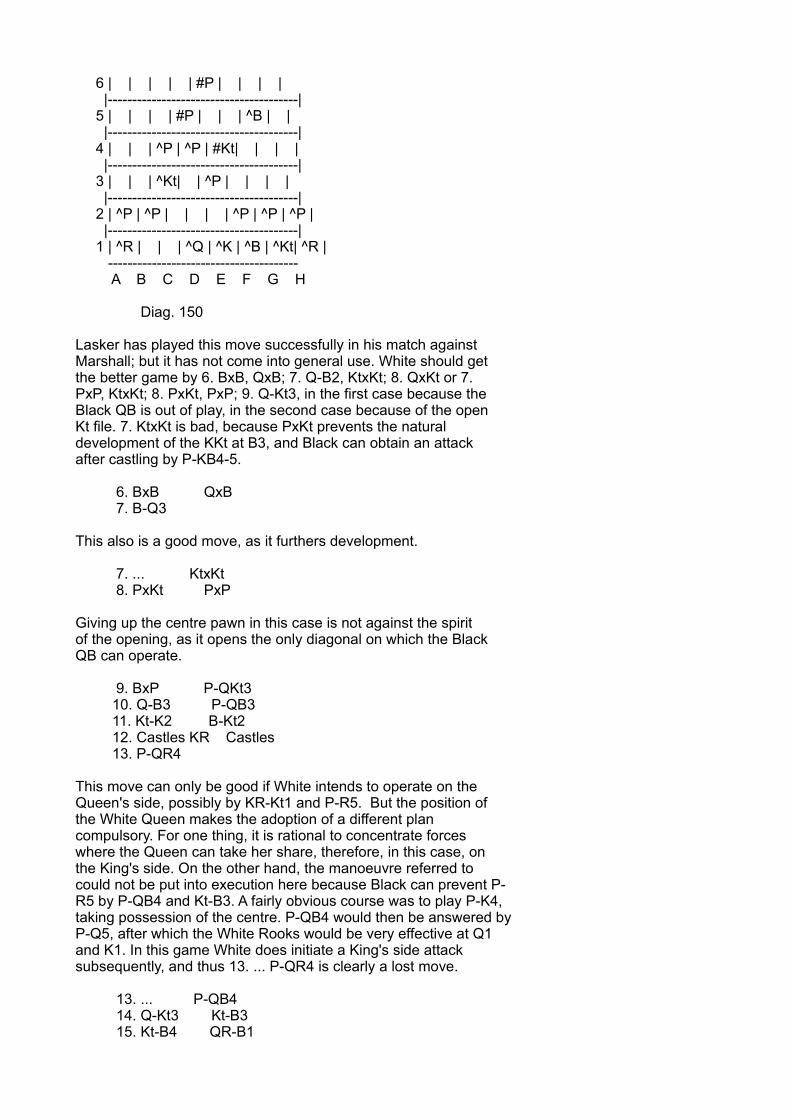
6 | | | | | #P | | | | |---------------------------------------| 5 | | | | #P | | | ^B | | |---------------------------------------| 4 | | | ^P | ^P | #Kt| | | | |---------------------------------------| 3 | | | ^Kt| | ^P | | | | |---------------------------------------| 2 | ^P | ^P | | | | ^P | ^P | ^P | |---------------------------------------| 1 | ^R | | | ^Q | ^K | ^B | ^Kt| ^R | --------------------------------------- A B C D E F G H
Diag. 150
Lasker has played this move successfully in his match againstMarshall; but it has not come into general use. White should getthe better game by 6. BxB, QxB; 7. Q-B2, KtxKt; 8. QxKt or 7.PxP, KtxKt; 8. PxKt, PxP; 9. Q-Kt3, in the first case because theBlack QB is out of play, in the second case because of the openKt file. 7. KtxKt is bad, because PxKt prevents the naturaldevelopment of the KKt at B3, and Black can obtain an attackafter castling by P-KB4-5.
6. BxB QxB 7. B-Q3
This also is a good move, as it furthers development.
7. ... KtxKt 8. PxKt PxP
Giving up the centre pawn in this case is not against the spiritof the opening, as it opens the only diagonal on which the BlackQB can operate.
9. BxP P-QKt3 10. Q-B3 P-QB3 11. Kt-K2 B-Kt2 12. Castles KR Castles 13. P-QR4
This move can only be good if White intends to operate on theQueen's side, possibly by KR-Kt1 and P-R5. But the position ofthe White Queen makes the adoption of a different plancompulsory. For one thing, it is rational to concentrate forceswhere the Queen can take her share, therefore, in this case, onthe King's side. On the other hand, the manoeuvre referred tocould not be put into execution here because Black can prevent P-R5 by P-QB4 and Kt-B3. A fairly obvious course was to play P-K4,taking possession of the centre. P-QB4 would then be answered byP-Q5, after which the White Rooks would be very effective at Q1and K1. In this game White does initiate a King's side attacksubsequently, and thus 13. ... P-QR4 is clearly a lost move.
13. ... P-QB4 14. Q-Kt3 Kt-B3 15. Kt-B4 QR-B1
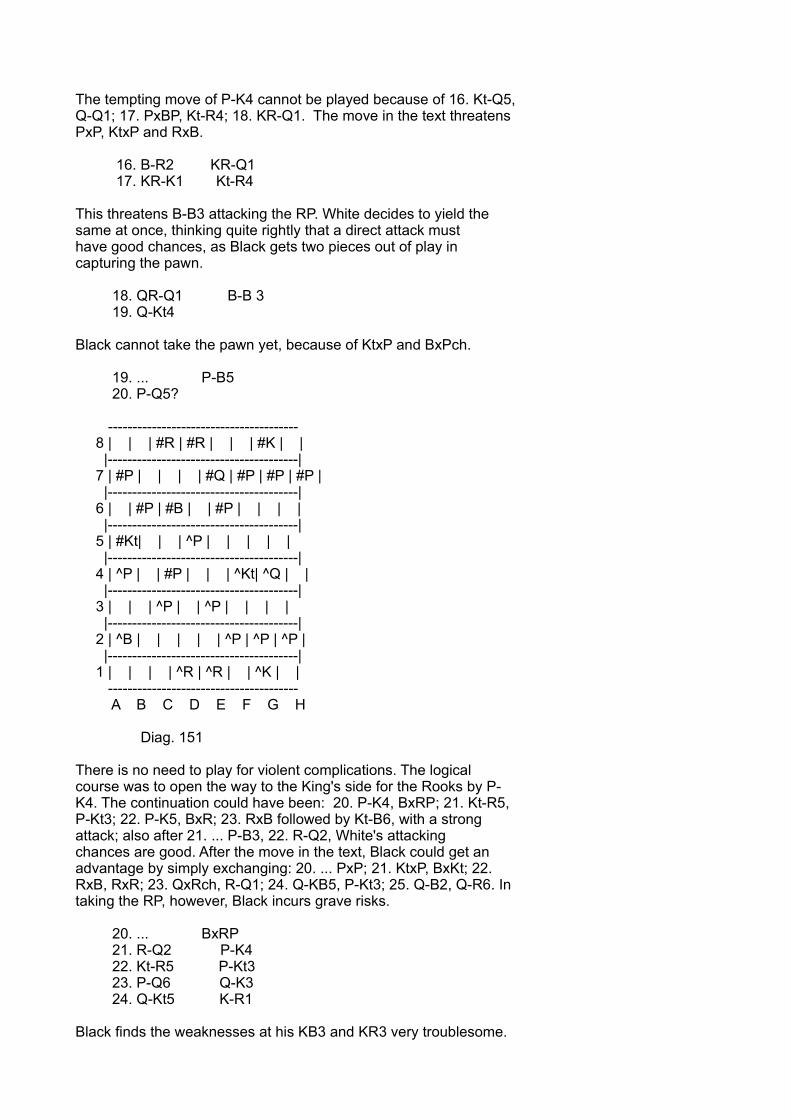
The tempting move of P-K4 cannot be played because of 16. Kt-Q5,Q-Q1; 17. PxBP, Kt-R4; 18. KR-Q1. The move in the text threatensPxP, KtxP and RxB.
16. B-R2 KR-Q1 17. KR-K1 Kt-R4
This threatens B-B3 attacking the RP. White decides to yield thesame at once, thinking quite rightly that a direct attack musthave good chances, as Black gets two pieces out of play incapturing the pawn.
18. QR-Q1 B-B 3 19. Q-Kt4
Black cannot take the pawn yet, because of KtxP and BxPch.
19. ... P-B5 20. P-Q5?
--------------------------------------- 8 | | | #R | #R | | | #K | | |---------------------------------------| 7 | #P | | | | #Q | #P | #P | #P | |---------------------------------------| 6 | | #P | #B | | #P | | | | |---------------------------------------| 5 | #Kt| | | ^P | | | | | |---------------------------------------| 4 | ^P | | #P | | | ^Kt| ^Q | | |---------------------------------------| 3 | | | ^P | | ^P | | | | |---------------------------------------| 2 | ^B | | | | | ^P | ^P | ^P | |---------------------------------------| 1 | | | | ^R | ^R | | ^K | | --------------------------------------- A B C D E F G H
Diag. 151
There is no need to play for violent complications. The logicalcourse was to open the way to the King's side for the Rooks by P-K4. The continuation could have been: 20. P-K4, BxRP; 21. Kt-R5,P-Kt3; 22. P-K5, BxR; 23. RxB followed by Kt-B6, with a strongattack; also after 21. ... P-B3, 22. R-Q2, White's attackingchances are good. After the move in the text, Black could get anadvantage by simply exchanging: 20. ... PxP; 21. KtxP, BxKt; 22.RxB, RxR; 23. QxRch, R-Q1; 24. Q-KB5, P-Kt3; 25. Q-B2, Q-R6. Intaking the RP, however, Black incurs grave risks.
20. ... BxRP 21. R-Q2 P-K4 22. Kt-R5 P-Kt3 23. P-Q6 Q-K3 24. Q-Kt5 K-R1
Black finds the weaknesses at his KB3 and KR3 very troublesome.
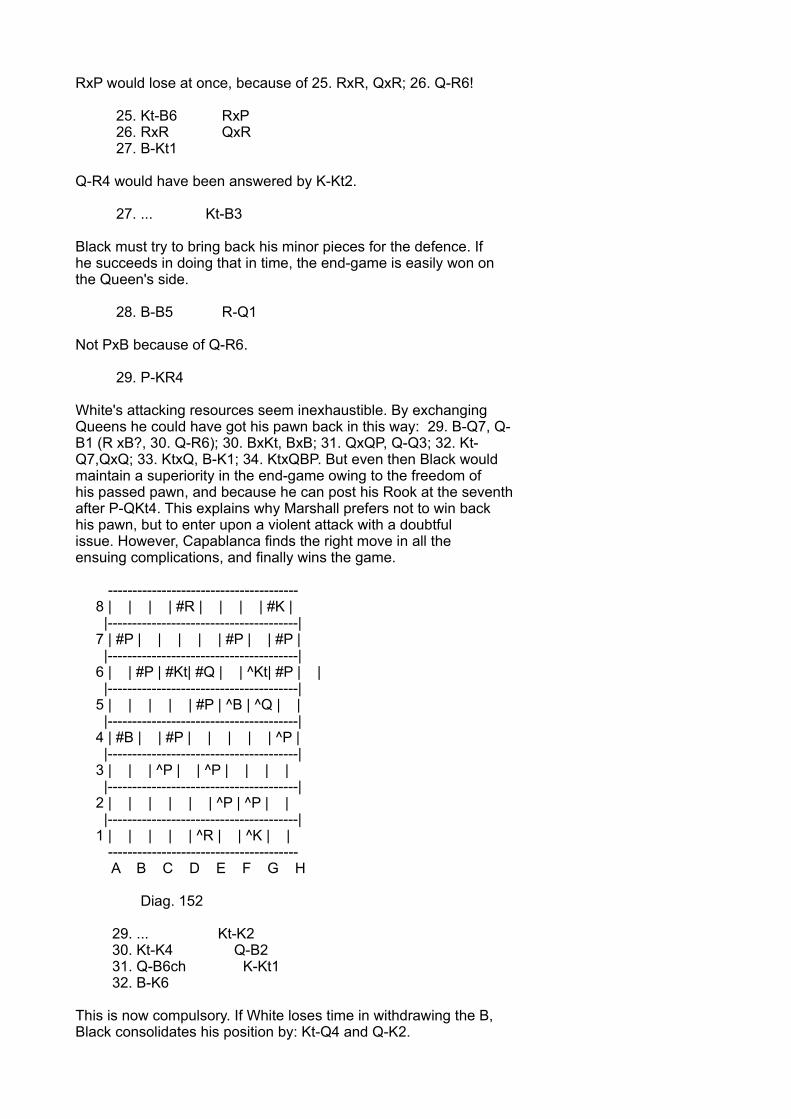
RxP would lose at once, because of 25. RxR, QxR; 26. Q-R6!
25. Kt-B6 RxP 26. RxR QxR 27. B-Kt1
Q-R4 would have been answered by K-Kt2.
27. ... Kt-B3
Black must try to bring back his minor pieces for the defence. Ifhe succeeds in doing that in time, the end-game is easily won onthe Queen's side.
28. B-B5 R-Q1
Not PxB because of Q-R6.
29. P-KR4
White's attacking resources seem inexhaustible. By exchangingQueens he could have got his pawn back in this way: 29. B-Q7, Q-B1 (R xB?, 30. Q-R6); 30. BxKt, BxB; 31. QxQP, Q-Q3; 32. Kt-Q7,QxQ; 33. KtxQ, B-K1; 34. KtxQBP. But even then Black wouldmaintain a superiority in the end-game owing to the freedom ofhis passed pawn, and because he can post his Rook at the seventhafter P-QKt4. This explains why Marshall prefers not to win backhis pawn, but to enter upon a violent attack with a doubtfulissue. However, Capablanca finds the right move in all theensuing complications, and finally wins the game.
--------------------------------------- 8 | | | | #R | | | | #K | |---------------------------------------| 7 | #P | | | | | #P | | #P | |---------------------------------------| 6 | | #P | #Kt| #Q | | ^Kt| #P | | |---------------------------------------| 5 | | | | | #P | ^B | ^Q | | |---------------------------------------| 4 | #B | | #P | | | | | ^P | |---------------------------------------| 3 | | | ^P | | ^P | | | | |---------------------------------------| 2 | | | | | | ^P | ^P | | |---------------------------------------| 1 | | | | | ^R | | ^K | | --------------------------------------- A B C D E F G H
Diag. 152
29. ... Kt-K2 30. Kt-K4 Q-B2 31. Q-B6ch K-Kt1 32. B-K6
This is now compulsory. If White loses time in withdrawing the B,Black consolidates his position by: Kt-Q4 and Q-K2.
32. ... PxB
R-B1 is refuted by 33. Kt-Kt5!, PxB; 34. QxR, etc.
33. QxKPch
Better than Kt-Kt5, for after Kt-Q4, 34. QxPch, the Black Kingfinds a safe retreat at Kt2.
33. ... K-B1 34. Kt-Kt5 Kt-Kt1 35. P-B4
in order to open the file for the Rook.
35. ... R-K1 36. PxP R-K2 37. R-B1ch K-Kt2 38. P-R5 B-K1 39. P-R6ch K-R1
KtxP fails on account of Q-B6ch.
40. Q-Q6
White takes all possible advantage from the position, but cannotbring home his attack, as Black has concentrated his forces forthe defence. Black must still be careful to avoid a mate, e.g.QxQ?; 41. PxQ, RxP; 42. R-B7 or 4l. ... R-Q2; 42. R-B8.
40. ... Q-B4 41. Q-Q4
Here White could have tried QxQ and R-B8. There was then apermanent threat of RxB, e.g. 41. QxQ, PxQ; 42. R-B8, RxP; 43.Kt-B3, R-K2; 44. Kt-Kt5, etc. It seems as if Black would have togive up the piece again by 43. ... R-R4 in order to win. White,however, would then have drawing chances, which would have been afitting conclusion to this wonderful game.
41. ... RxP 42. Q-Q7 R-K2 Resigns
GAME No. 38
White: Rotlewi. Black: Teichmann.
Queen's Gambit Declined.
1. P-Q4 P-Q 4 2. Kt-KB3 Kt-KB3 3. P-B4 P-K3 4. Kt-B3 QKt-Q2 5. B-Kt5 B-K2
Capablanca tried 5. ... B-Kt5; against Ed. Lasker in New York,
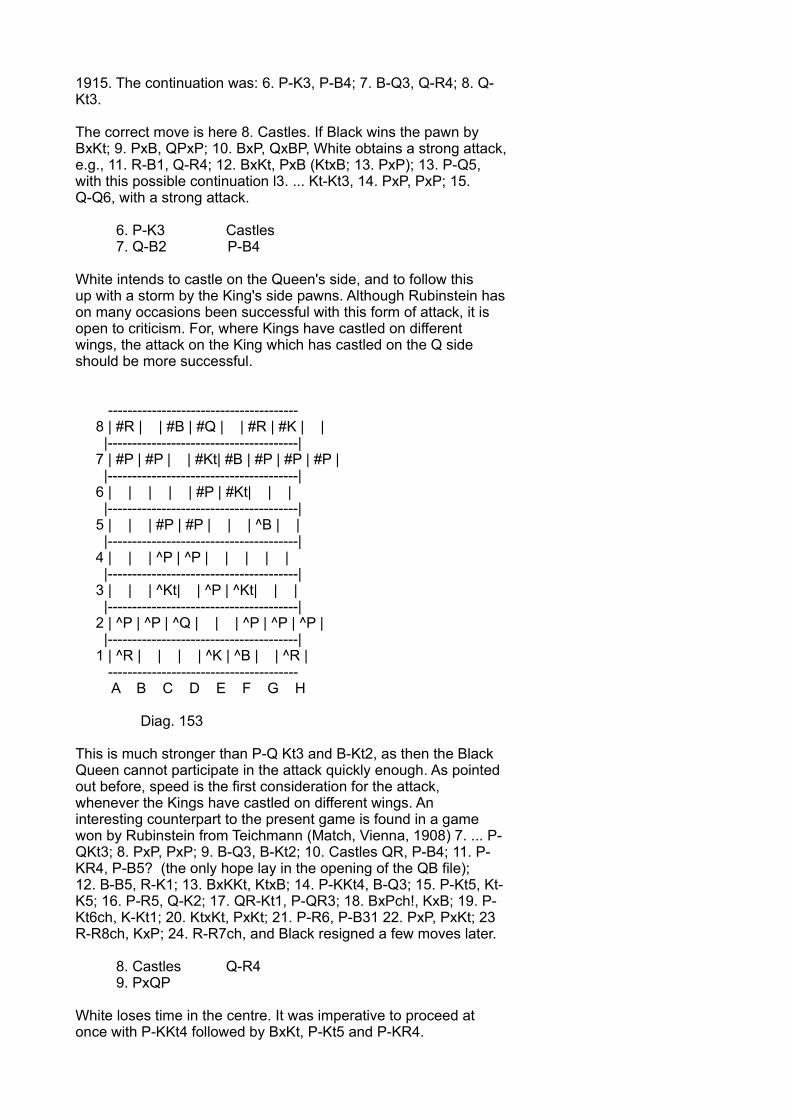
1915. The continuation was: 6. P-K3, P-B4; 7. B-Q3, Q-R4; 8. Q-Kt3.
The correct move is here 8. Castles. If Black wins the pawn byBxKt; 9. PxB, QPxP; 10. BxP, QxBP, White obtains a strong attack,e.g., 11. R-B1, Q-R4; 12. BxKt, PxB (KtxB; 13. PxP); 13. P-Q5,with this possible continuation l3. ... Kt-Kt3, 14. PxP, PxP; 15.Q-Q6, with a strong attack.
6. P-K3 Castles 7. Q-B2 P-B4
White intends to castle on the Queen's side, and to follow thisup with a storm by the King's side pawns. Although Rubinstein hason many occasions been successful with this form of attack, it isopen to criticism. For, where Kings have castled on differentwings, the attack on the King which has castled on the Q sideshould be more successful.
--------------------------------------- 8 | #R | | #B | #Q | | #R | #K | | |---------------------------------------| 7 | #P | #P | | #Kt| #B | #P | #P | #P | |---------------------------------------| 6 | | | | | #P | #Kt| | | |---------------------------------------| 5 | | | #P | #P | | | ^B | | |---------------------------------------| 4 | | | ^P | ^P | | | | | |---------------------------------------| 3 | | | ^Kt| | ^P | ^Kt| | | |---------------------------------------| 2 | ^P | ^P | ^Q | | | ^P | ^P | ^P | |---------------------------------------| 1 | ^R | | | | ^K | ^B | | ^R | --------------------------------------- A B C D E F G H
Diag. 153
This is much stronger than P-Q Kt3 and B-Kt2, as then the BlackQueen cannot participate in the attack quickly enough. As pointedout before, speed is the first consideration for the attack,whenever the Kings have castled on different wings. Aninteresting counterpart to the present game is found in a gamewon by Rubinstein from Teichmann (Match, Vienna, 1908) 7. ... P-QKt3; 8. PxP, PxP; 9. B-Q3, B-Kt2; 10. Castles QR, P-B4; 11. P-KR4, P-B5? (the only hope lay in the opening of the QB file);12. B-B5, R-K1; 13. BxKKt, KtxB; 14. P-KKt4, B-Q3; 15. P-Kt5, Kt-K5; 16. P-R5, Q-K2; 17. QR-Kt1, P-QR3; 18. BxPch!, KxB; 19. P-Kt6ch, K-Kt1; 20. KtxKt, PxKt; 21. P-R6, P-B31 22. PxP, PxKt; 23R-R8ch, KxP; 24. R-R7ch, and Black resigned a few moves later.
8. Castles Q-R4 9. PxQP
White loses time in the centre. It was imperative to proceed atonce with P-KKt4 followed by BxKt, P-Kt5 and P-KR4.
9. ... KPxP 10. PxP KtxP 11. Kt-Q4 B-K3 12. K-Kt1
It would be too risky to leave both King and Queen on the QBfile.
12. ... QR-B1 13. B-Q3 P-KR3
The threat was: BxKt and BxPch. Had White played P-KKt4 and P-KR4instead of effecting exchanges in the centre, Black would nothave been able to afford this weakening move. But now Black winsthe game on the other wing, before White is able to make use ofthe weakness thus created.
14. BxKt BxB 15. B-B5 KR-Q1 16. BxB PxB 17. Q-Kt6
The Queen must leave the QB file without delay, as Kt-K5 isthreatened. Black's game is already superior; with the exceptionof the Queen, White has no piece available for the attack on theopposing King.
17. ... R-Q3 18. R-QB1 R-R3
Now White must again provide against Black's Kt-K5, as White'sQKt is needed for the defence of QR2.
19. P-B3 R-Q1
Black intends to move his B and then to advance his KP with anattack on the Queen. The object of the text move is to preventWhite from saving himself by an attack on the Rook (Q-B5).
20. R-B2 BxKt
By this exchange Black achieves his object of driving off theKnight by P-Q5, but White has time to give his RP furtherprotection by P-QKt3, This, Black would have prevented by playingB-Kt4 instead of the text move, e.g. 21. P-B4, P-K4; 22. Q-B5,PxKt; 23. PxP, B-B3; 24. PxKt, P-Q5, etc.
21. PxB P-K4 22. Q-Kt4 PxP 23. QxP Kt-K3 24. Q-K5
This delays the fatal advance of the QP for one move.
24. ... P-QKt4 25. P-QKt3 P-Q5 26. Kt-K4 P-Q6 27. R-Q2 Kt-Q5
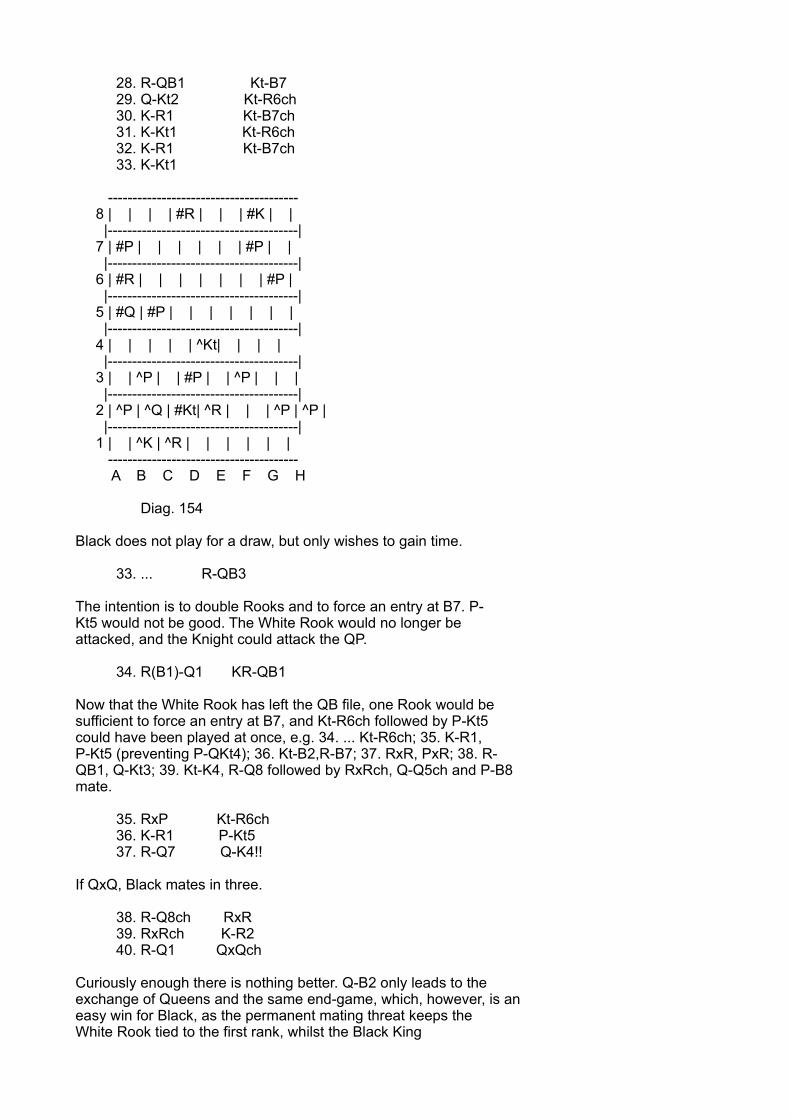
28. R-QB1 Kt-B7 29. Q-Kt2 Kt-R6ch 30. K-R1 Kt-B7ch 31. K-Kt1 Kt-R6ch 32. K-R1 Kt-B7ch 33. K-Kt1
--------------------------------------- 8 | | | | #R | | | #K | | |---------------------------------------| 7 | #P | | | | | | #P | | |---------------------------------------| 6 | #R | | | | | | | #P | |---------------------------------------| 5 | #Q | #P | | | | | | | |---------------------------------------| 4 | | | | | ^Kt| | | | |---------------------------------------| 3 | | ^P | | #P | | ^P | | | |---------------------------------------| 2 | ^P | ^Q | #Kt| ^R | | | ^P | ^P | |---------------------------------------| 1 | | ^K | ^R | | | | | | --------------------------------------- A B C D E F G H
Diag. 154
Black does not play for a draw, but only wishes to gain time.
33. ... R-QB3
The intention is to double Rooks and to force an entry at B7. P-Kt5 would not be good. The White Rook would no longer beattacked, and the Knight could attack the QP.
34. R(B1)-Q1 KR-QB1
Now that the White Rook has left the QB file, one Rook would besufficient to force an entry at B7, and Kt-R6ch followed by P-Kt5could have been played at once, e.g. 34. ... Kt-R6ch; 35. K-R1,P-Kt5 (preventing P-QKt4); 36. Kt-B2,R-B7; 37. RxR, PxR; 38. R-QB1, Q-Kt3; 39. Kt-K4, R-Q8 followed by RxRch, Q-Q5ch and P-B8mate.
35. RxP Kt-R6ch 36. K-R1 P-Kt5 37. R-Q7 Q-K4!!
If QxQ, Black mates in three.
38. R-Q8ch RxR 39. RxRch K-R2 40. R-Q1 QxQch
Curiously enough there is nothing better. Q-B2 only leads to theexchange of Queens and the same end-game, which, however, is aneasy win for Black, as the permanent mating threat keeps theWhite Rook tied to the first rank, whilst the Black King
threatens to capture all the White pawns.
If Q-B2 White forces the exchange of Queens with the followingcombination: 41. Q-Q2, R-B7; 42. Q-Q3, R-B8ch; 43. K-Kt2, with athreat of Kt-B6ch and Q-R7 mate. Black therefore would have toplay Q-B7ch, etc., as in the game.
41. KxQ R-B7ch 42. K-R1 RxP 43. R-R1 P-Kt4 44. Kt-B6ch K-Kt2 45. Kt-K4 K-Kt3 46. Kt-Q6 P-QR4
We have now a position with a forced move. If the White Knightmoves, there follows K-B4-B5, etc. Therefore White gives up his RP voluntarily.
47. R-QB1 RxP 48. Kt-B4 Kt-Kt4
Now Kt-B6 and RxP mate are threatened.
49. Kt-K5ch K-Kt2 50. Kt-Kt4 R-K7 51. R-B5 R-K8ch 52. K-Kt2 Kt-R6 53. R-B7ch K-B1 54. R-B1 R-K7ch 55. K-R1 Kt-B7ch 56. K-Kt1 Kt-R6ch
Black again appears to be short of time.
57. K-R1 Kt-Kt4 58. R-B5 R-K8ch 59. K-Kt2 Kt-R6 60. R-B1 R-K7ch
Now, after the sixtieth move Black has again plenty of time, andcan prepare the final combination at leisure.
61. K-R1 R-K3 62. R-R1 K-Kt2 63. R-QB1 K-Kt3 64. R-B6 RxR 65. Kt-K5ch K-B4 66. KtxR P-R4 67. Kt-Q4ch K-K4 68. Kt-K2 Kt-B7ch 69. K-Kt2 Kt-Q5 Resigns.
GAME NO. 39.
White: Rotlewi. Black: Rubinstein
Queen's Gambit Declined.
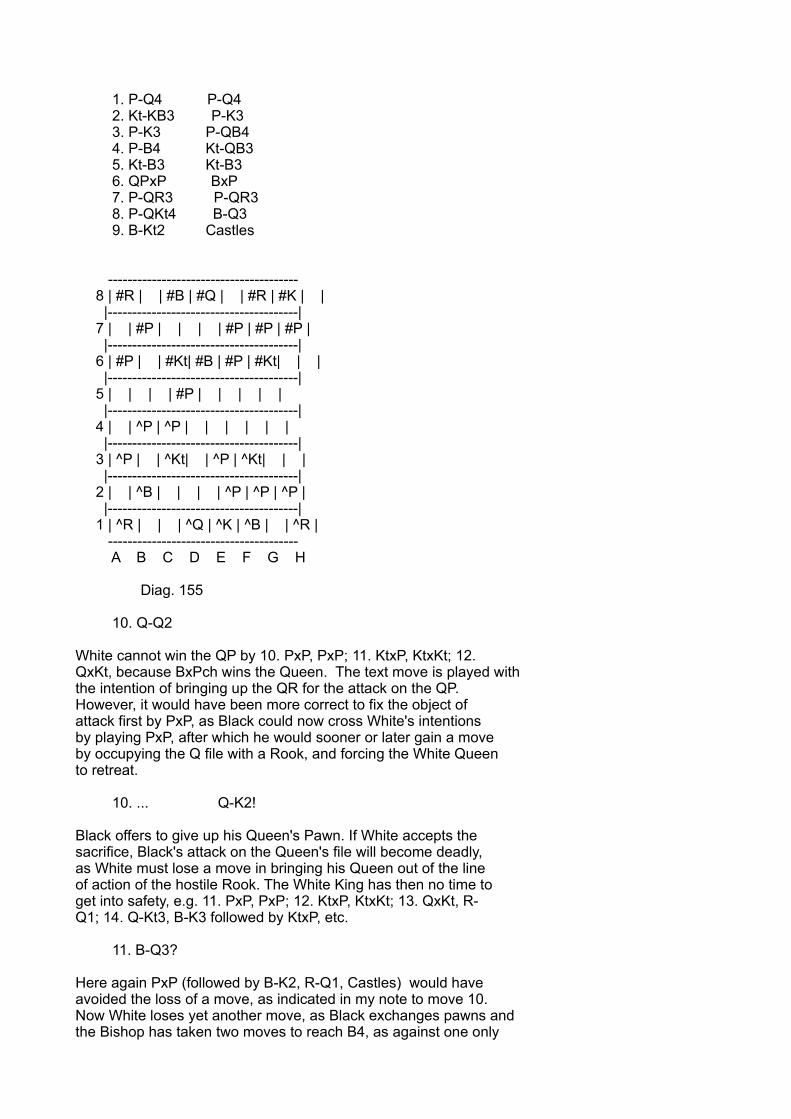
1. P-Q4 P-Q4 2. Kt-KB3 P-K3 3. P-K3 P-QB4 4. P-B4 Kt-QB3 5. Kt-B3 Kt-B3 6. QPxP BxP 7. P-QR3 P-QR3 8. P-QKt4 B-Q3 9. B-Kt2 Castles
--------------------------------------- 8 | #R | | #B | #Q | | #R | #K | | |---------------------------------------| 7 | | #P | | | | #P | #P | #P | |---------------------------------------| 6 | #P | | #Kt| #B | #P | #Kt| | | |---------------------------------------| 5 | | | | #P | | | | | |---------------------------------------| 4 | | ^P | ^P | | | | | | |---------------------------------------| 3 | ^P | | ^Kt| | ^P | ^Kt| | | |---------------------------------------| 2 | | ^B | | | | ^P | ^P | ^P | |---------------------------------------| 1 | ^R | | | ^Q | ^K | ^B | | ^R | --------------------------------------- A B C D E F G H
Diag. 155
10. Q-Q2
White cannot win the QP by 10. PxP, PxP; 11. KtxP, KtxKt; 12.QxKt, because BxPch wins the Queen. The text move is played withthe intention of bringing up the QR for the attack on the QP.However, it would have been more correct to fix the object ofattack first by PxP, as Black could now cross White's intentionsby playing PxP, after which he would sooner or later gain a moveby occupying the Q file with a Rook, and forcing the White Queento retreat.
10. ... Q-K2!
Black offers to give up his Queen's Pawn. If White accepts thesacrifice, Black's attack on the Queen's file will become deadly,as White must lose a move in bringing his Queen out of the lineof action of the hostile Rook. The White King has then no time toget into safety, e.g. 11. PxP, PxP; 12. KtxP, KtxKt; 13. QxKt, R-Q1; 14. Q-Kt3, B-K3 followed by KtxP, etc.
11. B-Q3?
Here again PxP (followed by B-K2, R-Q1, Castles) would haveavoided the loss of a move, as indicated in my note to move 10.Now White loses yet another move, as Black exchanges pawns andthe Bishop has taken two moves to reach B4, as against one only
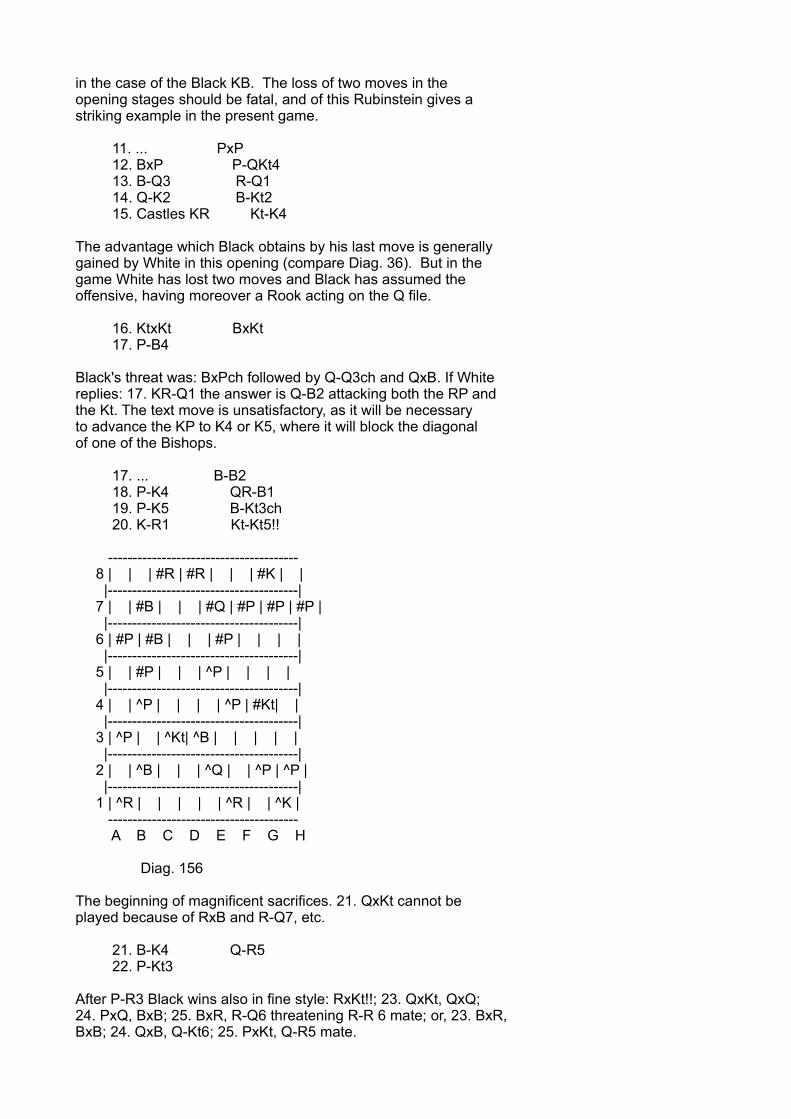
in the case of the Black KB. The loss of two moves in theopening stages should be fatal, and of this Rubinstein gives astriking example in the present game.
11. ... PxP 12. BxP P-QKt4 13. B-Q3 R-Q1 14. Q-K2 B-Kt2 15. Castles KR Kt-K4
The advantage which Black obtains by his last move is generallygained by White in this opening (compare Diag. 36). But in thegame White has lost two moves and Black has assumed theoffensive, having moreover a Rook acting on the Q file.
16. KtxKt BxKt 17. P-B4
Black's threat was: BxPch followed by Q-Q3ch and QxB. If Whitereplies: 17. KR-Q1 the answer is Q-B2 attacking both the RP andthe Kt. The text move is unsatisfactory, as it will be necessaryto advance the KP to K4 or K5, where it will block the diagonalof one of the Bishops.
17. ... B-B2 18. P-K4 QR-B1 19. P-K5 B-Kt3ch 20. K-R1 Kt-Kt5!!
--------------------------------------- 8 | | | #R | #R | | | #K | | |---------------------------------------| 7 | | #B | | | #Q | #P | #P | #P | |---------------------------------------| 6 | #P | #B | | | #P | | | | |---------------------------------------| 5 | | #P | | | ^P | | | | |---------------------------------------| 4 | | ^P | | | | ^P | #Kt| | |---------------------------------------| 3 | ^P | | ^Kt| ^B | | | | | |---------------------------------------| 2 | | ^B | | | ^Q | | ^P | ^P | |---------------------------------------| 1 | ^R | | | | | ^R | | ^K | --------------------------------------- A B C D E F G H
Diag. 156
The beginning of magnificent sacrifices. 21. QxKt cannot beplayed because of RxB and R-Q7, etc.
21. B-K4 Q-R5 22. P-Kt3
After P-R3 Black wins also in fine style: RxKt!!; 23. QxKt, QxQ;24. PxQ, BxB; 25. BxR, R-Q6 threatening R-R 6 mate; or, 23. BxR,BxB; 24. QxB, Q-Kt6; 25. PxKt, Q-R5 mate.
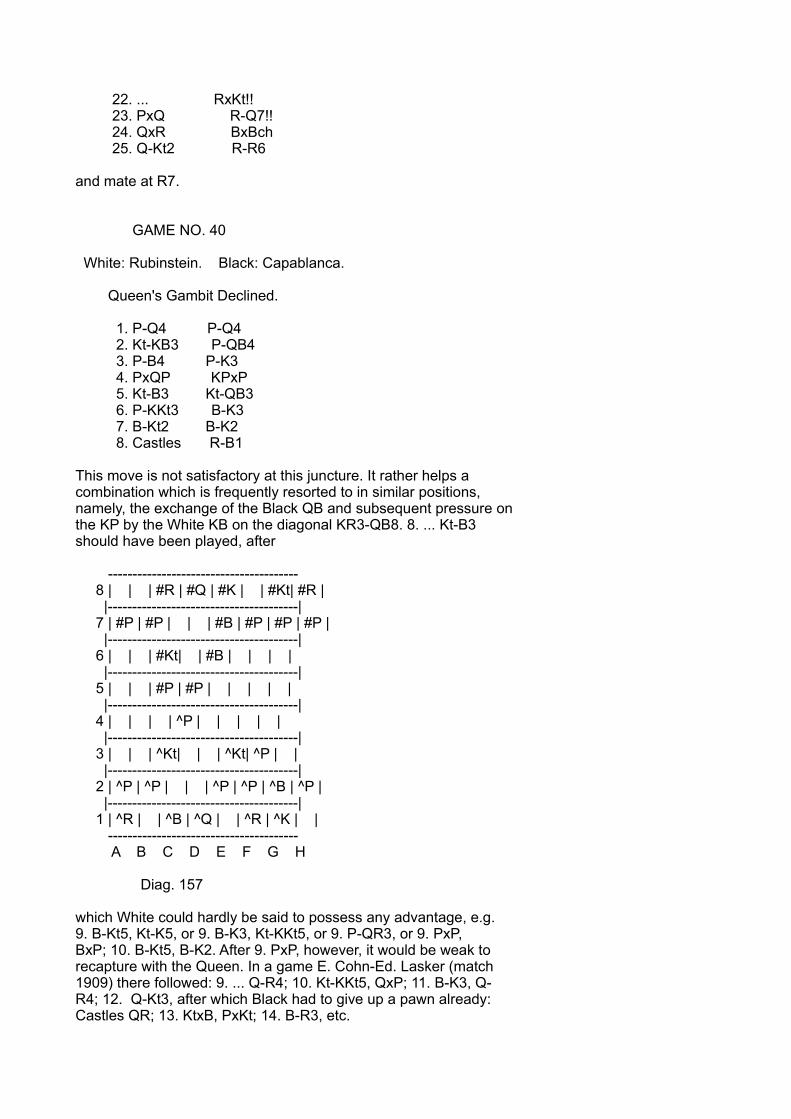
22. ... RxKt!! 23. PxQ R-Q7!! 24. QxR BxBch 25. Q-Kt2 R-R6
and mate at R7.
GAME NO. 40
White: Rubinstein. Black: Capablanca.
Queen's Gambit Declined.
1. P-Q4 P-Q4 2. Kt-KB3 P-QB4 3. P-B4 P-K3 4. PxQP KPxP 5. Kt-B3 Kt-QB3 6. P-KKt3 B-K3 7. B-Kt2 B-K2 8. Castles R-B1
This move is not satisfactory at this juncture. It rather helps acombination which is frequently resorted to in similar positions,namely, the exchange of the Black QB and subsequent pressure onthe KP by the White KB on the diagonal KR3-QB8. 8. ... Kt-B3should have been played, after
--------------------------------------- 8 | | | #R | #Q | #K | | #Kt| #R | |---------------------------------------| 7 | #P | #P | | | #B | #P | #P | #P | |---------------------------------------| 6 | | | #Kt| | #B | | | | |---------------------------------------| 5 | | | #P | #P | | | | | |---------------------------------------| 4 | | | | ^P | | | | | |---------------------------------------| 3 | | | ^Kt| | | ^Kt| ^P | | |---------------------------------------| 2 | ^P | ^P | | | ^P | ^P | ^B | ^P | |---------------------------------------| 1 | ^R | | ^B | ^Q | | ^R | ^K | | --------------------------------------- A B C D E F G H
Diag. 157
which White could hardly be said to possess any advantage, e.g.9. B-Kt5, Kt-K5, or 9. B-K3, Kt-KKt5, or 9. P-QR3, or 9. PxP,BxP; 10. B-Kt5, B-K2. After 9. PxP, however, it would be weak torecapture with the Queen. In a game E. Cohn-Ed. Lasker (match1909) there followed: 9. ... Q-R4; 10. Kt-KKt5, QxP; 11. B-K3, Q-R4; 12. Q-Kt3, after which Black had to give up a pawn already:Castles QR; 13. KtxB, PxKt; 14. B-R3, etc.
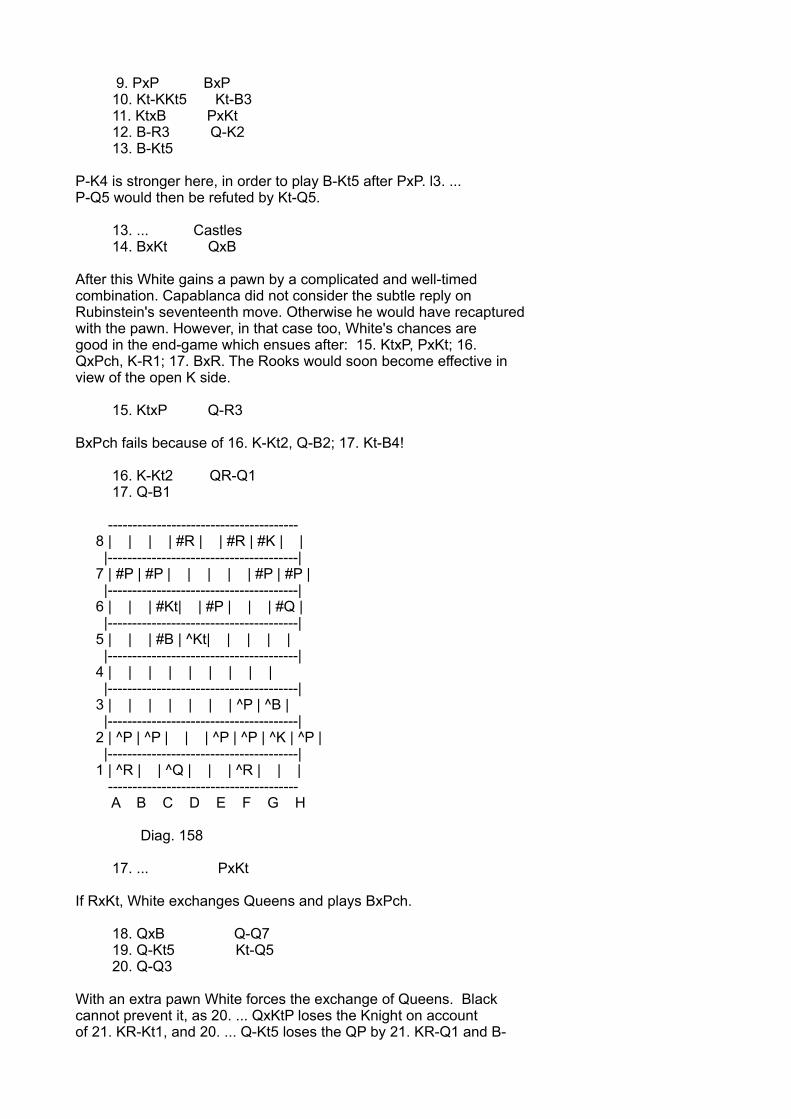
9. PxP BxP 10. Kt-KKt5 Kt-B3 11. KtxB PxKt 12. B-R3 Q-K2 13. B-Kt5
P-K4 is stronger here, in order to play B-Kt5 after PxP. l3. ...P-Q5 would then be refuted by Kt-Q5.
13. ... Castles 14. BxKt QxB
After this White gains a pawn by a complicated and well-timedcombination. Capablanca did not consider the subtle reply onRubinstein's seventeenth move. Otherwise he would have recapturedwith the pawn. However, in that case too, White's chances aregood in the end-game which ensues after: 15. KtxP, PxKt; 16.QxPch, K-R1; 17. BxR. The Rooks would soon become effective inview of the open K side.
15. KtxP Q-R3
BxPch fails because of 16. K-Kt2, Q-B2; 17. Kt-B4!
16. K-Kt2 QR-Q1 17. Q-B1
--------------------------------------- 8 | | | | #R | | #R | #K | | |---------------------------------------| 7 | #P | #P | | | | | #P | #P | |---------------------------------------| 6 | | | #Kt| | #P | | | #Q | |---------------------------------------| 5 | | | #B | ^Kt| | | | | |---------------------------------------| 4 | | | | | | | | | |---------------------------------------| 3 | | | | | | | ^P | ^B | |---------------------------------------| 2 | ^P | ^P | | | ^P | ^P | ^K | ^P | |---------------------------------------| 1 | ^R | | ^Q | | | ^R | | | --------------------------------------- A B C D E F G H
Diag. 158
17. ... PxKt
If RxKt, White exchanges Queens and plays BxPch.
18. QxB Q-Q7 19. Q-Kt5 Kt-Q5 20. Q-Q3
With an extra pawn White forces the exchange of Queens. Blackcannot prevent it, as 20. ... QxKtP loses the Knight on accountof 21. KR-Kt1, and 20. ... Q-Kt5 loses the QP by 21. KR-Q1 and B-
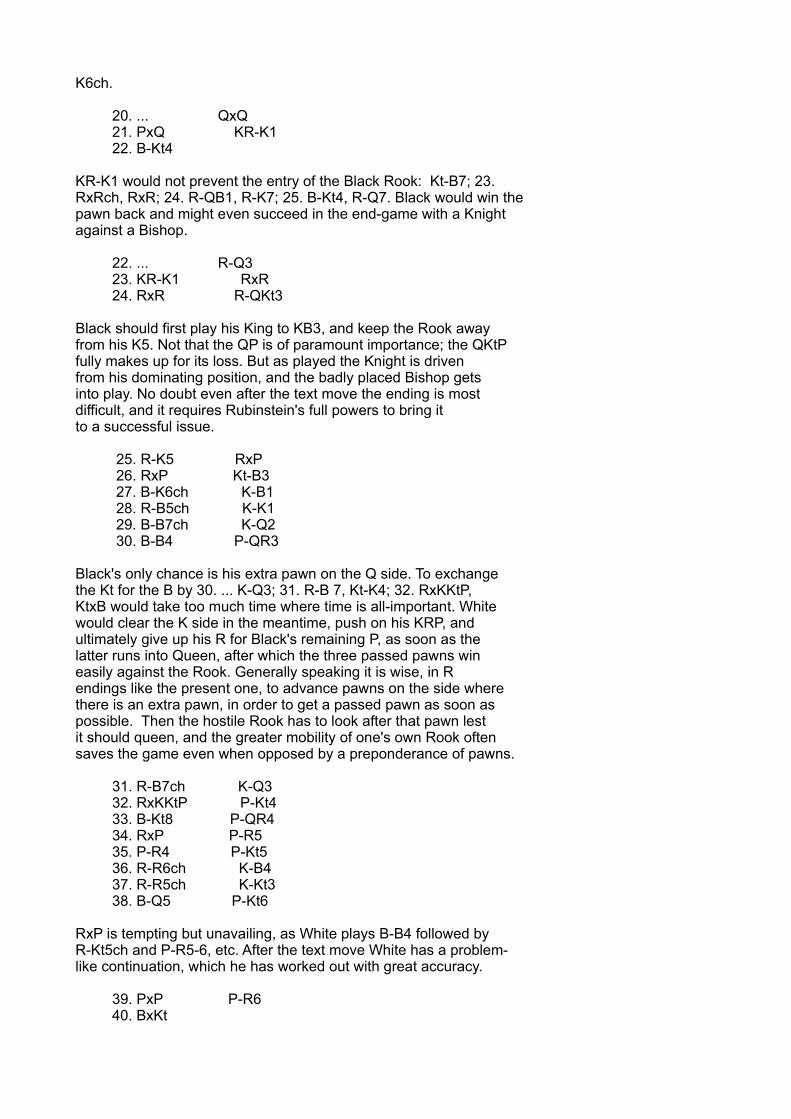
K6ch.
20. ... QxQ 21. PxQ KR-K1 22. B-Kt4
KR-K1 would not prevent the entry of the Black Rook: Kt-B7; 23.RxRch, RxR; 24. R-QB1, R-K7; 25. B-Kt4, R-Q7. Black would win thepawn back and might even succeed in the end-game with a Knightagainst a Bishop.
22. ... R-Q3 23. KR-K1 RxR 24. RxR R-QKt3
Black should first play his King to KB3, and keep the Rook awayfrom his K5. Not that the QP is of paramount importance; the QKtPfully makes up for its loss. But as played the Knight is drivenfrom his dominating position, and the badly placed Bishop getsinto play. No doubt even after the text move the ending is mostdifficult, and it requires Rubinstein's full powers to bring itto a successful issue.
25. R-K5 RxP 26. RxP Kt-B3 27. B-K6ch K-B1 28. R-B5ch K-K1 29. B-B7ch K-Q2 30. B-B4 P-QR3
Black's only chance is his extra pawn on the Q side. To exchangethe Kt for the B by 30. ... K-Q3; 31. R-B 7, Kt-K4; 32. RxKKtP,KtxB would take too much time where time is all-important. Whitewould clear the K side in the meantime, push on his KRP, andultimately give up his R for Black's remaining P, as soon as thelatter runs into Queen, after which the three passed pawns wineasily against the Rook. Generally speaking it is wise, in Rendings like the present one, to advance pawns on the side wherethere is an extra pawn, in order to get a passed pawn as soon aspossible. Then the hostile Rook has to look after that pawn lestit should queen, and the greater mobility of one's own Rook oftensaves the game even when opposed by a preponderance of pawns.
31. R-B7ch K-Q3 32. RxKKtP P-Kt4 33. B-Kt8 P-QR4 34. RxP P-R5 35. P-R4 P-Kt5 36. R-R6ch K-B4 37. R-R5ch K-Kt3 38. B-Q5 P-Kt6
RxP is tempting but unavailing, as White plays B-B4 followed byR-Kt5ch and P-R5-6, etc. After the text move White has a problem-like continuation, which he has worked out with great accuracy.
39. PxP P-R6 40. BxKt
If now P-R7, White simply plays 41. R-Kt5ch, K-R3; 42. R-Kt8-R8.
40. ... RxKtP 41. B-Q5 P-R7 42. R-R6ch Resigns.
As the R holds the RP, e.g. K-R4; 43. B-B4 followed by R-R6ch or42. ... K-R2; 43. R-R8, etc.
GAME NO. 41
White: Niemzowitsch. Black: Tarrasch.
Queen's Gambit Declined.
1. P-Q4 P-Q4 2. Kt-KB3 P-QB4 3. P-B4 P-K3 4. P-K3 Kt-KB3 5. B-Q3 Kt-B3 6. Castles B-Q3 7. P-QKt3 Castles 8. B-Kt2 P-QKt3 9. QKt-Q2 B-Kt2 10. R-B1 Q-K2 11. PxQP
The most natural move to which the development of the QKt at Q2instead of B3 would seem to lead is Kt-K5 followed by P-B4. After11. Kt-K5 Black could not yet attempt 11. ... PxQP; 12. KPxP, B-R6, weakening the QP, because of 13. BxB, QxB; 14. PxP, KtxKt;15. PxKt, KtxP; 16. Kt-B4 and Kt-Q6.
11. ... KPxP 12. Kt-R4
In order to provoke Black's weakening move: P-Kt3, which mightgive White chances of attack on the long diagonal QR1-KR8, Whitegives up two clear moves. Black is able to get considerably aheadin his development, much to White's disadvantage.
12. ... P-Kt3 13. KKt-B3 QR-Q sq
Not Kt-K5 yet, on account of 14. PxP, PxP?; 15. BxKt, PxB; 16.KtxP.
14. PxP
White's position is uncomfortable, and a satisfactorycontinuation is hard to find. Possibly passive resistance mighthave been the best plan, thus: Q-K2, KR-Q1, Kt-B1-Kt3. The textmove is a preliminary to operations on the Queen's side, butallows Black too much scope in the centre.
14. ... PxP 15. B-Kt5
White wishes to get rid of the Black Knight which supports theadvance of P-Q5.
15. ... Kt-K5 16. BxKt BxB 17. Q-B2
White has no idea of the threatened disaster, or he would haveplayed P-KKt3. Even then, however, Black has the better game withtwo Bishops, and the Q and Kt better placed.
17. ... KtxKt
The beginning of a brilliant mating combination.
18. KtxKt P-Q5!
Black would have played the same move if White had retaken withthe Queen.
19. PxP
P-K4 was comparatively the best move, although Black's attackwould have become overwhelming after P-B4, e.g. 20. P-B3, B-B5,etc.
--------------------------------------- 8 | | | | #R | | #R | #K | | |---------------------------------------| 7 | #P | | | | #Q | #P | | #P | |---------------------------------------| 6 | | | #B | #B | | | #P | | |---------------------------------------| 5 | | | #P | | | | | | |---------------------------------------| 4 | | | | ^P | | | | | |---------------------------------------| 3 | | ^P | | | | | | | |---------------------------------------| 2 | ^P | ^B | ^Q | ^Kt| | ^P | ^P | ^P | |---------------------------------------| 1 | | | ^R | | | ^R | ^K | | --------------------------------------- A B C D E F G H
Diag. 159
19. ... BxPch!! 20. KxB Q-R5ch 21. K-Kt1 BxP!
Emanuel Lasker won a celebrated game from Bauer (Amsterdam,1889) with a similar sacrifice of two Bishops, and very likelythis is the reason why Tarrasch's beautiful game only earned himthe second brilliancy prize at Petrograd (1914).
22. P-B3
If KxB, then Q-Kt5ch; 23. K-R1, R-Q4; 24. QxP, R-R4ch; 25. QxR,

QxQch; 26. K-Kt2, Q-Kt4ch and QxKt.
22. ... KR-K1
Not Q-Kt6, because of Kt-K4.
23. Kt-K4 Q-R8ch 24. K-B2 BxR 25. P-Q5 P-B4 26. Q-B3 Q-Kt7ch 27. K-K3 RxKtch! 28. PxR P-B5ch
With Q-Kt6ch Black mates two moves earlier.
29. KxP R-B1ch 30. K-K5 Q-R7ch 31. K-K6 R-K1ch Resigns.
If K-Q7, B-Kt4 mate, if K-B6, Q-R5 mate.
[FOOTNOTE: Emanuel Lasker-Bauer: 1. P-KB4, P-Q4; 2. P-K3, Kt-KB3;3. P-QKt3, P-K3; 4. B-Kt2, B-K2; 5. B-Q3, P-QKt3; 6. Kt-QB3, B-Kt2; 7. Kt-B3, QKt-Q2; 8. Castles, Castles; 9. Kt-K2, P-B4; 10.Kt-Kt3, Q-B2; 11. Kt-K5, KtxKt; 12. BxKt, Q-B3; 13. Q-K2, P-QR3;14. Kt-R5, KtxKt; 15. BxPch!!, KxB; 16. QxKtch, K-Kt1; 17. BxP!,KxB; 18. Q-Kt4ch, K-R2; 19. R-B3, P-K4; 20. R-R3ch, Q-R3; 21.RxQ, KxR; 22. Q-Q7, and White won.]
GAME No. 42
White: Capablanca. Black: Aljechin.
Queen's Gambit Declined (see pp. 57 and 58).
1. P-Q4 P-Q4 2. P-QB4 P-QB3 3. P-K3 Kt-B3 4. Kt-KB3 P-K3 5. QKt-Q2 QKt-Q2 6. B-Q3 B-K2 7. Castles Castles 8. Q-B2
--------------------------------------- 8 | #R | | #B | #Q | | #R | #K | | |---------------------------------------| 7 | #P | #P | | #Kt| #B | #P | #P | #P | |---------------------------------------| 6 | | | #P | | #P | #Kt| | | |---------------------------------------| 5 | | | | #P | | | | | |---------------------------------------| 4 | | | ^P | ^P | | | | | |---------------------------------------| 3 | | | | ^B | ^P | ^Kt| | | |---------------------------------------|
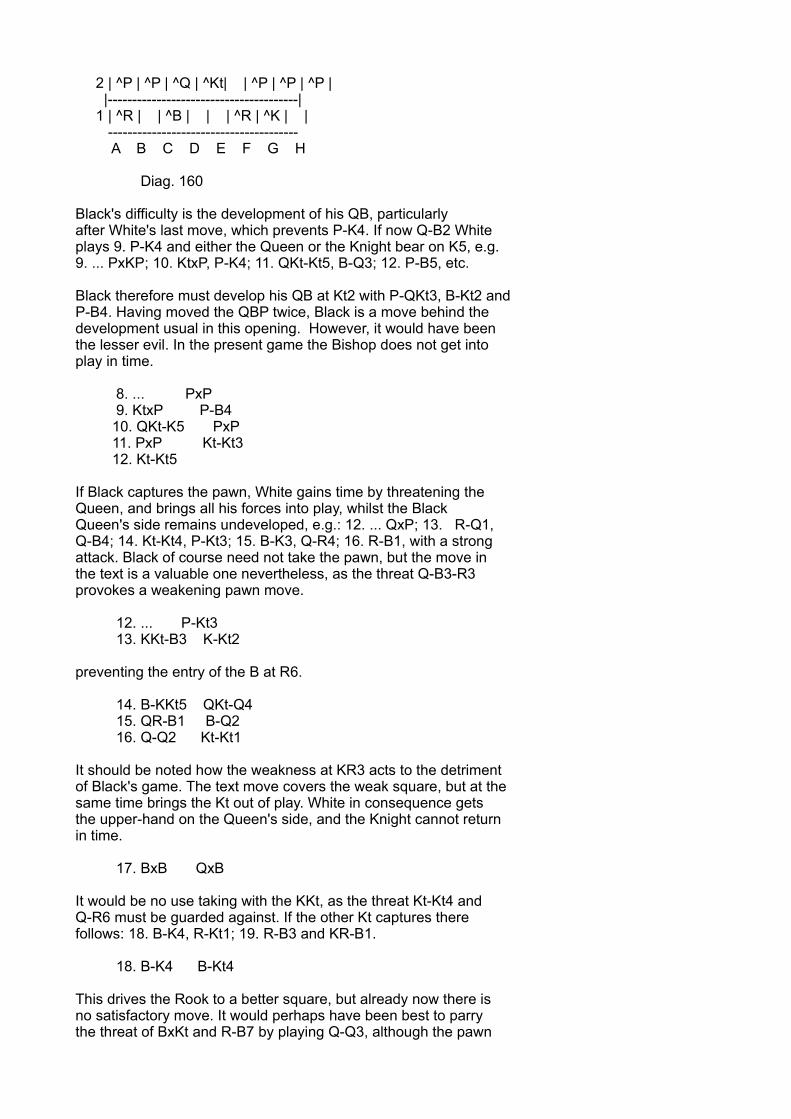
2 | ^P | ^P | ^Q | ^Kt| | ^P | ^P | ^P | |---------------------------------------| 1 | ^R | | ^B | | | ^R | ^K | | --------------------------------------- A B C D E F G H
Diag. 160
Black's difficulty is the development of his QB, particularlyafter White's last move, which prevents P-K4. If now Q-B2 Whiteplays 9. P-K4 and either the Queen or the Knight bear on K5, e.g.9. ... PxKP; 10. KtxP, P-K4; 11. QKt-Kt5, B-Q3; 12. P-B5, etc.
Black therefore must develop his QB at Kt2 with P-QKt3, B-Kt2 andP-B4. Having moved the QBP twice, Black is a move behind thedevelopment usual in this opening. However, it would have beenthe lesser evil. In the present game the Bishop does not get intoplay in time.
8. ... PxP 9. KtxP P-B4 10. QKt-K5 PxP 11. PxP Kt-Kt3 12. Kt-Kt5
If Black captures the pawn, White gains time by threatening theQueen, and brings all his forces into play, whilst the BlackQueen's side remains undeveloped, e.g.: 12. ... QxP; 13. R-Q1,Q-B4; 14. Kt-Kt4, P-Kt3; 15. B-K3, Q-R4; 16. R-B1, with a strongattack. Black of course need not take the pawn, but the move inthe text is a valuable one nevertheless, as the threat Q-B3-R3provokes a weakening pawn move.
12. ... P-Kt3 13. KKt-B3 K-Kt2
preventing the entry of the B at R6.
14. B-KKt5 QKt-Q4 15. QR-B1 B-Q2 16. Q-Q2 Kt-Kt1
It should be noted how the weakness at KR3 acts to the detrimentof Black's game. The text move covers the weak square, but at thesame time brings the Kt out of play. White in consequence getsthe upper-hand on the Queen's side, and the Knight cannot returnin time.
17. BxB QxB
It would be no use taking with the KKt, as the threat Kt-Kt4 andQ-R6 must be guarded against. If the other Kt captures therefollows: 18. B-K4, R-Kt1; 19. R-B3 and KR-B1.
18. B-K4 B-Kt4
This drives the Rook to a better square, but already now there isno satisfactory move. It would perhaps have been best to parrythe threat of BxKt and R-B7 by playing Q-Q3, although the pawn
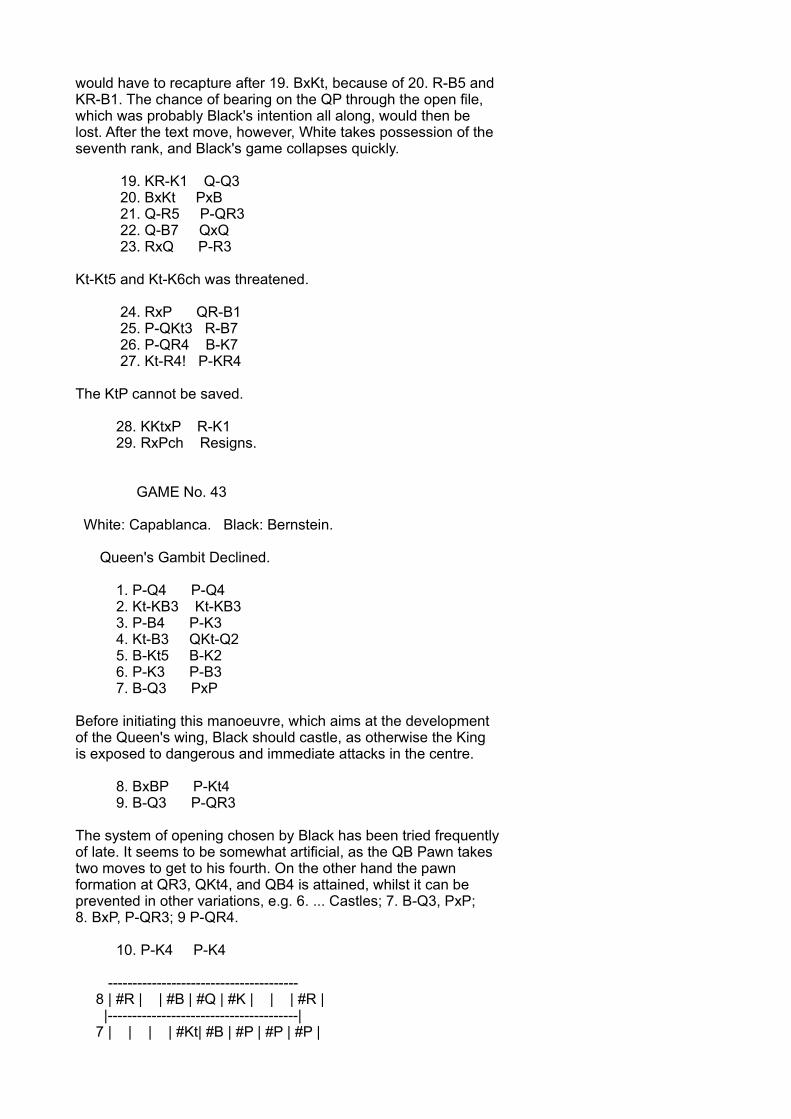
would have to recapture after 19. BxKt, because of 20. R-B5 andKR-B1. The chance of bearing on the QP through the open file,which was probably Black's intention all along, would then belost. After the text move, however, White takes possession of theseventh rank, and Black's game collapses quickly.
19. KR-K1 Q-Q3 20. BxKt PxB 21. Q-R5 P-QR3 22. Q-B7 QxQ 23. RxQ P-R3
Kt-Kt5 and Kt-K6ch was threatened.
24. RxP QR-B1 25. P-QKt3 R-B7 26. P-QR4 B-K7 27. Kt-R4! P-KR4
The KtP cannot be saved.
28. KKtxP R-K1 29. RxPch Resigns.
GAME No. 43
White: Capablanca. Black: Bernstein.
Queen's Gambit Declined.
1. P-Q4 P-Q4 2. Kt-KB3 Kt-KB3 3. P-B4 P-K3 4. Kt-B3 QKt-Q2 5. B-Kt5 B-K2 6. P-K3 P-B3 7. B-Q3 PxP
Before initiating this manoeuvre, which aims at the developmentof the Queen's wing, Black should castle, as otherwise the Kingis exposed to dangerous and immediate attacks in the centre.
8. BxBP P-Kt4 9. B-Q3 P-QR3
The system of opening chosen by Black has been tried frequentlyof late. It seems to be somewhat artificial, as the QB Pawn takestwo moves to get to his fourth. On the other hand the pawnformation at QR3, QKt4, and QB4 is attained, whilst it can beprevented in other variations, e.g. 6. ... Castles; 7. B-Q3, PxP;8. BxP, P-QR3; 9 P-QR4.
10. P-K4 P-K4
--------------------------------------- 8 | #R | | #B | #Q | #K | | | #R | |---------------------------------------| 7 | | | | #Kt| #B | #P | #P | #P |
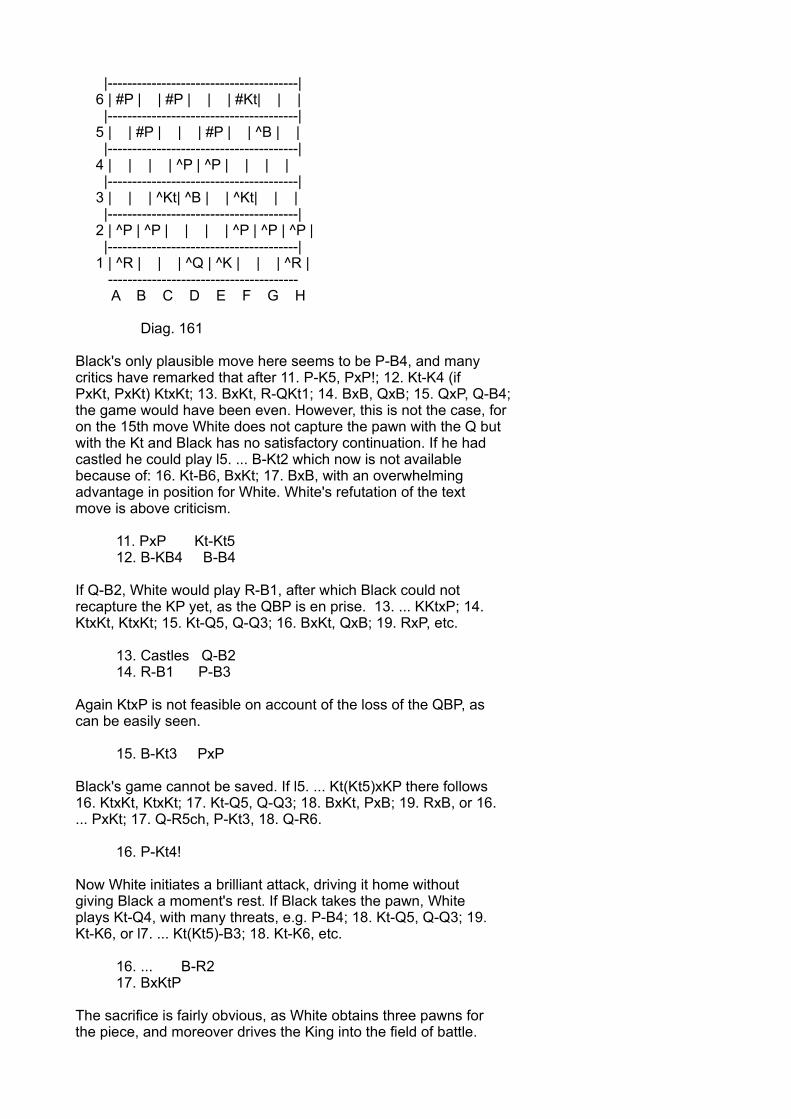
|---------------------------------------| 6 | #P | | #P | | | #Kt| | | |---------------------------------------| 5 | | #P | | | #P | | ^B | | |---------------------------------------| 4 | | | | ^P | ^P | | | | |---------------------------------------| 3 | | | ^Kt| ^B | | ^Kt| | | |---------------------------------------| 2 | ^P | ^P | | | | ^P | ^P | ^P | |---------------------------------------| 1 | ^R | | | ^Q | ^K | | | ^R | --------------------------------------- A B C D E F G H
Diag. 161
Black's only plausible move here seems to be P-B4, and manycritics have remarked that after 11. P-K5, PxP!; 12. Kt-K4 (ifPxKt, PxKt) KtxKt; 13. BxKt, R-QKt1; 14. BxB, QxB; 15. QxP, Q-B4;the game would have been even. However, this is not the case, foron the 15th move White does not capture the pawn with the Q butwith the Kt and Black has no satisfactory continuation. If he hadcastled he could play l5. ... B-Kt2 which now is not availablebecause of: 16. Kt-B6, BxKt; 17. BxB, with an overwhelmingadvantage in position for White. White's refutation of the textmove is above criticism.
11. PxP Kt-Kt5 12. B-KB4 B-B4
If Q-B2, White would play R-B1, after which Black could notrecapture the KP yet, as the QBP is en prise. 13. ... KKtxP; 14.KtxKt, KtxKt; 15. Kt-Q5, Q-Q3; 16. BxKt, QxB; 19. RxP, etc.
13. Castles Q-B2 14. R-B1 P-B3
Again KtxP is not feasible on account of the loss of the QBP, ascan be easily seen.
15. B-Kt3 PxP
Black's game cannot be saved. If l5. ... Kt(Kt5)xKP there follows16. KtxKt, KtxKt; 17. Kt-Q5, Q-Q3; 18. BxKt, PxB; 19. RxB, or 16.... PxKt; 17. Q-R5ch, P-Kt3, 18. Q-R6.
16. P-Kt4!
Now White initiates a brilliant attack, driving it home withoutgiving Black a moment's rest. If Black takes the pawn, Whiteplays Kt-Q4, with many threats, e.g. P-B4; 18. Kt-Q5, Q-Q3; 19.Kt-K6, or l7. ... Kt(Kt5)-B3; 18. Kt-K6, etc.
16. ... B-R2 17. BxKtP
The sacrifice is fairly obvious, as White obtains three pawns forthe piece, and moreover drives the King into the field of battle.
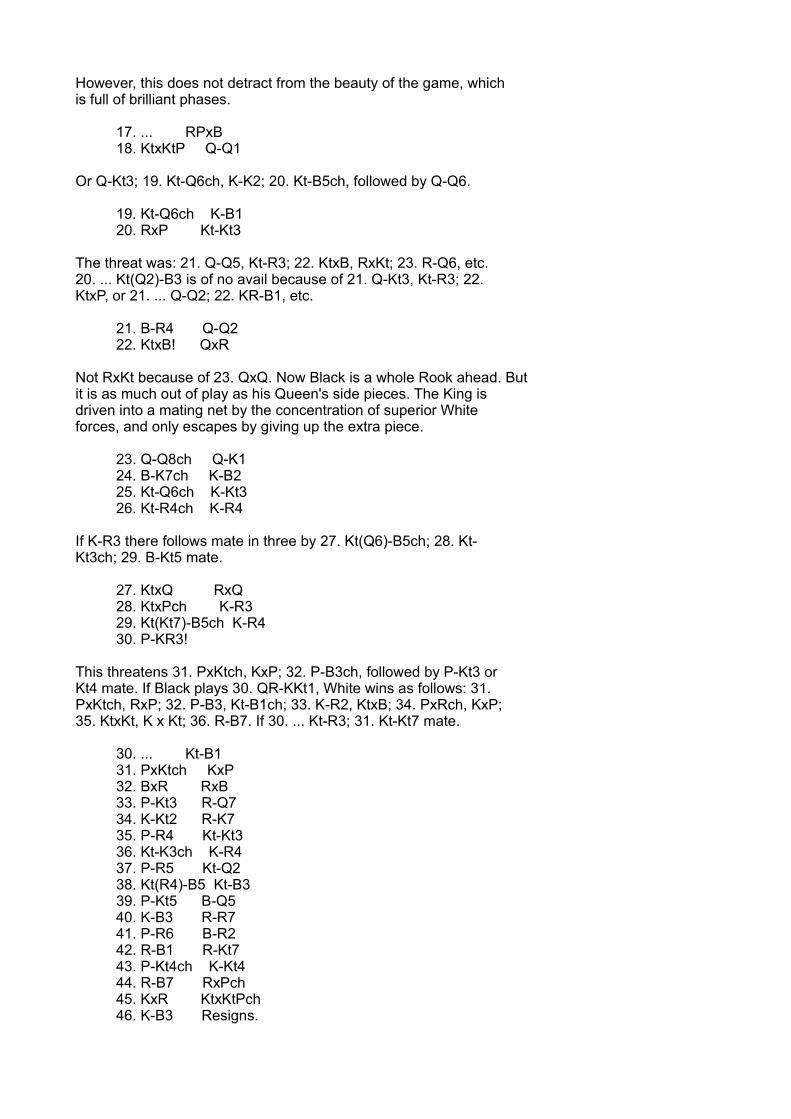
However, this does not detract from the beauty of the game, whichis full of brilliant phases.
17. ... RPxB 18. KtxKtP Q-Q1
Or Q-Kt3; 19. Kt-Q6ch, K-K2; 20. Kt-B5ch, followed by Q-Q6.
19. Kt-Q6ch K-B1 20. RxP Kt-Kt3
The threat was: 21. Q-Q5, Kt-R3; 22. KtxB, RxKt; 23. R-Q6, etc.20. ... Kt(Q2)-B3 is of no avail because of 21. Q-Kt3, Kt-R3; 22.KtxP, or 21. ... Q-Q2; 22. KR-B1, etc.
21. B-R4 Q-Q2 22. KtxB! QxR
Not RxKt because of 23. QxQ. Now Black is a whole Rook ahead. Butit is as much out of play as his Queen's side pieces. The King isdriven into a mating net by the concentration of superior Whiteforces, and only escapes by giving up the extra piece.
23. Q-Q8ch Q-K1 24. B-K7ch K-B2 25. Kt-Q6ch K-Kt3 26. Kt-R4ch K-R4
If K-R3 there follows mate in three by 27. Kt(Q6)-B5ch; 28. Kt-Kt3ch; 29. B-Kt5 mate.
27. KtxQ RxQ 28. KtxPch K-R3 29. Kt(Kt7)-B5ch K-R4 30. P-KR3!
This threatens 31. PxKtch, KxP; 32. P-B3ch, followed by P-Kt3 orKt4 mate. If Black plays 30. QR-KKt1, White wins as follows: 31.PxKtch, RxP; 32. P-B3, Kt-B1ch; 33. K-R2, KtxB; 34. PxRch, KxP;35. KtxKt, K x Kt; 36. R-B7. If 30. ... Kt-R3; 31. Kt-Kt7 mate.
30. ... Kt-B1 31. PxKtch KxP 32. BxR RxB 33. P-Kt3 R-Q7 34. K-Kt2 R-K7 35. P-R4 Kt-Kt3 36. Kt-K3ch K-R4 37. P-R5 Kt-Q2 38. Kt(R4)-B5 Kt-B3 39. P-Kt5 B-Q5 40. K-B3 R-R7 41. P-R6 B-R2 42. R-B1 R-Kt7 43. P-Kt4ch K-Kt4 44. R-B7 RxPch 45. KxR KtxKtPch 46. K-B3 Resigns.
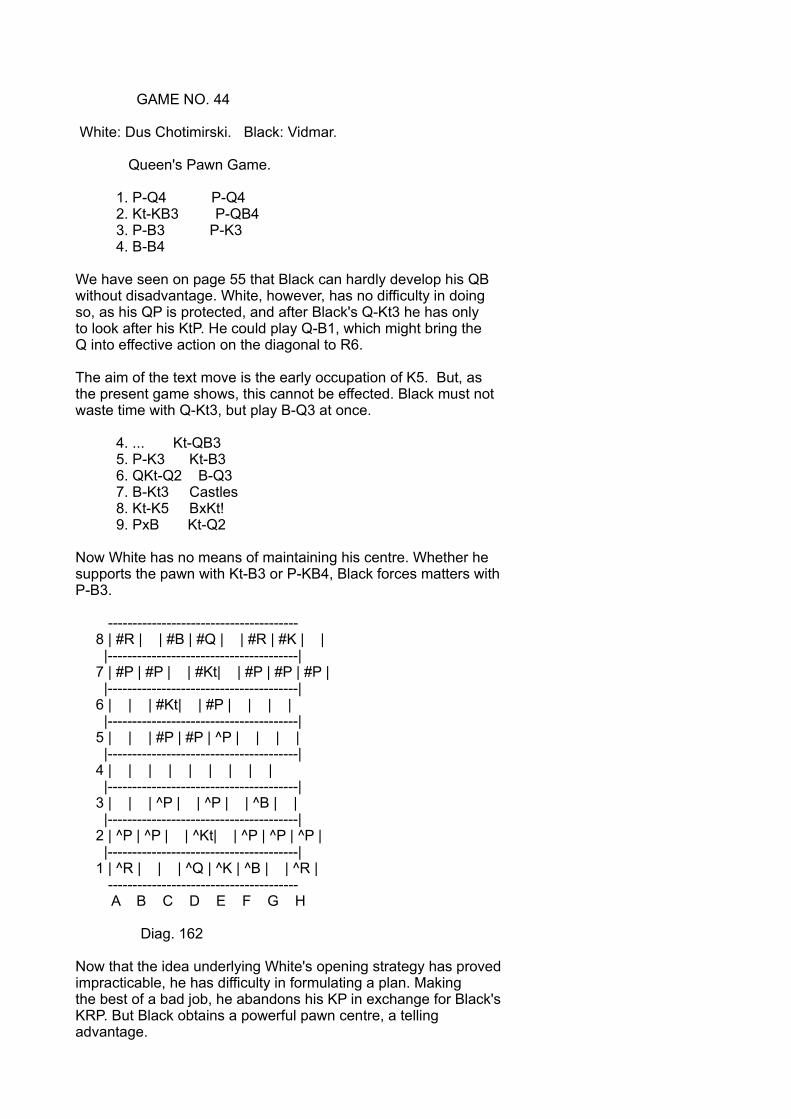
GAME NO. 44
White: Dus Chotimirski. Black: Vidmar.
Queen's Pawn Game.
1. P-Q4 P-Q4 2. Kt-KB3 P-QB4 3. P-B3 P-K3 4. B-B4
We have seen on page 55 that Black can hardly develop his QBwithout disadvantage. White, however, has no difficulty in doingso, as his QP is protected, and after Black's Q-Kt3 he has onlyto look after his KtP. He could play Q-B1, which might bring theQ into effective action on the diagonal to R6.
The aim of the text move is the early occupation of K5. But, asthe present game shows, this cannot be effected. Black must notwaste time with Q-Kt3, but play B-Q3 at once.
4. ... Kt-QB3 5. P-K3 Kt-B3 6. QKt-Q2 B-Q3 7. B-Kt3 Castles 8. Kt-K5 BxKt! 9. PxB Kt-Q2
Now White has no means of maintaining his centre. Whether hesupports the pawn with Kt-B3 or P-KB4, Black forces matters withP-B3.
--------------------------------------- 8 | #R | | #B | #Q | | #R | #K | | |---------------------------------------| 7 | #P | #P | | #Kt| | #P | #P | #P | |---------------------------------------| 6 | | | #Kt| | #P | | | | |---------------------------------------| 5 | | | #P | #P | ^P | | | | |---------------------------------------| 4 | | | | | | | | | |---------------------------------------| 3 | | | ^P | | ^P | | ^B | | |---------------------------------------| 2 | ^P | ^P | | ^Kt| | ^P | ^P | ^P | |---------------------------------------| 1 | ^R | | | ^Q | ^K | ^B | | ^R | --------------------------------------- A B C D E F G H
Diag. 162
Now that the idea underlying White's opening strategy has provedimpracticable, he has difficulty in formulating a plan. Makingthe best of a bad job, he abandons his KP in exchange for Black'sKRP. But Black obtains a powerful pawn centre, a tellingadvantage.

10. B-Q3 KKtxP 11. BxKt KtxB 12. BxPch KxB 13. Q-R5ch K-Kt1 14. QxKt P-B3 15. Q-R5 Q-Kt3
Black wishes to provoke the advance of the QKtP and QBP in orderto obtain a passed pawn (16. P-QKt3, P-K4; 17. Castles KR, Q-R4;18. P-QB4, P-Q5). In order to avoid this continuation, Whitetakes his chance of castling on the Queen's side. This turns outto Black's advantage. Indeed it is a foregone conclusion. In theensuing double assault by pawns, Black is several moves ahead, asthe White pawns concerned in the attack are still on theiroriginal squares.
16. Castles QR P-K4 17. P-KKt4 P-Q5 18. P-QB4 B-Q2 19. P-Kt5 PxKtP 20. QxP RxP 21. PxP BPxP!
Finely played. Black gives up his KP in order to get his QR intoplay with the gain of a move.
22. QxP R-K1 23. Q-Kt3 QR-K7 24. KR-K1
KR-Kt1 would also be of no avail because of Q-KR3, 25. Q-Q3, Q-KB3 threatening B-B4. The move in the text puts an end to theagony.
24. ... RxKt!! Resigns.
For after 25. RxR, RxR; 26. KxR, QxPch; 27. K-Q3, B-B4ch; 28. R-K4, Q-B6ch; 29. K-K2, QxQ; Black remains with an extra piece.
GAME No. 45
White: Rubinstein. Black: Spielmann.
Irregular Opening.
1. P-Q4 P-QB4
With this move Black tries to avoid well-trodden paths oftournament practice. White can, at will, lead into a peacefulQueen's Gambit by 2. P-K3 or into a Sicilian Defence by P-K4. Itis more usual, however, to play P-Q5, which blocks up the Blackcentre to some extent.
If 2. PxP, Black regains his pawn after P-K3 without anydisadvantage.
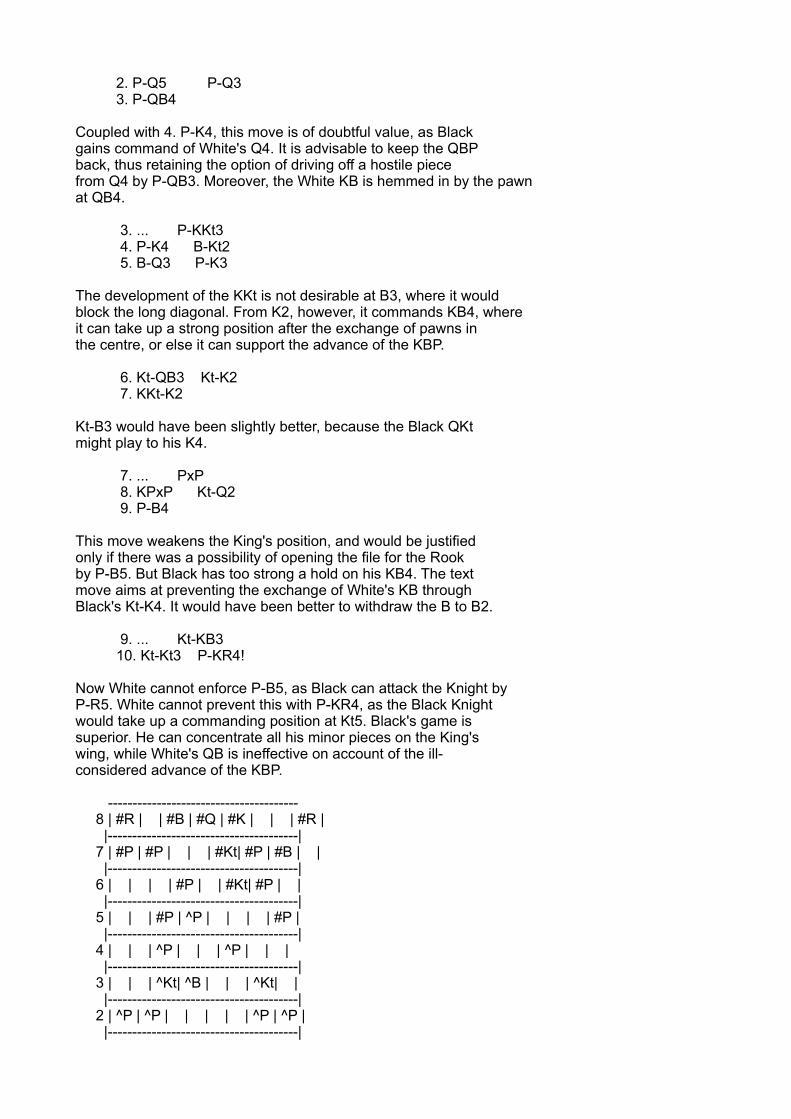
2. P-Q5 P-Q3 3. P-QB4
Coupled with 4. P-K4, this move is of doubtful value, as Blackgains command of White's Q4. It is advisable to keep the QBPback, thus retaining the option of driving off a hostile piecefrom Q4 by P-QB3. Moreover, the White KB is hemmed in by the pawnat QB4.
3. ... P-KKt3 4. P-K4 B-Kt2 5. B-Q3 P-K3
The development of the KKt is not desirable at B3, where it wouldblock the long diagonal. From K2, however, it commands KB4, whereit can take up a strong position after the exchange of pawns inthe centre, or else it can support the advance of the KBP.
6. Kt-QB3 Kt-K2 7. KKt-K2
Kt-B3 would have been slightly better, because the Black QKtmight play to his K4.
7. ... PxP 8. KPxP Kt-Q2 9. P-B4
This move weakens the King's position, and would be justifiedonly if there was a possibility of opening the file for the Rookby P-B5. But Black has too strong a hold on his KB4. The textmove aims at preventing the exchange of White's KB throughBlack's Kt-K4. It would have been better to withdraw the B to B2.
9. ... Kt-KB3 10. Kt-Kt3 P-KR4!
Now White cannot enforce P-B5, as Black can attack the Knight byP-R5. White cannot prevent this with P-KR4, as the Black Knightwould take up a commanding position at Kt5. Black's game issuperior. He can concentrate all his minor pieces on the King'swing, while White's QB is ineffective on account of the ill-considered advance of the KBP.
--------------------------------------- 8 | #R | | #B | #Q | #K | | | #R | |---------------------------------------| 7 | #P | #P | | | #Kt| #P | #B | | |---------------------------------------| 6 | | | | #P | | #Kt| #P | | |---------------------------------------| 5 | | | #P | ^P | | | | #P | |---------------------------------------| 4 | | | ^P | | | ^P | | | |---------------------------------------| 3 | | | ^Kt| ^B | | | ^Kt| | |---------------------------------------| 2 | ^P | ^P | | | | | ^P | ^P | |---------------------------------------|
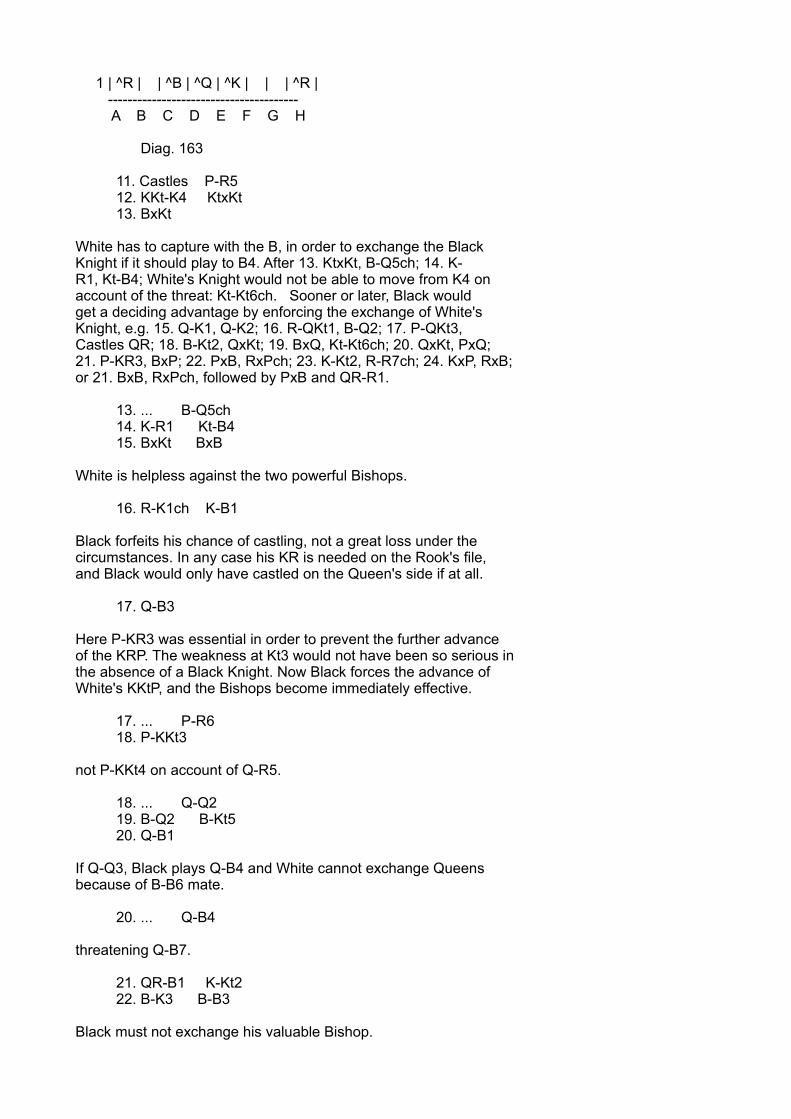
1 | ^R | | ^B | ^Q | ^K | | | ^R | --------------------------------------- A B C D E F G H
Diag. 163
11. Castles P-R5 12. KKt-K4 KtxKt 13. BxKt
White has to capture with the B, in order to exchange the BlackKnight if it should play to B4. After 13. KtxKt, B-Q5ch; 14. K-R1, Kt-B4; White's Knight would not be able to move from K4 onaccount of the threat: Kt-Kt6ch. Sooner or later, Black wouldget a deciding advantage by enforcing the exchange of White'sKnight, e.g. 15. Q-K1, Q-K2; 16. R-QKt1, B-Q2; 17. P-QKt3,Castles QR; 18. B-Kt2, QxKt; 19. BxQ, Kt-Kt6ch; 20. QxKt, PxQ;21. P-KR3, BxP; 22. PxB, RxPch; 23. K-Kt2, R-R7ch; 24. KxP, RxB;or 21. BxB, RxPch, followed by PxB and QR-R1.
13. ... B-Q5ch 14. K-R1 Kt-B4 15. BxKt BxB
White is helpless against the two powerful Bishops.
16. R-K1ch K-B1
Black forfeits his chance of castling, not a great loss under thecircumstances. In any case his KR is needed on the Rook's file,and Black would only have castled on the Queen's side if at all.
17. Q-B3
Here P-KR3 was essential in order to prevent the further advanceof the KRP. The weakness at Kt3 would not have been so serious inthe absence of a Black Knight. Now Black forces the advance ofWhite's KKtP, and the Bishops become immediately effective.
17. ... P-R6 18. P-KKt3
not P-KKt4 on account of Q-R5.
18. ... Q-Q2 19. B-Q2 B-Kt5 20. Q-B1
If Q-Q3, Black plays Q-B4 and White cannot exchange Queensbecause of B-B6 mate.
20. ... Q-B4
threatening Q-B7.
21. QR-B1 K-Kt2 22. B-K3 B-B3
Black must not exchange his valuable Bishop.
23. P-Kt3 KR-K1 24. B-B2
There is no answer to Black's threat of doubling the Rooks on theK file. If White plays Q-B2, Black's Queen effects an entry atQ6, after which he would double his Rooks, and White's Bishopcannot be defended. After the text move, Black forces theexchange of his two Rooks for the Queen. Generally speaking, thisis no disadvantage, but in consequence of the exposed position ofthe White King, it means a speedy loss for White.
24. ... B-B6ch 25. K-Kt1 B-Kt7 26. RxR BxQ 27. RxR Q-Q6!
If now RxB Black plays Q-B6.
28. R-K8
In order to play R-K3 if Black plays BxKt.
28. ... Q-B6! 29. KxB Q-R8ch 30. B-Kt1 Q-Kt7ch 31. K-K1 QxBch 32. K-Q2 QxPch Resigns
for the pawn queens.
GAME NO. 46
White: G. A. Thomas. Black: Ed. Lasker.
Irregular Opening (compare Game No. 45).
1. P-Q4 P-QB4 2. P-Q5 P-Q3 3. P-QB4 P-KKt3 4. Kt-QB3 B-Kt2 5. B-Q2
This is not necessary. Black could hardly exchange his B for theKt; the weakness at his KB3 and KR3 would become too serious adisadvantage.
5. ... P-K3 6. P-K4 PxP 7. KtxP!
In view of the fact that Black's position after BP or KPxP wouldbe very promising, as all his pieces would be easy to bring intoplay, White decides upon the sacrifice of a pawn, in order tofurther his own development.
7. ... BxP
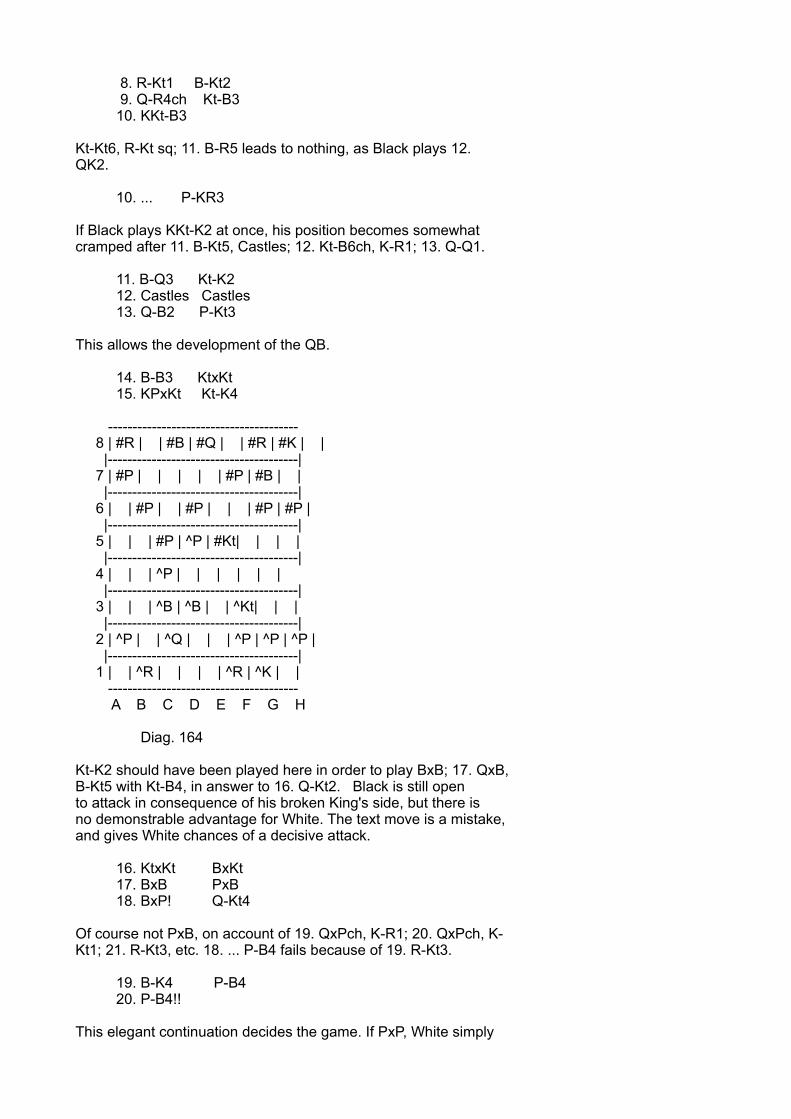
8. R-Kt1 B-Kt2 9. Q-R4ch Kt-B3 10. KKt-B3
Kt-Kt6, R-Kt sq; 11. B-R5 leads to nothing, as Black plays 12.QK2.
10. ... P-KR3
If Black plays KKt-K2 at once, his position becomes somewhatcramped after 11. B-Kt5, Castles; 12. Kt-B6ch, K-R1; 13. Q-Q1.
11. B-Q3 Kt-K2 12. Castles Castles 13. Q-B2 P-Kt3
This allows the development of the QB.
14. B-B3 KtxKt 15. KPxKt Kt-K4
--------------------------------------- 8 | #R | | #B | #Q | | #R | #K | | |---------------------------------------| 7 | #P | | | | | #P | #B | | |---------------------------------------| 6 | | #P | | #P | | | #P | #P | |---------------------------------------| 5 | | | #P | ^P | #Kt| | | | |---------------------------------------| 4 | | | ^P | | | | | | |---------------------------------------| 3 | | | ^B | ^B | | ^Kt| | | |---------------------------------------| 2 | ^P | | ^Q | | | ^P | ^P | ^P | |---------------------------------------| 1 | | ^R | | | | ^R | ^K | | --------------------------------------- A B C D E F G H
Diag. 164
Kt-K2 should have been played here in order to play BxB; 17. QxB,B-Kt5 with Kt-B4, in answer to 16. Q-Kt2. Black is still opento attack in consequence of his broken King's side, but there isno demonstrable advantage for White. The text move is a mistake,and gives White chances of a decisive attack.
16. KtxKt BxKt 17. BxB PxB 18. BxP! Q-Kt4
Of course not PxB, on account of 19. QxPch, K-R1; 20. QxPch, K-Kt1; 21. R-Kt3, etc. 18. ... P-B4 fails because of 19. R-Kt3.
19. B-K4 P-B4 20. P-B4!!
This elegant continuation decides the game. If PxP, White simply
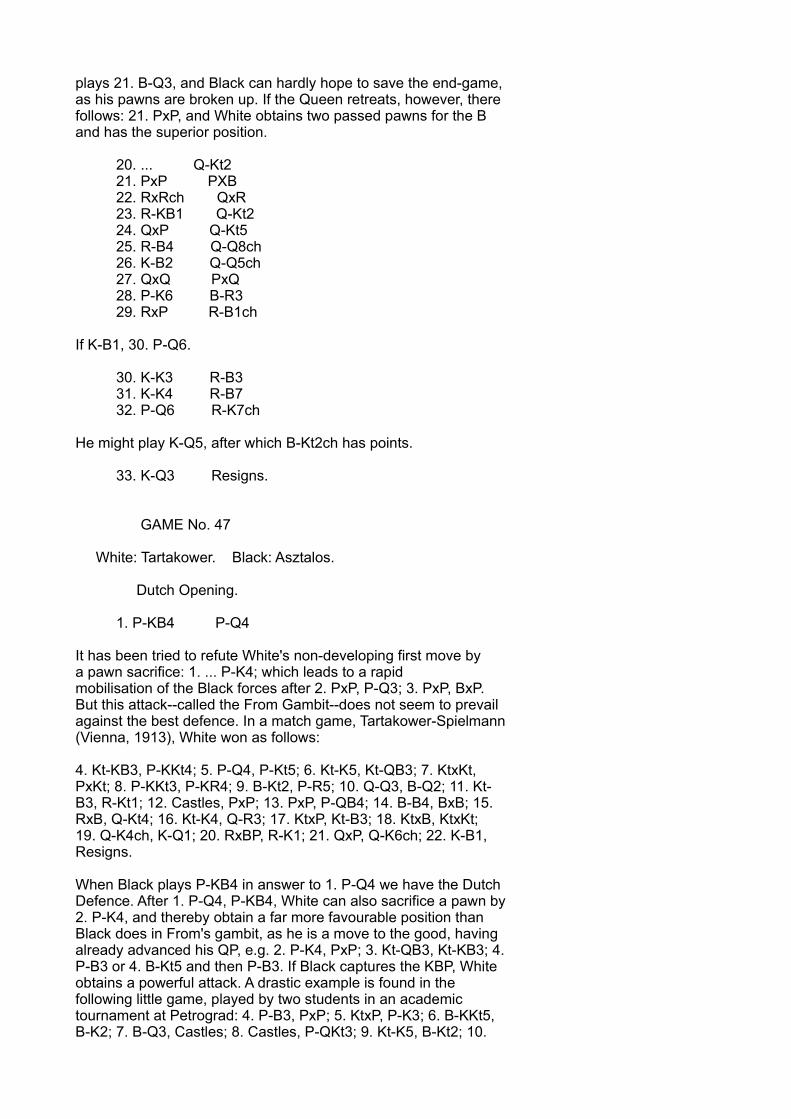
plays 21. B-Q3, and Black can hardly hope to save the end-game,as his pawns are broken up. If the Queen retreats, however, therefollows: 21. PxP, and White obtains two passed pawns for the Band has the superior position.
20. ... Q-Kt2 21. PxP PXB 22. RxRch QxR 23. R-KB1 Q-Kt2 24. QxP Q-Kt5 25. R-B4 Q-Q8ch 26. K-B2 Q-Q5ch 27. QxQ PxQ 28. P-K6 B-R3 29. RxP R-B1ch
If K-B1, 30. P-Q6.
30. K-K3 R-B3 31. K-K4 R-B7 32. P-Q6 R-K7ch
He might play K-Q5, after which B-Kt2ch has points.
33. K-Q3 Resigns.
GAME No. 47
White: Tartakower. Black: Asztalos.
Dutch Opening.
1. P-KB4 P-Q4
It has been tried to refute White's non-developing first move bya pawn sacrifice: 1. ... P-K4; which leads to a rapidmobilisation of the Black forces after 2. PxP, P-Q3; 3. PxP, BxP.But this attack--called the From Gambit--does not seem to prevailagainst the best defence. In a match game, Tartakower-Spielmann(Vienna, 1913), White won as follows:
4. Kt-KB3, P-KKt4; 5. P-Q4, P-Kt5; 6. Kt-K5, Kt-QB3; 7. KtxKt,PxKt; 8. P-KKt3, P-KR4; 9. B-Kt2, P-R5; 10. Q-Q3, B-Q2; 11. Kt-B3, R-Kt1; 12. Castles, PxP; 13. PxP, P-QB4; 14. B-B4, BxB; 15.RxB, Q-Kt4; 16. Kt-K4, Q-R3; 17. KtxP, Kt-B3; 18. KtxB, KtxKt;19. Q-K4ch, K-Q1; 20. RxBP, R-K1; 21. QxP, Q-K6ch; 22. K-B1,Resigns.
When Black plays P-KB4 in answer to 1. P-Q4 we have the DutchDefence. After 1. P-Q4, P-KB4, White can also sacrifice a pawn by2. P-K4, and thereby obtain a far more favourable position thanBlack does in From's gambit, as he is a move to the good, havingalready advanced his QP, e.g. 2. P-K4, PxP; 3. Kt-QB3, Kt-KB3; 4.P-B3 or 4. B-Kt5 and then P-B3. If Black captures the KBP, Whiteobtains a powerful attack. A drastic example is found in thefollowing little game, played by two students in an academictournament at Petrograd: 4. P-B3, PxP; 5. KtxP, P-K3; 6. B-KKt5,B-K2; 7. B-Q3, Castles; 8. Castles, P-QKt3; 9. Kt-K5, B-Kt2; 10.

BxKt, BxB; 11. BxPch, KxB; 12. Q-R5ch, K-Kt1; 13. Kt-Kt6, R-K1;14. Q-R8ch, K-B2; 15. Kt-K5ch, K-K2; 16. QxPch!!, BxQ; 17. R-B7ch, K-Q3; 18. Kt-Kt5ch, K-Q4; 19. P-B4ch, K-K5; 20. R-K1 mate.
Black's best answer is to play P-Q4 after White's 4. P-KB3 (5.B-Kt5, B-B4). If 4. B-Kt5, it is not yet possible to play P-Q4because of the threat: BxKt, Q-R5ch, and QxQP. In that case Blackmust first play P-QB3, after which White again obtains a strongattack by P-KB3.
Black can avoid the attacks which follow after 1. P-Q4, P-KB4; 2.P-K4, by playing P-K3 on his first move, and then lead into theDutch defence with P-KB4 on his second move. He must, however,reckon with having to play the French defence which White canbring about with 2. P-K4.
2. P-K3 P-K3 3. Kt-KB3 P-QB4 4. P-QKt3 Kt-QB3 5. B-Kt5 Kt-B3
Black should have played B-Q2 here, as White can exchange at B6,leaving Black with a doubled pawn. This in itself is not adrawback, but in the present position it is serious, as Blackwill have difficulty in finding a place for his QB. For there isno prospect of enforcing P-K4, as White commands that square insufficient force.
6. B-Kt2 B-K2 7. Castles Castles 8. BxQKt PxB 9. Kt-K5 Q-B2 10. P-Q3 P-QR4
Black's attempt of capturing his K4 by playing Kt-Q2 and P-B3,White would cross at once with Q-Kt4. With the text move Blackbegins operations on the Q side, which is quite correct, as Whitehas the upper hand on the other wing.
11. Q-K2
White should have prevented the further advance of the Black RPby 11. P-QR4. This would have been sound policy in any case, asthe R file could not have been forced open for the Black Rooks.
11. ... P-R5 12. Kt-Q2 PxP
Premature. The capture is only of value if the file can be held.To that end it is first necessary to play B-Kt2 and to occupy theR file with Rooks and Queen. After the exchange of Rooks, Black is at a disadvantage for the end-game because ofthe inefficiency of the QB.
--------------------------------------- 8 | #R | | #B | | | #R | #K | | |---------------------------------------| 7 | | | #Q | | #B | #P | #P | #P | |---------------------------------------|
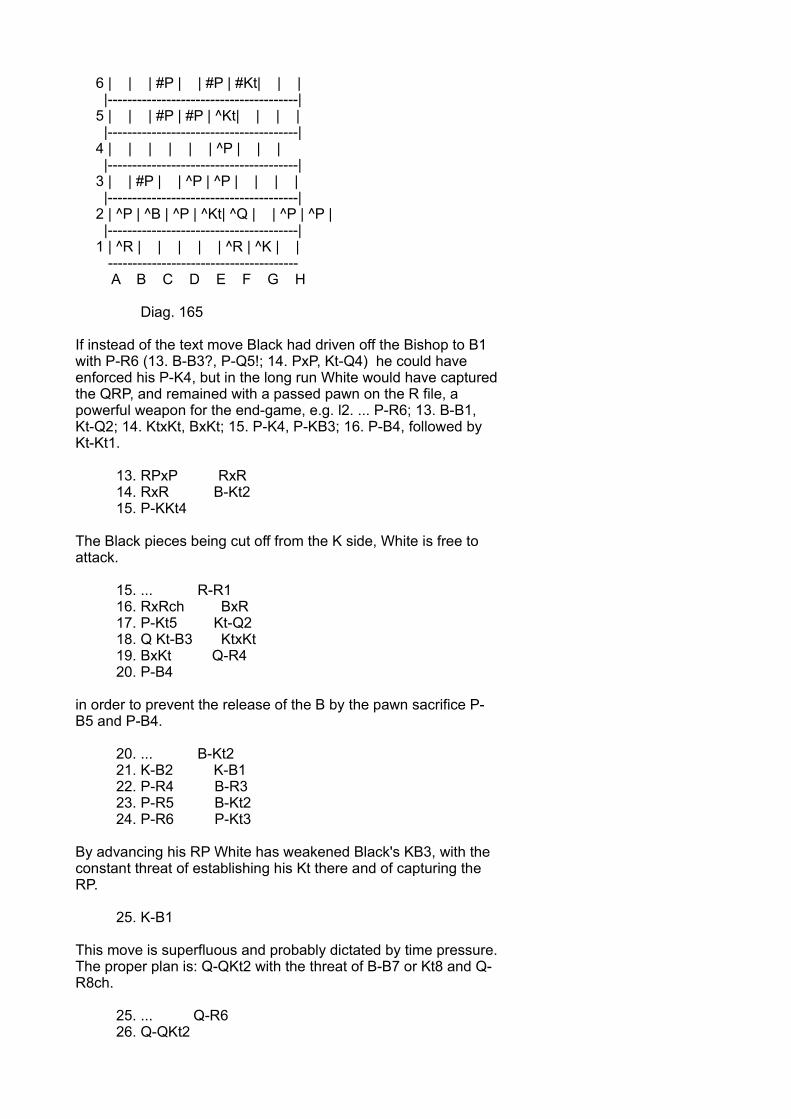
6 | | | #P | | #P | #Kt| | | |---------------------------------------| 5 | | | #P | #P | ^Kt| | | | |---------------------------------------| 4 | | | | | | ^P | | | |---------------------------------------| 3 | | #P | | ^P | ^P | | | | |---------------------------------------| 2 | ^P | ^B | ^P | ^Kt| ^Q | | ^P | ^P | |---------------------------------------| 1 | ^R | | | | | ^R | ^K | | --------------------------------------- A B C D E F G H
Diag. 165
If instead of the text move Black had driven off the Bishop to B1with P-R6 (13. B-B3?, P-Q5!; 14. PxP, Kt-Q4) he could haveenforced his P-K4, but in the long run White would have capturedthe QRP, and remained with a passed pawn on the R file, apowerful weapon for the end-game, e.g. l2. ... P-R6; 13. B-B1,Kt-Q2; 14. KtxKt, BxKt; 15. P-K4, P-KB3; 16. P-B4, followed byKt-Kt1.
13. RPxP RxR 14. RxR B-Kt2 15. P-KKt4
The Black pieces being cut off from the K side, White is free toattack.
15. ... R-R1 16. RxRch BxR 17. P-Kt5 Kt-Q2 18. Q Kt-B3 KtxKt 19. BxKt Q-R4 20. P-B4
in order to prevent the release of the B by the pawn sacrifice P-B5 and P-B4.
20. ... B-Kt2 21. K-B2 K-B1 22. P-R4 B-R3 23. P-R5 B-Kt2 24. P-R6 P-Kt3
By advancing his RP White has weakened Black's KB3, with theconstant threat of establishing his Kt there and of capturing theRP.
25. K-B1
This move is superfluous and probably dictated by time pressure.The proper plan is: Q-QKt2 with the threat of B-B7 or Kt8 and Q-R8ch.
25. ... Q-R6 26. Q-QKt2

The end-game is a clear win for White. He plays his Kt to KKt4,threatening to reach B6 or K5. The effect is twofold.
--------------------------------------- 8 | | | | | | #K | | | |---------------------------------------| 7 | | #B | | | #B | #P | | #P | |---------------------------------------| 6 | | | #P | | #P | | #P | ^P | |---------------------------------------| 5 | | | #P | #P | ^B | | ^P | | |---------------------------------------| 4 | | | ^P | | | ^P | | | |---------------------------------------| 3 | #Q | ^P | | ^P | ^P | ^Kt| | | |---------------------------------------| 2 | | ^Q | | | | | | | |---------------------------------------| 1 | | | | | | ^K | | | --------------------------------------- A B C D E F G H
Diag. 166
Black must keep his B at K2 and his K must remain near the KBP.White's King marches to QKt6 and captures the QB pawns, queeninghis QKtP. Black cannot prevent the White King from doing this byB-Q1, as White, by attacking Black's QB4 with his B, could at anytime force the B back to his K2. The remainder of the game needsno comment.
26. ... QxQ 27. BxQ B-Q3 28. Kt-R2 K-K1 29. Kt-Kt4 B-K2 30. B-K5 K-Q2 31. K-K2 K-K1 32. K-Q2 K-Q2 33. K-B2 K-K1 34. K-Kt2 K-Q2 35. K-R3 K-K1 36. K-R4 K-Q2 37. B-Kt8 K-B1 38. B-R7 K-Q2 39. B-Kt6 P-Q5 40. P-K4 K-K1 41. P-K5 K-Q2 42. Kt-B2 Resigns.
because there follows Kt-K4 and BxP.
GAME No. 48
White: Blackburne. Black: Niemzowitsch.
Irregular Opening.
1. P-K3 P-Q3
It is due to this reply of Black's that the opening is irregular.For had he played P-Q4 a peaceful QP game would have resulted, orafter White's 2. P-KB4 a Dutch opening.
2. P-KB4 P-K4 3. PxP PxP
Black has the superior position; he has a pawn in the centre andhis pieces are more free.
4. Kt-QB3 B-Q3
As was seen on a former occasion, it is a shade better to developthe Knights before the Bishops, as the choice of moves for thelatter is less limited. The alternative might have been 5. Kt-B3,B-KKt5; 6. B-K2, Kt-B3.
5. P-K4
Now White has also a pawn in the centre, but he is a move behindin his development.
5. ... B-K3 6. Kt-B3 P-KB3 7. P-Q3 Kt-K2 8. B-K3 P-QB4 9. Q-Q2 QKt-B3 10. B-K2 Kt-Q5 11. Castles KR Castles 12. Kt-Q1 KKt-B3 13. P-B3
Now Black has gained an advantage from the command of his Q5. Theadvance of White's QBP, which was necessitated by the dominatingposition of the Black Knight, has left White with a "backward"pawn at Q3.
13. ... KtxBch 14. QxKt R-K1
If now a general exchange takes place after P-Q4, the KP is lostthrough B-Q4.
15. Kt-R4
White's counter attack on the King's side becomes threatening,and Black must continue his operations on the Queen's wing withthe greatest care, as he may be called upon at any time toconcentrate his pieces for the defence of the King's wing.
15. ... B-KB1 16. Kt-B5 K-R1 17. P-KKt4 Q-Q2 18. Kt-B2 P-QR4
Black wishes to open up files on the Queen's side.
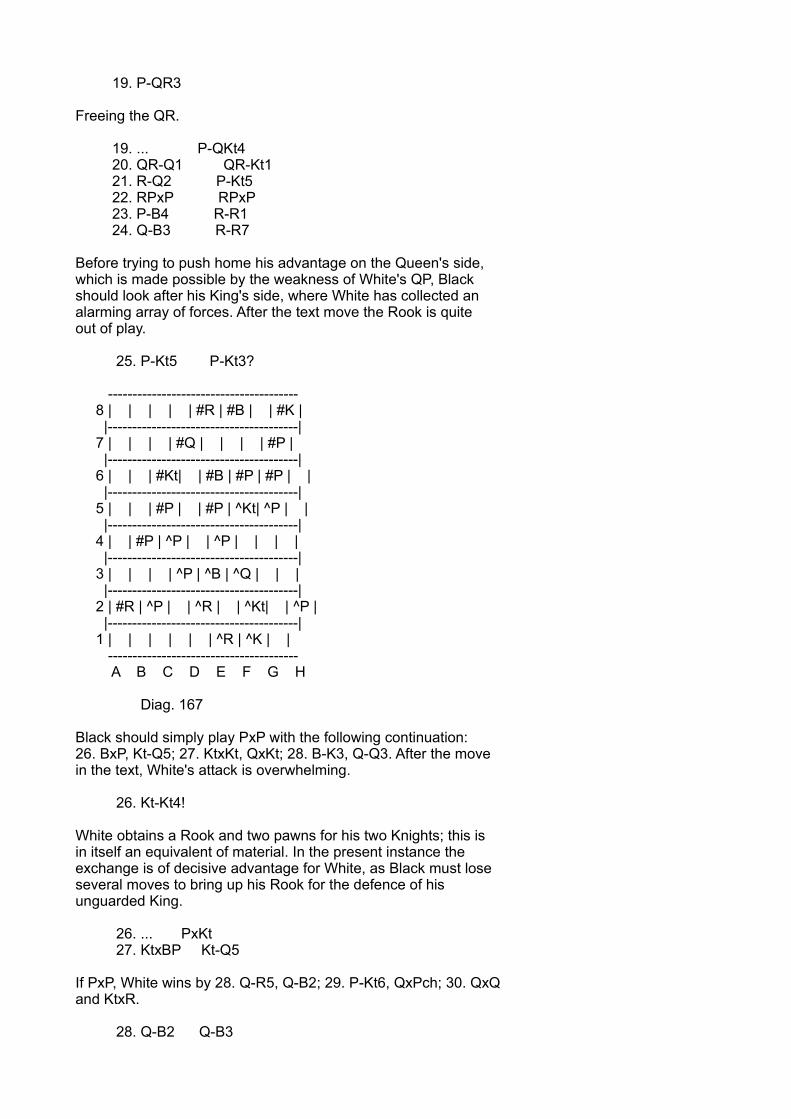
19. P-QR3
Freeing the QR.
19. ... P-QKt4 20. QR-Q1 QR-Kt1 21. R-Q2 P-Kt5 22. RPxP RPxP 23. P-B4 R-R1 24. Q-B3 R-R7
Before trying to push home his advantage on the Queen's side,which is made possible by the weakness of White's QP, Blackshould look after his King's side, where White has collected analarming array of forces. After the text move the Rook is quiteout of play.
25. P-Kt5 P-Kt3?
--------------------------------------- 8 | | | | | #R | #B | | #K | |---------------------------------------| 7 | | | | #Q | | | | #P | |---------------------------------------| 6 | | | #Kt| | #B | #P | #P | | |---------------------------------------| 5 | | | #P | | #P | ^Kt| ^P | | |---------------------------------------| 4 | | #P | ^P | | ^P | | | | |---------------------------------------| 3 | | | | ^P | ^B | ^Q | | | |---------------------------------------| 2 | #R | ^P | | ^R | | ^Kt| | ^P | |---------------------------------------| 1 | | | | | | ^R | ^K | | --------------------------------------- A B C D E F G H
Diag. 167
Black should simply play PxP with the following continuation:26. BxP, Kt-Q5; 27. KtxKt, QxKt; 28. B-K3, Q-Q3. After the movein the text, White's attack is overwhelming.
26. Kt-Kt4!
White obtains a Rook and two pawns for his two Knights; this isin itself an equivalent of material. In the present instance theexchange is of decisive advantage for White, as Black must loseseveral moves to bring up his Rook for the defence of hisunguarded King.
26. ... PxKt 27. KtxBP Kt-Q5
If PxP, White wins by 28. Q-R5, Q-B2; 29. P-Kt6, QxPch; 30. QxQand KtxR.
28. Q-B2 Q-B3
29. KtxR QxKt 30. BxKt KPxB 31. PxP B-Q2 32. R-K1 Q-B2 33. Q-R4! R-R1
Not BxP because of 34. R-KB2, followed by KR-KB sq.
34. R-KB2 B-B3 35. Q-Kt4
The threat is to open the Rook's file by P-Kt6 with an attack onthe King by the Rooks.
35. ... R-K1 36. RxR QxR
BxR in order to play Q-R4 might be better. With the Queens offthe board, Black has winning chances on account of his twoBishops. But then White might evade the exchange and proceed toseize the King's file with the Rook after 37. Q-B4.
37. R-K2 Q-Q2 38. R-K6 B-R1
in order to play Q-QKt2 or R2.
39. P-Kt6! PxP
If Q-QKt2, 40. R-K8!, if Q-R2, 40. Q-R4. White wins in eithercase.
40. RxP Q-KR2 41. Q-Kt3
Threatens Q-K5ch.
41. ... Q-R4 42. R-Kt4! Resigns.
TABLE OF OPENINGS
A. KING'S PAWN GAMES
a. 1. P-K4 P-K4 2. P-KB4 PxP 2. ... B-B4 2. ... P-Q4 2. P-Q4 PxP 3. QxP 3. Kt-KB3 P-QB4 3. ... Kt-QB3 3. B-QB4 3. P-QB3 PxP
3. ... P-Q4 2. Kt-KB3 Kt-QB3 3. P-Q4 PxP 4. KtxP 4. B-QB4 4. P-B3 3. B-B4 B-B4 4. P-Q3 4. P-B3 3. ... Kt-B3 3. Kt-B3 Kt-B3 3. ... B-Kt5 3. B-Kt5 P-Q3 4. P-Q4 3. ... Kt-B3 4. Castle P-Q3 4. ... KtxP 3. ... P-QR3 4. B-R4 Kt-B3 5. Castle B-K2 5. ... KtxP
4. BxKt QPxB 5. KtxP 5. P-Q4 2. ... P-Q3 3. P-Q4 QKt-Q2 2. Kt-QB3 Kt-KB3 3. P-B4 P-Q4
b. 1. P-K4 P-K3 2. P-Q4 P-Q4 3. P-K5 3. Kt-QB3 Kt-KB3 4. P-K5 4. B-Kt5 B-K2 4. ... B-Kt5 3. ... PxP 1. P-K4 P-Q4 2. PxP QxP 1. P-K4 P-QB3 2. P-Q4 P-Q4 1. P-K4 P-QB4
B. QUEEN'S PAWN GAMES
a. 1. P-Q4 P-Q4 2. P-QB4 PxP 2. ... P-K3 3. KtQB3 KtKB3 3. ... PQB4 4. PK3 4. Kt-KB3 Kt-QB3 5. PxQP 2. ... P--K4 2. ... B-B4 2. ... P-QB3 2. Kt-KB3 P-K3 3. P-B4 PxP 3. ... P-QB4 3. ... Kt-KB3 2. ... P-QB4 3. P-B4 P-K3 4. P-K3 4. Kt-B3 Kt-QB3 3. P-K3 P-K3 4. B-Q3 Kt-KB3 5. P-QKt3 3. P-B3 2. ... Kt-KB3
b. 1. P-Q4 P-QB4 1. P-Q4 Kt-KB3 2. Kt-KB3 P-Q3 1. P-Q4 P-KB4
C. IRREGULAR OPENINGS
1. P-QB4 1. P-KB4 P-Q4 1. ... P-K4 1. P-K3 P-Q3
End of the Project Gutenberg EBook of Chess Strategy, by Edward Lasker
*** END OF THE PROJECT GUTENBERG EBOOK CHESS STRATEGY ***
This file should be named chsst10.txt or chsst10.zipCorrected EDITIONS of our eBooks get a new NUMBER, chsst11.txtVERSIONS based on separate sources get new LETTER, chsst10a.txt
Produced by John Mamoun <[email protected]>, Charles Franks,and the Online Distributed Proofreaders website.
Project Gutenberg eBooks are often created from several printededitions, all of which are confirmed as Public Domain in the USunless a copyright notice is included. Thus, we usually do notkeep eBooks in compliance with any particular paper edition.
We are now trying to release all our eBooks one year in advanceof the official release dates, leaving time for better editing.Please be encouraged to tell us about any error or corrections,even years after the official publication date.
Please note neither this listing nor its contents are final tilmidnight of the last day of the month of any such announcement.The official release date of all Project Gutenberg eBooks is atMidnight, Central Time, of the last day of the stated month. Apreliminary version may often be posted for suggestion, commentand editing by those who wish to do so.
Most people start at our Web sites at:http://gutenberg.net orhttp://promo.net/pg
These Web sites include award-winning information about ProjectGutenberg, including how to donate, how to help produce our neweBooks, and how to subscribe to our email newsletter (free!).
Those of you who want to download any eBook before announcementcan get to them as follows, and just download by date. This isalso a good way to get them instantly upon announcement, as theindexes our cataloguers produce obviously take a while after anannouncement goes out in the Project Gutenberg Newsletter.
http://www.ibiblio.org/gutenberg/etext03 orftp://ftp.ibiblio.org/pub/docs/books/gutenberg/etext03
Or /etext02, 01, 00, 99, 98, 97, 96, 95, 94, 93, 92, 92, 91 or 90
Just search by the first five letters of the filename you want,as it appears in our Newsletters.
Information about Project Gutenberg (one page)
We produce about two million dollars for each hour we work. Thetime it takes us, a rather conservative estimate, is fifty hoursto get any eBook selected, entered, proofread, edited, copyrightsearched and analyzed, the copyright letters written, etc. Ourprojected audience is one hundred million readers. If the valueper text is nominally estimated at one dollar then we produce $2million dollars per hour in 2002 as we release over 100 new textfiles per month: 1240 more eBooks in 2001 for a total of 4000+We are already on our way to trying for 2000 more eBooks in 2002If they reach just 1-2% of the world's population then the totalwill reach over half a trillion eBooks given away by year's end.
The Goal of Project Gutenberg is to Give Away 1 Trillion eBooks!This is ten thousand titles each to one hundred million readers,which is only about 4% of the present number of computer users.
Here is the briefest record of our progress (* means estimated):
eBooks Year Month
1 1971 July 10 1991 January 100 1994 January 1000 1997 August 1500 1998 October 2000 1999 December 2500 2000 December 3000 2001 November 4000 2001 October/November 6000 2002 December* 9000 2003 November*10000 2004 January*
The Project Gutenberg Literary Archive Foundation has been createdto secure a future for Project Gutenberg into the next millennium.
We need your donations more than ever!
As of February, 2002, contributions are being solicited from peopleand organizations in: Alabama, Alaska, Arkansas, Connecticut,Delaware, District of Columbia, Florida, Georgia, Hawaii, Illinois,Indiana, Iowa, Kansas, Kentucky, Louisiana, Maine, Massachusetts,Michigan, Mississippi, Missouri, Montana, Nebraska, Nevada, NewHampshire, New Jersey, New Mexico, New York, North Carolina, Ohio,Oklahoma, Oregon, Pennsylvania, Rhode Island, South Carolina, SouthDakota, Tennessee, Texas, Utah, Vermont, Virginia, Washington, West
Virginia, Wisconsin, and Wyoming.
We have filed in all 50 states now, but these are the only onesthat have responded.
As the requirements for other states are met, additions to this listwill be made and fund raising will begin in the additional states.Please feel free to ask to check the status of your state.
In answer to various questions we have received on this:
We are constantly working on finishing the paperwork to legallyrequest donations in all 50 states. If your state is not listed andyou would like to know if we have added it since the list you have,just ask.
While we cannot solicit donations from people in states where we arenot yet registered, we know of no prohibition against acceptingdonations from donors in these states who approach us with an offer todonate.
International donations are accepted, but we don't know ANYTHING abouthow to make them tax-deductible, or even if they CAN be madedeductible, and don't have the staff to handle it even if there areways.
Donations by check or money order may be sent to:
Project Gutenberg Literary Archive FoundationPMB 1131739 University Ave.Oxford, MS 38655-4109
Contact us if you want to arrange for a wire transfer or paymentmethod other than by check or money order.
The Project Gutenberg Literary Archive Foundation has been approved bythe US Internal Revenue Service as a 501(c)(3) organization with EIN[Employee Identification Number] 64-622154. Donations aretax-deductible to the maximum extent permitted by law. As fund-raisingrequirements for other states are met, additions to this list will bemade and fund-raising will begin in the additional states.
We need your donations more than ever!
You can get up to date donation information online at:
http://www.gutenberg.net/donation.html
***
If you can't reach Project Gutenberg,you can always email directly to:
Michael S. Hart <[email protected]>
Prof. Hart will answer or forward your message.
We would prefer to send you information by email.
**The Legal Small Print**
(Three Pages)
***START**THE SMALL PRINT!**FOR PUBLIC DOMAIN EBOOKS**START***Why is this "Small Print!" statement here? You know: lawyers.They tell us you might sue us if there is something wrong withyour copy of this eBook, even if you got it for free fromsomeone other than us, and even if what's wrong is not ourfault. So, among other things, this "Small Print!" statementdisclaims most of our liability to you. It also tells you howyou may distribute copies of this eBook if you want to.
*BEFORE!* YOU USE OR READ THIS EBOOKBy using or reading any part of this PROJECT GUTENBERG-tmeBook, you indicate that you understand, agree to and acceptthis "Small Print!" statement. If you do not, you can receivea refund of the money (if any) you paid for this eBook bysending a request within 30 days of receiving it to the personyou got it from. If you received this eBook on a physicalmedium (such as a disk), you must return it with your request.
ABOUT PROJECT GUTENBERG-TM EBOOKSThis PROJECT GUTENBERG-tm eBook, like most PROJECT GUTENBERG-tm eBooks,is a "public domain" work distributed by Professor Michael S. Hartthrough the Project Gutenberg Association (the "Project").Among other things, this means that no one owns a United States copyrighton or for this work, so the Project (and you!) can copy anddistribute it in the United States without permission andwithout paying copyright royalties. Special rules, set forthbelow, apply if you wish to copy and distribute this eBookunder the "PROJECT GUTENBERG" trademark.
Please do not use the "PROJECT GUTENBERG" trademark to marketany commercial products without permission.
To create these eBooks, the Project expends considerableefforts to identify, transcribe and proofread public domainworks. Despite these efforts, the Project's eBooks and anymedium they may be on may contain "Defects". Among otherthings, Defects may take the form of incomplete, inaccurate orcorrupt data, transcription errors, a copyright or otherintellectual property infringement, a defective or damageddisk or other eBook medium, a computer virus, or computercodes that damage or cannot be read by your equipment.
LIMITED WARRANTY; DISCLAIMER OF DAMAGESBut for the "Right of Replacement or Refund" described below,[1] Michael Hart and the Foundation (and any other party you mayreceive this eBook from as a PROJECT GUTENBERG-tm eBook) disclaimsall liability to you for damages, costs and expenses, includinglegal fees, and [2] YOU HAVE NO REMEDIES FOR NEGLIGENCE ORUNDER STRICT LIABILITY, OR FOR BREACH OF WARRANTY OR CONTRACT,INCLUDING BUT NOT LIMITED TO INDIRECT, CONSEQUENTIAL, PUNITIVEOR INCIDENTAL DAMAGES, EVEN IF YOU GIVE NOTICE OF THE
POSSIBILITY OF SUCH DAMAGES.
If you discover a Defect in this eBook within 90 days ofreceiving it, you can receive a refund of the money (if any)you paid for it by sending an explanatory note within thattime to the person you received it from. If you received iton a physical medium, you must return it with your note, andsuch person may choose to alternatively give you a replacementcopy. If you received it electronically, such person maychoose to alternatively give you a second opportunity toreceive it electronically.
THIS EBOOK IS OTHERWISE PROVIDED TO YOU "AS-IS". NO OTHERWARRANTIES OF ANY KIND, EXPRESS OR IMPLIED, ARE MADE TO YOU ASTO THE EBOOK OR ANY MEDIUM IT MAY BE ON, INCLUDING BUT NOTLIMITED TO WARRANTIES OF MERCHANTABILITY OR FITNESS FOR APARTICULAR PURPOSE.
Some states do not allow disclaimers of implied warranties orthe exclusion or limitation of consequential damages, so theabove disclaimers and exclusions may not apply to you, and youmay have other legal rights.
INDEMNITYYou will indemnify and hold Michael Hart, the Foundation,and its trustees and agents, and any volunteers associatedwith the production and distribution of Project Gutenberg-tmtexts harmless, from all liability, cost and expense, includinglegal fees, that arise directly or indirectly from any of thefollowing that you do or cause: [1] distribution of this eBook,[2] alteration, modification, or addition to the eBook,or [3] any Defect.
DISTRIBUTION UNDER "PROJECT GUTENBERG-tm"You may distribute copies of this eBook electronically, or bydisk, book or any other medium if you either delete this"Small Print!" and all other references to Project Gutenberg,or:
[1] Only give exact copies of it. Among other things, this requires that you do not remove, alter or modify the eBook or this "small print!" statement. You may however, if you wish, distribute this eBook in machine readable binary, compressed, mark-up, or proprietary form, including any form resulting from conversion by word processing or hypertext software, but only so long as *EITHER*:
[*] The eBook, when displayed, is clearly readable, and does *not* contain characters other than those intended by the author of the work, although tilde (~), asterisk (*) and underline (_) characters may be used to convey punctuation intended by the author, and additional characters may be used to indicate hypertext links; OR
[*] The eBook may be readily converted by the reader at no expense into plain ASCII, EBCDIC or equivalent form by the program that displays the eBook (as is
the case, for instance, with most word processors); OR
[*] You provide, or agree to also provide on request at no additional cost, fee or expense, a copy of the eBook in its original plain ASCII form (or in EBCDIC or other equivalent proprietary form).
[2] Honor the eBook refund and replacement provisions of this "Small Print!" statement.
[3] Pay a trademark license fee to the Foundation of 20% of the gross profits you derive calculated using the method you already use to calculate your applicable taxes. If you don't derive profits, no royalty is due. Royalties are payable to "Project Gutenberg Literary Archive Foundation" the 60 days following each date you prepare (or were legally required to prepare) your annual (or equivalent periodic) tax return. Please contact us beforehand to let us know your plans and to work out the details.
WHAT IF YOU *WANT* TO SEND MONEY EVEN IF YOU DON'T HAVE TO?Project Gutenberg is dedicated to increasing the number ofpublic domain and licensed works that can be freely distributedin machine readable form.
The Project gratefully accepts contributions of money, time,public domain materials, or royalty free copyright licenses.Money should be paid to the:"Project Gutenberg Literary Archive Foundation."
If you are interested in contributing scanning equipment orsoftware or other items, please contact Michael Hart at:[email protected]
[Portions of this eBook's header and trailer may be reprinted onlywhen distributed free of all fees. Copyright (C) 2001, 2002 byMichael S. Hart. Project Gutenberg is a TradeMark and may not beused in any sales of Project Gutenberg eBooks or other materials bethey hardware or software or any other related product withoutexpress permission.]
*END THE SMALL PRINT! FOR PUBLIC DOMAIN EBOOKS*Ver.02/11/02*END*
Livros Grátis( http://www.livrosgratis.com.br )
Milhares de Livros para Download: Baixar livros de AdministraçãoBaixar livros de AgronomiaBaixar livros de ArquiteturaBaixar livros de ArtesBaixar livros de AstronomiaBaixar livros de Biologia GeralBaixar livros de Ciência da ComputaçãoBaixar livros de Ciência da InformaçãoBaixar livros de Ciência PolíticaBaixar livros de Ciências da SaúdeBaixar livros de ComunicaçãoBaixar livros do Conselho Nacional de Educação - CNEBaixar livros de Defesa civilBaixar livros de DireitoBaixar livros de Direitos humanosBaixar livros de EconomiaBaixar livros de Economia DomésticaBaixar livros de EducaçãoBaixar livros de Educação - TrânsitoBaixar livros de Educação FísicaBaixar livros de Engenharia AeroespacialBaixar livros de FarmáciaBaixar livros de FilosofiaBaixar livros de FísicaBaixar livros de GeociênciasBaixar livros de GeografiaBaixar livros de HistóriaBaixar livros de Línguas
Baixar livros de LiteraturaBaixar livros de Literatura de CordelBaixar livros de Literatura InfantilBaixar livros de MatemáticaBaixar livros de MedicinaBaixar livros de Medicina VeterináriaBaixar livros de Meio AmbienteBaixar livros de MeteorologiaBaixar Monografias e TCCBaixar livros MultidisciplinarBaixar livros de MúsicaBaixar livros de PsicologiaBaixar livros de QuímicaBaixar livros de Saúde ColetivaBaixar livros de Serviço SocialBaixar livros de SociologiaBaixar livros de TeologiaBaixar livros de TrabalhoBaixar livros de Turismo


