Embed Size (px)
Citation preview
CloudCenter Suite Admin 5.1 DocumentationFirst Published: August 19, 2019
Last Modified: November 25, 2019
Americas HeadquartersCisco Systems, Inc.170 West Tasman Drive San Jose, CA 95134-1706 USAhttp://www.cisco.comTel: 408 526-4000
800 553-NETS (6387) Fax: 408 527-0883

© 2021 Cisco Systems, Inc. All rights reserved.
1. Suite Admin 5.1 Home . . . . . . . . . . . . . . . . . . . . . . . . . . . . . . . . . . . . . . . . . . . . . . . . . . . . . . . . . . . . . . . . . . . . . . . . . . . . . . . . . . . . . . . . . . 21.1 Release Notes . . . . . . . . . . . . . . . . . . . . . . . . . . . . . . . . . . . . . . . . . . . . . . . . . . . . . . . . . . . . . . . . . . . . . . . . . . . . . . . . . . . . . . . . . . . . 3
1.1.1 Suite Admin 5.1.2 . . . . . . . . . . . . . . . . . . . . . . . . . . . . . . . . . . . . . . . . . . . . . . . . . . . . . . . . . . . . . . . . . . . . . . . . . . . . . . . . . . . . 41.1.2 Suite Admin 5.1.1 . . . . . . . . . . . . . . . . . . . . . . . . . . . . . . . . . . . . . . . . . . . . . . . . . . . . . . . . . . . . . . . . . . . . . . . . . . . . . . . . . . . . 71.1.3 Suite Admin 5.1.0 . . . . . . . . . . . . . . . . . . . . . . . . . . . . . . . . . . . . . . . . . . . . . . . . . . . . . . . . . . . . . . . . . . . . . . . . . . . . . . . . . . . 10
1.2 UI Language Availability . . . . . . . . . . . . . . . . . . . . . . . . . . . . . . . . . . . . . . . . . . . . . . . . . . . . . . . . . . . . . . . . . . . . . . . . . . . . . . . . . . . 151.3 Suite Admin Dashboard . . . . . . . . . . . . . . . . . . . . . . . . . . . . . . . . . . . . . . . . . . . . . . . . . . . . . . . . . . . . . . . . . . . . . . . . . . . . . . . . . . . 161.4 User Tenant Management . . . . . . . . . . . . . . . . . . . . . . . . . . . . . . . . . . . . . . . . . . . . . . . . . . . . . . . . . . . . . . . . . . . . . . . . . . . . . . . . . 21
1.4.1 Create and Manage Users . . . . . . . . . . . . . . . . . . . . . . . . . . . . . . . . . . . . . . . . . . . . . . . . . . . . . . . . . . . . . . . . . . . . . . . . . . . . 221.4.2 Create and Assign Groups . . . . . . . . . . . . . . . . . . . . . . . . . . . . . . . . . . . . . . . . . . . . . . . . . . . . . . . . . . . . . . . . . . . . . . . . . . . . 281.4.3 OOB Suite Admin Groups . . . . . . . . . . . . . . . . . . . . . . . . . . . . . . . . . . . . . . . . . . . . . . . . . . . . . . . . . . . . . . . . . . . . . . . . . . . . . 301.4.4 Custom Groups by Admin . . . . . . . . . . . . . . . . . . . . . . . . . . . . . . . . . . . . . . . . . . . . . . . . . . . . . . . . . . . . . . . . . . . . . . . . . . . . . 311.4.5 Understand Roles . . . . . . . . . . . . . . . . . . . . . . . . . . . . . . . . . . . . . . . . . . . . . . . . . . . . . . . . . . . . . . . . . . . . . . . . . . . . . . . . . . . 321.4.6 Understand User Levels . . . . . . . . . . . . . . . . . . . . . . . . . . . . . . . . . . . . . . . . . . . . . . . . . . . . . . . . . . . . . . . . . . . . . . . . . . . . . . 341.4.7 Manage Tenants . . . . . . . . . . . . . . . . . . . . . . . . . . . . . . . . . . . . . . . . . . . . . . . . . . . . . . . . . . . . . . . . . . . . . . . . . . . . . . . . . . . . 381.4.8 Manage Module-Specific Content . . . . . . . . . . . . . . . . . . . . . . . . . . . . . . . . . . . . . . . . . . . . . . . . . . . . . . . . . . . . . . . . . . . . . . . 40
1.5 Admin Menu . . . . . . . . . . . . . . . . . . . . . . . . . . . . . . . . . . . . . . . . . . . . . . . . . . . . . . . . . . . . . . . . . . . . . . . . . . . . . . . . . . . . . . . . . . . . 421.5.1 Backup . . . . . . . . . . . . . . . . . . . . . . . . . . . . . . . . . . . . . . . . . . . . . . . . . . . . . . . . . . . . . . . . . . . . . . . . . . . . . . . . . . . . . . . . . . . 431.5.2 Proxy Settings . . . . . . . . . . . . . . . . . . . . . . . . . . . . . . . . . . . . . . . . . . . . . . . . . . . . . . . . . . . . . . . . . . . . . . . . . . . . . . . . . . . . . . 501.5.3 Email Settings . . . . . . . . . . . . . . . . . . . . . . . . . . . . . . . . . . . . . . . . . . . . . . . . . . . . . . . . . . . . . . . . . . . . . . . . . . . . . . . . . . . . . . 521.5.4 Base URL Configuration . . . . . . . . . . . . . . . . . . . . . . . . . . . . . . . . . . . . . . . . . . . . . . . . . . . . . . . . . . . . . . . . . . . . . . . . . . . . . . 531.5.5 Offline Repository Configuration . . . . . . . . . . . . . . . . . . . . . . . . . . . . . . . . . . . . . . . . . . . . . . . . . . . . . . . . . . . . . . . . . . . . . . . . 541.5.6 Log Archive . . . . . . . . . . . . . . . . . . . . . . . . . . . . . . . . . . . . . . . . . . . . . . . . . . . . . . . . . . . . . . . . . . . . . . . . . . . . . . . . . . . . . . . . 561.5.7 SSO Setup . . . . . . . . . . . . . . . . . . . . . . . . . . . . . . . . . . . . . . . . . . . . . . . . . . . . . . . . . . . . . . . . . . . . . . . . . . . . . . . . . . . . . . . . 581.5.8 Currency Conversion . . . . . . . . . . . . . . . . . . . . . . . . . . . . . . . . . . . . . . . . . . . . . . . . . . . . . . . . . . . . . . . . . . . . . . . . . . . . . . . . 76
1.6 Troubleshoot Suite Admin . . . . . . . . . . . . . . . . . . . . . . . . . . . . . . . . . . . . . . . . . . . . . . . . . . . . . . . . . . . . . . . . . . . . . . . . . . . . . . . . . . 771.7 Suite Admin API . . . . . . . . . . . . . . . . . . . . . . . . . . . . . . . . . . . . . . . . . . . . . . . . . . . . . . . . . . . . . . . . . . . . . . . . . . . . . . . . . . . . . . . . . 80
1.7.1 API Overview . . . . . . . . . . . . . . . . . . . . . . . . . . . . . . . . . . . . . . . . . . . . . . . . . . . . . . . . . . . . . . . . . . . . . . . . . . . . . . . . . . . . . . 811.7.2 API Authentication . . . . . . . . . . . . . . . . . . . . . . . . . . . . . . . . . . . . . . . . . . . . . . . . . . . . . . . . . . . . . . . . . . . . . . . . . . . . . . . . . . 871.7.3 API Key . . . . . . . . . . . . . . . . . . . . . . . . . . . . . . . . . . . . . . . . . . . . . . . . . . . . . . . . . . . . . . . . . . . . . . . . . . . . . . . . . . . . . . . . . . . 881.7.4 Base URI Format . . . . . . . . . . . . . . . . . . . . . . . . . . . . . . . . . . . . . . . . . . . . . . . . . . . . . . . . . . . . . . . . . . . . . . . . . . . . . . . . . . . 901.7.5 HTTP Status Codes . . . . . . . . . . . . . . . . . . . . . . . . . . . . . . . . . . . . . . . . . . . . . . . . . . . . . . . . . . . . . . . . . . . . . . . . . . . . . . . . . 921.7.6 CSRF Token Protection . . . . . . . . . . . . . . . . . . . . . . . . . . . . . . . . . . . . . . . . . . . . . . . . . . . . . . . . . . . . . . . . . . . . . . . . . . . . . . 931.7.7 API Permissions . . . . . . . . . . . . . . . . . . . . . . . . . . . . . . . . . . . . . . . . . . . . . . . . . . . . . . . . . . . . . . . . . . . . . . . . . . . . . . . . . . . . 951.7.8 Synchronous and Asynchronous Calls . . . . . . . . . . . . . . . . . . . . . . . . . . . . . . . . . . . . . . . . . . . . . . . . . . . . . . . . . . . . . . . . . . . 971.7.9 Suite Admin 5.1.2 API Calls . . . . . . . . . . . . . . . . . . . . . . . . . . . . . . . . . . . . . . . . . . . . . . . . . . . . . . . . . . . . . . . . . . . . . . . . . . . 99
1.7.9.1 Authentication Service API Calls 5.1.2 . . . . . . . . . . . . . . . . . . . . . . . . . . . . . . . . . . . . . . . . . . . . . . . . . . . . . . . . . . . . . 1001.7.9.2 Email Service API Calls 5.1.2 . . . . . . . . . . . . . . . . . . . . . . . . . . . . . . . . . . . . . . . . . . . . . . . . . . . . . . . . . . . . . . . . . . . . 1011.7.9.3 IDM Service API Calls 5.1.2 . . . . . . . . . . . . . . . . . . . . . . . . . . . . . . . . . . . . . . . . . . . . . . . . . . . . . . . . . . . . . . . . . . . . . 1021.7.9.4 License Service API Calls 5.1.2 . . . . . . . . . . . . . . . . . . . . . . . . . . . . . . . . . . . . . . . . . . . . . . . . . . . . . . . . . . . . . . . . . . 1031.7.9.5 Logs Service API Calls 5.1.2 . . . . . . . . . . . . . . . . . . . . . . . . . . . . . . . . . . . . . . . . . . . . . . . . . . . . . . . . . . . . . . . . . . . . 1041.7.9.6 Monitor Service API Calls 5.1.2 . . . . . . . . . . . . . . . . . . . . . . . . . . . . . . . . . . . . . . . . . . . . . . . . . . . . . . . . . . . . . . . . . . 1051.7.9.7 Password Service API Calls 5.1.2 . . . . . . . . . . . . . . . . . . . . . . . . . . . . . . . . . . . . . . . . . . . . . . . . . . . . . . . . . . . . . . . . 1061.7.9.8 Suite Notification Service API Calls 5.1.2 . . . . . . . . . . . . . . . . . . . . . . . . . . . . . . . . . . . . . . . . . . . . . . . . . . . . . . . . . . . 1071.7.9.9 Product Registry Service API Calls 5.1.2 . . . . . . . . . . . . . . . . . . . . . . . . . . . . . . . . . . . . . . . . . . . . . . . . . . . . . . . . . . . 1081.7.9.10 Resource Management Service API Calls 5.1.2 . . . . . . . . . . . . . . . . . . . . . . . . . . . . . . . . . . . . . . . . . . . . . . . . . . . . . 109
1.7.10 Suite Admin 5.1.1 API Calls . . . . . . . . . . . . . . . . . . . . . . . . . . . . . . . . . . . . . . . . . . . . . . . . . . . . . . . . . . . . . . . . . . . . . . . . . 1101.7.10.1 Authentication Service API Calls 5.1.1 . . . . . . . . . . . . . . . . . . . . . . . . . . . . . . . . . . . . . . . . . . . . . . . . . . . . . . . . . . . . 1111.7.10.2 Email Service API Calls 5.1.1 . . . . . . . . . . . . . . . . . . . . . . . . . . . . . . . . . . . . . . . . . . . . . . . . . . . . . . . . . . . . . . . . . . . 1121.7.10.3 IDM Service API Calls 5.1.1 . . . . . . . . . . . . . . . . . . . . . . . . . . . . . . . . . . . . . . . . . . . . . . . . . . . . . . . . . . . . . . . . . . . . 1131.7.10.4 License Service API Calls 5.1.1 . . . . . . . . . . . . . . . . . . . . . . . . . . . . . . . . . . . . . . . . . . . . . . . . . . . . . . . . . . . . . . . . . 1141.7.10.5 Logs Service API Calls 5.1.1 . . . . . . . . . . . . . . . . . . . . . . . . . . . . . . . . . . . . . . . . . . . . . . . . . . . . . . . . . . . . . . . . . . . 1151.7.10.6 Monitor Service API Calls 5.1.1 . . . . . . . . . . . . . . . . . . . . . . . . . . . . . . . . . . . . . . . . . . . . . . . . . . . . . . . . . . . . . . . . . 1161.7.10.7 Suite Notification Service API Calls 5.1.1 . . . . . . . . . . . . . . . . . . . . . . . . . . . . . . . . . . . . . . . . . . . . . . . . . . . . . . . . . . 1171.7.10.8 Password Service API Calls 5.1.1 . . . . . . . . . . . . . . . . . . . . . . . . . . . . . . . . . . . . . . . . . . . . . . . . . . . . . . . . . . . . . . . 1181.7.10.9 Product Registry Service API Calls 5.1.1 . . . . . . . . . . . . . . . . . . . . . . . . . . . . . . . . . . . . . . . . . . . . . . . . . . . . . . . . . . 1191.7.10.10 Resource Management Service API Calls 5.1.1 . . . . . . . . . . . . . . . . . . . . . . . . . . . . . . . . . . . . . . . . . . . . . . . . . . . . 120
1.7.11 Suite Admin 5.1.0 API Calls . . . . . . . . . . . . . . . . . . . . . . . . . . . . . . . . . . . . . . . . . . . . . . . . . . . . . . . . . . . . . . . . . . . . . . . . . 1211.7.11.1 Authentication Service API Calls 5.1.0 . . . . . . . . . . . . . . . . . . . . . . . . . . . . . . . . . . . . . . . . . . . . . . . . . . . . . . . . . . . . 1221.7.11.2 Email Service API Calls 5.1.0 . . . . . . . . . . . . . . . . . . . . . . . . . . . . . . . . . . . . . . . . . . . . . . . . . . . . . . . . . . . . . . . . . . . 1231.7.11.3 IDM Service API Calls 5.1.0 . . . . . . . . . . . . . . . . . . . . . . . . . . . . . . . . . . . . . . . . . . . . . . . . . . . . . . . . . . . . . . . . . . . . 1241.7.11.4 License Service API Calls 5.1.0 . . . . . . . . . . . . . . . . . . . . . . . . . . . . . . . . . . . . . . . . . . . . . . . . . . . . . . . . . . . . . . . . . 1251.7.11.5 Logs Service API Calls 5.1.0 . . . . . . . . . . . . . . . . . . . . . . . . . . . . . . . . . . . . . . . . . . . . . . . . . . . . . . . . . . . . . . . . . . . 1261.7.11.6 Monitor Service API Calls 5.1.0 . . . . . . . . . . . . . . . . . . . . . . . . . . . . . . . . . . . . . . . . . . . . . . . . . . . . . . . . . . . . . . . . . 1271.7.11.7 Suite Notification Service API Calls 5.1.0 . . . . . . . . . . . . . . . . . . . . . . . . . . . . . . . . . . . . . . . . . . . . . . . . . . . . . . . . . . 1281.7.11.8 Password Service API Calls 5.1.0 . . . . . . . . . . . . . . . . . . . . . . . . . . . . . . . . . . . . . . . . . . . . . . . . . . . . . . . . . . . . . . . 1291.7.11.9 Product Registry Service API Calls 5.1.0 . . . . . . . . . . . . . . . . . . . . . . . . . . . . . . . . . . . . . . . . . . . . . . . . . . . . . . . . . . 1301.7.11.10 Resource Management Service API Calls 5.1.0 . . . . . . . . . . . . . . . . . . . . . . . . . . . . . . . . . . . . . . . . . . . . . . . . . . . . 131
1
Cisco CloudCenter Suite -- Suite Admin
Cisco Cloud Management Documentation 1
Suite Admin 5.1 HomeCloudCenter Suite Administration Documentation
Cisco released on August , 2019.CloudCenter Suite 5.1 19
Suite Admin 5.1.0 released on August , 2019 19 released on SeptemberSuite Admin 5.1.1 , 2019 26 released on November 25, 2019Suite Admin 5.1.2
Search
Suite Admin 5.1.2updated Jan 27, 2021view changeBackupupdated Nov 25, 2020view changeTroubleshoot Suite Adminupdated Jan 23, 2020view change
2
Cisco CloudCenter Suite -- Suite Admin
Cisco Cloud Management Documentation 1
Release NotesSuite Admin Release Notes
Suite Admin 5.1.2Suite Admin 5.1.1Suite Admin 5.1.0
3

Cisco CloudCenter Suite -- Suite Admin
Cisco Cloud Management Documentation 1
Suite Admin 5.1.2Suite Admin 5.1.2 Release Notes
Release DateInstallationBackup and RestoreKubernetes Cluster UpgradeUpdating ModulesLimited Trial ProgramArchitectureCloudsAdministrationModule ManagementSmart Software LicensingSuite Admin DashboardUser Tenant ManagementCluster ManagementSecurity ManagementSuite UIDeprecatedAPIDocumentationKnown IssuesResolved Issues
First Published: November 25, 2019
Updated:
August 4, 2020: Removed references to SaaS EU from the entire siteAugust 26, 2020: Added the sectionLimited Trial ProgramJanuary 27, 2021: Updated the Documentation section to include a list of pages that were updated.
CloudCenter Suite 5.1.2 is available as installers for ALL components for all supported clouds. Contact the for additional CloudCenter Suite Support teamdetails.
CloudCenter Suite 5.1.2 allows you to restore data in the following environments:
Proxy environments. See for additional context.Restore with ProxyNon-proxy environments. See for additional details.Restore without Proxy
To restore data, the CloudCenter Suite requires that you launch a new cluster. If you configured the old cluster using a DNS, you must update the new IP Once you update the DNS entry of your new cluster, these services will continue to address (from the restored cluster) that is mapped to the DNS entry.
work as designed.
The backup/restore feature is only available on CloudCenter Suite clusters installed using CloudCenter Suite installers and not on existing Kubernetes clusters.
No updates
While you can update just the modules without upgrading the Kubernetes cluster, you will continue to see the new CloudCenter Suite 5.1 features for each module. See for additional details.Update Module
See for FAQs on updating SaaS environments.SaaS Access
The 30-day trial is a limited program that ends on September 30, 2020. Contact a Cisco sales representative for additional details.
No updates
No updates
Effective CloudCenter Suite 5.1.2, tenants admins can configure the Base URL of any of their ancestor tenants. The only caveat is that the admin See for additional details. cannot set the Base URL of child tenant for a parent tenant. Base URL Configuration
module-update scenario requires verify that you have twice the required CPU/Memory in your cluster. ABefore updating any module, additional resources for the old pod to continue running until the new pod initializes and takes over. This additional resource requirement is temporary and only required while a module update is in progress. After the module is updated, the additional resources are no longer needed.You must update the Suite Admin module before you update any other CloudCenter Suite module. Update only one module at at time. If you simultaneously update more than one module, your update process may fail due to limited resource availability. See for additional context.Prepare InfrastructureYou may see one or more error messages during the update process. Be aware that these messages will not affect the update itself.
4
Cisco CloudCenter Suite -- Suite Admin
Cisco Cloud Management Documentation 2
After upgrading from Suite Admin 5.1.0 to 5.1.1, Kibana may not be accessible. This was a known issue in CloudCenter Suite CloudCenter Suite .5.1.1 After upgrading to CloudCenter Suite 5.1.2, Kibana is accessible and the workaround is no longer required.
When configuring the backup storage location for the first time, CloudCenter Suite 5.1.1 uses this location as the default region. Subsequent changes to this region are no longer accepted. Once configured, you cannot change or update the backup storage location for the AWS S3 cloud region, when using CloudCenter Suite 5.1.1. This was a known issue in CloudCenter Suite 5.1.1 and has been fixed in CloudCenter Suite 5.1.2 – you can now change the backup storage location for the AWS S3 cloud region. When configuring a , you cannot change the cloud account at any point in the process. his was a known issue in CloudCenter Suite 5.1.1 Backupand has been fixed in CloudCenter Suite 5.1.2 – you can now change the cloud account.Prior to CloudCenter Suite 5.1.2, users were unable to delete a subtenant. Effective CloudCenter Suite 5.1.2, a tenant deletion is successful and tenants do not reappear post deletion.
No updates
No updates
No updates
No updates
No updates
This release addresses security vulnerabilities by upgrading OS libraries. Cisco provides updated OS and Docker files that address the security vulnerability for both applications.
When logging into the CloudCenter Suite UI in prior releases, the Tenant ID was always required. Effective CloudCenter Suite 5.1.2, users have the option to save the Tenant ID on the login page so when they open the browser and login every day they are not required to manually enter the Tenant ID.
No updates
The following APIs were introduced in CloudCenter Suite 5.1.2:
Lists all users under the requested tenant's last login information – to help identify how often different types of users log into the application:
GET /suite-auth/api/v1/tenants/{tenantId}/lastLoginInfoThe must be a child of the current tenant.tenantIdSee > for additional details. IDM Service API Calls 5.1.2 User Controller
Lists the total current users as a snapshot in time long with the user count per tenant ID and the user count per role:
GET /suite-idm/api/v1/admin/user_statisticsSee > for additional details. IDM Service API Calls 5.1.2 User Controller
The following documentation changes were implemented in CloudCenter Suite 5.1.2:
(Swagger API files are available for Suite Admin 5.1.2)Suite Admin 5.1.2 API CallsBase URL Configuration (updated the Requirements section)Email Settings (added a note for AWS environments)Proxy Settings (added a new sentence to the note in Step 6)Restore without Proxy (added the command to remove the backup folder if it does not exist)VMware vSphere Appliance Setup (added note on NTP settings)
(added a note about the SSH key pair dependency)OpenStack InstallationVMware vSphere Installation (updated the details to upload the tenant image for OVA files, added a note to the HTTP/HTTPS settings step, updated the unique IP note, added examples to indicate that the UI does not accepts keys without the username@machine entry, NTP note, proxy allowed list tip)
(added the section and the Troubleshoot Suite Admin Deployment Repo Uses the Public Repo Even if Kubernetes was Restarted DHCP IP section)Allocation Mode
(VMware vSphere Appliance Setup added nuances and procedures for with/without DHCP settings and added Step 10)Update Module (added a new section, )Configuring Memory Limits for ModulesTroubleshooting (added a new section, Expired Certificates)Existing Cluster Installation (updated for technical accuracy based on supported Kubernetes version)
(SaaS Access removed references to SaaS EU) (emphasized backup only being available on new CloudCenter Suite clusters)Backup
End of Support Notices (updated the page to reflect the latest information for the EOL and EOS for Cisco CloudCenter products) (added the notification for the date when the CloudCenter Suite SaaS platform will be SaaS Access completely decommissioned)
In some CloudCenter Suite 5.x environments it may be necessary to increase CPU and memory limits for the common-framework-suite-prod-mgmt pod prior to upgrade of any module. See for details.CloudCenter Suite Update Module
CloudCenter Suite 5.1.2 has the following resolved issue:
CSCvp23756: After upgrading from CloudCenter Suite 5.0 to 5.0.1 and having a certificate installed in the UI, the user cannot login to the CloudCenter Suite UI.
: CloudCenter Suite 5.1.2 includes a fix to ensure that this feature works as designed.ResolutionCSCvq96291: After upgrading from Suite Admin 5.0.3 to Suite Admin 5.1 on a Kubernetes cluster that was setup as a pre-existing cluster (no installers were used other than to install products/modules), a user reported that the whole CloudCenter Suite system stopped working because the ingress controller pod continually crashed.
: CloudCenter Suite 5.1.2 was tested with this procedure and the product installation completed on an existing, upgraded cluster, Resolutionwithout any issues.
5
Cisco CloudCenter Suite -- Suite Admin
Cisco Cloud Management Documentation 3
6

Cisco CloudCenter Suite -- Suite Admin
Cisco Cloud Management Documentation 1
Suite Admin 5.1.1Suite Admin 5.1.1 Release Notes
Release DateInstallationBackup and RestoreKubernetes Cluster UpgradeUpdating ModulesArchitectureCloudsAdministration Module ManagementSmart Software LicensingSuite Admin DashboardUser Tenant ManagementCluster ManagementSecurity ManagementSuite UIDeprecatedAPIDocumentationKnown IssuesResolved Issues
First Published: September 26, 2019
Updated:
September 30, 2019: Added the supported Kubernetes version and updated cluster availability details for the Backup/Restore feature.October 15, 2019: Updated the Kibana search filter access in the section.Known IssuesNovember 4, 2019: Updated the Documentation section to list modified pages.
CloudCenter Suite 5.1.1 is available as installers for ALL components for all supported clouds. Contact the for additional CloudCenter Suite Support teamdetails.
CloudCenter Suite supports Kubernetes 1.15.4 and earlier releases.
CloudCenter Suite 5.1.1 allows you to restore data in the following environments:
Proxy environments. See for additional context.Restore with ProxyNon-proxy environments. See for additional details.Restore without Proxy
To restore data, the CloudCenter Suite requires that you launch a new cluster. If you configured the old cluster using a DNS, you must update the new IP Once you update the DNS entry of your new cluster, these services will continue to address (from the restored cluster) that is mapped to the DNS entry.
work as designed.
The backup/restore feature is only available on CloudCenter Suite clusters installed using CloudCenter Suite installers and not on existing Kubernetes clusters.
You can use the installer to upgrade the Kubernetes cluster from CloudCenter Suite 5.1.0 to a later version. During this upgrade, the base image (CCS-ver) from the upgrader is used to upgrade the Kubernetes cluster nodes. See the following pages for additional details.-Base-Imagesion
Upgrade ApproachAmazon EKS UpgradeAzure AKS UpgradeGoogle GKE UpgradeOpenStack UpgradeVMware vSphere Upgrade
See for FAQs on updating SaaS environments.SaaS Access
While you can update just the modules without upgrading the Kubernetes cluster, you will continue to see the new CloudCenter Suite 5.1 features for each module. See for additional details.Update Module
1.
2. 3.
To upgrade the Kubernetes cluster from CloudCenter Suite 5.0.x to CloudCenter Suite 5.1.1, follow this process:
Update the Suite Admin on your CloudCenter Suite 5.0.x cluster to CloudCenter Suite 5.1.1. This update introduces the Backup and Restore functionality.Backup your CloudCenter Suite 5.0.x cluster. See for additional details.BackupLaunch a new CloudCenter Suite 5.1.1 cluster and restore the backup from the previous step. See for additional details.Restore
7
Cisco CloudCenter Suite -- Suite Admin
Cisco Cloud Management Documentation 2
See for FAQs on updating SaaS environments.SaaS Access
The load balancer that was used for the master nodes in CloudCenter Suite 5.0.x is no longer required in CloudCenter Suite 5.1.1.
No updates
No updates
No updates
No updates
No updates
No updates
No updates
See for details.Security Considerations
No updates
If you upgrade only the Suite Admin from 5.0.x to 5.1.0, you will continue to see the option. However, if you install Download SSH KeyCloudCenter Suite or Suite Admin using the 5.1.1 appliance in private clouds, you will no longer see the option in the Download SSH KeyInstaller success page and in the Suite Admin Details page. This is because you have provided the key being used in the placement properties page when installing CloudCenter Suite.System administrators no longer have root access to CloudCenter Suite clusters. The feature is no longer available for OpenStack environments.Reconfigure Cloud Credentials
The following new APIs are available effective Suite Admin 5.1.1:
GET /suite-idm/api/v1/admin/tenant_hierarchy
This new API lists all tenant and subtenants with the ability to select hierarchy reporting under a tenant, along with the total tenant count, the breakdown by tenant ID with a defined tenant name, and the last login by a user for each tenant.See for additional details.IDM Service API Calls 5.1.1
GET /suite-idm/api/v1/admin/user_statistics
This new API identifies the total users as a snapshot in time and includes the user count per tenant ID and user count per role.See for additional details.IDM Service API Calls 5.1.1
GET /suite-idm/api/v1/admin/users?roles=SUITE_TENANT_ADMIN
This new API lists the email address of all tenant admin roles for maintenance and event notifications.The roles enumeration accepts any role listed in the Suite Admin as a valid entry.See for additional details.IDM Service API Calls 5.1.1
DELETE /suite-idm/api/v1/tenants/id?force=true
This new API option (force= ) forces a resource deletion even if resources are still attached to the requested tenant.trueSee for additional details.IDM Service API Calls 5.1.1
The following documentation changes were implemented in CloudCenter Suite 5.1.0:
(deleted this page and replaced it with the page)Restore Approach Restore (updated the installer vCPU requirements)Prepare Infrastructure (add the tenant network field details and added Port 6443 requirements)OpenStack Installation
(added a note to clarify usability)Offline Repository (added cloud-specific tips)Manage Clusters
(added the supported Kubernetes version support information)Prepare Infrastructure (added a note on feature availability)Backup
Restore with Proxy (added a note on feature availability) Restore without Proxy (added a note on feature availability)
(updated for technical accuracy)Offline Repository (updated the OpenStack credentials note)Manage Clusters
(updated the SSH Public Key description and added nuances and clarifications to ensure technical accuracy)VMware vSphere Installation (added a tip in Step 4g)VMware vSphere Appliance Setup
(added a note about the save implications)Email Settings (updated for technical accuracy)Without Internet Access
module-update scenario requires verify that you have twice the required CPU/Memory in your cluster. ABefore updating any module, additional resources for the old pod to continue running until the new pod initializes and takes over. This additional resource requirement is temporary and only required while a module update is in progress. After the module is updated, the additional resources are no longer needed.You must update the Suite Admin module before you update any other CloudCenter Suite module. Update only one module at at time. If you simultaneously update more than one module, your update process may fail due to limited resource availability. See for additional context.Prepare InfrastructureYou may see one or more error messages during the update process. Be aware that these messages will not affect the update itself.
8
Cisco CloudCenter Suite -- Suite Admin
Cisco Cloud Management Documentation 3
1.
2.
3. 4.
5. 6. 7. 8.
9.
(add port and Ubuntu clarification notes)OpenStack Installation (updated the reference link in Step 1)Azure Appliance Setup
CloudCenter Suite 5.1.1 has the following known issues:
CloudCenter Suite 5.1.1 only supports air gap environments with proxy services. See for additional details. Any isolated Without Internet Accessenvironment without proxy services is not supported.When configuring the , use lowercase characters when providing the installer hostname in the Customize vApp VMware vSphere Appliance SetupProperties page.When configuring the backup storage location for the first time, CloudCenter Suite 5.1.1 uses this location as the default region. Subsequent changes to this region are no longer accepted. Once configured, you cannot change or update the backup storage location for the AWS S3 cloud region, when using CloudCenter Suite 5.1.1.When configuring a , you cannot change the cloud account at any point in the process.BackupAfter upgrading from Suite Admin 5.1.0 to 5.1.1, Kibana may not be accessible. To workaround this issue, you must delete the Kibana Index file and restart the Kibana pod in your Kubernetes cluster as described in the following procedure.
Access any of the pods in your Kubernetes Suite Admin cluster (for example, the license pod) using the following command.
kubectl exec -it common-framework-suite-license-0 -n cisco /bin/bash
D file using the following command.elete the Kibana index
curl -XDELETE http://suite-logging-elasticsearch-2:9200/.kibana_1
Exit this pod that you just accessed.Kubernetes Suite Admin clusterRestart the Kibana pod (search for exact name using the kubectl get pods -n cisco | grep kibana using the following command. string)
kubectl delete pod <kibana pod name> -n cisco
Wait for approximately 30 seconds for Kibana pod to come up.Once the Kibana pod is up and running, access > > > .Suite Admin Dashboard View Modules Details View Logs KibanaKibana will be accessible at this point.Import the attached search filters file to the Kibana Application > > > click the link > then click Management Saved Objects Import Impo
within the pane and finally select the attached JSON file.rt Import saved objects
Once you select the attached file in your Kibana application, click the button at the bottom of the Import pane.Import saved objects
You have now deleted the Kibana Index file, restarted the Kibana pod, and imported the search filters in your Kubernetes cluster.
This release includes fixes for internally found issues that do not change the product behavior in any way.
9
Cisco CloudCenter Suite -- Suite Admin
Cisco Cloud Management Documentation 1
Suite Admin 5.1.0Suite Admin 5.1.0 Release Notes
Release DateInstallationUpdating ModulesArchitectureCloudsAdministration Module ManagementSmart Software LicensingSuite Admin DashboardUser Tenant ManagementCluster ManagementSecurity ManagementSuite UIDeprecatedAPI
New APIsUpdated APIsDeprecated APIs
DocumentationKnown IssuesResolved Issues
First Published: August 16, 2019
Updated:
September 17, 2019: Enhanced the section to include a list of pages that were updated. Documentation
CloudCenter Suite 5.1.0 is available as installers for ALL components for all supported clouds. Contact the for additional CloudCenter Suite Support teamdetails.
While you can update just the modules without upgrading the Kubernetes cluster, you will continue to see the new CloudCenter Suite 5.1 features for each module. See for additional details.Update Module
See for FAQs on updating SaaS environments.SaaS Access
The load balancer that was used for the master nodes in CloudCenter Suite 5.0.x is no longer required in CloudCenter Suite 5.1.0.
vSphere and OpenStack:
OVA and QCOW2 Images:
In prior releases, the same OVA image for vSphere and QCOW2 image for OpenStack was used for both the installer and the Kubernetes cluster that is launched by the installer. Effective CloudCenter Suite 5.1.0, different images will be used for this purpose.The installer includes a default Kubernetes cluster image (called, ) with a configurable option to CCS- -Base-Imageversionoverride the use of this default image. See or for additional context. VMware vSphere Installation OpenStack Installation This is a change!
Proxy Configuration Private Clouds:
Installers support proxy configuration with two additional fields, and , to configure the IP address HTTP Proxy HTTPS Proxyand port of your proxy server.If you are behind a proxy environment, you must provide the proxy settings in the installers and you will not need an offline repository.See for additional details.Offline Repository
vSphere:
Take Me to Suite Admin Link:
module-update scenario requires verify that you have twice the required CPU/Memory in your cluster. ABefore updating any module, additional resources for the old pod to continue running until the new pod initializes and takes over. This additional resource requirement is temporary and only required while a module update is in progress. After the module is updated, the additional resources are no longer needed.You must update the Suite Admin module before you update any other CloudCenter Suite module. Update only one module at at time. If you simultaneously update more than one module, your update process may fail due to limited resource availability. See for additional context.Prepare InfrastructureYou may see one or more error messages during the update process. Be aware that these messages will not affect the update itself.
10
Cisco CloudCenter Suite -- Suite Admin
Cisco Cloud Management Documentation 2
In CloudCenter Suite 5.0, if you select mode, once the installation completes, you see the vSphere DHCP IP Allocation Suite link which provides the IP address of one of the Masters. This IP address cannot be controlled by the user.Admin URL
In CloudCenter Suite 5.1, configure . the IP address of the Master VIP for the linkSuite Admin URL This is a change!SSH Key and Username:
In CloudCenter Suite 5.0, this field value was dynamically assigned.In CloudCenter Suite 5.1, you can provide your own SSH key and username. This is a change!
OpenStack:
SSH Key:
In CloudCenter Suite 5.0, this field value was dynamically assigned.In CloudCenter Suite 5.1, you can provide your own SSH key. This is a change!
As a Suite Admin administrator, you can perform the following additional tasks in CloudCenter Suite 5.1:
Backup and Restore:
The CloudCenter Suite uses the cloud/cloud account and bucket configurations to retrieve the list of existing backups. This option latestis displayed in the table in the > page (under the Data Recovery section in the Suite Admin UI). You can backup data to Admin BackupGoogle Cloud Storage or AWS S3. See for additional detailsBackupTo restore data, the CloudCenter Suite requires that you launch a new cluster. This is a manual process. See for additional Restoredetails.For isolated, air gap, environments, that do not have internet access, or to back up to a local system, a manual backup procedure is available – see for additional details.Isolated Environments
Last Login Indicator:
The log session history information for each CloudCenter Suite session provides details on the last login time, the type of login, and the location (IP address) of the person logging into the session.The number of failed attempts provides a point of verification and allows the user to notice unauthorized use of the CloudCenter Suite system at any given time.See > for additional details.Suite Admin Dashboard Last Login Indicator
Impersonate a User:
User impersonation allows you to temporarily sign into any CloudCenter Suite module as a different user. Suite and tenant s can impersonate all other users in their tenants and sub-tenants and take any action, regardless of the administratorpermission level of the user being impersonated. See > for additional details.Create and Manage Users Impersonate User
:Archive Logs on the AWS S3 Region
By default, raw log data is collected by the Kubernetes pod and saved to a temporary location on the CloudCenter Suite server.The temporarily stored logs on the CloudCenter Suite server are automatically purged. This log file location is not configurable from the CloudCenter Suite.If you configure an archive location for your AWS S3 region, the CloudCenter Suite logs can also be saved to the AWS S3 region besides the temporary location on the CloudCenter Suite server. If so, you can enable the archive of log files from the Suite Admin UI to the AWS S3 region using the S3 bucket name and AWS credentials.See for additional details.Log Archive
:Expanded List of Currency Codes
The Suite Admin now offers additional currency code options.See for a complete list.Currency Conversion
No updates
No updates
CloudCenter Suite introduces a feature that is accessible from any page and can be triggered at any time by clicking the bell icon.Notifications
This feature is available to be viewed in all modules.T Action Orchestrator and Cost Optimizer modules.he notification is only triggered by thecontentSee > for additional details.Suite Admin Dashboard Notifications
Users can perform the following additional tasks in CloudCenter Suite 5.1:
Standard Log Format Support:
Where relevant, modules display the user and tenant information.You can search by or when you view logsuserId tenantId .The log files support JSON format.See for additional context.Monitor Modules
Delete User/Tenant:
When you, as the administrator, attempt to delete a CloudCenter Suite user (or tenant or sub-tenant), the Suite Admin triggers a confirmation process to verify (with each module) that the resource can be deleted.
As each user/tenant/sub-tenant may have a separate set of dependencies, multi-selection is not possible for this action. This is a change!See > and > for additional details.Create and Manage Users Delete User Manage Tenants Tenants List Page
:Enable/Disable User
A new column allows administrators to configure the state for each user.EnableThis column replaces the Enable/Disable option in the Actions dropdown list. This is a change!See > for additional details.Create and Manage Users Enable/Disable User
11
Cisco CloudCenter Suite -- Suite Admin
Cisco Cloud Management Documentation 3
:Email Link Expiration
The user receives an alert when logging in for the first time, along with a link to change the assigned password. The user has 30 days to act on this message and use the link to change the password. This time period has changed from 1 day in earlier releases. This is a change!See > for additional details.Manage Tenants General Settings
No updates
See for details.Security Considerations
The Suite Admin UI includes the following updates and changes:
The CloudCenter Suite UI is available in the following languages and is only configurable from the UI:
EnglishFrenchJapaneseSimplified Chinese
You can set your language of choice in one of two configuration screens once the CloudCenter Suite has been installed:
Administrative Level: When you configure the suite administrator. See > Initial Administrator Setup Configure an Admin User and Tenantfor details.User Level: When you edit your user profile. See > for details.Suite Admin Dashboard The Header
See for additional details.UI Language Availability
The following list identifies the functions that were deprecated in Suite Admin UI:
The section above.Enable/Disable option in the Actions dropdown list as identified in the Enable/Disable User when deleting users/tenants/sub-tenants as identified in the Multi-selection is not possible section as identified in the User Tenant Management
.above
Suite Admin 5.1.0 includes the following new and updated APIs:
New APIs
The following list identifies the new Suite Admin APIs:
Suite Notification Service API Calls 5.1.0
List notifications: /api/v1/notificationsGET
Get a notification: /api/v1/notifications/{id}
Acknowledge notifications:PUT/api/v1/notified
Authentication Service API Calls 5.1.0
Obtain the last login information: GET /suite-auth/api/v1/currentUser/lastLoginInfoAuthentication endpoint for impersonation of a child or descendant tenant. The generated JWT token will have additional SUITE_IMP role:POST /suite-auth/api/v1/impersonateAuthentication endpoint for impersonation. The generated JWT token will have additional SUITE_IMP role:POST /suite-auth/api/v1/impersonate/{userId}Return to the original user after impersonation, restores role and creates a new JWT for the original user:GET /suite-auth/api/v1/returnUser
IDM Service API Calls 5.1.0
Create a task: POST /api/v1/develop/tasksUpdate a task: PUT /api/v1/develop/tasks/{id}Delete a task: DELETE /api/v1/develop/tasks/{id}Get a preflight: GET /api/v1/preflights/{preflightId}List of users in a simplified format:GET /api/v1/simple_usersList of users for a tenant's in simplified format: GET /api/v1/tenants/{tenantId}/simple_usersList preflights under a tenant: GET /api/v1/tenants/{tenantId}/preflights
Logs Service API Calls 5.1.0
Get log archive configuration: GET /api/v1/configs/archiveSave log archive configuration: POST /api/v1/configs/archive
12
Cisco CloudCenter Suite -- Suite Admin
Cisco Cloud Management Documentation 4
Delete log archive configuration:DELETE /api/v1/configs/archiveDisable log archive configuration: POST /api/v1/configs/archive/disableTest permission to write to AWS S3 Bucket: POST /api/v1/configs/validate_s3_bucketGet all loggers configuration for the specified service: GET /api/v1/services/{serviceName}/loggersSet loggers configuration for a service: POST /api/v1/services/{serviceName}/loggers
Updated APIs
The following list identifies the updated Suite Admin APIs:
IDM Service API Calls 5.1.0
Search and update tenants using the parameter:idPUT /api/v1/search/tenants Search and update groups using the parameter:idPUT /api/v1/search/tenants/{tenantId}/groups Search groups Delete tenants using a unique, alphanumeric :tenantIdDELETE /api/v1/tenants/{tenantId} Tenant-based settings includes useParent, useParentConfig detailsbased on root user credentials and updated currencyExchange.
details:currencyCode
GET /api/v1/tenants/{tenantId}/effective_tenant_configGET /api/v1/tenants/{tenantId}/tenant_configPUT /api/v1/tenants/{tenantId}/tenant_configPOST /api/v1/tenants/{tenantId}/tenant_config
Add a product to a tenant includes preflight details:POST /api/v1/tenants/{tenantId}/products/{productId} Check validity of new user parameter includes preflight details:PUT /api/v1/tenants/{tenantId}/validity/newUser Delete the requested user includes preflight details:DELETE /api/v1/users/{userId}
Product Registry Service API Calls 5.1.0
Get Product Metadata includes preflight details:GET /api/v1/products/{productId}
Resource Management Service API Calls 5.1.0
Deletes a resource deletes the (date), , , , and details:created id lastUpdated resourceName resourceTypeDELETE /api/v1/resource/{resourceId} Returns tenant branding information with , , , , details:companyWebsite contactEmail privacyPolicyUrl termOfServiceUrl trademarkUrlGET /api/v1/tenants/{tenantId}/branding Save tenant branding information with , , , , details:companyWebsite contactEmail privacyPolicyUrl termOfServiceUrl trademarkUrlPOST /api/v1/tenants/{tenantId}/branding
Deprecated APIs
The following list identifies the deprecated Suite Admin APIs:
Logs Service API Calls 5.1.0
Get log files:GET /api/v1/products/{productId}/files Get services:GET /api/v1/products/{productId}/services
Resource Management Service API Calls 5.1.0
Get all loggers configuration for the specified service:GET /api/v1/services/{serviceName}/loggers Set loggers configuration for a service:POST /api/v1/services/{serviceName}/loggers Deletes the specified list of loggers configuration for the specified service:DELETE /api/v1/services/{serviceName}/loggers
The documentation path differs based on your environment using the SaaS solution or the Self-Hosted solution. Consequently, the following sections were moved from the section to the section:Suite Admin Self-Hosted Installation
Suite ArchitectureSuite Admin WorkflowInitial Administrator SetupKubernetes Cluster ManagementConfigure Smart Licenses
The following documentation changes were implemented in CloudCenter Suite 5.1.0:
(deleted this page and replaced it with the page)Restore Approach Restore
13
Cisco CloudCenter Suite -- Suite Admin
Cisco Cloud Management Documentation 5
(updated the installer vCPU requirements)Prepare Infrastructure (add the tenant network field details and added Port 6443 requirements)OpenStack Installation
(added a note to clarify usability)Offline Repository (added cloud-specific tips)Manage Clusters
(added screenshots and tips)VMware vSphere Appliance Setup
CloudCenter Suite 5.1.0 has the following known issue:
If a notification is read by one user, then this icon reflects the notification as read for all users.
The following issue was resolved in CloudCenter Suite 5.1.0:
CSCvq09604: The web service global parameter does not work with proxy authentication.: As web service calls are routed through the proxy CloudCenter Suite 5.1 includes a fix to ensure that when proxy settings are Resolution
modified on the Suite Admin, the CloudCenter Suite management pod is rebooted to apply the configuration. See for additional Proxy Settingsdetails.
14
Cisco CloudCenter Suite -- Suite Admin
Cisco Cloud Management Documentation 1
UI Language AvailabilityUI Language Availability
OverviewLanguage OptionsBrowser Language DetectionLanguage Configuration
Cisco provides as the only language option for CloudCenter Suite documentation.English
You have multiple language options when you view the CloudCenter Suite UI.
Cisco provides the following language choices to view the CloudCenter Suite UI:
EnglishFrenchJapaneseSimplified Chinese
The CloudCenter Suite detects your browser's language of choice and automatically displays the CloudCenter Suite UI in the same language – provided it is one of the language options listed in the above section.
Regardless of the detected browser language or the administrator settings at the time of CloudCenter Suite installation, each end user can change the language at any time from the module to which each user has access.
You can set your language of choice in one of two configuration screens:
Administrative Level: When you configure the suite administrator. See > for Initial Administrator Setup Configure an Admin User and Tenantdetails.User Level: When you edit your user profile. See > for details.Suite Admin Dashboard The Header
In CloudCenter Suite 5.1.0, the UI for the installation process (from running the installer up to the ) is only available in Initial Administrator Setup – you cannot change the language, not does Cisco detect your browser language at that time.English
The first point where you can change the language and where Cisco detects your browser language, is in the Suite Admin login page as listed in the sections below.
15
Cisco CloudCenter Suite -- Suite Admin
Cisco Cloud Management Documentation 1
Suite Admin DashboardSuite Admin Dashboard
OverviewWho Can Access the Suite Admin Dashboard?Navigating to the Suite Admin DashboardContents of the Suite Admin DashboardThe Header
Edit ProfileLast Login IndicatorModule NavigationOffline RepoNotificationsCluster Management
The Tree PaneThe Display PaneThe Footer
The Suite Admin Dashboard displays the following information:
The Suite Admin to a the CloudCenter Suite as described in .dminister Initial Administrator SetupAdditional modules that you can install on an as-needed basis.
The Suite Admin Dashboard is visible to suite administrators configured by the .Initial Administrator
To access the Dashboard, bookmark the page to ensure easy navigation. During the course of using the Suite Admin documentation, you will see instructions to navigate to the Suite Admin Dashboard. This step implies that the must access this home page to perform the remaining suite administrator procedure!
The Suite Admin Dashboard is made up of multiple panes:
The headerThe left tree paneThe main display paneThe footer
The CloudCenter Suite uses the same header for all modules installed by the Suite Admin. As such, the following items are displayed for all modules in their respective dashboards:
Edit Profile
16
Cisco CloudCenter Suite -- Suite Admin
Cisco Cloud Management Documentation 2
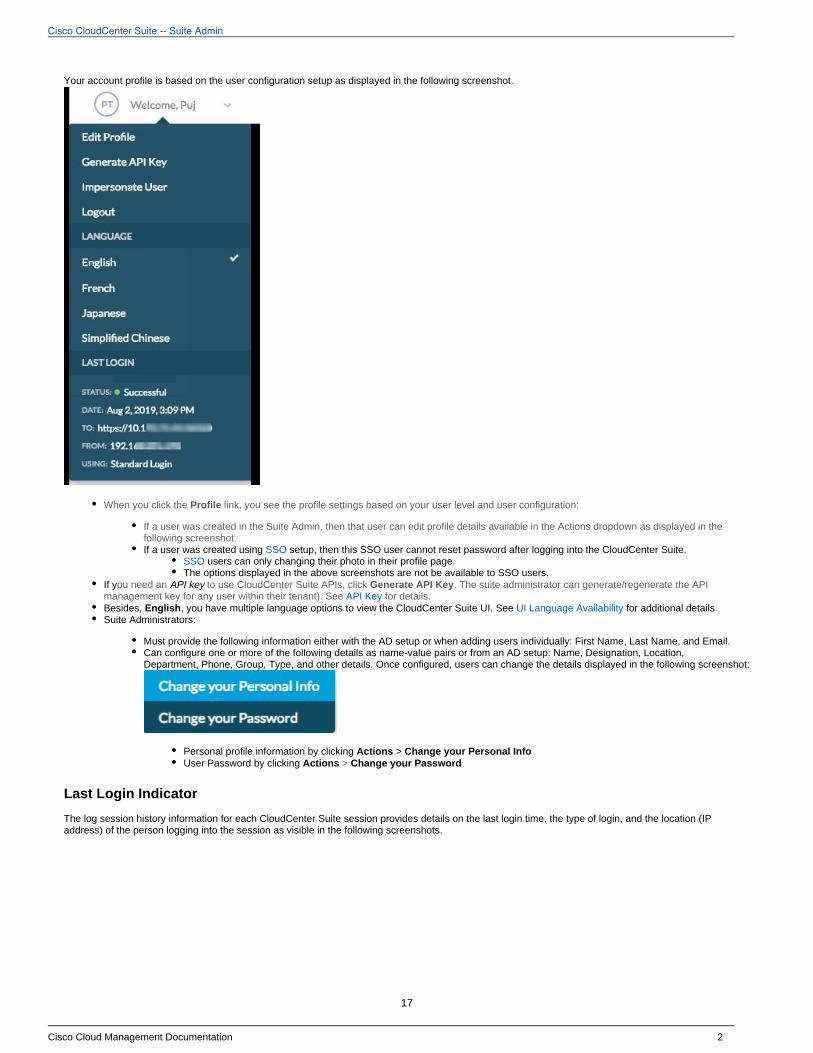
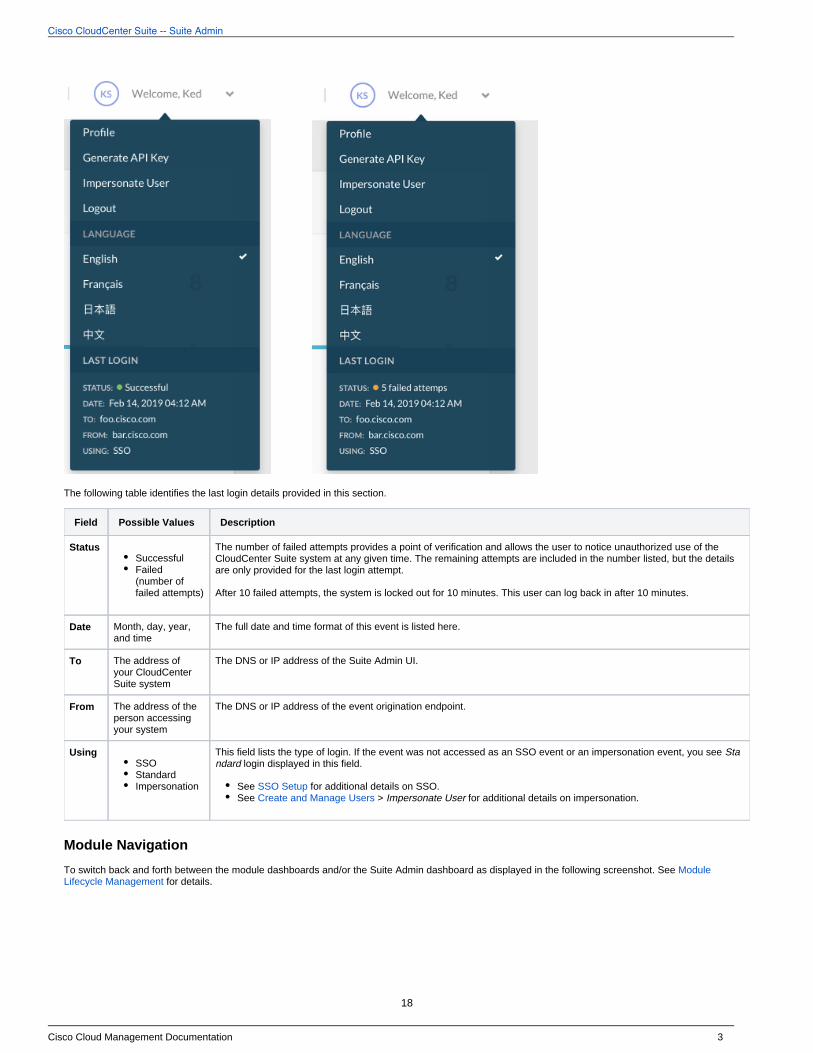
Your account profile is based on the user configuration setup as displayed in the following screenshot.
When you click the Profile link, you see the profile settings based on your user level and user configuration:
If a user was created in the Suite Admin, then that user can edit profile details available in the Actions dropdown as displayed in the following screenshot.If a user was created using setup, then this SSO user cannot reset password after logging into the CloudCenter Suite. SSO
SSO users can only changing their photo in their profile page.The options displayed in the above screenshots are not be available to SSO users.
If you need an API key to use CloudCenter Suite APIs, click . The suite Generate API Key administrator can generate/regenerate the API management key for any user within their tenant). See for details.API KeyBesides, , you have multiple language options to view the CloudCenter Suite UI. See for additional details.English UI Language AvailabilitySuite Administrators:
Must provide the following information either with the AD setup or when adding users individually: First Name, Last Name, and Email.Can configure one or more of the following details as name-value pairs or from an AD setup: Name, Designation, Location, Department, Phone, Group, Type, and other details. Once configured, users can change the details displayed in the following screenshot:
Personal profile information by clicking > Actions Change your Personal InfoUser Password by clicking Actions > Change your Password
Last Login Indicator
The log session history information for each CloudCenter Suite session provides details on the last login time, the type of login, and the location (IP address) of the person logging into the session as visible in the following screenshots.
17
Cisco CloudCenter Suite -- Suite Admin
Cisco Cloud Management Documentation 3
The following table identifies the last login details provided in this section.
Field Possible Values Description
StatusSuccessfulFailed (number of failed attempts)
The number of failed attempts provides a point of verification and allows the user to notice unauthorized use of the CloudCenter Suite system at any given time. The remaining attempts are included in the number listed, but the details are only provided for the last login attempt.
After 10 failed attempts, the system is locked out for 10 minutes. This user can log back in after 10 minutes.
Date Month, day, year, and time
The full date and time format of this event is listed here.
To The address of your CloudCenter Suite system
The DNS or IP address of the Suite Admin UI.
From The address of the person accessing your system
The DNS or IP address of the event origination endpoint.
UsingSSOStandardImpersonation
This field lists the type of login. If the event was not accessed as an SSO event or an impersonation event, you see Sta login displayed in this field.ndard
See for additional details on SSO.SSO SetupSee > for additional details on impersonation.Create and Manage Users Impersonate User
Module Navigation
To switch back and forth between the module dashboards and/or the Suite Admin dashboard as displayed in the following screenshot. See Module for details.Lifecycle Management
18
Cisco CloudCenter Suite -- Suite Admin
Cisco Cloud Management Documentation 4
Offline Repo
After you create a VM from the OVA, you can use the VM as an offline repository server. If you set up this connection, the icon displays a green status circle as displayed in the following screenshot. See for details.Offline Repository Configuration
Notifications
The Notifications feature is accessible from any page and can be triggered at any time.
If triggered (bell icon), you receive the notification stream for selective events within the module.
Cost Optimizer Events: For example, trend and budget alerts. See for a complete list of notifications.Alerts PageAction Orchestrator Events: For example, overspending alerts. See > for details.System Elements Workflow Events
Each notification contains the following details:
The event title.
Notifications are listed as an aggregation for all modules. The new tab icon indicates that a new tab will be opened for that notification.
The event details, if available, for each event.The created timestamp on each notification displays the relative time (for example, 4 hours, 2 days, and so forth) if within 4 weeks and the absolute time (for example, August 10, 2019) if later than 4 weeks.
An end user can view module-specific notifications based on their role and access level within the CloudCenter Suite. The grey, bell icon displays a blue circle (displayed in the following screenshot) when unread notification(s) become available for a module.
This feature is available for Action Orchestrator and Cost Optimizer all modules, however, the notification feed is only triggered by thecontentmodules.
19
Cisco CloudCenter Suite -- Suite Admin
Cisco Cloud Management Documentation 5
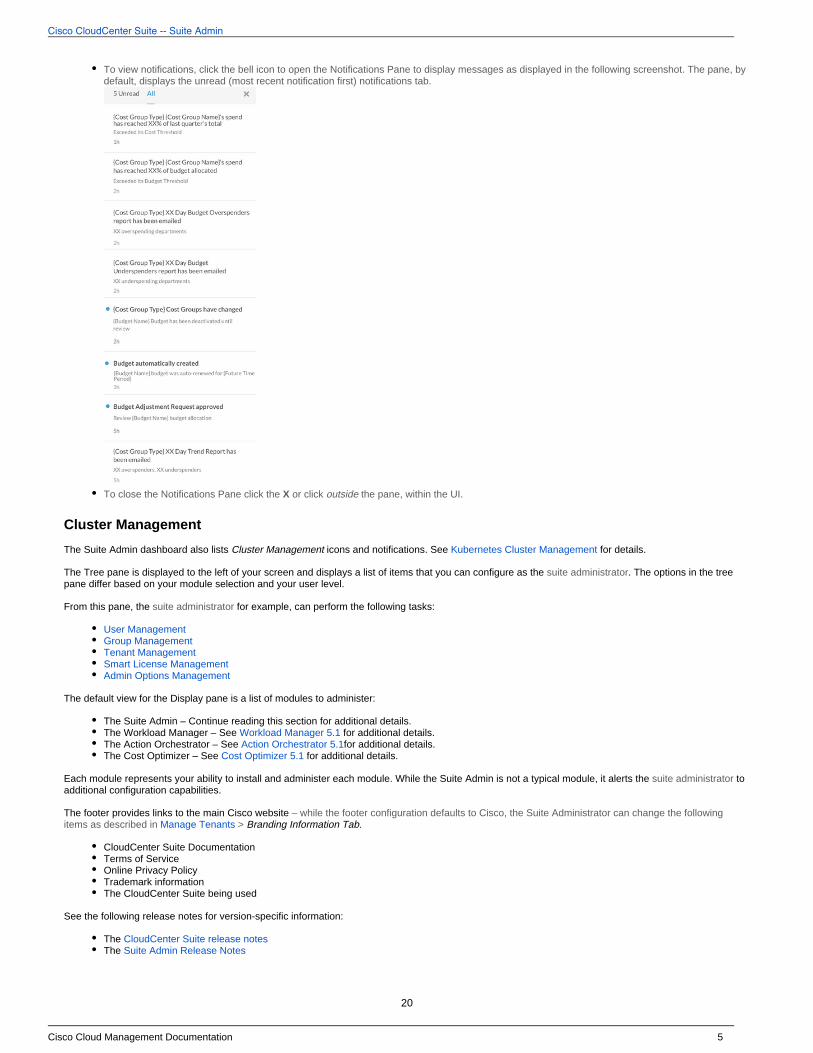
, click the bell icon to open the . The pane, by To view notifications Notifications Pane to display messages as displayed in the following screenshotdefault, displays the unread notifications tab.(most recent notification first)
To close the Notifications Pane click the or click , within the UI.X the paneoutside
Cluster Management
The Suite Admin dashboard also lists icons and notifications. See for details.Cluster Management Kubernetes Cluster Management
The Tree pane is displayed to the left of your screen and displays a list of items that you can configure as the . The options in the tree suite administratorpane differ based on your module selection and your user level.
From this pane, the for example, can perform the following tasks:suite administrator
User ManagementGroup ManagementTenant Management Smart License ManagementAdmin Options Management
The default view for the Display pane is a list of modules to administer:
The Suite Admin – Continue reading this section for additional details.The Workload Manager – See for additional details.Workload Manager 5.1The Action Orchestrator – See for additional details.Action Orchestrator 5.1The Cost Optimizer – See for additional details.Cost Optimizer 5.1
Each module represents your ability to install and administer each module. While the Suite Admin is not a typical module, it alerts the to suite administratoradditional configuration capabilities.
The footer provides links to the main Cisco website – while the footer configuration defaults to Cisco, the Suite Administrator can change the following items as described in Manage Tenants > Branding Information Tab.
CloudCenter Suite Documentation Terms of ServiceOnline Privacy PolicyTrademark informationThe CloudCenter Suite being used
See the following release notes for version-specific information:
The CloudCenter Suite release notesThe Suite Admin Release Notes
20

Cisco CloudCenter Suite -- Suite Admin
Cisco Cloud Management Documentation 1
User Tenant ManagementUser Tenant Management
Create and Manage UsersCreate and Assign GroupsOOB Suite Admin GroupsCustom Groups by AdminUnderstand RolesUnderstand User LevelsManage TenantsManage Module-Specific Content
21
Cisco CloudCenter Suite -- Suite Admin
Cisco Cloud Management Documentation 1
Create and Manage UsersCreate and Manage Users
OverviewThe Users List PageThe Suite AdministratorCreate a User Create Another Suite Administrator Create a Tenant AdministratorCreate a User with a Module-Specific RoleImporting User DataDisabled UsersUser ActionsDisable/Enable UserDelete UserImpersonate User
RestrictionsLogsProcess
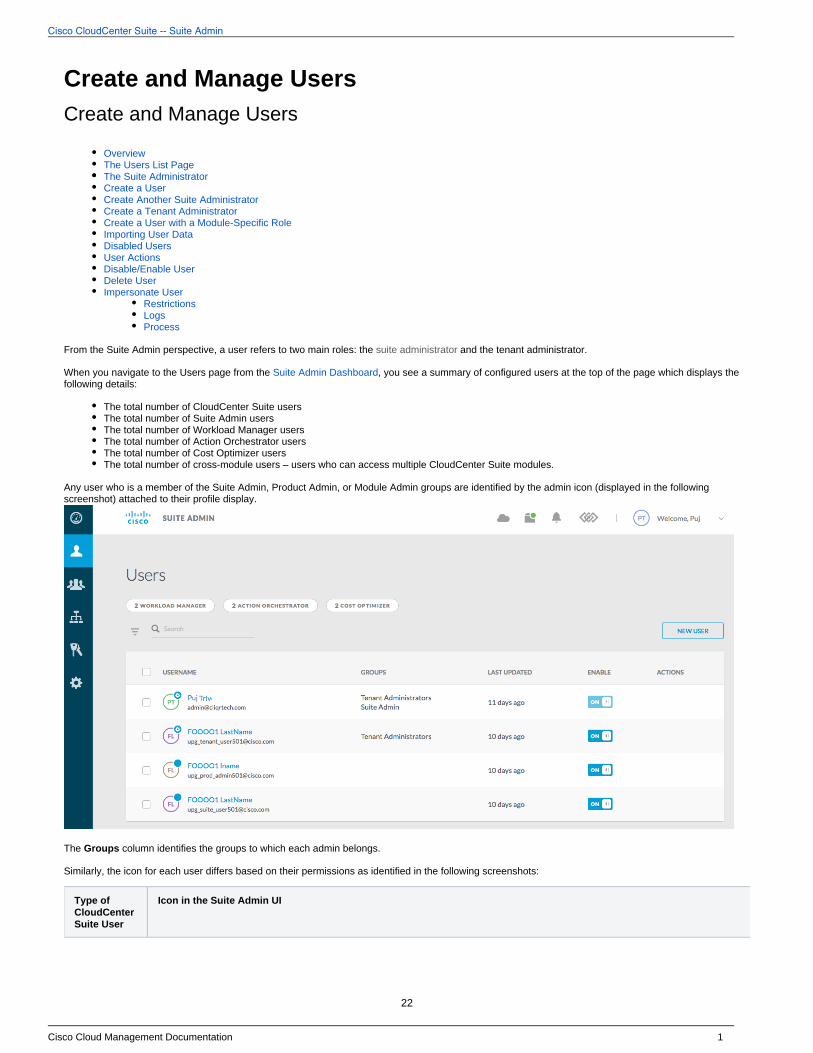
From the Suite Admin perspective, a user refers to two main roles: the and the tenant administrator.suite administrator
When you navigate to the Users page from the , you see a summary of configured users at the top of the page which displays the Suite Admin Dashboardfollowing details:
The total number of CloudCenter Suite usersThe total number of Suite Admin usersThe total number of Workload Manager usersThe total number of Action Orchestrator usersThe total number of Cost Optimizer usersThe cross-module users – users who can access multiple CloudCenter Suite modules.total number of
Any user who is a member of the Suite Admin, Product Admin, or Module Admin groups are identified by the admin icon (displayed in the following screenshot) attached to their profile display.
The column identifies the groups to which each admin belongs. Groups
Similarly, the icon for each user differs based on their permissions as identified in the following screenshots:
Type of CloudCenter Suite User
Icon in the Suite Admin UI
22
Cisco CloudCenter Suite -- Suite Admin
Cisco Cloud Management Documentation 2
1.
Suite Administrator
Suite User
SSO User
The :suite administrator
Is configured as part of the process. Initial Administrator SetupIs responsible for all user roles for all modules. As such, all CloudCenter Suite of modules share the same user base.Can add other s.suite administrator
You can add additional users in the Suite Admin or for each module beyond the . These users can be assigned to any module, OOB Suite Admin Groupsgroup, or tenant depending on why they were added in the first place.
Tenant AdministratorA user created with administrative permission at the tenant level is referred to as a . Tenant Admin A tenant admin does not have visibility into the Suite
. Admin Dashboard
While each user can be assigned a specific role with access to individual modules, each module also has its' own pre-defined roles and groups. The Suite Admin leaves it to the tenant admin to manage these roles and groups at the tenant level for each module.While a can add unlimited tenant admins, it is better to have close control on the number of tenant admins for each module as suite administratorthey have the highest level of permissions and privileges for that module.
Tenant admins can perform the following tasks:
Manage users, groups and tenants WITHIN their tenant hierarchy.Access modules made available for their tenant(s).Execute a subset of tasks as permitted by the or their parent tenant.suite administrator
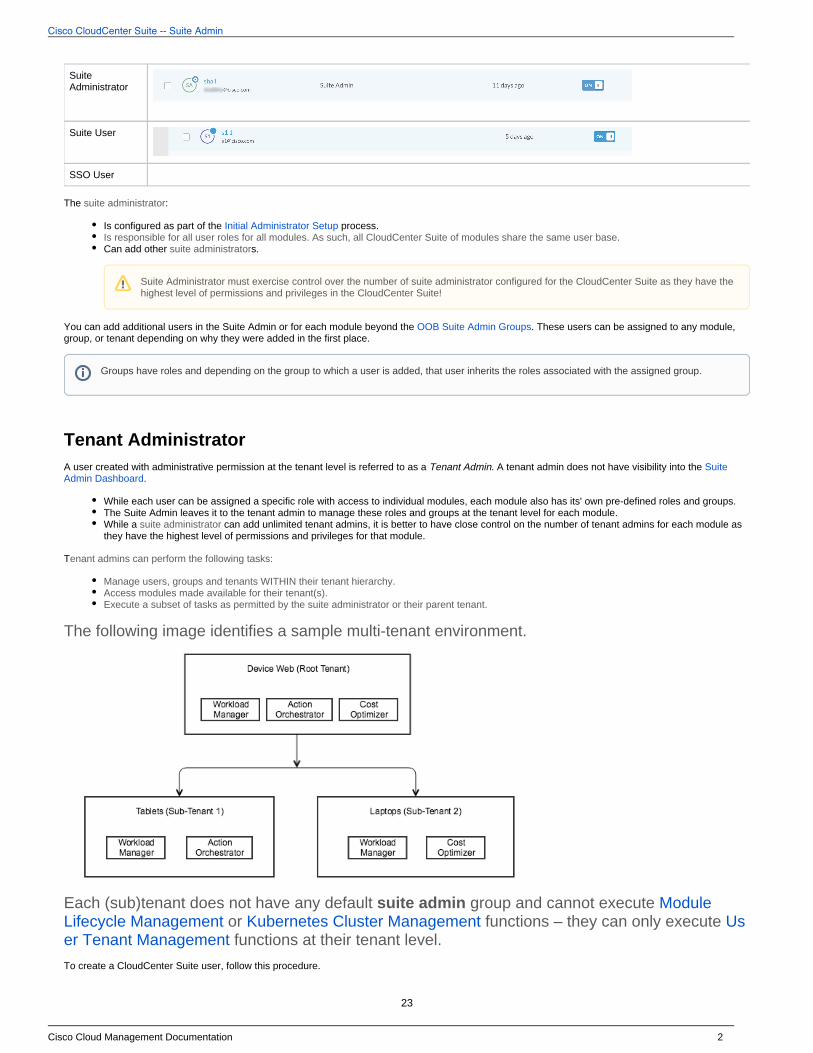
The following image identifies a sample multi-tenant environment.
Each (sub)tenant does not have any default group and cannot execute suite admin Module or functions – they can only execute Lifecycle Management Kubernetes Cluster Management Us functions at their tenant level.er Tenant Management
To create a CloudCenter Suite user, follow this procedure.
Suite Administrator must exercise control over the number of for the CloudCenter Suite as they have the suite administrator configuredhighest level of permissions and privileges in the CloudCenter Suite!
Groups have roles and depending on the group to which a user is added, that user inherits the roles associated with the assigned group.
23
Cisco CloudCenter Suite -- Suite Admin
Cisco Cloud Management Documentation 3
1. 2. 3. 4.
5.
6.
7.
1. 2. 3. 4.
1. 2. 3. 4.
Navigate to the Suite Admin Dashboard > page.UsersClick .Add UserEnter the details for this user in the Add User form.Optional. Disable the switch if you prefer to provide your own password. If enabled, the system sends an email to the Auto Generate Passworduser with the link so the user can generate the password.
Optional. Provide name-value pairs for the field to be displayed and the value to be provided so the user can add more information at a later point. Some examples of name-value pair can be Designation, Badge ID, Location, Department, Phone, and other details.Select the group(s) to which this user must belong.
Click . The newly added user can now be added to any group.Save
Until you add this newly-created user to a group, this user will have no role or ability to perform any actions.
To create another suite administrator for the Suite Admin, besides the administrator created as part of the process, follow this Initial Administrator Setupprocedure.
Follow the process above to .Create a UserNavigate to the > page.Suite Admin Dashboard GroupsLocate the group to which you want to add this user.suite administratorAssign the newly added user to the group.suite administrator
This newly-assigned now has all administrative abilities associated with the group. suite administrator suite administrator
To create a tenant admin, follow this procedure.
Follow the process above to .Create a UserNavigate to the > page.Suite Admin Dashboard GroupsLocate the tenant admin group to which you want to add this user.Assign the newly added user to the tenant admin group.
This newly-assigned tenant admin now has all administrative abilities associated with the tenant admin group.
A module administrator refers to a user who can administer any of the CloudCenter Suite modules. The suite administrator can add a user to a module-specific role to make this user a module administrator. See Understand Roles for details.
To import Active Directory data, you must follow ia manual process to mport user data. See for additional details.SSO Setup
Only an can disable a user. Once disabled, the user's profile updates to display this state.user administrator
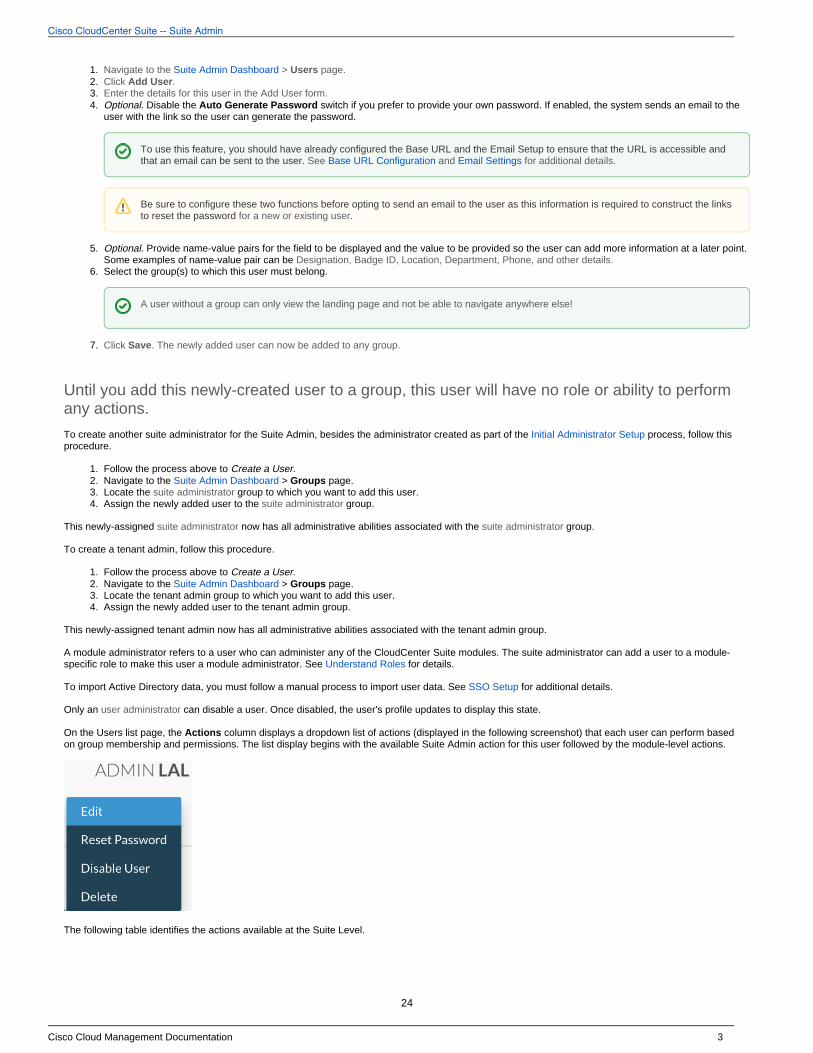
On the Users list page, the column displays a dropdown list of actions (displayed in the following screenshot) that each user can perform based Actionson group membership and permissions. The list display begins with the available Suite Admin action for this user followed by the module-level actions.
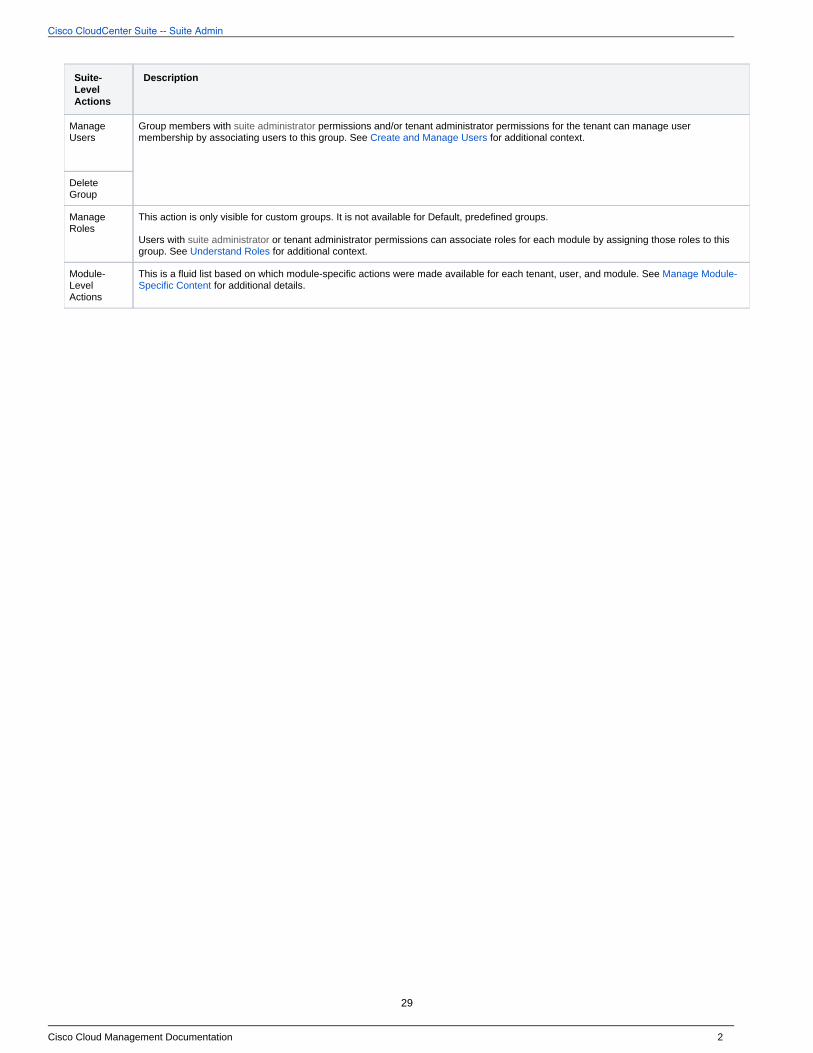
The following table identifies the actions available at the Suite Level.
To use this feature, you should have already configured the Base URL and the Email Setup to ensure that the URL is accessible and that an email can be sent to the user. See Base URL Configuration and Email Settings for additional details.
Be sure to configure these two functions before opting to send an email to the user as this information is required to construct the links to reset the password . for a new or existing user
A user without a group can only view the landing page and not be able to navigate anywhere else!
24
Cisco CloudCenter Suite -- Suite Admin
Cisco Cloud Management Documentation 4
Suite-Level Actions
Multi-Select Action?
Description
Edit User No Users with permissions and/or tenant administrator permissions for this tenant can edit any user's profile suite administratorby changing the first/middle/last name and email, Configure metadata details, Configure groups, Reset password, or disable the user.Reset
PasswordNo
Disable/Enable User
No Once disabled, you must first enable a user to assign the user to a group and to see other Actions for this user.
Delete User
No As each user/tenant/sub-tenant may have a separate set of dependencies, multi-selection is not possible for this action. See the section below for additional details.Delete User
Impersonate User
No A suite administrator or a can temporarily sign into the CloudCenter Suite as a different user. See the tenant administrator Imp section below for additional details.ersonate User
Manage Groups
No Users with permissions for this tenant can manage groups. See suite administrator permissions and/or tenant administrator Cu for additional details.stom Groups by Admin
Module-Level Actions
This is a fluid list based on which module-specific actions were made available for each tenant, user, and module. See Manage Module-Specific Content for additional details
Generate API Key
A suite administrator can generate an API key for any user. See for details.API Key
The Enable column allows administrators to individually enable or disable CloudCenter Suite users. Any user is enabled by default.
If a user deletion is in process, this user is automatically moved to the Disabled state as described in the section below.Delete User
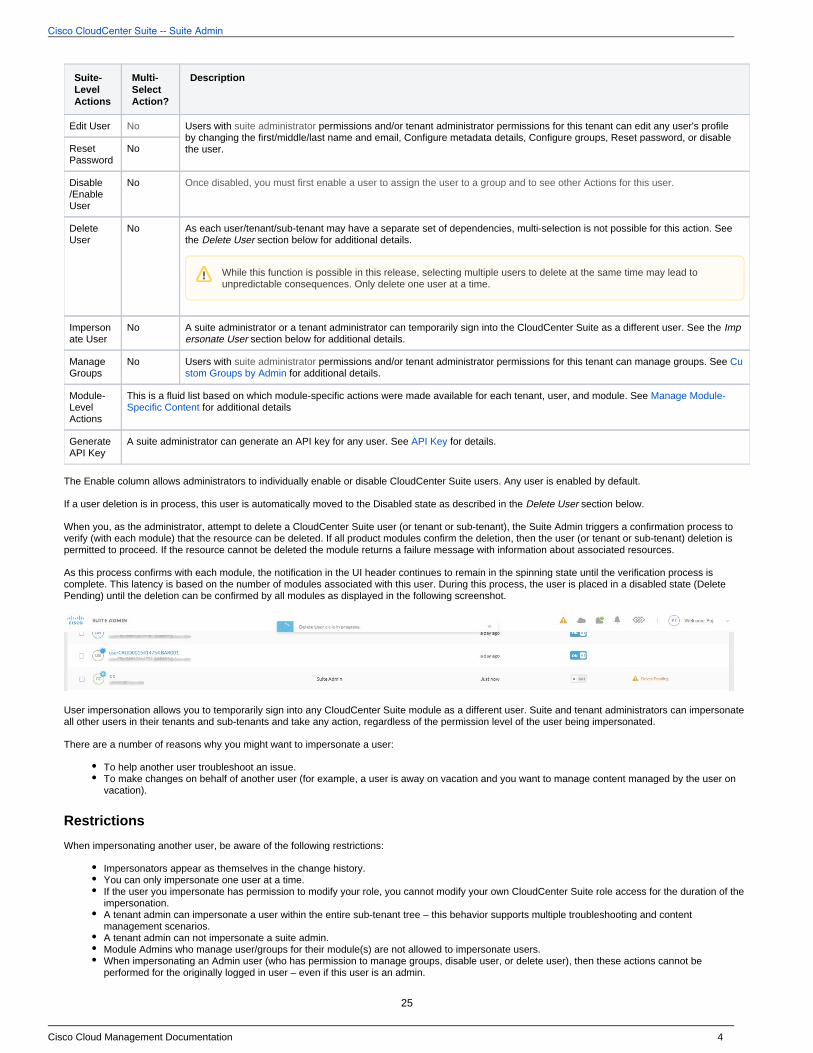
When you, as the administrator, attempt to delete a CloudCenter Suite user (or tenant or sub-tenant), the Suite Admin triggers a confirmation process to verify (with each module) that the resource can be deleted. If all product modules confirm the deletion, then the user (or tenant or sub-tenant) deletion is
cannotpermitted to proceed. If the resource be deleted the module returns a failure message with information about associated resources.
As this process confirms with each module, the notification in the UI header continues to remain in the spinning state until the verification process is complete. This latency is based on the number of modules associated with this user. During this process, the user is placed in a disabled state (Delete Pending) until the deletion can be confirmed by all modules as displayed in the following screenshot.
User impersonation allows you to temporarily sign into any CloudCenter Suite module as a different user. Suite and tenant s can impersonate administratorall other users in their tenants and sub-tenants and take any action, regardless of the permission level of the user being impersonated.
There are a number of reasons why you might want to impersonate a user:
To help another user troubleshoot an issue. To make changes on behalf of another user (for example, a user is away on vacation and you want to manage content managed by the user on vacation).
Restrictions
When impersonating another user, be aware of the following restrictions:
Impersonators appear as themselves in the change history.You can only impersonate one user at a time.If the user you impersonate has permission to modify your role, you cannot modify your own CloudCenter Suite role access for the duration of the impersonation.A tenant admin can impersonate a user within the entire sub-tenant tree – this behavior supports multiple troubleshooting and content management scenarios.A tenant admin can not impersonate a suite admin.Module Admins who manage user/groups for their module(s) are not allowed to impersonate users.When impersonating an Admin user (who has permission to manage groups, disable user, or delete user), then these actions cannot be performed for the originally logged in user – even if this user is an admin.
While this function is possible in this release, selecting multiple users to delete at the same time may lead to unpredictable consequences. Only delete one user at a time.
25
Cisco CloudCenter Suite -- Suite Admin
Cisco Cloud Management Documentation 5
1.
2.
Logs
In the history and log files, the Tenant ID and email of the admin who impersonated a user will be displayed for the actions taken during the impersonation session.
When an administrator and performs any operation, the log files will display the original User ID, the impersonated , and impersonates another user User IDthe impersonated user’s Tenant ID in the as visible in the following DEBUG snippet: POD details for the corresponding service
./common-framework-suite-idm-85dc97c79f-zjf4l:[[originalUserId=1&userId=2&tenantId=1]] 2019-07-23 19:14:39,742DEBUG com.cisco.cpsg.idm.controller.helper.UserHelperImpl [http-nio-8080-exec-4] - product list for user 2:[com.cisco.cpsg.prodregistry.api.v1.dto.ProductDto@77771337, com.cisco.cpsg.prodregistry.api.v1.dto.ProductDto@2c1c70b0]./common-framework-suite-idm-85dc97c79f-zjf4l:[[originalUserId=1&userId=2&tenantId=1]] 2019-07-23 19:14:40,161DEBUG com.cisco.cpsg.idm.controller.helper.UserHelperImpl [http-nio-8080-exec-6] - product list for user 2:[com.cisco.cpsg.prodregistry.api.v1.dto.ProductDto@620f9219, com.cisco.cpsg.prodregistry.api.v1.dto.ProductDto@63c2a6be]
Process
To create a CloudCenter Suite user, follow this procedure.
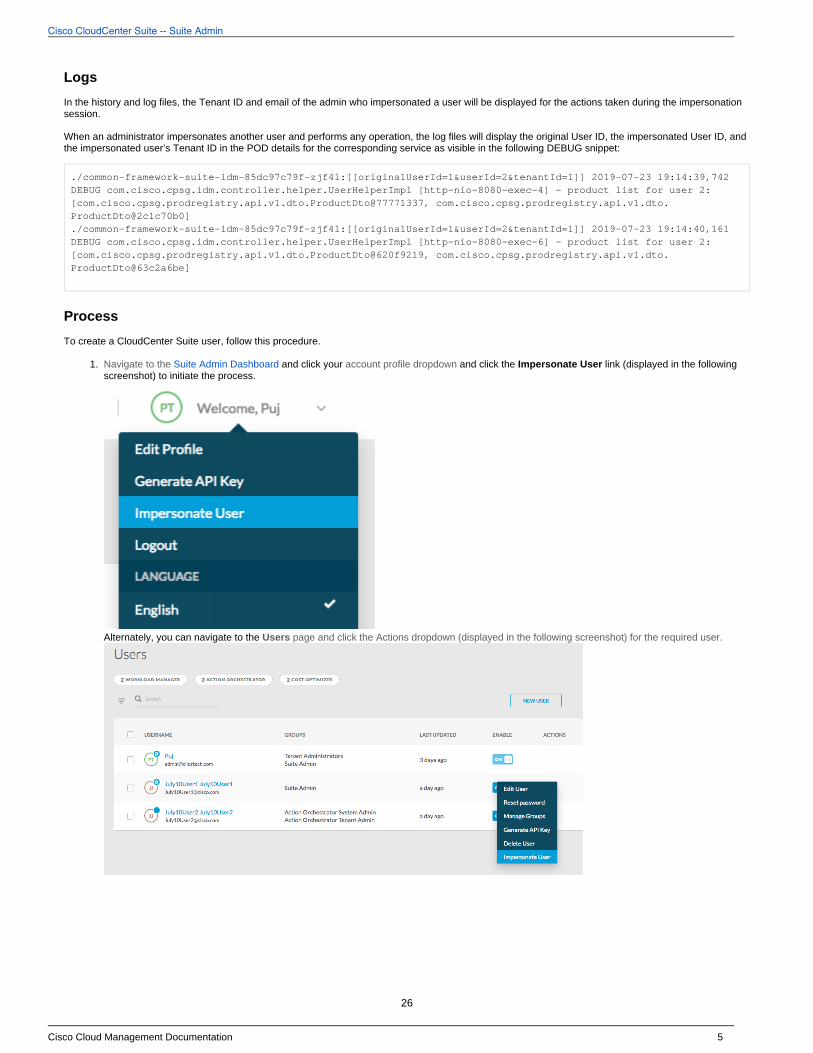
Navigate to the Suite Admin Dashboard and click your and click the link (displayed in the following account profile dropdown Impersonate Userscreenshot) to initiate the process.
Alternately, you can navigate to the page and click the Actions dropdown (displayed in the following screenshot) for the required user.Users
26
Cisco CloudCenter Suite -- Suite Admin
Cisco Cloud Management Documentation 6
2.
3. 4.
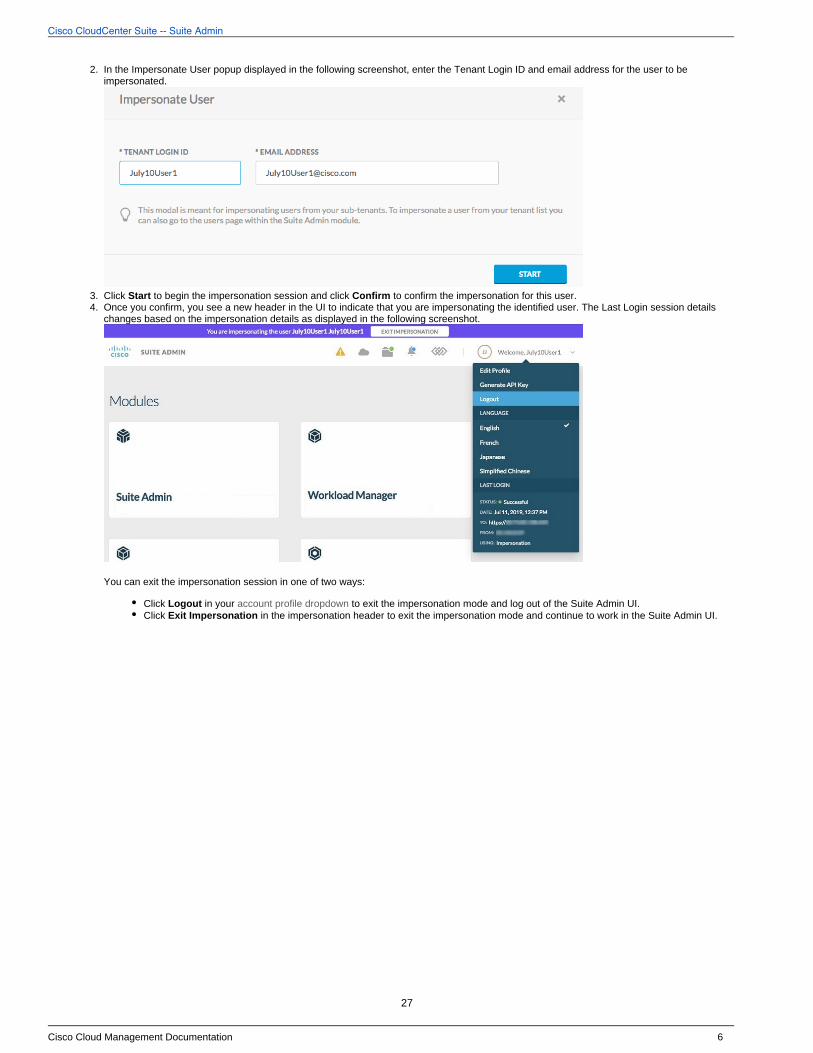
In the Impersonate User popup displayed in the following screenshot, enter the Tenant Login ID and email address for the user to be impersonated.
Click to begin the impersonation session and click to confirm the impersonation for this user.Start ConfirmOnce you confirm, you see a new header in the UI to indicate that you are impersonating the identified user. The Last Login session details changes based on the impersonation details as displayed in the following screenshot.
You can exit the impersonation session in one of two ways:
Click in your to exit the impersonation mode and log out of the Suite Admin UI.Logout account profile dropdownClick in the impersonation header to exit the impersonation mode and continue to work in the Suite Admin UI.Exit Impersonation
27
Cisco CloudCenter Suite -- Suite Admin
Cisco Cloud Management Documentation 1
1. 2. 3. 4.
Create and Assign GroupsCreate and Assign Groups
OverviewThe Groups List PageDefault Suite Admin GroupsDefault Module GroupsAssign a User to a GroupAssign a Tenant Administrator to a GroupAssign a Module Administrator to a GroupGroup Actions
A CloudCenter Suite user must belong to at least one group to be able to view resources authorized for that group. A user without a group can only view the landing page and not be able to navigate anywhere else!
When you navigate to the Groups page from the , you see a summary of configured groups at the top of the page which displays Suite Admin Dashboardthe following details:
The total number of CloudCenter Suite groupsThe total number of Suite Admin groupsThe total number of Workload Manager groupsThe total number of Action Orchestrator groupsThe total number of Cost Optimizer groupsThe total number of cross-module groups – groups with access to multiple CloudCenter Suite modules.
Any user who is a member of the Suite Admin, Product Admin, or Module Admin groups are identified by the admin icon attached to their profile display.
The column identifies the groups to which each admin belongs. Groups
The displays Group Name column Default next to each out-of-box, predefined group.
Two default groups are available to the :suite administrator out-of-box
The suite administrator groupThe grouptenant admin
When the installs any module, additional, default out-of-box groups become available. These groups vary based on the module.suite administrator
It is the responsibility of the module admins to leverage the functionality of these module-level, default groups. administer and
By installing the module, the :suite administrator
Automatically inherits the module admin role.Can add three more module admins.
A module role allows the module admin to monitor and manage the module.administrator
When you add a user to the CloudCenter Suite, you must assign the user to at least one group to ensure that the user can view resources at a minimum.
To assign a user to a group, follow this procedure.
Navigate to the Suite Admin Dashboard > page and verify that the user is listed in the Users page.UsersNavigate to the Groups page.Locate and click the group to which you want to add this user.Assign the newly added user to the group.
Promote a User to be a Suite AdminA can promote any user to the Suite group!suite administrator Administrator
To assign a user to a group, follow the section above. procedure listed in the Assign a User to a Group
A Tenant can promote any user to the Tenant group!Administrator Administrator
To assign a user to the Tenant group, follow the section above. Administrator procedure listed in the Assign a User to a Group
A Module Admin can promote any user to the Module Admin group!
To assign a user to the Module Admin group, follow the section above. procedure listed in the Assign a User to a Group
On the Groups list page, the column displays a dropdown list of actions that each group member can perform based on group membership and Actionspermissions. The list display begins with the available Suite Admin action for this group followed by the module-level actions.
The following table identifies the actions available at the Suite Level.
28
Cisco CloudCenter Suite -- Suite Admin
Cisco Cloud Management Documentation 2
Suite-Level Actions
Description
Manage Users
Group members with permissions and/or tenant administrator permissions for the tenant can manage user suite administratormembership by associating users to this group. See Create and Manage Users for additional context.
Delete Group
Manage Roles
This action is only visible for custom groups. It is not available for Default, predefined groups.
Users with or tenant administrator permissions can associate roles for each module by assigning those roles to this suite administratorgroup. See for additional context.Understand Roles
Module-Level Actions
This is a fluid list based on which module-specific actions were made available for each tenant, user, and module. See Manage Module-Specific Content s.for additional detail
29
Cisco CloudCenter Suite -- Suite Admin
Cisco Cloud Management Documentation 1
OOB Suite Admin GroupsOOB Suite Admin Groups
OverviewThe Suite Admin GroupThe Tenant Admin GroupThe Module Admin GroupAdmin User RestrictionsActive Directory Mapping
Default out-of-box (predefined) groups provide a majority of the required functionality to module users. As such, enterprises will not need to create custom groups unless, this group is extremely specific to their environments. At each level, any CloudCenter Suite user can be assigned to one of the following predefined groups:
Suite : The GroupLevel Suite AdministratorTenant Level: The Tenant Administrator GroupModule Level: The Module Administrator Group
The Suite Admin group can :execute the following roles and functions
User Tenant ManagementModule Lifecycle ManagementKubernetes Cluster Management
Users in this group have access to the entire Suite Admin functionality. Additionally, if a user in this group installs a module, the default roles for that module are also assigned to this user.
The can add any user to the Suite Adminsuite administrator .
The Tenant Admin group can execute the roles and function for (for tenant or sub-tenant, depending on User Tenant Management at the tenant levelpermissions and ownership).
Users in this group manage all users, groups, and sub-tenants within their own tenant. Additionally, if a user in this group installs a module, the default roles for that module are also assigned to this user.
The Module Admin group can execute the roles and function for (not for a tenant or sub-tenant).User Tenant Management at the module level
Users in this group have access to module-specific functionalities. A user in this group can automatically manage all users and groups for this module. For example, a Workload Manager admin can create a custom service and restrict that service to some users, but cannot delete or create a tenant.
No administrator can perform the following functions:
Remove themselves from a default groupDisable or delete a default groupReset their own passwordCreate a new group with a suite administrator role
As a module admin, be aware that you can use SAML configuration for Active Directories to map existing enterprise users to the default Suite Admin groups or to default module group(s). See for additional context.SSO Setup
30
Cisco CloudCenter Suite -- Suite Admin
Cisco Cloud Management Documentation 1
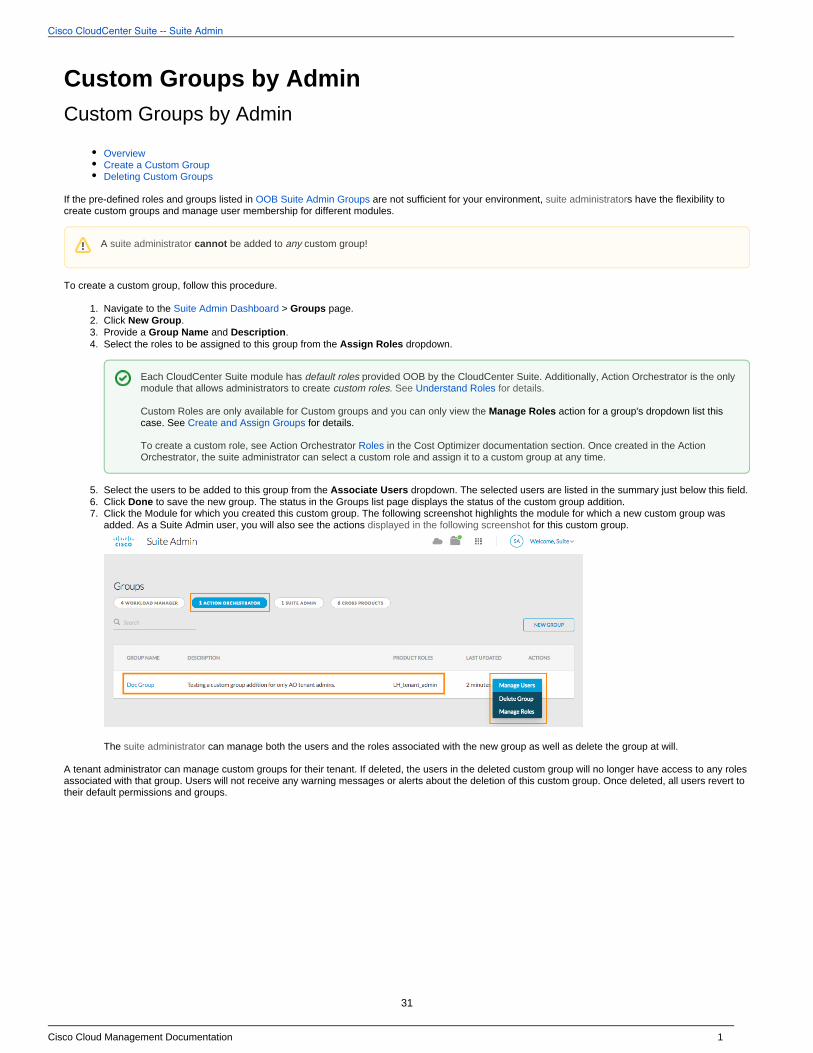
1. 2. 3. 4.
5. 6. 7.
Custom Groups by AdminCustom Groups by Admin
OverviewCreate a Custom GroupDeleting Custom Groups
If the pre-defined roles and groups listed in are not sufficient for your environment, s have the flexibility to OOB Suite Admin Groups suite administratorcreate custom groups and manage user membership for different modules.
To create a custom group, follow this procedure.
Navigate to the > page.Suite Admin Dashboard GroupsClick .New GroupProvide a and .Group Name DescriptionSelect the roles to be assigned to this group from the dropdown.Assign Roles
Select the users to be added to this group from the dropdown. The selected users are listed in the summary just below this field.Associate UsersClick to save the new group. The status in the Groups list page displays the status of the custom group addition.DoneClick the Module for which you created this custom group. The following screenshot highlights the module for which a new custom group was added. As a Suite Admin user, you will also see the actions for this custom group. displayed in the following screenshot
The can manage both the users and the roles associated with the new group as well as delete the group at will.suite administrator
A tenant administrator can manage custom groups for their tenant. If deleted, the users in the deleted custom group will no longer have access to any roles associated with that group. Users will not receive any warning messages or alerts about the deletion of this custom group. Once deleted, all users revert to their default permissions and groups.
A be added to custom group!suite administrator cannot any
Each CloudCenter Suite module has provided OOB by the CloudCenter Suite. Additionallydefault roles , Action Orchestrator is the only module that allows administrators to create . custom roles See Understand Roles for details.
Custom Roles are only available for Custom groups and you can only view the action dropdown list this Manage Roles for a group's case. See for details.Create and Assign Groups
To create a custom role, see Action Orchestrator in the Cost Optimizer documentation section. Once created in the Action RolesOrchestrator, the suite administrator can select a custom role and assign it to a custom group at any time.
31

Cisco CloudCenter Suite -- Suite Admin
Cisco Cloud Management Documentation 1
Understand RolesUnderstand Roles
OverviewRole-Based Access Control (RBAC)Predefined, Default RolesCustom RolesPredefined Roles for Each Module
Roles are a collection of permissions provided to a . The users within each group can perform on OOB Suite Admin Group permitted functions permitted by virtue of being part of the group. resources
Permitted function refers to configuration functions like create, view, update, delete, run, and so forth.Permitted resources differ based on the module where users in a group perform these actions. As the resources differ between modules, each user can only perform actions within the authorized group. permitted
Permissions identify what operations can be performed on which resources based on tenant association, module restriction, and user level (see Understan). d User Levels
Authorization is based on Role-Based Access Control (RBAC), but restricted to groups in this release.
Roles are associated with user groups. Coupled with permissions and Access Control Lists (ACL, see the documentation for each module for related onlydetails), roles offer the ability to perform specific tasks and view corresponding data.
Permissions can be configured and controlled by different types of roles:
Predefined, default roles Custom roles are controlled by the modules to which these roles belong. These roles may be required to provide additional granularity for a resource. These roles can be configured for each module. Only the Action Orchestrator allows custom role creation.
Default/custom roles are from the Suite Admin's list page or the list page, which displays the configured action for each tenant or visible Tenants Usersuser.
See content specific to the Action Orchestrator at the tenant level.Action Orchestrator Roles for
Predefined, default roles are provided OOB by the Suite Admin for each modules. These roles cover 90% of the functionality required for you to get started with the CloudCenter Suite. These roles cannot be configured as they provide specific permission to specific resources.
Each module in the CloudCenter Suite also has default OOB roles that is specific to just that module. The suite administrator can manage these settings at the tenant level and the user level.
The actions displayed for each module is a fluid list that is created and made available for each tenant or user within the module.
Custom roles are :configured from the module
Module admins can create custom roles within the module.
Custom roles are available to as the administrator can associate each new or existing user with one or more roles. See suite administrators Custo > for details.m Groups by Admin Create a Custom Group
When module admins Create a Group, they can assign custom roles for the new group. See for additional details.Custom Groups by Admin
The OOB ACLs, permissions, and roles that are predefined for each module are explained in the corresponding module documentation. See the pages identified in the following table for additional details.
You cannot assign a role to a specific user in any group.
The RBAC function is inherent and cannot be configured on a per role/user basis. It is inherent because of the group association to users.
Currently, the Action Orchestrator is the only module that . See for ils.uses the custom role configuration function Action Orchestrator Roles deta
Currently, the Action Orchestrator is the only module that uses the custom role configuration function. See Action Orchestrator Roles fordetails.
The Workload Manager and Cost Optimizer do not allow custom role creation as all required roles are already available through this user's group membership.
32
Cisco CloudCenter Suite -- Suite Admin
Cisco Cloud Management Documentation 2
Module Page Reference
Workload Manager See OOB Groups, Roles, and Permissions
Action Orchestrator See Action Orchestrator Roles
Cost Optimizer See Access and Roles
33
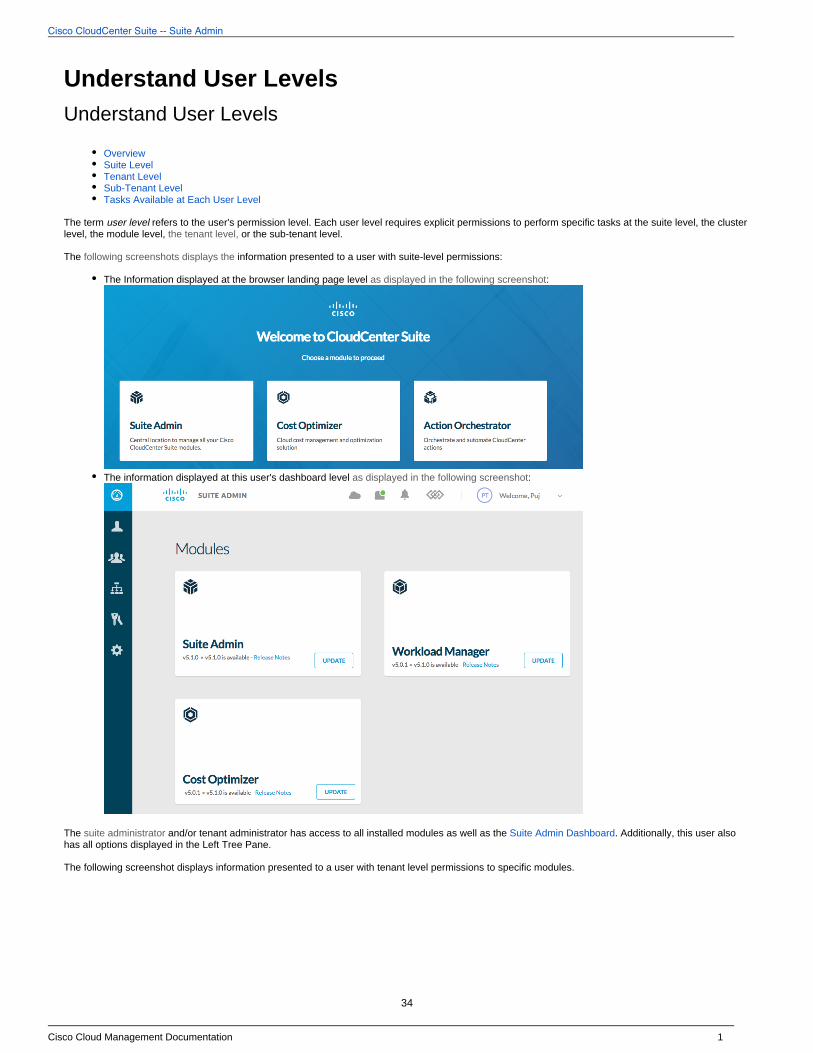
Cisco CloudCenter Suite -- Suite Admin
Cisco Cloud Management Documentation 1
Understand User LevelsUnderstand User Levels
OverviewSuite LevelTenant Level Sub-Tenant LevelTasks Available at Each User Level
The term refers to the user's permission level. Each user level requires explicit permissions to perform specific tasks at the suite level, the cluster user levellevel, the module level, or the sub-tenant level.the tenant level,
The information presented to a user with suite-level permissions:following screenshots displays the
The Information displayed at the browser landing page level :as displayed in the following screenshot
The information displayed at this user's dashboard level :as displayed in the following screenshot
The has access to all installed modules as well as the . Additionally, this user also suite administrator and/or tenant administrator Suite Admin Dashboardhas all options displayed in the Left Tree Pane.
The information presented to a user with tenant level permissions to specific modules. following screenshot displays
34
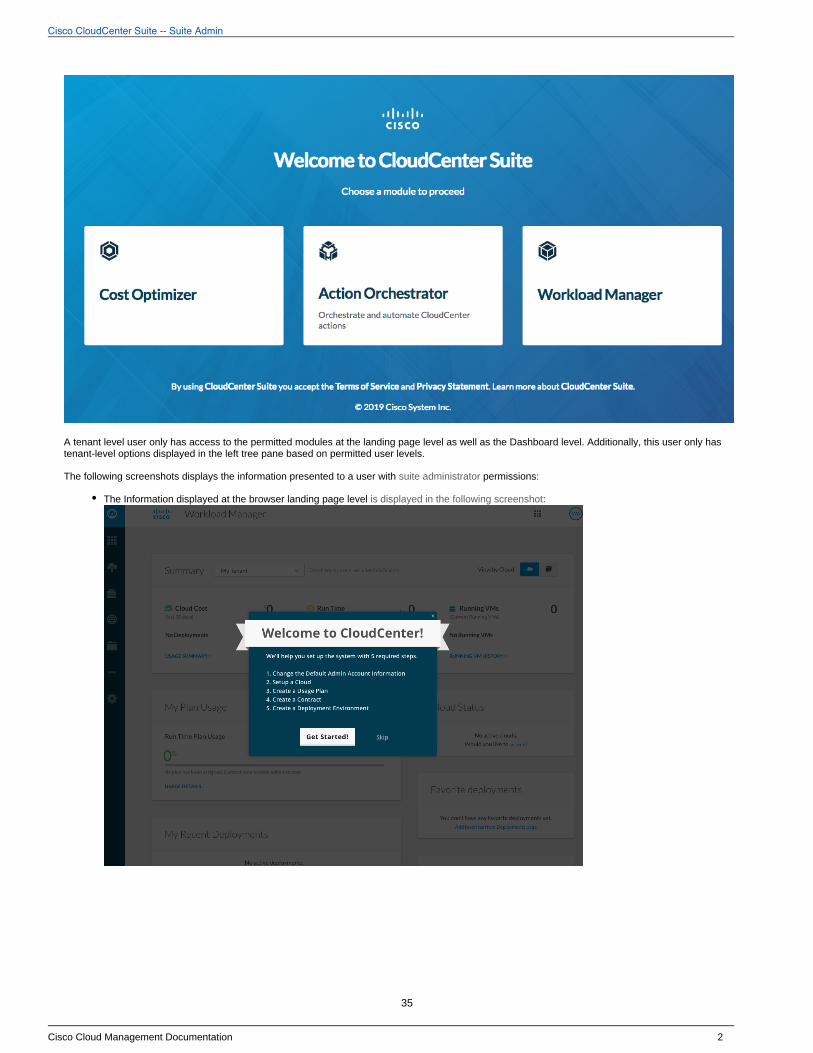
Cisco CloudCenter Suite -- Suite Admin
Cisco Cloud Management Documentation 2
A tenant level user only has access to the permitted modules at the landing page level as well as the Dashboard level. Additionally, this user only has tenant-level options displayed in the left tree pane based on permitted user levels.
The information presented to a user with :following screenshots displays the suite administrator permissions
The Information displayed at the browser landing page level :is displayed in the following screenshot
35

Cisco CloudCenter Suite -- Suite Admin
Cisco Cloud Management Documentation 3
The information displayed at the user's dashboard level :is displayed in the following screenshot
Note that this sub-tenant level user, has direct access into the only permitted module at the landing page level as well as the Dashboard level – this user will not be able to see any suite-level options and will only see the module-level options (in this case, the Workload Manager) displayed in the Left Tree Pane based on the user level.
The following table lists the task available to each user level and identifies the permission level as follows:
= Permitted = Not permitted = Permitted based on tenant ownership (if tenant owner or if sub-tenant owner)
Task Suite Administrator
Tenant Admin Sub-Tenant Admin Module Admin
Module Lifecycle Management (Self-Hosted)
Install Module
Update Module
Monitor Modules
Configure Smart Licenses
Admin Menu
Backup
SSO Setup
Proxy Settings
Email Settings
Base URL Configuration
Offline Repository
Currency Conversion
Kubernetes Cluster Management (Self-Hosted)
Cluster Status
Manage Clusters
User Tenant Management
Create and Manage Users
Create and Assign Groups
Custom Groups by Admin
Manage Tenants
36
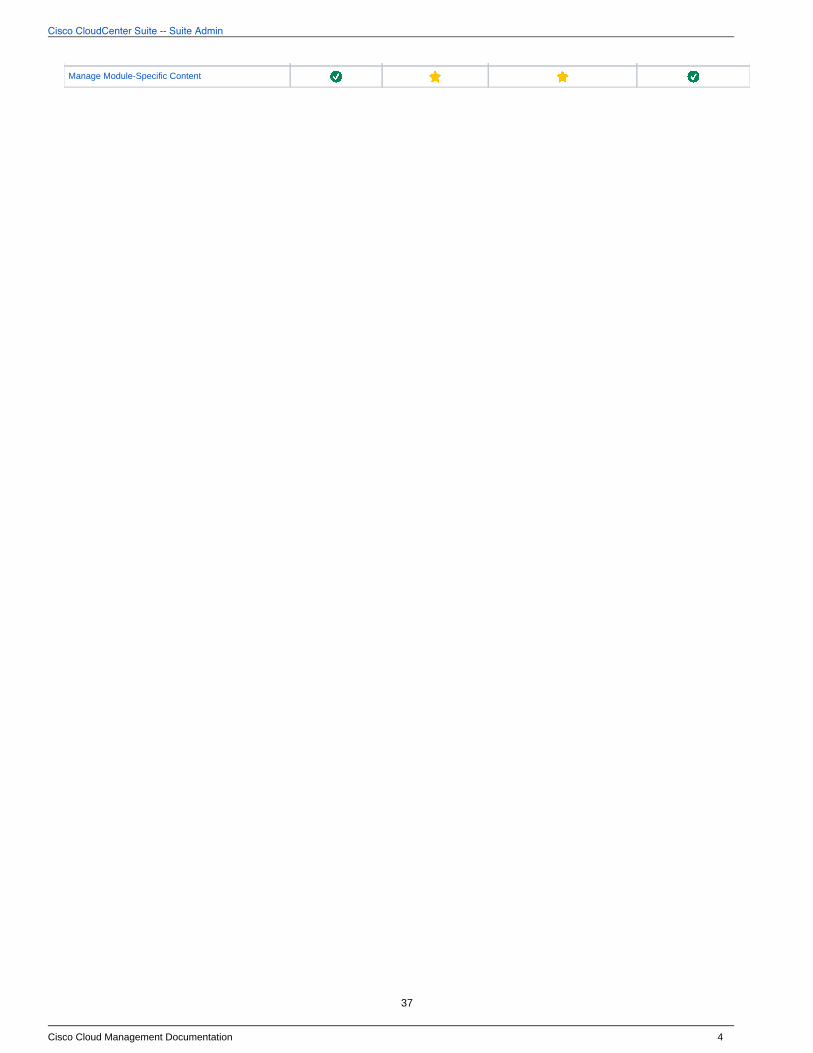
Cisco CloudCenter Suite -- Suite Admin
Cisco Cloud Management Documentation 4
Manage Module-Specific Content
37
Cisco CloudCenter Suite -- Suite Admin
Cisco Cloud Management Documentation 1
1. 2. 3.
4. 5.
Manage TenantsManage Tenants
OverviewTenants List PageGeneral Settings TabBranding Information TabUser Password Rules TabPredefined Tenant Actions
By default, the suite administrator belongs to the root tenant. The can perform the following tasks at this level: suite administrator
Create sub-tenantsModify the root tenant
Each task is explained in the context of configuration tabs that are explained in the following sections.
When you navigate to the page from the , you see the following details:Tenant Suite Admin Dashboard
My Tenant: This is always the parent tenant from each CloudCenter Suite user's perspective! The always belongs to the root suite administratortenant that was configured during the . Initial Administrator SetupSub-Tenants: Each tenant admin can configure sub-tenants as required. If configured, they are listed in this section. Once configured, the sub-tenant admin receives an automatic email.welcome
The Tenant ID and the administrator's email is also listed in this page for both the My Tenant and the Sub-Tenants sections.
The root tenant configuration in this section is restricted to modifying the Tenant Name and Tenant Login ID. Root tenant users cannot disable or delete themselves.
When configuring sub-tenants, a tenant admin can configure the following details:
: Tenant Name and Tenant Login IDTenant Settings: First and Last Names, Email, and Auto Generate Password (default) to trigger a new message to this user (not Tenant Admin Settings
available for the root tenant).
: Select the modules that this tenant user can access by virtue of being in this tenant. The can manage Module Assignment Initial Administrator modules for sub-tenants at the root-tenant level
This tab is only available at the level. The information in this tab is inherited from the parent tenant, if configured. However, tenant admins can My Tenantoverwrite this information for their respective sub-tenants.
To configure branding information at the My Tenant level, follow this procedure.
Click the in the Tenant Name column to open the form. This form has three tabs.link Editing tenant Tenant NameClick the tab, if required. General SettingsClick the tab to configure the product branding, terms of service, privacy policy, and trademark details as listed in the form. Branding InformationAll details in this form are optional and the default Cisco settings are identified in the > section.Suite Admin Dashboard FooterClick the if required. User Password Rules, Click .Done
This tab is only available at the level. My Tenant The information in this tab is inherited from the parent tenant, if configured. However, tenant admins can overwrite this information for their respective sub-tenants.
On the Tenant list page, the column displays a dropdown list of actions that each Tenant admin can perform based on group membership and Actionspermissions.
The following table identifies the actions available at the Tenant Level.
Tenant-Level Action
Description
If you disable the switch, you must manually create a password and manually send an email to this user.Auto Generate Password
The eye icon besides making the password visible also monitors the password rule check to ensure that you set an acceptable password based on the listed rules. The password rules are configured by the as specified in the suite administrator User Password
section below.Rules Tab
The SMTP settings must be set up on a per-tenant basis as required for your enterprise. See for additional context.Email Settings
Either way, when the user's password expires, the user sees this alert when logging in for the first time, along with a link to change the assigned password. Be sure to change the password and then dismiss the alert. The user has 30 days to act on this message and use the link to change the password.
38
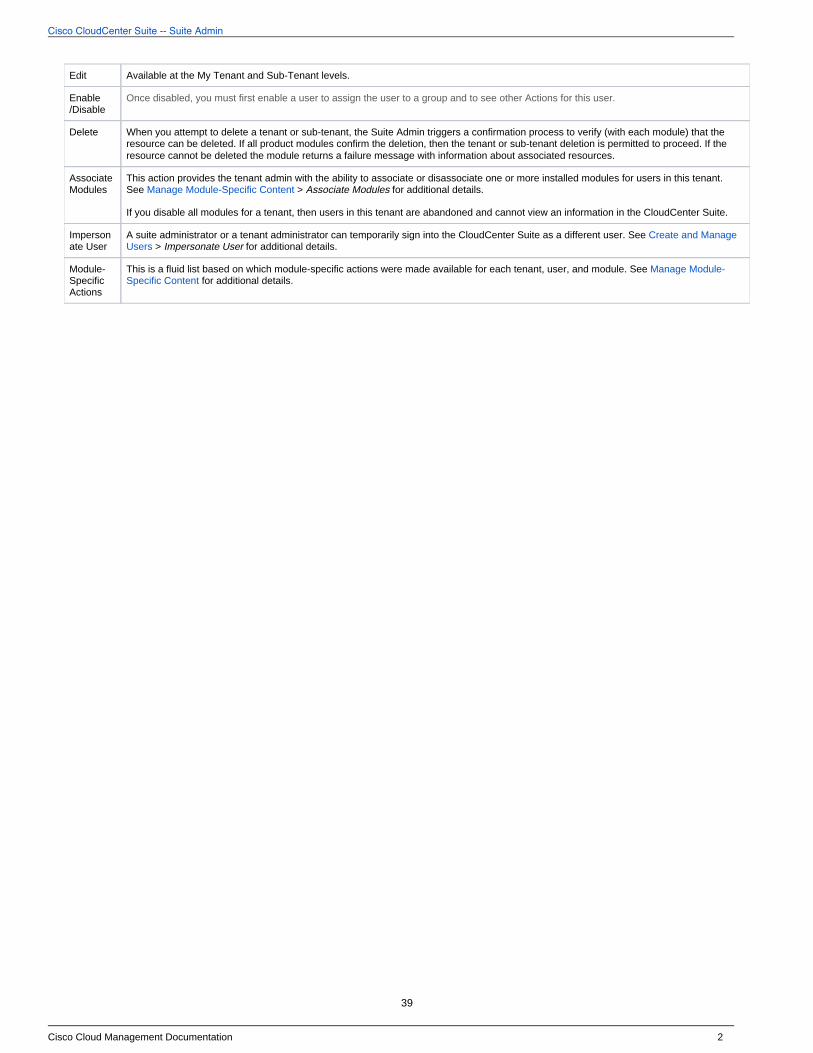
Cisco CloudCenter Suite -- Suite Admin
Cisco Cloud Management Documentation 2
Edit Available at the My Tenant and Sub-Tenant levels.
Enable/Disable
Once disabled, you must first enable a user to assign the user to a group and to see other Actions for this user.
Delete When you attempt to delete a tenant or sub-tenant, the Suite Admin triggers a confirmation process to verify (with each module) that the resource can be deleted. If all product modules confirm the deletion, then the tenant or sub-tenant deletion is permitted to proceed. If the resource cannot be deleted the module returns a failure message with information about associated resources.
Associate Modules
This action provides the tenant admin with the ability to associate or disassociate one or more installed modules for users in this tenant. See for additional details. > Manage Module-Specific Content Associate Modules
If you disable all modules for a tenant, then users in this tenant are abandoned and cannot view an information in the CloudCenter Suite.
Impersonate User
A suite administrator or a can temporarily sign into the CloudCenter Suite as a different user. See tenant administrator Create and Manage > for additional details.Users Impersonate User
Module-Specific Actions
This is a fluid list based on which module-specific actions were made available for each tenant, user, and module. See Manage Module- for additional details.Specific Content
39
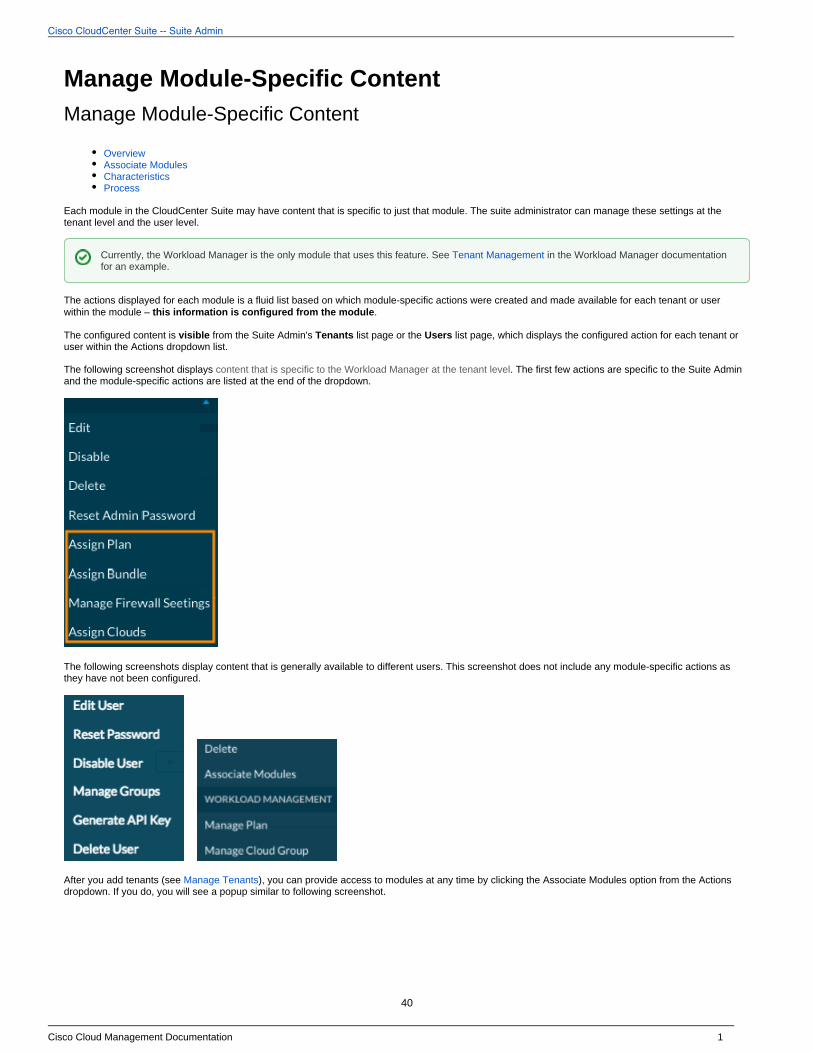
Cisco CloudCenter Suite -- Suite Admin
Cisco Cloud Management Documentation 1
Manage Module-Specific ContentManage Module-Specific Content
OverviewAssociate ModulesCharacteristicsProcess
Each module in the CloudCenter Suite may have content that is specific to just that module. The suite administrator can manage these settings at the tenant level and the user level.
The actions displayed for each module is a fluid list based on which module-specific actions were created and made available for each tenant or user within the module – .this information is configured from the module
The configured content is from the Suite Admin's list page or the list page, which displays the configured action for each tenant or visible Tenants Usersuser within the Actions dropdown list.
The following screenshot displays . The first few actions are specific to the Suite Admin content that is specific to the Workload Manager at the tenant leveland the module-specific actions are listed at the end of the dropdown.
The following display content that is generally available to different users. This screenshot does not include any module-specific actions as screenshotsthey have not been configured.
After you add tenants (see ), you can provide access to modules at any time by clicking the Associate Modules option from the Actions Manage Tenantsdropdown. If you do, you will see a popup similar to following screenshot.
Currently, the Workload Manager is the only module that uses this feature. See in the Workload Manager documentation Tenant Managementfor an example.
40
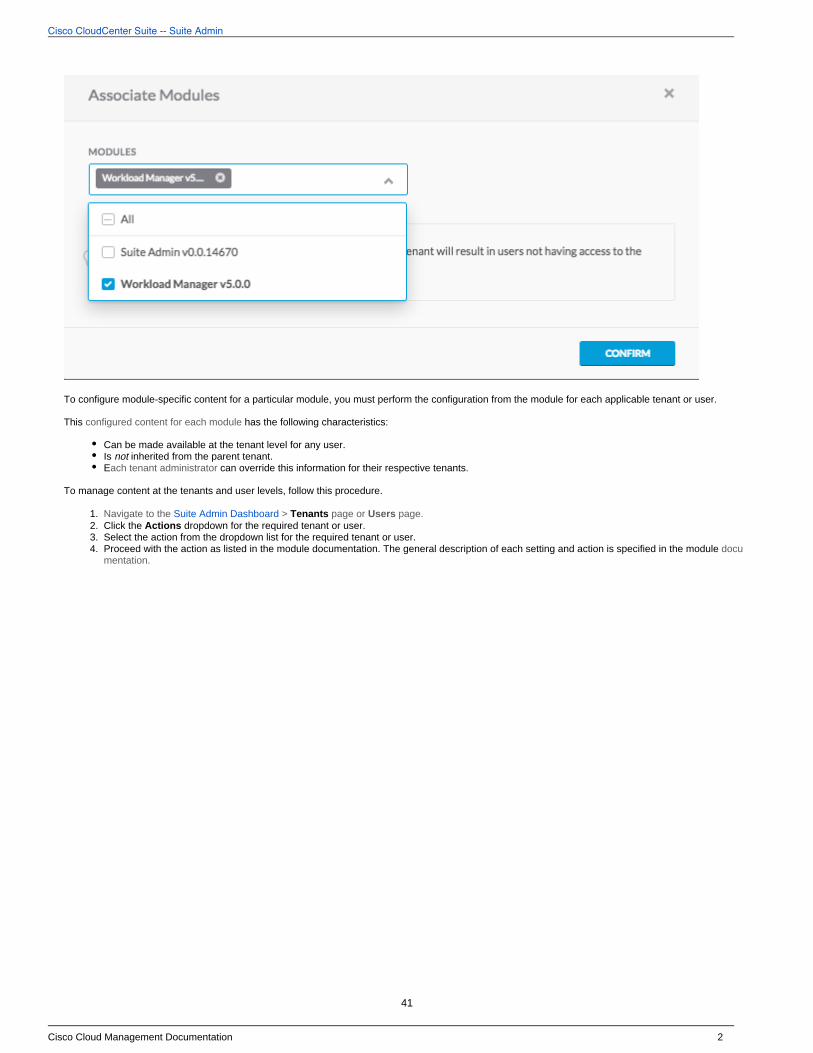
Cisco CloudCenter Suite -- Suite Admin
Cisco Cloud Management Documentation 2
1. 2. 3. 4.
To configure module-specific content for a particular module, you must perform the configuration from the module for each applicable tenant or user.
This has the following characteristics:configured content for each module
Can be made available at the tenant level for any user.Is not inherited from the parent tenant. E can override this information for their respective tenants.ach tenant administrator
To manage content at the tenants and user levels, follow this procedure.
Navigate to the Suite Admin Dashboard > Tenants page or page.UsersClick the dropdown for the required tenant or user. ActionsSelect the action from the dropdown list for the required tenant or user.Proceed with the action as listed in the module documentation. The general description of each setting and action is specified in the module documentation.
41
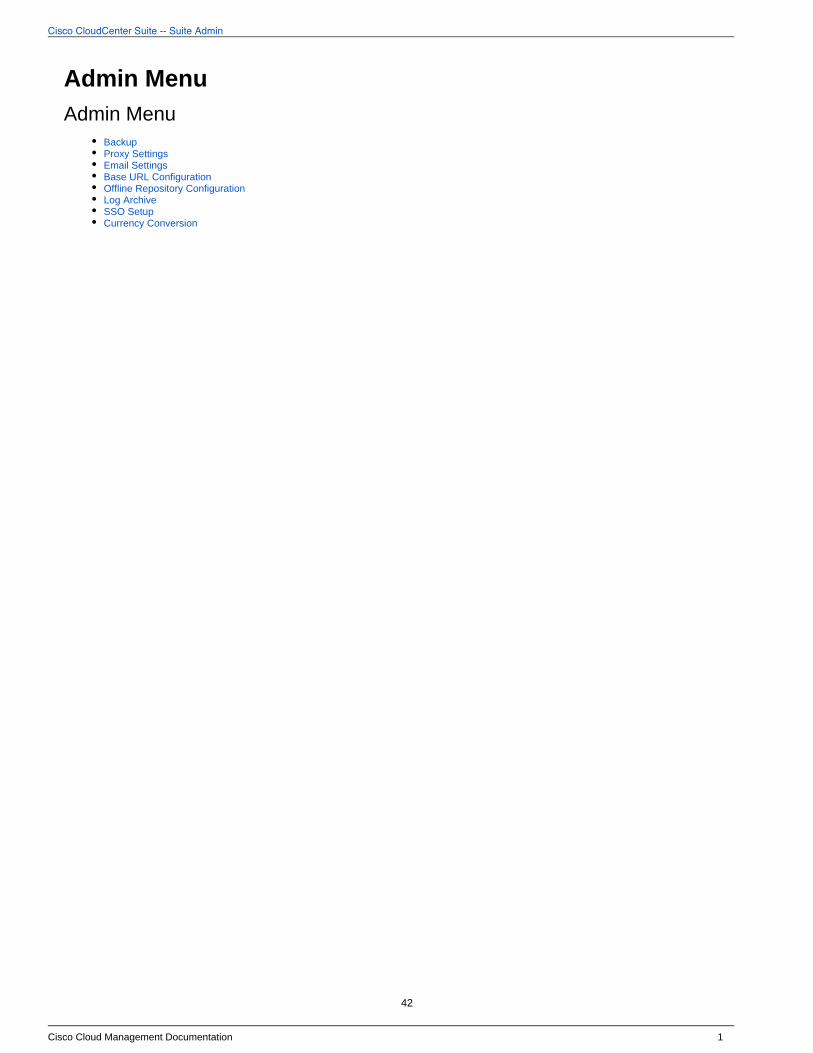
Cisco CloudCenter Suite -- Suite Admin
Cisco Cloud Management Documentation 1
Admin MenuAdmin Menu
BackupProxy SettingsEmail SettingsBase URL ConfigurationOffline Repository ConfigurationLog ArchiveSSO SetupCurrency Conversion
42
Cisco CloudCenter Suite -- Suite Admin
Cisco Cloud Management Documentation 1
Backup
Backup Approach
OverviewLimitationsWhat Data Is Backed Up?RequirementsProcessActions after Configuring the Backup
You may sometimes need to backup your CloudCenter Suite setup so you have the option to recover the data when required. When you have a cluster running, it can go into a bad state for a number of reasons (resource shortage, application unavailability, infrastructure changes, undependable state and so forth). In these cases, backing up the data allows you a to recover data when required.
Before proceeding with a backup, adhere to the following limitations:
Supported Clouds: You can backup data to one of the following locations:
Google Cloud Storage (use the procedure below)AWS S3 (use the procedure below)
Switching between Clouds and Cloud Accounts:
While editing the storage location in the CloudCenter Suite, if you switch to a new cloud type or cloud account within the same cloud type, be aware that backups in the previously configured storage location will no longer be accessible from the CloudCenter Suite.The backup files from the previously configured storage location will continue to be available via your cloud console.
Restoring to a Different Cluster:
This feature is only supported for clusters launched by the CloudCenter Suite installer.You cannot backup from and restore to the same cluster – you backup to one cluster and restore to a different cluster.can onlyThe backed up cluster and the target restore cluster should both be on the same cloud.
User Credentials:
The credentials are specific to your service account in the cloud and only the user with those credentials can configure and initiate the backup.If you change the credentials you will see a warning message to indicate that you cannot access previous backups.
The CloudCenter Suite uses the cloud/cloud account and bucket configurations to retrieve the list of existing backups, displayed in the table in the latest A > page (under the Data Recovery section in the Suite Admin UI).dmin Backup
The backup action backs up the ENTIRE namespace. cisco
Backed Up: Any data under the Cisco ( ) name space. This includes but is not restricted to the Kubernetes resources with associated ciscoapplication data, pod data, secrets, PersistentVolumeClaim (PVC) data, PersistentVolume (PV) data, and other relevant data associated with these sub-systemsNot Backed Up: Any data that is not under the Cisco ( ) name space.cisco
Before proceeding with a backup, adhere to the following limitations:
General: When configuring a backup for the first time, verify that the storage bucket is empty before scheduling any backups.GCP:
Configure a Storage Bucket with the required permissions: The following screenshot displays a sample storage bucket in a GCP environment:
The backup/restore feature is only available on new CloudCenter Suite clusters installed using CloudCenter Suite installers and existing not onKubernetes clusters.
For isolated, air gap, environments, that do not have internet access, or to back up to a local system, a manual backup procedure is available – see for additional details.Without Internet Access
The CloudCenter Suite does NOT provide a granular option to backup Kubernetes resources or application-specific databases.
Additionally, you CANNOT take volume snapshots.
If you update the existing configuration for any reason, users cannot manage the backups from the earlier cloud/cloud account and bucket configuration.
43

Cisco CloudCenter Suite -- Suite Admin
Cisco Cloud Management Documentation 2
The cloud account used to configure the backup must have an empty storage.bucket.list.The bucket must have its ACL set to storage.objects(create,delete,get,list).
AWS:
The storage bucket in your AWS S3 environment must be empty with the applicable ACL permission.The IAM user permissions define the user privilege on the S3 bucket as listed in the following screenshot:
In the following code block, the bucket name is defined as – ! Be sure to change this velero-cisco this is just an examplevalue to reflect the name of your own bucket!
44
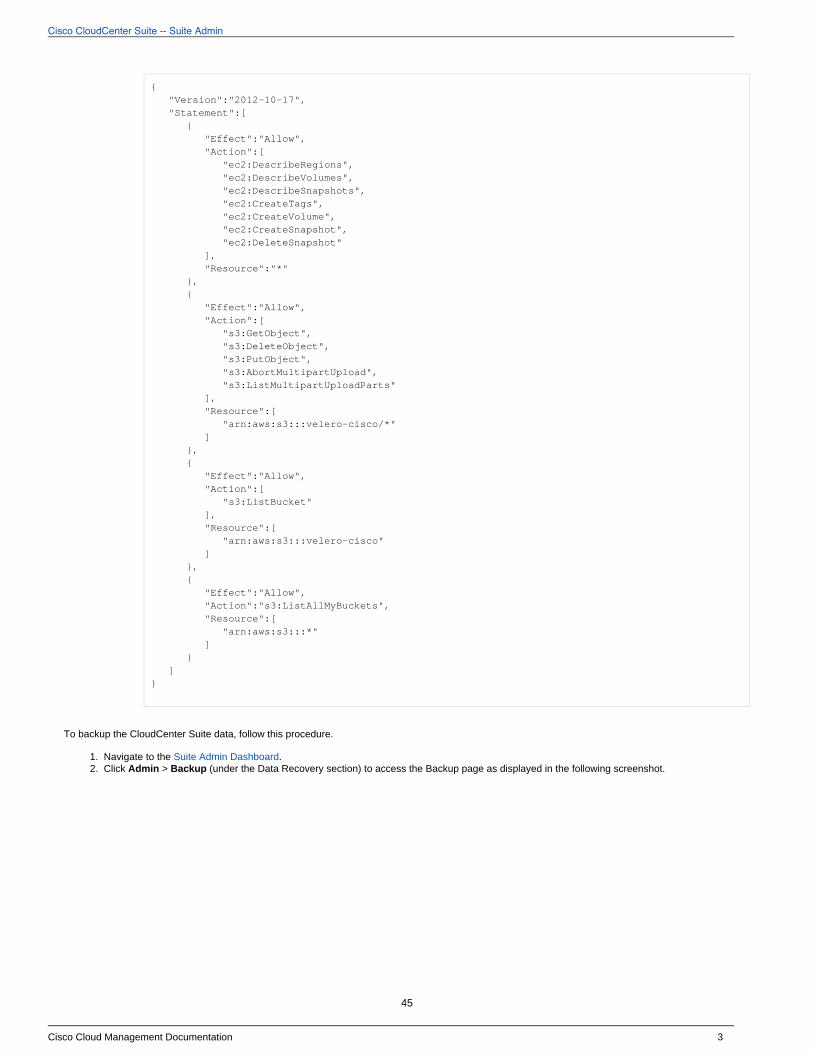
Cisco CloudCenter Suite -- Suite Admin
Cisco Cloud Management Documentation 3
1. 2.
{ "Version":"2012-10-17", "Statement":[
{"Effect":"Allow","Action":[
"ec2:DescribeRegions","ec2:DescribeVolumes","ec2:DescribeSnapshots","ec2:CreateTags","ec2:CreateVolume","ec2:CreateSnapshot","ec2:DeleteSnapshot"
],"Resource":"*"
},{
"Effect":"Allow","Action":[
"s3:GetObject","s3:DeleteObject","s3:PutObject","s3:AbortMultipartUpload","s3:ListMultipartUploadParts"
],"Resource":[
"arn:aws:s3:::velero-cisco/*"]
},{
"Effect":"Allow","Action":[
"s3:ListBucket"],"Resource":[
"arn:aws:s3:::velero-cisco"]
},{
"Effect":"Allow","Action":"s3:ListAllMyBuckets","Resource":[
"arn:aws:s3:::*"]
} ]}
To backup the CloudCenter Suite data, follow this procedure.
Navigate to the .Suite Admin DashboardClick > (under the Data Recovery section) to access the Backup page as displayed in the following screenshot.Admin Backup
45
Cisco CloudCenter Suite -- Suite Admin
Cisco Cloud Management Documentation 4
2.
3.
4.
5.
a.
b.
Click the icon in the Backup page (as displayed in the following screenshot) to configure a new backup storage location.cog
Select the required cloud in the Configure a Backup Storage Location page as displayed in the following screenshot.
Depending on the selected cloud, the Add Credential section differs:
GCP:
Select the file containing the credentials is displayed in the following screenshot.
Select the Storage bucket as displayed in the following screenshot.
46
Cisco CloudCenter Suite -- Suite Admin
Cisco Cloud Management Documentation 5
5.
b.
c.
a.
b.
c.
Click to save the backup configuration as displayed in the following screenshot.Done
AWS S3:
Select the file containing the credentials as displayed in the following screenshot.
Select the Storage bucket as displayed in the following screenshot.
Click to save the backup configuration as displayed in the following screenshot.Done
47
Cisco CloudCenter Suite -- Suite Admin
Cisco Cloud Management Documentation 6
5.
c.
6.
7.
Once configured, click in the Backup page to initiate the data backup. Until you initiate the first backup, this page will be empty. Once you Backuphave initiated one or more backups, they are automatically listed in this page as visible in the following screenshot.
In the Backup Name popup, assign a unique name (by default, the current date is listed) for this backup task and click as displayed in the OKfollowing screenshot.
You have now backed up the CloudCenter Suite data to a cloud of choice.
Once you have configure one or more backup settings in the Backup page, you may see the following actions in the Actions column.
48
Cisco CloudCenter Suite -- Suite Admin
Cisco Cloud Management Documentation 7
Delete: You can delete the configured backup as visible in the following screenshot:
Cancel: You will only see the option when you are in the process of backing up a storage location. After you create the location, the only Canceloption you will see is .Delete
Back to: With Internet Access
49
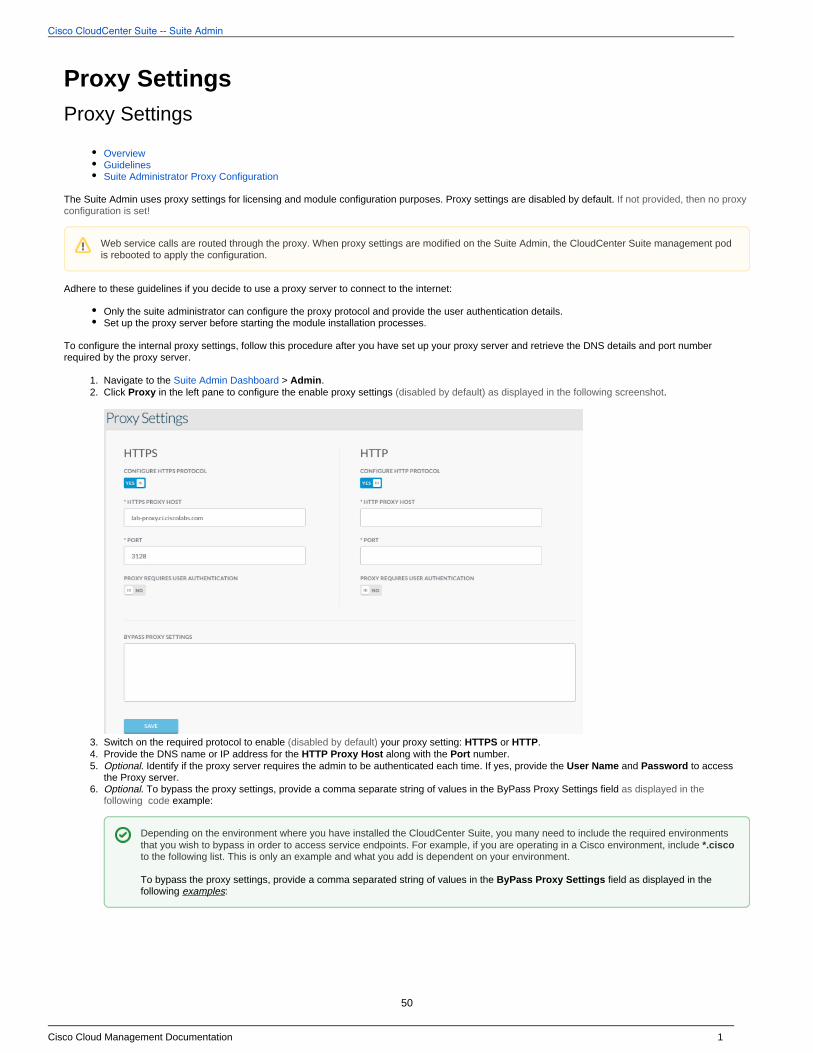
Cisco CloudCenter Suite -- Suite Admin
Cisco Cloud Management Documentation 1
1. 2.
3. 4. 5.
6.
Proxy SettingsProxy Settings
OverviewGuidelinesSuite Administrator Proxy Configuration
The Suite Admin uses proxy settings for licensing and module configuration purposes. Proxy settings are disabled by default. If not provided, then no proxy configuration is set!
Adhere to these guidelines if you decide to use a proxy server to connect to the internet:
Only the suite administrator can configure the proxy protocol and provide the user authentication details.Set up the proxy server before starting the module installation processes.
To configure the internal proxy settings, follow this procedure after you have set up your proxy server and retrieve the DNS details and port number required by the proxy server.
Navigate to the > .Suite Admin Dashboard AdminClick in the left pane to configure the enable proxy settings .Proxy (disabled by default) as displayed in the following screenshot
Switch on the required protocol to enable your proxy setting: or .(disabled by default) HTTPS HTTPProvide the DNS name or IP address for the along with the number.HTTP Proxy Host PortOptional. Identify if the proxy server requires the admin to be authenticated each time. If yes, provide the and to access User Name Passwordthe Proxy server.Optional. To bypass the proxy settings, provide a comma separate string of values in the ByPass Proxy Settings field as displayed in the
example:following code
Web service calls are routed through the proxy. When proxy settings are modified on the Suite Admin, the CloudCenter Suite management pod is rebooted to apply the configuration.
Depending on the environment where you have installed the CloudCenter Suite, you many need to include the required environments that you wish to bypass in order to access service endpoints. For example, if you are operating in a Cisco environment, include *.ciscoto the following list. This is only an example and what you add is dependent on your environment.
To bypass the proxy settings, provide a comma separated string of values in the field as displayed in the ByPass Proxy Settingsfollowing :examples
50
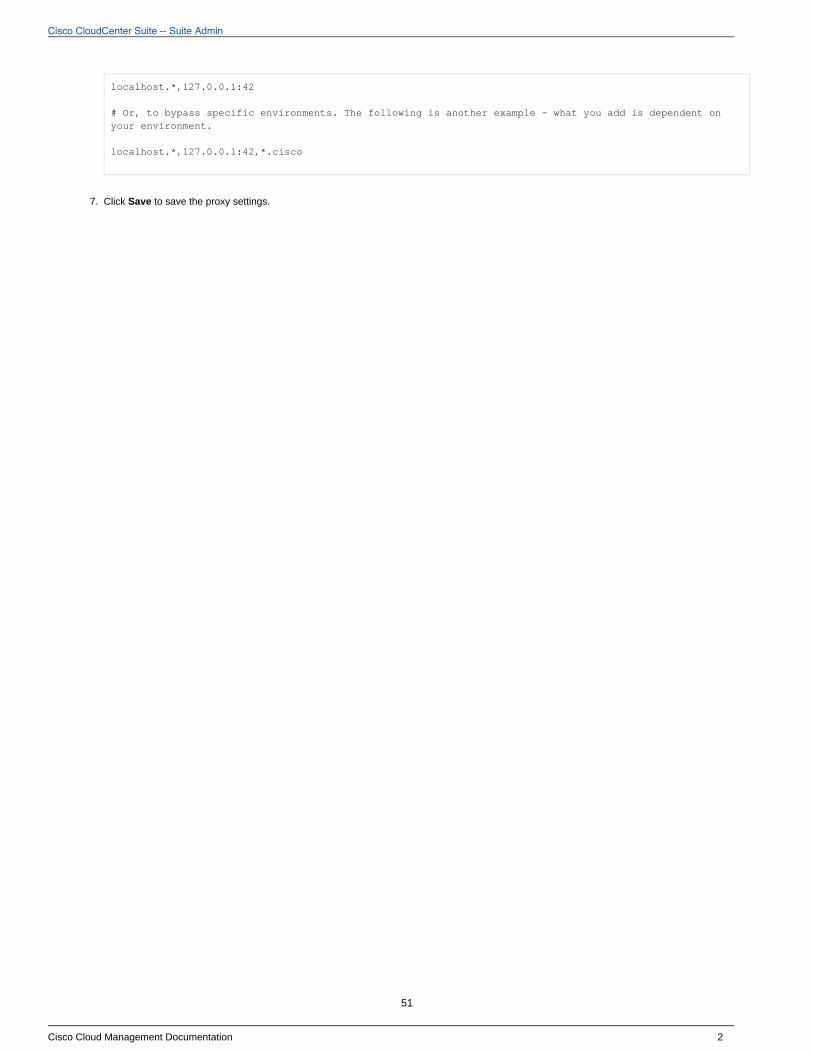
Cisco CloudCenter Suite -- Suite Admin
Cisco Cloud Management Documentation 2
6.
7.
localhost.*,127.0.0.1:42
# Or, to bypass specific environments. The following is another example - what you add is dependent on your environment.
localhost.*,127.0.0.1:42,*.cisco
Click to save the proxy settings.Save
51
Cisco CloudCenter Suite -- Suite Admin
Cisco Cloud Management Documentation 1
1. 2. 3. 4. 5. 6. 7.
Email SettingsEmail Settings
OverviewRequirementsProcess
Email settings are required to communicate with CloudCenter Suite users when triggering the reset password function or the password auto-generation function – the email settings are used to construct the links when resetting a password for new or existing users.
You can enable the protocol to secure SMTP at the transport layer. SMTPS uses port 465 to indicate that the client and server communicate using SMTPSnormal SMTP at the application layer, but the connection is secured by SSL or TLS.
To use this function:
The enterprise should have already setup an SMTP server. The user must have tenant administrator permissions.The SMTP configuration must be authenticated and that you are able to send and receive emails before setting up your email communication.
You should have already configured the and completed the to ensure that the URL is accessible and that Base URL Configuration Email Settingsan email can be sent to the user.
To configure SMTP details in the Suite Admin, follow this procedure.
Navigate to the > .Suite Admin Dashboard AdminClick in the left tree pane to display the SMTP Settings page. SMTPToggle the switch to enable settings. (disabled by default) SMTPOptional. Toggle the switch to enable (Secure SMTP) at the transport level.SMTPSOptional. Toggle the to enable switch TLS security protocol if required by your SMTP server.Provide the , , IP address or DNS for the , and the Number to enable SMTP authentication.Username Password SMTP Host PortClick to save your edits. Save
The Suite Admin does not support TLS ports – it only supports SSL ports to configure SMTP mail servers.
If the SMTP settings are not configured for a sub-tenant, then the parent tenant's SMTP settings are used to send emails to users.
1. 2. 3. 4.
When a cloud is configured in a different region using some carriers (for example, GMAIL), the carrier may assume this configuration as a suspicious activity and block the email sending functionality. This is an example of an issue with your carrier's SMTP settings.
Example: If you send an email using GMAIL from different region/machines, then GMAIL may trigger emails for suspicious activity and stops sending emails. In this case, you must resolved this issue by following this procedure.
Login into this email from to access your account.gmail.comIn the page, click Security in the left pane.https://myaccount.google.com/?utm_source=OGB&utm_medium=actSearch for and turn it on to ensure that you allow access for this application.Access allowed for less secure appsYou can now configure your GMAIL email in the Email Setup page in Suite Admin.
Be sure to resolve these issues before proceeding with the configuration.
In AWS Environments, you must configure the application password to configure GMAIL in AWS cluster.
When you save the SMTP settings, be aware that you are only saving the configuration parameters to the CloudCenter Suite database and that the connection is still pending connection verification. As soon as the connection is verified by the CloudCenter Suite, the current user (who changed the SMTP configuration) is notified in the notification pane (see > ) Suite Admin Dashboard Notificationsabout the connection status with details on the SMTP connection check passing/failing.
52
Cisco CloudCenter Suite -- Suite Admin
Cisco Cloud Management Documentation 1
1. 2. 3. 4. 5.
Base URL ConfigurationBase URL
OverviewRequirementsProcess
The Base URL provides a DNS entry, instead of an IP address, to access the CloudCenter Suite.
Functions like and Email Settings SSO Setup require the Base URL to be configured.
If you do not configure the Base URL for a particular tenant, then the Suite Admin uses the parent-level configuration details to set the host/port link.
If a tenant does not have a Base URL configured, the URL is inherited from the immediate parent where the Base URL is configured.
Prior to CloudCenter Suite 5.1.2, admins did not have the option to configure a specific parent/ancestor's Base URL for a tenant.
Effective CloudCenter Suite 5.1.2, tenants admins can configure the Base URL of any of their ancestor tenants. The only caveat is that the admin cannot set the Base URL of child tenant for a parent tenant.
To configure the Base URL, follow this procedure.
Navigate to the > .Suite Admin Dashboard AdminClick in the left tree pane.Base URLIn the Base URL settings page, enter the and number that should be displayed in the Base URL.DNS/IP Address PortCopy and paste the and/or details for the DNS provided in the previous step.Private Key CertificateClick to save your changes and enable a direct connection to the IDP server.Save
53
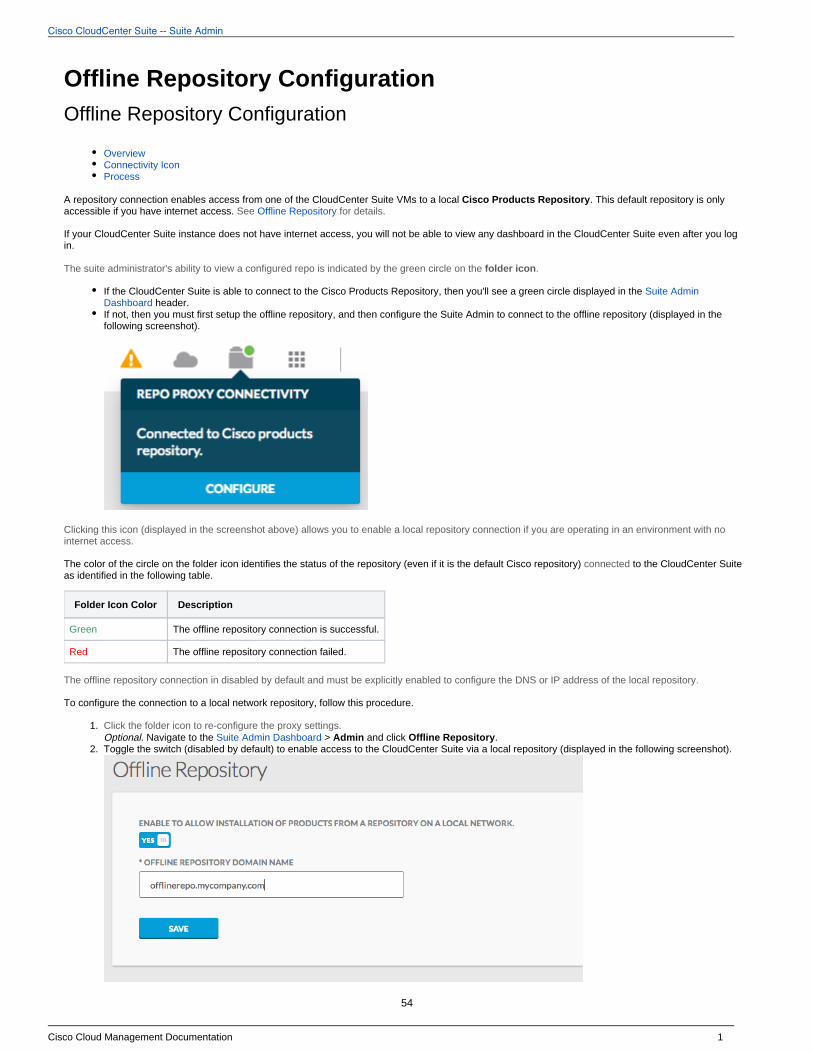
Cisco CloudCenter Suite -- Suite Admin
Cisco Cloud Management Documentation 1
1.
2.
3.
Offline Repository ConfigurationOffline Repository Configuration
OverviewConnectivity IconProcess
A repository connection enables access from one of the CloudCenter Suite VMs to a local . This default repository is only Cisco Products Repositoryaccessible if you have internet access. See Offline Repository for details.
If your CloudCenter Suite instance does not have internet access, you will not be able to view any dashboard in the CloudCenter Suite even after you log in.
The suite administrator's ability to view a configured repo is indicated by the green circle on the folder icon.
If the CloudCenter Suite is able to connect to the Cisco Products Repository, then you'll see a green circle displayed in the Suite Admin header. Dashboard
If not, then you must first setup the offline repository, and then configure the Suite Admin to connect to the offline repository (displayed in the following screenshot).
Clicking this icon ( allows you to enable a local repository connection if you are operating in an environment with no displayed in the screenshot above)internet access.
The color of the circle on the folder icon identifies the status of the repository (even if it is the default Cisco repository) to the CloudCenter Suite connected as identified in the following table.
Folder Icon Color Description
Green The offline repository connection is successful.
Red The offline repository connection failed.
The offline repository connection in disabled by default and must be explicitly enabled to configure the DNS or IP address of the local repository.
To configure the connection to a local network repository, follow this procedure.
Click the folder icon to re-configure the proxy settings.Optional. Navigate to the > and click .Suite Admin Dashboard Admin Offline RepositoryToggle the switch (disabled by default) to enable access to the CloudCenter Suite via a local repository (displayed in the following screenshot).
54
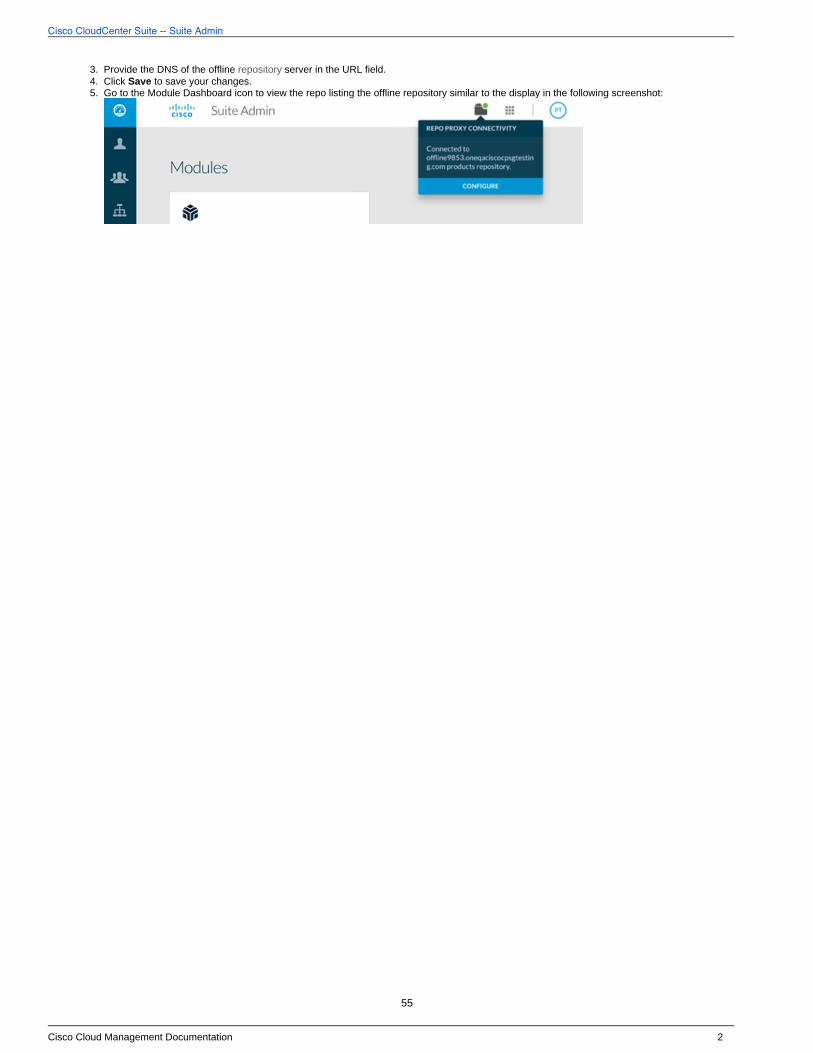
Cisco CloudCenter Suite -- Suite Admin
Cisco Cloud Management Documentation 2
3. 4. 5.
P S of the offline server in the URL field.rovide the DN repository Click to save your changes.SaveGo to the Module Dashboard icon to view the repo listing the offline repository similar to the display in the following screenshot:
55
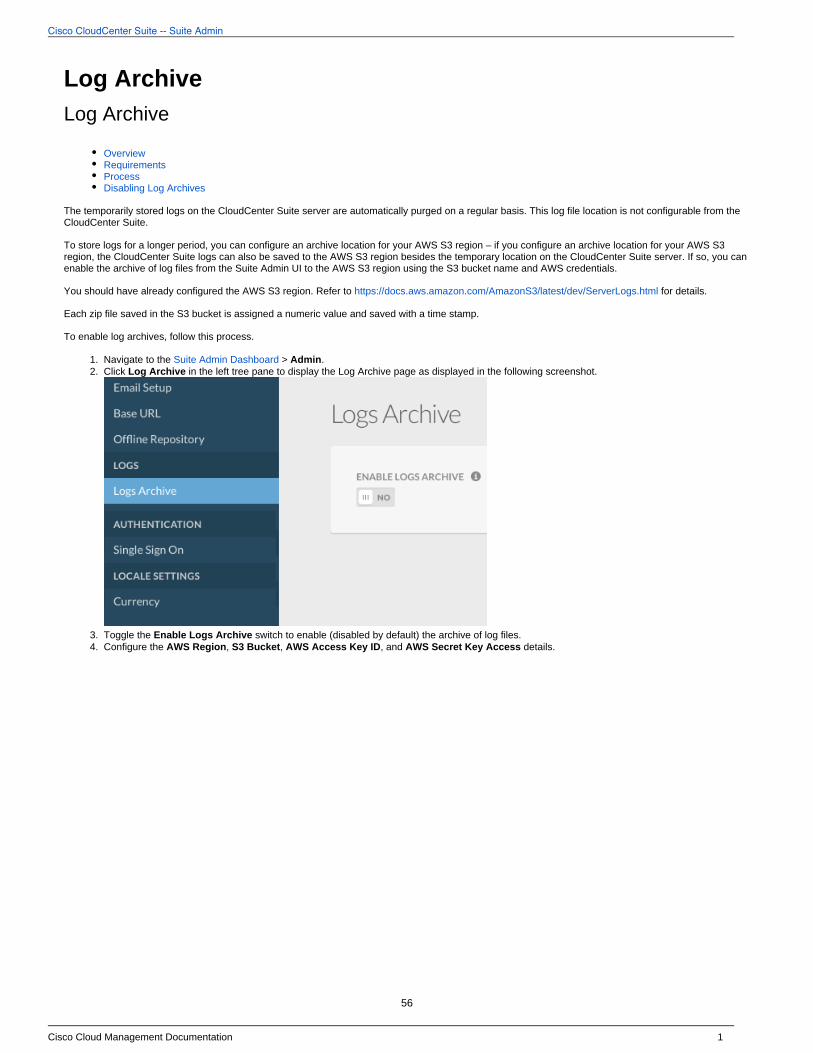
Cisco CloudCenter Suite -- Suite Admin
Cisco Cloud Management Documentation 1
1. 2.
3. 4.
5.
Log ArchiveLog Archive
OverviewRequirementsProcessDisabling Log Archives
The temporarily stored logs on the CloudCenter Suite server are automatically purged on a regular basis. This log file location is not configurable from the CloudCenter Suite.
To store logs for a longer period, you can configure an archive location for your AWS S3 region – if you configure an archive location for your AWS S3 region, the CloudCenter Suite logs can also be saved to the AWS S3 region besides the temporary location on the CloudCenter Suite server. If so, you can enable the archive of log files from the Suite Admin UI to the AWS S3 region using the S3 bucket name and AWS credentials.
You should have already configured the AWS S3 region. Refer to for details.https://docs.aws.amazon.com/AmazonS3/latest/dev/ServerLogs.html
Each zip file saved in the S3 bucket is assigned a numeric value and saved with a time stamp.
To enable log archives, follow this process.
Navigate to the > .Suite Admin Dashboard AdminClick in the left tree pane to display the Log Archive page as displayed in the following screenshot.Log Archive
Toggle the switch to enable (disabled by default) the archive of log files.Enable Logs ArchiveConfigure the , , , and details.AWS Region S3 Bucket AWS Access Key ID AWS Secret Key Access
56
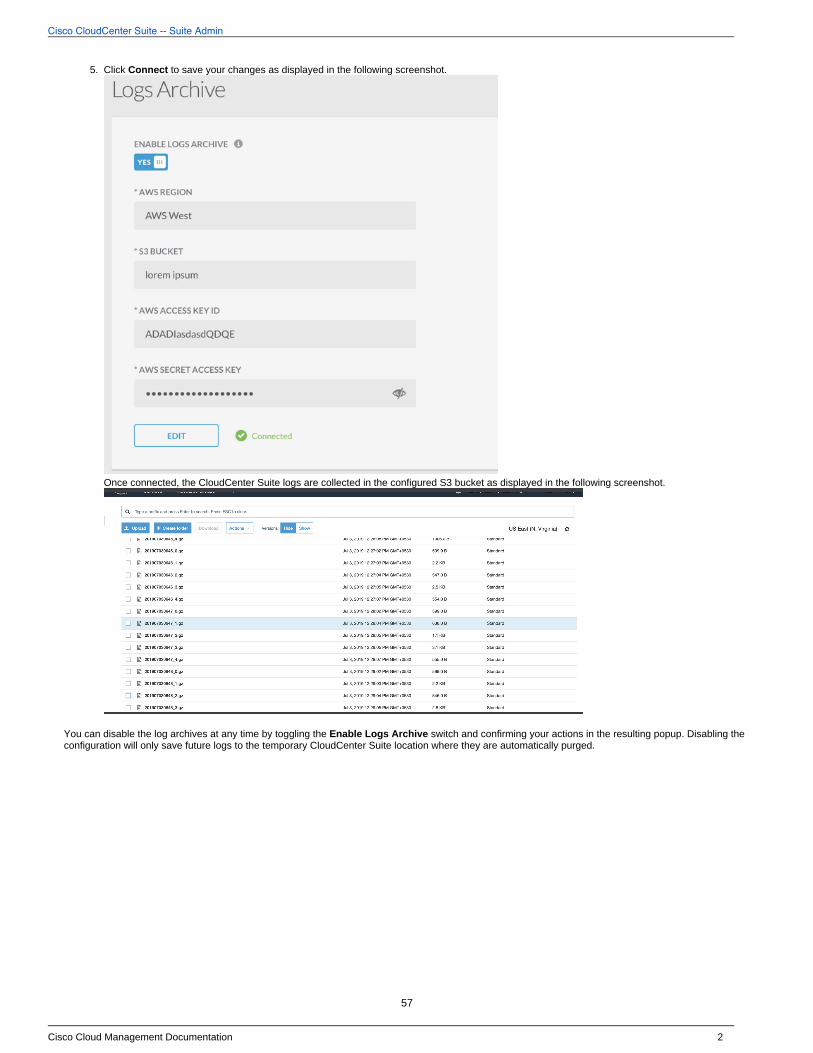
Cisco CloudCenter Suite -- Suite Admin
Cisco Cloud Management Documentation 2
5. Click to save your changes as displayed in the following screenshot.Connect
Once connected, the CloudCenter Suite logs are collected in the configured S3 bucket as displayed in the following screenshot.
You can disable the log archives at any time by toggling the switch and confirming actions in the resulting popup. Disabling the Enable Logs Archive yourconfiguration will only save future logs to the temporary CloudCenter Suite location where they are automatically purged.
57
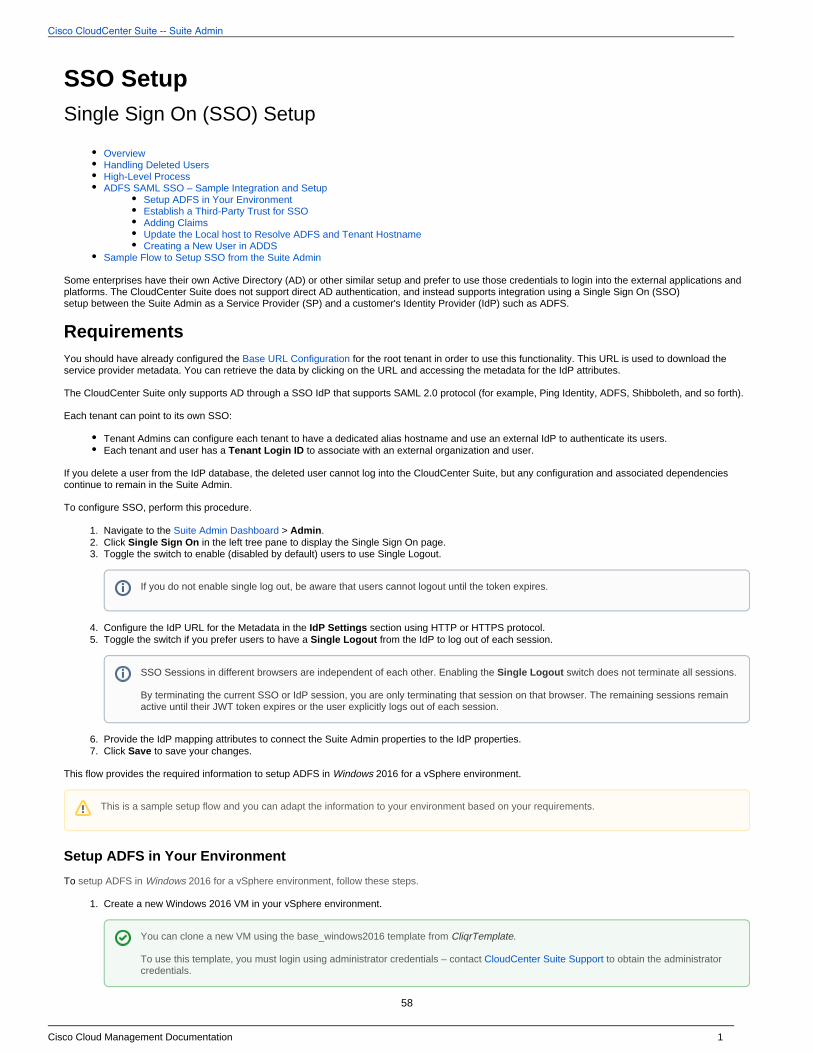
Cisco CloudCenter Suite -- Suite Admin
Cisco Cloud Management Documentation 1
1. 2. 3.
4. 5.
6. 7.
1.
SSO SetupSingle Sign On (SSO) Setup
OverviewHandling Deleted UsersHigh-Level ProcessADFS SAML SSO – Sample Integration and Setup
Setup ADFS in Your EnvironmentEstablish a Third-Party Trust for SSOAdding ClaimsUpdate the Local host to Resolve ADFS and Tenant HostnameCreating a New User in ADDS
Sample Flow to Setup SSO from the Suite Admin
Some enterprises have their own Active Directory (AD) or other similar setup and prefer to use those credentials to login into the external applications and platforms. The CloudCenter Suite does not support direct AD authentication, and instead supports integration using a Single Sign On (SSO) setup between the Suite Admin as a Service Provider (SP) and a customer's Identity Provider (IdP) such as ADFS.
RequirementsYou should have already configured the for the root tenant in order to use this functionality. This URL is used to download the Base URL Configurationservice provider metadata. You can retrieve the data by clicking on the URL and accessing the metadata for the IdP attributes.
The CloudCenter Suite only supports AD through a SSO IdP that supports SAML 2.0 protocol (for example, Ping Identity, ADFS, Shibboleth, and so forth).
Each tenant can point to its own SSO:
Tenant Admins can configure each tenant to have a dedicated alias hostname and use an external IdP to authenticate its users.Each tenant and user has a to associate with an external organization and user.Tenant Login ID
If you delete a user from the IdP database, the deleted user cannot log into the CloudCenter Suite, but any configuration and associated dependencies continue to remain in the Suite Admin.
To configure SSO, perform this procedure.
Navigate to the > .Suite Admin Dashboard AdminClick in the left tree pane to display the Single Sign On page.Single Sign OnToggle the switch to enable (disabled by default) users to use Single Logout.
Configure the IdP URL for the Metadata in the section using HTTP or HTTPS protocol.IdP SettingsToggle the switch if you prefer users to have a from the IdP to log out of each session.Single Logout
Provide the IdP mapping attributes to connect the Suite Admin properties to the IdP properties.Click to save your changes.Save
This flow provides the required information to setup ADFS in 2016 for a vSphere environment. Windows
Setup ADFS in Your Environment
To setup ADFS in 2016 for a vSphere environment, follow these steps.Windows
Create a new Windows 2016 VM in your vSphere environment.
If you do not enable single log out, be aware that users cannot logout until the token expires.
SSO Sessions in different browsers are independent of each other. Enabling the switch does not terminate all sessions.Single Logout
By terminating the current SSO or IdP session, you are only terminating that session on that browser. The remaining sessions remain active until their JWT token expires or the user explicitly logs out of each session.
This is a sample setup flow and you can adapt the information to your environment based on your requirements.
You can clone a new VM using the base_windows2016 template from CliqrTemplate.
To use this template, you must login using administrator credentials – contact CloudCenter Suite Support to obtain the administrator credentials.
58
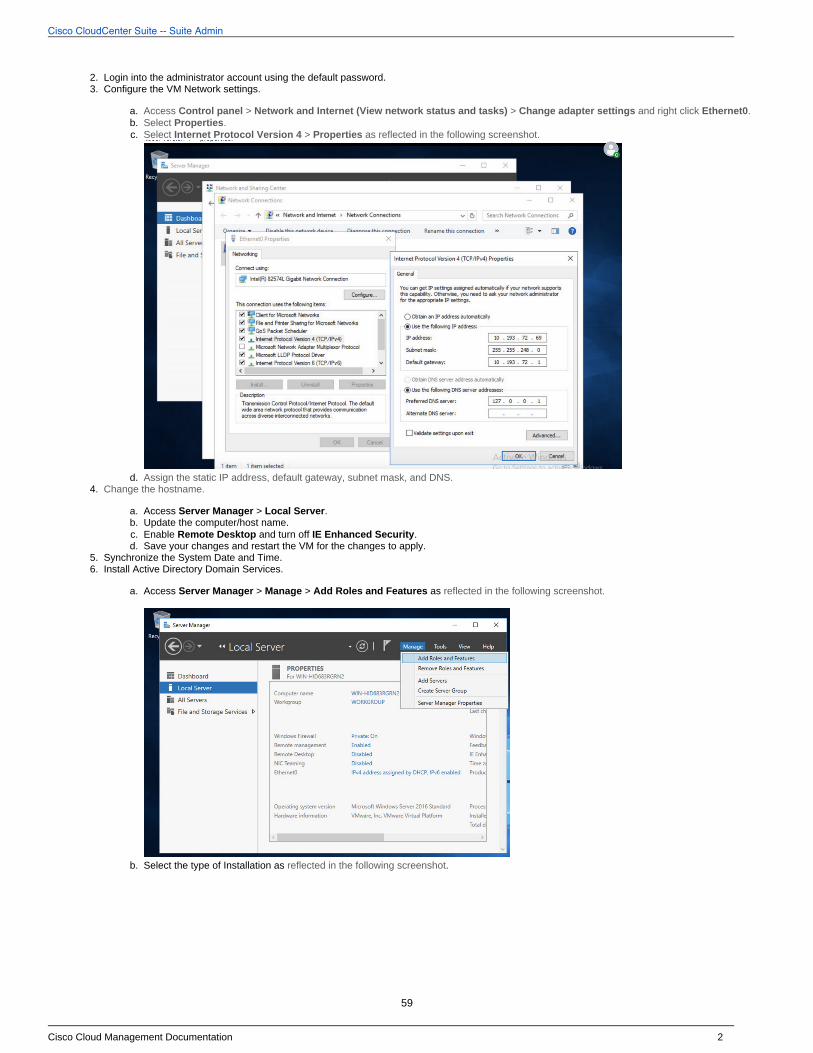
Cisco CloudCenter Suite -- Suite Admin
Cisco Cloud Management Documentation 2
2. 3.
a. b. c.
d. 4.
a. b. c. d.
5. 6.
a.
b.
Login into the administrator account using the default password. Configure the VM Network settings.
Access > > and right click .Control panel Network and Internet (View network status and tasks) Change adapter settings Ethernet0Select .PropertiesSelect > as Internet Protocol Version 4 Properties reflected in the following screenshot.
Assign the static IP address, default gateway, subnet mask, and DNS.Change the hostname.
Access > .Server Manager Local ServerUpdate the computer/host name.Enable and turn off .Remote Desktop IE Enhanced SecuritySave your changes and restart the VM for the changes to apply.
Synchronize the System Date and Time.Install Active Directory Domain Services.
Access > > as Server Manager Manage Add Roles and Features reflected in the following screenshot.
Select the type of Installation as .reflected in the following screenshot
59
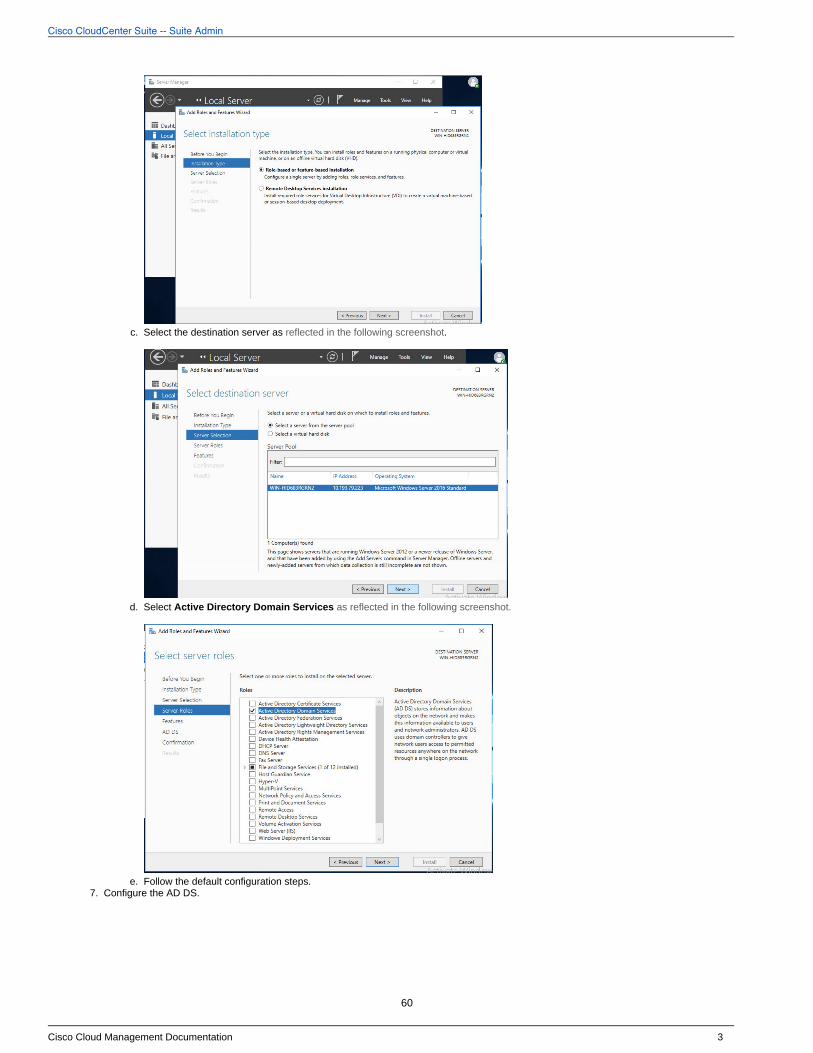
Cisco CloudCenter Suite -- Suite Admin
Cisco Cloud Management Documentation 3
6.
b.
c.
d.
e. 7.
a.
Select the destination server as .reflected in the following screenshot
Select Active Directory Domain Services as reflected in the following screenshot.
Follow the default configuration steps.Configure the AD DS.
60
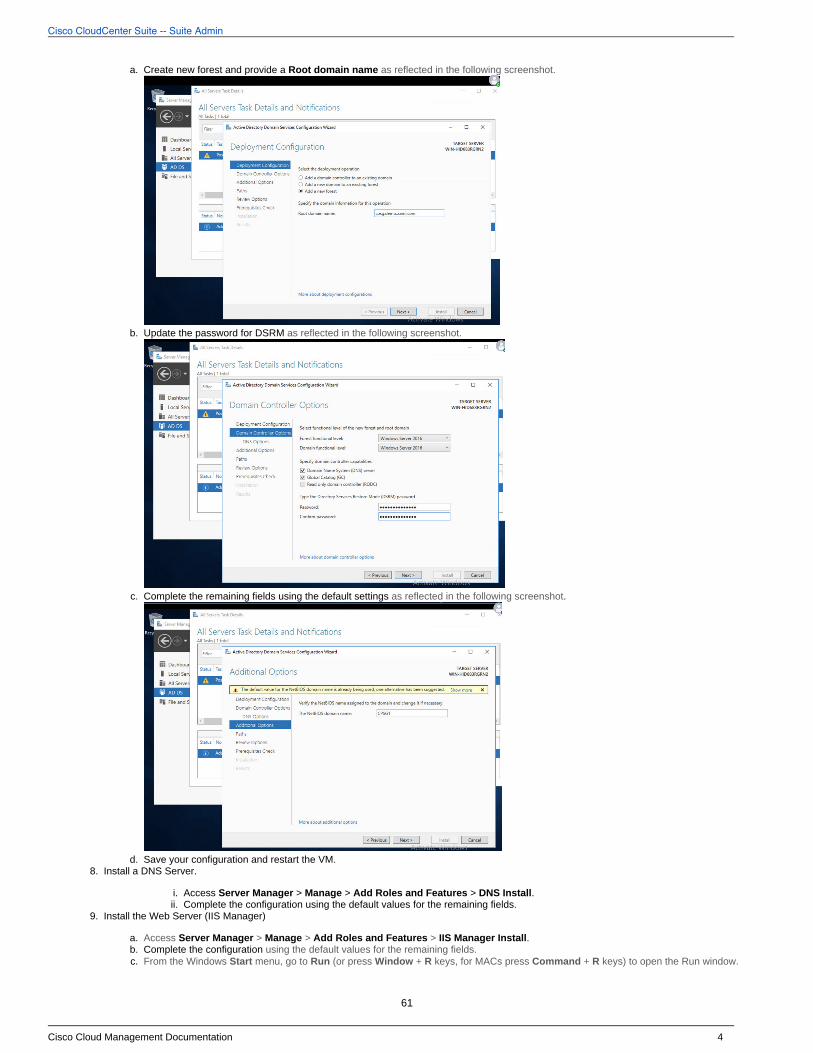
Cisco CloudCenter Suite -- Suite Admin
Cisco Cloud Management Documentation 4
7.
a.
b.
c.
d. 8.
i. ii.
9.
a. b. c.
d.
Create new forest and provide a Root domain name as reflected in the following screenshot.
Update the password for DSRM as reflected in the following screenshot.
Complete the remaining fields using the default settings .as reflected in the following screenshot
Save your configuration and restart the VM.Install a DNS Server.
Access > > > .Server Manager Manage Add Roles and Features DNS InstallComplete the configuration using the default values for the remaining fields.
Install the Web Server (IIS Manager)
Access Server Manager > Manage > Add Roles and Features > IIS Manager Install.Complete the configuration using the default values for the remaining fields.From the Windows menu, go to (or press + keys, for MACs press + keys) to open the Run window.Start Run Window R Command R
61
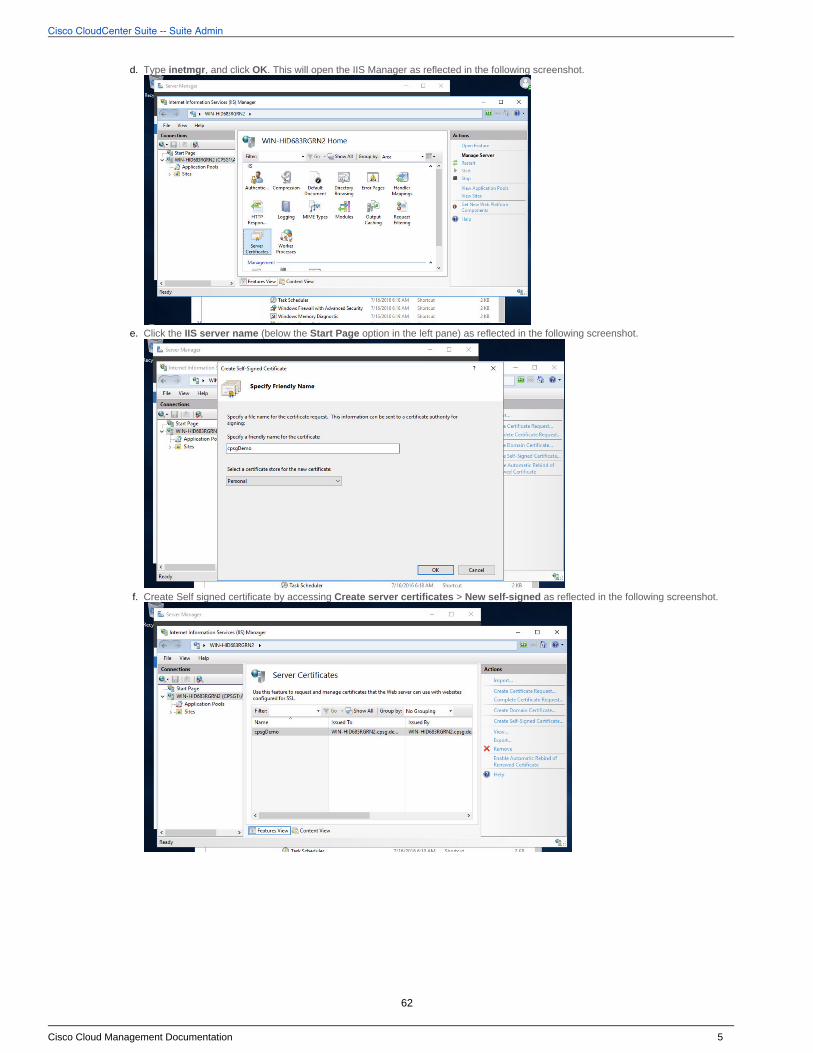
Cisco CloudCenter Suite -- Suite Admin
Cisco Cloud Management Documentation 5
9.
d.
e.
f.
g.
Type , and click . This will open the IIS Manager .inetmgr OK as reflected in the following screenshot
Click the (below the option in the left pane) . IIS server name Start Page as reflected in the following screenshot
Create Self signed certificate by accessing > .Create server certificates New self-signed as reflected in the following screenshot
62
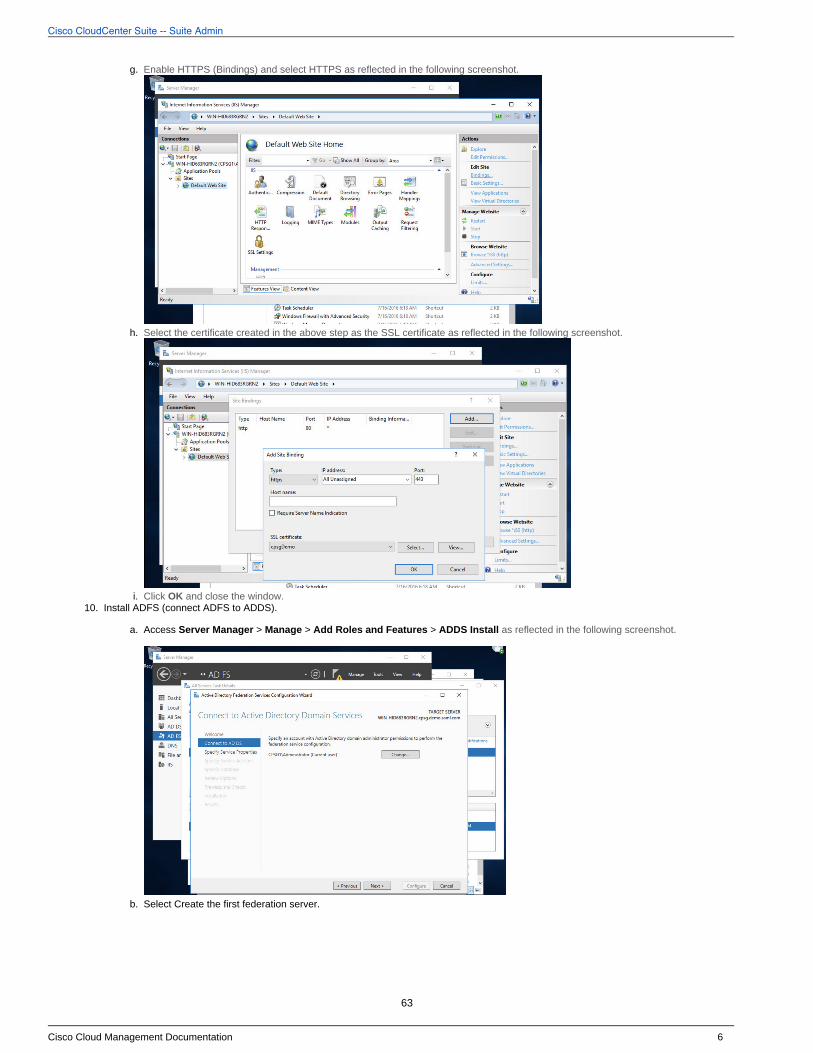
Cisco CloudCenter Suite -- Suite Admin
Cisco Cloud Management Documentation 6
9.
g.
h.
i. 10.
a.
b.
Enable HTTPS (Bindings) and select HTTPS . as reflected in the following screenshot
Select the certificate created in the above step as the SSL certificate .as reflected in the following screenshot
Click and close the window.OKInstall ADFS (connect ADFS to ADDS).
Access Server Manager > Manage > Add Roles and Features > ADDS Install as reflected in the following screenshot.
Select Create the first federation server.
63
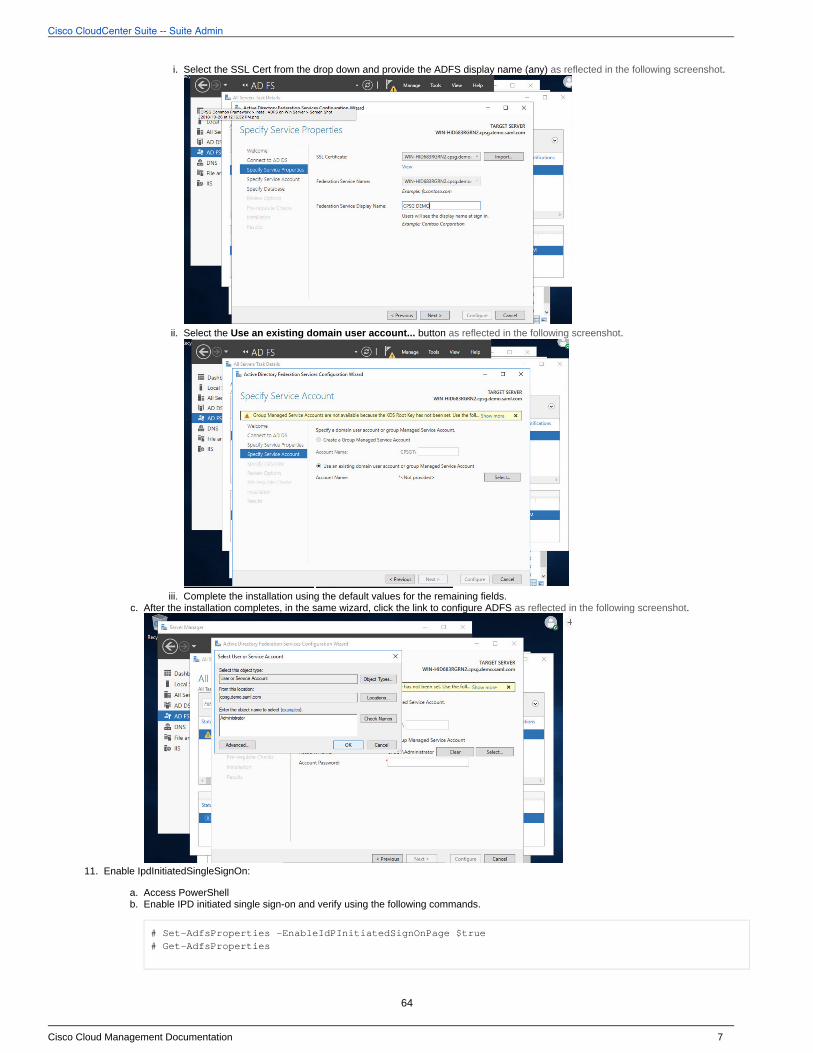
Cisco CloudCenter Suite -- Suite Admin
Cisco Cloud Management Documentation 7
10.
b.
i.
ii.
iii. c.
11.
a. b.
12.
Select the SSL Cert from the drop down and provide the ADFS display name (any) .as reflected in the following screenshot
Select the button .Use an existing domain user account... as reflected in the following screenshot
Complete the installation using the default values for the remaining fields.After the installation completes, in the same wizard, click the link to configure ADFS .as reflected in the following screenshot
Enable IpdInitiatedSingleSignOn:
Access PowerShellEnable IPD initiated single sign-on and verify using the following commands.
# Set-AdfsProperties -EnableIdPInitiatedSignOnPage $true# Get-AdfsProperties
64
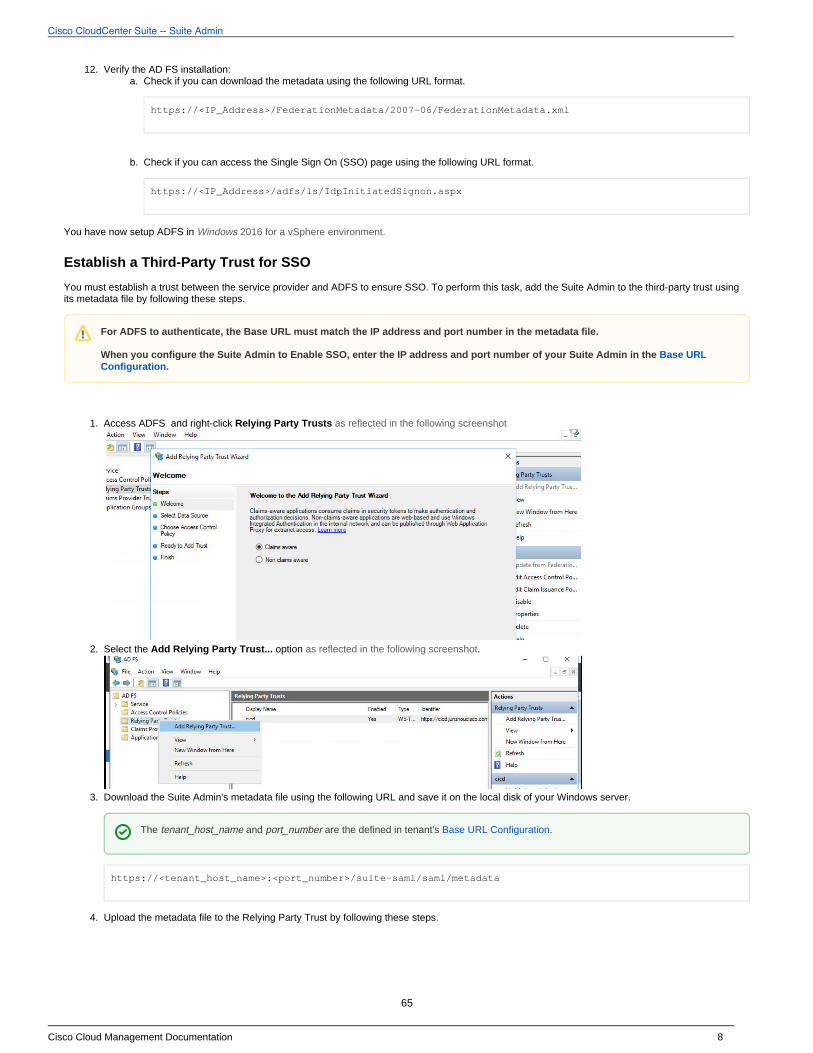
Cisco CloudCenter Suite -- Suite Admin
Cisco Cloud Management Documentation 8
12. a.
b.
1.
2.
3.
4.
a.
Verify the AD FS installation:Check if you can download the metadata using the following URL format.
https://<IP_Address>/FederationMetadata/2007-06/FederationMetadata.xml
Check if you can access the Single Sign On (SSO) page using the following URL format.
https://<IP_Address>/adfs/ls/IdpInitiatedSignon.aspx
You have now setup ADFS in 2016 for a vSphere environment.Windows
Establish a Third-Party Trust for SSO
You must establish a trust between the service provider and ADFS to ensure SSO. To perform this task, add the Suite Admin to the third-party trust using its metadata file by following these steps.
Access ADFS and right-click Relying Party Trusts as reflected in the following screenshot
Select the option .Add Relying Party Trust... as reflected in the following screenshot
Download the Suite Admin's metadata file using the following URL and save it on the local disk of your Windows server.
https://<tenant_host_name>:<port_number>/suite-saml/saml/metadata
Upload the metadata file to the Relying Party Trust by following these steps.
For ADFS to authenticate, the Base URL must match the IP address and port number in the metadata file.
When you configure the Suite Admin to Enable SSO, enter the IP address and port number of your Suite Admin in the Base URL .Configuration
The and are the defined in tenant's .tenant_host_name port_number Base URL Configuration
65
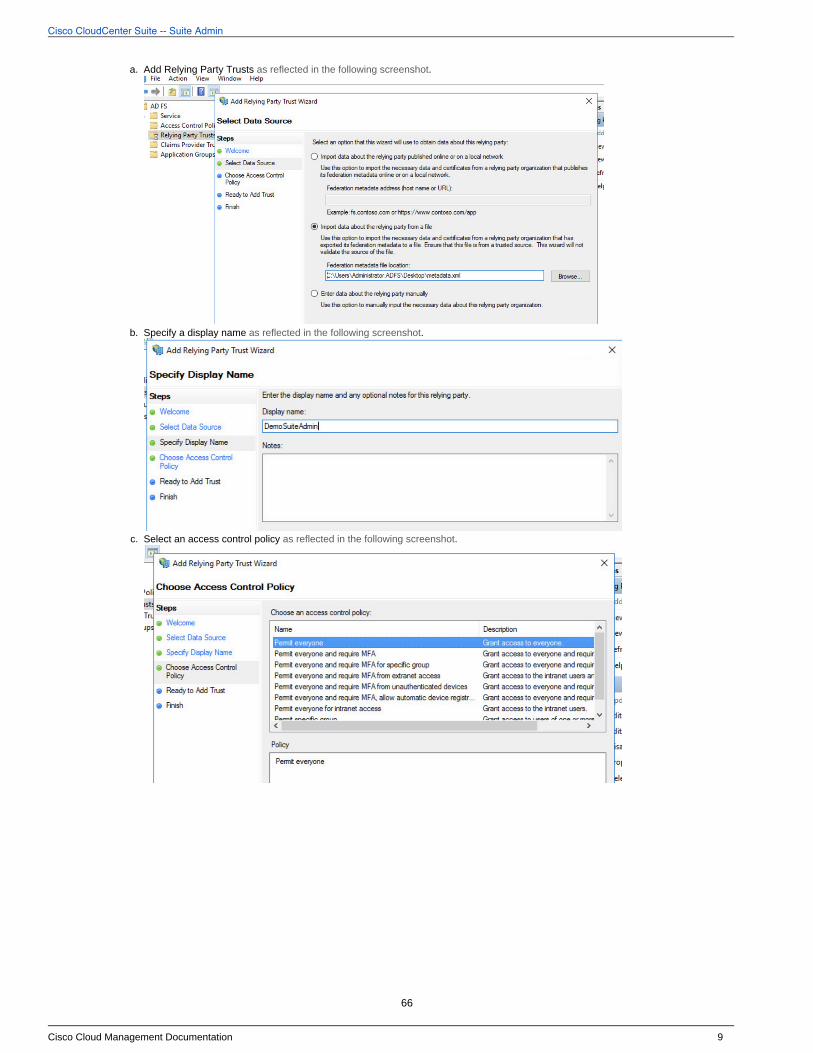
Cisco CloudCenter Suite -- Suite Admin
Cisco Cloud Management Documentation 9
4.
a.
b.
c.
Add Relying Party Trusts .as reflected in the following screenshot
Specify a display name .as reflected in the following screenshot
Select an access control policy .as reflected in the following screenshot
66
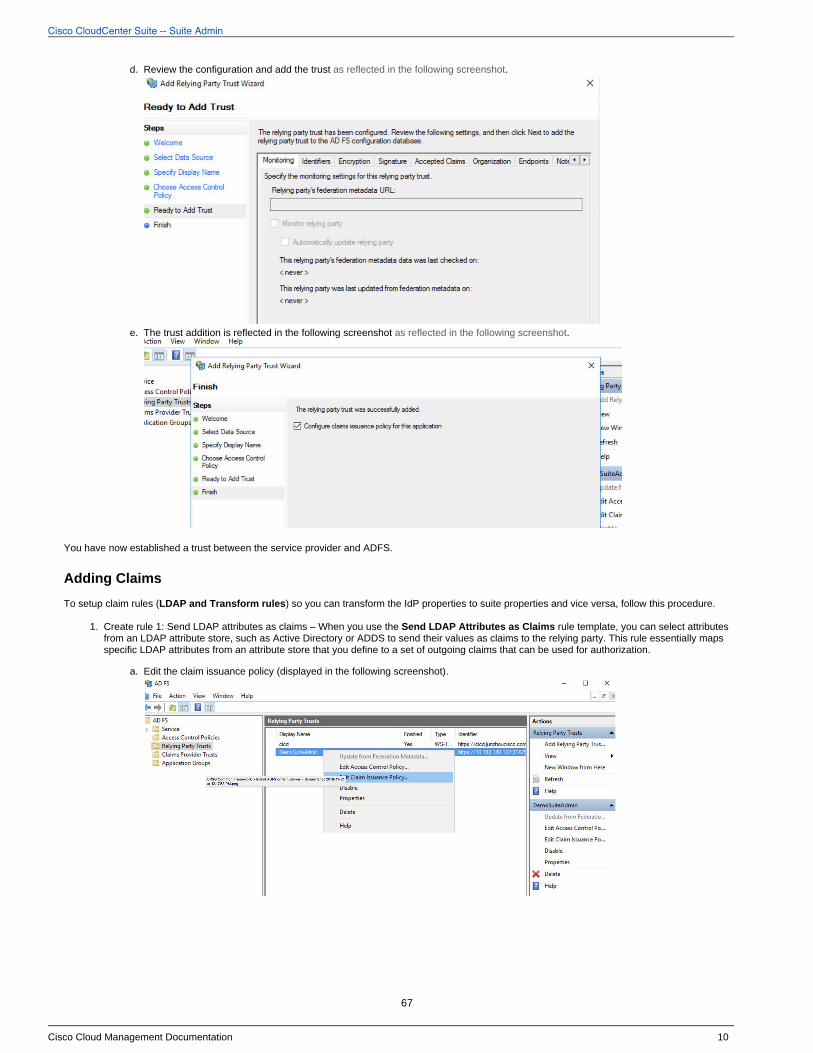
Cisco CloudCenter Suite -- Suite Admin
Cisco Cloud Management Documentation 10
4.
d.
e.
1.
a.
b.
Review the configuration and add the trust .as reflected in the following screenshot
The trust addition is reflected in the following screenshot .as reflected in the following screenshot
You have now established a trust between the service provider and ADFS.
Adding Claims
To setup claim rules ( ) so you can transform the IdP properties to suite properties and vice versa, follow this procedure.LDAP and Transform rules
Create rule 1: Send LDAP attributes as claims – When you use the rule template, you can select attributes Send LDAP Attributes as Claimsfrom an LDAP attribute store, such as Active Directory or ADDS to send their values as claims to the relying party. This rule essentially maps specific LDAP attributes from an attribute store that you define to a set of outgoing claims that can be used for authorization.
Edit the claim issuance policy (displayed in the following screenshot).
67

Cisco CloudCenter Suite -- Suite Admin
Cisco Cloud Management Documentation 11
1.
b.
c.
2.
a.
b.
Choose the rule type .(displayed in the following screenshot)
Edit the rule .(displayed in the following screenshot)
Create Rule 2: Transform an Incoming Claim – By using the Transform an Incoming Claim rule template in ADFS, you can select an incoming claim, change its claim type, and optionally change its claim value.
Edit the claim issuance policy .(displayed in the following screenshot)
68
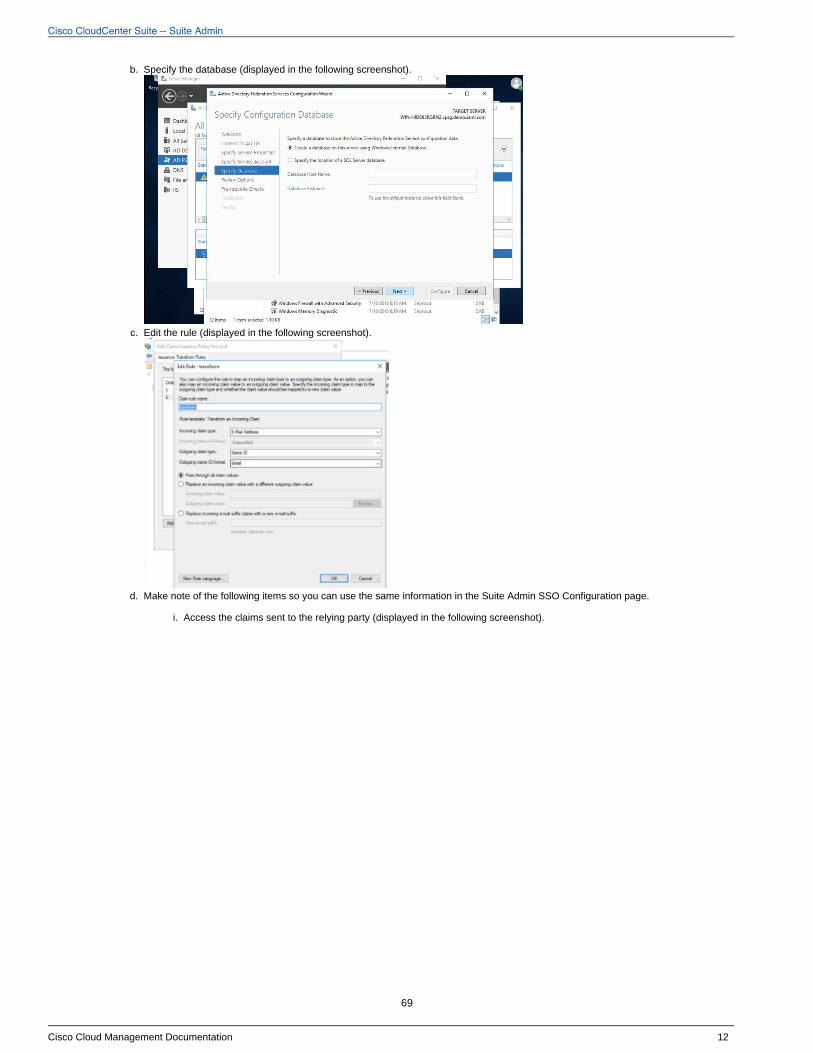
Cisco CloudCenter Suite -- Suite Admin
Cisco Cloud Management Documentation 12
2.
b.
c.
d.
i.
Specify the database .(displayed in the following screenshot)
Edit the rule .(displayed in the following screenshot)
Make note of the following items so you can use the same information in the Suite Admin SSO Configuration page.
Access the claims sent to the relying party .(displayed in the following screenshot)
69
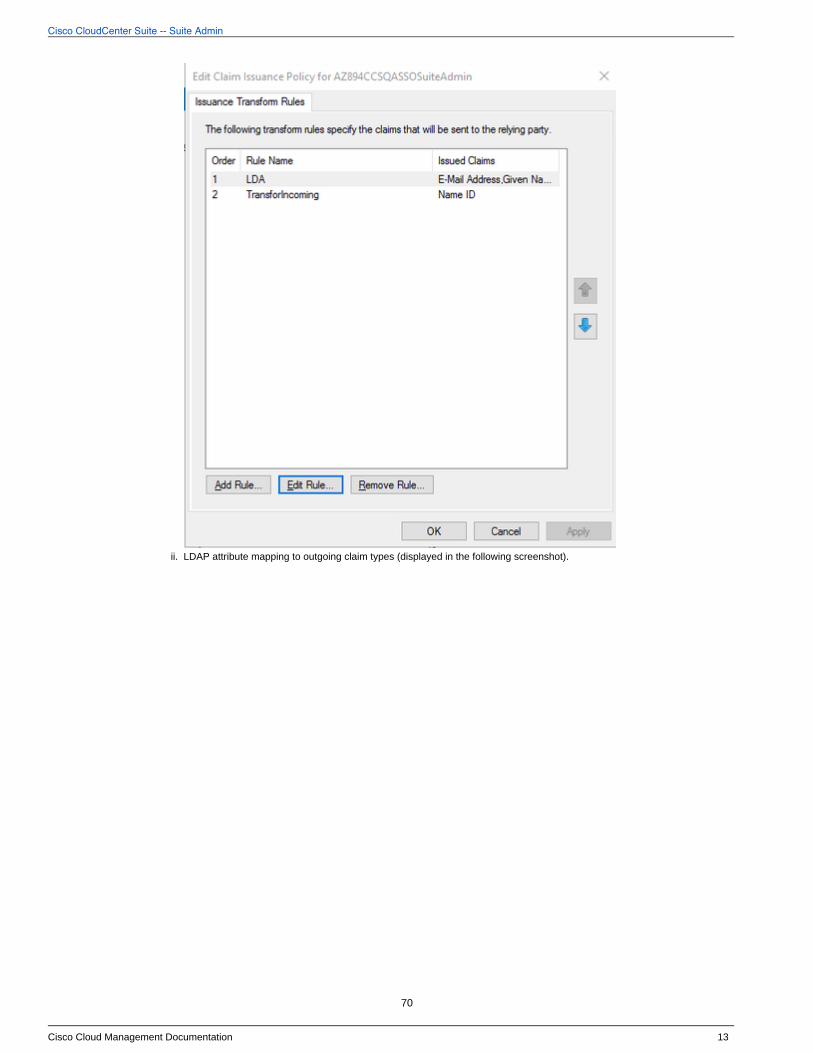
Cisco CloudCenter Suite -- Suite Admin
Cisco Cloud Management Documentation 13
2.
d.
i.
ii. LDAP attribute mapping to outgoing claim types .(displayed in the following screenshot)
70
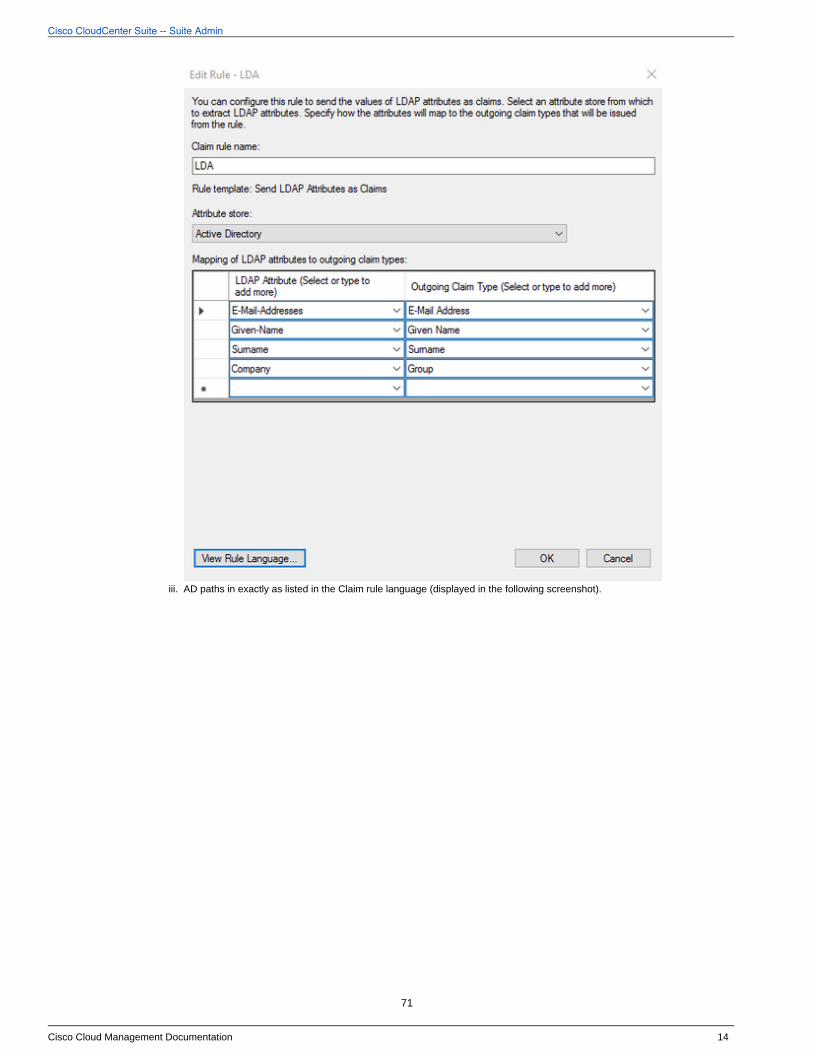
Cisco CloudCenter Suite -- Suite Admin
Cisco Cloud Management Documentation 14
2.
d.
ii.
iii. AD paths in exactly as listed in the Claim rule language .(displayed in the following screenshot)
71
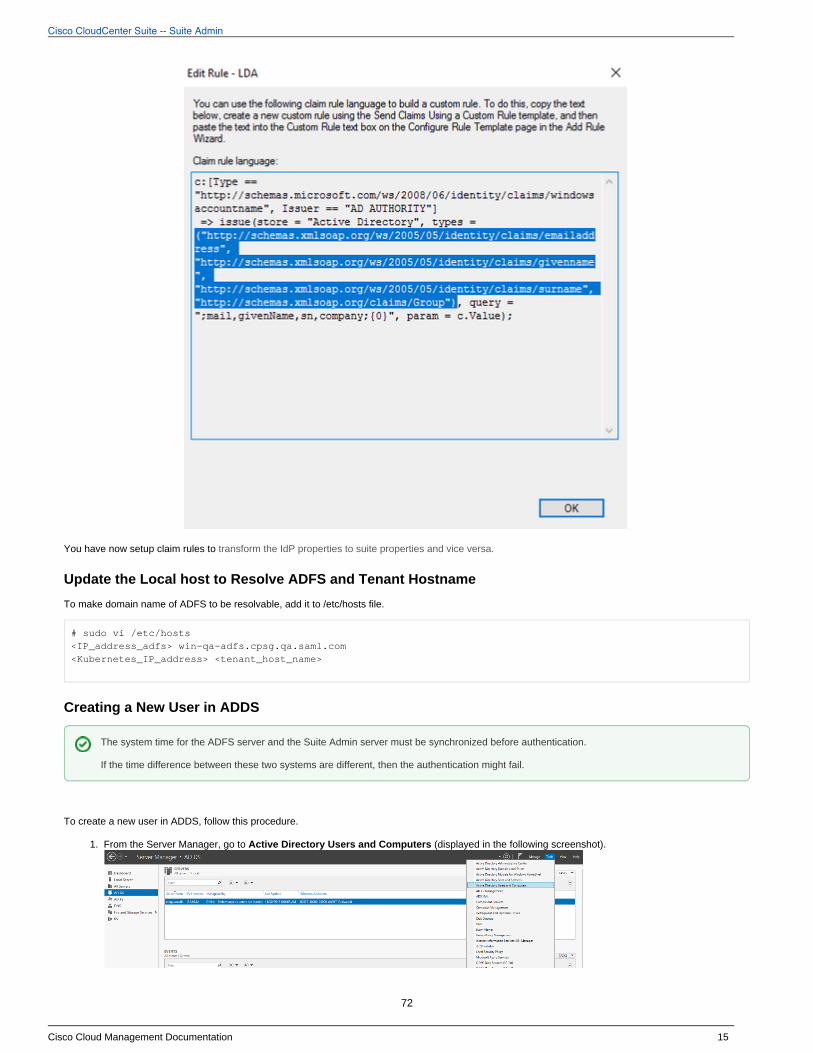
Cisco CloudCenter Suite -- Suite Admin
Cisco Cloud Management Documentation 15
2.
d.
iii.
1.
You have now setup claim rules to transform the IdP properties to suite properties and vice versa.
Update the Local host to Resolve ADFS and Tenant Hostname
To make domain name of ADFS to be resolvable, add it to /etc/hosts file.
# sudo vi /etc/hosts<IP_address_adfs> win-qa-adfs.cpsg.qa.saml.com<Kubernetes_IP_address> <tenant_host_name>
Creating a New User in ADDS
To create a new user in ADDS, follow this procedure.
From the Server Manager, go to .Active Directory Users and Computers (displayed in the following screenshot)
The system time for the ADFS server and the Suite Admin server must be synchronized before authentication.
If the time difference between these two systems are different, then the authentication might fail.
72
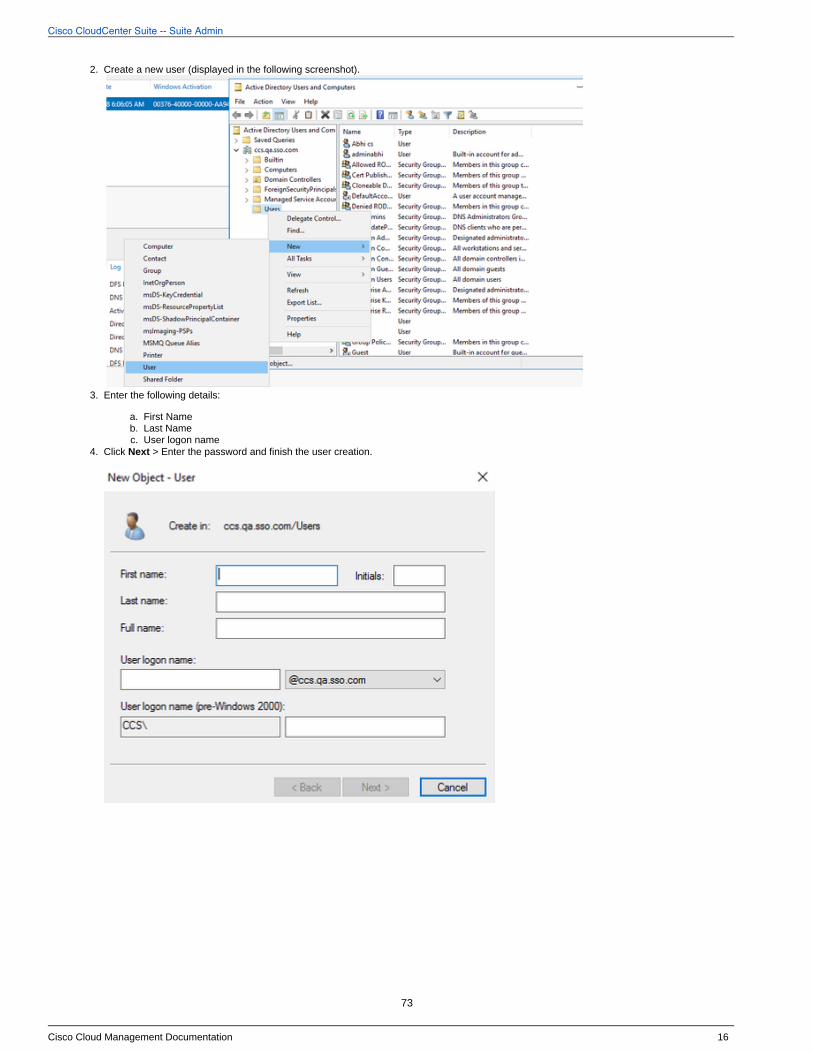
Cisco CloudCenter Suite -- Suite Admin
Cisco Cloud Management Documentation 16
2.
3.
a. b. c.
4.
5.
Create a new user .(displayed in the following screenshot)
Enter the following details:
First NameLast NameUser logon name
Click > Enter the password and finish the user creation.Next
73
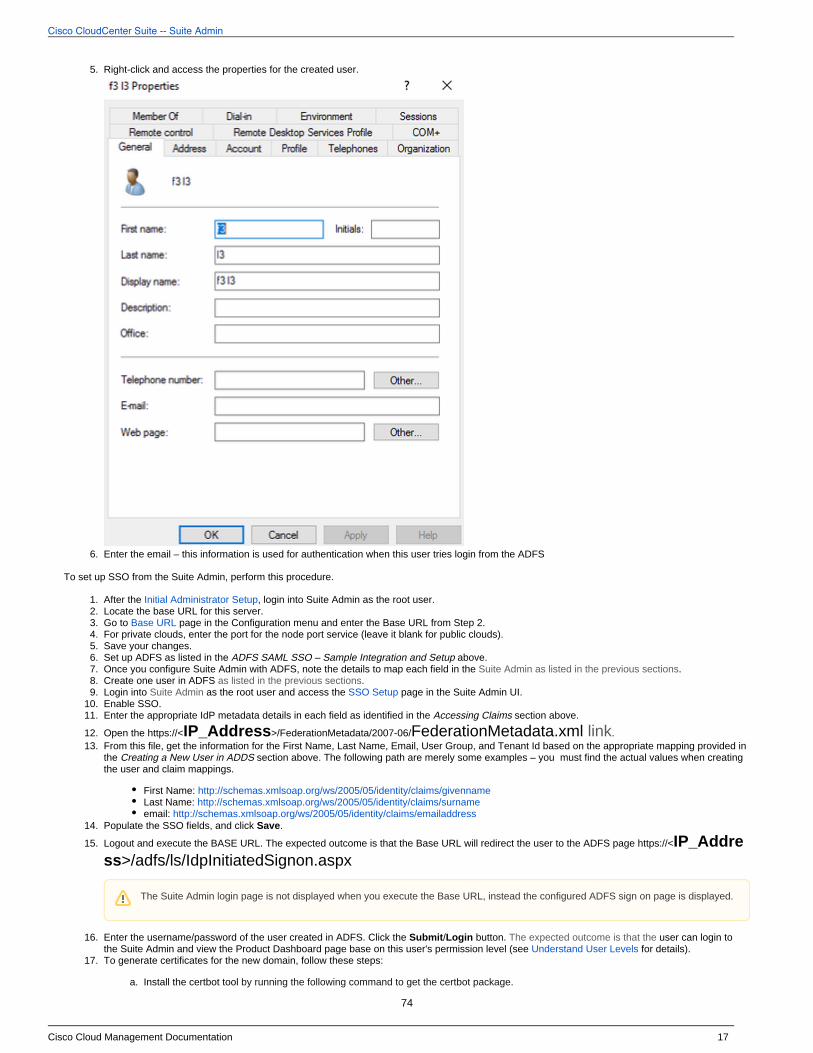
Cisco CloudCenter Suite -- Suite Admin
Cisco Cloud Management Documentation 17
5.
6.
1. 2. 3. 4. 5. 6. 7. 8. 9.
10. 11.
12. 13.
14.
15.
16.
17.
a.
Right-click and access the properties for the created user.
Enter the email – this information is used for authentication when this user tries login from the ADFS
To set up SSO from the Suite Admin, perform this procedure.
After the , login into Suite Admin as the root user. Initial Administrator SetupLocate the base URL for this server.Go to page in the Configuration menu and enter the Base URL from Step 2.Base URLFor private clouds, enter the port for the node port service (leave it blank for public clouds). Save your changes.Set up ADFS as listed in the above.ADFS SAML SSO – Sample Integration and SetupOnce you configure Suite Admin with ADFS, note the details to map each field in the .Suite Admin as listed in the previous sectionsCreate one user in ADFS .as listed in the previous sectionsLogin into as the root user and access the page in the Suite Admin UI. Suite Admin SSO SetupEnable SSO.Enter the appropriate IdP metadata details in each field as identified in the section above.Accessing Claims
Open the https://< >/FederationMetadata/2007-06/ .IP_Address FederationMetadata.xml linkFrom this file, get the information for the First Name, Last Name, Email, User Group, and Tenant Id based on the appropriate mapping provided in the section above. The following path are merely some examples – you must find the actual values when creating Creating a New User in ADDSthe user and claim mappings.
First Name: http://schemas.xmlsoap.org/ws/2005/05/identity/claims/givennameLast Name: http://schemas.xmlsoap.org/ws/2005/05/identity/claims/surnameemail: http://schemas.xmlsoap.org/ws/2005/05/identity/claims/emailaddress
Populate the SSO fields, and click .Save
Logout and execute the BASE URL. The expected outcome is that the Base URL will redirect the user to the ADFS page https://<IP_Address>/adfs/ls/IdpInitiatedSignon.aspx
Enter the username/password of the user created in ADFS. Click the / button. user can login to Submit Login The expected outcome is that the the Suite Admin and view the Product Dashboard page base on this user's permission level (see for details).Understand User LevelsTo generate certificates for the new domain, follow these steps:
Install the certbot tool by running the following command to get the certbot package.
The Suite Admin login page is not displayed when you execute the Base URL, instead the configured ADFS sign on page is displayed.
74
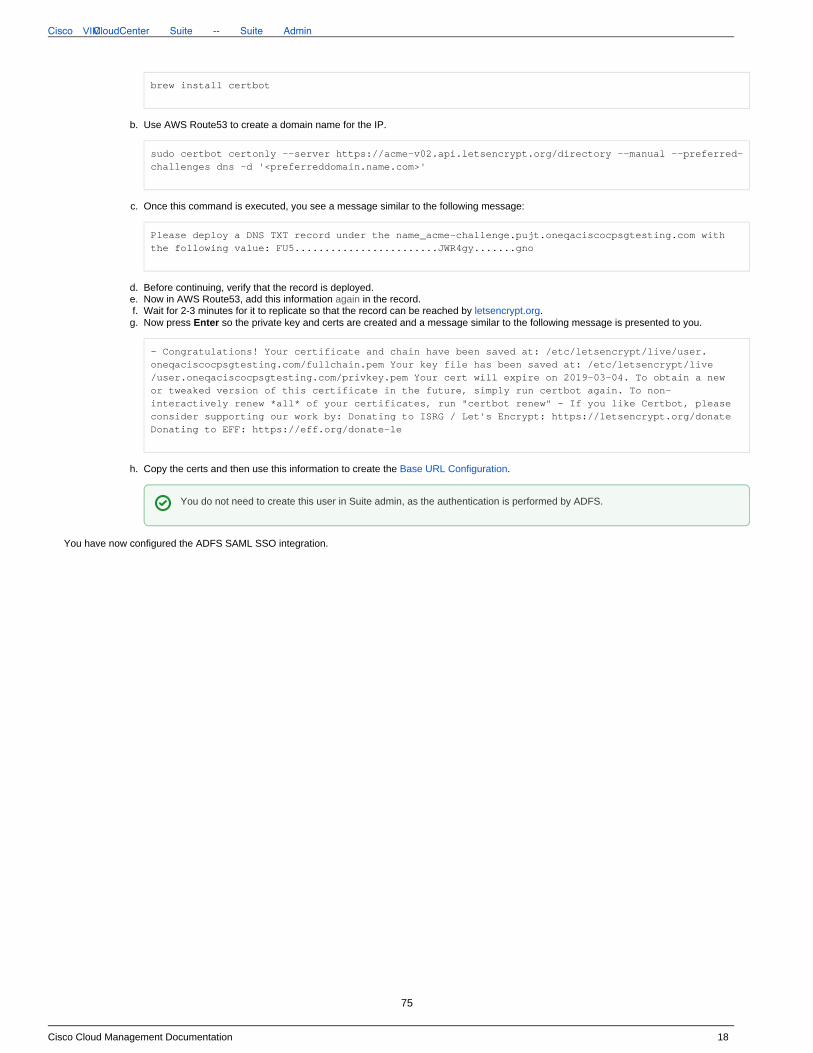
VIMCisco CloudCenter Suite -- Suite Admin
Cisco Cloud Management Documentation 18
17.
a.
b.
c.
d. e. f. g.
h.
brew install certbot
Use AWS Route53 to create a domain name for the IP.
sudo certbot certonly --server https://acme-v02.api.letsencrypt.org/directory --manual --preferred-challenges dns -d '<preferreddomain.name.com>'
Once this command is executed, you see a message similar to the following message:
Please deploy a DNS TXT record under the name_acme-challenge.pujt.oneqaciscocpsgtesting.com with the following value: FU5........................JWR4gy.......gno
Before continuing, verify that the record is deployed.Now in AWS Route53, add this information in the record.againWait for 2-3 minutes for it to replicate so that the record can be reached by .letsencrypt.orgNow press so the private key and certs are created and a message similar to the following message is presented to you.Enter
- Congratulations! Your certificate and chain have been saved at: /etc/letsencrypt/live/user.oneqaciscocpsgtesting.com/fullchain.pem Your key file has been saved at: /etc/letsencrypt/live/user.oneqaciscocpsgtesting.com/privkey.pem Your cert will expire on 2019-03-04. To obtain a newor tweaked version of this certificate in the future, simply run certbot again. To non-interactively renew *all* of your certificates, run "certbot renew" - If you like Certbot, pleaseconsider supporting our work by: Donating to ISRG / Let's Encrypt: https://letsencrypt.org/donateDonating to EFF: https://eff.org/donate-le
Copy the certs and then use this information to create the .Base URL Configuration
You have now configured the ADFS SAML SSO integration.
You do not need to create this user in Suite admin, as the authentication is performed by ADFS.
75
Cisco CloudCenter Suite -- Suite Admin
Cisco Cloud Management Documentation 1
1. 2. 3. 4. 5.
Currency ConversionCurrency Conversion
OverviewProcess
The CloudCenter Suite provides support for the following currencies to analyze cost reports, billing units, or savings functions used in the Workload and modules:Manager Cost Optimizer
AED = United Arab Emirates DirhamAUD = Australian DollarBRL = Brazilian RealCAD = Canadian DollarCHF = Swiss FrancCNY = Chinese Yuan RenminbiEUR = European EuroGBP = British PoundHKD = Hong Kong DollarIDR = Indonesian RupiahINR = Indian RupeeJPY = Japanese YenKWD = Kuwaiti DinarMXN = Mexican PesoRUB = Russian RubleSEK = Swedish KronaSGD = Singapore DollarSAR = Saudi RiyalTRY = Turkish LiraUSD = US Dollar (default)
RequirementsOnce you select the currency option of choice, you must also enter the conversion factor for this currency.
To configure the conversion rate to the selected currency, follow this procedure.
Navigate to the > .Suite Admin Dashboard AdminClick in the left tree pane to view the Currency page.CurrencySelect the currency from the dropdown list.Assign the conversion rate for this currency for 1 USD.Click to register your changes.Save
All User input fields accept and display values in USD.
Changing from the default USD currency to any other currency in this list may impact billing for environments as currency information is used by and not limited to the multiple features in the CloudCenter Suite.
76
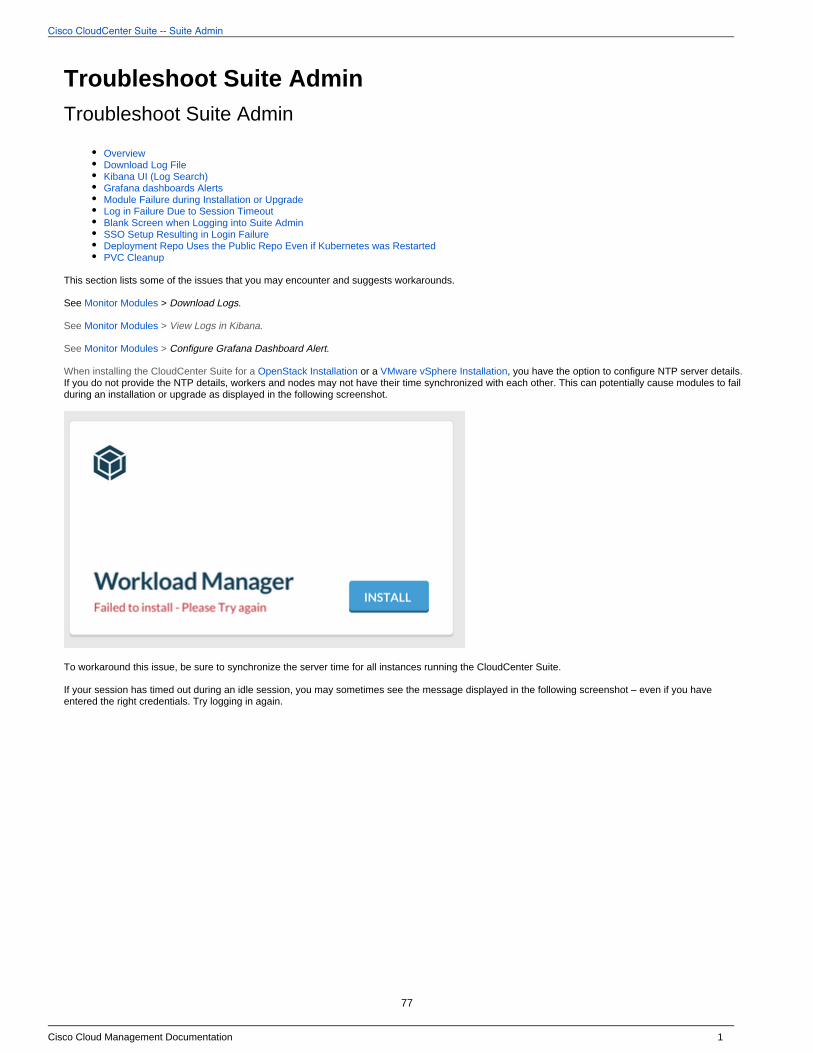
Cisco CloudCenter Suite -- Suite Admin
Cisco Cloud Management Documentation 1
Troubleshoot Suite AdminTroubleshoot Suite Admin
OverviewDownload Log FileKibana UI (Log Search)Grafana dashboards AlertsModule Failure during Installation or UpgradeLog in Failure Due to Session TimeoutBlank Screen when Logging into Suite AdminSSO Setup Resulting in Login FailureDeployment Repo Uses the Public Repo Even if Kubernetes was RestartedPVC Cleanup
This section lists some of the issues that you may encounter and suggests workarounds.
See > . Monitor Modules Download Logs
See Monitor Modules > .View Logs in Kibana
See Monitor Modules > Configure Grafana Dashboard Alert.
When installing the CloudCenter Suite for a or a , you have the option to configure NTP server details. OpenStack Installation VMware vSphere InstallationIf you do not provide the NTP details, workers and nodes may not have their time synchronized with each other. This can potentially cause modules to fail during an installation or upgrade as displayed in the following screenshot.
To workaround this issue, be sure to synchronize the server time for all instances running the CloudCenter Suite.
If your session has timed out during an idle session, you may sometimes see the message – even if you have displayed in the following screenshotentered the right credentials. Try logging in again.
77
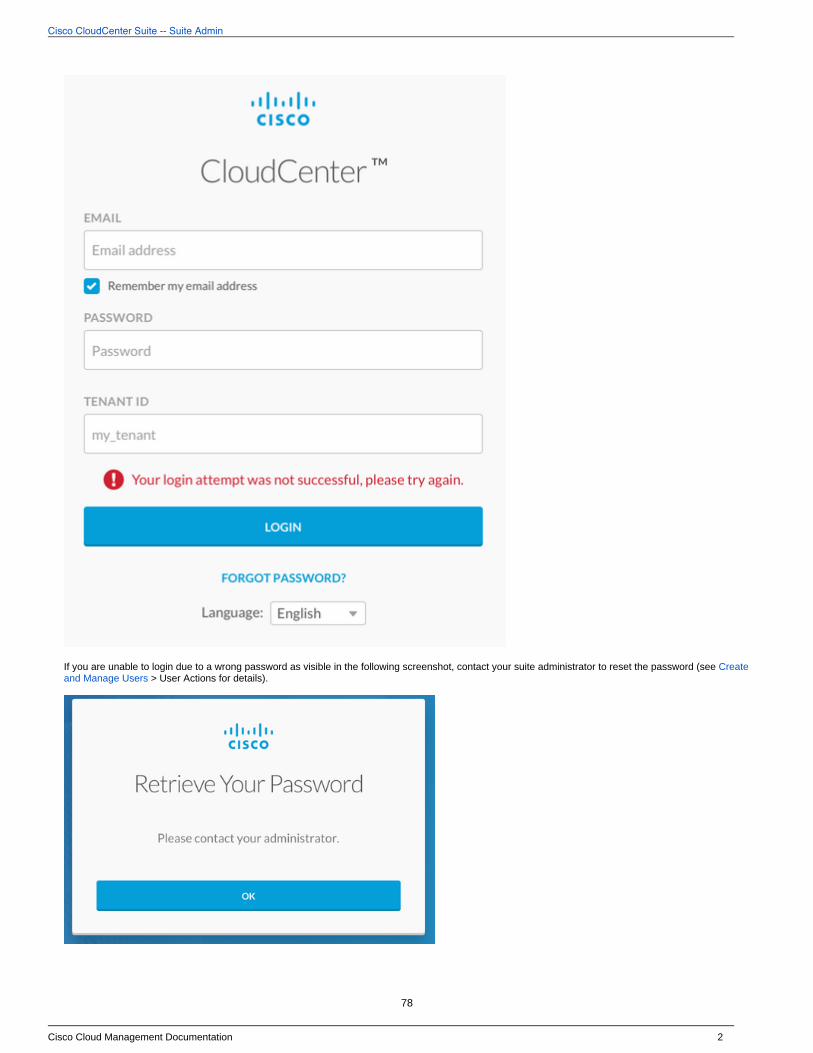
Cisco CloudCenter Suite -- Suite Admin
Cisco Cloud Management Documentation 2
If you are unable to login due to a wrong password as visible in the following screenshot, contact your suite administrator to reset the password (see Create > User Actions for details).and Manage Users
78
Cisco CloudCenter Suite -- Suite Admin
Cisco Cloud Management Documentation 3
A user who only belong to one group is abandoned if the group was only specific to one module and if that module was uninstalled. In this case, the abandoned user must follow up with one of the CloudCenter Suite administrators based on their enterprise policies. If a user does not have any active roles, this user may see a blank screen on log in.
If you log in as root admin, configure SSO, and was subsequently timed out, you may not be able to log back in. This is because the ADFS user may not have the roles mapped and will not be able to access any modules. This user may not be able to login by using the direct URL (ui/auth/login).
To address this issue, complete the , add the ADFS user to the Suite Admin Group any session timeout. be sure to SSO Setup before
If you initially use the public repository to install the CloudCenter Suite, the repo for deployments and other activities may continue to point to the public repository. If so, your deployments may continue to reference the public repo even for cases where the Kubernetes nodes were restarted.
After an offline repo is registered with the CloudCenter Suite, users may expect Deployments to pickup images from the automatically and immediatelyoffline repo. This is not the natural behavior.
During product installation/upgrade events, the repository settings are set to Helm (the package manager for Kubernetes). Consequently, offline repository settings are only registered after the next upgrade or new product installation event.
To workaround this natural behavior, you can opt to start a new cluster with the offline repository during the first event to ensure that your environment continues to use this offline repository.
When you uninstall the Workload Manager or Cost Optimizer modules in the Suite Admin, the are not Kubernetes Persistent Volume Claims (PVCs)deleted – they are retained as is for the Suite Administrator to take appropriate steps to backup or manually delete the PVC. The secrets for the Workload
are not deleted when you uninstall the product. To work around this issue, the Suite Administrator must clean up their Manager and the Cost Optimizer. instances using one of the following suggestions
Backup PVC: Take a snapshot of the volume backing up the PVC or just the data contained within. Refer to the for Kubernetes Documentationadditional details.Delete PVC: Manually delete the PVCs by running the following command:
kubectl delete pvc -n <namespace>
79
Cisco CloudCenter Suite -- Suite Admin
Cisco Cloud Management Documentation 1
Suite Admin APISuite Admin API
API OverviewAPI AuthenticationAPI KeyBase URI FormatHTTP Status CodesCSRF Token ProtectionAPI PermissionsSynchronous and Asynchronous CallsSuite Admin 5.1.2 API Calls
Authentication Service API Calls 5.1.2Email Service API Calls 5.1.2IDM Service API Calls 5.1.2License Service API Calls 5.1.2Logs Service API Calls 5.1.2Monitor Service API Calls 5.1.2Password Service API Calls 5.1.2Suite Notification Service API Calls 5.1.2Product Registry Service API Calls 5.1.2Resource Management Service API Calls 5.1.2
Suite Admin 5.1.1 API CallsAuthentication Service API Calls 5.1.1Email Service API Calls 5.1.1IDM Service API Calls 5.1.1License Service API Calls 5.1.1Logs Service API Calls 5.1.1Monitor Service API Calls 5.1.1Suite Notification Service API Calls 5.1.1Password Service API Calls 5.1.1Product Registry Service API Calls 5.1.1Resource Management Service API Calls 5.1.1
Suite Admin 5.1.0 API CallsAuthentication Service API Calls 5.1.0Email Service API Calls 5.1.0IDM Service API Calls 5.1.0License Service API Calls 5.1.0Logs Service API Calls 5.1.0Monitor Service API Calls 5.1.0Suite Notification Service API Calls 5.1.0Password Service API Calls 5.1.0Product Registry Service API Calls 5.1.0Resource Management Service API Calls 5.1.0
80
Cisco CloudCenter Suite -- Suite Admin
Cisco Cloud Management Documentation 1
API Overview
CloudCenter Suite API Overview
OverviewCloudCenter Suite API VersionDate FormatHTTPS Request MethodsResponse SchemaResource URL and IDPagination
Pagination Request AttributesPagination Response Attributes
SortingSearchingHTTP Location URLWho Can Use CloudCenter Suite APIs?
The payloads for the CloudCenter Suite APIs are visible in the API documentation section for each module.
CloudCenter Suite APIs provide support for the CloudCenter Suite modules: , , , and Suite Admin API Workload Manager API Action Orchestrator API Cost .Optimizer API
The User, Groups, and Tenant APIs are part of the Suite Admin and each API using these services have an additional prefix in the URI. The payloads for the CloudCenter Suite APIs are visible the API documentation section for each module.
The v2 APIs, where available, provide structured responses with minimum details and provides links for nested resources as well as improved search, sort, and pagination filters.
The CloudCenter Suite API date and time values are formatted in to the millisecond level. The APIs are agnostic to dates and time zones.Unix time
CloudCenter Suite APIs support the following request methods:
GET: To query or view the server information based on a CloudCenter Suite deploymentPUT: To replace the entire object for update operationsPOST: To perform a CloudCenter Suite task or creating the resourceDELETE: To remove specific aspects of the CloudCenter Suite deployment
CloudCenter APIs issue responses for all APIs using both JSON and XML formats. You can set the response format by sending the appropriate Content-Type request headers:
JSON (Default)
Content-Type: application/json Accept: application/json
XML
Content-Type: application/xml Accept: application/xml
CSV (Only for Reports)
Content-Type: application/csv Accept: text/csv
The CSV format only applies to report-based APIs
81
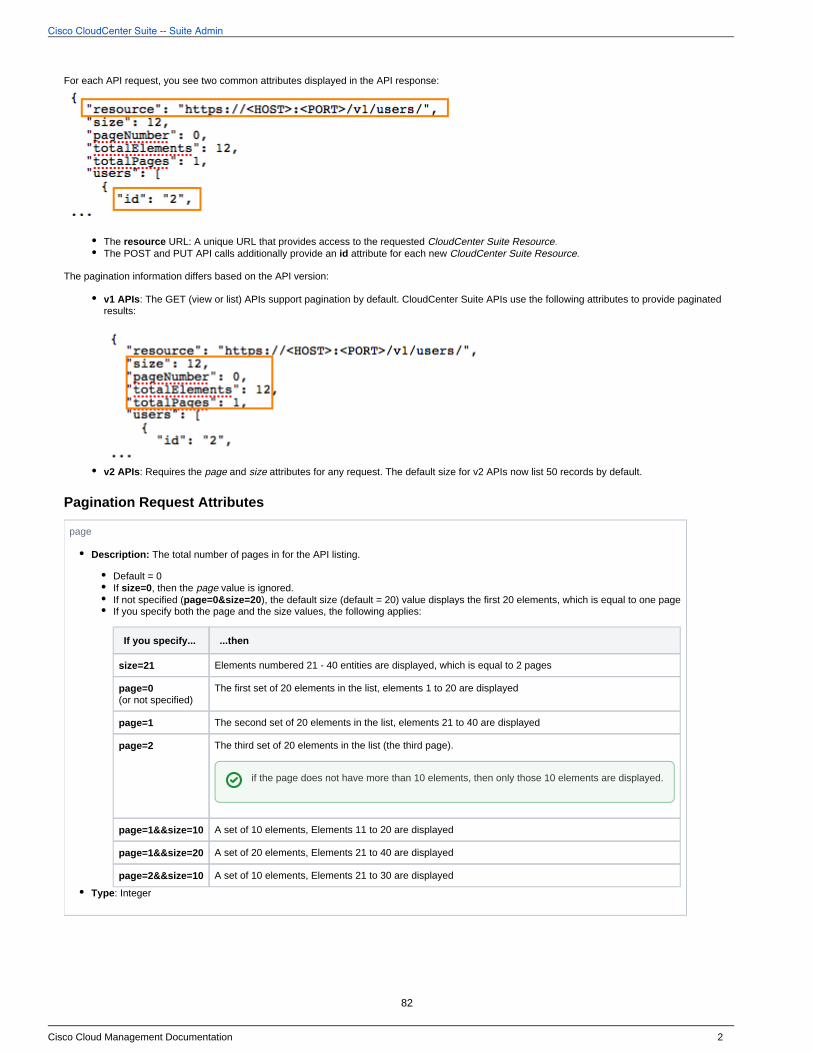
Cisco CloudCenter Suite -- Suite Admin
Cisco Cloud Management Documentation 2
For each API request, you see two common attributes displayed in the API response:
The URL: A unique URL that provides access to the requested resource CloudCenter Suite Resource.The POST and PUT API calls additionally provide an attribute for each new .id CloudCenter Suite Resource
The pagination information differs based on the API version:
v1 APIs: The GET (view or list) APIs support pagination by default. CloudCenter Suite APIs use the following attributes to provide paginated results:
v2 APIs: Requires the and attributes for any request. page size The default size for v2 APIs now list 50 records by default.
Pagination Request Attributes
page
Description: The total number of pages in for the API listing.
Default = 0If , then the value is ignored.size=0 pageIf not specified ( ), the default size (default = 20) value displays the first 20 elements, which is equal to one pagepage=0&size=20If you specify both the page and the size values, the following applies:
If you specify... ...then
size=21 Elements numbered 21 - 40 entities are displayed, which is equal to 2 pages
page=0 (or not specified)
The first set of 20 elements in the list, elements 1 to 20 are displayed
page=1 The second set of 20 elements in the list, elements 21 to 40 are displayed
page=2 The third set of 20 elements in the list (the third page).
page=1&& =10size A set of 10 elements, Elements 11 to 20 are displayed
page=1&& =20size A set of 20 elements, Elements 21 to 40 are displayed
page=2&& =10size A set of 10 elements, Elements 21 to 30 are displayed
Type: Integer
if the page does not have more than 10 elements, then only those 10 elements are displayed.
82

Cisco CloudCenter Suite -- Suite Admin
Cisco Cloud Management Documentation 3
size
: Total number of records that any list page should contain.Description The default is:
v1 APIs = 20 recordsv2 APIs = 50 records: IntegerType
Pagination Response Attributes
v1 APIs: pageResource
Description: Identifies the pagination information for each resourceType: Sequence of attributes for v1 APIs
size (see above)
pageNumberDescription: The page number that the client wants to fetch. Page numbers start with 0 (default).Type: Integer
totalElementsDescription: The number resources that an API call returnsType: Long
totalPagesDescription: The number of pages in a response Type: Integer
v2 APIs: pageResource
Description: Identifies the pagination information for each resourceType: Sequence of attributes for v2 APIs
resourceDescription: Unique URL to access this resource.Type: String
size (see above)
pageNumberDescription: The page number that the client wants to fetch. Page numbers start with 0 (default).Type: Integer
totalPagesDescription: The number of pages in a response Type: Integer
jobsDescription: Array of JSON objects that use as the key.jobsType: Array of JSON objects
previousPageDescription: A resource link to the previous page.Type: URI as a string
nextPageDescription: A resource link to the following page.Type: URI as a string
lastPageDescription: A resource link to the last page.Type: URI as a string
v1 APIs: All list APIs support sorting by default and use the query-string parameters to provide sorted results with a comma-separated set of property names.
Sorting Order:
Ascending order: Default when you specify the property.Descending order: Append a dash to the property.
Example:
sort=id,name: Sort by ID property in ascending order and then sort by name property in ascending order. sort=id,name-,description: Sort by ID property in ascending order, then sort by name property in descending order, and finally sort by description in ascending order.
83
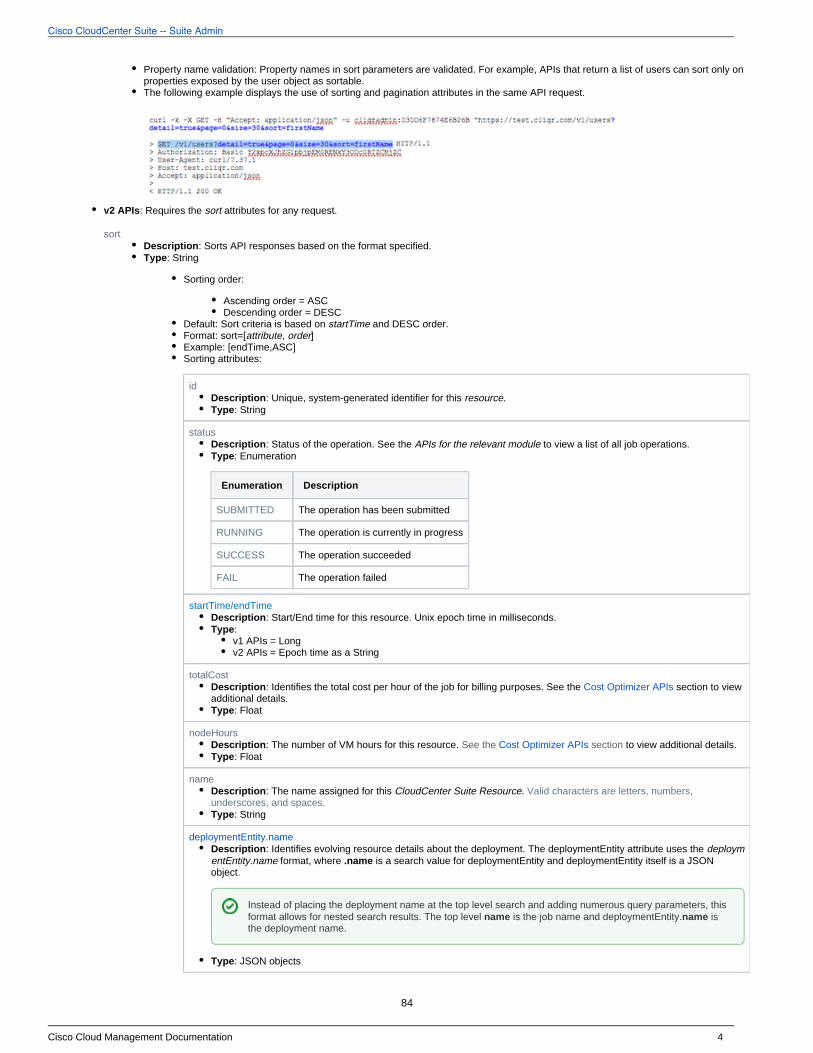
Cisco CloudCenter Suite -- Suite Admin
Cisco Cloud Management Documentation 4
Property name validation: Property names in sort parameters are validated. For example, APIs that return a list of users can sort only on properties exposed by the user object as sortable.The following example displays the use of sorting and pagination attributes in the same API request.
v2 APIs: Requires the attributes for any request. sort
sortDescription: Sorts API responses based on the format specified.Type: String
Sorting order:
Ascending order = ASCDescending order = DESC
Default: Sort criteria is based on and DESC order.startTimeFormat: sort=[ , ]attribute orderExample: [endTime,ASC]Sorting attributes:
idDescription: Unique, system-generated identifier for this . resourceType: String
statusDescription: Status of the operation. See to view a list of all job operations.the APIs for the relevant moduleType: Enumeration
Enumeration Description
SUBMITTED The operation has been submitted
RUNNING The operation is currently in progress
SUCCESS The operation succeeded
FAIL The operation failed
startTime/endTime: Start/EndDescription time for this resource. Unix epoch time in milliseconds.
Type: v1 APIs = Longv2 APIs = Epoch time as a String
totalCostDescription: Identifies the total cost per hour of the job for billing purposes. See the section to view Cost Optimizer APIsadditional details.Type: Float
nodeHoursDescription: The number of VM hours for this resource. to view additional details.See the Cost Optimizer APIs sectionType: Float
nameDescription: The name assigned for this . CloudCenter Suite Resource Valid characters are letters, numbers, underscores, and spaces.Type: String
deploymentEntity.nameDescription: Identifies evolving resource details about the deployment. The deploymentEntity attribute uses the deploym
format, where is a search value for deploymentEntity and deploymentEntity itself is a JSON entEntity.name .nameobject.
Type: JSON objects
Instead of placing the deployment name at the top level search and adding numerous query parameters, this format allows for nested search results. The top level is the job name and deploymentEntity. is name namethe deployment name.
84
Cisco CloudCenter Suite -- Suite Admin
Cisco Cloud Management Documentation 5
favoriteCreationTimeDescription: If the job was configured as a favorite job, then this attribute identifies the time when this configuration took place. See section for the relevant release for additional context.the Favorite DeploymentsType: Epoch time as a String
This attribute is only available for v2 APIs.
search
Description: Searches API responses based on the format specified.Type: String
Format: search=[field, searchType, , ]SearchExpression1 SearchExpression2Example: search =[startTime, gt, 01/01/2016]Search Expressions:
pattern: Provide a pattern using the format provided in the table below.searchTypessearchTypes
searchType Format
eq ==
ne !=
el LIKE %pattern
fl LIKE %pattern
eln NOT LIKE %pattern
fln NOT LIKE %pattern
fle LIKE % %"pattern
gt > searchValue
lt < searchValue
ge >= searchValue
le <= searchValue
gtlt > && searchValue searchValue
gtelt >= && < searchValue searchValue
gtlte > && <= searchValue searchValue
gtelte >= && <= searchValue searchValue
emp Empty string
noemp Not Empty string
nu Null value
nn Not Null Value
searchValue:
searchValue SearchType Availability
id eq
startTime eq, nu, gtlt
endTime eq, nu, nn, gtlt
totalCost eq, gt, ge, le, gtlt, gtlte, gtelte, gtelt
favoriteCreationTime eq, nu, ,nn gtlt
jobStatusMessage el, eln, fl, fln, fle, nn, emp, noemp
nodeHours eq, gt, ge, le, gtlt, gtlte, gtelte, gtelt
name eq, nn, eln, fle, fln, el, emp, noemp, fl
description eq, nn, eln, fle, fln, el, emp, noemp, fl
85
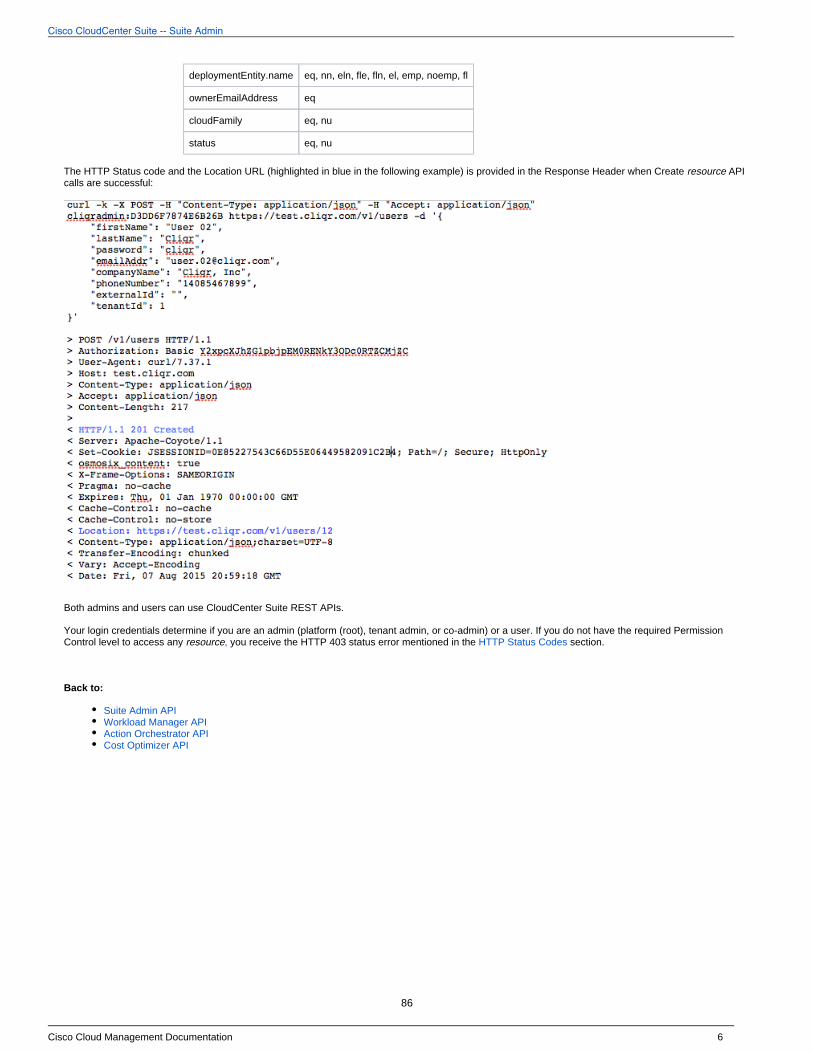
Cisco CloudCenter Suite -- Suite Admin
Cisco Cloud Management Documentation 6
deploymentEntity.name eq, nn, eln, fle, fln, el, emp, noemp, fl
ownerEmailAddress eq
cloudFamily eq, nu
status eq, nu
The HTTP Status code and the Location URL (highlighted in blue in the following example) is provided in the Response Header when Create API resourcecalls are successful:
Both admins and users can use CloudCenter Suite REST APIs.
Your login credentials determine if you are an admin (platform (root), tenant admin, or co-admin) or a user. If you do not have the required Permission level to access any you receive the HTTP 403 status error mentioned in the section.Control resource, HTTP Status Codes
Back to:
Suite Admin APIWorkload Manager APIAction Orchestrator APICost Optimizer API
86

Cisco CloudCenter Suite -- Suite Admin
Cisco Cloud Management Documentation 1
API Authentication
API Authentication
OverviewAuthentication Format in CURL RequestsSuccessful AuthenticationSession Timeout Length
CloudCenter Suite APIs require the following authentication details for each API call:
UsernameAPI access key
Standalone CURL Request Example:
curl -H "Accept:application/json" -H "Content-Type:application/json" -u writer:BED74F4D9BFE0DA0 -X GET https://<HOST>:<PORT>/v1/users/27
In this CURL request example:
writer1 is the usernameBED74F4D9BFE0DA0 is the API accessKey
Your can retrieve the username and API access key from the UI. See for additional details.tenant administrator API Key
On successful authentication, CloudCenter Suite sends a browser cookie to maintain the authentication session. The cookie forwards the information to the server for each API call so you do not need to authenticate each time you make an API call. If you do not want to maintain cookies in your browser, you can send the authentication information for each API request. Once authenticated, you can begin making API calls.
The CloudCenter Suite authentication session times out after 15 minutes. If you use a REST client to make API calls by authenticating through the UI's, this session timeout applies to the REST client as well.
However, if you add and save the REST client authentication headers or if you issue CURL commands with the authentication details, you can circumvent the session timeout restriction.
Back to:
Suite Admin APIWorkload Manager APIAction Orchestrator APICost Optimizer API
The authentication HTTP header is not required when making standalone REST API calls using the username/API Key credentials.
87
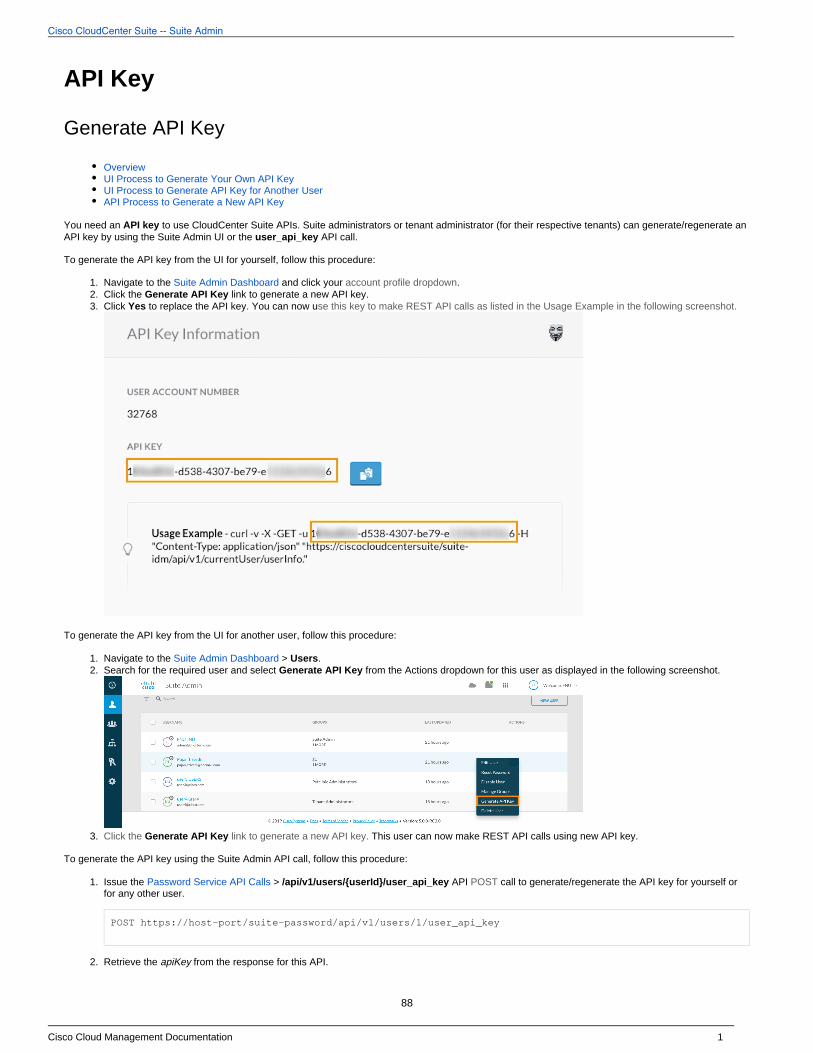
Cisco CloudCenter Suite -- Suite Admin
Cisco Cloud Management Documentation 1
1. 2. 3.
1. 2.
3.
1.
2.
API Key
Generate API Key
OverviewUI Process to Generate Your Own API KeyUI Process to Generate API Key for Another UserAPI Process to Generate a New API Key
You need an to use CloudCenter Suite APIs. Suite administrators or tenant administrator (for their respective tenants) can generate/regenerate an API keyAPI key by using the Suite Admin UI or the API call. user_api_key
To generate the API key from the UI for yourself, follow this procedure:
Navigate to the and click your .Suite Admin Dashboard account profile dropdownClick the link to generate a new API key.Generate API KeyClick to replace the API key. You can now uYes se this key to make REST API calls as listed in the Usage Example in the following screenshot.
To generate the API key from the UI for another user, follow this procedure:
Navigate to the > .Suite Admin Dashboard UsersSearch for the required user and select Generate API Key from the Actions dropdown for this user as displayed in the following screenshot.
This user can now make REST API calls using new API key.Click the Generate API Key link to generate a new API key.
To generate the API key using the Suite Admin API call, follow this procedure:
Issue the > API call to generate/regenerate the API key for yourself or Password Service API Calls /api/v1/users/{userId}/user_api_key POST for any other user.
POST https://host-port/suite-password/api/v1/users/1/user_api_key
Retrieve the from the response for this API.apiKey
88
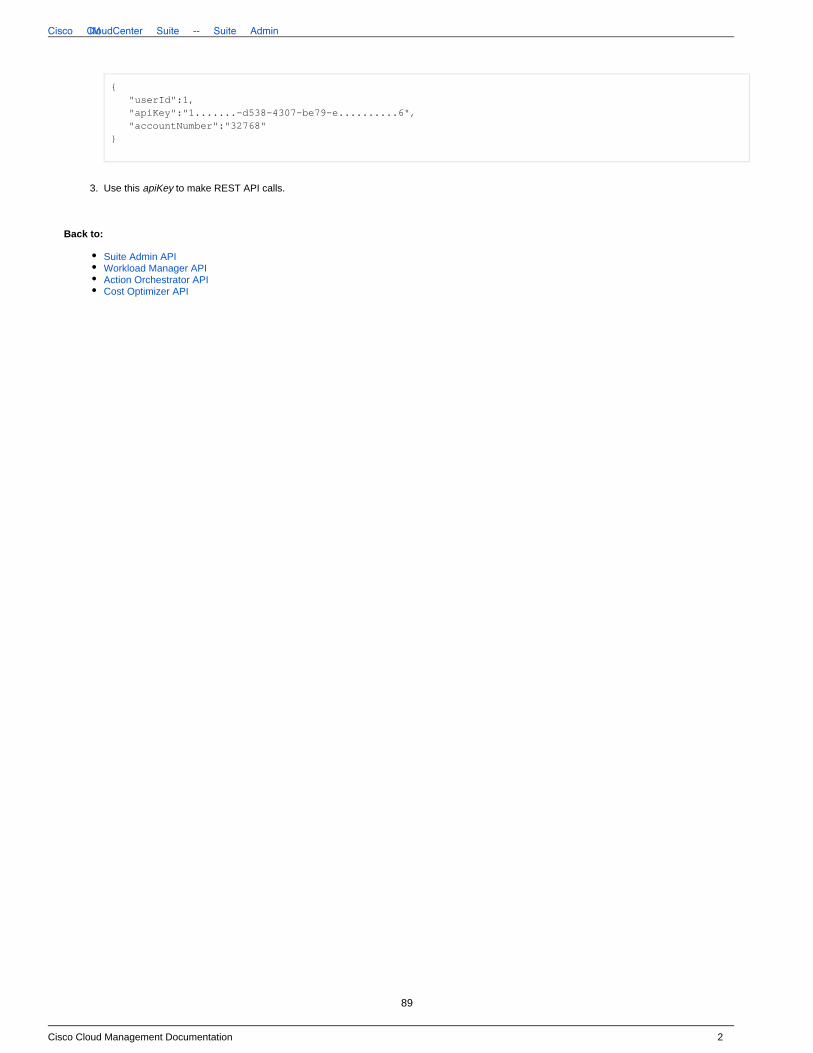
IMCisco CloudCenter Suite -- Suite Admin
Cisco Cloud Management Documentation 2
2.
3.
{ "userId":1, "apiKey":"1.......-d538-4307-be79-e..........6", "accountNumber":"32768"}
Use this to make REST API calls.apiKey
Back to:
Suite Admin APIWorkload Manager APIAction Orchestrator APICost Optimizer API
89
Cisco CloudCenter Suite -- Suite Admin
Cisco Cloud Management Documentation 1
Base URI Format
Base URI Format
OverviewHost NamePort UsageAPI VersionParametersParameter Types
The base URI format is https:// <host>:<port>/…
The host is generally represented as <HOST> in all CloudCenter APIs. It represents the IP address or the DNS name.
The host differs based on your DNS or IP address and port usage.
The port is generally represented at <PORT> in all CloudCenter APIs. It represents the port used to connect to the CCO server for the API connection. The <PORT> in the REST endpoint is . You can decide if you want to use the port for each API call. All CloudCenter API requests and responses optionaldisplay <PORT> in all examples.
curl -H "Accept:application/json" -H "Content-Type:application/json" -u \cloudcenteradmin:40E45DBE57E35ECB -X GET https://<HOST>:<PORT>/...
The CloudCenter Suite 5.0.0 API version can be v1 or v2 as applicable. The version is identified for each API, where applicable.
Parameters used to make the API call are displayed after the APIs and are called out after the description.
Attribute Type
Description
String Any combination of characters. Maximum of 255 characters.
Integer A whole number value. Restricted to 32-bit values.
Long A whole number value. Restricted to 64-bit values.
Float A number with or without a decimal point. Displayed as a string in the response.
Boolean A logical true or false value. May be passed to API requests as true or false or 1 or 0.
Enumeration A predefined list of values, for example STANDARD or TENANT describes the possible values for each type. Only listed values are permitted, other values result in an error.
JSON Object
A method to parse ( ) and return the object value to which a specified name is mapped.JavaScript Object Notation JSON
Name-Value Pair
A name–value pair where each element is an attribute–value pair.
Array A sequential collection of like elements corresponding to the element's data type. The type of the array is determined by the types of the elements (can be String, Integer, Name-Value Pair Type)
Perms List Lists the permissions for specific user if the user is logged in. An empty response is indicative of the resource not being currently alsosupported.
Metadata Metadata information associated with the cloud provider.
Back to:
Suite Admin APIWorkload Manager APIAction Orchestrator APICost Optimizer API
If you do not specify the port, when accessing CloudCenter Suite REST APIs.then API requests default to Port 443 for a HTTPS connection
90

Cisco CloudCenter Suite -- Suite Admin
Cisco Cloud Management Documentation 2
91
Cisco CloudCenter Suite -- Suite Admin
Cisco Cloud Management Documentation 1
HTTP Status Codes
HTTP Status CodesCloudCenter APIs return one or more of the following HTTPS status codes for all (synchronous and asynchronous) API requests:
HTTP Response Code
Status Description
200 Success Successful GET and PUT
201 Successful POST (when a resource is created)
202 Request accepted for a time-consuming task (asynchronous update and created requests). See Shared 5.1 for more detailsSynchronous and Asynchronous APIs
You can issue GET calls until the request completes.
204 Successful DELETE
30x Redirection
Only displays if a client calls an API using HTTP instead of HTTPS
400 Client failure
Validation error. This category has additional error codes in the response body for each API (as applicable).
401 Not authenticated
403 Forbidden. You do not have the required permission level to access the CloudCenter Resource
404 Resource not found
500 Server failure
Server error: The server failed to respond to this request due to an internal error
Back to:
Suite Admin APIWorkload Manager APIAction Orchestrator APICost Optimizer API
92
Cisco CloudCenter Suite -- Suite Admin
Cisco Cloud Management Documentation 1
1. 2.
a. b. c.
CSRF Token Protection
CSRF Token Protection
OverviewThe 403 Forbidden Error for Some APIsSetting the CSRF TokenRetrieving the CSRF TokenUsing the CSRF Token
Cisco provides CSRF protection for all API calls. When an API call is made by you or the CloudCenter Suite, be aware that a CSRF token is required for the following scenarios:
If the request method is , , or POST PUT DELETEandIf the request is not Content-Type application/json
For example, the following functions require the CSRF token:
Suite Admin Resource Management Service API Calls that use the following functions:
Company logo uploadUser avatar upload
Workload Manager API Calls that use the following functions
Application profilesLogo uploadServices logo uploadImport applicationsCloud account management API callsDELETE calls that change the database contents
If the CSRF token is missing or incorrect, you will see a 403 error due to the CSRF token protection.
If you see this error, you must first set the CSRF token in the request header for the affected API.
To set a CSRF token, add to the header name (case sensitive, all uppercase).X-CSRF-TOKEN
To obtain the CSRF token, follow this procedure.
You must first pass authentication. See for details.API AuthenticationOnce authenticated, use one of the following APIs to retrieve the CSRF token from the response body ( attribute). See csrfToken Authentication
for details.Service API Calls
Login API (/suite-auth/login)Token Refresh API (/suite-auth/api/v1/token)CSRF Token API (/suite-auth/api/v1/csrfToken)
See the following request for examples of using a CSRF Token.
Java Rest Client Example
WebResource.Builder builder = webResource.type(MediaType.APPLICATION_JSON).header("X-CSRF-TOKEN", "<TOKEN>");
Python Example
headers = {'content-type': 'application/json', 'X-CSRF-TOKEN': '<TOKEN>'}
requests.delete(url, headers = headers, verify=False)
requests.post(url, json=jobJson, headers = headers, verify=False)
Where is retrieved as specified in the section above.<TOKEN> Retrieving the CSRF Token
Back to:
Suite Admin API
93
Cisco CloudCenter Suite -- Suite Admin
Cisco Cloud Management Documentation 2
Workload Manager APIAction Orchestrator APICost Optimizer API
94
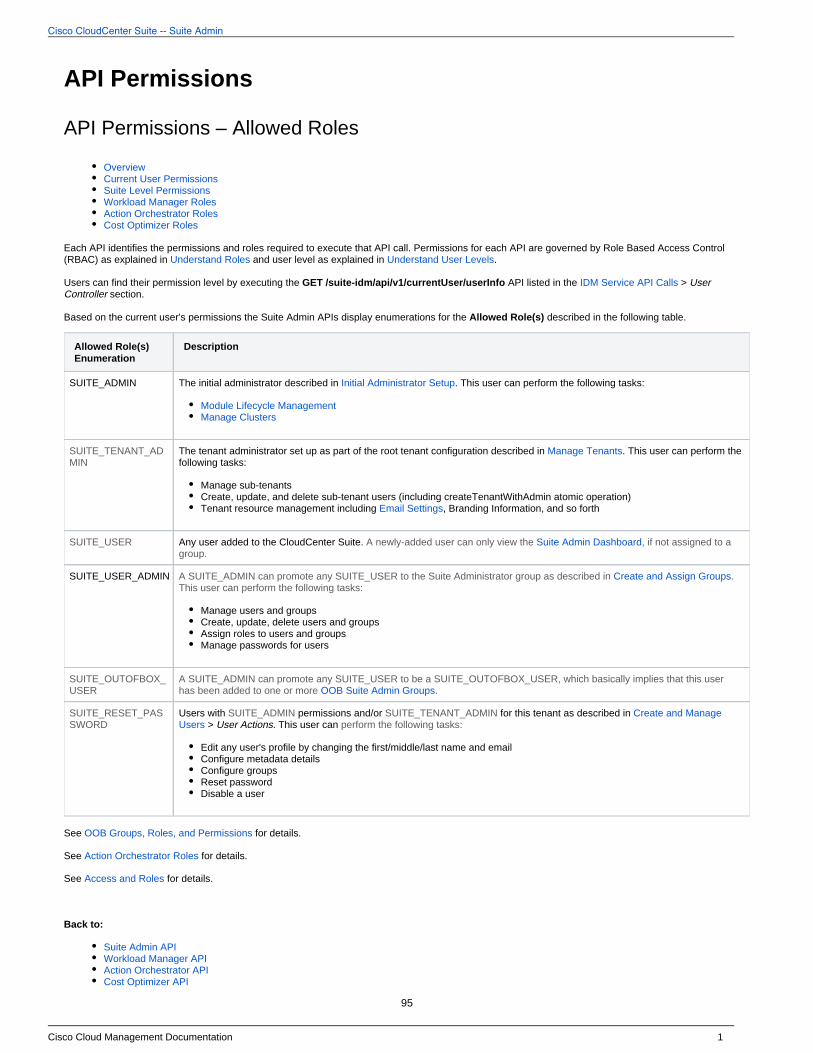
Cisco CloudCenter Suite -- Suite Admin
Cisco Cloud Management Documentation 1
API Permissions
API Permissions – Allowed Roles
OverviewCurrent User PermissionsSuite Level PermissionsWorkload Manager RolesAction Orchestrator RolesCost Optimizer Roles
Each API identifies the permissions and roles required to execute that API call. Permissions for each API are governed by Role Based Access Control (RBAC) as explained in and user level as explained in . Understand Roles Understand User Levels
Users can find their permission level by executing the API listed in the > GET /suite-idm/api/v1/currentUser/userInfo IDM Service API Calls User section.Controller
Based on the current user's permissions the Suite Admin APIs display enumerations for the described in the following table.Allowed Role(s)
Allowed Role(s) Enumeration
Description
SUITE_ADMIN The initial administrator described in . This user can perform the following tasks:Initial Administrator Setup
Module Lifecycle ManagementManage Clusters
SUITE_TENANT_ADMIN
The tenant administrator set up as part of the root tenant configuration described in . This user can perform the Manage Tenantsfollowing tasks:
Manage sub-tenantsCreate, update, and delete sub-tenant users (including createTenantWithAdmin atomic operation)Tenant resource management including , Branding Information, and so forthEmail Settings
SUITE_USER Any user added to the CloudCenter Suite. A newly-added user can only view the , if not assigned to a Suite Admin Dashboardgroup.
SUITE_USER_ADMIN A SUITE_ADMIN can promote any to the Suite SUITE_USER Administrator group as described in . Create and Assign GroupsThis user can perform the following tasks:
Manage users and groupsCreate, update, delete users and groupsAssign roles to users and groupsManage passwords for users
SUITE_OUTOFBOX_USER
A SUITE_ADMIN can promote any to be a SUITE_USER SUITE_OUTOFBOX_USER, which basically implies that this user has been added to one or more .OOB Suite Admin Groups
SUITE_RESET_PASSWORD
Users with SUITE_ADMIN permissions and/or for this tenant as described inSUITE_TENANT_ADMIN Create and Manage This user canUsers > User Actions. perform the following tasks:
Edit any user's profile by changing the first/middle/last name and emailConfigure metadata detailsConfigure groupsReset passwordDisable a user
See for details.OOB Groups, Roles, and Permissions
See for details.Action Orchestrator Roles
See for details.Access and Roles
Back to:
Suite Admin APIWorkload Manager APIAction Orchestrator APICost Optimizer API
95
Cisco CloudCenter Suite -- Suite Admin
Cisco Cloud Management Documentation 2
96
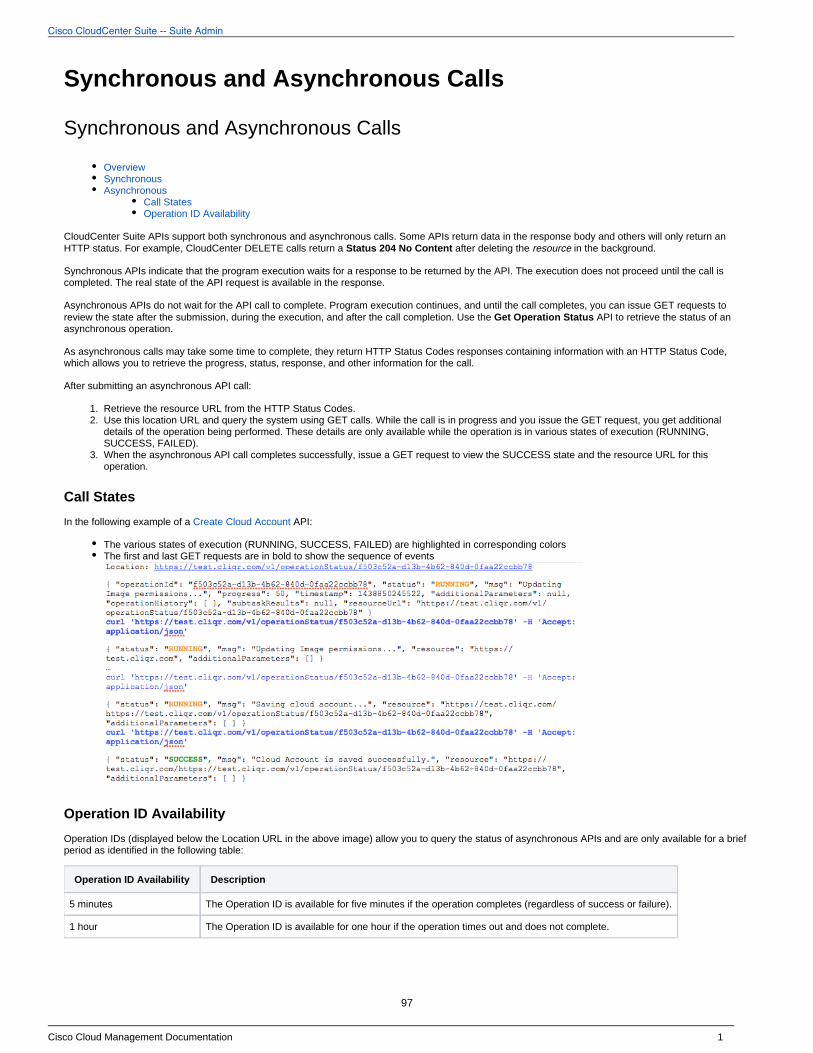
Cisco CloudCenter Suite -- Suite Admin
Cisco Cloud Management Documentation 1
1. 2.
3.
Synchronous and Asynchronous Calls
Synchronous and Asynchronous Calls
OverviewSynchronousAsynchronous
Call StatesOperation ID Availability
CloudCenter Suite APIs support both synchronous and asynchronous calls. Some APIs return data in the response body and others will only return an HTTP status. For example, CloudCenter DELETE calls return a after deleting the in the background.Status 204 No Content resource
Synchronous APIs indicate that the program execution waits for a response to be returned by the API. The execution does not proceed until the call is completed. The real state of the API request is available in the response.
Asynchronous APIs do not wait for the API call to complete. Program execution continues, and until the call completes, you can issue GET requests to review the state after the submission, during the execution, and after the call completion. Use the API to retrieve the status of an Get Operation Statusasynchronous operation.
As asynchronous calls may take some time to complete, they return responses containing information with an HTTP Status Code, HTTP Status Codeswhich allows you to retrieve the progress, status, response, and other information for the call.
After submitting an asynchronous API call:
Retrieve the resource URL from the .HTTP Status CodesUse this location URL and query the system using GET calls. While the call is in progress and you issue the GET request, you get additional details of the operation being performed. These details are only available while the operation is in various states of execution (RUNNING, SUCCESS, FAILED).When the asynchronous API call completes successfully, issue a GET request to view the SUCCESS state and the URL for this resourceoperation.
Call States
In the following example of a API:Create Cloud Account
The various states of execution (RUNNING, SUCCESS, FAILED) are highlighted in corresponding colorsThe first and last GET requests are in bold to show the sequence of events
Operation ID Availability
Operation IDs (displayed below the Location URL in the above image) allow you to query the status of asynchronous APIs and are only available for a brief period as identified in the following table:
Operation ID Availability Description
5 minutes The Operation ID is available for five minutes if the operation completes (regardless of success or failure).
1 hour The Operation ID is available for one hour if the operation times out and does not complete.
97
Cisco CloudCenter Suite -- Suite Admin
Cisco Cloud Management Documentation 2
Back to:
Suite Admin APIWorkload Manager APIAction Orchestrator APICost Optimizer API
98
Cisco CloudCenter Suite -- Suite Admin
Cisco Cloud Management Documentation 1
Suite Admin 5.1.2 API CallsSuite Admin 5.1.2 API Calls
Refer to the Suite Admin 5.1.2 JSON files.
99
Cisco CloudCenter Suite -- Suite Admin
Cisco Cloud Management Documentation 1
Suite Admin 5.1.1 API CallsSuite Admin 5.1.1 API Calls
Refer to the Suite Admin 5.1.1 JSON files.
100
Cisco CloudCenter Suite -- Suite Admin
Cisco Cloud Management Documentation 1
Suite Admin 5.1.0 API CallsSuite Admin 5.1.0 API Calls
Refer to the Suite Admin 5.1.0 JSON files.
101


