Embed Size (px)
Citation preview
Compass 3.0
Software for
Computer Access Assessment
User Guide
Created By: Koester Performance Research Contact: [email protected]
Website: www.kpronline.com
Copyright 2019 by Koester Performance Research
Table of Contents
About Compass 3Overview 3Trial Period and Registration 4Glossary of Terms 6Tips for Using Compass 7Getting Help 8Tailoring the Compass Interface 10International Languages 11What's New 12Compass Accessibility 21
Compass Accessibility 21Operating System Settings 22Pointing Devices 23Alternative Keyboards 24Word Prediction 25Speech Recognition 27
Getting Started 29Welcome to Compass 29Choose an Action 30Sample Client Scenarios 31
Overview of Sample Scenarios 31Task 1 32Task 2 33Task 3 34Task 4 35Task 5 36Task 6 37Task 7 38Task 8 39
Working with Clients 40How Compass Stores Client Information 40Enter Information for a New Client 41Open Existing Clients 43Edit Client Information 45
Working with Tests 46Skill Tests 46Choosing Skill Tests 47Test Lists 49Configuring Tests 50
Running Tests 53Viewing Results 55Multi-Test Reports 57Skill Tests 60
Aim 60Aim Test Overview 60Aim Test Configuration 61Aim Test Results 66
Drag 70Drag Test Overview 70Drag Test Configuration 71Drag Test Results 74
Menu 78Menu Test Overview 78Menu Test Configuration 80Menu Test Results 84
Scan 88Scan Test Overview 88Scan Test Configuration 90Scan Test Results 96
Switch 100Switch Test Overview 100Switch Test Configuration 102Switch Test Results 106
Letter 110Letter Test Overview 110Letter Test Configuration 111Letter Test Results 115
Word 118Word Test Overview 118Word Test Configuration 119Word Test Results 123
Sentence 127Sentence Test Overview 127Sentence Test Configuration 128Sentence Test Results 133
Contact Us 137About KPR 137Technical Support 138Development Team 139
Index 140
Welcome to Compass!Compass functional assessment software is a tool to assist professionals who provide educational,vocational, and clinical interventions in the area of computer use for people with disabilities. It can beused to:
• help diagnose difficulties with an existing interface;• evaluate and compare the performance of potential access systems;• plan and document the results of training interventions;• track changes in a client’s abilities over time; and• measure the effectiveness of an intervention.
Compass consists of eight different Skill Tests, each designed to evaluate a specific skill area, such astext entry or use of a pointing device. Any number and combination of the tests can be selected foreach client. The selected tests can be run in any order and can be repeated to track changes over time.Additional tests can be added and tests can be removed at any time even after some tests have beenrun.
Each skill test has configuration settings that help determine characteristics of the test, such as thenumber of trials, the text size, or the type of feedback provided. Every test has a set of default valuesfor these settings, which have been chosen to be reasonable for a wide range of clients. Configurationsettings can also be adjusted based on a client's needs and the goals of the assessment. SeeConfiguring Tests for more information.
For each test that is run, Compass records performance data and makes it available in a test report.This shows a snapshot of performance during a single test. Compass also provides multi-test reportsthat let you compare results across multiple tests, as long as they have the same skill type. Thesereports present views of the assessment data to help you understand and interpret the results. Compassreports may be useful to a variety of individuals, including family members, funding sources, andother professionals involved with the client.
Please note that Compass does not replace a good fundamental knowledge of computer accessevaluation practices. It is intended to be another tool available to augment the practical experience ofthe clinician. It is important to know the types of assistive technologies (AT) that can be used forcomputer access and the features of the specific devices that are being considered. The clinician needsto understand the issues involved in working with people with disabilities and the impact that ATinterventions can have on their functional activities on and off of the computer.
Compass Help -Welcome to Compass!
3 / 145
Trial Period and RegistrationWhen you run Compass for the first time, you will be asked whether you want to run it as a free trialor whether you want to register it for permanent use.
The free trial period lasts 30 days, during which you can explore all of the features of Compass. Afterthe trial period expires, you will need to register Compass in order to continue using it. You canpurchase a license code by visiting the KPR website at www.kpronline.com.
You may request an extension of the trial period, if you feel you didn't get sufficient chance to tryCompass during the original 30 days. Please email your request to [email protected].
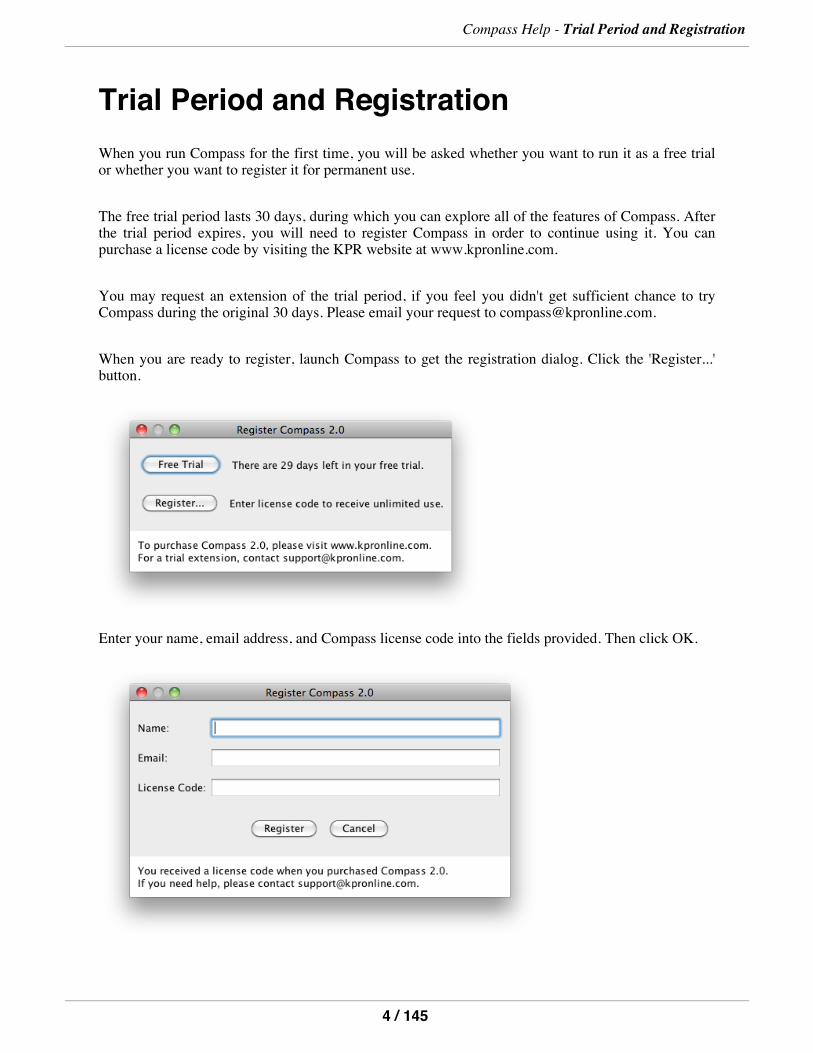
When you are ready to register, launch Compass to get the registration dialog. Click the 'Register...'button.
Enter your name, email address, and Compass license code into the fields provided. Then click OK.
Compass Help - Trial Period and Registration
4 / 145

Your information will be sent to KPR, so that we can notify you of free Compass upgrades whenavailable. (Please note: Your information will never be provided to anyone else.)
Compass Help - Trial Period and Registration
5 / 145
Glossary of TermsThe following terms are used throughout the Compass help system.
Assistive Technology - Devices or services used to increase, maintain, or improve functionalcapabilities of people with disabilities
AT - Assistive Technology
Client - The person who's computer access skills are being evaluated. The client is the personperforming the actions of the tests.
Clinician - The AT professional who is setting up the tests or conducting the evaluations. May also bereferred to as a Practitioner, or ATP.
Compass Help - Glossary of Terms
6 / 145
Tips for Using Compass
1. Planning Your Assessment
Think carefully about what questions you are trying to answer with Compass. That will help youdetermine how to best set up Compass. For example, if you are trying to compare performance withtwo different keyboards, you might run two identical text entry tests, and run one with each keyboard.Try to only change one factor from one test to the next (e.g., the input device OR the size of theletters, but not both), to help you clearly interpret the results.
2. Tailoring the Tests
Remember that you can configure every Compass test in a variety of ways to meet your client's needs.And the configuration screen lets you preview how the settings will look and feel, so you can be sureit's the right set up before you start collecting data.
3. Running the Tests
Before you start a test, consider whether the client needs you to provide spoken instructions. The StartTest screen for each test has some written instructions that you can read out loud, or use as a basis forproviding your own instructions. Also consider whether practice is necessary before the test. You canrun a few practice trials right from the Start Test screen, to make sure the client understands the test.
4. Using the Results
In most cases, knowing what input device was used with a test is important to interpreting the results.Remember that Compass does not know what input device is being used, so you need to set the inputdevice yourself, either during test configuration or on the test report. Also note that you cancopy-and-paste any Compass table into other applications, such as word processors and spreadsheets.
If you have questions, or other tips to add to this list, please contact us at [email protected].
Compass Help - 4. Using the Results
7 / 145
Getting HelpSeveral types of resources are available if you need help with any of the features of Compass.
First, information about some elements within Compass is available while you work.
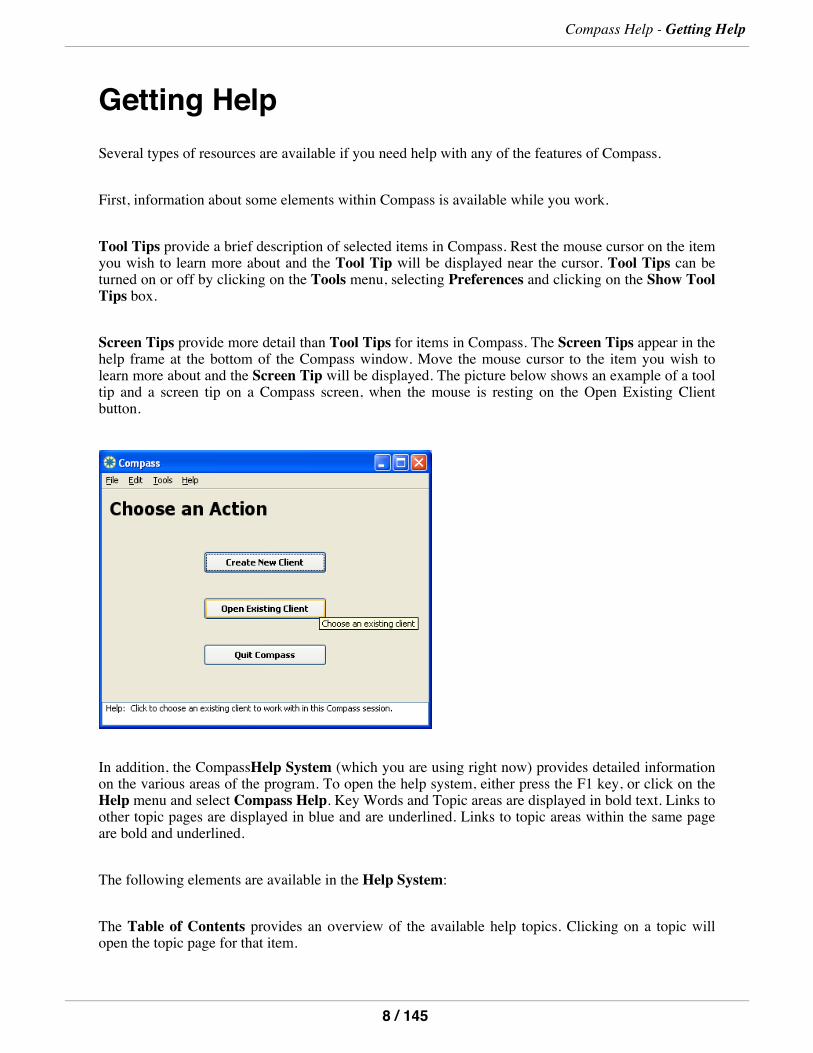
Tool Tips provide a brief description of selected items in Compass. Rest the mouse cursor on the itemyou wish to learn more about and the Tool Tip will be displayed near the cursor. Tool Tips can beturned on or off by clicking on the Tools menu, selecting Preferences and clicking on the Show ToolTips box.
Screen Tips provide more detail than Tool Tips for items in Compass. The Screen Tips appear in thehelp frame at the bottom of the Compass window. Move the mouse cursor to the item you wish tolearn more about and the Screen Tip will be displayed. The picture below shows an example of a tooltip and a screen tip on a Compass screen, when the mouse is resting on the Open Existing Clientbutton.
In addition, the CompassHelp System (which you are using right now) provides detailed informationon the various areas of the program. To open the help system, either press the F1 key, or click on theHelp menu and select Compass Help. Key Words and Topic areas are displayed in bold text. Links toother topic pages are displayed in blue and are underlined. Links to topic areas within the same pageare bold and underlined.
The following elements are available in the Help System:
The Table of Contents provides an overview of the available help topics. Clicking on a topic willopen the topic page for that item.
Compass Help - Getting Help
8 / 145
The SearchHelp section allows you to type in a word or phrase to find information on that topic.
Finally, there is a PDF version of this Help System included with your installation of Compass. Youcan find this in the Compass installation folder, or visit www.kpronline.com to view it for downloador printing.
Compass Help - Getting Help
9 / 145

Tailoring the Compass InterfaceYou can adjust many aspects of the Compass interface, such as the text size used on Compass screens,the overall color scheme, the Compass window size, and more.
By default, Compass uses the display Theme, Appearance, and Settings that are currently set on yourcomputer system. If you like the way the screens look, you don't have to do anything. But if you wantto change the text size, for example, you can adjust the display settings as desired by using theDisplay Control Panel within Windows. Please see Compass Accessibility and Operating SystemSettings for more information.
Finally, Compass provides a Preferences menu item to adjust two features within the program: theappearance of an initial "welcome" screen, and the presence of tooltips while using Compass. Toadjust the Preferences:
1. Select Tools/Preferences from the Compass menu at the top of the window.2. This will display the following dialogue box:
3. If you want to see the Welcome to Compass screen when Compass starts, be sure that option hasa check mark beside it. This is the default setting. To skip the welcome screen and go directly tothe Choose an Action screen when Compass starts, uncheck the welcome screen option. (Use amouse click to check and uncheck the option.)
4. If you want to see short tooltips on some Compass items when you hover over them with themouse, check the "Show tooltips" option. This is the default setting. If you'd rather not see thetooltips, uncheck the option. Note that there are lengthier "screen tips" at the bottom of theCompass window, and these are always displayed, regardless of the tooltip setting. See GettingHelp for more information about the various forms of help within Compass.
5. When you are done setting your preferences, click OK to save them, or Cancel to discard thechanges.
Compass Help - Tailoring the Compass Interface
10 / 145
International Languages and CompassThe overall Compass interface uses English as its language. However, it is possible to run eachCompass test using other languages. For example, you can present the Word Test using French words,to provide a better and more realistic assessment for users whose first language is French. (If youwould like to help translate Compass test materials into a new language, please contact us [email protected].)
Currently, every test has the option of presenting Arabic, English, French, Portuguese, or Spanish testmaterials. In the text entry tests, for example, test materials include letters, words, and sentences in thetest language. In the Menu test, the test presents menu and item names that are in the test language.And in all tests, vocal feedback (if selected) is presented in the test language. Please see ConfiguringTests for more information about running Compass tests in languages other than English.
A huge thank you to the practitioners who have helped us support non-English languages! The Frenchtranslations were produced by Dale Szlamkowicz and her team at the Centre de réadaptationLucie-Bruneau, in Montréal, Québec, Canada, with the help of Sylvie Saint Arneault from the Centrede réadaptation L'InterAction in Rivière du loup, Québec. The Spanish translations were produced byEmiliano Diez at Universidad de Salamanca in Spain, with some additional translations performed byKPR. The Portuguese translations were produced by Julio de Melo of Geraes Tecnologia Assistiva inBelo Horizonte, Brazil. The Arabic translations were produced by Noha Ibrahim Halawani during hergraduate work at the University of Pittsburgh.
If you are working in a multi-lingual setting, please note that the Regional Options setting in Windowsis used by Compass for formatting dates and times and other information that can vary by regions.This can be important. Compass may have trouble if you create a Compass client with one RegionalOptions setting, such as "English (Canada)", and then try to open the client file later with a differentRegional Options setting, such as "French (Canada)." If that happens, you can change the RegionalOptions setting back to the original value (in this case "English (Canada)"), and then re-open the file.You can inspect and set the Regional Options by opening the Windows Control Panel, then Regionaland Language Options, and viewing the Regional Options tab.
Compass Help - International Languages and Compass
11 / 145
What's New in Version 3.0
1. Use of Java 11
This version moves to Java 11 to update the platform upon which Compass runs. This is a majorchange internally. It does offer greater compatibility with Dragon Naturally Speaking on Windows;see the help page on speech recognition for more information.
2. Better text entry results with Mac OS X Dictation
Mac OS X Dictation allows you to dictate sentences and words into the Sentence Test and Word Test.This Compass version fixes a problem where the Compass report could not display true results fortrial time and text entry rate when using Mac OS X Dictation. See the help page on speech recognitionfor more information.
3. Assorted minor fixes
We fixed a few typos, included the version in the registration email, and tried to spruce things up ingeneral.
Compass Help - 3. Assorted minor fixes
12 / 145
What was New in Version 2.5
1. Option to Use Arabic Test Materials
While the overall Compass interface is still in English, you now have the option of presenting Arabictest materials in every test. In the text entry tests, for example, Arabic test materials include Arabicletters, words, and sentences. In the Menu test, the Arabic option presents menu and item names thatare in Arabic. And in all tests, vocal feedback (if selected) is presented in Arabic. Please seeConfiguring Tests for more information about running Compass tests in Arabic. Thanks to NohaIbrahim Halawani, who produced the Arabic translations during her graduate work at the Universityof Pittsburgh. For more information about using Compass in a multi-lingual setting, please seeInternational Languages.
Compass Help - 1. Option to Use Arabic Test Materials
13 / 145
What was New in Version 2.4
1. Use of Java JRE 8
This version moves to Java JRE 8 to update the platform upon which Compass runs. This is mainlyfor maintenance purposes but may offer some greater compatibility with newer screen recognitionsystems or screen readers.
2. Change to Java Access Bridge Installation
Java Access Bridge, which is needed for Compass to work with Windows screen readers such asNVDA, is now included automatically when you install Compass. Compass installation includes alocal installation of the Access Bridge, for Compass only, so it will not affect any other Javaapplications that you may have on your computer. Enabling Java Access Bridge in the Windows Easeof Access Center has no effect on Compass.
Compass Help - 2. Change to Java Access Bridge Installation
14 / 145
What was New in Version 2.3
1. Option to Use Portuguese Test Materials
While the overall Compass interface is still in English, you now have the option of presentingPortuguese test materials in every test. In the text entry tests, for example, Portuguese test materialsinclude Portuguese letters, words, and sentences. In the Menu test, the Portuguese option presentsmenu and item names that are in Portuguese. And in all tests, vocal feedback (if selected) is presentedin Portuguese. Please see Configuring Tests for more information about running Compass tests inPortuguese. The Portuguese translations were produced by Julio de Melo of Geraes TecnologiaAssistiva in Belo Horizonte, Brazil. For more information about using Compass in a multi-lingualsetting, please see International Languages.
Compass Help - 1. Option to Use Portuguese Test Materials
15 / 145
What was New in Version 2.2
1. Option to Use Spanish Test Materials
While the overall Compass interface is still in English, you now have the option of presenting Spanishtest materials in every test. In the text entry tests, for example, Spanish test materials include Spanishletters, words, and sentences. In the Menu test, the Spanish option presents menu and item names thatare in Spanish. And in all tests, vocal feedback (if selected) is presented in Spanish. Please seeConfiguring Tests for more information about running Compass tests in Spanish. The Spanishtranslations were produced by Emiliano Diez at Universidad de Salamanca in Spain, with someadditional translations performed by KPR. For more information about using Compass in amulti-lingual setting, please see International Languages.
2. Additional Sentence Test Materials
There are four additional sentence test lists, designed for more controlled testing:
1. Practice - contains 1 practice sentence. This is useful if you want to run a separate practice testwith the guarantee that it will use a unique sentence.
2. 4-Sentence Test 1,4-Sentence Test 2, and 4-Sentence Test 3 - each of these is a list withexactly 4 sentences. All three tests are matched with respect to the number of shifted characters,the total number of characters in the test, the characters per word, and the grade level of the text.
For more information about using these test lists, please see Sentence Test Configuration.
Compass Help - 2. Additional Sentence Test Materials
16 / 145
What Was New in Version 2.1
1. Scan Test Enhancements
Five additional configuration settings have been added to the Scan Test. These include: additionalletter matrix layouts, an extra-delay timing setting, scan initiation setting (auto or manual), loop count,as well as a type-a-sentence test option. See the Scan Test Configuration page for a completedescription of these new options.
The Scan Test report now includes the specific scanning errors that occurred during the test. Clearerinformation on error types can help identify adjustments to reduce those errors. See the Scan TestResults page for a complete description of these new results.
2. Switch Test Enhancements
The visual prompt for this test has been improved to be a bit more interesting. It now shows a simpleneutral face, which turns to a yellow smiley face when the switch is hit. Additionally, the test can nowbe configured to require 1, 2, or 3 switch hits in each trial. See the Switch Test Configuration page fora complete description of these new options.
The Switch Test report now provides recommendations for scanning timing parameters based on theresults of the test. See the Switch Test Results page for a complete description of theserecommendations.
Compass Help - 2. Switch Test Enhancements
17 / 145
What Was New in Version 2.0
1. Multi-Test Reports
Now you can compare two or more test results side-by-side. While single-test reports show you theresults for one skill test, the new multi-test reports graphically compare results for multiple tests. Thismakes it much easier to see performance changes over time, or see the effect of using a different inputdevice. See the Multi-Test Reports page for a complete description of this new report feature.
2. Runs on Mac OS X
Compass now runs on Mac OS X, in addition to Windows XP, Vista, and 7. It runs on OS X 10.6(Snow Leopard) as well as most configurations of OS X 10.5 (Leopard). Compass relies on the Javasoftware installed in Mac OS X, and requires at least Java SE 6.
3. New Format for Compass Files (.cms extension)
The way in which Compass data is stored has been completely revamped. One implication of this isthat when you try to open .cms files created with Compass v1.2 or earlier, you will be asked if youwant to convert them to the new format. If you agree to this conversion and save it, the old file will beoverwritten. If you want to save a copy of your file in the old format, make a copy of it before doingthe conversion in Compass.
4. New Licensing and Registration Process
We have tried to simplify the registration procedure while still providing a free 30-day trial. Please seethe Trial Period and Registration page for more information.
5. Updated Look-and-Feel
One of the challenges of developing software to run on both Windows and Mac is getting the userinterface to "look right" on both platforms. Previous versions of Compass used a generic look-and-feeldue to some problems with the Windows-specific look-and-feel. We've been able to solve thoseproblems, and now offer platform-specific look-and-feel for both Windows and Mac. So for the mostpart, Compass will look like a Windows application on Windows, and a Mac application on the Mac.Some gaps still exist, but overall it just looks a bit better than in previous versions.
Compass Help - 5. Updated Look-and-Feel
18 / 145
What Was New in Version 1.2Version 1.2 is the most recent version prior to this version 2.0 release. All of these features are alsoincluded in version 2.0.
1. New Layouts for the Scan Test
The Scan Test now includes 7 layouts, making the Scan test applicable to a much broader range ofusers. Layouts use either text or pictures and include row-column matrices and 2- and 4-item lineararrangements. See the Scan Test Configuration section for a complete description of the optionsavailable.
2. Support for Microsoft Windows Vista
Compass Version 1.2 and 1.1 work under the Windows Vista operating system, as well as WindowsXP. If you need to use an earlier version of Windows, such as Win 98 or 2000, we suggest you useCompass Version 1.0.
3. Option to Use French Test Materials
While the overall Compass interface is still in English, you now have the option of presenting Frenchtest materials in every test. In the text entry tests, for example, French test materials include Frenchletters, words, and sentences. In the Menu test, the French option presents menu and item names thatare in French. And in all tests, vocal feedback (if selected) is presented in French. Please seeConfiguring Tests for more information about running Compass tests in French. The Frenchtranslations were produced by Dale Szlamkowicz and her team at the Centre de réadaptationLucie-Bruneau, in Montréal, Québec, Canada, with the help of Sylvie Saint Arneault from the Centrede réadaptation L'InterAction in Rivière du loup, Quebec. For more information about using Compassin a multi-lingual setting, please see International Languages.
4. New Switch Hit Data in Switch Test
Compass now records and reports additional switch hit data in the Switch skill test. Version 1.0counted only the single switch hit that immediately followed the test prompt. All additional switchhits that occurred during the pause between prompts were ignored. Version 1.2 and 1.1 count allswitch hits that occur during a trial, to help show whether the client has sufficient understanding andcontrol to only press the switch after a prompt is presented. For more information, please see therevised Switch report.
Compass Help - 5. Support for Java Access Bridge
19 / 145
5. Support for Java Access Bridge
The Java Access Bridge is a piece of stand-alone software produced by Sun Microsystems. You needthe Access Bridge in order for some assistive technologies to work properly with Windows Javaapplications, such as Compass. When you install Compass, it will attempt to also install the JavaAccess Bridge for Compass' use. While Compass will run just fine without the Access Bridge, thisnew support lets Compass work with a wider range of assistive technologies.
Compass Help - 5. Support for Java Access Bridge
20 / 145
Compass AccessibilityCompass is designed to be accessible to users with a wide range of abilities. The skill tests areintended to evaluate clients' abilities to use computers. All tests can be used with alternative inputmethods, such as alternative keyboards or pointing devices. The general procedure is to set up theinput method you are assessing, if necessary, then run a Compass test using that input method. Forexample, to assess a client's performance using a standard keyboard with and without word prediction,you might first run a Sentence test without word prediction. Then you would set up the wordprediction software you are interested in, and run a second Sentence test using word prediction. Youcan also change a test's configuration settings to help determine what types of assistive technology(AT) may be best for a particular client.
The parts of the program that are used by clinicians are also intended to be fully accessible using ATdevices and methods. Navigation though Compass can be performed using a mouse or mouseemulator or using a keyboard or keyboard emulator.
If you have set custom display characteristics in the operating system, Compass will do its best to usethose settings. For example, in Windows, Compass uses the "Message Box" font for most of the textdisplayed on Compass screens. To increase the size of Compass text, you can use the WindowsControl Panel (the Display/Appearance tab) to increase the Message Box font size. You will need tore-start Compass after changing this display setting, in order for it to take effect. (Unfortunately, suchdisplay adjustments do not affect the Compass Help system.)
We have successfully tested Compass with a variety of AT devices and software, including pointingdevices, alternative keyboards, screen magnifiers, as well as with the operating system settings withinWindows and Mac OS X. This help system includes additional information on using Compass withword prediction and speech recognition. If you find instances where Compass is not fully compatiblewith your AT, please let us know.
One known gap is the use of screen readers with Compass. On Windows, some screen readers, such asthe free NVDA, work to some extent. The built-in Narrator does not work. On Mac OS X, the built-inVoiceOver reader does read some Compass elements, but not all. We are working to provide betterscreen reader support, and apologize for not being 100% accessible to all of our users.
Compass Help - Compass Accessibility
21 / 145
Operating System SettingsThe Windows and Mac operating systems provide many adjustments to keyboard, pointing device,and display settings in order to accommodate varied user abilities. Compass supports the settingslisted below.
Keyboard Settings - in general, Compass will work with any keyboard setting, since they are designedto adjust keyboard behavior for all applications on the computer. These settings include:
• StickyKeys• Key Repeat Rate• Key Repeat Delay• SlowKeys• BounceKeys (not available on Mac)
Pointing device settings - in general, Compass will work with any pointing device setting, since theyare designed to adjust mouse/pointing device behavior for all applications on the computer. Thesesettings include:
• Pointer Speed• Enhance Pointer Precision (not available on Mac)• Double-click Speed
Display Settings
• Fonts set in Control Panel/Display/Appearance (Windows only). If you increase the 'messagebox'font in Windows, the fonts used in Compass will also increase accordingly.
• Color schemes set in Control Panel/Ease of Access Center/Make the computer easier to see(Windows) or Preferences/Accessibility/Display (OS X)
• Zoom feature in Control Panel/Ease of Access Center/Make the computer easier to see(Windows) or Preferences/Accessibility/Zoom (Mac OS X)
[Note that while Compass will respond to changes in control panel font settings, screens may not belegible if the font is too large.]
This allows you to tailor the Compass interface to accommodate the needs of the clinician (forexample, by increasing the font size used on Compass screens). It also allows you to test the effect ofinput device settings such as changes in the double-click speed or key repeat rate.
Note that Compass test configurations also allow adjustment of fonts, colors, and timing parameters,which will override the operating system settings.
Compass Help - Operating System Settings
22 / 145

Using Compass with Pointing DevicesLike other application programs, Compass accepts mouse input from a standard mouse or any otherdevice that acts exactly like (or emulates) a mouse. This includes off-the-shelf alternative mice andtrackballs, as well as more specialized pointing devices, such as head controls, speech recognition,and MouseKeys. The table below summarizes Compass' compatibility with some of the pointingdevices currently available.
Pointing Device Compatible Notes
Mouse Y Numerous mice tried with no problems
Trackball Y Numerous trackballs tried with no problems
MiniJoystick Y
Dragon NaturallySpeaking v11
(Mouse Move, Mouse Grid)
Y
SmartNav
(NaturalPoint)
Y Generates clicks as expected, and counted properly inCompass
MouseKeys
(Windows & OSX)
Y Generates clicks as expected, and counted properly inCompass
Please note that the presence of a particular pointing device in the table in no way reflects anendorsement of its use with Compass or with any client. Our goal was simply to test a representativeof each type of alternative pointing device (i.e., hand-controlled, head-controlled, voice-controlled,and keyboard-controlled). Other head-controlled pointing devices, for example, would be expected tobe equally compatible with Compass.
Compass will not "know" which pointing device you are using unless you tell it. This is important sothat you can accurately interpret your data. For example, if you are assessing a client using twodifferent pointing devices, you might use a series of Aim tests. If you do not keep track of whichpointing device was used with which test, it will be impossible to determine whether one pointingdevice gave better performance than the other. The best time to enter the input device is during testconfiguration (before running the test), but you can also do it when viewing the report.
Compass Help - Using Compass with Pointing Devices
23 / 145
Using Compass with AlternativeKeyboardsCompass has been successfully tested with a variety of typical keyboards as well as alternativekeyboards designed to accommodate physical impairment. Like other application programs, Compassaccepts text input from a standard keyboard or any other device that acts exactly like (or emulates) akeyboard. The category of "alternative keyboards" is a very broad one, as it includes at least thefollowing:
• Direct keyboard replacements, such as expanded or mini keyboards that take the place of thestandard keyboard.
• On-screen keyboards, which present a visual image of a keyboard on the computer display. Itemsfrom the on-screen keyboard can be selected using direct selection with a pointing device, one ortwo-switch scanning, or other methods. On-screen keyboards often include some form of wordprediction or other rate enhancement technique.
• Speech recognition, in which the user speaks the text to be entered.
Compass is compatible with all of the direct keyboard replacements and on-screen keyboards tested sofar. It also works with word prediction (and other rate enhancement), as well as speech recognition,but we suggest that you read the Help pages about each of those methods to use them most effectively.
Note that Compass will not "know" which keyboard device you are using unless you tell it. This isimportant so that you can accurately interpret your data. For example, if you are assessing a clientusing two different keyboards, you might use a series of Word tests. If you do not keep track of whichkeyboard was used with which test, it will be impossible to determine whether one keyboard gavebetter performance than the other. The best time to enter the input device is during test configuration(before running the test), but you can also do it when viewing the report.
Compass Help - Using Compass with Alternative Keyboards
24 / 145
Using Compass with Word PredictionWord prediction is a technique that reduces the number of selections required to enter text. As the userenters letters, a word list that matches the user's input is presented on the screen. If the desired word isin the prediction list, the user can complete the word by selecting it from the list. Word prediction canenhance text entry rate if the time saved by making fewer selections is greater than the time spentsearching the prediction list. It may also lead to fewer spelling errors in some cases.
Compass can help you determine the effect of word prediction on speed and accuracy of text input.While Compass does not provide its own word prediction feature, it does allow you to enter text usingany commercial word prediction program. This means that you could run, say, one Sentence test withno word prediction, then a Sentence test with word prediction. By comparing the Typing Speed andNet Errors between the two tests, you could get an idea of how word prediction affected performance.This same approach could be used to compare two different types of word prediction, or differentsettings within the same word prediction program.
Note that the Total Errors measure may be difficult to interpret when using word prediction withCompass. The reason is that most word prediction systems will insert some Backspace characters intothe text as part of their operation. For example, when you end a sentence with a period, any automaticspaces added to the last word in the sentence will be deleted before the period is entered. These extrabackspace characters will be counted as part of Total Errors, even though the user wasn't actuallyresponsible for making the error. So Total Errors would include any backspace characters entered bythe word prediction system, as well as those errors that might actually be typed by the user.
Regarding automatic spacing, Compass will not count any space characters that fall between the lastcharacter entered and the Enter key as errors. This means that the Net Errors measure will be accuratewhen using word prediction systems.
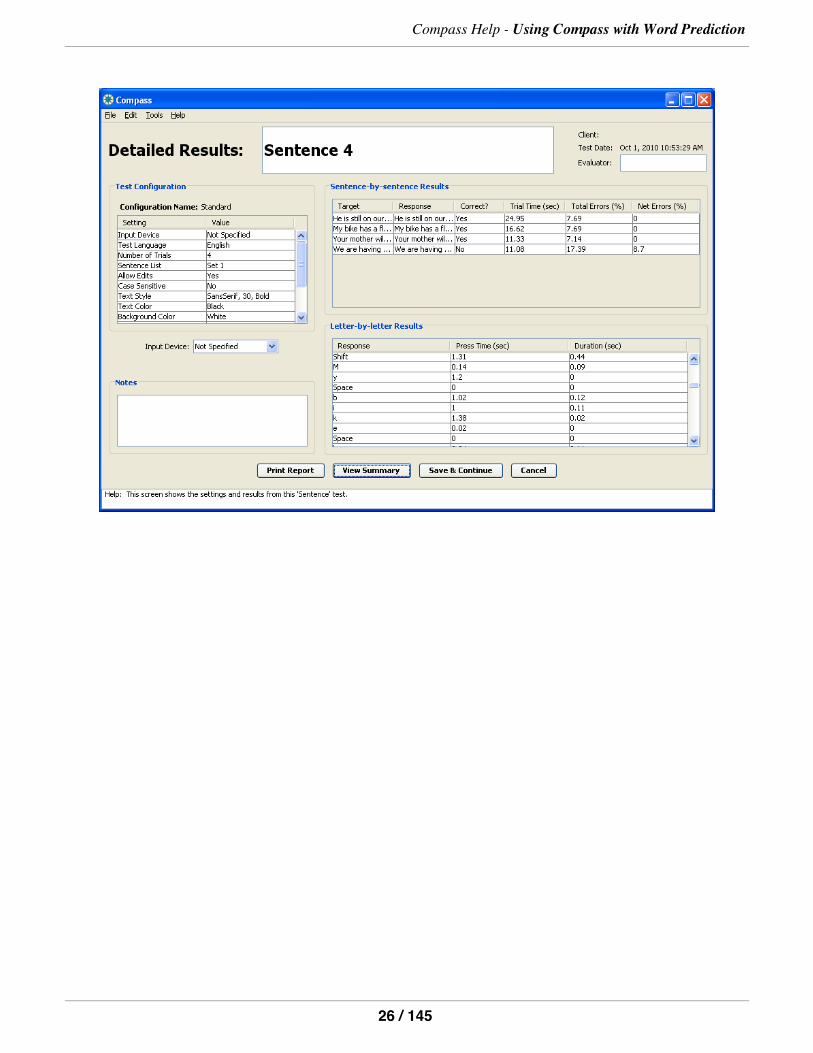
If you want to get a visual look at which characters were selected with word prediction, you canexamine the detailed letter-by-letter table in the report (see Word Test Results or Sentence TestResults). As shown in the example below, this client selected the word "My" from the prediction listafter first entering the initial letter "M". It took 1.2 seconds for the client to find and select the correctentry, and the entry caused the letters "y" and "Space" to be placed in the text field.
Compass Help - Using Compass with Word Prediction
25 / 145
Compass Help - Using Compass with Word Prediction
26 / 145
Using Compass with Speech RecognitionSpeech recognition is a text input method that tries to recognize a user's speech, then convert it intotext. If the recognition accuracy is high, speech recognition can improve text entry rate for typists withphysical impairments. It may also reduce the user's physical effort, since most, if not all, text can beentered using voice rather than keypresses.
Some speech recognition systems work fine with Compass, but some do not. We wish we could report100% compatibility, but speech recognition with Compass has been a bit of a moving target. ForDragon NaturallySpeaking on Windows, you should be able to dictate directly into Compass textfields using Dragon 12 and below. As of Dragon 13, Dragon will automatically open its Dictation Boxwhen dictating into Compass (as it does for any "Basic Text Control" application). You can dictate inthe Dictation Box, then do a Transfer into Compass. (If Dragon's Dictation Box comes up and doesn'twork properly, try disabling it with Settings/Options, then Miscellaneous, and uncheck Use theDictation Box for unsupported applications.)
The built-in Dictation for Mac OS X works successfully for dictating into the Compass text entrytexts. However, the built-in Windows Speech Recognition doesn't seem to work. Please contact us [email protected] with any reports of success or difficulty.
Compass can help you assess a user's performance with speech recognition, in at least two differentways. The basic approach is straightforward, but there are some measurement details that areimportant and will be described below.
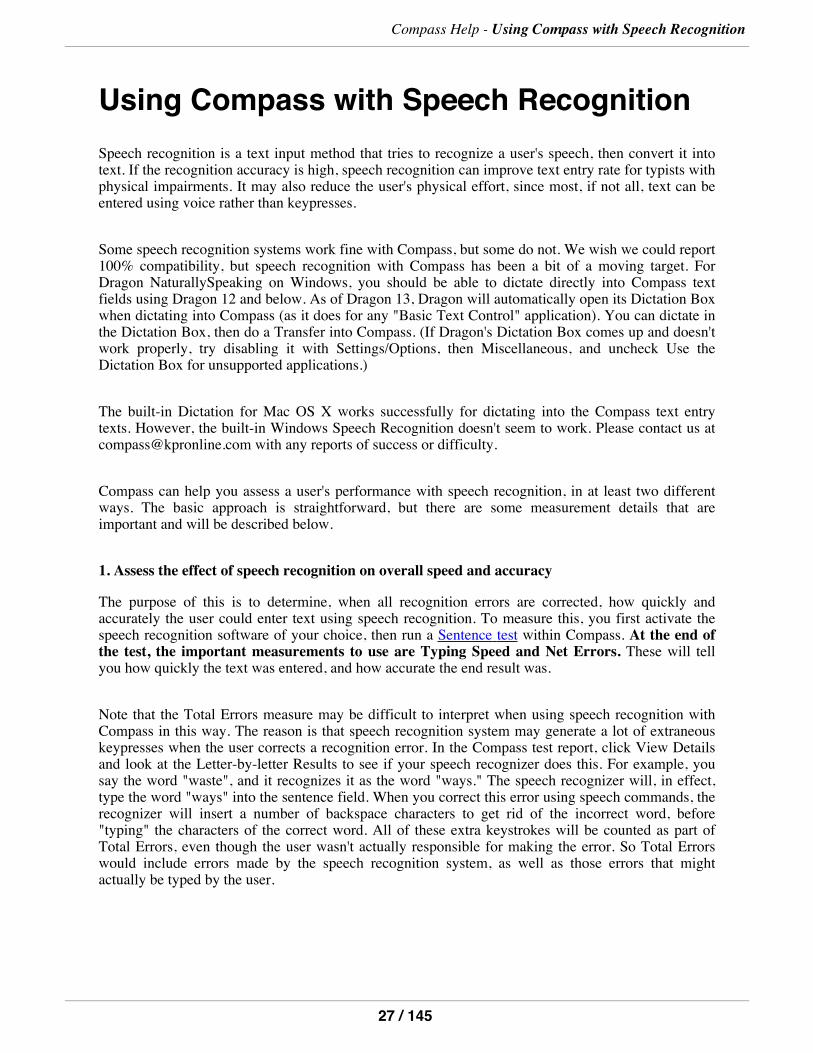
1. Assess the effect of speech recognition on overall speed and accuracy
The purpose of this is to determine, when all recognition errors are corrected, how quickly andaccurately the user could enter text using speech recognition. To measure this, you first activate thespeech recognition software of your choice, then run a Sentence test within Compass. At the end ofthe test, the important measurements to use are Typing Speed and Net Errors. These will tellyou how quickly the text was entered, and how accurate the end result was.
Note that the Total Errors measure may be difficult to interpret when using speech recognition withCompass in this way. The reason is that speech recognition system may generate a lot of extraneouskeypresses when the user corrects a recognition error. In the Compass test report, click View Detailsand look at the Letter-by-letter Results to see if your speech recognizer does this. For example, yousay the word "waste", and it recognizes it as the word "ways." The speech recognizer will, in effect,type the word "ways" into the sentence field. When you correct this error using speech commands, therecognizer will insert a number of backspace characters to get rid of the incorrect word, before"typing" the characters of the correct word. All of these extra keystrokes will be counted as part ofTotal Errors, even though the user wasn't actually responsible for making the error. So Total Errorswould include errors made by the speech recognition system, as well as those errors that mightactually be typed by the user.
Compass Help - Using Compass with Speech Recognition
27 / 145
Please note also that not all versions of Dragon NaturallySpeaking (DNS) allow the user to makevoice corrections within Compass. If you are using a version of DNS that does not support voicecorrections, you can still use Compass to help measure recognition accuracy, as described below.
2. Assess recognition accuracy with speech recognition
The purpose of this is to determine the raw recognition accuracy that speech recognition is providingto a user, when no attempts at corrections are made. This can provide a useful benchmark of how wellthe recognizer is working, and whether training interventions are having the desired effect.
To measure recognition accuracy, first activate the speech recognition software of your choice, thenrun a Sentence test within Compass. Tell the user not to correct any recognition errors, whether byvoice or keyboard. Simply speak each sentence and leave it at that. At the end of the test, the NetErrors measurement will tell you how accurately the system recognized the user's speech.(Recognition Accuracy would actually be (100 - Net Errors).) In this case, since no corrections weremade, Total Errors and Net Errors should be the same. The Typing Speed measure will give you anidea of how quickly the user is speaking, and how fast text entry would be if no recognition errorsoccurred.
Compass Help - Using Compass with Speech Recognition
28 / 145
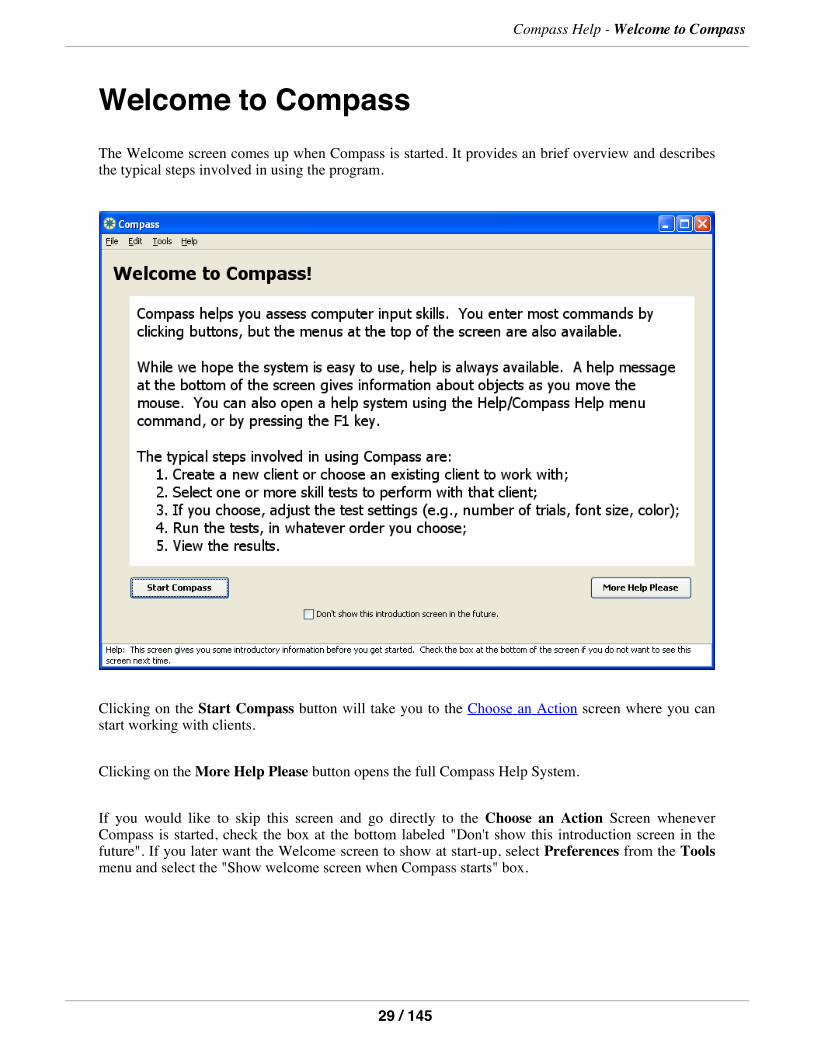
Welcome to CompassThe Welcome screen comes up when Compass is started. It provides an brief overview and describesthe typical steps involved in using the program.
Clicking on the Start Compass button will take you to the Choose an Action screen where you canstart working with clients.
Clicking on theMore Help Please button opens the full Compass Help System.
If you would like to skip this screen and go directly to the Choose an Action Screen wheneverCompass is started, check the box at the bottom labeled "Don't show this introduction screen in thefuture". If you later want the Welcome screen to show at start-up, select Preferences from the Toolsmenu and select the "Show welcome screen when Compass starts" box.
Compass Help -Welcome to Compass
29 / 145
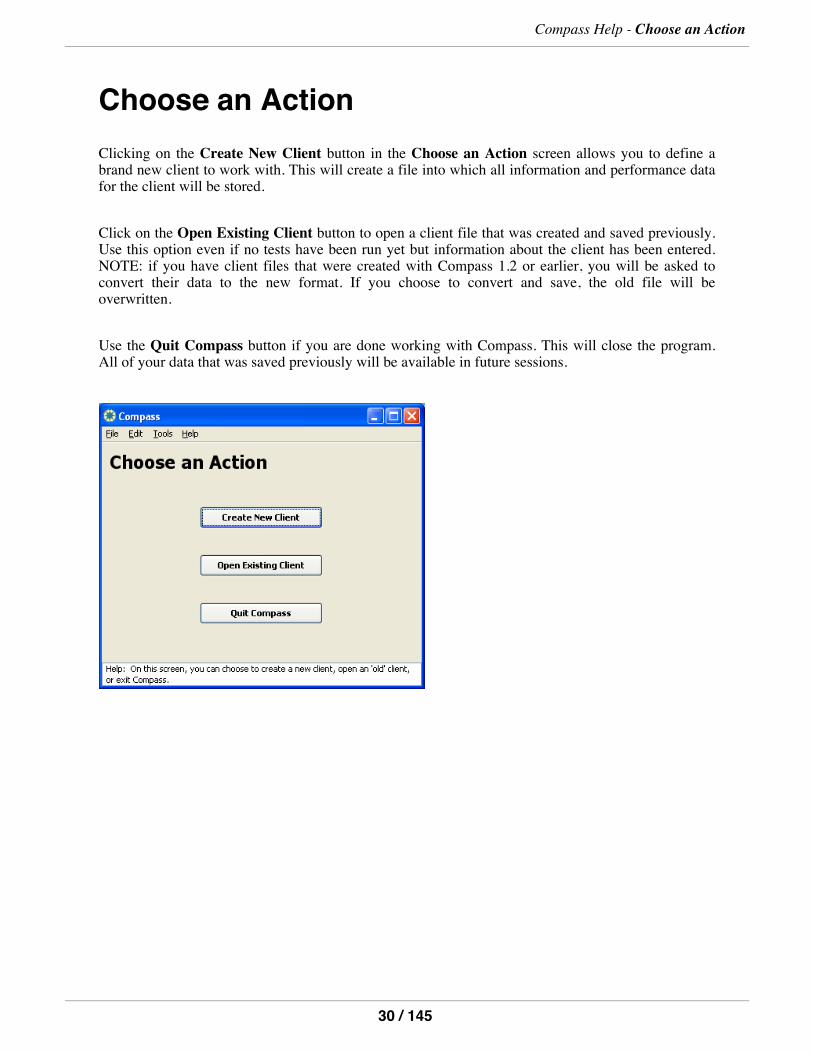
Choose an ActionClicking on the Create New Client button in the Choose an Action screen allows you to define abrand new client to work with. This will create a file into which all information and performance datafor the client will be stored.
Click on the Open Existing Client button to open a client file that was created and saved previously.Use this option even if no tests have been run yet but information about the client has been entered.NOTE: if you have client files that were created with Compass 1.2 or earlier, you will be asked toconvert their data to the new format. If you choose to convert and save, the old file will beoverwritten.
Use the Quit Compass button if you are done working with Compass. This will close the program.All of your data that was saved previously will be available in future sessions.
Compass Help - Choose an Action
30 / 145
Overview of Sample ScenariosThese sample scenarios are taken from tasks that Compass beta testers were asked to do. We'veincluded them here because they seemed to help users quickly understand how Compass could beused to address typical clinical assessment questions.
If you'd like to try any of the tasks in the sample scenarios, we suggest that you start with Task 1 andgo from there. Note that the tasks do not give specific instructions on what to do. See if you can figureout how to use Compass to perform the task. Working through all eight tasks will give you a goodsense of how to use Compass and what it can do.
Compass Help - Overview of Sample Scenarios
31 / 145
Task 1You are meeting a 35 year-old client named Steve Jones for the first time. He would like to startsurfing the Web and using email, but he has not had much experience with computers. It is possiblethat he could use the standard mouse, but it is not clear whether this is optimal for him or not.
To get a simple baseline measure, run the test called "Aim" using the standard settings. View theresults.
Compass Help - Task 1
32 / 145
Task 2Having seen Steve complete the aiming test relatively easily, you wonder how he would do selectingcommands from menus.
Run the "Menu" test using standard settings.
Steve seemed to have some trouble reading the menu items on the screen. Repeat the Menu test, using24 point font. View the results.
Compass Help - Task 2
33 / 145
Task 3You only had time for a short session with Steve today. Quit the Compass program to stop for the day.
Compass Help - Task 3
34 / 145
Task 4Now it's a couple of weeks later. You want to repeat the standard aiming test with Steve, and see if hewill benefit from using a trackball instead of the standard mouse.
Do the Aim test once with the trackball. View the results.
Generate a multi-test report to compare the results from Steve's first Aim test (from Task #1 above) tothis one. (Hint: on the Test List, select BOTH Aim tests, then click the Multi-Test Report button.)
Print the report, and see if there is a difference in Steve’s performance using the trackball as comparedto the mouse.
Compass Help - Task 4
35 / 145
Task 5A new client, Joan Smith, is here for a computer access evaluation. You want to use a variety ofCompass tasks to assess her keyboarding and pointing skills. You think the Sentence, Drag, and Menutests will be good ones to start with. Choose all three of these tests. Run the Sentence test with Joan,using standard settings. View the results.
Time runs out in this session with Joan. Quit Compass.
Compass Help - Task 5
36 / 145
Task 6Joan Smith returns for the second part of her computer access evaluation. You want to run the Dragtest that you didn’t have time for in the last session. Start the Drag test with Joan, using standardsettings. After three trials, Joan is struggling and appears frustrated. You decide to stop the test butsave the data. View the results.
You decide to try a second Drag test with the following settings adjusted to make it easier and moreinteresting for Joan:
- pictures for targets
- large targets
- large destination
- Engaging feedback.
Save the settings and run the test. Save the data but don’t view the results.
Compass Help - Task 6
37 / 145
Task 7A new client, Joe Clark, is here for a computer access evaluation. His literacy skills are reported to beat the 1st grade level. In his school, he has been trying to do some single switch scanning activities,with mixed success.
You try the Scan test with Joe to see if he can choose the right picture from a choice of two. You haveJoe practice first to make sure he is familiar with the task. Then run the test and view the results.
Compass Help - Task 7
38 / 145
Task 8Joe (from Task #7) had some trouble controlling his switch, and you decide to take a step back andmake sure his switch site is in the best location.
Choose a Switch test for Joe, and run it with the current switch location, to get a baseline measure ofJoe's speed and consistency at hitting the switch.
Try a new switch location, and run a second Switch test. It's a good idea to configure each test with aname that reflects the switch location, so you can keep track of it later. Repeat for as many locationsas desired.
Create a multi-test report showing how performance varied with different switch locations. This mayreveal a better switch location for Joe.
Compass Help - Task 8
39 / 145
How Compass Stores Client InformationCompass stores all of the data for a client in a single file. The initial client information, the test list,test configurations and results are all within this file. Clicking on a Save or Save and Continuebutton anywhere with Compass updates the file with any changes made since the last save. Cancellingan action or exiting a screen without saving will not change any information that was previouslysaved.
When a new client is created by clicking on the Save & Continue in the Enter Information for a NewClient screen, a Save As window is opened. The default file name will be the client's last namefollowed by their first name and middle initial without spaces. If you haven't entered any nameinformation for this client, the default file name is "Client.cms." Compass automatically adds a .cmsextension to the file name.
In Windows, the default file location is the My Documents folder. In Mac OS X, it is the user's homedirectory.
If you would like to use a different file name from the default name, enter the new name using any filename that is valid on your operating system. You do not need to enter the .cms extension; it will beadded automatically when the file is saved. Changing the extension is not recommended as it maycause difficulties opening files later.
If you would like to use a different file location, files can be saved to alternative locations on yourcomputer or network by navigating through the system using the standard file management methodsfor your operating system. If you are not sure how to navigate through your computer folders andfiles, we recommend using the default file location.
Click on Save to accept the displayed name and location. If you do not wish to save this data, click onCancel to return to the Enter Information for a New Client screen.
We recommend that you backup your Compass files regularly to protect your client information.
Compass Help - How Compass Stores Client Information
40 / 145
Create a New ClientIf you have never run Compass with this client before, you create a new client file in which to storeCompass information for this client. You can create a new client file in one of two ways:
1. Click the Create New Client button on the Choose an Action screen, which is displayed whenyou first run Compass. OR,
2. Choose File/New Client from the menubar.
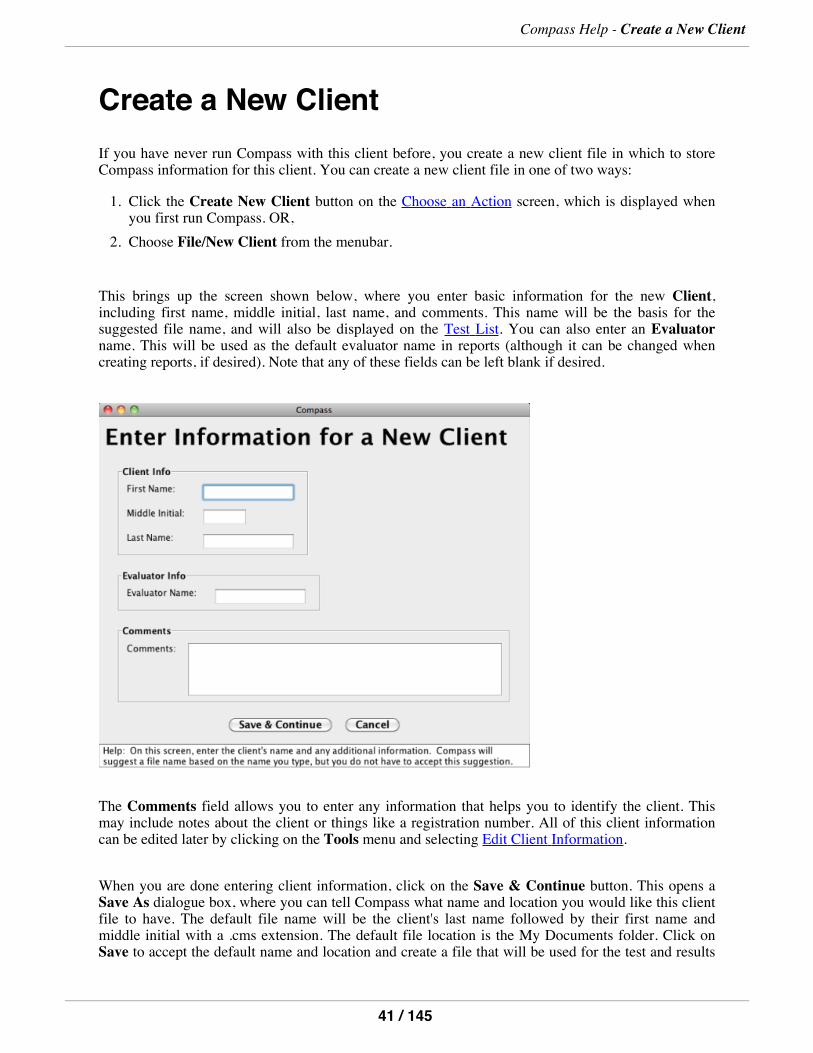
This brings up the screen shown below, where you enter basic information for the new Client,including first name, middle initial, last name, and comments. This name will be the basis for thesuggested file name, and will also be displayed on the Test List. You can also enter an Evaluatorname. This will be used as the default evaluator name in reports (although it can be changed whencreating reports, if desired). Note that any of these fields can be left blank if desired.
The Comments field allows you to enter any information that helps you to identify the client. Thismay include notes about the client or things like a registration number. All of this client informationcan be edited later by clicking on the Tools menu and selecting Edit Client Information.
When you are done entering client information, click on the Save & Continue button. This opens aSave As dialogue box, where you can tell Compass what name and location you would like this clientfile to have. The default file name will be the client's last name followed by their first name andmiddle initial with a .cms extension. The default file location is the My Documents folder. Click onSave to accept the default name and location and create a file that will be used for the test and results
Compass Help - Create a New Client
41 / 145
data for the new client. You may also type a file name of your own choosing if you wish, then click onSave to create the file. This opens the Choose Skill Tests screen.
For more information on saving files or changing the default values, see How Compass StoresInformation.
If you wish to end this step without saving a new client file, click the Cancel button. This will returnyou to the Choose an Action screen.
Compass Help - Create a New Client
42 / 145
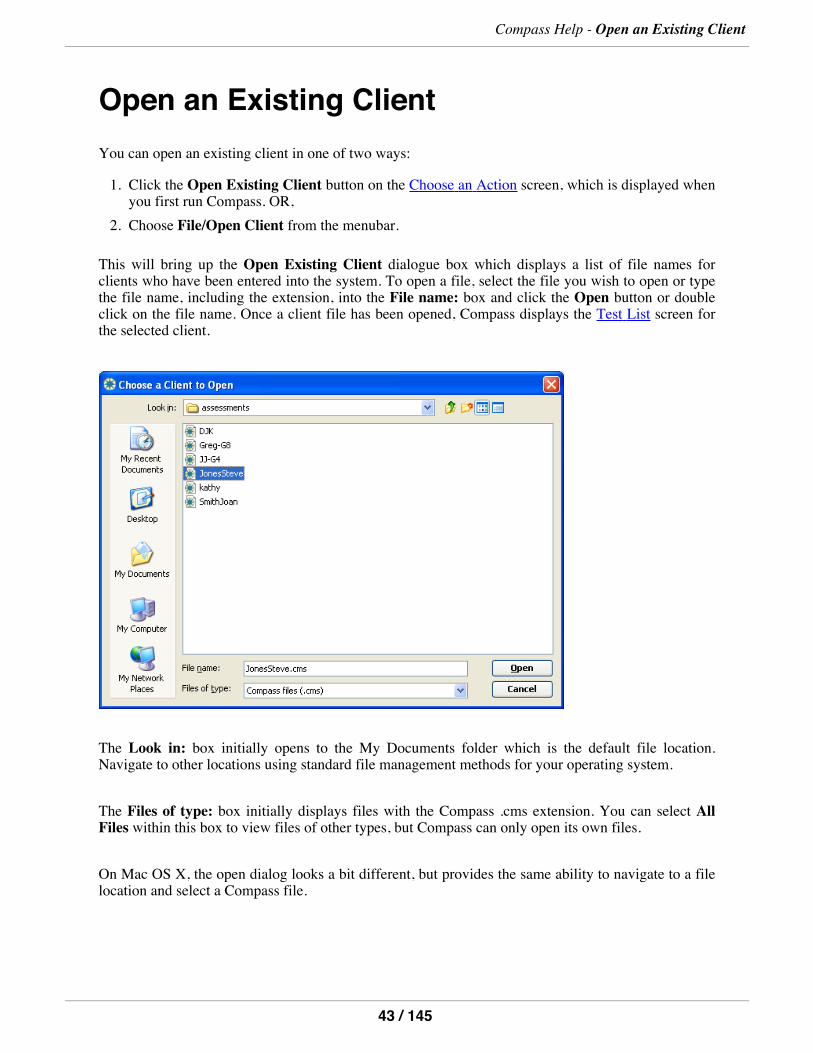
Open an Existing ClientYou can open an existing client in one of two ways:
1. Click the Open Existing Client button on the Choose an Action screen, which is displayed whenyou first run Compass. OR,
2. Choose File/Open Client from the menubar.
This will bring up the Open Existing Client dialogue box which displays a list of file names forclients who have been entered into the system. To open a file, select the file you wish to open or typethe file name, including the extension, into the File name: box and click the Open button or doubleclick on the file name. Once a client file has been opened, Compass displays the Test List screen forthe selected client.
The Look in: box initially opens to the My Documents folder which is the default file location.Navigate to other locations using standard file management methods for your operating system.
The Files of type: box initially displays files with the Compass .cms extension. You can select AllFiles within this box to view files of other types, but Compass can only open its own files.
On Mac OS X, the open dialog looks a bit different, but provides the same ability to navigate to a filelocation and select a Compass file.
Compass Help - Open an Existing Client
43 / 145
NOTE: if you have client files that were created with Compass 1.2 or earlier, you will be asked toconvert their data to the new format when you first open them. If you choose to convert and save, theold file will be overwritten.
To return to the original screen without opening any files, click on the Cancel button.
Compass Help - Open an Existing Client
44 / 145
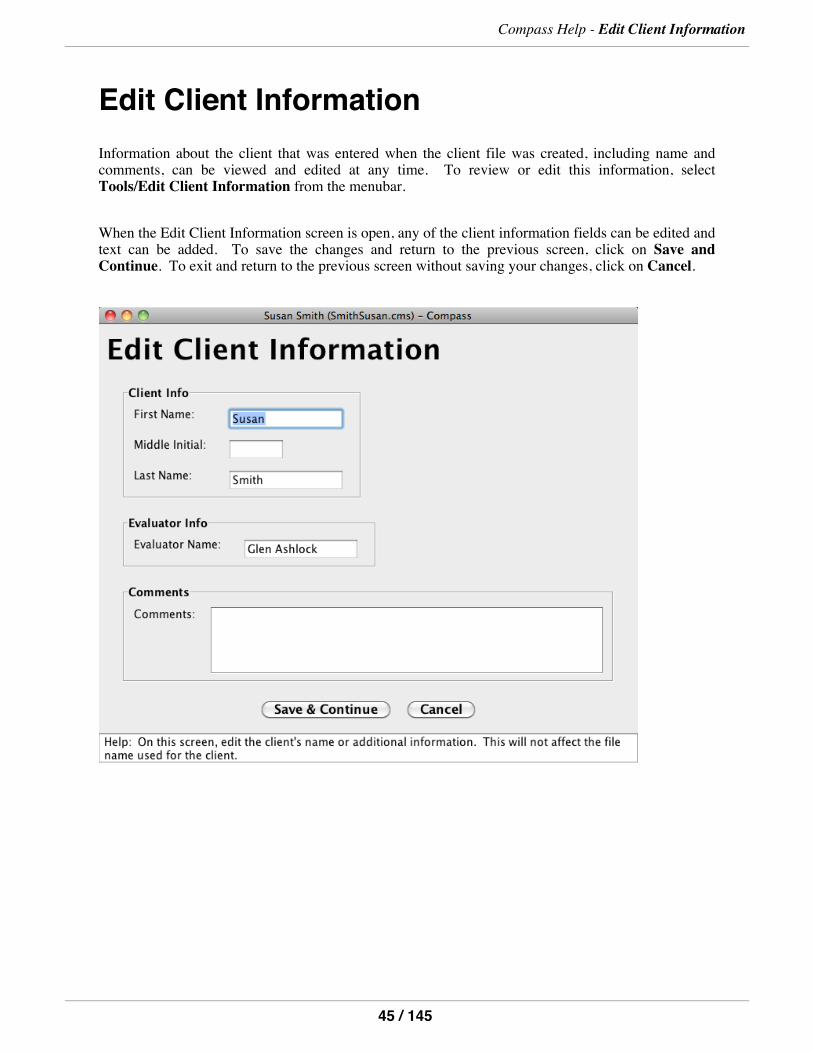
Edit Client InformationInformation about the client that was entered when the client file was created, including name andcomments, can be viewed and edited at any time. To review or edit this information, selectTools/Edit Client Information from the menubar.
When the Edit Client Information screen is open, any of the client information fields can be edited andtext can be added. To save the changes and return to the previous screen, click on Save andContinue. To exit and return to the previous screen without saving your changes, click on Cancel.
Compass Help - Edit Client Information
45 / 145
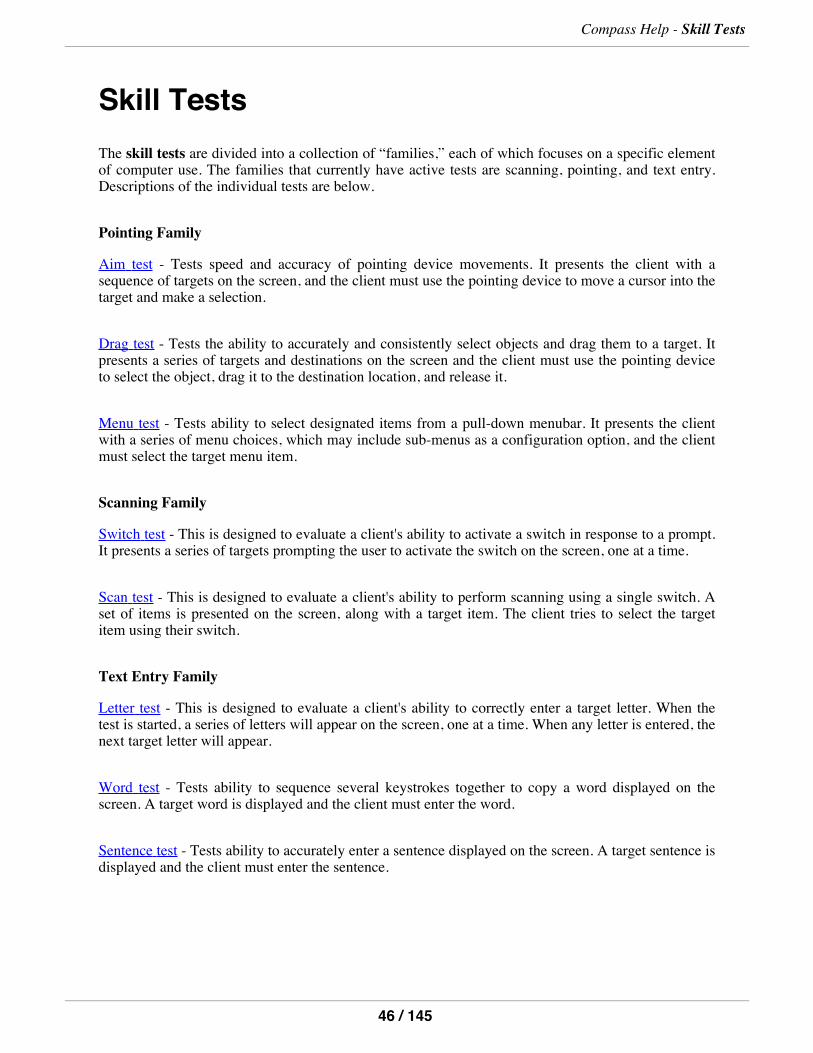
Skill TestsThe skill tests are divided into a collection of “families,” each of which focuses on a specific elementof computer use. The families that currently have active tests are scanning, pointing, and text entry.Descriptions of the individual tests are below.
Pointing Family
Aim test - Tests speed and accuracy of pointing device movements. It presents the client with asequence of targets on the screen, and the client must use the pointing device to move a cursor into thetarget and make a selection.
Drag test - Tests the ability to accurately and consistently select objects and drag them to a target. Itpresents a series of targets and destinations on the screen and the client must use the pointing deviceto select the object, drag it to the destination location, and release it.
Menu test - Tests ability to select designated items from a pull-down menubar. It presents the clientwith a series of menu choices, which may include sub-menus as a configuration option, and the clientmust select the target menu item.
Scanning Family
Switch test - This is designed to evaluate a client's ability to activate a switch in response to a prompt.It presents a series of targets prompting the user to activate the switch on the screen, one at a time.
Scan test - This is designed to evaluate a client's ability to perform scanning using a single switch. Aset of items is presented on the screen, along with a target item. The client tries to select the targetitem using their switch.
Text Entry Family
Letter test - This is designed to evaluate a client's ability to correctly enter a target letter. When thetest is started, a series of letters will appear on the screen, one at a time. When any letter is entered, thenext target letter will appear.
Word test - Tests ability to sequence several keystrokes together to copy a word displayed on thescreen. A target word is displayed and the client must enter the word.
Sentence test - Tests ability to accurately enter a sentence displayed on the screen. A target sentence isdisplayed and the client must enter the sentence.
Compass Help - Skill Tests
46 / 145
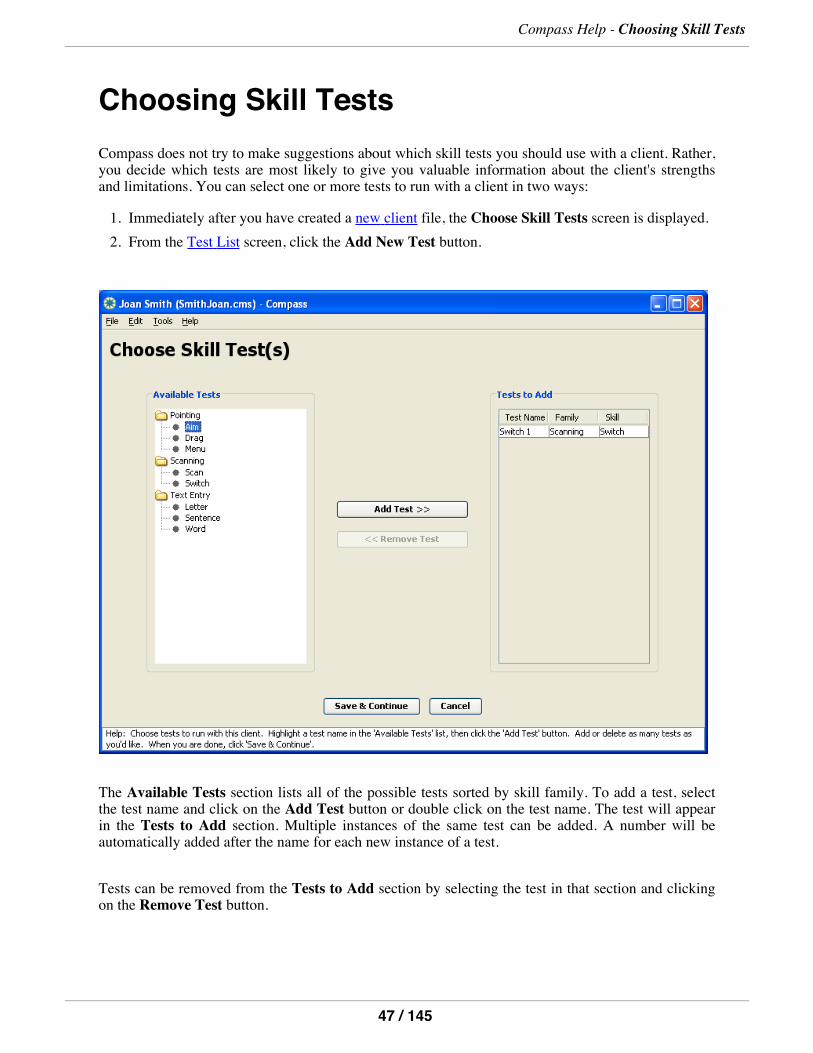
Choosing Skill TestsCompass does not try to make suggestions about which skill tests you should use with a client. Rather,you decide which tests are most likely to give you valuable information about the client's strengthsand limitations. You can select one or more tests to run with a client in two ways:
1. Immediately after you have created a new client file, the Choose Skill Tests screen is displayed.2. From the Test List screen, click the Add New Test button.
The Available Tests section lists all of the possible tests sorted by skill family. To add a test, selectthe test name and click on the Add Test button or double click on the test name. The test will appearin the Tests to Add section. Multiple instances of the same test can be added. A number will beautomatically added after the name for each new instance of a test.
Tests can be removed from the Tests to Add section by selecting the test in that section and clickingon the Remove Test button.
Compass Help - Choosing Skill Tests
47 / 145
Clicking on the Save & Continue button will save the selected tests and display the Test List screen.You can return to this screen and add additional tests at any time from the Test List screen. ClickCancel if you do not want to save any of the selected tests and return to the previous screen.
Compass Help - Choosing Skill Tests
48 / 145
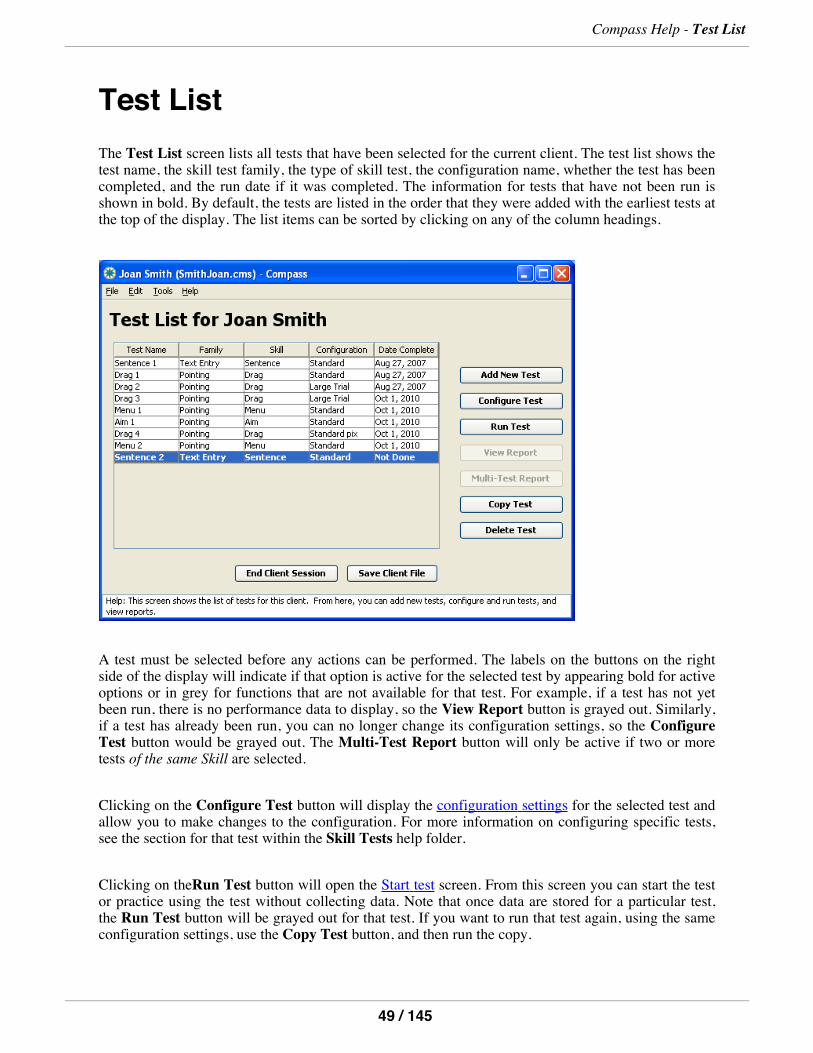
Test ListThe Test List screen lists all tests that have been selected for the current client. The test list shows thetest name, the skill test family, the type of skill test, the configuration name, whether the test has beencompleted, and the run date if it was completed. The information for tests that have not been run isshown in bold. By default, the tests are listed in the order that they were added with the earliest tests atthe top of the display. The list items can be sorted by clicking on any of the column headings.
A test must be selected before any actions can be performed. The labels on the buttons on the rightside of the display will indicate if that option is active for the selected test by appearing bold for activeoptions or in grey for functions that are not available for that test. For example, if a test has not yetbeen run, there is no performance data to display, so the View Report button is grayed out. Similarly,if a test has already been run, you can no longer change its configuration settings, so the ConfigureTest button would be grayed out. The Multi-Test Report button will only be active if two or moretests of the same Skill are selected.
Clicking on the Configure Test button will display the configuration settings for the selected test andallow you to make changes to the configuration. For more information on configuring specific tests,see the section for that test within the Skill Tests help folder.
Clicking on theRun Test button will open the Start test screen. From this screen you can start the testor practice using the test without collecting data. Note that once data are stored for a particular test,the Run Test button will be grayed out for that test. If you want to run that test again, using the sameconfiguration settings, use the Copy Test button, and then run the copy.
Compass Help - Test List
49 / 145
Clicking on the View Report button will allow you to view the results for a completed test.
Clicking on theMulti-Test Report button will allow you to create a multi-test report for two or morecompleted tests.
Clicking on the Copy Test button will create a duplicate of the selected test. The duplicate test willhave the same configuration as the original test. This is useful if you want to make sure you arecomparing performance data resulting from identical tests, or if you want to make sure you are onlychanging one configuration setting when running a subsequent test.
Clicking on the Add Test button will return you to the Choose Skill Test screen so that additionaltests can be added.
Clicking on the Delete Test button will remove the selected test. Tests can be deleted before or afterthey have been run. Selected tests can also be deleted by pressing the Delete key on the keyboard. Theremaining tests and client information will not be affected. You can also select multiple tests to deleteall at once, if desired. Prior to actually deleting any test, Compass will ask if you are sure you want todelete.
Click on the End Client Session button to end work with this client and return to the Choose anAction Screen. Any changes made during the session will automatically be saved when you confirmyou are done with the client.
Click on the Save Client File button to save any changes made during the session without exiting theTest List screen. If the Save button is grey, no changes have been made since the file was last saved.You can also save a client file at any time using the File/Save or File/Save As menu commands.
Compass Help - Test List
50 / 145
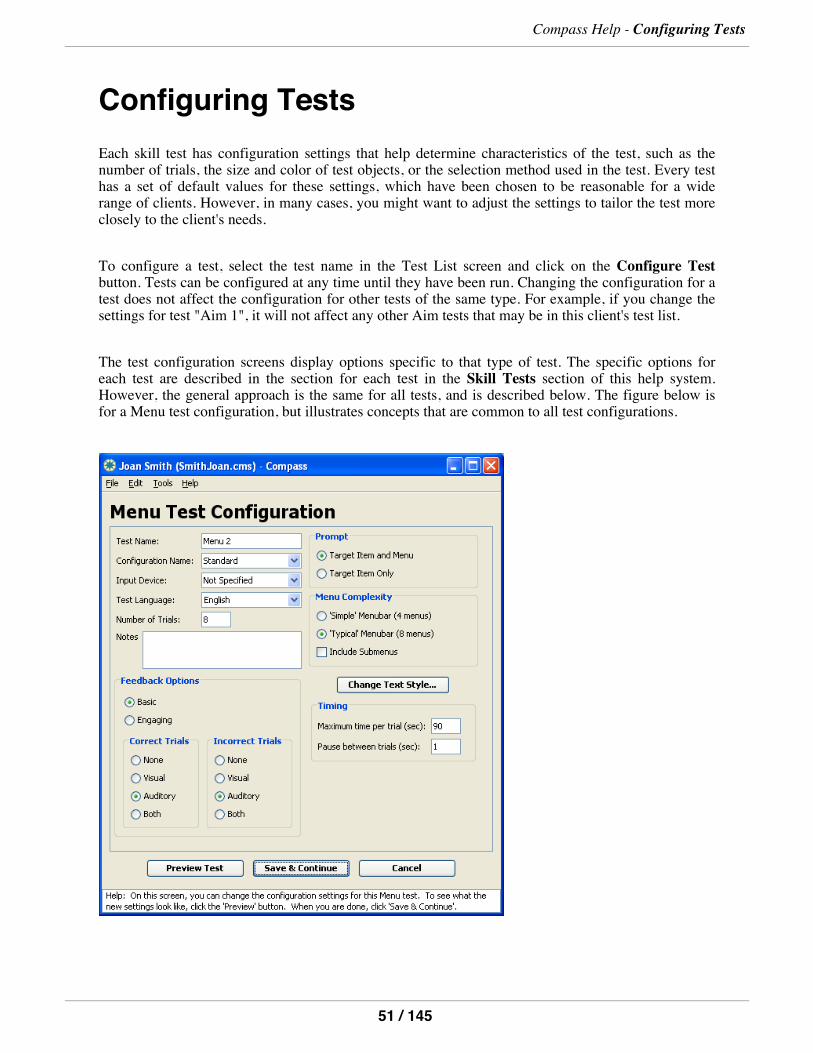
Configuring TestsEach skill test has configuration settings that help determine characteristics of the test, such as thenumber of trials, the size and color of test objects, or the selection method used in the test. Every testhas a set of default values for these settings, which have been chosen to be reasonable for a widerange of clients. However, in many cases, you might want to adjust the settings to tailor the test moreclosely to the client's needs.
To configure a test, select the test name in the Test List screen and click on the Configure Testbutton. Tests can be configured at any time until they have been run. Changing the configuration for atest does not affect the configuration for other tests of the same type. For example, if you change thesettings for test "Aim 1", it will not affect any other Aim tests that may be in this client's test list.
The test configuration screens display options specific to that type of test. The specific options foreach test are described in the section for each test in the Skill Tests section of this help system.However, the general approach is the same for all tests, and is described below. The figure below isfor a Menu test configuration, but illustrates concepts that are common to all test configurations.
Compass Help - Configuring Tests
51 / 145
The configuration screen allows you to change the test and configuration names. Each test name mustbe unique within each client file. For example, you cannot have two tests with the name "My Menutest". The default test name is the type of test with a number indicating how many of those tests havebeen selected for this client (e.g., Menu 1, Menu 2, and Menu 3).
You do not have to change the test names, but if you do, you should try to develop a consistentstrategy that provides information about each test when you are viewing the test list. This might be thedate the tests were created (Menu 7-8-2009), the type of session (e.g., eval or follow-up), or whateverallows you to manage the tests most effectively.
Note that test names are used as labels in the multi-test reports, so informative test names can make iteasier to interpret that report.
Since the same configuration may be used for more than one test, the configuration name does nothave to be unique, as long as the settings are the same for a given configuration name. The defaultconfiguration name is Standard, reflecting the default settings that are provided with Compass. If youmake changes to the standard configuration, Compass will prompt you to change the name when youtry to save those settings. This is because Standard refers to a specific collection of settings, andkeeping it that way helps you have a better understanding of how each test was configured when youlook at the test list.
You should develop a consistent strategy for naming the configurations to describe the settings. If youhave multiple tests for a particular client, this will definitely help you manage tests. A usefulconfiguration name could describe the type of input method (e.g., trackball or head pointer), the typeand size of objects (e.g., 14 bold text), or other important settings that distinguish this test from othertests.
The Input Device field is important for keeping track of which input method was used with each test.Compass will not know if the client is using a trackball, rather than a mouse, unless you tell it. Youmay select the input device from the list provided, or type in more specific device information ifdesired.
The Test Language field defines which language is used for any text or vocal feedback presented tothe client during the test. Currently, the choices are English, French, Spanish, Portuguese, and Arabic.
A Notes field is available in each configuration screen for any additional information you would liketo add concerning the configuration of the test. The comments can be viewed in the Notes field of thereport for that test.
Compass Help - Configuring Tests
52 / 145
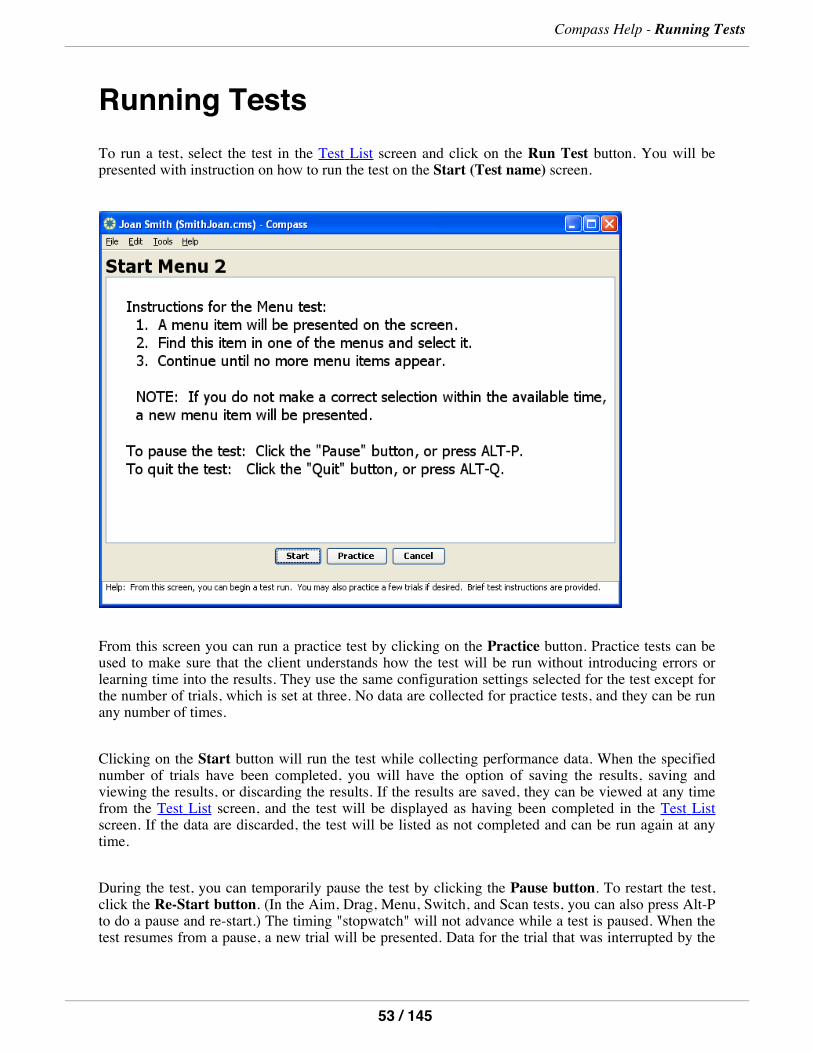
Running TestsTo run a test, select the test in the Test List screen and click on the Run Test button. You will bepresented with instruction on how to run the test on the Start (Test name) screen.
From this screen you can run a practice test by clicking on the Practice button. Practice tests can beused to make sure that the client understands how the test will be run without introducing errors orlearning time into the results. They use the same configuration settings selected for the test except forthe number of trials, which is set at three. No data are collected for practice tests, and they can be runany number of times.
Clicking on the Start button will run the test while collecting performance data. When the specifiednumber of trials have been completed, you will have the option of saving the results, saving andviewing the results, or discarding the results. If the results are saved, they can be viewed at any timefrom the Test List screen, and the test will be displayed as having been completed in the Test Listscreen. If the data are discarded, the test will be listed as not completed and can be run again at anytime.
During the test, you can temporarily pause the test by clicking the Pause button. To restart the test,click the Re-Start button. (In the Aim, Drag, Menu, Switch, and Scan tests, you can also press Alt-Pto do a pause and re-start.) The timing "stopwatch" will not advance while a test is paused. When thetest resumes from a pause, a new trial will be presented. Data for the trial that was interrupted by the
Compass Help - Running Tests
53 / 145
Pause are not recorded. (The Sentence test is the one exception to this; the same sentence remains onthe screen for completion following a re-start.)
To stop the test before the selected number of trials have been completed, click the Quit button. (Inthe Aim, Drag, Menu, Switch, and Scan tests, you can also press Alt-Q to quit the test.) You will beasked to confirm that you wish to exit the test. If you confirm that you want to exit, you will be giventhe option of saving the partial data or discarding the data. If you save the data, the test will be listedas completed in the Test List screen. If the data are discarded, the test will be listed as not completedand can be run again at any time.
Special Note for Mac OS X Users:When running a test, the standard Apple and Application menuswill still be active in the menubar. (We tried very hard to remove them, but were unable to do so.) Ifthe user mistakenly selects the 'About Compass' and 'Quit Compass' items, nothing will happen, andthe test can continue. If they do happen to mistakenly select another item, such as 'Hide Compass' or'Sleep', that action will unfortunately occur and cause a disruption to the test in progress. In mostcases, it will be possible to continue the test by Pausing the current trial, and Re-starting.
Compass Help - Running Tests
54 / 145
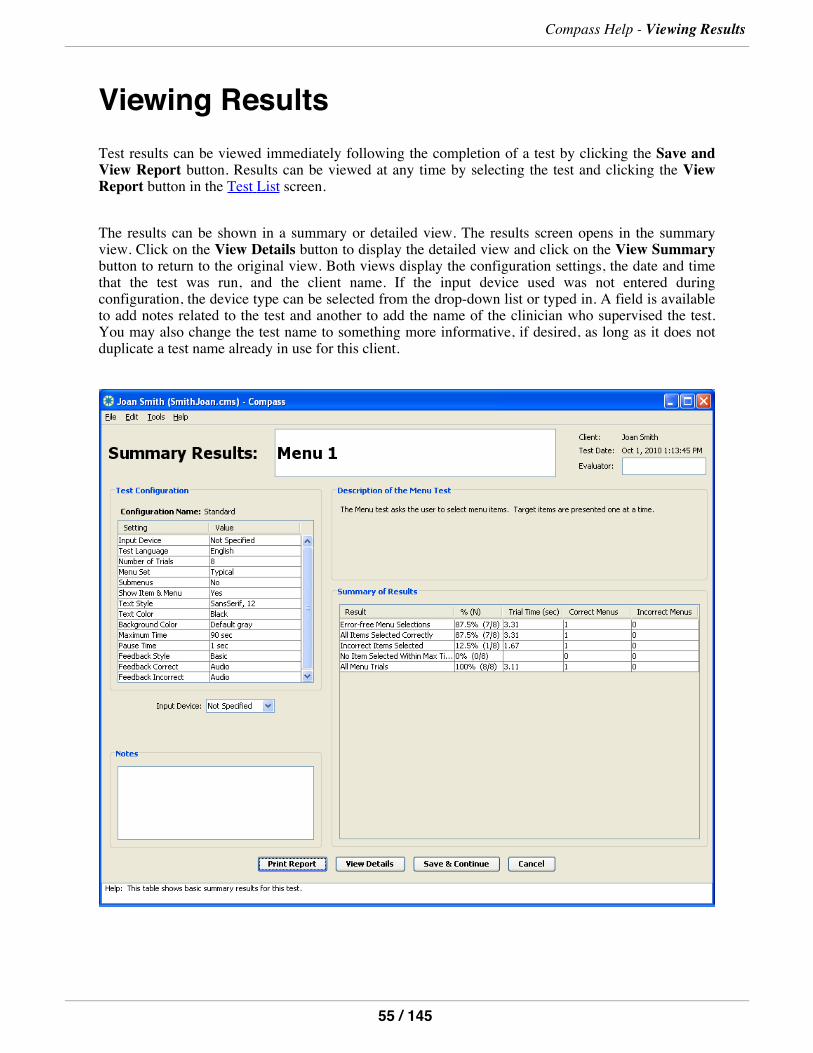
Viewing ResultsTest results can be viewed immediately following the completion of a test by clicking the Save andView Report button. Results can be viewed at any time by selecting the test and clicking the ViewReport button in the Test List screen.
The results can be shown in a summary or detailed view. The results screen opens in the summaryview. Click on the View Details button to display the detailed view and click on the View Summarybutton to return to the original view. Both views display the configuration settings, the date and timethat the test was run, and the client name. If the input device used was not entered duringconfiguration, the device type can be selected from the drop-down list or typed in. A field is availableto add notes related to the test and another to add the name of the clinician who supervised the test.You may also change the test name to something more informative, if desired, as long as it does notduplicate a test name already in use for this client.
Compass Help - Viewing Results
55 / 145
The summary view provides an basic overview of the test results and graphical results whereavailable. The detailed view shows each trial and client response during the test. Specific results foreach test are described in the help section for that test.
To print a report, click the Print Report button. This will print the configuration settings, as well asboth the summary and detailed performance data for the test.
Additionally, you can cut-and-paste the contents of any table into another application, such as a wordprocessor. This may be useful when preparing reports on a particular client. To do this:
1. Select the portion of the table that you want to cut-and-paste. This can be done by draggingacross the rows of the table with your mouse, or by using the cursor keys with the Shift key helddown.
2. Choose Edit/Copy from the menubar, or press Ctrl-C, to copy the selected table.3. Open the second application where you want to paste the table. Choose the paste command inthat application.
From a report screen, clicking on either the Save & Continue or Cancel button will return you to theTest List screen. The test data cannot be edited. The only changes you can make in the Report screensare to enter text into the Test Name, Input Device, Notes, and Evaluator fields. Save & Continue willpreserve changes while Cancel exits without saving any changes or additions. The test data have beensaved previously and will be preserved using either method.
Compass Help - Viewing Results
56 / 145
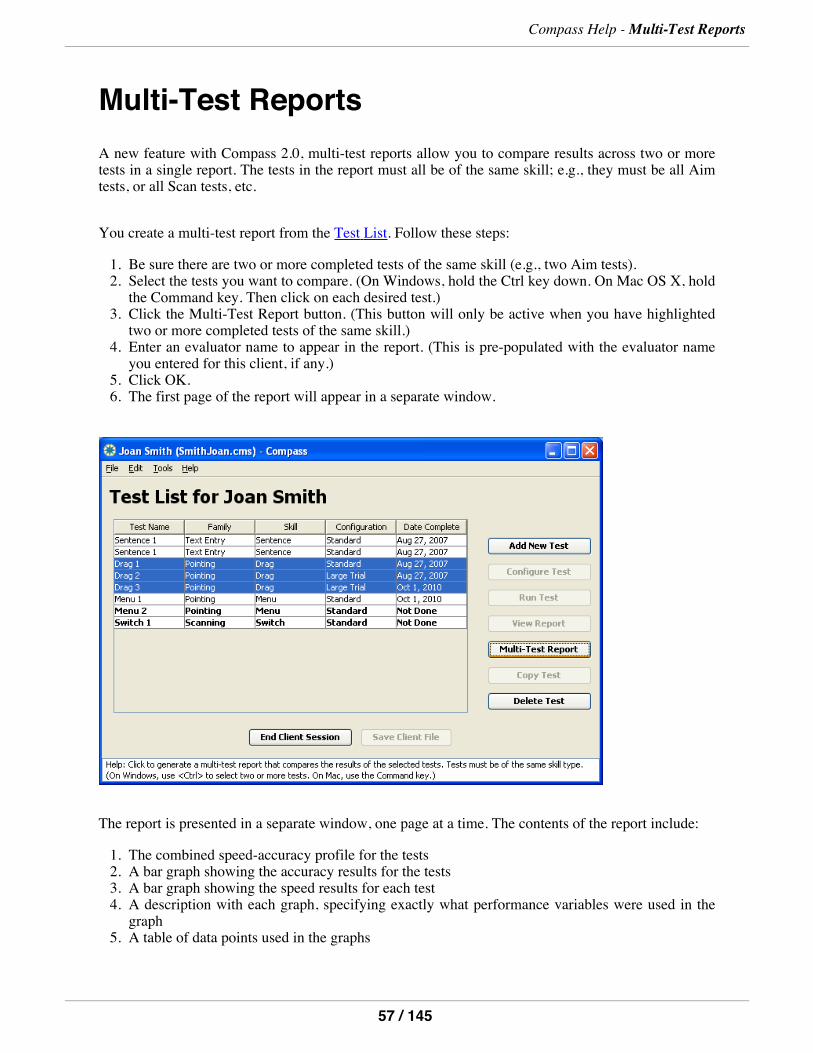
Multi-Test ReportsA new feature with Compass 2.0, multi-test reports allow you to compare results across two or moretests in a single report. The tests in the report must all be of the same skill; e.g., they must be all Aimtests, or all Scan tests, etc.
You create a multi-test report from the Test List. Follow these steps:
1. Be sure there are two or more completed tests of the same skill (e.g., two Aim tests).2. Select the tests you want to compare. (On Windows, hold the Ctrl key down. On Mac OS X, holdthe Command key. Then click on each desired test.)
3. Click the Multi-Test Report button. (This button will only be active when you have highlightedtwo or more completed tests of the same skill.)
4. Enter an evaluator name to appear in the report. (This is pre-populated with the evaluator nameyou entered for this client, if any.)
5. Click OK.6. The first page of the report will appear in a separate window.
The report is presented in a separate window, one page at a time. The contents of the report include:
1. The combined speed-accuracy profile for the tests2. A bar graph showing the accuracy results for the tests3. A bar graph showing the speed results for each test4. A description with each graph, specifying exactly what performance variables were used in thegraph
5. A table of data points used in the graphs
Compass Help -Multi-Test Reports
57 / 145
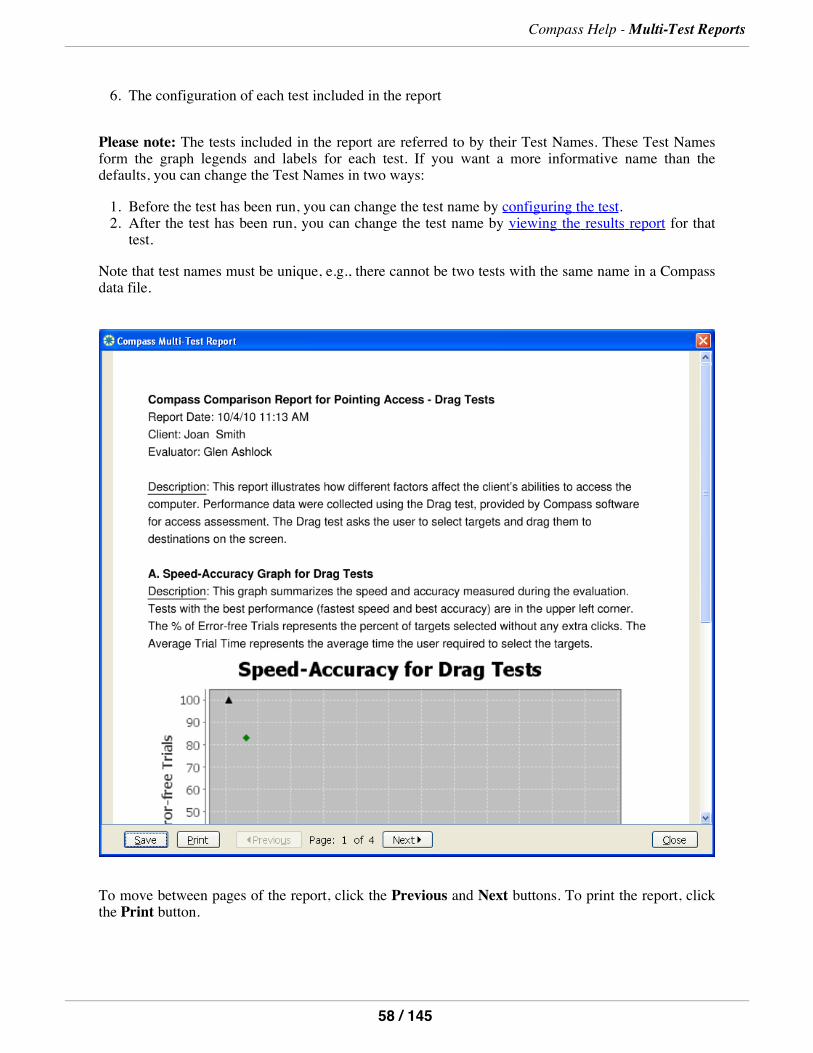
6. The configuration of each test included in the report
Please note: The tests included in the report are referred to by their Test Names. These Test Namesform the graph legends and labels for each test. If you want a more informative name than thedefaults, you can change the Test Names in two ways:
1. Before the test has been run, you can change the test name by configuring the test.2. After the test has been run, you can change the test name by viewing the results report for thattest.
Note that test names must be unique, e.g., there cannot be two tests with the same name in a Compassdata file.
To move between pages of the report, click the Previous and Next buttons. To print the report, clickthe Print button.
Compass Help -Multi-Test Reports
58 / 145
Reports can be saved in RTF (Rich Text Format) or PDF (Portable Document Format) formats. OnWindows, RTF is the default format, since it allows you to edit the report later if desired. On Mac OSX, PDF is the default format, since RTF is not a strongly supported format on the Mac. Either way,you can choose the format you prefer. To save the report, click the Save button. Then provide a nameand location for the file, select the file format if desired, and click OK.
To close the report window, click the Close button. If you haven't saved the report, you'll be askedwhether you want to save.
Compass Help -Multi-Test Reports
59 / 145
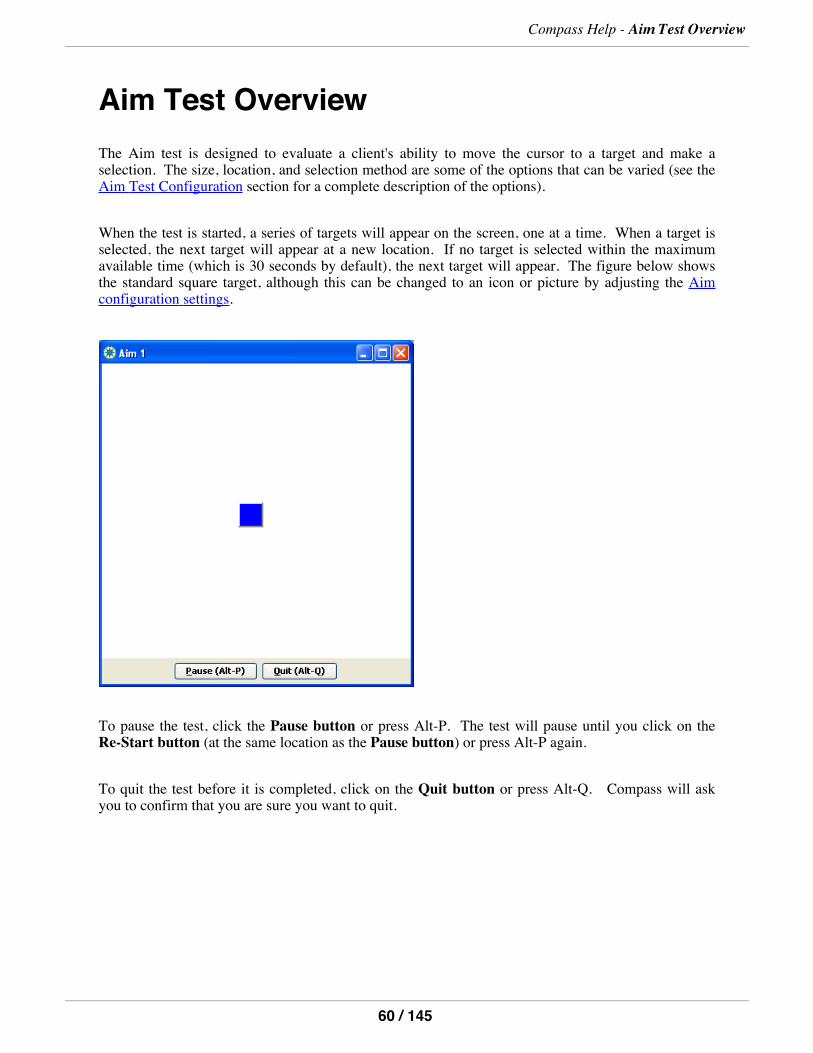
Aim Test OverviewThe Aim test is designed to evaluate a client's ability to move the cursor to a target and make aselection. The size, location, and selection method are some of the options that can be varied (see theAim Test Configuration section for a complete description of the options).
When the test is started, a series of targets will appear on the screen, one at a time. When a target isselected, the next target will appear at a new location. If no target is selected within the maximumavailable time (which is 30 seconds by default), the next target will appear. The figure below showsthe standard square target, although this can be changed to an icon or picture by adjusting the Aimconfiguration settings.
To pause the test, click the Pause button or press Alt-P. The test will pause until you click on theRe-Start button (at the same location as the Pause button) or press Alt-P again.
To quit the test before it is completed, click on the Quit button or press Alt-Q. Compass will askyou to confirm that you are sure you want to quit.
Compass Help - Aim Test Overview
60 / 145
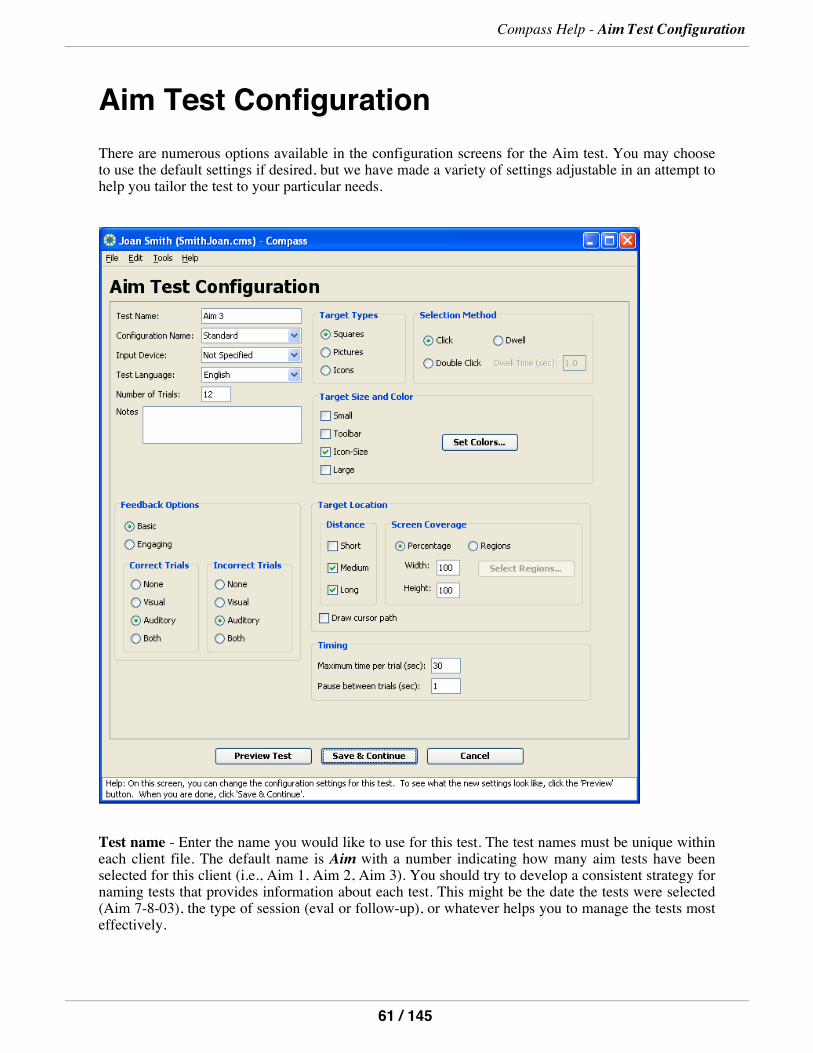
Aim Test ConfigurationThere are numerous options available in the configuration screens for the Aim test. You may chooseto use the default settings if desired, but we have made a variety of settings adjustable in an attempt tohelp you tailor the test to your particular needs.
Test name - Enter the name you would like to use for this test. The test names must be unique withineach client file. The default name is Aim with a number indicating how many aim tests have beenselected for this client (i.e., Aim 1, Aim 2, Aim 3). You should try to develop a consistent strategy fornaming tests that provides information about each test. This might be the date the tests were selected(Aim 7-8-03), the type of session (eval or follow-up), or whatever helps you to manage the tests mosteffectively.
Compass Help - Aim Test Configuration
61 / 145
Configuration name - Enter the name you would like to use for this configuration. Since the sameconfiguration may be used for more than one test, the configuration name does not have to be unique,as long as the settings are the same. The default name is Standard. When changes are made to thestandard configuration, Compass will prompt you to change the name upon exiting the configurationscreen.
You should develop a consistent strategy for naming the configurations to describe the settings used.This will help you recall how this test differs from another one. A good configuration name mightdescribe the type of input method (e.g., trackball or head pointer), the type and size of targets (e.g.,small icons), or other important settings.
Input device - Allows the input device being used to be selected from a drop-down list of commondevices. Device names that are not on the drop-down list can be typed into the field. The default valueis Not Specified. If you are comparing performance with different input devices, it is important to setthe Input Device field accordingly. Otherwise, it may not be clear which input device was used whenviewing test results.
The Test Language field defines which language is used for any text or vocal feedback presented tothe client during the test. Currently, the choices are English, French, Spanish, Portuguese, and Arabic,with English as the default value. In the Aim test, only Engaging Feedback is affected by the TestLanguage.
Notes - A field for any comments relating to the configuration. By default, this field is empty. Addingcomments may be useful for describing why certain choices were made in the configuration or anyother information that will help you when reviewing the test.
Number of Trials - The number of targets that will be presented during the test. The default value is12 trials. The number should be large enough to provide a representative sample of the client's abilityto perform the task and small enough to avoid unintended fatigue or loss of interest.
Feedback Options
Style - The feedback style option allows you to select the most appropriate form of feedback for theuser. Basic feedback provides simple, direct feedback. Engaging feedback provides a morestimulating response to help motivate and hold the interest of clients when necessary. Feedback stylesare consistent across all of the trials. The default feedback style is Basic.
Four feedback options are available for correct and/or incorrect trials. The option for Correct Trialsdefines the type of feedback provided when the user selects the target within the time allowed. Thedefault value for Correct Trials is Auditory. The option for Incorrect Trials defines the type offeedback provided when the user does not select the target in the time allowed. The default value forIncorrect Trials is Auditory. The feedback options are:
1. None - Compass will provide no feedback for any of the trials of this type. When a selection ismade or the trial times out, the next trial will start until the test is completed.
2. Visual - Compass will provide a visual response.
Compass Help - Aim Test Configuration
62 / 145
3. Auditory - Compass will provide an auditory response.4. Both - Compass will provide both a visual and an auditory response.
Target Types - This allows you to select the type of targets to be used in the test. Three types oftargets are available:
1. Squares- These are simple square targets.2. Icons - These are realistic icons similar to the ones used in applications and the operating system.3. Pictures - These are color drawings of animals or other objects.
Only one type of target can be selected for each test. The default target style is Squares.
Selection Method - This is used to define the method of selecting the targets. The selection methodshould be reliable and consistent so that the test is evaluating the client's ability to position the cursoron the target, and to recognize when the cursor is on the target. Once you have established that theclient can accurately move and position the cursor, the test can be run again using alternate selectionmethods to evaluate the best selection option.
There are three choices of selection methods:
1. Click - This is the typical method for making selections. Compass will record a selection whenthe mouse button or the method being used to emulate the mouse button is activated. Click is thedefault value.
2. Double Click - Compass will record a selection only when either the mouse button or buttonemulator is double clicked within the time and distance parameters defined in the Windowsoperating system. (On Mac OS X, an Aim double-click is valid if both clicks occur within thetarget and within 500 milliseconds of each other.)
3. Dwell - When Dwell is selected, Compass will record a selection when the cursor is held in oneposition for the length of time entered in the Dwell Time field. The default dwell time is 1.0seconds.
Target Size and Color - This is used to determine the size of the targets used in the test. There arefour size options which can be used in any combination within a test.
1. Small - These targets are approximately the size of the minimize, restore, and close buttons.2. Toolbar- These targets are approximately the size of buttons on the toolbar.3. Icon-Size - These targets are approximately the size of icons on the desktop. Icon-Size is thedefault value.
4. Large - These targets are enlarged versions of the icons.
By default, Compass uses blue targets on a white background. To change the color of the targetsand/or the color of the test background, click the Set Colors... button. This will bring up the dialoguebox shown below. The three rows of white, black, and blue targets on different backgrounds showpre-set color combinations. You can select one of these by clicking on it. To set the background color,
Compass Help - Aim Test Configuration
63 / 145
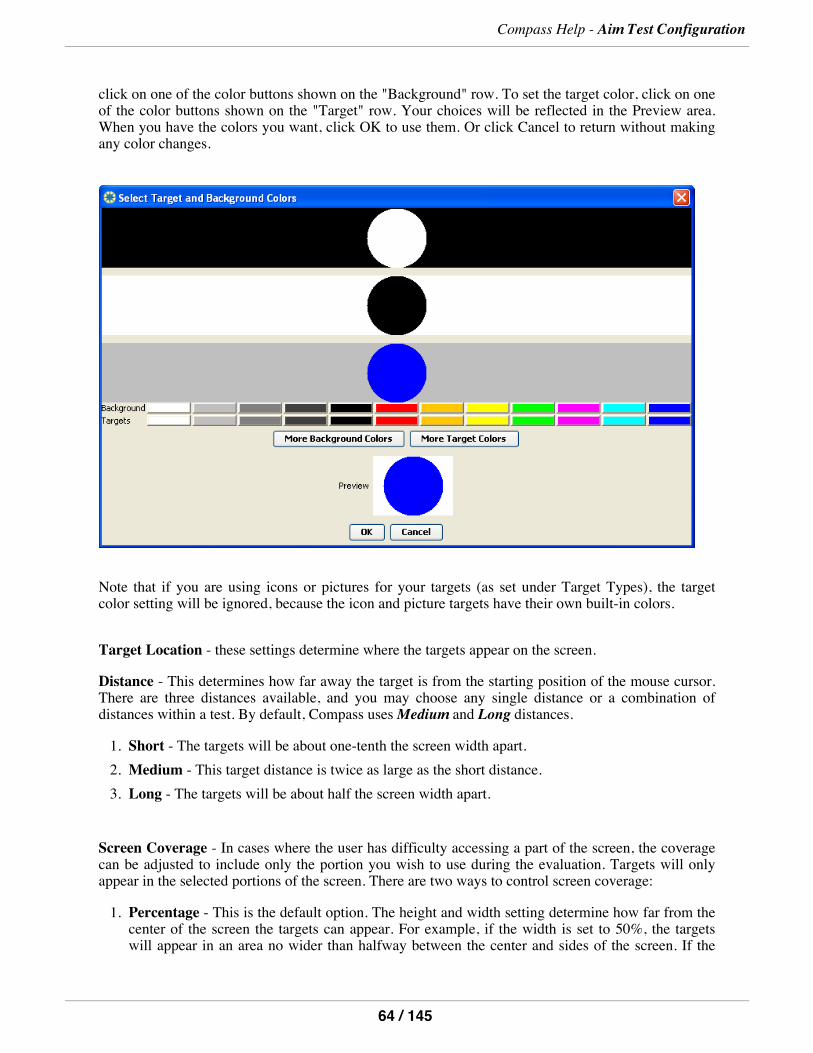
click on one of the color buttons shown on the "Background" row. To set the target color, click on oneof the color buttons shown on the "Target" row. Your choices will be reflected in the Preview area.When you have the colors you want, click OK to use them. Or click Cancel to return without makingany color changes.
Note that if you are using icons or pictures for your targets (as set under Target Types), the targetcolor setting will be ignored, because the icon and picture targets have their own built-in colors.
Target Location - these settings determine where the targets appear on the screen.
Distance - This determines how far away the target is from the starting position of the mouse cursor.There are three distances available, and you may choose any single distance or a combination ofdistances within a test. By default, Compass usesMedium and Long distances.
1. Short - The targets will be about one-tenth the screen width apart.2. Medium - This target distance is twice as large as the short distance.3. Long - The targets will be about half the screen width apart.
Screen Coverage - In cases where the user has difficulty accessing a part of the screen, the coveragecan be adjusted to include only the portion you wish to use during the evaluation. Targets will onlyappear in the selected portions of the screen. There are two ways to control screen coverage:
1. Percentage - This is the default option. The height and width setting determine how far from thecenter of the screen the targets can appear. For example, if the width is set to 50%, the targetswill appear in an area no wider than halfway between the center and sides of the screen. If the
Compass Help - Aim Test Configuration
64 / 145
height is set to 50% targets will be no higher than halfway between the center and top of thescreen and no lower than halfway between the center and bottom of the screen. The default is touse 100% of the screen.
2.Regions - This option allows you to specify the regions of the screen where you would like the targetsto appear. When you select the regions button, you will be shown a box representing the screen that isdivided into six regions.Select the regions you want the test to use by clicking on them or by movingbetween them with the tab key and pressing the space bar to select them. Colored regions show screenareas where the targets can appear. Any combination of the regions may be selected, as long as at least1 region is used.
Note that certain combinations of target distance and screen coverage can contradict each other. Forexample, if you've selected Long target distances, but set screen coverage to only one small region,the requested distance may not fit in the requested region. Compass will do its best to place the targetin that situation, generally putting it at one of the corners of the requested region.
Draw Cursor Path - If this box is selected, a path between the starting position of the mouse cursorand the current target will be shown. This provides a visual prompt that may be useful for someclients. The default is to have no cursor path shown.
Timing
Maximum Time per Trial - This allows you to define the maximum time allowed to complete eachtrial. If no selection is made within the designated time, the trial times out and advances to the nexttrial. The time should be long enough to give the client the opportunity to make a selection but not beso long that the client becomes frustrated or bored if they are unable to successfully make a selection.The default value is 30 seconds.
Pause Between Trials - This allows you to define the length of the pause between a selection or timeout and the start of the next trial. A longer pause may be useful for users who need time to recoverphysically or to process the feedback of the previous trial before starting the next one. The defaultvalue is 1 second.
The three buttons at the bottom of the configuration screen perform the following functions:
1.Preview Test - Click this button to run an abbreviated version of the test using the settings you haveselected. No data are collected for the trials in the preview.2.Save & Continue - Click this button to save the test configuration settings you have selected and
return to the Test List. If necessary, Compass will prompt you to change the configuration namebefore you can exit (see Configuring Tests).3.Cancel - Click this button to return you to the Test List without saving any changes to the
configuration settings.
Compass Help - Aim Test Configuration
65 / 145
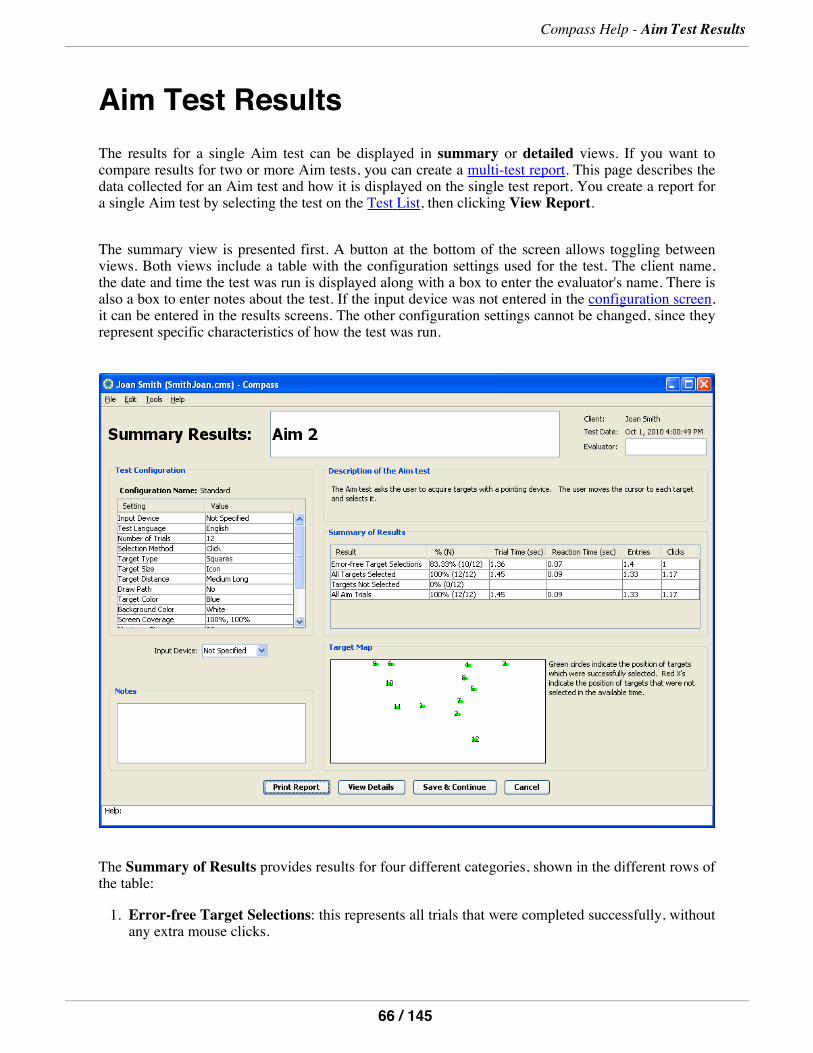
Aim Test ResultsThe results for a single Aim test can be displayed in summary or detailed views. If you want tocompare results for two or more Aim tests, you can create a multi-test report. This page describes thedata collected for an Aim test and how it is displayed on the single test report. You create a report fora single Aim test by selecting the test on the Test List, then clicking View Report.
The summary view is presented first. A button at the bottom of the screen allows toggling betweenviews. Both views include a table with the configuration settings used for the test. The client name,the date and time the test was run is displayed along with a box to enter the evaluator's name. There isalso a box to enter notes about the test. If the input device was not entered in the configuration screen,it can be entered in the results screens. The other configuration settings cannot be changed, since theyrepresent specific characteristics of how the test was run.
The Summary of Results provides results for four different categories, shown in the different rows ofthe table:
1. Error-free Target Selections: this represents all trials that were completed successfully, withoutany extra mouse clicks.
Compass Help - Aim Test Results
66 / 145
2. All Targets Selected: this represents all trials that were completed successfully, whether or notthey had any extra mouse clicks. (Note that this includes all the "Error-free Target Selections",plus any successful selections that had at least one extra mouse click.)
3. Targets Not Selected: this represents trials in which the target was not successfully selected inthe time available. The available time per trial is specified by the max time configuration setting.
4. All Aim Trials: this represents all trials in the test. This combines the results of "All TargetsSelected" and "Targets Not Selected."
For each category of trials, the following results are reported in the table columns:
1. % (N): how many trials fell into this category. This is shown both as a percentage of all trials inthe test, as well as the exact number of trials.
2. Trial Time (sec): the average time required to perform each trial in this category. This ismeasured in seconds from when the target is first presented until the target is selected by theclient. Trial Time is displayed as the maximum time setting for targets that were not selectedwithin the available time.
3. Reaction Time (sec): the average reaction time for each trial in this category. Reaction time ismeasured from when the target is first presented until the mouse cursor starts to move.
4. Entries: the average number of times the mouse cursor entered the target, for the trials in thiscategory. A value of 1 is the minimum, and indicates that the client did not move the cursor offany targets once it had been positioned within the target area. A larger number would indicatethat the client had some difficulty keeping the cursor within the target area long enough to makea selection. Occasional movements off of a target do not necessarily indicate difficulty withtargeting.
5. Clicks: The average number of mouse clicks needed to select the targets in this category. Thiscounts all clicks that occur from when the target is presented until the next target is presented. Avalue of 1 indicates that the client was able to select each target with a single click. Larger valueswould indicate that the client activated their selection method without being on a target. Whenthe Dwell setting is used, a successful dwell is counted as one click. When the Double-clicksetting is used, a successful selection is counted as two clicks.
TheTarget Map is a graphical representation of the display showing the relative location of targetsand whether they were correctly selected. Correctly selected targets appear as a green circle andtargets that were not selected within the available time appear as a red X. The size of the circlesrepresents the relative size of the target. The number of the trial is displayed for each target aswell.This can help identify areas of the screen in which target selection is more difficult for the client.
Compass Help - Aim Test Results
67 / 145
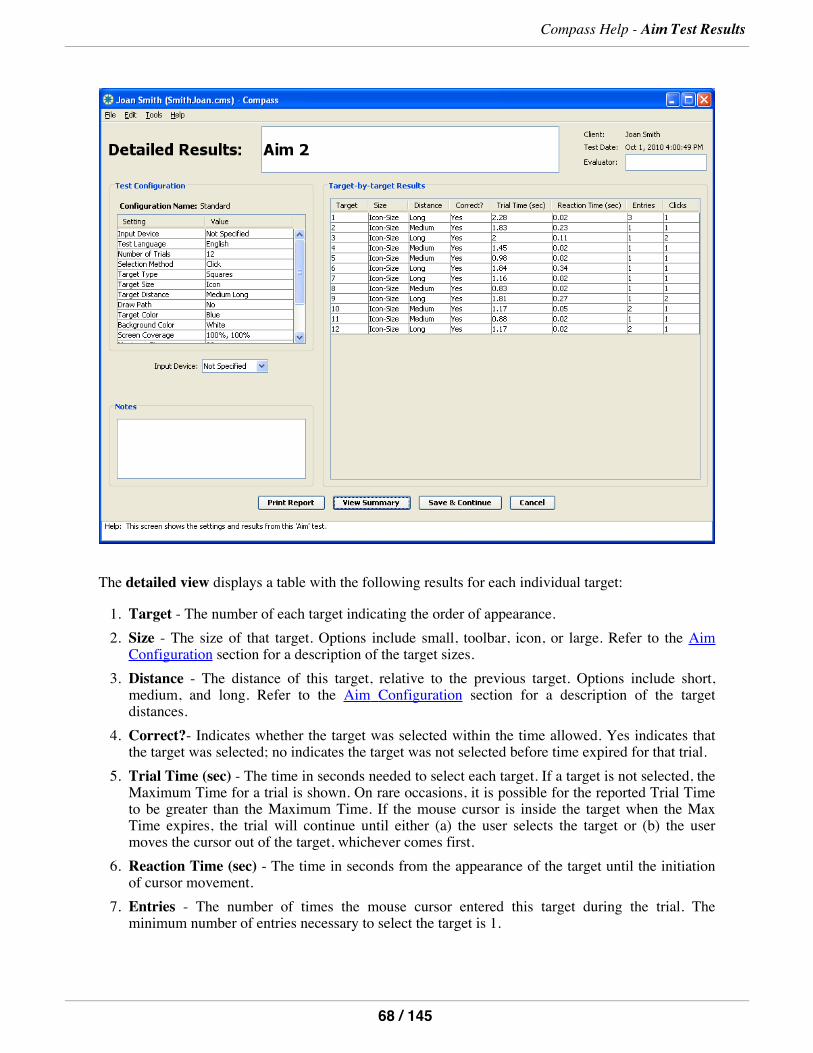
The detailed view displays a table with the following results for each individual target:
1. Target - The number of each target indicating the order of appearance.2. Size - The size of that target. Options include small, toolbar, icon, or large. Refer to the AimConfiguration section for a description of the target sizes.
3. Distance - The distance of this target, relative to the previous target. Options include short,medium, and long. Refer to the Aim Configuration section for a description of the targetdistances.
4. Correct?- Indicates whether the target was selected within the time allowed. Yes indicates thatthe target was selected; no indicates the target was not selected before time expired for that trial.
5. Trial Time (sec) - The time in seconds needed to select each target. If a target is not selected, theMaximum Time for a trial is shown. On rare occasions, it is possible for the reported Trial Timeto be greater than the Maximum Time. If the mouse cursor is inside the target when the MaxTime expires, the trial will continue until either (a) the user selects the target or (b) the usermoves the cursor out of the target, whichever comes first.
6. Reaction Time (sec) - The time in seconds from the appearance of the target until the initiationof cursor movement.
7. Entries - The number of times the mouse cursor entered this target during the trial. Theminimum number of entries necessary to select the target is 1.
Compass Help - Aim Test Results
68 / 145

8. Clicks - The number of mouse clicks made during that trial. If the selection method is set toDwell, the number of clicks will include any Dwells of the specified length within the target, aswell as any physical mouse clicks. Dwells outside of the target are not counted.
Note that the width of the columns in any of the tables can be resized by moving the cursor to the edgeof the box containing the label and dragging it to the left or right.
Additionally, you can cut-and-paste the contents of an Aim report into another application, such as aword processor. This may be useful when preparing reports on a particular client.
The following buttons are available to help you navigate and work with reports.
1. Print Report - Clicking this button prints the summary and detailed report.2. View Details - When in the summary view, clicking on this button changes the display to thedetailed report view.
3. View Summary - When in the detailed view, clicking on this button returns the display to thesummary view.
4. Save & Continue - Clicking on this button from either view will save the data for the test, anycomments you have entered, and the evaluator name and return you to the Test List screen.
5. Cancel - Clicking on this button from either view will return you to the Test List screen withoutsaving any changes to the results information. Note that all performance data have already beensaved before viewing the report and will not be lost or changed by selecting the Cancel button.
Compass Help - Aim Test Results
69 / 145
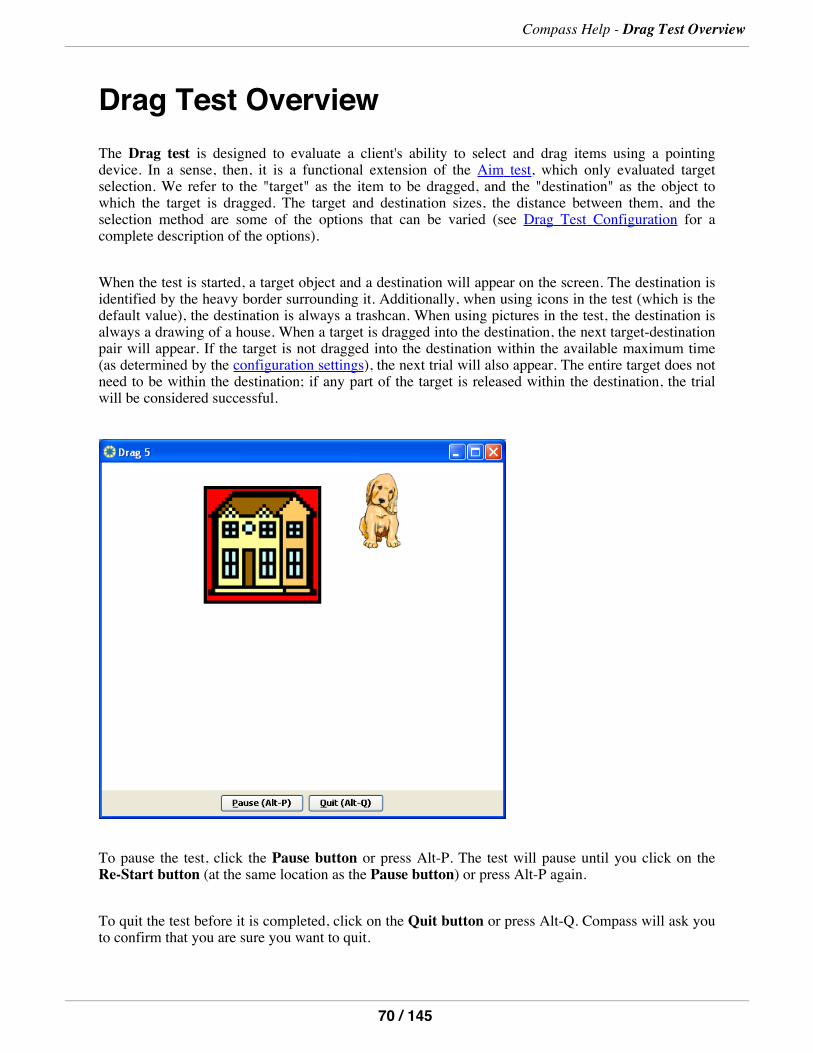
Drag Test OverviewThe Drag test is designed to evaluate a client's ability to select and drag items using a pointingdevice. In a sense, then, it is a functional extension of the Aim test, which only evaluated targetselection. We refer to the "target" as the item to be dragged, and the "destination" as the object towhich the target is dragged. The target and destination sizes, the distance between them, and theselection method are some of the options that can be varied (see Drag Test Configuration for acomplete description of the options).
When the test is started, a target object and a destination will appear on the screen. The destination isidentified by the heavy border surrounding it. Additionally, when using icons in the test (which is thedefault value), the destination is always a trashcan. When using pictures in the test, the destination isalways a drawing of a house. When a target is dragged into the destination, the next target-destinationpair will appear. If the target is not dragged into the destination within the available maximum time(as determined by the configuration settings), the next trial will also appear. The entire target does notneed to be within the destination; if any part of the target is released within the destination, the trialwill be considered successful.
To pause the test, click the Pause button or press Alt-P. The test will pause until you click on theRe-Start button (at the same location as the Pause button) or press Alt-P again.
To quit the test before it is completed, click on the Quit button or press Alt-Q. Compass will ask youto confirm that you are sure you want to quit.
Compass Help - Drag Test Overview
70 / 145
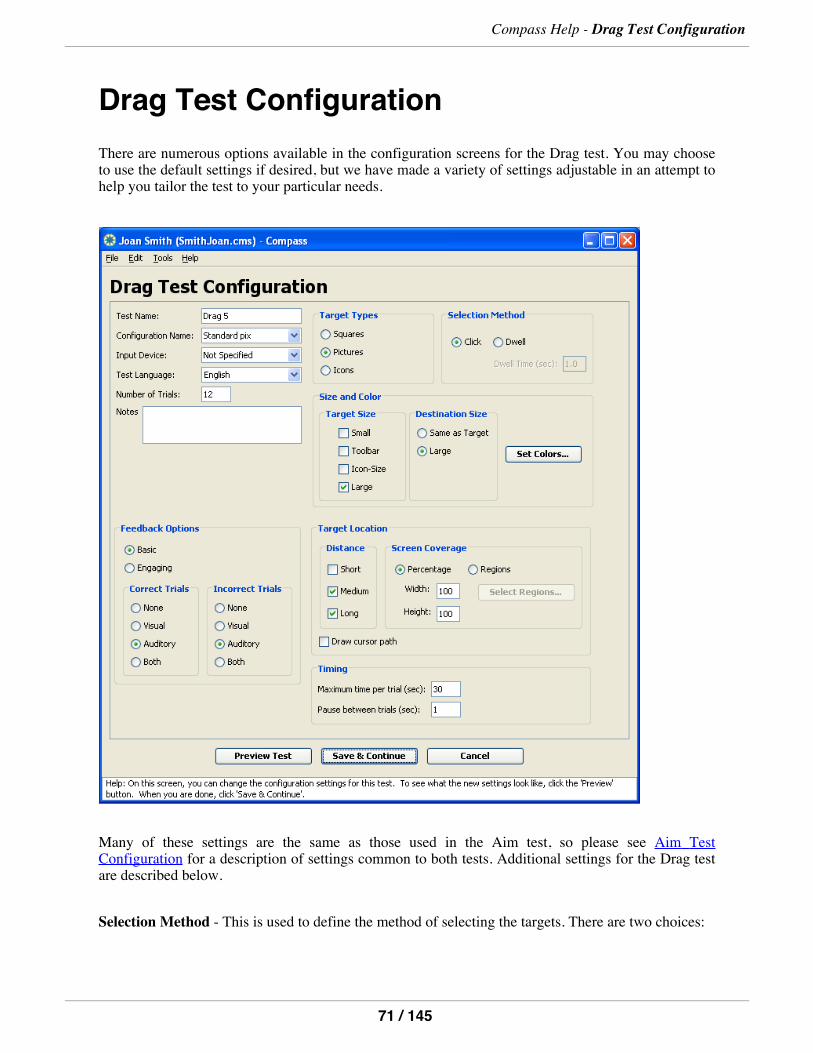
Drag Test ConfigurationThere are numerous options available in the configuration screens for the Drag test. You may chooseto use the default settings if desired, but we have made a variety of settings adjustable in an attempt tohelp you tailor the test to your particular needs.
Many of these settings are the same as those used in the Aim test, so please see Aim TestConfiguration for a description of settings common to both tests. Additional settings for the Drag testare described below.
Selection Method - This is used to define the method of selecting the targets. There are two choices:
Compass Help - Drag Test Configuration
71 / 145
1. Click - This is the typical method for making selections. Compass will record a selection whenthe mouse button or the method being used to emulate the mouse button is activated. Click is thedefault value.
2. Dwell - When Dwell is selected, Compass will record a selection when the cursor is held in oneposition for the length of time entered in the Dwell Time field. The default dwell time is 1.0seconds.
Size and Color - This is used to determine the size of the targets and destination items used in thetest. There are four Target Size options which can be used in any combination within a test.
1. Small - These targets are approximately the size of the minimize, restore, and close buttons.2. Toolbar- These targets are approximately the size of buttons on the toolbar.3. Icon-Size - These targets are approximately the size of icons on the desktop. Icon-Size is thedefault value.
4. Large - These targets are enlarged versions of the icons.
There are two Destination Size options:
1. Same as Target - The destination object is always the size of the target object. This mimics anoperation such as dragging a file icon into the recycle bin. Same As Target is the default value.
2. Large - The destination object is about 2" square, providing a bigger drag destination. Thismimics an operation such as dragging a file icon into an open folder window.
Target Location - these settings determine where targets and destinations are presented on the screen.Screen coverage works the same way as described under Aim Test Configuration, but distance andcursor path are defined somewhat differently from how they are used in the Aim test.
Distance - This determines how far away the destination is from the target. There are three distancesavailable, and you may choose any single distance or a combination of distances within a test. Bydefault, Compass usesMedium and Long distances.
1. Short - The targets and destinations are within the same region of the screen.2. Medium - This distance between target and destination is twice as large as the short distance.3. Long - The targets and destinations will be about half the screen distance apart.
Draw Cursor Path - If this box is selected, an arrow will be drawn between the location of the targetand the destination. This provides a visual prompt that may be useful for some clients. The default isto have no cursor path shown.
The three buttons at the bottom of the configuration screen perform the following functions:
1.Preview Test - Click this button to run an abbreviated version of the test using the settings you haveselected. No data are collected for the trials in the preview.
Compass Help - Drag Test Configuration
72 / 145
2.Save & Continue - Click this button to save the test configuration settings you have selected andreturn to the Test List. If necessary, Compass will prompt you to change the configuration namebefore you can exit (see Configuring Tests).3.Cancel - Click this button to return you to the Test List without saving any changes to the
configuration settings.
Compass Help - Drag Test Configuration
73 / 145
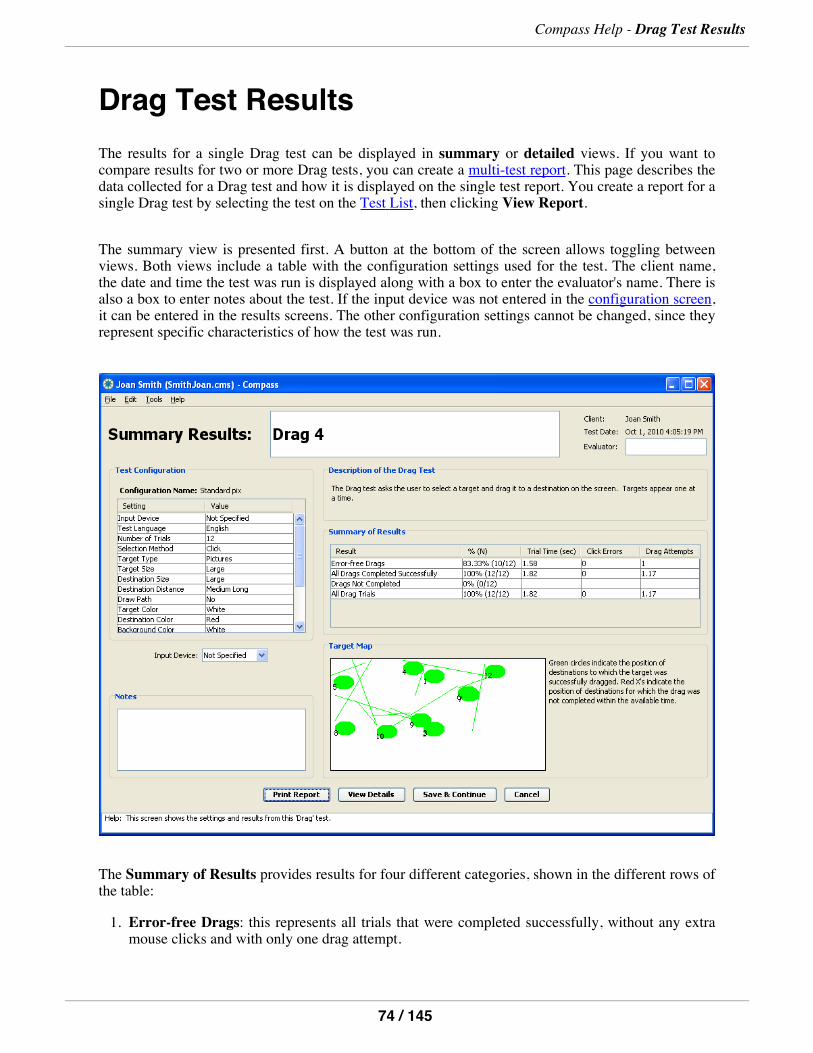
Drag Test ResultsThe results for a single Drag test can be displayed in summary or detailed views. If you want tocompare results for two or more Drag tests, you can create a multi-test report. This page describes thedata collected for a Drag test and how it is displayed on the single test report. You create a report for asingle Drag test by selecting the test on the Test List, then clicking View Report.
The summary view is presented first. A button at the bottom of the screen allows toggling betweenviews. Both views include a table with the configuration settings used for the test. The client name,the date and time the test was run is displayed along with a box to enter the evaluator's name. There isalso a box to enter notes about the test. If the input device was not entered in the configuration screen,it can be entered in the results screens. The other configuration settings cannot be changed, since theyrepresent specific characteristics of how the test was run.
The Summary of Results provides results for four different categories, shown in the different rows ofthe table:
1. Error-free Drags: this represents all trials that were completed successfully, without any extramouse clicks and with only one drag attempt.
Compass Help - Drag Test Results
74 / 145

2. All Drags Completed Successfully: this represents all trials that were completed successfully,whether or not they had any extra mouse clicks or additional drag attempts. (Note that thisincludes all the "Error-free Drags", plus any successful selections that had at least one extramouse click or drag attempt.)
3. Drags Not Completed: this represents trials in which the target was not successfully dragged tothe destination in the time available. The available time per trial is specified by the max timeconfiguration setting.
4. All Drag Trials: this represents all trials in the test. This combines the results of "All DragsCompleted Successfully" and "Drags Not Completed."
For each category of trials, the following results are reported in the table columns:
1. % (N): how many trials fell into this category. This is shown both as a percentage of all trials inthe test, as well as the exact number of trials.
2. Trial Time (sec): the average time required to perform each trial in this category. This ismeasured in seconds from when the target and destination are first presented until the target isdragged and released into the destination.
3. Click Errors: The average number of mouse clicks that occurred outside of the presented target.This counts all clicks that occur outside the target, from when the trial is presented until the usercompletes the trial. A value of 0 indicates that the client was able to select each target with asingle click. Larger values would indicate that the client activated their selection method withoutbeing on a target. (If Dwell is the specified selection method, Click Errors is always 0.)
4. Drag Attempts: the average number of times the target was picked up and dragged before thecompletion of each trial. A value of 1 is the minimum, and indicates that the client did not "letgo" of the target once dragging began.
TheTarget Map is a graphical representation of the display showing the relative location ofdestinations and whether the target was correctly dragged to them. Correctly completed destinationsappear as a green circle, and those not completed within the available time appear as a red X. Thenumber of the trial is displayed for each destination, as well as a line showing the target starting point.While there is a lot of information provided in a small space, it does display a pattern that can helpidentify areas of the screen in which target selection is more difficult for the client.
Compass Help - Drag Test Results
75 / 145
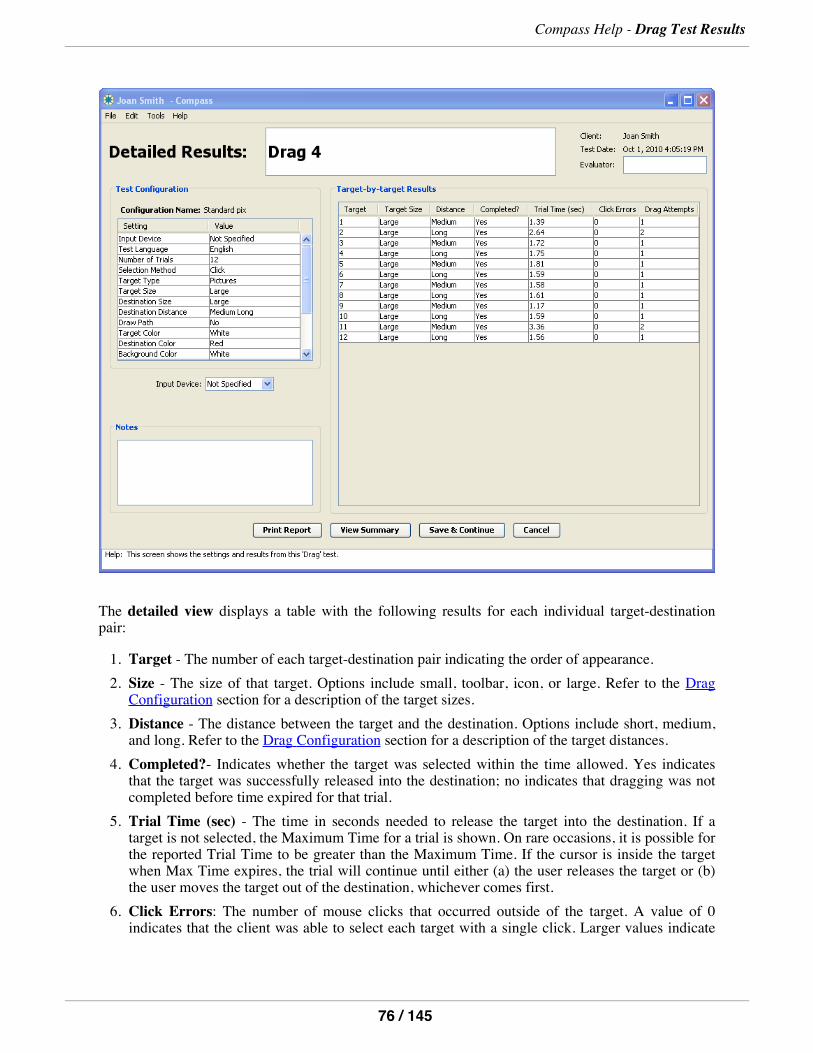
The detailed view displays a table with the following results for each individual target-destinationpair:
1. Target - The number of each target-destination pair indicating the order of appearance.2. Size - The size of that target. Options include small, toolbar, icon, or large. Refer to the DragConfiguration section for a description of the target sizes.
3. Distance - The distance between the target and the destination. Options include short, medium,and long. Refer to the Drag Configuration section for a description of the target distances.
4. Completed?- Indicates whether the target was selected within the time allowed. Yes indicatesthat the target was successfully released into the destination; no indicates that dragging was notcompleted before time expired for that trial.
5. Trial Time (sec) - The time in seconds needed to release the target into the destination. If atarget is not selected, the Maximum Time for a trial is shown. On rare occasions, it is possible forthe reported Trial Time to be greater than the Maximum Time. If the cursor is inside the targetwhen Max Time expires, the trial will continue until either (a) the user releases the target or (b)the user moves the target out of the destination, whichever comes first.
6. Click Errors: The number of mouse clicks that occurred outside of the target. A value of 0indicates that the client was able to select each target with a single click. Larger values indicate
Compass Help - Drag Test Results
76 / 145
that the client activated their selection method without being on a target. (If Dwell is thespecified selection method, Click Errors is always 0.)
7. Drag Attempts: the number of times the target was picked up and dragged for this trial. A valueof 1 is the minimum, and indicates that the client did not "let go" of the target once draggingbegan.
Note that the width of the columns in any of the tables can be resized by moving the cursor to the edgeof the box containing the label and dragging it to the left or right.
Additionally, you can cut-and-paste the contents of an Drag report into another application, such as aword processor. This may be useful when preparing reports on a particular client.
The following buttons are available to help you navigate and work with reports.
1. Print Report - Clicking this button prints the summary and detailed report.2. View Details - When in the summary view, clicking on this button changes the display to thedetailed report view.
3. View Summary - When in the detailed view, clicking on this button returns the display to thesummary view.
4. Save & Continue - Clicking on this button from either view will save the data for the test, anycomments you have entered, and the evaluator name and return you to the Test List screen.
5. Cancel - Clicking on this button from either view will return you to the Test List screen withoutsaving any changes to the results information. Note that all performance data have already beensaved before viewing the report and will not be lost or changed by selecting the Cancel button.
Note that some users have reported that the target map does not print properly on their printer. At thispoint, we have not figured out how to guarantee that it will print correctly on every printer, and weapologize for the inconvenience.
Compass Help - Drag Test Results
77 / 145
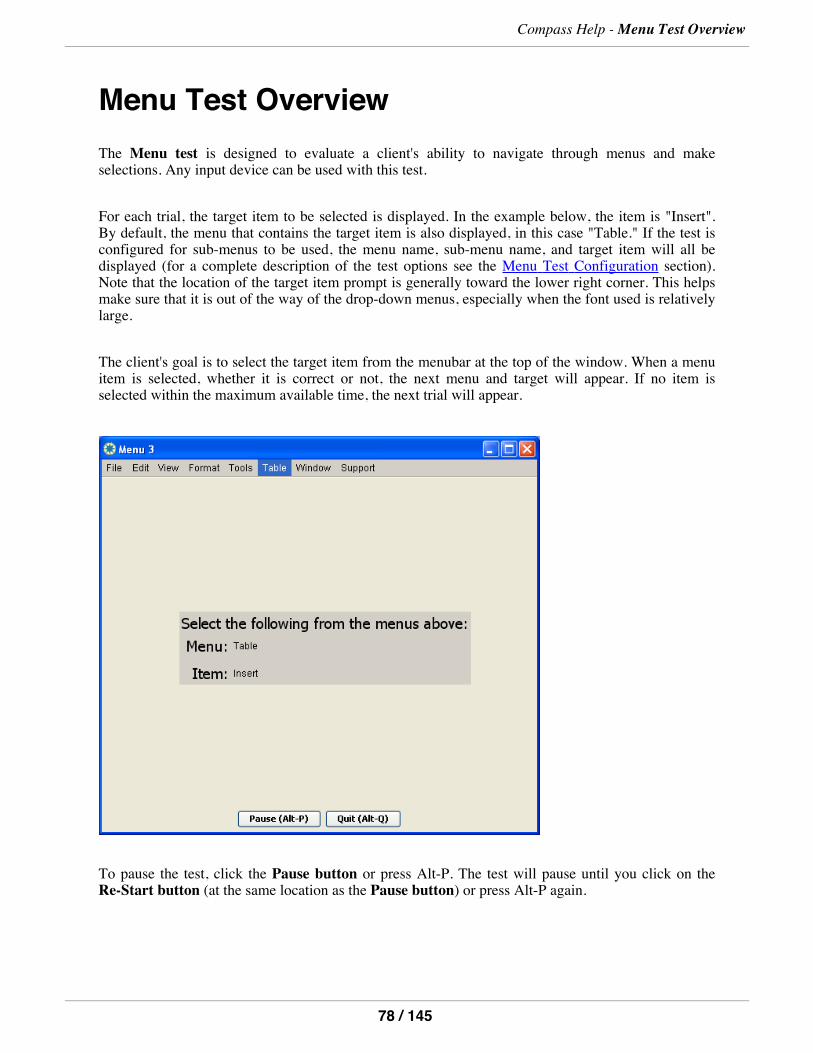
Menu Test OverviewThe Menu test is designed to evaluate a client's ability to navigate through menus and makeselections. Any input device can be used with this test.
For each trial, the target item to be selected is displayed. In the example below, the item is "Insert".By default, the menu that contains the target item is also displayed, in this case "Table." If the test isconfigured for sub-menus to be used, the menu name, sub-menu name, and target item will all bedisplayed (for a complete description of the test options see the Menu Test Configuration section).Note that the location of the target item prompt is generally toward the lower right corner. This helpsmake sure that it is out of the way of the drop-down menus, especially when the font used is relativelylarge.
The client's goal is to select the target item from the menubar at the top of the window. When a menuitem is selected, whether it is correct or not, the next menu and target will appear. If no item isselected within the maximum available time, the next trial will appear.
To pause the test, click the Pause button or press Alt-P. The test will pause until you click on theRe-Start button (at the same location as the Pause button) or press Alt-P again.
Compass Help -Menu Test Overview
78 / 145
To quit the test before it is completed, click on the Quit button or press Alt-Q. Compass will ask youto confirm that you are sure you want to quit.
Special Note for Mac OS X Users:When running the Menu test, the standard Apple and Applicationmenus will still be active in the menubar. (We tried very hard to remove them, but were unable to doso.) If the user mistakenly selects the 'About Compass' and 'Quit Compass' items, nothing will happen,and the test can continue. If they do happen to mistakenly select another item, such as 'Hide Compass'or 'Sleep', that action will unfortunately occur and cause a disruption to the test in progress. In mostcases, it will be possible to continue the test by Pausing the current trial, and Re-starting.
Compass Help -Menu Test Overview
79 / 145

Menu Test ConfigurationThere are numerous options available in the configuration screens for the Menu test. You may chooseto use the default settings if desired, but we have made a variety of settings adjustable in an attempt tohelp you tailor the test to your particular needs.
Test name - Enter the name you would like to use for this test. The test names must be unique withineach client file. The default name is Menu with a number indicating how many menu tests have beenselected for this client (i.e., Menu 1, Menu 2, Menu 3). You should try to develop a consistent strategyfor naming tests that provides information about each test. This might be the date the tests wereselected (Menu 8-5-04), the type of session (eval or follow-up), or whatever helps you to manage thetests most effectively.
Configuration name - Enter the name you would like to use for this configuration. Since the sameconfiguration may be used for more than one test, the configuration name does not have to be unique,as long as the settings are the same. The default name is Standard. When changes are made to thestandard configuration, Compass will prompt you to change the name upon exiting the configurationscreen.
Compass Help -Menu Test Configuration
80 / 145
You should develop a consistent strategy for naming the configurations to describe the settings used.This will help you recall how this test differs from another one. A good configuration name mightdescribe the type of input method (e.g., trackball or head pointer), the type and size of the text (e.g.,14 bold), or other important settings.
Input device - Allows the input device being used to be selected from a drop-down list of commondevices. Device names that are not on the drop-down list can be typed into the field. The default valueis Not Specified. If you are comparing performance with different input devices, it is important to setthe Input Device field accordingly. Otherwise, it may not be clear which input device was used whenviewing test results.
The Test Language field defines which language is used for any text or vocal feedback presented tothe client during the test. Currently, the choices are English, French, Spanish, Portuguese, and Arabic,with English as the default value. In the Menu test, the menus and items to select from are presentedin the Test Language.
Notes - A field for any comments relating to the configuration. By default, this field is empty. Addingcomments may be useful for describing why certain choices were made in the configuration or anyother information that will help you when reviewing the test.
Number of Trials - The number of targets that will be presented during the test. The default value is8 trials. The number should be large enough to provide a representative sample of the client's ability toperform the task and small enough to avoid unintended fatigue or loss of interest.
Feedback Options
Style - The feedback style option allows you to select the most appropriate form of feedback for theuser. Basic feedback provides simple, direct feedback. Engaging feedback provides a morestimulating response to help motivate and hold the interest of clients when necessary. Feedback stylesare consistent across all of the trials. The default feedback style is Basic.
Four feedback options are available for correct and/or incorrect trials. The option for Correct Trialsdefines the type of feedback provided when the user selects the target within the time allowed. Thedefault value for Correct Trials is Auditory. The option for Incorrect Trials defines the type offeedback provided when the user selects an incorrect menu item. The default value for Incorrect Trialsis Auditory. The feedback options are:
1. None - Compass will provide no feedback for any of the trials of this type. When a selection ismade or the trial times out, the next trial will start until the test is completed.
2. Visual - Compass will provide a visual response.3. Auditory - Compass will provide an auditory response.4. Both - Compass will provide both a visual and an auditory response.
Prompt - This specifies what information is displayed to tell the client which menu item to select ineach trial. The options are:
Compass Help -Menu Test Configuration
81 / 145
1.Target Item and Menu - The target item and the menu in which it is located will both be displayed tothe user. This gives the client full information about where to find the target item, and is the defaultoption.2.Target Item Only - Only the target item will be displayed to the user. For example, the item "Save"
would be displayed, without telling the user that "Save" is found in the "File" menu. This option mightbe useful to see if a client can search an unfamiliar menubar effectively.
Menu Complexity - This specifies how many menus and menu items there are to choose from, aswell as whether sub-menus are included. There are two choices for the size of the menubar:
1.Simple Menubar - When this is selected, the menubar at the top of the test window includes fourmenus. The number of choices within each menu varies from three to six items. This provides fewerdistractions than are typically found in most menubars, and may make it easier to perform the task forsome clients.2.Typical Menubar - When this is selected, the menubar displays eight menus. The number of item
choices within each menu varies from three to ten. This is intended to be similar to a commonmenubar, such as the one found in Microsoft Word, and is the default option.
Include Submenus - When this is selected, several of the menus will include items that havesubmenus which cascade to the side of the main menu. Submenus can be used with both the simpleand typical menubars. If the Prompt is set to Target Item and Menu, the prompt display willinclude the submenu (if any), as well as the menu name and the target item. The default value issubmenus off.
Text Style (Windows only) - By default, Compass uses a bold size 12 font, with black letters on agray background for the Menu test. To change the font and/or color of the text and/or the color of thetest background, click the Text Style... button. This will bring up the dialogue box shown below. Thethree panels at the top show the available fonts, styles, and sizes for the text. You can select one ofthese by clicking on it. To set the background color, click on one of the color buttons shown on the"Background" row. To set the text color, click on one of the color buttons shown on the "Font" row.Your choices will be reflected in the Preview area. When you have the colors you want, click OK touse them. Or click Cancel to return without making any changes.
Please note: Changing the text style is only available on Windows. Mac OS X uses only a fixed fontfor menus.
Compass Help -Menu Test Configuration
82 / 145
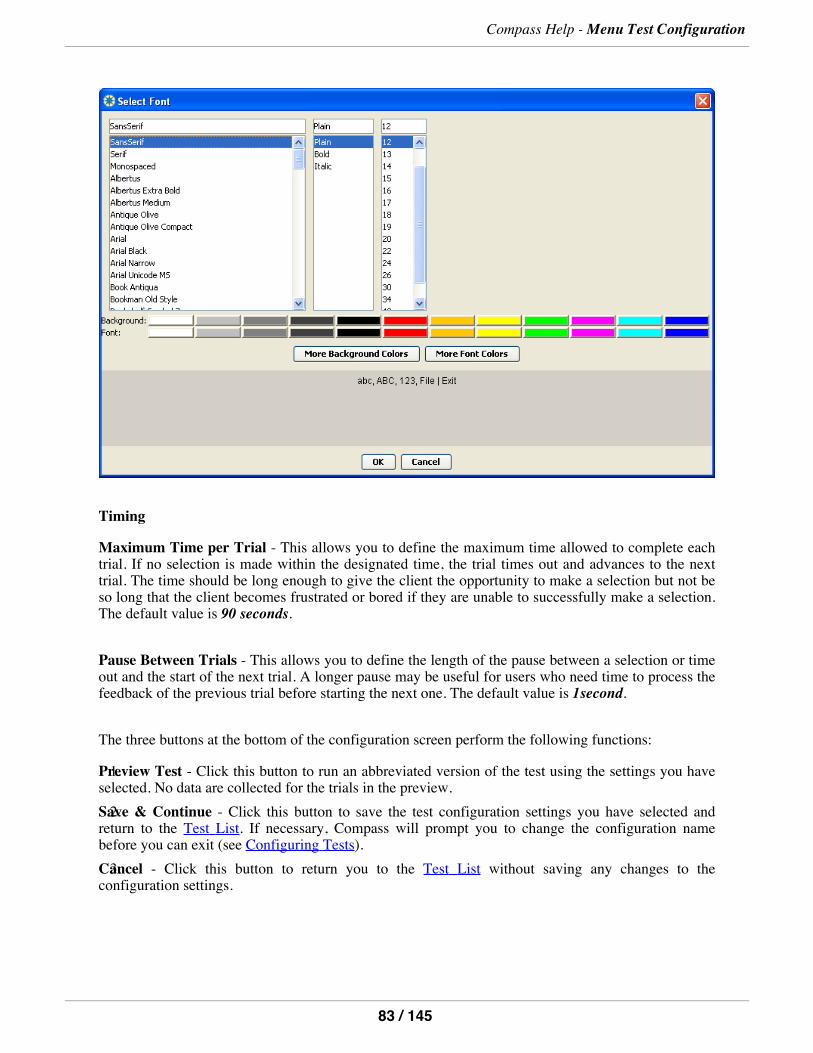
Timing
Maximum Time per Trial - This allows you to define the maximum time allowed to complete eachtrial. If no selection is made within the designated time, the trial times out and advances to the nexttrial. The time should be long enough to give the client the opportunity to make a selection but not beso long that the client becomes frustrated or bored if they are unable to successfully make a selection.The default value is 90 seconds.
Pause Between Trials - This allows you to define the length of the pause between a selection or timeout and the start of the next trial. A longer pause may be useful for users who need time to process thefeedback of the previous trial before starting the next one. The default value is 1second.
The three buttons at the bottom of the configuration screen perform the following functions:
1.Preview Test - Click this button to run an abbreviated version of the test using the settings you haveselected. No data are collected for the trials in the preview.2.Save & Continue - Click this button to save the test configuration settings you have selected and
return to the Test List. If necessary, Compass will prompt you to change the configuration namebefore you can exit (see Configuring Tests).3.Cancel - Click this button to return you to the Test List without saving any changes to the
configuration settings.
Compass Help -Menu Test Configuration
83 / 145
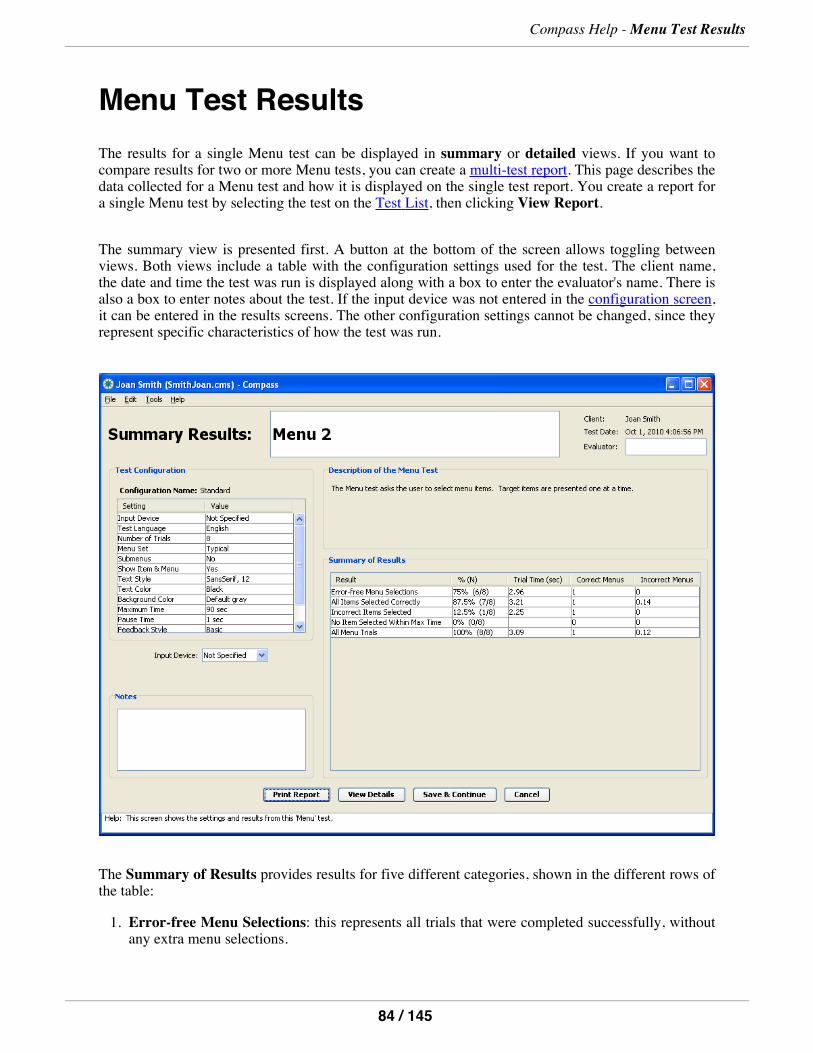
Menu Test ResultsThe results for a single Menu test can be displayed in summary or detailed views. If you want tocompare results for two or more Menu tests, you can create a multi-test report. This page describes thedata collected for a Menu test and how it is displayed on the single test report. You create a report fora single Menu test by selecting the test on the Test List, then clicking View Report.
The summary view is presented first. A button at the bottom of the screen allows toggling betweenviews. Both views include a table with the configuration settings used for the test. The client name,the date and time the test was run is displayed along with a box to enter the evaluator's name. There isalso a box to enter notes about the test. If the input device was not entered in the configuration screen,it can be entered in the results screens. The other configuration settings cannot be changed, since theyrepresent specific characteristics of how the test was run.
The Summary of Results provides results for five different categories, shown in the different rows ofthe table:
1. Error-free Menu Selections: this represents all trials that were completed successfully, withoutany extra menu selections.
Compass Help -Menu Test Results
84 / 145
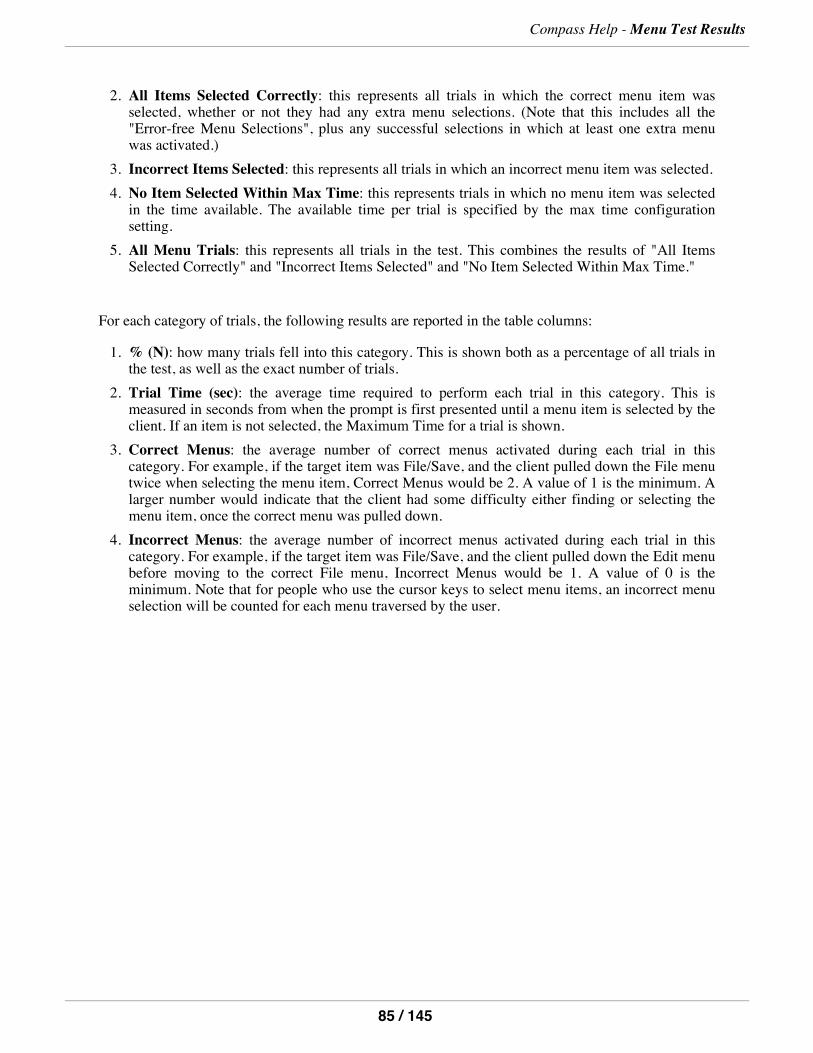
2. All Items Selected Correctly: this represents all trials in which the correct menu item wasselected, whether or not they had any extra menu selections. (Note that this includes all the"Error-free Menu Selections", plus any successful selections in which at least one extra menuwas activated.)
3. Incorrect Items Selected: this represents all trials in which an incorrect menu item was selected.4. No Item Selected Within Max Time: this represents trials in which no menu item was selectedin the time available. The available time per trial is specified by the max time configurationsetting.
5. All Menu Trials: this represents all trials in the test. This combines the results of "All ItemsSelected Correctly" and "Incorrect Items Selected" and "No Item Selected Within Max Time."
For each category of trials, the following results are reported in the table columns:
1. % (N): how many trials fell into this category. This is shown both as a percentage of all trials inthe test, as well as the exact number of trials.
2. Trial Time (sec): the average time required to perform each trial in this category. This ismeasured in seconds from when the prompt is first presented until a menu item is selected by theclient. If an item is not selected, the Maximum Time for a trial is shown.
3. Correct Menus: the average number of correct menus activated during each trial in thiscategory. For example, if the target item was File/Save, and the client pulled down the File menutwice when selecting the menu item, Correct Menus would be 2. A value of 1 is the minimum. Alarger number would indicate that the client had some difficulty either finding or selecting themenu item, once the correct menu was pulled down.
4. Incorrect Menus: the average number of incorrect menus activated during each trial in thiscategory. For example, if the target item was File/Save, and the client pulled down the Edit menubefore moving to the correct File menu, Incorrect Menus would be 1. A value of 0 is theminimum. Note that for people who use the cursor keys to select menu items, an incorrect menuselection will be counted for each menu traversed by the user.
Compass Help -Menu Test Results
85 / 145
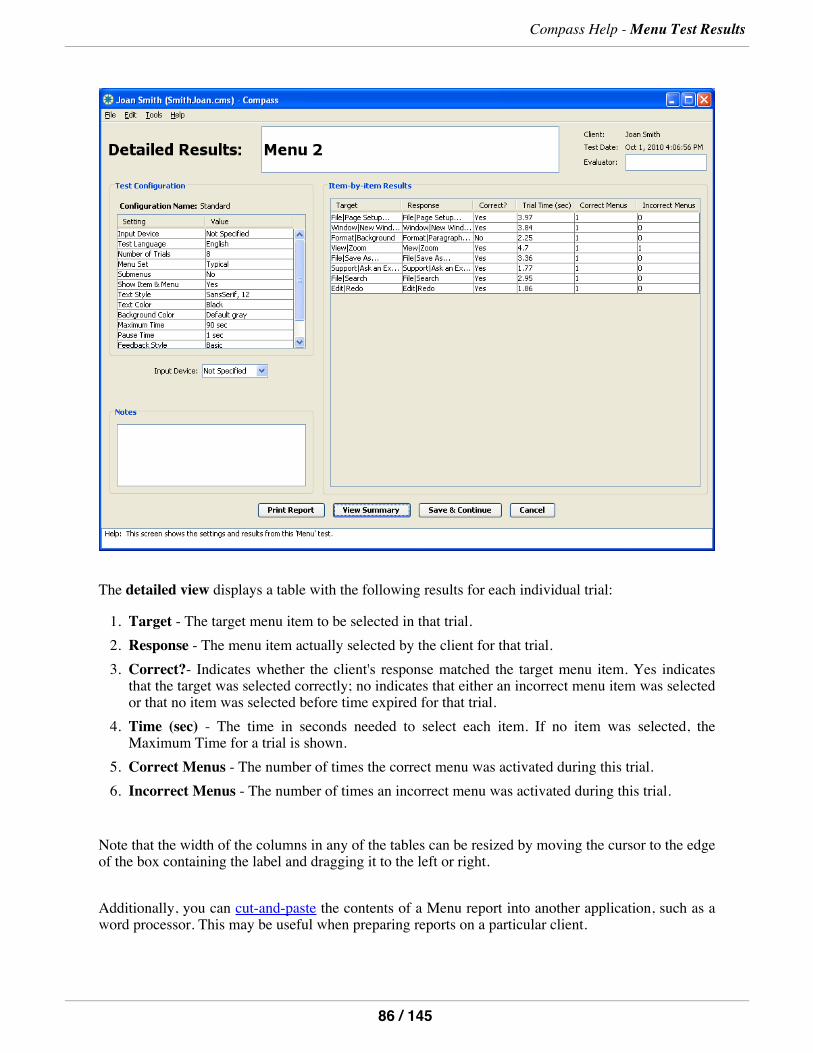
The detailed view displays a table with the following results for each individual trial:
1. Target - The target menu item to be selected in that trial.2. Response - The menu item actually selected by the client for that trial.3. Correct?- Indicates whether the client's response matched the target menu item. Yes indicatesthat the target was selected correctly; no indicates that either an incorrect menu item was selectedor that no item was selected before time expired for that trial.
4. Time (sec) - The time in seconds needed to select each item. If no item was selected, theMaximum Time for a trial is shown.
5. Correct Menus - The number of times the correct menu was activated during this trial.6. Incorrect Menus - The number of times an incorrect menu was activated during this trial.
Note that the width of the columns in any of the tables can be resized by moving the cursor to the edgeof the box containing the label and dragging it to the left or right.
Additionally, you can cut-and-paste the contents of a Menu report into another application, such as aword processor. This may be useful when preparing reports on a particular client.
Compass Help -Menu Test Results
86 / 145
The following buttons are available to help you navigate and work with reports.
1. Print Report - Clicking this button prints the summary and detailed report.2. View Details - When in the summary view, clicking on this button changes the display to thedetailed report view.
3. View Summary - When in the detailed view, clicking on this button returns the display to thesummary view.
4. Save & Continue - Clicking on this button from either view will save the data for the test, anycomments you have entered, and the evaluator name and return you to the Test List screen.
5. Cancel - Clicking on this button from either view will return you to the Test List screen withoutsaving any changes to the results information. Note that all performance data have already beensaved before viewing the report and will not be lost or changed by selecting the Cancel button.
Compass Help -Menu Test Results
87 / 145
Scan Test OverviewThe Scan test is designed to evaluate a client's ability to use a single switch to make choices from ascanning layout. The target item is displayed in the window with a layout of item choices below it.Items can be selected from the layout using the mouse button or external switch to performsingle-switch scanning. (The external switch needs to emulate the mouse button in order to work.) Thescan rate can be adjusted, as well as the letter size and color.
Additionally, a variety of scan layouts are available, using text or pictures as the items. Layoutsinclude row-column matrices and 2- and 4-item linear layouts. They are pre-filled with text or pictureitems, depending on how you've configured the Scan test. See the Scan Test Configuration section fora complete description of the options available.
When the test is started, a target item is presented. The client's goal is to select the target item from thescanning layout. For a row-column layout, items are selected from the layout as follows:
1. Press the switch to begin scanning through the rows. (Not required if Scan Initiation is set toAutomatic.)
2. When the desired row is highlighted, press the switch again to select it. This begins scanningthrough the letters in that row.
3. When the desired letter is highlighted, press the switch a third time to select it.
Selecting items from a linear layout is similar, except that one fewer switch hit is required, since thereis no need to select a specific row. In the figure below, the 'pig' item is ready to be selected. Note thata scanning selection occurs on the switch press; scanning does not pause while the client releases theswitch.
When an item has been selected, it will be displayed briefly, and the next target item will appear. If noitem is entered within the maximum available time, the trial will "time-out", and the next target itemwill appear.
Compass Help - Scan Test Overview
88 / 145
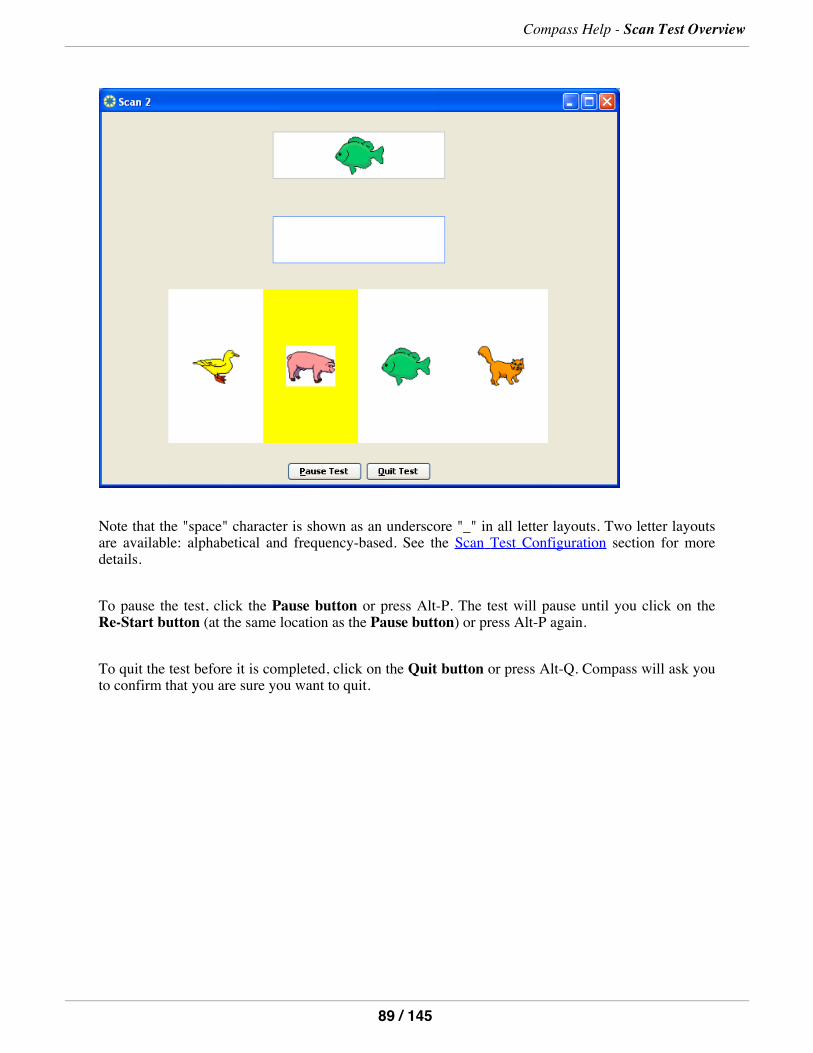
Note that the "space" character is shown as an underscore "_" in all letter layouts. Two letter layoutsare available: alphabetical and frequency-based. See the Scan Test Configuration section for moredetails.
To pause the test, click the Pause button or press Alt-P. The test will pause until you click on theRe-Start button (at the same location as the Pause button) or press Alt-P again.
To quit the test before it is completed, click on the Quit button or press Alt-Q. Compass will ask youto confirm that you are sure you want to quit.
Compass Help - Scan Test Overview
89 / 145
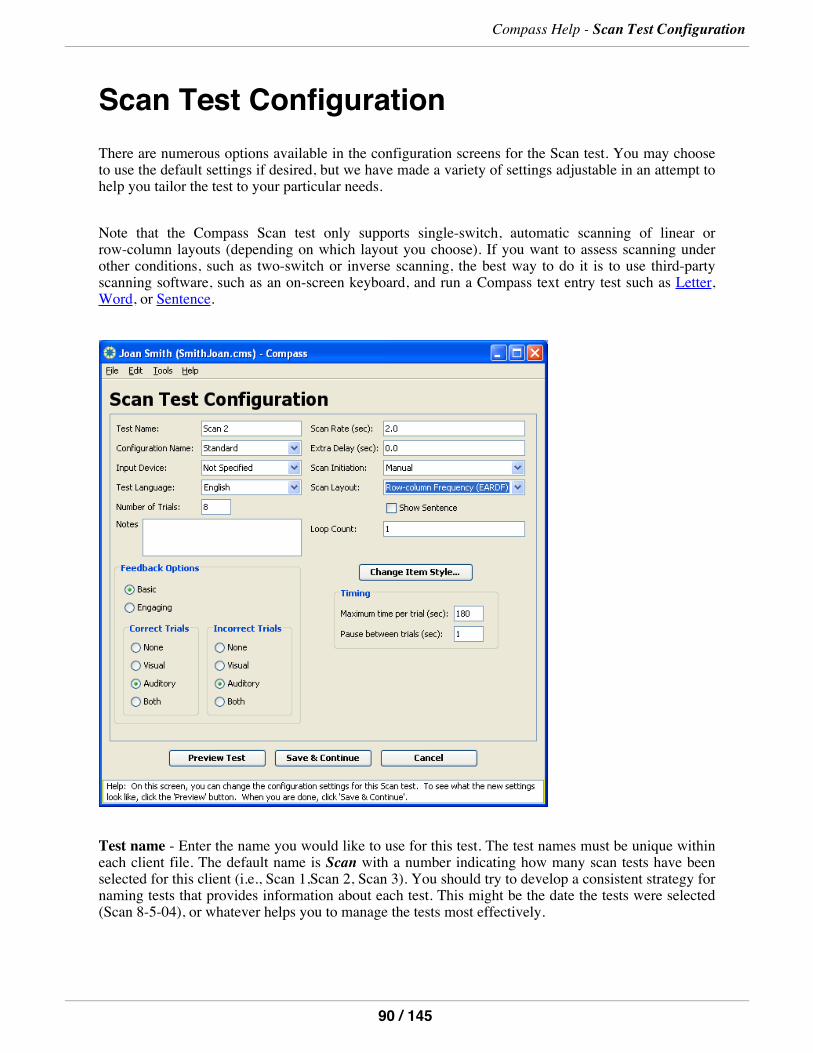
Scan Test ConfigurationThere are numerous options available in the configuration screens for the Scan test. You may chooseto use the default settings if desired, but we have made a variety of settings adjustable in an attempt tohelp you tailor the test to your particular needs.
Note that the Compass Scan test only supports single-switch, automatic scanning of linear orrow-column layouts (depending on which layout you choose). If you want to assess scanning underother conditions, such as two-switch or inverse scanning, the best way to do it is to use third-partyscanning software, such as an on-screen keyboard, and run a Compass text entry test such as Letter,Word, or Sentence.
Test name - Enter the name you would like to use for this test. The test names must be unique withineach client file. The default name is Scan with a number indicating how many scan tests have beenselected for this client (i.e., Scan 1,Scan 2, Scan 3). You should try to develop a consistent strategy fornaming tests that provides information about each test. This might be the date the tests were selected(Scan 8-5-04), or whatever helps you to manage the tests most effectively.
Compass Help - Scan Test Configuration
90 / 145
Configuration name - Enter the name you would like to use for this configuration. Since the sameconfiguration may be used for more than one test, the configuration name does not have to be unique,as long as the settings are the same. The default name is Standard. When changes are made to thestandard configuration, Compass will prompt you to change the name upon exiting the configurationscreen.
You should develop a consistent strategy for naming the configurations to describe the settings used.This will help you recall how this test differs from another one. A good configuration name mightdescribe the scan rate (e.g., 0.75 sec), the type and size of the text (e.g., 14 bold), or other importantsettings.
Input device - Allows the input device being used to be selected from a drop-down list of commondevices. Device names that are not on the drop-down list can be typed into the field. The default valueis Not Specified. If you are comparing performance with different input devices, it is important to setthe Input Device field accordingly. Otherwise, it may not be clear which input device was used whenviewing test results. For the Scan test, you may find it helpful to enter specific switch sites in theconfiguration settings. This could be done in the input device field, in the Notes field, or perhaps aspart of the test or configuration name.
The Test Language field defines which language is used for any text or vocal feedback presented tothe client during the test. Currently, the choices are English, French, Spanish, Portuguese, and Arabic,with English as the default value. In the Scan test, the matrix letters to select from are presented in theTest Language.
Notes - A field for any comments relating to the configuration. By default, this field is empty. Addingcomments may be useful for describing why certain choices were made in the configuration or anyother information that will help you when reviewing the test.
Number of Trials - The number of targets that will be presented during the test. The default value is8 trials. The number should be large enough to provide a representative sample of the client's ability toperform the task and small enough to avoid unintended fatigue or loss of interest.
Feedback Options
Style - The feedback style option allows you to select the most appropriate form of feedback for theuser. Basic feedback provides simple, direct feedback. Engaging feedback provides a morestimulating response to help motivate and hold the interest of clients when necessary. Feedback stylesare consistent across all of the trials. The default feedback style is Basic.
Four feedback options are available for correct and/or incorrect trials. The option for Correct Trialsdefines the type of feedback provided when the user selects the target within the time allowed. Thedefault value for Correct Trials is Auditory. The option for Incorrect Trials defines the type offeedback provided when the user does not select the target in the time allowed. The default value forIncorrect Trials is Auditory. The feedback options are:
1. None - Compass will provide no feedback for the trials of this type (correct or incorrect). When aselection is made or the trial times out, the next trial will start unless the test is completed.
Compass Help - Scan Test Configuration
91 / 145
2. Visual - Compass will provide a visual response.3. Auditory - Compass will provide an auditory response.4. Both - Compass will provide both a visual and an auditory response.
Scan Rate - This allows you to define how quickly the scan highlight moves during scanning. Thescan rate represents how long the highlight stays on a row or column before moving to the next row orcolumn. The default value is 2 seconds.
Extra Delay - This allows you to define an extra delay to add to the first row and first column duringscanning. The extra delay is added to the scan rate to define how long the highlight stays on the firstrow and first column. The default value is 0 seconds.
Scan Initiation - This defines whether scanning begins automatically after each selection (automatic)or whether the switch must be pressed in order to begin scanning (manual). The default value isAutomatic.
Scan Layout - This defines what sort of items are presented in the test, and how they are arranged forscanning selection. The default value for Scan Layout is Row/column Frequency (EARDF). Tenpre-built layouts are available:
1. Row/column Alphabetical - This is a letter matrix arranged into 5 rows and 6 columns. Thearrangement of letters in the matrix is alphabetical.
2. Row/column Frequency (EARDF) - This is a letter matrix arranged into rows and columns. Thearrangement of letters in the matrix is based on the frequency of their use in the selected TestLanguage; more frequently used letters are located fewer scan steps away from the upper leftcorner. For example, when English is the Test Language, the 'space' character, indicated by '_', isin the upper left corner, since it is the most frequently used character in English. The 'EARDF'indicates the letters in the top row and distinguishes this matrix from the other frequency-basedmatrices that are included as options. 'EARDF' roughly corresponds to the Time Logical matrixfrom Lesher et al. 1998. This matrix can be used as a French frequency-of-use layout; in thatcase, the letters are arranged to reflect their frequency-of-use in the French language.
3. Row/column Frequency (EARDU) - This is a row-column letter matrix, where the arrangementof letters in the matrix is based on the frequency of their use in English. More frequently usedletters are located fewer scan steps away from the upper left corner. The 'EARDU' indicates theletters in the top row and distinguishes this matrix from the other frequency-based matrices thatare included as options. 'EARDU' roughly corresponds to the TIC Logical matrix from Lesher etal. 1998. We have not yet provided this layout in a French version; the EARDF matrix can beused as a French frequency-of-use layout.
4. Row/column Frequency (EASTO) - This is a row-column letter matrix, where the arrangementof letters in the matrix is based on the frequency of their use in English. More frequently usedletters are located fewer scan steps away from the upper left corner. The 'EASTO' indicates theletters in the top row and distinguishes this matrix from the other frequency-based matrices thatare included as options. The space character is shifted away from the upper-left corner, since thislayout was originally used in systems that combine letter selection with word prediction, therebyrequiring fewer selections of the space character. We have not yet provided this layout in aFrench version; the EARDF matrix can be used as a French frequency-of-use layout.
Compass Help - Scan Test Configuration
92 / 145
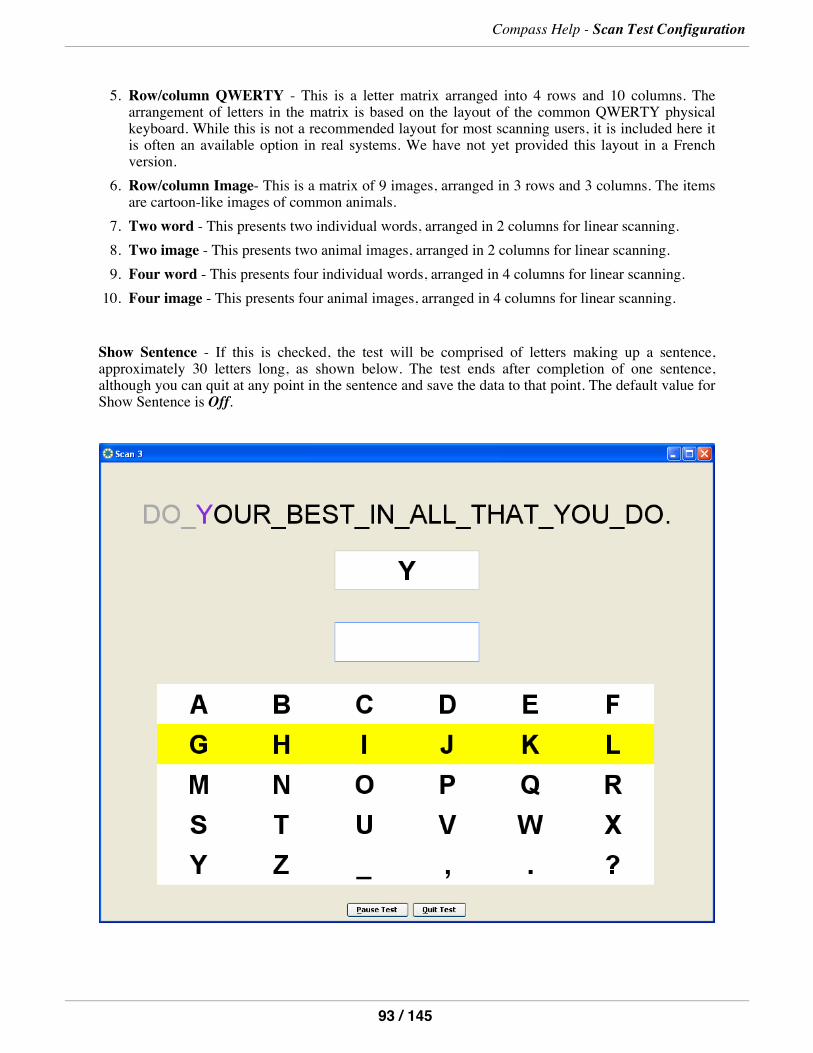
5. Row/column QWERTY - This is a letter matrix arranged into 4 rows and 10 columns. Thearrangement of letters in the matrix is based on the layout of the common QWERTY physicalkeyboard. While this is not a recommended layout for most scanning users, it is included here itis often an available option in real systems. We have not yet provided this layout in a Frenchversion.
6. Row/column Image- This is a matrix of 9 images, arranged in 3 rows and 3 columns. The itemsare cartoon-like images of common animals.
7. Two word - This presents two individual words, arranged in 2 columns for linear scanning.8. Two image - This presents two animal images, arranged in 2 columns for linear scanning.9. Four word - This presents four individual words, arranged in 4 columns for linear scanning.10. Four image - This presents four animal images, arranged in 4 columns for linear scanning.
Show Sentence - If this is checked, the test will be comprised of letters making up a sentence,approximately 30 letters long, as shown below. The test ends after completion of one sentence,although you can quit at any point in the sentence and save the data to that point. The default value forShow Sentence is Off.
Compass Help - Scan Test Configuration
93 / 145
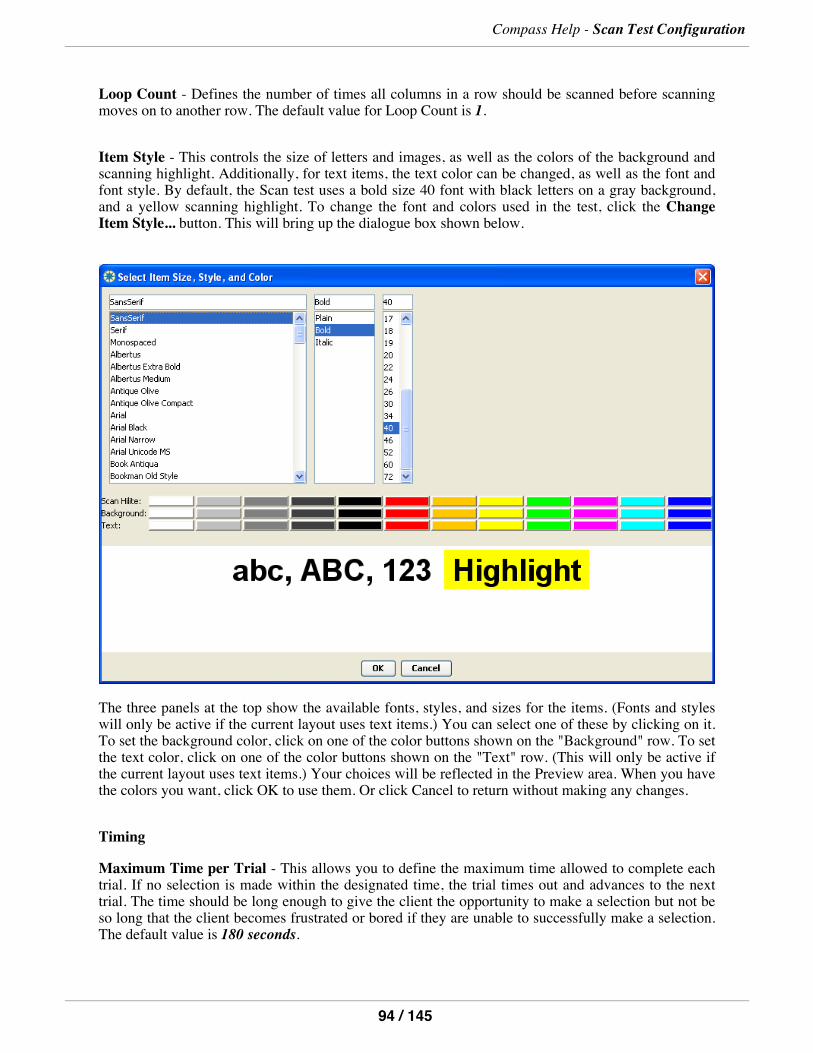
Loop Count - Defines the number of times all columns in a row should be scanned before scanningmoves on to another row. The default value for Loop Count is 1.
Item Style - This controls the size of letters and images, as well as the colors of the background andscanning highlight. Additionally, for text items, the text color can be changed, as well as the font andfont style. By default, the Scan test uses a bold size 40 font with black letters on a gray background,and a yellow scanning highlight. To change the font and colors used in the test, click the ChangeItem Style... button. This will bring up the dialogue box shown below.
The three panels at the top show the available fonts, styles, and sizes for the items. (Fonts and styleswill only be active if the current layout uses text items.) You can select one of these by clicking on it.To set the background color, click on one of the color buttons shown on the "Background" row. To setthe text color, click on one of the color buttons shown on the "Text" row. (This will only be active ifthe current layout uses text items.) Your choices will be reflected in the Preview area. When you havethe colors you want, click OK to use them. Or click Cancel to return without making any changes.
Timing
Maximum Time per Trial - This allows you to define the maximum time allowed to complete eachtrial. If no selection is made within the designated time, the trial times out and advances to the nexttrial. The time should be long enough to give the client the opportunity to make a selection but not beso long that the client becomes frustrated or bored if they are unable to successfully make a selection.The default value is 180 seconds.
Compass Help - Scan Test Configuration
94 / 145
Pause Between Trials - This allows you to define the length of the pause between a selection or timeout and the start of the next trial. A longer pause may be useful for users who need time to process thefeedback of the previous trial before starting the next one. The default value is 1second.
The three buttons at the bottom of the configuration screen perform the following functions:
1. Preview Test - Click this button to run an abbreviated version of the test using the settings youhave selected. No data are collected for the trials in the preview.
2. Save & Continue - Click this button to save the test configuration settings you have selected andreturn to the Test List. If necessary, Compass will prompt you to change the configuration namebefore you can exit (see Configuring Tests).
3. Cancel - Click this button to return you to the Test List without saving any changes to theconfiguration settings.
Compass Help - Scan Test Configuration
95 / 145
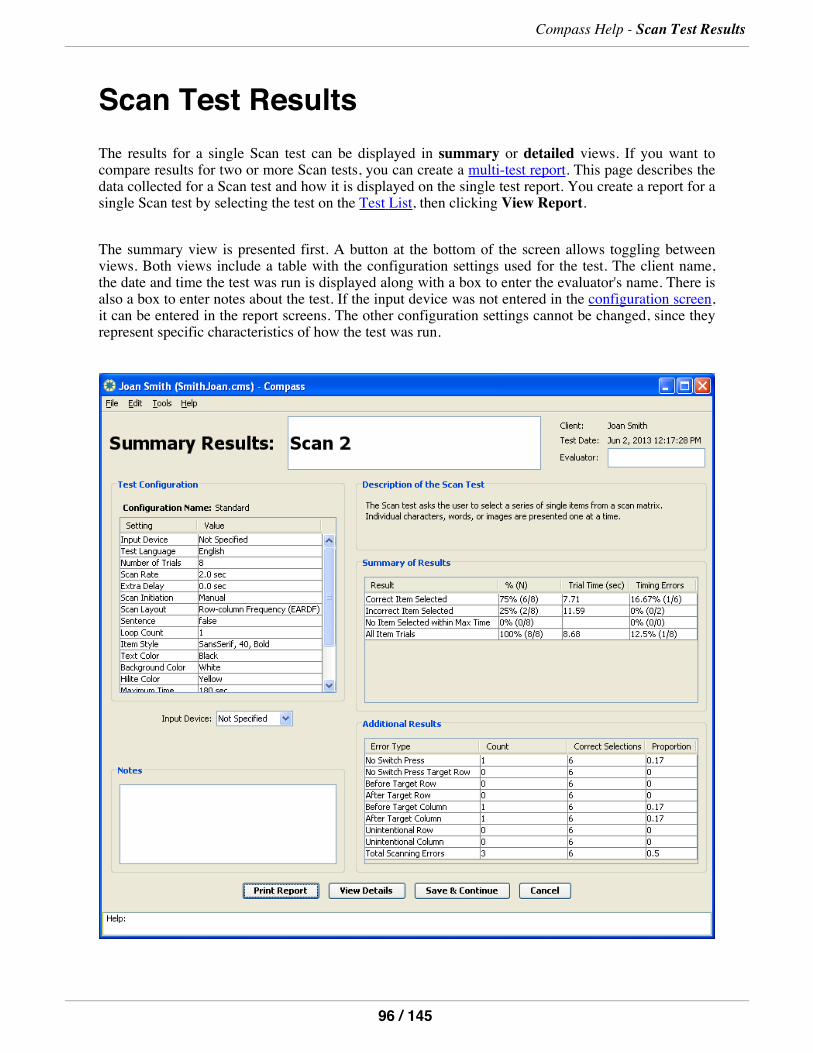
Scan Test ResultsThe results for a single Scan test can be displayed in summary or detailed views. If you want tocompare results for two or more Scan tests, you can create a multi-test report. This page describes thedata collected for a Scan test and how it is displayed on the single test report. You create a report for asingle Scan test by selecting the test on the Test List, then clicking View Report.
The summary view is presented first. A button at the bottom of the screen allows toggling betweenviews. Both views include a table with the configuration settings used for the test. The client name,the date and time the test was run is displayed along with a box to enter the evaluator's name. There isalso a box to enter notes about the test. If the input device was not entered in the configuration screen,it can be entered in the report screens. The other configuration settings cannot be changed, since theyrepresent specific characteristics of how the test was run.
Compass Help - Scan Test Results
96 / 145
The Summary of Results provides results for four different categories, shown in the different rows ofthe table:
1. Correct Item Selected: this represents all trials in which the correct item was selected.2. Incorrect Item Selected: this represents all trials in which an incorrect item was selected.3. No Item Selected Within Max Time: this represents trials in which no item was selected in thetime available. The available time per trial is specified by the max time configuration setting.
4. All Trials: this represents all trials in the test. It combines the results from the first threecategories.
For each category of trials, the following results are reported in the table columns:
1. % (N): how many trials fell into this category. This is shown both as a percentage of all trials inthe test, as well as the exact number of trials.
2. Trial Time (sec): the average time required to perform each trial in this category. This ismeasured in seconds from when the target item is first presented until an item is selected by theclient. The end of the trial occurs when the final switch is pressed (not including the release timefor the final switch hit).
3. Timing Errors: the number and percentage of timing errors committed for the trials in thiscategory. A timing error occurs when an item is not selected at the first opportunity, with theminimum number of scan steps. For example, if the client scans through the rows two timesbefore making a selection, that would count as a timing error. A maximum of 1 timing error iscounted for each trial. A lack of timing errors indicates good control of the switch and goodunderstanding of single-switch scanning.
Below the main summary table, the Additional Results table displays more details about the scanningerrors that occurred during the test. Eight different types of scanning error are counted, in thefollowing rows:
1. No Switch Press: occurs when the user did not hit the switch during one complete pass throughall the rows. If there is only one row in the matrix, this error cannot occur.
2. No Switch Press Target Row: occurs when the user did not hit the switch during one completepass through all the columns.
3. Before Target Row: occurs when the user mistakenly selects the row immediately before thedesired row (i.e., the row that contains the target item). If there is only one row in the matrix, thiserror cannot occur.
4. After Target Row: occurs when the user mistakenly selects the row immediately after thedesired row (i.e., the row that contains the target item). If there is only one row in the matrix, thiserror cannot occur.
5. Before Target Column: occurs when the user mistakenly selects the column immediately beforethe desired column (i.e., the target item).
6. After Target Column: occurs when the user mistakenly selects the column immediately afterthe desired row (i.e., the target item).
7. Unintentional Row: occurs when the user mistakenly selects an incorrect row that is neitherimmediately before or immediately after the target row.
Compass Help - Scan Test Results
97 / 145
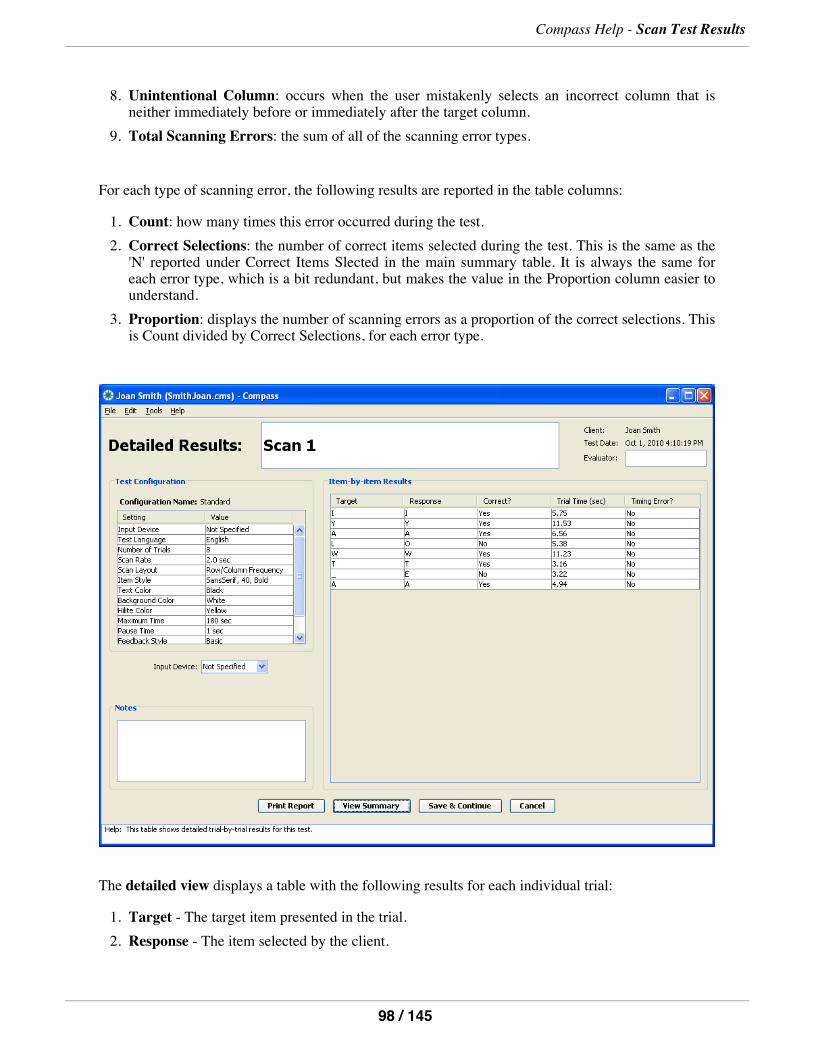
8. Unintentional Column: occurs when the user mistakenly selects an incorrect column that isneither immediately before or immediately after the target column.
9. Total Scanning Errors: the sum of all of the scanning error types.
For each type of scanning error, the following results are reported in the table columns:
1. Count: how many times this error occurred during the test.2. Correct Selections: the number of correct items selected during the test. This is the same as the'N' reported under Correct Items Slected in the main summary table. It is always the same foreach error type, which is a bit redundant, but makes the value in the Proportion column easier tounderstand.
3. Proportion: displays the number of scanning errors as a proportion of the correct selections. Thisis Count divided by Correct Selections, for each error type.
The detailed view displays a table with the following results for each individual trial:
1. Target - The target item presented in the trial.2. Response - The item selected by the client.
Compass Help - Scan Test Results
98 / 145
3. Correct?- Indicates whether the target was selected within the time allowed. "Yes" indicates thatthe correct item was entered. "No" indicates that either an incorrect item was entered or that noitem was entered before time expired for that trial.
4. Trial Time (sec) - The time in seconds needed to complete each trial, measured until the finalswitch hit is pressed. If an item is not entered within the available time, the Maximum Time for atrial is shown.
5. Timing Error? - Indicates whether a timing error occurred during the trial. A timing erroroccurs when an item is not selected at the first opportunity, with the minimum number of scansteps. For example, if the client scans through the rows two times before making a selection, thatwould count as a timing error. A maximum of 1 timing error is counted for each trial.
Note that the width of the columns in any of the tables can be resized by moving the cursor to the edgeof the box containing the label and dragging it to the left or right.
Additionally, you can cut-and-paste the contents of a Scan report into another application, such as aword processor. This may be useful when preparing reports on a particular client.
The following buttons are available to help you navigate and work with reports.
1. Print Report - Clicking this button prints the summary and detailed report.2. View Details - When in the summary view, clicking on this button changes the display to thedetailed report view.
3. View Summary - When in the detailed view, clicking on this button returns the display to thesummary view.
4. Save & Continue - Clicking on this button from either view will save the data for the test, anycomments you have entered, and the evaluator name and return you to the Test List screen.
5. Cancel - Clicking on this button from either view will return you to the Test List screen withoutsaving any changes to the results information. Note that all performance data have already beensaved before viewing the report and will not be lost or changed by selecting the Cancel button.
Compass Help - Scan Test Results
99 / 145
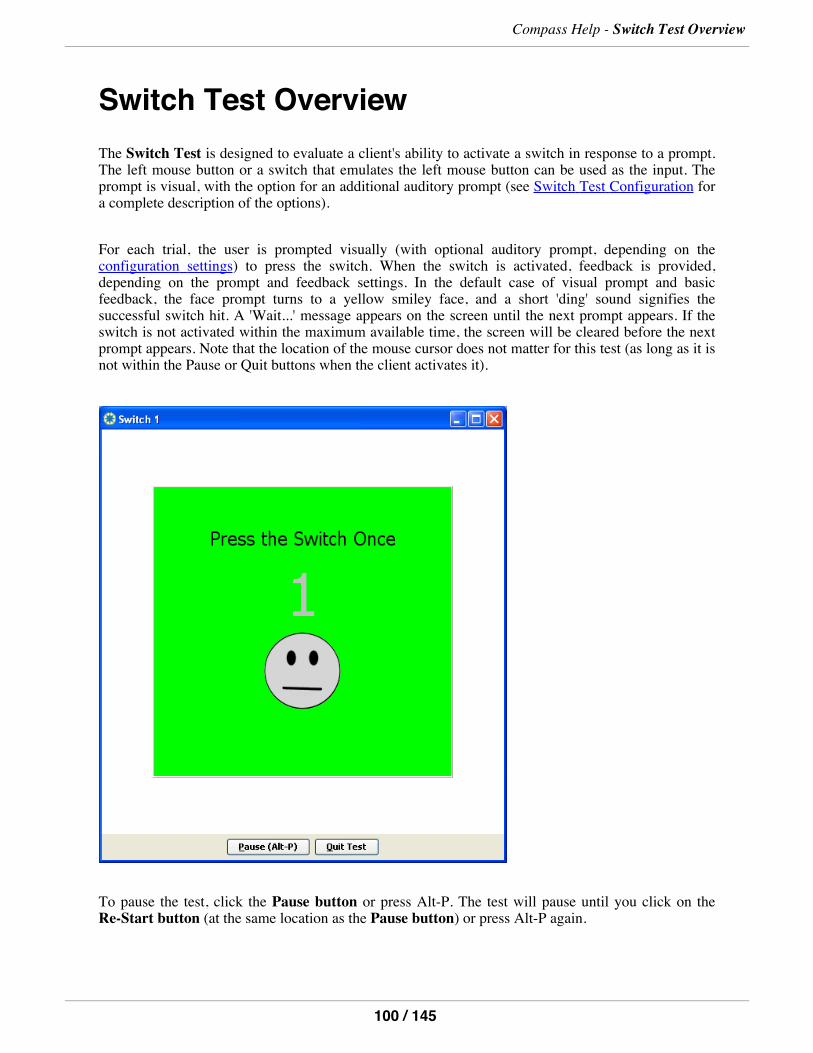
Switch Test OverviewThe Switch Test is designed to evaluate a client's ability to activate a switch in response to a prompt.The left mouse button or a switch that emulates the left mouse button can be used as the input. Theprompt is visual, with the option for an additional auditory prompt (see Switch Test Configuration fora complete description of the options).
For each trial, the user is prompted visually (with optional auditory prompt, depending on theconfiguration settings) to press the switch. When the switch is activated, feedback is provided,depending on the prompt and feedback settings. In the default case of visual prompt and basicfeedback, the face prompt turns to a yellow smiley face, and a short 'ding' sound signifies thesuccessful switch hit. A 'Wait...' message appears on the screen until the next prompt appears. If theswitch is not activated within the maximum available time, the screen will be cleared before the nextprompt appears. Note that the location of the mouse cursor does not matter for this test (as long as it isnot within the Pause or Quit buttons when the client activates it).
To pause the test, click the Pause button or press Alt-P. The test will pause until you click on theRe-Start button (at the same location as the Pause button) or press Alt-P again.
Compass Help - Switch Test Overview
100 / 145
To quit the test before it is completed, click on the Quit button or press Alt-Q. Compass will ask youto confirm that you are sure you want to quit.
Compass Help - Switch Test Overview
101 / 145
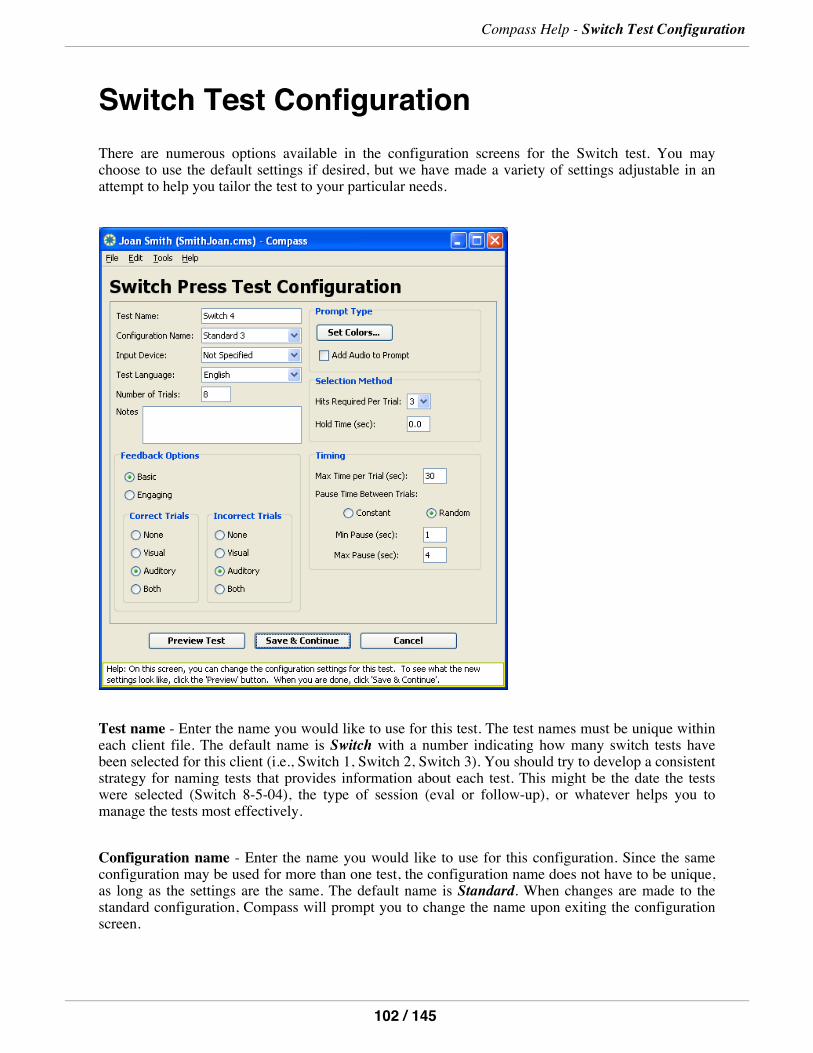
Switch Test ConfigurationThere are numerous options available in the configuration screens for the Switch test. You maychoose to use the default settings if desired, but we have made a variety of settings adjustable in anattempt to help you tailor the test to your particular needs.
Test name - Enter the name you would like to use for this test. The test names must be unique withineach client file. The default name is Switch with a number indicating how many switch tests havebeen selected for this client (i.e., Switch 1, Switch 2, Switch 3). You should try to develop a consistentstrategy for naming tests that provides information about each test. This might be the date the testswere selected (Switch 8-5-04), the type of session (eval or follow-up), or whatever helps you tomanage the tests most effectively.
Configuration name - Enter the name you would like to use for this configuration. Since the sameconfiguration may be used for more than one test, the configuration name does not have to be unique,as long as the settings are the same. The default name is Standard. When changes are made to thestandard configuration, Compass will prompt you to change the name upon exiting the configurationscreen.
Compass Help - Switch Test Configuration
102 / 145

You should develop a consistent strategy for naming the configurations to describe the settings used.This will help you recall how this test differs from another one. A good configuration name mightdescribe the type of switch (e.g., large buddy or puff switch), the prompt color (e.g., blue), or otherimportant settings.
Input device - Allows the input device being used to be selected from a drop-down list of commondevices. Device names that are not on the drop-down list can be typed into the field. The default valueis Not Specified. If you are comparing performance with different input devices, it is important to setthe Input Device field accordingly. Otherwise, it may not be clear which input device was used whenviewing test results. For the Switch test, you may find it helpful to enter specific switch sites in theconfiguration settings. This could be done in the input device field, in the Notes field, or perhaps aspart of the test or configuration name.
The Test Language field defines which language is used for any text or vocal feedback presented tothe client during the test. Currently, the choices are English, French, Spanish, Portuguese, and Arabic,with English as the default value. In the Switch test, the Engaging Feedback is presented in the TestLanguage.
Notes - A field for any comments relating to the configuration. By default, this field is empty. Addingcomments may be useful for describing why certain choices were made in the configuration or anyother information that will help you when reviewing the test.
Number of Trials - The number of prompts that will be presented during the test. The default value is8 trials. The number should be large enough to provide a representative sample of the client's ability toperform the task and small enough to avoid unintended fatigue or loss of interest.
Feedback Options
Style - The feedback style option allows you to select the most appropriate form of feedback for theuser. Basic feedback provides simple, direct feedback. Engaging feedback provides a morestimulating response to help motivate and hold the interest of clients when necessary. Feedback stylesare consistent across all of the trials. The default feedback style is Basic.
Four feedback options are available for correct and/or incorrect trials. The option for Correct Trialsdefines the type of feedback provided when the user selects the target within the time allowed. Thedefault value for Correct Trials is Auditory. The option for Incorrect Trials defines the type offeedback provided when the user does not select the target in the time allowed. The default value forIncorrect Trials is Auditory. The feedback options are:
1. None - Compass will provide no feedback for this type of trial (correct or incorrect). When aselection is made or the trial times out, the next trial will start until the test is completed.
2. Visual - Compass will provide a visual response.3. Auditory - Compass will provide an auditory response.4. Both - Compass will provide both a visual and an auditory response.
Compass Help - Switch Test Configuration
103 / 145
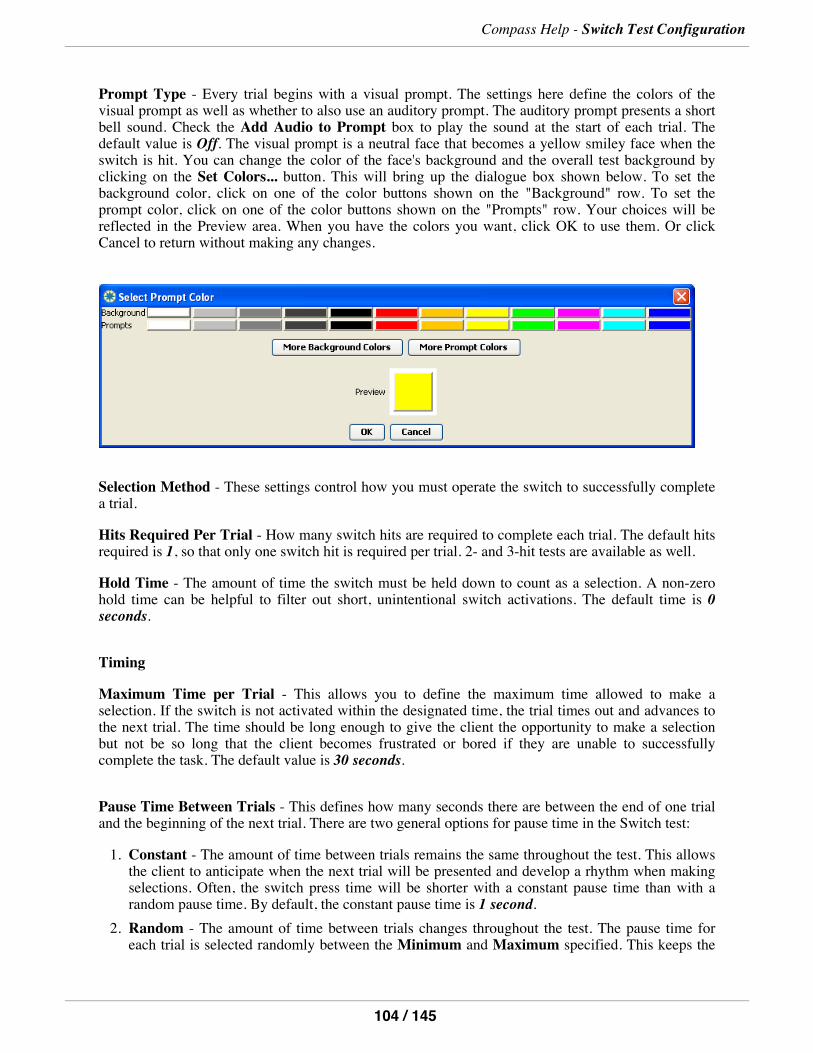
Prompt Type - Every trial begins with a visual prompt. The settings here define the colors of thevisual prompt as well as whether to also use an auditory prompt. The auditory prompt presents a shortbell sound. Check the Add Audio to Prompt box to play the sound at the start of each trial. Thedefault value is Off. The visual prompt is a neutral face that becomes a yellow smiley face when theswitch is hit. You can change the color of the face's background and the overall test background byclicking on the Set Colors... button. This will bring up the dialogue box shown below. To set thebackground color, click on one of the color buttons shown on the "Background" row. To set theprompt color, click on one of the color buttons shown on the "Prompts" row. Your choices will bereflected in the Preview area. When you have the colors you want, click OK to use them. Or clickCancel to return without making any changes.
Selection Method - These settings control how you must operate the switch to successfully completea trial.
Hits Required Per Trial - How many switch hits are required to complete each trial. The default hitsrequired is 1, so that only one switch hit is required per trial. 2- and 3-hit tests are available as well.
Hold Time - The amount of time the switch must be held down to count as a selection. A non-zerohold time can be helpful to filter out short, unintentional switch activations. The default time is 0seconds.
Timing
Maximum Time per Trial - This allows you to define the maximum time allowed to make aselection. If the switch is not activated within the designated time, the trial times out and advances tothe next trial. The time should be long enough to give the client the opportunity to make a selectionbut not be so long that the client becomes frustrated or bored if they are unable to successfullycomplete the task. The default value is 30 seconds.
Pause Time Between Trials - This defines how many seconds there are between the end of one trialand the beginning of the next trial. There are two general options for pause time in the Switch test:
1. Constant - The amount of time between trials remains the same throughout the test. This allowsthe client to anticipate when the next trial will be presented and develop a rhythm when makingselections. Often, the switch press time will be shorter with a constant pause time than with arandom pause time. By default, the constant pause time is 1 second.
2. Random - The amount of time between trials changes throughout the test. The pause time foreach trial is selected randomly between the Minimum and Maximum specified. This keeps the
Compass Help - Switch Test Configuration
104 / 145
client from anticipating the next prompt, which can yield a "purer" measure of response time. Bydefault, the random pause time ranges between 1 and 4 seconds.
Note that switch hits that occur during the pause between trials are ignored.
The three buttons at the bottom of the configuration screen perform the following functions:
1.Preview Test - Click this button to run an abbreviated version of the test using the settings you haveselected. No data are collected for the trials in the preview.2.Save & Continue - Click this button to save the test configuration settings you have selected and
return to the Test List. If necessary, Compass will prompt you to change the configuration namebefore you can exit (see Configuring Tests).3.Cancel - Click this button to return you to the Test List without saving any changes to the
configuration settings.
Compass Help - Switch Test Configuration
105 / 145
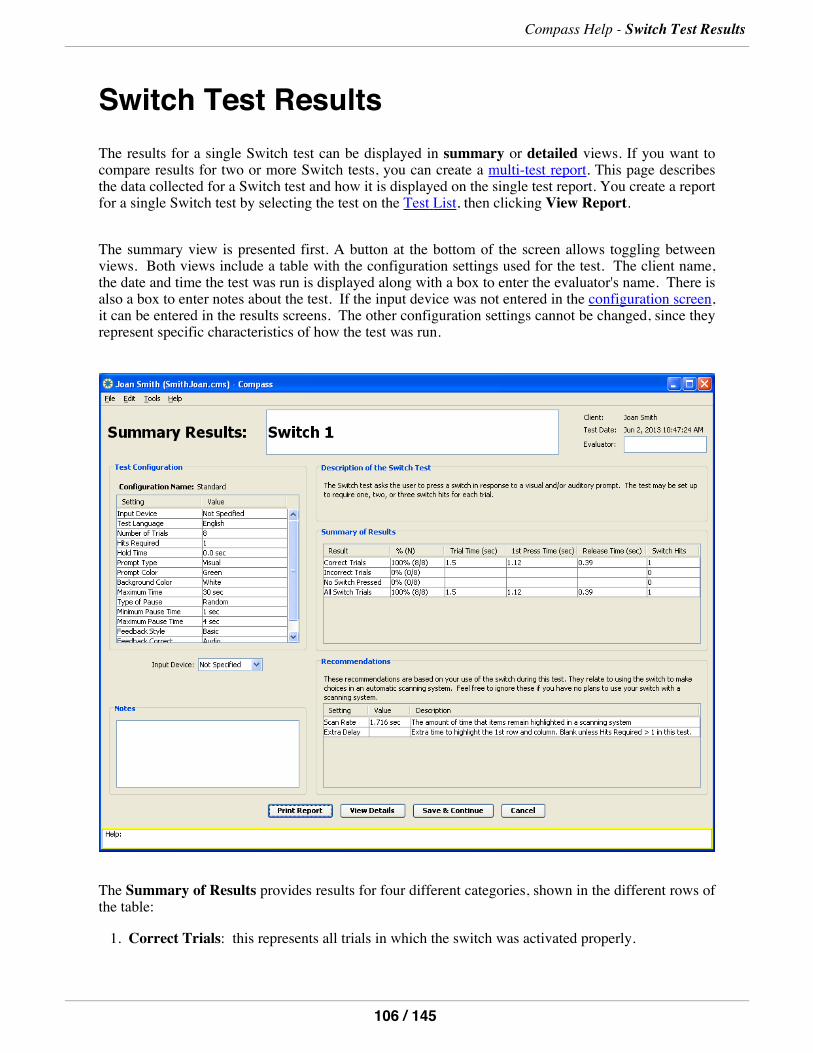
Switch Test ResultsThe results for a single Switch test can be displayed in summary or detailed views. If you want tocompare results for two or more Switch tests, you can create a multi-test report. This page describesthe data collected for a Switch test and how it is displayed on the single test report. You create a reportfor a single Switch test by selecting the test on the Test List, then clicking View Report.
The summary view is presented first. A button at the bottom of the screen allows toggling betweenviews. Both views include a table with the configuration settings used for the test. The client name,the date and time the test was run is displayed along with a box to enter the evaluator's name. There isalso a box to enter notes about the test. If the input device was not entered in the configuration screen,it can be entered in the results screens. The other configuration settings cannot be changed, since theyrepresent specific characteristics of how the test was run.
The Summary of Results provides results for four different categories, shown in the different rows ofthe table:
1. Correct Trials: this represents all trials in which the switch was activated properly.
Compass Help - Switch Test Results
106 / 145
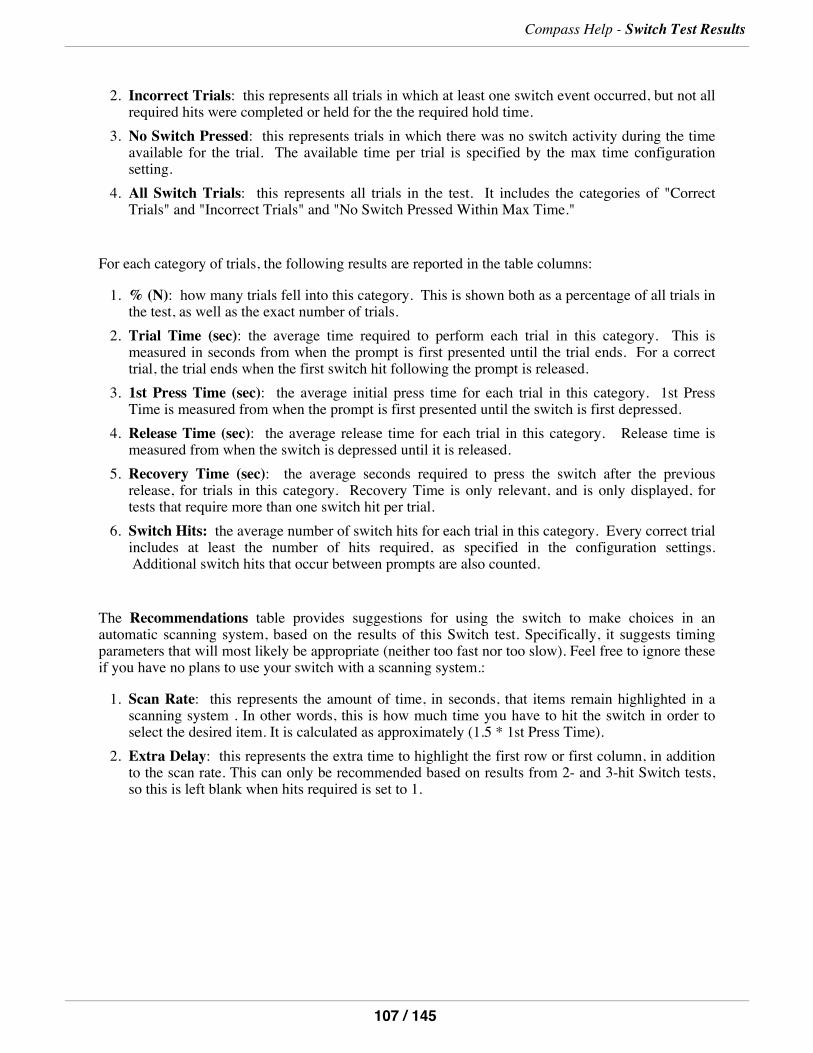
2. Incorrect Trials: this represents all trials in which at least one switch event occurred, but not allrequired hits were completed or held for the the required hold time.
3. No Switch Pressed: this represents trials in which there was no switch activity during the timeavailable for the trial. The available time per trial is specified by the max time configurationsetting.
4. All Switch Trials: this represents all trials in the test. It includes the categories of "CorrectTrials" and "Incorrect Trials" and "No Switch Pressed Within Max Time."
For each category of trials, the following results are reported in the table columns:
1. % (N): how many trials fell into this category. This is shown both as a percentage of all trials inthe test, as well as the exact number of trials.
2. Trial Time (sec): the average time required to perform each trial in this category. This ismeasured in seconds from when the prompt is first presented until the trial ends. For a correcttrial, the trial ends when the first switch hit following the prompt is released.
3. 1st Press Time (sec): the average initial press time for each trial in this category. 1st PressTime is measured from when the prompt is first presented until the switch is first depressed.
4. Release Time (sec): the average release time for each trial in this category. Release time ismeasured from when the switch is depressed until it is released.
5. Recovery Time (sec): the average seconds required to press the switch after the previousrelease, for trials in this category. Recovery Time is only relevant, and is only displayed, fortests that require more than one switch hit per trial.
6. Switch Hits: the average number of switch hits for each trial in this category. Every correct trialincludes at least the number of hits required, as specified in the configuration settings.Additional switch hits that occur between prompts are also counted.
The Recommendations table provides suggestions for using the switch to make choices in anautomatic scanning system, based on the results of this Switch test. Specifically, it suggests timingparameters that will most likely be appropriate (neither too fast nor too slow). Feel free to ignore theseif you have no plans to use your switch with a scanning system.:
1. Scan Rate: this represents the amount of time, in seconds, that items remain highlighted in ascanning system . In other words, this is how much time you have to hit the switch in order toselect the desired item. It is calculated as approximately (1.5 * 1st Press Time).
2. Extra Delay: this represents the extra time to highlight the first row or first column, in additionto the scan rate. This can only be recommended based on results from 2- and 3-hit Switch tests,so this is left blank when hits required is set to 1.
Compass Help - Switch Test Results
107 / 145
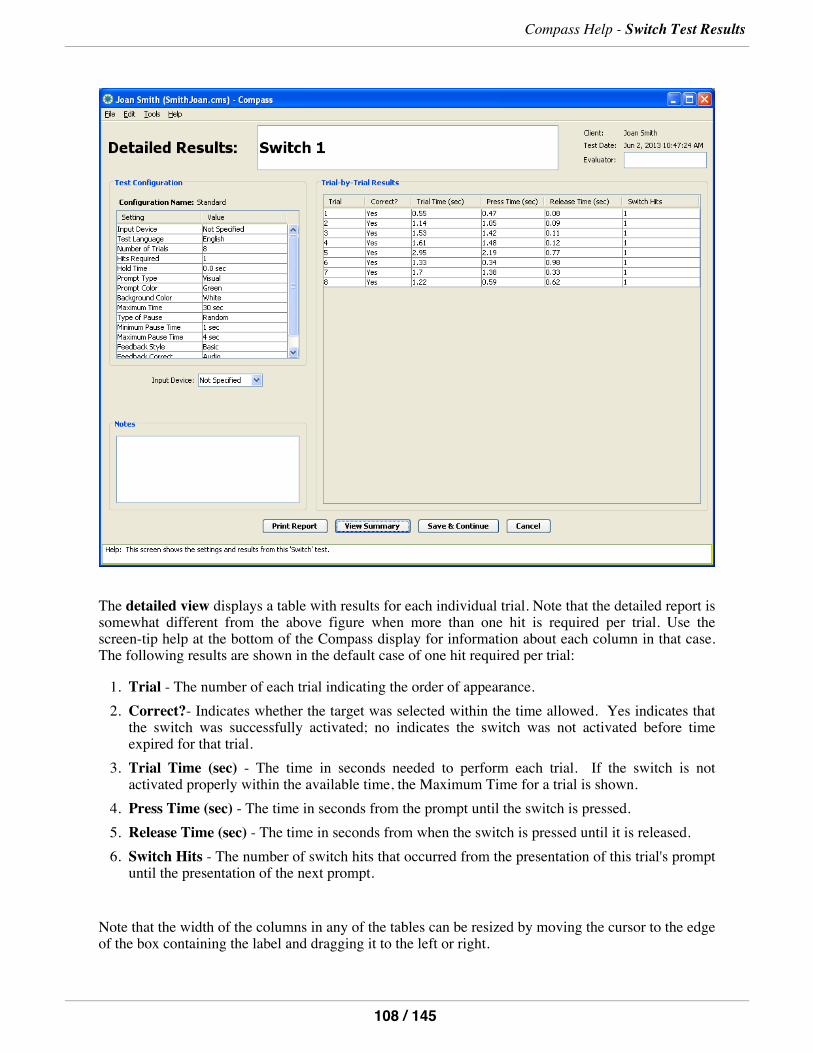
The detailed view displays a table with results for each individual trial. Note that the detailed report issomewhat different from the above figure when more than one hit is required per trial. Use thescreen-tip help at the bottom of the Compass display for information about each column in that case.The following results are shown in the default case of one hit required per trial:
1. Trial - The number of each trial indicating the order of appearance.2. Correct?- Indicates whether the target was selected within the time allowed. Yes indicates thatthe switch was successfully activated; no indicates the switch was not activated before timeexpired for that trial.
3. Trial Time (sec) - The time in seconds needed to perform each trial. If the switch is notactivated properly within the available time, the Maximum Time for a trial is shown.
4. Press Time (sec) - The time in seconds from the prompt until the switch is pressed.5. Release Time (sec) - The time in seconds from when the switch is pressed until it is released.6. Switch Hits - The number of switch hits that occurred from the presentation of this trial's promptuntil the presentation of the next prompt.
Note that the width of the columns in any of the tables can be resized by moving the cursor to the edgeof the box containing the label and dragging it to the left or right.
Compass Help - Switch Test Results
108 / 145

Additionally, you can cut-and-paste the contents of a Switch report into another application, such as aword processor. This may be useful when preparing reports on a particular client.
The following buttons are available to help you navigate and work with reports.
1. Print Report - Clicking this button prints the summary and detailed report.2. View Details - When in the summary view, clicking on this button changes the display to thedetailed report view.
3. View Summary - When in the detailed view, clicking on this button returns the display to thesummary view.
4. Save & Continue - Clicking on this button from either view will save the data for the test, anycomments you have entered, and the evaluator name and return you to the Test List screen.
5. Cancel - Clicking on this button from either view will return you to the Test List screen withoutsaving any changes to the results information. Note that all performance data have already beensaved before viewing the report and will not be lost or changed by selecting the Cancel button.
Compass Help - Switch Test Results
109 / 145
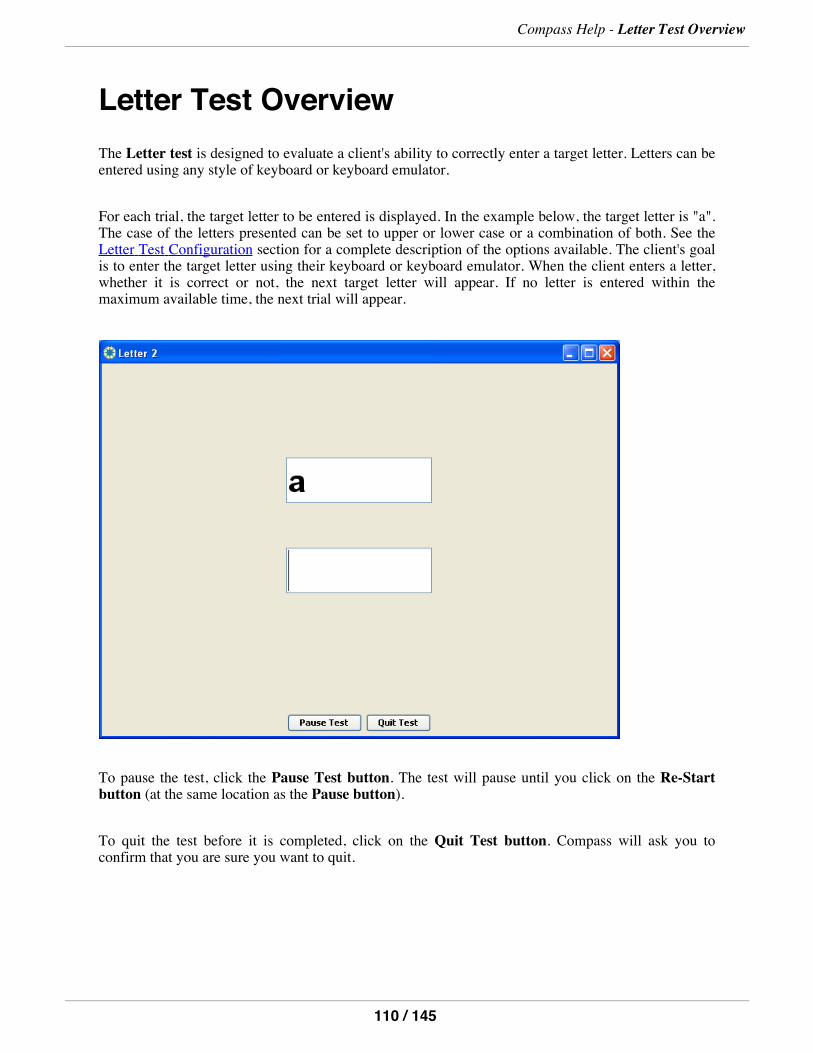
Letter Test OverviewThe Letter test is designed to evaluate a client's ability to correctly enter a target letter. Letters can beentered using any style of keyboard or keyboard emulator.
For each trial, the target letter to be entered is displayed. In the example below, the target letter is "a".The case of the letters presented can be set to upper or lower case or a combination of both. See theLetter Test Configuration section for a complete description of the options available. The client's goalis to enter the target letter using their keyboard or keyboard emulator. When the client enters a letter,whether it is correct or not, the next target letter will appear. If no letter is entered within themaximum available time, the next trial will appear.
To pause the test, click the Pause Test button. The test will pause until you click on the Re-Startbutton (at the same location as the Pause button).
To quit the test before it is completed, click on the Quit Test button. Compass will ask you toconfirm that you are sure you want to quit.
Compass Help - Letter Test Overview
110 / 145
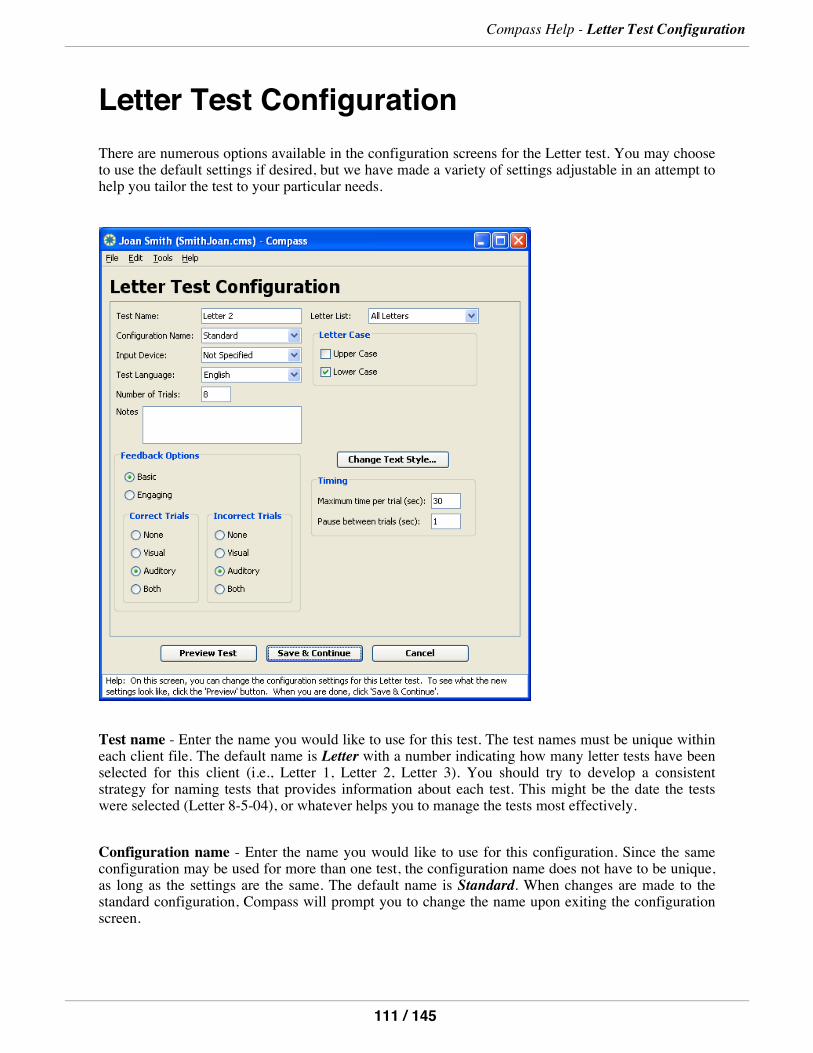
Letter Test ConfigurationThere are numerous options available in the configuration screens for the Letter test. You may chooseto use the default settings if desired, but we have made a variety of settings adjustable in an attempt tohelp you tailor the test to your particular needs.
Test name - Enter the name you would like to use for this test. The test names must be unique withineach client file. The default name is Letter with a number indicating how many letter tests have beenselected for this client (i.e., Letter 1, Letter 2, Letter 3). You should try to develop a consistentstrategy for naming tests that provides information about each test. This might be the date the testswere selected (Letter 8-5-04), or whatever helps you to manage the tests most effectively.
Configuration name - Enter the name you would like to use for this configuration. Since the sameconfiguration may be used for more than one test, the configuration name does not have to be unique,as long as the settings are the same. The default name is Standard. When changes are made to thestandard configuration, Compass will prompt you to change the name upon exiting the configurationscreen.
Compass Help - Letter Test Configuration
111 / 145

You should develop a consistent strategy for naming the configurations to describe the settings used.This will help you recall how this test differs from another one. A good configuration name mightdescribe the input method (e.g., type of on-screen keyboard), the color of the text (e.g., blue onyellow), or other important settings.
Input device - Allows the input device being used to be selected from a drop-down list of commondevices. Device names that are not on the drop-down list can be typed into the field. The default valueis Not Specified. If you are comparing performance with different input devices, it is important to setthe Input Device field accordingly. Otherwise, it may not be clear which input device was used whenviewing test results.
The Test Language field defines which language is used for any text or vocal feedback presented tothe client during the test. Currently, the choices are English, French, Spanish, Portuguese, and Arabic,with English as the default value. In the Letter test, the letters to copy are presented in the TestLanguage.
Notes - A field for any comments relating to the configuration. By default, this field is empty. Addingcomments may be useful for describing why certain choices were made in the configuration or anyother information that will help you when reviewing the test.
Number of Trials - The number of targets that will be presented during the test. The default value is8 trials. The number should be large enough to provide a representative sample of the client's ability toperform the task and small enough to avoid unintended fatigue or loss of interest.
Feedback Options
Style - The feedback style option allows you to select the most appropriate form of feedback for theuser. Basic feedback provides simple, direct feedback. Engaging feedback provides a morestimulating response to help motivate and hold the interest of clients when necessary. Feedback stylesare consistent across all of the trials. The default feedback style is Basic.
Four feedback options are available for correct and/or incorrect trials. The option for Correct Trialsdefines the type of feedback provided when the user selects the target within the time allowed. Thedefault value for Correct Trials is Auditory. The option for Incorrect Trials defines the type offeedback provided when the user selects an incorrect letter. The default value for Incorrect Trials isAuditory. The feedback options are:
1. None - Compass will provide no feedback for any of the trials of this type. When a selection ismade or the trial times out, the next trial will start until the test is completed.
2. Visual - Compass will provide a visual response.3. Auditory - Compass will provide an auditory response.4. Both - Compass will provide both a visual and an auditory response.
Letter List - This defines the group of letters from which target letters are selected. There are threeoptions for Letter List:
Compass Help - Letter Test Configuration
112 / 145
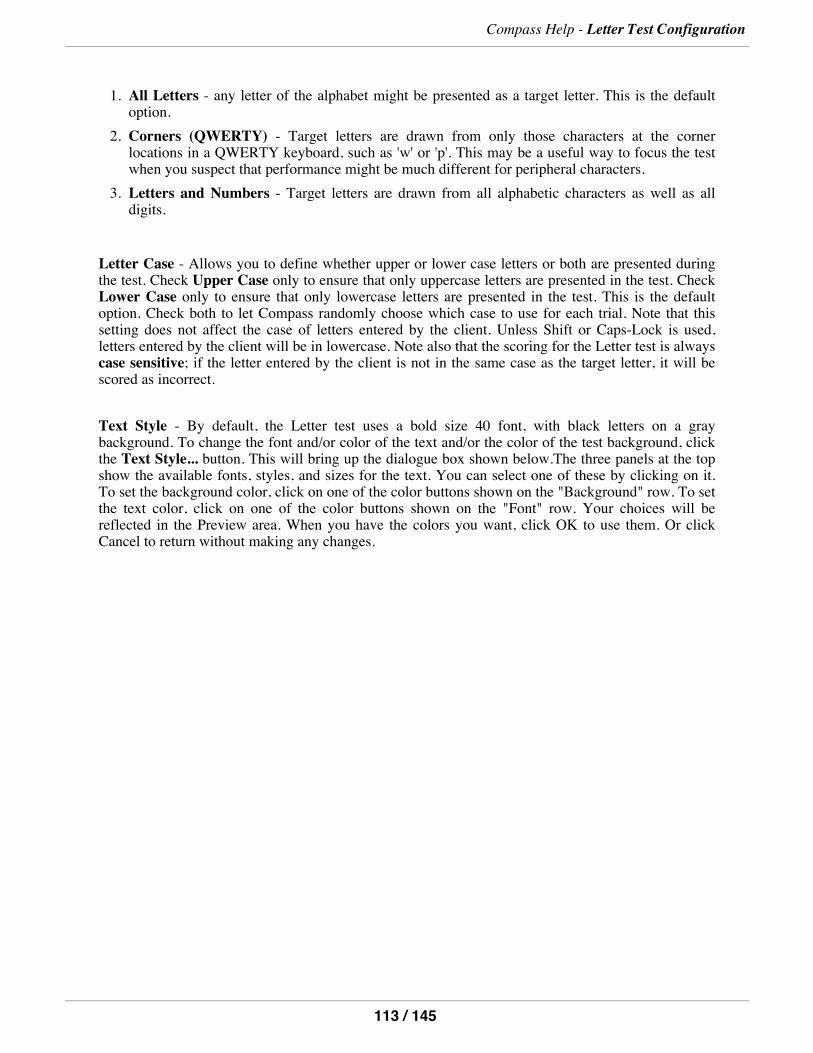
1. All Letters - any letter of the alphabet might be presented as a target letter. This is the defaultoption.
2. Corners (QWERTY) - Target letters are drawn from only those characters at the cornerlocations in a QWERTY keyboard, such as 'w' or 'p'. This may be a useful way to focus the testwhen you suspect that performance might be much different for peripheral characters.
3. Letters and Numbers - Target letters are drawn from all alphabetic characters as well as alldigits.
Letter Case - Allows you to define whether upper or lower case letters or both are presented duringthe test. Check Upper Case only to ensure that only uppercase letters are presented in the test. CheckLower Case only to ensure that only lowercase letters are presented in the test. This is the defaultoption. Check both to let Compass randomly choose which case to use for each trial. Note that thissetting does not affect the case of letters entered by the client. Unless Shift or Caps-Lock is used,letters entered by the client will be in lowercase. Note also that the scoring for the Letter test is alwayscase sensitive; if the letter entered by the client is not in the same case as the target letter, it will bescored as incorrect.
Text Style - By default, the Letter test uses a bold size 40 font, with black letters on a graybackground. To change the font and/or color of the text and/or the color of the test background, clickthe Text Style... button. This will bring up the dialogue box shown below.The three panels at the topshow the available fonts, styles, and sizes for the text. You can select one of these by clicking on it.To set the background color, click on one of the color buttons shown on the "Background" row. To setthe text color, click on one of the color buttons shown on the "Font" row. Your choices will bereflected in the Preview area. When you have the colors you want, click OK to use them. Or clickCancel to return without making any changes.
Compass Help - Letter Test Configuration
113 / 145
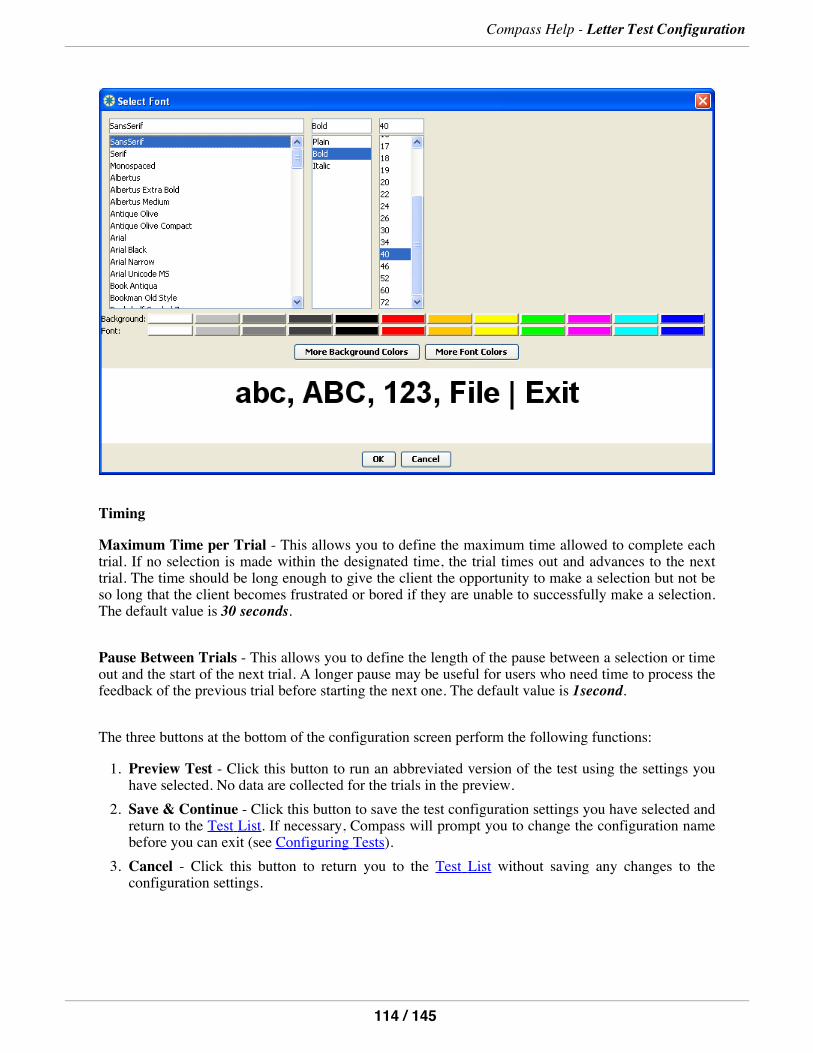
Timing
Maximum Time per Trial - This allows you to define the maximum time allowed to complete eachtrial. If no selection is made within the designated time, the trial times out and advances to the nexttrial. The time should be long enough to give the client the opportunity to make a selection but not beso long that the client becomes frustrated or bored if they are unable to successfully make a selection.The default value is 30 seconds.
Pause Between Trials - This allows you to define the length of the pause between a selection or timeout and the start of the next trial. A longer pause may be useful for users who need time to process thefeedback of the previous trial before starting the next one. The default value is 1second.
The three buttons at the bottom of the configuration screen perform the following functions:
1. Preview Test - Click this button to run an abbreviated version of the test using the settings youhave selected. No data are collected for the trials in the preview.
2. Save & Continue - Click this button to save the test configuration settings you have selected andreturn to the Test List. If necessary, Compass will prompt you to change the configuration namebefore you can exit (see Configuring Tests).
3. Cancel - Click this button to return you to the Test List without saving any changes to theconfiguration settings.
Compass Help - Letter Test Configuration
114 / 145
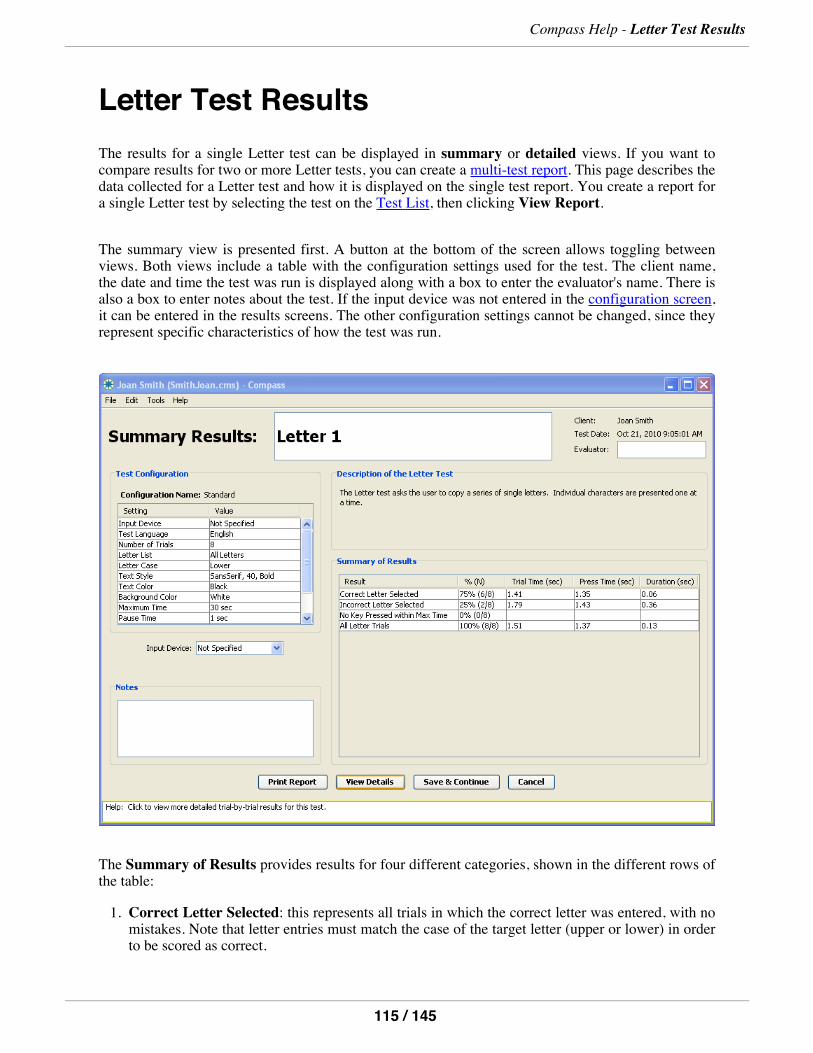
Letter Test ResultsThe results for a single Letter test can be displayed in summary or detailed views. If you want tocompare results for two or more Letter tests, you can create a multi-test report. This page describes thedata collected for a Letter test and how it is displayed on the single test report. You create a report fora single Letter test by selecting the test on the Test List, then clicking View Report.
The summary view is presented first. A button at the bottom of the screen allows toggling betweenviews. Both views include a table with the configuration settings used for the test. The client name,the date and time the test was run is displayed along with a box to enter the evaluator's name. There isalso a box to enter notes about the test. If the input device was not entered in the configuration screen,it can be entered in the results screens. The other configuration settings cannot be changed, since theyrepresent specific characteristics of how the test was run.
The Summary of Results provides results for four different categories, shown in the different rows ofthe table:
1. Correct Letter Selected: this represents all trials in which the correct letter was entered, with nomistakes. Note that letter entries must match the case of the target letter (upper or lower) in orderto be scored as correct.
Compass Help - Letter Test Results
115 / 145

2. Incorrect Letter Selected: this represents all trials in which an incorrect letter was entered.3. No Key Pressed Within Max Time: this represents trials in which no letter was entered in thetime available. The available time per trial is specified by the max time configuration setting.
4. All Letter Trials: this represents all trials in the test. This combines the results of "CorrectTrials" and "Incorrect Trials" and "No Key Pressed Within Max Time."
For each category of trials, the following results are reported in the table columns:
1. % (N): how many trials fell into this category. This is shown both as a percentage of all trials inthe test, as well as the exact number of trials.
2. Trial Time (sec): the average time required to perform each trial in this category. This ismeasured in seconds from when the target letter is first presented until a letter is entered by theclient. The end of the trial occurs when the key is released.
3. Press Time (sec): the average press time for the trials in this category. Press time is measuredfrom when the target letter is first presented until a key is pressed.
4. Duration (sec): the average release time for the trials in this category. Release time is measuredfrom when the client presses a key until its release.
Compass Help - Letter Test Results
116 / 145
The detailed view displays a table with the following results for each individual trial:
1. Target - The target letter presented in the trial.2. Response - The letter (or letters) entered by the client.3. Correct?- Indicates whether the target was selected within the time allowed. "Yes" indicates thatthe correct letter was entered, in the correct case. "No" indicates that either an incorrect letter wasentered or that no letter was entered before time expired for that trial.
4. Trial Time (sec) - The time in seconds needed to complete each trial, measured until the key isreleased. If a letter is not entered within the available time, the Maximum Time for a trial isshown.
5. Press Time (sec) - The time in seconds from the prompt until the first key is pressed.6. Duration (sec) - The time in seconds from when the key is pressed until it is released.
Note that the width of the columns in any of the tables can be resized by moving the cursor to the edgeof the box containing the label and dragging it to the left or right.
Additionally, you can cut-and-paste the contents of a Letter report into another application, such as aword processor. This may be useful when preparing reports on a particular client.
The following buttons are available to help you navigate and work with reports.
1. Print Report - Clicking this button prints the summary and detailed report.2. View Details - When in the summary view, clicking on this button changes the display to thedetailed report view.
3. View Summary - When in the detailed view, clicking on this button returns the display to thesummary view.
4. Save & Continue - Clicking on this button from either view will save the data for the test, anycomments you have entered, and the evaluator name and return you to the Test List screen.
5. Cancel - Clicking on this button from either view will return you to the Test List screen withoutsaving any changes to the results information. Note that all performance data have already beensaved before viewing the report and will not be lost or changed by selecting the Cancel button.
Compass Help - Letter Test Results
117 / 145
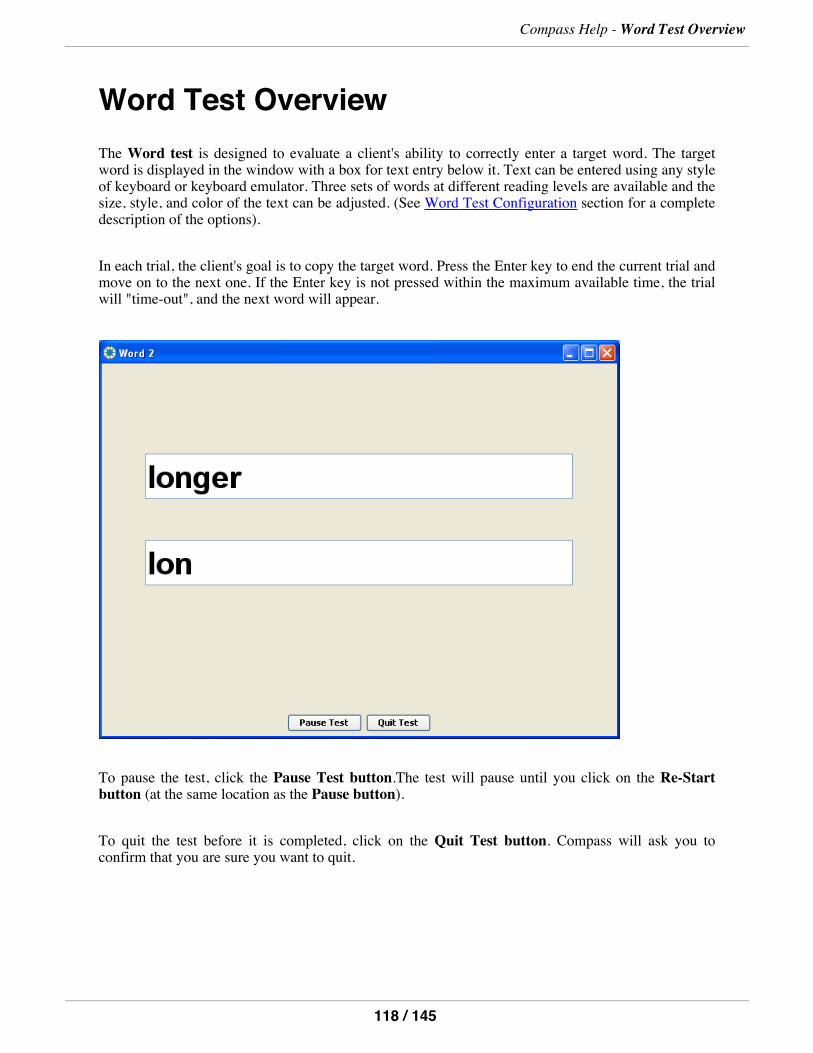
Word Test OverviewThe Word test is designed to evaluate a client's ability to correctly enter a target word. The targetword is displayed in the window with a box for text entry below it. Text can be entered using any styleof keyboard or keyboard emulator. Three sets of words at different reading levels are available and thesize, style, and color of the text can be adjusted. (See Word Test Configuration section for a completedescription of the options).
In each trial, the client's goal is to copy the target word. Press the Enter key to end the current trial andmove on to the next one. If the Enter key is not pressed within the maximum available time, the trialwill "time-out", and the next word will appear.
To pause the test, click the Pause Test button.The test will pause until you click on the Re-Startbutton (at the same location as the Pause button).
To quit the test before it is completed, click on the Quit Test button. Compass will ask you toconfirm that you are sure you want to quit.
Compass Help -Word Test Overview
118 / 145
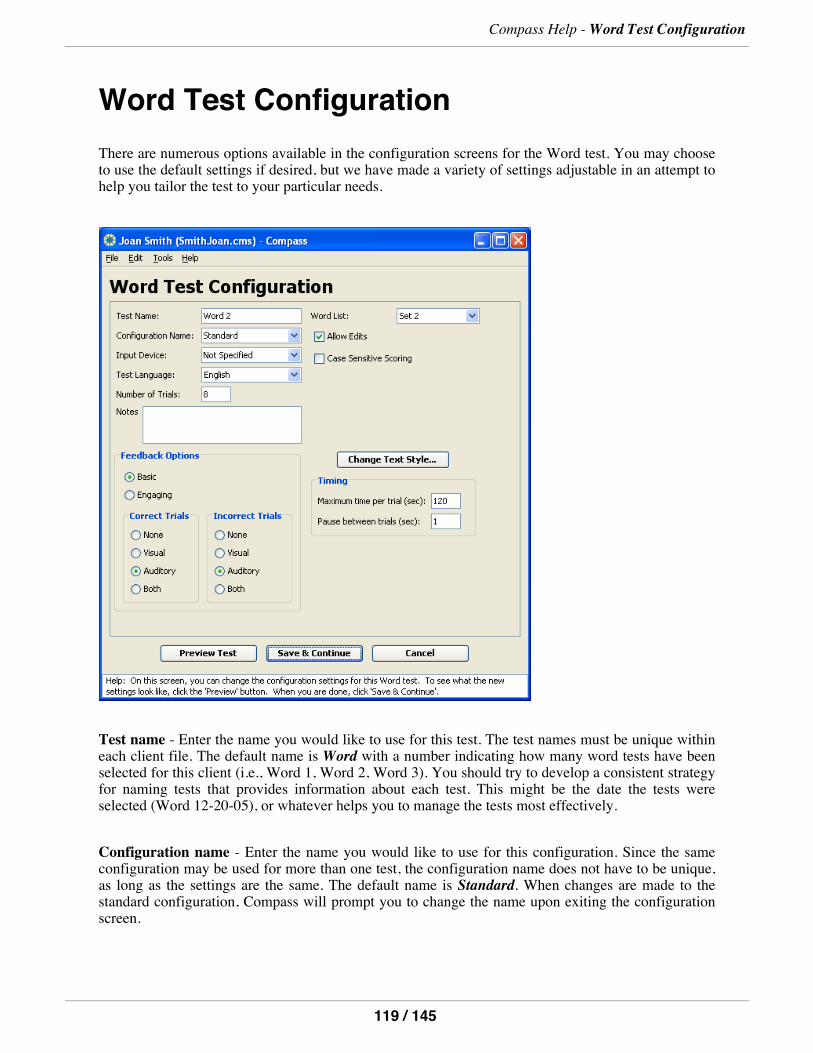
Word Test ConfigurationThere are numerous options available in the configuration screens for the Word test. You may chooseto use the default settings if desired, but we have made a variety of settings adjustable in an attempt tohelp you tailor the test to your particular needs.
Test name - Enter the name you would like to use for this test. The test names must be unique withineach client file. The default name is Word with a number indicating how many word tests have beenselected for this client (i.e., Word 1, Word 2, Word 3). You should try to develop a consistent strategyfor naming tests that provides information about each test. This might be the date the tests wereselected (Word 12-20-05), or whatever helps you to manage the tests most effectively.
Configuration name - Enter the name you would like to use for this configuration. Since the sameconfiguration may be used for more than one test, the configuration name does not have to be unique,as long as the settings are the same. The default name is Standard. When changes are made to thestandard configuration, Compass will prompt you to change the name upon exiting the configurationscreen.
Compass Help -Word Test Configuration
119 / 145
You should develop a consistent strategy for naming the configurations to describe the settings used.This will help you recall how this test differs from another one. A good configuration name mightdescribe the input method (e.g., word prediction), the type and size of the text (e.g., 14 bold), or otherimportant settings.
Input device - Allows the input device being used to be selected from a drop-down list of commondevices. Device names that are not on the drop-down list can be typed into the field. The default valueis Not Specified. If you are comparing performance with different input devices, it is important to setthe Input Device field accordingly. Otherwise, it may not be clear which input device was used whenviewing test results.
The Test Language field defines which language is used for any text or vocal feedback presented tothe client during the test. Currently, the choices are English, French, Spanish, Portuguese, and Arabic,with English as the default value. In the Word test, the words to transcribe are presented in the TestLanguage.
Notes - A field for any comments relating to the configuration. By default, this field is empty. Addingcomments may be useful for describing why certain choices were made in the configuration or anyother information that will help you when reviewing the test.
Number of Trials - The number of targets that will be presented during the test. The default value is8 trials. The number should be large enough to provide a representative sample of the client's ability toperform the task and small enough to avoid unintended fatigue or loss of interest.
Feedback Options
Style - The feedback style option allows you to select the most appropriate form of feedback for theuser. Basic feedback provides simple, direct feedback. Engaging feedback provides a morestimulating response to help motivate and hold the interest of clients when necessary. Feedback stylesare consistent across all of the trials.The default feedback style is Basic.
Four feedback options are available for correct and/or incorrect trials. The option for Correct Trialsdefines the type of feedback provided when the user completes the word correctly within the timeallowed. The default value for Correct Trials is Auditory. The option for Incorrect Trials defines thetype of feedback provided at the end of trial if the word entered is incorrect. The default value forIncorrect Trials is Auditory. The feedback options are:
1. None - Compass will provide no feedback for any of the trials of this type. When a selection ismade or the trial times out, the next trial will start until the test is completed.
2. Visual - Compass will provide a visual response.3. Auditory - Compass will provide an auditory response.4. Both - Compass will provide both a visual and an auditory response.
Word List - This defines the group of words from which target words are selected. There are threeoptions for Word List, in increasing level of reading difficulty:
Compass Help -Word Test Configuration
120 / 145
1.Set 1 - corresponds roughly to 1st grade reading level.2.Set 2 - corresponds roughly to 3rd grade reading level. This is the default option.3.Set 3 - corresponds roughly to 6th grade reading level.
Note that even though the words in these lists have different word lengths, the words per minute ratecalculations assume a constant word length of 5 letters per word. This allows you to meaningfullycompare the rates achieved for different word lists.
Allow Edits - Determines whether or not the client can fix any mistakes made. If Allow Edits ischecked, errors in letter entry are displayed and can be edited in the usual fashion with keyboard ormouse. This is the default option, since it represents the typical text entry scenario. If Allow Edits isnot checked, only those letters that are correct for the target word will be displayed. Incorrect letterentries will not be displayed, although they will be counted in the results for the test. This setting mayhelp reduce distraction due to errors for some clients.
Case Sensitive Scoring - Determines whether an entry must be in the correct upper or lower case inorder to count as "correct." If Case Sensitive Scoring is checked, errors in case are counted as errors,even if the letters match the target. For example, "A" vs. "a" would be an error, with case sensitivescoring. If Case Sensitive Scoring is not checked, errors in case are not considered when countingerrors. So the "A" vs. "a" example would be scored as correct. This is the default option.
Text Style - By default, the Word test uses a bold size 40 font, with black letters on a whitebackground. To change the font and/or color of the text and/or the color of the test background, clickthe Text Style... button. This will bring up the dialogue box shown below. The three panels at the topshow the available fonts, styles, and sizes for the text. You can select one of these by clicking on it.To set the background color, click on one of the color buttons shown on the "Background" row. To setthe text color, click on one of the color buttons shown on the "Font" row. Your choices will bereflected in the Preview area. When you have the colors you want, click OK to use them. Or clickCancel to return without making any changes.
Compass Help -Word Test Configuration
121 / 145
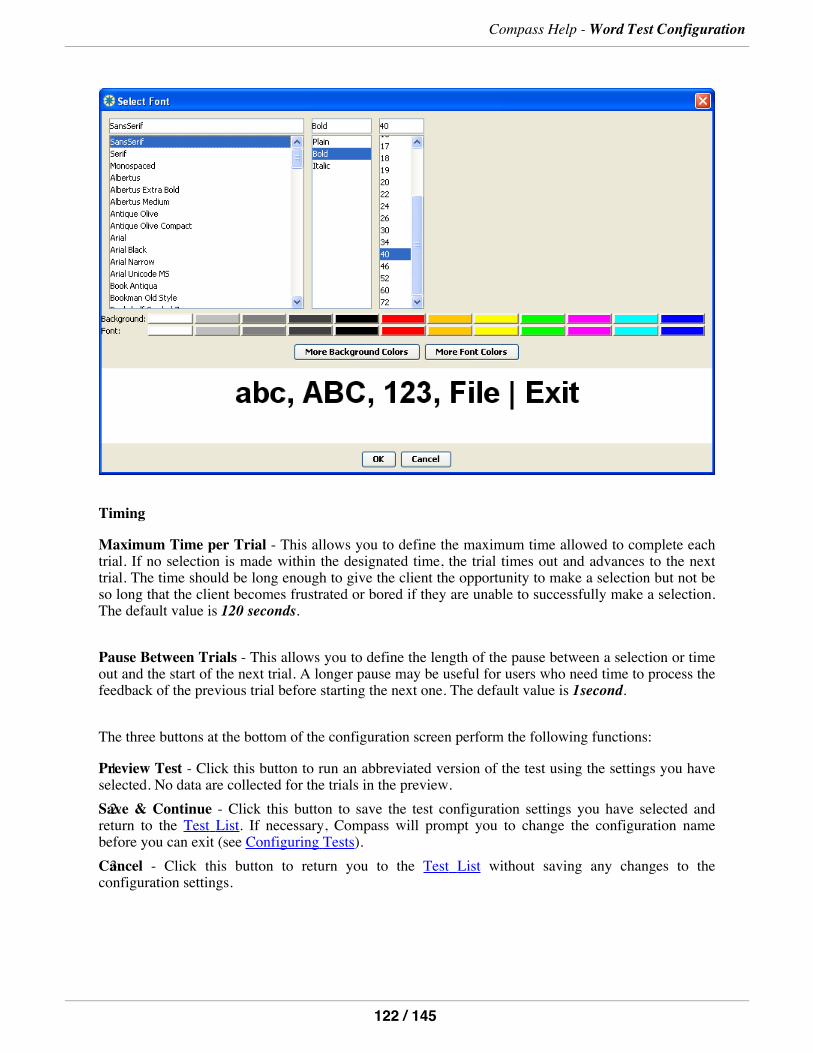
Timing
Maximum Time per Trial - This allows you to define the maximum time allowed to complete eachtrial. If no selection is made within the designated time, the trial times out and advances to the nexttrial. The time should be long enough to give the client the opportunity to make a selection but not beso long that the client becomes frustrated or bored if they are unable to successfully make a selection.The default value is 120 seconds.
Pause Between Trials - This allows you to define the length of the pause between a selection or timeout and the start of the next trial. A longer pause may be useful for users who need time to process thefeedback of the previous trial before starting the next one. The default value is 1second.
The three buttons at the bottom of the configuration screen perform the following functions:
1.Preview Test - Click this button to run an abbreviated version of the test using the settings you haveselected. No data are collected for the trials in the preview.2.Save & Continue - Click this button to save the test configuration settings you have selected and
return to the Test List. If necessary, Compass will prompt you to change the configuration namebefore you can exit (see Configuring Tests).3.Cancel - Click this button to return you to the Test List without saving any changes to the
configuration settings.
Compass Help -Word Test Configuration
122 / 145
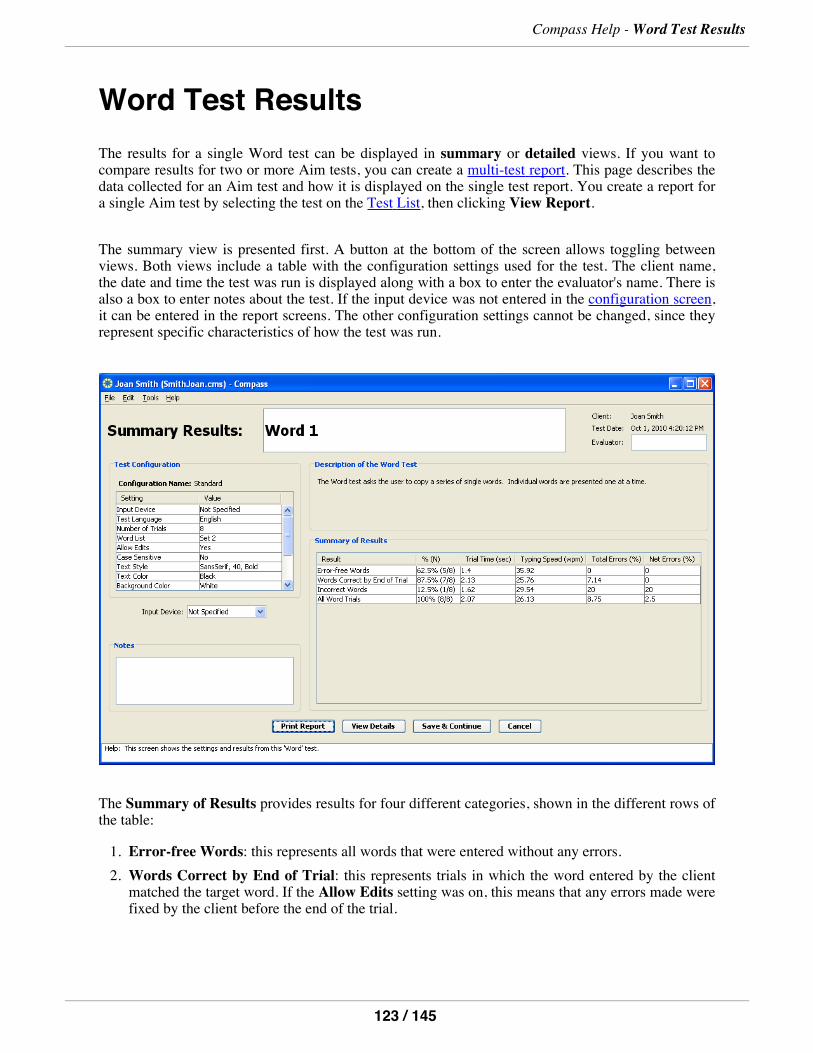
Word Test ResultsThe results for a single Word test can be displayed in summary or detailed views. If you want tocompare results for two or more Aim tests, you can create a multi-test report. This page describes thedata collected for an Aim test and how it is displayed on the single test report. You create a report fora single Aim test by selecting the test on the Test List, then clicking View Report.
The summary view is presented first. A button at the bottom of the screen allows toggling betweenviews. Both views include a table with the configuration settings used for the test. The client name,the date and time the test was run is displayed along with a box to enter the evaluator's name. There isalso a box to enter notes about the test. If the input device was not entered in the configuration screen,it can be entered in the report screens. The other configuration settings cannot be changed, since theyrepresent specific characteristics of how the test was run.
The Summary of Results provides results for four different categories, shown in the different rows ofthe table:
1. Error-free Words: this represents all words that were entered without any errors.2. Words Correct by End of Trial: this represents trials in which the word entered by the clientmatched the target word. If the Allow Edits setting was on, this means that any errors made werefixed by the client before the end of the trial.
Compass Help -Word Test Results
123 / 145
3. Incorrect Words: this represents trials in which the word entered by the client was notcompleted or not completed correctly. The available time per trial is specified by the max timeconfiguration setting.
4. All Trials: this represents all trials in the test. This combines the results of "Words Correct byEnd of Trial" and "Incorrect Words."
For each category of trials, the following results are reported in the table columns:
1. % (N): how many trials fell into this category. This is shown both as a percentage of all trials inthe test, as well as the exact number of trials.
2. Trial Time (sec): the average time required to perform each trial in this category. This ismeasured in seconds from when the target word is first presented until the Enter key is selectedby the client, ending the trial. (Note that the time required to press the Enter key is not added intothe overall trial time.)
3. Typing Speed: the average typing speed in words per minute for the trials in this category. Thisis calculated based on the average seconds per letter, and converted into words per minuteassuming that there are 5 letters per word.
4. Total Errors (%): this is the average percent errors committed for the trials in this category. Itincludes unfixed as well as fixed errors, if any.
5. Net Errors (%): this is the average net errors remaining in these words at the end of the trial. Itincludes only those errors that were not fixed before the end of the trial. Note that if the AllowEdits setting is off, the Net Errors column is not displayed. This is because if the client is notable to fix any errors, the Total Errors and Net Errors are exactly the same. If the Allow Editssetting is on, comparing Net Errors to Total Errors can give a sense of how well the clientrecognized and corrected errors that they made.
For more information on calculating error rates, please see the Notes below.
Compass Help -Word Test Results
124 / 145
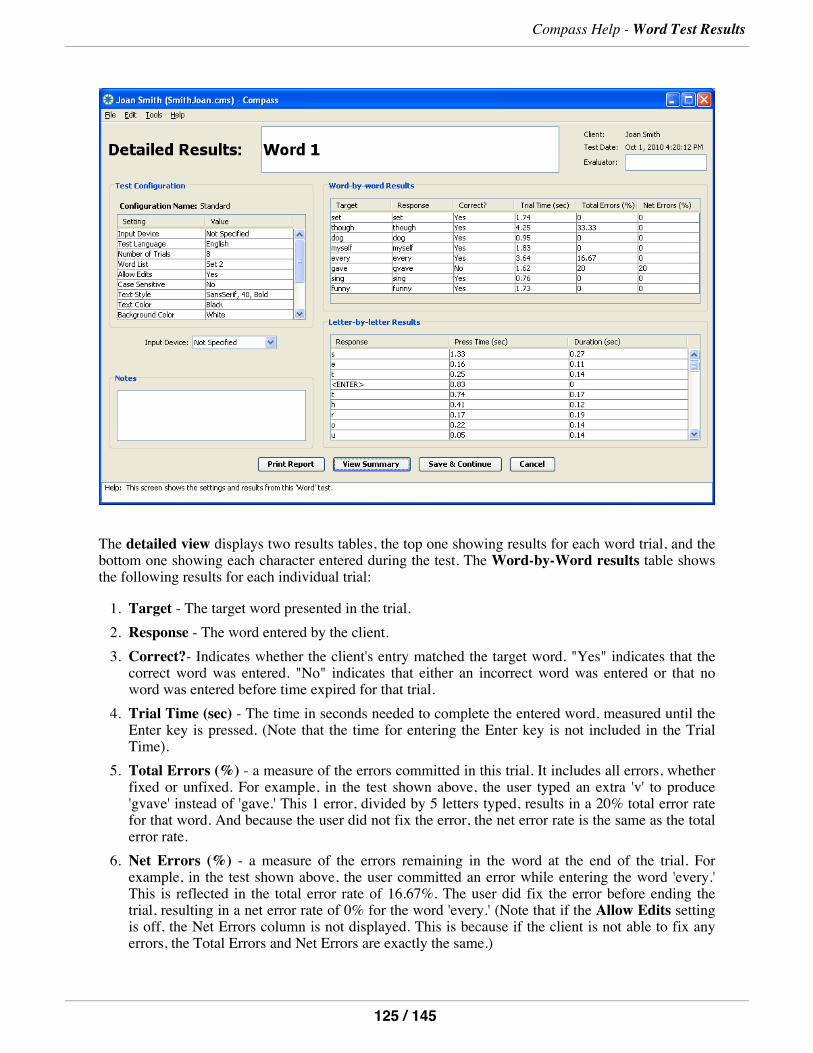
The detailed view displays two results tables, the top one showing results for each word trial, and thebottom one showing each character entered during the test. The Word-by-Word results table showsthe following results for each individual trial:
1. Target - The target word presented in the trial.2. Response - The word entered by the client.3. Correct?- Indicates whether the client's entry matched the target word. "Yes" indicates that thecorrect word was entered. "No" indicates that either an incorrect word was entered or that noword was entered before time expired for that trial.
4. Trial Time (sec) - The time in seconds needed to complete the entered word, measured until theEnter key is pressed. (Note that the time for entering the Enter key is not included in the TrialTime).
5. Total Errors (%) - a measure of the errors committed in this trial. It includes all errors, whetherfixed or unfixed. For example, in the test shown above, the user typed an extra 'v' to produce'gvave' instead of 'gave.' This 1 error, divided by 5 letters typed, results in a 20% total error ratefor that word. And because the user did not fix the error, the net error rate is the same as the totalerror rate.
6. Net Errors (%) - a measure of the errors remaining in the word at the end of the trial. Forexample, in the test shown above, the user committed an error while entering the word 'every.'This is reflected in the total error rate of 16.67%. The user did fix the error before ending thetrial, resulting in a net error rate of 0% for the word 'every.' (Note that if the Allow Edits settingis off, the Net Errors column is not displayed. This is because if the client is not able to fix anyerrors, the Total Errors and Net Errors are exactly the same.)
Compass Help -Word Test Results
125 / 145
For more information on calculating error rates, please see the Notes below.
The Letter-by-Letter results table shows the following results for each individual character enteredduring the test:
1. Target - The target letter. This is only displayed if the Allow Edits setting is off, because that isthe only time that Compass will reliably know the target letter at all times.
2. Response - The letter entered by the client.3. Correct? - Whether the response matched the target. This is only displayed if the Allow Editssetting is off, because that is the only time that Compass will reliably know the target letter at alltimes.
4. Press Time (sec) - The time in seconds from when the previous key was depressed until this keywas pressed.
5. Duration (sec) - The time in seconds from when the key was pressed until it was released.
The sum of Press TImes for a word is the Trial Time for that word.
Note that the width of the columns in any of the tables can be resized by moving the cursor to the edgeof the box containing the label and dragging it to the left or right.
Additionally, you can cut-and-paste the contents of a Word report into another application, such as aword processor. This may be useful when preparing reports on a particular client.
The following buttons are available to help you navigate and work with reports.
1. Print Report - Clicking this button prints the summary and detailed report.2. View Details - When in the summary view, clicking on this button changes the display to thedetailed report view.
3. View Summary - When in the detailed view, clicking on this button returns the display to thesummary view.
4. Save & Continue - Clicking on this button from either view will save the data for the test, anycomments you have entered, and the evaluator name and return you to the Test List screen.
5. Cancel - Clicking on this button from either view will return you to the Test List screen withoutsaving any changes to the results information. Note that all performance data have already beensaved before viewing the report and will not be lost or changed by selecting the Cancel button.
Note on error rate calculations: The calculations used to determine Total Error and Net Error ratesare based on the work of Soukoreff and MacKenzie (2003), in their paper entitled "Metrics for textentry research: An evaluation of MSD and KSPC, and a new unified error metric", Proceedings ofCHI 2003. Their method is used to determine the "distance" between the word entered by the clientand the target word, at the end of the trial. This forms the basis for the net error rate. If the wordentered matches the target word exactly, this distance is zero. For total error rate, the distance at theend of the trial is adjusted to account for any errors that were fixed along the way.
Compass Help -Word Test Results
126 / 145
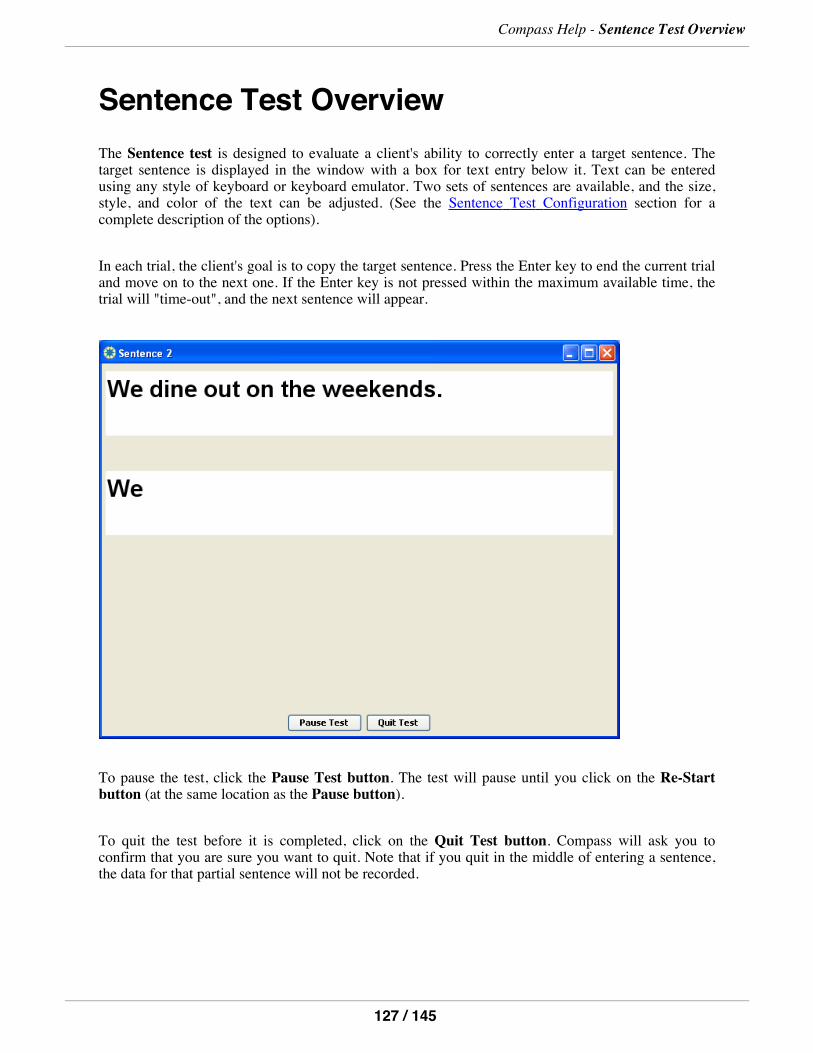
Sentence Test OverviewThe Sentence test is designed to evaluate a client's ability to correctly enter a target sentence. Thetarget sentence is displayed in the window with a box for text entry below it. Text can be enteredusing any style of keyboard or keyboard emulator. Two sets of sentences are available, and the size,style, and color of the text can be adjusted. (See the Sentence Test Configuration section for acomplete description of the options).
In each trial, the client's goal is to copy the target sentence. Press the Enter key to end the current trialand move on to the next one. If the Enter key is not pressed within the maximum available time, thetrial will "time-out", and the next sentence will appear.
To pause the test, click the Pause Test button. The test will pause until you click on the Re-Startbutton (at the same location as the Pause button).
To quit the test before it is completed, click on the Quit Test button. Compass will ask you toconfirm that you are sure you want to quit. Note that if you quit in the middle of entering a sentence,the data for that partial sentence will not be recorded.
Compass Help - Sentence Test Overview
127 / 145
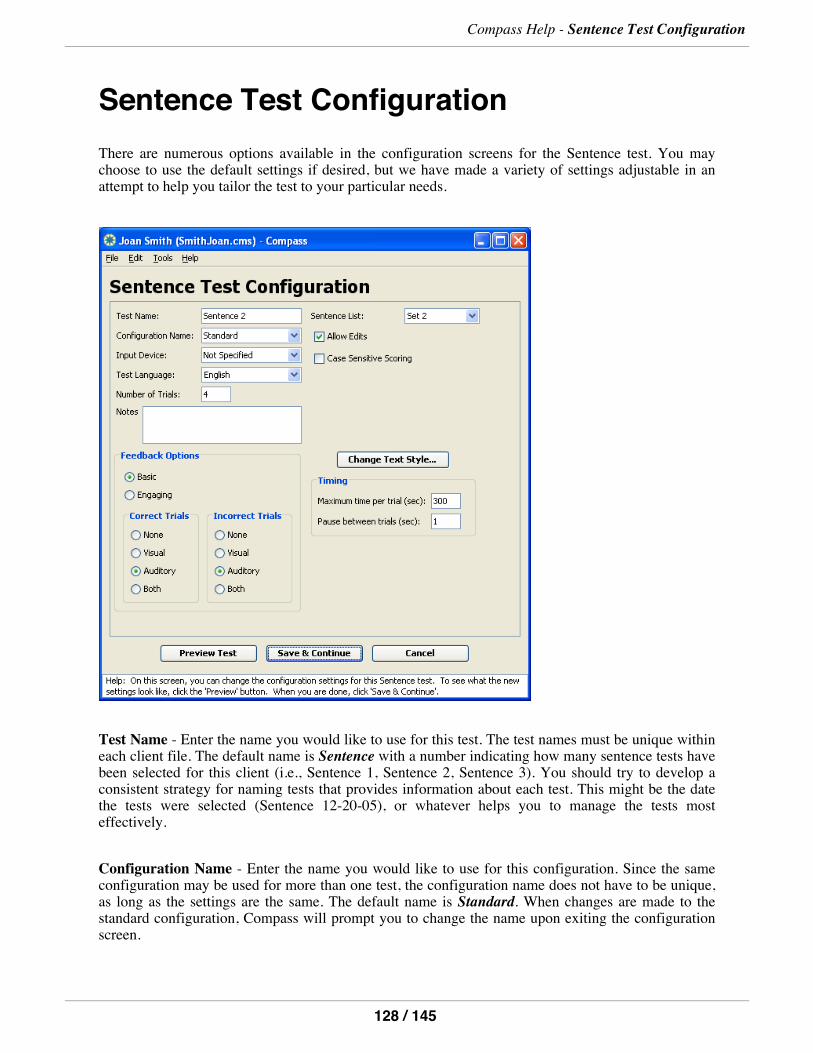
Sentence Test ConfigurationThere are numerous options available in the configuration screens for the Sentence test. You maychoose to use the default settings if desired, but we have made a variety of settings adjustable in anattempt to help you tailor the test to your particular needs.
Test Name - Enter the name you would like to use for this test. The test names must be unique withineach client file. The default name is Sentence with a number indicating how many sentence tests havebeen selected for this client (i.e., Sentence 1, Sentence 2, Sentence 3). You should try to develop aconsistent strategy for naming tests that provides information about each test. This might be the datethe tests were selected (Sentence 12-20-05), or whatever helps you to manage the tests mosteffectively.
Configuration Name - Enter the name you would like to use for this configuration. Since the sameconfiguration may be used for more than one test, the configuration name does not have to be unique,as long as the settings are the same. The default name is Standard. When changes are made to thestandard configuration, Compass will prompt you to change the name upon exiting the configurationscreen.
Compass Help - Sentence Test Configuration
128 / 145
You should develop a consistent strategy for naming the configurations to describe the settings used.This will help you recall how this test differs from another one. A good configuration name mightdescribe the input method (e.g., word prediction), the type and size of the text (e.g., 14 bold), or otherimportant settings.
Input Device - Allows the input device being used to be selected from a drop-down list of commondevices. Device names that are not on the drop-down list can be typed into the field. The default valueis Not Specified. If you are comparing performance with different input devices, it is important to setthe Input Device field accordingly. Otherwise, it may not be clear when viewing test results whichinput device was used.
The Test Language field defines which language is used for any text or vocal feedback presented tothe client during the test. Currently, the choices are English, French, Spanish, Portuguese, and Arabic,with English as the default value. In the Sentence test, the sentences to transcribe are presented in theTest Language.
Notes - A field for any comments relating to the configuration. By default, this field is empty. Addingcomments may be useful for describing why certain choices were made in the configuration or anyother information that will help you when reviewing the test.
Number of Trials - The number of targets that will be presented during the test. The default value is4 trials. The number should be large enough to provide a representative sample of the client's ability toperform the task and small enough to avoid unintended fatigue or loss of interest.
Feedback Options
Style - The feedback style option allows you to select the most appropriate form of feedback for theuser. Basic feedback provides simple, direct feedback. Engaging feedback provides a morestimulating response to help motivate and hold the interest of clients when necessary. Feedback stylesare consistent across all of the trials. The default feedback style is Basic.
Four feedback options are available for correct and/or incorrect trials. The option for Correct Trialsdefines the type of feedback provided when the user completes the sentence correctly within the timeallowed. The default value for Correct Trials is Auditory. The option for Incorrect Trials defines thetype of feedback provided at the end of trial if the sentence entered is incorrect. The default value forIncorrect Trials is Auditory. The feedback options are:
1. None - Compass will provide no feedback for any of the trials of this type. When a selection ismade or the trial times out, the next trial will start until the test is completed.
2. Visual - Compass will provide a visual response.3. Auditory - Compass will provide an auditory response.4. Both - Compass will provide both a visual and an auditory response.
Sentence List - This defines the group of sentences from which target words are selected. There aresix options for Sentence List. The first two options are, in increasing level of reading difficulty:
Compass Help - Sentence Test Configuration
129 / 145
1. Sentence Set 1 - corresponds roughly to 1st grade reading level, or lower. (The Flesch-KinkaidGrade Level score is 0.0 for these sentences.)
2. Sentence Set 2 - these are slightly longer than the sentences in Set 1, with some longer words. Itcorresponds roughly to 3rd grade reading level. (The Flesch-Kinkaid Grade Level score is 2.4 forthese sentences.) This is the default option.
Sentence Set 1 contains about 25 sentences, and Sentence Set 2 contains about 100 sentences. Whenyou run a Sentence test using either of these sets, the test will select each sentence at random andensure that no sentence is presented more than once in the test.
The remaining list options are designed for more controlled testing, and are best-suited for use with 4or fewer sentences in the test:
1. Practice - contains 1 practice sentence. This is useful if you want to run a separate practice testwith the guarantee that it will use a unique sentence.
2. 4-Sentence Test 1, 4-Sentence Test 2, and 4-Sentence Test 3 - each of these is a list withexactly 4 sentences. All three tests are matched with respect to the number of shifted characters,the total number of characters in the test, the characters per word, and the grade level of the text.They correspond roughly to a 3rd or 4th grade reading level. (The Flesch-Kinkaid Grade Levelscore is 3.8 for these sentences.)
When you use any of these 4-Sentence tests, each sentence in the test is presented in a fixed order.These tests lend themselves to more strict data collection requirements. They allow you to run up tothree Sentence tests in a row with a guarantee that all the sentences will be unique. (With Sentence Set1 and Set 2, it is likely that all sentences will be unique, but it is possible that a sentence could getrandomly selected in two successive tests.)
Note that even though the words in these sentence lists have different word lengths, the words perminute rate calculations assume a constant word length of 5 letters per word. This allows you tomeaningfully compare the rates achieved for different word lists. The sentence lists were derived fromthe phrase sets described by MacKenzie & Soukoreff (2003), in their paper entitled "Phrase sets forevaluating text entry techniques", Proceedings of CHI 2003 Conference.
Allow Edits - Determines whether or not the client can fix any mistakes made. If Allow Edits ischecked, errors in letter entry are displayed and can be edited in the usual fashion with keyboard ormouse. This is the default option, since it represents the typical text entry scenario. ;If Allow Edits isnot checked, only those letters that are correct for the target sentence will be displayed. Incorrect letterentries will not be displayed, although they will be counted in the results for the test. This setting mayhelp reduce distraction due to errors for some clients.
Case Sensitive Scoring - Determines whether an entry must be in the correct upper or lower case inorder to count as "correct." If Case Sensitive Scoring is checked, errors in case are counted as errors,even if the letters match the target. For example, "A" vs. "a" would be an error, with case sensitivescoring. If Case Sensitive Scoring is not checked, errors in case are not considered when countingerrors. So the "A" vs. "a" example would be scored as correct. This is the default option.
Compass Help - Sentence Test Configuration
130 / 145

Text Style - By default, the Sentence test uses a bold size 30 font, with black letters on a whitebackground. To change the font and/or color of the text and/or the color of the test background, clickthe Text Style... button. This will bring up the dialogue box shown below. The three panels at the topshow the available fonts, styles, and sizes for the text. You can select one of these by clicking on it.To set the background color, click on one of the color buttons shown on the "Background" row. To setthe text color, click on one of the color buttons shown on the "Font" row. Your choices will bereflected in the Preview area. When you have the colors you want, click OK to use them. Or clickCancel to return without making any changes.
Timing
Maximum Time per Trial - This allows you to define the maximum time allowed to complete eachtrial. If no selection is made within the designated time, the trial times out and advances to the nexttrial. The time should be long enough to give the client the opportunity to make a selection but not beso long that the client becomes frustrated or bored if they are unable to successfully make a selection.The default value is 300 seconds (or 5 minutes per sentence).
Pause Between Trials - This allows you to define the length of the pause between a selection or timeout and the start of the next trial. A longer pause may be useful for users who need time to process thefeedback of the previous trial before starting the next one. The default value is 1second.
The three buttons at the bottom of the configuration screen perform the following functions:
1.Preview Test - Click this button to run an abbreviated version of the test using the settings you haveselected. No data are collected for the trials in the preview.
Compass Help - Sentence Test Configuration
131 / 145
2.Save & Continue - Click this button to save the test configuration settings you have selected andreturn to the Test List. If necessary, Compass will prompt you to change the configuration namebefore you can exit (see Configuring Tests).3.Cancel - Click this button to return you to the Test List without saving any changes to the
configuration settings.
Compass Help - Sentence Test Configuration
132 / 145
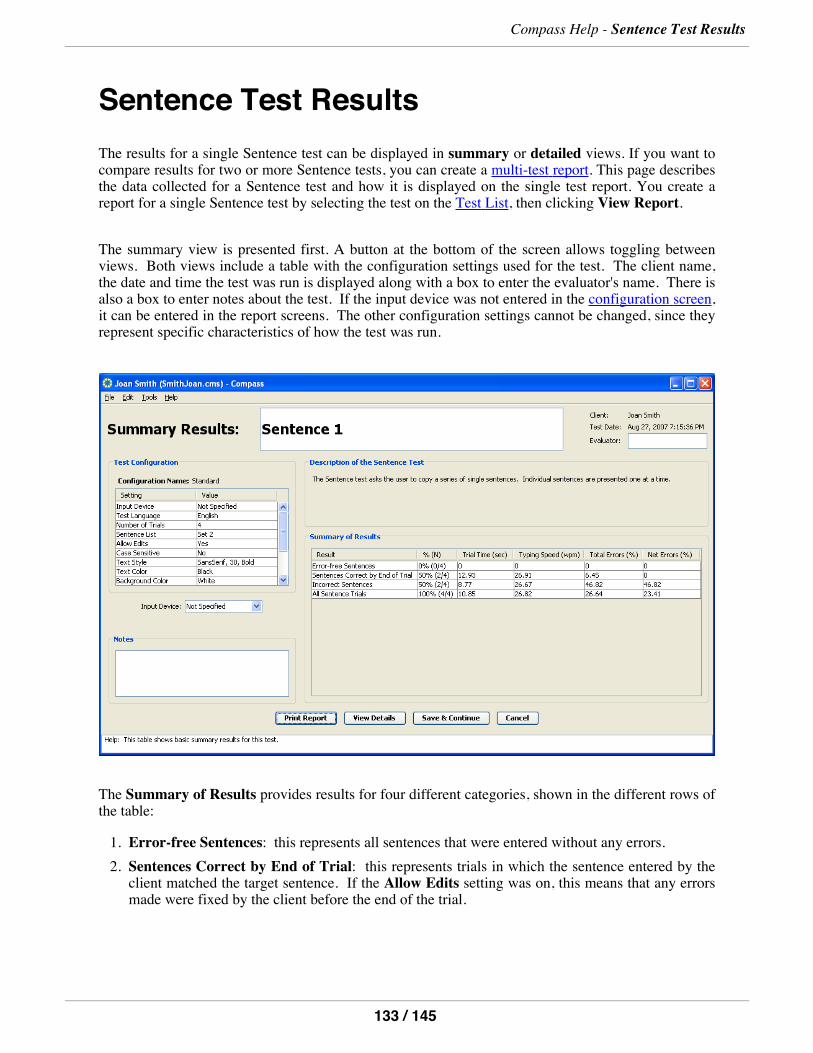
Sentence Test ResultsThe results for a single Sentence test can be displayed in summary or detailed views. If you want tocompare results for two or more Sentence tests, you can create a multi-test report. This page describesthe data collected for a Sentence test and how it is displayed on the single test report. You create areport for a single Sentence test by selecting the test on the Test List, then clicking View Report.
The summary view is presented first. A button at the bottom of the screen allows toggling betweenviews. Both views include a table with the configuration settings used for the test. The client name,the date and time the test was run is displayed along with a box to enter the evaluator's name. There isalso a box to enter notes about the test. If the input device was not entered in the configuration screen,it can be entered in the report screens. The other configuration settings cannot be changed, since theyrepresent specific characteristics of how the test was run.
The Summary of Results provides results for four different categories, shown in the different rows ofthe table:
1. Error-free Sentences: this represents all sentences that were entered without any errors.2. Sentences Correct by End of Trial: this represents trials in which the sentence entered by theclient matched the target sentence. If the Allow Edits setting was on, this means that any errorsmade were fixed by the client before the end of the trial.
Compass Help - Sentence Test Results
133 / 145
3. Incorrect Sentences: this represents trials in which the sentence entered by the client was notcorrectly completed in the time available. The available time per trial is specified by the maxtime configuration setting.
4. All Trials: this represents all trials in the test. This combines the results of "Sentences Correctby End of Trial" and "Incorrect Sentences."
For each category of trials, the following results are reported in the table columns:
1. % (N): how many trials fell into this category. This is shown both as a percentage of all trials inthe test, as well as the exact number of trials.
2. Trial Time (sec): the average time required to perform each trial in this category. This ismeasured in seconds from when the target sentence is first presented until the Enter key isselected by the client, ending the trial. (Note that the time required to press the Enter key is notadded into the overall trial time.)
3. Typing Speed: the average typing speed in words per minute for the trials in this category. Thisis calculated based on the average seconds per letter, and converted into words per minuteassuming that there are 5 letters per word.
4. Total Errors (%): this is the average percent errors committed for the trials in this category. Itincludes unfixed as well as fixed errors, if any.
5. Net Errors (%): this is the average net errors remaining in these sentences at the end of thetrial. It includes only those errors that were not fixed before the end of the trial. Note that if theAllow Edits setting is off, the Net Errors column is not displayed. This is because if the client isnot able to fix any errors, the Total Errors and Net Errors are exactly the same. If the AllowEdits setting is on, comparing Net Errors to Total Errors can give a sense of how well the clientrecognized and corrected errors that they made.
For more information on calculating error rates, please see the Notes below.
Compass Help - Sentence Test Results
134 / 145
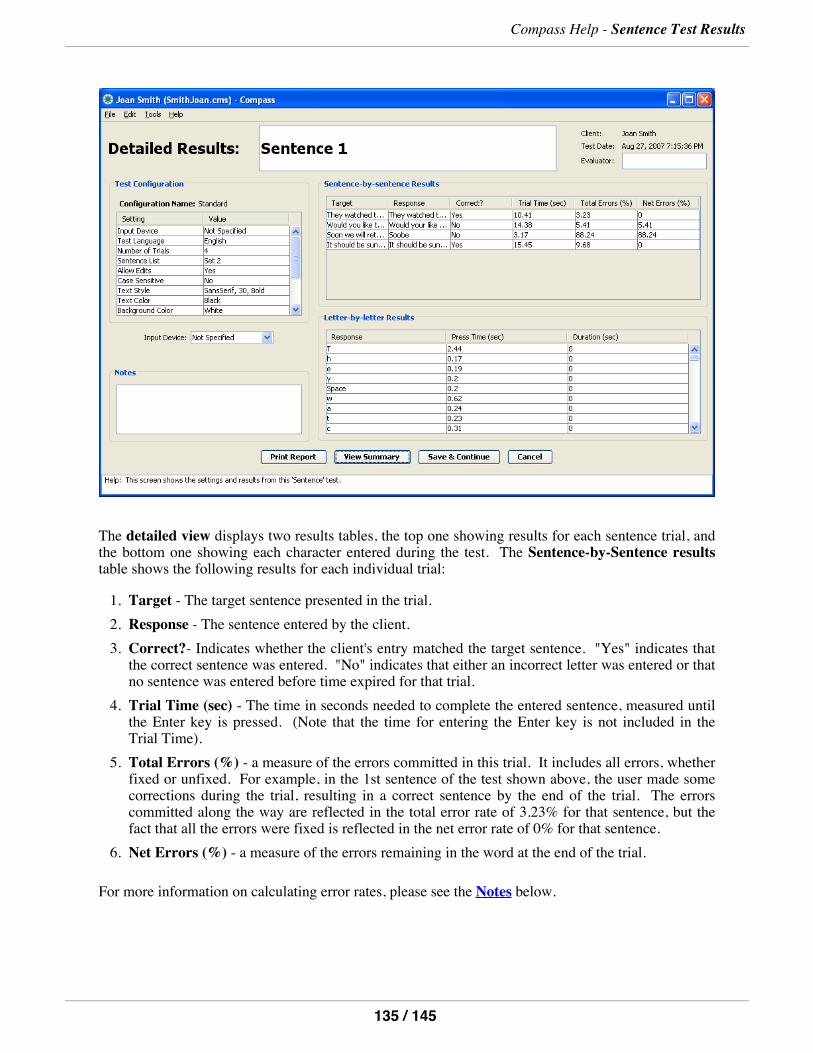
The detailed view displays two results tables, the top one showing results for each sentence trial, andthe bottom one showing each character entered during the test. The Sentence-by-Sentence resultstable shows the following results for each individual trial:
1. Target - The target sentence presented in the trial.2. Response - The sentence entered by the client.3. Correct?- Indicates whether the client's entry matched the target sentence. "Yes" indicates thatthe correct sentence was entered. "No" indicates that either an incorrect letter was entered or thatno sentence was entered before time expired for that trial.
4. Trial Time (sec) - The time in seconds needed to complete the entered sentence, measured untilthe Enter key is pressed. (Note that the time for entering the Enter key is not included in theTrial Time).
5. Total Errors (%) - a measure of the errors committed in this trial. It includes all errors, whetherfixed or unfixed. For example, in the 1st sentence of the test shown above, the user made somecorrections during the trial, resulting in a correct sentence by the end of the trial. The errorscommitted along the way are reflected in the total error rate of 3.23% for that sentence, but thefact that all the errors were fixed is reflected in the net error rate of 0% for that sentence.
6. Net Errors (%) - a measure of the errors remaining in the word at the end of the trial.
For more information on calculating error rates, please see the Notes below.
Compass Help - Sentence Test Results
135 / 145
The Letter-by-Letter results table shows the following results for each individual character enteredduring the test:
1. Target - The target letter. This is only displayed if the Allow Edits setting is off, because that isthe only time that Compass will reliably know the target letter at all times.
2. Response - The letter entered by the client.3. Correct?- Whether the response matched the target. This is only displayed if the AllowEditssetting is off, because that is the only time that Compass will reliably know the target letterat all times.
4. Press Time (sec) - The time in seconds from when the previous key was depressed until this keywas pressed.
5. Duration (sec) - The time in seconds from when the key was pressed until it was released.
The sum of Press TImes for a sentence is the Trial Time for that sentence.
Note that the width of the columns in any of the tables can be resized by moving the cursor to the edgeof the box containing the label and dragging it to the left or right.
Additionally, you can cut-and-paste the contents of a Sentence report into another application, such asa word processor. This may be useful when preparing reports on a particular client.
The following buttons are available to help you navigate and work with reports.
1. Print Report - Clicking this button prints the summary and detailed report.2. View Details - When in the summary view, clicking on this button changes the display to thedetailed report view.
3. View Summary - When in the detailed view, clicking on this button returns the display to thesummary view.
4. Save & Continue - Clicking on this button from either view will save the data for the test, anycomments you have entered, and the evaluator name and return you to the Test List screen.
5. Cancel - Clicking on this button from either view will return you to the Test List screen withoutsaving any changes to the results information. Note that all performance data have already beensaved before viewing the report and will not be lost or changed by selecting the Cancel button.
Note on error rate calculations: The calculations used to determine Total Error and Net Error ratesare based on the work of Soukoreff and MacKenzie (2003), in their paper entitled "Metrics for textentry research: An evaluation of MSD and KSPC, and a new unified error metric", Proceedings ofCHI 2003. Their method is used to determine the "distance" between the text entered by the clientand the target text, at the end of the trial. This forms the basis for the net error rate. If the text enteredmatches the target text exactly, this distance is zero. For total error rate, the distance at the end of thetrial is adjusted to account for any errors that were fixed along the way.
Compass Help - Sentence Test Results
136 / 145
About Koester Performance Research(KPR)Koester Performance Research (KPR) works to enhance computer access, particularly for people whohave physical impairments or other disabilities. Our goal is to help ensure that everyone gets the rightaccess solution to meet their needs. To pursue this goal, we develop software and conduct research onusability and accessibility.
KPR is located in beautiful Ann Arbor, MI. Visit us on the web at https://kpronline.com.
If you have suggestions about Compass, we hope you will send them to us [email protected]. We want to make sure that Compass continues to meet your needs as itevolves.
You can also subscribe to our mailing list at kpronline.com, for news and updates about once or twicea month. (See kpronline.com/blog for the types of things we post.)
Compass Help - About Koester Performance Research (KPR)
137 / 145
Technical SupportCompass has been extensively tested and designed with the highest quality and ease of use in mind.We hope that you will have a great experience with Compass. However, an issue may arise for whichyou need some support.
You may contact KPR directly at [email protected]. We will do our best to respond to yourquestion within 24 hours.
As we develop additional support resources, we will list those at our website at https://kpronline.com.You may want to visit there regularly to see what's new.
You can also subscribe to our mailing list at kpronline.com, for news and updates about once or twicea month. (See kpronline.com/blog for the types of things we post.)
Thank you for choosing Compass!
Compass Help - Technical Support
138 / 145
Development TeamCompass research and development is led by Koester Performance Research. Contributors alsoincluded the Ann Arbor Center for Independent Living, University of Pittsburgh, and EasternMichigan University. Support for development was provided by Phase I and Phase II STTR grantsfrom the National Institutes of Health.
Team members:
Heidi Horstmann Koester, Koester Performance Research
Jen Mankowski, Koester Performance Research (now an independent consultant)
Ed LoPresti, Koester Performance Research (now with University of Pittsburgh)
Rich Simpson, University of Pittsburgh (now with Duquesne University)
Glen Ashlock, Ann Arbor Center for Independent Living (now with Region 2 Area Agency on Aging)
The team also thanks Wally Welch and Kathy Koehler for valuable consulting services during thedevelopment process.
Compass Help - Development Team
139 / 145
Index
AAccept Incorrect Keystrokes (119)Action Screen:Test Lists (49)Action Screen:Welcome to Compass (29)Choose:Test Lists (49)Choose:Welcome to Compass (29)
Activating (106)Switch (106)
Aim:Aim Test Configuration (61)Aim:Aim Test Overview (60)Aim:Configuring Tests (51)Aim Configuration:Aim TestConfiguration (61)Aim Configuration:Aim Test Overview (60)Aim Configuration:Aim Test Results (66)Aim Configuration:Word Test Results (123)Aim Test Overview (60)Aim Test Results (66)Assistive Technology (6)AT:Compass Accessibility (21)AT:Glossary of Terms (6)AT:Overview (3)Auditory:Aim Test Configuration (61)Auditory:Drag Test Configuration (71)Auditory:Letter Test Configuration (111)Auditory:Menu Test Configuration (80)Auditory:Word Test Configuration (119)Available Tests (47)Average Initial Start Time:Aim TestResults (66)Average Initial Start Time:Word TestResults (123)Average Keypress Time (115)Average Key Release Time (115)Average Number:Aim Test Results (66)Average Number:Drag Test Results (74)Average Number:Switch Test Results (106)Average Number:Word Test Results (123)Mouse Clicks:Aim Test Results (66)Mouse Clicks:Drag Test Results (74)Mouse Clicks:Word Test Results (123)Mouse Releases (74)Switch Hits (106)Switch Releases (106)Times Cursor Entered:Aim TestResults (66)Times Cursor Entered:Word TestResults (123)
Average Target Drag Time (74)Average Target Selection Time:Aim TestResults (66)
Average Target Selection Time:Drag TestResults (74)Average Target Selection Time:Word TestResults (123)Average Time (106)Hit Switch (106)Release Switch After Activation (106)
BBackground Colors (111)Background Style (111)
CCase Sensitive (119)Characteristics (21)Choose Skill (47)Choose Skill Tests:Choosing SkillTests (47)Choose Skill Tests:Enter Information for aNew Client (41)Choose Skill Tests:Test Lists (49)Enter (47)opens (41)
Client (6)Clients:Enter Information for a NewClient (41)Clients:Open Existing Clients (43)Clinician (6)Cms:Enter Information for a NewClient (41)Cms:How Compass Stores ClientInformation (40)Cms:Open Existing Clients (43)Comments (41)Compass:Aim Test Configuration (61)Compass:Choose an Action (30)Compass:Compass Accessibility (21)Compass:Configuring Tests (51)Compass:Drag Test Configuration (71)Compass:Enter Information for a NewClient (41)Compass:Getting Help (8)Compass:Glossary of Terms (6)Compass:How Compass Stores ClientInformation (40)Compass:Letter Test Configuration (111)Compass:Menu Test Configuration (80)Compass:Open Existing Clients (43)Compass:Overview (3)Compass:Switch Test Configuration (102)Compass:Welcome to Compass (29)Compass:Word Test Configuration (119)Compass:Word Test Overview (118)Welcome (29)
Compass Help (8)Compass Stores Client Information (40)
140 / 145
Compass window (8)Configuring (51)Tests (51)
Contents (8)Copy Test (49)Correct Keystroke (119)Correct Selection:Aim TestConfiguration (61)Correct Selection:Drag TestConfiguration (71)Correct Selection:Menu TestConfiguration (80)Correct Selection:Menu Test Results (84)Correct Word (119)Cursor Entries:Aim Test Results (66)Cursor Entries:Word Test Results (123)
DDestination Distance:Drag TestConfiguration (71)Destination Distance:Drag TestResults (74)Destination Size:Drag TestConfiguration (71)Destination Size:Drag Test Results (74)Devices (6)Disability (21)Display:Choosing Skill Tests (47)Display:Menu Test Configuration (80)submenu (80)Test List (47)
Double Click (61)Drag:Drag Test Configuration (71)Drag:Drag Test Overview (70)Dragged? (74)Dragging Targets (74)Drag Test Configuration:Drag TestConfiguration (71)Drag Test Configuration:Drag TestOverview (70)Drag Test Configuration:Drag TestResults (74)Drag Test Configuration:Letter TestOverview (110)Drag Test Overview (70)Drag Test Results (74)Drag Time (74)Draw Cursor Path:Aim TestConfiguration (61)Draw Cursor Path:Drag TestConfiguration (71)Dwell Time:Aim Test Configuration (61)Dwell Time:Drag Test Configuration (71)Dwell Time:Menu Test Configuration (80)
E
Enter Information:Enter Information for aNew Client (41)Enter Information:How Compass StoresClient Information (40)New Client:Enter Information for a NewClient (41)New Client:How Compass Stores ClientInformation (40)
Evaluator (55)
FFeedback Options (80)Font Colors (111)Font Size (111)
HHelp (8)Getting (8)Searching (8)
Hit Switch (106)Average Time (106)
Hold Time (102)How Compass Stores ClientInformation (43)How Compass Stores Information (41)
IIcons:Aim Test Configuration (61)Icons:Drag Test Configuration (71)Include Submenus (80)Incorrect Keystroke (119)Incorrect Letter (111)Incorrect Selection:Aim TestConfiguration (61)Incorrect Selection:Drag TestConfiguration (71)Incorrect Selection:Menu TestConfiguration (80)Incorrect Selection:Menu Test Results (84)Incorrect Selection:Switch TestConfiguration (102)Incorrect Word (119)Input Device (55)
KKeypress Time (115)
LLetter:Letter Test Configuration (111)Letter:Letter Test Overview (110)Letter Accuracy (115)Letter Case (111)Letter Test (111)Letter Test Configuration (111)Letter Test Overview (110)
141 / 145
Letter Test Results (115)
MMaximum (102)Maximum Pause Between Trials (102)Maximum Time:Aim TestConfiguration (61)Maximum Time:Aim Test Results (66)Maximum Time:Drag TestConfiguration (71)Maximum Time:Drag Test Results (74)Maximum Time:Letter TestConfiguration (111)Maximum Time:Letter Test Results (115)Maximum Time:Menu TestConfiguration (80)Maximum Time:Switch TestConfiguration (102)Maximum Time:Switch Test Results (106)Maximum Time:Word TestConfiguration (119)Maximum Time:Word Test Results (123)Menubar (80)Menubar Layout (80)Menubars (80)Minimum (102)Minimum Pause Between Trials (102)More Background Colors:Drag TestConfiguration (71)More Background Colors:Letter TestConfiguration (111)More Font Colors (111)Mouse (80)Mouse Releases (74)Average Number (74)
NNew Client:Enter Information for a NewClient (41)New Client:How Compass Stores ClientInformation (40)Enter Information:Enter Information for aNew Client (41)Enter Information:How Compass StoresClient Information (40)
Notes:Configuring Tests (51)Notes:Viewing Results (55)Number:Aim Test Configuration (61)Number:Drag Test Configuration (71)Number:Letter Test Configuration (111)Number:Menu Test Configuration (80)Number:Switch Test Configuration (102)Number:Switch Test Results (106)Number:Word Test Configuration (119)Switch Hits (106)Switch Releases (106)
Trials:Aim Test Configuration (61)Trials:Drag Test Configuration (71)Trials:Letter Test Configuration (111)Trials:Menu Test Configuration (80)Trials:Switch Test Configuration (102)Trials:Word Test Configuration (119)
OOpen button (43)Open Existing Client (43)Open Existing Client window (43)Overall Target Selection Accuracy:AimTest Results (66)Overall Target Selection Accuracy:DragTest Results (74)Overall Target Selection Accuracy:WordTest Results (123)Overview (3)
PPause:Aim Test Overview (60)Pause:Drag Test Overview (70)Pause:Letter Test Overview (110)Pause:Menu Test Overview (78)Pause:Running Tests (53)Pause:Switch Test Overview (100)Pause:Word Test Overview (118)Pause Between Trials:Aim TestConfiguration (61)Pause Between Trials:Drag TestConfiguration (71)Pause Between Trials:Letter TestConfiguration (111)Pause Between Trials:Menu TestConfiguration (80)Pause Between Trials:Switch TestConfiguration (102)Pause Between Trials:Word TestConfiguration (119)Preferences (29)Press:Aim Test Overview (60)Press:Drag Test Overview (70)Press:Letter Test Overview (110)Press:Menu Test Overview (78)Press:Running Tests (53)Press:Switch Test Overview (100)Press:Word Test Overview (118)Preview Test:Aim Test Configuration (61)Preview Test:Drag Test Configuration (71)Preview Test:Letter TestConfiguration (111)Preview Test:Menu Test Configuration (80)Preview Test:Switch TestConfiguration (102)Preview Test:Word TestConfiguration (119)
142 / 145
Previous Target:Aim Test Results (66)Previous Target:Word Test Results (123)Print Report:Aim Test Results (66)Print Report:Drag Test Results (74)Print Report:Letter Test Results (115)Print Report:Menu Test Results (84)Print Report:Switch Test Results (106)Print Report:Word Test Results (123)Print Report button (55)
QQuit:Aim Test Overview (60)Quit:Drag Test Overview (70)Quit:Letter Test Overview (110)Quit:Menu Test Overview (78)Quit:Switch Test Overview (100)Quit:Word Test Overview (118)QWERTY (119)QWERTY Keyboard (111)
RRelease Switch:Switch TestConfiguration (102)Release Switch:Switch Test Results (106)Release Switch After Activation (106)Average Time (106)
Results (55)Viewing (55)
Right Click (61)Running (53)Tests (53)
SSave As window:Enter Information for aNew Client (41)Save As window:How Compass StoresClient Information (40)Screen Coverage:Aim TestConfiguration (61)Screen Coverage:Drag TestConfiguration (71)Screen Tips (8)Select All Files (43)Select Font window (111)Selecting:Aim Test Results (66)Selecting:Drag Test Configuration (71)Selecting:Drag Test Results (74)Selecting:Letter Test Configuration (111)Selecting:Letter Test Results (115)Selecting:Menu Test Results (84)Selecting:Switch Test Results (106)Selecting:Welcome to Compass (29)Selecting:Word Test Results (123)Cancel button:Aim Test Results (66)Cancel button:Drag Test Results (74)
Cancel button:Letter Test Results (115)Cancel button:Menu Test Results (84)Cancel button:Switch Test Results (106)Cancel button:Word Test Results (123)General (29)OK button (111)Targets (71)
Selecting Targets (74)Selection Cases:Aim TestConfiguration (61)Selection Cases:Drag TestConfiguration (71)Selection Cases:Letter TestConfiguration (111)Selection Cases:Menu TestConfiguration (80)Selection Cases:Switch TestConfiguration (102)Selection Cases:Word TestConfiguration (119)Selection Made (84)Selection Method (102)Selection Time:Aim Test Results (66)Selection Time:Drag Test Results (74)Selection Time:Word Test Results (123)Set Colors (71)Simple Menubar (80)Skill Tests:Choosing Skill Tests (47)Skill Tests:Skill Tests (46)Standard:Aim Test Configuration (61)Standard:Drag Test Configuration (71)Standard:Switch Test Configuration (102)Standard Menubar (80)Start:Aim Test Overview (60)Start:Drag Test Overview (70)Start:Letter Test Overview (110)Start:Menu Test Overview (78)Start:Running Tests (53)Start:Switch Test Overview (100)Start:Test Lists (49)Start:Word Test Overview (118)Start Time:Aim Test Results (66)Start Time:Word Test Results (123)Submenus (80)Switch:Switch Test Configuration (102)Switch:Switch Test Results (106)Activating (106)
Switch Activated (106)Switch Hits (106)Average Number (106)Number (106)
Switch Releases (106)Average Number (106)Number (106)
Switch Test (100)
143 / 145
Switch Test Configuration:Switch TestConfiguration (102)Switch Test Configuration:Switch TestOverview (100)Switch Test Overview (100)Switch Test Results (106)
TTarget:Aim Test Results (66)Target:Drag Test Configuration (71)Target:Word Test Results (123)selected (71)
Target Appearance:Aim TestConfiguration (61)Target Appearance:Drag TestConfiguration (71)Target Distance (61)Target Map:Aim Test Results (66)Target Map:Drag Test Results (74)Target Map:Word Test Results (123)Target Size:Aim Test Configuration (61)Target Size:Aim Test Results (66)Target Size:Drag Test Configuration (71)Target Size:Drag Test Results (74)Target Size:Word Test Results (123)Test Families:Configuring Tests (51)Test Families:Test Lists (49)Test List:Aim Test Configuration (61)Test List:Aim Test Results (66)Test List:Choosing Skill Tests (47)Test List:Configuring Tests (51)Test List:Drag Test Configuration (71)Test List:Drag Test Results (74)Test List:Letter Test Configuration (111)Test List:Letter Test Results (115)Test List:Menu Test Configuration (80)Test List:Menu Test Results (84)Test List:Open Existing Clients (43)Test List:Running Tests (53)Test List:Switch Test Configuration (102)Test List:Switch Test Results (106)Test List:Test Lists (49)Test List:Viewing Results (55)Test List:Word Test Configuration (119)Test List:Word Test Results (123)display (47)exiting (49)opens (43)
Test Overview (78)Test Results (84)Tests:Choosing Skill Tests (47)Tests:Configuring Tests (51)Tests:Running Tests (53)Tests:Skill Tests (46)Add (47)Configuring (51)
Running (53)Text Entry (46)Text Style:Letter Test Configuration (111)Text Style:Menu Test Configuration (80)Text Style:Word Test Configuration (119)Time Between Trials (102)Times Cursor Entered:Aim TestResults (66)Times Cursor Entered:Word TestResults (123)Average Number:Aim Test Results (66)Average Number:Word TestResults (123)
Tips (8)Tools menu (29)Tool Tip (8)Trials:Aim Test Configuration (61)Trials:Drag Test Configuration (71)Trials:Letter Test Configuration (111)Trials:Menu Test Configuration (80)Trials:Switch Test Configuration (102)Trials:Word Test Configuration (119)Number:Aim Test Configuration (61)Number:Drag Test Configuration (71)Number:Letter Test Configuration (111)Number:Menu Test Configuration (80)Number:Switch Test Configuration (102)Number:Word Test Configuration (119)
UUsing Compass (21)
VView Details:Aim Test Results (66)View Details:Drag Test Results (74)View Details:Letter Test Results (115)View Details:Menu Test Results (84)View Details:Switch Test Results (106)View Details:Word Test Results (123)View Details button (55)Viewing (55)Results (55)
View Results button (55)View Summary:Aim Test Results (66)View Summary:Drag Test Results (74)View Summary:Letter Test Results (115)View Summary:Menu Test Results (84)View Summary:Switch Test Results (106)View Summary:Word Test Results (123)Visual (102)
WWelcome (29)Compass (29)
Word:Speech Recognition (27)
144 / 145
Word:Word Test Configuration (119)Word:Word Test Overview (118)Word Configuration (118)Word List (119)Word Test Configuration (119)Word Test Overview (118)Word Test Results (123)Word Transition (119)
145 / 145


