Embed Size (px)
Citation preview

Oracle® Identity ManagerConnector Guide for Oracle E-Business SuiteUser Management
11.1.1E62129-11April 2022

Oracle Identity Manager Connector Guide for Oracle E-Business Suite User Management, 11.1.1
E62129-11
Copyright © 2015, 2021, Oracle and/or its affiliates.
Primary Author: Alankrita Prakash
Contributing Authors: Gowri.G.R, Mike Howlett
This software and related documentation are provided under a license agreement containing restrictions onuse and disclosure and are protected by intellectual property laws. Except as expressly permitted in yourlicense agreement or allowed by law, you may not use, copy, reproduce, translate, broadcast, modify, license,transmit, distribute, exhibit, perform, publish, or display any part, in any form, or by any means. Reverseengineering, disassembly, or decompilation of this software, unless required by law for interoperability, isprohibited.
The information contained herein is subject to change without notice and is not warranted to be error-free. Ifyou find any errors, please report them to us in writing.
If this is software or related documentation that is delivered to the U.S. Government or anyone licensing it onbehalf of the U.S. Government, then the following notice is applicable:
U.S. GOVERNMENT END USERS: Oracle programs (including any operating system, integrated software,any programs embedded, installed or activated on delivered hardware, and modifications of such programs)and Oracle computer documentation or other Oracle data delivered to or accessed by U.S. Government endusers are "commercial computer software" or "commercial computer software documentation" pursuant to theapplicable Federal Acquisition Regulation and agency-specific supplemental regulations. As such, the use,reproduction, duplication, release, display, disclosure, modification, preparation of derivative works, and/oradaptation of i) Oracle programs (including any operating system, integrated software, any programsembedded, installed or activated on delivered hardware, and modifications of such programs), ii) Oraclecomputer documentation and/or iii) other Oracle data, is subject to the rights and limitations specified in thelicense contained in the applicable contract. The terms governing the U.S. Government’s use of Oracle cloudservices are defined by the applicable contract for such services. No other rights are granted to the U.S.Government.
This software or hardware is developed for general use in a variety of information management applications.It is not developed or intended for use in any inherently dangerous applications, including applications thatmay create a risk of personal injury. If you use this software or hardware in dangerous applications, then youshall be responsible to take all appropriate fail-safe, backup, redundancy, and other measures to ensure itssafe use. Oracle Corporation and its affiliates disclaim any liability for any damages caused by use of thissoftware or hardware in dangerous applications.
Oracle, Java, and MySQL are registered trademarks of Oracle and/or its affiliates. Other names may betrademarks of their respective owners.
Intel and Intel Inside are trademarks or registered trademarks of Intel Corporation. All SPARC trademarks areused under license and are trademarks or registered trademarks of SPARC International, Inc. AMD, Epyc,and the AMD logo are trademarks or registered trademarks of Advanced Micro Devices. UNIX is a registeredtrademark of The Open Group.
This software or hardware and documentation may provide access to or information about content, products,and services from third parties. Oracle Corporation and its affiliates are not responsible for and expresslydisclaim all warranties of any kind with respect to third-party content, products, and services unless otherwiseset forth in an applicable agreement between you and Oracle. Oracle Corporation and its affiliates will not beresponsible for any loss, costs, or damages incurred due to your access to or use of third-party content,products, or services, except as set forth in an applicable agreement between you and Oracle.

Contents
Preface
Audience x
Documentation Accessibility x
Related Documents x
Conventions x
What's New in Oracle Identity Manager Connector for Oracle E-BusinessSuite User Management?
Software Updates xii
Documentation-Specific Updates xii
1 About the Connector
Introduction to the Connector 1-1
Certified Components 1-2
Usage Recommendation 1-3
Certified Languages 1-3
Connector Architecture 1-4
Features of the Connector 1-5
Support for Target Resource Reconciliation 1-6
SoD Validation of Entitlement Provisioning 1-6
Support for an SSO-Enabled Target System Installation 1-6
Account Status Reconciliation and Provisioning 1-7
Account Password Management 1-7
Full and Incremental Reconciliation 1-7
Batched Reconciliation 1-8
Limited (Filtered) Reconciliation 1-8
Support for Connector Server 1-8
Connection Pooling 1-8
Support for SSL Communication Between the Target System and Oracle IdentityManager 1-9
iii

2 Deploying the Connector
Preinstallation 2-1
Creating a Target System User Account for Connector Operations 2-1
Privileges Granted to the User Account 2-2
Determining Values for the JDBC URL and Connection Properties Parameters 2-5
Supported JDBC URL Formats 2-5
Only SSL Communication Is Configured 2-6
Both Data Encryption and Integrity and SSL Communication Are Configured 2-7
Installation 2-7
Understanding Installation 2-7
Running the Connector Installer 2-7
Configuring the IT Resource for the Target System 2-9
Postinstallation 2-10
Configuring SoD 2-10
Configuring the Oracle Applications Access Controls Governor to Act As the SoDEngine 2-11
Specifying a Value for the TopologyName IT Resource Parameter 2-11
Disabling and Enabling SoD 2-11
Configuring Secure Communication Between the Target System and Oracle IdentityGovernance 2-13
Configuring Data Encryption and Integrity in Oracle Database 2-13
Configuring SSL Communication in Oracle Database 2-13
Configuring Oracle Identity Manager 2-14
Creating and Activating a Sandbox 2-15
Creating a New UI Form 2-15
Associating the Form with the Application Instance 2-15
Publishing a Sandbox 2-16
Harvesting Entitlements and Sync Catalog 2-16
Updating an Existing Application Instance with a New Form 2-16
Clearing Content Related to Connector Resource Bundles from the Server Cache 2-17
Managing Logging 2-17
Understanding Log Levels 2-17
Enabling logging 2-18
Setting up the Lookup Definition for Connection Pooling 2-19
Configuring the Connector for SSO 2-21
Localizing Field Labels in UI Forms 2-22
Upgrading the Connector 2-24
Preupgrade Steps 2-24
Upgrade Steps 2-25
Postupgrade Steps 2-25
iv

Postcloning Steps 2-30
3 Using the Connector
Lookup Definitions Used During Connector Operations 3-1
Lookup Definitions Synchronized with the Target System 3-1
Preconfigured Lookup Definitions 3-2
Lookup.Configuration.Oracle EBS UM 3-2
Lookup.Oracle EBS UM.UM.Configuration 3-3
Lookup.Oracle EBS UM.UM.ProvAttrMap 3-3
Lookup.Oracle EBS UM.UM.ReconAttrMap 3-4
Lookup.Oracle EBS UM.PartyType 3-5
Lookup.Oracle EBS UM.PasswordExpTypes 3-6
Lookup.Objects.EDIR User.Oracle EBS User Management.CopyAttributesMap 3-6
Lookup.Objects.LDAP User.Oracle EBS User Management.CopyAttributesMap 3-7
Lookup.Objects.OID User.Oracle EBS User Management.CopyAttributesMap 3-7
Lookup.Objects.AD User.Oracle EBS User Management.CopyAttributesMap 3-8
Reconciliation Scheduled Jobs 3-8
Scheduled Jobs for Lookup Field Synchronization 3-9
Scheduled Job for Target User Reconciliation 3-10
Scheduled Job for Incremental Target User Reconciliation 3-11
Scheduled Job for Target User Delete Reconciliation 3-11
Configuring Scheduled Jobs 3-12
Configuring Reconciliation 3-13
Reconciliation Queries 3-13
Reconciliation Rules 3-14
Reconciliation Rule for Target Resource Reconciliation 3-15
Viewing Reconciliation Rules for Target Resource Reconciliation 3-15
Reconciliation Action Rules 3-16
Target Resource Reconciliation Action Rule for the EBS User ManagementConnector 3-16
Viewing Reconciliation Action Rules for Target Resource Reconciliation in theDesign Console 3-17
Performing Full and Incremental Reconciliation 3-18
Performing Limited Reconciliation 3-18
Performing Batched Reconciliation 3-18
Configuring Provisioning 3-19
Provisioning Procedures 3-19
Provisioning Functions 3-22
Performing Provisioning Operations in Oracle Identity Manager 3-22
Provisioning Operations Performed in an SoD-Enabled Environment 3-23
Overview of the Provisioning Process in an SoD-Enabled Environment 3-23
v

Direct Provisioning in an SoD-Enabled Environment 3-23
Uninstalling the Connector 3-25
4 Extending the Functionality of the Connector
Adding New Attributes for Reconciliation and Provisioning 4-1
Summary of Steps to Add New Attributes for Reconciliation and Provisioning 4-1
Extending the Connector Schema 4-2
Understanding Connector Schema Extension 4-2
Adding New Attributes to the Connector Schema 4-3
Updating Connector Artifacts 4-3
Creating a Process Form Field 4-4
Updating the Oracle EBS User Management Resource Object 4-4
Updating the Oracle EBS UM User Process Definition 4-5
Updating the Lookup Definition for Reconciliation Attribute Mapping 4-5
Updating the Lookup Definition for Provisioning Attribute Mapping 4-6
Creating a Reconciliation Profile for the Oracle EBS User Management ResourceObject 4-6
Enabling Provisioning Operations on the New Attribute 4-6
Updating the search.properties File 4-8
Updating the Procedures.properties File 4-9
Adding New Multivalued Attributes for Reconciliation and Provisioning 4-13
Summary of Steps to Add New Multivalued Attributes for Reconciliation andProvisioning 4-13
Extending the Connector Schema 4-14
Extending Oracle Identity Manager Metadata 4-15
Creating Lookup Definitions 4-15
Creating Child Process Form 4-16
Updating the Parent Process Form 4-17
Updating the Lookup Definition for Reconciliation Attribute Mapping 4-17
Updating the Lookup Definition for Provisioning Attribute Mapping 4-18
Updating the Oracle EBS User Management Resource Object 4-19
Updating the Oracle EBS UM User Process Definition 4-19
Replicating Form Designer Changes to a New UI Form 4-20
Enabling Provisioning Operations on the New Attribute 4-20
Creating Scheduled Jobs 4-22
Updating the Connector Bundle 4-23
Adding APIs to Wrapper Packages 4-24
Configuring Transformation of Data During User Reconciliation 4-26
Configuring Validation of Data During Reconciliation and Provisioning 4-28
vi

A Sample SQL Queries for the UM_USER_RECON andUM_USER_SYNC SQL Query Names
Sample SQL Queries Updated to Include Single-Valued Attributes A-1
Sample SQL Queries Updated to Include Multivalued Attributes A-3
B Sample Code Snippets for Extending the Connector Schema
C Files and Directories in the EBS User Management Connector Package
D Scheduled Jobs for Lookup Field Synchronization and Reconciliation
Index
vii

List of Figures
1-1 Connector Architecture 1-5
3-1 Reconciliation Rule for Target Resource Reconciliation 3-16
3-2 Reconciliation Action Rules for Target Resource Reconciliation 3-17
viii

List of Tables
1-1 Certified Components 1-2
2-1 Parameters of the Oracle EBS UM IT Resource 2-9
2-2 Certificate Store Locations 2-14
2-3 Log Levels and ODL Message Type:Level Combinations 2-18
2-4 Connection Pooling Properties 2-20
3-1 Entries in the Lookup.Configuration.Oracle EBS UM Lookup Definition 3-2
3-2 Entries in the Lookup.Oracle.EBS UM.UM.Configuration Lookup Definition 3-3
3-3 Entries in the Lookup.Oracle EBS UM.UM.ProvAttrMap Lookup Definition 3-3
3-4 Entries in the Lookup.Oracle EBS UM.UM.ReconAttrMap Lookup Definition 3-4
3-5 Entries in the Lookup.Oracle EBS UM.PartyType Lookup Definition 3-6
3-6 Entries in the Lookup.Oracle EBS UM.PasswordExpTypes Lookup Definition 3-6
3-7 Entries in the Lookup.Objects.EDIR User.Oracle EBS User
Management.CopyAttributesMap Lookup Definition 3-7
3-8 Entries in the Lookup.Objects.LDAP User.Oracle EBS User
Management.CopyAttributesMap Lookup Definition 3-7
3-9 Entries in the Lookup.Objects.OID User.Oracle EBS User Management.CopyAttributesMap
Lookup Definition 3-8
3-10 Entries in the Lookup.Objects.AD User.Oracle EBS User Management.CopyAttributesMap
Lookup Definition 3-8
3-11 Attributes of the Scheduled Jobs for Lookup Field Synchronization 3-9
3-12 Attributes of the Oracle EBS UM Target User Reconciliation Scheduled Job 3-10
3-13 Attributes of the Oracle EBS UM Target Incremental User Reconciliation Scheduled Job 3-11
3-14 Attributes of the Oracle EBS UM Target User Delete Reconciliation Scheduled Job 3-11
3-15 Action Rules for Target Resource Reconciliation 3-16
3-16 Provisioning Functions 3-22
C-1 Files and Directories in the Installation Package C-1
D-1 Scheduled Jobs for Lookup Field Synchronization and Reconciliation D-1
ix
Preface
This guide describes the connector that is used to integrate Oracle Identity Managerwith Oracle E-Business Suite.
AudienceThis guide is intended for resource administrators and target system integration teams.
Documentation AccessibilityFor information about Oracle's commitment to accessibility, visit the OracleAccessibility Program website at http://www.oracle.com/pls/topic/lookup?ctx=acc&id=docacc.
Access to Oracle Support
Oracle customers that have purchased support have access to electronic supportthrough My Oracle Support. For information, visit http://www.oracle.com/pls/topic/lookup?ctx=acc&id=info or visit http://www.oracle.com/pls/topic/lookup?ctx=acc&id=trsif you are hearing impaired.
Related DocumentsFor information about installing and using Oracle Identity Manager, visit the followingOracle Help Center page:
http://docs.oracle.com/cd/E52734_01/oim/index.htmlFor information about Oracle Identity Manager Connectors documentation, visit thefollowing Oracle Help Center page:
http://docs.oracle.com/cd/E22999_01/index.htm
ConventionsThe following text conventions are used in this document:
Convention Meaning
boldface Boldface type indicates graphical user interface elements associatedwith an action, or terms defined in text or the glossary.
italic Italic type indicates book titles, emphasis, or placeholder variables forwhich you supply particular values.
Preface
x

Convention Meaning
monospace Monospace type indicates commands within a paragraph, URLs, codein examples, text that appears on the screen, or text that you enter.
Preface
xi

What's New in Oracle Identity ManagerConnector for Oracle E-Business SuiteUser Management?
This chapter provides an overview of the updates made to the software anddocumentation for the Oracle E-Business Suite User Management connector inrelease 11.1.1.5.0.
The updates discussed in this chapter are divided into the following categories:
• Software Updates
This section describes updates made to the connector software.
• Documentation-Specific Updates
This section describes major changes made to this guide. These changes are notrelated to software updates.
Software UpdatesThe following section discusses software updates:
Software Updates in Release 11.1.1.5.0This is the first release of the Oracle Identity Manager connector for Oracle E-Business Suite User Management on ICF architecture. Therefore, there are nosoftware updates in this release.
Documentation-Specific UpdatesThe following section discusses documentation-specific updates:
Documentation-Specific Updates in Release 11.1.1.5.0The following is a documentation-specific update in revision "10" of release 11.1.1.5.0:
Additional prerequisite regarding EBS registration type added to Configuring theConnector for SSO
The following is a documentation-specific update in revision "9" of release 11.1.1.5.0:
The "Target system" row in Table 1-1 has been updated for the following:
• Oracle Database 19c has been added as one of the supported versions forrunning the target system.
What's New in Oracle Identity Manager Connector for Oracle E-Business Suite User Management?
xii

• The note about applying a patch if you are using target system versions 12.2.4 or laterhas been modified.
• A note about applying an Oracle Database patch if your target system is running onOracle Database release 19.x has been added.
The following is a documentation-specific update in revision "8" of release 11.1.1.5.0:
The "Oracle Identity Governance or Oracle Identity Manager" row in Table 1-1 has beenmodified to include support for Oracle Identity Governance release 12c PS4 (12.2.1.4.0).
The following is a documentation-specific update in revision "7" of release 11.1.1.5.0:
The sample value for parameter Latest Token in Table 3-12 and parameter Sync Token in Table 3-13 have been modified.
The following is a documentation-specific update in revision "6" of release 11.1.1.5.0:
In Postupgrade Steps, step 8 has been modified.
The following are documentation-specific updates in revision "5" of release 11.1.1.5.0:
• The following updates are made to Table 1-1:
– The "Target System" row has been modified to include support for target versions12.2.5 and 12.2.6.
– The "Connector server" row has been modified to include a note related to JDBCdriver.
– The "SSO system" row has been modified to include Oracle Unified Directory as anLDAP-based repository.
• A note on Oracle Unified Directory has been added in Lookup.Objects.LDAP User.OracleEBS User Management.CopyAttributesMap.
The following are documentation-specific updates in revision "4" of release 11.1.1.5.0:
• The "Oracle Identity Manager" row of Table 1-1 has been renamed as "Oracle IdentityGovernance or Oracle Identity Manager" and also updated for Oracle IdentityGovernance 12c (12.2.1.3.0) certification
• The "Target System" row of Table 1-1 has been modified to include exact target versionfrom 12.2.x to 12.2.1 through 12.2.4.
• In Privileges Granted to the User Account, the wrapper packages in "Execute privilegesgranted to the following wrapper packages created in APPS schema" have beenmodified.
The following are documentation-specific updates in revision "3" of release 11.1.1.5.0:
• The "Target System" row of Table 1-1 has been updated to include support for OracleDatabase 12c.
• Chapter 5, "Known Issues and Workarounds" has been removed as there are no knownissues associated with this connector.
The following is a documentation-specific update in revision "2" of release 11.1.1.5.0:
The "JDK" row of Table 1-1 has been renamed to "Connector Server JDK".
What's New in Oracle Identity Manager Connector for Oracle E-Business Suite User Management?
xiii

1About the Connector
This chapter introduces the Oracle E-Business Suite User Management connector.This chapter discusses the following topics:
• Introduction to the Connector
• Certified Components
• Usage Recommendation
• Certified Languages
• Connector Architecture
• Features of the Connector
Introduction to the ConnectorOracle Identity Manager (OIM) platform automates access rights management, security, andprovisioning of IT resources. Oracle Identity Manager connects users to resources, andrevokes and restricts unauthorized access to protect sensitive corporate information. TheOracle E-Business Suite User Management connector (EBS UM connector) enables you touse Oracle E-Business Suite as a target resource for Oracle Identity Manager.
An FND_USER record represents an Oracle E-Business User Management account. Thisrecord is the main component of the account data whose management is enabled by theconnector. This connector can be used to manage either the FND_USER records orFND_USER records with TCA records. In other words, this connector is used to manageplain user accounts or user accounts with parties.
You can use the User Management connector to create Oracle E-Business Suite useraccounts (FND_USER records) for OIM users and to grant user roles and responsibilities tothese accounts. You can also reconcile newly created users and modified user accounts(FND_USER records) from the target system. These reconciled records are used to createand update Oracle E-Business User Management accounts assigned to OIM Users.
In addition to creating Oracle E-Business User Management accounts, you can use thisconnector to create Party or Vendors (Suppliers) in the target system. Party or vendorsrepresent a Trading Community Architecture (TCA) record in the HZ_PARTIES table. Someapplications such as iStore, iProcurement in the Oracle E-Business Suite require users tohave a TCA record that is a representative or employee of parties and vendors in yourorganization.
The following are the types of TCA records that this connector supports:
• Parties
• Vendors or Suppliers
The object class used for the User Management connector with TCA party is __ACCOUNT__.Roles and responsibilities are handled as child data. You can use this connector to removeexisting roles and responsibilities as well.
1-1

During user provisioning, if you enter the party or supplier information along with theEBS user information, the connector creates an E-Business user account first, createsthe party or vendor next, and then establishes the link between the user record andTCA record. For target system users that are linked with party or Supplier records, thevalue in the PERSON_PARTY_ID column in the FND_USER table is the same as thevalue in the PARTY_ID column of the HZ_PARTIES table.
During a create or update user provisioning operation, you can link the target systemuser account with an existing HRMS employee record by providing Person ID.
Certified ComponentsThese are the software components and their versions required for installing and usingthe connector.
Table 1-1 lists the certified components for the connector.
Table 1-1 Certified Components
Component Requirement
Oracle Identity Manager You can use one of the following releases of Oracle Identity Governance orOracle Identity Manager:
• Oracle Identity Governance 12c (12.2.1.4.0)• Oracle Identity Governance 12c (12.2.1.3.0)• Oracle Identity Manager 11g Release 2 PS3 (11.1.2.3.0) and any later BP
in this release track• Oracle Identity Manager 11g Release 2 PS2 (11.1.2.2.0) and any later BP
in this release track
Target system The target system can be any one of the following:
• Oracle E-Business Suite 12.1.1 through 12.1.3• Oracle E-Business Suite 12.2.1 through 12.2.7 or laterThese applications may run on Oracle Database 10g, 11g, 12c, or 19c as eithersingle database or Oracle RAC implementation.
Notes:• If you are using 12.2.4 or later versions, then you must download and apply
the latest EBS connector 11.1.1.5.0J Patch 27733565. To download thepatch, sign in to My Oracle Support and search for the patch number on thePatches and Updates page.
• If your target system is running on Oracle Database release 19.x, thendownload and apply the Oracle Database patch 31142749 from My OracleSupport. Applying this patch ensures that provisioning operations work fine.
• Communication between Oracle Identity Manager and the target systemcan be in SSL or non-SSL mode.
Connector server 11.1.2.1.0
Note: The JDBC driver ojdbcx.jar is supported with character sets such asUS7ASCII, WE8DEC, WE8ISO8859P1, WE8MSWIN1252, and UTF8. To useany other character sets and ensure all connector operations work successfullywith the Connector Server, download the orai18n.jar file from the Oracle JDBCdrivers OTN page and copy it to the lib directory of Connector Server.
Connector Server JDK JDK 1.6 or later
Chapter 1Certified Components
1-2

Table 1-1 (Cont.) Certified Components
Component Requirement
SSO system The target system can use one of the following single sign-on (SSO) solutions:
• Oracle Single Sign on with Oracle Internet Directory (release 11.1.1.7.0) asLDAP based repository
• Oracle Access Manager with Microsoft Active Directory (2008, 2012 R2),Oracle Directory Server Enterprise Edition (11.1.1.7.0) or Novel eDirectory(8.8) as the LDAP-based repository
SoD engine If you want to enable and use the Segregation of Duties (SoD) feature of OracleIdentity Manager with this target system, then install Oracle Applications AccessControls Governor release 8.6.4.
Usage RecommendationDepending on the Oracle Identity Manager version that you are using, you must deploy anduse one of the following connectors:
• If you are using an Oracle Identity Manager release that is earlier than Oracle IdentityManager 11g Release 2 PS2 (11.1.2.2.0) and you want to configure the connector to usethe target system as a target resource, then use the 9.1.x version of the Oracle E-Business User Management connector.
• If you are using any of the Oracle Identity Manager releases listed in Table 1-1, then youmust use the latest 11.1.1.x version of this connector.
Certified LanguagesThe connector supports the following languages:
• Arabic
• Chinese (Simplified)
• Chinese (Traditional)
• Czech
• Danish
• Dutch
• English (US)
• Finnish
• French
• French (Canadian)
• German
• Greek
• Hebrew
• Hungarian
• Italian
Chapter 1Usage Recommendation
1-3

• Japanese
• Korean
• Norwegian
• Polish
• Portuguese
• Portuguese (Brazilian)
• Romanian
• Russian
• Slovak
• Spanish
• Swedish
• Thai
• Turkish
Connector ArchitectureThe Oracle E-Business User Management connector is implemented by using theIdentity Connector Framework (ICF).
The ICF is a component that provides basic reconciliation and provisioning operationsthat are common to all Oracle Identity Manager connectors. In addition, ICF providescommon features that developers would otherwise need to implement on their own,such as connection pooling, buffering, time outs, and filtering. The ICF is shippedalong with Oracle Identity Manager. Therefore, you need not configure or modify theICF.
Figure 1-1 shows the architecture of the Oracle E-Business Suite connectors.
Chapter 1Connector Architecture
1-4

Figure 1-1 Connector Architecture
During connector operations, Oracle Identity Manager interacts with a layer called ICFintegration. ICF integration is specific to each application with which OIM interacts and usesthe ICF API to invoke operations on the Identity Connector (IC). The connector then calls thetarget system APIs to perform operations on the resource.
The connector communicates with the target system by making calls to the stored proceduresin OIM Wrapper packages, which in turn call the target system stored procedures internally.The OIM Wrapper packages are created in the target system when you run a script that ispresent in the connector installation package. The procedure to run this script is discussedlater in this guide.
The basic function of this connector is to enable management of user data on Oracle E-Business Suite through Oracle Identity Manager. In other words, the Oracle E-Business SuiteUser Management connector enables you to use Oracle E-Business Suite (the target system)as a managed or target resource of Oracle Identity Manager. You can create and managetarget system accounts (resources) for OIM Users through provisioning. In addition, datarelated to newly created and modified target system accounts can be reconciled (usingscheduled tasks) and linked with existing OIM Users and provisioned resources.
Features of the ConnectorThe features of the connector include support for connector server, target resourcereconciliation, Segregation of Duties (SoD) validation of role and responsibility entitlementrequests, reconciliation of all existing or modified account data, limited and batchedreconciliation, transformation and validation of account data during reconciliation andprovisioning, and so on.
Chapter 1Features of the Connector
1-5

The following are the features of the connector:
• Support for Target Resource Reconciliation
• SoD Validation of Entitlement Provisioning
• Support for an SSO-Enabled Target System Installation
• Account Status Reconciliation and Provisioning
• Account Password Management
• Full and Incremental Reconciliation
• Batched Reconciliation
• Limited (Filtered) Reconciliation
• Support for Connector Server
• Connection Pooling
• Support for SSL Communication Between the Target System and Oracle IdentityManager
Support for Target Resource ReconciliationYou can use the EBS UM connector to configure the target system as a targetresource of Oracle Identity Manager.
In this mode, you can use this connector to provision and reconcile the followingentities from Oracle E-Business Suite:
• EBS accounts/FND_USR records
• TCA Party records/Vendor records
SoD Validation of Entitlement ProvisioningThis connector supports the SoD feature. These are the focal points of this feature.
• The SoD Invocation Library (SIL) is bundled with Oracle Identity Governancerelease. The SIL acts as a pluggable integration interface with any SoD engine.
• The EBS UM connector is preconfigured to work with Oracle Applications AccessControls Governor as the SoD engine. To enable this, changes have been made inthe approval and provisioning workflows of the connector.
• The SoD engine processes role and responsibility entitlement requests that aresent through the connector. Potential conflicts in role and responsibilityassignments can be automatically detected.
See Configuring SoD for more information on configuring the connector for the SoDfeature.
Support for an SSO-Enabled Target System InstallationOracle E-Business Suite can be configured to use a single sign-on solution such asOracle Single Sign-On and Oracle Access Manager, to authenticate users. OracleSingle Sign-On uses Oracle Internet Directory as an LDAP-based repository for storinguser records. Oracle Access Manager can use Microsoft Active Directory, Oracle
Chapter 1Features of the Connector
1-6

Directory Server Enterprise Edition, or Novell eDirectory as the LDAP-based repository.
You can configure the connector to work with either one of these SSO solutions duringreconciliation and provisioning operations.
The connector is shipped with an adapter that is responsible for copying SSO account detailssuch as GUID and so on from an enterprise directory process form to EBS user processform.
See Configuring the Connector for SSO for information about configuring the connector for asingle sign-on solution.
Account Status Reconciliation and ProvisioningWhen you enable an account on the target system, the Effective Date From field is set to thecurrent date and the Effective Date To field is set to NULL on the target system.
When you disable an account on the target system, the Effective Date To field is set to thecurrent date on the target system.
The same effect can be achieved through provisioning operations performed on OracleIdentity Manager. In addition, status changes made directly on the target system can becopied into Oracle Identity Manager during reconciliation.
See Provisioning Operations Performed in an SoD-Enabled Environment for moreinformation about provisioning operations in an SoD-enabled environment.
Account Password ManagementThe connector supports basic password management features. For a particular user, you canspecify when the user's password must expire by using the following process form fields:
• Password Expiration Type
You use the Password Expiration Type field to specify the factor (or measure) that youwant to use to set a value for password expiration. You can select either Accesses orDays as the password expiration type.
• Password Expiration Interval
In the Password Expiration Interval field, you specify the number of access or days forwhich the user must be able to use the password.
For example, if you specify Accesses in the Password Expiration Type field and enter 20 inthe Password Expiration Interval field, then the user is prompted to change the user'spassword at the twenty-first login. Similarly, if you specify Days in the Password ExpirationType field and enter 100 in the Password Expiration Interval field, then the user is promptedto change the user's password on the hundred and first day after setting a new password.
See Lookup.Oracle EBS UM.PasswordExpTypes for information about the lookup definitioncorresponding to the Password Expiration Type field.
Full and Incremental ReconciliationIn full reconciliation, all records are fetched from the target system to Oracle IdentityManager. In incremental reconciliation, only records that are added or modified after the lastreconciliation run are fetched into Oracle Identity Manager.
Chapter 1Features of the Connector
1-7

You can switch from incremental to full reconciliation at any time after you deploy theconnector. See section Performing Full and Incremental Reconciliation for moreinformation on performing full and incremental reconciliation runs.
Batched ReconciliationYou can break down a reconciliation run into batches by specifying the number ofrecords that must be included in each batch.
See Performing Batched Reconciliation for more information on performing batchedreconciliation.
Limited (Filtered) ReconciliationTo limit or filter the records that are fetched into Oracle Identity Manager during areconciliation run, you can specify the subset of added or modified target systemrecords that must be reconciled.
See Performing Limited Reconciliation for more information on performing limitedreconciliation.
Support for Connector ServerConnector Server is a component provided by ICF. By using one or more connectorservers, the connector architecture permits your application to communicate withexternally deployed bundles. In other words, a connector server enables remoteexecution of an Oracle Identity Manager connector.
A Java connector server is useful when you do not wish to execute a Java connectorbundle in the same VM as your application. It can be beneficial to run a Javaconnector on a different host for performance improvements.
See Installation for more information about the installation options for this connector.
Connection PoolingA connection pool is a cache of objects that represent physical connections to thetarget. Oracle Identity Manager connectors can use these connections tocommunicate with target systems.
At run time, the application requests a connection from the pool. If a connection isavailable, then the connector uses it and then returns it to the pool. A connectionreturned to the pool can again be requested for and used by the connector for anotheroperation. By enabling the reuse of connections, the connection pool helps reduceconnection creation overheads like network latency, memory allocation, andauthentication.
One connection pool is created for each IT resource. For example, if you have three ITresources for three installations of the target system, then three connection pools willbe created, one for each target system installation.
For more information about the parameters that you can configure for connectionpooling, see Setting up the Lookup Definition for Connection Pooling.
Chapter 1Features of the Connector
1-8

Support for SSL Communication Between the Target System and OracleIdentity Manager
You can configure SSL to secure communication between Oracle Identity Manager and thetarget system.
See Configuring Secure Communication Between the Target System and Oracle IdentityGovernance for more information about securing communication between the target systemand Oracle Identity Manager.
Chapter 1Features of the Connector
1-9

2Deploying the Connector
The procedure to deploy the connector can be divided across three stages namelypreinstallation, installation, and postinstallation.
This chapter contains the following sections:
• Preinstallation
• Installation
• Postinstallation
• Upgrading the Connector
• Postcloning Steps
PreinstallationPreinstallation for the EBS UM connector involves performing a series of tasks on the targetsystem.
Preinstallation information is divided across the following sections:
• Creating a Target System User Account for Connector Operations
• Determining Values for the JDBC URL and Connection Properties Parameters
Creating a Target System User Account for Connector OperationsThis preinstallation step involves creating a user account in the target system that can beused by the connector to perform connector operations.
Note:
You must have DBA privileges to run the scripts described in this section and grantthe required permissions to the target system user account.
You must have Oracle Database Client installed on the computer on which youperform the procedure described in this section. The Oracle Database Clientrelease must be the same as the database release. In addition, if Oracle DatabaseClient is not installed on the database host computer, then the tnsnames.ora file onthe Oracle Database Client host must contain an entry for the SID of the database.
Oracle Identity Manager requires a target system user account to access the target systemduring connector operations. You provide the credentials of this user account as part of Configuring the IT Resource for the Target System while creating an application.
To create a target system user account for connector operations:
2-1

1. From the installation media, copy the scripts directory to a temporary directory oneither the target system host computer or a computer on which the OracleDatabase Client has been installed.
2. On the computer where you copy the scripts directory, verify that there is a TNSentry in the tnsnames.ora file for the target system database.
3. Change to the directory containing the scripts directory and depending on the hostplatform, run either the Run_UM_DBScripts.sh or Run_UM_DBScripts.bat file.These files are present in the scripts directory of the installation media.
4. When you run the script, you are prompted for the following information:
• Enter the ORACLE_HOMESet a value for the ORACLE_HOME environment variable. This prompt isdisplayed only if the ORACLE_HOME environment variable has not been seton the computer on which you are running the script.
• Enter the System User NameEnter the login (user name) of a DBA account with the privileges to create andconfigure a new target system user.
• Enter the name of the databaseEnter the connection string or service name given in the tnsnames.ora file toconnect to the target system database.
This connects you to the SQL*Plus client.
• Enter passwordEnter the password of the APPS user in the target system. The Type andPackage are created, and then the connection to the database isdisconnected.
• Enter passwordEnter the password of the dba user.
• Enter New database Username to be createdEnter a user name for the target system account that you want to create.
• Enter the New user passwordEnter a password for the target system account that you want to create.
This installs all wrappers packages under the APPS schema, creates the newtarget system account, and then grants all the required privileges on the tablesand packages.
• Connecting with newly created database userEnter the connection string or service name that you provided earlier.
The user account for connector operations is created.
Privileges Granted to the User AccountThis section lists the privileges that are granted to the user account created in Creatinga Target System User Account for Connector Operations. The following privileges aregranted to this account:
GRANT CREATE SYNONYM TO &USERNAME;
Chapter 2Preinstallation
2-2

GRANT CONNECT, RESOURCE TO &USERNAME;
GRANT ALTER ANY PROCEDURE TO &USERNAME;
Execute permission granted to the following packages:
APPS.WF_LOCAL_SYNCH
APPS.FND_USER_PKG
APPS.FND_API
APPS.FND_GLOBAL
APPS.UMX_ACCESS_ROLES_PVT
APPS.FND_USER_RESP_GROUPS_API
Select privilege has been granted to the following tables:
APPS.FND_APPLICATION
APPS.FND_RESPONSIBILITY
APPS.FND_RESPONSIBILITY_TL
APPS.FND_USER_RESP_GROUPS_DIRECT
APPS.FND_APPLICATION_VL
APPS.FND_RESPONSIBILITY_VL
APPS.FND_SECURITY_GROUPS_VL
APPS.FND_USER_RESP_GROUPS_DIRECT
APPS.PER_ALL_PEOPLE_F
APPS.FND_APPLICATION_TL
APPS.WF_LOCAL_USER_ROLES
APPS.WF_USER_ROLES
APPS.WF_LOCAL_ROLES
SELECT, UPDATE privileges granted to the following tables:
APPS.FND_USER
APPS.HZ_PARTIES
APPS.HZ_PERSON_PROFILES
APPS.AP_SUPPLIERS
APPS.AP_SUPPLIER_CONTACTS
APPS.HZ_RELATIONSHIPS
APPS.UMX_ROLE_ASSIGNMENTS_V
Execute privileges granted to the following wrapper packages created in APPSschema:
APPS.OIM_FND_GLOBAL
Chapter 2Preinstallation
2-3

APPS.OIM_FND_USER_TCA_PKG
APPS.WF_LOCAL_SYNCH
APPS.FND_OID_USERS
APPS.FND_OID_UTIL
In addition to the privileges granted above, the following synonyms are created orreplaced:
SYNONYM FND_RESPONSIBILITY FOR APPS.FND_RESPONSIBILITY
SYNONYM FND_APPLICATION FOR APPS.FND_APPLICATION
SYNONYM FND_RESPONSIBILITY_VL FOR APPS.FND_RESPONSIBILITY_VL
SYNONYM FND_SECURITY_GROUPS_VL FORAPPS.FND_SECURITY_GROUPS_VL
SYNONYM FND_APPLICATION_VL FOR APPS.FND_APPLICATION_VL
SYNONYM FND_USER_RESP_GROUPS_DIRECT FORAPPS.FND_USER_RESP_GROUPS_DIRECT
SYNONYM FND_USER FOR APPS.FND_USER
SYNONYM FND_RESPONSIBILITY_TL FOR APPS.FND_RESPONSIBILITY_TL
SYNONYM FND_USER_RESP_GROUPS_DIRECT FORAPPS.FND_USER_RESP_GROUPS_DIRECT
SYNONYM PER_ALL_PEOPLE_F FOR APPS.PER_ALL_PEOPLE_F
SYNONYM FND_APPLICATION_TL FOR APPS.FND_APPLICATION_TL
SYNONYM WF_LOCAL_USER_ROLES FOR APPS.WF_LOCAL_USER_ROLES
SYNONYM WF_USER_ROLES FOR APPS.WF_USER_ROLES
SYNONYM WF_LOCAL_ROLES FOR APPS.WF_LOCAL_ROLES
SYNONYM FND_API FOR APPS.FND_API
SYNONYM FND_SECURITY_GROUPS FOR APPS.FND_SECURITY_GROUPS
SYNONYM FND_SECURITY_GROUPS_TL FORAPPS.FND_SECURITY_GROUPS_TL
SYNONYM HZ_PARTIES FOR APPS.HZ_PARTIES
SYNONYM HZ_PERSON_PROFILES FOR APPS.HZ_PERSON_PROFILES
SYNONYM FND_OID_USERS FOR APPS.FND_OID_USERS
SYNONYM FND_OID_UTIL FOR APPS.FND_OID_UTIL
SYNONYM UMX_ROLE_ASSIGNMENTS_V FORAPPS.UMX_ROLE_ASSIGNMENTS_V
SYNONYM WF_USER_ROLE_ASSIGNMENTS FORAPPS.WF_USER_ROLE_ASSIGNMENTS
SYNONYM AP_SUPPLIERS FOR APPS.AP_SUPPLIERS
Chapter 2Preinstallation
2-4

SYNONYM AP_SUPPLIER_CONTACTS FOR APPS.AP_SUPPLIER_CONTACTS
SYNONYM HZ_RELATIONSHIPS FOR APPS.HZ_RELATIONSHIPS
SYNONYM ICX_USER_SEC_ATTR_PUB FOR APPS.ICX_USER_SEC_ATTR_PUB
Determining Values for the JDBC URL and Connection PropertiesParameters
This section discusses the JDBC URL and Connection Properties parameters. You apply theinformation in this section while configuring the IT resource for your target system. Thisprocedure is discussed later in this guide.
The values that you specify for the JDBC URL and Connection Properties parametersdepend on the security measures that you have implemented:
• Supported JDBC URL Formats
• Only SSL Communication Is Configured
• Both Data Encryption and Integrity and SSL Communication Are Configured
Supported JDBC URL FormatsThe following are the supported JDBC URL formats:
• Multiple database instances support one service (Oracle RAC)
JDBC URL format:
jdbc:oracle:thin:@(DESCRIPTION=(ADDRESS=(PROTOCOL=TCP)(HOST=HOST1_NAME.DOMAIN)(PORT=PORT1_NUMBER))(ADDRESS=(PROTOCOL=TCP)(HOST=HOST2_NAME.DOMAIN)(PORT=PORT2_NUMBER))(ADDRESS=(PROTOCOL=TCP)(HOST=HOST3_NAME.DOMAIN)(PORT=PORT3_NUMBER)) . . . (ADDRESS=(PROTOCOL=TCP)(HOST=HOSTn_NAME.DOMAIN)(PORT=PORTn_NUMBER))(CONNECT_DATA=(SERVICE_NAME=ORACLE_DATABASE_SERVICE_NAME)))Sample value:
jdbc:oracle:thin:@(DESCRIPTION=(ADDRESS=(PROTOCOL=TCP)(HOST=host1.example.com)(PORT=1521))(ADDRESS=(PROTOCOL=TCP)(HOST=host2.example.com)(PORT=1521))(ADDRESS=(PROTOCOL=TCP)(HOST=host3.example.com)(PORT=1521))(ADDRESS=(PROTOCOL=TCP)(HOST=host4.example.com)(PORT=1521))(CONNECT_DATA=(SERVICE_NAME= srvce1)))
• One database instance supports one service
JDBC URL format:
jdbc:oracle:thin:@HOST_NAME.DOMAIN:PORT_NUMBER:ORACLE_DATABASE_SERVICE_NAMESample value:
jdbc:oracle:thin:@host1.example:1521:srvce1• One database instance supports multiple services (for Oracle Database 10g and later)
JDBC URL format:
jdbc:oracle:thin:@//HOST_NAME.DOMAIN:PORT_NUMBER/ORACLE_DATABASE_SERVICE_NAMESample value:
Chapter 2Preinstallation
2-5

jdbc:oracle:thin:@host1.example.com:1521/srvce1
Only SSL Communication Is ConfiguredAfter you configure SSL communication, the database URL is recorded in thetnsnames.ora file. See Local Naming Parameters in the tnsnames.ora File in OracleDatabase Net Services Reference for detailed information about the tnsnames.ora file.
The following are sample formats of the contents of the tnsnames.ora file. In theseformats, DESCRIPTION contains the connection descriptor, ADDRESS contains theprotocol address, and CONNECT_DATA contains the database service identificationinformation.
Sample Format 1:
NET_SERVICE_NAME= (DESCRIPTION= (ADDRESS=(PROTOCOL_ADDRESS_INFORMATION)) (CONNECT_DATA= (SERVICE_NAME=SERVICE_NAME)))
Sample Format 2:
NET_SERVICE_NAME= (DESCRIPTION_LIST= (DESCRIPTION= (ADDRESS=(PROTOCOL_ADDRESS_INFORMATION)) (ADDRESS=(PROTOCOL_ADDRESS_INFORMATION)) (ADDRESS=(PROTOCOL_ADDRESS_INFORMATION)) (CONNECT_DATA= (SERVICE_NAME=SERVICE_NAME))) (DESCRIPTION= (ADDRESS=(PROTOCOL_ADDRESS_INFORMATION)) (ADDRESS=(PROTOCOL_ADDRESS_INFORMATION)) (ADDRESS=(PROTOCOL_ADDRESS_INFORMATION)) (CONNECT_DATA= (SERVICE_NAME=SERVICE_NAME))))
Sample Format 3:
NET_SERVICE_NAME= (DESCRIPTION= (ADDRESS_LIST= (LOAD_BALANCE=on) (FAILOVER=off) (ADDRESS=(PROTOCOL_ADDRESS_INFORMATION)) (ADDRESS=(PROTOCOL_ADDRESS_INFORMATION))) (ADDRESS_LIST= (LOAD_BALANCE=off) (FAILOVER=on) (ADDRESS=(PROTOCOL_ADDRESS_INFORMATION)) (ADDRESS=(PROTOCOL_ADDRESS_INFORMATION))) (CONNECT_DATA= (SERVICE_NAME=SERVICE_NAME)))
If you have configured only SSL communication and imported the certificate that youcreate on the target system host computer into the JVM certificate store of OracleIdentity Manager, then you must derive the value for the JDBC URL parameter fromthe value of NET_SERVICE_NAME in the tnsnames.ora file. For example:
Chapter 2Preinstallation
2-6

Note:
As shown in this example, you must include only the (ADDRESS=(PROTOCOL=TCPS)(HOST=HOST_NAME)(PORT=2484)) element because you are configuring SSL. Youneed not include other (ADDRESS=(PROTOCOL_ADDRESS_INFORMATION)) elements.
jdbc:oracle:thin:@(DESCRIPTION=(ADDRESS_LIST=(ADDRESS=(PROTOCOL=TCPS)(HOST=myhost)(PORT=2484)))(CONNECT_DATA=(SERVER=DEDICATED)(SERVICE_NAME=mysid)))
Both Data Encryption and Integrity and SSL Communication Are ConfiguredIf both data encryption and integrity and SSL communication are configured, then specify avalue for the JDBC URL parameter in the following manner:
Enter a comma-separated combination of the values for the JDBC URL parameter describedin Only SSL Communication Is Configured. For example:
jdbc:oracle:thin:@(DESCRIPTION=(ADDRESS_LIST=(ADDRESS=(PROTOCOL=TCPS)(HOST=myhost)(PORT=2484)))(CONNECT_DATA=(SERVER=DEDICATED)(SERVICE_NAME=mysid)))
InstallationYou must install the connector in Oracle Identity Manager. If necessary, you can also deploythe connector in a Connector Server.
Installation information is divided across the following sections:
• Understanding Installation
• Running the Connector Installer
• Configuring the IT Resource for the Target System
Understanding InstallationDepending on where you want to run the connector code (bundle), the connector providesthe following installation options:
• Run the connector code locally in Oracle Identity Manager.
In this scenario, you deploy the connector in Oracle Identity Manager. Deploying theconnector in Oracle Identity Manager involves performing the procedures described in Running the Connector Installer and Configuring the IT Resource for the Target System.
• Run the connector code remotely in a Connector Server.
In this scenario, you deploy the connector in Oracle Identity Manager, and then, deploythe connector bundle in a Connector Server. See Using an Identity Connector Server inOracle Fusion Middleware Developing and Customizing Applications for Oracle IdentityManager for information about installing, configuring, and running the Connector Server,and then installing the connector in a Connector Server.
Running the Connector InstallerTo run the Connector Installer:
Chapter 2Installation
2-7

1. Copy the contents of the connector installation media directory into the followingdirectory:
OIM_HOME/server/ConnectorDefaultDirectory
2. Log in to Oracle Identity System Administration.
3. In the left pane, under System Management, click Manage Connector.
4. In the Manage Connector page, click Install.
5. From the Connector List drop-down list, select Oracle EBS UM ConnectorRELEASE_NUMBER. This list displays the names and release numbers ofconnectors whose installation files you copy into the default connector installationdirectory in Step 1.
If you have copied the installation files into a different directory, then:
a. In the Alternative Directory field, enter the full path and name of thatdirectory.
b. To repopulate the list of connectors in the Connector List list, click Refresh.
c. From the Connector List drop-down list, select the connector that you want toinstall.
6. Click Load.
7. To start the installation process, click Continue.
The following tasks are performed, in sequence:
a. Configuration of connector libraries
b. Import of the connector XML files (by using the Deployment Manager)
c. Compilation of adapters
On successful completion of a task, a check mark is displayed for the task. If atask fails, then an X mark and a message stating the reason for failure isdisplayed. Depending on the reason for the failure, make the required correctionand then perform one of the following steps:
• Retry the installation by clicking Retry.
• Cancel the installation and begin again from Step 1.
8. If all three tasks of the connector installation process are successful, then amessage indicating successful installation is displayed. In addition, a list of stepsthat you must perform after the installation is displayed. These steps are asfollows:
a. Ensuring that the prerequisites for using the connector are addressed
Note:
At this stage, run the Oracle Identity Manager PurgeCache utility toload the server cache with content from the connector resourcebundle in order to view the list of prerequisites. See Clearing ContentRelated to Connector Resource Bundles from the Server Cache forinformation about running the PurgeCache utility.
There are no prerequisites for some predefined connectors.
Chapter 2Installation
2-8

b. Configuring the IT resource for the connector
The procedure to configure the IT resource is described later in this guide.
c. Configuring the scheduled jobs
The procedure to configure these scheduled jobs is described later in this guide.
Configuring the IT Resource for the Target SystemThe IT resource for the target system is created during connector installation. This ITresource contains connection information about the target system. Oracle Identity Manageruses this information during reconciliation and provisioning.
You must specify values for the parameters of the Oracle EBS UM IT resource as follows:
1. Log in to Oracle Identity System Administration.
2. In the left pane, under Configuration, click IT Resource.
3. In the IT Resource Name field on the Manage IT Resource page, enter Oracle EBS UMand then click Search. Alternatively, from the IT Resource Type menu, select the name ofthe IT resource type Oracle EBS User Management, and then click Search.
4. Click the edit icon corresponding to the Oracle EBS UM IT resource.
5. From the list at the top of the page, select Details and Parameters.
6. Specify values for the parameters of the Oracle EBS UM IT resource.
Table 2-1 describes each parameter of the Oracle EBS UM IT resource.
Table 2-1 Parameters of the Oracle EBS UM IT Resource
Parameter Description
batchSize Enter the number of records that must be included in each batch fetched from the targetsystem during reconciliation.
Default value: 1000ConfigurationLookup
This parameter holds the name of the configuration lookup definition.
Default value: Lookup.Configuration.Oracle EBS UMYou must not change the value of this parameter. However, if you create a copy of this lookupdefinition, then you can enter the name of the newly created lookup definition as the value ofthe Configuration Lookup Name parameter.
Connector ServerName
Enter the name of the connector server IT resource.
Context ApplicationName
An application context is a set of elements associated with an artifact in Oracle E-BusinessSuite. The context implements user preferences and access control on the artifact. TheContext Application Name, Context Responsibility Name, and Context User ID parametersdefine the context that is used for connector operations.
For the Context Application Name parameter, enter the name of the application to which thisuser belongs.
Default value: 0ContextResponsibilityName
Enter the responsibility assigned to the user in whose context connector operations areperformed on the target system.
Default value: 0
Chapter 2Installation
2-9

Table 2-1 (Cont.) Parameters of the Oracle EBS UM IT Resource
Parameter Description
Context User ID Enter the user ID of the user in whose context connector operations are performed on thetarget system.
Default value: 0database Enter the name of the target system database.
host Enter the host name or IP address of the computer hosting the target system.
jdbcUrlTemplate Enter the JDBC URL template of the target system database. See Determining Values for theJDBC URL and Connection Properties Parameters for information about JDBC URL formats.
port Enter the number of the port at which the target system database is listening.
user Enter the user ID of the database user account that Oracle Identity Manager uses to connectto the target system.
password Enter the password of the database user account that Oracle Identity Manager uses toconnect to the target system.
TopologyName Name of the Segregation of Duties (SoD) topology, if any SoD integration exists.
See Specifying a Value for the TopologyName IT Resource Parameter for more informationabout the values for this parameter.
7. To save the values, click Update.
PostinstallationPostinstallation for the connector involves configuring Oracle Identity Manager,enabling logging to track information about all connector events, and configuring SSL.It also involves performing some optional configurations such as localizing the userinterface.
Postinstallation steps are divided across the following sections:
• Configuring SoD
• Configuring Secure Communication Between the Target System and OracleIdentity Governance
• Configuring Oracle Identity Manager
• Clearing Content Related to Connector Resource Bundles from the Server Cache
• Managing Logging
• Setting up the Lookup Definition for Connection Pooling
• Configuring the Connector for SSO
• Localizing Field Labels in UI Forms
Configuring SoDThis section discusses the following procedures:
• Configuring the Oracle Applications Access Controls Governor to Act As the SoDEngine
• Specifying a Value for the TopologyName IT Resource Parameter
Chapter 2Postinstallation
2-10

• Disabling and Enabling SoD
Note:
The ALL USERS group has INSERT, UPDATE, and DELETE permissions on theUD_EBS_USER, UD_EBS_RESP, UD_EBS_RLS, UD_EBSH_USR,UD_EBSH_RSP, UD_EBST_RLS, UD_EBST_USR, UD_EBST_RSP, andUD_EBST_RLS process forms. This is required to enable the following process:
During SoD validation of an entitlement request, data first moves from a dummyobject form to a dummy process form. From there, data is sent to the SoD enginefor validation. If the request clears the SoD validation, then data is moved from thedummy process form to the actual process form. Because the data is moved to theactual process forms through APIs, the ALL USERS group must have INSERT,UPDATE, and DELETE permissions on the three process forms.
Configuring the Oracle Applications Access Controls Governor to Act As the SoDEngine
See Configuring Oracle Application Access Controls Governor in Oracle Fusion MiddlewareDeveloper's Guide for Oracle Identity Manager for information about this procedure.
Specifying a Value for the TopologyName IT Resource ParameterThe TopologyName IT resource parameter holds the name of the combination of the followingelements that you want to use for SoD validation of entitlement provisioning operations:
• Oracle Identity Manager installation
• Oracle Applications Access Controls Governor installation
• Oracle E-Business Suite installation
The value that you specify for the TopologyName parameter must be the same as the valueof the topologyName element in the SILConfig.xml file. If you are using default SILregistration, then specify sodoaacg as the value of the topologyName parameter.
For more information about this element, see Using Segregation of Duties (SoD) in OracleFusion Middleware Developer's Guide for Oracle Identity Manager.
Disabling and Enabling SoDThe following sections describe the procedures to disable and enable SoD:
• Disabling SoD
• Enabling SoD
Chapter 2Postinstallation
2-11

Disabling SoD
Note:
The SoD feature is disabled by default. Perform the following procedure onlyif the SoD feature is currently enabled and you want to disable it.
Perform the following steps to disable SoD:
1. Log in to the System Administration console.
2. Set the XL.SoDCheckRequired system property to FALSE as follows:
a. In the left pane, under System Management, click System Configuration.The Advanced Administration is displayed with the System Configurationsection in the System Management tab is active.
b. On the left pane, in the Search System Configuration field, enterXL.SoDCheckRequired, which is the name of the system property as thesearch criterion.
c. In the search results table on the left pane, click the XL.SoDCheckRequiredsystem property in the Property Name column.
d. On the System Property Detail page, in the Value field, enter FALSE.
e. Click Save to save the changes made.
A message confirming that the system property has been modified isdisplayed.
3. Restart Oracle Identity Governance.
Enabling SoDPerform the following steps to enable SoD:
1. Log in to the System Administration console.
2. Set the XL.SoDCheckRequired system property to TRUE as follows:
a. In the left pane, under System Management, click System Configuration.The Advanced Administration is displayed with the System Configurationsection in the System Management tab is active.
b. On the left pane, in the Search System Configuration field, enterXL.SoDCheckRequired, which is the name of the system property as thesearch criterion.
c. In the search results table on the left pane, click the XL.SoDCheckRequiredsystem property in the Property Name column.
d. On the System Property Detail page, in the Value field, enter TRUE.
e. Click Save to save the changes made.
A message confirming that the system property has been modified isdisplayed.
Chapter 2Postinstallation
2-12

3. Restart Oracle Identity Governance.
Configuring Secure Communication Between the Target System andOracle Identity Governance
To secure communication between Oracle Database and Oracle Identity Governance, youcan perform either one or both of the following procedures:
Note:
To perform the procedures described in this section, you must have the permissionsrequired to modify the TNS listener configuration file.
• Configuring Data Encryption and Integrity in Oracle Database
• Configuring SSL Communication in Oracle Database
Configuring Data Encryption and Integrity in Oracle DatabaseSee Data Encryption in Oracle Database Advanced Security Administrator's Guide forinformation about configuring data encryption and integrity.
Configuring SSL Communication in Oracle DatabaseTo enable SSL communication between Oracle Database and Oracle Identity Governance:
1. See Secure Socket Layer in Oracle Database Advanced Security Administrator's Guidefor information about enabling SSL communication between Oracle Database and OracleIdentity Governance.
2. Export the certificate on the Oracle Database host computer.
3. Copy the certificate to Oracle Identity Governance.
4. Import the certificate into the JVM certificate store of the application server on whichOracle Identity Governance is running.
To import the certificate into the certificate store, run the following command:
keytool -import -file FILE_LOCATION -keystore TRUSTSTORE_LOCATION -storepass TRUSTSTORE_PASSWORD -trustcacerts -alias ALIAS
In this command:
• Replace FILE_LOCATION with the full path and name of the certificate file.
• Replace ALIAS with an alias for the certificate.
• Replace TRUSTSTORE_PASSWORD with a password for the certificate store.
• Replace TRUSTSTORE_LOCATION with one of the certificate store paths given in Table 2-2. This table shows the location of the certificate store for each of thesupported application servers.
Chapter 2Postinstallation
2-13

Note:
In an Oracle Identity Governance cluster, you must import the file into thecertificate store on each node of the cluster.
Table 2-2 Certificate Store Locations
Application Server Certificate Store Location
Oracle WebLogic Server • If you are using Oracle jrockit_R27.3.1-jdk, then copy the certificate into thefollowing directory:
JROCKIT_HOME/jre/lib/security• If you are using the default Oracle WebLogic Server JDK, then copy the
certificate into the following directory:
WEBLOGIC_HOME/java/jre/lib/security/cacerts
IBM WebSphere ApplicationServer
• For a nonclustered configuration of any supported IBM WebSphereApplication Server release, import the certificate into the following certificatestore:
WEBSPHERE_HOME/java/jre/lib/security/cacerts• For IBM WebSphere Application Server 6.1.x, in addition to the cacerts
certificate store, you must import the certificate into the following certificatestore:
WEBSPHERE_HOME/Web_Sphere/profiles/SERVER_NAME/config/cells/CELL_NAME/nodes/NODE_NAME/trust.p12
For example:
C:/Web_Sphere/profiles/AppSrv01/config/cells/tcs055071Node01Cell/nodes/tcs055071Node0/trust.p12
• For IBM WebSphere Application Server 5.1.x, in addition to the cacertscertificate store, you must import the certificate into the following certificatestore:
WEBSPHERE_HOME/etc/DummyServerTrustFile.jks
JBoss Application Server JAVA_HOME/jre/lib/security/cacerts
Oracle Application Server ORACLE_HOME/jdk/jre/lib/security/cacerts
Configuring Oracle Identity ManagerYou must create additional metadata such as a UI form and an application instance forthe resource against which you want to perform reconciliation and provisioningoperations. In addition, you must run entitlement and catalog synchronization jobs.These procedures are described in the following sections:
• Creating and Activating a Sandbox
• Creating a New UI Form
• Associating the Form with the Application Instance
• Publishing a Sandbox
• Harvesting Entitlements and Sync Catalog
• Updating an Existing Application Instance with a New Form
Chapter 2Postinstallation
2-14

Creating and Activating a SandboxSee Managing Sandboxes in Oracle Fusion Middleware Developing and CustomizingApplications for Oracle Identity Manager for instructions on creating and activating asandbox.
Creating a New UI FormSee Managing Forms in Oracle Fusion Middleware Administering Oracle Identity Manager forinstructions on creating a new UI form. While creating the UI form, ensure that you select theresource object corresponding to the EBS UM connector that you want to associate the formwith.
Note:
• While creating a new UI form, the form type should be Parent Form + ChildTables (Master/Detail).
• Ensure that you select the Generate Entitlement Forms check box.
Associating the Form with the Application InstanceBy default, an application instance named Oracle EBS UM Application Instance isautomatically created after you install the connector. You must associate this applicationinstance with the form created in Creating a New UI Form.
See Managing Application Instances in Oracle Fusion Middleware Administering OracleIdentity Manager for instructions on modifying an application instance.
After updating the application instance, you must publish it to an organization to make theapplication instance available for requesting and subsequent provisioning to users. However,as a best practice, perform the following procedure before publishing the application instance:
1. In the System Administration console, deactivate the sandbox.
2. Log out of the System Administration console.
3. Log in to the Self Service console and activate the sandbox that you deactivated in Step1.
4. In the Catalog, check for the Application Instance UI (form fields) and ensure that itappears correctly.
5. Publish the application instance only if everything appears correctly. Otherwise, fix theissues and then publish the application instance.
See Managing Organizations Associated With Application Instances in Oracle FusionMiddleware Administering Oracle Identity Manager for instructions on publishing anapplication instance to an organization.
Chapter 2Postinstallation
2-15

Publishing a SandboxBefore you publish a sandbox, perform the following procedure as a best practice tovalidate all sandbox changes made till this stage as it is hard to revert changes once asandbox is published:
1. In the System Administration console, deactivate the sandbox.
2. Log out of the System Administration console.
3. Log in to the Self Service console using the xelsysadm user credentials and thenactivate the sandbox that you deactivated in Step 1.
4. In the Catalog, ensure that the EBS UM application instance form appears withcorrect fields.
5. Publish the sandbox. See Publishing a Sandbox in Oracle Fusion MiddlewareDeveloping and Customizing Applications for Oracle Identity Manager forinstructions on publishing a sandbox.
Harvesting Entitlements and Sync CatalogTo harvest entitlements and sync catalog:
1. Run the scheduled jobs for lookup field synchronization listed in Scheduled Jobsfor Lookup Field Synchronization.
2. Run the Entitlement List scheduled job to populate Entitlement Assignmentschema from child process form table. See Predefined Scheduled Tasks in OracleFusion Middleware Administering Oracle Identity Manager for more informationabout this scheduled job.
3. Run the Catalog Synchronization Job scheduled job. See Predefined ScheduledTasks in Oracle Fusion Middleware Administering Oracle Identity Manager formore information about this scheduled job.
Updating an Existing Application Instance with a New FormFor any changes you do in the Form Designer, you must create a new UI form andupdate the changes in an application instance. To update an existing applicationinstance with a new form:
1. Create a sandbox and activate it as described in Creating and Activating aSandbox.
2. Create a new UI form for the resource as described in Creating a New UI Form.
3. Open the existing application instance.
4. In the Form field, select the new UI form that you created.
5. Save the application instance.
6. Publish the sandbox as described in Publishing a Sandbox.
Chapter 2Postinstallation
2-16

Clearing Content Related to Connector Resource Bundles from the ServerCache
When you deploy the connector, the resource bundles are copied from the resourcesdirectory on the installation media into the Oracle Identity Manager database. Whenever youadd a new resource bundle to the connectorResources directory or make a change in anexisting resource bundle, you must clear content related to connector resource bundles fromthe server cache.
To clear content related to connector resource bundles from the server cache:
1. In a command window, switch to the OIM_HOME/server/bin directory.
2. Enter one of the following commands:
• On Microsoft Windows: PurgeCache.bat All• On UNIX: PurgeCache.sh AllWhen prompted, enter the user name and password of an account belonging to theSYSTEM ADMINISTRATORS group. In addition, you are prompted to enter the serviceURL in the following format:
t3://OIM_HOST_NAME:OIM_PORT_NUMBER
In this format:
• Replace OIM_HOST_NAME with the host name or IP address of the Oracle IdentityManager host computer.
• Replace OIM_PORT_NUMBER with the port on which Oracle Identity Manager islistening.
Managing LoggingOracle Identity Manager uses the Oracle Diagnostic Logging (ODL) logging service forrecording all types of events pertaining to the connector.
The following topics provide detailed information about logging:
• Understanding Log Levels
• Enabling logging
Understanding Log LevelsOracle Identity Manager uses Oracle Java Diagnostic Logging (OJDL) for logging. OJDL isbased on java.util.logger. To specify the type of event for which you want logging to takeplace, you can set the log level to one of the following:
• SEVERE.intValue()+100
This level enables logging of information about fatal errors.
• SEVERE
This level enables logging of information about errors that might allow Oracle IdentityManager to continue running.
• WARNING
Chapter 2Postinstallation
2-17

This level enables logging of information about potentially harmful situations.
• INFO
This level enables logging of messages that highlight the progress of theapplication.
• CONFIG
This level enables logging of information about fine-grained events that are usefulfor debugging.
• FINE, FINER, FINEST
These levels enable logging of information about fine-grained events, whereFINEST logs information about all events.
These log levels are mapped to ODL message type and level combinations as shownin Table 2-3.
Table 2-3 Log Levels and ODL Message Type:Level Combinations
Log Level ODL Message Type:Level
SEVERE.intValue()+100 INCIDENT_ERROR:1
SEVERE ERROR:1
WARNING WARNING:1
INFO NOTIFICATION:1
CONFIG NOTIFICATION:16
FINE TRACE:1
FINER TRACE:16
FINEST TRACE:32
The configuration file for OJDL is logging.xml, which is located at the following path:
DOMAIN_HOME/config/fmwconfig/servers/OIM_SERVER/logging.xml
Here, DOMAIN_HOME and OIM_SERVER are the domain name and server namespecified during the installation of Oracle Identity Manager.
Enabling loggingTo enable logging in Oracle WebLogic Server:
1. Edit the logging.xml file as follows:
a. Add the following blocks in the file:
<log_handler name="ebs-um-handler" level='[LOG_LEVEL]' class='oracle.core.ojdl.logging.ODLHandlerFactory'><property name='logreader:' value='off'/> <property name='path' value='[FILE_NAME]'/> <property name='format' value='ODL-Text'/> <property name='useThreadName' value='true'/> <property name='locale' value='en'/> <property name='maxFileSize' value='5242880'/> <property name='maxLogSize' value='52428800'/> <property name='encoding' value='UTF-8'/> </log_handler>
Chapter 2Postinstallation
2-18

<logger name='ORG.IDENTITYCONNECTORS.EBS' level='[LOG_LEVEL]' useParentHandlers='false'> <handler name='ebs-um-handler'/> <handler name='console-handler'/> </logger>
b. Replace both occurrences of [LOG_LEVEL] with the ODL message type and levelcombination that you require. Table 2-3 lists the supported message type and levelcombinations.
Similarly, replace [FILE_NAME] with the full path and name of the log file in which youwant log messages to be recorded.
The following blocks show sample values for [LOG_LEVEL] and [FILE_NAME] :
<log_handler name='ebs-um-handler' level='NOTIFICATION:1' class='oracle.core.ojdl.logging.ODLHandlerFactory'><property name='logreader:' value='off'/> <property name='path' value='F:\MyMachine\middleware\user_projects\domains\base_domain1\servers\oim_server1\logs\oim_server1-diagnostic-1.log'/> <property name='format' value='ODL-Text'/> <property name='useThreadName' value='true'/> <property name='locale' value='en'/> <property name='maxFileSize' value='5242880'/> <property name='maxLogSize' value='52428800'/> <property name='encoding' value='UTF-8'/> </log_handler> <logger name='ORG.IDENTITYCONNECTORS.EBS' level='NOTIFICATION:1' useParentHandlers='false'> <handler name='ebs-um-handler'/> <handler name='console-handler'/> </logger>
With these sample values, when you use Oracle Identity Manager, all messagesgenerated for this connector that are of a log level equal to or higher than theNOTIFICATION:1 level are recorded in the specified file.
2. Save and close the file.
3. Set the following environment variable to redirect the server logs to a file:
For Microsoft Windows:
set WLS_REDIRECT_LOG=FILENAME
For UNIX:
export WLS_REDIRECT_LOG=FILENAME
Replace FILENAME with the location and name of the file to which you want to redirectthe output.
4. Restart the application server.
Setting up the Lookup Definition for Connection PoolingBy default, this connector uses the ICF connection pooling. Table 2-4 lists the connectionpooling properties, their description, and default values set in ICF:
Chapter 2Postinstallation
2-19
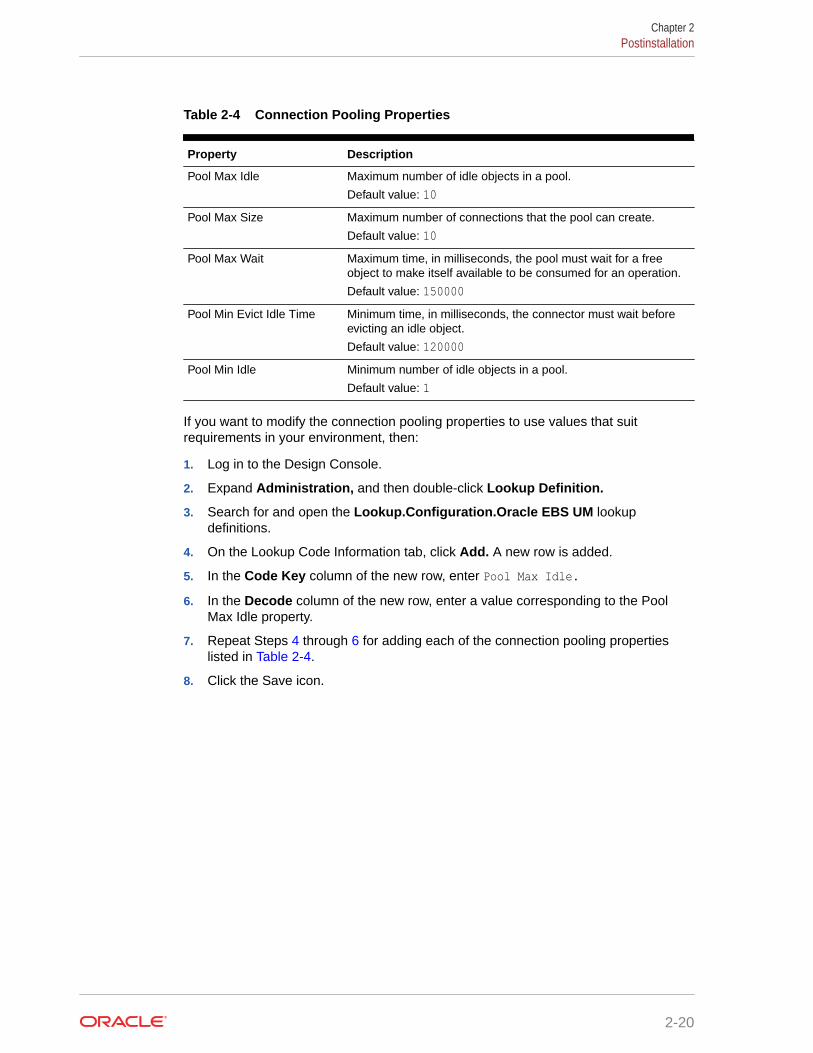
Table 2-4 Connection Pooling Properties
Property Description
Pool Max Idle Maximum number of idle objects in a pool.
Default value: 10Pool Max Size Maximum number of connections that the pool can create.
Default value: 10Pool Max Wait Maximum time, in milliseconds, the pool must wait for a free
object to make itself available to be consumed for an operation.
Default value: 150000Pool Min Evict Idle Time Minimum time, in milliseconds, the connector must wait before
evicting an idle object.
Default value: 120000Pool Min Idle Minimum number of idle objects in a pool.
Default value: 1
If you want to modify the connection pooling properties to use values that suitrequirements in your environment, then:
1. Log in to the Design Console.
2. Expand Administration, and then double-click Lookup Definition.
3. Search for and open the Lookup.Configuration.Oracle EBS UM lookupdefinitions.
4. On the Lookup Code Information tab, click Add. A new row is added.
5. In the Code Key column of the new row, enter Pool Max Idle.6. In the Decode column of the new row, enter a value corresponding to the Pool
Max Idle property.
7. Repeat Steps 4 through 6 for adding each of the connection pooling propertieslisted in Table 2-4.
8. Click the Save icon.
Chapter 2Postinstallation
2-20

Configuring the Connector for SSO
Note:
• Perform the procedure described in this section only if you want to configure theconnector to work with a single sign-on solution during reconciliation andprovisioning operations.
• Before you perform this procedure, ensure that the connector for the LDAP-based repository of your single sign-on solution has been installed in yourproduction environment.
• Before performing this procedure, the EBS registration of OID needs to be ofType 4. This prevents EBS attempting to create the user in OID when an EBSUM account or user is provisioned by OIM. This is not required as LDAPSync ora Connector in OIM will have already created the user in OID. If EBSregistration of OID has already been performed specifying a different type, thende-register and register again specifying provisioning type = 4.
You must perform the following steps to configure the connector for SSO:
1. Log in to the Design Console.
2. Modify the resource object as follows:
a. Expand Resource Management, and then double-click Resource Object.
b. In the Name field, enter Oracle EBS User Management and then click Search.
c. On the Depends On tab, click Assign.
d. Select the resource object corresponding to your SSO target (for example, OIDUser), and then click OK.
e. Click the Save icon.
3. Modify the Update SSO Attributes process task to assign an event handler as follows:
a. Expand Process Management, and then double-click Process Definition.
b. Search for and open the Oracle EBS UM User process definition.
c. On the Tasks tab, double-click the Update SSO Attributes process task.
d. In the Editing Task: Update SSO Attributes dialog box, on the Integration tab, clickAdd.
The Handler Selection dialog box is displayed.
e. In the Handler Type region, select the System option, and then select theCopyProcessFormData event handler from the Handler Name region.
f. Click the Save icon.
g. In the confirmation dialog box that is displayed, click OK.
The CopyProcessFormData event handler is assigned to the process task.
4. Modify the Create EBS User process task to assign a generated task as follows:
Chapter 2Postinstallation
2-21

a. On the Tasks tab of the Oracle EBS UM User process definition, double-clickthe Create EBS User process task.
The Editing Task: Create EBS User dialog box is displayed.
b. On the Responses tab, select the response code SUCCESS.
c. From the Tasks to Generate region, click Assign.
d. In the dialog box that is displayed, move the Update SSO Attributes taskname from the right column to the left, and then click OK.
The Update SSO Attributes task is assigned to the process task.
e. Click the Save icon and close the Editing Task: Create EBS User dialog box.
5. Ensure that the lookup definition corresponding to the LDAP server that you areusing exists and contains the right entries. For example, if you are using OID, thenensure the Lookup.Objects.OID User.Oracle EBS UserManagement.CopyAttributesMap exists and contains the following entry:
• Code Key: orclGuid
• Decode: SSO GUID
See Preconfigured Lookup Definitions for a list of lookup definitions correspondingto your LDAP server.
6. Modify the Oracle EBS UM Application Instance as follows:
a. Log in to the System Administration console.
b. Create and activate a Sandbox. See Managing Sandboxes in Oracle FusionMiddleware Developing and Customizing Applications for Oracle IdentityManager for instructions on creating and activating a sandbox
c. Modify the Oracle EBS UM Application Instance to specify the applicationinstance of your SSO target (for example, OID) as a parent instance. See Modifying Application Instance Attributes in Oracle Fusion MiddlewareAdministering Oracle Identity Manager for instructions on modifying anapplication instance.
d. Publish the sandbox. See Publishing a Sandbox in Oracle Fusion MiddlewareDeveloping and Customizing Applications for Oracle Identity Manager forinstructions on publishing a sandbox.
Localizing Field Labels in UI FormsTo localize field label that you add to in UI forms:
1. Log in to Oracle Enterprise Manager.
2. In the left pane, expand Application Deployments and then selectoracle.iam.console.identity.sysadmin.ear.
3. In the right pane, from the Application Deployment list, select MDS Configuration.
4. On the MDS Configuration page, click Export and save the archive to the localcomputer.
5. Extract the contents of the archive, and open the following files in a text editor:
• For Oracle Identity Manager 11g Release 2 PS2 (11.1.2.2.0):
SAVED_LOCATION\xliffBundles\oracle\iam\ui\runtime\BizEditorBundle_en.xlf
Chapter 2Postinstallation
2-22
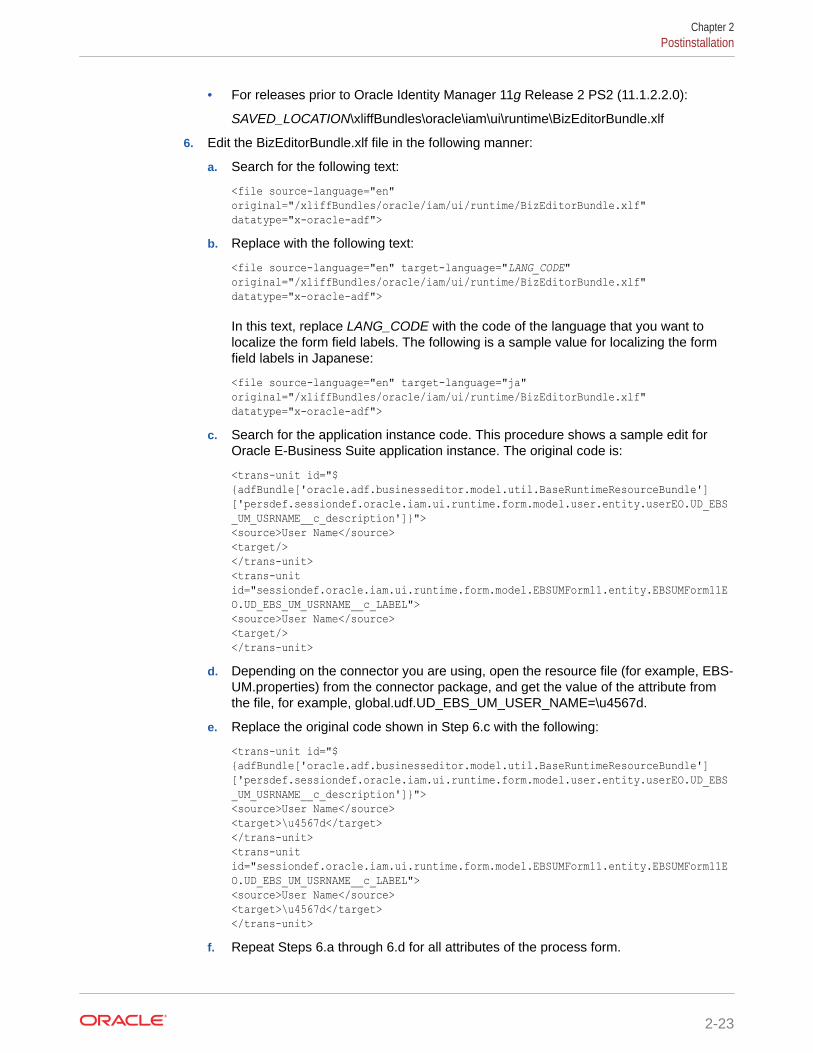
• For releases prior to Oracle Identity Manager 11g Release 2 PS2 (11.1.2.2.0):
SAVED_LOCATION\xliffBundles\oracle\iam\ui\runtime\BizEditorBundle.xlf
6. Edit the BizEditorBundle.xlf file in the following manner:
a. Search for the following text:
<file source-language="en" original="/xliffBundles/oracle/iam/ui/runtime/BizEditorBundle.xlf"datatype="x-oracle-adf">
b. Replace with the following text:
<file source-language="en" target-language="LANG_CODE"original="/xliffBundles/oracle/iam/ui/runtime/BizEditorBundle.xlf"datatype="x-oracle-adf">
In this text, replace LANG_CODE with the code of the language that you want tolocalize the form field labels. The following is a sample value for localizing the formfield labels in Japanese:
<file source-language="en" target-language="ja"original="/xliffBundles/oracle/iam/ui/runtime/BizEditorBundle.xlf"datatype="x-oracle-adf">
c. Search for the application instance code. This procedure shows a sample edit forOracle E-Business Suite application instance. The original code is:
<trans-unit id="${adfBundle['oracle.adf.businesseditor.model.util.BaseRuntimeResourceBundle']['persdef.sessiondef.oracle.iam.ui.runtime.form.model.user.entity.userEO.UD_EBS_UM_USRNAME__c_description']}"><source>User Name</source><target/></trans-unit><trans-unit id="sessiondef.oracle.iam.ui.runtime.form.model.EBSUMForm11.entity.EBSUMForm11EO.UD_EBS_UM_USRNAME__c_LABEL"><source>User Name</source><target/></trans-unit>
d. Depending on the connector you are using, open the resource file (for example, EBS-UM.properties) from the connector package, and get the value of the attribute fromthe file, for example, global.udf.UD_EBS_UM_USER_NAME=\u4567d.
e. Replace the original code shown in Step 6.c with the following:
<trans-unit id="${adfBundle['oracle.adf.businesseditor.model.util.BaseRuntimeResourceBundle']['persdef.sessiondef.oracle.iam.ui.runtime.form.model.user.entity.userEO.UD_EBS_UM_USRNAME__c_description']}"><source>User Name</source><target>\u4567d</target></trans-unit><trans-unit id="sessiondef.oracle.iam.ui.runtime.form.model.EBSUMForm11.entity.EBSUMForm11EO.UD_EBS_UM_USRNAME__c_LABEL"><source>User Name</source><target>\u4567d</target></trans-unit>
f. Repeat Steps 6.a through 6.d for all attributes of the process form.
Chapter 2Postinstallation
2-23

g. Save the file as BizEditorBundle_LANG_CODE.xlf. In this file name, replaceLANG_CODE with the code of the language to which you are localizing.
Sample file name: BizEditorBundle_ja.xlf.
7. Repackage the ZIP file and import it into MDS.
See Also:
Deploying and Undeploying Customizations in Oracle Fusion MiddlewareDeveloping and Customizing Applications for Oracle Identity Manager,for more information about exporting and importing metadata files
8. Log out of and log in to Oracle Identity Manager.
Upgrading the ConnectorIf you have already deployed an earlier release of this connector, then upgrade theconnector to the current release 11.1.1.5.0. The following sections discuss theprocedure to upgrade the connector:
Note:
• Upgrade of the EBS UM connector from Oracle EBS UM TCA connectorand the plain Oracle EBS UM connector release 9.1.0.7.x to 11.1.1.5.0 issupported.
• Before you perform the upgrade procedure, it is strongly recommendedthat you create a backup of the Oracle Identity Manager database. Referto the database documentation for information about creating a backup.
• As a best practice, first perform the upgrade procedure in a testenvironment.
• Preupgrade Steps
• Upgrade Steps
• Postupgrade Steps
Preupgrade StepsPerform the following preupgrade steps:
1. Perform a reconciliation run to fetch all latest updates to Oracle Identity Manager.
2. Define the source connector (an earlier release of the connector that must beupgraded) in Oracle Identity Manager. You define the source connector to updatethe Deployment Manager XML file with all customization changes made to theconnector. See Managing Connector Lifecycle in Oracle Fusion MiddlewareAdministering Oracle Identity Manager for more information.
3. If required, create the connector XML file for a clone of the source connector.
Chapter 2Upgrading the Connector
2-24

4. If you are using Oracle Identity Manager release 11.1.2.x, then:
a. Log in to the Design Console.
b. Expand Development Tools and then double-click Form Designer.
c. Create a new version for all child forms in your environment. For example, create anew version for the UD_EBS_RESP child form. This is the child form forResponsibilities.
d. Open the child form version.
e. On the Properties tab, except for the Entitlement and OIAParentAttribute properties,delete all the existing properties. In other words, delete all lookup query propertiescurrently associated with the form fields such as Responsibility Name.
f. For each column name, add the Lookup Code property and set its property value tothe corresponding lookup definition name. For example, for the Application Namecolumn, add the Lookup Code property and then set its value toLookup.EBS.Responsibility.
g. Repeat Step 4.f for the remaining columns. The following table lists the columnnames and the corresponding lookup definitions:
Column Lookup Definition
Application Name Lookup.EBS.Application
Security Group Name Lookup.EBS.SecurityGroup
Role Name Lookup.EBS.UMX.Roles
h. Make version active.
i. Create UI form.
5. Disable all the scheduled jobs by stopping the scheduler service.
Upgrade StepsDepending on the environment in which you are upgrading the connector, perform one of thefollowing steps:
• Staging Environment
Perform the upgrade procedure by using the wizard mode.
• Production Environment
Perform the upgrade procedure by using the silent mode.
See Managing Connector Lifecycle in Oracle Fusion Middleware Administering OracleIdentity Manager for detailed information about the wizard and silent modes.
Postupgrade StepsPerform the following procedure:
1. Download the latest version of this connector from Oracle Technology Network andextract its contents to any directory on the computer hosting Oracle Identity Manager.
Chapter 2Upgrading the Connector
2-25

2. Run the Upload JARs utility to post the latest version of the connector bundle JARfile (org.identityconnectors.ebs-1.0.1115.jar) from the /bundle directory of theinstallation media to the Oracle Identity Manager database.
For Microsoft Windows:
OIM_HOME/server/bin/UploadJars.bat
For UNIX:
OIM_HOME/server/bin/UploadJars.sh
When you run the utility, you are prompted to enter the login credentials of theOracle Identity Manager administrator, URL of the Oracle Identity Manager hostcomputer, context factory value, type of JAR file being uploaded (specify the JARtype as ICFBundle, option 4), and the location from which the JAR file is to beuploaded.
3. Run the Form Version Control (FVC) utility to manage data changes on a formafter an upgrade operation. To do so:
a. In a text editor, open the fvc.properties file located in the OIM_DC_HOMEdirectory and include the following entries:
ResourceObject;Oracle EBS User ManagementFormName;UD_EBST_USRFromVersion;SPECIFY_THE_VERSION_OF_FORM_THAT_WAS_IN_THE_ACTIVE_STATUS_BEFORE_THE_UPGRADEToVersion;SPECIFY_THE_VERSION_OF_FORM_THAT_IS_IN_THE_ACTIVE_STATUS_AFTER_THE_UPGRADE
b. Run the FVC utility. This utility is copied into the following directory when youinstall the design console:
For Microsoft Windows:
OIM_DC_HOME/fvcutil.bat
For UNIX:
OIM_DC_HOME/fvcutil.sh
When you run this utility, you are prompted to enter the login credentials of theOracle Identity Manager administrator, and the logger level and log filelocation.
See Also:
Using the Form Version Control Utility in Oracle Fusion MiddlewareAdministering Oracle Identity Manager for detailed information aboutthe FVC utility
4. Run the Post Upgrade Script as follows:
a. Connect to the Oracle Identity Manager database by using the OIM Usercredentials.
b. If you are upgrading the Oracle EBS UM TCA connector, then run thePostUpgradeScript_TCAEBSUM.sql script located in the OIM_HOME/server/ConnectorDefaultDirectory/EBSUM_PCKG/upgrade directory.
Chapter 2Upgrading the Connector
2-26

c. If you are upgrading the plain EBS UM connector, then run thePostUpgradeScript_PlainEBSUM.sql script located in the OIM_HOME/server/ConnectorDefaultDirectory/EBSUM_PCKG/upgrade directory.
5. Configure the upgraded IT resource of the source connector. See Configuring the ITResource for the Target System for information about configuring the IT resource.
6. Change the literal value for child forms as follows:
a. Log in to the Design Console.
b. Expand Process Management, and then double-click Process Definition.
c. Search for and open the Oracle EBS UM User process definition.
d. On the Tasks tab, double-click the Add User Responsibility process task.
The Editing Task: Add User Responsibility dialog box is displayed.
e. On the Integration tab, double-click the childTableName adapter variable.
The Edit Mapping for Variable dialog box is displayed.
f. In the Literal Value field, depending on the connector that you are upgrading from,perform one of the following steps:
• If you are upgrading the Oracle EBS UM TCA connector from release 9.1.0.7.x tothis release, then change the value from UD_UM_RESP to UD_EBST_RSP.
• If you are upgrading the plain Oracle EBS UM connector from release 9.1.0.7.xto this release, then change the value from UD_UM_RESP to UD_EBS_RSP.
g. Click the Save icon and close the dialog box.
h. Repeat Steps 6.d through 6.g for the Update User Responsibility and RemoveUser Responsibility process tasks.
i. If you are upgrading the Oracle EBS UM TCA connector from release 9.1.0.7.x to thisrelease, then repeat Steps 6.d through 6.g for the following process tasks bychanging the value of the Literal Value field from UD_UM_ROLE to UD_EBST_RLS:
• Add User Role
• Update User Role
• Remove User Role
j. If you are upgrading the plain Oacle EBS UM connector from release 9.1.0.7.x to thisrelease, then repeat Steps 6.d through 6.g for the following process tasks bychanging the value of the Literal Value field from UD_UM_ROLE to UD_EBS_RLS:
• Add User Role
• Update User Role
• Remove User Role
7. Change the name of the child form in the Lookup.Oracle EBS UM.UM.ProvAttrMaplookup definition as follows:
a. Expand Administration, and then double-click Lookup Definition.
b. Search for and open the Lookup.Oracle EBS UM.UM.ProvAttrMap lookupdefinition.
c. In the Code Key column:
Chapter 2Upgrading the Connector
2-27

• If you are upgrading the Oracle EBS UM TCA connector, then search forall entries beginning with UD_UM_RESP and replace it with UD_EBST_RSP.For example, replace the UD_UM_RESP~Application Name[LOOKUP]entry with UD_EBST_RSP~Application Name[LOOKUP].Similarly, search for all entries beginning with UD_UM_ROLE and replaceit with UD_EBST_RLS. For example, replace the UD_UM_ROLE~RoleStart Date[DATE] entry with UD_EBST_RLS~Role Start Date[DATE].
• If you are upgrading the plain Oracle EBS UM connector, then search forall entries beginning with UD_UM_RESP and replace it with UD_EBS_RSP.For example, replace the UD_UM_RESP~Application Name[LOOKUP]entry with UD_EBS_RESP~Application Name[LOOKUP].Similarly, search for all entries beginning with UD_UM_ROLE and replaceit with UD_EBS_RLS. For example, replace the UD_UM_ROLE~Role StartDate[DATE] entry with UD_EBS_RLS~Role Start Date[DATE].
d. Click the Save icon.
8. Modify the UD_EBS_UM Updated process task to set itResourceFieldNameadapter variable as follows:
a. Expand Process Management, and then double-click Process Definition.
b. Search for and open the Oracle EBS UM User process definition.
c. On the Tasks tab, double-click the UD_EBS_UM Updated process task.
The Editing Task: UD_EBS_UM Updated dialog box is displayed.
d. On the Integration tab:
• If you are upgrading the Oracle EBS UM TCA connector, then change theliteral value of itResourceFieldName adapter variable fromUD_EBS_UM_EBS_ITRES to UD_EBST_USR_EBS_ITRES.
• If you are upgrading the plain Oracle EBS UM connector, then change theliteral value from to UD_EBS_UM_EBS_ITRES toUD_EBS_USER_EBS_ITRES.
e. Click the Save icon and close the dialog box.
f. Click the Save icon of the task and close the task.
g. Click the Save icon of the process definition.
9. Remove the old prepopulate adapter associated with the process form field asfollows:
• If you are upgrading the Oracle EBS UM TCA connector, then:
a. Expand Development Tools, and then double-click Form Designer.
b. Search for and open the UD_EBST_USR form.
c. Create a new version (for example, v_11.1.1.5.0_1) of the form and saveit.
d. Select the newly created form version.
e. On the Pre-Populate tab, select the row containing the old prepopulateadapter EBSPrePopFirstName, and then click Delete.
f. Click OK in the Alert dialog box to confirm that you want to proceed withdeleting the prepopulate adapter.
Chapter 2Upgrading the Connector
2-28

g. Repeat Steps 9.e and 9.f to delete the EBSPrePopLastName prepopulateadapter associated with the Party Last Name form field.
h. Click the Save icon and then Click Make Version Active.
• If you are upgrading the Oracle EBS UM connector, then:
a. Expand Development Tools, and then double-click Form Designer.
b. Search for and open the UD_EBS_USR form.
c. Create a new version (for example, v_11.1.1.5.0_1) of the form and save it.
d. Select the newly created form version.
e. On the Pre-Populate tab, select the row containing the old prepopulate adapterEBSPrePopSystemDate, and then click Delete.
f. Click OK in the Alert dialog box to confirm that you want to proceed with deletingthe prepopulate adapter.
g. Click the Save icon and then Click Make Version Active.
10. Update the localization properties. To do so, you must update the resource bundle of auser locale with new names of the process form attributes for proper translations afterupgrading the connector. You can modify the properties file of your locale in theresources directory of the connector bundle.
For example, the process form (UD_EBS_UM) attributes are referenced in the Japaneseproperties file, EBS-UM_ja.properties, as global.udf.UD_EBS_UM_PARTY_FNAME.During upgrade, the process form name is changed to old form name UD_EBST_USR (incase of EBS UM TCA upgrade) or UD_EBS_USER (in case of EBS Plain UM upgrade) toglobal.udf.UD_EBS_UM_PARTY_FNAME. Therefore, you must add the process formattributes to global.udf.UD_EBS_UM_PARTY_FNAME.
11. Restart Oracle Identity Manager. Alternatively, you can purge the cache for the changesto reflect in Oracle Identity Manager. See Purging Cache in Oracle Fusion MiddlewareAdministering Oracle Identity Manager for more information about the PurgeCache utility.
12. Replicate all the changes made to the Form Designer of the Design Console to a new UIform as follows:
a. Log in to Oracle Identity System Administration.
b. Create and active a sandbox. See Creating and Activating a Sandbox for moreinformation.
c. Create a new UI form to view the upgraded fields. See Creating a New UI Form formore information about creating a UI form.
d. Associate the newly created UI form with the application instance of your targetsystem. To do so, open the existing application instance for your resource, from theForm field, select the form (created in Step 12.c), and then save the applicationinstance.
e. Publish the sandbox. See Publishing a Sandbox for more information.
After upgrading the connector, you can perform either full reconciliation or incrementalreconciliation. This ensures that records created or modified since the last reconciliation run(the one that you performed in Preupgrade Steps) are fetched into Oracle Identity Manager.From the next reconciliation run onward, the reconciliation engine automatically enters avalue for the Latest Token attribute.
Chapter 2Upgrading the Connector
2-29

Before you perform lookup field synchronization, ensure to remove all preupgradeentries from the lookup definitions Oracle Identity Manager. After upgrade these valuesmust be synchronized with the lookup fields in the target system.
See Performing Full and Incremental Reconciliation for more information aboutperforming full or incremental reconciliation.
Postcloning StepsYou can clone this connector by setting new names for some of the objects thatcomprise the connector. The outcome of the process is a new connector XML file.Most of the connector objects, such as Resource Object, Process Definition, ProcessForm, IT Resource Type Definition, IT Resource Instances, Lookup Definitions,Adapters, Reconciliation Rules and so on in the new connector XML file have newnames.
Note:
Managing Connector Lifecycle in Oracle Fusion Middleware AdministeringOracle Identity Manager for detailed information about cloning connectorsand the postcloning steps.
After a copy of the connector is created by setting new names for connector objects,some objects might contain the details of the old connector objects. Therefore, youmust modify the following Oracle Identity Manager objects to replace the baseconnector artifacts or attribute references with the corresponding cloned artifacts orattributes:
• IT Resource
The cloned connector has its own set of IT resources. You must configure both thecloned connector IT resources and ensure you use the configuration lookupdefinition of the cloned connector.
• Scheduled Job
The values of the Resource Object Name and IT Resource scheduled jobattributes in the cloned connector refer to the values of the base connector.Therefore, these values (values of the Resource Object Name and IT resourcescheduled job attributes that refer to the base connector) must be replaced withthe new cloned connector artifacts.
• Lookup Definition
The cloned lookup definition (for example, Lookup.Oracle EBSUMClone.UM.ProvAttrMap) corresponding to the Lookup.Oracle EBSUM.UM.ProvAttrMap lookup definition has Code Key entries related to child formfields that still map to the old child form fields. You must change the values ofthese Code Key entries so that they map to the cloned child form fields.
For example, consider UD_UM_ROL1 and UD_UM_RES1 to be the cloned childforms of the UD_UM_ROLE and UD_UM_RESP child forms respectively. Aftercloning, the Lookup.Oracle EBS UMClone.UM.ProvAttrMap lookup definitioncontains Code Key entries that correspond to the fields of the old child formUD_UM_ROLE and UD_UM_RESP respectively. To ensure that the Code Key
Chapter 2Postcloning Steps
2-30

entries point to the fields of the cloned child form (UD_UM_ROL1 and UD_UM_RES1),specify the following values in the corresponding Code Key columns:
– UD_UM_ROL1~Application Name[LOOKUP]
– UD_UM_ROL1~Role Expiration Date[DATE]
– UD_UM_ROL1~Role Name[LOOKUP]
– UD_UM_ROL1~Role Start Date[DATE]
– UD_UM_RES1~Application Name[LOOKUP]
– UD_UM_RES1~Responsibility Description
– UD_UM_RES1~Responsibility End Date[DATE]
– UD_UM_RES1~Responsibility Name[LOOKUP]
– UD_UM_RES1~Responsibility Start Date[DATE]
– UD_UM_RES1~Security Group[LOOKUP]
• Process Tasks
You must change the literal value of the childTableName adapter variable fromUD_UM_ROLE and UD_UM_RESP to the cloned form names UD_UM_ROL1anUD_UM_RES1, respectively in the following process tasks:
– Add User Responsibility Process Task
– Add User Role Process Task
– Update User Responsibility Process Task
– Update User Role Process Task
– Remove User Responsibility Process Task
– Remove User Role Process Task
You must change the literal value of the parent form from UD_EBS_UM to the clonedform name UD_EBS_U1 in the UD_EBS_UM Updated in the Bulk adapter process task.
• Localization Properties
You must update the resource bundle of a user locale with new names of the processform attributes for proper translations after cloning the connector. You can modify theproperties file of your locale in the resources directory of the connector bundle.
For example, the process form (UD_EBS_UM) attributes are referenced in the Japaneseproperties file, EBS-UM_ja.properties, as global.udf.UD_EBS_UM_PARTY_FNAME.During cloning, if you change the process form name from UD_EBS_UMCLONED toglobal.udf.UD_EBS_UMCLONED _PARTY_FNAME, then you must add the process formattributes to global.udf.UD_EBS_UM_PARTY_FNAME.
• Replicate changes made to the form designer to a new UI form
To do so, perform the procedure described in Postupgrade Steps.
Chapter 2Postcloning Steps
2-31

3Using the Connector
This chapter provides information about the following topics:
Note:
These sections provide both conceptual and procedural information aboutconfiguring the connector. It is recommended that you read the conceptualinformation before you perform the procedures.
• Lookup Definitions Used During Connector Operations
• Reconciliation Scheduled Jobs
• Configuring Reconciliation
• Configuring Provisioning
• Uninstalling the Connector
Lookup Definitions Used During Connector OperationsLookup definitions that are used during reconciliation and provisioning operations are eitherpreconfigured or synchronized with the target system.
Lookup definitions used during connector operations can be categorized as follows:
• Lookup Definitions Synchronized with the Target System
• Preconfigured Lookup Definitions
Lookup Definitions Synchronized with the Target SystemDuring a provisioning operation, you use a lookup field on the process form to specify asingle value from a set of values. For example, you use the Responsibilities lookup field toselect a responsibility to be assigned from the list of responsibilities in the lookup field. Whenyou deploy the connector, lookup definitions corresponding to the lookup fields on the targetsystem are created in Oracle Identity Manager. Lookup field synchronization involves copyingadditions or changes made to the target system lookup fields into the lookup definitions inOracle Identity Manager.
The following is the format in which data is stored after lookup definition synchronization:
Code Key: <IT_RESOURCE_KEY>~<LOOKUP_FIELD_VALUE>
In this format:
• IT_RESOURCE_KEY is the numeric code assigned to each IT resource in Oracle IdentityManager.
• LOOKUP_FIELD_VALUE is the connector attribute value defined for code.
3-1

Sample value: 245~0Decode: <IT_RESOURCE_NAME>~<LOOKUP_FIELD_VALUE>
In this format:
• IT_RESOURCE_KEY is the name of the IT resource in Oracle Identity Manager.
• LOOKUP_FIELD_VALUE is the connector attribute value defined for decode.
Sample value: Oracle EBS UM~FNDDuring a provisioning operation, lookup fields are populated with values correspondingto the target system that you select for the operation.
Preconfigured Lookup DefinitionsThis section discusses the other lookup definitions that are created in Oracle IdentityManager when you deploy the connector. These lookup definitions are eitherprepopulated with values or values must be manually entered in them after theconnector is deployed. The other lookup definitions are as follows:
• Lookup.Configuration.Oracle EBS UM
• Lookup.Oracle EBS UM.UM.Configuration
• Lookup.Oracle EBS UM.UM.ProvAttrMap
• Lookup.Oracle EBS UM.UM.ReconAttrMap
• Lookup.Oracle EBS UM.PartyType
• Lookup.Oracle EBS UM.PasswordExpTypes
• Lookup.Objects.EDIR User.Oracle EBS User Management.CopyAttributesMap
• Lookup.Objects.LDAP User.Oracle EBS User Management.CopyAttributesMap
• Lookup.Objects.OID User.Oracle EBS User Management.CopyAttributesMap
• Lookup.Objects.AD User.Oracle EBS User Management.CopyAttributesMap
Lookup.Configuration.Oracle EBS UMThe Lookup.Configuration.Oracle EBS UM holds connector configuration entries thatare used during target resource reconciliation and provisioning operations.
Table 3-1 lists the default entries in this lookup definition.
Table 3-1 Entries in the Lookup.Configuration.Oracle EBS UM Lookup Definition
Code Key Decode Description
Bundle Name org.identityconnectors.ebs This entry holds the name of the connector bundle class.Do not modify this entry.
Bundle Version 1.0.1115 This entry holds the version of the connector bundle class.Do not modify this entry.
Connector Name org.identityconnectors.ebs.EBSConnector
This entry holds the name of the connector class. Do notmodify this entry.
Chapter 3Lookup Definitions Used During Connector Operations
3-2
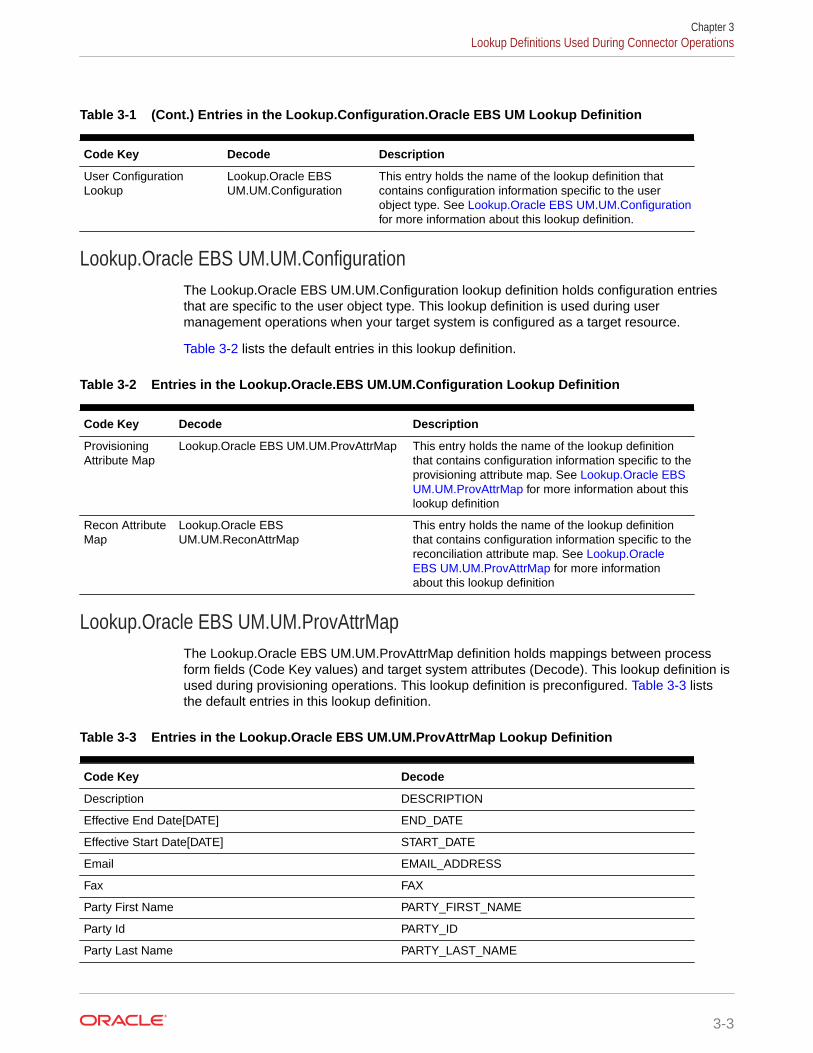
Table 3-1 (Cont.) Entries in the Lookup.Configuration.Oracle EBS UM Lookup Definition
Code Key Decode Description
User ConfigurationLookup
Lookup.Oracle EBSUM.UM.Configuration
This entry holds the name of the lookup definition thatcontains configuration information specific to the userobject type. See Lookup.Oracle EBS UM.UM.Configurationfor more information about this lookup definition.
Lookup.Oracle EBS UM.UM.ConfigurationThe Lookup.Oracle EBS UM.UM.Configuration lookup definition holds configuration entriesthat are specific to the user object type. This lookup definition is used during usermanagement operations when your target system is configured as a target resource.
Table 3-2 lists the default entries in this lookup definition.
Table 3-2 Entries in the Lookup.Oracle.EBS UM.UM.Configuration Lookup Definition
Code Key Decode Description
ProvisioningAttribute Map
Lookup.Oracle EBS UM.UM.ProvAttrMap This entry holds the name of the lookup definitionthat contains configuration information specific to theprovisioning attribute map. See Lookup.Oracle EBSUM.UM.ProvAttrMap for more information about thislookup definition
Recon AttributeMap
Lookup.Oracle EBSUM.UM.ReconAttrMap
This entry holds the name of the lookup definitionthat contains configuration information specific to thereconciliation attribute map. See Lookup.OracleEBS UM.UM.ProvAttrMap for more informationabout this lookup definition
Lookup.Oracle EBS UM.UM.ProvAttrMapThe Lookup.Oracle EBS UM.UM.ProvAttrMap definition holds mappings between processform fields (Code Key values) and target system attributes (Decode). This lookup definition isused during provisioning operations. This lookup definition is preconfigured. Table 3-3 liststhe default entries in this lookup definition.
Table 3-3 Entries in the Lookup.Oracle EBS UM.UM.ProvAttrMap Lookup Definition
Code Key Decode
Description DESCRIPTION
Effective End Date[DATE] END_DATE
Effective Start Date[DATE] START_DATE
Email EMAIL_ADDRESS
Fax FAX
Party First Name PARTY_FIRST_NAME
Party Id PARTY_ID
Party Last Name PARTY_LAST_NAME
Chapter 3Lookup Definitions Used During Connector Operations
3-3
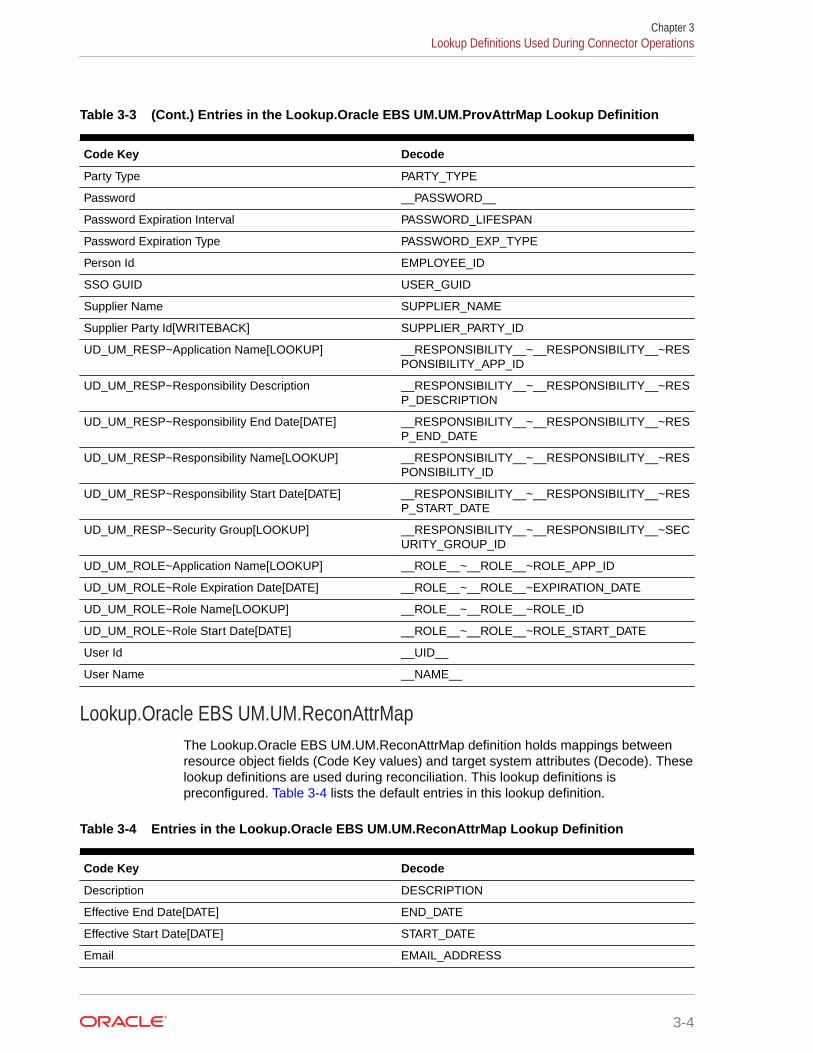
Table 3-3 (Cont.) Entries in the Lookup.Oracle EBS UM.UM.ProvAttrMap Lookup Definition
Code Key Decode
Party Type PARTY_TYPE
Password __PASSWORD__
Password Expiration Interval PASSWORD_LIFESPAN
Password Expiration Type PASSWORD_EXP_TYPE
Person Id EMPLOYEE_ID
SSO GUID USER_GUID
Supplier Name SUPPLIER_NAME
Supplier Party Id[WRITEBACK] SUPPLIER_PARTY_ID
UD_UM_RESP~Application Name[LOOKUP] __RESPONSIBILITY__~__RESPONSIBILITY__~RESPONSIBILITY_APP_ID
UD_UM_RESP~Responsibility Description __RESPONSIBILITY__~__RESPONSIBILITY__~RESP_DESCRIPTION
UD_UM_RESP~Responsibility End Date[DATE] __RESPONSIBILITY__~__RESPONSIBILITY__~RESP_END_DATE
UD_UM_RESP~Responsibility Name[LOOKUP] __RESPONSIBILITY__~__RESPONSIBILITY__~RESPONSIBILITY_ID
UD_UM_RESP~Responsibility Start Date[DATE] __RESPONSIBILITY__~__RESPONSIBILITY__~RESP_START_DATE
UD_UM_RESP~Security Group[LOOKUP] __RESPONSIBILITY__~__RESPONSIBILITY__~SECURITY_GROUP_ID
UD_UM_ROLE~Application Name[LOOKUP] __ROLE__~__ROLE__~ROLE_APP_ID
UD_UM_ROLE~Role Expiration Date[DATE] __ROLE__~__ROLE__~EXPIRATION_DATE
UD_UM_ROLE~Role Name[LOOKUP] __ROLE__~__ROLE__~ROLE_ID
UD_UM_ROLE~Role Start Date[DATE] __ROLE__~__ROLE__~ROLE_START_DATE
User Id __UID__
User Name __NAME__
Lookup.Oracle EBS UM.UM.ReconAttrMapThe Lookup.Oracle EBS UM.UM.ReconAttrMap definition holds mappings betweenresource object fields (Code Key values) and target system attributes (Decode). Theselookup definitions are used during reconciliation. This lookup definitions ispreconfigured. Table 3-4 lists the default entries in this lookup definition.
Table 3-4 Entries in the Lookup.Oracle EBS UM.UM.ReconAttrMap Lookup Definition
Code Key Decode
Description DESCRIPTION
Effective End Date[DATE] END_DATE
Effective Start Date[DATE] START_DATE
Email EMAIL_ADDRESS
Chapter 3Lookup Definitions Used During Connector Operations
3-4

Table 3-4 (Cont.) Entries in the Lookup.Oracle EBS UM.UM.ReconAttrMap Lookup Definition
Code Key Decode
Fax FAX
Party First Name PARTY_FIRST_NAME
Party Id PARTY_ID
Party Last Name PARTY_LAST_NAME
Party Type PARTY_TYPE
Password Expiration Interval PASSWORD_LIFESPAN
Password Expiration Type PASSWORD_EXP_TYPE
Person Id EMPLOYEE_ID
Responsibilities~Application Name[LOOKUP] __RESPONSIBILITY__~__RESPONSIBILITY__~RESPONSIBILITY_APP_ID
Responsibilities~Responsibility Description __RESPONSIBILITY__~__RESPONSIBILITY__~RESP_DESCRIPTION
Responsibilities~Responsibility End Date[DATE] __RESPONSIBILITY__~__RESPONSIBILITY__~RESP_END_DATE
Responsibilities~Responsibility Name[LOOKUP] __RESPONSIBILITY__~__RESPONSIBILITY__~RESPONSIBILITY_ID
Responsibilities~Responsibility Start Date[DATE] __RESPONSIBILITY__~__RESPONSIBILITY__~RESP_START_DATE
Responsibilities~Security Group[LOOKUP] __RESPONSIBILITY__~__RESPONSIBILITY__~SECURITY_GROUP_ID
Roles~Application Name[LOOKUP] __ROLE__~__ROLE__~ROLE_APP_ID
Roles~Role Expiration Date[DATE] __ROLE__~__ROLE__~EXPIRATION_DATE
Roles~Role Name[LOOKUP] __ROLE__~__ROLE__~ROLE_ID
Roles~Role Start Date[DATE] __ROLE__~__ROLE__~ROLE_START_DATE
SSO GUID USER_GUID
Status __ENABLE__
Supplier Name SUPPLIER_NAME
Supplier Party Id SUPPLIER_PARTY_ID
User Id __UID__
User Name __NAME__
Lookup.Oracle EBS UM.PartyTypeThe Lookup.Oracle EBS UM.PartyType lookup definition holds information about the types ofparties that you can select for a target system account, which you create through OracleIdentity Manager.
The following is the format of the Code Key and Decode values in this lookup definition:
• Code Key: The type of party
• Decode: Description of the type of party
Chapter 3Lookup Definitions Used During Connector Operations
3-5

Note:
You cannot add new entries to this lookup definition.
Table 3-5 lists the default entries in this lookup definition.
Table 3-5 Entries in the Lookup.Oracle EBS UM.PartyType Lookup Definition
Code Key Decode
Party Party
Supplier Supplier
Lookup.Oracle EBS UM.PasswordExpTypesThe Lookup.Oracle EBS UM.PasswordExpTypes lookup definition holds the optionsthat you can select to specify when the password for the target system account(created through Oracle Identity Manager) must expire.
The following is the format of entries in this lookup definition:
• Code Key: The type of password expiry
• Decode: The type of password expiry
Table 3-6 lists the default entries in this lookup definition.
Table 3-6 Entries in the Lookup.Oracle EBS UM.PasswordExpTypes Lookup Definition
Code Key Decode
Accesses Accesses
Days Days
None None
Lookup.Objects.EDIR User.Oracle EBS User Management.CopyAttributesMapThe Lookup.Objects.EDIR User.Oracle EBS User Management.CopyAttributesMaplookup definition is used to configure the connector to work with an SSO solutionduring provisioning operations. In other words, this lookup definition is used when thetarget system is configured to use Oracle Access Manager to authenticate users.Oracle Access Manager in turn uses Novell eDirectory as an LDAP-based repositoryfor storing user records.
The Lookup.Objects.EDIR User.Oracle EBS User Management.CopyAttributesMaplookup definition holds information that is used internally by an OIM adapter to copyfield values from a Novell eDirectory account to the target system account. Forexample, the entries in the Lookup.Objects.EDIR User.Oracle EBS UserManagement.CopyAttributesMap lookup definition are used internally by the OIMadapter to copy the Reference ID value of a Novell eDirectory account to the SSOGUID field of the EBS UM account.
The following is the format of entries in this lookup definition:
Chapter 3Lookup Definitions Used During Connector Operations
3-6

• Code Key: Name of the field in the target system that must be populated with a valuefrom a corresponding field in Novell eDirectory
• Decode: Corresponding field name in Novell eDirectory
Table 3-7 lists the default entries in this lookup definition.
Table 3-7 Entries in the Lookup.Objects.EDIR User.Oracle EBS UserManagement.CopyAttributesMap Lookup Definition
Code Key Decode
Reference ID SSO GUID
Lookup.Objects.LDAP User.Oracle EBS User Management.CopyAttributesMapThe Lookup.Objects.LDAP User.Oracle EBS User Management.CopyAttributesMap lookupdefinition is used when the target system is configured to use either Oracle Single Sign-On orOracle Access Manager, to authenticate users. Oracle Single Sign-On and Oracle AccessManager in turn use an LDAP-based repository for storing user records.
The Lookup.Objects.LDAP User.Oracle EBS User Management.CopyAttributesMap lookupdefinition holds information is used internally by an OIM adapter to copy field values from anLDAP-based repository account to the target system account. For example, the entries in theLookup.Objects.LDAP User.Oracle EBS User Management.CopyAttributesMap lookupdefinition are used internally by the OIM adapter to copy the NsuniqueID value of an LDAPaccount to the SSO GUID field of the EBS UM account.
The following is the format of entries in this lookup definition:
• Code Key: Name of the field in the target system that must be populated with a valuefrom a corresponding field in any LDAP-based repository
• Decode: Corresponding field name in the LDAP-based repository
Table 3-8 lists the default entries in this lookup definition.
Table 3-8 Entries in the Lookup.Objects.LDAP User.Oracle EBS UserManagement.CopyAttributesMap Lookup Definition
Code Key Decode
NsuniqueID SSO GUID
Lookup.Objects.OID User.Oracle EBS User Management.CopyAttributesMapThe Lookup.Objects.OID User.Oracle EBS User Management.CopyAttributesMap lookupdefinition is used when the target system is configured to use Oracle Single Sign-On toauthenticate users. Oracle Single Sign-On in turn uses Oracle Internet Directory as an LDAP-based repository for storing user records.
The Lookup.Objects.OID User.Oracle EBS User Management.CopyAttributesMap lookupdefinition holds information that is used internally by an OIM adapter to copy field values froman Oracle Internet Directory account to the target system account. For example, the entries inthe Lookup.Objects.OID User.Oracle EBS User Management.CopyAttributesMap lookupdefinition are used internally by the OIM adapter to copy the orclGuid value of an OIDaccount to the SSO GUID field of the EBS UM account.
Chapter 3Lookup Definitions Used During Connector Operations
3-7

The following is the format of entries in this lookup definition:
• Code Key: Name of the field in the target system that must be populated with avalue from a corresponding field in OID
• Decode: Corresponding field name in OID
Table 3-9 lists the default entries in this lookup definition.
Table 3-9 Entries in the Lookup.Objects.OID User.Oracle EBS UserManagement.CopyAttributesMap Lookup Definition
Code Key Decode
orclGuid SSO GUID
Lookup.Objects.AD User.Oracle EBS User Management.CopyAttributesMapThe Lookup.Objects.AD User.Oracle EBS User Management.CopyAttributesMaplookup definition is used when the target system is configured to use Oracle SingleSign-On to authenticate users. Oracle Single Sign-On in turn uses Active Directory asan LDAP-based repository for storing user records.
The Lookup.Objects.AD User.Oracle EBS User Management.CopyAttributesMaplookup definition holds information that is used internally by an OIM adapter to copyfield values from a Microsoft Active Directory account to the target system account.For example, the entries in the Lookup.Objects.AD User.Oracle EBS UserManagement.CopyAttributesMap lookup definition are used internally by the OIMadapter to copy the Unique Id value of an AD account to the SSO GUID field of theEBS UM account.
The following is the format of entries in this lookup definition:
• Code Key: Name of the field in the target system that must be populated with avalue from a corresponding field in AD
• Decode: Corresponding field name in AD
Table 3-9 lists the default entries in this lookup definition.
Table 3-10 Entries in the Lookup.Objects.AD User.Oracle EBS UserManagement.CopyAttributesMap Lookup Definition
Code Key Decode
Unique Id SSO GUID
Reconciliation Scheduled JobsWhen you run the Connector Installer, the scheduled jobs are automatically created inOracle Identity Manager.
The following sections provide more information:
• Scheduled Jobs for Lookup Field Synchronization
• Scheduled Job for Target User Reconciliation
Chapter 3Reconciliation Scheduled Jobs
3-8

• Scheduled Job for Incremental Target User Reconciliation
• Scheduled Job for Target User Delete Reconciliation
• Configuring Scheduled Jobs
Scheduled Jobs for Lookup Field SynchronizationLookup field synchronization involves copying additions or changes made to the targetsystem lookup fields into the lookup definitions in Oracle Identity Manager.
The following scheduled jobs are used for lookup fields synchronization:
• Oracle EBS UM Target Applications Lookup Reconciliation
• Oracle EBS UM Target Responsibilities Lookup Reconciliation
• Oracle EBS UM Target Roles Lookup Reconciliation
• Oracle EBS UM Target Security Groups Lookup Reconciliation
You must specify values for the attributes of these scheduled jobs. Table 3-11 describes theattributes of these scheduled jobs. Configuring Scheduled Jobs describes the procedure toconfigure scheduled jobs.
Table 3-11 Attributes of the Scheduled Jobs for Lookup Field Synchronization
Attribute Description
Code Key Attribute Name of the connector or target system attribute that is used to populate the CodeKey column of the lookup definition (specified as the value of the Lookup Nameattribute).
Default value: CODENote: Do not change the value of this attribute.
Decode Attribute Name of the connector or target system attribute that is used to populate the Decodecolumn of the lookup definition (specified as the value of the Lookup Name attribute).
Default value: DECODENote: Do not change the value of this attribute.
IT Resource Name Enter the name of the IT resource for the target system installation from which youwant to reconcile user records.
Default value: Oracle EBS UMLookup Name Enter the name of the lookup definition in Oracle Identity Manager that must be
populated with values fetched from the target system.
Depending on the scheduled job that you are using, the default values are as follows:
• For Oracle EBS UM Target Applications Lookup Reconciliation:Lookup.Oracle EBS UM.Applications
• For Oracle EBS UM Target Responsibilities Lookup Reconciliation:Lookup.Oracle EBS UM.Responsibilities
• For Oracle EBS UM Target Roles Lookup Reconciliation: Lookup.Oracle EBSUM.Roles
• For Oracle EBS UM Target Security Groups Lookup Reconciliation:Lookup.Oracle EBS UM.SecurityGroups
Chapter 3Reconciliation Scheduled Jobs
3-9

Table 3-11 (Cont.) Attributes of the Scheduled Jobs for Lookup Field Synchronization
Attribute Description
Object Type Enter the type of object you want to reconcile.
Depending on the scheduled job that you are running, the default value is one of thefollowing:
• For Oracle EBS UM Target Applications Lookup Reconciliation:__APPLICATIONS__
• For Oracle EBS UM Target Responsibilities Lookup Reconciliation:__RESPONSIBILITIES__
• For Oracle EBS UM Target Roles Lookup Reconciliation: __ROLES__• For Oracle EBS UM Target Security Groups Lookup Reconciliation:
__SECURITY_GROUPS__
Scheduled Job for Target User ReconciliationThe Oracle EBS UM Target User Reconciliation scheduled job is used for user datareconciliation.
You must specify values for the attributes of the Oracle EBS UM Target UserReconciliation scheduled job. Table 3-12 describes the attributes of this scheduled job.
Table 3-12 Attributes of the Oracle EBS UM Target User Reconciliation Scheduled Job
Attribute Description
Filter Enter the search filter for fetching records from the target system during areconciliation run.
See Performing Limited Reconciliation for more information.
Sample Value: equalTo('__UID__','1017905')Incremental ReconAttribute
Enter the name of the target system attribute that holds the timestamp at which theuser record was modified.
ITResource Name Enter the name of the IT resource for the target system installation from which youwant to reconcile user records.
Default value: Oracle EBS UMLatest Token This attribute holds the value of the attribute that is specified as the value of the
Incremental Recon Attribute attribute. The Latest Token attribute is used for internalpurposes. By default, this value is empty.
Note: Do not enter a value for this attribute. The reconciliation engine automaticallyenters a value in this attribute.
Sample value: <Long>1234567890</Long>Object Type Enter the type of object you want to reconcile.
Default value: UserNote: User is the only object that is supported. Therefore, do not change the value ofthe attribute.
Resource Object Name Enter the name of the resource object that is used for reconciliation.
Default value: Oracle EBS User ManagementScheduled Task Name Name of the scheduled task that is used for reconciliation.
Default value: Oracle EBS UM Target User Reconciliation
Chapter 3Reconciliation Scheduled Jobs
3-10

Scheduled Job for Incremental Target User ReconciliationThe Oracle EBS UM Target Incremental User Reconciliation scheduled job is used forincremental reconciliation of user data.
You must specify values for the attributes of the Oracle EBS UM Target Incremental UserReconciliation scheduled job. Table 3-13 describes the attributes of this scheduled job.
Table 3-13 Attributes of the Oracle EBS UM Target Incremental User Reconciliation ScheduledJob
Attribute Description
ITResource Name Enter the name of the IT resource for the target system installation from which youwant to reconcile user records.
Default value: Oracle EBS UMObject Type Enter the type of object you want to reconcile.
Default value: UserResource Object Name Enter the name of the resource object that is used for reconciliation.
Default value: Oracle EBS UM UserScheduled Task Name Name of the scheduled task that is used for reconciliation.
Default value: Oracle EBS UM Target Incremental User ReconciliationSync Token This attribute must be left blank when you run incremental reconciliation for the first
time. This ensures that data about all records from the target system are fetched intoOracle Identity Manager.
After the first reconciliation run, the connector automatically enters a value for thisattribute in an XML serialized format. From the next reconciliation run onward, onlydata about records that are modified since the last reconciliation run ended arefetched into Oracle Identity Manager.
Sample value: <Long>123454502019</Long>
Scheduled Job for Target User Delete ReconciliationThe Oracle EBS UM Target User Delete Reconciliation scheduled job is used for user datareconciliation.
You must specify values for the attributes Oracle EBS UM Target User Delete Reconciliationscheduled job.
Table 3-14 describes the attributes of this scheduled job.
Table 3-14 Attributes of the Oracle EBS UM Target User Delete Reconciliation Scheduled Job
Attribute Description
ITResource Name Enter the name of the IT resource for the target system installation from which youwant to reconcile user records.
Default value: Oracle EBS UMObject Type Enter the type of object you want to reconcile.
Default value: User
Chapter 3Reconciliation Scheduled Jobs
3-11

Table 3-14 (Cont.) Attributes of the Oracle EBS UM Target User Delete Reconciliation ScheduledJob
Attribute Description
Resource Object Name Enter the name of the resource object that is used for reconciliation.
Default value: Oracle EBS UM User
Configuring Scheduled JobsYou can apply this procedure to configure the scheduled jobs for lookup fieldsynchronization and reconciliation.
See Scheduled Jobs for Lookup Field Synchronization and Reconciliation for the list ofscheduled jobs that you can configure.
To configure a scheduled job:
1. Log in to Oracle Identity System Administration.
2. In the left pane, under System Management, click Scheduler.
3. Search for and open the scheduled task as follows:
a. On the left pane, in the Search field, enter the name of the scheduled job asthe search criterion. Alternatively, you can click Advanced Search and specifythe search criterion.
b. In the search results table on the left pane, click the scheduled job in the JobName column.
4. On the Job Details tab, you can modify the following parameters:
• Retries: Enter an integer value in this field. This number represents thenumber of times the scheduler tries to start the job before assigning theStopped status to the job.
• Schedule Type: Depending on the frequency at which you want the job to run,select the appropriate schedule type.
Note:
See Creating Jobs in Oracle Fusion Middleware Administering OracleIdentity Manager for detailed information about schedule types.
In addition to modifying the job details, you can enable or disable a job.
5. On the Job Details tab, in the Parameters region, specify values for the attributesof the scheduled task.
Chapter 3Reconciliation Scheduled Jobs
3-12

Note:
• Attribute values are predefined in the connector XML file that you import.Specify values only for those attributes that you want to change.
• Values (either default or user-defined) must be assigned to all theattributes. If even a single attribute value is left empty, then reconciliation isnot performed.
6. Click Apply to save the changes.
Note:
You can use the Scheduler Status page in Identity System Administration toeither start, stop, or reinitialize the scheduler.
Configuring ReconciliationReconciliation involves duplicating in Oracle Identity Manager the creation of andmodifications to user accounts on the target system.
This section provides details on the following topics related to configuring reconciliation:
• Reconciliation Queries
• Reconciliation Rules
• Reconciliation Action Rules
• Performing Full and Incremental Reconciliation
• Performing Limited Reconciliation
Reconciliation QueriesThe User Management connector is configured to perform target resource reconciliation withthe target system. Data from newly created and updated target system records is brought toOracle Identity Manager and used to create and update Oracle E-Business Suite resourcesprovisioned to OIM Users.
A SQL query is used to fetch target system records during reconciliation. All predefined SQLqueries that are required to perform reconciliation are stored in the search.properties file. Thesearch.properties file is a common file for all EBS Suite connectors. In other words, thesearch.properties file contains the queries for the EBS UM, HRMS Target, HRMS Trustedconnectors.
When you run a scheduled job, the connector locates the corresponding SQL query in thesearch.properties file and then runs it on the target system database. Target system recordsthat meet the query criteria are returned to Oracle Identity Manager.
Depending on your requirements, you can modify existing queries or add your own query inthe search.properties. This is discussed later in this guide.
Chapter 3Configuring Reconciliation
3-13

Information in the search.properties file is virtually divided into two parts. The first partlists entries containing the SQL query names in the following format:
OBJ_NAME.OP_NAME.MODE=QUERY_NAME
In this format:
• OBJ_CLASS is the name of the object class on which the reconciliation operationmust be performed.
• OP_NAME is the type of reconciliation operation to be performed. A reconciliationoperation can be a search op, sync op, or lookup op.
• QUERY_NAME is the name of the SQL query that is to be run on the targetsystem database.
The second part lists the SQL query names and the corresponding SQL queries.
The following are the entries corresponding to the EBS UM connector in thesearch.properties file:
• __ACCOUNT__.search=UM_USER_RECON
This query is used to reconcile all newly created and modified user records fromthe target system. The reconciliation operation that is performed is search based.
• __ACCOUNT__.sync=UM_USER_SYNC
This query is used to reconcile all newly created and modified user records fromthe target system. The reconciliation operation that is performed is sync based.
• __APPLICATIONS__.lookup=LOOKUP_APPLICATION_QUERY
This query is used to synchronize values in the fnd_application table of the targetsystem with the Lookup.Oracle EBS UM.Applications lookup definition in OracleIdentity Manager.
• __ROLES__.lookup=LOOKUP_ROLES_QUERY
This query is used to synchronize values in the fnd_application table of the targetsystem with the Lookup.Oracle EBS UM.Roles lookup definition in Oracle IdentityManager.
• __RESPONSIBILITIES__.lookup=LOOKUP_RESPONSIBILITY_QUERY
This query is used to synchronize values in the fnd_responsibility_vl table of thetarget system with the Lookup.Oracle EBS UM.Responsibilities lookup definition inOracle Identity Manager.
• __SECURITY_GROUPS__.lookup=LOOKUP_SECURITY_GROUP_QUERY
This query is used to synchronize values in the fnd_security_groups table of thetarget system with the Lookup.Oracle EBS UM.SecurityGroups lookup definition inOracle Identity Manager.
Reconciliation RulesThe following sections provide information about the reconciliation rules for thisconnector:
• Reconciliation Rule for Target Resource Reconciliation
• Viewing Reconciliation Rules for Target Resource Reconciliation
Chapter 3Configuring Reconciliation
3-14

Reconciliation Rule for Target Resource ReconciliationThe following is the process-matching rule:
Rule name: Oracle EBS User
Rule element: User Login Equals User Name
In the rule element:
• User Login is the User ID field of the OIM User form.
• User Name is the __NAME__ field of the target system.
Viewing Reconciliation Rules for Target Resource ReconciliationAfter you deploy the connector, you can view the reconciliation rule for target resourcereconciliation by performing the following steps:
Note:
Perform the following procedure only after the connector is deployed.
1. Log in to the Oracle Identity Manager Design Console.
2. Expand Development Tools.
3. Double-click Reconciliation Rules.
4. Search for the Oracle EBS User rule name.
Figure 3-1 shows the reconciliation rule for target resource reconciliation.
Chapter 3Configuring Reconciliation
3-15
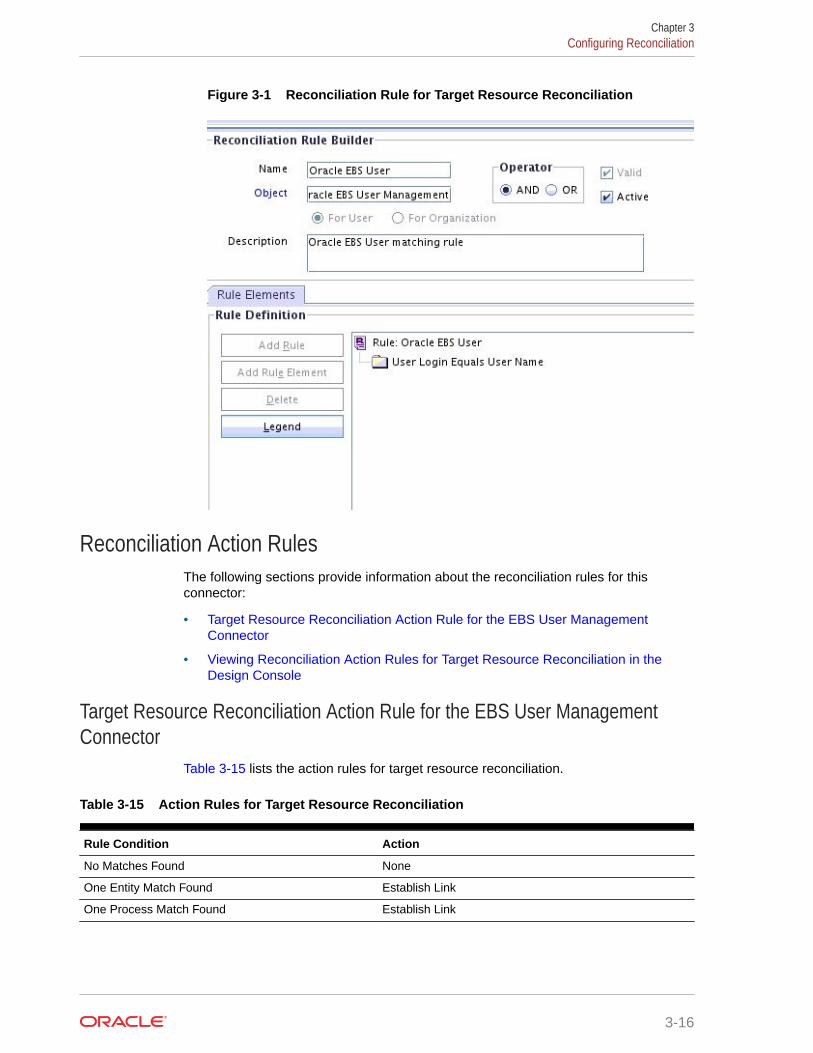
Figure 3-1 Reconciliation Rule for Target Resource Reconciliation
Reconciliation Action RulesThe following sections provide information about the reconciliation rules for thisconnector:
• Target Resource Reconciliation Action Rule for the EBS User ManagementConnector
• Viewing Reconciliation Action Rules for Target Resource Reconciliation in theDesign Console
Target Resource Reconciliation Action Rule for the EBS User ManagementConnector
Table 3-15 lists the action rules for target resource reconciliation.
Table 3-15 Action Rules for Target Resource Reconciliation
Rule Condition Action
No Matches Found None
One Entity Match Found Establish Link
One Process Match Found Establish Link
Chapter 3Configuring Reconciliation
3-16

Note:
No action is performed for rule conditions that are not predefined for this connector.You can define your own action rule for such rule conditions. See the followingsections in Oracle Fusion Middleware Developing and Customizing Applications forOracle Identity Manager for information about setting or modifying a reconciliationaction rule:
• Setting a Reconciliation Action Rule (Developing Identity Connectors usingJava)
• Setting a Reconciliation Action Rule (Developing Identity Connectorsusing .NET)
Viewing Reconciliation Action Rules for Target Resource Reconciliation in theDesign Console
After you deploy the connector, you can view the reconciliation action rules for targetresource reconciliation by performing the following steps:
1. Log in to the Oracle Identity Manager Design Console.
2. Expand Resource Management.
3. Double-click Resource Objects.
4. Search for and open the Oracle EBS User Management resource object.
5. Click the Object Reconciliation tab, and then click the Reconciliation Action Rulestab. The Reconciliation Action Rules tab displays the action rules defined for thisconnector. Figure 3-2 shows the reconciliation action rule for target resourcereconciliation.
Figure 3-2 Reconciliation Action Rules for Target Resource Reconciliation
Chapter 3Configuring Reconciliation
3-17

Performing Full and Incremental ReconciliationFull reconciliation involves reconciling all existing user records from the target systeminto Oracle Identity Manager. After you deploy the connector, you must first perform fullreconciliation. In addition, you can switch from incremental reconciliation to fullreconciliation whenever you want to ensure that all target system records arereconciled in Oracle Identity Manager.
To perform full reconciliation, ensure that no values are specified for the Latest Tokenand Filter attributes of the scheduled jobs for reconciling user records.
In incremental reconciliation, only records created or modified after the latest date/timestamp the last reconciliation was run are considered for reconciliation. To performincremental reconciliation, configure and run the scheduled job for incrementalreconciliation. The first time you run the scheduled job for incremental reconciliation,note that a full reconciliation is performed.
Performing Limited ReconciliationBy default, all target system records that are added or modified after the lastreconciliation run are reconciled during the current reconciliation run. You cancustomize this process by specifying the subset of added or modified target systemrecords that must be reconciled.
You can perform limited reconciliation by creating filters for the reconciliation module.This connector provides a Filter attribute (a scheduled job attribute) that allows you touse any of the Oracle EBS User Management resource attributes to filter the targetsystem records.
When you specify a value for the Filter attribute, only the target system records thatmatch the filter criterion are reconciled into Oracle Identity Manager. If you do notspecify a value for the Filter attribute, then all the records in the target system arereconciled into Oracle Identity Manager.
You specify a value for the Filter attribute while configuring the user reconciliationscheduled job. The following are a few examples of the values for the Filter attribute:
• To reconcile all target system accounts whose user name is like 'jo*', use the filterstartsWith('user_name', 'jo').
• To reconcile all target system accounts whose email address is like'*@example.com', use the filter endsWith('EMAIL_ADDRESS', '@example.com').
• To reconcile all target system accounts whose start date is later than 1st August,2015, use the filter greaterThan('START_DATE', 1438367400000). Note that thedate value must be specified in milliseconds.
For detailed information about ICF Filters, see ICF Filter Syntax in Oracle FusionMiddleware Developing and Customizing Applications for Oracle Identity Manager.
Performing Batched ReconciliationDuring a reconciliation run, all changes in the target system records are reconciled intoOracle Identity Manager. Depending on the number of records to be reconciled, thisprocess may require a large amount of time. In addition, if the connection breaksduring reconciliation, then the process would take longer to complete.
Chapter 3Configuring Reconciliation
3-18

You can configure batched reconciliation to avoid these problems.
To configure batched reconciliation, you must specify value for the batchSize parameter ofthe IT resource. Use this parameter to specify the number of records that must be included ineach batch. By default, this value is set to 1000.
Configuring ProvisioningThis section discusses the following topics:
• Provisioning Procedures
• Provisioning Functions
• Performing Provisioning Operations in Oracle Identity Manager
• Provisioning Operations Performed in an SoD-Enabled Environment
Provisioning ProceduresProvisioning involves management of user accounts and assignment of responsibilities androles to users in the target system. When you allocate (or provision) an Oracle E-BusinessSuite resource to an OIM User, the operation results in the creation of an account on OracleE-Business Suite for that user. Similarly, when you update the resource on Oracle IdentityManager, the same update is made to the account on the target system.
The connector uses stored procedures for performing provisioning operations. These storedprocedures are available in the wrapper packages of the target system. Information about allstored procedures used for performing provisioning operations is defined in theProcedures.properties file. The same file contains stored procedures information for both theEBS UM and HRMS Target connectors.
When you perform a provisioning operation, the connector locates the corresponding storedprocedure in the Procedures.properties file and then runs it on the target system to completethe provisioning operation.
Depending on your requirements, you can modify existing stored procedures or add your ownstored procedures to the Procedures.properties file. This is discussed later in the guide.
The first property in the Procedures.properties file, DB.PACKAGES, lists all the wrapperpackages that are used during connector operations. The subsequent entries in this file are inthe following format:
OBJ_NAME.OP_NAME.TCA_TYPE=WRAPPER_PCKG.STORED_PROC
In this format:
• OBJ_NAME is the name of the object on which the provisioning operation must beperformed.
• OP_NAME is the type of provisioning operation to be performed. For example, aprovisioning operation can be either create, update, delete, enable, or disable.
• TCA_TYPE is the type of TCA record, whether party or supplier. TCA_TYPE is presentonly for entries corresponding to TCA record provisioning.
• WRAPPER_PCKG is the name of the wrapper package.
• STORED_PROC is the name of the stored procedure in the wrapper package that is tobe run to on the target system to complete the provisioning operation.
Chapter 3Configuring Provisioning
3-19

The following are the entries corresponding to the EBS UM connector in theProcedures.properties file:
• Entries corresponding to the __ACCOUNT__ object:
– __ACCOUNT__.create=OIM_FND_USER_TCA_PKG.CREATEUSER
In this entry, the CREATEUSER stored procedure of theOIM_FND_USER_TCA_PKG wrapper package is used for performing theCreate User provisioning operation against the __ACCOUNT__ object.
– __ACCOUNT__.create.userparty=OIM_FND_USER_TCA_PKG.CREATEUSERPARTY
In this entry, the CREATEUSERPARTY stored procedure of theOIM_FND_USER_TCA_PKG wrapper package is used for creating a userrecord with an existing TCA record.
– __ACCOUNT__.validatepartyandperson=OIM_FND_USER_TCA_PKG.VALIDATEPARTYANDPERSON
In this entry, the VALIDATEPARTYANDPERSON stored procedure of theOIM_FND_USER_TCA_PKG wrapper package is used for validating personand party records before creating an account.
– __ACCOUNT__.update=OIM_FND_USER_TCA_PKG.UPDATEUSER
In this entry, the UPDATEUSER stored procedure of theOIM_FND_USER_TCA_PKG wrapper package is used for performing theUpdate provisioning operation against the __ACCOUNT__ object.
– __ACCOUNT__.enable=OIM_FND_USER_TCA_PKG.ENABLEUSER
In this entry, the ENABLEUSER stored procedure of theOIM_FND_USER_TCA_PKG wrapper package is used for enabling the useraccount of the __ACCOUNT__ object.
– __ACCOUNT__.disable=OIM_FND_USER_TCA_PKG.DISABLEUSER
In this entry, the DISABLEUSER stored procedure of theOIM_FND_USER_TCA_PKG wrapper package is used for disabling the useraccount of the __ACCOUNT__ object.
– __ACCOUNT__.update.username=OIM_FND_USER_TCA_PKG.CHANGE_USER_NAME
In this entry, the CHANGE_USER_NAME stored procedure of theOIM_FND_USER_TCA_PKG wrapper package is used for performing theUpdate user name provisioning operation against the __ACCOUNT__ object.
– __ACCOUNT__.update.password=OIM_FND_USER_TCA_PKG.CHANGEPASSWORD
In this entry, the CHANGEPASSWORD stored procedure of theOIM_FND_USER_TCA_PKG wrapper package is used for performing theUpdate user password provisioning operation against the __ACCOUNT__object.
– __ACCOUNT__.update.userparty=OIM_FND_USER_TCA_PKG.UPDATEUSERPARTY
In this entry, the UPDATEUSERPARTY stored procedure of theOIM_FND_USER_TCA_PKG wrapper package is used for performing theUpdate user party provisioning operation against the __ACCOUNT__ object.
Chapter 3Configuring Provisioning
3-20

– __ACCOUNT__.delete=OIM_FND_USER_TCA_PKG.REVOKEUSER
In this entry, the DELETE_PERSON_API stored procedure of theOIM_FND_USER_TCA_PKG wrapper package is used for performing the Deleteprovisioning operation against the __ACCOUNT__ object.
– __ACCOUNT__.create.supplier=OIM_FND_USER_TCA_PKG.CREATE_SUPPLIER
In this entry, the CREATE_SUPPLIER stored procedure of theOIM_FND_USER_TCA_PKG wrapper package is used for performing the CreateSupplier provisioning operation against the __ACCOUNT__ object.
– __ACCOUNT__.create.supplier_contact=OIM_FND_USER_TCA_PKG.CREATE_SUPPLIER_CONTACT
In this entry, the CREATE_SUPPLIER_CONTACT stored procedure of theOIM_FND_USER_TCA_PKG wrapper package is used for performing the CreateSupplier Contact provisioning operation against the __ACCOUNT__ object.
– __ACCOUNT__.create.supplier_secattr=OIM_FND_USER_TCA_PKG.CREATE_SUPPLIER_SECURITY_ATTRS
In this entry, the CREATE_SUPPLIER_SECURITY_ATTRS stored procedure of theOIM_FND_USER_TCA_PKG wrapper package is used for performing the CreateSecurity Attributes provisioning operation against the __ACCOUNT__ object.
– __ACCOUNT__.create.linkuser=OIM_FND_USER_TCA_PKG.LINK_USER_PARTY
In this entry, the LINK_USER_PARTY stored procedure of theOIM_FND_USER_TCA_PKG wrapper package is used for linking a user record withan existing party record. The LINK_USER_PARTY stored procedure is invoked soonafter CREATEUSERPARTY stored procedure.
– __ACCOUNT__.create.party=OIM_FND_USER_TCA_PKG.CREATE_PARTY
In this entry, the CREATE_PARTY stored procedure of theOIM_FND_USER_TCA_PKG wrapper package is used for creating a new partyrecord.
– __ACCOUNT__.update.party=OIM_FND_USER_TCA_PKG.UPDATE_PARTY
In this entry, the UPDATE_PARTY stored procedure of theOIM_FND_USER_TCA_PKG wrapper package is used for performing the UpdateParty record provisioning operation against the __ACCOUNT__ object.
• Entries corresponding to child objects:
– __RESPONSIBILITY__.add=OIM_FND_USER_TCA_PKG.ADDRESP
In this entry, the ADDRESP stored procedure of the OIM_FND_USER_TCA_PKGwrapper package is used for adding responsibilities for the __ACCOUNT__ object.
– __RESPONSIBILITY__.remove =OIM_FND_USER_TCA_PKG.DELRESP
In this entry, the DELRESP stored procedure of the OIM_FND_USER_TCA_PKGwrapper package is used for removing responsibilities for the __ACCOUNT__ object.
– __ROLE__.add=OIM_FND_USER_TCA_PKG.PROPAGATEUSERROLE
In this entry, the PROPAGATEUSERROLE stored procedure of theOIM_FND_USER_TCA_PKG wrapper package is used for adding roles for the__ACCOUNT__ object.
– __ROLE__.remove=OIM_FND_USER_TCA_PKG.REVOKEUSERROLE
Chapter 3Configuring Provisioning
3-21

In this entry, the REVOKEUSERROLE stored procedure of theOIM_FND_USER_TCA_PKG wrapper package is used for removing roles forthe __ACCOUNT__ object.
Provisioning FunctionsTable 3-16 lists the provisioning functions that are supported by the connector. TheAdapter column gives the name of the adapter that is used when the function isperformed.
Table 3-16 Provisioning Functions
Function Adapter
Add Child Data adpEBSUMADDCHILDDATA
Create adpEBSUMCREATE
Delete adpEBSUMDELETE
Disable User adpEBSUMDISABLEUSER
Enable User adpEBSUMENABLEUSER
Remove Child Data adpEBSUMREMOVECHILDDATA
Update Child Data adpEBSUMUPDATECHILDDATA
Update Single Attributes adpEBSUMUPDATESINGLEATTRIBUTE
User Bulk Update adpEBSUMUSERBULKUPDATE
Performing Provisioning Operations in Oracle Identity ManagerTo perform provisioning operations in Oracle Identity Manager:
1. Log in to Oracle Identity Administrative and User console.
2. Create a user. See Managing Users in Oracle Fusion Middleware Performing SelfService Tasks with Oracle Identity Manager for more information about creating auser.
3. On the Account tab, click Request Accounts.
4. In the Catalog page, search for and add to cart the application instance created in Associating the Form with the Application Instance, and then click Checkout.
5. Specify value for fields in the application form and then click Ready to Submit.
6. Click Submit.
7. If you want to provision entitlements, then:
a. On the Entitlements tab, click Request Entitlements.
b. In the Catalog page, search for and add to cart the entitlement, and then clickCheckout.
c. Click Submit.
Chapter 3Configuring Provisioning
3-22

Provisioning Operations Performed in an SoD-Enabled EnvironmentProvisioning a resource for an OIM User involves using Oracle Identity Governance to createan Oracle E-Business Suite User Management account for the user.
The following are the types of provisioning operations:
• Direct provisioning
• Provisioning triggered by policy changes
This section discusses the following topics:
• Overview of the Provisioning Process in an SoD-Enabled Environment
• Direct Provisioning in an SoD-Enabled Environment
Overview of the Provisioning Process in an SoD-Enabled EnvironmentThe following is the sequence of steps that take places during a provisioning operationperformed in an SoD-enabled environment:
1. The provisioning operation triggers the appropriate adapter.
2. The adapter carries provisioning data to the corresponding API on the target system.
3. If you select an account or entitlements to be provisioned to the OIM User, then the SoDcheck is initiated. The SoDChecker task submits the User Account and Entitlementsdetails in a form of Duties list to Oracle Application Access Controls Governor. In otherwords, the SoD validation process takes place asynchronously.
4. The Web service of Oracle Application Access Controls Governor receives theentitlement data.
5. After Oracle Application Access Controls Governor runs the SoD validation process onthe entitlement data, the response from the process is returned to Oracle IdentityGovernance.
6. The status of the process task that received the response depends on the response. Ifthe entitlement data clears the SoD validation process, then the status of the processtask changes to Completed. This translates into the entitlement being granted to the user.If the SoD validation process returns the failure response, then status of the process taskchanges to Canceled.
Direct Provisioning in an SoD-Enabled EnvironmentThe procedure for direct provisioning in an SoD-enabled environment is similar to theprocedure for direct provisioning in a typical environment.
To provision a resource by using the direct provisioning approach:
1. Log in to the Administrative and User Console.
2. If you want to first create an OIM User and then provision a target system account, then:
a. On the Identity Manager - Self Service page, click Administration.
b. On the Welcome to Identity Administration page, in the Users section, click CreateUser.
c. On the Create User page, enter values for the OIM User fields, and then click Save.
Chapter 3Configuring Provisioning
3-23

3. If you want to provision a target system account to an existing OIM User, then:
a. On the Welcome to Identity Administration page, search for the OIM User byselecting Users from the drop-down list on the left pane.
b. From the list of users displayed in the search results, select the OIM User. Theuser details page is displayed on the right pane.
4. On the user details page, click the Resources tab.
5. From the Action menu, select Add Resource. Alternatively, you can click the addresource icon with the plus (+) sign. The Provision Resource to User page isdisplayed in a new window.
6. On the Step 1: Select a Resource page, select the resource that you want toprovision from the list and then click Continue.
7. On the Step 2: Verify Resource Selection page, click Continue.
8. On the Step 3: Provide Resource Data page for process data, enter the details ofthe account that you want to create on the target system and then click Continue.
9. On the Step 3: Provide Process Data page for role data, specify the role name forthe account, and then click Add. If you want to add more than one role, repeat theprocess. Then, click Continue.
10. On the Step 4: Verify Process Data page, verify the data that you have providedand then click Continue.
11. The "Provisioning has been initiated" message is displayed. To view the newlyprovisioned resource, perform one of the following steps:
a. Close the window displaying the "Provisioning has been initiated" message.
b. On the Accounts tab of the user details page, click Refresh to view the newlyprovisioned resource.
12. To view the process form, on the Accounts tab of the user details page, select therow displaying the newly provisioned resource, and then click Open. The EditForm page is displayed.
Note:
If Oracle Identity Governance is not SoD enabled, then SOD CheckStatus field shows SODCheckNotInitiated.
13. To view the Resource Provisioning Details page, on the Accounts tab of the userdetails page, select Resource History.
Note:
SoD validation by Oracle Application Access Controls Governor isasynchronous. The validation process returns a result as soon as it iscompleted.
14. After the SoD validation process is initiated, the results of the process are broughtto Oracle Identity Governance. To view the process form, on the Accounts tab of
Chapter 3Configuring Provisioning
3-24

the User Details page, select the row displaying the newly provisioned resource, and thenclick Open. The Edit Form page is displayed.
On this page, the SOD Check Status field shows SoDCheckCompleted. Because aviolation by the SoD engine in this particular example, the SoD Check Violation fieldshows the details of the violation.
In addition, the Resource Provisioning Details page shows the status of the SODCheckerand Holder tasks as Completed.
On this page, the status of the Add User Role tasks is Canceled because the requestfailed the SoD validation process.
15. As the administrator assigning a resource to a user, you can either end the process whena violation is detected or modify the assignment data and then resend it. To modify theassignment data, on the Resource tab of the user details page, select the row containingthe resource, and then click Open.
16. In the Edit Form window that is displayed, you can modify the role and profile data thatyou had selected earlier.
Note:
To modify a set of entitlements In the Edit Form window, you must first removeall entitlements and then add the ones that you want to use.
17. After the SoD validation process is initiated, the results of the process are brought toOracle Identity Governance. On the Accounts tab of the user details page, select the rowcontaining the resource, and then click Open. The process form is displayed.
On this form, the SOD Check Status field shows SoDCheckCompleted. Because noviolation was detected by the SoD engine, the SoDCheckResult field shows Passed.
In addition, the Resource Provisioning Details page shows the status of the SODCheckerand Holder tasks as Completed.
On the Resource Provisioning Details page, the state of the Add Role to User task iscompleted.
Uninstalling the ConnectorUninstalling the connector deletes all the account-related data associated with the resourceobjects of the connector.
If you want to uninstall the connector for any reason, see Uninstalling Connectors in OracleFusion Middleware Administering Oracle Identity Manager.
Chapter 3Uninstalling the Connector
3-25

4Extending the Functionality of the Connector
You can extend the functionality of the connector to address your specific businessrequirements.
This chapter contains the following sections:
• Adding New Attributes for Reconciliation and Provisioning
• Adding New Multivalued Attributes for Reconciliation and Provisioning
• Configuring Transformation of Data During User Reconciliation
• Configuring Validation of Data During Reconciliation and Provisioning
Adding New Attributes for Reconciliation and ProvisioningYou can add new attributes such as Customer Id to the existing set of attributes. For this, youneed to add new parameters to wrapper procedure and then update the reconciliation queryto include the new attribute.
By default, the attributes listed in Table 3-3 are mapped for reconciliation and provisioningbetween Oracle Identity Manager and the target system. If required, you can map additionalsingle-valued attributes for reconciliation and provisioning.
The following sections describe the procedures to be performed for adding new single-valuedattributes:
• Summary of Steps to Add New Attributes for Reconciliation and Provisioning
• Extending the Connector Schema
• Updating Connector Artifacts
• Updating the search.properties File
• Updating the Procedures.properties File
Summary of Steps to Add New Attributes for Reconciliation andProvisioning
The following is a summary of high-level steps to be performed to add a new attribute forreconciliation and provisioning:
1. Update the DB wrapper package to include the new single-valued attribute in theget_schema() stored procedure as described in Extending the Connector Schema.
2. Update the connector artifacts to include the new attribute as described in UpdatingConnector Artifacts.
3. Update the connector bundle to include the new attribute in the search.properties file asdescribed in Updating the search.properties File.
4-1

4. Update the connector bundle to include the new attribute in theProcedures.properties file as described in Updating the Procedures.propertiesFile.
Extending the Connector SchemaYou must extend the connector schema to include new attributes for reconciliation andprovisioning. This section discusses the following topics:
• Understanding Connector Schema Extension
• Adding New Attributes to the Connector Schema
Understanding Connector Schema ExtensionYou can extend the connector schema by adding new attributes to the get_schema()stored procedure in the OIM_FND_USER_TCA_PKG.pck wrapper package.Extending the connector schema requires you to understand the following concepts:
• Attribute initialization
The following initialization statement reserves an internal array that holds attributedefinitions of the connector schema:
attr.extend(NUM);Here, NUM defines the size of the array that is to be initialized. The size of thearray must always be greater than or equal to the number of attributes defined. Forexample, the initialization statement attr.extend(20); reserves an internal arrayof 20 attributes for initialization.
• Attribute definition
After initialization, you define the information for each attribute by adding astatement in the following format:
attr (ORD_NO) :=attributeinfo(ATTR_NAME,ATTR_TYPE,CREATE_FLAG,UPDATE_FLAG,REQUIRED_FLAG,READ_FLAG);
In this format:
– ORD_NO is the order of the attribute in the array. This is mandatory.
– ATTR_NAME is the name of single-valued attribute.
– ATTR_TYPE is the SQL datatype of the single-valued attribute.
– CREATE_FLAG is a flag to represent whether the attribute is required during acreate provisioning operation.
– UPDATE_FLAG is a flag to represent whether the attribute can be updated.
– REQUIRED_FLAG is a flag to represent whether the attribute is mandatory.
– READ_FLAG is flag to represent whether the attribute can be read.
A value of 1 or 0 for each flag denotes True or False, respectively. For example, avalue 1, 0, 1, 0 for the flags means that the attribute is a mandatory attributeand must be considered during create provisioning operations.
• Attribute array extension
Chapter 4Adding New Attributes for Reconciliation and Provisioning
4-2

You can increase the array size post initialization by including the following statement:
attr.extend;Each inclusion of this statement increments the array size by 1.
Adding New Attributes to the Connector SchemaYou must extend the connector schema by updating the DB wrapper package to include thenew attribute for reconciliation and provisioning as follows:
1. Open any SQL client (for example, SQL Developer) and connect to the target systemdatabase using the apps user.
2. Open the body of the OIM_FND_USER_TCA_PKG.pck wrapper package.
3. Select the get_schema() stored procedure. The list of attributes defined in the storedprocedure is displayed.
4. If the number of attributes defined exceeds the number of attributes initialized, then:
a. Add the following attribute initialization statement:
attr.extend;b. Enter the definition for the new attribute that you want to add in the following format:
attr (ORD_NO) :=attributeinfo(ATTR_NAME,ATTR_TYPE,CREATE_FLAG,UPDATE_FLAG,REQUIRED_FLAG,READ_FLAG);
For example, if you are adding a new attribute to hold the customer Id for a useraccount, then include the following statements:
attr.extend;attr (28) := attributeinfo('CUSTOMER_ID','varchar2',1,1,0,1);
In this example, a value of 1,1,0,1 for the flags means that the CUSTOMER_IDattribute is required during create provisioning operations, it can be updated andread.
5. If the number of attributes defined does not exceed the number of attributes initializedthen add only the definition for the new attribute. For example, attr (28) :=attributeinfo('CUSTOMER_ID','varchar2',1,1,0,1);
6. Re-compile the wrapper package.
Updating Connector ArtifactsYou must update the connector artifacts to include the new single-valued attribute added in Extending the Connector SchemaUpdating connector artifacts involves performing thefollowing procedures:
• Creating a Process Form Field
• Updating the Oracle EBS User Management Resource Object
• Updating the Oracle EBS UM User Process Definition
• Updating the Lookup Definition for Reconciliation Attribute Mapping
• Updating the Lookup Definition for Provisioning Attribute Mapping
• Creating a Reconciliation Profile for the Oracle EBS User Management Resource Object
Chapter 4Adding New Attributes for Reconciliation and Provisioning
4-3

• Enabling Provisioning Operations on the New Attribute
Creating a Process Form FieldYou must add the new single-valued attribute as a field on the process form as follows:
1. Expand Development Tools, and then double-click Form Designer.
2. Search for and open the UD_EBS_UM process form.
3. Click Create New Version to create a version of the form.
4. In the Label field, enter the version name. For example, version#1.5. Click the Save icon.
6. Select the current version created in Step 4 from the Current Version list.
7. Click Add to create a new field for the single-valued attribute, and provide thevalues for that attribute.
For example, if you are adding the Customer Id attribute, then enter the followingvalues in the Additional Columns tab:
Field Value
Name UD_EBS_UM_CUSTOMER_IDVariant Type StringLength 100
Field Label Customer Id
Field Type TextFieldOrder 25
8. Click the Save icon.
9. Click Make Version Active.
Updating the Oracle EBS User Management Resource ObjectUpdate the resource object to add a reconciliation field corresponding to the newsingle-valued attribute created in Creating a Process Form Field as follows:
1. Expand the Resource Management folder, and then double-click ResourceObjects.
2. Search for and open the Oracle EBS User Management resource object.
3. On the Object Reconciliation tab, click Add Field to open the Add ReconciliationField dialog box.
4. In the Field Name field, enter the name of the attribute. For example, CustomerId.
5. From the Field Type list, select a data type for the field. For example, String.
6. If you want to designate the attribute as a mandatory attribute, then select thecheck box.
7. Click the Save icon and close the dialog box.
Chapter 4Adding New Attributes for Reconciliation and Provisioning
4-4
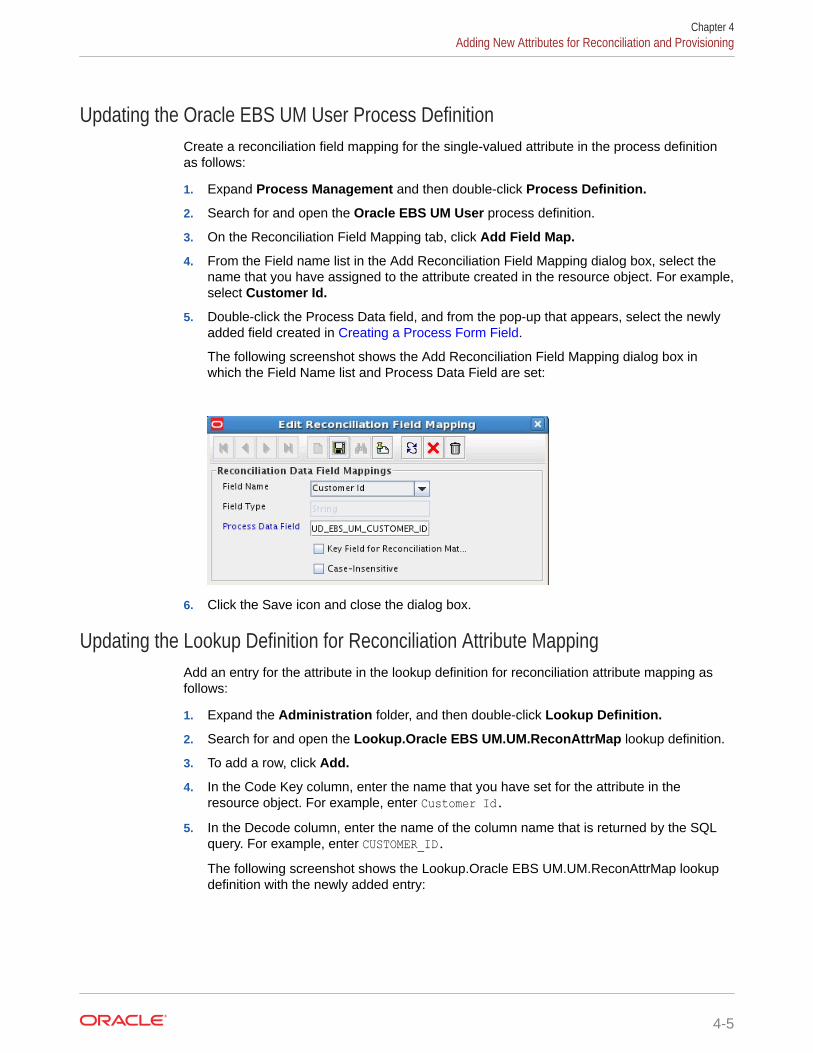
Updating the Oracle EBS UM User Process DefinitionCreate a reconciliation field mapping for the single-valued attribute in the process definitionas follows:
1. Expand Process Management and then double-click Process Definition.
2. Search for and open the Oracle EBS UM User process definition.
3. On the Reconciliation Field Mapping tab, click Add Field Map.
4. From the Field name list in the Add Reconciliation Field Mapping dialog box, select thename that you have assigned to the attribute created in the resource object. For example,select Customer Id.
5. Double-click the Process Data field, and from the pop-up that appears, select the newlyadded field created in Creating a Process Form Field.
The following screenshot shows the Add Reconciliation Field Mapping dialog box inwhich the Field Name list and Process Data Field are set:
6. Click the Save icon and close the dialog box.
Updating the Lookup Definition for Reconciliation Attribute MappingAdd an entry for the attribute in the lookup definition for reconciliation attribute mapping asfollows:
1. Expand the Administration folder, and then double-click Lookup Definition.
2. Search for and open the Lookup.Oracle EBS UM.UM.ReconAttrMap lookup definition.
3. To add a row, click Add.
4. In the Code Key column, enter the name that you have set for the attribute in theresource object. For example, enter Customer Id.
5. In the Decode column, enter the name of the column name that is returned by the SQLquery. For example, enter CUSTOMER_ID.The following screenshot shows the Lookup.Oracle EBS UM.UM.ReconAttrMap lookupdefinition with the newly added entry:
Chapter 4Adding New Attributes for Reconciliation and Provisioning
4-5

6. Click the Save icon.
Updating the Lookup Definition for Provisioning Attribute MappingAdd an entry for the attribute in the lookup definition for provisioning attribute mappingas follows:
1. Expand the Administration folder, and then double-click Lookup Definition.
2. Search for and open the Lookup.Oracle EBS UM.UM.ProvAttrMap lookupdefinition.
3. To add a row, click Add.
4. In the Code Key column, enter the name that you have set for the attribute in theresource object. For example, enter Customer Id.
5. In the Decode column, enter the name of the column name that is returned by theSQL query. For example, enter CUSTOMER_ID.
6. Click the Save icon.
Creating a Reconciliation Profile for the Oracle EBS User ManagementResource Object
Create a reconciliation profile to copy all the changes made to the resource object (inthe earlier section) into MDS:
1. Expand the Resource Management folder, and then double-click ResourceObjects.
2. Search for and open the Oracle EBS User Management resource object.
3. On the Object Reconciliation tab, click Create Reconciliation Profile.
4. Click the Save icon.
Enabling Provisioning Operations on the New AttributeUpdate the process definition by creating process tasks for handling provisioningoperations on the newly added single-valued attribute as follows:
Chapter 4Adding New Attributes for Reconciliation and Provisioning
4-6

1. Expand Process Management, and then double-click Process Definition.
2. Search for and open the Oracle EBS UM User process definition.
3. On the Tasks tab, click Add.
The Creating New Task dialog box is displayed.
4. In the Task Name field, enter the name of the process task. For example, enter CustomerId Updated.
5. In the Task Description field, enter a description for the task. For example, enter Taskfor Customer Id updation.
6. In the Task Properties region, select the properties to suit your requirement. For example,perform the following actions in the Task Properties region:
• Select the following checkboxes:
Conditional
Allow Cancellation while Pending
Allow Multiple Instances
• From the Task Effect list, select No Effect.
The following is a screenshot of the Creating New Task dialog box with relevant detailsfilled in:
7. Click the Save icon.
8. On the Integration tab, click Add to assign an adapter for the process task created in thepreceding steps.
9. In the Handler Selection dialog box, select the Adapter option.
Chapter 4Adding New Attributes for Reconciliation and Provisioning
4-7

10. From the list of adapters displayed in the Handler Name region, select the adapterthat you want to assign to the process task. For example, select theadpEBSUMUPDATESINGLEATTRIBUTE adapter.
11. Click the Save icon and close the dialog box.
12. On the Integration tab, from the table in the Adapter Variables region, select thevariable that you want to map. For example, select the fieldName variable.
13. Click Map.
14. In the Edit Data Mapping For Variable dialog box, create the adapter variablemapping as per your requirement. For example, create the following mapping:
• Variable Name: fieldName• Map To: Literal• Qualifier: String• Literal Value: UD_EBS_UM_CUSTOMER_ID
15. Click the Save icon and close the dialog box.
16. Perform Steps 12 through 15 for the remaining variables listed in the AdapterVariables region. The following table lists sample values that you can select fromthe Map To, Qualifier, and Literal Value lists for each variable:
Variable Map To Qualifier Literal Value
fieldOldValue Process Data Customer Id, OldValue:select
NA
AdapterReturnCode Response Code NA NA
objectType Literal String User
ItResourceFieldName Literal String UD_EBS_UM_IT_RESOURCE_NAME
fieldValue Process Data Customer Id NA
processInstanceKey Process Data Process Instance NA
17. Click the Save icon on the Process Definition form.
18. On the Responses tab, click Add to add the SUCCESS response code, withStatus C. This ensures that if the custom task is successfully run, then the statusof the task is displayed as Completed. Similarly, add the CONNECTION_FAILEDresponse code, with Status R.
19. Click the Save icon and close the dialog box, and then save the process definition.
Updating the search.properties FileUpdate the search.properties file to include the newly added single-valued attribute asfollows:
1. Extract the contents of the org.identityconnectors.ebs-1.0.1115.jar file into adirectory of your choice.
2. In a text editor, open the search.properties located in the configuration directory.
3. Search for the SQL query that must include the column name corresponding to thenewly created attribute. For example, search for the UM_USER_RECON query.
Chapter 4Adding New Attributes for Reconciliation and Provisioning
4-8

4. If the SQL query already contains the column name corresponding to the newly addedattribute, then you can skip the rest of the steps mentioned in this section.
5. If the SQL query does not include information about the newly added column name, thenmodify it to include the newly added column.
See Sample SQL Queries Updated to Include Single-Valued Attributes for a samplequery that includes the CUSTOMER_ID column in the UM_USER_RECON query.
6. Repeat Steps 3 through 5 to update the remaining SQL queries such asUM_USER_SYNC, if applicable. For example, modify the UM_USER_SYNC SQL queryto include PAPF.CUSTOMER_ID AS CUSTOMER_ID in the select query.
7. Save the changes and close the file.
8. Verify the updated queries.
9. Update the connector bundle (org.identityconnectors.ebs-1.0.1115.jar) by running thefollowing command:
jar -cvfm org.identityconnectors.ebs-1.0.11150.jar META-INF/MANIFEST.MF *10. Run the Oracle Identity Manager Update JARs utility to update the new connector bundle
(updated in Step 9) to the Oracle Identity Manager database. This utility is copied into thefollowing location when you install Oracle Identity Manager:
Note:
Before you use this utility, verify that the WL_HOME environment variable is setto the directory in which Oracle WebLogic Server is installed.
For Microsoft Windows:
OIM_HOME/server/bin/UpdateJars.bat
For UNIX:
OIM_HOME/server/bin/UpdateJars.sh
When you run the utility, you are prompted to enter the login credentials of the OracleIdentity Manager administrator, URL of the Oracle Identity Manager host computer,context factory value, type of JAR file being uploaded, and the location from which theJAR file is to be uploaded. Specify 4 as the value of the JAR type.
Updating the Procedures.properties FileIn order to support the newly added attribute (Customer Id) during create and updateprovisioning operations, you must update the stored procedure that is invoked in theProcedures.properties file. To do so:
1. In a text editor, open the Procedures.properties file for editing.
2. Search for and determine the names of wrapper packages and stored procedures usedfor invoking the create person and update person provisioning operations. For example,OIM_FND_USER_TCA_PKG.CREATEUSER andOIM_FND_USER_TCA_PKG.UPDATEUSER are the wrapper packages and storedprocedures used for the create user and update user provisioning operations.
3. Update the stored procedures determined in the earlier step as follows:
Chapter 4Adding New Attributes for Reconciliation and Provisioning
4-9

a. Open any SQL client (for example, SQL Developer) and connect to the targetsystem database using the apps user.
b. Open the wrapper package and add the newly added attribute (for example,Customer Id) to the create user and update user stored procedures. Forexample, open the OIM_FND_USER_TCA_PKG package and add the newlyadded attribute to the CreateUser and UpdateUser stored procedures.
The following screenshot highlights the stored procedures that must beupdated in the OIM_FND_USER_TCA_PKG package to include the newlyadded attribute:
c. Select the CreateUser stored procedure and update the input parameters toinclude the newly added attribute.
The following screenshot highlights the newly added attribute (customer_id) inthe CreateUser stored procedure:
d. Select the UpdateUser stored procedure and update the input parameters toinclude the newly added attribute.
Chapter 4Adding New Attributes for Reconciliation and Provisioning
4-10

The following screenshot highlights the newly added attribute (customer_id) in theUpdateUser stored procedure:
e. Open OIM_FND_USER_TCA_PKG Body and select the CreateUser storedprocedure.
f. Update the CreateUser API call in the procedure with the newly added attribute.
The following screenshots that show the updated CreateUser API:
Chapter 4Adding New Attributes for Reconciliation and Provisioning
4-11

Chapter 4Adding New Attributes for Reconciliation and Provisioning
4-12

g. Repeat Steps 3.3.c through 3.3.f to update the UPDATEUSER stored procedure toinclude the newly added attribute.
h. Re-compile the wrapper package.
This completes the procedure to add a new single-valued attribute for reconciliation andprovisioning.
Adding New Multivalued Attributes for Reconciliation andProvisioning
You can add new multivalued attributes for reconciliation and provisioning.
By default, the attributes listed in Table 3-3 are mapped for reconciliation and provisioningbetween Oracle Identity Manager and the target system. If required, you can map additionalmultivalued attributes for reconciliation and provisioning. The following sections describe theprocedures to be performed for adding new multivalued attributes. The Security Attributesmultivalued attribute has been used as an example to illustrate these procedures.
• Summary of Steps to Add New Multivalued Attributes for Reconciliation and Provisioning
• Extending the Connector Schema
• Extending Oracle Identity Manager Metadata
• Creating Scheduled Jobs
• Updating the Connector Bundle
• Adding APIs to Wrapper Packages
Summary of Steps to Add New Multivalued Attributes for Reconciliationand Provisioning
The following a summary of high-level steps to be performed to add a new multivaluedattribute for reconciliation and provisioning:
1. Update the DB wrapper package to include the new multivalued attribute. You mustinclude the parent attribute in the main attribute list of the get_schema procedure andthen create an attribute list with all the child attributes as described in Extending theConnector Schema.
2. Update Oracle Identity Manager metadata to include the new attribute as described in Extending Oracle Identity Manager Metadata.
3. Create a scheduled job to synchronize values in the target system attributescorresponding to the newly created multivalued attribute with values in Oracle IdentityManager as described in Creating Scheduled Jobs.
4. Update the connector bundle to include the new multivalued attribute in thesearch.properties and Procedures.properties file as described in Updating the ConnectorBundle.
5. Add APIs to Wrapper packages to enable provisioning operation on the newly addedmultivalued attribute as described in Adding APIs to Wrapper Packages.
Chapter 4Adding New Multivalued Attributes for Reconciliation and Provisioning
4-13

Extending the Connector SchemaYou must extend the connector schema to include a new multivalued attribute forreconciliation and provisioning. To do so:
1. Open any SQL client and connect to database using APPS user.
2. Open the body of the OIM_FND_USER_TCA_PKG.pck wrapper package.
3. Select the get_schema() stored procedure.
4. Declare the new multivalued attribute. The syntax for declaring the newmultivalued attribute is as follows:
attr := attributelist();5. Initialize the attribute list by specifying the number of child attributes that the new
multivalued attribute must contain in the following format:
attr.extend(NUM);Here, NUM is the number of child attributes. Internally, an array for the specifiednumber of child attributes is created.
Sample value: attr.extend(4);You can also initialize the attribute list or increase the number of child attributes inthe list by 1 by using the following statement for each child attribute to be added:
attr.extend;
See Also:
Sample Code Snippets for Extending the Connector Schema for samplecode snippets
6. Define each child attribute to include information such as the attribute name,datatype, and permission flags in the following format:
attr (ORD_NO) :=attributeinfo(ATTR_NAME,ATTR_TYPE,CREATE_FLAG,UPDATE_FLAG,REQUIRED_FLAG,READ_FLAG)
In this format:
• ORD_NO is the order of the attribute in the list. This is mandatory.
• ATTR_NAME is the name of the child attribute.
• ATTR_TYPE is the SQL datatype of the child attribute.
• CREATE_FLAG is a flag to represent whether the attribute is required during acreate provisioning operation.
• UPDATE_FLAG is a flag to represent whether the attribute can be updated.
• REQUIRED_FLAG is a flag to represent whether the attribute is mandatory.
• READ_FLAG is flag to represent whether the attribute can be read.
Chapter 4Adding New Multivalued Attributes for Reconciliation and Provisioning
4-14

A value of 1 or 0 for each flag denotes True or False, respectively. For example, a value1, 0, 1, 0 for the flags mean that the attribute is a mandatory attribute and must beconsidered during create provisioning operations.
7. End the new multivalued attribute definition and schema by using the followingstatements:
schemaout.extend;schemaout(ORD_NO) := schema_object('ATTR_NAME', attr)
In this statement, ORD_NO is the order of the multivalued attribute in the connectorschema and ATTR_NAME is the name of the multivalued attribute being added. Thefollowing are sample statements:
schemaout.extend;schemaout( 4 ) := schema_object('__SECURITY_ATTRS__',attr);
8. Re-compile the wrapper package.
Extending Oracle Identity Manager MetadataYou must extend the metadata of Oracle Identity Manager to include the new attribute addedin Extending the Connector Schema. Extending Oracle Identity manager metadata involvesperforming the following procedures:
• Creating Lookup Definitions
• Creating Child Process Form
• Updating the Parent Process Form
• Updating the Lookup Definition for Reconciliation Attribute Mapping
• Updating the Lookup Definition for Provisioning Attribute Mapping
• Updating the Oracle EBS User Management Resource Object
• Updating the Oracle EBS UM User Process Definition
• Replicating Form Designer Changes to a New UI Form
• Enabling Provisioning Operations on the New Attribute
Creating Lookup DefinitionsYou must create lookup definitions for the new attribute, added in Extending the ConnectorSchema, as follows:
1. Log in to the Design Console.
2. Expand the Administration folder, and then double-click Lookup Definition.
3. In the Code field, enter the name of the lookup definition. For example, enterLookup.Oracle EBS UM.SecAttrNames.
4. Select the Lookup Type option to specify that the look up definition represents a lookupfield.
5. In the Group field, enter the name of the form on which the lookup definition is displayed.For example, enter EBS UM.
6. Click the Save icon.
Chapter 4Adding New Multivalued Attributes for Reconciliation and Provisioning
4-15
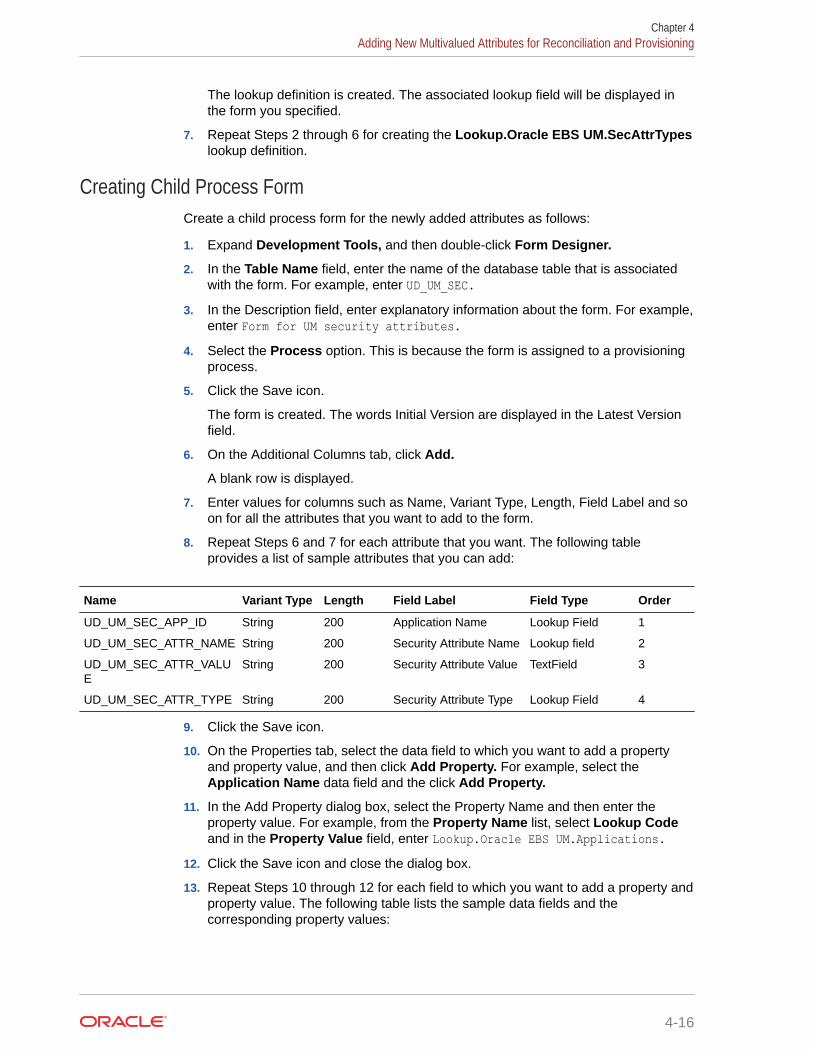
The lookup definition is created. The associated lookup field will be displayed inthe form you specified.
7. Repeat Steps 2 through 6 for creating the Lookup.Oracle EBS UM.SecAttrTypeslookup definition.
Creating Child Process FormCreate a child process form for the newly added attributes as follows:
1. Expand Development Tools, and then double-click Form Designer.
2. In the Table Name field, enter the name of the database table that is associatedwith the form. For example, enter UD_UM_SEC.
3. In the Description field, enter explanatory information about the form. For example,enter Form for UM security attributes.
4. Select the Process option. This is because the form is assigned to a provisioningprocess.
5. Click the Save icon.
The form is created. The words Initial Version are displayed in the Latest Versionfield.
6. On the Additional Columns tab, click Add.
A blank row is displayed.
7. Enter values for columns such as Name, Variant Type, Length, Field Label and soon for all the attributes that you want to add to the form.
8. Repeat Steps 6 and 7 for each attribute that you want. The following tableprovides a list of sample attributes that you can add:
Name Variant Type Length Field Label Field Type Order
UD_UM_SEC_APP_ID String 200 Application Name Lookup Field 1
UD_UM_SEC_ATTR_NAME String 200 Security Attribute Name Lookup field 2
UD_UM_SEC_ATTR_VALUE
String 200 Security Attribute Value TextField 3
UD_UM_SEC_ATTR_TYPE String 200 Security Attribute Type Lookup Field 4
9. Click the Save icon.
10. On the Properties tab, select the data field to which you want to add a propertyand property value, and then click Add Property. For example, select theApplication Name data field and the click Add Property.
11. In the Add Property dialog box, select the Property Name and then enter theproperty value. For example, from the Property Name list, select Lookup Codeand in the Property Value field, enter Lookup.Oracle EBS UM.Applications.
12. Click the Save icon and close the dialog box.
13. Repeat Steps 10 through 12 for each field to which you want to add a property andproperty value. The following table lists the sample data fields and thecorresponding property values:
Chapter 4Adding New Multivalued Attributes for Reconciliation and Provisioning
4-16

Column Name Column Type Property Name Property Value
Security Attribute Name Lookup field Lookup Code Lookup.Oracle EBS UM.SecAttrNames
Security Attribute Type Lookup field Lookup Code Lookup.Oracle EBS UM.SecAttrTypes
14. Click the Save icon.
15. Click Make Version Active. Accept any confirmation message that is displayed.
Updating the Parent Process FormUpdate the parent process form of the newly added attribute as follows:
1. Expand Development Tools, and then double-click Form Designer.
2. Search for and open the UD_EBS_UM process form.
3. Click Create New Version to create a version of the form.
4. In the Label field, enter the version name. For example, version#2.5. Click the Save icon.
6. Select the current version created in Step 4 from the Current Version list.
7. On the Child Table(s) tab, click Assign to assign the child table to the form.
8. From the Assign Child Table(s) dialog box, select the newly created child form and clickthe right arrow. For example, select UD_UM_SEC.
9. Click OK.
The selected child table is assigned to the form.
10. Click the Save icon.
11. Click Make Version Active.
Updating the Lookup Definition for Reconciliation Attribute MappingAdd an entry for the new attribute in the lookup definition for reconciliation attribute mappingas follows:
1. Expand the Administration folder, and then double-click Lookup Definition.
2. Search for and open the Lookup.Oracle EBS UM.UM.ReconAttrMap lookup definition.
3. To add a row, click Add.
4. In the Code Key and Decode columns, enter values corresponding to the newly addedchild attributes. The Code Key and Decode values must be in the following format:
Code Key: MULTIVALUED_FIELD_NAME~CHILD_FORM_FIELD_NAME[LOOKUP]
In this format:
• MULTIVALUED_FIELD_NAME is the name field on the parent process form.
• CHILD_FORM_FIELD_NAME is the name of the field on the child process form.
• [LOOKUP] is a flag denoting that the field is a lookup field.
Decode: Corresponding target system attribute.
5. Repeat Steps 3 and 4 for every newly added child attribute. The following table lists thesample entries you can add:
Chapter 4Adding New Multivalued Attributes for Reconciliation and Provisioning
4-17

Code Key Decode
SecAttrs~Application Name[LOOKUP] __SECURITY_ATTRS__~__SECURITY_ATTRS__~SECURITY_APP_ID
SecAttrs~Security AttributeName[LOOKUP]
__SECURITY_ATTRS__~__SECURITY_ATTRS__~SECURITY_ATTR_NAME
SecAttrs~Security Attribute Value __SECURITY_ATTRS__~__SECURITY_ATTRS__~SECURITY_ATTR_VALUE
SecAttrs~Security AttributeType[LOOKUP]
__SECURITY_ATTRS__~__SECURITY_ATTRS__~SECURITY_ATTR_TYPE
6. Click the Save icon.
Updating the Lookup Definition for Provisioning Attribute MappingAdd an entry for the attribute in the lookup definition for provisioning attribute mappingas follows:
1. Expand the Administration folder, and then double-click Lookup Definition.
2. Search for and open the Lookup.Oracle EBS UM.UM.ProvAttrMap lookupdefinition.
3. To add a row, click Add.
4. In the Code Key and Decode columns, enter values corresponding to the newlyadded child attributes. The Code Key and Decode values must be in the followingformat:
Code Key: CHILD_FORM_NAME~CHILD_FIELD_LABEL[LOOKUP]
In this format:
• CHILD_FORM_NAME specifies the name of the child form.
• CHILD_FIELD_NAME specifies the name of the field on the child form.
• [LOOKUP] is a flag denoting that the field is a lookup field.
Decode: Corresponding target system attribute.
5. Repeat Steps 3 and 4 for every newly added child attribute. The following tablelists the sample entries you can add:
Code Key Decode
UD_UM_SEC~ApplicationName[LOOKUP]
__SECURITY_ATTRS__~__SECURITY_ATTRS__~SECURITY_APP_ID
UD_UM_SEC~Security AttributeName[LOOKUP]
__SECURITY_ATTRS__~__SECURITY_ATTRS__~SECURITY_ATTR_NAME
UD_UM_SEC~Security AttributeValue
__SECURITY_ATTRS__~__SECURITY_ATTRS__~SECURITY_ATTR_VALUE
UD_UM_SEC~Security AttributeType[LOOKUP]
__SECURITY_ATTRS__~__SECURITY_ATTRS__~SECURITY_ATTR_TYPE
6. Click the Save icon.
Chapter 4Adding New Multivalued Attributes for Reconciliation and Provisioning
4-18

Updating the Oracle EBS User Management Resource ObjectIn the resource object, add the reconciliation field corresponding to the new attribute asfollows:
1. Expand the Resource Management folder, and then double-click Resource Objects.
2. Search for and open the Oracle EBS User Management resource object.
3. On the Object Reconciliation tab, click Add Field to open the Add Reconciliation Fielddialog box.
4. In the Field Name field, enter the name of the attribute. For example, SecAttrs.5. From the Field Type list, select a data type for the field. For example, select Multi-
Valued Attribute.
6. If you want to designate the attribute as a mandatory attribute, then select the Requiredcheck box.
7. Click the Save icon and close the dialog box.
8. Right-click the newly created field (for example, SecAttrs) and select Define PropertyFields.
For example, in the Field Name field, enter Application Name and select String fromthe Field Type list.
9. Click the Save icon and close the dialog box.
10. Repeat Steps 8 and 9 for adding all the child fields. The following table lists the samplefield names and field types that you can add:
Field Name Field Type
Security Attribute Name String
In addition, select the Required checkbox to designate thisattribute as mandatory
Security Attribute Value String
Security Attribute Type String
11. Click Create Reconciliation Profile. This copies changes made to the resource objectinto the MDS.
Updating the Oracle EBS UM User Process DefinitionCreate a reconciliation field mapping for the newly added attribute in the process definition asfollows:
1. Expand Process Management and then double-click Process Definition.
2. Search for and open the Oracle EBS UM User process definition.
3. On the Reconciliation Field Mapping tab, click Add Table Map to map the newly createdmultivalued field.
4. In the Add Reconciliation Table Mapping dialog box, from the Field Name list, select themultivalued field on the target system that you created in the resource object in Updatingthe Oracle EBS User Management Resource Object. For example, select SecAttrs.
Chapter 4Adding New Multivalued Attributes for Reconciliation and Provisioning
4-19

5. From the Table Name list, select the child table process form created in CreatingChild Process Form.For example, select UD_UM_SEC.
6. Click the Save icon and close the dialog box.
7. Right-click the multivalued field you just mapped, and select Define PropertyField Map from the menu that is displayed. For example, right-click the SecAttrsmultivalued field and the select Define Property Field Map.
8. From the Field Name list, select child field you want to map. For example, selectApplication Name.
9. Double-click the Process Data Field field, select the correct mapping from theLookup dialog box and click OK. For example, double-click Process Data Fieldfield, and then select UD_UM_SEC_APP_ID.
10. Repeat Steps 7 through 9 for each child field defined on the multivalued field. Thefollowing table lists sample field names and process data fields that you can add:
Field Name Process Data Field
Security Attribute Name _UM_SEC_ATTR_NAME
In addition, select the Key Field for ReconciliationMatching check box.
Security Attribute Value UD_UM_SEC_ATTR_VALUE
Security Attribute Type UD_UM_SEC_ATTR_TYPE
11. Click the Save icon.
Replicating Form Designer Changes to a New UI FormReplicate all the changes made to the Form Designer of the Design Console to a newUI form as follows:
1. Log in to Oracle Identity System Administration.
2. Create and active a sandbox. See Creating and Activating a Sandbox for moreinformation.
3. Create a new UI form to view the upgraded fields. See Creating a New UI Form formore information about creating a UI form.
4. Associate the newly created UI form with the application instance of your targetsystem. To do so, open the existing application instance for your resource, fromthe Form field, select the form (created in the previous step), and then save theapplication instance.
5. Publish the sandbox. See Publishing a Sandbox for more information.
Enabling Provisioning Operations on the New AttributeUpdate the process definition by creating process tasks for handling provisioningoperations on the newly added attribute as follows:
1. Expand Process Management, and then double-click Process Definition.
2. Search for and open the Oracle EBS UM User process definition.
3. On the Tasks tab, click Add.
The Creating New Task dialog box is displayed.
Chapter 4Adding New Multivalued Attributes for Reconciliation and Provisioning
4-20

4. In the Task Name field, enter the name of the process task. For example, enter AddAttributes.
5. In the Task Description field, enter a description for the task. For example, enter Taskto add security attributes.
6. In the Task Properties region, select the properties to suit your requirement and click theSave icon. For example, perform the following actions in the Task Properties region:
• Select the following checkboxes:
Conditional
Allow Cancellation while Pending
Allow Multiple Instances
• From the Child Table list, select the child table name, UD_UM_SEC.
• From the Trigger Type list, select Insert.
7. On the Integration tab, click Add to assign an adapter for the process task created in thepreceding steps.
8. In the Handler Selection dialog box, select the Adapter option.
9. From the list of adapters displayed in the Handler Name region, select the adapter thatyou want to assign to the process task. For example, select theadpEBSUMADDCHILDDATA adapter.
10. Click the Save icon and close the dialog box.
11. On the Integration tab, in the table in the Adapter Variables region, click the variable thatyou want to map. For example, click the objectType variable.
12. In the Edit Data Mapping For Variable dialog box, create the adapter variable mapping asper your requirement. For example, create the following mapping:
Variable Name: objectTypeMap To: LiteralQualifier: StringLiteral Value: User
13. Click the Save icon and close the dialog box.
14. Perform Steps 11 through 13 for the remaining variables listed in the Adapter Variablesregion. The following table lists sample values that you can select from the Map To,Qualifier, and Literal Value lists for each variable:
Variable Map To Qualifier Literal Value
procInstanceKey Process Data Process Instance NA
itResourceFieldName Literal String UD_EBS_UM_EBS_ITRES
childTableName Literal String UD_UM_SEC
childPrimaryKey Process Data Child Primary Key NA
Adapter return value Response Code NA NA
15. Click the Save icon on the Process Definition form.
16. Repeat Steps 3 through 15 to create process tasks for Update and Delete provisioningoperations.
Chapter 4Adding New Multivalued Attributes for Reconciliation and Provisioning
4-21

17. On the Responses tab, click Add to add at least the SUCCESS response code,with Status C. This ensures that if the custom task is successfully run, then thestatus of the task is displayed as Completed.
18. Click the Save icon and close the dialog box, and then save the process definition.
Creating Scheduled Jobs
Note:
Perform the procedure described in this section for lookup schedule job thatis used for any lookup attribute that can be a parent attribute or a childattribute.
You must create scheduled jobs for synchronizing values in the target systemattributes (corresponding to the newly created multivalued field) with the lookupdefinitions created Creating Lookup Definitions. To do so:
1. Log in to the Oracle Identity System Administration Console.
2. In the left pane, under System Configuration, click Scheduler. The AdvancedAdministration is displayed with the Scheduler section in the System Managementtab active.
3. On the left pane, from the Actions menu, select Create. Alternatively, you can clickthe icon with the plus (+) sign beside the View list.
4. On the Create Job page, enter values in the following fields under the JobInformation section:
• Job Name: Enter a name for the job. For example, enter Oracle EBS UMTarget Security Attributes Lookup Reconciliation.
• Task: Specify or select the name of the scheduled task that runs the job. Forexample, select Oracle EBS UM Target Connector Lookup Reconciliation.
• Enter values for the remaining fields such Start Date, Retries, and ScheduleType.
5. In the Parameters section, enter values for all the parameters of the scheduledjob. For example, the following are the scheduled job parameters and their values:
• Code Key Attribute: Code• Decode Attribute: Decode• IT Resource Name: Oracle EBS UM• Lookup Name: Lookup.Oracle EBS UM.SecAttrNames• Object Type: __SECURITY_ATTR_NAMES__
6. Click Apply.
7. Repeat Steps 2 through 6 to create scheduled jobs for any remaining multivaluedfields. For example, repeat these steps to create a scheduled job for reconcilingvalues into the Lookup.Oracle EBS UM.SecAttrTypes lookup definition with the__SECURITY_ATTR_TYPES__ object type.
Chapter 4Adding New Multivalued Attributes for Reconciliation and Provisioning
4-22

Updating the Connector BundleYou must update the connector bundle (org.identityconnectors.ebs-1.0.1115.jar) to include allthe updates made in the earlier sections. To do so:
1. Download the connector bundle (org.identityconnectors.ebs-1.0.11150.jar) file from theOracle Identity Manager database by running the Download JARs utility. This utility iscopied into the following location when you install Oracle Identity Manager:
Note:
Before you use this utility, verify that the WL_HOME environment variable is setto the directory in which Oracle WebLogic Server is installed.
For Microsoft Windows:
OIM_HOME/server/bin/DownloadJars.bat
For UNIX:
OIM_HOME/server/bin/DownloadJars.sh
When you run the utility, you are prompted to enter the login credentials of the OracleIdentity Manager administrator, URL of the Oracle Identity Manager host computer,context factory value, type of JAR file being uploaded, and the location from which theJAR file is to be uploaded. Specify 4 as the value of the JAR type.
2. Extract the contents of the JAR file to any directory on the computer hosting OracleIdentity Manager.
3. In a text editor, open the search.properties file located in the configuration directory of theextracted JAR file.
4. In the first part of the search.properties file, add entries corresponding to the newly addedattributes
5. In the first part of the search.properties file, add entries corresponding entries for thenewly added attribute by defining the object name, type of reconciliation operation, andthe SQL query name. For example, add the following entries:
__SECURITY_ATTR_NAMES__.lookup=LOOKUP_SECATTR_NAME_QUERY__SECURITY_ATTR_TYPES__.lookup=LOOKUP_SECATTR_DATATYPE_QUERY
In this example:
• __SECURITY_ATTR_NAMES and __SECURITY_ATTR_TYPES__ are the object names
• lookup specifies that the query in this qntry will be used for performing lookup fieldsynchronization.
• LOOKUP_SECATTR_NAME_QUERY and LOOKUP_SECATTR_DATATYPE_QUERY are the SQLquery names.
6. In the second part of the search.properties file, add the SQL query corresponding to theSQL query name specified in Step 5. For example, add the following entries:
LOOKUP_SECATTR_DATATYPE_QUERY= select datatype as CODE, datatype as DECODE from ( select distinct(DATA_TYPE) as datatype from AK_ATTRIBUTES)
Chapter 4Adding New Multivalued Attributes for Reconciliation and Provisioning
4-23

LOOKUP_SECATTR_NAME_QUERY= select sa.ATTRIBUTE_CODE as CODE, (CONCAT(fa.application_short_name || '~', sa.ATTRIBUTE_CODE)) AS DECODE FROM fnd_application fa, AK_ATTRIBUTES sa where fa.application_id=sa.attribute_application_id
7. Update the SQL queries of UM_USER_RECON and UM_USER_SYNC to includeinformation about the newly added attributes. For example, update both theUM_USER_RECON and UM_USER_SYNC SQL queries with the SQL query in Sample SQL Queries Updated to Include Multivalued Attributes.
8. Save and close the search.properties file.
9. In a text editor, open the Procedures.properties file located in the configurationdirectory of the JAR file extracted in Step 2.
10. Add entries to corresponding to the newly added attributes. For example, add thefollowing entries:
__SECURITY_ATTRS__.add=OIM_FND_USER_TCA_PKG.ADDUSERSECURITYATTRIBUTE__SECURITY_ATTRS__.remove=OIM_FND_USER_TCA_PKG.DELETEUSERSECURITYATTRIBUTE
See Provisioning Procedures for information about the format for adding entries tothe Procedures.properties file.
11. Save and close the Procedures.properties file.
12. Re-create the connector bundle JAR file with the updated .properties files.
13. Run the Oracle Identity Manager Upload JARs utility to post the new connectorbundle (updated in Step 12) to the Oracle Identity Manager database. This utility iscopied into the following location when you install Oracle Identity Manager:
Note:
Before you use this utility, verify that the WL_HOME environmentvariable is set to the directory in which Oracle WebLogic Server isinstalled.
For Microsoft Windows:
OIM_HOME/server/bin/UploadJars.bat
For UNIX:
OIM_HOME/server/bin/UploadJars.sh
When you run the utility, you are prompted to enter the login credentials of theOracle Identity Manager administrator, URL of the Oracle Identity Manager hostcomputer, context factory value, type of JAR file being uploaded, and the locationfrom which the JAR file is to be uploaded. Specify 4 as the value of the JAR type.
Adding APIs to Wrapper PackagesYou must add APIs to Wrappers packages to enable the connector to performprovisioning operations on the newly added attribute. To do so:
1. Open any SQL client. For example, SQL Developer.
Chapter 4Adding New Multivalued Attributes for Reconciliation and Provisioning
4-24

2. Open specification of the OIM_FND_USER_TCA_PKG package and then add entriesthat define the methods and their input parameters for performing provisioningoperations. For example, add the following methods for the newly added attribute:
procedure addUserSecurityAttribute(user_id in number, SECURITY_ATTR_NAME in varchar2, SECURITY_APP_ID varchar2,SECURITY_ATTR_VALUE varchar2,SECURITY_ATTR_TYPE varchar2);procedure deleteUserSecurityAttribute(user_id in number, SECURITY_ATTR_NAME in varchar2, SECURITY_APP_ID varchar2,SECURITY_ATTR_VALUE varchar2,SECURITY_ATTR_TYPE varchar2);
3. Open the OIM_FND_USER_TCA_PKG package body and add the implementation ofmethods defined in the preceding step. For example, add the following implementationfor the newly added attribute:
procedure addUserSecurityAttribute(user_id in number, SECURITY_ATTR_NAME in varchar2, SECURITY_APP_ID varchar2,SECURITY_ATTR_VALUE varchar2,SECURITY_ATTR_TYPE varchar2) IS x_return_status VARCHAR2(2000); x_msg_count NUMBER; x_msg_data VARCHAR2(2000); l_varchar2_value varchar2(2000); l_date_value date; l_number_value NUMBER; begin if SECURITY_ATTR_TYPE = 'NUMBER' thenl_number_value := SECURITY_ATTR_VALUE;elsif SECURITY_ATTR_TYPE = 'DATE' then l_date_value := SECURITY_ATTR_VALUE;elsel_varchar2_value := SECURITY_ATTR_VALUE;end if; icx_user_sec_attr_pub.create_user_sec_attr( p_api_version_number => 1, p_return_status => x_return_status, p_msg_count => x_msg_count, p_msg_data => x_msg_data, p_web_user_id => user_id, p_attribute_code => SECURITY_ATTR_NAME, p_attribute_appl_id => SECURITY_APP_ID, p_varchar2_value => l_varchar2_value, p_date_value => l_date_value, p_number_value => l_number_value, p_created_by => -1, p_creation_date => sysdate, p_last_updated_by => -1, p_last_update_date => sysdate, p_last_update_login => -1); end addUserSecurityAttribute;
procedure deleteUserSecurityAttribute(user_id in number, SECURITY_ATTR_NAME in varchar2, SECURITY_APP_ID varchar2,SECURITY_ATTR_VALUE varchar2,SECURITY_ATTR_TYPE varchar2) IS x_return_status VARCHAR2(2000); x_msg_count NUMBER; x_msg_data VARCHAR2(2000); l_varchar2_value varchar2(2000); l_date_value date; l_number_value NUMBER; begin
Chapter 4Adding New Multivalued Attributes for Reconciliation and Provisioning
4-25

if SECURITY_ATTR_TYPE = 'NUMBER' thenl_number_value := SECURITY_ATTR_VALUE;elsif SECURITY_ATTR_TYPE = 'DATE' then l_date_value := SECURITY_ATTR_VALUE;elsel_varchar2_value := SECURITY_ATTR_VALUE;end if; icx_user_sec_attr_pub.Delete_User_Sec_Attr( p_api_version_number => 1, p_return_status => x_return_status, p_msg_count => x_msg_count, p_msg_data => x_msg_data, p_web_user_id => user_id, p_attribute_code => SECURITY_ATTR_NAME, p_attribute_appl_id => SECURITY_APP_ID, p_varchar2_value => l_varchar2_value, p_date_value => l_date_value, p_number_value => l_number_value ); end deleteUserSecurityAttribute;
4. Save and close the file.
5. Rerun the scripts to compile the wrapper package.
Configuring Transformation of Data During UserReconciliation
You can configure transformation of reconciled single-valued account data accordingto your requirements.
Note:
This section describes an optional procedure. Perform this procedure only ifyou want to configure transformation of data during reconciliation.
You can configure transformation of reconciled single-valued data according to yourrequirements. For example, you can use email to create a different value for the Emailfield in Oracle Identity Manager.
To configure transformation of data:
1. Write code that implements the required transformation logic in a Java class.
The following sample transformation class creates a value for the Email attributeby using values fetched from the EMAIL_ADDRESS column of the target system:
package oracle.iam.connectors.common.transform; import java.util.HashMap; public class TransformAttribute { /* Description:Abstract method for transforming the attributes
Chapter 4Configuring Transformation of Data During User Reconciliation
4-26

param hmUserDetails<String,Object> HashMap containing parent data details param hmEntitlementDetails <String,Object> HashMap containing child data details */ public Object transform(HashMap hmUserDetails, HashMap hmEntitlementDetails,String sField) { /* * You must write code to transform the attributes. Parent data attribute values can be fetched by using hmUserDetails.get("Field Name"). *To fetch child data values, loop through the * ArrayList/Vector fetched by hmEntitlementDetails.get("Child Table") * Return the transformed attribute. */ String sEmail= "trans" + (String)hmUserDetails.get(sField); return sEmail; }}
2. Create a JAR file to hold the Java class.
3. Run the Oracle Identity Manager Upload JARs utility to post the JAR file to the OracleIdentity Manager database. This utility is copied into the following location when youinstall Oracle Identity Manager:
Note:
Before you use this utility, verify that the WL_HOME environment variable is set tothe directory in which Oracle WebLogic Server is installed.
For Microsoft Windows:
OIM_HOME/server/bin/UploadJars.bat
For UNIX:
OIM_HOME/server/bin/UploadJars.sh
When you run the utility, you are prompted to enter the login credentials of the OracleIdentity Manager administrator, URL of the Oracle Identity Manager host computer,context factory value, type of JAR file being uploaded, and the location from which theJAR file is to be uploaded. Specify 1 as the value of the JAR type.
4. Create a lookup definition for transformation and add an entry to it as follows:
a. Log in to the Design Console.
b. Expand Administration, and then double-click Lookup Definition.
c. In the Code field, enter Lookup.Oracle EBS UM.UM.ReconTransformation as thename of the lookup definition.
d. Select the Lookup Type option.
e. On the Lookup Code Information tab, click Add.
Chapter 4Configuring Transformation of Data During User Reconciliation
4-27

A new row is added.
f. In the Code Key column, enter the name of the resource object field intowhich you want to store the transformed value. For example: Email.
g. In the Decode column, enter the name of the class that implements thetransformation logic. For example,oracle.iam.connectors.common.transform.TransformAttribute.
h. Save the changes to the lookup definition.
5. Add an entry in the Lookup.Oracle EBS UM.UM.Configuration lookup definition toenable transformation as follows:
a. Expand Administration, and then double-click Lookup Definition.
b. Search for and open the Lookup.Oracle EBS UM.UM.Configuration lookupdefinition.
c. Create an entry that holds the name of the lookup definition used fortransformation as follows:
Code Key: Recon Transformation LookupDecode: Lookup.Oracle EBS UM.UM.ReconTransformation
d. Save the changes to the lookup definition.
Configuring Validation of Data During Reconciliation andProvisioning
You can configure validation of reconciled and provisioned single-valued dataaccording to your requirements.
For example, you can validate data fetched from the Email attribute to ensure that itdoes not contain the number sign (#). In addition, you can validate data entered in theFirst Name field on the process form so that the number sign (#) is not sent to thetarget system during provisioning operations.
For data that fails the validation check, the following message is displayed or recordedin the log file:
oracle.iam.connectors.icfcommon.recon.SearchReconTask : handle : Recon event skipped, validation failed [Validation failed for attribute: [FIELD_NAME]]
To configure validation of data:
1. Write code that implements the required validation logic in a Java class.
The following sample validation class checks if the value in the Email attributecontains the number sign (#):
package com.validate;import java.util.*;public class MyValidation {public boolean validate(HashMap hmUserDetails, HashMap hmEntitlementDetails, String field) { /* * You must write code to validate attributes. Parent * data values can be fetched by using hmUserDetails.get(field) * For child data values, loop through the * ArrayList/Vector fetched by hmEntitlementDetails.get("Child
Chapter 4Configuring Validation of Data During Reconciliation and Provisioning
4-28

Table") * Depending on the outcome of the validation operation, * the code must return true or false. */ /* * In this sample code, the value "false" is returned if the field * contains the number sign (#). Otherwise, the value "true" is * returned. */ boolean valid=true; String sEmail=(String) hmUserDetails.get(field); for(int i=0;i<sEmail.length();i++){ if (sEmail.charAt(i) == '#'){ valid=false; break; } } return valid; }}
2. Create a JAR file to hold the Java class.
3. Run the Oracle Identity Manager Upload JARs utility to post the JAR file to the OracleIdentity Manager database. This utility is copied into the following location when youinstall Oracle Identity Manager:
Note:
Before you use this utility, verify that the WL_HOME environment variable is set tothe directory in which Oracle WebLogic Server is installed.
For Microsoft Windows:
OIM_HOME/server/bin/UploadJars.bat
For UNIX:
OIM_HOME/server/bin/UploadJars.sh
When you run the utility, you are prompted to enter the login credentials of the OracleIdentity Manager administrator, URL of the Oracle Identity Manager host computer,context factory value, type of JAR file being uploaded, and the location from which theJAR file is to be uploaded. Specify 1 as the value of the JAR type.
4. If you created the Java class for validating a process form field for reconciliation, then:
a. Log in to the Design Console.
b. Expand Administration, and then double-click Lookup Definition.
c. In the Code field, enter Lookup.Oracle EBS UM.UM.ReconValidation as the name ofthe lookup definition.
d. Select the Lookup Type option.
e. On the Lookup Code Information tab, click Add.
A new row is added.
f. In the Code Key column, enter the resource object field name. For example, Email.
Chapter 4Configuring Validation of Data During Reconciliation and Provisioning
4-29

g. In the Decode column, enter the class name. For example,com.validate.MyValidation.
h. Save the changes to the lookup definition.
i. Search for and open the Lookup.Oracle EBS UM.UM.Configuration lookupdefinition.
j. Create an entry with the following values:
Code Key: Recon Validation LookupDecode: Lookup.Oracle EBS UM.UM.ReconValidation
k. Save the changes to the lookup definition.
5. If you created the Java class for validating a process form field for provisioning,then:
a. Log in to the Design Console.
b. Expand Administration, and then double-click Lookup Definition.
c. In the Code field, enter Lookup.Oracle EBS UM.UM.ProvValidation as thename of the lookup definition.
d. Select the Lookup Type option.
e. On the Lookup Code Information tab, click Add.
A new row is added.
f. In the Code Key column, enter the process form field name. In the Decodecolumn, enter the class name.
g. Save the changes to the lookup definition.
h. Search for and open the Lookup.Oracle EBS UM.UM.Configuration lookupdefinition.
i. Create an entry with the following values:
Code Key: Provisioning Validation LookupDecode: Lookup.Oracle EBS UM.UM.ProvValidation
j. Save the changes to the lookup definition.
Chapter 4Configuring Validation of Data During Reconciliation and Provisioning
4-30

ASample SQL Queries for theUM_USER_RECON and UM_USER_SYNCSQL Query Names
This appendix lists sample SQL queries that can be used to update the UM_USER_RECONand UM_USER_SYNC queries in the search.properties file.This appendix contains the following sections:
• Sample SQL Queries Updated to Include Single-Valued Attributes
• Sample SQL Queries Updated to Include Multivalued Attributes
Sample SQL Queries Updated to Include Single-ValuedAttributes
Use this SQL query to update the UM_USER_RECON and UM_USER_SYNC queries.
If you have added a single-valued attribute (Customer Id) as part of performing the proceduredescribed Adding New Attributes for Reconciliation and Provisioning:
with roledata as ( \ select fa.application_id,fa.application_short_name,wlr.name,ura.user_name user_name ,ura.start_date active_from,ura.end_date active_to from wf_local_roles wlr,wf_user_role_assignments ura,fnd_application fa where ura.role_name like 'UMX%' AND wlr.parent_orig_system = 'UMX' and wlr.name=ura.role_name and fa.application_short_name = wlr.owner_tag and ( (ura.start_date < nvl(ura.end_date, TO_DATE('31-DEC-4712','dd-mon-yyyy')) and ura.start_date > sysdate) or sysdate between ura.start_date and nvl(ura.end_date, TO_DATE('31-DEC-4712','dd-mon-yyyy')) ) \ ) , party as ( \ select USER_ID AS user_id,USER_GUID AS user_guid,sysdate as system_date, LAST_UPDATE_DATE DATE_UPDATED, case when password_lifespan_days > 0 then 'Days' when password_lifespan_accesses > 0 then 'Accesses' else 'None' end as PASSWORD_EXP_TYPE, case when password_lifespan_days > 0 then password_lifespan_days when password_lifespan_accesses > 0 then password_lifespan_accesses else null end as PASSWORD_LIFESPAN, EMPLOYEE_ID as EMPLOYEE_ID, USER_NAME AS user_name, TO_NUMBER(SUPPLIER_ID) as SUPPLIER_ID, session_number as session_number,CUSTOMER_ID as CUSTOMER_ID, DESCRIPTION as description, EMAIL_ADDRESS as EMAIL_ADDRESS, FAX as FAX, START_DATE AS START_DATE, END_DATE AS END_DATE,'Supplier' as PARTY_TYPE,b.person_first_name as party_first_name,b.person_last_name as party_last_name,b.party_id as party_id ,b.party_name as supplier_name,b.sup_party_id as supplier_party_id,null as security_group_id, null as responsibility_ID,null as RESPONSIBILITY_APP_ID, null AS RESP_END_DATE,null AS RESP_START_DATE,null as ROLE_ID ,null as role_start_date ,null as expiration_date ,null as RESP_DESCRIPTION,null as ROLE_APP_ID from fnd_user a,( select hp.party_id,hp.person_first_name,hp.person_last_name,hp1.party_name,hp1.party_id as sup_party_id FROM hz_relationships hr , hz_parties hp,hz_parties hp1 where hr.subject_ID = hp1.party_id and hr.object_ID=hp.party_id and hr.subject_type='ORGANIZATION' and hr.object_type='PERSON') b where a.person_party_id= b.party_id \
A-1

union all \ select USER_ID AS user_id,USER_GUID AS user_guid,sysdate as system_date, LAST_UPDATE_DATE DATE_UPDATED, case when password_lifespan_days > 0 then 'Days' when password_lifespan_accesses > 0 then 'Accesses' else 'None' end as PASSWORD_EXP_TYPE, case when password_lifespan_days > 0 then password_lifespan_days when password_lifespan_accesses > 0 then password_lifespan_accesses else null end as PASSWORD_LIFESPAN, EMPLOYEE_ID as EMPLOYEE_ID, USER_NAME AS user_name, TO_NUMBER(SUPPLIER_ID) as SUPPLIER_ID, session_number as session_number,CUSTOMER_ID as CUSTOMER_ID, DESCRIPTION as description, EMAIL_ADDRESS as EMAIL_ADDRESS, FAX as FAX, START_DATE AS START_DATE,END_DATE AS END_DATE,'Party' as PARTY_TYPE,b.person_first_name as party_first_name,b.person_last_name as party_last_name,b.party_id as party_id,null as supplier_name,null as supplier_party_id,null as security_group_id, null as responsibility_ID,null as RESPONSIBILITY_APP_ID, null AS RESP_END_DATE,null AS RESP_START_DATE ,null as ROLE_ID ,null as role_start_date ,null as expiration_date ,null as RESP_DESCRIPTION,null as ROLE_APP_ID from fnd_user a,( select hp.party_id,hp.person_first_name,hp.person_last_name FROM hz_parties hp) b where a.person_party_id not in (select hr.object_ID FROM hz_relationships hr where hr.subject_type='ORGANIZATION' and hr.object_type='PERSON') and a.person_party_id= b.party_id \ union all \ select USER_ID AS user_id,USER_GUID AS user_guid,sysdate as system_date, LAST_UPDATE_DATE DATE_UPDATED, case when password_lifespan_days > 0 then 'Days' when password_lifespan_accesses > 0 then 'Accesses' else 'None' end as PASSWORD_EXP_TYPE, case when password_lifespan_days > 0 then password_lifespan_days when password_lifespan_accesses > 0 then password_lifespan_accesses else null end as PASSWORD_LIFESPAN, EMPLOYEE_ID as EMPLOYEE_ID, USER_NAME AS user_name, TO_NUMBER(SUPPLIER_ID) as SUPPLIER_ID, session_number as session_number,CUSTOMER_ID as CUSTOMER_ID, DESCRIPTION as description, EMAIL_ADDRESS as EMAIL_ADDRESS, FAX as FAX, START_DATE AS START_DATE,END_DATE AS END_DATE,null as PARTY_TYPE,null as party_first_name,null as party_last_name,null as party_id,null as supplier_name,null as supplier_party_id,null as security_group_id, null as responsibility_ID,null as RESPONSIBILITY_APP_ID, null AS RESP_END_DATE,null AS RESP_START_DATE ,null as ROLE_ID ,null as role_start_date ,null as expiration_date ,null as RESP_DESCRIPTION,null as ROLE_APP_ID from fnd_user a where person_party_id IS NULL \ ) \ select * from ( \ select RESULTTABLE.*,ROW_NUMBER() OVER (ORDER BY user_id) AS Row_Num from \ ( \ select * from party \ union all \ select f.USER_ID AS user_id,f.user_guid as user_guid,f.system_date,f.DATE_UPDATED,f.PASSWORD_EXP_TYPE,f.PASSWORD_LIFESPAN,f.EMPLOYEE_ID, f.USER_NAME,f.SUPPLIER_ID, f.session_number,f.CUSTOMER_ID, f.DESCRIPTION , f.EMAIL_ADDRESS , f.FAX , f.START_DATE,f.END_DATE,f.PARTY_TYPE, f.party_first_name,f.party_last_name,f.party_id,f.supplier_name,f.supplier_party_id,s.security_group_id as security_group_id, (CONCAT(a.application_ID || '~', r.responsibility_id)) as responsibility_id,ur.RESPONSIBILITY_APPLICATION_ID as RESPONSIBILITY_APP_ID,ur.END_DATE AS RESP_END_DATE,ur.START_DATE AS RESP_START_DATE, null as ROLE_ID ,null as role_start_date ,null as expiration_date ,ur.DESCRIPTION as RESP_DESCRIPTION,null as ROLE_APP_ID from party f,FND_USER_RESP_GROUPS_DIRECT ur, fnd_application_vl a, fnd_responsibility_vl r, fnd_security_groups_vl s where f.user_id = ur.user_id and ur.responsibility_ID = r.responsibility_ID and r.application_ID = a.application_ID and ur.security_group_id = s.security_group_id and ( (ur.START_DATE < nvl(ur.END_DATE, TO_DATE('31-DEC-4712','dd-mon-yyyy')) and ur.START_DATE > sysdate) or sysdate between ur.START_DATE and nvl(ur.END_DATE,
Appendix ASample SQL Queries Updated to Include Single-Valued Attributes
A-2

TO_DATE('31-DEC-4712','dd-mon-yyyy')) ) \ union all \ select f.USER_ID AS user_id,f.user_guid as user_guid,f.system_date,f.DATE_UPDATED,f.PASSWORD_EXP_TYPE,f.PASSWORD_LIFESPAN,f.EMPLOYEE_ID, f.USER_NAME,f.SUPPLIER_ID, f.session_number,f.CUSTOMER_ID, f.DESCRIPTION , f.EMAIL_ADDRESS , f.FAX , f.START_DATE,f.END_DATE,f.PARTY_TYPE, f.party_first_name,f.party_last_name,f.party_id,f.supplier_name,f.supplier_party_id, null as security_group_id, null as responsibility_id, null as RESPONSIBILITY_APP_ID, null AS RESP_END_DATE,null AS RESP_START_DATE, (CONCAT(r.application_id || '~', r.name)) AS ROLE_ID ,r.active_from AS role_start_date,r.active_to AS expiration_date,null as RESP_DESCRIPTION,r.application_id as ROLE_APP_ID from party f , roledata r where f.user_name = r.user_name \ ) RESULTTABLE \ --<FILTER> \ ) WHERE Row_Num BETWEEN <START_ROW_NUMBER> and <END_ROW_NUMBER>
Sample SQL Queries Updated to Include Multivalued AttributesUse this SQL query to update the UM_USER_RECON and UM_USER_SYNC queries.
The following SQL query can be used to update the UM_USER_RECON andUM_USER_SYNC queries if you have added new security attributes as part of performing theprocedure described in Updating the Connector Bundle:
with roledata as ( \ select fa.application_id,fa.application_short_name,wlr.name,ura.user_name user_name ,ura.start_date active_from,ura.end_date active_to from wf_local_roles wlr,wf_user_role_assignments ura,fnd_application fa where ura.role_name like 'UMX%' AND wlr.parent_orig_system = 'UMX' and wlr.name=ura.role_name and fa.application_short_name = wlr.owner_tag and ( (ura.start_date < nvl(ura.end_date, TO_DATE('31-DEC-4712','dd-mon-yyyy')) and ura.start_date > sysdate) or sysdate between ura.start_date and nvl(ura.end_date, TO_DATE('31-DEC-4712','dd-mon-yyyy')) ) \ ) , securitydata as ( \ select userak.web_user_id as user_id,userak.attribute_code as SECURITY_ATTR_NAME, userak.attribute_application_id as SECURITY_APP_ID,NVL(userak.VARCHAR2_VALUE,NVL(to_char(userak.DATE_VALUE),userak.NUMBER_VALUE)) as SECURITY_ATTR_VALUE,ak.DATA_TYPE as SECURITY_ATTR_TYPE from ak_web_user_sec_attr_values userak,AK_ATTRIBUTES ak where ak.attribute_code=userak.attribute_code and ak.attribute_application_id= userak.attribute_application_id \ ), party as ( \ select null as SECURITY_ATTR_NAME, null as SECURITY_APP_ID, null as SECURITY_ATTR_VALUE,null as SECURITY_ATTR_TYPE,USER_ID AS user_id,USER_GUID AS user_guid,sysdate as system_date, LAST_UPDATE_DATE DATE_UPDATED, case when password_lifespan_days > 0 then 'Days' when password_lifespan_accesses > 0 then 'Accesses' else 'None' end as PASSWORD_EXP_TYPE, case when password_lifespan_days > 0 then password_lifespan_days when password_lifespan_accesses > 0 then password_lifespan_accesses else null end as PASSWORD_LIFESPAN, EMPLOYEE_ID as EMPLOYEE_ID, USER_NAME AS user_name, TO_NUMBER(SUPPLIER_ID) as SUPPLIER_ID, session_number as session_number,CUSTOMER_ID as CUSTOMER_ID, DESCRIPTION as description, EMAIL_ADDRESS as EMAIL_ADDRESS, FAX as FAX, START_DATE AS START_DATE, END_DATE AS END_DATE,'Supplier' as PARTY_TYPE,b.person_first_name as party_first_name,b.person_last_name as party_last_name,b.party_id as party_id ,b.party_name as supplier_name,b.sup_party_id as supplier_party_id,null as security_group_id, null as responsibility_ID,null as RESPONSIBILITY_APP_ID, null AS RESP_END_DATE,null AS RESP_START_DATE,null as ROLE_ID ,null as role_start_date ,null as expiration_date ,null as RESP_DESCRIPTION,null as ROLE_APP_ID from fnd_user a,( select hp.party_id,hp.person_first_name,hp.person_last_name,hp1.party_name,hp1.party_id as
Appendix ASample SQL Queries Updated to Include Multivalued Attributes
A-3

sup_party_id FROM hz_relationships hr , hz_parties hp,hz_parties hp1 where hr.subject_ID = hp1.party_id and hr.object_ID=hp.party_id and hr.subject_type='ORGANIZATION' and hr.object_type='PERSON') b where a.person_party_id= b.party_id \ union all \ select null as SECURITY_ATTR_NAME, null as SECURITY_APP_ID, null as SECURITY_ATTR_VALUE,null as SECURITY_ATTR_TYPE,USER_ID AS user_id,USER_GUID AS user_guid,sysdate as system_date, LAST_UPDATE_DATE DATE_UPDATED, case when password_lifespan_days > 0 then 'Days' when password_lifespan_accesses > 0 then 'Accesses' else 'None' end as PASSWORD_EXP_TYPE, case when password_lifespan_days > 0 then password_lifespan_days when password_lifespan_accesses > 0 then password_lifespan_accesses else null end as PASSWORD_LIFESPAN, EMPLOYEE_ID as EMPLOYEE_ID, USER_NAME AS user_name, TO_NUMBER(SUPPLIER_ID) as SUPPLIER_ID, session_number as session_number,CUSTOMER_ID as CUSTOMER_ID, DESCRIPTION as description, EMAIL_ADDRESS as EMAIL_ADDRESS, FAX as FAX, START_DATE AS START_DATE,END_DATE AS END_DATE,'Party' as PARTY_TYPE,b.person_first_name as party_first_name,b.person_last_name as party_last_name,b.party_id as party_id,null as supplier_name,null as supplier_party_id,null as security_group_id, null as responsibility_ID,null as RESPONSIBILITY_APP_ID, null AS RESP_END_DATE,null AS RESP_START_DATE ,null as ROLE_ID ,null as role_start_date ,null as expiration_date ,null as RESP_DESCRIPTION,null as ROLE_APP_ID from fnd_user a,( select hp.party_id,hp.person_first_name,hp.person_last_name FROM hz_parties hp) b where a.person_party_id not in (select hr.object_ID FROM hz_relationships hr where hr.subject_type='ORGANIZATION' and hr.object_type='PERSON') and a.person_party_id= b.party_id \ union all \ select null as SECURITY_ATTR_NAME, null as SECURITY_APP_ID, null as SECURITY_ATTR_VALUE,null as SECURITY_ATTR_TYPE,USER_ID AS user_id,USER_GUID AS user_guid,sysdate as system_date, LAST_UPDATE_DATE DATE_UPDATED, case when password_lifespan_days > 0 then 'Days' when password_lifespan_accesses > 0 then 'Accesses' else 'None' end as PASSWORD_EXP_TYPE, case when password_lifespan_days > 0 then password_lifespan_days when password_lifespan_accesses > 0 then password_lifespan_accesses else null end as PASSWORD_LIFESPAN, EMPLOYEE_ID as EMPLOYEE_ID, USER_NAME AS user_name, TO_NUMBER(SUPPLIER_ID) as SUPPLIER_ID, session_number as session_number,CUSTOMER_ID as CUSTOMER_ID, DESCRIPTION as description, EMAIL_ADDRESS as EMAIL_ADDRESS, FAX as FAX, START_DATE AS START_DATE,END_DATE AS END_DATE,null as PARTY_TYPE,null as party_first_name,null as party_last_name,null as party_id,null as supplier_name,null as supplier_party_id,null as security_group_id, null as responsibility_ID,null as RESPONSIBILITY_APP_ID, null AS RESP_END_DATE,null AS RESP_START_DATE ,null as ROLE_ID ,null as role_start_date ,null as expiration_date ,null as RESP_DESCRIPTION,null as ROLE_APP_ID from fnd_user a where person_party_id IS NULL \ ) \ select * from ( \ select RESULTTABLE.*,ROW_NUMBER() OVER (ORDER BY user_id) AS Row_Num from \ ( \ select * from party \ union all \ select f.SECURITY_ATTR_NAME, f.SECURITY_APP_ID, f.SECURITY_ATTR_VALUE,f.SECURITY_ATTR_TYPE,f.USER_ID AS user_id,f.user_guid as user_guid,f.system_date,f.DATE_UPDATED,f.PASSWORD_EXP_TYPE,f.PASSWORD_LIFESPAN,f.EMPLOYEE_ID, f.USER_NAME,f.SUPPLIER_ID, f.session_number,f.CUSTOMER_ID, f.DESCRIPTION , f.EMAIL_ADDRESS , f.FAX , f.START_DATE,f.END_DATE,f.PARTY_TYPE, f.party_first_name,f.party_last_name,f.party_id,f.supplier_name,f.supplier_party_id,s.security_group_id as security_group_id, (CONCAT(a.application_ID || '~', r.responsibility_id)) as responsibility_id,ur.RESPONSIBILITY_APPLICATION_ID as
Appendix ASample SQL Queries Updated to Include Multivalued Attributes
A-4

RESPONSIBILITY_APP_ID,ur.END_DATE AS RESP_END_DATE,ur.START_DATE AS RESP_START_DATE, null as ROLE_ID ,null as role_start_date ,null as expiration_date ,ur.DESCRIPTION as RESP_DESCRIPTION,null as ROLE_APP_ID from party f,FND_USER_RESP_GROUPS_DIRECT ur, fnd_application_vl a, fnd_responsibility_vl r, fnd_security_groups_vl s where f.user_id = ur.user_id and ur.responsibility_ID = r.responsibility_ID and r.application_ID = a.application_ID and ur.security_group_id = s.security_group_id and ( (ur.START_DATE < nvl(ur.END_DATE, TO_DATE('31-DEC-4712','dd-mon-yyyy')) and ur.START_DATE > sysdate) or sysdate between ur.START_DATE and nvl(ur.END_DATE, TO_DATE('31-DEC-4712','dd-mon-yyyy')) ) \ union all \ select f.SECURITY_ATTR_NAME, f.SECURITY_APP_ID, f.SECURITY_ATTR_VALUE,f.SECURITY_ATTR_TYPE,f.USER_ID AS user_id,f.user_guid as user_guid,f.system_date,f.DATE_UPDATED,f.PASSWORD_EXP_TYPE,f.PASSWORD_LIFESPAN,f.EMPLOYEE_ID, f.USER_NAME,f.SUPPLIER_ID, f.session_number,f.CUSTOMER_ID, f.DESCRIPTION , f.EMAIL_ADDRESS , f.FAX , f.START_DATE,f.END_DATE,f.PARTY_TYPE, f.party_first_name,f.party_last_name,f.party_id,f.supplier_name,f.supplier_party_id, null as security_group_id, null as responsibility_id, null as RESPONSIBILITY_APP_ID, null AS RESP_END_DATE,null AS RESP_START_DATE, (CONCAT(r.application_id || '~', r.name)) AS ROLE_ID ,r.active_from AS role_start_date,r.active_to AS expiration_date,null as RESP_DESCRIPTION,r.application_id as ROLE_APP_ID from party f , roledata r where f.user_name = r.user_name \ union all \ select sa.SECURITY_ATTR_NAME as SECURITY_ATTR_NAME, sa.SECURITY_APP_ID as SECURITY_APP_ID, sa.SECURITY_ATTR_VALUE as SECURITY_ATTR_VALUE,sa.SECURITY_ATTR_TYPE as SECURITY_ATTR_TYPE,f.USER_ID AS user_id,f.user_guid as user_guid,f.system_date,f.DATE_UPDATED,f.PASSWORD_EXP_TYPE,f.PASSWORD_LIFESPAN,f.EMPLOYEE_ID, f.USER_NAME,f.SUPPLIER_ID, f.session_number,f.CUSTOMER_ID, f.DESCRIPTION , f.EMAIL_ADDRESS , f.FAX , f.START_DATE,f.END_DATE,f.PARTY_TYPE, f.party_first_name,f.party_last_name,f.party_id,f.supplier_name,f.supplier_party_id, null as security_group_id, null as responsibility_id, null as RESPONSIBILITY_APP_ID, null AS RESP_END_DATE,null AS RESP_START_DATE, null AS ROLE_ID ,null AS role_start_date,null AS expiration_date,null as RESP_DESCRIPTION,null as ROLE_APP_ID from party f , securitydata sa where f.user_id = sa.user_id \ ) RESULTTABLE \ --<FILTER> \ ) WHERE Row_Num BETWEEN <START_ROW_NUMBER> and <END_ROW_NUMBER>
Appendix ASample SQL Queries Updated to Include Multivalued Attributes
A-5

BSample Code Snippets for Extending theConnector Schema
This appendix lists sample code snippets for extending the connector schema by adding amultivalued attribute (for example, __SECUTIRY_ATTRS__). All the code snippets listed inthis appendix consider __SECURITY_ATTRS__ as the multivalued attribute being added tothe connector schema.
The following is a sample code snippet for extending the connector schema to include themultivalued attribute that has been initialized by specifying the number of child attributes:
attr := attributelist(); attr.extend(5); attr (1) := attributeinfo('SECURITY_ATTR_NAME','varchar',1,1,1,1); attr (2) := attributeinfo('SECURITY_ATTR_VALUE','varchar',1,1,1,1); attr (3) := attributeinfo('SECURITY_ATTR_TYPE','varchar',1,1,1,1); attr (4) := attributeinfo('SECURITY_APP_ID','varchar',1,1,1,1);
schemaout.extend; schemaout( 4 ) := schema_object('__SECURITY_ATTRS__',attr);
The following is a sample code snippet for extending the connector schema to include themultivalued attribute without initializing the child attributes in advance:
attr := attributelist(); attr.extend; attr (1) := attributeinfo('SECURITY_ATTR_NAME','varchar',1,1,1,1); attr.extend; attr (2) := attributeinfo('SECURITY_ATTR_VALUE','varchar',1,1,1,1); attr.extend; attr (3) := attributeinfo('SECURITY_ATTR_TYPE','varchar',1,1,1,1); attr.extend; attr (4) := attributeinfo('SECURITY_APP_ID','varchar',1,1,1,1);
schemaout.extend; schemaout( 4 ) := schema_object('__SECURITY_ATTRS__',attr);
The following is a sample code snippet for extending the connector schema to include themultivalued attribute with mixed ways of initializing the child attributes:
attr := attributelist(); attr.extend(2); attr (1) := attributeinfo('SECURITY_ATTR_NAME','varchar',1,1,1,1); attr (2) := attributeinfo('SECURITY_ATTR_VALUE','varchar',1,1,1,1); attr.extend; attr (3) := attributeinfo('SECURITY_ATTR_TYPE','varchar',1,1,1,1); attr.extend; attr (4) := attributeinfo('SECURITY_APP_ID','varchar',1,1,1,1);
schemaout.extend; schemaout( 4 ) := schema_object('__SECURITY_ATTRS__',attr);
B-1

CFiles and Directories in the EBS UserManagement Connector Package
This appendix lists the table that describes the files and directories corresponding to theOracle E-Business Suite User Management connector.The contents of the connector installation package are described in Table C-1.
Table C-1 Files and Directories in the Installation Package
File in the Installation Package Directory Description
bundle/org.identityconnectors.ebs-1.0.11150.jar This JAR file contains the connector bundle.
configuration/EBS-UM-CI.xml This XML file contains configuration information that is usedduring the connector installation process.
resources/EBS-UM.properties This file is a resource bundle that contains language-specificinformation that is used by the connector. During connectorinstallation, these resource bundles are copied to the OracleIdentity Manager database.
Note: A resource bundle is a file containing localizedversions of the text strings that are displayed on theAdministrative and User Console. These text strings includeGUI element labels and messages.
scripts/OIM_FND_GLOBAL.pck This package contains the procedures that are called toinitialize the global security context for a database sessionduring provisioning operations.
scripts/OIM_FND_USER_TCA_PKG.pck This is a customized wrapper package for creating andupdating party records.
scripts/OIM_TYPES.pck This package file contains SQL statements used for creatingOracle types. Oracle types are used for storing OIM schema.
scripts/OimUser.sql
scripts/OimUserAppstablesSynonyms.sql
scripts/OimUserGrants.sql
scripts/OimUserSynonyms.sql
These files contain the SQL scripts to create a target systemuser account, grant the required rights to the user, and createsynonyms of various database objects to be used by theconnector.
See Creating a Target System User Account for ConnectorOperations for more information about this user.
scripts/Run_UM_DBScripts.bat
scripts/Run_UM_DBScripts.sh
This file contains commands to run the SQL scripts forcreating a service account with the required grants.
See Creating a Target System User Account for ConnectorOperations for more information about this user.
upgrade/PostUpgradeScript_PlainEBSUM.sql This file is used during the plain Oracle EBS UserManagement connector upgrade procedure.
upgrade/PostUpgradeScript_TCAEBSUM.sql This file is used during Oracle EBS User Management TCAconnector upgrade procedure.
C-1

Table C-1 (Cont.) Files and Directories in the Installation Package
File in the Installation Package Directory Description
xml/EBS-UM-ConnectorConfig.xml This XML file contains definitions for the following connectorcomponents:
• Resource objects• IT resource types• IT resource instance• Process forms• Process tasks and adapters• Process definition• Prepopulate rules• Lookup definitions• Reconciliation rules• Scheduled tasks
Appendix C
C-2

DScheduled Jobs for Lookup FieldSynchronization and Reconciliation
This appendix lists the table that describes the scheduled jobs that you can configure.
Table D-1 lists the scheduled jobs.
Table D-1 Scheduled Jobs for Lookup Field Synchronization and Reconciliation
Scheduled Task Description
Oracle EBS UM Target UserReconciliation
This scheduled job is used for user reconciliation. See Scheduled Job for TargetUser Reconciliation for information about this scheduled job.
Oracle EBS UM TargetIncremental UserReconciliation
This scheduled job is used for incremental reconciliation of user information. See Scheduled Job for Incremental Target User Reconciliation for more information.
Oracle EBS UM Target UserDelete Reconciliation
This scheduled job is used for reconciliation of deleted user records. See ScheduledJob for Target User Delete Reconciliation for more information.
Oracle EBS UM TargetApplications LookupReconciliation
This scheduled job is used to synchronize values of the applications lookup fieldsbetween Oracle Identity Manager and the target system. See Scheduled Jobs forLookup Field Synchronization for information about this scheduled job.
Oracle EBS UM TargetResponsibilities LookupReconciliation
This scheduled job is used to synchronize values of the responsibilities lookup fieldsbetween Oracle Identity Manager and the target system. See Scheduled Jobs forLookup Field Synchronization for information about this scheduled job.
Oracle EBS UM TargetRoles Lookup Reconciliation
This scheduled job is used to synchronize values of the roles lookup fields betweenOracle Identity Manager and the target system. See Scheduled Jobs for LookupField Synchronization for information about this scheduled job.
Oracle EBS UM TargetSecurity Groups LookupReconciliation
This scheduled job is used to synchronize values of the security groups lookup fieldsbetween Oracle Identity Manager and the target system. See Scheduled Jobs forLookup Field Synchronization for information about this scheduled job.
D-1

Index
Index-1


