Embed Size (px)
Citation preview
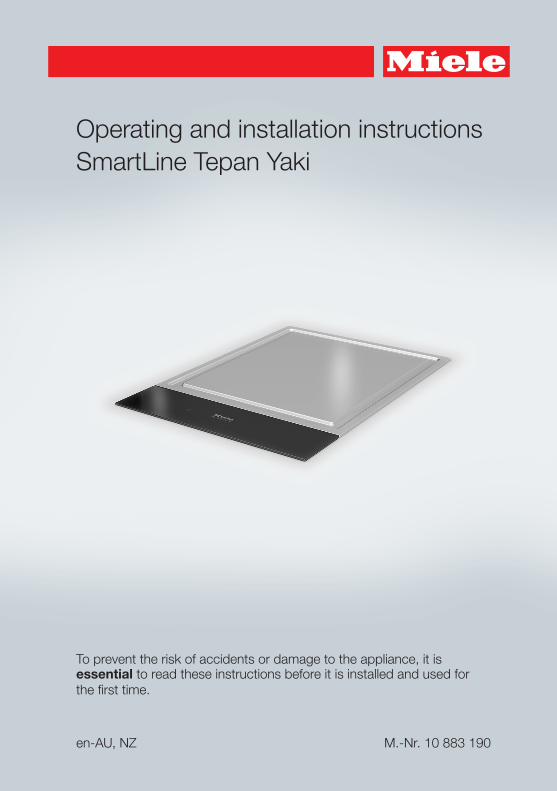
Operating and installation instructionsSmartLine Tepan Yaki
To prevent the risk of accidents or damage to the appliance, it isessential to read these instructions before it is installed and used forthe first time.
en-AU, NZ M.-Nr. 10 883 190
Contents
2
Warning and Safety instructions .......................................................................... 4
Caring for the environment ................................................................................ 14
Overview............................................................................................................... 15TepanYaki .............................................................................................................. 15Controls / Indicators.............................................................................................. 16
Before using for the first time ............................................................................ 17Cleaning the SmartLine appliance for the first time .............................................. 17Switching on the SmartLine appliance for the first time ....................................... 17
The induction principle ....................................................................................... 18
Power level range ................................................................................................ 19
Operation.............................................................................................................. 20Operating principles .............................................................................................. 20Setting the power level.......................................................................................... 21Switching off.......................................................................................................... 21Residual heat indicator.......................................................................................... 21Setting the power level - extended level range ..................................................... 22Switching the heating elements on together......................................................... 22Tips for frying ........................................................................................................ 23Keeping warm ....................................................................................................... 23
Timer..................................................................................................................... 24Minute minder ....................................................................................................... 24Switching off the heating element/cooking zone automatically............................ 25
Additional functions ............................................................................................ 26Stop & Go.............................................................................................................. 26Recall..................................................................................................................... 26Wipe protection ..................................................................................................... 27Demonstration mode............................................................................................. 27Displaying the SmartLine appliance data.............................................................. 27
Safety features..................................................................................................... 28System lock / Safety lock...................................................................................... 28Safety switch-off ................................................................................................... 30Overheating protection.......................................................................................... 31
Programming ....................................................................................................... 32
Cleaning and care ............................................................................................... 35Control panel ......................................................................................................... 36

Contents
3
Frying surface........................................................................................................ 36
Problem solving guide ........................................................................................ 37
Optional accessories .......................................................................................... 40
Safety instructions for installation ..................................................................... 41
Safety distances .................................................................................................. 42
Installation notes ................................................................................................. 44Installation of surface-mounted appliances .......................................................... 44Flush-fit installation ............................................................................................... 45Installing several SmartLine appliances ................................................................ 46Combination with a downdraft extractor............................................................... 46
Building-in dimensions ....................................................................................... 47Surface-mounted installation ................................................................................ 47Flush-fit installation ............................................................................................... 48
Worktop cut-out for surface-mounted installation .......................................... 49
Worktop cut-out for flush-fit installation........................................................... 52
Spacer bars.......................................................................................................... 55
Installation............................................................................................................ 56Preparing the worktop........................................................................................... 56Fitting the spacer bars .......................................................................................... 56Installing the SmartLine appliances ...................................................................... 57
Electrical connection .......................................................................................... 59
Service.................................................................................................................. 61Contact in case of fault ......................................................................................... 61Data plate .............................................................................................................. 61Warranty ................................................................................................................ 61
Warning and Safety instructions
4
This appliance complies with all relevant safety requirements.Inappropriate use can, however, lead to personal injury anddamage to property.
To avoid the risk of accidents or damage to the appliance, pleaseread these instructions carefully before installation and beforeusing it for the first time. They contain important notes oninstallation, safety, use and maintenance.Miele cannot be held liable for damage caused by non-compliancewith these Warning and Safety instructions.Keep these instructions in a safe place and ensure that new usersare familiar with the content. Pass them on to any future owner.
Warning and Safety instructions
5
Correct application
This Tepan plate is designed for domestic use and for use insimilar environments by guests in hotel or motel rooms, bed &breakfasts and other typical living quarters. This does not includecommon/shared facilities or commercial facilities within hotels,motels or bed & breakfasts.
This appliance is not suitable for outdoor use.
It is intended to cook food and keep it warm. Any other use is notsupported by the manufacturer and could be dangerous.
This appliance is not intended for use by persons (includingchildren) with reduced physical, sensory or mental capabilities, orlack of experience and knowledge, unless they have been givensupervision or instruction concerning its use by a person responsiblefor their safety, and are able to recognise the dangers of misuse.
Warning and Safety instructions
6
Safety with children
Young children must not be allowed to use this appliance.
Older children may use the appliance only when its operation hasbeen clearly explained to them and they are able to use it safely.They must be aware of the potential dangers caused by incorrectoperation.
Children must not be allowed to clean the applianceunsupervised.
Please supervise children in the vicinity of the appliance, and donot let them play with it.
The appliance gets hot when in use and remains hot for a whileafter being switched off. Keep children well away from the applianceuntil it has cooled down and there is no danger of burning.
Danger of burning!Do not store anything which might arouse a child's interest instorage areas above or next to the appliance. Otherwise they couldbe tempted into climbing onto the appliance.
Danger of suffocation!Whilst playing, children may become entangled in packagingmaterial (such as plastic wrapping) or pull it over their head with therisk of suffocation. Keep packaging material away from children.
Activate the system lock to ensure that children cannot switch onthe Tepan plate inadvertently. Use the safety lock when the Tepanplate is in use to prevent children from altering the settings selected.
Warning and Safety instructions
7
Technical safety
Unauthorised installation, maintenance and repairs can causeconsiderable danger for the user. Installation, maintenance andrepairs must only be carried out by a Miele authorised technician.
A damaged appliance can be dangerous. Always check for visiblesigns of damage. Never use a damaged appliance.
Reliable and safe operation of this appliance can only be assuredif it has been connected to the mains electricity supply.
The appliance must not be connected to the inverter of anautonomous power supply, e.g. a solar power system. When theappliance is switched on, power surges could result in a safetyswitch-off. This may damage the electronic unit.
The electrical safety of this appliance can only be guaranteedwhen continuity is complete between it and an effective earthingsystem. It is most important that this basic safety requirement ispresent and tested regularly and, where there is any doubt, thehousehold wiring system should be inspected by a qualifiedelectrician.
Before connecting the appliance to the mains supply, ensure thatthe connection data on the data plate (voltage and frequency) matchthe mains electricity supply.This data must correspond in order to avoid the risk of damage tothe appliance. Consult a qualified electrician if in any doubt.
Do not connect the appliance to the mains electrical supply by amulti-socket adapter or extension lead. These are a fire hazard anddo not guarantee the required safety of the appliance.
For safety reasons, this appliance may only be used when it hasbeen built in.
This appliance must not be installed and operated in mobileinstallations (e.g. on a ship).

Warning and Safety instructions
8
Never open the casing of the appliance.Touching or tampering with electrical connections or componentsand mechanical parts is highly dangerous to the user and can causeoperational faults.
The manufacturer's warranty will be invalidated if the appliance isnot repaired by a Miele approved service technician.
Faulty components must only be replaced by genuine Miele spareparts. The manufacturer can only guarantee the safety of theappliance when Miele replacement parts are used.
The appliance is not intended for use with an external timer switchor a remote control system.
If the plug has been removed or the connection cable is notsupplied with a plug, the appliance must be connected to the mainssupply by a suitably qualified electrician.
If the mains connection cable is damaged, it must be replacedwith a special connection cable by an electrician in order to avoid ahazard (see “Electrical connection”).
During installation, maintenance and repair work, the appliancemust be disconnected from the mains electricity supply. It is onlycompletely isolated from the electricity supply when:
– the mains circuit breaker is switched off, or
– it is switched off at the wall socket and the plug is withdrawn fromthe socket. Do not pull the mains connection cable but the mainsplug to disconnect your appliance from the mains electricitysupply.
Danger of electric shock!Do not use the appliance if it is faulty. Switch it off immediately,disconnect it from the mains electricity supply and contact Miele.
Warning and Safety instructions
9
If the appliance is installed behind a furniture panel (e.g. a door),ensure that the door is never closed whilst the appliance is in use.Heat and moisture can build up behind a closed furniture panel andcause subsequent damage to the appliance, the housing unit andthe floor. Do not close the door until the residual heat indicators havegone out.
DO NOT MODIFY THIS APPLIANCE.
Warning and Safety instructions
10
Correct use
The appliance gets hot when in use and remains hot for a whileafter being switched off. There is a danger of burning until theresidual heat indicators go out.
Due to the high temperatures radiated, objects left near theappliance when it is in use could catch fire. Do not use the appliance to heat up the room.
Oil and fat can overheat and catch fire. Do not leave the applianceunattended when cooking with oil and fat. If it does ignite, do notattempt to put the flames out with water.Switch off the appliance and use a suitable fire blanket, saucepanlid, damp towel or similar to smother the flames.
The cooking process has to be supervised. A short term cookingprocess has to be supervised continuously.
Flames could set the grease filters of a rangehood on fire. Do notflambé under a rangehood.
Spray canisters, aerosols and other inflammable substances canignite when heated. Therefore do not store such items or substancesin a drawer under the TepanYaki. Cutlery inserts must be heat-resistant.
Do not heat up food in closed containers, e.g. tins or sealed jars,on the appliance, as pressure can build up in the containers, causingthem to explode.
Do not cover the appliance, e.g. with a cover, a cloth or protectivefoil. The material could catch fire, shatter or melt if the appliance isswitched on by mistake or if residual heat is still present.
Warning and Safety instructions
11
When the appliance is switched on either deliberately or bymistake, or when there is residual heat present, there is the risk ofany metal items left on the appliance heating up, with the danger ofburning. Depending on the material, other items left on the appliancecould also melt or catch fire. Do not use the appliance as a restingplace. Switch the appliance off after use.
You could burn yourself on the hot Tepan plate. Protect yourhands with heat-resistant pot holders or gloves when handling hotpots and pans. Do not let them get wet or damp, as this causes heatto transfer through the material more quickly with the risk of scaldingor burning yourself.
When using an electrical appliance, e.g. a hand-held mixer, nearthe TepanYaki, ensure that the cable of the electrical appliancecannot come into contact with the hot Tepan plate. The insulation onthe cable could become damaged.
Placing hot pans on the sensors and indicators could damage theelectronics underneath. Do not place hot pans on the sensors orindicators.
Because induction heating works so quickly, the temperature atwhich oil or fat self-ignites may be reached within a very short time.Do not leave the Tepan plate unattended whilst it is being used.
For people fitted with a heart pacemaker: please note that thearea immediately surrounding the Tepan plate is electromagneticallycharged when it is switched on. It is very unlikely to affect apacemaker. However, if in any doubt, consult the manufacturer ofthe pacemaker or your doctor.
When switched on, the electromagnetic field of the Tepan platecan impair the function of magnetisable objects. Do not leave creditcards, digital storage devices, pocket calculators, etc. in theimmediate vicinity of the Tepan plate.
Warning and Safety instructions
12
Metal utensils stored in a drawer under the Tepan plate canbecome hot if the appliance is used intensively for a long time. Donot store any metal items or utensils in a drawer directly under theTepan plate.
The Tepan plate is fitted with a cooling fan. If a drawer is fitteddirectly underneath the appliance, ensure that there is sufficientspace between the drawer and its contents and the underside of theappliance in order to ensure sufficient ventilation of the Tepan plate(see “Safety distances”). Do not store pointed or small items orpaper in the drawer. They could get in through the ventilation slots orbe sucked into the casing by the fan and damage the fan or impaircooling.
The appliance becomes very hot while in use. Do not use plasticutensils. Even heat-resistant plastic utensils are unsuitable.
Warning and Safety instructions
13
Cleaning and care
Do not use a steam cleaning appliance to clean the Tepan plate.The steam could reach electrical components and cause a shortcircuit.
If the Tepan plate is built in over a pyrolytic oven, it should not beused whilst the pyrolytic process is being carried out, as this couldtrigger the overheating protection mechanism on the Tepan plate(see relevant section).
Caring for the environment
14
Disposal of the packingmaterialThe transport and protective packaginghas been selected from materials whichare environmentally friendly fordisposal, and can normally be recycled.
Recycling the packaging reduces theuse of raw materials in themanufacturing process and alsoreduces the amount of waste in landfillsites. Ensure that any plasticwrappings, bags etc. are disposed ofsafely and kept out of the reach ofbabies and young children. Danger ofsuffocation.
Disposing of your oldapplianceElectrical and electronic appliancesoften contain valuable materials. Theyalso contain specific materials,compounds and components, whichwere essential for their correct functionand safety. These could be hazardousto human health and to the environmentif disposed of with your domestic wasteor if handled incorrectly. Please do not,therefore, dispose of your old appliancewith your household waste.
Please dispose of it at your localcommunity waste collection / recyclingcentre for electrical and electronicappliances. You are also responsible fordeleting any personal data that may bestored on the appliance prior todisposal. Please ensure that your oldappliance poses no risk to childrenwhile being stored prior to disposal.
Overview
15
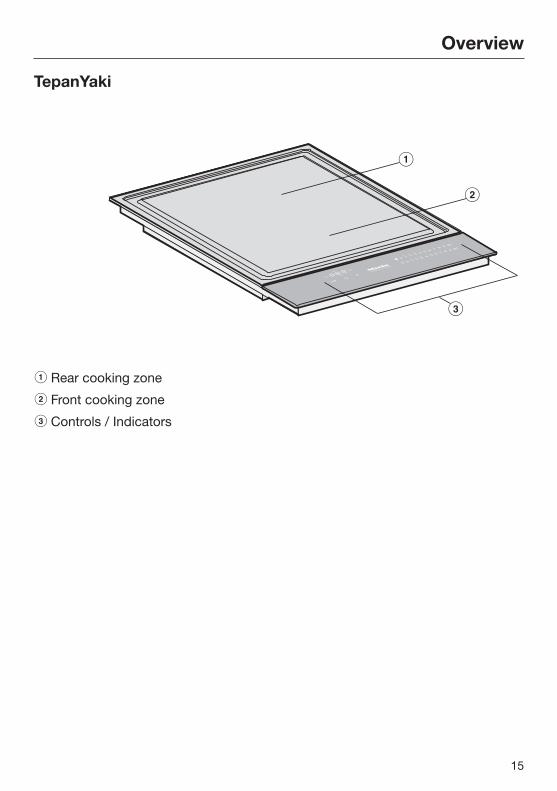
TepanYaki
a Rear cooking zone
b Front cooking zone
c Controls / Indicators
Overview
16
Controls / Indicators
Sensor controls
a Switching the SmartLine appliance on/off
b Stop & Go
c Wipe protection
d Switching the heating elements on together/separately
e Activating/Deactivating the keeping warm function
f Numerical keybankFor setting power levels/minute minder and switch-off times
g Heating element selection, automatic switch-off
h Minute minder
Indicator lights
i Heating element allocation, automatic switch-off
j Residual heat
k Timer display
: to:
Duration
System lock/Safety lock activated Demonstration mode activated
Before using for the first time
17
Please stick the extra data plate forthe appliance supplied with thisdocumentation in the space providedin the “Service” section of thisbooklet. Alternatively, the additionallabel can be stuck near the applianceif the appliance markings are notvisible after installation.
Remove any protective wrapping andstickers.
Cleaning the SmartLineappliance for the first time Clean all surfaces with a damp cloth,
and then wipe dry.
Switching on the SmartLineappliance for the first timeThe metal components have aprotective coating. Smells and possiblysome vapours may occur when theSmartLine appliance is used for the firsttime. The heating of the induction coilsalso causes odours in the first fewhours of operation. This smell will beless noticeable with each subsequentuse before dissipating completely.
The smell and any vapours given off donot indicate a faulty connection orappliance and they are not hazardousto health.
Please note that the heating-up timefor induction is much shorter than forconventional electric heating.
The induction principle
18
The Tepan plate is heated by induction.An induction coil is located under theTepan plate. When the Tepan plate isswitched on, this coil creates amagnetic field which impacts directlyon the surface and heats it up.
When the Tepan plate isswitched on either deliberately or bymistake, or when there is residualheat present, there is a risk of anymetal items placed on the Tepanplate heating up.Danger of burning!Do not use the Tepan plate as aresting place for anything else.Switch the Tepan plate off after usewith the appropriate sensor control.

Power level range
19
Cooking process Power levelrange
Keeping cooked food warm 1–2
Gently cooking fruit, e.g. apple slices, peach halves, bananasslices, etc.
3–4
Gently stir-frying vegetables, e.g. leeks, sliced mushrooms,capsicum strips, onion rings, etc.
4–5
Gently frying eggs, fish, meat, sausages, schnitzels, vegetables,bacon
5–6
Frying meat, fish, hash browns, potato cakes 6–8
Frying steak, pancakes, marinated meat 8–9
These settings should only be taken as a guide. Times will vary according to thetype, texture and thickness of the food being cooked.
Operation
20
Operating principlesThis SmartLine appliance is equippedwith electronic sensor controls whichreact to finger contact. For safetyreasons, in order to switch theappliance on, the On/Off sensorneeds to be touched for a little longerthan the other sensors.Each time you touch a sensor, anaudible tone sounds.
Only the printed On/Off symbol isvisible when the SmartLine appliance isswitched off. The other sensor controlslight up when the SmartLine applianceis switched on.
Malfunction due to dirty and/orcovered sensor controls.If the sensor controls are dirty orcovered, this could cause them tofail to react, or may lead to theappliance inadvertently switching oneven switching off automatically (see“Safety switch-off”). Placing hotpans on the sensor controls/indicators can damage the electronicunit underneath.Keep the sensor controls andindicators clean and do not placeanything on top of them. Do notplace hot pans on them.
The Tepan plate has two cooking zoneswhich can be switched on andregulated independently of one another.The entire area can be used whencooking large quantities of food. Forsmaller quantities, the front element canbe used to cook the food whilst the rearelement can be used to keep foodwarm with the keeping warmfunction .
Operation
21
Fire hazard!Do not leave the Tepan plateunattended whilst it is being used.Please note that the heating-up timefor induction is much shorter than forconventional electric heating.
Switching on the Tepan plate Touch the sensor.
Further sensor controls will light up. Ifno further entry is made, the Tepanplate will switch itself off after a fewseconds for safety reasons.
Setting the power level Touch the appropriate sensor control
on the respective numerical keybankfor the power level you want.
Switching off To switch off a cooking zone, touch
the 0 sensor control on the numericalkeybank for that zone.
To switch off the Tepan plate andthus both cooking zones, touchthe sensor control.
Residual heat indicatorIf the SmartLine applinace is still hot,the residual heat indicator will light upafter it has been switched off.Depending on the temperature, a dotwill appear above power levels 1, 2 and3.
The dots of the residual heat indicatorgo out one after the other as theSmartLine appliance cools down. Thelast dot only goes out when theSmartLine appliance is safe to touch.
Danger of burning!Do not touch the SmartLineappliance whilst the residual heatindicators are lit up.
Operation
22
Setting the power level -extended level range
9 power levels are programmed at thefactory. If you wish to fine-tune asetting, you can extend the powerlevel range to 17 power levels (see“Programming”).
Touch the numerical keybankbetween two number sensors.
The sensors in front of and after theinterim level will light up brighter thanthe other sensors.
Example:If you have set power level 7., thenumbers 7 and 8 will be brighter thanthe other numbers.
Switching the heatingelements on togetherIf you want to use the entire surfacewith a single setting, the heatingelements can be switched on andlinked together. The settings arecontrolled by the front numericalkeybank.
Touch the sensor.
Operation
23
Tips for frying
Wipe the surface of the Tepan platebefore each use with a damp cloth toremove any dust or other soilingwhich may have settled on it since itwas last used.
– Pre-heat the Tepan plate thoroughlyfor 2–3 minutes. To do this, set thepower level that you are going to beusing for cooking.
– It is important to get the Tepansufficiently hot before use,particularly when browning andsealing meat. If it is not hot enough,the meat will lose too much juice andbecome tough.
– You only need to use the minimumamount of oil or fat when cooking onthe Tepan plate. With marinated food,no fat or oil is needed. Wait until thetemperature indicator light has goneout before adding cooking fat.
– Use only fats and oils that canwithstand high temperatures.
– We recommend that you marinate thefood to be cooked. This will improvethe flavour of the food.
– Pat wet food dry with kitchen paperbefore cooking to prevent it spitting.
– To prevent meat drying out, do notseason with salt until after it has beencooked.
Keeping warm
This function is for keeping food warmwhich has just been cooked and is stillhot. It is not for reheating food thathas gone cold.
The maximum duration for keeping foodwarm is 2 hours.
Activating/Deactivating the keepingwarm function
Touch the sensor for the cookingzone you wish to use.
Timer
24
The SmartLine appliance has to beswitched on if you wish to use the timer.A duration of between 1 minute (:)and 9 hours 59 minutes (:) can beset.
Times of up to 59 minutes are shown inminutes (0:59) and times of more than60 minutes are shown in hours andminutes. Times are entered in the orderof hours, followed by minutes in tensand then units.
Example:
59 min = 0:59, entry: 5-980 min = 1:20, entry: 1-2-0
After the first number has been entered,the timer display will light up constantly.After the second number has beenentered, the first number will move tothe left. After the third number has beenentered, the first and second numberswill move to the left.
The timer can be used for two differentfunctions:
– For setting the minute minder.
– For automatically switching off acooking zone/heating element/Tepanplate zone.
The functions can be used at the sametime. The shortest time is alwaysdisplayed and the sensor control(minute minder) or the indicator light forautomatic switch-off pulsates.
Touch the or sensor control if youwant to show the times remainingcounting down in the background. Ifmore than one switch-off time isprogrammed, touch the sensorcontrol repeatedly until thecorresponding indicator light pulsates.
Minute minderThe minute minder is set using thenumerical keybank for the left or frontleft cooking zone (depending on model).
Setting the minute minder
Touch the sensor.
The timer display will start to flash.
Select the time you require.
Changing the time set for the minuteminder
Touch the sensor.
Select the time you require.
Cancelling the minute minderduration
Touch the sensor until :appears in the timer display.
Timer
25
Switching off the heatingelement/cooking zoneautomaticallyYou can set a time after which theheating element/cooking zone will turnoff automatically. This function can beused on all heating elements/cookingzones at the same time.
The switch-off time is set on thenumerical keybank for the heatingelement/cooking zone that you wantto switch off automatically.
If the time programmed is longer thanthe maximum operational timeallowed, the heating element/cookingzone is switched off by the safetyswitch-off (see relevant section).
Select a power level for the requiredheating element/cooking zone.
Touch the sensor.
The indicator light will start to flash.
Select the required time.
If you want to set a switch-off time foranother heating element/cookingzone, follow the same steps asdescribed above.
If more than one switch-off time isprogrammed, the shortest timeremaining will be displayed, and thecorresponding indicator light will flash.The other indicator lights will light upconstantly.
If you want to show the remainingtimes counting down in thebackground, touch the sensorcontrol repeatedly until the indicatorlight for the required heating element/cooking zone flashes.
Changing the switch-off time
Touch the sensor controlrepeatedly until the indicator light forthe required heating element/cookingzone flashes.
Select the required time.
Deleting the switch-off time
Touch the sensor controlrepeatedly until the indicator light forthe required heating element/cookingzone flashes.
Touch the 0 sensor control on thenumerical keybank.
Additional functions
26
Stop & GoThe set power level is reduced to 1when the Stop & Go function isactivated.The power levels and the timer settingscannot be changed, the SmartLineappliance can only be switched off. Theminute minder and automatic switch-offtimes continue to run.
If the function is deactivated, theappliance switches back to the powerlevel that was set last.
If the function is not deactivated within1 hour, the SmartLine appliance willswitch off.
Activating / Deactivating
Touch the sensor.
RecallIf the SmartLine appliance isaccidentally switched off during use,you can use this function to restore allthe settings. The SmartLine appliancemust be switched on again within10 seconds.
Switch the SmartLine appliance onagain.
The previously set power levels flash.
Press one of the flashing power levelindicators immediately.
The appliance will continue to operateusing the settings selected previously.
Additional functions
27
Wipe protection
You can lock the SmartLine appliancesensor controls for 20 seconds inorder, for example, to remove soiling.The sensor control is not locked.
Activating
Touch the sensor.
The time counts down in the timerdisplay.
Deactivating
Touch the sensor control until thetimer display goes out.
Demonstration modeThis function enables the SmartLineappliance to be demonstrated inshowrooms without heating up.
Activating/Deactivating thedemonstration mode
Switch the SmartLine appliance on.
Touch the 0 sensor control on any ofthe numerical keybanks.
Then touch the 0 and 2 sensors atthe same time for 6 seconds.
In the timer display, flashesalternately with (demonstration modeactivated) or (demonstration modedeactivated) for a few seconds.
Displaying the SmartLineappliance dataThe model designation and softwareversion of the SmartLine appliance canbe displayed. To do this, there must notbe any pots or pans on the SmartLineappliance.
Model designation
Switch the SmartLine appliance on.
Touch the 0 sensor control on any ofthe numerical keybanks.
Then touch the 0 and 4 sensorcontrols at the same time.
The timer display shows 2 numbersflashing alternately:
flashes alternately with = CS 1234(example only)
Software version
Switch the SmartLine appliance on.
Touch the 0 sensor control on any ofthe numerical keybanks.
Then touch the 0 and 3 sensorcontrols at the same time.
Numbers will appear in the timerdisplay:
: = software version
Safety features
28
System lock / Safety lock
The safety lock is deactivated if thereis a break in the mains supply.
Your SmartLine appliance is equippedwith a system lock and a safety lock toprevent the appliance from beingswitched on or any settings beingaltered by mistake.
The system lock is activated when theSmartLine appliance is switched off. Ifthe system lock is activated, theappliance cannot be switched on andthe timer cannot be used. A set minuteminder time continues to count down.The SmartLine appliance isprogrammed so that the system lockmust be activated manually. It can beprogrammed to be activatedautomatically 5 minutes after theSmartLine appliance has been switchedoff if it is not manually locked first (see“Programming”).
The safety lock is activated when theSmartLine appliance is switched on.When the safety lock is activated, theappliance can be operated only undercertain conditions:
– Selected power levels cannot bechanged.
– A set minute minder time can bemodified.
– The SmartLine appliance can only beswitched off.
If an unavailable sensor control istouched whilst the system lock orsafety lock is activated, will appearin the timer display for a few secondsand a tone will sound.
Activating the system lock
Touch the sensor for 6 seconds.
The seconds can be seen countingdown in the timer display. When thistime has elapsed will appear in thetimer display. The system lock has beenactivated.
Deactivating the system lock
Touch the sensor for 6 seconds.
will appear briefly in the timerdisplay and then the seconds will countdown. The system lock is deactivatedonce the time has elapsed.
Safety features
29
Activating the safety lock
Touch and hold the and sensors at the same time for6 seconds.
The time counts down in the timerdisplay. will appear once the timehas elapsed. The safety lock isactivated.
Deactivating the safety lock
Touch and hold the and sensors at the same time for6 seconds.
will appear briefly in the timerdisplay and then the time will countdown. Once the time has elapsed, thesafety lock is deactivated.
Safety features
30
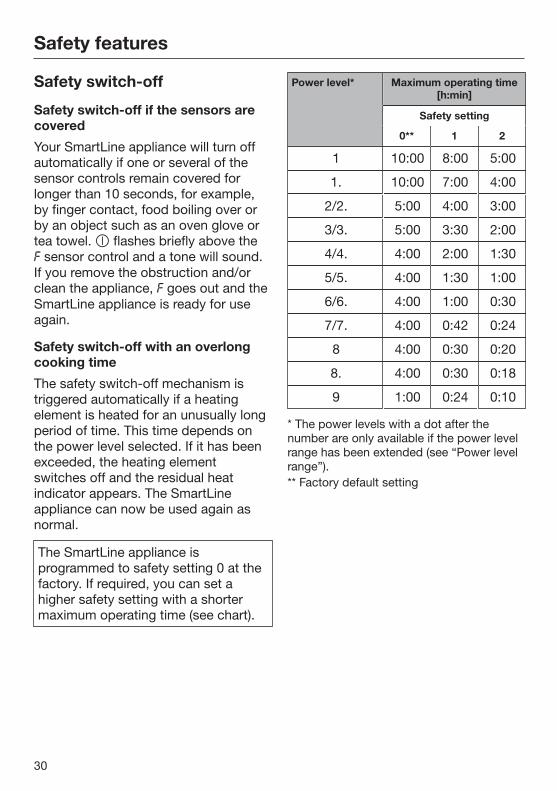
Safety switch-off
Safety switch-off if the sensors arecovered
Your SmartLine appliance will turn offautomatically if one or several of thesensor controls remain covered forlonger than 10 seconds, for example,by finger contact, food boiling over orby an object such as an oven glove ortea towel. flashes briefly above the sensor control and a tone will sound.If you remove the obstruction and/orclean the appliance, goes out and theSmartLine appliance is ready for useagain.
Safety switch-off with an overlongcooking time
The safety switch-off mechanism istriggered automatically if a heatingelement is heated for an unusually longperiod of time. This time depends onthe power level selected. If it has beenexceeded, the heating elementswitches off and the residual heatindicator appears. The SmartLineappliance can now be used again asnormal.
The SmartLine appliance isprogrammed to safety setting 0 at thefactory. If required, you can set ahigher safety setting with a shortermaximum operating time (see chart).
Power level* Maximum operating time[h:min]
Safety setting
0** 1 2
1 10:00 8:00 5:00
1. 10:00 7:00 4:00
2/2. 5:00 4:00 3:00
3/3. 5:00 3:30 2:00
4/4. 4:00 2:00 1:30
5/5. 4:00 1:30 1:00
6/6. 4:00 1:00 0:30
7/7. 4:00 0:42 0:24
8 4:00 0:30 0:20
8. 4:00 0:30 0:18
9 1:00 0:24 0:10
* The power levels with a dot after thenumber are only available if the power levelrange has been extended (see “Power levelrange”).** Factory default setting
Safety features
31
Overheating protectionAll the induction coils and coolingelements for the electronics are fittedwith an overheating protectionmechanism. Before the induction coilsor cooling elements get too hot, theoverheating protection mechanism cutsin in one of the following ways:
Induction coils
– The set power level will be reduced.
– The cooking zone switches offautomatically. flashes alternatelywith in the timer display.
You can use the cooking zone again asusual when the fault code has gone out.
Cooling elements
– The set power level will be reduced.
– The cooking zone switches offautomatically.
The affected cooking zone can only beused again as usual once the coolingelement has cooled down to a safelevel.
Overheating can be caused by:
– Fat or oil being heated on a highpower level.
– Insufficient ventilation of theunderside of the Tepan plate.
– A hot cooking zone being switchedon after an interruption to the powersupply.
If, despite removing the cause, theoverheating protection mechanismtriggers again, contact Miele.
Programming
32
You can adapt the programming of theSmartLine appliance to your personalneeds. Several settings can be alteredin succession.
After accessing the programmingmode, the symbol lights up and appears in the timer display. After a fewseconds : (Programme 01) will flashalternately with : (Code) in the timerdisplay.
Changing the programming
Calling up programming
With the SmartLine applianceswitched off, press and hold the and sensor controls together untilthe symbol lights up and appears in the timer display.
Setting a programme
For a two-digit programme numberyou need to first set the tens position.
Touch the sensor controlrepeatedly until the programmenumber you want appears in thedisplay, or touch the appropriatenumber on the numerical keybank.
Setting the code
Touch the sensor controlrepeatedly until the code number youwant appears in the display, or touchthe appropriate number on thenumerical keybank.
How to save the settings
While the programme is visible in thedisplay (e.g. :), touch the sensor control until the indicatorsgo out.
How to avoid saving the settings
Touch the sensor until theindicators go out.
Programming
33
Programme1) Code2) Settings
P:01 Demonstration mode C:00 Demonstration mode off
C:01 Demonstration mode on3)
P:03 Factory settings C:00 Factory default settings notrestored
C:01 Factory default settings restored
P:04 Number of power levels C:00 9 power levels
C:01 17 power levels4)
P:06 Keypad tone when a sensor istouched
C:00 Off5)
C:01 Quiet
C:02 Medium
C:03 Loud
P:07 Audible tone for the timer C:00 Off5)
C:01 Quiet
C:02 Medium
C:03 Loud
P:08 System lock C:00 System lock can only be activatedmanually
C:01 System lock activatedautomatically
P:09 Maximum operating time C:00 Safety setting 0
C:01 Safety setting 1
C:02 Safety setting 2
Programming
34
Programme1) Code2) Settings
P:12 Sensor controls reactionspeed
C:00 Slow
C:01 Normal
C:02 Fast
1) Programmes not shown here have no allocation.2) The factory setting is shown in bold.3) After the SmartLine appliance has been switched on, appears in the timer display for afew seconds.4) In the text and charts, the extended power levels are shown with a dot after the numberfor better understanding.5) The tone which sounds when the On/Off sensor is touched cannot be switched off.
Cleaning and care
35
Danger of burning!Before cleaning the appliance, makesure that you have switched it offand that it has cooled down.
Danger of injury!The steam from a steam cleaningappliance could reach electricalcomponents and cause a shortcircuit.Do not use a steam cleaner to cleanthe appliance.
The use of unsuitable cleaningagents can cause the surfaces todiscolour or alter.The external surfaces of thisappliance are all susceptible toscratching.Remove any cleaning agent residuesimmediately.
Allow the SmartLine appliance tocool down before cleaning.
Clean the SmartLine appliance andaccessories after each use.
Dry the SmartLine appliancethoroughly every time after cleaningto avoid limescale residue.
Unsuitable cleaning agentsTo avoid damaging the surfaces of yourappliance, do not use:
– cleaning agents containing soda,ammonia, acids or chlorides,
– cleaning agents containing descalingagents,
– stain or rust removers,
– abrasive cleaning agents, e.g.powder cleaners and cream cleaners,
– solvent-based cleaning agents,
– dishwasher cleaner,
– grill and oven cleaners,
– glass cleaning agents,
– hard, abrasive brushes or sponges,e.g. pot scourers, brushes orsponges which have been previouslyused with abrasive cleaning agents,
– dirt erasers.
Cleaning and care
36
Control panel Remove any coarse soiling with a
damp cloth and more stubbornsoiling with a glass scraper.
Then clean the control panel with theMiele ceramic and stainless steelcooktop cleaner (see “Optionalaccessories”) or with a commerciallyavailable ceramic glass cleanerapplied with a paper towel or a cleancloth.
Finally wipe the control panel with adamp cloth, and then dry it.
Frying surface Use a spatula to remove any large
particles immediately.
Allow the appliance to cool downuntil it can be touched by hand, andthen use a solution of hot water andwashing-up liquid to soften thesoiling. Clean the surface with therough side of a non-scouring spongeand a few drops of Miele Ceramicand stainless steel cooktop cleaner(see “Optional accessories”). Finallywipe with a damp cloth and drythoroughly.
Always use clean water to wipe theappliance to ensure that every trace ofcleaning agent has been removed.Any remaining traces could affect foodthe next time you use the appliance.
Important - Conditioning agents forstainless steel must not be used onthe frying surface.
Problem solving guide
37
With the help of the following guide, minor faults in the performance of theappliance, some of which may result from incorrect operation, can be remediedwithout contacting Miele. This will save you time and money because you will notneed a service call.
Please note that a call-out charge will be applied to unnecessary service visitswhere the problem could have been rectified as described in these operatinginstructions.
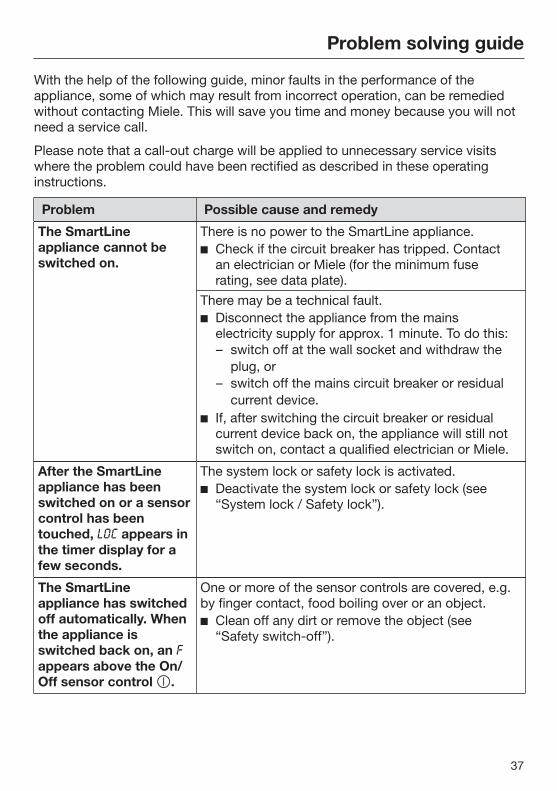
Problem Possible cause and remedy
The SmartLineappliance cannot beswitched on.
There is no power to the SmartLine appliance. Check if the circuit breaker has tripped. Contact
an electrician or Miele (for the minimum fuserating, see data plate).
There may be a technical fault. Disconnect the appliance from the mains
electricity supply for approx. 1 minute. To do this:– switch off at the wall socket and withdraw the
plug, or– switch off the mains circuit breaker or residual
current device. If, after switching the circuit breaker or residual
current device back on, the appliance will still notswitch on, contact a qualified electrician or Miele.
After the SmartLineappliance has beenswitched on or a sensorcontrol has beentouched, appears inthe timer display for afew seconds.
The system lock or safety lock is activated. Deactivate the system lock or safety lock (see
“System lock / Safety lock”).
The SmartLineappliance has switchedoff automatically. Whenthe appliance isswitched back on, an appears above the On/Off sensor control .
One or more of the sensor controls are covered, e.g.by finger contact, food boiling over or an object. Clean off any dirt or remove the object (see
“Safety switch-off”).
Problem solving guide
38
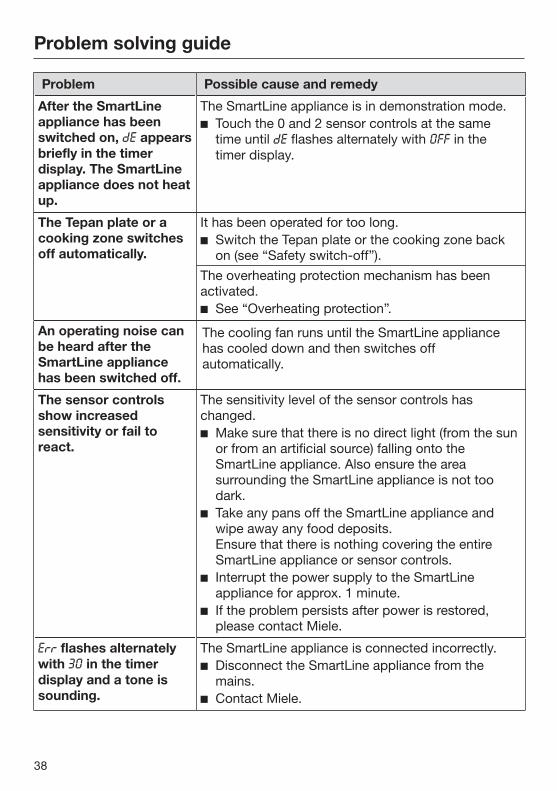
Problem Possible cause and remedy
After the SmartLineappliance has beenswitched on, appearsbriefly in the timerdisplay. The SmartLineappliance does not heatup.
The SmartLine appliance is in demonstration mode. Touch the 0 and 2 sensor controls at the same
time until flashes alternately with in thetimer display.
The Tepan plate or acooking zone switchesoff automatically.
It has been operated for too long. Switch the Tepan plate or the cooking zone back
on (see “Safety switch-off”).The overheating protection mechanism has beenactivated. See “Overheating protection”.
An operating noise canbe heard after theSmartLine appliancehas been switched off.
The cooling fan runs until the SmartLine appliancehas cooled down and then switches offautomatically.
The sensor controlsshow increasedsensitivity or fail toreact.
The sensitivity level of the sensor controls haschanged. Make sure that there is no direct light (from the sun
or from an artificial source) falling onto theSmartLine appliance. Also ensure the areasurrounding the SmartLine appliance is not toodark.
Take any pans off the SmartLine appliance andwipe away any food deposits.Ensure that there is nothing covering the entireSmartLine appliance or sensor controls.
Interrupt the power supply to the SmartLineappliance for approx. 1 minute.
If the problem persists after power is restored,please contact Miele.
flashes alternatelywith in the timerdisplay and a tone issounding.
The SmartLine appliance is connected incorrectly. Disconnect the SmartLine appliance from the
mains. Contact Miele.
Problem solving guide
39
Problem Possible cause and remedy
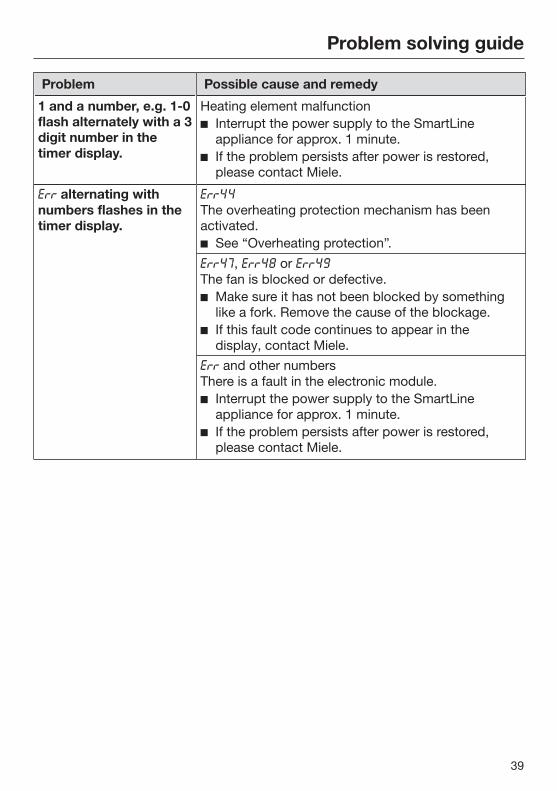
1 and a number, e.g. 1-0flash alternately with a 3digit number in thetimer display.
Heating element malfunction Interrupt the power supply to the SmartLine
appliance for approx. 1 minute. If the problem persists after power is restored,
please contact Miele.
alternating withnumbers flashes in thetimer display.
The overheating protection mechanism has beenactivated. See “Overheating protection”.
, or The fan is blocked or defective. Make sure it has not been blocked by something
like a fork. Remove the cause of the blockage. If this fault code continues to appear in the
display, contact Miele. and other numbersThere is a fault in the electronic module. Interrupt the power supply to the SmartLine
appliance for approx. 1 minute. If the problem persists after power is restored,
please contact Miele.
Optional accessories
40
Miele offers a range of usefulaccessories, as well as cleaning andconditioning products for yourappliance.
These products can be ordered fromthe Miele online shop.
They can also be ordered directly fromMiele (see end of this booklet forcontact details).
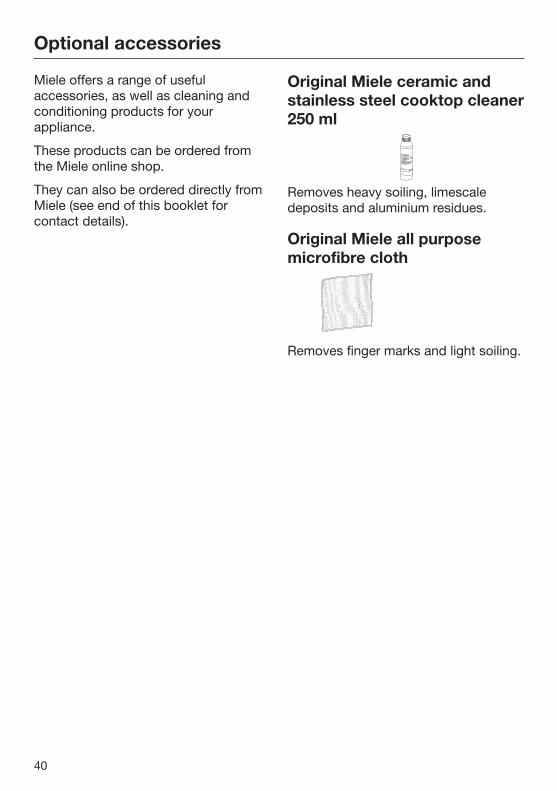
Original Miele ceramic andstainless steel cooktop cleaner250 ml
Removes heavy soiling, limescaledeposits and aluminium residues.
Original Miele all purposemicrofibre cloth
Removes finger marks and light soiling.
Safety instructions for installation
41
Install the wall units and rangehood before installing the SmartLine appliance toavoid damaging it.
The veneer or laminate coatings of worktops (or adjacent kitchenunits) must be treated with 100 °C heat-resistant adhesive which willnot dissolve or distort. Any splashbacks must be of heat-resistantmaterial as well.
The SmartLine appliance must not be installed over a fridge,fridge-freezer, freezer, dishwasher, washing machine, washer-dryeror tumble dryer.
When installing the SmartLine appliance, make sure that themains connection cable cannot come into contact with hot applianceparts.
After installation, the mains connection cable of the SmartLineappliance must not come into contact with any moving kitchencomponent (e.g. a drawer) or be subject to mechanical loads whichcould damage it.
Carefully observe the safety clearances listed on the followingpages.
Safety distances
42
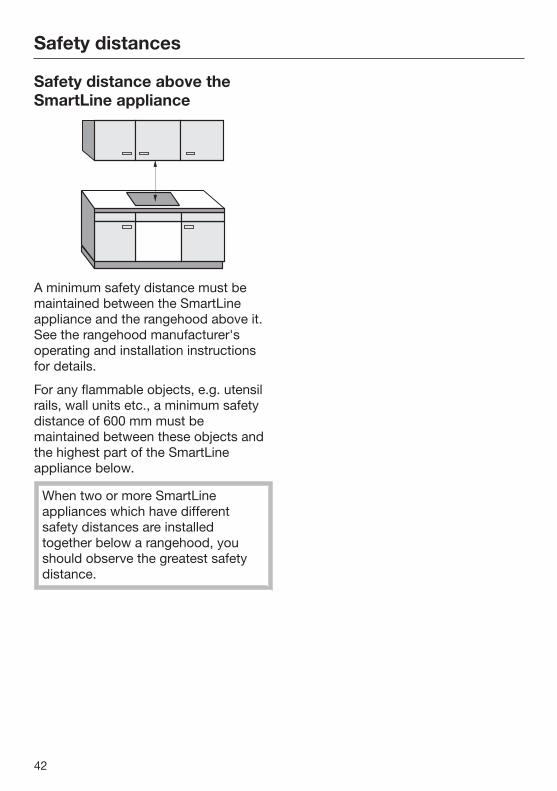
Safety distance above theSmartLine appliance
A minimum safety distance must bemaintained between the SmartLineappliance and the rangehood above it.See the rangehood manufacturer'soperating and installation instructionsfor details.
For any flammable objects, e.g. utensilrails, wall units etc., a minimum safetydistance of 600 mm must bemaintained between these objects andthe highest part of the SmartLineappliance below.
When two or more SmartLineappliances which have differentsafety distances are installedtogether below a rangehood, youshould observe the greatest safetydistance.
Safety distances
43
Safety distances to the sidesand back of the applianceThe SmartLine appliance shouldpreferably be installed with plenty ofspace on the right and left.
The minimum distance specifiedbelow must be observed between therear of the SmartLine applianace and atall unit or room wall.
The minimum distance , specifiedbelow must be adhered to between oneside of the SmartLine appliance (right orleft) and a tall unit or room wall. Aminimum distance of 300 mm must beobserved on the opposite side.
Minimum horizontal distance fromthe back edge of the appliance to acombustible surface: 50 mm
Minimum horizontal distance fromthe right edge of the appliance to acombustible surface:50 mm.
Minimum horizontal distance fromthe left edge of the appliance to acombustible surface: 50 mm.
Minimum safety distancesunderneath the SmartLineapplianceTo ensure proper ventilation of theSmartLine appliance, a minimumclearance is required between theappliance and an oven, interim shelf, ordrawer.
The minimum clearance from the loweredge of the SmartLine appliance to
– the top edge of an oven is 15 mm.
– the top edge of an interim shelf is15 mm.
– the base of a drawer is 75 mm.
Interim shelfIt is not necessary to fit an interim shelfunderneath the SmartLine appliance,but one may be fitted if you wish.
Leave a gap of 10 mm at the back ofthe shelf to accommodate the mainsconnection cable. We recommend agap at the front of the SmartLineappliance of 20 mm to ensure goodventilation.
Installation notes
44
All dimensions in this instructionbooklet are given in mm.
Installation of surface-mounted appliances
Sealing between the SmartLineappliance and the worktop
The SmartLine appliance andworktop may be damaged if theappliance needs to be removed afterit has been sealed with a sealant.Do not use any sealant between theSmartLine appliance and theworktop.The sealing strip under the edge ofthe top part of the applianceprovides a sufficient seal for theworktop.
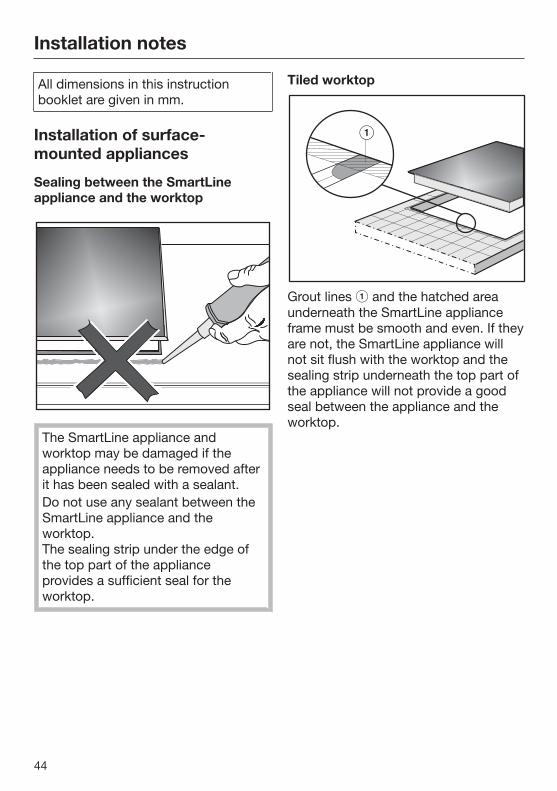
Tiled worktop
Grout lines and the hatched areaunderneath the SmartLine applianceframe must be smooth and even. If theyare not, the SmartLine appliance willnot sit flush with the worktop and thesealing strip underneath the top part ofthe appliance will not provide a goodseal between the appliance and theworktop.

Installation notes
45
Flush-fit installation
Flush-fit installation is only possible innatural stone (granite, marble), solidwood and tiled worktops. Forinstallation in worktops made of othermaterials, please consult the relevantmanufacturer as to whether theirworktops are suitable for flush-fitinstallation.
The internal width of the base unitunderneath the appliance must be atleast as wide as the inner worktop cut-out (see “Worktop cut-out for flush-fitinstallation”), so that the SmartLineappliance is easily accessible fromunderneath after installation and thebottom half of the casing can beremoved for maintenance. If theappliance is not freely accessible frombelow after installation, the sealantmust be removed so that theappliance can be removed.
The SmartLine appliance is
– directly installed in a suitable cut-outin a natural stone worktop,
– in a suitable cut-out in solid woodand tiled worktops with a woodensupport frame. The frame must beprovided on site, and is not suppliedwith the appliance.
Installation notes
46
Installing several SmartLineappliancesThe gaps between the individualSmartLine appliances are sealed with asilicone sealant that is heat-resistant toat least 160 °C. With flush-fitinstallation, the gap between theSmartLine appliances and the worktopmust also be sealed with a siliconesealant that is heat-resistant to at least160 °C.After installation, the SmartLineappliances must be easily accessiblefrom below, so that the bottom half ofthe casing can be removed formaintenance. If the SmartLineappliances are not accessible frombelow, the sealant must be removed sothat they can be removed.
Combination with a downdraftextractorIf the SmartLine cooking appliance isinstalled in combination with adowndraft extractor, the latter must beinstalled first.
Building-in dimensions
47
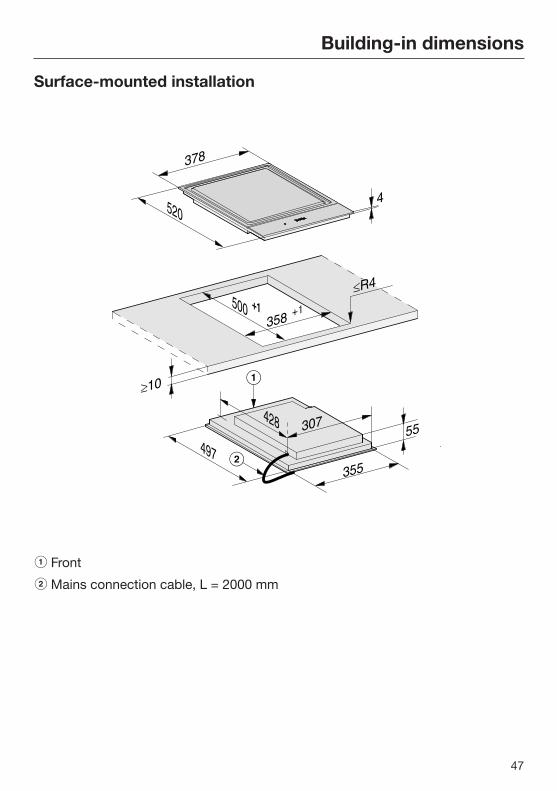
Surface-mounted installation
a Front
b Mains connection cable, L = 2000 mm
Building-in dimensions
48
Flush-fit installation
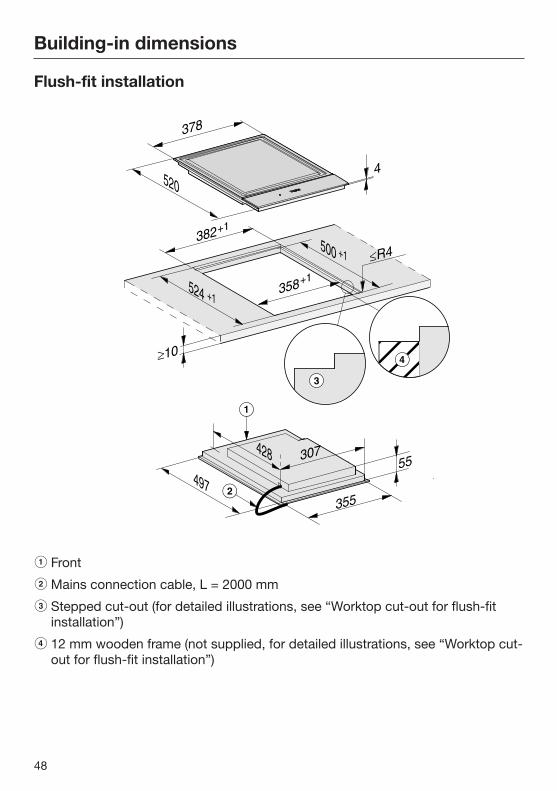
a Front
b Mains connection cable, L = 2000 mm
c Stepped cut-out (for detailed illustrations, see “Worktop cut-out for flush-fitinstallation”)
d 12 mm wooden frame (not supplied, for detailed illustrations, see “Worktop cut-out for flush-fit installation”)
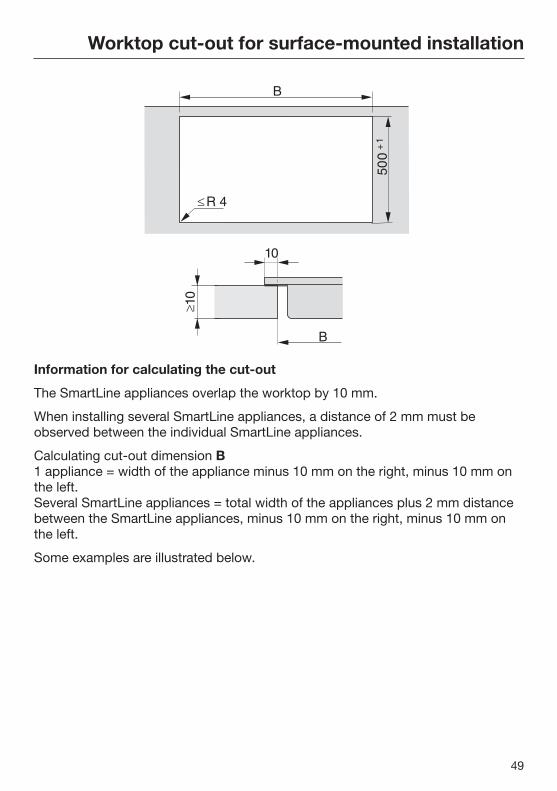
Worktop cut-out for surface-mounted installation
49
B
50
0+
1
�R 4
B
10
�10
Information for calculating the cut-out
The SmartLine appliances overlap the worktop by 10 mm.
When installing several SmartLine appliances, a distance of 2 mm must beobserved between the individual SmartLine appliances.
Calculating cut-out dimension B1 appliance = width of the appliance minus 10 mm on the right, minus 10 mm onthe left.Several SmartLine appliances = total width of the appliances plus 2 mm distancebetween the SmartLine appliances, minus 10 mm on the right, minus 10 mm onthe left.
Some examples are illustrated below.
Worktop cut-out for surface-mounted installation
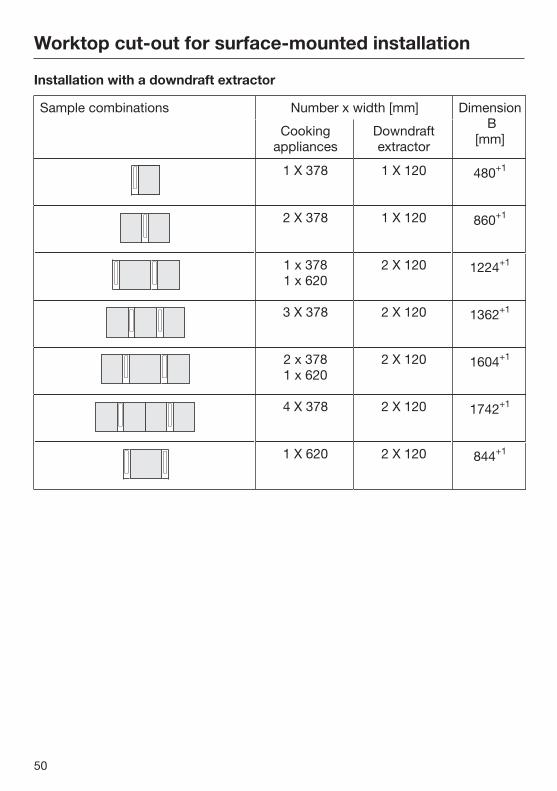
50
Installation with a downdraft extractor
Sample combinations Number x width [mm] Dimension B
[mm]Cooking
appliancesDowndraftextractor
1 X 378 1 X 120 480+1
2 X 378 1 X 120 860+1
1 x 3781 x 620
2 X 120 1224+1
3 X 378 2 X 120 1362+1
2 x 3781 x 620
2 X 120 1604+1
4 X 378 2 X 120 1742+1
1 X 620 2 X 120 844+1
Worktop cut-out for surface-mounted installation
51
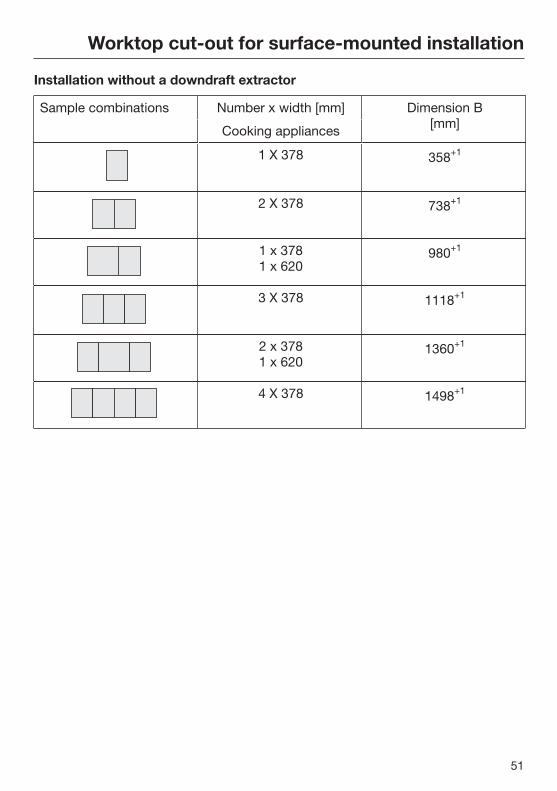
Installation without a downdraft extractor
Sample combinations Number x width [mm] Dimension B[mm]Cooking appliances
1 X 378 358+1
2 X 378 738+1
1 x 3781 x 620
980+1
3 X 378 1118+1
2 x 3781 x 620
1360+1
4 X 378 1498+1
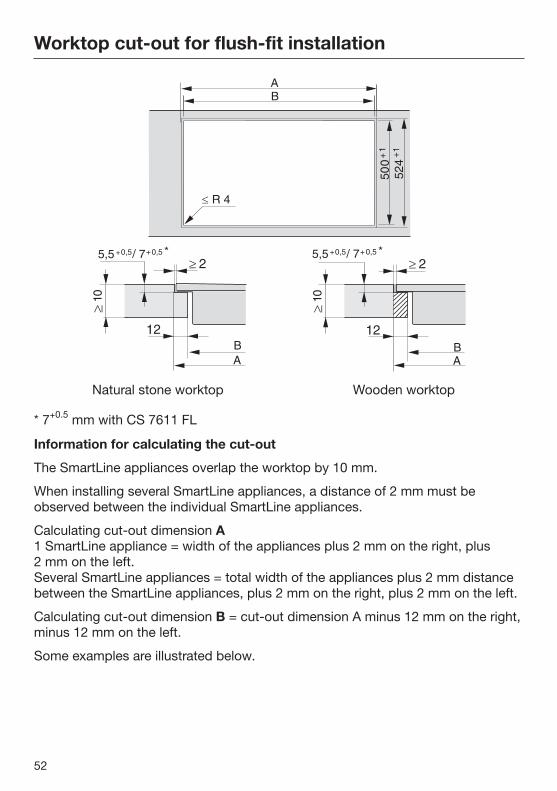
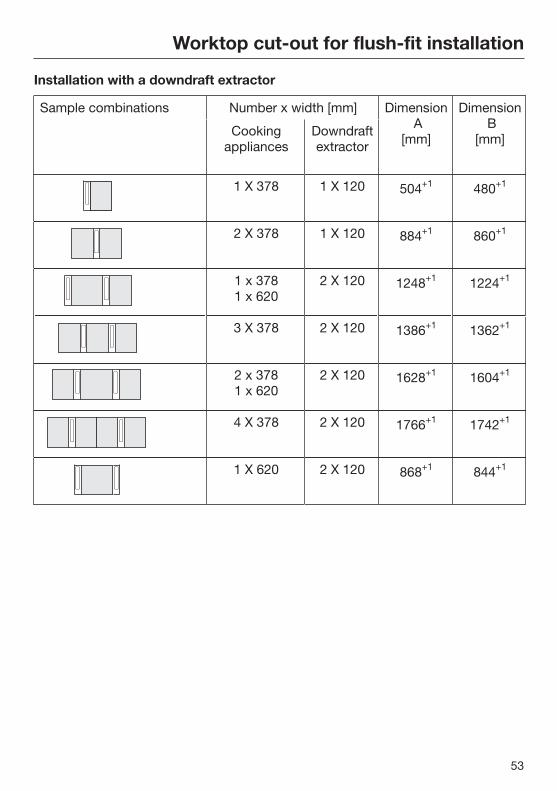
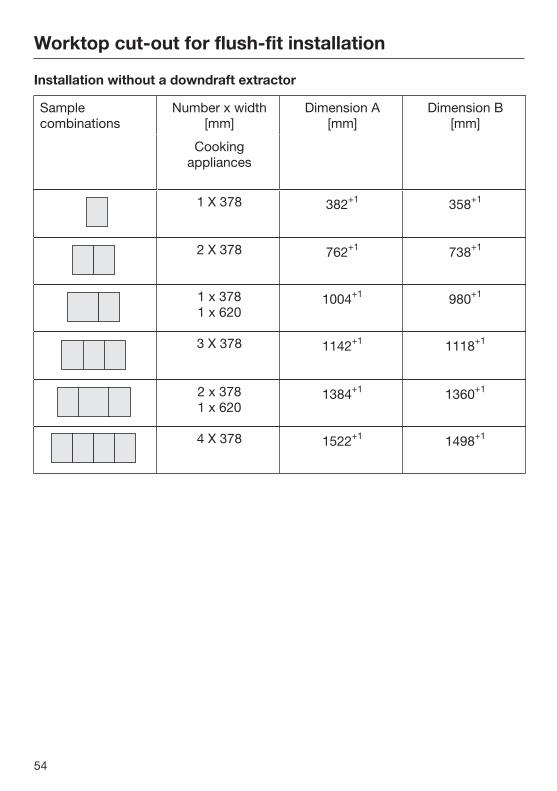
Worktop cut-out for flush-fit installation
52
B
A
524
50
0+
1
+1
� R 4
B
A
� 2
12
�10
5,5+0,5/ 7 *+0,5
� 2
B
A
12
�10
5,5+0,5/ 7 *+0,5
Natural stone worktop Wooden worktop
* 7+0.5 mm with CS 7611 FL
Information for calculating the cut-out
The SmartLine appliances overlap the worktop by 10 mm.
When installing several SmartLine appliances, a distance of 2 mm must beobserved between the individual SmartLine appliances.
Calculating cut-out dimension A1 SmartLine appliance = width of the appliances plus 2 mm on the right, plus2 mm on the left.Several SmartLine appliances = total width of the appliances plus 2 mm distancebetween the SmartLine appliances, plus 2 mm on the right, plus 2 mm on the left.
Calculating cut-out dimension B = cut-out dimension A minus 12 mm on the right,minus 12 mm on the left.
Some examples are illustrated below.
Worktop cut-out for flush-fit installation
53
Installation with a downdraft extractor
Sample combinations Number x width [mm] Dimension A
[mm]
Dimension B
[mm]Cooking
appliancesDowndraftextractor
1 X 378 1 X 120 504+1 480+1
2 X 378 1 X 120 884+1 860+1
1 x 3781 x 620
2 X 120 1248+1 1224+1
3 X 378 2 X 120 1386+1 1362+1
2 x 3781 x 620
2 X 120 1628+1 1604+1
4 X 378 2 X 120 1766+1 1742+1
1 X 620 2 X 120 868+1 844+1
Worktop cut-out for flush-fit installation
54
Installation without a downdraft extractor
Samplecombinations
Number x width[mm]
Dimension A[mm]
Dimension B[mm]
Cookingappliances
1 X 378 382+1 358+1
2 X 378 762+1 738+1
1 x 3781 x 620
1004+1 980+1
3 X 378 1142+1 1118+1
2 x 3781 x 620
1384+1 1360+1
4 X 378 1522+1 1498+1
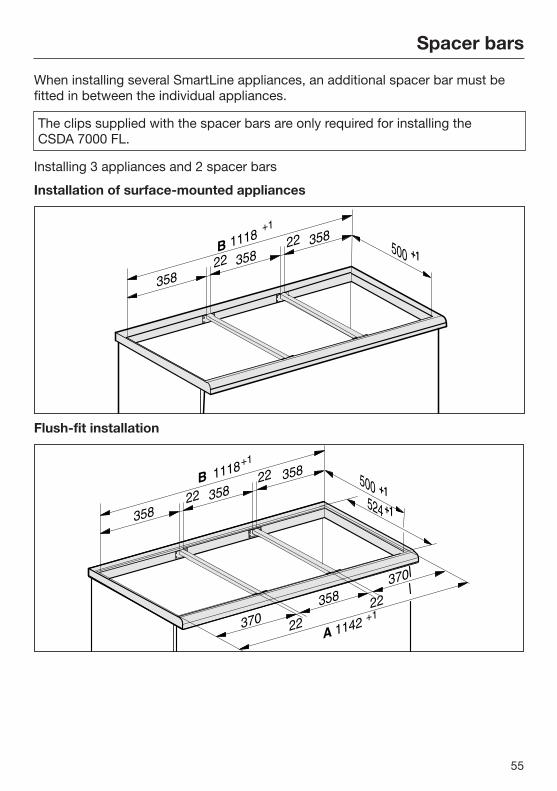
Spacer bars
55
When installing several SmartLine appliances, an additional spacer bar must befitted in between the individual appliances.
The clips supplied with the spacer bars are only required for installing theCSDA 7000 FL.
Installing 3 appliances and 2 spacer bars
Installation of surface-mounted appliances
Flush-fit installation
Installation
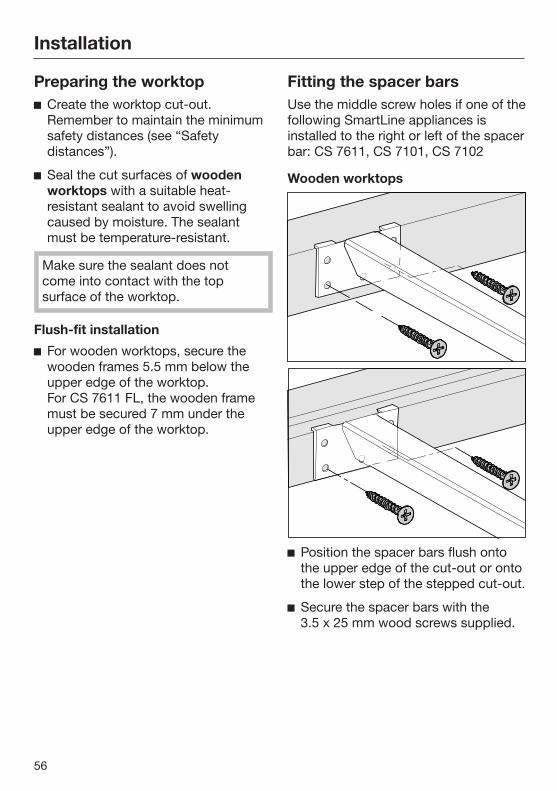
56
Preparing the worktop Create the worktop cut-out.
Remember to maintain the minimumsafety distances (see “Safetydistances”).
Seal the cut surfaces of woodenworktops with a suitable heat-resistant sealant to avoid swellingcaused by moisture. The sealantmust be temperature-resistant.
Make sure the sealant does notcome into contact with the topsurface of the worktop.
Flush-fit installation
For wooden worktops, secure thewooden frames 5.5 mm below theupper edge of the worktop.For CS 7611 FL, the wooden framemust be secured 7 mm under theupper edge of the worktop.
Fitting the spacer barsUse the middle screw holes if one of thefollowing SmartLine appliances isinstalled to the right or left of the spacerbar: CS 7611, CS 7101, CS 7102
Wooden worktops
Position the spacer bars flush ontothe upper edge of the cut-out or ontothe lower step of the stepped cut-out.
Secure the spacer bars with the3.5 x 25 mm wood screws supplied.
Installation
57
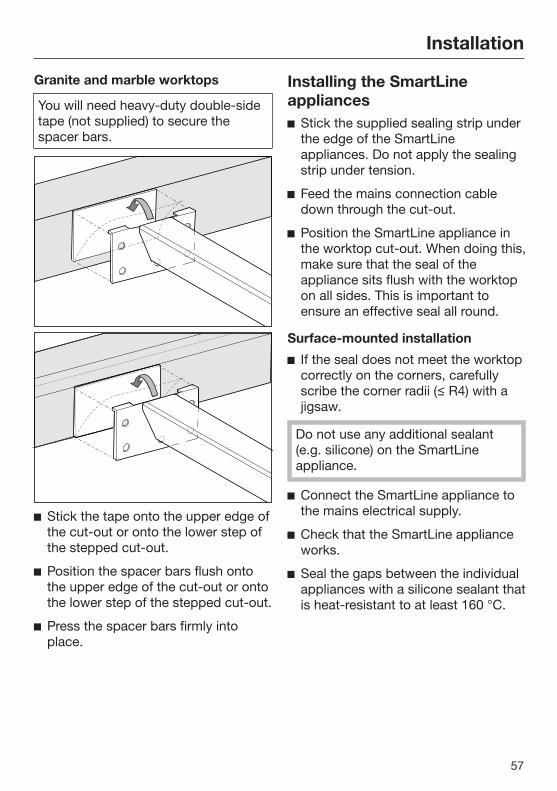
Granite and marble worktops
You will need heavy-duty double-sidetape (not supplied) to secure thespacer bars.
Stick the tape onto the upper edge ofthe cut-out or onto the lower step ofthe stepped cut-out.
Position the spacer bars flush ontothe upper edge of the cut-out or ontothe lower step of the stepped cut-out.
Press the spacer bars firmly intoplace.
Installing the SmartLineappliances Stick the supplied sealing strip under
the edge of the SmartLineappliances. Do not apply the sealingstrip under tension.
Feed the mains connection cabledown through the cut-out.
Position the SmartLine appliance inthe worktop cut-out. When doing this,make sure that the seal of theappliance sits flush with the worktopon all sides. This is important toensure an effective seal all round.
Surface-mounted installation
If the seal does not meet the worktopcorrectly on the corners, carefullyscribe the corner radii (≤ R4) with ajigsaw.
Do not use any additional sealant(e.g. silicone) on the SmartLineappliance.
Connect the SmartLine appliance tothe mains electrical supply.
Check that the SmartLine applianceworks.
Seal the gaps between the individualappliances with a silicone sealant thatis heat-resistant to at least 160 °C.
Installation
58
Flush-fit installation
Connect the SmartLine appliance tothe mains electrical supply.
Check that the SmartLine applianceworks.
Seal the gaps between the individualappliances and between theappliances and the worktop with asilicone sealant that is heat-resistantto at least 160 °C.
Unsuitable sealant can damagenatural stone.For natural stone worktops andnatural stone tiles, only use siliconesealant that is specially formulatedfor natural stone. Please follow themanufacturer's instructions.
Electrical connection
59
Danger of injury!Installation, repairs and other workby unqualified persons could bedangerous. Miele cannot be heldliable for unauthorised work.Miele cannot be held liable fordamage or injury caused byunauthorised installation,maintenance or repair work, or by aninadequate or faulty on-site earthingsystem (e.g. electric shock).The SmartLine appliance must beconnected to the mains electricitysupply by a suitably qualified andcompetent person in strictaccordance with current national andlocal safety regulations.After installation, ensure that allelectrical components are shieldedand cannot be accessed by users.
Total power outputSee data plate.
Connection dataThe connection data is given on thedata plate. Please ensure thisinformation matches the householdmains supply.
Residual current deviceFor extra safety, it is advisable toprotect the SmartLine appliance with asuitable residual current device (RCD)with a trip range of 30 mA.
Disconnecting devicesConnection must be made via asuitable isolator switch which providesdisconnection on all poles and whichcomplies with national and local safetyregulations. When switched off theremust be an all-pole contact gap of atleast 3 mm in the isolator switch. Theisolator switch must be easilyaccessible after the appliance has beenbuilt in.
Electrical connection
60
Replacing the mainsconnection cable
Danger of electric shock!Incorrect connection to the electricitysupply may result in an electricshock.The mains connection cable mustonly be replaced by a suitablyqualified and competent person inaccordance with current local andnational safety regulations in order toavoid a hazard.
When replacing the mains connectioncable, it must be replaced with cabletype H 05 VV-F with a suitable cross-section. These cables are available fromMiele.
Service
61
Contact in case of faultIn the event of any faults which you cannot remedy yourself, please contact Miele.
Contact information for Miele can be found at the end of this booklet.
Please quote the model and serial number of your appliance when contactingMiele. This information can be found on the data plate.
Data plateAdhere the extra data plate supplied with the appliance in the space below. Makesure that the model number matches the one specified on the back cover of thisdocument.
WarrantyThe manufacturer's warranty for this appliance is 2 years.
For further information, please refer to your warranty booklet.


www.miele.com.au
Miele Experience Centre and Head Office Melbourne:1 Gilbert Park DriveKnoxfield, VIC 3180
Miele Experience Centre South Melbourne:206-210 Coventry StreetSouth Melbourne, VIC 3205
Miele Experience Centre and Office Sydney:3 Skyline PlaceFrenchs Forest, NSW 2086
Miele Experience Centre and Office Brisbane:Tenancy 4C, 63 Skyring TerraceNewstead, QLD 4006
Miele Experience Centre and Office Perth:
83-85 Sir Donald Bradman DriveHilton, SA 5033
205-207 Stirling HighwayClaremont, WA 6010
Miele Experience Centre and Office Adelaide:
Miele Australia Pty. Ltd.
Miele New Zealand Limited
Level 2, 10 College HillFreemans Bay, Auckland 1011
Miele Experience CentreAuckland:8 College HillFreemans Bay, Auckland 1011Telephone:0800 464 353 (0800 4 MIELE)www.miele.co.nz
Miele Global HeadquartersGermanyMiele & Cie. KGCarl-Miele-Straße 2933332 GüterslohFederal Republic of Germany
Head Office:
IRD 98 463 631
ACN 005 635 398ABN 96 005 635 398
Miele Experience Centre Gold Coast:131 Ferry RoadSouthport, QLD 4215
M.-Nr. 10 883 190 / 02en-AU, NZ
CS 7632


