Embed Size (px)
Citation preview
DB2 Web Query for IBM iWizardsVersion 2 Release 1.0

Active Technologies, EDA, EDA/SQL, FIDEL, FOCUS, Information Builders, the Information Builders logo, iWay, iWay Software,Parlay, PC/FOCUS, RStat, Table Talk, Web390, WebFOCUS, WebFOCUS Active Technologies, and WebFOCUS Magnify areregistered trademarks, and DataMigrator and Hyperstage are trademarks of Information Builders, Inc.
Adobe, the Adobe logo, Acrobat, Adobe Reader, Flash, Adobe Flash Builder, Flex, and PostScript are either registeredtrademarks or trademarks of Adobe Systems Incorporated in the United States and/or other countries.
Due to the nature of this material, this document refers to numerous hardware and software products by their trademarks.In most, if not all cases, these designations are claimed as trademarks or registered trademarks by their respective companies.It is not this publisher's intent to use any of these names generically. The reader is therefore cautioned to investigate allclaimed trademark rights before using any of these names other than to refer to the product described.
Copyright © 2015 , by Information Builders, Inc. and iWay Software. All rights reserved. Patent Pending. This manual, or partsthereof, may not be reproduced in any form without the written permission of Information Builders, Inc.
IBM
Contents
Preface................................................................................................................5Documentation Conventions..............................................................................................5
1. Working With Metadata in DB2 Web Query ....................................................7Working With Metadata......................................................................................................8
Defining Synonyms....................................................................................................8
Creating a Synonym With the Metadata Wizard ...................................................................9
Authorization Requirements......................................................................................11
Launching the Metadata Wizard ...............................................................................11
Step One: Connect to SQL........................................................................................12
Step Two: Import Metadata......................................................................................14
Step Three: Joins....................................................................................................16
Step Four: Measures and Dimensions.......................................................................17
Editing Metadata.............................................................................................................19
Managing Synonyms........................................................................................................22
2. Uploading Data in DB2 Web Query.................................................................25Authorization Requirements.............................................................................................26
Guidelines for Uploading Data Files..................................................................................26
Launching the Upload Tools.............................................................................................27
Uploading Files to the Repository.....................................................................................35
DB2 Web Query for IBM i Wizards 3

4 IBM
Contents
IBM
Preface
This documentation describes the functions that are available for IBM DB2 Web Query forIBM i.
How This Manual Is Organized
This manual includes the following chapters:
ContentsChapter/Appendix
Describes how to create, test, and manage asynonym, using the Metadata tools.
Working With Metadata inDB2 Web Query
1
Describes how to upload (import) external data filesin DB2 Web Query.
Uploading Data in DB2 WebQuery
2
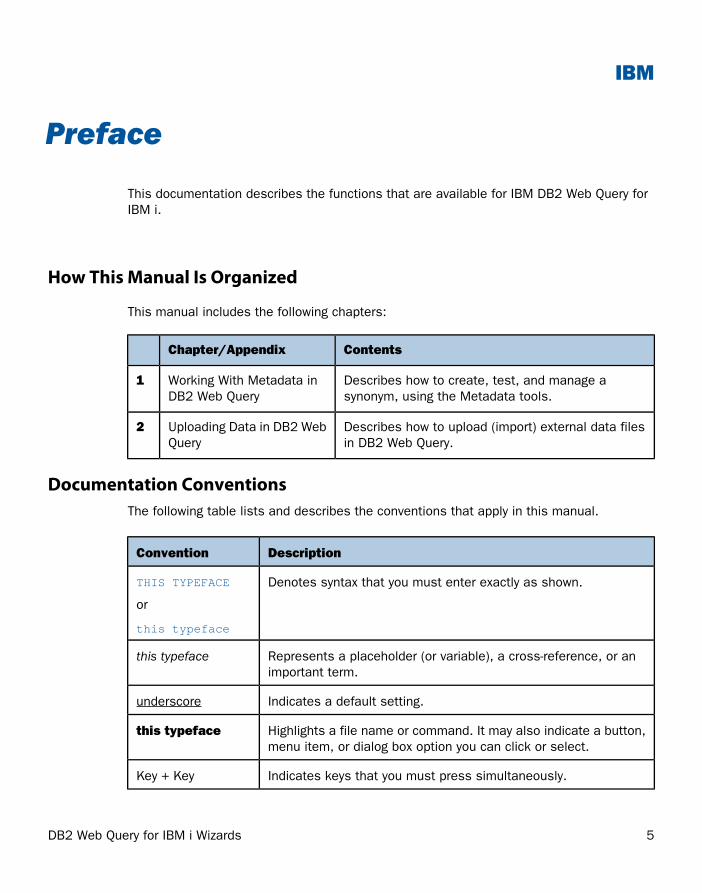
Documentation ConventionsThe following table lists and describes the conventions that apply in this manual.
DescriptionConvention
Denotes syntax that you must enter exactly as shown.THIS TYPEFACE
or
this typeface
Represents a placeholder (or variable), a cross-reference, or animportant term.
this typeface
Indicates a default setting.underscore
Highlights a file name or command. It may also indicate a button,menu item, or dialog box option you can click or select.
this typeface
Indicates keys that you must press simultaneously.Key + Key
DB2 Web Query for IBM i Wizards 5
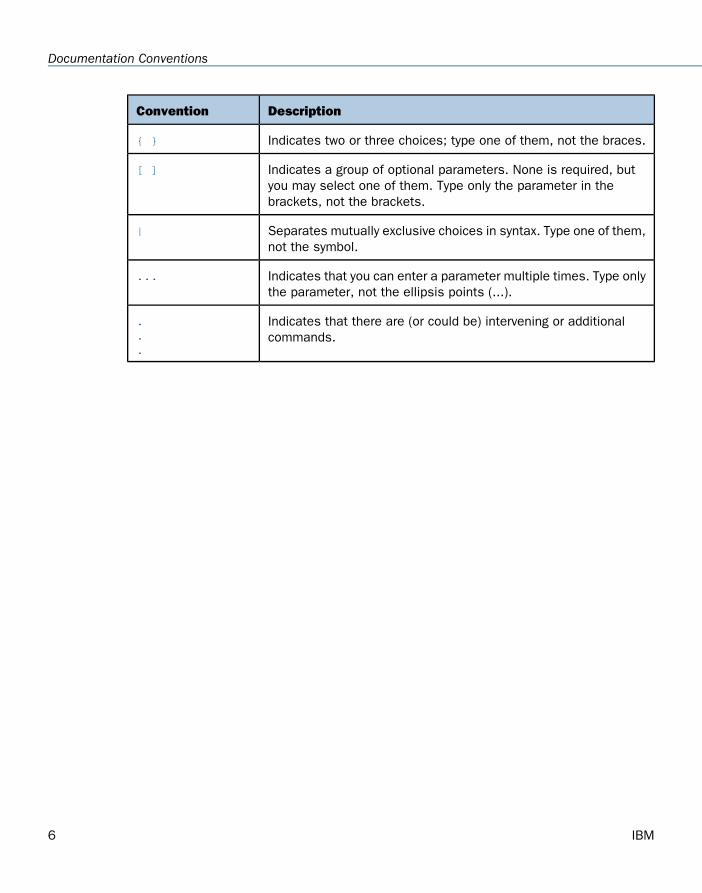
DescriptionConvention
Indicates two or three choices; type one of them, not the braces.{ }
Indicates a group of optional parameters. None is required, butyou may select one of them. Type only the parameter in thebrackets, not the brackets.
[ ]
Separates mutually exclusive choices in syntax. Type one of them,not the symbol.
|
Indicates that you can enter a parameter multiple times. Type onlythe parameter, not the ellipsis points (...).
...
Indicates that there are (or could be) intervening or additionalcommands.
.
.
.
6 IBM
Documentation Conventions
IBM
Working With Metadata in DB2 Web Query1Topics:
This topic describes how to create, test,and manage a synonym, using theMetadata tools. This includes theMetadata Wizard, which generates a setof Express Analytics based upon thesynonym that is defined during the wizardprocess.
Working With Metadata
Creating a Synonym With the MetadataWizard
Editing Metadata
Managing Synonyms
DB2 Web Query for IBM i Wizards 7

Working With Metadata
In this section:
Defining Synonyms
The data source being used determines the type of metadata that is required. For example:
When the server accesses a relational data source, it needs to know how to interpretthe data stored there. You must create a synonym that describes the structure of thedata source and the server mapping of the data types.
When the server invokes a transaction or procedure, it needs to know how to build therequest, what parameters to pass, and how to format an answer set from the response.You must create a synonym that describes the layout of the request or response area.
Whatever your data source, the adapter you are using manages the synonym creation processfor you, creating a synonym that meets your specific requirements.
Defining SynonymsSynonyms define unique names (or aliases) for each table, view, transaction, or procedurethat is accessible from the server. Synonyms are useful because they hide the underlyingdata source location, identity, transaction, or procedure from client applications. They alsoprovide support for extended metadata features of the server, such as virtual fields andadditional security mechanisms.
Note: Although all synonym creation panes have the same look and feel, the parametersare specific to each adapter. To obtain detailed information for an adapter, click the questionmark (?) next to a parameter.
8 IBM
Working With Metadata
Creating a Synonym With the Metadata Wizard
In this section:
Authorization Requirements
Launching the Metadata Wizard
Step One: Connect to SQL
Step Two: Import Metadata
Step Three: Joins
Step Four: Measures and Dimensions
How to:
Save a Synonym and Visualize Data
The Metadata Wizard provides a step-by-step process for configuring adapters that connectto data sources in DB2 Web Query.
Using the Metadata Wizard, you can perform the following steps:
1. Connect to SQL. Configures an adapter, creates a new connection, or changes connectionparameters.
2. Import Metadata. Creates a synonym for one or more data sources.
3. Joins. Creates a cluster of facts and dimensions (star schema) by joining one or moresynonyms. A single synonym can also be created for analysis during this step.
4. Measures and Dimensions. Enhances metadata by adding measures, dimensions, anddimension hierarchies.
5. Generate a set of express analytics based on the synonyms created or modified by theMetadata Wizard.
DB2 Web Query for IBM i Wizards 9
1. Working With Metadata in DB2 Web Query
Note:
A measure is a numeric value, such as Gross Profit or Cost of Goods Sold, that you maywant to aggregate. All numeric values that can be summed are measures. Numeric fieldsthat cannot be summed, such as product number and miles per gallon, are not treatedas measures. Instead, they may be used in the same way as dimension fields to analyzemeasures. It is up to you to understand your data and determine whether each numericfield can be summed. Related measures can be organized into measure groups. Forexample, Gross Profit and Cost of Goods Sold can be part of a Sales measure group.
A dimension is a way to categorize data. You can use a dimension to analyze and comparemeasures. Generally, any field that is not a measure, usually an alphanumeric field suchas product, is a dimension. Dimensions can be organized into hierarchies to define therelationships between the fields in the hierarchies. For example, a Geography hierarchycan contain the Continent, Country, State, and City dimensions. You can also definedimension fields that are not part of a dimension hierarchy.
You can assign dimension attributes to any dimension field, whether or not it is in ahierarchy. When applied to a field, attributes provide supplementary information that canbe used for analysis or display. For example, in a Geography hierarchy, which includesthe Country, State, and City dimensions, Population can be assigned as an attribute ofthe City dimension. It is up to you to determine whether a measure as an attribute isuseful. It depends on the design of the data source.
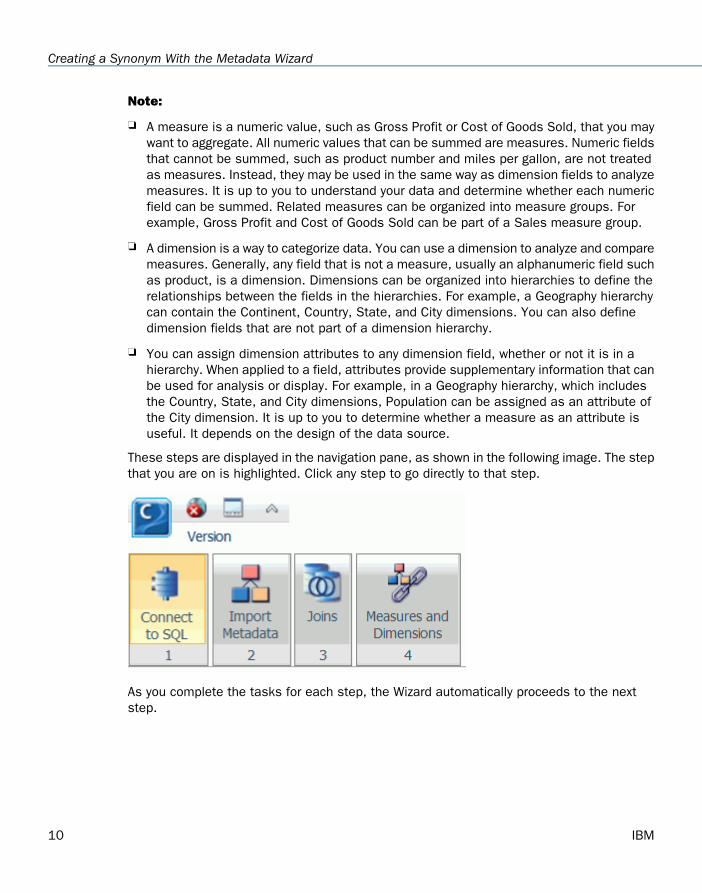
These steps are displayed in the navigation pane, as shown in the following image. The stepthat you are on is highlighted. Click any step to go directly to that step.
As you complete the tasks for each step, the Wizard automatically proceeds to the nextstep.
10 IBM
Creating a Synonym With the Metadata Wizard
Authorization RequirementsA user must belong to one or more of the following groups in order to use the MetadataWizard:
WebQueryAdministrator
TLF-dev and TLF-dba
TLF-analyst and TLF-dba
Note: TLF indicates Top Level Folder.
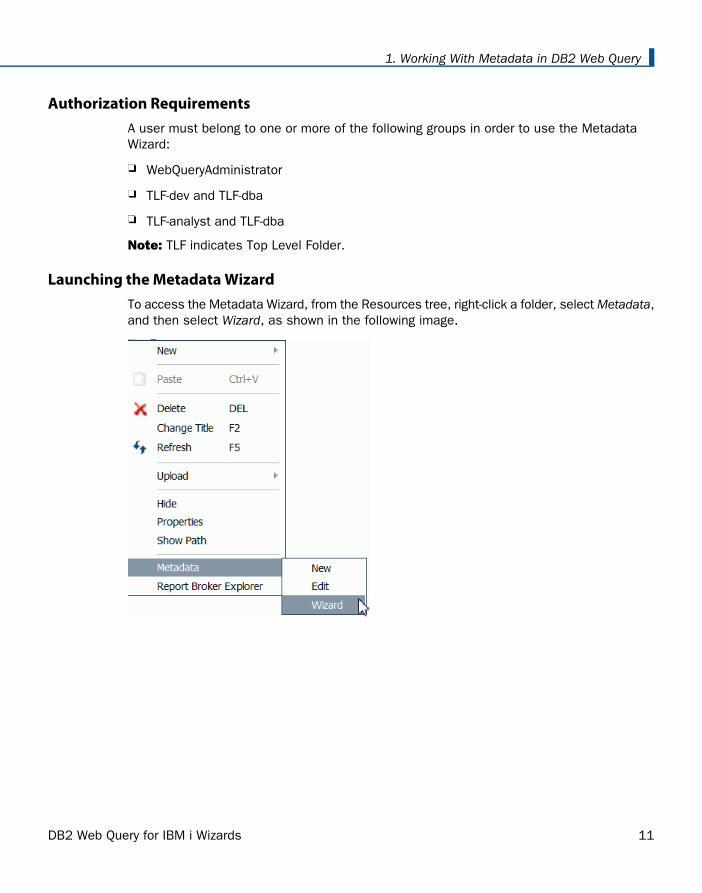
Launching the Metadata WizardTo access the Metadata Wizard, from the Resources tree, right-click a folder, select Metadata,and then select Wizard, as shown in the following image.
DB2 Web Query for IBM i Wizards 11
1. Working With Metadata in DB2 Web Query
Step One: Connect to SQL
How to:
Configure a New Adapter/Connection
Add a Connection
Change a Connection
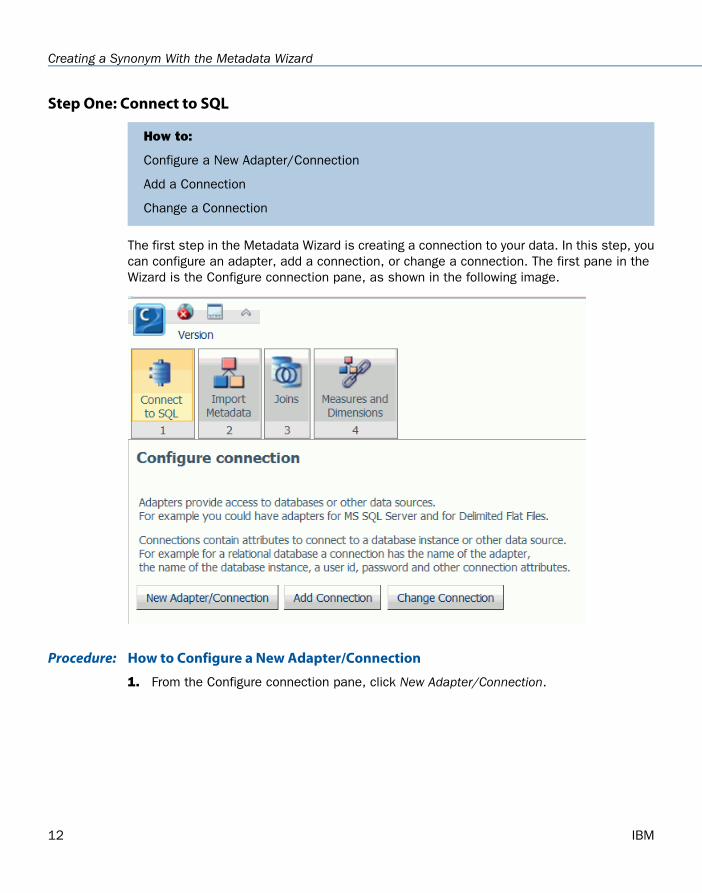
The first step in the Metadata Wizard is creating a connection to your data. In this step, youcan configure an adapter, add a connection, or change a connection. The first pane in theWizard is the Configure connection pane, as shown in the following image.
How to Configure a New Adapter/ConnectionProcedure:
1. From the Configure connection pane, click New Adapter/Connection.
12 IBM
Creating a Synonym With the Metadata Wizard
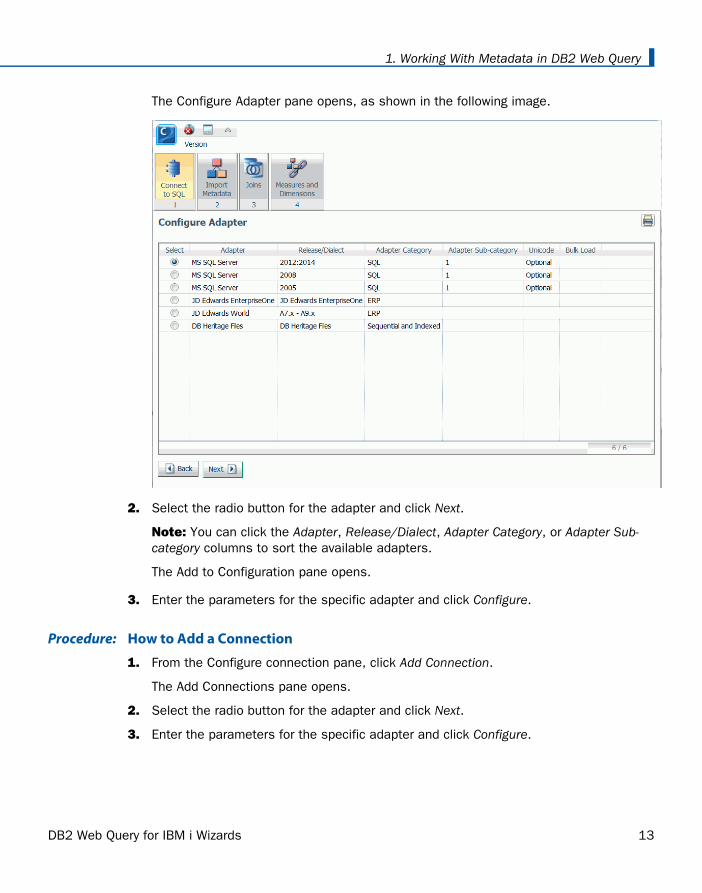
The Configure Adapter pane opens, as shown in the following image.
2. Select the radio button for the adapter and click Next.
Note: You can click the Adapter, Release/Dialect, Adapter Category, or Adapter Sub-category columns to sort the available adapters.
The Add to Configuration pane opens.
3. Enter the parameters for the specific adapter and click Configure.
How to Add a ConnectionProcedure:
1. From the Configure connection pane, click Add Connection.
The Add Connections pane opens.
2. Select the radio button for the adapter and click Next.
3. Enter the parameters for the specific adapter and click Configure.
DB2 Web Query for IBM i Wizards 13
1. Working With Metadata in DB2 Web Query
How to Change a ConnectionProcedure:
1. From the Configure connection pane, click Change Connection.
The Edit Connections pane opens.
2. Select the radio button for the connection and click Next.
Note: You can click the Adapter, Connection, Connection string, or Profile columns tosort the available connections.
3. Change the parameters for the specific connection and click Configure.
Step Two: Import Metadata
How to:
Import Metadata
The first pane in this step is the Select connection to create synonyms pane, as shown inthe following image.
14 IBM
Creating a Synonym With the Metadata Wizard
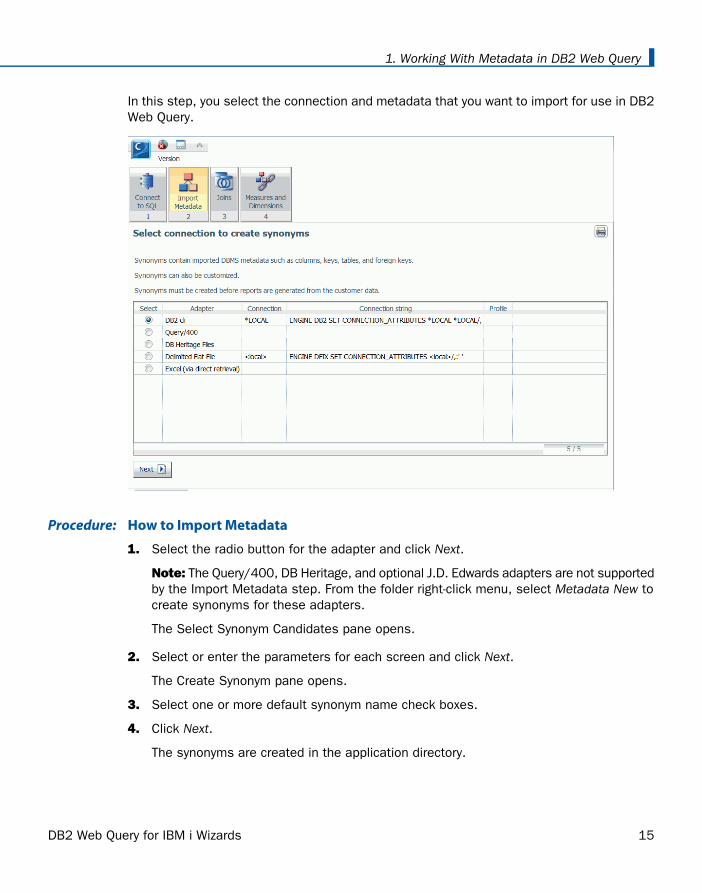
In this step, you select the connection and metadata that you want to import for use in DB2Web Query.
How to Import MetadataProcedure:
1. Select the radio button for the adapter and click Next.
Note: The Query/400, DB Heritage, and optional J.D. Edwards adapters are not supportedby the Import Metadata step. From the folder right-click menu, select Metadata New tocreate synonyms for these adapters.
The Select Synonym Candidates pane opens.
2. Select or enter the parameters for each screen and click Next.
The Create Synonym pane opens.
3. Select one or more default synonym name check boxes.
4. Click Next.
The synonyms are created in the application directory.
DB2 Web Query for IBM i Wizards 15
1. Working With Metadata in DB2 Web Query
Step Three: Joins
How to:
Select a Fact Table
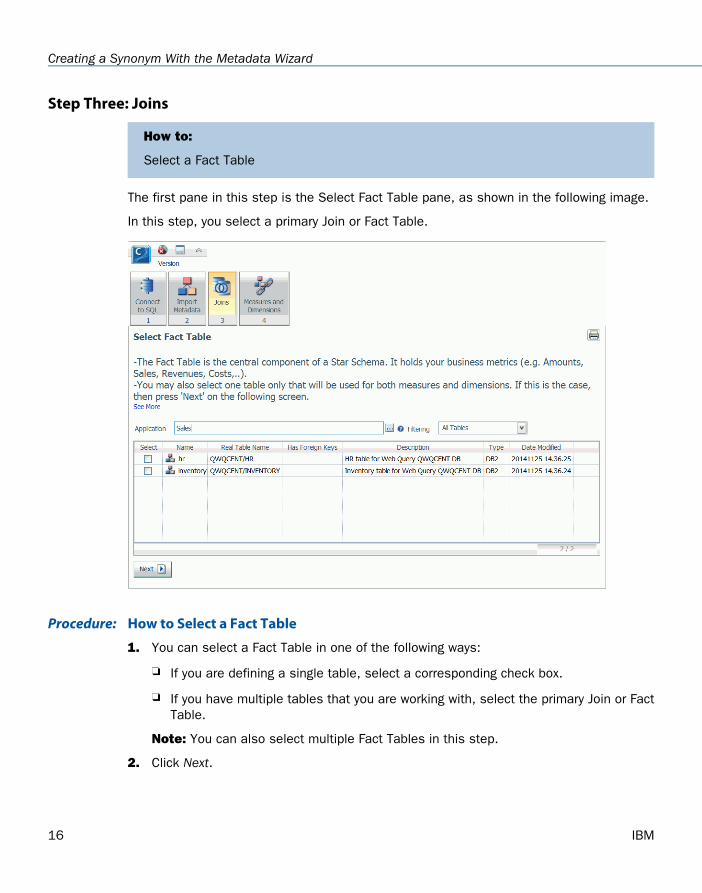
The first pane in this step is the Select Fact Table pane, as shown in the following image.
In this step, you select a primary Join or Fact Table.
How to Select a Fact TableProcedure:
1. You can select a Fact Table in one of the following ways:
If you are defining a single table, select a corresponding check box.
If you have multiple tables that you are working with, select the primary Join or FactTable.
Note: You can also select multiple Fact Tables in this step.
2. Click Next.
16 IBM
Creating a Synonym With the Metadata Wizard
The Select Synonyms to be added for the Star Schema pane opens, where you areshown default Joins based on identical field names and attributes.
Note: If you are defining a single table, skip this pane and click Next.
3. Select the tables that you want to join to your primary or Fact Table or Tables and clickNext.
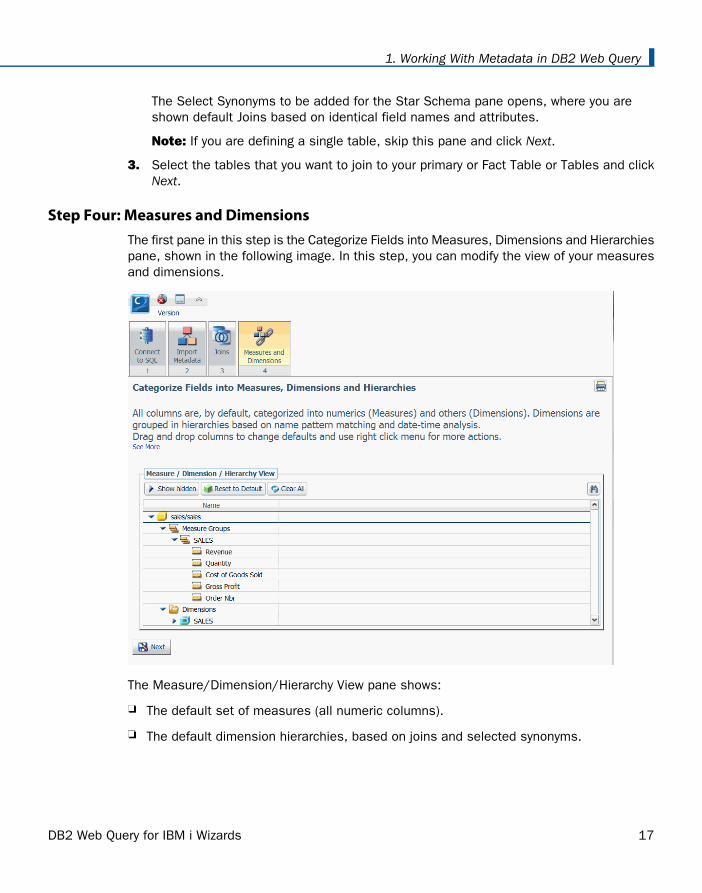
Step Four: Measures and DimensionsThe first pane in this step is the Categorize Fields into Measures, Dimensions and Hierarchiespane, shown in the following image. In this step, you can modify the view of your measuresand dimensions.
The Measure/Dimension/Hierarchy View pane shows:
The default set of measures (all numeric columns).
The default dimension hierarchies, based on joins and selected synonyms.
DB2 Web Query for IBM i Wizards 17
1. Working With Metadata in DB2 Web Query
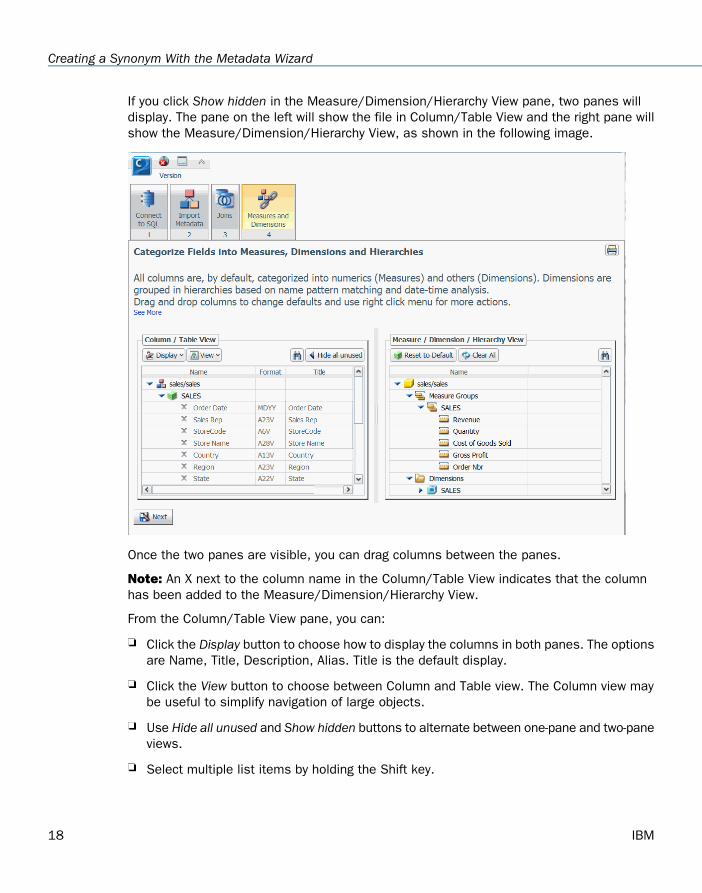
If you click Show hidden in the Measure/Dimension/Hierarchy View pane, two panes willdisplay. The pane on the left will show the file in Column/Table View and the right pane willshow the Measure/Dimension/Hierarchy View, as shown in the following image.
Once the two panes are visible, you can drag columns between the panes.
Note: An X next to the column name in the Column/Table View indicates that the columnhas been added to the Measure/Dimension/Hierarchy View.
From the Column/Table View pane, you can:
Click the Display button to choose how to display the columns in both panes. The optionsare Name, Title, Description, Alias. Title is the default display.
Click the View button to choose between Column and Table view. The Column view maybe useful to simplify navigation of large objects.
Use Hide all unused and Show hidden buttons to alternate between one-pane and two-paneviews.
Select multiple list items by holding the Shift key.
18 IBM
Creating a Synonym With the Metadata Wizard
From the Measure/Dimension/Hierarchy View pane, you can:
Click the Reset to Default button to undo all changes and refresh the view back to theinitial categorization of measures and dimensions.
Click the Clear All button to move all columns back to the Column/Table View pane.
Drag the measures, dimensions, and hierarchies within the pane to rearrange the order.
Select multiple list items by holding the Shift key.
Using shortcut menu options, you can:
Right-click the Measure Groups folder and click New Measure Group, New Measure Groupbased on Segment, or Sample Data.
Right-click a measure and click Rename, Geographic Role, Sample Data, or Hide. TheHide option moves the measure to the Column/Table View pane.
Right-click a dimension and click Create Hierarchy, Rename, Geographic Role, SampleData, Hide or Show/Hide Attribute. The Hide option moves the dimension to theColumn/Table View pane.
Right-click a hierarchy and click Remove Hierarchy, Rename, Sample Data, or Hide. TheHide option removes the hierarchy and moves the columns contained in the hierarchy tothe Column/Table View pane.
How to Save a Synonym and Visualize DataProcedure:
1. Once you have defined the measures and dimensions, click Next.
The Save As dialog box opens.
2. Enter a name for the synonym in the File Name field and click OK.
The Express Analytics generator appears and generates a set of procedures in the DB2Web Query Repository. You will find these in a new folder that matches the name of thenew or modified synonym.
A new active dashboard is automatically run and will appear in the Report output paneof Web Query.
Editing Metadata
How to:
Edit a Synonym
You are able to edit previously created synonyms using the shortcut menu.
DB2 Web Query for IBM i Wizards 19
1. Working With Metadata in DB2 Web Query
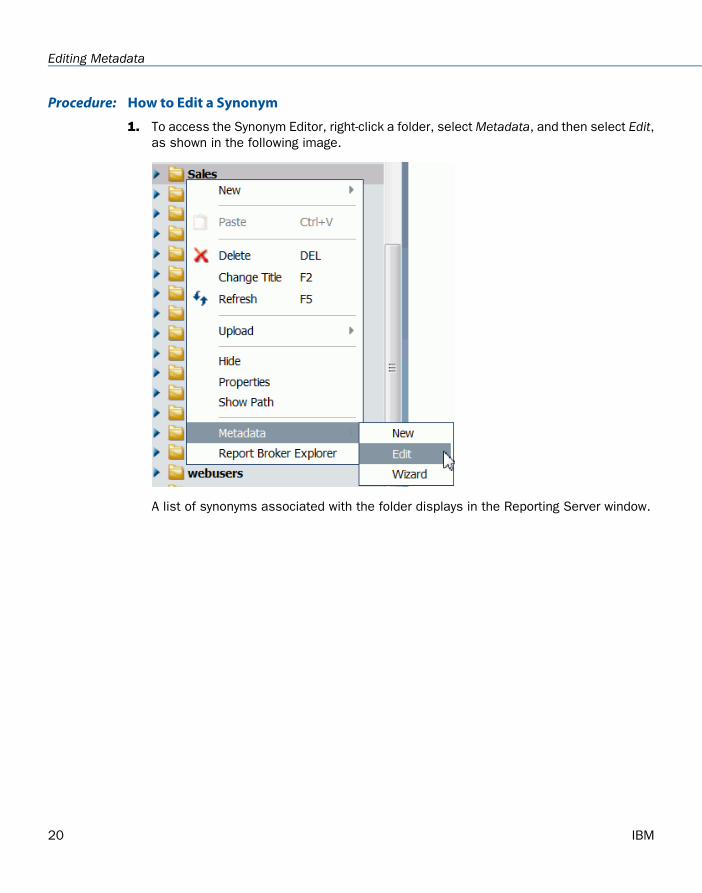
How to Edit a SynonymProcedure:
1. To access the Synonym Editor, right-click a folder, select Metadata, and then select Edit,as shown in the following image.
A list of synonyms associated with the folder displays in the Reporting Server window.
20 IBM
Editing Metadata
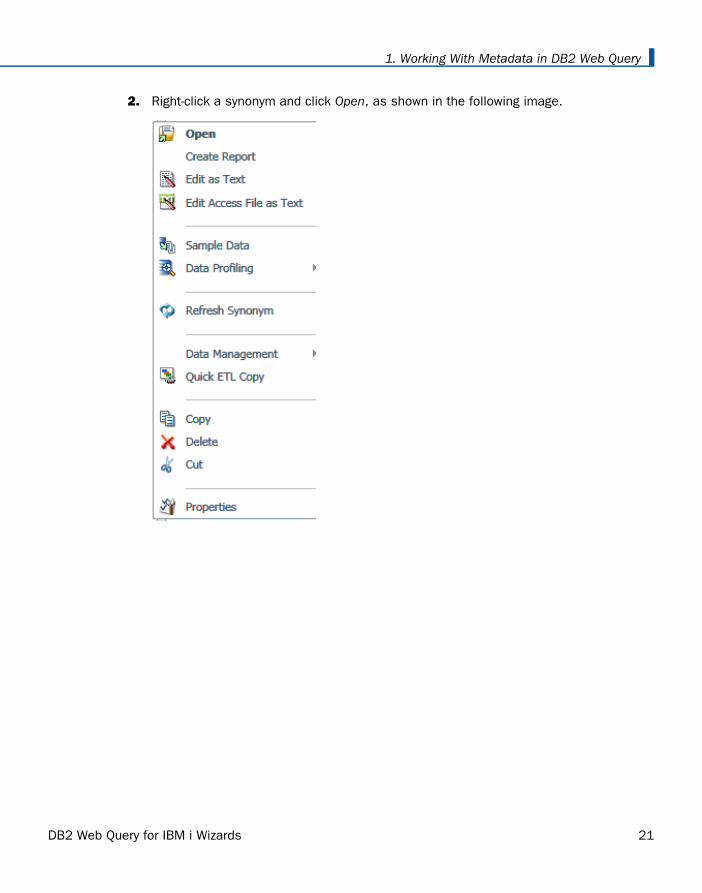
2. Right-click a synonym and click Open, as shown in the following image.
DB2 Web Query for IBM i Wizards 21
1. Working With Metadata in DB2 Web Query
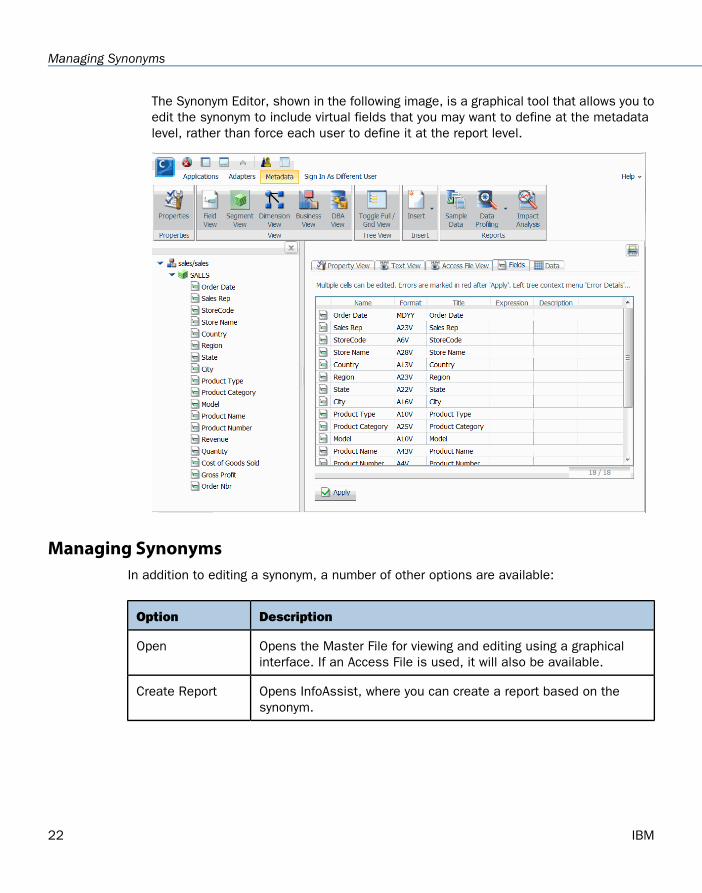
The Synonym Editor, shown in the following image, is a graphical tool that allows you toedit the synonym to include virtual fields that you may want to define at the metadatalevel, rather than force each user to define it at the report level.
Managing SynonymsIn addition to editing a synonym, a number of other options are available:
DescriptionOption
Opens the Master File for viewing and editing using a graphicalinterface. If an Access File is used, it will also be available.
Open
Opens InfoAssist, where you can create a report based on thesynonym.
Create Report
22 IBM
Managing Synonyms
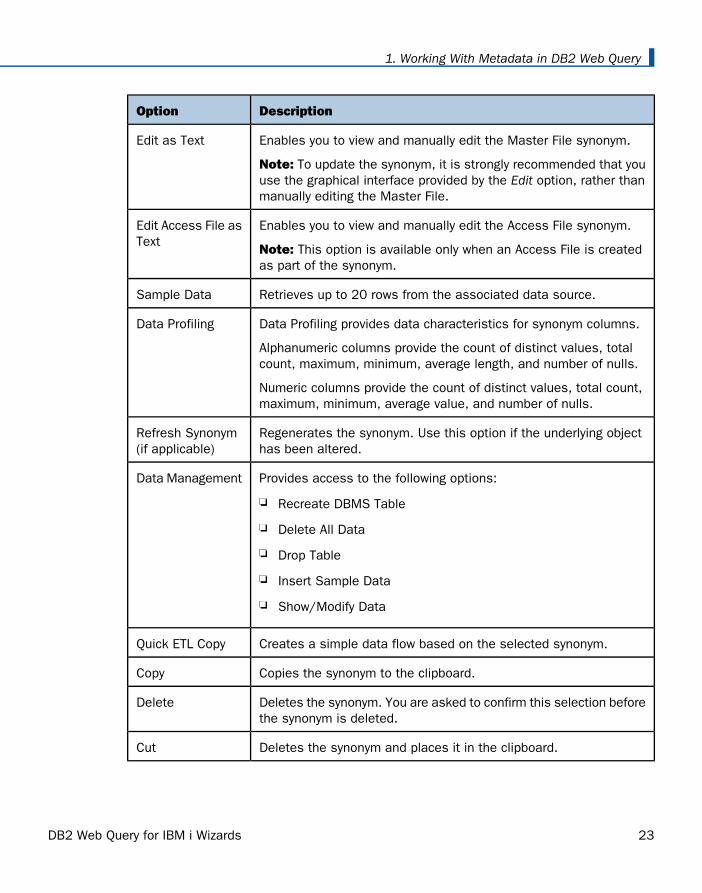
DescriptionOption
Enables you to view and manually edit the Master File synonym.
Note: To update the synonym, it is strongly recommended that youuse the graphical interface provided by the Edit option, rather thanmanually editing the Master File.
Edit as Text
Enables you to view and manually edit the Access File synonym.
Note: This option is available only when an Access File is createdas part of the synonym.
Edit Access File asText
Retrieves up to 20 rows from the associated data source.Sample Data
Data Profiling provides data characteristics for synonym columns.
Alphanumeric columns provide the count of distinct values, totalcount, maximum, minimum, average length, and number of nulls.
Numeric columns provide the count of distinct values, total count,maximum, minimum, average value, and number of nulls.
Data Profiling
Regenerates the synonym. Use this option if the underlying objecthas been altered.
Refresh Synonym(if applicable)
Provides access to the following options:
Recreate DBMS Table
Delete All Data
Drop Table
Insert Sample Data
Show/Modify Data
Data Management
Creates a simple data flow based on the selected synonym.Quick ETL Copy
Copies the synonym to the clipboard.Copy
Deletes the synonym. You are asked to confirm this selection beforethe synonym is deleted.
Delete
Deletes the synonym and places it in the clipboard.Cut
DB2 Web Query for IBM i Wizards 23
1. Working With Metadata in DB2 Web Query

DescriptionOption
Displays the properties of the synonym, including physical location,last modified date, and description.
Properties
24 IBM
Managing Synonyms
IBM
Uploading Data in DB2 Web Query2Topics:
In DB2 Web Query, you can upload(import) external data files. After theinitial file is uploaded, you can appendnew data or replace data withoutchanging the structure and parametersof the file.
Authorization Requirements
Guidelines for Uploading Data Files
Launching the Upload ToolsThe Upload tools are available from theDB2 Web Query Resources tree. Thisincludes the Upload Wizard, whichgenerates a set of Express Analyticsbased upon the uploaded data and newlycreated synonym.
Uploading Files to the Repository
DB2 Web Query for IBM i Wizards 25
Authorization RequirementsA user must belong to one or more of the following groups in order to use the MetadataWizard:
WebQueryAdministrator
TLF-dev and TLF-dba
TLF-analyst and TLF-dba
Note: TLF indicates Top Level Folder.
Guidelines for Uploading Data FilesThe Excel or delimited flat file to be uploaded using the Upload tools should:
Contain header, row, and data records where all data records have the same layout.
Should not have multiple record formats, Subtotals, or Totals.
26 IBM
Authorization Requirements
Launching the Upload Tools
How to:
Upload an Excel Spreadsheet
Append New Data to an Existing Synonym
Replace Data in an Existing Synonym
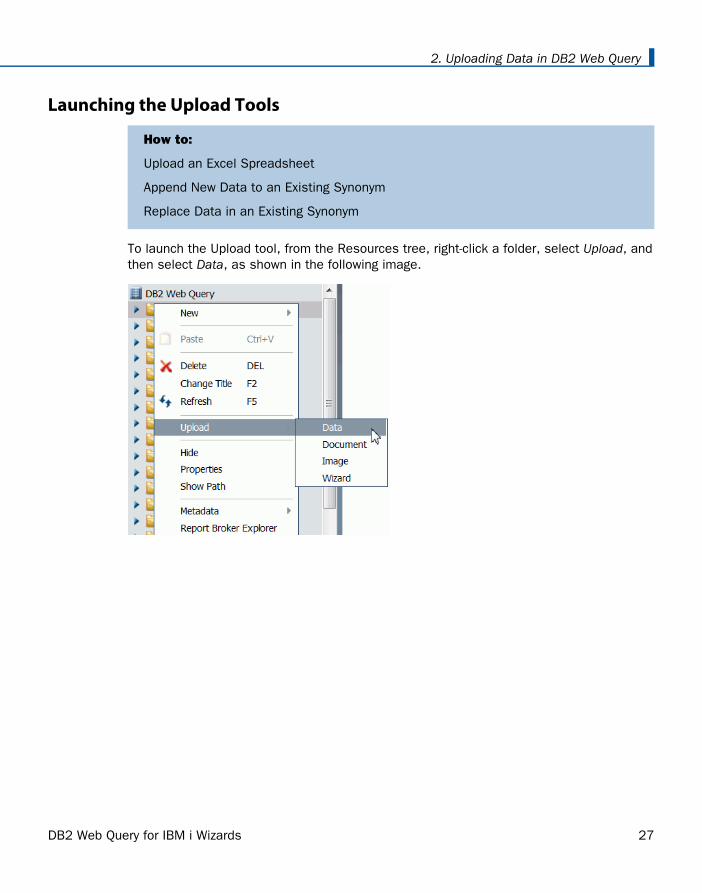
To launch the Upload tool, from the Resources tree, right-click a folder, select Upload, andthen select Data, as shown in the following image.
DB2 Web Query for IBM i Wizards 27
2. Uploading Data in DB2 Web Query
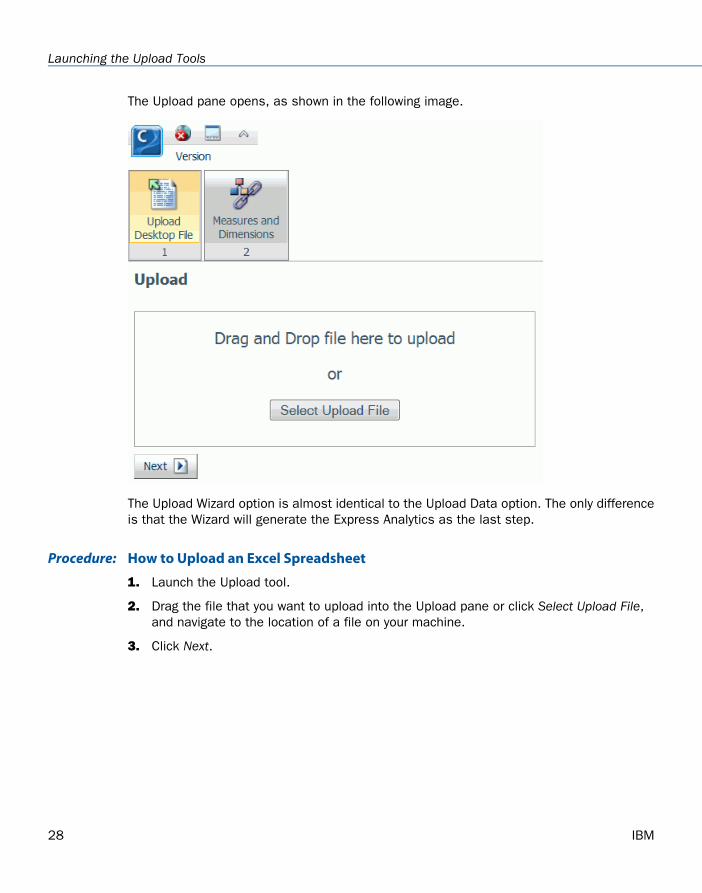
The Upload pane opens, as shown in the following image.
The Upload Wizard option is almost identical to the Upload Data option. The only differenceis that the Wizard will generate the Express Analytics as the last step.
How to Upload an Excel SpreadsheetProcedure:
1. Launch the Upload tool.
2. Drag the file that you want to upload into the Upload pane or click Select Upload File,and navigate to the location of a file on your machine.
3. Click Next.
28 IBM
Launching the Upload Tools
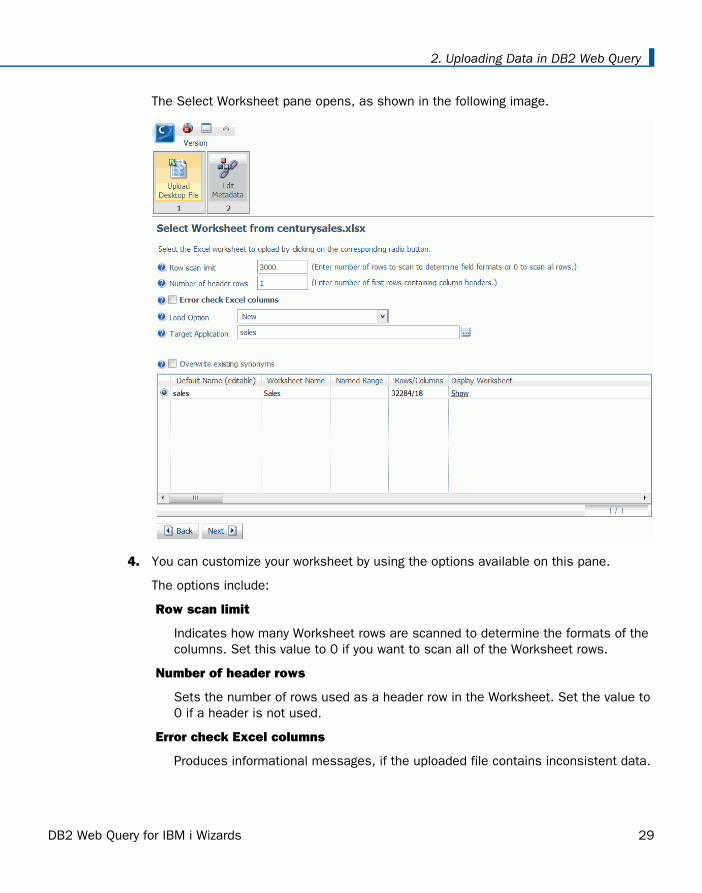
The Select Worksheet pane opens, as shown in the following image.
4. You can customize your worksheet by using the options available on this pane.
The options include:
Row scan limit
Indicates how many Worksheet rows are scanned to determine the formats of thecolumns. Set this value to 0 if you want to scan all of the Worksheet rows.
Number of header rows
Sets the number of rows used as a header row in the Worksheet. Set the value to0 if a header is not used.
Error check Excel columns
Produces informational messages, if the uploaded file contains inconsistent data.
DB2 Web Query for IBM i Wizards 29
2. Uploading Data in DB2 Web Query
Load Option
Provides access to the following options:
New
Uploads a new worksheet to create a synonym.
Append Existing Data (Keep Metadata)
Adds new data to the existing synonym without changing the structure andparameters of the synonym.
Replace Existing Data (Keep Metadata)
Replaces data in the existing synonym without changing the structure andparameters of the synonym.
Target Application
Sets the application folder location for the output metadata (synonym).
Note: This option is available when the Load Option field is set to New.
Select Target Synonym
Sets the application folder location for the existing synonym.
Note: This option is available when the Load Option field is set to Append ExistingData (Keep Metadata) or Replace Existing Data (Keep Metadata).
Overwrite existing synonyms
Overwrites the existing synonym with the same name.
Note: This option is available when the Load Option field is set to New.
Default Name (editable)
Indicates the synonym name to be created, based on the worksheet name. You canchange this default name.
Note: This option is available when the Load Option field is set to New.
Worksheet Name
Indicates the worksheet name, determined from the uploaded file.
Named Range
Indicates an Excel Named Range to a specific group of cells within a worksheet.
Rows/Columns
Indicates the number of rows and columns in the worksheet.
30 IBM
Launching the Upload Tools
Display Worksheet
Shows the data in the selected worksheet in tabular format.
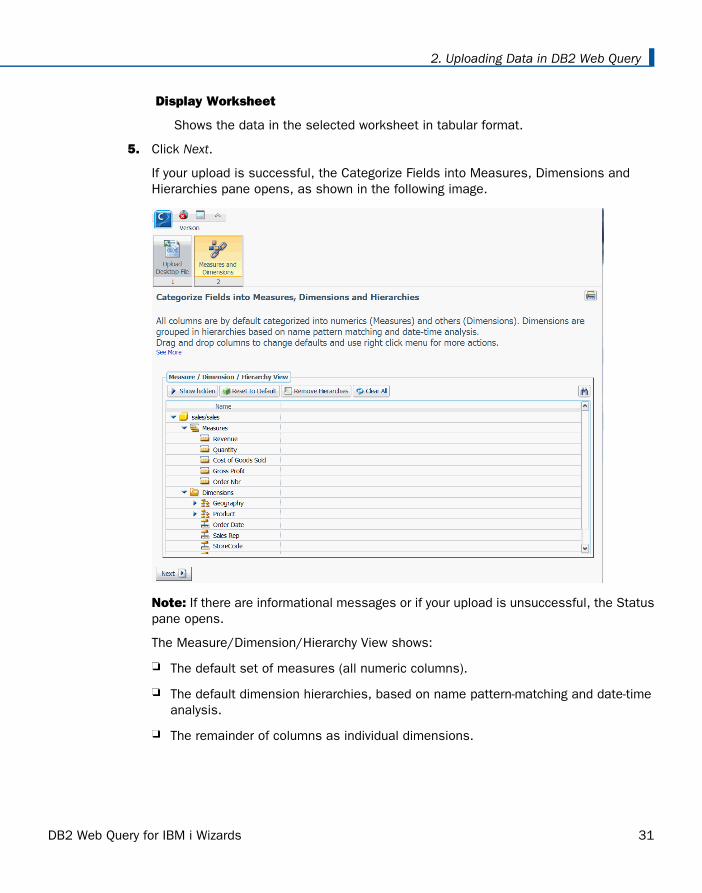
5. Click Next.
If your upload is successful, the Categorize Fields into Measures, Dimensions andHierarchies pane opens, as shown in the following image.
Note: If there are informational messages or if your upload is unsuccessful, the Statuspane opens.
The Measure/Dimension/Hierarchy View shows:
The default set of measures (all numeric columns).
The default dimension hierarchies, based on name pattern-matching and date-timeanalysis.
The remainder of columns as individual dimensions.
DB2 Web Query for IBM i Wizards 31
2. Uploading Data in DB2 Web Query
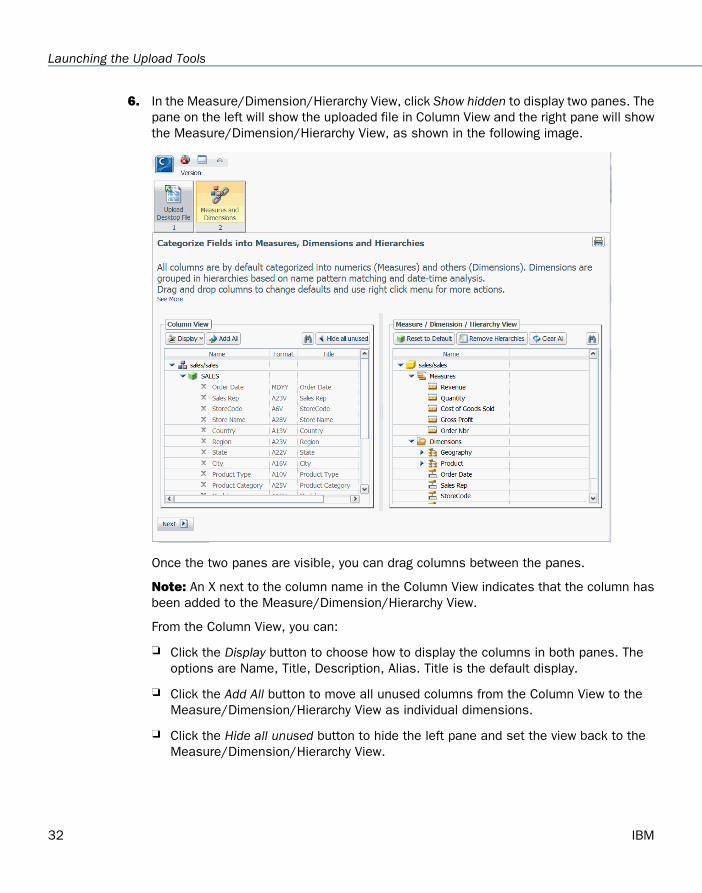
6. In the Measure/Dimension/Hierarchy View, click Show hidden to display two panes. Thepane on the left will show the uploaded file in Column View and the right pane will showthe Measure/Dimension/Hierarchy View, as shown in the following image.
Once the two panes are visible, you can drag columns between the panes.
Note: An X next to the column name in the Column View indicates that the column hasbeen added to the Measure/Dimension/Hierarchy View.
From the Column View, you can:
Click the Display button to choose how to display the columns in both panes. Theoptions are Name, Title, Description, Alias. Title is the default display.
Click the Add All button to move all unused columns from the Column View to theMeasure/Dimension/Hierarchy View as individual dimensions.
Click the Hide all unused button to hide the left pane and set the view back to theMeasure/Dimension/Hierarchy View.
32 IBM
Launching the Upload Tools
Manage columns by accessing their shortcut menu options, such as Sample Dataand Rename.
Select multiple list items by holding the Shift key.
From the Measure/Dimension/Hierarchy View, you can:
Click the Reset to Default button to undo all changes and refresh the view back tothe initial categorization of measures and dimensions.
Click the Remove Hierarchies button to remove all hierarchies, but leave columns asindividual dimensions.
Click the Clear All button to move all columns back to the Column View.
Drag the measures, dimensions, and hierarchies within the pane to rearrange theorder.
Select multiple list items by holding the Shift key.
Using shortcut menu options:
Right-click the Measures folder and select New Measure Group or Sample Data.
Right-click a measure and select Rename, Geographic Role, Sample Data, or Hide.The Hide option moves the measure to the Column View.
Right-click a dimension and select, Create Hierarchy, Rename, Geographic Role,Sample Data, Hide or Show/Hide Attribute. The Hide option moves the dimension tothe Column View.
Right-click a hierarchy and select Remove Hierarchy, Rename, Sample Data, or Hide.The Hide option will remove the hierarchy and moves the columns contained in thehierarchy to the Column View.
7. Once you have defined the measures and dimensions, click Next.
InfoAssist opens, so you can start analyzing your uploaded file.
How to Append New Data to an Existing SynonymProcedure:
1. Launch the Upload tool.
2. Drag the file, containing the data that you want to append, into the Upload pane or clickSelect Upload File, and navigate to the location of a file on your machine.
3. Click Next.
The Select Worksheet pane opens.
4. From the Load Option drop-down list, click Append Existing Data (Keep Metadata).
DB2 Web Query for IBM i Wizards 33
2. Uploading Data in DB2 Web Query
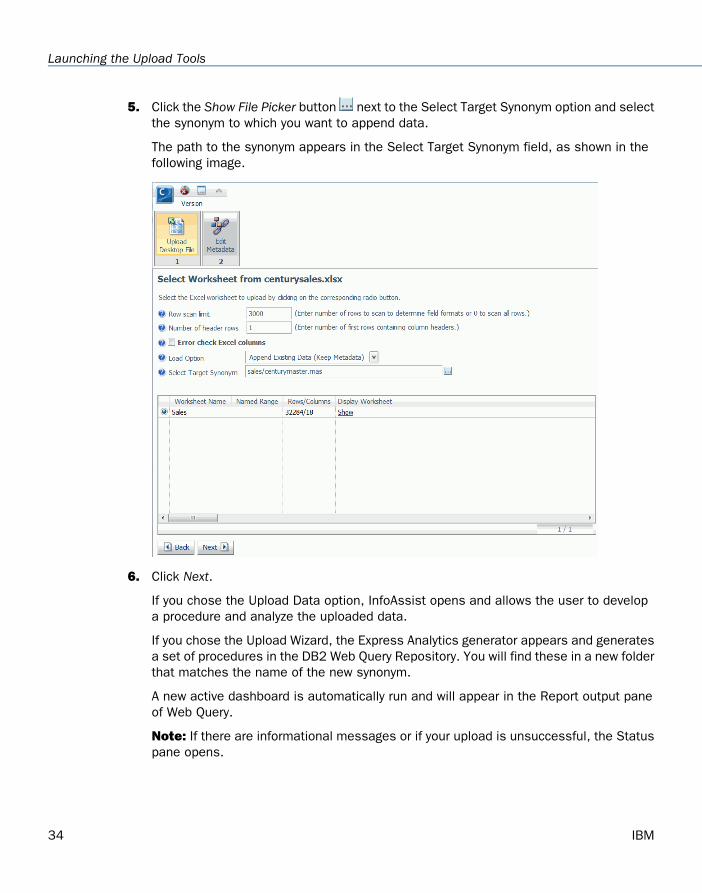
5. Click the Show File Picker button next to the Select Target Synonym option and selectthe synonym to which you want to append data.
The path to the synonym appears in the Select Target Synonym field, as shown in thefollowing image.
6. Click Next.
If you chose the Upload Data option, InfoAssist opens and allows the user to developa procedure and analyze the uploaded data.
If you chose the Upload Wizard, the Express Analytics generator appears and generatesa set of procedures in the DB2 Web Query Repository. You will find these in a new folderthat matches the name of the new synonym.
A new active dashboard is automatically run and will appear in the Report output paneof Web Query.
Note: If there are informational messages or if your upload is unsuccessful, the Statuspane opens.
34 IBM
Launching the Upload Tools
How to Replace Data in an Existing SynonymProcedure:
1. Launch the Upload tool.
2. Drag the file that you want to use for replacing data into the Upload pane or click SelectUpload File, and navigate to the location of a file on your machine.
3. Click Next.
The Select Worksheet pane opens.
4. From the Load Option drop-down list, click Replace Existing Data (Keep Metadata).
5. Click the Show File Picker button next to the Select Target Synonym option and selectthe synonym for which you want to replace data.
6. Click Next.
InfoAssist opens, so you can start analyzing your uploaded file.
Note: If there are informational messages or if your upload is unsuccessful, the Statuspane opens.
Uploading Files to the Repository
How to:
Upload an Image
Upload a Document
In DB2 Web Query, you can upload other files, such as images and documents. These filescan be shared with other users and groups.
How to Upload an ImageProcedure:
1. From the Resources tree, right-click a folder, select Upload and then select Image.
DB2 Web Query for IBM i Wizards 35
2. Uploading Data in DB2 Web Query
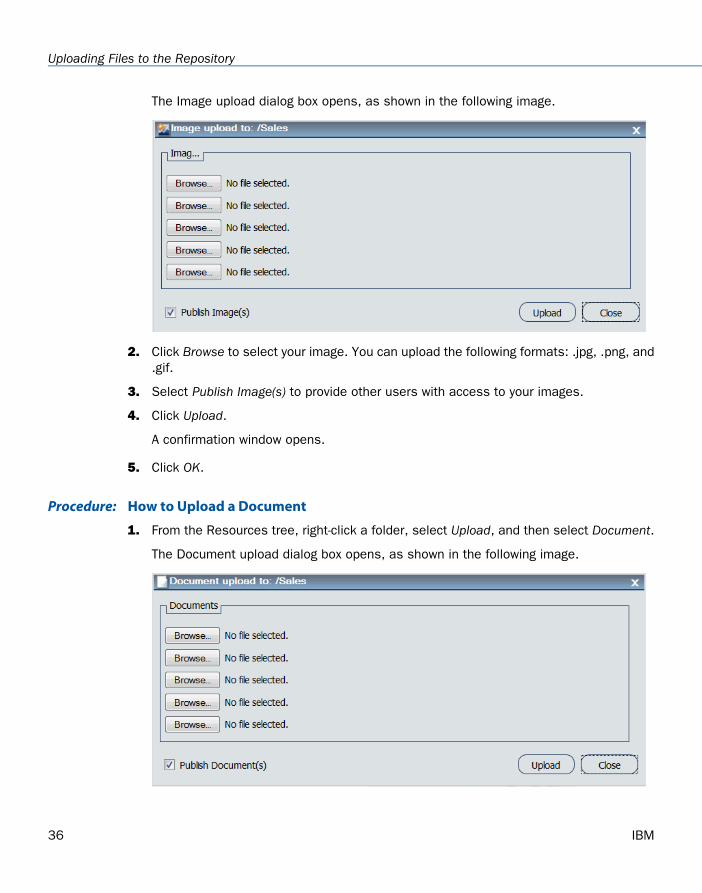
The Image upload dialog box opens, as shown in the following image.
2. Click Browse to select your image. You can upload the following formats: .jpg, .png, and.gif.
3. Select Publish Image(s) to provide other users with access to your images.
4. Click Upload.
A confirmation window opens.
5. Click OK.
How to Upload a DocumentProcedure:
1. From the Resources tree, right-click a folder, select Upload, and then select Document.
The Document upload dialog box opens, as shown in the following image.
36 IBM
Uploading Files to the Repository
2. Click Browse to select your document.
3. Select Publish Document(s) to provide other users with access to your documents.
4. Click Upload.
The confirmation window opens.
5. Click OK.
DB2 Web Query for IBM i Wizards 37
2. Uploading Data in DB2 Web Query

38 IBM
Uploading Files to the Repository


