Embed Size (px)
Citation preview

Direct Entry
User Guide
Version Date Status Comments
4.0 2 March 2018 New release AVETMISS 8.0 update
D18024496
STELA V2 Student Training Enrolment Logistics Application

2
Contents SECTION 1 –OVERVIEW AND ACCESS 3
VET Data Reporting in South Australia ....................................................................................................... 3
Obtaining access ......................................................................................................................................... 4
Sign-In ......................................................................................................................................................... 4
Changing Password ..................................................................................................................................... 4
Forgotten Password .................................................................................................................................... 5
Logout ......................................................................................................................................................... 5
Helpdesk Support ....................................................................................................................................... 5
Home Screen .............................................................................................................................................. 6
STELA Navigation Menu Bar 7
SECTION 2 –STUDENTS AND ENROLMENTS IN STELA 9
STEP 1 – Training Locations and Fund Types ............................................................................................. 9
1A - Training Locations .........................................................................................................................10
1B - Funding Types................................................................................................................................11
STEP 2 - STUDENTS ...................................................................................................................................13
2A – Search for a Student .....................................................................................................................13
2B - Add a new Student ........................................................................................................................14
2C - Edit an Existing Student .................................................................................................................18
STEP 3 –ENROLMENT METHODS ..............................................................................................................19
Create/Update Existing Enrolment Template ..........................................................................................20
3A Create a New Template ...................................................................................................................20
3B Updating and Existing Enrolment Template ....................................................................................25
STEP 4 – STUDENT ENROLMENTS .............................................................................................................26
4A Enrol a Single Student Using a Template ........................................................................................26
4B Bulk Enrolment ................................................................................................................................28
4C - Individual Student Enrolment .......................................................................................................33
STEP 5 - RESULTING ..................................................................................................................................39
5A Bulk Resulting ......................................................................................................................................39
5B Individual Student Resulting ................................................................................................................42
Resulting Codes, Descriptions and Guidance for Correct Use ..................................................................45
Section 3 - SUBMISSION PROGRESS REPORTS 47
Submission Progress Page Explained ........................................................................................................47
Section 4- REPORTS 50
Enrolment Reports ....................................................................................................................................50
Enrolment Summary .................................................................................................................................53
Program Completion Report.....................................................................................................................55

3
SECTION 1 –OVERVIEW AND ACCESS
VET Data Reporting in South Australia Training organisations providing Vocational Education and Training (VET) are required to report all VET activity data that has occurred in each calendar year. The AVETMIS Standard provides the national framework for the collection of VET activity.
South Australian training organisations, registered and non-registered1, must have an AVETMISS compliant system to collect their VET activity. This system must also meet the requirements of South Australia’s reporting specifications. Training organisations may purchase commercial software systems that are AVETMISS compliant. A list of compliant systems is available from the National Centre of Vocational Education and Research (NCVER) website at www.ncver.edu.au .
From 1 January 2014, all training organisations delivering nationally recognised training, except as exempted by regulators, are required to report all of this training (referred to as Total VET Activity) to NCVER under the authority of the Data Provision Requirements under the National Vocational Education and Training Act 2011. South Australian providers receiving state government funding must report this activity into the Student Training Enrolment Logistics Application (STELA). STELA is an online application enabling training organisations to report their VET activity in a format that complies with both National AVETMIS and South Australian reporting specifications and requirements.
There are two ways to submit your South Australian Total VET activity into STELA:
DIRECT ENTRY Training organisations can report their VET activity by directly entering data into STELA Direct Entry (V2) which fully complies with the AVETMIS Standard. AVS validation is not required for organisations choosing this method of submitting their data.
NAT UPLOAD Training organisations using AVETMISS compliant Student Management Systems (SMS) will need to produce a set of NAT Files from their SMS, validate them using the NCVER online AVETMISS Validation Software (AVS), and upload error free NAT Files into STELA.
All finalised training activity reported through STELA will be submitted to NCVER for inclusion in the National VET Data collection. In the event that the Department has identified issues with a training organisation’s submission, they will be individually contacted for resolution of these issues.
The following information in this STELA Direct Entry V2 User Guide provides detailed instructions for training organisations who have chosen to direct enter their VET activity rather than using NAT files.
If any support is required in using STELA V2 please contact the STELA Helpdesk on 08 8226 3050 (9am – 5pm CST) or email [email protected] .
1 If delivering government funded training activity

4
Obtaining access
To obtain access to STELA V2 each user in your organisation is required to have an individual STELA login and email address.
To request access to STELA new users will need to complete the “Online STELA application form” which can be accessed at www.skills.sa.gov.au/stela . When completing the form new users will need to provide details of a Delegate within their organisation who can approve the access request. When the application has been submitted, an email will be sent to the Delegate requesting their approval. We suggest check with the nominated Delegate to see if they have received your application. If they have not received the email have them check their ‘junk’ folder. Once approved the request will be forwarded to the STELA Helpdesk for processing. Account details will be forwarded to the user via email within 5 business days of receiving the approved request.
Sign-In
1. Open your web browser and type in https://stela.statedevelopment.sa.gov.au
2. The Account Login screen will open. Enter your User Name and Password into the fields provided and click Sign In
Changing Password When signing in for the first time we recommend you change your password to ensure you comply with the STELA user agreement.
1. To change your password, click on Change Password located bottom left of screen

5
2. Enter you Current Password in the Old Password field. Enter a new password and re-confirm the new password and click Save. If your password change was sucessful you will be taken to the STELA home page.
Forgotten Password If you have forgotten your password, please contact the STELA helpdesk (details below) to have your password re-set.
Logout
1. To log out of STELA click on the word Logout located top right of screen or simply close your internet browser. Note: STELA will automatically log you out where the system remains idle for 20 minutes.
Helpdesk Support
The STELA Helpdesk can assist you with questions about the STELA system and complying with the AVETMISS and South Australian reporting requirements.
When you contact the STELA Helpdesk for support/assistance we will ask you to provide your STELA ID Number to assist us with your enquiry. When logged into STELA this can be found in the top right hand corner of STELA.
STELA Helpdesk
[email protected] (08) 8226 3050

6
Home Screen Upon successful login to STELA, your login name will appear top right of screen (along with your STELA Organisation ID) and you will be directed to the Home page (see image below).
7
STELA NAVIGATION MENU BAR The STELA menu bar is viewable across the left section of STELA. Clicking on a menu item will take you to that section of the system. A summary of each section and the functionality can be found below:
Menu Item Description
This section is the default landing page for users and contains a range of useful support tools and information to assist users meet AVETMISS reporting requirements in SA.
This section allows users to:
Create, Modify and View Students and Enrolments Create, Modify and View Enrolment Templates
which can be used to enrol students Create new Bulk Enrolments using an existing
Enrolment Template or make changes to an existing Bulk Enrolment.
Run a range of reports relating to training activity entered by your organsiation for the current and past collection years.
More information on these sections are covered in this user guide.
This section allows users to monitor potential discrepancies with an organisation’s AVETMISS data submission to date. Discrepancies can include duplicate students, duplicate enrolments, parchment numbers and actual hours. All discrepancies must be resolved for end of year reporting.
More information on these sections are covered in this user guide.
Organisation Information
The section is made up of four sub tabs:
Organisation tab - displays organisation details specific to the organisation your login is linked with. This information is sourced from training.gov.au for RTOs and where incorrect you should contact ASQA to have these details updated. For non-registered organisations, these details are maintained by STELA help desk. If incorrect, please contact the STELA helpdesk to have this information updated.
Contacts tab – this area is obsolete and was used for the purposes of communicating with a key contact person in a training organisation in relation to any

8
AVETMISS reporting issues. Communication is now sent to all active users in STELA.
Training Locations tab – this area is used to add/maintain delivery locations where training is delivered by your organisation. More information on how to add/modify training locations is covered in this user guide.
Funding Types tab – lists all available funding types linked to your organisation. More information on funding types is covered in this user guide.
Qualification/Course/Skill Set Scope and Competency Module Scope
This section allows Registered Training Organisations (RTOs) to view their scope of registration as listed on training.gov.au. STELA will only allow training activity to be reported where it is on your approved scope of registration. This section will appear blank for users who are linked to a non-registered training organisation.
This section allows users to view a list of all accredited and non-accredited training products in STELA. All accredited training information is sourced from training.gov.au.
This section allows users who are ‘Training Organisation Administrators’ to update the email and phone numbers for users associated with their organisation. Organisations must notify the STELA Helpdesk via email [email protected] when user accounts are no longer required so they can be deactivated.

9
SECTION 2 –STUDENTS AND ENROLMENTS IN STELA This section outlines the steps required to create and result student enrolments in STELA.

10
STEP 1 – Training Locations and Fund Types Before creating student enrolments in STELA, you must ensure the delivery location of where the training is taking place exists and that the correct funding type for the training is linked to your organisation in STELA.
1A - Training Locations are the physical location of where training delivery takes place for your organisation. This may be at one site or numerous sites. A delivery location must exist for all delivery sites. Where training is online or via correspondence the delivery location would be the site where the assessment/administrative processing occurs at. Examples of names could be ‘ABC Institute’, ‘XYZ Campus’, ‘Civic Park’ or ‘Adelaide City’.
Below are the steps needed to add, modify or delete a training location. Skip this step and proceed to 1B - Funding Types if the delivery location already exists.
1. On the STELA Menu Bar under the heading Organisation click Organisation Information to open the Training Organisation screen which has four sub tabs.
2. Select the Training Locations tab Create New Location
Click the New Location link to open the ‘New Training Location’ screen.

11
Complete the required fields, click Save. Once saved you will be returned to the ‘Training Locations’ tab where your new location will be listed.
Note: As a minimum you must enter Location Name, State and suburb to create a new location.
Modify/Delete Training Locations
Select the Location you wish to edit or delete by clicking on the name.
a. To Modify - edit the fields as required then click Save, OR b. To Delete – click Delete
1B - Funding Types tab – lists all available funding types in which a training organisation can report against. By default, your organisation will have the following ‘fee for service’ fund types to use:
o Domestic Full Fee Paying Student o International On-Shore full fee paying student o Overseas Off Shore fee paying student
Where your organisation receives government funding you will be required to report your funded enrolments against a specified state fund type as outlined in your contract schedule.
Below are the steps needed to check the funding type available to your organisation. Skip this step and proceed to Step 2 Students if the fund type is already linked to your organisation.
1. On the STELA Menu Bar under the heading Organisation click Organisation Information which will open the Training Organisation screen which has four sub tabs.

12
2. Select the Funding Types tab to view all fund sources linked to your organisation.
If this fund type does not exist in your funding type list or you are unsure of the correct fund type to use, contact the STELA Helpdesk on 08 8226 3050.

13
STEP 2 - STUDENTS Before you create an enrolment in STELA the student(s) must exist in STELA. Below are the steps required to add or update student(s) in STELA.
2A – Search for a Student 1. On the STELA Menu Bar under the heading Students / Enrolments, click Students to open
the Student Search screen.
2. Enter one of the following search criteria into the search field: State Student ID Apprentice/Trainee ID Organisation Student ID Surname First Name
Unique Student Identifier
3. Click Search to execute search. If any students are found matching your search criteria they
will appear in the results screen.
Note: To clear your search criteria, select the Clear Button
4. If the Student does not exist proceed to Step 2B Add a new Student. If the student is found proceed to Step 2C Edit an existing student.

14
2B - Add a new Student Note: Once confirmed that the student does not already exist (See Step 2A Search for a Student) proceed with steps below to add a new student.
1. On the STELA Menu Bar, from the Students / Enrolments heading click Students to open
the Student Search screen.
2. Click the Add New Student link under the Student Search screen.
3. Enter all mandatory student details (marked with a red asterisk) and click Save.
Note: Unique Student Identifier (USI) is not required where a student is undertaking non-accredited training. However, if provided by Student at time of enrolment you can still enter the details in STELA.
4. Upon saving, STELA will check to see if the Student has been reported previously to the department by your organisation or another. If a match is found on Surname, First Name, Gender and Date of Birth (DOB) you will be presented with possible matches.
15
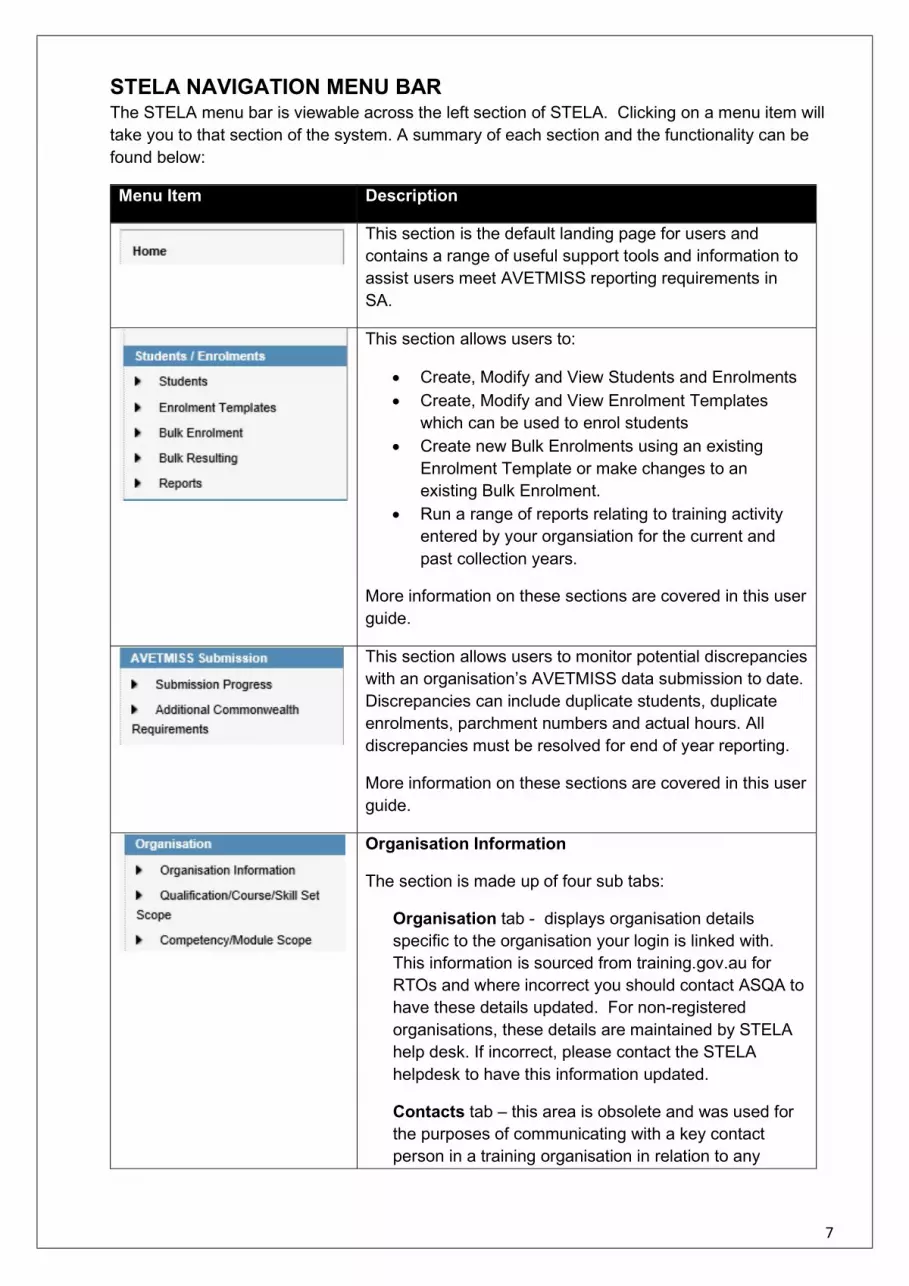
5. Check the details in the Matched Students screen to see if there are potential matches. Where an exact match exists on Name, Gender and DOB click Match which will link the student record you are adding with other instances of the student in STELA. This allows us to link training activity for the student across multiple training organisations. Where no match exists click No Match.
6. You will be now prompted to enter the remaining student profile information to create the student in STELA. Note: Mandatory fields are marked with a red asterisk.

16
Note: For AVETMISS compliance, training organisations must collect student profile information as outlined in the AVETMISS 8.0 student enrolment form which can be downloaded from:

17
https://www.ncver.edu.au/publications/publications/all-publications/statistical-standard-software/standard-enrolment-questions-example-forms
You can add additional details to the enrolment form to meet the needs of your organisation; however, you can not modify or remove any of the AVETMISS fields specified on the form.
8. Click Save when complete. If any mandatory fields are missing or data has been entered in
an incorrect format, an error message will appear highlighted in red next to the relevant field(s). All discrepencies must be fixed before you can save the record.
9. Once the record has been saved sucessfully a new State Student ID will be created and you will be taken to the Student Details Screen.
Note: It is recommended you record the State Student ID on the Enrolment Form as this will be required for enrolment purposes and allows you to search for the student by their unique ID.
10. Repeat the above process for each new student you need to add.

18
2C - Edit an Existing Student
1. Search for the student – see Step 2A ‘Search for a Student.
2. Select the student from search results by clicking State Student ID. This will open the Student Details screen.
3. Update the student details as required on the ‘Student Details’ tab and/or the ‘Other Student Details’ tab. Note: Fields that appear shaded in grey can not be modified.
4. Click Save to save any updates. Repeat the above process for each student record you need to update.

19
STEP 3 –ENROLMENT METHODS There are two ways of creating student enrolments in STELA:
1. Using an Enrolment Template which can be used to enrol one or multiple students at a time.
2. Individual Student Enrolment.
Enrolment Templates The Enrolment Template feature in STELA allows users to create a series of templates for each different ‘course offering’ an organisation provides such as ‘Certificate IV in Accounting’ or short courses such as ‘Workplace Health and Safety’ or ‘Senior First Aid’.
An enrolment template contains the following key enrolment information relating to the ‘course offering’:
Course/qualification (hereinafter referred to as ‘Program’) Unit(s)/module(s) (hereinafter referred to as ‘Subject(s)’) Funding types Modes of delivery Delivery locations Purchasing contract ID (where government funded) Start and end dates
Once a template is created it can then be re-used on an as needs basis to enrol one or multiple students without needing to re-create all the enrolment details individually.
Where your organisation provides ‘offerings’ that contain different electives, delivery locations, modes of delivery or funding types it is recommended that a different template be created for each ‘course offering’ to avoid having to customise templates each time prior to use.
This enrolment option is recommended where your organisation runs the same or similar offerings throughout the year to multiple students.
See Step 3A Create a New Template or Step 3B Update an Existing Template.
Individual Student Enrolment Individual enrolment is where users create individual student enrolments without using an Enrolment Template. Each enrolment requires users to manually add course offering details including individual subjects, funding types, modes of delivery, delivery locations, etc.
This enrolment option is recommended where an offering is unique to an individual student as opposed to a group of students.
See Step 4C Enrol a Single Student

20
Create/Update Existing Enrolment Template Before you enrol students using a template you need to create an enrolment template or utilise an existing template (which may or may not require updating). Below are the steps needed to create a new template or search and update an existing template in STELA.
Skip this step and proceed to Step 4 Student Enrolments if the template already exists and does not require any updating.
3A Create a New Template
1. On the STELA Menu Bar under the heading of Students/Enrolments, click Enrolment Templates to open the Enrolment Template screen.
2. Click on New Template link.
3. The Qualification / Course tab will open.
For non-accredited training or accredited training that leads to a Statement of Attainment only, click on the Here option.
For accredited training that leads to a nationally recognised qualification select the program from the list available.

21
Note: The list of programs is obtained from your scope of registration listed on training.gov.au. Where any programs are missing please contact the STELA helpdesk
If you have many programs on scope, you can use the search function to locate the relevant program or click on the page numbers beneath the list to scroll through your list of available programs.
4. The ‘Enrolment Competencies’ tab will open which will allow you to attach the relevant subjects to the enrolment template you are creating for your offering. By default, a list of every subject that exists in STELA will be listed in alphabetical order.
5. Search for the subject you wish to attach to your template (see search tips and examples below) Search tips: Relevant subjects can be found by searching on code or name. We recommend using the code field to search as it allows you to better narrow your search results. Searches can be executed using exact or partial combinations. Example 1: - Partial Search - If you want to see a list of all subjects that belong to the CHC training package, enter CHC in the code field and click search.
This search method will return a list of subjects that contain CHC in the code.

22
Example 2: Individual Subject Search - If you want to find a particular subject for example NFSKOCM02, enter NFSKOCM02 into the code field and click search.
This search method will return one subject at a time. Repeat this search for all competencies you wish to add to your template.
6. Click on the name of the subject to attach to the template. Once attached to the template the subject name will be ‘greyed out’ and will appear in the bottom section of the Enrolment screen.
7. Repeat steps 5 and 6 for each subject that needs to be attached to the template. If you select an incorrect subject, click on the remove button against the subject and it will be removed from your enrolment template list.
8. Once all subjects have been attached click Next.
9. The ‘Funding Type’ tab will open where you need to select the Funding Type, Mode of Delivery, Predominant Delivery Mode and flag if the training in your template relates to VET in Schools.

23
Notes: - If the funding type you required is not in the list contact the STELA helpdesk to have it added. - VET in Schools should only be selected where the training is accredited and is being counted towards a student’s senior secondary certificate known as SACE in SA. - Study Reason is provided at a later stage when attaching students to the template. - Predominant Delivery Mode is a mandatory field that identifies which delivery mode is the largest or only component of delivery for each subject enrolment. STELA requires Predominant Delivery Modes to align with at least one of the reported values under ‘Mode of Delivery’. See the table below for guidance on selecting the correct Predominant Delivery Mode.
Mode of Delivery selected in STELA
Predominant Delivery Mode for STELA (one of the following must be chosen as the largest component of delivery)
Internal only “Internal delivery” External only “External delivery” Workplace-based only “Workplace-based delivery” Combination of internal and external “Internal delivery” OR “External delivery” Combination of internal and workplace-based
“Internal delivery” OR “Workplace-based delivery”
Combination of external and workplace-based
“External delivery” OR “Workplace-based delivery”
Combination of all modes “External delivery” OR “Workplace-based delivery” OR “Internal delivery”
Not applicable (RPL or credit transfer) “Not Applicable – Recognition of Prior Learning/Credit Transfer”
10. Once you have entered the required information for each subject click Next to go to the
‘Competency Details’ tab.
11. Enter the approximate start and finish dates for each subject and select the relevant training location. Where the subject is ‘VET in Schools’ select the School Location. Click Next when completed to take you to the ‘Confirm Enrolment’ tab.

24
Notes: - Start and finish dates can be adjusted at time of resulting to reflect the actual start and finish dates of the training. - If the training location you require is not in the list, you will need to exit out of the template and add the location. See Step 1 Check Training Locations and Fund Types
12. Review your template for accuracy before saving. If any details are incorrect use the Back
button to make any necessary changes or Click on the relevant tab(s). Once changes have been made click Next until you return to the ‘Confirm Enrolment’ tab.
13. Once satisfied the details are correct enter a template name and click Finish to Save the Enrolment Template. Note: Template names are for your reference only and are not used by the Department for reporting purposes. We suggest using naming conventions that will allow you to easily identify the course offering. Examples may be:
- 2018 - Certificate I in Work Preparation (Elective Stream 1) - 2018 – Work Readiness - Senior First Aid 2018 - 2017 - CHC10108

25
14. Once the template has been saved you will be taken back to the Enrolment Template Screen where your template will appear in the list of ‘Existing Templates’
15. Repeat the above steps for each template you need to create.
16. End of process. To enrol a student using a template refer to Step 4 – Student Enrolments.;
3B Updating an Existing Enrolment Template
1. On the STELA Menu Bar under the heading Students/Enrolments, click Enrolment Templates which will open the Enrolment template screen and list all available templates in alphabetical order by template name.
2. To edit a template, use the search feature to locate your template or simply select from the
list of available templates. Once found click on the template name to commence editing.
3. The template will open onto the ‘Confirm Enrolment’ tab. Use the Back button or click on
the various tabs to make amendments as required. When updates have been made use the Next button until you return to the ‘Confirm Enrolment’ tab. Enter a template name and click Finish to update the Enrolment.
Notes: - You can use the same template name as used previously or you can update the name if necessary. - If you need to add or remove competencies refer to relevant instructions in Step 3A Create a New Template.

26
STEP 4 – STUDENT ENROLMENTS Below are the steps for enrolling students in STELA using the various enrolment methods:
A. Using an Enrolment Template to enrol a single student B. Using an Enrolment Template to enrol multiple students at a time (known as Bulk
Enrolment) C. Individual Student Enrolment
4A Enrol a Single Student Using a Template
1. On the STELA Menu Bar, under the heading Students / Enrolments click Students which will open the Student Search screen.
2. Search for the Student you wish to create an enrolment for. For instructions on how to search for a student refer to ‘Step 2A - Search for a Student’
3. Once you have found the Student click on the State Student ID to open the student record.
4. Click on the Enrol using a Template tab.

27
5. Using the Enrolment Template dropdown list select the template you wish to use for enrolment. Click Next This will take you to the ‘Funding Type & Delivery Method’ tab.
6. Enter the Study Reason for each subject enrolment as specified on the student enrolment form. If required update the Funding Type, Mode of Delivery and VET in Schools fields.
7. Click Next which will take you to the ‘Competency Details’ tab. Where any subject enrolments are marked ‘Vet in Schools’ you will need to enter the SACE ID for the student (e.g. 456121F) and the School Location. If required update the Start Date, Finish Date, Location and if applicable Contract ID.
17. Click Next which will take you to the ‘Confirm Enrolment’ tab. If any details are incorrect use the Back button to make any necessary changes. Once changes have been made click Next until you return to the ‘Confirm Enrolment’ tab. Once satisfied the details are correct click Finish.

28
18. This will save the enrolment and you will be returned to the ‘Student Enrolments’ tab with the enrolment details listed.
Note: If you need to make any amendments to the enrolment, click on the course name (appears in blue) on the left of screen which will open the enrolment allowing you to make amendments as required.
19. End of Process. To result student enrolments, refer to Step 5 - Resulting
4B Bulk Enrolment This feature allows you to enrol multiple students into an existing enrolment template at one time.
Create Bulk Enrolment Using a Template
1. On the STELA Menu Bar, under the heading Students / Enrolments click Bulk Enrolment to open the Bulk Enrolments screen whereby you can create new bulk enrolments and edit existing bulk enrolments. To edit an existing bulk enrolment, refer to Edit Bulk Enrolment)
2. Click on the name of the relevant template from the list on the left of screen under the heading ‘Templates’ to create a new bulk enrolment.
Notes: - Templates appear in order of date in which they were created. The first template created
29
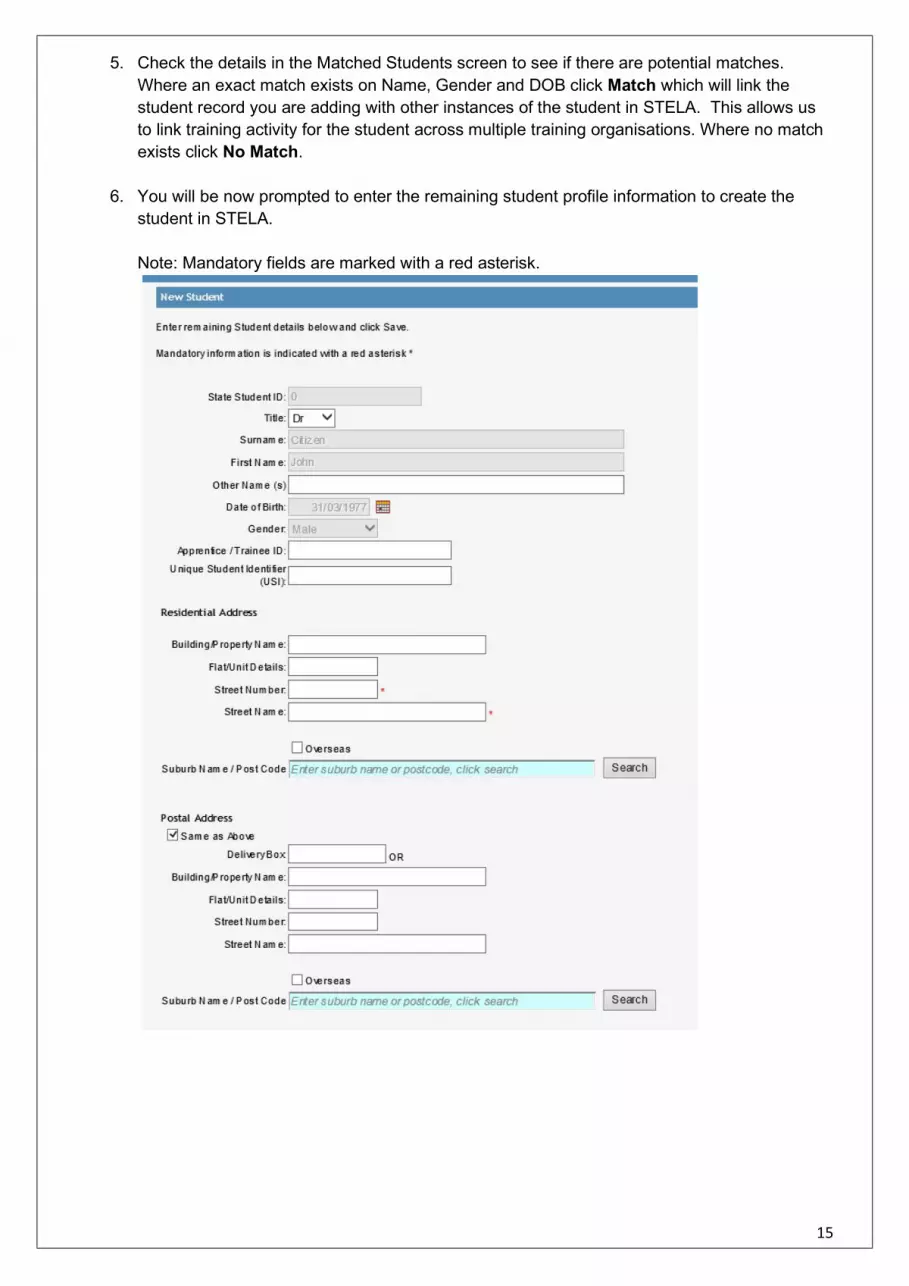
will appear at the top of the list with the latest one appearing at the end. - A maximum of 15 templates are shown on each page.
3. The ‘Bulk Enrolment Template’ screen will open. Click on the Show/Hide Competencies link to reveal the enrolment details for the chosen template. Click Back if the incorrect template has been chosen and repeat steps 1 and 2.
4. To add a student to the bulk enrolment, enter their Student ID, First Name or Surname in the Student Search Criteria field. Once you have entered the first three numbers of the student’s ID or the first three characters of the name a list of possible matches will begin to appear. At this point you can select the student from the list by clicking on their name. If multiple students with the same or similar names are listed, continue entering the remainder of their student ID or Surname which will further refine the search results.
5. Once the student has been selected from the list their profile details will pre-populate the Student ID, Surname, First Name, Date of Birth and Gender fields.

30
6. Add the Students Training Contract ID and SACE ID (where relevant) and select the
appropriate Study Reason. Click Add to link the student to the template. This will add the student and their enrolment details beneath the bulk enrolment.
7. Repeat steps 4-6 for each student you wish to add to the bulk enrolment. If you have added a student in error, click on the Remove link to the far right of the student’s enrolment.
8. Once you have added all students to the enrolment template, you need to provide a name for the Bulk Enrolment. Enter the name and click Save Enrolment. Note: Bulk enrolment names are for your reference only and are not used by the Department for reporting purposes. We suggest using naming conventions that will allow you to easily identify the course offering. Examples may be:
- CHC10108 Semester 1 2018 - 2018 – Work Readiness Term 2 - Senior First Aid 2018 Wk1 evening class
9. You will be asked to confirm if you wish to save the enrolment. Click OK to confirm and save the Bulk Enrolment or click Cancel to allow you to make further changes before saving.

31
10. Upon clicking OK the record will save and you will be returned back to the Bulk Enrolment screen. Note: you can add or remove students at any time from a saved Bulk Enrolment (unless you have already provided a final result for the student). See Edit Existing Bulk Enrolment.
11. End of Process. To result student enrolments, refer to Step 5 - Resulting.
Edit Existing Bulk Enrolment
1. On the STELA Menu Bar, under the heading Students / Enrolments click Bulk Enrolment to open the Bulk Enrolments screen.
2. To edit a bulk enrolment, find the enrolment template name in the list on the left of screen under the heading ‘Templates’. Notes: - Templates appear in order of date in which they were created. The first template created will appear at the top of the list with the latest one appearing at the end. - A maximum of 15 templates are shown on each page.
3. Once you have found the required template, select from the far right of screen the Bulk Enrolment associated with the Template.

32
Note: where multiple bulk enrolments exist click on the dropdown list to select the correct one.
4. Click on the Show/Hide Competencies link to reveal the enrolment details for the chosen bulk enrolment. Click Back if the incorrect one has been chosen and repeat steps 1 and 2.
5. To add a student to the bulk enrolment, repeat steps 4-6 above under Create Bulk Enrolment Using a Template.
6. To remove a student from the bulk enrolment, click on the Remove link to the far right of the
student’s enrolment you wish to remove. Repeat for each student you wish to remove.
7. Once all amendments have been made click Save Enrolment.
8. You will be asked to confirm if you wish to save the enrolment. Click OK to confirm and save the Bulk Enrolment or click Cancel to allow you to make further changes before saving.
9. Upon clicking OK the record will save and take you back to the Bulk Enrolment screen.

33
4C - Individual Student Enrolment
1. On the STELA Menu Bar, under the heading Students / Enrolments click Students, to open the Student Search screen.
2. Search for the Student you wish to create an enrolment for. For instructions on how to search for a student refer to ‘Step 2A - Search for a Student’
3. Once you have found the Student click on the State Student ID to open the student record.
4. Click on the New Enrolment tab. The Enrolment – ‘Choose Qualification or Course’ screen will open.
For non-accredited training or accredited training that leads to a Statement of Attainment only, click the Here option.

34
For accredited training that leads to a nationally recognised qualification select the program from the list available.
Notes: The list of programs is obtained from your scope of registration listed on training.gov.au. Where any programs are missing please contact the STELA helpdesk.
If you have many items on scope you can use the search function to locate the relevant program or click on the page numbers beneath the list to scroll through your list of available programs.
5. Once the program has been selected, the ‘Competencies’ tab will open with the name of the program selected beneath the student name.
6. This tab allows you to attach the relevant subjects to the enrolment you are creating for the chosen student. By default, a list of every subject that exists in STELA will be listed in alphabetical order.

35
7. Search for the subject you wish to attach (refer to Step 5 in Create a New Template for
search tips)
8. Once you have found the relevant subject, click on the name to attach to the enrolment. Once attached to the enrolment the subject name will be ‘greyed out’ and will appear in the bottom section of the Enrolment screen.
9. Repeat steps 7 and 8 for each subject that needs to be attached to the enrolment. If you attach a subject incorrectly, click the Remove button (located far right) against the relevant subject and it will be removed from your enrolment.
10. Once all subjects have been attached click Next.
11. This will open the ‘Funding Type and Delivery Method’ tab where you need to select the Funding Type, Mode of Delivery, Predominant Delivery Mode, Study Reason and indicate if any of the enrolments are VET in Schools. If the student is undertaking the training as part of an apprenticeship or traineeship enter the Training Contract ID.

36
Notes: - If the funding type needed is not in the list contact the STELA helpdesk to have it added. - VET in Schools should only be selected where the training is accredited and is being counted towards a student’s senior secondary certificate known as SACE in SA. - Predominant Delivery Mode is a mandatory field that identifies which delivery mode is the largest or only component of delivery for each subject enrolment. STELA requires Predominant Delivery Modes to align with at least one of the reported values under ‘Mode of Delivery’. See the table below for guidance on selecting the correct Predominant Delivery Mode.
Mode of Delivery selected in STELA
Predominant Delivery Mode for STELA (one of the following must be chosen as the largest component of delivery)
Internal only “Internal delivery” External only “External delivery” Workplace-based only “Workplace-based delivery” Combination of internal and external “Internal delivery” OR “External delivery” Combination of internal and workplace-based
“Internal delivery” OR “Workplace-based delivery”
Combination of external and workplace-based
“External delivery” OR “Workplace-based delivery”
Combination of all modes “External delivery” OR “Workplace-based delivery” OR “Internal delivery”
Not applicable (RPL or credit transfer) “Not Applicable – Recognition of Prior Learning/Credit Transfer”
12. Once you have entered the required information for each subject click Next to go to the
‘Competency Details’ tab.
37
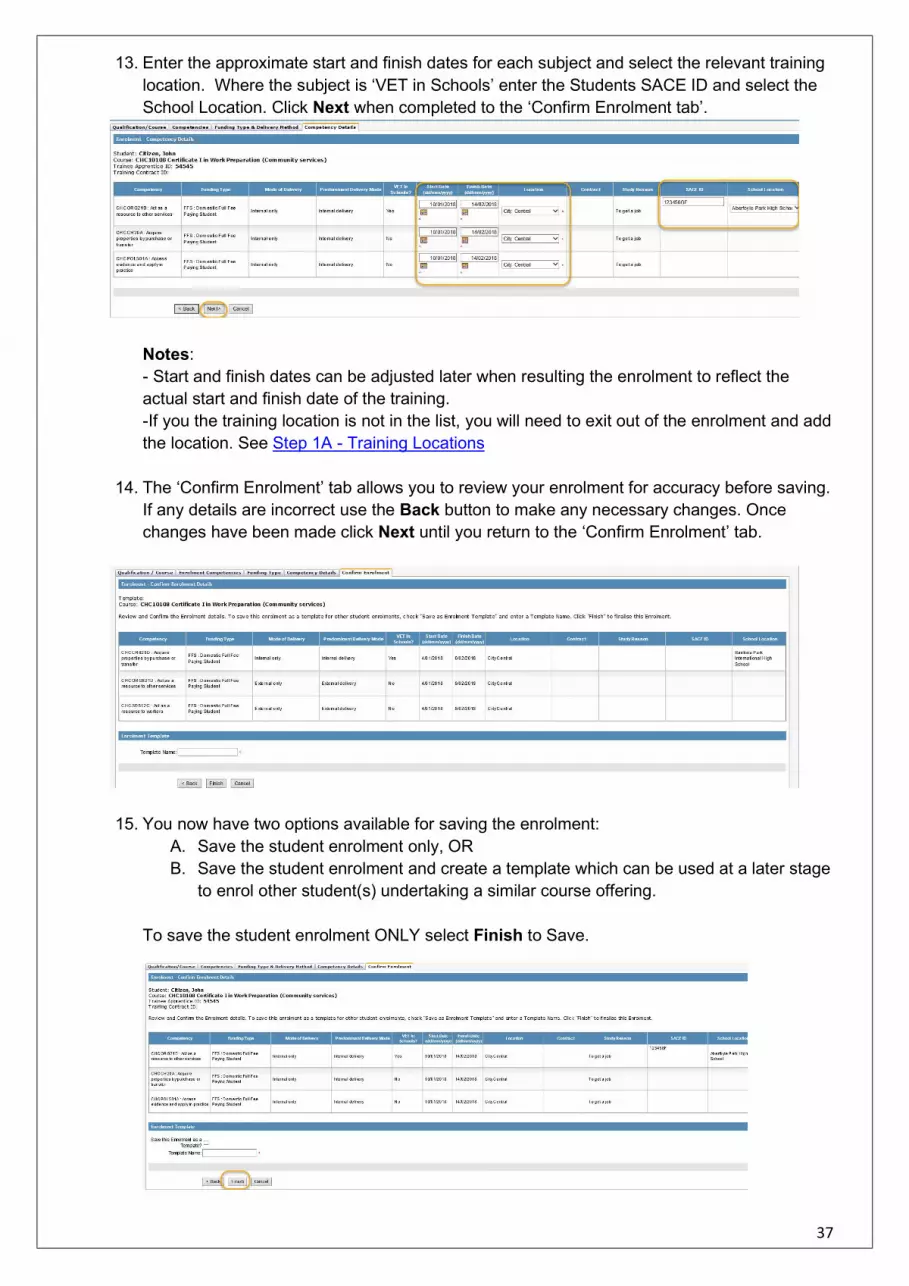
13. Enter the approximate start and finish dates for each subject and select the relevant training location. Where the subject is ‘VET in Schools’ enter the Students SACE ID and select the School Location. Click Next when completed to the ‘Confirm Enrolment tab’.
Notes: - Start and finish dates can be adjusted later when resulting the enrolment to reflect the actual start and finish date of the training. -If you the training location is not in the list, you will need to exit out of the enrolment and add the location. See Step 1A - Training Locations
14. The ‘Confirm Enrolment’ tab allows you to review your enrolment for accuracy before saving.
If any details are incorrect use the Back button to make any necessary changes. Once changes have been made click Next until you return to the ‘Confirm Enrolment’ tab.
15. You now have two options available for saving the enrolment: A. Save the student enrolment only, OR B. Save the student enrolment and create a template which can be used at a later stage
to enrol other student(s) undertaking a similar course offering. To save the student enrolment ONLY select Finish to Save.

38
To Save the enrolment AND create a new template select the tick box adjacent to ‘Save the Enrolment as a Template’ and enter a name for the template. Click Finish to save both.
16. Upon saving you will be returned to the ‘Student Enrolments’ tab which will list the enrolment you just created for the chosen student as well as any other existing enrolments that existed for them previously.
17. End of Process. To Result the student enrolment, see Step 5 - Resulting. To use the Template to create further enrolments see Step 4 – Student Enrolments.

39
STEP 5 - RESULTING There are two methods you can use to result students who are enrolled within STELA:
Bulk Resulting is used to result multiple students and associated enrolments at one time. This feature can only be used where the enrolment was created using the Bulk Enrolment function.
Individual Student Resulting is used to result an individual student and associated enrolments.
5A Bulk Resulting Once a Bulk Enrolment has been created you can result students at any time and do not have to wait until all students and associated enrolments have been completed.
1. On the STELA Menu Bar under the heading Students/Enrolments, select Bulk Resulting which will open the Bulk Enrolment screen with a list of existing bulk enrolments created for your organisation.
Notes:
- Bulk enrolments will appear in the order of when the template they have been associated with were created. The first template created will appear at the top of the list with the latest one appearing at the end.
- A maximum of 15 templates are shown on each page.
- Where more than one bulk enrolment exists for a template use the Bulk Enrolment drop down list to select the relevant Bulk Enrolment.
2. Select the relevant ‘Bulk Enrolment’ you wish to begin resulting
3. Update the relevant details for each completed student enrolment listed in the bulk enrolment which includes: Outcome (refer to Resulting Codes, Descriptions and Guidance for Correct Use) Actual Hours (only required where subject is non-accredited training. Must be entered as
full hours and not half e.g. 2 and not 2.5) Start and finish dates (these should reflect the actual dates the student commenced and
finished training)

40
4. Where the enrolment is for an accredited program and the Student has completed all requirements of the program you can also enter:
Date Program Completed
Parchment Number and Issue date (only once parchment has been issued)
Notes:
Date Program Completed and Parchment Number and Issue Date can only be entered:
for accredited training attached to an AQF qualification. Do not use this section to record details relating to a Statement of Attainment.
where the student has a valid USI for a student where all subject enrolments have been resulted with an outcome and
at least one outcome must have a pass mark (Competency Achieved, RPL, Credit Transfer)
Date Program Completed can be entered at the time the student has completed the requirements of the program. Parchment Number and Issue date can only be entered once the parchment has been issued.

41
5. Click on the Save button to save the results. If any completion rules are not met relevant messaging will appear in red. These will need to be corrected before you can save the changes. Once saved the following pop-up message will be displayed.
6. End of process.

42
5B Individual Student Resulting
1. On the STELA Menu Bar under the heading Students/Enrolments, select Students which will open the Student Search screen.
2. Search for the student using the search option. Refer to Step 2 A – Search for a Student
3. Open the Student record by clicking on the State Student ID to the left of the Student Search screen which will open the ‘Student Details’ tab for the selected student.
4. Select the Student Enrolments tab to display all enrolments associated with the student.
5. For the program enrolment you wish to result, select the Results for this Enrolment option located beneath the last subject for the enrolment. This will open the Enrolment Results screen.

43
6. Update the relevant details for each completed student enrolment listed in the bulk enrolment which includes:
Outcome (refer to Resulting Codes, Descriptions and Guidance for Correct Use) Actual Hours (only required where subject is non-accredited training. Must be
entered as full hours and not half e.g. 2 and not 2.5) Start and finish dates (these should reflect the actual dates the student commenced
and finished training)
7. Where the enrolment is for an accredited program and the Student has completed all requirements of the program you can also enter:
Date Program Completed Parchment Number and Issue date (only once parchment has been issued)
Notes:
Date Program Completed and Parchment Number and Issue Date can only be entered: for accredited training attached to an AQF qualification. Do not use this section to
record details relating to a Statement of Attainment. where the student has a valid USI for a student where all subject enrolments have been resulted with an outcome and
at least one outcome must have a pass mark (Competency Achieved, RPL, Credit Transfer)
Date Program Completed can be entered at the time the student has completed the requirements of the program. Parchment Number and Issue date can only be entered once the parchment has been issued.

44
8. Click on the Save button to save the results. If any completion rules are not met relevant messaging will appear in red. These will need to be corrected before you can save the changes. Once saved the following pop-up message will be displayed.
9. End of process.
45
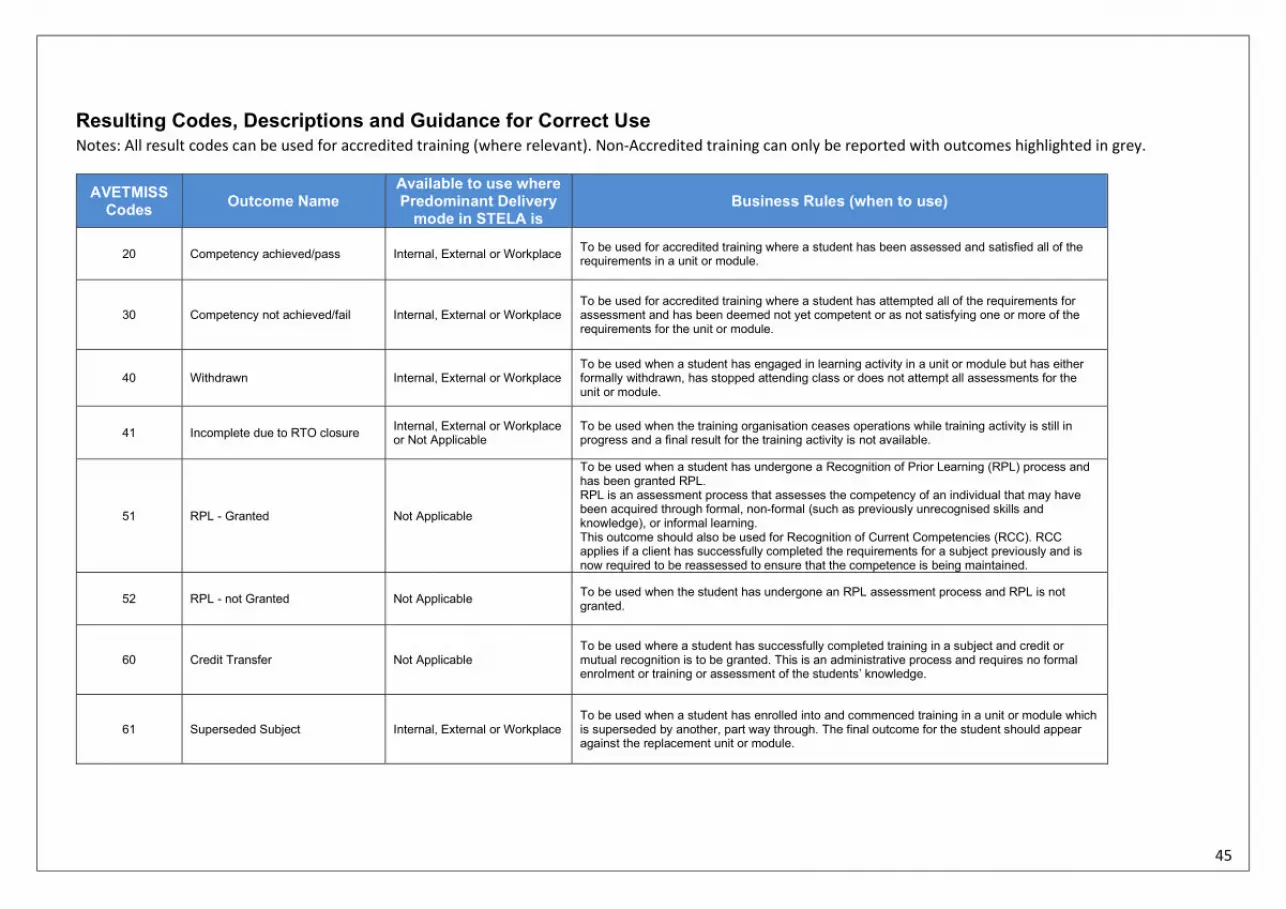
Resulting Codes, Descriptions and Guidance for Correct Use Notes: All result codes can be used for accredited training (where relevant). Non-Accredited training can only be reported with outcomes highlighted in grey.
AVETMISS Codes
Outcome Name Available to use where Predominant Delivery
mode in STELA is Business Rules (when to use)
20 Competency achieved/pass Internal, External or Workplace To be used for accredited training where a student has been assessed and satisfied all of the requirements in a unit or module.
30 Competency not achieved/fail Internal, External or Workplace To be used for accredited training where a student has attempted all of the requirements for assessment and has been deemed not yet competent or as not satisfying one or more of the requirements for the unit or module.
40 Withdrawn Internal, External or Workplace To be used when a student has engaged in learning activity in a unit or module but has either formally withdrawn, has stopped attending class or does not attempt all assessments for the unit or module.
41 Incomplete due to RTO closure Internal, External or Workplace or Not Applicable
To be used when the training organisation ceases operations while training activity is still in progress and a final result for the training activity is not available.
51 RPL - Granted Not Applicable
To be used when a student has undergone a Recognition of Prior Learning (RPL) process and has been granted RPL. RPL is an assessment process that assesses the competency of an individual that may have been acquired through formal, non-formal (such as previously unrecognised skills and knowledge), or informal learning. This outcome should also be used for Recognition of Current Competencies (RCC). RCC applies if a client has successfully completed the requirements for a subject previously and is now required to be reassessed to ensure that the competence is being maintained.
52 RPL - not Granted Not Applicable To be used when the student has undergone an RPL assessment process and RPL is not granted.
60 Credit Transfer Not Applicable To be used where a student has successfully completed training in a subject and credit or mutual recognition is to be granted. This is an administrative process and requires no formal enrolment or training or assessment of the students’ knowledge.
61 Superseded Subject Internal, External or Workplace To be used when a student has enrolled into and commenced training in a unit or module which is superseded by another, part way through. The final outcome for the student should appear against the replacement unit or module.

46
AVETMISS Codes
Outcome Name Available to use where Predominant Delivery
mode in STELA is Business Rules (when to use)
70 Continuing Enrolment Internal, External, Workplace or Not Applicable
To be used when a student has commenced training in a module or unit but will not receive a final outcome before the end of the Collection year and will continue study in the following year.
70 - AP Academic Pass Internal, External or Workplace
To be used only when a government funded student has completed the off-job component in an approved* AP accredited subject. Once the on-job component has been assessed the outcome should be updated to a 20 – Competency Achieved/Pass, 30 Competency Not Achieved/Fail or 40 Withdrawn (where student fails to complete work placement). * refer to approved list of subjects - http://skills.sa.gov.au/for-training-providers/workready-subsidies/subsidised-training-list/subsidy-payments#70AP
81 Non-Assessed enrolment - satisfactorily completed
Internal, External or Workplace
To be used when a student has completed the program of study in a way that satisfies the requirements of the training organisation. Not to be used against accredited subjects which are government funded. NOTE: Non-assessable activity is reported when training activity in a program is designed so that the client is not required to undertake an assessment or the client has elected by agreement with the training organisation at enrolment not to be assessed.
82 Non-Assessed enrolment - withdrawn or not satisfactorily completed
Internal, External or Workplace
To be used when a student has not completed the program of study in a way that satisfies the requirements of the training organisation or the client has withdrawn after engaging in the program’s activities. Not to be used against accredited units or modules which are Government funded.
85 Not Started Internal, External or Workplace or Not Applicable
To be used where a student has enrolled in a subject, but has not yet commenced activity.

47
Section 3 - SUBMISSION PROGRESS REPORTS
The Submission Progress page in STELA allows training organisations to monitor the progress of their reported AVETMISS data (for the chosen collection year) to ensure their data complies with both state and national reporting requirements. Where potential discrepancies are identified with your data these will be listed on this page for you to review and action as necessary. Discrepancies can include:
Duplicate Students Duplicate Subject Enrolments Parchment Discrepancies Missing Details USI discrepancies
In addition to the above discrepancies you will also be able to identify and monitor any enrolments you have reported for the collection year that are:
Un-resulted Continuing Resulted as Academic Pass
1. To view your Submission Progress page, under the heading AVETMISS Submission select
Submission Progress.
Submission Progress Page Explained
2. Where any data discrepancies or un-resulted, continuing or academic pass enrolments are identified, the number of affected records will appear on screen. To view the report, click on the report name.
3. Reports highlighted in Red are potential errors with data in your submission and should be fixed as soon as possible. Where your organisation receives public funding these errors have the potential to affect payments until resolved.
48
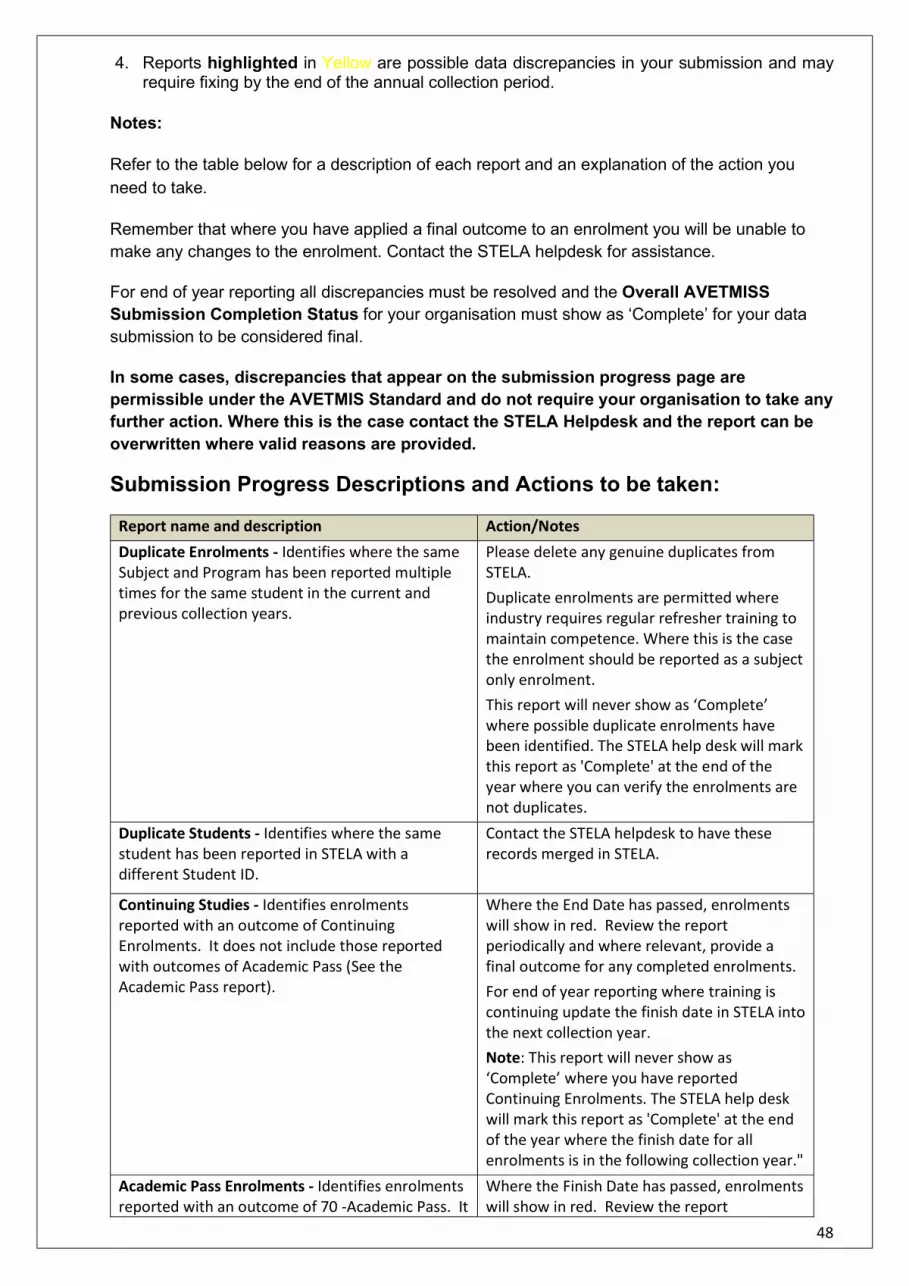
4. Reports highlighted in Yellow are possible data discrepancies in your submission and may require fixing by the end of the annual collection period.
Notes:
Refer to the table below for a description of each report and an explanation of the action you need to take.
Remember that where you have applied a final outcome to an enrolment you will be unable to make any changes to the enrolment. Contact the STELA helpdesk for assistance.
For end of year reporting all discrepancies must be resolved and the Overall AVETMISS Submission Completion Status for your organisation must show as ‘Complete’ for your data submission to be considered final.
In some cases, discrepancies that appear on the submission progress page are permissible under the AVETMIS Standard and do not require your organisation to take any further action. Where this is the case contact the STELA Helpdesk and the report can be overwritten where valid reasons are provided.
Submission Progress Descriptions and Actions to be taken:
Report name and description Action/Notes
Duplicate Enrolments - Identifies where the same Subject and Program has been reported multiple times for the same student in the current and previous collection years.
Please delete any genuine duplicates from STELA. Duplicate enrolments are permitted where industry requires regular refresher training to maintain competence. Where this is the case the enrolment should be reported as a subject only enrolment. This report will never show as ‘Complete’ where possible duplicate enrolments have been identified. The STELA help desk will mark this report as 'Complete' at the end of the year where you can verify the enrolments are not duplicates.
Duplicate Students - Identifies where the same student has been reported in STELA with a different Student ID.
Contact the STELA helpdesk to have these records merged in STELA.
Continuing Studies - Identifies enrolments reported with an outcome of Continuing Enrolments. It does not include those reported with outcomes of Academic Pass (See the Academic Pass report).
Where the End Date has passed, enrolments will show in red. Review the report periodically and where relevant, provide a final outcome for any completed enrolments. For end of year reporting where training is continuing update the finish date in STELA into the next collection year. Note: This report will never show as ‘Complete’ where you have reported Continuing Enrolments. The STELA help desk will mark this report as 'Complete' at the end of the year where the finish date for all enrolments is in the following collection year."
Academic Pass Enrolments - Identifies enrolments reported with an outcome of 70 -Academic Pass. It
Where the Finish Date has passed, enrolments will show in red. Review the report

49
Report name and description Action/Notes
does not include those reported with outcomes of 70 - Continuing Enrolment (See the Continuing Enrolment report).
periodically and where relevant provide a final outcome for any completed enrolments. For end of year reporting where training is continuing update the finish date in STELA into the next collection year. Note: This report will never show as ‘Complete’ where you have reported Academic Pass Enrolments. The STELA help desk will mark this report as 'complete' at the end of the year where the finish date for all enrolments is in the following collection year."
Not Specified Details - Identifies student demographic information that is missing or reported as ‘not specified’. This data is required by NCVER, State and Commonwealth departments for national reporting and decision making. ‘Not specified’ values can only be provided where a student has NOT given this information at time of enrolment.
Please review the Information to ensure the details you have reported matches the information provided by the student on their enrolment form and update where necessary. Amend the identified records in STELA. Note: This report will never show as ‘Complete’ where you have reported ‘Not specified’ values. The STELA help desk will mark this report as complete at the end of the year where you can confirm the student never reported these values at time of enrolment.
Unique Student Identifier - Identifies where the same student has been reported in STELA across multiple training organisations and there is a discrepancy between the USI, First name, Last Name or Date of Birth
Verify the student against the USI registry to ensure the Student Details match. Amend the identified records in STELA. Please note that if you have verified this information is correct, the student will continue to appear on the report until the training organisation who has reported the incorrect details resolves the discrepancy in their SMS. This is due to STELA not knowing which organisation has reported the correct details.

50
Section 4- REPORTS The reports section allows users to generate a range of reports relating to training activity reported for an organisation within a specified time period.
To view available reports in STELA, under the heading Students / Enrolments click on Reports to open the reports window.
Note: STELA reports will appear in a new window. Depending on your security settings for your internet browser it may be set to block pop-ups from automatically showing on your screen. If the reports window fails to appear, it is most likely being blocked by your browser. We recommend that you adjust your browser to allow pop-ups or add stela.statedevelopment.sa.gov.au as a trusted website. You may need to seek assistance from your ICT department.
Enrolment Reports
Provides a detailed summary of student enrolments including names, subjects, start and end dates, outcomes, scheduled hours and parchment based on:
Contract Funding Type Funding Type and Location Program (Course/Qualification) Bulk Enrolment Name Funding Type and Outcome
1. To run the report, click on Enrolment Reports from the reports window where you will need
to select the report type:

51
2. Select the relevant report option from the drop-down list. Depending on the report option chosen you may be asked to specify a date range.
3. Click Run Report will open a new window. Depending on the report type selected in step 2 you will need select the required Contract No, Funding Type, Funding Type and Location, Program, Bulk Enrolment Name or Funding Type and Outcome that you wish to run the report by. E.g. where report option ‘Funding Type’ was chosen you will need to select the funding type you wish to report against.
4. Select the required option from the drop-down list, then click View Report to the right of screen.
5. Once the report has run the report results will appear within the report window.
Screenshot below is an example of report: Enrolment Report by Funding Type. Note: Where fields appear in blue click on the link to drill down to a lower level.

52
Screenshot below demonstrates how the report can be drilled down further to display detailed information on CPC30111 Certificate III in Bricklaying/Blocklaying.
Notes:
To print the report, click on the printer icon from the reports window.
To export the report and save in a different format, click the disc icon and select the required format.

53
Enrolment Summary Provides a high-level summary of the number of students, subject enrolments, hours and parchments by fund type for the chosen time period.
1. To run the report, click on Enrolment Summary Report from the reports window where you will need to specify a date range.
2. Once the From and To dates have been entered, click View Report to the right of screen.
3. Once the report has run the report results will appear within the report window.
Screenshot below is an example of the Enrolment Summary Report. Note: Click on the plus icon that appear to the left of the report to drill down to a lower level.
4. To view the detailed information for each fund source, select the disc icon and export the report to excel.
54
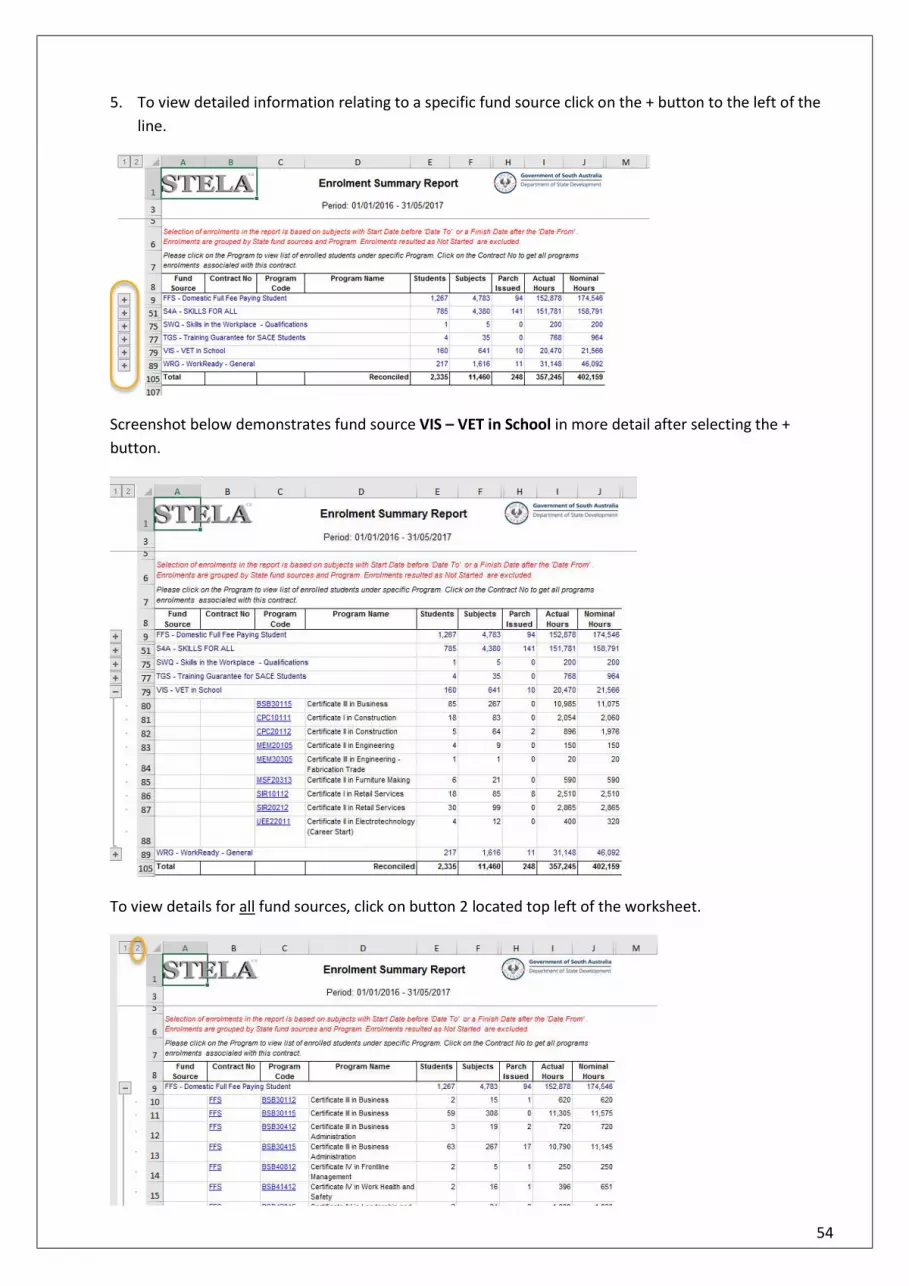
5. To view detailed information relating to a specific fund source click on the + button to the left of the line.
Screenshot below demonstrates fund source VIS – VET in School in more detail after selecting the + button.
To view details for all fund sources, click on button 2 located top left of the worksheet.

55
Program Completion Report Provides a list of program completions including parchment details for students by program within a specified date range.
1. To run the report, click on Program Completion Report from the reports window where you will need to specify a date range.
2. Once the From and To dates have been entered, click Run Report
3. Once the report has run the report results will appear within the report window.
Notes:
To print the report, click on the printer icon from the reports window.
To export the report and save in a different format, click the disc icon and select the required format.