Embed Size (px)
Citation preview

DocuCentre-IV C2265DocuCentre-IV C2263
User Guide

Microsoft, Windows, Windows NT, Windows Server, Windows Vista, Internet Explorer, and Microsoft Network are trademarks or registered trademarks of Microsoft Corporation in the U.S. and other countries.
NetWare is a registered trademark of Novell, Inc. in the United States and other countries.
Adobe, Acrobat, PostScript, and Adobe PostScript 3 are trademarks of Adobe Systems Incorporated.
EtherTalk, Macintosh, and Mac OS are trademarks of Apple Inc.
PCL, HP-GL, and HP-GL/2 are registered trademarks of Hewlett-Packard Corporation.
Memory Stick is a registered trademark of Sony Corporation.
SmartMedia is a registered trademark of Toshiba Corporation.
RSA and BSAFE are either registered trademarks or trademarks of RSA Security Inc. in the United States and/or other countries.RSA Security Inc. All right reserved.
All product/brand names are trademarks or registered trademarks of the respective holders.
Microsoft product screen shot(s) reprinted with permission from Microsoft Corporation.
For information on license, refer to About License.
XEROX, the sphere of connectivity design, PDF Bridge, ContentsBridge, and CentreWare are trademarks or registered trademarks of Xerox Corporation in the U.S. or Fuji Xerox Co., Ltd. DocuWorks is a trademark of Fuji Xerox Co., Ltd.
In this manual, safety instructions are preceded by the symbol . Always read and follow the instructions before performing the required procedures.
The data saved in the hard disk of the machine may be lost if there is any problem in the hard disk. Fuji Xerox is not responsible for any direct and indirect damages arising from or caused by such data loss.
Fuji Xerox is not responsible for any breakdown of machines due to infection of computer virus or computer hacking.
Important1. This manual is copyrighted with all rights reserved. Under the copyright laws, this manual may
not be copied or modified in whole or part, without the written consent of the publisher.2. Parts of this manual are subject to change without prior notice.3. We welcome any comments on ambiguities, errors, omissions, or missing pages.4. Never attempt any procedure on the machine that is not specifically described in this manual.
Unauthorized operation can cause faults or accidents. Fuji Xerox is not liable for any problems resulting from unauthorized operation of the equipment.
An export of this product is strictly controlled in accordance with Laws concerning Foreign Exchange and Foreign Trade of Japan and/or the export control regulations of the United States.

Table of Contents
3
Table of Contents
Table of Contents................................................................................................................................................. 3
1 Before Using the Machine .................................................................................................................. 13
Preface ................................................................................................................................................................... 14
Types of Manuals .............................................................................................................................................. 15
Using This Guide................................................................................................................................................ 16Organization of This Guide ..................................................................................................................... 16Conventions................................................................................................................................................... 17
Safety Notes........................................................................................................................................................ 19Electrical Safety ........................................................................................................................................... 20Machine Installation.................................................................................................................................. 21Operational Safety ..................................................................................................................................... 26Consumable................................................................................................................................................... 29Location of Warning and Caution Labels.......................................................................................... 30
Regulation ............................................................................................................................................................ 31Radio Frequency Emissions (Class B) .................................................................................................. 31Product Safety Certification (UL, CB) ................................................................................................. 31
Environment ........................................................................................................................................................ 32
About License...................................................................................................................................................... 33RSA BSAFE...................................................................................................................................................... 33Heimdal........................................................................................................................................................... 33JPEG Code ...................................................................................................................................................... 33Libcurl............................................................................................................................................................... 34FreeBSD........................................................................................................................................................... 34OpenLDAP...................................................................................................................................................... 35DES.................................................................................................................................................................... 36AES .................................................................................................................................................................... 37TIFF (libtiff) ................................................................................................................................................... 37ICC Profile (Little cms) .............................................................................................................................. 37XPS (XML Paper Specification) .............................................................................................................. 37EDICT and COMPDIC................................................................................................................................ 37Cyrus SASL...................................................................................................................................................... 38
Legal Notice......................................................................................................................................................... 39
2 Product Overview ................................................................................................................................... 41
Machine Components ..................................................................................................................................... 42
Power Source ....................................................................................................................................................... 51Switching the Main Power On................................................................................................................ 51Switching the Power On............................................................................................................................ 52Switching the Power Off........................................................................................................................... 53Switching the Main Power Off ............................................................................................................... 53
Ground Fault Interrupter................................................................................................................................ 55
Energy Saver Mode........................................................................................................................................... 57Entering the Energy Saver Mode .......................................................................................................... 58

4
Exiting the Energy Saver Mode..............................................................................................................58
Cooling Mode ......................................................................................................................................................60
Control Panel........................................................................................................................................................61Screens and Buttons Displayed..............................................................................................................65
About the [Services Home] Screen..............................................................................................................66
Entering Text........................................................................................................................................................70
Installing the Tray Attachment on the Finisher-B1 .............................................................................71
3 Copy.............................................................................................................................................................73
Copying Procedure ............................................................................................................................................74Step 1 Loading Documents .....................................................................................................................74Step 2 Selecting Features.........................................................................................................................76Step 3 Entering a Quantity ......................................................................................................................77Step 4 Starting the Copy Job ..................................................................................................................78Step 5 Confirming the Copy Job in Job Status ................................................................................79
Operations during Copying............................................................................................................................80Stopping the Copy Job ..............................................................................................................................80Changing the Number of Copies...........................................................................................................81Interrupting the Copy Job........................................................................................................................82
Simple Copy..........................................................................................................................................................83Paper Supply (Selecting the Paper for Copying).............................................................................83Reduce/Enlarge (Making Enlarged/Reduced Copies)....................................................................852 Sided Copying (Making 2 Sided Copies).........................................................................................85Auto/Color/Black & White (Selecting the Color for Copying) ....................................................86Lighten/Darken (Adjusting the Copy Density).................................................................................862 Pages per Side (Copying Two Pages onto One Sheet)..............................................................871 Staple............................................................................................................................................................87
Copy.........................................................................................................................................................................88Reduce/Enlarge (Making Enlarged/Reduced Copies)....................................................................88Paper Supply (Selecting the Paper for Copying).............................................................................92Output Color (Selecting the Color for Copying) ..............................................................................952 Sided Copying (Making 2 Sided Copies).........................................................................................99Copy Output (Specifying Finishing Options) ....................................................................................99Pages per Side (Copying Multiple Pages onto One Sheet) ...................................................... 100Lighten/Darken (Adjusting the Copy Density).............................................................................. 100
Image Quality................................................................................................................................................... 101Original Type (Selecting the Document Type) ............................................................................. 101Image Options (Adjusting Copy Density/Sharpness/Saturation of Images)................... 103Image Enhancement (Erasing the Background Color of Documents/Adjusting Contrast).................................................................................................................................. 103Color Effects (Selecting an Image Quality).................................................................................... 104Color Balance (Adjusting Color Balance) ........................................................................................ 105Color Shift (Adjusting the Color Tone)............................................................................................. 107
Layout Adjustment......................................................................................................................................... 1082 Sided Copying (Making 2 Sided Copies)...................................................................................... 109Book Copying (Copying Facing Pages onto Separate Sheets)............................................... 1102 Sided Book Copying (Making 2 Sided Copies of Facing Pages)......................................... 112

Table of Contents
5
Original Size (Specifying the Scan Size for the Document) .....................................................113Mixed Size Originals (Scanning Different Size Documents Simultaneously)....................114Edge Erase (Erasing Edges and Margin Shadows of the Document)...................................115Image Shift (Adjusting the Image Position)..................................................................................117Invert Image (Making Reversed Copies of Images)...................................................................119Original Orientation (Specifying the Orientation of Loaded Documents).........................120Image Rotation (Changing the Orientation of Images)...........................................................121
Output Format..................................................................................................................................................1232 Sided Copying (Making 2 Sided Copies)......................................................................................123Booklet Creation (Creating a Booklet)..............................................................................................124Covers (Attaching Covers to Copies).................................................................................................127Pages per Side (Copying Multiple Pages onto One Sheet).......................................................128Poster (Making Enlarged Copies Spread over Multiple Sheets) .............................................129Repeat Image (Making Multiple Copies on One Sheet)............................................................131Annotations (Adding a Comment/a Date/Page Numbers to Copies) .................................132Watermark (Printing Control Numbers on the Background of Copies)...............................138Folding (Outputting Bi-Folded) ...........................................................................................................141Preset Repeat Image (Making Multiple Copies on a Single Sheet)......................................142Copy Output (Specifying Finishing Options)..................................................................................143ID Card Copy (Copying Both Sides of an ID Card)......................................................................146
Job Assembly.....................................................................................................................................................148Build Job (Processing Documents Scanned with Different Settings as One Job) ...........148Sample Job (Checking the Finished Output of the Copy).........................................................152Combine Original Sets (Adding Originals) ......................................................................................153Delete Outside/Delete Inside (Deleting Outside or Inside of the Selected Area)...........155Stored Programming (Calling a Stored Program for Build Job) .............................................156
4 Fax.............................................................................................................................................................157
Fax Procedure ...................................................................................................................................................158Step 1 Loading Documents...................................................................................................................158Step 2 Selecting Features ......................................................................................................................160Step 3 Specifying Destinations............................................................................................................161Step 4 Starting the Fax Job...................................................................................................................163Step 5 Confirming the Fax Job in Job Status.................................................................................164
Operations during Faxing.............................................................................................................................165Stopping the Fax Job...............................................................................................................................165Changing the Scan Settings .................................................................................................................166
About Internet Fax .........................................................................................................................................168Internet Fax Features..............................................................................................................................168Sending Internet Fax...............................................................................................................................170Receiving Internet Fax............................................................................................................................171Useful Features ..........................................................................................................................................172
About IP Fax (SIP)...........................................................................................................................................175IP Fax (SIP) Features ...............................................................................................................................176Feature Comparison with Regular Fax .............................................................................................177Sending IP Fax (SIP) ................................................................................................................................178Receiving IP Fax (SIP) .............................................................................................................................178
About Server Fax..............................................................................................................................................179

6
Sending Server Fax................................................................................................................................... 179
Simple Fax.......................................................................................................................................................... 181Specifying a Destination Using the Numeric Keypad................................................................ 181Speed Dialing (Specifying a Destination Using an Address Number) ................................ 182Specifying a Destination Using a One Touch Button ................................................................ 183Resolution (Specifying the Scanning Resolution)........................................................................ 184Original Type (Selecting the Document Type) ............................................................................. 1842 Sided Scanning (Transmitting 2-sided Originals) .................................................................... 185
Fax/Internet Fax.............................................................................................................................................. 186Internet Fax/Fax/IP Fax (SIP) (Selecting Internet Fax/Fax/IP Fax (SIP)) ......................... 186+ Add (Sending Faxes to Multiple Recipients) .............................................................................. 187Specifying a Destination Using the Address Book ...................................................................... 187Speed Dialing (Specifying a Destination Using an Address Number) ................................ 191Add New Address (Registering a Destination on the Address Book)................................... 192Specifying a Destination using a One Touch Button ................................................................. 195Specifying a Destination using the Keyboard Screen................................................................ 195Specifying a Destination using the Redial Feature..................................................................... 196Specifying a Line (Port) .......................................................................................................................... 197Entering Specific Symbols .....................................................................................................................198Removing/Confirming a Recipient.....................................................................................................198Lighten/Darken (Adjusting Fax Density)......................................................................................... 1992 Sided Scanning (Transmitting 2-sided Originals) .................................................................... 199Original Type (Selecting the Document Type) ............................................................................. 201Resolution (Specifying the Scanning Resolution)........................................................................ 201
Layout Adjustment......................................................................................................................................... 2032 Sided Scanning (Transmitting 2-sided Originals) .................................................................... 203Original Type (Selecting the Document Type) ............................................................................. 203Resolution (Specifying the Scanning Resolution)........................................................................ 203Original Size (Specifying the Scan Size for the Original) .......................................................... 203Mixed Size Originals (Scanning Different Size Documents Simultaneously) ................... 204Book Faxing (Scanning Facing Pages onto Separate Sheets) ................................................ 205Reduce/Enlarge (Specifying a Scan Ratio) ..................................................................................... 207Stamp (Adding a Stamp when Scanning a Document) ............................................................ 208
Fax/Internet Fax Options............................................................................................................................. 209Acknowledgement Report (Confirming Transmission Results) .............................................. 209Starting Rate (Selecting a Communication Mode)..................................................................... 211Priority Send/Delay Start (Specifying Send Priority/Send Time)........................................... 212Transmission Header Text (Adding Sender Name and Phone Number to Faxes) ......... 214Cover Page (Transmitting Documents With a Cover Page) .................................................... 215Internet Fax Subject (Specifying the Internet Fax Subject) ................................................... 217Internet Fax Message (Editing the Internet Fax Mail Contents).......................................... 217Recipient Print Sets (Printing Multiple Sets at the Remote Machine)................................. 218Pages per Side (Combining Multiple Pages into One Sheet) .................................................. 219Remote Folder (Using Remote Folder)............................................................................................. 219F Code (Using F Code Transmission) ................................................................................................ 223Internet Fax Profile (Specifying Internet Fax Profiles)..............................................................226Encryption (Sending Internet Fax Encrypted by S/MIME)....................................................... 227Digital Signature (Sending Internet Fax with a Digital Signature by S/MIME).............. 228

Table of Contents
7
More Options.....................................................................................................................................................229Remote Polling (Retrieving Files from Remote Machines) .......................................................229Store for Polling (Storing Files on the Machine that a Remote Machine can Retrieve) ...............................................................................................................................................232On-hook (Confirming Remote Machine Response Prior to Transmission).........................233
Broadcast............................................................................................................................................................235Broadcast Send (Transmitting to Multiple Recipients)..............................................................235Relay Broadcast (Transmitting Documents Through a Relay Station)...............................236Remote Relay Broadcast (Performing Relay Broadcast to Remote Locations) ...............239
Receiving Faxes ................................................................................................................................................243Switching between Auto Receive and Manual Receive.............................................................243Using Auto Receive...................................................................................................................................244Using Manual Receive.............................................................................................................................244Using Folder Receive................................................................................................................................245
Facsimile Information Services..................................................................................................................246Using the Receiver ....................................................................................................................................246When Not Using a Receiver ..................................................................................................................246
5 Scan...........................................................................................................................................................249
Scanning Procedure........................................................................................................................................250Step 1 Loading Documents...................................................................................................................250Step 2 Selecting the Features ..............................................................................................................252Step 3 Starting the Scan Job ................................................................................................................255Step 4 Confirming the Scan Job in Job Status ..............................................................................256Step 5 Saving the Scanned Data........................................................................................................257
Operations during Scanning .......................................................................................................................258Stopping the Scan Job ............................................................................................................................258Previewing the Scanned Images during a Scan Job ...................................................................259Changing Scan Settings .........................................................................................................................260
E-mail....................................................................................................................................................................261Address Book (Specifying an E-mail Address) ...............................................................................262Add New Address (Registering a Recipient on the Address Book)........................................267Specifying a Destination Using a One Touch Button.................................................................269New Recipient (Entering an Address) ...............................................................................................270Add Me (Adding the Sender’s Address)............................................................................................271Recipient(s) (Editing a Recipient) .......................................................................................................272From (Setting the Sender’s Address).................................................................................................273Subject (Setting the Subject) ...............................................................................................................274Message (Entering the E-mail Body).................................................................................................274Preview (Previewing the Scanned Images during a Scan Job) ...............................................274Color Scanning (Selecting an Output Color) ..................................................................................2752 Sided Scanning (Scanning Both Sides of a Document).........................................................275Original Type (Selecting the Document Type)..............................................................................277File Format (Selecting a File Format for Output Data) .............................................................277
Network Scanning ...........................................................................................................................................289Preview (Previewing the Scanned Images during a Scan Job) ...............................................290Color Scanning (Selecting an Output Color) ..................................................................................2902 Sided Scanning (Scanning Both Sides of a Document).........................................................290

8
Original Type (Selecting the Document Type) ............................................................................. 290File Format (Selecting a File Format for Output Data) ............................................................. 290
Scan to PC .......................................................................................................................................................... 291Transfer Protocol (Selecting a Transfer Protocol)........................................................................ 292Address Book (Specifying a Destination PC Using the Address Book)................................ 292Add New Address (Registering a Destination PC on the Address Book) ............................ 294Specifying a Destination PC Using a One Touch Button.......................................................... 297Browse (Specifying a Destination PC by Browsing Your Network) ....................................... 298Specifying a Destination (Specifying a Destination PC Using the Screen Keyboard) .. 299Preview (Previewing the Scanned Images during a Scan Job)............................................... 301Color Scanning (Selecting an Output Color).................................................................................. 3012 Sided Scanning (Scanning Both Sides of a Document)......................................................... 301Original Type (Selecting the Document Type) ............................................................................. 301File Format (Selecting a File Format for Output Data) ............................................................. 301
Store to Folder.................................................................................................................................................. 302Color Scanning (Selecting an Output Color).................................................................................. 3032 Sided Scanning (Scanning Both Sides of a Document)......................................................... 303Original Type (Selecting the Document Type) ............................................................................. 303Preview (Previewing the Scanned Images during a Scan Job)............................................... 303
Store to USB...................................................................................................................................................... 304Save in (Specifying a Storage Location in the USB Memory Device).................................. 308Details (Displaying the Details of a Storage Location in the USB Memory Device) ..... 309Preview (Previewing the Scanned Images during a Scan Job)............................................... 310Color Scanning (Selecting an Output Color).................................................................................. 3102 Sided Scanning (Scanning Both Sides of a Document)......................................................... 310Original Type (Selecting the Document Type) ............................................................................. 310File Format (Selecting a File Format for Output Data) ............................................................. 310
Store & Send Link ............................................................................................................................................ 311Scan To (Displaying the E-mail Address of the Authenticated User) .................................. 311From (Displaying the E-mail Address of the Authenticated User)........................................ 312Subject (Setting the Subject) ............................................................................................................... 312Message (Entering the E-mail Body)................................................................................................. 312Color Scanning (Selecting an Output Color).................................................................................. 3122 Sided Scanning (Scanning Both Sides of a Document)......................................................... 312Original Type (Selecting the Document Type) ............................................................................. 312Preview (Previewing the Scanned Images during a Scan Job)............................................... 312File Format (Selecting a File Format for Output Data) ............................................................. 313
Store to WSD..................................................................................................................................................... 314Computer (Starting a Scan Job via Computer Operation)....................................................... 314This Device (Storing Data Scanned by the Machine on a Network Computer) .............. 316
Advanced Settings.......................................................................................................................................... 317Color Scanning (Selecting an Output Color).................................................................................. 317Original Type (Selecting the Document Type) ............................................................................. 317Photographs (Scanning a Color Photograph) ............................................................................... 318Image Options (Adjusting Scan Density and Image Sharpness).......................................... 318Image Enhancement (Erasing the Background Color of Documents/Adjusting Contrast).................................................................................................................................. 319Shadow Suppression (Suppressing the Document Background) .......................................... 319

Table of Contents
9
Color Space (Specifying Color Space)...............................................................................................320
Layout Adjustment .........................................................................................................................................322Resolution (Specifying a Scanning Resolution) ............................................................................3222 Sided Scanning (Scanning Both Sides of a Document).........................................................323Book Scanning (Scanning Facing Pages on Separate Sheets)................................................323Original Size (Specifying a Scan Size) ...............................................................................................324Mixed Size Originals (Scanning Different Size Documents Simultaneously)....................325Edge Erase (Erasing Edges and Margin Shadows in the Document) ...................................326Reduce/Enlarge (Specifying a Scanning Ratio) ............................................................................328Original Orientation (Specifying the Orientation of the Loaded Document) ..................329
E-mail Options/Filing Options.....................................................................................................................330Quality/File Size (Specifying an Image Compression Ratio When Scanning)..................331File Format (Selecting a File Format for Output Data) .............................................................331Read Receipts (Specifying Read Receipts)......................................................................................331Split Send (Sending in Sections)..........................................................................................................332File Name (Specifying a Name for the File to be Sent).............................................................333Reply To (Specifying a Reply Address) .............................................................................................333File Name Conflict (Setting the Action to be Taken for File Name Conflict) ...................334File Name (Specifying a Name for the File to be Saved)..........................................................334Encryption (Sending E-mail Encrypted by S/MIME)....................................................................335Digital Signature (Sending E-mail with a Digital Signature by S/MIME) ...........................335Login Name .................................................................................................................................................335Password.......................................................................................................................................................336Meta Data....................................................................................................................................................336
6 Send from Folder..................................................................................................................................337
Folder Operating Procedure ........................................................................................................................338Step 1 Opening the [Send from Folder] Screen ............................................................................338Step 2 Selecting a Folder .......................................................................................................................339Step 3 Checking/Selecting Files in a Folder....................................................................................339Step 4 Operating Files in a Folder ......................................................................................................339
Selecting a Folder ............................................................................................................................................340
Checking/Operating Files in a Folder.......................................................................................................341
Checking File Details ......................................................................................................................................343
Printing Files in a Folder................................................................................................................................345
Configuring/Starting Job Flow ...................................................................................................................348[Link Job Flow Sheet to Folder] Screen.............................................................................................350Job Flow Restrictions................................................................................................................................353
7 Job Flow Sheets ....................................................................................................................................355
Job Flow Procedure.........................................................................................................................................356Step 1 Opening the [Job Flow Sheets] Screen...............................................................................356Step 2 Selecting a Job Flow Sheet......................................................................................................356Step 3 Confirming/Changing the Job Flow Sheet........................................................................357Step 4 Starting the Job Flow Sheet....................................................................................................357
Selecting/Changing a Job Flow Sheet.....................................................................................................358

10
8 Stored Programming ..........................................................................................................................361
Stored Programming Overview.................................................................................................................. 362
Registering/Deleting/Renaming Stored Programs ............................................................................ 363Registering Stored Programs................................................................................................................ 364Notes and Restrictions on Registering Stored Programs.......................................................... 365Registering Stored Programs for Build Job..................................................................................... 366Deleting Stored Programs .....................................................................................................................367Entering/Changing a Stored Program Name ................................................................................ 367Assigning/Changing Icons for Stored Programs .......................................................................... 368
Calling a Stored Program............................................................................................................................. 369Calling a Stored Program for Build Job............................................................................................ 370
9 Media Print (Text and Photos)........................................................................................................371
Overview of Media Print ............................................................................................................................... 372Supported Media and File Formats................................................................................................... 373Notes and Restrictions on Media Print............................................................................................. 373
Inserting a USB Memory Device............................................................................................................... 375
Media Print - Text............................................................................................................................................ 378Selecting Files............................................................................................................................................. 378[Select From List] Screen........................................................................................................................ 379
Media Print - Photos....................................................................................................................................... 380Selecting Files............................................................................................................................................. 380[Select From List] Screen........................................................................................................................ 381
Selecting the Printing Options ................................................................................................................... 382Media Print - Photos ................................................................................................................................ 382Media Print - Text ..................................................................................................................................... 383Index Print ................................................................................................................................................... 384
10 Job Status ...............................................................................................................................................385
Job Status Overview....................................................................................................................................... 386
Checking Current/Pending Jobs ................................................................................................................ 387
Checking Completed Jobs ........................................................................................................................... 389
Printing and Deleting Stored Jobs............................................................................................................ 390Secure Print ................................................................................................................................................. 390Sample Set................................................................................................................................................... 392Delayed Print .............................................................................................................................................. 394Charge Print ................................................................................................................................................ 395Private Charge Print................................................................................................................................. 398Public Folder................................................................................................................................................ 400Undelivered Faxes .................................................................................................................................... 401
Printing Pending Jobs.................................................................................................................................... 403
Handling Error Terminations ...................................................................................................................... 404
11 Computer Operations.........................................................................................................................405
Features Overview .......................................................................................................................................... 406
Print....................................................................................................................................................................... 407Print Features ............................................................................................................................................. 407

Table of Contents
11
Setup ..............................................................................................................................................................409Printing ..........................................................................................................................................................409
E-mail Printing...................................................................................................................................................410Setup ..............................................................................................................................................................410Receiving E-Mail.........................................................................................................................................410
Sending Fax .......................................................................................................................................................412Registering Destinations ........................................................................................................................412
Importing Scanned Data .............................................................................................................................415Importing to a TWAIN Compatible Application ..........................................................................415Importing Using Stored File Manager 3..........................................................................................417Importing Using CentreWare Internet Services ...........................................................................419Importing Using EasyOperator ...........................................................................................................421
CentreWare Internet Services ....................................................................................................................423
12 Appendix .................................................................................................................................................427
Glossary ...............................................................................................................................................................428
Index.....................................................................................................................................................................435

12

1 Before Using the Machine
This chapter describes how to use this guide, as well as safety notes and legal notice you should read before using the machine.
Preface ...............................................................................................................................................14
Types of Manuals ..........................................................................................................................15
Using This Guide............................................................................................................................16
Safety Notes....................................................................................................................................19
Regulation ........................................................................................................................................31
Environment ....................................................................................................................................32
About License..................................................................................................................................33
Legal Notice.....................................................................................................................................39

1 Before Using the Machine
14
Before Using the M
achine
1
Warning:This equipment will be inoperable when mains power fails.
Preface
Thank you for selecting the DocuCentre-IV C2265/C2263 (hereafter referred to as "the machine").
This guide describes how to operate the machine and the precautions you should follow during operation. To get the most out of the machine and to use it effectively, be sure to read this guide before use.
This guide assumes that you have a basic knowledge of the operating environment of the personal computer in use and networking environments. For information on the environment of the personal computer in use and the basic knowledge and operations of networking environments, refer to the manuals provided with the personal computer, operating system, and network system.
For information on how to configure your network environment, refer to the Administrator Guide. For information on optional accessories for the print service, also refer to the guide provided with each optional accessory.
After reading this guide, be sure to keep it handy for quick reference. It will be useful in case you forget how to perform operations or if a problem occurs with the machine.

Types of Manuals
15
Before Using the M
achine
1
Types of Manuals
The following guides are provided with the machine.
Accompanying Manuals
User Guide (this guide) (Document CD-ROM)The guide describes all the necessary steps for copy, print, scan, and fax.
Administrator Guide (Document CD-ROM)The guide is intended for system administrators, and describes how to configure network and how to solve problems that may occur with the machine. This guide also describes daily maintenance and the system settings procedures.
Quick Reference Guide (Booklet)The guide describes the basic operations of the machine, as well as daily management and maintenance.
Manual (HTML)The manual describes installation and configuration procedures for print drivers and the printer environment. This manual is included in the Driver CD Kit.
Print Driver HelpThe help describes print features and operations.
CentreWare Internet Services HelpThe help describes how to change various settings of the machine using a web browser, and how to import scanned data to a computer from the machine.Important • To display the help for CentreWare Internet Services, users need to have the environment to connect
to the Internet. The communication fee shall be borne by the users.
Guides for Optional ComponentsOptional components are available for the machine. Some of them come with user guides. The guides for optional components describe all the necessary steps for using the optional components and installing the software.

1 Before Using the Machine
16
Before Using the M
achine
1
Using This Guide
This guide is intended for first time users of the machine. It describes the basic operations for the Copy, Print, Scan, and Fax services.
Organization of This Guide
This guide consists of the following chapters:
1 Before Using the MachineDescribes how to use this guide, as well as safety notes, legal notices, and other important information you should read before using the machine.
2 Product OverviewDescribes the basic information of the machine, such as the names of components, how to use the touch screen, how to switch the machine on and off, and how to exit the Energy Saver mode.
3 CopyDescribes the basic operation and features for the Copy service.
4 FaxDescribes the basic operations and features for the Fax services.
5 ScanDescribes the basic operations and features for the Scan services.
6 Send from FolderDescribes the basic operations and features to use folders.
7 Job Flow SheetsDescribes the operations to use a job flow created on a remote system.
8 Stored ProgrammingDescribes the Stored Programming service that enables you to store customized job settings.
9 Media Print (Text and Photos)Describes the basic operations and features of Media Print that allows you to print image data and document files.
10 Job StatusDescribes how to check job status and how to delete jobs.
11 Computer OperationsDescribes operations performed from a computer, such as printing documents, importing scanned files, using Direct Fax, and operating CentreWare Internet Services.
12 AppendixContains a glossary of terms used in this guide.

Using This Guide
17
Before Using the M
achine
1
Conventions
The screen shots and illustrations used in this guide vary depending on the machine configuration and optional components installed. Some of the items in the screen shots may not be displayed or available depending on your machine configuration.
The procedures in this guide may vary depending on the driver and utility software being used due to the upgrades.
In this guide, "Computer" refers to a personal computer or workstation.
The following terms are used in this guide:
The following symbols are used in this guide:
Important : Important information that you should read.
Note : Additional information on operations or features.
" " : A cross-reference included in this guide.
Names of CD-ROM, features, and touch screen messages and input text.
[ ] : Folders, files, applications, button or menu names displayed on the touch screen.
Names of menus, commands, windows, or dialog boxes displayed on the computer screen and their buttons and menu names.
< > button : Hardware buttons on the control panel.
< > key : Keys on the keyboard of the computer.
> : Path to a certain item within a procedure on the control panel.
For example: When you see the procedure "select [Tools] > [Setup] > [Create Folder]", this means that you need to select [Tools], select [Setup], and then select [Create Folder].
Path to a certain item within a procedure on a computer.
For example: When you see the procedure "to search for files and folders, click [Start] > [Search] > [For Files or Folders]", this means that you need to click [Start], click [Search], and then click [For Files or Folders] to search for files and folders.
Cross-reference
For example: "Refer to "5 Tools" > "Common Service Settings" > "Audio Tones" in the Administrator Guide." The sentence above means that you need to refer to the section "Audio Tones", which can be found under "Common Service Settings" in chapter 5 Tools of the Administrator Guide.

1 Before Using the Machine
18
Before Using the M
achine
1
Orientation of documents or paper is described in this guide as follows:
, ,Long Edge Feed (LEF):Loading the document or paper in portrait orientation when viewed from the front of the machine.
, ,Short Edge Feed (SEF):Loading the document or paper in landscape orientation when viewed from the front of the machine.
LEF Orientation
Paper feed direction
SEF Orientation
Paper feed direction

Safety Notes
19
Before Using the M
achine
1
Safety Notes
Before using this product, read "Safety Notes" carefully for safety use.
This product and recommended supplies have been tested and found to comply with strict safety requirements including safety agency approvals and compliance with environmental standards. Follow the following instructions for safety use.
Follow all warning instructions marked on this product. The warning marks stand for the followings:
WARNING
Any unauthorized alteration including an addition of new functions or connection to external devices may not be covered by the product warranty. Contact your local Fuji Xerox representative for more information.
Used for item that if not followed strictly, can lead death or severe or fatal injuries and the possibility to do it is comparatively high.
Used for items that if not followed strictly, can lead to severe or fatal injuries.
Used for items that if not followed strictly, can cause injuries to user or damages to machine.
: A symbol for items to pay attention to when handling machine. Follow instructions carefully to use machine safely.
: A symbol for prohibited items. Follow instructions carefully to avoid any dangerous acts.
: A symbol for items that must be performed. Follow instructions carefully to carry out these essential tasks.
Caution Flammable Explodable Electric shock
Heated surface
Moving object
Pinched fingers
Prohibited No fire Do not touch
Do not use in bathroom
Do not tear down
Keep away from wet
Never touch with wet hand
Instructions Unplug Ground/Earth

1 Before Using the Machine
20
Before Using the M
achine
1
Electrical Safety
This product shall be operated by the power source as indicated on the product's data plate. Consult your local power company to check if your power source meets the requirements.
WARNING: Connect this product to a protective earth circuit.
This product is supplied with a plug that has a protective earth pin. The plug fits only into an earthed electrical outlet. This is a safety feature. If the plug doesn't fit to the outlet, contact an electrician to replace the outlet to avoid risk of electric shock. Never use an earthed adapter plug to connect the product to the electrical outlet that has no earth connection terminal.
Improper connection of a grounding conductor may cause electric shock.
Plug the power cord directly into a grounded electrical outlet. To prevent overheat and a fire accident, do not use an extension cord, a multi-plug adaptor or a multiple connector. Consult your local Fuji Xerox representative to check if an outlet is grounded.
Connect this product to a branch circuit or an outlet that has larger capacity than the rated ampere and voltage of this product. See the data plate on the rear panel of this product for its rated ampere and voltage.
Never touch the power cord with wet hands. It may cause electric shock.
Do not place an object on the power cord.
Always keep the plug connection free of dust. The dusty and damp environment may bring about minute electric current in a connector. It may generate heat and eventually cause a fire accident.
To avoid the risk of electric shock and a fire accident, only use the power cord supplied with this product or the ones designated by Fuji Xerox.
The power cord is exclusive use for this product. Do not use it for any other product.
Do not damage or alter the power cord. Damage and alteration may generate heat and eventually cause electric shock or a fire accident.
If the power cord is damaged or insulated wires are exposed, contact your local Fuji Xerox representative for its replacement. Do not use a damaged or uninsulated cord to avoid the risk of electric shock and a fire accident.
When cleaning this product, always switch off the power and then the main power inside the body front cover, and unplug the product. Access to a live machine interior may cause electric shock.
Do not unplug or re-plug this product with the main power switch and the power switch on. Plugging and unplugging a live connector may deform the plug and generate heat, and eventually cause a fire accident.
Hold the plug not the cord when unplugging this product, or it may damage the cord and cause electric shock or a fire accident.

Safety Notes
21
Before Using the M
achine
1Machine Installation
Switch off the power and then the main power inside the body front cover, and unplug the product when it (i.e., fax function) is not used over weekends or long holidays. Please note that it cannot receive fax message during switch-off.
Once a month, switch off this product and check if
the power cord is plugged firmly into an electrical outlet;
the plug is not excessively heated, rusted or bent;
the plug and electrical outlet are free of dust; and
the power cord is not cracked or worn down.
Once you notice any unusual condition, switch off the power and then the main power inside the body front cover, and unplug the power cord. Contact your local Fuji Xerox representative.
Do not locate this product where people might step on or trip over the power cord. Friction or excessive pressure may generate heat and eventually cause electric shock or a fire accident.
Never locate this product in the following places:
Near radiators or any other heat sources
Near volatile flammable materials such as curtain
In the hot, humid, dusty or poorly ventilated environment
In the place receiving direct sunlight
Near cookers or humidifiers
Locate this product on a level and sturdy surface that can withstand a weight of 160 Kg (maximum weight when DADF, Finisher-B1, Booklet Maker Unit for Finisher-B1, 2/4 Hole Punch Kit for Finisher-B1, Fax Kit 2, and Side Tray are installed). Otherwise, if tilted, the product may fall over and cause injuries.
Locate this product in a well-ventilated area. Do not obstruct ventilation openings of the product.
Keep the minimum clearance as follows for ventilation and an access to the power plug. Unplug the product if an abnormal condition is noted.

1 Before Using the Machine
22
Before Using the M
achine
1
919
1548
70
640
408
100
100 400
1089
With the document cover
(Unit: mm)
960
1548
70
640
408
100
100 400
1130
With the document cover and Side Tray (optional)
(Unit: mm)
919964
1548
70
640
408
100
100 400
1089
With the duplex automatic document feeder
(Unit: mm)

Safety Notes
23
Before Using the M
achine
1
9601004
1548
70
640
408
100
100 400
1130
With the duplex automatic document feeder and Side Tray (optional)
(Unit: mm)
1039
1548
70
640
408
100
50 400
1159
With Finisher-A1 (optional)
(Unit: mm)
1079
1548
70
640
408
100
50 400
1199
With Finisher-A1 (optional) and Side Tray (optional)
(Unit: mm)

1 Before Using the Machine
24
Before Using the M
achine
1
400
408
640
100
70 50
1696
1548
1576
With Finisher-B1 (optional)
(Unit: mm)
400
408
640
100
70 50
1736
1548
1616
With Finisher-B1 (optional) and Side Tray (optional)
(Unit: mm)
400
397408
651
100
70 50
1696
1548
1576
With Booklet Maker Unit for Finisher-B1 (optional)
(Unit: mm)
Safety Notes
25
Before Using the M
achine
1
Others
400
397408
651
100
70 50
1736
1548
1616
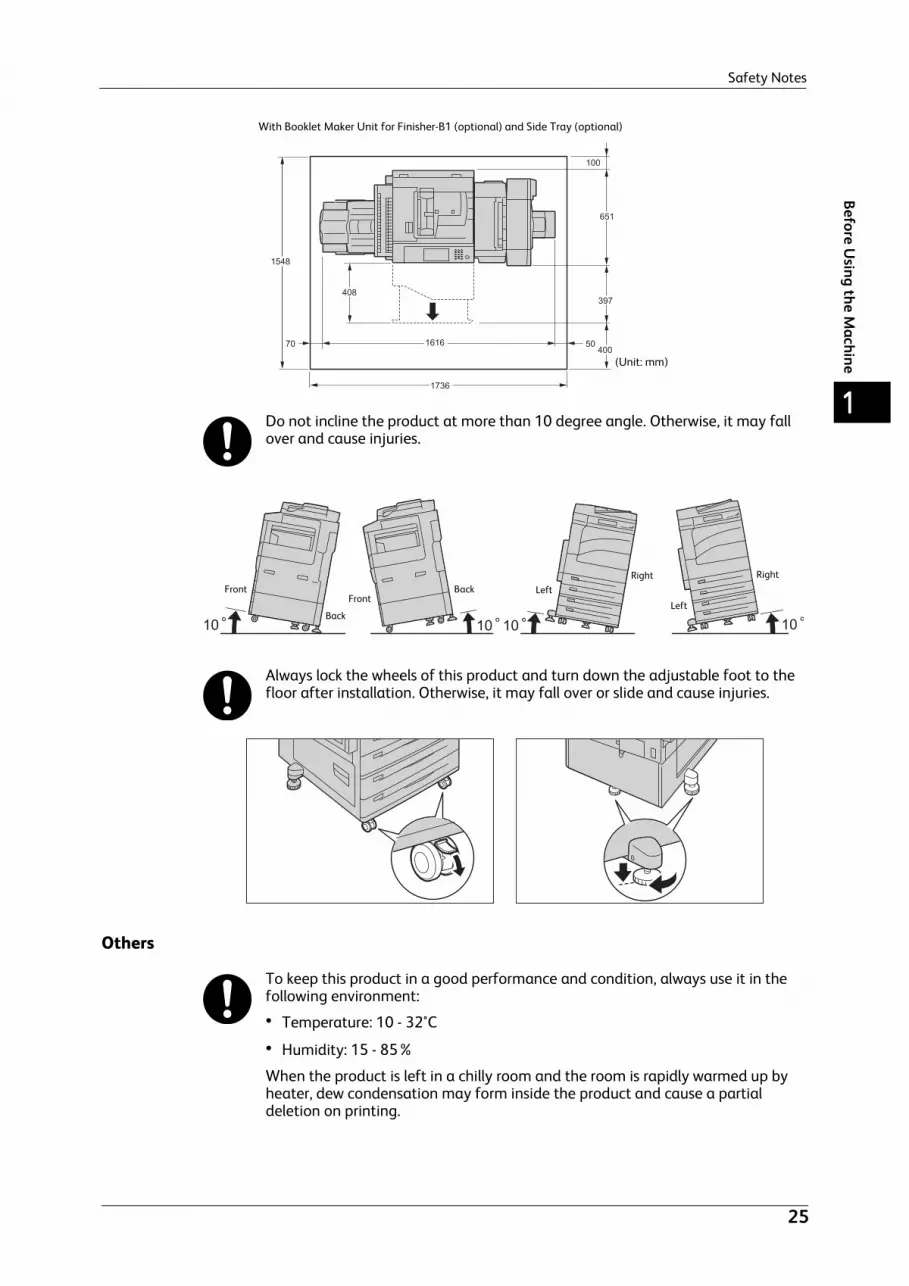
With Booklet Maker Unit for Finisher-B1 (optional) and Side Tray (optional)
(Unit: mm)
Do not incline the product at more than 10 degree angle. Otherwise, it may fall over and cause injuries.
FrontFront
Left
LeftBack
BackRight Right
Always lock the wheels of this product and turn down the adjustable foot to the floor after installation. Otherwise, it may fall over or slide and cause injuries.
To keep this product in a good performance and condition, always use it in the following environment:
Temperature: 10 - 32°C
Humidity: 15 - 85%
When the product is left in a chilly room and the room is rapidly warmed up by heater, dew condensation may form inside the product and cause a partial deletion on printing.

1 Before Using the Machine
26
Before Using the M
achine
1
Operational Safety
The operator's product maintenance procedures are described in the customer documentation supplied with this product. Do not carry out any other maintenance procedures not described in the documentation.
This product features safety design not to allow operators access to hazard areas. The hazard areas are isolated from operators by covers or protectors which require a tool to remove. To prevent electric shock and injuries, never remove those covers and protectors.
To avoid the risk of electric shock and a fire accident, switch off the power and then the main power inside the body front cover. Unplug the product promptly in the following conditions, then contact your local Fuji Xerox representative.
The product emits smoke or its surface is unusually hot.
The product emits unusual noise or odor.
The power cord is cracked or worn down.
A circuit breaker, fuse or any other safety device becomes activated.
Any liquid is spilled into the product.
The product is soaked in water.
Any part of the product is damaged.
Do not insert any object into slots or openings of this product.
Do not place any of the followings on the product:
Liquid container such as flower vases or coffee cups
Metal parts such as staples or clips
Heavy objects
If liquid is spilled over or metal parts are slipped into the product, it may cause electric shock or a fire accident.
Do not use conductive paper such as origami paper, carbonic paper or conductively-coated paper. When paper jam occurs, it may cause short-circuit and eventually a fire accident.
When cleaning this product, use the designated cleaning materials exclusive to it. Other cleaning materials may result in poor performance of the product. Never use aerosol cleaners to avoid catching fire and explosion.
If you need to pull out a tray to remove paper jam, contact your local Fuji Xerox representative. Do not pull out a tray, otherwise it may cause injuries.
Never play the CD-ROM supplied with the product on an audio player. Always use a CD-ROM player. Otherwise, large sound may damage audio players or your ears.

Safety Notes
27
Before Using the M
achine
1
1 Press the power switch to the [ ] position to switch the power off.
2 Make sure that the touch screen is blank and the <Energy Saver> button does not light up.
3 Open the front cover.
4 Press the main power switch to the [ ] position to switch the main power off.
Laser Safety
CAUTION: Any operations or adjustments not stated in the operation manual may cause hazardous light exposure and eventually burn injuries or loss of eyesight.
This product has been tested and found to comply with the Class 1 Laser Equipment requirements defined by the international standard IEC60825 and has no light exposure hazard. The product has no hazardous light emission as it features light protection components and covers to shut in all light beam during operation and maintenance.
Keep electrical and mechanical safety interlocks active. Keep the safety interlocks away from magnetic materials. Magnetic materials may accidentally activate the product and cause injuries or electric shock.
A ground fault interrupter is embedded in this product. If current leakage occurs, the ground fault interrupter automatically cuts off power circuit to prevent electric shock and a fire accident. The ground fault interrupter is normally ON ("|"). Check once a month if the ground fault interrupter works properly in accordance with the following procedures:

1 Before Using the Machine
28
Before Using the M
achine
1
5 Press the <TEST> button lightly with a sharp edge such as a pen tip. The depressed <RESET> button will stick out again.
If the <RESET> button sticks out, the ground fault interrupter is properly working. If the <RESET> button remains in the depressed position, the ground fault interrupter has a problem.
6 Press the <RESET> button back to the depressed position.
<RESET> button
<TEST> button
<RESET> button
If the circuit does not work properly, contact your local Fuji Xerox representative.
Do not attempt to remove a paper jammed deeply inside the product, particularly a paper wrapped around a fusing unit or a heat roller. Otherwise, it may cause injuries or burns. Switch off the power and then the main power inside the body front cover immediately and contact your local Fuji Xerox representative.
Never touch the paper output area of the finisher during operation. It may cause injuries.
Be careful in removing jammed staples.
Waste staples may come out with output paper. Be careful not to get injured by the staples.
Never touch safety interlocks. When a front cover is open, safety interlocks become activated to stop the machinery. Do not apply pressure on safety interlocks with a coin or screwdriver. Otherwise, the machinery may become activated and cause injuries.
Do not staple punched holes of paper. Sharp points of a staple may cause injuries.
Do not apply excessive force to hold thick document on the document glass. It may break the glass and cause injuries.
To move this product to another location, contact Fuji Xerox Customer Support Center.
Ventilate well during extended operation or mass copying. It may affect the office air environment due to odor such as ozone in a poorly ventilated room.
Provide proper ventilation to ensure the comfortable and safe environment.

Safety Notes
29
Before Using the M
achine
1
Consumable
Store all consumables in accordance with the instructions given on its package or container.
Use a broom or a wet cloth to wipe off spilled toner. Never use a vacuum cleaner for the spills. It may catch fire by electric sparks inside the vacuum cleaner and cause explosion. If you spill a large volume of toner, contact your local Fuji Xerox representative.
Never throw a toner cartridge into an open flame. Remaining toner in the cartridge may catch fire and cause burn injuries or explosion.
If you have a used toner cartridge no longer needed, contact your local Fuji Xerox representative for its disposal.
Never throw a waste toner container into an open flame. Toner may catch fire and cause burn injuries or explosion.
If you have a used waste toner container no longer needed, contact your local Fuji Xerox representative for its disposal.
Keep the drum cartridges and toner cartridges out of the reach of children. If a child accidentally swallows toner, spit it out, rinse mouth with water, drink water and consult a physician immediately.
When replacing the drum cartridges and toner cartridges, be careful not to spill the toner. In case of any toner spills, avoid contact with clothes, skin, eyes and mouth as well as inhalation.
If toner spills onto your skin or clothing, wash it off with soap and water.
If you get toner particles in your eyes, wash it out with plenty of water for at least 15 minutes until irritation is gone. Consult a physician if necessary.
If you inhale toner particles, move to a fresh air location and rinse your mouth with water.
If you swallow toner, spit it out, rinse your mouth with water, drink plenty of water and consult a physician immediately.
Fusing Unit Safety
When removing the Fusing Unit, always switch off first and wait for 40 minutes until it cools off.

1 Before Using the Machine
30
Before Using the M
achine
1
Location of Warning and Caution Labels
Always follow all warning instructions marked on or supplied with this product.
To avoid the risk of burn injuries and electric shock, never touch the area with the "High Temperature" or "High Voltage" marks on.

Regulation
31
Before Using the M
achine
1
Regulation
Radio Frequency Emissions (Class B)
Product Safety Certification (UL, CB)
This product is certified by the following agency using the safety standards listed.
This product has been tested and found to comply with the limits for a Class B digital device, pursuant to the International Standard for Electromagnetic Interference (CISPR Publ. 22) and Radiocommunications Act 1992 in Australia/New Zealand. These limits are designed to provide reasonable protection against harmful interference in a residential installation. This product generates, uses and can radiate radio frequency energy and, if not installed and used in accordance with the instructions, may cause harmful interference to radio communications. However, there is no guarantee that interference will not occur in a particular installation. If this product does cause harmful interference to radio or television reception, which can be determined by turning this product off and on, the user is encouraged to try to correct the interference by one or more of the following measures:
Reorient or relocate the receiving antenna.
Increase the separation between this product and the receiver.
Connect this product into an outlet on a circuit different from that to which the receiver is connected.
Consult the dealer or an experienced radio/TV technician for help.
Changes and modifications to this product not specifically approved by Fuji Xerox may void the user’s authority to operate this product.
Agency Standard
NEMKO IEC60950-1:ed. 2

1 Before Using the Machine
32
Before Using the M
achine
1
Environment
For environmental protection and efficient use of resources, Fuji Xerox reuses returned toner cartridges and drum cartridges to make recycle parts, recycle materials or energy recovery.
Proper disposal is required for toner cartridges and drum cartridges no longer needed. Do not open toner cartridges and drum cartridges. Return them to your local Fuji Xerox representative.

About License
33
Before Using the M
achine
1
About License
This section describes information about licenses. Be sure to read through it.
RSA BSAFE
This product includes RSA BSAFE® Cryptographic software from RSA Security Inc.
Heimdal
Copyright (c)2000 Kungliga Tekniska Högskolan (Royal Institute of Technology, Stockholm, Sweden). All rights reserved.
Redistribution and use in source and binary forms, with or without modification, are permitted provided that the following conditions are met:
THIS SOFTWARE IS PROVIDED BY THE INSTITUTE AND CONTRIBUTORS ''AS IS'' AND ANY EXPRESS OR IMPLIED WARRANTIES, INCLUDING, BUT NOT LIMITED TO, THE IMPLIED WARRANTIES OF MERCHANTABILITY AND FITNESS FOR A PARTICULAR PURPOSE ARE DISCLAIMED. IN NO EVENT SHALL THE INSTITUTE OR CONTRIBUTORS BE LIABLE FOR ANY DIRECT, INDIRECT, INCIDENTAL, SPECIAL, EXEMPLARY, OR CONSEQUENTIAL DAMAGES (INCLUDING, BUT NOT LIMITED TO, PROCUREMENT OF SUBSTITUTE GOODS OR SERVICES; LOSS OF USE, DATA, OR PROFITS; OR BUSINESS INTERRUPTION) HOWEVER CAUSED AND ON ANY THEORY OF LIABILITY, WHETHER IN CONTRACT, STRICT LIABILITY, OR TORT (INCLUDING NEGLIGENCE OR OTHERWISE) ARISING IN ANY WAY OUT OF THE USE OF THIS SOFTWARE, EVEN IF ADVISED OF THE POSSIBILITY OF SUCH DAMAGE.
JPEG Code
Our printer software uses some of the codes defined by the Independent JPEG Group.
1. Redistributions of source code must retain the above copyright notice, this list of conditions and the following disclaimer.
2. Redistributions in binary form must reproduce the above copyright notice, this list of conditions and the following disclaimer in the documentation and/or other materials provided with the distribution.
3. Neither the name of the Institute nor the names of its contributors may be used to endorse or promote products derived from this software without specific prior written permission.

1 Before Using the Machine
34
Before Using the M
achine
1
Libcurl
COPYRIGHT AND PERMISSION NOTICE
Copyright (c) 1996 - 2006, Daniel Stenberg, <[email protected]>.
All rights reserved.
Permission to use, copy, modify, and distribute this software for any purpose with or without fee is hereby granted, provided that the above copyright notice and this permission notice appear in all copies.
THE SOFTWARE IS PROVIDED "AS IS", WITHOUT WARRANTY OF ANY KIND, EXPRESS OR IMPLIED, INCLUDING BUT NOT LIMITED TO THE WARRANTIES OF MERCHANTABILITY, FITNESS FOR A PARTICULAR PURPOSE AND NONINFRINGEMENT OF THIRD PARTY RIGHTS. IN NO EVENT SHALL THE AUTHORS OR COPYRIGHT HOLDERS BE LIABLE FOR ANY CLAIM, DAMAGES OR OTHER LIABILITY, WHETHER IN AN ACTION OF CONTRACT, TORT OR OTHERWISE, ARISING FROM, OUT OF OR IN CONNECTION WITH THE SOFTWARE OR THE USE OR OTHER DEALINGS IN THE SOFTWARE.
Except as contained in this notice, the name of a copyright holder shall not be used in advertising or otherwise to promote the sale, use or other dealings in this Software without prior written authorization of the copyright holder.
FreeBSD
This product contains the part of FreeBSD codes.
The FreeBSD Copyright
Copyright 1994-2006 The FreeBSD Project. All rights reserved.
Redistribution and use in source and binary forms, with or without modification, are permitted provided that the following conditions are met:
Redistributions of source code must retain the above copyright notice, this list of conditions and the following disclaimer.
Redistributions in binary form must reproduce the above copyright notice, this list of conditions and the following disclaimer in the documentation and/or other materials provided with the distribution.
THIS SOFTWARE IS PROVIDED BY THE FREEBSD PROJECT ''AS IS'' AND ANY EXPRESS OR IMPLIED WARRANTIES, INCLUDING, BUT NOT LIMITED TO, THE IMPLIED WARRANTIES OF MERCHANTABILITY AND FITNESS FOR A PARTICULAR PURPOSE ARE DISCLAIMED. IN NO EVENT SHALL THE FREEBSD PROJECT OR CONTRIBUTORS BE LIABLE FOR ANY DIRECT, INDIRECT, INCIDENTAL, SPECIAL, EXEMPLARY, OR CONSEQUENTIAL DAMAGES (INCLUDING, BUT NOT LIMITED TO, PROCUREMENT OF SUBSTITUTE GOODS OR SERVICES; LOSS OF USE, DATA, OR PROFITS; OR BUSINESS INTERRUPTION) HOWEVER CAUSED AND ON ANY THEORY OF LIABILITY, WHETHER IN CONTRACT, STRICT LIABILITY, OR TORT (INCLUDING NEGLIGENCE OR OTHERWISE) ARISING IN ANY WAY OUT OF THE USE OF THIS SOFTWARE, EVEN IF ADVISED OF THE POSSIBILITY OF SUCH DAMAGE.

About License
35
Before Using the M
achine
1
The views and conclusions contained in the software and documentation are those of the authors and should not be interpreted as representing official policies, either expressed or implied, of the FreeBSD Project.
OpenLDAP
Copyright 1998-2006 The OpenLDAP Foundation All rights reserved.
Redistribution and use in source and binary forms, with or without modification, are permitted only as authorized by the OpenLDAP Public License.
A copy of this license is available in the file LICENSE in the top-level directory of the distribution or, alternatively, at <http://www.OpenLDAP.org/license.html>.
OpenLDAP is a registered trademark of the OpenLDAP Foundation.
Individual files and/or contributed packages may be copyright by other parties and/or subject to additional restrictions.
This work is derived from the University of Michigan LDAP v3.3 distribution. Information concerning this software is available at <http://www.umich.edu/~dirsvcs/ldap/ldap.html>.
This work also contains materials derived from public sources.
Additional information about OpenLDAP can be obtained at <http://www.openldap.org/>.
---
Portions Copyright 1998-2006 Kurt D. Zeilenga.
Portions Copyright 1998-2006 Net Boolean Incorporated.
Portions Copyright 2001-2006 IBM Corporation.
All rights reserved.
Redistribution and use in source and binary forms, with or without modification, are permitted only as authorized by the OpenLDAP Public License.
---
Portions Copyright 1999-2005 Howard Y.H. Chu.
Portions Copyright 1999-2005 Symas Corporation.
Portions Copyright 1998-2003 Hallvard B. Furuseth.
All rights reserved.
Redistribution and use in source and binary forms, with or without modification, are permitted provided that this notice is preserved.
The names of the copyright holders may not be used to endorse or promote products derived from this software without their specific prior written permission. This software is provided ''as is'' without express or implied warranty.
---

1 Before Using the Machine
36
Before Using the M
achine
1
Portions Copyright (c) 1992-1996 Regents of the University of Michigan.
All rights reserved.
Redistribution and use in source and binary forms are permitted provided that this notice is preserved and that due credit is given to the University of Michigan at Ann Arbor. The name of the University may not be used to endorse or promote products derived from this software without specific prior written permission. This software is provided ''as is'' without express or implied warranty.
------------------------------------------
The OpenLDAP Public License
Version 2.8, 17 August 2003
Redistribution and use of this software and associated documentation ("Software"), with or without modification, are permitted provided that the following conditions are met:
The OpenLDAP Foundation may revise this license from time to time.
Each revision is distinguished by a version number. You may use this Software under terms of this license revision or under the terms of any subsequent revision of the license.
THIS SOFTWARE IS PROVIDED BY THE OPENLDAP FOUNDATION AND ITS CONTRIBUTORS ''AS IS'' AND ANY EXPRESSED OR IMPLIED WARRANTIES, INCLUDING, BUT NOT LIMITED TO, THE IMPLIED WARRANTIES OF MERCHANTABILITY AND FITNESS FOR A PARTICULAR PURPOSE ARE DISCLAIMED. IN NO EVENT SHALL THE OPENLDAP FOUNDATION, ITS CONTRIBUTORS, OR THE AUTHOR(S) OR OWNER(S) OF THE SOFTWARE BE LIABLE FOR ANY DIRECT, INDIRECT, INCIDENTAL, SPECIAL, EXEMPLARY, OR CONSEQUENTIAL DAMAGES (INCLUDING, BUT NOT LIMITED TO, PROCUREMENT OF SUBSTITUTE GOODS OR SERVICES; LOSS OF USE, DATA, OR PROFITS; OR BUSINESS INTERRUPTION) HOWEVER CAUSED AND ON ANY THEORY OF LIABILITY, WHETHER IN CONTRACT, STRICT LIABILITY, OR TORT (INCLUDING NEGLIGENCE OR OTHERWISE) ARISING IN ANY WAY OUT OF THE USE OF THIS SOFTWARE, EVEN IF ADVISED OF THE POSSIBILITY OF SUCH DAMAGE.
he names of the authors and copyright holders must not be used in advertising or otherwise to promote the sale, use or other dealing in this Software without specific, written prior permission. Title to copyright in this Software shall at all times remain with copyright holders.
OpenLDAP is a registered trademark of the OpenLDAP Foundation.
Copyright 1999-2003 The OpenLDAP Foundation, Redwood City, California, USA. All Rights Reserved. Permission to copy and distribute verbatim copies of this document is granted.
DES
This product includes software developed by Eric Young([email protected])
1. Redistributions in source form must retain copyright statements and notices,
2. Redistributions in binary form must reproduce applicable copyright statements and notices, this list of conditions, and the following disclaimer in the documentation and/or other materials provided with the distribution, and
3. Redistributions must contain a verbatim copy of this document.

About License
37
Before Using the M
achine
1
AES
Copyright (c) 2003. Dr Brian Gladman. Worcester. UK. All rights reserved.This product uses published AES software provided by Dr Brian Gladman under BSD licensing terms.
TIFF (libtiff)
Lib TIFF copyright (c) 1988-1997 Sam leffler
Copyright (c) 1991-1997 Silicon Graphics. Inc.
ICC Profile (Little cms)
Little cms copyright (c) 1988-2004 Marti Maria
XPS (XML Paper Specification)
This product may incorporate intellectual property owned by Microsoft Corporation. The terms and conditions upon which Microsoft is licensing such intellectual property may be found at http://go.microsoft.com/fwlink/LinkId=52369.
EDICT and COMPDIC
The Japanese-English dictionaries (EDICT and COMPDIC) edited by The Electronic Dictionary Research and Development Group under the coordination of Professor James William Breen at Monash University are used in the searchable PDF kit option of Fuji Xerox.
These Japanese-English dictionary files are licensed to customers under the terms and conditions of a Creative Commons Attribution-ShareAlike License. Prior to use, be sure to check the terms and conditions of this license at the URL below. Use of these Japanese-English dictionaries is not permitted unless you agree to the terms and conditions of this license.
Furthermore, care should be taken because at the point in time that you begin to use these Japanese-English dictionaries as specified in the said license, you accept and agree to be bound by the terms and conditions of this license.
The Japanese-English dictionaries are provided to customers on an as-is basis, and Fuji Xerox and the original supplier make no representations of warranties of any kind.
Original Author Information (extracted from http://www.csse.monash.edu.au/~jwb/edrdg/licence.html) Copyright over the documents covered by this statement is held by James William BREEN and The Electronic Dictionary Research and Development Group at Monash University.
Monash University License Information
http://www.csse.monash.edu.au/~jwb/edrdg/licence.html
Information Regarding EDICT and COMPDIC
http://www.csse.monash.edu.au/~jwb/edict.html

1 Before Using the Machine
38
Before Using the M
achine
1
http://www.csse.monash.edu.au/~jwb/compdic_doc.html
Information Regarding the Creative Commons Attribution-ShareAlike License
http://creativecommons.org/licenses/by-sa/2.5/legalcode
Cyrus SASL
Copyright (c) 1998-2003 Carnegie Mellon University. All rights reserved.
Redistribution and use in source and binary forms, with or without modification, are permitted provided that the following conditions are met:
CARNEGIE MELLON UNIVERSITY DISCLAIMS ALL WARRANTIES WITH REGARD TO THIS SOFTWARE, INCLUDING ALL IMPLIED WARRANTIES OF MERCHANTABILITY AND FITNESS, IN NO EVENT SHALL CARNEGIE MELLON UNIVERSITY BE LIABLE FOR ANY SPECIAL, INDIRECT OR CONSEQUENTIAL DAMAGES OR ANY DAMAGES WHATSOEVER RESULTING FROM LOSS OF USE, DATA OR PROFITS, WHETHER IN AN ACTION OF CONTRACT, NEGLIGENCE OR OTHER TORTIOUS ACTION, ARISING OUT OF OR IN CONNECTION WITH THE USE OR PERFORMANCE OF THIS SOFTWARE.
1. Redistributions of source code must retain the above copyright notice, this list of conditions and the following disclaimer.
2. Redistributions in binary form must reproduce the above copyright notice, this list of conditions and the following disclaimer in the documentation and/or other materials provided with the distribution.
3. The name "Carnegie Mellon University" must not be used to endorse or promote products derived from this software without prior written permission. For permission or any other legal details, please contact
Office of Technology Transfer
Carnegie Mellon University
5000 Forbes Avenue
Pittsburgh, PA 15213-3890
(412) 268-4387, fax: (412) 268-7395
4. Redistributions of any form whatsoever must retain the following acknowledgment:
"This product includes software developed by Computing Services at Carnegie Mellon University (http://www.cmu.edu/computing/)."

Legal Notice
39
Before Using the M
achine
1
Legal Notice
Copying or printing certain documents may be illegal in your country. Penalties of fines or imprisonment may be imposed on those found guilty. The following are examples of items that may be illegal to copy or print in your country.
Currency
Banknotes and checks
Bank and government bonds and securities
Passports and identification cards
Copyright material or trademarks without the consent of the owner
Postage stamps and other negotiable instruments
This list is not inclusive and no liability is assumed for either its completeness or accuracy. In case of doubt, contact your legal counsel.

1 Before Using the Machine
40
Before Using the M
achine
1

2 Product Overview
This chapter describes the basic information of the machine, such as machine components, how to switch the machine on and off, and how to use the touch screen.
Machine Components .................................................................................................................42
Power Source ...................................................................................................................................51
Ground Fault Interrupter............................................................................................................55
Energy Saver Mode.......................................................................................................................57
Cooling Mode..................................................................................................................................60
Control Panel ...................................................................................................................................61
About the [Services Home] Screen .........................................................................................66
Entering Text ...................................................................................................................................70
Installing the Tray Attachment on the Finisher-B1.........................................................71

2 Product Overview
42
Product Overview
2
Machine Components
The following describes machine components and their functions.
Main unit
5
6
7
8
9
10
11
1
3
4
2
12
13
14
No. Component Function
1 Document cover Holds a document in place.
2 Document glass Load a document here.
3 Control panel Consists of operation buttons, LED indicators, and the touch screen.Refer to "Control Panel" (P.61).
4 Exit 2 Tray Outputs are delivered here by separating the center tray into two levels.
Note • When the Exit 2 Tray is installed, select [Installed] in [Extra Center Tray] in the System Administration mode. For more information, refer to "5 Tools" > "Common Service Settings" > "Other Settings" > "Extra Center Tray" in the Administrator Guide.

Machine Components
43
Product Overview
2
5 Lower center tray (Output tray)
Copies and prints are delivered here, facing down.
6 Power switch Switches the power of the machine on and off.Refer to "Power Source" (P.51).
7 Front cover Open this cover to replace the consumables.
8 Tray 1, 2, 3, 4 Load paper here.
Note • Trays 3 and 4 are optional for some models.
• The Envelope Tray (optional) can be inserted into the slot for Tray 1. The standard Tray 1 cannot be used when the Envelope Tray is used.
9 Locking casters Used for locking the wheels of the machine. Lock these casters after moving the machine to its installation site.
10 Tray 5 (Bypass) Used for loading non-standard paper, such as thick-stock paper and other special media, that cannot be loaded in Trays 1 to 4.
11 Side Tray (optional) Copies and prints are delivered here, facing up.
12 Stylus pen holder Stores the stylus pen.
13 Stylus pen Used for touching the touch screen on the control panel to configure settings.
Note • You can directly touch the touch screen not only with the stylus pen but also with a finger.
14 Stand (optional) The machine with Trays 1 and 2 can be mounted on this Stand.The attached casters also allows you to move the machine.
Note • The stand may not be available for some models.
No. Component Function
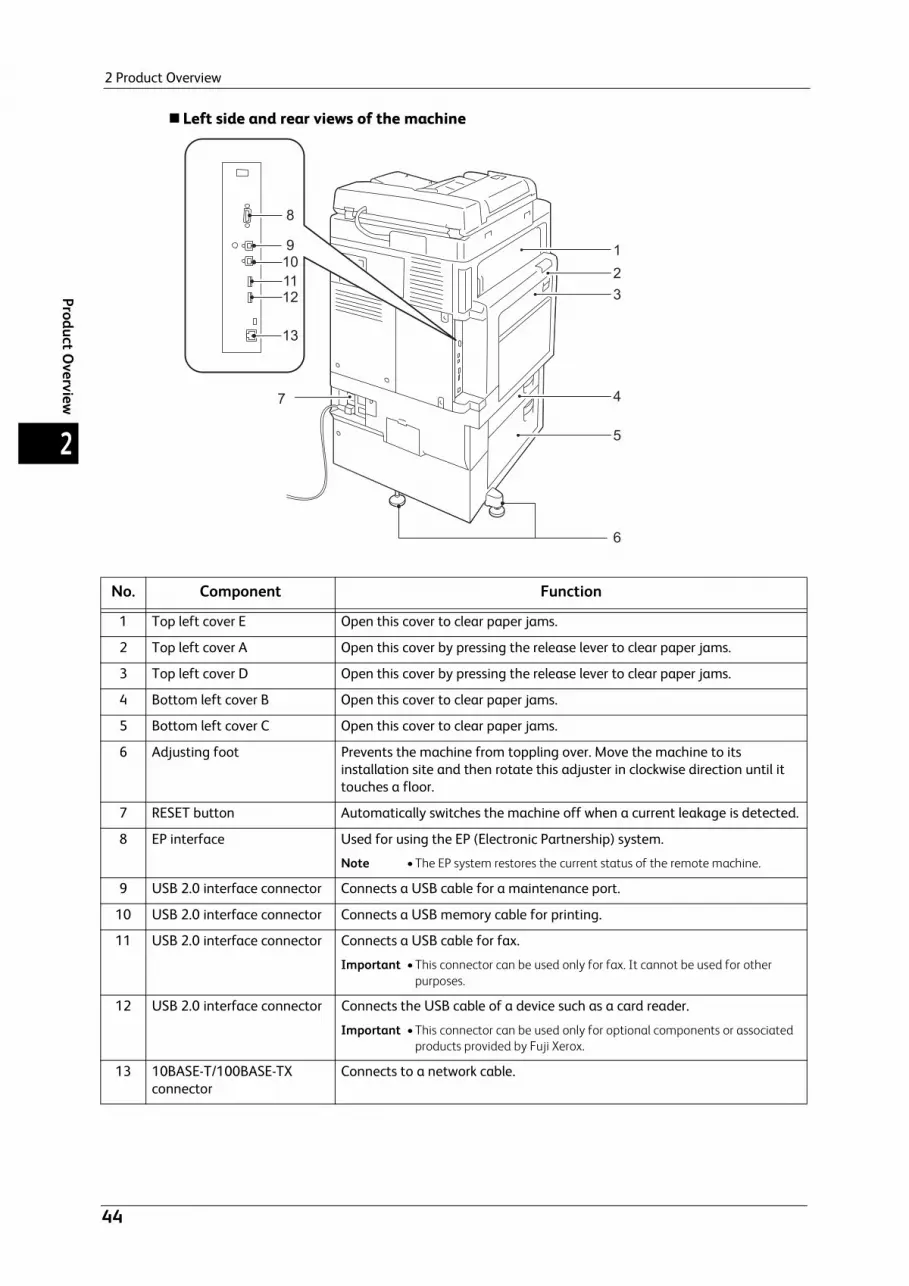
2 Product Overview
44
Product Overview
2
Left side and rear views of the machine
6
7
23
5
4
1
13
9101112
8
No. Component Function
1 Top left cover E Open this cover to clear paper jams.
2 Top left cover A Open this cover by pressing the release lever to clear paper jams.
3 Top left cover D Open this cover by pressing the release lever to clear paper jams.
4 Bottom left cover B Open this cover to clear paper jams.
5 Bottom left cover C Open this cover to clear paper jams.
6 Adjusting foot Prevents the machine from toppling over. Move the machine to its installation site and then rotate this adjuster in clockwise direction until it touches a floor.
7 RESET button Automatically switches the machine off when a current leakage is detected.
8 EP interface Used for using the EP (Electronic Partnership) system.
Note • The EP system restores the current status of the remote machine.
9 USB 2.0 interface connector Connects a USB cable for a maintenance port.
10 USB 2.0 interface connector Connects a USB memory cable for printing.
11 USB 2.0 interface connector Connects a USB cable for fax.
Important • This connector can be used only for fax. It cannot be used for other purposes.
12 USB 2.0 interface connector Connects the USB cable of a device such as a card reader.
Important • This connector can be used only for optional components or associated products provided by Fuji Xerox.
13 10BASE-T/100BASE-TX connector
Connects to a network cable.

Machine Components
45
Product Overview
2
Inside
1
2
3
56
8
7
4
No. Component Function
1 Toner cartridges Contains Black (K), Cyan (C), Magenta (M), and Yellow (Y) toner (image forming powder).
2 Main power switch Switches the main power on/off of the machine. Always follow the instructions by the system administrator.
Important • Always switch the power off before switching the main power off. Refer to "Power Source" (P.51).
3 Drum cartridges (R1 (Black), R2 (Cyan), R3 (Magenta), R4 (Yellow))
Contains photoconductors and development units. Drum cartridges are arranged in order R1 (Black), R2 (Cyan), R3 (Magenta), R4 (Yellow) from the left as you face the machine.
Note • The drum cartridge is always marked with R1, R2, R3, or R4. Make sure to align the drum cartridge R1, R2, R3, or R4 with the corresponding slot. Otherwise, the drum cartridge cannot be inserted into the machine.
4 Cleaning bar Used for cleaning the exposure unit when density unevenness or stripes appear on copied or printed outputs due to dirt in the exposure unit.
5 Drum cartridge cover Open this cover when replacing a drum cartridge or cleaning the interior of the machine.
6 Drum cartridge release lever Unlock this lever when replacing a drum cartridge.
7 Waste toner container (R5) Collects waste toner.
8 Fusing unit (R8) Fuses toner on paper. Do not touch this unit as it is extremely hot.

2 Product Overview
46
Product Overview
2
Duplex automatic document feeder
Note • In this guide, the duplex automatic document feeder is referred to as the “document feeder” or "DADF".
71 2 3 5 6 84
9
No. Component Function
1 Confirmation indicator Lights up when a document is loaded correctly.
2 Lever Turn this lever to clear paper jams.
3 Left cover Open this cover to clear paper jams.
4 Inner cover Open this cover to clear paper jams.
5 Document guides Use these guides to align the edges of documents.
6 Document feeder tray Load documents here.
7 Document stopper Prevents outputs from falling off.
8 Document output tray Scanned documents are delivered here.
9 Document glass Scans a loaded document.

Machine Components
47
Product Overview
2
Telephone line connectors
Note • The Fax service is not available for some models. An optional component is required. For more information, contact our Customer Support Center.
• LINE 2 (Line 2) and LINE 3 (Line 3) are optional.
• When you talk into the external telephone receiver connected to TEL, only the line connected to LINE 1 is available. (LINE 2 and LINE 3 are not available.)
TEL LINE1
LINE2
LINE3
1 2
3
4
No.Name marked on the cover of the
machine
Name displayed on the touch screen Function
1 TEL - Enables you to connect the machine to a telephone device.
2 LINE 1 Line 1 Use this connector to connect to a telephone line.
3 LINE 2 Line 2 Use this connector to connect to a telephone line.
4 LINE 3 Line 3 Use this connector to connect to a telephone line.

2 Product Overview
48
Product Overview
2
Finisher-A1 (optional)
Note • The Finisher-A1 is optional. In this guide, the Finisher-A1 and Finisher-B1 are referred to as the "finisher".
3
21
45
No. Component Function
1 Center tray Copies or prints are delivered here.
2 Finisher-A1 (optional) Staples copies or prints.
3 Staple cartridge Contains staples. Remove this cartridge when replacing or adding staples, or clearing staple jams.
4 Front cover Open this cover when replacing staples or clearing staple jams.
5 Top cover Open this cover to clear paper jams.

Machine Components
49
Product Overview
2
Finisher-B1 (optional)
3
45678
9
10
1413
12
2
1
11
No. Component Function
1 Tray attachment Install this attachment when delivering A4 or B5 paper to the finisher tray without stapling.For more information, refer to "Installing the Tray Attachment on the Finisher-B1" (P.71).
2 Booklet unit (optional) Staples creased outputs.
3 Booklet unit side cover Open this cover when replacing the booklet staple cartridge.
4 Booklet staple cartridge Contains staples. Remove this cartridge when replacing or adding staples, or clearing staple jams.
5 Top cover Open this cover to clear paper jams.
6 Finisher tray Stapled or creased outputs are delivered here.
7 Creaser unit Creases outputs in half.
8 Staple cartridge Contains staples.
9 Front cover Open this cover when clearing paper jams or replacing staples.
10 Finisher-B1 (optional) Staples copies or prints.
11 Front transport cover Open this cover when discarding punch scraps.
12 Hole-punch waste container Collects scraps from the puncher.
13 US 2/3 Hole Punch Kit(US standard) (optional)2/4 Hole Punch Kit (optional)
Hole-punches outputs.
Note • The distance between the two holes made with the US 2/3 Hole Punch Kit (US standard) is 70 mm, which is different from the 80 mm distance made with the 2/4 Hole Punch Kit.

2 Product Overview
50
Product Overview
2
Note • The Finisher-B1 is optional. In this guide, the Finisher-A1 and Finisher-B1 are referred to as the "finisher".
• The power cord connected to the Finisher-B1 is a connecting cord dedicated to the machine. Do not connect this cord to any other devices than the machine.
14 Center tray (Top cover of the finisher transport)
Copies and prints are delivered here when they are unable to be delivered to the output tray or the finisher tray. Pull the cover upward when clearing paper jams.
Note • Remove outputs delivered to the center tray constantly.
No. Component Function

Power Source
51
Product Overview
2
Power Source
The machine is provided with the power switch and the main power switch.
Power switchTo use the machine, press the power switch to the [ | ] position to switch its power on. You can start operations after the machine warms up.
Main power switch
Press the main power switch to the [ ] position. The <Main Power> indicator goes out on the right side of the control panel, and the machine powers off. Do not switch the main power off except when you connect a cable to the machine or clean the machine. Switching off the main power may erase the data in the memory when using the Fax service.
Switching the Main Power On
The following describes how to switch the main power on. Important • Do not switch off the main power immediately after switching on the main power. This may
damage the hard disk and the memory or cause a machine malfunction.
1 Make sure that the power cord is plugged in correctly.
2 Open the front cover.
3 Press the main power switch to the [ | ] position to switch the main power on.
The <Main Power> indicator lights up on the control panel.
4 Close the front cover.
Power switch
Main power switch

2 Product Overview
52
Product Overview
2
Switching the Power On
The following describes how to switch the power on.
To warm up and to be ready to copy or print after switching the power on, the machine takes approximately 17 seconds when the HDD is not installed, or approximately 24 seconds when the HDD is installed. This may take more time depending on your machine configuration.
Switch the power off at the end of the day or when not using the machine for an extended period of time.
Use also the Energy Saver feature to save power consumption while the machine is not in use.For information on the Energy Saver feature, refer to "Energy Saver Mode" (P.57).
Important • If the power is switched off, all the services of the machine will stop. When using the machine throughout the day for jobs such as receiving fax, do not switch the power off.
1 Press the power switch to the [ | ] position to switch the power on.
When the Finisher B-1 (optional) is installed.
Note • The “Please wait...” message indicates that the machine is warming up. The machine is not available during warming up.
• If the machine does not power on, check the following:
- The power cord is plugged in.
- The main power is switched on.
- The <RESET> button is in the depressed position.
- The ground fault interrupter is in the ON position ("|").

Power Source
53
Product Overview
2
Switching the Power Off
The following describes how to switch the power off.
1 Before switching the power off, make sure that the machine has completed all copy or print jobs. Then, make sure that the <Data> indicator does not blink.Important • Do not switch the power off in the following situations. If the power is switched off, the processing
data may be erased.
- While data is being received
- While a job is being printed
- While a job is being copied
- While a job is being scanned
• When switching the power off, wait 5 seconds after outputs have been delivered.
2 Press the power switch to the [ ] position.
Important • Power off processing is performed internally on the machine for a while after the power is switched off. Therefore, do not switch the main power off immediately after switching the power off.
When the Finisher B-1 (optional) is installed.
Important • Power off processing is performed internally on the machine for a while after the power is switched off. Therefore, do not switch the main power off immediately after switching the power off.
Note • When powering the machine on after it has been switched off, wait 10 seconds after the touch screen has gone dark.
Switching the Main Power Off
The following describes how to switch the main power off.Important • Do not switch the main power off while the touch screen displays a screen or the <Energy Saver>
button blinks. Switching off the main power may damage the hard disk and the memory or cause a machine malfunction.
• Switch the main power off first when unplugging the power cord. Unplugging the power cord with the main power on may damage the hard disk and the memory or cause a machine malfunction.
1 Make sure that the power is switched off.
2 Make sure that the touch screen is blank and the <Energy Saver> button does not light up.

2 Product Overview
54
Product Overview
2
3 Open the front cover.
4 Press the main power switch to the [ ] position to switch the main power off.
The <Main Power> indicator goes out on the control panel.
5 Close the front cover.

Ground Fault Interrupter
55
Product Overview
2
Ground Fault Interrupter
The machine is provided with a ground fault interrupter.
In the event of a current leakage, the ground fault interrupter will automatically cut off the power circuit to prevent any leakage or fire from occurring.
Check that the ground fault interrupter works properly at least once a month.
If you have any problems with the ground fault interrupter, contact our Customer Support Center.
The following describes how to check the ground fault interrupter.
1 Press the power switch to the [ ] position to switch the power off.
2 Make sure that the touch screen is blank and the <Energy Saver> button does not light up.
3 Open the front cover.
4 Press the main power switch to the [ ] position to switch the main power off.
5 Press the <TEST> button lightly with a sharp edge such as a pen tip. The depressed <RESET> button will stick out again.
If the <RESET> button sticks out, the ground fault interrupter is properly working. If the <RESET> button remains in the depressed position, the ground fault interrupter has a problem.
<RESET> button<TEST> button

2 Product Overview
56
Product Overview
2
6 Press the <RESET> button back to the depressed position.
<RESET> button

Energy Saver Mode
57
Product Overview
2
Energy Saver Mode
The machine is equipped with the Energy Saver mode that saves electricity by reducing power consumption when no copy or print data is received for a specified time.
The Energy Saver feature has two modes: Low Power mode and Sleep mode.
The machine enters the Low Power mode after the preset time has elapsed if the machine is left unused for a fixed period of time.
The machine then enters the Sleep mode if a further preset time elapses.
To enter the Energy Saver mode, press the <Energy Saver> button on the control panel.Note • If the preset time period is the same for the Low Power mode and the Sleep mode, the machine
directly enters the Sleep mode without entering the Low Power mode first.
Low Power ModeIn this mode, the power to the control panel and fusing unit is lowered to save power.
The touch screen goes out, and the <Energy Saver> button on the control panel lights up. To use the machine, press the <Energy Saver> button. The <Energy Saver> button goes out to indicate that the Low Power mode is exited.
Sleep ModeIn this mode, the power is lowered more than in the Low Power mode.
The touch screen goes out, and the <Energy Saver> button on the control panel lights up. To use the machine, press the <Energy Saver> button. The <Energy Saver> button goes out to indicate that the Sleep mode is exited.Note • When you press the <Energy Saver> button during the Energy Saver mode, the touch screen lights up
by factory default. At this point, the document scanning unit and the output devices remain the Energy Saver mode. Afterwards, by operations such as using the touch screen and opening or closing of the document cover, you can make the devices necessary to activate the machine to exit the Energy Saver mode and make the machine ready to start exiting the Energy Saver mode.
• When you make the machine exit the Energy Saver mode by pressing the <Energy Saver> button, the machine does not immediately identify the movements such as opening or closing of the front cover. To make the machine identify these operations, operate the control panel before opening the front cover.
• If you replace toner cartridges or supply paper during the Energy Saver mode, the machine does not identify these changes. Before performing these operations, exit the Energy Saver mode by pressing the <Energy Saver> button and the <Machine Status> button on the control panel.
• The Energy Saver mode is not exited by the following operations:
- Charge print
- Secure print
- Delayed print
- Private charge print
- Fax using Folder Receive
- Direct fax
- Accessing a folder of the machine using CentreWare Internet Services
• The control panel remains lit off and only the output devices exit the Energy Saver mode by the following operations:
- Sample print
- Print fax
• When the following device is connected to the machine and a user performs the following operation, the Low Power mode can be deactivated without pressing the <Energy Saver> button. If the machine is in the Sleep mode, however, the Sleep mode will not be deactivated by the operation. By setting longer time to elapse until the machine enters the Sleep mode, you can make the machine exit the Energy Saver mode without pressing the <Energy Saver> button. For more information on how to change the time to elapse until the machine enters the Sleep mode, refer to

2 Product Overview
58
Product Overview
2
"1 Before Using the Machine" > "Energy Saver Mode" > "Changing the Interval for Entering Energy Saver Mode" in the Administrator Guide.
- Touch the card to IC Card Reader (optional)
• When the machine enters the Low Power mode while a user is authenticated, the machine exits the Authentication mode.
• When IC Card Reader (optional) is installed, it may take longer time before the machine exits the Sleep mode.
Entering the Energy Saver Mode
The following describes how to enter the Energy Saver mode.
1 Press the <Energy Saver> button.
Note • The touch screen is lit off by pressing the <Energy Saver> button, and the machine enters the Energy Saver mode.
• If you press the <Energy Saver> button immediately after the touch screen goes out or if the machine does not enter the Energy Saver mode completely, the machine may not enter the Energy Saver mode or it may take longer time before the machine exits the mode even when you press the <Energy Saver> button. In such a case, wait for a few seconds until the machine is ready to exit the Energy Saver mode, and then press the <Energy Saver> button again.
• The machine will not enter the Energy Saver mode while a job is being processed. Press the <Energy Saver> button after the job is completed.
• The machine will not enter the Energy Saver mode when [Skip Blank Pages] is enabled. For information on [Skip Blank Pages], refer to "5 Tools" > “Fax Service Settings” > “Fax Control" > "Skip Blank Pages" in the Administrator Guide.
• A time period after pressing the <Energy Saver> button until entering the Energy Saver mode can be set in the System Administration mode. For more information, refer to "5 Tools" > "Common Service Settings" > "Energy Saver Settings" > "Energy Saver Timers" in the Administrator Guide.
Exiting the Energy Saver Mode
The following describes how to exit the Energy Saver mode.
The Energy Saver mode is exited in the following instances:
The machine exits the Energy Saver mode partially depending on the settings. For more information, refer to "5 Tools" > "Common Service Settings" > "Energy Saver Settings" > "Energy Saver Deactivation" in the Administrator Guide.
Pressing the <Energy Saver> button
Receiving a job
Selecting [Apply] in CentreWare Internet Services
Loading a document in the document feeder
Opening the document coverImportant • The machine may not immediately exit the Energy Saver mode if the machine enters the mode by
pressing the <Energy Saver> button and press the button again in five seconds to exit.
1 2 3
4 5 6
7 8 9
0 #
C
<Energy Saver> button

Energy Saver Mode
59
Product Overview
2
When the following device is connected to the machine and a user performs the following operation, the Energy Saver mode can be deactivated without pressing the <Energy Saver> button.
Touch the card to IC Card Reader (optional)Note • If the machine is in the Sleep mode, however, the Sleep mode will not be deactivated by the
operation above. Set the time long to elapse until the machine enters the Sleep mode. For more information on how to change the time to elapse until the machine enters the Sleep mode, refer to "1 Before Using the Machine" > "Energy Saver Mode" > "Changing the Interval for Entering Energy Saver Mode" in the Administrator Guide.
1 Press the <Energy Saver> button.
1 2 3
4 5 6
7 8 9
0 #
C
<Energy Saver> button

2 Product Overview
60
Product Overview
2
Cooling Mode
The machine enters the Cooling mode if its internal temperature rises too high. During this mode, the following screen is displayed on the touch screen.
This screen disappears when the internal temperature has cooled down. Wait until the screen disappears.
If the room temperature is high, lower the room temperature because it may take longer time for the machine to cool down.Note • You can select [Close] to forcibly close the screen above. However, you cannot operate the machine
because the machine is still in the Cooling mode. Wait until the message "Machine Cooling in Progress" disappears in the upper left corner of the screen.
Important • During the Cooling mode, the fan inside the machine is working to release heat. Do not open the front cover or switch off the machine during the mode.

Control Panel
61
Product Overview
2
Control Panel
The following describes the names and functions of components on the control panel.
1 2 3
4 5 6
7 8 9
0 #
C
1 2 3
4 5 6
7 8 9
0 #
C
3 4 5 6
11121314151617181922 202123
1 2
910
87
25 24
No. Component Function
1 <Services Home> button Press this button to display the [Services Home] screen.You can change the services displayed on the [Services Home] screen. For more information, refer to "1 Before Using the Machine" > "Customizing the Control Panel" > "Customizing the Button Layout" in the Administrator Guide.
2 Touch screen Displays messages required for operation, and buttons for various features. You can directly touch the touch screen to instruct operations and set features.
3 <Log In/Out> button Lights up when a user is authenticated in the System Administration mode, the Authentication mode, or the Accounting mode. Displays the User ID entry screen for entering the System Administration mode, the Authentication mode, or the Accounting mode. Press this button to exit these modes.
4 <Job Status> button Press this button to check or cancel the current job, to check or print stored jobs, or to check completed jobs.
5 <Machine Status> button Press this button to check the machine status and meters, to check the status of consumables, and to print reports.
Note • When you replace consumables, press the <Machine Status> button to enable the output devices of the machine to exit the Energy Saver mode. Then, you can check the current status of the consumables.
6 <Energy Saver> button When the machine is not used for a while, it enters the Energy Saver mode to reduce power consumption. When the Energy Saver mode is active, the <Energy Saver> button lights up.Press this button to enter or exit the Energy Saver mode.

2 Product Overview
62
Product Overview
2
7 <Interrupt> button Press this button to suspend a copy or print job in progress to have the machine process another job. During the Interrupt mode, the <Interrupt> button lights up. Pressing the <Interrupt> button again exits the Interrupt mode and resumes the suspended job.Some types of jobs cannot be executed in the Interrupt mode. Refer to "16 Appendix" > "Notes and Restrictions" > "Notes and Restrictions on the Interrupt Mode" in the Administrator Guide.
8 <Clear All> button Returns the settings you made to the default values. The machine returns to the same state as when it is powered on.
9 <Stop> button Press this button to stop the current copy job or communications.
10 <Start> button Press this button to start scanning a document.
11 <Main Power> indicator Lights up when the main power is switched on.
Note • If the main power is not switched on, the machine will not be powered on even when the power is switched on.
12 <Error> indicator Blinks if a system error occurs.This indicator lights up when a problem other than a system error occurs with the machine, including paper jams and running out of paper or toner.If the <Error> indicator blinks, contact our Customer Support Center.If the <Error> indicator lights up, refer to "15 Problem Solving" > "Machine Trouble" in the Administrator Guide.
13 <Data> indicator Blinks when the machine is sending or receiving data to or from a client.This indicator lights up when data is stored in the machine's memory, when received faxes are waiting to be printed, or when faxes are stored in a folder.You can check stored scan files in a Folder List. For information on the Folder List, refer to "4 Machine Status" > "Machine Information" > "Print Reports" > "Folder List" in the Administrator Guide.You can check stored fax files in a Stored File List. For information on the Stored File List, refer to "4 Machine Status" > "Machine Information" > "Print Reports" > "Job Status/Activity Report" > "Stored File List" in the Administrator Guide.You can change the lighting pattern of the <Data> indicator. For more information, refer to "5 Tools" > "Common Service Settings" > "Other Settings" > "Data Indicator" in the Administrator Guide.
14 <Speed Dial> button Press this button to specify a recipient with an address number when sending a fax or e-mail.
15 <C (Clear)> button Press this button to cancel a numerical value you have entered with the numeric keypad.
16 <Dial Pause> button Press this button to insert a pause into a destination number.
17 Numeric keypad Use the numeric buttons on the keypad to enter the number of copies, passcodes, and other numerical values.
18 <Custom Button 1> (Copy) "Copy" is assigned to this button by default.Press this button to display the [Copy] screen.For information on how to assign a service to the button, refer to "1 Before Using the Machine" > "Customizing the Control Panel" > "Assigning Services to the Custom Buttons" in the Administrator Guide.
19 <Custom Button 2> Press this button to call its associated service.To the button, you can assign [Language] or any service displayed on the [Services Home] screen.For information on how to assign a service to the button, refer to "1 Before Using the Machine" > "Customizing the Control Panel" > "Assigning Services to the Custom Buttons" in the Administrator Guide.
No. Component Function

Control Panel
63
Product Overview
2
20 <Custom Button 3> (Review) "Review" is assigned to this button by default.On the [Review] screen, you can check a list of the status of Copy, Fax, and Scan services whose settings have been changed from the defaults. You can also check the details of fax and e-mail recipients.For information on how to assign a service to the button, refer to "1 Before Using the Machine" > "Customizing the Control Panel" > "Assigning Services to the Custom Buttons" in the Administrator Guide.
21 USB memory slot Insert a USB 2.0 memory device here.
Note • This feature is not available for some models. An optional component is required. For more information, contact our Customer Support Center.
22 One touch panels(Only available for machines with the Fax service)
Contains one touch buttons.Turn over the panels to display buttons 1 - 54.There are two ways in which address numbers and stored programs are assigned to the one touch buttons. Select either of the following:
[Type 1]The buttons 1 to 52 are used for address numbers and they correspond to the registered address numbers 0001 to 0052, while the buttons 53 and 54 are used for stored programs and they correspond to the registered stored programs 1 and 2.[Type 2]The buttons 1 to 45 are used for address numbers and they correspond to the registered address numbers 0001 to 0045, while the buttons 46 to 54 are used for stored programs and they correspond to the registered stored programs 1 to 9.
Note • By default, [Type 1] is selected.
• This feature is not available for some models. An optional component is required. For more information, contact our Customer Support Center.
For information on how to change the settings registered to the one touch buttons, refer to "5 Tools" > "Common Service Settings" > "Screen/Button Settings" in the Administrator Guide.
23 One touch buttons(Only available for machines with the Fax service)
Allows you to specify a recipient with the simple press of a button. You can use the buttons for fax and Internet fax jobs.There are two ways in which address numbers and stored programs are assigned to the one touch buttons. Select either of the following:
[Type 1]The buttons 1 to 52 are used for address numbers and they correspond to the registered address numbers 0001 to 0052, while the buttons 53 and 54 are used for stored programs and they correspond to the registered stored programs 1 and 2.[Type 2]The buttons 1 to 45 are used for address numbers and they correspond to the registered address numbers 0001 to 0045, while the buttons 46 to 54 are used for stored programs and they correspond to the registered stored programs 1 to 9.
Note • By default, [Type 1] is selected.
• This feature is not available for some models. An optional component is required. For more information, contact our Customer Support Center.
For information on how to change the settings registered to the one touch buttons, refer to "5 Tools" > "Common Service Settings" > "Screen/Button Settings" in the Administrator Guide.
No. Component Function

2 Product Overview
64
Product Overview
2
24 Embedded IC Card Reader (optional)
Used to authenticate a user using a smart card.When you touch the smart card to the IC Card Reader, the machine reads the user information registered on the smart card and authenticates the user.
Note • An optional component is required to use this feature. For more information, contact our Customer Support Center.
• When the machine is in the Energy Saver mode, touching the smart card to the IC Card Reader deactivates the Low Power mode. However, this operation does not deactivate the Sleep mode. For more information, refer to "Energy Saver Mode" (P.57).
25 Paper clip tray Used for placing paper clips and staples.
No. Component Function

Control Panel
65
Product Overview
2
Screens and Buttons Displayed
You can register or change the services and buttons displayed on the touch screen. You can customize the following screens:Note • The following screens and buttons may have been changed by the system administrator. Use the
machine according to the changes being made.
Setting the Initial ScreenYou can set the screen displayed after switching the power on or exiting the Energy Saver mode.
Setting the Screen Displayed after Auto ClearYou can select [Last Selection Screen] or [Services Home] for the screen to be displayed after Auto Clear.
Assigning Services to the Custom ButtonsYou can assign services to the custom buttons on the control panel: Custom 1 to Custom 3.
By assigning frequently-used services to the custom buttons, you can switch to the services without returning to the [Services Home] screen. Note • By default, "Copy" is assigned to the <Custom Button 1>, and "Review" is assigned to the <Custom
Button 3>. No service is assigned to the <Custom Button 2>.
Customizing the [Services Home] ScreenYou can customize the layout of services and buttons on the [Services Home] screen that is displayed when you press the <Services Home> button on the control panel.For information on how to customize the [Services Home] screen, refer to "1 Before Using the Machine" > "Customizing the Control Panel" > "Customizing the Button Layout" in the Administrator Guide.

2 Product Overview
66
Product Overview
2
About the [Services Home] Screen
This section describes the fields and buttons on the [Services Home] screen which is displayed by pressing the <Services Home> button.
Message FieldDisplays a message.
Login Information FieldSelect this field in the upper right corner of the touch screen to display the User ID entry screen for entering the System Administration mode, the Authentication mode, or the Accounting mode.
When a user is authenticated, the login information is displayed in this field.Note • You can also press the <Log In/Out> button on the control panel to enter the Authentication mode.
• To exit the Authentication mode, press the <Log In/Out> button on the control panel. You can also select the login information field in the upper right corner of the touch screen.
For information on the Authentication or Accounting mode, refer to "14 Authentication and Accounting Features" in the Administrator Guide.
Service ButtonsAllows you to set the features for each service.
CopyYou can set the features for the Copy service.For more information, refer to "Copy" (P.73).
Fax/Internet FaxYou can set the features for the Fax service.For more information, refer to "Fax" (P.157).
Message field
Next page
Service buttonsAdditional feature buttons
Login information field

About the [Services Home] Screen
67
Product Overview
2
E-mailYou can scan documents and send the scanned data as an e-mail attachment.For more information, refer to "E-mail" (P.261).
Simple CopyYou can set the features for the Copy service. Selecting [Simple Copy] allows you to simply specify the basic copy features on a single screen.For more information, refer to "Simple Copy" (P.83).
Simple FaxYou can set the features for the Fax service. Selecting [Simple Fax] allows you to easily specify the basic fax features on a single screen.Note • This service does not appear on the screen when the Server Fax service is enabled.
For more information, refer to "Simple Fax" (P.181).
Scan to PCYou can scan documents and send the scanned data to a network computer via the FTP or SMB protocol.For more information, refer to "Scan to PC" (P.291).
Store to FolderYou can scan documents and save the scanned data in a folder of the machine. For more information, refer to "Store to Folder" (P.302).
Send from FolderYou can operate files stored in a folder of the machine.For more information, refer to "Send from Folder" (P.337).
Stored ProgrammingYou can operate stored programs.
Stored Programming is a service that allows you to store settings that you expect to use frequently and call them with a single button operation.For more information, refer to "Stored Programming" (P.361).
Network ScanningYou can scan documents after specifying a file (job template) saving scanning conditions, information on the forwarding destination server, and others.For more information, refer to "Network Scanning" (P.289).
Store & Send LinkAfter you scan documents, the machine temporarily saves the scanned data and sends you e-mail attached with two URLs: one is for the location to retrieve the scanned data, and the other is for the location to delete the data.For more information, refer to "Store & Send Link" (P.311).
Note • This service appears when using the Authentication feature.
For information on how to display [Store & Send Link] on the [Services Home] screen, refer to "1 Before Using the Machine" > "Customizing the Control Panel" in the Administrator Guide.
Store to USBYou can scan documents and save the scanned data to a USB memory device.For more information, refer to "Store to USB" (P.304).

2 Product Overview
68
Product Overview
2
Note • This service is not available for some models. An optional component is required. For more information, contact our Customer Support Center.
Media Print - TextYou can print document files (PDF, TIFF, XML Paper Specification (XPS), XDW (XBD), and JPG (JFIF)) after retrieving the files from a CompactFlash card or a USB memory device. You can also print the scan data stored with the Store to USB service.For more information, refer to "Media Print - Text" (P.383).
Note • This service is not available for some models. An optional component is required. For more information, contact our Customer Support Center.
Media Print - PhotosYou can print image data (DCF1.0) taken with a digital camera. You can retrieve the data only from a CompactFlash card.For more information, refer to "Media Print - Photos" (P.382).
Note • This service is not available for some models. An optional component is required. For more information, contact our Customer Support Center.
Job Flow SheetsYou can scan documents using a job flow sheet.
Job Flow Sheets is a service that allows you to set a flow of transfer settings of scan data for the efficient routine transfer.For more information, refer to "Job Flow Sheets" (P.355).
Store to WSDYou can scan documents loaded on the machine and save the scanned data by operating from a computer on the network. Using the control panel on the machine, you can also save the scanned data to a computer on the network.For more information, refer to "Store to WSD" (P.314).
Additional Feature ButtonsAllows you to set the additional features that are not related to jobs.
LanguageYou can select the language to be displayed on the touch screen.
The language selected here will be invalid when the power is switched off and on.Important • When you select [English], only ASCII characters can be used.
• When you set [Language] to [English] on the [Services Home] screen and an address book entry or contents of [Details] of Job Flow Sheets is entered in double-byte characters, the characters may not be displayed properly.
• When you use CentreWare Internet Services to import a CSV file* including double-byte characters other than a selected language, the characters in the file may be garbled or the import may fail. * : CSV (Comma Separated Values) is a file format that is often used for saving data by spreadsheets and
database programs.
Note • Under [Default Language] in the System Administration mode, you can select the standard language displayed on the touch screen when the power is switched on. For more information on how to set [Default Language], refer to "5 Tools" > "Common Service Settings" > "Screen/Button Settings" > "Default Language" in the Administrator Guide.
Screen BrightnessYou can adjust the screen brightness of the touch screen.

About the [Services Home] Screen
69
Product Overview
2
Lock Out Printer/Release PrinterYou can set the machine to temporarily enable printing during the printer lockout period or to temporarily disable printing while [Release Printer] is displayed.Note • You can assign this button when [Printer Lockout] is set to [On] under [Tools] > [Common Service
Settings] > [Machine Clock/Timers] and the [Allow User to Lock Out] check box is selected. For information on how to assign the feature to the button, refer to "5 Tools" > "Common Service Settings" > "Screen/Button Settings" in the Administrator Guide.
SetupYou can create or update folders, job flows, and the Address Book.For more information, refer to "5 Tools" > "Setup" in the Administrator Guide.
CalibrationThe machine can automatically calibrate colors when the reproducibility of density or color in copies and prints deteriorates.For more information, refer to "3 Maintenance" > "Executing Calibration" in the Administrator Guide.
Activity ReportYou can print an Activity Report to check if a transmission is successfully completed.For information on the contents listed in the Activity Report, refer to "16 Appendix" > "Activity Report" in the Administrator Guide.
Fax Receiving ModeYou can specify a mode for receiving faxes.For more information, refer to "4 Machine Status" > "Machine Information" > "Fax Receiving Mode" in the Administrator Guide.
Print ModeYou can register a print mode and change its settings.For more information, refer to "4 Machine Status" > "Machine Information" > "Print Mode" in the Administrator Guide.

2 Product Overview
70
Product Overview
2
Entering Text
During operations, a screen for entering text sometimes appears. The following describes how to enter text.
You can enter the following characters: numerals, alphabets, and symbols.
Item Description
Entering alphabets and numerals To enter uppercase letters, select [Shift]. To return to the lowercase letters, select [Shift] again.
Entering symbols Select [More Characters].
Note • Depending on the keyboard, you can select a symbol from the pull-up options displayed on the left bottom of the screen.
Entering a space Select [Space].
Deleting characters Select [Backspace] to delete one character at a time.Select [Delete Text] to delete all characters.

Installing the Tray Attachment on the Finisher-B1
71
Product Overview
2
Installing the Tray Attachment on the Finisher-B1
When delivering A4 or B5 paper to the finisher tray without stapling, install the tray attachment supplied with the finisher tray if the outputs are not properly stacked up. Doing so may help the outputs to be stacked more neatly.
1 Remove the tray attachment from the rear of the finisher tray.
2 Install the tray attachment onto the middle of the finisher tray as shown in the diagram.

2 Product Overview
72
Product Overview
2

3 Copy
This chapter describes the basic operation and features for the Copy service.
Copying Procedure........................................................................................................................74
Operations during Copying .......................................................................................................80
Simple Copy .....................................................................................................................................83
Copy....................................................................................................................................................88
Image Quality..............................................................................................................................101
Layout Adjustment ....................................................................................................................108
Output Format.............................................................................................................................123
Job Assembly................................................................................................................................148

3 Copy
74
Copy
3
Copying Procedure
This section describes the basic copy procedures. The following shows the reference section for each procedure.
Step 1 Loading Documents ..........................................................................................................................................................74Step 2 Selecting Features .............................................................................................................................................................76Step 3 Entering a Quantity...........................................................................................................................................................77Step 4 Starting the Copy Job .......................................................................................................................................................78Step 5 Confirming the Copy Job in Job Status.........................................................................................................................79
Step 1 Loading Documents
The following two methods are available to load documents:
Document Feeder
Single sheet
Multiple sheets
Document Glass
Single sheet
Bound documents, such as books
Document FeederThe document feeder supports single and multiple sheet documents with sizes from 125 x 85 mm (Standard size: A5, A5 ) to 297 x 432 mm (Standard size: A3, 11 x 17").
The document feeder automatically detects standard size documents. For non-standard size documents, enter the size on the [Original Size] screen.For information on document sizes that can be detected automatically and how to enter a non-standard document size, refer to "Original Size (Specifying the Scan Size for the Document)" (P.113).The standard document sizes that can be detected automatically depend on [Paper Size Settings] in the System Administration mode. For information on [Paper Size Settings], refer to "5 Tools" > "Common Service Settings" > "Other Settings" > "Paper Size Settings" in the Administrator Guide.
The document feeder accepts the following number of sheets.
Important • To avoid paper jams, use the document glass for folded or wrinkled documents, cut-and-pasted documents, curled paper, or back carbon paper.
• 2-sided scanning of lightweight paper (38 - 49 gsm) is not supported.
For information on how to copy mixed sized documents, refer to "Mixed Size Originals (Scanning Different Size Documents Simultaneously)" (P.114).
1 Remove any paper clips and staples before loading a document.
Document Type (Weight) Number of Sheets
Lightweight paper (38 - 49 gsm) 110 sheets
Plain paper (50 - 80 gsm) 110 sheets
Heavyweight paper (81 - 128 gsm) 75 sheets

Copying Procedure
75
Copy
3
2 Load the document face up (when the document is 2-sided, load the front side up) in the center of the document feeder.Note • The Confirmation indicator lights up when
the document is loaded correctly. If the indicator does not light, load the document again.
3 Adjust the document guides to match the size of the document loaded.
4 Open the document stopper.
Document GlassThe document glass supports a single sheet, a book, or other similar documents with sizes from 15 x 15 mm to 297 x 432 mm (Standard size: A3, 11 x 17").Important • Always close the document cover after using the document glass.
The document glass automatically detects standard size documents. For non-standard size documents, enter the size on the [Original Size] screen.For information on document sizes that can be detected automatically and how to enter a non-standard document size, refer to "Original Size (Specifying the Scan Size for the Document)" (P.113).The standard document sizes that can be detected automatically depend on [Paper Size Settings] in the System Administration mode. For information on the paper size settings, refer to "5 Tools" > "Common Service Settings" > "Other Settings" > "Paper Size Settings" in the Administrator Guide.
Confirmation indicator
CAUTION
Do not apply excessive force to hold thick document on the document glass. It may break the glass and cause injuries.
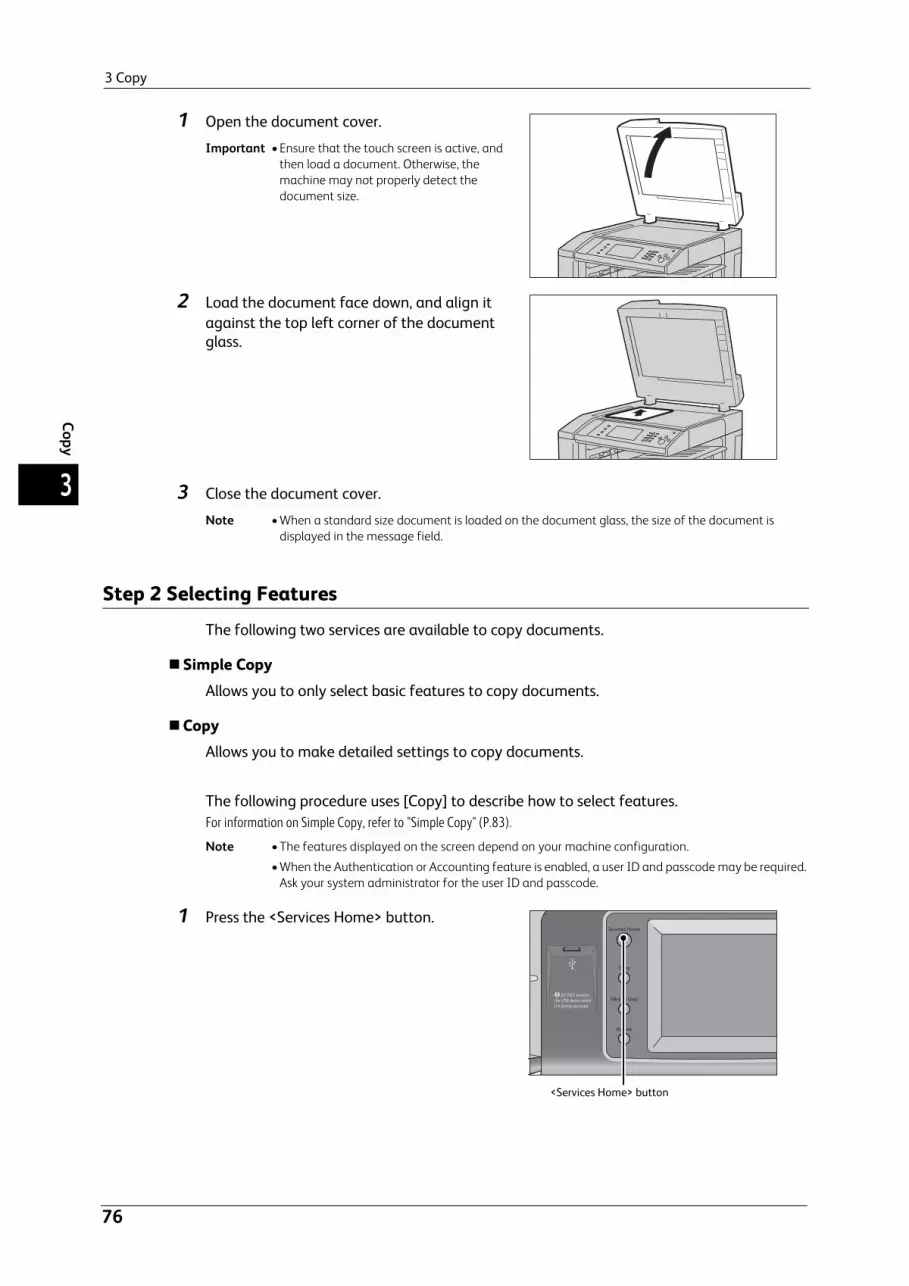
3 Copy
76
Copy
3
1 Open the document cover.
Important • Ensure that the touch screen is active, and then load a document. Otherwise, the machine may not properly detect the document size.
2 Load the document face down, and align it against the top left corner of the document glass.
3 Close the document cover.
Note • When a standard size document is loaded on the document glass, the size of the document is displayed in the message field.
Step 2 Selecting Features
The following two services are available to copy documents.
Simple CopyAllows you to only select basic features to copy documents.
CopyAllows you to make detailed settings to copy documents.
The following procedure uses [Copy] to describe how to select features.For information on Simple Copy, refer to "Simple Copy" (P.83).
Note • The features displayed on the screen depend on your machine configuration.
• When the Authentication or Accounting feature is enabled, a user ID and passcode may be required. Ask your system administrator for the user ID and passcode.
1 Press the <Services Home> button.
<Services Home> button

Copying Procedure
77
Copy
3
2 Select [Copy].
3 If the previous settings still remain, press the <Clear All> button.
4 Select each tab, and configure features as necessary.
The following shows the reference section for each tab."Copy" (P.88)"Image Quality" (P.101)"Layout Adjustment" (P.108)"Output Format" (P.123)"Job Assembly" (P.148)
Step 3 Entering a Quantity
The following describes how to enter the number of copy sets. You can enter up to 999 sets.
1 Enter the number of copies using the numeric keypad. The number of copies entered appears on the upper right of the touch screen.
1 2 3
4 5 6
7 8 9
0 #
C
<Clear All> button
1 2 3
4 5 6
7 8 9
0 #
C
Numeric keypad

3 Copy
78
Copy
3
2 If you have entered an incorrect value, press the <C (Clear)> button and then enter the correct value.
Step 4 Starting the Copy Job
The following describes how to start a copy job.
1 Press the <Start> button.
Important • If the document has been loaded in the document feeder, do not hold down the document while it is being conveyed.
Note • If a problem occurs, an error message appears on the touch screen. Solve the problem according to the message.
• You can set the next job during copying.
If you have more documentsIf you have more documents to copy, select [Next Original] on the touch screen while the current document is being scanned. This allows you to scan the documents as a single set of data.
2 Select [Next Original] while scanning is in progress.Note • When using the document feeder, load the
next document after the machine has finished scanning the first document.
• When [Next Original] is displayed on the screen shown on the right and no operation is performed for a certain period of time, the machine automatically assumes that there are no more documents.
• You can change the number of copies by selecting [Change Quantity] that is displayed after selecting [Delete].
3 Load the next document.
4 Press the <Start> button.If you have more documents, repeat steps 3 and 4.
1 2 3
4 5 6
7 8 9
0 #
C
<C (Clear)> button
1 2 3
4 5 6
7 8 9
0 #
C
<Start> button

Copying Procedure
79
Copy
3
5 When all documents have been scanned, select [Last Original].
Step 5 Confirming the Copy Job in Job Status
If copies are not output after you start the copy job, the job may be in pending status. Use the following procedure to confirm the job status.
1 Press the <Job Status> button.
2 Confirm the job status.
Note • Select [ ] to return to the previous screen or [ ] to move to the next screen.
1 2 3
4 5 6
7 8 9
0 #
C
<Job Status> button

3 Copy
80
Copy
3
Operations during Copying
This section describes available operations during copying. The following shows the reference section for each operation.
Stopping the Copy Job...................................................................................................................................................................80Changing the Number of Copies.................................................................................................................................................81Interrupting the Copy Job ............................................................................................................................................................82
Stopping the Copy Job
To cancel a copy job in progress, use the following procedure.
1 Press either the <Stop> button on the control panel or [Delete] on the touch screen.
2 Select [Delete].
If [Delete] does not appear on the screen:
1 Press the <Job Status> button.
1 2 3
4 5 6
7 8 9
0 #
C
<Stop> button
1 2 3
4 5 6
7 8 9
0 #
C
<Job Status> button

Operations during Copying
81
Copy
3
2 Select the job to cancel.
Note • Select [ ] to return to the previous screen or [ ] to move to the next screen.
3 Select [Delete].
4 Select [Delete].
Changing the Number of Copies
To change the number of copy sets during scanning or copying, use the following procedure.
1 Press either the <Stop> button on the control panel or [Delete] on the touch screen.
1 2 3
4 5 6
7 8 9
0 #
C
<Stop> button

3 Copy
82
Copy
3
2 Select [Change Quantity].
3 Specify the number of copy sets with the numeric keypad. The new quantity must include the number of copies that have already been printed. You cannot enter a number less than the number of copies that have already been printed.
4 Press the <Start> button.
Note • If you enter the same value as the number of copies that have already been printed, the machine will not execute a copy job even when you press the <Start> button.
Interrupting the Copy Job
You can temporarily stop the copy job to have the machine process another job.Important • Press the <Interrupt> button only after all the documents have been scanned. The machine does not
accept another job while it is scanning the documents, or [Next Original] has been selected.
1 Press the <Interrupt> button.
The <Interrupt> button lights up to indicate that the machine is in the Interrupt mode.
2 Load a document and set features if necessary.
3 Specify the number of copy sets with the numeric keypad.
4 Press the <Start> button.
5 After you have finished making the interrupt copy, press the <Interrupt> button.
The <Interrupt> button goes out to indicate that the Interrupt mode is exited.Note • If you used the document glass to copy the document, remove the document from the document
glass.
6 Press the <Start> button.
The suspended copy job is resumed.
1 2 3
4 5 6
7 8 9
0 #
C
<Interrupt> button

Simple Copy
83
Copy
3
Simple Copy
You can select [Copy] or [Simple Copy] on the [Services Home] screen to set the features for the Copy service.
This section describes the features you can select on the [Simple Copy] screen. [Simple Copy] allows you to use only basic features to easily copy documents. The following shows the reference section for each feature.
Paper Supply (Selecting the Paper for Copying) .................................................................................................................... 83Reduce/Enlarge (Making Enlarged/Reduced Copies)............................................................................................................ 852 Sided Copying (Making 2 Sided Copies) ............................................................................................................................... 85Auto/Color/Black & White (Selecting the Color for Copying).............................................................................................. 86Lighten/Darken (Adjusting the Copy Density) ........................................................................................................................ 862 Pages per Side (Copying Two Pages onto One Sheet)....................................................................................................... 871 Staple............................................................................................................................................................................................. 87
1 Select [Simple Copy] on the [Services Home] screen.
2 Select a feature on the [Simple Copy] screen.
Paper Supply (Selecting the Paper for Copying)
This feature allows you to select the paper tray for copying.
1 Select [Paper Supply].

3 Copy
84
Copy
3
2 Select a paper tray to be used.
Auto SelectAutomatically determines the tray holding the appropriate paper, based on the document size and the specified copy ratio.Note • If you select [Auto Select], an option other than [Auto %] is selected in [Reduce/Enlarge].
Trays 1 to 4, or Trays 1 and 2Allows you to directly select the desired tray.Note • Trays 3 and 4 are optional for some models.
• When the Envelope Tray (optional) is inserted into the slot for Tray 1, you can load envelopes in the tray. For more information, refer to "Paper Supply (Selecting the Paper for Copying)" (P.92).
Tray 5 Bypass Auto DetectAutomatically detects the size of paper loaded in the bypass tray.
Checking the Remaining Amount of Paper in a TrayThe icon displayed in a tray allows you to check the remaining amount of paper loaded in the tray.
: Indicates that the remaining amount of paper is 25 to 100%.
: Indicates that the remaining amount of paper is 25% or less.
: Indicates that the tray runs out of paper, or no paper is loaded in the tray.
You can view the icons to check the remaining amount of paper in a tray.

Simple Copy
85
Copy
3
Reduce/Enlarge (Making Enlarged/Reduced Copies)
This feature allows you to select a copy ratio to enlarge or reduce the size of copies.
1 Select [Reduce/Enlarge].
2 Select a copy ratio.
100%Copies at the same image size as the original document.
Auto %Automatically determines the copy ratio based on the document size and the paper size specified in [Paper Supply], and copies the document to fit into the paper.Note • If you select [Auto %], an option other than [Auto Select] is selected in [Paper Supply].
RatiosAllows you to select from preset copy ratios.
2 Sided Copying (Making 2 Sided Copies)
This feature allows you to copy 1-sided and 2-sided documents on one side or both sides of paper.
1 Select any option.
1 1 SidedMakes a copy of a 1-sided document on one side of the paper.
1 2 SidedMakes a copy of a 1-sided document on both sides of the paper.

3 Copy
86
Copy
3
2 2 SidedMakes a copy of a 2-sided document on both sides of the paper.
Auto/Color/Black & White (Selecting the Color for Copying)
This feature allows you to select a color mode.
1 Select [Auto], [Color] or [Black & White].
AutoThe machine automatically determines the colors of the original document and makes copies in full color if the original document is colored, and in single color (black) if the document is black-and-white.Note • If a color document is in one of the following conditions, the machine may copy the document in
black and white.
- The colored area is too small.
- The colors are too light.In that case, change a level from the five levels which is used for the machine to recognize color. For more information, refer to "5 Tools" > "Common Service Settings" > "Image Quality Adjustment" > "Image Quality" > "Output Color Recognition" in the Administrator Guide.
ColorCopies in full color.
Black & WhiteCopies in black and white regardless of the colors in the original document.Note • If the use of certain colors is not allowed, the available colors will be restricted. For more information,
refer to "5 Tools" > "Accounting" > "Create/View User Accounts" > "Service Access" in the Administrator Guide.
Lighten/Darken (Adjusting the Copy Density)
This feature allows you to select a copy-density level from seven levels.
1 Use [ ] and [ ] to select a density level.

Simple Copy
87
Copy
3
2 Pages per Side (Copying Two Pages onto One Sheet)
This feature allows you to copy two pages of a document together onto a single sheet of paper.
When you select [2 Pages per Side], [Auto %] is automatically selected in [Reduce/Enlarge]. The machine automatically sets the copy ratio and makes copies of the images so that they fit on the selected paper.Note • When you deselect [Auto %] in [Reduce/Enlarge] (when you select another copy ratio), image loss
may occur depending on the image size of the document.
• Select a tray other than [Auto Select] in [Paper Supply]. When you select [Auto Select], the tray containing A4 paper is selected. If no tray contains A4 paper, the machine select a tray based on the [Auto Paper Off] setting. For information on [Auto Paper Off], refer to "5 Tools" > "Copy Service Settings" > "Copy Control" > "Auto Paper Off" in the Administrator Guide.
For information on how to copy four or eight pages of a document together onto a single sheet of paper, refer to "Pages per Side (Copying Multiple Pages onto One Sheet)" (P.128).
1 Select [2 Pages per Side].
1 Staple
This feature allows you to select whether to staple copied outputs at the top left corner.
The number of sheets that can be stapled is 2 - 50 (when 80 gsm paper is used). Available paper types are: Plain paper, Recycled paper, Reload paper, Bond paper, Heavyweight paper (106 - 169 gsm), Heavyweight Reload paper, Extra Heavyweight paper (170 - 216 gsm), Extra Heavyweight Reload paper, Extra Heavyweight Plus paper (217 - 220 gsm), Extra Heavyweight Plus Reload paper, Gloss paper (106 - 169 gsm), Gloss Reload paper, Heavyweight Gloss paper (170 - 216 gsm), Heavyweight Gloss Reload paper, Extra Heavyweight Gloss paper (217 - 220 gsm), Extra Heavyweight Gloss Reload paper, and Custom paper 1 to 5.Note • This feature does not appear for some models. An optional component is required. For more
information, contact our Customer Support Center.
1 Select [1 Staple].

3 Copy
88
Copy
3
Copy
You can select [Copy] or [Simple Copy] on the [Services Home] screen to set the features for the Copy service.
This section describes the features you can select on the [Copy] screen. The following shows the reference section for each feature.
Reduce/Enlarge (Making Enlarged/Reduced Copies) ............................................................................................................88Paper Supply (Selecting the Paper for Copying) .....................................................................................................................92Output Color (Selecting the Color for Copying).......................................................................................................................952 Sided Copying (Making 2 Sided Copies)................................................................................................................................99Copy Output (Specifying Finishing Options) ............................................................................................................................99Pages per Side (Copying Multiple Pages onto One Sheet) ................................................................................................ 100Lighten/Darken (Adjusting the Copy Density)...................................................................................................................... 100
You can customize the layout of the features displayed on the [Copy] screen. For more information, refer to "5 Tools" > "Copy Service Settings" > "Copy Tab - Features Allocation" in the Administrator Guide.
1 Select [Copy] on the [Services Home] screen.
2 Select a feature on the [Copy] screen.
Reduce/Enlarge (Making Enlarged/Reduced Copies)
This feature allows you to select a copy ratio to enlarge or reduce the size of copies.
1 Specify a copy ratio. You can use the numeric keypad to specify a value, or [+] and [-] to specify reduction/enlargement ratios directly.
100%Copies at the same image size as the original document.

Copy
89
Copy
3
Auto %Automatically determines the copy ratio based on the document size and the paper size specified in [Paper Supply], and copies the document to fit into the paper.Note • If you select [Auto %], an option other than [Auto Select] is selected in [Paper Supply].
Ratios (3rd to 4th buttons on the screen)Displays preset copy ratios.You can change the copy ratio associated with each button. For information on the settings, refer to "5 Tools" > "Copy Service Settings" > "Preset Buttons" > "Reduce/Enlarge - Button 3 - 4" in the Administrator Guide.
MoreDisplays the [Reduce/Enlarge] screen on which you can set [Proportional %], [Independent X - Y%], and [Calculator %].For information on the settings on the [Reduce/Enlarge] screen, refer to "When [Proportional %] is Selected" (P.89), "When [Independent X - Y%] is Selected" (P.90), or "When [Calculator %] is Selected" (P.91).
When [Proportional %] is SelectedYou can select a ratio from the standard copy ratios, or can enter a ratio directly.
1 Select a copy ratio, or specify a value.
Variable %Specify a ratio in the range from 25 to 400% in 1% increments. To specify a value, use the numeric keypad or [+] and [-]. Specifying "100 %" allows you to make copies at the same image size as the original document.
When you make enlarged/reduced copies from standard sized documents on standard sized paper, the following copy ratios will be applied.
* : Load a document in landscape orientation ( ) to match the paper orientation loaded in the tray.
How to load a document depends on the size and orientation of a document. For more information, refer to "Step 1 Loading Documents" (P.74).For information on paper that can be loaded, refer to "2 Paper and Other Media" > "Paper Types" in the Administrator Guide.
Copy/
OriginalA6 B6 A5 B5 A4 B4 A3
A6 100% 122% 141% 173% 200% 245%* 283%*
B6 82% 100% 116% 142% 164% 200%* 232%*
A5 71% 86% 100% 122% 141% 174%* 200%*
B5 58% 70% 81% 100% 115% 141%* 163%*
A4 50% 61% 70% 86% 100% 122%* 141%*
B4 41% 50% 58% 70% 81% 100% 115%
A3 35% 43% 50% 61% 70% 86% 100%
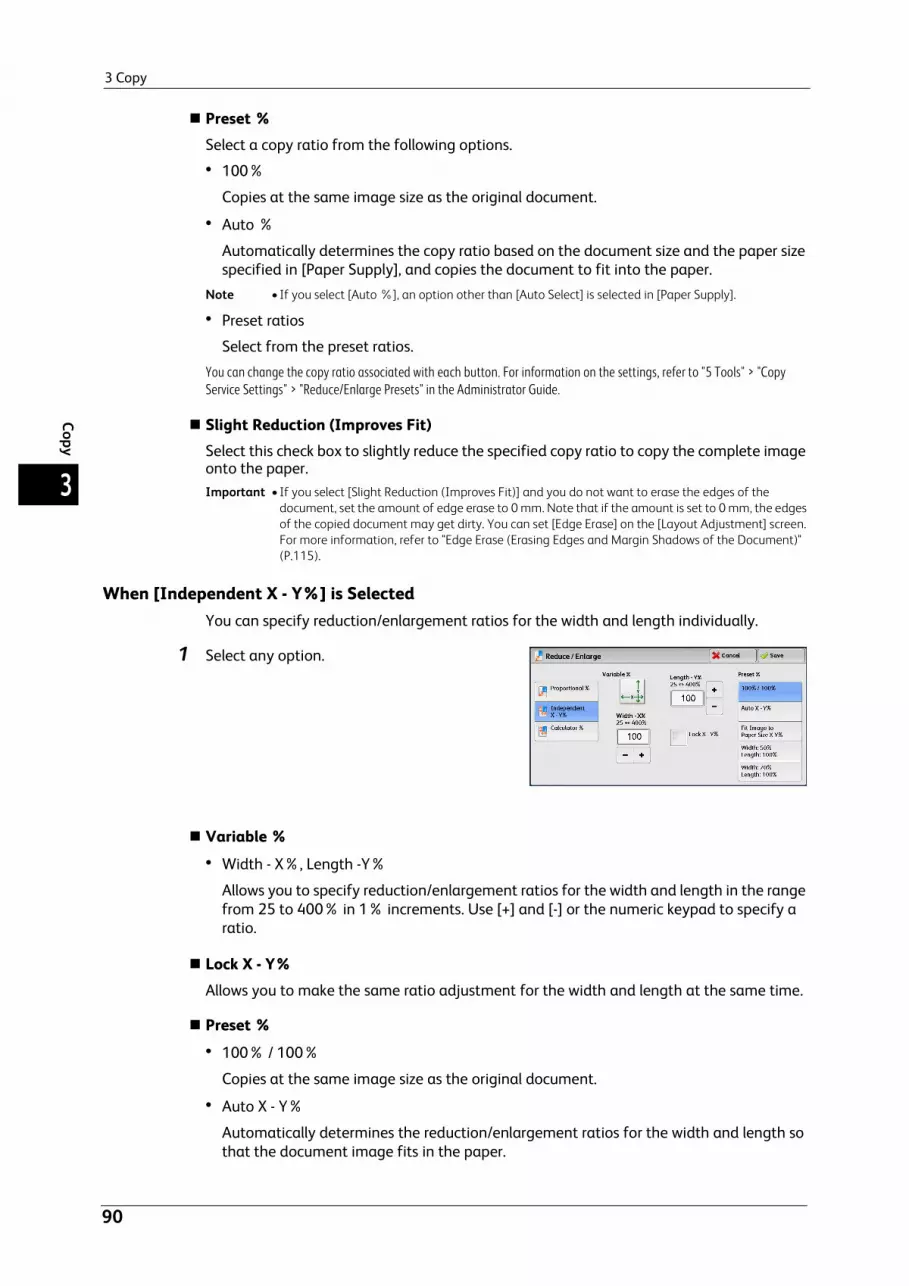
3 Copy
90
Copy
3
Preset %Select a copy ratio from the following options.
100%
Copies at the same image size as the original document.
Auto %
Automatically determines the copy ratio based on the document size and the paper size specified in [Paper Supply], and copies the document to fit into the paper.
Note • If you select [Auto %], an option other than [Auto Select] is selected in [Paper Supply].
Preset ratios
Select from the preset ratios.
You can change the copy ratio associated with each button. For information on the settings, refer to "5 Tools" > "Copy Service Settings" > "Reduce/Enlarge Presets" in the Administrator Guide.
Slight Reduction (Improves Fit)Select this check box to slightly reduce the specified copy ratio to copy the complete image onto the paper.Important • If you select [Slight Reduction (Improves Fit)] and you do not want to erase the edges of the
document, set the amount of edge erase to 0 mm. Note that if the amount is set to 0 mm, the edges of the copied document may get dirty. You can set [Edge Erase] on the [Layout Adjustment] screen. For more information, refer to "Edge Erase (Erasing Edges and Margin Shadows of the Document)" (P.115).
When [Independent X - Y%] is SelectedYou can specify reduction/enlargement ratios for the width and length individually.
1 Select any option.
Variable %
Width - X%, Length -Y%
Allows you to specify reduction/enlargement ratios for the width and length in the range from 25 to 400% in 1% increments. Use [+] and [-] or the numeric keypad to specify a ratio.
Lock X - Y%Allows you to make the same ratio adjustment for the width and length at the same time.
Preset %
100% / 100%
Copies at the same image size as the original document.
Auto X - Y%
Automatically determines the reduction/enlargement ratios for the width and length so that the document image fits in the paper.

Copy
91
Copy
3
Fit Image to Paper Size X - Y%
Automatically determines the reduction/enlargement ratios for the width and length so that the document image fits in the paper, and then slightly reduces the ratios so that the complete image is copied onto the paper.
Width: XX% Length: XX%
Allows you to specify the preset reduction/enlargement ratios.
When [Calculator %] is SelectedYou can specify values for the length and width individually.
If you specify both the original document size and the desired copy size, the copy ratios for the length and width are calculated automatically in the range from 25 to 400% according to the values that you entered.Note • Selecting [Calculator %] allows you to set copy ratios. The values entered in [Original Size] and
[Copy Size] are used to calculate ratios, and do not reflect a scan size for the document or the paper size. Be sure to specify a scan size for the document. Also, select a paper tray if necessary.
For information on how to specify a scan size for the document, refer to "Original Size (Specifying the Scan Size for the Document)" (P.113). For information on how to select a paper tray, refer to "Paper Supply (Selecting the Paper for Copying)" (P.92).
1 Enter the width of the original document in [Original Size] of [Width - X%] using the numeric keypad.
2 Enter the width of the output copy in [Copy Size] of [Width - X%] using the numeric keypad.
3 In the same way, enter the length for [Original Size] and [Copy Size] of [Length - Y%].
Width - X% / Length - Y%Displays the ratios that are automatically calculated using the values set in [Original Size] and [Copy Size].
Original SizeAllows you to enter the width and length of the original document, in the range from 1 to 999 mm in 1 mm increments.
Copy SizeAllows you to enter the width and length of output copies, in the range from 1 to 999 mm in 1 mm increments.
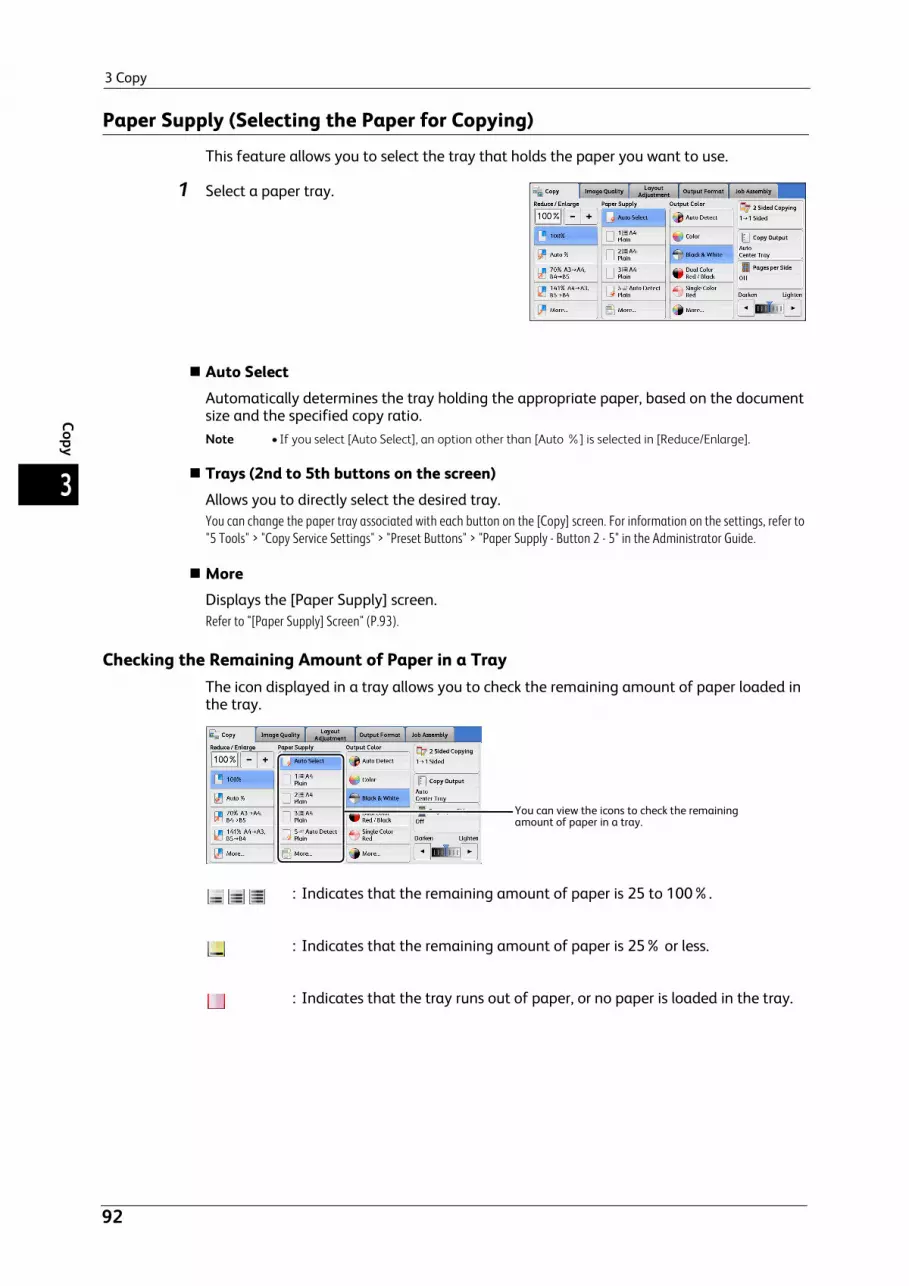
3 Copy
92
Copy
3
Paper Supply (Selecting the Paper for Copying)
This feature allows you to select the tray that holds the paper you want to use.
1 Select a paper tray.
Auto SelectAutomatically determines the tray holding the appropriate paper, based on the document size and the specified copy ratio.Note • If you select [Auto Select], an option other than [Auto %] is selected in [Reduce/Enlarge].
Trays (2nd to 5th buttons on the screen)Allows you to directly select the desired tray.You can change the paper tray associated with each button on the [Copy] screen. For information on the settings, refer to "5 Tools" > "Copy Service Settings" > "Preset Buttons" > "Paper Supply - Button 2 - 5" in the Administrator Guide.
MoreDisplays the [Paper Supply] screen.Refer to "[Paper Supply] Screen" (P.93).
Checking the Remaining Amount of Paper in a TrayThe icon displayed in a tray allows you to check the remaining amount of paper loaded in the tray.
: Indicates that the remaining amount of paper is 25 to 100%.
: Indicates that the remaining amount of paper is 25% or less.
: Indicates that the tray runs out of paper, or no paper is loaded in the tray.
You can view the icons to check the remaining amount of paper in a tray.

Copy
93
Copy
3
[Paper Supply] ScreenThis screen allows you to select a paper tray from all trays available on the machine.
1 Select a paper tray.
TrayAllows you to select a paper tray. When [Tray] is selected, the [Tray 5] screen is displayed where you can specify a paper type other than plain paper, and non-standard size paper.Note • Trays 3 and 4 are optional for some models.
For more information, refer to "[Tray 5] Screen" (P.94).
When the Envelope Tray (optional) is inserted into the slot for Tray 1, you can load envelopes in the tray. To use the Envelope Tray, prior settings are required in the System Administration mode.For information on the settings to use the Envelope Tray, refer to "5 Tools" > "Common Service Settings" > "Other Settings" > "Tray 1 Configuration" and "Common Service Settings" > "Paper Tray Settings" > "Paper Tray Attributes" in the Administrator Guide.For information on envelope sizes that can be loaded in the Envelope Tray, refer to "5 Tools" > "Common Service Settings" > "Other Settings" > "Paper Size Settings" in the Administrator Guide.
Note • The Envelope Tray can only be used in place of Tray 1. The standard Tray 1 cannot be used when the Envelope Tray is used.
% FullDisplays the remaining amounts of paper loaded in trays.
SizeDisplays paper sizes.
TypeDisplays paper types.
ColorDisplays paper colors.For information on how to set [Paper Color], refer to "5 Tools" > "Common Service Settings" > "Paper Tray Settings" > "Paper Tray Attributes" in the Administrator Guide.
Size DetectionDisplays how the machine detects a paper size.For information on how to set [Size Detection], refer to "5 Tools" > "Common Service Settings" > "Other Settings" > "Paper Size Settings" in the Administrator Guide.

3 Copy
94
Copy
3
[Tray 5] ScreenSet the paper loaded in Tray 5.For information on paper that can be loaded in Tray 5, refer to "2 Paper and Other Media" > "Paper Types" in the Administrator Guide.
1 Select a paper size and a paper type.
Note • Select [ ] to return to the previous screen or [ ] to move to the next screen.
• [Auto Detect] is available only when standard sized paper is loaded.
Paper SizeSelect from [Auto Detect], [Standard Size], and [Custom Size].
When you select [Auto Detect], the paper size is identified automatically.When you select [Standard Size] or [Custom Size], refer to "When [Standard Size] is Selected" (P.94) or "When [Custom Size] is Selected" (P.94), respectively.
Paper TypeSelect a paper type.
When [Standard Size] is SelectedSelect [Standard Size], and from the lists displayed, select a paper size and then a paper type.
1 Select a paper size and a paper type.
Note • Select [ ] to return to the previous screen or [ ] to move to the next screen.
When [Custom Size] is SelectedEnter the width and length of the original document on the fields displayed after selecting [Custom Size].
Specify the X (width) in the range from 98 to 483 mm, and the Y (length) in the range from 89 to 297 mm in 1 mm increments.Important • If the X (width) of non-standard size paper is less than 140 mm, documents may not be copied
properly.
• When copying on both sides of non-standard size paper, specify the size in the range from 140 to 432 mm for the X (width) direction and from 128 to 297 mm for the Y (length) direction.

Copy
95
Copy
3
1 Enter a paper size using [+] and [-] or the numeric keypad.
2 Select a paper type.
Note • Select [ ] to return to the previous screen or [ ] to move to the next screen.
Output Color (Selecting the Color for Copying)
This feature allows you to select copy colors.Note • If the use of certain colors is not allowed, the available colors will be restricted. For more information,
refer to "5 Tools" > "Accounting" > "Create/View User Accounts" > "Service Access" in the Administrator Guide.
1 Select a color mode.
Auto DetectThe machine automatically determines the colors of the original document and makes copies in full color if the original document is colored, and in single color (black) if the document is black-and-white.Note • If a color document is in one of the following conditions, the machine may copy the document in
black and white.
- The colored area is too small.
- The colors are too light. In that case, change a level from the five levels which is used for the machine to recognize color. For more information, refer to "5 Tools" > "Common Service Settings" > "Image Quality Adjustment" > "Image Quality" > "Output Color Recognition" in the Administrator Guide.
ColorCopies in full color.
Black & WhiteCopies in black and white regardless of the colors in the original document.
Dual Color Red/BlackCopies color documents using two colors.You can change the two colors. For more information, refer to "5 Tools" > "Copy Service Settings" > "Copy Defaults" > "Dual Color - Target Area Color" and "Dual Color - Non-target Area Color" in the Administrator Guide.
Single Color RedCopies color documents using one color.

3 Copy
96
Copy
3
You can change the red color to another one on the screen displayed after selecting [More] > [Single Color] > [Color]. For more information, refer to "5 Tools" > "Copy Service Settings" > "Copy Defaults" > "Single Color" in the Administrator Guide.
MoreDisplays the [Output Color] screen to set colors. For more information, refer to "[Output Color] Screen" (P.96).
[Output Color] ScreenThis screen allows you to make settings for full color, dual color, and single color.
1 Select [More].
2 Select the desired output color mode.
Auto DetectAutomatically determines the color of the original document and makes copies in full color if the original document is colored, or in single color (black) if the document is black-and-white.
ColorCopies in full color using all the four colors of toner: yellow, magenta, cyan, and black.
Black & WhiteCopies in black and white regardless of the colors in the original document.
Dual ColorSeparates the colors of your document into the source colors and the other colors, and then copies the document using two colors. Selecting [Dual Color] allows you to set the following:
Source Color
Displays the [Source Color] screen on which you can select one or more colors from your document to define them as source colors.
Refer to "[Source Color] Screen" (P.97).
Target Area Color
Displays the [Target Area Color] screen on which you can select the target color to be used in place of the selected source colors.
Refer to "[Target Area Color] Screen" (P.97).

Copy
97
Copy
3
Non-target Area Color
Displays the [Non-target Area Color] screen on which you can select the color to be used in place of the colors other than the selected source colors.
Refer to "[Non-target Area Color] Screen" (P.98).
Single ColorCopies in one specified color regardless of the color of the document.
Selecting this option displays [Color] on the screen. Select a color on the [Output Color - Color] screen which is displayed after selecting [Color].Refer to "[Output Color - Color] Screen" (P.99).
[Source Color] ScreenThis screen allows you to select one or more colors from your document to define them as source colors.
1 Select [Dual Color].
2 Select [Source Color].
3 Select [Other than Black] or [Color].
Other than BlackThe colors other than black will be the source colors.
ColorAllows you to select one or more source colors from six preset options.
[Target Area Color] ScreenThis screen allows you to select the target color to be used in place of the source colors specified in [Source Color]. You can select one color from seven preset and six custom options.For information on how to set custom colors, refer to "5 Tools" > "Copy Service Settings" > "Custom Colors" in the Administrator Guide.

3 Copy
98
Copy
3
1 Select [Dual Color].
2 Select [Target Area Color].
3 Select any color.
[Non-target Area Color] ScreenThis screen allows you to select the color to be used in place of the colors other than the selected source colors. You can select one color from seven preset and six custom options.For information on how to set custom colors, refer to "5 Tools" > "Copy Service Settings" > "Custom Colors" in the Administrator Guide.
1 Select [Dual Color].
2 Select [Non-target Area Color].

Copy
99
Copy
3
3 Select any color.
[Output Color - Color] ScreenThis screen allows you to specify the color to be used for single-color copying regardless of the colors in the original document.
You can select one color from six preset and six custom options for [Single Color].For information on how to set custom colors, refer to "5 Tools" > "Copy Service Settings" > "Custom Colors" in the Administrator Guide.
1 Select [Single Color].
2 Select [Color].
3 Select any color.
2 Sided Copying (Making 2 Sided Copies)This feature is the same as [2 Sided Copying] on the [Layout Adjustment] screen. For more information, refer to "2 Sided Copying (Making 2 Sided Copies)" (P.109).
Copy Output (Specifying Finishing Options)This feature is the same as [Copy Output] on the [Output Format] screen. For more information, refer to "Copy Output (Specifying Finishing Options)" (P.143).

3 Copy
100
Copy
3
Pages per Side (Copying Multiple Pages onto One Sheet)This feature is the same as [Pages per Side] on the [Output Format] screen. For more information, refer to "Pages per Side (Copying Multiple Pages onto One Sheet)" (P.128).
Lighten/Darken (Adjusting the Copy Density)
This feature allows you to select a copy-density level from seven levels.Note • [Lighten/Darken] on the [Copy], [Image Quality] and [Simple Copy] screens is the same.
1 Use [ ] and [ ] to select from seven density levels.

Image Quality
101
Copy
3
Image Quality
The section describes the features you can select on the [Image Quality] screen. The following shows the reference section for each feature.
Original Type (Selecting the Document Type) ......................................................................................................................101Image Options (Adjusting Copy Density/Sharpness/Saturation of Images) ................................................................103Image Enhancement (Erasing the Background Color of Documents/ Adjusting Contrast) ......................................103Color Effects (Selecting an Image Quality) ...........................................................................................................................104Color Balance (Adjusting Color Balance) ...............................................................................................................................105Color Shift (Adjusting the Color Tone) ....................................................................................................................................107
1 Select [Copy] on the [Services Home] screen.
2 Select a feature on the [Image Quality] screen.
Note • If the color reproduction is unsatisfactory, perform calibration. For information on the calibration, refer to "3 Maintenance" > "Executing Calibration" in the Administrator Guide.
Original Type (Selecting the Document Type)
This feature allows you to select the type of documents, such as text and photos. By selecting a document type, you can make copies at optimum image quality.
1 Select [Original Type].
2 Select any option.

3 Copy
102
Copy
3
AutoAutomatically sets the document type based on the setting made in the System Administration mode and the setting made in [Output Color] on the [Copy] screen.
Photo & TextSelect this option when the document contains both text and photos. The machine automatically distinguishes the text and photo areas of the document and sets the appropriate image quality for each area. To process photo areas, select the photo type from [Printed Original], [Photograph], and [Photocopied Original].
Printed Original
Select this option when the document contains printed photos, such as a brochure.
Photograph
Select this option when the document contains pasted photos. This option prevents the copy from being reproduced bluish.
Photocopied Original
Select this option when the document is a copy or print made with a color copier such as this machine. This option prevents the copy from being reproduced faintly.
TextSelect this option to copy text areas of the document sharply. This option is suitable for graphs and illustrations.
Normal Text
Select this option for printed documents, or for documents written with ink.
Light Text
Select this option for text that requires enhancement, such as handwritten pencil text.
See-Through Paper
Select this option to reduce blurs of tracing-paper documents or to suppress background shadows of lightweight documents.
[See-Through Paper] may not be displayed depending on the setting in the System Administration mode. For information on how to display [See-Through Paper], refer to "5 Tools" > "Copy Service Settings" > "Copy Control" > "Original Type - See-Through Paper" in the Administrator Guide.
PhotoSelect this option to make copies of photos. Select the photo type from the same options as [Photo & Text]: [Printed Original], [Photograph], and [Photocopied Original].
MapSelect this option to make copies of documents that have text placed on color backgrounds, such as maps.
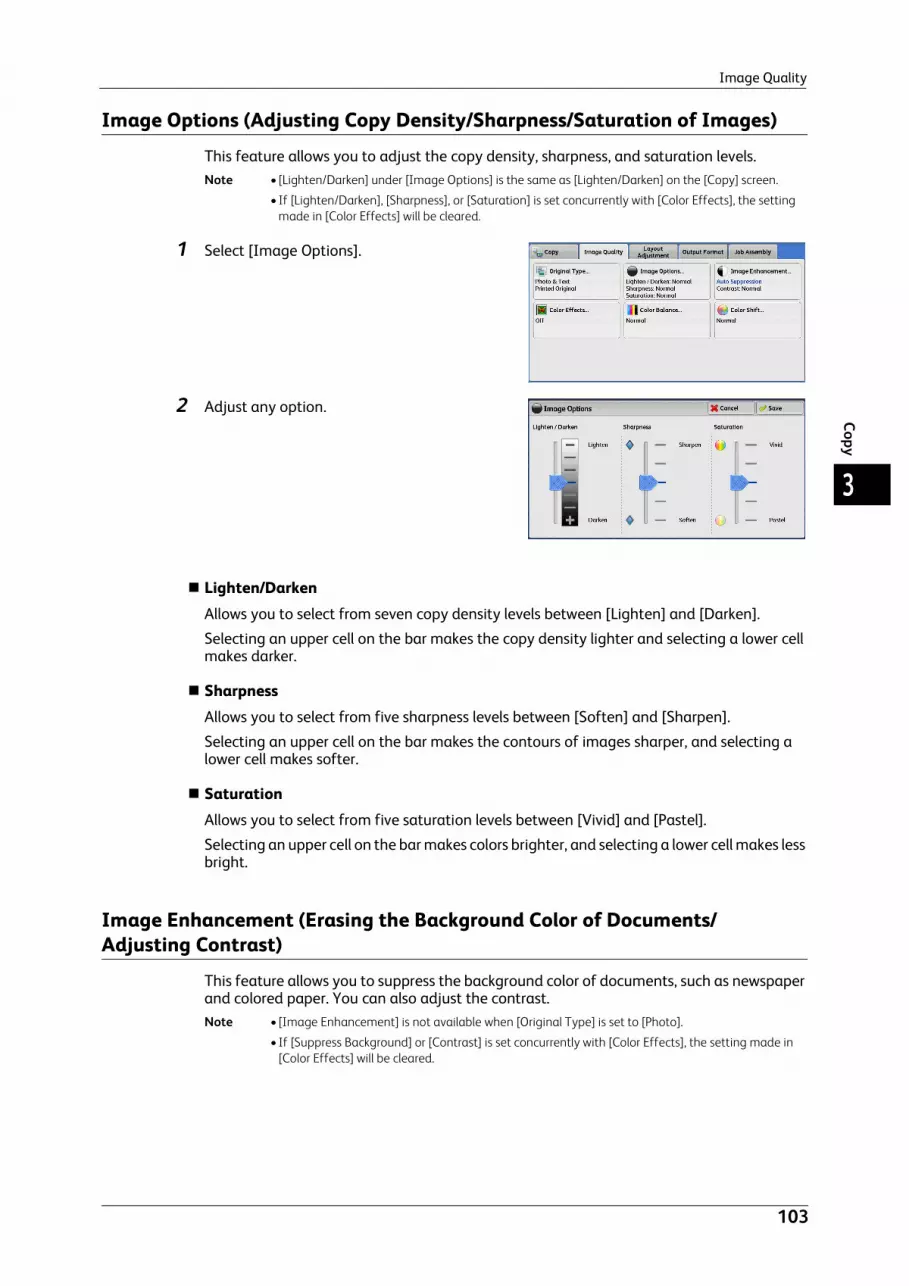
Image Quality
103
Copy
3
Image Options (Adjusting Copy Density/Sharpness/Saturation of Images)
This feature allows you to adjust the copy density, sharpness, and saturation levels.Note • [Lighten/Darken] under [Image Options] is the same as [Lighten/Darken] on the [Copy] screen.
• If [Lighten/Darken], [Sharpness], or [Saturation] is set concurrently with [Color Effects], the setting made in [Color Effects] will be cleared.
1 Select [Image Options].
2 Adjust any option.
Lighten/DarkenAllows you to select from seven copy density levels between [Lighten] and [Darken].
Selecting an upper cell on the bar makes the copy density lighter and selecting a lower cell makes darker.
SharpnessAllows you to select from five sharpness levels between [Soften] and [Sharpen].
Selecting an upper cell on the bar makes the contours of images sharper, and selecting a lower cell makes softer.
SaturationAllows you to select from five saturation levels between [Vivid] and [Pastel].
Selecting an upper cell on the bar makes colors brighter, and selecting a lower cell makes less bright.
Image Enhancement (Erasing the Background Color of Documents/Adjusting Contrast)
This feature allows you to suppress the background color of documents, such as newspaper and colored paper. You can also adjust the contrast.Note • [Image Enhancement] is not available when [Original Type] is set to [Photo].
• If [Suppress Background] or [Contrast] is set concurrently with [Color Effects], the setting made in [Color Effects] will be cleared.

3 Copy
104
Copy
3
1 Select [Image Enhancement].
2 Set [Suppress Background] and [Contrast].
Suppress Background
Off
Scans document backgrounds with no filtering.
Auto Suppression
When [Output Color] is set to [Black & White], the background of a document printed on colored paper, such as newspaper, will be suppressed.
When [Output Color] is set to [Color], [Dual Color], or [Single Color], the color element on white-color paper such as the blot and the print on the other side which is seen through will be suppressed.
Note • When [Output Color] is set to [Color], you can change the level of background suppression. For more information, refer to "5 Tools" > "Copy Service Settings" > "Copy Control" > "Background Suppression (Photo & Text)" and "Background Suppression Level (Text)" in the Administrator Guide.
Contrast
Auto Contrast
Automatically adjusts the brightness and hue of the original document to sharpen the image.
Note • [Auto Contrast] is not available when you use the document feeder.
Manual Contrast
Allows you to select from the five levels between [More] and [Less].
Selecting an upper cell on the bar makes the difference between light and dark areas greater; light areas become lighter and dark areas darker. In contrast, selecting a lower cell on the bar makes the difference between light and dark areas smaller.
Color Effects (Selecting an Image Quality)
If you set this feature, the [Image Enhancement], [Image Options], [Color Shift], and [Color Balance] settings are automatically adjusted and copies are made at the specified quality.Important • When the Color Effects feature is used, [Auto Contrast] is not available.
Note • If other image-quality settings are made after you set [Color Effects], the setting made in [Color Effects] will be cleared.

Image Quality
105
Copy
3
1 Select [Color Effects].
2 Select any option.
OffCopies with the [Image Enhancement], [Image Options], [Color Shift], and [Color Balance] settings at their defaults.
LivelyReproduces fresher, livelier images with increased color saturation.
BrightReproduces brighter images with enhanced contrast. This option is suitable for documents that are intended to attract people's attention, such as posters.
WarmReproduces brighter, warmer, more reddish images. This option is suitable when skin tones are to be reproduced more pinkish or when subdued images are to be reproduced more warmly.
CoolReproduces clearer blue colors. This option is suitable for water and sky images, and is also suitable when smoky blue colors are to be reproduced more clearly.
Shadow SuppressionSuppresses the colors on the reverse side of the original document from being reproduced in the copy.
Color Balance (Adjusting Color Balance)
This feature allows you to adjust the color balance of the four CMYK toner colors (cyan, magenta, yellow and black). You can select from seven levels for each density level: Highlights, Midtones, and Shadows.
The Color Balance feature finely adjusts the density level for each toner color to fine-tune the color balance, such as a reddish or bluish tint, while the Lighten/Darken feature adjusts the overall density level of four colors.Note • If [Color Balance] is set concurrently with [Color Effects], the setting made in [Color Effects] will be
cleared.

3 Copy
106
Copy
3
1 Select [Color Balance].
2 Select any option.
NormalAlways copies a document with the balance for the density level "0" for each toner color: magenta, cyan, black, and yellow.
Basic ColorAllows you to adjust the density level for each toner color: magenta, cyan, black, and yellow.
Advanced ColorAllows you to adjust the density level for each toner color (magenta, cyan, black, yellow) which is divided to [Highlights], [Midtones], and [Shadows].
HighlightsAllows you to adjust the color strength of low-density areas.
Example: If low-density yellow is printed darker, adjust the color strength in the minus (-) direction under [Yellow Balance] > [Highlights].
MidtonesAllows you to adjust the color strength of medium-density areas.
Example: If medium-density yellow is printed lighter, adjust the color strength in the plus (+) direction under [Yellow Balance] > [Midtones].
ShadowsAllows you to adjust the color strength of high-density areas.

Image Quality
107
Copy
3
Example: If high-density yellow is printed lighter, adjust the color strength in the plus (+) direction under [Yellow Balance] > [Shadows].
Color Shift (Adjusting the Color Tone)
This feature allows you to adjust the tone of the colors to be reproduced in copies, by a maximum of two levels in two directions.
On the screen, the [Original Color] slider represents the color tone of the original document, and the [Copy Color] slider represents the color tone of output copies. Selecting a button on the screen moves the [Original Color] slider to adjust the tone of the colors.
When the [Original Color] slider is moved to the left, the Y (yellow) cell on the [Original Color] slider becomes closer to the R (red) cell on the [Copy Color] slider, and thus a yellow fruit appears more reddish and riper-looking. At the same time, the tone of all the other colors changes. The red color appears more magentish, and the green color appears more yellowish.
Conversely, when the [Original Color] slider is moved to the right, the Y (yellow) cell on the [Original Color] slider becomes closer to the G (green) cell on the [Copy Color] slider, and thus a yellow fruit appears more greenish. At the same time, the tone of all the other colors changes. The magenta color appears more reddish, and the red color appears more yellowish.Note • Ensure that [Output Color] is set to [Color] on the [Copy] screen. [Color Shift] is not available when
[Output Color] is set to [Black & White].
• If [Color Shift] is set concurrently with [Color Effects], the setting made in [Color Effects] will be cleared.
1 Select [Color Shift].
2 Select a button to adjust the color tone.

3 Copy
108
Copy
3
Layout Adjustment
This section describes the features you can select on the [Layout Adjustment] screen. The following shows the reference section for each feature.
2 Sided Copying (Making 2 Sided Copies)............................................................................................................................. 109Book Copying (Copying Facing Pages onto Separate Sheets).......................................................................................... 1102 Sided Book Copying (Making 2 Sided Copies of Facing Pages) .................................................................................... 112Original Size (Specifying the Scan Size for the Document) ............................................................................................... 113Mixed Size Originals (Scanning Different Size Documents Simultaneously) ................................................................ 114Edge Erase (Erasing Edges and Margin Shadows of the Document).............................................................................. 115Image Shift (Adjusting the Image Position)......................................................................................................................... 117Invert Image (Making Reversed Copies of Images) ........................................................................................................... 119Original Orientation (Specifying the Orientation of Loaded Documents)..................................................................... 120Image Rotation (Changing the Orientation of Images).................................................................................................... 121
1 Select [Copy] on the [Services Home] screen.
2 Select a feature on the [Layout Adjustment] screen.Note • Select [ ] to return to the previous screen or
[ ] to move to the next screen.

Layout Adjustment
109
Copy
3
2 Sided Copying (Making 2 Sided Copies)
This feature allows you to make copies of 1-sided and 2-sided documents on one side or both sides of paper.
1 Select [2 Sided Copying].
2 Select any option.
1 1 SidedMakes a copy of a 1-sided document on one side of paper.
1 2 SidedMakes a copy of a 1-sided document on both sides of paper.
Select this option when you copy 1-sided documents on both sides of paper.
2 2 SidedMakes a copy of a 2-sided document on both sides of paper.
2 1 SidedMakes a copy of a 2-sided document on one side of paper.
OriginalsThis option is displayed when you select [2 2 Sided] or [2 1 Sided].
Head to Head
Select this option when the front and back sides of the document are in the same orientation.
Head to Toe
Select this option when the front and back sides of the document are in opposite orientations.
CopiesThis option is displayed when you select [1 2 Sided] or [2 2 Sided].
Head to Head
Select this option when you want the orientation of the front and back sides of the copy to be the same as that of the document.

3 Copy
110
Copy
3
Head to Toe
Select this option when you want the orientation of the front and back sides of the copy to be the opposite of that of the document.
Original OrientationAllows you to specify the orientation of the document so that the machine can identify the top of the document.Note • If the [Original Orientation] setting differs from the actual document orientation, the machine may
not detect the top of the document correctly.
Upright Images
Select this option when placing the top edge of the document against the top side of the document glass or document feeder.
Sideways Images
Select this option when placing the top edge of the document against the left side of the document glass or document feeder.
Book Copying (Copying Facing Pages onto Separate Sheets)
This feature allows you to copy facing pages of a document on separate sheets of paper in page order.This is useful when you need to make separate copies of facing pages of a bound document such as a booklet.Note • You cannot use the document feeder with this feature.
• A non-standard size document or undetectable-size document may not be separated into two accurately.
1 Select [Book Copying].
2 Select any option.
OffDoes not copy as a bound document.

Layout Adjustment
111
Copy
3
Left Page then RightCopies the left page and then the right page of facing pages.
Right Page then LeftCopies the right page and then the left page of facing pages.
Top Page then BottomCopies the top page and then the bottom page of facing pages.
Both PagesCopies both pages in page order.
Left Page OnlyCopies the left page only. You can select this option when [Left Page then Right] or [Right Page then Left] is selected.
Right Page OnlyCopies the right page only. You can select this option when [Left Page then Right] or [Right Page then Left] is selected.
Top Page OnlyCopies the top page only. You can select this option when [Top Page then Bottom] is selected.
Bottom Page OnlyCopies the bottom page only. You can select this option when [Top Page then Bottom] is selected.
Binding Edge EraseErases the shadow from the center section of the document. You can set the binding erase width in the range from 0 to 50 mm in 1 mm increments.

3 Copy
112
Copy
3
2 Sided Book Copying (Making 2 Sided Copies of Facing Pages)
This feature allows you to assign pages when making copies of facing pages in a bound document so that pages face each other in the same way as the document. You can also specify the starting and ending pages from the left and right of facing pages.Note • A non-standard size document or undetectable-size document will not be separated into two
accurately.
• Use the document glass to load a document.
• This feature does not appear for some models. An optional component is required. For more information, contact our Customer Support Center.
1 Select [2 Sided Book Copying].
2 Select any option.
OffDisables this feature.
Left Page then RightScans the left page and then the right page of facing pages, to make 2-sided copies.
Right Page then LeftScans the right page and then the left page of facing pages, to make 2-sided copies.
Top Page then BottomScans the top page and then the bottom page of facing pages, to make 2-sided copies.
Starting & Ending PageDisplays the [Starting & Ending Page] screen.Refer to "[Starting & Ending Page] Screen" (P.113).
Binding Edge EraseErases the shadow from the center section of the document. You can set the binding erase width in the range from 0 to 50 mm in 1 mm increments.

Layout Adjustment
113
Copy
3
[Starting & Ending Page] ScreenThis screen allows you to set the starting and ending pages to be copied.
1 Set [Starting Page] and [Ending Page].
Starting Page
[Left Page] / [Right Page]
You can select these options when [Left Page then Right] or [Right Page then Left] is selected.
[Top Page] / [Bottom Page]
You can select these options when [Top Page then Bottom] is selected.
Ending Page
[Left Page] / [Right Page]
You can select these options when [Left Page then Right] or [Right Page then Left] is selected.
[Top Page] / [Bottom Page]
You can select these options when [Top Page then Bottom] is selected.
Original Size (Specifying the Scan Size for the Document)
This feature allows you to specify the scan size for a document.
Use this feature when a document is a non-standard size, or when you want to copy a document at a size different from the original size. You can also add margins, or delete unnecessary margins using this feature.
1 Select [Original Size].
2 Select the size of the document. If you select a non-standard size, specify values for the X and Y directions.

3 Copy
114
Copy
3
Auto DetectDetects the document size automatically. The following table shows the document sizes that can be detected automatically.
Note • If the document size cannot be detected automatically, a screen to enter the document size appears.
The document sizes that can be automatically detected depend on [Paper Size Settings] in the System Administration mode. For more information, refer to "5 Tools" > "Common Service Settings" > "Other Settings" > "Paper Size Settings" in the Administrator Guide.
Standard SizeSelect a document size from preset options.You can change the sizes displayed on the screen. For information on the settings, refer to "5 Tools" > "Copy Service Settings" > "Original Size Defaults" in the Administrator Guide.
Variable SizeEnter the desired scan size when scanning a non-standard size document or when making copies at a size different from the original document size. You can specify a value in the range from 15 to 432 mm for the width (X), and a value in the range from 15 to 297 mm for the length (Y), in 1 mm increments. To help you specify values, use the scales attached on the upper and left edges of the document glass.Important • When the document is loaded in the document feeder, the base point in the Y (length) direction is
the center of the edge. If you specify 100 mm, the scan length will be from 50 mm above to 50 mm below the center of the document.
Mixed Size Originals (Scanning Different Size Documents Simultaneously)
You can scan documents of various sizes simultaneously and make copies on each size or a single size of paper. To use this feature, load the documents in the document feeder.Important • Load documents in landscape orientation. However, always load A5 documents in portrait
orientation.
• When loading B5 documents together with A3 documents loaded in landscape orientation or A4 documents loaded in portrait orientation, load B5 documents in portrait orientation.
• If the top left corners of the documents are not aligned properly, the documents may not be scanned correctly.
• The recommended document size combinations are A4 portrait and A3 landscape, or B5 portrait and B4 landscape. If another combination of document sizes is used, the documents can be fed at an angle and may not be copied properly.
Note • This feature does not appear for some models. An optional component is required. For more information, contact our Customer Support Center.
Document Feeder Document Glass
Auto-detectableDocument Sizes
B5, B5 , B4, A5, A5 , A4,
A4 , A3, 8.5 x 11",
8.5 x 11" , 11 x 17", 16K , 8K
B6, B5, B5 , B4, A6, A5, A5 ,
A4, A4 , A3

Layout Adjustment
115
Copy
3
1 Select [Mixed Size Originals].
2 Select [On].
OffSelect this option when copying documents are of the same size.
OnWhen documents of different sizes are copied, the machine automatically detects the size of each document.
Original OrientationAllows you to specify the orientation of the document so that the machine can identify the top of the document.Note • The [Original Orientation] setting is based on the orientation of the first page of a document. Load
the second and subsequent pages of the document based on this setting.
• If the [Original Orientation] setting differs from the actual document orientation, the machine may not detect the top of the document correctly.
Upright Images
Select this option when placing the top edge of the document against the top side of the document glass or document feeder.
Sideways Images
Select this option when placing the top edge of the document against the left side of the document glass or document feeder.
Edge Erase (Erasing Edges and Margin Shadows of the Document)
When you copy a document with the document cover open or when you copy a book, the edges and center margin of the document may be printed as black shadows. The Edge Erase feature allows you to erase such shadows.Note • For 2-sided originals, the same edge erase amounts are set for the front and back sides.
• If you set [Reduce/Enlarge], the edge erase amounts will be reduced or enlarged in proportion to the ratio you specified.
• The binding shift specified in [Booklet Creation] will not affect the edge erase amounts.
• If you load an original document on the document glass and select [1 2 Sided] in [2 Sided Copying] to copy a 1-sided document on both sides of paper, the Mirror Side 1 feature is disabled even when you select [Individual Edges] in [Edge Erase] and then select [Mirror Side 1] in [2 Sided Original - Side 2]. In such a case, select [2 2 Sided] in [2 Sided Copying].

3 Copy
116
Copy
3
Even when the edge erase amount is set to 0 mm, full page copying cannot be made. For information on the areas that can actually be printed, refer to "16 Appendix" > "Printable Area" in the Administrator Guide.
1 Select [Edge Erase].
2 Select any option.
NormalThe edge width to erase is set to 2 mm for the top and bottom, and left and right edges.
All EdgesErases the shadows of the four edges of a document, as well as the shadow in the center of the document if it is a bound document or a booklet. You can specify values for [All Edges] and [Center] individually.
Individual EdgesErases the shadows of the top, bottom, left, and right edges of a document, as well as the shadow in the center of the document if it is a bound document or a booklet. You can specify values for [Top], [Bottom], [Left], [Right], and [Center] individually.
Parallel EdgesErases the shadows of the top and bottom edges, and left and right edges of a document, as well as the shadow in the center of the document if it is a bound document or a booklet. You can specify values for [Top & Bottom], [Left & Right], and [Center] individually.
Erase ValueAllows you to specify values to erase the edges of a document.
All Edges
Erases the shadows of the four edges of the document according to the orientation of the loaded document. You can specify the edge width you want to erase in the range from 0 to 50 mm in 1 mm increments.
Top & Bottom (Top/Bottom)
Erases the shadows of top and bottom edges of the document according to the orientation of the loaded document. You can specify the edge width you want to erase in the range from 0 to 50 mm in 1 mm increments.
Left & Right (Left/Right)
Erases the shadows of left and right edges of the document according to the orientation of the loaded document. You can specify the edge width you want to erase in the range from 0 to 50 mm in 1 mm increments.

Layout Adjustment
117
Copy
3
Center
Erases the shadow in the center of facing pages of a bound document or a booklet. You can set the binding erase width in the range from 0 to 50 mm in 1mm increments.
Original OrientationAllows you to specify the orientation of the document so that the machine can identify the top of the document.Note • If the [Original Orientation] setting differs from the actual document orientation, the machine may
not detect the top of the document correctly.
Upright Images
Select this option when placing the top edge of the document against the top side of the document glass or document feeder.
Sideways Images
Select this option when placing the top edge of the document against the left side of the document glass or document feeder.
2 Sided Original - Side 2You can select this option when [Individual Edges] is selected. Set whether the same value is set to the edge erase amount of Side 1 and Side 2.
Same as Side 1
The same value is set to the edge erase amount of Side 1 and Side 2.
Mirror Side 1
The edge erase amounts of Side 1 and Side 2 are set symmetrically.
Image Shift (Adjusting the Image Position)
This feature allows you to shift the position of document images so that the images are placed on the left, right, top, bottom, or center of paper. You can also adjust the amounts of the left, right, top, and bottom margins. If you make 2-sided copies, you can adjust the image positions for Side 1 and Side 2 individually.Note • The image shift amount is set in accordance with the paper, and does not affect the setting made in
[Reduce/Enlarge].
1 Select [Image Shift].
2 Select any option.

3 Copy
118
Copy
3
OffDoes not shift the position of document images.
Auto CenterShifts document images so that they are placed in the center of paper.
Margin ShiftAllows you to specify the amounts of the top and bottom, and left and right margins in the range from 0 to 50 mm in 1 mm increments.
Side 1
Displays the [Image Shift - Side 1] screen.
Refer to "[Image Shift - Side 1] Screen" (P.118).
Side 2
Displays the [Image Shift - Side 2] screen.
Refer to "[Image Shift - Side 2] Screen" (P.119).
Mirror Side 1
Select this check box when you want the positioning of Side 2 to match the positioning of Side 1.
Original OrientationAllows you to specify the orientation of the document so that the machine can identify the top of the document.Note • If the [Original Orientation] setting differs from the actual document orientation, the machine may
not detect the top of the document correctly.
Upright Images
Select this option when placing the top edge of the document against the top side of the document glass or document feeder.
Sideways Images
Select this option when placing the top edge of the document against the left side of the document glass or document feeder.
[Image Shift - Side 1] ScreenThis screen allows you to set the image shift for Side 1.
1 Select any option.
OffDoes not shift the position of document image.
Auto CenterShifts document images so that they are placed in the center of paper.

Layout Adjustment
119
Copy
3
Specify the amounts of the top and bottom, and left and right margins in the range from 0 to 50 mm in 1 mm increments.
Corner ShiftShifts document images so that they are placed at an edge or corner of paper. You can select from 8 shift directions.
Specify the amounts of the top and bottom, and left and right margins in the range from 0 to 50 mm in 1 mm increments.
Margin ShiftAllows you to specify the amounts of the top and bottom, and left and right margins in the range from 0 to 50 mm in 1 mm increments.
[Image Shift - Side 2] ScreenThis screen allows you to set the image shift for Side 2.
1 Select any option.
OffDoes not shift the position of document image.
Auto CenterShifts document images so that they are placed in the center of paper.
Specify the amounts of the top and bottom, and left and right margins in the range from 0 to 50 mm in 1 mm increments.
Corner ShiftShifts document images so that they are placed at an edge or corner of paper. You can select from 8 shift directions.
Specify the amounts of the top and bottom, and left and right margins in the range from 0 to 50 mm in 1 mm increments.
Margin ShiftAllows you to specify the amounts of the top and bottom, and left and right margins in the range from 0 to 50 mm in 1 mm increments.
Invert Image (Making Reversed Copies of Images)
This feature allows you to reverse the left and right sides of the document image or to create a negative image of the document when making copies.Note • When [Output Color] is set to [Black & White] or [Single Color], the black color on the document is
inverted to white, and the white color to black.
• When [Output Color] is set to [Color], the colors are inverted to their complementary colors.
• When [Negative Image] and [Edge Erase] are set simultaneously, the edge erase area turns to white.

3 Copy
120
Copy
3
1 Select [Invert Image].
2 Select any option.
Mirror ImageReverses the left and right sides of the document image.
Negative ImageCreates a negative image of the document.
Original Orientation (Specifying the Orientation of Loaded Documents)
This feature allows you to specify the orientation of a document so that the machine can identify the top of the document.Note • If the [Original Orientation] setting differs from the actual document orientation, the machine may
not detect the top of the document correctly.
1 Select [Original Orientation].
2 Select [Upright Images] or [Sideways Images] according to the orientation of the document loaded.
Upright ImagesSelect this option when placing the top edge of the document against the top side of the document glass or document feeder.

Layout Adjustment
121
Copy
3
Sideways Images Select this option when placing the top edge of the document against the left side of the document glass or document feeder.
Image Rotation (Changing the Orientation of Images)
If the orientation of the paper currently loaded in the tray differs from that of the document loaded, the machine automatically rotates the document image so that the orientation of the image matches that of the paper. You can also select a reference position for image rotation if documents are of mixed orientations.
This feature is available only when you make copies on A4, 8.5 x 11", or smaller size paper.
1 Select [Image Rotation].
2 Select any option.
OffCopies documents as they are, even if the orientation of the images does not match that of the paper.
Always OnAutomatically rotates document images so that the orientation of the images matches that of the paper.
On during AutoAutomatically rotates document images so that the orientation of the images matches that of the paper only when [Auto %] is selected in [Reduce/Enlarge], or when [Auto Select] is selected in [Paper Supply].
Rotation DirectionDisplays the [Image Rotation - Rotation Direction] screen.Refer to "[Image Rotation - Rotation Direction] Screen" (P.122).

3 Copy
122
Copy
3
[Image Rotation - Rotation Direction] ScreenThis screen allows you to set the reference position for rotation.
1 Select any option.
Staple PositionThis option is displayed when the finisher is installed. If documents are of mixed orientations, the images will be rotated to match the stapling edge specified in the settings of the Staple feature.
Portrait Original - Left EdgeIf documents are of mixed orientations, the images will be rotated so that the top edge of landscape documents is aligned with the left edge of portrait documents.
Portrait Original - Right EdgeIf documents are of mixed orientations, the images will be rotated so that the top edge of landscape documents is aligned with the right edge of portrait documents.

Output Format
123
Copy
3
Output Format
This section describes the features you can select on the [Output Format] screen. The following shows the reference section for each feature.
2 Sided Copying (Making 2 Sided Copies) .............................................................................................................................123Booklet Creation (Creating a Booklet) ....................................................................................................................................124Covers (Attaching Covers to Copies) .......................................................................................................................................127Pages per Side (Copying Multiple Pages onto One Sheet).................................................................................................128Poster (Making Enlarged Copies Spread over Multiple Sheets)........................................................................................129Repeat Image (Making Multiple Copies on One Sheet) .....................................................................................................131Annotations (Adding a Comment/a Date/Page Numbers to Copies).............................................................................132Watermark (Printing Control Numbers on the Background of Copies) ..........................................................................138Folding (Outputting Bi-Folded).................................................................................................................................................141Preset Repeat Image (Making Multiple Copies on a Single Sheet) .................................................................................142Copy Output (Specifying Finishing Options) .........................................................................................................................143ID Card Copy (Copying Both Sides of an ID Card)...............................................................................................................146
1 Select [Copy] on the [Services Home] screen.
2 Select a feature on the [Output Format] screen.
Note • Select [ ] to return to the previous screen or [ ] to move to the next screen.
2 Sided Copying (Making 2 Sided Copies)This feature is the same as [2 Sided Copying] on the [Layout Adjustment] screen. For more information, refer to "2 Sided Copying (Making 2 Sided Copies)" (P.109).
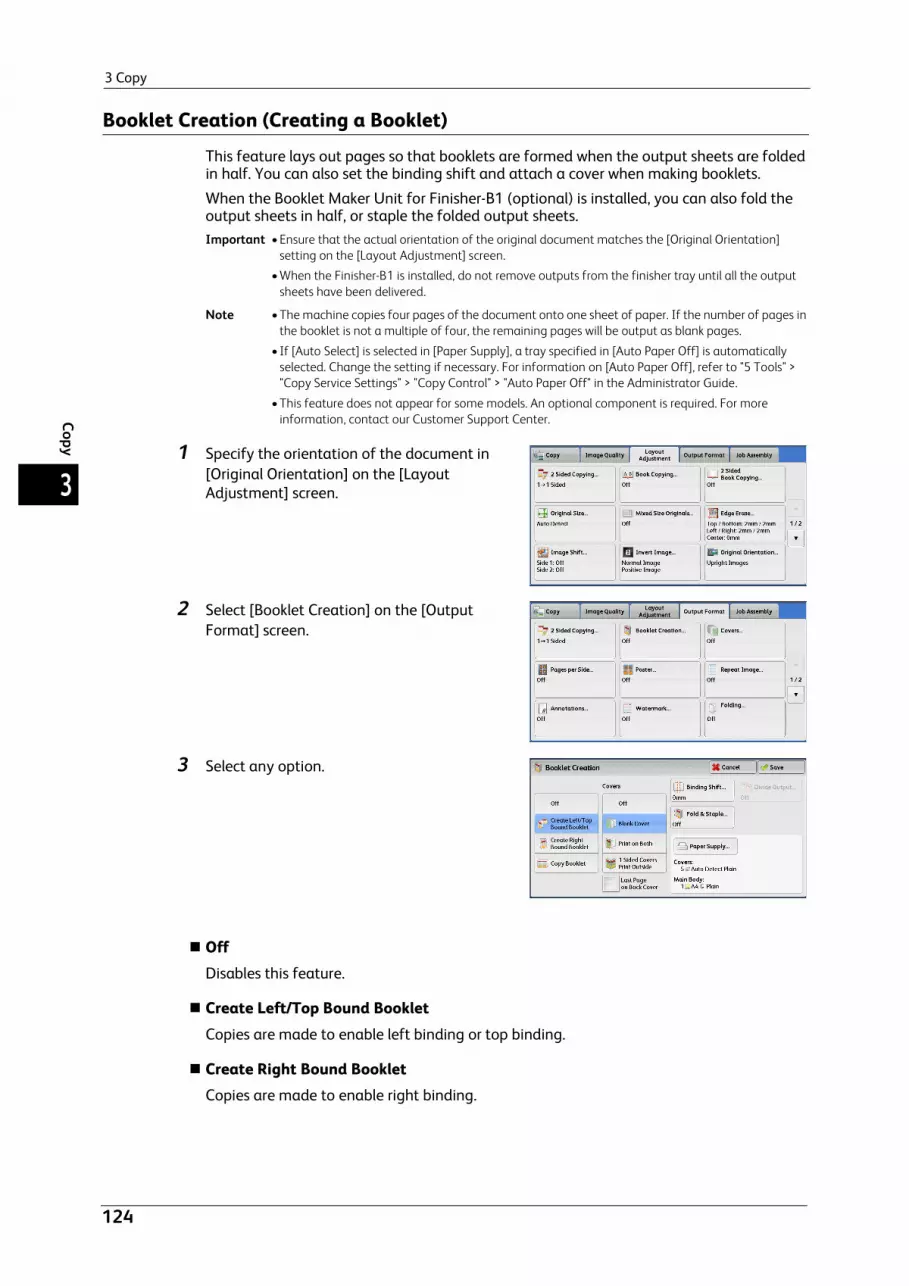
3 Copy
124
Copy
3
Booklet Creation (Creating a Booklet)
This feature lays out pages so that booklets are formed when the output sheets are folded in half. You can also set the binding shift and attach a cover when making booklets.
When the Booklet Maker Unit for Finisher-B1 (optional) is installed, you can also fold the output sheets in half, or staple the folded output sheets.Important • Ensure that the actual orientation of the original document matches the [Original Orientation]
setting on the [Layout Adjustment] screen.
• When the Finisher-B1 is installed, do not remove outputs from the finisher tray until all the output sheets have been delivered.
Note • The machine copies four pages of the document onto one sheet of paper. If the number of pages in the booklet is not a multiple of four, the remaining pages will be output as blank pages.
• If [Auto Select] is selected in [Paper Supply], a tray specified in [Auto Paper Off] is automatically selected. Change the setting if necessary. For information on [Auto Paper Off], refer to "5 Tools" > "Copy Service Settings" > "Copy Control" > "Auto Paper Off" in the Administrator Guide.
• This feature does not appear for some models. An optional component is required. For more information, contact our Customer Support Center.
1 Specify the orientation of the document in [Original Orientation] on the [Layout Adjustment] screen.
2 Select [Booklet Creation] on the [Output Format] screen.
3 Select any option.
OffDisables this feature.
Create Left/Top Bound BookletCopies are made to enable left binding or top binding.
Create Right Bound BookletCopies are made to enable right binding.

Output Format
125
Copy
3
Copy BookletYou can output the copies of scanned documents as they are by specifying [Fold & Staple]. Select this option when you do not need a document to be copied in booklet page order.Note • This feature does not appear for some models. An optional component is required. For more
information, contact our Customer Support Center.
CoversYou can attach covers to a booklet.
Off
No cover is attached.
Blank Cover
A blank sheet of paper is attached as the cover.
Print on Both
The first and second pages of the document are copied on both sides of the cover.
1 Sided Covers Print Outside
The first and the last pages of the document is copied on the front side of the cover.
Last Page on Back Cover
Select this check box to copy the image of the last document page onto the last page of the copy sheets as a back cover. When you use [Divide Output] to divide a booklet into subsets, the image of the last document page will be copied onto the last page of the last subset.
Note • Depending on the number of pages in the original document, a blank page may be inserted before the last page of a booklet.
Binding ShiftDisplays the [Booklet Creation - Binding Shift] screen.Refer to "[Booklet Creation - Binding Shift] Screen" (P.125).
Divide OutputDisplays the [Booklet Creation - Divide Output] screen.Refer to "[Booklet Creation - Divide Output] Screen" (P.126).
Fold & StapleDisplays the [Booklet Creation - Fold & Staple] screen.Refer to "[Booklet Creation - Fold & Staple] Screen" (P.126).
Note • This feature does not appear for some models. An optional component is required. For more information, contact our Customer Support Center.
Paper SupplyDisplays the [Booklet Creation - Paper Supply] screen.
Select the tray to be used for body pages from [Main Body Tray], and the tray for cover pages from [Cover Tray]. Select the same size of paper for [Main Body Tray] and [Cover Tray], and also select the trays with paper loaded in landscape orientation ( ).When [Tray 5] is selected, the [Tray 5] screen is displayed. For more information, refer to "[Tray 5] Screen" (P.94).
[Booklet Creation - Binding Shift] ScreenThis screen allows you to specify the binding shift value in the range from 0 to 50 mm in 1 mm increments.
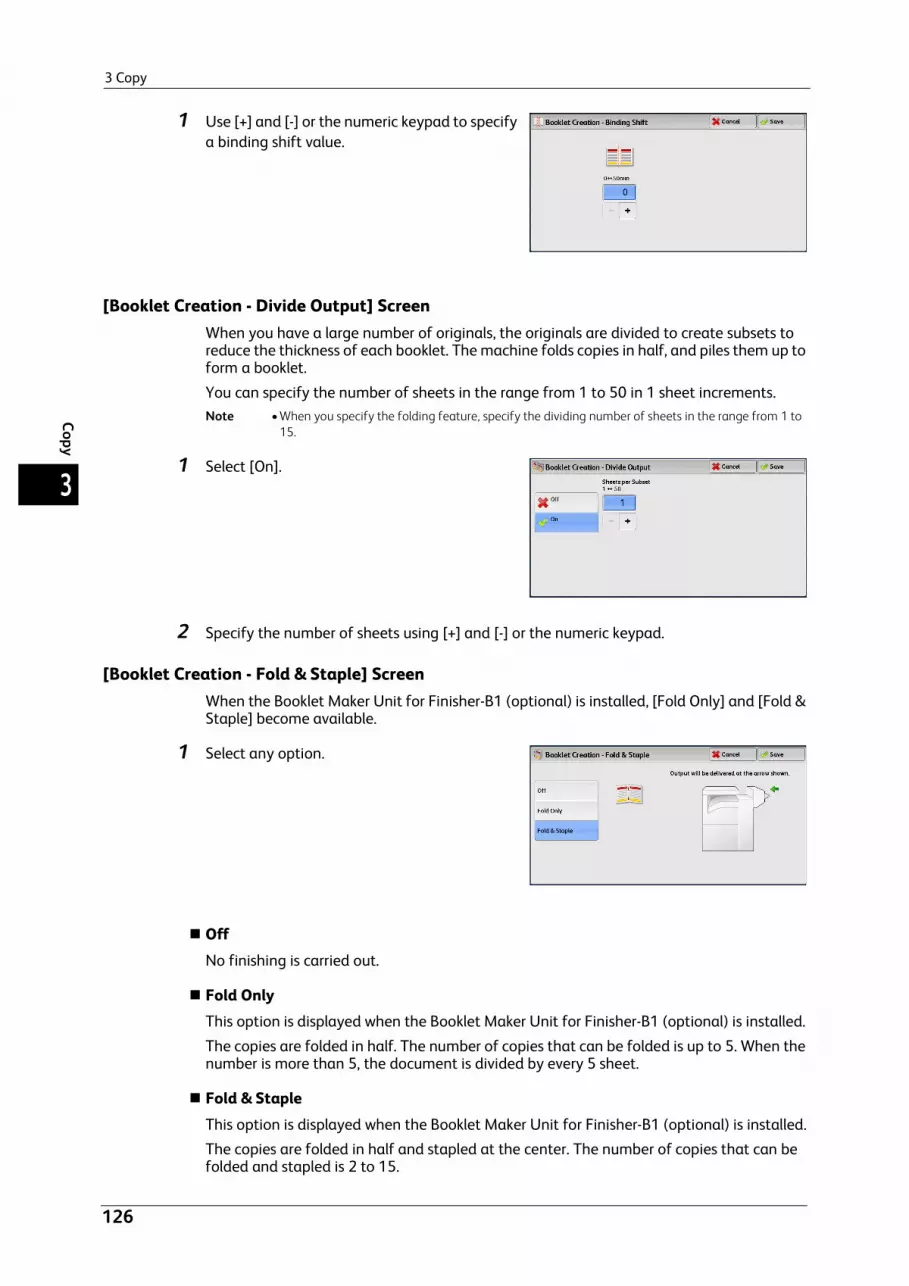
3 Copy
126
Copy
3
1 Use [+] and [-] or the numeric keypad to specify a binding shift value.
[Booklet Creation - Divide Output] ScreenWhen you have a large number of originals, the originals are divided to create subsets to reduce the thickness of each booklet. The machine folds copies in half, and piles them up to form a booklet.
You can specify the number of sheets in the range from 1 to 50 in 1 sheet increments.Note • When you specify the folding feature, specify the dividing number of sheets in the range from 1 to
15.
1 Select [On].
2 Specify the number of sheets using [+] and [-] or the numeric keypad.
[Booklet Creation - Fold & Staple] ScreenWhen the Booklet Maker Unit for Finisher-B1 (optional) is installed, [Fold Only] and [Fold & Staple] become available.
1 Select any option.
OffNo finishing is carried out.
Fold OnlyThis option is displayed when the Booklet Maker Unit for Finisher-B1 (optional) is installed.
The copies are folded in half. The number of copies that can be folded is up to 5. When the number is more than 5, the document is divided by every 5 sheet.
Fold & StapleThis option is displayed when the Booklet Maker Unit for Finisher-B1 (optional) is installed.
The copies are folded in half and stapled at the center. The number of copies that can be folded and stapled is 2 to 15.

Output Format
127
Copy
3
Covers (Attaching Covers to Copies)
This feature allows you to attach covers to copies.
You can use different types of paper (such as colored paper and heavyweight paper) as the front and back covers of copies.Important • When you select this feature, if the number of pages scanned by the machine exceeds the
maximum, the machine will not print the already-scanned data. In that case, follow the instructions of the message displayed on the screen to cancel the job. The maximum number of pages that the machine can scan is 999 pages per job.
• This feature does not appear for some models. An optional component is required. For more information, contact our Customer Support Center.
1 Select [Covers].
2 Select any option.
Front CoverAttaches a front cover to the copies.
Off
No front cover is attached.
Blank Cover
Blank sheets of paper are attached as front covers.
Print on Side 1
The first page of the document is copied on the front side of the front cover.
Print on Side 2
The first page of the document is copied on the back side of the front cover.
Print on Both
The first and second pages of the document are copied on the front and back sides of the front cover.
Back CoverAttaches a back cover to the copies.
Off
No back cover is attached.
Blank Cover
Blank sheets of paper are attached as back covers.

3 Copy
128
Copy
3
Print on Side 1
The first page of the document is copied on the front side of the back cover.
Print on Side 2
The first page of the document is copied on the back side of the back cover.
Print on Both
The first and second pages of the document are copied on the front and back sides of the back cover.
Paper SupplyDisplays the [Covers - Paper Supply] screen.
Select a tray to be used.
Front Cover Tray
Select the tray used for front covers.
Back Cover Tray
Select the tray used for back covers.
Main Body Tray
Select the tray used for the body pages of the document.
When you use the bypass tray, select [Tray 5] on the [Covers - Paper Supply] screen. When [Tray 5] is selected, the [Tray 5] screen is displayed. For more information, refer to "[Tray 5] Screen" (P.94).
Note • If [Covers] is set, [Auto Detect] cannot be selected in [Tray 5].
Front Cover QuantityThis option is displayed when you select [Blank Covers] in [Front Cover]. Specify the number of blank sheets to be used as front covers.
Back Cover QuantityThis option is displayed when you select [Blank Covers] in [Back Cover]. Specify the number of blank sheets to be used as back covers.
Pages per Side (Copying Multiple Pages onto One Sheet)
This feature allows you to copy two, four, or eight pages of a document together onto a single sheet of paper.
When you set [Pages per Side], [Auto %] is automatically selected in [Reduce/Enlarge]. The machine automatically sets the copy ratio and makes copies of the images so that they fit on the selected paper.Note • When you deselect [Auto %] in [Reduce/Enlarge] (when you select another copy ratio), image loss
may occur depending on the image size of the document.
• When [Image Shift] is set, the image shift amounts are applied to the whole document. For this reason, image loss may occur depending on the image size of the document.
• When [Edge Erase] is set, the edge erase amounts are applied to each document page.
• Select a tray other than [Auto Select] in [Paper Supply] on the [Copy] screen. If [Auto Select] is selected in [Paper Supply], a tray specified in [Auto Paper Off] is automatically selected. Change the setting as necessary. For information on [Auto Paper Off], refer to "5 Tools" > "Copy Service Settings" > "Copy Control" > "Auto Paper Off" in the Administrator Guide.

Output Format
129
Copy
3
1 Select [Pages per Side].
2 Select any option.
OffDisables this feature.
2 PagesCopies two document pages onto one side of a single sheet of paper.
4 PagesCopies four document pages onto one side of a single sheet of paper.
8 PagesCopies eight document pages onto one side of a single sheet of paper.
Reading OrderAllows you to select how to layout images on a page.
Original OrientationAllows you to specify the orientation of the document so that the machine can identify the top of the document.Note • If the [Original Orientation] setting differs from the actual document orientation, the machine may
not detect the top of the document correctly.
Upright Images
Select this option when placing the top edge of the document against the top side of the document glass or document feeder.
Sideways Images
Select this option when placing the top edge of the document against the left side of the document glass or document feeder.
Poster (Making Enlarged Copies Spread over Multiple Sheets)
An enlarged copy of a document can be made spread over multiple sheets.
This feature allows you to create a large poster by pasting together the copies spread over multiple sheets. Copied sheets are provided with a paste margin so that they can be pasted together. The paste margin is fixed to 10 mm.

3 Copy
130
Copy
3
Important • Ensure that the actual orientation of the original document matches the [Original Orientation] setting on the [Layout Adjustment] screen.
Note • You cannot use the document feeder with this feature.
1 Select [Poster].
2 Select any option.
OffNo enlarged copies are made.
Output SizeAllows you to select the paper size.
Enlargement %Refer to "When [Enlargement %] is Selected" (P.130).
Paper SupplyDisplays the [Paper Supply] screen.
Select the paper tray to be used.Note • When you use the bypass tray, select [Tray 5] on the [Paper Supply] screen.
When [Tray 5] is selected, the [Tray 5] screen is displayed. For more information, refer to "[Tray 5] Screen" (P.94).
When [Enlargement %] is SelectedThis screen allows you to specify a different ratio for the width and length.
1 Use [+] and [-] to specify the copy ratios for the width and length.
Width - X% / Length - Y%Allows you to specify the copy ratios for the width and length in the range from 100 to 400% in 1% increments.

Output Format
131
Copy
3
Lock X - Y%Allows you to make the same ratio adjustment for the width and length at the same time.
Repeat Image (Making Multiple Copies on One Sheet)
This feature allows you to copy a document image on one sheet of paper repeatedly for a specified number of times.
When [Reduce/Enlarge] is set to [Auto %], the repeated copies of the image are reduced to fit on the selected paper. You can also specify how the repeated copies of the image are arranged.Note • When making copies at the same size as the document image, the number of repeats is specified so
that the copies fit on the paper.
• If [Auto Select] is selected in [Paper Supply], a tray specified in [Auto Paper Off] is automatically selected. Change the setting if necessary. For information on [Auto Paper Off], refer to "5 Tools" > "Copy Service Settings" > "Copy Control" > "Auto Paper Off" in the Administrator Guide.
1 Select [Repeat Image].
2 Select any option.
OffDisables this feature.
Auto RepeatAutomatically determines the number of the repeated copies according to the document size, paper size, and copy ratio, and then repeatedly copies the document image onto the paper.Note • Copies cannot be made when the document image is larger than the specified paper size.
Variable RepeatAllows you to specify how many copies to place along each of the long and short edges of paper. You can specify a value between 1 and 23 in the Y direction (Rows), and a value between 1 and 33 in the X direction (Columns).
Image Layout
Evenly Spaced
The specified number of images are evenly arranged on the paper.
Side by Side
The specified number of images are arranged with no space on the paper.

3 Copy
132
Copy
3
Annotations (Adding a Comment/a Date/Page Numbers to Copies)
This feature allows you to add a comment, date, and page numbers onto copies.
You can select a comment, date, and page numbers, and their print positions from preset formats.Important • When you select this feature, if the number of pages scanned by the machine exceeds the
maximum, the machine will not print the already-scanned data. In that case, follow the instructions of the message displayed on the screen to cancel the job. The maximum number of pages that the machine can scan is 999 pages per job.
Note • The setting in [Reduce/Enlarge] does not affect the annotation image and text sizes.
• If you specify a comment, date, and page numbers together, make sure that their print positions do not overlap before making copies.
• When [Pages per Side] is set, an annotation is added to the combined image.
• When [Repeat Image] or [Booklet Creation] is set, an annotation is added to each copy image.
• If a layout template is specified in [Apply Layout Template to Copy/Print Jobs] under [Force Annotation] in the System Administration mode, the comment, date, and page number specified here are overlapped with the text on the layout template when printed. For information on [Force Annotation], refer to "5 Tools" > "Common Service Settings" > "Force Annotation" in the Administrator Guide.
1 Select [Annotations].
2 Select any option.
CommentDisplays the [Comment] screen.Refer to "[Comment] Screen" (P.133).
DateDisplays the [Date] screen.Refer to "[Date] Screen" (P.134).
Page NumbersDisplays the [Page Numbers] screen.Refer to "[Page Numbers] Screen" (P.134).
Bates StampDisplays the [Bates Stamp] screen.Refer to "[Bates Stamp] Screen" (P.136).

Output Format
133
Copy
3
Original OrientationAllows you to specify the orientation of the document so that the machine can identify the top of the document.Note • If the [Original Orientation] setting differs from the actual document orientation, the machine may
not detect the top of the document correctly.
Upright Images
Select this option when placing the top edge of the document against the top side of the document glass or document feeder.
Sideways Images
Select this option when placing the top edge of the document against the left side of the document glass or document feeder. Always select [Sideways Images] when the top of the document is placed facing the left side (horizontal text).
[Comment] ScreenThis screen allows you to select a comment style and its position.
1 Select any option.
OffNo comment is added.
OnA comment is added.
Stored CommentsAllows you to select comment text from eight preset options, or text set in the System Administration mode.For information on how to register text, refer to "5 Tools" > "Common Service Settings" > "Watermark" > "Custom Watermark 1 to 3" in the Administrator Guide.
Apply ToDisplays the [Apply Comment To] screen.
You can select whether to add a comment onto the first copy page only, or onto each copy page.
PositionDisplays the [Comment - Position] screen.
You can select a comment position from nine options. For side 2 of copy sheets, you can select [Same as Side 1] or [Mirror Side 1].
Format & StyleDisplays the [Comment - Format & Style] screen.

3 Copy
134
Copy
3
You can select a font size from three options, or can directly specify the size in the range from 6 to 64 points in 1 point increments. You can also select a font color from seven options. Note • When both [Date] and [Page Numbers] are set, or when [Force Annotation] is set, [Font Color] is set
to [Black].
[Date] ScreenThis screen allows you to add a date onto copies. The date shows when you started copying the document.You can change the date format. For more information, refer to "5 Tools" > "Common Service Settings" > "Watermark" > "Date Format" in the Administrator Guide.
1 Select any option.
OffNo date is added.
OnA date is added.
Apply ToDisplays the [Apply Date To] screen.
You can select whether to add a date onto the first copy page only, or onto each copy page.
PositionDisplays the [Date - Position] screen.
You can select a date position from six options.For side 2 of copy sheets, you can select [Same as Side 1] or [Mirror Side 1].
Font SizeDisplays the [Date - Font Size] screen.
You can select a date size from three options, or can directly specify a size in the range from 6 to 24 points in 1 point increments.
[Page Numbers] ScreenThis screen allows you to select a page-number style and its position.
1 Select any option.
Output Format
135
Copy
3
OffNo page number is added.
OnPage numbers are add onto copies.
Style
1, 2, 3
Adds page numbers only.
-1-, -2-, -3-
Adds page numbers, and hyphens before and after each page number. (Example: -1-)
Page 1, Page 2, Page 3
Adds page numbers, and the text "Page" before each page number. (Example: Page1, Page2)
1/N, 2/N, 3/N
Adds page numbers, and the total number of pages to the right of each page number. (Example: 1/50, 2/50)
When you select [1/N, 2/N, 3/N], the value specified in [Total Pages (N)] is used.
-1/N-, -2/N-, -3/N-
Adds page numbers followed by the total number of pages, and hyphens before and after the numbers. (Example: -1/50-, -2/50-)
When you select [-1/N-, -2/N-, -3/N-], the value specified in [Total Pages (N)] is used.
Page 1/N, Page 2/N
Adds page numbers followed by the total number of pages, and the text "Page" before each page number.
When you select [Page 1/N, Page 2/N], the value specified in [Total Pages (N)] is used.
Total Pages (N)
Displays the [Total Pages (N)] screen.
- AutoAutomatically calculates the total number of pages.
- Enter NumberAllows you to specify the total number of pages in the range from 1 to 999.
Apply ToDisplays the [Apply Page Numbers To] screen.Refer to "[Apply Page Numbers To] Screen" (P.136).
PositionDisplays the [Page Numbers - Position] screen.
You can select a page-number position from six options.
For side 2 of copy sheets, you can select [Same as Side 1] or [Mirror Side 1].
Font SizeDisplays the [Page Numbers - Font Size] screen.

3 Copy
136
Copy
3
You can select a page-number size from three options, or can directly specify a size in the range from 6 to 24 points in 1 point increments.
[Apply Page Numbers To] ScreenThis screen allows you to specify a page range to add page numbers.
1 Select any option.
All PagesAdds page numbers to all copy pages.
Starting Page NumberAllows you to specify the start page to add a page number, in the range from 1 to 999.Note • Use [+] and [-], or the numeric keypad to enter the start page number.
Ending Page NumberAllows you to specify the end page to add a page number, in the range from 1 to 999. The start page is fixed to "1".Note • Use [+] and [-], or the numeric keypad to enter the end page number.
Start & End Page Numbers Allows you to specify the start and end pages to add page numbers, in the range from 1 to 999.Note • Use [+] and [-], or the numeric keypad to enter the start and end page numbers.
Include Covers/SeparatorsThis option is available when you select [All Pages]. Select this check box to include covers and separators.
Starting Number Allows you to specify a starting page number to add page numbers, in the range from 1 to 999.Note • Use [+] and [-], or the numeric keypad to enter a starting page number.
[Bates Stamp] ScreenThis screen allows you to add prefix text and page numbers onto copies.
1 Select any option.

Output Format
137
Copy
3
OffDoes not add prefix text and page numbers onto copies.
OnAdds prefix text and page numbers onto copies.
PrefixAllows you to enter prefix text with up to 16 characters, using the displayed keyboard.
Number of DigitsDisplays the [Bates Stamp - Number of Digits] screen.
You can select [Auto Assign] or [Manual Assign]. When you select [Manual Assign], you can specify the number of digits to be used for page numbers in the range from 1 to 9 in 1 digit increments.
Apply ToDisplays the [Apply Bates Stamp To] screen.Refer to "[Apply Bates Stamp To] Screen" (P.137).
PositionDisplays the [Bates Stamp - Position] screen.
You can select a prefix and page-number position from six options. For side 2 of copy sheets, you can select [Same as Side 1] or [Mirror Side 1].
Font SizeDisplays the [Bates Stamp - Font Size] screen.
You can select a prefix and page-number size from three options, or can directly specify a size in the range from 6 to 24 points in 1 point increments.
[Apply Bates Stamp To] ScreenThis screen allows you to specify a page range to add prefix text and page numbers.
1 Select any option.
All PagesAdds prefix text and page numbers to all pages.
Starting Page NumberAllows you to specify the start page to add prefix text and a page number, in the range from 1 to 999.Note • Use [+] and [-], or the numeric keypad to enter the start page number.
Ending Page NumberAllows you to specify the end page to add prefix text and a page number, in the range from 1 to 999. The start page is fixed to "1".

3 Copy
138
Copy
3
Note • Use [+] and [-], or the numeric keypad to enter the end page number.
Start & End Page Numbers Allows you to specify the start and end pages to add prefix text and page numbers, in the range from 1 to 999.Note • Use [+] and [-], or the numeric keypad to enter the start and end page numbers.
Include Covers/SeparatorsThis option is available when you select [All Pages]. Select this check box to include covers and separators.
Starting NumberYou can specify a starting page number in the range from 1 to 999999999 when you do not set [Number of Digits], or can specify a starting page number of up to the allowable number of digits specified in [Number of Digits].Note • Use [+] and [-], or the numeric keypad to enter the end page number.
Important • If the page number exceeds the specified value (999999999 when [Number of Digits] is not set) during copying, the copy job will be canceled.
Watermark (Printing Control Numbers on the Background of Copies)
This feature allows you to faintly print a sequential control number in the background of each copy page.
If you set "1" as the starting number, "1" is printed on each page of the first copy set and "2" is printed on each page of the second set.
To prevent, for instance, the duplication of confidential documents that are to be distributed at a conference, you can use this feature to add sequential numbers to the copies, and associate the numbers with the conference members.Important • When you select this feature, if the number of pages scanned by the machine exceeds the
maximum, the machine will not print the already-scanned data. In that case, follow the instructions of the message displayed on the screen to cancel the job. The maximum number of pages that the machine can scan is 999 pages per job.
Note • If a layout template is specified in [Apply Layout Template to Copy/Print Jobs] under [Force Annotation] in the System Administration mode, the watermark specified here is overlapped with the text on the layout template when printed. For information on [Force Annotation], refer to "5 Tools" > "Common Service Settings" > "Force Annotation" in the Administrator Guide.
• When [Force Watermark - Copy] is set to [On], [Watermark] is fixed to [On], which cannot be changed. For more information on Watermark, refer to "5 Tools" > "Common Service Settings" > "Watermark" in the Administrator Guide.
1 Select [Watermark].

Output Format
139
Copy
3
2 Select any option.
Control Number
Do Not Add
No control number is printed.
Add
A control number is printed. Enter the starting number of the control number. You can specify a value in the range from 1 to 999, using [+] and [-] or the numeric keypad.
Stored WatermarksDisplays the [Stored Watermarks] screen.Refer to "[Stored Watermarks] Screen" (P.140).
User Account NumberAllows you to select whether to print a user account number when the Authentication or Accounting feature is enabled. However, if a user is not authenticated, the account number will not be printed.Note • [User Account Number] is the No. (User Administration Number) registered by users with the
Authentication and Accounting feature.
• You can see if a user is authenticated by checking that the <Log In/Out> button lights up.
Date & TimeAllows you to select whether to print the date and time when the copy job started.For information on the date format, refer to "5 Tools" > "Common Service Settings" > "Watermark" > "Date Format" in the Administrator Guide.
Serial NumberAllows you to select whether to print the serial number of the machine.
Original OrientationAllows you to specify the orientation of the document so that the machine can identify the top of the document.Note • If the [Original Orientation] setting differs from the actual document orientation, the machine may
not detect the top of the document correctly.
Upright Images
Select this option when placing the top edge of the document against the top side of the document glass or document feeder.
Sideways Images
Select this option when placing the top edge of the document against the left side of the document glass or document feeder. Always select [Sideways Images] when the top of the document is placed facing the left side (horizontal text).

3 Copy
140
Copy
3
Watermark EffectDisplays the [Watermark Effect] screen.Refer to "[Watermark Effect] Screen" (P.140).
Note • This feature does not appear for some models. An optional component is required. For more information, contact our Customer Support Center.
[Stored Watermarks] ScreenThis screen allows you to select text to print on copies.
1 Select [On].
2 Select any text.
OffNo text is printed.
OnText is printed. Select the text to be used for watermark. You can specify text from three preset options, or text registered in the System Administration mode.For information on how to register text, refer to "5 Tools" > "Common Service Settings" > "Watermark" > "Custom Watermark 1 to 3" in the Administrator Guide.
[Watermark Effect] ScreenThis screen allows you to set the Watermark Effect feature.
If you enable the Watermark Effect feature, the text strings specified in [Control Number], [Stored Watermarks], [User Account Number], [Date & Time], and [Serial Number] on the [Watermark] screen are embedded in the background of each copy. When you copy a document that has been copied with Watermark Effect, the text embedded in the background is printed as embossed or outline text depending on the option you select on the [Watermark Effect] screen.Note • This feature does not appear for some models. An optional component is required. For more
information, contact our Customer Support Center.
1 Select any option.
OffPrints the text specified in [Stored Watermarks] as it is.

Output Format
141
Copy
3
EmbossedWhen you copy a document that has been copied with Watermark Effect, the text embedded in the background of the copy is printed as embossed text.
OutlineWhen you copy a document that has been copied with Watermark Effect, the text embedded in the background of the copy is printed as outline text.You can specify the size, density, and others of text to be printed with Watermark in the System Administration mode. For more information, refer to "5 Tools" > "Common Service Settings" > "Watermark" in the Administrator Guide.
Folding (Outputting Bi-Folded)
This feature allows you to fold copies in half, or crease in half.Important • When the Finisher-B1 is installed, do not remove output copies from the finisher tray until all the
output copies have been delivered.
Note • The supported paper orientation is only . Select the tray whose orientation is set to .
• This feature does not appear for some models. An optional component is required. For more information, contact our Customer Support Center.
1 Select [Folding].
2 Select any option.
OffDoes not fold copies.
Single FoldThis option is displayed when the Booklet Maker Unit for Finisher-B1 (optional) is installed.
Creases copies in half.

3 Copy
142
Copy
3
Preset Repeat Image (Making Multiple Copies on a Single Sheet)
This feature allows you to repeatedly copy one original onto equally divided areas according to the specified number of copies.
You can select the number of the times the original is copied onto one sheet from [2 Times], [4 Times], or [8 Times].
Note • When you select an option other than [Auto %] in [Reduce/Enlarge], image loss may occur depending on the image size of the document.
1 Select [Preset Repeat Image].
2 Select any option.
OffDisables this feature.
2 TimesMakes two copies of the document image on a single sheet of paper.
4 TimesMakes four copies of the document image on a single sheet of paper.
8 TimesMakes eight copies of the document image on a single sheet of paper.
2 Times 4 Times 8 Times
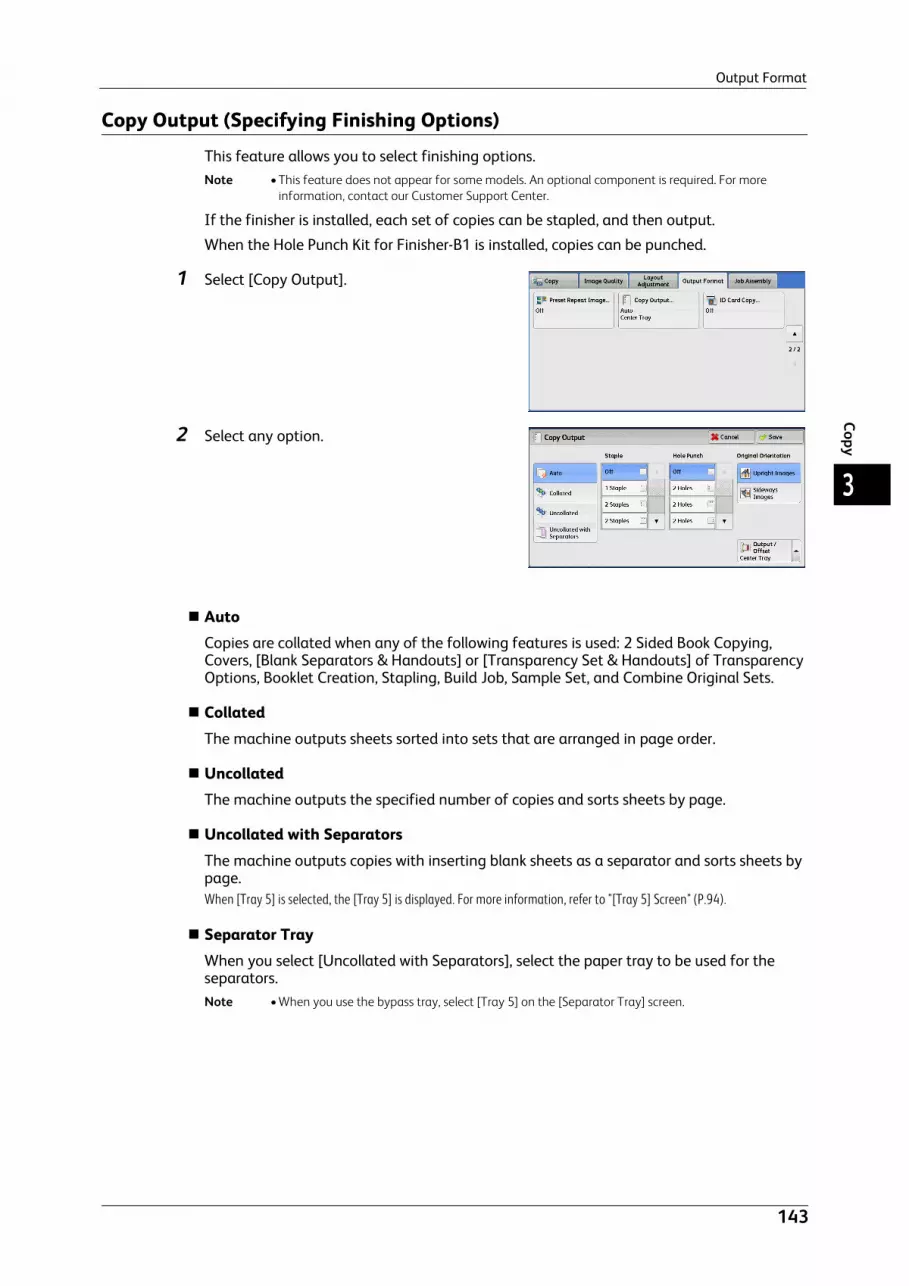
Output Format
143
Copy
3
Copy Output (Specifying Finishing Options)
This feature allows you to select finishing options.Note • This feature does not appear for some models. An optional component is required. For more
information, contact our Customer Support Center.
If the finisher is installed, each set of copies can be stapled, and then output.
When the Hole Punch Kit for Finisher-B1 is installed, copies can be punched.
1 Select [Copy Output].
2 Select any option.
AutoCopies are collated when any of the following features is used: 2 Sided Book Copying, Covers, [Blank Separators & Handouts] or [Transparency Set & Handouts] of Transparency Options, Booklet Creation, Stapling, Build Job, Sample Set, and Combine Original Sets.
CollatedThe machine outputs sheets sorted into sets that are arranged in page order.
UncollatedThe machine outputs the specified number of copies and sorts sheets by page.
Uncollated with SeparatorsThe machine outputs copies with inserting blank sheets as a separator and sorts sheets by page.When [Tray 5] is selected, the [Tray 5] is displayed. For more information, refer to "[Tray 5] Screen" (P.94).
Separator TrayWhen you select [Uncollated with Separators], select the paper tray to be used for the separators.Note • When you use the bypass tray, select [Tray 5] on the [Separator Tray] screen.

3 Copy
144
Copy
3
StapleSpecify the position for stapling. The number of sheets that can be stapled is 2 - 50 (when 80 gsm paper is used). Available paper types are: Plain paper, Recycled paper, Reload paper, Bond paper, Heavyweight paper (106 - 169 gsm), Heavyweight Reload paper, Extra Heavyweight paper (170 - 216 gsm), Extra Heavyweight Reload paper, Extra Heavyweight Plus paper (217 - 220 gsm), Extra Heavyweight Plus Reload paper, Gloss paper (106 - 169 gsm), Gloss Reload paper, Heavyweight Gloss paper (170 - 216 gsm), Heavyweight Gloss Reload paper, Extra Heavyweight Gloss paper (217 - 220 gsm), Extra Heavyweight Gloss Reload paper, and Custom paper 1 to 5. If paper heavier than 90 gsm or lighter than 64 gsm is used, outputs may not be stapled correctly even if the number of sheets is 50 or less. Important • In the following cases, the actual stapling position differs from the stapling position displayed on
the screen:
- When [Original Orientation] is set to [Upright Images], and [Staple] is set to one position at the right side.
- When [Original Orientation] is set to [Sideways Images], and [Staple] is set to one position at the left side.
Hole PunchSets the position for punching.
The positions for punching vary depending on a finisher installed.Important • When the punching feature of a finisher is defective, output is delivered to the center tray instead of
the finisher tray. Remove the output delivered to the center tray every now and then.
Original OrientationAllows you to specify the orientation of the document so that the machine can identify the top of the document.Note • If the [Original Orientation] setting differs from the actual document orientation, the machine may
not detect the top of the document correctly.
Upright Images
Select this option when placing the top edge of the document against the top side of the document glass or document feeder.
Sideways Images
Select this option when placing the top edge of the document against the left side of the document glass or document feeder. Always select [Sideways Images] when the top of the document is placed facing the left side (horizontal text).
Output/OffsetAllows you to select the output destination tray and offset operation.
Offset Stacking
This option is displayed when you select [Center Tray - Upper] or [Center Tray - Lower] for the output destination.When an optional finisher is installed, this option is displayed when you select [Center Tray] or [Right Middle Tray].
The offset is a function for slightly offsetting and outputting each paper stack to allow you to distinguish the separations. You can select from [Offset per Set], [Offset per Job], [Offset Every N Pages], [Offset Every N Sets], and [System Default].
Note • This feature does not appear for some models. An optional component is required. For more information, contact our Customer Support Center.
• If you select [System Default], the setting in the System Administration mode will be effective. For information on how to change the setting, refer to "5 Tools" > "Copy Service Settings" > "Copy Defaults" > "Output Destination" in the Administrator Guide.

Output Format
145
Copy
3
Paper Size and Stapling PositionFinisher-A1
Finisher-B1
* : The staple orientation displayed on the touch screen differs from the actual staple orientation. Outputs are stapled in the orientation shown in the above table.
Paper Size and Punching Position (Finisher-B1)2 holes*
* : For the Finisher-B1, the distance between the two holes is 70 mm with the US 2/3 Hole Punch Kit, and is 80 mm with the 2/4 Hole Punch Kit, which is ordinary used.
1 Staple (Left)
1 Staple (Right)
A4 , B5 ,
7.25 x 10.5" ,
8.5 x 11" ,
16K
A4, A3, B4, 8.5 x 11", 8.5 x 13", 8.5 x 14", 11 x 17", 8K
1 Staple (Left)
1 Staple (Right)
2 Staples (Left)
2 Staples (Top)
2 Staples (Right)
A4 , B5 ,
7.25 x 10.5" ,
8 x 10" ,
8.5 x 11" ,
16K
A4, A3, B4, 8.5 x 11", 8.5 x 13", 8.5 x 14", 11 x 15", 11 x 17", 8K
* *
*
*
2 Holes (Left)
2 Holes (Top)
2 Holes (Right)
A4 , B5 , 7.25 x 10.5" , 8 x 10" ,
8.5 x 11" , 16K
A4, A3, B4, 8.5 x 11", 8.5 x 13", 8.5 x 14", 11 x 15", 11 x 17", 8K

3 Copy
146
Copy
3
3 holes
4 holes (Finisher-B1 only)
ID Card Copy (Copying Both Sides of an ID Card)
This feature allows you to copy both sides of a small undetectable original, such as an ID card, onto one side of paper.
1 Specify the orientation of the document in [Original Orientation] on the [Layout Adjustment] screen.
2 Place the document slightly away from the top left corner of the document glass, and close the document glass.
3 Holes (Left)
3 Holes (Top)
3 Holes (Right)
A4 , B5 , 7.25 x 10.5" , 8 x 10" ,
8.5 x 11" , 16K
A3, B4, 11 x 15", 11 x 17", 8K
4 Holes (Left)
4 Holes (Top)
4 Holes (Right)
A4 , B5 , 7.25 x 10.5" , 8.5 x 11" , 16K
A3, B4, 11 x 15", 11 x 17", 8K
Original document Original orientation Copied output
Front side
Back side
Front side Back side

Output Format
147
Copy
3
Important • Always use the document glass when copying. You cannot use the document feeder with this feature.
• Specify the orientation of the original document correctly.
• If the edges of the image are missing, slightly move the card inward on the document glass so that the whole image can be scanned.
• When the reduced size is specified to copy an ID card, the machine may copy the ID card in a different orientation from the original orientation depending on the magnification ratio specified. For information on the copy magnification ratio for ID Card Copy, refer to "5 Tools" > "Common Service Settings" > "Copy Service Settings" > "Copy Control" > "ID Card Copy - Reduce/Enlarge" in the Administrator Guide.
For information on how to specify the orientation of a document, refer to "Original Orientation (Specifying the Orientation of Loaded Documents)" (P.120).
3 Select [ID Card Copy] on the [Output Format] screen.
4 Select [On].
OffDisables ID card copying.
OnEnables ID card copying.

3 Copy
148
Copy
3
Job Assembly
This section describes the features you can select on the [Job Assembly] screen. The following shows the reference section for each feature.
Build Job (Processing Documents Scanned with Different Settings as One Job)......................................................... 148Sample Job (Checking the Finished Output of the Copy) .................................................................................................. 152Combine Original Sets (Adding Originals)............................................................................................................................. 153Delete Outside/Delete Inside (Deleting Outside or Inside of the Selected Area) ........................................................ 155Stored Programming (Calling a Stored Program for Build Job) ....................................................................................... 156
1 Select [Copy] on the [Services Home] screen.
2 Select a feature on the [Job Assembly] screen.
Build Job (Processing Documents Scanned with Different Settings as One Job)
This feature allows you to apply different copy settings to each document page or each document stack, and then output the copies as one job.
1 Select [Build Job].
2 Select [On].
3 Select any option.

Job Assembly
149
Copy
3
OffBuild Job is not applied.
OnBuild Job is applied. The feature buttons appear. Specify any option if necessary.Important • The features selected here cannot be canceled or changed while the machine executes a copy job.
For information on features available in Build Job, refer to "Features that can be set in Build Job" (P.149).
Features that can be set in Build Job
Copy OutputFor more information, refer to "Copy Output (Specifying Finishing Options)" (P.143).
Booklet CreationFor more information, refer to "Booklet Creation (Creating a Booklet)" (P.124).
CoversImportant • The machine does not copy on a cover when using the Build Job feature.
For more information, refer to "Covers (Attaching Covers to Copies)" (P.127).
AnnotationsFor more information, refer to "Annotations (Adding a Comment/a Date/Page Numbers to Copies)" (P.132).
Segment SeparatorsFor more information, refer to "[Segment Separators] Screen" (P.151).
WatermarkFor more information, refer to "Watermark (Printing Control Numbers on the Background of Copies)" (P.138).
[Copy] Screen When Build Job is in ProgressThe following describes the screen that appears while the Build Job is being executed.
Chapter StartDisplays the [Build Job - Chapter Start] screen.Refer to "[Build Job - Chapter Start] Screen" (P.150).
Insert SeparatorsDisplays the [Segment Separators] screen.Refer to "[Segment Separators] Screen" (P.151).
Change QuantityDisplays the [Change Quantity] screen on which you can change the number of copy sets using the numeric keypad.

3 Copy
150
Copy
3
Change SettingsDisplays the [Copy] screen on which you can change the settings for the next document. After changing the settings, press the <Start> button on the control panel to start scanning of the document. To return to the previous screen, press the < # > button.
When using a stored program for Build Job
While the machine makes copies using the Build Job feature, you can use a stored program.
1) Select [Change Settings].
2) Select the [Job Assembly] tab.
3) Select [Stored Programming].
4) Select the number of the stored program that contains the features you want to use.For information on how to register stored program, refer to "Registering Stored Programs for Build Job" (P.366).
DeleteClears the document data stored by the Build Job feature, and cancels the job.Note • You can also press the <C (Clear)> or <Clear All> button on the control panel to perform the same
operation.
• While the machine is scanning the loaded document, [Delete] is displayed. Select [Delete] to pause scanning. Select [Start] on the touch screen, or press the <Start> button on the control panel to resume scanning.
Last OriginalSelect this button to end scanning of documents. The build job starts.
Next OriginalSelect this button when you have another document. This button is always selected when you use the Build Job feature.
StartAfter loading the next document, select this button to scan the next document.Note • You can also press the <Start> button on the control panel to perform the same operation.
Sample JobWhen making multiple sets of copies, you can print a sample set to check the finished output and then print the remaining copy sets. You can select to continue or cancel the job after the confirmation.
[Build Job - Chapter Start] ScreenThis screen allows you to set the chapter start.
1 Select any option.
OffThe next stack of documents is copied after the previous stack.
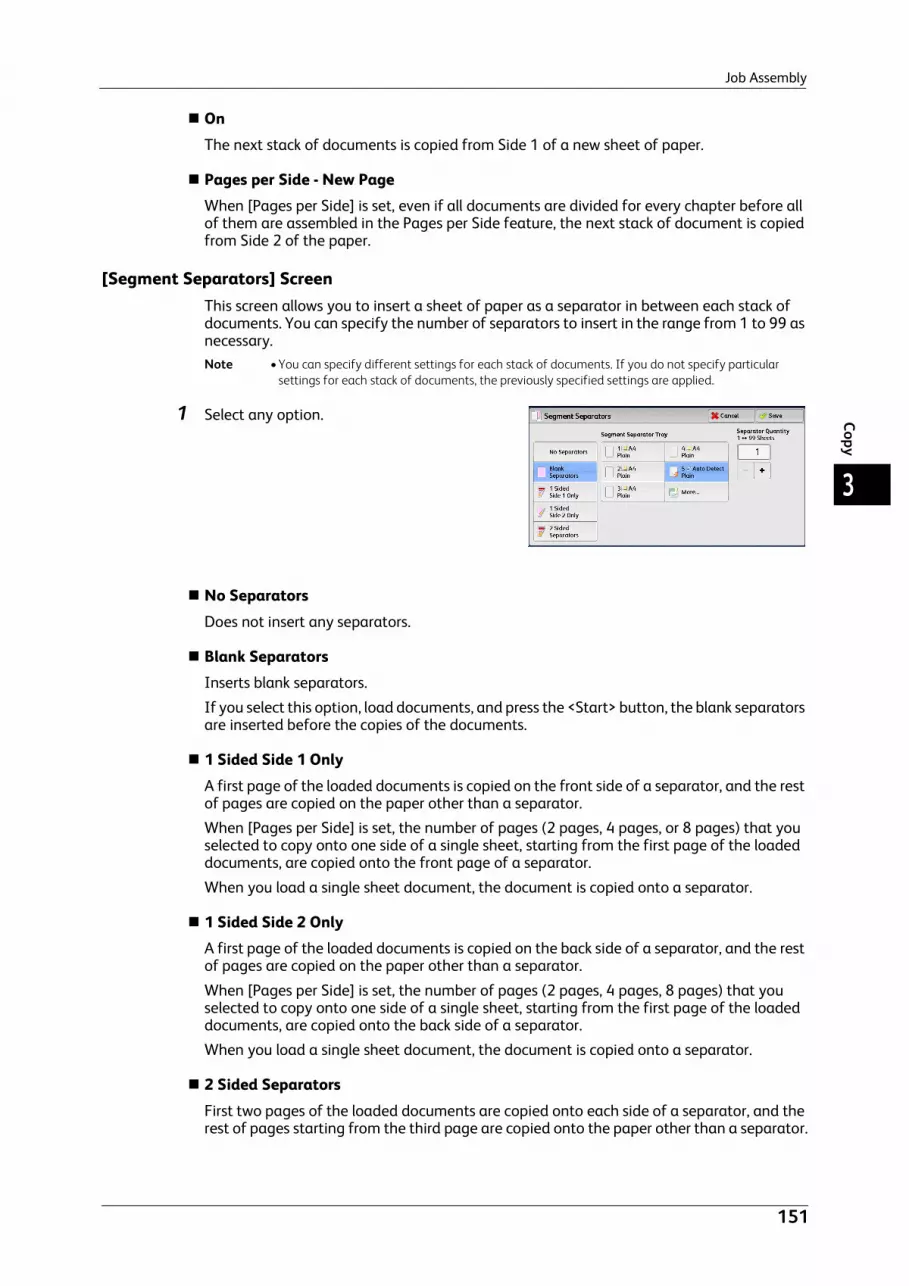
Job Assembly
151
Copy
3
OnThe next stack of documents is copied from Side 1 of a new sheet of paper.
Pages per Side - New PageWhen [Pages per Side] is set, even if all documents are divided for every chapter before all of them are assembled in the Pages per Side feature, the next stack of document is copied from Side 2 of the paper.
[Segment Separators] ScreenThis screen allows you to insert a sheet of paper as a separator in between each stack of documents. You can specify the number of separators to insert in the range from 1 to 99 as necessary.Note • You can specify different settings for each stack of documents. If you do not specify particular
settings for each stack of documents, the previously specified settings are applied.
1 Select any option.
No SeparatorsDoes not insert any separators.
Blank SeparatorsInserts blank separators.
If you select this option, load documents, and press the <Start> button, the blank separators are inserted before the copies of the documents.
1 Sided Side 1 Only A first page of the loaded documents is copied on the front side of a separator, and the rest of pages are copied on the paper other than a separator.
When [Pages per Side] is set, the number of pages (2 pages, 4 pages, or 8 pages) that you selected to copy onto one side of a single sheet, starting from the first page of the loaded documents, are copied onto the front page of a separator.
When you load a single sheet document, the document is copied onto a separator.
1 Sided Side 2 Only A first page of the loaded documents is copied on the back side of a separator, and the rest of pages are copied on the paper other than a separator.
When [Pages per Side] is set, the number of pages (2 pages, 4 pages, 8 pages) that you selected to copy onto one side of a single sheet, starting from the first page of the loaded documents, are copied onto the back side of a separator.
When you load a single sheet document, the document is copied onto a separator.
2 Sided SeparatorsFirst two pages of the loaded documents are copied onto each side of a separator, and the rest of pages starting from the third page are copied onto the paper other than a separator.

3 Copy
152
Copy
3
When [Pages per Side] is set, the number of pages (2 pages, 4 pages, 8 pages) that you selected to copy onto one side of a single sheet, starting from the first page of the loaded documents, are copied onto each side of a separator.
When you load two-sheet documents, both sheets are copied onto each side of a separator.Note • When you have two separate documents, a single sheet document and multiple sheet documents, if
you want to copy this single sheet document and the first page of the multiple sheet documents onto each side of a separator, when loading the multiple sheet documents, select [No Separators] in [Segment Separators]. If you do not select [No Separators], the machine processes these two documents separately under different separator settings, the single-sheet document is copied onto a separator, and the first page (or first two page) of the multiple sheet documents is copied onto another separator.
Segment Separator TrayAllows you to select the tray, which is loaded with paper to be used as a separator.When [Tray 5] is selected, the [Tray 5] screen is displayed. For more information, refer to "[Tray 5] Screen" (P.94).
Separator QuantityThis option is available when you select [Blank Separators]. You can specify the number of separators in the range from 1 to 99.
Sample Job (Checking the Finished Output of the Copy)
When making multiple sets of copies, you can print a sample set to check the finished output and then print the remaining copy sets. You can select whether to continue or cancel the job after the confirmation. This feature also allows you to change the number of copy sets. The sample copy is included in the total number of copy sets.Note • After a sample set is output, the machine automatically outputs the data remained if the machine is
left uninstructed for the period specified in [Auto Job Release]. For more information on [Auto Job Release], refer to "5 Tools" > "Common Service Settings" > "Machine Clock/Timers" > "Auto Job Release" in the Administrator Guide.
1 Select [Sample Job].
2 Select [On].
OffNo sample set is made.
OnA sample set is made.

Job Assembly
153
Copy
3
[Copy] Screen When Sample Job is in ProgressAfter the sample set is copied, the machine pauses the job and displays the [Copy] screen.
Change QuantityDisplays the [Change Quantity] screen on which you can change the number of copies entered before. Enter a new quantity using the numeric keypad. The new value must include the number of the sample set that has already been printed. When reducing the quantity, specify a value between 1 (sample set) and the number of copies entered before.Note • If you specify "1" as a new quantity and then press the <Start> button, the machine will not process
the job.
Change SettingsDisplays the [Change Settings] screen. To cancel the settings you have made, deselect the check box for the feature you want to cancel.
DeleteThe remaining copies are canceled.
StartThe remaining copies are made.Note • You can also press the <Start> button on the control panel to perform the same operation.
Combine Original Sets (Adding Originals)
Use this feature when you copy a document that has too many pages to be loaded into the document feeder at one time, or when you scan each document page using the document glass and have the machine process the pages as one job.
When you use this feature, [Next Original] is always selected on the screen during scanning documents with the document feeder or the document glass.
If [Copy Output] is set to [Auto], the output is automatically sorted.
When all documents have been scanned, select [Last Original].Note • After the first original set is copied, the machine automatically outputs the data remained if the
machine is left unused for the period specified in [Auto Clear]. For more information on [Auto Clear], refer to "5 Tools" > "Common Service Settings" > "Machine Clock/Timers" > "Auto Clear" in the Administrator Guide.
1 Select [Combine Original Sets].

3 Copy
154
Copy
3
2 Select [On].
OffDisables this feature.
OnEnables this feature.
Original OrientationAllows you to specify the orientation of the document so that the machine can identify the top of the document.Note • If the [Original Orientation] setting differs from the actual document orientation, the machine may
not detect the top of the document correctly.
Upright Images
Select this option when placing the top edge of the document against the top side of the document glass or document feeder.
Sideways Images
Select this option when placing the top edge of the document against the left side of the document glass or document feeder.
[Copy] Screen When Combine Original Sets is in ProgressThe [Copy] screen is displayed when copying starts.
DeleteClears the document data stored with the Combine Original Sets feature, and cancels copying.Note • You can also press the <C (Clear)> or <Clear All> button on the control panel to perform the same
operation.
Last OriginalSelect this button to end scanning documents.
Next OriginalSelect this button when you have more documents to copy. This button is always selected when the Combine Original Sets feature is used.

Job Assembly
155
Copy
3
StartAfter loading the next document, select this button to scan the next document.Note • You can also press the <Start> button on the control panel to perform the same operation.
Delete Outside/Delete Inside (Deleting Outside or Inside of the Selected Area)
This feature allows you specify the areas to be deleted from a document image. Up to three areas can be specified.
1 Select [Delete Outside/Delete Inside].
2 Select any option.
OffNo area is deleted.
Delete OutsideDeletes the outside of the selected area.
Delete InsideDeletes the inside of the selected area.
Area SettingsDisplays the [Delete Outside/Delete Inside - Area 1 (Area 2 or Area 3)] screen. You can specify up to three areas.Refer to "[Delete Outside/Delete Inside - Area 1 (Area 2 or Area 3)] Screen" (P.156).
OriginalsWhen the original document is a 2-sided document, specify from which side the specified area is to be deleted.
Both Sides
Applies the settings to both sides of the document.
Side 1 Only
Applies the settings to Side 1 of the document.
Side 2 Only
Applies the settings to Side 2 of the document.

3 Copy
156
Copy
3
Original OrientationAllows you to specify the orientation of the document so that the machine can identify the top of the document.Note • If the [Original Orientation] setting differs from the actual document orientation, the machine may
not detect the top of the document correctly.
Upright Images
Select this option when placing the top edge of the document against the top side of the document glass or document feeder.
Sideways Images
Select this option when placing the top edge of the document against the left side of the document glass or document feeder.
[Delete Outside/Delete Inside - Area 1 (Area 2 or Area 3)] ScreenThis screen allows you to specify the area to be deleted. The area is defined by the rectangle formed between the points X1,Y1 and X2,Y2. The origin point is the top right corner of a document.
You can specify a value in the range from 0 to 432 mm for the width (X) and the length (Y) in 1 mm increments.Note • Specify the 2 coordinates from the top right corner of the document.
• When specifying multiple areas, the specified areas can overlap each other.
• When [Reduce/Enlarge] is set, the specified area will be reduced or enlarged accordingly.
1 Select [Area 1], [Area 2], or [Area 3].
2 Enter the value for X1 in [X1] using the numeric keypad.
3 Enter the value for Y1 in [Y1] using the numeric keypad.
4 Enter the value for X2 in [X2] using the numeric keypad
5 Enter the value for Y2 in [Y2] using the numeric keypad.
Note • If all of [X1], [Y1], [X2], and [Y2] are set to [0], the area will be invalid. If no other area is specified, the Delete Outside/Delete Inside feature cannot be used.
• Pressing the <C (Clear)> button clears the value you have entered.
Clear Area 1 (Area 2 or Area 3)Clears all the values set for Area 1 (Area 2 or Area 3).
Stored Programming (Calling a Stored Program for Build Job)
This feature allows you to call a stored program for Build Job.This feature is the same as "8 Stored Programming" > "Calling a Stored Program" > "Calling a Stored Program for Build Job". For more information, refer to "Calling a Stored Program for Build Job" (P.370).

4 Fax
This chapter describes the basic operations and features for the Fax services.
Fax Procedure ..............................................................................................................................158
Operations during Faxing........................................................................................................165
About Internet Fax ....................................................................................................................168
About IP Fax (SIP)......................................................................................................................175
About Server Fax.........................................................................................................................179
Simple Fax .....................................................................................................................................181
Fax/Internet Fax .........................................................................................................................186
Layout Adjustment ....................................................................................................................203
Fax/Internet Fax Options........................................................................................................209
More Options................................................................................................................................229
Broadcast.......................................................................................................................................235
Receiving Faxes ...........................................................................................................................243
Facsimile Information Services.............................................................................................246Note • LINE 2 (Line 2), LINE 3 (Line 3), and SIP are optional.
• The Fax services are not available for some models. An optional component is required. For more information, contact our Customer Support Center.

4 Fax
158
Fax
4
Fax Procedure
This section describes the basic fax procedures. The following shows the reference section for each procedure.
Step 1 Loading Documents ....................................................................................................................................................... 158Step 2 Selecting Features .......................................................................................................................................................... 160Step 3 Specifying Destinations................................................................................................................................................. 161Step 4 Starting the Fax Job ....................................................................................................................................................... 163Step 5 Confirming the Fax Job in Job Status ........................................................................................................................ 164
Step 1 Loading Documents
The following two methods are available to load documents:
Document Feeder
Single sheet
Multiple sheets
Document Glass
Single sheet
Bound documents, such as books
Document FeederThe document feeder supports single and multiple sheet documents with sizes from 125 x 85 mm (Standard size: A5, A5 ) to 297 x 1500 mm (long) (Standard size: A3, 11 x 17").
The document feeder automatically detects documents of standard-size widths.The standard document sizes that can be detected automatically depend on [Paper Size Settings] in the System Administration mode. For information on [Paper Size Settings], refer to "5 Tools" > "Common Service Settings" > "Other Settings" > "Paper Size Settings" in the Administrator Guide.
The sizes on the left are detected as the sizes shown on the right as follows.
The document feeder accepts the following number of sheets.
Important • To avoid paper jams, use the document glass for folded or wrinkled documents, cut-and-pasted documents, curled paper, or back carbon paper.
• 2-sided scanning of lightweight paper (38 - 49 gsm) is not supported.
Original Document Size Document Size Detected by the Document Feeder
8-inch width document B5 width document
10-inch width document B4 width document
Document Type (Weight) Number of Sheets
Lightweight paper (38 - 49 gsm) 110 sheets
Plain paper (50 - 80 gsm) 110 sheets
Heavyweight paper (81 - 128 gsm) 75 sheets
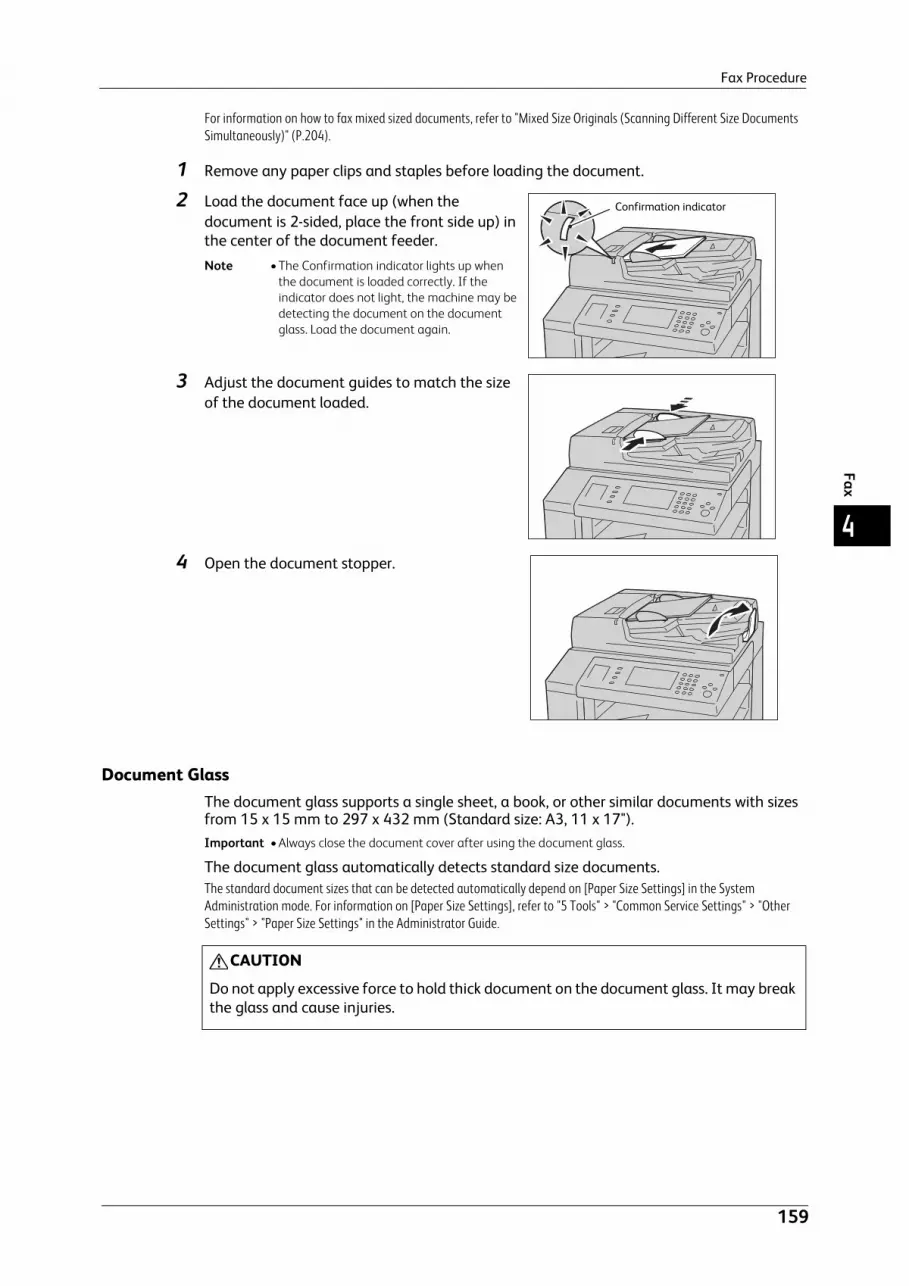
Fax Procedure
159
Fax
4
For information on how to fax mixed sized documents, refer to "Mixed Size Originals (Scanning Different Size Documents Simultaneously)" (P.204).
1 Remove any paper clips and staples before loading the document.
2 Load the document face up (when the document is 2-sided, place the front side up) in the center of the document feeder.Note • The Confirmation indicator lights up when
the document is loaded correctly. If the indicator does not light, the machine may be detecting the document on the document glass. Load the document again.
3 Adjust the document guides to match the size of the document loaded.
4 Open the document stopper.
Document GlassThe document glass supports a single sheet, a book, or other similar documents with sizes from 15 x 15 mm to 297 x 432 mm (Standard size: A3, 11 x 17").Important • Always close the document cover after using the document glass.
The document glass automatically detects standard size documents.The standard document sizes that can be detected automatically depend on [Paper Size Settings] in the System Administration mode. For information on [Paper Size Settings], refer to "5 Tools" > "Common Service Settings" > "Other Settings" > "Paper Size Settings" in the Administrator Guide.
Confirmation indicator
CAUTION
Do not apply excessive force to hold thick document on the document glass. It may break the glass and cause injuries.

4 Fax
160
Fax
4
1 Open the document cover.
Important • Ensure that the touch screen is active, and then load a document. Otherwise, the machine may not properly detect the document size.
2 Load the document face down, and align it against the top left corner of the document glass. Note • When you load a A5, B5 or A4 document on
the document glass in portrait orientation, the scanned image is transmitted with 180 degrees rotated.
3 Close the document cover.
Note • When a standard size document is loaded on the document glass, the size of the document is displayed in the message field.
Step 2 Selecting Features
The following two services are available to send faxes.
Simple FaxAllows you to only select basic features to send faxes.
Fax/Internet FaxAllows you to make detailed settings to send faxes.
The following procedure uses [Fax/Internet Fax] to describe how to select features.
You can select the Fax or Internet Fax service, or the Server Fax service on the [Services Home] screen.For information on the Simple Fax feature, refer to "Simple Fax" (P.181).
Important • The Fax and Internet Fax services are not available while the Server Fax service is enabled.
Note • The features displayed on the screen depend on your machine configuration.
• When the Authentication or Accounting feature is enabled, a user ID and passcode may be required. Ask your system administrator for the user ID and passcode.
1 Press the <Services Home> button.
<Services Home> button

Fax Procedure
161
Fax
4
2 Select [Fax/Internet Fax].
3 If the previous settings still remain, press the <Clear All> button.
4 Select each tab, and select a feature as necessary.
When you press the <Energy Saver> button while configuring the features, you can select whether to enable the 2 Sided (Skip Blank Pages) feature. For more information on [2 Sided (Skip Blank Pages)], refer to "2 Sided (Skip Blank Pages)" (P.185).
The following shows the reference section for each tab."Fax/Internet Fax" (P.186)"Layout Adjustment" (P.203)"Fax/Internet Fax Options" (P.209)"More Options" (P.229)
Step 3 Specifying Destinations
Three methods are available to specify recipients: by phone number, by address number, and by group dial number. The following shows input methods supported by each method.
1 2 3
4 5 6
7 8 9
0 #
C
<Clear All> button
Numeric Keypad One Touch buttons Address Book
Phone Number O X X
Address Number(Speed Dialing)
4 digits (0001 to 2000)
2 digits (1 to 52) or (1 to 45)*
From the list tab and index
3 digits + *(nnn0 to nnn9)
2 digits + * (nn00 to nn99)
Group Dial Number # + 2 digits X O

4 Fax
162
Fax
4
* : There are two ways in which address numbers and stored programs are assigned to the one touch buttons. Select either of the following:
* : By default, [Type 1] is selected. For information on how to change the settings registered to the one touch buttons, refer to "5 Tools" > "Common Service Settings" > "Screen/Button Settings" in the Administrator Guide.
Important • When using the Server Fax service, you cannot specify address numbers using the numeric keypad or use one touch buttons.
You can specify multiple recipients (Broadcast Send) using the above methods. You can also use a combination of the methods.
If the same recipient was specified for several pending documents, you can send the documents with a single phone call. This feature is called Batch Send. Note that you cannot use Batch Send with Broadcast Send, Relay Broadcast, Remote Folder, and Delay Start when prior to the specified time. When using a redial, resend, or delayed start send transmission job, or authentication feature, to send to the same address from different users, then Batch Send is not possible.Important • Confirm recipients before sending a fax.
For information on Broadcast Send, refer to "Broadcast Send (Transmitting to Multiple Recipients)" (P.235).To specify a line to send a fax when the Additional G3 Port Kit 2 (optional) is installed, refer to "Specifying a Line (Port)" (P.197).
The following describes how to enter a phone number with the numeric keypad as an example.
1 Enter a fax number using the numeric keypad.
2 To specify multiple recipients, select [+ Add] on the touch screen. Note • Select [Reconfirm Recipients] in the message
field to check the entered value. You can hide [Reconfirm Recipients] to show the remaining memory capacity. For more information, refer to "5 Tools" > "Common Service Settings" > "Screen/Button Settings" > "Reconfirm Button - Fax/Internet Fax" in the Administrator Guide.
• If you have entered an incorrect value, press the <C (Clear)> button and enter the correct value.
• Depending on the settings, a screen to re-enter the recipient may be displayed after you specify the recipient and then select [+ Add]. In such case, re-enter the recipient.
• You can combine the fax numbers registered in the one touch buttons, speed dial, and the Address Book respectively and the numbers entered using the numeric keypad to specify as one recipient. This is called Chain Dial. Select [+ Add] when you finish combining. You can set wether the chain dial
OX
::AvailableNot available
[Type 1] The buttons 1 to 52 are used for address numbers and they correspond to the registered address numbers 0001 to 0052, while the buttons 53 and 54 are used for stored programs and they correspond to the registered stored programs 1 and 2.
[Type 2] The buttons 1 to 45 are used for address numbers and they correspond to the registered address numbers 0001 to 0045, while the buttons 46 to 54 are used for stored programs and they correspond to the registered stored programs 1 to 9.
1 2 3
4 5 6
7 8 9
0 #
C
Numeric keypad

Fax Procedure
163
Fax
4
is used or not in the System Administration mode. For more information, refer to "5 Tools" > "Fax Service Settings" > "Fax Control" > "Chain Dial" in the Administrator Guide.
For information how to specify a fax number using the Address Book, refer to "Specifying a Destination Using the Address Book" (P.187).For information how to specify a fax number using the speed dialing, refer to "Speed Dialing (Specifying a Destination Using an Address Number)" (P.191).For information how to specify a fax number using one touch buttons, refer to "Specifying a Destination using a One Touch Button" (P.195).For information on the Internet Fax, refer to "About Internet Fax" (P.168).For information on the IP Fax (SIP), refer to "Internet Fax/Fax/IP Fax (SIP) (Selecting Internet Fax/Fax/IP Fax (SIP))" (P.186).
Step 4 Starting the Fax Job
The following describes how to start a fax job.
1 Press the <Start> button.
Important • If the document has been loaded in the document feeder, do not hold down the document while it is being conveyed.
Note • Depending on the settings, the screen to re-enter the recipient may be displayed after pressing the <Start> button. In this case, re-enter the recipient.
• If a problem occurs, an error message appears on the touch screen. Solve the problem according to the message.
If you have more documentsIf you have more documents to fax, select [Next Original] on the touch screen while the current document is being scanned. This allows you to send the documents as one set of data.
2 While documents are being scanned, select [Next Original]. Note • When using the document feeder, load the
next document after the machine has finished scanning the first document.
• When [Next Original] is displayed on the screen shown on the right and no operation is performed during a certain period of time, the machine automatically assumes that there are no more documents.
• You can change the scan settings of the next document by selecting [Resolution], [Original Size] and [Lighten/Darken] that are displayed after selecting [Next Original].
1 2 3
4 5 6
7 8 9
0 #
C
<Start> button

4 Fax
164
Fax
4
3 Load the next document.
4 Press the <Start> button.If you have more documents, repeat steps 3 and 4.
5 When all documents have been scanned, select [Last Original].
Step 5 Confirming the Fax Job in Job Status
The following describes how to confirm the status of a fax job.
1 Press the <Job Status> button.
2 Confirm the job status.
Note • Select [ ] to return to the previous screen or [ ] to move to the next screen.
• From the drop-down menu, you can select [Scan, Fax, & Internet Fax Jobs] and display the desired job.
If undelivered faxes existYou can confirm undelivered faxes on the [Job Status] screen or in an Activity Report.For information on how to resend or delete undelivered faxes, refer to "Job Status" (P.385).
1 2 3
4 5 6
7 8 9
0 #
C
<Job Status> button

Operations during Faxing
165
Fax
4
Operations during Faxing
This section describes the available operations during faxing. The following shows the reference section for each operation.
Stopping the Fax Job...................................................................................................................................................................165Changing the Scan Settings ......................................................................................................................................................166
Stopping the Fax Job
To cancel scanning a fax document, use the following procedure.
1 Press either the <Stop> button on the control panel or [Delete] on the touch screen.
2 Select [Delete].
If [Delete] does not appear on the screen:
1 Press the <Job Status> button.
1 2 3
4 5 6
7 8 9
0 #
C
<Stop> button
1 2 3
4 5 6
7 8 9
0 #
C
<Job Status> button

4 Fax
166
Fax
4
2 Select the job to cancel.
Note • Select [ ] to return to the previous screen or [ ] to move to the next screen.
3 Select [Delete].
4 Select [Delete].
Changing the Scan Settings
You can change the scan settings while scanning a document.
1 Select [Next Original] on the touch screen.
2 Select [Change Settings].

Operations during Faxing
167
Fax
4
3 Set [Resolution], [Original Size], and [Lighten/Darken].
For each setting, refer to "Resolution (Specifying the Scanning Resolution)" (P.201), "Original Size (Specifying the Scan Size for the Original)" (P.203), or "Lighten/Darken (Adjusting Fax Density)" (P.199).
4 Select [Save].
5 Press the <Start> button.

4 Fax
168
Fax
4
About Internet Fax
Unlike general fax communications using public phone lines, Internet Fax uses corporate intranets and the Internet to send or receive scanned documents as e-mail attachments.
Because Internet Fax uses existing corporate intranets and the Internet, the transmission is less expensive than general fax transmission.Note • This feature is not available for some models. An optional component is required. For more
information, contact our Customer Support Center.
• To use Internet Fax, various settings are required to display [Internet Fax] from the drop-down menu on the [Fax/Internet Fax] screen. For more information, consult your system administrator.
• Internet Fax does not support color documents. If the machine receives color documents for Internet Fax (Profile: TIFF-C), an error occurs. To send and receive color documents, use the E-mail service.
For information on how to connect the machine to a network and how to set the network environment, refer to "5 Tools" > "Connectivity & Network Setup" in the Administrator Guide, and the manual included in the Driver CD Kit.
Internet Fax Features
The following describes the Internet Fax features of the machine.
Sending Internet FaxThe Internet Fax service allows you to send documents scanned by the machine as TIFF-format attachments to Internet Fax-compatible machines.Important • The TIFF file profiles that can be processed differ depending on the Internet Fax-compatible
machine of the recipient. Confirm the profile that can be processed by the recipient's Internet Fax-compatible machine before specifying a profile. For more information, refer to "Sending Internet Fax" (P.170). For information on profiles, refer to "Internet Fax Profile (Specifying Internet Fax Profiles)" (P.226).
• If a document is sent to a computer using the Internet Fax service, it cannot be opened in some cases. When you send a document to a computer, use the E-mail service.
Using Direct Internet Fax featureYou can send an Internet fax directly to the Internet Fax-compatible machines without going through the SMTP server.Note • You can switch between Internet Fax and Direct Internet Fax in the System Administration mode.
These two features cannot be enabled simultaneously. For information on how to switch them, refer to "5 Tools" > "Fax Service Settings" > "Internet Fax Control" > "Internet Fax Path" in the Administrator Guide.
Registering e-mail addresses in address numbersOnce you register a recipient's e-mail address in an address number, you do not need to enter the e-mail address each time you send Internet Fax to the recipient.Note • To address numbers, you can also register the Internet Fax profile and other settings required for
transmission.
For information on how to register address numbers, refer to "5 Tools" > "Setup" > "Add Address Book Entry" in the Administrator Guide.
Using the Broadcast Send featureYou can send an Internet fax to multiple destinations by specifying multiple e-mail addresses. Also, you can mix regular fax recipients and Internet Fax recipients to send a broadcast transmission for fax and Internet Fax.Note • Up to three broadcast transmissions can be performed. The subsequent jobs will be sent in the
sequential order after the former jobs are finished.

About Internet Fax
169
Fax
4
For information on how to specify recipients, refer to "Step 3 Specifying Destinations" (P.161) and "Specifying a Destination Using the Address Book" (P.187).
Forwarding files stored in foldersBy enabling the forwarding feature and registering a forwarding e-mail address for a folder in advance, the faxes stored in the folder are automatically forwarded to the specified computer, as e-mail attachments. The user, therefore, does not need to walk up to the machine to pick up the faxes.For more information, refer to "Forwarding Files Stored in a Folder" (P.173).
Sending Internet Fax to regular fax machines via a relay stationBy specifying e-mail addresses in a specific format, you can send faxes from a machine on the network via an Internet Fax-compatible machine (fax gateway) to fax machines that do not support the Internet Fax service.Important • This feature is available only when the e-mail reception method on the fax gateway is set to SMTP.
For information on the fax gateway feature, refer to "Sending Internet Fax to regular fax machines via a relay station" (P.173).
Precautions when sending Internet FaxThe message "Files Sent" displayed on the [Job Status] screen of the machine, the Job History Report, and a Transmission Report indicates that the transmission to the SMTP server configured on the machine has been successful. The Internet Fax transmission to the recipient may not complete if there is a problem on the Internet. In such case, the machine will not be notified of such transmission error. After sending an important e-mail, we suggest that you confirm it is received, such as by calling the recipient.You can receive an e-mail of the transmission result if you set Read Receipts and Delivery Receipt when transmitting. For more information, refer to "Acknowledgement Report (Confirming Transmission Results)" (P.209).
Receiving Internet Fax (Printing Internet Fax)The machine automatically prints Internet Fax documents that are sent by e-mail from an Internet Fax-compatible machine.Note • The following TIFF file formats and profiles are available for e-mail reception.
File format: TIFF-FX (RFC2301) Profile: TIFF-S, TIFF-F, and TIFF-J. If an unsupported profile is received, the machine may not be able to print the file. For more information, refer to "Receiving Internet Fax" (P.171).
Restrictions on the E-mail ServerDepending on the system environment, such as restrictions on the e-mail server, large-size e-mails cannot be sent or received. Before you set the data-split feature, therefore, check the system environments of the sending and receiving ends.
If data is split into multiple data but each data size is still too large, change the image quality or resolution of each data to make its size even smaller.
Features Unavailable for Sending Internet FaxThe following features are available for regular fax transmission, but are not available for Internet Fax transmission.
Starting Rate
Priority Send
Delay Start
Cover Page
Recipient Print Sets
F Code
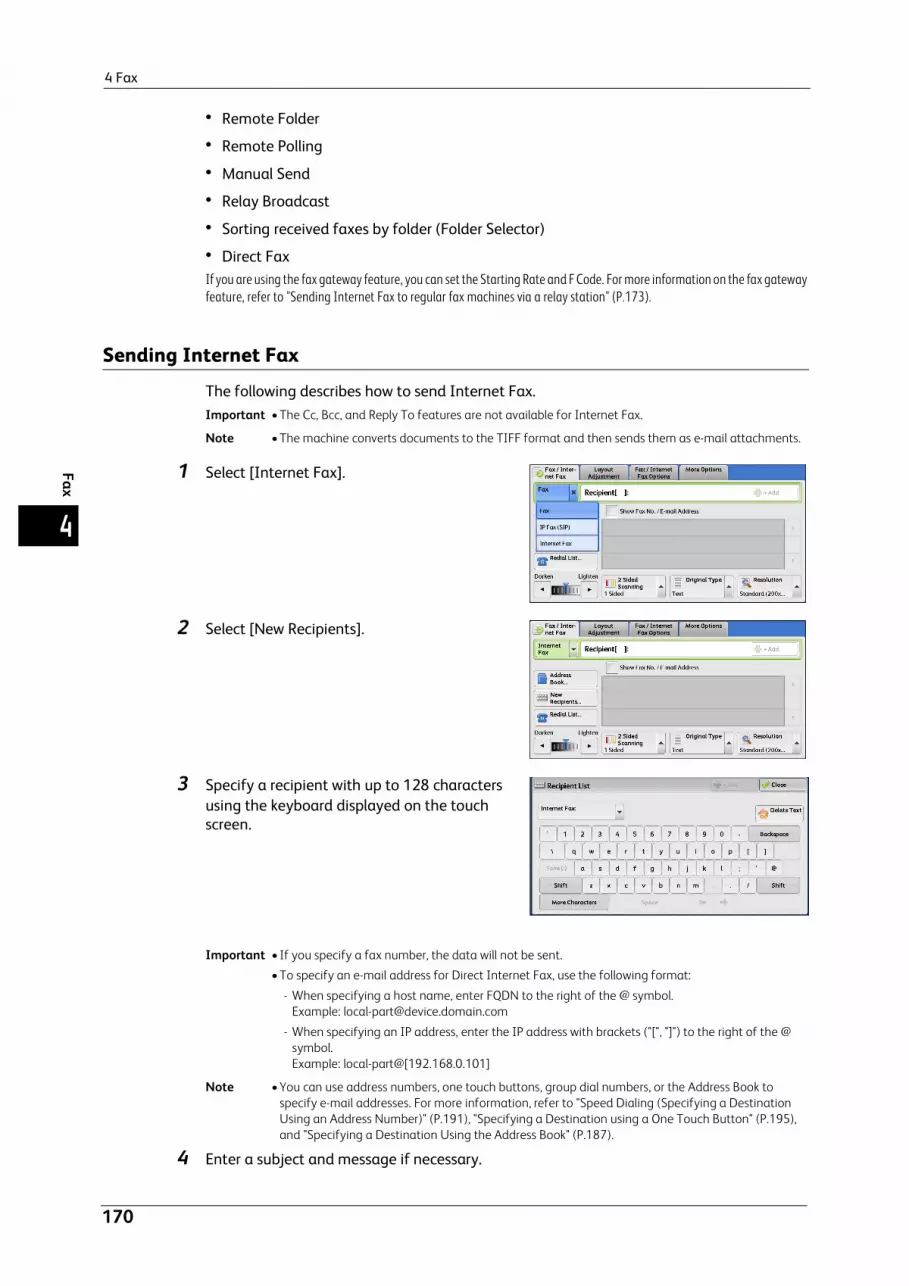
4 Fax
170
Fax
4
Remote Folder
Remote Polling
Manual Send
Relay Broadcast
Sorting received faxes by folder (Folder Selector)
Direct FaxIf you are using the fax gateway feature, you can set the Starting Rate and F Code. For more information on the fax gateway feature, refer to "Sending Internet Fax to regular fax machines via a relay station" (P.173).
Sending Internet Fax
The following describes how to send Internet Fax.Important • The Cc, Bcc, and Reply To features are not available for Internet Fax.
Note • The machine converts documents to the TIFF format and then sends them as e-mail attachments.
1 Select [Internet Fax].
2 Select [New Recipients].
3 Specify a recipient with up to 128 characters using the keyboard displayed on the touch screen.
Important • If you specify a fax number, the data will not be sent.
• To specify an e-mail address for Direct Internet Fax, use the following format:
- When specifying a host name, enter FQDN to the right of the @ symbol. Example: [email protected]
- When specifying an IP address, enter the IP address with brackets ("[", "]") to the right of the @ symbol. Example: local-part@[192.168.0.101]
Note • You can use address numbers, one touch buttons, group dial numbers, or the Address Book to specify e-mail addresses. For more information, refer to "Speed Dialing (Specifying a Destination Using an Address Number)" (P.191), "Specifying a Destination using a One Touch Button" (P.195), and "Specifying a Destination Using the Address Book" (P.187).
4 Enter a subject and message if necessary.

About Internet Fax
171
Fax
4
For information on how to enter the subject, refer to "Internet Fax Subject (Specifying the Internet Fax Subject)" (P.217). For information on how to enter the message, refer to "Internet Fax Message (Editing the Internet Fax Mail Contents)" (P.217).
Note • If the hard disk of the machine becomes full during scanning of a document, a screen appears to prompt you to select whether to send the job up to the stored pages or to cancel the job. Select one of the processes.
• If the hard disk of the machine becomes full during Internet Fax transmission, the transmission is canceled and the document data is deleted.
• If TIFF-J is specified for the profile, the recipient's computer may not be able to display the attached TIFF file properly. In this case, specify the TIFF-S or TIFF-F profile.
• If the Internet Fax-compatible machine of a recipient is not the same model as this machine, it may not print data received from this machine. Confirm the Internet Fax features supported by the destination machine before sending data to it.
• When specifying an address from the Address Book for Internet Fax, check if the address contains a domain that is not permitted for use. In this case, the address cannot be used.
Receiving Internet Fax
Reception methodWhen the machine receives e-mail from an Internet Fax-compatible machine, the received document is printed automatically.
The machine also accepts e-mails addressed to folders on the machine, such as "[email protected]".For information on folders, refer to "5 Tools" > "Setup" > "Create Folder" in the Administrator Guide. For information on job flow sheets, refer to "5 Tools" > "Setup" > "Create Job Flow Sheet" in the Administrator Guide.
Note • If domains for receiving e-mail are restricted by CentreWare Internet Services, you will only receive Internet Fax from the permitted domains. For information on the domain filtering, refer to "5 Tools" > "Connectivity & Network Setup" > "Other Settings" > "Domain Filtering" in the Administrator Guide.
• You can confirm the domain setting status in a Domain Filter List. For information on the Domain Filter List, refer to "4 Machine Status" > "Machine Information" > "Print Reports" in the Administrator Guide.
Printing sizeInternet Fax documents received on the machine are printed at the same size as the original documents of the senders.Note • When [TIFF-S] is selected for the profile, the printing size will be A4.
When the loaded paper is not the same size as the sent document or when the paper tray used for printing received documents is restricted, the receiving process will be the same as that for regular faxes.
Receiving e-mailEach e-mail header and attachment (TIFF file) of received e-mail will be printed.
Split documents sent by e-mail
If a document scanned by the machine is split into segments according to the [Maximum Number of Pages per Split Send] setting made with CentreWare Internet Services, each segment will be treated as individual e-mail and attached with the details of split data.
Attachments (TIFF format)
If an unsupported attachment file is received, the file is deleted. You can confirm the error in a Job History Report.
When the folder number is not registered
If the specified folder is not registered, the received data is deleted. You can confirm the cause of the problem in a Job History Report.

4 Fax
172
Fax
4
Folder operations
If the hard disk space of the machine is insufficient while printing e-mail or storing e-mail to the folder, the page being processed will be deleted at the point in time when the machine runs out of hard disk space.
Restricting incoming e-mailThe machine can be configured to accept or reject e-mails received from specified domains. This feature is called "Domain Filtering". You can register up to 50 domains as permitted or rejected domains.
When receiving an e-mail, the machine checks the Domain Filtering settings. If the domain is registered as a rejected domain, or if the domain is not registered as an accepted domain, the machine will not receive the e-mail. You can confirm the result in the Job History Report. The job history of any rejected e-mail is not stored.For information on the Domain Filtering, refer to "5 Tools" > "Connectivity & Network Setup" > "Other Settings" > "Domain Filtering" in the Administrator Guide.
Useful Features
Using an E-mail Address to Send Internet Fax to a FolderBy specifying the e-mail address of a folder on this machine, you can send Internet Fax from an Internet Fax-compatible machine to the folder.
When Internet Fax data is received, the machine stores it in the target folder and prints a Folder Report.This feature is available only when the recipient’s machine can receive e-mail via SMTP. To use this feature, the recipient’s machine must have a folder that does not have a passcode. For information on how to create a folder, refer to "5 Tools" > "Setup" > "Create Folder" in the Administrator Guide.
1 Select [Internet Fax].
2 Select any option.
3 Enter the e-mail address of the target folder in the following format:
BOX (fixed characters to indicate folder) + folder number
@ + host name of the receiving machine
Domain name of the receiving machine
B O X 1 2 3 @ m y h o s t . e x a m p l e . c o m
Example Folder number 123(Enter the digits of the folder number to match those of the recipient)
Host name of the receiving machine myhost
Domain name of the receiving machine example.com

About Internet Fax
173
Fax
4
Important • If the hard disk of the machine becomes full during Internet Fax transmission, the transmission is canceled and the document data is deleted.
Note • If the hard disk of the machine becomes full during scanning of a document, a screen appears to prompt you to select whether to send the job up to the stored pages or to cancel the job. Select one of the processes.
Sending Internet Fax to regular fax machines via a relay stationBy specifying e-mail addresses in a specific format, you can send a document to regular fax machines (that do not support the Internet Fax service) via a network.
This feature enables the machine to first send a document to an Internet Fax-compatible machine (fax gateway) by e-mail via the Internet. The e-mail document is then converted to a fax document on the Internet Fax-compatible machine, and is forwarded to its destinations. If you locate the fax gateway and regular fax machines within an area where the same local rate applies, the fax transmission costs can be reduced.Important • This feature is available only when the fax gateway can receive e-mail via SMTP.
Note • The e-mail received by the fax gateway is deleted even if the fax was not correctly sent.
• The setting specified in [Starting Rate] on the [Fax/Internet Fax Options] screen is used as the communication mode from the fax gateway to the destination fax machine.
• You can restrict fax forwarding in [Fax Transfer from Address Book] and [Fax Transfer Maximum Data Size] in the System Administration mode.
1 Select [Internet Fax].
2 Select any option.
3 Enter the e-mail address of the receiving machine in the following format:
Important • If the hard disk of the machine becomes full during Internet Fax transmission, the transmission is canceled and the document data is deleted.
Note • If the hard disk of the machine becomes full during scanning of a document, a screen appears to prompt you to select whether to send the job up to the stored pages or to cancel the job. Select one of the processes.
Forwarding Files Stored in a FolderYou can automatically forward faxes stored in a folder, as e-mail attachments.
Faxes sent to folders using the fax signal method (proprietary communication procedures), F Code method, or DTMF method, and faxes stored in folders by the Folder Selector feature can be forwarded as e-mail attachments.Important • This feature is available only when the mail receiving protocol is SMTP.
For information on how to forward files in a folder, send files to a folder, use the Folder Selector to receive files in a folder, and print or delete files received in a folder, refer to "Checking/Operating Files in a Folder" (P.341).
FAX= (fixed characters)
Fax number of the recipient
/T33S= (fixed characters) and F code (if necessary)
@ + host name of the machine that converts and sends the received e-mail as a fax.
Domain name
FAX= 0312345678 /T33S=123 @myhost. example.com
Example Fax numberF code (if necessary)Host name of the receiving machineDomain name of the receiving machine
0312345678/T33S=123myhostexample.com

4 Fax
174
Fax
4
For information on how to set the Folder Selector feature, refer to "5 Tools" > "Fax Service Settings" > "Fax Received Options" in the Administrator Guide.
Forwarding Internet FaxThe machine can automatically forward faxes received in a folder or faxes stored in a folder by using the Folder Selector feature to the forwarding address specified for the folder as e-mail.
With this forwarding feature, you can receive Internet Fax documents on your computer without having to walk up to the machine to pick them up. You can also save paper by displaying the documents on your computer screen.
How to forward Internet FaxThe following operations are required for using the forwarding feature of Internet Fax.
On the machine sending a fax
Sending faxes to the folder using the fax signal method (proprietary communication procedure), F Code method, or DTMF method.
For information on the transmission method, refer to "More Options" (P.229).
On the machine receiving the fax in a folder and forwarding an Internet fax
Creating a job flow sheet to specify a forwarding address and then making a link between the job flow sheet and the folder.
For information on how to create a job flow, refer to "5 Tools" > "Setup" > "Create Job Flow Sheet" in the Administrator Guide.
Important • Do not set the address of the machine as the forwarding address.
Note • You can register up to 100 forwarding addresses.
• [Folder Number] and [Passcode] are required by the sender. Inform the sender of the settings.
• If the fax you received is a JBIG-compressed image, and if the Internet Fax profile of the forwarding destination is set to TIFF-F, the image is converted into MH format when forwarding. Also, if the Internet Fax profile is TIFF-S, the fax image is forwarded as is without changing the size and resolution settings.
• If the hard disk in the machine becomes full while the machine is receiving an Internet fax, the reception is canceled and the partly received file is deleted.
• If there is a problem with the data during Internet Fax forwarding, the forwarding is canceled and the received file is stored in the folder.
• If forwarding using SMTP fails, the received file is stored in the folder.
• You can confirm the forwarding result in a Job History Report.
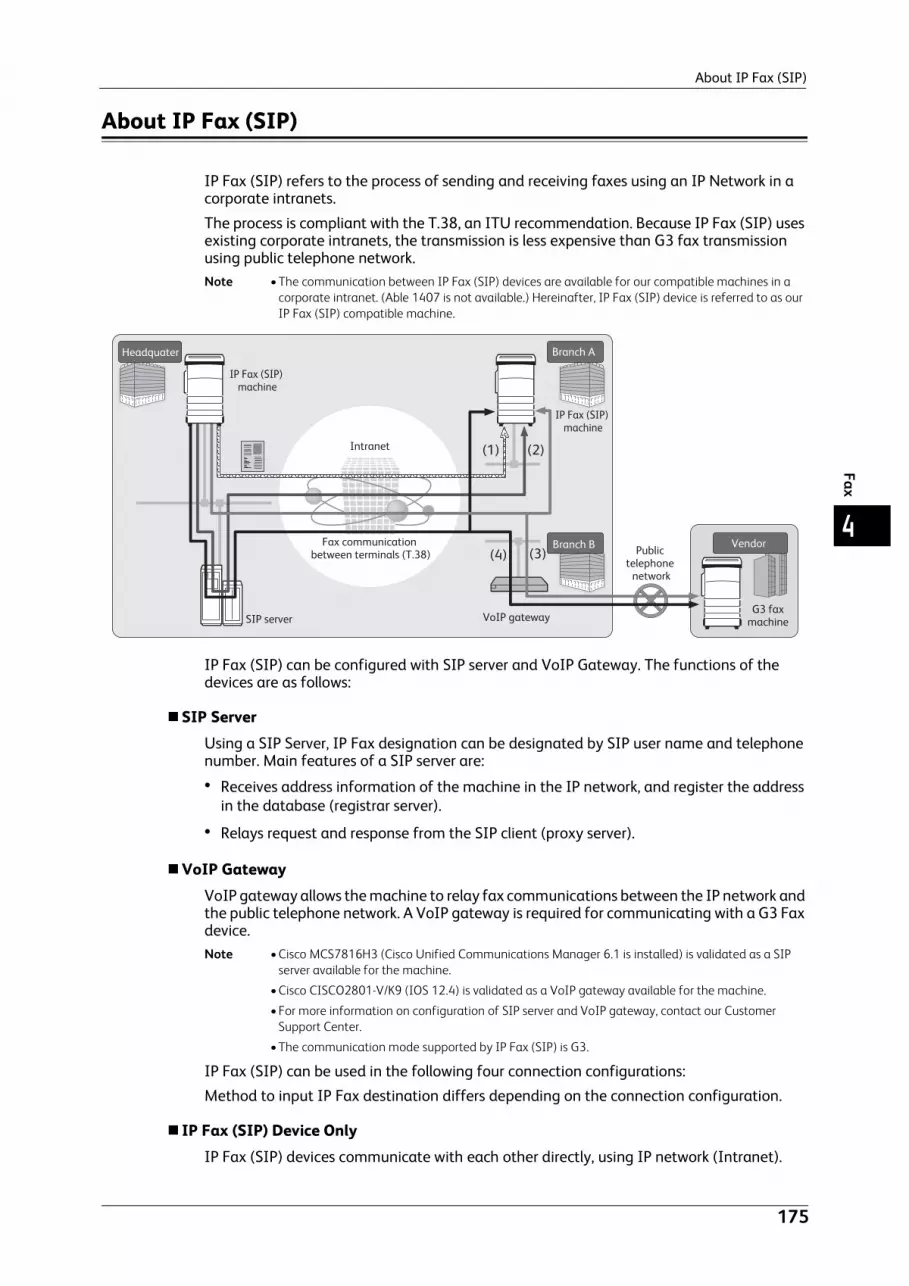
About IP Fax (SIP)
175
Fax
4
About IP Fax (SIP)
IP Fax (SIP) refers to the process of sending and receiving faxes using an IP Network in a corporate intranets.
The process is compliant with the T.38, an ITU recommendation. Because IP Fax (SIP) uses existing corporate intranets, the transmission is less expensive than G3 fax transmission using public telephone network.Note • The communication between IP Fax (SIP) devices are available for our compatible machines in a
corporate intranet. (Able 1407 is not available.) Hereinafter, IP Fax (SIP) device is referred to as our IP Fax (SIP) compatible machine.
IP Fax (SIP) can be configured with SIP server and VoIP Gateway. The functions of the devices are as follows:
SIP ServerUsing a SIP Server, IP Fax designation can be designated by SIP user name and telephone number. Main features of a SIP server are:
Receives address information of the machine in the IP network, and register the address in the database (registrar server).
Relays request and response from the SIP client (proxy server).
VoIP GatewayVoIP gateway allows the machine to relay fax communications between the IP network and the public telephone network. A VoIP gateway is required for communicating with a G3 Fax device.Note • Cisco MCS7816H3 (Cisco Unified Communications Manager 6.1 is installed) is validated as a SIP
server available for the machine.
• Cisco CISCO2801-V/K9 (IOS 12.4) is validated as a VoIP gateway available for the machine.
• For more information on configuration of SIP server and VoIP gateway, contact our Customer Support Center.
• The communication mode supported by IP Fax (SIP) is G3.
IP Fax (SIP) can be used in the following four connection configurations:
Method to input IP Fax destination differs depending on the connection configuration.
IP Fax (SIP) Device OnlyIP Fax (SIP) devices communicate with each other directly, using IP network (Intranet).

4 Fax
176
Fax
4
SIP device address of the communication target shall be designated as an IP Fax (SIP) between IP Fax (SIP) devices. For example, [email protected] (address of SIP device).
SIP Server InstalledIP Fax (SIP) devices communicate via a SIP server, using an IP network (Intranet).
Since SIP server utilizes address translation, IP Fax (SIP) can be sent to IP Fax (SIP) devices by a designated SIP user name or telephone number. For example, 1111 (SIP user name) or 0312345678 (telephone number).
VoIP Gateway InstalledIn addition to direct communication between IP Fax (SIP) devices in an IP network (Intranet), communication with a G3 Fax device, which does not have IP Fax (SIP) feature, is possible using a VoIP gateway.
IP Fax (SIP) can be sent in the following two methods:
For IP Fax (SIP) device, designate the SIP device address of the communication target. For example, [email protected] (SIP device address).
For G3 Fax device, designate the telephone number. For example, 0312345678 (telephone number)
SIP Server and VoIP Gateway InstalledIn addition to the communication between an IP Fax (SIP) device using a SIP server in an IP network (Intranet), communication with a G3 Fax device, which does not have a IP Fax (SIP) features, is possible using a VoIP gateway.
Since SIP server utilizes address translation, an IP Fax (SIP) can be sent to an IP Fax (SIP) device by designating the SIP user name or telephone number.
For G3 Fax device, IP Fax can be sent by designating telephone number.
For example, 1111 (SIP user name) or 0312345678 (telephone number).
IP Fax (SIP) Features
The following describes the IP Fax (SIP) features.
Operations similar to operating regular faxBy selecting [IP Fax (SIP)] and entering address in appropriate form, you can send and receive fax documents in a similar manner of operating regular fax.
Also, you can use most features available for regular fax such as redial feature, remote folder, and others.For other available features, refer to "Feature Comparison with Regular Fax" (P.177).For operations of fax documents received by using the Remote Folder, refer to "Fax/Internet Fax" (P.186).
Reduction of telecommunication feeWithin an intranet, communication between IP Fax (SIP) devices requires no telecommunication fee. For this reason, IP Fax (SIP) is suitable for sending and receiving fax documents between head office and branches in an intranet.
By using a VoIP gateway, you can reduce the telecommunication cost for sending fax documents to the outside of the intranet.
Communication with regular fax machinesWhen a VoIP gateway is installed and configured for IP Fax (SIP), you can have fax communication with G3 fax machines connected to the public telephone network.Note • For the configuration of a VoIP gateway, check with your network administrator.

About IP Fax (SIP)
177
Fax
4
• The Starting Rate supported in IP Fax (SIP) is G3.
Direct FaxYou can use the Direct Fax feature to fax documents created with your computer applications directly in the same manner as printing.For the Direct Fax feature, refer to "Sending Fax" (P.412).
Forwarding feature registered in job flow sheetBy registering job flow, you can forward documents in stored folder or scanned documents via IP Fax (SIP).
Registering in the Job MemoryBy storing a setting you frequently use in IP Fax (SIP), you can call the setting with a single button operation.
Feature Comparison with Regular Fax
The feature comparison between the IP Fax (SIP) and the regular fax is as follows:
*1 : Refers to G3 fax machines connected to the public telephone network.*2 : Available for the Remote Folder and the Relay Broadcast using F code.*3 : Available for the Remote Folder using fax signal method. Unavailable for DTMF method.
FeaturesRegular
fax*1
IP Fax (SIP)
IP Fax (SIP) only SIP server VoIP
Gateway
Redial List O O O O
Relay Broadcast O X X X
Local Name O O O X*2
Starting Rate O O O O
Priority Send O O O O
Delay Start O O O O
Cover Page O O O O
Recipient Print Sets O O O O
Remote Folder O O*3 O*3 X*2
F Code O O O O
Remote Polling O O*4 O*4 O*4
On-hook O X X X
Manual Send O X X X
Manual Receive O X X X
Direct Fax O O O O
Folder Selector - Service Setup O X X X
Folder Selector Setup O O O O
Output Destination Setup O O O O
OX
::AvailableNot available

4 Fax
178
Fax
4
*4 : Available for the Remote Polling and the Store for Secure Polling. Unavailable for the On-hook.
Note • The buttons of some unavailable features are not displayed on the control panel.
Sending IP Fax (SIP)
The following describes the procedure of sending IP Fax (SIP).
1 Select [IP Fax (SIP)] from the options for fax type.
2 Configure features as necessary.
For available features, refer to "Fax/Internet Fax" (P.186).3 Specify a recipient.
Example:
Telephone number: 0312345678
SIP user name: 1111
SIP device address: [email protected]
Important • The method to input IP Fax (SIP) destination differs depending on the fax type of a recipient or the connection configuration. For these differences, refer to "About IP Fax (SIP)" (P.175).
• Check the recipient information before sending the fax.
For the method to specify a recipient using keyboard, refer to "Entering Text" (P.70).For other methods to specify a recipient, refer to "Fax/Internet Fax" (P.186).For the broadcast sending, refer to "Broadcast" (P.235).
4 Press the <Start> button.
Important • If the document has been loaded in the document feeder, do not hold down the document while it is being conveyed.
Note • Depending on the settings, the screen to re-enter the recipient may be displayed after pressing the <Start> button. In this case, re-enter the recipient.
• If a problem occurs, an error message appears on the touch screen. Solve the problem according to the message.
If a fax cannot be sent, refer to "15 Problem Solving" > "Trouble during Faxing" in the Administrator Guide.For the method to cancel sending fax, refer to "Stopping the Fax Job" (P.165).
Receiving IP Fax (SIP)
Received fax documents are printed automatically in a manner similar to that of a regular fax.For information on operations of the Remote Folder, refer to "Receiving Faxes" (P.243).
1 2 3
4 5 6
7 8 9
0 #
C
<Start> button

About Server Fax
179
Fax
4
About Server Fax
If your machine supports the Scan service, installing the Server Fax Kit (optional) allows you to use the Fax service of a Server Fax server.
When your machine does not support the Fax service and supports the Server Fax service only, the Server Fax service will be enabled automatically.
When your machine supports both the Fax and Server Fax services, manually switch to the Server Fax service in the System Administration mode.
With this Server Fax service, you can transfer image data received by the machine to the Server Fax server and can transfer image data received by the Server Fax server to the machine via a network based on the settings you made.
The Server Fax service supports the SMB, FTP, and SMTP protocols.For information on how to connect the machine to a network and how to set the network environment, refer to the Administrator Guide, and the manual included in the Driver CD Kit.
Important • While the Server Fax service is enabled, the Fax service is detected as "not installed" even if the Fax Kit 2 (optional) is installed on the machine. During that time, therefore, fax transmission and reception are disabled and printed reports show that the machine does not support the Fax service.
Note • The Server Fax service cannot be used together with the Fax or Internet Fax service.
• This service is not available for some models. An optional component is required. For more information, contact our Customer Support Center.
Sending Server Fax
1 Select [Fax] on the [Services Home] screen.
2 Use the keyboard to directly enter a destination, or use the Address Book to specify a destination.
For information on how to use the keyboard, refer to "Specifying a Destination using the Keyboard Screen" (P.195).For information on how to use the Address Book, refer to "Specifying a Destination Using the Address Book" (P.187).
Important • When the Server Fax service is used for fax transmission, the attributes other than [Fax Number], [Name], and [Index] are ignored in the Address Book.

4 Fax
180
Fax
4
Features Unavailable for Sending Server FaxThe following features are available for regular faxes, but are not available for server faxes.
* : When the SMB or FTP protocol is used, the available options are [Standard (200 x 100 dpi)] and [Fine (200 dpi)], and the resolution of data that is sent to a final destination depends on the resolution setting on the fax server. When the SMTP protocol is used, the available option is [Fine (200 dpi)] only.
You can specify the following settings of the Server Fax service under [Tools] > [System Settings] > [Scan Service Settings] > [Scan Defaults]:
Background Suppression
Lighten/Darken
Sharpness
Features Available for Sending Server Fax (When SMTP is Used)When the SMTP protocol is used, the Server Fax service is compliant with the E-mail settings configured in the System Administration mode. The following E-mail settings, however, are not available for the Server Fax service:
Read Receipts
Reply To
Screen Features
Fax Resolution*
Transmission Options Priority Send
Cover Page
Recipient Print Sets
Remote Folder
F Code
More Options Remote Polling
Store for Polling
On-hook

Simple Fax
181
Fax
4
Simple Fax
You can select [Fax/Internet Fax] or [Simple Fax] on the [Services Home] screen to set the features for the Fax service.
This section describes the features you can select on the [Simple Fax] screen. [Simple Fax] allows you to use only basic features to easily send faxes. The following shows the reference section for each feature.
Specifying a Destination Using the Numeric Keypad .........................................................................................................181Speed Dialing (Specifying a Destination Using an Address Number).............................................................................182Specifying a Destination Using a One Touch Button ..........................................................................................................183Resolution (Specifying the Scanning Resolution).................................................................................................................184Original Type (Selecting the Document Type) ......................................................................................................................1842 Sided Scanning (Transmitting 2-sided Originals) .............................................................................................................185
1 Select [Simple Fax] on the [Services Home] screen.Note • [Simple Fax] is not displayed on the [Services
Home] screen when the Server Fax service is enabled.
2 Select a feature on the [Simple Fax] screen.
Note • For the Simple Fax service, you can only set [Resolution], [Original Type], and [2 Sided Scanning]. In addition, when you use this service, [Mixed Size Originals] is set to [On], and [Transmission Header Text] is set to [Display Header]. If you want to set the other options, use [Fax/Internet Fax] on the [Services Home] screen to send faxes.
• You cannot switch between [Fax/Internet Fax] and [Simple Fax]. To switch one to another, you must return to the [Services Home] screen. Once you return to the [Services Home] screen, the settings you have made in [Fax/Internet Fax] or [Simple Fax] will be cleared.
Specifying a Destination Using the Numeric Keypad
Specify a destination using the numeric keypad.
1 Enter a fax number using the numeric keypad.
Note • If you have entered an incorrect value, press the <C (Clear)> button and enter the correct value.
1 2 3
4 5 6
7 8 9
0 #
C
Numeric keypad

4 Fax
182
Fax
4
2 Press the <Start> button.
Speed Dialing (Specifying a Destination Using an Address Number)
You can use address numbers to specify recipients. Register the address numbers for speed dialing in advance.When you specify address numbers, confirm that the corresponding fax numbers are correctly registered on the machine. For information on how to register address numbers, refer to "5 Tools" > "Setup" > "Add Address Book Entry" in the Administrator Guide.
Note • If you have entered an incorrect value, press the <C (Clear)> button and enter the correct value.
• You can specify only fax recipients using address numbers for the Simple Fax feature. The numbers registered for the Internet Fax service and IP Fax (SIP) cannot be specified.
1 Press the <Speed Dial> button, and enter a 4-digit address number.Note • If you have entered an incorrect value, press
the <C (Clear)> button and enter the correct value.
2 Press the <Start> button.
3 Confirm the destination displayed on the touch screen, and then select [Yes].
1 2 3
4 5 6
7 8 9
0 #
C
<Start> button
1 2 3
4 5 6
7 8 9
0 #
C
<Speed Dial> button
1 2 3
4 5 6
7 8 9
0 #
C
<Start> button

Simple Fax
183
Fax
4
Specifying a Destination Using a One Touch Button
You can use the one touch buttons to specify recipients. One touch buttons correspond to the address numbers from 0001 to 0052, or 0001 to 0045. For example, when the number you want to dial is registered to the address number 0001, press one touch button <1>.For information on how to register address numbers, refer to "5 Tools" > "Setup" > "Add Address Book Entry" in the Administrator Guide.
Note • There are two ways in which address numbers and stored programs are assigned to the one touch buttons. Select either of the following. By default, [Type 1] is selected.
• [Type 1]The buttons 1 to 52 are used for address numbers and they correspond to the registered address numbers 0001 to 0052, while the buttons 53 and 54 are used for stored programs and they correspond to the registered stored programs 1 and 2.
• [Type 2]The buttons 1 to 45 are used for address numbers and they correspond to the registered address numbers 0001 to 0045, while the buttons 46 to 54 are used for stored programs and they correspond to the registered stored programs 1 to 9.
1 Press a one touch button. Confirm that the recipient (fax number) specified with the one touch button is displayed on the touch screen.
Important • The one touch buttons have a sensor to detect which page of one touch buttons (1 - 18, 19 - 36, or 37 - 54) is currently opened. Before pressing a one touch button, turn over the one touch panel completely, and take your hand off from the panel. Do not press the button while you are turning over the panel.
• Do not place any objects near the one touch buttons or spill any liquid over them.
Note • Turn the one touch panel over to press the one touch buttons 19 and above.
• If you have entered an incorrect value, press the <C (Clear)> button and enter the correct value.
2 Press the <Start> button.
3 Confirm the destination displayed on the touch screen, and then select [Yes].
One touch buttons
1 2 3
4 5 6
7 8 9
0 #
C
<Start> button

4 Fax
184
Fax
4
Resolution (Specifying the Scanning Resolution)
You can set the resolution for the documents to be scanned.Note • The machine scans a document at the specified resolution, but if the recipient's machine does not
support the resolution, the machine automatically changes the resolution to one supported by the recipient's machine and there is a corresponding loss in quality.
• The higher the resolution, the lower the transmission speed. Usually, we recommend that you select [Superfine (400 dpi)] or lower.
• Only [Fine (200 dpi)] is available for the Server Fax service.
You can specify the resolution for each address number. For information on how to register address numbers, refer to "5 Tools" > "Setup" > "Add Address Book Entry" in the Administrator Guide.
1 Select [Resolution].
Standard (200 x 100 dpi)Select this option when transmitting standard documents.
(200 x 100 pels/25.4 mm)
Fine (200 dpi)Select this option when transmitting documents with small text or detailed images.
(200 x 200 pels/25.4 mm)
Superfine (400 dpi)Select this option when transmitting documents with fine images.
(400 x 400 pels/25.4 mm)
Superfine (600 dpi)Select this option when transmitting documents with extremely fine images.
(600 x 600 pels/25.4 mm)
Original Type (Selecting the Document Type)
You can select the type of the original document, such as text and photo documents.
1 Select [Original Type].
TextSelect this option when transmitting a document that contains only text.

Simple Fax
185
Fax
4
Photo & TextSelect this option when transmitting a document that contains both text and photos. The machine automatically distinguishes the text and photo areas and sets the appropriate image quality for each area of the document.
PhotoSelect this option when transmitting a document that contains only photos.Note • If reduced in size, the scan documents may have stripes in their photo areas.
2 Sided Scanning (Transmitting 2-sided Originals)
You can scan a 1-sided or 2-sided document on one or both sides of paper for fax transmission.Note • The image on the back side of a 2-sided document is rotated so that it is placed in the same
orientation as the image on the front side.
1 Select [2 Sided Scanning].
1 SidedSelect this option to scan one side of the document.
2 SidedSelect this option to scan both sides of the document.
2 Sided (Skip Blank Pages)Select this option to scan only the document pages that are not blank. You do not need to take into account which side is the front when sending documents.Important • If you select [2 Sided (Skip Blank Pages)] in [2 Sided Scanning] when the Skip Blank Pages feature is
enabled, image loss may occur on the fax document depending on the recipient's machine. For example, when you select [2 Sided (Skip Blank Pages)] to send an A4 fax document, image loss may occur in the area where the edge erase amounts is set when the fax is printed on an A4 document by the recipient's machine.
• When you select [2 Sided (Skip Blank Pages)] on the [Simple Fax] screen, the machine is set to select [100%] in [Reduce/Enlarge] automatically. When you select an option other than [2 Sided (Skip Blank Pages)], the machine is set to select [Auto %] in [Reduce/Enlarge] automatically.
Note • When [2 Sided (Skip Blank Pages)] is selected, the setting of [Original Type] changes to [Text].
• You can switch whether to enable [2 Sided (Skip Blank Pages)] by pressing the <Energy Saver> button while setting the fax features.
• The level of accuracy in which the machine determines whether a page is blank or not differs depending on a document. For example, if a blank page has background shadows, the machine may not determine the page as a blank page.
• [2 Sided (Skip Blank Pages)] is displayed only when [Skip Blank Pages] is enabled. For more information, refer to "5 Tools" > "Fax Service Settings" > "Fax Control" > "Skip Blank Pages" in the Administrator Guide.

4 Fax
186
Fax
4
Fax/Internet Fax
You can select [Fax/Internet Fax] or [Simple Fax] on the [Services Home] screen to set the features for the Fax service.
This section describes the features you can select on the [Fax/Internet Fax] screen. The following shows the reference section for each feature.
Internet Fax/Fax/IP Fax (SIP) (Selecting Internet Fax/Fax/IP Fax (SIP))...................................................................... 186+ Add (Sending Faxes to Multiple Recipients) ...................................................................................................................... 187Specifying a Destination Using the Address Book............................................................................................................... 187Speed Dialing (Specifying a Destination Using an Address Number) ............................................................................ 191Add New Address (Registering a Destination on the Address Book) .............................................................................. 192Specifying a Destination using a One Touch Button .......................................................................................................... 195Specifying a Destination using the Keyboard Screen ......................................................................................................... 195Specifying a Destination using the Redial Feature.............................................................................................................. 196Specifying a Line (Port) .............................................................................................................................................................. 197Entering Specific Symbols.......................................................................................................................................................... 198Removing/Confirming a Recipient........................................................................................................................................... 198Lighten/Darken (Adjusting Fax Density)................................................................................................................................ 1992 Sided Scanning (Transmitting 2-sided Originals) ............................................................................................................ 199Original Type (Selecting the Document Type)...................................................................................................................... 201Resolution (Specifying the Scanning Resolution) ................................................................................................................ 201
You can customize the layout of features displayed on the [Fax/Internet Fax] screen. For more information, refer to "5 Tools" > "Fax Service Settings" > "Screen Defaults" in the Administrator Guide.
1 Select [Fax/Internet Fax] on the [Services Home] screen.
2 Select a feature on the [Fax/Internet Fax] screen.
Note • Depending on the settings for [Fax Screen Default] in the System Administration mode, the [Fax Address Book] screen is displayed. For more information, refer to "5 Tools" > "Fax Service Settings" > "Screen Defaults" > "Fax Screen Default" in the Administrator Guide.
Internet Fax/Fax/IP Fax (SIP) (Selecting Internet Fax/Fax/IP Fax (SIP))
You can switch among Internet Fax, Fax, and IP Fax (SIP) as necessary.
1 Select [Fax], [IP Fax (SIP)], or [Internet Fax] from the drop-down menu.

Fax/Internet Fax
187
Fax
4
+ Add (Sending Faxes to Multiple Recipients)
The Broadcast Send feature allows you to transmit the same document to multiple recipients in a single operation. There is no need to repeat the same operation for each recipient.For information on the Broadcast Send feature, refer to "Broadcast Send (Transmitting to Multiple Recipients)" (P.235).
Specifying a Destination Using the Address Book
The following describes how to use the Address Book to specify recipients.
The Address Book shows the fax numbers registered in the address numbers.For information on how to register address numbers, refer to "5 Tools" > "Setup" > "Add Address Book Entry" in the Administrator Guide.
Note • Select [Add New Address] on the [Fax Address Book] screen to register a destination. For more information, refer to "Add New Address (Registering a Destination on the Address Book)" (P.192).
Important • When the Server Fax service is used for fax transmission, the attributes other than [Fax Number], [Name], and [Index] are ignored in the Address Book.
When the Address Book Type 1 is Displayed
1 Select [Address Book].
Note • When you select [Address Book], the Address Book [Type1] or [Type2] will be displayed depending on the setting of [Address Book Type] in the System Administration mode. For more information, refer to "5 Tools" > "Address Book Settings" > "Address Book Type" in the Administrator Guide.
• The Directory Service is not available for some models. An optional component is required. For more information, contact our Customer Support Center.
2 Select the item you want to set for a recipient.
Note • To specify multiple recipients, specify the recipients one after another.
• To switch the Address Book entry type, select [Public Entries] or [Network Entries] from the drop-down menu on the [Fax Address Book] screen. The methods that appear in the drop-down menu depend on the settings in the System Administration mode.
• Depending on the network settings, [Search Network] may not appear in the drop-down menu. For information on the Network settings, refer to "5 Tools" > "Connectivity & Network Setup" > "Remote Authentication/Directory Service" > "LDAP Server/Directory Service Settings" in the Administration Guide.
• You can sort recipients in alphabetical order or registered number order.
Important • When specifying an address from the Address Book for Internet Fax/IP Fax (SIP), check if the address contains a domain that is not permitted for use. In this case, the address cannot be used.
Using the Address BookYou can search for the fax numbers of recipients using [Public Entries] and [Network Entries]. You can use [Simple Search] with keywords or [Advanced Search] with multiple attributes for each Address Book searching.
Public EntriesDisplays the list of registered recipients.

4 Fax
188
Fax
4
Network EntriesAllows you to search for fax numbers not in the local address book but the ones registered in a server on a network.
Address typesSelect from [All Types], [Fax], [IP Fax (SIP)], and [Internet Fax].
The features displayed on the screen depend on your machine configuration.
NextThis item is displayed when [Chain Dial] is set to [Yes] in the System Administration mode. Select [Next] to specify another recipient.
When you select [Public Entries]
1 Select at least one recipient.
Note • Select [ ] to return to the previous screen or [ ] to move to the next screen.
• You can sort recipients in alphabetical order or registered number order.
You can set the starting numbers of address numbers in the System Administration mode. For information on how to change the settings, refer to "5 Tools" > "Address Book Settings" > "Fax Speed Dial Default" in the Administrator Guide.
Go toEnter the desired speed dial number with the numeric keypad. The corresponding address appears at the top of the list.
(List/Thumbnail)Allows you to switch the number of the recipients displayed from a list (five items) or thumbnail (15 items).
Speed DialDisplays the list of speed dials.
RecipientDisplays the list of names.
[ ] buttonDisplays detailed information on the recipient.
Add New AddressAllows you to add a new recipient. To add a new recipient, use the keyboard screen or current recipients. For more information on how to add new recipients, refer to "Add New Address (Registering a Destination on the Address Book)" (P.192).
AllLists all the registered recipients for Fax or Internet Fax.
Alphanumeric IndexLists the registered recipients with alphanumeric index characters in alphabetical order.

Fax/Internet Fax
189
Fax
4
GroupLists all the registered Fax Group Recipients.For more information on how to register groups dial numbers, refer to "5 Tools" > "Setup" > "Create Fax Group Recipients" in the Administrator Guide.
SearchAllows you to set [Simple Search] or [Advanced Search].
Searches by the specified keyword for [Simple Search], or by search entries for [Advanced Search].Note • For [Advanced Search], you can set multiple search entries.
When you select [Network Entries]Note • Enable filters from the [Custom Filters] screen using CentreWare Internet Services to search with
keywords ([Simple Search]) without [Name], [Fax Number], or [Custom Item]. For more information, refer to the help of CentreWare Internet Services.
Important • To display the help for CentreWare Internet Services, users need to have the environment to connect to the Internet. The communication fee shall be borne by the users.
1 Select a search target from the drop-down menu on the left.
You can select [Name], [Fax Number], [Internet Fax Address], or [IP Fax (SIP) Number] for a search target.
2 Select an advanced search condition from the drop-down menu on the right.
You can select [Begins With], [Ends With], [Contains], [Equals], or [Registered] for search entries of the Advanced Search.
3 When you select a button other than [Registered], select the box and enter the text.
For information on how to enter characters, refer to "Entering Text" (P.70).
Search EntriesSelect the check boxes to enable the search condition.
Add Search EntriesSelect the check box to create a new search entry.Note • When you have multiple search entries, select [Match All Entries (AND)] or [Match Any Entry (OR)]
from the drop-down menu.
NameSearches with a recipient name as a keyword. After you set an advanced search condition, select the box to display the screen for entering the keyword. Up to 32 characters are allowed.
Example: Smith

4 Fax
190
Fax
4
Fax NumberSearches with a fax number as a keyword. After you set an advanced search condition, select the box to display the screen for entering the keyword. Up to 60 characters are allowed.
Internet Fax AddressSearches with an internet fax address as a keyword. After you set an advanced search condition, select the box to display the screen for entering the keyword. Up to 128 characters are allowed.
Example: [email protected]
IP Fax (SIP) NumberSearches with a telephone number, SIP user name, or SIP device address as a keyword.
After you set an advanced search condition, select the box to display the screen for entering the keyword. Up to 128 characters are allowed.
Example:
Telephone number: 0312345678
SIP user name: 1111
SIP device address: [email protected]
SearchThe search starts. The searched results are listed on the screen.
When the Address Book Type 2 is Displayed
1 Select [Address Book].
Note • When you select [Address Book], the address book [Type1] or [Type2] will be displayed depending on the setting of [Address Book Type] in the System Administration mode. For more information, refer to "5 Tools" > "Address Book Settings" > "Address Book Type" in the Administrator Guide.
• The Directory Service is not available for some models. An optional component is required. For more information, contact our Customer Support Center.
2 Select the item you want to set for a recipient, and select [Add]. Note • To specify multiple recipients, specify them
continuously.
• To switch the Address Book entry type, select [List all public entries], [Retrieve fax entries using index], [List all group entries], or [Search Network] from the drop-down menu on the [Fax Address Book] screen. The methods that appear in the drop-down menu depend on the settings in the System Administration mode.
• Depending on the network settings, [Search Network] may not appear in the drop-down menu. For information on the Network settings, refer to "5 Tools" > "Connectivity & Network Setup" > "Remote Authentication/Directory Service" > "LDAP Server/Directory Service Settings" in the Administration Guide.
• You can sort recipients in alphabetical order or registered number order.
Important • When specifying an address from the Address Book for Internet Fax/IP Fax (SIP), check if the address contains a domain that is not permitted for use. In this case, the address cannot be used.

Fax/Internet Fax
191
Fax
4
Using the Address BookYou can search for the fax numbers of recipients using [List all public entries], [Retrieve fax entries using index], [List all group entries], and [Search Network].You can set the starting numbers of address numbers in the System Administration mode. For information on how to change the settings, refer to "5 Tools" > "Address Book Settings" > "Fax Speed Dial Default" in the Administrator Guide.
List all public entriesDisplays the list of registered recipients.Select [ ] to return to the previous screen or [ ] to move to the next screen. Select items you want to set for a recipient, and select [Add].
Retrieve fax entries using indexAllows you to search for the fax numbers or group names of recipients using texts and numbers specified when registering address numbers. Select items you want to set for a recipient, and select [Add].
List all group entriesAllows you to search for the pre-registered group dial numbers.Select [ ] to return to the previous screen or [ ] to move to the next screen. Select items that you want to specify for a recipient, and select [Add].For more information on how to register groups dial numbers, refer to "5 Tools" > "Setup" > "Create Fax Group Recipients" in the Administrator Guide.
Search NetworkAllows you to search for fax numbers not in the local address book but the one registered in a server on a network. Set any items for [Name], [Fax Number], [Custom Item], and select [Search]. Select items you want to specify for a recipient, and select [Add].
Go toEnter the desired speed dial number with the numeric keypad. The corresponding address appears at the top of the list.
[ ] button
Select an item of which details you want to check, and select the [ ] button.
Chain DialAllows you to combine the fax numbers registered in one touch button, speed dial, and address book respectively and the numbers entered using the numeric keypad to specify as one recipient. You do not use the [+ Add] button.
Show Fax No./E-mail AddressWhen you select this check box, the names of recipients will not be displayed in the recipient fields.
Speed Dialing (Specifying a Destination Using an Address Number)
You can use address numbers to specify recipients. Register the address numbers for speed dialing in advance.
You can use wildcards (the <*> button on the numeric keypad or [*] on the keyboard screen) for the last digit or last two digits of address numbers.
The following tables show examples of using the wildcards to specify multiple recipients.Note • Select [Add New Address] on the [Fax Address Book] screen to register a destination. For more
information, refer to "Add New Address (Registering a Destination on the Address Book)" (P.192).

4 Fax
192
Fax
4
When using a wildcard for the last digit
When using wildcards for the last two digits
When you specify address numbers, confirm that the corresponding fax numbers are correctly registered on the machine. For information on how to register address numbers, refer to "5 Tools" > "Setup" > "Add Address Book Entry" in the Administrator Guide.
Note • The maximum number of recipients that you can specify at one time is as follows: Using address numbers only: 600 locations. Using the numeric keypad in combination with address numbers: 600 locations.
• An address number is always displayed in four digits. If [Auto Validation of Speed Dial Entry] is set to [Validate entry after a fixed time] in the System Administration mode, and for example when you enter "**", "0" is automatically added to the beginning of the wildcards to display "00**". For more information, refer to "5 Tools" > "Common Service Settings" > "Other Settings" > "Auto Validation of Speed Dial Entry" in the Administrator Guide.
• You can use wildcards only for the last digit or last two digits of address numbers. The following is not available: "*100", "**10", and "1*00"
1 Press the <Speed Dial> button, and enter a 4-digit address number. Repeat this step for each additional recipient.
Add New Address (Registering a Destination on the Address Book)
You can register destinations on the Address Book. The current destinations specified on the First Tab screen can also be registered.Note • [Add New Address] is not displayed depending on the settings in the System Administration mode or
depending on the number of registered recipients. Ask your system administrator to confirm the settings and the number of recipients.
How to Enter Wildcard Target Address Numbers The Number of Target Addresses
000* 0001 - 0009 9
001* 0010 - 0019 10
010* 0100 - 0109 10
100* 1000 - 1009 10
How to Enter Wildcard Target Address Numbers The Number of Target Addresses
00** 0001 - 0099 99
01** 0100 - 0199 100
10** 1000 - 1099 100
1 2 3
4 5 6
7 8 9
0 #
C
<Speed Dial> button

Fax/Internet Fax
193
Fax
4
1 Select [Add New Address].
2 Select a method to register a recipient.
NewEnter a new recipient using the keyboard.
Add From RedialSelect a recipient to be registered from the Redial list.Note • This item does not appear on the screen when the Server Fax service is enabled.
• This item cannot be selected when no telephone number is stored in Redial List.
Add current recipientSelect a recipient to be registered from the current recipients specified on the First Tab screen.Note • his item cannot be selected if no recipient is specified on the First Tab screen.
When [New] is selected
3 Use the keyboard displayed on the screen to enter a fax number with up to 128 single-byte characters.
4 Select [Next].
Note • To return to the previous screen, select the [Back] button.
When [Add From Redial] is selected
3 Select a recipient to be registered.
Note • Speed Dial, Group, and Broadcast Recipients cannot be selected.
4 Select [Next].
Note • To return to the previous screen, select the [Back] button.
When [Add current recipient] is selected
3 Select a recipient to be registered.
Note • Speed Dial, Group, and Broadcast Recipients cannot be selected.
4 Select [Next].
Note • To return to the previous screen, select the [Back] button.

4 Fax
194
Fax
4
5 Select [Name], enter a name using the keyboard displayed on the screen, and then select [Save].
For information on how to enter characters, refer to "Entering Text" (P.70).
6 When you change the index, select [Index], select a new character from the keyboard displayed on the screen, and then select [Save].
You can register a single alphanumeric index character for use as a keyword to search with the Address Book.For information on how to enter characters, refer to "Entering Text" (P.70).
7 When you change the address number, select [Change], select a number from the list, and then select [Save].
8 Select [Next].
Note • To return to the previous screen, select the [Back] button.
9 Select an item to set and set.
The following items appear:
Address Type
Fax Number
E-mail Address
Name
Index
Extension/Outside Line
Relay Station Setup
Starting Rate
Resolution
Cover Page
Maximum Image Size
Delay Start
Remote Folder
F Code
Relay Broadcast
Billing - Day Time, Billing - Night Time, Billing - Midnight
Internet Fax Profile
S/MIME Certificate

Fax/Internet Fax
195
Fax
4
Note • To delete the input data and return to the [Fax Address Book] screen, select [Cancel].
The items displayed on the screen depend on the Address Book entry type. For more information on the setting items, refer to "5 Tools" > "Setup" > "Add Address Book Entry" in the Administrator Guide.
10 When the settings are completed, select [Registered].
Note • To return to the previous screen, select the [Back] button.
Specifying a Destination using a One Touch Button
You can use the one touch buttons to specify recipients. One touch buttons correspond to the address numbers from 0001 to 0052, or 0001 to 0045. For example, when the number you want to dial is registered to the address number 0001, press one touch button <1>.For information on how to register address numbers, refer to "5 Tools" > "Setup" > "Add Address Book Entry" in the Administrator Guide.
Note • There are two ways in which address numbers and stored programs are assigned to the one touch buttons. Select either of the following. By default, [Type 1] is selected.
- [Type 1]The buttons 1 to 52 are used for address numbers and they correspond to the registered address numbers 0001 to 0052, while the buttons 53 and 54 are used for stored programs and they correspond to the registered stored programs 1 and 2.
- [Type 2]The buttons 1 to 45 are used for address numbers and they correspond to the registered address numbers 0001 to 0045, while the buttons 46 to 54 are used for stored programs and they correspond to the registered stored programs 1 to 9.
1 Press a one touch button. Confirm that the recipient (fax number) specified with the one touch button is displayed on the touch screen.
Important • The one touch buttons have a sensor to detect which page of one touch buttons (1 - 18, 19 - 36, or 37 - 54) is currently opened. Before pressing a one touch button, turn over the one touch panel completely, and take off your hand from the panel. Do not press the button while you are turning over the panel.
• Do not place any objects near the one touch buttons, nor spill any liquid over them.
Note • To specify multiple recipients, press the one touch buttons continuously.
• Turn the one touch panel over to press the one touch buttons 19 and above.
Specifying a Destination using the Keyboard Screen
You can specify recipients using the keyboard screen.Important • When transmission to a certain recipient is prohibited in the System Administration mode, the [New
Recipients] button cannot be used.
One touch buttons

4 Fax
196
Fax
4
1 Select [New Recipients].
2 Specify a recipient with up to 128 characters using the keyboard displayed on the touch screen.
Note • When the Server Fax service is used, a destination must be less than 50 characters long. The available characters are as follows:
Specifying a Destination using the Redial Feature
You can specify recipients using the Redial feature.Important • When transmission to a certain recipient is prohibited in the System Administration mode, the
[Redial list] button cannot be used.
1 Select [Redial List].
0 to 9 Numeric characters
- Pause
# A starting character for a group number
\ A delimiter for private data. Using this character before and after private data hides the destination string.
S A character for password verification
: DTMF signal
= A character to wait for dial tones
+ Available, but ignored
(Space) Available, but ignored
For more information, refer to the documentation provided with the Server Fax Kit.

Fax/Internet Fax
197
Fax
4
2 Select items you want to specify for a recipient, and select [Close].
Specifying a Line (Port)
You can specify lines using the keyboard screen. When the Additional G3 Port Kit 2 (optional) is installed, you can specify the line (port) and send faxes. Local terminal information can be registered to each line. You can use each line for a different purpose.Important • When transmission to a certain recipient is prohibited in the System Administration mode, the [New
Recipients] button cannot be used.
For information on how to set [Local Terminal Information], refer to "5 Tools" > "Fax Service Settings" > "Local Terminal Information" in the Administrator Guide.
1 Select [New Recipients].
2 Select [Shift], and enter in the following format: "<", "port number", ">", "recipient’s telephone number"
The following shows the corresponding lines to each port.
<1>: Line 1
<2>: Line 2
<3>: Line 3
Example when using Line 1: <1>XXXXXXXXXX

4 Fax
198
Fax
4
Entering Specific Symbols
When specifying a recipient, you can use the following features to enter specific symbols on the touch screen.
When using the DTMF method, use specific symbols. For information on the DTMF method, refer to "Remote Folder (Using Remote Folder)" (P.219) and "Broadcast" (P.235).
Removing/Confirming a Recipient
You can remove or confirm recipients from the pop-up menu.
1 Select the recipient to be removed or confirmed from the selected recipients.
2 Select any option from the pop-up menu.
RemoveRemoves the recipient.
DetailsDisplays the [Details] screen. You can confirm recipients or address numbers.
Feature Button Function Input method
Enter pause - or <Pause> (-)
Used to enter a pause.One pause is 3 seconds.You can enter pauses of 6 seconds, 9 seconds, etc. with additional button presses.
Press the <Pause> button.(Example)0-123 ...0--123 ...
Transmit using a password
S When a password has been set, transmission will start only if the password matches the ID number on the remote terminal.
1. Select [New Recipients] on the [Fax/Internet Fax] screen to display the keyboard.
2. Select [S].(Example)0312345678S12345678
Transmit DTMF signal
! Used to transmit the DTMF signal.
1. Select [New Recipients] on the [Fax/Internet Fax] screen to display the keyboard.
2. Select [More Characters].
3. Select [!].(Example)0311123456!123#
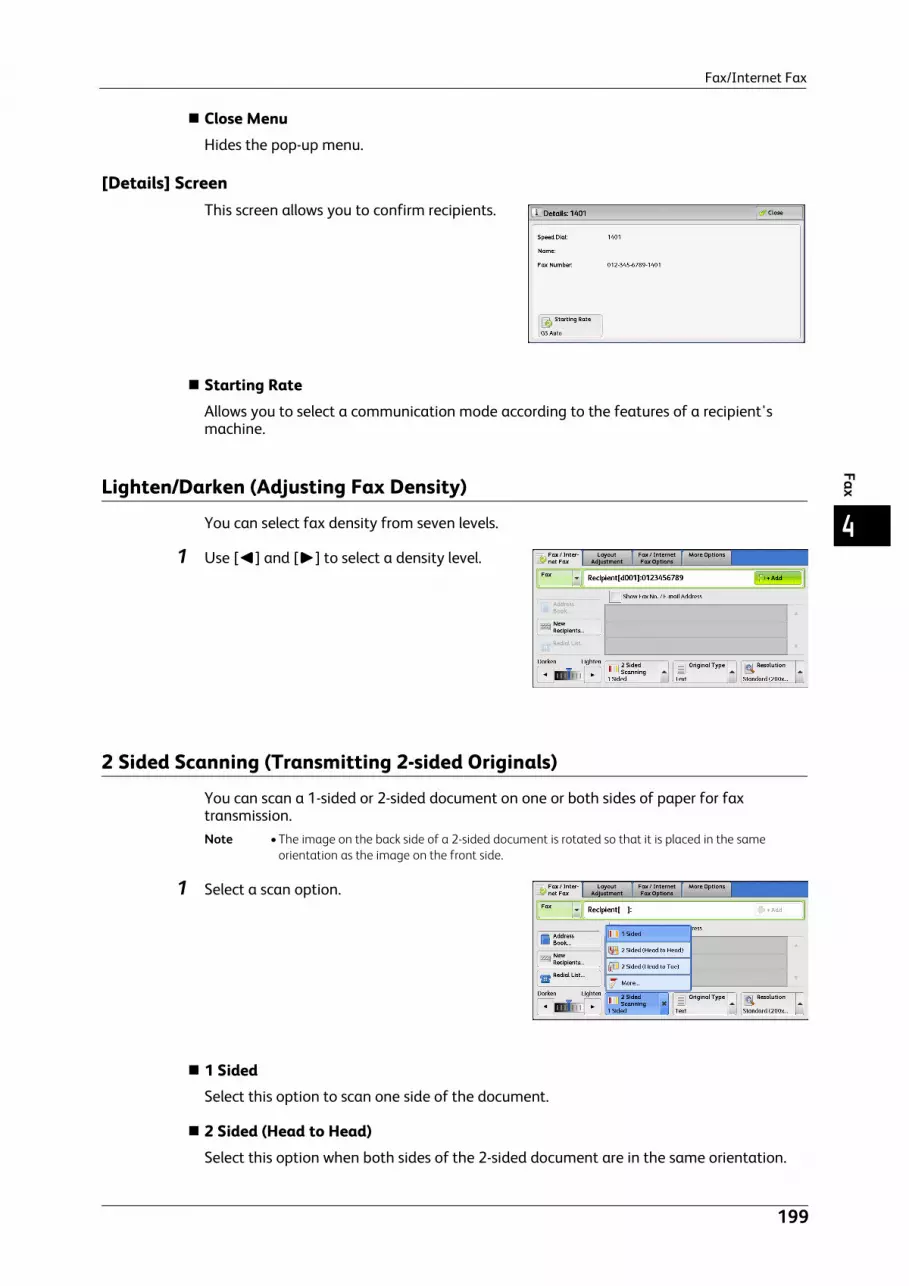
Fax/Internet Fax
199
Fax
4
Close MenuHides the pop-up menu.
[Details] ScreenThis screen allows you to confirm recipients.
Starting RateAllows you to select a communication mode according to the features of a recipient's machine.
Lighten/Darken (Adjusting Fax Density)
You can select fax density from seven levels.
1 Use [ ] and [ ] to select a density level.
2 Sided Scanning (Transmitting 2-sided Originals)
You can scan a 1-sided or 2-sided document on one or both sides of paper for fax transmission.Note • The image on the back side of a 2-sided document is rotated so that it is placed in the same
orientation as the image on the front side.
1 Select a scan option.
1 SidedSelect this option to scan one side of the document.
2 Sided (Head to Head)Select this option when both sides of the 2-sided document are in the same orientation.

4 Fax
200
Fax
4
2 Sided (Head to Toe)Select this option when both sides of the 2-sided document are in opposite orientations.
MoreDisplays the [2 Sided Scanning] screen.Refer to "[2 Sided Scanning] Screen" (P.200).
[2 Sided Scanning] Screen
1 Select whether the document is one-sided or two-sided. When [2 Sided] or [2 Sided (First Page 1 Sided)] is selected, also select the orientation of the document.
1 SidedSelect this option to scan one side of the document.
2 SidedSelect this option to scan both sides of the document.
2 Sided (First Page 1 Sided)Select this option to scan the front side of the first page and both sides of the remaining pages. Use this option when the back side of the first page is blank.
2 Sided (Skip Blank Pages)Select this option to scan only the document pages that are not blank. You can send documents without concerning for which side is the front.Important • If you select [2 Sided (Skip Blank Pages)] in [2 Sided Scanning] when the Skip Blank Pages feature is
enabled, image loss may occur on the fax document depending on the recipient's machine. For example, when you select [2 Sided (Skip Blank Pages)] to send an A4 fax document, image loss may occur in the area where the edge erase amounts is set when the fax is printed on an A4 document by the recipient's machine.
Note • When [2 Sided (Skip Blank Pages)] is selected, the settings change as follows:[Original Type]: [Text] [Lighten / Darken]: [Normal][Reduce/Enlarge]: [100%]
• You can switch whether to enable [2 Sided (Skip Blank Pages)] by pressing the <Energy Saver> button while setting the fax features.
• The level of accuracy in which the machine determines whether a page is blank or not differs depending on a document. For example, if a blank page has background shadows, the machine may not determine the page as a blank page.
[2 Sided (Skip Blank Pages)] is displayed only when [Skip Blank Pages] is enabled. For more information, refer to "5 Tools" > "Fax Service Settings" > "Fax Control" > "Skip Blank Pages" in the Administrator Guide.
OriginalsSelect [Head to Head] when both sides of the documents are in the same orientation. Select [Head to Toe] when the front and back sides of the documents are in opposite orientations.

Fax/Internet Fax
201
Fax
4
Original Type (Selecting the Document Type)
You can select the type of the original document, such as text and photo documents.
1 Select the original type.
TextSelect this option when transmitting a document that contains only text.
Photo & TextSelect this option when transmitting a document that contains both text and photos. The machine automatically distinguishes the text and photo areas and sets the appropriate image quality for each area of the document.
PhotoSelect this option when transmitting a document that contains only photos.Note • If reduced in size, the scan documents may have stripes in their photo areas.
Resolution (Specifying the Scanning Resolution)
You can set the resolution for the documents to be scanned.Note • The machine scans a document at the specified resolution, but if the recipient's machine does not
support the resolution, the machine automatically changes the resolution to one supported by the recipient's machine and there is a corresponding loss in quality.
• The higher the resolution, the lower the transmission speed. Usually, we recommend that you select [Superfine (400 dpi)] or lower.
• Only [Fine (200 dpi)] is available for the Server Fax service.
You can specify the resolution for each address number. For information on how to register address numbers, refer to "5 Tools" > "Setup" > "Add Address Book Entry" in the Administrator Guide.
1 Select the resolution.
Standard (200 x 100dpi)Select this option when transmitting standard documents.
(Approx. 200 x 100 pels/25.4 mm)
Fine (200 dpi)Select this option when transmitting documents with small text or detailed images.

4 Fax
202
Fax
4
(Approx. 200 x 200 pels/25.4 mm)
Superfine (400 dpi)Select this option when transmitting documents with fine images.
(400 x 400 pels/25.4 mm)
Superfine (600 dpi)Select this option when transmitting documents with extremely fine images.
(600 x 600 pels/25.4 mm)

Layout Adjustment
203
Fax
4
Layout Adjustment
This section describes the features you can select on the [Layout Adjustment] screen. The following shows the reference section for each feature.
2 Sided Scanning (Transmitting 2-sided Originals) .............................................................................................................203Original Size (Specifying the Scan Size for the Original) ....................................................................................................203Mixed Size Originals (Scanning Different Size Documents Simultaneously).................................................................204Book Faxing (Scanning Facing Pages onto Separate Sheets)...........................................................................................205Reduce/Enlarge (Specifying a Scan Ratio).............................................................................................................................207Stamp (Adding a Stamp when Scanning a Document)......................................................................................................208
1 Select [Fax/Internet Fax] on the [Services Home] screen.
2 Select a feature on the [Layout Adjustment] screen.
2 Sided Scanning (Transmitting 2-sided Originals)This feature is the same as [2 Sided Scanning] on the [Fax/Internet Fax] screen. For more information, refer to "2 Sided Scanning (Transmitting 2-sided Originals)" (P.199).
Original Type (Selecting the Document Type)This feature is the same as [Original Type] on the [Fax/Internet Fax] screen. For more information, refer to "Original Type (Selecting the Document Type)" (P.201).
Resolution (Specifying the Scanning Resolution)This feature is the same as [Resolution] on the [Fax/Internet Fax] screen. For more information, refer to "Resolution (Specifying the Scanning Resolution)" (P.201).
Original Size (Specifying the Scan Size for the Original)
You can specify the scan size for fax transmission.
Use this feature when a document is a non-standard size, or when you want to scan a document at a size different from the original size. You also can add margins, or delete unwanted margins.

4 Fax
204
Fax
4
You can change the default values for buttons other than [Auto Detect] in the System Administration mode. For information on how to change the default values, refer to "5 Tools" > "Fax Service Settings" > "Original Size Defaults" in the Administrator Guide.
1 Select [Original Size].
2 Select any option.
Auto DetectDetects the document size automatically.
Note • If the document size cannot be detected automatically, a screen to enter the document size appears.
The document sizes that can be automatically detected depend on [Paper Size Settings] in the System Administration mode. For information on [Paper Size Settings], refer to "5 Tools" > "Common Service Settings" > "Other Settings" > "Paper Size Settings" in the Administrator Guide.
Standard SizeSelect the original size from preset sizes.You can change the sizes displayed on the screen. For more information, refer to "5 Tools" > "Fax Service Settings" > "Original Size Defaults" in the Administrator Guide.
Mixed Size Originals (Scanning Different Size Documents Simultaneously)
You can scan documents of various sizes simultaneously and send faxes using each size or a single size of paper. To use this feature, load the documents in the document feeder.Important • Load documents in landscape orientation. However, always load A5 and B5 documents in portrait
orientation so that the machine can detect the size of the documents automatically.
• When loading documents, align the top left corners of the documents properly. Otherwise, a paper jam may occur.
• The recommended document size combinations are A4 portrait and A3 landscape, or B5 portrait and B4 landscape. If another combination of document sizes is used, the documents can be fed at an angle and may not be scanned properly.
Note • Be sure to set [Original Size] to [Auto Detect] on the [Layout Adjustment] screen, when using the Mixed Size Originals feature.
Document Feeder Document Glass
Auto-detectableDocument size
B5, B5 , B4, A5, A5 , A4,
A4 , A3, 8.5 x 11",
8.5 x 11" , 11 x 17, 16K , 8K
B6, B5, B5 , B4, A6, A5, A5 ,
A4, A4 , A3

Layout Adjustment
205
Fax
4
• This feature does not appear for some models. An optional component is required. For more information, contact our Customer Support Center.
1 Select [Original Size].
2 Confirm that [Auto Detect] is selected, and select [Save]. If [Auto Detect] is not selected, select [Auto Detect] and then [Save].
3 Select [Mixed Size Originals].
4 Select [On].
OffSelect this option when all documents are of the same size.
OnWhen scanning documents of different sizes, the machine automatically detects the size of each document.
Book Faxing (Scanning Facing Pages onto Separate Sheets)
You can scan the left and right pages of a bound document separately to fax them. This feature is useful if you want to separately scan facing pages of a bound document.Note • You cannot use the document feeder with this feature.
• A non-standard size document or undetectable-size document may not be separated into two accurately.

4 Fax
206
Fax
4
1 Select [Book Faxing].
2 Select any option.
OffDoes not scan as a bound document.
Left Page then RightScans the left page and then the right page of facing pages.
Right Page then LeftScans the right page and then the left page of facing pages.
Top Page then BottomScans the top page and then the bottom page of facing pages.
Both PagesScans both pages in page order.
Left Page OnlyScans the left page only. You can select this option when [Left Page then Right] or [Right Page then Left] is selected.
Right Page OnlyScans the right page only. You can select this option when [Left Page then Right] or [Right Page then Left] is selected.
Top Page OnlyScans the top page only. You can select this option when [Top Page then Bottom] is selected.
Bottom Page OnlyScans the bottom page only. You can select this option when [Top Page then Bottom] is selected.

Layout Adjustment
207
Fax
4
Reduce/Enlarge (Specifying a Scan Ratio)
This feature enlarges or reduces scanned images with a specified ratio.Important • Some destination machines may not be able to receive faxes at the specified ratio.
1 Select [Reduce/Enlarge].
2 Select a preset ratio, or specify a value.
Note • If a magnification is specified in [Reduce/Enlarge], [Rotate 90 degrees] does not function.
Variable %Specify a ratio in the range from 50 to 400% in 1% increments. To specify a value, use the numeric keypad or [+] and [-].
Preset %
100%
Scans at the same size as the original.
Auto %
If the scan width of the document exceeds the maximum image size, the scanned image is rotated or reduced to fit the maximum size.
When the speed dialing is used, the maximum image size will be the size registered in the Address Number. When speed dialing is not used, the maximum size will be A3.
Note • You can specify whether to rotate documents in the System Administration mode. For more information, refer to "5 Tools" > "Fax Service Settings" > "Fax Control" > "Rotate 90 degrees" in the Administrator Guide.
Preset ratios
Select from preset scan ratios.
You can change the default values of scan ratios other than [100%] and [Auto %]. For more information, refer to "5 Tools" > "Fax Service Settings" > "Reduce/Enlarge Presets" in the Administrator Guide.

4 Fax
208
Fax
4
Stamp (Adding a Stamp when Scanning a Document)
This feature stamps a circle mark at the bottom corner of each document page when it is fed through the document feeder. This helps you easily check if each page of the documents has been scanned correctly.Important • Stamps cannot be affixed on the following documents:
- Documents loaded on the document glass
- Documents suspended by pressing the <Stop> button
- Documents suspended by paper jams
- 1-sided documents longer than 600 mm
- 2-sided documents longer than 431.8 mm
- Documents not fed into the document feeder.
- Documents suspended due to memory overflow
- Documents that were being scanned when an immediate transmission is suspended
Note • This feature does not appear for some models. An optional component is required. For more information, contact our Customer Support Center.
1 Select [Stamp].
2 Select [On].
OffNo stamp is affixed.
OnA stamp is affixed.

Fax/Internet Fax Options
209
Fax
4
Fax/Internet Fax Options
This section describes the features you can select on the [Fax/Internet Fax Options] screen. The following shows the reference section for each feature.
Acknowledgement Report (Confirming Transmission Results).........................................................................................209Starting Rate (Selecting a Communication Mode)..............................................................................................................211Priority Send/Delay Start (Specifying Send Priority/Send Time) ......................................................................................212Transmission Header Text (Adding Sender Name and Phone Number to Faxes) .......................................................214Cover Page (Transmitting Documents With a Cover Page) ...............................................................................................215Internet Fax Subject (Specifying the Internet Fax Subject) ..............................................................................................217Internet Fax Message (Editing the Internet Fax Mail Contents) .....................................................................................217Recipient Print Sets (Printing Multiple Sets at the Remote Machine).............................................................................218Pages per Side (Combining Multiple Pages into One Sheet).............................................................................................219Remote Folder (Using Remote Folder)....................................................................................................................................219F Code (Using F Code Transmission) .......................................................................................................................................223Internet Fax Profile (Specifying Internet Fax Profiles) .......................................................................................................226Encryption (Sending Internet Fax Encrypted by S/MIME).................................................................................................227Digital Signature (Sending Internet Fax with a Digital Signature by S/MIME)............................................................228
1 Select [Fax/Internet Fax] on the [Services Home] screen.
2 Select a feature on the [Fax/Internet Fax Options] screen. Note • Only [Delay Start] is available for the Server
Fax service.
Acknowledgement Report (Confirming Transmission Results)
You can check fax and Internet Fax transmission results.
To receive fax transmission results, select [On] in [Confirmation Options] on the [Acknowledgement Report] screen. By enabling this feature, the machine automatically prints a Transmission Report when fax transmission completes successfully, and prints a Transmission Report - Job Undelivered when fax transmission ends unsuccessfully.
To confirm Internet Fax transmission results, the following two types are available: [Read Receipts] and [Delivery Receipts].
Selecting [Delivery Receipts] allows you to check whether or not the Internet Fax you sent was delivered successfully to the recipient’s folder.
Selecting [Read Receipts] allows you to check whether or not the Internet Fax you sent was correctly delivered and the attached files were correctly processed.

4 Fax
210
Fax
4
Note • The optional component is required to use the Read Receipts and Delivery Receipts features. For information, contact our Customer Support Center.
• Read Receipts (MDN) and Delivery Receipts (DSN) are available when the recipient’s machine supports MDN and DSN, respectively.
• You can select either [Read Receipts] or [Delivery Receipts] in the System Administration mode. For more information, refer to "5 Tools" > "Fax Service Settings" > "Internet Fax Control" > "Delivery Confirmation Method" in the Administrator Guide.
• You can only use the Delivery Receipts (DSN) feature to check the delivery of e-mail to servers that support this feature. Furthermore, if any of the e-mail servers on the transmission route do not support DSN, you cannot verify the delivery of the e-mail, even if the e-mail has been delivered successfully. For this reason, the result of the Delivery Receipts may differ from the actual delivery status.
• If [Confirmation Options] is set to [On] and the transmission completes unsuccessfully, a Transmission Report - Job Undelivered will be printed.
The following procedure uses the Read Receipts feature as an example. The procedure is the same for the Delivery Receipts feature.
1 Select [Acknowledgement Report].
2 Select any option.
Confirmation Options
Off
No Transmission Report is printed.
On
A Transmission Report is automatically printed when the transmission completes successfully. If the transmission does not end successfully, a Transmission Report - Job Undelivered is printed.
Read Receipts
Off
Disables the Read Receipts feature.
On
Enables the Read Receipts feature. You can check whether the Internet Fax you sent was correctly delivered and the attached files were correctly processed.
Delivery Receipts
Off

Fax/Internet Fax Options
211
Fax
4
Disables the Delivery Receipts feature.
On
Enables the Delivery Receipts feature. You can check whether the Internet Fax you sent was correctly delivered to the destination folder.
Starting Rate (Selecting a Communication Mode)
You can select a communication mode based on the features of the remote machine.
G3 is the international standard for facsimile transmissions established by the ITU-T.When you use speed dialing, one touch buttons, group dial number or address book to specify a recipient registered in an address number, the communication mode currently set to the address number is set and cannot be changed. For information on how to register address numbers, refer to "5 Tools" > "Setup" > "Add Address Book Entry" in the Administrator Guide.You can change the default mode of [Starting Rate] in the System Administration mode. For information on how to change the default mode, refer to "5 Tools" > "Fax Service Settings" > "Fax Defaults" > "Starting Rate" in the Administrator Guide.
1 Select [Starting Rate].
2 Select any option.
G3 AutoSelect this mode if the remote machine is G3 compatible. This mode is normally selected.
Depending on the reception capabilities of the remote machine, the machine automatically switches modes in the following order: G3 Unique ECM G3 Unique ITU-T G3 ECM ITU-T G3.
Forced 4800 bpsSelect this mode when transmitting over noisy or poor telephone lines, as can be the case with overseas calls.
Also select this mode when transmitting over noisy or poor telephone lines domestically.
G4 AutoThis setting is applied to the transmission speed between the fax gateway and destination fax for the Internet Fax.
About Forced 4800 bpsYou can communicate with faxes overseas via telephone company exchanges, etc.

4 Fax
212
Fax
4
Note • The international telephone networks are originally designed for voice communications. Noise that does not really affect voice communications causes a problem with fax communications. It may result in the deterioration of images quality, the inability to transmit a fax, or even terminate the transmission. Regardless of whether transmission is successful, you are charged for the call once the line is connected. For information on line trouble and call charges, contact your telephone company.
• If you select [Forced 4800 bps], the transmission time may be longer because transmission is performed at 4800 bps or less to ensure transmission is successful.
1 Select [Starting Rate].
2 Select [Forced 4800 bps], and then select [Save].
3 Enter the recipient fax number in the same manner as when you make an international call.
The following is an example:
Important • In some areas, you may need to enter a pause after the telephone company ID number.
Note • For information on the telephone company ID number, contact your telephone company.
Priority Send/Delay Start (Specifying Send Priority/Send Time)
The Priority Send feature allows you to give priority to a fax or polling job over other jobs.
The Delay Start feature allows you to specify when to send your fax. This feature is useful for sending faxes when communication charges are low, such as during night time.Note • [Priority Send/Delay Start] is not available for Internet Fax.
• The Priority Send feature is not available for Server Fax.
• For Server Fax, [Delay Start] is available when the FTP of SMB protocol is used, but not when the SMTP protocol is used.
• When [Delay Start] is set for Server Fax, this setting applies to transmission from the Server Fax server to a final destination, but not from the machine to the Server Fax server.
• [Priority Send] can be set in combination with [Delay Start]. If both features are set, Priority Send is performed at the time specified in [Delay Start].
Telephone company ID
Fax number of the other party
Country code
Area code

Fax/Internet Fax Options
213
Fax
4
1 Select [Priority Send/Delay Start].
2 Select any option.
Priority Send
Off
Priority Send is not applied.
On
Priority Send is applied.Note • If the Priority Send feature is selected during transmission, the fax will be sent after the current
transmission ends.
• In redial mode, the fax will be resent preferentially after the specified redial interval.
• The Priority Send feature cannot be set separately for each recipient of Broadcast and multi-polling jobs.
You can give priority to a pending job. For more information, refer to "Job Status" (P.385).
Delay Start
Off
Delay Start is not applied.
Specific Time
Delay Start is applied.Note • You can specify a time within 24 hours in 1 minute increments. You cannot specify a date.
• You can set [Delay Start] independently for each address number. For information on how to register address numbers, refer to "5 Tools" > "Setup" > "Add Address Book Entry" in the Administrator Guide.
• If you use address numbers or group dial numbers to specify recipients for the Broadcast Send feature, the [Delay Start] setting specified for each address number is invalid.
• If the fax cannot be sent at the specified time because, for example, the telephone line is busy, it will be sent as soon as the line becomes available.
Specific TimeDisplays the [Delay Start - Specific Time] screen. Refer to "[Delay Start - Specific Time] Screen" (P.214).

4 Fax
214
Fax
4
[Delay Start - Specific Time] ScreenThis screen allows you to specify the start time for fax transmission.Note • You can change the default value of [Specific Time] in the System Administration mode. For more
information, refer to "5 Tools" > "Fax Service Settings" > "Fax Defaults" > "Delay Start - Specific Time" in the Administrator Guide.
1 Select [AM] or [PM].
2 Set [Hours] and [Minutes].
Important • If you press the <Start> button after the specified time, the stored document will be sent at the specified time on the following day.
Transmission Header Text (Adding Sender Name and Phone Number to Faxes)
The Transmission Header Text feature adds the start time, sender name, recipient name, G3 ID, and number of pages onto the transmitted document.
This feature enables the recipient to confirm when and from whom the fax was sent.Important • Header information is printed at the top of the document, so an area of about 3 to 5 mm may not
be printed at the top of each page at the remote machine.
Note • If the document is resent, "Resend" is printed at the left of the date and time indication.
• If this feature is enabled for Broadcast Send, header information is attached to faxes for all the recipients.
• The start time is printed in the format set on the machine (12 or 24 hour clock). For information on how to set the time, refer to "5 Tools" > "Common Service Settings" > "Machine Clock/Timers" in the Administrator Guide.
• The recipient name is only added if it has been registered in the address number.
• If you specify the line to send a fax, the sender name registered for the selected line is printed. If you do not specify a line, the sender name (company logo) of the machine is printed, but not the sender name of the line.
For information on the sender name and G3 ID, refer to "5 Tools" > "Fax Service Settings" > "Local Terminal Information" in the Administrator Guide.You can change the default value of [Transmission Header Text] in the System Administration mode. For information on how to change the default value, refer to "5 Tools" > "Fax Service Settings" > "Fax Defaults" > "Transmission Header Text" in the Administrator Guide.
1 Select [Transmission Header Text].

Fax/Internet Fax Options
215
Fax
4
2 Select [Display Header].
OffNo header information is attached.
Display HeaderHeader information is attached.
Cover Page (Transmitting Documents With a Cover Page)
This feature allows you to attach a cover page to the document.
The cover page includes the recipient name, comment, sender name, machine fax number, number of pages, and date and time of transmission.You can specify whether to attach a cover page for each address number. For information on how to register address numbers, refer to "5 Tools" > "Setup" > "Add Address Book Entry" in the Administrator Guide.
Note • This feature is not available for the Server Fax service.
• When [Transmission Header Text] is set, the header information is not printed on the cover page.
• You cannot use the Cover Page feature for Broadcast transmission using the numeric keypad. To use this feature for Broadcast transmission, register recipients to address numbers.
• The size and resolution of the cover page is based on the first page of the document.
1 Select [Cover Page].
2 Select [Print Cover Page].
OffNo cover page is added.
Print Cover PageA cover page is added.

4 Fax
216
Fax
4
CommentsDisplays the [Cover Page - Comments] screen. Refer to "[Cover Page - Comments] Screen" (P.216).
[Cover Page - Comments] ScreenThis screen allows you to select comments to be added to the recipient and sender fields.
1 Select any option.
Recipient's CommentDisplays the registered comments in the recipient field. Select a comment to be used. Select [None] when no comment is added to this field.
Sender's CommentDisplays the registered comments in the sender field. Select a comment to be used. Select [None] when no comment is added to this field.For information on how to register comments, refer to "5 Tools" > "Setup" > "Add Fax Comment" in the Administrator Guide.
About the Cover Page
ToWhen an address number is used, the recipient name registered for the address number is printed. This field is blank if no recipient name is registered for the address number.
Recipient's CommentPrints the comment selected in [Recipient’s Comment].
FromPrints the registered sender name.
Sender's CommentPrints the comment selected in [Sender’s Comment].
Fax NumberPrints the fax number of the machine. For G3 communications, "G3 ID" is printed.
Number of PagesPrints the number of pages.
Send Date and TimePrints the transmission date and time.
RemarksPrints remarks when the document is sent using Broadcast, Folder, Relay Broadcast, or Redial Mode.

Fax/Internet Fax Options
217
Fax
4
Internet Fax Subject (Specifying the Internet Fax Subject)
You can specify an Internet Fax subject. If no subject is specified, the preset subject is automatically entered.
1 Select [Internet Fax Subject].
2 Select [Keyboard].
3 Enter a subject with up to 128 characters using the displayed keyboard.
For information on how to enter characters, refer to "Entering Text" (P.70).
Note • If no subject is entered, the following will be automatically entered as a subject: [InternetFAX;<From> ; <Send Date and Time>].
Internet Fax Message (Editing the Internet Fax Mail Contents)
You can edit Internet Fax comments. Enter text using the keyboard or use a pre-registered comment.For information on how to register comments, refer to "5 Tools" > "Setup" > "Add Fax Comment" in the Administrator Guide.
1 Select [Internet Fax Message].
2 Select any option.
Delete TextDeletes the comment displayed on the screen.

4 Fax
218
Fax
4
KeyboardAllows you to enter body text using the displayed keyboard. Up to 256 characters can be entered.
You can also select [Add Comment] to select a registered comment and edit it.For information on how to enter characters, refer to "Entering Text" (P.70).
Add CommentAllows you to insert a registered comment. Select this button to display the [Add Comment] screen. Refer to "[Add Comment] Screen" (P.218).
[Add Comment] ScreenThis screen allows you to select a comment to be added.
1 Select any option.
Select CommentDisplays the registered comments.For information on how to register comments, refer to "5 Tools" > "Setup" > "Add Fax Comment" in the Administrator Guide.
Recipient Print Sets (Printing Multiple Sets at the Remote Machine)
This feature allows you to print multiple sets of a fax document at the remote machine.Note • This feature is not available for the Server Fax service.
1 Select [Recipient Print Sets].
2 Select any option.
1 SetThe remote machine will output one set of the fax document.

Fax/Internet Fax Options
219
Fax
4
Multiple SetsAllows you to specify the number of print sets the remote machine will output, in the range from 2 to 99 in 1 set increments. Use [+] and [-] or the numeric keypad to specify the value.
Pages per Side (Combining Multiple Pages into One Sheet)
This feature allows you to send a fax by combining multiple pages of a document into one side of a single sheet of paper. For example, if you have a document of 12 pages, and you specify 3, the machine combines the scan data into 4 pages. You can specify a value for [Pages per Side] in the range from 2 to 9.Important • If the length of each resultant page is too long, the output data may be split on the recipient’s
machine.
• If the number of pages of documents is smaller than the specified pages, the scanned number of pages will be only combined and transmitted.
Note • This feature is not available for some models. An optional component is required. For more information, contact our Customer Support Center.
1 Select [Pages per Side].
2 Select [On].
OffThe Pages per Side feature is not applied.
OnAllows you to scan multiple pages of a document onto one side of a single sheet of paper for fax transmission. Specify the number of pages in [Originals] to fit onto one sheet. Use [+] and [-] or the numeric keypad to specify the value.
Remote Folder (Using Remote Folder)
This feature allows you to send or receive confidential documents that you do not want others to see.Note • This feature is not available for the Server Fax service.
• The fax signal method and F code method are available in IP Fax (SIP). For the method to use remote folder using the F code method, refer to "F Code (Using F Code Transmission)" (P.223).
• In the IP Fax (SIP) using VoIP Gateway, remote folder using the fax signal method is not available. Only the F code method is available.

4 Fax
220
Fax
4
Sending to Folder (Fax Signal Method)This feature allows you to send a file directly to a folder on the remote machine. The file can be printed on the remote machine. To use this feature, you need the folder number and passcode of the remote folder.
Secure Polling (Fax Signal Method)This feature allows you to retrieve a file from a folder on a remote machine by sending a polling request from your machine. To use this feature, you need the folder number and passcode of the remote folder.
The retrieved file is stored in a folder on the machine. When a file is received in a folder, the <Data> indicator lights up and a Folder Report is printed. The Folder Report lists the folder number and name.Important • You cannot use polling to retrieve files from multiple remote folders simultaneously.
Note • The DTMF method is available for Remote Folder. The supported signals are numerals, "?", and "#" only.
For information on how to print files received in a folder, refer to "Printing Files in a Folder" (P.345).Files received in folders can be automatically printed depending on the folder settings. For information on the folder settings, refer to "Configuring/Starting Job Flow" (P.348).Depending on the report print settings, a Folder Report may not be printed even after a file is received in a folder. For information on the Folder Report setting, refer to "5 Tools" > "Common Service Settings" > "Reports" > "Folder Report" in the Administrator Guide.
Sending to Folder (DTMF Method)To send a fax to a folder using the DTMF method, you need the folder number of the remote folder. Two DTMF methods are available: Auto and Manual.
Sending to Folder (Fax Signal Method)
1 Select [Remote Folder].
2 Select [On].
OffDisables the Remote Folder feature.
OnEnables the Remote Folder feature. Enter a folder number in [Remote Folder Number].

Fax/Internet Fax Options
221
Fax
4
Remote Folder NumberSelect the [Remote Folder Number] box, and enter a 3-digit folder number of the remote machine using the numeric keypad.
Folder PasscodeSelect the [Folder Passcode] box, and enter the 4-digit passcode of the remote folder using the numeric keypad. If a passcode is not set, leave this box blank.
Secure Polling (Fax Signal Method)
1 Select [More Options] tab to display the [More Options] screen.
2 Select [Remote Polling].
3 Select [Poll a Remote Device].
4 Select [Save].
5 Select the [Fax/Internet Fax Options] tab to display the [Fax/Internet Fax Options] screen, and select [ ] to display the next page.
6 Select [Remote Folder].

4 Fax
222
Fax
4
7 Select [On].
OffDisables the Secure Polling feature.
OnEnables the Secure Polling feature. Enter a folder number in [Remote Folder Number].
Remote Folder NumberSelect [Remote Folder Number] box, and enter a 3-digit folder number of the remote machine using the numeric keypad.
Folder PasscodeSelect [Folder Passcode] box, and enter the 4-digit passcode of the remote folder using the numeric keypad. If a passcode is not set, leave this box blank.
Format for Auto Send (DTMF Method)
1 Select [New Recipients] on the [Fax/Internet] screen to display the keyboard on the touch screen, and enter the destination and passcode in the following format.
Format for Manual Send (DTMF Method)
1 Select [On-hook (Manual Send/Receive)] on the [More Options] screen to display the keyboard on the touch screen, and enter the destination and passcode in the following format.
Note • Use the keyboard on the touch screen to enter symbols such as "!" and "?". For information on how to enter characters, refer to "Entering Text" (P.70).
• Enter a passcode only if necessary.
• You can specify any machine that supports our DTMF method feature.
By registering destinations in address numbers using the above dialing formats, you can use the address numbers for the Secure Polling feature. For information on how to register address numbers, refer to "5 Tools" > "Setup" > "Add Address Book Entry" in the Administrator Guide.
Telephone number of remote machine
Passcode of folder on remote
machine
Folder number on remote machine
Telephone number of remote machine
Passcode of folder on remote
machine
Folder number on remote machine
Facsimile tone Beep!
Beep! Ready to start

Fax/Internet Fax Options
223
Fax
4
F Code (Using F Code Transmission)
F Code is the transmission procedure set by the Communications and Information Network Association of Japan and is the T.30 (communication protocol) method for using sub-addresses that was standardized by the ITU-T. The F Code feature enables various features to be used with transmission among F Code-compatible machines regardless of their manufacturers.
When using F Code transmission, use an F Code and password. The F Code, which is also called a sub-address by other companies, must be registered (entered). Set the password if necessary.Note • This feature is not available for the Server Fax service except when an F code is included in a dialing
number.
• To use the F Code feature, you need to confirm the F Code of the recipient’s machine in advance.
• If you perform Sending to Folder or Secure Polling between machines of this model, we recommend that you use the fax signal method.
You can set the F Code and password for each address number. For information on how to register address numbers, refer to "5 Tools" > "Setup" > "Add Address Book Entry" in the Administrator Guide.You can use the Relay Broadcast and Remote Relay Broadcast features with F Code transmission. For information on Relay Broadcast and Remote Relay Broadcast, refer to "Relay Broadcast (Transmitting Documents Through a Relay Station)" (P.236) and "Remote Relay Broadcast (Performing Relay Broadcast to Remote Locations)" (P.239), respectively.
You can use the following features with F Code transmission.
Sending to Folder (F Code Method)When a folder is set on a remote machine, you can send a document directly to the folder by specifying the F code (sub-address) and password (if set up) of the folder.
Obtain the F code (sub-address) and password of the remote folder in advance.
Example of specifying a destination:
Secure Polling (F Code Method)When a folder is set on a remote machine, you can perform secure polling for the folder by specifying its F code (sub-address) and password (if set up).
If you use your machine to perform secure polling for a folder on a remote machine, obtain the F Code (sub-address) and password of the target folder.
If you use a remote machine to perform secure polling for a folder on your machine, give the following information.
Note • The DTMF method is available for Remote Folder. The supported signals are numerals, "?", and "#" only.
A file received in the folder can automatically be printed depending on the folder settings. For information on the folder settings, refer to "Configuring/Starting Job Flow" (P.348).Depending on the report print settings, a Folder Report may not be printed even after a file is received in a folder. For information on the Folder Report setting, refer to "5 Tools" > "Common Service Settings" > "Reports" > "Folder Report" in the Administrator Guide.For information on how to print files received, refer to "Printing Files in a Folder" (P.345).
F Code (sub-address) : 0 (to designate an F Code transmission) and the folder number of a folder on the remote machine
Password (if set up) : The password of the remote folder
F Code (sub-address) : 0 (to designate an F Code transmission) and the folder number of the target folder
Password (if necessary) : The password of the target folder

4 Fax
224
Fax
4
Sending to Folder (F Code Method)
1 Select [F Code].
2 Select [On].
3 Select the [F Code] box, and enter an F code using the keyboard or the numeric keypad.
Note • You can enter up to 20 digits for the F code.
4 If necessary, select the [Password] box, and enter a password using the keyboard or the numeric keypad.Note • You can enter up to 20 digits for the password.
OffThe F code transmission is not used.
OnThe F code transmission is used. Enter the F Code.
F CodeSelect the [F Code] box, and enter the F code using the keyboard or the numeric keypad.Note • You can enter up to 20 digits for the F Code.
PasswordSelect the [Password] box, and enter the password using the keyboard or the numeric keypad. If a password is not set, leave this box blank.Note • You can enter up to 20 digits for the password.
KeyboardYou can use the keyboard to enter the F code or the password.For information on how to enter texts, refer to "Entering Text" (P.70).
5 Specify a destination, and then press the <Start> button.

Fax/Internet Fax Options
225
Fax
4
Secure Polling (F Code Method)
1 Select the [More Options] tab to display the [More Options] screen.
2 Select [Remote Polling].
3 Select [Poll a Remote Device].
4 Select [Save].
5 Select the [Fax/Internet Fax Options] tab to display the [Fax/Internet Fax Options] screen.
6 Select [F Code].
7 Select [On].
8 Select the [F Code] box, and enter the F Code using the keyboard or the numeric keypad.
Note • You can enter up to 20 digits for the F Code.
9 If necessary, select the [Password] box, and enter a password using the keyboard or the numeric keypad.Note • You can enter up to 20 digits for the password.
OffDisables the Secure Polling feature.

4 Fax
226
Fax
4
OnEnables the Secure Polling feature.
F CodeSelect the [F Code] box, and enter the F code using the keyboard or the numeric keypad.Note • You can enter up to 20 digits for the F Code.
PasswordSelect the [Password] box, and enter the password using the numeric keypad. If a password is not set, leave this box blank.Note • You can enter up to 20 digits for the password.
KeyboardYou can use the keyboard to enter the F code or the password.For information on how to enter texts, refer to "Entering Text" (P.70).
10 Specify a destination, and then press the <Start> button.
Internet Fax Profile (Specifying Internet Fax Profiles)
A profile is specified to restrict attribute information such as image resolution and paper size for transmissions between Internet Fax-compatible machines.Note • The profiles that can be processed differ depending on the Internet Fax-compatible machine of the
recipient. Before specifying a profile, confirm the profiles the Internet Fax-compatible machine of the recipient can process.
• If inconsistency occurs between a profile, and stored document size and resolution, priority is given to the settings specified in the profile.
• If the profile differs for each recipient when using Broadcast Send, the smallest size becomes the maximum image size.
You can set an Internet Fax profile for each address number. For information on how to register address numbers, refer to "5 Tools" > "Setup" > "Add Address Book Entry" in the Administrator Guide.You can change the default value of [Internet Fax Profile] in the System Administration mode. For information on how to change the default value, refer to "5 Tools" > "Fax Service Settings" > "Fax Defaults" > "Internet Fax Profile" in the Administrator Guide.
1 Select [Internet Fax Profile].
2 Select any option.

Fax/Internet Fax Options
227
Fax
4
TIFF-SThis profile is the Internet Fax standard. For documents that are larger than A4, the size is reduced automatically to A4 for transmission.
Note • [TIFF-S] is not available when [Superfine (400 dpi)] or [Superfine (600 dpi)] is selected in [Resolution] on the [Fax/Internet Fax] screen.
TIFF-FSelect this profile when you specify super-fine for the resolution or when you send A3 or B4 documents.
Note • When a fax is sent to a machine that does not support TIFF-F, the recipient’s machine will not be able to display or print the images.
TIFF-JSelect this profile for sending documents in JBIG.
Note • When a fax is sent to a machine that does not support TIFF-J, the recipient’s machine will not be able to display or print the images.
Encryption (Sending Internet Fax Encrypted by S/MIME)
You can send Internet Fax encrypted by S/MIME.
When sending encrypted Internet Fax, select an e-mail address associated with a certificate that can be encrypted, from the Address Book.Note • To send Internet Fax encrypted by S/MIME, register certificates of the machine and the recipient’s
machine in advance. For information on certificates, refer to "13 Encryption and Digital Signature Settings" > "Configuration of E-mail Encryption/Digital Signature" in the Administrator Guide.
• You can change the default value of [Internet Fax Encryption] in the System Administration mode. For information on how to change the default value, refer to "5 Tools" > "Fax Service Settings" > "Fax Defaults" > "Internet Fax Encryption" in the Administrator Guide.
• This feature does not appear for some models. An optional component is required. For more information, contact our Customer Support Center.
OffSends Internet Fax without encryption.
OnSends encrypted Internet Fax.
Encoding method : MH
Stored document size : A4
Resolution : Standard (200 x 100 dpi), Fine (200 dpi)
Encoding method : MMR
Stored document size : A4, B4, A3
Resolution : Standard (200 x 100 dpi), Fine (200 dpi),Superfine (400 dpi), Superfine (600 dpi)
Encoding method : JBIG
Stored document size : A4, B4, A3
Resolution : Standard (200 x 100 dpi), Fine (200 dpi),Superfine (400 dpi), Superfine (600 dpi)

4 Fax
228
Fax
4
Digital Signature (Sending Internet Fax with a Digital Signature by S/MIME)
You can send Internet Fax with a digital signature by S/MIME.
Digital Signature allows a recipient to confirm whether the contents of the Internet Fax are changed, or whether the Internet Fax is sent from the proper sender.Note • To send Internet Fax with a digital signature by S/MIME, register certificates of the machine and the
recipient’s machine in advance. For information on certificates, refer to "13 Encryption and Digital Signature Settings" > "Configuration of E-mail Encryption/Digital Signature" in the Administrator Guide.
• When [Digital Signature - Outgoing Internet Fax] is set to [Do not add signature] or [Always add signature] in the System Administration mode, depending the selected option, [On] or [Off] is displayed on the [Digital Signature] screen, which cannot be changed. For information on [Digital Signature - Outgoing Internet Fax], refer to "5 Tools" > "Connectivity & Network Setup" > "Security Settings" > "S/MIME Settings" in the Administrator Guide.
• This feature does not appear for some models. An optional component is required. For more information, contact our Customer Support Center.
OffSends Internet Fax without a digital signature.
OnSends Internet Fax with a digital signature.

More Options
229
Fax
4
More Options
This section describes the features you can select on the [More Options] screen. The following shows the reference section for each feature.
Remote Polling (Retrieving Files from Remote Machines) .................................................................................................229Store for Polling (Storing Files on the Machine that a Remote Machine can Retrieve)..............................................232On-hook (Confirming Remote Machine Response Prior to Transmission) .....................................................................233
1 Select [Fax/Internet Fax] on the [Services Home] screen.
2 Select a feature on the [More Options] screen.
Remote Polling (Retrieving Files from Remote Machines)
Remote Polling is a feature that allows your machine to retrieve a file stored in a remote machine. You are charged for the transmission fee.
This feature is used for Facsimile Information Services.For information on Facsimile Information Services, refer to "Receiving Faxes" (P.243).
Note • The Remote Polling feature may not be available depending on the remote machine.
• This feature is not available for the Server Fax service.
• When you specify polling in combination with [Delay Start] on the [Fax/Internet Fax Options] screen, you can retrieve a file at a specified time.
Remote PollingYou can retrieve a file stored on a remote machine by sending a polling request from your machine. You can also retrieve files from multiple machines. This is called Multi-Polling.
Secure Polling (DTMF Method)You can retrieve a file from a folder on a remote machine by sending a request from your machine. A folder must be created on the remote machine. If the folder is passcode-protected, you can retrieve a file confidentially.Important • You cannot use polling to retrieve files from multiple remote folders simultaneously.
Note • The DTMF method is not available in the IP Fax (SIP).
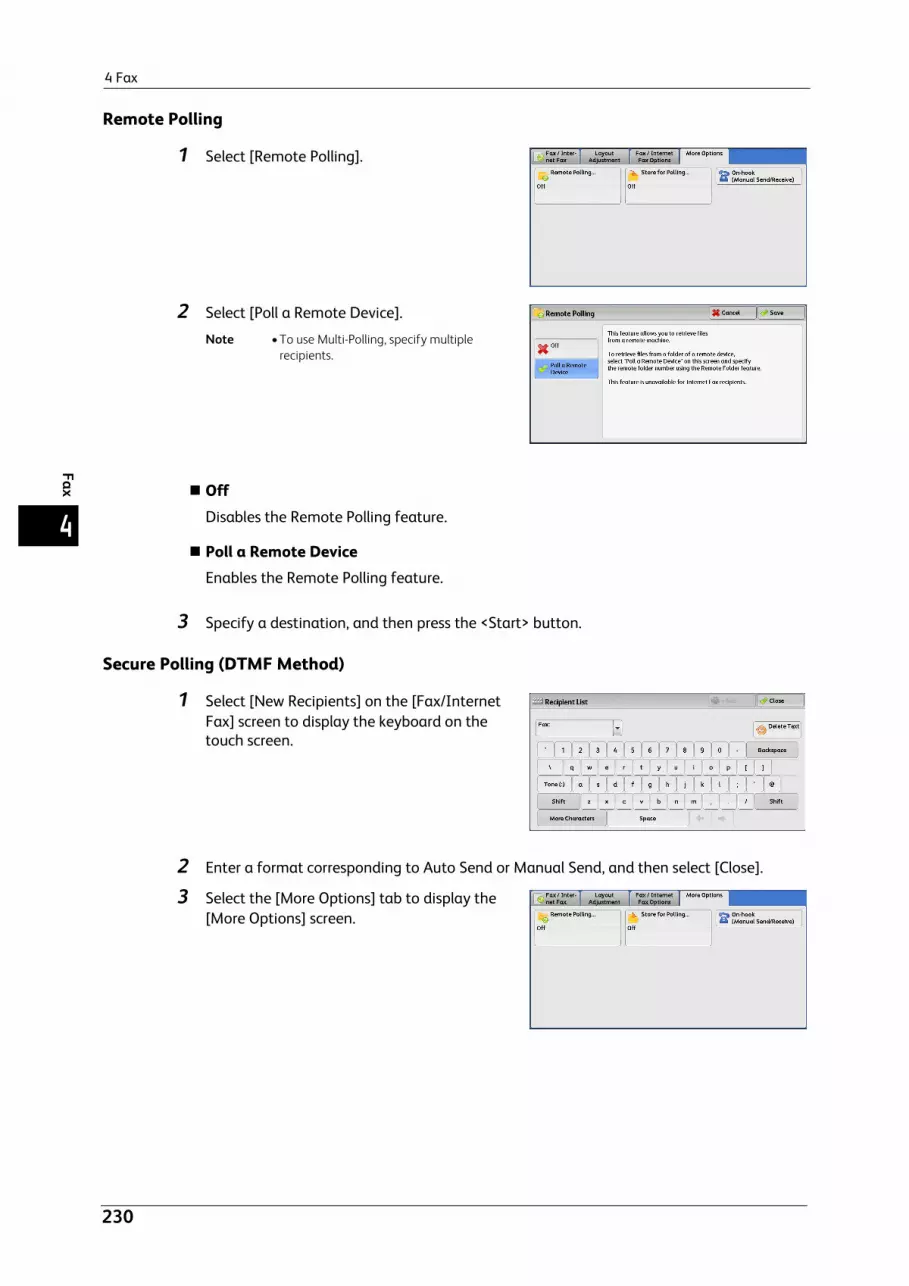
4 Fax
230
Fax
4
Remote Polling
1 Select [Remote Polling].
2 Select [Poll a Remote Device].
Note • To use Multi-Polling, specify multiple recipients.
OffDisables the Remote Polling feature.
Poll a Remote DeviceEnables the Remote Polling feature.
3 Specify a destination, and then press the <Start> button.
Secure Polling (DTMF Method)
1 Select [New Recipients] on the [Fax/Internet Fax] screen to display the keyboard on the touch screen.
2 Enter a format corresponding to Auto Send or Manual Send, and then select [Close].
3 Select the [More Options] tab to display the [More Options] screen.

More Options
231
Fax
4
4 Select [Remote Polling].
5 Select [Poll a Remote Device].
6 Select [Save].
OffDisables the Secure Polling feature.
Poll a Remote DeviceEnables the Secure Poling feature.
Format for Auto Send
Format for Manual Send
Note • Use the keyboard on the touch screen to enter symbols such as "!" and "?". For information on how to enter characters, refer to "Entering Text" (P.70).
• Enter a passcode only if necessary.
• You can specify any machine that supports our DTMF method feature.
By registering destinations in address numbers using the above dialing formats, you can use the address numbers for the Secure Polling feature. For information on how to register address numbers, refer to "5 Tools" > "Setup" > "Add Address Book Entry" in the Administrator Guide.
Telephone number of remote machine
Passcode of folder on remote
machine
Folder number on remote machine
Telephone number of remote machine
Passcode of folder on remote
machineFolder number on remote machine
Facsimile tone Beep!
Beep! Ready to start

4 Fax
232
Fax
4
Store for Polling (Storing Files on the Machine that a Remote Machine can Retrieve)
Store for Polling is a feature that store a file on your machine so that a remote machine can retrieve it from your machine. The following two methods are available for Store for Polling: Store for Free Polling and Store for Secure Polling.The machine can be set to automatically delete files after they are retrieved with polling. For more information, refer to "5 Tools" > "Fax Service Settings" > "Fax Control" > "Polled Files - Auto Delete" in the Administrator Guide.
Note • This feature is not available for the Server Fax service.
1 Select [Store for Polling].
2 Select any option.
OffDisables a Store for Polling feature.
Store for Free PollingStores the file in a public folder on the machine. The file in the public folder can be retrieved by a remote machine.
Store for Secure PollingStores a file in a private folder on the machine. If the folder is passcode-protected, the file can be retrieved by a remote machine confidentially.You need to create a private folder in advance. For more information on how to create a folder, refer to "5 Tools" > "Setup" > "Create Folder" in the Administrator Guide.
Save in:
When [Store for Free Polling] is selected
The [Public Folder] button is displayed. Selecting this button displays the [Public Folder] screen.
Refer to "[Public Folder] Screen" (P.233).
When [Store for Secure Polling] is selected
The [Private Folder] button is displayed. Selecting this button displays the [Folder] screen. Select a folder to store files in for Secure Polling.
For information on how to select a folder, refer to "Selecting a Folder" (P.340). For information on how to check files for Secure Polling, refer to "Checking/Operating Files in a Folder" (P.341).
3 Press the <Start> button.

More Options
233
Fax
4
[Public Folder] ScreenThis screen allows you to print and delete files stored for Free Polling.
1 Select the file to be printed or deleted. You can select either one file or all files. Note • Select [ ] to return to the previous screen or
[ ] to move to the next screen.
RefreshRefreshes the information about files stored in the public folder.
Select AllSelects all files stored in the public folder.
DeleteDeletes the selected file. Selecting this button displays a confirmation screen. Select [Delete] on the screen to delete the file.
PrintPrints the selected file.
On-hook (Confirming Remote Machine Response Prior to Transmission)
Use this feature when using Manual Send.
Manual Send is the transmission method that allows you to send a fax after you make a phone call to a remote machine and then check that the connection is established. This feature can be used with the receiver either off-hook or on-hook.
We recommend that you set the line monitor volume to "Loud".Note • If an error occurs during transmission of, for example, the second page, the transmission of the first
page may also end abnormally.
• The On-hook feature is not available in the IP Fax (SIP).
You can change the volume of the line monitor in the System Administration mode. For information on how to change the volume, refer to "5 Tools" > "Common Service Settings" > "Audio Tones" > "Line Monitor Volume" in the Administrator Guide.
1 Pick up the telephone receiver, or select [On-hook (Manual Send/Receive)].

4 Fax
234
Fax
4
2 Select any option.
Manual Receive/Manual SendUse the drop-down menu to switch between [Manual Receive] and [Manual Send].
Entering a destinationUse alphanumeric characters to specify a destination.Note • Some touch-tone services may not be available even if you set your telephone to send tones.
• When the line type is set to a tone line, [:] (Tone) is not displayed on the screen. If you want to send tones (or to use the touch-tone services) while using a pulse line, select [:] (Tone).
More CharactersSelect this button to display a symbol screen, allowing you to use symbols to specify a destination.
Line CutCuts the line connected.
Manual Send : Allows you to check if connection is established before sending a fax.
Manual Receive : Allows you to receive a fax manually, such as Facsimile Information Services.

Broadcast
235
Fax
4
Broadcast
This section describes how to set Broadcast Send and Relay Broadcast.Broadcast Send (Transmitting to Multiple Recipients).......................................................................................................235Relay Broadcast (Transmitting Documents Through a Relay Station)...........................................................................236Remote Relay Broadcast (Performing Relay Broadcast to Remote Locations).............................................................239
Broadcast Send (Transmitting to Multiple Recipients)
The Broadcast Send feature allows you to transmit the same document to multiple recipients in a single operation. There is no need to repeat the same operation for each recipient.
When the Additional G3 Port Kit 2 (optional) is installed, you can use the extra lines to make multiple transmissions simultaneously with Broadcast Send.
If you specify Broadcast Send, the machine prints a Broadcast/Multi-Poll Report after the Broadcast Send operation finishes.Note • You can use Broadcast Send by specifying recipients from Fax, Internet Fax, and IP Fax (SIP) for a
single job. (Mix Broadcast).
• The maximum number of recipients that you can specify at one time is as follows: Using the numeric keypad: 200 locations; using address numbers: 600 locations; and using the numeric keypad in combination with address numbers: 600 locations.
• The address numbers 0001 - 0052, or 0001 - 0045 correspond to the one touch buttons 1 - 52, or 1 - 45. For more information on the one touch buttons, refer to "Control Panel" (P.61).
• When using Broadcast Send, the Cover Page and Remote Folder features are not available even if they are enabled on the control panel. If you want to use [Cover Page] and [Remote Folder], set them when registering each recipient in an address number.
• [Confirmation Options] is not available. Check a Broadcast/Multi-Poll Report to see transmission results.
Show Fax No./E-mail AddressIf you select this check box, the recipient’s name will not be displayed in the recipient field.
Enable BroadcastTo prevent missending a fax to multiple recipients, you can set whether to use Broadcast Send prior to specifying multiple recipients. Select the [Enable Broadcast] check box to specify multiple recipients.[Enable Broadcast] is displayed only when [Broadcast Checkbox on 1st Tab] is set to [Enabled]. For more information on the setting, refer to "5 Tools" > "Fax Service Settings" > "Fax Control" > "Broadcast Checkbox on 1st Tab" in the Administrator Guide.
1 Select the first recipient.
Note • When you specify recipients from Fax and Internet Fax for a single job (Mix Broadcast), select the fax type for each recipient from the drop-down menu.
2 Select [+ Add].
3 Select the next recipient.
4 Repeat Step 2 and Step 3.

4 Fax
236
Fax
4
5 Press the <Start> button.
6 Select [Yes] on the confirmation screen to start transmission.
Relay Broadcast (Transmitting Documents Through a Relay Station)
The Relay Broadcast feature transmits documents to multiple recipients via other fax machines (relay stations). When a document is to be transmitted over a long distance to multiple recipients, it is first transmitted to one relay station and from there to multiple recipients. When you transmit documents over a long distance to many recipients, using Relay Broadcast can save on transmission cost.
Furthermore, multiple Relay Broadcast operations can be performed simultaneously. This is called Multiple Relay Broadcast.Note • For IP Fax (SIP), only Relay Broadcast with the F Code method is available.
The following three methods are available for Relay Broadcast:
Fax Signal MethodThis method employs a Fuji Xerox proprietary communication procedure that is only for use with specific machines that have the Relay Broadcast feature.
DTMF MethodG3 fax machines that support Manual Send can perform Relay Broadcast for the machine.
F Code MethodThis method can be used among machines that support the F Code and the Relay Broadcast features.
Before using the Relay Broadcast FeatureBefore using the Relay Broadcast feature, register the following information.Note • Select [Add New Address] on the [Fax Address Book] screen to register a destination. For more
information, refer to "Add New Address (Registering a Destination on the Address Book)" (P.192).
For information on how to register address numbers, refer to "5 Tools" > "Setup" > "Add Address Book Entry" in the Administrator Guide.
For information on the setting items to be registered in relay stations, refer to the documentation provided with relay stations.
Where Contents
Initiating Station
Fax Signal MethodAssign the relay station to an address number (0001 to 2000) to set up the Relay Broadcast feature.
Register the last two digits of the address number of the initiating station (which is already registered at a relay station) as a relay station ID for the Relay Broadcast operation.Register the address numbers or group dial number of the relay recipients (which are registered at a relay station) as broadcast recipients. The wildcard "*" can be used.
DTMF Method (G3)/F Code MethodNo registration is required. The dialing format can be registered to an address number.

Broadcast
237
Fax
4
Fax Signal Method
1 Select an address number or group dial number to which a relay broadcast is registered, and press the <Start> button.To perform Multiple Relay Broadcast, repeat this step.
DTMF MethodThe following two types are available in the DTMF method: Auto Send and Manual Send.
Auto Send (Transmitting without picking up the receiver)
1 Select [New Recipients] to display the keyboard on the touch screen and enter in the following format.
Password
A pre-registered two-digit numberNote • By default, no password is set. For setting a password, contact our Customer Support Center. If a
password is not set, you do not need to enter one.
Relay station ID
The last two digits of the initiating station address number registered at the relay station
Address number
An address number for the relay recipients registered at the relay station
The wildcard "*" can also be used.
You can register the above dialing format in an address number to send using the address number. For information on how to register address numbers, refer to "5 Tools" > "Setup" > "Add Address Book Entry" in the Administrator Guide.
2 Select [+ Add] to perform Multiple Relay Broadcast.
3 Press the <Start> button.
Manual Send (Transmitting with picking up the receiver or on-hook)
1 Select the [More Options] tab to display the [More Options] screen.
2 Pick up the telephone receiver, or select [On-hook (Manual Send/Receive)]
Relay station telephone
number
Address number
Relay station
ID
Password Address number

4 Fax
238
Fax
4
3 Select [Manual Send] from the drop-down menu.
4 Use the keyboard displayed on the touch screen to enter numbers in the following format.
Note • You can specify up to 20 locations for relay recipients.
F Code MethodYou can perform Relay Broadcast by registering the relay station’s F code and password (if necessary) to the machine.Note • When performing Relay Broadcast with the F Code method, you can use a password if you set a
receive password for the relay station.
• When performing Relay Broadcast between Fuji Xerox manufactured machines that can be used as both a initiating station and a relay station, we recommend that you use the fax signal method.
• Confirm the F code (sub-address) and password of the target relay station.
1 Select the [Fax/Internet Fax Options] tab to display the [Fax/Internet Fax Options] screen.
2 Select [F Code].
3 Select [On].
Relay station telephone
number
Facsimile tone Relay station
ID
Password Address number
Beep! Beep!

Broadcast
239
Fax
4
4 Select the [F Code] box, and enter the F code with the numeric keypad.
Note • You can enter up to 20 digits for the F Code.
Relay Broadcast
The number of digits of the relay station ID:
1: When the relay station IDs and address numbers are two digits
2: When the relay station IDs and address numbers are three digits
Print Directive
Printing/not printing at the relay station
1: Printing at the relay station
0: Not printing at the relay station
Relay Station ID
An address number for an initiating station registered at the relay station
When the relay station ID is set, the initiating station is notified of the results of a Relay Broadcast.
When the relay station ID is "00" or "000", the initiating station is not notified of the results of a Relay Broadcast.
Address Number
The address number assigned to the relay recipient
The following shows an example of F Code that indicates printing at the relay station, notifying the initiating station (100) of the results, and performing Relay Broadcast to relay recipients (200, 201, 202, and 203).
F Code example: 21100200201202203
5 If necessary, enter the password using the numeric keypad.
Remote Relay Broadcast (Performing Relay Broadcast to Remote Locations)
The Remote Relay Broadcast feature combines two or more Relay Broadcast operations and use Broadcast Send.
This feature is more economical than Relay Broadcast in transmitting documents to multiple remote machines.Note • Multiple Relay Broadcast can be performed from a secondary relay station.
• For IP Fax (SIP), only Relay Broadcast with the F Code method is available.
The following three methods are available in Remote Relay Broadcast:
Fax Signal MethodThis method employs a Fuji Xerox proprietary communication procedure that is only for use with specific machines that support the Relay Broadcast feature.
DTMF MethodG3 fax machines that support Manual Send can perform Remote Relay Broadcast for the machine.
Relay Broadcast Print Directive
Relay Station ID
Address Number
Address Number
Address Number
....
Up to 20 digits
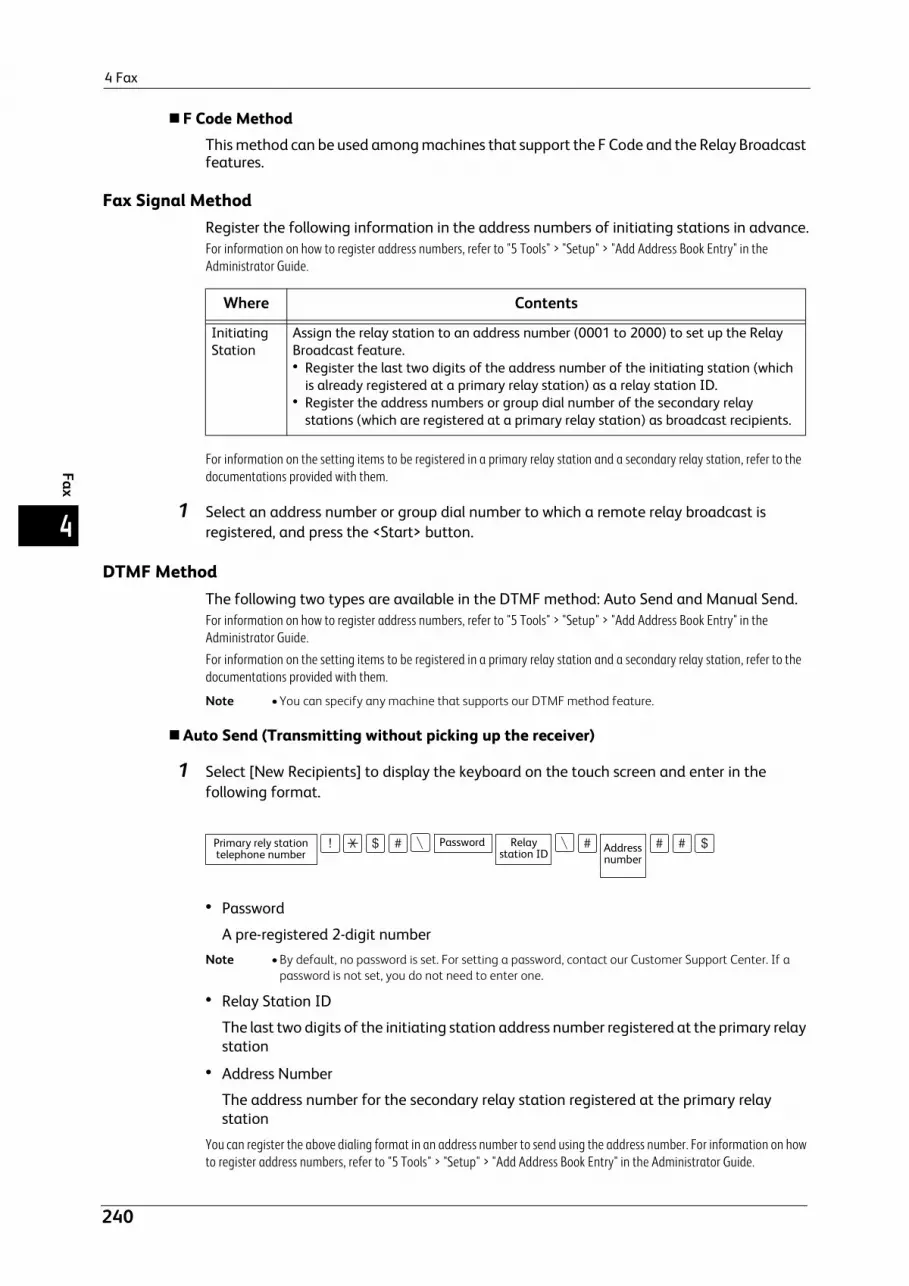
4 Fax
240
Fax
4
F Code MethodThis method can be used among machines that support the F Code and the Relay Broadcast features.
Fax Signal MethodRegister the following information in the address numbers of initiating stations in advance.For information on how to register address numbers, refer to "5 Tools" > "Setup" > "Add Address Book Entry" in the Administrator Guide.
For information on the setting items to be registered in a primary relay station and a secondary relay station, refer to the documentations provided with them.
1 Select an address number or group dial number to which a remote relay broadcast is registered, and press the <Start> button.
DTMF MethodThe following two types are available in the DTMF method: Auto Send and Manual Send.For information on how to register address numbers, refer to "5 Tools" > "Setup" > "Add Address Book Entry" in the Administrator Guide.For information on the setting items to be registered in a primary relay station and a secondary relay station, refer to the documentations provided with them.
Note • You can specify any machine that supports our DTMF method feature.
Auto Send (Transmitting without picking up the receiver)
1 Select [New Recipients] to display the keyboard on the touch screen and enter in the following format.
Password
A pre-registered 2-digit numberNote • By default, no password is set. For setting a password, contact our Customer Support Center. If a
password is not set, you do not need to enter one.
Relay Station ID
The last two digits of the initiating station address number registered at the primary relay station
Address Number
The address number for the secondary relay station registered at the primary relay station
You can register the above dialing format in an address number to send using the address number. For information on how to register address numbers, refer to "5 Tools" > "Setup" > "Add Address Book Entry" in the Administrator Guide.
Where Contents
Initiating Station
Assign the relay station to an address number (0001 to 2000) to set up the Relay Broadcast feature.
Register the last two digits of the address number of the initiating station (which is already registered at a primary relay station) as a relay station ID.Register the address numbers or group dial number of the secondary relay stations (which are registered at a primary relay station) as broadcast recipients.
Primary rely station telephone number
Relay station ID
Password Address number

Broadcast
241
Fax
4
2 Select [+ Add] to perform Multiple Relay Broadcast.
Manual Send (Transmitting with picking up the receiver or on-hook)
1 Select the [More Options] tab to display the [More Options] screen.
2 Pick up the telephone receiver, or select [On-hook (Manual Send/Receive)].
3 Select [Manual Send] from the drop-down menu.
4 Use the keyboard displayed on the touch screen to enter numbers in the following format.
Note • You can specify up to 20 locations for relay recipients.
F Code MethodWhen using the machine as the initiating station for performing Remote Relay Broadcast, confirm the F code and the password (if necessary) for the primary relay station.Important • When using the F Code method for Remote Relay Broadcast, the primary relay stations and
secondary relay stations must support our F Code method and the Relay Broadcast feature.
Note • When performing Relay Broadcast with Fuji Xerox manufactured machines that can be used as both a initiating station and a relay station, we recommend that you use the fax signal method.
1 Select the [Fax/Internet Fax Options] tab to display the [Fax/Internet Fax Options] screen.
2 Select [F Code].
Primary rely station telephone
number
Relay station
ID
Password Address number
Facsimile tone Beep! Beep!

4 Fax
242
Fax
4
3 Select [On].
4 Select the [F Code] box, and enter the F Code with the numeric keypad.
Note • You can enter up to 20 digits for the F Code.
Relay Broadcast
The number of digits of the primary relay station ID:
1: When the primary relay station IDs and address numbers are two digits
2: When the primary relay station IDs and address numbers are three digits
Print Directive
Printing/not printing at the primary relay station
1: Printing at the primary relay station
0: No printing at the primary relay station
Primary Relay Station ID
The address number for the initiating station registered at the primary relay station
When the primary relay station ID is set, the initiating station is notified of the results of the Remote Relay Broadcast.
When the primary relay station ID is "00" or "000", the initiating station is not notified of the results of a Remote Relay Broadcast.
Address Number
The address number assigned to the secondary relay station
5 If necessary, enter the password using the numeric keypad.
Relay Broadcast Print Directive
Primary Relay Station ID
Address Number
Address Number
Address Number
....
Up to 20 digits
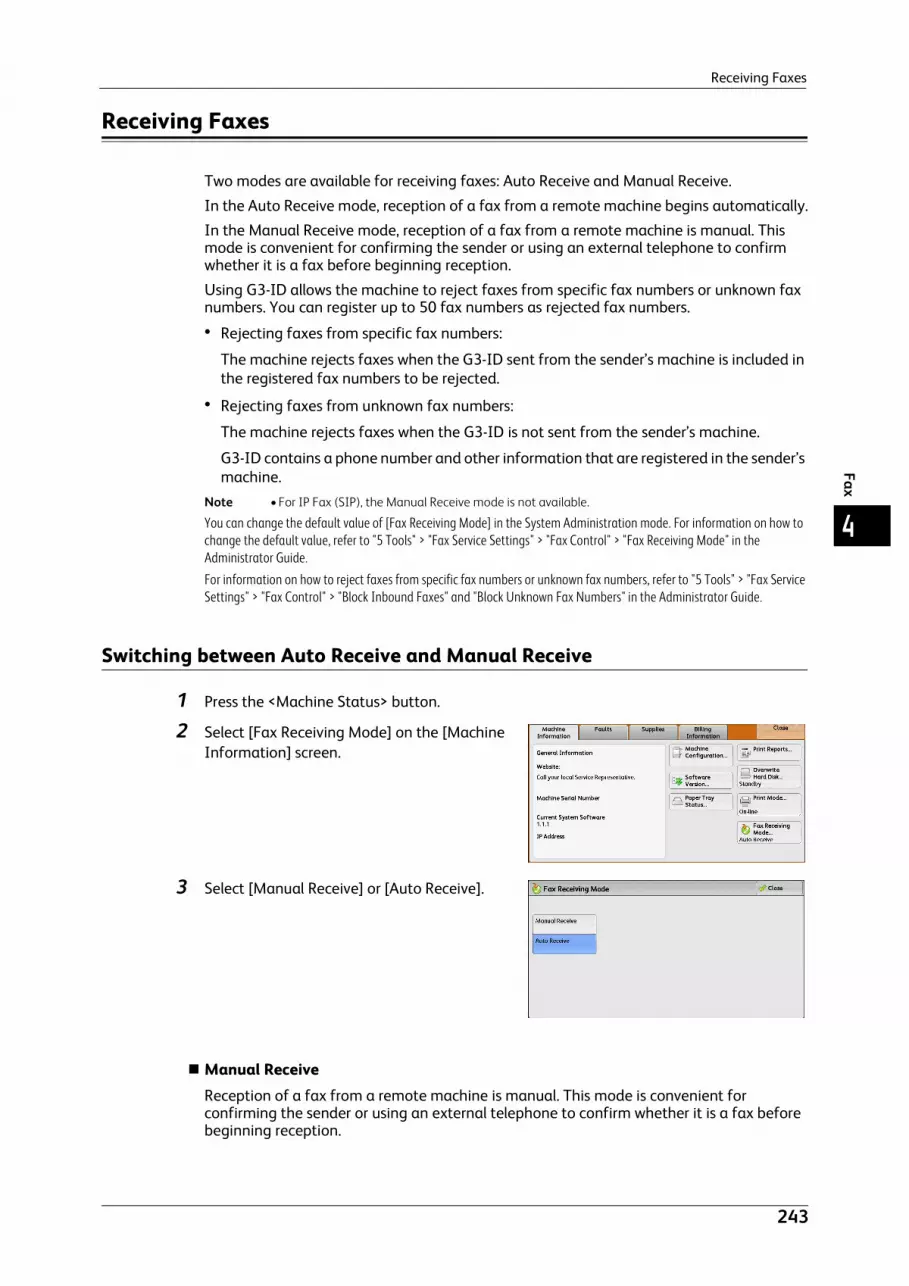
Receiving Faxes
243
Fax
4
Receiving Faxes
Two modes are available for receiving faxes: Auto Receive and Manual Receive.
In the Auto Receive mode, reception of a fax from a remote machine begins automatically.
In the Manual Receive mode, reception of a fax from a remote machine is manual. This mode is convenient for confirming the sender or using an external telephone to confirm whether it is a fax before beginning reception.
Using G3-ID allows the machine to reject faxes from specific fax numbers or unknown fax numbers. You can register up to 50 fax numbers as rejected fax numbers.
Rejecting faxes from specific fax numbers:
The machine rejects faxes when the G3-ID sent from the sender’s machine is included in the registered fax numbers to be rejected.
Rejecting faxes from unknown fax numbers:
The machine rejects faxes when the G3-ID is not sent from the sender’s machine.
G3-ID contains a phone number and other information that are registered in the sender’s machine.
Note • For IP Fax (SIP), the Manual Receive mode is not available.
You can change the default value of [Fax Receiving Mode] in the System Administration mode. For information on how to change the default value, refer to "5 Tools" > "Fax Service Settings" > "Fax Control" > "Fax Receiving Mode" in the Administrator Guide.For information on how to reject faxes from specific fax numbers or unknown fax numbers, refer to "5 Tools" > "Fax Service Settings" > "Fax Control" > "Block Inbound Faxes" and "Block Unknown Fax Numbers" in the Administrator Guide.
Switching between Auto Receive and Manual Receive
1 Press the <Machine Status> button.
2 Select [Fax Receiving Mode] on the [Machine Information] screen.
3 Select [Manual Receive] or [Auto Receive].
Manual ReceiveReception of a fax from a remote machine is manual. This mode is convenient for confirming the sender or using an external telephone to confirm whether it is a fax before beginning reception.
4 Fax
244
Fax
4
When extra lines are added to the machine, [Fax Receiving Mode] is set to [Auto Receive] even when [Manual Receive] is selected.
Auto ReceiveReception of a fax from a remote machine begins automatically.
Using Auto Receive
When [Fax Receiving Mode] is set to [Auto Receive] on the [Machine Information] screen, the following two methods are available to receive a fax:
When the machine automatically switches to fax receptionWhen there is an incoming call, the machine automatically receives a fax after it rings for a certain period of time.
When the machine automatically switches between a call and fax receptionWhen there is an incoming fax, the machine automatically receives a fax. When there is an incoming call, pick up the telephone receiver to talk while the machine is ringing.
Using Manual Receive
When [Fax Receiving Mode] is set to [Manual Receive], and the machine rings to notify of an incoming call, pick up the receiver of the external telephone or select [On-hook] on the screen displayed.Note • We recommend that you set the monitor volume to [Loud] when using the On-hook feature. For
information on how to change the volume of the line monitor, refer to "5 Tools" > "Common Service Settings" > "Audio Tones" > "Line Monitor Volume" in the Administrator Guide.
1 When the machine rings, the receiving screen appears.
If there is a telephone, pick the receiver up. If not, select [On-hook] on the receiving screen.
2 Confirm whether the call is from a telephone or a fax machine.
If the call is from a telephone, use the receiver to talk.
If the call is from a fax machine, you will hear the sound of a fax machine.Note • If you select [On-hook], you will hear the sound from the machine speaker. However, you cannot talk
to the other party.
3 Press the <Start> button.
4 If you picked up the receiver, place it back in the cradle when the <Data> indicator lights up on the control panel.Important • Make sure to place the receiver back in the cradle properly. Otherwise, the line will remain "busy" with
the receiver being left off the cradle.

Receiving Faxes
245
Fax
4
Using Folder Receive
Files received using Folder Receive are stored in a folder. After a file is received in a folder, the <Data> indicator lights up and the machine prints a Folder Report. The Folder Report lists the folder number and folder name.
To receive files in a folder using the F Code method, notify the sender of the following information:
F Code (sub-address): 0 (to designate F Code transmission) and the folder number to store the file in
Password (if necessary): the passcode of the folder to store the file inNote • For IP Fax (SIP), the fax signal method and F code method are available.
• For IP Fax (SIP), in communicating via VoIP gateway, theSending to Folder with the fax signal method is not available. Only the Sending to Folder with the F code method is available.
• The DTMF method is available for Remote Folder. The supported signals are numerals, "?", and "#" only.
Depending on the report print settings, a Folder Report may not be printed even after a file is received in a folder. For more information on the Folder Report settings, refer to "5 Tools" > "Common Service Settings" > "Reports" > "Folder Report" in the Administrator Guide.For information on how to print a file stored in a folder, refer to "Printing Files in a Folder" (P.345).

4 Fax
246
Fax
4
Facsimile Information Services
For information on subscriptions and advanced operating procedures, contact the corresponding facsimile information service.
Using the Receiver
1 Pick up the telephone receiver.
2 Select [Manual Receive] from the drop-down menu.
3 Specify the fax number of the facsimile information service.
You can use the numeric keypad, address numbers, or one touch buttons to specify the call destination, but cannot use the Address Book.
You can use the keyboard displayed on the screen to specify the call destination. Selecting [More Characters] on the screen displays symbols.
Note • When the line type is set to a tone line, [:] (Tone) is not displayed on the screen. If you want to send tones (or to use the touch-tone services) while using a pulse line, select [:] (Tone).
• Some touch-tone services may not be available even if you set your telephone to send tones.
4 When the machine connects to the service, you will hear voice prompts. Follow the voice prompts to enter the required numbers.
5 After entering the numbers, press the <Start> button.
Note • The <Data> indicator lights up on the control panel, and reception begins.
6 Place the receiver back in the cradle.
Important • Make sure to place the receiver back in the cradle properly. Otherwise, the line will remain "busy".
When Not Using a Receiver
1 Adjust the volume of the line monitor.We recommend that you set the volume of the line monitor to [Loud] so that you can hear the voice prompts clearly.
For information on how to change the volume of the line monitor, refer to "5 Tools" > "Common Service Settings" > "Audio Tones" > "Line Monitor Volume" in the Administrator Guide.

Facsimile Information Services
247
Fax
4
2 Select [On-hook (Manual Send/Receive)] on the [More Options] screen.
3 Select [Manual Receive] from the drop-down menu.
4 Specify the fax number of the facsimile information service.
You can use the numeric keypad, address numbers, or one touch buttons to specify the call destination, but cannot use the Address Book.
You can use the keyboard displayed on the screen to specify the call destination. Selecting [More Characters] on the screen displays symbols.
Note • When the line type is set to a tone line, [:] (Tone) does not appear. If you want to send tones (or to use the touch-tone services) while using a pulse line, select [:] (Tone).
• Some touch-tone services may not be available even if you set your telephone to send tones.
5 When the machine connects to the service, you will hear voice prompts. Follow the voice prompts to enter the required numbers.
6 After entering the numbers, press the <Start> button.

4 Fax
248
Fax
4

5 Scan
This chapter describes the basic operations and features for the Scan services.Note • The Scan services are not available for some models. An optional component is required. For more
information, contact our Customer Support Center.
To use the Scan services, network settings are required. For information on the network settings, refer to "9 Scanner Environment Settings" in the Administrator Guide.
Scanning Procedure...................................................................................................................250
Operations during Scanning ..................................................................................................258
E-mail...............................................................................................................................................261
Network Scanning ......................................................................................................................289
Scan to PC......................................................................................................................................291
Store to Folder .............................................................................................................................302
Store to USB .................................................................................................................................304
Store & Send Link........................................................................................................................311
Store to WSD................................................................................................................................314
Advanced Settings .....................................................................................................................317
Layout Adjustment ....................................................................................................................322
E-mail Options/Filing Options................................................................................................330

5 Scan
250
Scan
5
Scanning Procedure
This section describes the basic scanning procedure. The following shows the reference section for each procedure.
Step 1 Loading Documents ....................................................................................................................................................... 250Step 2 Selecting the Features ................................................................................................................................................... 252Step 3 Starting the Scan Job..................................................................................................................................................... 255Step 4 Confirming the Scan Job in Job Status ...................................................................................................................... 256Step 5 Saving the Scanned Data ............................................................................................................................................. 257
Step 1 Loading Documents
The following two methods are available to load documents:
Document Feeder
Single sheet
Multiple sheets
Document Glass
Single sheet
Bound documents, such as books
Document FeederThe document feeder supports single and multiple sheet documents with sizes from 125 x 85 mm (Standard size: A5, A5 ) to 297 x 432 mm (Standard size: A3, 11 x 17").
The document feeder automatically detects standard size documents. For non-standard size documents, enter the size on the [Original Size] screen.For information on document sizes that can be detected automatically and how to enter a non-standard document size, refer to "Original Size (Specifying a Scan Size)" (P.324).The standard document sizes that can be detected automatically depend on [Paper Size Settings] in the System Administration mode. For information on paper size settings, refer to "5 Tools" > "Common Service Settings" > "Other Settings" > "Paper Size Settings" in the Administrator Guide.
The document feeder accepts the following number of sheets.
Important • To avoid paper jams, use the document glass for folded or wrinkled documents, cut-and-pasted documents, curled paper, or back carbon paper.
• 2-sided scanning of lightweight paper (38 - 49 gsm) is not supported.
For information on how to scan mixed sized documents, refer to ""Mixed Size Originals (Scanning Different Size Documents Simultaneously)" (P.325).
1 Remove any paper clips and staples before loading a document.
Document Type (Weight) Number of Sheets
Lightweight paper (38 - 49 gsm) 110 sheets
Plain paper (50 - 80 gsm) 110 sheets
Heavyweight paper (81 - 128 gsm) 75 sheets

Scanning Procedure
251
Scan
5
2 Load the document face up (when the document is 2-sided, place the front side up) in the center of the document feeder.Note • In normal occasions, load the document in
the [Sideways Images] orientation. The document is displayed in the [Upright Images] orientation when viewed on a computer.
• The Confirmation indicator lights up when the document is loaded correctly. If the indicator does not light, the machine may be detecting a document on the document glass. Load the document again.
3 Adjust the document guides to match the size of the document loaded.
4 Open the document stopper.
Document GlassThe document glass supports a single sheet, a book, or other similar documents with sizes from 15 x 15 mm to 297 x 432 mm (Standard size: A3, 11 x 17").Important • Always close the document cover after using the document glass.
The document glass automatically detects standard size documents. For non-standard size documents, enter the size on the [Original Size] screen.For information on document sizes that can be detected automatically and how to enter a non-standard document size, refer to "Original Size (Specifying a Scan Size)" (P.324).The standard document sizes that can be detected automatically depend on [Paper Size Settings] in the System Administration mode. For information on the paper size settings, refer to "5 Tools" > "Common Service Settings" > "Other Settings" > "Paper Size Settings" in the Administrator Guide.
Confirmation indicator
CAUTION
Do not apply excessive force to hold thick document on the document glass. It may break the glass and cause injuries.

5 Scan
252
Scan
5
1 Open the document cover.
Important • Ensure that the touch screen is active, and then load a document. Otherwise, the machine may not properly detect the document size.
2 Load the document face down, and align it against the top left corner of the document glass.
3 Close the document cover.
Step 2 Selecting the Features
On the [Services Home] screen, you can select from seven Scan services: [E-mail], [Store to Folder], [Network Scanning], [Scan to PC], [Store to USB], [Store & Send Link], and [Store to WSD]. You can select features for each service.Note • The features displayed on the screen depend on your machine configuration.
• When the Accounting feature is enabled, a user ID and passcode may be required. Ask your system administrator for the user ID and passcode.
• To use the Scan services, network settings are required. For information on the network settings, refer to "9 Scanner Environment Settings" in the Administrator Guide.
E-mailScans a document and sends the scanned data as an e-mail attachment after converting the data to TIFF, JPEG, PDF, DocuWorks, or XPS (XML Paper Specification).
Store to FolderScans a document and saves the scanned data in a folder on the machine.You need to create a folder in advance. For information on how to create a folder, refer to "5 Tools" > "Setup" > "Create Folder" in the Administrator Guide.
Network ScanningScans a document using a job template created on CentreWare Internet Services.
When Scan to Home is enabled and the Remote Access feature is available, the scanned data can be transferred to a different destination according to an authenticated user.For information on how to create a job template, refer to the help of CentreWare Internet Services.
Important • To display the help for CentreWare Internet Services, users need to have the environment to connect to the Internet. The communication fee shall be borne by the users.
Scan to PCScans a document and sends the scanned data to a network computer via the FTP or SMB protocol.

Scanning Procedure
253
Scan
5
Store to USBScans a document and saves the scanned data to a USB memory device.
Store & Send LinkScans a document and temporarily saves the scanned data on the machine. The user is notified by e-mail of the URL to the location where the scanned data is stored. Then, the user can access the URL to retrieve the scanned data.
Store to WSDYou can scan a document loaded on the machine and save the scanned data from a computer. Using the control panel on the machine, you can also save the scanned data to a computer on the network.
The following table shows file formats available for each Scan service.
*1 : XPS stands for XML Paper Specification.*2 : Supported on Acrobat 4.0 or later*3 : Supported on DocuWorks Ver.4 or later*4 : TWAIN compatible application*5 : Supported on Windows Vista Service Pack 2 or later
Scan ServiceFile Format can
be Selected When
File Format
PDF Docu-Works XPS*1 TIFF JPEG BMP PNG
E-mail Using the control panel when scanning
O*2 O*3 O O O X X
Scan to PC O*2 O*3 O O O X X
Store to USB O*2 O*3 O O O X X
Store & Send Link
O*2 O*3 O O O X X
Store to Folder Using CentreWare Internet Services
O*2 O*3 O O O X X
Using Stored File Manager 3
X X X O O X X
Using DocuWorks*4
X O*3 X X X X X
Using EasyOperator
X X X O O X X
Using Adobe Acrobat*4
O*2 X X X X X X
Job Flow Sheets
Creating a job flow
O*2 O*3 O O O X X
Network Scanning
Creating a job template
X X X O O O O
Store to WSD Using [Scan Profiles] of Windows*5
X X O O O O O
OX
::AvailableNot available

5 Scan
254
Scan
5
Note • If you do not specify a file name for the document to be saved, a file name is automatically assigned to each file or folder based on a particular rule. For example, the file name "img-123123456" indicates that the document was scanned at 12:34:56 on January 23. X, Y, and Z represent October, November, and December, respectively.
The following describes how to store scanned data into a folder as an example.
1 Press the <Services Home> button.
2 Select [Store to Folder].
3 If the previous settings still remain, press the <Clear All> button.
4 Specify a folder to save the data in.
5 Select each tab, and configure features as necessary.
The following shows the reference section for each tab."Store to Folder" (P.302)"Advanced Settings" (P.317)"Layout Adjustment" (P.322)
<Services Home> button
1 2 3
4 5 6
7 8 9
0 #
C
<Clear All> button

Scanning Procedure
255
Scan
5
"E-mail Options/Filing Options" (P.330)
When you use another Scan service, [Store to Folder] is replaced with [E-mail], [Network Scanning], [Scan to PC], [Store to USB], [Store & Send Link], or [Store to WSD].
The following shows the reference section for each service."E-mail" (P.261)"Network Scanning" (P.289)"Scan to PC" (P.291)"Store to USB" (P.304)"Store & Send Link" (P.311)"Store to WSD" (P.314)
Step 3 Starting the Scan Job
The following describes how to start a scan job.For information on how to start a scan job on the [Store to WSD] screen, refer to "Store to WSD" (P.314).
1 Press the <Start> button.
Important • If the document has been loaded in the document feeder, do not hold down the document while it is being conveyed.
Note • If a problem occurs, an error message appears on the touch screen. Solve the problem according to the message.
• You can set the next job during scanning.
If you have more documentsIf you have more documents to scan, select [Next Original] on the touch screen while the current document is being scanned. This allows you to scan the documents as a single set of data.
Up to 999 pages can be stored.Note • If the number of pages scanned by the machine exceeds the maximum, the machine stops
scanning. Follow the message displayed on the screen, and either abort the operation or save the already-scanned data as a single set of data.
For information on how to set the maximum number of pages stored for a scan document, refer to "5 Tools" > "Scan Service Settings" > "Other Settings" > "Maximum Stored Pages" in the Administrator Guide.
2 While documents are being scanned, select [Next Original].Note • When using the document feeder, load the
next document after the machine has finished scanning the first document.
• When [Next Original] is displayed on the screen shown on the right and no operation is performed for a certain period of time, the machine automatically assumes that there are no more documents.
• You can change the scan settings of the next document by selecting [Change Settings] that is displayed after selecting [Next Original].
1 2 3
4 5 6
7 8 9
0 #
C
<Start> button

5 Scan
256
Scan
5
3 Load the next document.
4 Press the <Start> button.If you have more documents, repeat steps 3 and 4.
5 When all documents have been scanned, select [Last Original].
Step 4 Confirming the Scan Job in Job Status
The following describes how to confirm the status of a scan job.
1 Press the <Job Status> button.
2 Confirm the job status.
Note • Select [ ] to return to the previous screen or [ ] to move to the next screen.
• From the drop-down menu, you can select [Scan, Fax, & Internet Fax Jobs] and display the desired job.
1 2 3
4 5 6
7 8 9
0 #
C
<Start> button
1 2 3
4 5 6
7 8 9
0 #
C
<Job Status> button
Scanning Procedure
257
Scan
5
Step 5 Saving the Scanned Data
When you used the Store to Folder service, you can use the following methods to import the file stored in a folder of the machine to your computer:
Import using an applicationUse Network Scanner Driver.Refer to "Importing to a TWAIN Compatible Application" (P.415).
Import using Stored File Manager 3Use Stored File Manager 3 (Fuji Xerox application software).Refer to "Importing Using Stored File Manager 3" (P.417).
Import using CentreWare Internet ServicesUse CentreWare Internet Services.Refer to "Importing Using CentreWare Internet Services" (P.419).
Import using EasyOperatorUse EasyOperator (Fuji Xerox application software).Refer to "Importing Using EasyOperator" (P.421).

5 Scan
258
Scan
5
Operations during Scanning
The following describes the operations available during scanning. The following shows the reference section for each operation.
Stopping the Scan Job ................................................................................................................................................................ 258Previewing the Scanned Images during a Scan Job............................................................................................................ 259Changing Scan Settings ............................................................................................................................................................. 260
Stopping the Scan Job
To cancel scanning a document, use the following procedure.
1 Press either the <Stop> button on the control panel or [Delete] on the touch screen.
2 Select [Delete].
If [Delete] does not appear on the screen:
1 Press the <Job Status> button.
1 2 3
4 5 6
7 8 9
0 #
C
<Stop> button
1 2 3
4 5 6
7 8 9
0 #
C
<Job Status> button

Operations during Scanning
259
Scan
5
2 Select the job to cancel.
3 Select [Delete].
4 Select [Delete].
Note • If you cancel the job, the scanned data stored in the folder will also be deleted.
Previewing the Scanned Images during a Scan Job
You can preview the scanned images while scanning the document.Important • You cannot preview the scanned images when [MRC High Compression] is set to [On] or the [Specific
Color] check box is selected on the [File Format] screen.
Note • You cannot preview the scanned images on the touch screen of the machine for [Store to WSD].
1 Select [Next Original].
2 Select [Preview] to display a preview screen. The first page of the last scanned document is displayed.

5 Scan
260
Scan
5
3 From the drop-down menu, specify the view size by selecting [Whole Page] or [Enlarge View], and set [Current Page].
4 After the confirmation, select [Close] to close the preview screen.
Changing Scan Settings
You can change scan settings while scanning the document.Note • For [Store to WSD], you cannot change scan settings while scanning the document.
1 Select [Next Original].
2 Select [Change Settings].
3 Set [Color Scanning], [Original Type], [Resolution], [Lighten/Darken], [Original Orientation], [2 Sided Scanning], and [Original size].
The following shows the reference section for each feature."Color Scanning (Selecting an Output Color)" (P.275)"Original Type (Selecting the Document Type)" (P.277)"Resolution (Specifying a Scanning Resolution)" (P.322)"Image Options (Adjusting Scan Density and Image Sharpness)" (P.318)"Original Orientation (Specifying the Orientation of the Loaded Document)" (P.329)"2 Sided Scanning (Scanning Both Sides of a Document)" (P.323)"Original Size (Specifying a Scan Size)" (P.324)
4 Press the <Start> button.

261
Scan
5
This section describes the features you can select on the [E-mail] screen. The E-mail service allows you to scan a document and send the scanned data as an e-mail attachment. The following shows the reference section for each feature.
Address Book (Specifying an E-mail Address) .......................................................................................................................262Add New Address (Registering a Recipient on the Address Book) ...................................................................................267Specifying a Destination Using a One Touch Button ..........................................................................................................269New Recipient (Entering an Address)......................................................................................................................................270Add Me (Adding the Sender’s Address) ..................................................................................................................................271Recipient(s) (Editing a Recipient).............................................................................................................................................272From (Setting the Sender’s Address) .......................................................................................................................................273Subject (Setting the Subject).....................................................................................................................................................274Message (Entering the E-mail Body) .......................................................................................................................................274Preview (Previewing the Scanned Images during a Scan Job)..........................................................................................274Color Scanning (Selecting an Output Color)..........................................................................................................................2752 Sided Scanning (Scanning Both Sides of a Document)...................................................................................................275Original Type (Selecting the Document Type) ......................................................................................................................277File Format (Selecting a File Format for Output Data) .......................................................................................................277
Note • You can encrypt e-mail or send it with a digital signature by S/MIME. To use this feature, you need to register certificates of the machine and the recipient’s device in advance. For information on certificates, refer to "13 Encryption and Digital Signature Settings" > "Configuration of E-mail Encryption/Digital Signature" in the Administrator Guide.
You can customize the layout of the features displayed on the [E-mail] screen. For more information, refer to "5 Tools" > "Scan Service Settings" > "Screen Defaults" > "1st Tab - Features Allocation" in the Administrator Guide.You can set [First Tab] or [Address Book] for the screen displayed when you select [E-mail] on the [Service Home] screen. For more information, refer to "5 Tool" > "Scan Service Settings" > "Screen Defaults" > "Email Screen Default" in the Administrator Guide.
1 Select [E-mail] on the [Services Home] screen.
2 Select a feature on the [E-mail] screen.
Important • You can only specify recipients registered for e-mail, but not for faxes.
• You cannot use address numbers using the numeric keypad, one touch buttons, or group numbers to specify recipients.
• The [New Recipient] and [Add Me] buttons may not be displayed depending on the settings in the System Administration mode.
• Depending on the settings for [Email Screen Default] in the System Administration mode, the [E-mail Address Book] screen is displayed. For more information, refer to "5 Tools" > "Scan Service Settings" > "Screen Defaults" > "Email Screen Default" in the Administrator Guide.

5 Scan
262
Scan
5
Address Book (Specifying an E-mail Address)
The following describes how to select a recipient using the Address Book.Note • You cannot use address numbers input by the numeric keypad to specify the destination registered
in the Address Book.
When sending an encrypted e-mail, select an e-mail address associated with a certificate that can be encrypted, from the Address Book.To use this feature, an e-mail address associated with a certificate for S/MIME must be registered in the Address Book in advance. For information on how to set the Address Book, refer to "5 Tools" > "Setup" > "Add Address Book Entry" in the Administrator Guide.To verify the validity of a certificate, prior settings are required. For information on the settings, refer to "5 Tools" > "Connectivity & Network Setup" > "Security Settings" > "Certificate Revocation Retrieval Settings" in the Administrator Guide.
When the Address Book Type 1 is Displayed
1 Select [Address Book].
Note • When you select [Address Book], the Address Book [Type1] or [Type2] will be displayed depending on the setting of [Address Book Type] in the System Administration mode. For more information, refer to "5 Tools" > "Address Book Settings" > "Address Book Type" in the Administrator Guide.
• The Directory Service is not available for some models. An optional component is required.
2 Select a recipient from the address list, and then select [To], [Cc], or [Bcc].Note • To specify multiple recipients, specify them
continuously.
• Select [Reconfirm Recipients] in the message field to check the selected value. You can hide [Reconfirm Recipients] to show the remaining memory capacity. For more information, refer to "5 Tools" > "Common Service Settings" > "Screen/Button Settings" > "Reconfirm E-mail Recipient Button" in the Administrator Guide.
• To switch the Address Book entry type, select [Public Entries], [Network Entries], or [Smart Card E-mail Address] from the drop-down menu on the [E-mail Address Book] screen. The methods that appear in the drop-down menu depend on the settings in the System Administration mode.
Important • When specifying an e-mail address, check if the address contains a domain that is not permitted for use. In this case, the address cannot be used.
Public EntriesDisplays the local address list.Refer to "When [Public Entries] is Selected" (P.263).
Network EntriesSearches recipients in the remote address list.Note • To display [Search Network], the prior setting is required in the System Administration mode.
Refer to "When [Network Entries] is Selected" (P.264).
Smart Card E-mail AddressDisplays addresses specified on the certificate in the smart card.

263
Scan
5
Note • This item is displayed when the IC Card Reader (optional) is connected.
When [Public Entries] is Selected
1 Select a recipient from a list under [Name].
Note • Select [ ] to return to the previous screen or [ ] to move to the next screen.
• You can sort recipients in alphabetical order or registered number order.
(List/Thumbnail)Allows you to switch the number of the recipients displayed from a list (five items) or thumbnail (15 items).
#Displays the list of speed dials.
NameLists names and their e-mail addresses.
Go toEnter an address number using the numeric keypad to display the e-mail address at the top of the list.
[ ] button Displays detailed information on the recipient.
Add New AddressAllows you to add a new recipient. To add a new recipient, use the keyboard screen or current recipients.For more information on how to add new recipients, refer to "Add New Address (Registering a Recipient on the Address Book)" (P.267).
AllLists all the registered recipients for e-mail.
Alphanumeric IndexLists the registered recipients with alphanumeric index characters in alphabetical order.
SearchAllows you to set [Simple Search] or [Advanced Search].
Searches by the specified keyword for [Simple Search], or by search entries for [Advanced Search].Note • For [Advanced Search], you can set multiple search entries.

5 Scan
264
Scan
5
When [Network Entries] is Selected
1 Select a search target from the drop-down menu on the left.
You can select [Name], [E-mail Address], or [Custom Item X] for a search target. (X represents a number between 1 and 3.)Note • Enable filters from the [Custom Filters] screen
using CentreWare Internet Services to search with keywords ([Simple Search]) without [Name], [E-mail Address], or [Custom Item]. For more information, refer to the help of CentreWare Internet Services.
Important • To display the help for CentreWare Internet Services, users need to have the environment to connect to the Internet. The communication fee shall be borne by the users.
For information on how to change a search target, refer to "5 Tools" > "Address Book Settings" > "Directory Service" in the Administrator Guide.
2 Select an advanced search condition from the drop-down menu on the right.
You can select [Begins With], [Ends With], [Contaings], [Equals], or [Registered] for search entries of the Advanced Search.
3 When you select a button other than [Registered], select the box and enter the text.
For information on how to enter characters, refer to "Entering Text" (P.70).
Search EntriesSelect the check boxes to enable the search condition.
Add Search EntriesSelect the check box to create a new search entry.Note • When you have multiple search entries, select [Match All Entries (AND)] or [Match Any Entry (OR)]
from the drop-down menu.
NameSearches with a recipient name as a keyword. After you set an advanced search condition, select the box to display the screen for entering the keyword. Up to 32 characters are allowed.
Example: Smith
E-mail AddressSearches with an e-mail address as a keyword. After you set an advanced search condition, select the box to display the screen for entering the keyword. Up to 128 characters are allowed.
Example: [email protected]
Custom ItemSearches with a custom item as a keyword. After you set an advanced search condition, select the box to display the screen for entering the keyword. Up to 60 characters are allowed.Attribute names of custom items differ depending on the setting of [Attribute Name of Custom Items 1, 2, and 3] in the System Administration mode. For more information, refer to "Connectivity & Network Setup" > "Remote Authentication/Directory Service" > "LDAP Server/Directory Service Settings"

265
Scan
5
SearchThe search starts. The searched results are listed on the screen.
When the Address Book Type 2 is Displayed
1 Select [Address Book].
Note • When you select [Address Book], the Address Book [Type1] or [Type2] will be displayed depending on the setting of [Address Book Type] in the System Administration mode. For more information, refer to "5 Tools" > "Address Book Settings" > "Address Book Type" in the Administrator Guide.
• The Directory Service is not available for some models. An optional component is required.
2 Select a recipient from the address list, and then select [To], [Cc], or [Bcc].Note • To specify multiple recipients, specify them
continuously.
• Select [Reconfirm Recipients] in the message field to check the selected value. You can hide [Reconfirm Recipients] to show the remaining memory capacity. For more information, refer to "5 Tools" > "Common Service Settings" > "Screen/Button Settings" > "Reconfirm E-mail Recipient Button" in the Administrator Guide.
• To switch the Address Book entry type, select [List all public entries], [Retrieve fax entries using index], [Search Public], or [Search Network] from the drop-down menu on the [E-mail Address Book] screen. The methods that appear in the drop-down menu depend on the settings in the System Administration mode.
Important • When specifying an e-mail address, check if the address contains a domain that is not permitted for use. In this case, the address cannot be used.
List all public entriesDisplays the local address list.Refer to "When [Public Entries] is Selected" (P.263).
Retrieve fax entries using indexSpecify a single alphanumeric index character which is set when registering speed dials to retrieve the addresses, or specify a speed dial to display at the top of the address list.
Search PublicSearches recipients in the local address list.Refer to "When [Search Public] or [Search Network] is Selected" (P.266).
Search NetworkSearches recipients in the remote address list.Note • Enable filters from the [Custom Filters] screen using CentreWare Internet Services to search with
keywords ([Simple Search]) without [Name], [E-mail Address], or [Custom Item]. For more information, refer to the help of CentreWare Internet Services.
Important • To display the help for CentreWare Internet Services, users need to have the environment to connect to the Internet. The communication fee shall be borne by the users.
Note • To display [Search Network], the prior setting is required in the System Administration mode.
Refer to "When [Search Public] or [Search Network] is Selected" (P.266).

5 Scan
266
Scan
5
Name/E-mail AddressLists names and their e-mail addresses.
ToSets the selected address as a recipient.
CcSets the selected address as Cc.
BccSets the selected address as Bcc.
Go toEnter an address number using the numeric keypad to display the e-mail address at the top of the list.
[ ] button Displays detailed information on the selected recipient.
Show E-mail AddressSelect this check box to display only e-mail addresses in the list.
When [List all public entries] is Selected
1 Select a recipient from a list under [Name/E-mail Address].Note • Select [ ] to return to the previous screen or
[ ] to move to the next screen.
• You can sort recipients in alphabetical order or registered number order.
When [Retrieve fax entries using index] is Selected
1 Specify a single alphanumeric index character or a speed dial.
When [Search Public] or [Search Network] is Selected
1 Enter keywords to search for an address.
Note • The screen on the right appears when [Search Public] is selected.
• When multiple keywords are used, the address is searched with the AND clause.
For information on how to enter characters, refer to "Entering Text" (P.70).

267
Scan
5
NameSearches with a recipient name as a keyword. Selecting the field for [Name] under [Keyword] displays the screen for entering the keyword. Up to 32 characters are allowed.
Example: John Smith
E-mail AddressSearches with an e-mail address as a keyword. Selecting the field for [E-mail Address] under [Keyword] displays the screen for entering the keyword. Up to 128 characters are allowed.Example: [email protected]
Custom ItemSelect this option to search with a keyword item other than a recipient name and e-mail address.
Select any option from [Custom Item] and then select the box under [Keyword] to display a screen for entering a keyword. You can enter the keyword with up to 60 characters.Note • You can select only one custom item.
None
No custom item is used for the keyword search.
Custom Item 1 (Telephone Number)
[Telephone Number] is set as by default. When selected, a telephone number is used for the keyword search.
Custom Item 2 (Office)
[Office] is set by default. When selected, an office name is used for the keyword search.
Custom Item 3 (Department)
[Department] is set by default. When selected, a department name is used for the keyword search.
For information on how to change the settings for the custom items, refer to "5 Tools" > "Address Book Settings" > "Directory Service" in the Administrator Guide.
KeywordSelect a keyword item, and then enter the keyword.
SearchThe search starts. The searched results are listed on the screen.
Add New Address (Registering a Recipient on the Address Book)
You can register addresses on the Address Book. The current recipients specified on the First Tab screen can also be registered.
1 Select [Add New Address].

5 Scan
268
Scan
5
2 Select a method to register a recipient.
NewEnter a new recipient using the keyboard.
Add current recipientSelect a recipient to be registered from the current recipients specified on the First Tab screen.Note • This item cannot be selected if no recipient is specified on the First Tab screen.
When [New] is selected
3 Use the keyboard displayed on the screen to enter an e-mail address with up to 128 single-byte characters.
4 Select [Next].
Note • To return to the previous screen, select the [Back] button.
When [Add current recipient] is selected
3 Select a recipient to be registered.
4 Select [Next].
Note • To return to the previous screen, select the [Back] button.
5 Select [Name], enter a name using the keyboard displayed on the screen, and then select [Save].
For information on how to enter characters, refer to "Entering Text" (P.70).
6 When you change the index, select [Index], select a new character from the keyboard displayed on the screen, and then select [Save].
For information on how to enter characters, refer to "Entering Text" (P.70).7 When you change the address number, select [Change], select a number from the list, and
then select [Save].
8 Select [Next].

269
Scan
5
9 Select an item to set and set.
The following items appear:
Address Type
E-mail Address
Name
Index
Surname
Given Name
Custom Item 1
Custom Item 2
Custom Item 3
S/MIME CertificateNote • To delete the input data and return to the [E-mail Address Book] screen, select [Cancel].
For more information on the setting items, refer to "5 Tools" > "Setup" > "Add Address Book Entry" in the Administrator Guide.
10 When the settings are completed, select [Registered].
Note • To return to the previous screen, select the [Back] button.
Specifying a Destination Using a One Touch Button
You can use the one touch buttons to specify the e-mail address, the name of the user who can decrypt an encrypted file, and other information from the Address Book.
One touch buttons correspond to the address numbers from 0001 to 0052, or 0001 to 0045.
For example, when the number you want to dial is registered to the address number 0001, press one touch button <1>.Note • One touch buttons can be used when the Fax service is available.
• There are two ways in which address numbers and stored programs are assigned to the one touch buttons. Select either of the following. By default, [Type 1] is selected.
- [Type 1]The buttons 1 to 52 are used for address numbers and they correspond to the registered address numbers 0001 to 0052, while the buttons 53 and 54 are used for stored programs and they correspond to the registered stored programs 1 and 2.
- [Type 2]The buttons 1 to 45 are used for address numbers and they correspond to the registered address numbers 0001 to 0045, while the buttons 46 to 54 are used for stored programs and they correspond to the registered stored programs 1 to 9.
• A one touch button is available when the machine displays the [E-mail] screen, the [Advanced Settings] screen, the [Layout Adjustment] screen, or the [E-mail Options] screen. The button is not available when the pop-up menu is displayed, or when the other screen is displayed after an item is selected.When you press a one touch button when the machine displays the [Advanced Settings] screen, the [Layout Adjustment] screen, or the [E-mail Options] screen, the screen switches to the [E-mail] screen automatically.

5 Scan
270
Scan
5
1 Press a one touch button. Confirm that the recipient (e-mail address) specified with the one touch button is displayed on the touch screen.
Important • The one touch buttons have a sensor to detect which page of one touch buttons (1 - 18, 19 - 36, or 37 - 54) is currently opened. Before pressing a one touch button, turn over the one touch panel completely, and take off your hand from the panel. Do not press the button while you are turning over the panel.
• Do not place any objects near the one touch buttons, nor spill any liquid over them.
Note • Turn the one touch panel over to press the one touch buttons 19 and above.
• If you have entered an incorrect value, select the recipient (e-mail address) displayed on the touch screen, select [Remove] on the pop-up menu, and enter the correct value.
New Recipient (Entering an Address)
You can enter e-mail addresses using the keyboard.Note • [Add New Address] is not displayed depending on the settings in the System Administration mode or
depending on the number of registered recipients. Ask your system administrator to confirm the settings and the number of recipients.
1 Select [New Recipient].
2 Use the keyboard displayed on the screen to enter an e-mail address with up to 128 characters.
To/Cc/BccAllows you to switch the recipient type (To/Cc/Bcc) from the drop-down menu.
+ AddAllows you to add e-mail addresses to send e-mails to multiple recipients (Broadcast).
One touch buttons

271
Scan
5
Delete TextDeletes all the entered e-mail addresses.
BackspaceMoves the cursor back to delete one character.
ShiftUsed for entering uppercase characters.
More CharactersDisplays symbols. Use this button to enter symbols for the e-mail address.
Add Me (Adding the Sender’s Address)
The sender's address can be added to [To], [Cc], or [Bcc].
1 Select [Add Me].
2 Select any option.
ToAdds the sender's address to To.
CcAdds the sender's address to Cc.
BccAdds the sender's address to Bcc.

5 Scan
272
Scan
5
Recipient(s) (Editing a Recipient)
You can confirm, delete, or edit recipients using the pop-up menu displayed.
1 From the [Recipient(s)] list, select the recipient to be deleted, confirmed, or edited.
2 Select any option from the pop-up menu.
RemoveRemoves the selected recipient.
EditDisplays the [Edit Recipient] screen on which you can confirm or edit the recipient.Refer to "[Edit Recipient] Screen" (P.272).
Note • The recipient cannot be edited depending on the settings in the System Administration mode.
Close MenuHides the pop-up menu.
[Edit Recipient] ScreenThis screen allows you to confirm and change the settings of the recipient.
1 Select the item to be changed.
2 Select [Edit].
3 Select any option.
E-mail AddressTo change the e-mail address, select [E-mail Address] and enter a new address on the displayed keyboard.

273
Scan
5
NameTo change the recipient name, select [Name] and enter a new name on the displayed keyboard.
When you specify a recipient from the Address Book and the recipient name is registered in the Address Book, that recipient name is displayed.
S/MIME CertificateCertificates which are linked to the e-mail address are displayed.
If S/MIME is enabled, and a certificate is linked to the e-mail address, you can check the contents of the S/MIME certificate by selecting [S/MIME Certificate].For information on S/MIME communication, refer to "13 Encryption and Digital Signature Settings" > "Configuration of E-mail Encryption/Digital Signature" in the Administrator Guide.
From (Setting the Sender’s Address)
Specify a sender's e-mail address. You can specify only one address as a sender's address.Note • When [Login to Local Accounts] is selected, the e-mail address registered in user information is
automatically set as a sender's address. For more information on user information, refer to "5 Tools" > "Accounting" > "Create/View User Accounts" in the Administrator Guide.
• [From] may not be editable depending on the setting in the System Administration mode.
• When you send e-mail with a digital signature, the items used in the signature are different depending on the settings in the System Administration mode.
For information on a digital signature, refer to "13 Encryption and Digital Signature Settings" > "Configuration of E-mail Encryption/Digital Signature" in the Administrator Guide.
1 Select [From].
2 Select any option from the pop-up menu displayed.
Address BookAllows you to select the sender's e-mail address from the Address Book.For information on the Address Book, refer to "Address Book (Specifying an E-mail Address)" (P.262).
KeyboardAllows you to enter the sender’s e-mail address with up to 128 characters using the displayed keyboard.
Close MenuHides the pop-up menu.

5 Scan
274
Scan
5
Subject (Setting the Subject)
You can specify the e-mail subject using the following procedure.
Auto SetAutomatically sets the subject to [Scan data from XXX] (where XXX is the host name of the machine).
To set a user-defined subject
1 Select [Subject].
2 Enter a subject with up to 128 characters using the displayed keyboard.
For information on how to enter characters, refer to "Entering Text" (P.70).
Message (Entering the E-mail Body)
You can enter the e-mail body using the following procedure.
1 Select [Message].
2 Enter a message with up to 512 characters using the displayed keyboard.
For information on how to enter characters, refer to "Entering Text" (P.70).
Preview (Previewing the Scanned Images during a Scan Job)
You can preview the scanned images while scanning the document.
1 Select the [Preview] check box.
2 Preview the scanned images after the document is scanned.
Important • You cannot preview the scanned images when [MRC High Compression] is set to [On] or the [Specific Color] check box is selected on the [File Format] screen.
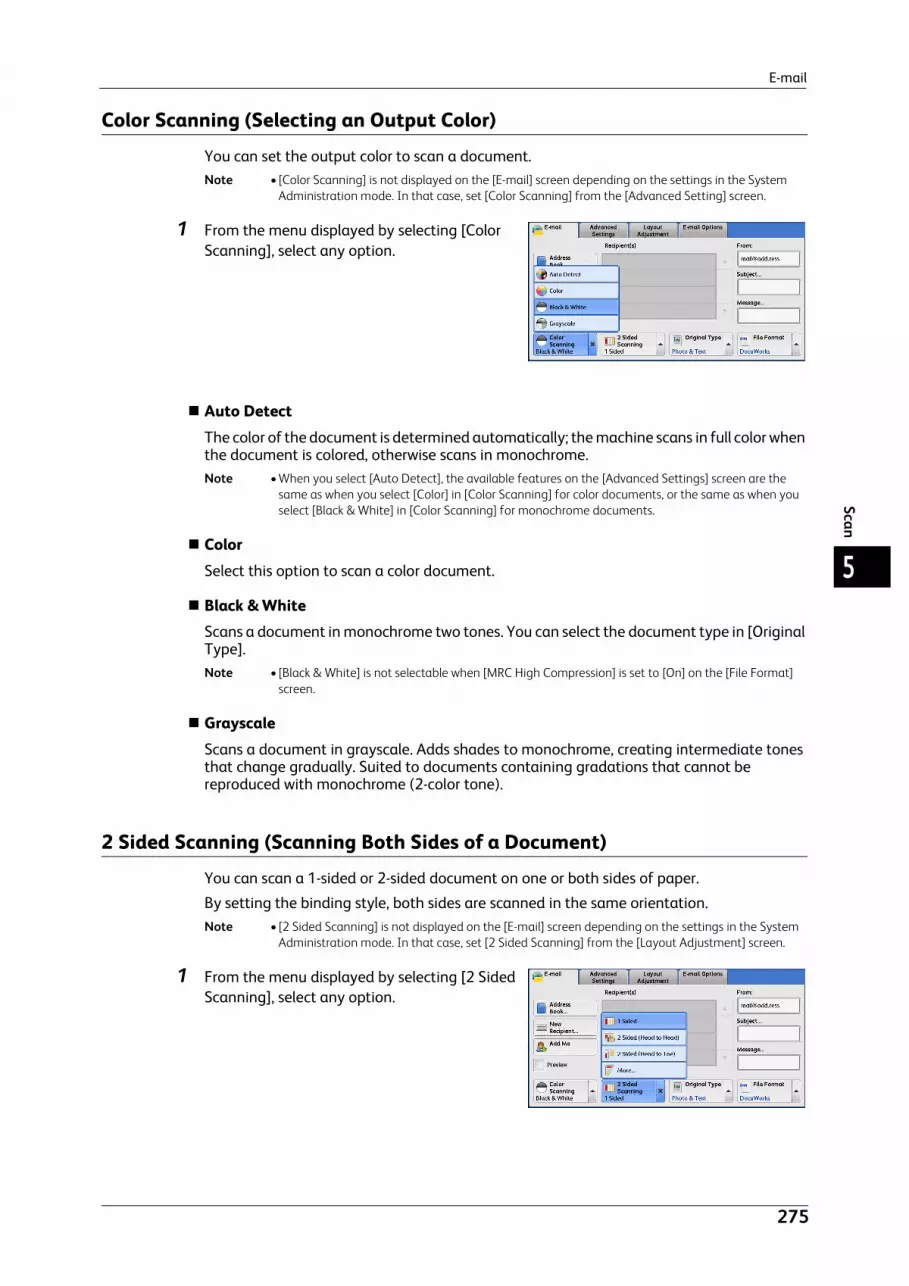
275
Scan
5
Color Scanning (Selecting an Output Color)
You can set the output color to scan a document.Note • [Color Scanning] is not displayed on the [E-mail] screen depending on the settings in the System
Administration mode. In that case, set [Color Scanning] from the [Advanced Setting] screen.
1 From the menu displayed by selecting [Color Scanning], select any option.
Auto DetectThe color of the document is determined automatically; the machine scans in full color when the document is colored, otherwise scans in monochrome.Note • When you select [Auto Detect], the available features on the [Advanced Settings] screen are the
same as when you select [Color] in [Color Scanning] for color documents, or the same as when you select [Black & White] in [Color Scanning] for monochrome documents.
ColorSelect this option to scan a color document.
Black & WhiteScans a document in monochrome two tones. You can select the document type in [Original Type].Note • [Black & White] is not selectable when [MRC High Compression] is set to [On] on the [File Format]
screen.
GrayscaleScans a document in grayscale. Adds shades to monochrome, creating intermediate tones that change gradually. Suited to documents containing gradations that cannot be reproduced with monochrome (2-color tone).
2 Sided Scanning (Scanning Both Sides of a Document)
You can scan a 1-sided or 2-sided document on one or both sides of paper.
By setting the binding style, both sides are scanned in the same orientation.Note • [2 Sided Scanning] is not displayed on the [E-mail] screen depending on the settings in the System
Administration mode. In that case, set [2 Sided Scanning] from the [Layout Adjustment] screen.
1 From the menu displayed by selecting [2 Sided Scanning], select any option.

5 Scan
276
Scan
5
1 SidedSelect this option to scan only one side of the document.
2 Sided (Head to Head)Select this option when both sides of the 2-sided document are in the same orientation.
2 Sided (Head to Toe)Select this option when both sides of the 2-sided document are in opposite orientations.
MoreDisplays the [2 Sided Scanning] screen.Refer to "[2 Sided Scanning] Screen" (P.276).
[2 Sided Scanning] ScreenThis screen allows you to select the status and orientation of original documents.
1 Select any option.
1 SidedSelect this option to scan only one side of the document.
2 SidedSelect this option to scan both sides of the document.
OriginalsThis option is displayed when [2 Sided] is selected.
Head to Head
Select this option when both sides of the 2-sided document are in the same orientation.
Head to Toe
Select this option when both sides of the 2-sided document are in opposite orientations.
Original OrientationSpecify the orientation of the loaded document.
When you load the top edge of the document against the left side of the document glass or the document feeder, and then select [Sideways Images], the document is displayed in the correct orientation when viewed on your computer screen.
Load the document in the [Sideways Images] orientation when [File Format] is set to [TIFF/JPEG Auto Select], [TIFF], or [JPEG]. The document is displayed in the [Upright Images] orientation when viewed on your computer screen.Note • If the [Original Orientation] setting differs from the actual document orientation, the machine may
not detect the top of the document correctly.

277
Scan
5
Upright Images
Select this option when placing the top edge of the document against the top side of the document glass or document feeder.
Sideways Images
Select this option when placing the top edge of the document against the left side of the document glass or the document feeder.
Original Type (Selecting the Document Type)
When you select [Black & White] in [Color Scanning], select the document type.Note • [Original Type] is not displayed on the [E-mail] screen depending on the settings in the System
Administration mode. In that case, set [Original Type] from the [Advanced Settings] screen.
1 From the menu displayed by selecting [Original Type], select any option.
Photo & TextSelect this option when scanning a document that contains both text and photos. The machine automatically identifies text and photo areas to scan each area with optimum quality.
TextSelect this option when scanning text clearly.
PhotoSelect this option when scanning photos.Note • [Photo] is not selectable when [Searchable Text] is set to [Searchable] on the [File Format] screen.
File Format (Selecting a File Format for Output Data)
You can select a file format for scanned data.Note • If the High Compression Image Kit (optional) is installed, the machine can save PDF, DocuWorks,
and XPS files with high compression.
• If the High Compression Image Kit (optional) is installed, scanned data containing a small number of colors can be compressed with the Specific Color feature. For more information, refer to "Specific Color" (P.280).
• [File Format] is not displayed on the [E-mail] screen depending on the settings in the System Administration mode. In that case, set [File Format] from the [E-mail Options] screen.

5 Scan
278
Scan
5
1 From the menu displayed by selecting [File Format], select any option.
TIFF/JPEG Auto SelectAutomatically selects JPEG or TIFF. The file format is determined for each page: [JPEG] for full-color and grayscale pages, and [TIFF] for monochrome pages.
TIFFSaves scanned data in TIFF format.
JPEGSaves scanned data in JPEG format. This option is selectable when either [Color] or [Grayscale] is selected in [Color Scanning].
PDFSaves scanned data in PDF format.Note • The version of PDF files is Adobe®Acrobat® 4.0 (PDF 1.3).
DocuWorksSaves scanned data in DocuWorks format.Note • To browse or print DocuWorks files on a computer, one of the following software is required:
- DocuWorks 4.0 or later
- DocuWorks Viewer Light 4.0 or later
- DocuWorks Viewer Light for Web 4.0 or later
MoreDisplays the [File Format] screen.Refer to "[File Format] Screen" (P.278).
[File Format] ScreenThis screen allows you to select all available options for File Format.
1 Select any option.
TIFF/JPEG Auto SelectAutomatically selects JPEG or TIFF. The file format is determined for each page: [JPEG] for full-color and grayscale pages, and [TIFF] for monochrome pages.

279
Scan
5
TIFFSaves scanned data in TIFF format.
JPEGSaves scanned data in JPEG format. This option is selectable when either [Color] or [Grayscale] is selected in [Color Scanning].
PDFSaves scanned data in PDF format.Note • The version of PDF files is Adobe®Acrobat® 4.0 (PDF 1.3).
DocuWorksSaves scanned data in DocuWorks format.Note • To browse or print DocuWorks files on a computer, one of the following software is required:
- DocuWorks 4.0 or later
- DocuWorks Viewer Light 4.0 or later
- DocuWorks Viewer Light for Web 4.0 or later
XPSSaves scanned data in XPS format.
Compression MethodAllows you to select a compression method for scanned image data.Note • When you select [Auto], the following compression methods will be used:
- When [Original Type] is set to [Photo & Text] or [Text] for black-and-white images: MMR
- When [Original Type] is set to [Photo] for black-and-white images: MH
- For grayscale and color images: JPEG
• When you select [TIFF], [DocuWorks], or [XPS] and then select [Manual Select] in [Compression Method] under [File Format], you can select a compression method from [MH] and [MMR] under [Black & White Pages].
• If you select [PDF] and then select [Manual Select] in [Compression Method] under [File Format], you can select a compression method from [MH], [MMR], [JBIG2 Arithmetic Encoded], and [JBIG2 Huffman Encoded] under [Black & White Pages], and one from [JPEG] and [Flate] under [Grayscale/Color Pages]. Selecting [Flate] saves the image data with higher compression than [JPEG].
• You cannot retrieve grayscale or color images in uncompressed (Raw) format.
MRC High CompressionAllows you to save PDF, DocuWorks, and XPS files with high compression.Important • If you use the E-mail or Scan to PC service to scan a document with [MRC High Compression]
enabled, the image quality of the scanned data may differ from when you use CentreWare Internet Services to retrieve the scanned data from a folder with [MRC High Compression] enabled.
• DocuWorks 5.0.x and earlier versions (including trial version) do not support high-compressed DocuWorks files.
Note • To browse or print DocuWorks files on a computer, one of the following software is required:
- DocuWorks 6.0 or later
- DocuWorks Viewer Light 5.1 or later
- DocuWorks Viewer Light for Web 5.1 or later
• This feature is available when [Color Scanning] is set to [Auto Detect], [Color], or [Grayscale], when [Resolution] is set to [200 dpi] or [300 dpi], and when [File Format] is set to [PDF], [DocuWorks], or [XPS].
• This feature is not available for some models. An optional component is required. For more information, contact our Customer Support Center.

5 Scan
280
Scan
5
Searchable TextAllows you to select whether to perform character recognition in PDF and DocuWorks files.
When [Searchable Text] is set to [Searchable], select a language to identify the text.Refer to "[File Format - Searchable Text] Screen" (P.282).
When [Searchable Text] is set to [Searchable], the following settings are available.
* : [Color Space] may not appear for some models, or may not appear on the screen depending on the setting in the System Administration mode. For more information, refer to "5 Tools" > "Scan Service Settings" > "Other Settings" > "Color Space" in the Administrator Guide, and "Color Space (Specifying Color Space)" (P.320).
Specific ColorAllows you to scan documents containing a small number of colors and save the scanned data with compression. Selecting this check box enables the file size to be smaller than selecting [MRC High Compression].Note • This feature is available when [Color Scanning] is set to [Color], when [Resolution] is set to [200 dpi]
or [300 dpi], and when [File Format] is set to [PDF] or [DocuWorks].
• To browse or print DocuWorks files on a computer, one of the following software is required:
- DocuWorks 6.0 or later
- DocuWorks Viewer Light 5.1 or later
- DocuWorks Viewer Light for Web 5.1 or later
• This feature is not available for some models. An optional component is required. For more information, contact our Customer Support Center.
Add ThumbnailAllows you to attach thumbnails to DocuWorks and XPS files when [DocuWorks] or [XPS] is selected. A thumbnail is a reduced, small file size image that helps you check the file contents.
Single File for Each Page Saves each page as a single file in the specified format.Note • When you use the Store to Folder, Job Flow Sheets, or Network Scanning service, files cannot be split.
PDF SecurityDisplays the [File Format - PDF Security] screen.
Allows you to configure security on the data saved as a PDF file to prevent unauthorized access.Refer to "[File Format - PDF Security] Screen" (P.283).
Setting ItemWhen [MRC High
Compression] is Set to [No]
When [MRC High Compression] is Set to
[On]
E-mail/Store to Folder/ Network Scanning/ Scan to PC/ Store & Send Link/Store to USB
Color Scanning Auto Detect, Color, Grayscale
Auto Detect, Color, Grayscale
Original Type Photo & Text, Text
File Format PDF, DocuWorks
Advanced Settings Color Space* sRGB
Layout Adjustment Resolution 200 dpi, 300 dpi
Reduce/Enlarge 100%
Note • [Auto %] is not supported.

281
Scan
5
PDF SignatureDisplays the [File Format - PDF Signature] screen.
A visible signature added to a file enables to detect alterations in the file, or to prevent impersonation of the sender.
To verify the signature with Adobe Acrobat, select [Digital Signatures] under [Preferences] on Acrobat, and then select the following option for [When Verifying].
- Acrobat 6.0.x : Windows Digital Certificate Security- Acrobat 7.0.x : Adobe Default Security- Acrobat 8.0.x : Adobe Default Security
Off
No visible signature is added.
On
Adds a visible signature using the certificate of the machine.Note • The items used in the signature are different depending on the machine configuration and settings
in the System Administration mode.
Signature Location
Select the position where the signature is displayed when you select [On] in [PDF Signature]. When you select [Invisible Signature], an invisible signature is added using the certificate of the machine.
Optimize For Quick Web ViewOptimizes the PDF file so that it is displayed faster on a web browser.
DocuWorks SecurityDisplays [File Format - DocuWorks Security] screen.
Allows you to configure security on the data saved as a DocuWorks file to prevent unauthorized access.Refer to "[File Format - DocuWorks Security] Screen" (P.285).
DocuWorks SignatureDisplays the [File Format - DocuWorks Signature] screen.
A visible signature added to a file enables to detect alterations in the file, or prevent impersonation of the sender.
Off
No visible signature is added.
On
Adds a visible signature using the certificate of the machine.Note • The items used in the signature are different depending on the machine configuration and settings
in the System Administration mode.
Signature Location
Select the position where the signature is displayed when you select [On] in [DocuWorks Signature].
XPS SignatureDisplays the [File Format - XPS Signature] screen.
A visible signature added to a file enables to detect alterations in the file, or prevent impersonation of the sender.

5 Scan
282
Scan
5
Off
No visible signature is added.
On
Adds a visible signature using the certificate of the machine.Note • The items used in the signature are different depending on the machine configuration and settings
in the System Administration mode.
[File Format - Searchable Text] Screen
1 Select any option.
Language of the OriginalAllows you to select a language to identify the text on the original document.Note • This feature is not available for some models. An optional component is required. For more
information, contact our Customer Support Center.
Text CompressionAllows you to select whether to compress the text areas of the document when using the Searchable Text feature.Important • Note the following when [Searchable Text] is set to [Searchable].
- When the text on the document is small (10 points or smaller), scan the document with high resolution (300 dpi).
- Color scanning is recommended when the document has outlined white text, or when it has text placed on a dark background.
- If you use the E-mail or Scan to PC service to scan a document with both [MRC High Compression] and [Searchable Text] enabled, the recognition rate of the scanned data may differ from that of the data retrieved from a folder with both [MRC High Compression] and [Searchable Text] enabled, using CentreWare Internet Services.
• In the following cases, the Searchable Text feature may not function properly.
- If the document is not loaded correctly and thus the text is slanted, or if the text on the document is in different orientations
- If the text on the document is decorated (italic, hatching, strike-through, etc.)
- If the document has background patterns or noise
- If the text on the document is handwritten
Note • This feature is not available for some models. An optional component is required. For more information, contact our Customer Support Center.

283
Scan
5
[File Format - PDF Security] ScreenThis screen allows you to encrypt a PDF file with a password, and assign the access privileges for the file operation.
1 Select any option.
OffThe file is not encrypted, and no access privilege is assigned.
PasswordEncrypts the file using a password.
Encryption AlgorithmAllows you to specify the encryption method.
128-bit RC4
Encrypts the file by the 128-bit RC4 method. Files encrypted by this method can be opened with Adobe® Acrobat® 5.0 or later.
Important • When the 128-bit RC4 method is used to encrypt a file, and [PDF Signature] is selected, files can be opened only with Adobe® Acrobat® 6.0 or later.
128-bit AES
Encrypts the file by the 128-bit AES method. Files encrypted by this method can be opened with Adobe® Acrobat® 7.0 or later.
256-bit AES
Encrypts the file by the 256-bit AES method. Files encrypted by this method can be opened with Adobe® Acrobat® 9.0 or later.
Supported Version
Displays the supported versions of Adobe® Acrobat® for encryption.
File Open PasswordDisplays the [PDF Security - File Open Password] screen.
If you select [On] and set a password, the password is required to open the file.
You can enter a password with up to 32 characters.
PermissionsDisplays the [PDF Security - Permissions] screen.Refer to "[PDF Security - Permissions] Screen" (P.284).

5 Scan
284
Scan
5
[PDF Security - Permissions] ScreenThis screen allows you to assign access privileges to a file.
1 Select [Permissions].
2 Select [Security Password].
3 Select [On].
4 Enter the security password, and select [Save].
5 Likewise, re-enter the security password, and select [Save].
6 Select any option.
Security PasswordDisplays the [PDF Security - Security Password] screen.
[Security Password] allows to assign access privileges to files. The password is required to change the access privileges or to perform unauthorized operations.
You can enter a password with up to 32 characters.
PrintingDisplays the [Permissions - Printing] screen.
Specify whether to allow printing the file. If allowed, select the print resolution.
Changes AllowedDisplays the [Permissions - Changes Allowed] screen.
Specify whether to allow changing the file contents, such as inserting pages or adding notes.
Allow Contents Copying and ExtractionDisplays the [Allow Contents Copying and Extraction] screen.
Specify whether to allow copying the file contents, such as text and images.
Text Editing by Screen ReaderDisplays the [Text Editing by Screen Reader] screen.
Select [Allowed] to use application software, such as a screen reader, that reads out PDF documents for the visually handicapped.

285
Scan
5
[File Format - DocuWorks Security] ScreenThis screen allows you to encrypt a DocuWorks file with a password, and assign the access privileges for the file operation.
1 Select any option.
OffThe file is not encrypted, and no access privilege is assigned.
Password (V4 Compatible)Encrypts the file by the 56 bit DES method using a password. Files encrypted by this method can be opened with DocuWorks Ver. 4.0 or later.Select [Open Password] to set a password.
Password (V4 Incompatible)Encrypts the file by the 128 bit AES method using a password. Files encrypted by this method can be opened with DocuWorks Ver. 5.0 or later.Select [Open Password] to set a password.
Digital Certificate (V4 Incompatible)Encrypts the file by the 128 bit AES method using a certificate. Files encrypted by this method can be opened with DocuWorks Ver. 5.0 or later.Select [Certificate] to set a certificate.Important • If you encrypt a file using a certificate without Basic Constraints, you cannot use DocuWorks Ver.
5.0.1 and Ver. 6.0.1 to open the file. To use such certificates, use DocuWorks Ver. 5.0.2, or Ver. 6.0.2 or later.
Note • When you select [Full Access Password] or [Open Password] in [Digital Certificate (V4 Incompatible)], the same certificate name may be redundantly displayed in [Security Settings] of a DocuWorks document to be generated, in the following conditions. However, this does not affect the operation.
- When you created a job flow on the machine, the same certificate was selected redundantly.
- The certificate data was obtained from an LDAP server, and the same certificate was selected redundantly.
Encryption AlgorithmDisplays the encryption methods.
Restricted OperationsSelect file operations to assign access privileges. When assigning access privileges, set [Full Access Password].
Open PasswordDisplays the [DocuWorks Security - Open Password] screen.
If you select [On] and set a password, the file is encrypted. To open the file, the password is required. The access privileges set in [Restricted Operations] are assigned.
You can enter a password with up to 32 characters.

5 Scan
286
Scan
5
Full Access PasswordDisplays the [DocuWorks - Full Access Password] screen.
If a password is set, the password is required to change the access privileges set in [Restricted Operations].
You can enter a password with up to 32 characters.
CertificateDisplays the [DocuWorks Security - Certificate] screen.Note • When you select [Certificate], the Address Book [Type1] or [Type2] will be displayed depending on
the setting of [Address Book Type] in the System Administration mode. For more information, refer to "5 Tools" > "Address Book Settings" > "Address Book Type" in the Administrator Guide.
Refer to "[DocuWorks Security - Certificate] Screen" (P.286).
[DocuWorks Security - Certificate] ScreenThis screen allows you to specify parties to whom the encrypted file is disclosed, and addresses to which privileges are assigned.Note • You can specify up to 50 parties to whom the encrypted file is disclosed, on the [DocuWorks Security
- Certificate] screen.
When the Address Book Type 1 is Displayed
List all certificates
Displays all the certificates currently configured on the machine. Select [ ] to return to the previous screen or [ ] to move to the next screen.
Certificate Type Name/E-mail Address
For [Certificate Type], select [Open File] to open the file, or select [Full Access] to allow all operations such as editing the file.
When selecting a certificate, a pop-up menu appears. Select [Delete], [Change Rights], [CertificateDetails], or [Cancel].
Select [CertificateDetails] to display [CertificateDetails] screen. You can confirm certificate information, such as issuer, expiration date, and persons to whom the certificate is issued on the screen.
Delete All
Deletes all certificates currently configured on the machine.
Add Certificate
Select [Add Certificate] and then [Certificate Address Book] screen appears.
[Certificate Address Book] screenSelect a certificate from the certificate address book.Note • To switch the Address Book entry type, select [Public Entries], [Network Entries], [Smart Card E-mail
Address], or [Device Certificate] from the drop-down menu on the [Certificate Address Book] screen.
• The methods that appear in the drop-down menu depend on the settings in the System Administration mode.
Public EntriesDisplays the local addresses.
All
Lists all the registered recipients for using SMB or FTP protocol.

287
Scan
5
Alphanumeric Index
Lists the registered recipients with alphanumeric index characters in alphabetical order.
Search
Allows you to set [Simple Search] or [Advanced Search].
Searches by the specified keyword for [Simple Search], or by search entries for [Advanced Search].
Note • For [Advanced Search], you can set multiple search entries.
#/Name/E-mail Address
Displays the list of names, registered numbers, and E-mail addresses.
Go to
Enter a recipient number using the numeric keypad to display the recipient at the top of the list.
[ ] button
Certificate information, such as issuer, expiration date, and persons to whom the certificate is issued, is displayed.
Network EntriesSearches recipients in the remote address list.Note • Enable filters from the [Custom Filters] screen using CentreWare Internet Services to search with
keywords ([Simple Search]) without [Name], [E-mail Address], or [Custom Item]. For more information, refer to the help of CentreWare Internet Services.
Important • To display the help for CentreWare Internet Services, users need to have the environment to connect to the Internet. The communication fee shall be borne by the users.
Note • To display [Search Network], prior settings are required in the System Administration mode.
Smart Card CertificateSearches recipients in the remote address list.Note • This item is displayed when the IC Card Reader (optional) is connected.
Device CertificateSearches recipients in the remote address list.Note • This item is displayed when the machine stores a certificate.
When the Address Book Type 2 is Displayed
List all public entriesDisplays the local address list.
Retrieve fax entries using indexSpecify a single alphanumeric index character which is set when registering speed dials to retrieve the addresses, or specify a speed dial to display at the top of the address list.
Search PublicSearches recipients in the local address list.
Search NetworkSearches recipients in the remote address list.Note • To display [Search Network], prior settings are required in the System Administration mode.

5 Scan
288
Scan
5
[ ] button Displays the [Certificate Details] screen.
Certificate information, such as issuer, expiration date, and persons to whom the certificate is issued, is displayed.
Name/E-mail Address/DNLists names and their e-mail addresses.
AddSelect this button to add the certificate as one of the certificates of persons who are allowed to open the file.
Grant full access to this fileConfigure certificates of persons who are allowed to change access privileges including editing or operating the file (full access).

Network Scanning
289
Scan
5
Network Scanning
This section describes the procedure to select features on the [Network Scanning] screen. On the [Network Scanning] screen, you can scan documents after specifying a file (job template) saving scanning conditions, information on the forwarding destination server, and others.
This feature creates job templates on a computer using CentreWare Internet Services. Scanned data is converted to the format specified in a job template, and is automatically sent to a server. The machine allows you to automatically retrieve job templates stored in a server. The following describes features available on the [Network Scanning] tab.Note • If characters not supported by the machine are used in names or descriptions of job templates
sheets, the characters will not be displayed or will be garbled on the screen. For information on characters available for use, refer to "16 Appendix" > "Notes and Restrictions" > "Notes and Restrictions on the Use of the Machine" in the Administrator Guide.
When Scan to Home is enabled, and when the Remote Access feature is available, the scanned document can be transferred to a different destination according to an authenticated user.Important • When using the Scan to Home feature in computer environment earlier than Windows 98/NT, a
destination user name in the earlier format (domain name\user name) will not be determined automatically.Before scanning, change the user name with which you can log in correctly.
Note • You can configure the Scan to Home feature from CentreWare Internet Services.
For information on how to use CentreWare Internet Services, refer to the help of CentreWare Internet Services.
Important • To display the help for CentreWare Internet Services, users need to have the environment to connect to the Internet. The communication fee shall be borne by the users.
1 Select [Network Scanning] on the [Services Home] screen.
2 Select a job template, and then select a feature on the [Network Scanning] screen.
Job TemplateSelect a job template for the scan job.
DEFAULT - This is the default job template. This template is used as a base template when a new template is created on CentreWare Internet Services. This template cannot be deleted. It can be edited and returned to the factory-default template only by the system administrator.
@S2HOME - This is the template for the Scan to Home feature. Selecting this template verifies a user and sends scanned data to the folder prespecified for the user.

5 Scan
290
Scan
5
Note • The job template "@S2HOME" is displayed only when the remote authentication is enabled, and also [Enabled] is selected in [Status] under [Properties] > [Services] > [Scan to Home] on CentreWare Internet Services.
• The job template name "@S2HOME" can be changed by the system administrator from CentreWare Internet Services.
For information on how to use CentreWare Internet Services, refer to the help of CentreWare Internet Services.
Important • To display the help for CentreWare Internet Services, users need to have the environment to connect to the Internet. The communication fee shall be borne by the users.
Go toUse the numeric keypad to enter a 3-digit job template number. The job template then appears at the top of the list.
Template DescriptionDisplays the [Template Description] screen on which you can view the description of the job template. This button is displayed only when the description has been added to a job template.
Update TemplatesRefreshes the information. If a created job template has not been displayed, selecting [Update Templates] will display the job template.
Preview (Previewing the Scanned Images during a Scan Job)
You can preview the scanned images while scanning the document.For more information, refer to "Preview (Previewing the Scanned Images during a Scan Job)" (P.274).
Color Scanning (Selecting an Output Color)
You can set the output color to scan a document.For more information, refer to "Color Scanning (Selecting an Output Color)" (P.275).
2 Sided Scanning (Scanning Both Sides of a Document)
You can automatically scan both sides of a 2-sided document.
By setting the binding style, both sides are scanned in the same orientation.For more information, refer to "2 Sided Scanning (Scanning Both Sides of a Document)" (P.275).
Original Type (Selecting the Document Type)
You can select the type of the document.For more information, refer to "Original Type (Selecting the Document Type)" (P.277).
File Format (Selecting a File Format for Output Data)
You can select a file format for output data.For more information, refer to "File Format (Selecting a File Format for Output Data)" (P.277).

Scan to PC
291
Scan
5
Scan to PC
This section describes the procedure to select features on the [Scan to PC] screen. The Scan to PC service allows you to scan documents and send the scanned data to a network computer via the FTP or SMB protocol. The following describes features available on the [Scan to PC] tab. The following shows the reference section for each feature.
Transfer Protocol (Selecting a Transfer Protocol) ................................................................................................................292Address Book (Specifying a Destination PC Using the Address Book) ............................................................................292Add New Address (Registering a Destination PC on the Address Book).........................................................................294Specifying a Destination PC Using a One Touch Button ....................................................................................................297Browse (Specifying a Destination PC by Browsing Your Network)...................................................................................298Specifying a Destination (Specifying a Destination PC Using the Screen Keyboard) .................................................299Preview (Previewing the Scanned Images during a Scan Job)..........................................................................................301Color Scanning (Selecting an Output Color)..........................................................................................................................3012 Sided Scanning (Scanning Both Sides of a Document)...................................................................................................301Original Type (Selecting the Document Type) ......................................................................................................................301File Format (Selecting a File Format for Output Data) .......................................................................................................301
Note • Before scanning, you must create a shared folder on your computer to save scanned data in. Furthermore, if you use the FTP protocol, you must set the FTP service. For information on the computer settings, refer to the documentation provided with your operating system. For information on how to configure the FTP service on Mac OS X v10.7 Lion, consult the official website of Apple Inc. For information on supported operating systems, refer to "16 Appendix" > "Specifications" in the Administrator Guide.
• If you use Mac OS X v10.7 Lion, contact our Customer Support Center and ask if your operating system is supported.
You can customize the layout of the features displayed on the [Scan to PC] screen. For more information, refer to "5 Tools" > "Scan Service Settings" > "Screen Defaults" > "1st Tab - Features Allocation" in the Administrator Guide.You can set [First Tab] or [Address Book] for the screen displayed when you select [Scan to PC] on the [Service Home] screen. For more information, refer to "5 Tool" > "Scan Service Settings" > "Screen Defaults" > "Scan to PC Screen Default" in the Administrator Guide.
1 Select [Scan to PC] on the [Services Home] screen.
2 Select a feature on the [Scan to PC] screen.
Note • Depending on the settings for [Save to PC Screen Default] in the System Administration mode, the [Server Address Book] screen is displayed. For more information, refer to "5 Tools" > "Scan Service Settings" > "Screen Defaults" > "Save to PC Screen Default" in the Administrator Guide.
• Fields displayed on the screen vary depending on the protocol you have selected.

5 Scan
292
Scan
5
Transfer Protocol (Selecting a Transfer Protocol)
You can select a transfer protocol using the following procedure.
1 Select [Transfer Protocol].
2 Select any option.
FTPTransfers using the FTP protocol.
SMBTransfers using the SMB protocol.
SMB (UNC Format)Transfers using the SMB protocol (UNC Format).
UNC stands for Universal Naming Convention and its format is as follows:\\host name\shared name\directory name
Address Book (Specifying a Destination PC Using the Address Book)
You can specify the server name, the user name used for login to the destination server or other computers, and other information from the Address Book. Note • You cannot use address numbers input by the numeric keypad to specify the destination registered
in the Address Book.
For information on how to set the Address Book, refer to "5 Tools" > "Setup" > "Add Address Book Entry" in the Administrator Guide.
When the Address Book Type 1 is Displayed
1 Select [Address Book].
Note • When you select [Address Book], the Address Book [Type1] or [Type2] will be displayed depending on the setting of [Address Book Type] in the System Administration mode. For more information, refer to "5 Tools" > "Address Book Settings" > "Address Book Type" in the Administrator Guide.

Scan to PC
293
Scan
5
2 Select the destination to store the data in.
Important • You can only use destinations configured for SMB or FTP.
Note • Select [ ] to return to the previous screen or [ ] to move to the next screen.
(List/Thumbnail)Allows you to switch the number of the recipients displayed from a list (five items) or thumbnail (15 items).
NameLists recipient names and protocols.
Go toEnter a recipient number using the numeric keypad to display the recipient at the top of the list.
[ ] buttonAllows you to confirm information, such as [Name] and [Server Name/IP Address], on the screen displayed.
AllLists all the registered recipients for using SMB or FTP protocol.
Alphanumeric IndexLists the registered recipients with alphanumeric index characters in alphabetical order.
SearchAllows you to set [Simple Search] or [Advanced Search].
Searches by the specified keyword for [Simple Search], or by search entries for [Advanced Search].Note • For [Advanced Search], you can set multiple search entries.
Add New AddressAllows you to add a new recipient. To add a new recipient, use the screen keyboard or current locations.For more information on how to add new recipients, refer to "Add New Address (Registering a Destination PC on the Address Book)" (P.294).
When the Address Book Type 2 is Displayed
1 Select [Address Book].
Note • When you select [Address Book], the Address Book [Type1] or [Type2] will be displayed depending on the setting of [Address Book Type] in the System Administration mode. For more information, refer to "5 Tools" > "Address Book Settings" > "Address Book Type" in the Administrator Guide.

5 Scan
294
Scan
5
2 Select the destination to store the data in.
Note • To switch the Address Book entry type, select [List all public entries], or [Retrieve fax entries using index] from the drop-down menu on the [Server Address Book] screen.
3 Select [Add].
Important • You can only use destinations configured for SMB or FTP.
Note • Select [ ] to return to the previous screen or [ ] to move to the next screen.
List all public entriesDisplays the local address list.
Select [ ] to return to the previous screen or [ ] to move to the next screen. Select items you want to set for a recipient, and select [Add].
Retrieve fax entries using indexSpecify a single alphanumeric index character which is set when registering speed dials to retrieve the addresses, or specify a speed dial to display at the top of the address list.
Name, ProtocolLists recipient names and protocols.
AddAdds a selected recipient to the [Save in] box.
Save inDisplays a selected recipient.
Go toEnter a recipient number using the numeric keypad to display the recipient at the top of the list.
[ ] buttonAllows you to confirm information, such as [Name] and [Server Name/IP Address], on the screen displayed.
Add New Address (Registering a Destination PC on the Address Book)
You can register a destination PC on the Address Book. The current destination PC specified on the First Tab screen can also be registered.Note • [Add New Address] is not displayed depending on the settings in the System Administration mode or
depending on the number of registered recipients. Ask your system administrator to confirm the settings and the number of recipients.

Scan to PC
295
Scan
5
1 Select [Add New Address].
2 Select a method to register a recipient.
NewEnter a new recipient using the keyboard.
Add from current locationRegister the current location specified on the First Tab screen.Note • When you select this item, the location information will be displayed. This item cannot be selected if
no location is specified on the First Tab screen.
When [New] is selected
3 Select a transfer protocol.
For more information on [Transfer Protocol], refer to "Transfer Protocol (Selecting a Transfer Protocol)" (P.292).For more information on [Browse], refer to "Browse (Specifying a Destination PC by Browsing Your Network)" (P.298).
4 Select an item to set and set.
When [FTP] is selected The following items appear:
Server
Save in
User Name
Password
When [SMB] is selected The following items appear:
Server
Shared Name
Save in

5 Scan
296
Scan
5
User Name
Password
When [SMB (UNC Format)] is selected The following items appear:
Save in
User Name
PasswordFor more information on the setting items, refer to "Specifying a Destination (Specifying a Destination PC Using the Screen Keyboard)" (P.299).
5 Select [Next].
Note • To return to the previous screen, select the [Back] button.
When [Add from current location] is selected
3 Select an item to set and set if you change a setting.Note • [Transfer Protocol] cannot be changed.
For more information on the setting items, refer to "Specifying a Destination (Specifying a Destination PC Using the Screen Keyboard)" (P.299).
4 Enter each item using the keyboard displayed on the screen, and then select [Save].
For more information on the setting items, refer to "Specifying a Destination (Specifying a Destination PC Using the Screen Keyboard)" (P.299).
5 Select [Next].
Note • To return to the previous screen, select the [Back] button.
6 Select [Name], enter a name using the keyboard displayed on the screen, and then select [Save].
For information on how to enter characters, refer to "Entering Text" (P.70).
7 When you change the index, select [Index], select a new character from the keyboard displayed on the screen, and then select [Save].
You can register a single alphanumeric index character for use as a keyword to search with the Address Book.For information on how to enter characters, refer to "Entering Text" (P.70).
8 When you change the address number, select [Change], select a number from the list, and then select [Save].
9 Select [Next].
Note • To return to the previous screen, select the [Back] button.

Scan to PC
297
Scan
5
10 Select an item to set and set.
The following items appear:
Address Type
Name
Index
Transfer Protocol
Server Name/IP address
Shared Name (SMB Only)
Save in
User Name
Password
Port NumberNote • To delete the input data and return to the [Server Address Book] screen, select [Cancel].
For more information on the setting items, refer to "5 Tools" > "Setup" > "Add Address Book Entry" in the Administrator Guide.
11 When the settings are completed, select [Registered].
Note • To return to the previous screen, select the [Back] button.
Specifying a Destination PC Using a One Touch Button
You can use the one touch buttons to specify the server name, the user name used for login to the destination server or other computers, and other information from the Address Book.
One touch buttons correspond to the address numbers from 0001 to 0052, or 0001 to 0045.
For example, when the number you want to dial is registered to the address number 0001, press one touch button <1>.Note • One touch buttons can be used when the Fax service is available.
• There are two ways in which address numbers and stored programs are assigned to the one touch buttons. Select either of the following. By default, [Type 1] is selected.
- [Type 1]The buttons 1 to 52 are used for address numbers and they correspond to the registered address numbers 0001 to 0052, while the buttons 53 and 54 are used for stored programs and they correspond to the registered stored programs 1 and 2.
- [Type 2]The buttons 1 to 45 are used for address numbers and they correspond to the registered address numbers 0001 to 0045, while the buttons 46 to 54 are used for stored programs and they correspond to the registered stored programs 1 to 9.
1 Press a one touch button. Confirm that the recipient (destination PC) specified with the one touch button is displayed on the touch screen.
Important • The one touch buttons have a sensor to detect which page of one touch buttons (1 - 18, 19 - 36, or 37 - 54) is currently opened. Before pressing a one touch button, turn over the one touch panel

5 Scan
298
Scan
5
completely, and take off your hand from the panel. Do not press the button while you are turning over the panel.
• Do not place any objects near the one touch buttons, nor spill any liquid over them.
Note • Turn the one touch panel over to press the one touch buttons 19 and above.
• If you have entered an incorrect value, select the recipient (destination PC) displayed on the touch screen, select [Remove] on the pop-up menu, and enter the correct value.
Browse (Specifying a Destination PC by Browsing Your Network)
This feature displays a hierarchy consisting of server names and folders. You can specify a save destination by tracing the hierarchy.
1 Select [Browse].
2 Select the destination to save the data in. Select [Previous] or [Next] to move to another level. Important • You can specify recipients for SMB only.
Save inShows the current location in the hierarchy.
Add to Address BookDisplays the [Add to Address Book] screen.Refer to "[Add to Address Book] Screen" (P.299).
PreviousAllows you to move to the upper directory. Note • This button is grayed out if there is no upper directory.
NextAllows you to move to the lower directory.Note • This button is available when a folder is selected.

Scan to PC
299
Scan
5
[Add to Address Book] ScreenThis screen allows you to register the save destination specified in [Browse], in the Address Book.
1 Select [Add to Address Book].
2 Select [Save].
AddressTo change the address number, select [Edit] and then the desired number.
NameTo change the recipient name, enter a new name with the keyboard displayed by selecting [Name].Note • The recipient name may not be displayed depending on the settings.
Specifying a Destination (Specifying a Destination PC Using the Screen Keyboard)
Enter information in the fields provided for the selected protocol, to specify a forwarding destination.
1 Select the item to be set.
Note • You can also select [Address Book] to enter information.
• Fields displayed on the screen vary depending on the selected protocol.
2 Enter information using the keyboard displayed on the screen.
For information on how to enter characters, refer to "Entering Text" (P.70).
Note • To delete characters, select [Backspace].
ServerThis option is displayed when you select [FTP] or [SMB] in [Transfer Protocol]. Enter a server name or IP address. When the save location is in the DFS namespace on Windows, enter a domain name or server name. Up to 64 characters are allowed.

5 Scan
300
Scan
5
The following are examples:
For [FTP]:
Server name: myhost.example.com (myhost: host name, example.com: domain name)
IP address: 192.168.1.100
For [SMB]:
Server name: myhost
IP address: 192.168.1.100
Shared NameThis option is displayed when you select [SMB] in [Transfer Protocol]. Enter a shared name. When the save location is in the DFS namespace on Windows, enter a root name. Up to 64 characters are allowed.
Save inThis option is displayed when you select [FTP] or [SMB] in [Transfer Protocol]. Enter a directory path. When the save location is in the DFS namespace on Windows, enter a folder name. Up to 128 characters are allowed. Note • The folder name is the same as the link name for Windows Server 2003.
For [FTP]:
Example: mydoc/Scan
For [SMB]:
Example: mydoc\Scan
Save inThis option is displayed when you select [SMB (UNC Format)] in [Transfer Protocol].
Enter the following directory path: "\\Host Name\Shared Name\Directory Name". When the save location is in the DFS namespace on Windows, enter "\\Domain Name\Root Name\Folder Name" or "\\Server Name\Root Name\Folder Name". Up to 260 characters are allowed.
User NameEnter the user name of the computer you are forwarding to. When a user name is not required for the destination, this field can be skipped.
When you select [FTP] in [Transfer Protocol], up to 97 characters are allowed.
When you select [SMB] in [Transfer Protocol], use one of the following formats:
For Active Directory:
User name@Domain name (user name: up to 32 characters, domain name: up to 64 characters)
Example: [email protected] (fuji: user name, example.com: domain name)
For Windows NT Domain:
Domain name\User name (domain name: up to 64 characters, user name: up to 32 characters)
Example: example\fuji (example: domain name, fuji: user name)
For workgroups:
Local user (up to 32 characters)
Example: Fuji-Taro

Scan to PC
301
Scan
5
PasswordEnter the password for the user name. Up to 32 characters are allowed.
Preview (Previewing the Scanned Images during a Scan Job)
You can preview the scanned images while scanning the document.For more information, refer to "Preview (Previewing the Scanned Images during a Scan Job)" (P.274).
Color Scanning (Selecting an Output Color)
You can set the output color to scan a document.For more information, refer to "Color Scanning (Selecting an Output Color)" (P.275).
2 Sided Scanning (Scanning Both Sides of a Document)
You can automatically scan both sides of a 2-sided document.
By setting the binding style, both sides are scanned in the same orientation.For more information, refer to "2 Sided Scanning (Scanning Both Sides of a Document)" (P.275).
Original Type (Selecting the Document Type)
You can select the type of the document.For more information, refer to "Original Type (Selecting the Document Type)" (P.277).
File Format (Selecting a File Format for Output Data)
You can select a file format for output data.For more information, refer to "File Format (Selecting a File Format for Output Data)" (P.277).
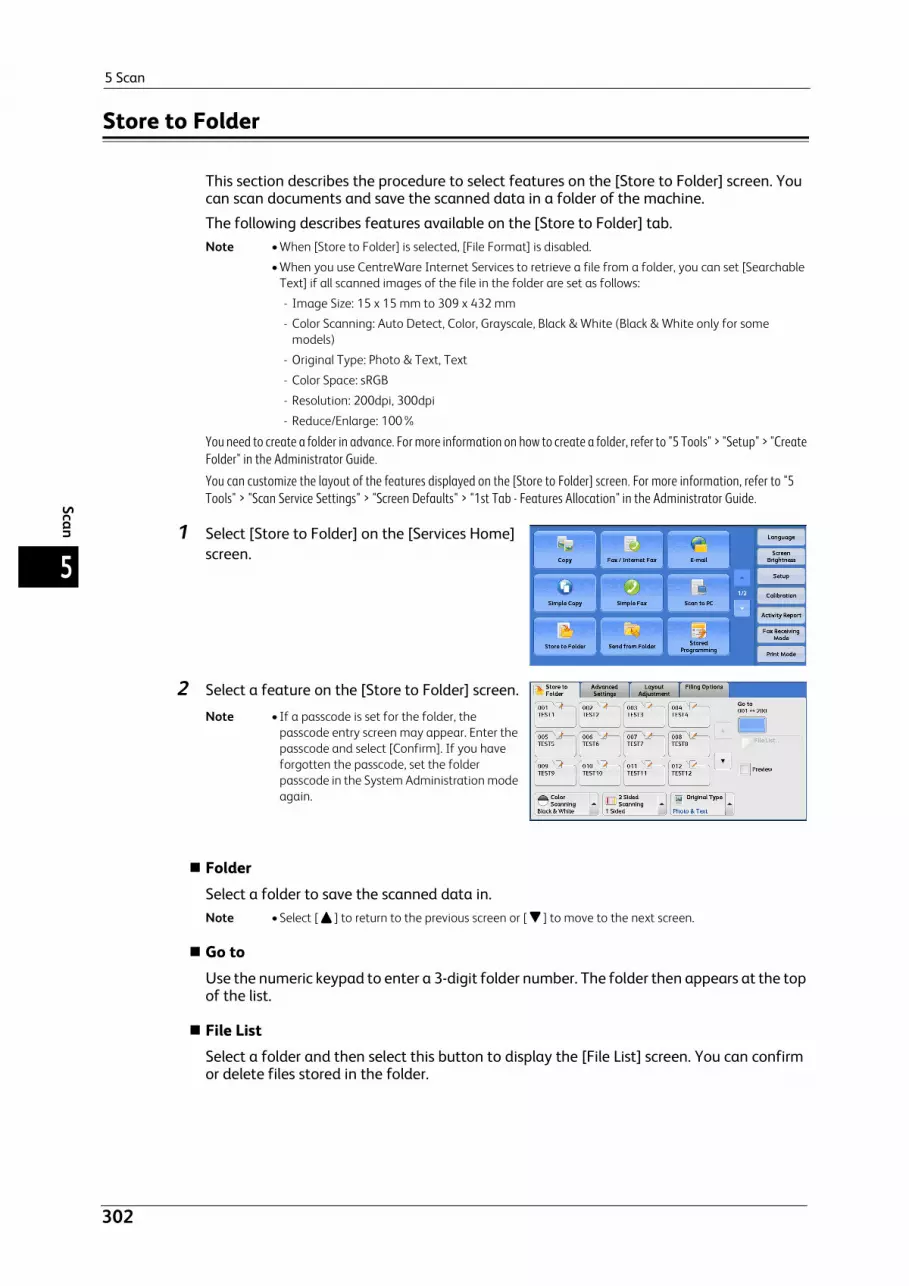
5 Scan
302
Scan
5
Store to Folder
This section describes the procedure to select features on the [Store to Folder] screen. You can scan documents and save the scanned data in a folder of the machine.
The following describes features available on the [Store to Folder] tab.Note • When [Store to Folder] is selected, [File Format] is disabled.
• When you use CentreWare Internet Services to retrieve a file from a folder, you can set [Searchable Text] if all scanned images of the file in the folder are set as follows:
- Image Size: 15 x 15 mm to 309 x 432 mm
- Color Scanning: Auto Detect, Color, Grayscale, Black & White (Black & White only for some models)
- Original Type: Photo & Text, Text
- Color Space: sRGB
- Resolution: 200dpi, 300dpi
- Reduce/Enlarge: 100%
You need to create a folder in advance. For more information on how to create a folder, refer to "5 Tools" > "Setup" > "Create Folder" in the Administrator Guide.You can customize the layout of the features displayed on the [Store to Folder] screen. For more information, refer to "5 Tools" > "Scan Service Settings" > "Screen Defaults" > "1st Tab - Features Allocation" in the Administrator Guide.
1 Select [Store to Folder] on the [Services Home] screen.
2 Select a feature on the [Store to Folder] screen.
Note • If a passcode is set for the folder, the passcode entry screen may appear. Enter the passcode and select [Confirm]. If you have forgotten the passcode, set the folder passcode in the System Administration mode again.
FolderSelect a folder to save the scanned data in.Note • Select [ ] to return to the previous screen or [ ] to move to the next screen.
Go toUse the numeric keypad to enter a 3-digit folder number. The folder then appears at the top of the list.
File ListSelect a folder and then select this button to display the [File List] screen. You can confirm or delete files stored in the folder.

Store to Folder
303
Scan
5
Color Scanning (Selecting an Output Color)
You can specify the output color to scan a document.For more information, refer to "Color Scanning (Selecting an Output Color)" (P.275).
2 Sided Scanning (Scanning Both Sides of a Document)
You can automatically scan both sides of a 2-sided document.
By setting the binding style, both sides are scanned in the same orientation.For more information, refer to "2 Sided Scanning (Scanning Both Sides of a Document)" (P.275).
Original Type (Selecting the Document Type)
You can select the type of the document.For more information, refer to "Original Type (Selecting the Document Type)" (P.277).
Preview (Previewing the Scanned Images during a Scan Job)
You can preview the scanned images while scanning the document.For more information, refer to "Preview (Previewing the Scanned Images during a Scan Job)" (P.274).
5 Scan
304
Scan
5
Store to USB
This section describes the procedure to select features on the [Store to USB] screen. The Store to USB service allows you to scan documents and save the scanned data to a USB memory device. The following describes features available on the [Store to USB] tab.
Save in (Specifying a Storage Location in the USB Memory Device) .............................................................................. 308Details (Displaying the Details of a Storage Location in the USB Memory Device) .................................................... 309Preview (Previewing the Scanned Images during a Scan Job) ......................................................................................... 310Color Scanning (Selecting an Output Color) ......................................................................................................................... 3102 Sided Scanning (Scanning Both Sides of a Document) .................................................................................................. 310Original Type (Selecting the Document Type)...................................................................................................................... 310File Format (Selecting a File Format for Output Data)....................................................................................................... 310
Important • Before removing the USB memory device, make sure that the screen indicating that data is being transferred is not displayed. If you remove the USB memory device while the data is being stored, the data in the device may be damaged. You can also view the [Job Status] screen to confirm if the data has been stored to the USB memory device.
Note • This feature may not be available depending on the setting in the CentreWare Internet Services. For more information, refer to "6 CentreWare Internet Services Settings" > "Configuring Machine Settings Using CentreWare Internet Services" in the Administrator Guide.
• An optional component is required to use this service. For more information, contact our Customer Support Center.
• A USB memory device and the Memory Card Reader cannot be used simultaneously. If they are connected simultaneously, proper operation cannot be guaranteed.
• A USB memory device encrypted with software is not supported.
• Use the following USB memory devices:
- A formatted USB memory device
- A USB 2.0 compliant memory device (USB 1.1 is not supported.)
- A USB memory device with a storage capacity of up to 128 GB
• Commercially available Memory Card Readers with a single slot*1 can be used for the Media Print - Text service, but its safe performance is not guaranteed.When a Memory Card Reader with multiple slots*2 is used, only one particular slot is available. And which slot is available differs according to the types of Memory Card Readers, and a slot of a medium or memory card that you want to use is not always available for the machine. Its safe performance is not guaranteed, either.*1 : A medium or memory card that has one slot. Some allow only one type of a medium or memory card, while
others allow more than one types (ex. SD card, xD-Picture Card).*2 : A medium or memory card that has two or more slots.
You can customize the layout of the features displayed on the [Store to USB] screen. For more information, refer to "5 Tools" > "Scan Service Settings" > "Screen Defaults" > "1st Tab - Features Allocation" in the Administrator Guide.
1 Insert the USB memory device into the USB memory slot on the control panel.
2 One of the following occurs.
The [USB Memory Device Detected] screen appears.
The [Store to USB] screen appears.
The [Media Print - Text] screen appears.
The [Media Print - Photos] screen appears.
The screen display does not change.Note • The behavior depends on settings. Ask your system administrator for more information.
• When a USB memory device is inserted into the USB memory slot during the Energy Saver mode, the touch screen does not light. After exiting the Energy Saver mode by pressing the <Energy Saver> button, insert the USB memory device again or select [Store to USB] on the [Services Home] screen. For information on other ways to exit the Energy Saver mode, refer to "Exiting the Energy Saver Mode" (P.58).
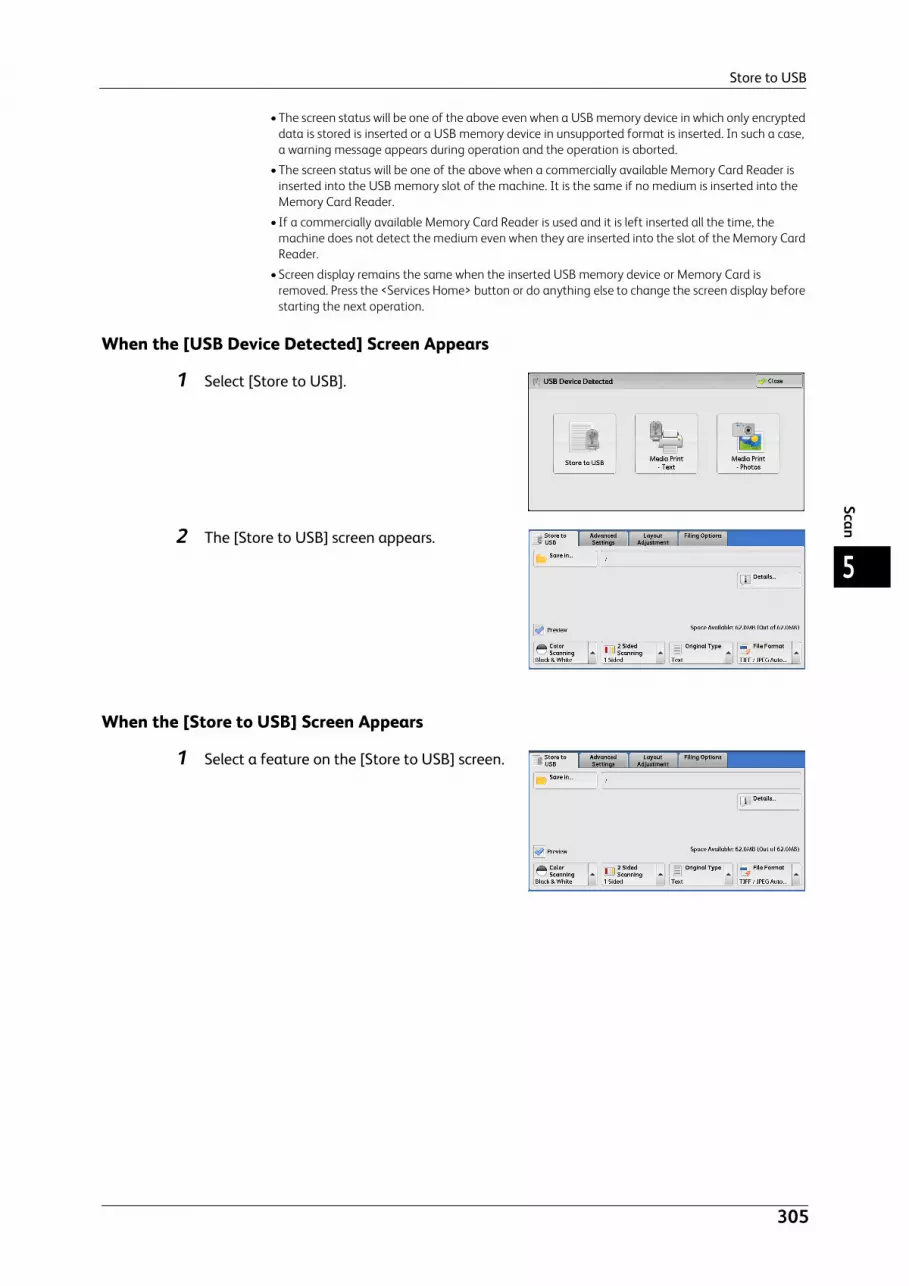
Store to USB
305
Scan
5
• The screen status will be one of the above even when a USB memory device in which only encrypted data is stored is inserted or a USB memory device in unsupported format is inserted. In such a case, a warning message appears during operation and the operation is aborted.
• The screen status will be one of the above when a commercially available Memory Card Reader is inserted into the USB memory slot of the machine. It is the same if no medium is inserted into the Memory Card Reader.
• If a commercially available Memory Card Reader is used and it is left inserted all the time, the machine does not detect the medium even when they are inserted into the slot of the Memory Card Reader.
• Screen display remains the same when the inserted USB memory device or Memory Card is removed. Press the <Services Home> button or do anything else to change the screen display before starting the next operation.
When the [USB Device Detected] Screen Appears
1 Select [Store to USB].
2 The [Store to USB] screen appears.
When the [Store to USB] Screen Appears
1 Select a feature on the [Store to USB] screen.

5 Scan
306
Scan
5
When the [Media Print - Text] Screen Appears
1 Press the <Services Home> button.
2 Select [Store to USB] on the [Services Home] screen.
3 The [Store to USB] screen appears.
When the [Media Print - Photos] Screen Appears
<Services Home> button

Store to USB
307
Scan
5
1 Press the <Services Home> button.
2 Select [Store to USB] on the [Services Home] screen.
3 The [Store to USB] screen appears.
When the Screen Display Does Not Change
1 If any screen other than the [Services Home] screen is displayed, press the <Services Home> button.
2 Select [Store to USB] on the [Services Home] screen.
<Services Home> button
<Services Home> button

5 Scan
308
Scan
5
3 The [Store to USB] screen appears.
Important • Data stored in a USB memory device may be lost or damaged in the following cases. Make sure to back up the data in the device before use.
- When disconnecting/connecting the USB memory device by methods other than described in this guide.
- When receiving the effect of electrical noise or an electrical discharge
- When a fault or failure occurs during operation
- If the USB memory device receives mechanical damage
• We assume no responsibility for any direct and indirect damages arising from or caused by such data loss.
Note • If you do not specify the file storage location, the scanned data is saved in the root directory.
Save in (Specifying a Storage Location in the USB Memory Device)
You can specify a file storage location in the USB memory device.
1 Select [Save in].
2 Select a folder to save the data in.
Note • Select [ ] to return to the previous screen or [ ] to move to the next screen.
• You can sort the order of folders displayed in ascending or descending order by selecting [Name] or [Last Updated].
• Up to 900 folder names can be displayed in the list of [Save in]. File names are not displayed.
• If a folder or file name has more than 170 characters long, the folder or file name is not displayed.
• Folders in the DCIM folder of digital cameras cannot be displayed. Thus, you cannot save files in these folders either.
• Folder names which include characters that the machine does not support may not be correctly displayed. If you specify the folders as file storage locations, an error occurs. For more information on characters that the machine supports, refer to "Entering Text" (P.70).
• The machine does not distinguish between upper and lower cases of folder and file names that are created in Windows environment and that consist of eight characters or less. The names for these folders and files are displayed in capital letters.

Store to USB
309
Scan
5
• If a full path (a string of folder and file names in all directories) of the file created exceeds 257 characters long, an error occurs.
3 Select [Save].
PreviousAllows you to move to the upper directory.Note • This button is grayed out if there is no upper directory.
NextAllows you to move to the lower directory.Note • This button is available when a folder is selected.
Details (Displaying the Details of a Storage Location in the USB Memory Device)
Selecting [Details] displays the [Details] screen.
[Details] ScreenThis screen displays the folder directory in the USB memory device.
1 Specify the folder directory, and then select [Save].
2 Select [Details].
3 The folder and file names in all directories to be saved are displayed.

5 Scan
310
Scan
5
Preview (Previewing the Scanned Images during a Scan Job)
You can preview the scanned images while scanning the document.For more information, refer to "Preview (Previewing the Scanned Images during a Scan Job)" (P.274).
Color Scanning (Selecting an Output Color)
You can set the output color to scan a document.For more information, refer to "Color Scanning (Selecting an Output Color)" (P.275).
2 Sided Scanning (Scanning Both Sides of a Document)
You can automatically scan both sides of a 2-sided document.
By setting the binding style, both sides are scanned in the same orientation.For more information, refer to "2 Sided Scanning (Scanning Both Sides of a Document)" (P.275).
Original Type (Selecting the Document Type)
You can select the type of the document.For more information, refer to "Original Type (Selecting the Document Type)" (P.277).
File Format (Selecting a File Format for Output Data)
You can select a file format for output data.For more information, refer to "File Format (Selecting a File Format for Output Data)" (P.277).

Store & Send Link
311
Scan
5
Store & Send Link
If an authenticated user scans a document, the machine temporarily saves the scanned data, and automatically obtains the user’s e-mail address that was registered in advance. Then, the machine sends an e-mail to the user to notify of two URLs: one is for the location to retrieve the scanned data, and the other is for the location to delete the data.
Only the authenticated user who logs in to the machine can be the recipient of an e-mail transmission. The machine cannot send e-mail to multiple recipients.
After receiving the e-mail on a computer, the user can retrieve the scanned data using a web browser.
The following describes features available on the [Store & Send Link] tab.Important • Scan files stored in the machine will be automatically deleted when the retention period expires. This
retention period can be specified in [URL File Expiration] by the System Administrator in the range of 1 to 168 hours. The default value is 3 hours. The files are to be always deleted automatically.
• To strengthen security, after retrieving the scanned data, access the URL to delete the scanned data stored in the machine.
Note • The Store & Send Link service does not provide document management features, such as backing up/restoring files, deleting all data at one time, listing files, and displaying available storage space.
• The Store & Send Link service allows you to retrieve scanned data without specifying an e-mail address from the Address Book or a folder for each scan job. However, the size of the data and its retention period are restricted on the machine. If you want to avoid these restrictions, use the Scan to PC or E-mail service.
For more information, refer to "5 Tools" > "Scan Service Settings" > "Other Settings" > "Store & Send Link - Maximum File Size" and "URL File Expiration" in the Administrator Guide.You can customize the layout of the features displayed on the [Store & Send Link] screen. For more information, refer to "5 Tools" > "Scan Service Settings" > "Screen Defaults" > "1st Tab - Features Allocation" in the Administrator Guide.
1 Press the <Log In/Out> button on the control panel, or select the login information field on the touch screen.
2 Enter the user ID.
3 Select [Store & Send Link] on the [Services Home] screen.
4 Select a feature on the [Store & Send Link] screen.
Scan To (Displaying the E-mail Address of the Authenticated User)
Automatically obtains the pre-registered e-mail address of the authenticated user.

5 Scan
312
Scan
5
From (Displaying the E-mail Address of the Authenticated User)
Automatically obtains the pre-registered e-mail address of the authenticated user.
Subject (Setting the Subject)
You can specify the e-mail subject using the following procedure.
Auto SetAutomatically sets the subject to [Scan Reference from XXX] (where XXX is the host name of the machine).
To set a user-defined subject
1 Select [Subject].
2 Enter a subject with up to 128 characters using the displayed keyboard.
For information on how to enter characters, refer to "Entering Text" (P.70).
Message (Entering the E-mail Body)
You can enter the e-mail body using the following procedure.
1 Select [Message].
2 Enter a message with up to 512 characters using the displayed keyboard.
For information on how to enter characters, refer to "Entering Text" (P.70).
Color Scanning (Selecting an Output Color)
You can set the color mode to scan a document.For more information, refer to "Color Scanning (Selecting an Output Color)" (P.275).
2 Sided Scanning (Scanning Both Sides of a Document)
You can automatically scan both sides of a 2-sided document.
By setting the binding style, both sides are scanned in the same orientation.For more information, refer to "2 Sided Scanning (Scanning Both Sides of a Document)" (P.275).
Original Type (Selecting the Document Type)
You can select the type of the document.For more information, refer to "Original Type (Selecting the Document Type)" (P.277).
Preview (Previewing the Scanned Images during a Scan Job)
You can preview the scanned images while scanning the document.For more information, refer to "Preview (Previewing the Scanned Images during a Scan Job)" (P.274).

Store & Send Link
313
Scan
5
File Format (Selecting a File Format for Output Data)
You can select a file format for output data.
The Store & Send Link service allows you to retrieve scanned data from a computer without password authentication.
To prevent other parties from viewing your scan data, select [PDF] or [DocuWorks] in [File Format] and set a password in [PDF Security] or [DocuWorks Security] before scanning the document.For more information, refer to "File Format (Selecting a File Format for Output Data)" (P.277).
Note • If you select [TIFF/JPEG Auto Select] or the [Single File for Each Page] check box on the [File Format] screen when scanning a document, a file is downloaded in zip format.

5 Scan
314
Scan
5
Store to WSD
This section describes the procedure to select features on the [Store to WSD] screen. The Store to WSD service allows you to scan documents set on the machine from a network computer. It also allows you to save the scanned data to a network computer.Note • [Store to WSD] may not appear on the [Services Home] screen for some models. For more
information, refer to "9 Scanner Environment Settings" > "Configuration of Store to WSD" in the Administrator Guide.
• This service requires the scanner driver included as standard in Windows Vista Service Pack 2 or later. Thus, this service is not available for computers with older OS.
• The resolution, file format and others cannot be specified from the control panel of the machine. Specify these settings in [Scan Profiles] of Windows. For more information on how to specify the settings, refer to Windows Help.
1 Select [Store to WSD] on the [Services Home] screen.
2 Select a feature on the [Store to WSD] screen.
Start Scan Job FromSelect from where to start a scan job.
Computer
Starts a scan job by sending a request from a network computer.
This Device
Starts a scan job with the scan command from the machine, and save the scanned data to a network computer.
List of ComputersLists network computers and their scanning methods. Select one from this list as destination.
Computer (Starting a Scan Job via Computer Operation)
You can scan documents set on the machine by sending a request from a network computer.

Store to WSD
315
Scan
5
1 Select [Computer].
2 Load the document on the document glass or in the document feeder, and select [Operate From Computer].
3 The stanby screen is displayed on the touch screen. Note • Select the [Delete] button to exit stanby
mode. After exiting stanby mode, the [Remove Your Originals] screen is displayed on the touch screen.
4 Operate scan from a network computer. To operate scan from a network computer, use an application which supports image loading feature such as [Windows Fax and Scan].
The following describes the method using [Windows Fax and Scan] with Windows 7.Note • This method is not available for computers with Windows Vista Home Basic or Windows Vista Home
Premium. To operate scan from such a computer, use another method, such as [From Scanner or Camera] in the Paint application.
1) Click the [Start] button, click [All Programs], and then click [Windows Fax and Scan].
2) Click [Scan] at the bottom of the left pane, and then click [New Scan] on the toolbar.
3) In the [New Scan] dialog box, click [Change], and then select the machine.
4) Check that the machine model name is displayed to the right of [Scanner:].Note • If the machine model name is not displayed, click [Change] and select the machine.
5) Click the [Profile] list, and then select [Document].
6) Specify the settings as necessary, and then click [Scan].
5 After being scanned, the scanned data is forwarded to the specified computer.
6 The [Remove Your Originals] screen appears on the touch screen after a scan job has been completed. Remove the originals from the document glass or the document feeder, and then select [OK].Note • If the standby screen is not displayed, a scan
job will not be started even when the network computer recognizes the machine.
• Select the [Delete] button to abort an operation. After an operation is aborted, the [Remove Your Originals] screen is displayed on the touch screen.
• The machine will not enter the Energy Saver mode while the standby screen is displayed. For information on the Energy Saver mode, refer to "Energy Saver Mode" (P.57).
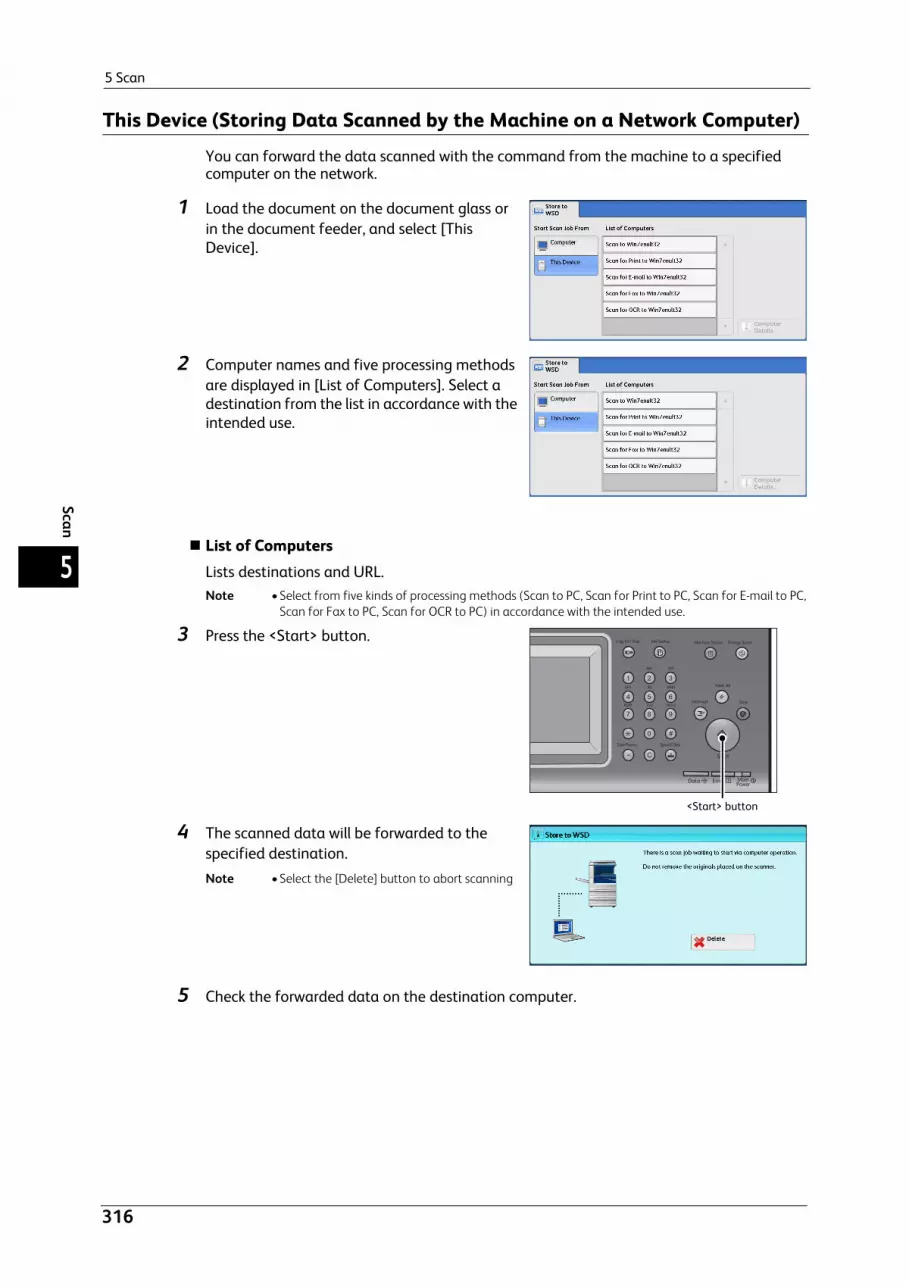
5 Scan
316
Scan
5
This Device (Storing Data Scanned by the Machine on a Network Computer)
You can forward the data scanned with the command from the machine to a specified computer on the network.
1 Load the document on the document glass or in the document feeder, and select [This Device].
2 Computer names and five processing methods are displayed in [List of Computers]. Select a destination from the list in accordance with the intended use.
List of ComputersLists destinations and URL.Note • Select from five kinds of processing methods (Scan to PC, Scan for Print to PC, Scan for E-mail to PC,
Scan for Fax to PC, Scan for OCR to PC) in accordance with the intended use.
3 Press the <Start> button.
4 The scanned data will be forwarded to the specified destination.Note • Select the [Delete] button to abort scanning
5 Check the forwarded data on the destination computer.
1 2 3
4 5 6
7 8 9
0 #
C
<Start> button

Advanced Settings
317
Scan
5
Advanced Settings
This section describes the features you can select on the [Advanced Settings] screen under [E-mail], [Store to Folder], [Network Scanning], [Scan to PC], [Store & Send Link], or [Store to USB]. The following shows the reference section for each feature.
Color Scanning (Selecting an Output Color)..........................................................................................................................317Original Type (Selecting the Document Type) ......................................................................................................................317Photographs (Scanning a Color Photograph).......................................................................................................................318Image Options (Adjusting Scan Density and Image Sharpness) .....................................................................................318Image Enhancement (Erasing the Background Color of Documents/ Adjusting Contrast) ......................................319Shadow Suppression (Suppressing the Document Background) .....................................................................................319Color Space (Specifying Color Space) .....................................................................................................................................320
1 On the [Services Home] screen, select [E-mail], [Store to Folder], [Network Scanning], [Scan to PC], [Store & Send Link], or [Store to USB].
2 Select a feature on the [Advanced Settings] screen. Note • To activate [Color Space], a prior setting must
be made in the System Administration mode. For information on the setting procedure, refer to "5 Tools" > "Scan Service Settings" > "Other Settings" > "Color Space" in the Administrator Guide and "Color Space (Specifying Color Space)" (P.320).
Color Scanning (Selecting an Output Color)
You can set the output color to scan a document.For more information, refer to "Color Scanning (Selecting an Output Color)" (P.275) .
Original Type (Selecting the Document Type)
You can select the type of the document.For more information, refer to "Original Type (Selecting the Document Type)" (P.277).

5 Scan
318
Scan
5
Photographs (Scanning a Color Photograph)
Use this feature when scanning a color photograph.
This feature is available only when [Color Scanning] is set to [Color].Important • You cannot use the document feeder with this feature.
• When this feature is enabled, the Shadow Suppression and Background Suppression features cannot be used.
1 Select [Photographs].
2 Select [Enhance Photographs].
Image Options (Adjusting Scan Density and Image Sharpness)
This feature allows you to adjust the scan density and image sharpness.
1 Select [Image Options].
2 Select any option.
Lighten/DarkenYou can select a scan density level from seven levels between [Lighten] and [Darken].
Selecting an upper cell on the bar makes the scan density lighter, and selecting a lower cell makes darker.

Advanced Settings
319
Scan
5
SharpnessYou can select a sharpness level from five levels between [Soften] and [Sharpen].
Selecting an upper cell on the bar makes the contours of images sharper, and selecting a lower cell makes softer.
Image Enhancement (Erasing the Background Color of Documents/Adjusting Contrast)
This feature allows you to suppress the background color of a document such as newspaper and colored paper. In addition, when [Color Scanning] is set to [Color] or [Grayscale], you can adjust the contrast.
1 Select [Image Enhancement].
2 Set [Background Suppression] and [Contrast].
Background Suppression
Off
Scans the document backgrounds with no filtering.
Auto Suppression
When [Color Scanning] is set to [Black & White], the background of a document printed on colored paper, such as newspaper, will be suppressed.When [Color Scanning] is set to [Color], the background of a document printed on white-color paper will be suppressed.
ContrastAllows you to select a contrast level from five levels between [Less] and [More].Selecting an upper cell on the bar makes the difference between light and dark areas greater; light areas become lighter and dark areas darker. In contrast, selecting a lower cell on the bar makes the difference between light and dark areas smaller.
Shadow Suppression (Suppressing the Document Background)
When you scan a 2-sided document printed on thin paper, this feature allows you to suppress the image and colors on the reverse side of each document page from appearing in the scan image.
This feature is available only when [Color Scanning] is set to [Color] or [Grayscale].Important • This feature cannot be used with [Photographs].

5 Scan
320
Scan
5
1 Select [Shadow Suppression].
2 Select [Auto Suppression].
Color Space (Specifying Color Space)
This feature allows you to set the color space.Note • [Color Space] is available when [Color Scanning] is set to [Color].
• To activate [Color Space] on the [Advanced Settings] screen, a prior setting must be made in the System Administration mode. For more information, refer to "5 Tools" > "Scan Service Settings" > "Other Settings" > "Color Space" in the Administrator Guide.
• [Device Color Space] is not selectable when [Searchable Text] is set to [Searchable] on the [File Format] screen.
1 Select [Color Space].
2 Select either [sRGB] or [Device Color Space].
sRGBDocuments are scanned based on color representation (color space) that conforms to sYCC.
Device Color SpaceDocuments are scanned based on the original color representation (color space) of the machine. This option is recommended for advanced color processing to faithfully reproduce colors.

Advanced Settings
321
Scan
5
Note • You can find ICC profile data for Device Color Space in the Driver CD Kit. ICC profile is useful when using color processing application and performing special processing of data scanned based on Device Color Space.
• When [Device Color Space] is selected, the following image quality features are changed to their defaults: Lighten/Darken, Sharpness, Shadow Suppression, Contrast, Background Suppression
• When [Color Scanning] is set to [Auto Detect], [sRGB] is applied to color pages of the documents.

5 Scan
322
Scan
5
Layout Adjustment
This section describes the features you can select on the [Layout Adjustment] screen under [E-mail], [Store to Folder], [Network Scanning], [Scan to PC], [Store & Send Link], or [Store to USB]. The following shows the reference section for each feature.
Resolution (Specifying a Scanning Resolution).................................................................................................................... 3222 Sided Scanning (Scanning Both Sides of a Document) .................................................................................................. 323Book Scanning (Scanning Facing Pages on Separate Sheets) ......................................................................................... 323Original Size (Specifying a Scan Size) ..................................................................................................................................... 324Mixed Size Originals (Scanning Different Size Documents Simultaneously) ................................................................ 325Edge Erase (Erasing Edges and Margin Shadows in the Document) .............................................................................. 326Reduce/Enlarge (Specifying a Scanning Ratio).................................................................................................................... 328Original Orientation (Specifying the Orientation of the Loaded Document) ............................................................... 329
1 On the [Services Home] screen, select [E-mail], [Store to Folder], [Scan to PC], [Store & Send Link], [Network Scanning], or [Store to USB].
2 Select a feature on the [Layout Adjustment] screen.
Resolution (Specifying a Scanning Resolution)
This feature allows you to set the resolution to scan a document.
As the value increases, the scan becomes more detailed, but the data size also increases. The scanning and transfer time increases as well.

Layout Adjustment
323
Scan
5
1 Select [Resolution].
2 Select any option.
Note • Select either [200 dpi] or [300 dpi] when [MRC High Compression] is set to [On] for PDF, DocuWorks or XPS files on the [File Format] screen.
• Select either [200 dpi] or [300 dpi] when [Searchable Text] is set to [Searchable] for PDF or DocuWorks files on the [File Format] screen.
• Select either [200 dpi] or [300 dpi] when the [Specific Color] check box is selected for PDF or DocuWorks files on the [File Format] screen.
2 Sided Scanning (Scanning Both Sides of a Document)
You can automatically scan both sides of a 2-sided document.
By setting the binding style, both sides are scanned in the same orientation.For more information, refer to "2 Sided Scanning (Scanning Both Sides of a Document)" (P.275).
Book Scanning (Scanning Facing Pages on Separate Sheets)
This feature allows you to scan facing pages of a document onto separate sheets of paper in page order.
It is useful if you want to separately scan facing pages of a bound document such as a booklet.Note • You cannot use the document feeder with this feature.
• A non-standard size document or undetectable size document may not be separated into two accurately.
1 Select [Book Scanning].
2 Select any option.

5 Scan
324
Scan
5
OffDoes not scan as a bound document.
Left Page then RightScans the left page and then the right page of facing pages.
Right Page then LeftScans the right page and then the left page of facing pages.
Top Page then BottomScans the top page and then the bottom page of facing pages.
Both PagesScans both pages in page order.
Left Page OnlyScans the left page only in page order. You can select this option when [Left Page then Right] or [Right Page then Left] is selected.
Right Page OnlyScans the right page only in page order. You can select this option when [Left Page then Right] or [Right Page then Left] is selected.
Top Page OnlyScans the top page only in page order. You can select this option when [Top Page then Bottom] is selected.
Bottom Page OnlyScans the bottom page only in page order. You can select this option when [Top Page then Bottom] is selected.
Binding Edge EraseErases the shadow from the center section of the document. You can specify the binding erase width in the range from 0 to 50 mm in 1 mm increments.
Original Size (Specifying a Scan Size)
This feature allows you to set the scan size for a document.
Use this feature when a document is a non-standard size, or when you want to scan a document at a size different from the original size. You can also add margins, or delete unnecessary margins using this feature.
1 Select [Original Size].

Layout Adjustment
325
Scan
5
2 Select any option.
When you select a non-standard size, specify values for the X and Y directions.
Auto DetectDetects the document size automatically. The following table shows the document sizes that can be detected automatically.
Note • If the document size cannot be detected automatically, a screen to enter the document size appears.
The standard document sizes that can be detected automatically depend on [Paper Size Settings] in the System Administration mode. For information on [Paper Size Settings], refer to "5 Tools" > "Common Service Settings" > "Other Settings" > "Paper Size Settings" in the Administrator Guide.
Standard SizeAllows you to select from preset sizes.
Variable SizeAllows you to enter the desired scan size when scanning a non-standard size document or when scanning at a size different from the original document size. You can specify a value in the range from 15 to 432 mm for the scan width (X), and a value in the range from 15 to 297 mm for the scan length (Y), in 1 mm increments. The scales attached on the upper and left edges of the document glass are helpful for you to specify values.Note • When [MRC High Compression] is set [On] for PDF, DocuWorks, and XPS files on the [File Format]
screen, or when the [Specific Color] check box is selected, the variable ranges are 50 to 432 mm for the scan width (X) and 50 to 297 mm for the scan length (Y), in 1 mm increments.
Mixed Size Originals (Scanning Different Size Documents Simultaneously)
When loading documents in the document feeder, you can simultaneously scan different size documents with the respective sizes and copy. You can also specify a size to scan different size documents with the same size.Important • When you select [Color] in [Color Scanning], and [2 Sided] in [2 Sided Scanning], set [Resolution] to
[400dpi] or lower.
• Always load A5 documents in portrait orientation.
• When loading B5 documents together with A3 documents loaded in landscape orientation or A4 documents loaded in portrait orientation, load the B5 documents in portrait orientation.
• When loading documents, align the top left corners of the documents properly. Otherwise, a paper jam may occur.
• The recommended document size combinations are A4 portrait and A3 landscape, or B5 portrait and B4 landscape. If another combination of document sizes is used, the documents can be fed at an angle and may not be scanned properly.
Document feeder Document glass
Auto-detectableDocument Sizes
B5, B5 , B4, A5, A5 , A4, A4 , A3,
8.5 x 11", 8.5 x 11" ,
11 x 17", 16K , 8K
B6, B5, B5 , B4, A6, A5, A5 , A4,
A4 , A3

5 Scan
326
Scan
5
Note • When you select [Enter Output Size] in [Reduce/Enlarge] and specify the output size in [Output Size], the scanned data is automatically reduced/enlarged to the specified size. However, since the scanned image is not rotated, the image will be reduced/enlarged to fit the specified size while keeping its orientation. For example, when an A3 landscape original is loaded and the output size is set to A4 portrait, the scanned image is reduced to A5 landscape and printed on A4 portrait paper.
• If the document size cannot be detected automatically, a screen to enter the document size appears.
1 Select [Mixed Size Originals].
2 Select any option.
OffSelect this option when all documents are of the same size.
OnWhen scanning documents of different sizes, the machine automatically detects the size of each document.
Original OrientationSpecify the orientation of the loaded document.
When you load the top edge of the document against the left side of the document glass or the document feeder, and then select [Sideways Images], the document is displayed in the correct orientation when viewed on your computer screen.Note • If the [Original Orientation] setting differs from the actual document orientation, the machine may
not detect the top of the document correctly.
Upright Images
Select this option when placing the top edge of the document against the top side of the document glass or document feeder.
Sideways Images
Select this option when placing the top edge of the document against the left side of the document glass or document feeder.
Edge Erase (Erasing Edges and Margin Shadows in the Document)
When you scan a document with the document cover open or when you scan a book, the edges and center margin of the document may be scanned as black shadows. The Edge Erase feature allows you to erase such shadows.Note • For 2-sided originals, the same edge erase amounts are set for the front and back sides.

Layout Adjustment
327
Scan
5
• If you set [Reduce/Enlarge], the edge erase amounts will be reduced or enlarged in proportion to the ratio you specified.
1 Select [Edge Erase].
2 Select any option.
3 If you select [Parallel Edges], use [+] and [-] to specify the erase widths of top and bottom, left and right, and center of the document.
4 Select [Original Orientation].
All EdgesThe edge width to erase is set to 2 mm for the top and bottom, and left and right edges.
Parallel EdgesAllows you to specify the edge erase amounts.
Top & Bottom
Erases the shadows of top and bottom edges of the document according to the orientation of the loaded document. You can specify the edge width to erase in the range from 0 to 50 mm in 1 mm increments.
Left & Right
Erases the shadows of left and right edges of the document according to the orientation of the loaded document. You can specify the edge width to erase in the range from 0 to 50 mm in 1 mm increments.
Center
Erases the shadow in the center of facing pages of a bound document. You can specify the center erase width in the range from 0 to 50 mm in 1 mm increments.
Original OrientationSpecify the orientation of the loaded document.
When you load the top edge of the document against the left side of the document glass or the document feeder, and then select [Sideways Images], the document is displayed in the correct orientation when viewed on your computer screen.Note • If the [Original Orientation] setting differs from the actual document orientation, the machine may
not detect the top of the document correctly.
Upright Images
Select this option when placing the top edge of the document against the top side of the document glass or document feeder.

5 Scan
328
Scan
5
Sideways Images
Select this option when placing the top edge of the document against the left side of the document glass or document feeder.
Reduce/Enlarge (Specifying a Scanning Ratio)
This feature allows you to set the scanning ratio for the document to be scanned.Note • When [Searchable Text] is set to [Searchable] and the [Specific Color] check box is selected on the
[File Format] screen, [Reduce/Enlarge] is [100%].
1 Select [Reduce/Enlarge].
2 Select any option
Proportional %Allows you to select a preset ratio, or enter a value in the range from 25 to 400% in 1% increments.
Use the numeric keypad or [+] and [-] to enter a value.
Variable %
Enter the scanning ratio. Specifying "100%" scans at the same image size as the original document.
Preset %
Select from preset ratios.
You can change the default values of scan ratios other than [100%]. For information on the settings, refer to "5 Tools" > "Scan Service Settings" > "Reduce/Enlarge Presets" in the Administrator Guide.
Enter Output SizeIn [Output Size], select the output size of the scanned document. The machine automatically calculates the scanning ratio based on the selected output size and the original document size.Note • Selecting [Enter Output Size] may generate
blank margin areas.

Layout Adjustment
329
Scan
5
Original Orientation (Specifying the Orientation of the Loaded Document)
This feature allows you specify the orientation of the loaded document.
When you load the top edge of the document against the left side of the document glass or the document feeder, and then select [Sideways Images], the document is displayed in the correct orientation when viewed on your computer screen.Note • If the [Original Orientation] setting differs from the actual document orientation, the machine may
not detect the top of the document correctly.
Upright Images
Select this option when placing the top edge of the document against the top side of the document glass or document feeder.
Sideways Images
Select this option when placing the top edge of the document against the left side of the document glass or document feeder.

5 Scan
330
Scan
5
E-mail Options/Filing Options
This section describes the features you can select on the [E-mail Options]/[Filing Options] screen under [E-mail], [Store to Folder], [Network Scanning], [Scan to PC], [Store & Send Link], or [Store to USB]. The following shows the reference section for each feature.
Quality/File Size (Specifying an Image Compression Ratio When Scanning) .............................................................. 331File Format (Selecting a File Format for Output Data)....................................................................................................... 331Read Receipts (Specifying Read Receipts)............................................................................................................................. 331Split Send (Sending in Sections) .............................................................................................................................................. 332File Name (Specifying a Name for the File to be Sent) ...................................................................................................... 333Reply To (Specifying a Reply Address).................................................................................................................................... 333File Name Conflict (Setting the Action to be Taken for File Name Conflict)................................................................. 334File Name (Specifying a Name for the File to be Saved) ................................................................................................... 334Encryption (Sending E-mail Encrypted by S/MIME)............................................................................................................ 335Digital Signature (Sending E-mail with a Digital Signature by S/MIME) ...................................................................... 335Login Name................................................................................................................................................................................... 335Password........................................................................................................................................................................................ 336Meta Data ..................................................................................................................................................................................... 336
1 On the [Services Home] screen, select [E-mail], [Store to Folder], [Network Scanning], [Scan to PC], [Store & Send Link], or [Store to USB].
2 Select a feature on the [E-mail Options]/[Filing Options] screen. Note • The features displayed on the screen depend
on the Scan service selected on the [Services Home] screen. The screen on the right appears when [E-mail] is selected.

E-mail Options/Filing Options
331
Scan
5
Quality/File Size (Specifying an Image Compression Ratio When Scanning)
This feature allows you to select an image compression level when [Color Scanning] is set to [Color] or [Grayscale].
1 Select [Quality/File Size].
2 Select any button.
Note • If the High Compression Image Kit (optional) is installed, and when [MRC High Compression] is set [On] on the [File Format] screen, three image compression levels are available.
Normal QualityThe image is saved with high compression. Image quality degrades, but the file size decreases.
High QualityThe image is saved with low compression. Image quality improves, but the file size increases.
File Format (Selecting a File Format for Output Data)
You can select a file format for output data.For more information, refer to "File Format (Selecting a File Format for Output Data)" (P.277).
Read Receipts (Specifying Read Receipts)
When using the E-mail service, you can receive read receipts from e-mail recipients. This feature is available only when recipients support the MDN feature.Note • [Read Receipts] is displayed only when [Tools] > [System Settings] > [E-mail/Internet Fax Settings] >
[E-mail Control] > [Read Receipts] is set to [On].
• When multiple e-mails are sent using [Split Send], a read receipt is requested for each e-mail.
• Read receipts are returned to the address specified in [Reply To], or they are returned to the address specified in [From] on the [E-mail] screen if [Reply To] is not set.
• This feature is only available when the recipient also sets to return read receipts.
1 Select [Read Receipts].

5 Scan
332
Scan
5
2 Select [On].
OffSelect this option when you do not request read receipts.
OnSelect this option when you request read receipts.
Split Send (Sending in Sections)
When using the E-mail service, and the size of the data to be attached is large, you can split the data at page breaks or by a certain data size and then send the data.For information on [Split Send], refer to "5 Tools" > "E-mail/Internet Fax Service Settings" > "E-mail Control" > "Split Send Method" in the Administrator Guide.
1 Select [Split Send].
2 Select any option.
Split by PageThe data is split at page breaks.Note • [Split by Page] is available only when [File Format] on the [E-mail] screen is set to [PDF],
[DocuWorks], or [XPS], or when [File Format] is set to [TIFF] with [Single File for Each Page] check box not selected.
Split by Data SizeThe data is split by a certain data size.Note • Select this option if your e-mail application supports message/partial.

E-mail Options/Filing Options
333
Scan
5
File Name (Specifying a Name for the File to be Sent)
When using the E-mail, Scan to PC, Network Scanning, or Store & Send Link service, you can specify a name for the file to be sent.
Auto NameThe file name is "img-xxx-yyy.zzz" (where xxx is the date and time, yyy is the page number, and zzz is the extension).
The extension depends on the setting in [File Format].
When [TIFF] is selected in [File Format]: tif
When [JEPG] is selected in [File Format]: jpeg
When [PDF] is selected in [File Format]: pdf
When [XPS] is selected in [File Format]: xps
When [DocuWorks] is selected in [File Format]: xdw
To set the file name
1 Select [File Name].
2 Enter a file name using the displayed keyboard.
For information on how to enter characters, refer to "Entering Text" (P.70).
Note • When each page is saved as one file, the page number is added to the end of each file name.
• Up to 128 characters can be entered as a file name for the Scan to PC service.
• Up to 28 characters can be entered as a file name for the E-mail service.
• Up to 28 characters can be entered as a file name for the Store & Send Link service.
• Up to 40 characters can be entered as a file name for the Network Scanning service.
Reply To (Specifying a Reply Address)
When using the E-mail service, you can specify the address for reply.
1 Select [Reply To].
2 Enter an address for reply.
Reply ToSelect the [Reply To] box to display the keyboard screen on which you can enter an address for reply.

5 Scan
334
Scan
5
ClearDeletes the address entered in [Reply To].
Reply To MeUses the address specified in [From] on the [E-mail] screen as a reply address.Note • [Reply To Me] is selectable only when an address is specified in [From] on the [E-mail] screen.
Address BookAllows you to select a reply address from the Address Book.For more information, refer to "Address Book (Specifying an E-mail Address)" (P.262).
File Name Conflict (Setting the Action to be Taken for File Name Conflict)
When using the Scan to PC service, you can set the action to be taken when the file name conflicts with another file stored in the destination.
1 Select [File Name Conflict].
2 Select any option.
Do Not SaveCancels the job without saving the file.
Rename New FileAutomatically changes the file name by appending a number (0001 - 9999) to the file name, and saves the file.
Overwrite Existing FileReplaces the existing file with the new one.
File Name (Specifying a Name for the File to be Saved)
When using the Store to Folder service, you can specify a name for the file to be saved.
Auto NameThe file name is "img-xxx" (where xxx is the date and time).Note • If a file name is deleted, [(Auto Set)] is displayed.

E-mail Options/Filing Options
335
Scan
5
To set the file name
1 Select [File Name].
2 Up to 28 characters can be entered as a file name using the displayed keyboard.
Note • If a document stored in a folder of the machine is imported to a computer, the specified name may not be reflected on it depending on the import method.
For information on how to enter characters, refer to "Entering Text" (P.70).
Encryption (Sending E-mail Encrypted by S/MIME)
When using the E-mail service, you can send e-mail encrypted by S/MIME.
When sending encrypted e-mail, select an e-mail address associated with a certificate that can be encrypted, from the Address Book.Note • You can change the default value of [E-mail Encryption] in the System Administration mode. For
information on how to change the default value, refer to "5 Tools" > "Scan Service Settings" > "Scan Defaults" > "E-mail Encryption" in the Administrator Guide.
OffSends e-mail without encryption.
OnSends e-mail with encryption.
Digital Signature (Sending E-mail with a Digital Signature by S/MIME)
When using the E-mail service, you can send e-mail with a digital signature by S/MIME.
Digital Signature allows a recipient to confirm whether contents of the e-mail are changed, or whether the e-mail is sent from the proper sender.
To use this feature, the machine's mail address must be linked to a certificate.For information on how to link a certificate to the machine’s e-mail address, refer to "13 Encryption and Digital Signature Settings" > "Configuration of E-mail Encryption/Digital Signature" in the Administrator Guide.
OffSends e-mail without a digital signature.
OnSends e-mail with a digital signature.
Login Name
You can use this feature to enter the login name for a destination server.Note • This feature is displayed only when [Network Scanning] is selected on the [Services Home] screen.
1 Select [Login Name].
2 Enter the login name using the keyboard displayed on the screen.
For information on how to enter characters, refer to "Entering Text" (P.70).

5 Scan
336
Scan
5
Password
You can use this feature to enter the password for a destination server.Note • This feature is displayed only when [Network Scanning] is selected on the [Services Home] screen.
1 Select [Password].
2 Enter the password using the keyboard displayed on the screen.
For information on how to enter characters, refer to "Entering Text" (P.70).
Meta Data
You can use this feature to change the values of the Document Management Field (DMF) if they are specified for a selected job template.Note • This feature is displayed only when [Network Scanning] is selected on the [Services Home] screen.
6 Send from Folder
This chapter describes the basic operations and features to use folders.
Folder Operating Procedure ...................................................................................................338
Selecting a Folder .......................................................................................................................340
Checking/Operating Files in a Folder..................................................................................341
Checking File Details .................................................................................................................343
Printing Files in a Folder...........................................................................................................345
Configuring/Starting Job Flow ..............................................................................................348

6 Send from Folder
338
Send from Folder
6
Folder Operating Procedure
This section describes the basic procedure to operate files in folders.
You can store print files submitted by a computer, scan files, and fax files in folders on the machine.
These files stored in a folder can be sent by e-mail and be retrieved from a network computer.
You can also automate routine tasks, or register private folders and shared folders separately.
The following shows the reference section for each procedure.Step 1 Opening the [Send from Folder] Screen.................................................................................................................... 338Step 2 Selecting a Folder ........................................................................................................................................................... 339Step 3 Checking/Selecting Files in a Folder ........................................................................................................................... 339Step 4 Operating Files in a Folder............................................................................................................................................ 339
Step 1 Opening the [Send from Folder] Screen
The following describes how to select features on the [Send from Folder] screen.Note • The features displayed on the screen depend on your machine configuration.
1 Press the <Services Home> button.
2 Select [Send from Folder]. <Services Home> button

Folder Operating Procedure
339
Send from Folder
6
Step 2 Selecting a Folder
Access to some folders may be restricted, depending on the settings of the Authentication feature.For information on selectable folders depending on the Authentication feature, refer to "14 Authentication and Accounting Features" > "Authentication for Job Flow Sheets and Folders" in the Administrator Guide.
1 Select a folder to operate on.
2 If a passcode is set for the folder, enter the passcode and select [Confirm].
Step 3 Checking/Selecting Files in a Folder
1 Select a file to send by e-mail or to print.
For information on the [File List] screen, refer to "Checking/Operating Files in a Folder" (P.341).
Step 4 Operating Files in a Folder
The following shows the reference sections for operations available on the [Send from Folder] screen.
Selecting a Folder.........................................................................................................................................................................340Checking/Operating Files in a Folder ......................................................................................................................................341Checking File Details ...................................................................................................................................................................343Printing Files in a Folder .............................................................................................................................................................345Configuring/Starting Job Flow ..................................................................................................................................................348

6 Send from Folder
340
Send from Folder
6
Selecting a Folder
The following describes how to select a folder.
Access to some folders may be restricted, depending on the settings of the Authentication feature.For information on selectable folders depending on the Authentication feature, refer to "14 Authentication and Accounting Features" > "Authentication for Job Flow Sheets and Folders" in the Administrator Guide.
1 Select a folder on the [Send from Folder] screen. Note • Select [ ] to return to the previous screen or
[ ] to move to the next screen.
• An arrow is displayed next to each folder which has a link to a job flow sheet and for which the auto start is set.
• If the passcode entry screen appears, enter the passcode and select [Confirm].
Go toDisplays a folder at the top when you enter the 3-digit folder number with the numeric keypad.

Checking/Operating Files in a Folder
341
Send from Folder
6
Checking/Operating Files in a Folder
You can check or operate files stored in a folder.Note • When selecting print files, [Job Flow Settings] cannot be selected for some models.
1 Select a folder on the [Send from Folder] screen.
2 Select a file.
Note • Select [ ] to return to the previous screen or [ ] to move to the next screen.
• Files can be displayed in list view. For more information, refer to "Step 3 Checking/Selecting Files in a Folder" (P.339).
• When the list view is selected, the following screen appears.
• You can sort files in ascending or descending order by selecting either [File Name] or [Date & Time].
• At the left of each file name, an icon is displayed to show the file type.
: Scan file: Print file: File for Secure Polling: Fax file/IP Fax (SIP) file: Internet Fax file
• You can select up to 100 files separately, or select all files at a time. If you select files separately, a number appears to the left of the icon indicating the order in which it was selected. Files are processed in this order.
3 Select any option.
RefreshDisplays the updated information.
ListLists the files stored in the folder, with their stored dates and pages.

6 Send from Folder
342
Send from Folder
6
ThumbnailDisplays the images and names of the files stored in the folder.Important • If power is cut off immediately after a scanned file is stored in a folder, or if the hard disk space is
insufficient to display thumbnails, files in the folder may not be displayed in thumbnail view. In that case, display them in list view.
• Characters and images in thumbnail view may not be correctly displayed because they are scaled down from the actual sizes.
Note • The orientation of an image displayed in thumbnail view depends on which orientation the document was stored in.
Number of FilesDisplays the number of files stored in the selected folder.
Select AllSelects all the files in the folder. To deselect all the files, select this button again while all the files are being selected.
DeleteDeletes the selected files in the folder.
File Details (Preview)Previews the selected file to allow you to check its details.Refer to "Checking File Details" (P.343).
Job Flow SettingsDisplays the [Job Flow Settings] screen on which you can create, link, and execute job flows.Refer to "Configuring/Starting Job Flow" (P.348).
Note • Files stored in a folder by specifying [Store in Remote Folder] on a print driver are called "print files". Job flows are not available for print files. If print files are included in the selected files, a job flow can be executed for the files other than the print files.
PrintAllows you to print the selected files separately.Refer to "Print" (P.345).
Batch PrintAllows you to print the selected multiple files as one file.Refer to "Batch Print" (P.346).

Checking File Details
343
Send from Folder
6
Checking File Details
You can preview the selected file to check its details.Note • Monochrome images with high gradation levels may appear bluish when previewed.
1 Select a file on the [Folder - File List] screen.
2 Select [File Details (Preview)].
3 Select any option.
Whole PageAllows you to select whether to display the whole page or to enlarge the image by 200%. You can select the view size from [Whole Page] and [Enlarged View].Note • A small size of a document may not be enlarged even if you select [Enlarged View].
• You can rotate or enlarge the image of the file in a folder in preview, but cannot save the file with the image rotated or enlarged.
No RotationAllows you to select an angle to preview the image from [Right 90 degrees], [Left 90 degrees], and [180 degrees].Note • You can rotate or enlarge the image of the file in a folder in preview, but cannot save the file with
the image rotated or enlarged.
Change File NameAllows you to change the file name. Use the displayed keyboard to enter a new name.
Current PageSpecify a page to preview on the screen.
DeleteDeletes the selected files in the folder.

6 Send from Folder
344
Send from Folder
6
PrintPrints the selected files.Note • To make the print settings, return to the [Folder - File List] screen, and then select [Print]. For more
information, refer to "Printing Files in a Folder" (P.345).
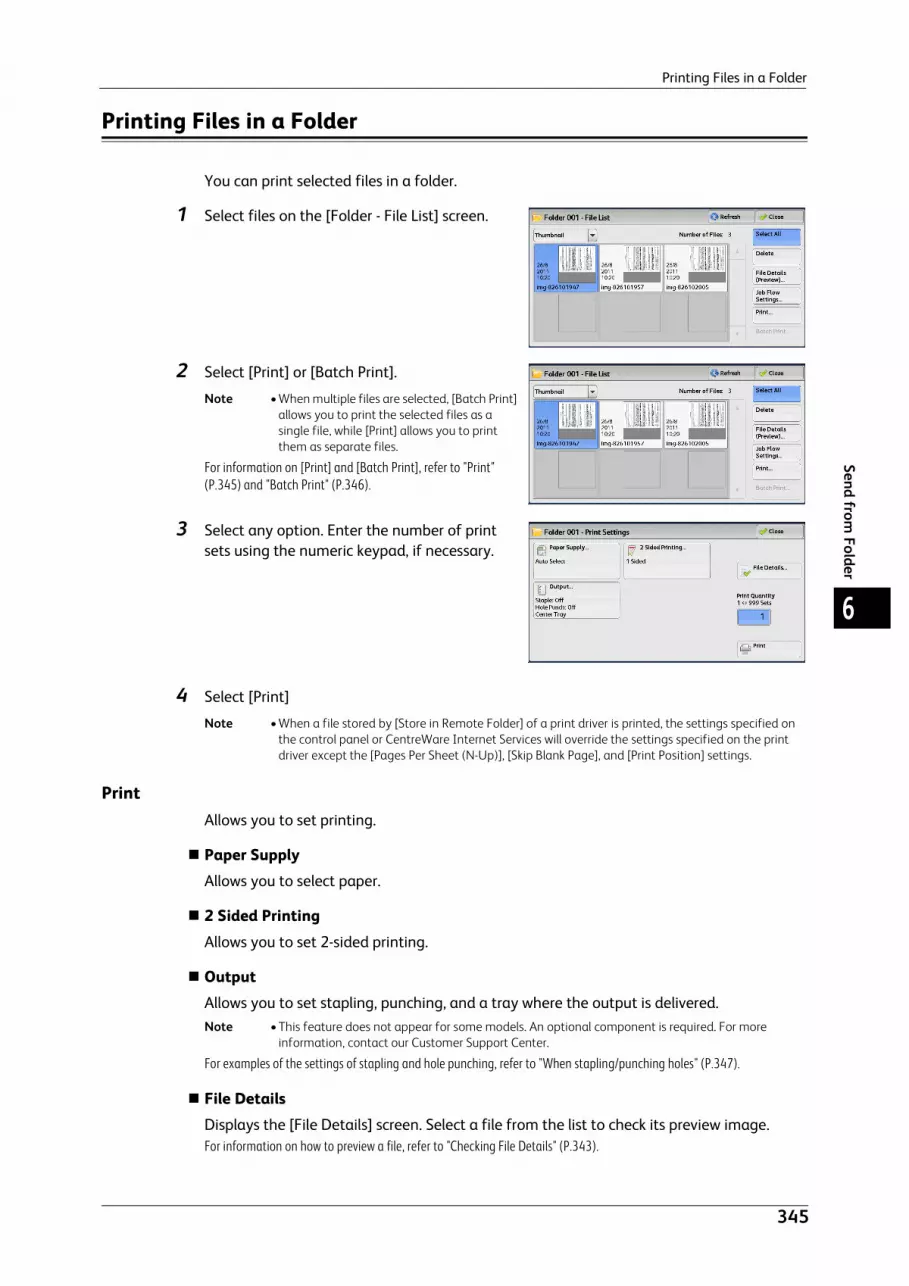
Printing Files in a Folder
345
Send from Folder
6
Printing Files in a Folder
You can print selected files in a folder.
1 Select files on the [Folder - File List] screen.
2 Select [Print] or [Batch Print].
Note • When multiple files are selected, [Batch Print] allows you to print the selected files as a single file, while [Print] allows you to print them as separate files.
For information on [Print] and [Batch Print], refer to "Print" (P.345) and "Batch Print" (P.346).
3 Select any option. Enter the number of print sets using the numeric keypad, if necessary.
4 Select [Print]
Note • When a file stored by [Store in Remote Folder] of a print driver is printed, the settings specified on the control panel or CentreWare Internet Services will override the settings specified on the print driver except the [Pages Per Sheet (N-Up)], [Skip Blank Page], and [Print Position] settings.
PrintAllows you to set printing.
Paper SupplyAllows you to select paper.
2 Sided PrintingAllows you to set 2-sided printing.
OutputAllows you to set stapling, punching, and a tray where the output is delivered.Note • This feature does not appear for some models. An optional component is required. For more
information, contact our Customer Support Center.
For examples of the settings of stapling and hole punching, refer to "When stapling/punching holes" (P.347).
File DetailsDisplays the [File Details] screen. Select a file from the list to check its preview image.For information on how to preview a file, refer to "Checking File Details" (P.343).

6 Send from Folder
346
Send from Folder
6
Print QuantitySpecify the number of print sets.
PrintPrints the selected file.
Batch PrintAllows you to set batch printing.
You can print multiple files as one file. Up to 100 files can be bound in selected order. Note • For 2-sided printing, the last page becomes blank when the total number of printed pages is odd. For
printing of multiple files, a blank page is inserted after the final page of each file.
• If a different size document is included in multiple files, it may be printed in improper orientation.
• [Batch Print] is not available while interrupting another job.
• [Batch Print] is not available for files received by fax or Internet Fax, or files for Secure Polling. When the selected files contain fax or Internet Fax files, the machine will not print the fax or Internet Fax files but only the scan and print files.
Paper SupplyAllows you to select paper.
2 Sided PrintingAllows you to set 2-sided printing.
OutputAllows you to set stapling and punching, and a tray where the output is delivered.
The number of sheets that can be stapled is 2 - 50 (when 80gsm paper is used).Note • This feature does not appear for some models. An optional component is required. For more
information, contact our Customer Support Center.
For examples of the settings of stapling and hole punching, refer to "When stapling/punching holes" (P.347).
File DetailsDisplays the [File Details] screen. Select a file from the list to check its preview image.For information on how to preview a file, refer to "Checking File Details" (P.343).
Print QuantitySpecify the number of print sets.
PrintPrints the selected file.

Printing Files in a Folder
347
Send from Folder
6
When stapling/punching holesThe following table shows the stapling/punching positions for print files stored in a folder by specifying [Store in Remote Folder] on a print driver, and for scan files. The following uses the example of [1 Staple] for stapling and [2 Holes] for punching.
For print files in a folder stored by specifying [Store in Remote Folder] on a print driver
For scan files stored in a folderImportant • Ensure that the actual orientation of the original document matches the [Original Orientation]
setting in [Edge Erase] or in [2 Sided Scanning] on the [Layout Adjustment] screen.
Original
Stapling Position
Punching Position
Report
Report
Report
Report
Report
Report
Original
Original Orientation
Stapling Position
Punching Position
Report Report Report Report
ReportReport
Report Report
Report Report
Report
Report
Report Report
Report
Report

6 Send from Folder
348
Send from Folder
6
Configuring/Starting Job Flow
Job Flow is a feature that allows you to register transfer settings of scan data, such as a transfer method and destination, to simplify data-transfer tasks.
Job flow sheets are categorized into two types according to the target. One type of job flow sheet targets files stored in folders, and the other type targets scan files. This section describes the first type of job flow sheet, targeting files stored in folders.
A job flow operates files stored in a folder, and starts in either of the following ways: 1) automatically start a job flow when a file is stored in a folder, or 2) select a job flow to manually operate files stored in a folder.
To automatically start a job flow, you must make a link with a folder and a job flow sheet in advance. Files are automatically processed with the job flow sheet when they are stored in the linked folder.Note • When the Authentication feature is disabled, a job flow created in [Send from Folder] can only be
used/edited/duplicated/deleted through the folder where the job flow is created. This type of job flow is not displayed on the [Create Job Flow Sheet] screen. When the Authentication feature is enabled, job flows whose owners are authenticated are displayed on the [Create Job Flow Sheet] screen.
• To use the Job Flow feature, the HDD Extension Kit (optional) is required for some models.
For information on job flows that target scan files, refer to "Job Flow Sheets" (P.355).
You can register the following features:
Forward
E-mail Notification
PrintFor information on the restrictions on the combination of features, refer to "5 Tools" > "Setup" > "Create Job Flow Sheet" in the Administrator Guide.
ForwardMultiple forwarding recipients can be configured for each forwarding method.
FTP
Forwards via FTP. Up to 2 recipients can be specified.
SMB
Forwards via SMB. Up to 2 recipients can be specified.
Forwards via E-mail. Up to 100 recipients can be specified.
Fax
Forwards via fax. Up to 100 recipients can be specified.
Internet Fax
Forwards via Internet Fax. Up to 100 recipients can be specified.
IP Fax (SIP)
Forwards via IP Fax. Up to 100 recipients can be specified.
E-mail NotificationYou can receive the job results by e-mail.For more information, refer to "5 Tools" > "Setup" > "Create Job Flow Sheet" > "Create New Job Flow Sheet" in the Administrator Guide.

Configuring/Starting Job Flow
349
Send from Folder
6
PrintFiles in a folder can be printed.
1 Select files on the [Folder - File List] screen.
2 Select [Job Flow Settings].
3 Select any option.
Auto StartThis sets auto start of the job flow for files stored in the folder. The job flow automatically starts when a file is stored.
Start Current Job FlowSelect files in the folder, and then select this button to start the job flow linked to this folder.Important • After executing the job flow, confirm the [Job Status] screen or print a Job History Report to check
the result. For information on the Job History Report, refer to "5 Tools" > "Common Service Settings" > "Reports" > "Job History Report" in the Administrator Guide.
Cut LinkCancels the link between a folder and the linked job flow sheet.
Create/Change LinkDisplays the [Link Job Flow Sheet to Folder] screen.Refer to "[Link Job Flow Sheet to Folder] Screen" (P.350).
Select Job Flow SheetSelect this button while files are selected to display the [Select Job Flow Sheet] screen.Refer to "[Select Job Flow Sheet] Screen" (P.352).

6 Send from Folder
350
Send from Folder
6
[Link Job Flow Sheet to Folder] Screen
You can change the link between the folder and its job flow sheet.Note • Linking, delinking, and auto start settings can be also performed when you create a folder.
1 Select a job flow sheet to link to.
Important • Selecting [Save] without selecting a job flow sheet does not set a link. If the selected job flow sheet is already linked, the link is canceled.
Note • Select [ ] to return to the previous screen or [ ] to move to the next screen.
• You can sort the list in ascending or descending order by selecting either [Name] or [Updated].
2 Select [Job Flow Settings].
3 Select [Create/Change Link].
4 Select any option.
RefreshDisplays the updated information.
CreateDisplays the [Create New Job Flow Sheet] screen.For more information, refer to "5 Tools" > "Setup" > "Create Job Flow Sheet" > "Create New Job Flow Sheet" in the Administrator Guide.
Edit/DeleteDisplays the [Details] screen.For more information, refer to "5 Tools" > "Setup" > "Create Job Flow Sheet" > "Edit/Delete" in the Administrator Guide.

Configuring/Starting Job Flow
351
Send from Folder
6
Search by NameSearches for job flows that partially match the entry. The machine searches through job flow names that were registered upon each job flow creation. The entry can be up to 128 characters long.For information on how to enter characters, refer to "Entering Text" (P.70).
Search by KeywordSearches for job flows that fully match the entry. The machine searches through keywords that were registered upon each job flow creation. The entry can be up to 12 characters long. You can select from preset keywords if they have been registered in the System Administration mode.For information on how to enter characters, refer to "Entering Text" (P.70).
Select KeywordDisplays the [Select Keyword] screen. Select a keyword registered in the System Administration mode to search for job flows. Job flows that fully match the entry are searched. The machine searches through keywords that were registered upon each job flow creation.
Sheet FilteringDisplays the [Sheet Filtering] screen.Refer to "[Sheet Filtering] Screen" (P.351).
[Sheet Filtering] ScreenThis screen allows you to filter the job flow sheets displayed.Displayed job flow sheets may vary depending on the Authentication feature. For more information, refer to "14 Authentication and Accounting Features" > "Authentication for Job Flow Sheets and Folders" in the Administrator Guide.
1 Select the filtering conditions, and select [Save].Note • The job flows that can be displayed on [Send
from Folder] are those whose [Target] is [Folder], and those stored in the machine.
OwnerSelect the owner of job flow sheets to filter.
TargetSelect the target of job flow sheets to filter.

6 Send from Folder
352
Send from Folder
6
[Select Job Flow Sheet] ScreenThis screen allows you to select and execute a job flow for the selected files.
1 Select a job flow, and select [Start].
Note • Select [ ] to return to the previous screen or [ ] to move to the next screen.
• You can sort the list in ascending or descending order by selecting either [Name] or [Updated].
StartExecutes the selected job flow sheet.
RefreshDisplays the updated information.
DetailsDisplays the [Details] screen.For more information, refer to "5 Tools" > "Setup" > "Create Job Flow Sheet" > "Edit/Delete" in the Administrator Guide.
Change SettingsIf the selected job flow sheet setting is editable, the [Change Settings] screen appears. You can temporarily change the settings.
Search by NameSearches for job flows that partially match the entry. The machine searches through job flow names that were registered upon each job flow creation. The entry can be up to 128 characters long.For information on how to enter characters, refer to "Entering Text" (P.70).
Search by KeywordSearches for job flows that fully match the entry. The machine searches through keywords that were registered upon each job flow creation. The entry can be up to 12 characters long. You can select from preset keywords if they have been registered in the System Administration mode.For information on how to enter characters, refer to "Entering Text" (P.70).
Select KeywordDisplays the [Select Keyword] screen. Select a keyword registered in the System Administration mode to search for job flows. Job flows that fully match the entry are searched. The machine searches through keywords that were registered upon each job flow creation.
Sheet FilteringDisplays the [Sheet Filtering] screen.Refer to "[Sheet Filtering] Screen" (P.351).

Configuring/Starting Job Flow
353
Send from Folder
6
Job Flow Restrictions
A job flow sheet can be used by only one user, can be shared by multiple users, or can be used for only certain folders.Job flow restrictions may vary depending on the Authentication feature. For more information, refer to "13 Authentication and Accounting Features" > "Authentication for Job Flow Sheets and Folders" in the Administrator Guide.

6 Send from Folder
354
Send from Folder
6

7 Job Flow Sheets
This chapter describes the scanning operation using a job flow sheet registered on the machine.
Job Flow Sheets is a service that allows you to register transfer settings of scan data, such as a transfer method and destination, to simplify data-transfer tasks.
Job Flow Procedure ....................................................................................................................356
Selecting/Changing a Job Flow Sheet................................................................................358

7 Job Flow Sheets
356
Job Flow Sheets
7
Job Flow Procedure
Job flow sheets are categorized into two types according to the target. One type of job flow sheets targets scanned documents, and the other type targets files stored in folders. This section describes the first type of job flow sheets, targeting scanned documents.For information on job flow sheets that target files stored in folders, refer to "Configuring/Starting Job Flow" (P.348).
The following describes the procedure to operate a job flow. Refer to the following section for each procedure.
Step 1 Opening the [Job Flow Sheets] Screen ...................................................................................................................... 356Step 2 Selecting a Job Flow Sheet ........................................................................................................................................... 356Step 3 Confirming/Changing the Job Flow Sheet................................................................................................................ 357Step 4 Starting the Job Flow Sheet ......................................................................................................................................... 357
To create and register a job flow sheet, use a computer.Note • To create a job flow sheet, use CentreWare EasyOperator or Device Setup Tool. EasyOperator is
included in the Driver CD Kit provided with the machine. You can download Device Setup Tool from Fuji Xerox website.
Step 1 Opening the [Job Flow Sheets] Screen
The following describes how to open the [Job Flow Sheets] screen.
1 Press the <Services Home> button.
2 Select [Job Flow Sheets].
Step 2 Selecting a Job Flow Sheet
1 Select a job flow sheet.
For more information on the [Job Flow Sheets] screen, refer to "Selecting/Changing a Job Flow Sheet" (P.358).
<Services Home> button

Job Flow Procedure
357
Job Flow Sheets
7
Step 3 Confirming/Changing the Job Flow Sheet
1 To confirm the details, select [Details]. To change the settings, select [Change Settings].
For information on how to check or change job flow settings, refer to "Selecting/Changing a Job Flow Sheet" (P.358).
Step 4 Starting the Job Flow Sheet
1 Load a document.
Note • A job flow with an application linked does not require you to load a document.
2 Press the <Start> button.
Important • After executing the job flow, be sure to print a Job History Report to check the result. For information on the Job History Report, refer to "5 Tools" > "Common Service Settings" > "Reports" > "Job History Report" in the Administrator Guide.

7 Job Flow Sheets
358
Job Flow Sheets
7
Selecting/Changing a Job Flow Sheet
This section describes how to select or edit a job flow sheet created on a network computer with EasyOperator or Device Setup Tool.Important • If characters not supported by the machine are used in the name or description of a job flow sheet,
the characters will not be displayed or will be garbled on the screen. For information on characters that can be used in the names or descriptions of job flow sheets, refer to "16 Appendix" > "Notes and Restrictions" > "Notes and Restrictions on the Use of the Machine" in the Administrator Guide.
Note • To communicate with network computers, enable the SOAP port on the machine.
• A job flow sheet created on a network computer can be deleted, but cannot be changed or duplicated. However, you can temporarily change some items that are permitted to be changed.
For information on how to enable the port, refer to "5 Tools" > "Connectivity & Network Setup" > "Port Settings" in the Administrator Guide.
1 Select a job flow sheet.
Note • Displayed job flow sheets may vary depending on the settings of the Authentication feature. For more information, refer to "14 Authentication and Accounting Features" > "Authentication for Job Flow Sheets and Folders" > "Overview" > "Job Flow Sheet Types and Overview" in the Administrator Guide.
• Select [ ] to return to the previous screen or [ ] to move to the next screen.
• You can sort the list in ascending or descending order by selecting either [Name] or [Updated].
RefreshDisplays refreshed information.
DetailsDisplays the [Details] screen. You can confirm the details of a job flow such as the name, last updated date, target, owner, and save location. When you select the [ ] button, the whole text of the description which was registered when creating the job flow sheet is displayed.
Change SettingsDisplays the [Change Settings] screen. You can change the job flow settings.Refer to "[Change Settings] Screen" (P.359).
Search by NameSearches for job flows that partially match the entry. The machine searches through job flow names that were registered upon each job flow creation. The entry can be up to 128 characters long.
Search by KeywordSearches for job flows that fully match the entry. The machine searches through keywords that were registered upon each job flow creation. The entry can be up to 12 characters long. You can select from preset keywords if they have been registered in the System Administration mode.
Select KeywordDisplays the [Select Keyword] screen. Select a keyword registered in the System Administration mode to search for job flows. Job flows that fully match the entry are searched. The machine searches through keywords that were registered upon each job flow creation.

Selecting/Changing a Job Flow Sheet
359
Job Flow Sheets
7
Sheet FilteringDisplays the [Sheet Filtering] screen on which you can filter the job flow sheets displayed.Refer to "[Sheet Filtering] Screen" (P.360).
[Change Settings] Screen
1 Select [Change Settings].
2 Select a group to be changed from [Group of Items]. Note • The screen on the right does not appear if
only one group is registered.
3 Select the item to be changed.
Note • A triangle icon appears at the left of each mandatory item.
4 Select any option.
ItemsDisplays the items set for the job flow sheet.
Current SettingsDisplays the values set for the job flow sheet.
Previous GroupDisplays the items of the previous group.
Next GroupDisplays the items of the next group.
Add E-mail RecipientAdds recipients for the e-mail.

7 Job Flow Sheets
360
Job Flow Sheets
7
[Sheet Filtering] ScreenThis screen allows you to filter the job flow sheets displayed.Job flow sheets displayed vary depending on the settings of the Authentication feature. For more information, refer to "14 Authentication and Accounting Features" > "Authentication for Job Flow Sheets and Folders" > "Overview" > "Job Flow Sheet Types and Overview" in the Administrator Guide.
1 Select [Sheet Filtering].
2 Select the filtering conditions, and select [Save].
OwnerSelect the owner of job flow sheets to filter.
TargetSelect the target of job flow sheets to filter.Note • Job flow sheets whose [Target] is [Folder] can be used only from [Send from Folder].

8 Stored Programming
This chapter describes the Stored Programming service that enables you to store customized job settings.
Stored Programming Overview.............................................................................................362
Registering/Deleting/Renaming Stored Programs........................................................363
Calling a Stored Program ........................................................................................................369

8 Stored Programming
362
Stored Programm
ing
8
Stored Programming Overview
The Stored Programming service allows you to store settings that you expect to use frequently and call them with a single button operation. You can also assign a screen to a stored program button, to use the button as a short-cut to the screen.
A stored program can store not only settings of a feature, but a flow of settings configured on multiple screens.
For example, this service is available when you want to record a procedure starting from pressing the <Machine Status> button, to displaying the screen under [Print Reports] to print a Job History Report.
In addition, while Build Job is running, this service can be used for the remaining document stacks.For information on Build Job, refer to "Build Job (Processing Documents Scanned with Different Settings as One Job)" (P.148).
The following shows the reference section for each feature.Registering/Deleting/Renaming Stored Programs.............................................................................................................. 363Calling a Stored Program........................................................................................................................................................... 369

Registering/Deleting/Renaming Stored Programs
363
Stored Programm
ing
8
Registering/Deleting/Renaming Stored Programs
You can register and delete stored programs on the [Stored Programming] screen.
1 Press the <Services Home> button.
2 Select [Setup].
3 Select [Stored Programming].
4 Select a feature.
StoreRegister a stored program.Refer to "Registering Stored Programs" (P.364).
Store Build JobRegister a stored program for Build Job.Refer to "Registering Stored Programs for Build Job" (P.366).
DeleteDeletes a stored program. Select the stored program number to be deleted.Refer to "Deleting Stored Programs" (P.367).
<Services Home> button
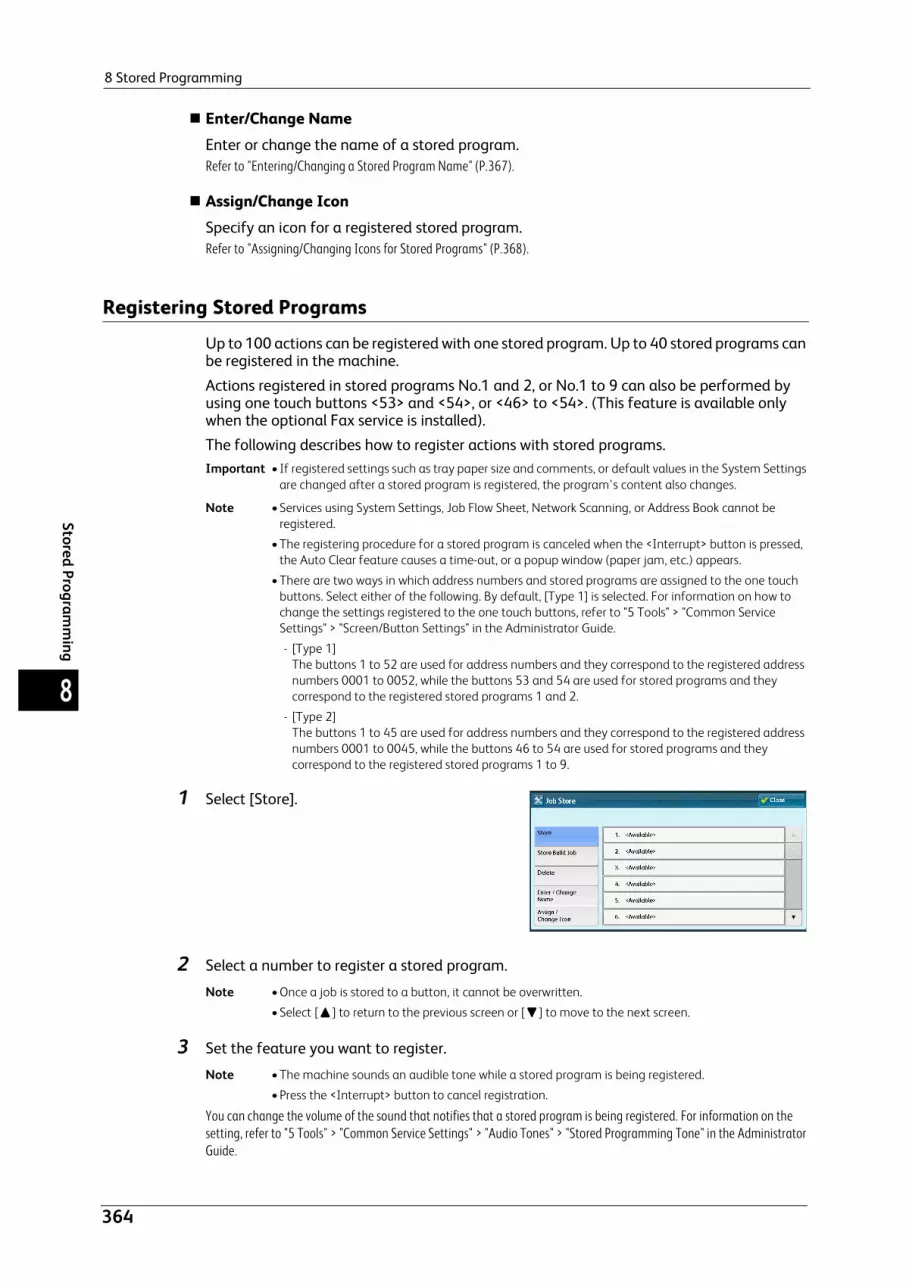
8 Stored Programming
364
Stored Programm
ing
8
Enter/Change NameEnter or change the name of a stored program.Refer to "Entering/Changing a Stored Program Name" (P.367).
Assign/Change IconSpecify an icon for a registered stored program.Refer to "Assigning/Changing Icons for Stored Programs" (P.368).
Registering Stored Programs
Up to 100 actions can be registered with one stored program. Up to 40 stored programs can be registered in the machine.
Actions registered in stored programs No.1 and 2, or No.1 to 9 can also be performed by using one touch buttons <53> and <54>, or <46> to <54>. (This feature is available only when the optional Fax service is installed).
The following describes how to register actions with stored programs.Important • If registered settings such as tray paper size and comments, or default values in the System Settings
are changed after a stored program is registered, the program's content also changes.
Note • Services using System Settings, Job Flow Sheet, Network Scanning, or Address Book cannot be registered.
• The registering procedure for a stored program is canceled when the <Interrupt> button is pressed, the Auto Clear feature causes a time-out, or a popup window (paper jam, etc.) appears.
• There are two ways in which address numbers and stored programs are assigned to the one touch buttons. Select either of the following. By default, [Type 1] is selected. For information on how to change the settings registered to the one touch buttons, refer to "5 Tools" > "Common Service Settings" > "Screen/Button Settings" in the Administrator Guide.
- [Type 1]The buttons 1 to 52 are used for address numbers and they correspond to the registered address numbers 0001 to 0052, while the buttons 53 and 54 are used for stored programs and they correspond to the registered stored programs 1 and 2.
- [Type 2]The buttons 1 to 45 are used for address numbers and they correspond to the registered address numbers 0001 to 0045, while the buttons 46 to 54 are used for stored programs and they correspond to the registered stored programs 1 to 9.
1 Select [Store].
2 Select a number to register a stored program.
Note • Once a job is stored to a button, it cannot be overwritten.
• Select [ ] to return to the previous screen or [ ] to move to the next screen.
3 Set the feature you want to register.
Note • The machine sounds an audible tone while a stored program is being registered.
• Press the <Interrupt> button to cancel registration.
You can change the volume of the sound that notifies that a stored program is being registered. For information on the setting, refer to "5 Tools" > "Common Service Settings" > "Audio Tones" > "Stored Programming Tone" in the Administrator Guide.
Registering/Deleting/Renaming Stored Programs
365
Stored Programm
ing
8
4 Press the <Start> or <Clear All> button.
Note • If no name is entered for a registered stored program, the name becomes "(No Name)".
For information on how to name a registered stored program, refer to "Entering/Changing a Stored Program Name" (P.367).
Notes and Restrictions on Registering Stored Programs
The following notes and restrictions applies when you register stored programs.
When registering a stored program to select paper size or type loaded on the bypass tray, register both the paper size and the paper type. If only the paper size or type is registered, the stored program may not be called properly.
If any of the following operations is performed while a stored program is being registered, the stored program may not be registered or may not work correctly.- Removing or inserting a paper tray- Loading or reloading paper in the bypass tray
If any of the following operations is performed after a stored program is registered, the registered stored program may not be called properly.- If the stored program has the Watermark feature and the default values of that
feature are changed.- If the stored program has an operation for a folder and the folder passcode is changed.- If the settings of the control panel are changed.- If the features assigned to the <Custom> buttons are changed.- If any setting is changed under [Tools] > [System Settings] > [Copy Service Settings] >
[Preset Buttons].- If the selection is made from a list of the Address Book or Job Flow Sheet.- If any optional components installed on the machine, such as a finisher, are changed,
and thereby the associated buttons become no longer available.- If the measurement unit, millimeters or inches, is changed.- If a job is selected from the list of the stored jobs in [Secure Print Jobs & More] under
Job Status.
The following features and operations cannot be registered in Stored Programming.- Registration and call of a stored program- EP Diagnostic Request- System Settings- The [Media Print - Text] and [Media Print - Photos] buttons on the [Services Home]
screen - The [Store to USB] button on the [Services Home] screen- The [Network Scanning] and [Job Flow Sheets] buttons on the [Services Home] screen- The <Custom> button to which the Network Scanning or Job Flow Sheets service is
assigned.- The Address Book for the Fax/Internet Fax, E-mail, and Scan to PC services- Unselectable buttons- The [Language] button on the [Services Home] screen- The [Screen Brightness] button on the [Services Home] screen- Selecting items using the scroll bar- Scrolling operation while previewing- The [Browse] button for the Scan to PC service- Operations to edit e-mail addresses for the E-mail service (the pop-up menu
[Keyboard], [Remove], and [Edit] displayed by selecting [Recipient(s)] or [From]).

8 Stored Programming
366
Stored Programm
ing
8
- The <Energy Saver> button
A stored program registration is canceled when the <Interrupt> button is pressed, the Auto Clear feature causes a time-out, or a popup window (such as a paper jam window) appears.
If the Fax service is available, one-touch buttons can be used.
Registering Stored Programs for Build Job
Up to 100 actions can be registered with one stored program for Build Job. Up to 40 stored programs can be registered in the machine.
The following describes how to register actions with stored programs.
1 Select [Store Build Job].
Note • Once a job is stored to a button, it cannot be overwritten.
• Select [ ] to return to the previous screen or [ ] to move to the next screen.
2 Select a number to register a stored program.
Note • Once a job is stored to a button, it cannot be overwritten.
• Select [ ] to return to the previous screen or [ ] to move to the next screen.
3 Set the feature you want to register.
Note • The machine sounds an audible tone while a stored program is being registered.
• Press the <Interrupt> button to cancel registration.
You can change the volume of the sound that notifies that a stored program is being registered. For information on the settings, refer to "5 Tools" > "Common Service Settings" > "Audio Tones" > "Stored Programming Tone" in the Administrator Guide.
4 Press the <Start> or <Clear All> button.
Note • An icon is displayed to the left of each registered stored program for Build Job.
• If no name is entered for a registered stored program, the name becomes “(No Name)”.
For information on how to name a registered stored program, refer to "Entering/Changing a Stored Program Name" (P.367).

Registering/Deleting/Renaming Stored Programs
367
Stored Programm
ing
8
Deleting Stored Programs
The following describes how to delete stored programs.
1 Select [Delete].
2 Select the number to deleted.
Note • Select [ ] to return to the previous screen or [ ] to move to the next screen.
3 Select [Delete].
DeleteDeletes the stored program.Note • Deleted stored programs cannot be restored.
CancelCancels deleting the stored program.
Entering/Changing a Stored Program Name
The following describes how to enter or change the name of a stored program.
Up to 36 characters are allowed for a stored program's name.For information on how to enter characters, refer to "Entering Text" (P.70).
1 Select [Enter/Change Name].
2 Select the number to register or change a name.
Note • Select [ ] to return to the previous screen or [ ] to move to the next screen.

8 Stored Programming
368
Stored Programm
ing
8
3 Enter a name, and select [Save].
Assigning/Changing Icons for Stored Programs
The following describes how to assign or change an icon of a stored program.
You can select from 12 icons.
1 Select [Assign/Change Icon].
2 Select the number to assign or change an icon.
Note • Select [ ] to return to the previous screen or [ ] to move to the next screen.
3 Select an icon, and select [Save].
No IconNo icon is assigned to a registered stored program.
IconSelect an icon according to the content of the registered stored program.

Calling a Stored Program
369
Stored Programm
ing
8
Calling a Stored Program
The following describes how to call a stored program.
When you call a specified stored program, the last screen shown when you registered the stored program appears.
1 Press the <Services Home> button.
2 Select [Stored Programming].
3 Select a number of a stored program containing the features you want to use. Note • You can only select registered numbers.
• Select [ ] to return to the previous screen or [ ] to move to the next screen.
• After the stored program has been called, the machine sounds an audible tone. If a failure occurs, the machine sounds a fault tone.
For information on how to change the volume of the sound that notifies that a stored program has been called, refer to "5 Tools" > "Common Service Settings" > "Audio Tones" > "Stored Programming Complete Tone" in the Administrator Guide.
4 After the stored program is called, select other features if necessary.
5 Press the <Start> button.
<Services Home> button
1 2 3
4 5 6
7 8 9
0 #
C
<Start> button
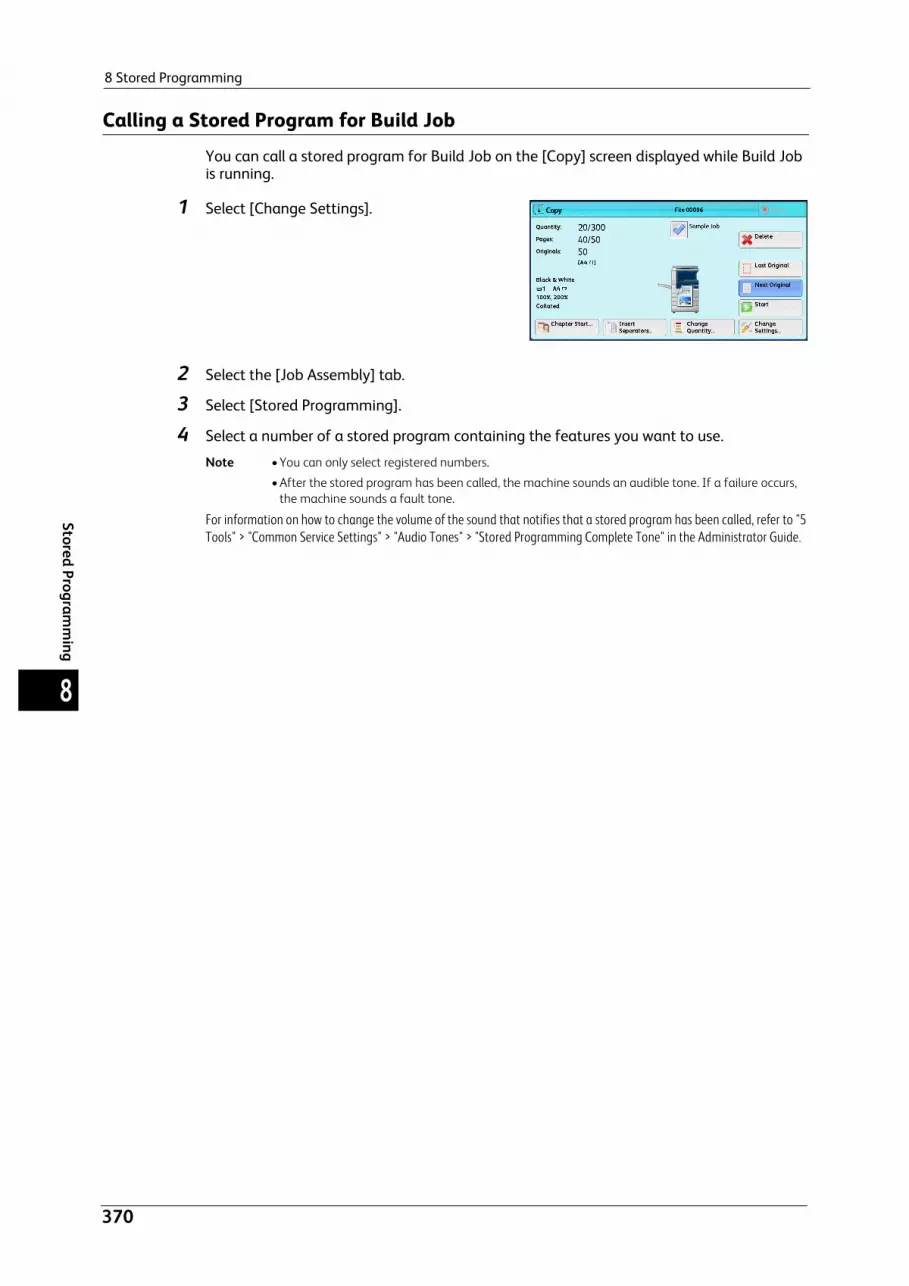
8 Stored Programming
370
Stored Programm
ing
8
Calling a Stored Program for Build Job
You can call a stored program for Build Job on the [Copy] screen displayed while Build Job is running.
1 Select [Change Settings].
2 Select the [Job Assembly] tab.
3 Select [Stored Programming].
4 Select a number of a stored program containing the features you want to use.
Note • You can only select registered numbers.
• After the stored program has been called, the machine sounds an audible tone. If a failure occurs, the machine sounds a fault tone.
For information on how to change the volume of the sound that notifies that a stored program has been called, refer to "5 Tools" > "Common Service Settings" > "Audio Tones" > "Stored Programming Complete Tone" in the Administrator Guide.

9 Media Print (Text and Photos)
This chapter describes the basic procedures and features of Media Print - Text and Media Print - Photos when the USB Memory Kit is connected.Note • This service is not available for some models. An optional component is required. For more
information, contact our Customer Support Center.
Overview of Media Print ..........................................................................................................372
Inserting a USB Memory Device ..........................................................................................375
Media Print - Text .......................................................................................................................378
Media Print - Photos ..................................................................................................................380
Selecting the Printing Options...............................................................................................382

9 Media Print (Text and Photos)
372
Media Print (Text and Photos)
9
Overview of Media Print
If a USB memory device is connected to the machine, the data stored in the USB memory device can also be printed. You can also print scanned data stored with the Store to USB service.
The installation of a commercially available Memory Card Reader allows the machine to retrieve and print image data (DCF1.0-compliant JPEG and TIFF) taken with a digital camera as well as document files (PDF, TIFF, XPS, XDW, XBD, and JPEG (JFIF)).Important • Data stored in a USB memory device may be lost or damaged in the following cases. Make sure to
back up data in media before use.
- When disconnecting/connecting the USB memory device by methods other than described in this guide.
- When receiving the effect of electrical noise or an electrical discharge
- When a fault or failure occurs during operation
- If the USB memory device receives mechanical damage
• We assume no responsibility for any direct and indirect damages arising from or caused by such data loss.
• For Media Print - Photos, images can be displayed in thumbnail view, but cannot be previewed. For Media Print - Text, files cannot be displayed in thumbnail view and cannot be previewed either.
Note • Commercially available Memory Card Readers with a single slot*1 can be used for the Media Print - Text and Media Print - Photo services, but its safe performance is not guaranteed.
When a Memory Card Reader with multiple slots*2 is used, only one particular slot is available. And which slot is available differs according to the types of Memory Card Readers, and a slot of a medium or memory card that you want to use is not always available for the machine. Its safe performance is not guaranteed, either.*1 : A medium or memory card that has one slot. Some allow only one type of a medium or memory card, while
others allow more than one types (ex. SD card, xD-Picture Card).*2 : A medium or memory card that has two or more slots.
• This feature may not be available depending on the setting in the CentreWare Internet Services. For more information, refer to "6 CentreWare Internet Services Settings" > "Configuring Machine Settings Using CentreWare Internet Services" in the Administrator Guide.
• "Exif" is a file format that embeds information required to print the image data taken with a digital camera. The machine supports Exif 2.0 to 2.2.
• The Store to USB service is not available for some models. An optional component is required. For more information, contact our Customer Support Center.
The Media Print feature comprises two modes: Media Print - Photos and Media Print - Text. The Media Print - Photo mode prints data stored in the standard digital camera format, while the Media Print - Text mode prints data stored in text format. The feature also includes Index Printing that prints a list of files retrieved in the both modes.

Overview of Media Print
373
Media Print (Text and Photos)
9
Supported Media and File Formats
The machine supports USB memory devices.
Supported media and file formats are as follows.
Important • When you specify the save location, only folder names are displayed in the list. File names and shortcuts (symbolic link or alias) are not displayed.
• Folders that comply with the Design rule for Camera File system (DCF) standard used for digital cameras are not displayed.
• If a full path (a string of folder and file names in all directories) of the file created exceeds 257 characters long, an error occurs.
• If the medium contains more than 900 folders, the machine may not be able to recognize the medium correctly.
• PDF files saved on Mac OS cannot be displayed on the screen and cannot be printed.
• If a file name contains characters that are not supported by the machine, the file name will not be displayed on the screen.
Note • In the Media Print - Photos mode, only 8 characters can be recognized as a file name. In the Media Print - Text mode, up to 255 characters can be recognized.
• Up to 900 files can be processed with Media Print.
• Use media formatted with digital cameras or computers (FAT 12, 16, 32 only).
• Use USB 2.0 compliant memory devices with a storage capacity of up to 128 GB. (USB 1.1 compliant memory devices are not supported.)
• If a file name contains machine-dependent codes, the file may not be recognized or displayed on the screen correctly.
Notes and Restrictions on Media Print
The following notes and restrictions apply on the use of the Media Print service.
Use the Media Print - Photos service with a medium inserted. Otherwise, an error code (016-794/116-212) displayed on the screen.
Image files other than files in Exif format (JPEG/TIFF files created on computers) cannot be printed.
Once an image file in Exif format is edited or saved on a computer, the file format is no longer the Exif format.
Supported MediaSupported File Format
Media Print - Photos Media Print - Text
USB 2.0 memory JPEG filesTIFF files Supports DCF1.0-compliant JPEG/TIFF files (Exif2.0, Exif2.1, Exif2.2)
PDF filesExtension: pdf, PDF 1.3 or laterTIFF filesExtension: tif, Grayscale 4 bit/8bit uncompressed, 8bit/24 bit JPEG compressed, MH/MMR compressedXPS filesExtension: xpsDocuWorks filesExtension: xdwDocuWorks binder filesExtension: xbdJPEG (JFIF) filesExtension: jpg

9 Media Print (Text and Photos)
374
Media Print (Text and Photos)
9
If the medium fails, the process is terminated within a few minutes, and an error message is displayed.
Eject the medium before switching off the power.
Be sure to wait until printing is completed and then eject the medium by following the procedure described in this chapter.
Always back up data in medium before use.
Printing data may take from a few minutes to several tens of minutes, depending on the size and number of files in the medium.
Before storing document files, format a USB memory device with a computer (FAT12, FAT16, FAT32 only).
When you print a PDF file using Media Print, [PDF Bridge] is selected regardless of the [Print Processing Mode] setting in [PDF Direct Print].
For more information on [Print Processing Mode], refer to "16 Appendix" > "PDF Direct Print" in the Administrator Guide.
You can use a USB host adapter to print from your USB memory device or via your USB cable (as necessary), but the operation is not guaranteed.
Multiple USB memory devices cannot be used simultaneously.
Use USB 2.0 compliant memory devices only. USB 1.1 compliant memory devices are not supported. The following USB memory devices are not supported:- A USB memory device with multiple media partitions that require other utilities to
access to the contents therein.- A USB memory device connected via an external hub.
Do not use a medium if it stores data that cannot be backed up, such as music data with the copyright protection function. We assume no responsibility for any direct and indirect damages arising from or caused by such data loss.
The machine does not display a menu to prevent you from removing a USB memory device while it is being accessed.

Inserting a USB Memory Device
375
Media Print (Text and Photos)
9
Inserting a USB Memory Device
1 Insert the USB memory device into the USB memory slot on the control panel.
2 One of the following occurs.
The [USB Memory Device Detected] screen appears.
The [Store to USB] screen appears.
The [Media Print - Text] screen appears.
The screen display does not change.Note • The behavior depends on settings. Ask your system administrator for more information.
• When a USB memory device is inserted into the USB memory slot during the Energy Saver mode, the touch screen does not light. After exiting the Energy Saver mode by pressing the <Energy Saver> button, insert the USB memory device again or select [Store to USB] on the [Services Home] screen. For information on other ways to exit the Energy Saver mode, refer to "Exiting the Energy Saver Mode" (P.58).
• The screen status will be one of the above even when a USB memory device in which only encrypted data is stored is inserted or a USB memory device in unsupported format is inserted. In such a case, a warning message appears during operation and the operation is aborted.
• The screen status will be one of the above when a commercially available Memory Card Reader is inserted into the USB memory slot of the machine. It is the same if no medium is inserted into the Memory Card Reader.
• If a commercially available Memory Card Reader is used and it is left inserted all the time, the machine does not detect the medium even when they are inserted into the slot of the Memory Card Reader.
• Screen display remains the same when the inserted USB memory device or Memory Card is removed. Press the <Services Home> button or do anything else to change the screen display before starting the next operation.
When the [USB Device Detected] Screen Appears
1 Select [Media Print - Text] or [Media Print - Photos].
2 The [Media Print - Text] screen or the [Media Print - Photos] screen appears.

9 Media Print (Text and Photos)
376
Media Print (Text and Photos)
9
When the [Store to USB] Screen Appears
1 Press the <Services Home> button.
2 Select [Media Print - Text] or [Media Print - Photos] on the [Services Home] screen.
3 The [Media Print - Text] screen or the [Media Print - Photos] screen appears.
When the [Media Print - Text] Screen Appears
1 Select a feature on the [Media Print - Text] screen.
<Services Home> button

Inserting a USB Memory Device
377
Media Print (Text and Photos)
9
When the [Media Print - Photos] Screen Appears
1 Select a feature on the [Media Print - Photos] screen.
When the Screen Display Does Not Change
1 If any screen other than the [Services Home] screen is displayed, press the <Services Home> button
2 Select [Media Print - Text] or [Media Print - Photos] on the [Services Home] screen.
3 The [Media Print - Text] screen or the [Media Print - Photos] screen appears.
Important • Data stored in a USB memory device may be lost or damaged in the following cases. Make sure to back up data in media before use.
- When disconnecting/connecting the USB memory device by methods other than described in this guide.
- When receiving the effect of electrical noise or an electrical discharge
- When a fault or failure occurs during operation
- If the USB memory device receives mechanical damage
• We assume no responsibility for any direct and indirect damages arising from or caused by such data loss.
Note • If you do not specify the file storage location, the scanned data is saved in the root directory.
<Services Home> button

9 Media Print (Text and Photos)
378
Media Print (Text and Photos)
9
Media Print - Text
Selecting Files
You can select files using any of the following three methods:
Selecting all files
Selecting the desired files on the [Select From List] screen
Selecting one file or a range of files with index numbersNote • You can select up to 32 files simultaneously.
1 Select either [Select All] or [Select From List] to specify files.
2 After selecting the files to be printed, select the printing options.
For more information on the printing options, refer to "Selecting the Printing Options" (P.382).
Note • On the pop-up menu displayed when selecting files, you can cancel the selection or display details.
• Select [ ] to return to the previous screen or [ ] to move to the next screen.
Select AllSelects all document files to be printed.Note • Depending on the types of files stored on the USB memory device or the directory configuration,
some files may not be printed.
Select From ListDisplays the [Select From List] screen.Refer to "[Select From List] Screen" (P.379).
Select RangeUse [+] and [-] to specify the range of files to be printed in [First File] and [Last File] under [Media Print - Text].Note • Select [Select From List] to display a list of files, and reference the list when selecting the range.
Index PrintPrints a list of the selected files with the index numbers automatically assigned.For more information on Index Print, refer to "Index Print" (P.384).

Media Print - Text
379
Media Print (Text and Photos)
9
[Select From List] Screen
This screen displays a list of files with their folder and file names and stored dates and times.
You can select the desired files from a list of files.
1 Select the desired files from a list of files.
Note • Select [ ] to return to the previous screen or [ ] to move to the next screen.
• You can sort the list in ascending or descending order by selecting [# ], [Name], or [Last Updated].
• A check mark is placed in the check box for each file selected. To deselect the file, select the file again while the file is selected (highlighted).
• If a folder or file name has more than 170 characters long, the folder or file name is not displayed.
• Folder names which include characters that the machine does not support may not be correctly displayed. If you specify the folders as file storage locations, an error occurs. For more information on characters that the machine supports, refer to "Entering Text" (P.70).
• The machine does not distinguish between upper and lower cases of folder and file names that are created in Windows environment and that consist of eight characters or less. The names for these folders and files are displayed in capital letters.
Select all files in this levelSelects all files in the current folder.
DetailsDisplays detailed information on the selected (highlighted) file. To print the file, select the [Print] check box on the [Details] screen.
PreviousAllows you to move to the upper directory.Note • This button is grayed out if there is no upper directory.
NextAllows you to move to the lower directory.Note • This button is available when a folder is selected.

9 Media Print (Text and Photos)
380
Media Print (Text and Photos)
9
Media Print - Photos
Selecting Files
You can select files using any of the following three methods:
Selecting all files
Selecting the desired files on the [Select From List] screen. You can select up to 100 files simultaneously
Selecting one file or a range of files with index numbers
1 Select either [Select All] or [Select From List] to specify files.
2 After selecting the files to be printed, select the printing options.
For more information on the printing options, refer to "Selecting the Printing Options" (P.382).
Note • On the pop-up menu displayed when selecting files, you can cancel the selection or display details.
• Select [ ] to return to the previous screen or [ ] to move to the next screen.
Select AllSelects all image data to be printed.Note • Depending on the types of files stored on the USB memory device or the directory configuration,
some files may not be printed.
Select From ListDisplays the [Select From List] screen.Refer to "[Select From List] Screen" (P.381).
Select RangeUse [+] and [-] to specify the range of files to be printed in [First picture] and [Last picture] under [Media Print - Photos].Note • Select [Select From List] to display a list of files, and reference the list when selecting the range.
Index PrintPrints a list of the selected files with the index numbers automatically assigned.For more information on Index Print, refer to "Index Print" (P.384).

Media Print - Photos
381
Media Print (Text and Photos)
9
[Select From List] Screen
You can select the desired files from a list of files.Note • Select [ ] to return to the previous screen or
[ ] to move to the next screen.
• A check mark is placed in the check box for each file selected. To deselect the file, select the file again while the file is selected (highlighted).
ListDisplay a list of files with their names and stored dates and times.Note • You can sort the list in ascending or descending order by selecting [# ], [Name], or [Date & Time].
The number of files selected appears on the top on the screen.
ThumbnailDisplays a list of the images and names of the files.Important • The thumbnail view may not be available for some files. If a file is not displayed in thumbnail view,
display it in list view or in Index Print.
• Characters and images may not be correctly displayed in thumbnail view because they are reduced in size.
Note • An image is displayed in thumbnail view in the orientation with which the file was stored.
DetailsDisplays detailed information on the selected (highlighted) file. To print the file, select the [Print] check box on the [Details] screen.
Deselect AllDeselects all selected files.
Select AllSelects all files.

9 Media Print (Text and Photos)
382
Media Print (Text and Photos)
9
Selecting the Printing Options
You can set the printing options on the [Media Print -Text] or [Media Print - Photos], and [Advanced Settings] tabs.
By default, pressing the <Custom 3> (Review) button on the control panel allows you to view a list of the setting values.
Media Print - Photos
Note • When you select a paper size smaller than the image size, the image is automatically reduced. When you select a paper size larger than the image size, the image is printed at its original size.
Tab Item Setting Value
- Quantity Specify the number of print sets in the range of 1 - 999, using the numeric keypad.
Media Print Photos Output Color Color, Black & White
Paper Supply Trays 1 - 5
Note • Trays 3 and 4 are optional for some models.
• Select the tray in which any of the following
sizes of paper is loaded: A3, B4, A4, A4 , B5,
B5 , 8.5 x 11", 8.5 x 11" , 100 x 148 mm
• When the desired tray is not displayed, select [More], and on the screen displayed, select the tray.
When you select [More] and then [Tray 5], you can set [Paper Size] and [Paper Type].
Paper Size
A3, B4, A4, A4 , B5, B5 , 8.5 x 11", 8.5 x 11" , 100 x 148 mmPaper TypeSelect the paper type to be used from the list.
2 Sided Printing 1 Sided, Long Edge Flip, Short Edge Flip
Output Photo Size Full Page Print5 x 7"When you select [Output Size] on the screen displayed after selecting [More], the following sizes are selectable:A4, 8.5 x 11", 100 x 148 mm, 3.5 x 5", 5 x 7"
Note • According to the size selected here and the paper size, only the photos fitting on one sheet of paper are aligned and printed. If you select [1 Picture per Page], one sheet of paper is used for one file and printed.
3 Pictures per Page (Center) When you select [Pictures per Page] on the screen displayed after selecting [More], the following options are available:2 Pictures, 3 Pictures (Center), 3 Pictures (Left), 4 Pictures, 6 Pictures, 8 Pictures
Advanced Settings Bitmap Smoothing Off, On

Selecting the Printing Options
383
Media Print (Text and Photos)
9
• The features displayed on the [Media Print - Photos] and [Advanced Settings] screens may vary depending on the combination of the optional components installed on the machine.
Media Print - Text
Note • When you select a paper size smaller than the document size, the document image is automatically reduced. When you select a paper size larger than the document size, the document is printed at its original size.
• The features displayed on the [Media Print - Text] and [Advanced Settings] screens may vary depending on the combination of the optional components installed on the machine.
Tab Item Setting Value
- Quantity Specify the number of print sets in the range of 1 - 999, using the numeric keypad.
Media Print Text Output Color Color, Black & White
Paper Supply Trays 1 - 5
Note • Trays 3 and 4 are optional for some models.
• Select [Auto Select] or the tray in which any of the following sizes of paper is loaded: A3, B4,
A4, A4 , B5, B5 , A5, A5 ,
8.5 x 11", 8.5 x 11" , 8.5 x 14", 11 x 17"
• When you select [Auto Select], the machine automatically selects a tray that contains the same size of paper as the document, and prints the document at its original size.
• When the desired tray is not displayed, select [More], and on the screen displayed, select the tray.
When you select [More] and then [Tray 5], you can set [Paper Size] and [Paper Type].
Paper Size
A3, B4, A4, A4 , B5, B5 , A5, A5 ,
8.5 x 11", 8.5 x 11" , 8 x 14", 11 x 17"Paper TypeSelect the paper type to be used from the list.
2 Sided Printing 1 Sided, Long Edge Flip, Short Edge Flip
Staple Specify the stapling/punching positions.When the desired stapling/punching positions are not displayed, select [More].
Important • If you select and print multiple documents, all of the documents are stapled together. To staple only one document, print only that document.
Advanced Settings Pages per Side Off, 2 Pages, 4 Pages
Bitmap Smoothing Off, On

9 Media Print (Text and Photos)
384
Media Print (Text and Photos)
9
Index Print
In the Media Print - Photos mode, a list of 30 x 40 mm reduced images, plus index numbers, file names, and dates when images were stored in the medium are printed.
In the Media Print - Text mode, names (up to 2 lines and 100 characters), dates when files were stored in the medium, and the total number of files are printed.
You can specify only the number of print sets for Index Print, in the range from 1 - 999 sets in 1 set increments. For other printing options, the settings you have specified for Media Print - Text or Media Print - Photos before selecting the [Index Print] check box will be effective. To change these settings, deselect the [Index Print] check box, change the print settings, and then perform Index Print. The setting values return to the defaults if the machine is rebooted.
The following setting items are restricted when you select Index Print.
Setting Item Value
Output Color In the Media Print - Photos modeColor only
In the Media Print - Text modeBlack & White only
Paper Supply Trays 1 - 5
Note • Trays 3 and 4 are optional for some models.
• Select the tray in which any of the following sizes of paper is loaded: A3, A4, or 8.5 x 11".
2 Sided Printing Not available
Staple Not available
Pages per Side Not available

10 Job Status
This chapter describes how to check the status of jobs and operate the jobs.
Job Status Overview ..................................................................................................................386
Checking Current/Pending Jobs............................................................................................387
Checking Completed Jobs.......................................................................................................389
Printing and Deleting Stored Jobs .......................................................................................390
Printing Pending Jobs ...............................................................................................................403
Handling Error Terminations..................................................................................................404

10 Job Status
386
Job Status
10
Job Status Overview
The Job Status feature allows you to check current, pending, and completed jobs. You can also cancel printing and print jobs that are waiting to be output or resumed.
1 Press the <Job Status> button.
You can operate the following on the [Job Status] screen.
Checking current/pending jobs Lists current and pending jobs, and displays their details. Also allows you to cancel current or pending jobs.For more information, refer to "Checking Current/Pending Jobs" (P.387).
Checking completed jobs Displays the status of completed jobs, and their details.For more information, refer to "Checking Completed Jobs" (P.389).
Checking stored jobsPrints or deletes jobs stored using the Charge Print, Secure Print, Private Charge Print, Sample Set, and Delayed Print features.For more information, refer to "Printing and Deleting Stored Jobs" (P.390).
Printing pending jobs Prints jobs that are waiting to be output or resumed.For more information, refer to "Printing Pending Jobs" (P.403).
1 2 3
4 5 6
7 8 9
0 #
C
<Job Status> button

Checking Current/Pending Jobs
387
Job Status
10
Checking Current/Pending Jobs
This section describes how to check current or pending jobs. On the status screen, you can cancel or preferentially execute jobs.
1 Press the <Job Status> button.
2 Select the job to be canceled or preferentially executed. Note • Select [ ] to return to the previous screen or
[ ] to move to the next screen.
• From the drop-down menu, you can select and display the desired type of jobs.
3 Select [Delete] or [Promote Job].
Print Waiting JobsPrints the jobs that are waiting to be output or resumed.For more information, refer to "Printing Pending Jobs" (P.403).
DeleteCancels the current or pending job.
Promote JobPreferentially executes the selected job.
If you select this button, [ ] appears under the [Status] of the selected job.
DeleteStops processing the job.
Last OriginalSelect this button to end scanning of documents. The job is then executed.
Next OriginalSelect this button when you have another document to scan.
1 2 3
4 5 6
7 8 9
0 #
C
<Job Status> button
10 Job Status
388
Job Status
10
StartResumes the suspended job.
Change QuantityDisplays the [Change Quantity] screen on which you can change the number of copies entered before. Enter a new quantity using the numeric keypad.

Checking Completed Jobs
389
Job Status
10
Checking Completed Jobs
This section describes how to check completed jobs.
You can check whether a job has been completed successfully. Selecting a job allows you to see its details.
1 Press the <Job Status> button.
2 Select the [Completed Jobs] tab.
Note • Select [ ] to return to the previous screen or [ ] to move to the next screen.
• From the drop-down menu, you can select and display the desired type of jobs.
3 Select a job to see the details.
4 Select [Close] after the confirmation.
Group Parent JobsAllows you to check the list or history of related jobs (such as job flow jobs).
Show Child JobsDisplays a job list.
Print this Job History ReportPrints the Job History Report.
Print this Job ReportPrints the Job Report.
1 2 3
4 5 6
7 8 9
0 #
C
<Job Status> button

10 Job Status
390
Job Status
10
Printing and Deleting Stored Jobs
This section describes how to print or delete jobs stored with the Secure Print or Sample Set feature, or stored with the [Receive Control] setting of the Charge Print feature. The [Secure Print Jobs & More] screen allows you to print or delete stored jobs.
The following shows the reference section for each feature.Secure Print ................................................................................................................................................................................... 390Sample Set..................................................................................................................................................................................... 392Delayed Print ................................................................................................................................................................................ 394Charge Print .................................................................................................................................................................................. 395Private Charge Print .................................................................................................................................................................... 398Public Folder.................................................................................................................................................................................. 400Undelivered Faxes ....................................................................................................................................................................... 401
1 Press the <Job Status> button.
2 Select the [Secure Print Jobs & More] tab.
[Secure Print] and [Private Charge Print] are not displayed simultaneously on the screen. For more information on the settings, refer to "5 Tools" > "Authentication/Security Settings" > "Authentication" > "Charge/Private Print Settings" in the Administrator Guide.
Secure Print
This feature allows you to temporarily store print data in the machine to print it with the print command from the machine. The feature also enables you to set a passcode, which is helpful to print confidential documents.
The following describes how to print or delete jobs stored with the Secure Print feature.Note • This feature does not appear when [Receive Control] in [Charge/Private Print Settings] is set to either
of the following:
- Select [According to Print Auditron], and then select [Save as Private Charge Print Job] in [Job Login Success].
- Select [Save as Private Charge Print Job].
When [Save as Private Charge Print Job] or [Save as Charge Print Job] is selected in [Receive Control] under [Charge/Private Print Settings], jobs will not be saved in [Secure Print] under [Secure Print Jobs & More] even if you select [Secure Print] on
1 2 3
4 5 6
7 8 9
0 #
C
<Job Status> button

Printing and Deleting Stored Jobs
391
Job Status
10
the print driver. For more information, refer to "5 Tools" > "Authentication/Security Settings" > "Authentication" > "Charge/Private Print Settings" in the Administrator Guide.For information on how to operate a Secure Print job, refer to the print driver's help.
1 Select [Secure Print].
2 Select the user to be checked, and select [Job List]. Note • Select [Refresh] to display the updated
information.
• Select [ ] to return to the previous screen or [ ] to move to the next screen.
• You can enter a user ID in [Go to] using the numeric keypad to display the user ID at the top of the list.
3 Enter the passcode, and select [Confirm].
Note • If the passcode is not set, the passcode entry screen does not appear.
4 Select the job to be printed or deleted.
Note • You can select up to 100 files simultaneously to print or delete the files. If you select multiple files, they are printed in the selected order.
5 Select any option.
6 When printing, specify the number of print sets using the numeric keypad.
Select AllSelects all jobs. To deselect all the jobs, select this button again.
DeleteDeletes the Secure Print job.Note • If jobs with the same Billing ID are all deleted, the Billing ID will be deleted.
Refer to "When [Delete] is Selected" (P.392).
Print QuantitySpecify the number of print sets.
PrintPrints the Secure Print job. After printing, the job is deleted.Refer to "When [Print] is Selected" (P.392).

10 Job Status
392
Job Status
10
When [Delete] is Selected
1 Select [Delete].
DeleteDeletes the job.Important • Once the job is deleted, it cannot be restored.
CancelCancels deleting the job.
When [Print] is Selected
1 Specify how to process the job after printing.
Note • The screen as shown on the right does not appear if [Print Job Confirmation Screen] is set to [Disabled] in the System Administration mode. If [Disabled] is selected, the machine automatically deletes the job after printing without displaying the confirmation screen. For more information, refer to "5 Tools" > "Stored File Settings" > "Print Job Confirmation Screen" in the Administrator Guide.
Print and DeleteStarts printing the job. After printing, the job is deleted.
Print and SaveStarts printing the job. After printing, the job remains undeleted.
CancelCancels printing the job.
Sample Set
The following describes how to print or delete jobs stored with the Sample Set feature.
Before printing multiple sets of a document, you can first print one set for trial, and then print the remaining sets from the machine.For information on how to operate a Sample Set job, refer to the print driver's help.
Note • When [Save as Private Charge Print Job] or [Save as Charge Print Job] is selected in [Receive Control] under [Charge/Private Print Settings], jobs will not be saved in [Sample Set] under [Secure Print Jobs & More] even if you select [Sample Set] on the print driver.
For more information, refer to "5 Tools" > "Authentication/Security Settings" > "Authentication" > "Charge/Private Print Settings" in the Administrator Guide.

Printing and Deleting Stored Jobs
393
Job Status
10
1 Select [Sample Set].
2 Select the user to be checked, and select [Job List]. Note • Select [Refresh] to display the updated
information.
• Select [ ] to return to the previous screen or [ ] to move to the next screen.
• You can enter a user ID in [Go to] using the numeric keypad to display the user ID at the top of the list.
3 Select the job to be printed or deleted.
Note • You can select up to 100 files simultaneously to print or delete the files. If you select multiple files, they are printed in the selected order.
4 Select any option.
When printing, specify the number of print sets using the numeric keypad.
Select AllSelects all jobs. To deselect all the jobs, select this button again.
DeleteDeletes the Sample Set job.Refer to "When [Delete] is Selected" (P.393).
Print QuantitySpecify the number of print sets using the numeric keypad.
PrintPrints the Sample Set job. After printing the remaining sets of the job, the job is deleted.Refer to "When [Print] is Selected" (P.394).
When [Delete] is Selected
1 Select [Delete].
DeleteDeletes the job.Important • Once the job is deleted, it cannot be restored.
CancelCancels deleting the job.

10 Job Status
394
Job Status
10
When [Print] is Selected
1 Select [Yes].
Note • The screen as shown on the right does not appear if [Print Job Confirmation Screen] is set to [Disabled] in the System Administration mode. If [Disabled] is selected, the machine automatically deletes the job after printing without displaying the confirmation screen. For more information, refer to "5 Tools" > "Stored File Settings" > "Print Job Confirmation Screen" in the Administrator Guide.
YesStarts printing the job. After printing, the job is deleted.Note • After a sample set is output, the remaining sets will automatically be output if the machine is not
instructed for the period specified in [Auto Job Release]. To prevent the remaining sets from being output automatically, set [Auto Job Release] to [Off]. For information on how to set [Auto Job Release], refer to "5 Tools" > "Common Service Settings" > "Machine Clock/Timers" > "Auto Job Release" in the Administrator Guide.
NoCancels printing the job.
Delayed Print
This feature allows you to temporarily store print data on the machine to print it at specified time.
Up to 100 jobs can be stored (queued) simultaneously for the Delayed Print feature. If the power is switched off when jobs are in queue (before the specified print time), the jobs whose print time has elapsed will automatically be printed immediately after the power is switched on again.
The following describes how to print or delete jobs stored with the Delayed Print feature.For information on how to operate a Delayed Print job, refer to the print driver's help.
Note • When [Save as Private Charge Print Job] or [Save as Charge Print Job] is selected in [Receive Control] under [Charge/Private Print Settings], jobs will not be saved in [Delayed Print] under [Secure Print Jobs & More] even if you select [Delayed Print] on the print driver. For more information, refer to "5 Tools" > Authentication/Security Settings" > "Authentication" > "Charge/Private Print Settings" in the Administrator Guide.
1 Select [Delayed Print].
2 Select the job to be printed or deleted.
Note • Select [Refresh] to display the updated information.
• Select [ ] to return to the previous screen or [ ] to move to the next screen.
• [Print Time] shows the time to start printing.
3 Select any option.
DeleteDeletes the Delayed Print job.

Printing and Deleting Stored Jobs
395
Job Status
10
Refer to "When [Delete] is Selected" (P.395).
PrintPrints the Delayed Print job. After printing, the job is deleted. If printed manually, the job will not be printed at the specified time.Refer to "When [Print] is Selected" (P.395).
When [Delete] is Selected
1 Select [Delete].
DeleteDeletes the job.Important • Once the job is deleted, it cannot be restored.
CancelCancels deleting the job.
When [Print] is Selected
1 Select [Yes].
Note • The screen as shown on the right does not appear if [Print Job Confirmation Screen] is set to [Disabled] in the System Administration mode. If [Disabled] is selected, the machine automatically deletes the job after printing without displaying the confirmation screen. For more information, refer to "5 Tools" > "Stored File Settings" > "Print Job Confirmation Screen" in the Administrator Guide.
YesStarts printing the job. After printing, the job is deleted.
NoCancels printing the job.
Charge Print
This feature authenticates users on the machine to prevent unauthorized users from operating print jobs. When this feature is enabled, the machine prints only the jobs of authenticated users. You can also configure the machine to store print jobs temporarily, and then print them from the machine’s control panel.
If received print jobs are set to be saved as Charge Print under [Tools] > [Authentication/Security Settings] > [Authentication] > [Charge/Private Print Settings] > [Receive Control],

10 Job Status
396
Job Status
10
the jobs are saved for each Billing ID. Any jobs that were not given a Billing ID on the print driver are saved in [No User ID].For more information on how to register user IDs on the machine, refer to "5 Tools" > "Accounting" > "Create/View User Accounts" in the Administrator Guide.
Note • Unlike the Private Charge Print feature, the Charge Print feature can store jobs without a user ID, such as e-mail printing and print jobs sent from ContentsBridge or CentreWare Internet Services, and can print the jobs after authenticating users.
• [Charge Print] appears when [Save as Charge Print Job] is selected by using one of the following procedures in the System Administration mode:
- Select [Save as Charge Print Job] in [Receive Control].
- Select [According to Print Auditron] in [Receive Control], and then select [Save as Charge Print Job] in [Job Login Failure].
- Select [According to Print Auditron] or [Save as Private Charge Print Job] in [Receive Control], and then select [Save as Charge Print Job] in [Job without User ID].
For information on how to set Charge Print, refer to "5 Tools" > "Authentication/Security Settings" > "Authentication" > "Charge/Private Print Settings" in the Administrator Guide.
The following describes how to print and delete a job stored with the Charge Print feature.
1 Press the <Log In/Out> button on the control panel, or select the login information field on the touch screen.
2 Enter the user ID, and select [Enter].
Note • When the passcode is set, enter the user ID and select [Next]. Then, enter the passcode and select [Enter].
• While a user is authenticated, the <Log In/Out> button lights up on the control panel.
• To log out of the machine, press the <Log In/Out> button on the control panel.
3 Select [Charge Print].
4 Select the user to be checked, and select [Job List]. Note • Select [Refresh] to display the updated
information.
• Select [ ] to return to the previous screen or [ ] to move to the next screen.
• You can enter a user ID in [Go to] using the numeric keypad to display the user ID at the top of the list.
5 Enter the passcode, and select [Confirm].
Note • If the passcode is not set, the passcode entry screen does not appear.

Printing and Deleting Stored Jobs
397
Job Status
10
6 Select the job to be printed or deleted.
7 Select any option.
When printing, specify the number of print sets using the numeric keypad.
DeleteDeletes the Charge Print job.Refer to "When [Delete] is Selected" (P.397).
Print QuantitySpecify the number of print sets using the numeric keypad.
PrintPrints the Charge Print job. After printing, the job is deleted.Refer to "When [Print] is Selected" (P.397).
When [Delete] is Selected
1 Select [Delete].
DeleteDeletes the job.Important • Once the job is deleted, it cannot be restored.
CancelCancels deleting the job.
When [Print] is Selected
1 Specify how to process the job after printing.
Note • The screen as shown on the right does not appear if [Print Job Confirmation Screen] is set to [Disabled] in the System Administration mode. If [Disabled] is selected, the machine automatically deletes the job after printing without displaying the
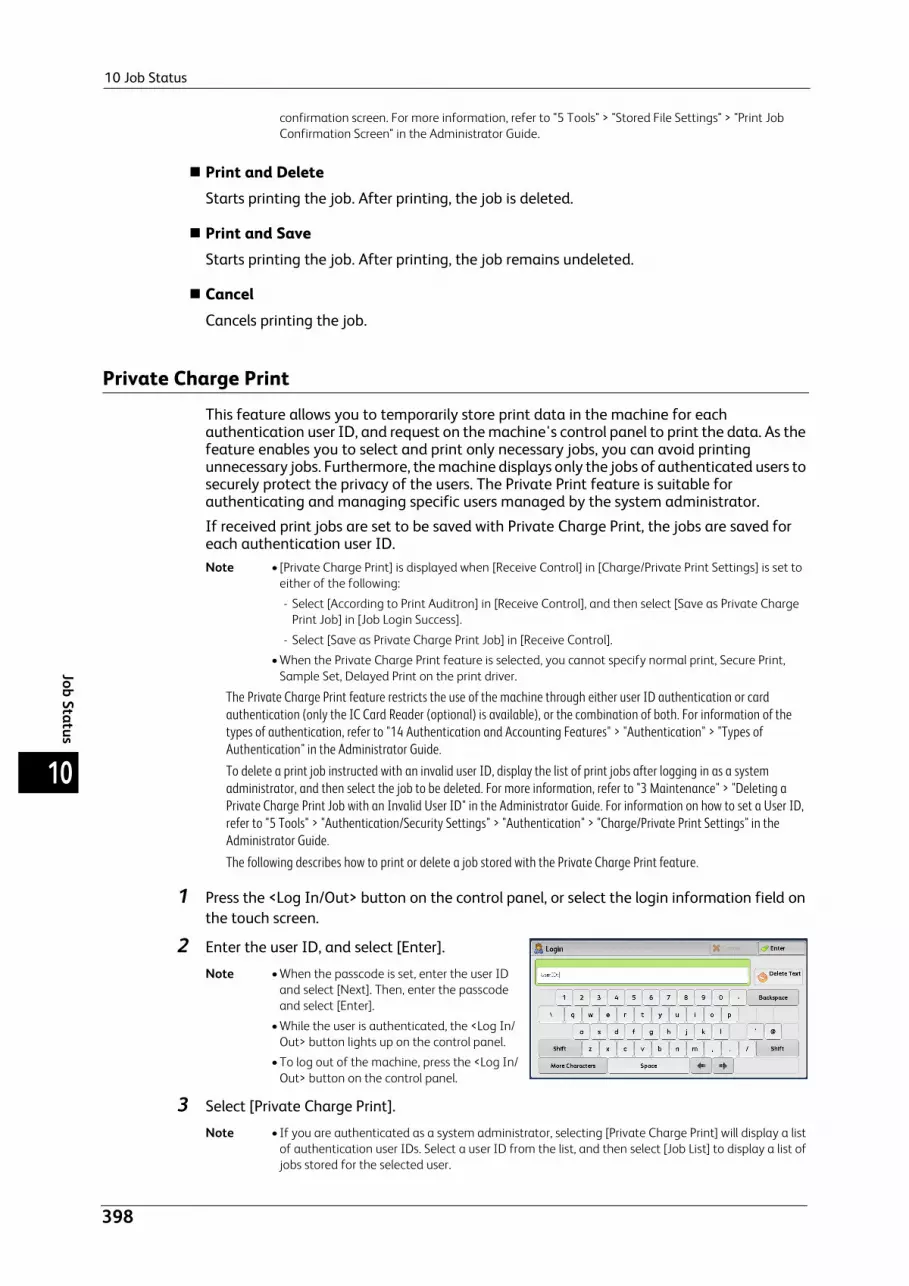
10 Job Status
398
Job Status
10
confirmation screen. For more information, refer to "5 Tools" > "Stored File Settings" > "Print Job Confirmation Screen" in the Administrator Guide.
Print and DeleteStarts printing the job. After printing, the job is deleted.
Print and SaveStarts printing the job. After printing, the job remains undeleted.
CancelCancels printing the job.
Private Charge Print
This feature allows you to temporarily store print data in the machine for each authentication user ID, and request on the machine's control panel to print the data. As the feature enables you to select and print only necessary jobs, you can avoid printing unnecessary jobs. Furthermore, the machine displays only the jobs of authenticated users to securely protect the privacy of the users. The Private Print feature is suitable for authenticating and managing specific users managed by the system administrator.
If received print jobs are set to be saved with Private Charge Print, the jobs are saved for each authentication user ID.Note • [Private Charge Print] is displayed when [Receive Control] in [Charge/Private Print Settings] is set to
either of the following:
- Select [According to Print Auditron] in [Receive Control], and then select [Save as Private Charge Print Job] in [Job Login Success].
- Select [Save as Private Charge Print Job] in [Receive Control].
• When the Private Charge Print feature is selected, you cannot specify normal print, Secure Print, Sample Set, Delayed Print on the print driver.
The Private Charge Print feature restricts the use of the machine through either user ID authentication or card authentication (only the IC Card Reader (optional) is available), or the combination of both. For information of the types of authentication, refer to "14 Authentication and Accounting Features" > "Authentication" > "Types of Authentication" in the Administrator Guide. To delete a print job instructed with an invalid user ID, display the list of print jobs after logging in as a system administrator, and then select the job to be deleted. For more information, refer to "3 Maintenance" > "Deleting a Private Charge Print Job with an Invalid User ID" in the Administrator Guide. For information on how to set a User ID, refer to "5 Tools" > "Authentication/Security Settings" > "Authentication" > "Charge/Private Print Settings" in the Administrator Guide.The following describes how to print or delete a job stored with the Private Charge Print feature.
1 Press the <Log In/Out> button on the control panel, or select the login information field on the touch screen.
2 Enter the user ID, and select [Enter].
Note • When the passcode is set, enter the user ID and select [Next]. Then, enter the passcode and select [Enter].
• While the user is authenticated, the <Log In/Out> button lights up on the control panel.
• To log out of the machine, press the <Log In/Out> button on the control panel.
3 Select [Private Charge Print].
Note • If you are authenticated as a system administrator, selecting [Private Charge Print] will display a list of authentication user IDs. Select a user ID from the list, and then select [Job List] to display a list of jobs stored for the selected user.

Printing and Deleting Stored Jobs
399
Job Status
10
4 Select the job to be printed or deleted.
Note • You can select up to 100 files simultaneously to print or delete the files. If you select multiple files, they are printed in selected order.
5 Select any option.
6 When printing, specify the number of print sets using the numeric keypad.
Select AllSelects all jobs. To deselect all the jobs, select this button again.
DeleteDeletes the Private Charge Print job.Note • If jobs with the same user ID are all deleted, the user ID will be deleted.
Refer to "When [Delete] is Selected" (P.399).
Print QuantitySpecify the number of print sets using the numeric keypad.
PrintPrints the Private Charge Print job. After printing, the job is deleted.Refer to "When [Print] is Selected" (P.400).
When [Delete] is Selected
1 Select [Delete].
DeleteDeletes the job.Important • Once the job is deleted, it cannot be restored.
CancelCancels deleting the job.

10 Job Status
400
Job Status
10
When [Print] is Selected
1 Specify how to process the job after printing.
Note • The screen as shown on the right does not appear if [Print Job Confirmation Screen] is set to [Disabled] in the System Administration mode. If [Disabled] is selected, the machine automatically deletes the job after printing without displaying the confirmation screen. For more information, refer to "5 Tools" > "Stored File Settings" > "Print Job Confirmation Screen" in the Administrator Guide.
Print and DeleteStarts printing the job. After printing, the job is deleted.
Print and SaveStarts printing the job. After printing, the job remains undeleted.
CancelCancels printing the job.
Public Folder
This feature allows you to store data in the machine and send the data by operating on a remote machine.
The following describes how to print or delete a job stored in a public folder.For information on how to operate public folders, refer to "Store for Polling (Storing Files on the Machine that a Remote Machine can Retrieve)" (P.232).
Note • This feature does not appear for some models. An optional component is required. For more information, contact our Customer Support Center.
1 Select [Public Folder].
2 Select the job to be printed or deleted.
Note • Select [Refresh] to display the updated information.
• Select [ ] to return to the previous screen or [ ] to move to the next screen.
3 Select any option.
Select AllSelects all jobs. To deselect all the jobs, select this button again.
DeleteDeletes the selected job stored in the public folder.

Printing and Deleting Stored Jobs
401
Job Status
10
Refer to "When [Delete] is Selected" (P.401).
PrintPrints the selected job stored in the public folder.Refer to "When [Print] is Selected" (P.401).
When [Delete] is Selected
1 Select [Delete].
DeleteDeletes the job.Important • Once the job is deleted, it cannot be restored.
CancelCancels deleting the job.
When [Print] is SelectedStarts printing the job.
Undelivered Faxes
The following describes how to re-send or delete an undelivered fax job. Note • This feature may not appear depending on the settings in the System Administration mode.
This feature does not appear for some models. An optional component is required. For more information, contact our Customer Support Center.
1 Select [Undelivered Faxes].
2 Select the job to be re-sent or deleted.
Note • Select [Refresh] to display the updated information.
• Select [ ] to return to the previous screen or [ ] to move to the next screen.
3 Select any option.To re-send to the previously specified fax number, press the <Start> button.

10 Job Status
402
Job Status
10
Delete This FaxDeletes the undelivered fax job.Refer to "When [Delete This Fax] is Selected" (P.402).
Change RecipientsAllows you to change the fax recipient and re-send the undelivered fax job.Refer to "When [Change Recipients] is Selected" (P.402).
When [Delete This Fax] is Selected
1 Select [Delete].
DeleteDeletes the undelivered fax job.
CancelCancels deleting the undelivered fax job.
When [Change Recipients] is SelectedSpecify a fax recipient for the undelivered fax job.
Besides the fax recipient, the following features can be changed on the control panel:
Important • If the fax recipient has been changed, header information will not be added even if [Transmission Header Text] is set to [Display Header].
For information on how to specify fax recipients, refer to "Step 3 Specifying Destinations" (P.161).
Fax type
Starting Rate
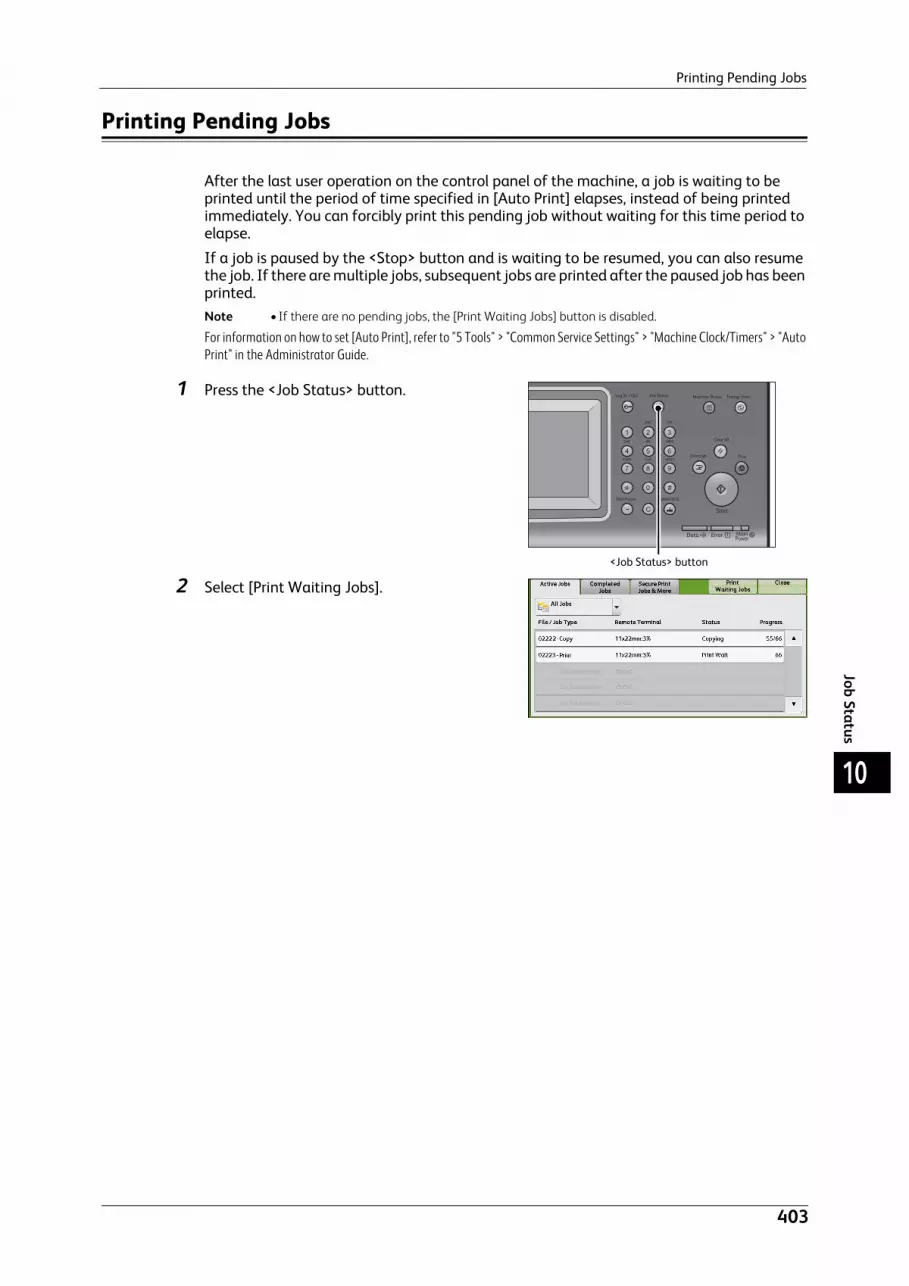
Printing Pending Jobs
403
Job Status
10
Printing Pending Jobs
After the last user operation on the control panel of the machine, a job is waiting to be printed until the period of time specified in [Auto Print] elapses, instead of being printed immediately. You can forcibly print this pending job without waiting for this time period to elapse.
If a job is paused by the <Stop> button and is waiting to be resumed, you can also resume the job. If there are multiple jobs, subsequent jobs are printed after the paused job has been printed.Note • If there are no pending jobs, the [Print Waiting Jobs] button is disabled.
For information on how to set [Auto Print], refer to "5 Tools" > "Common Service Settings" > "Machine Clock/Timers" > "Auto Print" in the Administrator Guide.
1 Press the <Job Status> button.
2 Select [Print Waiting Jobs].
1 2 3
4 5 6
7 8 9
0 #
C
<Job Status> button

10 Job Status
404
Job Status
10
Handling Error Terminations
This section describes how to handle error terminations.
For a Print JobSelect a job shown as an error termination on the [Completed Jobs] tab to check the error code. Follow the instructions of the error code to solve the problem.
If an error occurs during a print job, the machine can be configured either to pause the print job until the error is confirmed by the user, or to automatically cancel the error job so that subsequent jobs can be printed.For more information on the setting, refer to "5 Tools" > "Print Service Settings" in the Administrator Guide.For information on error codes, refer to "15 Problem Solving" > "Error Code" in the Administrator Guide.
For a Fax JobA Transmission Report - Job Undelivered is printed.For more information on the Transmission Report - Job Undelivered, refer to "4 Machine Status" > Machine Information" > "Automatically Printed Reports/Lists" > "Transmission Report - Job Undelivered" in the Administrator Guide. For more information on how to print the Transmission Report - Job Undelivered automatically, refer to "5 Tools" > "Common Service Settings" > "Reports" > "Transmission Report - Job Undelivered" in the Administrator Guide.
For a Scan JobA Transmission Report - Job Undelivered is printed.For more information on the Transmission Report - Job Undelivered, refer to "4 Machine Status" > Machine Information" > "Automatically Printed Reports/Lists" > "Transmission Report - Job Undelivered" in the Administrator Guide. For more information on how to print the Transmission Report - Job Undelivered automatically, refer to "5 Tools" > "Common Service Settings" > "Reports" > "Transmission Report - Job Undelivered" in the Administrator Guide.
For Other JobsPrint a Job History Report, and check the execution results.For information on the Job History Report, refer to "5 Tools" > "Common Service Settings" > "Reports" > "Job History Report" in the Administrator Guide.When an error code is listed in the Transmission Report - Job Undelivered or the Job History Report, refer to "15 Problem Solving" > "Error Code" in the Administrator Guide.

11 Computer Operations
This chapter describes how to print documents, import scanned files, use Direct Fax, and operate CentreWare Internet Services on your computer.Note • Some models do not support the features described in this chapter. An optional component is
required. For more information, contact our Customer Support Center.
• The computer screen images shown in this chapter are as of September 2011.
• The procedures in this chapter may vary depending on the driver and utility software being used due to the upgrades.
Features Overview......................................................................................................................406
Print ..................................................................................................................................................407
E-mail Printing..............................................................................................................................410
Sending Fax ..................................................................................................................................412
Importing Scanned Data.........................................................................................................415
CentreWare Internet Services ...............................................................................................423

11 Computer Operations
406
Computer O
perations11
Features Overview
This section describes an overview of features you can perform from a computer.
PrintingSubmits a print job to the machine from a computer.For more information, refer to "Print" (P.407).
E-mail PrintingSubmits a print job to the machine from a computer by sending e-mail attached with a document. The received e-mail is automatically printed from the machine according to the settings on the machine.For more information, refer to "E-mail Printing" (P.410).
Sending FaxSends a fax directly from a computer.For more information, refer to "Sending Fax" (P.412).
Importing Scanned DataImports files stored in a folder of the machine to a computer.For more information, refer to "Importing Scanned Data" (P.415).
CentreWare Internet ServicesDisplays the machine status and job status. The feature also allows you to change settings as well as to import files stored in a folder.For more information, refer to "CentreWare Internet Services" (P.423).For information on how to import scanned data stored in a folder, refer to "Importing Using CentreWare Internet Services" (P.419).

407
Computer O
perations
11
This section describes how to print with the machine by operating on a computer.
Print Features
The main print features of the machine are as follows:
Printing Using a Print DriverFor more information on print features, click [Help] on the print driver screen to view the print driver's help. For information on printing, refer to "Printing" (P.409).
Note • Some features become available after you make option settings on the [Options] tab. The unavailable features are grayed out.
Pages Per Sheet (N-UP)Prints multiple pages onto one sheet of paper.
2-Sided PrintPrints data on both sides of paper.
PosterSplits one page of print data into multiple sheets of paper and enlarges the printed image to fit the size of each sheet. Used to create large posters.
Booklet CreationPerforms 2-sided printing and page allocation for printing a booklet in the correct page order.
WatermarkPrints preset text, such as "Confidential", over the print data.
Secure PrintTemporarily stores the print data on the machine, to print it with the print command from the machine. This feature allows you to set a passcode, which is helpful to print confidential documents.For information on how to print a Secure Print job, refer to "Secure Print" (P.390).
Sample SetBefore printing multiple sets of a document, you can first print one set for trial, and then print the remaining sets from the machine.For information on how to print a Sample Set job, refer to "Sample Set" (P.392).
Delayed PrintTemporarily stores the print data on the machine to print it at specified time.For information on how to print a Delayed Print job, refer to "Delayed Print" (P.394).
Store in Remote FolderTemporarily stores the print data in a registered folder, to print the data with the print command from the machine.Important • The print result of the Store in Remote Folder feature may be inferior to the other print results in
quality.

11 Computer Operations
408
Computer O
perations11
For information on how to print files in a folder, refer to "Printing Files in a Folder" (P.345).
Universal Emphasis PrintDetects the original document to find the text in red, then apply shaded or underlined style for printing.Note • This feature enables the people with color vision deficiency to enhance the readability of the color
documents. The Color Universal Design Organization (CUDO) gave its design certification to this feature.
Direct PrintingAllows you to directly send TIFF, PDF, JPEG, XPS, XDW (DocuWorks), or XBD (DocuWorks binder) format files from a computer to the machine without using a print driver.For information on Direct Printing, refer to "Print" > "Job Submission" in the help of CentreWare Internet Services.
Important • To display the help for CentreWare Internet Services, users need to have the environment to connect to the Internet. The communication fee shall be borne by the users.
E-mail PrintingAllows you to send e-mail with the TIFF, PDF, JPEG (JFIF), XPS, XDW (DocuWorks), or XBD (DocuWorks binder) format documents attached from a computer to the machine. The received e-mail is automatically printed from the machine.Note • If the Authentication feature is enabled, received e-mails are not printed automatically.
For information on how to use E-mail Printing, refer to "E-mail Printing" (P.410).
Print Features Using Authentication Information
Charge PrintThis feature authenticates users on the machine to prevent unauthorized users from operating print jobs. When this feature is enabled, the machine prints only the jobs of authenticated users. The machine can also be configured to store multiple print jobs temporarily until the user requests to print them on the control panel.
In addition, by registering an authentication user ID and passcode on the machine in advance, only the registered user can print the jobs.Note • To prohibit other users from operating jobs, register a passcode for your Billing ID on the print driver.
For information on how to set Charge Print, refer to "5 Tools" > "Authentication/Security Settings" > "Authentication" > "Charge/Private Print Settings" in the Administrator Guide. For information on how to print a Charge Print job, refer to "Charge Print" (P.395).
Private Charge PrintThis feature allows you to temporarily store print data in the machine for each authentication user ID, and request on the machine's control panel to print the data. As the feature enables you to select and print only necessary jobs, you can avoid printing unnecessary jobs. Furthermore, the machine displays only the jobs of authenticated users to securely protect the privacy of the users. This feature is suitable for authenticating and managing specific users managed by the system administrator.Note • If you do not want to store unnecessary jobs, you can configure the machine to store only the jobs
whose authentication succeeded.
For information on how to set Private Charge Print, refer to "5 Tools" > "Authentication/Security Settings" > "Authentication" > "Charge/Private Print Settings" in the Administrator Guide. For information on how to print a Private Charge Print job, refer to "Private Charge Print" (P.398).

409
Computer O
perations
11
Setup
To print from your computer, your computer must have a print driver installed.For information on how to install the print driver, refer to the manual included in the Driver CD Kit.
Note • When printing using authentication information, you must configure the printer settings on your computer. Make the necessary settings on the [Configuration] tab of the printer’s properties. For more information, refer to the print driver's help.
Printing
This following describes how to print documents.
The printing procedure depends on the application software you use. For more information, refer to the documentation provided with the application.For more information on print features, click [Help] on the print driver screen to view the print driver's help.
1 Select [Print] from the [File] menu on the application.
2 Confirm [Printer Name] and click [Properties] if necessary.
3 Set the properties if necessary.
Note • You can change the print feature in [Job Type].
4 Click [OK].
5 Click [OK] in the [Print] dialog box.
Note • If the document monitor is installed and set to monitor the machine, the notification screen is displayed when printing has been completed. The document monitor is available in the CD-ROM of the Driver CD Kit. For information how to install the document monitor, refer to the manual included in the Driver CD Kit.
• The environment-friendliness level is indicated with leaves on the notification screen. This information is provided only when [Normal Print] or [Sample Print] is selected in [Job Type].

11 Computer Operations
410
Computer O
perations11
E-mail Printing
You can send e-mail with documents attached from a computer to the machine. The received e-mail is automatically printed from the machine according to the settings on the machine. This feature is called "E-mail Printing".Note • If the Authentication feature is enabled, received e-mails are not printed automatically.
• The following file formats can be used: TIFF, PDF, JPEG (JFIF), and XPS.
Setup
To use the E-mail Printing feature, the following settings are required. Check with your system administrator or network administrator whether these settings have been completed.
E-mail Account RegistrationRegistering an e-mail account in advance.
Configuration on the MachineConfiguring the required settings on the machine.For information on E-mail Environment Settings, refer to "8 E-mail Environment Settings" in the Administrator Guide.
Receiving E-Mail
The following describes how to receive e-mails from Outlook Express on a computer as an example.
1 Use your e-mail software to create an e-mail body, and then attach a document to the e-mail if necessary.Important • Only plain text is available for the e-mail body. Change the body text format to plain text on your e-
mail application.
• Any forwarded e-mail (that is attached to another e-mail) cannot be printed.
Note • If the extension of the attached file is other than ".tif", ".tiff", ".pdf", ".jpeg", ".jpg", ".jpe", ".jfif", ".xps", ".xdw", and ".xbd", the file may not be printed correctly.
• Up to 31 documents can be attached.
2 Enter the machine's e-mail address as a recipient.
E-mail Printing
411
Computer O
perations
11
3 Send the e-mail.
Note • The machine prints the e-mail body and the attached documents according to the following settings. The offset output setting is disabled in all cases.
- E-mail body: Default values of the PCL print driver for this machine which is installed on the computer
- TIFF or JPEG formatted attached file: Default values of the logical printer set in [Memory Settings] of [TIFF/JPEG] in [Language Emulations] of CentreWare Internet Services
- PDF formatted attached file: Settings of PDF Direct Print when [Print Processing Mode] is set to [PDF Bridge] in PDF Direct Print. Default values of the logical printer configured under [Language Emulations] > [PostScript] > [Logical Printer Number] in CentreWare Internet Services when [Print Processing Mode] is set to [PS] in PDF Direct Print.

11 Computer Operations
412
Computer O
perations11
Sending Fax
This section describes how to send a fax using the Direct Fax feature. The following procedure uses Windows XP WordPad as an example.
The Direct Fax procedure depends on the application you use. For more information, refer to the documentation provided with the application.For more information on the Direct Fax feature, click [Help] on the print driver screen to view the print driver's help.
Important • The Direct Fax feature is not available when the Server Fax service is enabled.
Note • This feature does not appear for some models. To use the feature, an optional component is required. For more information, contact our Customer Support Center.
1 Select [Print] from the [File] menu on the application.
2 Select a fax printer from [Printer Name].
3 Click [Properties], and select [Fax] in [Job Type].
4 Click [OK].
5 Click [OK] in the [Print] dialog box.
6 Specify a destination in the [Fax Recipient] dialog box.Note • If a problem occurs, an error message
appears on the touch screen. Solve the problem according to the message.
7 Click [OK].The [Fax Job Confirmation] dialog box appears after you have sent a fax job. A list of recipients to whom the fax job is being sent will be displayed.
Registering Destinations
The following describes how to register fax destinations from the machine to another machine (DocuCentre-IV C2265/C2263) in a single operation through a computer.
You can use the same procedure to register fax destinations from another machine (DocuCentre-IV C2265/C2263) to this machine.
Use CentreWare Internet Services to register fax destinations.For information on CentreWare Internet Services, refer to "6 CentreWare Internet Services Settings" > "Configuring Machine Settings Using CentreWare Internet Services" in the Administrator Guide.You can register fax destinations separately on the control panel. For more information, refer to "5 Tools" > "Setup" > "Add Address Book Entry" in the Administrator Guide.
Important • Because CentreWare Internet Services is accessible by multiple users simultaneously, the registered data will have a risk to be overwritten if a system administrator ID and passcode are not set. We recommend that data edit is permitted only by a system administrator with a passcode.
• Be sure not to perform this operation simultaneously with the address number registration from the control panel.
• If a number is duplicated, the existing number will be overwritten by the new one.
• A file in CSV format exported by CentreWare Internet Services (address book data) is not designed to be edited or changed by editing software. Such a file cannot be imported into the machine. Therefore, do not edit or change the file in CSV format (address book data) with software such as Microsoft® Excel.

Sending Fax
413
Computer O
perations
11
Note • Using CentreWare Internet Services, you can import a CSV format file which is created by other than the machine to the Address Book of the machine. For more information, refer to the help of CentreWare Internet Services.
This feature is not available depending on the version of the CSV format file or the model of the machine.
• Using CentreWare Internet Services, you can download a blank form of the Address Book (CSV format file) to a computer. After completing the form on a computer, batch registration of it (a CSV format file) on the machine is available via CentreWare Internet Services. For more information, refer to the help of CentreWare Internet Services
Important • To display the help for CentreWare Internet Services, users need to have the environment to connect to the Internet. The communication fee shall be borne by the users.
1 Start up the computer, and a web browser.
2 Enter the machine's IP address or Internet address in the browser address field, and press the <Enter> key.Note • If your network uses DNS (Domain Name System) and the machine's host name is registered in the
domain name server, you can access the machine using the URL with the combination of the host name and the domain name. For example, if the host name is "myhost", and the domain name is "example.com", then the URL is "myhost.example.com".
• Ask your system administrator for the IP address or Internet address.
• When specifying a port number, add ":" and the port number after the address. The default port number is "80".
• When the Authentication feature is enabled on the machine, enter a user ID and passcode in the [User Name] and [Password] fields respectively. Ask your system administrator for the user ID and passcode.
• If communications are encrypted, you must specify an address that starts with "https" instead of "http" to access CentreWare Internet Services.
3 Click the [Properties] tab, and select [Services] > [E-mail] > [Public Address Book] in the left frame on the screen.
4 Click [Export] in [Data Export (Export Public Address Book)].
5 Click [Save] in the Security Warning dialog box.
6 Specify the destination to save the file in.
7 Enter the IP address or Internet address of another machine (DocuCentre-IV C2265/C2263) in the browser address field, and press the <Enter> key.
8 Click the [Properties] tab, and select [Public Address Book] in the left frame on the screen.
Note • [Data Import (Import Public Address Book)] on the [Properties] tab is not available for the Address Book data created based on a CSV file which is downloaded from the [Export Template with Column Headings only] or [Download Template] on the [Address Book] tab. For the Address Book data, perform [Import] on the [Address Book] tab.
9 Click [Browse] in [Data Import (Import Public Address Book)] to specify the file saved in step 6.

11 Computer Operations
414
Computer O
perations11
10 Click [Import].

Importing Scanned Data
415
Computer O
perations
11
Importing Scanned Data
This section describes how to import files from a machine's folder to your computer. The following four methods are available.
Importing to a TWAIN Compatible Application ..................................................................................................................415Importing Using Stored File Manager 3.................................................................................................................................417Importing Using CentreWare Internet Services ...................................................................................................................419Importing Using EasyOperator.................................................................................................................................................421
Importing to a TWAIN Compatible Application
The following describes how to import files from a machine's folder to application software.
Network Scanner Driver is used to import stored files.
Network Scanner Driver is software that allows a client-side application to import stored files (scan data) from a machine's folder via a network.
To use Network Scanner Driver, you must have Network Scanner Utility 3 installed on your computer.Note • Install Network Scanner Utility 3 from the Driver CD Kit.
To import files stored in a folder, prior settings are required, such as enabling ports. For more information, refer to "9 Scanner Environment Settings" > "Configuration of Store to Folder" in the Administrator Guide. For information on the operation of the application, refer to the documentation provided with the application.For information on how to install Network Scanner Driver, refer to the manual included in the Driver CD Kit.To learn about fields in the displayed dialog box, click [Help] to view the Network Scanner Driver's help.
1 Launch application software to which files are imported.
Important • The application must support TWAIN. TWAIN is a standard for scanners and other input devices.
Note • For notes and restrictions on the use of application software, refer to the "Readme" included in Network Scanner Utility 3.
2 From the [File] menu, select the command for selecting the scanner (source).
3 Select [FX Network Scanner 3 TWAIN], and click [Select].
4 From the [File] menu, select the command for importing the image from the scanner.
5 From the displayed list, click the scanner name of the machine, and click [Next].Note • If no scanners are shown in the list, click [Search
Again]. The application searches for scanners.
• To change the display of scanner names, use the dialog box that appears by clicking [Search/Display Settings]. For more information, refer to "Changing the display of scanner names" (P.416).
• Only scanners on the network are automatically listed. To view a scanner on another network, click [Search/Display Settings], and register the IP Address and scanner name. For information on how to register a scanner, refer to "Changing the display of scanner names" (P.416).

11 Computer Operations
416
Computer O
perations11
6 In the [Folder Number] field, enter the number of the folder (001 - 200) that contains the file to be imported. In the [Passcode] field, enter a passcode (up to 20 digits).Note • You can also select a folder number from
[Registered Folders].
Clicking [Select Scanner] returns to step 5, where you can reselect a scanner.
7 Click [Confirm].
8 Select a file to be imported from the list, and click [Import].Note • You can select multiple files.
• [Import], [Refresh], and [Delete] are available from the menu that appears when you right-click on the list.
When the import starts, the scan data is forwarded from the folder to the computer.
After being forwarded, the data is loaded onto the application software and is deleted from the folder.Note • An icon is displayed next to a file that is scanned in pages and whose forwarding operation has not
been completed.
• For most applications except DocuWorks, Network Scanner Driver expands the compressed data and transfers the data to the applications in BMP format. For DocuWorks, on the other hand, Network Scanner Driver transfers the data without data expansion processing. For this reason, it does not take much time for data transfer.
• The machine can be configured not to delete files from a folder after forwarding them. For information on the setting, refer to "5 Tools" > "Setup" > "Create Folder" in the Administrator Guide.
Changing Network Scanner Driver SettingsTo learn about fields in the displayed dialog box, click [Help] to view the Network Scanner Driver's help.
Changing the display of scanner namesYou can change the display of scanner names listed.
To change the display of scanner names, use the dialog box that appears by clicking [Search/Display Settings] in the scanner selection dialog box.
Under [Scanner Name Display], you can change the method in which scanner names are displayed in [Scanner for Searching].
Specify scanners to search for under [Search Target Settings].Note • If you click [Add] and then register a scanner,
you can display scanners from other networks.

Importing Scanned Data
417
Computer O
perations
11
Import method for scanned filesYou can change the display and the import settings for files scanned from a folder.
To change the import method, click [Import Settings] from [File] menu in the file selection dialog box, and configure the settings in the dialog box that appears.
Importing Using Stored File Manager 3
The following describes how to use Stored File Manager 3 to import files from a machine's folder.
Stored File Manager 3 is software to import files from a machine's folder to a computer without using any client-side application.
To use Stored File Manager 3, your computer must have Network Scanner Utility 3 installed.Note • Install Network Scanner Utility 3 from the Driver CD Kit.
To import files stored in a folder, prior settings are required, such as enabling ports. For more information, refer to "9 Scanner Environment Settings" > "Configuration of Store to Folder" in the Administrator Guide. For information on the operation of the application, refer to the documentation provided with the application.For information on how to install Stored File Manager 3, refer to the manual included in the Driver CD Kit.To learn about fields in the displayed dialog box, click [Help] to view the Stored File Manager 3 help.
1 Click [Start] and select [Programs] > [Fuji Xerox] > [Network Scanner Utility 3] > [Stored File Manager 3].Note • If you used another directory for installation, specify the directory instead.
2 From the displayed list, click the scanner name of the machine, and click [Next].Note • If no scanners are shown in the list, click [Search
Again]. The application searches for scanners.
• To change the display of scanner names, use the dialog box that appears by clicking [Search/Display Settings]. For more information, refer to "Changing the display of scanner names" (P.418).
• Only when the machine is connected to the network, the scanner name is automatically listed. To view the machine connected to another network, click [Search/Display Settings] and register the IP address and scanner name. For information on how to change the settings, refer to "Changing the display of scanner names" (P.418).
3 In the [Folder Number] field, enter the number of the folder (001 - 200) that contains the file to be imported. In the [Passcode] field, enter a passcode (up to 20 digits).Note • You can also select a folder number from
[Registered Folders].
• Clicking [Select Scanner] returns to step 2, where you can reselect a scanner.
4 Click [Confirm].

11 Computer Operations
418
Computer O
perations11
5 Select a file to be imported from the list, and click [Import].Note • You can select multiple files.
• When [File Saving Options] is set to [Set Destination for Each File] under the import settings, a dialog box for specifying a save destination is displayed. When the dialog box appears, specify a save destination, and click [OK].For information on the import settings, refer to "Import settings for scanned files" (P.419).
6 The file is imported to the specified directory.
Note • When [File Saving Options] is set to [Save in Fixed Destination] under the import settings, a file is saved in the specified directory.For information on the import settings, refer to "Import settings for scanned files" (P.419).
Changing Stored File Manager 3 SettingsTo learn about fields in the displayed dialog box, click [Help] to view the Stored File Manager 3 help.
Changing the display of scanner namesYou can change the display of scanner names listed.
To change the display of scanner names, use the dialog box that appears by clicking [Search/Display Settings] in the scanner selection dialog box.
Under [Scanner Name Display], you can change the method in which scanner names are displayed in [Scanner for Searching].
Specify scanners to search for under [Search Target Settings].Note • If you click [Add] and then register a scanner,
you can display scanners from other networks.

Importing Scanned Data
419
Computer O
perations
11
Import settings for scanned filesYou can change the display and the import settings for files scanned from a folder.
To change the import method, click [Details] from [File] menu in the file selection dialog box, and configure the settings in the dialog box that appears.
Importing Using CentreWare Internet Services
This following describes how to import files stored in a machine's folder using CentreWare Internet Services.
When the machine is installed in a TCP/IP environment, CentreWare Internet Services allows you to import files stored in a machine's folder by accessing the machine from a computer via a web browser. You can also use a Macintosh computer to import files via a web browser.Note • You can retrieve scanned data in DocuWorks or PDF format, but cannot encrypt the DocuWorks or
PDF files and cannot attach a signature to the files when retrieving them.
For information on an overview of CentreWare Internet Services, refer to "CentreWare Internet Services" (P.423).For more information on this operation, click [Help] in the top frame to view the help.
Important • To display the help for CentreWare Internet Services, users need to have the environment to connect to the Internet. The communication fee shall be borne by the users.
1 Start up the computer, and a web browser.
2 Enter the machine's IP address or Internet address in the browser address field, and press the <Enter> key.Note • If your network uses DNS (Domain Name System) and the machine's host name is registered in the
domain name server, you can access the machine using the Internet address with the combination of the host name and the domain name. For example, if the host name is "myhost", and the domain name is "example.com", then the Internet address is "myhost.example.com".
• Ask your system administrator for the IP address or Internet address.
• When specifying a port number, add ":" and the port number after the IP address or the Internet address.
• If the authentication feature is enabled on the machine, enter a user ID and passcode in the [User Name] and [Password] fields. Ask your system administrator for the user ID and passcode.

11 Computer Operations
420
Computer O
perations11
• If communications are encrypted, you must specify an address that starts with "https" instead of "http" to access CentreWare Internet Services.
3 Select [Folder] on the [Scan] tab.
4 Click [File List] of the folder that contains the files to be imported.
Note • If a passcode is set, enter the passcode in the [Passcode] field (up to 20 digits).
5 Place a check mark next to each file to be imported, set the necessary items, and then click [Retrieve].Note • When you import files in
PDF format from a folder, they cannot be optimized for web view.
6 Click a file name and save a link.

Importing Scanned Data
421
Computer O
perations
11
7 Click [Save].
Importing Using EasyOperator
When you use Fuji Xerox applications such as EasyOperator, you can import files stored in a machine’s folder to your computer without using Network Scanner Driver.
The files in a folder can also be listed or displayed in thumbnail view.To import files stored in a folder, prior settings are required, such as enabling ports. For more information, refer to "9 Scanner Environment Settings" > "Configuration of Store to Folder" in the Administrator Guide. For information on the operation of the application, refer to the documentation provided with the application.
The following describes how to import files stored in a machine’s folder by using EasyOperator as an example.
1 Click the [Start] menu, and select [Programs] > [Fuji Xerox] > [CentreWare EasyOperator] > [EasyOperator].Note • If you used another directory for installation, specify the directory instead.
2 In the left frame of the window displayed, add a machine’s folder to [Mailbox].
Add the folder in which files to be imported are stored. For more information on how to add a folder, refer to the EasyOperator’s help.
3 Select [Refresh] from the [View] menu.
4 Click [+] to the left of [Folder] to display the added folder.When you select the added folder, the file will be displayed in the right frame.
5 Select [Show Thumbnail] in the [View] menu to display the file in thumbnail view.

11 Computer Operations
422
Computer O
perations11
6 Check the thumbnails of the file to be retrieved, and select the file.
7 Select [Retrieve] from the [Tools] menu.
8 Select a save destination in the [Browse For Folder] dialog box, and click [OK].

CentreWare Internet Services
423
Computer O
perations
11
CentreWare Internet Services
CentreWare Internet Services requires a TCP/IP environment, and enables you to view the status of the machine and its jobs, as well as change settings via a web browser. You can also import files stored in a folder.For information on how to import files, refer to "Importing Using CentreWare Internet Services" (P.419).For information on the settings of CentreWare Internet Services, refer to "6 CentreWare Internet Services Settings" in the Administrator Guide.
CentreWare Internet Services ScreenThe [CentreWare Internet Services] screen consists of five frames (divided windows). The information displayed in each frame depends on the feature selected: [Status], [Jobs], [Print], [Scan], [Address Book], [Properties], or [Support].Note • Clicking [Help] in the top frame displays the help for CentreWare Internet Services.
Important • To display the help for CentreWare Internet Services, users need to have the environment to connect to the Internet. The communication fee shall be borne by the users.
Top FrameDisplayed at the top of the window. This frame includes the machine model name, a link to the help, user information, and tabs (links) leading to each feature.For information on each feature provided by CentreWare Internet Services, click [Help] in this frame to view the help.
Important • To display the help for CentreWare Internet Services, users need to have the environment to connect to the Internet. The communication fee shall be borne by the users.
Upper Left Frame/Upper Right FrameInformation appearing in the upper left and upper right frames changes depending on the feature. Selecting a feature displays its available features and information in these frames.
Lower Left FrameDisplays the machine information and status, and the [Refresh] button. Clicking [Refresh] updates the information.
Lower Right FrameClicking the logo opens the Fuji Xerox home page.
Top frame
Upper left frame
Lower left frame
Lower right frame
Upper right frame

11 Computer Operations
424
Computer O
perations11
Main features of CentreWare Internet Services are listed below.
Note • Some field settings take effect after a reboot (after switching the power off and then on again, or after changing the System Settings from the control panel).
• If a setting is changed by CentreWare Internet Services during operation on the control panel, the updated information does not appear on the control panel. In that case, switch the power off and then on again.
• To change the settings of items set by the system administrator, you need to enter the user ID and passcode. Ask your system administrator for the user ID and passcode.
BrowserCentreWare Internet Services supports the following browsers:
For Windows 7
Microsoft Internet Explorer 8.0
For Windows Vista
Microsoft Internet Explorer 7.0
For Windows XP
Mozilla Firefox 3.0
Tab Name Main Features
Status Displaying the machine statusDisplaying the status of the paper trays, output trays, and consumables such as toner cartridges.Usage CountersDisplays the total number of pages used for each feature and cumulative numbers.Total RuntimeDisplays [Output Device Runtime], [Scanner Runtime], [Standby Time], [Low Power Time], [Sleep Time], [Warm-up Time], and [Power Off Time] by minutes.
Jobs Listing active jobs and allowing you to delete the jobs, and displaying completed jobs and error information
Print Job Submission Allows you to specify and print a file stored on your computer.
Scan Job TemplatesAllows you to create, edit, copy, and delete job templates.FolderAllows you to create and set folders. You can also import files in a folder and print the files.Job flow sheets Allows you to create, edit, and delete job flow sheets.
Address Book Allows you to add, edit, and delete recipients in the Address Book.Address BookAllows you to view a list of the Address Book, delete the Address Book data, and restrict users to access to the Address Book.CSV fileAllows you to import a CSV file which is created by other than the machine, and download the sample CSV file and a blank CSV file.
Properties Displaying and setting the items such as Machine configuration, Interface, and Emulation settings.
Support Displaying support information

CentreWare Internet Services
425
Computer O
perations
11
Microsoft Internet Explorer 6.0 Service Pack 3
For Mac OS X 10.6
Safari 4
Mozilla Firefox 3.0
For Mac OS X 10.5
Mozilla Firefox 3.0
For Mac OS X 10.4
Mozilla Firefox 3.0
Safari 1.3
For Mac OS X 10.3.9
Mozilla Firefox 3.0
Browser SettingsBefore using this service, ensure the following settings on your browser.
The following describes the setting procedure for Internet Explorer 6.0 Service Pack 3.
1 Select [Internet Options] from the [Tools] menu.
2 On the [General] tab, click [Settings] for [Temporary Internet Files].
3 In the [Settings] dialog box, select [Every visit to the page] or [Every time you start Internet Explorer] for [Check for newer versions of stored pages:].
4 Click [OK].
Proxy Server and Port NumberThe following describes proxy server settings and a port number required for this service.
Proxy ServerWe recommend that you access this service directly, not through a proxy server.Note • If using a proxy server, specifying the machine's IP address in the browser results in slower
responses, and could prevent some screens from appearing. In this case, set the machine's IP address on the browser not to use a proxy server. For information on the setting instructions, refer to the documentation provided with your browser.
Port NumberThe default port number of this service is "80". The port number can be changed in [Properties] > [Connectivity] > [Protocols] > [HTTP]. Usable ports are "1" to "65535".
If you set the port to a number other than 80, you must add ":" and the port number after the IP address or the Internet address when entering the address into your browser.
For example, if the port number is 8080, the URL is:
or
You can check the port number in a Configuration Report. For information on the Configuration Report, refer to "4 Machine Status" > "Machine Information" > "Print Reports" in the Administrator Guide.
http://[the machine's IP address]:8080/
http://[the machine's Internet address]:8080/

11 Computer Operations
426
Computer O
perations11
Note • If communications are encrypted, you must specify an address that starts with "https" instead of "http" to access CentreWare Internet Services.
Starting CentreWare Internet ServicesTo use this service, perform the following procedure on your computer.
1 Start up the computer, and a web browser.
2 Enter the machine's IP address or Internet address in the browser address field, and press the <Enter> key.Note • If your network uses DNS (Domain Name System) and the machine's host name is registered in the
domain name server, you can access the machine using the URL with the combination of the host name and the domain name. For example, if the host name is "myhost", and the domain name is "example.com", then the Internet address is "myhost.example.com".
• Ask your system administrator for the IP address or Internet address.
• When specifying a port number, add ":" and the port number after the IP address or the Internet address.
• If the Authentication feature is enabled on the machine, enter a user ID and passcode in the [User Name] and [Password] fields. Ask your system administrator for the user ID and passcode.
• If communications are encrypted, you must specify an address that starts with "https" instead of "http" to access CentreWare Internet Services.
• If authentication of the system administrator fails, the following message is displayed in the right frame of web browser:"Login failed."
• If the number of times that authentication fails exceeds the specified number, the following message is displayed in the right frame of web browser:"Switch the machine Off and then On for System Administrator login."

12 Appendix
This chapter contains a glossary of terms used in this guide.
Glossary ..........................................................................................................................................428

12 Appendix
428
Appendix
12
Glossary
Term Description
A3 420 x 297 mm paper
A4 297 x 210 mm paper
A5 210 x 148 mm paper
Alias An alternative name of the machine's e-mail address.For example, when the e-mail address for the machine is [email protected], you can use [email protected] (alias) to reach the same location.
Auto Center A feature that automatically moves an image to the center of paper when copying.
Auto Clear A feature that automatically returns the touch screen to its default display when the machine is inactive for a certain period of time.
Auto Select Based on the document loaded and the magnification selected, the machine automatically selects an appropriate paper size.
Auto Tray Switching When paper runs out during copying or printing, another tray of identical paper size and orientation automatically begins supplying paper.
B4 364 x 257 mm paper
B5 257 x 182 mm paper
Binding Shift When creating a booklet, this feature adds margins to the center binding area of documents.
Book Scanning A feature that copies the left and right pages of an unfolded document onto two separate sheets of paper.
Border Limit(Page split threshold value)
One more sheet is used when the length of the transmitted document exceeds the length of paper installed on the receiving terminal. A margin at the bottom of a received document can be eliminated so that the data can be printed on one page.The amount of space that can be removed from the bottom of a document is the border limit. When the border limit value is small, the data is printed on the next page. But when it is large, a larger space can be cut so that data can be printed on one page.
Calibration This refers to smoothness of colors. Calibration levels are shown in gradation steps. The greater the step, the smoother the color will be.
CMS An abbreviation of Color Management System. It corrects device-dependent color differences to match the colors printed on your output with the colors displayed on your screen.
Collate A feature where each copy set is delivered in the same order the documents were copied.
Communication(s) A communications network that can offer voice data (telephone), image data (fax), video data (videotext) and PC data (PC communication service) over the same channel.In this guide, it is mostly referred to as transmitting/receiving images as well as speaking with a remote user.
CSV File CSV (Comma Separated Values) is a file format that is often used for saving data by spreadsheets and database programs.

Glossary
429
Appendix
12
Cut Paper Standard paper sizes, such as A4 and B5.
Default Screen A screen displayed on the touch screen immediately after switching the power on, or pressing the <Clear All> button. The screen is also displayed when the Auto Clear feature is used.
Default Value A factory default value, or a value set in the System Administration mode.
Dial In this guide, it refers to entering a recipient's fax number.The method of dialing provided by the machine include: manual dialing using the numeric keypad, speed dialing, one touch dialing, and using the address book, etc.
Dial Tone A tone generated from the telephone line. It indicates that you are connected to the line.
Dial Type The dial type of connected line. The machine offers two dial types: Tone (push circuit) and 10PPS (dial circuit / 10PPS).
Direct Internet Fax Allows you to send e-mail directly to the Internet Fax-compatible machines without going through the SMTP server, while Internet Fax uses the SMTP server to send e-mail.
Document Image An image of a document scanned by the machine.
DPI An abbreviation of Dots Per Inch. A unit used to describe printing resolution in terms of the number of dots printed in one inch. Used as a unit to describe resolution.
ECM An abbreviation of Error Correction Mode.A type of G3 transmission. ECM transmission sends the document image data in segments and retransmits segments that the remote machine receives incorrectly."ECM" described on the Activity Report shows that the communication was processed using ECM.
Edge Erase A feature that erases the top/bottom, left/right or center edge of a document image when copying.
Emulation This refers to operating the printer to achieve the same print results as when printing with other manufacturers' printers. This mode is called the Emulation Mode.
Energy Saver Feature A feature that switches the machine status to standby after a period of inactivity.The following energy saver features can be set for the machine.
Low Power Mode:The power to the fusing unit and motor is lowered when the machine is left unused for a fixed amount of time. The touch screen goes out, and the <Energy Saver> button lights up.Sleep Mode:Most of the units in the machine are in standby status. The machine consumes the least power.
Error Code A code is displayed on the touch screen or a report when a problem occurs.
Term Description

12 Appendix
430
Appendix
12
F Code A transmission method defined by Communications and Information Network Association of Japan (CIAJ) for use of T.30* sub-addresses standardized by ITU-T. Between the machines with the F Code feature, including those manufactured by other companies, various features making use of F Code can be used. (*: Communication standard)With IP Fax (SIP) communication and the Internet Fax feature of the machine, you can use F Code to forward fax documents received in folders by e-mail.
F4800 This refers to communicating with a remote terminal outside the country.It is also one of the Transmission Mode selections that reduces transmission speed to enable reliable communications even under poor line conditions.
Fax Gateway Connects the Internet network to regular telephone lines, enabling e-mail documents to be sent as fax documents to regular fax machines.
Fax Server A feature that transfers image data received by the machine to a Server Fax server and transfers image data received by a Server Fax server to the machine via a network based on the settings you made.Using this feature enables you to manage multiple machines.
FQDN FQDN (Fully Qualified Domain Name) is fully specified with domain name, sub domain name, and host name so that it is identified in network.
G3 A facsimile communication system standardized by the advisory committee for International Telecommunications (CCITT, now the ITU-T).
Header A record of the sender. It is printed on the top edge of a received document.
ICM An abbreviation of Image Color Matching. A color management software used with Windows 2000, Windows XP, and Windows Server 2003. It corrects device-dependent color differences to match the colors printed on your output with the colors displayed on your screen.
Image Enhancement A feature which makes the border between black and white smooth, with rough edges reduced, giving the appearance of a higher resolution.
Image Rotation This feature rotates a document image by 90 degrees when the document orientation is not the same as the paper supply orientation.
Independent X - Y% A feature that transforms a document image horizontally or vertically.
Internet A worldwide communications network that combine miscellaneous networks.
Internet Fax Unlike a regular fax machine, Internet Fax uses corporate networks or the Internet to send or receive e-mail (TIFF attachments).
Job Offset This feature outputs sheets in alternating offsets to make each set easier to recognize.
Term Description
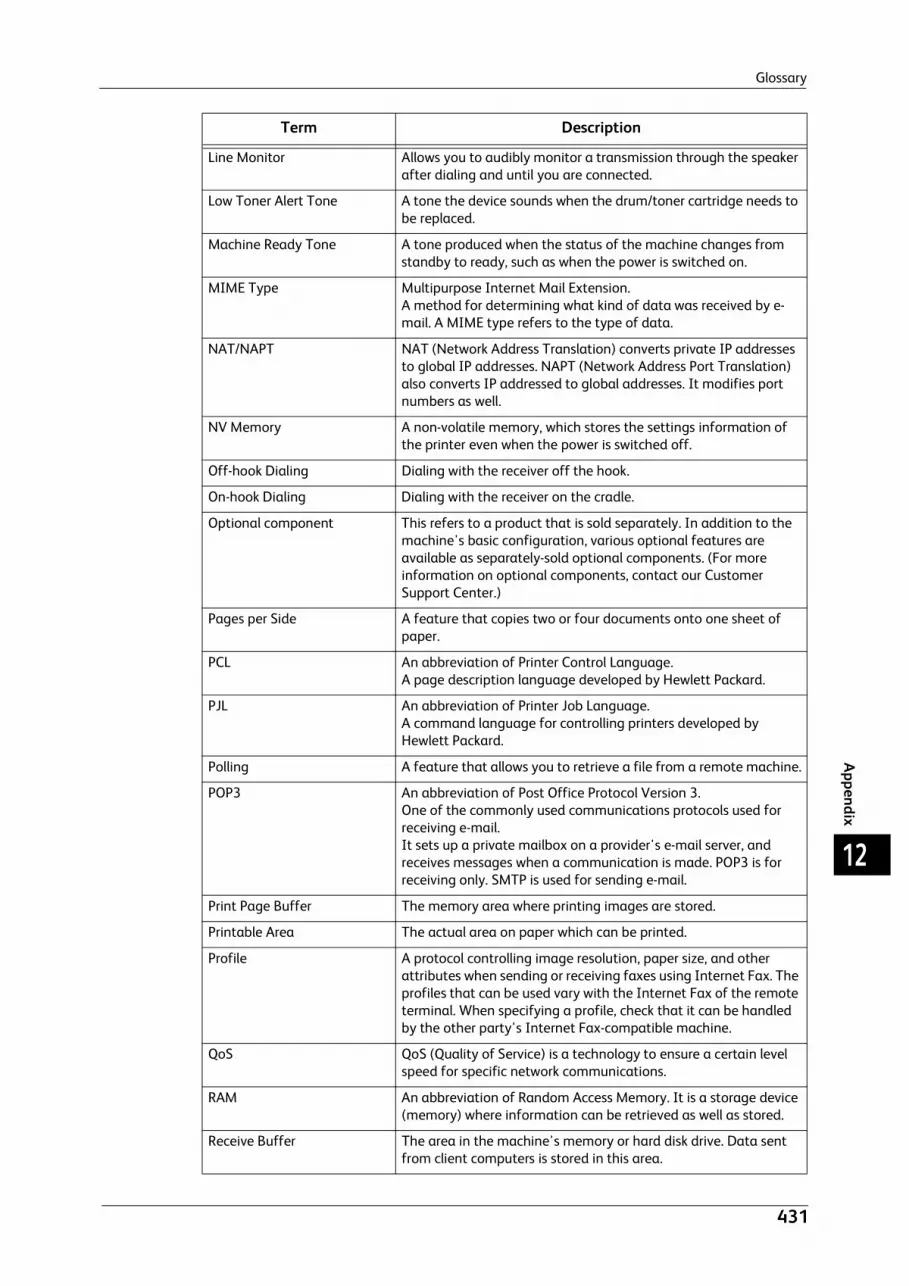
Glossary
431
Appendix
12
Line Monitor Allows you to audibly monitor a transmission through the speaker after dialing and until you are connected.
Low Toner Alert Tone A tone the device sounds when the drum/toner cartridge needs to be replaced.
Machine Ready Tone A tone produced when the status of the machine changes from standby to ready, such as when the power is switched on.
MIME Type Multipurpose Internet Mail Extension.A method for determining what kind of data was received by e-mail. A MIME type refers to the type of data.
NAT/NAPT NAT (Network Address Translation) converts private IP addresses to global IP addresses. NAPT (Network Address Port Translation) also converts IP addressed to global addresses. It modifies port numbers as well.
NV Memory A non-volatile memory, which stores the settings information of the printer even when the power is switched off.
Off-hook Dialing Dialing with the receiver off the hook.
On-hook Dialing Dialing with the receiver on the cradle.
Optional component This refers to a product that is sold separately. In addition to the machine's basic configuration, various optional features are available as separately-sold optional components. (For more information on optional components, contact our Customer Support Center.)
Pages per Side A feature that copies two or four documents onto one sheet of paper.
PCL An abbreviation of Printer Control Language.A page description language developed by Hewlett Packard.
PJL An abbreviation of Printer Job Language.A command language for controlling printers developed by Hewlett Packard.
Polling A feature that allows you to retrieve a file from a remote machine.
POP3 An abbreviation of Post Office Protocol Version 3.One of the commonly used communications protocols used for receiving e-mail.It sets up a private mailbox on a provider's e-mail server, and receives messages when a communication is made. POP3 is for receiving only. SMTP is used for sending e-mail.
Print Page Buffer The memory area where printing images are stored.
Printable Area The actual area on paper which can be printed.
Profile A protocol controlling image resolution, paper size, and other attributes when sending or receiving faxes using Internet Fax. The profiles that can be used vary with the Internet Fax of the remote terminal. When specifying a profile, check that it can be handled by the other party's Internet Fax-compatible machine.
QoS QoS (Quality of Service) is a technology to ensure a certain level speed for specific network communications.
RAM An abbreviation of Random Access Memory. It is a storage device (memory) where information can be retrieved as well as stored.
Receive Buffer The area in the machine's memory or hard disk drive. Data sent from client computers is stored in this area.
Term Description
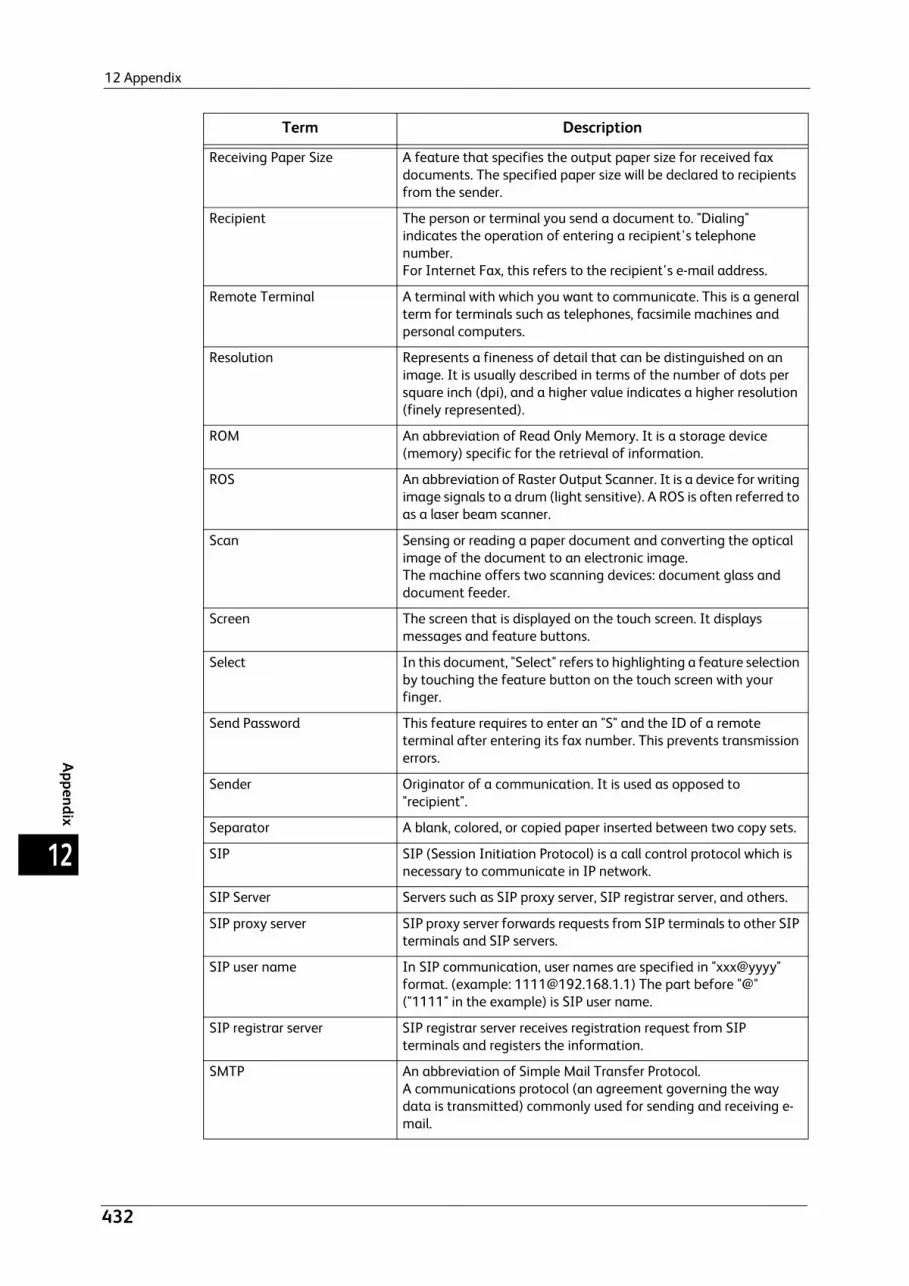
12 Appendix
432
Appendix
12
Receiving Paper Size A feature that specifies the output paper size for received fax documents. The specified paper size will be declared to recipients from the sender.
Recipient The person or terminal you send a document to. "Dialing" indicates the operation of entering a recipient's telephone number.For Internet Fax, this refers to the recipient's e-mail address.
Remote Terminal A terminal with which you want to communicate. This is a general term for terminals such as telephones, facsimile machines and personal computers.
Resolution Represents a fineness of detail that can be distinguished on an image. It is usually described in terms of the number of dots per square inch (dpi), and a higher value indicates a higher resolution (finely represented).
ROM An abbreviation of Read Only Memory. It is a storage device (memory) specific for the retrieval of information.
ROS An abbreviation of Raster Output Scanner. It is a device for writing image signals to a drum (light sensitive). A ROS is often referred to as a laser beam scanner.
Scan Sensing or reading a paper document and converting the optical image of the document to an electronic image.The machine offers two scanning devices: document glass and document feeder.
Screen The screen that is displayed on the touch screen. It displays messages and feature buttons.
Select In this document, "Select" refers to highlighting a feature selection by touching the feature button on the touch screen with your finger.
Send Password This feature requires to enter an "S" and the ID of a remote terminal after entering its fax number. This prevents transmission errors.
Sender Originator of a communication. It is used as opposed to "recipient".
Separator A blank, colored, or copied paper inserted between two copy sets.
SIP SIP (Session Initiation Protocol) is a call control protocol which is necessary to communicate in IP network.
SIP Server Servers such as SIP proxy server, SIP registrar server, and others.
SIP proxy server SIP proxy server forwards requests from SIP terminals to other SIP terminals and SIP servers.
SIP user name In SIP communication, user names are specified in "xxx@yyyy" format. (example: [email protected]) The part before "@" ("1111" in the example) is SIP user name.
SIP registrar server SIP registrar server receives registration request from SIP terminals and registers the information.
SMTP An abbreviation of Simple Mail Transfer Protocol.A communications protocol (an agreement governing the way data is transmitted) commonly used for sending and receiving e-mail.
Term Description

Glossary
433
Appendix
12
Start Reservation In this guide, this refers to loading a document, selecting features, and pressing the <Start> button immediately after switching the power on. Once the machine is warmed up and ready, it will automatically start copying.
Status Display Code A code that indicates the machine status. When an error occurs on the machine, a status display code appears on the touch screen.
Store In this guide, it is referred to as scanning an image of a document and saving the image on the machine.
Stored Programming By registering a series of operations, the machine executes the operations with just one press of [Stored Programming] on the touch screen.
T.38 T.38 is a protocol for timely fax communication over IP network. The protocol is also necessary for fax communication between existing public phone lines and IP network.
Transmission Interval The period between transmissions.
UNC An abbreviation of Universal Naming Convention. UNC is a way to specify a path describing the location of a network resource, such as shared folders, or shared printers, on a network, Microsoft Networks (SMB). The UNC syntax uses "\\" before the hostname, hostname and resource name are delimited by "\".If the hostname is "myhost", and if its host shared folder name is "sharefolder", the UNC syntax is described as follows:\\myhost\sharefolder
VoIP Gateway The device that relays voice signals including fax communication between IP network and public phone lines. It has a feature to convert the communication using VoIP and G3 fax communication in public phone lines.
Term Description

12 Appendix
434
Appendix
12

Index
435
Index
Index
Symbols
+ Add ...........................................................................................187
Numerics
1 Staple (Simple Copy)............................................................87
10BASE-T/100BASE-TX connector .....................................44
2 Pages per Side (Simple Copy)...........................................87
2 Sided Book Copying...........................................................112
2 Sided Copying ......................................................................109
2 Sided Copying (Simple Copy) ...........................................85
2 Sided Scanning............................................. 185, 199, 275
2/4 Hole Punch Kit ....................................................................49
2-Sided Print .............................................................................407
A
Activity Report ............................................................................69
Add Me .......................................................................................271
Add New Address ............................................ 192, 267, 294
Add Thumbnail........................................................................280
adding a comment/a date/page numbers
to copies .....................................................................................132
adding originals ......................................................................153
adding sender name and phone number
to faxes.......................................................................................214
Adding the Sender’s Address .............................................271
Additional Feature Buttons...................................................68
Address Book..................................................... 187, 262, 292
Address Book Type 1...................................... 187, 286, 292
Address Book Type 2...................................... 190, 287, 293
adjusting color balance........................................................105
adjusting contrast .......................................................103, 319
adjusting copy density/sharpness/saturation
of images ...................................................................................103
adjusting fax density ............................................................199
Adjusting foot.............................................................................44
adjusting scan density and image sharpness.............318
adjusting the color tone.......................................................107
adjusting the copy density .................................................100
adjusting the image position.............................................117
Advanced Settings .................................................................317
Annotations ..............................................................................132
attaching covers to copies..................................................127
Auto Detect....................................................................204, 325
Auto Receive.............................................................................243
Auto/Color/Black & White (Simple Copy)........................86
B
Background Suppression .....................................................319
Batch Print.................................................................................346
Book Copying ...........................................................................110
Book Faxing ..............................................................................205
Book Scanning.........................................................................323
Booklet Creation ..........................................................124, 407
Booklet staple cartridge..........................................................49
Booklet unit..................................................................................49
Booklet unit side cover ............................................................49
Bottom left cover B...................................................................44
Bottom left cover C...................................................................44
Broadcast...................................................................................235
Broadcast Send ................................................ 168, 187, 239
Browse.........................................................................................298
Build Job.....................................................................................148
C
<C (Clear)> button ....................................................................62
Calculator % ...............................................................................91
Calibration....................................................................................69
calling a stored program .....................................................369
calling a stored program for Build Job...........................370
Center tray .......................................................................... 48, 50
CentreWare Internet Services ................................419, 423
Change Quantity ....................................................................388
changing a job flow sheet ..................................................358
changing a stored program name...................................367
changing the orientation of images...............................121
Chapter Start............................................................................150
Charge Print...................................................................395, 408
checking completed jobs.....................................................389
checking file details ...............................................................343
checking files in a folder ......................................................339
checking the finished output of the copy.....................152
436
Index
Cleaning bar ................................................................................45
<Clear All> button .....................................................................62
Color Balance........................................................................... 105
Color Effects ............................................................................. 104
Color Scanning ........................................................................275
Color Shift.................................................................................. 107
Color Space ...............................................................................320
Combine Original Sets..........................................................153
combining multiple pages into one sheet.................... 219
Compression Method............................................................ 279
Computer................................................................................... 314
Confirmation indicator............................................................46
confirming a recipient ..........................................................198
confirming remote machine response prior
to transmission........................................................................233
confirming the fax job in Job Status ..............................164
Contrast......................................................................................319
Control panel...............................................................................42
Copies.......................................................................................... 109
Copy Output ............................................................................. 143
copying both sides of an ID card.....................................146
copying facing pages onto separate sheets................110
copying multiple pages onto one sheet........................ 128
Cover Page ................................................................................ 215
Covers.......................................................................................... 127
Creaser unit..................................................................................49
creating a booklet .................................................................. 124
Custom Button ..................................................................62, 63
D
<Data> indicator........................................................................62
Delay Start ................................................................................ 212
Delayed Print.................................................................394, 407
Delete Outside/Delete Inside ............................................155
deleting Charge Print jobs .................................................. 397
deleting Delayed Print jobs ................................................ 395
deleting outside or inside of the selected area.......... 155
deleting Private Charge Print jobs................................... 399
deleting Sample Set jobs..................................................... 393
deleting Secure Print jobs ...................................................392
deleting stored jobs............................................................... 390
deleting stored programs.................................................... 367
density levels ............................................................................ 318
<Dial Pause> button.................................................................62
Digital Signature..........................................................228, 335
Direct Fax .................................................................................. 412
Direct Printing.......................................................................... 408
Document cover.........................................................................42
document feeder................................................ 74, 158, 250
Document feeder tray.............................................................46
document glass ..................................42, 46, 75, 159, 251
Document guides ......................................................................46
Document output tray ............................................................46
Document stopper ....................................................................46
DocuWorks.....................................................................278, 279
DocuWorks Security .............................................................. 281
DocuWorks Signature........................................................... 281
drum cartridge cover................................................................45
Drum cartridge release lever.................................................45
Drum cartridges .........................................................................45
E
Edge Erase......................................................................116, 326
editing a recipient .................................................................. 272
editing the Internet Fax mail contents ......................... 217
E-mail .......................................................................................... 261
E-mail Printing ..............................................................408, 410
Embedded IC Card Reader....................................................64
Encryption ......................................................................227, 335
<Energy Saver> button............................................................61
Energy Saver Mode...................................................................57
enlarged copies ..........................................................................88
Enter Output Size ................................................................... 328
entering a stored program name .................................... 367
entering an address............................................................... 270
entering specific symbols.................................................... 198
Entering Text...............................................................................70
entering the e-mail body..........................................274, 312
EP interface..................................................................................44
erasing edges and margin shadows
in the document ..................................................................... 326
erasing edges and margin shadows
of the document..................................................................... 115
erasing the background color
of documents................................................................103, 319
<Error> indicator ........................................................................62
error terminations .................................................................. 404
Exit 2 Tray ....................................................................................42

Index
437
Index
F
F Code .........................................................................................223
Facsimile Information Services.................. 229, 234, 246
Fax................................................................................................186
Fax Receiving Mode .................................................................69
Fax/Internet Fax Options....................................................209
File Format .....................................................................277, 313
File Name........................................................................333, 334
File Name Conflict .................................................................334
Finisher tray .................................................................................49
Finisher-A1 ...................................................................................48
Finisher-B1....................................................................................49
Folder Receive..........................................................................245
Folding ........................................................................................141
Forced 4800 bps .....................................................................211
From.............................................................................................273
Front cover ................................................................. 43, 48, 49
Front transport cover ...............................................................49
Fusing unit....................................................................................45
G
G3 .................................................................................................211
ground fault interrupter..........................................................55
H
Hole-punch waste container .................................................49
I
ID Card Copy............................................................................146
Image Enhancement .................................................104, 319
Image Options..............................................................103, 318
Image Rotation.......................................................................121
Image Shift...............................................................................117
importing scanned data ......................................................415
Independent X - Y% ................................................................90
Index Print.................................................................................384
Inner cover ...................................................................................46
Internet Fax..............................................................................186
Internet Fax Message...........................................................217
Internet Fax Profile................................................................226
Internet Fax Subject .............................................................217
Internet Fax transmission...................................................170
<Interrupt> button....................................................................62
Invert Image ............................................................................120
IP Fax (SIP) ....................................................................175, 186
J
Job Assembly............................................................................148
Job Flow Sheets.......................................................................356
Job Status ..................................................................................386
<Job Status> button.................................................................61
job template.............................................................................289
JPEG ..................................................................................278, 279
L
Language......................................................................................68
Language of the Original ....................................................282
Last Original..............................................................................387
Layout Adjustment......................................... 108, 203, 322
Left cover ......................................................................................46
Lever ...............................................................................................46
license.............................................................................................33
Lighten/Darken................................................. 100, 103, 199
Lighten/Darken (Simple Copy).............................................86
LINE 1.............................................................................................47
LINE 2.............................................................................................47
LINE 3.............................................................................................47
List of Computers ........................................................314, 316
local terminal information..................................................197
Lock Out Printer..........................................................................69
Locking casters ...........................................................................43
<Log In/Out> button................................................................61
Login Information Field..........................................................66
Login Name ..............................................................................335
Low Power mode .......................................................................57
Lower center tray.......................................................................43
M
machine components ..............................................................42
<Machine Status> button ......................................................61
<Main Power> indicator..........................................................62
Main power switch....................................................................45
making 2 sided copies ..........................................................109
making 2-sided copies of facing pages .........................112

438
Index
making enlarged copies spread over
multiple sheets ........................................................................129
making enlarged/reduced copies........................................88
making multiple copies on a single sheet..................... 142
making multiple copies on one sheet ............................ 131
making reversed copies of images .................................. 119
Manual Receive....................................................................... 243
Manual Send ............................................................................ 233
Media Print................................................................................ 372
Media Print - Photos.............................................................. 382
Media Print - Text................................................................... 383
Memory Card Reader............................................................ 304
Message ..........................................................................274, 312
Message Field .............................................................................66
Meta Data................................................................................. 336
Mirror Image............................................................................ 120
Mixed Size Originals ....................................... 115, 204, 325
More Options ........................................................................... 229
MRC High Compression ....................................................... 279
N
Negative Image...................................................................... 120
Network Scanner Driver ....................................................... 416
Network Scanning.................................................................. 289
New Recipient.......................................................................... 270
Next Original ............................................................................ 387
non-standard size document............................................. 113
Non-target Area Color .............................................................98
Numeric keypad.........................................................................62
O
one touch button................................................63, 183, 195
One touch panels.......................................................................63
On-hook......................................................................................233
Optimize For Quick Web View........................................... 281
Original Orientation .................110, 115, 120, 133, 329
Original Size....................................................... 113, 203, 324
Original Type..........................................101, 184, 201, 277
Originals .....................................................................................109
Output Color................................................................................95
Output Format......................................................................... 123
Output tray ..................................................................................43
Output/Offset .......................................................................... 144
outputting bi-folded.............................................................. 141
P
Pages Per Sheet (N-UP) ....................................................... 407
Pages per Side ..............................................................128, 219
Paper clip tray.............................................................................64
Paper Supply ...............................................................................92
Paper Supply (Simple Copy)..................................................83
Password.........................................................................301, 336
PDF....................................................................................278, 279
PDF Security ............................................................................. 280
PDF Signature.......................................................................... 281
Photo ........................................................................................... 277
Photo & Text ............................................................................ 277
Photographs ............................................................................. 318
Poster ...............................................................................129, 407
Power switch................................................................................43
Preset Repeat Image ............................................................ 142
print driver................................................................................. 409
Print Mode....................................................................................69
printing ....................................................................................... 409
printing Charge Print jobs................................................... 397
printing control numbers on the background
of copies..................................................................................... 138
printing Delayed Print jobs................................................. 395
printing files in a folder........................................................ 345
Printing Multiple Sets at the Remote Machine .......... 218
printing pending jobs preferentially............................... 403
Printing Private Charge Print job ..................................... 400
printing Sample Set jobs ..................................................... 394
printing Secure Print jobs .................................................... 392
printing stored jobs ............................................................... 390
Priority Send ............................................................................. 212
Private Charge Print ...................................................398, 408
processing documents scanned with different
settings as one job................................................................. 148
Promote Job ............................................................................. 387
Proportional %................................................................89, 328
Public Folder ............................................................................. 400
Punching .................................................................................... 144
Q
Quality/File Size ...................................................................... 331

Index
439
Index
R
Read Receipts...........................................................................331
receiver .......................................................................................233
receiving IP Fax (SIP)............................................................178
Recipient Print Sets................................................................218
Recipient(s) ...............................................................................272
Reduce/Enlarge ...................................................88, 207, 328
Reduce/Enlarge (Simple Copy) ............................................85
reduced copies............................................................................88
registering a destination on the Address Book ..........192
registering a destination PC on the
Address Book............................................................................294
registering a recipient on the Address Book................267
registering stored programs...............................................364
Release Printer ............................................................................69
Remote Folder .........................................................................219
Remote Polling ........................................................................229
removing a recipient .............................................................198
Repeat Image..........................................................................131
Reply To......................................................................................333
RESET button ..............................................................................44
Resolution........................................................... 184, 201, 322
Retrieving Files from Remote Machines .......................229
RSA BSAFE....................................................................................33
S
Sample Job................................................................................152
Sample Set .....................................................................392, 407
Saturation..................................................................................103
Save in.........................................................................................300
saving the scanned data .....................................................257
scan density ..............................................................................318
Scan To.......................................................................................311
Scan to Home...........................................................................289
Scan to PC .................................................................................291
scanning a color photograph.............................................318
scanning both sides of a document................................275
scanning different size documents
simultaneously.................................................. 114, 204, 325
scanning facing pages on separate sheets..................323
scanning facing pages onto separate sheets .............205
Screen Brightness ......................................................................68
Searchable Text ......................................................................280
Secure Print ....................................................................390, 407
Segment Separators..............................................................151
selecting a communication mode ...................................211
selecting a file format for output data...............277, 313
selecting a folder ....................................................................339
selecting a job flow sheet ...................................................358
selecting a transfer protocol ..............................................292
selecting an image quality .................................................104
selecting an output color.....................................................275
selecting files.................................................................378, 380
selecting files in a folder......................................................339
Selecting Internet Fax/Fax/IP Fax (SIP) .......................186
selecting the color for copying.............................................95
selecting the document type...........101, 184, 201, 277
selecting the paper for copying...........................................92
selecting the printing options............................................382
sending e-mail encrypted by S/MIME............................335
sending e-mail with a digital signature
by S/MIME.................................................................................335
Sending faxes to multiple recipients ..............................187
sending in sections.................................................................332
sending Internet Fax encrypted by S/MIME...............227
Sending Internet Fax with a Digital Signature
by S/MIME.................................................................................228
sending IP Fax (SIP) ..............................................................178
Server...........................................................................................299
Server Fax ..................................................................................179
Service Buttons...........................................................................66
<Services Home> button ........................................................61
[Services Home] screen ...........................................................66
setting the action to be taken for
file name conflict....................................................................334
Setting the Sender’s Address .............................................273
setting the subject ......................................................274, 312
Setup ..............................................................................................69
Shadow Suppression .............................................................319
Shared Name ...........................................................................300
Sharpness ..................................................................................103
sharpness ...................................................................................319
Side Tray .......................................................................................43
Sideways Images....................................................................277
Simple Copy.................................................................................83
Single File for Each Page .....................................................280
SIP Server...................................................................................175
Sleep mode ..................................................................................57
Source Color.................................................................................97
Specific Color............................................................................280

440
Index
specifying a destination PC by browsing
your network ............................................................................ 298
specifying a destination PC using
a one touch button................................................................ 297
specifying a destination PC using
the address book .................................................................... 292
specifying a destination PC using
the screen keyboard.............................................................. 299
specifying a destination using
a one touch button.....................................................183, 195
specifying a destination using
an address number................................................................ 191
specifying a destination using
the address book .................................................................... 187
specifying a destination using
the keyboard screen.............................................................. 195
Specifying a destination using
the numeric keypad............................................................... 181
specifying a destination using
the redial feature.................................................................... 196
specifying a line (port) ......................................................... 197
specifying a name for the file to be saved................... 334
specifying a name for the file to be sent...................... 333
specifying a reply address...................................................333
specifying a scan ratio ......................................................... 207
specifying a scan size............................................................ 324
specifying a scanning ratio ................................................ 328
specifying a scanning resolution...................................... 322
specifying an e-mail address ............................................. 262
specifying an image compression ratio
when scanning......................................................................... 331
specifying color space ..........................................................320
specifying destinations ........................................................ 161
specifying finishing options ............................................... 143
specifying Internet Fax profiles........................................ 226
specifying read receipts....................................................... 331
specifying send priority........................................................ 212
specifying send time ............................................................. 212
specifying the Internet Fax Subject ............................... 217
specifying the orientation of
the loaded document ................................................120, 329
specifying the scan size for the document .................. 113
specifying the scan size for the original........................ 203
specifying the scanning resolution.......................184, 201
<Speed Dial> button ................................................................62
Speed Dialing........................................................................... 191
Split Send................................................................................... 332
Stand ..............................................................................................43
Standard Size ................................................................204, 325
Staple cartridge................................................................. 48, 49
<Start> button ............................................................................62
Start Scan Job From.............................................................. 314
starting a scan job via computer operation ................ 314
Starting Rate ............................................................................ 211
<Stop> button.............................................................................62
stopping a copy job..................................................................80
stopping a fax job .................................................................. 165
stopping a scan job ............................................................... 258
Store & Send Link ................................................................... 311
Store for Polling ...................................................................... 232
Store in Remote Folder ........................................................ 407
Store to Folder ......................................................................... 302
Store to USB ............................................................................. 304
Store to WSD............................................................................ 314
Stored File Manager 3...............................................257, 417
storing data scanned by the machine
on a network computer........................................................ 316
Storing Files on the Machine that a Remote Machine
can Retrieve.............................................................................. 232
Stylus pen .....................................................................................43
Stylus pen holder .......................................................................43
Subject.............................................................................274, 312
suppressing the document background........................ 319
T
Target Area Color ......................................................................98
TEL...................................................................................................47
Telephone line connectors.....................................................47
Text .............................................................................................. 277
Text Compression................................................................... 282
This Device................................................................................ 316
TIFF...................................................................................278, 279
TIFF/JPEG Auto Select.......................................................... 278
TIFF-F .......................................................................................... 227
TIFF-J........................................................................................... 227
TIFF-S .......................................................................................... 227
Toner cartridges.........................................................................45
Top cover ............................................................................. 48, 49
Top cover of the finisher transport ....................................50
Top left cover A..........................................................................44
Top left cover D..........................................................................44

Index
441
Index
Top left cover E...........................................................................44
Touch screen ...............................................................................61
Transfer Protocol ....................................................................292
Transmission Header Text ..................................................214
transmitting 2-sided originals ................................185, 199
transmitting documents with a cover page.................215
Tray 1 .............................................................................................43
Tray 2 .............................................................................................43
Tray 3 .............................................................................................43
Tray 4 .............................................................................................43
Tray 5 (Bypass)...........................................................................43
Tray attachment........................................................................49
U
Undelivered Faxes..................................................................401
Universal Emphasis Print .....................................................408
Upright Images.......................................................................277
US 2/3 Hole Punch Kit .............................................................49
USB 2.0 interface connector .................................................44
USB memory device ..............................................................304
USB memory slot .......................................................................63
User Name ................................................................................300
using F Code transmission..................................................223
using remote folder ...............................................................219
V
Variable Size .............................................................................325
VoIP Gateway..........................................................................175
W
Waste toner container ............................................................45
Watermark .....................................................................138, 407
X
XPS................................................................................................279
XPS Signature...........................................................................281

442
Index

DocuCentre-IV C2265/C2263User Guide
ME5469E2-1 (Edition 1)September 2011
Fuji Xerox Co., Ltd. Copyright © 2011 by Fuji Xerox Co., Ltd.


