Embed Size (px)
Citation preview
E-Series Battery User ManualE 系列电池用户手册
2020.05 V1.1
Copyright © 2020 ePropulsion. All Rights Reserved
Engl
ish
简中

1
Engl
ish
AcknowledgementThanks for choosing ePropulsion products, your trust and support in our company
are sincerely appreciated. We are dedicated to providing high-performance, reliable
lithium batteries and accessories.
Welcome to visit www.epropulsion.com and contact us if you have any concerns.
Using this manualBefore the use of this product, please read this reference manual thoroughly to
understand the correct and safe operations. By using this product, you hereby agree
that you have fully read and understood all the contents of this manual. ePropulsion
accepts no liability for any damage or injury caused by operations that contradict this
manual.
Due to the ongoing optimization of our products, ePropulsion reserves the rights of
constantly adjusting the contents described in the manual. ePropulsion also reserves
the intellectual property rights and industrial property rights including copyrights,
patents, logos and designs, etc.
This manual is subject to update without prior notice. Please visit our website www.
epropulsion.com for the latest version. If you find any discrepancy between your
products and this manual, or should you have any doubts concerning the product or
the manual, please visit www.epropulsion.com.
ePropulsion reserves the right of final interpretation of this manual.
This manual is multilingual, in case of any discrepancy in the interpretation of
different language versions, the English version shall prevail.
SymbolsThe following symbols will help to acquire some key information.
Useful information or tips
Important instructions or warnings

2
Product IdentificationBelow figure indicates the position of the product label on which the serial number
is located. Please record the serial number for access to maintenance or other after-
sale services.
Figure 0-1
3
Engl
ish
Table of contentAcknowledgement ..................................................................................... 1
Using this manual ...................................................................................... 1
Symbols .................................................................................................... 1
Product Identification ................................................................................ 2
1 Product Overview ................................................................................... 51.1 In the Package ......................................................................................... 51.2 Parts and Diagram................................................................................... 61.3 Specifications .......................................................................................... 71.4 Instructions before Use ........................................................................... 81.5 Important Instructions ............................................................................ 81.6 Declaration of Conformity ....................................................................... 9
2 Operation.............................................................................................. 102.1 Check the Battery Status ...................................................................... 102.2 Using the Battery ................................................................................... 10
2.2.1 Connecting the Battery to the Machine ...................................... 102.2.2 Turning on/off the Battery ........................................................... 122.2.3 Charging the Battery .................................................................... 13
2.3 Using Multiple Batteries ........................................................................ 152.3.1 Connecting Batteries in Parallel .................................................. 152.3.2 Connecting Parallel Batteries to the Machine ............................ 172.3.3 Turning on/off the Batteries in Parallel ...................................... 182.3.4 Charging the Batteries in Parallel ............................................... 19
2.4 LED Indicator ......................................................................................... 202.5 Buzzer .................................................................................................... 21
3 Troubleshooting ................................................................................... 22
4 Transportation and Storage .................................................................. 234.1 Transportation ....................................................................................... 234.2 Storage ................................................................................................... 24
5 Routine Maintenance ............................................................................ 25
6 Warranty .............................................................................................. 26

4
6.1 Warranty Policies ................................................................................... 266.2 Out of Warranty ...................................................................................... 276.3 Warranty Claim Procedures .................................................................. 27
5
Engl
ish
1 Product OverviewePropulsion E-Series Battery is a lithium iron phosphate battery with good safety
performance, high energy density, long cycle life and high reliability.
E-Series Battery includes three models, E40, E80 and E175, with a nominal voltage of
51.2V and a capacity of 40Ah, 80Ah and 175Ah.
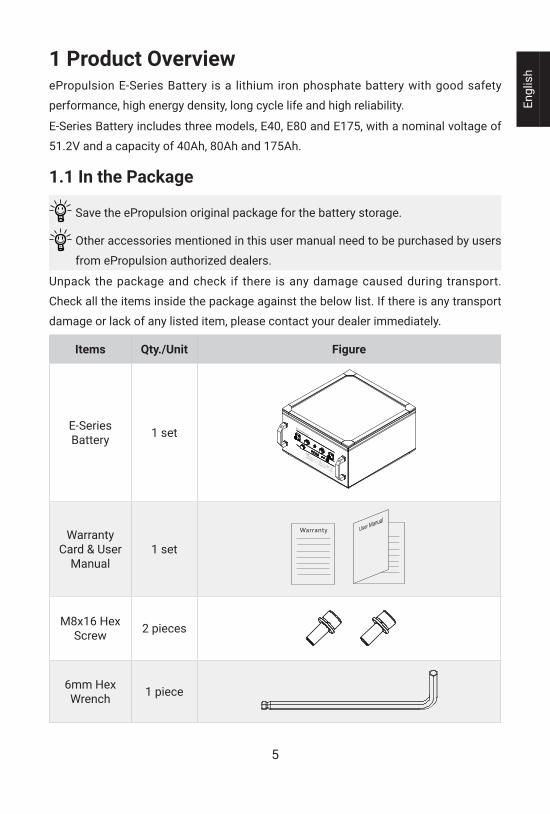
1.1 In the Package
Save the ePropulsion original package for the battery storage.
Other accessories mentioned in this user manual need to be purchased by users
from ePropulsion authorized dealers.
Unpack the package and check if there is any damage caused during transport.
Check all the items inside the package against the below list. If there is any transport
damage or lack of any listed item, please contact your dealer immediately.
Items Qty./Unit Figure
E-Series Battery 1 set
Warranty Card & User
Manual1 set
Warranty
M8x16 Hex Screw 2 pieces
6mm Hex Wrench 1 piece
6
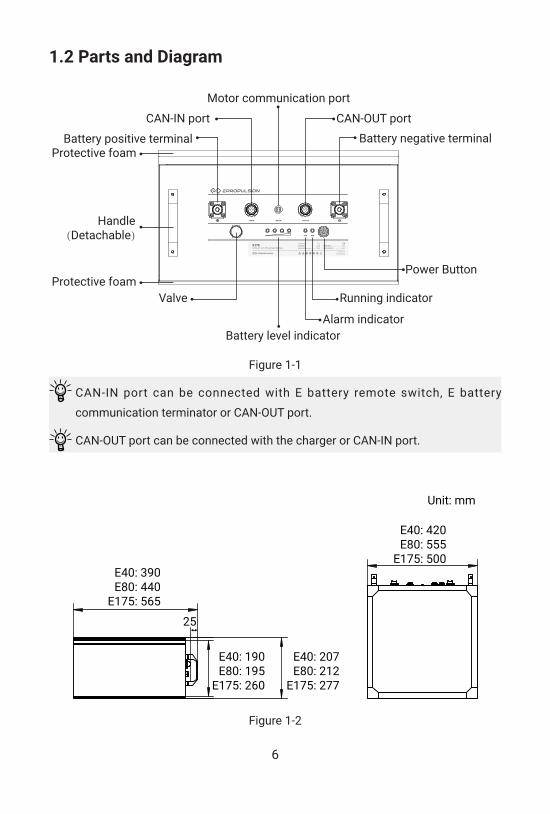
1.2 Parts and Diagram
Figure 1-1
CAN-IN port can be connected with E battery remote switch, E battery
communication terminator or CAN-OUT port.
CAN-OUT port can be connected with the charger or CAN-IN port.
Figure 1-2
Battery positive terminal
Battery level indicator
Valve
Alarm indicator
Running indicator
Power Button
CAN-IN port CAN-OUT port
Motor communication port
Battery negative terminal
Handle(Detachable)
Protective foam
Protective foam
E40: 390E80: 440
E175: 565
Unit: mm
25
E40: 207E80: 212
E175: 277
E40: 190E80: 195
E175: 260
E40: 420E80: 555
E175: 500
7
Engl
ish
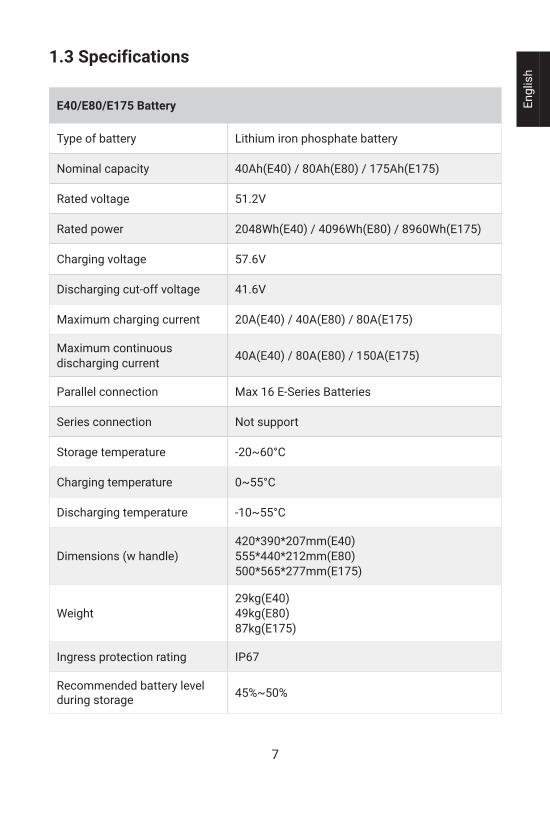
1.3 Specifications
E40/E80/E175 Battery
Type of battery Lithium iron phosphate battery
Nominal capacity 40Ah(E40) / 80Ah(E80) / 175Ah(E175)
Rated voltage 51.2V
Rated power 2048Wh(E40) / 4096Wh(E80) / 8960Wh(E175)
Charging voltage 57.6V
Discharging cut-off voltage 41.6V
Maximum charging current 20A(E40) / 40A(E80) / 80A(E175)
Maximum continuousdischarging current 40A(E40) / 80A(E80) / 150A(E175)
Parallel connection Max 16 E-Series Batteries
Series connection Not support
Storage temperature -20~60°C
Charging temperature 0~55°C
Discharging temperature -10~55°C
Dimensions (w handle)420*390*207mm(E40)555*440*212mm(E80)500*565*277mm(E175)
Weight29kg(E40)49kg(E80)87kg(E175)
Ingress protection rating IP67
Recommended battery level during storage 45%~50%
8
1.4 Instructions before Use• Before using the battery, please read the user manual carefully. Only adults who
have fully read and understood this manual are allowed to operate this product.
• Before each use, check if the battery is firmly fixed, and check the condition,
functionality and connection of the battery.
• Do not remove the protective foam on the battery base. The foam protects the
battery from corrosion and covers fixings.
• Avoid battery short-circuit during connection, do not disassemble the battery.
• Do not store the battery in a damp environment.
• During use, keep away from an external heat source and high voltage equipment.
• Do not exposure to shock or excessive vibrations.
• During use, when a fault occurs, please refer to Section 2.4 LED Indicators,
Section 2.5 Buzzer, and Section 3 Troubleshooting.
• It is not recommended to stack batteries.
• Used batteries should be disposed of according to local laws and regulations.
1.5 Important Instructions• When the battery is not in use, make sure that the battery's connectors are
covered well with the waterproof caps.
• E-Series Battery is splash, water, and dust resistant and was tested before delivery
with a rating of IP67. Splash, water, and dust resistance are not permanent
conditions and resistance might decrease as a result of normal wear. Liquid
damage is not covered under warranty.
• Do not expose the battery to high temperatures or sparks.
• Do not immerse or splash the battery in water.
• Ensure the battery can never cause a short via jewellery or tools.
• Do not exposure to shock or excessive vibrations.
• Never puncture the battery.
• Do not subject the battery to significant damage.
• Never touch a leaking battery or cell.
• Never mix up the positive terminals with negative terminals.
• Do not short circuit, overcharge or over discharge the battery.
• Never connect batteries in series.
9
Engl
ish
• It is strictly prohibited to mix this battery with different types or specifications of
batteries in parallel.
• If the battery is used in extreme environments (below 0°C or above 50°C), the
battery life will be shortened.
• Charge the battery in the place that is safe, dry and free of flammable materials.
• When the battery is not used for an extended period of time, make sure the battery
level is around 45%~50% before storing.
• Do not use conductive materials like metal that could cause a short circuit.
• Please keep the battery in a cool and dry place.
• Keep the battery away from children.
• Do not place the battery in direct sunlight.
• Never disassemble or modify the battery.
• Never open the battery case. If the case is damaged, do not use, charge or
discharge the battery. Please contact ePropulsion authorized distributor.
1.6 Declaration of Conformity
Object of the Declaration:
Product: Lithium-ion Battery Pack
Model: E40, E80, E175
Company Name: Guangdong ePropulsion Technology Limited
Address: Room 201, Bldg.17A, 4th XinZhu Road, SongShan Lake District, Dongguan
City, Guangdong Province, China
The object of the declaration is in conformity with the following directives:
EMC-directive 2014/30/EU
Applied Standards:
EN 61000-6-3:2007+A1:2011
EN IEC61000-6-1:2019
Signature: Shizheng Tao, Chief Executive Officer & Co-founder of
Guangdong ePropulsion Technology Limited
10
2 Operation
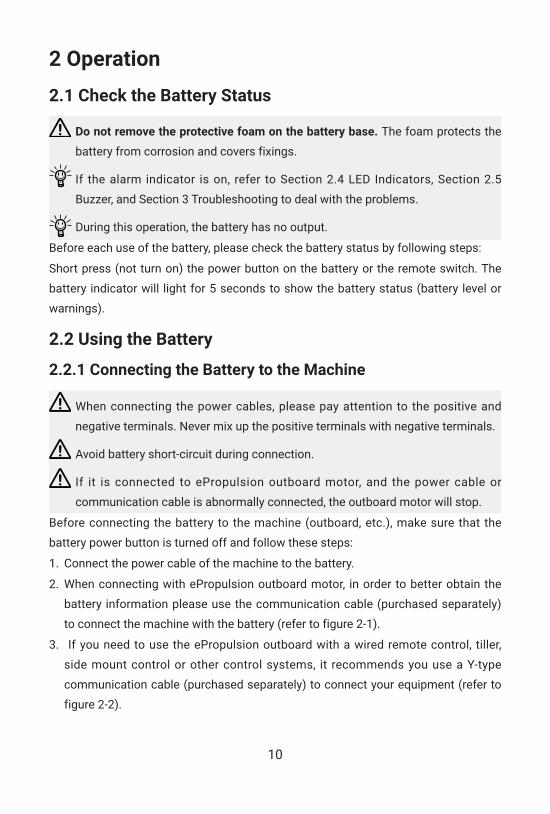
2.1 Check the Battery Status
Do not remove the protective foam on the battery base. The foam protects the
battery from corrosion and covers fixings.
If the alarm indicator is on, refer to Section 2.4 LED Indicators, Section 2.5
Buzzer, and Section 3 Troubleshooting to deal with the problems.
During this operation, the battery has no output.
Before each use of the battery, please check the battery status by following steps:
Short press (not turn on) the power button on the battery or the remote switch. The
battery indicator will light for 5 seconds to show the battery status (battery level or
warnings).
2.2 Using the Battery
2.2.1 Connecting the Battery to the Machine
When connecting the power cables, please pay attention to the positive and
negative terminals. Never mix up the positive terminals with negative terminals.
Avoid battery short-circuit during connection.
If it is connected to ePropulsion outboard motor, and the power cable or
communication cable is abnormally connected, the outboard motor will stop.
Before connecting the battery to the machine (outboard, etc.), make sure that the
battery power button is turned off and follow these steps:
1. Connect the power cable of the machine to the battery.
2. When connecting with ePropulsion outboard motor, in order to better obtain the
battery information please use the communication cable (purchased separately)
to connect the machine with the battery (refer to figure 2-1).
3. If you need to use the ePropulsion outboard with a wired remote control, tiller,
side mount control or other control systems, it recommends you use a Y-type
communication cable (purchased separately) to connect your equipment (refer to
figure 2-2).
11
Engl
ish
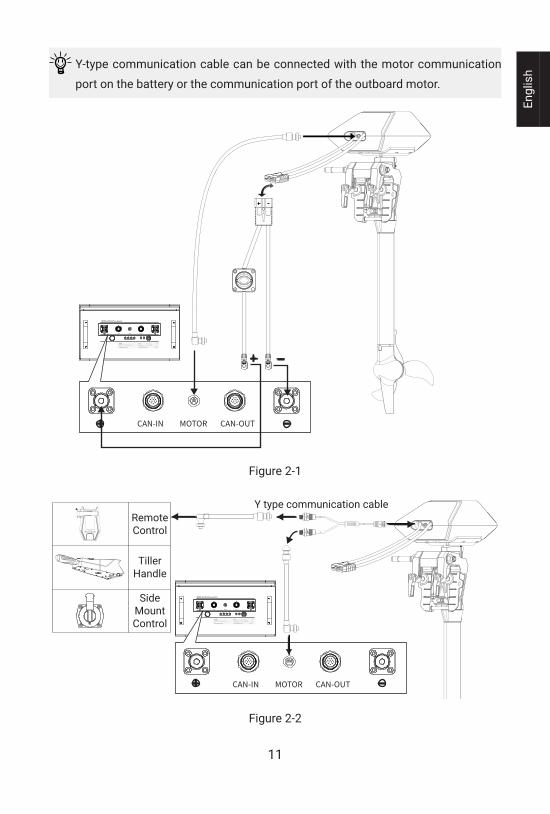
Y-type communication cable can be connected with the motor communication
port on the battery or the communication port of the outboard motor.
Figure 2-1
Figure 2-2
CAN-IN CAN-OUTMOTOR
Y type communication cableRemoteControl
TillerHandle
SideMountControl
CAN-IN CAN-OUTMOTOR
12
2.2.2 Turning on/off the Battery
The battery has an auto sleep function. After the battery is turned on, if no
operation or use is carried out within 24 hours, the battery will automatically turn
off.
Before turning on the battery, please make sure that the power cable of the
machine is securely connected to the battery, the connection is locked and there
is no risk of slipping, and there is no short circuit.
a. Using the power button on the battery
1. For turning on the battery, please press and hold the power button on the battery
for 1second (no more than 3 seconds). The battery will start and self-check. If no
warning, it means the battery turned on successfully.
2. For turning off the battery, please press and hold the power button on the battery
for 3 seconds, then the battery will turn off automatically.
b. Using E battery remote switch
The remote switch can only be connected to the CAN-IN port. Do not connect
to the CAN-OUT port.
When using the remote switch, there is no need to operate the power button on
the battery. Using either switch can control the switching on or off of the battery.
Remote switches need to be purchased separately.
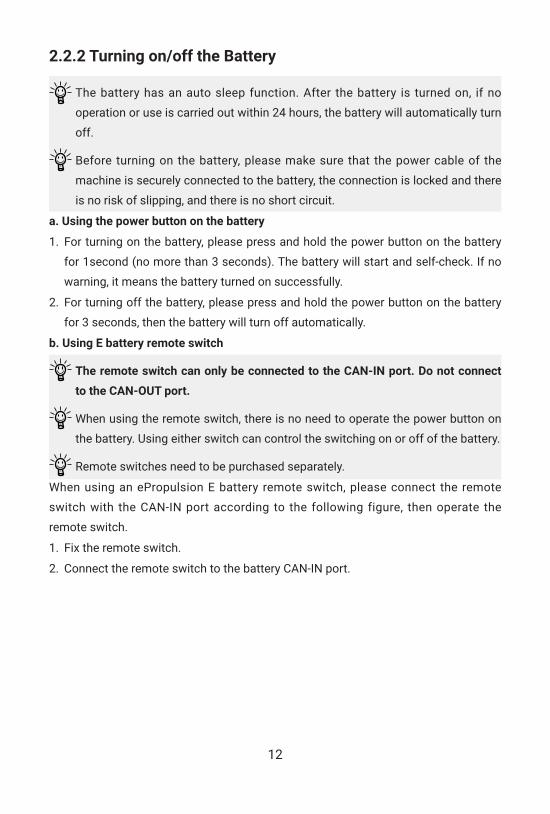
When using an ePropulsion E battery remote switch, please connect the remote
switch with the CAN-IN port according to the following figure, then operate the
remote switch.
1. Fix the remote switch.
2. Connect the remote switch to the battery CAN-IN port.
13
Engl
ish
Figure 2-3
1. To turn on the battery, please press and hold the power button on the remote
switch for 1second (no more than 3 seconds). The running indicator and the
indicator on the remote switch are both on. The battery will start and self-check. If
there are no warnings, it means the battery is really for use.
2. To turn off the battery, please press and hold the power button on the remote
switch for 3 seconds, you can see the indicators on the remote and battery are off.
2.2.3 Charging the Battery
Please read the following notices before charging:
Only use the ePropulsion charger specially designed for E-Series Batteries to
charge the battery. Do not use a third-party charger to charge the battery.
The charger's communication cable needs to be connected to the battery's
CAN-OUT port.
Please make sure that the AC power is turned off before charging.
Never mix up the positive terminals with negative terminals.
Only charge the battery at 0 ~ 55°C.
When charging, keep the battery away from water and avoid direct sunlight or
rain. Charge the battery in the dry, ventilated place.
Avoid direct contact with the charger when in use, the charger can get to a high
temperature.
Please do not overcharge the battery.
Keep the battery away from children.

14
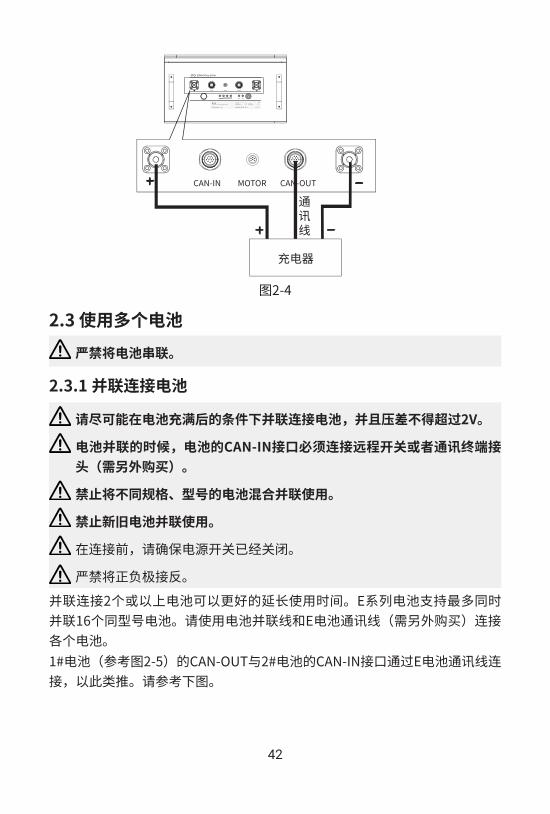
1. When charging the battery, connect the charger's power cable to the positive and
negative terminals of the battery. The positive terminal of the charger's power
cable is connected with the positive terminal of the battery, and the negative
terminal of the charger's power cable is connected with the negative terminal of
the battery. Then connect the communication cable from the charger to the battery
CAN-OUT port. Make sure that the connection is correct.
2. After confirming that the battery is turned off, connect the charger to AC power,
and then press the power button on the battery/remote switch to turn on the
battery. If the system has no alarms, indicating that the battery is successfully
charging.
3. After the charging is completed, long press the power button on the battery/
remote switch, then unplug the power plug of the charger, and then release the
connection with the battery charger.
Figure 2-4
Charger
Communicationcable
15
Engl
ish
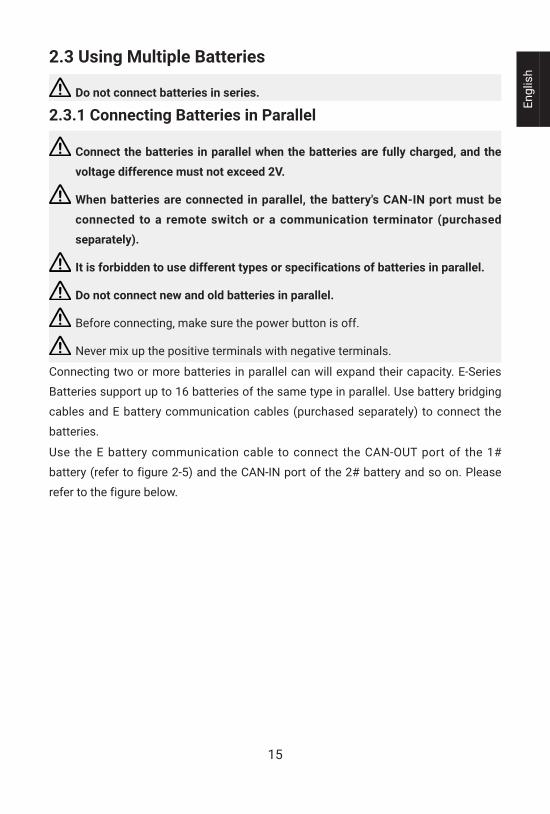
2.3 Using Multiple Batteries
Do not connect batteries in series.
2.3.1 Connecting Batteries in Parallel
Connect the batteries in parallel when the batteries are fully charged, and the
voltage difference must not exceed 2V.
When batteries are connected in parallel, the battery's CAN-IN port must be
connected to a remote switch or a communication terminator (purchased
separately).
It is forbidden to use different types or specifications of batteries in parallel.
Do not connect new and old batteries in parallel.
Before connecting, make sure the power button is off.
Never mix up the positive terminals with negative terminals.
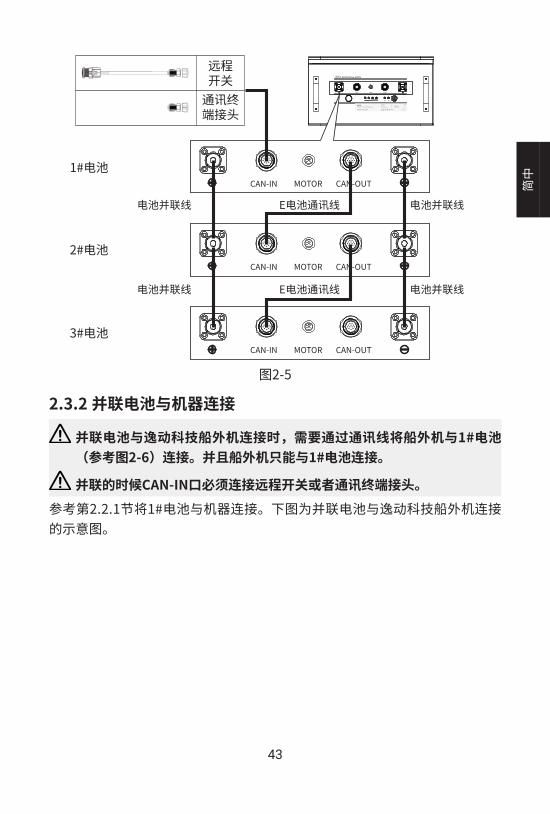
Connecting two or more batteries in parallel can will expand their capacity. E-Series
Batteries support up to 16 batteries of the same type in parallel. Use battery bridging
cables and E battery communication cables (purchased separately) to connect the
batteries.
Use the E battery communication cable to connect the CAN-OUT port of the 1#
battery (refer to figure 2-5) and the CAN-IN port of the 2# battery and so on. Please
refer to the figure below.
16
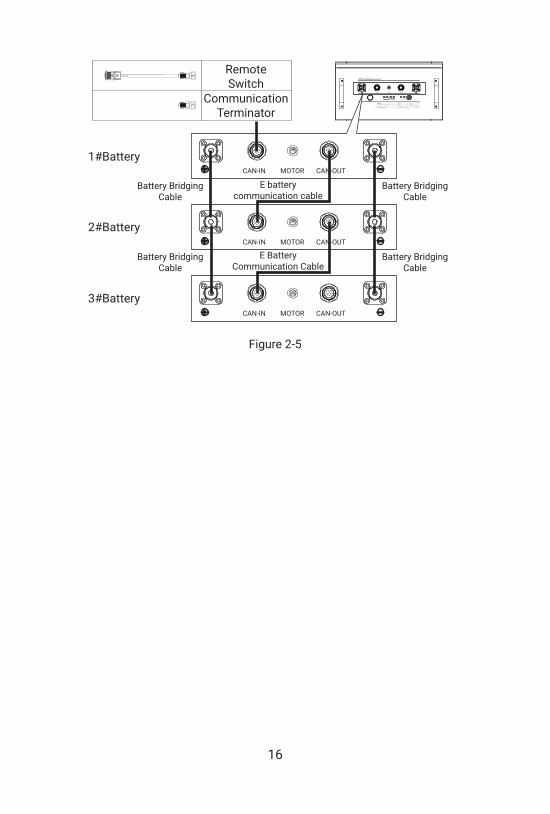
Figure 2-5
CAN-IN CAN-OUTMOTOR
CAN-IN CAN-OUTMOTOR
CAN-IN CAN-OUTMOTOR
RemoteSwitch
1#Battery
2#Battery
3#Battery
CommunicationTerminator
Battery BridgingCable
Battery BridgingCable
Battery BridgingCable
Battery BridgingCable
E batterycommunication cable
E BatteryCommunication Cable
17
Engl
ish
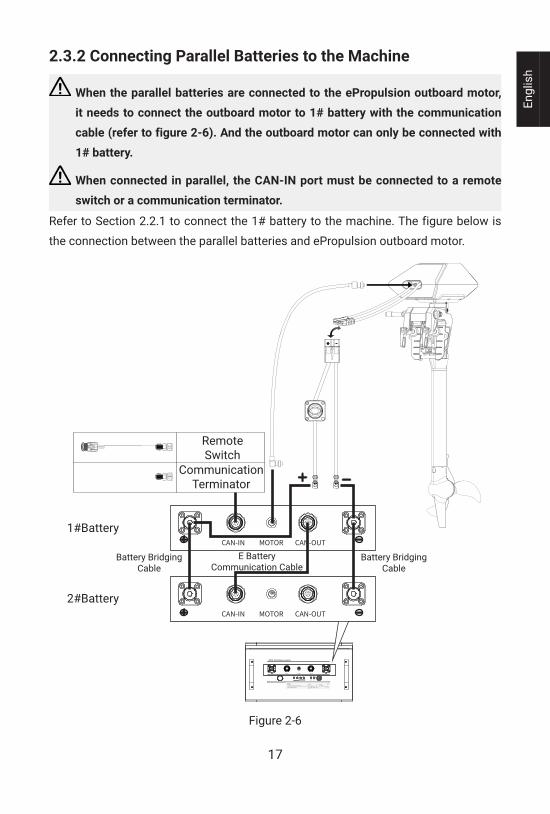
2.3.2 Connecting Parallel Batteries to the Machine
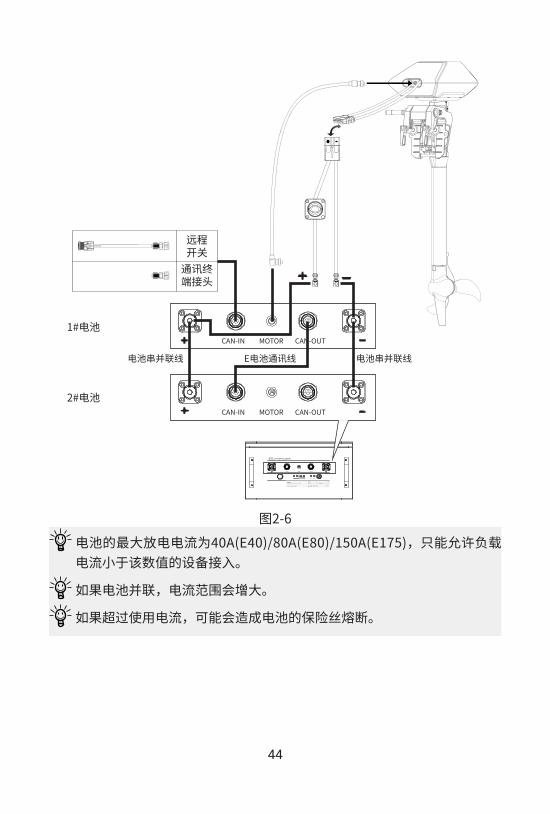
When the parallel batteries are connected to the ePropulsion outboard motor,
it needs to connect the outboard motor to 1# battery with the communication
cable (refer to figure 2-6). And the outboard motor can only be connected with
1# battery.
When connected in parallel, the CAN-IN port must be connected to a remote
switch or a communication terminator.
Refer to Section 2.2.1 to connect the 1# battery to the machine. The figure below is
the connection between the parallel batteries and ePropulsion outboard motor.
Figure 2-6
CAN-IN CAN-OUTMOTOR
CAN-IN CAN-OUTMOTOR
RemoteSwitch
1#Battery
2#Battery
CommunicationTerminator
Battery BridgingCable
Battery BridgingCable
E BatteryCommunication Cable
18
2.3.3 Turning on/off the Batteries in Parallel
When multiple batteries of the same model are connected in parallel, you
can only press the power button on the 1# battery (the battery connect to the
machine, refer to figure 2-6) or the remote switch to turn on/off the batteries.
1. To turn on the batteries, please press and hold the power button on the 1# battery
or the remote switch for 1 second (no more than 3 seconds). The batteries will
start and self-check. If there are no warnings, it means the batteries are really for
use.
2. To turn off the batteries, please press and hold the power button on the 1# battery
or the remote switch for 3 seconds, you can see the indicators on the remote and
batteries are off.
The maximum continuous discharging current of the battery is 40A (E40)/80A
(E80)/150A(E175). Only the machine with load current less than this value can
be connected.
If the batteries are connected in parallel, the discharging current range will
increase.
If the discharging current is exceeded, the fuse of the battery may be blown.

19
Engl
ish
2.3.4 Charging the Batteries in Parallel
When connected in parallel, the CAN-IN port must be connected to a remote
switch or a communication terminator.
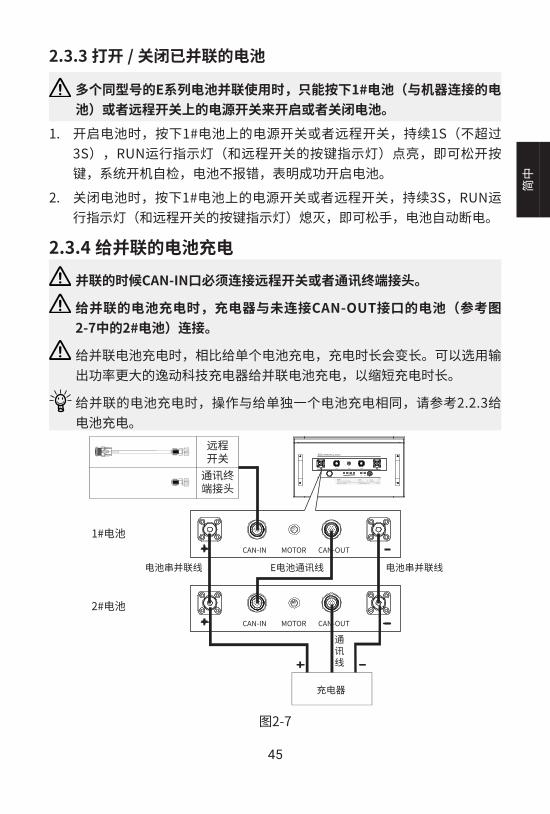
When charging parallel batteries, the charger should connect to a battery
whose CAN-OUT port is not connect with the E battery communication cable
(refer to the 2# battery in figure 2-7).
When charging parallel batteries, the charging time will be longer than charging
one battery. You can choose a charger with greater output power to charge the
parallel batteries to shorten the charging time.
When charging the parallel batteries, the operation is the same as charging the
battery. Please refer to 2.2.3 charging the battery.
Figure 2-7
CAN-IN CAN-OUTMOTOR
CAN-IN CAN-OUTMOTOR
RemoteSwitch
1#Battery
2#Battery
Charger
CommunicationTerminator
Battery BridgingCable
Battery BridgingCable
E batteryCommunication Cable
CommunicationCable
20
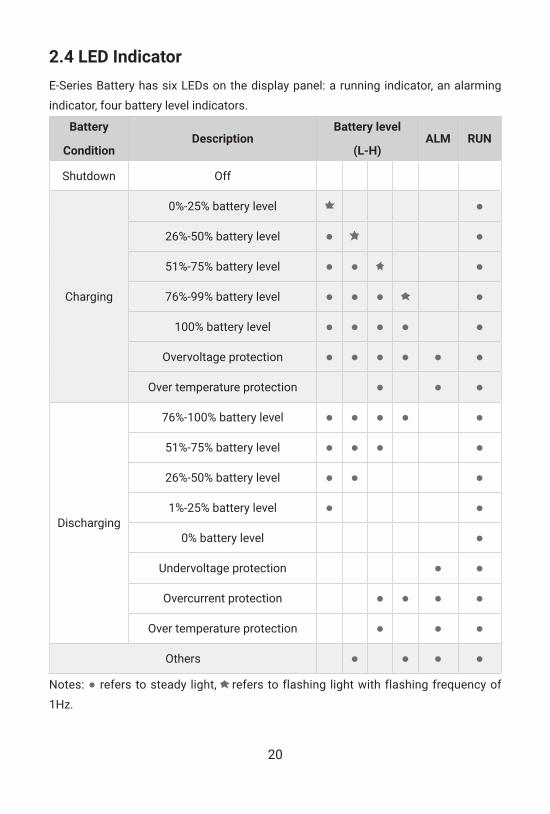
2.4 LED IndicatorE-Series Battery has six LEDs on the display panel: a running indicator, an alarming
indicator, four battery level indicators.
Battery
ConditionDescription
Battery level
(L-H)ALM RUN
Shutdown Off
Charging
0%-25% battery level ●
26%-50% battery level ● ●
51%-75% battery level ● ● ●
76%-99% battery level ● ● ● ●
100% battery level ● ● ● ● ●
Overvoltage protection ● ● ● ● ● ●
Over temperature protection ● ● ●
Discharging
76%-100% battery level ● ● ● ● ●
51%-75% battery level ● ● ● ●
26%-50% battery level ● ● ●
1%-25% battery level ● ●
0% battery level ●
Undervoltage protection ● ●
Overcurrent protection ● ● ● ●
Over temperature protection ● ● ●
Others ● ● ● ●
Notes: ● refers to steady light, refers to flashing light with flashing frequency of
1Hz.
21
Engl
ish
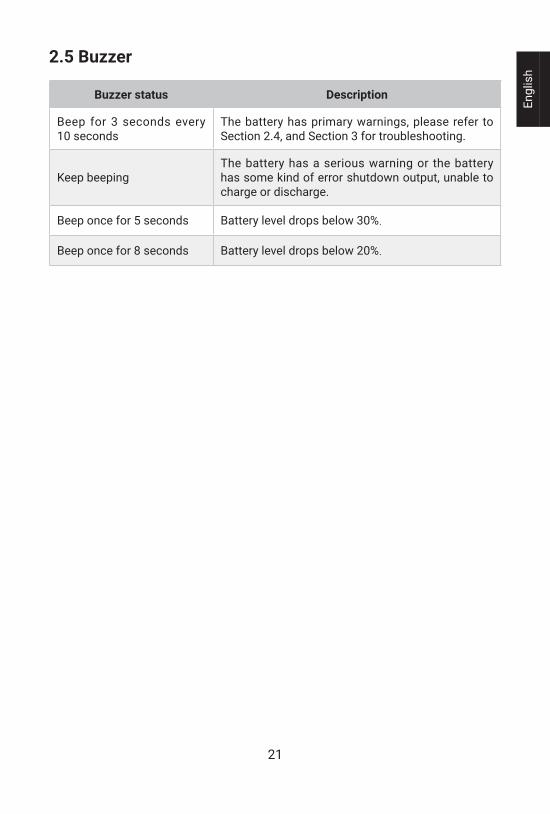
2.5 Buzzer
Buzzer status Description
Beep for 3 seconds every 10 seconds
The battery has primary warnings, please refer to Section 2.4, and Section 3 for troubleshooting.
Keep beepingThe battery has a serious warning or the battery has some kind of error shutdown output, unable to charge or discharge.
Beep once for 5 seconds Battery level drops below 30%.
Beep once for 8 seconds Battery level drops below 20%.
22
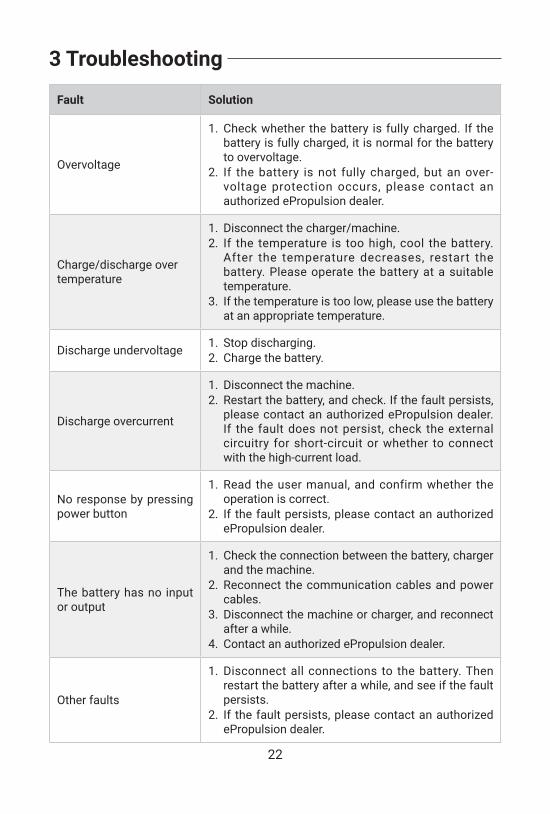
3 Troubleshooting
Fault Solution
Overvoltage
1. Check whether the battery is fully charged. If the battery is fully charged, it is normal for the battery to overvoltage.
2. If the battery is not fully charged, but an over-voltage protection occurs, please contact an authorized ePropulsion dealer.
Charge/discharge overtemperature
1. Disconnect the charger/machine.2. If the temperature is too high, cool the battery.
After the temperature decreases, restart the battery. Please operate the battery at a suitable temperature.
3. If the temperature is too low, please use the battery at an appropriate temperature.
Discharge undervoltage 1. Stop discharging.2. Charge the battery.
Discharge overcurrent
1. Disconnect the machine.2. Restart the battery, and check. If the fault persists,
please contact an authorized ePropulsion dealer. If the fault does not persist, check the external circuitry for short-circuit or whether to connect with the high-current load.
No response by pressing power button
1. Read the user manual, and confirm whether the operation is correct.
2. If the fault persists, please contact an authorized ePropulsion dealer.
The battery has no input or output
1. Check the connection between the battery, charger and the machine.
2. Reconnect the communication cables and power cables.
3. Disconnect the machine or charger, and reconnect after a while.
4. Contact an authorized ePropulsion dealer.
Other faults
1. Disconnect all connections to the battery. Then restart the battery after a while, and see if the fault persists.
2. If the fault persists, please contact an authorized ePropulsion dealer.
23
Engl
ish
4 Transportation and Storage
4.1 Transportation
Check and ensure the package is intact without any damage.
Avoid violent vibration, strike or squeeze during transport. Get adequate damping
protection measures before transport.
Do not expose the battery to the sun or rain during transport.
Check applicable local, national or international laws and regulations before
transport.
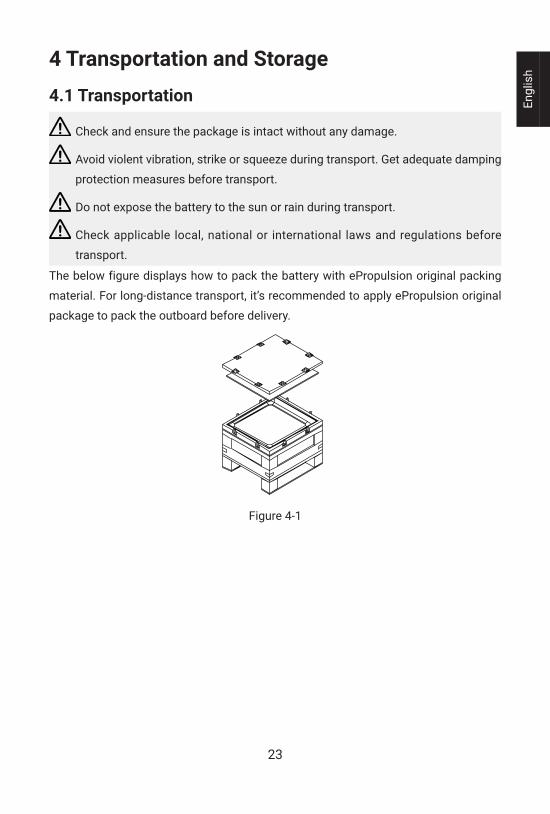
The below figure displays how to pack the battery with ePropulsion original packing
material. For long-distance transport, it’s recommended to apply ePropulsion original
package to pack the outboard before delivery.
Figure 4-1
24
4.2 Storage
When the battery is not in use, make sure that the battery's connectors are
covered well with the waterproof caps.
Disconnect all connections to the battery and check that all connectors are
clean.
Before storage, make sure the battery level is around 45%~50%, and stored at an
ambient temperature of 15°C ~ 25°C, relative humidity not more than 75%, clean,
dry and ventilated place, to avoid contact with corrosive contact, away from fire
and heat sources.
Protect against moisture, dust, water, shock and heat.
Every 6 months of storage, the battery should be recharged with an appropriate
ePropulsion charger.
25
Engl
ish
5 Routine MaintenanceVarious factors like operation environment (such as temperature, humidity, dust,
etc.), aging and wear of internal components, will increase the possibilities of battery
failure. In order to avoid this, keep your battery in optimal operating state, and
eventually extend the service lifespan of the battery. Therefore, routine maintenance
is very important.
• Before the first time use or reuse after long-term storage, charge the battery to
its full capacity in order to achieve the best performance. Only use ePropulsion
charger designed for E-Series Battery to charge the battery. Other chargers may
lead to reduced battery capacity, premature battery failure, fire or explosion. Avoid
over-charging, which may cause fire or explosion.
• Use the battery in moderate temperature to avoid negative effects of extreme
temperature posed on battery lifespan and useful cycles.
• Apply contact spay after use to keep the battery contacts in good condition.
• If a fault occurs, deal with the problem in a timely manner to avoid any further
damage. If necessary, consult the ePropulsion authorized dealer for repair or
parts replacement.
• During storage, strictly follow the instructions in Section 4.2 Storage. Pay special
attention to the residual charge and check the battery state in a regular manner.
• Use a clean & dry towel to keep the battery surface away from oil, dirt and water.
Avoid touching metal contacts. All the contacts need to be kept clean for best
performance. When carrying batteries around, do not touch the contacts with
metal objects such as keys or tools to avoid short circuit, battery damage, and
potential fire or explosion.
• To improve functionality and prolong lifespan of the battery, avoid direct sunshine
or radiation exposure. Meanwhile, avoid liquid, dust or dirt entering the battery.
• Do not leave the battery at a low state of charge.
• It is advised to check the battery state of charge on a regular basis.
26
6 Warranty The ePropulsion limited warranty is provided for the first end purchaser of an
ePropulsion product. Consumers are entitled to a free repair or replacement of
defective parts or parts which do not conform with the sales contract. This warranty
operates in addition to your statutory rights under your local consumer law.
6.1 Warranty Policies
ePropulsion warrants its products to be free of defects in material and workmanship
for a limited period since the date of purchase. Once a fault is discovered, the user
has the right to make a warranty claim under the ePropulsion warranty policies.
Product Warranty Expiry Date
E-Series Battery Two years after the date of purchase.
Components have been
repaired or replaced
Three months since the date of maintenance.
Note:
1. If the three-month period overlaps with the original warranty period, the warranty against these replaced or repaired parts still expires two years after the date of purchase.
2. If the three-month period exceeds the original warranty period, the repaired or replaced parts continue applying to warranty during the extended period.
In order to validate the warranty, users are required to fill in the Warranty Card
in the package in advance.
Keep the product label in intact state and record the serial number on the
label. Never tear the label off the product. An ePropulsion product without the
original product label will not be applicable to warranty services provided by
ePropulsion.
The warranty is valid only when the information is correct and complete.
Free warranty is only validated upon the presentation of legal serial number,
Warranty Card, and evidence of purchase from an authorized ePropulsion dealer.
Valid date of purchase should be established by the first-hand purchaser with
original sales slip.
27
Engl
ishFree warranty is not transferable and will not be reissued.
Within the limits of the applicable laws, the warranty policies of ePropulsion may
update without prior notice. The latest version is available at our website www.
epropulsion.com.
6.2 Out of Warranty
Make sure the product is properly packed during delivery, the original ePropulsion
package is recommended. If the product got further damaged due to improper
packing during delivery, the furtherly damaged part will be deemed as out of warranty
coverage.
In addition, faults or damages caused by the following reasons are also excluded
from warranty scope within the covered period:
• Any improper operation contradicts the user manual.
• Accident, misuse, wishful abuse, physical damage overcharging, liquid exposure
or unauthorized repair.
• Dropping, improper care or storage.
You should be noted that minor faults like normal wear and tear that pose no
influence on the intended function of the product are also not covered by the
warranty.
Consumables are out of warranty scope.
6.3 Warranty Claim Procedures
If you find your product defective, you can make a claim to your dealer following
below procedures:
1. Fill in the Warranty Card correctly and completely in advance. Then make your
warranty claim by sending it to your authorized ePropulsion service partner
together with valid proof of purchase. Usually these documents are required
when making a warranty claim: the Warranty Card, ex-factory serial number, and
evidence of purchase.
2. Send the defective product to your authorized ePropulsion service point after
getting the confirmation. Note that the label should be kept intact. You can
28
also deliver the product to your authorized ePropulsion dealer after getting
confirmation.
3. The defective components or parts will be either repaired or replaced according
to the diagnosis made by the ePropulsion authorized service partner.
4. If your warranty claim is accepted, the equipment will be repaired or replaced free
of cost. Note that any delivery cost incurred in the process is at your charge.
5. After careful examination and confirmation by ePropulsion authorized dealer, the
defective or faulty components will be repaired or replaced with brand new ones
against the actual condition.
6. In case your warranty claim is rejected, an estimated repair charge with round trip
delivery cost will be sent for confirmation. ePropulsion authorized service point
will conduct maintenance accordingly only after your confirmation.
If warranty expires, you can still enjoy maintenance services from authorized
ePropulsion service partners with minimum maintenance charge.
简中
29
致谢衷心感谢您购买逸动科技(ePropulsion)的产品以及对我们的信任与支持。我们将致力于为您提供更多高性能、可靠的电池和配件。欢迎浏览逸动科技的官网www.epropulsion.com。
使用须知在使用本产品之前,请充分阅读本使用手册,以了解正确和安全的操作方法。使用本产品即表示您已同意并充分阅读及理解本手册的所有内容。逸动科技不对因不符合本手册规定的操作而导致的任何财物损坏或人身伤害事件负责。 为持续优化我们的产品,逸动科技保留调整手册内容的权利。逸动科技也保留一切相关知识产权和工业产权,包括版权、专利、商标及设计等。 本手册将不定时更新,请浏览逸动科技官网www.epropulsion.com获取最新版本的使用手册。若您发现您的产品与本手册有任何冲突之处,或有任何关于产品或本手册的疑问,请浏览网站www.epropulsion.com或联系我们。逸动科技保留对本手册的最终解释权。本手册有多个语言版本,若不同语言版本之间有任何内容出入,请以英语版本为主。
图例在阅读本使用手册时,请参照以下图例:
重要的指示或警告
使用窍门或重要资讯
30
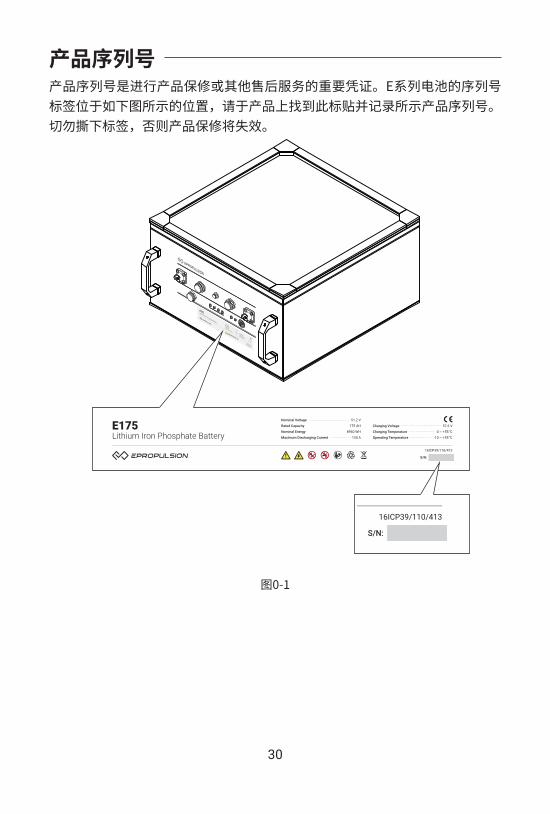
产品序列号产品序列号是进行产品保修或其他售后服务的重要凭证。E系列电池的序列号标签位于如下图所示的位置,请于产品上找到此标贴并记录所示产品序列号。切勿撕下标签,否则产品保修将失效。
图0-1
简中
31
目录致谢.............................................................................................. 29使用须知........................................................................................ 29图例.............................................................................................. 29产品序列号..................................................................................... 301.产品概览...................................................................................... 33
1.1 产品清单 ........................................................................................... 331.2 各部位名称 ........................................................................................ 341.3 详细规格 ........................................................................................... 351.4 使用前说明 ........................................................................................ 361.5 注意事项 ........................................................................................... 36
2 操作............................................................................................ 382.1 检查电池状态 .................................................................................... 382.2 使用单个电池 .................................................................................... 38
2.2.1 连接机器 .................................................................................. 382.2.2 开启 / 关闭电池 ........................................................................ 402.2.3 给电池充电 .............................................................................. 41
2.3 使用多个电池 .................................................................................... 422.3.1 并联连接电池 ........................................................................... 422.3.2 并联电池与机器连接 ................................................................ 432.3.3 打开 / 关闭已并联的电池 ......................................................... 452.3.4 给并联的电池充电 .................................................................... 45
2.4 LED 指示灯 ....................................................................................... 462.5 蜂鸣器 ............................................................................................... 47
3 故障排查...................................................................................... 484 运输与储存................................................................................... 49
4.1 运输 .................................................................................................. 494.2 储存 .................................................................................................. 49
5 日常维护...................................................................................... 506.保修条款...................................................................................... 51

32
6.1 保修期限 ........................................................................................... 516.2 不在保修范围内的情况 ...................................................................... 516.3 保修申请程序 .................................................................................... 52
简中
33
1.产品概览逸动科技E系列电池为磷酸铁锂电池,具有安全性能好,能量密度高,循环寿命长,可靠性高等特点。E系列电池有三个型号,分别为E40、E80和E175,标称电压均为51.2V,容量分别为40Ah、80Ah和175Ah。
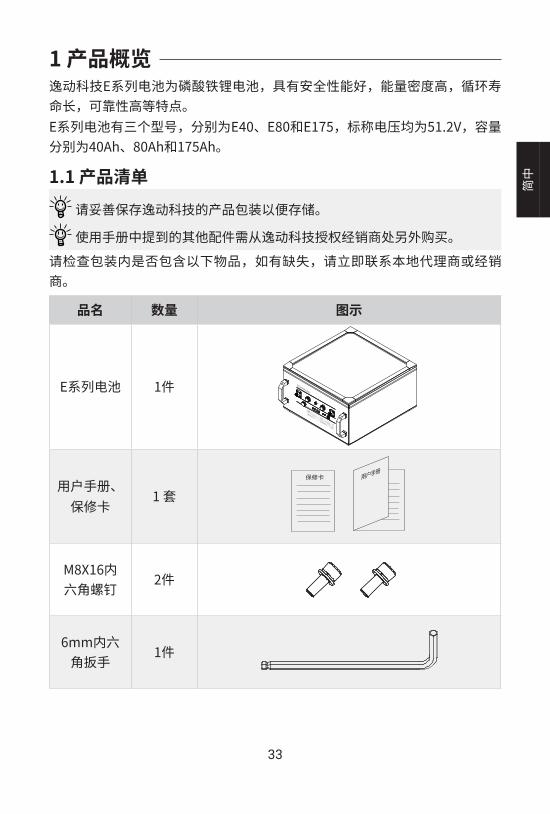
1.1.产品清单请妥善保存逸动科技的产品包装以便存储。
使用手册中提到的其他配件需从逸动科技授权经销商处另外购买。请检查包装内是否包含以下物品,如有缺失,请立即联系本地代理商或经销商。
品名 数量 图示
E系列电池 1件
用户手册、保修卡
1 套保修卡
M8X16内六角螺钉
2件
6mm内六角扳手
1件
34
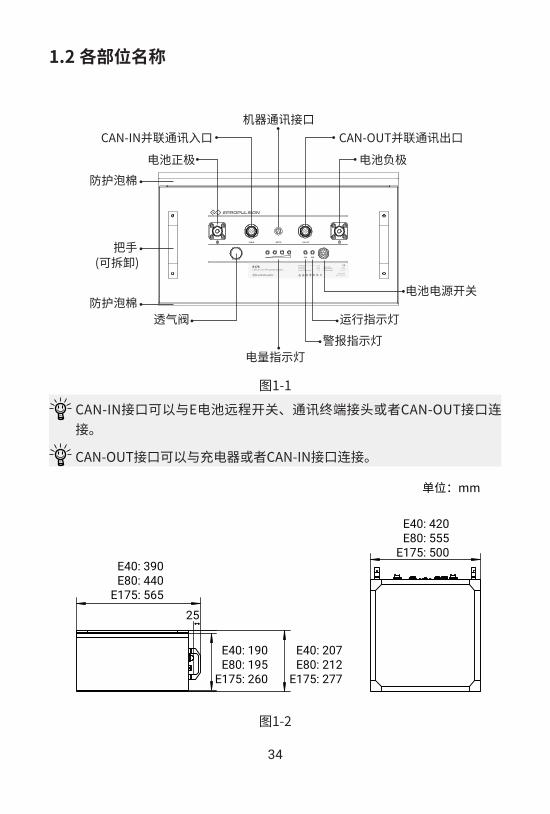
1.2 各部位名称
图1-1CAN-IN接口可以与E电池远程开关、通讯终端接头或者CAN-OUT接口连接。
CAN-OUT接口可以与充电器或者CAN-IN接口连接。
单位:mm
E40: 390E80: 440
E175: 565
25
E40: 207E80: 212
E175: 277
E40: 190E80: 195
E175: 260
E40: 420E80: 555
E175: 500
图1-2
电池正极
电量指示灯
透气阀警报指示灯运行指示灯
电池电源开关
CAN-IN并联通讯入口 CAN-OUT并联通讯出口机器通讯接口
电池负极
把手(可拆卸)
防护泡棉
防护泡棉
简中
35
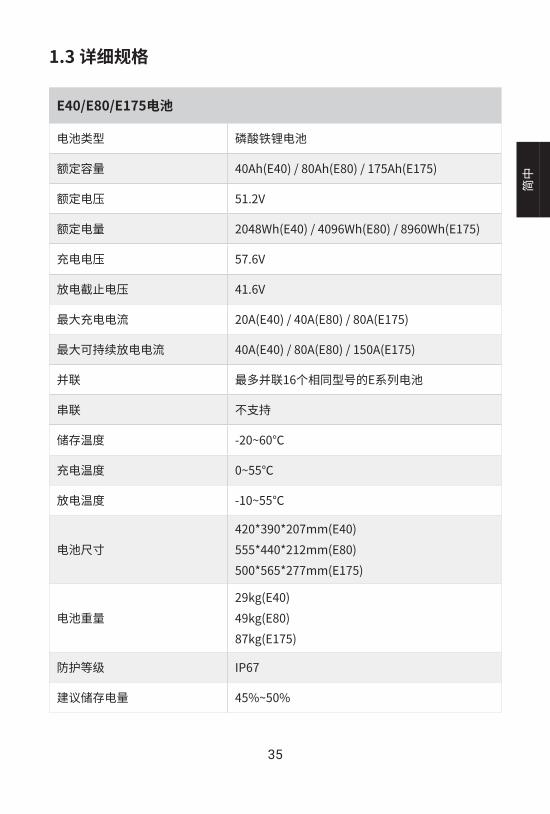
1.3 详细规格
E40/E80/E175电池
电池类型 磷酸铁锂电池
额定容量 40Ah(E40) / 80Ah(E80) / 175Ah(E175)
额定电压 51.2V
额定电量 2048Wh(E40) / 4096Wh(E80) / 8960Wh(E175)
充电电压 57.6V
放电截止电压 41.6V
最大充电电流 20A(E40) / 40A(E80) / 80A(E175)
最大可持续放电电流 40A(E40) / 80A(E80) / 150A(E175)
并联 最多并联16个相同型号的E系列电池
串联 不支持
储存温度 -20~60℃
充电温度 0~55℃
放电温度 -10~55℃
电池尺寸420*390*207mm(E40)555*440*212mm(E80)500*565*277mm(E175)
电池重量29kg(E40)49kg(E80)87kg(E175)
防护等级 IP67
建议储存电量 45%~50%
36
1.4 使用前说明• 使用电池前,请仔细阅读使用说明书。只有成人在充分阅读说明书后方可
进行操作。• 每次使用电池前,检查电池是否固定牢靠,检查电池的状态、功能和连接
是否正常。•. 请勿撕下电池表面的防护泡棉。因为电池表面的泡棉可以防止突出的螺钉
伤害用户,并且起到防腐蚀的作用。• 切勿将电池正负极短路,切勿自己拆装电池。• 切勿将电池放在受潮处。• 在使用过程中,应远离热源、高压。• 切勿摔打、跌落电池。• 在使用过程中,如出现故障报警,请参考第2.4节LED指示灯、第2.5节蜂鸣
器以及第3节故障排查进行处理。• 不建议将电池不带包装箱的叠放。• 废弃电池请依据当地法律规定安全妥当处理。
1.5 注意事项•. 在电池不使用的时候,请确保电池的防水帽都盖好。• E系列电池可防溅、抗水、防尘,在出厂前经测试,其效果达到 IP67级
别。防溅、抗水、防尘功能并非永久有效,防护性能可能会因日常磨损而下降。由于进水而导致的损坏不在保修范围之内。
• 严禁将电池暴露在高温或有火星的环境中。• 严禁将电池浸入水中,或者使其受潮。• 严禁将电池和项链、硬币或发夹等金属物品放置在一起。也不要将金属工
具放在电池上,否则可能会导致短路。只能使用妥善做好绝缘的工具。• 严禁撞击、投掷电池或使电池承受过重的机械冲击。• 严禁针刺、锤打或践踏电池。• 严禁使电池受到明显的损害或变形。• 严禁直接接触泄漏的电芯。• 严禁正负极接反。• 严禁将电池短路、过充或过放。• 严禁将电池串联。• 严禁将该电池与不同规格、型号的电池并联混用。

简中
37
• 如果在极端环境(低于0℃或者高于50℃)使用电池,电池寿命会缩短。• 只能在安全干燥且附近没有易燃物的场地给电池充电。• 长期不用时,在储存前,请确保电池电量在45%~50%左右。• 严禁使用导电材料包裹电池,避免金属直接接触电池,造成电池损坏。• 请将电池保存在阴凉干燥处。• 请将电池放置在远离儿童的地方。• 严禁将电池放置在太阳光直射的地方。• 严禁拆卸或修理电池。• 切勿打开电池外壳。如果外壳受到损坏,禁止使用电池或给电池充电。请
联系逸动科技授权经销商。
38
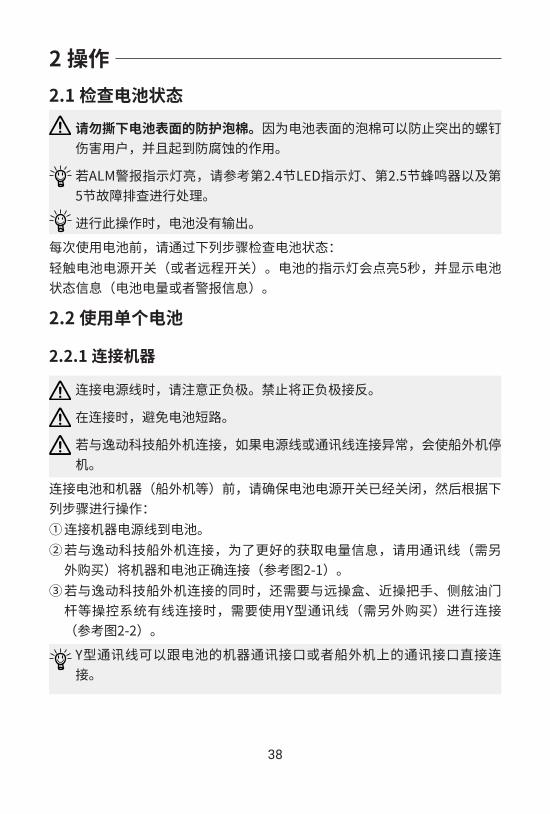
2 操作2.1 检查电池状态请勿撕下电池表面的防护泡棉。因为电池表面的泡棉可以防止突出的螺钉伤害用户,并且起到防腐蚀的作用。
若ALM警报指示灯亮,请参考第2.4节LED指示灯、第2.5节蜂鸣器以及第5节故障排查进行处理。
进行此操作时,电池没有输出。每次使用电池前,请通过下列步骤检查电池状态:轻触电池电源开关(或者远程开关)。电池的指示灯会点亮5秒,并显示电池状态信息(电池电量或者警报信息)。
2.2 使用单个电池
2.2.1 连接机器
连接电源线时,请注意正负极。禁止将正负极接反。
在连接时,避免电池短路。
若与逸动科技船外机连接,如果电源线或通讯线连接异常,会使船外机停机。
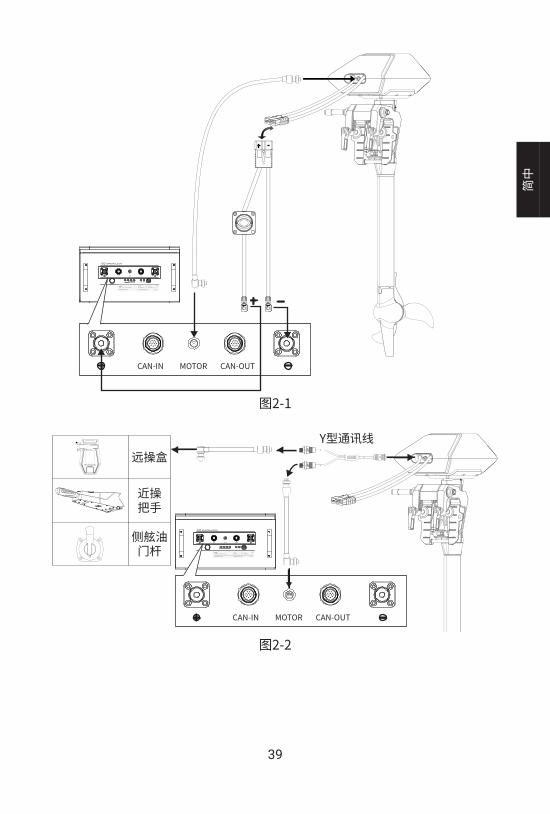
连接电池和机器(船外机等)前,请确保电池电源开关已经关闭,然后根据下列步骤进行操作:① 连接机器电源线到电池。② 若与逸动科技船外机连接,为了更好的获取电量信息,请用通讯线(需另
外购买)将机器和电池正确连接(参考图2-1)。③ 若与逸动科技船外机连接的同时,还需要与远操盒、近操把手、侧舷油门
杆等操控系统有线连接时,需要使用Y型通讯线(需另外购买)进行连接(参考图2-2)。
Y型通讯线可以跟电池的机器通讯接口或者船外机上的通讯接口直接连接。
简中
39
图2-1
图2-2
CAN-IN CAN-OUTMOTOR
CAN-IN CAN-OUTMOTOR
Y型通讯线
40
2.2.2 开启 / 关闭电池
电池具有自动休眠功能。电池开启后,如果24小时内不进行操作或使用,电池会自动关闭。
开启电池前,请先确保机器电源线与电池连接稳妥,连接处锁紧且不会有滑脱的风险,无短路等状况。
a.使用电池电源开关1. 开启电池时,按下电池上的电源开关,持续1S(不超过3S),RUN运行
指示灯点亮,即可松开按键,系统开机自检,按键灯5S不熄灭,电池不报错,表明成功开启电池。
2. 关闭电池时,按下电池上的电源开关,持续3S,RUN运行指示灯熄灭,即可松手,电池自动断电。
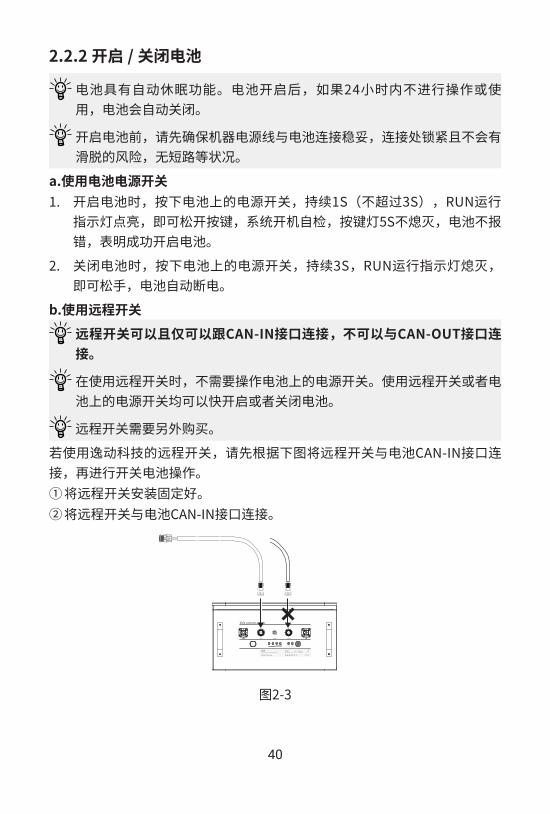
b.使用远程开关远程开关可以且仅可以跟CAN-IN接口连接,不可以与CAN-OUT接口连接。
在使用远程开关时,不需要操作电池上的电源开关。使用远程开关或者电池上的电源开关均可以快开启或者关闭电池。
远程开关需要另外购买。若使用逸动科技的远程开关,请先根据下图将远程开关与电池CAN-IN接口连接,再进行开关电池操作。① 将远程开关安装固定好。② 将远程开关与电池CAN-IN接口连接。
图2-3
简中
41
1. 开启电池时,按下远程开关上的电源开关,持续1S(不超过3S),按键上指示灯点亮,即可松开按键,系统开机自检,按键灯5S不熄灭,电池不报错,表明成功开启电池。
2. 关闭电池时,按下远程开关上的电源开关,长按3S,即可松手,电池自动断电,按键上指示灯熄灭。
2.2.3 给电池充电
在充电前请阅读以下注意事项:只使用逸动科技E系列电池专用的充电器给电池充电。严禁使用第三方充电器给电池充电。
充电器的通讯线需要与电池的CAN-OUT接口连接。
在充电前请确认交流电源(AC电源)处于关闭状态。
严禁将正负极接反。
只在0~55℃环境下对电池进行充电。
在充电时,避免电池与水接触并且避免暴露在太阳直晒或者雨水下。请在干燥、通风的环境下进行充电。
避免在充电时直接接触充电器,避免充电器表面温度较高烫伤皮肤。
请不要过充电池。
请将电池放置在远离儿童的地方。① 给电池充电时,将充电器电源线的正极与电池正极接口连接,将充电器电
源线的负极与电池负极接口连接,并将充电器的通讯线与电池CAN-OUT接口连接,确保连接处锁紧且不会有滑脱的风险。
② 确认电池处于关闭状态后,将充电器接通交流电源(AC电源),然后按下电池/远程开关的电源开关开启电池,系统无充电报警故障,表明电池充电成功。
③ 充电完成后,长按电池/远程开关的电源开关关闭电池,拔出充电器电源插头,然后解除充电器与电池连接。
42
充电器
通讯线
图2-4
2.3.使用多个电池严禁将电池串联。
2.3.1 并联连接电池
请尽可能在电池充满后的条件下并联连接电池,并且压差不得超过2V。
电池并联的时候,电池的CAN-IN接口必须连接远程开关或者通讯终端接头(需另外购买)。
禁止将不同规格、型号的电池混合并联使用。
禁止新旧电池并联使用。
在连接前,请确保电源开关已经关闭。
严禁将正负极接反。并联连接2个或以上电池可以更好的延长使用时间。E系列电池支持最多同时并联16个同型号电池。请使用电池并联线和E电池通讯线(需另外购买)连接各个电池。1#电池(参考图2-5)的CAN-OUT与2#电池的CAN-IN接口通过E电池通讯线连接,以此类推。请参考下图。
简中
43
CAN-IN CAN-OUTMOTOR
CAN-IN CAN-OUTMOTOR
CAN-IN CAN-OUTMOTOR
远程开关
1#电池
2#电池
3#电池
通讯终端接头
电池并联线
电池并联线电池并联线
电池并联线 E电池通讯线
E电池通讯线
图2-5
2.3.2 并联电池与机器连接
并联电池与逸动科技船外机连接时,需要通过通讯线将船外机与1#电池(参考图2-6)连接。并且船外机只能与1#电池连接。
并联的时候CAN-IN口必须连接远程开关或者通讯终端接头。参考第2.2.1节将1#电池与机器连接。下图为并联电池与逸动科技船外机连接的示意图。
44
图2-6电池的最大放电电流为40A(E40)/80A(E80)/150A(E175),只能允许负载电流小于该数值的设备接入。
如果电池并联,电流范围会增大。
如果超过使用电流,可能会造成电池的保险丝熔断。
CAN-IN CAN-OUTMOTOR
CAN-IN CAN-OUTMOTOR
1#电池
2#电池
电池串并联线电池串并联线 E电池通讯线
远程开关通讯终端接头
简中
45
2.3.3 打开 / 关闭已并联的电池
多个同型号的E系列电池并联使用时,只能按下1#电池(与机器连接的电池)或者远程开关上的电源开关来开启或者关闭电池。
1. 开启电池时,按下1#电池上的电源开关或者远程开关,持续1S(不超过3S),RUN运行指示灯(和远程开关的按键指示灯)点亮,即可松开按键,系统开机自检,电池不报错,表明成功开启电池。
2. 关闭电池时,按下1#电池上的电源开关或者远程开关,持续3S,RUN运行指示灯(和远程开关的按键指示灯)熄灭,即可松手,电池自动断电。
2.3.4 给并联的电池充电并联的时候CAN-IN口必须连接远程开关或者通讯终端接头。
给并联的电池充电时,充电器与未连接CAN-OUT接口的电池(参考图2-7中的2#电池)连接。
给并联电池充电时,相比给单个电池充电,充电时长会变长。可以选用输出功率更大的逸动科技充电器给并联电池充电,以缩短充电时长。
给并联的电池充电时,操作与给单独一个电池充电相同,请参考2.2.3给电池充电。
CAN-IN CAN-OUTMOTOR
CAN-IN CAN-OUTMOTOR
1#电池
2#电池
充电器
通讯线
电池串并联线电池串并联线 E电池通讯线
远程开关通讯终端接头
图2-7
46
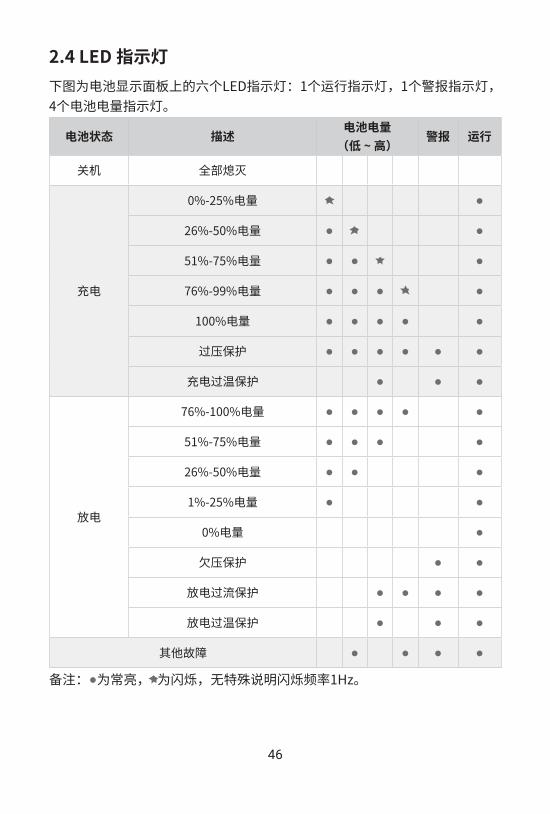
2.4.LED 指示灯下图为电池显示面板上的六个LED指示灯:1个运行指示灯,1个警报指示灯,4个电池电量指示灯。
电池状态 描述电池电量(低 ~高)
警报 运行
关机 全部熄灭
充电
0%-25%电量 ●
26%-50%电量 ● ●
51%-75%电量 ● ● ●
76%-99%电量 ● ● ● ●
100%电量 ● ● ● ● ●
过压保护 ● ● ● ● ● ●
充电过温保护 ● ● ●
放电
76%-100%电量 ● ● ● ● ●
51%-75%电量 ● ● ● ●
26%-50%电量 ● ● ●
1%-25%电量 ● ●
0%电量 ●
欠压保护 ● ●
放电过流保护 ● ● ● ●
放电过温保护 ● ● ●
其他故障 ● ● ● ●
备注:●为常亮,为闪烁,无特殊说明闪烁频率1Hz。

简中
47
2.5 蜂鸣器
蜂鸣器状态 描述
隔 10 秒响一次,持续 3 秒 电池出现初级告警,请参考第 2.4 节和第 3 节进行故障排查
持续响 电池出现了较严重的告警或是电池出现某种错误关断输出,不能充电或放电。
响一次,持续 5 秒 电量开始低于 30%。
响一次,持续 8 秒 电量开始低于 20%。
48
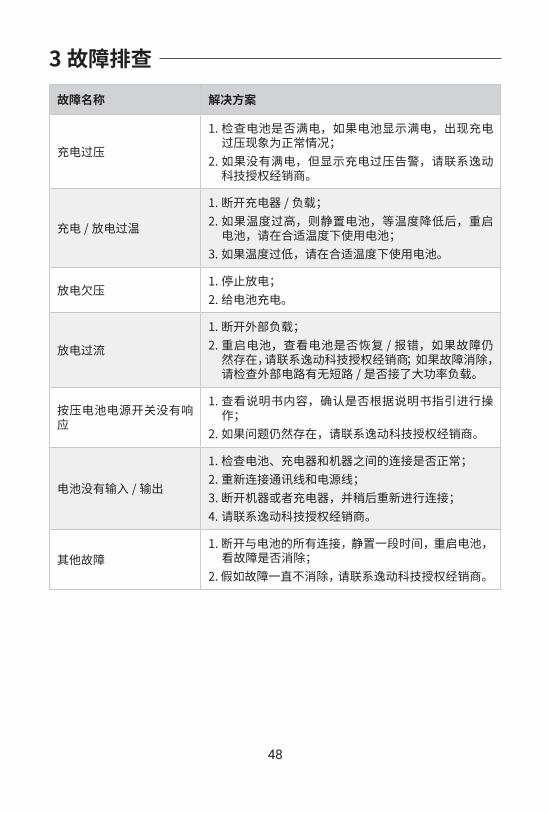
3 故障排查故障名称 解决方案
充电过压
1. 检查电池是否满电,如果电池显示满电,出现充电过压现象为正常情况;
2. 如果没有满电,但显示充电过压告警,请联系逸动科技授权经销商。
充电 / 放电过温
1. 断开充电器 / 负载;2. 如果温度过高,则静置电池,等温度降低后,重启
电池,请在合适温度下使用电池;3. 如果温度过低,请在合适温度下使用电池。
放电欠压1. 停止放电;2. 给电池充电。
放电过流
1. 断开外部负载;2. 重启电池,查看电池是否恢复 / 报错,如果故障仍
然存在,请联系逸动科技授权经销商;如果故障消除,请检查外部电路有无短路 / 是否接了大功率负载。
按压电池电源开关没有响应
1. 查看说明书内容,确认是否根据说明书指引进行操作;
2. 如果问题仍然存在,请联系逸动科技授权经销商。
电池没有输入 / 输出
1. 检查电池、充电器和机器之间的连接是否正常;2. 重新连接通讯线和电源线;3. 断开机器或者充电器,并稍后重新进行连接;4. 请联系逸动科技授权经销商。
其他故障1. 断开与电池的所有连接,静置一段时间,重启电池,
看故障是否消除;2. 假如故障一直不消除,请联系逸动科技授权经销商。
简中
49
4 运输与储存4.1 运输
检查并确保包装完好无损。
运输过程中避免剧烈振动、撞击、跌落或挤压。运输前应采取足够的保护措施。
在运输过程中,不要将电池暴露在阳光下或雨中。
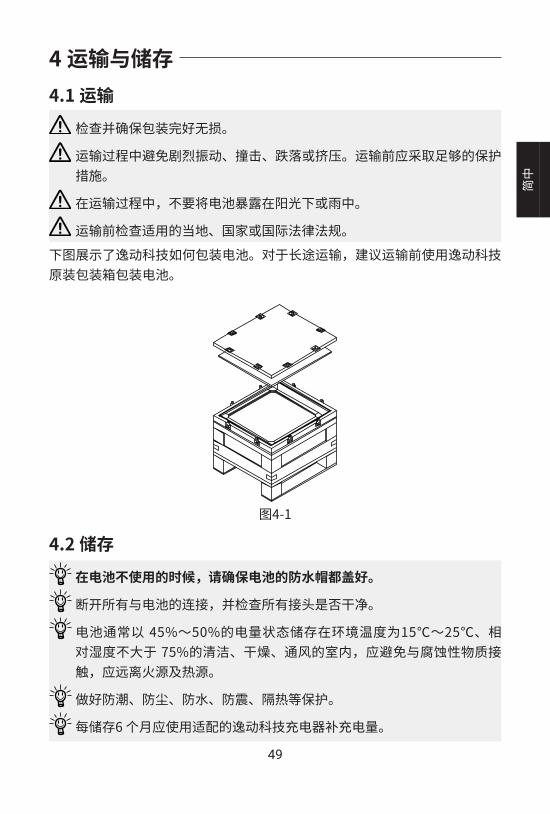
运输前检查适用的当地、国家或国际法律法规。 下图展示了逸动科技如何包装电池。对于长途运输,建议运输前使用逸动科技原装包装箱包装电池。
图4-1
4.2 储存在电池不使用的时候,请确保电池的防水帽都盖好。
断开所有与电池的连接,并检查所有接头是否干净。
电池通常以 45%~50%的电量状态储存在环境温度为15℃~25℃、相对湿度不大于 75%的清洁、干燥、通风的室内,应避免与腐蚀性物质接触,应远离火源及热源。
做好防潮、防尘、防水、防震、隔热等保护。
每储存6 个月应使用适配的逸动科技充电器补充电量。

50
5 日常维护操作环境(如温度、湿度、灰尘等)、内部部件的老化和磨损、线材与电池接触不良等各种因素都会增加电池故障的可能性。为了避免这种情况,请保持你的电池处于最佳工作状态,并最终延长电池的使用寿命。因此,日常维护非常重要。
• 首次使用前或长期存放后再使用时,应将电池充至最大容量,以达到最佳性能。充电时只能使用专为E系列电池设计的逸动科技充电器。其他充电器可能导致电池容量减少、电池过早失效,甚至起火或爆炸。避免过度充电,以免引起火灾或爆炸。
• 在合适温度下使用电池,以避免极端温度对电池寿命和有效循环造成负面影响。使用后,请使用触点喷雾,以保持电池触点处于良好状态。并盖好接头的防水帽。
• 一旦发生故障,应及时处理,以免造成进一步的损害。如有必要,请咨询逸动科技授权经销商进行维修或零件更换。
• 在储存期间,严格按照第4.2节储存的说明进行操作。特别注意剩余电量,定期检查电池状态。
• 使用干净干燥的毛巾清洁电池表面,使之没有油、污垢和水。所有的接头都需要保持清洁以获得最佳性能。携带电池时,不要接触金属物品,如钥匙或工具,以免短路、电池损坏和潜在火灾或爆炸。
• 为了提高电池的性能和延长使用寿命,避免阳光直射。同时,避免液体、灰尘或泥浆进入电池。
• 当电池电量不足时,请停止放电,并尽快给电池充电。建议定期检查电池电量。

简中
51
6.保修条款逸动科技(ePropulsion)为授权渠道售出的逸动科技产品提供保修服务。保修内容包括重大瑕疵产品的免费更换,不符合销售合同的产品的免费更换,以及缺损零件的免费维修或更换。保护消费者的合法权益是保修条款制定的重要原则。
6.1.保修期限
产品 /零件 保修到期日
E系列电池 购买日起2年(非商业用途)
已维修/已更换的零件
自维修/更换日起3个月注:1. 若这三个月的时期在原产品的保修期限内,则已维修或已更换的零件的保修期为自产品购买日起2年。2. 若这三个月的时期超出原产品保修期限内,则已维修或已更换零件的保修期限为自维修日起3个月。
为了满足保修条件,用户需提前填写包装中附带的《保修卡》。
保持产品标签完好无损并且记录标签上的序号。切勿将产品上的标签撕下。不具备原厂产品标签的产品将无法获得逸动科技提供的保修服务。
保修仅在所提供资讯正确且完整的情形下有效。
用户需要出示合法的产品序号、《保修卡》以及从逸动科技授权经销商处取得的购买单据。
有效购买日期应当由首位购买者以原始销售单据确定。
保修卡不可转让,也不可补发。
6.2.不在保修范围内的情况确保产品在交付保修时有合适包装。建议采用逸动科技的原厂包装。若产品因交付时包装不当而出现其他损坏,其他受损零件将被视为不在保修范围内。此外,在保修期內,因下列原因导致的故障或损坏也应被排除在保修范围之外。
52
任何与使用手册相背的不当操作造成的产品损坏。
事故、误用、凭主观意愿的滥用、有形损坏、充电过度、进水或未经授权的修理。
摔落、不当保养或储存。
微小瑕疵,例如不会影响产品预期功能的正常磨损亦不在保修范围内。
耗材不在保修范围内。
使用产品造成的其它赔偿或经济损失免责。
通过非逸动科技官方授权销售渠道购买逸动科技产品、将逸动科技产品用于商业目的、不能按要求提交保修所需的全部材料,发生以上任何一种情况时,将免除保修义务。
6.3.保修申请程序 若您发现产品有缺陷,可依照下列程序向经销商提出申请:1.提前正确完整地填写《保修卡》。然后将《保修卡》连同有效购买证明一并交给逸动科技授权的经销商。通常保修申请所需的文件有:《保修卡》、出厂产品序号和购买证明。2.获得保修确认后,将故障产品交给逸动科技授权的服务点。注意标签应保持完好无损。3.逸动科技授权经销商会依据故障诊断维修或更换有缺陷的零件。4.若您的保修申请被接受,设备的维修或更换即是免费进行的。注意在此过程中,任何运送费用需由用户自己承担。5.逸动科技授权经销商经过仔细检查和确认后,会依实际状况对有缺陷或故障的零件进行维修或更换。6.若您的保修申请被拒绝,逸动科技授权经销商会交给您一份维修费用评估表,其中同时包含往返的运输费用。逸动科技授权经销商仅在获得您的确认后才会进行维修。
保修到期后,仍可以以优惠的维修费享受逸动科技授权经销商提供的维修服务。

Thanks for reading this user manual.If you have any concerns or find any problems while reading, please don't hesitate to contact us. We are delighted to offer service for you.感谢您阅读逸动科技产品使用手册。如果您在阅读时有任何疑问或遇到任何问题,欢迎联系我们。我们将竭诚为您解答。
Guangdong.ePropulsion.Technology.Limited.广东逸动科技有限公司.Website/ 官网 :.www.epropulsion.com.Email/ 邮箱 :[email protected]...


