Embed Size (px)
Citation preview
EACH CHAPTER INCLUDES: •Prescriptivetargetedstrategic
interventioncharts. •Studentactivitypages
alignedtotheCommonCoreStateStandards.
•Completelessonplanpageswithlessonobjectives,gettingstartedactivities,teachingsuggestions,andquestionstocheckstudentunderstanding.
Grade 4
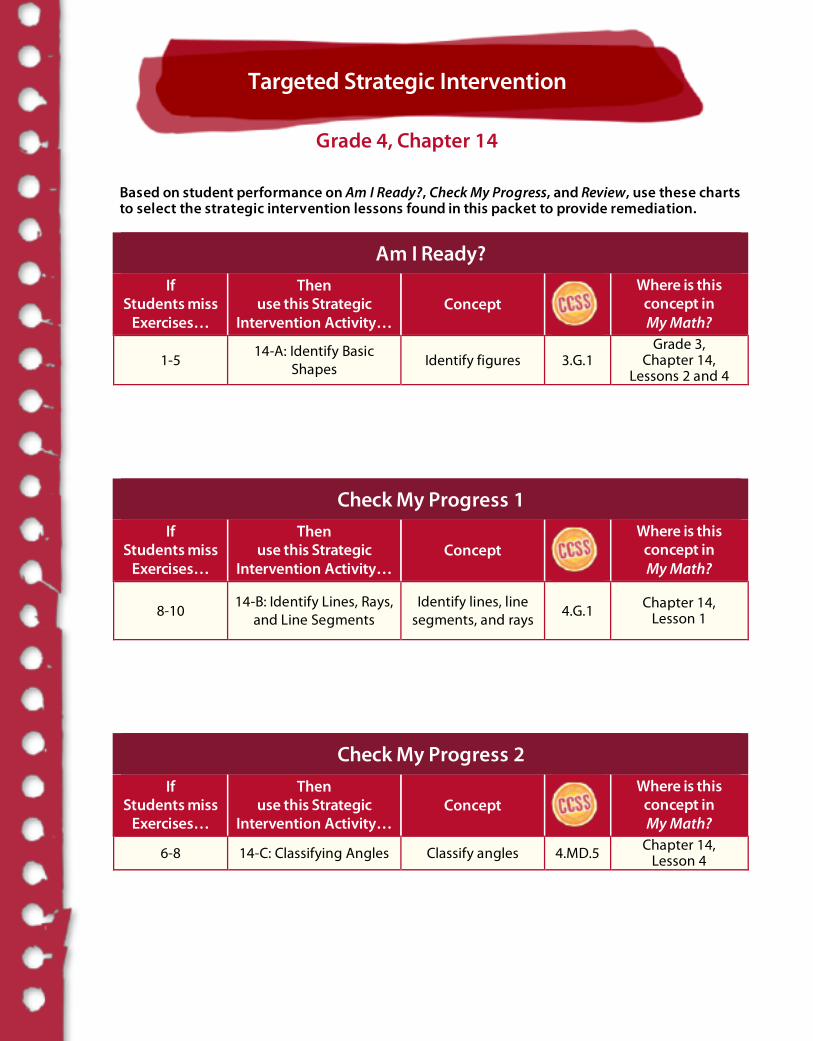
Targeted Strategic Intervention
Grade 4, Chapter 14
Based on student performance on Am I Ready?, Check My Progress, and Review, use these charts to select the strategic intervention lessons found in this packet to provide remediation.
Am I Ready?
If Students miss
Exercises…
Then use this Strategic
Intervention Activity… Concept
Where is this concept in My Math?
1-5 14-A: Identify Basic
Shapes Identify figures 3.G.1 Grade 3,
Chapter 14, Lessons 2 and 4
Check My Progress 1
If Students miss
Exercises…
Then use this Strategic
Intervention Activity… Concept
Where is this concept in My Math?
8-10 14-B: Identify Lines, Rays,
and Line Segments Identify lines, line
segments, and rays 4.G.1 Chapter 14, Lesson 1
Check My Progress 2
If Students miss
Exercises…
Then use this Strategic
Intervention Activity… Concept
Where is this concept in My Math?
6-8 14-C: Classifying Angles Classify angles 4.MD.5 Chapter 14, Lesson 4
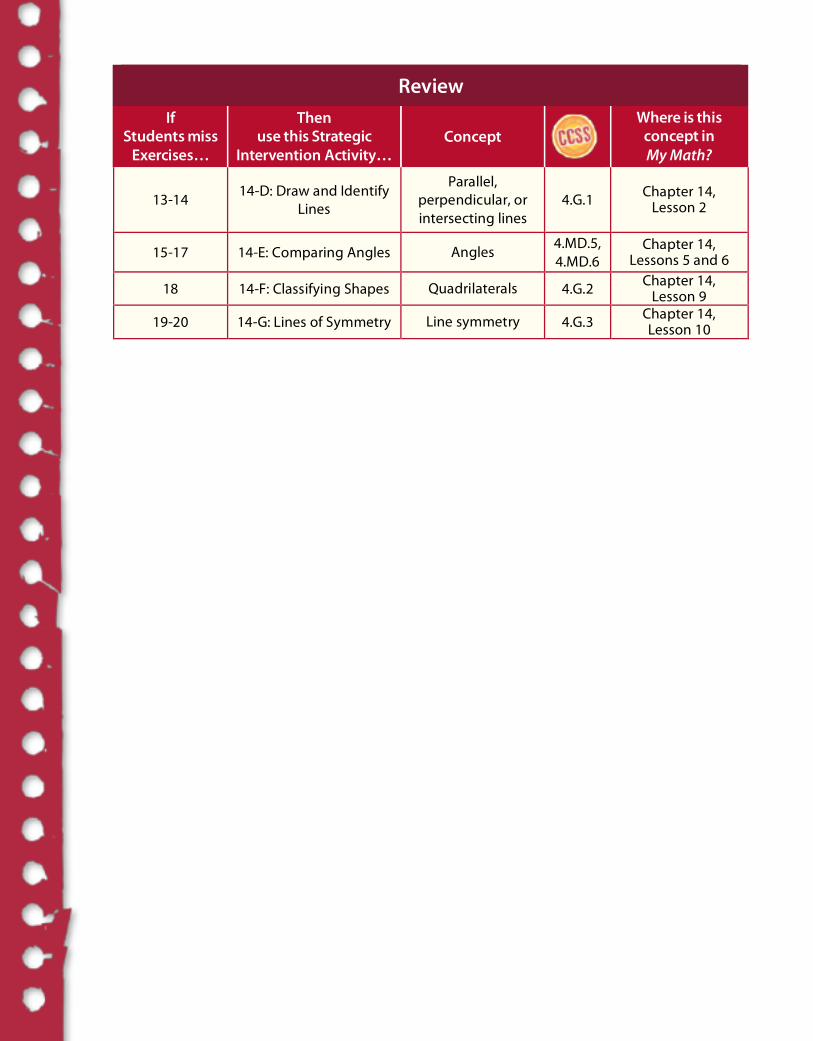
Review
If Students miss
Exercises…
Then use this Strategic
Intervention Activity… Concept
Where is this concept in My Math?
13-14 14-D: Draw and Identify Lines
Parallel, perpendicular, or intersecting lines
4.G.1 Chapter 14, Lesson 2
15-17 14-E: Comparing Angles Angles 4.MD.5, 4.MD.6
Chapter 14, Lessons 5 and 6
18 14-F: Classifying Shapes Quadrilaterals 4.G.2 Chapter 14, Lesson 9
19-20 14-G: Lines of Symmetry Line symmetry 4.G.3 Chapter 14, Lesson 10
Program: SI_Chart Component: SEPDF Pass
Vendor: Laserwords Grade: 4
Name
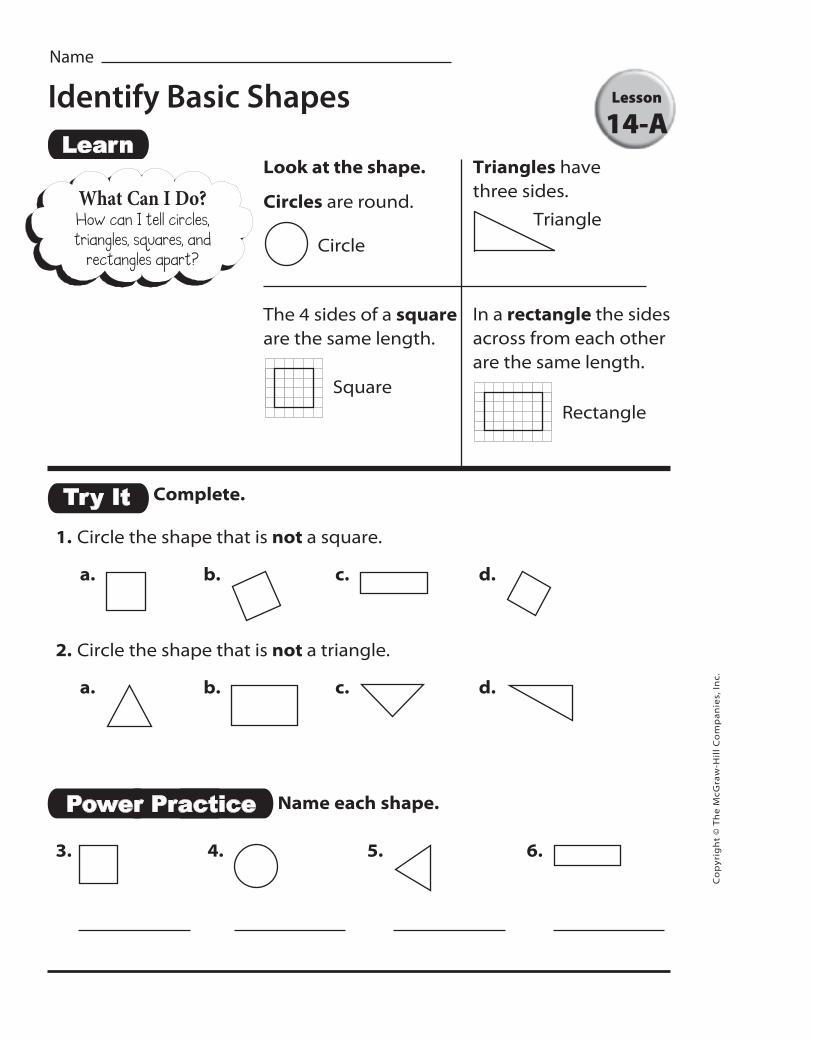
Complete.
1. Circle the shape that is not a square.
a. b. c. d.
2. Circle the shape that is not a triangle.
a. b. c. d.
Identify Basic Shapes
Name each shape.
Look at the shape.
Circles are round.
The 4 sides of a square are the same length.
Triangles have three sides.
In a rectangle the sides across from each other are the same length.
CircleTriangle
SquareRectangle
3. 4. 5. 6.
Lesson
14-A
What Can I Do?How can I tell circles, triangles, squares, and
rectangles apart?
Co
pyr
igh
t ©
Th
e M
cGra
w-H
ill
Co
mp
an
ies,
In
c.
412_S_G4_C14_SI_119816.indd 412412_S_G4_C14_SI_119816.indd 412 7/10/12 10:34 AM7/10/12 10:34 AM
Program: SI_Chart Component: TEPDF Pass
Vendor: Laserwords Grade: 4
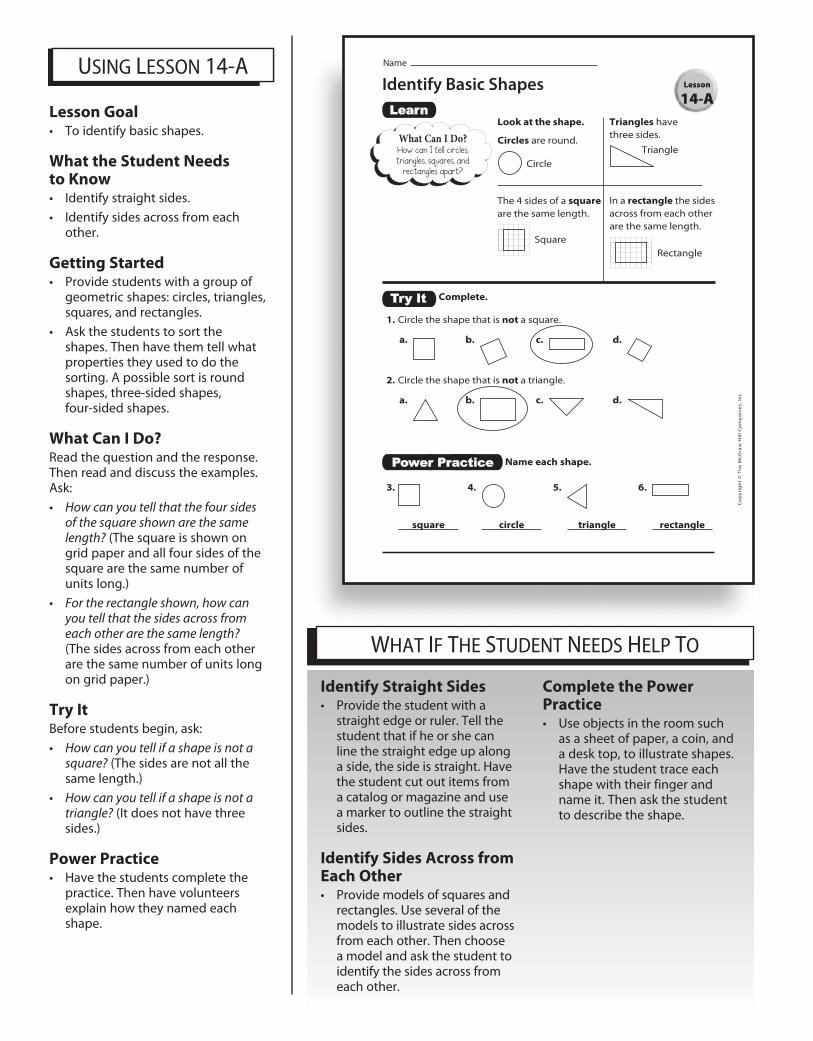
USING LESSON 14-A
Lesson Goal• To identify basic shapes.
What the Student Needs to Know• Identify straight sides.
• Identify sides across from each other.
Getting Started• Provide students with a group of
geometric shapes: circles, triangles, squares, and rectangles.
• Ask the students to sort the shapes. Then have them tell what properties they used to do the sorting. A possible sort is round shapes, three-sided shapes, four-sided shapes.
What Can I Do?Read the question and the response. Then read and discuss the examples. Ask:
• How can you tell that the four sides of the square shown are the same length? (The square is shown on grid paper and all four sides of the square are the same number of units long.)
• For the rectangle shown, how can you tell that the sides across from each other are the same length? (The sides across from each other are the same number of units long on grid paper.)
Try ItBefore students begin, ask:
• How can you tell if a shape is not a square? (The sides are not all the same length.)
• How can you tell if a shape is not a triangle? (It does not have three sides.)
Power Practice• Have the students complete the
practice. Then have volunteers explain how they named each shape.
Identify Straight Sides• Provide the student with a
straight edge or ruler. Tell the student that if he or she can line the straight edge up along a side, the side is straight. Have the student cut out items from a catalog or magazine and use a marker to outline the straight sides.
Identify Sides Across from Each Other• Provide models of squares and
rectangles. Use several of the models to illustrate sides across from each other. Then choose a model and ask the student to identify the sides across from each other.
Complete the Power Practice• Use objects in the room such
as a sheet of paper, a coin, and a desk top, to illustrate shapes. Have the student trace each shape with their finger and name it. Then ask the student to describe the shape.
WHAT IF THE STUDENT NEEDS HELP TO
Name
Complete.
1. Circle the shape that is not a square.
a. b. c. d.
2. Circle the shape that is not a triangle.
a. b. c. d.
Identify Basic Shapes
Name each shape.
Look at the shape.
Circles are round.
The 4 sides of a square are the same length.
Triangles have three sides.
In a rectangle the sides across from each other are the same length.
CircleTriangle
SquareRectangle
square circle triangle rectangle
3. 4. 5. 6.
Lesson
14-A
What Can I Do?How can I tell circles, triangles, squares, and
rectangles apart?
Co
pyr
igh
t ©
Th
e M
cGra
w-H
ill
Co
mp
an
ies,
In
c.
412_S_G4_C14_SI_119816.indd 412 7/10/12 10:34 AM
413_T_G4_C14_SI_119816.indd 413413_T_G4_C14_SI_119816.indd 413 7/10/12 10:35 AM7/10/12 10:35 AM
Program: SI_Chart Component: SEPDF 2nd
Vendor: Laserwords Grade: 4
Name
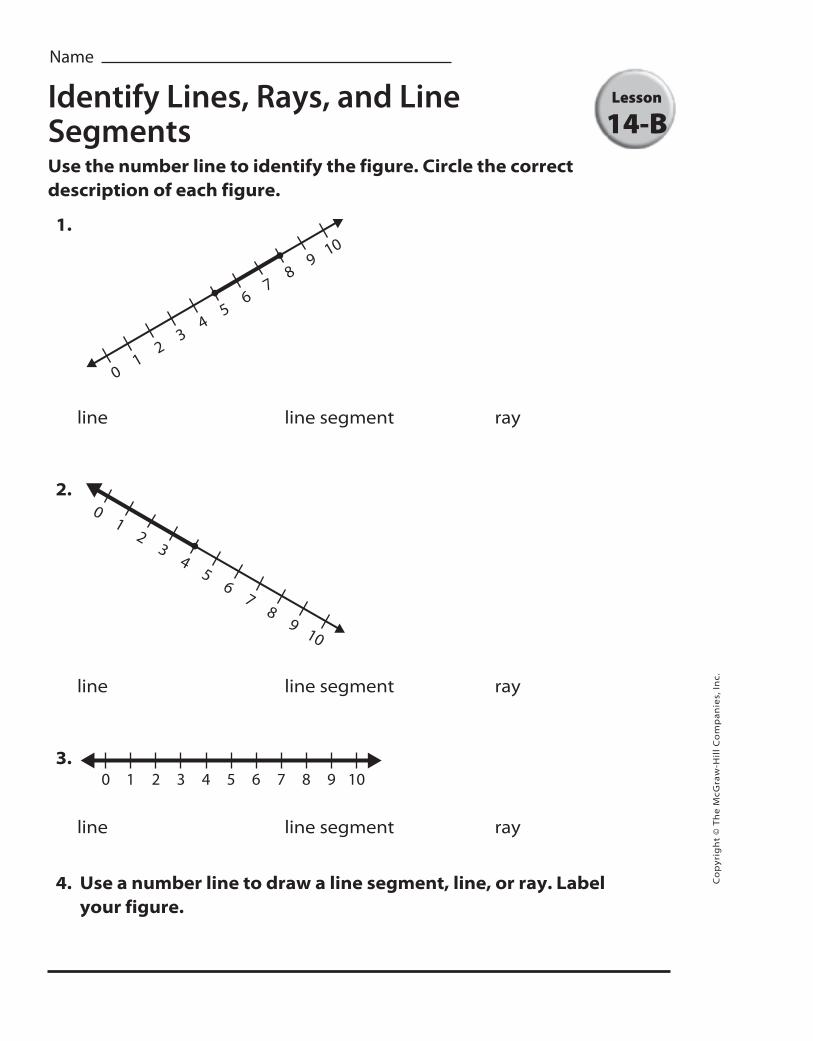
Identify Lines, Rays, and Line Segments Use the number line to identify the figure. Circle the correct description of each figure.
1.
01
23
45
67
89
10
line line segment ray
2. 0
12
34
56
78
910
line line segment ray
3. 0 1 2 3 4 5 6 7 8 9 10
line line segment ray
4. Use a number line to draw a line segment, line, or ray. Label your figure.
Lesson
14-B
Co
pyr
igh
t ©
Th
e M
cGra
w-H
ill
Co
mp
an
ies,
In
c.
414_S_G4_C14_SI_119816.indd 414414_S_G4_C14_SI_119816.indd 414 7/12/12 4:37 PM7/12/12 4:37 PM
Program: SI_Chart Component: TEPDF 2nd
Vendor: Laserwords Grade: 4
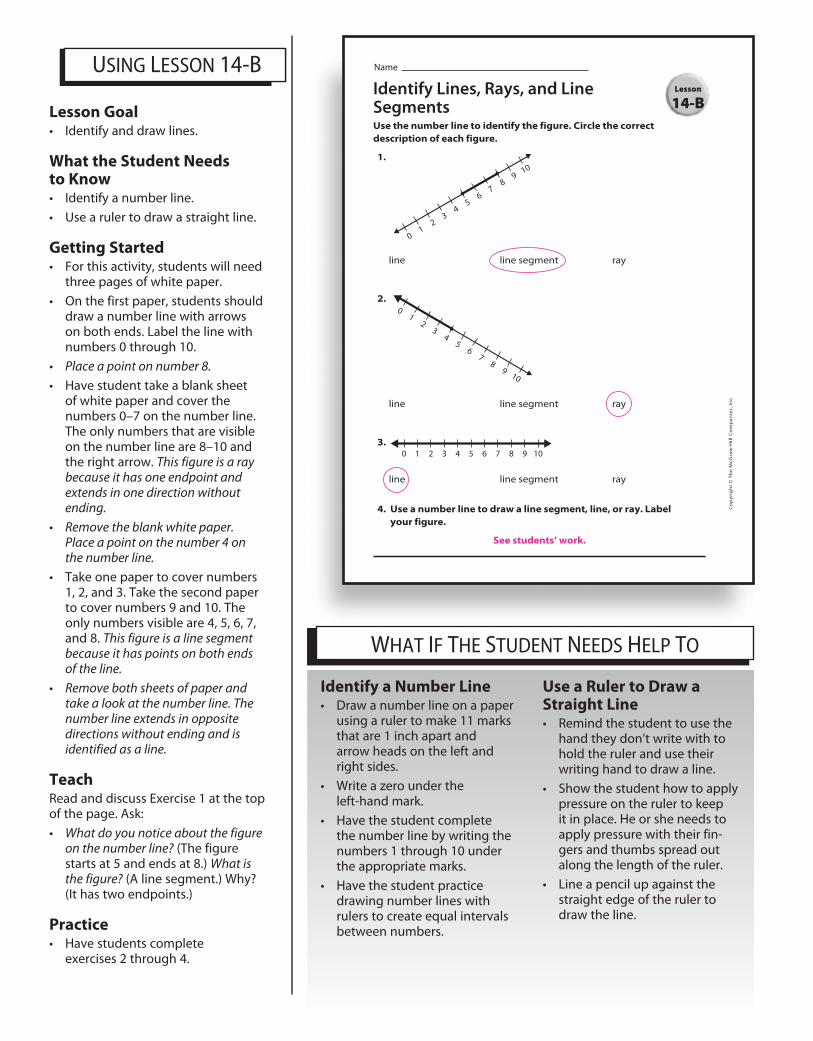
USING THE LESSONUSING LESSON 14-B
Identify a Number Line• Draw a number line on a paper
using a ruler to make 11 marks that are 1 inch apart and arrow heads on the left and right sides.
• Write a zero under the left-hand mark.
• Have the student complete the number line by writing the numbers 1 through 10 under the appropriate marks.
• Have the student practice drawing number lines with rulers to create equal intervals between numbers.
Use a Ruler to Draw a Straight Line• Remind the student to use the
hand they don’t write with to hold the ruler and use their writing hand to draw a line.
• Show the student how to apply pressure on the ruler to keep it in place. He or she needs to apply pressure with their fin-gers and thumbs spread out along the length of the ruler.
• Line a pencil up against the straight edge of the ruler to draw the line.
Lesson Goal• Identify and draw lines.
What the Student Needs to Know• Identify a number line.
• Use a ruler to draw a straight line.
Getting Started• For this activity, students will need
three pages of white paper.
• On the first paper, students should draw a number line with arrows on both ends. Label the line with numbers 0 through 10.
• Place a point on number 8.
• Have student take a blank sheet of white paper and cover the numbers 0–7 on the number line. The only numbers that are visible on the number line are 8–10 and the right arrow. This figure is a ray because it has one endpoint and extends in one direction without ending.
• Remove the blank white paper. Place a point on the number 4 on the number line.
• Take one paper to cover numbers 1, 2, and 3. Take the second paper to cover numbers 9 and 10. The only numbers visible are 4, 5, 6, 7, and 8. This figure is a line segment because it has points on both ends of the line.
• Remove both sheets of paper and take a look at the number line. The number line extends in opposite directions without ending and is identified as a line.
TeachRead and discuss Exercise 1 at the top of the page. Ask:
• What do you notice about the figure on the number line? (The figure starts at 5 and ends at 8.) What is the figure? (A line segment.) Why? (It has two endpoints.)
Practice • Have students complete
exercises 2 through 4.
WHAT IF THE STUDENT NEEDS HELP TO
Name
Identify Lines, Rays, and Line Segments Use the number line to identify the figure. Circle the correct description of each figure.
1.
01
23
45
67
89
10
line line segment ray
2. 0
12
34
56
78
910
line line segment ray
3. 0 1 2 3 4 5 6 7 8 9 10
line line segment ray
4. Use a number line to draw a line segment, line, or ray. Label your figure.
See students’ work.
Lesson
14-B
Co
pyr
igh
t ©
Th
e M
cGra
w-H
ill
Co
mp
an
ies,
In
c.
414_S_G4_C14_SI_119816.indd 414 7/12/12 4:37 PM
415_T_G4_C14_SI_119816.indd 415415_T_G4_C14_SI_119816.indd 415 7/12/12 5:09 PM7/12/12 5:09 PM

Program: SI_Chart Component: SEPDF Pass
Vendor: Laserwords Grade: 4
Name
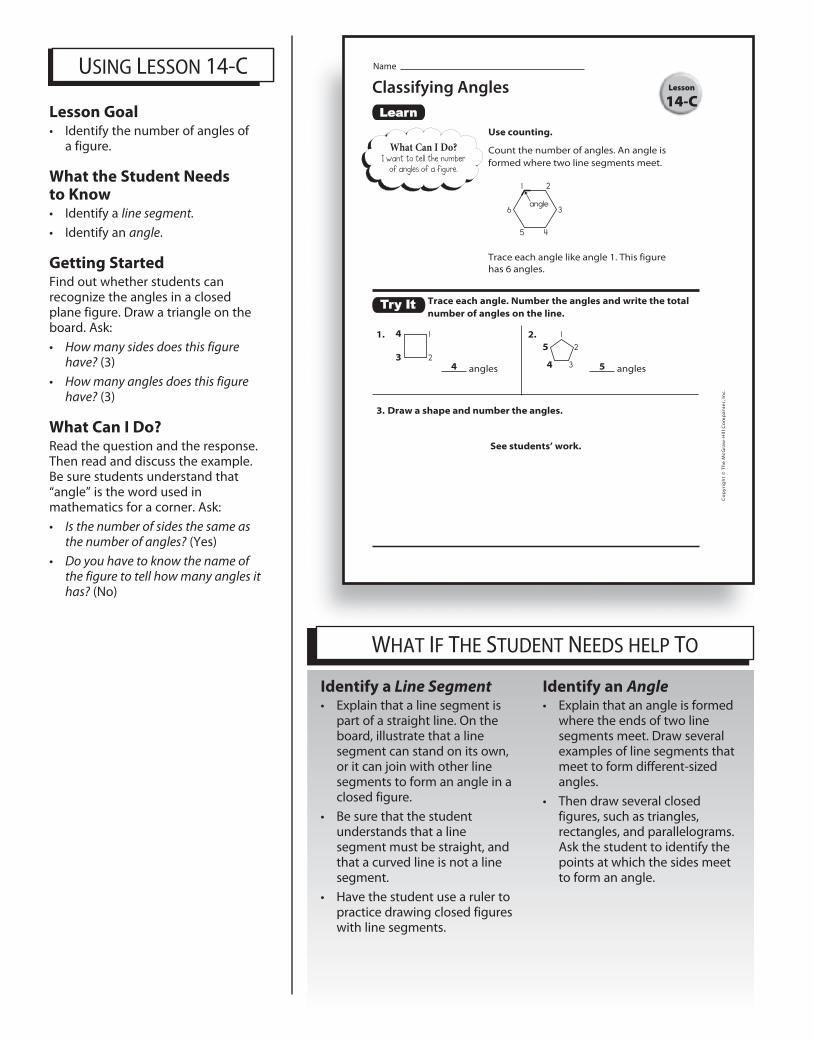
Classifying Angles
Use counting.
Count the number of angles. An angle is formed where two line segments meet.
2
3
45
6
l
angle
Trace each angle like angle 1. This figure has 6 angles.
Trace each angle. Number the angles and write the total number of angles on the line.
1. l
2
2. l
2
3 angles angles
3. Draw a shape and number the angles.
Lesson
14-C
What Can I Do?I want to tell the number
of angles of a figure.
Co
pyr
igh
t ©
Th
e M
cGra
w-H
ill
Co
mp
an
ies,
In
c.
416_417_S_G4_C14_SI_119816.indd 416416_417_S_G4_C14_SI_119816.indd 416 7/10/12 11:04 AM7/10/12 11:04 AM
Program: SI_Chart Component: SEPDF Pass
Vendor: Laserwords Grade: 4
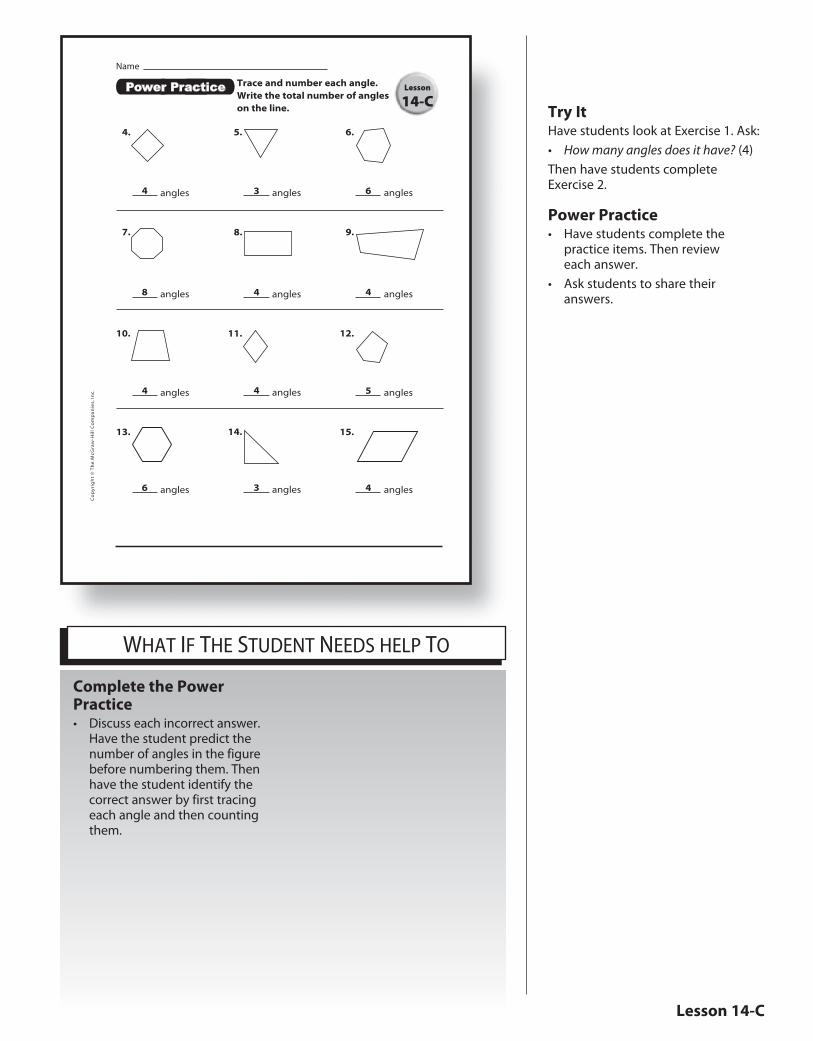
Name
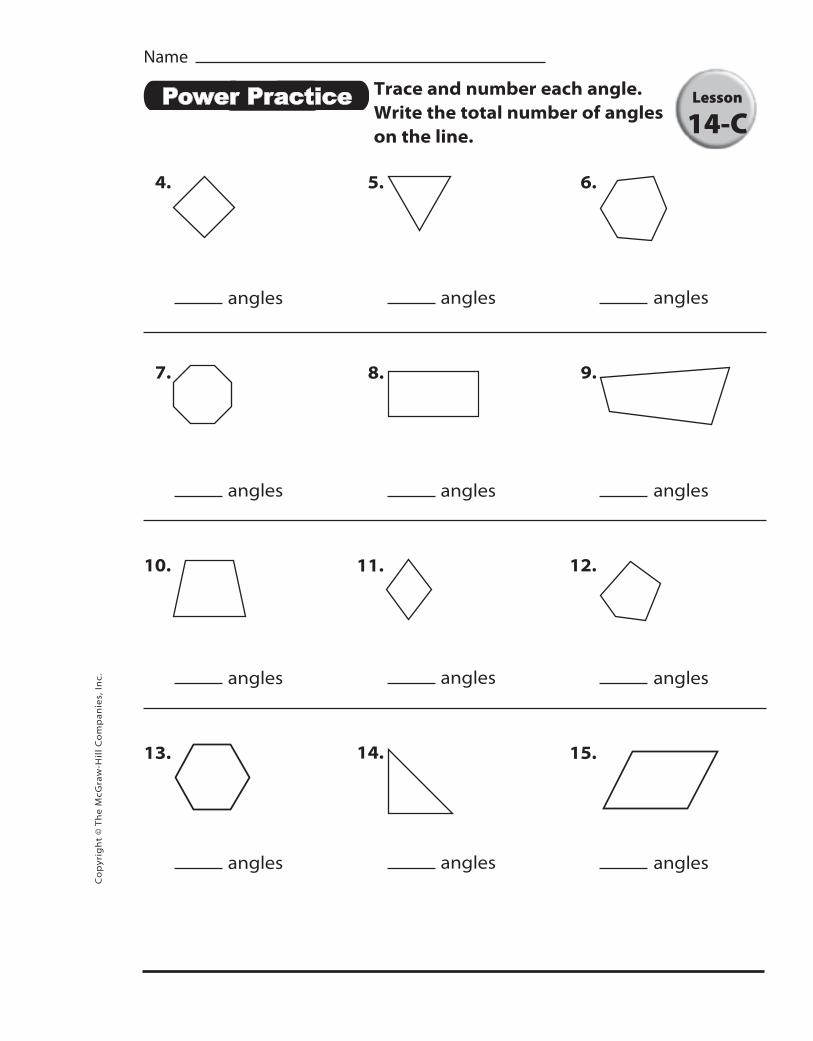
Trace and number each angle.Write the total number of angles on the line.
4.
angles
7.
angles
10.
angles
13.
angles
5.
angles
8.
angles
11.
angles
14.
angles
6.
angles
9.
angles
12.
angles
15.
angles
Lesson
14-CC
op
yrig
ht
© T
he
McG
raw
-Hil
l C
om
pa
nie
s, I
nc.
416_417_S_G4_C14_SI_119816.indd 417416_417_S_G4_C14_SI_119816.indd 417 7/10/12 11:04 AM7/10/12 11:04 AM
Program: SI_Chart Component: TEPDF Pass
Vendor: Laserwords Grade: 4
WHAT IF THE STUDENT NEEDS HELP TO
USING LESSON 14-C
Lesson Goal• Identify the number of angles of
a figure.
What the Student Needs to Know• Identify a line segment.
• Identify an angle.
Getting StartedFind out whether students can recognize the angles in a closed plane figure. Draw a triangle on the board. Ask:
• How many sides does this figure have? (3)
• How many angles does this figure have? (3)
What Can I Do?Read the question and the response. Then read and discuss the example. Be sure students understand that “angle” is the word used in mathematics for a corner. Ask:
• Is the number of sides the same as the number of angles? (Yes)
• Do you have to know the name of the figure to tell how many angles it has? (No)
Identify a Line Segment• Explain that a line segment is
part of a straight line. On the board, illustrate that a line segment can stand on its own, or it can join with other line segments to form an angle in a closed figure.
• Be sure that the student understands that a line segment must be straight, and that a curved line is not a line segment.
• Have the student use a ruler to practice drawing closed figures with line segments.
Identify an Angle• Explain that an angle is formed
where the ends of two line segments meet. Draw several examples of line segments that meet to form different-sized angles.
• Then draw several closed figures, such as triangles, rectangles, and parallelograms. Ask the student to identify the points at which the sides meet to form an angle.
Name
Classifying Angles
Use counting.
Count the number of angles. An angle is formed where two line segments meet.
2
3
45
6
l
angle
Trace each angle like angle 1. This figure has 6 angles.
Trace each angle. Number the angles and write the total number of angles on the line.
1. l
2
2. l
2
3 4 angles 5 angles
3. Draw a shape and number the angles.
4
4
53
See students’ work.
Lesson
14-C
What Can I Do?I want to tell the number
of angles of a figure.
Co
pyr
igh
t ©
Th
e M
cGra
w-H
ill
Co
mp
an
ies,
In
c.
416_417_S_G4_C14_SI_119816.indd 416 7/10/12 11:04 AM
418_419_T_G4_C14_SI_119816.indd 418418_419_T_G4_C14_SI_119816.indd 418 7/10/12 11:06 AM7/10/12 11:06 AM
Lesson 14-C
WHAT IF THE STUDENT NEEDS HELP TO
Complete the Power Practice• Discuss each incorrect answer.
Have the student predict the number of angles in the figure before numbering them. Then have the student identify the correct answer by first tracing each angle and then counting them.
Try ItHave students look at Exercise 1. Ask:
• How many angles does it have? (4)
Then have students complete Exercise 2.
Power Practice• Have students complete the
practice items. Then review each answer.
• Ask students to share their answers.
Name
Trace and number each angle.Write the total number of angles on the line.
4.
4 angles
7.
8 angles
10.
4 angles
13.
6 angles
5.
3 angles
8.
4 angles
11.
4 angles
14.
3 angles
6.
6 angles
9.
4 angles
12.
5 angles
15.
4 angles
Lesson
14-CC
op
yrig
ht
© T
he
McG
raw
-Hil
l C
om
pa
nie
s, I
nc.
416_417_S_G4_C14_SI_119816.indd 417 7/10/12 11:04 AM
418_419_T_G4_C14_SI_119816.indd 419418_419_T_G4_C14_SI_119816.indd 419 10/07/12 7:24 PM10/07/12 7:24 PM
Program: SI_Chart Component: SEPDF Pass
Vendor: Laserwords Grade: 4
Name
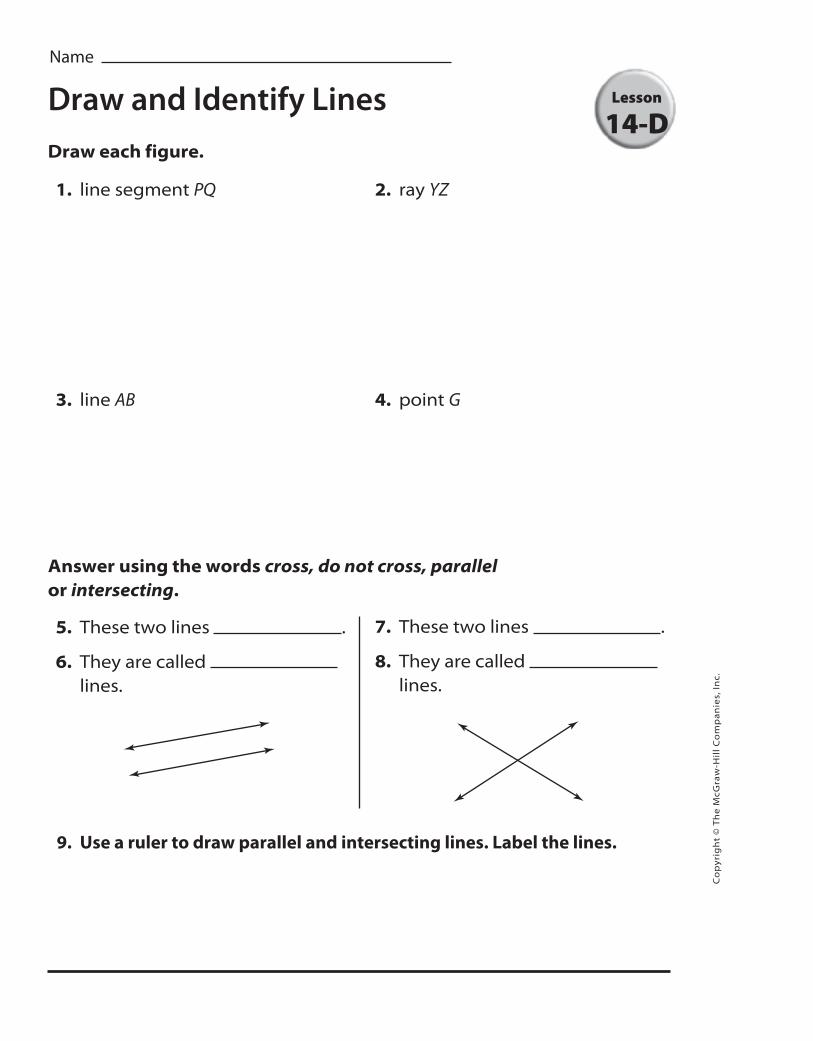
Draw and Identify Lines
Draw each figure.
1. line segment PQ
3. line AB
2. ray YZ
4. point G
9. Use a ruler to draw parallel and intersecting lines. Label the lines.
Answer using the words cross, do not cross, parallel or intersecting.
5. These two lines .
6. They are called lines.
7. These two lines .
8. They are called lines.
Lesson
14-D
Co
pyr
igh
t ©
Th
e M
cGra
w-H
ill
Co
mp
an
ies,
In
c.
420_S_G4_C14_SI_119816.indd 420420_S_G4_C14_SI_119816.indd 420 7/10/12 11:10 AM7/10/12 11:10 AM
Program: SI_Chart Component: TEPDF Pass
Vendor: Laserwords Grade: 4
USING LESSON 14-D
WHAT IF THE STUDENT NEEDS HELP TO
Draw Intersecting Lines • On a blank piece of paper, have
the student practice creating lines with a ruler.
• Have the student start by drawing one straight line segment. Then, have the student draw another line segment that intersects at one point.
• As the student practicesadditional intersecting lines, encourage him or her to draw lines in different positions. Explain that lines don’t have to only intersect in a vertical and horizontal line like a “+”. Show the student additional examples like an “X”.
Draw Parallel Lines• To practice drawing parallel
lines, have the student use graph or grid paper.
• Encourage the student to start by pointing out three squares on the graph or grid paper with their finger.
• Have the student use a pencil to trace the top line of the 3 squares. Then, have the student trace the bottom line of the 3 squares.
• Show the student how the lines model parallel lines because they are evenly spaced and will never intersect.
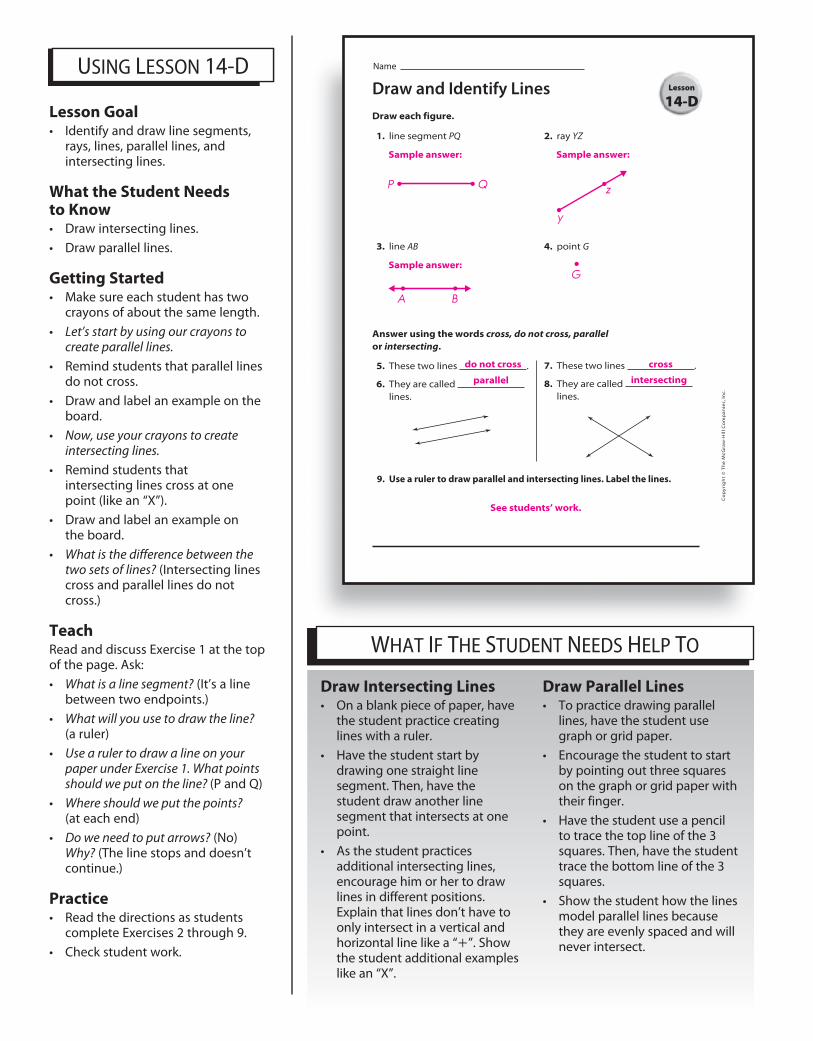
Lesson Goal• Identify and draw line segments,
rays, lines, parallel lines, and intersecting lines.
What the Student Needs to Know• Draw intersecting lines.
• Draw parallel lines.
Getting Started• Make sure each student has two
crayons of about the same length.
• Let’s start by using our crayons to create parallel lines.
• Remind students that parallel lines do not cross.
• Draw and label an example on the board.
• Now, use your crayons to create intersecting lines.
• Remind students that intersecting lines cross at one point (like an “X”).
• Draw and label an example on the board.
• What is the difference between the two sets of lines? (Intersecting lines cross and parallel lines do not cross.)
TeachRead and discuss Exercise 1 at the top of the page. Ask:
• What is a line segment? (It’s a line between two endpoints.)
• What will you use to draw the line? (a ruler)
• Use a ruler to draw a line on your paper under Exercise 1. What points should we put on the line? (P and Q)
• Where should we put the points? (at each end)
• Do we need to put arrows? (No) Why? (The line stops and doesn’t continue.)
Practice• Read the directions as students
complete Exercises 2 through 9.
• Check student work.
Name
Draw and Identify Lines
Draw each figure.
1. line segment PQ
Sample answer:
P Q
3. line AB
Sample answer:
A B
2. ray YZ
Sample answer:
y
z
4. point G
G
9. Use a ruler to draw parallel and intersecting lines. Label the lines.
Answer using the words cross, do not cross, parallel or intersecting.
5. These two lines do not cross .
6. They are called parallel lines.
7. These two lines cross .
8. They are called intersecting lines.
See students’ work.
Lesson
14-D
Co
pyr
igh
t ©
Th
e M
cGra
w-H
ill
Co
mp
an
ies,
In
c.
420_S_G4_C14_SI_119816.indd 420 7/10/12 11:10 AM
421_T_G4_C14_SI_119816.indd 421421_T_G4_C14_SI_119816.indd 421 7/10/12 11:36 AM7/10/12 11:36 AM
Program: SI_Chart Component: SEPDF 2nd
Vendor: Laserwords Grade: 4
Name
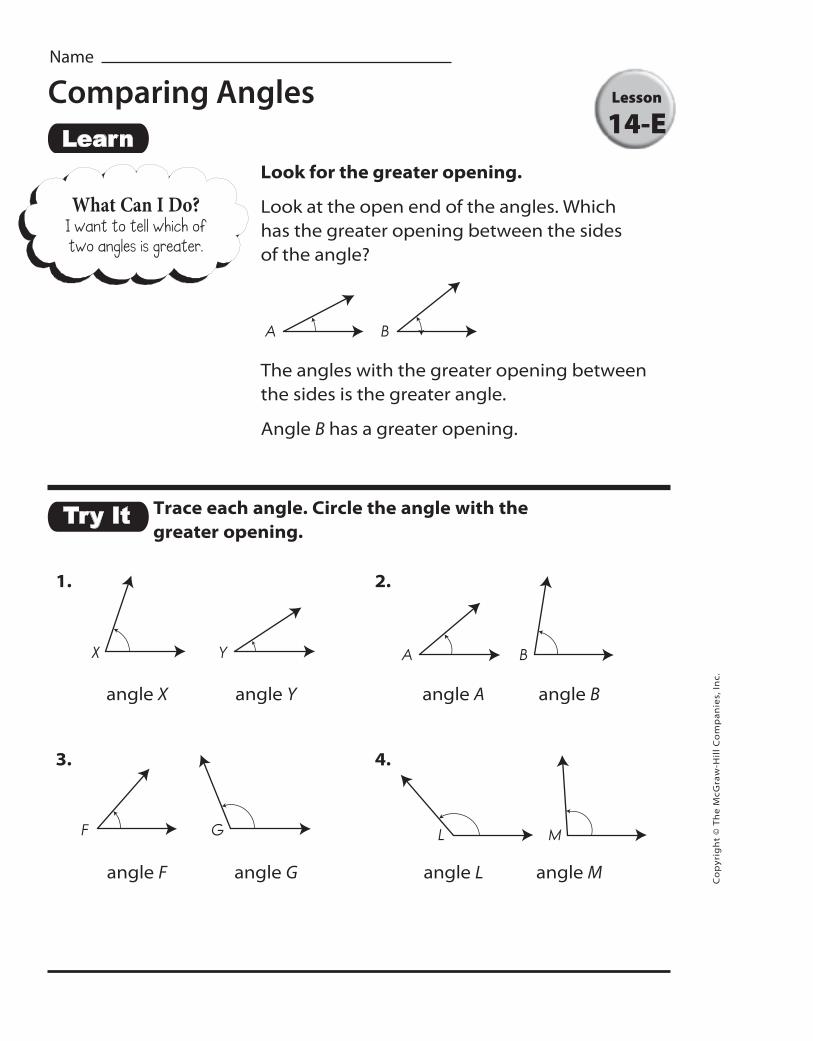
Comparing Angles
Look for the greater opening.
Look at the open end of the angles. Which has the greater opening between the sides of the angle?
A B
The angles with the greater opening between the sides is the greater angle.
Angle B has a greater opening.
Trace each angle. Circle the angle with the greater opening.
1.
YX
2.
A B
angle X angle Y angle A angle B
3.
F G
4.
ML
angle F angle G angle L angle M
Lesson
14-E
What Can I Do?I want to tell which of two angles is greater.
Co
pyr
igh
t ©
Th
e M
cGra
w-H
ill
Co
mp
an
ies,
In
c.
422_423_S_G4_C14_SI_119816.indd 422422_423_S_G4_C14_SI_119816.indd 422 7/12/12 6:37 PM7/12/12 6:37 PM
Program: SI_Chart Component: SEPDF 2nd
Vendor: Laserwords Grade: 4
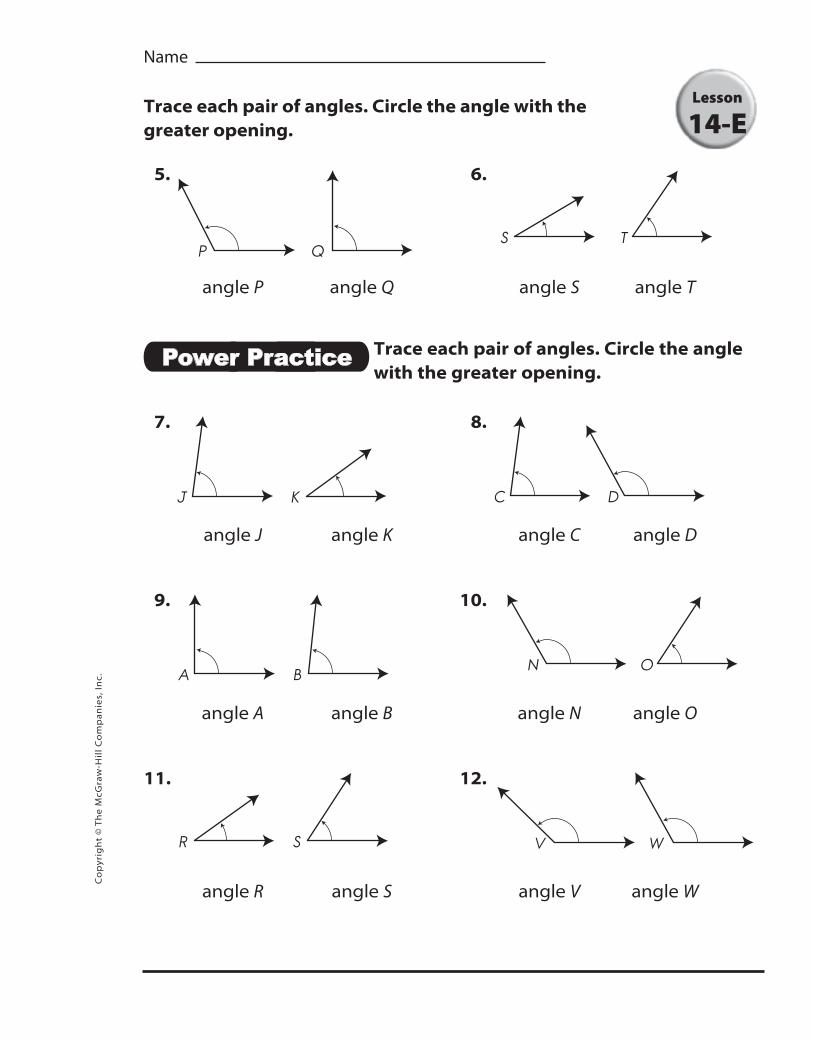
Name
Trace each pair of angles. Circle the angle with the greater opening.
5.
QP
6.
S T
angle P angle Q angle S angle T
Trace each pair of angles. Circle the angle with the greater opening.
7.
J K
8.
C D
angle J angle K angle C angle D
9.
A B
10.
N O
angle A angle B angle N angle O
11.
R S
12.
V W
angle R angle S angle V angle W
Lesson
14-EC
op
yrig
ht
© T
he
McG
raw
-Hil
l C
om
pa
nie
s, I
nc.
422_423_S_G4_C14_SI_119816.indd 423422_423_S_G4_C14_SI_119816.indd 423 7/12/12 6:37 PM7/12/12 6:37 PM
Program: SI_Chart Component: TEPDF 2nd
Vendor: Laserwords Grade: 4
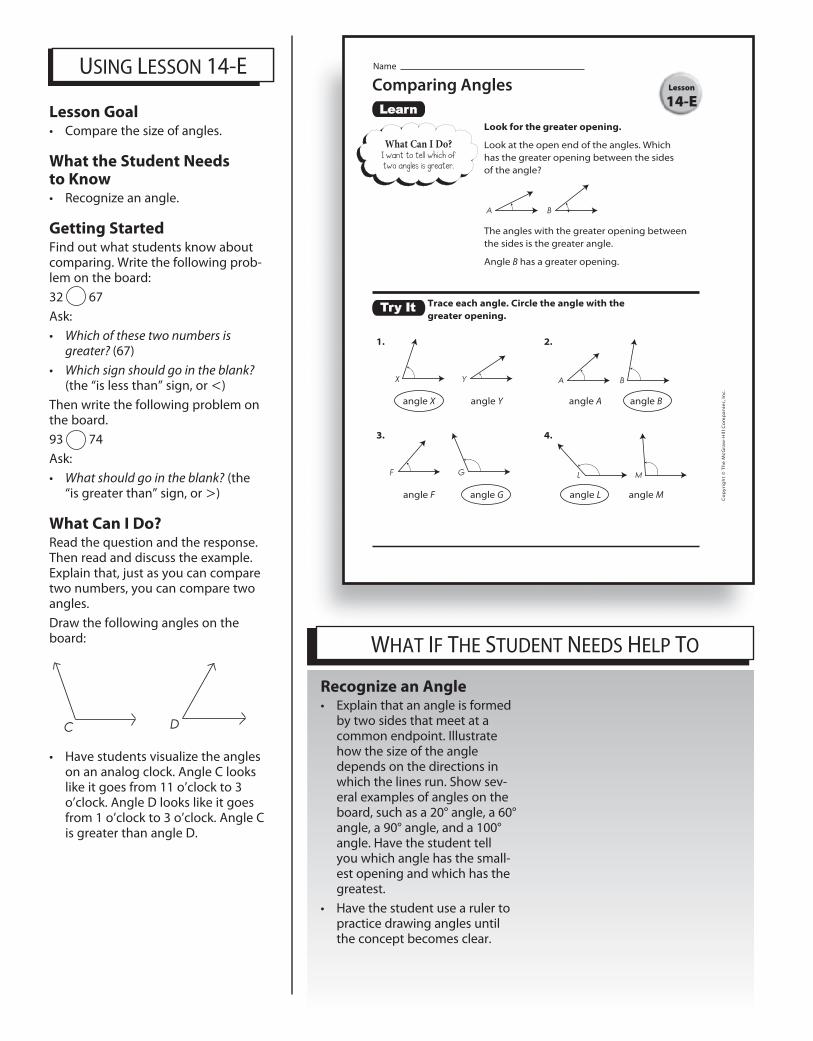
USING LESSON 14-E
WHAT IF THE STUDENT NEEDS HELP TO
Lesson Goal• Compare the size of angles.
What the Student Needs to Know• Recognize an angle.
Getting StartedFind out what students know about comparing. Write the following prob-lem on the board:
32 67
Ask:
• Which of these two numbers is greater? (67)
• Which sign should go in the blank? (the “is less than” sign, or <)
Then write the following problem on the board.
93 74
Ask:
• What should go in the blank? (the “is greater than” sign, or >)
What Can I Do?Read the question and the response. Then read and discuss the example. Explain that, just as you can compare two numbers, you can compare two angles.
Draw the following angles on the board:
C
D
• Have students visualize the angles on an analog clock. Angle C looks like it goes from 11 o’clock to 3 o’clock. Angle D looks like it goes from 1 o’clock to 3 o’clock. Angle C is greater than angle D.
Recognize an Angle• Explain that an angle is formed
by two sides that meet at a common endpoint. Illustrate how the size of the angle depends on the directions in which the lines run. Show sev-eral examples of angles on the board, such as a 20° angle, a 60° angle, a 90° angle, and a 100° angle. Have the student tell you which angle has the small-est opening and which has the greatest.
• Have the student use a ruler to practice drawing angles until the concept becomes clear.
Name
Comparing Angles
Look for the greater opening.
Look at the open end of the angles. Which has the greater opening between the sides of the angle?
A B
The angles with the greater opening between the sides is the greater angle.
Angle B has a greater opening.
Trace each angle. Circle the angle with the greater opening.
1.
YX
2.
A B
angle X angle Y angle A angle B
3.
F G
4.
ML
angle F angle G angle L angle M
Lesson
14-E
What Can I Do?I want to tell which of two angles is greater.
Co
pyr
igh
t ©
Th
e M
cGra
w-H
ill
Co
mp
an
ies,
In
c.
422_423_S_G4_C14_SI_119816.indd 422 7/12/12 6:37 PM
424_425_T_G4_C14_SI_119816.indd 424424_425_T_G4_C14_SI_119816.indd 424 7/12/12 6:39 PM7/12/12 6:39 PM
Program: SI_Chart Component: TEPDF 2nd
Vendor: Laserwords Grade: 4
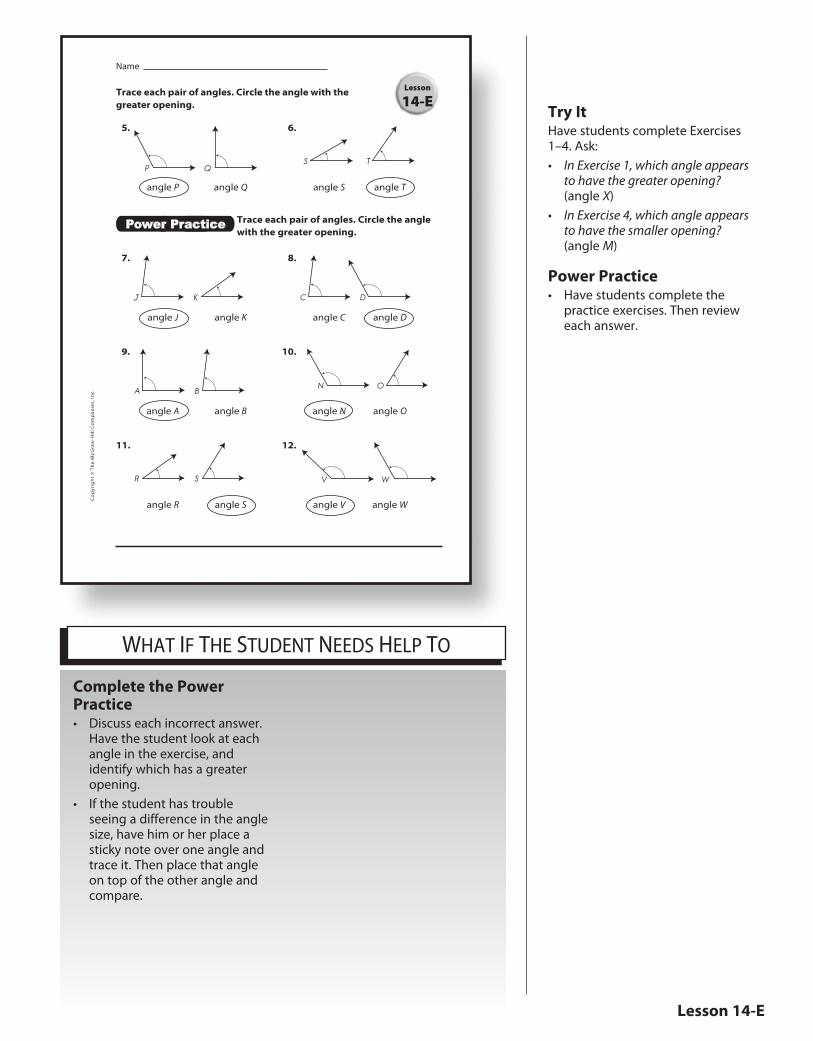
WHAT IF THE STUDENT NEEDS HELP TO
Complete the Power Practice• Discuss each incorrect answer.
Have the student look at each angle in the exercise, and identify which has a greater opening.
• If the student has trouble seeing a difference in the angle size, have him or her place a sticky note over one angle and trace it. Then place that angle on top of the other angle and compare.
Try ItHave students complete Exercises 1–4. Ask:
• In Exercise 1, which angle appears to have the greater opening? (angle X)
• In Exercise 4, which angle appears to have the smaller opening? (angle M)
Power Practice• Have students complete the
practice exercises. Then review each answer.
Lesson 14-E
Name
Trace each pair of angles. Circle the angle with the greater opening.
5.
QP
6.
S T
angle P angle Q angle S angle T
Trace each pair of angles. Circle the angle with the greater opening.
7.
J K
8.
C D
angle J angle K angle C angle D
9.
A B
10.
N O
angle A angle B angle N angle O
11.
R S
12.
V W
angle R angle S angle V angle W
Lesson
14-EC
op
yrig
ht
© T
he
McG
raw
-Hil
l C
om
pa
nie
s, I
nc.
422_423_S_G4_C14_SI_119816.indd 423 7/12/12 6:37 PM
424_425_T_G4_C14_SI_119816.indd 425424_425_T_G4_C14_SI_119816.indd 425 7/12/12 6:39 PM7/12/12 6:39 PM
Program: SI_Chart Component: SEPDF Pass
Vendor: Laserwords Grade: 4
Name
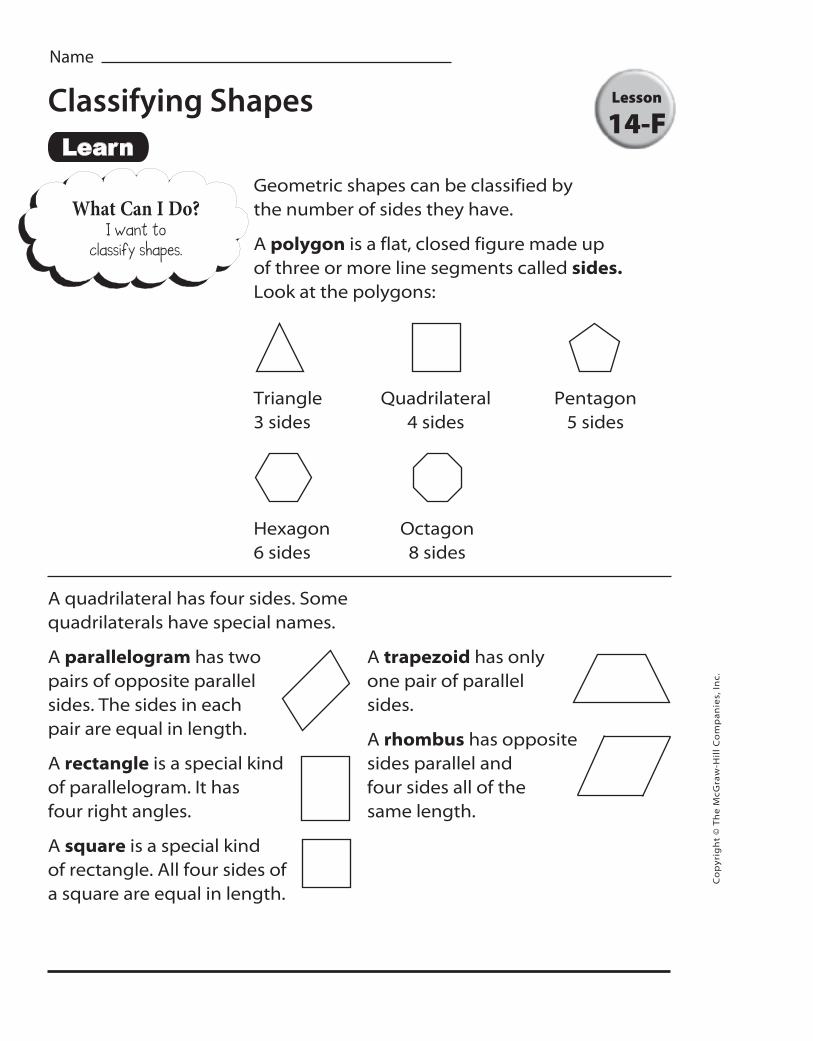
Classifying Shapes
Geometric shapes can be classified by the number of sides they have.
A polygon is a flat, closed figure made up of three or more line segments called sides. Look at the polygons:
Triangle Quadrilateral Pentagon3 sides 4 sides 5 sides
Hexagon Octagon6 sides 8 sides
A quadrilateral has four sides. Somequadrilaterals have special names.
A parallelogram has two pairs of opposite parallel sides. The sides in each pair are equal in length.
A rectangle is a special kind of parallelogram. It has four right angles.
A square is a special kind of rectangle. All four sides of a square are equal in length.
A trapezoid has only one pair of parallel sides.
A rhombus has opposite sides parallel and four sides all of the same length.
Lesson
14-F
What Can I Do?I want to
classify shapes.
Co
pyr
igh
t ©
Th
e M
cGra
w-H
ill
Co
mp
an
ies,
In
c.
426_427_S_G4_C14_SI_119816.indd 426426_427_S_G4_C14_SI_119816.indd 426 7/10/12 12:06 PM7/10/12 12:06 PM
Program: SI_Chart Component: SEPDF Pass
Vendor: Laserwords Grade: 4
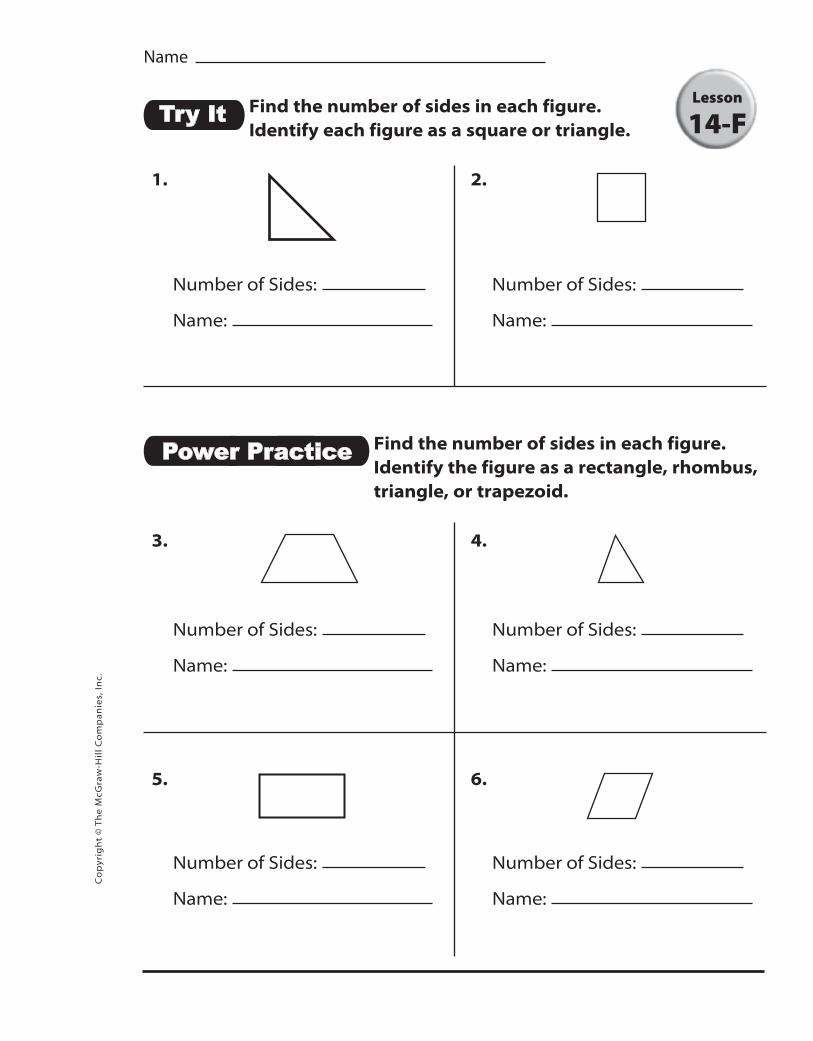
Name
Find the number of sides in each figure. Identify each figure as a square or triangle.
1. 2.
Number of Sides: Number of Sides:
Name: Name:
Find the number of sides in each figure. Identify the figure as a rectangle, rhombus, triangle, or trapezoid.
3. 4.
Number of Sides: Number of Sides:
Name: Name:
5. 6.
Number of Sides: Number of Sides:
Name: Name:
Lesson
14-FC
op
yrig
ht
© T
he
McG
raw
-Hil
l C
om
pa
nie
s, I
nc.
426_427_S_G4_C14_SI_119816.indd 427426_427_S_G4_C14_SI_119816.indd 427 7/10/12 12:06 PM7/10/12 12:06 PM
Program: SI_Chart Component: TEPDF Pass
Vendor: Laserwords Grade: 4
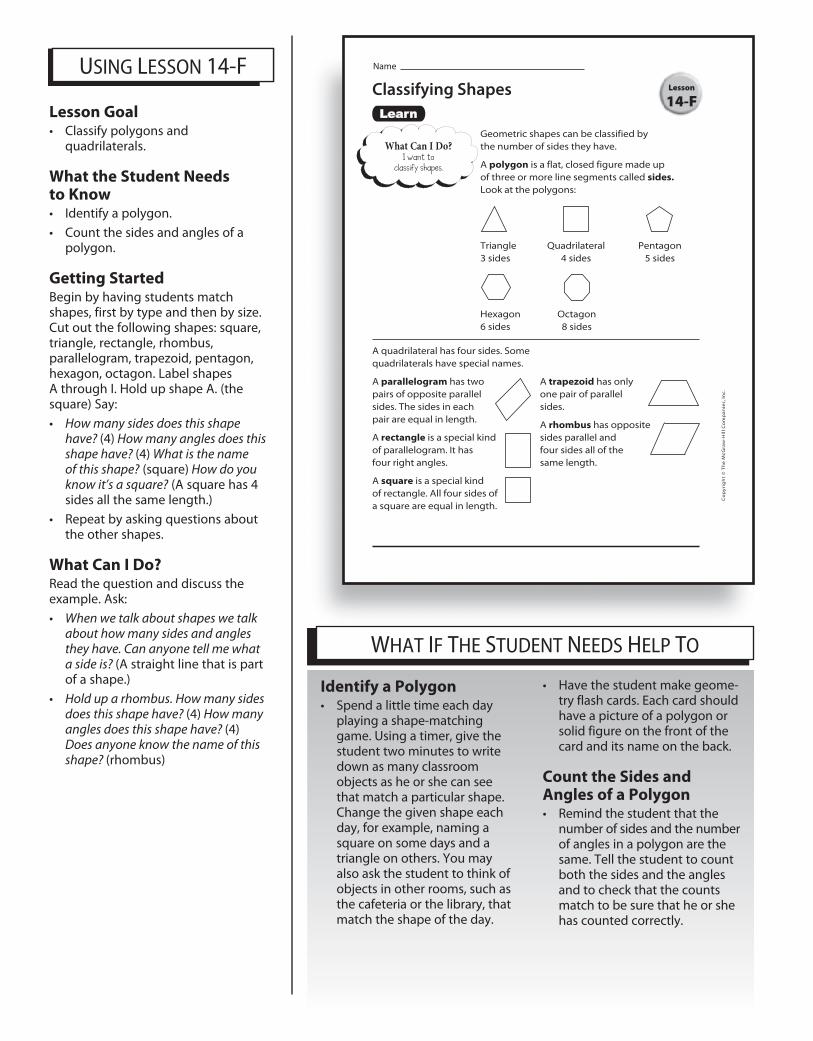
USING LESSON 14-F
WHAT IF THE STUDENT NEEDS HELP TO
Lesson Goal• Classify polygons and
quadrilaterals.
What the Student Needs to Know• Identify a polygon.
• Count the sides and angles of a polygon.
Getting StartedBegin by having students match shapes, first by type and then by size. Cut out the following shapes: square, triangle, rectangle, rhombus, parallelogram, trapezoid, pentagon, hexagon, octagon. Label shapes A through I. Hold up shape A. (the square) Say:
• How many sides does this shape have? (4) How many angles does this shape have? (4) What is the name of this shape? (square) How do you know it’s a square? (A square has 4 sides all the same length.)
• Repeat by asking questions about the other shapes.
What Can I Do? Read the question and discuss the example. Ask:
• When we talk about shapes we talk about how many sides and angles they have. Can anyone tell me what a side is? (A straight line that is part of a shape.)
• Hold up a rhombus. How many sides does this shape have? (4) How many angles does this shape have? (4) Does anyone know the name of this shape? (rhombus)
Identify a Polygon• Spend a little time each day
playing a shape-matching game. Using a timer, give the student two minutes to write down as many classroom objects as he or she can see that match a particular shape. Change the given shape each day, for example, naming a square on some days and a triangle on others. You may also ask the student to think of objects in other rooms, such as the cafeteria or the library, that match the shape of the day.
• Have the student make geome-try flash cards. Each card should have a picture of a polygon or solid figure on the front of the card and its name on the back.
Count the Sides and Angles of a Polygon• Remind the student that the
number of sides and the number of angles in a polygon are the same. Tell the student to count both the sides and the angles and to check that the counts match to be sure that he or she has counted correctly.
Name
Classifying Shapes
Geometric shapes can be classified by the number of sides they have.
A polygon is a flat, closed figure made up of three or more line segments called sides. Look at the polygons:
Triangle Quadrilateral Pentagon3 sides 4 sides 5 sides
Hexagon Octagon6 sides 8 sides
A quadrilateral has four sides. Somequadrilaterals have special names.
A parallelogram has two pairs of opposite parallel sides. The sides in each pair are equal in length.
A rectangle is a special kind of parallelogram. It has four right angles.
A square is a special kind of rectangle. All four sides of a square are equal in length.
A trapezoid has only one pair of parallel sides.
A rhombus has opposite sides parallel and four sides all of the same length.
Lesson
14-F
What Can I Do?I want to
classify shapes.
Co
pyr
igh
t ©
Th
e M
cGra
w-H
ill
Co
mp
an
ies,
In
c.
426_427_S_G4_C14_SI_119816.indd 426 7/10/12 12:06 PM
428_429_T_G4_C14_SI_119816.indd 428428_429_T_G4_C14_SI_119816.indd 428 7/10/12 12:14 PM7/10/12 12:14 PM
Lesson 14-F
Program: SI_Chart Component: TEPDF Pass
Vendor: Laserwords Grade: 4
WHAT IF THE STUDENT NEEDS HELP TO
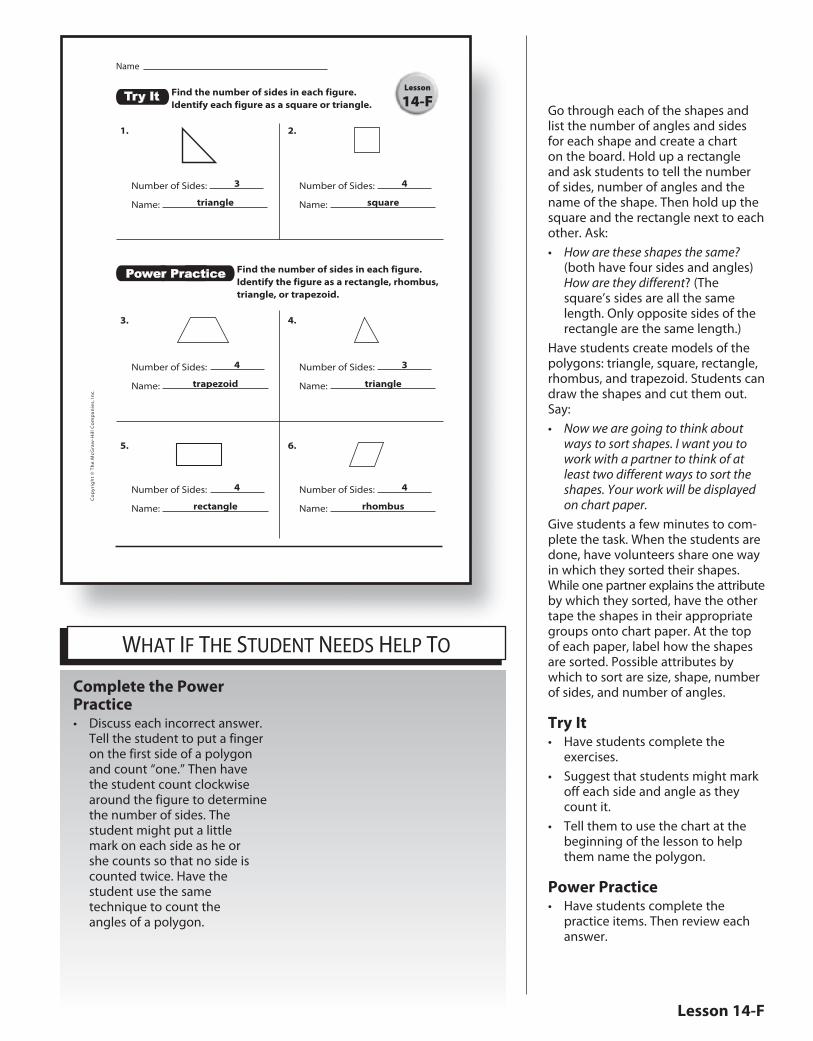
Complete the Power Practice• Discuss each incorrect answer.
Tell the student to put a finger on the first side of a polygon and count “one.” Then have the student count clockwise around the figure to determine the number of sides. The student might put a little mark on each side as he or she counts so that no side is counted twice. Have the student use the same technique to count the angles of a polygon.
Go through each of the shapes and list the number of angles and sides for each shape and create a chart on the board. Hold up a rectangle and ask students to tell the number of sides, number of angles and the name of the shape. Then hold up the square and the rectangle next to each other. Ask:
• How are these shapes the same? (both have four sides and angles) How are they different? (The square’s sides are all the same length. Only opposite sides of the rectangle are the same length.)
Have students create models of the polygons: triangle, square, rectangle, rhombus, and trapezoid. Students can draw the shapes and cut them out. Say:
• Now we are going to think about ways to sort shapes. I want you to work with a partner to think of at least two different ways to sort the shapes. Your work will be displayed on chart paper.
Give students a few minutes to com-plete the task. When the students are done, have volunteers share one way in which they sorted their shapes. While one partner explains the attribute by which they sorted, have the other tape the shapes in their appropriate groups onto chart paper. At the top of each paper, label how the shapes are sorted. Possible attributes by which to sort are size, shape, number of sides, and number of angles.
Try It• Have students complete the
exercises.
• Suggest that students might mark off each side and angle as they count it.
• Tell them to use the chart at the beginning of the lesson to help them name the polygon.
Power Practice• Have students complete the
practice items. Then review each answer.
Name
Find the number of sides in each figure. Identify each figure as a square or triangle.
1. 2.
Number of Sides: 3 Number of Sides: 4
Name: triangle Name: square
Find the number of sides in each figure. Identify the figure as a rectangle, rhombus, triangle, or trapezoid.
3. 4.
Number of Sides: 4 Number of Sides: 3
Name: trapezoid Name: triangle
5. 6.
Number of Sides: 4 Number of Sides: 4
Name: rectangle Name: rhombus
Lesson
14-FC
op
yrig
ht
© T
he
McG
raw
-Hil
l C
om
pa
nie
s, I
nc.
426_427_S_G4_C14_SI_119816.indd 427 7/10/12 12:06 PM
428_429_T_G4_C14_SI_119816.indd 429428_429_T_G4_C14_SI_119816.indd 429 7/17/12 4:14 PM7/17/12 4:14 PM
Name
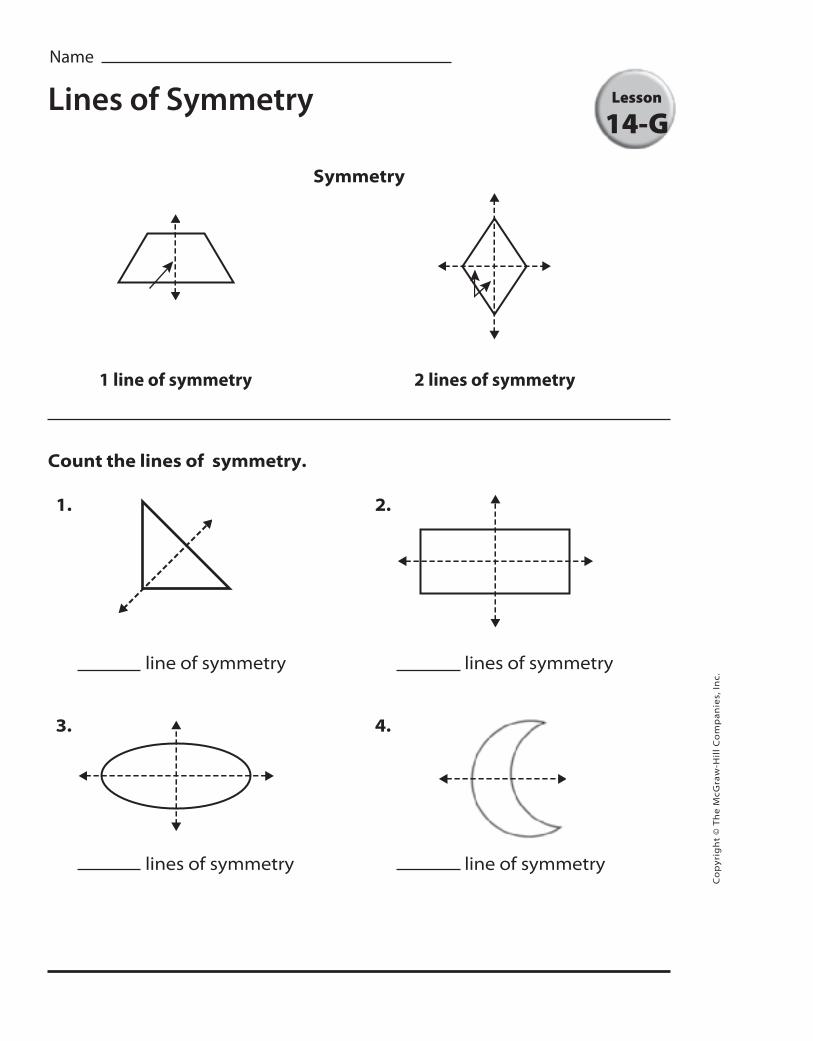
Symmetry
1 line of symmetry 2 lines of symmetry
Count the lines of symmetry.
1. 2.
line of symmetry lines of symmetry
3. 4.
lines of symmetry line of symmetry
Lines of Symmetry
Program: SI_Chart Component: SEPDF Pass
Vendor: Laserwords Grade: 4
Lesson
14-G
Co
pyr
igh
t ©
Th
e M
cGra
w-H
ill
Co
mp
an
ies,
In
c.
430_S_G4_C14_SI_119816.indd 430430_S_G4_C14_SI_119816.indd 430 7/17/12 3:54 PM7/17/12 3:54 PM
Program: SI_Chart Component: TEPDF Pass
Vendor: Laserwords Grade: 4
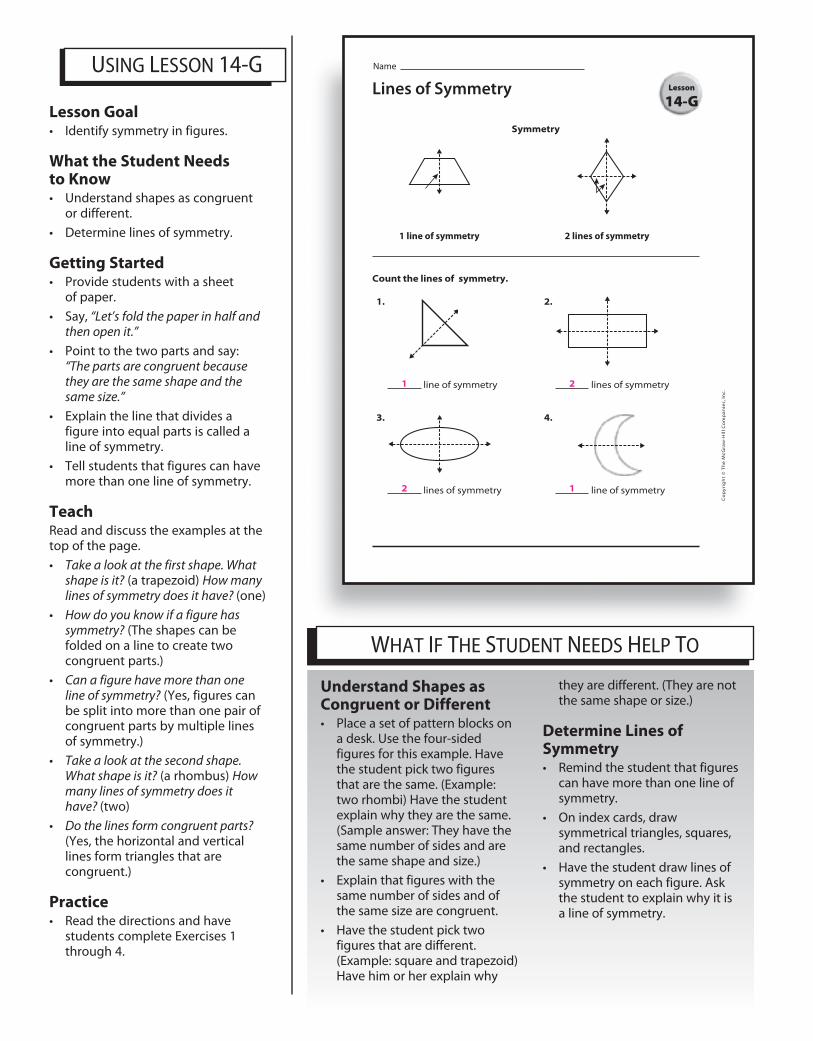
USING THE LESSONUSING LESSON 14-G
WHAT IF THE STUDENT NEEDS HELP TO
Understand Shapes as Congruent or Different• Place a set of pattern blocks on
a desk. Use the four-sided figures for this example. Have the student pick two figures that are the same. (Example: two rhombi) Have the student explain why they are the same. (Sample answer: They have the same number of sides and are the same shape and size.)
• Explain that figures with the same number of sides and of the same size are congruent.
• Have the student pick two figures that are different. (Example: square and trapezoid) Have him or her explain why
they are different. (They are not the same shape or size.)
Determine Lines of Symmetry• Remind the student that figures
can have more than one line of symmetry.
• On index cards, draw symmetrical triangles, squares, and rectangles.
• Have the student draw lines of symmetry on each figure. Ask the student to explain why it is a line of symmetry.
Lesson Goal• Identify symmetry in figures.
What the Student Needs to Know• Understand shapes as congruent
or different.
• Determine lines of symmetry.
Getting Started• Provide students with a sheet
of paper.
• Say, “Let’s fold the paper in half and then open it.”
• Point to the two parts and say: “The parts are congruent because they are the same shape and the same size.”
• Explain the line that divides a figure into equal parts is called a line of symmetry.
• Tell students that figures can have more than one line of symmetry.
TeachRead and discuss the examples at the top of the page.
• Take a look at the first shape. What shape is it? (a trapezoid) How many lines of symmetry does it have? (one)
• How do you know if a figure has symmetry? (The shapes can be folded on a line to create two congruent parts.)
• Can a figure have more than one line of symmetry? (Yes, figures can be split into more than one pair of congruent parts by multiple lines of symmetry.)
• Take a look at the second shape. What shape is it? (a rhombus) How many lines of symmetry does it have? (two)
• Do the lines form congruent parts? (Yes, the horizontal and vertical lines form triangles that are congruent.)
Practice• Read the directions and have
students complete Exercises 1 through 4.
Name
Symmetry
1 line of symmetry 2 lines of symmetry
Count the lines of symmetry.
1. 2.
1 line of symmetry 2 lines of symmetry
3. 4.
2 lines of symmetry 1 line of symmetry
Lines of Symmetry Lesson
14-G
Co
pyr
igh
t ©
Th
e M
cGra
w-H
ill
Co
mp
an
ies,
In
c.
430_S_G4_C14_SI_119816.indd 430 7/17/12 3:54 PM
431_T_G4_C14_SI_119816.indd 431431_T_G4_C14_SI_119816.indd 431 7/17/12 4:11 PM7/17/12 4:11 PM


