Embed Size (px)
Citation preview

ELEKTRIČNA PEKARSKA PEĆ D-PEK
ELECTRIC BAKERY OVEN D-PEK korisničko uputstvo
user manual
DADEX top quality bakery ovens

2

3
Dobrodošli u svet DADEX pekarskih peći
Hvala Vam što ste izabrali pekarsku peć DADEX koja će Vas, nadamo
se, pouzdano služiti u budućnosti. Naše ambicije su da Vam
ponudimo lepezu pekarskih peći i mašina koji će Vam obezbediti
ugodniji, pouzdaniji i kvalitetniji rad. Molimo Vas da izdvojite vreme
i pročitate ovo uputstvo kako biste mogli da izvučete maksimum iz
Vaše pekarske peći. Obećavamo Vam da ćete biti u mogućnosti da
iskoristite punu funkcionalnost pekarske peći uz očuvanu lakoću
korišćenja.
Ovde zapišite podatke o Vašoj peći / Please enter information about your oven
Tip peći / Type_______________________________________________
Serijski broj / Serial number______________________________________
Godina proizvodnje / Year of manufacture______________________________
Welcome to the world of DADEX bakery ovens
Thank you for purchasing DADEX bakery oven which will hopefully
serve you great. Our ambition is to offer wide a range of bakery ovens
and machines which provide comfortable, reliable and quality usage.
Please take a time to read this manual to take full advantage of your
oven’s many benefits and features. We promise you will be able to
get full functionality of the oven with least effort.

4
Sadržaj Električna pekarska peć DADEX D-PEK
5
1 SADRŽAJ
1 SADRŽAJ ........................................................................................................................... 5
2 UVODNE NAPOMENE ........................................................................................................ 6
2.1 Označavanje modela peći ............................................................................................ 6
2.2 Modeli peći na koje se ovo uputstvo odnosi .................................................................... 6
2.3 Tehničke karakteristike .................................................................................................. 8
2.4 Upozorenja ............................................................................................................... 10
2.5 Obaveze kupca pre instalacije ..................................................................................... 11
2.6 Izbor najbolje lokacije za peć i komoru ......................................................................... 12
2.7 Pomeranje peći .......................................................................................................... 12
2.8 Prvo zagrevanje peći................................................................................................... 13
2.9 Princip rada ............................................................................................................... 13
3 RAD NA PEĆI ................................................................................................................... 14
3.1 Rad na upravljačkom panelu osetljivom na dodir ........................................................... 14
Početni ekran ....................................................................................................... 14
Programiranje parametara programa / recepture ..................................................... 17
Radni režim ......................................................................................................... 18
Podešavanje parametara sistema ........................................................................... 21
Status alarma ....................................................................................................... 24
Ekran sa pomoćnim informacijama ........................................................................ 25
Napomene za korišćenje generatora pare – švelova ................................................. 25
3.2 Rad na elektronskom integrisanom upravljačkom panelu ................................................ 26
3.3 Rad sa elektromehaničkom komandom i termoregulatorima ........................................... 28
Podešavanje temperature na termoregulatoru .......................................................... 29
4 RAD NA FERMENTACIONOJ KOMORI .............................................................................. 30
4.1 Rad na upravljačkom integrisanom panelu .................................................................... 30
4.2 Rad sa elektromehaničkom komandom, termoregulatorom i vlagometrom ....................... 31
Podešavanje vlage na vlagometru .......................................................................... 31
5 ODRŽAVANJE PEĆI .......................................................................................................... 32
6 POZNATI PROBLEMI U RADU ............................................................................................ 35
7 USLOVI GARANCIJE ......................................................................................................... 36

Uvodne napomene Električna pekarska peć DADEX D-PEK
6
2 UVODNE NAPOMENE
2.1 Označavanje modela peći
Da bi se lakše definisao skup proizvoda na koji se odnosi ovo uputstvo, dobro je znati logiku u
označavanju modela električnih peći. Logika u označavanju modela je sledeća:
Prva cifra označava broj etaža u peći
3 - broj etaža je 3
4 - broj etaža je 4
5 - broj etaža je 5
Druga cifra označava širinu etaže
1 - širina etaže je 850 mm
2 - širina etaže je 1250 mm
3 - širina etaže je 1850 mm
Poslednje dve cifre označavaju broj plehova (600x400 mm) koji staje u kompletnu peć
06 - broj plehova je 6
08 - broj plehova je 8
.....
90 - broj plehova je 90
Primer:
Električna pekarska peć DADEX D-PEK 4224
broj etaža je 4
širina etaže je 1250 mm
broj plehova je 24
2.2 Modeli peći na koje se ovo uputstvo odnosi
Ovo uputstvo se odnosi na sve troetažne, četvoroetažne i petoetažne električne pekarske peći Dadex.
Razlike između modela su u veličini, tako da ne postoje funkcionalne razlike.
Kompletan spisak modela električnih pekarskih peći na koje se odnosi ovo uputstvo:
D-PEK 3006, D-PEK 3009, D-PEK 3012, D-PEK D-PEK 3106, D-PEK 3109, D-PEK 3112, D-PEK 3115,
D-PEK 3118, D-PEK 3212, D-PEK 3215, D-PEK 3218, D-PEK 3224, D-PEK 3227, D-PEK 3230, D-PEK
3233, D-PEK 3327, D-PEK 3336, D-PEK 3345, D-PEK 4008, D-PEK 4012, D-PEK 4016, D-PEK 4108,
D-PEK 4112, D-PEK 4116, D-PEK 4120, D-PEK 4124, D-PEK 4216, D-PEK 4216, D-PEK 4220, D-PEK

Uvodne napomene Električna pekarska peć DADEX D-PEK
7
4224, D-PEK 4232, D-PEK 4236, D-PEK 4240, D-PEK 4244, D-PEK 4324, D-PEK 4336, D-PEK 4348,
D-PEK 4360, D-PEK 4372, D-PEK 5010, D-PEK 5015, D-PEK 5020, D-PEK 5110, D-PEK 5115, D-PEK
5120, D-PEK 5125, D-PEK 5130, D-PEK 5215, D-PEK 5220, D-PEK 5225, D-PEK 5230, D-PEK 5235,
D-PEK 5240, D-PEK 5245, D-PEK 5250, D-PEK 5255, D-PEK 5345, D-PEK 5360, D-PEK 5375, D-PEK
5390

Uvodne napomene Električna pekarska peć DADEX
8
2.3 Tehničke karakteristike
Br.et
aža
Model peći El.snag
a (kW)
Br.ple
hova
Kapac
itet
Korisna
površina (m2)
Širina
etaže (cm)
Dubina
etaže (cm)
A - Spoljna
širina (cm)
B - Spoljna
dubina (cm)
D- Spoljna
visina (cm)
3 D-PEK 3006 18 6 24 1.65 65 82 125 145 200
3 D-PEK 3009 21 9 36 2.38 65 122 125 185 200
3 D-PEK 3012 24 12 48 3.00 65 162 125 225 200
3 D-PEK 3106 18 6 24 1.65 85 62 125 125 200
3 D-PEK 3109 21 9 36 2.55 85 102 125 165 200
3 D-PEK 3112 24 12 48 3.18 85 122 125 185 200
3 D-PEK 3115 27 15 60 3.75 85 162 125 225 200
3 D-PEK 3118 30 18 72 4.72 85 182 125 245 200
3 D-PEK 3212 22 12 36 3.00 125 82 185 125 200
3 D-PEK 3215 25 15 60 3.16 125 102 185 165 200
3 D-PEK 3218 27 18 72 4.32 125 122 185 185 200
3 D-PEK 3224 36 24 96 6..48 125 182 185 225 200
3 D-PEK 3227 40 27 108 6.48 125 182 185 245 200
3 D-PEK 3230 44 30 120 7.50 125 202 185 265 200
3 D-PEK 3233 48 33 132 8.50 125 222 185 285 200
3 D-PEK 3327 36 27 108 6.50 185 122 245 185 200
3 D-PEK 3336 42 36 132 9.00 185 162 245 225 200
3 D-PEK 3345 54 45 180 10.80 185 202 245 265 200
4 D-PEK 4108 18 8 32 2.00 85 62 145 125 200
4 D-PEK 4112 21 12 48 3.00 85 102 145 165 200
4 D-PEK 4116 24 16 64 4.00 85 122 145 185 200
4 D-PEK 4120 30 20 80 5.00 85 162 145 225 200
4 D-PEK 4124 36 24 96 6.00 85 182 145 245 200
4 D-PEK 4212 27 12 48 3.00 125 62 185 125 200
4 D-PEK 4216 30 16 64 4.00 125 82 185 145 200
4 D-PEK 4220 34 20 80 5.00 125 102 185 165 200
4 D-PEK 4224 36 24 96 6.00 125 122 185 185 200
4 D-PEK 4228 39 28 112 7.00 125 142 185 205 200
4 D-PEK 4232 42 32 128 8.00 125 162 185 225 200
4 D-PEK 4236 45 36 144 9.00 125 182 185 245 200
4 D-PEK 4240 48 40 160 10.00 125 202 185 265 200
4 D-PEK 4244 51 44 176 11.00 125 222 185 285 200
4 D-PEK 4336 45 36 144 9.00 185 122 245 185 200
4 D-PEK 4348 54 48 192 12.00 185 162 245 225 200
4 D-PEK 4360 72 60 240 15.00 185 202 245 265 200
4 D-PEK 4372 80 72 288 18.00 185 242 245 305 200

Uvodne napomene Električna pekarska peć DADEX
9
Br.et
aža
Model peći El.snag
a (kW)
Br.ple
hova
Kapac
itet
Korisna
površina (m2)
Širina
etaže (cm)
Dubina
etaže (cm)
A - Spoljna
širina (cm)
C - Spoljna
dubina (cm)
D – Spoljna
visina (cm)
5 D-PEK 5010 30 10 40 2.50 65 82 125 145 205
5 D-PEK 5015 34 15 45 4.00 65 122 125 185 205
5 D-PEK 5020 40 20 60 5.26 65 162 125 225 205
5 D-PEK 5110 23 10 40 2.50 85 62 145 145 205
5 D-PEK 5115 27 15 60 3.75 85 102 145 165 205
5 D-PEK 5120 30 20 80 5.00 85 122 145 185 205
5 D-PEK 5125 38 25 100 6.25 85 162 145 225 205
5 D-PEK 5130 45 30 120 7.50 85 182 145 245 205
5 D-PEK 5215 34 15 60 3.75 125 62 185 125 205
5 D-PEK 5220 38 20 80 5.00 125 82 185 145 205
5 D-PEK 5225 43 25 100 6.25 125 102 185 165 205
5 D-PEK 5230 45 30 120 7.50 125 122 185 185 205
5 D-PEK 5235 49 35 140 8.75 125 142 185 205 205
5 D-PEK 5240 53 40 160 10.00 125 162 185 225 205
5 D-PEK 5245 57 45 180 11.25 125 182 185 245 205
5 D-PEK 5250 60 50 200 12.50 125 202 185 265 205
5 D-PEK 5255 64 55 220 13.75 125 222 185 285 205
5 D-PEK 5345 57 45 180 11.25 185 122 245 185 205
5 D-PEK 5360 68 60 240 15.00 185 162 245 225 205
5 D-PEK 5375 90 75 300 18.75 185 202 245 265 205
5 D-PEK 5390 100 90 360 22.50 185 242 245 305 205

Uvodne napomene Električna pekarska peć DADEX
10
priključni napon naizmenična struja 400 V, 50 Hz, 3 faze
ulazni pritisak vode 0.2 - 0.4 MPa (2 - 4 bar)
peć poseduje stabilne termootporne patose
svaka etaža poseduje izvor tehnološke pare (švel)
uz peć se isporučuje radijalni turbinski ventilator za odvođenje pare ispod haube van prostorije
FERMENTACIONA KOMORA
spoljna širina komore 900 - 1600 mm
spoljna dubina komore C (mm)
spoljna visina komore 2000 mm
2.4 Upozorenja
Obavezno pažljivo pročitati opis rada pre pokušaja startovanja peći
Pokušaj startovanja peći bez prethodnog upoznavanja sa sadržajem uputstva može rezultovati
nepravilnim radom i ozbiljnim kvarovima
Veoma je važno pažljivo pratiti uputstvo radi sigurnosti rukovaoca peći i drugih lica
Slika 1 Skica peći i fermentacione komore sa dimenzijama

Uvodne napomene Električna pekarska peć DADEX
11
Zabranjen je rad na peći deci ili licima sa ograničenim fizičkim, čulnim ili mentalnim
ograničenjima ili manjkom iskustva i znanja, osim ukoliko su pod odgovarajućim stručnim
nadzorom
Zabranjeno je igranje dece sa peći ili u njenoj neposrednoj okolini
2.5 Obaveze kupca pre instalacije
Obezbediti električni priključak pomoću petožilnog kabla odgovarajućeg poprečnog preseka
(na
Slici 2. označen sa A). Vrednost poprečnog preseka kabla zavisi od ukupne nominalne električne
snage peći. Kabl je potrebno postaviti u ravni električnog ormana peći (sa strane peći, suprotno
od položaja fermentacione komore) na visini od 2.3 m. Ostaviti slobodno 3 m kabla. Izbegavati
napajanje drugih uređaja sa istih osigurača.
Obezbediti priključak vode pomoću standardnog ventila koji se koristi kod veš mašina (1/2").
Priključak postaviti u između peći i komore na visini 2.3 m. VAŽNO!! Pritisak vode na ulazu u peć
mora biti najmanje 0.2 MPa (2 bar). Ukoliko je pritisak manji od navedenog peć neće pravilno
funkcionisati, a veoma lako može doći i do oštećenja peći!! Priključak je na Slici 2. označen sa
C.
Obezbediti otvor za odvođenje pare iz peći (na Slici 2. označen sa B). Otvor treba da bude kružni
prečnika 170 mm. Otvor postaviti na sredini plafona peći na visini 2.3 m.
Slika 2 Skica peći i komore sa označenim priključcima

Uvodne napomene Električna pekarska peć DADEX
12
2.6 Izbor najbolje lokacije za peć i komoru
Parametri za izbor najbolje lokacije za peć i komoru:
Lokacija sa lakim pristupom napajanju vodom
Lokacija sa lakim pristupom napajanju strujom
lokacija sa ravnim (ili približno ravnim) podom
Sa bočne strane gde se nalazi komora, kao i sa zadnje strane dovoljno je ostaviti oko 50 mm
slobodnog prostora
Sa slobodne bočne strane potrebno je ostaviti minimalno 1 m slobodnog prostora (A) radi
obezbeđivanja pristupa delovima za servis za peći spoljne širine do 185 cm. Za šire peći treba
ostaviti 1.5 m slobodnog prostora (A).
Sa prednje strane peći potrebno je ostaviti dovoljno prostora kako bi se omogućila neometana
manipulacija plehovima, poteznim aparatima i kolicima za plehove i potezne aparate. Ispred peći
potreban je slobodan prostor širine peći i dužine otprilike jednakoj spoljašnjoj dubini peći (B).
Slika 3 Pozicija peći u prostoru
2.7 Pomeranje peći
Pomeranje peći i komore nije predviđeno. Ukoliko nekada dođe do potrebe za premeštanjem peći i
komore, treba imati u vidu da je to veoma komplikovan i skup proces koji zahteva angažovanje stručnih
montažera. Stoga je potrebno dobro razmisliti o poziciji peći i komore pre same montaže.
Uvodne napomene Električna pekarska peć DADEX
13
2.8 Prvo zagrevanje peći
Iako je peć nakon instalacije u potpunosti funkcionalna, ona nije spremna za rad dok se ne izvrši prvo
zagrevanje peći. Kod prvog zagrevanja peći potrebno je 24 časa zagrevati na temperaturi od 50°C i
narednih 48 časova postepeno dizati po 50°C do maksimalne željene temperature. Kod prvog zagrevanja
peć će dimiti i atmosfera oko nje će biti neprijatnog mirisa. Prvo zagrevanje peći je NEOPHODNO za
dalje normalno funkcionisanje peći!!
2.9 Princip rada
Proces pečenja pekarskih proizvode počinje ubacivanjem prethodno pravilno obrađenog testa u
fermentacionu komoru. Fermentaciona komora poseduje automatsku regulaciju temperature i vlage, kao
i mešanje vazduha u komori radi obezbeđivanja homogenog ambijenta. Na taj način se obezbeđuje
ravnomerna i identična fermentacija svih proizvoda. Nakon određenog vremena (koje zavisi od tipa
proizvoda i proizvodne tehnologije korisnika) završava se proces fermentacije i proizvodi se ubacuju u
peć na pečenje. Potrebno je da je peć prethodno zagrejana na željenu temperaturu što se postiže
podešavanjem parametara termoregulatora za svaku etažu koji upravljaju radom grejača. U toku pečenja
vrši se doziranje tehnološke pare pritiskom na odgovarajuće tastere. Nakon završetka pečenja proizvodi
se vade iz peći i time se proces pečenja pekarskog proizvoda završava.

Rad na peći Električna pekarska peć DADEX
14
3 RAD NA PEĆI
Peć se dovodi pod napon postavljanjem glavnog prekidača koji se nalazi na ormanu peći u položaj „1“. VAŽNO!! Manipulacija glavnim prekidačem na ormanu peći, tj. njegovo uključivanje i isključivanje preporučljivo je samo ako su svi prekidači na prednjim stubovima i upravljačkim panelima isključeni!! Ovim se izbegava rad prekidača pod snagom i kvarovi koji mogu nastati usled toga. U SLUČAJU NUŽDE, IGNORISATI PRETHODNU PREPORUKU!
Pritiskom na taster na panelu, uključuje se upravljački panel. Nakon uključenja, pojavljuje se početni
ekran.
3.1 Rad na upravljačkom panelu osetljivom na dodir
Početni ekran
Gornja traka sa
tasterima
Traka sa datumom i
vremenom
Sekcija za podešavanje
parametara pečenja
Statausna traka
Sekcija za izbor
recepture
Donja traka sa
tasterima

Rad na peći Električna pekarska peć DADEX
15
Gornja traka sa tasterima
- Pritiskom na ovaj taster ulazi se u ekran sa listom alarma.
- Pritiskom na ovaj taster ulazi se u ekran sa prikazom pomoćnih informacija.
- Pritiskom na ovaj taster ulazi se u ekran sa podešavanjima.
- Pritiskom na ovaj taster ulazi se u ručni režim rada.
- Pritiskom na ovaj taster snimaju se izmene.
Donja traka sa tasterima
- Pritiskom na ovaj taster uključuje / isključuje se svetlo u etaži.
- Pritiskom na ovaj taster pušta se para u etažu.
- Pritiskom na ovaj taster produžuje se vreme pečenja za 30 sekundi.
- Pritiskom na ovaj taster započinje se izvršavanje programa.
- Pritiskom na ovaj taster dobija se novi set funkcijskih tastera.
- Pritiskom na ovaj taster otvara se / zatvara klapna u etaži (opciono).
- Pritiskom na ovaj taster uključuje / isključuje se grejač generatora pare – švela.
- Pritiskom na ovaj taster uključuju / isključuju se grejači plafona etaže.
- Pritiskom na ovaj taster uključuju / isključuju se grejači poda etaže.

Rad na peći Električna pekarska peć DADEX
16
Sekcija za izbor recepture
- Pritiskom na sliku proizvoda ulazi se u ekran za izbor recepture.
- Pritiskom na ove strelice menja se trenutno aktivna receptura.
Sekcija za podešavanje parametara pečenja
- Pritiskom na sliku sata menja se faza pečenja / korak za koji se postavljaju parametri.
Moguće je postaviti 1 - 5 faza pečenja. Naznačeno vreme označava ukupno vreme pečenja za sve faze
/ korake.
Dve brojčane vrednosti u sredini ove sekcije označavaju trenutnu izmerenu vrednost temperature u vrhu
i u dnu etaže.
- Pritiskom na dve brojčane vrednosti sa natpisom Set Temperature iznad njih,
podešavaju se zadate temperature plafona i poda etaže, respektivno.
- Pritiskom na dve grupe strelica sa pravougaonicima podešava se angažovana snaga
grejača za plafon i patos etaže, respektivno.
- Pritiskom na brojčanu vrednost sa natpisom Steam time podešava se
vreme puštanja pare u etaži na početku faze / koraka pečenja.
- Pritiskom na brojčanu vrednost sa natpisom Bake time podešava se
vreme trajanja faze / koraka pečenja.
Traka sa datumom i vremenom
- Prikazuje datum i vreme
Statusna traka
- Prikazuje status izlaza: crno bela slika – iskjučeno
stanje, slika u boji – uključeno stanje.

Rad na peći Električna pekarska peć DADEX
17
Programiranje parametara programa / recepture
Pritisnite ikonu kako biste promenili aktivni korak programa / recepture gde trenutno
aktivna cifra označava broj aktivnog koraka. Moguće je programirati 1 – 5 koraka programa.
Pritisnite odgovarajuće ikone kako biste podesili temperaturu plafona i patosa, angažovanu snagu
grejača plafona i patosa, klapnu, vreme puštanja pare i vreme trajanje koraka / faze programa.
Pritisnite brojeve kako biste uneli željenu vrednost.
- brisanje jedne cifre
- brisanje svega
- izlazak bez unosa
- izlazak sa unosom
Nakon podešavanja svih parametara za jednu fazu, prelazi se
na podešavanje sledeće faze pečenja.
Nakon unosa svih podataka, pritisnite taster kako biste
snimili program / recepturu. Pojavljuje se dijalog kao na slici
ispod.
- Odustajanje od snimanja programa / recepture
- Snimanje svih paramtera u trenutno aktivan program / recepturu
- Snimanje svih parametara u program / recepturu pod drugim brojem
Pritiskom na taster pojavljuje se sledeći ekran:
Rad na peći Električna pekarska peć DADEX
18
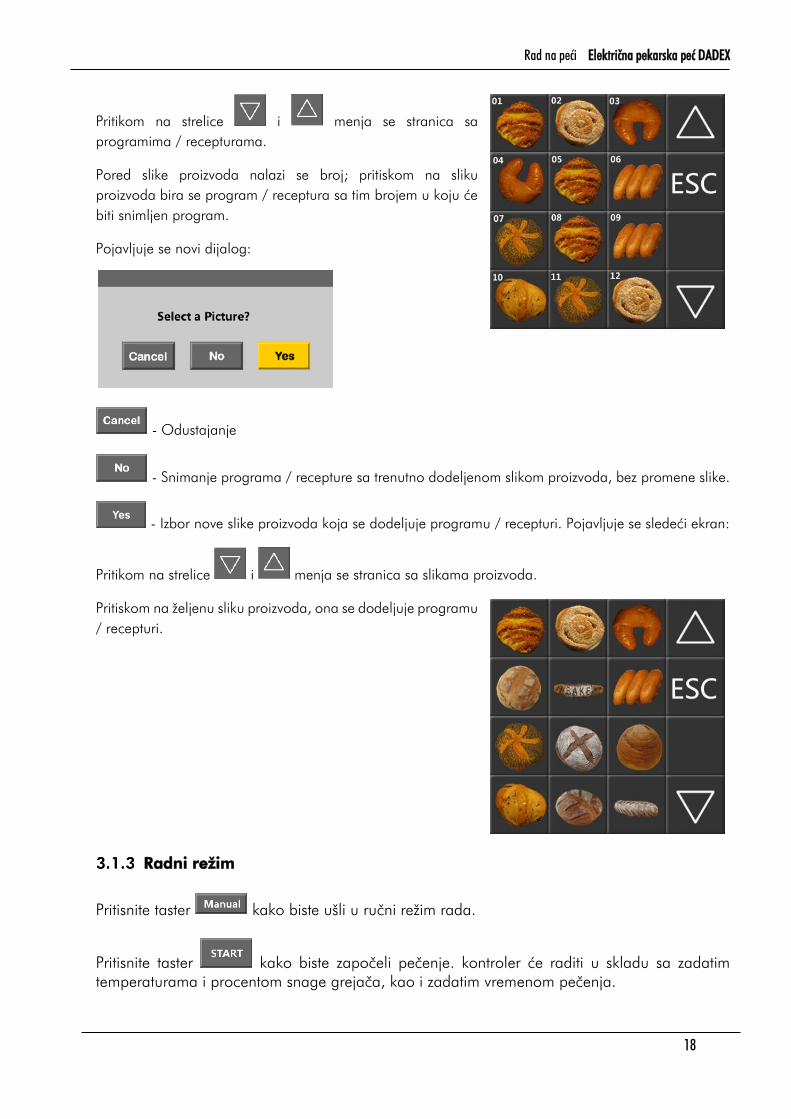
Pritikom na strelice i menja se stranica sa
programima / recepturama.
Pored slike proizvoda nalazi se broj; pritiskom na sliku
proizvoda bira se program / receptura sa tim brojem u koju će
biti snimljen program.
Pojavljuje se novi dijalog:
- Odustajanje
- Snimanje programa / recepture sa trenutno dodeljenom slikom proizvoda, bez promene slike.
- Izbor nove slike proizvoda koja se dodeljuje programu / recepturi. Pojavljuje se sledeći ekran:
Pritikom na strelice i menja se stranica sa slikama proizvoda.
Pritiskom na željenu sliku proizvoda, ona se dodeljuje programu
/ recepturi.
Radni režim
Pritisnite taster kako biste ušli u ručni režim rada.
Pritisnite taster kako biste započeli pečenje. kontroler će raditi u skladu sa zadatim
temperaturama i procentom snage grejača, kao i zadatim vremenom pečenja.

Rad na peći Električna pekarska peć DADEX
19
Pritisnite taster kako biste pustili paru (švel) u etažu. Ukoliko je proizvođač pare zagrejan
na dovoljnu temperaturu, para će biti puštena u etažu. Ukoliko nije, neće biti moguće pritisnuti
taster i pustiti paru u etažu.
Pritisnite taster kako biste uključili / isključili rasvetu etaže.
Pritisnite taster kako biste otvorili / zatvorili klapnu (opciono).
Pritisnite taster kako biste uključili / isključili grejače proizvođača pare – švela.
Tokom kontrole temperature i rada grejača, grejači plafona i patosa su podrazumevano aktivni.
Pritisnite tastere i kako biste uključili / isključili grejače plafona i patosa,
respektivno.
Pritisnite taster kako biste produžili pečenje za 30 sekundi.
Ukoliko je kontroler u Standby režimu, pritiskom na taster ispisuje se 30 sekundi i počinje
odbrojavanje do 0 s.
Pritisnite taster kako biste zaustavili odbrojavanje. Režim grejanja se ne menja pritiskom
na ovaj taster.
Kada istekne vreme pečenja, na ekranu će se prikazati ikona i čuće se zvučni signal koji
signalizira završetak programa. Svetlo će se automatski upaliti. Pritisnite bilo koji taster da biste
poništili alarm.
Po završetku programa, grejači neće biti isključeni. Ukoliko želite da isključite grejače, pritisnite
tastere i kako biste uključili / isključili grejače plafona i patosa, respektivno.‚
Pritisnite taster da biste promenili radni režim usred pečenja. Pojavljuje se sledeći dijalog:
Rad na peći Električna pekarska peć DADEX
20
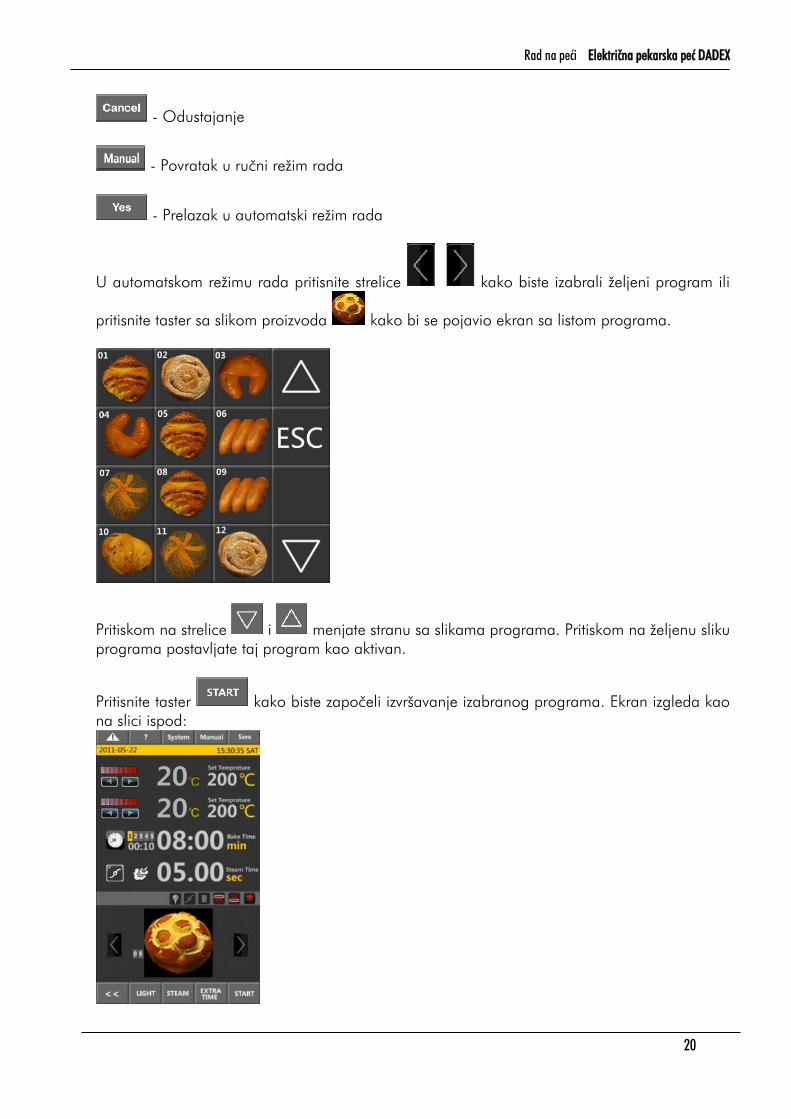
- Odustajanje
- Povratak u ručni režim rada
- Prelazak u automatski režim rada
U automatskom režimu rada pritisnite strelice kako biste izabrali željeni program ili
pritisnite taster sa slikom proizvoda kako bi se pojavio ekran sa listom programa.
Pritiskom na strelice i menjate stranu sa slikama programa. Pritiskom na željenu sliku
programa postavljate taj program kao aktivan.
Pritisnite taster kako biste započeli izvršavanje izabranog programa. Ekran izgleda kao
na slici ispod:

Rad na peći Električna pekarska peć DADEX
21
Kontroler će izvršavati program u skladu sa postavljenim parametrima. Brojevi 1 – 5 prikazuju
izvršavanje faza (koraka) programa.
Para će biti puštena u etažu u skladu sa postavljenim parametrima.
Pritisnite taster kako biste uključili / isključili rasvetu etaže.
Pritisnite taster kako biste otvorili / zatvorili klapnu (opciono).
Pritisnite taster kako biste uključili / isključili grejače proizvođača pare – švela.
Pritisnite taster kako biste produžili pečenje za 30 sekundi.
Ukoliko je kontroler u Standby režimu, pritiskom na taster ospisuje se 30 sekundi i
počinje odbrojavanje do 0 s.
Pritisnite taster kako biste zaustavili odbrojavanje. Režim grejanja se ne menja pritiskom
na ovaj taster.
Kada istekne vreme pečenja, na ekranu će se prikazati ikona i čuće se zvučni signal koji
signalizira završetak programa. Svetlo će se automatski upaliti. Pritisnite bilo koji taster da biste
poništili alarm.
Podešavanje parametara sistema
Pritisnite taster da biste ušli u podešavanja sistema.
- Podešavanje vremena
- Podešavanje fabričkih parametara kontrolera
- Ubacivanje slika proizvoda
- Rad sa USB diskom

Rad na peći Električna pekarska peć DADEX
22
- Povratak
Pritisnite taster da biste ušli u ekran za podešavanje vremena i datuma.
- Podesšavanje meseca, dana i godine.
- Podešavanje sata i minuta
- Podešavanje vremena automatskog uključenja (kontroler će se automatski
uključiti u zadato vreme i započeti grejanje po poslednjim zadatim parametrima temperature i
angažovane snage. Na ovaj način moguće je zagrejati etažu tako da na početku rada bude već
zagrejana na potrebnu temperaturu).
- Aktiviranje ili deaktiviranje funkcije automatskog uključenja:
- disable – isključeno
- enable – uključeno
- Podešavanje vremena automatskog isključenja kontolera.
- Aktiviranje ili deaktiviranje funkcije automatskog isključenja:
- disable – isključeno
- enable – uključeno
Izaberite dane za koje se vrši automatsko uključivanje / isključivanje peći. Ukoliko je ikonica
ispod sive boje, tog dana se neće vršiti automatsko uključivanje / isključivanje peći. Ukoliko je
ikonica ispod zelene boje, tog dana će se vršiti automatsko uključivanje / isključivanje peći.
Pritisnite taster da biste izašli i sačuvali podešavanja.
Fabrička podešavanja ne menjati bez prethodne konsultacije sa proizvođačem.
Pritisnite taster da biste ušli u ekran za ubacivanje slika proizvoda.
Pritisnite taster da biste se vratili na prethodni ekran.
Unesite šifru ‘123456' i pritisnite taster da biste izabrali sliku.

Rad na peći Električna pekarska peć DADEX
23
- strana sa slikama dole
- strana sa slikama gore
Na sledećem delu ekrana prikazane su slike koje se nalaze
na USB disku.
Koristite tastere da biste izabrali sliku sa USB
diska. Na gornjoj slici 07/16 predstavlja broj prikazane
slike u odnosu na ukupan broj slika na disku. Na ovom
primeru, u pitanju je slika broj 7 od ukupno 16 koje se
nalaze na USB disku.
Kada izaberete sliku sa USB diska koju želite da ubacite, pritisnite na polje iznad na koje želite
da ubacite sliku. Bez obzira da li je polje prazno ili se na njemu već nalazi neka slika, preko nje
će biti prepisana nova slika sa USB diska.
Pritisnite taster da biste se vratili na početni ekran.
NAPOMENA Da biste bili sigurni da će kontroler prepoznati sliku, konvertujte je u sledeći format:
bmp, boje 24 bit, rezolucija 72 dpi, 128 x 128 piksela, crna pozadina.
Pritisnite taster da biste ušli u ekran za rad sa USB diskom.
Pritisnite taster da biste se vratili na prethodni ekran.
Unesite šifru ‘112233' i pritisnite taster da biste ušli u ekran za rad sa USB diskom.
Vrše se sledeće provere USB diska:
Pronađen USB uređaj.
Pronađeni ispravni podaci.
Rad na peći Električna pekarska peć DADEX
24
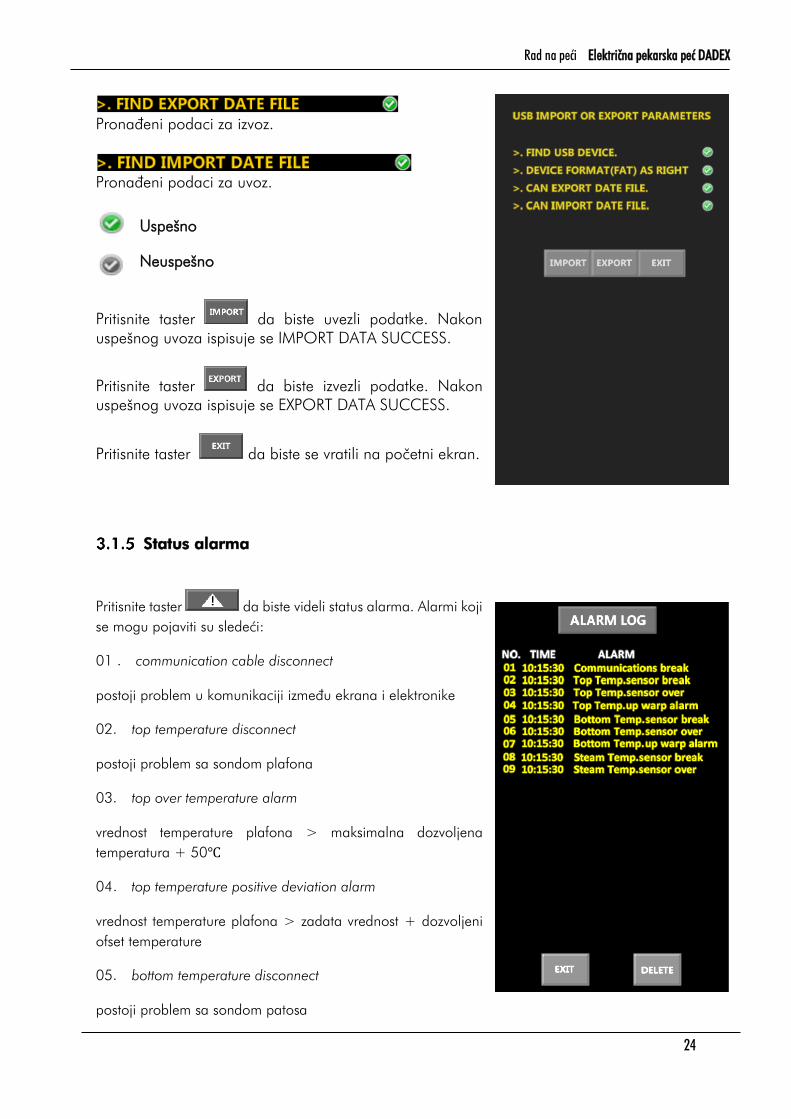
Pronađeni podaci za izvoz.
Pronađeni podaci za uvoz.
Pritisnite taster da biste uvezli podatke. Nakon
uspešnog uvoza ispisuje se IMPORT DATA SUCCESS.
Pritisnite taster da biste izvezli podatke. Nakon
uspešnog uvoza ispisuje se EXPORT DATA SUCCESS.
Pritisnite taster da biste se vratili na početni ekran.
Status alarma
Pritisnite taster da biste videli status alarma. Alarmi koji
se mogu pojaviti su sledeći:
01 . communication cable disconnect
postoji problem u komunikaciji između ekrana i elektronike
02. top temperature disconnect
postoji problem sa sondom plafona
03. top over temperature alarm
vrednost temperature plafona > maksimalna dozvoljena
temperatura + 50℃
04. top temperature positive deviation alarm
vrednost temperature plafona > zadata vrednost + dozvoljeni
ofset temperature
05. bottom temperature disconnect
postoji problem sa sondom patosa
Uspešno
Neuspešno

Rad na peći Električna pekarska peć DADEX
25
06. bottom over temperature alarm
vrednost temperature patosa > maksimalna dozvoljena temperatura + 50℃
07. bottom temperature positive deviation alarm
vrednost temperature patosa > zadata vrednost + dozvoljeni ofset temperature
08. steam temperature disconnect
Problem sa sondom generatora pare (švela)
09. steam over temperature alarm
temperatura generatora pare > maksimalna dozvoljena temperatura + 50℃
Pritisnite taster da biste izbrisali zapise alarma.
Pritisnite taster da biste se vratili na početni ekran.
Ekran sa pomoćnim informacijama
Pritiskom na taster prikazuje se ekran sa 6 zastava i to engleskom, nemačkom, francuskom,
rumunskom, ruskom i srpskom. Pritiskom na određenu zastavu dobija se ekran sa kratkim pomoćnim
informacijama na tom jeziku.
Pritisnite taster da biste se vratili na početni ekran.
Napomene za korišćenje generatora pare – švelova
Generatori pare se mogu koristiti samo kada su dobro zagrejani, tj. dobro pripremljeni tako je da je
potrebno ostaviti dovoljno vremena grejačima da nakon švelovanja ponovo zagreju švel na potrebnu
temperaturu. To vreme iznosi oko 15 minuta. Pre prvog švelovanja vreme zagrevanja iznosi 3 sata.
Prolaskom vode kroz švelove i pretvaranjem u paru dolazi do jako brzog hlađenja švelova i ukoliko se
predugo šveluje može doći do hlađenja generatora pare. U tom slučaju, uređaj ne dozvoljava sledeće
puštanje pare dok se generator pare ne zagreje na potrebnu temperaturu. Takođe, švel se u tom slučaju
previše hladi pa je potrebno i dosta više vremena za njegov oporavak, tj. zagrevanje na potrebnu
temperaturu. Zato je poželjno pridržavati se pravila da švelovanje ne traje duže od 5 sekundi!!

Rad na peći Električna pekarska peć DADEX
26
3.2 Rad na elektronskom integrisanom upravljačkom panelu
Na panelu se nalazi trocifreni
displej sa oznakom "°C" pored
njega. Veliki trocifreni broj
predstavlja trenutnu
temperaturu u etaži, dok manji
trocifreni brojevi predstavljaju
zadatu temperaturu (plafona i
patosa, respektivno). Dva
tastera sa diodom sa slikama i služe za
uključivanje/isključivanje rada gornjih i donjih grejača,
repektivno. Grejači plafona i patosa su aktivni kada svetli
dioda na tasterima i , respektivno.
Grupa od osam tastera od
kojih su šest označeni
strelicama služi za
podešavanje temperature.
Pritiskom na taster podešava se temperatura gornjih
grejača, a pritiskom na taster podešava se
temperatura donjih grejača. Prva dva tastera gore i dole
služe za podešavanje prve cifre temperature (stotine),
druga dva tastera gore i dole za podešavanje druge cifre
temperature (desetine) i treća dva tastera gore i dole za
podešavanje treće cifre temperature (jedinice).
Dvocifrenii displej sa
oznakom sata predstavlja
vreme tajmera koje se
podešava sa dva tastera
pored samog displeja.
Tasterima pored displeja, pode[ava se vreme tajmera u
minutama. Tajmer se aktivira pritiskom na taster .
Tajmer je aktivan kada svetli dioda na tasteru. Po isteku
vremena oglašava se alarm. Tajmer ni na koji način ne
utiče na pečenje, ne startuje i ne prekida rad grejača i
služi samo kao informacija korisniku da je pečenje
završeno.

Rad na peći Električna pekarska peć DADEX
27
Tasterima sa strelicama levo i desno između kojih stoji slika podešava se angažovana snaga
grejača plafona. Iznad se nalazi osam LED dioda koje vizuelno predstavljaju nivo angažovane snage, pri
čemu sve isključene diode predstavljaju isključenu snagu (100 %), a sve
uključene diode predstavljaju maksimalnu angažovanu snagu (60 %). Svaka
dioda angažuje dodatnih 5 % snage.
Tasterima sa strelicama levo i desno između kojih stoji slika
podešava se angažovana snaga grejača patosa. Iznad se nalazi osam LED
dioda koje vizuelno predstavljaju nivo angažovane snage, pri čemu sve isključene diode predstavljaju
isključenu snagu (100 %), a sve uključene diode predstavljaju maksimalnu angažovanu snagu (60 %).
Svaka dioda angažuje dodatnih 5 % snage.
Trocifreni displej u donjem delu panela prikazuje trenutnu temperaturu
generatora pare. Grejači generatora pare uključuju / isključuju se pomoću
tastera . Švelovi se mogu koristiti samo kada su dobro zagrejani, tj.
dobro pripremljeni tako je da je potrebno ostaviti dovoljno vremena
grejačima da nakon švelovanja ponovo zagreju švel na potrebnu
temperaturu. To vreme iznosi oko 15 minuta. Pre prvog švelovanja vreme
zagrevanja iznosi 3 sata. Jednocifreni displej prikazuje vreme puštanja
pare, tj. vreme za koje je elektromagnetni ventil koji pušta paru u etažu otvoren. Tasterima sa strelicama
gore i dole pored ovog displeja, podešava se to vreme i može iznositi 1 - 9 sekundi. Preporučeno vreme
švelovanja (držanja tastera) je od 1-3 sekunde (u zavisnosti od proizvoda i proizvodne tehnologije). Švel
se u etažu pušta pritiskom na taster . Prolaskom vode kroz švelove i pretvaranjem u paru dolazi do
jako brzog hlađenja švelova i moglo bi doći do puštanja vode u etažu umesto pare. Zbog toga je
onemogućeno puštanje pare kad je temperatura niža od 200 °C i tada će dioda na tasteru blinkati
što označava da je puštanje pare onemogućeno. Zato je poželjno pridržavati se pravila da švelovanje ne
traje duže od 3 sekunde kako bi se para optimalno trošila.
Donji levi taster služi za uključenje rada panela.
Donji desni taster služi za uključivanje svetla u etaži. Svetlo se automatski isključuje za 30 sekundi.
Prekidač označen sa Prekidač ventilatora haube služi za pokretanje ventilatora koji se nalazi u haubi i
povezan je sa ventilacionim odvodom, a služi za odvod viška pare.
%
%

Rad na peći Električna pekarska peć DADEX
28
3.3 Rad sa elektromehaničkom komandom i termoregulatorima
Postavljanjem prekidača označenog sa Glavni Prekidač u položaj „1“
uključuje se komanda peći. Termoregulatori i vlagometar su sada u
radnom stanju i može se pristupiti njihovom podešavanju što će biti
objašnjeno kasnije.
Kada su postavljene željenje temperature u etažama, termoregulator daje
uslov grejačima da počnu sa radom. Ipak, grejači ne počinju sa radom
ukoliko je isključen Prekidač grejača etaže , za svaku od četiri etaže;
nalaze se na stubu sa termoregulatorima). Ukoliko korisnik ne želi da
koristi određenu etažu, potrebno je samo da isključi prekidač koji se
odnosi na grejače te etaže i ne mora da brine o podešavanjima
termoregulatora sve do sledeće potrebe za korišćenjem te etaže. Pored
tastera koji kontrolišu grejače etaža nalaze se prekidači Rasvete etaže
za svaku od četiri etaže).
Prekidači na stubu komore označeni sa Prekidač grejača švela etaže ,
za svaku od četiri etaže) služe za uključivanje grejača koji zagrevaju
proizvođače pare – švelove. Švelovi se mogu koristiti samo kada su dobro
zagrejani, tj. dobro pripremljeni tako je da je potrebno ostaviti dovoljno
vremena grejačima da nakon švelovanja ponovo zagreju švel na potrebnu
temperaturu. To vreme iznosi oko 15 minuta. Pre prvog švelovanja vreme
zagrevanja iznosi 3 sata. Tasterima na stubu komore označenim sa Taster
švela etaže , za svaku od četiri etaže) zadaje se u stvari komanda
otvaranja elektro- magnetnog ventila koji pušta paru u etažu. Ventil je
otvoren sve dok je pritisnut taster i zatvara se puštanjem tastera.
Preporučeno vreme švelovanja (držanja tastera) je od 1-3 sekunde (u
zavisnosti od proizvoda i proizvodne tehnologije). Prolaskom vode kroz
švelove i pretvaranjem u paru dolazi do jako brzog hlađenja švelova i
ukoliko se taster predugo drži može doći do puštanja vode u etažu umesto
pare. Takođe, švel se u tom slučaju previše hladi pa je potrebno i dosta
više vremena za njegov oporavak, tj. zagrevanje da potrebnu
temperaturu. Zato je potrebno strogo se pridržavati pravila da švelovanje
ne traje duže od 3 sekunde!!
Prekidač označen sa Prekidač ventilatora haube služi za pokretanje
ventilatora koji se nalazi u haubi i povezan je sa ventilacionim odvodom,
a služi za odvod viška pare.
Rad na peći Električna pekarska peć DADEX
29
Peć poseduje tajmer koji može da obavesti korisnika da je proces pečenja završen. On se aktivira
postavljanjem prerkidača obeleženim sa Prekidač tajmera u položaj „1“, a podešava postavljanjem
točkića obeleženim sa Tajmer na željenu vrednost vremena.
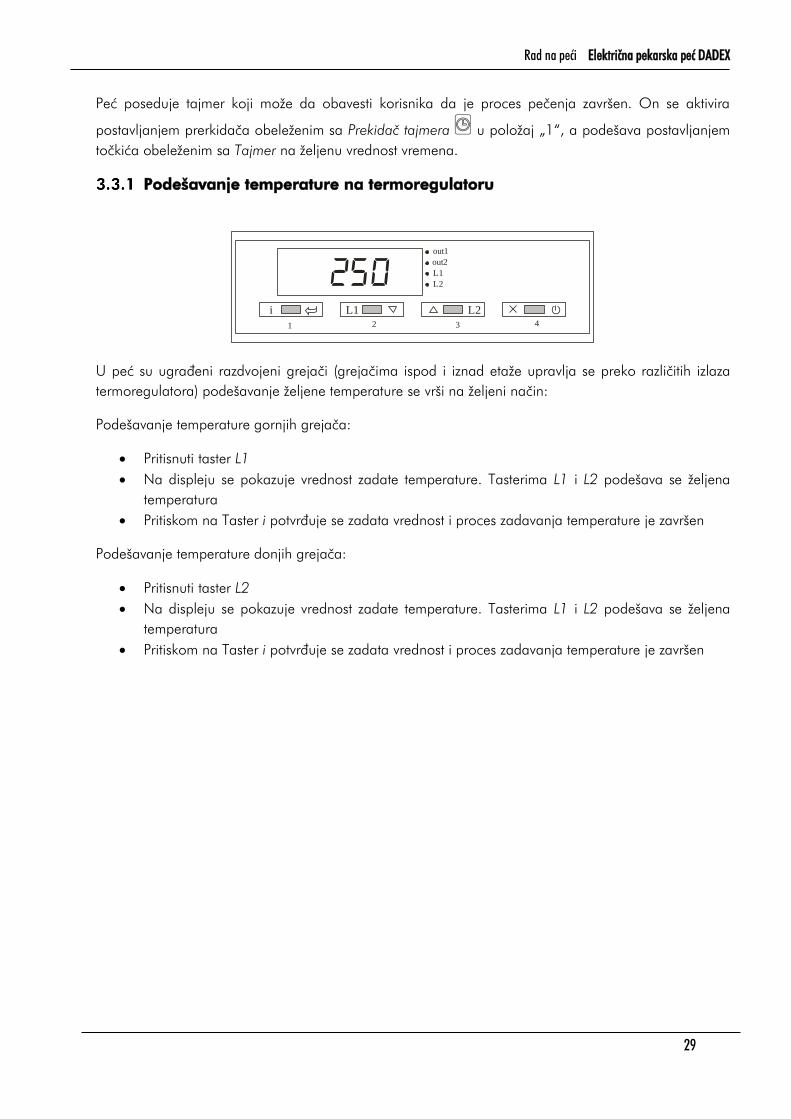
Podešavanje temperature na termoregulatoru
U peć su ugrađeni razdvojeni grejači (grejačima ispod i iznad etaže upravlja se preko različitih izlaza
termoregulatora) podešavanje željene temperature se vrši na željeni način:
Podešavanje temperature gornjih grejača:
Pritisnuti taster L1
Na displeju se pokazuje vrednost zadate temperature. Tasterima L1 i L2 podešava se željena
temperatura
Pritiskom na Taster i potvrđuje se zadata vrednost i proces zadavanja temperature je završen
Podešavanje temperature donjih grejača:
Pritisnuti taster L2
Na displeju se pokazuje vrednost zadate temperature. Tasterima L1 i L2 podešava se željena
temperatura
Pritiskom na Taster i potvrđuje se zadata vrednost i proces zadavanja temperature je završen
L1 L2
out1
out2
L1
L2
1 2 3 4
250i

Rad na fermentacioonoj komori Električna pekarska peć DADEX
30
4 RAD NA FERMENTACIONOJ KOMORI
4.1 Rad na upravljačkom integrisanom panelu
Na panelu se nalaze tri dvocifrena sedmosegmentna
displeja. Gornji displej iznad kojeg piše "Timer"
predstavlja preostalo vreme do aktiviranja alarma.
Srednji displej iznad koga piše "Temp" predstavlja
trenutnu temperaturu u komori. Donji displej iznad koga
piše "R.Humidity" predstavlja procenat vlažnosti
ambijenta u komori.
Taster sa oznakom služi za uključivanje /
isključivanje panela komore. Sa uključivanjem rada
panela startuje se i rad ventilatora komore i tada svetli
dioda pored simbola . Tasterom sa oznakom
ulazi se u mod podešavanja parametara. Nakon prvog
pritiska tastera, displej tajmera počinje da blinka. U tom
trenutku tasterima podešava se vrednost
zadatog vremena u minutama. Nakon sledećeg pritiska
tastera displej temperature počinje da blinka i vrši
se podešavanje vrednosti željene temperature u °C
tasterima sa strelicama. Ponovnim pritiskom tastera
počinje da trepće displej procenta vlage i
tasterima sa strelicama vrši se podešavanje željene
vrednosti vlažnosti ambijenta komore u procentima.
Konačno, još jednim pritiskom na taster svi displeji
prestaju da trepere i zadate vrednosti su zapamćene.
Taster sa slikom startuje i zaustavlja tajmer. Taster
služi za uključivanje / isključivanje rasvete.
Grejač švela komore se uključuje / isključujepomoću
tastera Grejač švela komore. Za švel komore važe iste
napomene kao i kod švela peći.
Prekidačem se bira režim rada komore. Kada je
prekidač postavljen na Auto ( ), para se pušta u
Rad na fermentacioonoj komori Električna pekarska peć DADEX
31
komoru automatski u skladu sa podešavanjem panela. Kada je ovaj prekidač postavljen na Ručno ( ),
para se ručno pušta u komoru pomoću tastera .
4.2 Rad sa elektromehaničkom komandom, termoregulatorom i
vlagometrom
Postavljanjem prekidača Izbor rada na odgovarajuću vrednost omogućava
se ručni ili automatski rad komore. Kod automatskog rada komore, korisnik
treba samo da zada vrednost temperature i vlage na termoregulatoru i
vlagometru i da izvrši inicijalno švelovanje proizvoda po ubacivanju
korišćenjem tastera Taster švela komore . Nakon toga, održavanje
mikroklimatskih uslova u komori se održava automatski bez ikakve intervencije
korisnika.
Kod ručnog rada, korisnik uz pomoć tastera T1 i Prekidača ventilatora komore
kontroliše rad ventilatora i doziranje pare. Prekidačem Grejač komore
uključuje se grejač komore, a Prekidačem grejača švela komore uključuje
se grejač švela komore. Prekidač Rasveta komore služi za paljenje rasvete
u komori.
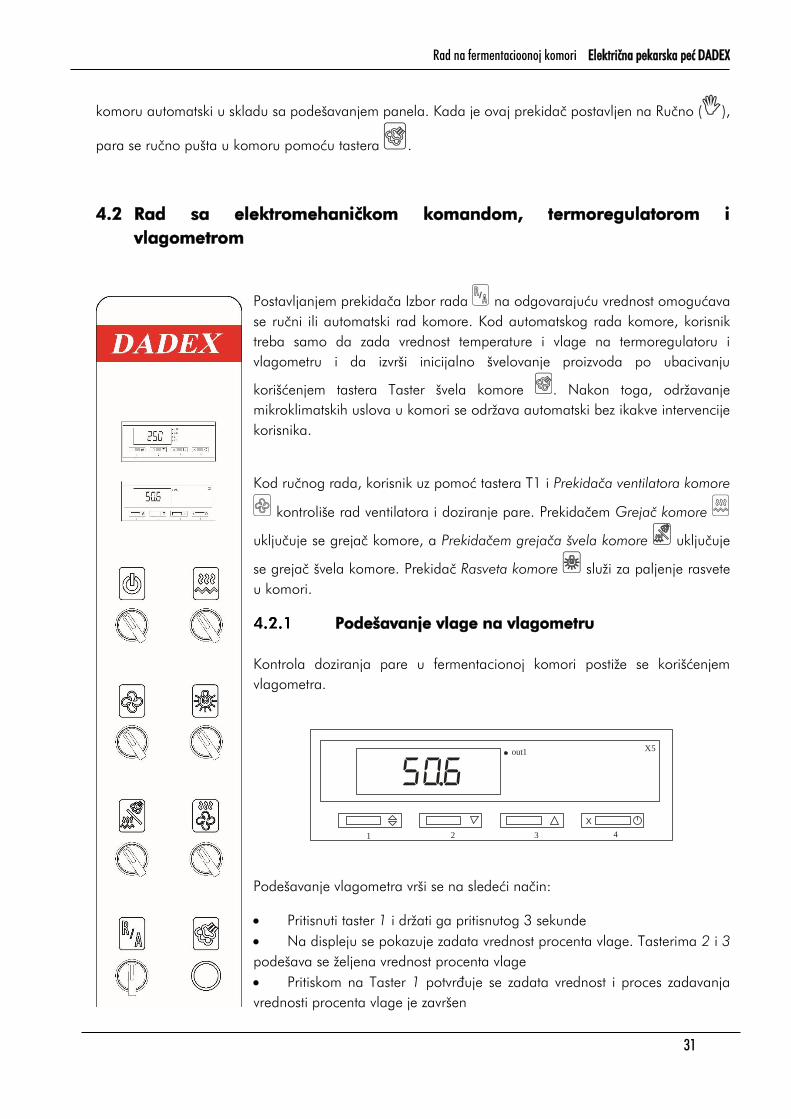
Podešavanje vlage na vlagometru
Kontrola doziranja pare u fermentacionoj komori postiže se korišćenjem
vlagometra.
Podešavanje vlagometra vrši se na sledeći način:
Pritisnuti taster 1 i držati ga pritisnutog 3 sekunde
Na displeju se pokazuje zadata vrednost procenta vlage. Tasterima 2 i 3
podešava se željena vrednost procenta vlage
Pritiskom na Taster 1 potvrđuje se zadata vrednost i proces zadavanja
vrednosti procenta vlage je završen
out1
1 2 3 4
506X5
X

Održavanje peći Električna pekarska peć DADEX
32
5 ODRŽAVANJE PEĆI
Da bi se obezbedio normalan rad peći, izbegli eventualni kvarovi i omogućio dug radni vek peći potrebno je
vršiti redovno održavanje peći.
DNEVNO ODRŽAVANJE PEĆI
U dnevno održavanje spada održavanje čistoće površina koje mogu ostati zaprljane od strane proizvoda. Tu
spadaju vrata etaža, ručke, pult peći, itd. Potrebno ih je čistiti pomoću deterdženata za kuhinjsko posuđe ili
sprejom za rerne.
PERIODIČNO ODRŽAVANJE PEĆI
ČIŠĆENJE GENERATORA PARE
Na svakih 6 meseci ili čim se primeti smanjena količina pare treba izvršiti čišćenje generatora pare od
kamenca. Generatori pare se nalaze ispod etaža i njima se prilazi sa slobodne bočne strane peći.
Ključem 21 treba odvrnuti spojnicu bakarne cevi (1) i istu staviti na stranu.
Slika 4 Čišćenje generatora pare - Korak 1

Održavanje peći Električna pekarska peć DADEX
33
Ključem 13 odvrnuti dve navrtke M8 (2) sa prirubnice perforirane cevi.
Slika 5 Čišćenje generatora pare - Korak 2
Nakon toga izvući perforiranu cev od 1/2 cola, koju treba razbušiti s čela burgijom ø 6 i rupice duž cevi
burgijom ø 3,5 mm. Obratiti pažnju da li je završetak bakarne cevi zapušen. Ako je potrebno i njega razbušiti
burgijom ø 6 mm.
Slika 6 Čišćenje generatora pare - Korak 3

Održavanje peći Električna pekarska peć DADEX
34
Slika 7 Čišćenje generatora pare - Korak 4
Sve obrnutim redom vratiti na svoje mesto. Sačekati oko dva i po sata da se švelovi zagreju i početi sa
njihovom upotrebom. Za normalan i dobar rad švelova mora biti pritisak vode minimum 0.2 MPa (2 bar).
PROVERA ISPRAVNOSTI DELOVA MOTORA
Na svakih godinu dana ili ukoliko se primeti nepravilan rad motora (npr., čudan zvuk) potrebno je izvršiti
kontrolu ispravnosti motora. Na peći i fermentacionoj komori se nalaze dva motora i to motor ventilatora
haube i motor ventilatora u komori. Potrebno je obratiti se stručnom serviseru koji će izvršiti kontrolu
ispravnosti motora (ležajeve, četkice, itd.) i eventualno izvršiti servis motora.
Ukoliko se primeti nepravilan rad motora ventilatora komore (čudan zvuk, vibracije) proveriti da li je
ventilatorsko kolo zaprljano i očistiti ga mehanički i pogodnim hemijskim sredstvima.

Poznati problemi u radu Električna pekarska peć DADEX
35
6 POZNATI PROBLEMI U RADU
UPOZORENJE!! Nestručnim licima je zabranjeno otvaranje električne table i rad na istoj pod naponom.
Problem Uzrok Rešenje
Glavni prekidač nije pod naponom Peć se ne nalazi pod naponom 1. Proveriti napajanje objekta
el.energijom, glavne
osigurače i FID sklopku
2. Proveriti osigurače u
el.ormanu koji se odnose na
napajanje peći
Dolazi do neslaganja u temperaturi
koja se meri/zadaje i stvarne
temperature u peći
Panel / termoregulator ili sonda su u
kvaru
Zameniti panel/termoregulator i/ili
sondu
Dolazi do pojave vode u etažama a) Predugo korišćenje švela
prilikom švelovanja
b) Neispravan grejač
generatora pare
c) Neispravan elektromagnetni
ventil
a) Prekinuti sa korišćenjem
švela sve dok se švel ponovo
ne zagreje i voda iz etaža
ispari (~4 sata)
b) Pozvati proizvođača da izvrši
zamenu neispravnog grejača
generatora pare
c) Zameniti neispravni
elektromagnetni ventil
Nije moguće švelovanje pritiskom na
taster
Taster je u kvaru ili je elektromagnetni
ventil u kvaru
Proveriti ispravnost jednog i drugog
dela i izvršiti zamenu neispravnog
U nekim etažama nema rasvete Pregorela je sijalica Zameniti neispravnu sijalicu
Etaža ne zagreva / ne postiže
temperaturu
a) Neispravan jedan ili više
grejača u etaži
b) Neispravan Solid State Relay
c) Osigurači grejača ili
osigurači napajanja peći u
ormanu su se isključili (pali
su) i / ili su neispravni
a) Ovo je moglo da se desi
samo usled mehaničkog
oštećenja. Pozvati
proizvođača da izvrši
zamenu neispravnih grejača
b) Izvršiti zamenu neispravnog
Solid State Relaya
c) Uključiti odgovarajuće
osigurače ili ih po potrebi
zameniti

Uslovi garancije Električna pekarska peć DADEX
36
7 USLOVI GARANCIJE
Garantni rok na svu opremu i delove je 2 godine. Garancija je nevažeća u sledećim slučajevima:
1. Ukoliko je kvar nastao nepravilnom upotrebom peći
2. Ukoliko je kvar nastao nepridržavanjem uputstva za prvo zagrevanje peći
3. Ukoliko je kvar nastao usled problema sa pravilnim snabdevanjem el.energije
4. Ukoliko je kvar nastao usled nedovoljnog pritiska vode na priključku za vodu
5. Ukoliko je kvar nastao servisiranjem peći od strane nestručnih lica i bez prethodnog odobrenja
firme “DADEX”
6. Usled korišćenja peći u svrhe za koju peć nije namenjena
7. Usled nedostatka održavanja
Proizvođač se obavezuje da ukloni sve nedostatke na peći koji su nastali usled greške proizvođača kao i
da zameni sve potrebne delove.

Table of contents Electric bakery oven DADEX D-PEK
37
TABLE OF CONTENTS
TABLE OF CONTENTS ...................................................................................................... 37
GENERAL......................................................................................................................... 38
Understanding letters and numbers in model codes ........................................................ 38
Electric bakery oven models that this manual refers to .................................................... 38
Technical data ........................................................................................................... 40
Warnings .................................................................................................................. 42
Installation prerequisites .............................................................................................. 43
Choosing the best location for the retarder proofer ........................................................ 44
Moving the oven ........................................................................................................ 44
First use of the oven ................................................................................................... 45
Work cycle ................................................................................................................ 45
OVEN CONTROLS ........................................................................................................... 46
Touch screen control panel controls ............................................................................. 46
3.1.1 Home screen ....................................................................................................... 46
3.1.2 Recipe parameters settings .................................................................................... 49
3.1.3 Working modes .................................................................................................... 50
3.1.4 System parameters settings .................................................................................... 53
3.1.5 Alarm status ......................................................................................................... 55
3.1.6 Help screen ......................................................................................................... 56
3.1.7 Steam generators usage recommendations .............................................................. 57
Electronic integrated control panel controls ................................................................... 58
Thermoregulator with electromechanic controls ............................................................. 60
3.3.1 Thermoregulator temperature setting ...................................................................... 61
PROOFER CONTROLS ..................................................................................................... 62
Electronic integrated control panel controls ................................................................... 62
Thermoregulator and humidity regulator with electromechanic controls ............................ 63
4.2.1 Humidity regulator setting ...................................................................................... 63
MAINTENANCE ................................................................................................................ 64
KNOWN ISSUES............................................................................................................... 67
GUARANTEE TERMS ......................................................................................................... 68

General Electric bakery oven DADEX D-PEK
38
GENERAL
Understanding letters and numbers in model codes
In order to be able to define products this manual refers to, it is good to know the rules of naming different
models. The rules are following:
The first figure refers to number of decks
3 – number of decks is 3
4 – number of decks is 4
5 – number of decks is 5
The second figure refers to deck width
1 – deck width is 850 mm
2 – deck width is 1250 mm
3 – deck width is 1850 mm
The third and fourth figures refer to the oven capacity in number of trays (600x400 mm)
06 – number of trays is 6
08 – number of trays is 8
.....
90 – number of trays is 90
Example:
Electric bakery oven DADEX D-PEK 4224
number of decks is 4
deck width is 1250 mm
number of trays is 24
Electric bakery oven models that this manual refers to
This manual refers to all electric bakery ovens made by Dadex. Differences are only in dimensions, so
there are no functional differences between models.
This manual refers to the following models:
D-PEK 3006, D-PEK 3009, D-PEK 3012, D-PEK D-PEK 3106, D-PEK 3109, D-PEK 3112, D-PEK 3115,
D-PEK 3118, D-PEK 3212, D-PEK 3215, D-PEK 3218, D-PEK 3224, D-PEK 3227, D-PEK 3230, D-PEK
3233, D-PEK 3327, D-PEK 3336, D-PEK 3345, D-PEK 4008, D-PEK 4012, D-PEK 4016, D-PEK 4108,

General Electric bakery oven DADEX D-PEK
39
D-PEK 4112, D-PEK 4116, D-PEK 4120, D-PEK 4124, D-PEK 4216, D-PEK 4216, D-PEK 4220, D-PEK
4224, D-PEK 4232, D-PEK 4236, D-PEK 4240, D-PEK 4244, D-PEK 4324, D-PEK 4336, D-PEK 4348,
D-PEK 4360, D-PEK 4372, D-PEK 5010, D-PEK 5015, D-PEK 5020, D-PEK 5110, D-PEK 5115, D-PEK
5120, D-PEK 5125, D-PEK 5130, D-PEK 5215, D-PEK 5220, D-PEK 5225, D-PEK 5230, D-PEK 5235,
D-PEK 5240, D-PEK 5245, D-PEK 5250, D-PEK 5255, D-PEK 5345, D-PEK 5360, D-PEK 5375, D-PEK
5390

General Electric bakery oven DADEX
40
Technical data
Nr.
of
decks
Electric
oven model
El.power
(kW)
Nr. of
trays
Kapac
itet
Baking area
(m2)
Deck width
(cm)
Deck
depth (cm)
A – External
width (cm)
B - External
depth (cm)
D- External
height (cm)
3 D-PEK 3006 18 6 24 1.65 65 82 125 145 200
3 D-PEK 3009 21 9 36 2.38 65 122 125 185 200
3 D-PEK 3012 24 12 48 3.00 65 162 125 225 200
3 D-PEK 3106 18 6 24 1.65 85 62 125 125 200
3 D-PEK 3109 21 9 36 2.55 85 102 125 165 200
3 D-PEK 3112 24 12 48 3.18 85 122 125 185 200
3 D-PEK 3115 27 15 60 3.75 85 162 125 225 200
3 D-PEK 3118 30 18 72 4.72 85 182 125 245 200
3 D-PEK 3212 22 12 36 3.00 125 82 185 125 200
3 D-PEK 3215 25 15 60 3.16 125 102 185 165 200
3 D-PEK 3218 27 18 72 4.32 125 122 185 185 200
3 D-PEK 3224 36 24 96 6..48 125 182 185 225 200
3 D-PEK 3227 40 27 108 6.48 125 182 185 245 200
3 D-PEK 3230 44 30 120 7.50 125 202 185 265 200
3 D-PEK 3233 48 33 132 8.50 125 222 185 285 200
3 D-PEK 3327 36 27 108 6.50 185 122 245 185 200
3 D-PEK 3336 42 36 132 9.00 185 162 245 225 200
3 D-PEK 3345 54 45 180 10.80 185 202 245 265 200
4 D-PEK 4108 18 8 32 2.00 85 62 145 125 200
4 D-PEK 4112 21 12 48 3.00 85 102 145 165 200
4 D-PEK 4116 24 16 64 4.00 85 122 145 185 200
4 D-PEK 4120 30 20 80 5.00 85 162 145 225 200
4 D-PEK 4124 36 24 96 6.00 85 182 145 245 200
4 D-PEK 4212 27 12 48 3.00 125 62 185 125 200
4 D-PEK 4216 30 16 64 4.00 125 82 185 145 200
4 D-PEK 4220 34 20 80 5.00 125 102 185 165 200
4 D-PEK 4224 36 24 96 6.00 125 122 185 185 200
4 D-PEK 4228 39 28 112 7.00 125 142 185 205 200
4 D-PEK 4232 42 32 128 8.00 125 162 185 225 200
4 D-PEK 4236 45 36 144 9.00 125 182 185 245 200
4 D-PEK 4240 48 40 160 10.00 125 202 185 265 200
4 D-PEK 4244 51 44 176 11.00 125 222 185 285 200
4 D-PEK 4336 45 36 144 9.00 185 122 245 185 200
4 D-PEK 4348 54 48 192 12.00 185 162 245 225 200
4 D-PEK 4360 72 60 240 15.00 185 202 245 265 200
4 D-PEK 4372 80 72 288 18.00 185 242 245 305 200

General Electric bakery oven DADEX
41
Nr.
of
decks
Electric
oven model
El.power
(kW)
Nr. of
trays
Kapac
itet
Baking area
(m2)
Deck width
(cm)
Deck
depth (cm)
A – External
width (cm)
B - External
depth (cm)
D- External
height (cm)
5 D-PEK 5010 30 10 40 2.50 65 82 125 145 205
5 D-PEK 5015 34 15 45 4.00 65 122 125 185 205
5 D-PEK 5020 40 20 60 5.26 65 162 125 225 205
5 D-PEK 5110 23 10 40 2.50 85 62 145 145 205
5 D-PEK 5115 27 15 60 3.75 85 102 145 165 205
5 D-PEK 5120 30 20 80 5.00 85 122 145 185 205
5 D-PEK 5125 38 25 100 6.25 85 162 145 225 205
5 D-PEK 5130 45 30 120 7.50 85 182 145 245 205
5 D-PEK 5215 34 15 60 3.75 125 62 185 125 205
5 D-PEK 5220 38 20 80 5.00 125 82 185 145 205
5 D-PEK 5225 43 25 100 6.25 125 102 185 165 205
5 D-PEK 5230 45 30 120 7.50 125 122 185 185 205
5 D-PEK 5235 49 35 140 8.75 125 142 185 205 205
5 D-PEK 5240 53 40 160 10.00 125 162 185 225 205
5 D-PEK 5245 57 45 180 11.25 125 182 185 245 205
5 D-PEK 5250 60 50 200 12.50 125 202 185 265 205
5 D-PEK 5255 64 55 220 13.75 125 222 185 285 205
5 D-PEK 5345 57 45 180 11.25 185 122 245 185 205
5 D-PEK 5360 68 60 240 15.00 185 162 245 225 205
5 D-PEK 5375 90 75 300 18.75 185 202 245 265 205
5 D-PEK 5390 100 90 360 22.50 185 242 245 305 205

General Electric bakery oven DADEX
42
power supply 400 V, 50 Hz, 3 phase
water supply 0.2 - 0.4 MPa (2 - 4 bar)
the oven has thermo-resistant stoves
every deck has its own steam generator
the oven has a radial fan for fumes extraction
PROOFER
external width 900 - 1600 mm
external depth C (mm)
external height 2000 mm
Warnings
Be sure to read the User manual before starting the baking oven
Attempt of starting the oven without reading this User manual may lead to serious damage of the
oven
It is very important to follow the instructions to maintain maximum safety of the user and other
persons
Figure 1 Electric oven and proofer with dimensions

General Electric bakery oven DADEX
43
Operation with the oven is forbidden for children
Operation with the oven is forbidden for people with physical or mental limitations or lack of
knowledge and experience, unless under supervision by trained and skilled users
It is forbidden for children to play with or near the baking oven
Installation prerequisites
The user must provide electric cable connection. The proper sizing of an electrical (load bearing)
cable is important to ensure that the cable can operate continuously under full load without being
damaged. The cable should be placed at the side of the oven where electric rack is located at
height of 2.3 m (marked with A on Figure 2.). The cable should be long enough to reach the
electric cabinet. Avoid powering other devices from the same circuit breakers.
The user must provide water supply using a standard valve that is used to connect water supply to
a washing machines (1/2"). IMPORTANT!! Water pressure must be at least 2 bar. If the pressure
is lower than 2 bar, the proofer will not work properly and can be severely damaged!! The
connection is marked with C on Figure 2.
The user must provide steam extraction openning (marked with B on Figure 2.). The opening
should be circle shaped with diameter 170 mm. Position the opeing in the horizontal middle plane
of the oven at 2.3 m.
Figure 4 Bakery oven and proofer with marked connections

General Electric bakery oven DADEX
44
Choosing the best location for the retarder proofer
When choosing the best location for the oven and the proofer, the user should consider:
a location with easy access to a water supply
a location with easy access to a electric power supply
a location with a flat (or nearly flat) floor
from the lateral side of the oven (where the proofer is) to the wall and from the back side of the
oven to the wall, there should be a 50 mm of space
at other lateral side of the oven, there should be at least 1 m of free space (A) to ensure easy
access for servicing purposes for the ovens not wider than 185 cm. For the wider ovens free space
should be 1.5 m (A).
in the front of the oven, there should be enough space to ensure unobstructed trolley
manipulation. In front of the oven, there should be free space the same width as the oven and the
same length as External oven depth (B).
Figure 5 Oven location
Moving the oven
Moving of the oven and the proofer is not advised. If moving of the oven and the proofer is considered
at some point, the user should be aware that it is very complicated and expensive procedure which requires
engagement of trained technicians. Therefore, the user should carefully consider the oven and the proofer
location before the installation starts.

General Electric bakery oven DADEX
45
First use of the oven
Although the oven is fully functional after installation, it is not ready for operating until first heating of the
oven is done. To perform first heating of the oven, the user must heat it up to 50°C and leave it like that
for 24 hours. For the next 48 hours, the user should slowly raise the oven for 50°C and leave it like that
for few hours until the oven reaches working temperature. When first heating is performed, steam and
smoke from the oven may appear, as well as awkward smell. First heating of the oven is NECESSARY for
the further normal operation of the proofer!!
Work cycle
The baking process starts with products on trolleys introduction to the proofer. The proofer has automatic
temperature and humidity regulation and also air mixing feature to achieve homogeneous environment.
Therefore, all the products are fermented with equal conditions. When the proofing phase ends, the
products are inserted into the oven for baking. The oven should be pre-heated to the desired temperature
which can be achieved by setting parameters on the panels for each deck. During the baking process, the
user can insert steam in the deck by using the steam generator. When products are properly baked, the
baking process ends and products can be removed from the oven.

Bakery oven controls Electric bakery oven DADEX
46
OVEN CONTROLS
The retarder proofer is turned on by turning the rotary switch which is placed on the electric cabinet to
position „1“. IMPORTANT!! Switching the main switch on the electric panel on and off should be
performed only if all the heaters are off!! In this case, the switch works with low power current and the
possibility of the switch damage is reduced. IN CASE OF EMERGENCY, IGNORE THE PREVIOUS
RECOMMENDATION!
When button is pressed, the control panel turns on. Home screen appears.
Touch screen control panel controls
3.1.1 Home screen
Upper ribbon with
buttons
Ribbon with date
and time
Baking parameters
section
Status ribbon
Recipe selection
Lower ribbon with
buttons

Bakery oven controls Electric bakery oven DADEX
47
Upper ribbon with buttons
- Press this button to enter the Alarms page.
- Press this button to enter the Help page.
- Press this button to enter the System settings page.
- Press this button to enter into the Manual mode.
- Press this button to save programs and modifications.
Lower ribbon with buttons
- Press this button to turn the light on and off.
- Press this button to release the steam.
- Press this button to add additional baking time (30 seconds).
- Press this button to start the program.
- Press this button to switch the buttons on the lower ribbon.
- Press this button to open/close the damper (optional).
- Press this button to turn the steam generator heaters on and off.
- Press this button to turn the top heaters on and off.
- Press this button to turn the bottom heaters on and off.

Bakery oven controls Electric bakery oven DADEX
48
Recipe selection section
- Press the product image to enter recipe selection screen.
- Press the arrows to change the active recipe.
Baking parameters settings section
- Press the clock image to cycle between baking phases for which the parameters are
being set. The recipe can have 1 – 5 baking phases. The time below the phase numbers is the sum of
the baking times of all phases (total baking time).
Two numeric values in the middle of this section refer to measured temperature values (top and bottom).
- Press two numbers with labels Set Temperature to set top and bottom temperatures,
respectively.
- Press the arrows below the array of rectangles to set top and bottom heaters power,
respectively.
- Press the number with label Steam time to set the steam release
duration at the beginning of the phase.
- Press the number with label Bake time to set the baking time of the
phase.
The ribbon with date and time
- Displays the current date and time
Status ribbon
- Show the outputs status: black and white image –
disabled output, color image – enabled output.

Bakery oven controls Electric bakery oven DADEX
49
3.1.2 Recipe parameters settings
Press icon to switch the active phase where highlighted number refers to active phase
number. The recipe can have 1 – 5 phases.
Press the corresponding buttons to set top and bottom temperature, top and bottom heaters power, the
damper, the steam release time and baking time of the phase, as described in the previous section.
Press the numbers to enter the desired value.
- delete a digit
- delete all
- exit without entering a value
- exit and enter value
After all the parameters of the phase has been set, the next phase
parameters are being set.
After you enter all the parameters, press button to
save the recipe. The following dialog appears.
- Cancel the recipe modifications
- Save all the recipe modifications
- Save the recipe under the other program number
When you press button the following screen appears:

Bakery oven controls Electric bakery oven DADEX
50
Press arrows to switch the recipe images page.
In the corner of every image, there is a program number; when
you press the image you choose the number under which the
recipe will be stored.
A new dialog appears:
- Cancel
- Store the recipe with the currently assigned image, without change.
- Choose the new image assigned to the recipe. The following screen appears:
Press arrows to switch the recipe images page.
Press the desired image and it will be assigned to the recipe.
3.1.3 Working modes
Press button to enter Manual mode.
Press button to start the temperature control. The controller will work according to the
temperatures, the heating power percentages and the baking time previously set.
Press button to release the steam. If the steam generator is heated to the working
temperature, the steam will be released. If not, you wouldn't be able to press button
and release the steam.
Bakery oven controls Electric bakery oven DADEX
51
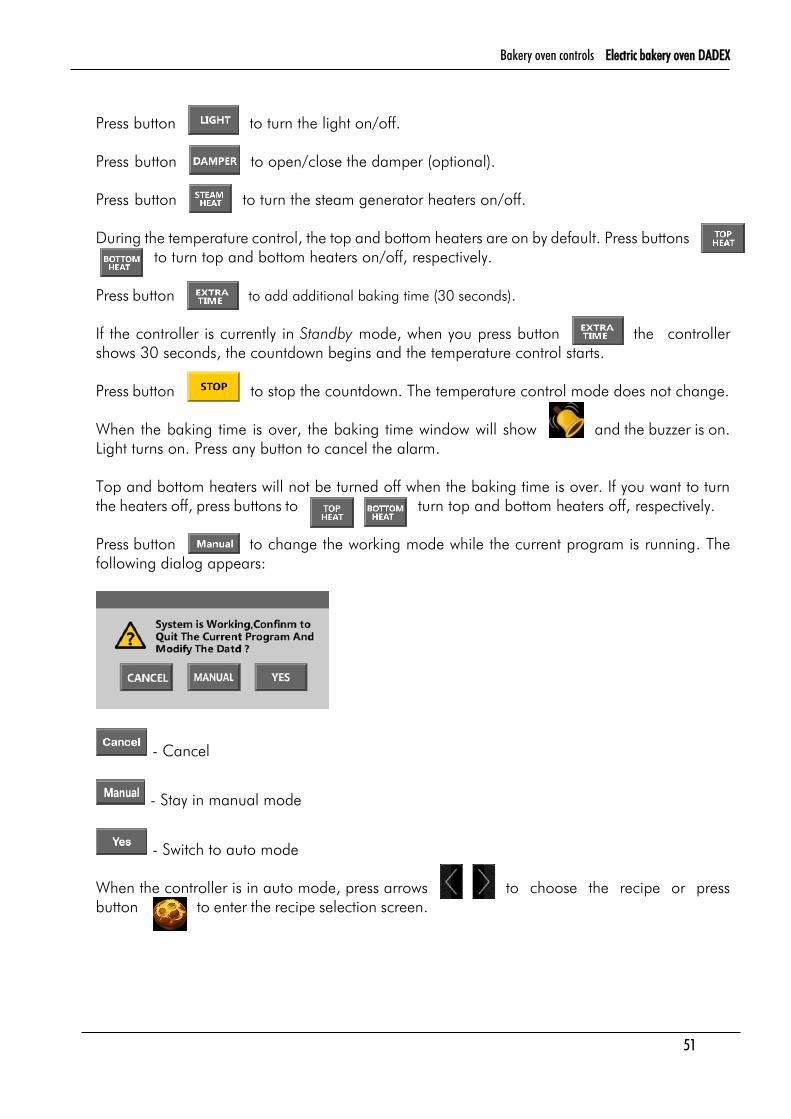
Press button to turn the light on/off.
Press button to open/close the damper (optional).
Press button to turn the steam generator heaters on/off.
During the temperature control, the top and bottom heaters are on by default. Press buttons
to turn top and bottom heaters on/off, respectively.
Press button to add additional baking time (30 seconds).
If the controller is currently in Standby mode, when you press button the controller
shows 30 seconds, the countdown begins and the temperature control starts.
Press button to stop the countdown. The temperature control mode does not change.
When the baking time is over, the baking time window will show and the buzzer is on.
Light turns on. Press any button to cancel the alarm.
Top and bottom heaters will not be turned off when the baking time is over. If you want to turn
the heaters off, press buttons to turn top and bottom heaters off, respectively.
Press button to change the working mode while the current program is running. The
following dialog appears:
- Cancel
- Stay in manual mode
- Switch to auto mode
When the controller is in auto mode, press arrows to choose the recipe or press
button to enter the recipe selection screen.

Bakery oven controls Electric bakery oven DADEX
52
Press arrows to switch the recipe images page. Press the image of the product you want to
bake to select its recipe.
Press button to start the controller with the selected recipe. The screen looks like in the
following figure:
The controller will work according to the parameters previously set in the recipe. Numbers 1 – 5
will indicate the current phase of baking.
At the beginning of each phase, the steam will be released according to previously set steam
release time parameters.
Press button to turn the light on/off.
Press button to open/close the damper (optional).
Press button to turn the steam generator heaters on/off.
Press button to add additional baking time (30 seconds).

Bakery oven controls Electric bakery oven DADEX
53
If the controller is currently in Standby mode, when you press button the controller
shows 30 seconds, the countdown begins and the temperature control starts.
Press button to stop the countdown. The temperature control mode does not change.
When the baking time is over, the baking time window will show and the buzzer is on.
Light turns on. Press any button to cancel the alarm.
3.1.4 System parameters settings
Press button to enter the system settings.
- Time settings
- Factory parameters settings
- Image management
- External USB drive management
- Quit
Press button to enter date and time settings screen.
- Set the month, the day and the year.
- Set the hour and the minute.
- Set the auto on time (the controller will automaticaly turn on at previously set
time and start the temnperature control according to the parameters it had when it was turned
off. This can be used to preheat the oven for the beginning of the shift).
- Activate or deactivate the auto on function:
- disable – disabled
- enable – enabled
- Set the auto off time.
- Activate or deactivate the auto off function:

Bakery oven controls Electric bakery oven DADEX
54
- disable – disabled
- enable – enabled
Pres the buttons to choose days for which you want to apply automatic turning on and off. If the
icon bellow the button is gray colored, the function will not be applied. If the icon bellow the
button is yellow colored, the function will be applied.
Press button to exit and save the settings.
Don't change factory settings without prior consultation with the producer.
Press button to enter the image management screen.
Press button to go back to the previous screen.
Enter password ‘123456' and press button to enter the image management screen.
- page down
- page up
At the bottom part of the screen, there are images located
on the USB drive shown.
Use arrows to select an image from the USB
drive. On the image to the right, number 07/16 represents
number of the image and total number of images on the
USB drive. In this example, the selected image is 7th of 16
that are located on the USB drive.
When you select the image you want to import from the USB drive to the controller, press the
image (field) where you want to put the picture. It doesn't matter if the location is empty or it has
an image on it, the image from the USB drive will be imported to that location.
Press button to go back to the Home screen.
IMPORTANT To make sure that the controller will be able to read the image from the USB drive,
before copying it to the drive from your computer, convert it to a file with following properties:
bmp, colors 24 bit, resolution 72 dpi, 128 x 128 pixel, black background.

Bakery oven controls Electric bakery oven DADEX
55
Press button to enter the USB drive management screen.
Press button to go back to the previous screen.
Enter password ‘112233' and press button to enter the USB drive management screen.
The following checks are being performed:
USB drive found.
Correct drive format found.
Export data found.
Import data found.
Press button to import data. After successful
import, the following message is displayed: IMPORT
DATA SUCCESS.
Press button to export data. After successful export, the following message is displayed:
EXPORT DATA SUCCESS.
Press button to go back to the Home screen.
3.1.5 Alarm status
Press button to check the alarm status.
01 . communication cable disconnect
there is a problem in communication between the display and the electronic board
02. top temperature disconnect
Success
Fail

Bakery oven controls Electric bakery oven DADEX
56
there is a problem with the top probe
03. top over temperature alarm
top temperature value > max allowed temperature + 50℃
04. top temperature positive deviation alarm
top temperature value > set top temperature value + top
temperature offset
05. bottom temperature disconnect
there is a problem with the bottom probe
06. bottom over temperature alarm
bottom temperature value > max allowed temperature + 50℃
07. bottom temperature positive deviation alarm
bottom temperature value > set bottom temperature value +
bottom temperature offset
08. steam temperature disconnect
there is a problem with the steam generator probe
09. steam over temperature alarm
steam generator temperature > max allowed temperature + 50℃
Press button to delete the alarm records.
Press button to go back to the Home screen.
3.1.6 Help screen
Press button to enter the Help language selection screen. It has 6 flags: English, German,
French, Romanian, Russian and Serbian. Press the button with the flag to enter the Help screen with helpful
info in that language.
Press button to go back to the Home screen.
Bakery oven controls Electric bakery oven DADEX
57
3.1.7 Steam generators usage recommendations
The steam generators may be used ONLY when they are well prepared and preheated, so they should
have enough time to be heated again after being used. That time is about 15 minutes. Before the first
usage, they should be heated for about 3 hours. When water flows through the steam generator and turns
into the steam, the steam generator cools down and if the steam release takes too long, the steam
generator can cool below the working temperature. In that case, the steam release button is disabled until
the steam generator heats up to the working temperature. Also, when steam release takes too long, the
steam generator needs more time to recover. Therefore, the steam release time should not be longer than
5 seconds!!

Bakery oven controls Electric bakery oven DADEX
58
Electronic integrated control panel controls
There are three 3-digit displays
on the control panel marked
with "°C". The big one shows
the measured temperature in
the deck, whilst two smaller
show the desired temperatures
(top and bottom, respectively).
Two buttons marked with i
are used to turn top and bottom heaters on and off.
Top and bottom heaters are active when LED diode on
the buttons i is on.
A group od 8 buttons (6 of
them are marked with
arrows) are used to set the
desired temperatures.
When button is pressed, you can set the temperature
at the top of the deck, and when button is pressed,
you can set the temperature at the bottom of the deck.
First group of two up and down arrow buttons are used
to set the first digit of temperature (hundreds), second
group of two up and down arrow buttons are used to set
the second digit of temperature (tens) and third group of
two up and down arrow buttons are used to set the third
digit of temperature (singles).
The two-digit display with
an image of clock
represents baking time.
The desired time is set
using the two buttons with
arrows beside the display. The timer is activated by
pressing button . The timer is active as long as the
button LED diode is on. When the timer reaches zero, the
alarm is activated. The timer does not affect the baking
process in any way, it does not trigger the heaters and it
is used only as an information that the baking process is
over.

Bakery oven controls Electric bakery oven DADEX
59
The buttons with left and right arrows, marked with symbol , are used to set the active power of
the top heaters. Above those buttons, there are 8 LED diodes which visually represent the level of active
power, where all LEDs on mean maximum power (100 %) and all LEDs off
mean minimum power (60 %). Every diode stands for 5 % of the total heater
power.
The buttons with left and right arrows, marked with symbol , are used
to set the active power of the bottom heaters. Above those buttons, there
are 8 LED diodes which visually represent the level of active power, where all LEDs on mean maximum
power (100 %) and all LEDs off mean minimum power (60 %). Every diode stands for 5 % of the total
heater power.
The three-digit display in the lower part of the panel shows the measured
temperature of the steam generator. The steam generator heaters are
turned on and off when button is pressed. The steam generators can
be used ONLY when they are well prepared, i.e. well heated, so they
should have enough time to be heated again after being used. That time
is about 15 minutes. Before the first usage, they should be heated for
about 3 hours. The one-digit display shows steam release time in seconds,
i.e. how long the electro-magnetic valve is going to be opened and release
steam into the deck. This time can be set between 1 and 9 seconds. This parameter is set using two
buttons with arrows next to the display. Recommended steaming time is from 1 to 3 seconds (depending
on the product being baked and baking technology). Steam is released into the deck by pressing
button. When water passes trough steam generating devices and turns into steam, the devices are cooling
and if steaming time is too long water may appear in the deck. Because of this, steam is disabled when
the temperature of the steam generator is bellow 200°C and if this is the case, when button is pressed
steam is not released in the deck and LED diode on button starts blinking which means that steam
release is disabled by the controller. That is the reason why steaming time should not last longer than 3
seconds!!
The lower left button is used to turn the panel on and off.
The lower right button is used to turn the lights on and off. The lights automatically turn off after 30
seconds.
The switch marked with symbol is used to turn the bonnet fan on and off.
%
%

Bakery oven controls Electric bakery oven DADEX
60
Thermoregulator with electromechanic controls
Turn the main switch on to turn the oven command on. The
thermoregulator and the humidity controller are now operational and can
be set, which will be explained later.
When the desired values of temperature in the decks are set, the
thermoregulator activates the heaters. Still, the heaters are not
operational, if switch for each deck is turned off. If you don't want to
use any of the decks, just turn off this switch and you don't need to care
about thermoregulator settings. The lights are turned on and off with
switch for each deck.
Switches for each deck are used to turn the steam generators on and
off. The steam generators can be used ONLY when they are well
prepared, i.e. well heated, so they should have enough time to be heated
again after being used. That time is about 15 minutes. Before the first
usage, they should be heated for about 3 hours. Steam is released into
the deck when the button for each deck is pressed. The electro-
magnetic vlave is opened as long as button is pressed. Recommended
steaming time is from 1 to 3 seconds (depending on the product being
baked and baking technology). When water passes trough the steam
generating devices and turns into steam, the devices are cooling and if
steaming time is too long water may appear in the deck. Also, when steam
release takes too long, the steam generator needs more time to recover.
That is the reason why steaming time should not last longer than 3
seconds!!
The switch marked with symbol is used to turn the bonnet fan on and
off.
The oven has a timer which alerts the user when the baking process is
finished. It is activated when the button is switched on. The time is set
by using the wheel on the timer.

Bakery oven controls Electric bakery oven DADEX
61
3.3.1 Thermoregulator temperature setting
Each deck heaters are controlled by the thermoregulators.
Setting the temperature of the top heaters:
Press the L1 button
The display shows the desired temperature. Use the L1 and L2 buttons to change the desired
temperature
Press the i button to confirm the desired temperature
Setting the temperature of the bottom heaters:
Press the L2 button
The display shows the desired temperature. Use the L1 and L2 buttons to change the desired
temperature
Press the i button to confirm the desired temperature
L1 L2
out1
out2
L1
L2
1 2 3 4
250i

Proofer controls Electric bakery oven DADEX
62
PROOFER CONTROLS
Electronic integrated control panel controls
There are three two-digit displays placed on the
controller. The upper one, marked with "Timer", displays
time that remains until the alarm is activated. The
middle one, marked with "Temp", displays measured
temperature in the chamber. The lower display, marked
with "R.Humidity", displays humidity percentage in the
proofer.
The button with symbol turns the command panel on
and off. When the command panel is on, the proofer
fan is also turned on and LED diode next to symbol
is on which indicates that the fan is activated. The button
with symbol is used to enter the panel settings.
When the button is pressed for the first time, the timer
display starts blinking. Now, buttons are used
to set the desired alarm time value. After button is
pressed for the second time, the temperature display
starts blinking. Now, buttons are used to set
the desired temperature value. After button is
pressed for the third time, the humidity display starts
blinking. Now, buttons are used to set the
desired humidity percent value. Finally, when button
is pressed one more time, all displays stop blinking
and all the parameters are set.
Button is used to start and stop the timer. Button
turns the lights on and off.
The steam generator heaters are turned on and off by
using switch .
Switch is used for the proofer mode selection.
When this switch is set to Auto ( ), steam is released
into the chamber automatically, according to the panel

Proofer controls Electric bakery oven DADEX
63
settings. When this switch is set to Manual ( ), steam is released into the chamber manually by using
switch .
Thermoregulator and humidity regulator with electromechanic controls
Switch is used for the proofer mode selection. When this switch is set to
Auto ( ), the user needs to set the temperature on the thermoregulator and the
humidity percentage on the humidity regulator, and to initially release the steam
into the proofer by using button . After that, everything is controlled
automatically without user intervention.
When this switch is set to Manual ( ), steam is released into the chamber
manually by using switch . Switch turns the proofer fan on and off. Switch
turns the proofer heaters on and off. Switch turns the steam generator
heaters on and off. Switch turns the proofer lights on and off.
4.2.1 Humidity regulator setting
The humidity level of the proofer is controled by the humidity regulator.
Setting the humidity of the proofer:
Press the 1 button and keep it pressed for 3 seconds
The display shows the desired humidity percent. Use the 2 and 3 buttons
to change the desired humidity percentage
Press the i button to confirm the desired humidity percentage
out1
1 2 3 4
506X5
X

Maintenance Electric bakery oven DADEX
64
MAINTENANCE
To ensure normal operation of the oven and avoid potential damage, regular maintenance of the oven is
required.
DAILY AND WEEKLY MAINTENANCE
Cleaning of the surfaces should be performed every few days. The parts that should be cleaned are deck
doors, handles, table, etc. Wash the parts with warm water and mild soap or with a cloth or sponge with
suitable products.
PERIODIC MAINTENANCE
CLEANING OF THE STEAM GENERATOR
Every 6 month, or when the user notice a reduced amount of steam is coming out from the steam generator,
it should be cleaned of calculus. The steam generators are located below the decks and can be accessed
from the lateral side.
The copper tie should be removed using a wrench (size 21) and put aside.
Cleaning of the steam generator - Step 1
Remove the copper tie

Maintenance Electric bakery oven DADEX
65
Two hex nuts M8 should be removed from the flange using a wrench (size 13).
Cleaning of the steam generator - Step 2
The perforated pipe (1/2”) should be removed and then cleaned of calculus with a drill. The hole on the front
side of the pipe should be drilled with a drill sized ø 6 mm. Rest of the holes should be drilled with a drill sized
ø 3,5 mm. If some other part of the pipe is also clogged, it should be drilled too using a drill sized ø 6 mm.
Cleaning of the steam generator - Step 3
Unscrew the hex nuts
Remove the perforated pipe
with the flange

Maintenance Electric bakery oven DADEX
66
Cleaning of the steam generator - Step 4
All the parts should be placed back as they were. The user should wait about 3 hours for the steam generator
to heat up and start using it. Water pressure must be sufficient, at least 0.2 MPa (2 bar).
MOTORS CHECK
Every year, or if some irregularity with one of the motors is noticed (i.e, strange noise) it should be inspected.
Trained and experienced service technician should inspect it and repair, if necessary. Also, the fan should be
checked for clogging and cleaned if necessary.
Drill the holes
Turn over the pipe

Known issues Electric bakery oven DADEX
67
KNOWN ISSUES
WARNING!! Incompetent persons are not allowed to open the electric cabinet and to perform actions on it!!
Problem Cause Solution
The main switch has no power The proofer has no power 1. Check the power supply of
the building, main fuses and
residual current circuit
breaker
2. Check the fuses in the main
electric cabinet which refer to
the proofer
Measured and real temperatures are
not the same
The control panel / thermoregulator
or the probe is damaged
Replace the control panel /
thermoregulator or the probe
Water appears in the deck a) Over-usage of the steam
generator
b) The steam generator heaters
are damaged
c) The electromagnetic valve is
damaged
a) Stop using the steam
generator and leave it to
recover (~4 hours)
b) Contact the manufacturer to
replace the heaters
c) Replace the electromagnetic
valve
When the button is pressed, there is
no steam released at all
The control panel is damaged or
electromagnetic valve is damaged
Check both parts and replace if
needed
There is no light in the deck The light bulb is damaged Replace the light bulb
The deck does not get heated / can
not achieve set temperature
a) One or more heaters are
damaged
b) The heaters contactor is
damaged
c) The heaters fuses are off or
damaged
a) This could happen only if
there is some mechanical
damage. Contact the
manufacturer to replace the
heaters
b) Replace the damaged
contactor
c) Turn the heaters fuses on or
replace them if needed

Guarantee terms Electric bakery oven DADEX
68
GUARANTEE TERMS
The guarantee period is 2 years. The guarantee does not cover following:
1. Damage caused by improper use
2. Damage caused if the first heatong of the oven is not properly performed
3. Damage caused by irregular power supply
4. Damage caused by insufficient water pressure
5. Damage caused by service performed by incompetent personnel and without prior permission of
DADEX
6. Damage caused if the proofer is used for usages it is not designed for
7. Damage caused by lack of maintenance
The manufacturer agrees to remove all defects of the proofer that were caused by some mistake made by
the manufacturer and also to replace all the required parts without charging anything for it.

Servisni list / Service book Electric bakery oven DADEX
69
SERVISNI LIST / SERVICE BOOK
SERVIS PLANIRAN /
NEPLANIRAN
SERVICE PLANNED /
NOT PLANNED
DATUM SERVISA / ZAMENJENI DELOVI / PODEŠAVANJA / KOMENTARI
DATE / REPLACED PARTS / ADJUSTMENTS / COMMENTS
POTPIS I DATUM
DATE AND
SIGNATURE

Servisni list / Service book Electric bakery oven DADEX
70
SERVIS PLANIRAN /
NEPLANIRAN
SERVICE PLANNED /
NOT PLANNED
DATUM SERVISA / ZAMENJENI DELOVI / PODEŠAVANJA / KOMENTARI
DATE / REPLACED PARTS / ADJUSTMENTS / COMMENTS
POTPIS I DATUM
DATE AND
SIGNATURE

Servisni list / Service book Electric bakery oven DADEX
71
SERVIS PLANIRAN /
NEPLANIRAN
SERVICE PLANNED /
NOT PLANNED
DATUM SERVISA / ZAMENJENI DELOVI / PODEŠAVANJA / KOMENTARI
DATE / REPLACED PARTS / ADJUSTMENTS / COMMENTS
POTPIS I DATUM
DATE AND
SIGNATURE

Servisni list / Service book Electric bakery oven DADEX
72
SERVIS PLANIRAN /
NEPLANIRAN
SERVICE PLANNED /
NOT PLANNED
DATUM SERVISA / ZAMENJENI DELOVI / PODEŠAVANJA / KOMENTARI
DATE / REPLACED PARTS / ADJUSTMENTS / COMMENTS
POTPIS I DATUM
DATE AND
SIGNATURE

“DADEX” d.o.o.
Mačvanska Mitrovica, Serbia
tel: +381 22 2155680 • 2155681 • 2155682
fax: +381 22 651722
web: www.dadex.rs • e-mail: [email protected]


