Embed Size (px)
Citation preview
January 2012
Essential Newborn Care and Resucitation
Essential Newborn Care and Resucitation
Protocols for PracticeProtocols for Practice
Introduction 3
SECTION I 4
I. Immediate newborn care (The first 60 minutes) 5
II. Essential newborn care (60 minutes to 6 hrs.) 11
III. Care prior to discharge 14
IV. Care from discharge to 7 days 20
V. Additional care 23
• • Additional care of a small baby
• Dealing with feeding problems
SECTION II
VI. Enabling the environment 35
VII. Skill checklists 39
VIII. Use of radiant warmer 47
IX. Newborn record register 58
SECTION III
Notes on ENC/R 59
Suggested outline for teaching 71
Newborn Resuscitation
Table of contents
2
Introduction
Every year approximately 1.1 million newborns die, majority within the first week. The high rates of mortality
and morbidity are related to inappropriate facility and community practices. The practice notes are protocols
of care that are intended to provide support to the health workers and other professionals with simple to the
point, user friendly, globally & nationally accepted evidence – based newborn care interventions focusing on
first week of life. Doctors, nurses and axillary nurse midwifes (ANM)s who are involved in caring for mothers
and newborn are target users. It provides step by step guide to administrating a core package of eessential
newborn care interventions that can be administered at all facility levels.
The protocol is a series of time bound, chronologically – ordered standard procedures that a baby receives
at birth. At the heart of the protocol are four time bound simple steps, yet, extremely effective interventions:
Immediate drying prevents hypothermia, which is extremely important to survival.
Delayed cord clamping until the umbilical cord stops pulsating decreases anemia in newborns
Keeping mother and baby in uninterrupted skin to skin contact prevents hypothermia, increases
colonization with protected family bacteria and improves breast feeding initiation and exclusivity.
Breast feeding within the first hour of life prevents neonatal deaths.
The protocols for practice will contribute to health facility efficiency, as it prohibits practices either without
evidence to back it up or with evidence of harm. Harmful practices include bathing of the newborn
immediately after birth, “routine” suctioning and routine separation, among others.
In addition, to these policy to support
Maternal newborn child health and nutrition should be brought into focus.
Essential Newborn Care practice protocol to be incorporated in basic emergency obstetric and
newborn care training.
l
l
l
l
l
l
3
Organization of the document
l
l
l
l
l
l
l
l
l
l
l
l
l
l
l
l
l
l
l
l
This document is organized by time. It walks a health worker through the process of preparing the delivery
area, standard precautions through essential newborn care practices, beginning at the time of perennial
bulging until one week of life.
Immediate Newborn Care (The First 60 minutes)
Newborn Care (from 60 minutes to 6 hours after birth)
Care prior to discharge
Care from discharge to 7 days
Additional care
Resuscitation
Care of low birth weight newborn,
Dealing with feeding problems
Enabling the environment
After every delivery
Standard Precautions
This manual will aid health workers to provide comprehensive, high quality care for the essentially healthy
newborn upto 7 days of age, however in order to implement, provided should have basic knowledge . (On
Section II of the manual)
Newborn adaption to extra-uterine life from intra-uterine life.
Basic needs of newborn:
Airway
Warmth
Nutrition and bonding
Elements of assessment of the immediate condition of newborn:
Basic newborn appearance and behaviors
Normal newborn and infant growth and development
Immunization
4
I. IMMEDIATE NEWBORN CARE
(THE FIRST 60 MINUTES)lAt perineal bulging, with presenting part visible (2nd stage of labor)
l Within the 1st 30 seconds
lIf after thorough drying , newborn is not breathing or is gasping
l If after thorough drying , newborn is breathing or crying
l 1 - 3 minutes
l Within 60 min. of age
5

TIME BAND:
INTERVENTION:
ACTION:
l
l
At perineal bulging, with
presenting part visible
Prepare for the delivery
Ensure that delivery area is draft-free and more 0than 25 C using a room thermometer.
Wash hands with clean water and soap for
2 minutes. (Refer fig. 1: six steps for hand
washing)
l
l
l
l
l
l
Wear double gloves just before delivery.
Check availabil i ty and functionality of
resuscitation equipment
Switch on the radiant warmer, if available
Place the clean towels/cloths under radiant
warmer for warming.
Ensure availability of HLD/ sterile delivery kit.
Place two pre-warm towel on mother’s abdomen.
Removing sterilized gloves
1. 2. 3. 4. 5. 6.
Wearing sterilized gloves
1. 2. 3. 4. 5.
6. 7. 8. 9. 10.
1. 2. 3. 4. 5.
6. 7. 8.
Palm WristBack of hand Web Spaces Fingers & knuckles Thumbs
Follow six steps for handwashing-wash for atleast 2 minutes
fig. 1
fig. 2
fig. 3
Steps in hand-washing
6
TIME BAND:
INTERVENTION:
ACTION:l
l
l
l
Within the 1st 30 seconds
Dry and provide warmth.
Deliver the baby on mothers’ abdomen.
Use a clean, warm towel/ cloth to thoroughly dry
the baby head, face, front and back, arms
and legs.
Remove the wet cloth and wrap the baby in a dry
towel/cloth.
Assess newborn’s breathing while drying.
eyes,
If meconium present and child not crying,
suction first and then dry the baby
Note:
During the first 30 seconds:
F
F
Do not ventilate unless the baby is floppy
/limp and not breathing.
Do not suction unless the mouth/nose are
blocked with secretions or other material.
TIME BAND:
INTERVENTION:
ACTION
l
l
l
l
If after thorough drying, newborn is not breathing or is gasping
Position, suction and ventilate
:
Clamp and cut the cord immediately
(Refer cord care)
Transfer to a warm, firm surface preferably under
a radiant warmer
Inform the mother that the newborn has difficulty
breathing and that you will help the baby to
breathe.
Start resuscitation (Refer resuscitation protocol )
7
Note:
a) If the baby is non-vigorous (limp/floppy and
not breathing) and not meconium stained
F Stimulate the baby by rubbing the back and
flickering the sole.
TIME BAND:
INTERVENTION:
ACTION:
1 - 3 minutes
Do delayed cord clamping
l
l
l
l
l
Remove the first set of gloves immediately prior to cord clamping.
Clamp and cut the cord after cord pulsations have
stopped (1 to 3 minutes)
Tie tightly around the cord at 2 cm and 5 cm
from the newborn’s abdomen.
Cut between ties with sterile instrument
(preferably with a new blade).
Observe for oozing blood. If oozing is there
put an another tie between 1st tie and
umbilicus.
Note:F Do not milk the cord towards the newborn.
F
F
F
F
F
When appropriate, and when personnel
skilled in advanced resuscitation (intubation,
chest compression) are available, refer to
appropriate guidelines
Assess breathing, if not improving, start PPV
with bag and mask .
Suction the mouth and then the nose of the
baby.
Stimulate the baby by rubbing the back and
flickering the sole.
Assess breathing, if not improving, start PPV
with bag and mask. (Refer bag & mask
ventilation)
Close watch on heart rate and respiration.
b) If the baby is non-vigorous (limp/floppy
and not breathing)
and meconium stained

8
Ensure 10 IU of oxytocin IM injection or 600
µgm. of misoprostol tablet orally is given to
the mother, after excluding the second baby
on palpation of mothers abdomen.
TIME BAND:
INTERVENTION:
ACTION:
l
l
l
l
l
l
l
If after thorough drying,
newborn is breathing or crying
Do skin-to-skin contact
(Provide routine care)
If the baby is crying and breathing normally, avoid
any manipulation, such as routine suctioning, that
may cause trauma or introduce infection.
The newborn dried at delivery, should be covered
with warm dry blanket and given to the mother.
Place to newborn prone on the mother’s
abdomen or chest skin-to-skin.
It is important to cover the baby to prevent heat
loss from exposed back.
Wipe both the eyes separately with sterile gauze
each.
Cover the baby’s back with a warm cloth and
head with a cap .
Place an identification tag on the baby’s ankle.
Note:
F
F
F
F
F
Do not separate the newborn from mother,
as long as the newborn does not exhibit
severe chest in-drawing, gasping or apnea
and the mother does not need urgent
medical stabi l izat ion e.g. emergent
hysterectomy.
Do not put the newborn on a cold or wet
surface.
Do not wipe off vernix, if present.
Do not bathe the newborn immediately after
birth
Do-not do foot printing
If the newborn must be separated from
his/her mother, put him/her on a warm
surface, in a safe place close to the
mother
Cord Clamp fig. 4
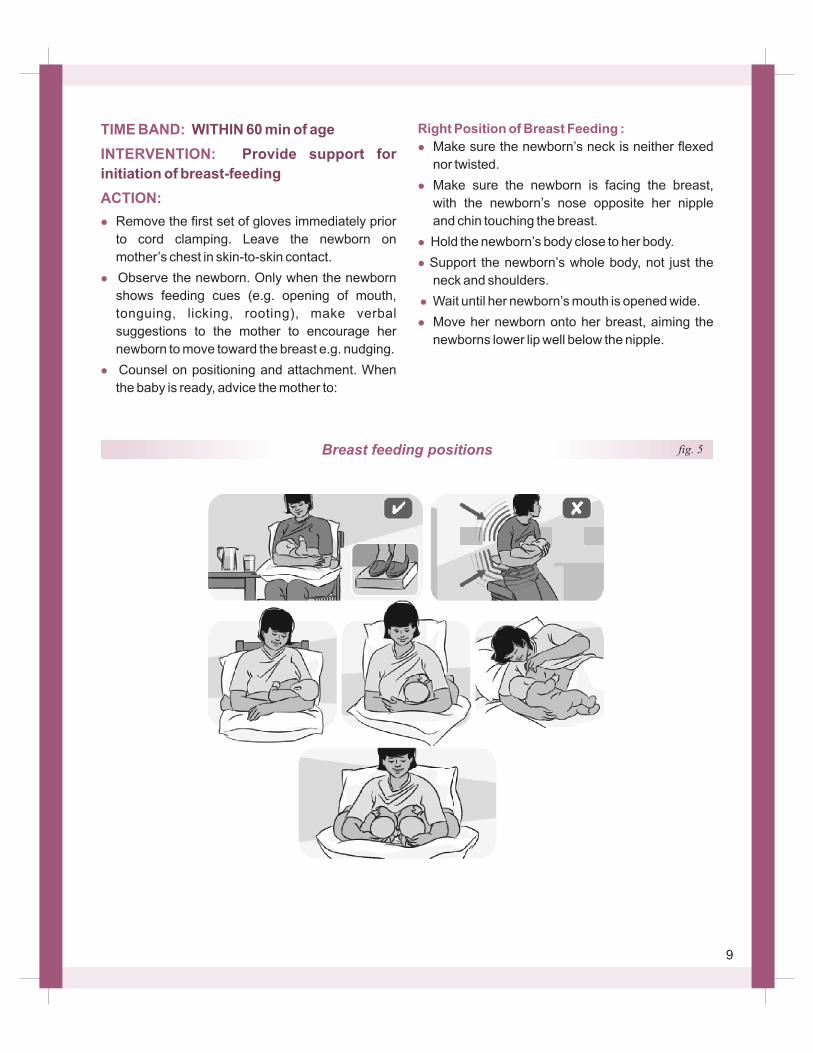
Breast feeding positions fig. 5
TIME BAND:
INTERVENTION:
ACTION:
l
l
l
WITHIN 60 min of age
Provide support for
initiation of breast-feeding
Remove the first set of gloves immediately prior
to cord clamping. Leave the newborn on
mother’s chest in skin-to-skin contact.
Observe the newborn. Only when the newborn
shows feeding cues (e.g. opening of mouth,
tonguing, licking, rooting), make verbal
suggestions to the mother to encourage her
newborn to move toward the breast e.g. nudging.
Counsel on positioning and attachment. When
the baby is ready, advice the mother to:
Right Position of Breast Feeding :
l
l
l
l
l
l
Make sure the newborn’s neck is neither flexed
nor twisted.
Make sure the newborn is facing the breast,
with the newborn’s nose opposite her nipple
and chin touching the breast.
Hold the newborn’s body close to her body.
Support the newborn’s whole body, not just the
neck and shoulders.
Wait until her newborn’s mouth is opened wide.
Move her newborn onto her breast, aiming the
newborns lower lip well below the nipple.
9
INTERVENTION:
ACTION:
INTERVENTION:
ACTION:l
l
l
Provide additional care
for a small baby or twin, apply KMC or
refer.
If the baby is small or twin,
Do eye care
Refer additional care section.
Clean eye with clean water using separate
gauze piece for each eye.
Look for pus or discharge from the
eyes. If present, administer chloramphenicol
ointment/ erythromycin ointment to both eyes if
after newborn has located breast.
Do not wash away the eye antimicrobial
Look for signs of good attachment and
suckling :
l
l
l
l
Effective suckling
l
l
than below.
Mouth wide open.
Lower lip turned outwards.
Baby’s chin touching breast.
ow, deep with pauses
If the attachment or suckling is not good, try
again and reassess..
More areola is visible above the baby's mouth
Sl
Note:
F
F
F
F
Health workers should not touch the newborn
unless there is a medical indication.
Do not give sugar water, formula or other pre-
lacteals.
Do not give bottles or pacifiers.
Do not throw away colostrum.
Breast feeding
Good Attachment Poor Attachment
Outside apperance
Good Attachment Poor Attachment
Inside apperance
fig. 6
10
II. ESSENTIAL NEWBORN CARE
FROM 60 MIN TO 6 HOURS
11
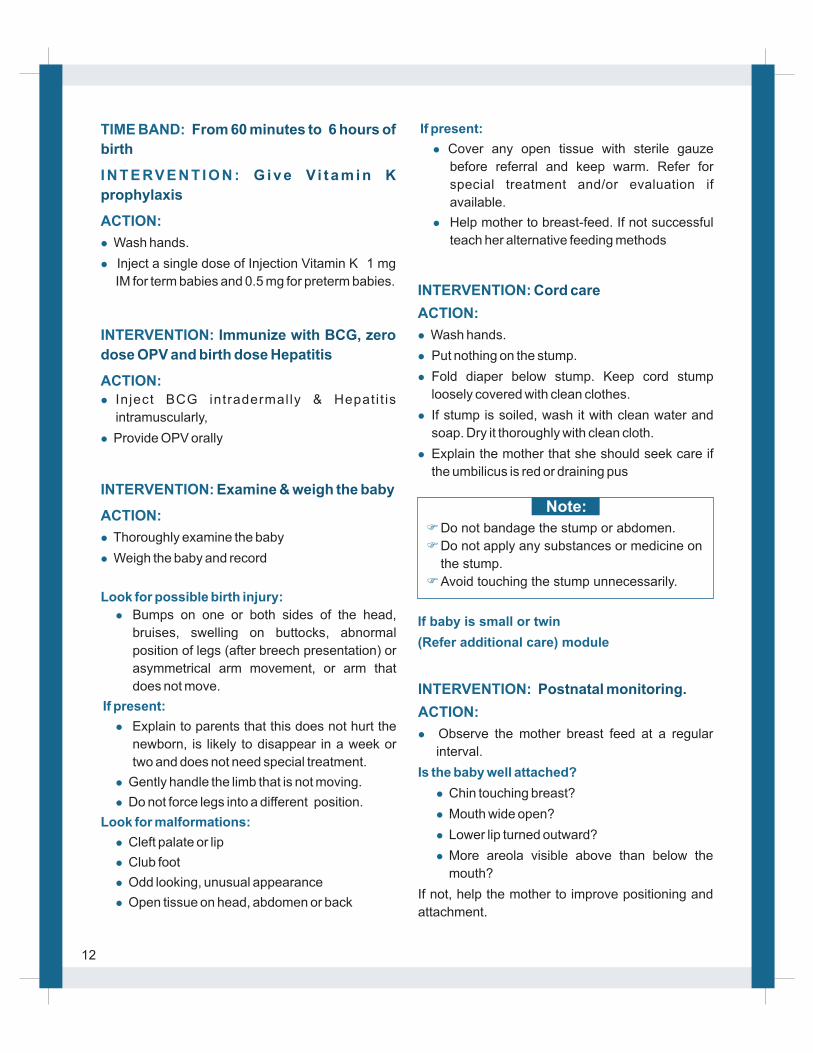
TIME BAND:
I N T E RV E N T I O N :
ACTION:
l
l
INTERVENTION:
ACTION:l
l
INTERVENTION:
ACTION:
l
l
From 60 minutes to 6 hours of
birth
G i v e V i t a m i n K
prophylaxis
Immunize with BCG, zero
dose OPV and birth dose Hepatitis
Examine & weigh the baby
Wash hands.
Inject a single dose of Injection Vitamin K 1 mg
IM for term babies and 0.5 mg for preterm babies.
Inject BCG intradermally & Hepati t is
intramuscularly,
Provide OPV orally
Thoroughly examine the baby
Weigh the baby and record
Look for possible birth injury:
l
If present:
l
l
l
Look for malformations:
l
l
l
l
Bumps on one or both sides of the head,
bruises, swelling on buttocks, abnormal
position of legs (after breech presentation) or
asymmetrical arm movement, or arm that
does not move.
Explain to parents that this does not hurt the
newborn, is likely to disappear in a week or
two and does not need special treatment.
Gently handle the limb that is not moving.
Do not force legs into a different position.
Cleft palate or lip
Club foot
Odd looking, unusual appearance
Open tissue on head, abdomen or back
12
If present:
l
l
Cover any open tissue with sterile gauze
before referral and keep warm. Refer for
special treatment and/or evaluation if
available.
Help mother to breast-feed. If not successful
teach her alternative feeding methods
INTERVENTION:
ACTION:
l
l
l
l
l
Cord care
Wash hands.
Put nothing on the stump.
Fold diaper below stump. Keep cord stump
loosely covered with clean clothes.
If stump is soiled, wash it with clean water and
soap. Dry it thoroughly with clean cloth.
Explain the mother that she should seek care if
the umbilicus is red or draining pus
F
F
F
Do not bandage the stump or abdomen.
Do not apply any substances or medicine on
the stump.
Avoid touching the stump unnecessarily.
If baby is small or twin
(Refer additional care) module
Note:
INTERVENTION:
ACTION:
Is the baby well attached?
Postnatal monitoring.
l
l
l
l
l
Observe the mother breast feed at a regular
interval.
Chin touching breast?
Mouth wide open?
Lower lip turned outward?
More areola visible above than below the
mouth?
If not, help the mother to improve positioning and
attachment.
13
Additional Care Newborn (Wash hands)
Temperature (Axillary) normal (36.5 –37.4 ) oIf cold <36.5 C place skin to skin to re-warm;
re-evaluate after 30 minutes
l
l
l
Respiratory rate (should be 30- 60 per minute)oC
Umbilical stump clean and dry
Eyes and skin
General condition
l
l
l
l
Confirm passage of urine and stool
III. CARE PRIOR TO DISCHARGE
14
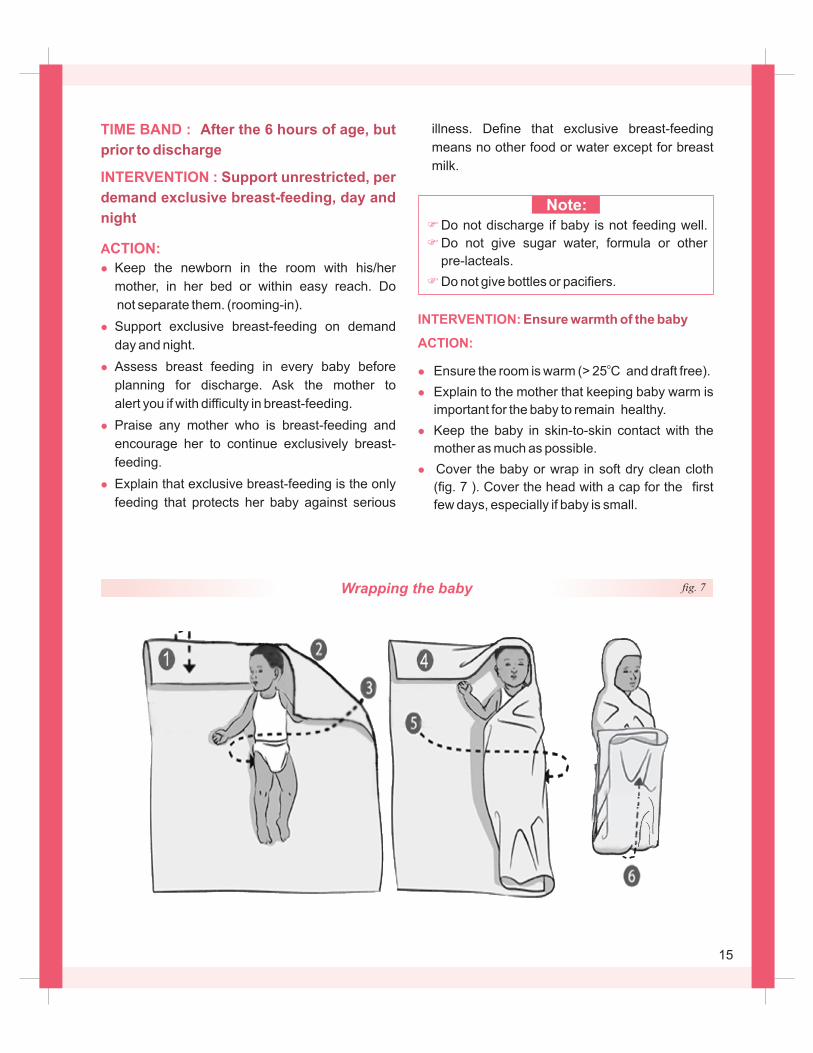
TIME BAND :
INTERVENTION :
ACTION:
After the 6 hours of age, but
prior to discharge
Support unrestricted, per
demand exclusive breast-feeding, day and
night
l
l
l
l
l
mother, in her bed or within easy reach. Do
not separate them. (rooming-in).
Support exclusive breast-feeding on demand
day and night.
Assess breast feeding in every baby before
planning for discharge. Ask the mother to
alert you if with difficulty in breast-feeding.
Praise any mother who is breast-feeding and
encourage her to continue exclusively breast-
feeding.
Explain that exclusive breast-feeding is the only
feeding that protects her baby against serious
Keep the newborn in the room with his/her
F
F
F
Do not discharge if baby is not feeding well.
Do not give sugar water, formula or other
pre-lacteals.
Do not give bottles or pacifiers.
Note:
INTERVENTION:
ACTION:
l
l
l
l
Ensure warmth of the baby
Ensure the room is warm (> 25 and draft free).
Explain to the mother that keeping baby warm is
important for the baby to remain healthy.
Keep the baby in skin-to-skin contact with the
mother as much as possible.
Cover the baby or wrap in soft dry clean cloth
(fig. 7 ). Cover the head with a cap for the first
few days, especially if baby is small.
oC
Wrapping the baby fig. 7
illness. Define that exclusive breast-feeding
means no other food or water except for breast
milk.
15
INTERVENTION:
ACTION:
l
l
l
l
Washing and bathing
(Hygiene)
Wash your hands.
Wipe the face, neck and underarms with a damp
cloth daily.
Wash the buttocks when soiled. Dry thoroughly.
If the baby is small, ensure that the room
temperature when changing, wiping or
bathing
o> 25 C
INTERVENTION:
ACTION:
l
l
l
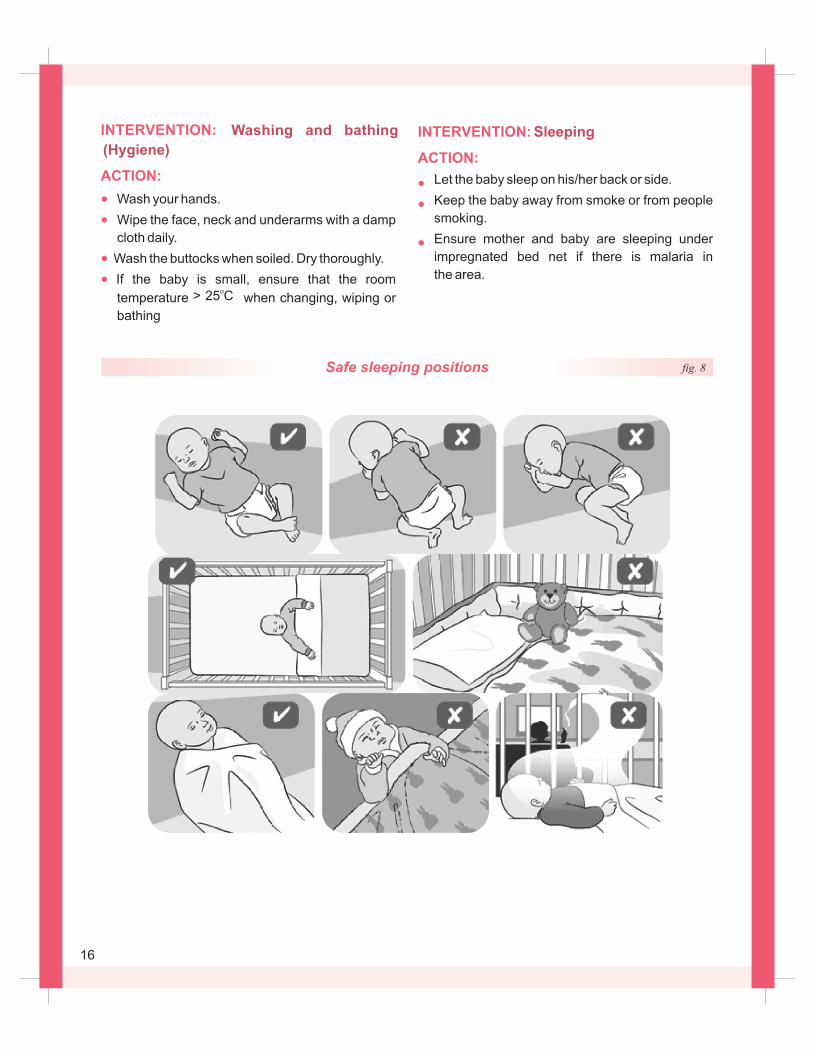
Sleeping
Let the baby sleep on his/her back or side.
Keep the baby away from smoke or from people
smoking.
Ensure mother and baby are sleeping under
impregnated bed net if there is malaria in
the area.
Safe sleeping positions fig. 8
16
INTERVENTION:
ACTION:
l
l
l
l
l
l
l
l
l
l
l
Look for danger signs
Look for signs of serious illness:
Slow breathing (<30 breaths per minute)
Severe chest in-drawing
Grunting
Convulsions
Lethargic or unconsciousoFever (temperature >37.4 C)
oTemperature <36.5 C or not rising after
re-warming.
More than 10 skin pustules or bullae, or
swelling, or redness, or hardness of skin
(sclerema)
Bulging fontenalles.
Fast breathing (>60 breaths per minute)
Nasal flaring
If any of the above is present, consider
possible serious illness.
l
l
l
l
l
Start resuscitation, if necessary.
Re-warm and keep warm during referral for
additional care.
Give first dose of antibiotics
Stop bleeding.
Give oxygen, if available.
INTERVENTION:
ACTION:
l
l
l
l
l
Look for signs of jaundice
and local infection
Look at the skin. Is it yellow? (Palms & Soles)
On face of <24 hour old newborn.
On palms and soles of 24 hour old infant.
Encourage breast-feeding.
If feeding difficulty, give expressed breast milk
by katori & spoon
Refer urgently, if jaundice present:
Look at the eyes:
l
l
l
l
l
Look at the umbilicus:
l
l
l
l
Look at the skin, especially around the neck,
armpits, inguinal area:
l
l
l
Are they swollen and draining
pus?
What has been applied
to the umbilicus?
Are there pustules?
Give single dose of appropriate antibiotic for
eye infection.
Teach mother to treat eyes.
Follow-up in two days. If pus or swelling
worsens or does not improve refer urgently.
Assess and treat mother and her partner for
possible gonorrhea.
Advise mother proper cord care
If there is redness that extends to the skin and
draining pus consider local umbilical infection.
Treat umbilical infection.
If no improvement in 2 days, or if worse, refer
urgently
If less than 10 pustules, consider local skin
infection: Treat skin infection.
Follow-up in 2 days. If pustules worsen or do
not improve in 2 days or more, refer urgently.
If more than 10 pustules, refer
If present, consider gonococcal eye infection.
17
Schedule additional follow up visits depending
on baby’s problems:
l
l
low birth weight in 1st week of life, red
umbilicus, skin infection, eye infection, thrush
or other problems.
After seven days –If low birth weight
discharged more than a week of age and
not gaining weight adequately.
After two days –if with breast-feeding difficulty,
INTERVENTION:
ACTION:
l
l
l
l
l
l
Schedule routine visits as follows:
l
l
l
Discharge Instructions
Advise the mother to return or go to hospital
immediately if baby has any of the following:
Feeding difficulty
Convulsions
Movement only when stimulated
Fast or slow or difficult breathing (e.g., severe
chest in-drawing)0 Temperature > 37.4 C or <36.5
Postnatal visit 1: at 48 –72 hours of life
Postnatal visit2: at 7 days of life
Immunization visit 1: at 6 weeks of life
Jaundice up to the soles
0 C
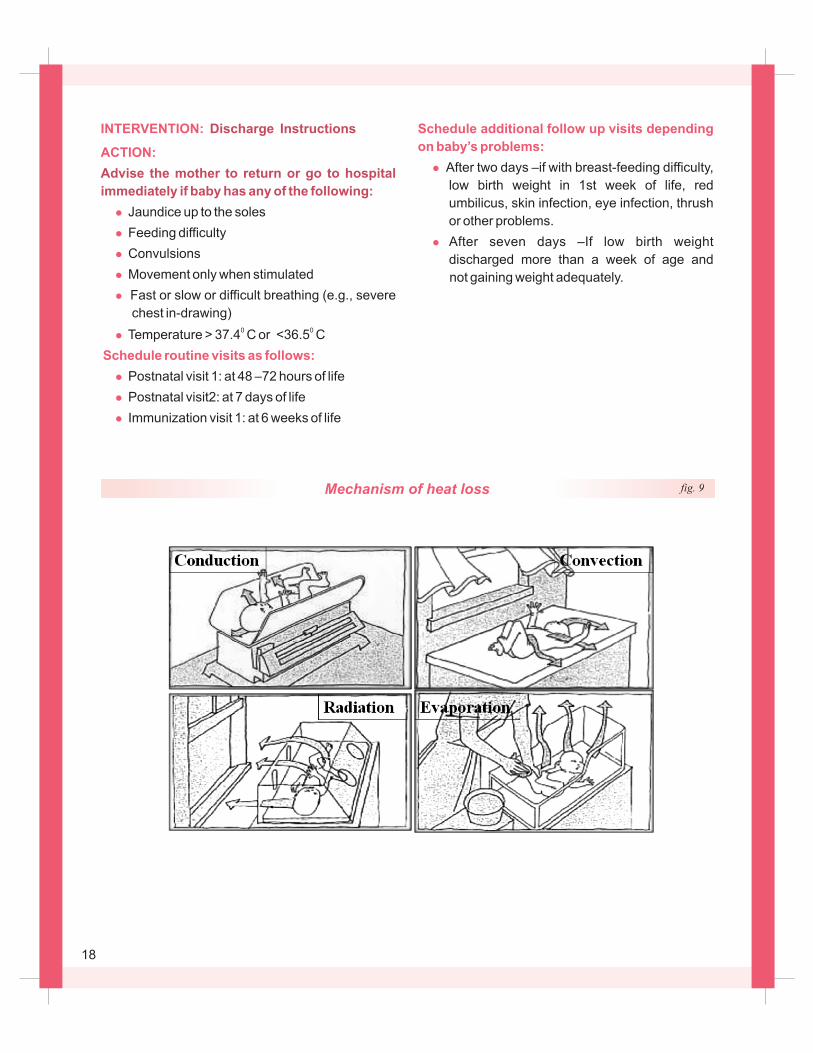
fig. 9Mechanism of heat loss
18
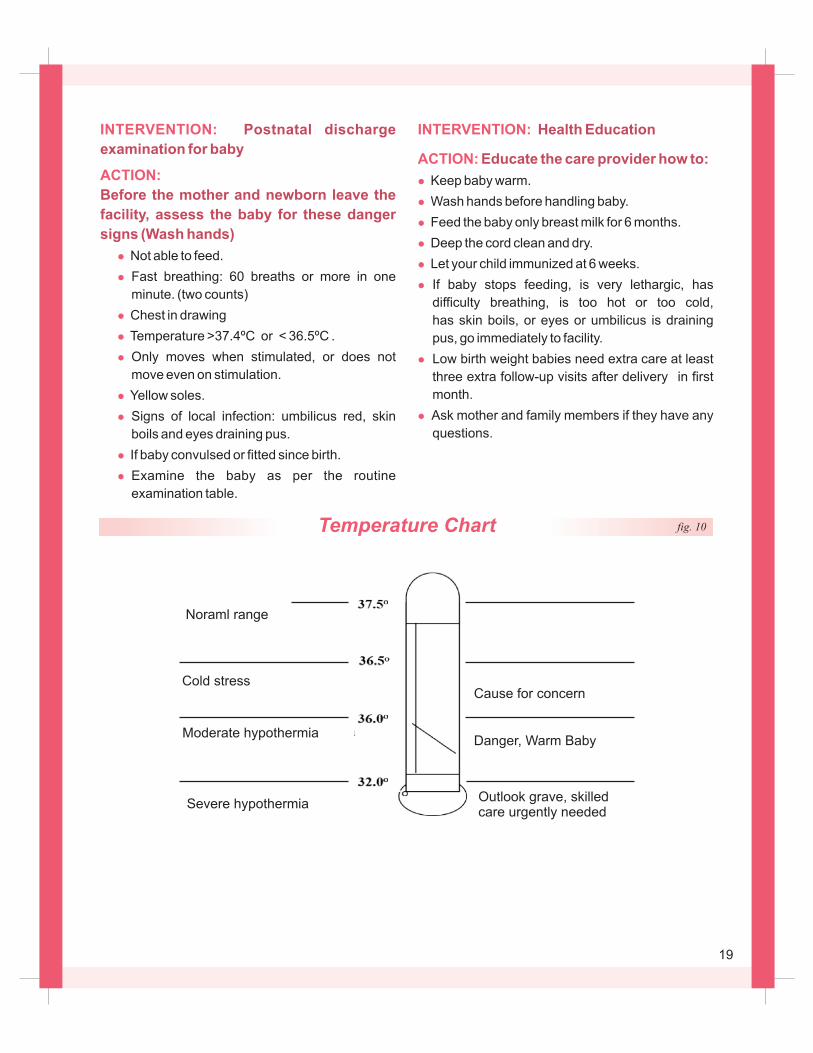
Cause for concern
Danger, Warm Baby
Noraml range
Cold stress
Moderate hypothermia
Severe hypothermiaOutlook grave, skilledcare urgently needed
Temperature Chart fig. 10
INTERVENTION:
ACTION:
l
l
l
l
l
l
l
l
l
Postnatal discharge
examination for baby
Before the mother and newborn leave the
facility, assess the baby for these danger
signs (Wash hands)
Fast breathing: 60 breaths or more in one
minute. (two counts)
Chest in drawing
Temperature >37.4ºC or < 36.5ºC .
Only moves when stimulated, or does not
move even on stimulation.
Yellow soles.
Signs of local infection: umbilicus red, skin
boils and eyes draining pus.
If baby convulsed or fitted since birth.
Not able to feed.
Examine the baby as per the routine
examination table.
INTERVENTION:
ACTION:
Health Education
Educate the care provider how to:
l
l
l
l
l
l
l
l
Keep baby warm.
Wash hands before handling baby.
Feed the baby only breast milk for 6 months.
Deep the cord clean and dry.
Let your child immunized at 6 weeks.
If baby stops feeding, is very lethargic, has
difficulty breathing, is too hot or too cold,
has skin boils, or eyes or umbilicus is draining
pus, go immediately to facility.
Low birth weight babies need extra care at least
three extra follow-up visits after delivery in first
month.
Ask mother and family members if they have any
questions.
19
IV. CARE FORM DISCHARGE TO 7 DAYS
20
TIME BAND:
INTERVENTION:
ACTION:
l
l
l
l
Advise the mother to:
l
l
Observe, Treat and Advice:
l
l
l
l
From discharge to 7 days
Support unrestricted, per
demand exclusive breast-feeding, day and
night
Ask the mother exactly what the baby fed on in the
past 24 hours before the visit. Ask about water,
vitamins, local foods and liquids, formula and use of
bottles and pacifiers. Ask about stools and wet
diapers.
Praise any mother who is breast-feeding and
encourage her to continue exclusively breast-
feed.
(Re) explain that exclusive breast-feeding is the
only food that protects her baby against serious
illness.
Define that exclusive breast-feeding means no
other food or water except for breast milk.
Reassure her that she has enough breast milk for
her baby’s needs.
Keep the newborn in the room with her, in her
bed or within easy reach
Exclusively breast-feed on demand day and
night ( 8 times in 24 hours).
Observe a breast-feed,Ask the mother to alert
you if she has breast-feeding difficulty, pain or
fever.
If nipple (s) is/are sore or fissured, and the
baby is not well attached, in addition to the
above.
Reassess after 2 feeds (within the same day).
Advise the mother to smear hind milk over the
sore nipple after a breastfeed.
Check the baby’s mouth for candidal thrush
and treat baby and mother.
l
breast milk from the affected breast and feed
baby by cup until breast (s) is/are better.
If breasts are swollen but the milk is dripping .
Reassure the mother, that this is normal breast
fullness and will improve with frequent breast-
feeding in 36-72 hours.
If breasts are swollen, shiny and the milk is not odripping, mother’s temperature is <38 C and
the baby is not well attached, treat and advise
for engorgement.
Breast-feed more frequently.
Reassess after 2 feeds (within the same day).
If not better, teach and help the mother
express enough breast milk to relieve the
discomfort.
If breast(s) is/are swollen, painful, there is
patchy redness, and mother’s temperature is o> 38 C, treat and advise for mastitis.
Give antibiotic
If severe pain, give paracetamol.
Reassess in 2 days. If no improvement or
worse, refer to a hospital.
l
l
l
In addition to the above:
l
l
l
l
l
l
If not better, teach the mother how to express
F
F
Do not give sugar water, formula or other pre-lacteals.
Do not give bottles or pacifiers.
Note:
21
INTERVENTION:
ACTION:
l
l
l
l
l
Ensure warmth for your
baby
Explain to the mother that babies need an
additional layer of clothing compared to older
children or adults.
Keep the room or part of the room warm,
especially in a cold climate.
During the day, dress up or wrap the baby.
At night, let the baby sleep with the mother or
within easy reach to facilitate breast-feeding.
Ensure additional warmth for the small baby (or
twin)
Note:
F
F
F
Do not put the baby on any cold or wet surface.
Do not swaddle/wrap too tightly.
Do not leave the baby in direct sunlight.
INTERVENTION:
ACTION:
Look for signs of “very severe disease”
l
l
l
l
l
l
l
l
Refer baby urgently to hospital:
l
l
l
l
l
Look for danger signs
Yellow skin to the soles
History or difficulty feeding
History of convulsions
Movement only when stimulated
Respiratory rate >60 per minute
Severe chest in-drawingo Temperature > 38.0 C
o Temperature <35.5 C
After emergency treatment, explain the need for
referral to the mother/father.
Organize safe transportation.
Always send the mother with the baby, if possible.
Send referral note with the baby.
Inform the referral hospital.
22
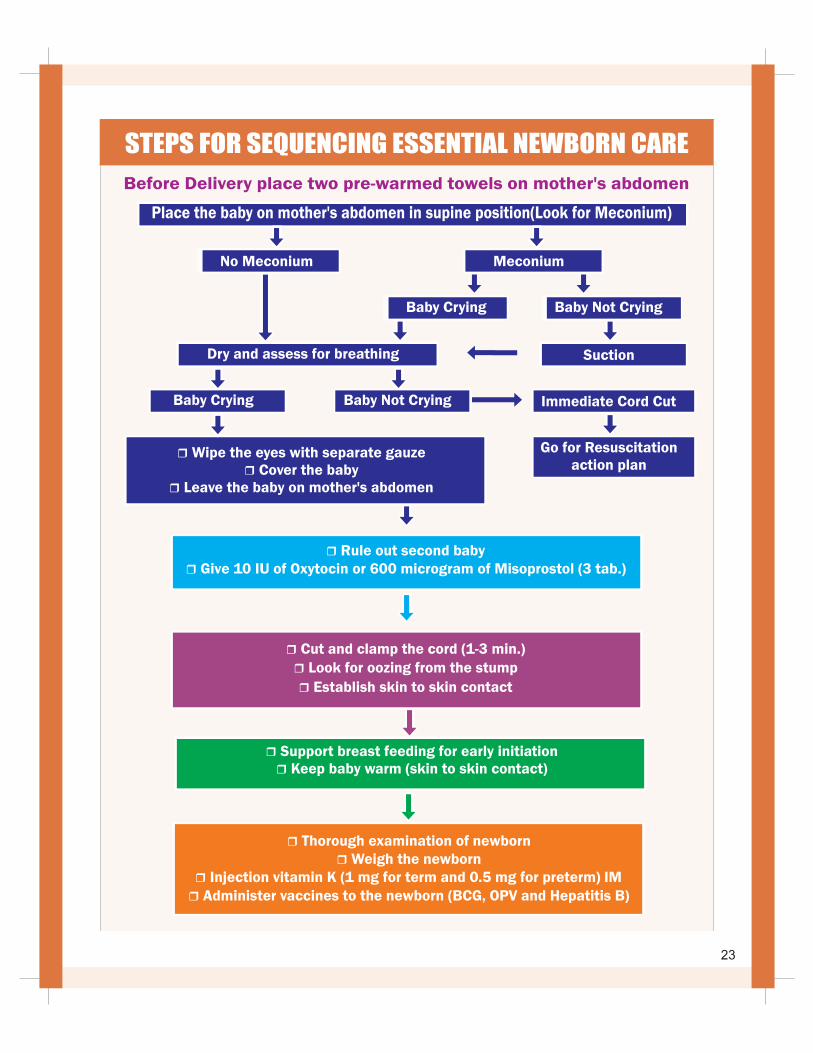
Place the baby on mother's abdomen in supine position(Look for Meconium)
No Meconium
Baby Crying
Dry and assess for breathing Suction
Baby Not Crying
Go for Resuscitationaction plan
r Rule out second babyr Give 10 IU of Oxytocin or 600 microgram of Misoprostol (3 tab.)
r Cut and clamp the cord (1-3 min.) r Look for oozing from the stump
r Establish skin to skin contact
r
r Keep baby warm (skin to skin contact) Support breast feeding for early initiation
r Thorough examination of newbornr Weigh the newborn
r Injection vitamin K (1 mg for term and 0.5 mg for preterm) IMr Administer vaccines to the newborn (BCG, OPV and Hepatitis B)
STEPS FOR SEQUENCING ESSENTIAL NEWBORN CARE
Baby Crying Immediate Cord CutBaby Not Crying
r
r Cover the babyr Leave the baby on mother's abdomen
Wipe the eyes with separate gauze
Before Delivery place two pre-warmed towels on mother's abdomen
Meconium
23
V: ADDITIONAL CARE
lNewborn Resuscitation
lAdditional care of a small baby
lDealing with feeding problems
24
Action Plan for Resucitation fig. 17
25
Important points about the equipment
used for resuscitation:
l
l
l
l
l
l
l
Equipment must be cleaned and checked after
each delivery and checked again before the
next delivery to ensure it is ready for use.
Broken equipment is dangerous and should be
replaced.
Equipment must be of the appropriate size.
Pediatric and adult bag and masks can not be
used on newborn babies who have small and
fragile lungs.
The volume of the bag should not be more than
250-500ml and generate a pressure of at least
35 cm of water.
If a mucus extractor is used the trap should
be big enough (20 ml) to prevent aspirated fluid
going into the resuscitator’s mouth.
A mucus extractor with a bulb is NOT
recommended because they are difficult to
lean and might act as a source of cross
infection.
Suction should not exceed a negative pressure
of 100 mm Hg or 130 cm water.
INTERVENTION :
ACTION:
l
l
l
INTERVENTION:
ACTION
l
l
l
l
Test the availability of
supplies & ensure equipment
Test the function of bag
and mask for ventilation
Check that radiant warmer and supplies are
available and are in working condition, before
birth.
Close the windows and switch off fan to prevent
drafts of air.
Fit mask onto the bag and deliver test breathes
against the palm. Pressure in the palm is felt as
the bag is squeezed.
Form a seal between the mask and the palm.
Squeeze the bag enough for the pop off
(pressure release) valve to open and make a
sound as the air escapes as shown in fig. 11.
Check that the bag re-inflates quickly when you
released.
Ensure that infant masks are in two sizes-0 for
smal baby & 1 for normal baby.
Ensure availability of suction device e.g. mucus
extractor.
Parts and functionality check of
self inflating bag and maskfig. 11
26
Newborn Resuscitation
l
l
Ensure availability of oxygen.
Ensure availability of a clock.
INTERVENTION :
ACTION
l
l
l
l
l
l
l
l
INTERVENTION:
ACTION
Open the baby’s airway: Position the head
l
l
l
Assess the baby’s breathing
Open airways
The baby’s breathing should be assessed whilst
drying.
Watch the way the baby’s chest rises and falls.
The chest should move equally on both sides with
no difficulty, between 30 to 60 times in a minute.
When a baby’s breathing is assessed one of four
main behaviours may be seen.
These are:
Baby is crying
Baby is not crying, but his chest is rising
regularly between 30 to 60 times in a minute
Baby is gasping
Baby is not breathing
Place the baby on its back.
Position the head so that it is slightly extended (to
open the airway).
Place a folded piece of cloth under the baby’s
shoulders to help maintain this position (the
folded cloth should not be too thick or thin - this
may cause over extension or flexion which will
close the airway).
Open the baby’s airway: suction the mouth and
the nose
l
INTERVENTION:
ACTION
l
l
l
Reassess the baby’s breathing
Observational care
l
l
l
l
Suction first the mouth and then the nose
(Remember ‘M’ comes before ‘N’).
If the baby does not cry after birth, wipe remove
wet cloth, position the baby and clear the airway
then stimulate the baby for breathing. Safe and
appropriate methods of providing tactile
stimulation include
Slapping or flicking of sole
Gently rubbing the newborns back or extremities
Suctioning may stimulate the baby to start
breathing. If this happens (i.e. the baby is
breathing), place the baby with mother and provide
observational care.
Baby who breathes after initial steps of
resuscitation requires ongoing observation for
the well being of baby. Observational care
comprises of:
Do not separate the mother and the newborn.
Allow the newborn skin-to-skin contact with the
mother
Observe for breathing and temperature at a
regular interval.
Watch for complications (convulsions, coma,
etc) refer, if so
Initiate breast-feeding, if well
Stimulate to breath
27
Too large: Covers eyes and extends over chin
Too small: does not coversnose and mouth well
Covers mouth, nose and chin but not eyes
Incorrect CorrectIncorrect
INTERVENTION:
ACTION
l
l
Position yourself at the bedside:
l
l
If still not breathing:
Reposition & Ventilate
Clear airways
Position of the baby’s head: The baby’s neck
should be placed in “sniffing position” to maintain
an open airway. You may use shoulder roll for
better positioning of head if required.
You should position yourself at the side or
head of the baby to use the resuscitation bag
effectively.
It is important that the bag is positioned so that
it does not block your view of the baby’s chest,
since you need to be able to observe chest
movement during ventilation.
Positioning bag and mask on the face
l
l
l
l
that it covers the nose and mouth and
the tip of the chin rest with in the rim of the
mask. You should begin by cupping the chin in
the mask and then covering the nose.
The mask usually is held on the face with the
thumb, index, and/or middle finger encircling
the rim of the mask in shape of letter ‘C’ while
the ring and fifth fingers.
Bring the chin forward to maintain a patent
airway.
Once the mask is positioned, using light
downward pressure on the rim of the mask can
form an airtight seal. Care should be taken in
holding the mask.
The mask should be placed on the face so
Correct use of face mask fig. 12
Positioning of bag and mask and use fig. 13
28
Observe the following precautions:
l
l
l
Do not “jam” the mask down on the face. Too
much pressure can mould (flatten) the back of
the head and bruise the face.
Be careful not to rest your fingers or hand on
the baby’s eyes.
Make sure that adequate seal has been
made between mask and face otherwise air
would leak from the mask leading to ineffective
ventilation.
Initiation of ventilation:
How often you squeeze the bag:
Ensure chest rise:
Reason for inadequate or absent chest
movement
l
l
l
Start ventilation by squeezing the bag to deliver
breath. Remember, the lungs of a fetus are filled
with fluid, so the first few breaths will often
require higher pressures and longer inflation
times than will subsequent breaths. Adequate
pressure required to squeeze the bag should be
just enough to produce gentle chest rise as it
happens in normal breathing.
During the init ial stages of neonatal
resuscitation, breaths should be delivered at a
rate of 40 to 60 breaths per minute, or slightly
less than once a second. To help maintain a rate
of 40 to 60 breaths per minute, try saying to
yourself as you ventilate the newborn: “Breathe-
Two-Three, Breath-Two-Three” If you squeeze
the bag on “Breathe” and release while you say
“Two, Three”, you will probably find you are
ventilating at a proper.
After starting ventilation with bag and mask, you
should look for chest movement after ventilating
two to three times to ensure adequacy of
ventilation. If the chest movement is absent or
inadequate then you should immediately take
“Steps to improve ventilation”.
The seal is inadequate
The airway blocked
Not enough pressure is being given
You should immediately take following
Reapply the mask to the face and try to form a
better seal. Use a little more pressure on the
rim of the mask and lift the jaw a little more
forward. Do not press down hard on the
baby’s face. The most common place for a
leak to occur is between the cheek and bridge
of the nose.
Check the baby’s position and extend the neck
a bit farther.
“Steps to
improve the ventilation”
l
l
If chest movement inadequate or absent
l
l
If chest movement is still inadequate or
absent
l
l
Check the mouth, oropharynx, and nose for
secretions clear the mouth and nose if
necessary.
Try ventilating with the baby’s mouth slightly
open.
Increase the pressure to squeeze the bag
until there is perceptible movement of chest.
After undertaking the steps to improve
ventilation (if required) you should continue
to ventilate the baby for 30 seconds and
afterwards assesses the baby for signs of
improvement and act accordingly.
How do you evaluate the success of
ventilation?
Improvement is indicated by:
Is the baby breathing spontaneously?
l
l
l
Spontaneous breathing
Some babies improve quickly and begin
breathing well after 30 seconds of adequate
ventilation. Some babies require prolong
ventilation with bag and mask. Evaluate the baby
after 30 seconds of adequate ventilation by
asking yourself:
If yes then gradually reduce the rate and volume
of breaths and watch for the baby’s
29
breathing. A baby who is breathing well will be
crying or breathing quietly and regularly (chest is
rising symmetrically with frequency 30-60
/minute, and there is no chest in drawing and no
grunting for one minute). If the baby is breathing
well then stop the ventilation and provide
observational care as described earlier.
Baby who is not breathing well (gasping or not
breathing at all) after 30 seconds of adequate
ventilation. Needs continued ventilation and
further evaluation.
Call for help. A more skilled worker will be
required to evaluate and assist in resuscitation.
Continue bag and mask ventilation.
Provide oxygen through bag and mask if
available.
Assess the heart rate.
l
l
l
l
l
Evaluate the heart rate
l
l
l
by feeling the umbilical
cord pulse or listening to the heart beat with
stethoscope while you stop ventilation for 6
seconds. Feel the pulse in the umbilical cord where
it attaches to the baby’s abdomen. If no pulse can
be felt in the cord, you or your helper must listen
over the left side of chest with the stethoscope and
count the heart beat. It may be necessary to stop
ventilation for few seconds to listen with
stethoscope. Counting the number of beats in 6
seconds and multiplying by 10 can provide quick
estimate of the beats per minute. (For example, if
you count 8 beats in 6 seconds, announce the
baby’s heart rate as 80 beats per minute.)
Heart rate above 100bpm is normal.
Heart rate less than 100bpm is slow.
If you are unable to count the heart rate then
minimize the time with out ventilation by
listening to the heart rate as below.
l
l
How does the heart rate change your further
action
l
l
l
If the heart rate is faster than your pulse rate it is
normal.
If the heart rate is slower than your pulse
probably it is slow.
If the heart rate is normal (above 100 beats per
minute) but the baby is still not breathing well
continue to provide bag and mask ventilation
and reassess after every 30 seconds until the
baby is breathing.
Majority of babies whose heart rate is above100
bpm eventually start to breathe well. However if
the baby still does not breathe, continue
ventilation and seek advanced care or organize
referral.
If the heart rate is slow make sure that you have
taken all the steps to improve the ventilation. The
chest should move gently with each breath.
Continue to do bag and mask ventilation and
reassess heart rate approximately after every 30
seconds, in he mean time the more skilled
healthcare provider (doctor) should provide
advanced care if possible. The baby may need
more advanced support such as endotracheal
intubation, chest compressions and medi-
cations. Arrange for referral if advanced care is
not available. Care in a specialty facility will be
required. Vent i lat ion should cont inue
uninterrupted during the transport process.
The procedure of bag and mask ventilation
should be continued until the baby establishes
spontaneous breathing; however, if there are no
signs of life (breathing / heart rate) even after 20
minutes of birth, ventilation may be stopped.
l
30
INTERVENTION:
ACTION
l
l
l
l
l
Follow up care after successful
resuscitation-
For the baby:
l
l
Post resuscitation care
Babies who have received only brief ventilation
can be given observational care. However
babies who require prolonged positive
pressure ventilation are at risk for deterioration,
and are at high risk for developing subsequent
complications; so these babies need
supervised medical care (post resuscitation
care).
Keep the baby warm.
Check breathing, temperature, colour and
capillary filling time(CFT).
Monitor blood sugar.
Watch for complications.
Initiate breast feeding if well.
The mother and baby should be kept
together in skin to skin contact.
Encourage the mother to breast-feed her
baby as soon as it is ready. This will help to
prevent hypoglycemia.
l
l
For the mother and family :
l
l
l
INTERVENTION:
ACTION
l
l
Assess the baby’s attachment at the breast,
can you hear him swallow? Help the mother
breast-feed if needed.
Good suckling is a sign of recovery. If the
baby is unable to suck effectively help the
mother to express colostrum.
After resuscitation, explain to the mother
and family what has happened and how the
baby is now.
Keep the mother and baby in the delivery
room and DO NOT separate them.
NEVER leave the woman and newborn
alone. Monitor them every 15 minutes
during the first hour.
Record what has happened as soon as possible
after the baby is stable and with the mother.
Keeping records of events which occur at the
time of delivery and in the immediate period
afterwards can be vital. The information is
important if a baby needs to be referred or
becomes sick in the next few days.
Record the events
31
Additional Care of a Small Baby (or Twin):
If newborn is preterm, 1-2 months early or
weighing 1500 -2499 g (or visibly small)
AREA OF CONCERN:
ACTION:
l
l
l
l
Warmth
oEnsure the room is maintained > 25 C.
Teach the mother how to keep the small baby
warm in skin to skin contact via Kangaroo
Mother Care .
Provide extra blankets for mother and baby,
plus bonnet, mittens and socks for baby.
Ensure additional warmth for the small baby.
Note:
F Do not bathe the small baby.
AREA OF CONCERN:
ACTION:
l
l
l
l
l
Feeding Support
Encourage the mother to breast-feed every 2
hours preferably on demand.
Assess breast-feeding daily: positioning,
attachment, suckling, duration & frequency of
feeds, and baby satisfaction with the feed.
Weigh baby daily .
When mother and newborn are separated, or if
the baby is not sucking effectively, use alternative
feeding methods.
Give special support for breast-feeding.
AREA OF CONCERN:
ACTION:
l
l
l
Explain KMC to the mother:
l
l
l
Expressing her milk.
l
l
l
l
l
l
l
l
l
Kangaroo Mother
Care (KMC)
Start kangaroo mother care when:
The baby is able to breathe on its own (no apn-
eic episodes).
The baby is free of life-threatening disease or
malformations.
Continuous skin-to-skin contact
Positioning her baby
Attaching her baby for breast-feeding
Caring for her baby.
Continuing her daily activities.
Preparing a ‘support binder’.
Position the baby for KMC.
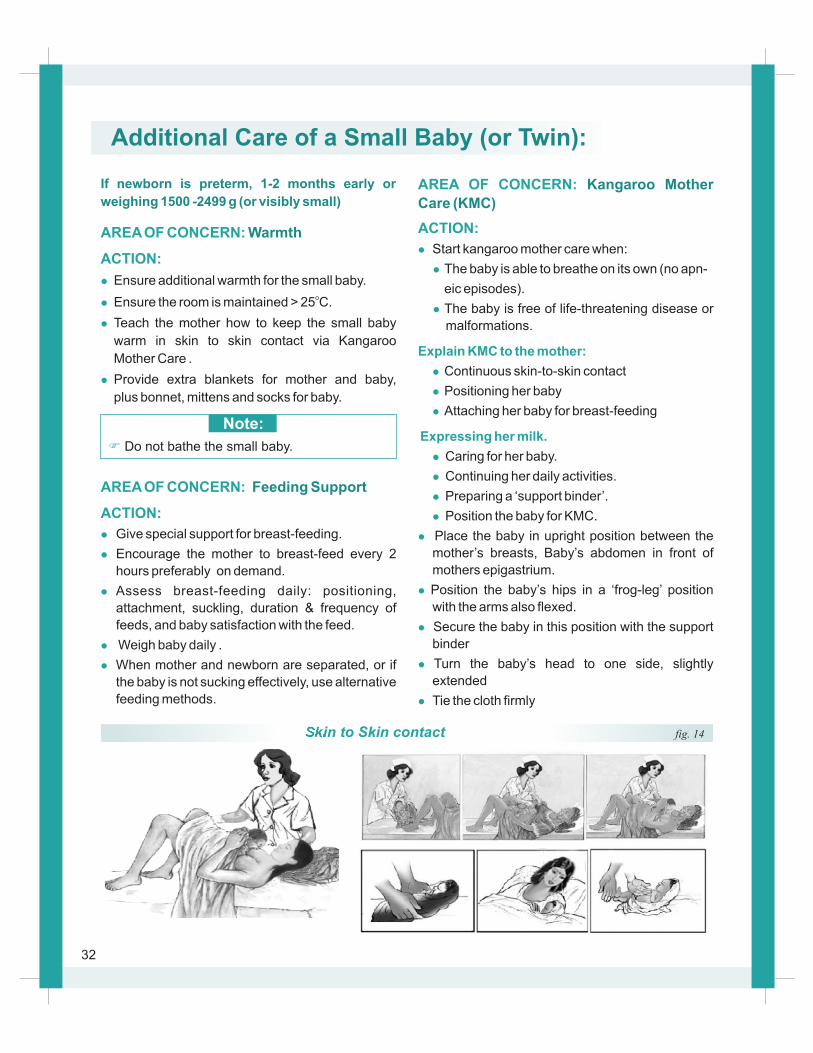
Place the baby in upright position between the
mother’s breasts, Baby’s abdomen in front of
mothers epigastrium.
Position the baby’s hips in a ‘frog-leg’ position
with the arms also flexed.
Secure the baby in this position with the support
binder
Turn the baby’s head to one side, slightly
extended
Tie the cloth firmly
Skin to Skin contact fig. 14
32
AREA OF CONCERN: Discharge Planning
ACTION:
l
l
l
Plan to discharge when:
Breast-feeding well and gaining weight
adequately for 3 consecutive days oBody temperature between 36.5 C and
o37.4 C for 3 consecutive days
Mother is able and confident in caring for baby.
33
Note:
F
F
F
The ability to coordinate sucking and
swallowing is not a pre-requisite to KMC.
Other methods of feeding can be used until
the baby can breastfeed.
KMC can begin after birth, after initial
assessment and basic resuscitation, provided
the baby and mother is stable. If kangaroo
mother care is not doable, wrap the baby in a
clean, dry, warm cloth and place beside
mother and cover with a blanket if possile. Use
a radiant warmer if available.
KMC should last for as long as possible each
day. If the mother needs to interrupt
KMC for a short period, the father, a relative or
friend should take over
AREA OF CONCERN:
ACTION:l
Teach the mother self expression of milk. Do not
do it for her.
l
l
l
l
l
If milk does not flow well:
l
l
Mother-Infant
Separation
When mother and newborn are separated, or if
the baby is not suckling effectively use
alternative feeding methods:
Teach her how to wash her hands thoroughly
Sit or stand comfortably and hold a clean
container below her breasts.
Press slightly inward towards the breast
between her finger and thumb.
Express one side until milk flow slows. Then
express the other side.
Continue alternating sides for at least 20-30
minutes.
Apply warm compresses.
Have someone massage her back and neck
before expressing.
Feed baby mother’s own milk whenever possible by:
l
l
l
l
l
l
l
l
Expressing directly into the baby’s mouth.
Hold the baby in skin-to-skin contact, the mouth close to the nipple.
Express the breast until some drops of breast milk appear on the nipple.
Wait until the baby is alert and opens mouth and eyes, or stimulate the baby lightly to awaken her/him.
Let the baby smell and lick the nipple.
Let some breast milk fall into the baby’s mouth.
Wait until the baby swallows before expressing more drops of breast milk.
Repeat this process every 1 hours if the baby is very small or every 2 hours if the baby is not very small .
Note:
F
F
Place finger and thumb each side of the areola
and press inwards towards the chest wall.
Press behind the nipple and areola between
your finger and thumb
Expressing milk by hand
Expression of milk fig. 15
34
Dealing with Feeding Problems
Cup Feeding -
l
l
l
l
l
l
l
l
l
l
l
l
l
If indicated, do not feed the baby yourself. Teach
the mother to feed the baby with a cup:
Measure the quantity of milk in the cup.
Hold the baby sitting semi-upright on her lap
Hold the cup of milk to the baby’s lips.
Rest cup lightly on lower lip.
Touch edge of cup to outer part of upper lip.
Lip cup so that milk just reaches the baby’s
lips.
Do not pour the milk into the baby’s mouth.
Baby becomes alert, opens mouth and eyes,
and starts to feed.
Baby will suck the milk, spilling some.
Small babies will start to take milk into their
mouth using the tongue.
Baby swallows milk.
Baby is finished feeding when mouth closes
or when not interested in taking more.
If baby does not take the calculated amount:
l
l
l
l
l
l
l
l
l
Feed for a longer time or feed more often.
Teach the mother to measure the baby’s
intake over 24 hours, not just at each feed.
Baby is cup (or with katori-spoon) feeding
well if required amount of milk is swallowed,
spilling little, and weight gain is maintained.
If feeding difficulty persists for 3 days, or
weight loss >10% of birth weight and no
other problems, refer for breast-feeding
counseling and management.
Assess mother/baby dyad and plan to
discharge when:
Breast-feeding well and gaining weight
adequately for 3 consecutive daysoBody temperature between 36.5 C and
o37.4 C for 3 consecutive days
Mother able and confident in caring for
baby.
If these methods are used, determine
appropriate amount for daily feeds by age.
Plan to keep the small baby longer before
discharging.
Feeding an infant with cup fig. 16
35
VI. ENABLING THE ENVIRONMENT
lPreparing for shifts
l After every Delivery
l Standard Precautions
36
Preparing for shifts
Preparing for the shifts
Prepare facility for
delivery and newborn care
The incoming and outgoing teams together
should perform the following actions:
After every Delivery
After every delivery
Restock delivery area &
newborn corner
TIME BAND:
INTERVENTION:
ACTION:
l
l
l
TIME BAND:
INTERVENTION:
ACTION:
l
l
l
l
l
Standard Precautions
TIME BAND: Standard Precautions
INTERVENTION: Universal precautions &
cleanliness
ACTION:
l
Complete the equipment and supplies
maintenance checklist to ensure all equipment is
disinfected and functioning and that supplies and
drugs are maintained at the right quantity.
Establish staffing lists and schedules.
Maintain and appropriately file all clinical records,
referrals & all other documentation.
Replace and process used delivery instruments
and resuscitation equipment
Replace used linen.
Update records.
Update essential information in logbook.
Document findings, treatments, referral, and
follow-up plans on clinical and home- visit
records.
Consider every person potentially infectious
(even the baby and medical staff).
l
l
l
l
lDuring deliveries:
l
l
l
l
l
l
l
Practice the routine procedures that protect both
health workers and patients from contact with
infectious materials:Wash hands before and during caring for a
woman or newborn, before any treatment
procedure including cord cutting and after
handling of waste or potentially contaminated
materials.
Wear fresh sterile or highly disinfected gloves
when performing delivery, cord c u t t i n g ,
or blood drawing.
Wear clean gloves when handling and cleaning
instruments, handling contaminated waste,
cleaning blood and body fluid spills.
Wear gloves, cover any cuts,
abrasions or broken skin with a waterproof
bandage, wear a long apron made from plastic or
other fluid resistant material and shoes, and
protect your eyes from splashes of blood.
Safely dispose sharps in a puncture proof
container kept near the bed.
Never reuse, recap or break needles after use
Dispose of bloody or contaminated items in leak-
proof containers.
Pour liquid waste in a drain or flushable toilet.
Collect and keep clothing or sheets stained with
blood or body fluids separate from other laundry.
Make sure that instruments that penetrate the
skin are adequately sterilized and that single-use
instruments are disposed of after one use.
Thoroughly clean or disinfect any equipment
which comes into contact with intact skin.
Use bleach for cleaning bowls, buckets,
bloody or body fluid spills.
37
l
l
l
l
STEP 2: HLD by Steaming
l
l
l
l
l
Place forceps or pickups on top of all other
items.
Cover all items completely with water. When
water comes to a boil, cover pot and boil for 20
minutes.
Remove items from pot with HLD forceps or
pickups and put in a HLD container.
Air-dry boiled items before use or storage. Do not
leave boiled items sitting in water that has
stopped boiling.
Put water into the bottom of a steamer pot.
Put all items onto a steamer tray. Open up
scissors and other instruments with joints. Place
forceps or pickups on top of all other equipment in
the pot.
Bring the water to a boil, then when the water
starts to boil, cover the pot and boil for 20
minutes.
Remove items from the pot with HLD for ceps or
pickups and put in a HLD container.
Air-Dry items, then use or store items in a
covered, HLD container.
Dry all cleaned items to be sterilized. Open all
jointed instruments, e.g. scissors so steam can
reach all surfaces of item.
STEP 3: Sterilization by Steaming (Autoclave)
l
INTERVENTION:
ACTION:
l
l
l
l
l
l
l
l
l
l
l
STEP 1: High-Level Disinfection (HLD) by
Boiling
l
Hand Washing
2 MINUTES hand washing (6 steps) to be done
before entering the unit
20 second hand washing to be done before and
after touching the baby
Rub back of hands and web spaces.
Rub knuckles
Rub thumbs
Rub finger tips
Rub wrists and forearm up-to-elbow
Once you have washed your hands, do not
touch anything e.g .hair, pen or any fomite till
you carry out the required job.
Remove hand jewellery, rings, and watches
Wet hands with running water. When clean
running water is not available, use either:
Basin/bucket of water and pitcher/dipper. Ask
another person to pour the clean water for hand-
Washing.
Apply soap to your hands, rub and work into a
lather covering all surfaces using 6 strokes each
as follows:
Rub palms against each other.
Put all instruments and other items into a pot
with scissors and all instruments with joints
opened.
Note:F HLD kills all germs except some endospores
(difficult-to-kill bacteria, such as tetanus or
gasgangrene). If sterilization is not available,
HLD(by boiling or steaming) is the only other
acceptable choice.
Note:
F Steaming causes less damage to gloves and
other plastic or rubber items, uses less water
and fuel and does not cause build-up of
lime salts on metal items.
38
Note:
F
F
F
F
F
Keep elbows always dependent, i.e. lower
than your hands
Close the tap with elbow
Dry hands using single-use sterile napkin or
autoclaved newspaper pieces
Discard napkin in the bin kept for the purpose,
if newspaper pieces-in the black bucket.
Do not keep long or polished nails
l
l
l
l
l
l
l
l
If wrapping items for autoclaving, use two layers
of paper, newsprint, or cotton.
Leave space between items so that steam can
move about freely. Follow manufacturer’s
instructions whenever possible. In general,
sterilize at 121°C (250°F) and 106 kPa (15 lb/in2)
pressure. Do not begin timing until autoclave
reaches required temperature and pressure:
Wrapped items take 30 mins; un-wrapped items
20 mins.
At end of cycle: If autoclave is automatic, heat
will shut off and pressure will begin to fall. If
autoclave is not automatic, turn off heat or
remove autoclave from heat source.
Wait until pressure gauge reaches “zero.” Open
autoclave lid/door so that remaining steam
escapes.
Leave instrument packs or items in autoclave
until completely dry. Damp packs draw
microorganisms from the environment and
should be considered contaminated.
Remove items from autoclave when dry.
Use or store autoclaved equipment immediately.
After processing, HLD or sterilized items should
be used immediately or stored properly to
prevent contamination. Proper storage is as
important as decon-tamination, cleaning,
sterilization, or HLD.
Note:F HLD kills all germs, include endospores. Any
item that will come in contact with the
blood stream or tissues under the skin should
be sterilized using steam (autoclaving) or dry
heat. Steam sterilization uses moist heat
under pressure so both water and heat are
needed. The autoclave machine must have a
pressure gauge.
STEP 4: Store or Use
l After processing, HLD or sterilized items should
be used immediately or stored properly to prevent
contamination. Proper storage is as important as
decontamination, cleaning, sterilization, or HLD.
39
Setting of a bed Keep a warm bed ready for the new admission:
l
l
l
l
l
l
a
b
c.
d
e
f.
Clean the radiant warmer with soap water/
Bacillocid
Use autoclaved linen
Keep oxygen hood and source of oxygen ready
Keep suction machine, suction catheter ready
Keep supplies for initiating I.V. line ready
Keep the following articles near the warmer for
exclusive use of each baby:
. Spirit swab container
. Povidone iodine swab container
Thermometer (clinical)
. Stethoscope
. Tape measure
Adhesive tape for fixing lines / probes
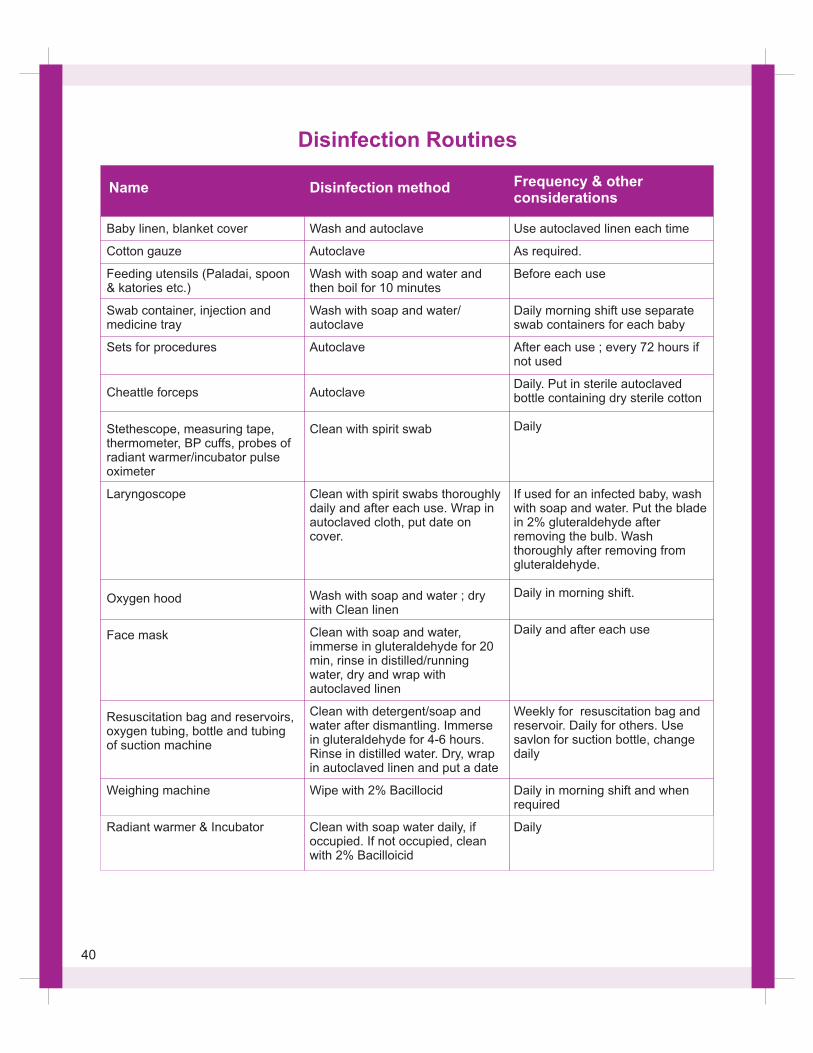
Baby linen, blanket cover
Cotton gauze
Feeding utensils (Paladai, spoon & katories etc.)
Swab container, injection and medicine tray
Sets for procedures
Cheattle forceps
Stethescope, measuring tape, thermometer, BP cuffs, probes of radiant warmer/incubator pulse oximeter
Laryngoscope
Oxygen hood
Face mask
Resuscitation bag and reservoirs, oxygen tubing, bottle and tubing of suction machine
Weighing machine
Radiant warmer & Incubator
Wash and autoclave
Autoclave
Wash with soap and water and then boil for 10 minutes
Wash with soap and water/ autoclave
Autoclave
Autoclave
Clean with spirit swab
Clean with spirit swabs thoroughly daily and after each use. Wrap in autoclaved cloth, put date on cover.
Wash with soap and water ; dry with Clean linen
Clean with soap and water, immerse in gluteraldehyde for 20 min, rinse in distilled/running water, dry and wrap with autoclaved linen
Clean with detergent/soap and water after dismantling. Immerse in gluteraldehyde for 4-6 hours. Rinse in distilled water. Dry, wrap in autoclaved linen and put a date
Wipe with 2% Bacillocid
Clean with soap water daily, if occupied. If not occupied, clean with 2% Bacilloicid
Use autoclaved linen each time
As required.
Before each use
Daily morning shift use separate swab containers for each baby
After each use ; every 72 hours if not used
Daily. Put in sterile autoclaved bottle containing dry sterile cotton
Daily
If used for an infected baby, wash with soap and water. Put the blade in 2% gluteraldehyde after removing the bulb. Wash thoroughly after removing from gluteraldehyde.
Daily in morning shift.
Daily and after each use
Weekly for resuscitation bag and reservoir. Daily for others. Use savlon for suction bottle, change daily
Daily in morning shift and when required
Daily
Name Disinfection method Frequency & other considerations
Disinfection Routines
40
Safe disposal of hospital waste
a. Black drums / Bags
Proper disposal of hospital waste is important to
keep the environment clean. The waste should be
disposed off in a proper way. All health
professionals should be well conversant with their
local hospital policies for waste disposal which
may vary from place to place.
The following are different colour drums with
different color polythene for different type of waste,
to be disposed off in a different way.
Left over food, fruits, feeds, vegetables, waste
paper, packing material, empty box, bags etc. This
waste is disposed off by routine municipal council
committee machinery.
b. Yellow drums / Bags
c. Blue drums / Bags
Infected non-plastic waste e.g. human anatomical
waste, blood, body fluids, placenta etc. This type of
waste requires incineration.
Infected plastic waste such as used disposable
syringes, needles (first destroy the needle in the
needle destroyer). Used sharps, blade and broken
glass should be discarded in puncture proof
containers before discarding.
Patients' IV set, blood transfusion set, ednotracheal
tube, catheter, urine bag etc. should be cut into
pieces and disposed in blue bag. This waste will be
autoclaved to make it noninfectious. This is then
shredded and disposed off.
41
VII. SKILLS CHECKLIST
42

43

3. SKIN TO SKIN CONTACT
4. CORD CLAMP
5. EYE CARE
44
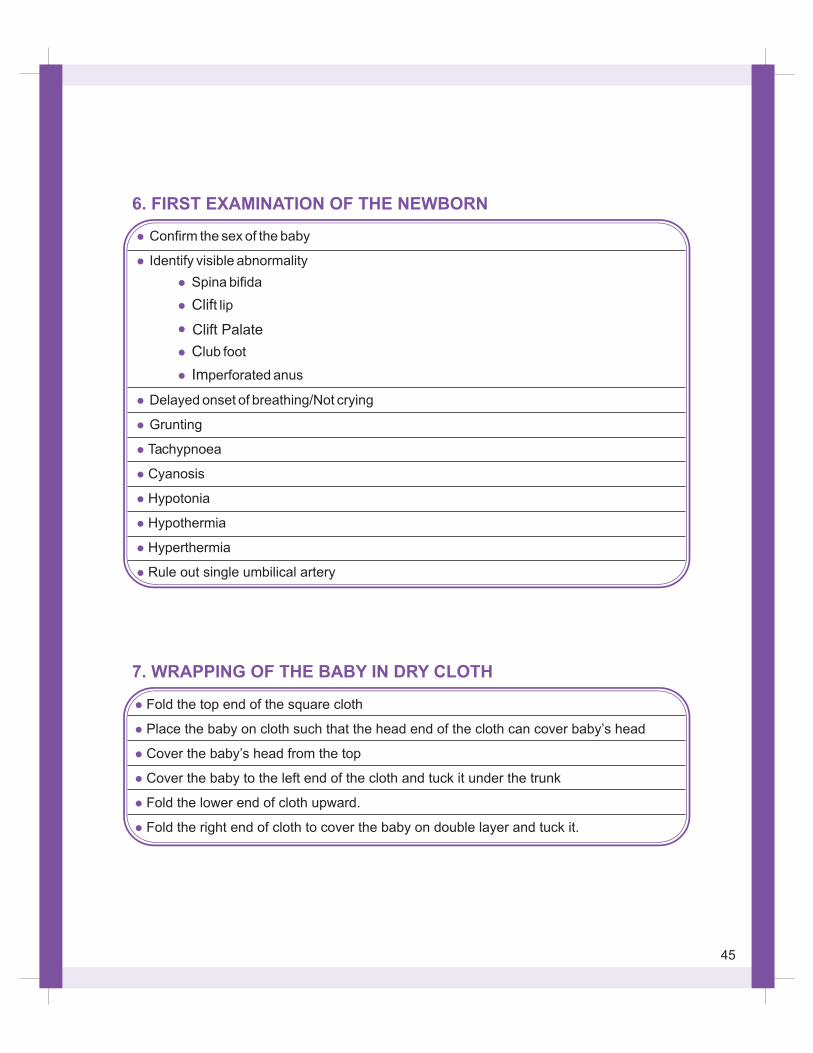
6. FIRST EXAMINATION OF THE NEWBORN
l
l
l
l
l
l
Fold the top end of the square cloth
Place the baby on cloth such that the head end of the cloth can cover baby’s head
Cover the baby’s head from the top
Cover the baby to the left end of the cloth and tuck it under the trunk
Fold the lower end of cloth upward.
Fold the right end of cloth to cover the baby on double layer and tuck it.
7. WRAPPING OF THE BABY IN DRY CLOTH
45
Clift Palate
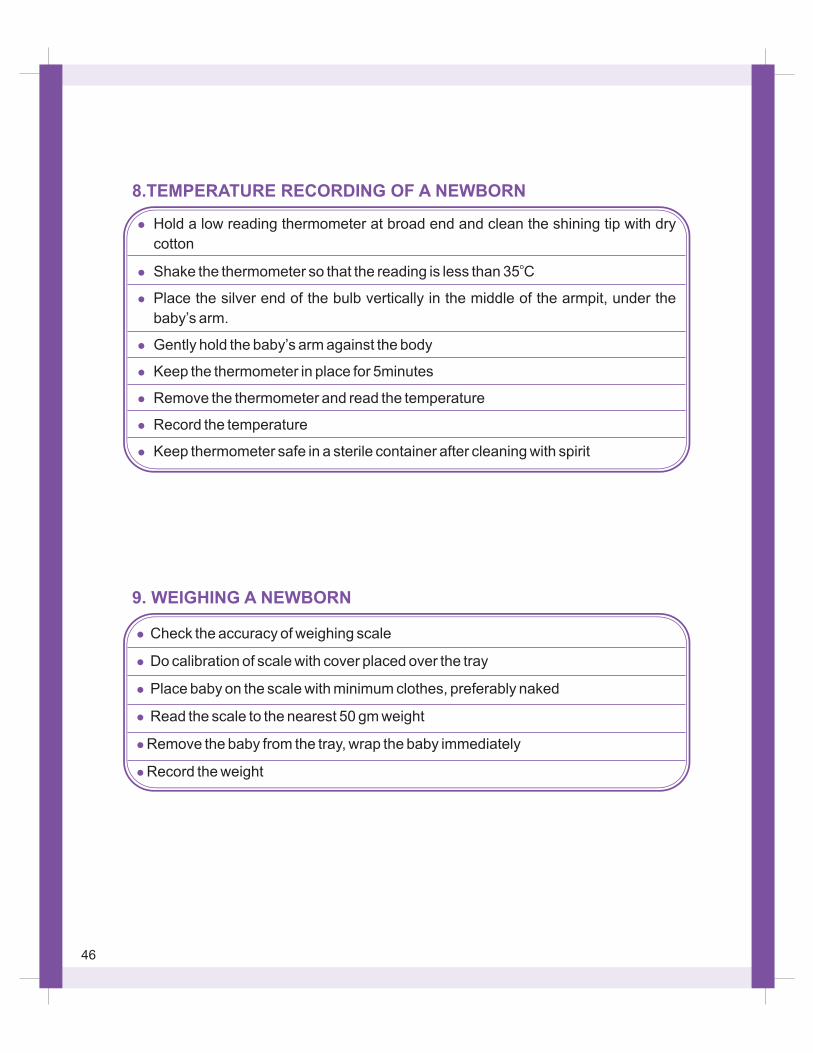
8.TEMPERATURE RECORDING OF A NEWBORN
9. WEIGHING A NEWBORN
46
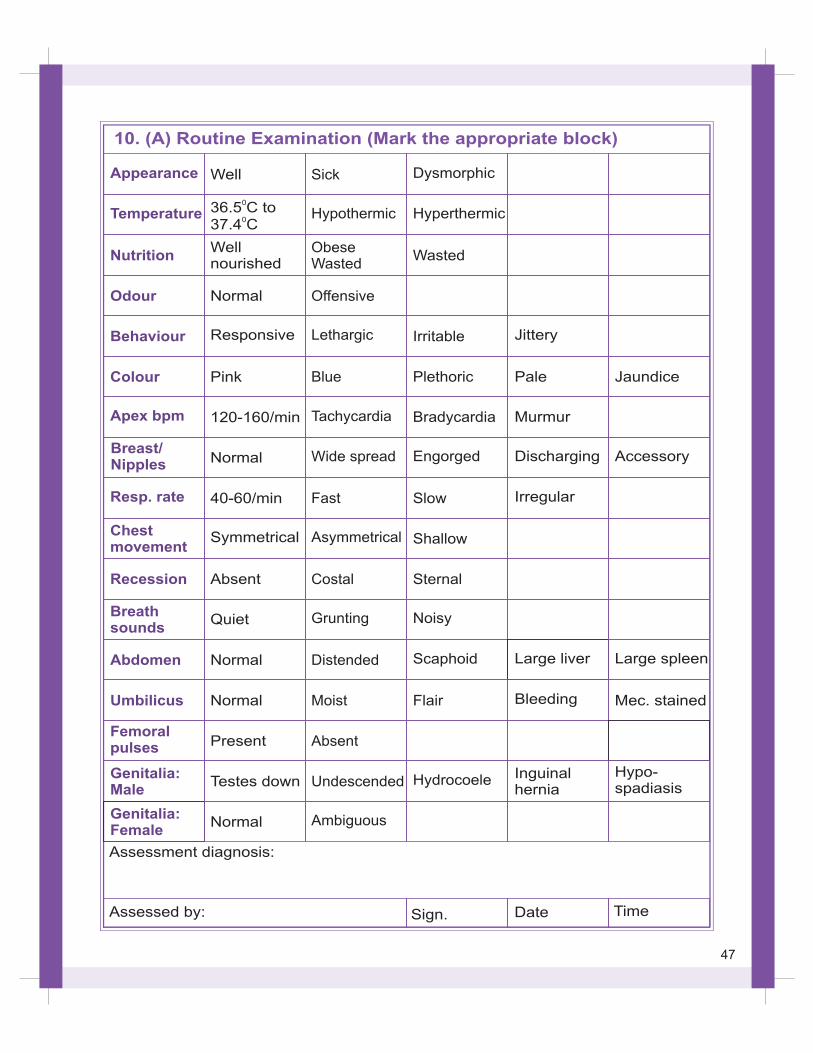
Appearance
Temperature
Nutrition
Odour
Behaviour
Colour
Apex bpm
Breast/Nipples
Resp. rate
Chestmovement
Recession
Breathsounds
Abdomen
Umbilicus
Femoralpulses
Genitalia:Male
Genitalia:Female
Well
036.5 to
037.4 CC
Wellnourished
Normal
Responsive
Pink
120-160/min
Normal
40-60/min
Symmetrical
Absent
Quiet
Normal
Normal
Present
Testes down
Normal
Sick
Hypothermic
ObeseWasted
Offensive
Lethargic
Blue
Tachycardia
Wide spread
Fast
Asymmetrical
Costal
Grunting
Distended
Moist
Absent
Undescended
Ambiguous
Dysmorphic
Hyperthermic
Wasted
Irritable
Plethoric
Bradycardia
Engorged
Slow
Shallow
Sternal
Noisy
Scaphoid
Flair
Hydrocoele
Jittery
Pale
Murmur
Discharging
Irregular
Large liver
Bleeding
Inguinalhernia
Jaundice
Accessory
Large spleen
Mec. stained
Hypo-spadiasis
10. (A) Routine Examination (Mark the appropriate block)
Assessment diagnosis:
Assessed by: Sign. Date Time
47
10. (B)Routine Examination (Mark the appropriate block)
Chin
Face
Nose
Eyes
Ear
Neck
Back
Head shape
Fontanelles
Sutures
Muscle tone
Skin
Cry
Normal
Symmetrical
Patent
Normal
Normal
Normal
Normal
Normal
Normal
Mobile
Normal
Intact
Normal
Small
Asymmetrical
Blocked
Small
Abnormal
Swellings
Meningocoele
Asymmetrical
Bulging
Overriding
Hypotonic
Bruising
Hoarse
Abnormal
Large
Low Position
Webbed
Sacral dimple
caput
Large
Widened
Hypertonic
Rash
High-pitched
Slanting
Hair tuft
Heamatoma
Third
Fused
Purpura
Weak
Infected
Scoliosis
Trauma
Sunken
absent
Assessment diagnosis:
Assessed by: Sign. Date Time
48
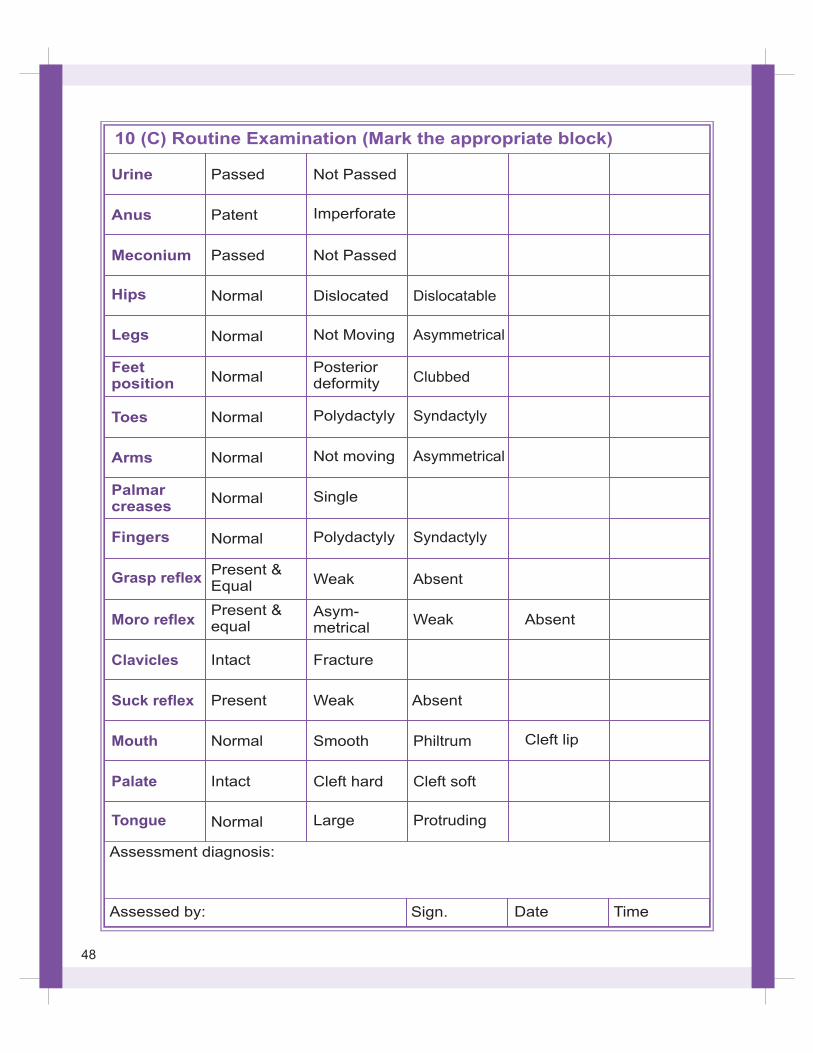
10 (C) Routine Examination (Mark the appropriate block)
Urine
Anus
Meconium
Hips
Legs
Feetposition
Toes
Arms
Palmarcreases
Fingers
Passed
Patent
Passed
Normal
Normal
Normal
Normal
Normal
Normal
Normal
Not Passed
Imperforate
Not Passed
Dislocated
Not Moving
Posteriordeformity
Polydactyly
Not moving
Single
Polydactyly
Dislocatable
Asymmetrical
Clubbed
Syndactyly
Asymmetrical
Syndactyly
Grasp reflex
Moro reflex
Clavicles
Suck reflex
Mouth
Palate
Tongue
Present &Equal
Present &equal
Intact
Present
Normal
Intact
Normal
Weak
Asym-metrical
Fracture
Weak
Smooth
Cleft hard
Large
Absent
Weak
Absent
Philtrum
Cleft soft
Protruding
Absent
Cleft lip
Assessment diagnosis:
Assessed by: Sign. Date Time
48
VIII. USE OF RADIANT WARMER
50
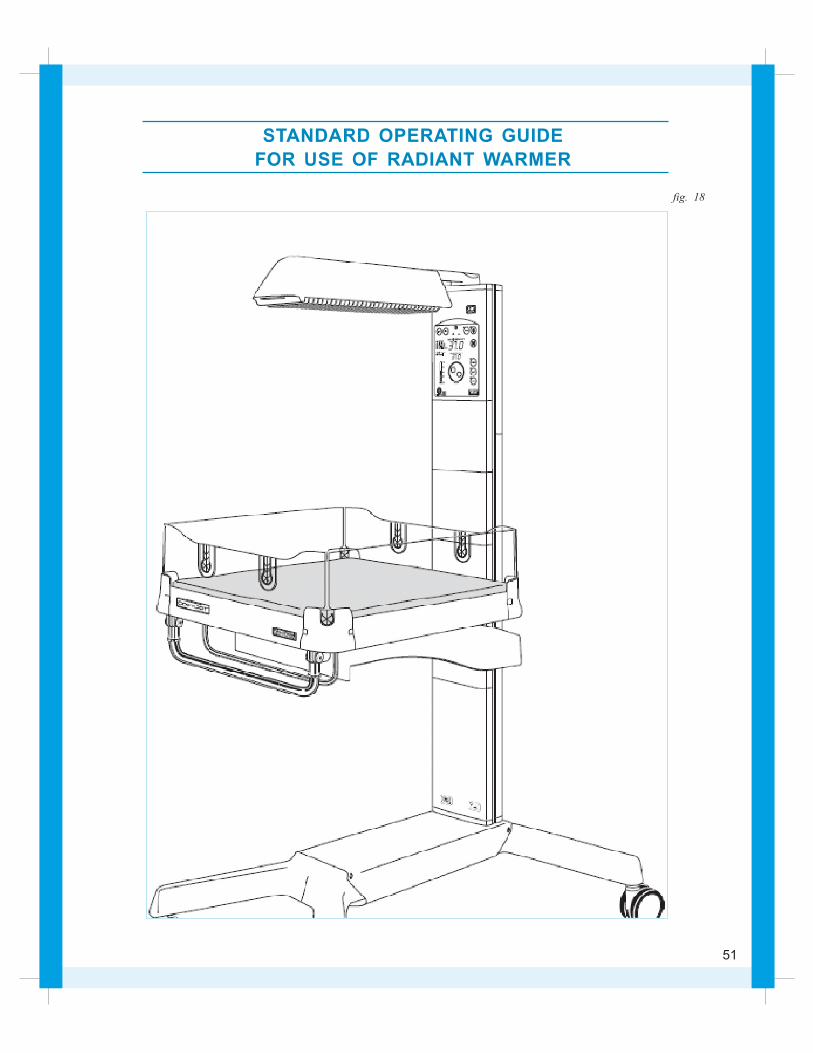
STANDARD OPERATING GUIDE
FOR USE OF RADIANT WARMER
fig. 18
51
Warmth is a basic need of newborn
Newborn are more prone to develop hypo-
thermia because of
?
?
?
Large surface area per unit of body weight.
Decreased thermal insulation ability due to less
subcutaneous fat .
Less heat production due to lack of brown fat
especially in low birth weight.
Note:
F The newborn can lose a tremendous amount of body heat during birth and first few
hours of life.
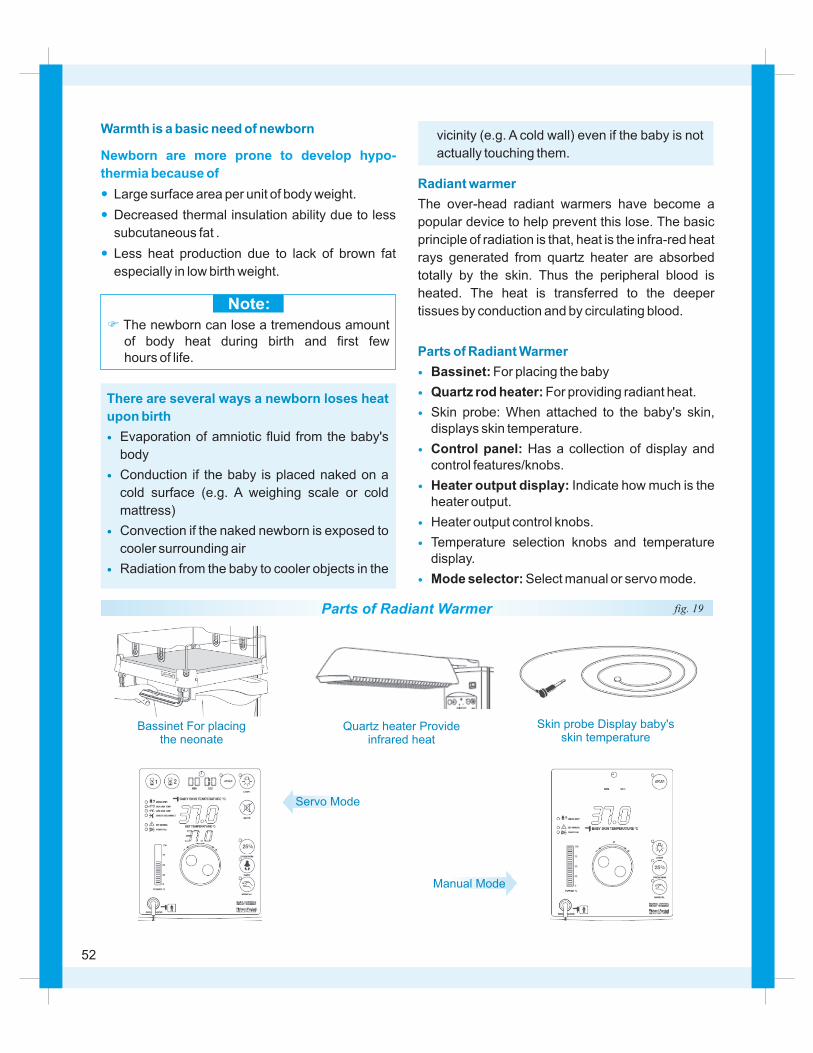
Radiant warmer
Parts of Radiant Warmer
The over-head radiant warmers have become a
popular device to help prevent this lose. The basic
principle of radiation is that, heat is the infra-red heat
rays generated from quartz heater are absorbed
totally by the skin. Thus the peripheral blood is
heated. The heat is transferred to the deeper
tissues by conduction and by circulating blood.
Bassinet: For placing the baby
Quartz rod heater: For providing radiant heat.
Skin probe: When attached to the baby's skin, displays skin temperature.
Control panel: Has a collection of display and control features/knobs.
Heater output display: Indicate how much is the heater output.
Heater output control knobs.
Temperature selection knobs and temperature display.
Mode selector: Select manual or servo mode.
?
?
?
?
?
?
?
?
There are several ways a newborn loses heat
upon birth
?
?
?
?
Evaporation of amniotic fluid from the baby's
body
Conduction if the baby is placed naked on a
cold surface (e.g. A weighing scale or cold
mattress)
Convection if the naked newborn is exposed to
cooler surrounding air
Radiation from the baby to cooler objects in the
Bassinet For placingthe neonate
Quartz heater Provideinfrared heat
Skin probe Display baby'sskin temperature
Servo Mode
Manual Mode
vicinity (e.g. A cold wall) even if the baby is not
actually touching them.
Parts of Radiant Warmer fig. 19
52
Controls & Indicators
Power switch
Baby skin temperature display
Control knob
Adjust set temperature in servo mode and power
level in manual mode. Adjust preset countdown
time when either the timer 1 or timer 2 buttons are
held down
Displays the current set temperature in servo mode
and display switches of in pre-warm and manual
mode
Displays the current power level in
the range of 0% to 100%
Only in servo mode displays the
current set time of the Apgar timer
Pressing this button
silences all audible alarms for 10 minutes. The
check baby alarm is reset for 15 min.
Pressing this button selects pre-warm
mode and illuminates green pre-warm mode
indicator light. The power level is preset to 25% to
provide alarm and trouble free pre-warming of the
heater and environment above the warmer
mattress before arrival of baby
Pressing this button
selects servo mode and illuminates green servo
mode indicator light. The power level automatically
control according to the baby skin temperature to
achieve the desired set temperature
Manual: Pressing this button selects manual mode
and illuminates green manual mode indicator light.
The power level is adjustable using the control knob
in the range of 0% to 100% in 5% steps.
Set temperature (Servo mode models only)
Power display:
Timer display:
Mute (Only in servo modes):
Pre-warm:
Baby (Only in servo modes):
fig. 20
53
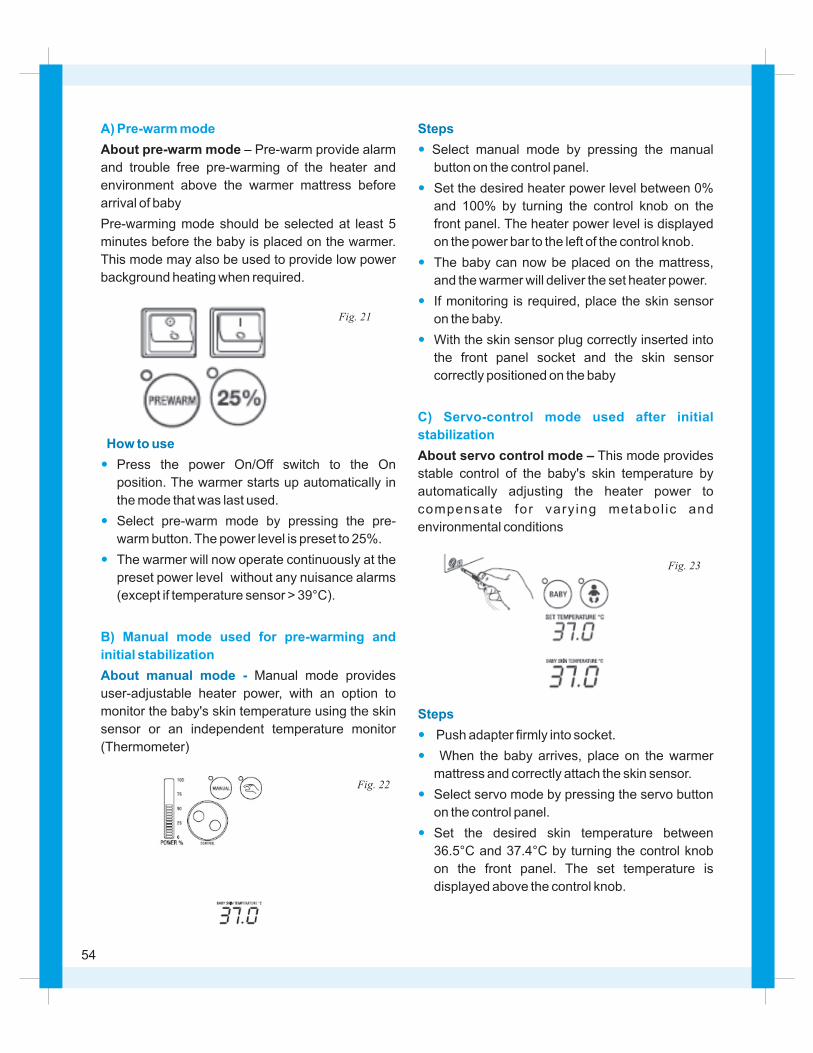
A) Pre-warm mode
?
?
?
B) Manual mode used for pre-warming and
initial stabilization
About pre-warm mode – Pre-warm provide alarm
and trouble free pre-warming of the heater and
environment above the warmer mattress before
arrival of baby
Pre-warming mode should be selected at least 5
minutes before the baby is placed on the warmer.
This mode may also be used to provide low power
background heating when required.
Press the power On/Off switch to the On
position. The warmer starts up automatically in
the mode that was last used.
Select pre-warm mode by pressing the pre-
warm button. The power level is preset to 25%.
The warmer will now operate continuously at the
preset power level without any nuisance alarms
(except if temperature sensor > 39°C).
Manual mode provides
user-adjustable heater power, with an option to
monitor the baby's skin temperature using the skin
sensor or an independent temperature monitor
(Thermometer)
How to use
About manual mode -
Fig. 21
Fig. 22
Steps
Steps
?
?
?
?
?
C) Servo-control mode used after initial
stabilization
?
?
?
?
Select manual mode by pressing the manual
button on the control panel.
Set the desired heater power level between 0%
and 100% by turning the control knob on the
front panel. The heater power level is displayed
on the power bar to the left of the control knob.
The baby can now be placed on the mattress,
and the warmer will deliver the set heater power.
If monitoring is required, place the skin sensor
on the baby.
With the skin sensor plug correctly inserted into
the front panel socket and the skin sensor
correctly positioned on the baby
About servo control mode – This mode provides
stable control of the baby's skin temperature by
automatically adjusting the heater power to
compensate for varying metabol ic and
environmental conditions
Push adapter firmly into socket.
When the baby arrives, place on the warmer
mattress and correctly attach the skin sensor.
Select servo mode by pressing the servo button
on the control panel.
Set the desired skin temperature between
36.5°C and 37.4°C by turning the control knob
on the front panel. The set temperature is
displayed above the control knob.
Fig. 23
54
?
?
?
?
With the skin sensor plug correctly inserted into
the front panel socket and the skin sensor
correctly positioned on the baby, the warmer will
now automatically adjust the heater power to
stabilize the baby's skin temperature at the
desired set temperature.
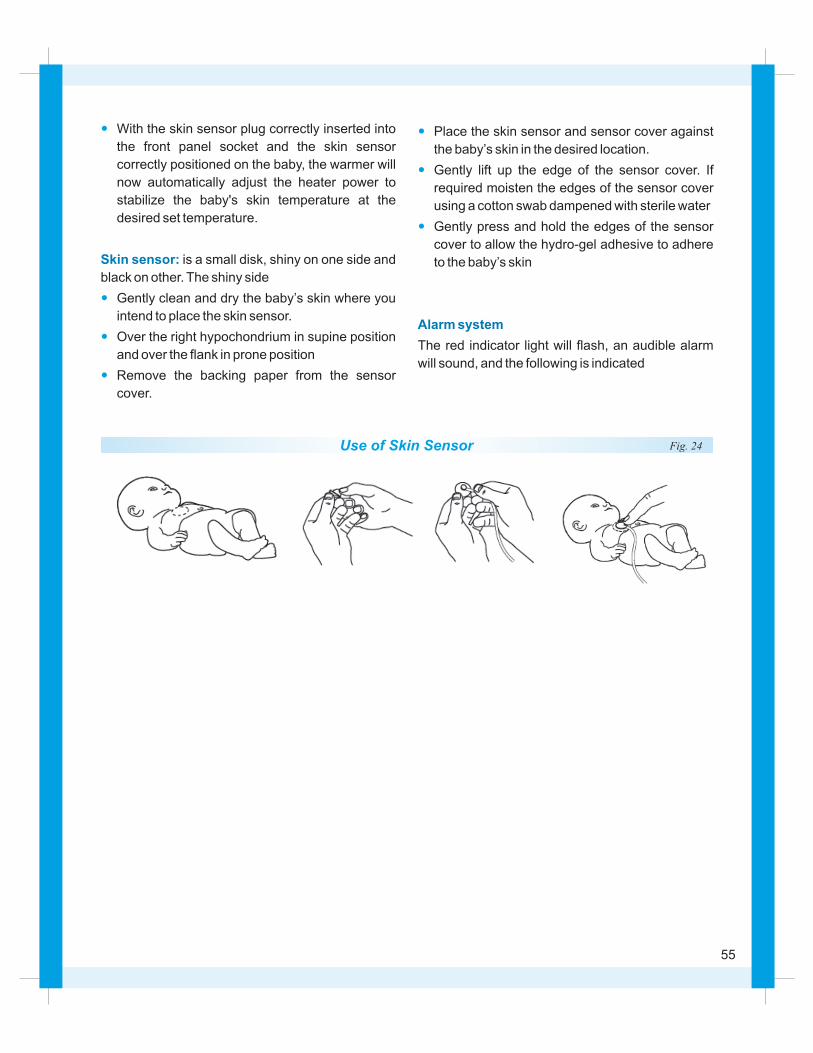
is a small disk, shiny on one side and
black on other. The shiny side
Gently clean and dry the baby’s skin where you
intend to place the skin sensor.
Over the right hypochondrium in supine position
and over the flank in prone position
Remove the backing paper from the sensor
cover.
Skin sensor:
?
?
?
Place the skin sensor and sensor cover against
the baby’s skin in the desired location.
Gently lift up the edge of the sensor cover. If
required moisten the edges of the sensor cover
using a cotton swab dampened with sterile water
Gently press and hold the edges of the sensor
cover to allow the hydro-gel adhesive to adhere
to the baby’s skin
The red indicator light will flash, an audible alarm
will sound, and the following is indicated
Alarm system
Use of Skin Sensor Fig. 24
55
Check baby
Heater power level is reduced to 25% if the warmer has been operating
In servo mode at 100% power
Heater power level is at more than 25% power, for longer than 15 minutes in manual mode
?
?
?
?
In servo mode: The skin temperature
measurement may be incorrect due to skin
sensor placement.
In manual mode: The heater power was set
higher than 25% for longer than 15 minutes.
Cause Action
?
?
Check the skin sensor placement,
then press the mute or servo button .
Adjust the heater power to less than 25%, or
press the mute or manual button.
High skin temperature +1 C°
?
?
?
The heater will be disabled if the baby skin temperature is greater than the set temperature by 1°C.
Pressing the mute button silences the audible alarm for 10 minutes, while the red indicator light will
remain flashing until the baby skin temperature is within 1°C of the set temperature.
In pre-warm or manual mode this alarm will occur if the baby skin temperature is greater than 39°C.
?
?
The set temperature may have been adjusted
lower by more than the alarm limit.
The baby may be experiencing heat stress
Cause Action
?
?
Press the mute button and wait for
the baby’s skin temperature to fall.
Check the baby’s clinical condition.
Low skin temperature – 1 C°
?
?
?
The heater power level will be reduced to 25% if the baby skin temperature is less than the set
temperature by 1°C.
Pressing the Mute button silences the alarm for 10 minutes and re-enables heater power, while the red
indicator light will remain flashing until the baby skin temperature is within 1°C of the set temperature.
This alarm is not active in pre-warm or manual mode.
Cause Action
?
?
?
?
The set temperature may have been adjusted
higher by more than 1°C
The skin sensor and cover may have been
accidentally covered
The skin sensor may have been detached or
is incorrectly positioned
The baby may be experiencing cold stress
?
?
?
?
Press the mute button and wait for the baby’s
skin temperature to rise.
Remove the object which is covering the skin
sensor
Check the skin sensor and reattach or
reposition as required
Check the baby’s clinical condition.
56
Sensor disconnect
?
?
?
The heater will be disabled if the skin sensor is either removed or faulty.
Pressing the Mute button silences the alarm for 10 minutes, while the red indicator light will remain
flashing and the heater remains disabled until the skin sensor is plugged in or replaced.
This alarm does not indicate if a sensor is removed in manual mode, and is not active in pre-warm mode.
Cause Action
?
?
The skin sensor may not
be connected to the warmer.
The skin sensor may be
faulty.
?
?
Check the connections of the skin sensor plug into the front
panel socket or the connection between the single use skin
sensor and the adaptor and the adaptor socket connection.
Replace the skin sensor. Have the suspect skin sensor checked
by a technician.
See Manual
?
?
?
If this indicator is flashing or illuminated continuously a fault has been detected or the overheat protector
in the heater has tripped.
For both faults the warmer should be immediately disconnected from the supply outlet.
The baby relocated onto another warmer, and the unit sent for servicing.
Cause Action
?
?
A software fault has been detected
An electronic fault has been detected.
?
?
Send warmer for servicing
Send warmer for servicing
Power fail
?
?
?
The power supply to the warmer has failed.
If the power on/off switch is on, then either the supply outlet has been switched off,
The warmer power cord has been unplugged from the wall supply outlet
Cause Action
?
?
?
The wall supply to the warmer has failed.
The wall supply to the warmer has been
switched off accidentally
The power cord has been accidentally
unplugged while the warmer is in use
?
?
?
Turn the power switch off to cancel the
audible and visual alarms.
We recommend providing an alternative
source of warmth for the baby.
Turn the wall supply switch on to restart the
warmer. Plug the cord back into the wall
supply outlet
57
Cleaning
Caution
Clean the warmer and accessories either weekly or
after every use
Cleaning shall be performed at ambient
conditions. Allow for heated surfaces to
cool for at least one hour or cool to the touch
before cleaning.
Before cleaning, remove and discard all used
disposable products. Dust all surfaces with a
clean damp soft cloth.
Clean all plastic surfaces with detergent based
solution (maximum 2% in water) eg. 2%
Gluteraldehyde. Dry all surfaces after cleaning
with a clean soft cloth or paper towel.
Ensure no part of the Infant Warmer or related
accessories is immersed in any cleaning liquid or
cleaning solution.
?
?
?
?
?
?
?
?
?
Do not clean the radiant warmer heating element
Do not autoclave or gas sterilize any part of the
warmer.
Only qualified personnel should carry out service
and maintenance procedures.
When performing maintenance procedures,
ensure the warmer is disconnected from the
power supply and the heater element is allowed
to cool for one hour.
Ensure all oxygen and air supplies are turned off
and disconnected.
The troubleshooting charts provide the user with
general situations, possible causes and suggested
actions. If these charts cannot assist in solving the
particular situation, the warmer should be sent for
servicing
Maintenance
Troubleshooting
58
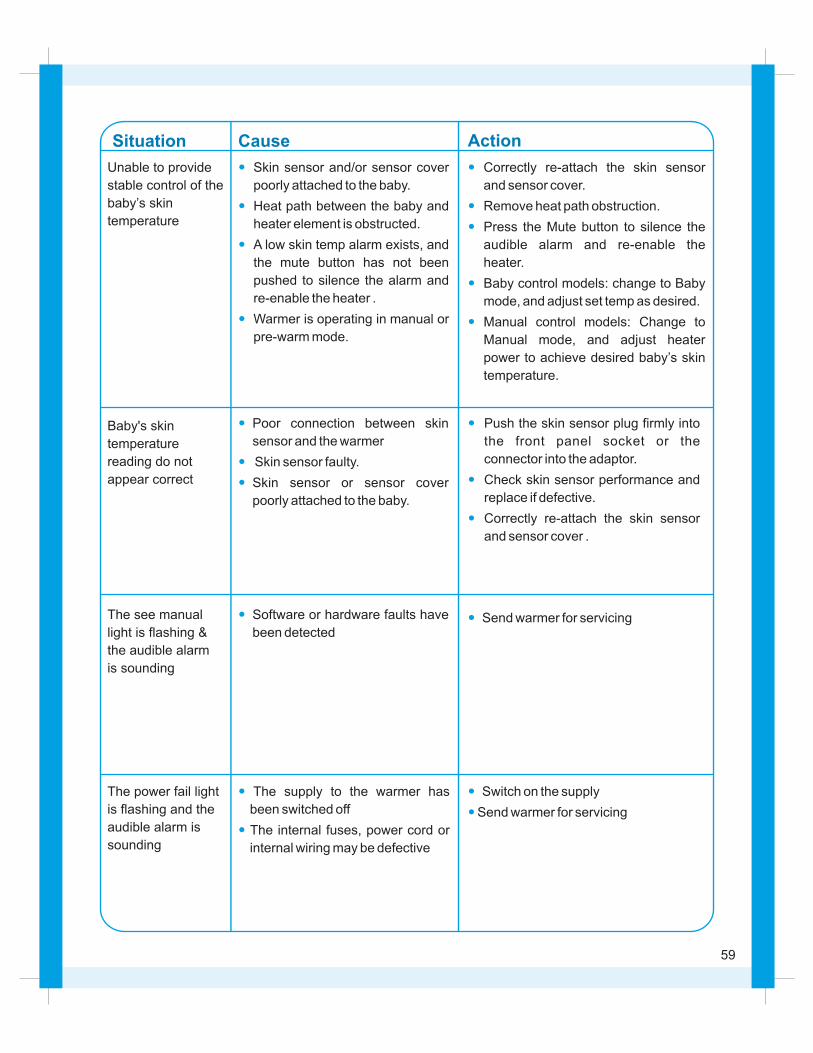
Cause ActionSituation
Unable to provide
stable control of the
baby’s skin
temperature
?
?
?
?
Skin sensor and/or sensor cover
poorly attached to the baby.
Heat path between the baby and
heater element is obstructed.
A low skin temp alarm exists, and
the mute button has not been
pushed to silence the alarm and
re-enable the heater .
Warmer is operating in manual or
pre-warm mode.
?
?
?
?
?
Correctly re-attach the skin sensor
and sensor cover.
Remove heat path obstruction.
Press the Mute button to silence the
audible alarm and re-enable the
heater.
Baby control models: change to Baby
mode, and adjust set temp as desired.
Manual control models: Change to
Manual mode, and adjust heater
power to achieve desired baby’s skin
temperature.
Baby's skin
temperature
reading do not
appear correct
?
?
?
Poor connection between skin
sensor and the warmer
Skin sensor faulty.
Skin sensor or sensor cover
poorly attached to the baby.
?
?
?
Push the skin sensor plug firmly into
the front panel socket or the
connector into the adaptor.
Check skin sensor performance and
replace if defective.
Correctly re-attach the skin sensor
and sensor cover .
The see manual
light is flashing &
the audible alarm
is sounding
? Software or hardware faults have
been detected?Send warmer for servicing
The power fail light
is flashing and the
audible alarm is
sounding
?
?
The supply to the warmer has
been switched off
The internal fuses, power cord or
internal wiring may be defective
?
?
Switch on the supply
Send warmer for servicing
59
Note:
Safe use of radiant warmer
?
?
?
?
?
?
?
?
The warmer cannot measure or control the
baby's skin temperature if the skin sensor is not
correctly positioned on the baby or a reflective
sensor cover is not used.
Use only the appropriate skin sensors to
measure the baby's skin temperature.
Ensure the skin sensor is always in direct contact
with the baby's skin.
Never place an obstruction between the heater
and the skin sensor other than a reflective
sensor cover.
Do not use an axillary or rectal temperature
sensor measurement to control baby skin tem-
perature. Use of an axillary or rectal temperature
sensor measurement to control baby skin
temperature can result in over-heating or under-
heating of the baby.
Ensure there is at least 30 cm (12”) clear
airspace above the heater
Do not place anything between the heater and
baby that may prevent radiant heat from being
effective
Accessories such as heated mattresses can
affect warmer performance by altering the heat
distribution across the bassinet mattress.
?
?
?
?
?
?
?
Try to avoid plugging in additional equipment
with radiant warmer
Ensure the power supply is continuous, earthed,
approved for hospital use and complies with the
voltage specified on the unit.
Ensure a power regulator is used
Do not use extension cords to connect the
warmer to the power supply. Do not use device in
electromagnetic environments.
Do not use the bassinet without the mattress
Do not move the warmer by pushing or pulling on
the bassinet side panels. This action may lead to
the deterioration. Tilting the bassinet from the
horizontal posit ion can affect warmer
performance by altering the heat distribution
across the bassinet mattress.
Inspect all tubes or wires connected to the baby
before and after tilting bassinet
F
F
Power audit should be performed before installation of radiant warmer.
Annual maintenance contract proposal ought to cover both preventive maintenance and on-
call corrective interventions.
60
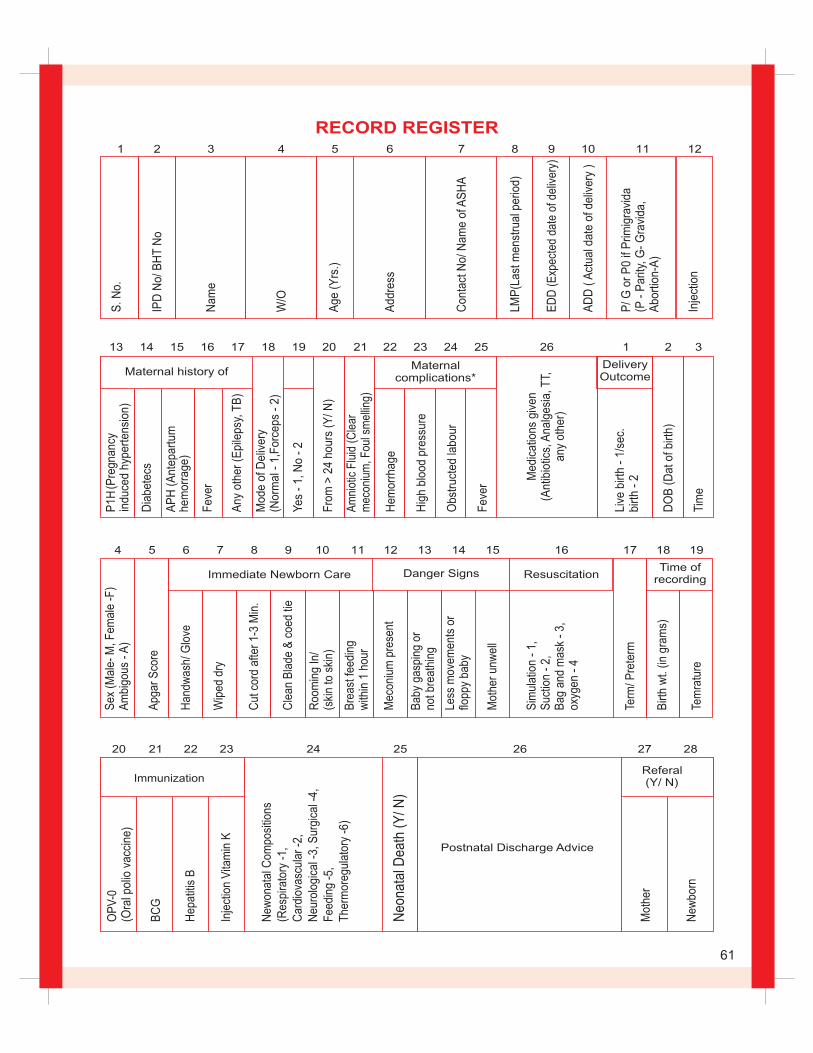
OP
V-0
(O
ral p
olio
vac
cine
)
BC
G
Hep
atiti
s B
Inje
ctio
n V
itam
in K
New
onat
al C
ompo
sitio
ns(R
espi
rato
ry -
1,C
ardi
ovas
cula
r -2
,N
euro
logi
cal -
3, S
urgi
cal -
4,F
eedi
ng -
5,
The
rmor
egul
ator
y -6
)
Neo
nata
l Dea
th (
Y/ N
)
Postnatal Discharge Advice
Mot
her
New
born
Referal (Y/ N)
S. N
o.
IPD
No/
BH
T N
o
Nam
e
W/O
Age
(Y
rs.)
Add
ress
Con
tact
No/
Nam
e of
AS
HA
LMP
()
Last
men
stru
al p
erio
d
ED
D (
)E
xpec
ted
date
of d
eliv
ery
AD
D (
) A
ctua
l dat
e of
del
iver
y
P/ G
or
P0
if P
rimig
ravi
da(P
- P
arity
, G-
Gra
vida
, A
bort
ion-
A)
Inje
ctio
n
1 2 3 4 5 6 7 8 9 10 11 12
P1H
(Pre
gnan
cy
indu
ced
hype
rten
sion
)
Dia
bete
cs
AP
H (
Ant
epar
tum
he
mor
rage
)
Fev
er
Any
oth
er (
Epi
leps
y, T
B)
Mod
e of
Del
iver
y (N
orm
al -
1,F
orce
ps -
2)
Yes
- 1
, No
- 2
Fro
m >
24
hour
s (Y
/ N)
Am
niot
ic F
luid
(C
lear
m
econ
ium
, Fou
l sm
ellin
g)
Hem
orrh
age
Hig
h bl
ood
pres
sure
Obs
truc
ted
labo
ur
Fev
er
Live
birt
h -
1/se
c.bi
rth
- 2
DO
B (
Dat
of b
irth)
Tim
e
Maternal history ofMaternal
complications*
Med
icat
ions
giv
en(A
ntib
iotic
s, A
nalg
esia
, TT,
an
y ot
her)
DeliveryOutcome
13 14 15 16 17 18 19 20 21 22 23 24 25 26 1 2 3
Sex
(M
ale-
M, F
emal
e -F
)A
mbi
gous
- A
)
Apg
ar S
core
Han
dwas
h/ G
love
Wip
ed d
ry
Cut
cor
d af
ter
1-3
Min
.
Cle
an B
lade
& c
oed
tie
Roo
min
g In
/(s
kin
to s
kin)
Bre
ast f
eedi
ng
with
in 1
hou
r
Mec
oniu
m p
rese
nt
Bab
y ga
spin
g or
no
t bre
athi
ng
Less
mov
emen
ts o
rflo
ppy
baby
Mot
her
unw
ell
Sim
ulat
ion
- 1,
S
uctio
n -
2,
Bag
and
mas
k -
3,
oxyg
en -
4
Term
/ Pre
term
Birt
h w
t. (in
gra
ms)
Tem
ratu
re
Danger Signs ResuscitationTime of
recordingImmediate Newborn Care
4 5 6 7 8 9 10 11 12 13 14 15 16 17 18 19
20 21 22 23 24 25 26 27 28
RECORD REGISTER
Immunization
61
X. NOTES ON ENC/R
62
BIRTH AND NEONATAL TRANSITION
The most vital change immediately after birth is for the
lungs to expand to take in air. If lung expansion fails,
death will occur quite rapidly and shortly after the
umbilical cord is clamped. Almost as important as lung
expansion is the change from the fetal type circulation,
to the postnatal pattern where cardiac output from the
right side of the heart will perfuse the lungs and be
oxygenated. Immediate newborn care ensures a safe
transition from the intrauterine environment to the
point where the newborn can be safely be taken care
of without professional help. Unnecessary actions by
the health provider can adversely affect the
development of the relationship between mother and
newborn & should be avoided. Planning of birth is vital.
Although, majority of deliveries progress in a natural
manner and the newborn is born without medical
intervention, it is not always possible to identify in
advance the newborn who may suffer harm, and all
care givers must watch for potential hazards and act
when necessary.
During intrauterine life, the fetus depends for oxygen
and carbon dioxide exchange on the placenta: The
lungs play no role before birth, and little blood, flows
through the pulmonary arteries. However, the heart
and circulation are specially adapted to enable the
major change from placental to pulmonary respiration
to occur at birth. At birth, the following events occurs:
The placenta blood flow ceases as the cord is cut. As a
result, the right atrial flow diminished and the pressure
in it drops. The lungs expand with air. This causes a
marked drop in the vascular resistance in the
pulmonary arteries and a substantial increase in the
blood flow through them. The right ventricular pressure
falls as its work rapidly decreases. A substantial
increase occurs in the blood flow from the lungs to the
left atrium, which raises the left atrial pressure. The
pressure difference which therefore develops between
the atria then closes the foramen ovale and prevents
mixing of blood between them. The oxygen saturation
in the pulmonary venous and systemic arterial blood
rises from 3-4 kPa to 10-11 kPa. This triggers the
contraction and closure of the ductus arteriosus, thus
preventing flow between the pulmonary artery and
aorta.Under normal circumstances, however, the
change from fetal to neonatal circulation is so efficient
that arterial blood oxygen saturation reaches 90%
within an hour of delivery.
ONSET OF RESPIRATION
The lungs of the fetal in utero are filled with a unique
fluid. Clearence of this fluid is crucial for successful air
breathing and begins during labour. Each uterine
contraction reduces the rate of lung liquid secretion
and as labour progresses leads to active absorption.
During a normal vaginal delivery, the thorax is
compressed, additional lung fluid is expelled during
2nd stage of labour the first inspiration of the air is
taken. The first gasps on cries of the baby achieves a
transthoracic pressure and a wave of air passes into
upper respiratory passages and larynx. This air
initiates a reflex in the head which potentiates the first
gasp. A valsalva maneuver achieved by the newborn
crying against a partially closed glottis pushes further
fluid from the airway through the lymphatics. The
gasps occurring immediately after birth are crucial for
the success of air breathing. So long as the brain has
not been impaired by intra-partum asphyxia, the
respiratory center responds to the mild acidosis and
increased CO2 level through the chemoreceptors in
the aorta and carotid arteries by initiating an
inspiratory gasp followed by strong breathing
movements. Many stimuli after birth such as tactile,
birth attendant hands, thermal (air temperature in the
delivery room and evaporation of liquor from the skin,
noise, position, light, gravity, pain, probably also
contribute to onset of breathing. Phospholipid
substances lining the alveoli reduces this tension and
prevent the from collapsing completely between each
expansion. During intrauterine life, little oxygen is
expended except on growth, basal metabolic activity
and functioning of the brain, heart and kidneys. After
delivery, the addition of muscular activity, the
production of heat to maintain the body temperature,
and the metabolic activity in the gut to enable enteral
feeding all increases very substantially the infant’s
63

oxygen requirement. Thus, so crucial is the transition
from placental to pulmonary respiration for the baby’s
survival and health that anything which prevents the
baby from breathing adequately immediately is
neonatal emergency. Although, in most cases, the
minor degree of asphyxia temporarily caused by the
normal diminution of gas exchange during each
contraction of labor has no effect on the baby’s brain, it
can do so in some circumstances. More profound
degrees of asphyxia and its management so crucial.
THERMO REGULATION IN A NEWBORN
Heat production
Mechanism of heat loss
lEvaporation from his wet skin -
l Radiation to his surroundings -
lConvention to the air -
Heat is produced as a by-product of cell metabolism in
the newborn. In the newborn this is usually taken as
minimal rate of oxygen consumption in an infant who is
lying still and asleep, at least 1 hour after a feed in a
neutral thermal environment. The thermo neutral
range is wide if the infant is mature and well insulated
by clothes and bedding, but narrow in the small and
naked baby.
At birth, he usually encounters dry air and a
dramatically lower environmental temperature.
Immediately, he starts to lose heat rapidly
Heat is lost as water
evaporates from the surface of skin (560 kcal/ml of
water), In a newly born evaporation of amniotic fluid
from the skin is the greatest source of heat loss.
Heat is lost from the
skin to the nearest surface facing the baby.
Radiative heat loss varies with the temperature of
that surface and its distance from the skin, but is
independent of the temperature of the interleaving
air.
Heat loss from the skin
surface to the surrounding air. Loss is high if there is
rapid movement of cold air over the exposed skin. A
naked baby in a cold drafty room has a high
convective heat loss.
Conduction to his coverings- Newborn infants are
not usually in direct contact with a structure of light
thermal capacity, so conductive losses are small.
Constriction of the skin arterioles, which reduces
blood flow and therefore diminishes heat losses
Enhanced heat production by increased muscular
activities (though the newborn’s capacity to produce
heat by shivering is very limited)
Liberation of heat chemically from a form of aft
peculiar to the newborn baby, known as brown fat
Accelerated metabolism of circulating glucose
because baby’s have a large surface in proportion to
their weights and volume, they can lose heat very
rapidly, especially if their birth weight is low and
hypothermia will quickly follow if the heat production
fails to keep up with losses.
l
These losses are usually counteracted
physiologically by four main
heat-Conserving mechanisms:
l
l
l
l
In all infant heat production is delayed during
adaptation to extra uterine life, especially if there is
asphyxia, hypoxia or maternal sedation. As
environmental temperature falls metabolism of brown
fat to produce heat increases (non – shivering
thermogenesis). Sweating is relatively poor defense
against over heating in the newborn, therefore heat
loss during increased environmental temperature may
RESPONSE TO THERMAL STRESS
be insufficient and baby’s body temperature rises. The
term newborn can alter skin blood flow effectively, and
hence the amount of heat loss by convention and
radiation.
Change in posture to increase or decrease the surface
area available for heat loss by convection and
radiation is important thermoregulation in healthy term
infant.
64
body temperature provided by bulb of the thermo-
meter is held in the roof of the axilla with newborn’s arm
pressed against the side of the chest until a stable
reading is obtained, usually by 3 min. The normal o orange is 36.5 to 37.4 C.
Skin temperature is measurable guide to deep body
temperature. A single temperature, measured
intermittently gives limited information on the thermal
state of the baby. Particularly in the sick or unstable
baby more information is needed from continuous
measurement.
BODY TEMPERATURE AND ITS MEASUREMENTMeasurement of body temperature is the only
practical way of assessing the thermal environment in
day -to – day care. Deep body temperature varies
depending on the metabolic rate of the tissue, with
brain having the highest temperature. Eesophageal
temperature, tympanic temperature are close to deep
body temperature but are not used in clinical practice.
Rectal temperature should no longer be used in
newborns due to significant rise of damage to the
mucosa.
Auxilliary temperature is a reasonable guide to deep
MANAGEMENT OF HYPOTHERMIA
There is a recognizable clinical picture associated with
hypothermia, which remain may un-detected for
several days unless the condition is kept in mind.
Although sepsis, under-feeding and intracranial
bleeding may all be associated causes the principal
factor is usually inadequate heating or clothing.
The baby makes good initial progress, but in 1st week
or two of life begins to show apathy, refuses some
feeds and fails to gain weight. The cry becomes feeble
and whimpering. At this time if felt the skin is cold to
touch though surprisingly enough the baby may not
look ill and there is often a mis-leading redness of the
face and extremities. The axillary temperature is found
to be below 340 C, sometime in the region of 300 C to
320 C. Hard oedema or, sometimes, true sclerma
develops and, if untreated, death ensues. Pulmonary
haemorrhage is the usual terminal complication.
The treatment involves re-warming the body gradually,
maintaining the newborn’s nutrition. The warming
process must be slow, taking several hours to return
the infant to normal body temperature. If it is done
quickly the increased metabolic activity of the body will
outstrip the available glucose and make the infant
more hypo-glycemic and increased the risks of long-
term cerebral complications such as learning
difficulties or epilepsy. It is best done by keeping the
infant lightly dressed in a radiant warmer with the
surrounding temperature just a few degree above his
body temperature, and increasing the heat setting as
the body temperature rises. The metabolic processes
of the body will produce heat by metabolizing the
administered glucose. Changes in the blood glucose
should be closely monitored to ensure that enough is
being given to maintain a normal blood level at all
times.
KANGAROO MOTHER CARE (KMC)
Kangaroo Mother Care (KMC)
The two components of KMC are:
i. Skin-to-skin contact
is a special way of
caring the low birth weight (LBW) babies. It improves
their health and well being by promoting effective
thermal control, breastfeeding, infection prevention
and bonding. In KMC, the baby is continuously kept in
skin-to-skin contact by the mother and breastfed
exclusively.KMC is initiated in the hospital and
continued at home.
Early, continuous and prolonged skin-to-skin
contact between the mother and her baby is the
basic component of KMC. The infant is placed on
her mother's chest between the breasts.
The baby on KMC is breastfed exclusively. Skin-to-
skin contact promotes lactation and thus facilitates
exclusive breast-feeding.
A mother needs counselling, support, and
supervision from health care providers for initiating
KMC in the hospital. She would also require
ii. Exclusive breast-feeding
The two prerequisites of KMC are:
i. Support to the mother in hospital and at home
65
assistance and cooperation from her family
members for continuing KMC at home.
KMC is continued at home after early discharge
from the hospital. A regular follow up and access to
health providers for solving problem are crucial to
ensure safe and successful KMC at home.
Temperature maintenance with a reduced risk of
hypothermia
Increased breast-feeding rates
Early discharge from the health facility
Less morbidities such as apnea and infections
Less stress (for both baby and mother) and
Better infant bonding.
All stable LBW babies are eligible for KMC. However,
very sick babies needing special care should be cared
ii. Post-discharge follow-up
Benefits of KMC
The benefits of KMC include:
l
l
l
l
l
l
Eligibility criteria
under radiant warmer initially. KMC should be started
after the baby is hemodynamically stable. Guidelines
for practicing KMC include:
These babies are generally
stable at birth. Therefore, in most of them KMC can be
initiated soon after birth.
Many babies of this group
have significant problems in neonatal period. It might
take a few days before KMC can be initiated. If such a
baby is born in a place where neonatal care services
are inadequate, he should be transferred to a proper
facility after initial stabilization and appropriate
management. One of the best ways of transporting
small babies is by keeping them in continuous skin-to-
skin contact with the mother / family member.
Frequently, these babies
develop serious prematurity-related morbidities often
starting soon after birth. They benefit the most from in-
utero transfer to the institutions with neonatal intensive
care facilities. It may take days to weeks before baby's
condition allows initiation of KMC.
Birth weight >1800 g :
Birth weight 1200-1799 g :
Birth weight <1200 g :
A formal examination in the first few days of life. This is
often referred to as the routine newborn examination
and it can be defined as the detailed proferional
examination, is thought to be well and without
significant problems. Examination of a baby to whom
attention has been drawn, for example because of
cyanosis, feed problems, obvious congenital anomaly,
is not a routine examination. It is advisable to examine
the baby between feeds and for the examination to be
guided by the infant’s clinical condition. A top – to – toe
assessment, rather than a system-oriented approach,
is useful.
ROUTINE NEWBORN CARE
Delayed clamping allows blood to be transferred from
the placenta to the baby until pulsation of the cord
ceases. It has been suggested that this may result in a
lower incidence of respiratory distress and the need of
fewer blood transfusions. Early clamping will allow the
UMBILICAL CORD CLAMPING
baby to be more rapidly resuscitated and prevent
hypothermia, polycythermia and hypobilirubineunia in
premature infants. The possibility of single umbilical
artery and its associated congenital malformation
should be checked at the time of clamping.
CORD CARE
Any fecal soiling should be wiped gently from the skin
as soon as possible after it occurs, particularly in the
nappy area to prevent nappy rash, using cotton wool
and water only. The nappy must be changed and the
skin washed about 4-hourly as the urea in the urine
can be broken down by fecal organisms to form
ammonia which may cause nappy rash. Separation
usually occurs between 7 and 10 days of life. The
stump is occasionally moist when the cord separates
and it can become colonised by potentially pathogenic
bacteria. Simply keeping the cord clean is as effective
as applying antimicrobial agents.
66
During pregnancy, milk production is inhibited by the
concomitant high level of progesterone. Rise in
prolaction secreted from arterior pituitary gland and
withdrawal circulating hormones like progesterone,
oestrogen and placental latogen act upon the
glandular tissue of breast which leads to milk
production.
Early skin to skin contact by placing the newborn on
the mother’s bare chest helps release maternal
oxytocin from posterior pituitary. Nipple stimulation
INITIATION OF BREAST FEEDINGhelps release further prolaction and oxytocin leads to
cortication of the myoepithelial cells surrounding the
milk sinuses resulting in milk ejection (the let down
refelex)
Initially small amounts of colostrums are produced this
is high in protein and immunoglobulein. Transitional
milk produced after few days also contains higher
concentration of fat and glucose. Towards the end of
two weeks ‘mature’ milk is produced.
Clothing the babies with an appropriate number and
type of garments is essential. A well-nourished baby
should have a vest, nappy, shirt/cardigan and a
blanket. A small/tiny baby may need more and a fatter
baby fewer clothes to keep warm. Swaddling the
newborn’s with blankets and also covering the head
increases the risk of over-heating by preventing the
CLOTHING THE BABY
baby from adjusting his own temperature through
increasing heat loss from the head. During the first
week regular temperature recording by a low reading
thermometer ensures that an harmful drop in
temperature, which can be one indication of the
neonatal infection, is not missed
MINIMIZING THE RISK OF INFECTION
Before birth the baby is largely protected from bacterial
and viral infection, but during and after birth he is
exposed to many organisms which may cause minor
or even major infection. As the baby has limited
protection against infection, prevention of
unnecessary exposure to pathogens is very important.
During the process of a vaginal birth, the infant
encounters the bacterial flora of the mother's birth
canal and perineum, with which the baby becomes
colonised harmlessly during the first few days of life.
Unless the mother has an active infection with a
pathogenic organism, she is unlikely to be the source
of serious infection for the baby, since the infant has
received her anti-bodies through the placenta. The
infants main sources of infection in hospital are
members of the hospital staff, clothing, feeding
utensils and, occasionally, other infants. In maternity
hospitals where the babies may be cared for in large
nurseries, ensuring that there is sufficient space
between cots reduces the risk of cross-infection from
other infants. The main practical precautions to
prevent infection after birth are as follows:
There possible, the mother should give the baby all l
the necessary care. Handling of the baby by health
professionals should be limited to essential care
e.g. bathing, changing nappies, feeding.
Hand washing is the single most effective measure
against cross-infection of infants in hospitals.
Mothers should wash their hands with ordinary
soap before handling their infant. All other care-
givers must wash their hands thoroughly with an
antiseptic soap or apply a suitable antiseptic lotion
before dealing with each baby, including children
who are visiting.
The umbilical cord stump should be kept clean and
dry. No antibiotic application at birth or an antiseptic
powder is required at each nappy change.
Good facilities are essential for preparation of
sterile feeds.
Nappies and excreta should be carefully disposed
of in sealable identifiable bags.
Cot blankets and infant clothing must be effectively
sterilized in laundering. Cotton blankets are easiest
to keep bacteriologically clean.
Special attention is paid to minor infections in those
who come into contact with the babies; for example,
l
l
l
l
l
l
67
a nurse, midwife or doctor with a bacterial skin
infection, throat infection or mild gastroenteritis
should be excluded temporarily.
Wherever possible, any infected infant or one,
carrying a pathogenic organism must be isolated
from the others, preferably being cared for by the
mother in a single isolation ward. If circumstances
make this impossible, extra precaution against
cross-infection (barrier nursing techniques with
plastic aprons) should be used whenever the baby
is handled. Disposal of infected material,
l
particularly faeces, must be carried out with great
care.
Healthy visitors, including young siblings of the new
baby, are rarely a source of infection, though
parents should be encouraged to report minor
illnesses in family members to the hospital staff, so
that advice can be given to deter those with
significant infections from visiting.
The use of face-masks and the routine wearing of
gowns by hospital staff or the parents does not
protect the infants from infection.
l
l
Meconium is a viscid semi-fluid substance which
consists mainly of mucus with an accumulation of
swallowed amniotic fluid, desquamated epithelial cells
and bilirubin which gives it the characteristic blackish-
green colour. The first stool is normally passed within
the first 24 hours but, exceptionally, it may be delayed
for up to 3 days in normal infants. A firm plug of
meconium may obstruct the anus and cause
abdominal distension, which is relieved after gentle
stretching of the anal sphincter by rectal examination.
If feeding is taking place normally, 'changing stools' of
ALIMENTARY TRACT FUNCTION-STOOLS
a light greenish-brown colour replace the meconium
on about the third or fourth day. Thereafter, there is a
gradual change to the mustard-coloured stools of the
breast-fed, or the paler yellow stools of the formula-fed
infant. There is great individual variation in the number
and consistency of the stools, which bears little
relation to the rate of the infant's weight gain. A
vigorous gastro-colic reflex may cause the breast-fed
baby to pass one or two stools at each feed, but
occasional infants pass only one large soft stool as
infrequently as once every 2 or 3 days.
Urine secretion takes place in the latter half of
pregnancy and much of the amniotic fluid is fetal urine.
The baby may also micturate during delivery, when it
may go unnoticed. Normally, infants pass urine first at
any time up to 48 hours, or even exceptionally as late
as the third day, though most infants will do so within
12 hours. Serious causes for delay are rare in the
absence of other clinical signs such as enlargement of
the bladder. The nature of the urinary stream should be
observed since dribbling micturition is the most useful
sign of urethral valves in a boy or ectopic ureters in a
girl. The amount and frequency of urine passed
gradually increases with the quantity of feed taken
during the first week and the bladder may empty up to
20 times a day during the second week. The volume is
RENAL FUNCTION-URINE
immensely variable and depends on the fluid intake.
Breast-fed infants average 20 mL on the 1st day, rising
to 200 mL on the 10th day. Urate crystals may colour
the urine at this age, leaving a brick-red stain on the
nappy which can be mistaken for blood. Albumin is not
normally present in more than slight traces but false-
positive tests due to urates can sometimes be
misleading. The term infant can conserve sodium but
the premature baby's kidney often leaks sodium even
when the serum level is low. Consequently, it is
important that the term baby is not given feeds with too
high a sodium concentration which could render him
or her hyper-natraemic and damage the developing
brain.
68
It is known that hyperthermia from overheating, is
more likely in the prone position, particularly if the
infant is under a radiant warmer. All infants should be
SLEEPING POSTURES
placed on their back to sleep unless there is a clear
medical reason to do otherwise, such as gastro-
oesophageal reflux.
The baby must be weighed accurately within a few
hours of birth and thereafter on alternate days.
Weighing should always be carried out immediately
before a feed and at the same time of day on each
occasion so that the weights are comparable. All
babies will lose a little weight in the first 4 days, but if
this exceeds 10% of birth weight an explanation
WEIGHING THE BABY
should be sought. So long as the weight begins to rise
from the fourth day, alternate daily measurements can
be reduced to weekly weighing after 10 days of age, by
which time most infants - should have regained their
birth weight. Rates of weight gain thereafter vary
considerably, and apparently unusual gain must be
interpreted carefully.
It is important to recognize that feeding not only is a
process designed to provide nutrition for the baby but
also it contributes to the protection of the infant from
infection and fosters and develops the relationship
between the baby and the parents. In the case of
breast feeding, it also assists in the mother's recovery
from the pregnant state great deal could be written
about infant feeding, but only those features which are
important in the newborn period will be described,
including ways of making feeding more effective and
alleviating some of the common difficulties.
During breast feeding, the milk is obtained by a
wavelike movement of the tongue compressing the
nipple from front to back while the areola is held in a
firm grip by the lips.
When the milk hits the palate, it induces swallowing,
which is completed before the next suck occurs
The coordination to ‘Latchn' and obtain the feed in
this way develops near term, and most infants over
35 weeks of gestation are able to suck adequately to
obtain enough milk to grow.
The normal infant swallows a variable quantity of air
during feeds, most of which is expelled afterwards,
sometimes with a little milk. Vomiting of a more
persistent nature should be regarded as abnormal
and a cause sought.
(A) PHYSIOLOGY OF FEEDING
l
l
l
l
FEEDING IN THE NEWBORN
(B) DIGESTION AND ABSORPTION
l
l
(C) PRINCIPAL OF NEONATAL NUTRITION
and absorbing surfaces in the infant gut from well
before term. This result in efficient absorption of
food, but the gut may become distended with wind
because of a lack of supportive tissues in the bowel
wall.
Digestive enzymes are fully active at term except for
pancreatic amylase, so that digestion of starch is
theoretically not possible.
At birth a baby has stores of brown fat and glycogen,
which are metabolized to produce-heat, which in turn
maintains body temperature.
The principal nutritional importance of the feeds given
within the first few hours of life is to maintain a safe
blood glucose level, whereas after the first few days
the provision of sufficient calories, proteins and
minerals for growth and increasing activity becomes
more important.
From the end of the first week, the rate of growth and
weight gain of the infant is faster than at any other time
and the average term baby gains between 180 and
210g each week, slowly reducing to around 110 g per
week at 6 months of age. To achieve this gain, at least
1.5 g/kg per day of protein are require-d with sufficient
calories from carbohydrate to utilize it, and
There is relatively good development of secretory
69
approximately one-third of the total calorie intake is
expended on growth.
An inadequate supply of energy will, therefore,
decrease weight gain, though brain growth is usually
spared until intake is grossly deficient.
Human milk contains appropriate amounts of all the
necessary nutrients, minerals and vitamins, including
fats, which pro-vide about half the baby's energy
needs, and the essential fatty acids, such as
arachidonic and linoleic acids, which are needed for
optimal brain development.
The amount of feed required varies from one baby to
another depending on the rate of metabolism, how
active the baby is and on the need to produce heat to
keep warm. In addition, a baby whose intrauterine
growth was reduced may need to make 'catch-up
growth' which requires additional nutrients. These
differences cannot be accurately calculated, but,
fortunately, except when the baby is ill or preterm, he
usually obtains the amount he needs by showing when
he is hungry or satisfied.
ENCOURAGING BREAST FEEDING
l
l
l
l
l
l
The nutritional advantages of human milk are
numerous. It has a varying composition which
alters over the days and weeks to provide for the
changing needs of the growing baby.
Initially the energy content of the milk provides
around 115 kcal/kg/ day, falling to 100 kcal/kg/ day
after about 3 months. The proteins, initially
consisting predominantly of lactalbumin with little
casein, are readily digested and absorbed.
The relative amounts change, and as breast
feeding continues, the proportion of casein
increases. Breast milk contains the correct
amounts and ratios of certain lipids including
longhain polyunsaturated fatty acids, which are
thought to be essential for optimal development of
the brain and retina.
Other individual components of breast milk,
including iron, are in a form well suited to the
healthy full-term baby's requirements such that
deficiency states rarely emerge. The low
concentration of sodium prevents the development
of hyper-natraemia, which can cause brain
damage.
Neonatal convulsions from hypo-calcaemia and
hypo-magnesaemia are prevented by the low
phosphate content of breast milk.
Colostrum and breast milk contain numerous
factors, including secretory IgA, ly-sozymes, lacto-
ferrin and white cells, which have a considerable
“protective effect against gastroenteritis and
infections of the middle ear, respiratory tract and
urinary tract, which is particularly important in
babies in developing countries.
The high lactose content, by producing a relatively
acid pH in the large intestine, favor’s the growth of
lactobacilli and inhibits that of potentially harmful
Escherichia coli, and the oligosaccharides, which
form about 15% of the carbohydrate in mature
breast milk, also inhibit bacterial growth. The stools
are inoffensive and constipation is rarely a problem.
Breast feeding also has psychosocial advantages.
Not only is the milk readily available whenever the
baby requires it, but also the mother is likely to lose
any excess weight gain more readily. It also assists
in the return of the uterus to the non-pregnant state.
However, perhaps the main value of breast feeding
lies in the act itself, for when it goes well, there is
often an emotional satisfaction to the mother, which
is reflected in the reactions of the baby, and this can
strengthen the strong attachment between the two.
Although bottle feeding by no means precludes
this, the closer contact of breast feeding often
provides an easier way of fostering the normal
stable relationship.
The disadvantages are few hemorrhagic disease of
the newborn due to vitamin K deficiency occurs
qmainly in breasted babies, but can be prevented
by giving a supplement of the vitamin at birth).
In a small proportion of infants, physiological
jaundice is prolonged by breast feeding, but the
condition is usually benign and seldom requires
treatment other than reassurance.
l
l
l
l
l
70
For successful breast feeding, the mother should be
comfortable and the baby physically well supported.
Either lying or sitting, she should support the baby's
back and buttocks in the crook of her arm, allowing the
nipple to touch the cheek, thus stimulating the rooting
reflex. Correct attachment may be achieved by
keeping the infant's lower jaw as Iowan the areola as
possible so that the maximum amount of the nipple is
taken into the mouth. It may also be assisted by
holding the breast underneath or behind the areola to
aid protrusion of the nipple, but the mother should not
SUPPORT BREAST FEEDING
push the nipple towards the baby. Correct positioning
of the infant at the breast will help to prevent nipple
damage and ensure that breast feeding is maintained.
Subsequently, the infant should be allowed to
determine the frequency of feeds and, so long as a
correct feeding technique is used, the suckling time
should not be limited. One additional benefit of
unrestricted suckling is that more bilirubin is excreted
in the increased number of stools passed, which may
reduce the severity of jaundice in the infant.
i) Breast engorgement and mastitis
l The breasts are subject to two types of
engorgement, 'vascular' and 'milk', although
there may be an overlap between them. Vascular
engorgement occurs 2 days after delivery and is
due to the increased blood flow to the breasts
which normally occurs at this time.
l Milk engorgement occurs as a result of the
increased milk production accompanied by only
limited removal of the milk by the baby. If this
continues, over-distension of the alveoli will lead
to eventual suppression of milk production and
may even cause rupture of the alveoli and the
symptoms of non-Infective mastitis. It results in a
painful lump covered by a red flush together with
fever and reduction of secretion, but may
often be dramatically cured within a few hours by
emptying the breast from which no pus, but only
milk, flows.
l If this is not done, however, staphylococcal
infection may supervene and a true breast
abscess develops. Treatment consists of early
and repeated emptying of the breast, but if after
48 hours there is no improvement, an antibiotic
may be necessary.
l Milk engorgement rarely occurs if the mother is
encouraged to feed her baby on demand day and
night and the baby is properly fixed and removing
the hind milk adequately. It may occur when the
baby becomes ill and is separated from the
mother. In these circmstances, the mother
should continue to remove milk for the baby's
MAKING BREAST FEEDING MORE EFFECTIVE
use,either manual or through the use of a breast
pump.
lInfective mastitis may also result from organisms
infecting a break in the skin, especially if the
mother is in a debilitated condition due to anemia
or malnutrition. It is treated with antibiotics but is
not an indication to discontinue breast feeding.
l Cracked nipples may follow engorgement or
prolonged vigorous sucking at a stage when
secretion is not established.
lNon-protractile nipples are the more likely to
become cracked because they are not drawn
properly into the baby's mouth and may be
subject to more trauma. Resting the affected
breast with expression of the milk or repositioning
the infant at the breast for the feeds. In this case
breast feeding can usually be maintained and the
use of bottle feeding in this phase should be
avoided if at all possible since the technique of
feeding from a bottle is quite different from that
required to take milk from the breast
This technique is an alternative to both bottle and tube
feeding in breastfed infants, particularly in some
preterm infants, if supplementary feeds are required or
when breast feeding must be interrupted. The baby
should be wrapped securely and a bib placed under
his chin. He should be awake and alert if possible and
held upright on the mother's lap with her hands
supporting the baby's back and neck. The cup should
be half full and the rim gently placed against the baby's
ii) Cup Feeding:
71
upper lip, leaving the lower lip and jaw to move freely. It
is then tipped until the milk just touches the upper lip,
but is not poured into the mouth. The baby is 'allowed
to suck the milk from the cup at his own pace until he is
satisfied. The advantages of this method are that it
encourages good eye contact with the baby, avoids
the confusion 'between the techniques of sucking at
the nipple and a teat, and enables others to do it if the
mother needs a rest. It also stimulates jaw movements
and maximizes the calorie intake.
Under feeding is common and shows itself as
excessive crying, poor weight gain, small stools and,
sometimes, vomiting. By far the most common reason
for this is that the feeding technique is not allowing the
infant to take the feed adequately. Test feeding, even
by weighing the newborn before and after a feed with
accurate electronic baby scales, has been shown to be
an unreliable means of estimating the amount of feed
the infant is taking and cannot be recommended. One
important reason for this is the variation of volumes
iii) Feeding Difficulties:
Under - feeding
taken at different feeds at different times of the day. If
under feeding is suspected, the position of the infant at
the breast should be modified as the first step, but if no
increase in weight occurs with improving breast-
feeding technique after 2-3 weeks, complementary
feeds may be given from a cup after each breast feed,
stopping when the infant appears satisfied.
Overfeeding
Some hold the view that overfeeding from the breast
never occurs. It is certainly un-common and is never a
cause of really serious trouble.
However, in the neonatal period, babies do sometimes
become fretful; pass large frequent stools producing
sore buttocks, and vomit small amounts after each
feed, all of which cease when a small amount of milk is
expressed from the breast before feeding is started.
It should be remembered that about three-quarters of
the feed is taken within the first 3 minutes of a breast
feed and reducing the available milk may also reduce
the speed with which it is taken yet stimulate the breast
adequately to produce enough milk for the next feed.
PROBLEM RELATED TO SUCKLING
An inability to suck may be caused by abnormalities in
the infant such as deft lip and cleft palate or
underdevelopment of the lower jaw. Partial nasal
obstruction can be a cause and is most commonly due
to a temporary excessive secretion of mucus which
may be reduced by applying one drop 0.25%
ephedrine in normal saline to each nostril before feeds
for 2-3 days only. Obstruction of breathing from
compression of the nose by the breast during feeding
is avoided if the mother holds the breast away from the
baby's face with her hand. In the absence of such a
mechanical difficulty, more general causes must be
sought, including the presence of infection
somewhere. Sometimes, the unwillingness to suck
may simply be due to tiredness from repeated fruitless
attempts when the milk supply is inadequate or the
baby too small to grasp the breast successfully. If
alterations in feeding technique fail to improve
matters, it is justifiable to feed the infant by either cup
or bottle for a day or two, whilst maintaining breast milk
production by expression, so that the baby may
become strong enough to resume breast feeding.
Occasionally, breast feeding is not successful despite
every attempt to support it or the mother may have
other reasons for discontinuing it.
BIRTH ASPHYXIA
When there has been a period of oxygen deprivation
during the birth, the resultant asphyxia can render the
infant academic and his brain less responsive to the
stimuli which normally initiate breathing.
After minor degrees of asphyxia during labor, the baby
may be born apneic but recover rapidly with relatively
little resuscitation (‘Primary apnea’).
Greater degrees of asphyxia are followed by irregular
slow gasping breaths or a state of ‘terminal apnea’ in
which none of the ordinary stimuli are effective, and a
progressive acidosis develops which only vigorous
resuscitation can rescue the infant.
An occasional baby fails to breathe without apparent
72
cause, but the great majority of infants requiring
resuscitation are born after a complicated labour or
delivery. Known predisposing causes before labour
are:
Placental dysfunction from preeclampsia or
smoking
Growth retardation of the fetus
Prolongation of pregnancy
Retrolacental hemorrhage
Congenital abnormalities
Prolongation of the second stage
Prolapsed of the umbilical cord
Excessive maternal analgesia
Mal-presentation (especially breech)
Cerebral injury.
These risks are greatly increased if the fetus is
l
l
l
l
l
During labor they are:
preterm, has suffered from prolonged partial asphyxia
or is growth retarded from chronic intrauterine
malnutrition.
Several clinical and biochemical features may
indicate that the fetus is asphyxiated during
labor. Meconium staining of the liquor often, but
not always, results from fetal hypoxia, but not all
asphyxiated babies pass meconium before birth.
A more consistent finding is a fetal bradycardia of
less than 120 beats per minute or a tachycardia
or a tachycardia of more than 160 beats per
minute. This has led to the practice of fetal heart
monitoring. A persistent fetal bradycardia of less
than 100 beats per minute is almost always
associated with a poor fetal cerebral circulation
and demand urgent delivery of the baby.
Importance of meconium staining &
Fetal Heart Sound (FHS) < 120 b/m>160b/m
l
l
73
SUGGESTED OUTLINE FOR TEACHING
74
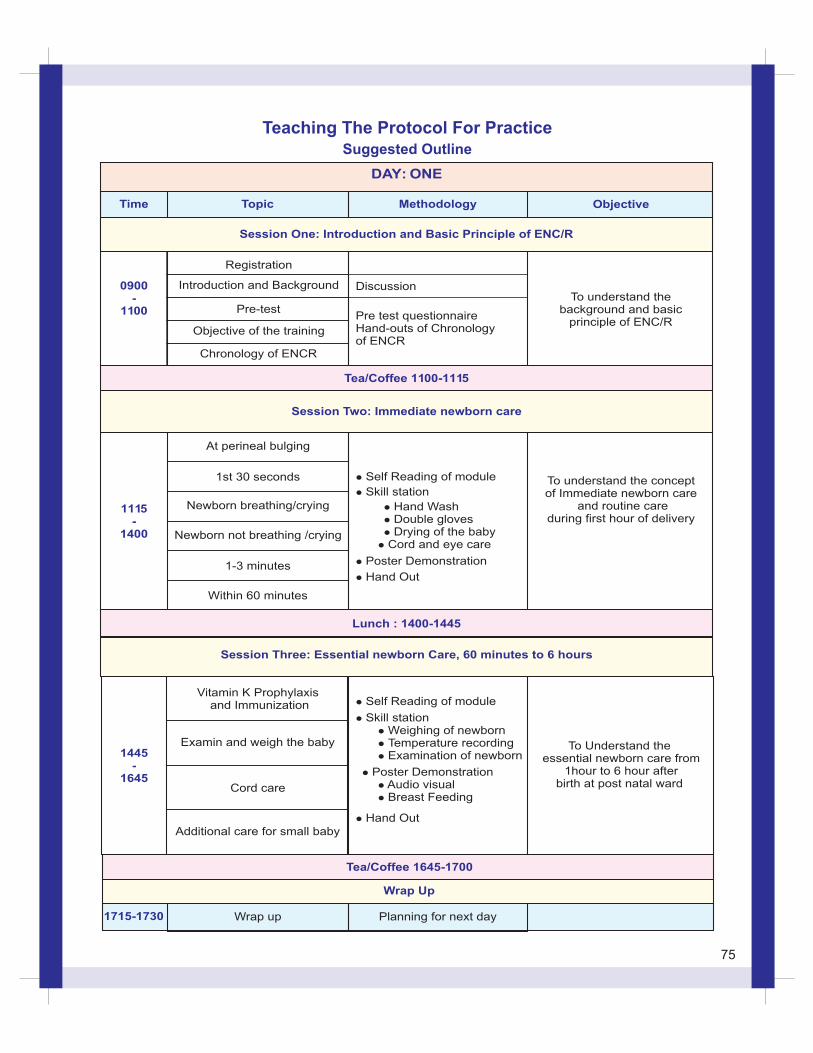
DAY: ONE
Time Topic Methodology Objective
Session One: Introduction and Basic Principle of ENC/R
0900-
1100
Registration
Introduction and Background
Pre-test
Objective of the training
Chronology of ENCR
Discussion
Pre test questionnaireHand-outs of Chronologyof ENCR
To understand thebackground and basic
principle of ENC/R
1115-
1400
At perineal bulging
l Self Reading of module
l Skill station
l Hand Washl Double glovesl Drying of the babyl Cord and eye care
l Poster Demonstration
l Hand Out
1st 30 seconds
Newborn breathing/crying
Newborn not breathing /crying
1-3 minutes
Within 60 minutes
To understand the conceptof Immediate newborn care
and routine careduring first hour of delivery
Lunch : 1400-1445
Session Three: Essential newborn Care, 60 minutes to 6 hours
1445-
1645
Vitamin K Prophylaxis and Immunization l Self Reading of module
l Skill stationl
l Temperature recordingl Examination of newborn
Weighing of newborn
l Poster Demonstrationl Audio visuall Breast Feeding
l Hand Out
To Understand the essential newborn care from
1hour to 6 hour afterbirth at post natal ward
Additional care for small baby
Examin and weigh the baby
Cord care
Tea/Coffee 1645-1700
Wrap Up
1715-1730 Wrap up Planning for next day
Tea/Coffee 1100-1115
Session Two: Immediate newborn care
Teaching The Protocol For PracticeSuggested Outline
75
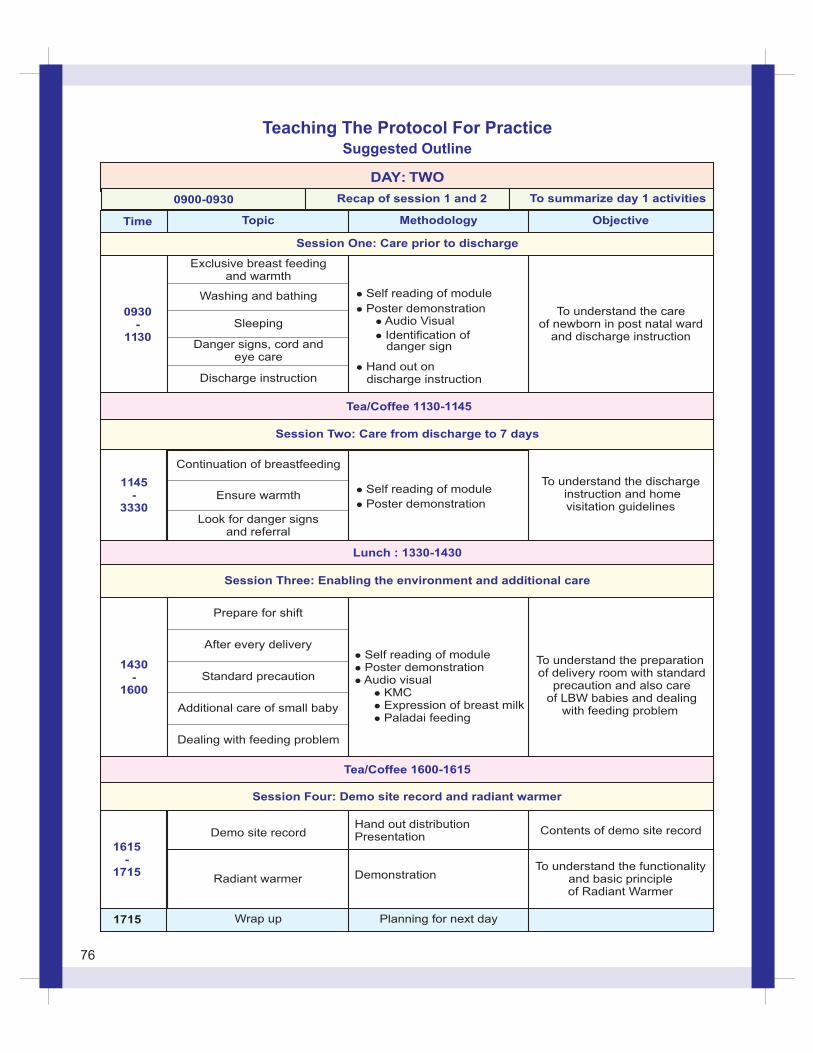
Time Topic
Session One: Care prior to discharge
0930-
1130
Exclusive breast feedingand warmth
l Self reading of module
Poster demonstrationl
Audio Visuall
l Identification ofdanger sign
l
discharge instruction Hand out on
To understand the careof newborn in post natal ward
and discharge instruction
Washing and bathing
Sleeping
Danger signs, cord andeye care
Discharge instruction
Tea/Coffee 1130-1145
Session Two: Care from discharge to 7 days
1145-
3330
Continuation of breastfeeding
Self reading of modulel
l Poster demonstration
To understand the discharge instruction and home visitation guidelines
Ensure warmth
Look for danger signsand referral
Lunch : 1330-1430
Session Three: Enabling the environment and additional care
1430-
1600
Prepare for shift
l Self reading of modulel Poster demonstrationl Audio visual KMC l Expression of breast milk l Paladai feeding
l
To understand the preparation of delivery room with standard
precaution and also care of LBW babies and dealing
with feeding problem
After every delivery
Standard precaution
Additional care of small baby
Dealing with feeding problem
Tea/Coffee 1600-1615
1615-
1715
Demo site record
Radiant warmer
Hand out distributionPresentation
Demonstration
Contents of demo site record
To understand the functionalityand basic principleof Radiant Warmer
1715 Wrap up Planning for next day
Objective
To summarize day 1 activities
Methodology
Recap of session 1 and 20900-0930
DAY: TWO
Session Four: Demo site record and radiant warmer
Teaching The Protocol For PracticeSuggested Outline
76
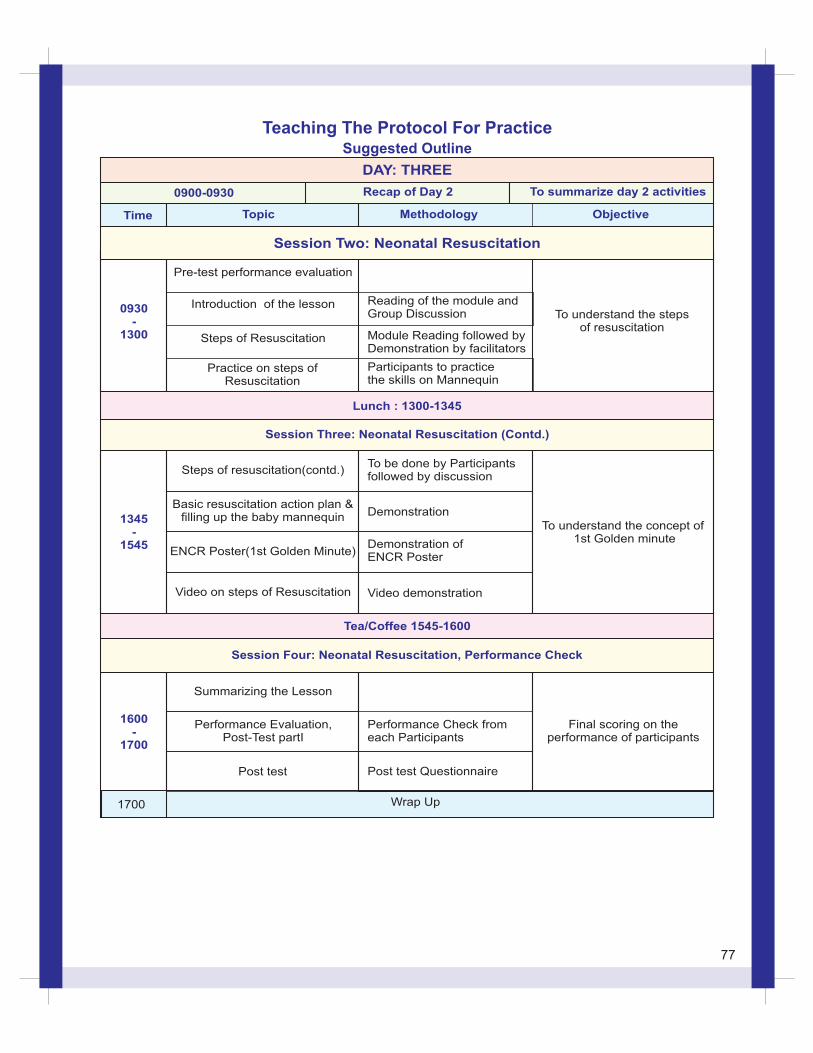
Time Topic Objective
To summarize day 2 activities
Methodology
Recap of Day 20900-0930
DAY: THREE
0930-
1300
Session Two: Neonatal Resuscitation
Pre-test performance evaluation
Introduction of the lesson
Steps of Resuscitation
Practice on steps ofResuscitation
Reading of the module and Group Discussion
Module Reading followed by Demonstration by facilitators
Participants to practice the skills on Mannequin
To understand the stepsof resuscitation
Lunch : 1300-1345
Session Three: Neonatal Resuscitation (Contd.)
1345-
1545
Basic resuscitation action plan &filling up the baby mannequin
Session Four: Neonatal Resuscitation, Performance Check
Steps of resuscitation(contd.)
ENCR Poster(1st Golden Minute)
Video on steps of Resuscitation
To be done by Participantsfollowed by discussion
Demonstration
Demonstration ofENCR Poster
Video demonstration
To understand the concept of 1st Golden minute
Tea/Coffee 1545-1600
1600-
1700
1700 Wrap Up
Summarizing the Lesson
Performance Evaluation, Post-Test partI
Post test Questionnaire
Performance Check fromeach Participants
Post test
Final scoring on theperformance of participants
Teaching The Protocol For PracticeSuggested Outline
77