Embed Size (px)
Citation preview
1
IMPORTANT SAFETY INSTRUCTIONS
Your Elna 8600 embroidery sewing machine is designed and constructed for HOUSEHOLD useonly. Read all instructions before using this machine.
DANGER – To reduce the risk of electric shock:
1. Your sewing machine should never be left unattended when plugged in. Always unplug themachine from the electrical outlet immediately after using and before cleaning.
2. Always unplug before replacing light bulb. Replace bulb with same type rated 12 Volts, 5 watts.3. Do not reach for the machine if it has fallen into water. Unplug immediately.4. Do not place or store machine where it can fall or be pulled into a tub or sink. Do not place it in
or drop it into water or other liquid.
WARNING – To reduce the risk of burns, fire, electrical shock or injury:
1. Do not allow machine to be used as a toy. Supervision is necessary when this machine is usedby or near children.
2. Use this sewing machine only for its intended use as described in this manual. Only useattachments recommended by the manufacturer as described in this manual.
3. Never operate this machine if it has a damaged cord or plug, is not working properly, has beendropped or damaged or dropped into water. Return the machine to the nearest authorized dealeror service center for examination, repair, electrical or mechanical adjustment.
4. This machine is equipped with a special connection cord which, if damaged, must be replacedby an identical cord. This can be obtained from your dealer.
5. Never operate the sewing machine with any air opening blocked. Keep ventilation openings ofthe sewing machine and foot control free from the accumulation of lint, dust and fibers.
6. Never drop or insert any object into any opening.7. Do not use outdoors.8. Do not operate where aerosol (spray) products are being used or where oxygen is being
administered.9. To disconnect, turn machine off and remove plug from outlet.10. Do not unplug by pulling on cord. To unplug, grasp the plug, not the cord.11. Keep fingers away from all moving parts, especially the needle.12. Always use the proper needle plate. The wrong plate can cause the needle to break.13. Do not use bent needles.14. Do not pull or push fabric while stitching. This may deflect the needle causing it to break.15. Switch the sewing machine off when making any adjustment in the needle area, such as
threading needle, changing needle, threading bobbin, changing presser foot, etc.16. Always unplug the sewing machine from the electrical outlet when removing covers, lubricating
or making any other servicing adjustments mentioned in the instruction manual.
SAVE THESE INSTRUCTIONSIMPORTANT
Be sure to keep machine away from static electricity, heat sources, humidity and direct sunlight.
USA onlyYour machine comes equipped with a polarized plug (one prong wider than the other). A polarized plugreduces the risk of electrical shock. This plug is intended to fit into a polarized outlet. If the plug does notfit fully into the outlet, reverse the plug. If it still does not fit, contact a qualified electrician to install theproper outlet. Do not modify the plug in any way.
Use only foot control 21371 (UL, CSA).
2
Shell Tuck ...................................................................... 63Twin Needle Sewing ................................................. 64-65Satin Stitch Window Keys ............................................. 66Satin Stitches – Single Repeat with Programmed
Lockstitch and Elongation ..................................... 67Combining a Sequence with Mirror
Image and Auto-lock .............................................. 67Reset Combined Sequence to Beginning ..................... 68Adjusting Stitch Width or Length of an Individual Stitch
Within a Sequence ................................................ 68Editing a Sequence ....................................................... 69Alphabet Selection Window Keys ................................. 70Sewing Alphabets .......................................................... 71Check Memorized Sequence ........................................ 72Files – Saving, Opening and Deleting ..................... 72-74QuiltingPiecing Fabrics Together ............................................... 75Quilt Guide ..................................................................... 75Quilt Stitch ..................................................................... 76Buttonhole Appliqué ...................................................... 76Free Motion Quilting or Stippling .................................. 77Stippling Stitch ............................................................... 77Patchwork ...................................................................... 78French Knots ................................................................. 78HeirloomPintucks ......................................................................... 79Bridging (Fagoting) ........................................................ 79Hemstitches ................................................................... 80Fringing .......................................................................... 81Drawn Work ................................................................... 81Smocking ....................................................................... 82
SECTION IV – Embroidery SewingGetting Ready to Embroider .......................................... 83Adjusting the Needle Thread Tension ........................... 84Embroidery Hoops ......................................................... 85Stabilizers ...................................................................... 85Templates ...................................................................... 86Securing Fabric in Hoop ........................................... 86-87Attaching Hoop to Carriage ........................................... 88Thread Holder ................................................................ 89Embroidering Small Areas ............................................. 89Embroidery Design Selection Window Keys ........... 89-90How to Select a Built-in Design ................................ 91-92Sewing a Single Built-in Design .................................... 93Ready to Sew Window After Embroidery Begins .......... 94Alphabets .................................................................. 95-96Sewing Alphabets ..................................................... 97-98Alphabet Corrections ..................................................... 992 Letter or 3 Letter Monograms .................................. 100Sewing with PC Design Cards (Optional) ................... 101Edit Window .......................................................... 102-104Combine a Built-in Design with Alphabet ............. 105-106Files – Saving, Opening and Deleting ................. 107-109Embroidering with Optional Free Arm Hoop C ........... 110
SECTION V – Taking Care of Your MachineCleaning ................................................................. 111-112Changing the Light Bulb .............................................. 112
STITCH and EMBROIDERY CHARTS ...... 113-115OPTIONAL ACCESSORIES ............................. 116TROUBLESHOOTING ............................... 117-118INDEX ......................................................... 119-121
NOTE: Information found in this instruction manual iscurrent at the time of printing. Elna reserves the right tochange and update specifications and information asneeded.
SECTION I – Machine Parts and FunctionsPart Names ...................................................................... 3Standard Accessories ................................................... 4-5Presser Foot and Accessory Definitions ...................... 6-7Extension Table and Free Arm ........................................ 8Controlling Sewing Speed ............................................... 9Foot Pressure Dial ........................................................... 9How to Drop the Feed Dog ........................................... 10Presser Foot Lever and Additional Presser
Foot Clearance ........................................................ 10Attaching and Removing Presser Feet ......................... 11Attaching and Removing Shank .................................... 11Seam Allowance Lines .................................................. 11Needle Thread Tension ................................................. 12Using the Fine Adjustment Screw ................................. 13
SECTION II – Getting Ready to SewConnecting Machine to Power Supply .......................... 14LCD Touch Screen ........................................................ 15Main Function of Keys ................................................... 16Operation Keys .............................................................. 17SET Preference Keys ............................................... 18-20How to Access On Screen Information ......................... 21Selecting the Correct Needle and Thread .................... 22Changing Needles ......................................................... 22Needle Definitions ......................................................... 23Winding a Bobbin ..................................................... 24-25Additional Spool Pin ...................................................... 24Inserting the Bobbin ...................................................... 26Threading the Machine.................................................. 27Built-in Needle Threader ............................................... 28Drawing Up the Bobbin Thread ..................................... 29
SECTION III – Traditional SewingTraditional Sewing Window Keys .................................. 30How to Select a Stitch and What
the Symbols Represent ......................................... 31Straight Stitch ................................................................ 31Starting to Sew .............................................................. 31Changing Sewing Direction ........................................... 32Finishing Off a Seam ..................................................... 32Cutting the Threads ....................................................... 32Adjusting Needle Position or Stitch Length .................. 33Sewing on Heavy Fabrics ............................................. 34Gathering ....................................................................... 34Zipper Insertion ........................................................ 35-37Rolled Hem .................................................................... 38Zigzag Stitch .................................................................. 39Overcasting ................................................................... 39Satin Stitch Appliqué ..................................................... 403-Step Zigzag ................................................................ 40Mending a Tear .............................................................. 41Applying Elastic ............................................................. 41Blind Hem Stitches ........................................................ 42Lingerie Stitch ................................................................ 43Basting Stitch ................................................................. 43Triple Seam ................................................................... 44Stretch Seam ................................................................. 44Double Overlock Stitch .................................................. 45Super Overlock Stitch .................................................... 45Super Stretch Stitch ...................................................... 46Buttonholes ............................................................... 47-55How to Sew on a Button ................................................ 56Darning ..................................................................... 57-58Bartacks ......................................................................... 59Arrowtack ....................................................................... 60Eyelets ........................................................................... 60Decorative Stitch Window Keys ............................... 61-62Saddle Stitch ................................................................. 63
TABLE OF CONTENTS
3
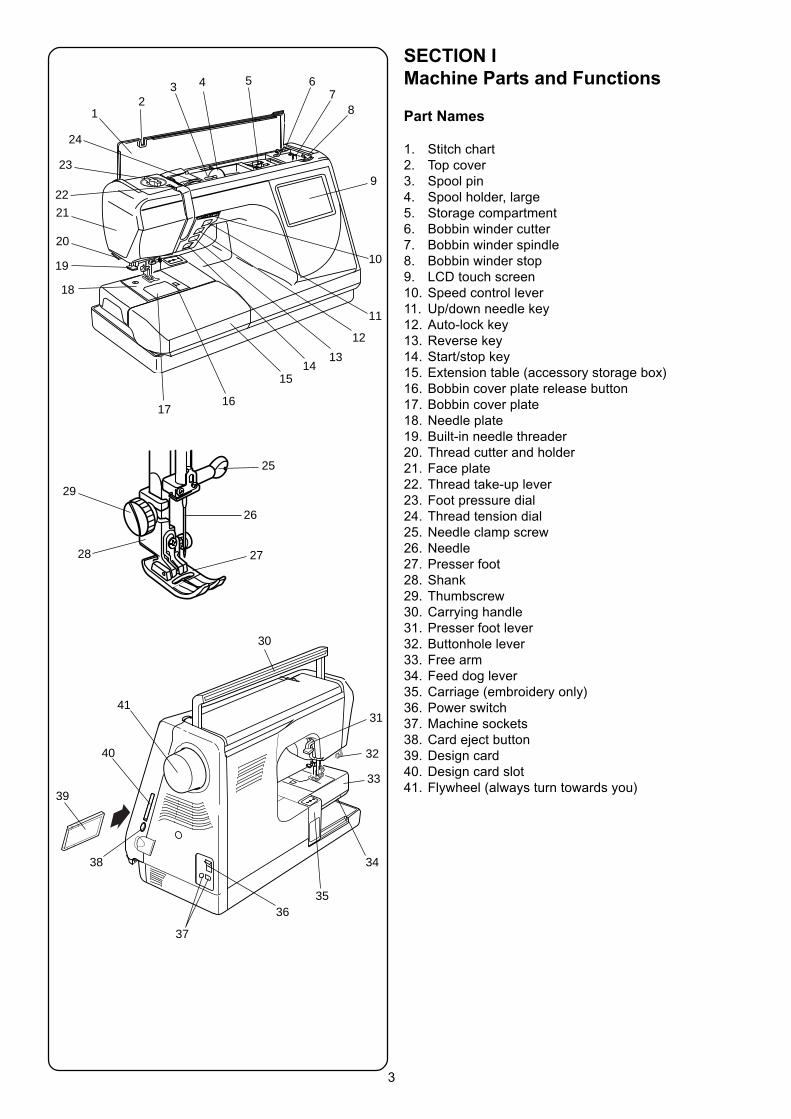
SECTION IMachine Parts and Functions
Part Names
1. Stitch chart2. Top cover3. Spool pin4. Spool holder, large5. Storage compartment6. Bobbin winder cutter7. Bobbin winder spindle8. Bobbin winder stop9. LCD touch screen10. Speed control lever11. Up/down needle key12. Auto-lock key13. Reverse key14. Start/stop key15. Extension table (accessory storage box)16. Bobbin cover plate release button17. Bobbin cover plate18. Needle plate19. Built-in needle threader20. Thread cutter and holder21. Face plate22. Thread take-up lever23. Foot pressure dial24. Thread tension dial25. Needle clamp screw26. Needle27. Presser foot28. Shank29. Thumbscrew30. Carrying handle31. Presser foot lever32. Buttonhole lever33. Free arm34. Feed dog lever35. Carriage (embroidery only)36. Power switch37. Machine sockets38. Card eject button39. Design card40. Design card slot41. Flywheel (always turn towards you)
12
3 4 5 67
8
9
10
11
12
1314
15
1617
18
19
20
21
22
23
24
25
26
2728
41
29
30
31
32
33
34
3536
37
38
39
40
4
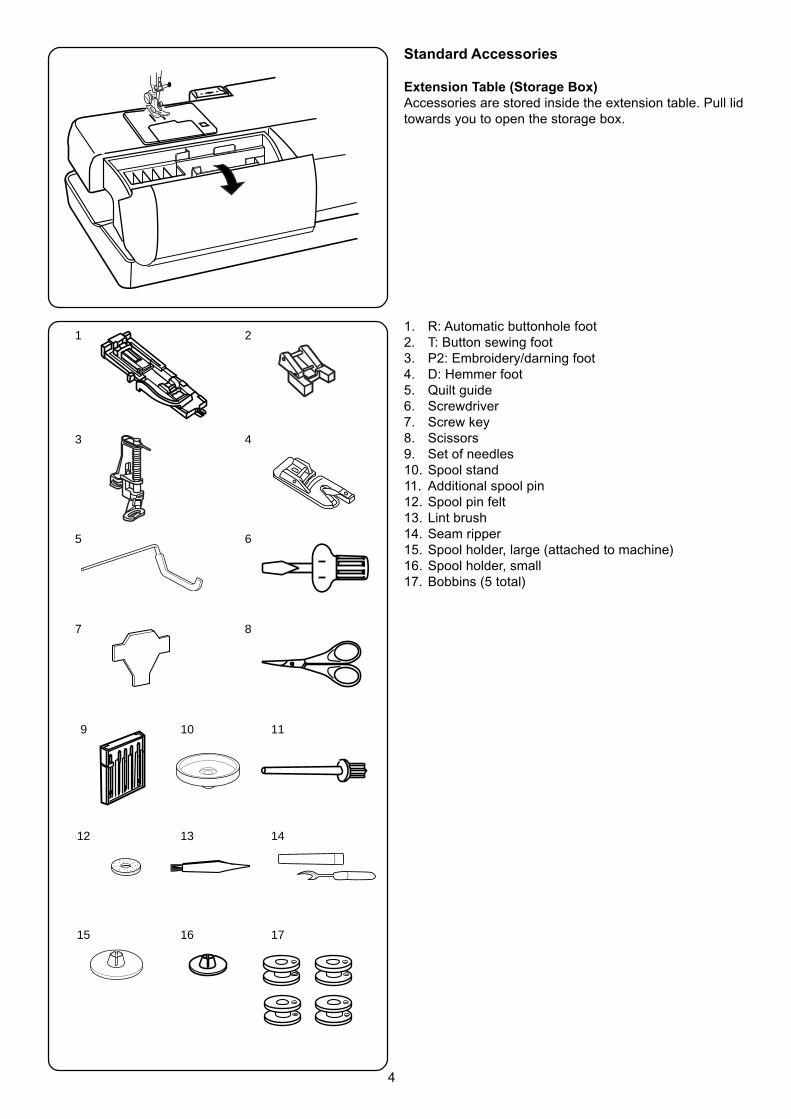
Standard Accessories
Extension Table (Storage Box)Accessories are stored inside the extension table. Pull lidtowards you to open the storage box.
1. R: Automatic buttonhole foot2. T: Button sewing foot3. P2: Embroidery/darning foot4. D: Hemmer foot5. Quilt guide6. Screwdriver7. Screw key8. Scissors9. Set of needles10. Spool stand11. Additional spool pin12. Spool pin felt13. Lint brush14. Seam ripper15. Spool holder, large (attached to machine)16. Spool holder, small17. Bobbins (5 total)
1 2
3 4
5 6
7 8
9 10 11
12 13 14
15 16 17
5
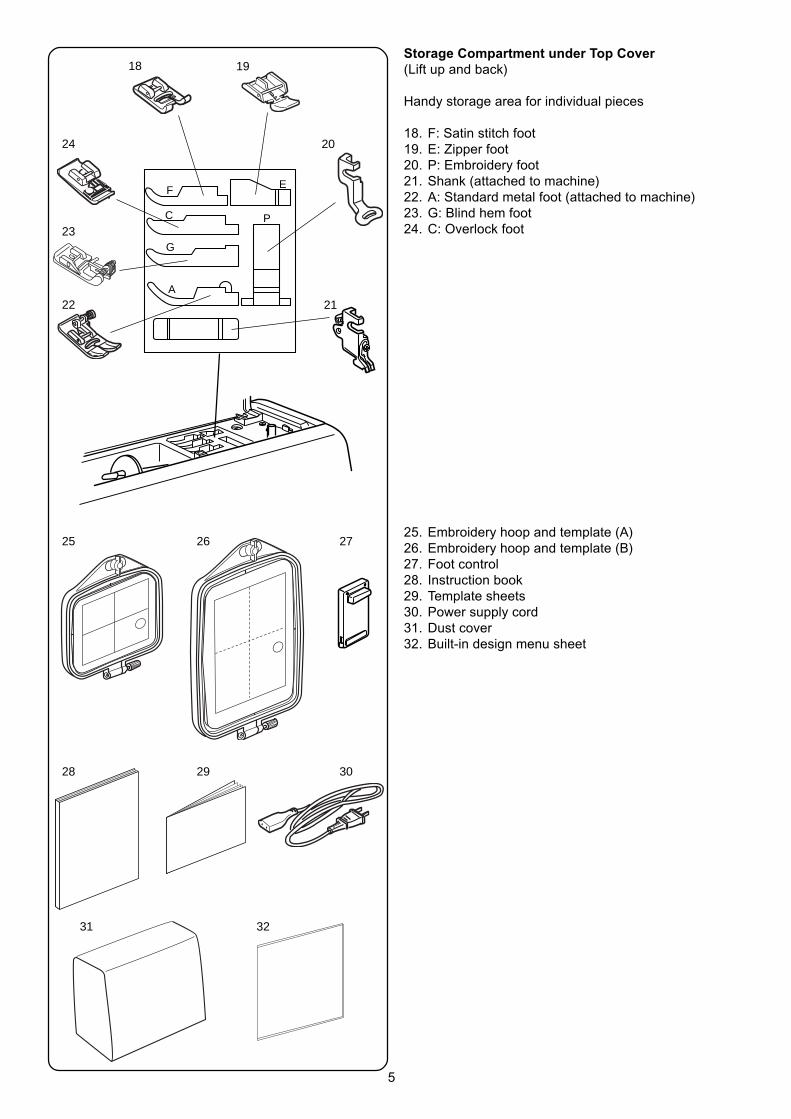
Storage Compartment under Top Cover(Lift up and back)
Handy storage area for individual pieces
18. F: Satin stitch foot19. E: Zipper foot20. P: Embroidery foot21. Shank (attached to machine)22. A: Standard metal foot (attached to machine)23. G: Blind hem foot24. C: Overlock foot
25. Embroidery hoop and template (A)26. Embroidery hoop and template (B)27. Foot control28. Instruction book29. Template sheets30. Power supply cord31. Dust cover32. Built-in design menu sheet
F
C
G
A
E
P
18 19
24
23
22
20
21
25 26 27
28 29 30
31 32
6
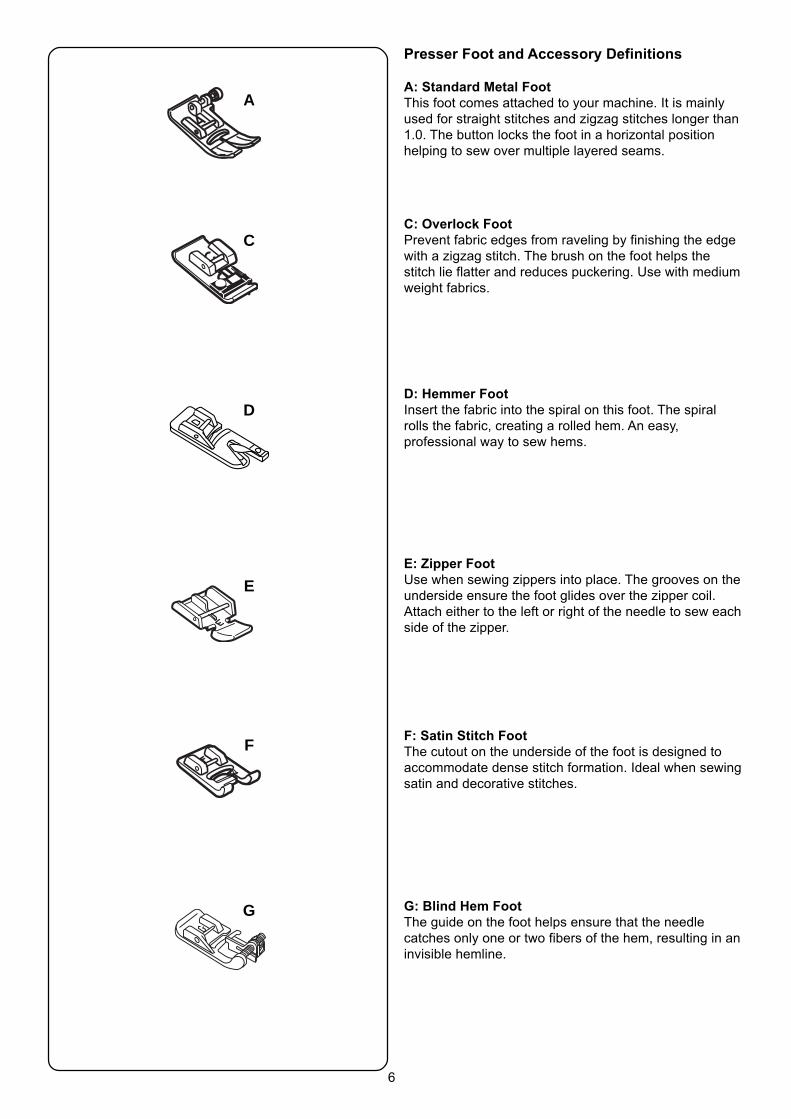
Presser Foot and Accessory Definitions
A: Standard Metal FootThis foot comes attached to your machine. It is mainlyused for straight stitches and zigzag stitches longer than1.0. The button locks the foot in a horizontal positionhelping to sew over multiple layered seams.
C: Overlock FootPrevent fabric edges from raveling by finishing the edgewith a zigzag stitch. The brush on the foot helps thestitch lie flatter and reduces puckering. Use with mediumweight fabrics.
D: Hemmer FootInsert the fabric into the spiral on this foot. The spiralrolls the fabric, creating a rolled hem. An easy,professional way to sew hems.
E: Zipper FootUse when sewing zippers into place. The grooves on theunderside ensure the foot glides over the zipper coil.Attach either to the left or right of the needle to sew eachside of the zipper.
F: Satin Stitch FootThe cutout on the underside of the foot is designed toaccommodate dense stitch formation. Ideal when sewingsatin and decorative stitches.
G: Blind Hem FootThe guide on the foot helps ensure that the needlecatches only one or two fibers of the hem, resulting in aninvisible hemline.
A
C
D
E
F
G
7
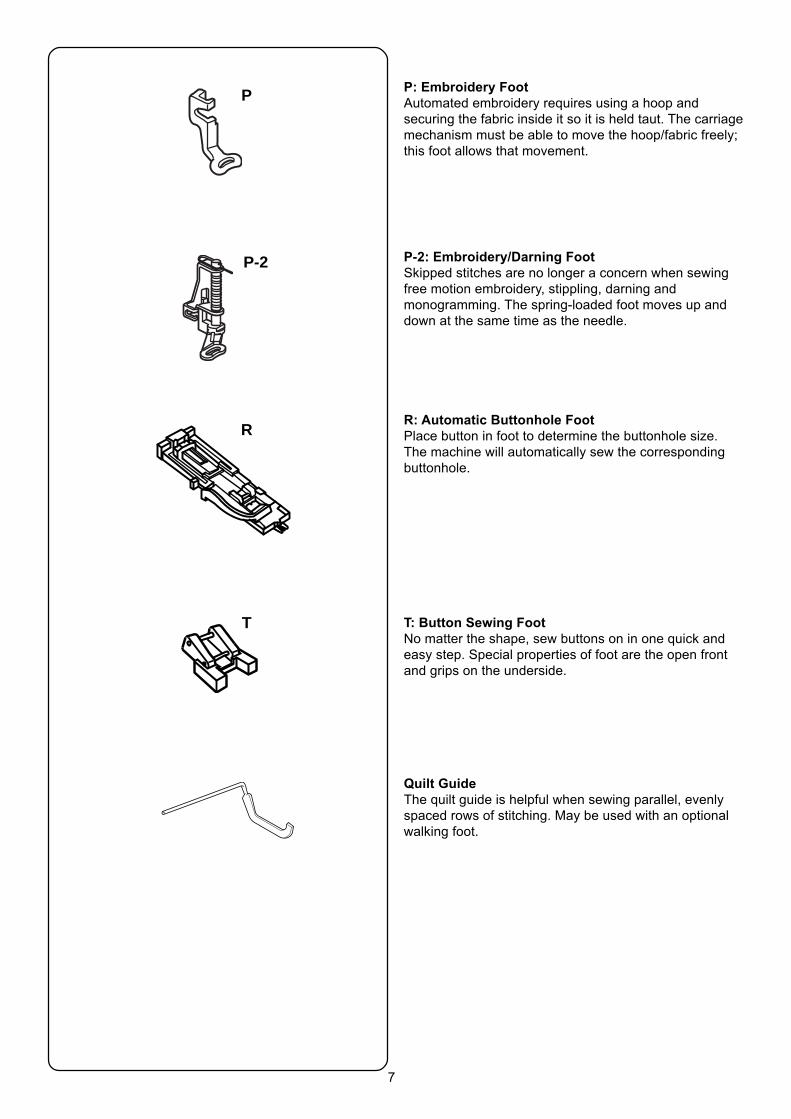
P: Embroidery FootAutomated embroidery requires using a hoop andsecuring the fabric inside it so it is held taut. The carriagemechanism must be able to move the hoop/fabric freely;this foot allows that movement.
P-2: Embroidery/Darning FootSkipped stitches are no longer a concern when sewingfree motion embroidery, stippling, darning andmonogramming. The spring-loaded foot moves up anddown at the same time as the needle.
R: Automatic Buttonhole FootPlace button in foot to determine the buttonhole size.The machine will automatically sew the correspondingbuttonhole.
T: Button Sewing FootNo matter the shape, sew buttons on in one quick andeasy step. Special properties of foot are the open frontand grips on the underside.
Quilt GuideThe quilt guide is helpful when sewing parallel, evenlyspaced rows of stitching. May be used with an optionalwalking foot.
P
P-2
R
T
8
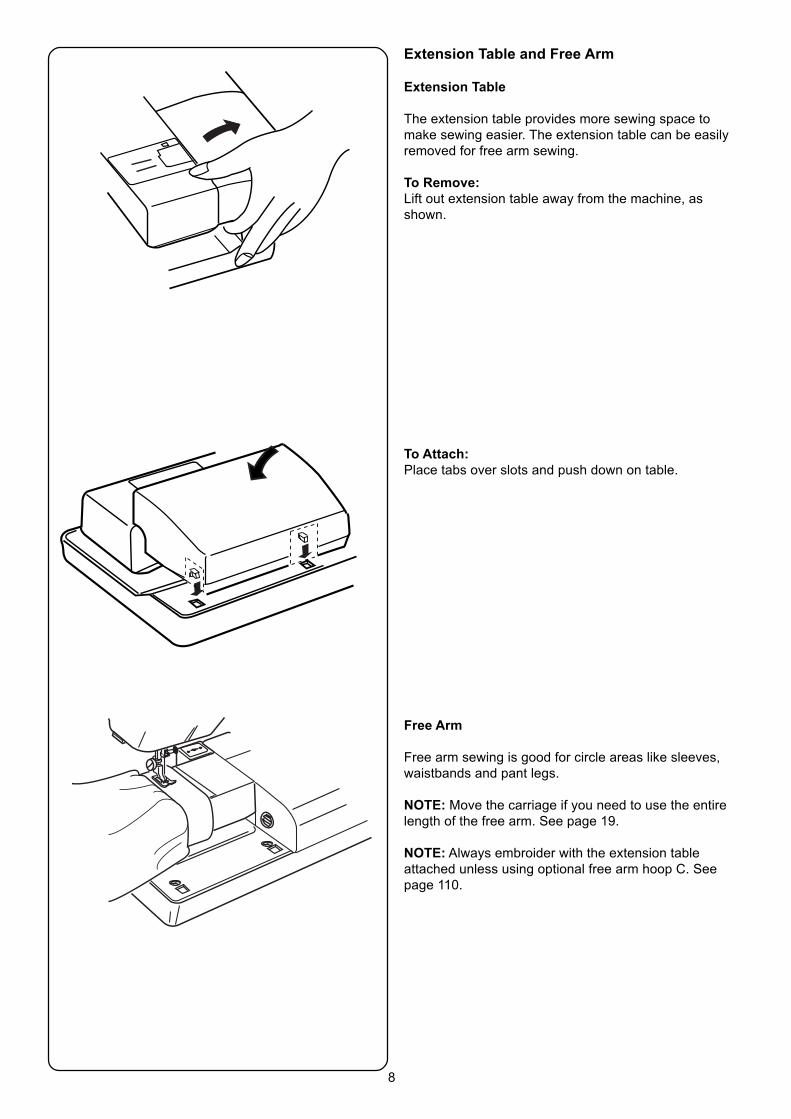
Extension Table and Free Arm
Extension Table
The extension table provides more sewing space tomake sewing easier. The extension table can be easilyremoved for free arm sewing.
To Remove:Lift out extension table away from the machine, asshown.
To Attach:Place tabs over slots and push down on table.
Free Arm
Free arm sewing is good for circle areas like sleeves,waistbands and pant legs.
NOTE: Move the carriage if you need to use the entirelength of the free arm. See page 19.
NOTE: Always embroider with the extension tableattached unless using optional free arm hoop C. Seepage 110.
9
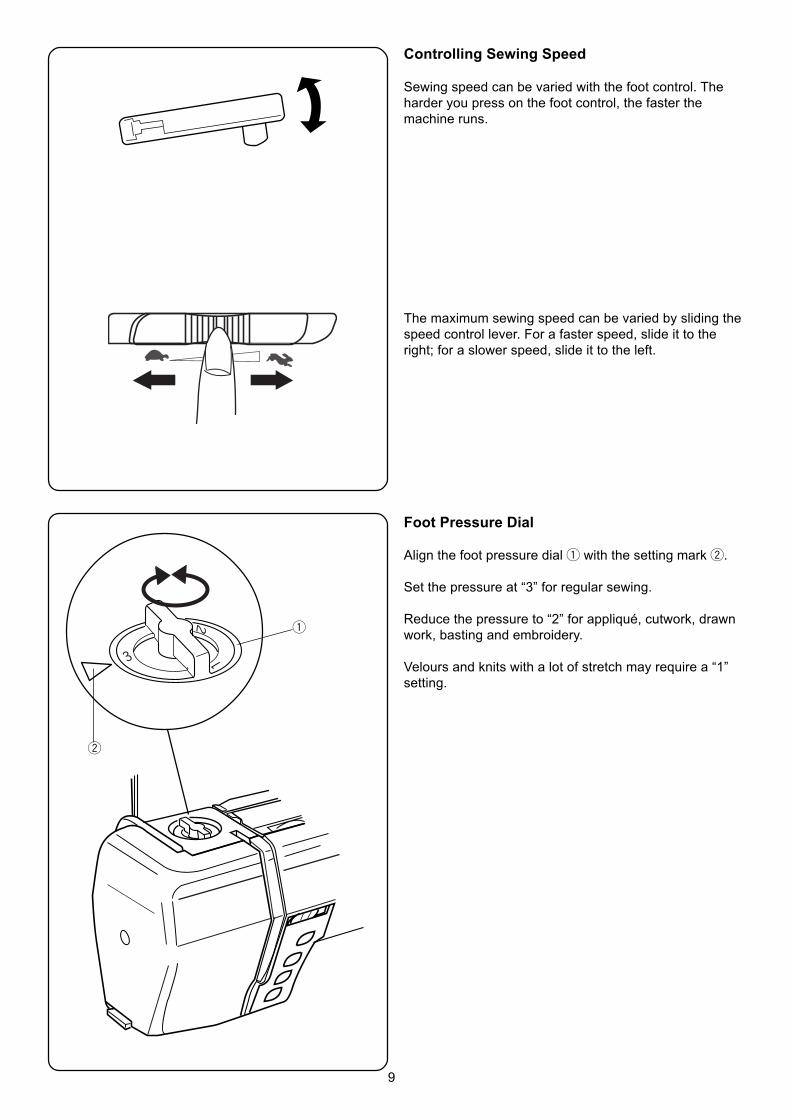
Controlling Sewing Speed
Sewing speed can be varied with the foot control. Theharder you press on the foot control, the faster themachine runs.
The maximum sewing speed can be varied by sliding thespeed control lever. For a faster speed, slide it to theright; for a slower speed, slide it to the left.
Foot Pressure Dial
Align the foot pressure dial q with the setting mark w.
Set the pressure at “3” for regular sewing.
Reduce the pressure to “2” for appliqué, cutwork, drawnwork, basting and embroidery.
Velours and knits with a lot of stretch may require a “1”setting.
q
w
10
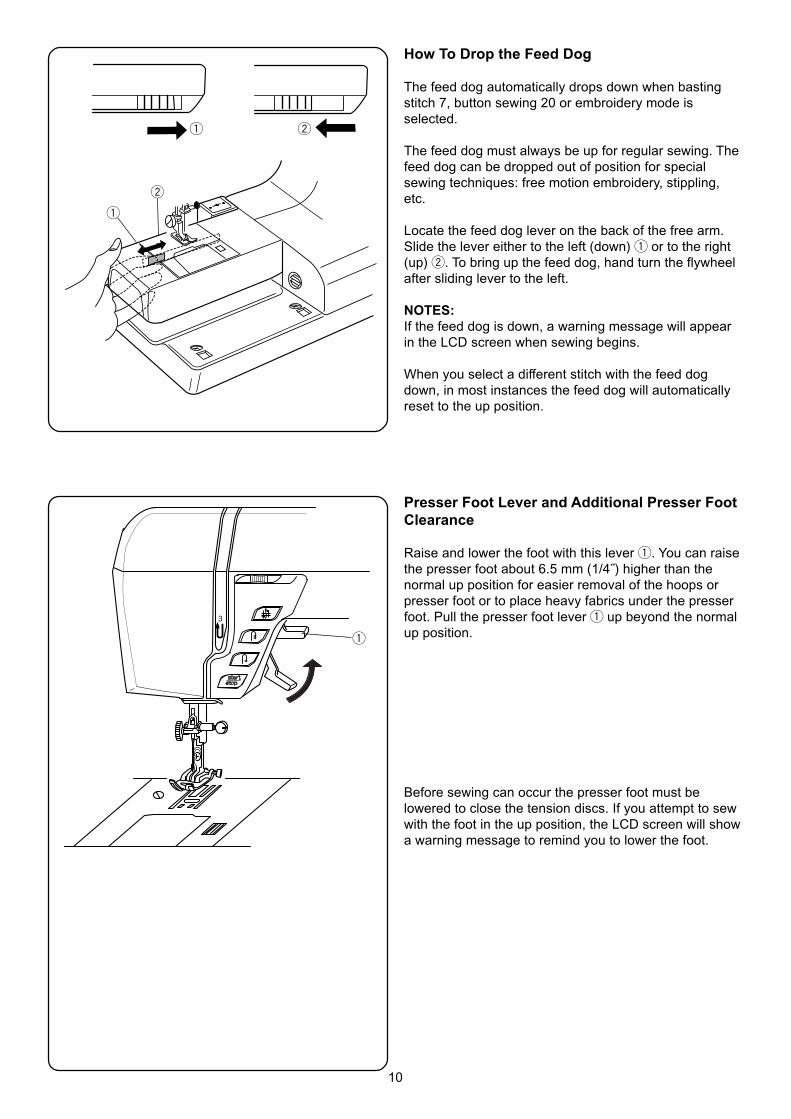
How To Drop the Feed Dog
The feed dog automatically drops down when bastingstitch 7, button sewing 20 or embroidery mode isselected.
The feed dog must always be up for regular sewing. Thefeed dog can be dropped out of position for specialsewing techniques: free motion embroidery, stippling,etc.
Locate the feed dog lever on the back of the free arm.Slide the lever either to the left (down) q or to the right(up) w. To bring up the feed dog, hand turn the flywheelafter sliding lever to the left.
NOTES:If the feed dog is down, a warning message will appearin the LCD screen when sewing begins.
When you select a different stitch with the feed dogdown, in most instances the feed dog will automaticallyreset to the up position.
Presser Foot Lever and Additional Presser FootClearance
Raise and lower the foot with this lever q. You can raisethe presser foot about 6.5 mm (1/4˝) higher than thenormal up position for easier removal of the hoops orpresser foot or to place heavy fabrics under the presserfoot. Pull the presser foot lever q up beyond the normalup position.
Before sewing can occur the presser foot must belowered to close the tension discs. If you attempt to sewwith the foot in the up position, the LCD screen will showa warning message to remind you to lower the foot.
w
q
q w
q
11
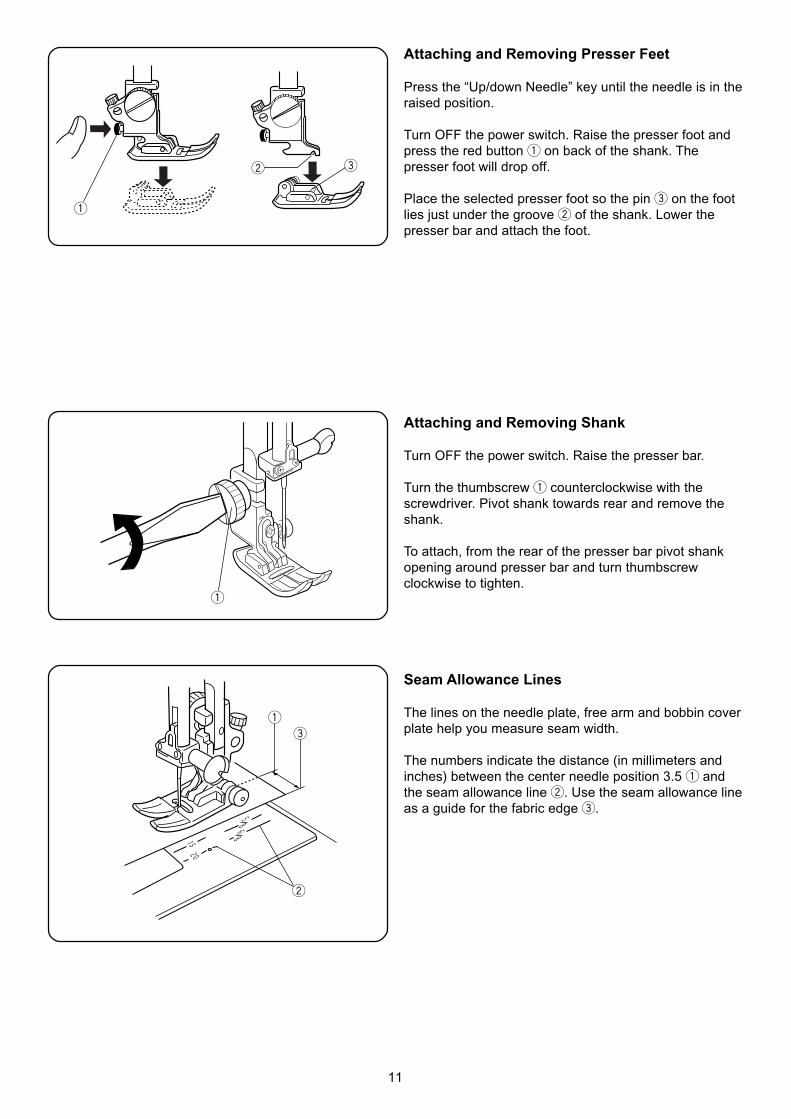
Attaching and Removing Presser Feet
Press the “Up/down Needle” key until the needle is in theraised position.
Turn OFF the power switch. Raise the presser foot andpress the red button q on back of the shank. Thepresser foot will drop off.
Place the selected presser foot so the pin e on the footlies just under the groove w of the shank. Lower thepresser bar and attach the foot.
Attaching and Removing Shank
Turn OFF the power switch. Raise the presser bar.
Turn the thumbscrew q counterclockwise with thescrewdriver. Pivot shank towards rear and remove theshank.
To attach, from the rear of the presser bar pivot shankopening around presser bar and turn thumbscrewclockwise to tighten.
Seam Allowance Lines
The lines on the needle plate, free arm and bobbin coverplate help you measure seam width.
The numbers indicate the distance (in millimeters andinches) between the center needle position 3.5 q andthe seam allowance line w. Use the seam allowance lineas a guide for the fabric edge e.
q
w e
q
w
e
q
12
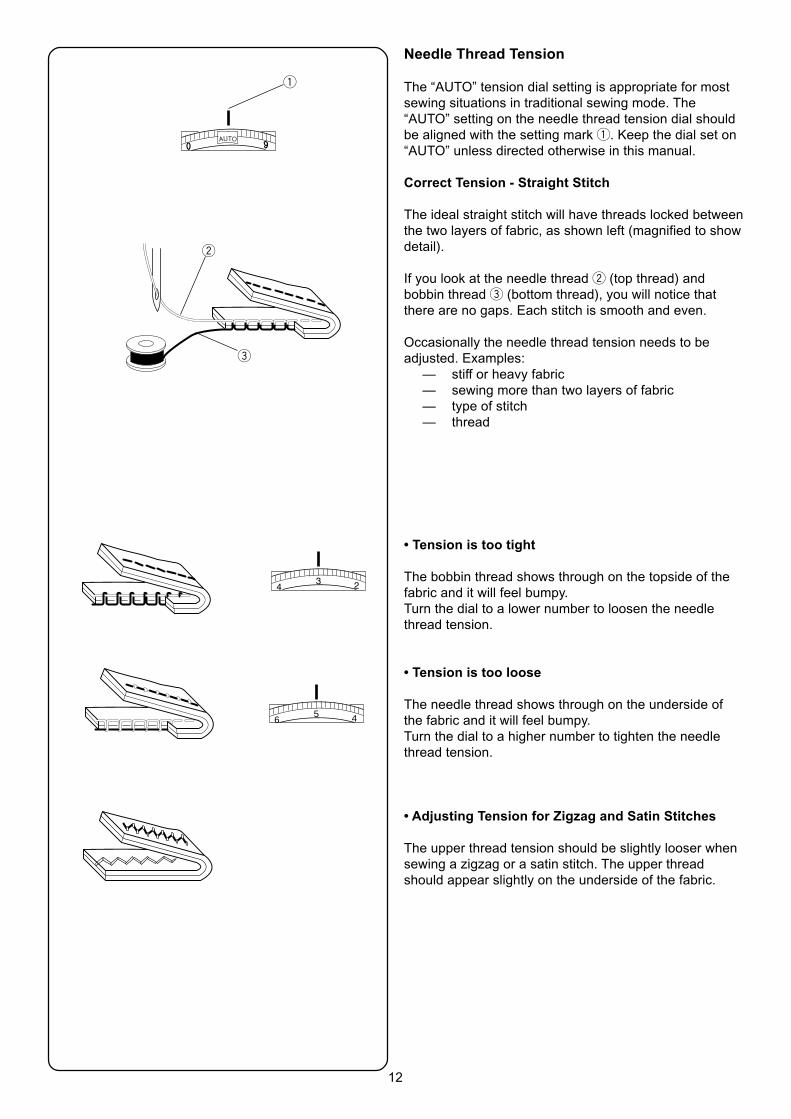
Needle Thread Tension
The “AUTO” tension dial setting is appropriate for mostsewing situations in traditional sewing mode. The“AUTO” setting on the needle thread tension dial shouldbe aligned with the setting mark q. Keep the dial set on“AUTO” unless directed otherwise in this manual.
Correct Tension - Straight Stitch
The ideal straight stitch will have threads locked betweenthe two layers of fabric, as shown left (magnified to showdetail).
If you look at the needle thread w (top thread) andbobbin thread e (bottom thread), you will notice thatthere are no gaps. Each stitch is smooth and even.
Occasionally the needle thread tension needs to beadjusted. Examples:
— stiff or heavy fabric— sewing more than two layers of fabric— type of stitch— thread
q
w
e
���
5 46
• Tension is too tight
The bobbin thread shows through on the topside of thefabric and it will feel bumpy.Turn the dial to a lower number to loosen the needlethread tension.
• Tension is too loose
The needle thread shows through on the underside ofthe fabric and it will feel bumpy.Turn the dial to a higher number to tighten the needlethread tension.
• Adjusting Tension for Zigzag and Satin Stitches
The upper thread tension should be slightly looser whensewing a zigzag or a satin stitch. The upper threadshould appear slightly on the underside of the fabric.
13
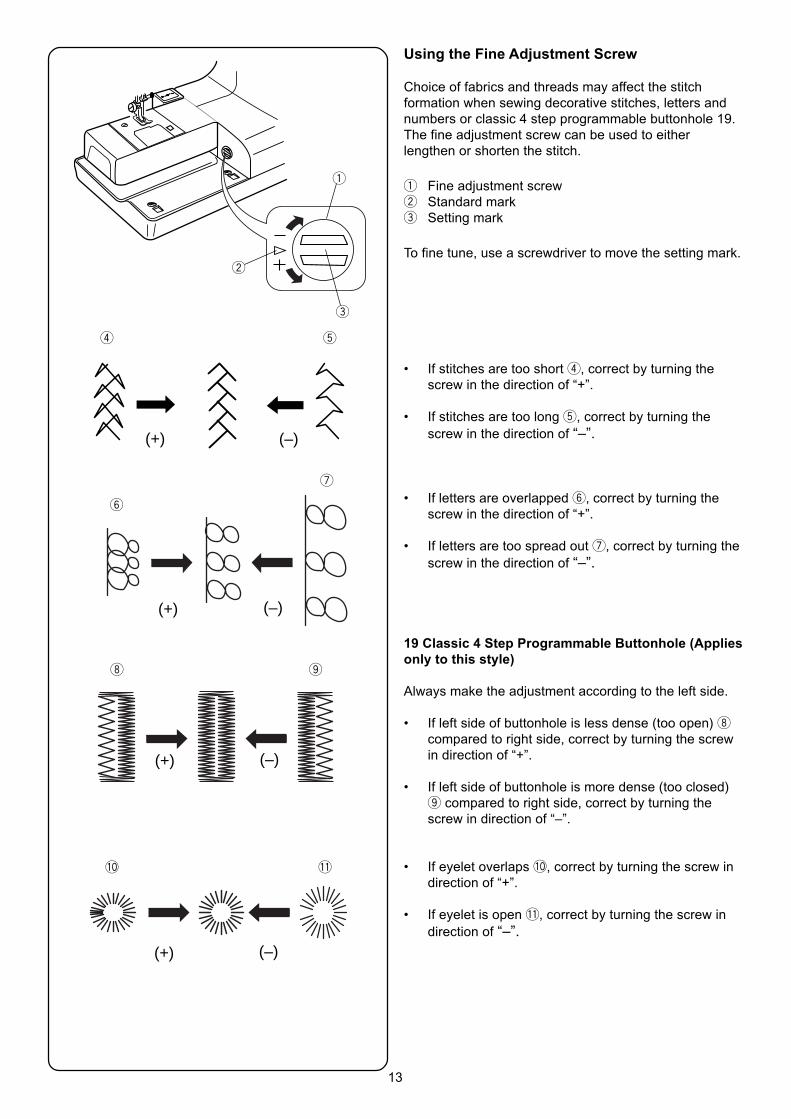
Using the Fine Adjustment Screw
Choice of fabrics and threads may affect the stitchformation when sewing decorative stitches, letters andnumbers or classic 4 step programmable buttonhole 19.The fine adjustment screw can be used to eitherlengthen or shorten the stitch.
q Fine adjustment screww Standard marke Setting mark
To fine tune, use a screwdriver to move the setting mark.
• If stitches are too short r, correct by turning thescrew in the direction of “+”.
• If stitches are too long t, correct by turning thescrew in the direction of “–”.
• If letters are overlapped y, correct by turning thescrew in the direction of “+”.
• If letters are too spread out u, correct by turning thescrew in the direction of “–”.
19 Classic 4 Step Programmable Buttonhole (Appliesonly to this style)
Always make the adjustment according to the left side.
• If left side of buttonhole is less dense (too open) icompared to right side, correct by turning the screwin direction of “+”.
• If left side of buttonhole is more dense (too closed)o compared to right side, correct by turning thescrew in direction of “–”.
• If eyelet overlaps !0, correct by turning the screw indirection of “+”.
• If eyelet is open !1, correct by turning the screw indirection of “–”.
q
w
e
r t
(+) (–)
y
u
(+) (–)
i o
(+) (–)
(+) (–)
!0 !1
14
SECTION IIGetting Ready to Sew
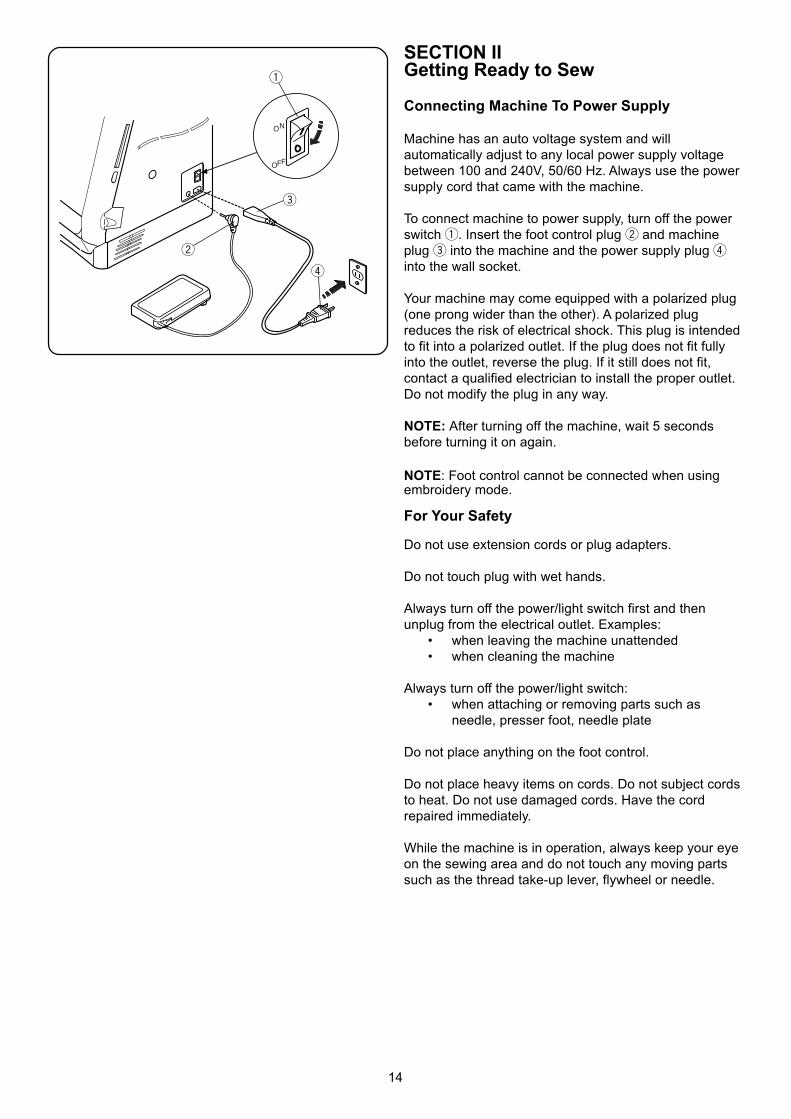
Connecting Machine To Power Supply
Machine has an auto voltage system and willautomatically adjust to any local power supply voltagebetween 100 and 240V, 50/60 Hz. Always use the powersupply cord that came with the machine.
To connect machine to power supply, turn off the powerswitch q. Insert the foot control plug w and machineplug e into the machine and the power supply plug rinto the wall socket.
Your machine may come equipped with a polarized plug(one prong wider than the other). A polarized plugreduces the risk of electrical shock. This plug is intendedto fit into a polarized outlet. If the plug does not fit fullyinto the outlet, reverse the plug. If it still does not fit,contact a qualified electrician to install the proper outlet.Do not modify the plug in any way.
NOTE: After turning off the machine, wait 5 secondsbefore turning it on again.
NOTE: Foot control cannot be connected when usingembroidery mode.
For Your Safety
Do not use extension cords or plug adapters.
Do not touch plug with wet hands.
Always turn off the power/light switch first and thenunplug from the electrical outlet. Examples:
• when leaving the machine unattended• when cleaning the machine
Always turn off the power/light switch:• when attaching or removing parts such as
needle, presser foot, needle plate
Do not place anything on the foot control.
Do not place heavy items on cords. Do not subject cordsto heat. Do not use damaged cords. Have the cordrepaired immediately.
While the machine is in operation, always keep your eyeon the sewing area and do not touch any moving partssuch as the thread take-up lever, flywheel or needle.
��
���
q
w
e
r
15
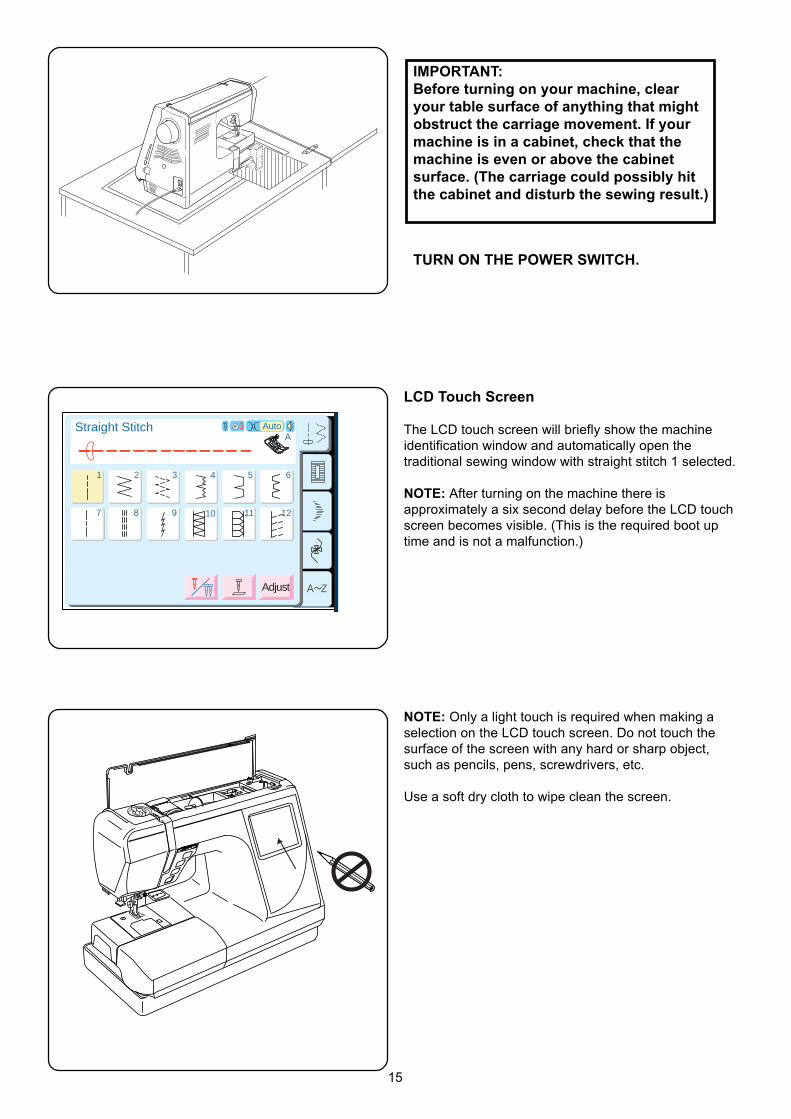
IMPORTANT:Before turning on your machine, clearyour table surface of anything that mightobstruct the carriage movement. If yourmachine is in a cabinet, check that themachine is even or above the cabinetsurface. (The carriage could possibly hitthe cabinet and disturb the sewing result.)
TURN ON THE POWER SWITCH.
LCD Touch Screen
The LCD touch screen will briefly show the machineidentification window and automatically open thetraditional sewing window with straight stitch 1 selected.
NOTE: After turning on the machine there isapproximately a six second delay before the LCD touchscreen becomes visible. (This is the required boot uptime and is not a malfunction.)
NOTE: Only a light touch is required when making aselection on the LCD touch screen. Do not touch thesurface of the screen with any hard or sharp object,such as pencils, pens, screwdrivers, etc.
Use a soft dry cloth to wipe clean the screen.
A Z
2 3 4 5 6
7 8 9 10 11 12
AAuto
Adjust
3
1
SETSET
2 3 4 5 6
7 8 9 10 11 12
1
SET
?
Straight Stitch

16
Main Function of Keys
q Start/Stop Key (changes color to indicatefunction)
Press this (green) key to start the machine. Intraditional sewing, the first few stitches will be sewnat a slow speed and then machine sews at the speedset by the speed control lever. Press (red) key againto stop machine.
NOTE: The foot control must be detached to use thiskey in traditional sewing.
w Reverse Key
If you are sewing 1 (straight stitch), 2 (zigzag stitch)or 3 (3-step zigzag stitch), press and hold this key.The machine will sew in reverse until you release thekey while using either the foot control or Start/Stopkey.
* Press this key when sewing any other stitch(except for stitches 13 to 22) and the machine willimmediately lockstitch and stop.
e Auto-Lock Key
Press this key while sewing 1 (straight stitch), 2(zigzag stitch) or 3 (3-step zigzag stitch) and themachine will sew a few stitches in place (lockstitch)and stop automatically.
* Press this key when sewing any other stitch(except for stitches 13 to 22) and the machine willcomplete the stitch, lockstitch and stop.
r Up/Down Needle Key
If the needle is up when you press this key, theneedle will go down to its lowest position.
If the needle is down when you press this key, theneedle will go up to its highest position.
NOTE: The Elna 8600 is equipped with a safety featurethat will automatically shut down the machine to preventoverheating if it is running overloaded. Follow theinstructions that appear in the LCD touch screen shouldthis occur.
q
w
er
17
A Z
Straight Stitch
4 5 6
7 8 9 10 11 12
AAuto
Adjust
3
1
SETSETSET
?
2 3
2 32 3
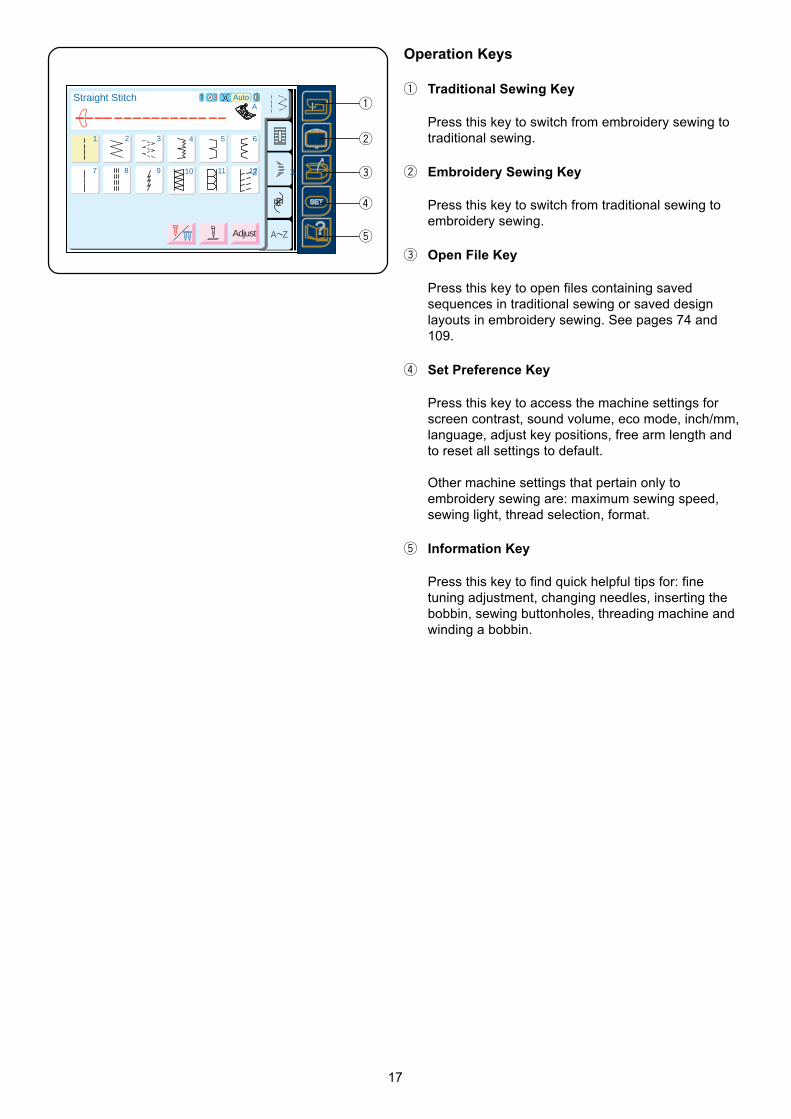
Operation Keys
q Traditional Sewing Key
Press this key to switch from embroidery sewing totraditional sewing.
w Embroidery Sewing Key
Press this key to switch from traditional sewing toembroidery sewing.
e Open File Key
Press this key to open files containing savedsequences in traditional sewing or saved designlayouts in embroidery sewing. See pages 74 and109.
r Set Preference Key
Press this key to access the machine settings forscreen contrast, sound volume, eco mode, inch/mm,language, adjust key positions, free arm length andto reset all settings to default.
Other machine settings that pertain only toembroidery sewing are: maximum sewing speed,sewing light, thread selection, format.
t Information Key
Press this key to find quick helpful tips for: finetuning adjustment, changing needles, inserting thebobbin, sewing buttonholes, threading machine andwinding a bobbin.
q
w
e
r
t
18
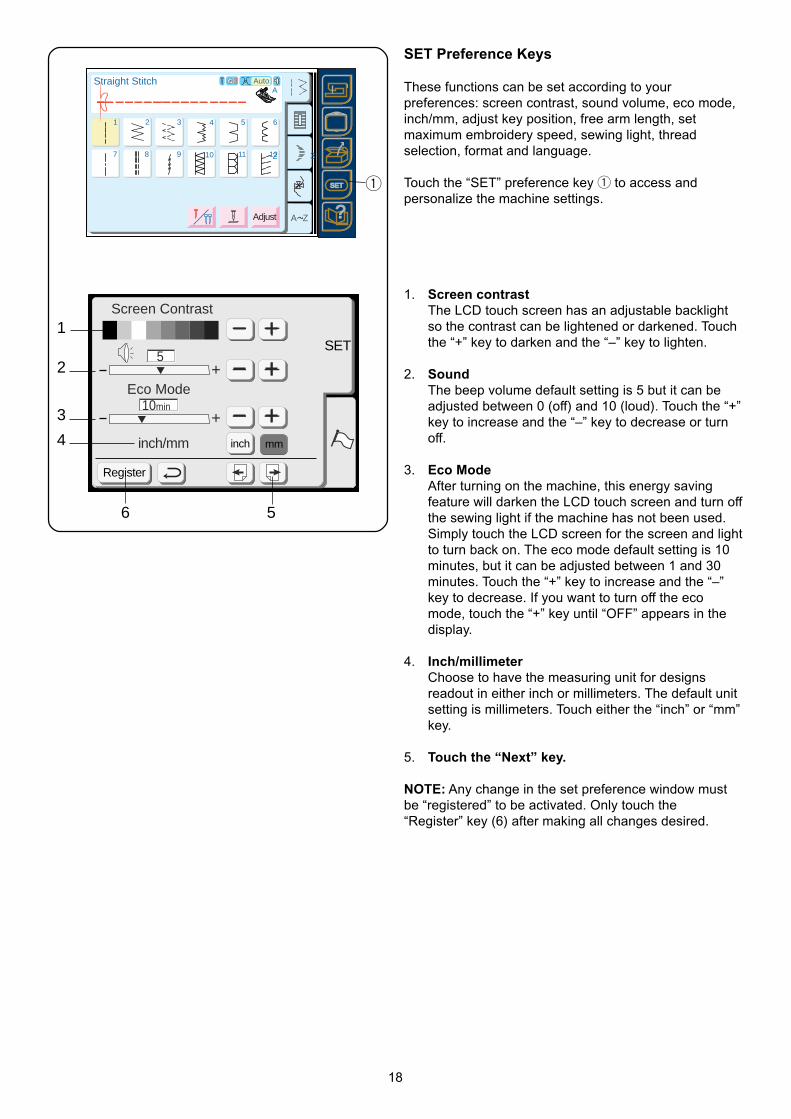
SET Preference Keys
These functions can be set according to yourpreferences: screen contrast, sound volume, eco mode,inch/mm, adjust key position, free arm length, setmaximum embroidery speed, sewing light, threadselection, format and language.
Touch the “SET” preference key q to access andpersonalize the machine settings.
1. Screen contrastThe LCD touch screen has an adjustable backlightso the contrast can be lightened or darkened. Touchthe “+” key to darken and the “–” key to lighten.
2. SoundThe beep volume default setting is 5 but it can beadjusted between 0 (off) and 10 (loud). Touch the “+”key to increase and the “–” key to decrease or turnoff.
3. Eco ModeAfter turning on the machine, this energy savingfeature will darken the LCD touch screen and turn offthe sewing light if the machine has not been used.Simply touch the LCD screen for the screen and lightto turn back on. The eco mode default setting is 10minutes, but it can be adjusted between 1 and 30minutes. Touch the “+” key to increase and the “–”key to decrease. If you want to turn off the ecomode, touch the “+” key until “OFF” appears in thedisplay.
4. Inch/millimeterChoose to have the measuring unit for designsreadout in either inch or millimeters. The default unitsetting is millimeters. Touch either the “inch” or “mm”key.
5. Touch the “Next” key.
NOTE: Any change in the set preference window mustbe “registered” to be activated. Only touch the“Register” key (6) after making all changes desired.
A Z
Straight Stitch
4 5 6
7 8 9 10 11 12
AAuto
Adjust
3
1
SETSETSET
?
2 3
2 32 3
Screen Contrast
+
inch/mm
5
+
Eco Mode
SET
inch mm
Register
10min
1
2
3
4
6 5
q
19
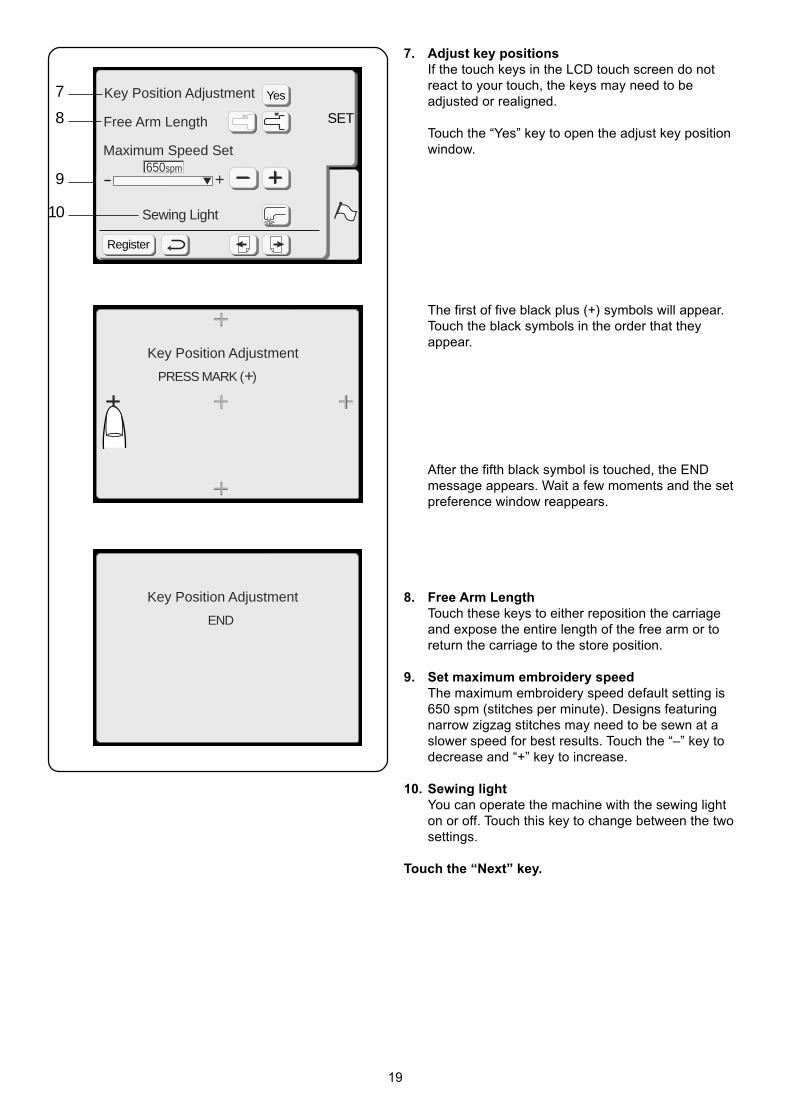
7. Adjust key positionsIf the touch keys in the LCD touch screen do notreact to your touch, the keys may need to beadjusted or realigned.
Touch the “Yes” key to open the adjust key positionwindow.
Key Position Adjustment
Sewing Light
+
Maximum Speed Set
SET
Register
650spm
Yes
Free Arm Length
7
8
9
10
Key Position Adjustment
PRESS MARK ( )+
Key Position Adjustment
END
The first of five black plus (+) symbols will appear.Touch the black symbols in the order that theyappear.
After the fifth black symbol is touched, the ENDmessage appears. Wait a few moments and the setpreference window reappears.
8. Free Arm LengthTouch these keys to either reposition the carriageand expose the entire length of the free arm or toreturn the carriage to the store position.
9. Set maximum embroidery speedThe maximum embroidery speed default setting is650 spm (stitches per minute). Designs featuringnarrow zigzag stitches may need to be sewn at aslower speed for best results. Touch the “–” key todecrease and “+” key to increase.
10. Sewing lightYou can operate the machine with the sewing lighton or off. Touch this key to change between the twosettings.
Touch the “Next” key.
20
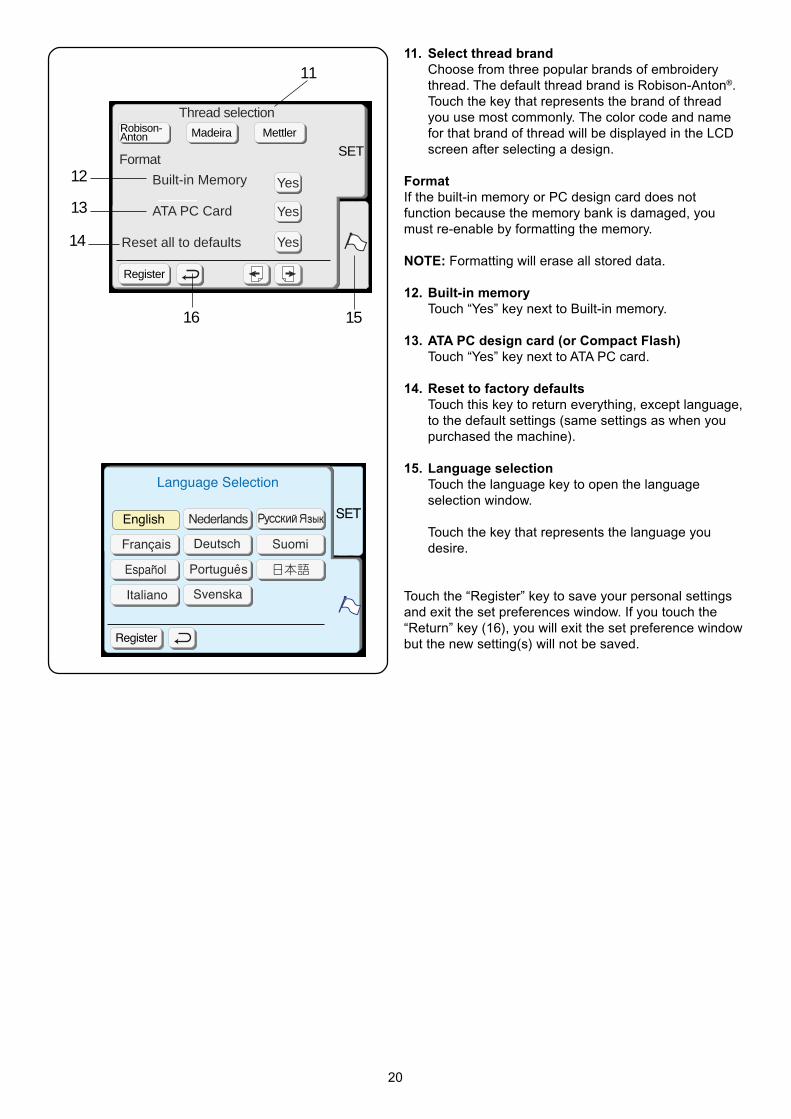
11. Select thread brandChoose from three popular brands of embroiderythread. The default thread brand is Robison-Anton®.Touch the key that represents the brand of threadyou use most commonly. The color code and namefor that brand of thread will be displayed in the LCDscreen after selecting a design.
FormatIf the built-in memory or PC design card does notfunction because the memory bank is damaged, youmust re-enable by formatting the memory.
NOTE: Formatting will erase all stored data.
12. Built-in memoryTouch “Yes” key next to Built-in memory.
13. ATA PC design card (or Compact Flash)Touch “Yes” key next to ATA PC card.
14. Reset to factory defaultsTouch this key to return everything, except language,to the default settings (same settings as when youpurchased the machine).
15. Language selectionTouch the language key to open the languageselection window.
Touch the key that represents the language youdesire.
Touch the “Register” key to save your personal settingsand exit the set preferences window. If you touch the“Return” key (16), you will exit the set preference windowbut the new setting(s) will not be saved.
Reset all to defaults
Format
Built-in Memory
ATA PC Card
SET
Register
Madeira Mettler
Yes
Yes
Yes
Thread selectionRobison-Anton
12
13
14
11
1516

21
How to Access On Screen Information
The LCD touch screen can show you information forthese basic machine operations: fine tuning adjustment,changing needles, inserting the bobbin, buttonholes,threading the machine and winding the bobbin.
1. Touch the “On Screen Information” key to open theindex window.
2. Touch one of the keys in the index window.
3. View the illustrations of the topic selected.
4. Touch the “Return” key to go back to the indexwindow. Touch “Return” key again to exit indexwindow.
A Z
Straight Stitch
4 5 6
7 8 9 10 11 12
AAuto
Adjust
3
1
SETSETSET
?
2 3
2 32 3
Index
Fine tuning adjustment
Changing needles
Buttonholes
Inserting the bobbin
?
Winding the bobbin ?
Threading the machine ?
?
?
?
Changing needles
22
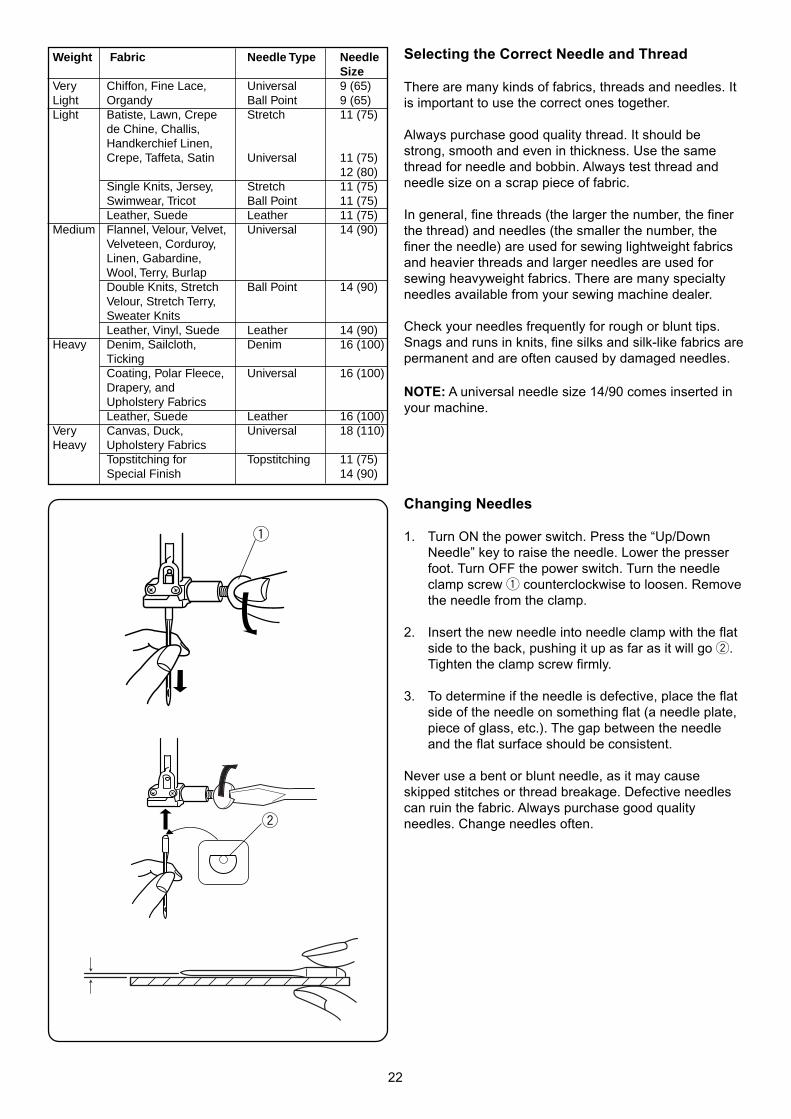
Selecting the Correct Needle and Thread
There are many kinds of fabrics, threads and needles. Itis important to use the correct ones together.
Always purchase good quality thread. It should bestrong, smooth and even in thickness. Use the samethread for needle and bobbin. Always test thread andneedle size on a scrap piece of fabric.
In general, fine threads (the larger the number, the finerthe thread) and needles (the smaller the number, thefiner the needle) are used for sewing lightweight fabricsand heavier threads and larger needles are used forsewing heavyweight fabrics. There are many specialtyneedles available from your sewing machine dealer.
Check your needles frequently for rough or blunt tips.Snags and runs in knits, fine silks and silk-like fabrics arepermanent and are often caused by damaged needles.
NOTE: A universal needle size 14/90 comes inserted inyour machine.
Changing Needles
1. Turn ON the power switch. Press the “Up/DownNeedle” key to raise the needle. Lower the presserfoot. Turn OFF the power switch. Turn the needleclamp screw q counterclockwise to loosen. Removethe needle from the clamp.
2. Insert the new needle into needle clamp with the flatside to the back, pushing it up as far as it will go w.Tighten the clamp screw firmly.
3. To determine if the needle is defective, place the flatside of the needle on something flat (a needle plate,piece of glass, etc.). The gap between the needleand the flat surface should be consistent.
Never use a bent or blunt needle, as it may causeskipped stitches or thread breakage. Defective needlescan ruin the fabric. Always purchase good qualityneedles. Change needles often.
Weight Fabric Needle Type NeedleSize
Very Chiffon, Fine Lace, Universal 9 (65)Light Organdy Ball Point 9 (65)Light Batiste, Lawn, Crepe Stretch 11 (75)
de Chine, Challis,Handkerchief Linen,Crepe, Taffeta, Satin Universal 11 (75)
12 (80)Single Knits, Jersey, Stretch 11 (75)Swimwear, Tricot Ball Point 11 (75)Leather, Suede Leather 11 (75)
Medium Flannel, Velour, Velvet, Universal 14 (90)Velveteen, Corduroy,Linen, Gabardine,Wool, Terry, BurlapDouble Knits, Stretch Ball Point 14 (90)Velour, Stretch Terry,Sweater KnitsLeather, Vinyl, Suede Leather 14 (90)
Heavy Denim, Sailcloth, Denim 16 (100)TickingCoating, Polar Fleece, Universal 16 (100)Drapery, andUpholstery FabricsLeather, Suede Leather 16 (100)
Very Canvas, Duck, Universal 18 (110)Heavy Upholstery Fabrics
Topstitching for Topstitching 11 (75)Special Finish 14 (90)
q
w
23
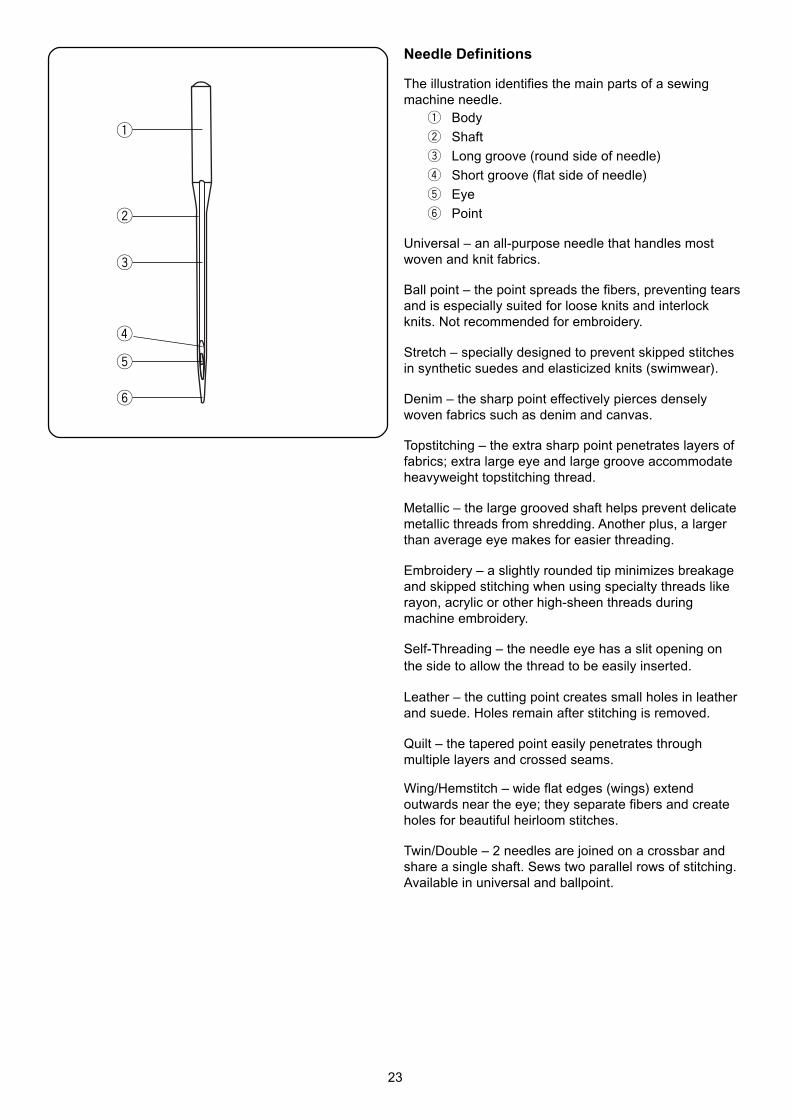
Needle Definitions
The illustration identifies the main parts of a sewingmachine needle.
q Body
w Shaft
e Long groove (round side of needle)
r Short groove (flat side of needle)
t Eye
y Point
Universal – an all-purpose needle that handles mostwoven and knit fabrics.
Ball point – the point spreads the fibers, preventing tearsand is especially suited for loose knits and interlockknits. Not recommended for embroidery.
Stretch – specially designed to prevent skipped stitchesin synthetic suedes and elasticized knits (swimwear).
Denim – the sharp point effectively pierces denselywoven fabrics such as denim and canvas.
Topstitching – the extra sharp point penetrates layers offabrics; extra large eye and large groove accommodateheavyweight topstitching thread.
Metallic – the large grooved shaft helps prevent delicatemetallic threads from shredding. Another plus, a largerthan average eye makes for easier threading.
Embroidery – a slightly rounded tip minimizes breakageand skipped stitching when using specialty threads likerayon, acrylic or other high-sheen threads duringmachine embroidery.
Self-Threading – the needle eye has a slit opening onthe side to allow the thread to be easily inserted.
Leather – the cutting point creates small holes in leatherand suede. Holes remain after stitching is removed.
Quilt – the tapered point easily penetrates throughmultiple layers and crossed seams.
Wing/Hemstitch – wide flat edges (wings) extendoutwards near the eye; they separate fibers and createholes for beautiful heirloom stitches.
Twin/Double – 2 needles are joined on a crossbar andshare a single shaft. Sews two parallel rows of stitching.Available in universal and ballpoint.
q
w
e
r
t
y
24
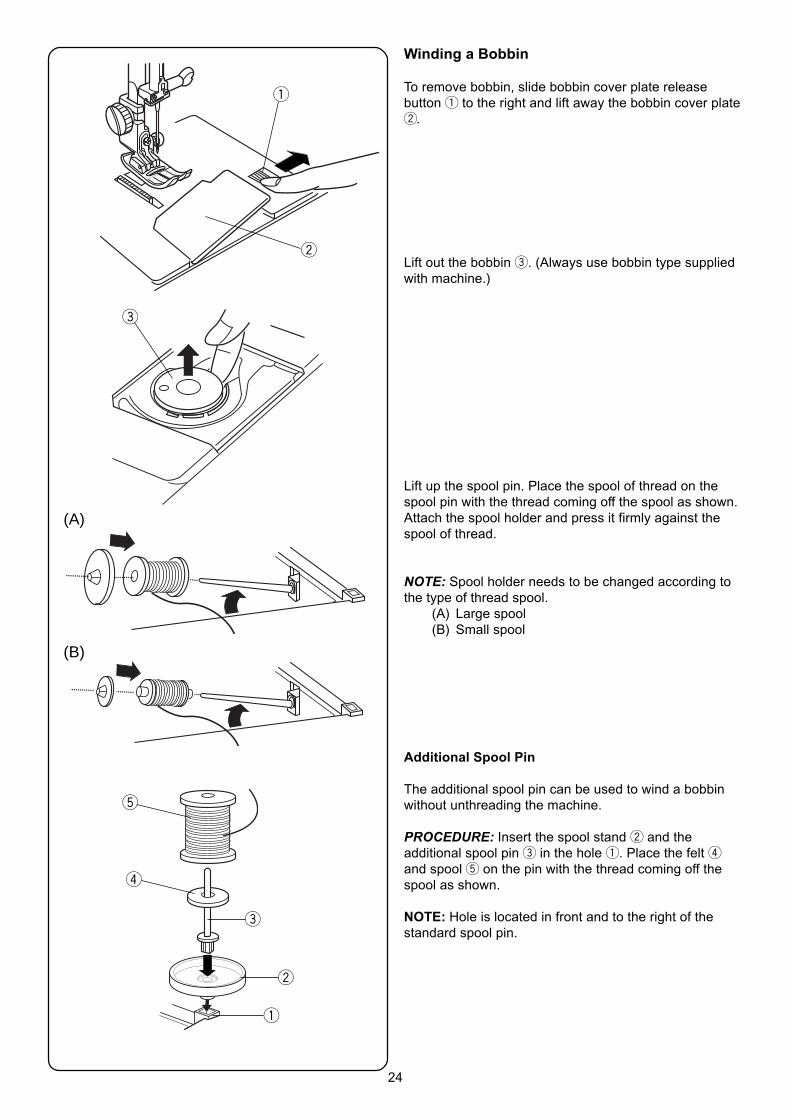
Winding a Bobbin
To remove bobbin, slide bobbin cover plate releasebutton q to the right and lift away the bobbin cover platew.
Lift out the bobbin e. (Always use bobbin type suppliedwith machine.)
Lift up the spool pin. Place the spool of thread on thespool pin with the thread coming off the spool as shown.Attach the spool holder and press it firmly against thespool of thread.
NOTE: Spool holder needs to be changed according tothe type of thread spool.
(A) Large spool(B) Small spool
Additional Spool Pin
The additional spool pin can be used to wind a bobbinwithout unthreading the machine.
PROCEDURE: Insert the spool stand w and theadditional spool pin e in the hole q. Place the felt rand spool t on the pin with the thread coming off thespool as shown.
NOTE: Hole is located in front and to the right of thestandard spool pin.
q
w
e
(A)
(B)
t
r
e
w
q
25
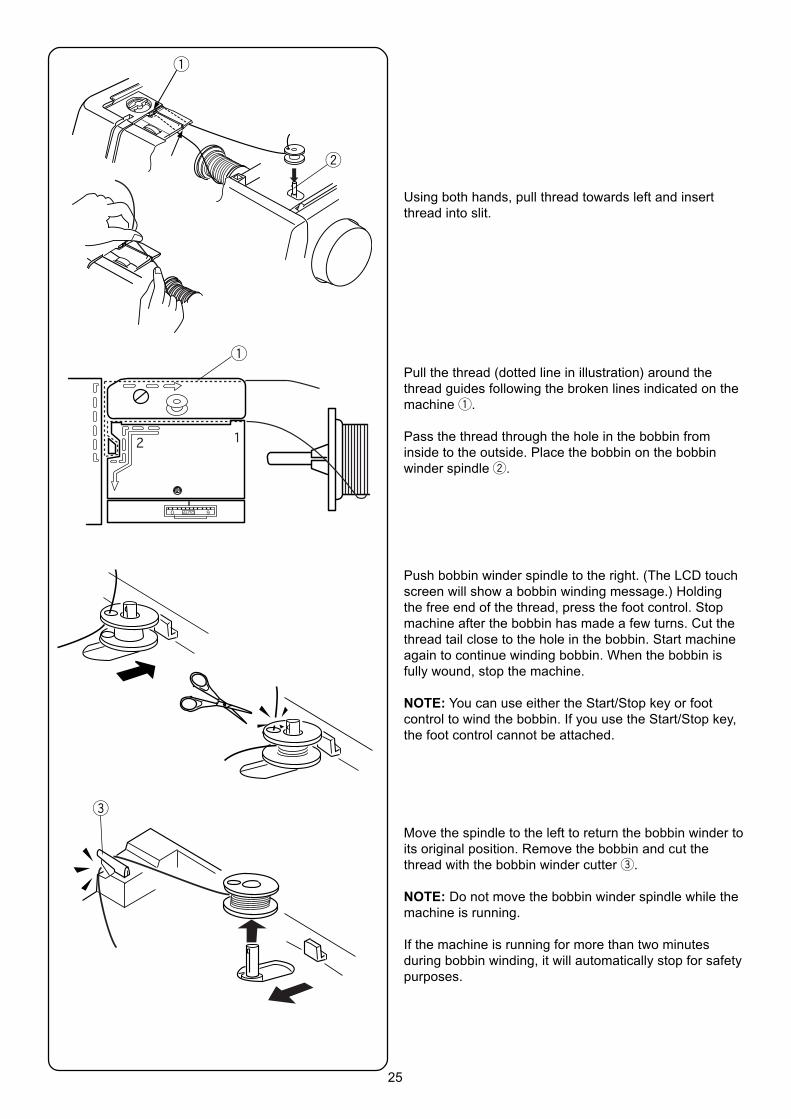
Using both hands, pull thread towards left and insertthread into slit.
Pull the thread (dotted line in illustration) around thethread guides following the broken lines indicated on themachine q.
Pass the thread through the hole in the bobbin frominside to the outside. Place the bobbin on the bobbinwinder spindle w.
AUTO 90
Push bobbin winder spindle to the right. (The LCD touchscreen will show a bobbin winding message.) Holdingthe free end of the thread, press the foot control. Stopmachine after the bobbin has made a few turns. Cut thethread tail close to the hole in the bobbin. Start machineagain to continue winding bobbin. When the bobbin isfully wound, stop the machine.
NOTE: You can use either the Start/Stop key or footcontrol to wind the bobbin. If you use the Start/Stop key,the foot control cannot be attached.
Move the spindle to the left to return the bobbin winder toits original position. Remove the bobbin and cut thethread with the bobbin winder cutter e.
NOTE: Do not move the bobbin winder spindle while themachine is running.
If the machine is running for more than two minutesduring bobbin winding, it will automatically stop for safetypurposes.
q
w
q
e
26
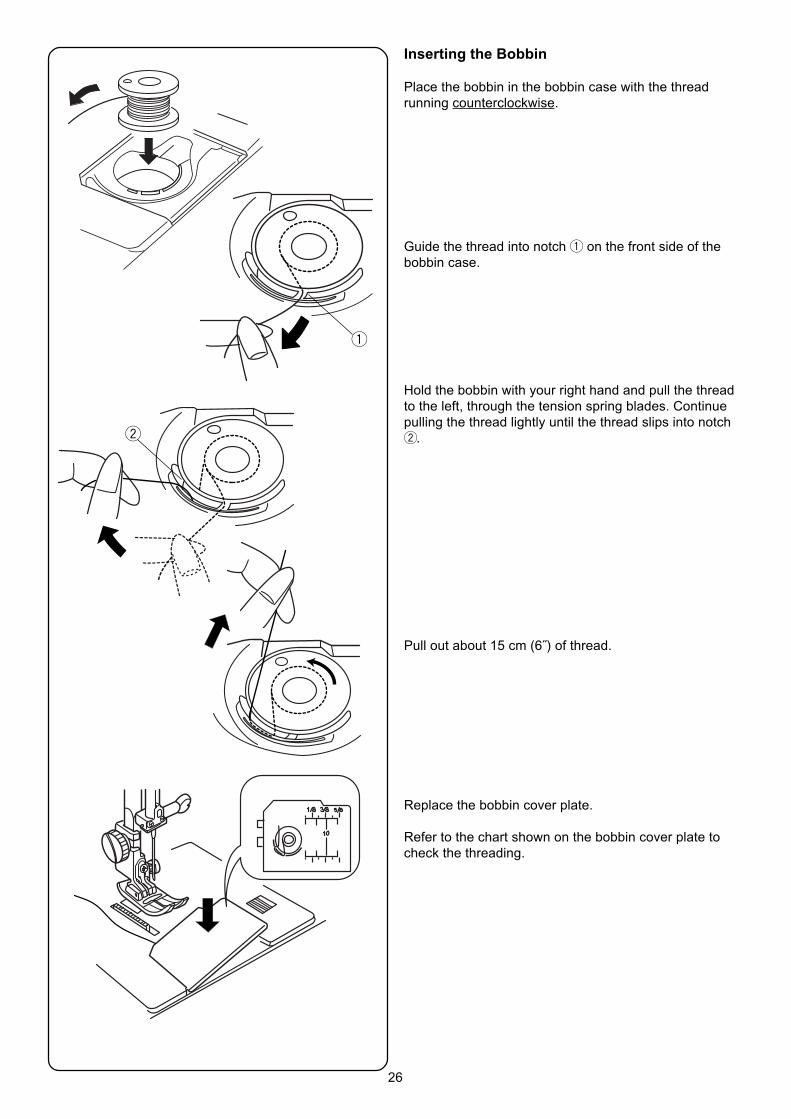
Inserting the Bobbin
Place the bobbin in the bobbin case with the threadrunning counterclockwise.
Guide the thread into notch q on the front side of thebobbin case.
Hold the bobbin with your right hand and pull the threadto the left, through the tension spring blades. Continuepulling the thread lightly until the thread slips into notchw.
Pull out about 15 cm (6˝) of thread.
Replace the bobbin cover plate.
Refer to the chart shown on the bobbin cover plate tocheck the threading.
q
w
27
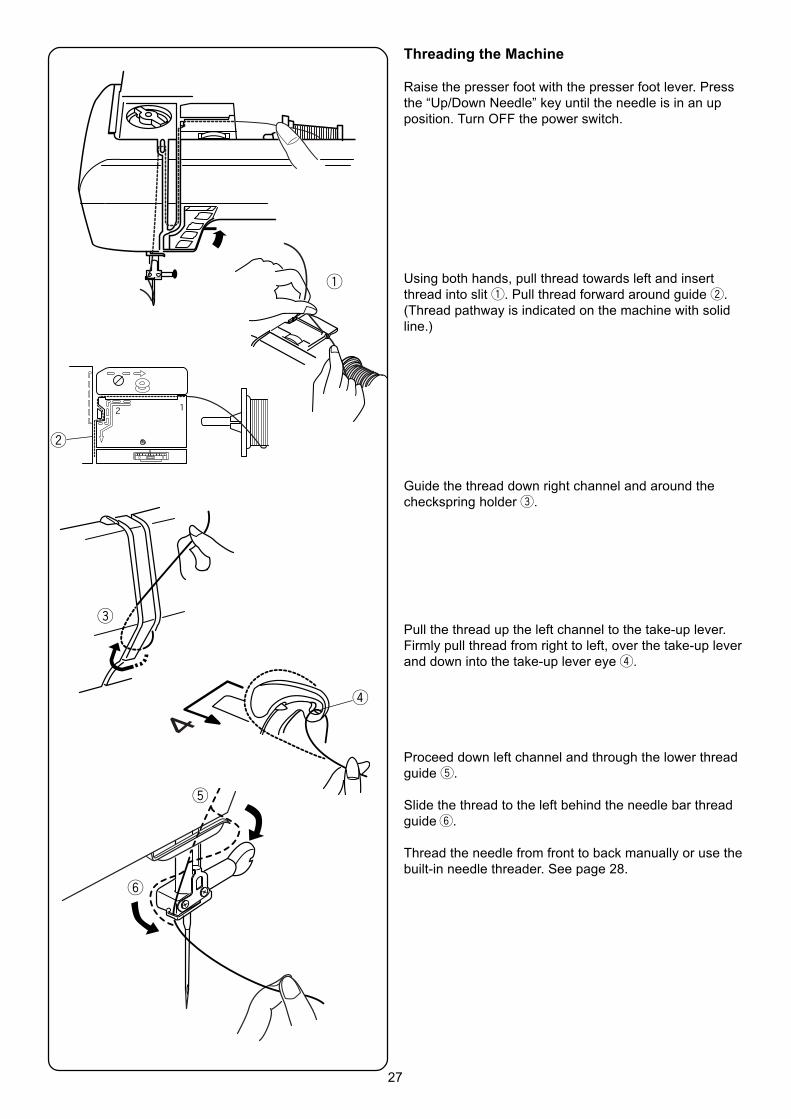
Threading the Machine
Raise the presser foot with the presser foot lever. Pressthe “Up/Down Needle” key until the needle is in an upposition. Turn OFF the power switch.
Using both hands, pull thread towards left and insertthread into slit q. Pull thread forward around guide w.(Thread pathway is indicated on the machine with solidline.)
Guide the thread down right channel and around thecheckspring holder e.
Pull the thread up the left channel to the take-up lever.Firmly pull thread from right to left, over the take-up leverand down into the take-up lever eye r.
Proceed down left channel and through the lower threadguide t.
Slide the thread to the left behind the needle bar threadguide y.
Thread the needle from front to back manually or use thebuilt-in needle threader. See page 28.
AUTO 90
q
w
e
r
t
y

28
Built-in Needle Threader
Press the “Up/Down Needle” key until the needle is in anup position. Turn OFF the power switch. Lower thepresser foot.
Pull down the needle threader lever q as far as it will go.Hook w is automatically inserted into the needle eye.
Bring the thread around guide e and under hook w.
Slowly release the lever while holding the thread endand let the needle threader return to its original position.A loop of thread r is pulled through the needle eye.
Pull the thread loop off the guide to the back andmanually bring the thread through the needle eye.
NOTE: The needle threader can be used with #11 to #16size needles. Thread weight may vary from 30 to 100.
If the needle threader does not catch a thread loop,check the needle and positioning.
qw
e w
r
29
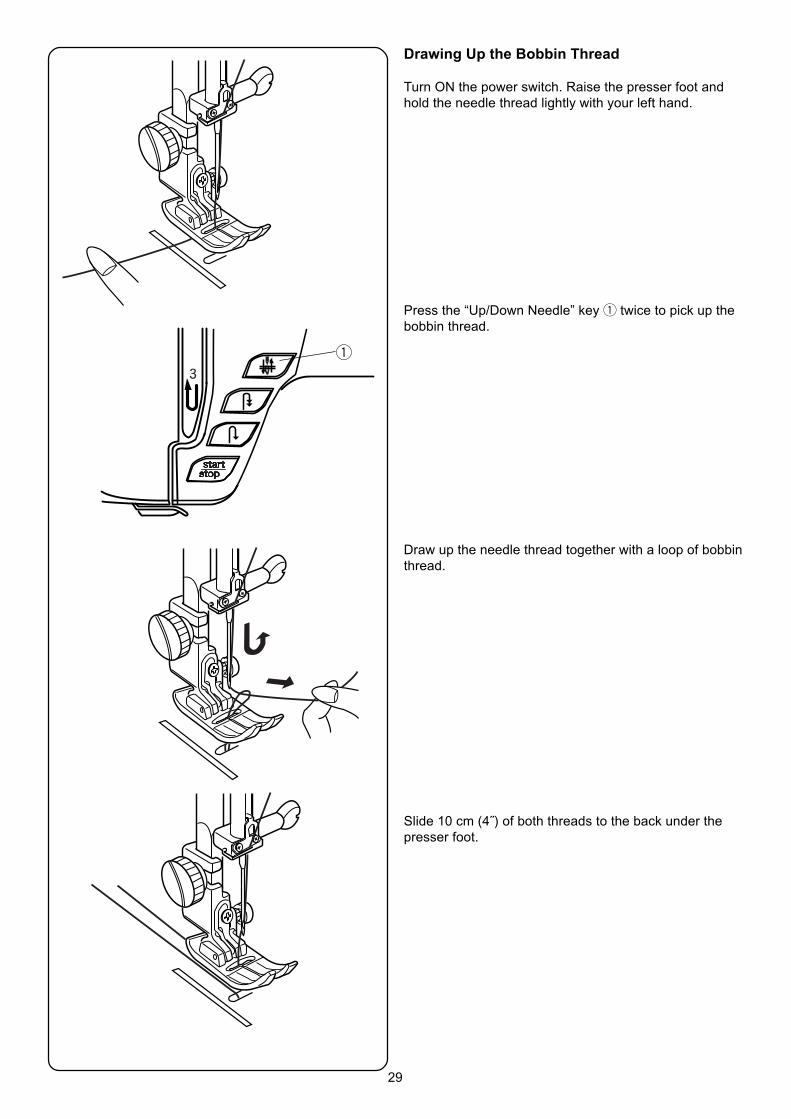
Drawing Up the Bobbin Thread
Turn ON the power switch. Raise the presser foot andhold the needle thread lightly with your left hand.
Press the “Up/Down Needle” key q twice to pick up thebobbin thread.
Draw up the needle thread together with a loop of bobbinthread.
Slide 10 cm (4˝) of both threads to the back under thepresser foot.
q
30
A Z
2 3 4 5 6
7 8 9 10 11 12
AAuto
Adjust
3
1
SETSET
2 3 4 5 6
7 8 9 10 11 12
1
SET
?
Straight Stitch
SECTION IIITraditional Sewing
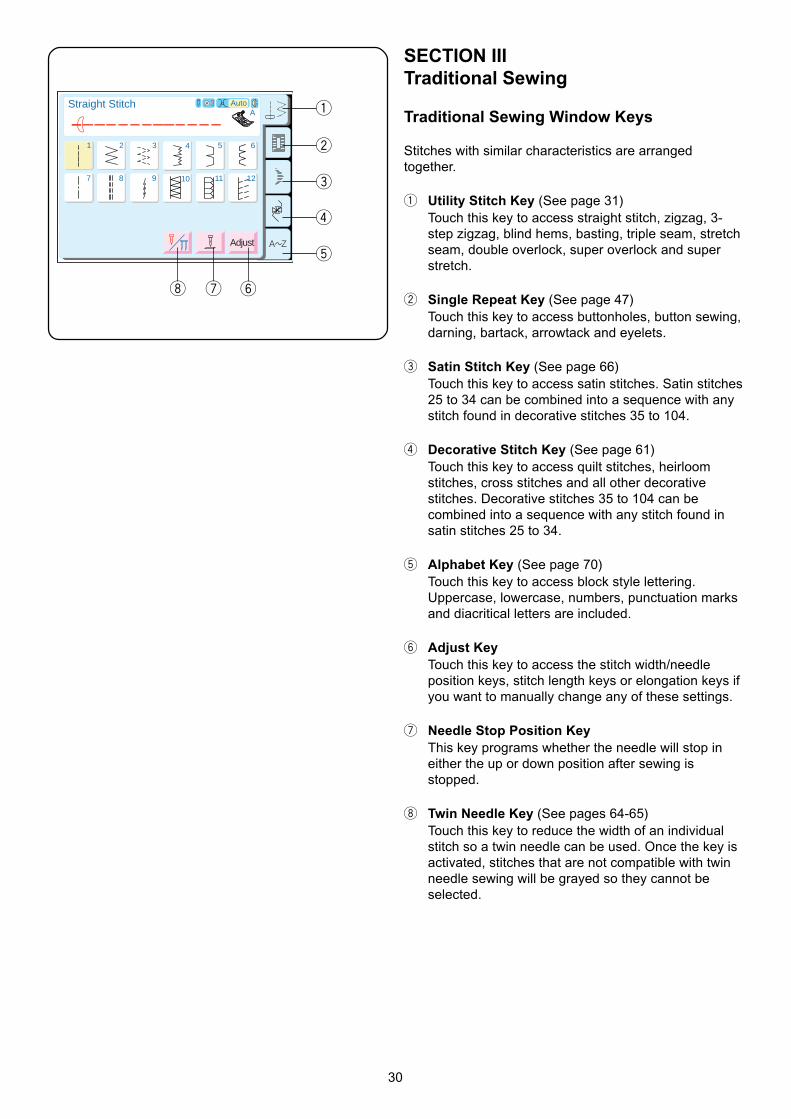
Traditional Sewing Window Keys
Stitches with similar characteristics are arrangedtogether.
q Utility Stitch Key (See page 31)Touch this key to access straight stitch, zigzag, 3-step zigzag, blind hems, basting, triple seam, stretchseam, double overlock, super overlock and superstretch.
w Single Repeat Key (See page 47)Touch this key to access buttonholes, button sewing,darning, bartack, arrowtack and eyelets.
e Satin Stitch Key (See page 66)Touch this key to access satin stitches. Satin stitches25 to 34 can be combined into a sequence with anystitch found in decorative stitches 35 to 104.
r Decorative Stitch Key (See page 61)Touch this key to access quilt stitches, heirloomstitches, cross stitches and all other decorativestitches. Decorative stitches 35 to 104 can becombined into a sequence with any stitch found insatin stitches 25 to 34.
t Alphabet Key (See page 70)Touch this key to access block style lettering.Uppercase, lowercase, numbers, punctuation marksand diacritical letters are included.
y Adjust KeyTouch this key to access the stitch width/needleposition keys, stitch length keys or elongation keys ifyou want to manually change any of these settings.
u Needle Stop Position KeyThis key programs whether the needle will stop ineither the up or down position after sewing isstopped.
i Twin Needle Key (See pages 64-65)Touch this key to reduce the width of an individualstitch so a twin needle can be used. Once the key isactivated, stitches that are not compatible with twinneedle sewing will be grayed so they cannot beselected.
yui
q
w
e
r
t
31
A Z
2 3 4 5 6
7 8 9 10 11 12
AAuto
Adjust
3
1
SETSET
2 3 4 5 6
7 8 9 10 11 12
1
SET
?
Straight Stitch
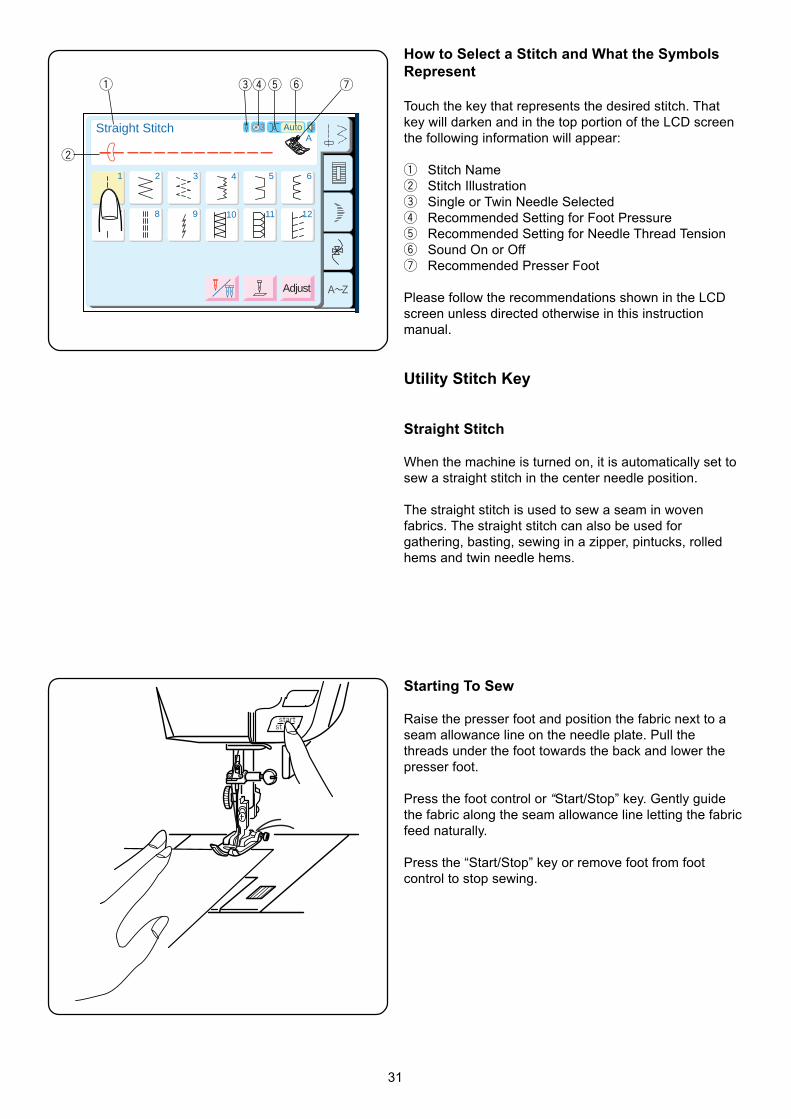
How to Select a Stitch and What the SymbolsRepresent
Touch the key that represents the desired stitch. Thatkey will darken and in the top portion of the LCD screenthe following information will appear:
q Stitch Namew Stitch Illustratione Single or Twin Needle Selectedr Recommended Setting for Foot Pressuret Recommended Setting for Needle Thread Tensiony Sound On or Offu Recommended Presser Foot
Please follow the recommendations shown in the LCDscreen unless directed otherwise in this instructionmanual.
Utility Stitch Key
Straight Stitch
When the machine is turned on, it is automatically set tosew a straight stitch in the center needle position.
The straight stitch is used to sew a seam in wovenfabrics. The straight stitch can also be used forgathering, basting, sewing in a zipper, pintucks, rolledhems and twin needle hems.
Starting To Sew
Raise the presser foot and position the fabric next to aseam allowance line on the needle plate. Pull thethreads under the foot towards the back and lower thepresser foot.
Press the foot control or “Start/Stop” key. Gently guidethe fabric along the seam allowance line letting the fabricfeed naturally.
Press the “Start/Stop” key or remove foot from footcontrol to stop sewing.
w
q ert y u
32
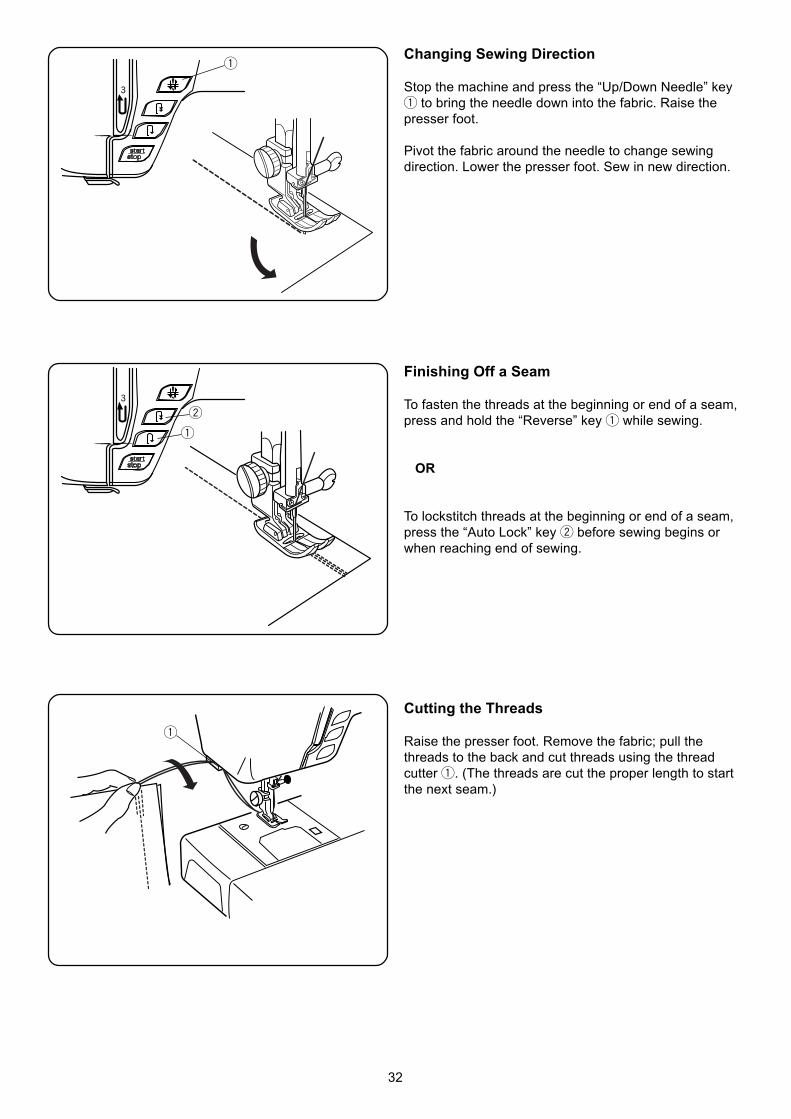
Changing Sewing Direction
Stop the machine and press the “Up/Down Needle” keyq to bring the needle down into the fabric. Raise thepresser foot.
Pivot the fabric around the needle to change sewingdirection. Lower the presser foot. Sew in new direction.
Finishing Off a Seam
To fasten the threads at the beginning or end of a seam,press and hold the “Reverse” key q while sewing.
OR
To lockstitch threads at the beginning or end of a seam,press the “Auto Lock” key w before sewing begins orwhen reaching end of sewing.
Cutting the Threads
Raise the presser foot. Remove the fabric; pull thethreads to the back and cut threads using the threadcutter q. (The threads are cut the proper length to startthe next seam.)
q
w
q
q
33
A Z
2 3 4 5 6
7 8 9 10 11 12
AAuto
Adjust
3
1
SETSET
2 3 4 5 6
7 8 9 10 11 12
1
SET
?
Straight Stitch
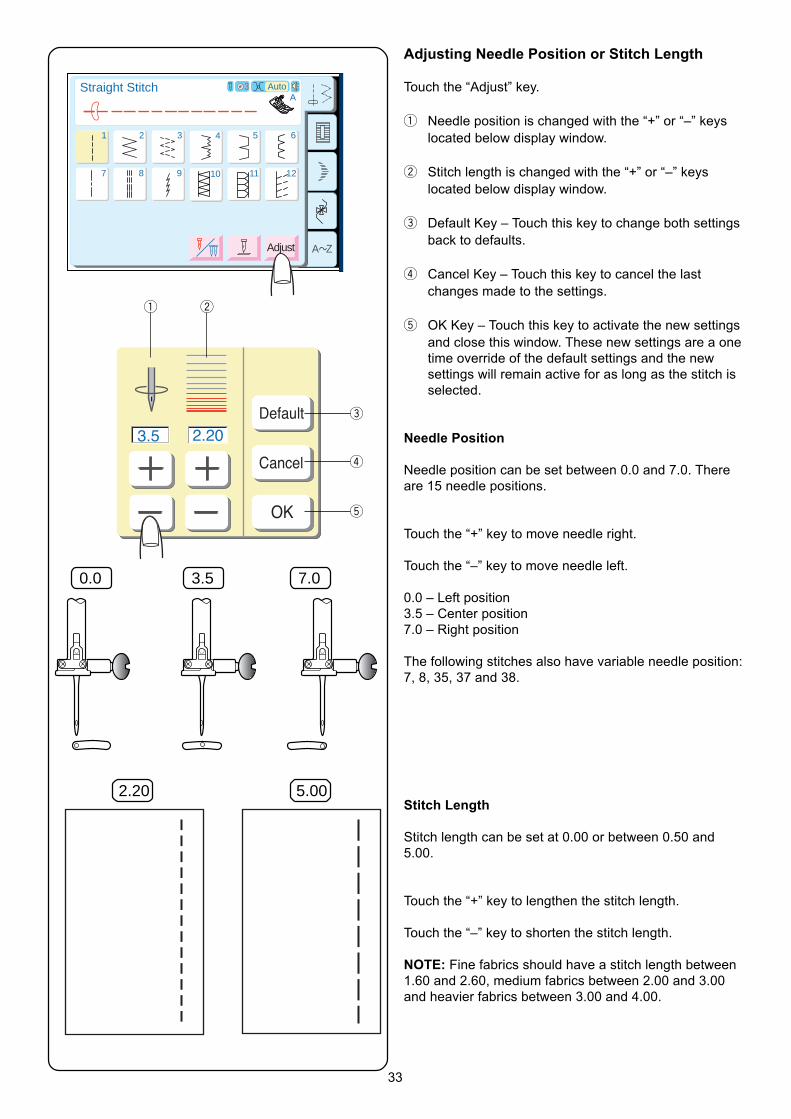
Adjusting Needle Position or Stitch Length
Touch the “Adjust” key.
q Needle position is changed with the “+” or “–” keyslocated below display window.
w Stitch length is changed with the “+” or “–” keyslocated below display window.
e Default Key – Touch this key to change both settingsback to defaults.
r Cancel Key – Touch this key to cancel the lastchanges made to the settings.
t OK Key – Touch this key to activate the new settingsand close this window. These new settings are a onetime override of the default settings and the newsettings will remain active for as long as the stitch isselected.
Needle Position
Needle position can be set between 0.0 and 7.0. Thereare 15 needle positions.
Touch the “+” key to move needle right.
Touch the “–” key to move needle left.
0.0 – Left position3.5 – Center position7.0 – Right position
The following stitches also have variable needle position:7, 8, 35, 37 and 38.
Stitch Length
Stitch length can be set at 0.00 or between 0.50 and5.00.
Touch the “+” key to lengthen the stitch length.
Touch the “–” key to shorten the stitch length.
NOTE: Fine fabrics should have a stitch length between1.60 and 2.60, medium fabrics between 2.00 and 3.00and heavier fabrics between 3.00 and 4.00.
3.5 2.20Default
Cancel
OK
q w
e
r
t
0.0 3.5 7.0
2.20 5.00
34
A Z
2 3 4 5 6
7 8 9 10 11 12
AAuto
Adjust
3
1
SETSET
2 3 4 5 6
7 8 9 10 11 12
1
SET
?
Straight Stitch
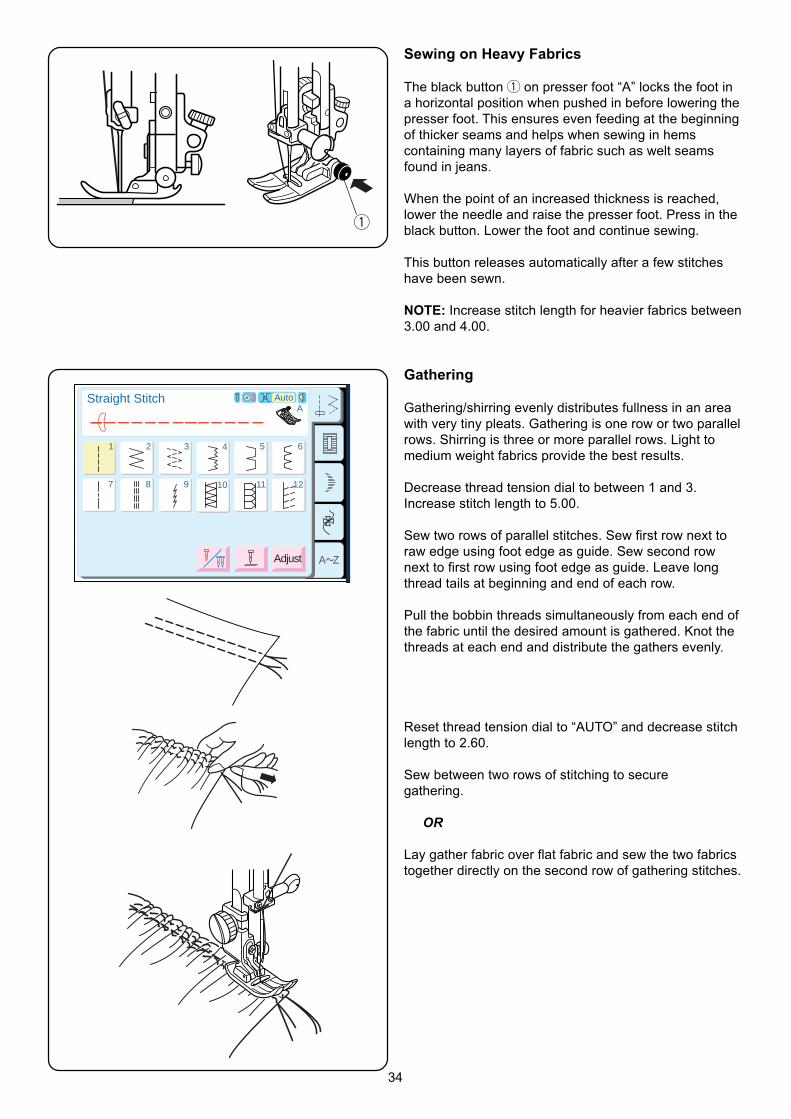
Sewing on Heavy Fabrics
The black button q on presser foot “A” locks the foot ina horizontal position when pushed in before lowering thepresser foot. This ensures even feeding at the beginningof thicker seams and helps when sewing in hemscontaining many layers of fabric such as welt seamsfound in jeans.
When the point of an increased thickness is reached,lower the needle and raise the presser foot. Press in theblack button. Lower the foot and continue sewing.
This button releases automatically after a few stitcheshave been sewn.
NOTE: Increase stitch length for heavier fabrics between3.00 and 4.00.
Gathering
Gathering/shirring evenly distributes fullness in an areawith very tiny pleats. Gathering is one row or two parallelrows. Shirring is three or more parallel rows. Light tomedium weight fabrics provide the best results.
Decrease thread tension dial to between 1 and 3.Increase stitch length to 5.00.
Sew two rows of parallel stitches. Sew first row next toraw edge using foot edge as guide. Sew second rownext to first row using foot edge as guide. Leave longthread tails at beginning and end of each row.
Pull the bobbin threads simultaneously from each end ofthe fabric until the desired amount is gathered. Knot thethreads at each end and distribute the gathers evenly.
Reset thread tension dial to “AUTO” and decrease stitchlength to 2.60.
Sew between two rows of stitching to securegathering.
OR
Lay gather fabric over flat fabric and sew the two fabricstogether directly on the second row of gathering stitches.
q
35
A Z
2 3 4 5 6
7 8 9 10 11 12
AAuto
Adjust
3
1
SETSET
2 3 4 5 6
7 8 9 10 11 12
1
SET
?
Straight Stitch
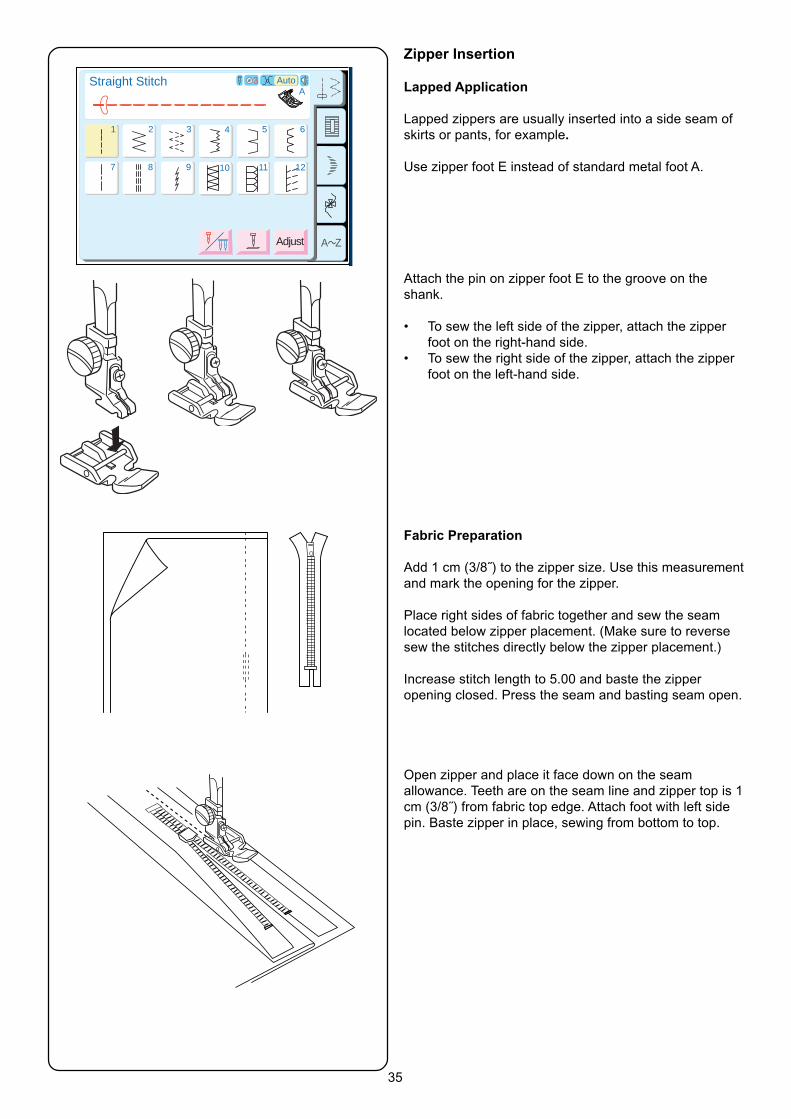
Zipper Insertion
Lapped Application
Lapped zippers are usually inserted into a side seam ofskirts or pants, for example.
Use zipper foot E instead of standard metal foot A.
Attach the pin on zipper foot E to the groove on theshank.
• To sew the left side of the zipper, attach the zipperfoot on the right-hand side.
• To sew the right side of the zipper, attach the zipperfoot on the left-hand side.
Fabric Preparation
Add 1 cm (3/8˝) to the zipper size. Use this measurementand mark the opening for the zipper.
Place right sides of fabric together and sew the seamlocated below zipper placement. (Make sure to reversesew the stitches directly below the zipper placement.)
Increase stitch length to 5.00 and baste the zipperopening closed. Press the seam and basting seam open.
Open zipper and place it face down on the seamallowance. Teeth are on the seam line and zipper top is 1cm (3/8˝) from fabric top edge. Attach foot with left sidepin. Baste zipper in place, sewing from bottom to top.
36
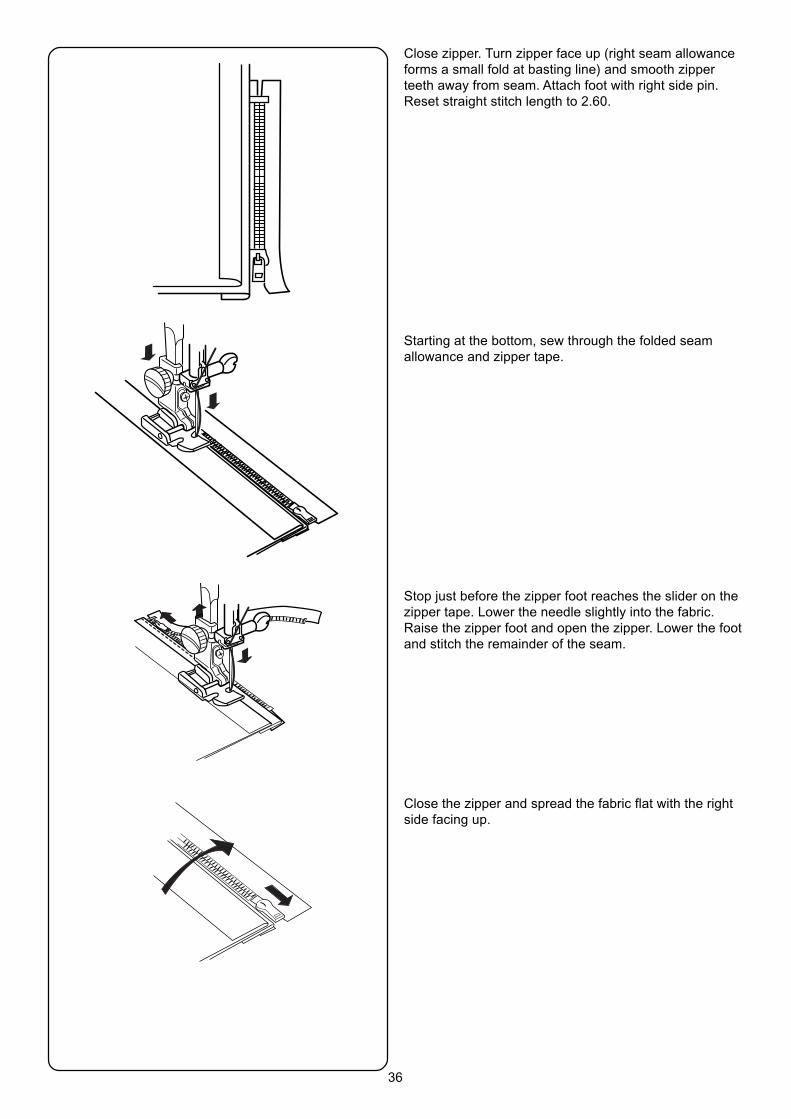
Close zipper. Turn zipper face up (right seam allowanceforms a small fold at basting line) and smooth zipperteeth away from seam. Attach foot with right side pin.Reset straight stitch length to 2.60.
Starting at the bottom, sew through the folded seamallowance and zipper tape.
Stop just before the zipper foot reaches the slider on thezipper tape. Lower the needle slightly into the fabric.Raise the zipper foot and open the zipper. Lower the footand stitch the remainder of the seam.
Close the zipper and spread the fabric flat with the rightside facing up.
37
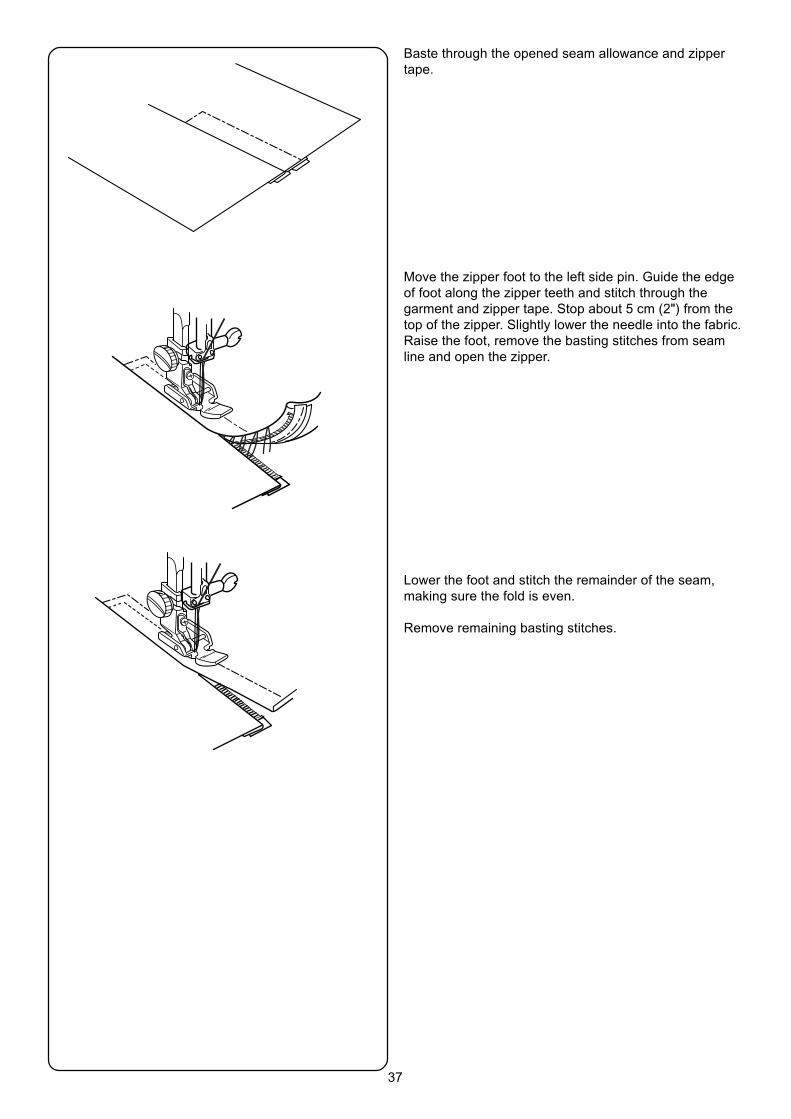
Baste through the opened seam allowance and zippertape.
Move the zipper foot to the left side pin. Guide the edgeof foot along the zipper teeth and stitch through thegarment and zipper tape. Stop about 5 cm (2") from thetop of the zipper. Slightly lower the needle into the fabric.Raise the foot, remove the basting stitches from seamline and open the zipper.
Lower the foot and stitch the remainder of the seam,making sure the fold is even.
Remove remaining basting stitches.
38
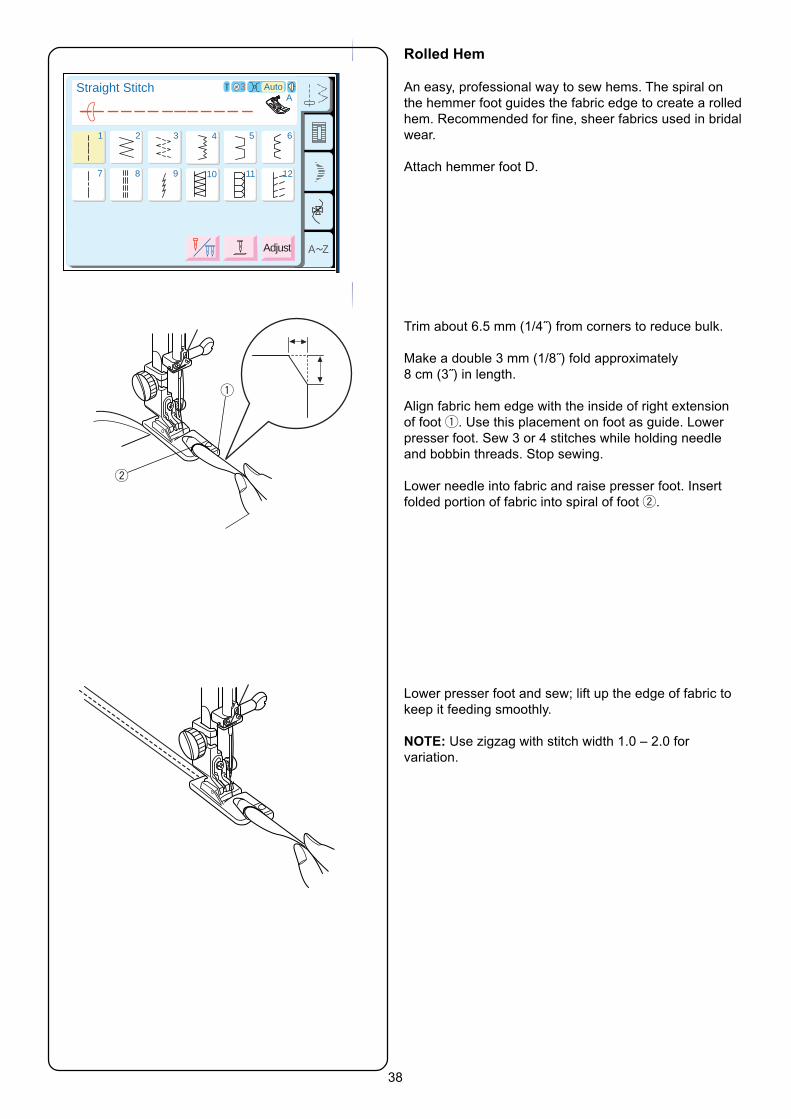
Rolled Hem
An easy, professional way to sew hems. The spiral onthe hemmer foot guides the fabric edge to create a rolledhem. Recommended for fine, sheer fabrics used in bridalwear.
Attach hemmer foot D.
Trim about 6.5 mm (1/4˝) from corners to reduce bulk.
Make a double 3 mm (1/8˝) fold approximately8 cm (3˝) in length.
Align fabric hem edge with the inside of right extensionof foot q. Use this placement on foot as guide. Lowerpresser foot. Sew 3 or 4 stitches while holding needleand bobbin threads. Stop sewing.
Lower needle into fabric and raise presser foot. Insertfolded portion of fabric into spiral of foot w.
Lower presser foot and sew; lift up the edge of fabric tokeep it feeding smoothly.
NOTE: Use zigzag with stitch width 1.0 – 2.0 forvariation.
q
w
A Z
2 3 4 5 6
7 8 9 10 11 12
AAuto
Adjust
3
1
SETSET
2 3 4 5 6
7 8 9 10 11 12
1
SET
?
Straight Stitch
39
A Z
2 3 4 5 6
7 8 9 10 11 12
AAuto
Adjust
3
1
Zigzag Stitch
2 3 4 5 6
7 8 9 10 11 12
1
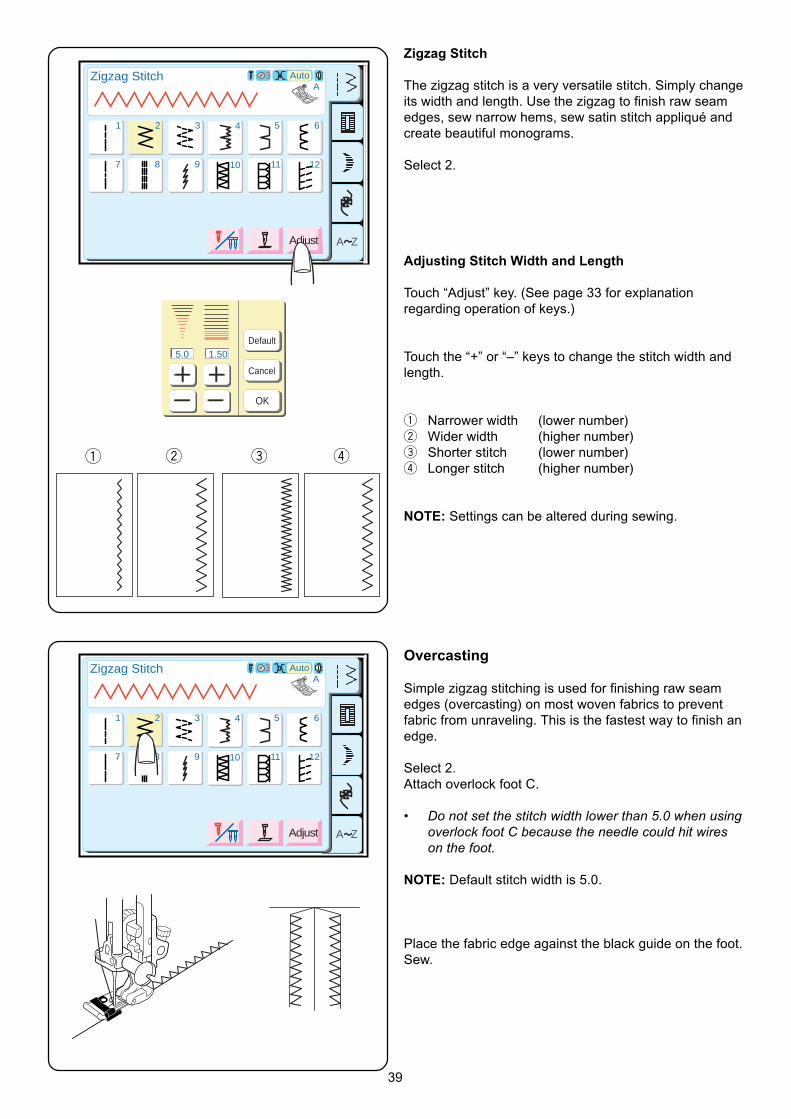
Zigzag Stitch
The zigzag stitch is a very versatile stitch. Simply changeits width and length. Use the zigzag to finish raw seamedges, sew narrow hems, sew satin stitch appliqué andcreate beautiful monograms.
Select 2.
Adjusting Stitch Width and Length
Touch “Adjust” key. (See page 33 for explanationregarding operation of keys.)
Touch the “+” or “–” keys to change the stitch width andlength.
q Narrower width (lower number)w Wider width (higher number)e Shorter stitch (lower number)r Longer stitch (higher number)
NOTE: Settings can be altered during sewing.
A Z
2 3 4 5 6
7 8 9 10 11 12
AAuto
Adjust
3
1
Zigzag Stitch
2 3 4 5 6
7 8 9 10 11 12
1
5.0 1.50Default
Cancel
OK
Default
Cancel
OK
q w e r
Overcasting
Simple zigzag stitching is used for finishing raw seamedges (overcasting) on most woven fabrics to preventfabric from unraveling. This is the fastest way to finish anedge.
Select 2.Attach overlock foot C.
• Do not set the stitch width lower than 5.0 when usingoverlock foot C because the needle could hit wireson the foot.
NOTE: Default stitch width is 5.0.
Place the fabric edge against the black guide on the foot.Sew.
40
A Z
2 3 4 5 6
7 8 9 10 11 12
AAuto
Adjust
3
1
Zigzag Stitch
2 3 4 5 6
7 8 9 10 11 12
1
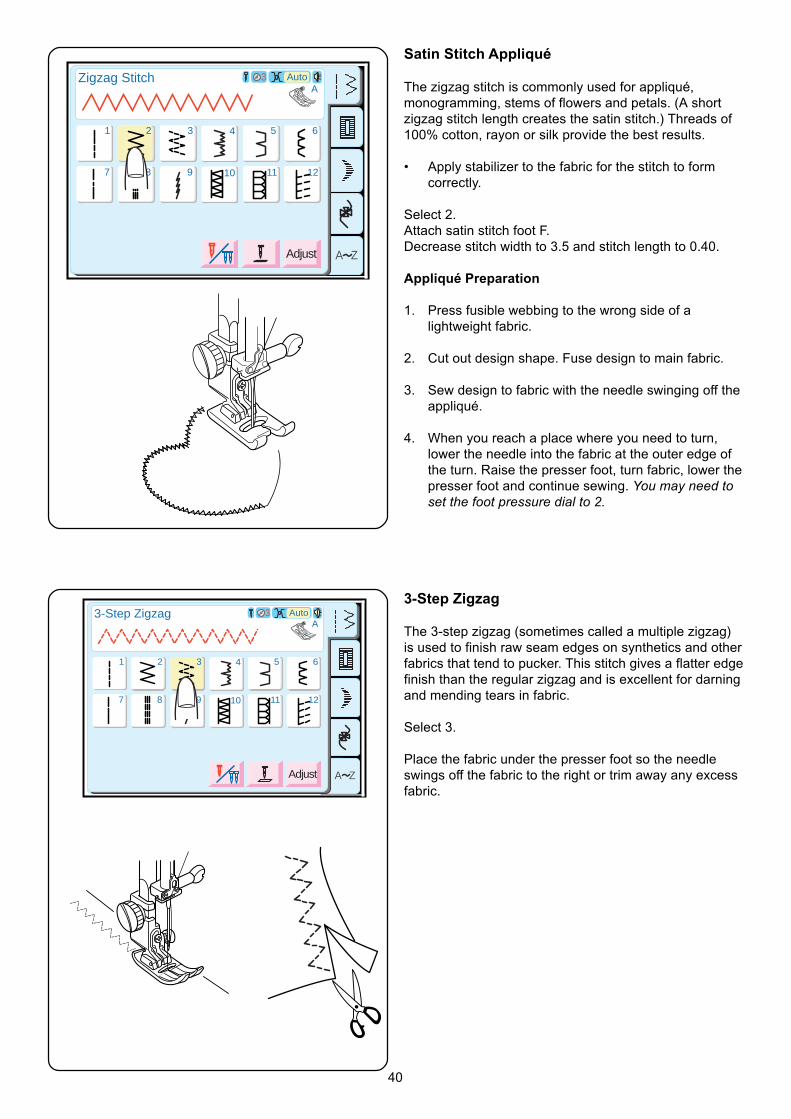
Satin Stitch Appliqué
The zigzag stitch is commonly used for appliqué,monogramming, stems of flowers and petals. (A shortzigzag stitch length creates the satin stitch.) Threads of100% cotton, rayon or silk provide the best results.
• Apply stabilizer to the fabric for the stitch to formcorrectly.
Select 2.Attach satin stitch foot F.Decrease stitch width to 3.5 and stitch length to 0.40.
Appliqué Preparation
1. Press fusible webbing to the wrong side of alightweight fabric.
2. Cut out design shape. Fuse design to main fabric.
3. Sew design to fabric with the needle swinging off theappliqué.
4. When you reach a place where you need to turn,lower the needle into the fabric at the outer edge ofthe turn. Raise the presser foot, turn fabric, lower thepresser foot and continue sewing. You may need toset the foot pressure dial to 2.
A Z
2 3 4 5 6
7 8 9 10 11 12
AAuto
Adjust
3
1
3-Step Zigzag
2 3 4 5 6
7 8 9 10 11 12
1
3-Step Zigzag
The 3-step zigzag (sometimes called a multiple zigzag)is used to finish raw seam edges on synthetics and otherfabrics that tend to pucker. This stitch gives a flatter edgefinish than the regular zigzag and is excellent for darningand mending tears in fabric.
Select 3.
Place the fabric under the presser foot so the needleswings off the fabric to the right or trim away any excessfabric.
41
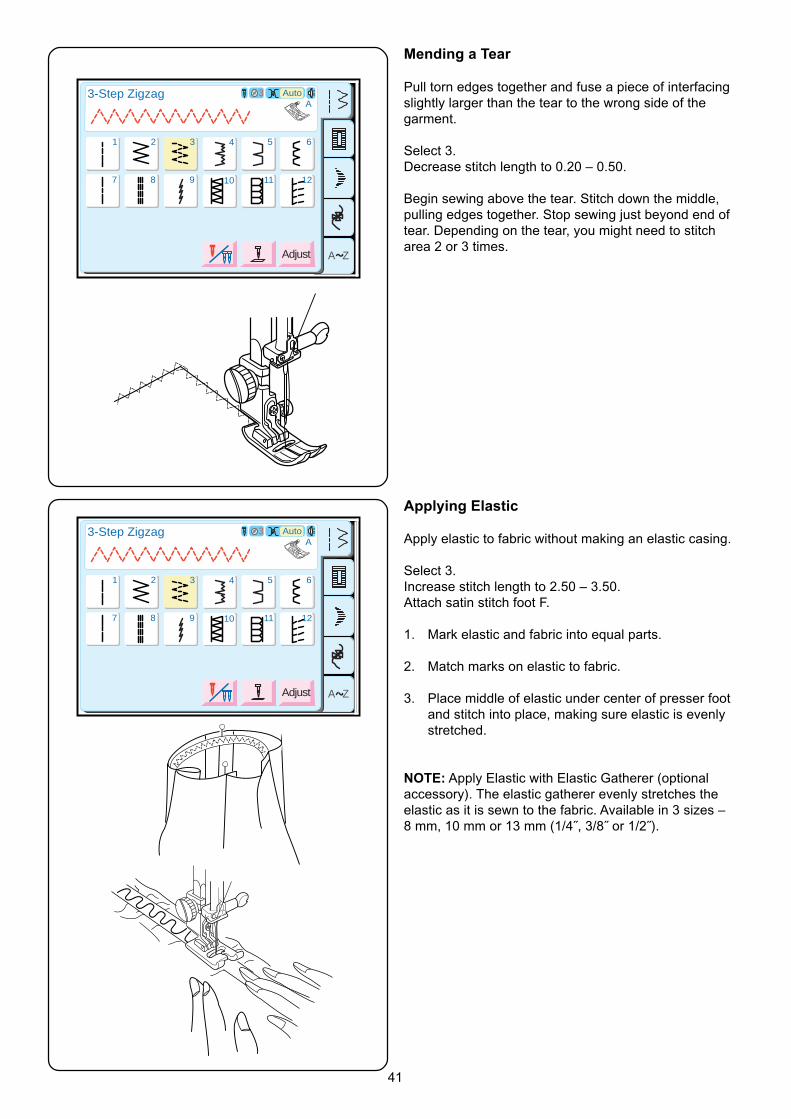
Mending a Tear
Pull torn edges together and fuse a piece of interfacingslightly larger than the tear to the wrong side of thegarment.
Select 3.Decrease stitch length to 0.20 – 0.50.
Begin sewing above the tear. Stitch down the middle,pulling edges together. Stop sewing just beyond end oftear. Depending on the tear, you might need to stitcharea 2 or 3 times.
A Z
2 3 4 5 6
7 8 9 10 11 12
AAuto
Adjust
3
1
3-Step Zigzag
2 3 4 5 6
7 8 9 10 11 12
1
A Z
2 3 4 5 6
7 8 9 10 11 12
AAuto
Adjust
3
1
3-Step Zigzag
2 3 4 5 6
7 8 9 10 11 12
1
Applying Elastic
Apply elastic to fabric without making an elastic casing.
Select 3.Increase stitch length to 2.50 – 3.50.Attach satin stitch foot F.
1. Mark elastic and fabric into equal parts.
2. Match marks on elastic to fabric.
3. Place middle of elastic under center of presser footand stitch into place, making sure elastic is evenlystretched.
NOTE: Apply Elastic with Elastic Gatherer (optionalaccessory). The elastic gatherer evenly stretches theelastic as it is sewn to the fabric. Available in 3 sizes –8 mm, 10 mm or 13 mm (1/4˝, 3/8˝ or 1/2˝).
42
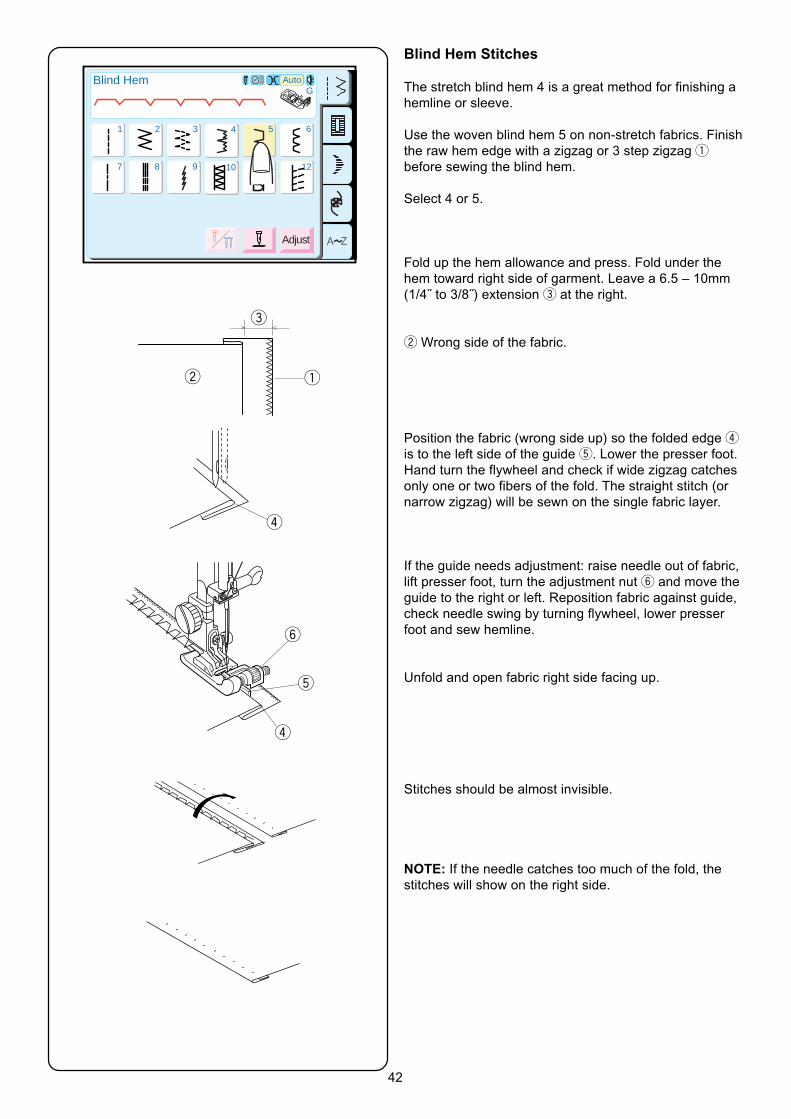
Blind Hem Stitches
The stretch blind hem 4 is a great method for finishing ahemline or sleeve.
Use the woven blind hem 5 on non-stretch fabrics. Finishthe raw hem edge with a zigzag or 3 step zigzag qbefore sewing the blind hem.
Select 4 or 5.
Fold up the hem allowance and press. Fold under thehem toward right side of garment. Leave a 6.5 – 10mm(1/4˝ to 3/8˝) extension e at the right.
w Wrong side of the fabric.
Position the fabric (wrong side up) so the folded edge ris to the left side of the guide t. Lower the presser foot.Hand turn the flywheel and check if wide zigzag catchesonly one or two fibers of the fold. The straight stitch (ornarrow zigzag) will be sewn on the single fabric layer.
If the guide needs adjustment: raise needle out of fabric,lift presser foot, turn the adjustment nut y and move theguide to the right or left. Reposition fabric against guide,check needle swing by turning flywheel, lower presserfoot and sew hemline.
Unfold and open fabric right side facing up.
Stitches should be almost invisible.
NOTE: If the needle catches too much of the fold, thestitches will show on the right side.
A Z
2 3 4 5 6
7 8 9 10 11 12
Auto
Adjust
3
1
Blind HemG
2 3 4 5 6
7 8 9 10 11 12
1
e
r
t
y
qw
r
43
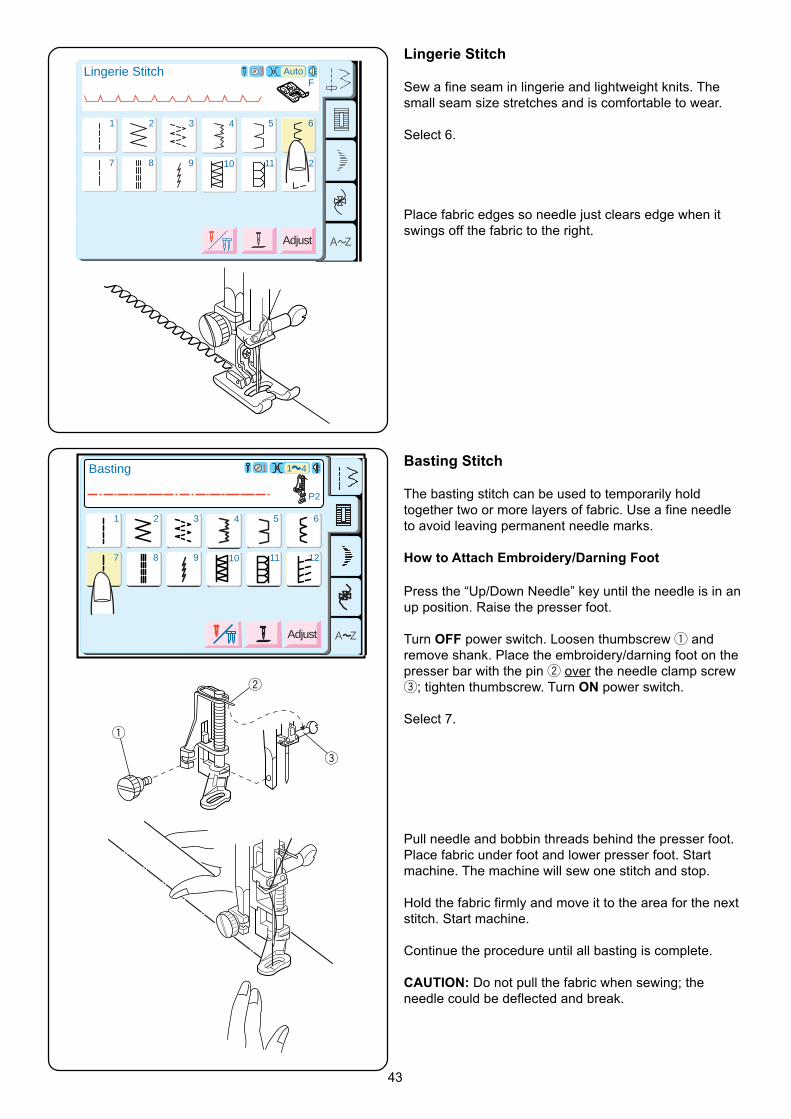
Lingerie Stitch
Sew a fine seam in lingerie and lightweight knits. Thesmall seam size stretches and is comfortable to wear.
Select 6.
Place fabric edges so needle just clears edge when itswings off the fabric to the right.
A Z
14
Adjust
Auto
13
Sensor
19 20 21
15 16 17 18
22 23 24
Basting
P2
1 41
2 3 4 5 6
7 8 9 10 11 12
1
Adjust
A Z
2 3 4 5 6
7 8 9 10 11 12
Auto
Adjust
3
1
Lingerie StitchF
2 3 4 5 6
7 8 9 10 11 12
1
Basting Stitch
The basting stitch can be used to temporarily holdtogether two or more layers of fabric. Use a fine needleto avoid leaving permanent needle marks.
How to Attach Embroidery/Darning Foot
Press the “Up/Down Needle” key until the needle is in anup position. Raise the presser foot.
Turn OFF power switch. Loosen thumbscrew q andremove shank. Place the embroidery/darning foot on thepresser bar with the pin w over the needle clamp screwe; tighten thumbscrew. Turn ON power switch.
Select 7.
Pull needle and bobbin threads behind the presser foot.Place fabric under foot and lower presser foot. Startmachine. The machine will sew one stitch and stop.
Hold the fabric firmly and move it to the area for the nextstitch. Start machine.
Continue the procedure until all basting is complete.
CAUTION: Do not pull the fabric when sewing; theneedle could be deflected and break.
q
w
e
44
A Z
Stretch Seam
2 3 4 5 6
7 8 9 10 11 12
AAuto
Adjust
3
1
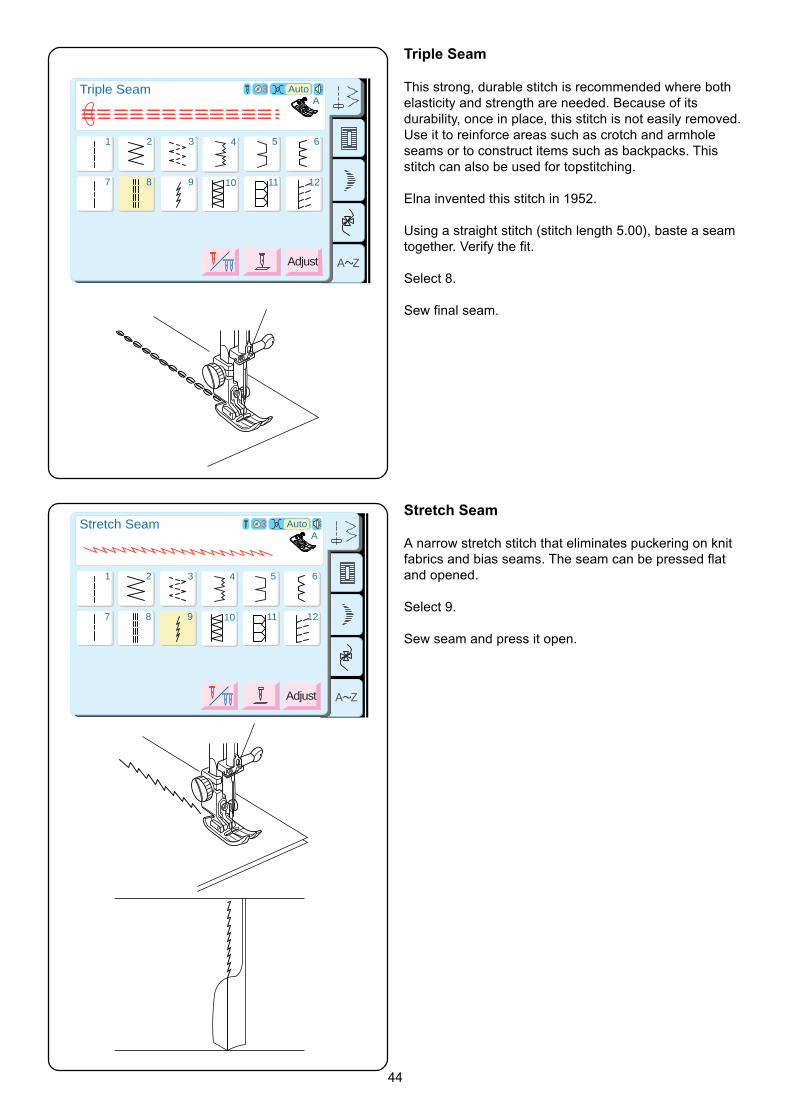
Triple Seam
This strong, durable stitch is recommended where bothelasticity and strength are needed. Because of itsdurability, once in place, this stitch is not easily removed.Use it to reinforce areas such as crotch and armholeseams or to construct items such as backpacks. Thisstitch can also be used for topstitching.
Elna invented this stitch in 1952.
Using a straight stitch (stitch length 5.00), baste a seamtogether. Verify the fit.
Select 8.
Sew final seam.
Stretch Seam
A narrow stretch stitch that eliminates puckering on knitfabrics and bias seams. The seam can be pressed flatand opened.
Select 9.
Sew seam and press it open.
A Z
Triple Seam
2 3 4 5 6
7 8 9 10 11 12
AAuto
Adjust
3
1
45
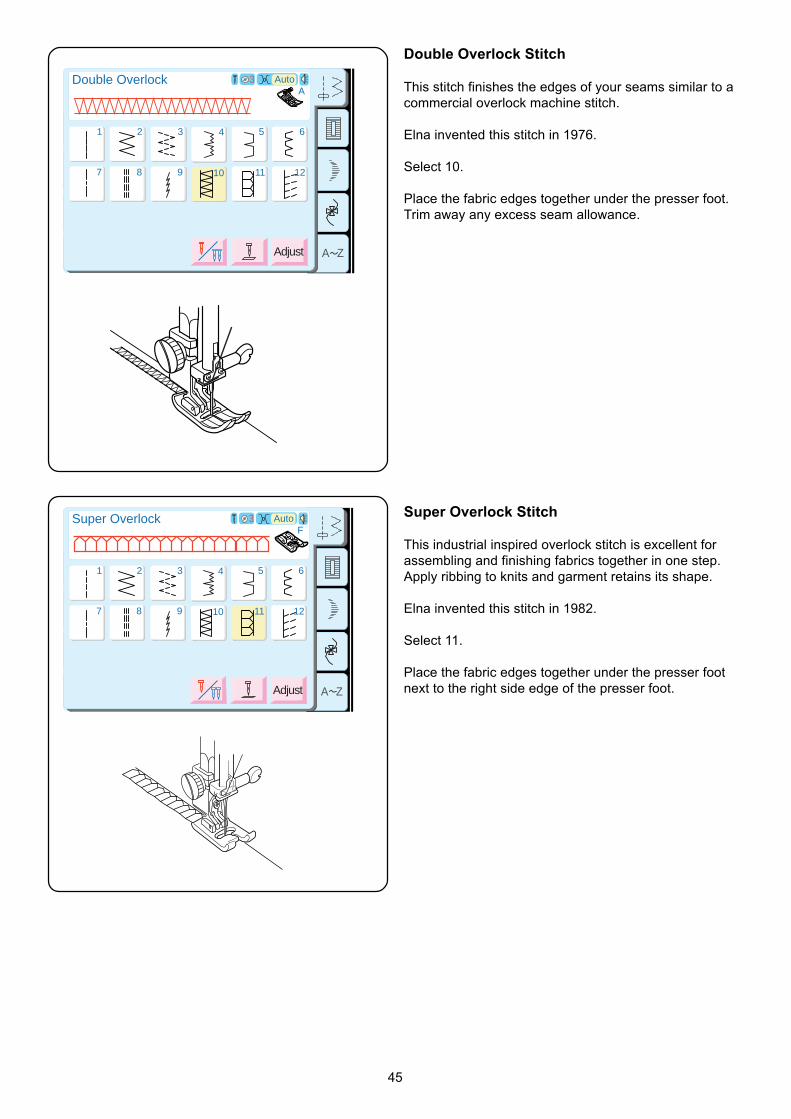
Double Overlock Stitch
This stitch finishes the edges of your seams similar to acommercial overlock machine stitch.
Elna invented this stitch in 1976.
Select 10.
Place the fabric edges together under the presser foot.Trim away any excess seam allowance.
Super Overlock Stitch
This industrial inspired overlock stitch is excellent forassembling and finishing fabrics together in one step.Apply ribbing to knits and garment retains its shape.
Elna invented this stitch in 1982.
Select 11.
Place the fabric edges together under the presser footnext to the right side edge of the presser foot.
A Z
Double Overlock
2 3 4 5 6
7 8 9 10 11 12
AAuto
Adjust
3
1
A Z
Super Overlock
2 3 4 5 6
7 8 9 10 11 12
FAuto
Adjust
3
1
46
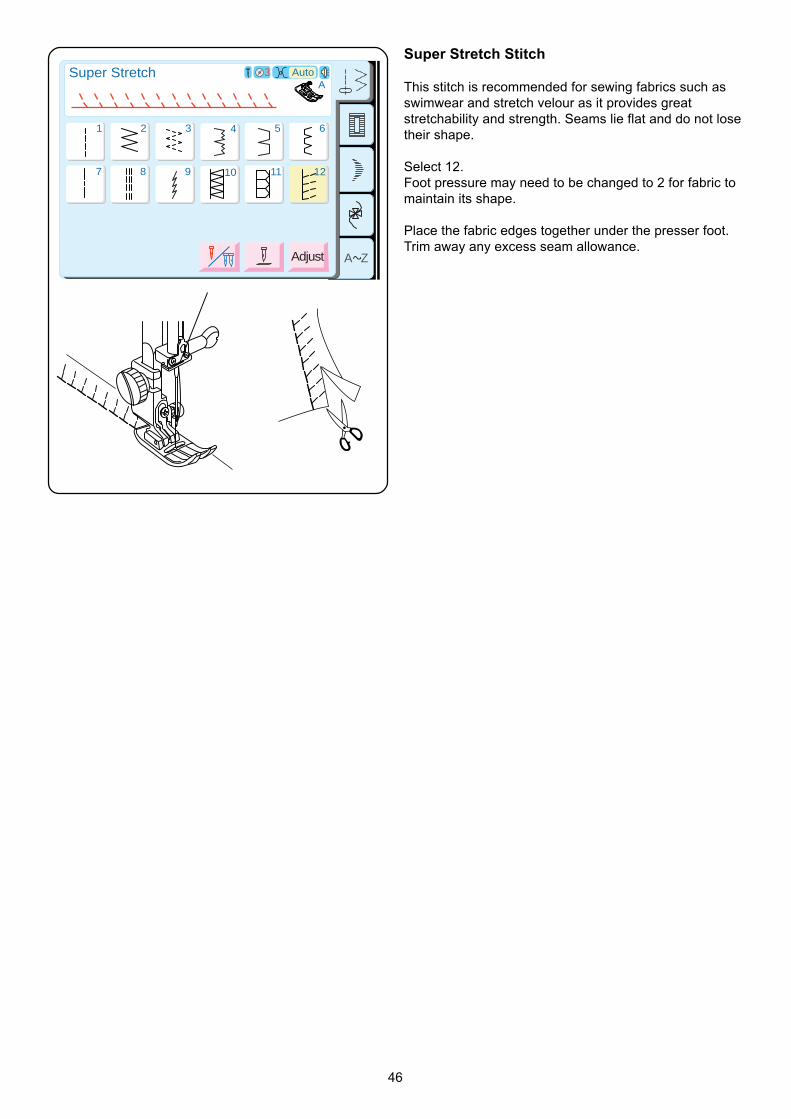
Super Stretch Stitch
This stitch is recommended for sewing fabrics such asswimwear and stretch velour as it provides greatstretchability and strength. Seams lie flat and do not losetheir shape.
Select 12.Foot pressure may need to be changed to 2 for fabric tomaintain its shape.
Place the fabric edges together under the presser foot.Trim away any excess seam allowance.
A Z
Super Stretch
2 3 4 5 6
7 8 9 10 11 12
AAuto
Adjust
3
1
47
A Z
SETSETSET
?
q
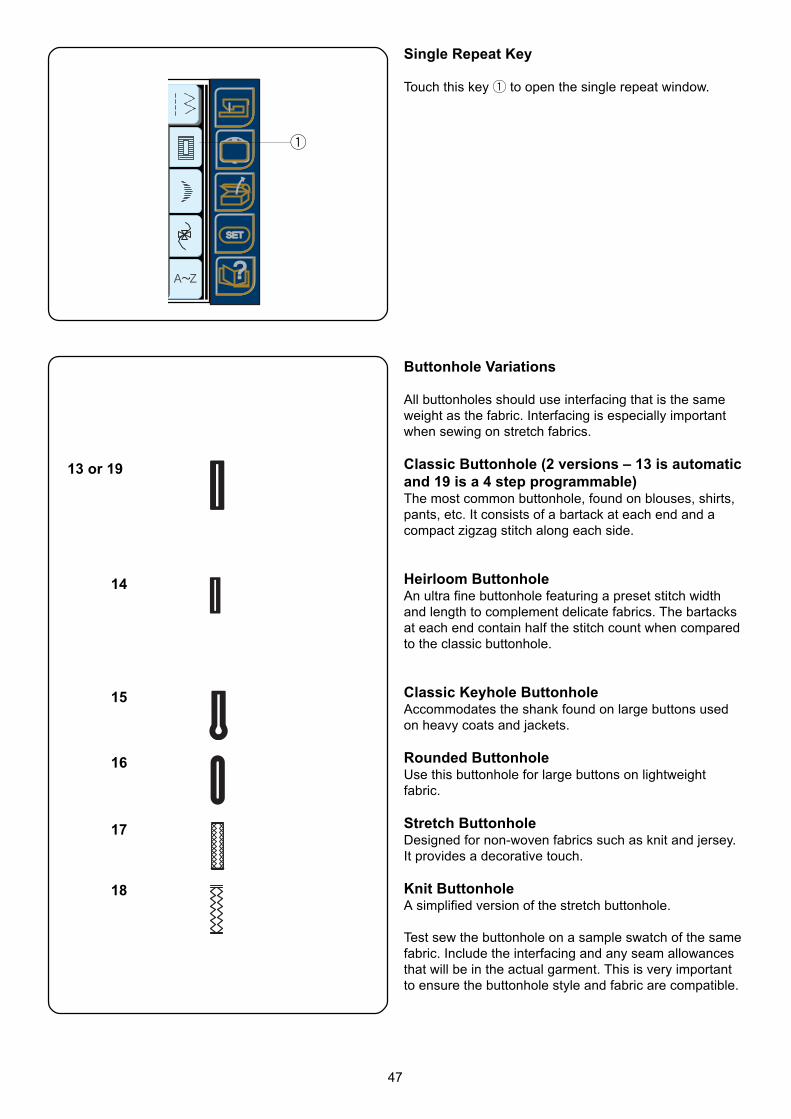
Single Repeat Key
Touch this key q to open the single repeat window.
Buttonhole Variations
All buttonholes should use interfacing that is the sameweight as the fabric. Interfacing is especially importantwhen sewing on stretch fabrics.
Classic Buttonhole (2 versions – 13 is automaticand 19 is a 4 step programmable)The most common buttonhole, found on blouses, shirts,pants, etc. It consists of a bartack at each end and acompact zigzag stitch along each side.
Heirloom ButtonholeAn ultra fine buttonhole featuring a preset stitch widthand length to complement delicate fabrics. The bartacksat each end contain half the stitch count when comparedto the classic buttonhole.
Classic Keyhole ButtonholeAccommodates the shank found on large buttons usedon heavy coats and jackets.
Rounded ButtonholeUse this buttonhole for large buttons on lightweightfabric.
Stretch ButtonholeDesigned for non-woven fabrics such as knit and jersey.It provides a decorative touch.
Knit ButtonholeA simplified version of the stretch buttonhole.
Test sew the buttonhole on a sample swatch of the samefabric. Include the interfacing and any seam allowancesthat will be in the actual garment. This is very importantto ensure the buttonhole style and fabric are compatible.
13 or 19
14
15
16
17
18
48
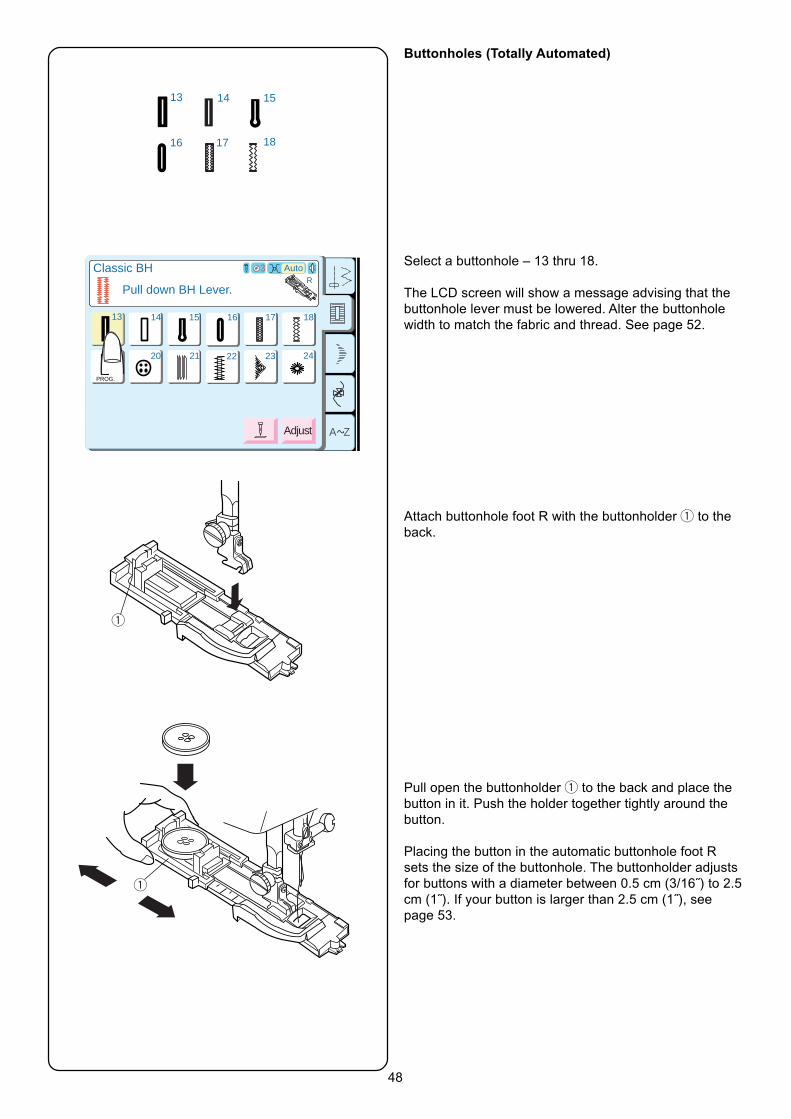
Buttonholes (Totally Automated)
Select a buttonhole – 13 thru 18.
The LCD screen will show a message advising that thebuttonhole lever must be lowered. Alter the buttonholewidth to match the fabric and thread. See page 52.
Attach buttonhole foot R with the buttonholder q to theback.
Pull open the buttonholder q to the back and place thebutton in it. Push the holder together tightly around thebutton.
Placing the button in the automatic buttonhole foot Rsets the size of the buttonhole. The buttonholder adjustsfor buttons with a diameter between 0.5 cm (3/16˝) to 2.5cm (1˝). If your button is larger than 2.5 cm (1˝), seepage 53.
A Z
Classic BH
14 15 16 17 18
19 20 21 22 23 24
R
Adjust
Pull down BH Lever.
Auto3
13
PROG.
q
q
14 15
1816 17
13
49
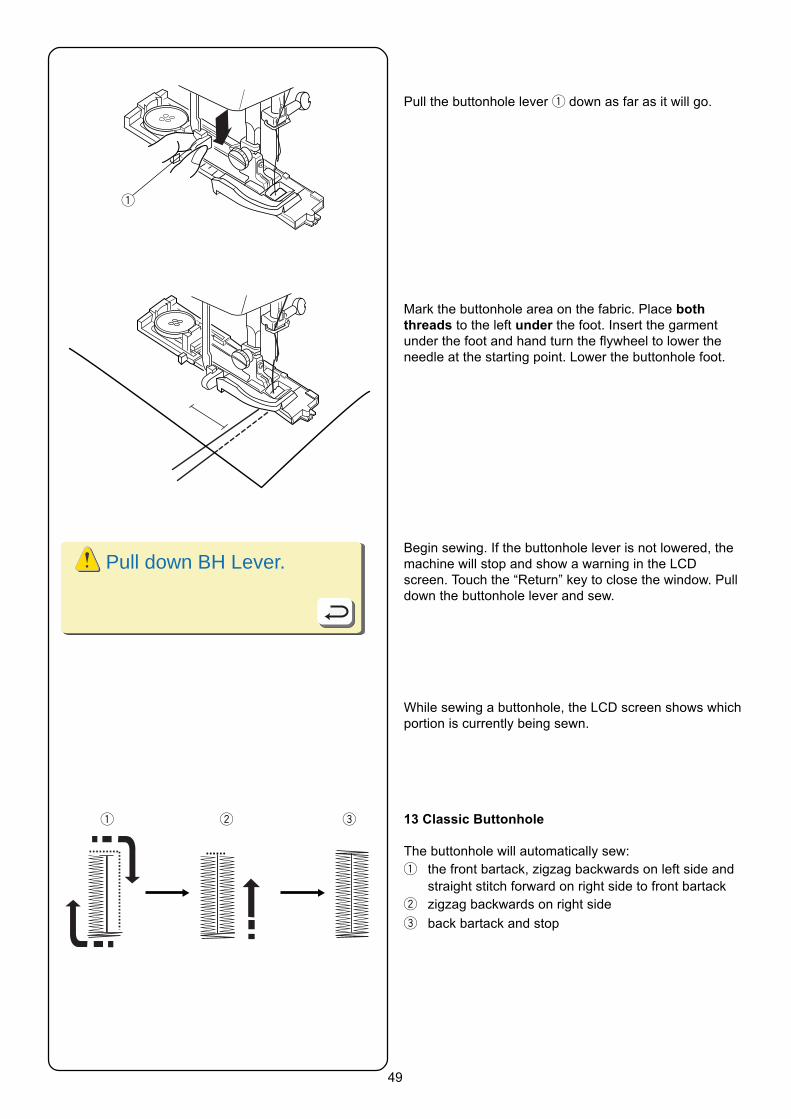
Pull the buttonhole lever q down as far as it will go.
Mark the buttonhole area on the fabric. Place boththreads to the left under the foot. Insert the garmentunder the foot and hand turn the flywheel to lower theneedle at the starting point. Lower the buttonhole foot.
Pull down BH Lever.
q
Begin sewing. If the buttonhole lever is not lowered, themachine will stop and show a warning in the LCDscreen. Touch the “Return” key to close the window. Pulldown the buttonhole lever and sew.
While sewing a buttonhole, the LCD screen shows whichportion is currently being sewn.
13 Classic Buttonhole
The buttonhole will automatically sew:q the front bartack, zigzag backwards on left side and
straight stitch forward on right side to front bartackw zigzag backwards on right side
e back bartack and stop
q w e

50
14 Heirloom Buttonhole
The buttonhole will automatically sew:q the front bartack, zigzag backwards on left side,
straight stitch forward on right side to front bartackw zigzag backwards on right side back bartack and
stop
15 Classic Keyhole Buttonhole
The buttonhole will automatically sew:q the front left half of keyhole, zigzag backwards on
left side and straight stitch on right side to frontw front right half of keyhole and zigzag backwards on
right sidee back bartack and stop
16 Rounded Buttonhole
The buttonhole will automatically sew:q the front left half, zigzag backwards on left side and
straight stitch on right side to frontw front right half and zigzag backward on right side
e back rounded end and stop
17 Stretch Buttonhole
The buttonhole will automatically sew:q straight stitch on left side backwards and cross stitch
forward on left sidew front bartack, straight stitch on right side backwards,
back bartack, cross stitch forward on right side andstop
q w e
q w e
q w
q w18 Knit Buttonhole
The buttonhole will automatically sew:q front bartack and triple zigzag backwards on left
side, back bartackw triple zigzag forward on right side and stop.
After the buttonhole is completed and the machine stopssewing, raise the presser foot.
q w
51
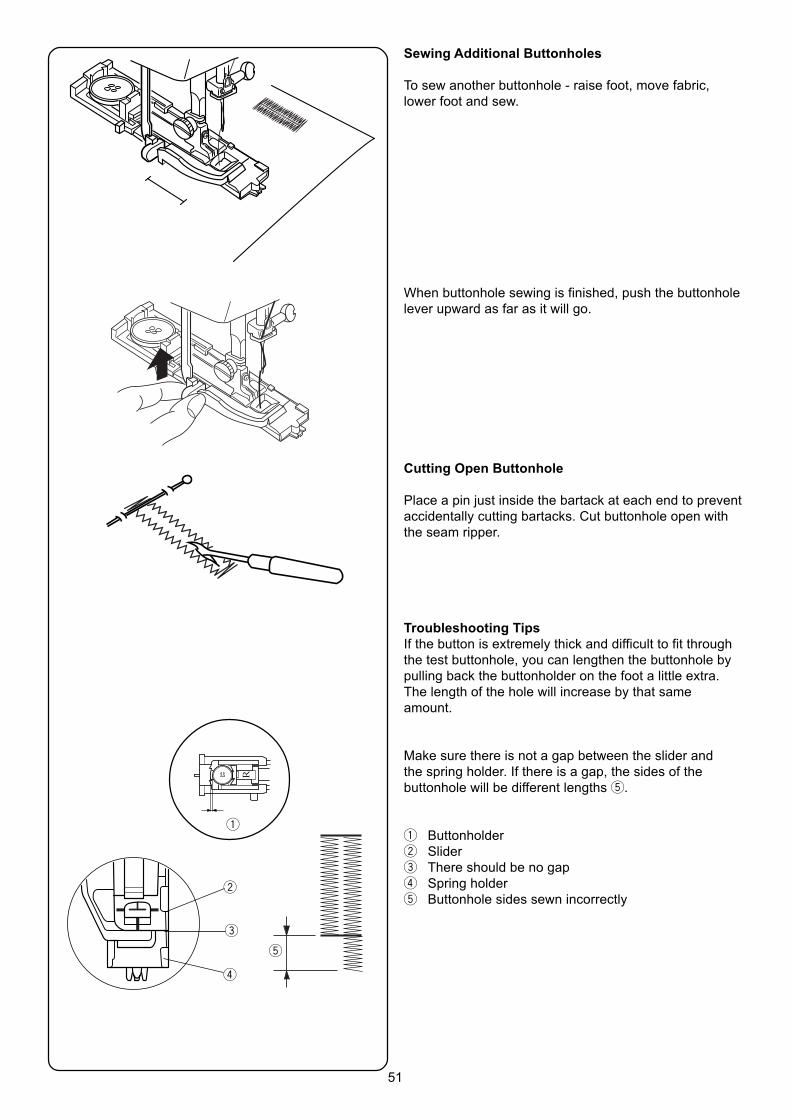
Sewing Additional Buttonholes
To sew another buttonhole - raise foot, move fabric,lower foot and sew.
When buttonhole sewing is finished, push the buttonholelever upward as far as it will go.
Cutting Open Buttonhole
Place a pin just inside the bartack at each end to preventaccidentally cutting bartacks. Cut buttonhole open withthe seam ripper.
Troubleshooting TipsIf the button is extremely thick and difficult to fit throughthe test buttonhole, you can lengthen the buttonhole bypulling back the buttonholder on the foot a little extra.The length of the hole will increase by that sameamount.
Make sure there is not a gap between the slider andthe spring holder. If there is a gap, the sides of thebuttonhole will be different lengths t.
q Buttonholderw Slidere There should be no gapr Spring holdert Buttonhole sides sewn incorrectly
w
e
r
t
q
52
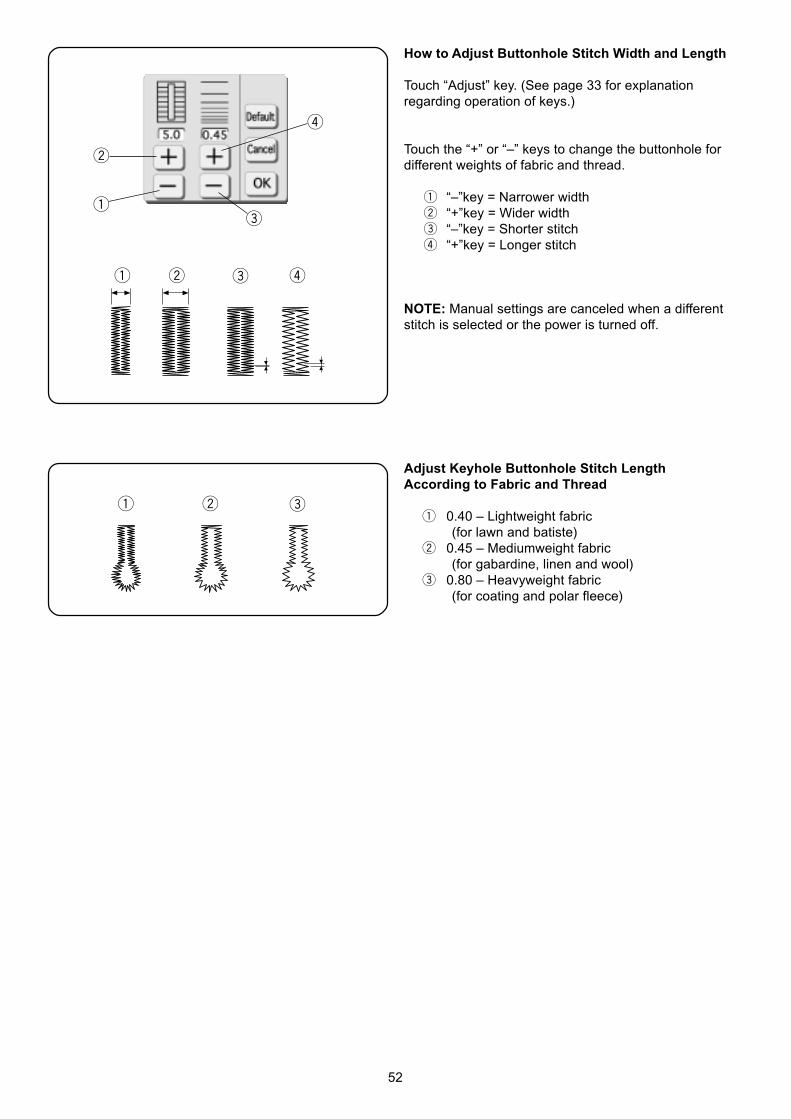
How to Adjust Buttonhole Stitch Width and Length
Touch “Adjust” key. (See page 33 for explanationregarding operation of keys.)
Touch the “+” or “–” keys to change the buttonhole fordifferent weights of fabric and thread.
q “–”key = Narrower widthw “+”key = Wider widthe “–”key = Shorter stitchr “+”key = Longer stitch
NOTE: Manual settings are canceled when a differentstitch is selected or the power is turned off.
Adjust Keyhole Buttonhole Stitch LengthAccording to Fabric and Thread
q 0.40 – Lightweight fabric(for lawn and batiste)
w 0.45 – Mediumweight fabric(for gabardine, linen and wool)
e 0.80 – Heavyweight fabric(for coating and polar fleece)
q w e r
q w e
w
q
r
e
53
A Z
PROG. Classic BH
14 15 16 17 18
19 20 21 22 23 24
R
Adjust
Pull Button Holder f irmly.
Auto3
13
PROG.
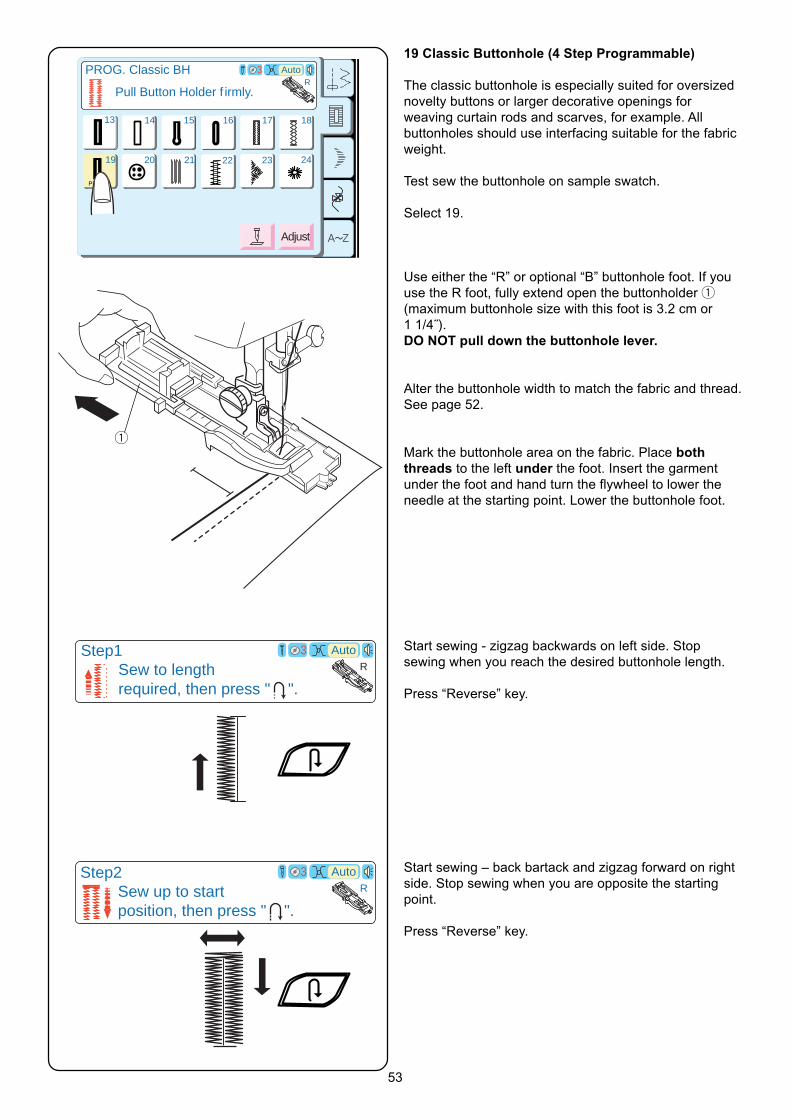
19 Classic Buttonhole (4 Step Programmable)
The classic buttonhole is especially suited for oversizednovelty buttons or larger decorative openings forweaving curtain rods and scarves, for example. Allbuttonholes should use interfacing suitable for the fabricweight.
Test sew the buttonhole on sample swatch.
Select 19.
Use either the “R” or optional “B” buttonhole foot. If youuse the R foot, fully extend open the buttonholder q(maximum buttonhole size with this foot is 3.2 cm or1 1/4˝).DO NOT pull down the buttonhole lever.
Alter the buttonhole width to match the fabric and thread.See page 52.
Mark the buttonhole area on the fabric. Place boththreads to the left under the foot. Insert the garmentunder the foot and hand turn the flywheel to lower theneedle at the starting point. Lower the buttonhole foot.
q
Auto3Step1RSew to length
required, then press " ".
Step2Sew up to startposition, then press " ".
Auto3R
Start sewing - zigzag backwards on left side. Stopsewing when you reach the desired buttonhole length.
Press “Reverse” key.
Start sewing – back bartack and zigzag forward on rightside. Stop sewing when you are opposite the startingpoint.
Press “Reverse” key.

54
Start sewing – front bartack, lockstitch and machine willautomatically stop when buttonhole is completed.Step3
RMachine stops whenBH is completed.
Auto3
Restart for the same size.
Different size Cancel
Sewing Additional Buttonholes
To sew another buttonhole the same size - raise foot,move fabric, lower foot and sew.
Reset Buttonhole Size
To sew a buttonhole a different size (or to adjust stitchlength), reset the machine by touching “Cancel” key orreselect buttonhole. Sew new buttonhole size usingsame method.
Cutting Open Buttonhole
See page 51.
Troubleshooting TipIf there is a difference in stitch length (density) betweenthe right and left sides of the buttonhole, use the fineadjustment screw. See page 13.
55
A Z
PROG. Classic BH
14 15 16 17 18
19 20 21 22 23 24
R
Adjust
Pull Button Holder f irmly.
Auto3
13
PROG.
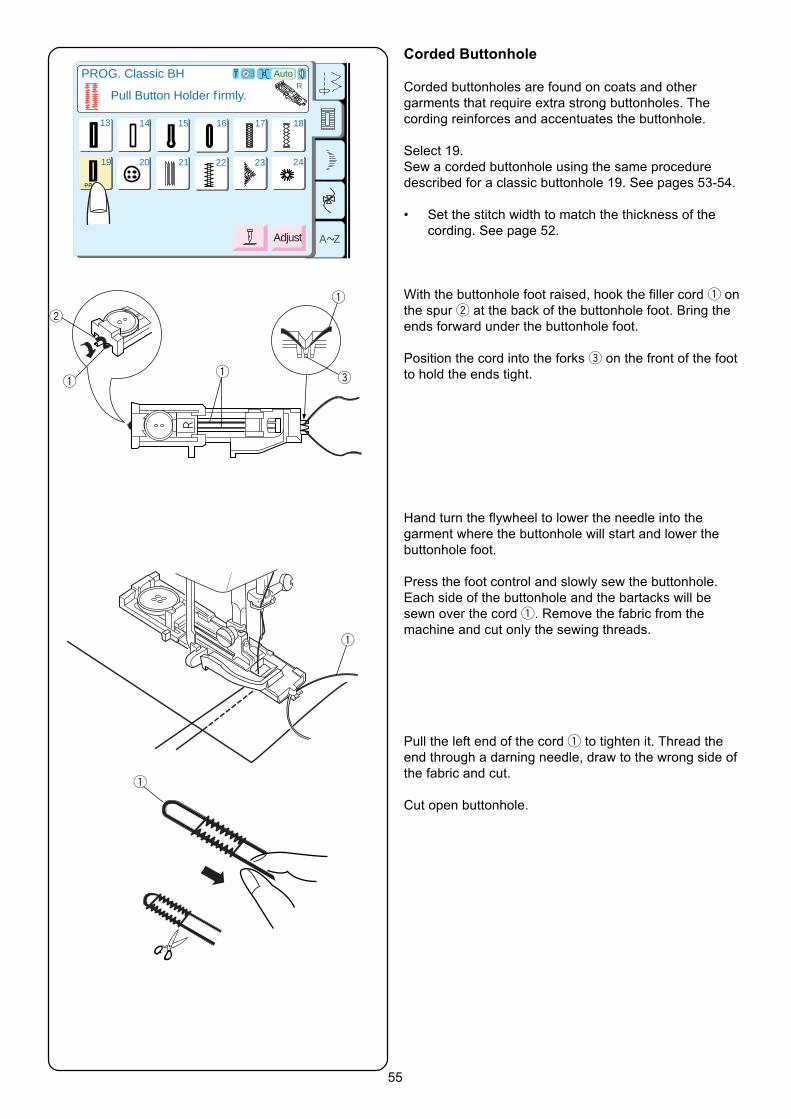
Corded Buttonhole
Corded buttonholes are found on coats and othergarments that require extra strong buttonholes. Thecording reinforces and accentuates the buttonhole.
Select 19.Sew a corded buttonhole using the same proceduredescribed for a classic buttonhole 19. See pages 53-54.
• Set the stitch width to match the thickness of thecording. See page 52.
With the buttonhole foot raised, hook the filler cord q onthe spur w at the back of the buttonhole foot. Bring theends forward under the buttonhole foot.
Position the cord into the forks e on the front of the footto hold the ends tight.
Hand turn the flywheel to lower the needle into thegarment where the buttonhole will start and lower thebuttonhole foot.
Press the foot control and slowly sew the buttonhole.Each side of the buttonhole and the bartacks will besewn over the cord q. Remove the fabric from themachine and cut only the sewing threads.
Pull the left end of the cord q to tighten it. Thread theend through a darning needle, draw to the wrong side ofthe fabric and cut.
Cut open buttonhole.
q
w
q
q
e
q
q
56
A Z
Button Sewing
14
Adjust
Auto
13
Sensor
Auto3
SET
T
19 20 21
15 16 17 18
22 23 24
SETSETSET
?
SETSETSET
?
14 15 16 17 18
19 20 21 22 23 24
13
PROG.
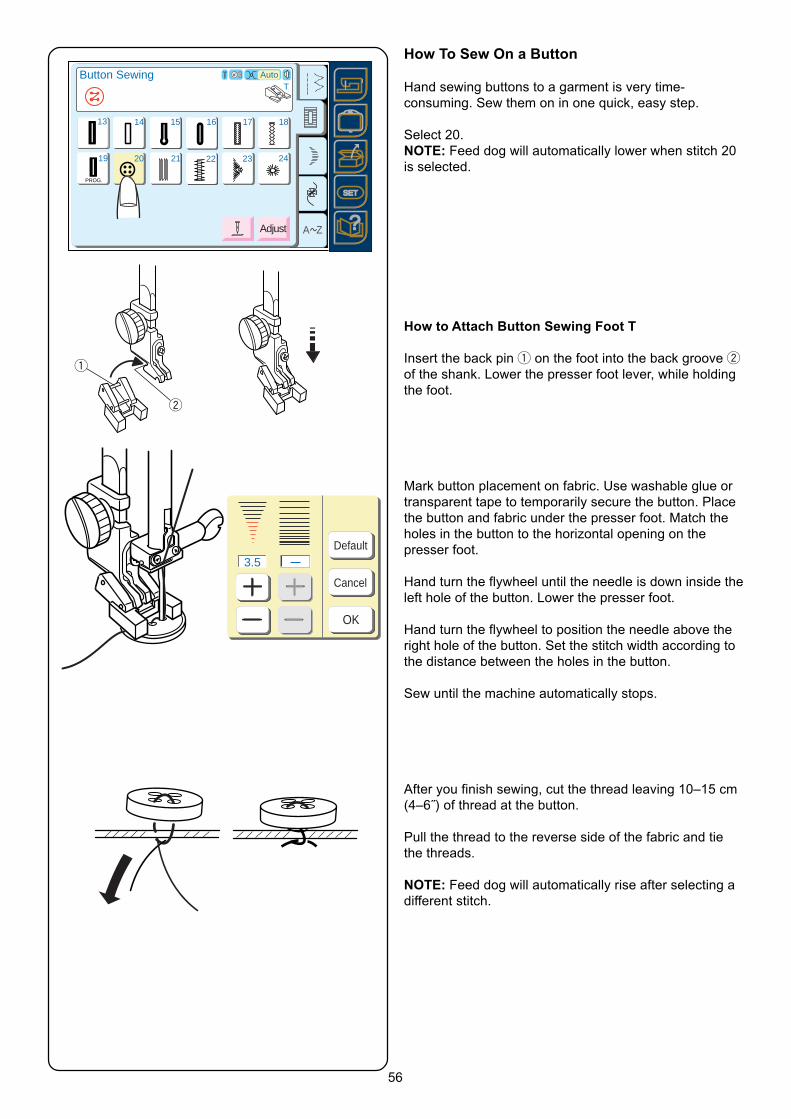
How To Sew On a Button
Hand sewing buttons to a garment is very time-consuming. Sew them on in one quick, easy step.
Select 20.NOTE: Feed dog will automatically lower when stitch 20is selected.
How to Attach Button Sewing Foot T
Insert the back pin q on the foot into the back groove wof the shank. Lower the presser foot lever, while holdingthe foot.
Mark button placement on fabric. Use washable glue ortransparent tape to temporarily secure the button. Placethe button and fabric under the presser foot. Match theholes in the button to the horizontal opening on thepresser foot.
Hand turn the flywheel until the needle is down inside theleft hole of the button. Lower the presser foot.
Hand turn the flywheel to position the needle above theright hole of the button. Set the stitch width according tothe distance between the holes in the button.
Sew until the machine automatically stops.
After you finish sewing, cut the thread leaving 10–15 cm(4–6˝) of thread at the button.
Pull the thread to the reverse side of the fabric and tiethe threads.
NOTE: Feed dog will automatically rise after selecting adifferent stitch.
3.5Default
Cancel
OK
Default
Cancel
OK
q
w
57
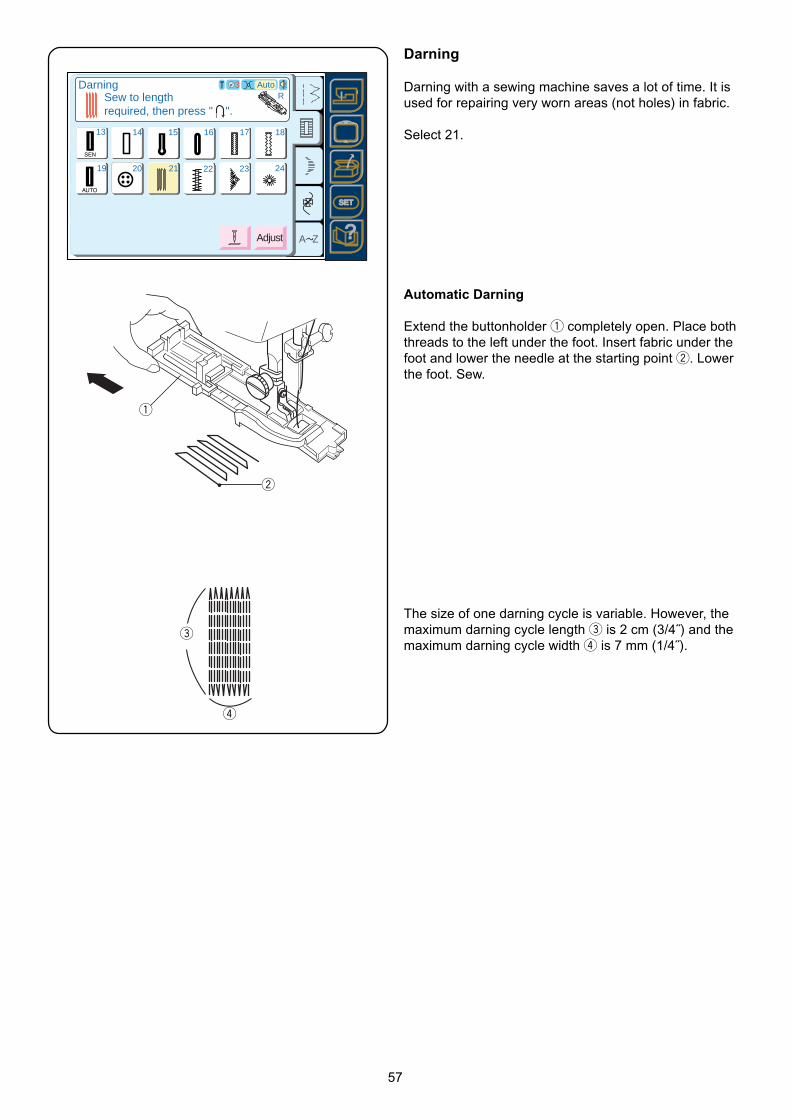
Darning
Darning with a sewing machine saves a lot of time. It isused for repairing very worn areas (not holes) in fabric.
Select 21.
Automatic Darning
Extend the buttonholder q completely open. Place boththreads to the left under the foot. Insert fabric under thefoot and lower the needle at the starting point w. Lowerthe foot. Sew.
The size of one darning cycle is variable. However, themaximum darning cycle length e is 2 cm (3/4˝) and themaximum darning cycle width r is 7 mm (1/4˝).
A Z
14
Adjust
Auto
13
Sensor
SET
19 20 21
15 16 17 18
22 23 24
DarningSew to lengthrequired, then press " ".
RAuto3
SETSETSET
?
SETSETSET
?
14
Auto
13
Sensor
19 20 21
15 16 17 18
22 23 24
14 15 16 17 18
19 20 21 22 23 24
13
q
w
e
r
58
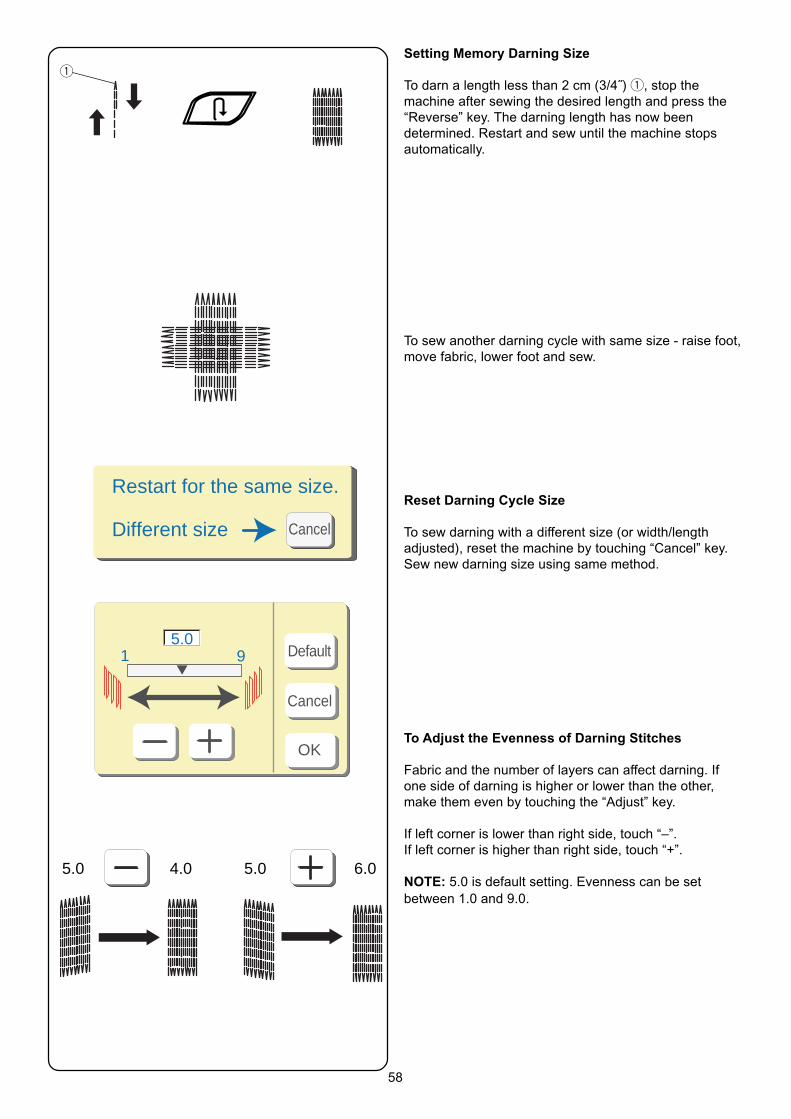
Setting Memory Darning Size
To darn a length less than 2 cm (3/4˝) q, stop themachine after sewing the desired length and press the“Reverse” key. The darning length has now beendetermined. Restart and sew until the machine stopsautomatically.
To sew another darning cycle with same size - raise foot,move fabric, lower foot and sew.
Reset Darning Cycle Size
To sew darning with a different size (or width/lengthadjusted), reset the machine by touching “Cancel” key.Sew new darning size using same method.
To Adjust the Evenness of Darning Stitches
Fabric and the number of layers can affect darning. Ifone side of darning is higher or lower than the other,make them even by touching the “Adjust” key.
If left corner is lower than right side, touch “–”.If left corner is higher than right side, touch “+”.
NOTE: 5.0 is default setting. Evenness can be setbetween 1.0 and 9.0.
Default
Cancel
OK
Default
Cancel
OK
1 95.0
q
Restart for the same size.
Different size Cancel
5.0 4.0 5.0 6.0

59
Bartacks
A bartack is a reinforced stitch used on garment areasthat receive extra stress like pockets, belt loops andzippers.
Select 22.
Automatic Bartack
Place the fabric under presser foot. Lower presser foot.Sew until the machine automatically stops.A 1.5 cm (5/8˝) bartack is sewn.
Touch the “Adjust” key to change bartack width ordensity.
Make a longer bartack by combining bartacks untildesired length is obtained.
Setting Memory Bartack Size
It is possible to sew a bartack length shorter than 1.5 cm(5/8˝).
Place the fabric under presser foot. Lower presser foot.Sew until the desired bartack length q is sewn. Stopand press the “Reverse” key. Sew until the machineautomatically stops.
To sew another bartack the same size - raise foot, movefabric, lower foot and sew.
Reset Bartack Size
To sew a bartack a different size (or after using Adjustkey), reset the machine by touching “Cancel” key. Sewnew bartack size using same method.
Fine Adjustment Screw - Very heavy fabrics may requirethe use of the fine adjustment screw. See page 13.
A Z
14
Adjust
Auto
13
Sensor
SET
19 20 21
15 16 17 18
22 23 24
BartackSew to lengthrequired, then press " ".
FAuto3
SETSETSET
?
SETSETSET
?
14
Auto
13
Sensor
19 20 21
15 16 17 18
22 23 24
14 15 16 17 18
19 20 21 22 23 24
13
PROG.
Restart for the same size.
Different size Cancel
q
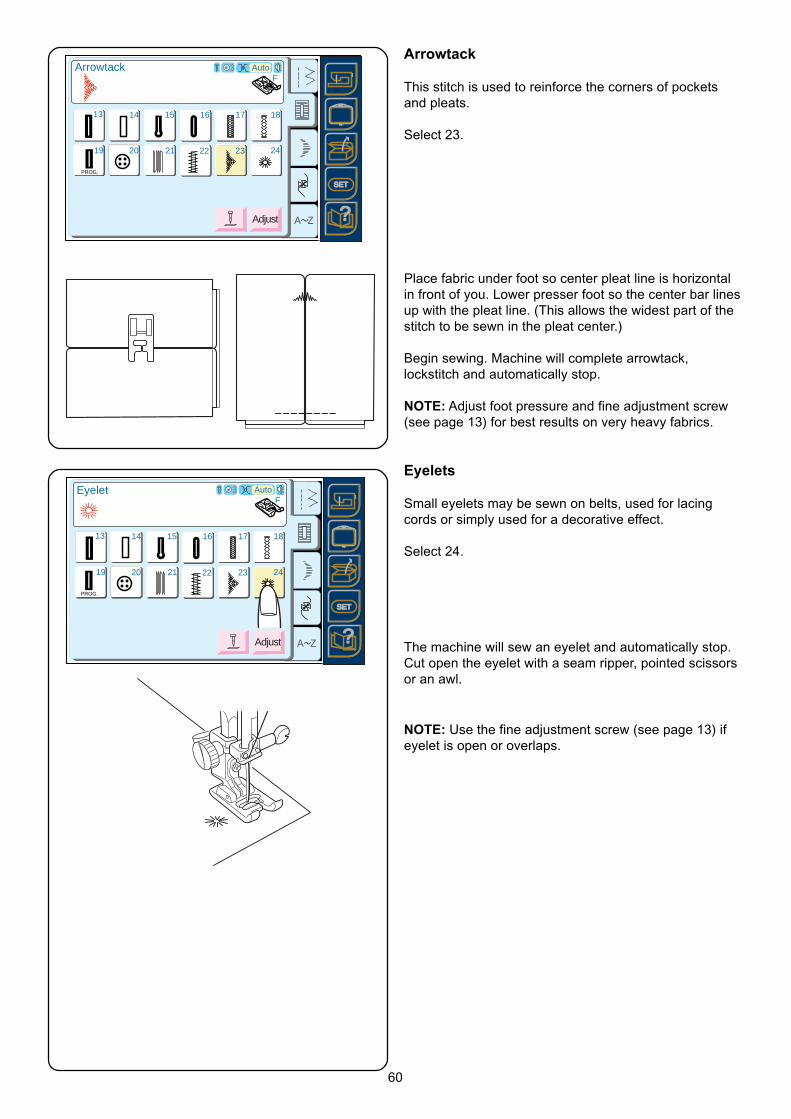
60
Arrowtack
This stitch is used to reinforce the corners of pocketsand pleats.
Select 23.
Place fabric under foot so center pleat line is horizontalin front of you. Lower presser foot so the center bar linesup with the pleat line. (This allows the widest part of thestitch to be sewn in the pleat center.)
Begin sewing. Machine will complete arrowtack,lockstitch and automatically stop.
NOTE: Adjust foot pressure and fine adjustment screw(see page 13) for best results on very heavy fabrics.
Eyelets
Small eyelets may be sewn on belts, used for lacingcords or simply used for a decorative effect.
Select 24.
The machine will sew an eyelet and automatically stop.Cut open the eyelet with a seam ripper, pointed scissorsor an awl.
A Z
14
Adjust
Auto
13
Sensor
SET
19 20 21
15 16 17 18
22 23 24
FAuto3Eyelet
SETSETSET
?
SETSETSET
?
14
Auto
13
Sensor
19 20 21
15 16 17 18
22 23 24
14 15 16 17 18
19 20 21 22 23 24
13
PROG.
A Z
14
Adjust
Auto
13
Sensor
SET
19 20 21
15 16 17 18
22 23 24
ArrowtackF
Auto3
SETSETSET
?
SETSETSET
?
14
Auto
13
Sensor
19 20 21
15 16 17 18
22 23 24
14 15 16 17 18
19 20 21 22 23 24
13
PROG.
NOTE: Use the fine adjustment screw (see page 13) ifeyelet is open or overlaps.
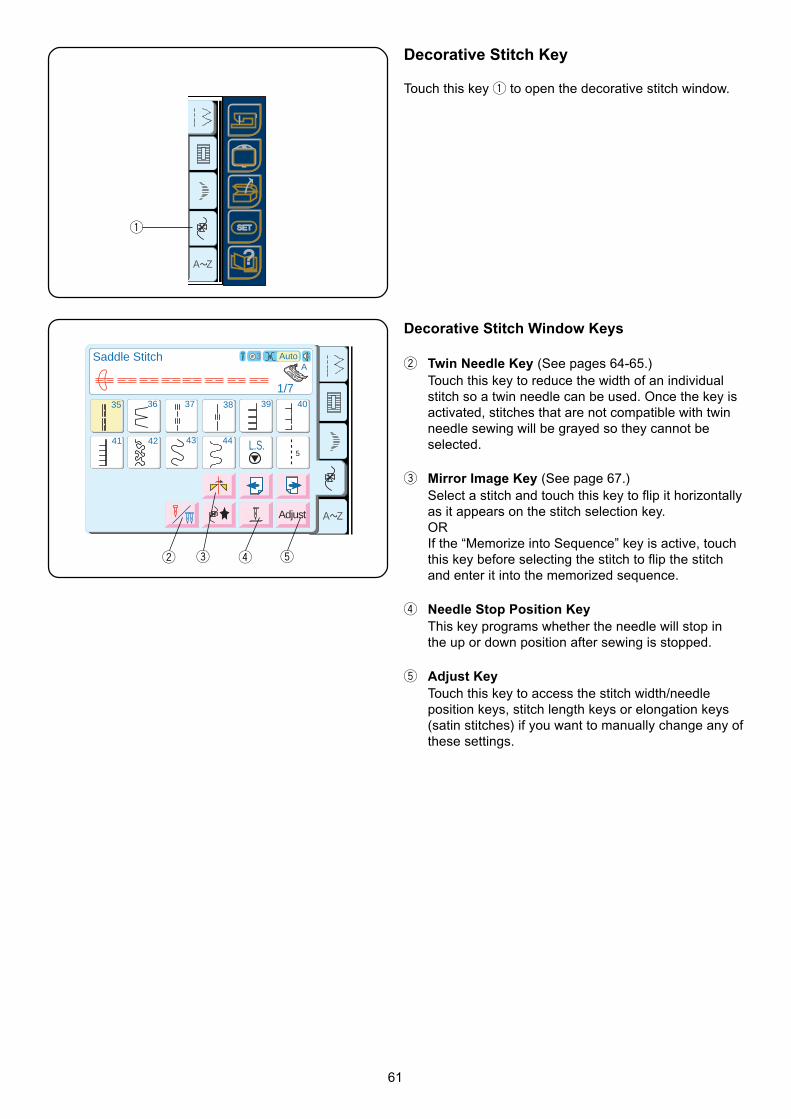
61
Decorative Stitch Key
Touch this key q to open the decorative stitch window.
Decorative Stitch Window Keys
w Twin Needle Key (See pages 64-65.)Touch this key to reduce the width of an individualstitch so a twin needle can be used. Once the key isactivated, stitches that are not compatible with twinneedle sewing will be grayed so they cannot beselected.
e Mirror Image Key (See page 67.)Select a stitch and touch this key to flip it horizontallyas it appears on the stitch selection key.ORIf the “Memorize into Sequence” key is active, touchthis key before selecting the stitch to flip the stitchand enter it into the memorized sequence.
r Needle Stop Position KeyThis key programs whether the needle will stop inthe up or down position after sewing is stopped.
t Adjust KeyTouch this key to access the stitch width/needleposition keys, stitch length keys or elongation keys(satin stitches) if you want to manually change any ofthese settings.
A Z
35 36 37 38 39 40
41 42 43 44
Adjust
L.S
AAuto3
35 36 37
1/7
Saddle Stitch
38 39 40
41 42 43 44
Adjust
L.S
35 36 37 38 39 40
41 42 43 44 L.S
35 36 37 38 39 40
41 42 43 44 L.S.5
A Z
SETSETSET
?
q
w e r t
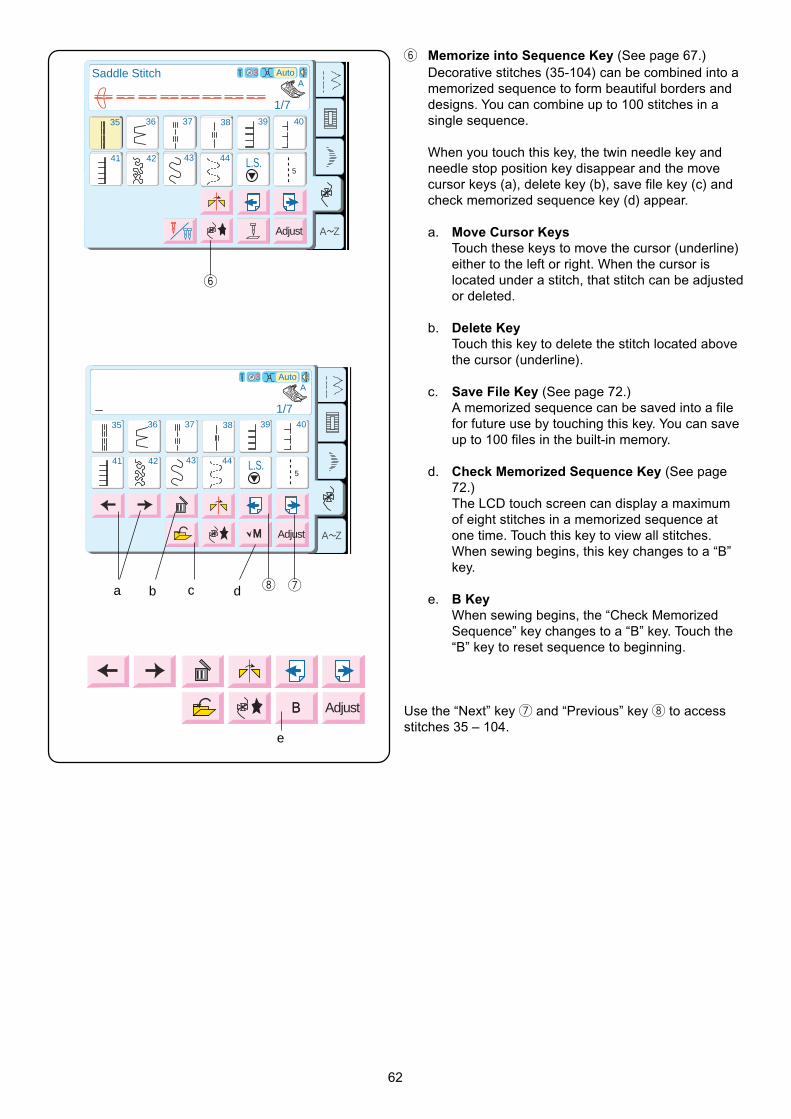
62
y Memorize into Sequence Key (See page 67.)Decorative stitches (35-104) can be combined into amemorized sequence to form beautiful borders anddesigns. You can combine up to 100 stitches in asingle sequence.
When you touch this key, the twin needle key andneedle stop position key disappear and the movecursor keys (a), delete key (b), save file key (c) andcheck memorized sequence key (d) appear.
a. Move Cursor KeysTouch these keys to move the cursor (underline)either to the left or right. When the cursor islocated under a stitch, that stitch can be adjustedor deleted.
b. Delete KeyTouch this key to delete the stitch located abovethe cursor (underline).
c. Save File Key (See page 72.)A memorized sequence can be saved into a filefor future use by touching this key. You can saveup to 100 files in the built-in memory.
d. Check Memorized Sequence Key (See page72.)The LCD touch screen can display a maximumof eight stitches in a memorized sequence atone time. Touch this key to view all stitches.When sewing begins, this key changes to a “B”key.
e. B KeyWhen sewing begins, the “Check MemorizedSequence” key changes to a “B” key. Touch the“B” key to reset sequence to beginning.
Use the “Next” key u and “Previous” key i to accessstitches 35 – 104.
A Z
35 36 37 38 39 40
41 42 43 44
Adjust
L.S
AAuto3
35 36 37
1/7
Saddle Stitch
38 39 40
41 42 43 44
Adjust
L.S
35 36 37 38 39 40
41 42 43 44 L.S
35 36 37 38 39 40
41 42 43 44 L.S.5
y
A Z
35 36 37 38 39 40
41 42 43 44
Adjust
L.S
AAuto3
35 36 37
1/738 39 40
41 42 43 44
Adjust
L.S
35 36 37 38 39 40
41 42 43 44 L.S
35 36 37 38 39 40
41 42 43 44 L.S.5
M
AdjustBB
d i ucba
e
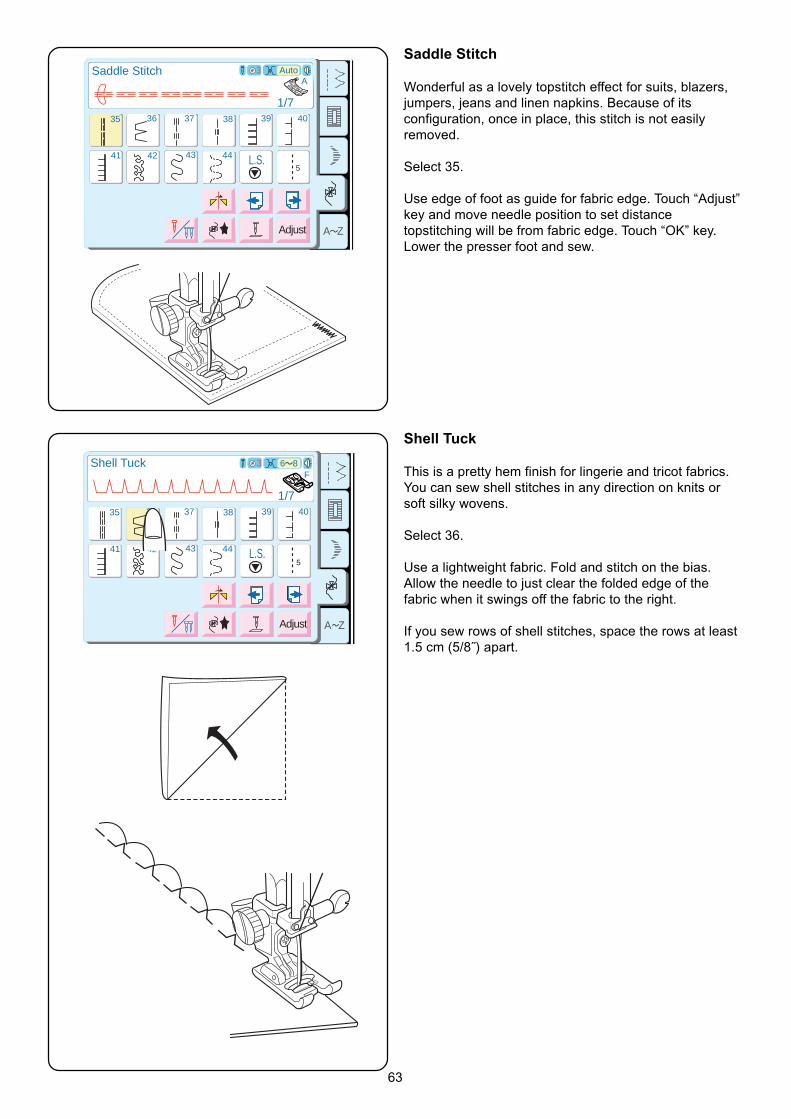
63
A Z
35 36 37 38 39 40
41 42 43 44
Adjust
L.S
3
35 36 37
1/738 39 40
41 42 43 44
Adjust
L.S.
6 8Shell TuckF
5
Saddle Stitch
Wonderful as a lovely topstitch effect for suits, blazers,jumpers, jeans and linen napkins. Because of itsconfiguration, once in place, this stitch is not easilyremoved.
Select 35.
Use edge of foot as guide for fabric edge. Touch “Adjust”key and move needle position to set distancetopstitching will be from fabric edge. Touch “OK” key.Lower the presser foot and sew.
Shell Tuck
This is a pretty hem finish for lingerie and tricot fabrics.You can sew shell stitches in any direction on knits orsoft silky wovens.
Select 36.
Use a lightweight fabric. Fold and stitch on the bias.Allow the needle to just clear the folded edge of thefabric when it swings off the fabric to the right.
If you sew rows of shell stitches, space the rows at least1.5 cm (5/8˝) apart.
A Z
35 36 37 38 39 40
41 42 43 44
Adjust
L.S
AAuto3
35 36 37
1/7
Saddle Stitch
38 39 40
41 42 43 44
Adjust
L.S
35 36 37 38 39 40
41 42 43 44 L.S
35 36 37 38 39 40
41 42 43 44 L.S.5
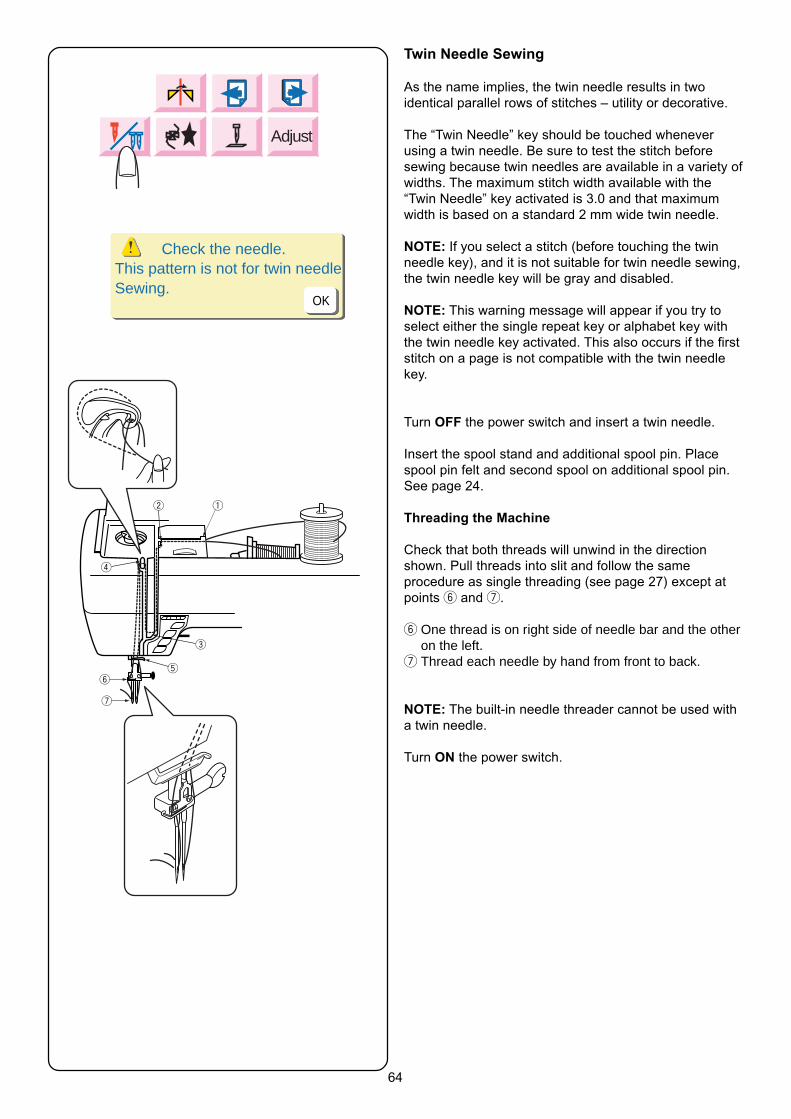
64
Twin Needle Sewing
As the name implies, the twin needle results in twoidentical parallel rows of stitches – utility or decorative.
The “Twin Needle” key should be touched wheneverusing a twin needle. Be sure to test the stitch beforesewing because twin needles are available in a variety ofwidths. The maximum stitch width available with the“Twin Needle” key activated is 3.0 and that maximumwidth is based on a standard 2 mm wide twin needle.
NOTE: If you select a stitch (before touching the twinneedle key), and it is not suitable for twin needle sewing,the twin needle key will be gray and disabled.
NOTE: This warning message will appear if you try toselect either the single repeat key or alphabet key withthe twin needle key activated. This also occurs if the firststitch on a page is not compatible with the twin needlekey.
Turn OFF the power switch and insert a twin needle.
Insert the spool stand and additional spool pin. Placespool pin felt and second spool on additional spool pin.See page 24.
Threading the Machine
Check that both threads will unwind in the directionshown. Pull threads into slit and follow the sameprocedure as single threading (see page 27) except atpoints y and u.
y One thread is on right side of needle bar and the otheron the left.
u Thread each needle by hand from front to back.
NOTE: The built-in needle threader cannot be used witha twin needle.
Turn ON the power switch.
qw
e
r
y
u
t
AdjustAdjust
Check the needle.This pattern is not for twin needleSewing.
OK
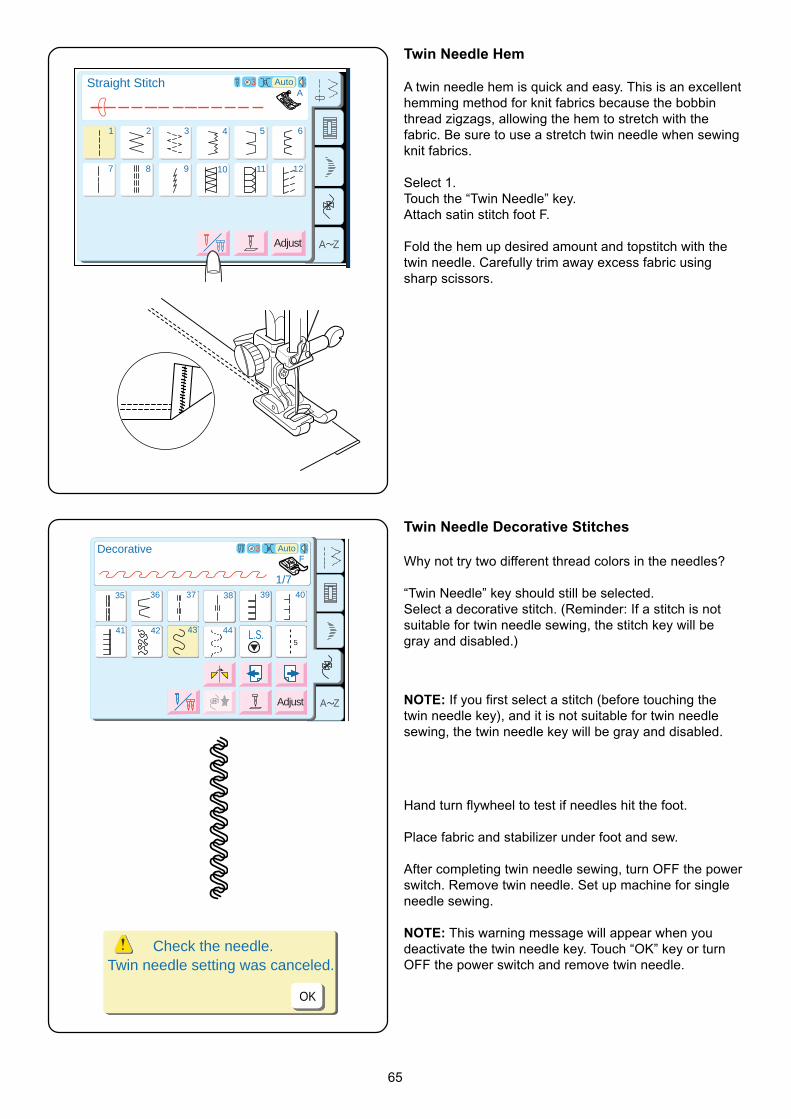
65
A Z
2 3 4 5 6
7 8 9 10 11 12
AAuto
Adjust
3
1
SETSET
2 3 4 5 6
7 8 9 10 11 12
1
SET
?
Straight Stitch
Twin Needle Hem
A twin needle hem is quick and easy. This is an excellenthemming method for knit fabrics because the bobbinthread zigzags, allowing the hem to stretch with thefabric. Be sure to use a stretch twin needle when sewingknit fabrics.
Select 1.Touch the “Twin Needle” key.Attach satin stitch foot F.
Fold the hem up desired amount and topstitch with thetwin needle. Carefully trim away excess fabric usingsharp scissors.
Twin Needle Decorative Stitches
Why not try two different thread colors in the needles?
“Twin Needle” key should still be selected.Select a decorative stitch. (Reminder: If a stitch is notsuitable for twin needle sewing, the stitch key will begray and disabled.)
Hand turn flywheel to test if needles hit the foot.
Place fabric and stabilizer under foot and sew.
After completing twin needle sewing, turn OFF the powerswitch. Remove twin needle. Set up machine for singleneedle sewing.
NOTE: This warning message will appear when youdeactivate the twin needle key. Touch “OK” key or turnOFF the power switch and remove twin needle.
A Z
35 36 37 38 39 40
41 42 43 44
Adjust
L.S
FAuto3
35 36 37
1/7
Decorative
38 39 40
41 42 43 44
Adjust
L.S
35 36 37 38 39 40
41 42 43 44 L.S
35 36 37 38 39 40
41 42 43 44 L.S.5
Check the needle.Twin needle setting was canceled.
OK
NOTE: If you first select a stitch (before touching thetwin needle key), and it is not suitable for twin needlesewing, the twin needle key will be gray and disabled.
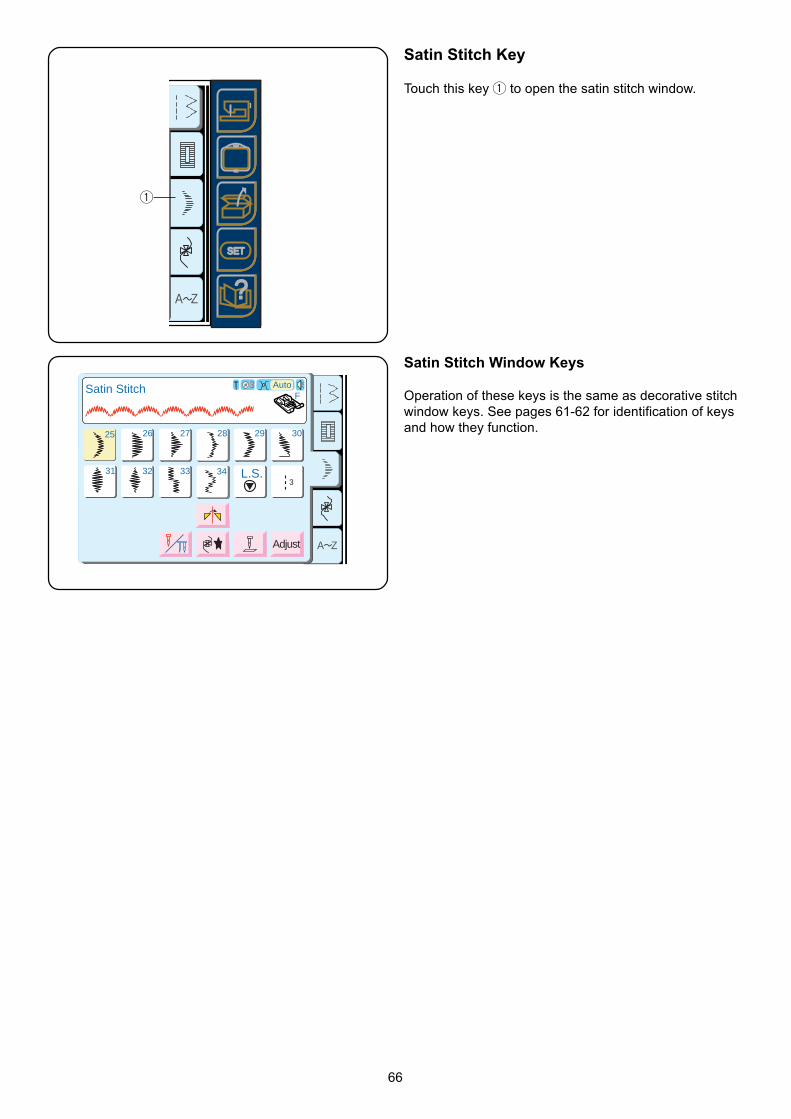
66
Satin Stitch Key
Touch this key q to open the satin stitch window.
A Z
SETSETSET
?
q
A ZAdjust
FAuto3
25 26 27 28 29 30
31 32 33 34 L.S.
Satin Stitch
3
Satin Stitch Window Keys
Operation of these keys is the same as decorative stitchwindow keys. See pages 61-62 for identification of keysand how they function.
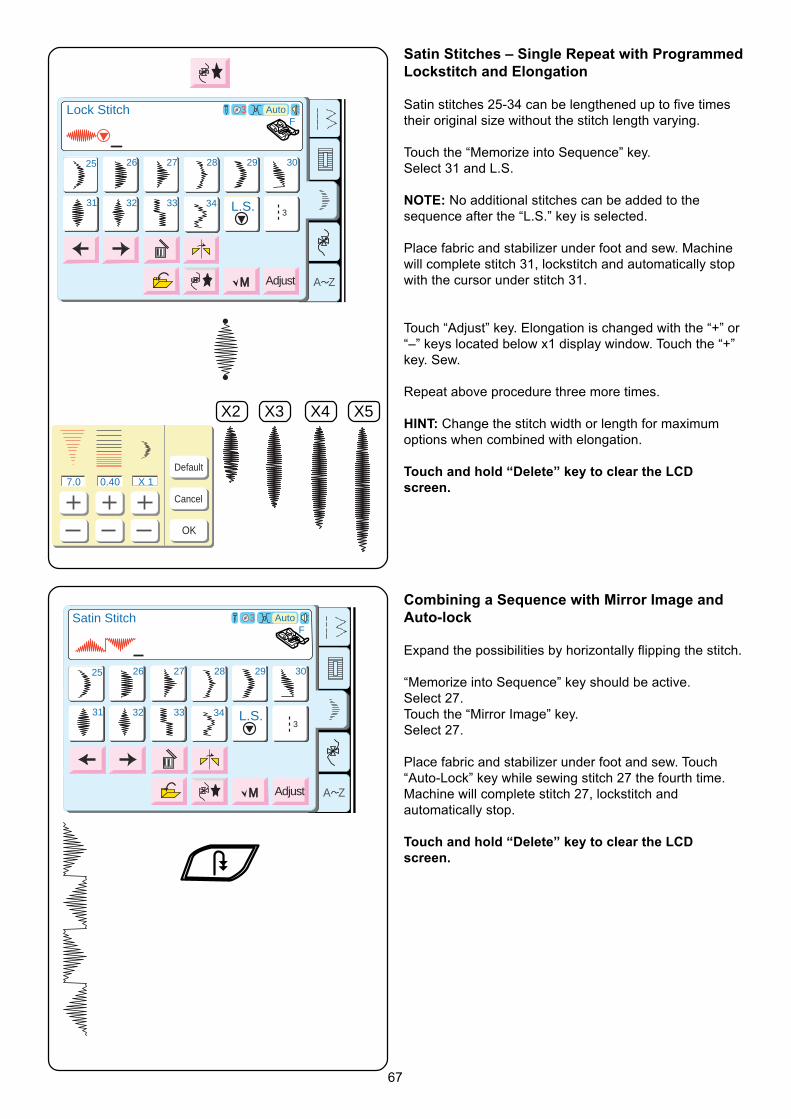
67
A ZAdjust
FAuto3
25 26 27 28 29 30
31 32 33 34 L.S
M
Lock Stitch
25 26 27 28 29 30
31 32 33 34 L.S
25 26 27 28 29 30
31 32 33 34 L.S. 3
Satin Stitches – Single Repeat with ProgrammedLockstitch and Elongation
Satin stitches 25-34 can be lengthened up to five timestheir original size without the stitch length varying.
Touch the “Memorize into Sequence” key.Select 31 and L.S.
NOTE: No additional stitches can be added to thesequence after the “L.S.” key is selected.
Place fabric and stabilizer under foot and sew. Machinewill complete stitch 31, lockstitch and automatically stopwith the cursor under stitch 31.
Touch “Adjust” key. Elongation is changed with the “+” or“–” keys located below x1 display window. Touch the “+”key. Sew.
Repeat above procedure three more times.
HINT: Change the stitch width or length for maximumoptions when combined with elongation.
Touch and hold “Delete” key to clear the LCDscreen.
Combining a Sequence with Mirror Image andAuto-lock
Expand the possibilities by horizontally flipping the stitch.
“Memorize into Sequence” key should be active.Select 27.Touch the “Mirror Image” key.Select 27.
Place fabric and stabilizer under foot and sew. Touch“Auto-Lock” key while sewing stitch 27 the fourth time.Machine will complete stitch 27, lockstitch andautomatically stop.
Touch and hold “Delete” key to clear the LCDscreen.
X 1Default
Cancel
OK
7.0 0.40
A ZAdjust
FAuto3
25 26 27 28 29 30
31 32 33 34
M
Satin Stitch
L.S
25 26 27 28 29 30
31 32 33 34 L.S
25 26 27 28 29 30
31 32 33 34 L.S.3
X2 X3 X4 X5
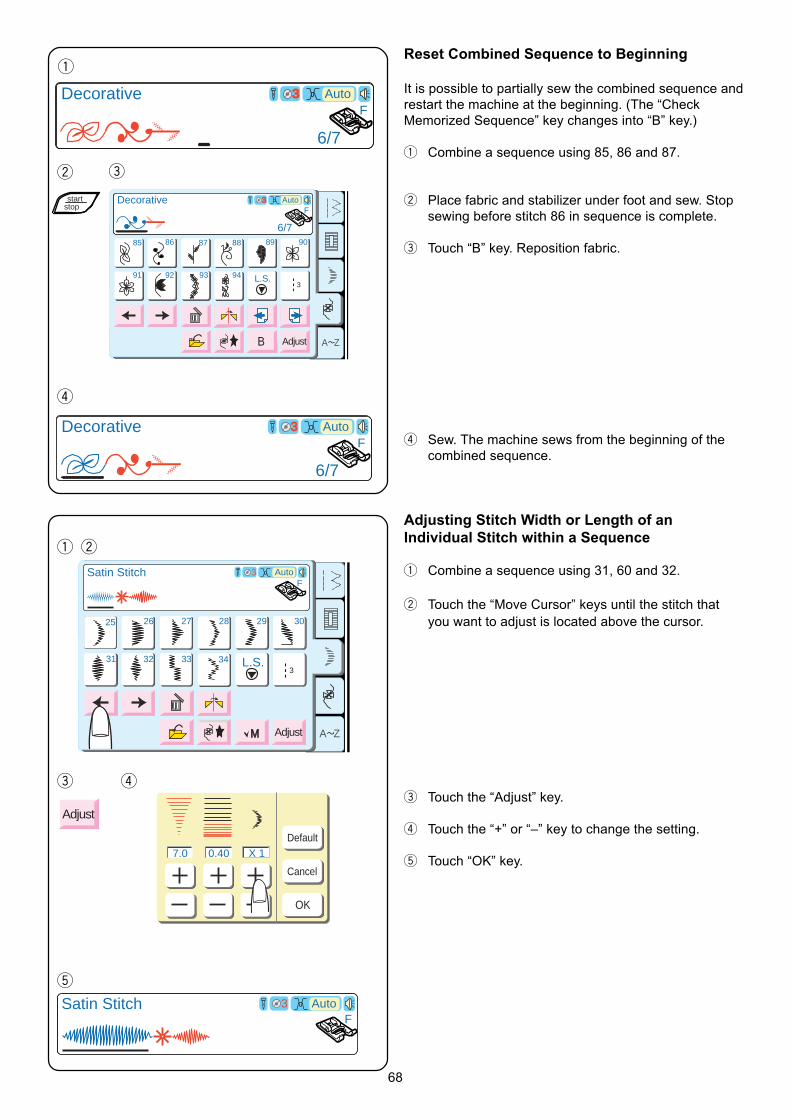
68
Reset Combined Sequence to Beginning
It is possible to partially sew the combined sequence andrestart the machine at the beginning. (The “CheckMemorized Sequence” key changes into “B” key.)
q Combine a sequence using 85, 86 and 87.
w Place fabric and stabilizer under foot and sew. Stopsewing before stitch 86 in sequence is complete.
e Touch “B” key. Reposition fabric.
r Sew. The machine sews from the beginning of thecombined sequence.
Adjusting Stitch Width or Length of anIndividual Stitch within a Sequence
q Combine a sequence using 31, 60 and 32.
w Touch the “Move Cursor” keys until the stitch thatyou want to adjust is located above the cursor.
e Touch the “Adjust” key.
r Touch the “+” or “–” key to change the setting.
t Touch “OK” key.
3/7
French KnotF
Auto3Decorative
6/7
A Z
56 57 58 60
61 62 63 64
Adjust
3/759
M
55
French KnotF
Auto3
L.S
Decorative
85
6/786 87 88 89 90
91 92 93 94
B
3L.S.
3/7
French KnotF
Auto3Decorative
6/7
A ZAdjust
FAuto3
25 26 27 28 29 30
31 32 33 34
M
Satin Stitch
L.S
25 26 27 28 29 30
31 32 33 34 L.S.3
X 1Default
Cancel
OK
7.0 0.40
3/7
French KnotF
Auto3Satin Stitch
startstop
Adjust
q
w e
r
q w
e r
t
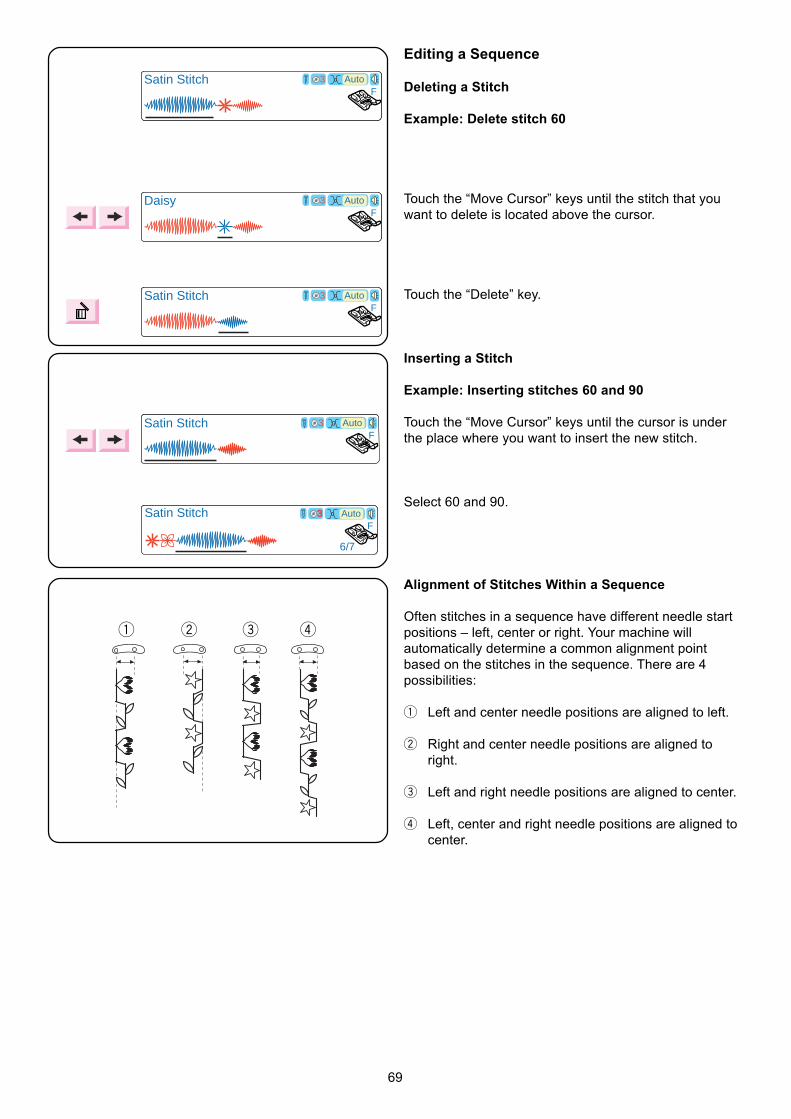
69
Editing a Sequence
Deleting a Stitch
Example: Delete stitch 60
Touch the “Move Cursor” keys until the stitch that youwant to delete is located above the cursor.
Touch the “Delete” key.
Inserting a Stitch
Example: Inserting stitches 60 and 90
Touch the “Move Cursor” keys until the cursor is underthe place where you want to insert the new stitch.
Select 60 and 90.
3/7
French KnotF
Auto3Satin Stitch
3/7
French KnotF
Auto3Daisy
3/7
French KnotF
Auto3Satin Stitch
3/7
French KnotF
Auto3Satin Stitch
3/7
French KnotF
Auto3Satin Stitch
6/7
q w e r
Alignment of Stitches Within a Sequence
Often stitches in a sequence have different needle startpositions – left, center or right. Your machine willautomatically determine a common alignment pointbased on the stitches in the sequence. There are 4possibilities:
q Left and center needle positions are aligned to left.
w Right and center needle positions are aligned toright.
e Left and right needle positions are aligned to center.
r Left, center and right needle positions are aligned tocenter.
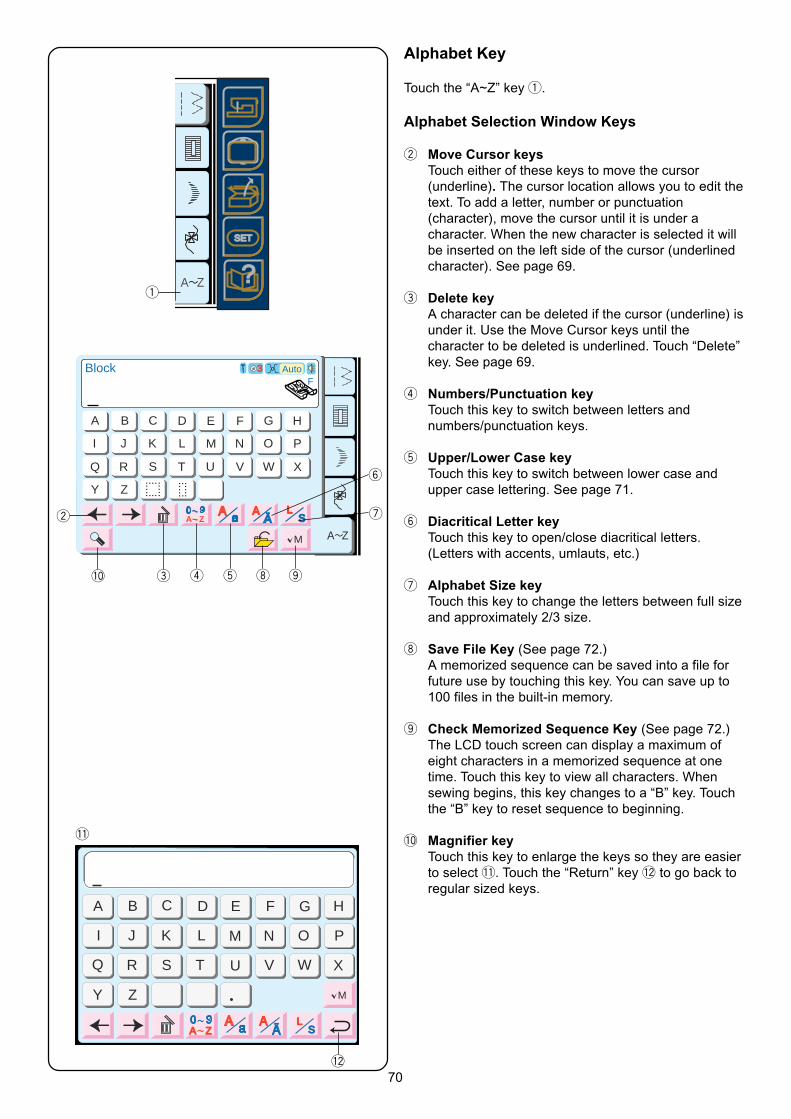
70
Alphabet Key
Touch the “A~Z” key q.
Alphabet Selection Window Keys
w Move Cursor keysTouch either of these keys to move the cursor(underline). The cursor location allows you to edit thetext. To add a letter, number or punctuation(character), move the cursor until it is under acharacter. When the new character is selected it willbe inserted on the left side of the cursor (underlinedcharacter). See page 69.
e Delete keyA character can be deleted if the cursor (underline) isunder it. Use the Move Cursor keys until thecharacter to be deleted is underlined. Touch “Delete”key. See page 69.
r Numbers/Punctuation keyTouch this key to switch between letters andnumbers/punctuation keys.
t Upper/Lower Case keyTouch this key to switch between lower case andupper case lettering. See page 71.
y Diacritical Letter keyTouch this key to open/close diacritical letters.(Letters with accents, umlauts, etc.)
u Alphabet Size keyTouch this key to change the letters between full sizeand approximately 2/3 size.
i Save File Key (See page 72.)A memorized sequence can be saved into a file forfuture use by touching this key. You can save up to100 files in the built-in memory.
o Check Memorized Sequence Key (See page 72.)The LCD touch screen can display a maximum ofeight characters in a memorized sequence at onetime. Touch this key to view all characters. Whensewing begins, this key changes to a “B” key. Touchthe “B” key to reset sequence to beginning.
!0 Magnifier keyTouch this key to enlarge the keys so they are easierto select !1. Touch the “Return” key !2 to go back toregular sized keys.
A Z
Block
G H
I J K L M N O P
Q R S T U V W X
Y Z
A B C D E F
LSA Z
M
Auto3F
A Z
SETSETSET
?q
w
!0 e r t i o
u
y
G H
I J K L M N O P
Q R S T U V W X
Y Z
A B C D E F
A ZL
S
M
!1
!2
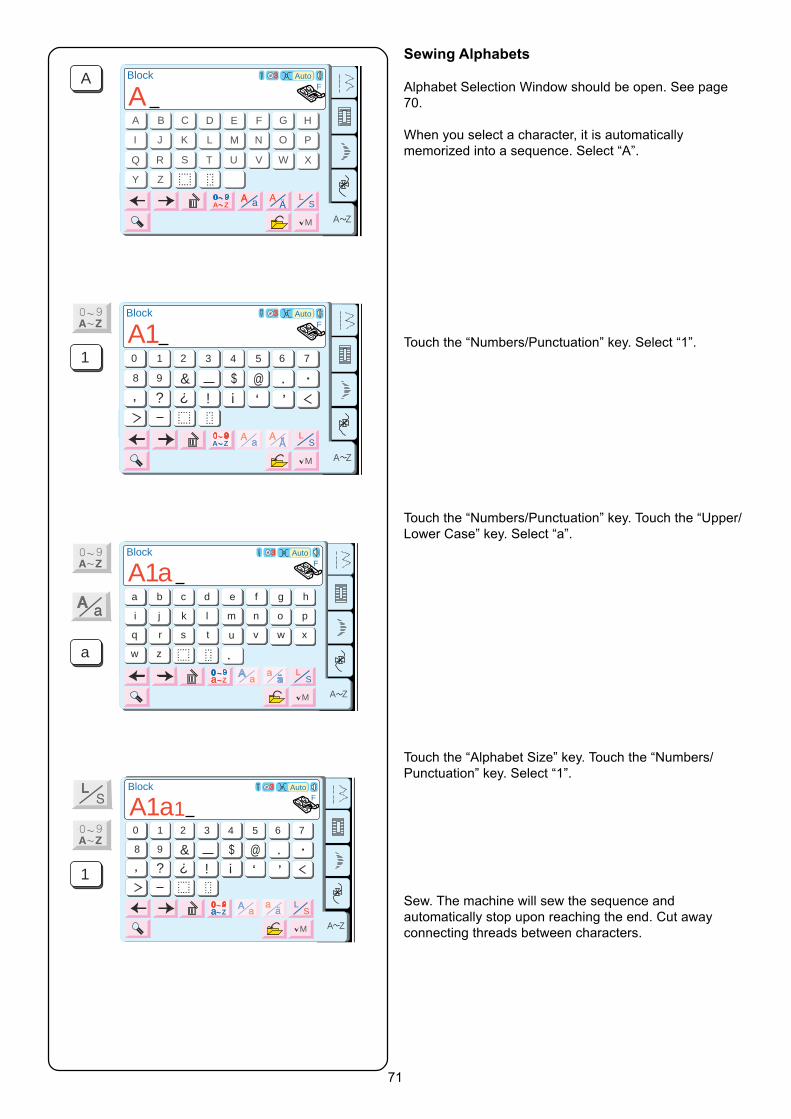
71
Sewing Alphabets
Alphabet Selection Window should be open. See page70.
When you select a character, it is automaticallymemorized into a sequence. Select “A”.
Touch the “Numbers/Punctuation” key. Select “1”.
Touch the “Numbers/Punctuation” key. Touch the “Upper/Lower Case” key. Select “a”.
Touch the “Alphabet Size” key. Touch the “Numbers/Punctuation” key. Select “1”.
Sew. The machine will sew the sequence andautomatically stop upon reaching the end. Cut awayconnecting threads between characters.
6 7
8 9
0 1 2 3 4 5
&?
?
!!$ @
A Z
Block
G H
I J K L M N O P
Q R S T U V W X
Y Z
A B C D E F
LSA Z
M
Auto3F
6 7
8 9
0 1 2 3 4 5
&?
?
!!$ @
A1
6 7
8 9
0 1 2 3 4 5
&?
?
!!$ @
A Z
Block
G H
I J K L M N O P
Q R S T U V W X
Y Z
A B C D E F
LSZ
M
Auto3F
A1a b c d e f g h
i j k l m n o p
q r s t u v w x
w z
a
6 7
8 9
0 1 2 3 4 5
&?
?
!!$ @
A Z
Block
G H
I J K L M N O P
Q R S T U V W X
Y Z
A B C D E F
LSZ
M
Auto3F
6 7
8 9
0 1 2 3 4 5
&?
?
!!$ @
A1 1a
A Z
Block
G H
I J K L M N O P
Q R S T U V W X
Y Z
A B C D E F
LSA Z
M
Auto3F
A
1
A
1
a
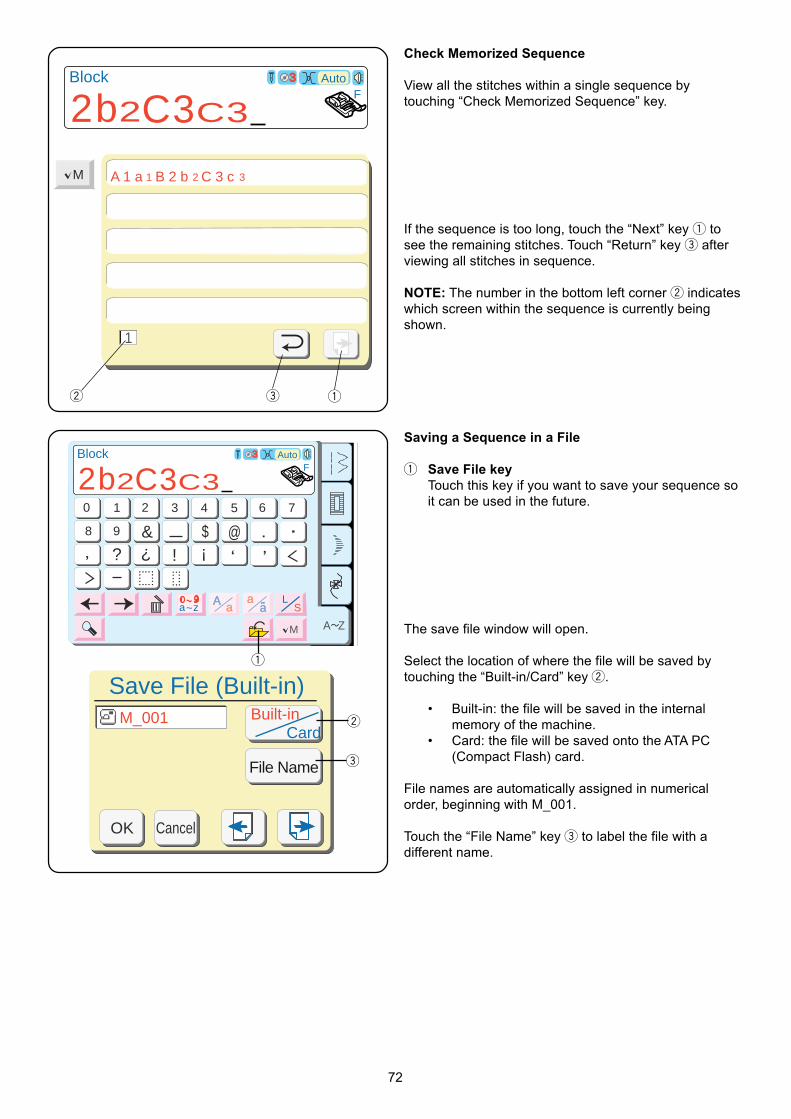
72
Check Memorized Sequence
View all the stitches within a single sequence bytouching “Check Memorized Sequence” key.
If the sequence is too long, touch the “Next” key q tosee the remaining stitches. Touch “Return” key e afterviewing all stitches in sequence.
NOTE: The number in the bottom left corner w indicateswhich screen within the sequence is currently beingshown.
Block Auto3F
2b2C C3 3
6 7
8 9
0 1 2 3 4 5
&?
?!
!$ @
A Z
Block
G H
I J K L M N O P
Q R S T U V W X
Y Z
A B C D E F
LS
M
Auto3F
6 7
8 9
0 1 2 3 4 5
&?
?!
!$ @
2b2C C3 3
a z~
Save File (Built-in)M_001
CancelOK
Built-inCard
File Name
1
-A 1 a 1 B 2 b 2 C 3 c 3
w e q
M
q
w
e
Saving a Sequence in a File
q Save File keyTouch this key if you want to save your sequence soit can be used in the future.
The save file window will open.
Select the location of where the file will be saved bytouching the “Built-in/Card” key w.
• Built-in: the file will be saved in the internalmemory of the machine.
• Card: the file will be saved onto the ATA PC(Compact Flash) card.
File names are automatically assigned in numericalorder, beginning with M_001.
Touch the “File Name” key e to label the file with adifferent name.

73
Touch the keys (up to 8 characters) that correspond tothe file name you wish to assign.
To correct the last character in the name, touch the“Backspace” key r.
Touch the remaining keys to complete file name.
Touch the “OK” key. The file name window will close andthe file will be saved with that name. All files will be listedin alphabetical order. (If you touch the “Cancel” key, thefile name window will close without assigning the new filename.)
NOTE: Should you try to save a file under a name thatalready exists, this warning message will appear. Touch“OK” key to overwrite the file. Touch “Cancel” key if youdon’t want to overwrite the file. Change the file name andthen save it under the new name.
NOTE: When the memory is full, a warning message willappear. Touch the “OK” key. Go to the open file window(see page 74) and delete a file you no longer want.
q Next and Previous keysThe save file window will display 5 saved file namesat a time in alphabetical order. Touch these keys toview the other saved file names.
Touch the “OK” key to save the file. Touch “Cancel” keyto close the save file window without saving the file.
CAUTION: Do not turn off the power switch or eject thecard when warning messages or hourglass icon isdisplayed. The stored data could be lost or damaged.
File name already exists.Overwrite it?
CancelOK
Short of memory space,the file cannot be saved.
Save File (Built-in)M_008
CancelOK
Built-inCard
File Name
M_001M_002M_003M_004M_005
q
Cancel
A B C D E F G
H I J K L M N
O P Q R S T U
0 1 2
7 8 9
3 4 5 6
V W X Y Z
OK
SAMPLE
r
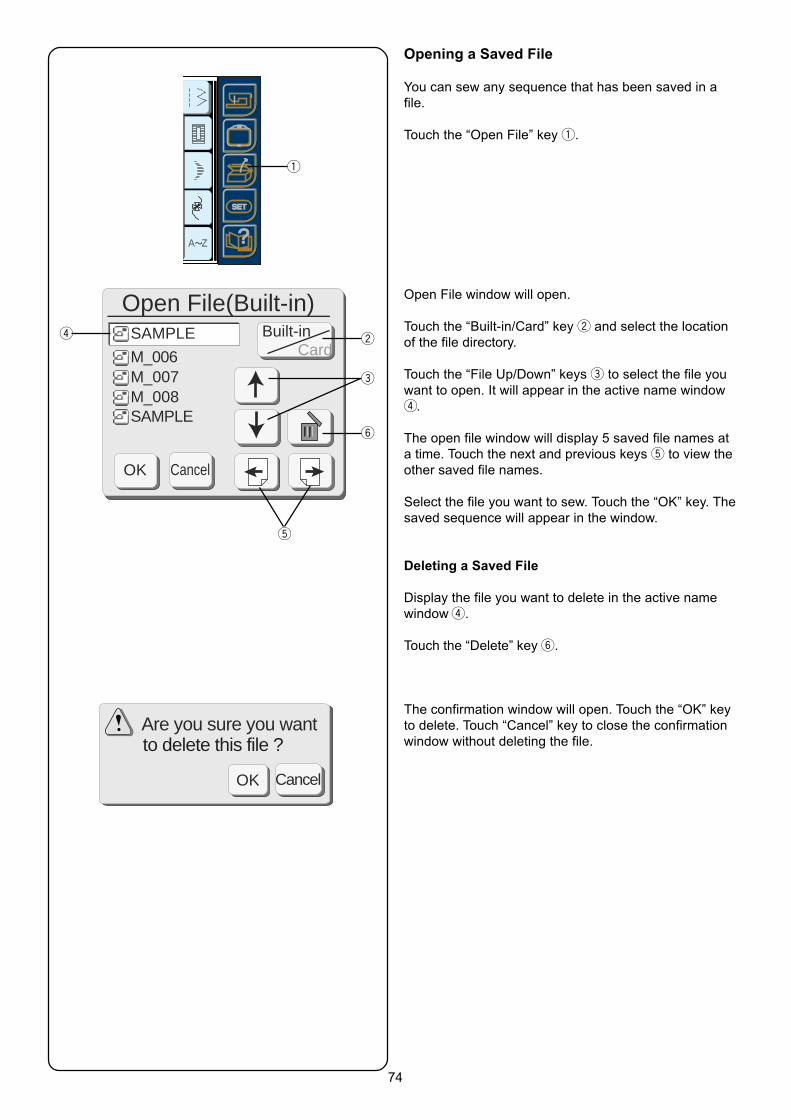
74
Opening a Saved File
You can sew any sequence that has been saved in afile.
Touch the “Open File” key q.
Open File window will open.
Touch the “Built-in/Card” key w and select the locationof the file directory.
Touch the “File Up/Down” keys e to select the file youwant to open. It will appear in the active name windowr.
The open file window will display 5 saved file names ata time. Touch the next and previous keys t to view theother saved file names.
Select the file you want to sew. Touch the “OK” key. Thesaved sequence will appear in the window.
Deleting a Saved File
Display the file you want to delete in the active namewindow r.
Touch the “Delete” key y.
The confirmation window will open. Touch the “OK” keyto delete. Touch “Cancel” key to close the confirmationwindow without deleting the file.
Open File(Built-in)
CancelOK
Built-inCardM_006
M_007M_008SAMPLE
SAMPLEr w
e
y
t
Are you sure you wantto delete this file ?
CancelOK
A Z
SETSETSET
?
q
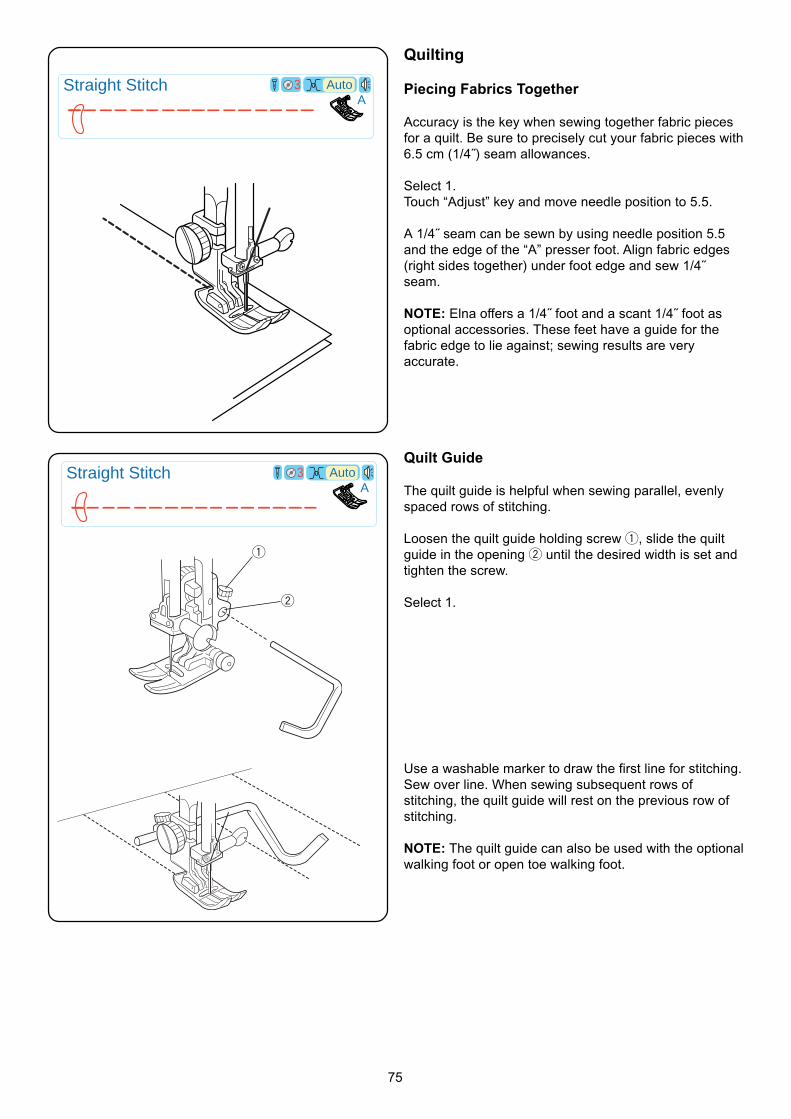
75
Quilting
Piecing Fabrics Together
Accuracy is the key when sewing together fabric piecesfor a quilt. Be sure to precisely cut your fabric pieces with6.5 cm (1/4˝) seam allowances.
Select 1.Touch “Adjust” key and move needle position to 5.5.
A 1/4˝ seam can be sewn by using needle position 5.5and the edge of the “A” presser foot. Align fabric edges(right sides together) under foot edge and sew 1/4˝seam.
NOTE: Elna offers a 1/4˝ foot and a scant 1/4˝ foot asoptional accessories. These feet have a guide for thefabric edge to lie against; sewing results are veryaccurate.
Quilt Guide
The quilt guide is helpful when sewing parallel, evenlyspaced rows of stitching.
Loosen the quilt guide holding screw q, slide the quiltguide in the opening w until the desired width is set andtighten the screw.
Select 1.
Straight StitchA
Auto3
Straight StitchA
Auto3
q
w
Use a washable marker to draw the first line for stitching.Sew over line. When sewing subsequent rows ofstitching, the quilt guide will rest on the previous row ofstitching.
NOTE: The quilt guide can also be used with the optionalwalking foot or open toe walking foot.
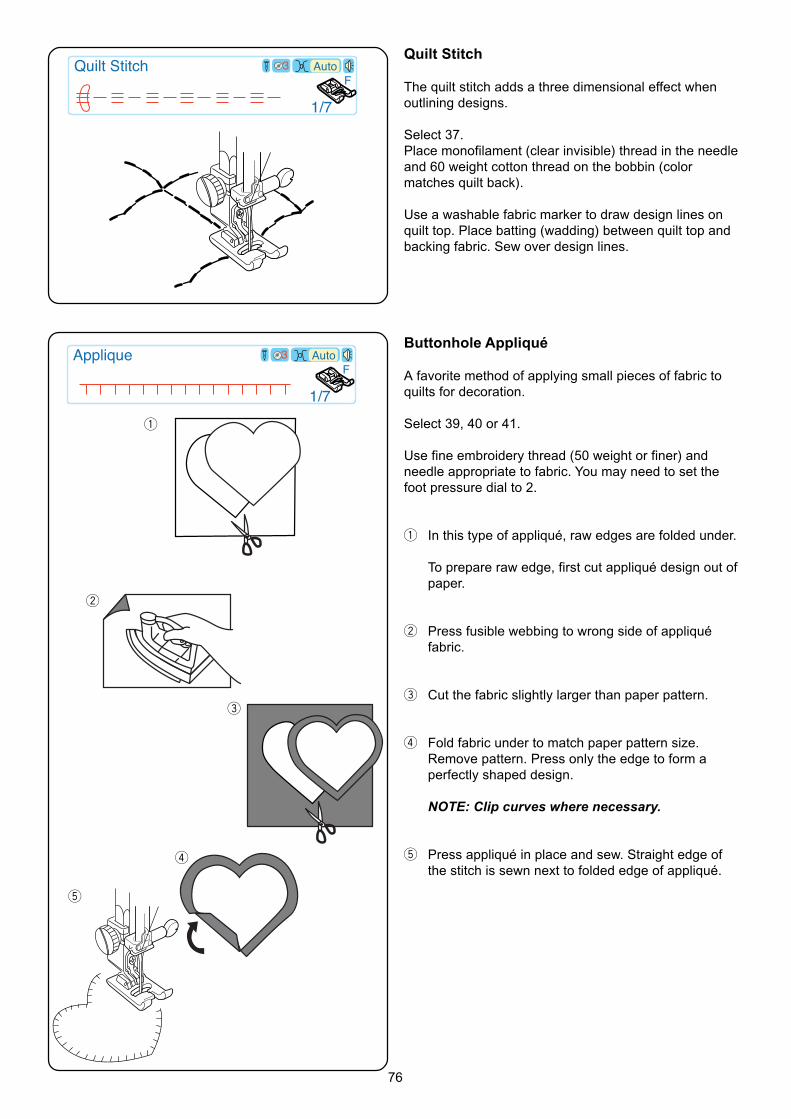
76
Quilt Stitch
The quilt stitch adds a three dimensional effect whenoutlining designs.
Select 37.Place monofilament (clear invisible) thread in the needleand 60 weight cotton thread on the bobbin (colormatches quilt back).
Use a washable fabric marker to draw design lines onquilt top. Place batting (wadding) between quilt top andbacking fabric. Sew over design lines.
Buttonhole Appliqué
A favorite method of applying small pieces of fabric toquilts for decoration.
Select 39, 40 or 41.
Use fine embroidery thread (50 weight or finer) andneedle appropriate to fabric. You may need to set thefoot pressure dial to 2.
q In this type of appliqué, raw edges are folded under.
To prepare raw edge, first cut appliqué design out ofpaper.
w Press fusible webbing to wrong side of appliquéfabric.
e Cut the fabric slightly larger than paper pattern.
r Fold fabric under to match paper pattern size.Remove pattern. Press only the edge to form aperfectly shaped design.
NOTE: Clip curves where necessary.
t Press appliqué in place and sew. Straight edge ofthe stitch is sewn next to folded edge of appliqué.
1/7
F3 AutoApplique
1/7
F3 AutoQuilt Stitch
q
w
e
r
t
77
Free Motion Quilting or Stippling
Add dimension to your quilt by stitching down thesurrounding background fabric around larger designs,like hearts or flowers. Lower the feed dog and sew fabriclayers in a random pattern without the stitching linescrossing each other. The more compact the stitching, themore the background will flatten and make surroundeddesigns stand out. This is a technique commonlyreferred to as stippling.
Attach embroidery/darning foot P-2. See page 43.
Select 1.Lower the feed dog.Set foot pressure dial to 2 or 1.
Test sew using exact conditions (fabric, thread, etc.) offinished project. Place batting between quilt top andbacking fabric. Place all fabric layers under foot andlower foot.
Press “Up/Down Needle” key and bring bobbin thread totop. Pull both threads under foot and to the back. Sewseveral stitches in place to lock threads at beginning.Move fabric layers while sewing and check tension.Adjust tension until it is balanced inside the batting (nothread loops on top or bottom).
HINT: Establish a good sewing rhythm by moving thefabrics slower than the machine speed in an even,consistent manner. Keep the fabrics flat against themachine bed.
Stippling Stitch
A pre-programmed stippling stitch is a fast and easymethod to quilt small areas.
Select 42.
Place batting (wadding) between quilt top and backingfabric.
Straight StitchA
Auto3
1/7
F3 AutoStippling Stitch
78
Patchwork
A fun method of decorating your quilt (often called “CrazyQuilting”) is to sew a patchwork stitch over the openedseam.
Select 1. Sew a straight stitch seam and press seamallowance open.
Select a patchwork stitch: 45 – 57.
Sew with stitching centered over the seam.
French Knots
Why spend time sewing French Knots by hand?
Select 59.
Place fabric under foot and sew one French Knot. Lift uppresser foot, move fabric, lower presser foot and sewnext French Knot.
NOTE: If you want to sew a row of evenly spaced FrenchKnots, you must program straight stitches after theFrench Knot. See Combining a Sequence on page 67.
#59
#59
#59
3
3
2/7
F3 AutoFeather
3/7
F3French Knot 5~8
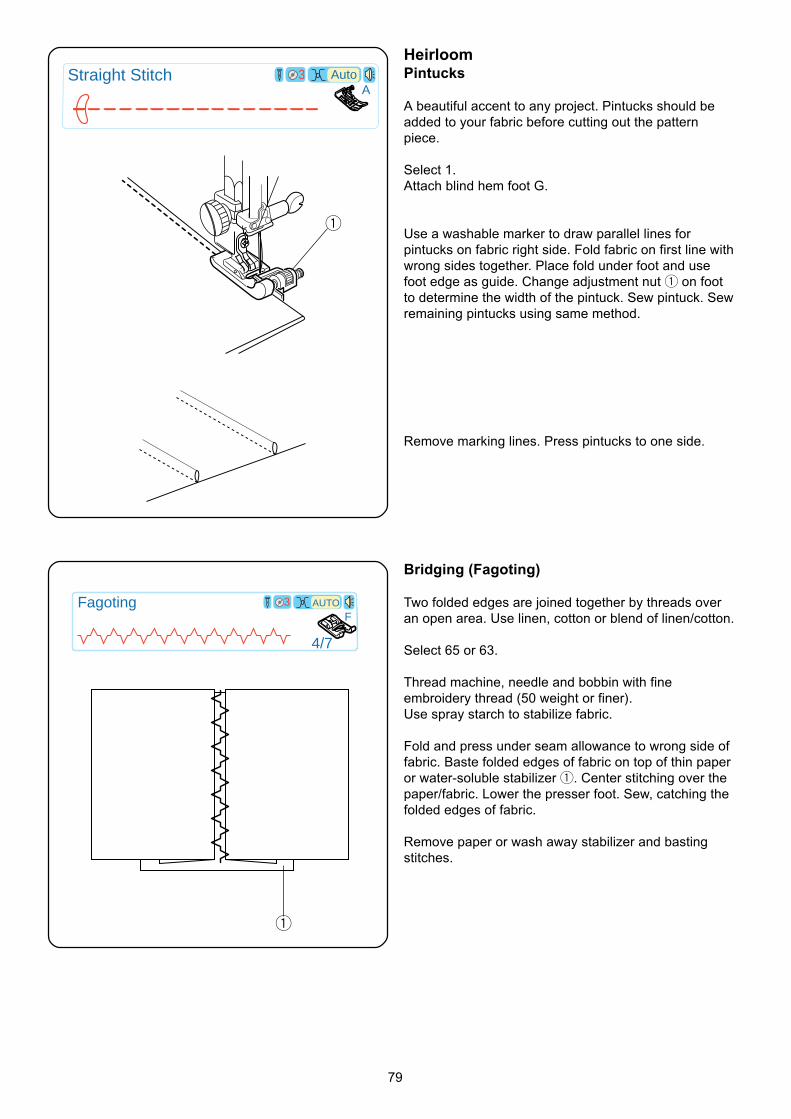
79
HeirloomPintucks
A beautiful accent to any project. Pintucks should beadded to your fabric before cutting out the patternpiece.
Select 1.Attach blind hem foot G.
Use a washable marker to draw parallel lines forpintucks on fabric right side. Fold fabric on first line withwrong sides together. Place fold under foot and usefoot edge as guide. Change adjustment nut q on footto determine the width of the pintuck. Sew pintuck. Sewremaining pintucks using same method.
Remove marking lines. Press pintucks to one side.
Bridging (Fagoting)
Two folded edges are joined together by threads overan open area. Use linen, cotton or blend of linen/cotton.
Select 65 or 63.
Thread machine, needle and bobbin with fineembroidery thread (50 weight or finer).Use spray starch to stabilize fabric.
Fold and press under seam allowance to wrong side offabric. Baste folded edges of fabric on top of thin paperor water-soluble stabilizer q. Center stitching over thepaper/fabric. Lower the presser foot. Sew, catching thefolded edges of fabric.
Remove paper or wash away stabilizer and bastingstitches.
Straight StitchA
Auto3
q
4/7
F3Fagoting AUTO
q

80
Hemstitches
Hemstitching, also known as French hand sewing, wastraditionally only a hand sewn art. There are severalstitches to choose from that will add an “old worldcharm”. Best results require the use of linen, cotton ora blend of linen/cotton.
Thread machine, needle and bobbin with a fine cottonembroidery thread (50 weight or finer). Insert auniversal needle size #100, #110 or a wing needle (seecautions below). Use spray starch and press tostabilize fabric.
CAUTION: Only insert a wing needle when sewing thestitches listed below. A wing needle is wider than aregular needle. Hand turn the flywheel a few times toensure needle does not touch needle plate. If needletouches needle plate, narrow the stitch width.
CAUTION: Built-in needle threader does not function if awing needle is inserted.
60 Daisy61 Point de Paris or Pinstitch62 Turkish63 Venetian or Entredeux64 Rickrack
Draw design lines with a washable fabric marker. Sewslowly over design lines.
Troubleshooting Tip: Adjust fine adjustment screw untilneedle precisely penetrates each repeat hole. See page13.
Remove wing needle after sewing is complete.
3/7
F3Daisy AUTO
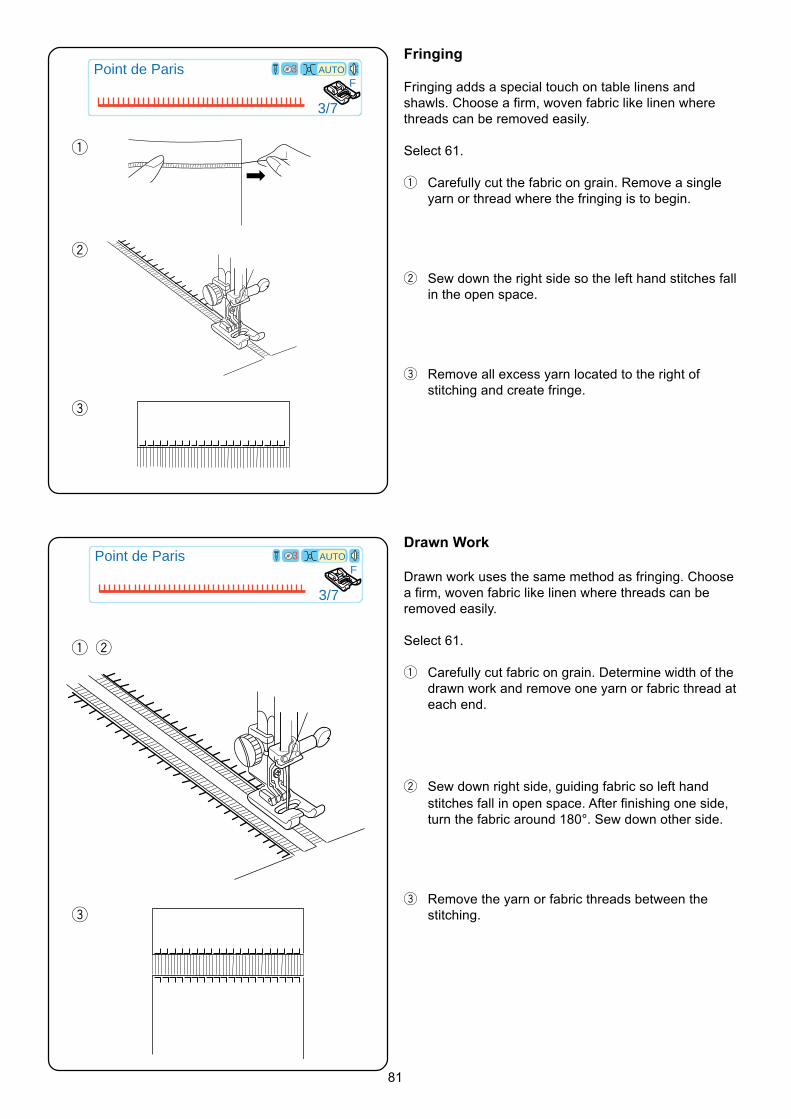
81
Fringing
Fringing adds a special touch on table linens andshawls. Choose a firm, woven fabric like linen wherethreads can be removed easily.
Select 61.
q Carefully cut the fabric on grain. Remove a singleyarn or thread where the fringing is to begin.
w Sew down the right side so the left hand stitches fallin the open space.
e Remove all excess yarn located to the right ofstitching and create fringe.
3/7
F3Point de Paris AUTO
q
w
e
q w
e
3/7
F3Point de Paris AUTO
Drawn Work
Drawn work uses the same method as fringing. Choosea firm, woven fabric like linen where threads can beremoved easily.
Select 61.
q Carefully cut fabric on grain. Determine width of thedrawn work and remove one yarn or fabric thread ateach end.
w Sew down right side, guiding fabric so left handstitches fall in open space. After finishing one side,turn the fabric around 180°. Sew down other side.
e Remove the yarn or fabric threads between thestitching.
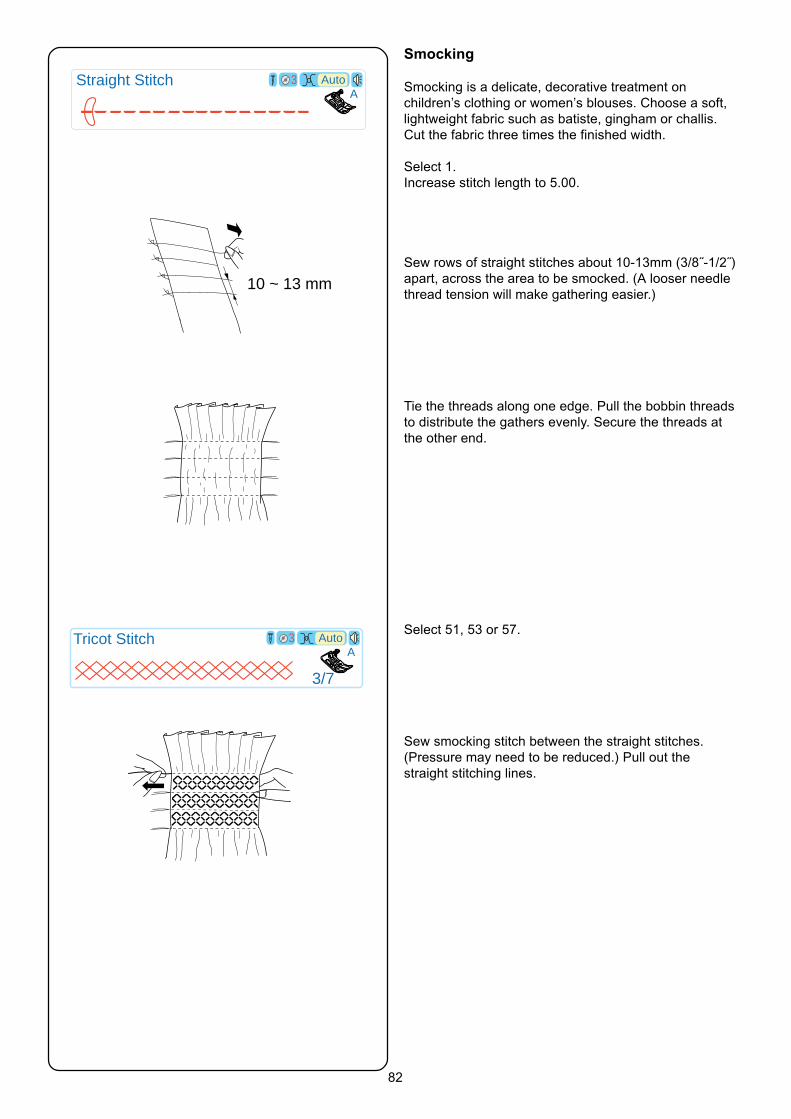
82
Smocking
Smocking is a delicate, decorative treatment onchildren’s clothing or women’s blouses. Choose a soft,lightweight fabric such as batiste, gingham or challis.Cut the fabric three times the finished width.
Select 1.Increase stitch length to 5.00.
Sew rows of straight stitches about 10-13mm (3/8˝-1/2˝)apart, across the area to be smocked. (A looser needlethread tension will make gathering easier.)
Tie the threads along one edge. Pull the bobbin threadsto distribute the gathers evenly. Secure the threads atthe other end.
Select 51, 53 or 57.
Sew smocking stitch between the straight stitches.(Pressure may need to be reduced.) Pull out thestraight stitching lines.
Straight StitchA
Auto3
AAuto3Tricot Stitch
3/7
10 ~ 13 mm
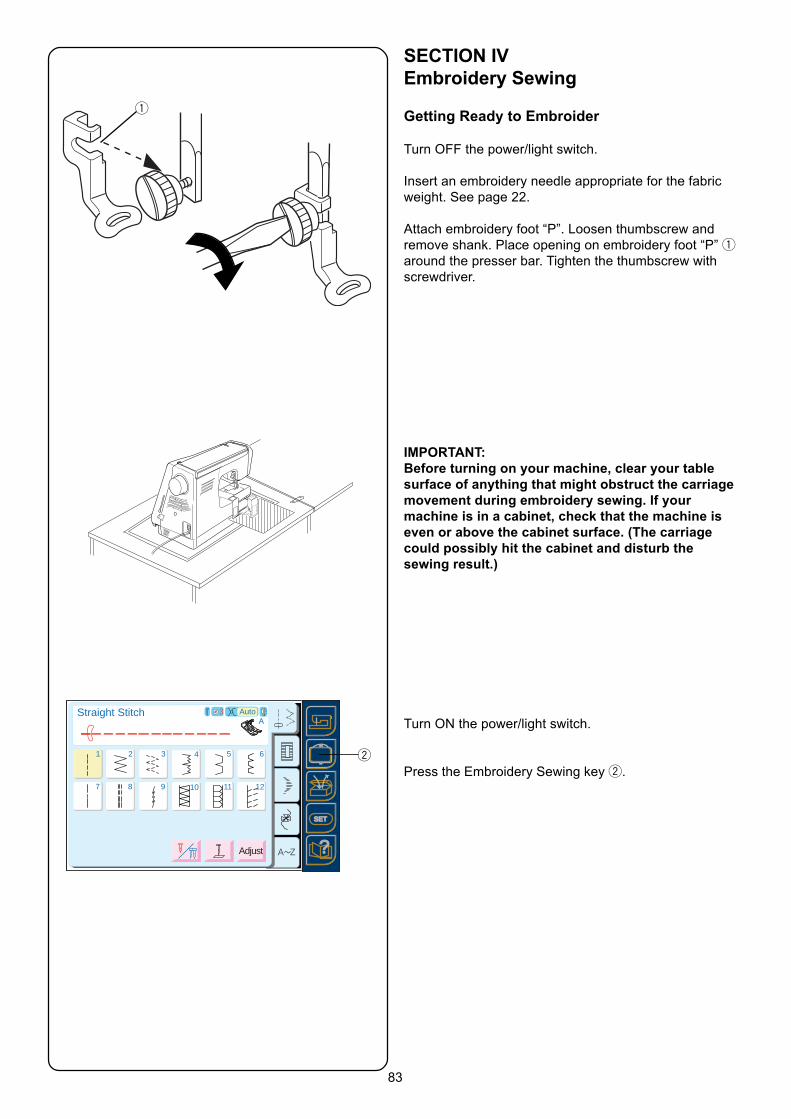
83
A Z
2 3 4 5 6
7 8 9 10 11 12
AAuto
Adjust
3
1
SETSET
2 3 4 5 6
7 8 9 10 11 12
1
SET
?
Straight Stitch
SECTION IVEmbroidery Sewing
Getting Ready to Embroider
Turn OFF the power/light switch.
Insert an embroidery needle appropriate for the fabricweight. See page 22.
Attach embroidery foot “P”. Loosen thumbscrew andremove shank. Place opening on embroidery foot “P” qaround the presser bar. Tighten the thumbscrew withscrewdriver.
IMPORTANT:Before turning on your machine, clear your tablesurface of anything that might obstruct the carriagemovement during embroidery sewing. If yourmachine is in a cabinet, check that the machine iseven or above the cabinet surface. (The carriagecould possibly hit the cabinet and disturb thesewing result.)
Turn ON the power/light switch.
Press the Embroidery Sewing key w.
q
w
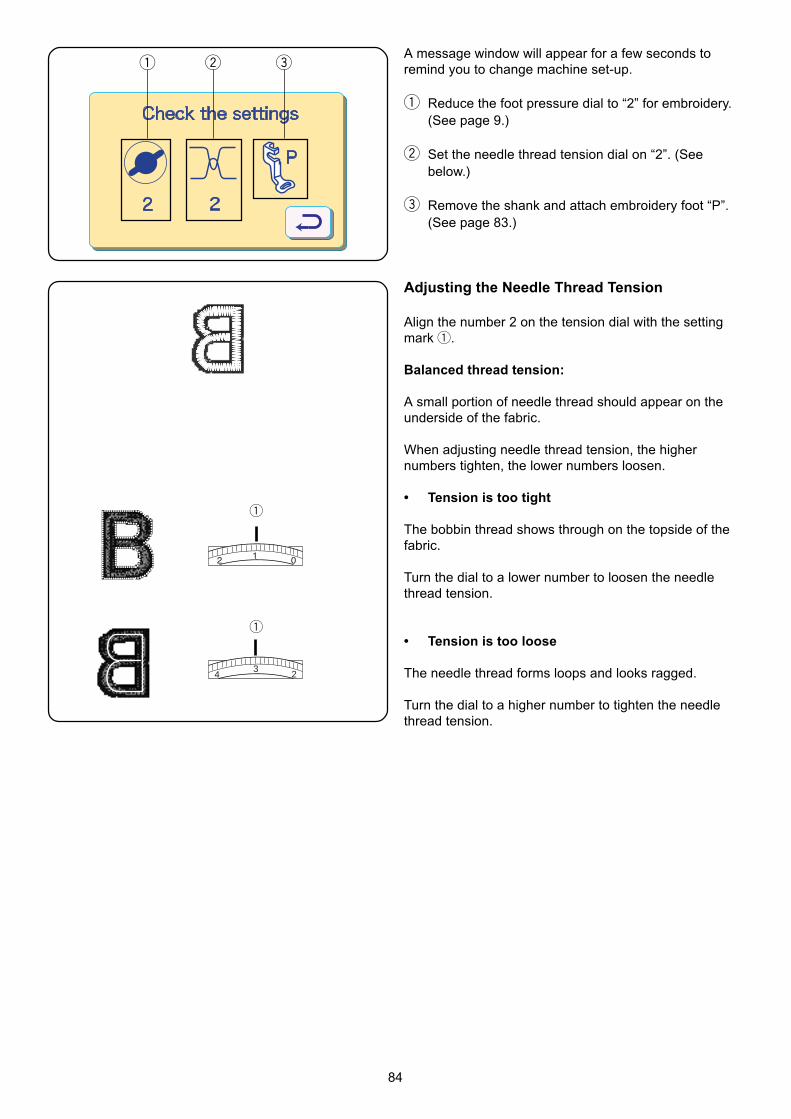
84
A message window will appear for a few seconds toremind you to change machine set-up.
q Reduce the foot pressure dial to “2” for embroidery.(See page 9.)
w Set the needle thread tension dial on “2”. (Seebelow.)
e Remove the shank and attach embroidery foot “P”.(See page 83.)
��
�
3 24
q
q
Adjusting the Needle Thread Tension
Align the number 2 on the tension dial with the settingmark q.
Balanced thread tension:
A small portion of needle thread should appear on theunderside of the fabric.
When adjusting needle thread tension, the highernumbers tighten, the lower numbers loosen.
• Tension is too tight
The bobbin thread shows through on the topside of thefabric.
Turn the dial to a lower number to loosen the needlethread tension.
• Tension is too loose
The needle thread forms loops and looks ragged.
Turn the dial to a higher number to tighten the needlethread tension.
q w e

85
Embroidery Hoops
Hoop AThe embroidery area is 126 mm x 110 mm(5˝ x 4 3/8˝). Ideal for sewing many of the built-in designsand designs from optional PC design cards.
Hoop BThe embroidery area is 140 mm x 200 mm(5 1/2˝ x 8˝). Use the generous dimensions of this hoopfor large size designs or combine several designs oralphabets into one arrangement.
Hoop Part Names:q Outer hoopw Inner hoope Hoop turnkeyr Hoop tightening screw
Stabilizers
All embroidery needs some form of stabilizer that can beeasily removed. Use a stabilizer appropriate to the fabricand project. Common forms of stabilizer for embroiderysewing are fusible, adhesive, tear-away, heat-away orwash-away.
The fusible type is recommended for stretch fabrics andfabrics that might shrink. Adhesive type is great forvelvets or other napped fabrics that would be damaged ifsecured in the hoop. The non adhesive types should beused when embroidering fabric which cannot be ironedor for areas which are difficult to iron.
Most stabilizers should be used on the wrong side offabric. More than one layer may be required. Wash-awaystabilizer may be placed on top of fabrics like toweling sothe loops lie flat under the embroidery.
For any type of stabilizer, prepare a piece larger than theembroidery hoop and place it in the hoop so that theentire piece can be fastened within.
q
w
e
r
q
w
e
r

86
Templates
Each hoop comes with a template to help you place yourdesign where you want it on the fabric.
There are a variety of starting points visible on thetemplate. Find the one that is appropriate for yourmachine/design.
q Starting point for built-in and PC design cards.
w Starting point for alphabets with horizontalplacement.
e Starting point for 100 series EnVision card andfor Elna EnVision CE20 and 8007.
r Boundary edges for built-in and PC designcards.
NOTE: The four indentations t for fitting the templateonto the hoop do not correspond with any of thereference lines.
STARTING POINT FOR MEMORY CARDS ( FROM No.1001 )
STARTING POINT FOR MEMORY CARDS ( FROM No.102 )
STAR
TIN
G P
OIN
T FO
R M
ON
OG
RAM
MIN
G
STARTING POINT
t
e
w
r q
t
q
Securing Fabric in Hoop
Use a washable fabric marker or tailor’s chalk to drawcenterlines q on your fabric (see stabilizers on page85).
Loosen the hoop tightening screw w and lift out theinner hoop.
w

87
Fit the template e into the inner hoop. (L and Rmarkings on the inner hoop should be visible.) Place theinner hoop and template over the fabric, matching thecenterlines.
Place the outer hoop on a flat surface. Position innerhoop, template and fabric over the outer hoop.
Set inner hoop into outer hoop and slightly tighten thehoop tightening screw r. Gently pull fabric taut in hoop,respecting the fabric grain (vertical and horizontal).Check fabric and template centerlines. Once fabric istaut and properly positioned, tighten adjustment screwwith screwdriver.
Remove template from inner hoop.
r
e

88
Attaching Hoop to Carriage
Lift up the presser foot. Rotate the hoop turnkey q so itlies parallel to the hoop. With the hoop turnkey turnedtowards the back, slide the hoop from left side ofmachine. Position the hoop pins w into the holes e onthe carriage.
Rotate the hoop turnkey clockwise to lock hoop ontocarriage.
CAUTION:
Always allow plenty of room behind the carriage so it canmove freely. See page 83.
Never try to move the carriage by hand or touch thecarriage when it is moving.
Always return the carriage to store position beforeturning off the machine. See page 19.
startstop
q
w
e
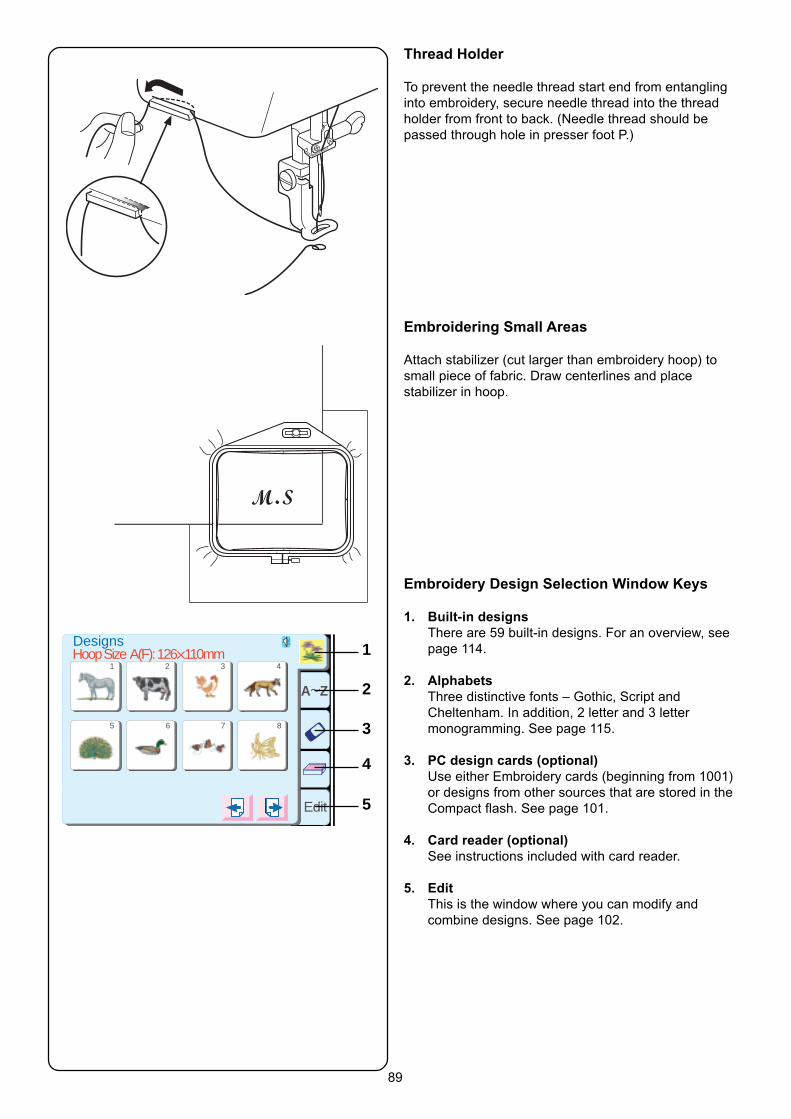
89
Thread Holder
To prevent the needle thread start end from entanglinginto embroidery, secure needle thread into the threadholder from front to back. (Needle thread should bepassed through hole in presser foot P.)
Embroidering Small Areas
Attach stabilizer (cut larger than embroidery hoop) tosmall piece of fabric. Draw centerlines and placestabilizer in hoop.
Embroidery Design Selection Window Keys
1. Built-in designsThere are 59 built-in designs. For an overview, seepage 114.
2. AlphabetsThree distinctive fonts – Gothic, Script andCheltenham. In addition, 2 letter and 3 lettermonogramming. See page 115.
3. PC design cards (optional)Use either Embroidery cards (beginning from 1001)or designs from other sources that are stored in theCompact flash. See page 101.
4. Card reader (optional)See instructions included with card reader.
5. EditThis is the window where you can modify andcombine designs. See page 102.
A Z
Edit
1 2 3 4
5 6 7 8
DesignsHoop Size A(F): 126X110mm 1
2
3
4
5
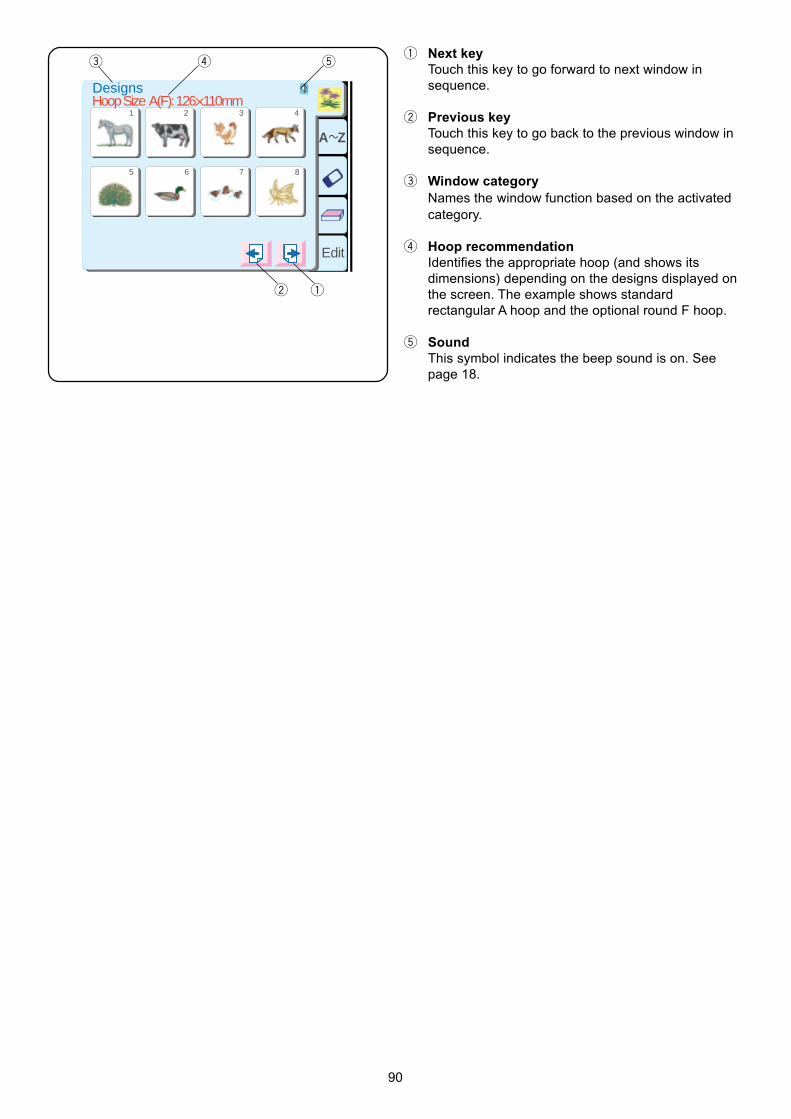
90
q Next keyTouch this key to go forward to next window insequence.
w Previous keyTouch this key to go back to the previous window insequence.
e Window categoryNames the window function based on the activatedcategory.
r Hoop recommendationIdentifies the appropriate hoop (and shows itsdimensions) depending on the designs displayed onthe screen. The example shows standardrectangular A hoop and the optional round F hoop.
t SoundThis symbol indicates the beep sound is on. Seepage 18.
A Z
Edit
1 2 3 4
5 6 7 8
DesignsHoop Size A(F): 126X110mm
tre
w q
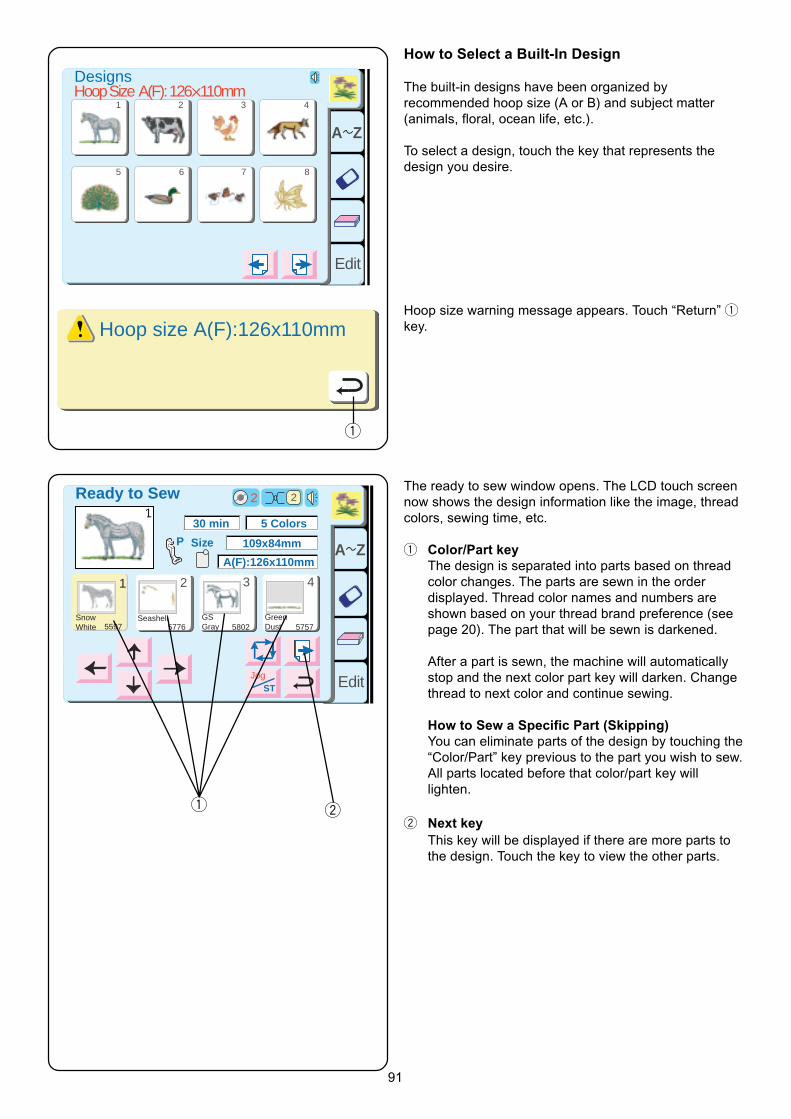
91
How to Select a Built-In Design
The built-in designs have been organized byrecommended hoop size (A or B) and subject matter(animals, floral, ocean life, etc.).
To select a design, touch the key that represents thedesign you desire.
Hoop size warning message appears. Touch “Return” qkey.
The ready to sew window opens. The LCD touch screennow shows the design information like the image, threadcolors, sewing time, etc.
q Color/Part keyThe design is separated into parts based on threadcolor changes. The parts are sewn in the orderdisplayed. Thread color names and numbers areshown based on your thread brand preference (seepage 20). The part that will be sewn is darkened.
After a part is sewn, the machine will automaticallystop and the next color part key will darken. Changethread to next color and continue sewing.
How to Sew a Specific Part (Skipping)You can eliminate parts of the design by touching the“Color/Part” key previous to the part you wish to sew.All parts located before that color/part key willlighten.
w Next keyThis key will be displayed if there are more parts tothe design. Touch the key to view the other parts.
A Z
Edit
1 2 3 4
5 6 7 8
DesignsHoop Size A(F): 126X110mm
A Z
Edit
1 2 3 4
Ready to Sew 2
P
JogST
2
A(F):126x110mm
Size
30 min 5 Colors
109x84mm
1
SnowWhite 5597
Seashell5776
GSGray 5802
GreenDust 5757
q w
Hoop size A(F):126x110mm
q
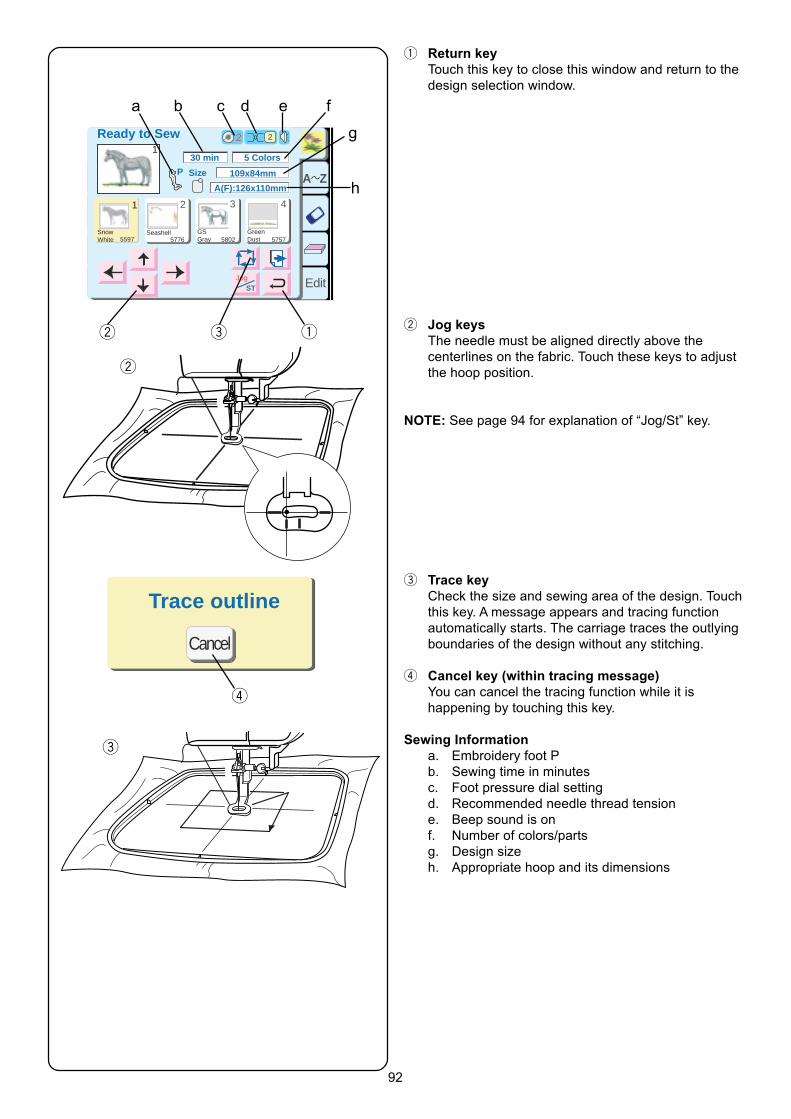
92
A Z
Edit
1 2 3 4
Ready to Sew 2
P
JogST
2
A(F):126x110mm
Size
30 min 5 Colors
109x84mm
1
SnowWhite 5597
Seashell5776
GSGray 5802
GreenDust 5757
q Return keyTouch this key to close this window and return to thedesign selection window.
w Jog keysThe needle must be aligned directly above thecenterlines on the fabric. Touch these keys to adjustthe hoop position.
NOTE: See page 94 for explanation of “Jog/St” key.
e Trace keyCheck the size and sewing area of the design. Touchthis key. A message appears and tracing functionautomatically starts. The carriage traces the outlyingboundaries of the design without any stitching.
r Cancel key (within tracing message)You can cancel the tracing function while it ishappening by touching this key.
Sewing Informationa. Embroidery foot Pb. Sewing time in minutesc. Foot pressure dial settingd. Recommended needle thread tensione. Beep sound is onf. Number of colors/partsg. Design sizeh. Appropriate hoop and its dimensions
Trace outline
Cancel
qew
a b c d e f
g
h
w
r
e
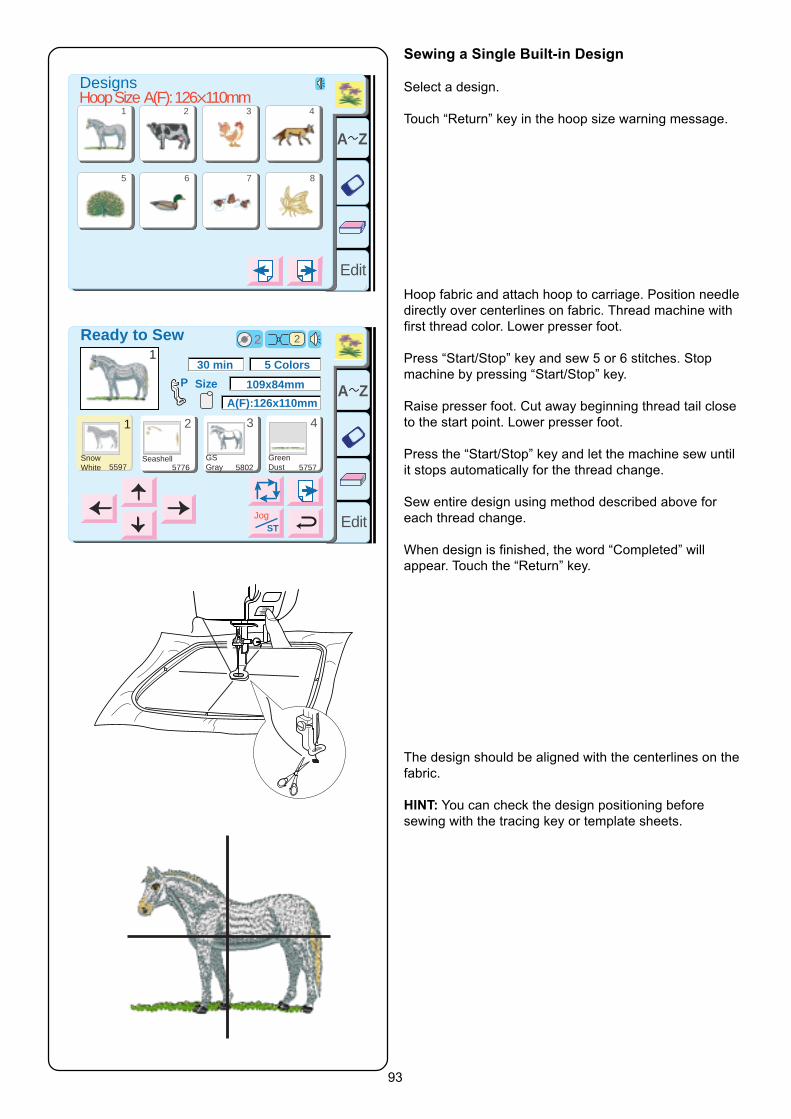
93
Sewing a Single Built-in Design
Select a design.
Touch “Return” key in the hoop size warning message.
Hoop fabric and attach hoop to carriage. Position needledirectly over centerlines on fabric. Thread machine withfirst thread color. Lower presser foot.
Press “Start/Stop” key and sew 5 or 6 stitches. Stopmachine by pressing “Start/Stop” key.
Raise presser foot. Cut away beginning thread tail closeto the start point. Lower presser foot.
Press the “Start/Stop” key and let the machine sew untilit stops automatically for the thread change.
Sew entire design using method described above foreach thread change.
When design is finished, the word “Completed” willappear. Touch the “Return” key.
The design should be aligned with the centerlines on thefabric.
HINT: You can check the design positioning beforesewing with the tracing key or template sheets.
startstop
A Z
Edit
1 2 3 4
5 6 7 8
DesignsHoop Size A(F): 126X110mm
A Z
Edit
1 2 3 4
Ready to Sew 2
P
JogST
2
A(F):126x110mm
Size
30 min 5 Colors
109x84mm
1
SnowWhite 5597
Seashell5776
GSGray 5802
GreenDust 5757

94
Ready to Sew Window After Embroidery Begins
When you start to sew, the ready to sew window willchange – jog keys disappear and current stitch count q,stitch minus/plus keys and return carriage key appear.
Thread Breaks
If the needle thread breaks, the machine will stop andshow a warning message. Touch the “Return” key.Rethread machine.
w Stitch Minus/Plus keysTouch the “–” key to move the hoop back to the pointbefore the thread break occurred. Each time youtouch the “–” key the hoop moves back 10 stitches.Each time you touch the “+” key the hoop movesforward 10 stitches.
e Jog/ST keyTouch this key before sewing – the jog keysdisappear and the stitch minus/plus keys appear.
r Return Carriage keySince this is a very important key to use beforeturning off your machine it appears here as well as inthe SET preferences window (see page 19).
A Z
Edit
1 2 3 4
Ready to Sew
Size
2
P
Jog
224 255
ST
2
BambooBlond Beige 213 Umber 237
JogST
00001 ST/NO
A(F):126x110mm
1 2 3 4
30 min 5 Colors
109x84mm
1
SnowWhite 5597
Seashell5776
GSGray 5802
GreenDust 5757
qw e r
�������� ��� ����
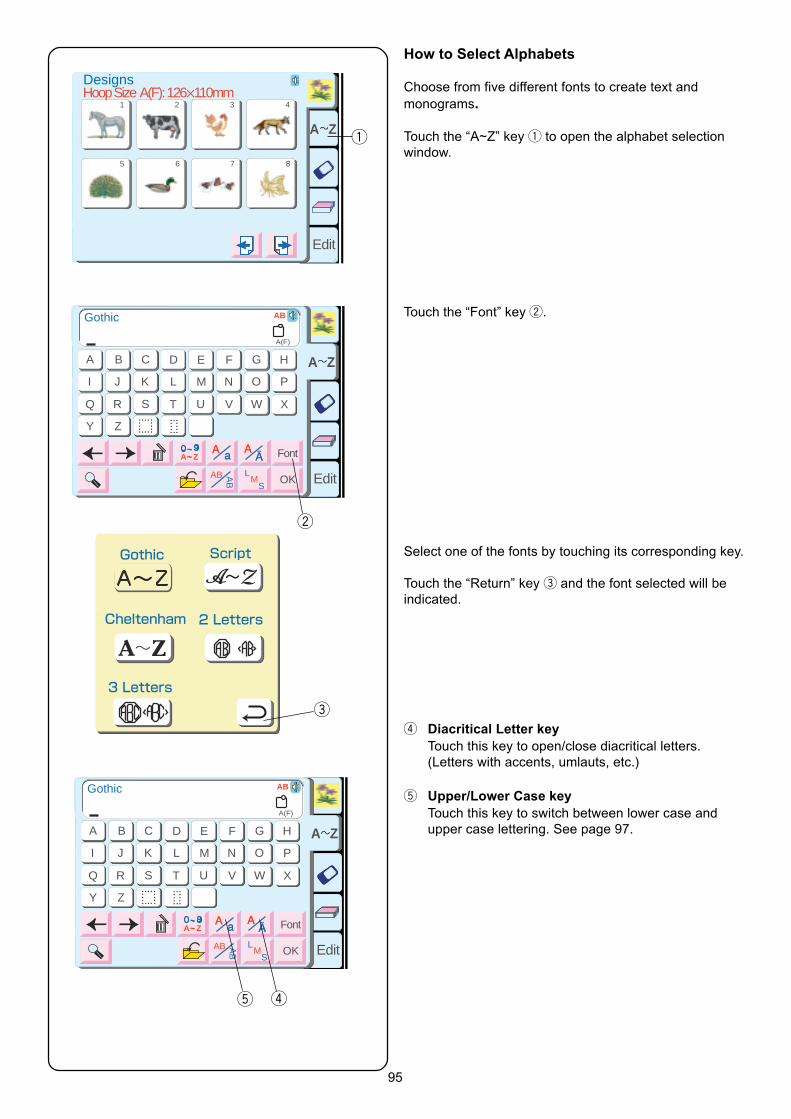
95
Edit
Font
AB OKML
S
AB
G H
I J K L M N O P
Q R S T U V W X
Y Z
A B C D E F
Gothic AB
A(F)
A ZG H
I J K L M N O P
Q R S T U V W X
Y Z
A B C D E F
A Z
How to Select Alphabets
Choose from five different fonts to create text andmonograms.
Touch the “A~Z” key q to open the alphabet selectionwindow.
Touch the “Font” key w.
Select one of the fonts by touching its corresponding key.
Touch the “Return” key e and the font selected will beindicated.
r Diacritical Letter keyTouch this key to open/close diacritical letters.(Letters with accents, umlauts, etc.)
t Upper/Lower Case keyTouch this key to switch between lower case andupper case lettering. See page 97.
A Z
Edit
1 2 3 4
5 6 7 8
DesignsHoop Size A(F): 126X110mm
Edit
Font
AB OKML
S
AB
G H
I J K L M N O P
Q R S T U V W X
Y Z
A B C D E F
Gothic AB
A(F)
A ZG H
I J K L M N O P
Q R S T U V W X
Y Z
A B C D E F
A Z
q
w
e
t r
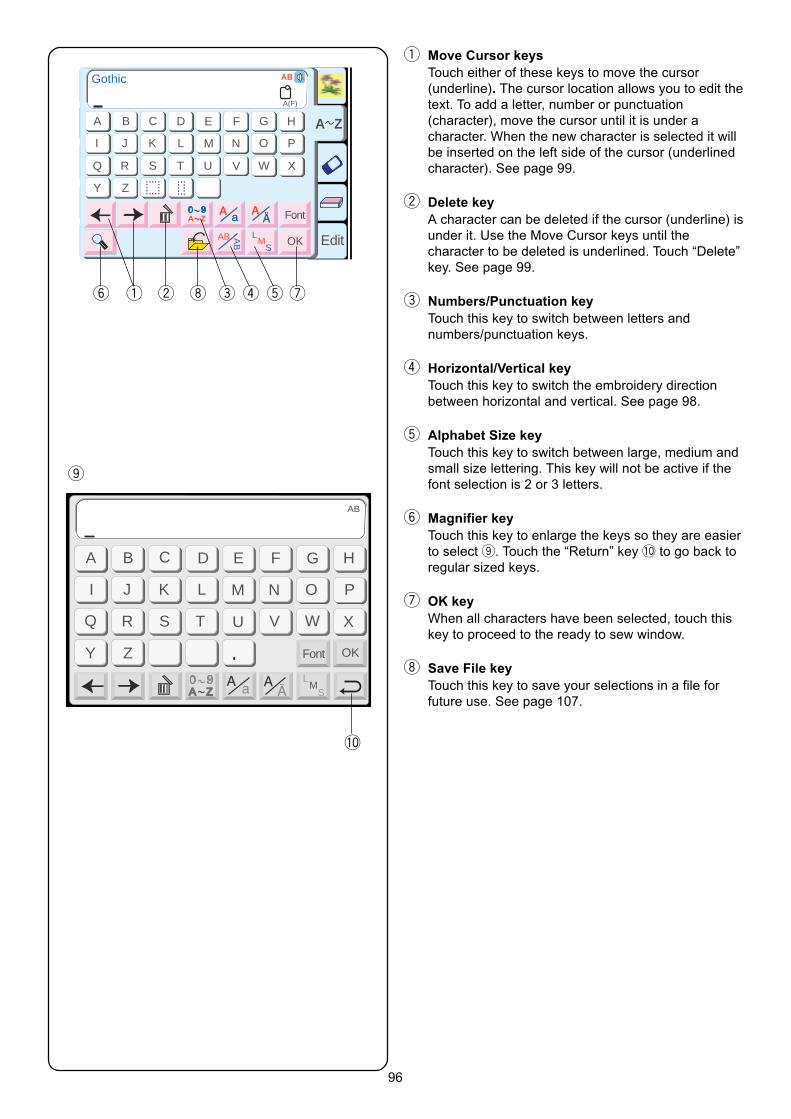
96
q Move Cursor keysTouch either of these keys to move the cursor(underline). The cursor location allows you to edit thetext. To add a letter, number or punctuation(character), move the cursor until it is under acharacter. When the new character is selected it willbe inserted on the left side of the cursor (underlinedcharacter). See page 99.
w Delete keyA character can be deleted if the cursor (underline) isunder it. Use the Move Cursor keys until thecharacter to be deleted is underlined. Touch “Delete”key. See page 99.
e Numbers/Punctuation keyTouch this key to switch between letters andnumbers/punctuation keys.
r Horizontal/Vertical keyTouch this key to switch the embroidery directionbetween horizontal and vertical. See page 98.
t Alphabet Size keyTouch this key to switch between large, medium andsmall size lettering. This key will not be active if thefont selection is 2 or 3 letters.
y Magnifier keyTouch this key to enlarge the keys so they are easierto select o. Touch the “Return” key !0 to go back toregular sized keys.
u OK keyWhen all characters have been selected, touch thiskey to proceed to the ready to sew window.
i Save File keyTouch this key to save your selections in a file forfuture use. See page 107.
y
Edit
Font
AB OKML
S
AB
G H
I J K L M N O P
Q R S T U V W X
Y Z
A B C D E F
Gothic AB
A(F)
A ZG H
I J K L M N O P
Q R S T U V W X
Y Z
A B C D E F
A Z
q w i e r t u
Font OK
ML
S
G H
I J K L M N O P
Q R S T U V W X
Y Z
A B C D E F
A Z
AB
o
!0
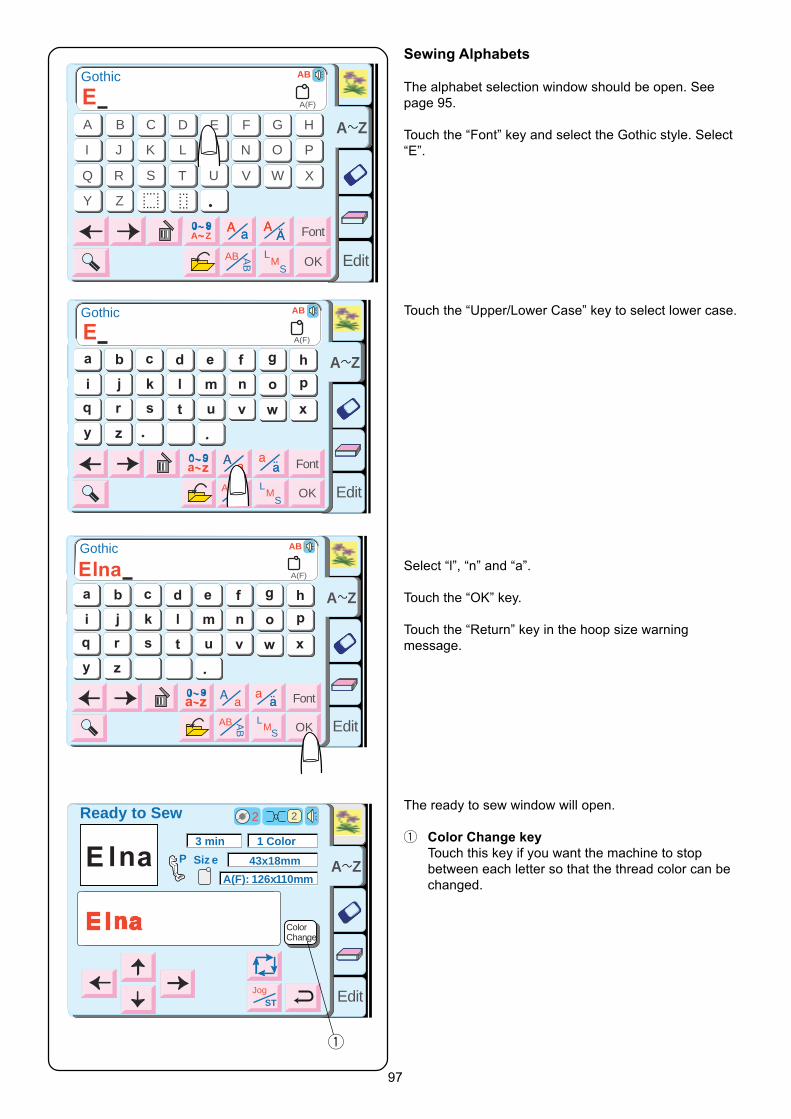
97
Sewing Alphabets
The alphabet selection window should be open. Seepage 95.
Touch the “Font” key and select the Gothic style. Select“E”.
Touch the “Upper/Lower Case” key to select lower case.
Select “l”, “n” and “a”.
Touch the “OK” key.
Touch the “Return” key in the hoop size warningmessage.
The ready to sew window will open.
q Color Change keyTouch this key if you want the machine to stopbetween each letter so that the thread color can bechanged.
Edit
Font
AB OKML
S
AB
G H
I J K L M N O P
Q R S T U V W X
Y Z
A B C D E F
Gothic AB
A(F)
A ZG H
I J K L M N O P
Q R S T U V W X
Y Z
A B C D E F
A Z
Edit
Font
AB OKML
S
AB
G H
I J K L M N O P
Q R S T U V W X
Y Z
A B C D E F
Gothic AB
A(F)
A ZG H
I J K L M N O P
Q R S T U V W X
Y Z
A B C D E F
Edit
Font
AB OKML
S
AB
G H
I J K L M N O P
Q R S T U V W X
Y Z
A B C D E F
Gothic AB
A(F)
A ZG H
I J K L M N O P
Q R S T U V W X
Y Z
A B C D E F
Edit
A ZSiz eP
A(F): 126x110mm
43x18mm
1 Color3 min
JogST
ColorChange
Ready to Sew 2
JogST
2
q
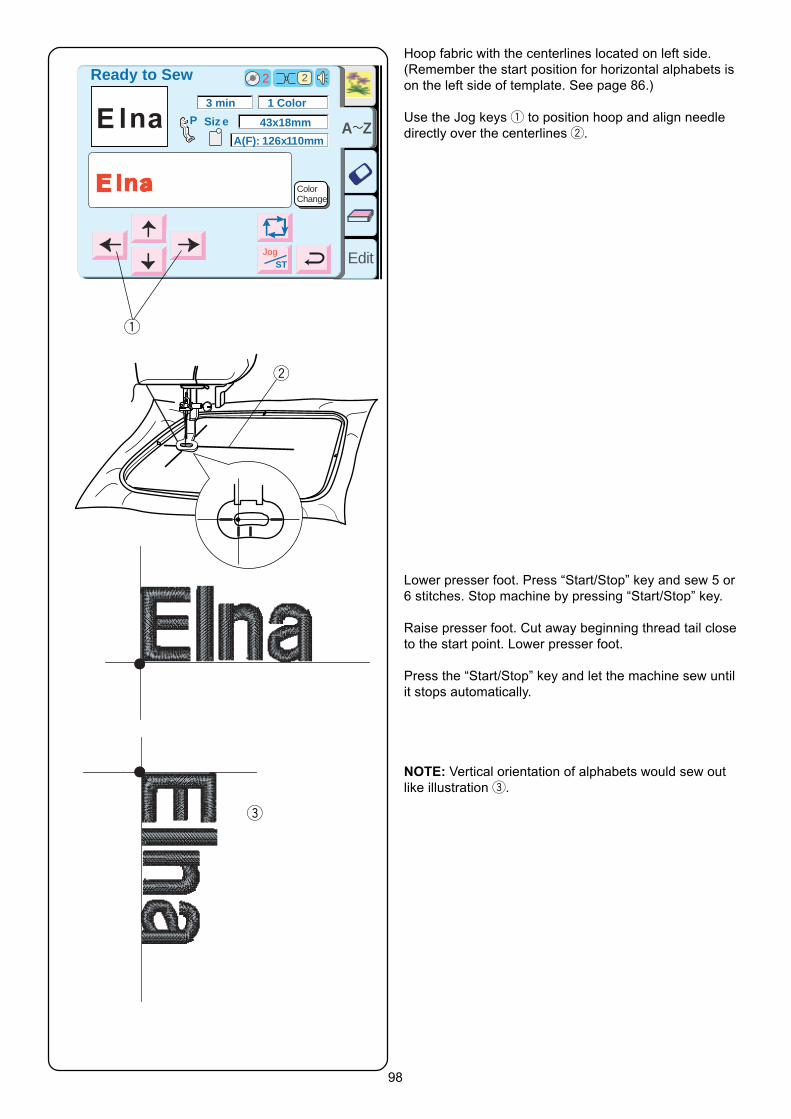
98
Hoop fabric with the centerlines located on left side.(Remember the start position for horizontal alphabets ison the left side of template. See page 86.)
Use the Jog keys q to position hoop and align needledirectly over the centerlines w.
Lower presser foot. Press “Start/Stop” key and sew 5 or6 stitches. Stop machine by pressing “Start/Stop” key.
Raise presser foot. Cut away beginning thread tail closeto the start point. Lower presser foot.
Press the “Start/Stop” key and let the machine sew untilit stops automatically.
NOTE: Vertical orientation of alphabets would sew outlike illustration e.
Edit
A ZSiz eP
A(F): 126x110mm
43x18mm
1 Color3 min
JogST
ColorChange
Ready to Sew 2
JogST
2
q
w
e
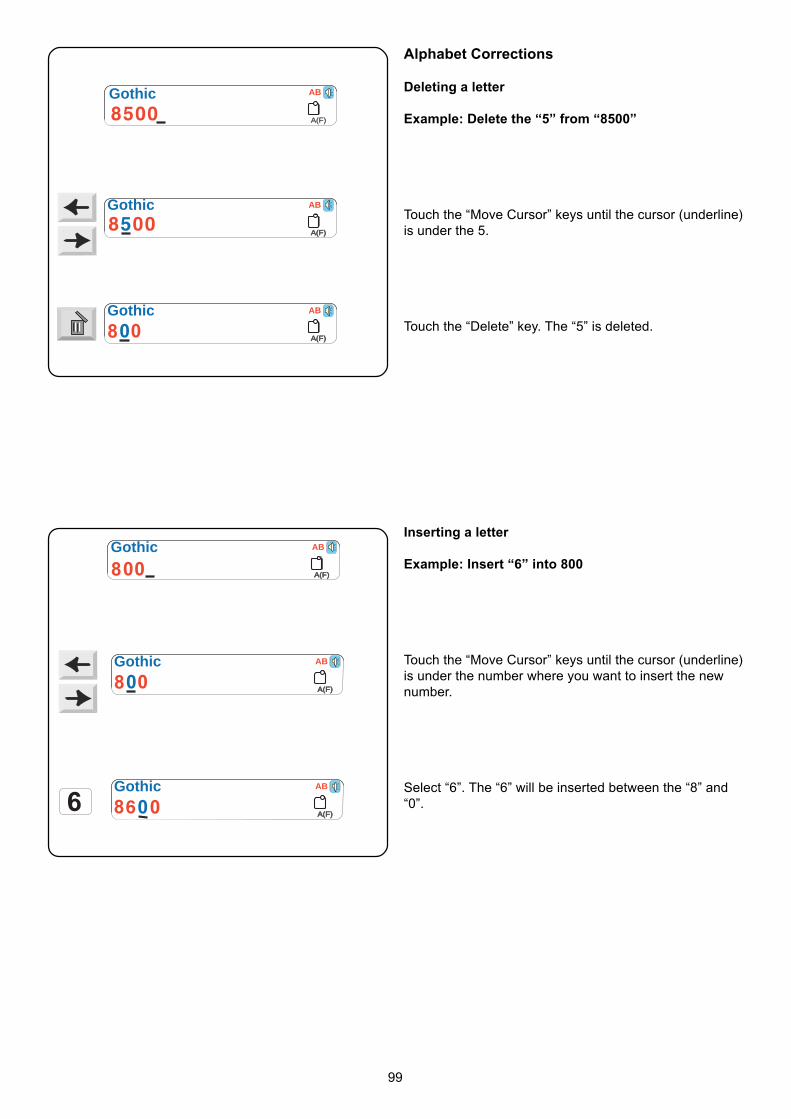
99
Alphabet Corrections
Deleting a letter
Example: Delete the “5” from “8500”
Touch the “Move Cursor” keys until the cursor (underline)is under the 5.
Touch the “Delete” key. The “5” is deleted.
Gothic
A(F)
AB
A(F)
A(F)
Gothic
A(F)
AB
A(F)
A(F)
Gothic
A(F)
AB
A(F)
A(F)
Gothic
A(F)
AB
A(F)
A(F)
Gothic
A(F)
AB
A(F)
A(F)
Gothic
A(F)
AB
A(F)
Inserting a letter
Example: Insert “6” into 800
Touch the “Move Cursor” keys until the cursor (underline)is under the number where you want to insert the newnumber.
Select “6”. The “6” will be inserted between the “8” and“0”.
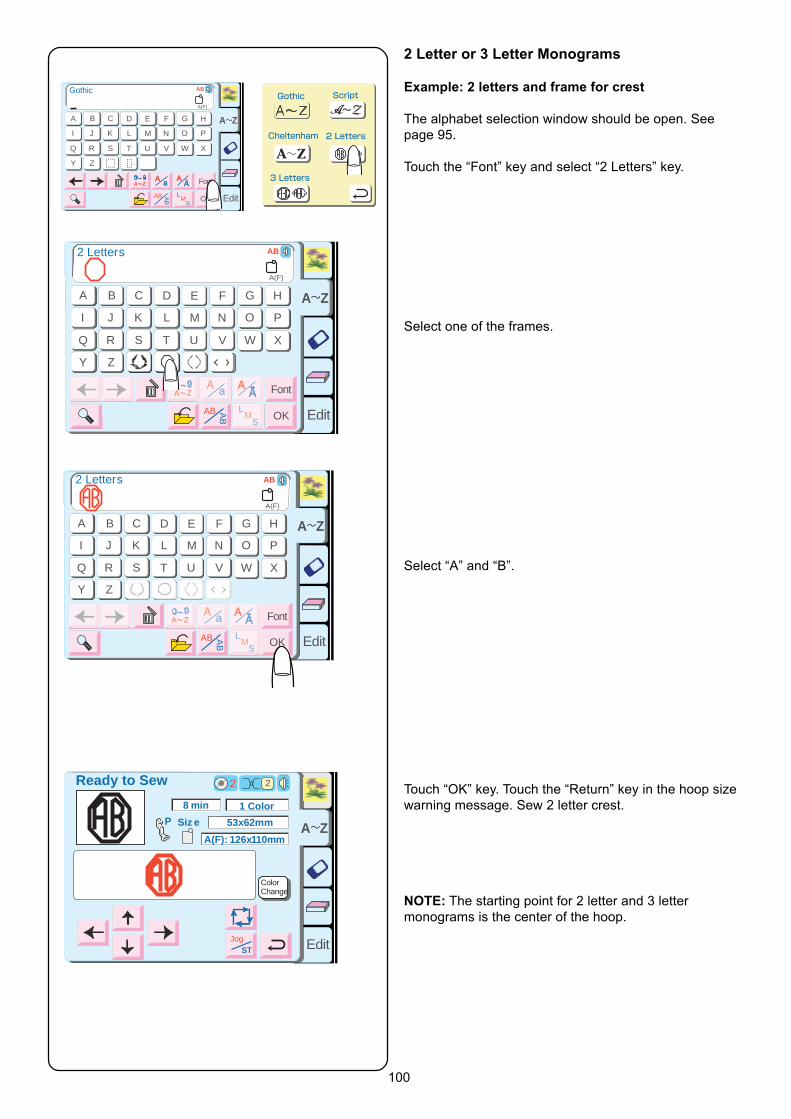
100
Edit
Font
AB OKML
S
AB
G H
I J K L M N O P
Q R S T U V W X
Y Z
A B C D E F
AB
A(F)
A ZG H
I J K L M N O P
Q R S T U V W X
Y Z
A B C D E F
2 Letters
A Z
ML
S
Edit
Font
AB OKML
S
AB
G H
I J K L M N O P
Q R S T U V W X
Y Z
A B C D E F
AB
A(F)
A ZG H
I J K L M N O P
Q R S T U V W X
Y Z
A B C D E F
2 Letters
A Z
ML
S
Edit
Font
AB OKML
S
AB
G H
I J K L M N O P
Q R S T U V W X
Y Z
A B C D E F
Gothic AB
A(F)
A ZG H
I J K L M N O P
Q R S T U V W X
Y Z
A B C D E F
A Z
2 Letter or 3 Letter Monograms
Example: 2 letters and frame for crest
The alphabet selection window should be open. Seepage 95.
Touch the “Font” key and select “2 Letters” key.
Select one of the frames.
Select “A” and “B”.
Touch “OK” key. Touch the “Return” key in the hoop sizewarning message. Sew 2 letter crest.
NOTE: The starting point for 2 letter and 3 lettermonograms is the center of the hoop.
Edit
A ZSiz eP
A(F): 126x110mm
JogST
ColorChange
Ready to Sew 2
JogST
2
8 min
53x62mm
1 Color
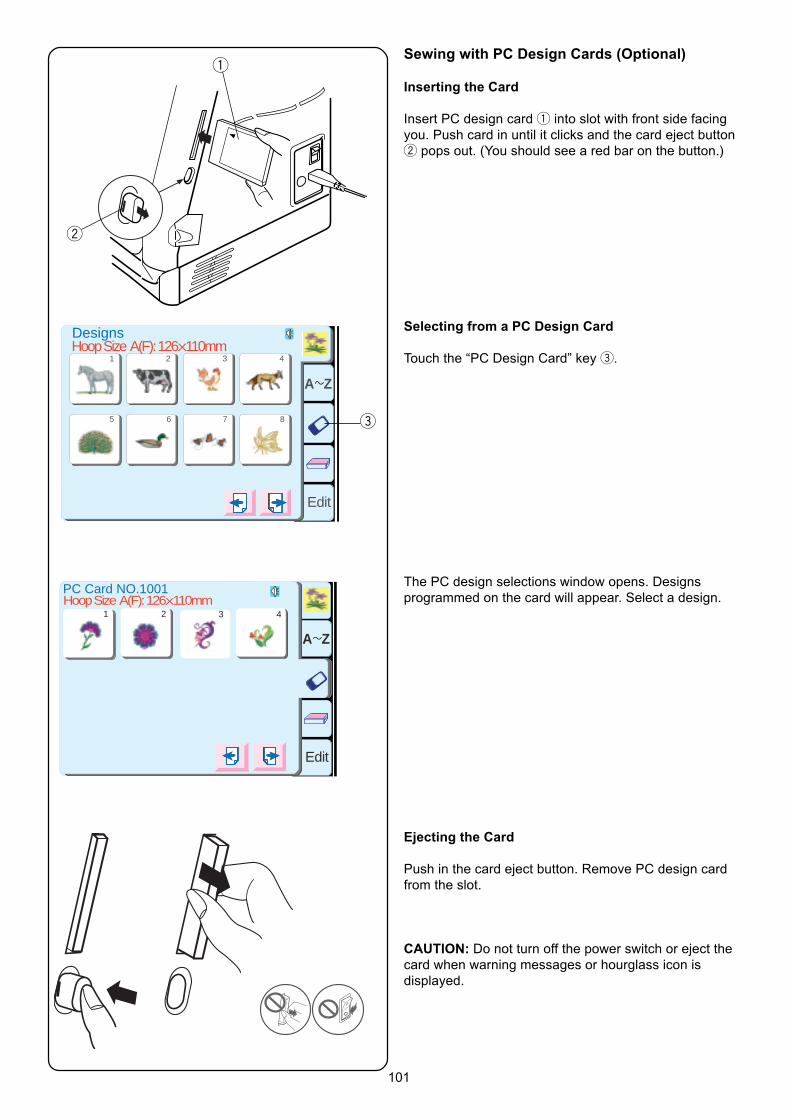
101
Sewing with PC Design Cards (Optional)
Inserting the Card
Insert PC design card q into slot with front side facingyou. Push card in until it clicks and the card eject buttonw pops out. (You should see a red bar on the button.)
Selecting from a PC Design Card
Touch the “PC Design Card” key e.
The PC design selections window opens. Designsprogrammed on the card will appear. Select a design.
Ejecting the Card
Push in the card eject button. Remove PC design cardfrom the slot.
CAUTION: Do not turn off the power switch or eject thecard when warning messages or hourglass icon isdisplayed.
q
w
A Z
Edit
1 2 3 4
5 6 7 8
DesignsHoop Size A(F): 126X110mm
Edit
A Z
PC Card NO.1001
21 3 4Hoop Size A(F): 126X110mm
e
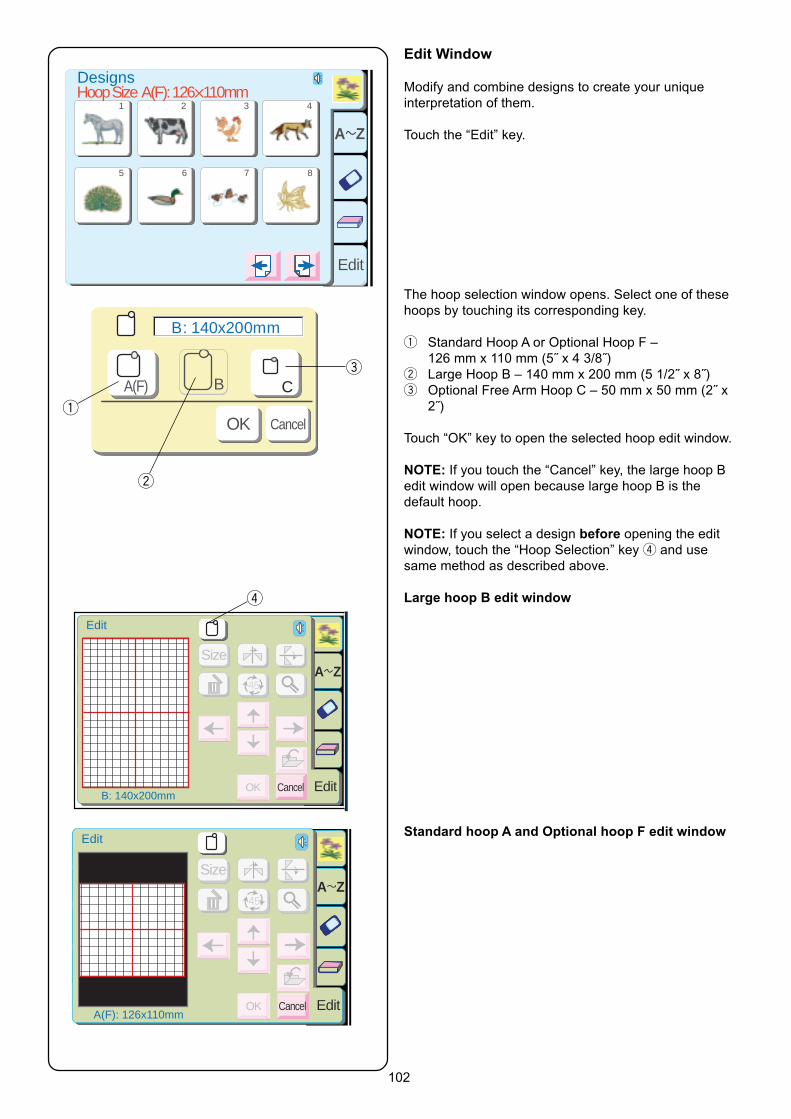
102
SET
Edit
B: 140x200mm
SizeA Z
Edit
SETSET
CancelOK
SETSETSET
?
Edit Window
Modify and combine designs to create your uniqueinterpretation of them.
Touch the “Edit” key.
The hoop selection window opens. Select one of thesehoops by touching its corresponding key.
q Standard Hoop A or Optional Hoop F –126 mm x 110 mm (5˝ x 4 3/8˝)
w Large Hoop B – 140 mm x 200 mm (5 1/2˝ x 8˝)e Optional Free Arm Hoop C – 50 mm x 50 mm (2˝ x
2˝)
Touch “OK” key to open the selected hoop edit window.
NOTE: If you touch the “Cancel” key, the large hoop Bedit window will open because large hoop B is thedefault hoop.
NOTE: If you select a design before opening the editwindow, touch the “Hoop Selection” key r and usesame method as described above.
Large hoop B edit window
CA(F)
CancelOK
B: 140x200mm
CB
A Z
Edit
1 2 3 4
5 6 7 8
DesignsHoop Size A(F): 126X110mm
q
w
e
r
Edit
SizeA Z
EditCancelOKA(F): 126x110mm
Standard hoop A and Optional hoop F edit window
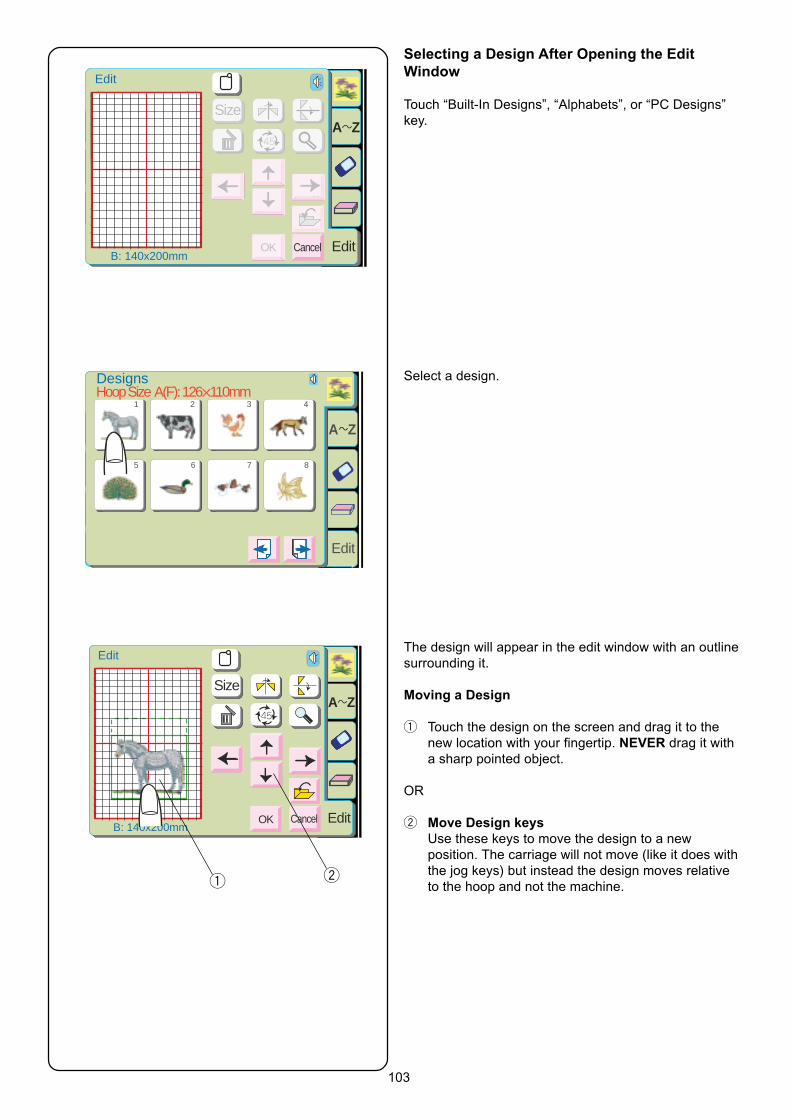
103
Selecting a Design After Opening the EditWindow
Touch “Built-In Designs”, “Alphabets”, or “PC Designs”key.
Select a design.
The design will appear in the edit window with an outlinesurrounding it.
Moving a Design
q Touch the design on the screen and drag it to thenew location with your fingertip. NEVER drag it witha sharp pointed object.
OR
w Move Design keysUse these keys to move the design to a newposition. The carriage will not move (like it does withthe jog keys) but instead the design moves relativeto the hoop and not the machine.
Edit
B: 140x200mm
SizeA Z
EditCancelOK
A Z
Edit
1 2 3 4
5 6 7 8
DesignsHoop Size A(F): 126X110mm
Edit
B: 140x200mm
A Z
EditCancel
Size
OK
q w
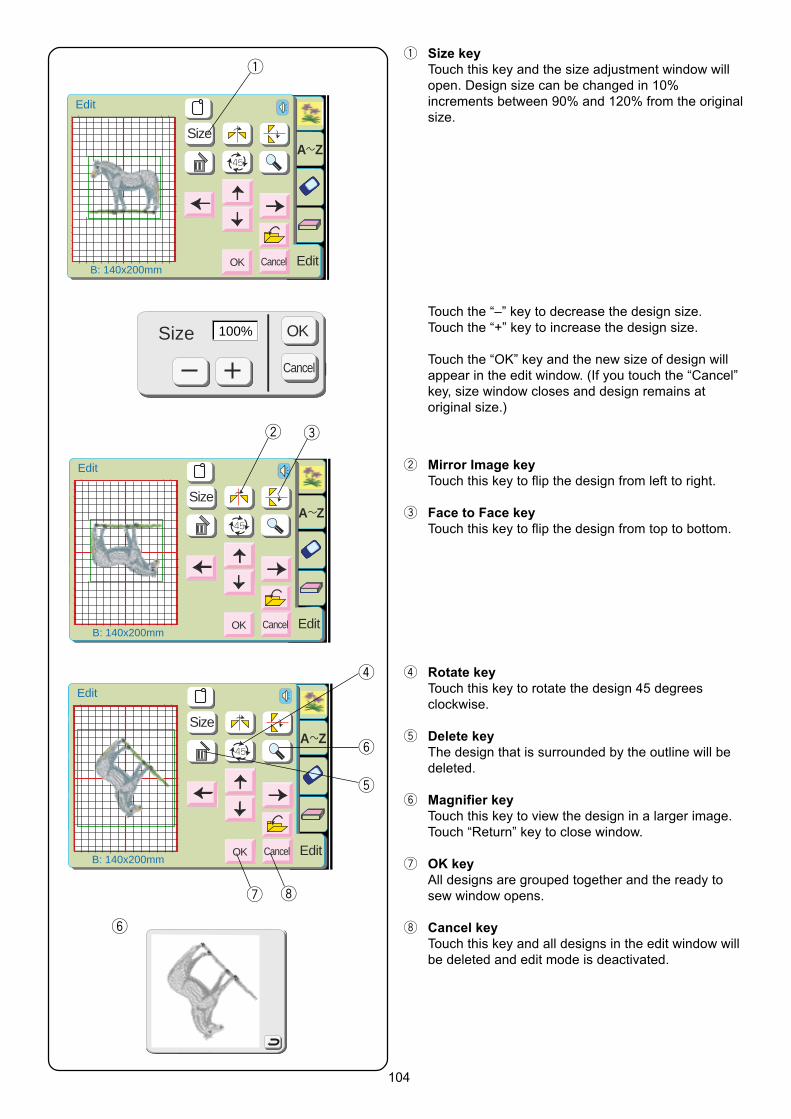
104
Edit
B: 140x200mm
A Z
EditCancel
Size
OK
q Size keyTouch this key and the size adjustment window willopen. Design size can be changed in 10%increments between 90% and 120% from the originalsize.
Edit
B: 140x200mm
A Z
EditCancel
Size
OK
Size OK
Cancel
100%
q
Edit
B: 140x200mm
A Z
EditCancel
Size
OK
w e
r
y
t
u i
y
Touch the “–” key to decrease the design size.Touch the “+” key to increase the design size.
Touch the “OK” key and the new size of design willappear in the edit window. (If you touch the “Cancel”key, size window closes and design remains atoriginal size.)
w Mirror Image keyTouch this key to flip the design from left to right.
e Face to Face keyTouch this key to flip the design from top to bottom.
r Rotate keyTouch this key to rotate the design 45 degreesclockwise.
t Delete keyThe design that is surrounded by the outline will bedeleted.
y Magnifier keyTouch this key to view the design in a larger image.Touch “Return” key to close window.
u OK keyAll designs are grouped together and the ready tosew window opens.
i Cancel keyTouch this key and all designs in the edit window willbe deleted and edit mode is deactivated.

105
SET
A Z
Edit
DesignsHoop Size A(F): 126X110mm
SETSETSET
?
17 18 19 20
21 22 23 24
Edit
SizeA Z
EditCancelOKA(F): 126x110mm
Cancel
Size
OK
A Z
Edit
1 2 3 4
Ready to Sew 2
P
JogST
2
A(F):126x110mm
Size 46x42mm
10 min
Seashell5776
Wicker5789 Date 5590
VisorGold 5698
6 Colors18
Combine a Built-in Design with Alphabet
Example: Built-in design #18 and “Bear”
Select design #18 from the built-in design selectionwindow.
Touch the “Return” key in the hoop size warningmessage.
Touch the “Edit” key.
Touch the “Alphabets” key.
Select “B” (upper case in Gothic style).
Touch the “Upper/Lower Case” key to activate lowercase.
Edit
Font
AB OKML
S
AB
G H
I J K L M N O P
Q R S T U V W X
Y Z
A B C D E F
Gothic AB
A(F)
A ZG H
I J K L M N O P
Q R S T U V W X
Y Z
A B C D E F
A Z
B
Edit
Font
AB OKML
S
AB
G H
I J K L M N O P
Q R S T U V W X
Y Z
A B C D E F
Gothic AB
A(F)
A ZG H
I J K L M N O P
Q R S T U V W X
Y Z
A B C D E F
B
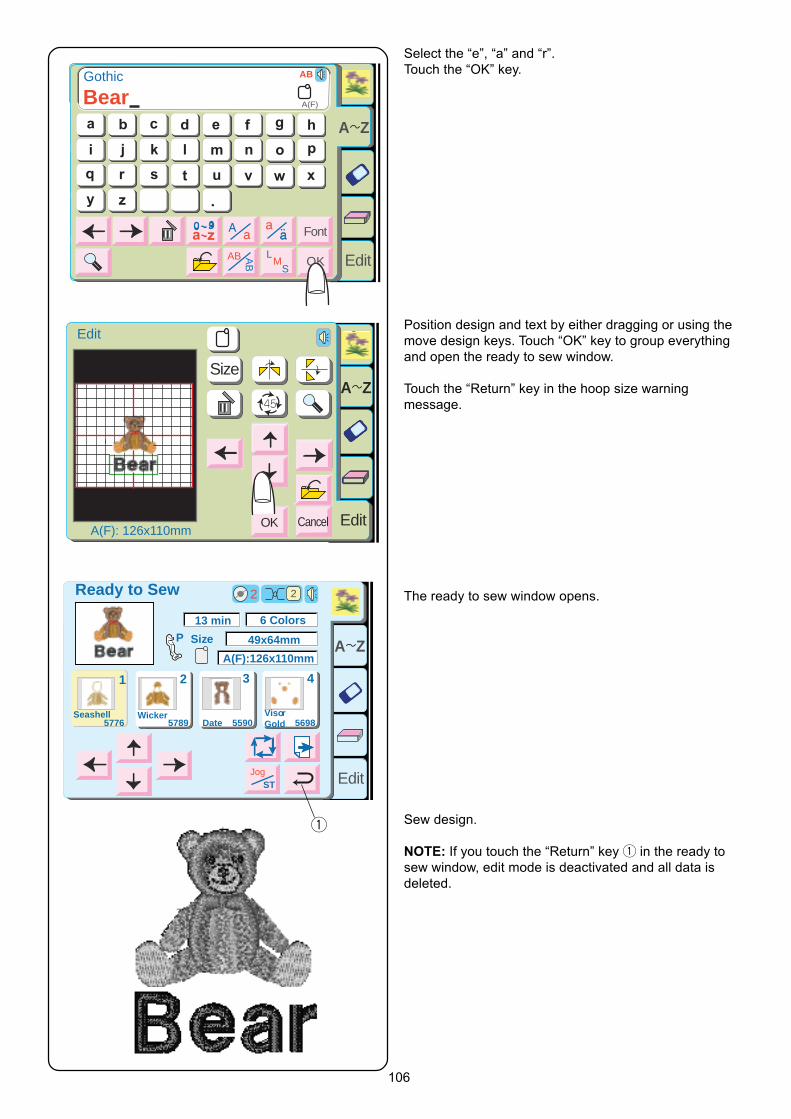
106
Edit
SizeA Z
EditCancelOKA(F): 126x110mm
Cancel
Size
OK
Edit
Font
AB OKML
S
AB
G H
I J K L M N O P
Q R S T U V W X
Y Z
A B C D E F
Gothic AB
A(F)
A ZG H
I J K L M N O P
Q R S T U V W X
Y Z
A B C D E F
Bear
Select the “e”, “a” and “r”.Touch the “OK” key.
Position design and text by either dragging or using themove design keys. Touch “OK” key to group everythingand open the ready to sew window.
Touch the “Return” key in the hoop size warningmessage.
The ready to sew window opens.
Sew design.
NOTE: If you touch the “Return” key q in the ready tosew window, edit mode is deactivated and all data isdeleted.
A Z
Edit
1 2 3 4
Ready to Sew 2
P
JogST
2
A(F):126x110mm
Size
Seashell5776
Wicker5789 Date 5590
VisorGold 5698
6 Colors13 min
49x64mm
q
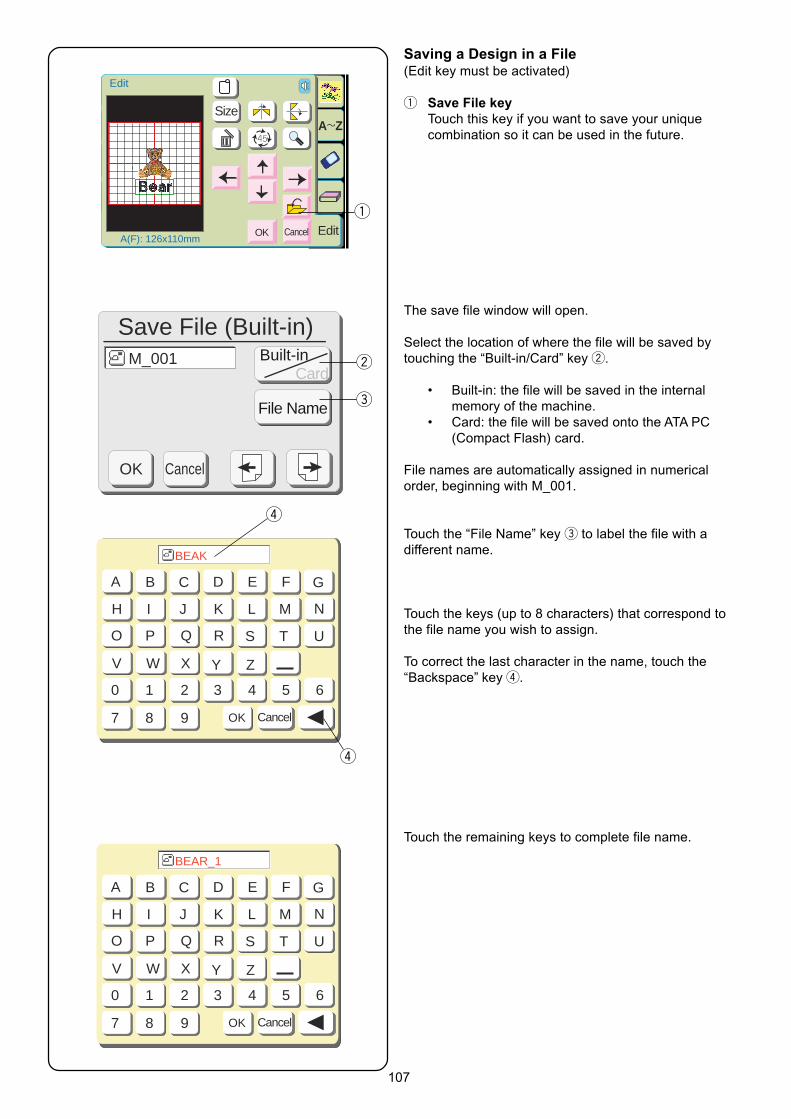
107
Saving a Design in a File(Edit key must be activated)
q Save File keyTouch this key if you want to save your uniquecombination so it can be used in the future.
The save file window will open.
Select the location of where the file will be saved bytouching the “Built-in/Card” key w.
• Built-in: the file will be saved in the internalmemory of the machine.
• Card: the file will be saved onto the ATA PC(Compact Flash) card.
File names are automatically assigned in numericalorder, beginning with M_001.
Touch the “File Name” key e to label the file with adifferent name.
Touch the keys (up to 8 characters) that correspond tothe file name you wish to assign.
To correct the last character in the name, touch the“Backspace” key r.
Touch the remaining keys to complete file name.
Edit
SizeA Z
EditCancelOKA(F): 126x110mm
Cancel
Size
OK
Save File (Built-in)M_001
CancelOK
Built-inCard
File Name
Cancel
A B C D E F G
H I J K L M N
O P Q R S T U
0 1 2
7 8 9
3 4 5 6
V W X Y Z
OK
BEAK
Cancel
A B C D E F G
H I J K L M N
O P Q R S T U
0 1 2
7 8 9
3 4 5 6
V W X Y Z
OK
BEAR_1
q
w
e
r
r
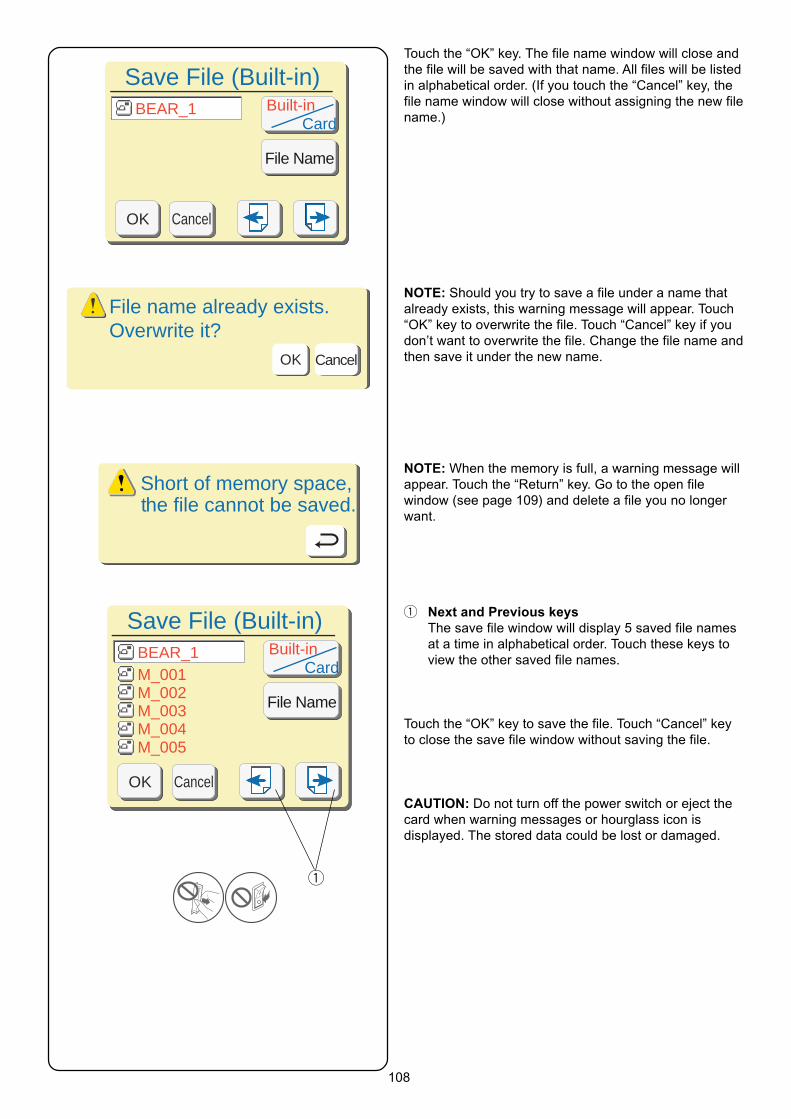
108
Touch the “OK” key. The file name window will close andthe file will be saved with that name. All files will be listedin alphabetical order. (If you touch the “Cancel” key, thefile name window will close without assigning the new filename.)
NOTE: Should you try to save a file under a name thatalready exists, this warning message will appear. Touch“OK” key to overwrite the file. Touch “Cancel” key if youdon’t want to overwrite the file. Change the file name andthen save it under the new name.
NOTE: When the memory is full, a warning message willappear. Touch the “Return” key. Go to the open filewindow (see page 109) and delete a file you no longerwant.
q Next and Previous keysThe save file window will display 5 saved file namesat a time in alphabetical order. Touch these keys toview the other saved file names.
Touch the “OK” key to save the file. Touch “Cancel” keyto close the save file window without saving the file.
CAUTION: Do not turn off the power switch or eject thecard when warning messages or hourglass icon isdisplayed. The stored data could be lost or damaged.
Save File (Built-in)BEAR_1
CancelOK
Built-inCard
File Name
File name already exists.Overwrite it?
CancelOK
Short of memory space,the file cannot be saved.
Save File (Built-in)BEAR_1M_001M_002M_003M_004M_005
CancelOK
Built-inCard
File Name
q
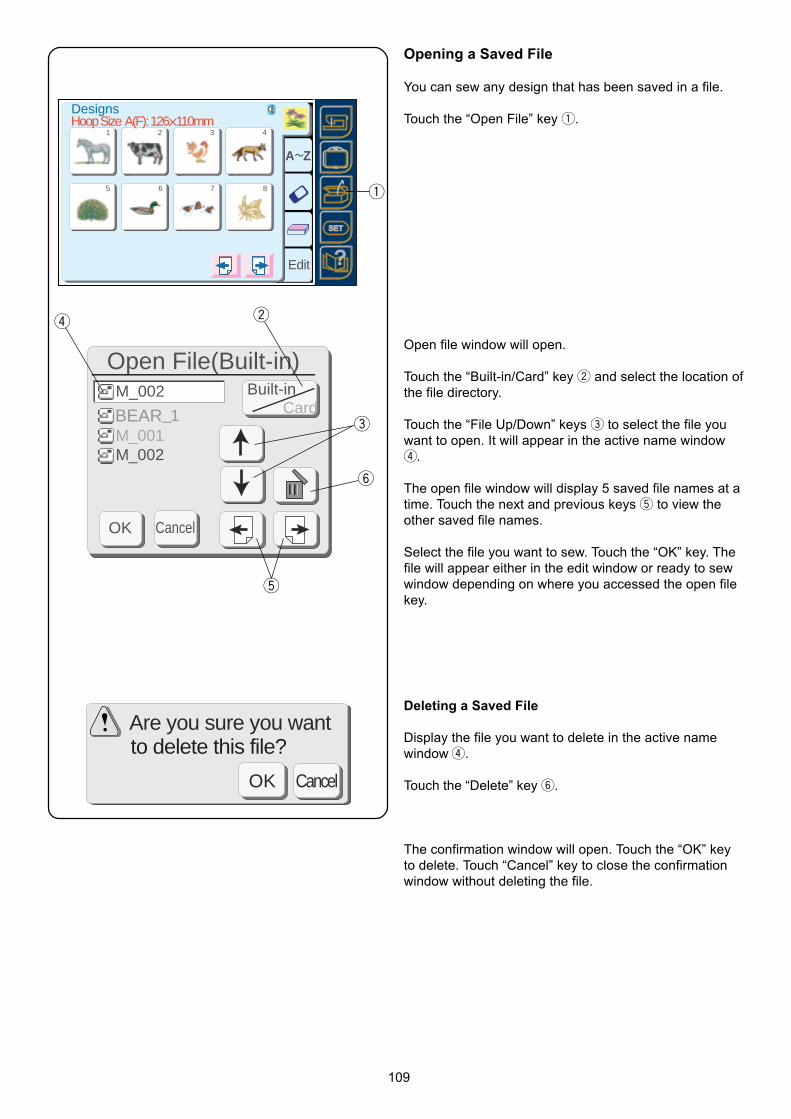
109
Opening a Saved File
You can sew any design that has been saved in a file.
Touch the “Open File” key q.
Open File(Built-in)
CancelOK
Built-inCard
M_002
M_002
M_001BEAR_1
Are you sure you wantto delete this file?
OK Cancel
SET
A Z
Edit
1 2 3 4
5 6 7 8
DesignsHoop Size A(F): 126X110mm
SETSETSET
?
SETSETSET
?
q
r w
e
y
t
Open file window will open.
Touch the “Built-in/Card” key w and select the location ofthe file directory.
Touch the “File Up/Down” keys e to select the file youwant to open. It will appear in the active name windowr.
The open file window will display 5 saved file names at atime. Touch the next and previous keys t to view theother saved file names.
Select the file you want to sew. Touch the “OK” key. Thefile will appear either in the edit window or ready to sewwindow depending on where you accessed the open filekey.
Deleting a Saved File
Display the file you want to delete in the active namewindow r.
Touch the “Delete” key y.
The confirmation window will open. Touch the “OK” keyto delete. Touch “Cancel” key to close the confirmationwindow without deleting the file.
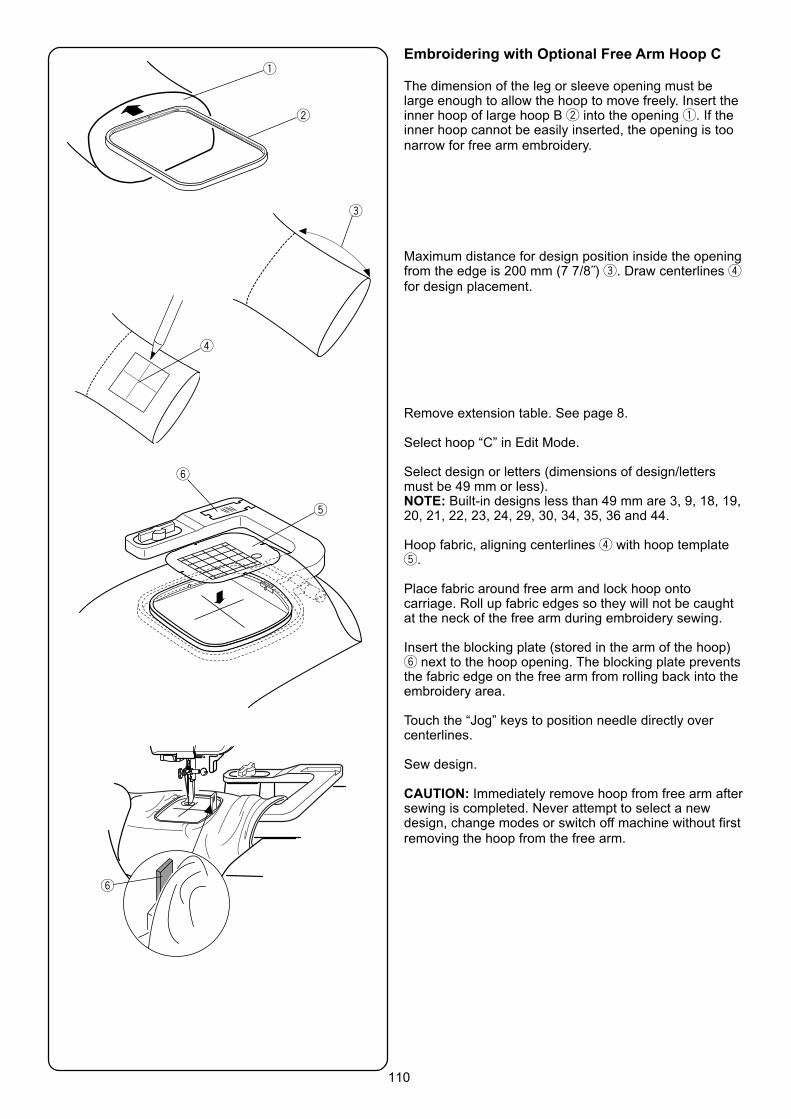
110
Embroidering with Optional Free Arm Hoop C
The dimension of the leg or sleeve opening must belarge enough to allow the hoop to move freely. Insert theinner hoop of large hoop B w into the opening q. If theinner hoop cannot be easily inserted, the opening is toonarrow for free arm embroidery.
Maximum distance for design position inside the openingfrom the edge is 200 mm (7 7/8˝) e. Draw centerlines rfor design placement.
Remove extension table. See page 8.
Select hoop “C” in Edit Mode.
Select design or letters (dimensions of design/lettersmust be 49 mm or less).NOTE: Built-in designs less than 49 mm are 3, 9, 18, 19,20, 21, 22, 23, 24, 29, 30, 34, 35, 36 and 44.
Hoop fabric, aligning centerlines r with hoop templatet.
Place fabric around free arm and lock hoop ontocarriage. Roll up fabric edges so they will not be caughtat the neck of the free arm during embroidery sewing.
Insert the blocking plate (stored in the arm of the hoop)y next to the hoop opening. The blocking plate preventsthe fabric edge on the free arm from rolling back into theembroidery area.
Touch the “Jog” keys to position needle directly overcenterlines.
Sew design.
CAUTION: Immediately remove hoop from free arm aftersewing is completed. Never attempt to select a newdesign, change modes or switch off machine without firstremoving the hoop from the free arm.
w
q
e
r
t
y
y
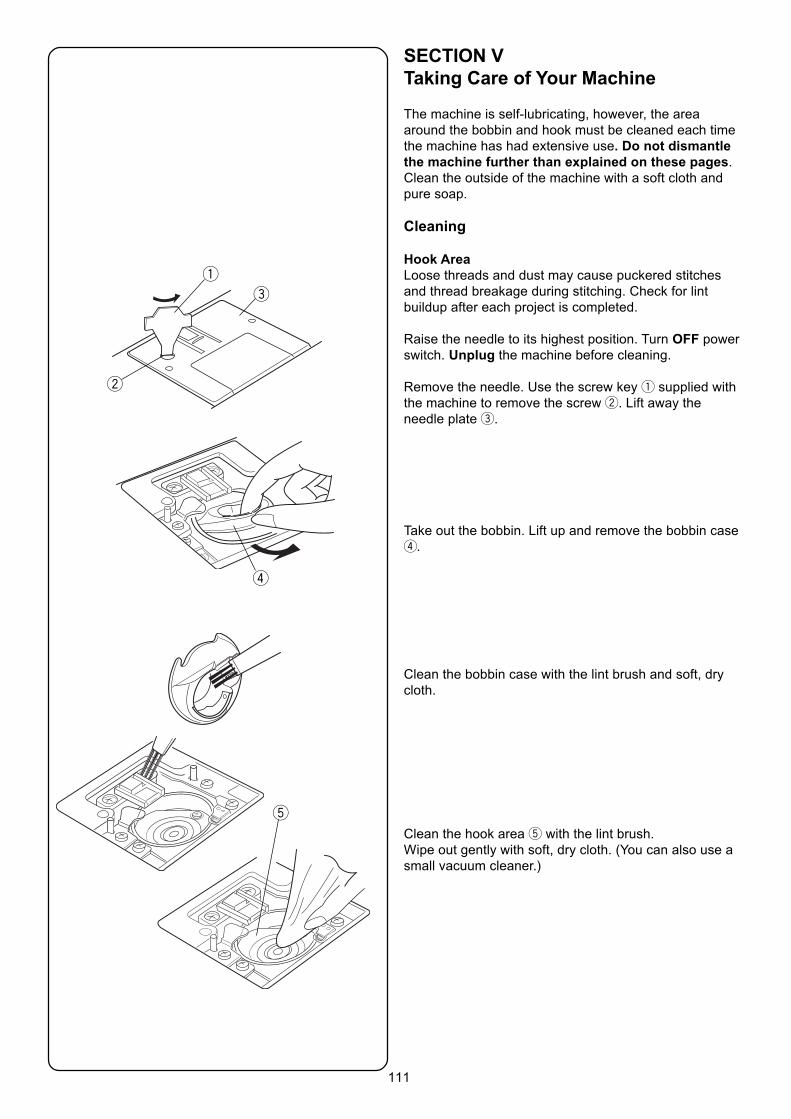
111
SECTION VTaking Care of Your Machine
The machine is self-lubricating, however, the areaaround the bobbin and hook must be cleaned each timethe machine has had extensive use. Do not dismantlethe machine further than explained on these pages.Clean the outside of the machine with a soft cloth andpure soap.
Cleaning
Hook AreaLoose threads and dust may cause puckered stitchesand thread breakage during stitching. Check for lintbuildup after each project is completed.
Raise the needle to its highest position. Turn OFF powerswitch. Unplug the machine before cleaning.
Remove the needle. Use the screw key q supplied withthe machine to remove the screw w. Lift away theneedle plate e.
Take out the bobbin. Lift up and remove the bobbin caser.
Clean the bobbin case with the lint brush and soft, drycloth.
Clean the hook area t with the lint brush.Wipe out gently with soft, dry cloth. (You can also use asmall vacuum cleaner.)
q
e
w
r
t
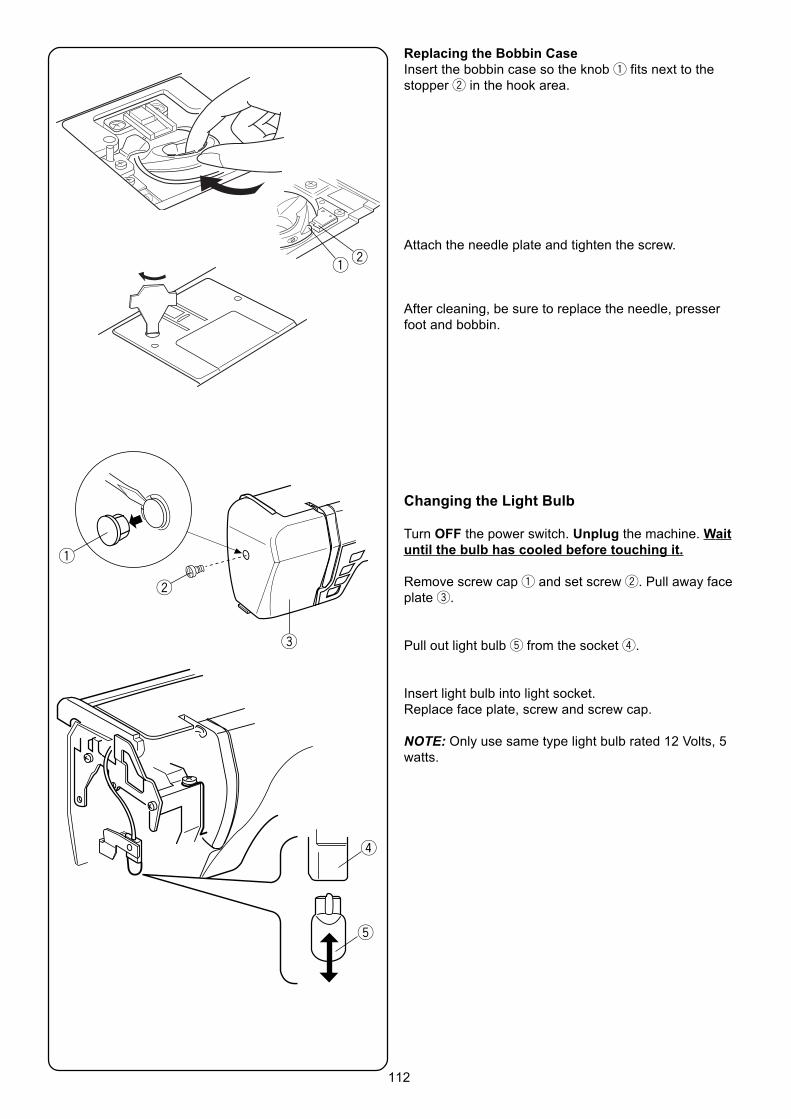
112
Replacing the Bobbin CaseInsert the bobbin case so the knob q fits next to thestopper w in the hook area.
Attach the needle plate and tighten the screw.
After cleaning, be sure to replace the needle, presserfoot and bobbin.
Changing the Light Bulb
Turn OFF the power switch. Unplug the machine. Waituntil the bulb has cooled before touching it.
Remove screw cap q and set screw w. Pull away faceplate e.
Pull out light bulb t from the socket r.
Insert light bulb into light socket.Replace face plate, screw and screw cap.
NOTE: Only use same type light bulb rated 12 Volts, 5watts.
q
w
e
r
qw
t
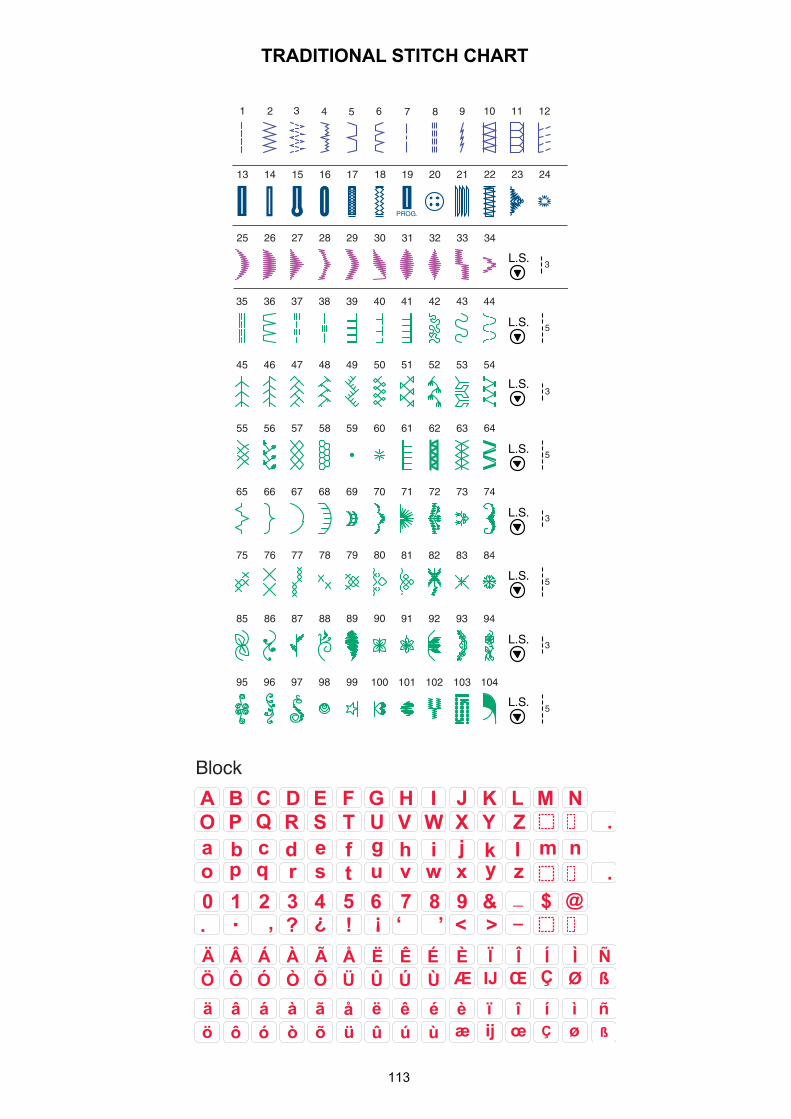
113
TRADITIONAL STITCH CHART
�����
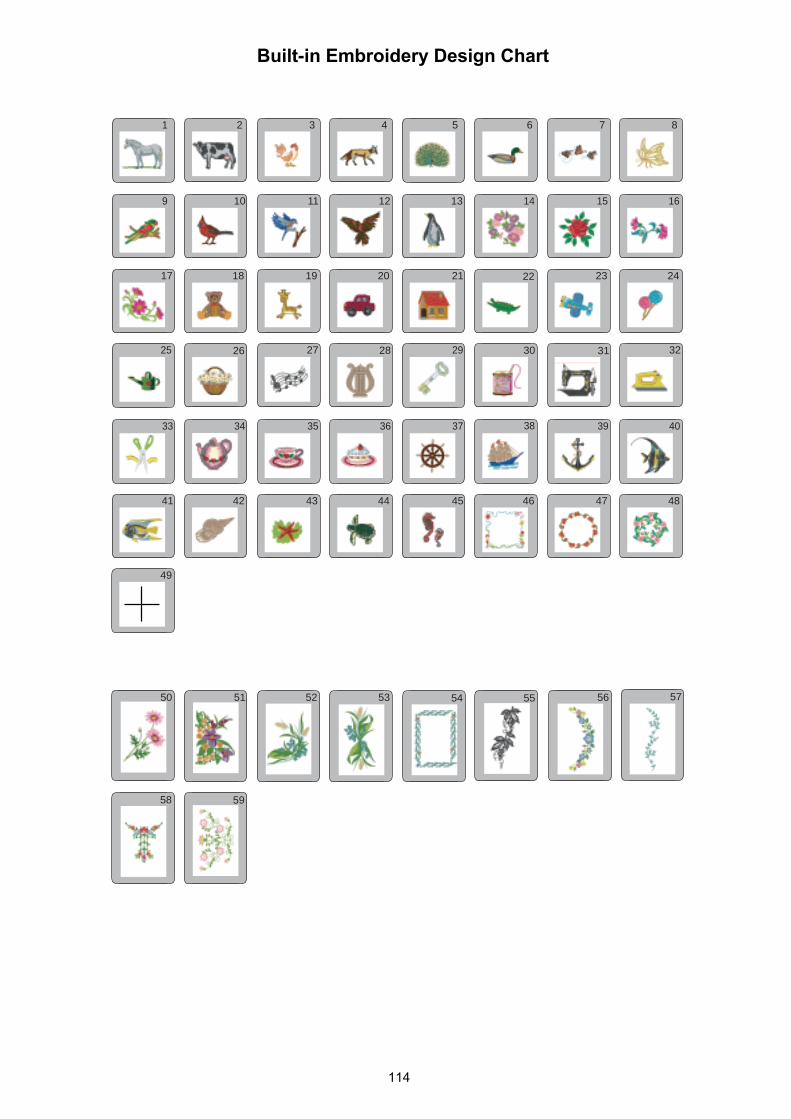
114
Built-in Embroidery Design Chart
21 3 4
20191817
9 10 11 12
65 7 8
24232221
13 14 15 16
2625 27 28
44434241
33 34 35 36
3029 31 32
48474645
5251
59
50 56555453
58
57
37 38 39 40
49
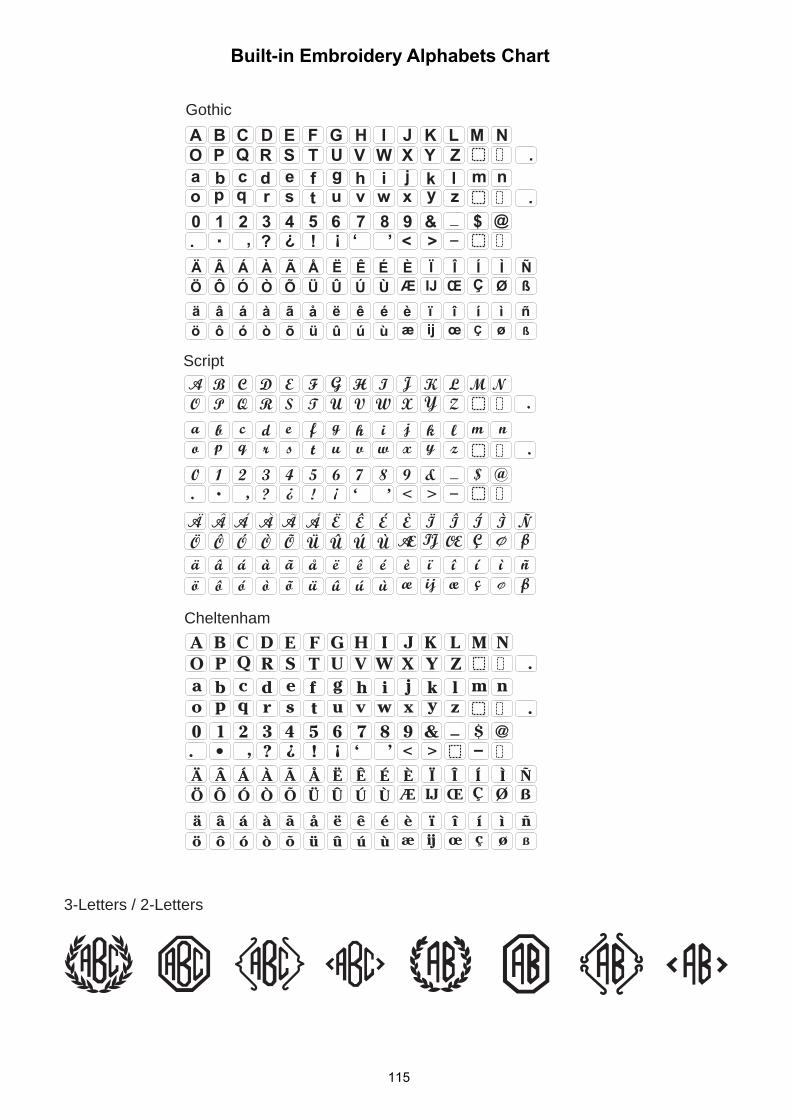
115
Built-in Embroidery Alphabets Chart
Gothic
Script
Cheltenham
3-Letters / 2-Letters
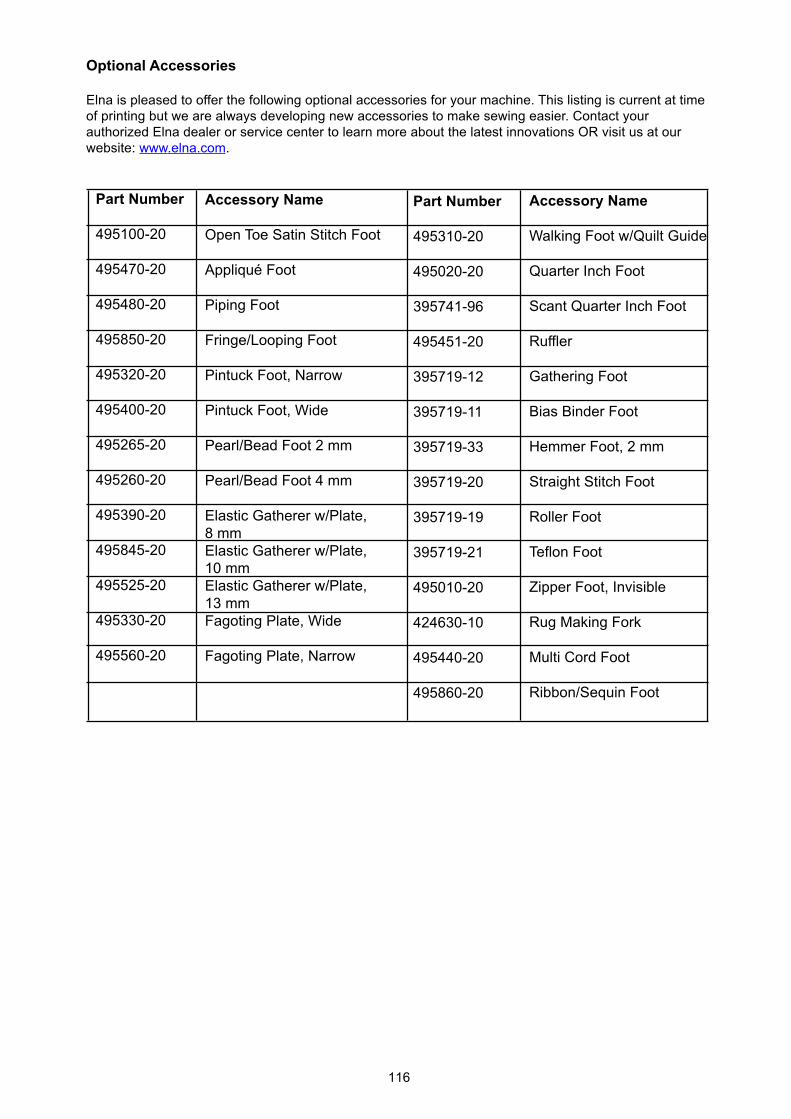
116
Optional Accessories
Elna is pleased to offer the following optional accessories for your machine. This listing is current at timeof printing but we are always developing new accessories to make sewing easier. Contact yourauthorized Elna dealer or service center to learn more about the latest innovations OR visit us at ourwebsite: www.elna.com.
Part Number
495100-20
495470-20
495480-20
495850-20
495320-20
495400-20
495265-20
495260-20
495390-20
495845-20
495525-20
495330-20
495560-20
Accessory Name
Open Toe Satin Stitch Foot
Appliqué Foot
Piping Foot
Fringe/Looping Foot
Pintuck Foot, Narrow
Pintuck Foot, Wide
Pearl/Bead Foot 2 mm
Pearl/Bead Foot 4 mm
Elastic Gatherer w/Plate,8 mmElastic Gatherer w/Plate,10 mmElastic Gatherer w/Plate,13 mmFagoting Plate, Wide
Fagoting Plate, Narrow
Part Number
495310-20
495020-20
395741-96
495451-20
395719-12
395719-11
395719-33
395719-20
395719-19
395719-21
495010-20
424630-10
495440-20
495860-20
Accessory Name
Walking Foot w/Quilt Guide
Quarter Inch Foot
Scant Quarter Inch Foot
Ruffler
Gathering Foot
Bias Binder Foot
Hemmer Foot, 2 mm
Straight Stitch Foot
Roller Foot
Teflon Foot
Zipper Foot, Invisible
Rug Making Fork
Multi Cord Foot
Ribbon/Sequin Foot
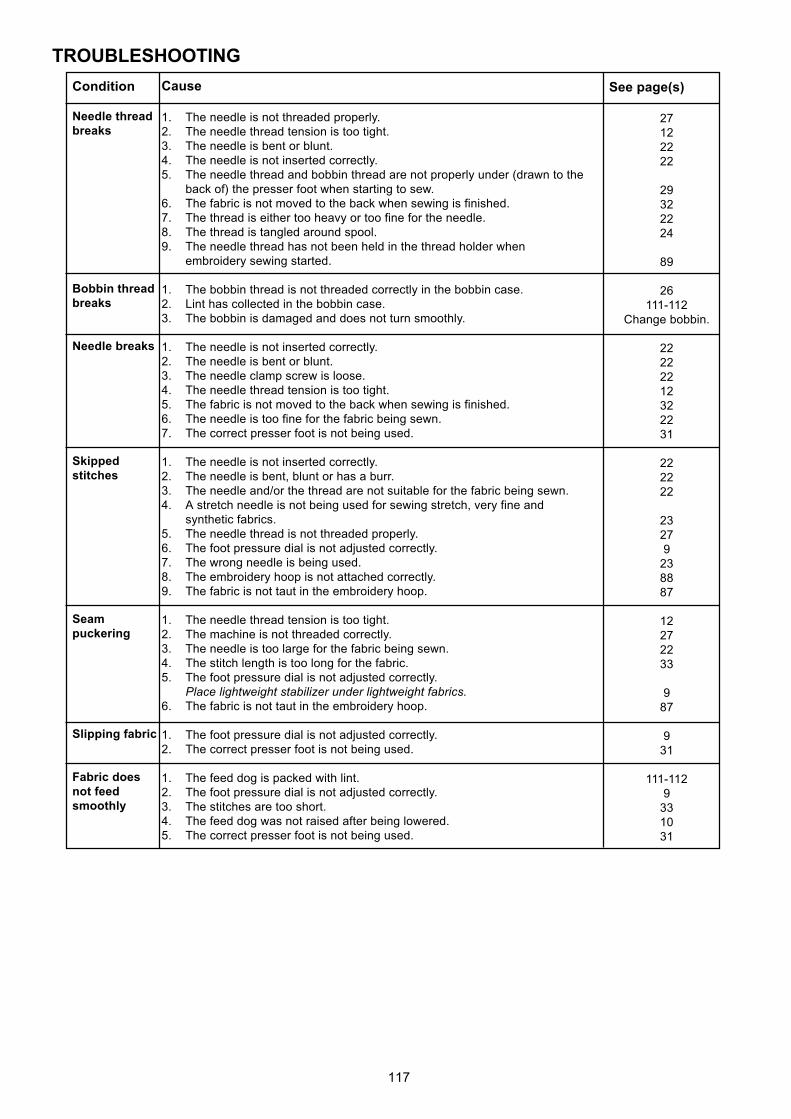
117
Condition
Needle threadbreaks
Bobbin threadbreaks
Needle breaks
Skippedstitches
Seampuckering
Slipping fabric
Fabric doesnot feedsmoothly
Cause
1. The needle is not threaded properly.2. The needle thread tension is too tight.3. The needle is bent or blunt.4. The needle is not inserted correctly.5. The needle thread and bobbin thread are not properly under (drawn to the
back of) the presser foot when starting to sew.6. The fabric is not moved to the back when sewing is finished.7. The thread is either too heavy or too fine for the needle.8. The thread is tangled around spool.9. The needle thread has not been held in the thread holder when
embroidery sewing started.
1. The bobbin thread is not threaded correctly in the bobbin case.2. Lint has collected in the bobbin case.3. The bobbin is damaged and does not turn smoothly.
1. The needle is not inserted correctly.2. The needle is bent or blunt.3. The needle clamp screw is loose.4. The needle thread tension is too tight.5. The fabric is not moved to the back when sewing is finished.6. The needle is too fine for the fabric being sewn.7. The correct presser foot is not being used.
1. The needle is not inserted correctly.2. The needle is bent, blunt or has a burr.3. The needle and/or the thread are not suitable for the fabric being sewn.4. A stretch needle is not being used for sewing stretch, very fine and
synthetic fabrics.5. The needle thread is not threaded properly.6. The foot pressure dial is not adjusted correctly.7. The wrong needle is being used.8. The embroidery hoop is not attached correctly.9. The fabric is not taut in the embroidery hoop.
1. The needle thread tension is too tight.2. The machine is not threaded correctly.3. The needle is too large for the fabric being sewn.4. The stitch length is too long for the fabric.5. The foot pressure dial is not adjusted correctly.
Place lightweight stabilizer under lightweight fabrics.6. The fabric is not taut in the embroidery hoop.
1. The foot pressure dial is not adjusted correctly.2. The correct presser foot is not being used.
1. The feed dog is packed with lint.2. The foot pressure dial is not adjusted correctly.3. The stitches are too short.4. The feed dog was not raised after being lowered.5. The correct presser foot is not being used.
See page(s)
27122222
29322224
89
26111-112
Change bobbin.
22222212322231
222222
23279
238887
12272233
987
931
111-1129
331031
TROUBLESHOOTING
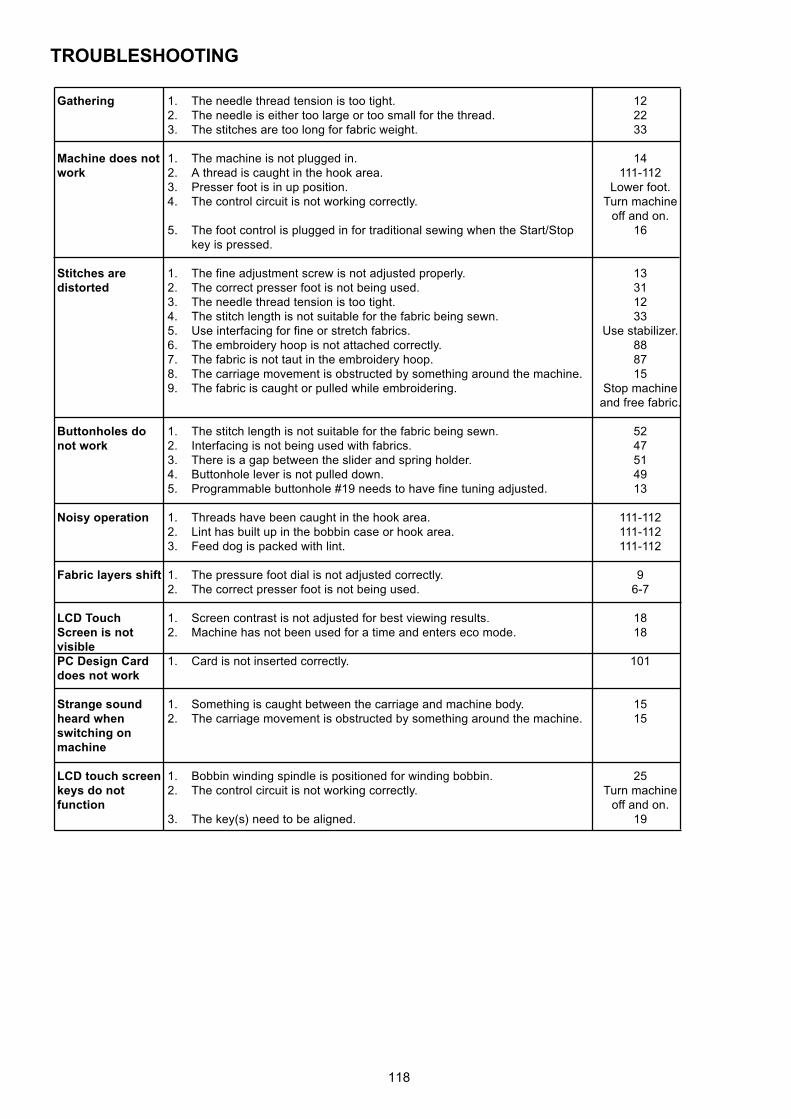
118
1. The needle thread tension is too tight.2. The needle is either too large or too small for the thread.3. The stitches are too long for fabric weight.
1. The machine is not plugged in.2. A thread is caught in the hook area.3. Presser foot is in up position.4. The control circuit is not working correctly.
5. The foot control is plugged in for traditional sewing when the Start/Stopkey is pressed.
1. The fine adjustment screw is not adjusted properly.2. The correct presser foot is not being used.3. The needle thread tension is too tight.4. The stitch length is not suitable for the fabric being sewn.5. Use interfacing for fine or stretch fabrics.6. The embroidery hoop is not attached correctly.7. The fabric is not taut in the embroidery hoop.8. The carriage movement is obstructed by something around the machine.9. The fabric is caught or pulled while embroidering.
1. The stitch length is not suitable for the fabric being sewn.2. Interfacing is not being used with fabrics.3. There is a gap between the slider and spring holder.4. Buttonhole lever is not pulled down.5. Programmable buttonhole #19 needs to have fine tuning adjusted.
1. Threads have been caught in the hook area.2. Lint has built up in the bobbin case or hook area.3. Feed dog is packed with lint.
1. The pressure foot dial is not adjusted correctly.2. The correct presser foot is not being used.
1. Screen contrast is not adjusted for best viewing results.2. Machine has not been used for a time and enters eco mode.
1. Card is not inserted correctly.
1. Something is caught between the carriage and machine body.2. The carriage movement is obstructed by something around the machine.
1. Bobbin winding spindle is positioned for winding bobbin.2. The control circuit is not working correctly.
3. The key(s) need to be aligned.
Gathering
Machine does notwork
Stitches aredistorted
Buttonholes donot work
Noisy operation
Fabric layers shift
LCD TouchScreen is notvisiblePC Design Carddoes not work
Strange soundheard whenswitching onmachine
LCD touch screenkeys do notfunction
122233
14111-112
Lower foot.Turn machine
off and on.16
13311233
Use stabilizer.888715
Stop machineand free fabric.
5247514913
111-112111-112111-112
96-7
1818
101
1515
25Turn machine
off and on.19
TROUBLESHOOTING

119
INDEXAAccessories ............................4-5, 41, 75, 116Accessory Definitions ................................. 6-7Accessory Storage .................................... 4, 5Adjust Key ........................... 30, 33, 39, 52, 61Adjust Key Positions .................................... 19Alignment of Stitches within a Sequence .... 69Alphabet Key ......................................... 30, 70Alphabet Size Key ................................. 70, 96Alphabets ................... 70-73, 95-100, 105-106Alphabets Key (Embroidery) ....................... 89Appliqué ................................................. 40, 76Arrowtack ..................................................... 60Auto-Lock Key ................................... 3, 16, 67Auto Tension ................................................ 12Auto Voltage ................................................ 14
BB Key ........................................................... 68Backspace Key .................................... 73, 107Bartacks ....................................................... 59Basting ......................................................... 43Blind Hem Stitches ...................................... 42Block Letters ........................................... 70-73Bobbin
Drawing Up Bobbin Thread .................. 29Inserting ................................................ 26Winding ............................................ 24-25
Bobbin Case ................................. 26, 111-112Bridging ........................................................ 79Built-in/Card Key .................................. 74, 107Built-in Designs Key .............................. 89, 91Button Sewing .............................................. 56Buttonhole Appliqué..................................... 76Buttonholes .............................................47-55
CCard Eject Button .................................. 3, 101Carriage .......................................3, 15, 83, 88Centerlines ............................................. 86, 93Centimeter Measurements .................... 11, 18Check Memorized Sequence Key ... 62, 70, 72Classic Buttonhole .................... 47, 49, 53, 55Classic Keyhole Buttonhole ............. 47, 50, 52Cleaning .............................................. 111-112Color Change Key ....................................... 97Color/Part Key ............................................. 91Combining Sequence ............................ 62, 67Connecting Machine to Power Supply ........ 14Corded Buttonhole ....................................... 55Cutting Threads ........................................... 32
DDaisy Hemstitch ........................................... 80Darning ...................................................57-58Decorative Stitch Key ............................ 30, 61Default Key .................................................. 33Delete Key ........................ 62, 67, 70, 96, 104Deleting Memory ................................. 74, 109
Design Cards ......................................... 3, 101Diacritical Letter Key ............................. 70, 95Double Overlock Stitch ................................ 45Drag and Drop ........................................... 103Drawn Work ................................................. 81
EEco Mode ..................................................... 18Edit Key................................................ 89, 102Editing .................................................... 69, 99Elastic .......................................................... 41Elongation Key....................................... 67, 68Embroidery Sewing Key ........................ 17, 83Entredeux .................................................... 80Extension Table ......................................... 4, 8Eyelets ......................................................... 60
FFabric ..................................................... 22, 86Face Plate .............................................. 3, 112Face to Face Key ...................................... 104Factory Default Settings .............................. 20Fagoting ....................................................... 79Fastening Threads ................................. 16, 32Feed Dog ........................................... 3, 10, 56File Name Key ..................................... 72, 107File Up/Down Key ................................ 74, 109Fine Adjustment Screw ................................ 13Flywheel ................................................... 3, 56Foot Control ......................................... 5, 9, 14Foot Pressure Dial ......................... 3, 9, 31, 84Format Memory ........................................... 20Four Step Prog. Buttonhole ............. 13, 53-54Free Arm .............................................. 3, 8, 19Free Motion Quilting .................................... 77French Knots ............................................... 78Fringing ........................................................ 81
GGathering ..................................................... 34
HHeavy Fabrics .............................................. 34Heirloom..................................................79-82Heirloom Buttonhole .............................. 47, 50Hems ................................................38, 42, 65Hemstitches ................................................. 80Hoops ........................... 5, 85, 86-87, 102, 110Horizontal/Vertical Key ................................ 96
IInch Measurements ............................... 11, 18Information Key ..................................... 17, 21Interfacing/Stabilizers ...................... 41, 47, 85
JJog Keys ...................................................... 92Jog/ST Key .................................................. 94
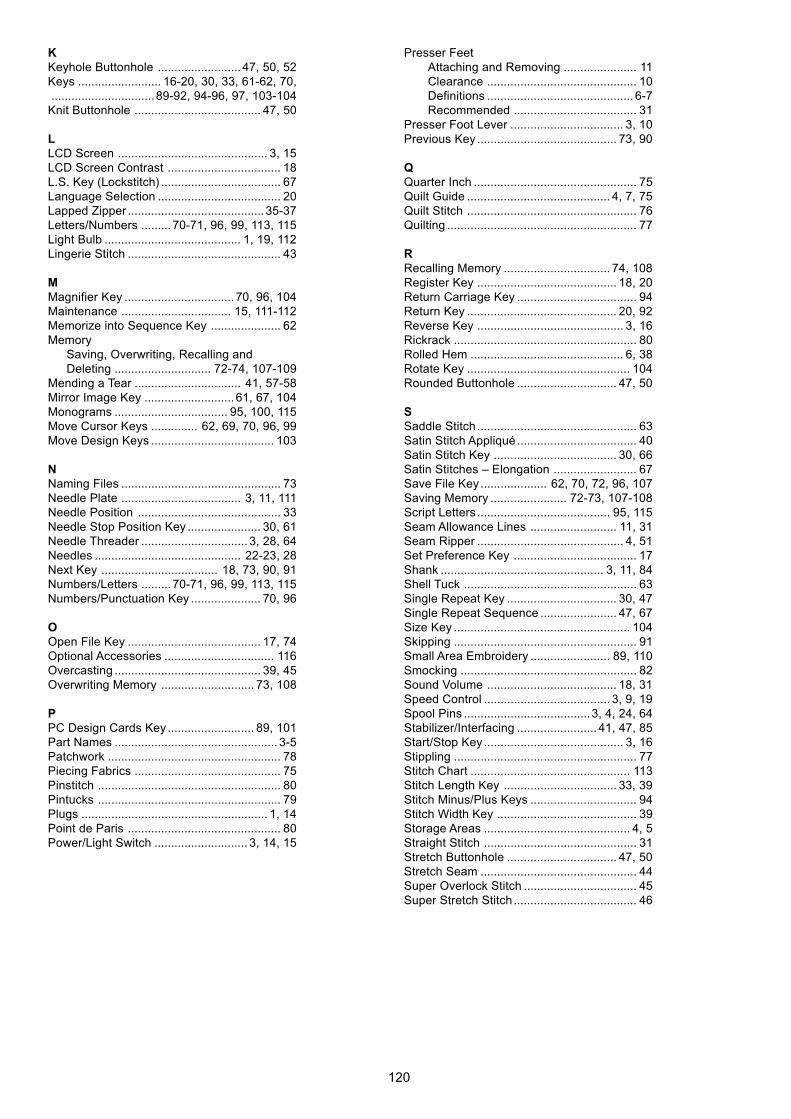
120
KKeyhole Buttonhole ......................... 47, 50, 52Keys ......................... 16-20, 30, 33, 61-62, 70,............................... 89-92, 94-96, 97, 103-104
Knit Buttonhole ...................................... 47, 50
LLCD Screen ............................................. 3, 15LCD Screen Contrast .................................. 18L.S. Key (Lockstitch) .................................... 67Language Selection ..................................... 20Lapped Zipper .........................................35-37Letters/Numbers .........70-71, 96, 99, 113, 115Light Bulb ......................................... 1, 19, 112Lingerie Stitch .............................................. 43
MMagnifier Key ................................. 70, 96, 104Maintenance ................................. 15, 111-112Memorize into Sequence Key ..................... 62Memory
Saving, Overwriting, Recalling andDeleting ............................. 72-74, 107-109
Mending a Tear ................................ 41, 57-58Mirror Image Key ........................... 61, 67, 104Monograms .................................. 95, 100, 115Move Cursor Keys .............. 62, 69, 70, 96, 99Move Design Keys ..................................... 103
NNaming Files ................................................ 73Needle Plate .................................... 3, 11, 111Needle Position ........................................... 33Needle Stop Position Key ...................... 30, 61Needle Threader ................................ 3, 28, 64Needles ............................................ 22-23, 28Next Key ................................... 18, 73, 90, 91Numbers/Letters .........70-71, 96, 99, 113, 115Numbers/Punctuation Key ..................... 70, 96
OOpen File Key ........................................ 17, 74Optional Accessories ................................. 116Overcasting ............................................ 39, 45Overwriting Memory ............................ 73, 108
PPC Design Cards Key .......................... 89, 101Part Names ................................................. 3-5Patchwork .................................................... 78Piecing Fabrics ............................................ 75Pinstitch ....................................................... 80Pintucks ....................................................... 79Plugs ........................................................ 1, 14Point de Paris .............................................. 80Power/Light Switch ............................ 3, 14, 15
Presser FeetAttaching and Removing ...................... 11Clearance ............................................. 10Definitions ............................................ 6-7Recommended ..................................... 31
Presser Foot Lever .................................. 3, 10Previous Key .......................................... 73, 90
QQuarter Inch ................................................. 75Quilt Guide ........................................... 4, 7, 75Quilt Stitch ................................................... 76Quilting ......................................................... 77
RRecalling Memory ................................ 74, 108Register Key .......................................... 18, 20Return Carriage Key .................................... 94Return Key ............................................. 20, 92Reverse Key ............................................ 3, 16Rickrack ....................................................... 80Rolled Hem .............................................. 6, 38Rotate Key ................................................. 104Rounded Buttonhole .............................. 47, 50
SSaddle Stitch ................................................ 63Satin Stitch Appliqué.................................... 40Satin Stitch Key ..................................... 30, 66Satin Stitches – Elongation ......................... 67Save File Key .................... 62, 70, 72, 96, 107Saving Memory ....................... 72-73, 107-108Script Letters ........................................ 95, 115Seam Allowance Lines .......................... 11, 31Seam Ripper ............................................ 4, 51Set Preference Key ..................................... 17Shank ................................................. 3, 11, 84Shell Tuck .................................................... 63Single Repeat Key ................................. 30, 47Single Repeat Sequence ....................... 47, 67Size Key ..................................................... 104Skipping ....................................................... 91Small Area Embroidery ........................ 89, 110Smocking ..................................................... 82Sound Volume ....................................... 18, 31Speed Control ...................................... 3, 9, 19Spool Pins ......................................3, 4, 24, 64Stabilizer/Interfacing ........................ 41, 47, 85Start/Stop Key.......................................... 3, 16Stippling ....................................................... 77Stitch Chart ................................................ 113Stitch Length Key .................................. 33, 39Stitch Minus/Plus Keys ................................ 94Stitch Width Key .......................................... 39Storage Areas ............................................ 4, 5Straight Stitch .............................................. 31Stretch Buttonhole ................................. 47, 50Stretch Seam ............................................... 44Super Overlock Stitch .................................. 45Super Stretch Stitch ..................................... 46
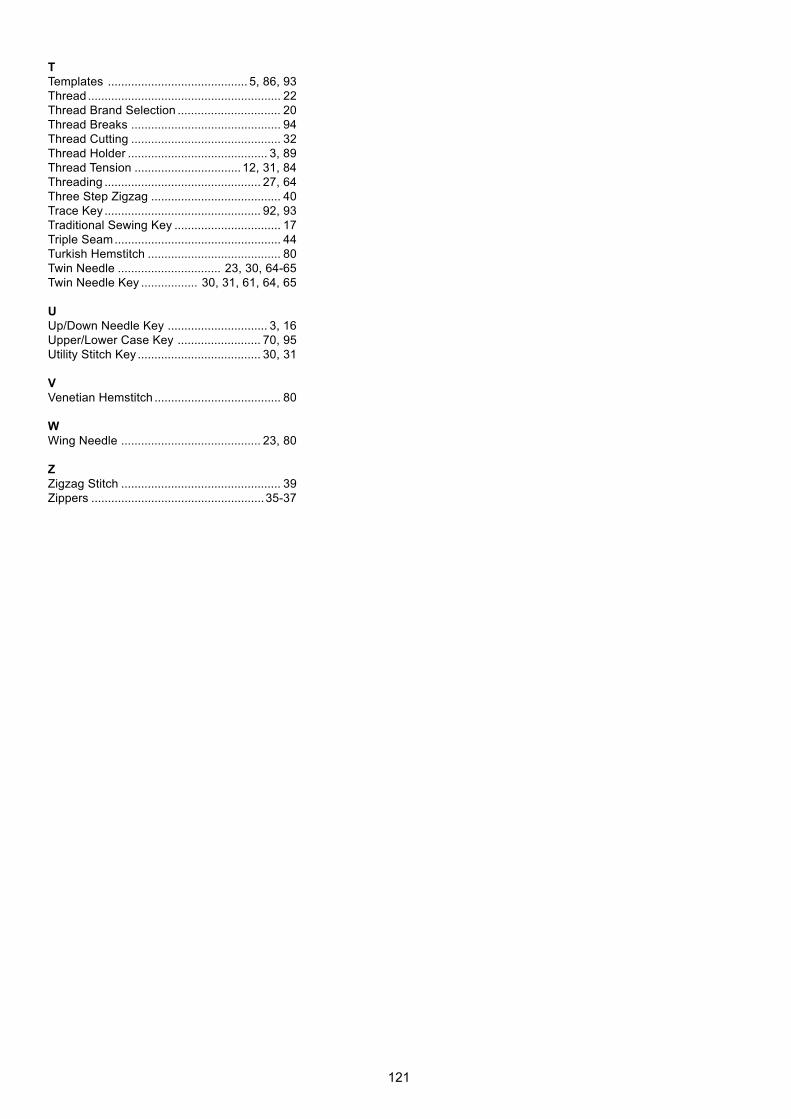
121
TTemplates .......................................... 5, 86, 93Thread.......................................................... 22Thread Brand Selection ............................... 20Thread Breaks ............................................. 94Thread Cutting ............................................. 32Thread Holder .......................................... 3, 89Thread Tension ................................ 12, 31, 84Threading ............................................... 27, 64Three Step Zigzag ....................................... 40Trace Key ............................................... 92, 93Traditional Sewing Key ................................ 17Triple Seam.................................................. 44Turkish Hemstitch ........................................ 80Twin Needle ............................... 23, 30, 64-65Twin Needle Key ................. 30, 31, 61, 64, 65
UUp/Down Needle Key .............................. 3, 16Upper/Lower Case Key ......................... 70, 95Utility Stitch Key ..................................... 30, 31
VVenetian Hemstitch ...................................... 80
WWing Needle .......................................... 23, 80
ZZigzag Stitch ................................................ 39Zippers ....................................................35-37

122
The following information is published to be in accordance with directive 2002/96/EC of theEuropean Parliament.
This equipment is marked with the below recycling symbol. It means that at the end of the life of this machine youmust dispose of it separately at an appropriate collection point and not place it in the normal domestic unsortedwaste system. This will benefit the environment for all.

Elna International Corp.SA Geneva, SwitzerlandPrinted in Japanwww.elna.comEnglish 395750-62 857-807-005


