Embed Size (px)
Citation preview
FOOD CALORIMETRY OVERVIEW & PURPOSE
How much energy is released when your body “burns” food? Have you ever looked at
the nutrition label on a package of food or a soda can? It’s here that you can find
“Calories per serving.” How do we determine how many calories are in food? What is a
calorie?
All living things need energy in order to do things like move, grow and keep warm.
While plants get their energy directly from sunlight, humans and other animals must
eat so that they can use the energy stored in food. This food is oxidized (or “burned”)
inside our bodies during digestion. As this happens, chemical energy stored in the food
is converted to heat energy (to maintain our constant body temperature), mechanical
energy (to move our muscles), and electrical energy (for nerve transmission). Different
types of food store and release different amounts of energy. For example, fat stores
and releases more energy than the same amount of protein. If we eat more food than
needed, our bodies convert it to fat in order to store the energy for future use.
The amount of energy released by food is usually measured in kilocalories (kcal).
Nutritionists and American food labels refer to these kilocalories as Calories (with a
capital C). Because these measure the same thing (energy), we can use simple math to
convert from one to another.
Calorie 1 kilocalorie 1, 00 calories 4, 84 joules1 = = 0 = 1
So, a can of soda containing 150 Calories contains 150,000 calories. A calorie is the
amount of energy needed to raise the temperature of 1 gram of water 1 degree Celsius.
Calorimetry is the measurement of heat energy released or absorbed in a chemical
reaction. When we burn food, heat energy is released as its chemical bonds are broken
http://www.rdcep.org/demo-collection page 1
down.
In this lab, you will observe an energy transformation – the transfer of chemical
energy (stored in food’s chemical bonds) to heat energy. As you burn a food sample,
heat is released and transferred to the water above it. By measuring the water’s
temperature increase, you can calculate how much heat energy was transferred to it
by the burning food using this equation:
m TQ = w ∙ cw ∙ Δ
where
heat energy absorbed by waterQ =
mass of water being heatedmw =
specific heat of water calories required to raise temperature of 1 gram of water 1 Cc = = o
= g ∙ Co1 calorie
T change in temperature of water final temperature initial temperatureΔ = = −
OBJECTIVES
● Learn how chemical energy stored in food can be transferred to other forms of
energy, like heat.
● Be able to convert between calories, kilocalories, food Calories, and joules.
● Understand how calorimetry is used to determine the energy content of food.
● Measure, calculate, and compare the energy (calorie) content in several food
samples.
METHOD
Students will use a calorimeter to determine how much energy is in various food
samples.
http://www.rdcep.org/demo-collection page 2
QUESTIONS FROM READING
1. How do humans and other animals get the energy they need to live?
2. Name some energy conversions (transformations) that occur as your body
“burns” (oxidizes) food.
3. What is the difference between a food (or nutritional) Calorie and a calorie?
PRE-LAB DISCUSSION QUESTIONS
1. Which of the food samples in this lab do you think contains the most energy?
Why?
2. What is the original source of energy for all foods?
MATERIALS (per group of students)
❏ Erlenmeyer flask
(200mL capacity)
❏ metal cylinder
stand
❏ metal square
suspension plate
❏ cork and nail food
sample holder
❏ rubber stopper ❏ thermometer
❏ digital scale with
0.1 gram accuracy
❏ long-reach lighter ❏ safety glasses
❏ heat-resistant
gloves
❏ food samples (e.g.
popcorn, peanuts,
marshmallows,
cheese puffs, cereal,
croutons)
❏ aluminum foil
❏ calculator ❏ long-reach tongs ❏ hand wipes
! SAFETY PRECAUTIONS !
Be sure to wear safety glasses during the entire lab, and use oven mitts when handling
parts that may be hot! Allow the food sample to cool down before touching it or
http://www.rdcep.org/demo-collection page 3

throwing it away. Do not eat the food samples. This lab should be performed in a
well-ventilated room. Be very careful when inserting the glass thermometer into the
rubber stopper!
PROCEDURE
Setup
1. For safety and to make cleanup easier, place a sheet of aluminum foil on the
table to be used as a work surface.
2. Pour 125 mL of water (at about room temperature) into the Erlenmeyer flask,
and insert the rubber stopper. (Figure 1)
3. Insert a thermometer into the flask through the hole in the rubber stopper. The
thermometer may be easier to insert if you wet it first. Be very careful not to
break the glass thermometer! Make sure that the thermometer is submerged
in the water but not touching the glass on the bottom of the flask (Figure 2).
4. Set up the calorimeter as shown in Figure 3.
a. Insert the top of the flask through the metal square suspension plate and
rotate it 90 degrees so that the metal clamp on the flask rests on the
square plate.
b. Place the square plate and flask on top of the metal cylinder stand so that
the flask is suspended. (Figure 4)
5. Wrap the food holder (cork with nail) in aluminum foil to prevent it from
burning. (Figure 5)
Data Collection
1. Choose a food sample.
2. Pin the food sample to the top of the nail on the cork (Figure 6). If the sample
cannot be easily pinned, bend a paper clip and stick both ends into the cork,
making a platform for the food sample.
a. Try to pin the food sample so that it points upward (so that its length is
parallel to the pin).
http://www.rdcep.org/demo-collection page 4
b. Practice placing the metal cylinder with flask over the food sample and
food holder, as this should be done quickly after the food sample has
been ignited.
c. Make sure the food sample does not touch the flask. (Figure 7)
3. Zero the scale.
4. Place the food holder with attached food sample on the scale to measure its
mass (Figure 8).
a. Write down this initial mass on the data sheet.
5. Just before igniting the food sample , record the initial temperature of the water.
a. Write down this initial temperature on the data sheet.
6. Using the long-reach lighter, ignite the food sample. Quickly and carefully place
the metal cylinder with flask over the ignited food sample. (Do not wait until the
sample is completely engulfed in flames. You want to capture all of the heat
generated by the burning food.
a. Do not ignite the food sample while it’s already under the flask, as you
don’t want to heat the water with the long-reach lighter. (Figure 9)
7. When the food stops burning, record the maximum temperature of the water in
the flask.
a. Let the samples smolder for a full minute before recording the final
water temperature. The water temperature will continue to rise after the
flame has gone out.
b. Write down this final temperature on the data sheet.
8. Measure the mass of the remaining burnt food sample and holder.
a. Write down this final sample mass on the data sheet.
9. Repeat steps 1 through 4 for each food sample.
Data Processing
1. Calcuate the temperature change of the water for each food sample andΔT )(
write them down on the data sheet.
2. Calculate the heat energy gained by the water. 1 mL of water has a mass of 1(Q)
gram, so 125 mL of water has a mass of 125g.
3. Convert the heat energy gained by the water from calories to food CaloriesQ) (
http://www.rdcep.org/demo-collection page 5

(kilocalories).
4. Calculate how much of the food sample burned.
5. Calculate the energy (Calories) per gram of the food sample.
6. Calculate the energy (Calories) per gram as stated on the food package’s
nutrition label. Nutrition labels often list the number of Calories per serving, so
you’ll need to convert this to Calories per gram.
7. Repeat steps 1 through 6 for all food samples.
POST-LAB QUESTIONS
1. Compare your group’s data with others. Use all of the data to calculate the
average energy content (in Calories per gram) in each food sample.
2. Rank the food samples in order from highest to lowest energy (calorie) content.
Which food has the highest energy content? The lowest?
3. What is the relationship between foods’ fat content and energy content?
4. Why might some foods with lower energy content be better energy sources than
other foods with a higher energy content?
5. Did you find the calorie content of your food samples to be higher or lower than
the calorie content stated on the nutrition labels?
6. Why do you think your results are higher or lower? What were some of the
sources of error in this lab?
FURTHER EXPLORATIONS
● Determine the caloric content of other combustible foods.
● Compare the caloric content of several foods to gasoline, natural gas, and coal.
http://www.rdcep.org/demo-collection page 6
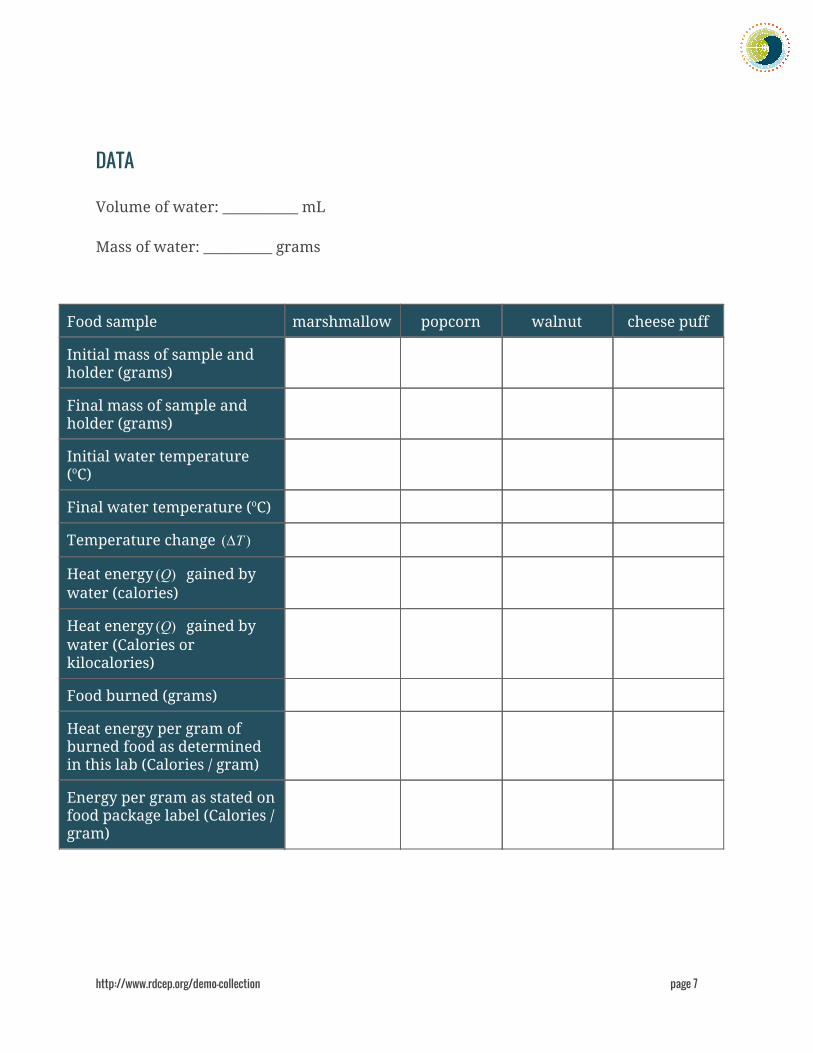
DATA
Volume of water: ___________ mL
Mass of water: __________ grams
Food sample marshmallow popcorn walnut cheese puff
Initial mass of sample and
holder (grams)
Final mass of sample and
holder (grams)
Initial water temperature
( o C)
Final water temperature ( o C)
Temperature change ΔT )(
Heat energy gained byQ) (
water (calories)
Heat energy gained byQ) (
water (Calories or
kilocalories)
Food burned (grams)
Heat energy per gram of
burned food as determined
in this lab (Calories / gram)
Energy per gram as stated on
food package label (Calories /
gram)
http://www.rdcep.org/demo-collection page 7
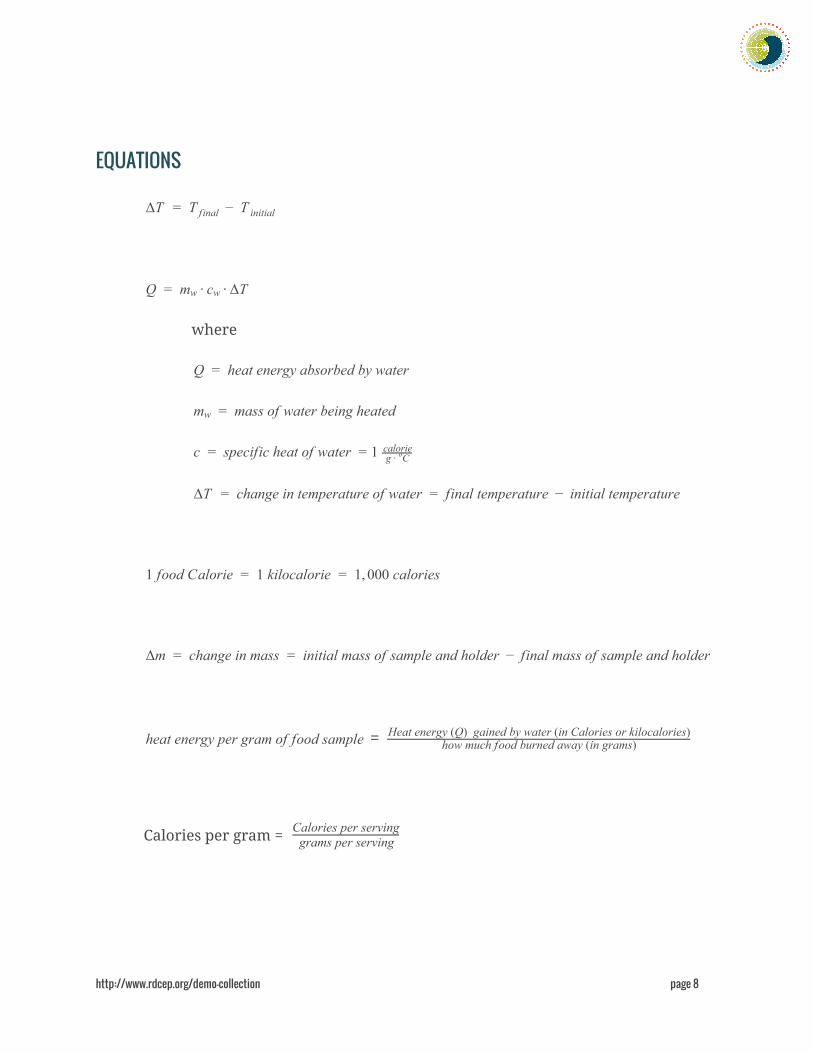
EQUATIONS
T T TΔ = f inal − initial
m TQ = w ∙ cw ∙ Δ
where
heat energy absorbed by waterQ =
mass of water being heatedmw =
specific heat of water c = = 1 g ∙ Cocalorie
T change in temperature of water final temperature initial temperatureΔ = = −
food Calorie 1 kilocalorie 1, 00 calories1 = = 0
m change in mass initial mass of sample and holder final mass of sample and holderΔ = = −
= eat energy per gram of food samplehhow much food burned away (in grams)
Heat energy (Q) gained by water (in Calories or kilocalories)
Calories per gram = grams per servingCalories per serving
http://www.rdcep.org/demo-collection page 8
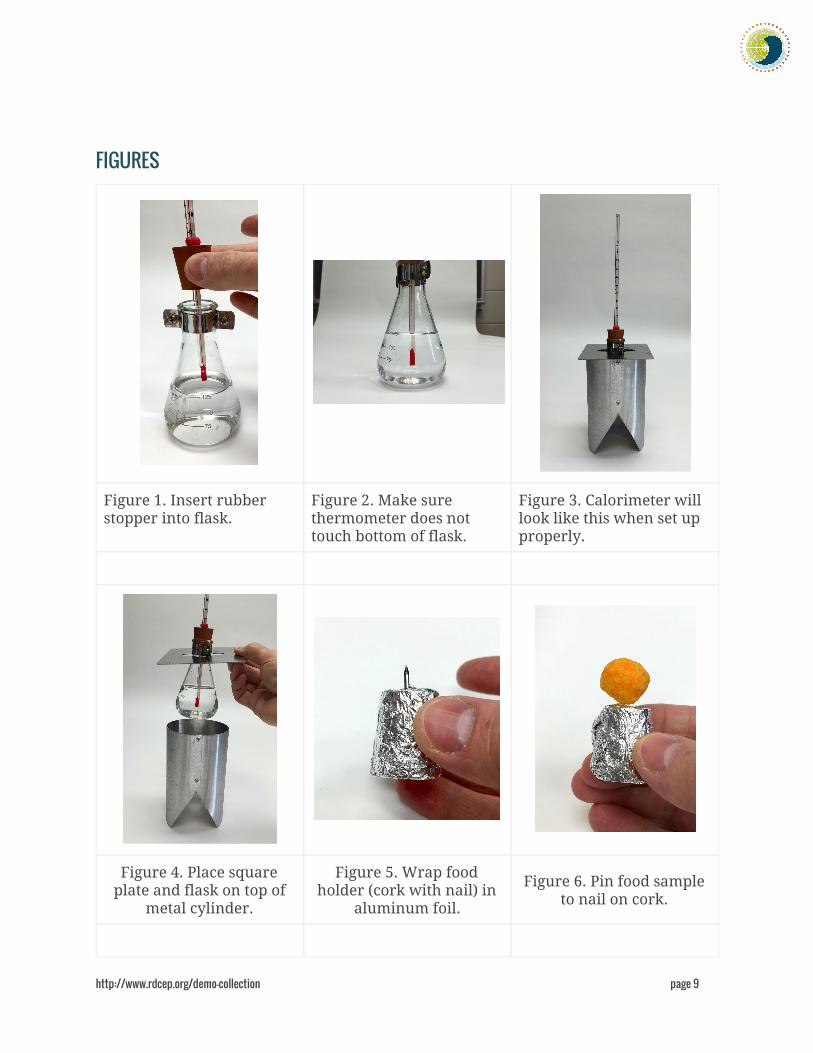
FIGURES
Figure 1. Insert rubber
stopper into flask.
Figure 2. Make sure
thermometer does not
touch bottom of flask.
Figure 3. Calorimeter will
look like this when set up
properly.
Figure 4. Place square
plate and flask on top of
metal cylinder.
Figure 5. Wrap food
holder (cork with nail) in
aluminum foil.
Figure 6. Pin food sample
to nail on cork.
http://www.rdcep.org/demo-collection page 9
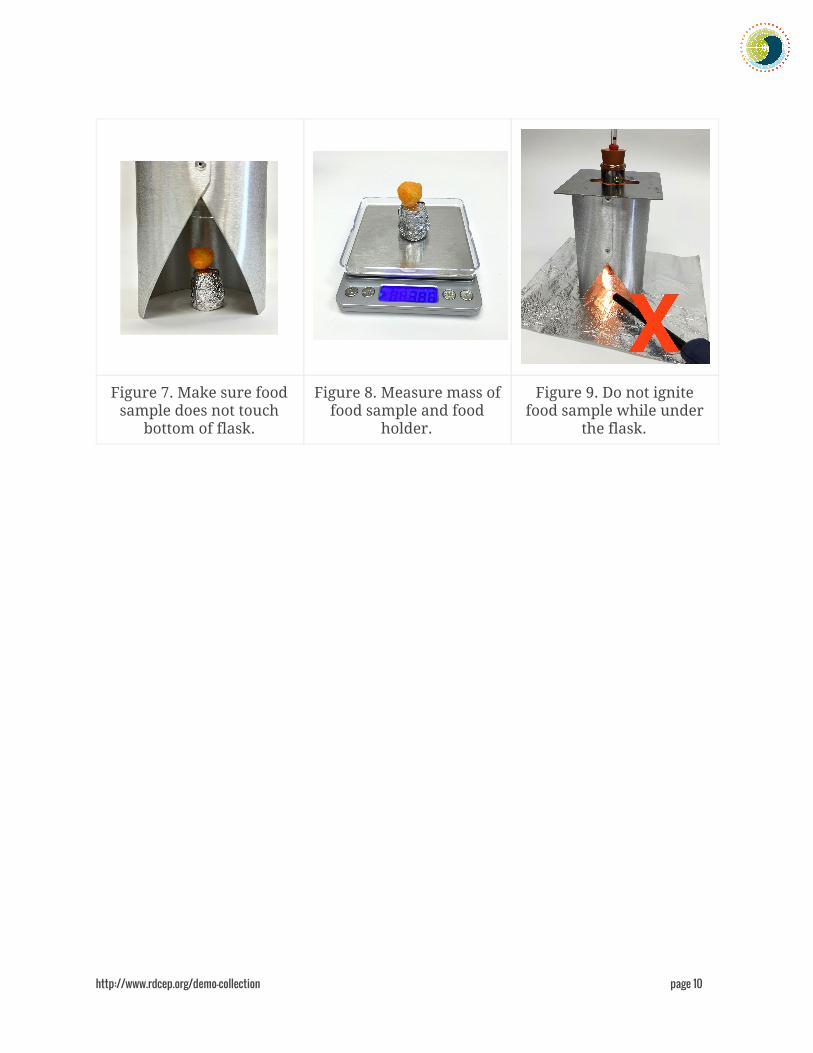
Figure 7. Make sure food
sample does not touch
bottom of flask.
Figure 8. Measure mass of
food sample and food
holder.
Figure 9. Do not ignite
food sample while under
the flask.
http://www.rdcep.org/demo-collection page 10
NOTES FOR THE TEACHER
● Teachers should pre-insert the thermometers into the rubber stoppers in order
to prevent students from breaking them and getting injured.
● There are enough materials in this kit for four groups of students.
http://www.rdcep.org/demo-collection page 11


