Embed Size (px)
Citation preview
SubVentory Getting Started Guide for Restaurants with SubwayPOS®
TheinformationinthisdocumentisproprietarytoZippyYumLLC. RevisedApril6,2018UseordisclosureofthisinformationisstrictlyprohibitedwithoutthewrittenPermissionofZippyYumLLC. Version4 Page1 of 17
ContentsIntroduction ............................................................................................................................................ 2
1 Getting Started Checklist ................................................................................................................. 3
Install the software and register to use the App ....................................................................... 3
Learn to use the App ................................................................................................................ 3 Sign in to the App to configure the Inventory Items and Containers/Bottles ............................. 3
Export a small inventory and then load it into SubwayPOS® ..................................................... 3
2 Getting Started Detailed Steps ......................................................................................................... 4
Install the software and register to use the App ....................................................................... 4
2.1.1 Download the App on your mobile device ............................................................................. 4
2.1.2 Register to use the App ......................................................................................................... 4
2.1.3 Install the SubVentory Agent on your POS ............................................................................. 7
Learn to use the App .............................................................................................................. 10
2.2.1 Watch the instructional videos ............................................................................................ 10
2.2.2 Attend a SubVentory Training Session ................................................................................. 11
2.2.3 Play around with the App in Demo Mode ............................................................................ 11
Sign in to the App to configure the Inventory Items and Containers/Bottles ........................... 13
2.3.1 Sign in to the App ................................................................................................................ 13
2.3.2 Review Containers and Bottles Settings and Print Prep Sheet .............................................. 13
2.3.3 Review Inventory Items with Exclamation Marks ................................................................. 14
2.3.4 Identify any Inventory Items that are missing from the App ................................................ 15
Export a small inventory and then load it into SubwayPOS® ................................................... 16
SubVentory Getting Started Guide for Restaurants with SubwayPOS®
TheinformationinthisdocumentisproprietarytoZippyYumLLC. RevisedApril6,2018UseordisclosureofthisinformationisstrictlyprohibitedwithoutthewrittenPermissionofZippyYumLLC. Version4 Page2 of 17
Introduction
Hello and welcome to the SubVentory App! We are excited that you are making the transition to this new tool and we want to make the conversion as smooth as possible. While the app is intuitive to use and very user-friendly, there are a few key setup steps that are critical to a smooth transition. This document outlines these critical steps – providing a high-level checklist of the steps involved in getting started as well as the detailed information associated with each step. If you have any questions about the information or a specific situation in your restaurant that we did not cover here, please contact Support ([email protected]) for more assistance.
SubVentory Getting Started Guide for Restaurants with SubwayPOS®
TheinformationinthisdocumentisproprietarytoZippyYumLLC. RevisedApril6,2018UseordisclosureofthisinformationisstrictlyprohibitedwithoutthewrittenPermissionofZippyYumLLC. Version4 Page3 of 17
1 Getting Started Checklist The checklist below outlines the steps involved in getting ready to use the App in your restaurant. We recommend that all of these steps be executed in this order prior to using the App for a week-ending inventory or a delivery. Detailed steps follow this checklist.
Install the software and register to use the App
□ Download the App on your mobile device
□ Register to use the App
□ Install the Agent on your POS
Learn to use the App
□ Watch the instructional videos
□ Attend a SubVentory Training Session
□ Play around with the App in Demo Mode
Sign in to the App to configure the Inventory Items and Containers/Bottles
These 2 steps are extremely important as they will insure that the counts are accurate and will be able to be loaded into the POS. They are required because the App uses information from a variety of sources including the Containers/Bottles area on the App, product information provided by the Distribution Center, and configuration information retrieved from the restaurant’s SubwayPOS®.
□ Review/update Inventory Items with red exclamation mark warnings and report any missing Inventory Items to Support.
□ Review and update the Containers/Bottles settings and then print the Prep Sheet.
Export a small inventory and then load it into SubwayPOS®
Do this to make sure the App is working properly.
□ Export a small delivery from the app to your POS
□ Load the delivery into your POS from the ZippyYum Agent
SubVentory Getting Started Guide for Restaurants with SubwayPOS®
TheinformationinthisdocumentisproprietarytoZippyYumLLC. RevisedApril6,2018UseordisclosureofthisinformationisstrictlyprohibitedwithoutthewrittenPermissionofZippyYumLLC. Version4 Page4 of 17
2 Getting Started Detailed Steps
Install the software and register to use the App
2.1.1 Download the App on your mobile device On your iOS, go to the App Store and search for SubVentory. Or if you have an Android device, go to Play Store from your device and search for SubVentory. Download and install the app on your mobile device.
2.1.2 Register to use the App Note – You will need the primary franchisee’s Partner ID and password and a valid email address to register. You may also need your credit card information.
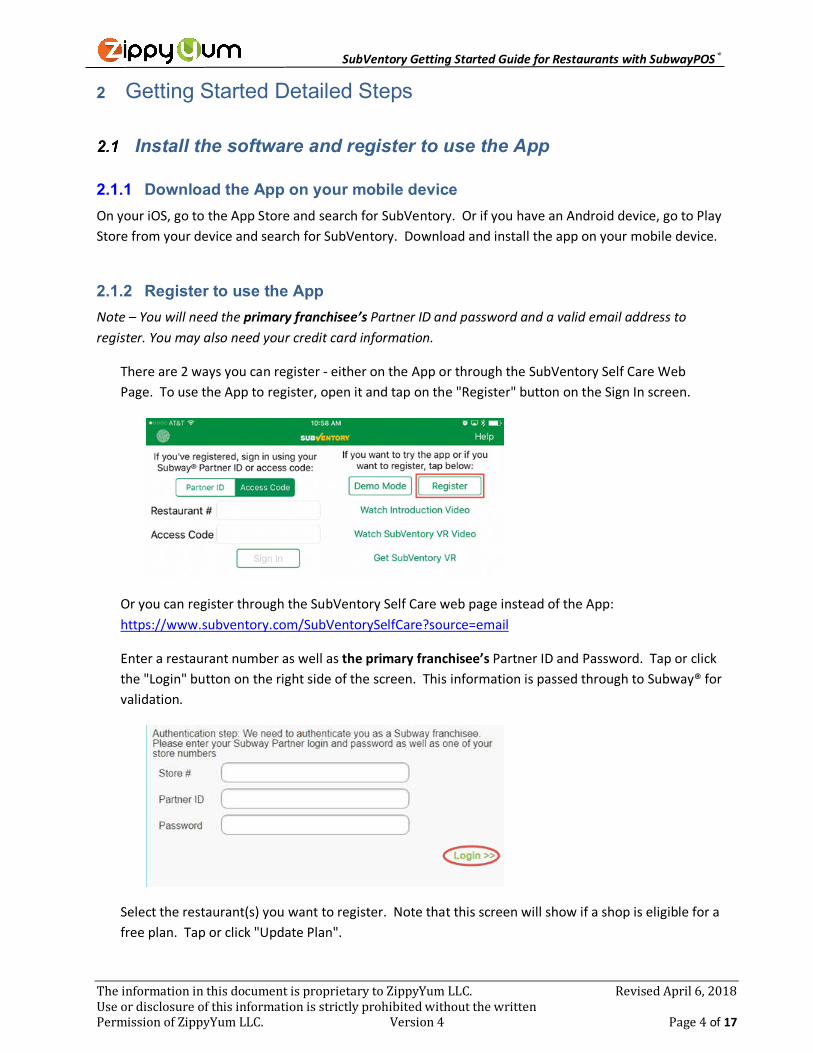
There are 2 ways you can register - either on the App or through the SubVentory Self Care Web Page. To use the App to register, open it and tap on the "Register" button on the Sign In screen.
Or you can register through the SubVentory Self Care web page instead of the App: https://www.subventory.com/SubVentorySelfCare?source=email
Enter a restaurant number as well as the primary franchisee’s Partner ID and Password. Tap or click the "Login" button on the right side of the screen. This information is passed through to Subway® for validation.
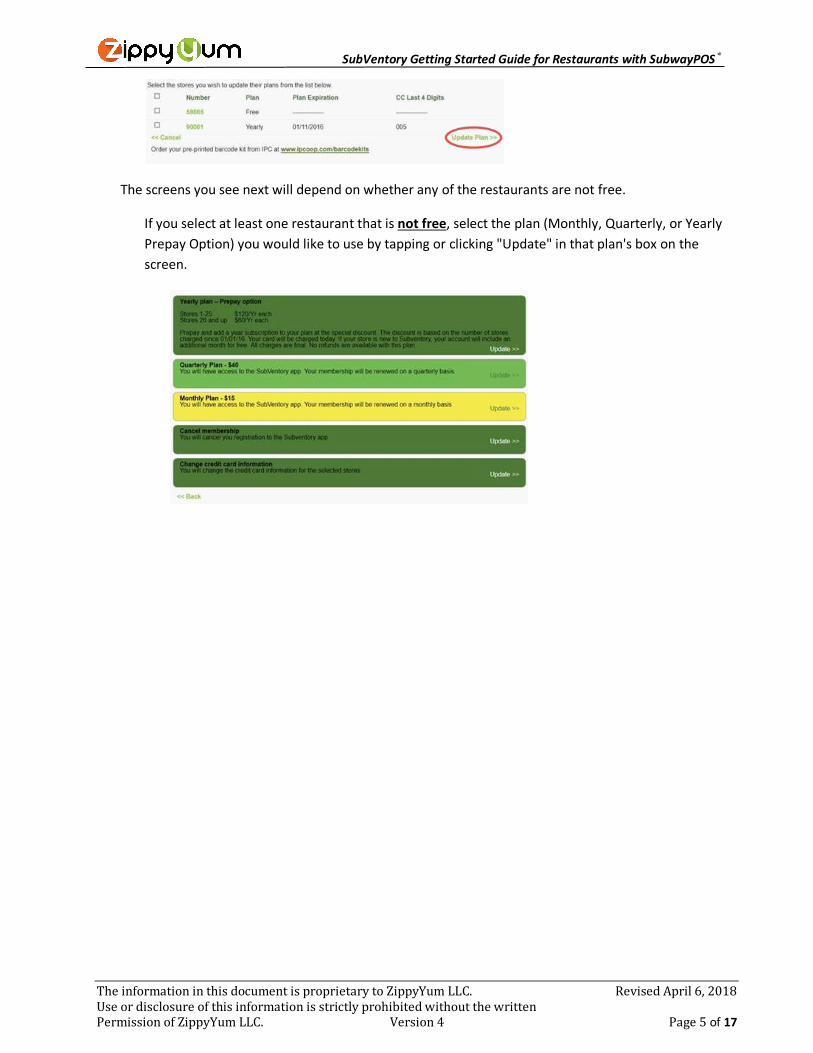
Select the restaurant(s) you want to register. Note that this screen will show if a shop is eligible for a free plan. Tap or click "Update Plan".
SubVentory Getting Started Guide for Restaurants with SubwayPOS®
TheinformationinthisdocumentisproprietarytoZippyYumLLC. RevisedApril6,2018UseordisclosureofthisinformationisstrictlyprohibitedwithoutthewrittenPermissionofZippyYumLLC. Version4 Page5 of 17
The screens you see next will depend on whether any of the restaurants are not free.
If you select at least one restaurant that is not free, select the plan (Monthly, Quarterly, or Yearly Prepay Option) you would like to use by tapping or clicking "Update" in that plan's box on the screen.
SubVentory Getting Started Guide for Restaurants with SubwayPOS®
TheinformationinthisdocumentisproprietarytoZippyYumLLC. RevisedApril6,2018UseordisclosureofthisinformationisstrictlyprohibitedwithoutthewrittenPermissionofZippyYumLLC. Version4 Page6 of 17
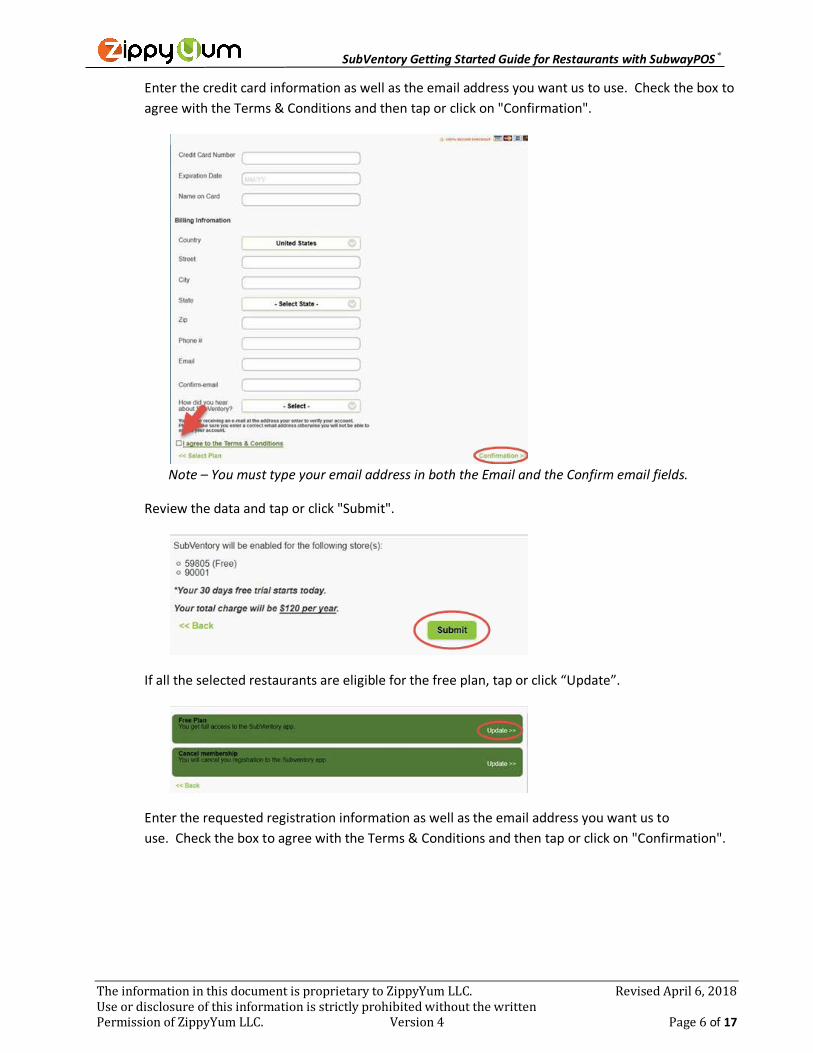
Enter the credit card information as well as the email address you want us to use. Check the box to agree with the Terms & Conditions and then tap or click on "Confirmation".
Note – You must type your email address in both the Email and the Confirm email fields.
Review the data and tap or click "Submit".
If all the selected restaurants are eligible for the free plan, tap or click “Update”.
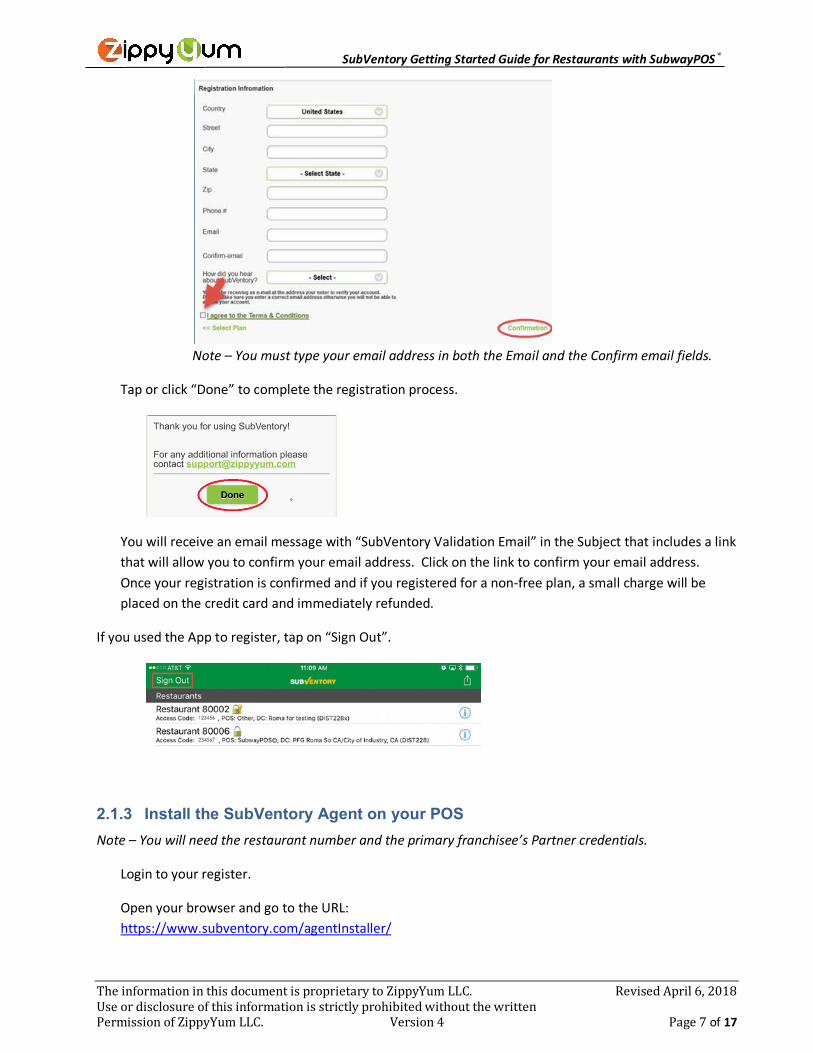
Enter the requested registration information as well as the email address you want us to use. Check the box to agree with the Terms & Conditions and then tap or click on "Confirmation".
SubVentory Getting Started Guide for Restaurants with SubwayPOS®
TheinformationinthisdocumentisproprietarytoZippyYumLLC. RevisedApril6,2018UseordisclosureofthisinformationisstrictlyprohibitedwithoutthewrittenPermissionofZippyYumLLC. Version4 Page7 of 17
Note – You must type your email address in both the Email and the Confirm email fields.
Tap or click “Done” to complete the registration process.
You will receive an email message with “SubVentory Validation Email” in the Subject that includes a link that will allow you to confirm your email address. Click on the link to confirm your email address. Once your registration is confirmed and if you registered for a non-free plan, a small charge will be placed on the credit card and immediately refunded.
If you used the App to register, tap on “Sign Out”.
2.1.3 Install the SubVentory Agent on your POS Note – You will need the restaurant number and the primary franchisee’s Partner credentials.
Login to your register.
Open your browser and go to the URL: https://www.subventory.com/agentInstaller/
SubVentory Getting Started Guide for Restaurants with SubwayPOS®
TheinformationinthisdocumentisproprietarytoZippyYumLLC. RevisedApril6,2018UseordisclosureofthisinformationisstrictlyprohibitedwithoutthewrittenPermissionofZippyYumLLC. Version4 Page8 of 17
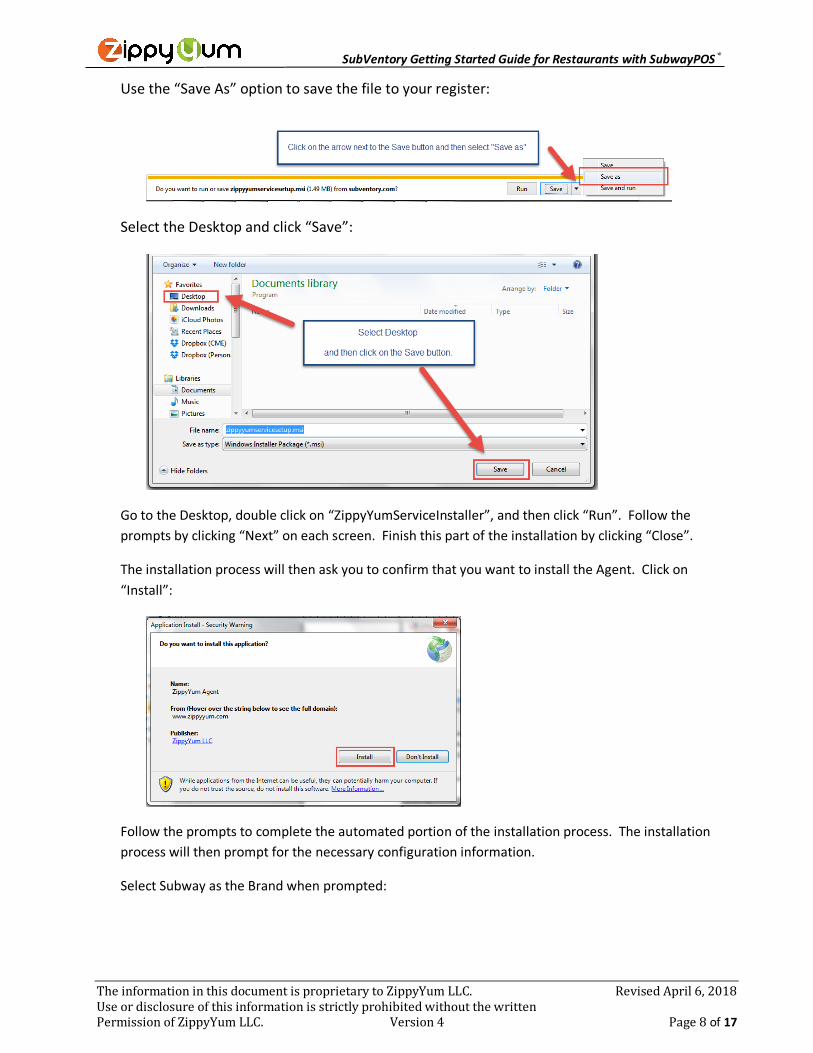
Use the “Save As” option to save the file to your register:
Select the Desktop and click “Save”:
Go to the Desktop, double click on “ZippyYumServiceInstaller”, and then click “Run”. Follow the prompts by clicking “Next” on each screen. Finish this part of the installation by clicking “Close”.
The installation process will then ask you to confirm that you want to install the Agent. Click on “Install”:
Follow the prompts to complete the automated portion of the installation process. The installation process will then prompt for the necessary configuration information.
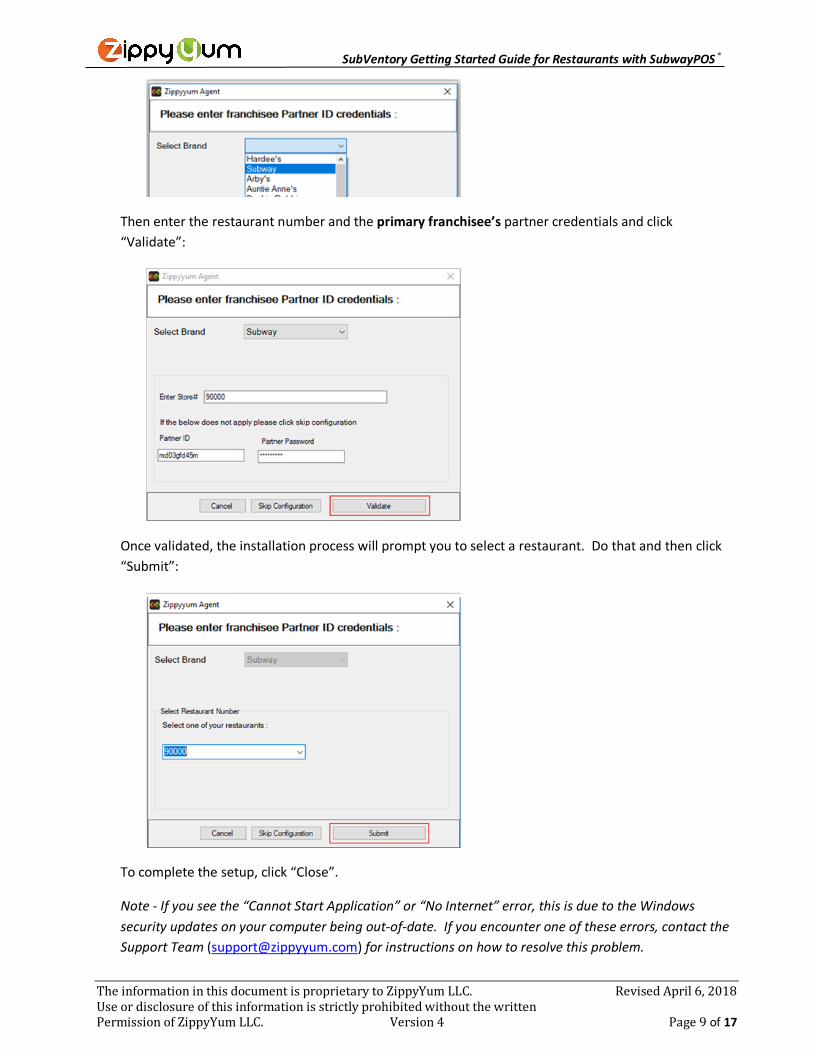
Select Subway as the Brand when prompted:
SubVentory Getting Started Guide for Restaurants with SubwayPOS®
TheinformationinthisdocumentisproprietarytoZippyYumLLC. RevisedApril6,2018UseordisclosureofthisinformationisstrictlyprohibitedwithoutthewrittenPermissionofZippyYumLLC. Version4 Page9 of 17
Then enter the restaurant number and the primary franchisee’s partner credentials and click “Validate”:
Once validated, the installation process will prompt you to select a restaurant. Do that and then click “Submit”:
To complete the setup, click “Close”.
Note - If you see the “Cannot Start Application” or “No Internet” error, this is due to the Windows security updates on your computer being out-of-date. If you encounter one of these errors, contact the Support Team ([email protected]) for instructions on how to resolve this problem.
SubVentory Getting Started Guide for Restaurants with SubwayPOS®
TheinformationinthisdocumentisproprietarytoZippyYumLLC. RevisedApril6,2018UseordisclosureofthisinformationisstrictlyprohibitedwithoutthewrittenPermissionofZippyYumLLC. Version4 Page10 of 17
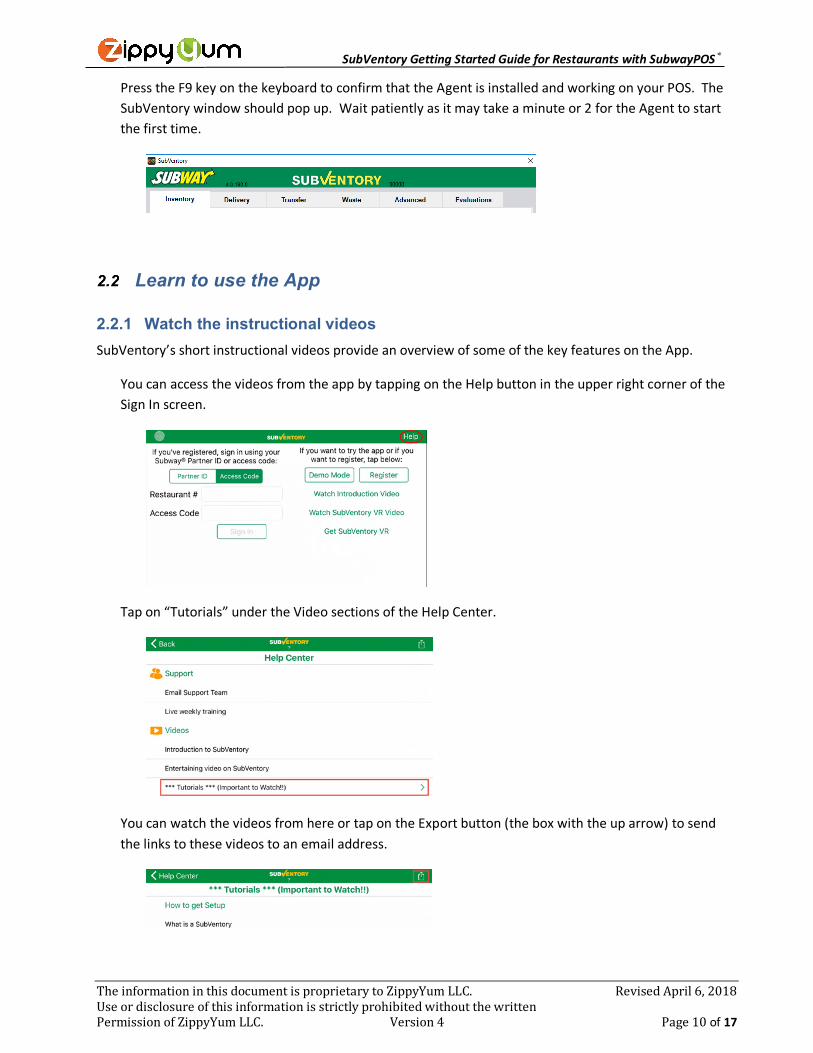
Press the F9 key on the keyboard to confirm that the Agent is installed and working on your POS. The SubVentory window should pop up. Wait patiently as it may take a minute or 2 for the Agent to start the first time.
Learn to use the App
2.2.1 Watch the instructional videos SubVentory’s short instructional videos provide an overview of some of the key features on the App.
You can access the videos from the app by tapping on the Help button in the upper right corner of the Sign In screen.
Tap on “Tutorials” under the Video sections of the Help Center.
You can watch the videos from here or tap on the Export button (the box with the up arrow) to send the links to these videos to an email address.
SubVentory Getting Started Guide for Restaurants with SubwayPOS®
TheinformationinthisdocumentisproprietarytoZippyYumLLC. RevisedApril6,2018UseordisclosureofthisinformationisstrictlyprohibitedwithoutthewrittenPermissionofZippyYumLLC. Version4 Page11 of 17
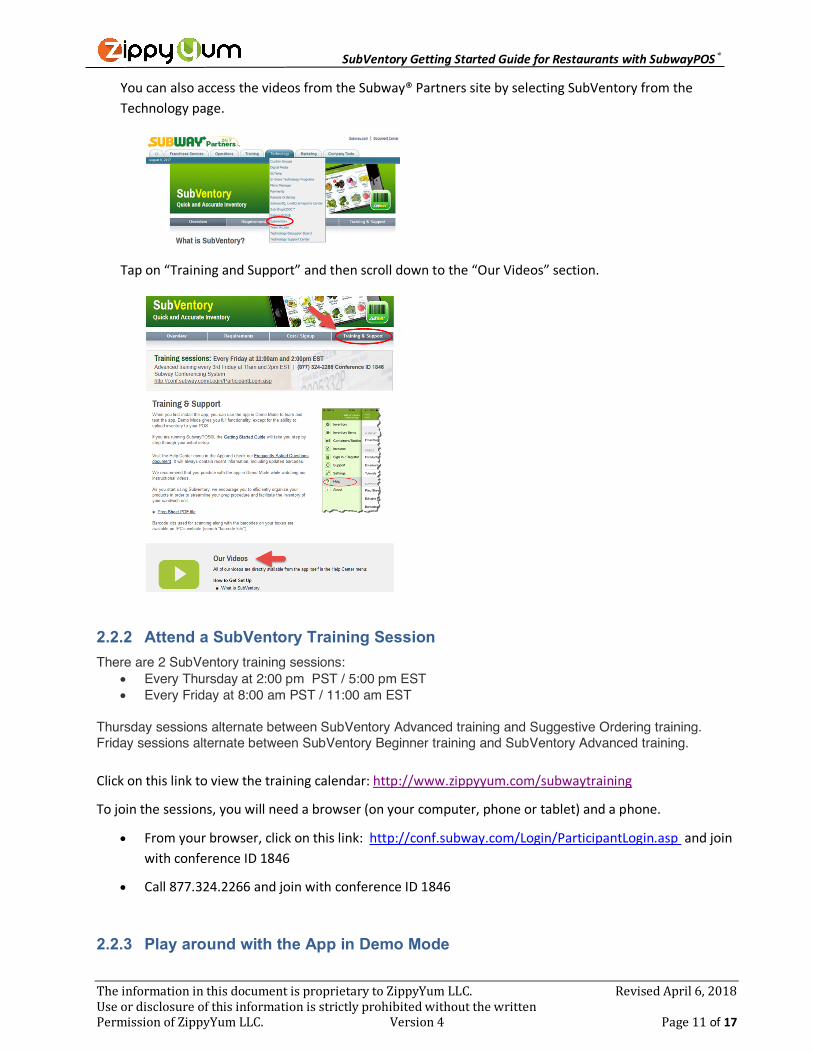
You can also access the videos from the Subway® Partners site by selecting SubVentory from the Technology page.
Tap on “Training and Support” and then scroll down to the “Our Videos” section.
2.2.2 Attend a SubVentory Training Session There are 2 SubVentory training sessions:
• Every Thursday at 2:00 pm PST / 5:00 pm EST • Every Friday at 8:00 am PST / 11:00 am EST
Thursday sessions alternate between SubVentory Advanced training and Suggestive Ordering training. Friday sessions alternate between SubVentory Beginner training and SubVentory Advanced training. Click on this link to view the training calendar: http://www.zippyyum.com/subwaytraining
To join the sessions, you will need a browser (on your computer, phone or tablet) and a phone.
• From your browser, click on this link: http://conf.subway.com/Login/ParticipantLogin.asp and join with conference ID 1846
• Call 877.324.2266 and join with conference ID 1846
2.2.3 Play around with the App in Demo Mode
SubVentory Getting Started Guide for Restaurants with SubwayPOS®
TheinformationinthisdocumentisproprietarytoZippyYumLLC. RevisedApril6,2018UseordisclosureofthisinformationisstrictlyprohibitedwithoutthewrittenPermissionofZippyYumLLC. Version4 Page12 of 17
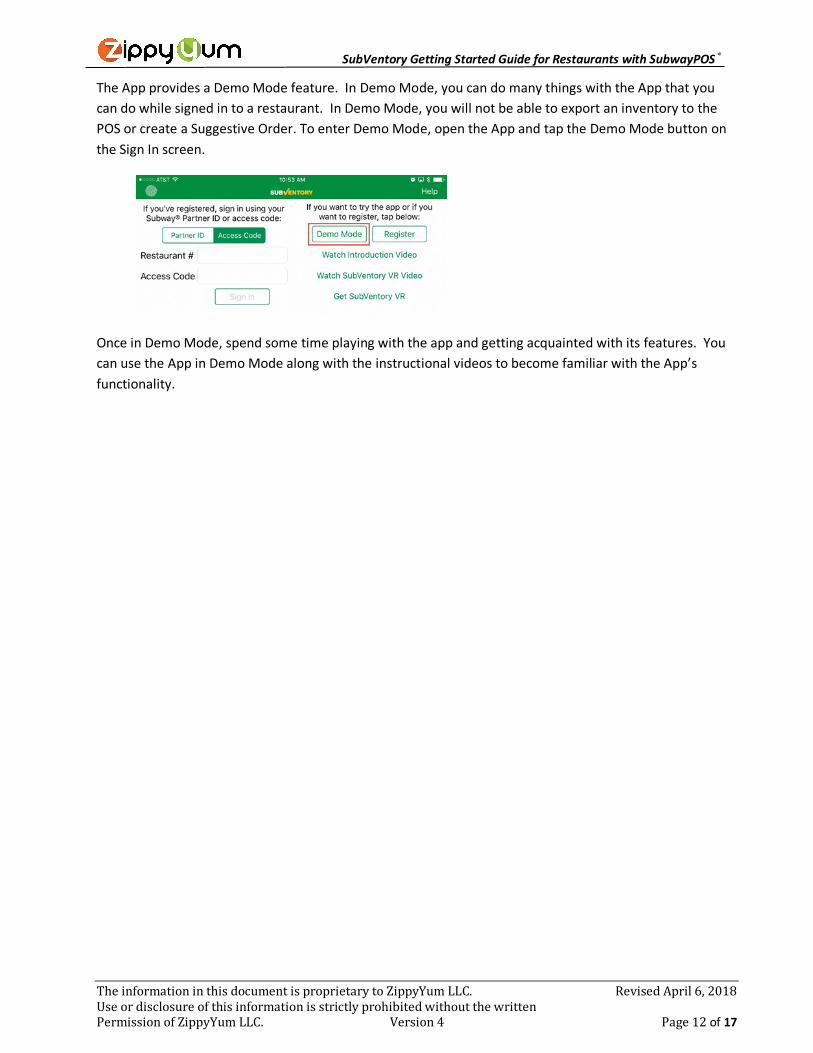
The App provides a Demo Mode feature. In Demo Mode, you can do many things with the App that you can do while signed in to a restaurant. In Demo Mode, you will not be able to export an inventory to the POS or create a Suggestive Order. To enter Demo Mode, open the App and tap the Demo Mode button on the Sign In screen.
Once in Demo Mode, spend some time playing with the app and getting acquainted with its features. You can use the App in Demo Mode along with the instructional videos to become familiar with the App’s functionality.
SubVentory Getting Started Guide for Restaurants with SubwayPOS®
TheinformationinthisdocumentisproprietarytoZippyYumLLC. RevisedApril6,2018UseordisclosureofthisinformationisstrictlyprohibitedwithoutthewrittenPermissionofZippyYumLLC. Version4 Page13 of 17
Sign in to the App to configure the Inventory Items and Containers/Bottles
These 2 steps are extremely important as they will insure that the counts are accurate and will be able to be loaded into the POS. They are required because the App uses information from a variety of sources including the Containers/Bottles area on the App, product information provided by the Distribution Center, and configuration information retrieved from the restaurant’s SubwayPOS®. At this point, you only need to focus on the items with red exclamation mark warnings and any missing inventory items.
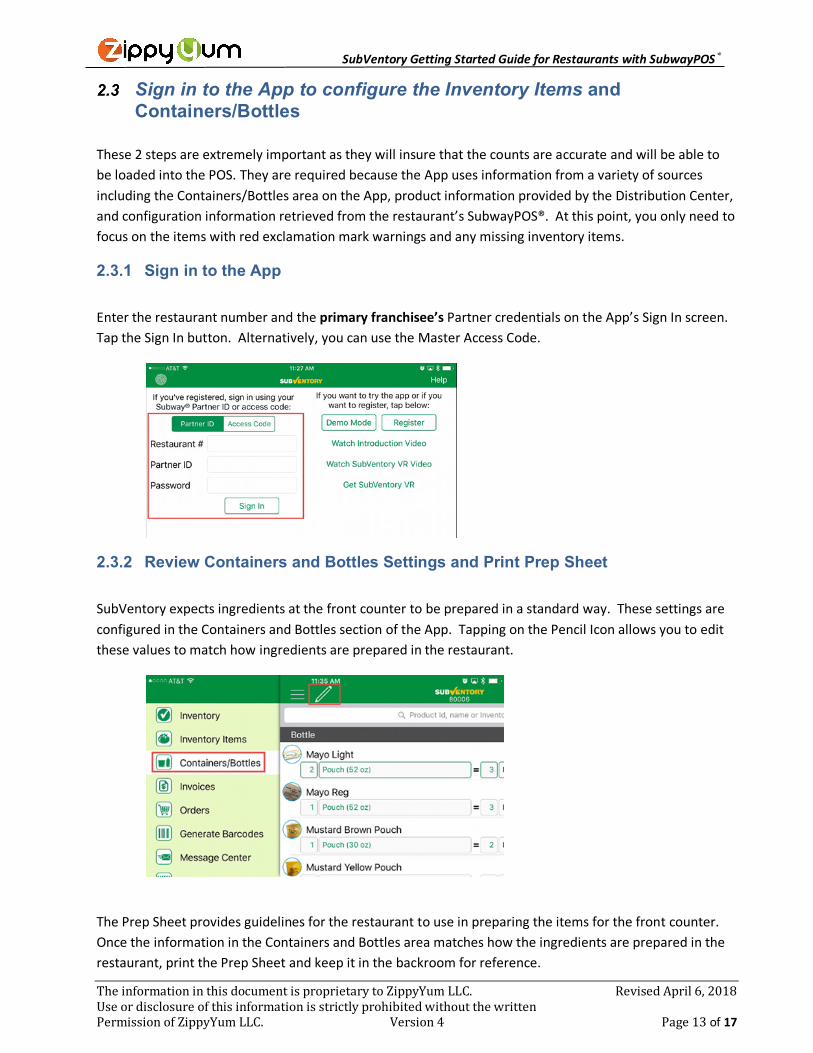
2.3.1 Sign in to the App Enter the restaurant number and the primary franchisee’s Partner credentials on the App’s Sign In screen. Tap the Sign In button. Alternatively, you can use the Master Access Code.
2.3.2 Review Containers and Bottles Settings and Print Prep Sheet SubVentory expects ingredients at the front counter to be prepared in a standard way. These settings are configured in the Containers and Bottles section of the App. Tapping on the Pencil Icon allows you to edit these values to match how ingredients are prepared in the restaurant.
The Prep Sheet provides guidelines for the restaurant to use in preparing the items for the front counter. Once the information in the Containers and Bottles area matches how the ingredients are prepared in the restaurant, print the Prep Sheet and keep it in the backroom for reference.
SubVentory Getting Started Guide for Restaurants with SubwayPOS®
TheinformationinthisdocumentisproprietarytoZippyYumLLC. RevisedApril6,2018UseordisclosureofthisinformationisstrictlyprohibitedwithoutthewrittenPermissionofZippyYumLLC. Version4 Page14 of 17
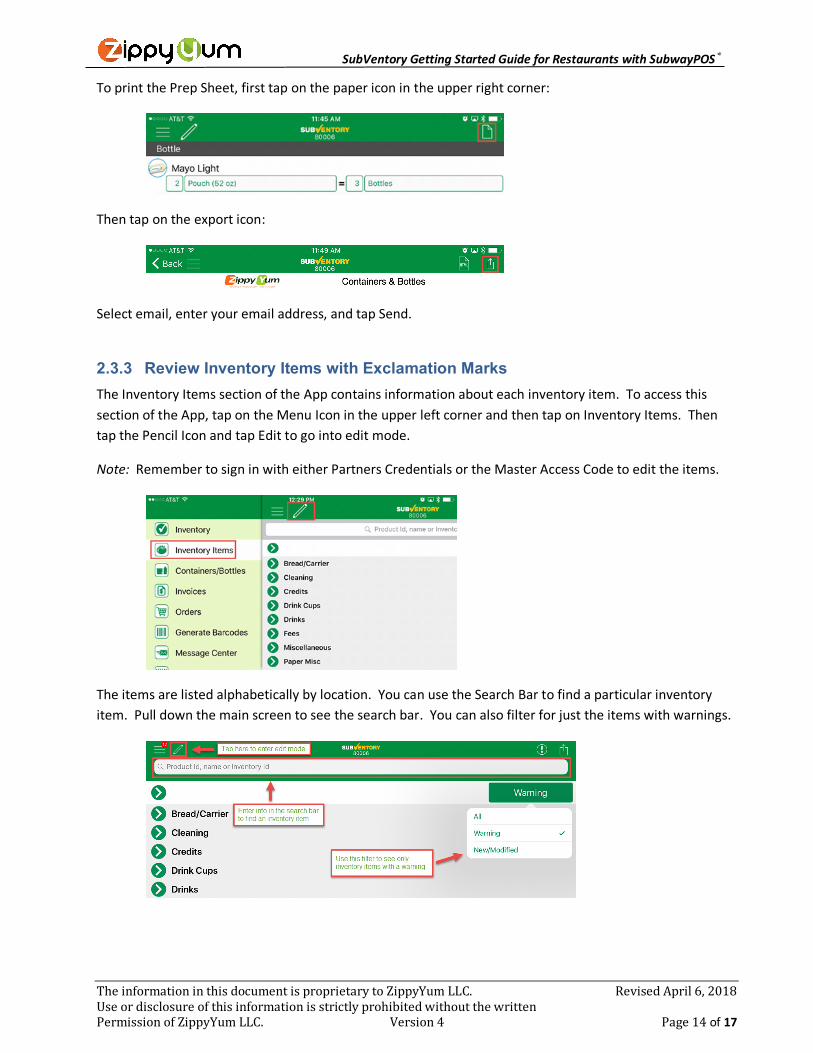
To print the Prep Sheet, first tap on the paper icon in the upper right corner:
Then tap on the export icon:
Select email, enter your email address, and tap Send.
2.3.3 Review Inventory Items with Exclamation Marks The Inventory Items section of the App contains information about each inventory item. To access this section of the App, tap on the Menu Icon in the upper left corner and then tap on Inventory Items. Then tap the Pencil Icon and tap Edit to go into edit mode.
Note: Remember to sign in with either Partners Credentials or the Master Access Code to edit the items.
The items are listed alphabetically by location. You can use the Search Bar to find a particular inventory item. Pull down the main screen to see the search bar. You can also filter for just the items with warnings.
SubVentory Getting Started Guide for Restaurants with SubwayPOS®
TheinformationinthisdocumentisproprietarytoZippyYumLLC. RevisedApril6,2018UseordisclosureofthisinformationisstrictlyprohibitedwithoutthewrittenPermissionofZippyYumLLC. Version4 Page15 of 17
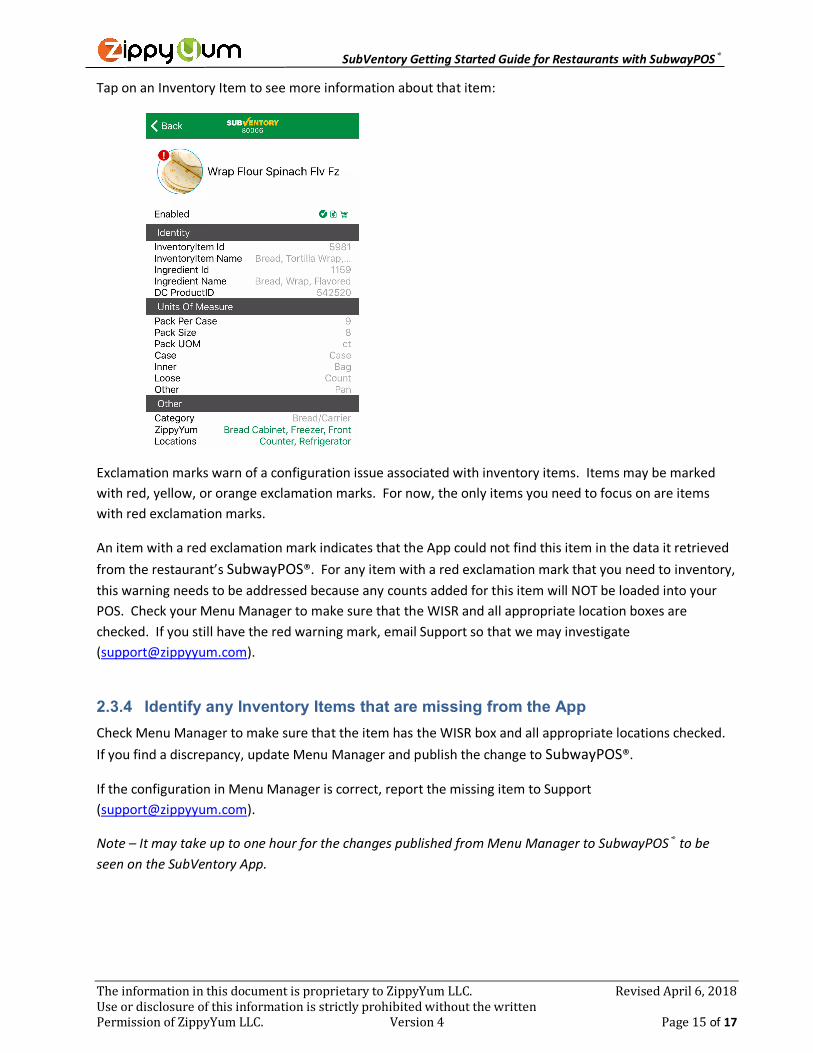
Tap on an Inventory Item to see more information about that item:
Exclamation marks warn of a configuration issue associated with inventory items. Items may be marked with red, yellow, or orange exclamation marks. For now, the only items you need to focus on are items with red exclamation marks.
An item with a red exclamation mark indicates that the App could not find this item in the data it retrieved from the restaurant’s SubwayPOS®. For any item with a red exclamation mark that you need to inventory, this warning needs to be addressed because any counts added for this item will NOT be loaded into your POS. Check your Menu Manager to make sure that the WISR and all appropriate location boxes are checked. If you still have the red warning mark, email Support so that we may investigate ([email protected]).
2.3.4 Identify any Inventory Items that are missing from the App Check Menu Manager to make sure that the item has the WISR box and all appropriate locations checked. If you find a discrepancy, update Menu Manager and publish the change to SubwayPOS®.
If the configuration in Menu Manager is correct, report the missing item to Support ([email protected]).
Note – It may take up to one hour for the changes published from Menu Manager to SubwayPOS® to be seen on the SubVentory App.
SubVentory Getting Started Guide for Restaurants with SubwayPOS®
TheinformationinthisdocumentisproprietarytoZippyYumLLC. RevisedApril6,2018UseordisclosureofthisinformationisstrictlyprohibitedwithoutthewrittenPermissionofZippyYumLLC. Version4 Page16 of 17
Export a small inventory and then load it into SubwayPOS®
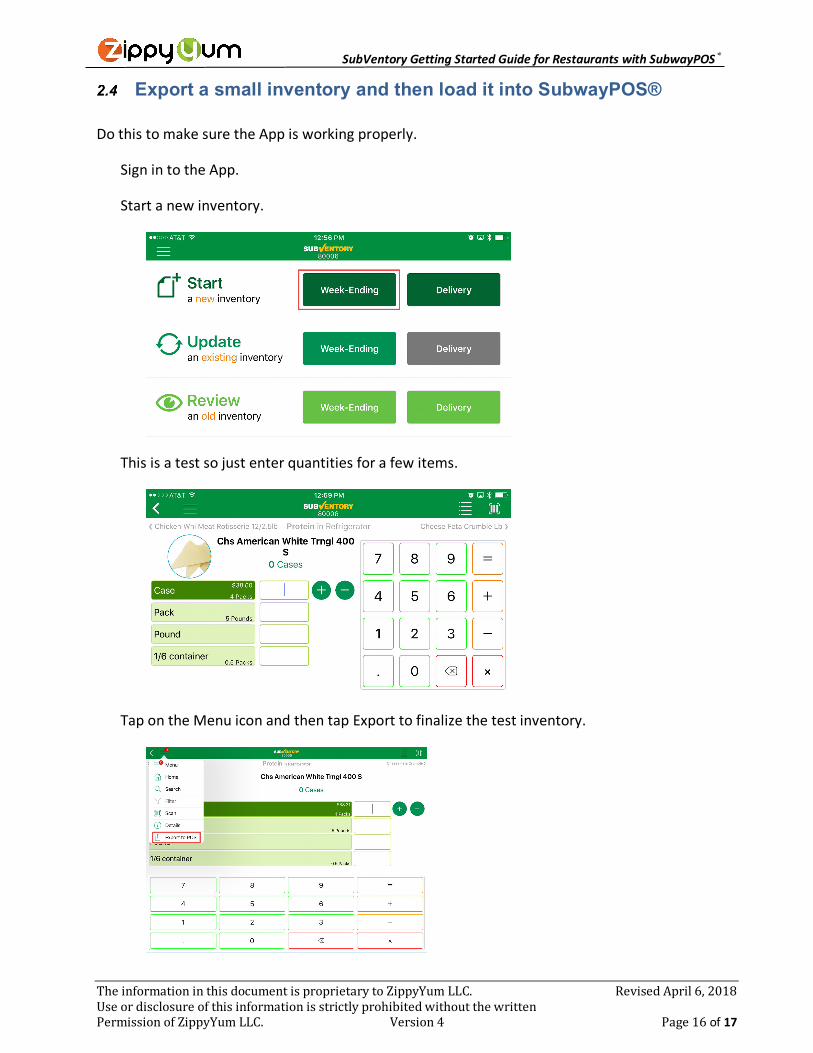
Do this to make sure the App is working properly.
Sign in to the App.
Start a new inventory.
This is a test so just enter quantities for a few items.
Tap on the Menu icon and then tap Export to finalize the test inventory.
SubVentory Getting Started Guide for Restaurants with SubwayPOS®
TheinformationinthisdocumentisproprietarytoZippyYumLLC. RevisedApril6,2018UseordisclosureofthisinformationisstrictlyprohibitedwithoutthewrittenPermissionofZippyYumLLC. Version4 Page17 of 17
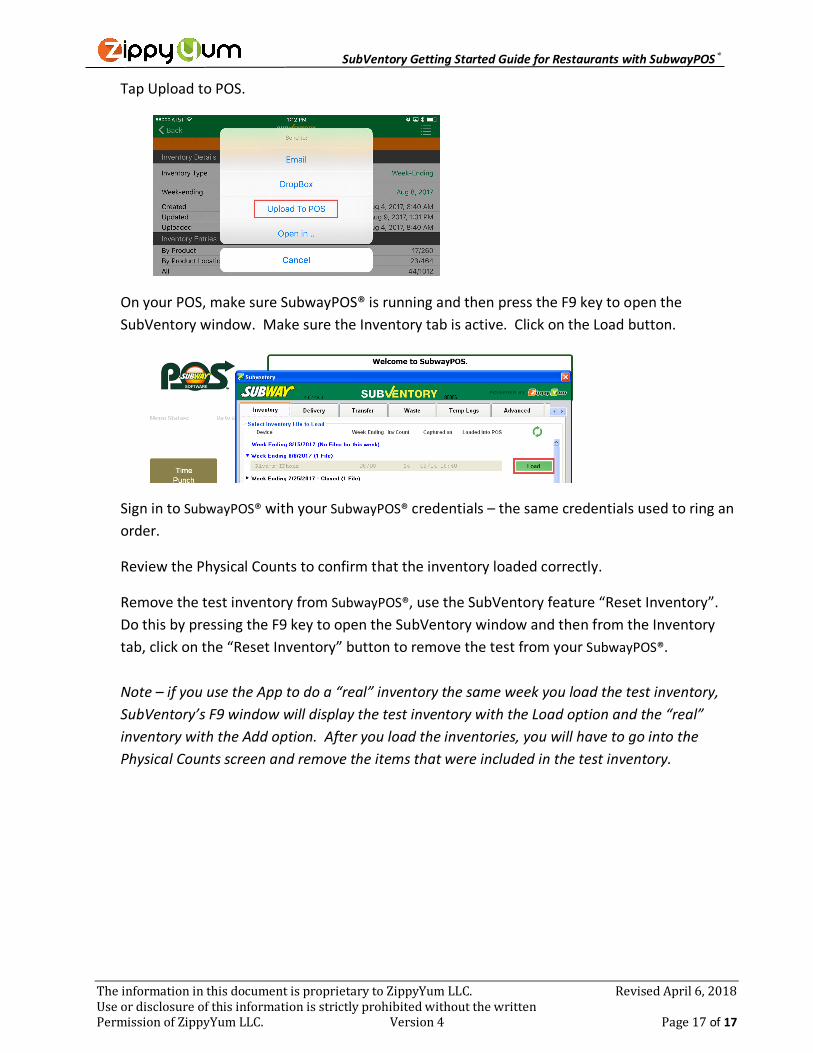
Tap Upload to POS.
On your POS, make sure SubwayPOS® is running and then press the F9 key to open the SubVentory window. Make sure the Inventory tab is active. Click on the Load button.
Sign in to SubwayPOS® with your SubwayPOS® credentials – the same credentials used to ring an order.
Review the Physical Counts to confirm that the inventory loaded correctly.
Remove the test inventory from SubwayPOS®, use the SubVentory feature “Reset Inventory”. Do this by pressing the F9 key to open the SubVentory window and then from the Inventory tab, click on the “Reset Inventory” button to remove the test from your SubwayPOS®. Note – if you use the App to do a “real” inventory the same week you load the test inventory, SubVentory’s F9 window will display the test inventory with the Load option and the “real” inventory with the Add option. After you load the inventories, you will have to go into the Physical Counts screen and remove the items that were included in the test inventory.


