Embed Size (px)
Citation preview
718 Washington Ave. N., Suite 202, Minneapolis, MN 55401
612-339-3355 | 1-866-770-3355
www.powerobjects.com
Getting Started With Office 365
Guide
718 Washington Ave. N., Suite 202, Minneapolis, MN 55401
612-339-3355 | 1-866-770-3355
www.powerobjects.com
\Context
Table of Contents Logging in to the Admin Center .................................................................................................................... 3
Overview of Microsoft Portal Online Features ............................................................................................. 4
Getting Started: Community and Help Guides ............................................................................................. 7
Managing Domain ......................................................................................................................................... 8
Add domain ........................................................................................................................................... 8
View DNS Settings ................................................................................................................................. 9
Troubleshoot ......................................................................................................................................... 9
Purchasing licenses ..................................................................................................................................... 10
Purchasing Licenses ............................................................................................................................ 10
Managing Subscription ....................................................................................................................... 11
Adding Users ....................................................................................................................................... 11
Using Bulk Editing................................................................................................................................ 14
Deleting a User Account...................................................................................................................... 14
Assigning licenses ................................................................................................................................ 15
Installing Office 2013 .................................................................................................................................. 16
Configuring your Office 365 account to Outlook Client on your desktop .................................................. 19
Creating Service Request ticket .................................................................................................................. 21
Adding an Aliases ........................................................................................................................................ 21
Adding Distribution Groups ........................................................................................................................ 24
Creating External Contacts .......................................................................................................................... 26
Setting up Mailbox Rules ............................................................................................................................ 27
Configuring Mobile Device Policy in Exchange Online ................................................................................ 28
Changing Personal Information .................................................................................................................. 29
Change personal password ................................................................................................................. 29
Directory Sync and federation for Office 365 ............................................................................................. 29
Naming Partner of Record in Microsoft Online Services ............................................................................ 30
Converting a Trial Account to a Paid Subscription ...................................................................................... 32
Links for Additional Assistance ................................................................................................................... 33
SharePoint and SkyDrive: .................................................................................................................... 33
Lync: .................................................................................................................................................... 33
Office Web Apps: ................................................................................................................................ 33
718 Washington Ave. N., Suite 202, Minneapolis, MN 55401
612-339-3355 | 1-866-770-3355
www.powerobjects.com
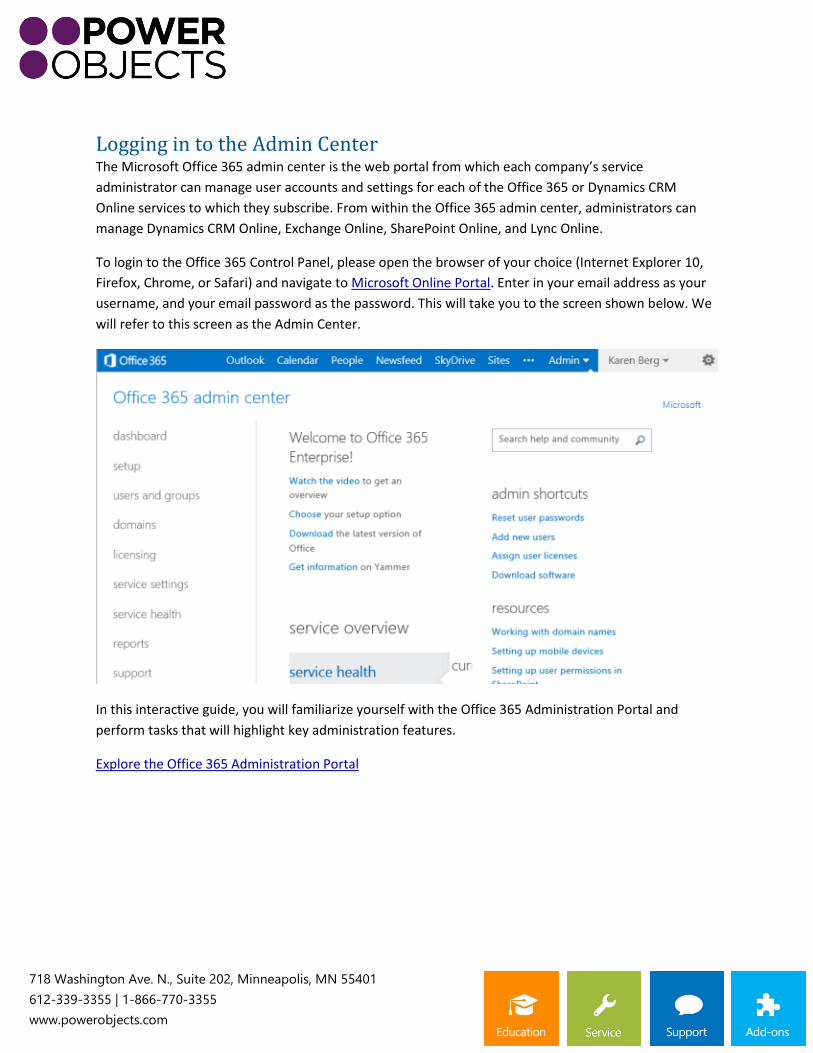
Logging in to the Admin Center The Microsoft Office 365 admin center is the web portal from which each company’s service
administrator can manage user accounts and settings for each of the Office 365 or Dynamics CRM
Online services to which they subscribe. From within the Office 365 admin center, administrators can
manage Dynamics CRM Online, Exchange Online, SharePoint Online, and Lync Online.
To login to the Office 365 Control Panel, please open the browser of your choice (Internet Explorer 10,
Firefox, Chrome, or Safari) and navigate to Microsoft Online Portal. Enter in your email address as your
username, and your email password as the password. This will take you to the screen shown below. We
will refer to this screen as the Admin Center.
In this interactive guide, you will familiarize yourself with the Office 365 Administration Portal and
perform tasks that will highlight key administration features.
Explore the Office 365 Administration Portal
718 Washington Ave. N., Suite 202, Minneapolis, MN 55401
612-339-3355 | 1-866-770-3355
www.powerobjects.com
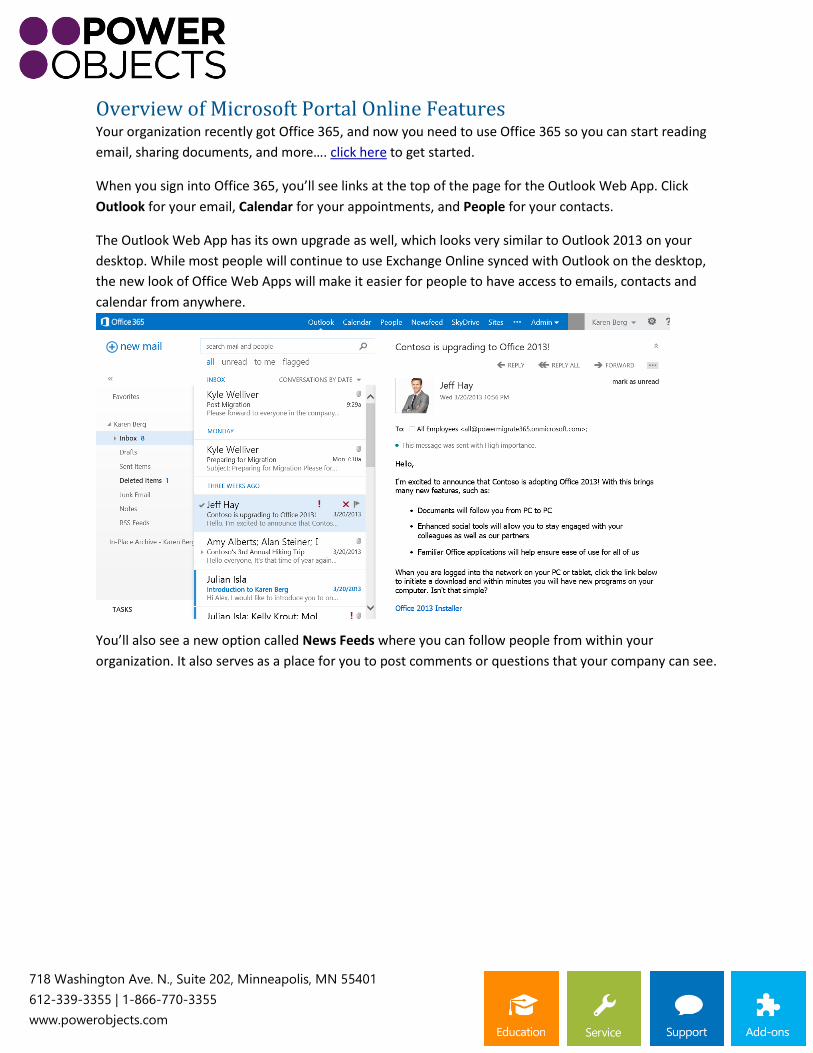
Overview of Microsoft Portal Online Features Your organization recently got Office 365, and now you need to use Office 365 so you can start reading
email, sharing documents, and more…. click here to get started.
When you sign into Office 365, you’ll see links at the top of the page for the Outlook Web App. Click
Outlook for your email, Calendar for your appointments, and People for your contacts.
The Outlook Web App has its own upgrade as well, which looks very similar to Outlook 2013 on your
desktop. While most people will continue to use Exchange Online synced with Outlook on the desktop,
the new look of Office Web Apps will make it easier for people to have access to emails, contacts and
calendar from anywhere.
You’ll also see a new option called News Feeds where you can follow people from within your
organization. It also serves as a place for you to post comments or questions that your company can see.
718 Washington Ave. N., Suite 202, Minneapolis, MN 55401
612-339-3355 | 1-866-770-3355
www.powerobjects.com
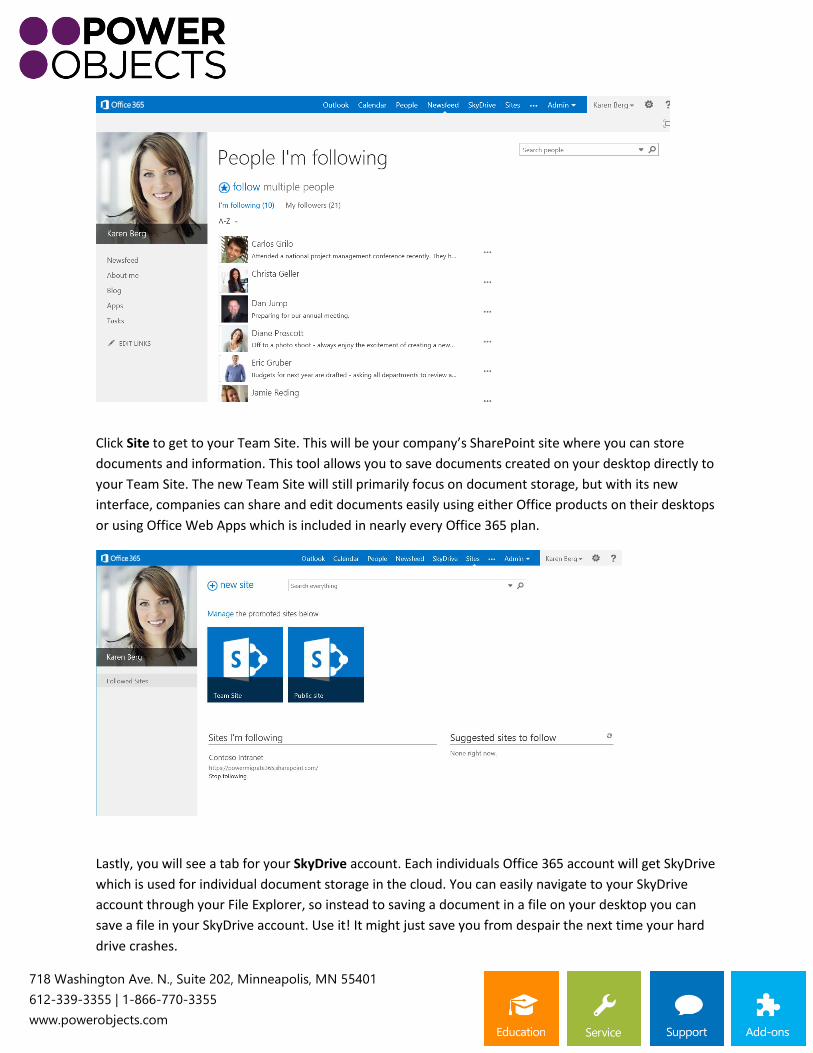
Click Site to get to your Team Site. This will be your company’s SharePoint site where you can store
documents and information. This tool allows you to save documents created on your desktop directly to
your Team Site. The new Team Site will still primarily focus on document storage, but with its new
interface, companies can share and edit documents easily using either Office products on their desktops
or using Office Web Apps which is included in nearly every Office 365 plan.
Lastly, you will see a tab for your SkyDrive account. Each individuals Office 365 account will get SkyDrive
which is used for individual document storage in the cloud. You can easily navigate to your SkyDrive
account through your File Explorer, so instead to saving a document in a file on your desktop you can
save a file in your SkyDrive account. Use it! It might just save you from despair the next time your hard
drive crashes.
718 Washington Ave. N., Suite 202, Minneapolis, MN 55401
612-339-3355 | 1-866-770-3355
www.powerobjects.com
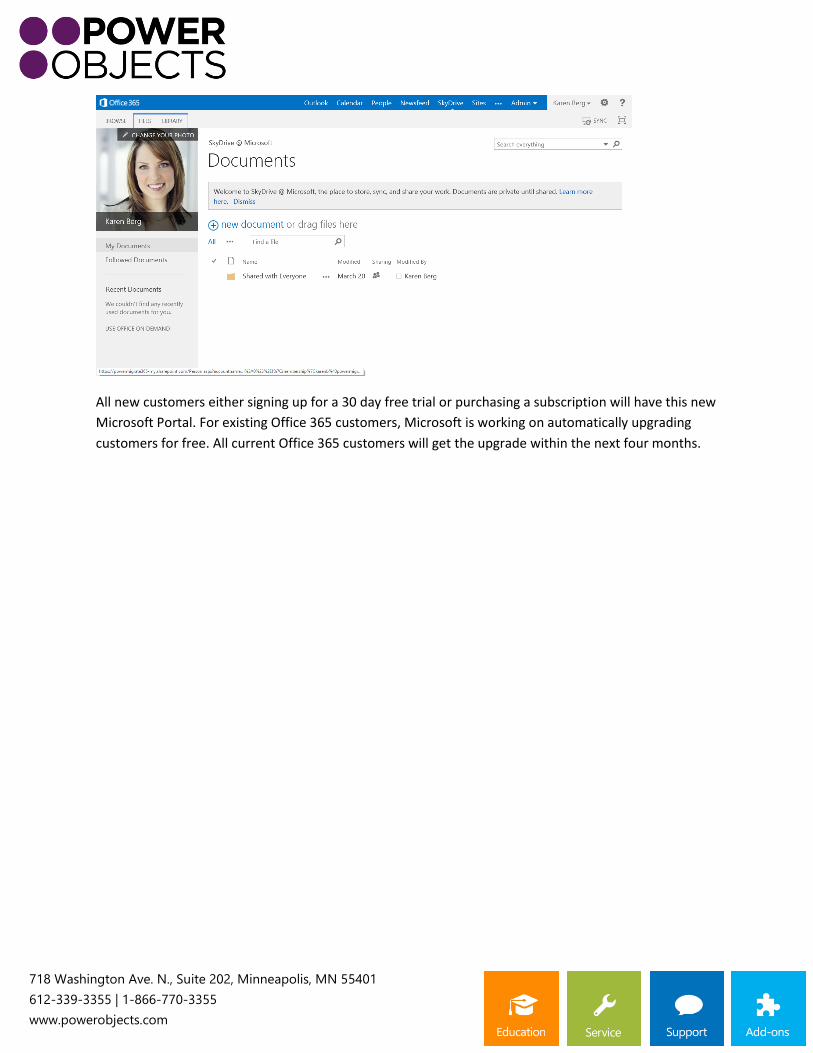
All new customers either signing up for a 30 day free trial or purchasing a subscription will have this new
Microsoft Portal. For existing Office 365 customers, Microsoft is working on automatically upgrading
customers for free. All current Office 365 customers will get the upgrade within the next four months.
718 Washington Ave. N., Suite 202, Minneapolis, MN 55401
612-339-3355 | 1-866-770-3355
www.powerobjects.com
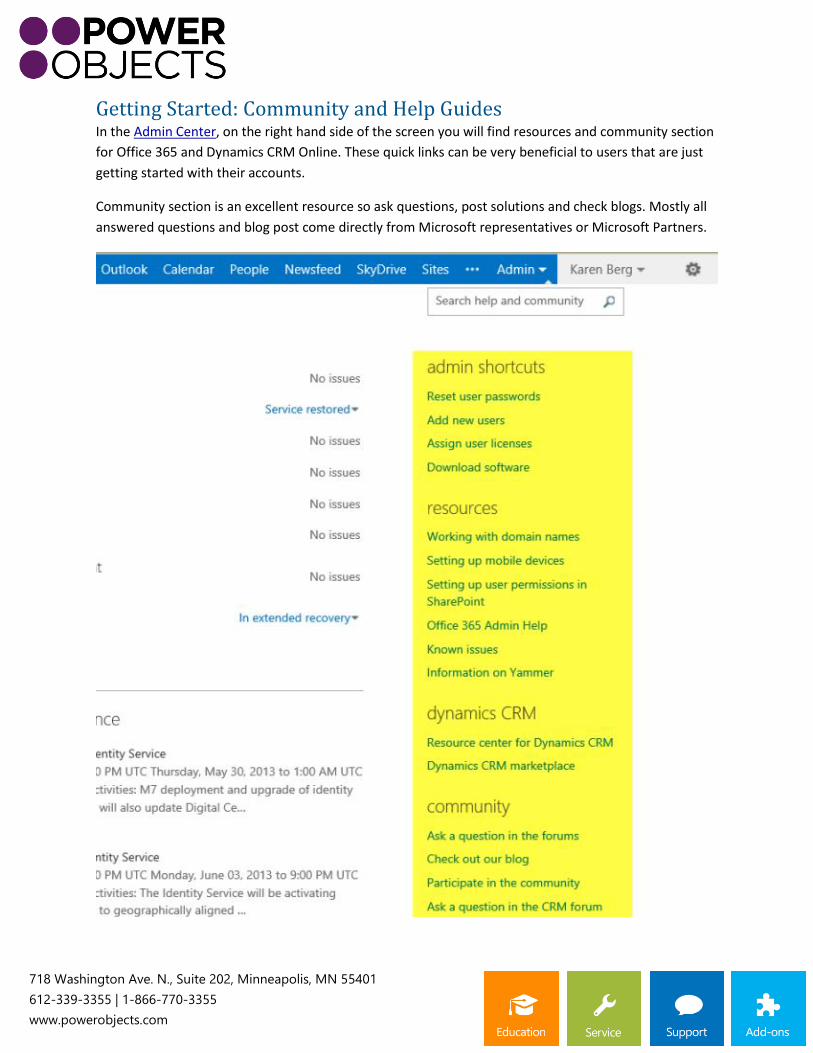
Getting Started: Community and Help Guides In the Admin Center, on the right hand side of the screen you will find resources and community section
for Office 365 and Dynamics CRM Online. These quick links can be very beneficial to users that are just
getting started with their accounts.
Community section is an excellent resource so ask questions, post solutions and check blogs. Mostly all
answered questions and blog post come directly from Microsoft representatives or Microsoft Partners.
718 Washington Ave. N., Suite 202, Minneapolis, MN 55401
612-339-3355 | 1-866-770-3355
www.powerobjects.com
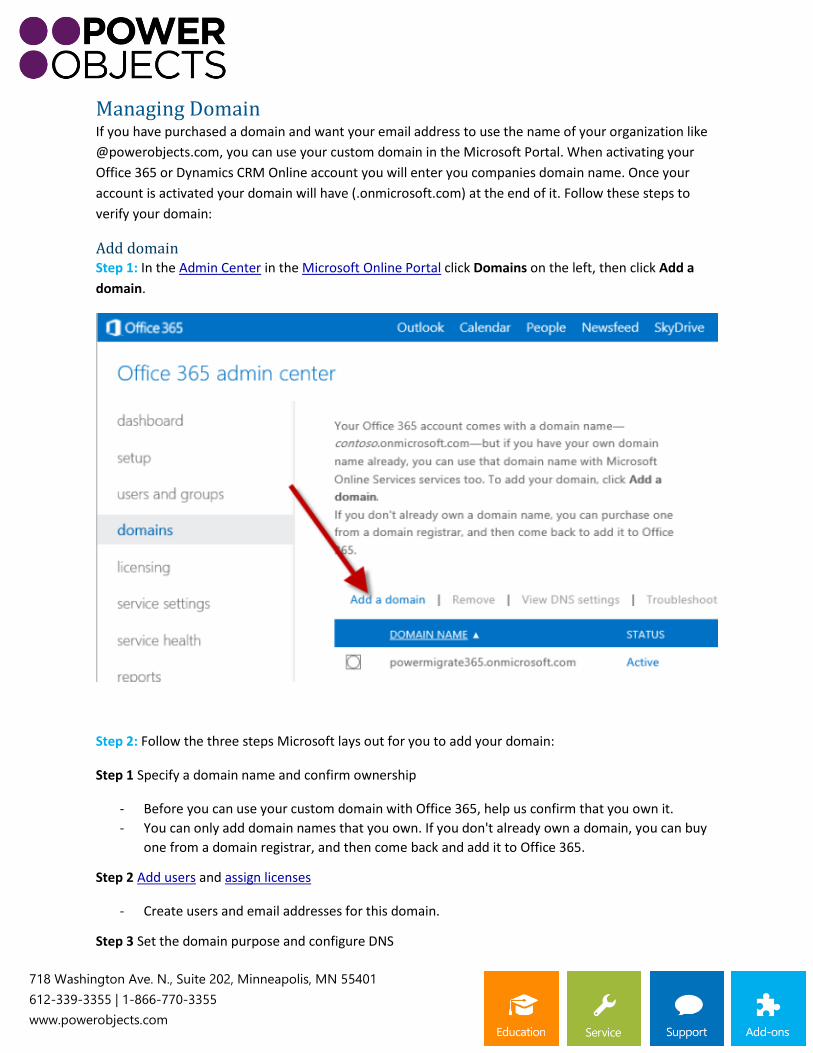
Managing Domain If you have purchased a domain and want your email address to use the name of your organization like
@powerobjects.com, you can use your custom domain in the Microsoft Portal. When activating your
Office 365 or Dynamics CRM Online account you will enter you companies domain name. Once your
account is activated your domain will have (.onmicrosoft.com) at the end of it. Follow these steps to
verify your domain:
Add domain Step 1: In the Admin Center in the Microsoft Online Portal click Domains on the left, then click Add a
domain.
Step 2: Follow the three steps Microsoft lays out for you to add your domain:
Step 1 Specify a domain name and confirm ownership
- Before you can use your custom domain with Office 365, help us confirm that you own it.
- You can only add domain names that you own. If you don't already own a domain, you can buy
one from a domain registrar, and then come back and add it to Office 365.
Step 2 Add users and assign licenses
- Create users and email addresses for this domain.
Step 3 Set the domain purpose and configure DNS
718 Washington Ave. N., Suite 202, Minneapolis, MN 55401
612-339-3355 | 1-866-770-3355
www.powerobjects.com
- Choose how you want to use this domain with Office 365 and create DNS records
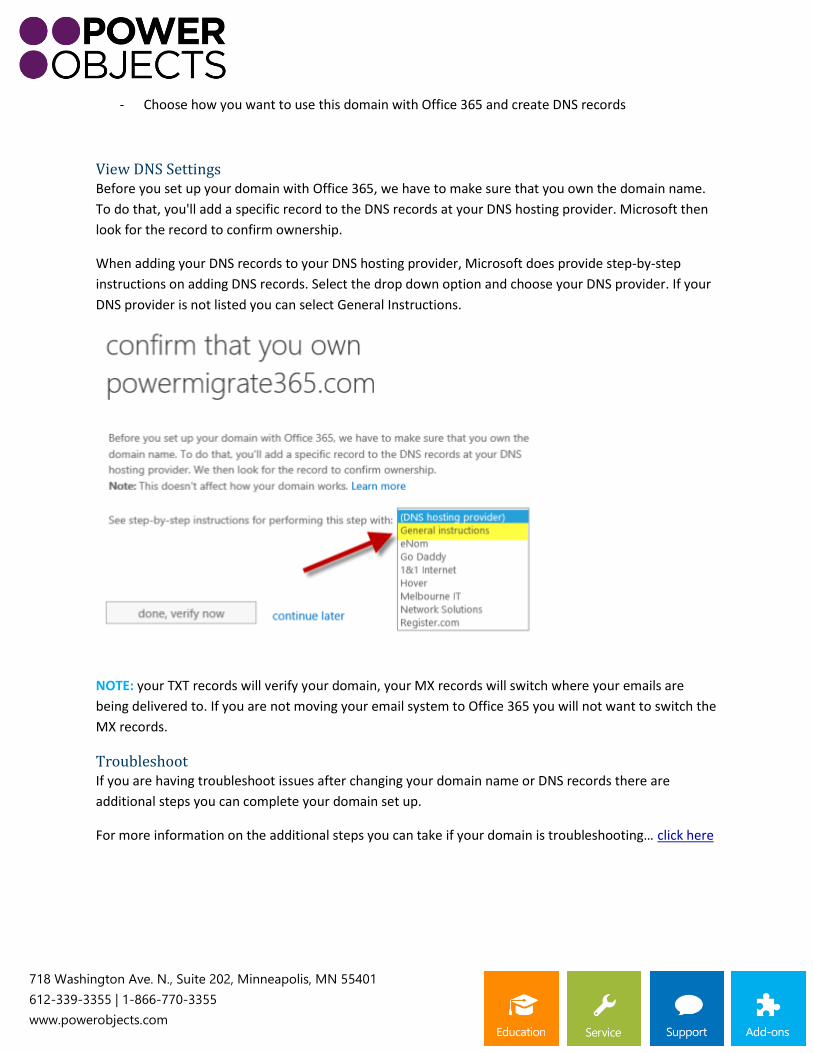
View DNS Settings Before you set up your domain with Office 365, we have to make sure that you own the domain name.
To do that, you'll add a specific record to the DNS records at your DNS hosting provider. Microsoft then
look for the record to confirm ownership.
When adding your DNS records to your DNS hosting provider, Microsoft does provide step-by-step
instructions on adding DNS records. Select the drop down option and choose your DNS provider. If your
DNS provider is not listed you can select General Instructions.
NOTE: your TXT records will verify your domain, your MX records will switch where your emails are
being delivered to. If you are not moving your email system to Office 365 you will not want to switch the
MX records.
Troubleshoot If you are having troubleshoot issues after changing your domain name or DNS records there are
additional steps you can complete your domain set up.
For more information on the additional steps you can take if your domain is troubleshooting… click here
718 Washington Ave. N., Suite 202, Minneapolis, MN 55401
612-339-3355 | 1-866-770-3355
www.powerobjects.com
Purchasing licenses When purchasing licenses for your Office 365 or Dynamics CRM Online account you’ll have options. If
you are currently on a trial you can Convert a Trial Account to a Paid Subscription or you can purchase
each license and assign them to each user, steps are below. Only Global Admins can purchase licenses
and assign them to each user. You will need a Credit Card on hand when purchasing licenses and you
can set up auto-pay for your subscription.
Note: PowerObjects recommends you purchase your licenses before adding user. This was, as you add
users you can assign them licenses as part of the process in setting up your account.
Purchasing Licenses To purchase licenses in the Microsoft Online Portal you must be a global administrator for your
companies account.
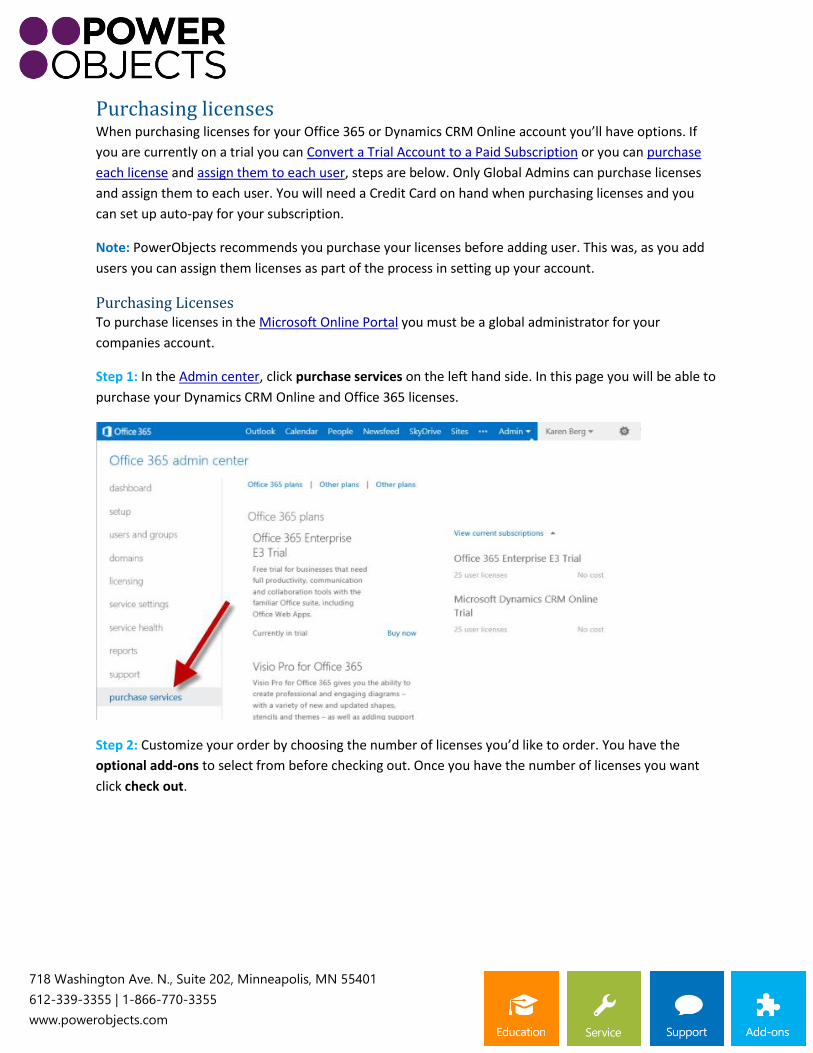
Step 1: In the Admin center, click purchase services on the left hand side. In this page you will be able to
purchase your Dynamics CRM Online and Office 365 licenses.
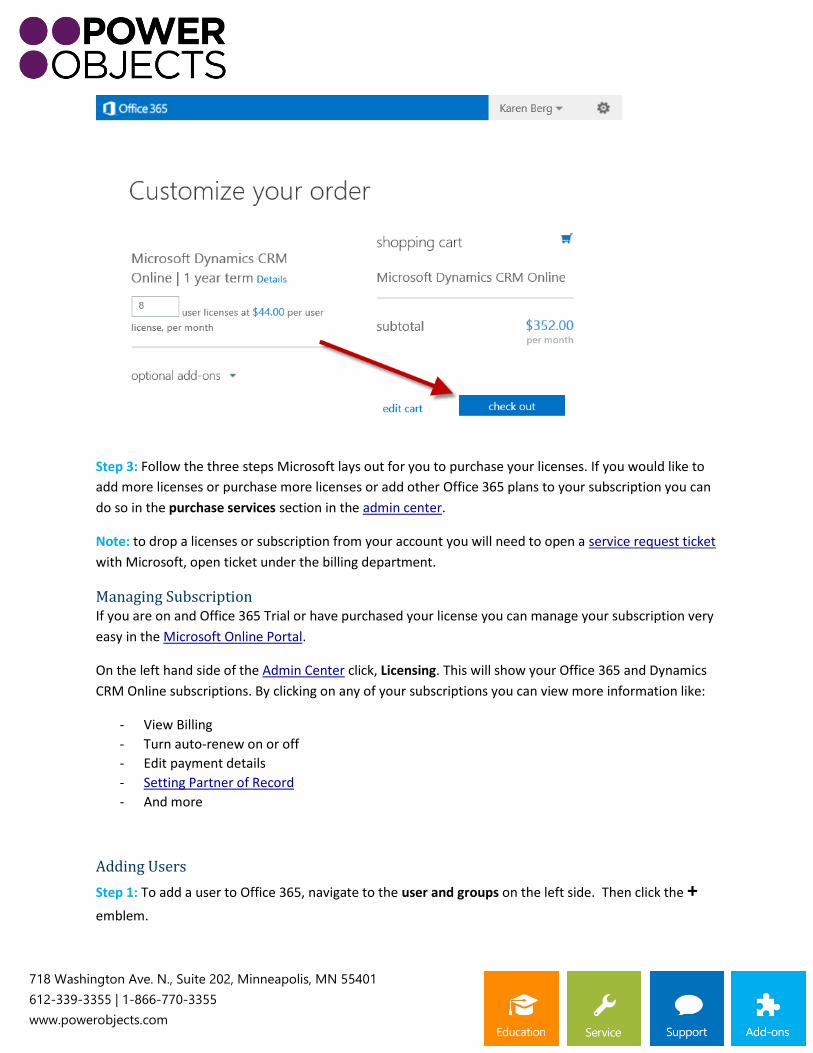
Step 2: Customize your order by choosing the number of licenses you’d like to order. You have the
optional add-ons to select from before checking out. Once you have the number of licenses you want
click check out.
718 Washington Ave. N., Suite 202, Minneapolis, MN 55401
612-339-3355 | 1-866-770-3355
www.powerobjects.com
Step 3: Follow the three steps Microsoft lays out for you to purchase your licenses. If you would like to
add more licenses or purchase more licenses or add other Office 365 plans to your subscription you can
do so in the purchase services section in the admin center.
Note: to drop a licenses or subscription from your account you will need to open a service request ticket
with Microsoft, open ticket under the billing department.
Managing Subscription If you are on and Office 365 Trial or have purchased your license you can manage your subscription very
easy in the Microsoft Online Portal.
On the left hand side of the Admin Center click, Licensing. This will show your Office 365 and Dynamics
CRM Online subscriptions. By clicking on any of your subscriptions you can view more information like:
- View Billing
- Turn auto-renew on or off
- Edit payment details
- Setting Partner of Record
- And more
Adding Users
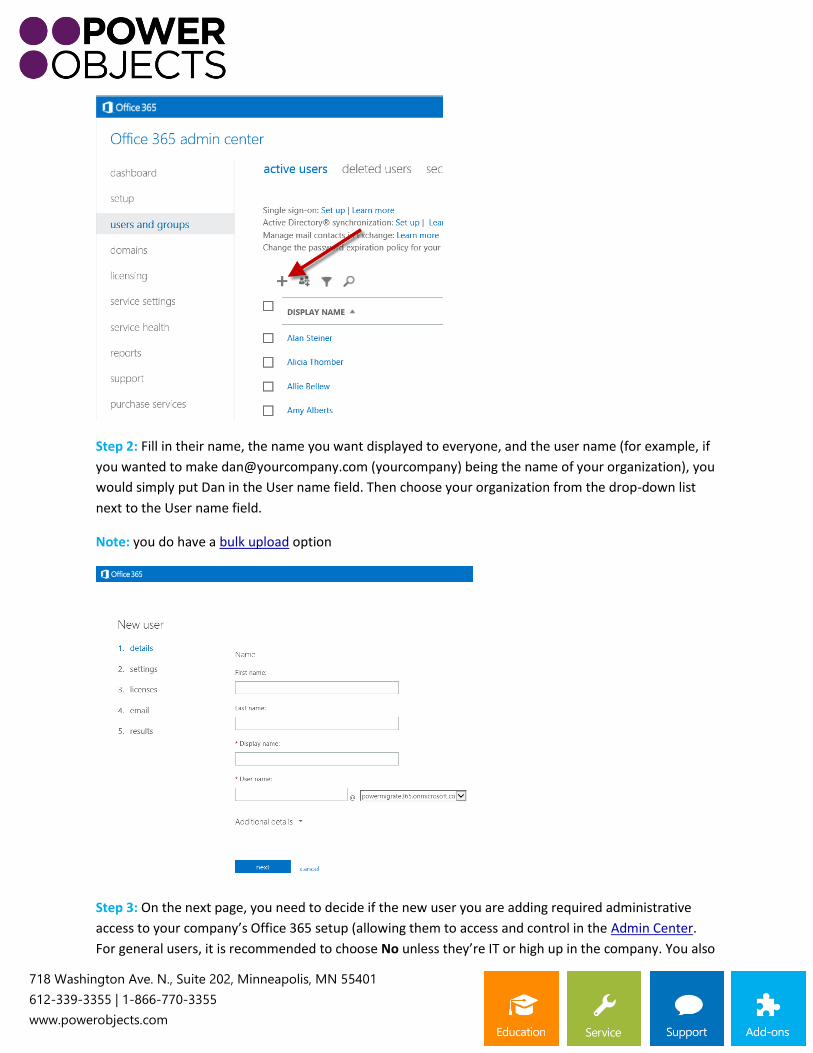
Step 1: To add a user to Office 365, navigate to the user and groups on the left side. Then click the +
emblem.
718 Washington Ave. N., Suite 202, Minneapolis, MN 55401
612-339-3355 | 1-866-770-3355
www.powerobjects.com
Step 2: Fill in their name, the name you want displayed to everyone, and the user name (for example, if
you wanted to make [email protected] (yourcompany) being the name of your organization), you
would simply put Dan in the User name field. Then choose your organization from the drop-down list
next to the User name field.
Note: you do have a bulk upload option
Step 3: On the next page, you need to decide if the new user you are adding required administrative
access to your company’s Office 365 setup (allowing them to access and control in the Admin Center.
For general users, it is recommended to choose No unless they’re IT or high up in the company. You also
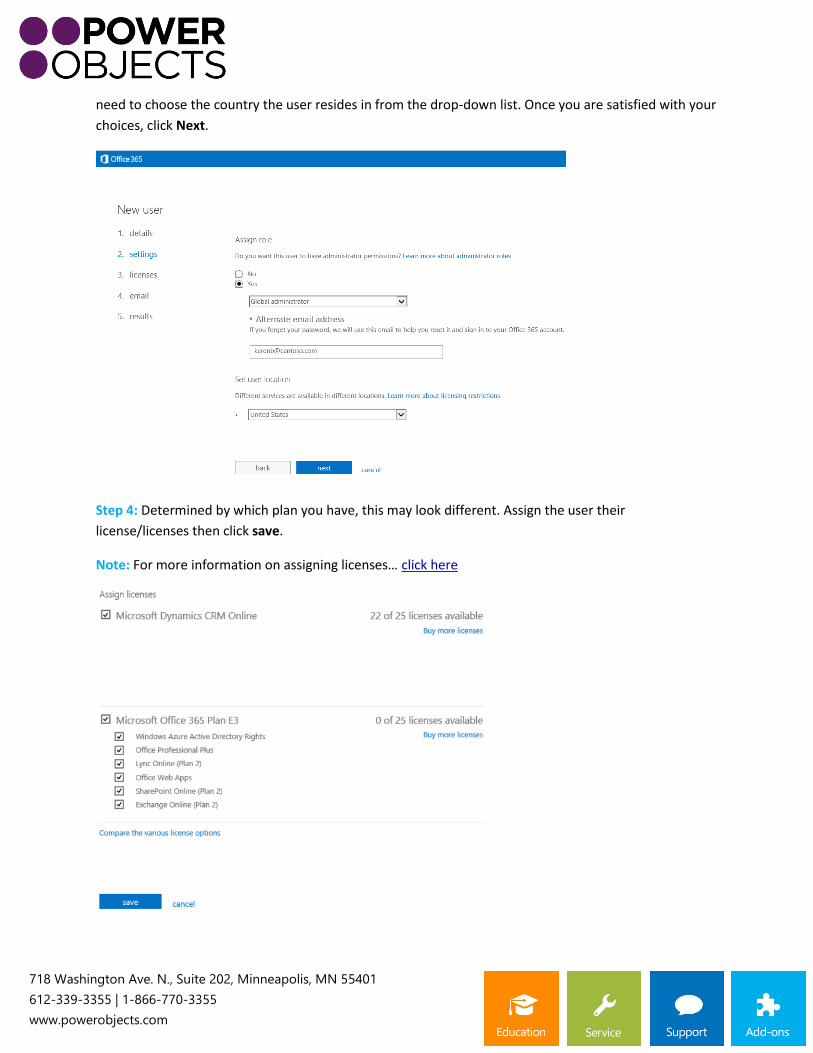
718 Washington Ave. N., Suite 202, Minneapolis, MN 55401
612-339-3355 | 1-866-770-3355
www.powerobjects.com
need to choose the country the user resides in from the drop-down list. Once you are satisfied with your
choices, click Next.
Step 4: Determined by which plan you have, this may look different. Assign the user their
license/licenses then click save.
Note: For more information on assigning licenses… click here
718 Washington Ave. N., Suite 202, Minneapolis, MN 55401
612-339-3355 | 1-866-770-3355
www.powerobjects.com
Step 5: To conclude, click on Create. The final page will show the new email address you created and the
temporary password for that specific user. Click Finish to return to the Users page.
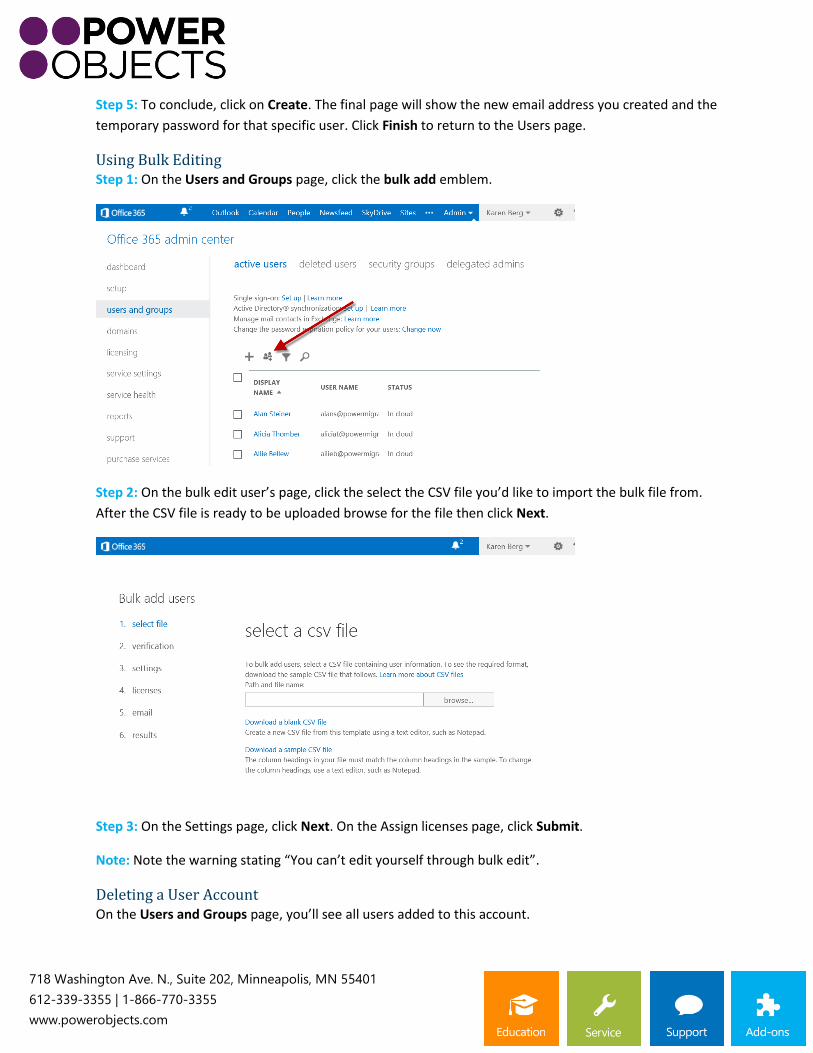
Using Bulk Editing Step 1: On the Users and Groups page, click the bulk add emblem.
Step 2: On the bulk edit user’s page, click the select the CSV file you’d like to import the bulk file from.
After the CSV file is ready to be uploaded browse for the file then click Next.
Step 3: On the Settings page, click Next. On the Assign licenses page, click Submit.
Note: Note the warning stating “You can’t edit yourself through bulk edit”.
Deleting a User Account On the Users and Groups page, you’ll see all users added to this account.
718 Washington Ave. N., Suite 202, Minneapolis, MN 55401
612-339-3355 | 1-866-770-3355
www.powerobjects.com
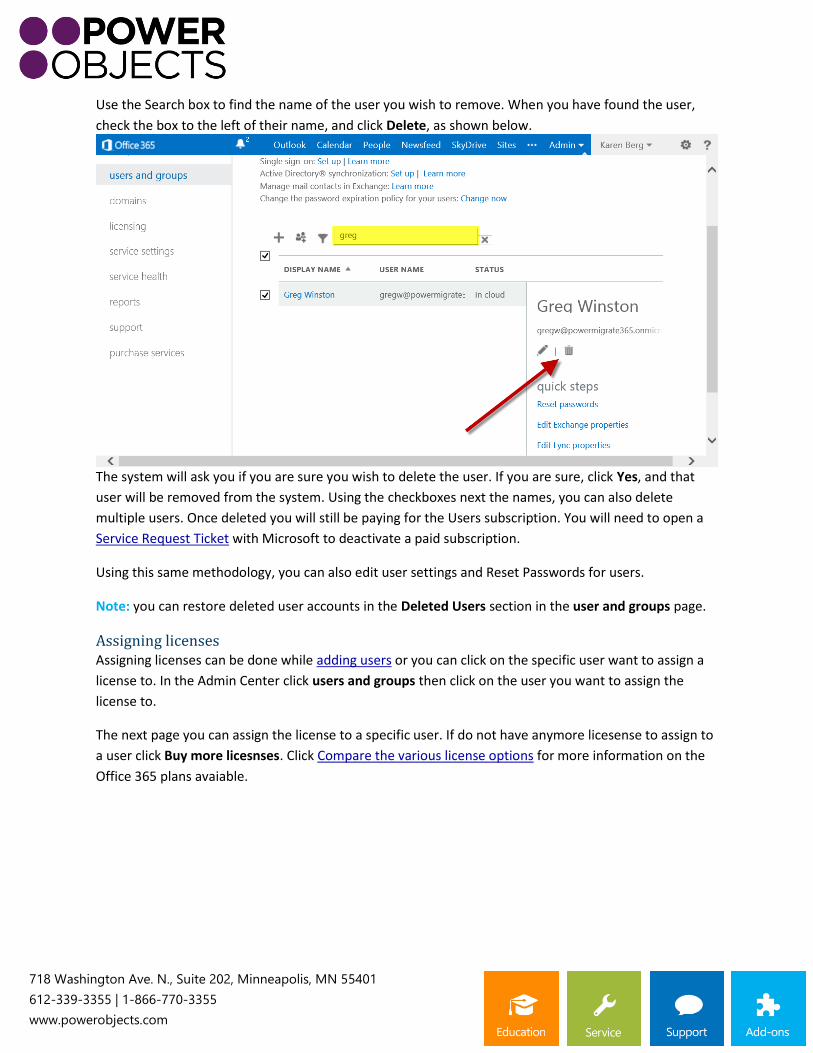
Use the Search box to find the name of the user you wish to remove. When you have found the user,
check the box to the left of their name, and click Delete, as shown below.
The system will ask you if you are sure you wish to delete the user. If you are sure, click Yes, and that
user will be removed from the system. Using the checkboxes next the names, you can also delete
multiple users. Once deleted you will still be paying for the Users subscription. You will need to open a
Service Request Ticket with Microsoft to deactivate a paid subscription.
Using this same methodology, you can also edit user settings and Reset Passwords for users.
Note: you can restore deleted user accounts in the Deleted Users section in the user and groups page.
Assigning licenses Assigning licenses can be done while adding users or you can click on the specific user want to assign a
license to. In the Admin Center click users and groups then click on the user you want to assign the
license to.
The next page you can assign the license to a specific user. If do not have anymore licesense to assign to
a user click Buy more licesnses. Click Compare the various license options for more information on the
Office 365 plans avaiable.
718 Washington Ave. N., Suite 202, Minneapolis, MN 55401
612-339-3355 | 1-866-770-3355
www.powerobjects.com
Installing Office 2013 If you have the Enterprise E3 Plan, Midsized Business Plan or just have an Office Professional as your
Office 365 license you can download Office Professional Plus directly to your PC, Mac or certain tablets.
To view the system requirements before installing click the link… System requirements for Office 2013
and Office 365 ProPlus
NOTE: if you are not running Office on your computer you can skip to Install
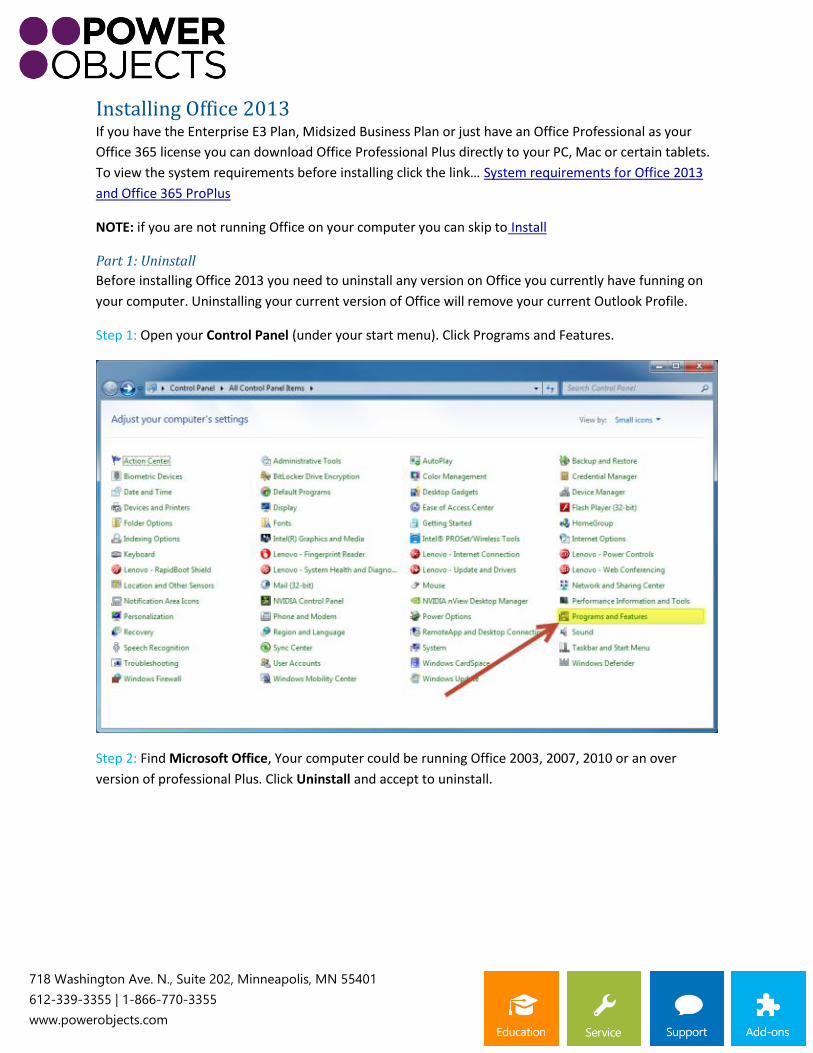
Part 1: Uninstall
Before installing Office 2013 you need to uninstall any version on Office you currently have funning on
your computer. Uninstalling your current version of Office will remove your current Outlook Profile.
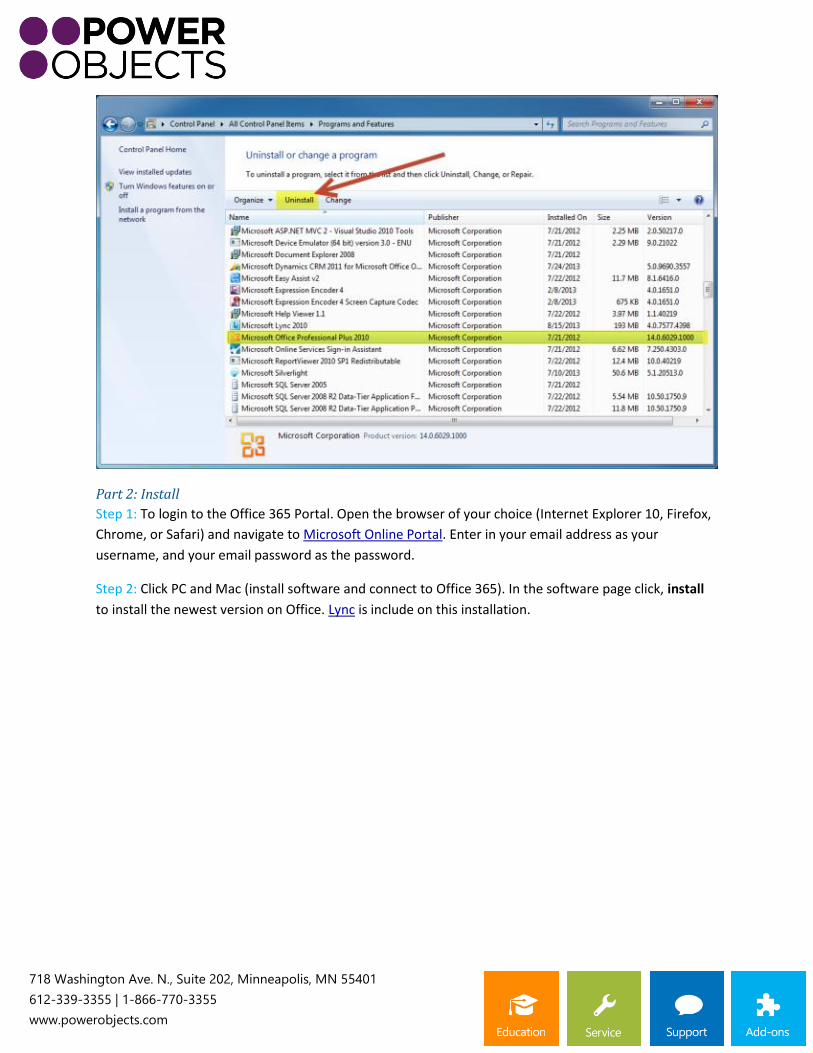
Step 1: Open your Control Panel (under your start menu). Click Programs and Features.
Step 2: Find Microsoft Office, Your computer could be running Office 2003, 2007, 2010 or an over
version of professional Plus. Click Uninstall and accept to uninstall.
718 Washington Ave. N., Suite 202, Minneapolis, MN 55401
612-339-3355 | 1-866-770-3355
www.powerobjects.com
Part 2: Install
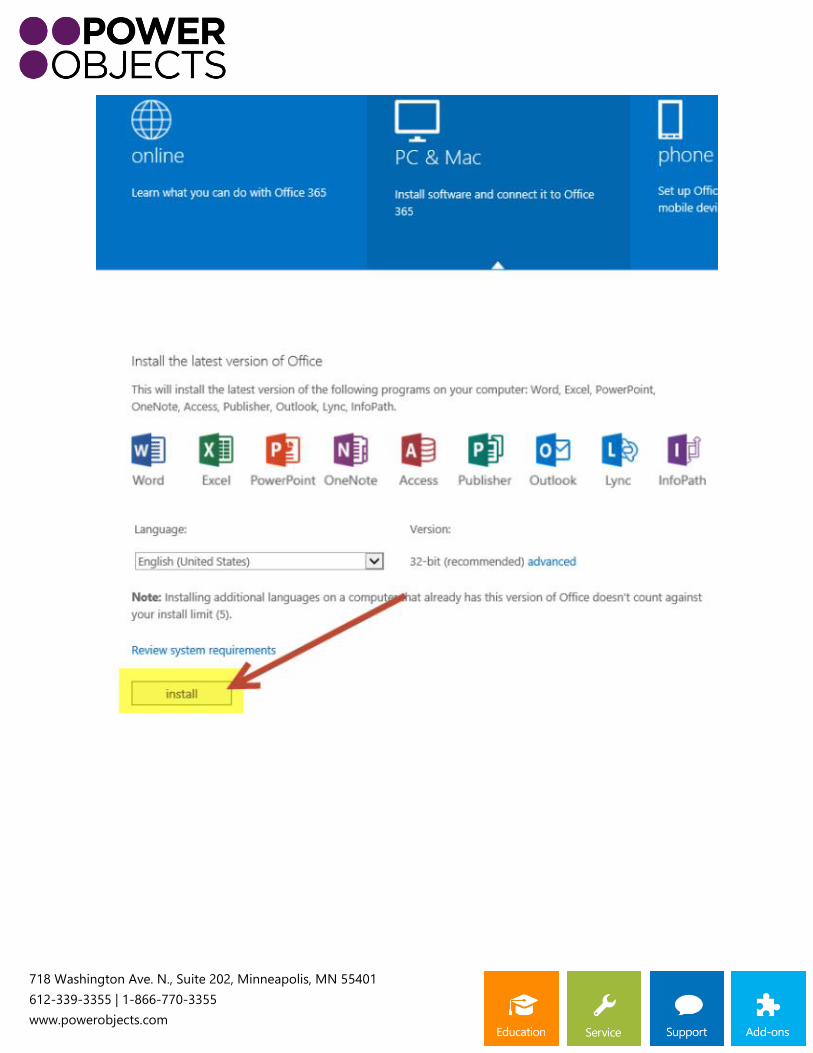
Step 1: To login to the Office 365 Portal. Open the browser of your choice (Internet Explorer 10, Firefox,
Chrome, or Safari) and navigate to Microsoft Online Portal. Enter in your email address as your
username, and your email password as the password.
Step 2: Click PC and Mac (install software and connect to Office 365). In the software page click, install
to install the newest version on Office. Lync is include on this installation.
718 Washington Ave. N., Suite 202, Minneapolis, MN 55401
612-339-3355 | 1-866-770-3355
www.powerobjects.com
718 Washington Ave. N., Suite 202, Minneapolis, MN 55401
612-339-3355 | 1-866-770-3355
www.powerobjects.com
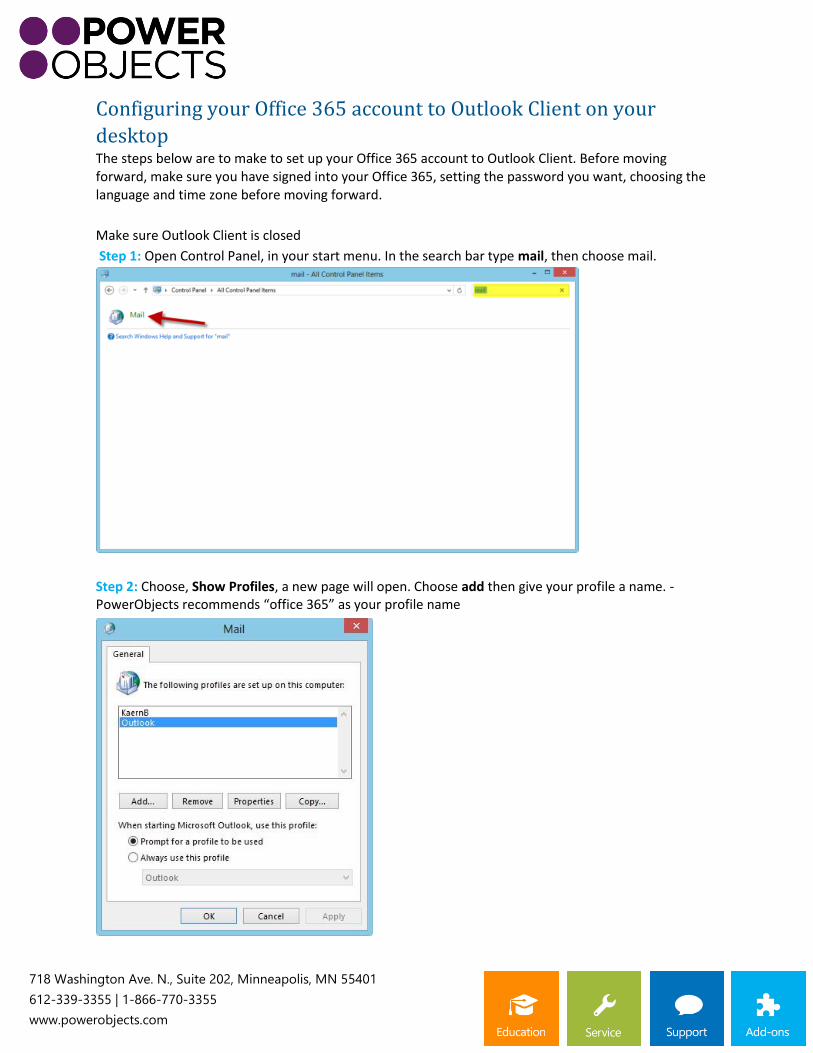
Configuring your Office 365 account to Outlook Client on your
desktop The steps below are to make to set up your Office 365 account to Outlook Client. Before moving forward, make sure you have signed into your Office 365, setting the password you want, choosing the language and time zone before moving forward.
Make sure Outlook Client is closed
Step 1: Open Control Panel, in your start menu. In the search bar type mail, then choose mail.
Step 2: Choose, Show Profiles, a new page will open. Choose add then give your profile a name. -PowerObjects recommends “office 365” as your profile name
718 Washington Ave. N., Suite 202, Minneapolis, MN 55401
612-339-3355 | 1-866-770-3355
www.powerobjects.com
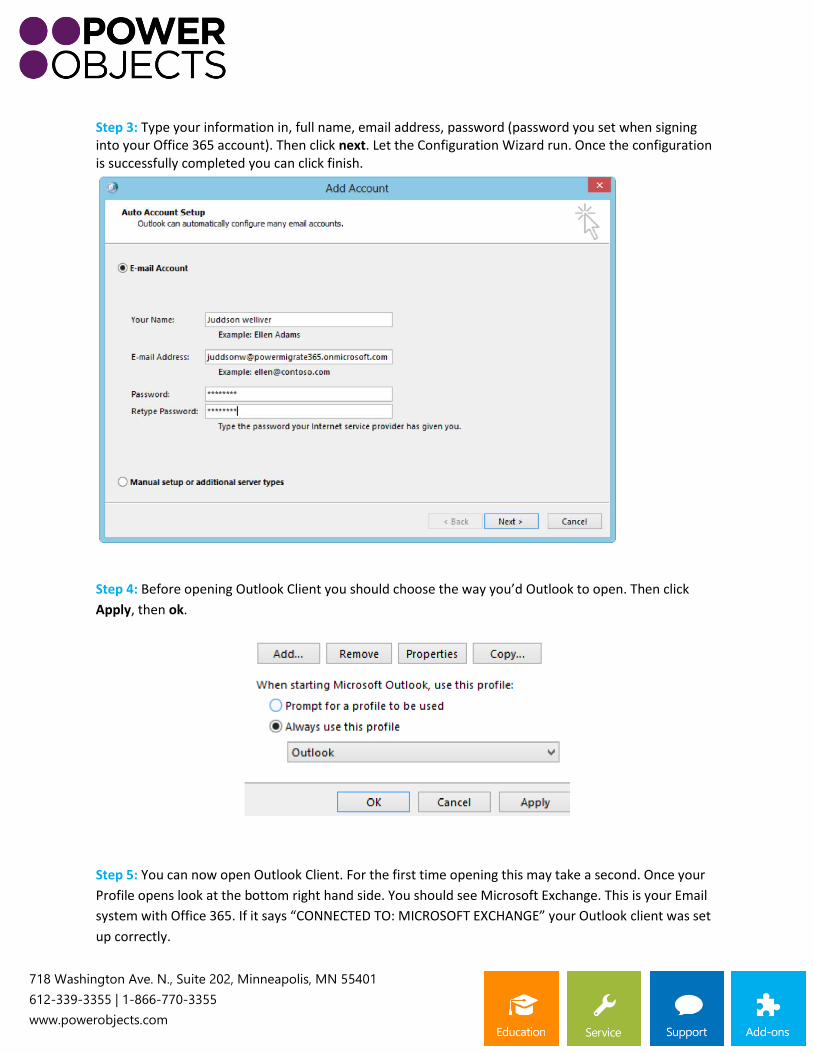
Step 3: Type your information in, full name, email address, password (password you set when signing into your Office 365 account). Then click next. Let the Configuration Wizard run. Once the configuration is successfully completed you can click finish.
Step 4: Before opening Outlook Client you should choose the way you’d Outlook to open. Then click
Apply, then ok.
Step 5: You can now open Outlook Client. For the first time opening this may take a second. Once your
Profile opens look at the bottom right hand side. You should see Microsoft Exchange. This is your Email
system with Office 365. If it says “CONNECTED TO: MICROSOFT EXCHANGE” your Outlook client was set
up correctly.
718 Washington Ave. N., Suite 202, Minneapolis, MN 55401
612-339-3355 | 1-866-770-3355
www.powerobjects.com
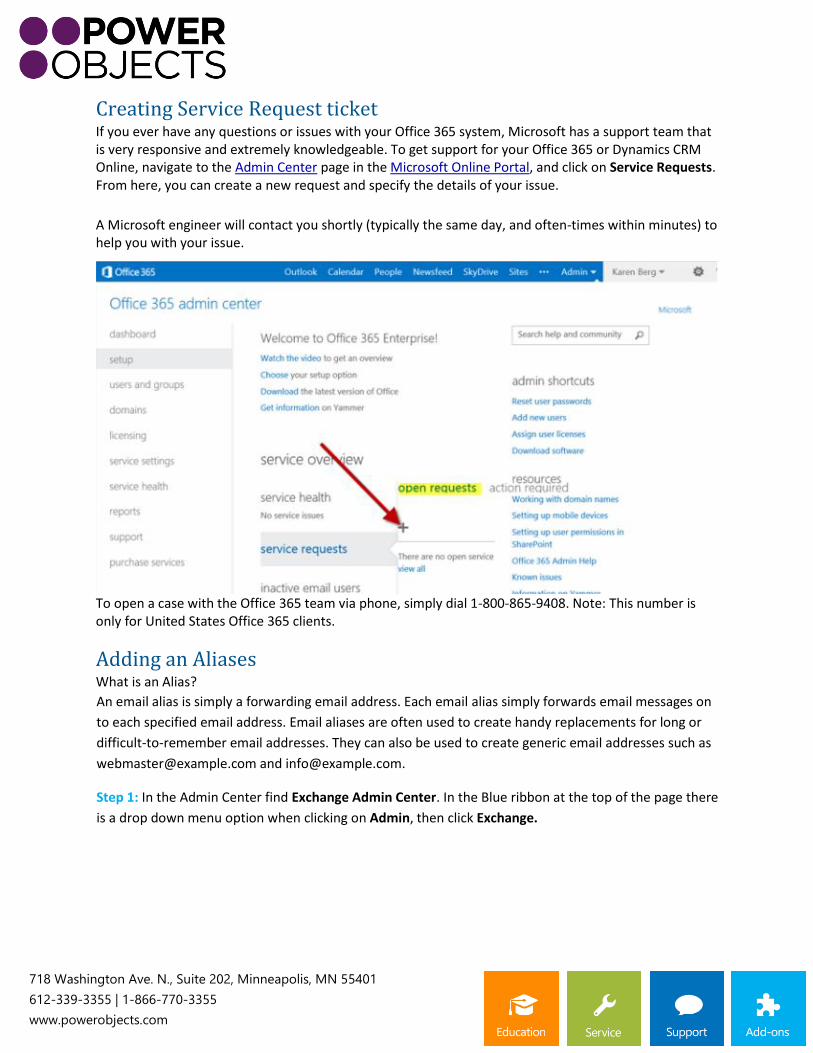
Creating Service Request ticket If you ever have any questions or issues with your Office 365 system, Microsoft has a support team that is very responsive and extremely knowledgeable. To get support for your Office 365 or Dynamics CRM Online, navigate to the Admin Center page in the Microsoft Online Portal, and click on Service Requests. From here, you can create a new request and specify the details of your issue.
A Microsoft engineer will contact you shortly (typically the same day, and often-times within minutes) to help you with your issue.
To open a case with the Office 365 team via phone, simply dial 1-800-865-9408. Note: This number is only for United States Office 365 clients.
Adding an Aliases What is an Alias?
An email alias is simply a forwarding email address. Each email alias simply forwards email messages on
to each specified email address. Email aliases are often used to create handy replacements for long or
difficult-to-remember email addresses. They can also be used to create generic email addresses such as
[email protected] and [email protected].
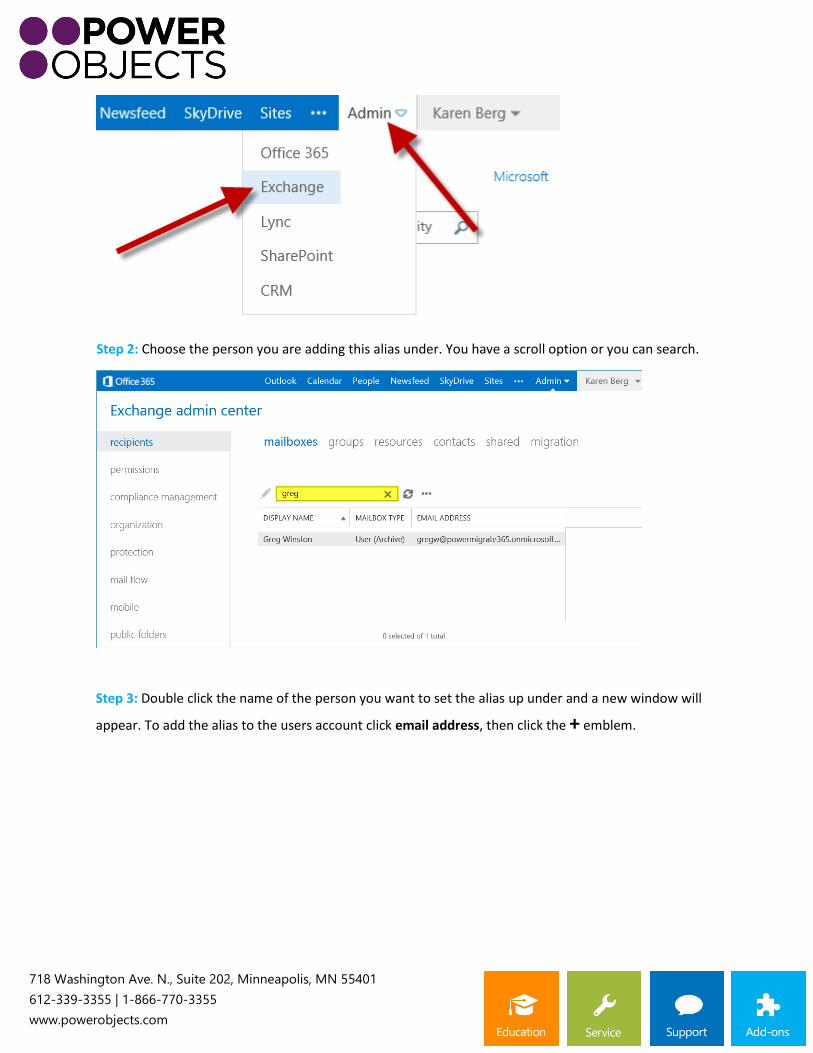
Step 1: In the Admin Center find Exchange Admin Center. In the Blue ribbon at the top of the page there
is a drop down menu option when clicking on Admin, then click Exchange.
718 Washington Ave. N., Suite 202, Minneapolis, MN 55401
612-339-3355 | 1-866-770-3355
www.powerobjects.com
Step 2: Choose the person you are adding this alias under. You have a scroll option or you can search.
Step 3: Double click the name of the person you want to set the alias up under and a new window will
appear. To add the alias to the users account click email address, then click the + emblem.
718 Washington Ave. N., Suite 202, Minneapolis, MN 55401
612-339-3355 | 1-866-770-3355
www.powerobjects.com
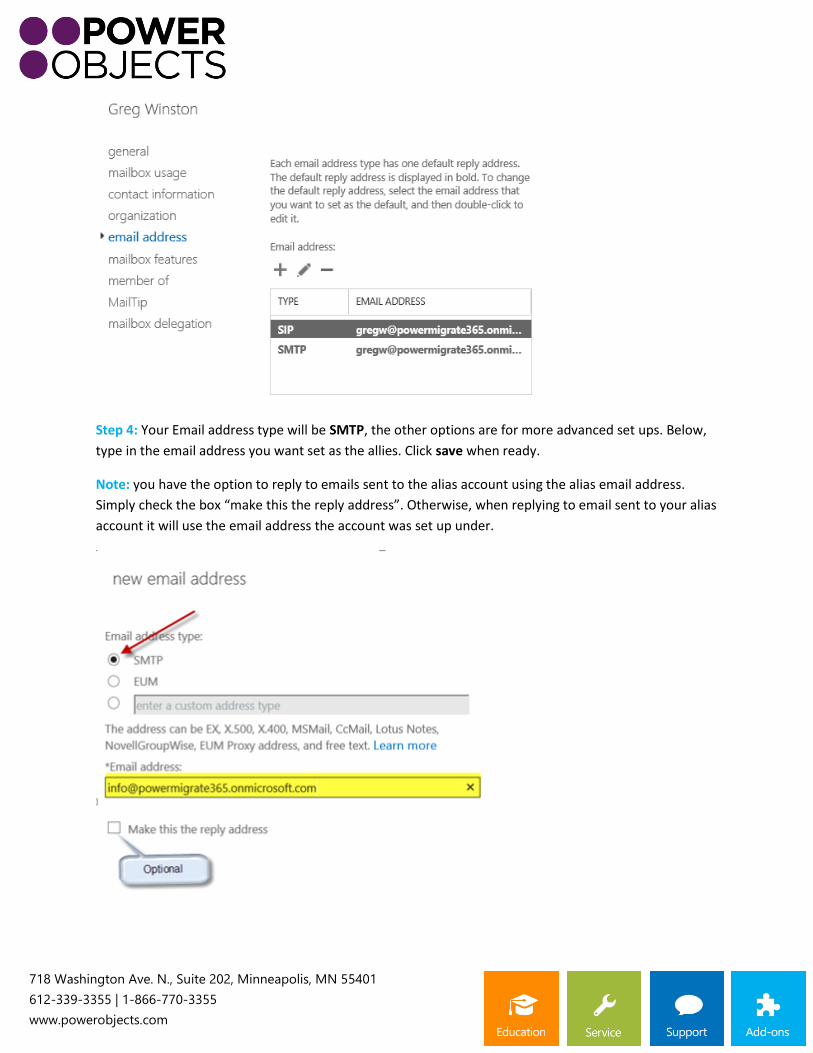
Step 4: Your Email address type will be SMTP, the other options are for more advanced set ups. Below,
type in the email address you want set as the allies. Click save when ready.
Note: you have the option to reply to emails sent to the alias account using the alias email address.
Simply check the box “make this the reply address”. Otherwise, when replying to email sent to your alias
account it will use the email address the account was set up under.
718 Washington Ave. N., Suite 202, Minneapolis, MN 55401
612-339-3355 | 1-866-770-3355
www.powerobjects.com
Adding Distribution Groups What is a Distribution Group?
A distribution list is feature of email client program that allows a user to maintain a list of email addresses and send messages to all of them at once. Essentially a collection of user email addresses bound to one global address
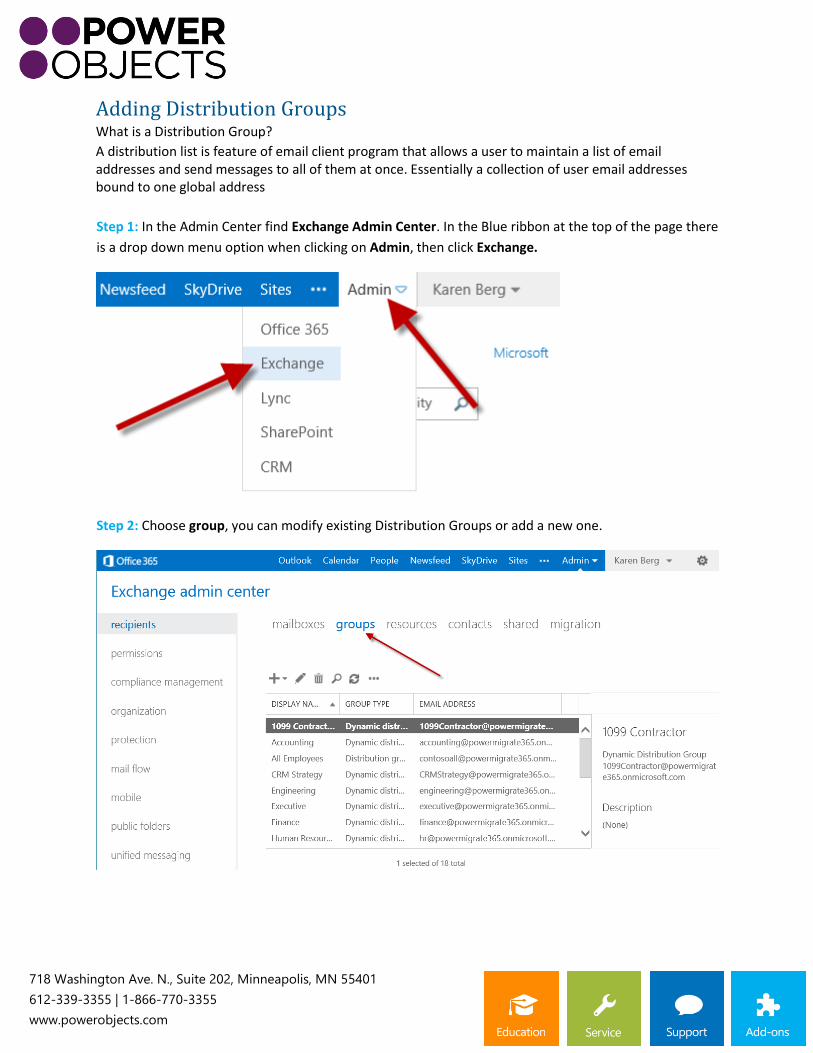
Step 1: In the Admin Center find Exchange Admin Center. In the Blue ribbon at the top of the page there
is a drop down menu option when clicking on Admin, then click Exchange.
Step 2: Choose group, you can modify existing Distribution Groups or add a new one.
718 Washington Ave. N., Suite 202, Minneapolis, MN 55401
612-339-3355 | 1-866-770-3355
www.powerobjects.com
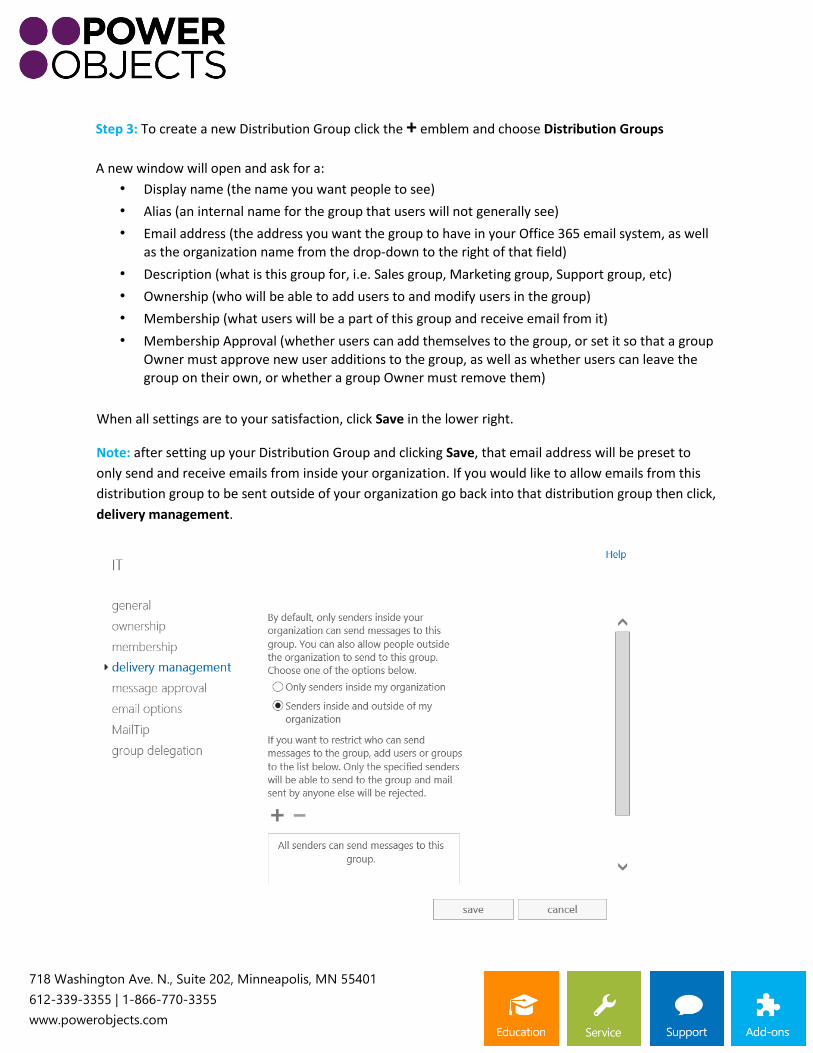
Step 3: To create a new Distribution Group click the + emblem and choose Distribution Groups
A new window will open and ask for a:
• Display name (the name you want people to see)
• Alias (an internal name for the group that users will not generally see)
• Email address (the address you want the group to have in your Office 365 email system, as well as the organization name from the drop-down to the right of that field)
• Description (what is this group for, i.e. Sales group, Marketing group, Support group, etc)
• Ownership (who will be able to add users to and modify users in the group)
• Membership (what users will be a part of this group and receive email from it)
• Membership Approval (whether users can add themselves to the group, or set it so that a group Owner must approve new user additions to the group, as well as whether users can leave the group on their own, or whether a group Owner must remove them)
When all settings are to your satisfaction, click Save in the lower right.
Note: after setting up your Distribution Group and clicking Save, that email address will be preset to
only send and receive emails from inside your organization. If you would like to allow emails from this
distribution group to be sent outside of your organization go back into that distribution group then click,
delivery management.
718 Washington Ave. N., Suite 202, Minneapolis, MN 55401
612-339-3355 | 1-866-770-3355
www.powerobjects.com
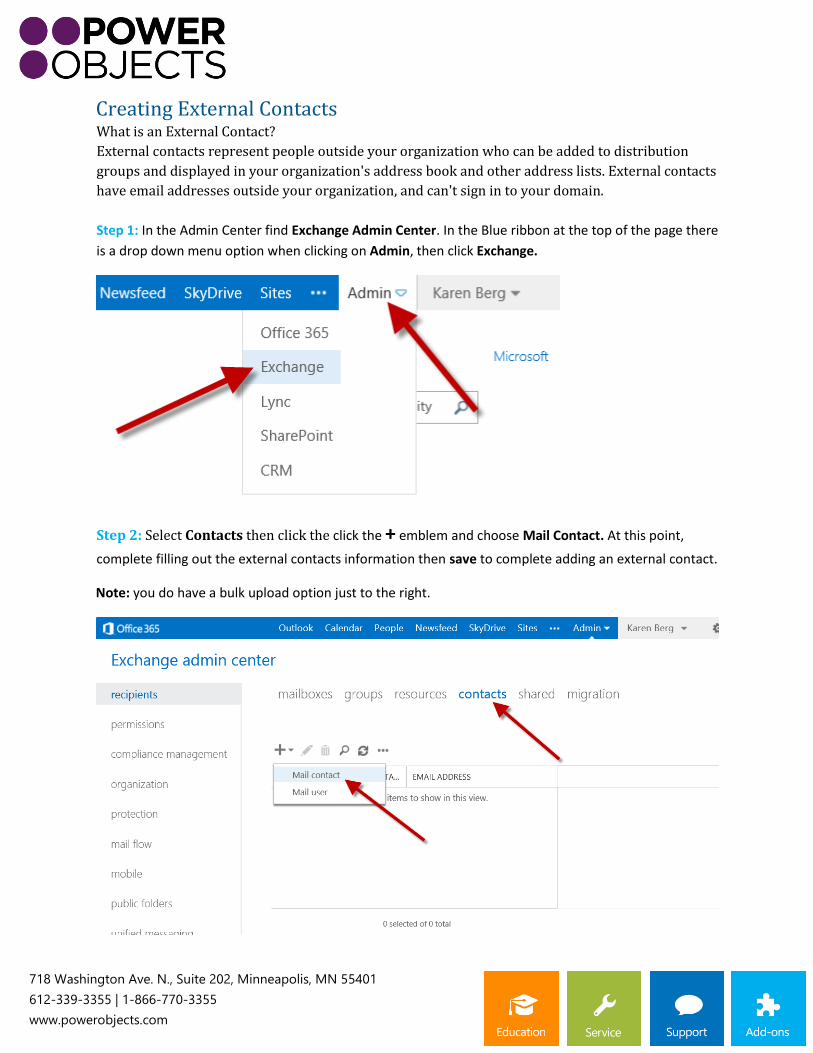
Creating External Contacts What is an External Contact?
External contacts represent people outside your organization who can be added to distribution
groups and displayed in your organization's address book and other address lists. External contacts
have email addresses outside your organization, and can't sign in to your domain.
Step 1: In the Admin Center find Exchange Admin Center. In the Blue ribbon at the top of the page there
is a drop down menu option when clicking on Admin, then click Exchange.
Step 2: Select Contacts then click the click the + emblem and choose Mail Contact. At this point,
complete filling out the external contacts information then save to complete adding an external contact.
Note: you do have a bulk upload option just to the right.

718 Washington Ave. N., Suite 202, Minneapolis, MN 55401
612-339-3355 | 1-866-770-3355
www.powerobjects.com
Setting up Mailbox Rules Step 1: In the Admin Center find Exchange Admin Center. In the Blue ribbon at the top of the page there
is a drop down menu option when clicking on Admin, then click Exchange.
Step 2: Choose mail flow on the left side to bring up the Rules page. Click the + emblem.
Note: Individual user accounts can also create mail rules for their account alone.
Rules in Office 365 operate on a simple principal: If something occurs, Then do the following.
Step 3: You are provided many options for rules in Office 365. Simply use the If drop-down to select what should trigger the rule action. Use the Do the following: drop-down to select exactly what you want Office 365 to do when your If selection occurs.
718 Washington Ave. N., Suite 202, Minneapolis, MN 55401
612-339-3355 | 1-866-770-3355
www.powerobjects.com
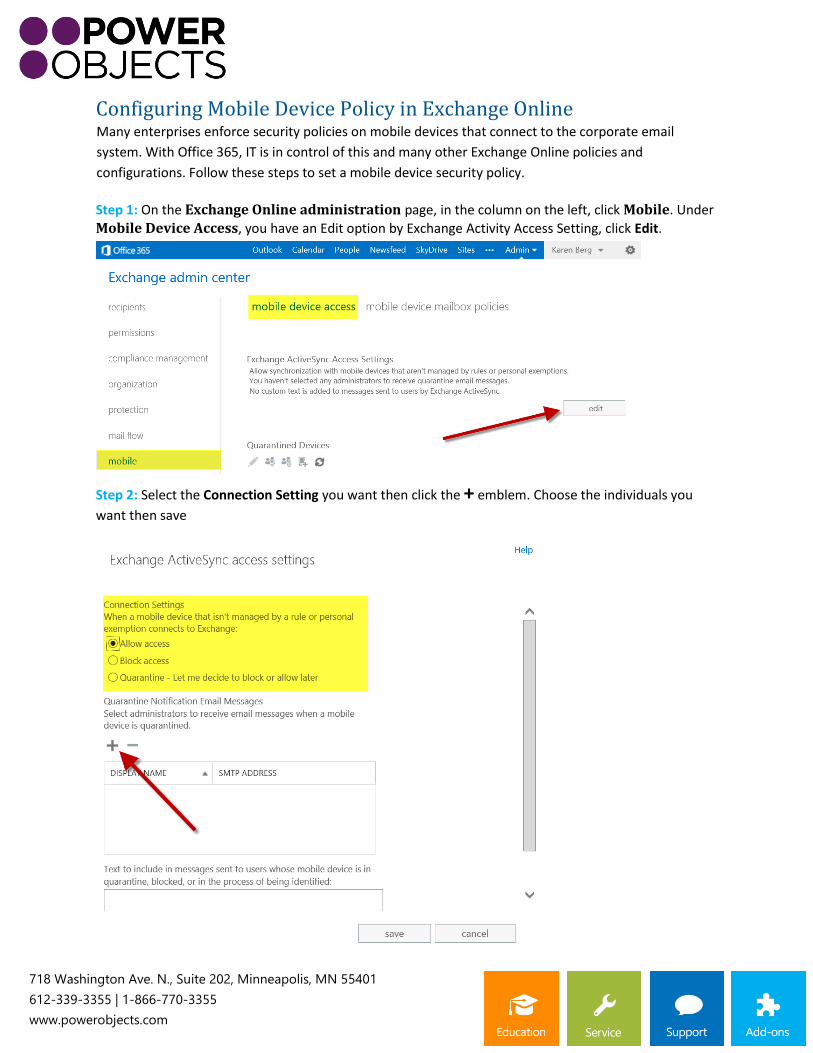
Configuring Mobile Device Policy in Exchange Online Many enterprises enforce security policies on mobile devices that connect to the corporate email
system. With Office 365, IT is in control of this and many other Exchange Online policies and
configurations. Follow these steps to set a mobile device security policy.
Step 1: On the Exchange Online administration page, in the column on the left, click Mobile. Under
Mobile Device Access, you have an Edit option by Exchange Activity Access Setting, click Edit.
Step 2: Select the Connection Setting you want then click the + emblem. Choose the individuals you
want then save
718 Washington Ave. N., Suite 202, Minneapolis, MN 55401
612-339-3355 | 1-866-770-3355
www.powerobjects.com
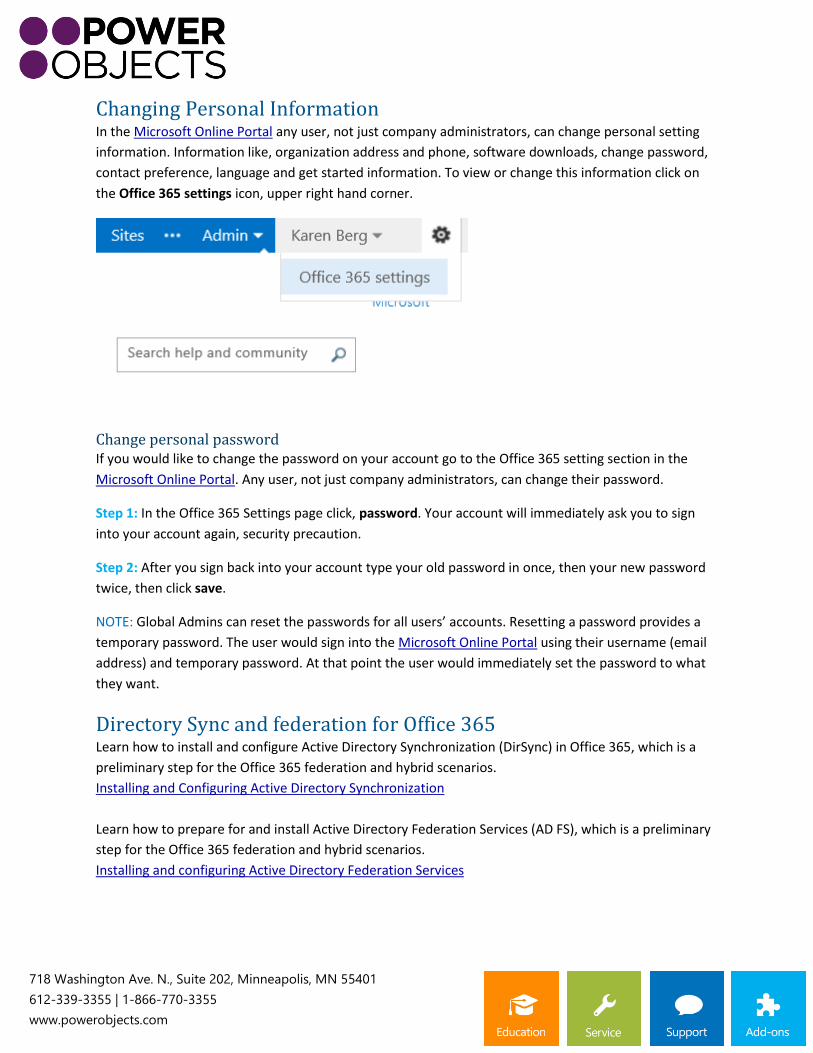
Changing Personal Information In the Microsoft Online Portal any user, not just company administrators, can change personal setting
information. Information like, organization address and phone, software downloads, change password,
contact preference, language and get started information. To view or change this information click on
the Office 365 settings icon, upper right hand corner.
Change personal password If you would like to change the password on your account go to the Office 365 setting section in the
Microsoft Online Portal. Any user, not just company administrators, can change their password.
Step 1: In the Office 365 Settings page click, password. Your account will immediately ask you to sign
into your account again, security precaution.
Step 2: After you sign back into your account type your old password in once, then your new password
twice, then click save.
NOTE: Global Admins can reset the passwords for all users’ accounts. Resetting a password provides a
temporary password. The user would sign into the Microsoft Online Portal using their username (email
address) and temporary password. At that point the user would immediately set the password to what
they want.
Directory Sync and federation for Office 365 Learn how to install and configure Active Directory Synchronization (DirSync) in Office 365, which is a
preliminary step for the Office 365 federation and hybrid scenarios.
Installing and Configuring Active Directory Synchronization
Learn how to prepare for and install Active Directory Federation Services (AD FS), which is a preliminary
step for the Office 365 federation and hybrid scenarios.
Installing and configuring Active Directory Federation Services
718 Washington Ave. N., Suite 202, Minneapolis, MN 55401
612-339-3355 | 1-866-770-3355
www.powerobjects.com
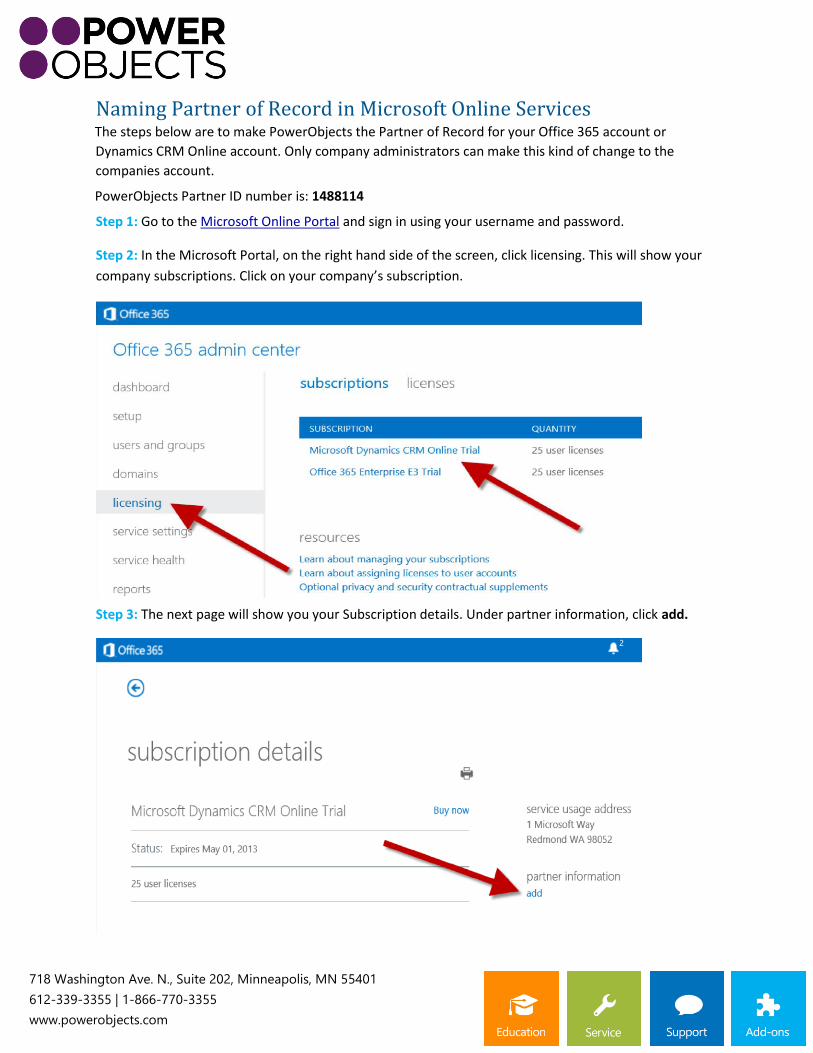
Naming Partner of Record in Microsoft Online Services The steps below are to make PowerObjects the Partner of Record for your Office 365 account or
Dynamics CRM Online account. Only company administrators can make this kind of change to the
companies account.
PowerObjects Partner ID number is: 1488114
Step 1: Go to the Microsoft Online Portal and sign in using your username and password.
Step 2: In the Microsoft Portal, on the right hand side of the screen, click licensing. This will show your
company subscriptions. Click on your company’s subscription.
Step 3: The next page will show you your Subscription details. Under partner information, click add.
718 Washington Ave. N., Suite 202, Minneapolis, MN 55401
612-339-3355 | 1-866-770-3355
www.powerobjects.com
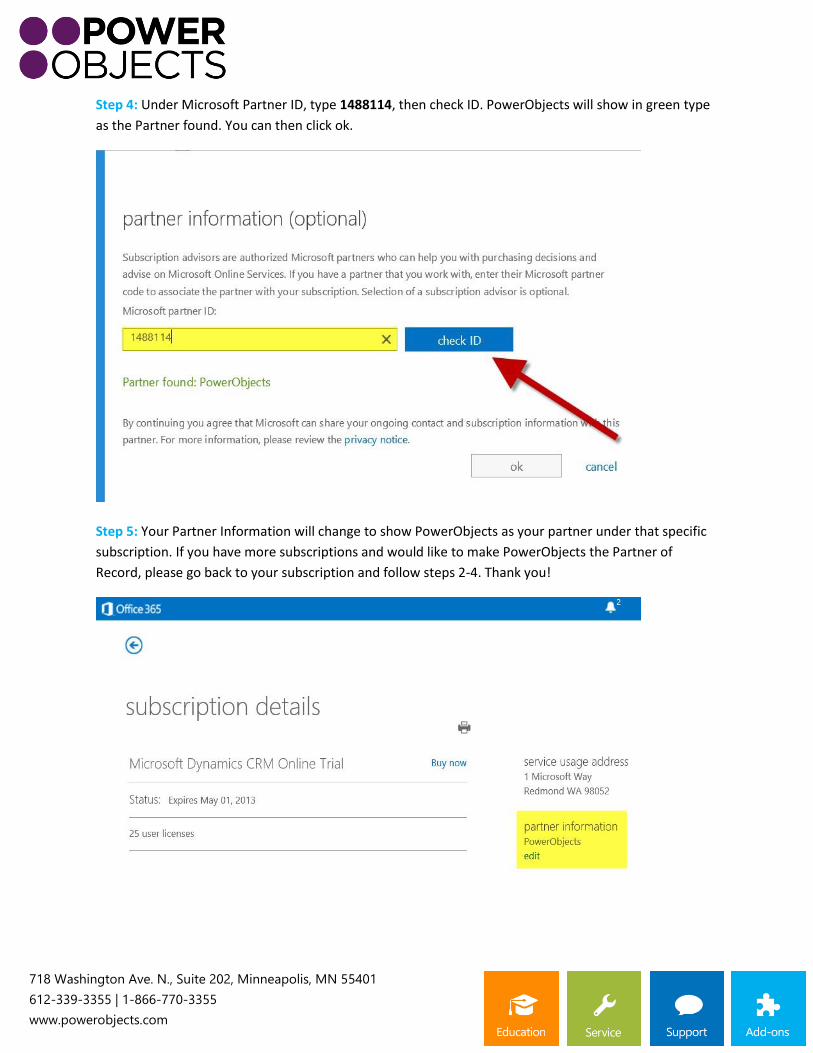
Step 4: Under Microsoft Partner ID, type 1488114, then check ID. PowerObjects will show in green type
as the Partner found. You can then click ok.
Step 5: Your Partner Information will change to show PowerObjects as your partner under that specific
subscription. If you have more subscriptions and would like to make PowerObjects the Partner of
Record, please go back to your subscription and follow steps 2-4. Thank you!
718 Washington Ave. N., Suite 202, Minneapolis, MN 55401
612-339-3355 | 1-866-770-3355
www.powerobjects.com
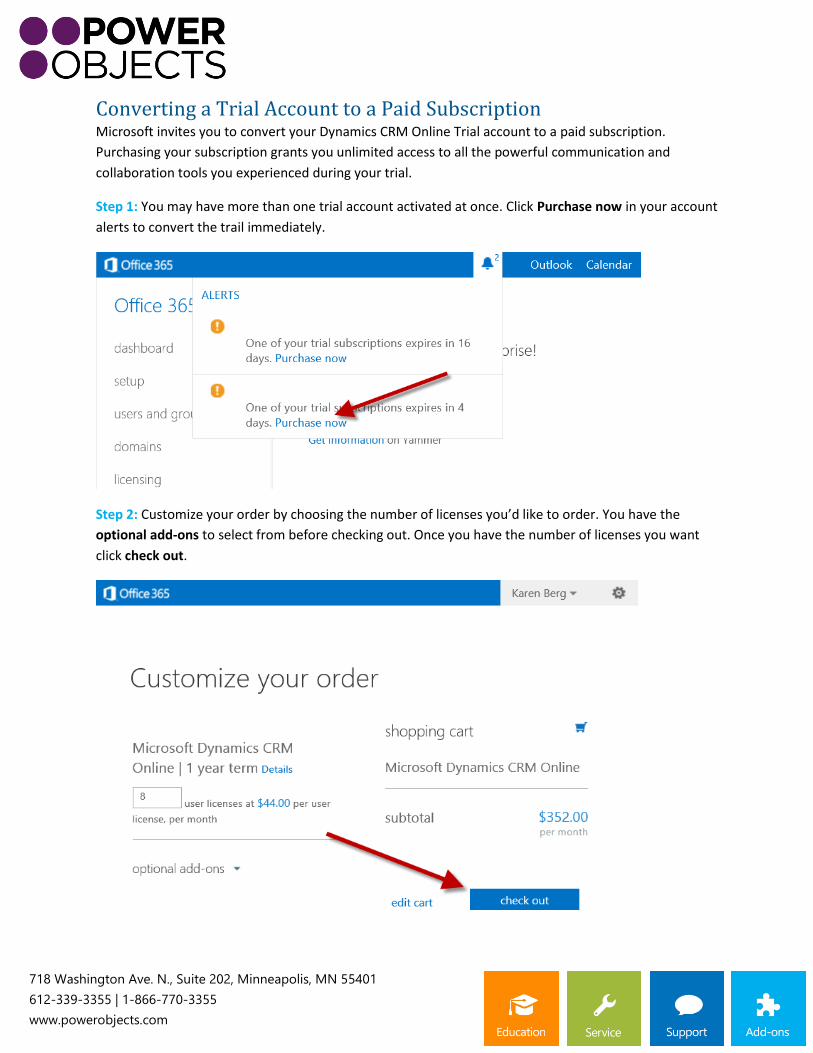
Converting a Trial Account to a Paid Subscription Microsoft invites you to convert your Dynamics CRM Online Trial account to a paid subscription.
Purchasing your subscription grants you unlimited access to all the powerful communication and
collaboration tools you experienced during your trial.
Step 1: You may have more than one trial account activated at once. Click Purchase now in your account
alerts to convert the trail immediately.
Step 2: Customize your order by choosing the number of licenses you’d like to order. You have the
optional add-ons to select from before checking out. Once you have the number of licenses you want
click check out.
718 Washington Ave. N., Suite 202, Minneapolis, MN 55401
612-339-3355 | 1-866-770-3355
www.powerobjects.com
Step 3: Follow the three steps Microsoft lays out for you to purchase your licenses. If you would like to
add more licenses or purchase more licenses or add other Office 365 plans to your subscription you can
do so in the purchase services section in the admin center.
Note: to drop a licenses from your account you will need to open a service request ticket with Microsoft,
create a service request ticket under the billing department.
Links for Additional Assistance As the admin, there are a few important setup tasks you need to do before the people in your organization can use Office 365. This guide leads you through those tasks. The goal is to help you get your organization up and running quickly. Set up your organization for Office Enterprise A new Office has arrived. It's a powerful service that helps you unleash your best ideas, get things done and stay connected on the go. Simply sign in for a personalized experience and all the most up-to-date Office applications, with new and enhanced features continually being added. Office 365 training for IT pros Microsoft Office 365 Community. This is a great way to see how other Office 365 users/companies communicate and learn about Office 365. It has features such as Blogs, Forums, Wikis and troubleshooting section. Microsoft Community
SharePoint and SkyDrive: Start using SharePoint sites, SkyDrive Pro, and Newsfeed to share documents and ideas… click here Save documents online… click here
Lync: Start using Lync for IM and online meetings… click here
Office Web Apps: Get Started with Office Web Apps… click here


