Embed Size (px)
Citation preview

Emma Jane Hogbin Westby
Git for TeamsA USER-CENTERED APPROACH TO CREATING EFFICIENT WORKFLOWS IN GIT
www.allitebooks.com

PROGR AMMING
Git for Teams
ISBN: 978-1-491-91118-1
US $49.99 CAN $57.99
“Byfocusingonworkflowsandinteractionsbetweenroles,Git for Teamsguidesyou,thereader,tounderstandyourexactneedswithinyourparticularprojects.Equippedwiththisknowledge,youwillthenlearnthefunpart:howtouseGittobestsupportyourneeds.”
—Dr. Johannes SchindelinGit for Windows maintainer
Twitter: @oreillymediafacebook.com/oreilly
You can do more with Git than just build software. This practical guide delivers a unique people-first approach to version control that also explains how using Git as a focal point can help your team work better together. You’ll learn how to plan and pursue a Git workflow that not only ensures that you accomplish project goals, but also fits the immediate needs and future growth of your team.
The first part of the book on structuring workflow is useful for project managers, technical team leads, and CTOs. The second part provides hands-on exercises to help developers gain a better understanding of Git commands.
■ Explore the dynamics of team building
■ Walk through the process of creating and deploying software with Git
■ Structure workflow to influence the way your team collaborates
■ Learn a useful process for conducting code reviews
■ Set up a shared repository and identify specific team members as contributors, consumers, or maintainers
■ Know the why behind the Git commands your teammates use
■ Use branching strategies to separate different approaches to your project
■ Examine popular collaboration platforms: GitHub, Bitbucket, and GitLab
Emma Jane Hogbin Westby has been developing websites since 1996, initially as a developer and later as a team leader. She’s been teaching web-related technologies since 2002 and has delivered over 100 conference presentations, courses, and work-shops around the world.
www.allitebooks.com

978-1-491-91118-1
LSI
Git for Teamsby Emma Jane Hogbin Westby
Copyright © 2015 Emma Jane Hogbin Westby. All rights reserved.
Foreword text by Mark Atwood, Copyright © 2015 Hewlett-Packard Company. All rights reserved.
Foreword text by Johannes Shindelin, Copyright © 2015 Johannes Shindelin. All rights reserved.
Printed in the United States of America.
Published by O’Reilly Media, Inc., 1005 Gravenstein Highway North, Sebastopol, CA 95472.
O’Reilly books may be purchased for educational, business, or sales promotional use. Online editions arealso available for most titles (http://safaribooksonline.com). For more information, contact our corporate/institutional sales department: 800-998-9938 or [email protected].
Editor: Rachel RoumeliotisProduction Editor: Colleen LobnerCopyeditor: Kim CoferProofreader: Jasmine Kwityn
Indexer: WordCo Indexing ServicesInterior Designer: David FutatoCover Designer: Ellie VolckhausenIllustrator: Emma Jane Hogbin Westby
September 2015: First Edition
Revision History for the First Edition2015-08-17: First Release
See http://oreilly.com/catalog/errata.csp?isbn=9781491911181 for release details.
The O’Reilly logo is a registered trademark of O’Reilly Media, Inc. Git for Teams, the cover image of wag‐tails, and related trade dress are trademarks of O’Reilly Media, Inc.
While the publisher and the author have used good faith efforts to ensure that the information andinstructions contained in this work are accurate, the publisher and the author disclaim all responsibilityfor errors or omissions, including without limitation responsibility for damages resulting from the use ofor reliance on this work. Use of the information and instructions contained in this work is at your ownrisk. If any code samples or other technology this work contains or describes is subject to open sourcelicenses or the intellectual property rights of others, it is your responsibility to ensure that your usethereof complies with such licenses and/or rights.
www.allitebooks.com

Table of Contents
Foreword. . . . . . . . . . . . . . . . . . . . . . . . . . . . . . . . . . . . . . . . . . . . . . . . . . . . . . . . . . . . . . . . . . . . . xi
Foreword. . . . . . . . . . . . . . . . . . . . . . . . . . . . . . . . . . . . . . . . . . . . . . . . . . . . . . . . . . . . . . . . . . . . xiii
Preface. . . . . . . . . . . . . . . . . . . . . . . . . . . . . . . . . . . . . . . . . . . . . . . . . . . . . . . . . . . . . . . . . . . . . . . xv
Introduction. . . . . . . . . . . . . . . . . . . . . . . . . . . . . . . . . . . . . . . . . . . . . . . . . . . . . . . . . . . . . . . . . . xix
Part I. Defining Your Workflow
1. Working in Teams. . . . . . . . . . . . . . . . . . . . . . . . . . . . . . . . . . . . . . . . . . . . . . . . . . . . . . . . . . . 1The People on Your Team 2Thinking Strategies 3Meeting as a Team 7
Kickoff 8Tracking Progress 8Cultivating Empathy 10Wrap-Up and Retrospectives 11
Teamwork in Terms of Git 12Summary 13
2. Command and Control. . . . . . . . . . . . . . . . . . . . . . . . . . . . . . . . . . . . . . . . . . . . . . . . . . . . . . 15Project Governance 16
Copyright and Contributor Agreements 16Distribution Licenses 18Leadership Models 19Code of Conduct 19
v
www.allitebooks.com

Access Models 20Dispersed Contributor Model 22Collocated Contributor Repositories Model 25Shared Maintenance Model 28Custom Access Models 30
Summary 31
3. Branching Strategies. . . . . . . . . . . . . . . . . . . . . . . . . . . . . . . . . . . . . . . . . . . . . . . . . . . . . . . . 33Understanding Branches 34Choosing a Convention 35Conventions 36
Mainline Branch Development 36Branch-Per-Feature Deployment 39State Branching 42Scheduled Deployment 45
Updating Branches 51Summary 55
4. Workflows That Work. . . . . . . . . . . . . . . . . . . . . . . . . . . . . . . . . . . . . . . . . . . . . . . . . . . . . . . 57Evolving Workflows 57
Documenting Your Process 58Documenting Encoded Decisions 59
Ticket Progression 60A Basic Workflow 62
Trusted Developers with Peer Review 64Untrusted Developers with QA Gatekeepers 66
Releasing Software According to Schedule 67Publishing a Stable Release 67Ongoing Development 68Post-Launch Hotfix 69
Collaborating on Nonsoftware Projects 69Summary 71
Part II. Applying the Commands to Your Workflow
5. Teams of One. . . . . . . . . . . . . . . . . . . . . . . . . . . . . . . . . . . . . . . . . . . . . . . . . . . . . . . . . . . . . . 75Issue-Based Version Control 76Creating Local Repositories 78
Cloning an Existing Project 80Converting an Existing Project to Git 81Initializing an Empty Project 83
vi | Table of Contents
www.allitebooks.com

Reviewing History 84Working with Branches 85
Listing Branches 86Updating the List of Remote Branches 87Using a Different Branch 87Creating New Branches 88
Adding Changes to a Repository 90Adding Partial File Changes to a Repository 93Committing Partial Changes 94Removing a File from the Stage 94Writing Extended Commit Messages 95Ignoring Files 96
Working with Tags 97Connecting to Remote Repositories 99
Creating a New Project 100Adding a Second Remote Connection 100Pushing Your Changes 102Branch Maintenance 103
Command Reference 103Summary 105
6. Rollbacks, Reverts, Resets, and Rebasing. . . . . . . . . . . . . . . . . . . . . . . . . . . . . . . . . . . . . 107Best Practices 108
Describing Your Problem 108Using Branches for Experimental Work 110
Rebasing Step by Step 113Begin Rebasing 114Mid-Rebase Conflict from a Deleted File 115Mid-Rebase Conflict from a Single File Merge Conflict 118
An Overview of Locating Lost Work 120Restoring Files 124Working with Commits 126
Amending Commits 126Combining Commits with Reset 127Altering Commits with Interactive Rebasing 130Unmerging a Branch 135
Undoing Shared History 137Reverting a Previous Commit 137Unmerging a Shared Branch 138
Really Removing History 144Command Reference 146Summary 148
Table of Contents | vii
www.allitebooks.com

7. Teams of More than One. . . . . . . . . . . . . . . . . . . . . . . . . . . . . . . . . . . . . . . . . . . . . . . . . . . . 149Setting Up the Project 150
Creating a New Project 150Establishing Permissions 151Uploading the Project Repository 152Document the Project in a README 156
Setting Up the Developers 157Consumers 158Contributors 160Maintainers 161
Participating in Development 163Constructing the Perfect Commit 163Keeping Branches Up to Date 167Reviewing Work 170Merging Completed Work 173Resolving Merge and Rebase Conflicts 174Publishing Work 176
Sample Workflows 177Sprint-Based Workflow 177Trusted Developers with No Peer Review 181Untrusted Developers with Independent Quality Assurance 183
Summary 183
8. Ready for Review. . . . . . . . . . . . . . . . . . . . . . . . . . . . . . . . . . . . . . . . . . . . . . . . . . . . . . . . . . 185Types of Reviews 186Types of Reviewers 186Software for Code Reviews 187Reviewing the Issue 188Applying the Proposed Changes 189
Shared Repository Setup 189Forked Repository Setup 190Checking Out the Proposed Branch 191
Reviewing the Proposed Changes 192Preparing Your Feedback 194Submitting Your Evaluation 194Completing the Review 195Summary 196
9. Finding and Fixing Bugs. . . . . . . . . . . . . . . . . . . . . . . . . . . . . . . . . . . . . . . . . . . . . . . . . . . . 197Using stash to Work on an Emergency Bug Fix 198Comparative Studies of Historical Records 201Investigating File Ancestry with blame 203
viii | Table of Contents
www.allitebooks.com

Historical Reenactment with bisect 206Summary 208
Part III. Git Hosting
10. Open Source Projects on GitHub. . . . . . . . . . . . . . . . . . . . . . . . . . . . . . . . . . . . . . . . . . . . . 211Getting Started on GitHub 212
Creating an Account 212Creating an Organization 215Personal Repositories 216
Using Public Projects on GitHub 224Downloading Repository Snapshots 225Working Locally 226
Contributing to Projects 230Tracking Changes with Issues 230Forking a Project 230Initiating a Pull Request 232
Running Your Own Project 234Creating a Project Repository 234Granting Co-Maintainership 235Reviewing and Accepting Pull Requests 236Pull Requests with Merge Conflicts 237
Summary 238
11. Private Team Work on Bitbucket. . . . . . . . . . . . . . . . . . . . . . . . . . . . . . . . . . . . . . . . . . . . . 241Project Governance for Nonpublic Projects 241Getting Started 242
Creating an Account 242Creating a Private Project from the Welcome Screen 245Creating a Private Project from the Dashboard 246Configuring Your New Repository 247Exploring Your Project 249Editing Files in Your Repository 251
Project Setup 254Project Documentation in Wiki Pages 255Tracking Your Changes with Issues 258
Access Control 262Shared Access 263Per-Developer Forks 264Limiting Access with Protected Branches 264
Pull Requests 266
Table of Contents | ix

Submitting a Pull Request 266Accepting a Pull Request 268
Extending Bitbucket with Atlassian Connect 268Summary 269
12. Self-Hosted Collaboration with GitLab. . . . . . . . . . . . . . . . . . . . . . . . . . . . . . . . . . . . . . . . 271Getting Started 271
Installing GitLab 272Configuring the Administrative Account 274Administrative Dashboard 275
Projects 279Creating a Project 279
User Accounts 280Creating User Accounts 281Adding People to Projects 284
Groups 284Adding People to Groups 286Adding Projects to Groups 287
Access Control 289Project Visibility 289Limiting Activities with Project Roles 290Limiting Access with Protected Branches 292
Milestones 293Summary 295
A. Butter Tarts. . . . . . . . . . . . . . . . . . . . . . . . . . . . . . . . . . . . . . . . . . . . . . . . . . . . . . . . . . . . . . . 297
B. Installing the Latest Version of Git. . . . . . . . . . . . . . . . . . . . . . . . . . . . . . . . . . . . . . . . . . . 301
C. Configuring Git. . . . . . . . . . . . . . . . . . . . . . . . . . . . . . . . . . . . . . . . . . . . . . . . . . . . . . . . . . . . 307
D. SSH Keys. . . . . . . . . . . . . . . . . . . . . . . . . . . . . . . . . . . . . . . . . . . . . . . . . . . . . . . . . . . . . . . . . 313
Index. . . . . . . . . . . . . . . . . . . . . . . . . . . . . . . . . . . . . . . . . . . . . . . . . . . . . . . . . . . . . . . . . . . . . . . 317
x | Table of Contents

Foreword
At the time of Git’s inception, the Linux kernel development had used the proprietaryversion control system BitKeeper for several years, with great success. But there wasone problem: some Linux developers took exception with the proprietary nature oftheir version control system and what ensued was an epic flame war. Out of this con‐flict, the free BitKeeper license for Linux developers was revoked, and Git was born.Linus Torvalds himself took two weeks off from working on Linux, originally tosearch for a replacement for BitKeeper. Failing to find any that met his criteria, heinstead wrote the first, very rudimentary version of what we now call Git: tiny pro‐grams cobbled together with shell scripts, Unix style. An ironic twist is that the dis‐tributed nature of Git was implemented using rsync, a tool which in turn had beendeveloped by the very Linux developer who triggered the fallout with BitKeeper.
As to myself, I was fascinated by the simplicity of Git’s data structures and got drawnin early on, first by working on Git’s portability, then on more and more generalimprovements, including the invention of the “interactive rebase” (sorry for thename!), and ultimately maintaining the Windows port of Git. For the past 10 years, Iused Git almost daily as a life science researcher, as part of different teams rangingfrom being the designated coder in interdisciplinary projects to leading highly dis‐tributed Open Source projects.
My first contact with Emma was at the Git Merge conference in Paris celebrating Git’s10th birthday, where she gave a compelling talk titled “Teaching People Git”. This talkleft quite the impression on me, reflecting Emma’s broad skill set and experience inteaching and project management.
Reading Git for Teams, I learned a lot from its unique perspective that emphasizeshow Git can facilitate teamwork. It sounds so simple, but all those years, I had beenfocusing on technical details, and I had been teaching Git in what must be one of themost frustrating ways: from the ground up. By focusing on workflows and interac‐tions between roles, Git for Teams guides you, the reader, to understand your exact
xi

needs within your particular projects. Equipped with this knowledge, you will thenlearn the fun part: how to use Git to best support your needs.
Just like her talk, Emma’s writing style is very enjoyable, making this book both edu‐cative and fun to read. It gave me valuable insights into my daily work. Whateveryour role in your daily work, let this book be more than just a manual. Explore thedifferent ways teams can work together, the ways a modern version control systemcan help moving projects forward, and let it inspire you to unleash the full power ofGit to support you in what you want to do.
—Dr. Johannes SchindelinGit for Windows maintainer
August 2015Cologne, Germany
xii | Foreword

Foreword
It is difficult to overstate the importance of version control.
I believe that it is as important as the inventions of the chalkboard and of the book formultiplying the power of people to create together.
Over my career, I have watched the approach to version control systems in softwaredevelopment advance from resistance to ubiquity, and have watched the underlyingtechnology make quantum jumps, each jump accelerating the value of the work wecreate together and the speed at which we create it. We are doing more, faster, withmore people.
The latest jump, exemplified by Git, imposes almost no arbitrary constraints on aworkflow. Thus, we have to discover and share the workflows that suit our people andour organizations, instead of living with past awkward workflows that suited ourmachines. Some of those workflows are explored in this book. I’m sure that more willbe discovered in the future.
It is also difficult to overstate the importance and difficulty of education. Not merelymemorizing facts or merely training tasks, but the deeper kind of education: how tothink a certain way, to understand why to think that way, and how to share thosethoughts with someone else.
Using a version control system properly is a way to think: to structure, remember,and share thoughts, at the level of depth and rigor demanded by the exhausting craftof writing software. Without that understanding, using Git will be, at best, “magicalincantations”, used by rote, and full of unknown dangers. With that understanding,Git can become almost invisible, leaving instead the patterns of working up the intri‐cate spells of symbols that are the magic of software.
xiii

This book will help you to educate yourself, to gain that understanding, and to dothat work.
—Mark AtwoodDirector of Open Source Engagement,
Hewlett-Packard CompanyAugust 2015Seattle, WA
xiv | Foreword

Preface
For nearly two decades, I’ve been working on teams of one or more in a distributedfashion. My first paid job as a web developer was in the mid-’90s. At the time, I main‐tained versions of my files by simply changing the names to denote a new version. Myworkspace was littered with files that had unusual extensions; v4.old-er.bak was an alltoo common sight. I wasn’t able to easily track my work. On one project, which was aparticularly challenging one for me, I resorted to the copyediting techniques I usedfor my essays: I’d print out the Perl scripts I was working on, and put the pages into aring binder. I’d then mark up my scripts with different colors of pen and transcribethe changes back into my text editor. (I wish I had photos to share.) I tracked versionsby flipping through the binder to find previous versions of the script. I had no ideahow to set up an actual version control system (VCS), but I was obsessive about notlosing good work if a refactoring failed.
When I started working with other developers, either for open source projects or cli‐ent work, I was never the first developer on the scene and there was always some kindof version control in place by the time I got there—typically Concurrent VersionsSystem (CVS). It wasn’t the easiest thing to use, but compared to my ring binder ofchanges, it was definitely more scalable for the distributed teams that I worked with.Very quickly I came to value the commit messages, and the ease of being able toreview the work others were doing. It motivated me to watch others commit theirwork to the repository. I didn’t want others to think I was slacking off!
Meanwhile, I’d been teaching web development at a couple of different communitycolleges. In 2004, I had my first opportunity to teach version control in a year-longprogram designed by Bernie Monette, at Humber College. The class was split intoseveral groups. In the first semester, the students sketched out a development plan fora website. In the second semester, the teams were mixed up, and the new teams wereasked to build the site described by the previous team. In the third and final semester,the groups were shuffled again, and the final task was to do bug fixing and qualityassurance on the built site. Each team was forced to use version control to track theirwork. The students, who had no prior programming experience, weren’t thrilled with
xv
having to use version control because they felt it got in the way of doing work. But italso made it easier because they never accidentally overwrote their classmates’ work.It taught me a lot about how to motivate people to use a tool that didn’t feel like it wascore to the job at hand.
In the decade since that class, I’ve learned a lot about how to teach version control,and a lot about best practices in adult education. This book is the culmination of whatI’ve learned about how to work efficiently with others when using version control. Iencourage you throughout the book to do whatever is best for your team. There areno Git police who will show up at your door and tell you “you’re doing it wrong.”That said, wherever I can, I explain to you “the Git way” of doing things so that youhave some guidance on where you might want to start with your team, or what youmight want to grow into. Using “common” ways of working will help you onboardothers who’ve previously used similar techniques.
This book won’t be for everyone. This book is for people who love to plan a route,and then follow the clearly defined road ahead. My hope is that, if nothing else, thisbook helps to fill the gaps that have been missing in Git resources to date. It’s not somuch a manual for the software as a manual for how teams collaborate. If your teamof one (or more) finds bits of this book confusing, I hope you’ll let me know([email protected]); and if you find it useful, I hope you’ll let the world know.
AcknowledgmentsSeveral years ago, in a little bar off the side of a graveyard in Prague, Carl Wiedemannindulged my questions about Git. Thank you, Carl. Your enthusiasm motivated me toconvert my frustration with Git into resources to help others avoid the painful pro‐cess I’d experienced when learning Git.
I had the wonderful fortune to work with Joe Shindelar at my first job-job after a dec‐ade of self-employment. Joe, your passion for excellence has raised the bar for myown work. I am grateful for your patience and leadership. This book was born out ofthe conversations we had about leadership, team structures, and the Git documenta‐tion we created for the Drupalize.Me team. Thank you.
O’Reilly found the excellent Christophe Portneuve to serve as one of my tech review‐ers. Christophe, thank you for your patience as I worked through the first few chap‐ters. Your feedback was invaluable. I am grateful for the conversation we had at GitMerge, which helped me to clarify the concepts I use in this book—I had lofty goalsof transforming the way people learn Git. I hope this book has become a resource youwill be proud to have been a part of.
Bernie Monette, Martin Poole, Drew McLelland: you gave me a platform to refine myunderstanding of version control through your own projects.
xvi | Preface

Lorna Jane Mitchell, your cheerleading is tireless. Thank you for sharing your ownwork on Git. It has inspired me to raise the bar even higher.
Much of this book was fueled by 200 Degrees Coffee, a Nottingham-based roaster. Mybeverage of choice is a flat white served from 200 Degrees Café, or Divine Coffee atthe Galleries of Justice. Thanks for providing an escape and letting me stay as long asI needed to.
To the O’Reilly family: you have been superb at handling all of my requests(and missed deadlines). Thank you Rachel, Heather, Robert, Colleen, Brian, Josh,Rebecca, Kim, and the countless others who worked behind the scenes to make thisbook happen.
To the core Git community: thank you for welcoming me with open arms at GitMerge in 2015. You embraced my rant from the stage about exploring new ways ofteaching Git. You took my suggestions to heart, and made improvements to the Gitexperience. I am looking forward to participating more in the wonderful communityyou have been quietly nurturing.
Thank you also to my community of reviewers: Diane Tani, Novella Chiechi, AmyBrown, Blake Winton, Stuart Langridge, Stewart Russell, Dave Hammond, John Wyn‐stra, Chris Tankersley, Mike Anello, Piotr Sipika, Nancy Deschenes, Robert Day, DaveHammond, Sébastien Simard, Tobias Hiep, Nick Gard, Christopher Maneu, JohannesSchindelin, Edward Thomson, matt j. sorenson, Douwe Maan, Sytse Sijbrandij, RobAllen, Steven Pears, Laura Lemay. Your feedback was invaluable.
To my partner, James Westby: thank you for patiently waiting as I finish just one lastthing. This book would not exist without your support and encouragement.
Preface | xvii

Introduction
The book takes a people-first approach to version control. I don’t start with a historyof Git; instead, I begin with a 10,000-foot view of how teams can work together. Thenwe will circle our way into the commands, ensuring you always know the why behindthe command you’re about to type. Sometimes you can save your future self time(and confusion) by adopting specific routines or workflows. These explanations giveyou a holistic understanding of how your work today affects your work tomorrow—and hopefully make sense out of the near-religious insistence by some people on whythey use Git the way they do.
Part I will be most useful to managers, technical team leads, chief technology officers,project managers, and technical project managers who need to outline a workflow fortheir team.
Good technology comes from great teams. In Chapter 1, you will learn about thedynamics of creating a great team. By the end of this chapter, you will be able to iden‐tify roles within a team; plan highly effective meetings; recognize key phrases frompeople who are out of sync with what your team needs; and apply strategies that willhelp you to cultivate empathy and trust within your team.
Set the expectations early for the type of project you are running. In Chapter 2, youwill learn about different permissions strategies used to grant and deny access to a Gitrepository. Should team members be allowed to save their work to the repositorywithout a review, or is it more of a trust and be trusted scenario? Both systems havetheir merits, and you’ll learn about them in this chapter.
Make the intentions of your work clear. In Git, you will separate streams of workwith branches. Chapter 3 shows you how to separate each of the ideas your team isworking on through the use of these branches. Of course, you will also need to knowhow to bring these disparate pieces of work into a unified piece of software. Thischapter covers some of the more common branching strategies, including GitFlow.
xix

Write the documentation today that will help you work more efficiently tomorrow.Chapter 4 is the culmination of all the ideas in Part I. You will learn how to createyour own documentation and walk through the process of creating and deploying asimple software product.
Part II will be most useful for developers. This is where (finally!) you will get to learnhow all those Git commands are actually supposed to work. If you’re impatient andwant to get your hands on code, you’ll do well to skip ahead to Part II and then onceyou’ve completed it, go back and read Part I.
Ground yourself in practical skills. Chapter 5 covers the basics of distributed ver‐sion control. In this chapter you will learn how to create repositories, and track yourchanges to files locally through commits, branches, and tags.
Learn to recover from your mistakes. Chapter 6 allows you to explore history revi‐sionism. This chapter covers how to amend commits, remove commits from yourtime line, and rebase your work.
Expand your team to be inclusive of others. Now that you’re a master of history inyour own repository, it’s time to begin collaborating with others. Chapter 7 will showyou how to track remote changes, upload your code to a shared repository, andupdate your local repository with the updates from others.
Through peer review, share the glory and the responsibility of a job well done. InChapter 8, you will learn about the process for conducting code reviews with yourteam. We’ll also cover the commands for a common reviewing methodology, alongwith suggestions on how to customize it for your team.
Investigate history; it holds the answer to the problem you’re facing. In Chapter 9,you will learn some advanced methods to track down bugs using Git. Don’t be scared,though! The commands we’ll be using are no more difficult than anything else you’vedone to date.
Finally, Part III gives the how-to for a few of the popular code hosting systems on themarket today. It is aimed at both managers and developers.
Through open collaboration we grow our community. Chapter 10 covers themechanics of starting and maintaining an open source project on GitHub.
A team must have a repository of their own if they are to write good code. InChapter 11, you will learn how to collaborate on private repositories. This chapterwill be especially useful for those who want to set up a private repository but haveextremely limited funds to pay for private teams on GitHub.
Good fences sometimes do make better neighbors. In Chapter 12, you will learnhow to host your own instance of GitLab, and run projects through it. This is particu‐larly useful for developers who are inside a firewall and cannot access public reposito‐ries on the Internet.
xx | Introduction

This book won’t be for everyone. It will be especially frustrating for people who learnby poking at things and tinkering and exploring. This book, rather, is written for peo‐ple who are a little afraid of things that go bump in the night.
Additional resources and larger versions of several of the flowcharts are availablefrom the book’s companion site.
Conventions Used in This BookThe following typographical conventions are used in this book:
ItalicIndicates new terms, URLs, email addresses, filenames, and file extensions.
Constant width
Used for program listings, as well as within paragraphs to refer to program ele‐ments such as variable or function names, databases, data types, environmentvariables, statements, and keywords.
Constant width bold
Shows commands or other text that should be typed literally by the user.
Constant width italic
Shows text that should be replaced with user-supplied values or by values deter‐mined by context.
This element signifies a tip or suggestion.
This element signifies a general note.
This element indicates a warning or caution.
Introduction | xxi

Using Code ExamplesSupplemental material (code examples, exercises, etc.) is available for download athttp://gitforteams.com.
This book is here to help you get your job done. In general, if example code is offeredwith this book, you may use it in your programs and documentation. You do notneed to contact us for permission unless you’re reproducing a significant portion ofthe code. For example, writing a program that uses several chunks of code from thisbook does not require permission. Selling or distributing a CD-ROM of examplesfrom O’Reilly books does require permission. Answering a question by citing thisbook and quoting example code does not require permission. Incorporating a signifi‐cant amount of example code from this book into your product’s documentation doesrequire permission.
We appreciate, but do not require, attribution. An attribution usually includes thetitle, author, publisher, and ISBN. For example: “Git for Teams by Emma Jane HogbinWestby (O’Reilly). Copyright 2015 Emma Jane Hogbin Westby, 978-1-491-91118-1.”
If you feel your use of code examples falls outside fair use or the permission givenabove, feel free to contact us at [email protected].
Safari® Books OnlineSafari Books Online is an on-demand digital library that deliv‐ers expert content in both book and video form from theworld’s leading authors in technology and business.
Technology professionals, software developers, web designers, and business and crea‐tive professionals use Safari Books Online as their primary resource for research,problem solving, learning, and certification training.
Safari Books Online offers a range of plans and pricing for enterprise, government,education, and individuals.
Members have access to thousands of books, training videos, and prepublicationmanuscripts in one fully searchable database from publishers like O’Reilly Media,Prentice Hall Professional, Addison-Wesley Professional, Microsoft Press, Sams, Que,Peachpit Press, Focal Press, Cisco Press, John Wiley & Sons, Syngress, Morgan Kauf‐mann, IBM Redbooks, Packt, Adobe Press, FT Press, Apress, Manning, New Riders,McGraw-Hill, Jones & Bartlett, Course Technology, and hundreds more. For moreinformation about Safari Books Online, please visit us online.
xxii | Introduction

How to Contact UsPlease address comments and questions concerning this book to the publisher:
O’Reilly Media, Inc.1005 Gravenstein Highway NorthSebastopol, CA 95472800-998-9938 (in the United States or Canada)707-829-0515 (international or local)707-829-0104 (fax)
We have a web page for this book, where we list errata, examples, and any additionalinformation. You can access this page at http://bit.ly/git-for-teams.
To comment or ask technical questions about this book, send email to bookques‐[email protected].
For more information about our books, courses, conferences, and news, see our web‐site at http://www.oreilly.com.
Find us on Facebook: http://facebook.com/oreilly
Follow us on Twitter: http://twitter.com/oreillymedia
Watch us on YouTube: http://www.youtube.com/oreillymedia
Introduction | xxiii


PART I
Defining Your Workflow
It is common to start teaching programming by writing a trivial program that dem‐onstrates the output of a specific set of commands. This can often leave adult learnersthinking “so what?”, unsure of how to apply the commands to their particular sce‐nario. This book begins with a 10,000-foot view of how structuring your workflow inspecific ways will impact how your team collaborates. If you prefer to tinker with thecommands, skip this part and start reading at Part II. Then, as you begin to ask your‐self “so what?”, return to the chapters in this part so that you can see how your day-to-day tasks with Git will affect future collaborations.
This part of the book will be of most use to those overseeing how work gets done.These folks are primarily in management roles and may include technical team lead‐ers, CTOs, managers, project managers, and technical project managers.


CHAPTER 1
Working in Teams
I’ve been teaching version control for more than a decade. The largest percentage ofthe folks who attend my in-person workshops are dealing with political issues, nottechnical ones. The issues vary, of course. Perhaps they are struggling to get theircoworkers to see the light on how important version control is; perhaps they want toforce accountability; or perhaps they have been nominated by the team to go figureout how to make sense of the mess that’s become the team’s workflow. No matter whatthe issue, understanding and dealing with the underlying social problems first canmake learning and using Git a lot easier.
By the end of this chapter, you will be able to:
• Identify roles within a complete team• Structure meetings so they have useful outcomes• Recognize key phrases from people who are working in an opposing state from
what the team should be working on• Apply strategies to cultivate empathy and trust within your team
You must begin by understanding your team and the requirements for your software.By beginning from a place of trust and compassion, you will almost always find it eas‐ier to map out the Git commands necessary to accomplish your goals. By workingwith a trusting team, you’ll be able to help one another out when people get stuckwith commands (and people will be more honest when they need help). And whenpeople feel supported, and they understand the reasons why they need to use specificcommands in Git, they will be that much more likely to make Git work for them,rather than simply committing a few commands to memory and hoping they’re allright.
1

The People on Your TeamOn small teams you may have one person who performs many roles. It’s relativelyeasy to stay in touch with all of the daily activities of everyone on a small team. Onlarge teams, however, you may have roles segregated into different departments.Those performing the user acceptance testing for your code base might never talk tothe designers and developers who designed and built the product that’s being tested.Both types of teams can have their own challenges: someone who’s being asked to dotoo much without the right amount of context is definitely going to miss something,eventually. Having artificial barriers between teams will always increase tensionbetween them. Fences do not make good neighbors in the development of code.
Have you heard the expression “begin with the end in mind”? When I build software,I am always building it for someone. Even if I think really hard, I can’t think of aproduct I’ve built that was just me tinkering. I’m not a hacker by nature. I was drawnto software because of what it could do for others. Every time I sit down to work on aproblem, I want to be making a better experience for the user. I want to avoid regres‐sions, and I want to keep my users safe. I want them to feel clever, and not stupid. Ifthere are clients between myself and the users, I sometimes need to help shape howthey think about the problem in order to accomplish their business goals, whilemaintaining the integrity of the experience for the end user. Each time we sit down towork, we should be starting with a description of a problem we want to solve for auser—literally a user story.
Next, in test-driven development, you will write the acceptance test so that you have adefinition of how you will know the problem has been solved. Depending on howthese statements are written, they may be used by an automated testing suite, a qual‐ity assurance (QA) team, or a peer reviewer. Working with the testing team ahead oftime to determine the acceptance test makes it much easier for developers to knowwhat the outcome of their work should be. Usually the test should be descriptive ofthe problem to be solved, not prescriptive of the technology that should be used.
Part of your testing process should include a security review. Larger organizations arevery lucky to have dedicated security specialists. Bring these experts on as early as youcan in the process and get them to teach you how to write secure code. If you havesegregated QA, security, and development teams, bringing the teams together at thebeginning can make the testing process that much more fun as the developers striveto provide perfect code, and the testing teams strive to break it.
If you are not responsible for your deployments, bring the operations team on boardas early as you can as well. Ensure your development environment is as close as it canbe to the final production environment. Ideally, you will have build scripts that can beused to automatically duplicate as much as possible. You may even choose to workwith Docker and/or Vagrant to create an exact replica of your environment. Work
2 | Chapter 1: Working in Teams
www.allitebooks.com
with your operations team to create a configuration management infrastructure withsomething like Chef, Puppet, or Ansible.
Moving along the development stack, if you are using open source software, get toknow the community that built the products you will be working with. We rarelyencounter new problems. Someone, somewhere, has probably seen what you’re deal‐ing with at this moment. Find mentors from within your code community, and offerto mentor others. Extending your team beyond the walls of your office building canmake scary problems a lot less stressful.
Wherever you can increase collaboration between departments that have been iso‐lated in larger corporations, you can reduce the time code spends sitting arounddoing nothing. Idle code costs you money in several ways: it may be preventing youfrom earning more money if it’s a new feature, or it may be preventing you from notlosing money if it’s a bug fix. It’s also getting stale. The longer code has to wait for areview, the more likely it has deviated from the main branch of work. To bring thework up to date so that it can be released is an increasingly difficult task the more itdeviates.
Finally, we look inward to our own team. A technical architect will be responsible forplanning how a solution will be implemented. The architecture decisions should bedocumented, and shared wherever possible. The architect may also be part of yourcoding team. The coding team may be comprised of frontend and backend develop‐ers, a designer, and a project manager. I’ve occasionally worked with business analystsas well. If you are working in an Agile environment, you may also have a ScrumMas‐ter and a Product Owner.
I prefer working in an environment where everyone is willing to roll up their sleevesand pitch in where necessary. Self-managing teams are often filled with trust andrespect for one another. It’s a state that you need to build toward, though. Consensus-driven development works best for smaller, internal projects, but that doesn’t meanyou can’t do your best to collaborate where possible. When I’m managing projects, Ilike for developers to choose the tickets they’re going to work on. It increases thesense of autonomy, and lets the developers take a break from specific tasks if theyneed to. I’ve also found, however, that some people actually prefer to have their tick‐ets picked for them.
There is no single right way to structure every team or manage every project. Thetrick to a motivated, cohesive team is to respect each of the individuals on the teamand, where possible, to optimize the process to suit their preferences.
Thinking StrategiesEveryone on your team will have a preferred way to work. Different ways of workingcan be perfect for different situations. There’s no right way to do things, and being
Thinking Strategies | 3
able to accommodate differences will actually make your team more robust, if youcan share the strategies of what makes each person productive. I know I’m alwayslooking for little ways to work in a more efficient manner, and I love to hear aboutwhat makes people able to really sink their teeth into a problem.
Several years ago, I was exposed to a leadership training program, Lead and Succeedin 4 Dimensions, by Bob Wiele, which described a series of thinking strategies. Thisprogram helped me to identify why I enjoyed some types of activities so much, whileothers left me drained. It also taught me a lot about how to structure meetings andinteractions to get what I needed to proceed with my own work. The system worksbest if everyone on the team is aware of the language, but it’s something you can takeadvantage of without having to convince others to participate. It breaks thinking intothree dimensions: creative thinking, understanding thinking, and decision thinking.A fourth dimension, personal spirit, is used to indicate how likely a person is toengage—I think of it as a volume control, or modifier for those of you who are intorole-playing games.
Individual preferences for different thinking strategies can derail teams quickly. If I’mtrying to brainstorm how to solve a merge conflict in Git, and you tell me I shouldn’thave used rebase, we’re at odds in the conversation. I’m trying to use my “green”thinking to go through a problem, and you’ve just used your “red” thinking to stopthe conversation. Being aware of these preferences can help us to have stronger col‐laboration while building new features, more productive code reviews, and overall, ahealthier, happier team.
One of the easiest places to introduce the concept of playing into and setting asidepreferences is in meetings that explicitly take advantage of these three dimensions.Focusing on the outcomes of the meeting can help identify to people which thinkingstrategies to employ during the meeting, which can then carry over into code reviews,and supporting teammates who have procedural questions about how to use Git, ormore general implementation questions about the product you’re working ontogether.
Let’s review each of these thinking strategies in a little more detail.
A creative thinker’s greatest asset is the ability to find unpredictable solutions to prob‐lems. Left unchecked, a creative thinker can sometimes spend too much time think‐ing about different ways to do something, instead of just committing to one idea andgetting the work done. Creative thinkers:
EnvisionTo see an alternative future (whether it’s good or bad). This is useful for long-term strategy work.
4 | Chapter 1: Working in Teams

ReframeTo pivot a little bit away from the current situation, or to see the current situationfrom a different perspective.
BrainstormThis is useful for muscling through a problem. Brainstorming is almost the abil‐ity to doodle through a problem. It includes a constant action without self-censorship.
Employ flash of insightWhere brainstorming takes “muscle,” flash of insight thinking happens whenyou’re not thinking about the problem. It happens when you’re out for a walk, orin the shower.
ChallengeTo question the status quo. The rebel; the child who points out that the king isnot wearing clothes.
FlowTo ignore distractions and focus wholly on a given task. From this uninterruptedflow, you are able to get deeper into a problem and understand it more fully.
You can recognize creative thinkers from their key phrases:
• “Can we try …”• “I know we’re done, but what about …?”• “OMG! I just had this great idea …”• “Have you thought about doing it like this instead?”
By developing creative thinking on your team, you can generate entirely new ways ofapproaching problems, allowing you to improve your workflow and solve biggerproblems.
The next type of thinking is understanding thinking. It can be broken into two sub-categories: understanding information (analytic), and understanding people (com‐passion). The analytic thinker’s greatest asset is the ability to see patterns and bringclarity to a situation. The tech industry tends to attract people who enjoy workingwith these thinking strategies. Analytic thinkers:
Scan the situationSurvey the environment to gather as much information as possible.
ClarifySharpen the understanding of a situation by gathering information and askingquestions.
Thinking Strategies | 5

StructureOrganize data, people, resources, and processes in meaningful and systematicways.
Tune-inSense and connect with the emotional dimensions in a situation.
Empathize*Show compassion for another’s thoughts, emotions, and situations.
ExpressSelect the appropriate emotional and verbal language to get the true messageacross to the receiver.
You can recognize analytic thinkers from their key phrases:
• “So what you’re saying is …?”• “Just to clarify …”• “Can you tell me how …?”• “Is this related to …?”• “So I made this spreadsheet …”• “That must feel horrible!”
Finally, we have the “buck stops here” thinking strategy: decision thinking. Someonewho favors “red” thinking hates talking around in circles forever. They want a quickdecision so they can move on to the action! Decision-making skills help teams get tothe real root of the problem, and then decide how to proceed. A decision thinker’sweakest point is lack of patience. They often want to jump ahead before the creativethinkers have had the necessary time to suggest the best possible solution, or before acareful analysis has been completed. Decision thinkers can often be misinterpreted asbeing negative. They aren’t. Using their ability to cut through the weeds to find thebest solution is invaluable. Decision thinkers:
Get to the cruxDetermine the essence, or most critical part, of a problem.
ConcludeReach a logical decision, or resolution, about the best way to proceed.
Validate the conclusionPose questions to eliminate inferior options and poor quality information inorder to critically assess and ensure the best decision.
ExperienceRely on experience to guide decision making and problem solving.
6 | Chapter 1: Working in Teams
Values-driveRely on personal core beliefs about what is good or bad, right or wrong.
Gut instinctRely, not on information, but on a hunch and deep instincts as a guide.
You can recognize decision thinkers from their key phrases:
• “I’m ready to move on to …”• “No. We’ve already made a decision …”• “I don’t know why I think this, but …”• “Last time we tried this …”• “So I think the real problem is …”• “My gut tells me …”
Meeting as a TeamNearly my entire career has been spent working on a distributed team where my co-workers were not in the same office as me. It is a rare treat when people are at least inthe same time zone as me. This has given me some excellent communication habitsthat I often take for granted. If you are already working with a prescribed methodol‐ogy, you may have an established pattern of meetings that you use to move yourproject forward.
Your project, and each of the component parts within the project, should have anopening sequence, the bulk of the activity, and a wrap-up. This open-engage-closesequence is also described in great detail in the excellent book Gamestorming by DaveGray, Sunni Brown, and James Macanufo (O’Reilly). It’s also used by teachers in theclassroom: a teacher will first tell you what you’re going to learn, engage you in thelearning, and then provide you with a summary of what you’ve learned.
All the way down to the planning of meetings, you should have this pattern in mind:start, engage, conclude. This becomes most apparent in meetings. Too often I seemeetings with a general outline of topics, but not the intended outcome for themeeting. For example, if you are at the beginning of your project, the team mightengage in ideation meetings, where your creative thinkers will be most engaged andproductive:
Agenda: Ideation Total time: 45 minutes
• Identify the crux of the problem (10 minutes)• Brainstorm solutions (25 minutes)
Meeting as a Team | 7

• Structure ideas (5 minutes)• Identify top three ideas to test (5 minutes)
Identifying the outcome for a meeting ahead of time can be as simple as needingsome free-flow time to discuss a problem.
KickoffThe beginning of a project is a chaotic time, especially if you are bringing together anew group of people who wouldn’t normally work together. If at all possible, have acollocated kickoff meeting with everyone present. This can be incredibly expensivefrom both a time and money perspective if you are a distributed team.
Face-to-Face is Best
Ideally a kickoff meeting is conducted face-to-face. If this is notpossible, try to have people in as few places as possible, and con‐nected through a video call.
By having everyone in the same place at the same time, you can take advantage of ashared experience. You can engage in kinetic (motion-based) processing of the infor‐mation through whiteboards, flip charts, and sticky notes. There’s something reallygratifying about being able to see your collective decisions, which helps motivate theteam into working on the project.
Tracking ProgressOnce the project has begun, you will want to continue meeting with your team regu‐larly. It is very easy to hide when you are working on a distributed team. Fallingbehind can be an embarrassing and often compounding problem. Over-communicating is a great habit to get into, but that doesn’t mean wasting all of yourtime in meetings. A successful team will only meet to achieve very specific outcomes.I like working in very tiny increments of one-week sprints. It’s very hard to hideproblems with such a small unit of time. It’s not about micromanaging, though. It’sabout trying to achieve a consistent velocity—or flow. Each of these meetings has aspecific project-focused outcome:
Sprint planningAs a project manager, I’ve found there are two types of workers: those who areready to jump in and take accountability for the work that is being done, andthose who prefer to have work assigned to them. Those who prefer having workassigned to them are often looking for help in identifying which tasks they cansucceed at, and which tasks have the highest business value to be completed inthe context of the project as a whole. You may choose to do your sprint planning
8 | Chapter 1: Working in Teams

as a group, or you may find that sprint planning is less time wasteful if it is doneamong a smaller group of client-facing team members and senior developers.
CommitmentThese meetings should happen several times a week at the same time each day.The outcome of this meeting is a list of “promises” that team members are mak‐ing regarding their work. People should not just answer “what are you workingon today?” but “what are you expecting to hand in before the next time wemeet?” This should be a “no shame; no blame” round robin with each person tak‐ing not longer than three minutes for their update. Larger, specific problems canbe discussed in a follow-up meeting. In Scrum parlance, these commitmentmeetings are referred to as “stand-ups” and are conducted with the participantsphysically standing up. I find the term “stand up” doesn’t push enough accounta‐bility onto a team that isn’t trained in Scrum. Use whatever term works for yourteam, but make sure you are extracting valuable information from the meeting.
Project deep divesAny problems that need further discussion than the commitment meeting willallow should have a follow-up deep dive. Ideally your team will use a calendaringsystem, such as Google Calendar, where people who need help can review theschedules of their coworkers and simply book an available time to have a follow-up conversation. Generally I have blocked off one or two deep dive time slots of45 minutes each week immediately following two of the 15 minute commitmentmeetings. Only the affected people need to attend to the deep dives, althougheveryone is welcome.
Sprint demosOnce a week, the team should get together to show off their work. During thedemo, each person who completed work should list the ticket number he or shewas working on, and show the outcome of that work. Having this demo once aweek encourages an “always be finishing” culture, which breaks work into small,doable chunks. This meeting can also be a great opportunity to see the site withfresh ideas and identify bugs that might need to be documented for fixing later, aswell as discuss any necessary refinements to the process for the upcoming worksprint. Depending on the cohesion of the team, and the level of communicationthroughout the week, you may find these meetings to be unnecessary. If, how‐ever, you are seeing an increase in incomplete features passing through codereview, or you find great work going unrecognized, or you find your team isn’treaching out for help often enough, it may be appropriate to introduce weeklydemos to your team. Google Hangouts and GoToMeeting work well for this typeof meeting.
Meeting as a Team | 9

Sprint retrospectivesAt the end of each sprint, you should assemble with your team to discuss the pro‐cess of working together. Identify things that are working well, and parts of theprocess that could be improved. One set of questions I have seen used effectivelyhas each participant answer the following prompts about the project: I wish; Iwant; I wonder. This meeting should be restricted to the core team. Its lengthmay vary, but plan to spend about an hour for a small team.
If you are a distributed team, you may also want to have a few scheduled social calls.Lullabot, a wholly distributed company of approximately 50 people, adds the follow‐ing nonproject calls to its schedule. The aim of these additional meetings is todevelop a greater empathy between staff members:
Company-wide stand-upsA weekly one-hour call where a lottery of staff members are given up to twominutes each to talk about what’s happening in their personal and work life.When the company was smaller, each person was asked to speak on this call. Asthe company grew in size, the lottery system was implemented and the one-on-one calls were added.
One-on-oneA lottery system where two to three company members are given the time to talk,in a facilitated space, about the life, the universe, and everything.
For the most part, these calls are conducted over a voice-only line, which also allowsstaff to use the call time to multitask (loading the dishwasher; or even time outdoorsfor those with good cell phone service).
Cultivating EmpathyWhen you are working in a distributed team, it becomes much easier to think of peo‐ple on your code team as “resources” and not as human beings. It takes a very con‐scious effort to cultivate relationships and to develop trust among the team. A teamthat is able to trust one another, that is not fearful, is a team that will be able to playmore with ideas, and will have greater capacity for finding appropriate and creativesolutions to tough problems.
The first step to improving the empathy on your team is to care just enough about thepeople you work with. You don’t need to become everyone’s therapist, but taking thetime to talk to people about nonwork things is a good investment of your time. If youare perceived as being a caring person, people will also like you more, which willimprove the trust between you and the other person. As a technical project manager,I’ve often been asked to lend an ear to someone as they talk through a problem. Mynaive understanding of the problem as they bring me up to speed can force the focusback onto the basics, where the solution often lies. But those conversations are rare
10 | Chapter 1: Working in Teams

with a new team—I must first earn the trust of the individuals on the team (that Iwon’t judge if they don’t know the answer; and that I can help to focus attentioninstead of just typing while they talk).
There are a few key tips to caring “just enough”:
Collect storiesAsk people questions about what’s happening in their life; about interesting chal‐lenges they’re working on; about what they’re enjoying (or hating) about theproject you’re working on together. This isn’t a gossip session! This is about con‐necting with the people you’re speaking with about their lives.
Listen with intentionWhen you talk with people, listen wholly. Do not multitask. Listen to what theperson is saying, and listen completely. Do not cut in, unless you are confusedand need to clarify. Some people are natural storytellers and have the capacity togo on. And on. For these folks, you might want to schedule a time so that youhave a predetermined finishing point.
Refer backIf someone tells you about their life, circle back with them to see how that storyhas progressed. Is their daughter still teething? How’s that cold doing; feeling bet‐ter today?
I like to think of this list as “Empathy for Beginners”. Everyone can, and should, man‐age this small amount of connection with the people they’re working with.
Wrap-Up and RetrospectivesThese meetings can be a prime time to talk about what worked, and what can berefined. They should also be used to clean up any templates that have been used dur‐ing the project to make them reusable in future projects. The closing activity for aperiod of work should always be a no-shame, no-blame event where people are ableto talk about things that didn’t go well. Only very rarely do I regret my decisions as aproject manager. I rely on my team to help me to make the best possible decision withthe available information. So in retrospect, I find it quite easy to avoid the “shouldacoulda” temptation. What I do try to do, though, is to identify the patterns to watchout for in the future. In other words, to discover ways we could have altered what weasked in meetings to get a different set of information available to us (which mighthave caused us to make better decisions for that type of project in the future).
From a version control perspective, the end of the project is also a great opportunityto find your favorite tickets and document the characteristics of what made themexcellent. Perhaps there was a new way of structuring the information that you’d liketo be able to reuse. Take a peek in your Git repository as well, and look for especially
Meeting as a Team | 11

good commit messages that you can have as examples in your documentation forfuture projects.
Teamwork in Terms of GitIf you are absolutely brand new to distributed version control, there is a set of termsyou will see throughout the rest of the book. These terms are easiest to understand inthe context of a simple developer workflow.
Each developer has a local copy of a repository. This is, at its core, a standalone copyof the history of changes made in the project. In order to share changes, developerswill typically publish a copy of the repository to a centralized code hosting system,such as GitHub. Although, as you will see later in this chapter, there are other ways toshare code.
From the central copy of the repository, developers will create a copy of the reposi‐tory that they can make changes to. In Git parlance, this process is referred to as cre‐ating a clone, although this process can also be referred to as forking.
When cloning a repository, software developers may choose to make their copy of theproject private or public. A private repository makes a quiet decision to not encour‐age people to look directly at this copy of the repository, and instead only look to themain project for officially accepted changes. A public copy of a developer’s repository,on the other hand, is available for individuals to contribute to directly. This is a moreopen approach to software development, but may cause confusion about which copyof a repository ought to be the starting point.
It’s only through project governance that one repository for a project is decided to bethe most important version. This is because every repository can accept changes, andshare its changes with others. The relationships between projects are not fixed instone. You can create a web of relationships between different copies of the reposito‐ries, or a more linear chain. Generally, though, the official version of a software prod‐uct is referred to as being upstream of the current repository. For example, my blog iscreated with Sculpin. I cloned the official release of the software and make changesdirectly to the repository to write blog posts. If I wanted to incorporate the latestchanges to the software, I would be incorporating the upstream changes.
12 | Chapter 1: Working in Teams
www.allitebooks.com

The Butter Tart Recipe was Forked
For long-time open source software developers, the term fork isloaded with the frustrations of a split community where a group ofdevelopers decided to “fork the project” and take it in a differentdirection. Forks are simply a divergence, like a path in the woods,or like my Great Granny Austin’s butter tart recipe. Each branch ona forked path leads in a different direction. Or, in the case of thebutter tarts, the addition or omission of currants. You can read myfamily’s version of a forked recipe in Appendix A.
Within a single repository, I can store different versions of the project. These in-repository changes are tracked via branches. To switch from my current branch toanother one, I will check out the branch I want to switch to. (In my head I say, “This isreally cool! Check! It! Out!”) Before switching, Git will force me to deal with theuncommitted changes by either committing them, stashing them, or discardingthem. The commit process will permanently store my changes to the repository,whereas stash will temporarily shelve the changes, allowing me to pull them off theshelf and reapply them later.
A Crafter’s Stash
Knitters, quilters, and other fiber artists will often refer to having astash of yarn or fabric. When starting a new project, we might“shop the stash” instead of going to the store. Those of us who havea lot of stashed supplies may talk about having “achieved SABLE”(Stash Amassed Beyond Life Expectancy). I think this analogyworks well for Git’s stash, and just like in crafting, I recommendpruning the stash regularly to look for moth damage. If you are aknitter, you may enjoy Git for Knitters.
The process of incorporating and publishing changes uses the following set ofcommands. I pull my changes from the remote repository to automatically incorpo‐rate them into the repository. This procedure fetches the new changes and thenmerges them into the tracked copy of the local branch. At any given time, I work on alocal branch within my repository. If I want to share my changes with other develop‐ers, I commit my work to the repository, and then push my branch to the remoterepository.
SummaryOne of my favorite things to do is to work with a broken-down, burnt-out team, tohelp them find a new way of working together in a fun and creative way. It’s not
Summary | 13

always easy, because broken teams always have at least some degree of mistrust.Sometimes there are tears. But the rewards are huge when it can come together:
• A trusting, empathetic team is more likely to help its coworkers with the specificGit commands necessary to get the job done.
• Preferences for different thinking strategies can derail progress. Ensuring theright strategies are being used at the right time can reduce friction, and makework faster and more fun.
• By having transparency around your work, and by including relevant stakehold‐ers at key points, you may be able to gain faster deployments by reducing thetime needed to test code, and by reducing the number of bugs found.
In the next chapter, you will begin to sketch out the governance for your projectrepositories.
14 | Chapter 1: Working in Teams

CHAPTER 2
Command and Control
By its very definition, distributed version control eschews centralized control. Thereare no fixed rules built into Git that will help you to control access to your code—Gitis, after all, just a simple content tracker. This can be a real turnoff for some peoplewho are accustomed to version control systems that double as gatekeepers and accesscontrol managers. This lack of centralized access controls doesn’t mean your projectsuddenly turns into anarchy.
In “Project Governance” on page 16, you will learn about:
• Authorship, copyright, and distribution licenses• Leadership models, which can set the tone for how contributions are made to
your project• Codes of Conduct, which establish firm guidelines for expected and acceptable
behavior of contributors
Then, in “Access Models” on page 20, you will learn how to structure access to yourproject. Three models are described:
• Dispersed contributors• Collocated contributor repositories• Shared maintenance
By the end of this chapter, you will be able to confidently establish an access modelfor your team that keeps contributors happy, and ensures you are still able to complywith any reporting requirements from regulatory bodies.
15

Project GovernanceIf I were the betting type, I’d wager you picked up this book with the intention oflearning Git. This section talks about legal mumbo jumbo. If you are the impatienttype, you may wonder exactly why I have wasted valuable time on this esoteric topic.Think of this information as a primer that outlines your rights as an author, and alsoyour responsiblities as a steward of a project repository. The content outlined in thissection will be slightly more relevant to public, open source projects. Increasingly,though, government and large enterprises are working with publicly available code,and choosing to make their own code open. (Even Microsoft has many open sourcelibraries available today! Go, Microsoft!)
Producing Open Source Software
In this chapter I cover the highlights for running a project. Softwaredevelopers and managers who are considering running theirproject as an open source project should also read Karl Fogel’s Pro‐ducing Open Source Software. This free book covers everythingfrom publicitly and handling growth to legal matters and politicalinfrastructure.
In this section, you will learn about the assignment of authorship for a given piece ofcode. Later, when you are working with Git, you will see that Git allows you to trackwho injected each tiny piece of code into your repository. In addition to trackingauthorship, you can even use Git to “sign off ” on new code that is added to a reposi‐tory.
Copyright and Contributor AgreementsCopyright is the exclusive, assignable, legal right to use and distribute a piece of work.Around the world, the details of copyright legislation vary; however, the general ruleis that the person who created a work owns the right to copy and distribute the work.In open source software, the copyright holders agree to license their work to a widercommunity. Popular Free Libre Open Source Software (FLOSS) distribution licensesare covered in the next section.
If the author was compensated for his or her work product, the copyright will oftenbe granted to the payer or patron. In the United States, this is referred to as a work forhire and is almost always the case in employer–employee relationships, and is typi‐cally the case for contract workers. If you’re not sure if you own the copyright to yourwork, check your agreement; and if there isn’t a clause, check your local jurisdictionto see if there is an established precedent. In the United States, contractors and free‐lancers don’t fall under the definition supplied by the Supreme Court, so it isn’t work
16 | Chapter 2: Command and Control
for hire. The terms are broad, though. Ideally, update your contract so that it explic‐itly states who owns the copyright to your work.
Copyright only covers the specific implementation of a work. You cannot copyrightan idea. You may have heard of reverse engineering, which is one way of gettingaround a specific author’s moral claim to a piece of work. Some jurisdictions aroundthe world also have a restraint of trade clause. This language prohibits an employee(or contractor) from engaging in similar work elsewhere for a period of time. Effec‐tively, this clause prevents employees from starting at a new job and reverse engineer‐ing or creating an equivalent piece of work from the one they developed for theirformer employer. It must be deemed by the courts as a “reasonable” restraint—limitedto an industry or specifics about the job; and cannot be so broadly interpreted thatthe worker is essentially prevented from working at any job.
Patents, in some jurisdictions, do cover the idea behind an invention. Software pat‐ents are extremely contentious because they are perceived in many cases to stifleinnovation. Patents are never automatically granted and always involve an applicationwithin a specific jurisdiction.
If you are participating on an open source project on behalf of your employer, theassignment of copyright might be a bit more complicated. This is especially true if theproject has a policy to only accept work from individuals, and your place of employ‐ment retains all copyright on the work you produce; it may also be true if your placeof employment has rules about what you are allowed to work on in your free time. (Ican name specific examples of both open source projects and companies with theserestrictions.) I am not a lawyer and cannot give you legal advice. Only you can chooseif you want to ask permission or beg forgiveness. I can, however, highlight the issue ofcopyright and encourage you to consider what is most appropriate for everyone inthe long term. It would be a shame if your work had to be removed from an opensource project for any reason. Radical transparency is risky, but I think it’s worth it inthe end.
To increase their future powers, some corporations have opted to put a contributoragreement on their public projects. Canonical, Chef, Puppet, Google, and .NET allhave a variation on a contributor license agreement. The agreement varies per com‐pany, but the gist of most of them is “if you choose to submit a contribution, youagree to reassign your copyright to the project.” Just as there is a Creative Commonslicense for content, there is now a Harmony Agreements template for contributionagreements. The biggest rationale I’ve seen for a contributor agreement is that itallows the project to change the distribution license of a project without explicit con‐sent from individual contributors. In open source software, these contributor agree‐ments are often perceived as being against the spirit of open source. On the otherhand, it can make it difficult for corporations to make legal decisions regarding thatsoftware in the future if they don’t own the copyright.
Project Governance | 17

Distribution LicensesOnce you have determined copyright for your project, the next piece you need toestablish is the distribution license. This will clarify how you want others to use, ornot use, your project.
GitHub has put together an excellent primer for the more popular open source licen‐ses it recommends. The primer includes the following licenses:
• The MIT License allows people to do anything they want with your code as longas they provide attribution back to the original authors of the work, and do nothold you liable for the software. jQuery and Rails both use an MIT license.
• The Apache License is similar to the MIT License, but it also explicitly grants pat‐ent rights from contributing authors to users, and requires a change notice thatdescribes how the derivative work changes from the previous version. Apache,Subversion, and NuGet use an Apache license.
• The GNU General Public License (GPL), V2 or V3, is a sharing-friendly copyleftlicense that requires anyone who distributes your code or a derivative work tomake the source available under the same terms. V3 is similar to V2, but furtherrestricts use in hardware that forbids software alterations. Linux, Git, and Word‐Press use this type of license.
• If your content isn’t code, a Creative Commons license may be more appropriatefor your work. This license allows you to grant redistribution rights, with orwithout modification, for commercial or noncommercial use.
You are also welcome to not choose a distribution license; however, this effectivelysignals to people that you are not interested in others using your work without seek‐ing explicit permission.
When to Not Use a Distribution License
Using a distribution license on a public project is almost always agood idea. That said, I sometimes choose to omit a distributionlicense on my public repositories. Typically this happens if I think Imay incorporate the work into a full-length book with a traditionalpublisher. Some publishers require you to reassign copyright tothem and will protect the work on your behalf. (O’Reilly leaves allcopyright with the original author.) If I have accepted contribu‐tions from others under an open license, it may impact my abilityto reassign copyright later.
If you encounter a public project that does not have an explicit license, and you wantto incorporate the work into your own, get in touch with the project maintainers firstand ask them to add a license to their work.
18 | Chapter 2: Command and Control

Leadership ModelsOpen source software allows people to collaborate on building systems that are morepowerful, more secure, more feature-rich, and more sustainable when the burden ofmaintenance is shared among many. If you are a project of one, it might not makesense to create a governance document, but if you are anticipating others contribu‐ting as well, you should consider outlining how you want the project to be run.
A few of the governance models I participated in include:
Benevolent Dictator for Life (BDFL)In this model, the leader of the project has final say over every decision aboutevery aspect of the code base. The BDFL may not actively participate in everycode review, but ultimately retains the control to reject or reverse any decisionmade. The community exists at the whim of the dictator. Sounds horrible, right?Well, it can be if the dictator isn’t benevolent. This model has been successfullyused by the Ubuntu project, and others.
Consensus-driven, leader-approvedThe Drupal community works on a consensus model where the community mostactive on a given part of the system is encouraged to find solutions that areappropriate. When the community is happy with the solution, they mark an issueas Reviewed and Tested by the Community (RTBC, which is a backronym forReady to be Committed). Drupal has additional working groups for content,licensing, and security issues.
Technical review board or Project Management CommitteeA fork of the Drupal project, Backdrop, distinguished itself early in the project byadopting an explicit governance model, which is based on the Apache projectProject Management Committee (PMC) model.
If you would like more guidance on setting up a governance plan for your project, Irecommend resources by Lisa Welchman, including her book Managing Chaos (Rose‐nfeld Media).
Code of ConductSome communities have made the difficult decision to reject code from communitymembers who refused to behave in a friendly manner toward others in the commu‐nity. Other communities, however, are notorious for their unfriendly, intolerantbehavior. You may be able to think of several communities you enjoy participating in,and want to emulate in your own project.
Community culture is the consistent reinforcement of behavioral standards.Although you may wish to simply cross your fingers and hope that people are excel‐lent to each other, there may come a day when you wish you had a rule book you
Project Governance | 19

could point to. A community code of conduct allows you to explicitly detail what isexpected of those who participate in your project. There are several established codesof conduct that have been community vetted. You may wish to begin with one ofthese as your starting point.
Flickr is the first community code of conduct that I was aware of using, and whichmade a point to ensure its members knew there were guidelines in place. I’m sure ithas changed since I first read the document; you can read the current version atFlickr Community Guidelines.
The Drupal Code of Conduct is the one I’m most familiar with. It was derived froman early version of the Ubuntu Code of Conduct (a newer version is now available),and has even been used as inspiration for the Humanitarian ID Code of Conduct, aproject by the United Nations Office for the Coordination of Humanitarian Affairs.
It is appropriate to add your Code of Conduct (CoC) document to the project’s sup‐porting website. If you do not have a separate website for your project, you could addyour CoC as a wiki page within GitHub. Links to wiki pages are available in the right‐hand sidebar from the home page for the project.
Access ModelsIf you have been using version control for a long time, you may remember systemslike CVS or Subversion with a centralized repository. Figure 2-1 demonstrates howchanges were made in Subversion’s centralized system. In this system, each time youwanted to save a snapshot of your work to the repository, you were potentially savingto the same place as someone else. Just when you thought you were ready to shareyour work, or request a code review, you would sometimes be prevented from doingso if someone else had recently updated the same branch with their own work.
Figure 2-1. Working with files in Subversion
20 | Chapter 2: Command and Control

Git, on the other hand, is a distributed version control system. This means instead ofhaving one central place that everyone must use if they want to have their changesrecorded, each person works independently from the centralized code hosting sys‐tem, and is responsible for making commits to his or her local copy of the repository.This means changes from other developers are never forced into your work; instead,it is your decision of when to incorporate outside work, and when to share your own.
Establishing Connections to Others
Although people love to talk about coding from airplanes that don’thave an Internet connection when working with Git, I think thereal advantage is that you can do more of your thinking in private.You can make new branches, think about new ideas in code and—only when you’re ready—establish a connection with others.If you subscribe to Myers-Briggs, Git might be INTP, and Subver‐sion might perhaps be ESFJ.
Every time you sit down to work with Git, you are sort of working in a centralizedfashion as far as your computer is concerned; your repository of changes is entirelyself-contained on your local machine, as shown in Figure 2-2. You do some work, andthen save that work to your local repository. Then, when you’re ready to share yourwork with others, you make a connection to a remote repository and push your copyof a specific branch to it.
Figure 2-2. Working with files in Git
Access Models | 21

Keeping your work entirely local would be very limiting! Instead, we make connec‐tions to other systems, and share our code through the remote repositories.
Git does not have the ability to control access—instead, it allows any developer fullread/write access to the repository. At the most coarse level, you limit this controlthrough login controls. I develop on my machine, to which you don’t have access, andtherefore you cannot change my repository. As soon as we put the repository in ashared location, such as a centralized code hosting server, we need to agree on howwe will govern our access to the repository.
Some Git hosting systems, such as Bitbucket, allow fine-grained, per-branch accesscontrols; however, most force you to limit control on a per-repository basis. In otherwords, you either are a committer for any branch on the repository, or you are limi‐ted to making your contributions through pull requests.
In this section, we cover the three most popular models:
• Single Repository; Shared Maintenance, wherein everyone on the team is consid‐ered a maintainer and is granted access to upload changes to the project reposi‐tory.
• Collocated Contributor Repositories, wherein contributing developers create aremote copy of a project, and have their changes accepted by project maintainers.
• Dispersed Contributor Repositories, wherein code is shared via a text-basedpatch file.
At the end of the section, you will learn how to chain these methods together to cre‐ate a custom access model that is perfect for your team.
Dispersed Contributor ModelWhen Git was originally conceived, conversations about changes to the code base ofan open source software project commonly happened on public mailing lists, not oncentralized web hubs. This model is still used today by the Git development team. It isalmost certainly not appropriate for your team to use this model for its development;however, understanding the model has implications for some of the more advancedconcepts required to use the commands rebase (Chapter 6) and bisect (Chapter 9).
To share their work with the community, developers would create a patch file usingthe program diff. They would then write an email to the discussion group, andattach their patch file as shown in Figure 2-3. To investigate the proposed changes,members of the mailing list would download the attached patch file, and apply it totheir local code base, using their system’s patch command.
By sharing the patch files via a mailing list, developers were able to encapsulate andshare their work—while efficiently limiting what was shared to that patch file so that
22 | Chapter 2: Command and Control
www.allitebooks.com

the people evaluating the work could easily see what had changed between two spe‐cific points in time within a shared code base.
Form Follows Function
To make the process of working with emailed patch files easier, Gitadded the ability to deal with patches that were sent via a mailinglist through the command am.
This model is still used by the Git project today—it is still using a mailing list to sharepatches, and have conversations about what features should be added to Git and whatbugs should be removed.
Although the model might seem archaic, it does have some advantages:
• You don’t need to use a specific version control system locally because the patchfile doesn’t require specific version control software to be installed locally.
• Developers can easily review the proposed changes from the comfort of theiremail application.
• This model encourages whole idea thinking. If you have to email a group of peo‐ple each time you make a change, you are more likely to ensure everything isright so you can avoid the embarrassment of “just one more thing.”
• Uploading your proposed changes to a system that is not the code hosting systemenforces a review procedure among the participants in the software project. Inother words, as a developer, I can’t just upload my changes to the main reposi‐tory; I have to announce my completed work and wait for someone else to mergeit in.
Access Models | 23

Figure 2-3. The community review process for patches
Having dispersed repositories isn’t specific to projects that communicate via mailinglists. At the time of this writing, the Drupal project was using a variant of this model.Instead of using a mailing list to share patches, though, it was using a self-hosted,centralized code hosting and ticket issue system. Figure 2-4 shows a screenshot of anissue with an attached patch file.
24 | Chapter 2: Command and Control

Figure 2-4. A Drupal issue queue with attached patch file
In this model, you can sign the individual commits before sharing them; however,this makes it more difficult to unpack the history of who made which changes if mul‐tiple people were involved. The team will need to, instead, adhere to a patch format‐ting policy (signed or not), and a commit message style. Drupal has strict formattingguidelines for its commit messages to ensure everyone receives credit for their work.
For most projects starting today, this model is not appropriate. It does, however, helpto understand some of the more advanced commands, such as bisect, if you are ableto think about commits as whole ideas. A more modern approach to this model is touse fork, or clone, repositories on a single code hosting system.
Collocated Contributor Repositories ModelThese days, software developers are unlikely to trade patch files—instead, they aremuch more likely to use a central code hosting system that manages the patch processfor them. Using a single code hosting system makes it easier to programmaticallycreate and submit patches between repositories. The method for how these patchesare managed is the secret sauce that makes up any code hosting system. The restric‐tions are presumably handled via Git’s pre-commit hooks to ensure access control isrespected.
On a collocated system, the “upstream” project retains complete control over who isallowed to write to the primary project repository. Individual contributors make aclone, or fork, of the project to their own repository on the code hosting system. Thecontributors make changes to the copy, and then submit their requested changes inthe form of a merge request or pull request, as shown in Figure 2-5. If you are workingon an open source project with a lot of contributors, you are most likely usingthis model.
Access Models | 25

Figure 2-5. Creating a chain of cloned repositories
GitHub has popularized this model for development for contemporary open sourceprojects. I’ve also seen this model used for internal projects with strict walls betweendepartments. For example, if the quality assurance team is solely responsible for thefinal merging of code into the stable release branch, the team is likely using some var‐iation on this model. Another reason for this separation would be if you were usingextra contractors and you wanted to limit their ability to accidentally add somethingto the repository that hadn’t first undergone a review of some kind.
26 | Chapter 2: Command and Control

Git Versus GitHub Terms
It can be difficult to know which terms to use because the GitHubterms, which have become commonplace, don’t always match theircorresponding Git commands. For example, the GitHub term forkuses the Git command clone to create a copy of a repository.Because the focus of this book is on the Git software, and not justthe implementation on GitHub, the Git commands will be used.Occasionally both terms will be used because the GitHub terminol‐ogy is sometimes more familiar than the individual commands.
When GitHub creates a fork of a repository, it is the same as using the Git commandclone to make a copy of a repository. Once you have created a fork, you can use theGitHub web interface to make your changes directly to your repository, but this isn’tgreat for more than a very minor typo fix. Instead, you will likely create a secondclone of the repository—this time from the forked repository to your local worksta‐tion. This effectively creates a chain of clones from one copy to another. Keeping allof the repositories in sync takes a little bit of work; however, it’s a lot fewer commandsto memorize than working directly with patches. You win some, you lose some.
Working with repositories that share the same infrastructure should be easier thanthe dispersed repositories because it allows you to more easily use wrapper software.In addition to it being a little easier to keep the work updated, the wrapper softwarecan also give you more control over who is able to commit work and receive creditfor their work.
Typically, the first repository in the chain can only be altered by a handful of corecommitters who can add new commits to the repository, or merge branches. Most ofthe people working on the project will, instead, be working from a local clone of therepository. In this local, cloned repository, each person will have infinite control overwhat happens. They can add new branches, add new code, and share their proposedchanges with others by pushing their work to their public clone of the main reposi‐tory. Once the work has been pushed to the public clone, coders can solicit feedbackon their work to date. Once the work has been fully reviewed and tested by the com‐munity, the coders can make a merge request or pull request from their public clone tothe main repository.
If someone doesn’t have the intention of contributing their work back to the mainproject, they can skip creating a public clone, and instead create a clone from themain project directly to their local environment. Things can get a little tangled if yourealize you do have changes you want to submit back to the project, and you’ve alsodone your own work, which shouldn’t be shared.
It isn’t always easy to know that you’re going to do something that might be useful toothers, though. For example, I was working on my slide deck for OSCON with an
Access Models | 27

open source presentation framework, reveal.js. Your equivalent example might be with a WordPress theme, or a frontend framework, or some other project that givesyou a basic starter kit as part of the initial package.
Previously while working on my slides with reveal.js, I decided I probably wouldn’tneed to upgrade the reveal.js software I was running and stopped worrying aboutkeeping a Git connection to the upstream project. I shuffled all of the folders aroundin my repository to make it work for what I was doing. A custom theme was created.Tweaks were made. It had truly become a forked project, disconnected from where itbegan. (Developers with even a little bit of open source experience will be groaning atthis point because they’re already jumping ahead to the inevitable realization that I’mabout to reveal.) But as I started working on things, I realized I couldn’t get the slidesto format properly for the handout. I wanted my speaker notes to appear alongsidethe slide, instead of having them tucked below it. I opened a bug report for theproject on GitHub, and continued working. A few people gave me suggestions onhow I might want to reformat things. Aha! I had some ideas on how to solve theproblem. I considered my own issue closed, but there were others who were alsointerested in my solution. Now I was truly stuck. I had created my project without theintention of sharing my work.
If you are submitting a patch, you might have been able to cheat and share only snip‐pet of your work, but when you are working with collocated contributors, you need achain of repositories in place to be able to share your work back. My own projectdidn’t have a branch for the upstream work because I never had the intention of shar‐ing my work back to the presentation framework. So I started by creating a new chainof repositories. Figure 2-6 shows the sequence of what I did next. On GitHub, I cre‐ated a fork of the main reveal.js project. Then I made a local clone of this forkedrepository. To my local clone I created a new branch for my changes. Then I copiedthe changes from my OSCON slide deck (there were only a few, so I didn’t bothercreating a patch, I just used my trusty copy-and-paste tools) into my cloned reposi‐tory of the presentation framework. With the changes in place, I pushed my changesback to my remote repository on GitHub, and created a pull request to ask to have mychanges incorporated back into the project.
The public clone of the reveal.js repository was required because I do not have writepermission for the reveal.js repository. If I did have write access, I could have skippedmaking the public clone and just created a local clone.
Shared Maintenance ModelFinally, we have arrived at what is likely the most typical permission model for inter‐nal teams (and teams of one): shared maintenance. In this model, there is an inherenttrust among team members. It is assumed that code will be checked and verifiedbefore it is committed to the main project branch, and that, generally, the developers
28 | Chapter 2: Command and Control

are trusted. In this model, work is done locally by all developers before it is pushedinto the shared repository for the project. When working with an internal team, asshown in Figure 2-7, this is often where we start: with a single shared repository thateveryone has shared write access into.
Figure 2-6. Suggesting changes to a project from collocated repositories
Git does not accommodate permissions and instead relies on other systems to grantor deny write access to a repository. If you do need to prevent people from uploadingtheir code to a shared repository, you need to use the host system’s access control todo so. If you are not using a Git hosting platform, this access control might be con‐trolled via SSH accounts.
In addition, Git further does not allow you to be locked out of only some branches, asyou might find in Subversion. Without additional software in place, it is by conven‐tion that teams agree not to commit changes to specific branches without the prereq‐uisite testing. Per-branch access restrictions are available through Bitbucket(Chapter 11) and GitLab (Chapter 12). If you prefer a more lightweight system, take alook at Gitolite.
Access Models | 29

Figure 2-7. Everyone on the team has write access to the central repository from theirlocal repository
Custom Access ModelsIn addition to these individual strategies, teams may also choose to use multipleaccess models for a given project. This would be particularly useful for projects withvery strict regulations on who could commit code to the canonical repository. Indeed,most open source projects will have different levels of access for different contribu‐tors.
A common workflow is as follows:
• An official project repository, to which only a very few people are able to commitcode. In an open source project, it would be the project maintainers; and in aclosed source, or corporate, project, it could be the quality assurance team.
• A less restricted, internal copy of the repository, which is used for integration byeach of the contributors and project teams. This repository might follow a sharedmaintenance model, where everyone is allowed to merge their branches into therepository as part of a code review process, or even on an ad hoc basis.
30 | Chapter 2: Command and Control

• Individually created personal repositories, locked to the individual contributors.These are typically hosted on the same code hosting system as the official reposi‐tory, because most modern code hosting systems have easy-to-integrate function‐ality (usually called a “pull request” or “merge request”).
This split would commonly be seen in teams that employ junior developers, qualityassurance teams, or perhaps external contractors.
Chapter 4 covers common workflows in more depth.
SummaryIn this chapter, you learned about different ways to grant and restrict access to yourproject repository:
• Clearly defining a project governance model will help ensure ownership isunderstood by all contributors.
• Copyright of code is typically assigned to the author, unless the right has beenreassigned to another legal entity as a work for hire or through a contributoragreement.
• The rules restricting distribution, and derivative works of a code base are definedby its software license.
• Git is just a simple content tracker; it does not include access control mecha‐nisms out of the box. Some code hosting systems have incorporated pre-commithooks that can be used to limit access per-branch.
• Access can be limited or open for any given repository. Changes submitted to arepository are made via a patch. On code hosting systems, a programmed graphi‐cal interface is used to manage the patch submission process.
With your permission structure in place for your repository, we will next look at howyou can divide your repository so that both work in progress and finished work canbe shared among team members.
Summary | 31

CHAPTER 3
Branching Strategies
In version control, a branch is a way to separate parallel thinking about how a pieceof code might evolve. A branch always begins from a specific point in the code base.In Chapter 2 we talked about forking and cloning a repository. A branch is like an in-repository split where new work begins. A branch might be created with the intentionof contributing work back, or it might be created with the intention of keeping workseparate. Branches don’t care what changes they’re tracking! They just are.
The branching strategy that you use depends on your release management process.Branches allow you to change the files that are visible in the working directory foryour project, and only one branch can be active at a time. Most branching strategiesseparate the work in your project by coarse ideas. An idea could be the version ofyour software—for example, version 1, version 2, version 3. And spawning fromthose software versions you might have ideas that are in progress. These ideas aregenerally separated into branches according to the name of the feature they represent.They might be a bug fix or a new feature, but they also represent whole ideas on asmaller scale.
This chapter outlines:
• How to choose a branching convention for your team• Mainline development• Branch-per-feature deployment• State branching• Scheduled deployment
33
There are no limits to the ways you can use branches. This can be a good thing and abad thing. A few artificial constraints (conventions) will help you consider the possi‐bilities for your team.
Understanding BranchesWithout getting into the internals of how Git works, having a basic understanding ofwhat a branch is will help you to choose and apply the strategies outlined in thischapter.
Each Git repository contains a pool of commits. These commits are linked to one-another through their metadata—each commit contains a reference to its parent. Inthe case of a merge commit, there may be more than one parent commit referenced. Ilike to think of a branch as a string of beads, with each commit represented as a beadon the string. The analogy isn’t technically correct, but it works quite well as a mentalmodel for our purposes. Branches in Git are actually a named pointer to a specificcommit. (Give yourself a magic wand, and tap on a specific bead while saying a name.You have just created a named branch.) When you check out a branch you are copy‐ing the data stored in the commit object (identified by the pointer) to your workingdirectory. Once the work has been copied into the working directory, you can makeas many changes as you like (add, edit, delete files), and save the changes as a newcommit object to your local repository. The named pointer will be automaticallyupdated to point to the new commit object you have just created and your branchwill be updated.
Any commit objects you create are local and exclusively yours until you choose toexplicitly share them with a remote repository. This is radically different than thecentralized model of version control where committing a change automaticallyuploads the work. For some foreshadowing of conflicts to come, just remember thateach developer has a magic wand for his or her own repository.
To avoid conflict, developers have created conventions for the naming and use ofbranches. These conventions help developers to choose when to allow work todiverge (create new branch), and when to merge (combine commit objects from twoor more branches). Generally there are two types of branches used in a convention: along-running public branch; and a short-lived private branch. The function of a long-running branch is to act as a mediator for code which is contributed by lots of devel‐opers. The function of a short-lived branch is to sandbox the development of a newidea. These new ideas could be bug fixes, feature additions, or experimental refactor‐ing. It’s up to you!
When you share a branch with others, you may continue adding commit objects toyour copy of the branch; however, now that the branch has been shared, someone elsecould also be adding commit objects to their copy of the branch. The next time you
34 | Chapter 3: Branching Strategies
try synchronize the two copies of the branch Git, as a simple content tracker, willdefer to your expertise in combining the two sets of commit objects into a singleshared history. This pause in the automated process is refered to as a merge conflictwhich sounds scary, I’ll admit. Your job is to engage in conflict resolution and choosethe best shared history for the work in question.
You will learn about strategies to keep your branches up to date in “UpdatingBranches” on page 51, and practical commands in Chapter 7. Conflict resolution isalso covered in Chapter 7. First, though, let’s take a look at some of the most commonbranch naming strategies developers use for maintaining their work in Git.
Choosing a ConventionA convention is an agreed-upon standard for how things are usually done. As devel‐opers, conventions allow us to quickly pick up the patterns of how a software projectruns and integrate our work without disrupting the flow for others on the team.A documented convention makes onboarding easier for both the newcomer and oth‐ers on the team who now need to take less time away from their work to help the newperson.
Choosing an appropriate branching strategy for your team requires a conversationwith your teammates about how you want to release your work. (From now on, I’lluse “software” to mean your project, even though Git can be used for other things aswell, such as writing books!) You might want to use a daily release schedule for a web‐site, but a monthly, quarterly, or biannual release schedule for a downloadable soft‐ware product. You may even have to comply with auditing or compliance regulationsthat have their own requirements. Once you know how you will release your soft‐ware, and whether you have auditing or tracking requirements, you can choose thebest branching strategy for your needs.
If you already know how you’ll be working, take a few minutes to sketch out yourrequirements before diving into the details and choosing the branching strategy thatbest matches your needs. If you’re not really sure what your system will look like,Chapter 4 will give you ideas about how you might want to structure your team inter‐actions.
As long as your team documents what they’re doing, there are no hard rules. Indeed,if you look at the repositories for several open source projects, you’ll see that there’sno standard way of doing things. I recommend using the GitHub mirrors to easilycompare the branching strategies used by Drupal, Git, and Sass. These three verypopular projects all use very different branching strategies.
There are no version control police who will show up at your door and tell you ifyou’re doing things wrong, and you’re almost guaranteed to find at least one otherteam who’s making software in a similar fashion to you. But if you are new to work‐
Choosing a Convention | 35

ing with version control, or your team has been struggling to figure out how to makethings a little smoother, using one of the conventions described in this chapter mighthelp.
ConventionsWhen working with software projects, there are generally two different approachesteams can take: they can either use an “always be integrating” approach, or they cancollate the work that’s being done and release a collection of work all at once.In between these two opposites there are many different variations on how work canbe done.
This section outlines several of the most common strategies used by developmentteams today. You may choose to adopt one of these strategies wholesale, or adapt itfor your needs. No matter what you choose, remember to document your decisions.
Mainline Branch DevelopmentThe easiest branching strategy to understand is the mainline branch method. In thisstrategy, there are fewer branches to work with. The developers are constantly com‐mitting their work into a single, central branch—which is always in a deployment-ready state. In other words, the main branch for the project should only containtested work, and should never be broken.
As a team of one, I often work on tiny side projects that only just barely warrant hav‐ing version control, such as writing an article for a magazine. In these cases, I commitall of my work in the default branch (named master by Git) as is shown in Figure 3-1.If I have two unrelated ideas that I am working on, I might be lazy and choose tocommit everything, or I might stash some of the work to save it for later. For thesesimple projects, it doesn’t warrant separating thinking into different branches inorder to work efficiently.
Reading Ball-and-Chain Diagrams
Each circle on the diagram represents a commit of work stored inthe Git repository that can be reversed. The proper name for these“ball-and-chain” commit diagrams is a directed acyclic graph(DAG). There’s no quiz where you need to remember this. Promise.But it is a useful term if you’re looking for keywords for futureresearch.
36 | Chapter 3: Branching Strategies

Figure 3-1. Mainline branch development: storing all commits to a single branch
As the project matures, there will be more and more to think about, and it will getharder to keep track of ideas. I’ll start adding new branches as I think about newdirections I might want to take my project in, but that aren’t as fully thought out assome of the other pieces I’m working on. Perhaps I’ll even expand my team and havea reviewer or two with their own, independent branches, as shown in Figure 3-2. Asthe project grows in complexity (and team members), so will the number of branches.But they won’t all be active all the time. Like in the story of Goldilocks and the ThreeBears, your team will likely settle on a number of branch types that feel “just right.”Each unit of work (or sprint) may have an accordion effect on the number ofbranches. At first, the developers are all working on their own pieces, and the numberof branches expands. Then, as each of the developers finishes his or her work andintegrates it with the others’, the accordion compresses back down again.
At scale, this approach of having a single working branch is used by teams workingwith automated build procedures.
Terms for Teams Who Are Always Deploying
Continuous integration is the practice of having all developersincorporate their work into the mainline of the project severaltimes a day. Continuous delivery is the practice of automating thesteps from a developer’s local workstation up to the server (but notdeploying through an automated process). And finally, continuousdeployment is the most complete definition of automation, with allcode passing through a series of test gates directly to the produc‐tion server.
Conventions | 37

Figure 3-2. Mainline development with branching: branches separate the work beingcontributed by multiple people
Perhaps it makes sense for your team to integrate their work into a central branchregularly, but only deploy work occasionally. As soon as you start collecting yourwork, you need to make a distinction between what you have locally, and what isbeing used on your production server. If all code is ready for deployment, it shouldn’tbe too big of a deal to add a little fix and roll everything out. But what if you havechanges committed in your repository that are only mostly finished? This is where westart to move away from a purely continuous deployment strategy, and toward multi‐ple branches in a scheduled deployment strategy.
There are several advantages to using a branching strategy that encourages regularintegration of your work:
• There aren’t very many branches across the entire project. This results in lessconfusion about where a change disappeared into.
38 | Chapter 3: Branching Strategies
• Commits that are being made into the code base are relatively small. If there is aproblem, it should be relatively quick to undo the mistake.
• There are fewer emergency fixes, because any code that is saved into the mainbranch is ready to be deployed. Deployments can often be stressful for developersas they hold their breath while code goes live in production and wait to hear backfrom the code’s users. With tiny frequent updates, this procedure becomes prac‐ticed, and finally automated to the point where it should be almost invisible tothe end user.
There are disadvantages to using this strategy as well:
• The assumption is that the main branch contains deployment-ready code. If yourteam doesn’t have a testing infrastructure, it can be risky to assume that new codewon’t break anything, especially as the project becomes more complex over time.
• The notion of a deployment is more appropriate for code that is automaticallyloaded onto a user’s device (for example, a website). It is less appropriate for soft‐ware that must be downloaded and installed. While updates that fix problems arewelcomed, even I would get annoyed if I had to download and reinstall an appli‐cation on my phone on a daily basis.
• One of the ways developers can verify code on production is to hide the featurebehind a flag or a flipper. Facebook, Flickr, and Etsy are all rumored to use thistechnique. The potential risk here is that code can be abandoned behind the flags,resulting in a large technical debt for code that isn’t removed because it is hidden.
Unfortunately, it is out of the book’s scope to describe how to set up the infrastructurefor continuous deployment because it will be somewhat dependent on the languageyou are writing in (each language has its own testing libraries) and your deploymenttools. If you would like to read more about the philosophy, the book ContinuousDelivery: Reliable Software Releases Through Build, Test, and Deployment Automationby Jez Humble and David Farley (Addison-Wesley Professional) is a good startingplace.
Branch-Per-Feature DeploymentTo overcome some of the limitations of the single branch strategy just described, youcan introduce two additional types of branches: feature branches and integrationbranches. Technically, they aren’t different kinds of branches; it’s just the conventionof what type of work is committed to the branch that differs.
In the branch-per-feature deployment strategy, all new work is done in a featurebranch, which is as small as it can be to contain a whole idea. These branches are keptup to date with the work being done by other developers via an integration branch.When it is time to release software, the build master can selectively choose which fea‐
Conventions | 39
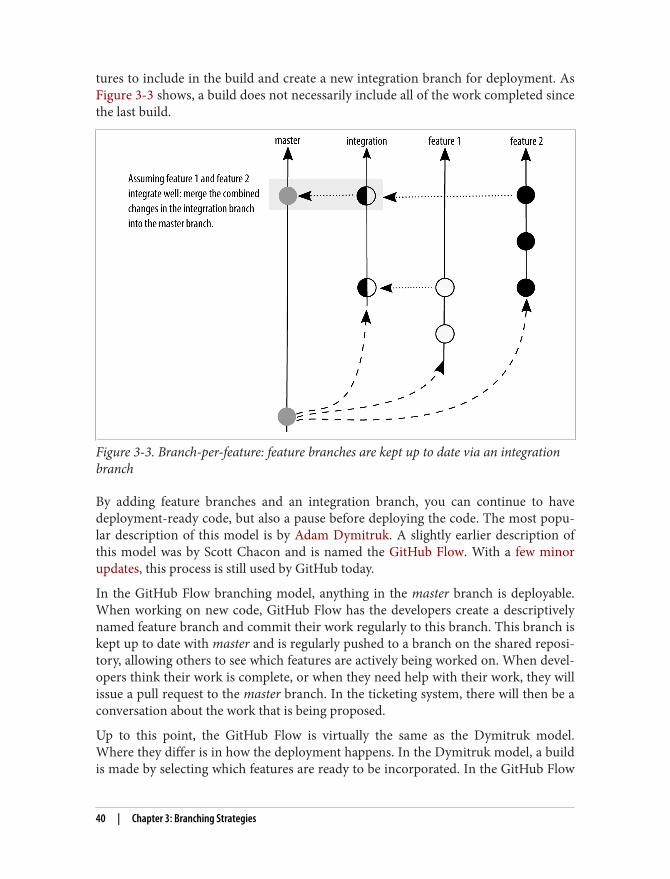
tures to include in the build and create a new integration branch for deployment. AsFigure 3-3 shows, a build does not necessarily include all of the work completed sincethe last build.
Figure 3-3. Branch-per-feature: feature branches are kept up to date via an integrationbranch
By adding feature branches and an integration branch, you can continue to havedeployment-ready code, but also a pause before deploying the code. The most popu‐lar description of this model is by Adam Dymitruk. A slightly earlier description ofthis model was by Scott Chacon and is named the GitHub Flow. With a few minorupdates, this process is still used by GitHub today.
In the GitHub Flow branching model, anything in the master branch is deployable.When working on new code, GitHub Flow has the developers create a descriptivelynamed feature branch and commit their work regularly to this branch. This branch iskept up to date with master and is regularly pushed to a branch on the shared reposi‐tory, allowing others to see which features are actively being worked on. When devel‐opers think their work is complete, or when they need help with their work, they willissue a pull request to the master branch. In the ticketing system, there will then be aconversation about the work that is being proposed.
Up to this point, the GitHub Flow is virtually the same as the Dymitruk model.Where they differ is in how the deployment happens. In the Dymitruk model, a buildis made by selecting which features are ready to be incorporated. In the GitHub Flow
40 | Chapter 3: Branching Strategies

model, once a pull request is accepted, the work is immediately ready to be deployedfrom its feature branch. This makes the strategy closer to mainline development.Originally, GitHub merged its feature branches into the master branch and thendeployed the master branch. Nowadays, the feature branch is deployed and if thereare no errors, it is merged into master as shown in Figure 3-4. This means that if thereare problems with a feature branch, master can immediately be redeployed because itis proven to be in a working state.
Figure 3-4. GitHub Flow: feature branches are deployed after a review and then mergedinto master
There are several advantages to using a branch-per-feature deployment strategy:
• Much like mainline development, the focus is on rapid deployment of code.• Unlike the mainline development, there is an optional build step. When the build
step is used, there is the option to select which features should be incorporatedinto the master branch for deployment.
Conventions | 41

There are disadvantages to using a branch-per-feature deployment branching strategyas well:
• If code is kept on a feature branch, but it is not immediately rolled into master,there is an extra maintenance requirement for developers who need to keep theirfeatures up to date while waiting to be rolled into the deployed branch.
• The semantic naming of the branches helps those who are familiar with the sys‐tem, but it also represents an insider language that can make onboarding moredifficult if there are a lot of open features.
• There is now a housekeeping requirement for developers to remove old branchesas they are rolled into master. This isn’t a large burden, but it is more than wouldbe required from working out of a single master branch.
The branch-per-feature strategy offers a nice middle ground between mainline devel‐opment and scheduled deployment. In some ways, scheduled deployment extends thebranch-per-feature strategy, but with specific naming conventions.
State BranchingUnlike the strategies up to this point, state branching introduces the idea of a locationor snapshot for some of the branches. Often our deployment diagrams are overly sim‐plified and suggest that code moves between environments (Figure 3-5), but generallythis isn’t really how it happens. Instead, Figure 3-6 shows the code is merged fromone branch to another, and each of the branches is deployed to a specific environ‐ment. (Yes, we’ll talk about tagged releases later. Patience, grasshopper.) As Figure 3-6shows, there’s often a mismatch between the branch names that are used and thename of the environment we are deploying to. (What does master mean? Is it for pro‐duction? For development? Are you sure?) This strategy was described as the GitLabFlow model.
Figure 3-5. Deployment lies: code doesn’t really walk from the local server to the produc‐tion server
42 | Chapter 3: Branching Strategies
www.allitebooks.com

Figure 3-6. The real deployment process uses a centralized code hosting system
Through branch naming conventions, GitLab Flow makes it clear what code is goingto be used in what environment, and therefore what conditions might need to be metbefore merging in commits. For example, you would clearly not merge untested codeinto a branch named production. Alternatively, if you are shipping code to “the out‐side world,” GitLab Flow suggests having release branches. Ideally, these releasebranches should follow semantic versioning conventions, although GitLab Flow doesnot explicitly require it.
Know When to Increment with Semantic Versioning
In semantic versioning, a release should always be numbered as fol‐lows: MAJOR.MINOR.PATCH. The first number (MAJOR) shouldbe incremented when you make API-level changes that are notbackward compatible. The second number (MINOR) should beincremented when you add new functionality that does not breakexisting functionality (it is backward compatible). The third number(PATCH) should be incremented when you make backward-compatible bug fixes.
Conventions | 43

An interesting variation on the state branching strategy is the branch naming conven‐tion that the Git project uses. It has four named integration branches:
maintThis branch contains code from the most recent stable release of Git as well asadditional commits for point releases (maintenance).
masterThis branch contains the commits that should go into the next release.
nextThis branch is intended to test topics that are being considered for stability in themaster branch.
puThe proposed updates branch contains commits that are not quite ready for inclu‐sion.
The branches work much like a stacked pyramid. Each of the “lower” branches con‐tain commits that are not present in the “higher” branches. As is shown in Figure 3-7,maint has the fewest commits, and pu has the most commits. Once code has passedthrough the review process, it is incorporated into the next integration branch, get‐ting closer to being incorporated into an official release.
Figure 3-7. Integration branches used by the Git project
There are several advantages to using a state branching strategy:
44 | Chapter 3: Branching Strategies

• Branch names are context specific and completely relevant to the work at hand.• There is no guessing about the purpose of each branch, making it easier for peo‐
ple to select the right branch when merging their work.
There are also disadvantages to using a state branching strategy:
• It’s not always obvious where to start a branch from without guidance.• Because the branch names are extremely specific to the context of that team,
it can be harder to get consistency across projects, making onboarding more dif‐ficult.
Left to my own devices, I typically end up with this style of branching for my ownprojects. I like using words that mean something to me instead of terms that meantsomething to someone else on some other team. Pedants, unite! Unless you preferyour own word. ;)
Scheduled DeploymentScheduled deployment branching is the most appropriate strategy to use if you do nothave a completely automated test suite, and in any situation where you must schedulea deployment. This may be because you have deployment windows (for example,never after 4PM, and never on a Friday); or an additional regulatory gate you need topass through (for example, iOS applications being deployed to the App Store). Assoon as you involve humans in a review process, or someone else’s arbitrary con‐straints on your deployment process, there will inevitably be delays somewhere, andyou will need a way to suspend your work while you wait for the humans.
Through the different types of branching strategies, we have been adding an increas‐ing amount of complexity to the branching that takes place in a repository. We startedwith just one branch, and then we added features and an integration branch. In ascheduled deployment, we add to this again. However, scheduled deployments canget quite complex in their branching patterns. They should be built up over time, andonly as the complexity is warranted.
In this section, I will walk you through the progression of how the GitFlow branchingstrategy can be implemented by a team. GitFlow, the most popular implementation ofthis strategy, was first described by Vincent Driessen. It has been used by countlessteams around the world to structure software projects. It can look very complex whenit is presented in its final form. Fortunately, though, software projects build up to thispoint; they don’t start out this way. If there are any parts of the GitFlow that which arenot relevant for your team, you can omit them from your project.
Let’s walk through the model together.
Conventions | 45
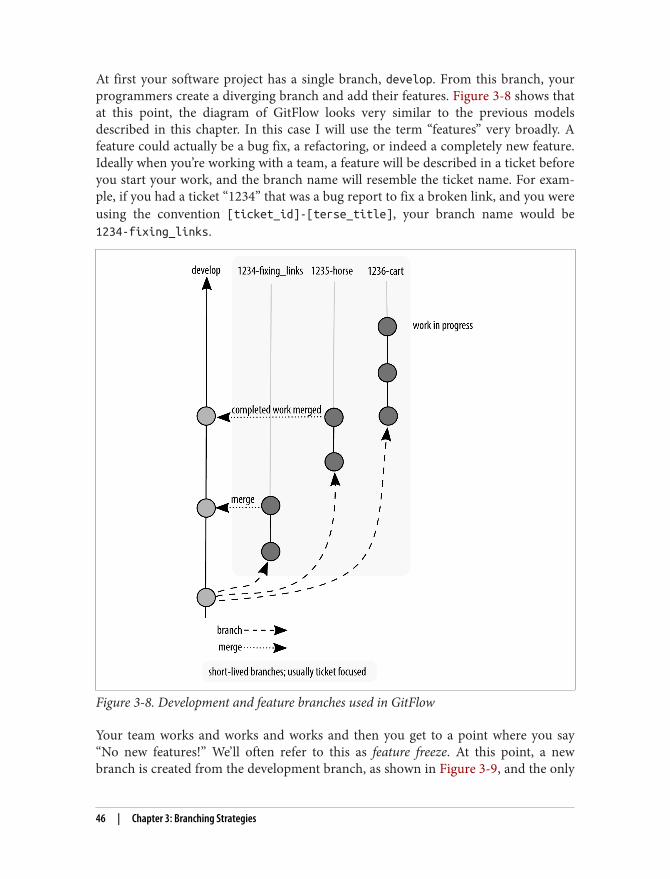
At first your software project has a single branch, develop. From this branch, yourprogrammers create a diverging branch and add their features. Figure 3-8 shows thatat this point, the diagram of GitFlow looks very similar to the previous modelsdescribed in this chapter. In this case I will use the term “features” very broadly. Afeature could actually be a bug fix, a refactoring, or indeed a completely new feature.Ideally when you’re working with a team, a feature will be described in a ticket beforeyou start your work, and the branch name will resemble the ticket name. For exam‐ple, if you had a ticket “1234” that was a bug report to fix a broken link, and you wereusing the convention [ticket_id]-[terse_title], your branch name would be1234-fixing_links.
Figure 3-8. Development and feature branches used in GitFlow
Your team works and works and works and then you get to a point where you say“No new features!” We’ll often refer to this as feature freeze. At this point, a newbranch is created from the development branch, as shown in Figure 3-9, and the only
46 | Chapter 3: Branching Strategies

things that can be committed to this branch are bug fixes. These bugs may includeregressions in performance, security flaws, and other general bits and bobs that arenow broken. In more traditional Waterfall team structures, this bug-fixing periodwould be led by a quality assurance team. In a more Agile team, a developer wouldfollow the issues through the series of branches to deployment, and would even beresponsible for testing the work of others. We’ll talk more about the review process inChapter 8.
Figure 3-9. Feature freeze in GitFlow; only bug fixes are allowed
Perhaps not all features were completed when the feature freeze happened, so there isstill work being committed to the develop branch. And if bugs are reported, thesebugs need to be incorporated “backward” into the develop branch as well.Figure 3-10 shows our first view of a branching diagram with code being merged intwo different directions. The longer your quality assurance period, the more likelyyou are going to have work happening both on the develop branch and also on therelease branch.
Conventions | 47

Figure 3-10. Development continues, but is not incorporated into the release branch
After an amount of time in testing, it will be declared that all bugs have been found,and what remains is ready to be deployed. Congratulations! At this point, all codethat has passed quality assurance testing is committed to a new branch, master,which is then tagged (like a bookmark) with the version of the software at that point.The software is then deployed as shown in Figure 3-11. Your project manager givesyou a heart-shaped candy, or maybe an animated GIF, and you get the rest of the dayoff. Good job, team! (If your project manager is not doing this, kindly send them myway and I’ll have a little chat with them on your behalf. We’re all friends here,it’s cool.)
Of course, reality dictates that sometimes bugs that need to be immediately fixed willsneak into the software. These hotfixes are so critical that a programmer should notgo home for the evening before they are fixed. They are generally made by initiating abranch from the production branch, and when the hotfixes are released, they do notcontain any additional work that has been happening since the last official release, asshown in Figure 3-12.
48 | Chapter 3: Branching Strategies

Figure 3-11. Software is released by merging onto a new branch, master, with a tag
Define “Urgent” with Your Team
A developer I used to work with once told me that a bug could onlybe marked as a hotfix if he wasn’t allowed to go to the pub for a pintof beer before it was fixed. This radically changed my perception ofwhat it meant for a problem to be marked as urgent. We recalibra‐ted our definition of “urgent” and had fewer late nights as a result.In the same vein, I once worked with a client who was willing tomark tickets as “super very important, for later.” Have fun withyour naming conventions where you can but make sure you docu‐ment what they mean so you can avoid frustration of things notbeing completed in a timely manner.
We’ve slowly built up these branches as we needed different places for work tocontinue happening. You don’t need to create all of these branches to start. In fact, it’sbetter if you don’t, because it ends up being more code to maintain. Once you’ve gotcode in production, and code in development, you end up having a lot of wheelsturning on your branching graph, as shown in Figure 3-12. This can be overwhelm‐ing for a newcomer, but it will be a natural progression for any developer who has
Conventions | 49

worked on the project from the beginning. And if you choose to use this convention,it will also feel familiar to any new developer who has worked with this model previ‐ously.
Figure 3-12. A hotfix is made, rolled into master, and our release tag is now 1.0.1
There are several advantages to using a scheduled deployment strategy:
• Scheduled deployment does not require an extensive testing infrastructure tostart using.
• The process of building software, with phases for development, quality assur‐ance, and production, is very common. This means GitFlow conventions will feelvery familiar to software developers once they understand the process of howand where their typical tasks happen in the branching convention.
• By adhering to conventions, developers should always be able to determine fromwhich branch they should begin their work.
• This is also a good model for versioned software, such as a product that you’ddownload from an app store where it is not appropriate to be deploying a newversion every few days.
50 | Chapter 3: Branching Strategies

There are disadvantages to using a scheduled deployment branching strategy as well:
• There is a lot of cognitive overhead for developers who are new to softwaredeployment and haven’t experienced the process of walking a product througheach phase of development.
• If developers start their work from the wrong branch, it can be squirrelly to geteverything back in sync.
• It’s not as trendy as continuous deployment.
The scheduled deployment strategy offers the most rigid conventions about how codeshould be moved through the review gates. It is typically used when there is little tono automation for code review, and it is always present in some form for projects thatare not using an automatic deployment scheme. Any time work is collated beforebeing released, you will have at least some of the characteristics described in thissection.
Updating BranchesThis chapter has focused on common strategies used to isolate and merge streams ofwork. The strategies have focused on a single best-path scenario where branches ofwork are magically kept up to date with all relevant work happening elsewhere. In adistributed version control system the way you incorporate external work is inde‐pendent of the branching strategy that you’ve chosen. When updating a branch, youcan choose from one of two strategies: merging or rebasing. Before diving into thedifferences in these two strategies, let’s take a quick look at how connections aremaintained between multiple repositories.
Every Git repository is an autonomous record of changes. Connections can be madebetween repositories by establishing a remote reference. This reference allows adeveloper to copy a record of all commit objects made in the remote repository to hisor her local repository. Remote connections are typically made to repositories with atleast a partially shared history. For example, the initial download of a repositoryusing the command clone would result in a duplicate copy of the remote repositoryand its commit objects.
Let’s say, for example, you wanted to add your work to your coworker’s branch. Youmake a connection to their remote repository, fetch their branch, and try to add yourwork. But you can’t! If it were a local branch, you could add a few new commitobjects to the tip of the branch. However, because it is a remote branch you want toupdate, you cannot assign a new commit object as the tip of the branch in your repos‐itory because this can only be done by the owner of the remote repository. Instead,you must first create a new tracking branch to store your changes.
Updating Branches | 51
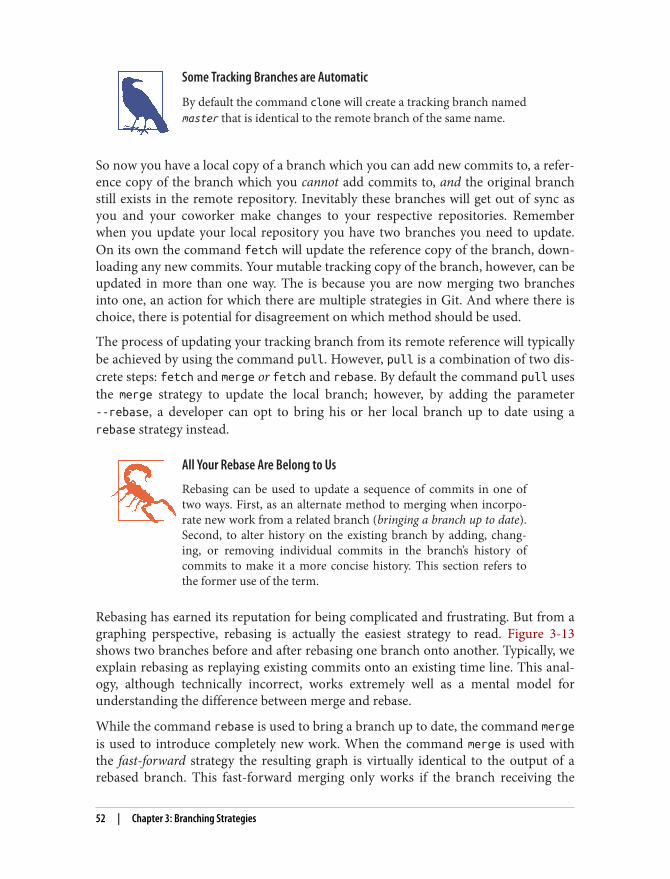
Some Tracking Branches are Automatic
By default the command clone will create a tracking branch namedmaster that is identical to the remote branch of the same name.
So now you have a local copy of a branch which you can add new commits to, a refer‐ence copy of the branch which you cannot add commits to, and the original branchstill exists in the remote repository. Inevitably these branches will get out of sync asyou and your coworker make changes to your respective repositories. Rememberwhen you update your local repository you have two branches you need to update.On its own the command fetch will update the reference copy of the branch, down‐loading any new commits. Your mutable tracking copy of the branch, however, can beupdated in more than one way. The is because you are now merging two branchesinto one, an action for which there are multiple strategies in Git. And where there ischoice, there is potential for disagreement on which method should be used.
The process of updating your tracking branch from its remote reference will typicallybe achieved by using the command pull. However, pull is a combination of two dis‐crete steps: fetch and merge or fetch and rebase. By default the command pull usesthe merge strategy to update the local branch; however, by adding the parameter--rebase, a developer can opt to bring his or her local branch up to date using arebase strategy instead.
All Your Rebase Are Belong to Us
Rebasing can be used to update a sequence of commits in one oftwo ways. First, as an alternate method to merging when incorpo‐rate new work from a related branch (bringing a branch up to date).Second, to alter history on the existing branch by adding, chang‐ing, or removing individual commits in the branch’s history ofcommits to make it a more concise history. This section refers tothe former use of the term.
Rebasing has earned its reputation for being complicated and frustrating. But from agraphing perspective, rebasing is actually the easiest strategy to read. Figure 3-13shows two branches before and after rebasing one branch onto another. Typically, weexplain rebasing as replaying existing commits onto an existing time line. This anal‐ogy, although technically incorrect, works extremely well as a mental model forunderstanding the difference between merge and rebase.
While the command rebase is used to bring a branch up to date, the command mergeis used to introduce completely new work. When the command merge is used withthe fast-forward strategy the resulting graph is virtually identical to the output of arebased branch. This fast-forward merging only works if the branch receiving the
52 | Chapter 3: Branching Strategies

merge contains only commits that are included in the incoming branch. AsFigure 3-14 shows, the graph for a fast-forward merge is as clean as rebasing.
Figure 3-13. Rebasing two branches changes the history of one branch so that it appearsas though the other branch was always in place
When there is new work on both branches, and you want to combine the work, youwill need to store the combined work in a new commit. Several different mergestrategies can be applied, and Git will choose the best one for your particular situa‐tion. If you’re really curious about the different merge strategies, the Git help pagesfor merging can tell you how an octopus and a recursive merge are different. To readthe documentation, run the command git help merge.
Need Help Choosing Between Merge and Rebase?
The graphed output is virtually identical for two branches whichhave been combined using either merge with fast forward orrebase. This can make it confusing to know which one should beused at what point. So confusing, in fact, that some teams choose touse the commands interchangeably! If you invest a little time inunderstanding when to use which strategy you will have agility inusing different branching strategies for different projects you maywork on. Merge or Rebase? includes a decision tree diagram to helpyou identify when you should be using each of the two strategies.
Updating Branches | 53

Figure 3-14. Merging two branches using the fast-forward strategy is as clean as rebasing
If you are merging to bring your work up to date, the graphed history can get quitedifficult to read as the connections become bidirectional. In other words, historyswerves between the two branches as the code is brought up to date and new featuresare published into the main branch. Figure 3-15 shows how a merge keeps a histori‐cal record of where something came from. This is great if you’re incorporating a fea‐ture branch into the main development branch for your project, but it can be quiteconfusing if you’re trying to read the history of only the current features because themain development branch will now be spaghettied into your history graph, withmerged connections being drawn from both the feature branch and the integrationbranch.
As a result of this synchronization issue, developers using Git typically don’t work onthe tracking branch when they are planning to submit their work back to a project.Instead, a developer will make a fourth copy of the branch (a copy of the trackingbranch which is a copy of the reference branch which is a copy of the remote branch).Regardless of the branching strategy, a tracking branch generally maps onto any long-running branch (e.g., master, or a release branch), and the working branch is a fea‐ture, ticket, or hotfix branch.
Rebasing a branch to bring it up to date makes history easier to read by simplifyingthe graph. Rebasing does, however, come at a cost especially if your copy of thebranch contains commit objects you have created. In order to rebase a branch thathas its own unique commits, you must replay each of your commits onto the newbranch tip—assigning each commit a completely new identifier in Git as it is assigned
54 | Chapter 3: Branching Strategies

a new parent. This can cause confusion if the commit that is assigned a new parentwas one that had previously be shared in other remote repositories. In addition to thenew identifiers, each time you replay a commit, there is a potential for a merge con‐flict, and conflicts are time consuming to deal with. It’s a little like keeping timesheets:so long as you invest a little time each day to keep your timesheets up to date, they’reno big deal. But if you’re really bad at remembering to make entries on your time‐sheets each day, it can be time consuming to try and catch up. The reward for main‐taining an up to date branch through a rebasing strategy is an easy-to-read branchhistory. But is it worth it? It can cost novice Git users a fair amount of confidence ifthey are not entirely comfortable resolving merge conflicts.
Your homework is to talk with your team about which is more important: ease of use(choose merging to bring branches up to date), or an easier-to-read historical graph(choose rebasing to bring branches up to date).
Figure 3-15. Merging two branches without the fast-forward strategy
SummaryIf you are working with a Git hosting system, such as GitHub, Bitbucket, or GitLab, abranch might be used to separate the work being done for a particular bug or featureticket. Depending on your branching strategy, your goal may be to keep the branchesseparate indefinitely, or you may want to merge the branches every so often to com‐
Summary | 55

bine the work that has been done separately into one deployable branch. Even thoughall of the information is stored in the repository, only one branch is ever visible at atime. The checked-out branch is visible in the working directory. So if you have twoideas that you’ve been working on and you want them both to be present on yourserver, you’ll need to merge the two branches into a common branch so that they canboth appear at once.
This chapter covered several branching strategies that you can use with Git, alongwith variations within these strategies that have been used by some teams:
• Mainline development• Branch-per-feature deployment• State branching• Scheduled deployment
In addition to these strategies, you will also need to decide how your team will incor‐porate new work into shared branches; and keep branches up to date. For very noviceteams, there is not always an obvious answer to how branches should be kept up todate. Two strategies were offered: rebasing or merging. A rebasing strategy can bemore difficult especially if it is not performed regularly; however, it does give yourhistory a cleaner graph that is easier to review. By using merges to keep your branchup to date, the history of your project will be more difficult to review. So if the originof how your work came to be doesn’t matter, you can choose either strategy, but if youwill be reviewing the history often, rebasing will make future work easier (eventhough it can be more time consuming in the moment).
56 | Chapter 3: Branching Strategies

CHAPTER 4
Workflows That Work
I love working with teams of people to hash out a plan of action—the more stickynotes and whiteboards the better. Throughout the process, there may be a bit of argu‐ing, and some compromises made, but eventually you get to a point where people canagree on a basic process. Everyone gets back to their desks, clear about the directionthey need to go in and suddenly, one by one, people start asking, “But how do Istart?” The more cues you can give your team to get working, the more they canfocus on the hard bits. Version control should never be the hard part.
By the end of this chapter, you will be able to create step-by-step documentationcovering:
• Basic workflow• Integration branches• Release schedules• Post-launch hotfixes
This chapter is essentially a set of abstracted case studies on how I have effectivelyused Git while working in teams. You will notice my strong preference for Agilemethodologies, in particular Scrum, in this chapter. This process for collaborationworks well with the popular workflow model, GitFlow. If you are already very famil‐iar with GitFlow, you should still read the first section in this chapter on establishingand documenting your team’s procedures.
Evolving WorkflowsIn Chapter 2, you learned about governance models, and in Chapter 3, you learnedabout branching strategies. The way we work together through Git can get quite com‐
57

plicated very quickly, and the greater the complexity, the harder it is to rememberhow it all works. Establishing conventions with your team will help to maintain con‐sistency, which will help you to quickly decipher the history of your code.
In this section you will discover:
• Basic tools to document your team’s process• Where documentation should be placed• What types of things need to be documented• Sample states for your ticketing system
It is never too late to talk to your team about how they want to work together, and it’snever too late to improve on the processes you have in place. If you are using Agilemethodologies, you may already have dedicated time for retrospective meetings, orKaizens, to review your development process.
Documenting Your ProcessGit, as an inanimate piece of software, doesn’t actually care how you set things up.Rest easy, because Git won’t suddenly reach out from your computer and wag its fin‐ger at you crossly if you use the wrong branch name or use merge when you shouldhave rebased (although sometimes I think it would be nice if it did). It’s up to you todecide how you want to use Git.
The easiest way to be consistent is to follow a set of rules, or a checklist. Each timeyou begin working on a new site you should document the workflow. By startingfrom a template (Example 4-1), you will ensure “obvious” details are still obviouswhen you onboard new people, or even better, in a moment of crisis.
Example 4-1. Template workflow
Product Manager: NameDev site: URLBranch deployed on dev site: name of branchLive site: URLBranch deployed on live site: name of branchWhen starting a dev ticket, branch from: name of branchWhen starting a hotfix ticket, branch from: name of branchWhen updating your work, use: git commandWhen merging your work post review, use: git command
The more details you include in your documentation, the more consistency you willhave among your teammates, and the easier it will be to unpack the historical recordof your repository.
58 | Chapter 4: Workflows That Work

If you are collocated, sit down and sketch out the diagram of where the permissiondivisions should be made in your code. If you’re a distributed team, that doesn’t meanyou can’t still sketch things out. And you don’t need to be an illustrator. There are lotsof decent diagram programs out there to help you sketch out your ideas. I’m a fan ofBalsamiq for very basic diagrams. Others have also recommended Pencil, Omni‐Graffle, Dia, and Inkscape. The diagrams from Chapter 2 will be a useful startingpoint for many teams. All of the diagrams from this book are also available as bothSVG files and Balsamiq files. You can download them from the Git for Teams Dia‐grams repository.
Documenting Encoded DecisionsThroughout this book, I will talk about working on tickets, or issues. The rigor ofopen source software projects has enforced more than a few good work habits, one ofwhich is the use of a bug tracker to capture all requirements. For open sourceprojects, I’ve used product-specific trackers, such as the Drupal Project module(affectionately referred to as The Issue Queue); and generic solutions, such as GitHub.For internal projects, I’ve also used Pivotal Tracker, JIRA, Redmine, and Unfuddle,among others.
Each of these systems has positive and negative aspects. I don’t have any one favoriteproduct. At their core, these systems allow you to document and track the discussionof the work to be done, the tasks that need to be completed, and a summary of anyfollow-up issues that may have been discovered during quality assurance testing. Icannot imagine working with a team where there wasn’t a centralized ticket trackercapturing the information about the work being done.
Collocated teams may choose to use a whiteboard and sticky notes to show what iscurrently being worked on. Some teams also use very simple spreadsheets to trackwho is currently working on what task. Perhaps the conversations and related assets(e.g., diagrams, design assets, wireframes) are stored in a wiki so that whiteboards canbe wiped down and used for the next conversation. No matter which system you use,I encourage you to track at least the rationale for the decisions that are made aboutwhy features are being built in an easy-to-read and searchable system. If you don’tcapture this information in writing somewhere, you may have to resort to guessingabout why decisions were made in the past.
Using ticketing systems, however, can make teams dependent on sticking with thatparticular system if the decisions aren’t also captured in the commit messages foreach change to the repository. Your team may choose to think of the conversation asephemeral, tracking conclusions in commit messages and allowing themselves tomove on from the conversation itself.
It’s a balance. The trick is to anticipate future conversations and ensure your trackingsystem has a way to easily answer questions. Perhaps you want to prevent a future
Evolving Workflows | 59

developer from forcing you to rehash a conversation after a decision is made. In thiscase, you’ll want a ticketing system that shows the progression of arguments fromboth sides (as comments) as well as the final conclusion, and a link to the commitwhere the decision was solidified as code. Perhaps you are creating software that issubject to industry regulations and you are required to prove that software has beenthrough a specific review process. In this case, it may be sufficient for your softwarerepository to have signed commits from individual quality assurance testers.
I don’t think there is any one system that is better at tracking software development.Many have strengths, and they all have their limitations. If you are using a specificprocess management philosophy that advocates a specific task workflow, you mayfind it easier to use software products that have been optimized for this process. Forexample, a Kanban board is a very specific way of dealing with tasks.
Most of the Git hosting platforms also have a basic ticket tracker to help you coordi‐nate the development of your project. Part III covers three of these systems (Bit‐bucket, GitHub, and GitLab) in greater detail.
Ticket ProgressionEven if you are working on an internal project without fixed deadlines, I recommendfinding a small unit of time to iterate through. My personal preference is for one-week sprints. For internal projects, these sprints can act as arbitrary deadlines to keepthe team motivated and moving forward. At the end of each sprint, I recommendhosting an internal demo so that the team can show off their work. This public dis‐play of work keeps developers accountable. If your team is distributed, you can hostthese demos over Google Hangout, or GoToMeeting for larger teams.
Project methodologies that track the work of people will all have some variation ofthese basic ideas:
Not NowIn Scrum terms, this would be referred to as the product backlog, Essentially,though, it’s anything that has not been deemed relevant for this work effort (orsprint). Developers should not pick from this list of tickets. The backlog shouldbe prioritized to give hints to the team on what should be worked on in the nextwork sprint. Recently, a team that I worked with referred to this as the “supervery important for later” pile.
Ready for WorkPrioritized tickets for this work iteration. These tickets might be blockers fortickets in the backlog, or simply be the next piece the team has chosen to workon. Your team may want to subdivide this stage into separate subcategories, suchas: Ready for Development, Ready for Code Review, Ready for Testing, Ready forClient Approval, and Ready for Deployment.
60 | Chapter 4: Workflows That Work

In ProgressA developer is currently working on this ticket, or a quality assurance review isbeing done. With larger teams, you may want to break this category down furtheras well. For example: In Definition, In Development, and In Testing.
CompletedThe work has been finished, or has been canceled. Perhaps there were follow-uptickets, but only very rarely should a ticket be reopened after it has passed a codereview, quality assurance review, and a client review.
Do Not Allow Your Project Managers to Overcategorize!
Allow your team to grow into states as needed. I have worked ontoo many projects where a team of project managers had decidedon a range of categories that described every possible state. Thesystem was always cumbersome to use. (And I am a category lovingmanager!) The developers never liked trying to remember tomicro-shift their tickets, and, more often than not, the ticketsweren’t in the right state unless a project manager was the onemoving the tickets through the progression of states. Have compas‐sion for developers who want to develop, not spend their dayupdating timesheets and micromanaging ticket updates. Start sim‐ple. Make as few categories as possible. As the team of developersasks for new states, add them.
As an example of a variation, the team I worked with in the fall of 2014 had nine peo‐ple working in the ticket tracker on the tickets throughout the project (a relativelysmall project, but a typical team size for Agile projects). The ticket tracker had sum‐mary columns for the following statuses:
On DeckThis ticket is ready to be worked on, and should be completed during this week’swork.
In ProgressThis ticket is actively being worked on.
Pull RequestThe code has been written, and is ready to be reviewed and merged into the mainbranch.
Needs TestingThe code has been reviewed, and rolled into the development branch. It is readyto be reviewed on the quality assurance server by a team member.
Ticket Progression | 61
DoneThe ticket is completed. This state is also used for tickets that are closed withoutbeing completed (duplicate task, feature no longer needed).
The backlog was simply a collection of tickets without a status assigned.
If a developer was ever blocked, he or she would reassign the ticket to the personmost likely to “unstick” the issue. Getting into the habit of trading tickets to commu‐nicate with others is a cultural piece that won’t work for all teams—but it does seemto work well for distributed teams where you can’t just tap someone on the shoulderto get your questions answered.
I love a categorization system more than the average developer; however, addingcomplexity has consequences. Complexity increases the time it takes people to decidewhich variation their ticket currently belongs to (“is this Needs Testing or PullRequest?”). It also increases the number of times developers have to open the ticket‐ing system, instead of their code editor. This has the potential of both improvingcommunication with other developers and slowing down the actual doing of thework. You’ll need to monitor this closely to see where you can make refinements toimprove your own process.
Pick Your Own Battles
Teams I’ve worked on have responded well to developers being ableto self-assign at least a few of their own tickets. Sure, there may besome tickets that require the specialized knowledge of one person,but it’s amazing how much of a difference it can make when it’s thatone person who identifies he or she needs to work on that ticketinstead of being told what to do.
It is near impossible to over-communicate with your team members. I don’t mean fill‐ing your time with unstructured meetings; I mean truly communicating what you areworking on, and what is preventing you from getting your tasks completed. Theticket status helps you to standardize the communication—so make it easy to keep upto date, and ensure everyone on the team gets into the habit of confirming their ticketstatus once a day.
A Basic WorkflowThis basic workflow is appropriate for small teams of one or two trusted developers.As was mentioned in the introduction, it is a stripped down version of GitFlow; butwithout the extra levels of complexity, it also resembles a branch-per-feature work‐flow. As such, you may find it also works well for teams of developers with a testinginfrastructure, who are aiming for rapid deployment of code.
62 | Chapter 4: Workflows That Work

Key characteristics include:
• Governance model: contributors with shared maintenance• Integration merge: performed by original developer• Integration branch: develop
My personal preference for this workflow is closer to a Kanban-style system, whichallows tickets to flow through a work board; however, I find it much easier to com‐municate plans to outside stakeholders by using the Scrum approach to time-boxedsprints. In Scrum, a specific set of tickets is loaded into a sprint and the goal is to getthe number of outstanding tickets down to zero by the deadline. For internal projects,Scrum-style sprinting can act as arbitrary deadlines to keep teams motivated andmoving forward.
At the end of each sprint, I recommend hosting an internal demo so that the team canshow off their work and ask for help from the wider group if they are stuck on a spe‐cific piece.
The workflow is as follows:
1. As you begin a ticket, update the status in the ticket tracker to say the ticket is InProgress. This will notify your team about what you are currently working on,and will give you the number for the branch you will create to work on yourticket.
2. From the branch develop, create a new branch whose name includes the ticketID and a terse description of the work. If you are working on tickets that havesubtasks, ensure the branch name uses the most relevant ticket number. For abigger feature, this ticket might be referred to in your ticketing system as a Metaticket or Epic ticket. If you are working on only part of the larger feature, youshould use the smallest relevant ticket number. Your ticket system might refer tothis as a user story, an issue, or bug ticket.
3. Work on your ticket, ensuring you keep the ticket branch up to date with anychanges that might have been incorporated into the branch master since youstarted your work. Begin each commit message with the ticket number enclosedin square brackets: [#1234].
4. Run relevant tests for your code to ensure typos and basic errors are caught. Thismay include a spellcheck, and a language syntax check (linting). If you are work‐ing in a test driven environment you will definitely have additional tests to run.
5. When you have completed your work (or think you have!), make a final commitwith the keyword “Resolves” and then the ticket number: Resolves #1234.
A Basic Workflow | 63

6. Optionally, push your ticket branch to the code hosting repository. With the key‐word in place in your commit message, this will move your ticket tracker for‐ward to the next step.
7. In your ticket tracker add a comment to the ticket to include a note about therationale for the approach you took and some kind of proof that the work wasbeen completed. For example, a screenshot of how the ticket changes the displayon your local development environment. This acts as a sanity check later if, sud‐denly, things stop working.
8. Ensure the ticket branch is up-to-date and then merge your work in the branchdevelop, and, assuming there are no merge conflicts, push the updated branch tothe central repository.
9. Assuming there were no new problems introduced by the new work (regressions),the ticket can be closed.
10. Finally, delete your local ticket branch and the remote copy of the ticket branch.
In some ticketing systems, adding a pound sign (#) will automati‐cally link the commit message to the ticket number. Adding squarebrackets around the ticket number will ensure that commit mes‐sages aren’t omitted if you choose to rebase your work because linesbeginning with a # are ignored when commit messages are auto‐matically composed for the new commit objects. In many systems,including the keyword “resolves” will automatically move a ticketfrom In Progress to the next state (for example, Needs Testing orClosed); this will vary depending on the ticketing system you’reusing. Check the documentation for whatever system you areusing.
This pattern works extremely well for small teams with no peer review requirements.As your team starts to grow, or if you have a specific quality assurance process youneed to undergo, you may find this pattern is not rigorous enough for your needs.
Trusted Developers with Peer ReviewThis expands the basic team workflow by adding a peer review process. Now, everyticket is reviewed by someone on the team from a code perspective. The rationale forpeer review testing, and not just automated testing (or test-driven development), iscovered in Chapter 8.
Key characteristics include:
• Governance model: contributors with shared maintenance• Integration merge: performed by the reviewer
64 | Chapter 4: Workflows That Work

• Integration branch: develop
The workflow is as follows:
1. As you begin a ticket, update the status in the ticket tracker to say the ticket is InProgress.
2. From your local copy of the branch develop, create a new branch.3. Work on your ticket, ensuring your branch is kept up to date with rebasing.
Begin each commit message with the ticket number enclosed in square brackets([#1234]), or with the keyword “Resolves” and then the ticket number: Resolves#1234.
4. Run relevant tests for your code to ensure typos and basic errors are caught. Thismay include a spellcheck, and a language syntax check (linting). If you are work‐ing in a test driven environment you will definitely have additional tests to run.
5. Push your branch to the code hosting repository. This acts as your backup, sodon’t skimp on this step!
6. When you’ve finished working on your ticket, ensure the branch is up to datewith develop, and uploaded to the code hosting system. Mark your ticket asNeeds Testing in the ticket tracker.
Assuming a manual review is necessary, and there isn’t a series of automated tests, thereviewer will finish off the remaining steps:
1. Perform a review of the work according to the original ticket description. It is thecoder’s responsibility to ensure his or her work is clear, and that the steps to testthe work are coherent. If necessary, send the ticket back to the developer with anynecessary changes, or to bring the branch up to date if it has gotten out of syncwith develop.
2. Merge the ticket branch into the branch develop, and, assuming there are nomerge conflicts, push the updated branch to the central repository.
3. Assuming there were no regressions, the reviewer will now close the ticket andnotify the developer that his or her work has been merged into the main branch.Both the developer and the reviewer can now delete their local copies of theticket branch. Because they are currently in cleanup mode, the reviewer shoulddelete the remote copy of the ticket branch; the developer might have to breakfocus in the current task to do the cleanup. Wherever possible, we should protectthe focus, and flow, of our teammates.
Once your team is large enough to have a review process, it makes sense to also havea shared development server from which the team can conduct regular demos oftheir work. This development server can also double as a quality assurance machine
A Basic Workflow | 65

during the development process. To reduce the overhead for team members needingto check out the latest version of the develop branch and build the software, you maychoose to set up a Jenkins instance to automate the process.
Untrusted Developers with QA GatekeepersThis process is a minor variation on the previous section “Trusted Developers withPeer Review” on page 64. This time the process assumes an untrusted developer, whois not allowed to merge anyone’s work into the main branch. Instead, a trusted qualityassurance (QA) team performs the final merge.
Key characteristics include:
• Governance model: contributors with collocated repositories• Integration merge: performed by the reviewer• Integration branch: develop
Developers begin by creating a fork of the project on the code hosting system, andthen creating a local clone from this forked copy of the repository. This step is onlyperformed once.
The workflow is as follows:
1. To begin a ticket, update the status in the ticket tracker to say the ticket is In Pro‐gress.
2. From your local copy of the branch develop, create a new branch.3. Work on your ticket, ensuring your branch is kept up to date with rebasing. Push
your ticket branch to your fork of the project as a backup of your work in pro‐gress.
4. Run relevant tests for your code to ensure typos and basic errors are caught. Thismay include a spellcheck, and a language syntax check (linting). If you are work‐ing in a test driven environment you will definitely have additional tests to run.
5. When you’ve finished working on your ticket, ensure the branch is up to datewith develop, and push your work to your forked repository. Open a pull request(in some ticketing systems, this might be called a merge request) for your work.
The reviewer will finish off the remaining steps:
1. Perform a review of the work according to the original ticket description.2. On the main copy of the repository, accept the pull request. Depending on
the ticketing system, this might be done via a web UI, or in a local clone of therepository.
66 | Chapter 4: Workflows That Work

3. Assuming there were no regressions, close the ticket. Because the work was com‐pleted in a fork of the main project, there is no additional cleanup in the mainrepository.
This approach also works well if your team is mostly trusted developers, but you havea few contractors as well. You might want to have your contractors working in a forkof the repository, instead of giving them write access to the main project. For sometypes of software, this split might even be a requirement for your own staff. Forexample, if you were working on firmware for a medical device, you might have verystrict government regulations you need to follow on who is allowed to check in work,and how that work must be reviewed before it is added to a repository.
Releasing Software According to ScheduleThe vast majority of the projects I have worked on have used a release schedule toexpose new versions of the software to its users. The process described in this sectionis based almost entirely on the very popular workflow, GitFlow. If you are deployingcontinuously, and do not collate multiple tickets worth of work into a specific release,this section will not be relevant to you.
Publishing a Stable ReleaseUp to this point, all of the examples have been working from the branch, develop.Eventually, though, you’ll want to release the product you’ve been working on. Whenyou’re ready to do this, you will need to split your repository into a public-facingstable version of the product, and a developer-facing “no guarantees” version of theproduct.
When the first version of your software is launched, a development manager will pre‐pare the repository for a code release. Generally this work is done locally, and thenpushed up to the main copy of the repository.
The workflow is as follows:
1. From an agreed-upon commit, create a new branch named master.2. Tag the agreed-upon commit with a version number with an easy-to-remember
naming convention. For example, v1.0.3. Push the updated repository to the central code hosting system. If an automated
build process is not being used, update the relevant servers with the new code.
Once the first release has been published, you will now split your work into stable,public-facing work and ongoing development.
Releasing Software According to Schedule | 67

Ongoing DevelopmentOnce an official release of a product has happened, your team will effectively beforced to think in two separate spaces at once: monitoring the health of the live code,and continuing the development process to add new features or improve those thatalready exist.
My preference, again, is for short work sprints. Developers are motivated to see theirwork in action. The longer the sprint, the longer people have to wait to see othersengaging with their work.
The one-week release schedule I commonly use has the following routine. The daysvary a little from team to team, but the generalized procedure is a good starting pointfor many teams.
Setup (Mondays):
• All work in the develop branch is merged into the testing branch, qa. Any workthat isn’t completed and peer reviewed by Monday simply remains in its ticketbranches.
• The testing server is updated with the latest version of the qa branch.• A QA checklist should be created for each of the user stories completed in the last
week of work. A standardized ticket format will make this list easy to compile.
You may want to compile your QA checklist in a separate document, such as a GoogleDoc, or an internal wiki. I’ve also used saved queries in JIRA to look for ticketsresolved in the last week, or which have been tagged for a specific release. This willdepend entirely on how you choose to track progress in your ticketing system.
Testing (Mondays and Tuesdays):
• Automated tests are run to ensure no new business-critical interactions havesuffered regressions (site visitors and members can still use all expected function‐ality).
• Team members responsible for testing complete the checklist and update thetickets according to a PASS or FAIL grade.
• Any bugs that are found have new tickets opened and are addressed beforelaunch day by either a new fix, or by removing the relevant commits from the qabranch.
Launch Day (Wednesday):
• The qa branch is merged into the master branch and tagged with the releaseversion.
68 | Chapter 4: Workflows That Work

• The live site is brought up to date by checking out the commit on the masterbranch, which has been designated as the newest release for the project. Using anexplicit tag ensures you can easily roll back to a previous known state.
Announcements about the latest features and fixes are posted to the developmentblog. Many teams choose to wait a day or two after Launch Day before publishingthe blog post. This allows the team to ensure the release is stable and does not need tobe reversed.
Post-Launch HotfixSometimes deployed code has mistakes in it. If a bug needs to be fixed quickly beforethe next batch of software is ready, an out-of-cycle fix might need to be made. Thesedeployments are referred to as a hotfix.
In a hotfix, the work begins not from the develop branch, but from the masterbranch. This ensures the changes only introduce a fix that addresses the problemidentified in the deployed code.
The workflow is as follows:
1. To create a hotfix branch, start by checking out the master branch, not thedevelop branch. This will ensure that no additional features accidentally sneakinto the fix.
2. Generate a list of tag names, and locate the latest tagged release.3. From the latest tagged release on the master branch, create a new branch, using
the branch name hotfix- <ticket_number>-<description>. For example,hotfix-1234-fixing_three_seat_issue.
4. Complete the same review steps as you would for a development ticket.5. Merge the tested hotfix branch into the master branch.6. Tag the new commit on the master branch with the latest release version. For
example, v1.0.1.7. Merge the tested hotfix branch into the development branch so that the changes
are not lost in the next official release of the software.
Collaborating on Nonsoftware ProjectsGit isn’t just for software developers! As a technical author, I’ve used Git a lot to trackchanges to files that weren’t software—for example, configuration files, articles I’mwriting, and even this book! Some people even use Git to maintain a personal journal.
Collaborating on Nonsoftware Projects | 69
To illustrate the importance of matching the Git commands to the team’s process, letme explain how I structured the repository for this book.
While writing this book, I worked with the O’Reilly automated build tool, Atlas. Thissystem also has a web-based GUI, which allows editors to work on book files directly,and saved files are immediately committed to the master branch. Due to the GUI,there is no peer review process because anyone on my team is able to make editsdirectly to a file. My preference, however, is to work locally, and not through a webGUI. Initially, I had been keeping the branch overhead low locally and had just beenworking in master as well. It only took me one merge conflict to alter the way I wasworking locally.
When I wanted to update my work, I would use the command fetch to see if anychanges had been made by my editors. With the fetch completed, I would comparemy copy of the master branch with their copy of the master branch (origin/master). Assuming I agreed with all the editors’ changes, I would merge in the edi‐tors’ copy of the branch; if I disagreed, I would merge in their branch with the strat‐egy --strategy-option=ours, effectively throwing out their changes but letting Gitthink that the two branches were merged.
This can be done on a per-commit basis, or if there is a merge conflict, it can be doneon a very granular line-by-line basis with a merge tool. (It feels a bit passive-aggressive to be throwing stuff out, but really it’s just the limitation of a single branchsystem where you don’t have the ability to talk about the proposed changes in a sepa‐rate branch.) Depending on the granularity of the commits, I might also choose tocherry-pick some commits (and keep them), but discard other commits.
Then I started getting reviews as marked-up PDFs and realized, once again, I hadanother way that I wanted to separate work. I wanted to be able to write a chapter andkeep those commits nice and tidy, but sometimes I was mid-chapter when an editcame in that I wanted to address immediately. Instead of intermingling these com‐mits, I set up the following structure for my branches: master, drafts, and onebranch per chapter.
The branch drafts gave me a place to integrate all of the work that I’d been doing. Itwas kept up to date by merging in chapters as they were completed, or rebasing themaster branch if changes had been made by one of my editors. When I was first writ‐ing chapters on my own, without others contributing, multiple branches would havebeen a lot of overhead to maintain, but as more contributors started offering differentkinds of contributions, more granularity in branches allowed me to pick and choosehow I wanted the manuscript to progress.
As you can see, my process differed wildly from the workflows used for softwareprojects, but it’s still Git that I’m working with! Your work may have its own idiosyn‐crasies that justify nonstandard branches. Don’t be afraid to experiment, but when
70 | Chapter 4: Workflows That Work

you do, document your process well so that others can understand what is expectedof them.
SummaryThe workflows described in this chapter have been successfully implemented inteams I have worked with. Your own team might want to make adjustments, butstarting from something will be a lot easier than starting from nothing.
• The workflow you use may change before and after the launch of your product.• Before launch, you will likely have fewer integration branches, because the con‐
cept of a hotfix is unlikely to be an issue.• By using your documentation to complete your work, you ensure your documen‐
tation is always up to date, which makes it faster to onboard others if you needhelp.
In Part II, you will learn the commands necessary to implement the processesdescribed in this part.
Summary | 71


PART II
Applying the Commands to YourWorkflow
This part of the book approaches the commands in Git from a very practical point ofview. You will be presented with a scenario first, and then given the commands youwould need to get yourself into (or out of) trouble.
Hands-on activities are sprinkled throughout the chapters. Where possible, youshould do these activities because it will help you gain a greater understanding of thecommands (and will make the messages feel more natural when working with yourown software projects). Where there are diagrams provided, you should redraw thembecause every motion that you make when learning a new activity will help todevelop the neural pathways needed to cement the information into your mind.
Before reading the chapters that follow, you should make sure you have the latest ver‐sion of Git installed (see Appendix B) and that your system is correctly configured(see Appendix C).


CHAPTER 5
Teams of One
Although this book is aimed at teams of more than one, there are often times whenwe are working as a team of one—a solo developer. This might be a personal sideproject, or you might actually be the only developer on your team. Working solo withno team constraints can be intimidating because there’s no one available to walk youthrough what you should do, or help you if you get stuck. In this chapter, I’ll showyou how I do my work when I’m working on my own projects. Of course there areplaces where I get tempted to cut corners as a solo developer (after all, no one iswatching over my shoulder, so who would know if I took a little shortcut here orthere?). Where I can, I will show you the implications of those shortcuts.
By the end of this chapter, you will be able to:
• Create a local copy of a remote repository• Initialize version control for an existing set of files• Create a new repository from an empty project directory• Examine the history of a repository via its commit messages• Work with branches to isolate different streams of work• Make commits to a local repository• Use tags to highlight individual commits• Connect your project to a remote code hosting system
If you are a creator (as opposed to a reviewer or manager), the majority of your timewill likely be spent using the commands outlined in this chapter. Being able to workeffectively with all of the tools outlined here should be considered a prerequisite tothe remaining chapters in this part.
75

Those who learn best by following along with video tutorials will benefit from Col‐laborating with Git (O’Reilly), the companion video series for this book.
Issue-Based Version ControlSomeone once told me that the person who can best describe a problem is the mostlikely to solve it. In writing this book, I’ve found that to be entirely too true. When Iwrite myself a TODO item that is vague, such as “finish chapter 4,” I rarely feel moti‐vated to work on the book. But when I write the task as “write-up sample workflowfor small teams like Mai’s,” I become way more motivated to dive into the writing.This isn’t unique to writing books, though. As a team of one, you might not feelentirely motivated to work on your code. If you’re like me, though, if the work is re-framed as a way to help a person, you’re more likely to get it done.
If you’ve never thought about what motivates you as a developer,you may enjoy Joe Shindelar’s presentation “A Developer’s Primerto Managing Developers”.
You might be asking yourself, “what does this have to do with Git?” Each time you sitdown to work on a project in source control, you should have an idea about whatyou’re trying to do. It doesn’t matter if you’re developing a new feature, fixing a bug,refactoring old code, or just trying out a new idea; you should still have some kind ofmotivation for tinkering. There are a lot of different ways to write down what youwant to work on, but the following works nicely and can be more rewarding than justworking on tickets.
The ticket has three main parts:
ProblemA terse description of what you’re trying to do
RationaleThe reason why you’d want to do this (who will it help if this problem is solved?)
Quality assurance testHow will I know that this problem has been solved?
This format is quite similar to another that I’ve seen used for Agile projects:
CardA terse description of the problem, written from the perspective of the user
76 | Chapter 5: Teams of One

ConversationDetails about the problem you’re trying to solve; where possible, it should avoidprescribing solutions
ConfirmationThe steps a user (from the first part) will be able to take to verify the problem hasbeen solved
In a team of one, you might feel that the overhead of a ticketing system is a bit muchfor you. Perhaps your paper notebook is sufficient. I often think this is true, but thenas I get working on my project, I start to lose track of all the little ideas I had. Some‐times I start a new branch for each idea, but then end up getting buried under an ava‐lanche of out-of-date branches. If this sounds like you, take a moment now to findthe ticket tracking options in whatever code hosting system you use, and start to getinto the habit of writing yourself love notes for what you plan to do with your soft‐ware. At the very least, it will give you arbitrary numbers that you can use to createbranches and help you keep track of your code.
If you don’t have a code hosting system yet, I recommend GitLab,or its free online offering, GitLab.com. It will allow you to createprivate repositories with unlimited collaborators for free, and it canbe installed on a local network if you are learning Git behind a fire‐wall. The advantage of a private repository is that you can hideyour work while you learn. If your work is hidden, you won’t beable to take advantage of community support, but I understand ifyou’re a bit shy right now. It happens to the best of us.
Once you have a way of tracking your ideas, the process for doing work should followthese steps:
1. Create a new ticket in your issue tracking system; note the number on the issue.2. In your local repository, create a new branch using the format issuenumber-
description.3. Do the work described in the ticket (and only the work described in the ticket).4. Test your work and make sure it is complete and correct. Ensure it passes your
QA test from the ticket you wrote in the development environment.5. You now have a “dirty” working directory that contains new and/or modified
files. Add your changes to the staging area of your local repository.6. Commit your staged changes to the repository.7. Push your changes to a backup server. In many cases, this will also be where your
tickets are being tracked, such as GitLab, Bitbucket, or GitHub. Depending on
Issue-Based Version Control | 77

your ticketing system, the ticket may now be marked as resolved but not neces‐sarily closed.
8. When you are completely satisfied with your work, merge your ticket branch intoyour main branch (usually master) and push the revised branches to the codehosting system.
9. Test your work again to ensure there are no follow-up issues.10. Update your ticket as appropriate to close it out.
Depending on the type of code you’re writing, these steps may vary slightly. Rewritethis list, in full, and include any steps that are different for the way you work. Forexample, you may practice test-driven development, or have build scripts that you useto deploy your code. Commit to following your own process. If you’re not reallymotivated by words, draw out your process instead (Figure 5-1).
However you choose to do it, make sure you capture your process. You may choose totuck it into the repository as a README file, or print it out and paste it to your Kan‐ban board. By practicing consistency now, it will become infinitely easier to workwith your coworkers to establish a process that everyone can follow.
In the remainder of the chapter, you will learn the commands needed to use the pro‐cess I described. We’ll start by creating a new repository where you can store yourwork.
Creating Local RepositoriesWhen you create a new repository in Git, you generally begin from one of three start‐ing points:
• From a clone of an existing repository• From an existing folder of untracked files• From an empty directory
In this section, you will learn how to create a new repository using each of these threemethods.
Begin by creating a folder that will store all of your sample repositories(Example 5-1). You may choose to put this folder on your desktop, or in your homedirectory, or somewhere else. Git won’t care, so long as you remember where thefolder is.
78 | Chapter 5: Teams of One

Figure 5-1. Sketch a diagram of your workflow
Creating Local Repositories | 79

Example 5-1. Create a project directory in your home directory
$ mkdir learning-git-for-teams$ cd learning-git-for-teams
Unless otherwise stated, each of the exercises in this book will assume you have navi‐gated to a sample repository within this folder. If it matters which repository you use,I will specify it in the instructions. Generally, however, it will not matter.
Cloning an Existing ProjectOn code hosting systems, such as GitLab or BitHub, when you navigate to a projectpage, you are typically given the option to download a .zip package of all the files orcreate a clone of the repository. Often these options are close together, but not always.Figure 5-2 shows the location of the repository URL in GitLab.
Figure 5-2. Locating the URL to clone a repository
Practice What You Will Do Most Often
By starting with a repository, you will also have an easier time oflearning the commands without having to invent problems to fix asyou learn Git.
To download a copy of a project, you will use the command clone, as shown inExample 5-2. Unlike downloading a zipped set of files, creating a clone of a project
80 | Chapter 5: Teams of One

will download a copy of all the files in the repository—along with the commit history—and it will remember where you downloaded the code from by setting up theremote code hosting server as a tracked repository. Don’t worry, it doesn’t keep a per‐sistent connection, but rather it bookmarks the location in case you want to check forupdates and download them to your local repository at a later date.
You will only clone a project once. Once the project is downloaded, you will use adifferent set of commands to keep it up to date. In Chapter 7, you will learn differentways to work with the command clone; in this chapter, we’re just going to use it tograb a snapshot of a project so that you have something to work with.
Example 5-2. Create a clone of the Git for Teams repository
$ git clone https://gitlab.com/gitforteams/gitforteams.git
The following should appear in the output of your terminal window:
Cloning into 'gitforteams'...remote: Counting objects: 1040, done.remote: Compressing objects: 100% (449/449), done.remote: Total 1040 (delta 603), reused 915 (delta 538)Receiving objects: 100% (1040/1040), 9.49 MiB | 1.68 MiB/s, done.Resolving deltas: 100% (603/603), done.Checking connectivity... done.
Congratulations! You have just cloned your first Git repository. You can muck aboutin this directory as much as you like. If you mess things up beyond recognition,delete the folder and run the clone command again.
Now that you have this directory, you also have all of the support material for thisbook. You can explore the supporting files, look for hidden Easter eggs, and generallyhave something to start with as you learn the more advanced commands withoutneeding to worry about inventing weird scenarios, or destroying your own work.
Converting an Existing Project to GitIf I am working with software for the very first time, I tend to download a zippedpackage of files and begin versioning with an initial import of the software at thatspecific point. I’ll rip things out, move things around, and generally give myself atrial-by-fire introduction of how (and why) I might want to keep things exactly theway the original developers intended things to be.
In order to compare the effect of the commands you’re running, download a secondinstance of the Git for Teams repository, but this time grab a zipped package of thesame repository you just cloned:
1. Navigate to https://gitlab.com/gitforteams/gitforteams.
Creating Local Repositories | 81
2. Locate and download the zipped package for the project.3. Unpack the project, and place it into your project directory for this book.
Because there is already a cloned copy of the files in this directory, you shouldname this new folder gitforteams-zip.
You can start with any folder of files and create a Git repository from it using the ini‐tialization command, init, as shown in Example 5-3. Git will be aware of all files inthis directory, including subfolders, so make sure you run the command init fromthe root folder for your project.
Example 5-3. Initialize a directory for version control
$ git init
You will see a message similar to the following:
Initialized empty Git repository in /Users/emmajane/gitforteams/gitforteams-zip/.git/
Files are not immediately added to the repository. This is a feature because Git allowsyou to ignore files as well, and so it is waiting for you to tell it exactly which files you’dlike to track. If there is a logical next step, Git will almost always have a useful sugges‐tion in its status message. You should get into the habit of using the command statusas frequently as you would use Save in a word processing program. This commanddoes not save your work, but rather it lets you know what’s happening at this momentin your repository—and knowing what’s happening is key to understanding Git. Goahead and check the status of your repository now (Example 5-4).
Example 5-4. Check the status of your repository
$ git status
Git lets you know the next step is to add the files you would like to track because youhave just initialized the repository:
On branch master
Initial commit
Untracked files: (use "git add <file>..." to include in what will be committed)
[ lots of files listed here ... ]
nothing added to commit but untracked files present (use "git add" to track)
Getting your files into Git is a two-step process. Although it feels a little tedious whenyou’re first getting started, this is a feature because it allows you to make multiple
82 | Chapter 5: Teams of One

unrelated changes at once in your working directory. Changes can be staged intogroups of commits in the index—each group getting a different commit message. Wewant to add everything that is in our working directory because this is the initialimport of files (Example 5-5).
Example 5-5. Add all files to the staging area of your repository
$ git add --all
Once again use the command status to check the status. The output will let youknow the files have been staged and are ready to be committed:
On branch master
Initial commit
Changes to be committed: (use "git rm --cached <file>..." to unstage)
new file: [ lots of files listed ... ]
Now that your files are added, you can save their current state into the repositorywith the command commit (Example 5-6).
Example 5-6. Commit all staged files to your repository
$ git commit -m "Initial import of all project files."
A lengthy commit confirmation message will be printed to the screen, notifying youthat the files have been added to your repository. Your project files are now underversion control.
Initializing an Empty ProjectWhen we teach Git, it’s generally easiest to start with a completely empty directory,void of any files. This is because it’s easiest for the instructor and the student to beginfrom the same point. This exercise allows you to introduce yourself to Git withoutworry:
1. Create a new, empty folder:$ mkdir empty-repository
2. Change into your new folder:$ cd empty-repository
3. Run the Git initialization command:$ git init
Creating Local Repositories | 83

4. Verify the hidden repository folder was added:$ ls -al
On Windows:dir
If you see a new hidden folder, .git, your repository has been created. This folder willcontain the record of all the changes to your repository. There’s nothing scary con‐tained in this folder, but if you remove it, your project will no longer be tracked. Thismeans you will not be able to recover previous versions of any of the files in yourrepository, you will lose all commit messages for your repository, and whatever statethe files are currently in will be immutable.
At this point, you can follow the additional steps from the previous section to addfiles (Example 5-5), and commit them to your repository (Example 5-6).
Reviewing HistoryOnce you have made your first commit into a repository, you are ready to startreviewing history. Of course, the history of your project is a combination of the workyou have done, as well as the work done by others you have collaborated with. It maynot feel like collaboration if you’ve merely downloaded an open source project, but itis. Collaboration can be as simple as adding your changes to someone else’s work.
To review the changes that have been made in a repository, use the command log(Example 5-7). By default, this command allows you to review the commit messageand author information for every commit in the branch that is currently checked outof your local repository.
Example 5-7. Reviewing a repository’s history with log
$ git log
The command log will output a full history of your repository’s commit messages inreverse chronological order.
Ensure Your Details are Configured
If your name and email address aren’t displayed, refer to Appen‐dix C for tips on how to configure Git.
If you’ve only made one commit message, the initial import, there will only be onemessage displayed:
84 | Chapter 5: Teams of One

commit fa04c309e3bb8de33f77c54c1f6cc46dc520c2caAuthor: emmajane <[email protected]>Date: Sat Oct 25 12:44:39 2014 +0100
Initial import of all project files.
If, however, you are working with a more established code base, there will be a lot ofmessages. This can be quite overwhelming and difficult to scan. You can shorten themessages to just the first line of the message by adding the parameter --oneline asshown in Example 5-8. To exit, press q.
Example 5-8. Viewing a condensed history of your project
$ git log --oneline
To get a sense of how the same files can have a different history, run the commandsfrom Examples 5-7 and 5-8 from both the cloned repository and from the repositoryyou created from a downloaded .zip package. Even though the files are identical, theirhistory is different (this will come up again when we talk about rebasing in Chap‐ter 6).
Other branches will have different commits, and different copies ofthe repository will have commits made by different developers. It’sbasically anarchy, but limited to each little repository. The conven‐tions we establish as software teams are what bring order to thechaos and allow us to share our work in a sane manner. (Remem‐ber the branching strategies we learned in Chapter 3? They’ll keepthe work sorted into logical thought streams. Remember the per‐mission strategies from Chapter 2? They’ll keep people locked intothe right place, and unable to make changes to the “blessed” reposi‐tory without the community gatekeeper’s consent.)
If you have completed all of the steps in this section, you will now have three separaterepositories to work from for the remaining activities. For the section on branching, Irecommend you work with the cloned repository because it has more to look at. Forthe other sections, you may choose any of the three.
Working with BranchesIn version control, branches are a way of separating different ideas. They are used in alot of different ways. You can use branches to denote different versions of software.You might use very short-term branches to work on a bug fix, or you might use alonger-term branch to test out a new idea.
Working with Branches | 85

Listing BranchesTo get a list of all branches (Example 5-9), you can use either the branch commandon its own, or add the parameter --list. At the beginning of this chapter, you cloneda repository; use that repository for this section because it already has branches foryou to look at.
Example 5-9. Listing local branches
$ git branch --list
A list of the local branches will be printed:
master
By default, the master branch is copied into your local repository and you can beginworking directly on it. In addition to this branch, you have also downloaded all otherbranches that were available in the remote repository. They are available for referencepurposes, but they are not available to be worked on until you have set up a workingcopy of the remote branch. To list all branches in your repository, use the parameter--all (Example 5-10).
Example 5-10. List all branches
$ git branch --all
If you use this command in your local copy of the cloned repository, you should seeboth your local branches and a list of remote branches. The * denotes which branchyou are currently viewing (or have “checked out”). The remainder of these lines allbegin with remotes/origin: remotes just means “not here,” and origin is the defaultconvention used for “my copy is cloned from here.” The final piece is the name of thebranch (master, sandbox, and video-lessons are all branches):
* master remotes/origin/master remotes/origin/sandbox remotes/origin/video-lessons
The list can be a bit misleading, though. The remote branch names do not actuallyinclude the word remotes. This is just a piece of information about what type ofbranch it is. To get a usable list of the names of the remote branches, use the parame‐ter --remotes (or -r for short) instead (Example 5-11).
Example 5-11. List remote branches
$ git branch --remotes
86 | Chapter 5: Teams of One

This will give a list of only the remote branches (using their real names):
origin/masterorigin/sandboxorigin/video-lessons
These branches are all accessible to you, although you’ll need to make your own copybefore committing changes to them.
Updating the List of Remote BranchesThe list of remote branches does not stay up to date automatically, so the list willbecome out of date over time. To update the list, use the command fetch(Example 5-12).
Example 5-12. Fetch a revised list and the contents of all remote branches
$ git fetch
You will learn more about working with remotes in Chapter 7.
Using a Different BranchWhen you check out a branch, you are updating the visible files on your system (theworking tree) to match the version stored in the repository. This switch is completedwith the command checkout (Example 5-13). The checkout process is a little differ‐ent from a centralized version control system (VCS), such as Subversion. In a central‐ized VCS, you would need an Internet connection to use the checkout commandbecause the branches are not stored locally, and must be downloaded in order to use.
Example 5-13. Switching branches with the command checkout
$ git checkout --track origin/video-lessons
Branch video-lessons set up to track remote branch video-lessons from origin.Switched to a new branch 'video-lessons'
This command works differently in older versions of Git. If the previous commandgave you an error, you may choose to upgrade (see Appendix B), or run the followingvariant:
$ git checkout --track -b video-lessons origin/video-lessons
This command (checkout -b) creates a new branch named video-lessons withtracking enabled (--track) from the branch video-lessons stored on the remoterepository, origin. The local copy of the remote branch is available at origin/video-lessons, and your copy of the branch is available at video-lessons.
Working with Branches | 87

You should now have a local copy of the remote branch video-lessons (Figure 5-3).
Figure 5-3. A local copy of a remote branch has been created
In your list of branches, it will look like the branch exists twice, except one includesthe reference information for the remote repository:
$ git branch -a
master* video-lessons remotes/origin/master remotes/origin/sandbox remotes/origin/video-lessons
From this new branch, you can review history using Example 5-22 or Example 5-23.Note the commit history is not the same between the two branches.
Creating New BranchesFor very tiny projects, I happily putter along in the master branch with each commitacting as a resolution to a problem; however, the bigger the team gets, the more it willbenefit from having some structure in how people collaborate on the work. Chapter 3covered the strategies you may want to adopt with your team for branching strategies.As a solo developer it can be more difficult to know if you should be working on adifferent branch. To help you decide, ask yourself a few questions:
• Is it possible I will want to completely abandon this idea if things don’t work out?• Am I creating something that is a significant deviation from the current pub‐
lished version of the software?• Does my work need to undergo a review before it’s published or accepted into the
published version of the software?• Is it possible I will need to switch tasks before I’ve completed this work?
88 | Chapter 5: Teams of One

If you answered “yes” to any of these questions, you should consider creating a newbranch for your work. Teaching yourself good habits now is like buying insurance.You hope you never have to use it, but you buy it just in case.
The best way to decide what goes into a branch is to start with the issue tracker. Bycreating a written description of what you’re about to do, you will have a clear senseof when to start and finish with your branch. Yes, this will often feel like overhead,but it is a really good habit to get into, especially when you’re working in larger teams.
When you start a new branch, it will contain the identical history as the place you arebranching from at the moment you create it (Figure 5-4). When you review the his‐tory of a new branch with the command log, it will also show the commits from itsancestor branch.
Figure 5-4. New branches contain the same commits as their ancestor
Seeing as you are working on issue-based version control, your branch name shouldreflect the ticket you are working on. For example, if the issue was “1: Add processnotes to README,” then the branch would be named 1-process_notes. The historyfor the new branch will include all of the commits up to the point of departure, somake sure you begin your new branch from the correct starting point. You can dothis by either using the command checkout to situate yourself in the correct branchfirst (Example 5-14), or you can add the desired parent branch to your command(Example 5-15).
Working with Branches | 89

Example 5-14. Creating a new development branch
First checkout the branch you want to use as the starting point:
$ git checkout master
Switched to branch 'master'
Next, create a new branch:
$ git branch 1-process_notes[no message displayed]
Finally, check out the new branch:
$ git checkout 1-process_notes
Switched to branch '1-process_notes'
Although it’s a little more to remember, Example 5-15 does have the advantage of cre‐ating a branch explicitly from the right base branch, meaning you don’t need toremember the extra checkout step from the previous instructions.
Example 5-15. Creating a new development branch from the master branch
$ git checkout -b 1-process_notes master
Switched to a new branch '1-process_notes'
Once you are in your new branch, you can go ahead and do your work. As an exer‐cise, I encourage you to try adding your notes on how your process works to one ofthe three repositories you’ve created in this chapter. Once you’ve made all of youredits, it’s time to commit the changes to your local repository.
Adding Changes to a RepositoryEach time you make a change to your working directory, you will need to explicitlysave the changes to your Git repository. This is a two-part process. Figure 5-5 showshow changes must be explicitly staged in the index, and then saved to your repository.
Figure 5-5. Changes in Git must be staged, and then saved to the repository
90 | Chapter 5: Teams of One

When you previously created a new repository, you imported a series of files all atonce (Example 5-5). You don’t have to add all the files at once, though. This can beespecially helpful if you have been working on unrelated edits that should be capturedin separate commits. If you do want to separate the changes into multiple commits,you need to change the parameter --all that you used previously for the filenameyou want to stage (Example 5-16). You can add one or more filenames at a time; thefilenames do not need to be the same type.
Example 5-16. Add selected changed files to your Git repository
$ git add README.md process-diagram.png
$ git add branch-naming-rules.png
For the most part, I add files to the staging area one at a time. I find this prevents mefrom accidentally adding more than I meant to. At the command line, I can type thefirst few letters of the filename and then press the Tab key, and the remainder of thefilename will be automatically typed out (this is known as tab completion and it’s oneof my favorite things to use). If, however, you have a lot of files you need to add, andthey’re all contained in the same directory, you may want to use a wildcard to matchfiles with a subdirectory (Example 5-17), or that all have a similar name(Example 5-18).
Example 5-17. Add all files, recursively, from a given path
$ git add <directory_name>/*
Example 5-18. Add all files with the file extension .svg
$ git add *.svg
You can also completely omit the filenames, and instead stage files according towhether or not they are known to Git. By using the parameter --update you canstage all files that are known to Git, and that have been edited (or updated) since thelast commit:
$ git add --update
If you want to be even more outrageous, you can stage all changed files in the work‐ing directory by adding the parameter --all. This will restage any files that have beenmodified since they were first staged (ensuring all new edits are captured in the com‐mit); stage any files that are known to Git, but not already staged; and stage any filesthat are not currently being tracked by Git. It is a very greedy command! Before usingit, you should check the list of files that will be added:
Adding Changes to a Repository | 91

$ git status$ git add --all
Once a change has been added to the staging area, it must be committed. If you con‐tinue to work in any of the files you’ve added to the index, only the previously stagedchanges will be added when you next run the command commit (Figure 5-6). If youkeep working on the file, and want to include these changes in your commit, you willneed to repeat the previous command where you added your files to the staging area.
Figure 5-6. A commit will only save the work that has been added to the index
You can commit your staged changes to the repository by running commit
(Example 5-6).
If this feels frustrating at first, you’re not alone! It took me a while to get used to thisbehavior and I felt it was broken when it didn’t automatically notice I’d changed the
92 | Chapter 5: Teams of One

file and stage the new changes. It wasn’t until I started playing around with partialstaging of files that I realized how powerful it was to not have my changes automati‐cally staged.
Adding Partial File Changes to a RepositoryIf you want even more granularity over your commits, you can choose to add partialchanges within a saved file by using the parameter --patch. One of my favorite rea‐sons for committing files in this way is to record several unrelated edits into multiplesmaller commits.
Adding files via the --patch process is a multistep approach (Example 5-19). You willfirst initialize the procedure, and then choose from a list of options on how you wantto create your patches. You will be prompted to add the change to the staging area (y),or leave this hunk unchanged (n). Changed lines will begin either with a - (lineremoved) or a + (line added). If a line has been changed, it will display as bothremoved and added.
To separate the hunks into smaller units, you can use the option s to split the hunk.This will only work if there is at least one line of unchanged work between the twohunks. If you want to separate two adjacent lines for staging separately, you can edit(e) the hunk.
Example 5-19. Add selected changes to your Git repository interactively
$ git add --patch filename
By adding the optional filename, you will not need to cycle through each file. If youknow exactly which file you need to split up, and you have a lot of files that need stag‐ing, it can save you time to work with specific files. After running the command, youwill begin the process of walking through the files, looking for changes to stage:
diff --git a/ch05.asciidoc b/ch05.asciidocindex 8f82732..e7be9ce 100644--- a/ch05.asciidoc+++ b/ch05.asciidoc@@ -6,7 +6,6 @@ changed significantly in the last few years; however, a few ofthe commands we'l easier to remember. Chances are very good that you have Gitinstalled if you are using Linux or OSX. If you are using Windows, however,the changes are very good that Git is not installed unless you've explicitlyinstalled it already.
-. Open a terminal window. . Enter the command: +git --version+
The version of Git you are running should be printed to the screen.
Stage this hunk [y,n,q,a,d,/,j,J,g,e,?]?
Adding Changes to a Repository | 93

In the output displayed, we can see that Git is asking if we want to stage this one linechange (. Open a terminal window), which is a proposed deletion as indicated bythe -. Additional options for what to do with this hunk are available by pressing ?.
Committing Partial ChangesAssuming you’ve only added some changes from a given file to the staging area, whenyou check the status of your repository, you will see that a file is both ready to becommitted, and has unstaged changes:
On branch masterChanges to be committed: (use "git reset HEAD <file>..." to unstage)
modified: ch05.asciidoc
Changes not staged for commit: (use "git add <file>..." to update what will be committed) (use "git checkout -- <file>..." to discard changes in working directory)
modified: ch05.asciidoc
This is the same message that is displayed if you add a file to the staging area and thencontinue to edit the file before committing it to the repository, or if you only chooseto stage some hunks while while adding files interactively to the index with theparameter patch.
Removing a File from the StageIf you accidentally add too many files from the staging area, and want to break yourchanges into smaller commits, you can unstage your proposed changes(Example 5-20). Removing a file from the stage doesn’t mean you’ll be undoing theedits you’ve made; it notifies Git that you’re not ready for these changes to be com‐mitted to the repository yet.
Example 5-20. Remove proposed file changes from the staging area
$ git statusOn branch masterChanges to be committed: (use "git reset HEAD <file>..." to unstage)
modified: ch05.asciidoc
$ git reset HEAD ch05.asciidocUnstaged changes after reset:M ch05.asciidoc
94 | Chapter 5: Teams of One

Optionally, you can also use the --patch parameter with the command reset if youonly want to unstage some of the changes you’ve made to a file.
Undoing your work will be covered in greater detail in Chapter 6.
Writing Extended Commit MessagesUp to this point it’s possible you have been writing terse, one-line commit messages.While this is fine if you’re just practicing version control commands, it’s not going tomake your future self very happy if you need to figure out what the commit message“Oops. Trying again.” means.
It took me quite a while to get out of the habit of thinking of Git as a place where Isaved my work and instead as a place where I recorded my results. When I firststarted working with version control the commits I was making were granular to takeadvantage of the advanced tools available to me (you’ll learn more about these inChapter 6). This is because I was coming the mindset of saving work and undoingmistakes. When in the save mindset, I would think of clicking the save button, orusing control-Z to undo the last few things I typed. When the commits are this small,the commit messages tend to be nearly useless (“stopped for lunch”; “tried some‐thing”; “didn’t work”; “oops”; “testing”). If I wanted to roll back history, how the heckwould I use those commit messages to find the spot where the code was working aftersomething broke? It make take you a while to find your stride as well.
Your commit messages should always include the rationale for why you made achange, as well as a quick summary of the changes you made. In order to write adetailed commit message, you will need more than one line the one line short mes‐sage style you have been using up to now. I typically write my commit messages witha two-step procedure (Example 5-21):
1. Use a terse, one-line message to commit the changes to the repository.2. Amend the commit to include a full description of what I was thinking when I
made the change.
Example 5-21. Writing a detailed commit message
$ git add --all$ git commit -m "CH05: Adding technical edits."$ git commit --amend
You don’t need to do this two-step process; you can jump straight into the messageeditor by omitting the parameter -m when first making your commit:
$ git commit
Adding Changes to a Repository | 95

Your default editor will open, and you will be prompted to add a new commit mes‐sage. The first line of the message will be used for the --oneline display, and all linesbeginning with # will be removed from the final message. Once you’ve crafted yourcommit message, you will need to save it and then quit the editor to complete thecommit.
Working with the Default Editor, VimBy default, the commit editor is Vim. This works for me because I like Vim, but if youdon’t, there’s information on changing the editor in Appendix C. You’ll need a few keycommands to navigate Vim:
• i takes you from visual mode to insert mode. You’ll need to do this so that youcan begin typing your commit message.
• esc returns you to visual mode. From here you can navigate using the arrow keysto a different line.
• :w saves the file by writing it to disk.• :q quits the editor, returning you back to the command line.
You can also chain these commands together. For example, after writing your commitmessage, you can save and quit the editor with esc :wq.
In Chapter 6 you will learn how to squash granular commits into whole ideas withinteractive rebasing.
Ignoring FilesEventually, you may run into a situation where Git keeps adding files to the reposi‐tory that you actually never want to add. If you’re on a Mac, this might include thepesky .DS_Store files. If you’re on Linux, maybe it’s your text editor’s .swp files. Ifyou’re working on a web project, this may include the compiled CSS files createdfrom Sass.
If you know that your favorite text editor, or IDE, creates temporary files, which arenot project specific, you should create a global setting to ignore these files.
First, run the following command to let Git know which file you would like to storeyour list of “ignored” files in:
$ git config --global core.excludesfile ~/.gitignore
You can now update this file using one filename per line. You can use exact filenames,or wildcards (for example: *.swp will match any file ending in .swp). For a usefulstarting point of files to ignore, check out gitignore.io.
96 | Chapter 5: Teams of One

Additionally, you may want specific repositories to ignore specific files or file exten‐sions. In this case, your best option is to add an extra .gitignore file to the repository.This has the added benefit of ensuring your teammates don’t accidentally sneak intheir build files.
Complete the following steps to customize which files should be ignored for a specificrepository:
1. Create a file in the root level of your project named .gitignore.2. Using one filename per line, add all of the files you never want Git to add to the
repository. You can use exact filenames, or wildcards (for example, *.swp).3. Add the file .gitignore to your repository by using the commands add and commit.
Files with these extensions will no longer be added to your repository, even if you areusing the parameter --all.
Working with TagsTags are used to pinpoint specific commits. You can think of them like a bookmark. Idon’t use tags nearly as much as I should. As a result, I rely on my commit messagesto find specific points in the repository. You may find working with tags is a goodhabit to get into because they will allow you to easily reference points in your timeline.
Tags for Teams of More Than One
In this chapter, we are referring to private repositories with nobranches that are shared with other teammates. When yourbranches aren’t shared, there are no reasons to limit how and whenyou use tags. Use them as often as you’d like! The tags you use onshared branches, however, are typically used for deployment pur‐poses and should follow a convention that is useful to the wholeteam.
Tags can only be added to specific commits. To know which commit you want to addyour tag to, you’ll probably want to use a combination of log and show. The com‐mand log will give you a list of all commits in your repository (Example 5-22), andthe command show will display the detailed information for any single commit.
Example 5-22. Quick list of recent commits
$ git log --oneline
fa04c30 Initial import
Working with Tags | 97

Once you think you have found a commit that you would like to investigate a littlefurther, you can get the detailed commit message beginning at that commit by addingthe commit ID (Example 5-23). To limit the output to only that commit, add theoptional parameter --max-depth= along with the number of log entries you wouldlike to show.
Example 5-23. Log details for a single commit
$ git log fa04c30 --max-depth=1
commit fa04c309e3bb8de33f77c54c1f6cc46dc520c2caAuthor: emmajane <[email protected]>Date: Sat Oct 25 12:44:39 2014 +0100
Initial import
If you want even more details about the commit object, you can use the commandshow (Example 5-24) to list the changes that happened in that commit as text (ofcourse, this will be less useful for binary files, such as images).
Example 5-24. Use show to display the log message and textual diff for a single commit
$ git show fa04c30
commit fa04c309e3bb8de33f77c54c1f6cc46dc520c2caAuthor: emmajane <[email protected]>Date: Sat Oct 25 12:44:39 2014 +0100
Initial import
diff --git a/ch05.asciidoc b/ch05.asciidocnew file mode 100644index 0000000..8f82732--- /dev/null+++ b/ch05.asciidoc@@ -0,0 +1,867 @@++=== Verifying Git++Before we dive into using Git, you'll want to check and see which version isinstalled. For our purposes, Gi
[etc]
Once you have identified a commit that you want to bookmark, you can do so byusing the command tag. In Example 5-25, a new tag, import, is created for the com‐mit hash fa04c30.
98 | Chapter 5: Teams of One

Example 5-25. Adding a new tag, import, to a commit object
$ git tag import fa04c30
You can now list the available tags by using the command tag without any parame‐ters (Example 5-26).
Example 5-26. Listing all tags
$ git tag
A list of tags will be printed to the screen. At this point, only one tag has been added,so the list is very short:
import
Once a tag is made, you can investigate the commit where the tag was added(Example 5-27).
Example 5-27. Reviewing a tagged commit
$ git show import
As you have seen previously, the command show will display the log message and tex‐tual diff for that commit.
Connecting to Remote RepositoriesIn a centralized version control system, like Subversion, there is one master copy ofthe repository and all work is written into that copy. When you commit, the informa‐tion is immediately uploaded to that central repository and available to others. In adecentralized version control system, like Git, there is no single repository that every‐one works with. It is merely a convention that declares one copy of the repository tobe privileged (and considered to be the official source for the code).
When you’re a team of one, a remote repository is really more of a backup to yourlocal repository because there won’t be any changes happening on the remote unlessyou put them there. This remote repository can also be used to transfer code betweenyour different local development environments. For example, you may use both a lap‐top and a desktop for your projects. The remote repository can be an effective way tobounce your work from one place to the next so that you can continue working evenwhen switching machines.
If you’ve been following along in this chapter, you should now have three local repo‐sitories: one created from a clone of a repository on GitLab, one created from adownloaded .zip package, and a third repository created from an empty folder. They
Connecting to Remote Repositories | 99

are all local, however, and you don’t have the option to share your work with othersbecause they either don’t have a remote associated with them (repository from thezipped package, and the repository that was initialized locally) or you don’t have writeaccess to the remote repository (repository that you cloned).
In order to upload your work, you will need to create a new project on GitLab andassociate it with one of your existing repositories.
Creating a New ProjectIf you haven’t already, you will need to create an account on GitLab.com (it’s free) andsign into your account. You can also sign in via GitHub, Twitter, or Google. Althoughyou can also complete these steps on another code hosting system, such as GitHub,GitLab is an open source product that you can host yourself for free if you need topractice source control from behind a firewall:
1. Log in to your GitLab account and navigate to your dashboard.2. From the project summary tab, click the button New project.3. Enter a Project path, such as gitforteams. All remaining fields can be left as
their defaults.4. Click Create project. You will be redirected to the instruction page on how to
upload your repository.
Adding a Second Remote ConnectionGitLab gives you the copy/paste instructions you need to upload your repository toits platform; however, you don’t necessarily want to complete all of the steps. Fromyour new project page, take a look at the second section, Create a new repository(Example 5-28).
Example 5-28. Create a new repository on GitLab
mkdir my-git-for-teamscd my-git-for-teamsgit inittouch README.mdgit add README.mdgit commit -m "first commit"git remote add origin [email protected]:emmajane/my-git-for-teams.gitgit push -u origin master
Can you see where your starting point would be if you had already created a reposi‐tory locally? (Hint: compare it with the section labeled Push an existing Git reposi‐tory.) You’ve already done all of the steps up to the line git remote add origin. If
100 | Chapter 5: Teams of One

you want to create a new repository from scratch, you would follow all of theseinstructions, but you already have three local repositories! So instead of creating anew one (again), you are going to add the remote connection so that you can uploadone of the three repositories to this new project on GitLab. It doesn’t matter which ofthe three you choose, but you can only choose one because each project presents asingle repository.
When you add a remote to your repository, you must also assign it a nickname(Example 5-29). By default, the nickname is origin. You could name it anything youlike, though--pickles, peanutbutter, kittens--Git wouldn’t care. The advantage ofusing origin is that more tutorials online will be as easy as copy and paste; the disad‐vantage is that origin doesn’t really explain very much, especially if your repositoryactually started locally. In addition to this, origin is already in use if you created yourrepository by cloning it from a remote repository. To connect the project you createdto any of the three repositories you have locally, use the nickname my_gitlab.
Example 5-29. Adding a remote to a local repository with a custom name
$ git remote add my_gitlab [email protected]:emmajane/my-git-for-teams.git
It wasn’t until I finally started taking control over the names of things in Git that Ireally started to understand how all the pieces fit together. For example, I will oftennickname my remote according to the name of the code hosting system. My localcopy of the Git for Teams repository has the following remotes: github, gitlab, andbitbucket (Example 5-30).
Confirm the remote was correctly added with the command remote, as shown inExample 5-30.
Example 5-30. List remote repositories connected to your current repository
$ git remote --verbose
If you have assigned the remote to the repository you cloned, you will see two pairs ofremotes listed:
my_gitlab [email protected]:emmajane/my-git-for-teams.git (fetch)my_gitlab [email protected]:emmajane/my-git-for-teams.git (push)origin [email protected]:emmajane/gitforteams.git (fetch)origin [email protected]:emmajane/gitforteams.git (push)
You are now ready to push your work from any branch to your remote repository.
Connecting to Remote Repositories | 101

Pushing Your ChangesTo upload your changes, you need to have a connection to the remote repository, per‐mission to publish to the repository, and the name of the branch to which you wantto upload your changes. The first time you push your branch, you will need to explic‐itly tell Git where to put things. If you start by using the command push, it will tellyou what to do next.
Avoid the Hassle of Typing Your Password
If you haven’t added your SSH keys to the code hosting system (seeAppendix D), you will need to enter your username and passwordeach time you want to push your changes.
For example, if you’re currently using the branch 1-process_notes, and you try topush it to the remote repository (Example 5-31), you will get an error message(Example 5-32).
Example 5-31. Upload a branch using the command push
$ git push
Example 5-32. Without an upstream branch, you will get an error message
fatal: The current branch 1-process_notes has no upstream branch.To push the current branch and set the remote as upstream, use
git push --set-upstream origin 1-process_notes
This error message provides us with very useful information, but it’s not quite right.Instead of uploading the branch to the remote origin, we actually want to use ournew remote, my_gitlab (Example 5-33).
Example 5-33. Set the upstream branch while uploading your local branch
$ git push --set-upstream my_gitlab 1-process_notes
This will upload your branch and set it up for future use. Now whenever you areusing this branch, you can issue the much shorter command git push to uploadyour work. By setting the upstream connection, you are building a relationshipbetween your local copy of the branch and the remote repository. This has the sameeffect as when you used --track to check out a remote branch, except in that caseyou were starting with the remote copy and adding a tracked local copy.
102 | Chapter 5: Teams of One

Branch MaintenanceOnce the code has been fully tested, you will want to merge the ticket branch into themaster branch (Example 5-34), and delete the local (Example 5-35) and remotecopies of the ticket branch (Example 5-36). As a team of one, it’s unlikely you’ll needto deal with merge conflicts. Merge conflicts will be covered in Chapter 7.
Example 5-34. Merging a ticket branch into your main branch
$ git checkout master$ git merge 1-process_notes
If a true merge needs to be performed, as opposed to just a fast-forwarding of history,you may be presented with the editor for a commit message. Generally I leave thedefault message in place. Once the work has been merged into the master branch,you should push the master branch to the remote repository as well:
$ git push --set-upstream my_gitlab master
Now that the changes have been merged into the master branch, there’s not a lot ofreason to keep the ticket branch open. To keep your repository tidy, you can go aheadand delete the ticket branch now (Example 5-35).
Example 5-35. Delete your local copy of the branch
$ git branch --delete 1-process_notes
Git will complain wildly if there are changes that haven’t been merged into anotherbranch, so you don’t need to worry (too much) about losing unsaved work.
Finally, you need to do a bit of housekeeping for the remote repository as well. Youshould also delete remote branches whose changes have been merged into master(Example 5-36).
Example 5-36. Delete remote branches that are no longer needed
$ git push --delete my_gitlab 1-process_notes
With your housekeeping finished, it’s time to repeat this process for your next newidea.
Command ReferenceTable 5-1 lists the commands used in this chapter. These commands are shell com‐mands and should be used as written.
Command Reference | 103

Table 5-1. Basic shell commands
Command Use
cd ~ Change to your home directory
mkdir Make a new directory
cd directory_name Change to a specified directory
ls -a List hidden files for OS X and Linux-based systems
dir List files on Windows
touch file_name Create a new, empty file with the specified name
Table 5-2 lists the subcommands for the Git application. They will always be precee‐ded by the command git when used at the command line.
Table 5-2. Basic Git commands
Command Use
git clone URL Download a copy of a remote repository
git init Convert the current directory into a new Git repository
git status Get a status report for your repository
git add --all Add all changed and new files to the staging area of your repository
git commit -m "message" Commit all staged files to your repository
git log Review a repository’s history
git log --oneline View a condensed history of your project
git branch --list List all local branches
git branch --all List local and remote branches
git branch --remotes List all remote branches
git checkout --track
remote_name/branch
Create a copy of a remote branch for local use
git checkout branch Switch to a different local branch
104 | Chapter 5: Teams of One

Command Use
git checkout -b branchbranch_parent
Create a new branch from a specified branch
git add filename(s) Stage only the specified file so that it is ready to be committed
git add --patch filename Stage only portions of a file so that they are ready to be committed
git reset HEAD filename Remove proposed file changes from the staging area
git commit --amend Update the previous commit with changes currently staged, and supply anew commit message
git show commit Log details for a single commit
git tag tag commit Add a tag to a commit object
git tag List all tags
git show tag Log details for the commit where the tag was applied
git remote add remote_name URL Create a new reference to a new remote repository
git push Upload changes for the current branch to a remote repository
git remote --verbose List the fetch and push URLs for all available remotes
git push --set-upstream
remote_name branch_local
branch_remote
Push a copy of your local branch to the remote server
git merge branch Incorporate the commits currently stored in another branch into the currentone
git push --delete remote_name branch_remote
Remove named branch from the remote server
SummaryThroughout this chapter you have learned how to work with Git as a team of one.The following is a guide to the best practices outlined in this chapter:
• Always begin your work by defining the problem you want to work on. This defi‐nition will help you determine the name of the branch, and which piece of workyou want to branch away from to start your work.
Summary | 105

• As you are making changes in your branch, you can choose to add some or all ofthe changes you’ve made through the staging area. This will help you to craftcommits with related work.
• Regardless of whether you start your repository locally or via a clone, you canalways start a new project on a code hosting system and upload your work byadding a new remote to your local repository.
• Housekeeping tasks should be performed as you wrap up each line of work. Youcan do this by merging your ticket branches into your main branch, and thendeleting the local and remote copies of your branch.
In the next chapter, you will learn how to go back in time in the Git time machine toundo your work and change your commit history.
106 | Chapter 5: Teams of One

CHAPTER 6
Rollbacks, Reverts, Resets, and Rebasing
This is otherwise known as the “Rrrrgh!” chapter. Bad things happen to good people.Fortunately, Git can help you undo some of those past mistakes by traveling back intime. There are several commands in Git that vary in their degree of severity—mak‐ing minor adjustments of a commit message all the way through to obliterating his‐tory. Mistakes are typically committed and removed from a personal repository, butthe way you deal with them can impact how others interact with the code base.Ensuring you are always dealing with problems in the most polite way possible willhelp your team work more efficiently.
By the end of this chapter, you will be able to:
• Amend a commit to add new work• Restore a file to a previous state• Restore your working directory to a previously committed state• Revert previously made changes• Reshape your commit history using rebase• Remove a file from your repository• Remove commits added to a branch from an incorrect merge
Throughout the chapter you will be learning techniques that feel invisible, but havehuge implications. Take the time to slow down, and draw a diagram of how you wantthings to appear after you have run the sequence of commands. This will help you toselect the right subcommand and the right parameters. It will also help you to recallinformation the next time you need to perform the same task again.
Those who learn best by following along with video tutorials will benefit from Col‐laborating with Git (O’Reilly), the companion video series for this book.
107

Best PracticesIn this chapter you are going to be learning to manipulate the history of your reposi‐tory. While the exercises in this book are easy to follow, there will come a time whenyou are a little under pressure and a little unpracticed and you will panic and thinkyou’ve lost your work. Take a deep breath. It will be okay. If you’ve committed some‐thing into the repository, it will (almost) always be there if you are willing to do somedigging. It’s very difficult to completely remove work from a repository in Git; it is,however, relatively easy to lose work and not be able to find it again. So before youlearn how to muck about with history, let’s make sure you’ve got some good recoverytools to help you MacGyver your way out of difficult situations.
Describing Your ProblemThere are a lot of ways to undo work in Git, and each method is exactly right some ofthe time. In order to choose the correct method, you need to know exactly what youwant to change—and how it should be different after you are finished. When I wasfirst learning version control, I would often draw a quick sketch of what I was tryingto accomplish to ensure I was using the right command for the job. Figure 6-1 showsthe three concepts you need to be aware of: the working directory (the files currentlyvisible on your filesystem); the staging area (the index of changes that will be writtento the repository after the next commit); and the repository (which stores files andrecords the changes made to the files over time).
Figure 6-1. The working directory, staging area, and repository each contain differentinformation about your files
The Staging Area is Not Automatically Updated
Figure 6-1 is a bit of a lie, as you need to explicitly place things intothe staging area using the command add, but it’s a decent workingmodel to start from.
108 | Chapter 6: Rollbacks, Reverts, Resets, and Rebasing

Whenever you can separate your problem into the discrete places where Git is storingits information, you have a better chance of choosing the correct command sequenceto return your work to the state you want it to be in. Table 6-1 contains a series ofscenarios might encounter while working with Git.
Table 6-1. Choosing the correct undo method
You want to… Notes Solution
Discard changes you’ve made to a file in yourworking directory
Changed file is not staged, orcommitted
checkout -- filename
Discard all unsaved changes in the workingdirectory
File is staged, but notcommitted
reset --hard
Combine several commits up to, but notincluding, a specific commit
reset commit
Remove all unsaved changes, including untrackedfiles
Changed files are notcommitted
clean -fd
Remove all staged changes and previouslycommitted work up to a specific commit, but donot remove new files from the working directory
reset --hard commit
Remove previous work, but keep the commithistory intact (“roll forward”)
Branch has been published;working directory is clean
revert commit
Remove a single commit from a branch’s history Changed files are committed;working directory is clean;branch has not beenpublished
rebase --interactive commit
Keep previous work, but combine it with anothercommit
Select the squash option rebase --interactive commit
Figure 6-2 shows one diagram for the first scenario. Additional answers are availableon the Git for Teams website.
Best Practices | 109
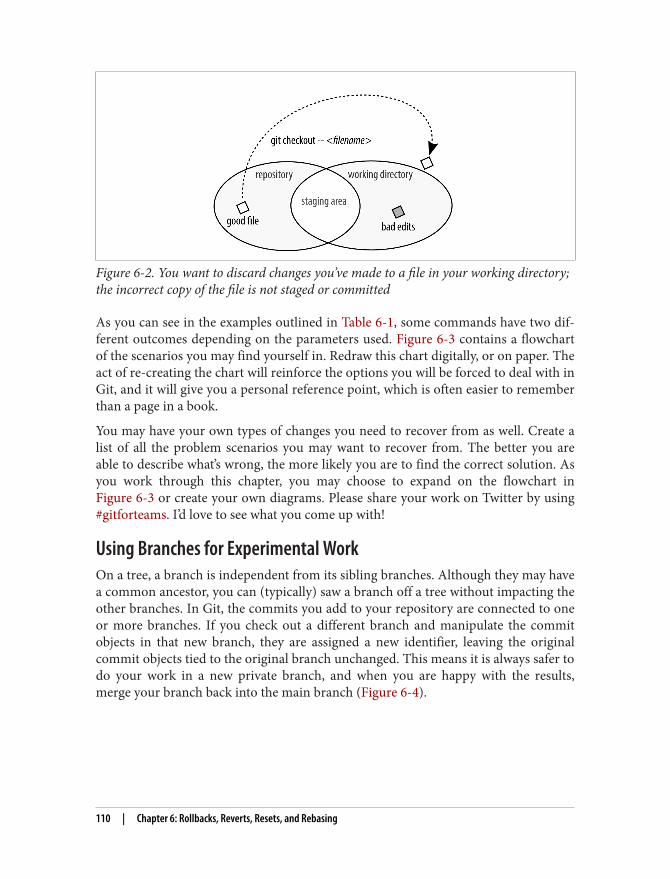
Figure 6-2. You want to discard changes you’ve made to a file in your working directory;the incorrect copy of the file is not staged or committed
As you can see in the examples outlined in Table 6-1, some commands have two dif‐ferent outcomes depending on the parameters used. Figure 6-3 contains a flowchartof the scenarios you may find yourself in. Redraw this chart digitally, or on paper. Theact of re-creating the chart will reinforce the options you will be forced to deal with inGit, and it will give you a personal reference point, which is often easier to rememberthan a page in a book.
You may have your own types of changes you need to recover from as well. Create alist of all the problem scenarios you may want to recover from. The better you areable to describe what’s wrong, the more likely you are to find the correct solution. Asyou work through this chapter, you may choose to expand on the flowchart inFigure 6-3 or create your own diagrams. Please share your work on Twitter by using#gitforteams. I’d love to see what you come up with!
Using Branches for Experimental WorkOn a tree, a branch is independent from its sibling branches. Although they may havea common ancestor, you can (typically) saw a branch off a tree without impacting theother branches. In Git, the commits you add to your repository are connected to oneor more branches. If you check out a different branch and manipulate the commitobjects in that new branch, they are assigned a new identifier, leaving the originalcommit objects tied to the original branch unchanged. This means it is always safer todo your work in a new private branch, and when you are happy with the results,merge your branch back into the main branch (Figure 6-4).
110 | Chapter 6: Rollbacks, Reverts, Resets, and Rebasing

Figure 6-3. Create a flowchart to help you select the appropriate command
Best Practices | 111

Figure 6-4. Working in a branch protects you from unintended changes; merge yourwork back into the main branch only when it is correct and complete
Previously we’ve created and deleted branches using the ticket as a starting point. Butwhat if you were working on a ticket, and you weren’t sure which of two approachesyou should take? In this case you could create a branch off of your ticket branch,make your experimental changes (Example 6-1), and then merge your experimentalbranch into your ticket branch (Example 6-2) if you want to save the changes.
Example 6-1. Use an experimental branch to test changes
$ git checkout -b experimental_idea (do work)$ git add --all$ git commit
You may have one or more commits in your experimental branch. When you mergethe two branches, you can optionally combine all of those commits into a single oneat the time of the merge with the parameter --squash. If you use this parameter, youwill still need to run the command commit separately to save the changes from theother branch. By merging the branch in this way, you will be unable to unmerge thebranch later. As such, it’s appropriate to use --squash only when merging branchesyou wish had never been separate to begin with.
Example 6-2. Merge your experimental branch back into the main branch
$ git checkout master$ git merge experimental_idea --squash
Squash commit -- not updating HEADAutomatic merge went well; stopped before committing as requested
112 | Chapter 6: Rollbacks, Reverts, Resets, and Rebasing

$ git commit
After merging your experimental branch, you can delete it (Example 6-3).
Example 6-3. Delete your experimental branch
$ git branch --delete experimental_idea
If you want to discard your experimental ideas, complete the preceding steps, butomit the step where you merge your work into your main ticket branch. To delete anunmerged branch, you will need to use the parameter -D instead of --delete.
Subsequent sections of this chapter cover removing commits you made in a branchbefore you realized they were just experiments.
Rebasing Step by StepOut of the three commands rebase, reset, and revert, rebase is the only commandwhich is not exclusively focused on undoing work. Generally when we talk aboutabout rebasing, we are referring to the process of bringing a branch up to date withcommits that have been made on its parent branch. This is typically a very straight‐forward process: from the branch you want to update, you run the command rebasealong with the name of the parent branch. Git removes your commits from the childbranch you have been working on, adds the new commits that were made on the par‐ent branch to the tip of your branch, and then adds an updated copy of your commitsto your branch. This makes it seem as though your commits were added after the newchanges from the parent branch. It’s the Git equivalent to whistling innocently andpretending nothing happened when actually it has snuck a vase with flowers onto thetable while you weren’t looking.
Although we often talk about rebasing as “replaying your history,” rebasing is perhapsmore correctly defined as traveling back in time and then attempting to re-enact his‐tory. If you have seen Back to the Future (or a modern time travel equivalent) youknow that history is never quite the same the second time around. This is the casewith rebase as well. Although it appears as though the commits are simply droppedback onto a new branch tip, they are actually completely new commits with their ownreference ID. As these new commits are applied to the time line, problems can arise ifthe new history conflicts with the work you are trying to apply. This will result inerrors about being in a detached HEAD state. Mind blown? Here is another way tothink of it: Git allows us to retell history, inserting new facts as it pleases us. It doesnot, however, actually allow us to change anything that has happened in the past.What’s done is done all we can do is change the stories we tell about it.
Rebasing Step by Step | 113

Most of the time, when bringing a branch up-to-date with command rebase, it is vir‐tually instant and happens automatically. If, however, during the rebasing processthere are conflicting changes in the work you have done and the work that you aretrying to sneak onto the parent branch, the process will stop and Git will ask you toresolve the conflicts by hand before it proceeds. This can be in-file changes, anddeleted files (where one deletes a file that the other has edited). Git is, after all, just asimple content tracker. A mediated conflict resolution by you, the expert, alwaysresults in a better end product. Even if you would rather that Git just figured it out, itis good that it stops and asks for help. Think of it as a valuable life lesson: asking forhelp is okay.
The second cause of frustration is when rebase is used to force updates into a publicbranch. In this case a timeline will end up with the same code represented by two (ormore) commit objects with distinct IDs. To help you choose whether you should berebasing, or merging, please use the rebase or merge decision tree.
The remainder of this section describes the process of dealing with mid-rebase con‐flicts when bringing a branch up-to-date. In our example, the parent (or source)branch is named master and the branch we are attempting to bring up-to-date (thechild branch) is named feature.
Begin RebasingEnsure your local copy of the parent branch is up to date with the most recent com‐mits available from the main project repository:
$ git checkout master$ git pull --rebase=preserve remote_nickname master
If It Helps, Be Explicit
When updating a local copy of a branch with the command pull,the parameters for the name of the remote, and name of the remotebranch are typically optional. Occasionally, if I have more than oneremote for a given repository, Git sometimes seems to miss if thereare updates available. Adding the two additional parameters seemsto help.
Change into the branch that is currently out of date from the main project, but whichcontains new work that hasn’t been introduced yet:
$ git checkout feature
Begin the rebasing process:
$ git rebase master
114 | Chapter 6: Rollbacks, Reverts, Resets, and Rebasing

If there are no conflicts, Git will skip merrily through the process and spit you out theother end with no additional action required from you. See? Rebasing is easy! Youshould try it! However, sometimes there are conflicts…
Mid-Rebase Conflict from a Deleted FileA conflict in the rebasing process occurs when the changes you have made occur onthe same line as the changes which are stored in one of the new commits on the par‐ent branch. As a simple content tracker, Git doesn’t feel qualified to know whetherour changes should be kept, or theirs. Instead of making guesses, Git stops and asksfor your help. I think that’s actually quite considerate that Git perceives me to bemore of an expert on the content than it is! Unfortunately the process isn’t called“asking you, the expert, for help”; it’s called “resolving conflict while in a detachedHEAD state.” This is very scary language for process that is actually quite respectful.
To resolve a conflict you will need to put on your content expert hat, and help Gitmake some decisions about what to do next.
This section covers an example of a mid-rebase conflict. The file ch10.asciidoc hasbeen deleted in the source branch, master, but I’ve been making updates to it in feature. This is a problem Git doesn’t know how to resolve. Do I want to keep the file?Should it be deleted? Git has put me into a detached HEAD state so that I can explain toGit how I want to proceed:
First, rewinding head to replay your work on top of it...Applying: CH10: Stub file added with notes copied from video recording lessons.Using index info to reconstruct a base tree...A ch10.asciidocFalling back to patching base and 3-way merge...CONFLICT (modify/delete): ch10.asciidoc deleted in HEAD and modified in CH10:Stub file added with notes copied from video recording lessons.. Version CH10:Stub file added with notes copied from video recording lessons. of ch10.asciidocleft in tree.Failed to merge in the changes.Patch failed at 0001 CH10: Stub file added with notes copied from videorecording lessons.The copy of the patch that failed is found in: /Users/emmajane/Git/1234000002182/.git/rebase-apply/patch
When you have resolved this problem, run "git rebase --continue".If you prefer to skip this patch, run "git rebase --skip" instead.To check out the original branch and stop rebasing, run "git rebase --abort".
The relevant piece of information from this output is:
When you have resolved this problem, run "git rebase --continue".
Rebasing Step by Step | 115

This tells me that I need to:
1. Resolve the merge conflict.2. Once I think the merge conflict is resolved, run the command:
git rebase --continue
I accomplish step 1 by opening the file in question in my designated file compari‐son tool:
$ git mergetool ch10.asciidoc
There are no merge conflict markers displayed in the file, so I quit the merge tool andproceed to the next step Git had identified:
$ git rebase --continue
The following message is returned from Git:
ch10.asciidoc: needs mergeYou must edit all merge conflicts and thenmark them as resolved using git add
That’s not very helpful! I just looked at that file and there were no merge conflicts. I’llask Git what the problem is using the command status:
$ git status
The output from Git is as follows:
rebase in progress; onto 6ef4edbYou are currently rebasing branch 'ch10' on '6ef4edb'. (fix conflicts and then run "git rebase --continue") (use "git rebase --skip" to skip this patch) (use "git rebase --abort" to check out the original branch)
Unmerged paths: (use "git reset HEAD <file>..." to unstage) (use "git add/rm <file>..." as appropriate to mark resolution)
deleted by us: ch10.asciidoc
no changes added to commit (use "git add" and/or "git commit -a")
Aha! There are two clues here for me. The text: Unmerged paths and then a little lateron the text: deleted by us: ch10.asciidoc. Well, I don’t want the file to be deleted.This is useful because Git has told me deleted by us and I know I don’t want todelete the file; therefore I need to unstage Git’s change. Unstaging a change is effec‐tively saying to Git, “That thing you were planning to do? Don’t do it. In fact, forgetyou were even thinking about doing anything with that file. Reset your HEAD, Git.”
116 | Chapter 6: Rollbacks, Reverts, Resets, and Rebasing

Git tells me how to prevent this change from happening with the following text:
(use "git reset HEAD <file>..." to unstage)
Using this message as a guide, I run the following command:
$ git reset HEAD ch10.asciidoc
Now, what this command is actually doing is clearing out the staging area, andmoving the pointer back to the most recent known commit. Because I am knee-deepin a rebase, and in a detached HEAD state as opposed to in a branch, reset clears awaythe staging area and puts me in the most recent state from the rebasing process. Inmy case, this leaves me with the older version of the file, which is fine. As I proceedthrough the rebase, I will replace the contents of the file with the latest version fromthe branch feature. If I wanted to preserve their deletion of the file, I would skip thisstep and proceed with the instructions, adding the file to the staging area as describedlater.
With my chapter file replaced, let’s see what clues Git is giving me on how I shouldproceed:
$ git status
The output from Git is as follows:
rebase in progress; onto 6ef4edbYou are currently rebasing branch 'ch10' on '6ef4edb'. (all conflicts fixed: run "git rebase --continue")
Untracked files: (use "git add <file>..." to include in what will be committed)
ch10.asciidoc
nothing added to commit but untracked files present (use "git add" to track)
So I’ve still got the file (great!), but Git is still confused about what to do, because asfar as it’s concerned, that file should have been deleted. I need to explicitly add the fileback into the repository, which Git tells me to do by giving me the message:
Untracked files: (use "git add <file>..." to include in what will becommitted) ch10.asciidoc
The formatting is awkward if there is only one affected file but in the case of a longerlist of files, the formatting is lovely.
Per Git’s request, I will now add the file ch10.asciidoc to the staging area:
$ git add ch10.asciidoc
Rebasing Step by Step | 117

Now at this point, I know that the command add is just the beginning of a process,and that I’m going to need to commit the file as well, but this is rebasing and the rulesare different. I’m going to ask Git what to do next by checking the output of the com‐mand status again:
$ git status
The output from Git is as follows:
rebase in progress; onto 6ef4edbYou are currently rebasing branch 'ch10' on '6ef4edb'. (all conflicts fixed: run "git rebase --continue")
Changes to be committed: (use "git reset HEAD <file>..." to unstage)
new file: ch10.asciidoc
Okay, it’s saying there are changes to be committed (yup, already knew that), but itdoesn’t tell me to commit them! Instead it tells me to continue with the rebasing withthe message:
all conflicts fixed: run "git rebase --continue"
I proceed with this command even though add is normally paired with commit to savechanges:
$ git rebase --continue
Mid-Rebase Conflict from a Single File Merge ConflictAfter restarting the rebasing process, Git has run into another conflict as it replaysthe commits. The output is as follows:
Applying: CH10: Stub file added with notes copied from video recording lessons.Applying: TOC: Adding Chapter 10 to the book build.Using index info to reconstruct a base tree...M book.asciidocFalling back to patching base and 3-way merge...Auto-merging book.asciidocCONFLICT (content): Merge conflict in book.asciidocRecorded preimage for 'book.asciidoc'Failed to merge in the changes.Patch failed at 0002 TOC: Adding Chapter 10 to the book build.The copy of the patch that failed is found in: /Users/emmajane/Git/1234000002182/.git/rebase-apply/patch
When you have resolved this problem, run "git rebase --continue".If you prefer to skip this patch, run "git rebase --skip" instead.To check out the original branch and stop rebasing, run "git rebase --abort".
118 | Chapter 6: Rollbacks, Reverts, Resets, and Rebasing

Another conflict. You’re being high maintenance, Git! No wonder peoplecomplain about rebasing! Okay, okay, at least it’s a different file this time (CONFLICT(content): Merge conflict in book.asciidoc). I take a closer look at the outputof the command status again to see if Git gives me additional clues:
$ git status
The output from Git is as follows:
rebase in progress; onto 6ef4edbYou are currently rebasing branch 'ch10' on '6ef4edb'. (fix conflicts and then run "git rebase --continue") (use "git rebase --skip" to skip this patch) (use "git rebase --abort" to check out the original branch)
Unmerged paths: (use "git reset HEAD <file>..." to unstage) (use "git add <file>..." to mark resolution)
both modified: book.asciidoc
no changes added to commit (use "git add" and/or "git commit -a")
Long sigh. Alright, Git. Let’s see what the conflict is in this file:
$ git mergetool book.asciidoc
Opening up the file in my favorite merge tool, I see there is indeed a merge conflict inthis file. The merge conflict markers are displayed as three columns. One column foreach of the two branches being merged, and one column displaying how the mergeconflict should be resolved. I choose the hunk of text I want to keep, which resolvesthe conflict. I save the file, close the merge tool, and ask Git if it’s happy by using thecommand status, again:
$ git status
The output from Git is as follows:
rebase in progress; onto 6ef4edbYou are currently rebasing branch 'ch10' on '6ef4edb'. (fix conflicts and then run "git rebase --continue") (use "git rebase --skip" to skip this patch) (use "git rebase --abort" to check out the original branch)
Unmerged paths: (use "git reset HEAD <file>..." to unstage) (use "git add <file>..." to mark resolution)
both modified: book.asciidoc
no changes added to commit (use "git add" and/or "git commit -a")
Rebasing Step by Step | 119

The message is a little misleading because I have fixed the conflicts. At this point, Iopen the file to double check. Nope, no conflicts there. So now I move on to thenext group of instructions: unmerged paths: use "git add <file> …" to markresolution and then both modified: book.asciidoc:
$ git add book.asciidoc
And check the status again:
$ git status
The output from Git is as follows:
rebase in progress; onto 6ef4edbYou are currently rebasing branch 'ch10' on '6ef4edb'. (all conflicts fixed: run "git rebase --continue")
Changes to be committed: (use "git reset HEAD <file>..." to unstage)
modified: book.asciidoc
As before, I don’t pair the command add with the command commit. Instead, Gitinstructs me as follows: all conflicts fixed: run "git rebase --continue", so Iproceed with the rebasing process:
$ git rebase --continue
The output from Git is as follows:
Applying: TOC: Adding Chapter 10 to the book build.Recorded resolution for 'book.asciidoc'.Applying: CH10: Outline of GitHub topics
The rebasing procedure has been completed. My copy of the branch feature is nowup to date with all changes that had been previously committed to the branch master.
There are a few different ways that rebasing can kick up a conflict. Take your time,read the instructions carefully, and if you aren’t getting useful information, try usingthe command status to see if there’s something more helpful that Git can offer. Ifyou are really in a panic about what’s happening, you can always abort the processwith the command git rebase --abort. This will return you the state your branchwas in right before you started the rebase.
An Overview of Locating Lost WorkIt is very difficult to completely remove committed work in Git. It is, however, prettyeasy to misplace your work with the same frequency that I misplace my keys, myglasses, my wallet, and my family’s patience. If you think you have lost some work, thefirst thing you will need to do is locate the commit where the work was stored. The
120 | Chapter 6: Rollbacks, Reverts, Resets, and Rebasing

command log displays commits that have been made to a particular branch; the com‐mand reflog lists a history of everything that has happened in your local copy of therepository. This means that if you are working with a repository you cloned from aremote server, the reflog history will begin at the point where you cloned the reposi‐tory to your local environment—whereas the log history will display all of the commitmessages since the command init was used to create the repository.
If you haven’t already, get a copy of the project repository for this book, and comparethe output of the two commands reflog and log (Example 6-4).
Example 6-4. Compare the output of log and reflog
$ git clone https://gitlab.com/gitforteams/gitforteams.git
Cloning into 'gitforteams'...remote: Counting objects: 1084, done.remote: Total 1084 (delta 0), reused 0 (delta 0)Receiving objects: 100% (1084/1084), 12.07 MiB | 813.00 KiB/s, done.Resolving deltas: 100% (628/628), done.Checking connectivity... done.
$ git log --oneline
e8d6aff Updating diagram: Adding commit ID reference to rebase.ae56a1f Adding workflow diagram for: reset, revert, rebase, checkout.2480520 Merge pull request #5 from xrmxrm/1-markdown_fixesee46470 Fix some markdown Issue #1
$ git reflog
2f17715 HEAD@{1}: clone: from https://gitlab.com/gitforteams/gitforteams.git
If the only thing you have done is clone the repository, you will only see one line ofhistory in the reflog. As you do more things, the reflog will start to grow. Following isa sample of the output from this book’s repository:
fdd19dc HEAD@{157}: merge drafts: Fast-forwardaf9e2c8 HEAD@{158}: checkout: moving from drafts to masterfdd19dc HEAD@{159}: merge ch04: Merge made by the 'recursive' strategy.af9e2c8 HEAD@{160}: checkout: moving from ch04 to draftse296faa HEAD@{161}: commit (amend): CH04: first draft completedd87941 HEAD@{162}: commit: CH04: first draft complete
This is a private history. Only you can see it, thank goodness! It will contain every‐thing that you have done including things that have no impact on the code, such aschecking out a branch.
Both of the commands log and reflog show you the commit ID for a particular statethat is stored in the repository. So long as you can find this commit ID, you can check
An Overview of Locating Lost Work | 121

it out (Example 6-5), temporarily restoring the state of the code base at that point intime.
Example 6-5. Check out a specific commit in your repository
$ git checkout commit
Checking out files: 100% (2979/2979), done.Note: checking out 'a94b4c4'.
You are in 'detached HEAD' state. You can look around, make experimentalchanges and commit them, and you can discard any commits you make in thisstate without impacting any branches by performing another checkout.
If you want to create a new branch to retain commits you create, you maydo so (now or later) by using -b with the checkout command again. Example:
git checkout -b new_branch_name
HEAD is now at a94b4c4... Fixing broken URL to the slides from the main README file.Was missing the end round bracket.
When you check out a commit, you will be detaching from the connected history fora particular branch. It’s not really as scary as it sounds, though. Normally when wework in Git we are working in a linear representation of history. When we check outa single commit, we are working in a suspended state (Figure 6-5).
Figure 6-5. In a detached HEAD state, you are temporarily disconnected from the linearhistory of a branch
This is typically where people start to freak out a bit—understandably—your HEADis DETACHED! Following the instructions Git provides will set you right. If you wantto save the state you are in, check out a new branch and your state will be recorded inthat new branch:
122 | Chapter 6: Rollbacks, Reverts, Resets, and Rebasing
$ git checkout -b restoring_old_commit
At this point you can continue to add a few fix-ups in the new branch if there’s any‐thing missing you want to add (or old work that is no longer relevant and that youwant to remove). Once you are finished, you will need to decide how you want toincorporate the new branch back into your working branch. You could choose tomerge the new branch into an existing branch, or just cherry-pick a few commit(s)that you want to keep. Let’s start with a merge, because this is something you shouldalready be familiar with from Chapter 5:
$ git checkout working_branch$ git merge restoring_old_commit
With the merge complete, you should now tidy up your local repository by deletingthe temporary branch:
$ git branch --delete restoring_old_commit
If you have published the temporary branch and wish to delete it from the remoterepository, you will need to do that explicitly:
$ git push --delete restoring_old_commit
This method has the potential to make an absolute mess of things if the temporarybranch contains a lot of unrelated work. In this case, it may be more appropriate touse the command cherry-pick (Example 6-6). It can be used in a number of differentways—check the documentation for this command with git help cherry-pick. Itend to use the commit ID that I want to copy into my current branch. The optionalparameter -x appends a line to the commit message letting you know this commitwas cherry-picked from somewhere else, as opposed to having been originally createdon this branch at this point in history. This addition makes it easier to identify thecommit later.
Example 6-6. Copying commits onto a new branch with cherry-pick
$ git cherry-pick -x commit
Assuming the commit was cleanly applied to your current branch, you will see a mes‐sage such as the following:
[master 6b60f9c] Adding office hours reminder. Date: Tue Jul 22 08:36:54 2014 -0700 1 file changed, 2 insertions(+)
If things don’t go well, you may need to resolve a merge conflict. The output for thatwould be as follows:
error: could not apply 9d7fbf3... Lesson 9: Removing lesson stubs fromsubsequent lessons.hint: after resolving the conflicts, mark the corrected paths
An Overview of Locating Lost Work | 123

hint: with 'git add <paths>' or 'git rm <paths>'hint: and commit the result with 'git commit'
Merge conflicts are covered in more detail in Chapter 7. Skip ahead to that chapter ifyou encounter a conflict while cherry-picking a commit.
Another output you may encounter is when the commit you want to incorporate isactually a merge commit. You will need to select the parent branch in this case. Youcan recognize this case by the following output from Git when you attempt to cherry-pick a commit:
error: Commit 0075f7eda6 is a merge but no -m option was given.fatal: cherry-pick failed
Confirm the parent branch you want to keep is the first branch lanes on the graphedoutput of your log (counting from left to right):
$ git log --oneline --graph
Then, run the command cherry-pick again, this time identifying the parent branchto keep with the parameter --mainline:
$ git cherry-pick -x commit --mainline 1
Finally, if you decide you don’t want to keep the recovered work, you can obliteratethe changes:
$ git reset --merge ORIG_HEAD
Published History Should Not Be Altered
The command reset should not be used on a shared branch toremove commits that have already been published. Undoingchanges on shared branches is covered later in this chapter.
If you have worked on each of the examples in this section, you should now be able tocheck out a single commit, create a new branch to recover from a detached HEAD state,merge changes from one branch into another, cherry-pick commits into a branch,and delete local branches.
Restoring FilesYou are working along and you just deleted the wrong file. You actually wanted tokeep the file. Or perhaps you edited a file that shouldn’t have been edited. Before thechanges are locked into place (or committed), you can check out the files. This willrestore the contents of the file to what was stored in the last known commit for thebranch you are on:
$ rm README.md
124 | Chapter 6: Rollbacks, Reverts, Resets, and Rebasing

$ git status
On branch masterChanges not staged for commit: (use "git add/rm <file>..." to update what will be committed) (use "git checkout -- <file>..." to discard changes in working directory)
deleted: README.md
no changes added to commit (use "git add" and/or "git commit -a")
The status message explains how to reverse the changes and recover your deleted file:
$ git checkout -- README.md
If you have already staged the file, you will need to unstage it before you can restorethe file by using the command reset. To try this, you will need to first delete a file,then use the command add to add the changes to the staging area, and finally use thecommand status to verify your next action:
$ rm README.md$ git add README.md
$ git status
On branch masterChanges to be committed: (use "git reset HEAD <file>..." to unstage)
deleted: README.md
At this point, the command you used previously, checkout, will not work. Instead,follow the instructions Git provides to unstage the file you want to restore. Instead ofselecting a specific commit, use the Git short form HEAD, which refers to the mostrecent commit on the current branch:
$ git reset HEAD README.md
Once the file is unstaged, you can use the command checkout as you did previouslyto restore the deleted file:
$ git checkout -- README.md
If you prefer, you can combine these two commands into one:
$ git reset --hard HEAD -- README.md
If you want to undo all of the changes in your working directory, restoring the ver‐sion of the files that was saved in the previous commit, you don’t need to make thechanges one at a time. You can do it in bulk:
$ git reset --hard HEAD
You should now be able to restore a deleted file in the working directory.
Restoring Files | 125

Working with CommitsA commit is a snapshot within your repository that contains the state of all of the filesat that point in time. Each of these commits can be manipulated within your history.You can remove the commit entirely with the command reset, you can reverse theeffects of a commit (but maintain it in your history) with the command revert, andyou can change the order of the commits with the command rebase. Altering thehistory of your repository is a big no-no if you’ve already published the commits.This is because even the slightest change will result in a new commit SHA beingstored in the repository—even if the code itself is exactly the same at the tip of thebranch. This is because Git assumes that all new commit IDs contain new informa‐tion that must be incorporated, regardless of the contents of the files stored in thosecommits.
In this section, it is assumed you are working with commits that have not been sharedwith others yet (i.e., you haven’t pushed your branch). Tips for working on changinghistory for shared branches are covered separately.
Amending CommitsIf you realize a commit you’ve just made is just missing one little fix, you can amendthe commit to include additional files, or update the message that was used for thecommit. I use this command frequently to convert my terse one-line commit mes‐sages into well-formed summaries of the work I’ve completed.
Do Not Change Shared History
If you have already pushed the work, it is considered bad form togo back and “fix” shared history.
If you have made any changes to the files in your working directory, you will need toadd the files to the staging area before amending your commit (Example 6-7). If youare just updating the commit message, and there are no new, or modified files, youcan omit the command add, and jump straight to the command commit.
Example 6-7. Updating the previous commit with --amend
$ git add --all$ git commit --amend
Your new changes will be added to the previous commit, and a new ID will beassigned to the revised commit object.
126 | Chapter 6: Rollbacks, Reverts, Resets, and Rebasing

Even More Commit Options Are Available
There are even more ways to construct your commit object. I’veoutlined the options I use most frequently. You may find additionalgems by reading the relevant manual page for commit. This infor‐mation is accessible by running the command: git help commit.
If you want to amend more than just the previous commit, though, you will need touse either reset or rebase.
Combining Commits with ResetThe command reset appears in many different forms during the undo process. Inthis example, we will use it to mimic the effects of squash in rebasing. The most basicexplanation of what reset does is essentially a pointing game. Wherever you pointyour finger is what Git is going to treat as the current HEAD (or tip) of your branch.
Reset Alters Your Logged History
This is going to alter history because it removes references to com‐mits. If someone were to merge their old copy of the branch, theywould reintroduce the commits you had tried to remove. As aresult, it’s best to only use reset to alter the history of branchesthat are not shared with others (this means you created the branchlocally, and you haven’t pushed it to the server yet).
Previously you used the command reset to unstage work before making a commit.This time you are using reset to remove commit objects from your branch’s history.Think of a string of beads. Let’s say the string is 20 beads long. Holding the fourthbead, allow the first three beads to slide off the string. You now have a shorter stringof beads as well as three loose beads. The parameters you use when issuing the resetcommand are part of what determines the fate of those beads.
If you want to discard the content contained in the commit objects you removed, youneed to use reset with the mode hard. This mode is enabled by using the parameter--hard. When you use the mode hard, the commit objects will be removed, and theworking directory will be updated so that all content stored in those commit objectsare also removed. If you do not use --hard when you reset your work, Git keeps thecontent of the working directory the same, but throws away the commit objects backto the reference point. It will be as if you typed all of the changes from the previouscommits into one giant piece of work. It’s now waiting to be added and committed.
Working with Commits | 127

Reset Reestablishes the Tip of a Branch
Somewhere along the way, I got it stuck in my head that resetought to reverse the action applied in a given commit. This defini‐tion is correct for the command revert, but not reset. The com‐mand reset resets the tip of the branch to the specified commit.Perhaps if it were named “restore” or “promote” or even just “set”my brain would have made a better separation between the twocommands. Remember: the target for reset is on what’s beingkept, and the target of revert is what is lost.
Using our previous bead example, let’s say you wanted to reset your string of beads sothat the most recent three beads were replaced by a single big bead. You would usethe command reset to point the new end for your string to the fourth bead from theend. You would then slide the three beads off the end of the string. (If you used theparameter --hard, these beads would be discarded.) Instead, we’re going to remoldthese beads, and put them back on the string as a new commit.
Commits Must Be Consecutive, and End with the Most Recent Commit
For this operation to work, you need to be compressing consecu‐tive commits leading up to your most recent commit. What we aredoing is essentially a stepping stone to interactive rebasing. Withthis use of reset you will be limited to the most recent commits.With rebasing, you will be able to select any range of commits.
Using the command log, identify the most recent commit that you want to keep. Thiswill become the new tip for your branch:
$ git log --oneline
699d8e0 More editing second fileeabb4cc Editing the second filed955e17 Adding second fileeppb98c Editing the first fileee3e63c Adding first file
Sticking with the three-bead analogy, the bead that I want to have as the new tip ofmy necklace is eppb98c. (This is the fourth bead from the end—not entirely intuitiveif you are completely focused on removing three beads.) We’re going to put our fingeron the bead we want to keep, and slide the rest off of the string:
$ git reset eppb98c
The are now three loose beads rattling around. These beads will appear as untrackedchanges in our repository. The content of the files will not have changed.
128 | Chapter 6: Rollbacks, Reverts, Resets, and Rebasing

You can view what will be in your new commit by using the command diff:
$ git diff
To combine all of the edits that were made in those three commits into a single com‐mit, use the command add to capture the changes in the staging area:
$ git add --all
Ensure the files are now staged and ready to be saved:
$ git status
Now that the files have been staged, the command diff will no longer show you whatyou are about to commit to your repository. Instead, you will need to examine thestaged version of the changes:
$ git diff --staged
Staging Is Also Caching
The parameter --staged is an alias of --cached. I choose to use thealiased version because it more closely matches the terms I usewhen talking about staging changes. If you are searching for moredocumentation about this parameter, be sure to also look for theoriginal parameter name.
Once you are satisfied with the contents of your new commit, you can go ahead andcomplete the commit process:
$ git commit -m "Replacing three small beads with this single, giant bead."
The three commits will now be combined into one single commit.
If you are having a hard time with the word reset and having to go one past the com‐mit you are looking for, I encourage you to use relative history instead of commitIDs. For example, if you wanted to compress three commits from your branch intoone, you would use the following command:
$ git reset HEAD~3
This version of the command puts your repository into the same state as the previousexample, but it’s as if the pointer was using another language. Either approach is fine.Use whichever one makes more sense to you. I personally find if there are more thana handful of commits that I want to reset, using the commit ID is a lot easier thancounting backward.
If you’ve been following along with the examples in this section, you should now beable to restore a file that was deleted, and combine several smaller commits into one.
Working with Commits | 129

Altering Commits with Interactive RebasingRebasing is one of those topics that has gained a strong positive following—andstrong opponents. While I have no technical problems using the command, I openlyadmit that I don’t like what it does. Rebasing is primarily used to change the way his‐tory is recorded, often without changing the content of the files in your workingdirectory. Used incorrectly, this can cause chaos on shared branches as new commitobjects with different IDs are used to store work identical work. But my complaintsare more to do with the idea that it’s okay to rewrite history to suit your fancy. In thenonsoftware world historical revisionism is wrong.
Complaints aside, rebasing is simply the model Git has decided on and so it fits quitewell into many workflows. (I use it when it is appropriate to do so—even for my soloprojects where its use is not being enforced by an outside team.) One of the times it isappropriate to use rebasing is when bringing a branch up-to-date (as was discussed in“Rebasing Step by Step” on page 113 and in Chapter 3); the second is before publish‐ing your work—interactive rebasing allows you to curate the commits into an easier-to-read history. In this section you will learn about the latter of these two methods.
Interactive rebasing can be especially useful if you’ve been committing microthoughts—leaving you with commits in your history that only capture partial ideas.Interactive rebasing is also useful if you have a number of commits that, due to a peerreview or sober second thought, you’ve decided were not the correct approach.Cleaning up your history so there are only good, intentional commits will make iteasier to use the command bisect in Chapter 9. To help explain the concept, I cre‐ated a simple animation showing the basic principles of squashing several small com‐mits into one whole idea.
The first thing you need to do is select a commit in your history that you want tohave as your starting point (I often choose one commit older than what I think I’llneed—just in case). Let’s say your branch’s history has the following commits:
d1dc647 Revert "Adding office hours reminder."50605a1 Correcting joke about horses and baths.eed5023 Joke: What goes 'ha ha bonk'?77c00e2 Adding an Easter egg of bad jokes.0f187d8 Added information about additional people to be thanked.c546720 Adding office hours reminder.3184b5d Switching back to BADCamp version of the deck.bd5c178 Added feedback request; formatting updates to pro-con lists876e951 Removing feedback request; added Twitter handle.
You have decided that the three commits about jokes should be collapsed into a singlecommit. Looking to the commit previous to this, you select 0f187d8 as your startingpoint. You are now ready to begin the rebasing process:
$ git rebase --interactive 0f187d8
130 | Chapter 6: Rollbacks, Reverts, Resets, and Rebasing

pick 77c00e2 Adding an Easter egg of bad jokes.pick eed5023 Joke: What goes 'ha ha bonk'?pick 50605a1 Correcting joke about horses and baths.pick d1dc647 Revert "Adding office hours reminder."
# Rebase 0f187d8..d1dc647 onto 0f187d8## Commands:# p, pick = use commit# r, reword = use commit, but edit the commit message# e, edit = use commit, but stop for amending# s, squash = use commit, but meld into previous commit# f, fixup = like "squash", but discard this commit's log message# x, exec = run command (the rest of the line) using shell## These lines can be re-ordered; they are executed from top to bottom.## If you remove a line here THAT COMMIT WILL BE LOST.## However, if you remove everything, the rebase will be aborted.## Note that empty commits are commented out
The list of commits has been reversed and the oldest commit is now at the top of thelist. Edit the list and replace the second and third use of the word squash to pick. Inmy case, the edited list would appear as follows:
pick 77c00e2 Adding an Easter egg of bad jokes.squash eed5023 Joke: What goes 'ha ha bonk'?squash 50605a1 Correcting joke about horses and baths.pick d1dc647 Revert "Adding office hours reminder."
Save and quit your editor to proceed. A new window commit message editor willopen. You will now need to craft a new commit message that represents all of thecommits you are combining. The current messages are provided as a starting point:
# This is a combination of 3 commits.# The first commit's message is:Adding an Easter egg of bad jokes.
You should add your bad jokes too.
# This is the 2nd commit message:
Joke: What goes 'ha ha bonk'?
# This is the 3rd commit message:
Correcting joke about horses and baths.
# Please enter the commit message for your changes. Lines starting# with '#' will be ignored, and an empty message aborts the commit.#
Working with Commits | 131

# Date: Wed Sep 10 06:12:01 2014 -0400## rebase in progress; onto 0f187d8# You are currently editing a commit while rebasing branch 'practice_rebasing'on '0f187d8'.## Changes to be committed:# new file: badjokes.md#
In this case, it is appropriate to update the commit message as follows:
Adding an Easter egg of bad jokes.
- New Joke: What goes 'ha ha bonk'?
You don’t need to remove lines starting with #. I have done this to make it a little eas‐ier to read.
When you are happy with the new commit message, save and quit the editor to pro‐ceed:
[detached HEAD 1c10178] Adding an Easter egg of bad jokes. Date: Wed Sep 10 06:12:01 2014 -0400 1 file changed, 7 insertions(+) create mode 100644 badjokes.mdSuccessfully rebased and updated refs/heads/practice_rebasing.
The rebasing procedure is now complete. Your revised log will appear as follows:
$ git log --oneline
ef4409f Revert "Adding office hours reminder."1c10178 Adding an Easter egg of bad jokes.0f187d8 Added information about additional people to be thanked.c546720 Adding office hours reminder.3184b5d Switching back to BADCamp version of the deck.
In the second example, we are going to separate changes that were made in a singlecommit so they are available as two commits instead. This would be useful if youadded made several changes to a single file and commited all of those changes as asingle commit but they should have have actually been saved as two separate com‐mits.
To separate a commit into several, begin the same way as you did before. This timewhen presented with the list of options, change pick to edit for one of the commits.When you save and close the editor this time, you will be presented with the optionto amend your commit (you know how to do this! yay!), and then proceed with therebase process:
Stopped at 0f187d831260b8e93d37bad11be1f41aaeca835e... Added informationabout additional people to be thanked.You can amend the commit now, with
132 | Chapter 6: Rollbacks, Reverts, Resets, and Rebasing

git commit --amend
Once you are satisfied with your changes, run
git rebase --continue
At this point you are in a detached HEAD state (you’ve been here before! it’s okay!), butthe files are all committed. You need to reset the working directory so that it hasuncommitted files that you can work with. Do you remember the command we usedpreviously to accomplish this? It’s reset! Instead of selecting a specific commit, it’sokay to use the shorthand for “one commit ago,” which is HEAD~1:
$ git reset HEAD~1
Unstaged changes after reset:M README.md
Now you have an uncommitted file in your working directory that needs to be addedbefore you can continue the rebasing.
At this point, you can stage your files interactively by adding the parameter --patchwhen you add your files. This allows you to separate changes saved into one file intotwo (or more) commits. You do this by adding one hunk of the change to the stagingarea, committing the change, and then adding a new hunk to the staging area:
$ git add --patch README.md
You will be asked if you want to stage each of the hunks in the file:
diff --git a/README.md b/README.mdindex 291915b..2eceb48 100644--- a/README.md+++ b/README.md@@ -49,3 +49,5 @@ Emma is grateful for the support she received while employed at Drupalize.Me (Lullabot) for the development of this material. The first version of the reveal.js slides for this work were posted at [workflow-git-workshop](https://github.com/DrupalizeMe/workflow-git-workshop).++Emma is also grateful to you for watching her git tutorials!Stage this hunk [y,n,q,a,d,/,e,?]?
If you want to include the hunk, choose y; otherwise, choose n. If it’s a big hunk andyou want to only include some of it, choose s (this option isn’t available if the hunk istoo small). Proceed through each of the changes in the file and select the appropriateoption. When you get to the end of the list of changes, you will be returned to theprompt. Use the command git status, and assuming there was more than one hunkto change, you will see your file is ready to be committed and not staged for commit:
$ git status
Working with Commits | 133

rebase in progress; onto bd5c178You are currently splitting a commit while rebasing branch 'practice_rebasing'on 'bd5c178'. (Once your working directory is clean, run "git rebase --continue")
Changes to be committed: (use "git reset HEAD <file>..." to unstage)
modified: README.md
Changes not staged for commit: (use "git add <file>..." to update what will be committed) (use "git checkout -- <file>..." to discard changes in working directory)
modified: README.md
Proceed by committing your staged changes:
$ git commit
If the remainder of the changes can all be included in the same commit, you can omitthe parameter --patch and add and commit the file to the repository:
$ git add README.md$ git commit
With all of your changes committed, you are ready to proceed with the rebase. Itseems like there aren’t any hints, but if you check the status, Git will remind you youare not done yet:
$ git status
rebase in progress; onto bd5c178You are currently editing a commit while rebasing branch 'practice_rebasing'on 'bd5c178'. (use "git commit --amend" to amend the current commit) (use "git rebase --continue" once you are satisfied with your changes)
nothing to commit, working directory clean
To complete the rebase, follow the command as Git has described in the status mes‐sage:
$ git rebase --continue
Successfully rebased and updated refs/heads/practice_rebasing.
Phew! You did it! That was a lot of steps, but they were all concepts you have previ‐ously tried; this time they were chained together. Well done, you.
If you have followed each of the examples in this section, you should now be able toamend commits, and alter the history of a branch using interactive rebasing.
134 | Chapter 6: Rollbacks, Reverts, Resets, and Rebasing

Unmerging a BranchMistakes can happen when you are merging branches. Maybe you had the wrongbranch checked out when you performed the merge; or maybe you were supposed touse the --no-ff parameter when merging, but you forgot. So long as you haven’tpublished the branch, it can be quite easy to “unmerge” your branches.
There Is No Such Thing as an Unmerge
“Inconceivable!” he cried. “I do not think that word means whatyou think it means,” the other replied. With apologies to The Prin‐cess Bride, it’s true; there’s no six-fingered man in Git, and there’snot really a way to “unmerge” something. You can, however,reverse the effects of a merge by resetting the tip of your branch tothe point immediately before you used the command merge..Hopefully this doesn’t happen to you often, because it’s possible itwill take years off your life just like The Machine does to our hero,Westley.
Ideally, you will notice you have incorrectly merged a branch immediately after doingit. This is the easiest scenario to reverse. Git knows some of its commands are moredangerous than others, so it stores a pointer to the most recent commit right before itperforms the dangerous maneuver. Git considers a merge to be dangerous, and soyou can easily undo a merge right after it occurs by running reset, and pointing thetip of your branch back to the commit right before the merge took place:
$ git reset --merge ORIG_HEAD
If you did not notice your mistake right away, you will need to ask yourself a fewmore questions before proceeding. Figure 6-6 summarizes the considerations youwill need to make in order to select the correct commands to unmerge your work.
You will need to think carefully about what work you may want to retain, and whatwork can be thrown out, before proceeding. If you have deleted the branch you areremoving, you may wish to create a backup copy of the commits in a separate branch.This will save you from having to dig through the reflog to find the lost commits.
Let’s say the branch you are working on is named master, and you want to create abackup branch named preservation_branch:
$ git checkout master
$ git checkout -b preservation_branch
Working with Commits | 135

Figure 6-6. Before unmerging your branch, consider what may happen to the lostcommits
You now have a branch with the good commits and the bad commits, and you canproceed with removing the bad commits. This assumes there are no additional com‐mits you want to save on the branch that needs cleaning:
$ git checkout master$ git reset --merge ORIG_HEAD
If you do want to save some of the commits, you can now cherry-pick them backfrom the backup branch you created.
$ git cherry-pick commit_to_restore
The method of using ORIG_HEAD as a reference point will only work if you notice rightaway that you need to unmerge the bad branch. If you have been working on other
136 | Chapter 6: Rollbacks, Reverts, Resets, and Rebasing

things, it’s possible that Git will have already established a new ORIG_HEAD. In thiscase, you will need to select the specific commit ID you want to return to:
$ git reset last_correct_commit
As Figure 6-6 shows, there are a few different scenarios for unmerging branches. Takeyour time and remember, the reflog keeps track of everything, so if something disap‐pears, you can always go back and check out a specific commit to center yourself andfigure out what to do without losing any of your work.
Undoing Shared HistoryThis chapter has been focused on altering the unpublished history of your repository.As soon as you start publishing your work you will eventually publish something thatneeds to be fixed up. There are lots of reasons why this can happen—new require‐ments from a client; you notice a bug; someone else notices a bug. There is nothing tobe ashamed of if you need to make a change and share it with others, and you almostcertainly don’t need to hide your learning! Sometimes, however, it’s appropriate toclean up a commit history that has already been shared. For example, lots of minorfixes can make debugging tools, such as bisect, less efficient; and a clean commithistory is easier to read. The most polite way to modify shared history is to not mod‐ify it at all. Instead of a “roll back” to recover a past working state, think of youractions as “rolling forward” to a future working state. You can do this by adding newcommits, or by using the command revert. In this section you will learn how to fixup a shared history without frustrating your teammates.
Reverting a Previous CommitIf there was a commit in the past that was incorrect, it is possible to apply a new com‐mit that is the exact opposite of what you had previously using the command revert.If you are into physics, revert is kind of like noise-canceling headphones. The com‐mand applies the exact opposite sound as the background noise, and the net effect toyour ears is a silent nothingness.
When you use the command revert, you will notice that your history is not altered.Commits are not removed; rather, a new commit is applied to the tip of your branch.For example, if the commit you are reverting applied three new lines, and removedone line, the revert will remove the three new lines and add back the deleted line.
For example, you have the following history for your branch:
50605a1 Correcting joke about horses and baths.eed5023 Joke: What goes 'ha ha bonk'?77c00e2 Adding an Easter egg of bad jokes.0f187d8 Added information about additional people to be thanked.c546720 Adding office hours reminder.
Undoing Shared History | 137

3184b5d Switching back to BADCamp version of the deck.bd5c178 Added feedback request; formatting updates to pro-con lists
You decide that you want to remove the commit made about the reminder for theoffice hours, because that message was only relevant for that particular point in time.This message was added at c546720:
$ git revert c546720
The commit message editor will open. A default message is provided, so you can saveand quit to proceed:
[master d1dc647] Revert "Adding office hours reminder." 1 file changed, 2 deletions(-)
Your logged history now includes a new commit to undo the changes that were addedin c546720:
d1dc647 Revert "Adding office hours reminder."50605a1 Correcting joke about horses and baths.eed5023 Joke: What goes 'ha ha bonk'?77c00e2 Adding an Easter egg of bad jokes.0f187d8 Added information about additional people to be thanked.c546720 Adding office hours reminder.3184b5d Switching back to BADCamp version of the deck.
Repeat for each commit that you want to revert.
If you have followed along with each of the examples in this section, you should nowbe able to reverse the changes that were implemented in a previous commit.
Unmerging a Shared BranchPreviously in this chapter you learned how unmerge two branches using the com‐mand reset. This command deletes commits from a branch’s history. As a result, Gitwill treat them as new commits if it encounters them again. This happens if peoplemerge their (now out of date) branch into the main repository.
To know which commands to use, you will first need to determine what kind ofmerge it is. Figure 6-7 compares a fast-forward merge and a true merge. A fast-forward merge is aligned with the commits from the branch it was merged into; atrue merge, however, is displayed as a hump on the graph and includes a commitwhere the merge was performed.
Using the command log, look for the point where the incorrect branch was mergedin (Example 6-8). If there is a merge commit, you’re in luck! If there is no merge com‐mit, you are going to have to do a lot more work to get the branch unmerged.
138 | Chapter 6: Rollbacks, Reverts, Resets, and Rebasing

Figure 6-7. When graphed, a fast-forward merge loses the visual of a branch; a truemerge maintains it.
Example 6-8. The graphed log of your commit history will show you if it’s a true merge
$ git log --oneline --graph
* 4f2eaa4 Merge branch 'ch07' into drafts|\| * c10fbdd CH07: snapshot after editing draft in LibreOffice| * 9716e7b CH07: snapshot before LibreOffice editing| * 8373ad7 App01: moving version check to the appendix from CH07
Undoing Shared History | 139

| * d602e51 CH7: Stub file added with notes copied from video recording lessons.* | 1ae7de0 CH08: Incorrect heading formatting was creating new chapter* | 7907650 CH08: Draft chapter. Based on ALA article.* | ad6c422 CH8: Stub file added with notes copied from video recording lessons.
You may also want to look at a single commit to confirm if it is a true merge using thecommand show. This will list SHA1 for the branches that were merged:
$ git show 90249389
commit 902493896b794d7bc6b19a1130240302efb1757fMerge: 54a4fdf c077a62Author: Joe Shindelar <[email protected]>Date: Mon Jan 26 18:30:55 2015 -0700
Merge branch 'dev' into qa
Thanks, Joe, for this tip!
Being Consistent Makes It Easier to Search Successfully
The default commit message for a merge commit is “Merge branchincoming into current,” which makes it easier to spot when readingthrough the output from the log command. Your team mightchoose to use a different commit message template; however, youcan add the optional parameters --merges and --no-merges to fur‐ther filter the logged history.
Once you know if there is a merge commit present, you can choose the appropriateset of commands. Figure 6-8 summarizes these options as a flowchart.
If the branch was merged using a true merge, and not a fast-forward merge, the undoprocess is as follows: use the command revert to reverse the effects of the mergecommit (Example 6-9). This command takes one additional parameter, --mainline.This parameter tells Git which of the branches it should keep while undoing themerge. Take a look at your graphed log and count the lanes from left to right. Thefirst lane is 1. You almost always want to keep the leftmost lane, and so the number touse is almost always 1.
Example 6-9. Reversing a merge commit
$ git checkout branch_to_clean_up$ git log --graph --oneline$ git revert --mainline 1 4f2eaa4
The commit message editor will open. A default commit message is provided indicat‐ing a revert is being performed, and including the commit message from the commitit is reversing (Example 6-10). I generally leave this message in place due to sheer
140 | Chapter 6: Rollbacks, Reverts, Resets, and Rebasing

laziness; however, the upside is that it is quite easy to search through my recordedhistory and find any commits where I’ve reverted a merge.
Figure 6-8. Depending on how your branch was merged, you will use different com‐mands to unmerge the shared branch
Example 6-10. Sample commit message for a revert of a merge commit
Revert "Merge branch 'video-lessons' into integration_test"
This reverts commit 0075f7eda67326f174623eca9ec09fd54d7f4b74, reversingchanges made to 0f187d831260b8e93d37bad11be1f41aaeca835e.
# Please enter the commit message for your changes. Lines starting# with '#' will be ignored, and an empty message aborts the commit.# On branch master# Your branch and 'origin/master' have diverged,# and have 23 and 2 different commits each, respectively.# (use "git pull" to merge the remote branch into yours)## Changes to be committed:# deleted: lessons/01-intro/README.md# deleted: lessons/02-getting-started/README.md# deleted: lessons/03-clone-remote/README.md
Undoing Shared History | 141

# deleted: lessons/04-config/README.md(etc)#
Occasionally you will run into conflicts when running a revert. No reason to panic.Simply treat it as any other merge conflict and follow Git’s on-screen instructions:
$ git revert --mainline 1 a1173fd
error: could not revert a1173fd... Merge branch 'unmerging'hint: after resolving the conflicts, mark the corrected pathshint: with 'git add <paths>' or 'git rm <paths>'hint: and commit the result with 'git commit'Resolved 'README.md' using previous resolution.
Something went wrong—check the status message to see which files need reviewing:
$ git status
On branch masterYour branch and 'origin/master' have diverged,and have 20 and 2 different commits each, respectively. (use "git pull" to merge the remote branch into yours)You are currently reverting commit a1173fd. (fix conflicts and run "git revert --continue") (use "git revert --abort" to cancel the revert operation)
Changes to be committed: (use "git reset HEAD <file>..." to unstage)
deleted: badjokes.md modified: slides/slides/session-oscon.html
Unmerged paths: (use "git reset HEAD <file>..." to unstage) (use "git add <file>..." to mark resolution)
both modified: README.md
The messages about the repository being out of sync with origin is unrelated to thisissue. Skip that, and keep reading. The first useful bit of information starts at: Youare currently reverting. You are given the options on how to proceed, and onhow to abort the process. Don’t give up! Keep reading. The next bit looks like a regu‐lar ol’ dirty working directory with some files that are staged, and some that aren’t. Ifyou were just making edits to your files, you would know how to deal with this. Firstyou add your changes to the staging area, and then you commit them:
$ git add README.md$ git commit -m "Reversing the merge commit a1173fd."
[master 291dabe] Reversing the merge commit a1173fd. 2 files changed, 2 insertions(+), 7 deletions(-) delete mode 100644 badjokes.md
142 | Chapter 6: Rollbacks, Reverts, Resets, and Rebasing

If there is no merge commit, you will need to deal with each of the commits you wantto undo individually. This is going to be especially frustrating because a fast-forwardmerge does not have any visual clues in the graphed log about which commits were inthe offending branch. (After the first time unpicking an incorrect merge, you’ll beginto see the logic in using a --no-ff strategy when merging branches.)
Consider Your Options by Talking to Your Team
Before unpicking the commits one at a time, you may want tocheck if there is anyone on the team with an unpublished, unsulliedversion of the branch they can share. Sometimes it is easier tobreak history with a well-placed push --force.
The first thing you need to do is get a sense of where the bad commits are. If you arenot entirely sure how things went wrong, you can get a list of all the branches a com‐mit is contained within by using the command branch with the parameter--contains:
$ git branch --contains commit
Assuming the merged-in branch hasn’t been deleted, you should be able to use theinformation to figure out which branch you are trying to unmerge, and what com‐mits were applied to that branch that you might want to remove. Remember, though,the commits are going to be in both branches, so you won’t be able to run a compari‐son to find which commits are different. This step isn’t necessary if you already knowwhich commits you are targeting.
If the commits you need to revert are sequential, you’re in luck! The commandrevert can accept a single commit, or a series of commits. Remember, though, that arevert is going to make a new commit for each commit it is reversing. This could getvery noisy in your commit history, so instead of reversing each commit individually,you can group them into a single reversal by opting to save your commit message tothe very end:
$ git revert --no-commit last_commit_to_keep..newest_commit_to_reject
After running this command you will end up with a dirty working directory with allof the files reverted back. Review the changes. Then, complete the revert process:
$ git revert --continue
Review the commit message and make any necessary updates to improve the clarityof the message. By default the message will be “Revert” followed by the quoted text ofwhat was in the newest of the commits you are reversing. Often this will be sufficient,but you may want to be more descriptive if the original message was subpar.
Undoing Shared History | 143
If the commits are not sequential, you will need to revert the offending commits oneat a time. Send me a tweet at @emmajanehw and I will commiserate and cheerlead.
$ git revert commit
Unmerging a merged branch is not something Git is designed to do unless a very spe‐cific workflow has been followed. Your team may never need to unmerge a branch. Ihave definitely had the occasional bad merge on a personal project where I was a solodeveloper and opted to swear a bit, and then shrug and move on. Sometimes historydoesn’t really matter all that much; sometimes it does. With experience and hindsight,you know for sure which commands you should have been using.
Really Removing HistoryIn this chapter, you’ve learned about updating the history of your repository, andespecially retrieving information you thought was lost. There may be times when youactually do want to lose part of your history—for example, if you accidentally commita very large data file or a configuration file that contains a password. Hopefully younever need to use this section, but just in case your “friend” ever needs help, I’veincluded the instructions. You know, just in case.
Published History Is Public History
If you have published content to a publicly available remote reposi‐tory, you should make the assumption that someone out therecloned a copy of your repository and has access to the secrets youdid not mean to publish. Update any passwords and API keys thatwere published in the repository immediately.
If you need to do your cleanup on a published branch, you should notify your teammembers as soon as you realize you need to clean the repository. You should let themknow you are going to be doing the cleanup, and will be “force pushing” a new his‐tory into the repository. Developers will need to evaluate their local repository anddecide which state it is in. Have each of the developers search for the offending file tosee if their repository is tainted:
• If the file you are trying to remove is not in their local repository, they will not beaffected by your cleanup.
• If their repository does have the file, in any of their local branches, it is tainted.However, if they have not done any of their own work since the file was intro‐duced, they will not be affected by your cleanup. This may be true for QA manag‐ers who are not also local developers. In this case, have them remove their localcopy of the repository and re-clone the repository once the cleanup is done.
144 | Chapter 6: Rollbacks, Reverts, Resets, and Rebasing

• If their repository is tainted, and they do have local work that was built from abranch that includes the tainted history, they will need to bring these branch(es)up-to-date through rebasing. If they use merge to bring their branches up-to-date, they will reintroduce the problem files back into the repository and yourwork will have been for naught. This can be a little scary for people if they are notfamiliar with rebasing, so you may want to suggest that they push any branchesthat have work they need to keep so that you can clean it up for them. (Havethem clone a new repository once the cleanup is done.)
While you are working on the cleanup, your coworkers could have a sword fight orsomething.
With everyone on the team notified, and with a plan of what will happen before, dur‐ing, and after the cleanup on everyone else’s repositories, you are ready to proceed.
For this procedure, you will use the command filter-branch. This command allowsyou to rewrite branch histories and tags. The examples provided in the Git documen‐tation are interesting, and worth reading. You can, for example, use this command topermanently remove any code submitted by a specific author. I cannot think of aninstance when I would choose to remove everything from someone without review‐ing the implications, but it’s interesting that the command can be used in this way.(Perhaps you know exactly how it would be useful, though?)
Assuming the file you want to remove is named SECRET.md, the command would beas follows (this is a single command, but it’s long; the \ allows you to wrap onto twolines):
$ git filter-branch --index-filter \ 'git rm --cached --ignore-unmatch SECRET.md' HEAD
With the file completely removed from the repository, add it to your .gitignore file sothat it doesn’t accidentally sneak in again. Instructions on working with .gitignore areavailable in Appendix C.
Unlike the other methods in this chapter, we are aiming to permanently remove theoffending content from your repository. For a brief period of time the commits willstill be available by using the command reflog. When you are sure you do not needthe commits anymore, you can obliterate them from your system by cleaning out thelocal history as well and doing a little garbage collection (gc):
$ git reflog expire --expire=now --all$ git gc --prune=now
Your repository is now cleaned, and you are ready to push the new version to yourremote repositories:
$ git push origin --force --all --tags
Really Removing History | 145

Once the new version of history is available from the shared repository, you can tellyour coworkers to update their work. Depending on the conversation you’ve had pre‐viously, they will incorporate your sanitized changes into their work by one of the fol‐lowing methods:
• Cloning the repository again from scratch. This method is better for teams thatare not currently using rebasing and are intimidated by it.
• Updating their branches with rebase. This method is better for teams that arealready comfortable with rebasing because it is faster than starting a new clone,and allows them to keep any work they have locally:
$ git pull --rebase=preserve
Both GitHub and Bitbucket offer articles on how to do this cleanup for repositoriesstored on their sites. Both are worth reading because they cover slightly different sce‐narios.
Now that you know Git’s built-in way of sanitizing a repository, check out this stand-alone package, BFG Repo Cleaner. It delivers the same outcome as filter-branch,but it is much faster to use, and once it is installed, it’s much easier, too. If you aredismayed by the amount of time a cleanup is taking with filter-branch, you shoulddefinitely try using BFG.
Command ReferenceTable 6-2 lists the commands covered in this chapter.
Table 6-2. Git commands for undoing work
Command Use
git checkout -b branch Create a new branch with the name branch
git add filename(s) Stage files in preparation for committing them to the repository
git commit Save the staged changes to the repository
git checkout branch Switch to the specified branch
git merge branch Incorporate the commits from the branch branch into the currentbranch
git branch --delete Remove a local branch
git branch -D Remove a local branch whose commits are not incorporated elsewhere
146 | Chapter 6: Rollbacks, Reverts, Resets, and Rebasing

Command Use
git clone URL Create a local copy of a remote repository
git log Read the commit history for this branch
git reflog Read the extended history for this branch
git checkout commit Check out a specific commit; puts you into a detached HEAD state
git cherry-pick commit Copy a commit from one branch to another
git reset --merge ORIG_HEAD Remove from the current branch all commits applied during a recentmerge
git checkout -- filename Restore a file that was changed, but has not yet been committed
git reset HEAD filename Unstage a file that is currently staged so that its changes are not savedduring the next commit
git reset --hard HEAD Restore all changed files to the previously stored state
git reset commit Unstage all of the changes that were previously committed up to thecommit right before this point
git rebase --interactive commit Edit, or squash commits since commit
git rebase --continue After resolving a merge conflict, continue with the rebasing process
git revert commit Unapply changes stored in the identified commit; this creates a sharing-friendly reversal of history
git log --oneline --graph Display the graphed history for this branch
git revert --mainline 1 commit Reverse a merge commit
git branch --contains commit List all branches that contain a specific commit object
git revert --no-commit last_commit_to_keep..newest_commit_to_reject
Reverse a group of commits in a single commit, instead of creating anobject for every commit that is being undone
git filter-branch Remove files from your repository permanently
git reflog expire Forget about extended history, and use only the stored commitmessages
Command Reference | 147

Command Use
git gc --prune=now Run the garbage collector and ensure all noncommitted changes areremoved from local memory
SummaryThroughout this chapter you learned how to work with the history of your Git repos‐itory. We covered common scenarios for some of the commands in Git which areoften considered “advanced” by new Git users. By drawing diagrams summarizingthe state of your repository, and the changes you wanted to make, you were able toefficiently choose the correct Git command to run for each of the scenarios outlined.You learned how to use the three “R"s of Git:
ResetMoves the tip of your branch to a previous commit. This command does notrequire a commit message and it may return a dirty working directory if theparameter --hard is not used.
RebaseAllows you to alter the way the commits are stored in the history of a branch.Commonly used to squash multiple commits into a single commit to clean up abranch; and to bring a branch up-to-date with another.
RevertReverses the changes made in a particular commit on a branch that has beenshared with others. This command is paired with a commit and it returns a cleanworking directory.
In the next chapter, you will take the lessons you’ve been working on in your localrepository and start integrating them with the rest of the team’s work.
148 | Chapter 6: Rollbacks, Reverts, Resets, and Rebasing

CHAPTER 7
Teams of More than One
The first few times you work with others on a project will shape how you approachversion control. If your collaborators are patient and empathetic, you are more likelyto use version control with confidence. Empathetic teammates will document theprocedure they want you to use, and support you with questions (updating the docu‐mentation as necessary). If you are responsible for starting a project, think of thatscene when Jerry Maguire says to his star player, “help me help you.” As a projectlead, this should be your mantra. Find the sticking points and remove them. Whereyou want consistency, provide detailed instructions, templates, and automated scripts.When something comes in that is not up to your standard, consider it a process prob‐lem that is yours to solve.
In this chapter, we have the culmination of everything covered in this book so far. InPart I, you learned about the different considerations for setting up a project. Nowyou will learn how to implement those decisions. In Chapters 5 and 6, you learnedhow to run the commands you’ll use on a daily basis as a developer. In this chapter,you will learn how to set up a connection to a remote project, and share your workwith others.
By the end of this chapter, you will be able to:
• Set up a new project on a code hosting system• Download a remote repository with clone• Upload your changes to a project with push• Refresh the list of branches available from the remote repository with fetch• Incorporate changes from the remote repository with pull• Explain the implications of updating your branches with pull, rebase, and merge
149

Where possible, this chapter includes templates you can use to help onboard newdevelopers. The easier it is for people to contribute usable work, the more likely theyare to enjoy working on your project. Even if it’s just a job, there’s no reason weshouldn’t all have a little more delight in our lives.
Those who learn best by following along with video tutorials will benefit from Col‐laborating with Git (O’Reilly), the companion video series for this book.
Setting Up the ProjectThe context for your project will dictate a lot of how the repository will be set up. Asuper-secret internal-only covert code base will be set up so as to ensure privacy; afree and open source code library will be set up for transparency and probably partic‐ipation. Once the project is established, the commands the developers use daily willlikely be quite similar.
This section covers the basic process for creating a new project on a code hosting sys‐tem. The specifics for GitHub, Bitbucket, and GitLab are covered in Part III (Chap‐ters 10, 11, and 12, respectively).
Creating a New ProjectIn order to share your work with your team, you will need to establish a new projectin your code hosting system of choice. These days most code hosting systems offermore than a place to dump a shared repository. They also include ticketing systems,basic workflow enhancements, project documentation repositories, and more! In thecommunities and teams I participate in, one of the following three services are gener‐ally used: GitHub (typically used by open source projects), Bitbucket (typically usedby internal teams and small teams who need free hosting for private projects), andGitLab (typically used by medium-sized companies that need to host their code inhouse for security reasons).
No matter which system you choose, the basics of setting up a project are going to bethe same. The first question you’ll need to ask yourself is: which account should youuse to create the repository? The standard format for project URLs on a web-basedsystem is as follows: https://<hosting-url.com>/<project-owner’s-name>/<project-name>. If the project is really and truly yours—for example, the repository for yourpersonal blog—it’s appropriate for the URL to include your username. If, however,the project belongs to an agency of developers, it would be more appropriate for theproject owner’s name to be the name of the agency. And finally, if the project belongsto a number of agencies, such as an open source software project, the most appropri‐ate project owner name would be the name of the software project.
The decisions you choose here may also affect who is able to write directly to theproject, and may be dependent on the code hosting system you’re using. For example,
150 | Chapter 7: Teams of More than One

if you choose to start the project under your personal name, you might not want toallow “just anyone” to write to the project without a review from you—especially sofor public projects where others could be evaluating the body of work under theassumption it was yours.
What’s in a Name?
The support repository for this book has existed in a number ofdifferent places over the years, including my personal account, ateam account, and three different code hosting systems (for a totalof six different repositories that need to be maintained). Althoughthe work has been developed by me, it becomes a question ofbranding on which URL I want to distribute. If I want others tothink of the repository as theirs (such as in a set of abstract learningmaterials where people don’t have direct access to me), I might usethe project URL; but when I want people to think of me as theauthor because it’s also a promotional piece, I might give people mypersonal URL. It’s quite possible I overthink this, but you shouldgive the naming of things at least a little consideration.
You are probably reading this book as a member of a team (even if it’s a very tinyteam of one!), and so you’ll want to select the name of your company, agency, or teamas the project owner, or the name of the project if you are working on an open sourceproject. Fortunately, you can move the code base to a new name or even a new codehosting platform very easily, so it’s not absolutely critical to get it right from thebeginning. It is, however, more difficult to transfer any of the metadata for yourproject from one account to another. Metadata could include the history of tickets foryour project, and any documentation stored outside of the repository.
With the project owner selected, go ahead and create a new empty project under thisaccount. Don’t worry about uploading files just yet.
Establishing PermissionsThere are two types of permissions you will need to set for your project: who can seethe project (“read”); and who can commit to the project (“write”)—this was discussedin greater detail in Chapter 2. If you are an ultra-transparent team, the project shouldbe visible to the world. Otherwise, create a private project.
Setting Up the Project | 151

The Cost of a Free Service
Some code hosting services will charge a small fee for private repo‐sitories, and some provide this service for free. If your code and itshistory are important, consider paying for hosting. You mightchoose to pay with your time and self-host the code internally, oryou may choose to pay a small monthly fee to a third-party service.The advantage of paying is that the hosting company is more likelyto be accountable to you as a customer, and you are more likely tokeep them in business by helping to pay their expenses. Of course,if you can’t afford to pay the fee, there are plenty of free optionsavailable—and there’s no sense feeling guilty if a company haschosen to offer a free service. Do what you can.
Additionally, some hosting systems will allow you to set per-branch restrictions. Atthis time Bitbucket and GitLab offer this functionality. Configuration options aredescribed in Chapters 11 and 12, respectively.
As a distributed version control system, Git is inherently good at dealing with incom‐ing requests for changes to a repository. Generally, team projects will have a singlerepository that is considered The Project, and many spin-off projects that contain thework of the individual developers for the project. If your project is internal, you maychoose to have everyone working directly in The Project repository; but if you preferto maintain a cleaner central repository, you may choose to have each of your devel‐opers work in a fork of The Project.
The Project
Throughout this chapter, you will see reference made to “TheProject.” I use this shorthand to refer to the canonical, or official,repository for a software project. This is the repository that thecommunity has agreed to use for official releases of the software.Git itself has no internal hierarchy that forces one repository to bemore important than another—only the declaration by the com‐munity makes a repository the official one.
Based on the decisions you made about your team structure in Chapter 2, assign theappropriate permissions for any contributors who should be allowed write access toThe Project—additional contributions can be accepted from non-authorized develop‐ers via pull requests (these are also referred to as merge requests by some services).
Uploading the Project RepositoryAs a distributed version control system, Git is a bit of a social butterfly. It loves toconnect with all kinds of repositories. It loves sharing stories, and making new
152 | Chapter 7: Teams of More than One

friends along the way. Git maintains its connections with its faraway friends througha stored connection referred to as a remote. A local repository may have zero, one, ormany remote connections. It is typical for Git repositories to have only one remoteconnection—the origin. You’ve probably seen this term used before. It’s the nicknameassigned to the remote repository from which you downloaded, or cloned, your localcopy. It’s just a nickname, though. You can use whatever names you like for yourremote connections.
When you first start a new project, you may have no code written, or some code writ‐ten. (Seems obvious, right?) If you have no code written, you may choose to startyour project by following the instructions from your code hosting system and cloningthe empty project to your local development environment. If, however, you alreadyhave some code locally, you will want to upload what you’ve already got. To do this,you will need to make a new connection from your local repository to the projecthosting service.
From your local copy of the project repository, take a look to see if you already have aremote connection set up:
$ git remote --verbose
If you started locally, you won’t see any remotes listed, so it’s okay if nothing shows upat this point. If you do a have a remote set up for this repository, you will see some‐thing like the following:
origin https://github.com:emmajane/gitforteams.git (fetch)origin https://github.com:emmajane/gitforteams.git (push)
Each line begins with the nickname for the remote connection (origin), as well asthe source for the remote repository. These lines will always appear in pairs: the firstline of the pair indicates where you will retrieve new work from (fetch), and the sec‐ond indicates where you will upload new work to (push).
Project owners will need to have a connection to the official copy of a project; theymay also have a connection to a fork of a project if they require themselves to gothrough a peer review process before incorporating their own work (peer reviews arecovered in Chapter 8). As soon as you start adding multiple remote repositories for aproject, the default nickname (origin) can get a bit confusing. As a result, I tend toname my remotes according to their purpose; for example, official and personal,which have meaning to me. When I upload work, I then decide between these twooptions. The standard Git terms for my nicknames are upstream and origin,although origin is assigned to the source of a cloned repository by default, regardlessof whether or not you can write to it.
Setting Up the Project | 153

Name It to Claim It
I’ve been working with Git a very long time, and I still screw up thecommand git remote show origin on an embarrassingly regularbasis. Four words. It shouldn’t be that hard for me to remember theorder, right? I can never seem to get the order of show and originright. By assigning my own names to the remote repositories, I ammore likely to make more sense of the command, and thus get theorder right. git remote show official just seems to make bettersense to my brain. You may never have this problem, but if youstruggle to remember this command, you might want to personal‐ize your remote names and change the name origin to somethingthat resonates.
To add a new remote connection, you will first need to know the URL for the project.The structure is generally https://<hosting-url.com>/<project-owner’s-name>/<project-name>.git. In newer versions of Git, the protocol https will be available to you, but inolder documentation the first block may be replaced with something like [email protected]. Once you know the URL for the remote repository, you can make a connec‐tion to it (Example 7-1).
Example 7-1. Add a connection to a remote repository
$ git remote add nickname project-url
After a connection is made to a remote, you should see two new lines when you listyour remote connections. If you want to use Git’s terminology, you would use thenickname upstream for the official project repository; if you are using my namingconvention, you would use official. This name will never be published, and thereare no Git police so you can use whatever you want and no one will ever know. (Youcould even call it cookies or coffee if that made you happy. It really doesn’t matter.)
For example, if I was a participant in a project named Mounties, and it was run by theagency Oh, Canada, I might have a series of remotes as follows:
$ git remote --verbose
official https://github.com:ohcanada/mounties.git (fetch)official https://github.com:ohcanada/mounties.git (push)personal https://github.com:emmajane/mounties.git (fetch)personal https://github.com:emmajane/mounties.git (push)
You can easily hook up as many new remote connections as you like. For example,you might have remote connections for devserver, staging, and production; or youmay log directly in to those machines and pull code from The Project repository,instead of pushing code directly to those locations.
154 | Chapter 7: Teams of More than One

If you already have a remote connection set up in your local repository that you nolonger need, you can easily delete it (Example 7-2).
Example 7-2. Remove a remote connection
$ git remote remove nickname
You can easily rename remotes, and even set up default remotes foreach of the branches in your local repository. Git’s built-in docu‐mentation for this command is easy to understand. You shouldread through the documentation if you want to personalize yourlist of remotes even further.
With the remote connection established for your project, you can now upload yourlocal copy of the repository to the remote server:
$ git push nickname branch_name
If you want to share all local branches with others, you can update this command asfollows:
$ git push --all nickname
Once you have uploaded your work, navigate to the project page to ensure the reposi‐tory was uploaded as expected. By default, most code hosting systems will display thebranch master if there is more than one branch present in the repository. If yourlocal repository uses nonstandard branch names, check to see if your code hostingsystem allows you to assign the default branch for the repository. This branch is typi‐cally the most stable version of the project, with experimental work existing in otherbranches. Every project is a little different, though. Your project may use the masterbranch as the fire hose of new work and it might not be the most stable version ofyour software. Be explicit in your documentation.
To upload a local name under a new name on the remote server, use the followingsyntax:
$ git push nickname branch_local:branch_remote
For example, if you wanted to upload your branch main to the remote repository official and rename it to master in the remote repository, you would use the followingcommand:
$ git push official main:master
Your local repository should now be uploaded to the remote project repository andwith the desired branch names.
Setting Up the Project | 155

Document the Project in a READMEWhen you navigate to your project page, you will notice most code hosting systemswill display the contents of the file README if one is present in your project. This fileshould be used to give people an overview of the project. If it is a development projectwith dependencies, those should be listed here. If there are installation instructions,those should be listed here as well (or a link should be provided to a more completeinstallation guide). If you would like people to contribute to the project, or reportbugs to the project, those instructions should be listed here, too.
The following projects have excellent README files that clearly explain what therepository is about, how you can use the code within it, and how you can contributeto it:
• Sculpin• Sass• Rails
Apply a License to Your Project
There is no single international copyright law. As a result, anyproject that does not include an explicit license is assumed to befully copyrighted, and not intended for reuse. I openly admit that anumber of my projects do not include licenses. This is usuallybecause I simply haven’t made the decision of how I want others touse my work. (I’m typically producing training materials in envi‐ronments where copyright ownership is more restricted than incode communities where open licensing is more prevalent.) Thelicense for a given repository is typically located in the fileLICENSE or LICENSE.txt file.
If your local repository didn’t already have a README file, now would be a good timeto add one! Today, new projects tend to use Markdown format for the READMEfile, and therefore rename the file to README.md to ensure the file is correctly for‐matted.
With the project uploaded and the instructions established, it is now time to start on-boarding contributors to your project. The process you use in the remainder of thischapter should be added to your project repository as documentation. This will allowdevelopers to have a copy locally, and will allow them easier access to the informationinstead of having to refer to an external wiki page.
Now that your project is in place, it’s time to flip the tables and look at things from acontributor’s perspective.
156 | Chapter 7: Teams of More than One

Setting Up the DevelopersWhen you think about projects from a developer’s perspective, it’s not always entirelyclear what the participation level is going to be. When it comes to publicly availableprojects, a developer might engage in three levels of participation:
• Download a zipped package of the project, never to return to the project pageagain. This might be seen in true forks of a project where the downstream devel‐opers have no intention of checking back to see how the code has progressed. Itmight also be used for projects that are designed to be a starting point—wherethe intention is to hack up the code and modify the source significantly.
• Clone the project repository with the intention of keeping the code up to datelocally, but without the intention of making modifications. This could be true ofany developer who is incorporating an open source library into his or her project.The developers might extend the library, and perhaps make little changes to thecloned library, but for the most part they are using the project code as is, relyingon upstream developers for enhancements and security updates.
• Clone the project repository with the intention of contributing work back. Thiswill be true for open source project volunteers and staff, in-house developers on asoftware project, as well as staff at an agency who are contributing to a build for aparticular project.
The main distinction between the latter two options is that a noncontributor will typ‐ically clone The Project directly, whereas a contributor will likely have a personalremote repository in addition to the project repository. The rationale for thesechoices was described in greater detail in Chapter 2.
Consumers Versus Contributors
Forward-thinking (intermediate to advanced) developers willalways assume they are going to contribute back to a project atsome point and create their own intermediate remote repository.Most novice developers, however, will aim to streamline theirworkflow where possible and omit the intermediate step of creatingtheir own remote repository. This also means they are perceiving ofthemselves only as a consumer, rather than a potential contributor,to your project.
Once developers identify themselves as consumers or contributors (including pri‐mary maintainers), they will be ready to choose a method to download your projectrepository.
Setting Up the Developers | 157

ConsumersConsumers have no intention to contribute back to a project. They don’t expect tohave write access to the code base, and they can’t imagine a possible future where theywould want to upload their changes to a project. This type of developer might down‐load your repository in one of two ways:
• As a zipped package.• As a clone of the repository directly from The Project page.
A zipped package has no connection back to The Project, and contains no history ofthe changes that have happened over time. A clone, on the other hand, maintains aconnection to the project, and can be updated to the latest version by running a fewGit commands. The structure to clone a remote repository is as follows:
$ git clone https://<hosting-url.com>/<project-owner's-name>/<project-name>.git
For example, if you wanted to download a copy of the project repository for the Gitfor Teams workshop, you would issue the following command:
$ git clone https://github.com/gitforteams/gitforteams.git
To update your local copy of the repository, first you would need to fetch the latestchanges to The Project (for now, we’ll assume you have only one remote connection):
$ git fetch --all
Once you’ve fetched the changes, you can compare what’s changed in the latest ver‐sion to what you have locally before choosing to update your local copy.
First, get a list of all branches in your repository:
$ git branch --all
You will see two groups of branches: your local branches and the remote trackingbranches. The currently checked-out branch will be marked with *. My personal copyof the project repository cloned previously is as follows:
gh-pages* master video-lessons remotes/personal/gh-pages remotes/personal/master remotes/personal/video-lessons
This list shows three local branches as well as three branches connected to a remotethat has been nicknamed personal.
For even more detail for each branch, use the parameter --verbose:
$ git branch --all --verbose
158 | Chapter 7: Teams of More than One

The output includes the commit message as well as the status for each branch com‐pared to its remote repository:
gh-pages 629b54f Resolving merge conflict; ...* master 2db982d Changes to "Undo" graphic: ... video-lessons 7798eb1 [ahead 11] Lesson 00: ... remotes/personal/gh-pages 629b54f Resolving merge conflict; ... remotes/personal/master 2db982d Changes to "Undo" graphic ... remotes/personal/video-lessons 653f875 Lesson 7: Added intro on ...
To see a history of the changes that have been added to the repository on the branchmaster, you can use the command log:
$ git log personal/master
To compare your local copy of a branch to what was just downloaded, you can addthe parameter --patch to see the per-commit changes, or use the command diff tosee a summary of all changes:
$ git log --patch personal/master$ git diff master personal/master
This will show you all of the changes in patch format. Look for lines that have beenadded (marked with +), or deleted (marked with -). If you prefer to check out thecode base as a whole, you can check out the branch tip:
$ git checkout personal/master
This will put you into a detached HEAD state. To return to the local copy of the masterbranch, check it out:
$ git checkout master
Once you’ve reviewed the changes, you can update your local copy of the masterbranch by rebasing to add the new changes:
$ git rebase personal/master
Using the command rebase provides a cleaner graphed history; however, if yourteam has opted to use merging, you can use the command merge to bring your localbranch up to date:
$ git merge personal/master
If you have multiple local branches that you want to update, you will need to checkout each one individually and then use this same procedure to incorporate thechanges. This needs to be done one branch at a time because if there are conflictsbetween the two copies of the branch, Git needs to give you a working directory toresolve the conflicts.
These few commands are the only ones that a consumer of a project will need to use.If, however, the developer makes a little change to her copy of the repository locally,
Setting Up the Developers | 159

and wants to contribute that change back to the project, she will be limited to submit‐ting a patch, or requesting access as a developer (which is probably not appropriate togrant for one-off contributors). Although it is possible to submit patches, it is notpreferred. (Yes, there are some projects that still use patches, including Git itself!) Instead, many projects have come to prefer pull requests. Originally used by GitHub,this term has become popular on other systems as well. A pull request is a meta fea‐ture—it is not something built into Git itself, but rather it is a feature of software thatsits alongside Git. It provides a visual prompt for a project maintainer to incorporatea branch of work from a remote repository. The connection between the two reposi‐tories exists only for that one particular request; it is not a persistent connection like adeveloper would set from his or her local workstation to a remote repository.
ContributorsSo you think you’re interested in contributing to a software project. Cool! (This iswhere, as the author of this book, I let out a huge sigh of relief. If you’ve made it thisfar into the book and weren’t interested in working on a software project, I’d feel reallybad.) As a distributed version control system, Git is focused on what you can dolocally. The built-in tools for direct collaboration on shared repositories are extremelycoarse—either you have full write access to a project, or you have none. There areno per-branch permissions, and indeed, without the support of SSH, there’s noauthentication system at all in Git. Git relies on wrapper software to provide theaccess control.
In order for wrapper software to make the connection between two repositories, itneeds them to both be accessible from the same place. The easiest way to design forthis is to have developers upload their changes to the same system that hosts TheProject repository. GitHub, as well as every other web-based system, does this by hav‐ing you create a clone, or a fork, of The Project, and upload your changes to thecopied repository. Then, you use the wrapper software to request that your changesbe pulled into The Project repository.
Using GitHub terms:
1. An aspiring contributing developer (The Developer) forks The Project reposi‐tory.
2. The Developer then makes her proposed changes in her copy of The Project.3. When finished, The Developer initiates a pull request from a branch in her copy
of the project to a branch in The Project repository.4. Using comments in GitHub’s web interface, a conversation will take place
between The Developer and The Maintainer. Sometimes additional updates willbe required by The Developer before The Maintainer is ready to accept the pro‐posed changes into The Project.
160 | Chapter 7: Teams of More than One

5. When the proposed changes are deemed worthy, The Maintainer will incorporatethe pull request into The Project.
GitHub Does Not Require a Local Clone of The Project
GitHub now allows developers to make minor edits directly to filesthrough a web interface; however, many developers will choose toclone their copy of The Project so they can work on it locally. Then,when they have completed their work, they will push their updatesto their own copy of the project and initiate a pull request fromtheir copy of the project to the main project repository.
The process for submitting a pull request will vary slightly depending on the wrappersoftware being used (e.g., GitHub, Bitbucket, GitLab, etc.); however, the basic processis covered in Part III.
MaintainersA developer who has direct commit access to The Project repository is a special kindof developer, known as The Maintainer. Depending on how your team is structured,The Maintainers might be only those on the quality assurance team, or they may behandpicked developers from the community. For smaller internal projects, The Main‐tainers may be everyone who is working on the project.
In Chapter 2, you learned a little bit about project governance models. The way TheMaintainer will interact with the project is a political, not technical, decision. Gitdoesn’t actually care how you structure your project, and so you will need to developa system that works best for you. Defining the workflow for Consumers and Contrib‐utors is relatively easy because you aren’t really working with Git, but rather theworkflow defined by the wrapper software (in the case of Consumers, they’re noteven really working with Git at all).
If everyone on your team is a Maintainer (i.e., they are allowed to commit directlyinto the repository), it’s your choice as to whether you require developers to create aseparate clone of the repository. The only limitation would be if your code hostingsystem does not have the capacity to accept incoming branches for merging fromwithin a single repository. Check with your system of choice to see if it has a recom‐mended workflow.
Generally I work with teams of fewer than 10 developers. Some of these teams I’veworked with have opted for separate remote repositories for each developer, andsome have allowed developers to commit their in-progress work directly to TheProject repository. In the Drupal project, where there are thousands of developers,only a handful of people can commit into the main project repository; however, there
Setting Up the Developers | 161

are an additional 30,000 contributed modules, each with its own maintainers whohave direct access to the project repository.
The Only Rules Are the Ones You Document
If there are no documented rules, your project will become anar‐chic so write down the exact steps you would like people to followwhen contributing to the project.
Project maintainers will need to have at least a clone of The Project repository locally.If you were the developer who started the project, you already have a local clone ofthis repository. If you aren’t, you will need to clone the repository using the following:
$ git clone https://<hosting-url.com>/<project-owner's-name>/<project-name>.git
You learned how to create a clone of a project repository as a team of one in Chap‐ter 6 with the following command:
$ git clone https://gitlab.com/gitforteams/gitforteams.git
This will create a local copy of the repository, with the remote nickname origin.
If your project requires it, you may also need to create a clone of The Project on thecode hosting system. This is covered in the previous section, or you may wish to fol‐low the more detailed instructions available in Part III. Once you’ve created theremote clone, you can add this remote connection to your local repository. This willallow you to switch between the two from within the same directory. If you prefer,you can keep two local directories, but I personally enjoy the efficiency of not havingto jump around as much. You are welcome to use your own naming conventions forthe remotes. The syntax for adding a new remote is as follows:
$ git remote add nickname https://<hosting-url.com>/<your-name>/<project>.git
If I were to add my personal clone from GitLab, to follow the previous example, Iwould use the following command. Because this connection was being made to mypersonal copy of the repository, I would choose to use the nickname personal here:
$ git remote add personal https://gitlab.com/emmajane/gitforteams.git
To avoid confusion, I might also choose to rename the nickname for The Projectremote from origin to official:
$ git remote rename origin official
These nicknames are completely arbitrary and are personal to your system. They willnot be shared with others, so use whatever names make sense to you. Generally theconvention is to use origin for the remote copy that most closely resembles yourlocal work, and upstream for the copy of the repository that has the most new fea‐
162 | Chapter 7: Teams of More than One

tures being added by other developers that you might want to incorporate into yourown work.
Once you’ve set up the remote connections to the project, and to your own personalcopy of the repository, you should verify the names and URLs are what you areexpecting:
$ git remote --verbose
In my case, the output is as follows:
official [email protected]:gitforteams/gitforteams.git (fetch)official [email protected]:gitforteams/gitforteams.git (push)personal [email protected]:emmajane/gitforteams.git (fetch)personal [email protected]:emmajane/gitforteams.git (push)
You are now ready to work on your project as both a Contributor and a Maintainer.
Participating in DevelopmentThere are four main activities you will engage in when working with Git: working onnew proposed changes, keeping your branches up to date, reviewing proposedchanges, and publishing completed worked. Inevitably, you will also need to work onresolving conflicts when you update your branches, or when you attempt to incorpo‐rate proposed changes into The Project.
Constructing the Perfect CommitThere are two basic approaches to commits: demonstrate the thinking process andpresent the final solution. When I’m programming in a language I’m not very famil‐iar with, I think in small increments focusing on little pieces of the system at a time.As I work, I commit snapshots of my work as I get to critical points. These snapshotsact as lifelines, allowing me to track how I thought through a problem. If you were toread my commit messages when I code, you would be able to easily unpack my think‐ing. Commits might represent units of work in increments as small as 15–30 minutesof effort. The commit messages are unlikely to explain why I’ve done something. Theinitial commit might include a docblock of code comments which outline what I’mabout to do, the next commit might have the scaffolding for what I was about tobuild, and it would proceed from there. The commit messages would add very littlevalue above and beyond what is shown in the diff for each commit.
When I’m working in on a task I feel more confident about, I’m more likely to makeradical changes to the working directory without those tiny lifeline commits. Then,when my work is finished, I’ll take a look at the overall changes, and shape smaller,relevant commits. This might be done by committing single changed files at a time,or perhaps I might make an even more granular commit using the --patch mode toadd hunks of each file at a time to the staging area in preparation for a commit. These
Participating in Development | 163

curated commits will be much more useful to me later if I need to dig through historyusing the command bisect. For example, in order to use a function, it must alreadybe created somewhere, so I might choose to separate the creation, and use of a func‐tion into two separate commits even if I wrote them at the same time.
I hesitate to refer to these two approaches as novice and advanced, but that phrasingdoes ring true. Different source control management systems will have different waysof presenting commits in the history of your project. Git is very granular in how itshows you the commit history, and as a result, thinking in tiny commit incrementsgets messy and frustrating to work with. This is why we say that as you mature withGit, you will be more likely to adopt the second approach.
You don’t need to give up your tiny commits though. You can use rebase to combinemany little unpublished commits into a history that is more like the second version.Work the way you want to work, then reshape history so that it stores information ina useful way.
Rewriting History
Yes, I hate with a screaming passion that Git allows you to rewritehistory, and then tells you how dangerous it is. To me it feels toomuch like arrogant history revisionism. But that’s the model thatGit uses. To work effectively with Git, I set aside my frustrationsand adopt the techniques that the original software set out as bestpractices. I’m not afraid of rebasing; I just don’t like that it exists tobegin with. I give you permission not to like it either; however, notliking what it represents isn’t a valid reason for not using it. It’sdeeply ingrained in the philosophy of how Git stores metadataabout code’s history. Have a cookie, it’ll be okay.
If you accidentally do too much work between commits, you don’t need to forgo agranular commit history. Previously you learned to add individual files to the stagingarea. You can get even more granular, assigning edits within a single file to multiplecommits. To add a partial change within a file, instead of the whole file, use the com‐mand git add --patch filename. This command will walk through your file, line byline, and ask you if you would like to include each changed line in the commit youare building.
164 | Chapter 7: Teams of More than One

Rewriting History as It Happens
If you have a culture of showing work in progress on a centralizedserver, you will need to be careful in how you rebase your work.When a commit is rebased, the metadata for any commit objectthat is altered is assigned a new identifier. For example, if you arebringing a branch up to date, your local commits now have newparents and get a new ID. If you are trying to clean up the historyof a branch, and you squash two commits, a new ID will beassigned to the resulting commit object even though the content isidentical! This dual timeline can confuse Git and cause conflicts. Toavoid these conflicts, limit your use of interactive rebasing to short-lived branches, such as ticket branches.
Excellent commit objects have the following characteristics:
• Contains only related code. No scope creep, no “just fixing white space issuestoo.”
• Conforms to coding standards for your project, including in-code documenta‐tion.
• Are just the right size. Perhaps this is 100 lines of code. Or perhaps it’s a megarefactoring where a function name changed and 1,000 lines of code were affected.
• Work is described in the best-ever commit message (see the next section).
The best rule of thumb I’ve heard for commit messages is “Whatever it takes to makefuture me not get pissed off at past me for being lazy.”
Your commit messages should include:
• A terse description (fewer than 60 characters) in a standard format to make iteasy to scan logs.
• A longer explanation of why the current code is problematic, and the rationalefor why the change is important.
• A high-level description of how the change addresses the issue at hand.• An outline of the potential side effects the change may have.• A summary of the changes made, so that reading the diff of the code confirms
the commit message, but reading the diff is not guesswork on what/why some‐thing has changed.
• A ticket number, or other reference to sources where discussion about the pro‐posed change can/has/will happen.
• Who will be affected by the change (e.g., an optimization for developers; a speedimprovement for users).
Participating in Development | 165

• A list of places where the documentation will need to be updated.
A bad commit message would be as follows:
git commit -am "rewrote entire site in angular.js - it's faster now, I'm sure"
This commit is insufficient for the following reasons:
• By using the -a parameter, all files will be committed as part of this commit enmasse, and without consideration of whether or not they should be included.
• By using the -m flag, the tendency will always be to write only a terse message thatdoes not describe why the change is necessary, and how the change addresses thisnecessary change.
• The commit message does not reference a ticket number, so it’s impossible toknow which issue(s) are now resolved and can be closed in the ticket tracker.
To compare, a good commit message would be as follows:
$ git commit
[#321] Stop clipping trainer meta-data on video nodes at small screen size.
- Removes an unnecessary overflow: hidden that was causing some clipping.
Resolves #321
This is a good message for the following reasons:
• It includes the ticket number, in square brackets, at the beginning of the tersecommit message, making it easier to read the logs later.
• The terse description (for the short log view) explains the symptom that was seenby site visitors.
• A detailed explanation explains the technical implementation that was used toresolve the problem.
• The final line of the commit message (Resolves #321) will be captured by theticketing system and move the ticket from open to needs review.
When making a proposed change, you should keep the proposal small, and focusedon solving a single problem. This will make it easier for The Maintainer of the projectto review your submission, and accept your work. For example, if you are fixing aspecific bug in one part of the code base, don’t also fix an extra line ending you foundelsewhere in the code. While projects likely have naming conventions for theirbranches, if you are donating a drive-by fix that doesn’t already have an identifiedissue in The Project repository, name your branch using a terse description of the
166 | Chapter 7: Teams of More than One

problem you are solving—perhaps, for example, css_button_padding orimproved_test_coverage (Example 7-3).
Example 7-3. Make a change to the code base
$ git checkout -b terse_description(edit files)
$ git add filename(s)$ git commit
At this point, the commit message editor will open and you will need to provide thebest commit message you’ve ever written.
With the proposed change in place, you can now publish it to your copy of the repos‐itory using the command push:
$ git push
Your personal branch has been uploaded, so it is now time to work with a team mem‐ber to have your changes incorporated into the main branch for the project.
Keeping Branches Up to DateBranches stored in Git can generally be thought of as one of two things: officialproject branches or short-lived suggestion branches. Shared project branches areused to integrate reviewed and approved code from multiple developers and containthe official history of a project’s code. Your local copy of these branches should alwaysbe up to date and should always be used as the base branch for your ticket branches.By convention, it is not appropriate to write new commits to the local copy of an offi‐cial branch. Instead, you would create a new branch, complete your work, and thenmerge that branch back into the official branch. Several branching strategies are dis‐cussed in Chapter 3—you may want to go back and review that chapter if your teamdoesn’t already have a branching strategy. The second type of branch is essentially adeveloper’s sandbox. This is where you test out new ideas and get your code ready forreview. These short-lived work branches must also be kept up to date, but they need aslightly different approach.
Participating in Development | 167

Rebase Versus Merge…Again
There are still no rebasing police who are going to show up at yourteam meetings. You’ll need to figure out, as a team, how you’regoing to tackle bringing branches up to date. (I still think you needto do whatever is best for your team, but I’m going to show you theinstructions for rebasing where it so that you can see it’s not signifi‐cantly more difficult to use this method.) Regardless of what youchoose, document your solution carefully, and support those whoare new to Git to ensure they are able to perform the commandsconsistently. The easiest way I’ve found to ensure consistency this isto provide copy/paste-friendly documentation, and have peoplework at the command line. Additionally, flowcharts can be quiteeffective.
To reduce the number of conflicts you need to deal with when bringing short-livedbranches together, you should keep your working branch up to date with the projectbranch you will eventually be merging into. How often is “regularly”? I recommendupdating your branches at least as often as you drink coffee. If you don’t drink coffee,I would recommend you update your working branches at least daily using the com‐mands in Example 7-4. Yes, this is going to seem tedious, but it can save you a lot oftime in the long run to keep your work as up to date as possible.
Example 7-4. Update your local copy of this project’s branches
$ git checkout master$ git pull --rebase=preserve
Git will update your local copy of the master repository to incorporate the changesfrom the upstream repository.
Once the project branches are up to date, you can now update your work branches.When you are bringing your work branches up to date, however, there will not be anupstream branch that you can pull your changes from like you used for the sharedproject branches. So how do you know if you should be merging or rebasing at thispoint? The rule of thumb is as follows: if you started your work right now would thechange you’re about to incorporate into your work branch already be in place? If it’s afeature you wrote, it wouldn’t already be in the branch you’re bringing up to date andtherefore you should merge the branch to incorporate the new work. If it’s a featuresomeone else wrote, you almost definitely want to rebase (if you are on TeamRebase). Another helpful tip is to match the names. If the changes you want to incor‐porate are coming from a branch with the same name, but on a different remote, youalmost definitely want to rebase.
168 | Chapter 7: Teams of More than One

In Git, rebasing and fast-forward merges both result in a linear timeline, as theyreplay your commits onto the work that was done in a different branch. As each com‐mit is replayed, there is the potential for a merge conflict, which needs to be resolved.As a result, developers who are less confident in their ability to deal with a mergeconflict will opt to simplify the process, and use the merge command to bring theirwork up to date. Using merge does make your historical record more difficult to read;it is, however, also technically less complicated because it generally involves fewermerge conflicts.
If you are working with a complicated code base and it is important to be able to rundebugging tools quickly, you should spend the time to get a clean history by using thecommand rebase to bring your work branches up to date. If, however, it is moreimportant for contributions to be as easy as possible, you may want to allow yourdevelopers to use the merge command to bring their work up to date. (The Gittiest ofGit readers just gritted their teeth while reading that last bit. But you know what?There are no Git police who will show up at your door if your team decides they justwant things to be easier. Promise. Insert picture of a honey badger not caring here,and let’s move on.)
The first thing you need to do when bringing your work branches up to date is toensure your project branches are up to date. Keeping a shared branch up to date istypically done with the command pull (which uses the optional parameter--rebase). To bring your personal work branch up to date, you will need to rememberthe source branch where you initially branched from and copy the changes made tothis branch over to your work branch. If you are following the GitFlow modeldescribed in Chapter 3, this will likely be the branch dev or development.
For example, if your work branch was named 2378-add-test and your source branchwas named development, the commands would be as follows:
$ git checkout development$ git pull --rebase=preserve$ git checkout 2378-add-test$ git rebase development
Each of the commits you have made in your work branch will now be reapplied as ifthe new commits from the branch development had always been in place. Thesecommits may apply cleanly, or you may need to deal with merge conflicts. Becauserebasing is the preferred method in Git for keeping a branch up to date, I will passive-aggressively omit giving you the commands for how to merge a branch. I am hopefulyou will forgive me.
In addition to keeping your branches up to date, you should also remember to updateyour personal repositories whenever your own work is incorporated into The Projectbecause its main branch will now contain new commits. This will be helpful when
Participating in Development | 169

you are responsible for reviewing someone else’s work and merging it into the masterbranch. The commands you run are exactly as they were described previously:
$ git checkout master$ git pull --rebase=preserve
Regardless of how you choose to keep your branches up to date, I hope you’ll at leasttry to incorporate rebasing into your workflow. As frustrating as it can be, it will helpyou to have a cleaner history if you need to use the debugging techniques describedin Chapter 9.
Reviewing WorkIn order to review someone else’s work, you must first get a local copy of that workinto your own repository. This might be work that has already been incorporated intothe official project branches, or it might be a new feature, or a bug fix that a colleaguehas asked you to review and merge into the main project.
Peer reviewing new work is a multistep process and is covered in greater detail inChapter 8. The basic process is as follows:
1. Add a remote connection to the relevant repository.2. Fetch the available branches for that repository.3. Create a local copy of any branch you want to examine in depth.4. Incorporate any changes from the other branch that you would like to adopt into
your own work.5. Push the revised branch back to the relevant remote repository.
The first thing you will need to do is find the repository that holds the work you wantto incorporate. To list each of the remote repositories, use the remote subcommandshow (Example 7-5). Just like listing branches, all available remotes will be listed asthe output to the command. In Example 7-5, the two remotes I added in the previoussection are displayed. This gives me a quick reminder of which repository I want tolook at in more depth.
Example 7-5. A terse list of remote repositories
$ git remote show
officialpersonal
170 | Chapter 7: Teams of More than One
Once you have the name of the repository, you can get a full listing for the remote byadding the name of the nickname to the previous command (Example 7-6).
Example 7-6. Full details about the remote repository, personal
$ git remote show personal
* remote personal Fetch URL: [email protected]:emmajane/gitforteams.git Push URL: [email protected]:emmajane/gitforteams.git HEAD branch: master Remote branches: 2-bad_jokes tracked master tracked sandbox tracked video-lessons tracked Local branch configured for 'git pull': master merges with remote master Local ref configured for 'git push': master pushes to master (up to date)
Here I can see there are four branches stored in the remote repository, all of which Ihave a copy of locally (this is indicated by the word tracked).
Update Your Local List of Branches
If you already have a connection to the remote repository, and youdon’t see the branch your partner has asked you to review, ensurethe list of remote branches is up to date by first running the com‐mand git fetch.
If you don’t want the extra overhead of getting all the information about the remoterepository, you can choose to show only remote branches by using the commandbranch and adding the parameter --remotes (Example 7-7). This will allow you tolocate the branch with the work you need to review. I like using this variation forbranch instead of the --all parameter because it gives the actual name of the branch,instead of adding on the reference information of remotes.
Example 7-7. Listing remote branches
$ git branch --remotes
Participating in Development | 171

Branches Group Commits
A branch is a line of development that links individual commitobjects. Different instances of a branch may have commits made bydifferent developers, and therefore repositories are not identicaluntil they are synced. It’s basically anarchy, but limited to each littlerepository. The conventions we establish as software teams arewhat bring order to the chaos and allow us to share our work in asane manner. Remember the branching strategies we learned inChapter 3? They’ll keep the work sorted into logical thoughtstreams. Remember the permission strategies from Chapter 2?They’ll keep people locked into the right repository, unable tomake changes without the community gatekeeper’s help.
If you add the parameter --verbose to branch, the one-line commit message for thetip of the branch will be included in the output. For example, I had several activework branches, an integration branch, and the official branch for the project(Example 7-8). Although I uploaded my commits occasionally to the remote server,mostly I just worked in the chapter branches, incorporating my work into the inte‐gration branch, drafts, and then the main branch, master.
Example 7-8. Selected output from git branch --verbose while working on this chapter
ch02 7313755 CH02: Adding patching workflow diagram. ch04 69a3ded CH4: Stub file added with notes copied from Drupalize.Me.* ch05 80b5200 [official/ch05: ahead 2] CH05: Fixing URL for image 05fig01. drafts 80b5200 CH05: Fixing URL for image 05fig01. master 319bb53 [official/master] Merge branch 'drafts'. Updates for CH05.
The first column contains the branch name, the second column contains the commitID, and the third column contains the first line of the most recent commit message. Ifthe branch is tracked remotely, the name of the remote branch is included in squarebrackets between the commit ID and the commit message.
Once you’ve located the remote branch that contains the work you want to review,you can either copy the branch into your local repository (Example 7-9), or examinethe reference to it with the commands log and diff (Example 7-10).
Example 7-9. Copy a remote branch into your local repository
$ git checkout --tracking remote_nickname/branch
Example 7-10. Examine a remote branch without creating a working copy
$ git log --oneline remote_nickname/branch$ git diff current_branch...remote_nickname/branch
172 | Chapter 7: Teams of More than One

Assuming the work passes review, it’s time to merge it into the main project branch.
Merging Completed WorkBefore merging the new work into your project branch, you will need to first ensureall branches are up to date. This is necessary because Git won’t allow you to pushyour copy of a remote repository if the destination branch (on the remote) containscommits which are not in your local copy.
When uploading new work to a remote server, Git will only accept work as a fast for‐ward merge. This means you don’t have to worry about having a merge conflict whenyou push your work. Because of this restriction, your local branch needs to containall of the remote commits before you can push your branch. To update your work,you will need to use the command pull to retrieve the changes from the remoteserver and incorporate any new work into your local branches.
First, update your local copy of the destination branch (Example 7-11) by using thecommand pull with the parameter --rebase.
Example 7-11. Incorporate updates from a project branch
$ git checkout master$ git pull --rebase=preserve
Once the public branch is up to date, you will need to bring the feature branch up todate as well (Example 7-12).
Example 7-12. Merge a completed ticket branch into a public project branch
$ git checkout 2378-add-test$ git rebase master
Finally, you can merge the ticket branch into the main project branch(Example 7-13).
Example 7-13. Merge the completed ticket branch into the public project branch.
$ git checkout master$ git merge --no-ff 2378-add-test
If the changes that were being introduced were unique from previous work that hadbeen completed, the merge will now be completed; however, if there was overlappingwork in the same area, Git will not know how to complete the merge and ask for yourguidance. The language is a little scary as asking for help in Git terminology is betterknown as a merge conflict.
Participating in Development | 173

Resolving Merge and Rebase ConflictsConflict sounds hard and scary, but in Git, a merge conflict is actually a very smallproblem and you won’t need to spend a lot of money on a mediator or a therapist toresolve it. Any time a file is changed in exactly the same place, Git can be unsure ofwhich version is the correct version, so it will ask you to make that decision. Gitrefers to this uncertainty as a conflict.
When you bring together two branches, there is always a chance that you will havechanges in both our and their version of the code on the exact same lines within a file.
Git will add three lines into any file that has lines with conflicting information atexactly the same point:
<<<<<<<=======>>>>>>>
This represents the our code, and their code separated by a dividing row of =. Toresolve a conflict you will need to edit the files, select the appropriate content to keep,and remove the markers. When you open the file to examine the conflict, look at thesurrounding areas as well. Sometimes Git will have misjudged where to put the mark‐ers, so you shouldn’t just delete one whole section, or the other whole section. Readcarefully, and you may find you need to take a little bit from each when you look atthe surrounding code:
<<<<<<< HEAD $p++;}=======}
>>>>>>> 2378-add-test
We don’t have enough information to resolve this merge conflict without understand‐ing what the code update is trying to accomplish. Probably the end brace should bekept because it’s in both sides of the conflict, but what about the new line? And whatabout the increment of the variable? If you run into merge conflicts you are not surehow to resolve, you should talk to the author of the original code if you cannot figureit out just from reading the code itself. Misunderstanding the code and deleting toomuch (or too little) may end up unintentionally adding new bugs to the code if youresolve the conflict incorrectly.
174 | Chapter 7: Teams of More than One

Resolving Merges Step by Step from Very Divergent Branches
There is a complementary program, git-imerge, which works tomerge the commits leading up to the tip of the two branches youare attempting to merge. Working with the incremental commitscan make it easier to see how the conflict should be resolvedbecause there is less to compare at each point. This is not part ofGit core, and you will need to download and install the softwareseparately. Check your favorite package manager if you want toreduce the install hassle. I installed my copy via OS X’s Brew.
When your edits are complete, you can remove the markers Git placed into the fileand continue using the on-screen instructions which Git provides in its status mes‐sage:
$ git status
If you were completing a merge, you will need to add the updated files and committhem to your repository:
$ git add filename(s)
By adding the files one at a time, you can use the status command as a TODO list offiles with outstanding merge conflicts that need to be resolved:
$ git status
Once all the merge conflicts have been cleaned up in each of the files, you can com‐mit your staged changes:
$ git commit
At this point, the default text editor for Git will open with additional informationabout the commit you are completing. When you have finished writing your message,save the changes and quit the editor to resume.
If you were attempting a rebase when the merge conflict occurred, you may be in themiddle of a multistep process. In this case, you’ll need to proceed with the rebasingprocedure:
$ git rebase --continue
If, before starting the merge, you know without a doubt that you will always want touse either the incoming work (theirs) or your own work (ours), you can preemp‐tively instruct Git on how you want to address the proposed changes from the twobranches. For example, if you wanted to merge in a branch that you knew containedfixes for the problem you were having, you could force Git to use the other branchwhen making its updates to your own branch:
$ git checkout branch_to_update$ git merge --strategy-option=theirs incoming_branch
Participating in Development | 175

Publishing WorkThe first time you upload your changes for a given branch, you will need to specifythe remote repository that you want to use, as well as the branch name. The conven‐tion is to keep the branch names the same on the local and remote repositories. Youwill need to include the nickname for the remote repository. In Example 7-14, it isassumed the name of the remote is origin.
Example 7-14. Upload your branch with the proposed changes to your remote repository
$ git push --set-upstream origin branch
Once you’ve set up the branch for the remote repository, you can upload your workto the same remote again using the command push:
$ git push
If you have multiple remotes set for your repository, you will need to explicitly pushto each of the remote repositories separately. By default, origin is used:
$ git push remote_nickname
The next part of the procedure will depend on the hosting system you’re using. Gen‐erally, though, you navigate to The Project page where you will locate a link for pullrequests (the language may be slightly different on your system of choice). From thislink you should be able to initiate a request to have your proposed updates includedin the project. The system should already know which of your repositories was clonedfrom The Project, and it should include a list of all the branches you’ve worked on inyour copy that might include proposed changes for The Project. You’ll select thebranch you want to submit for inclusion and walk through any additional steps nec‐essary. This process is covered in depth in Part III.
Once your pull request has been submitted, The Maintainer will review your pro‐posed update. He may accept your work as is, or request changes and ask you toresubmit your work. If additional changes are needed, repeat the steps outlined inthis section until the pull request is accepted.
To publish new work into a shared branch, the first thing you should do is check thatthe branch you are going to be merging into is up to date. This will ensure you canpush your work after merging your changes. If the branch isn’t up to date, you willnot be able to upload the revised copy of the shared branch until you have downloa‐ded the new updates and incorporated them into the branch:
$ git checkout master$ git pull --rebase=preserve
Once your local copy of the main project branch is up to date, you should ensurethese changes are also copied into the feature branch you have been working on so
176 | Chapter 7: Teams of More than One

that there is the smallest amount of difference between the two branches before themerge is performed:
$ git checkout 2378-add-test
$ git rebase master
Once the working branch is up to date, you are ready to merge in the reviewed andaccepted changes:
$ git merge --no-ff 2378-add-test
$ git push
The work branch can now be deleted from your local repository and any remoterepositories you have write access to:
$ git branch --delete 2378-add-test$ git push remote_nickname --delete 2378-add-test
Your branches should now be up-to-date and ready for your teammates to download.
What happens next will vary greatly depending on the type of software you are build‐ing. Web developers who want to connect Git with a continuous integration buildserver may benefit from watching Lorna Mitchell’s videos Git Fundamentals for WebDevelopers (O’Reilly).
Sample WorkflowsThe remainder of this chapter serves as a template for working with teams. Youshould discuss with your team how they would like to work, and write down thecommands each contributor and maintainer will need to use during the project.
Sprint-Based WorkflowThis process is more or less what I’ve used for several teams working in a sprint-based release cycle. It is a variation on GitFlow and it works well for weekly websitedeployments. The schedule for the sprint follows a weekly routine (as opposed to themore “traditional” two-week sprint). This encourages granular tickets and helps thedevelopers see their work in production as fast as possible. Some tickets will take sev‐eral “sprints” to complete if they are larger in scope.
The repository is set up with five different types of branches: development, ticket, qa,master, and hotfix (Table 7-1). These branches are used either as single-issue develop‐ment branches, or as integration branches.
Sample Workflows | 177

Table 7-1. Branch types in a weekly deployment workflow
Branch name / convention Type of branch Description Branchedfrom
dev Integration Used to collate peer reviewed code ticketbranches
ticket#-descriptive-name Development Used to complete work identified intickets
dev
qa Integration Used for quality assurance testing atthe end of each sprint; code thatdoes not pass QA testing is removedfrom the branch
dev
master Integration Used to deploy fully tested code qa
hotfix- ticket#-description Development Used to develop solutions for urgentproblems identified on production
latest releasetag onmaster
For the developers, every day is a development day. In addition, there are three daysin the week when all team members rally toward the same goal.
The workflow is not overly complex (Example 7-15) for developers: all work beginson a fresh ticket branch from the parent branch dev. Once completed, the work in aticket branch is pushed up to the shared project repository. Branches are kept up-to-date through rebasing, which allows for a cleaner branch history than merging.
Example 7-15. Git commands to work on tickets
In this example, substitute origin for the name of your remote, and 1234-new_ticket_branch for the name of your ticket branch:
$ git checkout dev$ git pull --rebase=preserve origin dev$ git checkout -b 1234-new_ticket_branch// do work$ git add --all$ git commit
Before sharing the work, ensure the branch contains any new commits:
$ git checkout dev$ git pull --rebase=preserve$ git checkout 1234-new_ticket_branch$ git rebase dev
178 | Chapter 7: Teams of More than One

Finally, share the new work with others:
$ git push origin 1234-new_ticket_branch
Once completed, a ticket branch is reviewed by another person on the team(Example 7-16). If the code passes review, the reviewer merges the ticket branch intothe development branch and removes the ticket branch from the main repository.The review process is covered in depth in Chapter 8.
Example 7-16. Git commands to complete a peer review
$ git checkout dev$ git pull --rebase=preserve$ git checkout 1234-new_ticket_branch// review process goes here$ git merge --no-ff 1234-new_ticket_branch master$ git branch --delete 1234-new_ticket_branch$ git push --delete origin 1234-new_ticket_branch
Quality Assurance (Monday–Tuesday):
• Automated test suite is run on dev to catch any regressions that may have snuckin while feature branches were being added up to this point.
• All work in the branch dev is merged into the branch qa for testing(Example 7-17). Development work continues in the branch dev.
• A sprint checklist is created in a shared document, such as Google Docs, by copy‐ing and pasting the user stories from the tickets that were merged into the qabranch. Typically, this is the first line of the ticket description—a convention thatshould be adopted to make the QA process faster.
• All team members are responsible for running through the list of tickets to betested in the shared document. In addition to the weekly tickets, there may berolling tests that need to be completed by a person.
• Anything that fails quality assurance has a new ticket created so that it can befixed, or reverted, prior to release (Example 7-18).
Example 7-17. Commands to set up the qa branch
$ git checkout dev$ git pull --rebase=preserve$ git checkout qa$ git merge --no-ff dev$ git push
Sample Workflows | 179

Example 7-18. Commands to remove tickets that have failed to pass QA in time forrelease
$ git log --oneline --grep ticket-number(locate the commits that need to be reversed)
$ git revert commit
$ git revert --mainline 1 merge_commit(ideally, however, you are merging work branches with --no-ff, which forces a commit IDthat can be easily undone)
Release Day (Wednesday):
• The branch qa is merged into the branch master and tagged (Example 7-19).• From the live site, the repository is updated to use the tagged commit for release.• The work for the next week is prioritized with the development team.
Example 7-19. Commands to prepare for deployment
$ git checkout master$ git merge qa$ git tag(locate the latest tag so that you can determine the next tag's number)
$ git tag --annotate -m tag_name$ git push --tags
When the tag is added, it is signed with the --annotate parameter, and a message isadded with the -m parameter. This ensures the tag will not be ignored.
Announcement Day (Thursday):
• A public announcement is made to the community of users about the changesthat were launched on the previous day. The extra day gives the team a chance todeal with any unexpected regressions, or bugs, when the code was moved to theproduction environment.
• Development continues on the new list of priorities established on the previousday.
In the unlikely event that a serious bug or regression is introduced to the productionenvironment, a hotfix is completed. Serious is, of course, a relative term. In this sys‐tem, deployments are made weekly, so a hotfix, generally speaking, is an update thatcannot wait a week to be deployed.
180 | Chapter 7: Teams of More than One
Each deployment is tagged as such, so the first step is to get a list of all tags and locatethe current live version of the code base (Example 7-20). A new branch is createdfrom this point, the updated code is applied, and then uploaded for review beforedeployment.
Example 7-20. Commands to create a hotfix branch
$ git checkout master$ git tag(review list of tags to determine the currently live tag)
$ git checkout -b hotfix-issue-description tag_name
The hotfix branch would then be worked on as if it were a regular developmentbranch, undergoing a peer review and quality assurance test. When it passes testing,it would then be immediately incorporated back into the master branch and taggedfor deployment (Example 7-21).
Example 7-21. Commands to prepare a hotfix for deployment
$ git checkout master$ git merge --no-ff hotfix-issue-description$ git tag --annotate -m new_tag_name$ git push --tags
In this system, semantic versioning is not used. Instead, tag names are incrementedusing the format <launch_version>.<sprint_week>.<hotfix>. For example, 1.4.3would be used to represent the third hotfix on the fourth week of development (inother words: a bad week for the team!).
Trusted Developers with No Peer ReviewWhile writing this book, I worked with the O’Reilly automated build tool, Atlas. Thissystem also has a web-based GUI that allows editors to work on book files directly.Saved files are immediately committed to the master branch. Due to the GUI, there isno peer review process because anyone on my team is able to make edits directly to afile. My preference, however, is to work locally, and not through a web GUI. I hadbeen keeping the branch overhead low locally and had just been working in master aswell. It only took me one local merge conflict to alter the way I was working locally.
When I wanted to update my work, I would use the command fetch to see if anychanges had been made by my editors. With the fetch completed, I would comparemy copy of the master branch with their copy of the master branch (origin/master). Assuming I agreed with all their edits, I would merge in their copy of thebranch. If I disagreed, I would merge in their branch with the strategy ours, effec‐
Sample Workflows | 181

tively throwing out their changes but letting Git think that the two branches were upto date:
$ git checkout master$ git fetch origin$ git diff origin/master
Depending on whether or not I wanted to keep the changes, I would merge the workin one of three ways: combine all work, overwrite their work with mine, or overwritemy work with theirs.
To combine all work (true merge):
$ git merge origin/master
To keep my own work:
$ git merge -X ours origin/master
To discard my own work in favor of the reviewer’s:
$ git merge -X theirs origin/master
This can be done on a per-commit basis, or if there is a merge conflict, it can be doneon a very granular change-by-change basis with a merge tool. (It feels a bit passive-aggressive to be throwing stuff out, but really it’s just the limitation of a single branchsystem where you don’t have the ability to talk about the proposed changes in a sepa‐rate branch.) Depending on the granularity of the commits, I might also choose tocherry-pick some commits to keep them, while discarding other commits. Cherry-picking commits was covered in Chapter 6.
Finally, I would upload the new version of the book to the repository, and update mylocal working branch drafts:
$ git push origin master$ git checkout drafts$ git rebase master
Then I started getting reviews as marked-up PDFs and realized, once again, I hadanother way that I wanted to separate work. I wanted to be able to write a chapter andkeep those commits nice and tidy, but sometimes I was mid-chapter when an editcame in that I wanted to address immediately. Instead of intermingling these com‐mits I set up the following structure for my branches: master, drafts, and onebranch per chapter:
$ git checkout ch04// write chapter$ git add ch04.asciidoc$ git commit$ git checkout drafts$ git merge ch04
182 | Chapter 7: Teams of More than One

The branch drafts gave me a place to integrate all of the work that I’d been doing. Itwas kept up to date by merging in chapters as they were completed, or rebasing themaster branch if changes had been made by one of my editors. When I was first writ‐ing chapters on my own, without others contributing, multiple branches would havebeen a lot of overhead to maintain, but as more contributors started offering differentkinds of contributions, more granularity in branches allowed me to pick and choosehow I wanted the manuscript to progress.
Untrusted Developers with Independent Quality AssuranceIf your team is mostly trusted developers, but you have a few contractors as well, youmight want to have your contractors working in a fork of the repository, instead ofgiving them write access to the main project. For some types of software, this splitmight even be a requirement for your own staff. For example, if you were working onfirmware for a medical device, you might have very strict government regulations youneed to follow on who is allowed to check in work, and how that work must bereviewed before it is added to a repository.
This model is the same as what was described for Contributors (as opposed to Main‐tainers) earlier in this chapter.
A second example was given in the description of the forking strategy in Chapter 2.Here I included a description of how I offered a patch back to the reveal.js project. Todo this, I made a fork of the project, and then cloned the project so that I could editthe files at my workstation. I then reversed the chaining to push my changes back tothe original project through a push to upload my work, and then a pull request tosubmit my work for review.
Based on your reading to date, put together the commands that would be necessaryfor these workflows. Hint: there’s nothing here that you haven’t read about already inthis chapter. Start by drawing yourself a diagram, then add arrows to show the pro‐gression of work through the process, and finally, add the Git commands for each ofthe arrows.
SummaryTo work on a new project, you must first decide on the governance structure for theproject. This will inform whether or not developers need to create a remote clone ofthe project, or just a local clone of the project. The way Consumers, Contributors,and Maintainers set up their access to the project may prevent them from doing sometasks; however, by adding remote repository connections, you can easily promote aDeveloper into a Maintainer.
Summary | 183


CHAPTER 8
Ready for Review
Growing up I learned there were two kinds of reviews I could seek out from myparents. My parents were predictable in their responses. One of my parents gavereviews in the form of a shower of praise. The other parent, the one with a degreefrom the Royal College of Art, would put me through a design crit. I’ll be honest andtell you that to this day I both dread and crave the review process.
Unfortunately, developers are rarely exposed to the peer review process in schools.The typical review process is the final submission of work to the instructor—with noroom for discussion on how to improve. This methodology doesn’t teach students toiterate based on feedback. Graduates released into the workforce may quietly scoff atshoddy workmanship they find around them, passing silent judgment when it’s toolate to make changes.
Completing a peer review is time consuming. At the last project where I introducedmandatory peer reviews, we estimated that it doubled the time to complete eachticket. It introduced more context switching to the developers, and was the source ofincreased frustration when it came to keeping the branches up to date while waitingfor a code review. The benefits, however, were huge. Junior coders were exposed to awider amount of the code base than just the portion they were working on, seniordevelopers had better opportunities to ask why decisions were being made in thecode base that could potentially affect future work, and by adopting an as-you-gopeer review process we reduced the amount of time needed for human quality assur‐ance testing at the end of each sprint. We felt the benefits were worth the timeinvested.
185

Types of ReviewsDuring the life cycle of a project, several types of reviews should be undertaken.While the majority of this chapter focuses on peer code reviews, you should be awareof the other types of reviews to ensure you’re not commenting too early (or too late)on various aspects of the project:
Design critiqueTypically developers are not involved at this stage of the project; however, includ‐ing a developer’s input may result in minor user interface enhancements that rad‐ically simplify the build.
Technical architecture reviewA peer review of the underlying foundation for the code that is about to be built.At this stage, developers should be ensuring the data model is complete and caneasily accommodate all parts of the build, and perhaps future features as well.
Automated self-checkLike spell-check, but for code; an automated self-check allows developers toensure their code is following coding standards for the project. You may haveadditional testing suites that you want to run. The purpose of this type of reviewis to automate any type of review that could easily be caught by a machine check,instead of wasting time performing human checks.
Ticket-based peer code reviewThe majority of this chapter will be spent discussing this type of review.
Quality assurance/user acceptance testingAfter the code review, the new feature will be merged into the developmentbranch and make it available for testing by human testers. This user interfacereview is typically conducted on a special, nonproduction server.
Types of ReviewersDepending on the size of your project, you probably have a variation on one of thefollowing types of review processes (or maybe a combination of several):
Peer ReviewWe are all equals and equally able to review code and accept it to the project. Welearn from one another and do our best work when we know our peers will bejudging it later.
186 | Chapter 8: Ready for Review

Automated GatekeeperOur code has test coverage. We trust our tests and only submit work we knowwill pass a comprehensive test suite. Typically we ask for a second opinion beforethe code is pushed into the test suite (for automated deployment).
Consensus ShepherdOur community of coders is vigilant, and opinionated. We require consensusfrom interested parties before code can be marked as reviewed by the community.We may also have a testbot that is part of our community, making it easier forhuman coders to know when a suggested change meets minimum standards.
Benevolent DictatorMy code, my way. You are welcome to submit your suggestions, but I will reviewor have my lieutenants review your work with a fine-tooth comb. I enjoy findingyour mistakes and rejecting your work. Only perfection is good enough.
Peer reviews should not be limited to those who are of equal stature on a team. Thebenefits will vary, but they can be extended to any combination of skill levels(Table 8-1).
Table 8-1. Benefits to junior and senior reviewers and developers
Junior Developer Senior Developer
Junior Reviewer Find bugs; compliance withstandards
Learn to read good code; suggest simplifications;exposure to the whole code base
Senior Reviewer Suggest new techniques;improve architecture
Improve architecture; cross-functional team(exposure to more code)
Software for Code ReviewsThe commands outlined in this chapter can be used with any Git hosting system.Detailed instructions for code hosting systems are outlined in Part III—includinginstructions on using GitHub (Chapter 10), Bitbucket (Chapter 11), and GitLab(Chapter 12). The code review capabilities of these systems are managed by pullrequests or merge requests, and they are relatively lightweight, making them easy touse and integrate into most workflows.
If your reporting requirements are more explicit due to industry regulations, you mayneed to consider using a more formal code review and sign-off process. The follow‐ing software packages focus explicitly on code review and sign-off. They are appro‐priate for the code review of extremely large software projects, and are likely moresoftware than the typical project needs:
Software for Code Reviews | 187

GerritUsed by Android, OpenStack, and Typo3, this review system is best for very largeprojects. There is a nice video presentation about its design (and limitations) byDave Borowitz.
Review BoardUsed by LinkedIn, the Apache Software Foundation, and Yelp, this softwareincludes additional information about when lines of code were moved within thecode base.
In addition to manual, peer review of code, it can also help developers to have auto‐mated tests to check their work against before requesting a peer review. Some opensource projects, such as Drupal, have tools that can be used to verify that code con‐forms to coding standards (Coder). There are also for-pay services, such as PullRe‐view for Ruby and bitHound for JavaScript, which are language specific but projectagnostic.
Although we will be focusing on technical code reviews, increasingly non-technicalreviewers are being included as part of the review process through customizable, on-demand build servers. A public example of this is the SimplyTest.Me service for Dru‐pal. This platform allows people to deploy a test machine for 30 minutes at a timewith a specific patch applied to the code so that they can review the changes proposedin the Drupal issue queue. These build servers can also benefit developers. Instead ofconducting reviews sequentially, a reviewer can initiate the build process for a num‐ber of reviews all at once. Now the reviewer can avoid the (sometimes lengthy) proce‐dure of building a local environment for each code review he or she is completing, byrunning the build process in parallel for all reviews that need to be completed. If thissounds appealing, you should read the Lullabot article on working with its pullrequest builder. Assuming your technology stack is a little different than theirs, a websearch for “pull request builder” should get you pointed in the right direction.
Reviewing the IssueBefore beginning the local code review process, you should read through the descrip‐tion of the proposed changes in your team’s issue tracker to discover why the changewas proposed. Is it a bug fix? How was the software broken? Is it adding a new fea‐ture? Who (and how) does the feature help? Understanding the problem before youlook at the code will help you to answer “is this code the best way to solve this prob‐lem?” when the time comes.
188 | Chapter 8: Ready for Review

Investigate Your Code Hosting Platform
Most code hosting systems also have a web interface that allowsyou to easily review the proposed changes online. Use this interfaceto quickly review the code before setting up your local environ‐ment. If, for example, the proposed change is just adding a missingcode comment, or fixing a spelling mistake, you might be able toreview the proposed changes online without the hassle of down‐loading everything to your local environment.
Once you have a good understanding of what the code is supposed to be doing, it istime to set up your local environment so that you can replicate the “before” state. Inother words, if it’s a bug, you should make sure you can replicate the bug in your test‐ing environment. If it’s a new feature, you should make sure the feature doesn’talready exist (to be fair, it is pretty unlikely that two people will implement the exactsame new feature).
The first step in reviewing someone else’s work is to verify how the code works cur‐rently. If you are testing a fix to a specific bug, that means you should start by repli‐cating the bug. This is the only way you’ll know for sure that the new code fixes theproblem, and it isn’t just a difference of environments making things appear to work.When you apply the new code, you also want to be able to catch any regressions, orproblems, it might introduce. You can only do this if you know for sure that the prob‐lems were introduced in the code you just applied.
Once you’ve got your environment set up and you have confirmed the current state ofthe code, you can now check out a copy of the code you need to review.
Applying the Proposed ChangesIn Chapter 2 you learned about several different access control models for Git. Yourproject might be setup such that the proposed review branch is in the main projectrepository (“Shared Repository Setup” on page 189), or it might be in a forked copyof the project repository (“Forked Repository Setup” on page 190). The instructionsfor the initial setup are different, so skip ahead to the section which is relevant to you.
Shared Repository SetupIf you are working from a shared repository, you have a very easy setup. Simplyupdate your local list of branches:
$ git fetch
Applying the Proposed Changes | 189

If you have more than one remote, you may need to explicitly name the remote youwould like to update. Assuming the name of the remote you want to update is namedorigin, the command is as follows:
$ git fetch origin
If you are working in an automated build environment you may need to explicitlyfetch the branch you want to review if you don’t have the complete history for theremote repository locally. Replace origin with the name of your remote and 61524-broken-link with the name of the branch you want to review:
$ git fetch origin 61524-broken-link:61524-broken-link
The third parameter, 61524-broken-link:61524-broken-link is a refspec whichmaps the name of the remote branch to a local branch name([remote_branch_name]:[local_branch_name]). Convention leaves the branchname the same because it is easier to remember, but it does make for a complicated-looking command to have things doubled up.
You are now ready to proceed to “Checking Out the Proposed Branch” on page 191.
Forked Repository SetupThere are two ways to approach a forked repository scenario. The first method is toclone a new copy of the remote repository which contains the proposed branch. Thismethod is appropriate if we are just conducting a review, and we will not be responsi‐ble for incorporating the proposed changes back into the main project repository.The second method is to add a new remote repository to our own local repositoryand pull the changes into a new branch within our own repository. This secondmethod will also allow us to merge the approved work back into the main projectrepository. You should proceed with the method that is appropriate for your situa‐tion. If you aren’t sure, choose the second method and add the remote repository ref‐erence to your own local repository.
For both methods we will need to know the URL for the remote repository whichholds the changes you want to review. It may be in the format of https://example.com/username/project.git or [email protected]:username/project.git.Once you have the remote URL, you are ready to proceed.
If you are using the first method of creating a new clone, navigate away from yourown copy of the project repository, perhaps to your desktop folder. Then, create aclone of the repository you want to review with the following command:
$ git clone https://example.com/<username>/<project>.git
Navigate into the new repository you have just cloned:
$ cd project
190 | Chapter 8: Ready for Review
You are now ready to proceed to “Checking Out the Proposed Branch” on page 191.
If you are using the second method of adding a remote repository to your own copyof the project repository, you will need to begin from within your project repository.At the command line, navigate to that directory now.
Once situated in your project folder, add a new remote repository for the fork thatcontains the branch you need to review. For the name of the remote, use theusername of the person whose work you are reviewing. For example, if you arereviewing Donna’s work and her repository is available at https://example.com/donna/likesgin, the command would be as follows:
$ git add remote donna https://example.com/donna/likesgin
Update the list of branches available to you now that you have a new connection to anew remote repository:
$ get fetch donna
You are now ready to proceed to “Checking Out the Proposed Branch” on page 191.
Checking Out the Proposed BranchYou should now be situated inside a project repository which contains the branch youneed to review. The next step is to check out a copy of the branch you need.
List all branches for your repository:
$ git branch --all
A list of branches will be returned. It may appear something like this:
* master remotes/origin/master remotes/origin/HEAD -> origin/master remotes/origin/61524-broken-link
The code we need to review is located within the last branch on that list. If you haveadded an additional remote to download the branch you want to review, the wordorigin may be something like donna instead. Simply substitute the word origin inthe instructions that follow with the nickname you have assigned the remote whichcontains the branch you are reviewing.
$ git checkout --track origin/61524-broken-link
We now have our own copy of the proposed changes in a local branch. This new localcopy of the branch will be named 61524-broken-link. By adding the parameter--track, we made an explicit connection as we switched to the new branch. Thismeans if we need to run the command push to upload our changes, Git will knowwhich repository we want to upload our changes to.
Applying the Proposed Changes | 191

We can now begin our review.
Reviewing the Proposed ChangesFirst, let’s take a look at the commit history for this branch with the command log:
$ git log master..
This gives us the full log message of all the commits (starting with the most recent)that differ from the branch you’re comparing yours to. If there are not descriptive com‐mit messages, return the work to the developer and ask her to add commit messages.There are instructions in Chapter 8 on how to write a great commit message, andinstructions in Chapter 6 on how to reshape history (including adding new commitmessages to previous commits with interactive rebasing).
To get a terse, but more complete history, examine only the current branch with thecommand log, but in graph form. By using the parameter --graph, you will get asense of how this branch fits into the recent historical context of the project:
$ git log --oneline --graph
And finally, use the command diff. This command shows the difference betweentwo points in your repository. These points can include commit objects, branch tips,and the staging area. We want to compare the current work to where you’ll merge thebranch “to”—by convention, this is the master branch:
$ git diff master
When you run the command to output the difference, the information will be presen‐ted as a patch file. Patch files are ugly to read. You’re looking for lines beginning with+ and -. These are lines that have been added or removed, respectively. You can scrollthrough the changes using the up and down arrows. When you have finished review‐ing the patch, press q to quit. If you need an even briefer comparison of what’s hap‐pened in the patch, consider listing only the files, and then looking at the changedfiles one at a time:
$ git diff master --stat$ git diff master filename
Let’s take a look at the format of a patch file:
diff --git a/jokes.txt b/jokes.txtindex a3aa100..a660181 100644 --- a/jokes.txt +++ b/jokes.txt@@ -4,5 +4,5 @@ an investigator. The Past, The Present and The Future walked into a bar. It was tense.
-What did one hat say to another's
192 | Chapter 8: Ready for Review

-You stay here, I'll go on a head!+What's the difference between a poorly dressed man on a tricycle and awell dressed man on a bicycle?+Attire.
The first five lines tell us we are looking at the difference between two files, with theline number of where the files begin to differ. There are a few lines of context pro‐vided leading up to the changes. These lines are indented by one space each. Thechanged lines of code are then displayed with a preceding - (line removed), or + (lineadded).
You can also get a slightly better visual summary of the same information we’velooked at to date by starting a Git repository browser. I use gitk, which ships with thebrew-installed version of Git (but not the version Apple provides). Any repositorybrowser will suffice and many GUI clients are available on the Git website:
$ gitk
When you run the command, gitk, a graphical tool will launch from the commandline. Click each commit to get more information about it. Many ticket systems willalso allow you to look at the changes in a merge proposal side by side. Even if youlove the command line as I do, I highly recommend getting an additional graphicaltool to compare changes. For OS X, I like Kaleidoscope App because it also allows meto spot differences in images as well as code.
Now that you’ve had a good look at the code, jot down your answers to the followingquestions:
• Does the code comply with your project’s identified coding standards?• Does the code limit itself to the scope identified in the ticket?• Does the code follow industry best practices in the most efficient way possible?• Has the code been implemented in the best possible way according to all of your
internal bug-a-boos? It’s important to separate your preferences and stylistic dif‐ferences from actual problems with the code.
With a sense of what the code changes are, you should go ahead and apply thechanges to your local environment. In other words, display the rendered code how‐ever is appropriate for your project. Assuming it’s a website, now is the time to launchyour browser and view the proposed change. How does it look? Does your solutionmatch what the coder thinks he’s built? If it doesn’t look right, do you need to clearthe cache, perhaps rebuild the Sass output to update the CSS for the project based onthe changes you’re reviewing?
Reviewing the Proposed Changes | 193

Now is the time to also test the code against whatever test suite you use:
• Does the code introduce any regressions?• Is the new code as performant as the old code? Does it still fall within your proj‐
ect’s performance budget for download and page rendering times?• Are the words all spelled correctly, and do they follow any brand-specific guide‐
lines you have (e.g., sentence case versus title case for headings)?
Depending on the nature of the original problem for this particular code change,there may be other obvious questions you need to address as part of your codereview. Ideally, your team will develop its own checklist of things to look for as part ofa review.
Preparing Your FeedbackDo your best to create the most comprehensive list of everything you can find wrong(and right) with the code. It’s annoying to get dribbles of feedback from someone aspart of the review process, so we’ll try to avoid “just one more thing” whereverwe can.
Let’s assume you’ve now got a big juicy list of feedback. Maybe you have no feedback,but I doubt it. Release your inner critique and let’s get your review structured in ausable manner for your teammates. For all the notes you’ve assembled to date, sepa‐rate them into the following categories:
The code is brokenIt doesn’t compile, introduces a regression, it doesn’t pass the testing suite, or insome way actually fails demonstrably. These are problems that absolutely must befixed.
The code does not follow best practicesYou have some conventions, the web industry has some guidelines. These fixesare pretty important to make, but they may have some nuances the developermight not be aware of.
The code isn’t how you would have written itYou’re a developer with battle-tested opinions; but you can’t actually prove you’reright without getting out your rocking chair and launching into story time.
Submitting Your EvaluationBased on this new categorization, you are ready to engage in passive-aggressive cod‐ing. If the problem is clearly a typo and falls into one of the first two categories, goahead and fix it. You’ll increase the efficiency of the team by reducing the number of
194 | Chapter 8: Ready for Review

round trips the code needs to take between the developer and the reviewer. Obvioustypos don’t really need to go back to the original author, do they? Sure, your team‐mates will be a little embarrassed, but they’ll appreciate you having saved them a bitof time. Hopefully the next time they won’t be so sloppy. However, if it’s the fourth orfifth time, do not fix the mistake. Your time is also valuable and your teammates needto check their own code before it gets to you.
If the change you are itching to make falls into the third category: stop right now. Donot touch the code. Instead, update the ticket where the problem was first identifiedand find out why your teammate took that particular approach. Asking “Why did youuse this function here?” might lead to a really interesting conversation about the mer‐its of the approach taken. It might also reveal limitations of the approach to the origi‐nal developer. By starting a conversation, reviews can increase the institutional levelof knowledge. By starting the conversation you’re also leaving yourself open to thepossibility that, just maybe, your way of doing things isn’t the only viable solution.
If you “needed” to make any changes to the code they should be absolutely tiny andminor. You should not be making substantive edits in a peer review process. Make thetiny edits and then add the changes to your local repository as follows:
$ git add --all$ git commit -m "Correcting <list problem> identified in peer review."
You can keep it brief because your changes should be minor. At this point, you shouldpush the reviewed code back up to the server for the original developer to test andreview. Assuming you’ve set up the branch as a tracking branch, it should just be amatter of running the command as follows:
$ git push
Update the issue queue as is appropriate for your review. Perhaps the code needsmore work, or perhaps it was good as written and it is now time to close the issuequeue.
Repeat the steps in this section until the proposed change is complete, and ready to bemerged into the main branch.
Completing the ReviewUp to this point, we’ve been comparing a ticket branch to the master branch in therepository. The final step in the review process will be to merge the ticket branch intothe designated main branch (master) for the repository, and clean up the corre‐sponding ticket branches.
Let’s start by updating our master branch to ensure we can publish our changes afterthe merge:
Completing the Review | 195

$ git checkout master$ git pull --rebase=preserve origin master
Take a deep breath, and merge your ticket branch back into the main branch for yourproject’s repository. As written, this command will create a new commit in yourrepository history, which can be used to unmerge a public copy of the branch usingthe command revert if necessary:
$ git merge --no-ff 61524-broken-link
The merge will either fail, or it will succeed. If the merge fails, the original coders areoften better equipped to figure out how to fix the merge errors, and you may need toask them to resolve the conflicts for you. Tips on dealing with merge errors are cov‐ered in Chapter 6.
Which Branching Strategy is Your Team Using?
Those who are using a streamlined mainline branching strategy(Chapter 3) should ensure they bring their working branch (61524-broken-link) up to date with the destination branch (master)using the command rebase. After checking out the destinationbranch, the new work should be merged in using the parameter --ff-only instead of --no-ff. This will omit the merge commit,remove the trace of the ticket branch, and leave a bump-freegraphed history. Check with your team to see which branchingstrategy you are using, and therefore which convention you shoulduse to merge in your work.
Once the branch is merged, you are ready to share the revised master branch byuploading it to the central repository:
$ git push
Once the new commits have been successfully integrated into the master branch, youcan delete the old copies of the ticket branches both from your local repository andthe central repository. It’s just basic housekeeping at this point:
$ git branch --delete 61524-broken-link$ git push origin --delete 61524-broken-link
SummaryThe peer review process can help your team. I have found it improves communica‐tion before ideas are committed to code. It fosters a mentoring attitude among teammembers. As a side benefit, it often encourages developers to start looking for ways toautomate the process of testing to improve the efficiency of the reviews. Yes, it willtake more time, but if you factor in the improvements I believe it’s time well spent.
196 | Chapter 8: Ready for Review

CHAPTER 9
Finding and Fixing Bugs
Even the best review processes will sometimes allow a bug into production. Perhapsthe bug was introduced by a bad merge, or a scenario your tests didn’t cover.Whatever the cause of the problem, Git will be able to help you uncover at whatpoint, and by whom, the offending code was introduced. This will allow you tounderstand the context of how the code ended up in the system, and tell you who thebest person is to help you unpack a problem in an area of the code base you mightnot be familiar with.
There are two main ways to apply your forensic investigating skills: use the existingcode to locate the problem and use the history of the code to locate the problem. Youwill be most effective when you use both of these techniques. When I’m debuggingcode, for example, I almost always start by looking at the code itself. This is left overfrom all of the frontend web development I’ve done, where it’s easiest to use a toollike Firebug to pick apart a web page to find the offending CSS. It’s definitely not theonly way to debug code—and for many projects it will not be a viable strategy.
In this chapter, you will learn how to:
• Set aside your current work with stash so you can check out another branch• Find the history of a file with blame• Find the last working commit with bisect
By the end of this chapter, you will also have a better understanding of how you storehistory in Git now will affect how you can recover from mistakes tomorrow. You willhopefully have a new appreciation for how useful a really great commit message canbe, and see how a rebasing workflow can help you create a history that is easier todecipher with bisect. This chapter does not include instructions on how you undomistakes you find, because that was covered in Chapter 6.
197

Those who learn best by following along with video tutorials will benefit from Col‐laborating with Git (O’Reilly), the companion video series for this book.
Using stash to Work on an Emergency Bug FixIn Chapter 6, you learned how to adjust commit messages, but in cases of emergency,it may actually be more appropriate to put your work on hold temporarily. This canbe accomplished with the command stash. This command allows you to temporarilyput aside something you are in the middle of, and which you want to return to atsome point in the future.
Real-World Git Applications
One of my favorite Git-related one-liners was dropped by a friend,Jeff Eaton, at DrupalCon Prague. He made a comment, at exactlythe right moment, about “having a git stash for morality.” I wish Icould remember the context now (horror movies? beer gardens?),but the one-liner itself has stuck with me.
In the code sense of the command, stash allows you to avoid useless commits thatneed to be undone later. These useless commits are often introduced if you are cur‐rently working on a problem, but need to switch to a different branch temporarilybecause you can only switch branches when you have a clean working directory.Unlike a branch, or an individual commit, a stash cannot be shared; it is specific toyour local repository.
To create a new stash that holds the changes currently in your working directory, youneed to issue the command stash. If you prefer the clarity, you can include theparameter save. It is implied, though, so you don’t need to include it if you want tosave a few keystrokes:
$ git stash save
Saved working directory and index state WIP on master: \ d7fe997 [9387] Adding test: check user existsHEAD is now at d7fe997 [9387] Adding test: check user exists
You’ll notice this command will only stash files Git already knows about. If you havenew files that have not been committed previously, these files will not be incorporatedinto the stash as the other changes are tucked into a stash—making it impossible foryou to switch to a different branch until all untracked changes have been cleaned up.To include untracked files, add the parameter --include-untracked:
$ git stash save --include-untracked
198 | Chapter 9: Finding and Fixing Bugs

Alternatively, if you want to throw out those new files instead of putting them intoyour stash, you can run the commands as follows:
$ git stash save$ git clean -d
Each time you issue the command stash in a dirty working directory, a new stashwill be created. You can see a list of your saved stashes by adding the parameter list:
$ git stash list
stash@{0}: WIP on master: d7fe997 [9387] Adding test: check user exists
If you only need to remember one stash, and only for a few minutes, this is probablyokay. Your short-term memory may be able to retain exactly what happened to you aminute ago, but the longer you need to hold this memory, and the more memoriesyou need to recall, the harder it’s going to be to remember what is in each stash.
To see the contents of a stash, use the command show. The patch for the selected stashwill be displayed including meta data and the stashed changes from your workingdirectory:
$ git show stash@{0}
If you don’t think you will remember what you were working on from looking at thecode, you can replace the commit message with a terse description of what you wereworking on when you stashed your working directory.
Adding a Description
If you want to include a description, you will need to explicitlyinclude the parameter save.
Git allows you to store multiple stashes, so it can be especially helpful to name yourstashes if you are working on a large problem and end up creating a stash multipletimes from the same branch:
$ git stash save --include-untracked "terse description of the stashed work"
Now if you check your list of stashes again, you will see your previous stash as well asthe new stash:
$ git stash list
stash@{0}: On master: terse description of the stashed workstash@{1}: WIP on master: d79e997 Revert "Merge branch 'video-lessons' ...
The newest stash will appear at the top of the list. Notice how the numbers used torefer to the stashes change as you create more stashes—it’s a variable assignment, nota permanent reference number. This can be a little confusing if you create multiple
Using stash to Work on an Emergency Bug Fix | 199

stashes in the same branch—but if you give each stash a terse description, it can beeasier to recall which stash you want to apply when you’re ready to get back to work,and which stashes are now old and ready to be deleted.
Stashed Work Can Be Applied to Any Branch
This command can also be used if you realize you are working inthe wrong branch, but have not made any commits yet. You canstash your work, switch branches, and then reapply the work youbrought with you in your stash.
Once you’re ready to return to work, you determine which stash you’d like to use, andthen apply it:
$ git stash list$ git stash apply stash@{0}
If you use the command apply, the stash will persist. This can be a little confusing ifyou start hoarding stashes. To remove a stash, use the command drop to delete it:
$ git stash drop stash@{0}
If you know you’re a bit of a hoarder, and you think you might not be very good atcleaning up old stashes, you should use apply and drop the stash with the single com‐mand, pop. Assuming you have only one stash, the command is as follows:
$ git stash pop
You can also pop off specific stashes using the same structure as apply and drop:
$ git stash pop stash@{0}
When in Doubt, Git Assumes You Meant the Latest Stash
If you have only one stash stored, you don’t need to list the stashyou want to work with. If you omit the name of the stash, and thereis more than one, Git will use the most recent stash (the top one onthe list; it will be named stash@{0}).
You should now be able to put your work on hold temporarily using the commandstash. Although you can stash your work whenever you’d like, you should only usethis command if you are truly interrupted. If you have a coherent unit of work com‐pleted, use commit instead. If you decide to add more work later, you can alwayschoose to rebase your branch and combine the commits you’d made previously.
200 | Chapter 9: Finding and Fixing Bugs

Comparative Studies of Historical RecordsOne of the most basic tools you can use to start the search for why code isn’t workingis to compare the broken code to another instance of the code. You can do this easilyby working with relative history. Instead of reading through the log for a particularbranch, you can compare a branch to another branch, or to another point in time.
Most of these commands have appeared previously, but this time, look at them withspecific questions in mind. Consider the commit history graph in Figure 9-1. Thereare two branches with a common history: one with a known bug and one that isknown to be working. The branch with the non-working code has four commits thatdiffer from the branch branch with the code that works. The working branch only hastwo new commits, which are not included in the broken branch.
Figure 9-1. Two branches diverged from a common ancestor with an unequal number ofcommits
Need a Sample Repository to Practice On?
If you want to try the following exercises, download a copy of therepository from the Git for Teams website. This repository has thenecessary branches set up so that you don’t need to replicate thescenario.
Using the command log, you can isolate many pieces of history. Draw the diagram ina notebook, and create circles around commits each of the commands are showing.You can also try each of these commands with diff instead of log for a variation onthe output.
Comparative Studies of Historical Records | 201

On the current branch, this is how I would view everything except the most recentlycommitted work:
$ git log HEAD^
On the current branch, this is how I would view everything except the three mostrecent commits:
$ git log HEAD~3
You can also make comparisons as if you were standing at different vantage points.You’re standing at the window of a tall building, looking out onto the street. You cansee the rooftops of other, shorter buildings. Now imagine you’re standing on thestreet looking up at the tall building. You can see people sitting under the caféumbrellas. In the context of Git, this means you can make comparisons using eitherbranch as the vantage point:
$ git log since_last_merge_to..what's_been_added_here --oneline
For example, this is how I would see what’s in the working branch; but not on thebroken branch:
$ git log working..broken
What about the opposite? How would I show which commits are in the brokenbranch, but missing from the working branch? Like this:
$ git log working..broken
If I wanted to see the code that was included in the broken branch, but missing in theworking branch, I would do this:
$ git difftool working..broken
You can also make these comparisons with remote branches. Don’t forget to down‐load the latest versions with fetch before making the comparisons:
$ git fetch$ git log working..remote_nickname/broken
If you aren’t able to uncover sufficient information, you can use log with the parame‐ter -S to search for a specific string of text with the commit message, or the text thatwas applied (or removed) as part of that commited change. Searching through yourrepository in this way is made significantly more useful if you use controlled vocabu‐laries for your commit messages. For example, I always try to include the name of thefile, or an equivalent shorthand, in the commit message so that I can easily filter on itlater (when this file is added to the repository for the book, it will get a commit mes‐sage which includes the text CH09):
$ git log -S foo
202 | Chapter 9: Finding and Fixing Bugs

If you were excited by the parameter -S, have I got news for you! There is also theability to search based on regular expressions. Use the parameter -G.
Using these commands should help you to isolate which files might be causing theproblems. Once you have the filenames, you can investigate them more closely.
Investigating File Ancestry with blameWhen working with teams, it can be very useful to see who has worked on a file overtime. The people working on files are the ones best equipped to walk through the his‐tory of why something was changed—especially if the commit messages aren’t givingany additional clues. Normally we use the command log to reveal how a repositoryhas changed over time, but this doesn’t give a very good overview of how all of thosechanges have come together to make the file you are currently looking at.
The command blame allows you to look at a file line by line, showing the last timeeach line was changed, by whom, and in which commit it was changed (Figure 9-2).
Figure 9-2. blame allows you to list when each line was introduced into a file, by its com‐mit ID and author
To examine the file README.md, use the blame command as shown in Example 9-1.
Example 9-1. Output of the command blame
$ git blame README.md
3e9dd558 (emmajane 2014-04-23 22:11:40 -0400 1) Git for Teams of One...^00de359 (Emma Jane 2014-04-23 18:54:03 -0700 2) =====================^00de359 (Emma Jane 2014-04-23 18:54:03 -0700 3)3e9dd558 (emmajane 2014-04-23 22:11:40 -0400 4) Supporting files for ...7874193c (emmajane 2014-06-26 00:37:41 -0400 5) developer work flow for ...
Investigating File Ancestry with blame | 203

3e9dd558 (emmajane 2014-04-23 22:11:40 -0400 6) version control system, git3e9dd558 (emmajane 2014-04-23 22:11:40 -0400 7)00000000 (Not Committed Yet 2015-01-15 21:08:09 +0000 8) Test edit!00000000 (Not Committed Yet 2015-01-15 21:08:09 +0000 9)3e9dd558 (emmajane 2014-04-23 22:11:40 -0400 10) ## Contents3e9dd558 (emmajane 2014-04-23 22:11:40 -0400 11)5cc35764 (emmajane 2014-06-25 17:45:38 -0400 12) */slides*3e9dd558 (emmajane 2014-04-23 22:11:40 -0400 13)
From left to right, the columns show:
• Commit hash ID• Author name• Date• Line number• Content for that particular line within the file
In Example 9-1, you may have noticed there were three authors listed: Not Commit‐ted Yet, emmajane, and Emma Jane. Hopefully the first is self-explanatory: these arechanges that are in my working directory but that are not yet committed. The twovariations of my name are a simple inconsistency in how I’ve configured Git overtime. You can read more about how to customize your attributed name in Appen‐dix C.
Two of the lines begin with ^. These lines have not been edited since the initial com‐mit.
Beware! The Word “blame” May Condition You into Negative Thinking
The command blame is poorly named. It immediately, and unnec‐essarily, creates an antagonistic view of the code. I much prefer thecommands used in one of Git’s competitors, Bazaar: annotate, alsoavailable under the alias praise. (Full disclosure, Bazaar also hasan alias of blame for annotate.) Git does have an annotate com‐mand, but the documentation for this command states that it isonly for compatibility reasons. It is not a true alias and the outputof blame and annotate differs slightly.The last person who changed a line of code is often the personmost qualified to explain what they were trying to accomplish;coming to them with a fight on your hands is going to decrease thelikelihood they’ll come to you for help in the future, which increa‐ses the chance of you needing to deal with their future mistakes aswell. Check your attitude when using this command, and see if youcan shift from blame thinking to simple annotation.
204 | Chapter 9: Finding and Fixing Bugs

Once you’ve located the line in the file that looks interesting, you can investigate fur‐ther using the commit ID along with the commands log, diff, and show. Table 9-1outlines what each of the commands can help you to isolate.
Table 9-1. Reason to use log, diff, and show
Description Command
Show the metadata for a particular commit log commit
Show the code changed in a particular commit show commit
Show the code changed since a particular commit diff commit
Start by using the command log to look at the commit message:
$ git show <commit>
If the commit message was well written, it should give you an explanation for why thechanges were made in this particular commit. If the detailed commit messageincludes a reference back to a ticket number in your project management system, youmay even be able to read a discussion for the changes made—giving you even moreinsight into what the developers were thinking when they created the fix. In the track‐ing system, you may also see other developers who were involved, and anyone whowas on the review team for this particular change.
To see the same amount of detail, but in all commits since that point, use the com‐mand log as follows:
$ git log --patch <commit>
The parameter --patch in this context shows you the changes between each of thecommits, as opposed to the command diff, which shows you the difference betweenthe referenced commit, and the files in the working directory.
blame Only Tells You About What Is Visible
blame is not perfect. If the bug was introduced in a line that is notpresent in the version of the file you are looking at, blame will notbe able to notify you about who last edited the file. So it is a goodtool to use, but it is not magic.
Using a combination of blame, log, and diff, you should now be able to review thehistory of a single file in the context of the total combined history of that file, and inthe context of other changes made at the same time. Using the commit message, youmay also be able to trace the rationale of why the changes were made. With a little bit
Investigating File Ancestry with blame | 205

of forensic investigation, you can turn your questioning of the author of the code intoa productive conversation—instead of a Columbo-style interrogation.
Historical Reenactment with bisectOften it can be difficult to figure out exactly when a bug was introduced in your codeif you don’t know which file is the problem. If the error message you are looking for isprinted to the screen, it can be relatively easy to search through the files in your codebase to locate the right file. Sometimes the error message will include the filenameand line number where the problem occurred. In any of these cases, you can use thecommands diff, log, and blame to gain a better understanding of what has gonewrong. Sometimes the problem code does not leave sufficient clues in the error mes‐sages to use these tools. Introducing bisect!
bisect performs a binary search through past commits to help you find the commitwhere the code went from a known working state to a known broken state. Unlike aregular checkout of a commit, bisect continues to wander through your history (ina very methodical way!) until you have given it enough clues to identify which com‐mit introduced the dysfunctional code. It’s sort of like a historical reenactment ofwhat the developers have done in a code base. At each point in the bisect process, youcan launch the product (compile the code; load it in a browser; install the app on yourphone; whatever is appropriate for your code base) and determine whether the codeat this moment in history was right, or wrong. Once you find the point where thingswent wrong, you can fix history at that exact moment. It’s like Back to the Future—and Git is your DeLorean.
To begin, you need to be in the top-level directory of your repository. This is thefolder where the hidden .git folder resides. Begin the bisect process, and notify Git ofone commit ID where the code is known to be good and one commit ID where thecode is known to be bad (Example 9-2).
Example 9-2. Identify good and bad commits to bisect
$ git bisect start$ git bisect good <commit-id>$ git bisect bad <commit-id>
Git will now proceed to check out a series of commits one at a time, looking for thecommit where the code went from bad to good:
$ git bisect start$ git bisect bad c04f374$ git bisect good 93b64fc
Bisecting: 10 revisions left to test after this (roughly 4 steps)[0075f7eda67326f1746] Merge branch 'video-lessons' into integration_test
206 | Chapter 9: Finding and Fixing Bugs

The repository is now in a detached HEAD state. At this point, you need to confirm ifthe code is good or bad and report back your findings:
$ git bisect bad
Bisecting: 5 revisions left to test after this (roughly 3 steps)[ed8056eb4b2aaf00e6d] Lesson 4: Adding details on using git config
$ git bisect bad
Bisecting: 2 revisions left to test after this (roughly 1 step)[c88a02babc42bb00a83] Lesson 4: Adding new lesson on configuring Git
$ git bisect good
Bisecting: 0 revisions left to test after this (roughly 1 step)[f1fa8e7e382f68c0558] Lesson 3: Extended descriptions for cloning a ...
$ git bisect good
ed8056eb4b2aaf00e6d is the first bad commitcommit ed8056eb4b2aaf00e6d9d183f974ed612d6f10e6Author: emmajane <[email protected]>Date: Sun Sep 7 12:50:58 2014 +0100
Lesson 4: Adding details on using git config
Added commands to customize the following:
- username (or real name, as you prefer) - email address - enable color helpers within the git messages
Added a self-study piece on customizing your command prompt to include additional color and branch information.
:040000 040000 e927a1263e6e23eb5237a363a20640f62349b27d31bc6c57d6acd8de214a63a47914b32d6809a866 M lessons
The problem commit has been located. At this point, you are in a detached HEAD state,but you also know which commit you need to come back to. To return to the tip ofyour branch, with the new information, use the subcommand reset. This commandcan also be used at any point during the bisect process to abandon the search andreturn to the most recent commit on your branch:
$ git bisect reset
If you have not done a lot of programming, the binary search process can feel a bitlike magic. (Really freaking cool magic, mind you.) If you want to remove some of
Historical Reenactment with bisect | 207

the mystery, you can use the subcommand visualize to show you the current statusof the bisect process (Figure 9-3). The outer good and bad commits will be identifiedin the GUI you have configured for gitk.
Figure 9-3. Running git bisect visualize shows you the current status of the bisect process
Bisect Assumes Bad Things Have Happened
It is assumed that the current work is bad. So, you can’t go back andfind when something is fixed—you need to go back and find wheresomething broke. It can be very confusing if you try to find where afix was introduced, although it is possible. You just need to remem‐ber to reverse the definitions of good and bad.
SummaryI will happily admit that I am a crime drama TV junkie, so the chapter on using Gitfor forensic investigation appeals to me greatly. In this chapter, you have beenexposed to a few of the commands I include in my detective toolkit:
• stash allows you to set aside your current work so you can check out anotherbranch.
• blame allows you to find the line-by-line history of a file.• bisect allows you to search methodically through history to find the spot where
things went wrong.
These tools, when paired with the information in Chapter 6 on recovering from mis‐takes, will help you dig into, and recover from, just about any crime scene you mayend up investigating.
208 | Chapter 9: Finding and Fixing Bugs
PART III
Git Hosting
The first two parts of the book included commands specific to Git, not any one par‐ticular code hosting platform. In Part III, you will learn about three popular collabo‐ration platforms: GitHub, Bitbucket, and GitLab. In the many projects I’ve workedon, I find that my work often falls into these divisions: open source projects are oftenhosted on GitHub; private, client work is often hosted on Bitbucket; and projects thatare concerned with autonomy are often hosted internally on GitLab.
There are no formal restrictions that say you must use these systems in this way.Indeed, there is an enterprise version of GitHub, which allows you to purchase a“locally hosted” instance of GitHub; and there is a community edition of GitLab,which offers free hosting of private and public Git repositories.
Entire books have been written on how to use each of these three platforms. Insteadof trying to replicate these works, each of the subsequent chapters is designed as a“Getting Started” guide for the ways I most commonly see these platforms used.Chapter 10 covers using GitHub for public, open source projects; Chapter 11 coversusing Bitbucket for private, closed source projects; and Chapter 12 covers usingGitLab to host private, internal repositories.


CHAPTER 10
Open Source Projects on GitHub
With more than nine million users, GitHub is the largest code hosting platform in theworld today. If you are a web developer, or involved in open source software develop‐ment, chances are good you have at least visited the GitHub website to downloadsome code, if not created an account and participated in a development community.Those who are working on proprietary code development may know less about Git‐Hub, but that doesn’t make it less relevant as a code hosting platform, because GitHubalso allows you to create private repositories if you don’t want to share your code.
The focus of this chapter will be using GitHub for open project development, becausethis tends to be how most newcomers will first be exposed to the system. By the endof this chapter, you will be able to complete the following on GitHub:
• Create a new account• Create an organization• Create a new project• Solicit contributions from new collaborators• Accept pull requests from collaborators
Up to this point, the repository examples you’ve been working with were hosted onGitLab. Unlike GitLab, GitHub’s platform is not based on open source software. Git‐Hub can definitely improve your experience with Git, but has several of its ownGitHub-isms that can make it difficult to know when you’re working with Git terms,and when you’re working with GitHub terms.
GitHub has a few great features that I have been able to take advantage of as a webbuilder. I have used GitHub to publish simple, static websites, and even HTML-basedslide decks. Taking the same approach as we have previously in this book, you will
211

first learn to use GitHub as a team of one, and then you will learn how to use its fea‐tures to collaborate with others. Of course, if you are already working on a team, Iencourage you to skip to the section of this chapter that is most relevant to you.
Those who learn best by following along with video tutorials will benefit from Col‐laborating with Git (O’Reilly), the companion video series for this book.
Getting Started on GitHubIn this section, you will learn how to create an account on GitHub, and publish arepository to your own GitHub account. The goal is to get yourself familiarized withGitHub as a team of one, so that some of the actions feel a little more natural whenyou start participating in larger teams.
Creating an AccountYou don’t need an account on GitHub to access public repositories. If you want toupload code, or participate in conversations about the code, you will need to create anaccount. It is, fortunately, very straightforward to set up an account; and for publicrepositories, it is free. A free account is sufficient for everything covered in thischapter.
Step 1: Create your account
1. Navigate to https://github.com (Figure 10-1).2. Enter a unique username. GitHub will let you know if the name has already been
selected.3. Enter a valid email address.4. Enter a secure password.5. Click the button Sign up for GitHub to proceed.
After passing the validation tests for a unique username, a valid email, and a securepassword, you will be directed to the next screen.
Step 2: Select a plan
At this point, you may choose to financially support GitHub by paying for a plan.There is absolutely no requirement to pay for this code hosting service. By default,GitHub chooses the free plan for you (Figure 10-2). You’ll need to follow these steps:
1. Confirm the plan type you would like to enable. By default, the free plan isselected.
2. Complete the account creation process by clicking Finish sign up.
212 | Chapter 10: Open Source Projects on GitHub

Figure 10-1. Sign up for a GitHub account
Supporting Businesses so They Stay in Business
If you would like to help ensure GitHub stays in business, you maywant to pay for a plan at some point in the future. One of the bene‐fits of a paid plan is that you can create private repositories that areonly available to the developers you choose to include in yourproject.
After you have created your account, you will receive an email from GitHub askingyou to confirm your email. You will need to click the link in this email to completethe account creation process. If you do not verify your email, you will not be able tocomplete some tasks.
You are now ready to use your account to perform a range of tasks, including creatingnew repositories, and contributing code to your own and other repositories.
SSH KeysIf you use a very secure password, you may be using a password generator and have apassword that is 45 characters including letters, numbers, and special characters. Noone wants to retype this kind of password, but in order to authorize uploads, you willbe prompted for your password when you try to push code up to GitHub. By upload‐ing your SSH key, you can avoid retyping your password each time you want to pub‐lish code.
Getting Started on GitHub | 213

Figure 10-2. Select a plan for your GitHub account
Appendix D includes instructions on how to create and retrieve SSH keys. Once youhave the public key copied to your clipboard, you are ready to proceed to GitHub:
1. Navigate to https://github.com/settings/ssh. You can also access this screen by log‐ging in to your account, clicking the configuration cog (top right), and thenclicking SSH Keys from the set of navigation options for your account.
2. On the SSH Keys summary screen, click Add SSH key.3. Optionally, add a title for your SSH keys. For example, you might have a personal
set of SSH keys, rather than the keys you generated for your work computer.4. Paste the public key that you copied previously into the Key field.
214 | Chapter 10: Open Source Projects on GitHub

5. Click the button Add key.
SSH Keys Must Be Unique
GitHub will only allow key pairs to be added once on its system. Ifyou have already use these keys on a different account, you will getan error message when you try to save the keys.
You will now be able to perform actions from your local computer that requireauthentication without typing your GitHub password.
Creating an OrganizationAssuming you will be working on an open source project, you may want to create anorganization at this point as well. An organization is able to own projects. Multiplepeople are able to join (or be assigned to) an organization. This allows you to managea project without having to create a second GitHub account. Organizations are free tocreate, so you may as well take advantage of them.
Naming Your Organization
Generally you will create an organization name that is the same asthe main project repository. So, for example, if your library is cur‐rently available in the repository named evilrooster, the name youwould aim to secure for the new project account would also be evil‐rooster. Once the new organization is created, you can reassignownership from your personal account to the organization for therepository. This will allow you to maintain the project history forthe repository.
To create an organization, complete the following steps:
1. From the top menu, click the + symbol next to your avatar.2. Click New organization. You will be redirected to the setup form for new organi‐
zations.3. On the form Create an organization, enter the following:
• Organization Name: This will be the URL for your organization.• Billing email: This is a required field even if you are selecting the free plan.• Plan: Open source is selected by default.
4. Click Create organization to proceed.
Getting Started on GitHub | 215

On the next screen you can add team members to your organization. Your ownaccount is added by default. To add additional accounts, complete the following steps:
1. In the search field, enter the name or username of the person you want to add.2. To the right of the person’s name, click the + symbol.3. Repeat steps 1 and 2 for each person you would like to add.4. Click Finish to send the invitations.
Your organization has been created, and it has been assigned new members as youdesignated while setting up the organization.
Personal RepositoriesThis section is a brief overview of putting your own repositories on GitHub. You willuse your personal account to create a new repository, which is appropriate forprojects you do not intend to have others contributing to on a regular basis, becausethey are essentially yours. For example, when I deliver conference presentations withHTML slides, I often publish them to a GitHub repository to share them.
Creating a projectA repository on Git is so much more than what you get locally on your computerwhen you run the command init in a directory. It has an issue tracker, the ability toconvert Markdown files into web pages, supplemental wiki pages, charts, graphs, andmore. GitHub, however, still refers to the process as creating a repository.
To begin the process of creating a new repository, locate and click the + icon in thetop-right corner of the screen, and then select New repository (Figure 10-3).
Figure 10-3. Create a new repository
Alternatively, you can log in and then navigate to the home page of GitHub; thenlocate and click the button Create new repository.
216 | Chapter 10: Open Source Projects on GitHub

Once you’ve initialized the process, you will be redirected to a screen where you areasked to fill out the details for this project (Figure 10-4). The information you willneed is also summarized in Table 10-1.
Figure 10-4. Enter the details for your new repository
Table 10-1. Details needed to create a new GitHub repository
Field Notes Use ifimporting?
Repository name Your new project will be available at the URL https://github.com/<username>/<repo-name>. Choose something short, but descriptive.
Yes
Repository description This text will appear at the top of the repository home page, above thelist of files.
Yes
Visibility Choose public (selected by default) or private (requires a paid account). Yes
Initialize this repository with aREADME
Add an empty file that can be used for details about your project. Thisfile will be rendered as HTML on the home page for your repository, butcan be written in Markdown.
No
Add .gitignore Many programming languages will generate compiled files during thebuild process that should not be included in the repository. You cangenerate a .gitignore file now, which has typical file extensions for yourlanguage already included.
No
Getting Started on GitHub | 217

Field Notes Use ifimporting?
Add license Without a license file, you do not give people permission to downloadand use your code. You retain full copyright, and do not grantpermission for others to use your work. Ideally, your project will have alicense. If you would like to include a license, but aren’t sure which oneto choose, Choose a License may help.
Maybe
If you have already started a repository locally, you may choose to upload it to thisnew project; however, if you have created files during the initialization process, youwill need to first download these changes, incorporate them into your local reposi‐tory, and then push them back up to GitHub. To avoid this extra step, if I already havea repository locally, I will omit the creation of the files for README, .gitignore, andthe license.
Once you have selected values for each of the items in Table 10-1, locate and click thebutton Create repository. Your new repository will be created, and you will be redi‐rected to a summary page with suggestions on what to do next (Figure 10-5).
Figure 10-5. Your new repository is ready for use
Because there were not any files initialized during the repository creation process,you have only two options at this point: upload a repository from your local com‐puter, or import a project from a publicly available URL. If, for example, you wanted
218 | Chapter 10: Open Source Projects on GitHub

to copy your GitLab project from earlier in the book, you could. These options will becovered next.
Importing a repositoryIf you have been following along from the beginning of this book, you will have cre‐ated a repository on GitLab that was a clone of the workshop files for the Git forTeams workshop. You can easily import this repository into GitHub. This process canonly be completed if there are no files in your GitHub repository:
1. Navigate to your project home page.2. If the repository is empty, you will be able to locate and click the button Import
code. Clicking on this button will redirect you to the GitHub importer.3. Enter the URL for the repository you want to import. This must be a public
project, but it does not need to be a Git repository. You can also import Subver‐sion and Mercurial repositories. If you are importing a Git project, ensure youget the full URL, including the .git extension—this is the same URL structure thatyou would use to clone a repository locally. Figure 10-6 shows a valid URL for aproject (https://gitlab.com/gitforteams/gitforteams.git).
Figure 10-6. Enter a valid URL for a Git repository to import it to GitHub
Getting Started on GitHub | 219

4. Click Begin import. The import process will begin.5. When the import process has completed, click Continue to repository. Your files
will have been imported from the remote repository (Figure 10-7).
Figure 10-7. The repository files and history have been successfully imported fromGitLab into GitHub
Connecting a local repositoryIn Chapter 7, you learned how to connect a local repository to a new remote reposi‐tory on GitLab. We’ll repeat those steps here for our new GitHub repository. GitHubgives you copy/paste–friendly commands to complete these steps from the projecthome page if there were no files created during the initialization process. The struc‐ture for the remote repository is https://github.com/<username>/<repo-name>.git.For example, I created a new repository using the sample name given to me by Git‐Hub (glowing-octo-dangerzone) with the account gitforteams. If I then wanted to con‐nect a repository on my own computer to this repository, I would complete stepsoutlined in Example 10-1.
220 | Chapter 10: Open Source Projects on GitHub

Example 10-1. Cloning a repository
$ git remote add origin https://github.com/gitforteams/glowing-octo-dangerzone.git
Once you have completed these steps, navigate to the project page, and you shouldsee all of your files uploaded. You are now ready to start working with your reposi‐tory as a GitHub project.
Publishing changes to your GitHub repositoryOnce you’ve connected your local repository to your GitHub repository, you canupload committed changes to any tracked branch using the command push. To pub‐lish a new branch to GitHub, you will need to explicitly tell Git which remote youwant to use as the upstream for your branch (Example 10-2).
Example 10-2. Set the upstream branch for a remote repository
$ git push --set-upstream origin master
After setting the upstream connection, you do not need to add the parameter --set-upstream again. If you want to publish your changes to more than one remote reposi‐tory, you will need to continue specifying which remote.
Making Commits via the WebOne of the nice things about using a code hosting system such as GitHub, and notjust working at the command line, are the tiny enhancements that are built into thesystem. For example, GitHub allows you to edit any of the files in your repositorythrough a web user interface. While I recommend you do not use this as your regularcode editor, it can be really handy if you just want to fix a typo as a fly-by commit.
To make an edit via the web editor, complete the following steps:
1. Navigate to the specific instance of the file you want to edit. The URL for this filewill include the branch name. For example, https://github.com/gitforteams/freezing-batman/blob/master/README.md.
2. Locate and click the pencil icon to edit this file (Figure 10-8); alternatively, presse on your keyboard.
You will be redirected to a browser-based text editor (Figure 10-9). You are now readyto make changes to the file in your repository.
After making edits you can click the button Preview changes. New lines have a greenbar to the left of the changed text (wrapped in the HTML element ins); lines thathave been removed have a red bar to the left (wrapped in the HTML element is del).In Figure 10-10, the first paragraph with a bar has been removed; the second para‐
Getting Started on GitHub | 221

graph is new. Apart from color and the HTML elements, there does not currentlyappear to be a way to perceive the difference in what’s been added or removed.
Figure 10-8. You can edit any text file by clicking the pencil icon
Figure 10-9. The browser-based text editor includes an optional preview
222 | Chapter 10: Open Source Projects on GitHub

Once the edits have been made to the file, you are ready to commit your changesback to your repository (Figure 10-11). A default value is provided for a short com‐mit message, which states which file is being updated. You should provide a moredescriptive description of the edits being made. An optional extended message canalso be added. You will need to decide if you want to just commit the changes to thecurrent branch, or if you want to create a new pull request from this change. Bydefault, GitHub assumes you would like to commit this change directly to the reposi‐tory, and on the same branch.
Because you are working with your own project at this point, it’s fine to commit thechange back to the master branch; leave the default option selected and click the but‐ton Commit changes.
Figure 10-10. The preview shows which lines have been changed (the first line has beenremoved; the second has been added)
Figure 10-11. Committing your changes back to the repository
Getting Started on GitHub | 223

Why You Might Want to Submit Yourself a Pull Request
If you are the sole editor for your project, you probably don’t needto create a pull request for your changes. Pull requests, however,are merged back into the master branch with the parameter --no-ff. This means it will show up in your graphed history as a blipoutside of the straight line of the master branch. If you don’t mindif this commit appears exclusively on the main branch, it’s fine toomit the pull request step. The step-by-step instructions for creat‐ing and closing pull requests are covered later in this chapter.
Once you’ve committed your changes to the repository, you will need to update yourlocal repository to reflect these changes.
Updating Your Local RepositoryIf you do use the web-based editor to update your branch, your local repository willbecome out of date. (Don’t try to redo the same edits in your local branch; Git needsto have exactly the same commit at exactly the same time to understand the two com‐mits are the same.) You will need to download these changes and integrate them intoyour local repository before GitHub will allow you to upload new changes. This canbe completed with the following sequence.
You should begin from within your local project repository directory. Next, ensureyou are using the same branch as the remote edits. This is likely the branch master:
$ git checkout master
Next, incorporate the remote changes into your local work. Because the changes arebeing copied into the same branch, and because these are minor updates and not newfeatures, I will use the option --rebase to incorporate the changes, instead of merge.This will keep my graphed history cleaner to read:
$ git pull --rebase=preserve
Your local branch should now be up to date and ready for new work.
Using Public Projects on GitHubWhen working with projects, you can choose to download a zipped package of files,or you can maintain a connection to the remote repository, downloading newchanges when they are available, and potentially contributing your own changes backto the project. In this section you will learn how to consume projects from GitHub,but not contribute to them. This will be covered in the next section.
224 | Chapter 10: Open Source Projects on GitHub

Downloading Repository SnapshotsAs your Git superpowers continue to grow, you will be less likely to download a pack‐age from GitHub. This option does exist if you want to share the code with someonewho just wants a .zip package (perhaps even for your own project).
To download the .zip package for a project, complete the following steps:
1. Navigate to the project page you want to download the code for.2. Locate and click the button Download ZIP. This button (Figure 10-12) is conven‐
iently located near the URL for cloning the project locally, or through the GitHubdesktop application (which is available for Windows and OS X).
The downloaded package of files will be named according to the project and branchyou downloaded. To change which branch you download, complete the followingsteps:
1. Locate and click the branch drop-down button near the top left of the repositoryhome page (Figure 10-13).
2. Select the branch you would like to download. Wait a moment for the page torefresh.
3. Locate and click the button Download ZIP.
There will not be an indication in the user interface that you are downloading a dif‐ferent branch; however, the filename will reflect the name of the branch(repository_name-branch_name.zip).
Figure 10-12. Download a snapshot of the repository
Using Public Projects on GitHub | 225

Figure 10-13. Change the branch you download by first selecting a different branch
Working LocallyConnecting to someone else’s project on GitHub is almost the same process as usingyour own, except you won’t have write access to the project (unless you are added tothe project team, of course). In this section, you will learn how to create a local clone.I use this technique for the Git for Teams website, which uses Sculpin, a static site gen‐erator.
226 | Chapter 10: Open Source Projects on GitHub

Get Started with Sculpin
Sculpin is a static site generator built in PHP. The instructions inthis section aren’t enough to get you up and running. If you’reinterested in trying Sculpin, start at the Get Started guide.
In this case, I want a local copy of the Sculpin templates for my site. Although I’malso a volunteer on the Sculpin project, this repository is just for my website. I’munlikely to have contributions back to the project in the local copy. I do, however,want to maintain a connection to the main project so that I can incorporate the latestupdates into my website easily. Although the commands are specific to the Sculpinproject, you can substitute the URLs for your project of choice.
The first step is to create a local clone of the project (Example 10-3):
1. Navigate to the project page for the repository you want to download.2. Locate and click the copy-to-clipboard icon (Figure 10-14) to get the URL for the
repository.3. Open a terminal window (or Git Bash window on Windows) and navigate to the
directory where you’d like to download the project to.4. Create a local copy of the project repository using the command clone and the
URL you copied in step 2. Optionally, add the directory name to the end of thiscommand.
5. Change the name of the directory to a name that is relevant to your project. Youcan optionally do this as part of the previous step by adding the new directoryname to the end of the command.
6. Navigate into the local repository.
Example 10-3. Create a clone of the repository
$ git clone https://github.com/sculpin/sculpin-blog-skeleton.git$ mv sculpin-blog-skeleton gitforteams.com$ cd gitforteams.com
The second step (Example 10-4) is to create an upstream, or “vendor branch” that willbe kept free from changes relevant only to your project. You will be able to keep thisbranch up to date with any changes to the main project. For the project I’m workingwith, the default branch is master. You can choose whatever name makes sense foryou; sometimes I use the project name, sometimes I use the generic nicknameupstream. I don’t think there’s an advantage of one over the other (although Shake‐speare might have said something about my naming whimsies). By moving thebranch instead of creating a new one, I maintain the relationship between my local
Using Public Projects on GitHub | 227

branch and the remote repository. Optionally, if you prefer to work on the masterbranch, you may recreate the branch master branch.
Figure 10-14. The copy-to-clipboard icon is located immediately above the downloadbutton
Example 10-4. Create an upstream branch
$ git branch --move master upstream$ git checkout -b master
The final step is to add a remote repository for your working copy of the project(Example 10-5). This new remote repository will hold all of the changes that you aremaking for your instance of the project. The Sculpin project shouldn’t keep a recordof all the changes I’m implementing for the Git for Teams website, but I need to keeptrack of them. In real life, I keep the Git for Teams repository on Bitbucket as a privaterepository. I don’t use the issue tracker, I just toodle away in the repository andupload it after commits, almost like a backup plan. It’s not taking advantage of thefeatures Bitbucket offers, but it does give me peace of mind.
When the project was first cloned, the remote name origin was assigned to theremote repository. We’re going to swap that nickname for upstream, because the con‐vention is to use origin for the repository that most closely mimics our own.
To prepare for adding the new remote, you will need to determine its URL. If youdon’t already have a remote repository set up, follow the steps for creating a projectearlier in this chapter and ensure the repository does not have any files added duringthe initialization process. Once you’ve created the new project, follow the on-screeninstructions to add the remote information to your repository and then upload thechanges. For example, if your GitHub username was gitforteams and your new reposi‐tory was named superhero-freda, you would add the remote repository as shown inExample 10-5.
228 | Chapter 10: Open Source Projects on GitHub

Example 10-5. Add a remote repository for the working copy
$ git remote rename origin upstream$ git remote add origin https://github.com/gitforteams/superhero-freda.git$ git push -u origin master
You now have both a branch named upstream and a remote named upstream.
Check the upstream repository regularly for updates (Example 10-6). You do this bychecking out the branch you designated as the upstream for the project, and pullingin changes.
Example 10-6. Check the upstream project for updates
$ git checkout upstream$ git pull --rebase=preserve
Assuming there have been updates to the main project, you can read the changes tosee if you want to incorporate them into your own project (Example 10-7).
Example 10-7. Compare the changes in upstream to your local work
$ git diff master upstream
Or you can just look for a summary of the specific commits with these fancy parame‐ters added to the command log:
$ git log --cherry-mark --left-right --oneline master...upstream
We’ve seen variations on this command before; the only real new piece is --cherry-mark --left-right. These parameters add a symbol to the beginning of the committhat indicates whether the change was introduced by the first branch on the list(points left), or the second (points right).
Once you have an understanding of the changes, you can bring your own branch upto date with the upstream changes (Example 10-8). This should be completed as if thechanges were already in place and your own work was starting fresh today. In otherwords, you should bring your working branch up to date by rebasing the changesfrom upstream repository onto your own branch. (As I’ve mentioned previously, ifyou are working alone, you can also merge the changes in if you find this easier thanusing rebase. I won’t judge you.)
Example 10-8. Incorporate upstream changes
$ git checkout master$ git rebase upstream
Using Public Projects on GitHub | 229

If conflicts arise, take them one at a time. There are additional tips for dealing withrebase conflicts in Chapter 6.
Contributing to ProjectsYou have decided to make the leap and submit a contribution to a project. Huzzah!Congratulations! This is not significantly different than what you’ve done previously.The main difference is that you will be submitting a pull request, which will bereviewed by someone else before it is incorporated into the main project.
Tracking Changes with IssuesOn public projects, issues are generally opened by users who have uncovered a bug. Amuch smaller set of contributors will create issues for new features they are interestedin contributing, or design changes they are interested in developing.
Issues Are Disabled by Default for Forks
Issues are disabled by default for repository forks. If you want totrack issues for your fork, you can enable the feature from the Set‐tings screen.
To create an issue, complete the following steps:
1. Navigate to the project page.2. Locate and click the tab labeled Issues. It appears on the right sidebar
(Figure 10-15). You will be redirected to the issues page.3. Locate and click the button New issue. It appears on the right side of the screen
(Figure 10-16). You will be redirected to an issue creation form.4. Enter a title, a description of the problem that you want solved (Figure 10-17),
and the ticket number of the issue that this pull request is being submitted tosolve. The more descriptive you can be about the problem, the more likely it is tobe solved.
5. When you are satisfied with your issue description, locate and click the buttonSubmit new issue.
With the issue created, you can now go about creating the pull request that solves theissue.
Forking a ProjectIf you want to contribute your changes back, complete the following steps:
230 | Chapter 10: Open Source Projects on GitHub

1. Navigate to the project page.2. Locate and click the button Fork. The repository will be forked, and you will
receive a copy of the repository set up under your own account.
Figure 10-15. Navigation icon for Issues
Figure 10-16. Navigation button to create new issue
You can now clone this copy of the project to your local computer, just as you did in“Personal Repositories” on page 216. Once the repository is downloaded, you canmake changes to the project, commit them to your repository, and then push themback up to your forked copy of the remote repository.
Contributing to Projects | 231

Once the changes you’d like to incorporate into the main project have been pushedback to GitHub, you are now ready to initiate a pull request.
Figure 10-17. Creating a new issue
Initiating a Pull RequestWhen you make a fork of a project, GitHub maintains a connection to the upstreamproject. This allows you to easily send your changes from your forked repository backto the main project.
Complete the following steps to initiate a pull request:
1. Navigate to the project page for your forked repository.2. Locate and click the button pull request (Figure 10-18). It is located near the top
left of the project description, below the title. You will be redirected to a sum‐mary of branches that can be used for a pull request. If there are not four drop-down menus displayed, click the link compare across forks before proceeding.
3. From the list of branches, select the branch you want to submit to the upstreamproject from the final drop-down menu (Figure 10-19). The differences betweenyour branch and the upstream branch will be displayed.
Figure 10-18. The pull request button is located below the project title
232 | Chapter 10: Open Source Projects on GitHub

Figure 10-19. Choose the branch you want to submit to the upstream project in your pullrequest
4. Locate and click the button Create pull request (Figure 10-20). A new form willopen.
5. Enter a title, and a description for why you are submitting this change to theproject (Figure 10-21).
6. Locate and click the button Create pull request to complete your request to haveyour changes included in the upstream project.
Once you have completed your pull request, the maintainers of the project will benotified through their GitHub interface for the project, and also via email if they havenotifications enabled.
Figure 10-20. To initiate the pull request process, locate and click button Create pullrequest
Contributing to Projects | 233

Figure 10-21. Enter a title and summary that explain the reason for your proposedchange
Running Your Own ProjectThe technical part of running a project on GitHub is very easy. GitHub provides youwith an issue queue, supplementary documentation pages (wiki), support for incom‐ing code changes via pull requests, and the ability to grant write access to the reposi‐tory. The difficult part, therefore, is the social part of creating a community ofconsumers and contributors around your software project. You should refer back toChapter 2 to refresh your memory on how to run a good project.
Creating a Project RepositoryMost of my public GitHub projects are very tiny—slide decks for various conferencepresentations and the like. I do not expect to have regular contributors, although Ihappily accept contributions if people are interested in submitting a new fix. If youare working on a software package, chances are better that others will be interested incontributing to your project. If you are creating a library or software package that youthink will be of interest to a larger group, you should not set it up under your per‐sonal account, but instead use an organization. By not using your personal account, itwill allow other developers to feel a greater sense of ownership over the project, andbe more committed to contributing to it.
To create a new project, complete the following steps:
1. From the top menu, click the + symbol.2. Click on New repository. You will be redirected to the new project form.
234 | Chapter 10: Open Source Projects on GitHub

3. Beneath the label Owner, click your account and change it to your organization.4. Enter a repository name. Generally this is the same name as the organization for
single repository projects.5. Enter a terse description for your project.6. Click Create repository.
Your new repository has been created and you are now ready to begin using it as if itwere one of your personal GitHub repositories.
If the project already exists under your personal account, you can reassign it usingthe following steps:
1. Navigate to the project page under your personal account.2. Locate and click the link labeled Settings.3. Locate and click the button labeled Transfer. A modal window will appear.4. Enter the name of the repository; and the organization, or account name, for the
new owner.5. Click I understand, transfer this repo.
Your project will be reassigned to the new account holder.
Based on your rules of governance, you will now need to decide if you are going tosubmit yourself to pull requests, or if you will continue to submit your work directlyto the project. Both have advantages, but they also follow different leadership models(it is faster to commit directly; but more equal for all contributors if you also submitpull requests, which undergo a review).
Granting Co-MaintainershipTo share the burden of maintenance, you can grant write access for the repository toothers. This is a big responsibility. You should decide ahead of time how you will dealwith the thorny issues, such as disagreement on the direction the code should take;and other types of bad behavior, such as being rude to other contributors. Assumingyou have worked through all of those difficult decisions, you can add contributors toyour project as follows:
1. Navigate to the project page.2. From the utility links in the top right of the page, click the + and then choose
New collaborator (Figure 10-22).3. You will be prompted to add your password. Do this and then click Continue.
Running Your Own Project | 235

4. Enter the GitHub username of the person you would like to assign co-maintainership to (Figure 10-23).
Figure 10-22. Navigating to the Collaborators page for your project
Figure 10-23. Adding a collaborator to your project
The person you’ve designated as being a co-maintainer will now have all the sameauthoring powers as yourself. You may wish to put together a maintenance cheatsheet to ensure you make decisions consistently for all community members.
To remove a collaborator, follow the instructions as outlined previously. Next to thecollaborator’s name, click the symbol x (Figure 10-24). The collaborator will nolonger have commit access to the repository.
Reviewing and Accepting Pull RequestsCongratulations! You’ve received your first pull request to a project. GitHub providesyou with an easy-to-use interface to review incoming pull requests. From here you
236 | Chapter 10: Open Source Projects on GitHub

can add comments to the request, reject the pull request outright, or accept the pullrequest.
Figure 10-24. Remove contributors from your project
GitHub will notify you if accepting the pull request will result in a merge conflict, andin this case will disable the button to accept the incoming request.
Test It Out by Submitting Yourself a Pull Request
You can also test this out by making a fork of your own work andthen submitting yourself pull requests.
Pull Requests with Merge ConflictsIf the pull request cannot be accepted without a merge conflict, you will be unable toaccept the pull request through the Web interface. Instead, you will need to downloadthe branch, resolve the conflict locally, and then push the new branch to the projectrepository.
The first step is to check out the branch where you want to receive the incoming pullrequest. For example, you may want to land this into the main branch for yourproject:
$ git checkout master
Currently your branch doesn’t know anything about the contributor’s repository. Youwill need to add it as a remote repository before you can download the proposedchanges. Instead of using a generic nickname as we have in the past (e.g., origin orupstream), be optimistic and use the contributor’s GitHub username. This will ensureyou are ready to accept more changes from them in the future.
In the following example, replace <username> and <repository-name> with theappropriate values for the incoming pull request branch:
$ git remote add username git://github.com/<username>/<repository_name>
Running Your Own Project | 237
With the remote repository added, you must now download the contributor’s work:
$ git fetch username
The branch will now be downloaded and available for local review. You should usethe guidelines from Chapter 7 on how to conduct a peer review. You may need toprovide feedback to the reviewer and request he or she submit a new pull request ifthe code isn’t quite right. Refer back to your governance model to see if it’s appropri‐ate for you to make the updates yourself, or if you are required to reopen the issue forfurther development. A good rule of thumb is this: if the contributors will learnsomething by doing the work, give them the opportunity to learn. If it’s a silly mistake(a typo, or a coding standard violation), it might make more sense to make thechange yourself (still crediting the original author) instead of rejecting a pull requestfor a trivial fix. Where possible, reduce round-trips the code needs to make, and berespectful of the intentions of the contributor.
When you are satisfied with the proposed change, you can merge it into the mainbranch for your project:
$ git merge --no-ff username/branch_name
If, however, you would like to make a few cleanup changes for minor whitespaceissues, or to fix a typo, you can optionally add the parameter --no-commit. Using thisoption may not be appropriate for your project if you’ve decided every change mustgo through the pull request process:
$ git merge --no-ff --no-commit username/branch_name
Regardless of which method you choose, once the branch is merged, you may pushthe updated master branch up to the server:
$ git push origin master
The change will now appear in the main repository for the project.
If you find you are working with pull requests a lot for your project, and frequentlyhave to deal with merge conflicts, you may find Hub useful. It is a command-linewrapper that allows you to perform more tasks from the comfort of the commandline instead of having to switch between GitHub’s web interface, and Git.
SummaryThroughout this chapter, you learned how to use GitHub as a team of one, as a con‐sumer of other projects, as a contributor to projects, and finally, as a project lead:
• As the owner of the repository, you can choose to contribute directly to it.
238 | Chapter 10: Open Source Projects on GitHub

• As the leader of a project, you can choose to commit directly to the project, orpass your own contributions through a personal repository to maintain the illu‐sion of fairness.
• Issues to your project can be used to track new features, or bugs. Issues are con‐versations and may result in a pull request being initiated.
• A pull request is a request to merge a branch from either an outside repository orthe nonmain branch. It can be completed by anyone with write access to therepository.
• If a pull request will not result in a merge conflict, it can be completed throughthe web-based user interface; otherwise, you will need to download the relevantbranch, merge the request locally, and push the resulting change back to themain project repository.
Although this chapter focused on public repositories, you can also apply the techni‐ques you learned in this chapter to private repositories.
For even more information on using GitHub, you may enjoy the title Introducing Git‐Hub by Peter Bell and Brent Beer (O’Reilly).
Summary | 239


CHAPTER 11
Private Team Work on Bitbucket
Bitbucket is a popular code hosting system by the same folks who built JIRA. Withapproximately three million users, it may have a smaller user base than GitHub, butfor small teams it has two very big advantages: free private repositories and per-branch access control. In addition to these features, I generally find Bitbucket’s inter‐face intuitive, and its documentation comprehensive. This commitment to usabilitywill go a long way to keep internal teams running smoothly.
By the end of this chapter, you will be able to complete the following on Bitbucket:
• Get set up as a solo developer• Share your repository with other developers• Limit access control per-branch for a given project
This chapter is not meant to be a comprehensive guide to Bitbucket. Rather, it is anup and running overview of several important features that you may want to use withyour team.
Those who learn best by following along with video tutorials will benefit from Col‐laborating with Git (O’Reilly), the companion video series for this book.
Project Governance for Nonpublic ProjectsThe default options for Bitbucket repositories have interesting implications whencompared to GitHub’s. Depending on your point of view, you may think of them as“discreet” or “antisocial.” By default, Bitbucket assumes the repository you are aboutto create is a private repository, and that forks of the repository should also be pri‐vate. This is the opposite to what GitHub chooses (public repository, and publicforks). Where GitHub coined the term “social coding,” Bitbucket takes a very differ‐
241

ent approach, but it’s not just the opposite of social. That is to say, it does not meanthat Bitbucket is anti-social. Instead, it is chooses discretion by default.
While private and public projects may have similarities in the commands you use tomove code from one place to another, they often have a very different political feelingto them when everyone who is involved on the project is there by invitation. Opensource projects tend to follow whole-repository access controls. A very small numberof maintainers may update any part of the code. The conventions of how code isaccepted into the project will vary, of course, but generally there is a submissionmade, some kind of review period, and then the code is adopted into the main reposi‐tory for the project. Private projects, on the other hand, tend to have very specificgovernance requirements. Sometimes these requirements are outlined by a regulatorybody, such as Payment Card Industry (PCI) compliance for those handling financialtransactions, or regulations for those building biomedical devices. In some cases,these regulations have strict requirements around auditing and accepting contribu‐tions into a code base.
Currently, Bitbucket offers much finer-grained access control than GitHub. On Bit‐bucket, you are able to prevent individuals, or groups of individuals, from pushing tospecific branches and whole repositories. If you are accustomed to per-branch accessin Subversion, your team will find this feature quite useful. Some of these features arealso available in GitLab, which is covered in Chapter 12.
Getting StartedIn this section, you will learn how to create an account on Bitbucket and your own,private repository. All developers on your team should be able to complete the stepsincluded in this section before they begin collaborating on projects with you.
Creating an AccountThe signup process for Bitbucket is straightforward:
1. Navigate to https://bitbucket.org.2. Locate and click the button labeled Get started (Figure 11-1). (There may be
more than one. Either is fine.)
242 | Chapter 11: Private Team Work on Bitbucket

Figure 11-1. From the home page, locate and click one of the Get started buttons
You will be presented with the option to create a new account, or to sign up with yourGoogle account:
1. Enter your first name and last name. These two fields are optional.2. Enter your preferred username. Bitbucket will let you know if the name has
already been selected.3. Enter a secure password.4. Enter a valid email address.5. Select a plan. By default the free personal account plan is selected, which is
appropriate for solo developers and very small teams.6. Enable the checkbox confirming you are not a robot. You may also be presented
with a CAPTCHA challenge if Bitbucket isn’t convinced you’re human.7. Enable the checkbox for the privacy policy and customer agreement. Obviously,
you should also click the links and read the agreements you’re signing.8. When you have completed all of the fields, click Sign up to proceed
(Figure 11-2).9. You will be sent an email asking you to confirm your email address. Click the
button Confirm this email address.
Getting Started | 243

Figure 11-2. Complete each of the fields in the registration form and click Sign up
Your account is now set up and ready to use; however, to save some time later on, youshould also add your SSH keys so that you can work with private repositories withouthaving to re-authenticate yourself each time:
Complete the following steps to add your SSH key to your account:
1. Using the instructions in Appendix D, locate and copy your SSH public key.2. Navigate to the dashboard for your Bitbucket account.3. In the top-right corner of the Bitbucket website, locate and click the user icon.4. From the drop-down list, click Manage account.5. From the sidebar navigation, locate and click SSH keys.6. Click on Add key. A modal window will appear.7. Into the form field, Key, paste your public SSH key.8. Click Add key.
244 | Chapter 11: Private Team Work on Bitbucket

Your SSH keys have been added to your Bitbucket account.
Creating a Private Project from the Welcome ScreenImmediately after creating your account, Bitbucket will redirect you to a welcomescreen (Figure 11-3). This screen is always available at https://bitbucket.org/welcome.
Figure 11-3. After completing the registration form, you will be redirected to a Getstarted welcome screen
Create a new repository by completing the following steps:
1. Click on the bucket icon with the dashed outline which is labeled Empty.2. Enter a name for this repository. For example, johannes.3. Leave the checkbox This is a private repository selected.4. Click Create. Your new repository has been created.
Getting Started | 245

5. Click Done. You will be redirected to the repository setup configuration screen.
Once you have completed these steps, proceed to Configuring Your New Repository.
Creating a Private Project from the DashboardWhen you log into your Bitbucket account, you will be redirected to a dashboardsummarizing your projects (Figure 11-4). From this dashboard you can get an over‐view of what is happening in each of your projects, and create a new repository.
Figure 11-4. The dashboard also gives a clear indication of how to create a new reposi‐tory
If you are starting from the dashboard (this is also the home page when you areauthenticated), create a new repository by completing the following instructions:
1. Locate and click the link to Create a repository. You will be redirected to the formshown in Figure 11-5.
2. Enter a name for this repository. For example, junio.3. Optionally, enter a description for the repository.4. Leave the default settings in place for the following:
• Access level (checkbox should be enabled for this is a private repository)• Forking (drop-down menu should be set to Allow only private forks)
246 | Chapter 11: Private Team Work on Bitbucket

• Repository type (radio button should be set to Git)
5. Optionally turn on Issue tracking, or Wiki pages. For personal projects I rarelyturn these on because I’m typically just using Bitbucket as a remote backup formy code, and not as a project management tool.
6. Finally, locate and click Create repository.
Figure 11-5. The form to create a new repository also has some configuration options forsharing
Your new repository has been created, and you have been redirected to the repositorysetup configuration screen. Proceed to Configuring Your New Repository.
Configuring Your New RepositoryYou will be redirected to a setup page (Figure 11-6).
Getting Started | 247

Figure 11-6. Setup instructions are available for GUI, and command-line (new projects,or existing projects).
Assuming you have been following along in this book, you likely already have a localrepository, or you know how to create one! I find the final set of instructions(Figure 11-7) most useful when setting up new repositories on Bitbucket.
To connect your local repository to the new repository on Bitbucket, complete thefollowing steps:
1. Locate and click on the link I have an existing project. A set of additional instruc‐tions will appear on-screen
2. At the command line, navigate to a local Git repository. It’s okay if it is alreadyconnected to a different hosting system, you are allowed to have multiple con‐nections to remote repositories.
3. Copy and paste the commands beginning with git from the instructions(Example 11-1).
Example 11-1. Sample instructions from Bitbucket to add newly created repository as aremote to a local repository
If the repository is already connected to a remote, you may need to substitute originfor bitbucket.
248 | Chapter 11: Private Team Work on Bitbucket
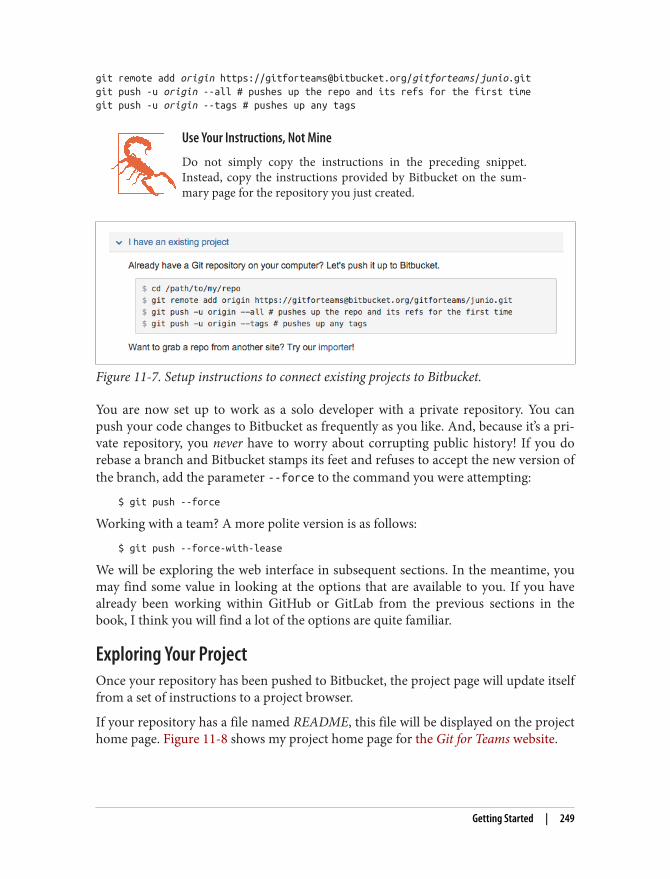
git remote add origin https://[email protected]/gitforteams/junio.gitgit push -u origin --all # pushes up the repo and its refs for the first timegit push -u origin --tags # pushes up any tags
Use Your Instructions, Not Mine
Do not simply copy the instructions in the preceding snippet.Instead, copy the instructions provided by Bitbucket on the sum‐mary page for the repository you just created.
Figure 11-7. Setup instructions to connect existing projects to Bitbucket.
You are now set up to work as a solo developer with a private repository. You canpush your code changes to Bitbucket as frequently as you like. And, because it’s a pri‐vate repository, you never have to worry about corrupting public history! If you dorebase a branch and Bitbucket stamps its feet and refuses to accept the new version ofthe branch, add the parameter --force to the command you were attempting:
$ git push --force
Working with a team? A more polite version is as follows:
$ git push --force-with-lease
We will be exploring the web interface in subsequent sections. In the meantime, youmay find some value in looking at the options that are available to you. If you havealready been working within GitHub or GitLab from the previous sections in thebook, I think you will find a lot of the options are quite familiar.
Exploring Your ProjectOnce your repository has been pushed to Bitbucket, the project page will update itselffrom a set of instructions to a project browser.
If your repository has a file named README, this file will be displayed on the projecthome page. Figure 11-8 shows my project home page for the Git for Teams website.
Getting Started | 249

Figure 11-8. The project home page displays a summary of the status of your site, as wellas the contents of the file README
The following summaries are available from the project home page:
• Last updated date• Language, if one is set• Access level (will be set to Admin if the repository is yours)• Branches (click on the number above Branch for a list of all branches)• Tags (click on the number above Tags for a list of all tags)• Forks (click on the number above Fork for a list of all public forks)• Watchers (click on the number above Watcher for a summary of accounts who
are following this repository)• Recent activity (visible in the right sidebar; includes recent commits, and merged
branches)
The left sidebar has the following icons (from top to bottom):
• Link to the project home page• Quick actions (includes clone, create branch, create pull request)
250 | Chapter 11: Private Team Work on Bitbucket

• Overview (appears to be the same content as the project home page)• Source (a list of all files in the repository)• Commits (the logged history for this repository)• Branches (only available if you have pushed more than one branch to the project)• Pull requests (irrelevant for personal projects)• Downloads (provides a list of zipped packages of the current branch; you may
also add untracked binaries for your project here)• Settings (includes access details, repository name, integrations)
At the bottom of the screen there is also the option to expand the icons to display atext label for each of the icons. Once you’ve expanded the sidebar, you can collapse itagain by clicking the double arrows (Figure 11-9).
Editing Files in Your RepositoryBitbucket allows you to edit text-only files from within its web-based text editor:
1. Click on the sidebar link Source.2. Navigate to the page you want to edit.3. Locate and click the button Edit. A text editor will appear (Figure 11-10, or
Figure 11-11 for the project README file).4. Across the bottom of the editor, confirm the Syntax mode, Indent mode, and
Number of spaces (not available for all file types) are correctly set.5. Edit the file to make the necessary changes.6. Locate and click the button View diff.7. Confirm the changes made are complete, correct, and do not introduce unwan‐
ted spaces.8. Locate and click the button Commit. A modal window will appear
(Figure 11-12).9. Enter a commit message. You will need to add your own formatting. The first line
should be a terse description not longer than 80 characters. Subsequent linesshould provide more detail.
10. Locate and click the button Commit.
Your changes have been saved to the repository on Bitbucket.
Getting Started | 251

Figure 11-9. Project sidebar expanded
252 | Chapter 11: Private Team Work on Bitbucket

Figure 11-10. In-repository text editor
Figure 11-11. Project home page editor
Getting Started | 253

Figure 11-12. Add a message that describes the changes you have made to the projecthome page
With your changes saved to Bitbucket, your local repository will now be out of date.You will need to update your local repository. Because the respository is entirely yourown, it is appropriate to pull the changes into your local copy without review(Example 11-2). Assuming you have followed the instructions outlined in this sec‐tion, the work has been completed in the main branch for the project, which is mostlikely to be master.
Example 11-2. Pull changes made in Bitbucket into your local repository
$ git checkout master$ git pull --rebase
The changes should apply cleanly. If, however, you end up with a conflict, refer backto Chapter 6.
Your local repository is now up to date.
Project SetupYou’ve been reading this book for a while. Maybe you even started at the beginning.So, you know I like to write about Git. I also know that a lot of people find documen‐tation tedious to write, and a complete pain to maintain, so I know that when I saythis next part, your inner Clay Davis is going to pipe up and say, “wellsheeeeeeeeeeeeit.” Ready for it? I think process documentation is one of the mostimportant things a team can do to ensure happy, healthy relationships. Now you goahead and give me your best Clay Davis and then we’ll move on.
Documenting your process:
• Makes it easier for people to participate in your team.
254 | Chapter 11: Private Team Work on Bitbucket

• Sets the expectations for how the work should get done.• Serves as a starting point for conversations about why certain methodologies and
commands are preferred.
Good documentation puts up guard rails on the bowling alley that is your project. Itmakes it virtually impossible for developers to throw a gutter ball, and it makes itmore likely they’ll succeed in knocking down all the pins when it’s their turn. Whilethe most experienced people on your team might have the loudest opinions abouthow something should be done, they may not write the best instructions. Pair theteam’s lead with a new developer and have them co-create the documentation. Then,make sure the entire team can consistently follow the documentation without outsidesupport.
Getting people into consistent habits will make it easier during high-pressure times toensure no steps are missed. This documentation may also extend beyond the com‐mands a developer needs to run to clone a repository and submit a pull request. Onceyou see how valuable documentation can be for the mundane tasks, you may evenstart to look at other processes that could use some proactive documentation (inci‐dent response plan, anyone?).
In addition to the amazing commit messages you’re already in the habit of writing,Bitbucket offers two tools that will help you to document your work: wiki pages andissues. In the remainder of this section, you will learn how to enable each of thesetools.
Project Documentation in Wiki PagesTo begin collaborating with others, it can be as simple as granting repository access toanother Bitbucket account. Hold up, though! Before you go jumping into a new rela‐tionship with a new developer, you should invest some time into stating how youwould like to work. These steps should be documented, and they should be steps youyourself are willing to use. Fortunately, wiki pages on Bitbucket are much easier toedit than stone tablets, so you should consider your documentation to be a startingpoint, not the final word.
To enable wiki pages for your project:
1. Locate and click the settings cog for your project.2. Locate and click the link Wiki settings.3. Change the settings from No wiki to Private wiki (Figure 11-13).4. Locate and click Save.
Wiki pages are now enabled for your project. A new icon will appear in the sidebar(Figure 11-14).
Project Setup | 255

In Bitbucket, wiki pages are also repositories which you can download and editlocally. Documentation is included on the welcome page for your wiki (Figure 11-15).At the top of each wiki page is a breadcrumb trail. By clicking on the name of theproject, you will be redirected to a list of all wiki pages for this project.
The editor for the wiki pages is a typical toolbar for Markdown files (Figure 11-16).
Figure 11-13. Enable a private wiki for your project
At a minimum, you should document the following for your project:
• Branch conventions• Step-by-step instructions for submitting new work to the project• Step-by-step instructions for peer reviews• Deployment instructions, including who to email, and copy/paste email tem‐
plates
256 | Chapter 11: Private Team Work on Bitbucket

Figure 11-14. The Wiki icon appears in the project sidebar
Figure 11-15. The default page provided for a Bitbucket wiki
Whenever you think there is a possibility for people to have different opinions, orwhere there’s a possibility a person could forget a step, you should have documenta‐tion. It doesn’t need to be long, but it does need to be correct. Check it regularly ifyour team likes process hacking. It’s possible the team has found an even more effi‐cient way to do something that is not recorded in the documentation.
Project Setup | 257

Figure 11-16. The Markdown editor for wiki pages
Tracking Your Changes with IssuesIssue tracking is another form of documentation. Although issues are much moreephemeral than wiki pages, capturing the information in a ticket provides the directlink from the business value, or rationale for building a feature, to the developmenttasks that are happening in code.
To enable the issue tracker, complete the following steps:
1. Navigate to your project repository.2. Locate and click on the Settings icon.3. Locate and click on the link Issue tracker settings.4. Change the form option from No issue tracker to Private issue tracker.5. Optionally, enter a new issue message.6. Locate and click the button Save.
As you can see in Figure 11-17, I have added a default message for all new issues inthe field New issue message.
The message reminds people to follow the Agile convention of Card, Conversation,Confirmation. This text will appear above the new issue form. Your team may have a
258 | Chapter 11: Private Team Work on Bitbucket

different format they prefer to follow. Another format I’ve worked with and quiteliked uses the headings: QA Test; Rationale; Details.
Figure 11-17. Enabling the issue tracker, and adding a default message for new issues
Creating Great Issues
Make sure the card clearly defines who benefits and how from thisfeature being built — in other words: what is the business value?This will allow people who are working on the task to ask questionswith the stakeholder about the implementation detail. Understand‐ing the context of how this issue fits into the larger project willensure the right scaffolding gets built and that the entire projectisn’t held together with duct tape.Not all issues begin as new features. Occasionally bugs will sneakinto your software. Excellent bug reports include: the steps torepeat the problem; the desired outcome; the actual outcome of thesteps, including a screen shot, or movie of the result.More information on creating great issues is available from Creat‐ing Tickets and Reporting Issues.
Issue tracking will now be enabled for your project (Figure 11-18).
To create a new issue, complete the following steps:
Project Setup | 259

1. In the project sidebar, locate and click the icon Issues.2. If this is your first time accessing the issue tracker, you will be directed to a wel‐
come screen. Click Create your first issue to continue. If it is not your first time,you will be redirected to the summary page for all issues. From this screen, locateand click the button Create Issue. You will be redirected to an issue creationform.
3. On the new issue creation form (Figure 11-19), add a title and a descriptionfor your issue. The default values for Assignee, Kind, and Priority may be appro‐priate.
4. When you have described your new issue as best as possible, click the buttonCreate issue.
Figure 11-18. The Issues icon now appears in the project sidebar
Your issue has been created (Figure 11-20), and is available from the Issues icon inthe sidebar of the project. You are now ready for someone to begin work on this issue.First, though, you will need to grant access to the project so that you don’t need tocomplete every ticket yourself.
260 | Chapter 11: Private Team Work on Bitbucket

Figure 11-19. New issue creation form
Figure 11-20. Issue summary page
Project Setup | 261

Access ControlAlthough I don’t have statistics to say this is the most popular way to use Bitbucket,the most common way I’ve seen teams use Bitbucket is to keep the defaults: a privaterepository with private forks allowed. The workflow I have most commonly seen forsmall teams then has developers creating their own forks, and submitting their pullrequests from their personal version of the repository (Figure 11-21). Teams of onlyone or two people, however, will generally omit the step of creating individual reposi‐tories for each person on the team and, instead, essentially collaborate directly intothe main repository (Figure 11-22).
Figure 11-21. Multiperson teams often use an intermediate repository within Bitbucket
Having a separate repository for each developer does not prohibit people from con‐tributing to the main project repository. If you are conducting peer reviews, this is, infact, exactly what you will want: every developer is able to commit to the main projectrepository, but the convention will dictate they do not commit their own workwithout a review first. If, however, you are working with a quality assurance team,you may want to restrict write-access to the main project repository to only the QA
262 | Chapter 11: Private Team Work on Bitbucket

team. In this case, each developer will need to create a fork of the project to be able tosubmit their work.
Figure 11-22. Teams of one or two often work directly in a shared repository
Shared AccessIf you are working with a team of very trusted developers, you may choose to havethem all commit into the same repository, and maintain a convention of whichbranches should be used for what purpose.
To grant a developer access to your repository, complete the following steps:
1. Navigate to Settings → Access management.2. In the field labeled Users add the Bitbucket username or email address for the
developer you want to add.3. Change the access level from read to write.4. Click Add.
Access Control | 263

Repeat these steps for each developer you would like to share this repository with.Developers will be able to do everything except administer the project. You’ve gotyour documentation in place, right? Because the only things holding this projecttogether right now are the social conventions you’ve documented and have agreed tofollow rigorously yourself.
Per-Developer ForksAs your team grows, you may want to prevent some parts of the team from havingdirect write access to the repository. Perhaps you would prefer if only the QA teamwere allowed to write to the main repository. In this case, developers will need to cre‐ate a fork of the project first, and submit their work through a pull request.
Complete the following steps to create a fork of the project:
1. Locate and click the Actions icon in the project sidebar. These are the three dotsdirectly below the logo.
2. Click on the link labeled Fork.3. You will be redirected to a repository creation screen that very closely matches
the one you saw when you were first creating your own Bitbucket repository. Onthis form it is acceptable to leave all of the defaults in place.
4. Optionally disable the Wiki and Issues options. You should use the main projectrepository to track this information.
5. To complete the process, click Fork repository.
You are now ready to create a local clone and begin your work:
1. Click the Actions icon in the project sidebar.2. Select Clone. A modal window will appear.3. From the pop-up window, select and copy the command line instructions.4. At the command-line, navigate to the directory where you would like to place
your copy of the cloned repository.5. Paste the command provided by Bitbucket. The repository will begin download‐
ing.
Once the repository has downloaded, you are ready to create a new branch and beginworking on your ticket.
Limiting Access with Protected BranchesIf you have worked with Subversion, you may have been quite surprised when youcame to Git and found virtually no access controls. Instead of building in this func‐
264 | Chapter 11: Private Team Work on Bitbucket

tionality, Git has built in the ability for you to build your own access controls throughhooks. These hooks allow you to script a response before or after a commit takesplace, or before or after a push to a remote repository takes place. If you are hostingyour own Git repository, you might think to take advantage of these hooks, but if youhave become accustomed to using code hosting systems, you may not have knownabout this functionality. (And even if you did, it’s not necessarily something that youwould have thought to script if you were just learning the basics of Git.)
Fortunately, Bitbucket has done the work for you. Through the web interface, you areable to grant write access per-person or per-team. In Chapters 2 and 3, you workedthrough your governance strategy with your team, and perhaps also your branchingstrategy. I won’t cover that again here. You should go back and review those chaptersif you aren’t sure how you might want to take advantage of these access controloptions.
Previously you learned how to grant access to an entire repository. In this section,you will learn how to refine this access per-branch. Before proceeding with this sec‐tion, ensure you’ve given repository access to the developers you want to work with.
To limit branch access, complete the following steps:
1. Navigate to Settings → Branch management.2. In the first field under the heading limit pushes to specific users and groups,
enter the name of the branch you want to limit control to; in the second field,enter the name of the person who should be allowed to update files in thisbranch.
3. Click the button Add.
The ability to push code to this branch has now been limited from all people exceptthe person listed. Figure 11-23 shows that once you have added a person, you are wel‐come to add more.
Figure 11-23. Prevent others from pushing code to a branch
From the same configuration screen, Bitbucket also gives you the option to preventthe deletion of any branch, or prevent history rewrites on any branch. Although thesetwo options are of less interest to you now that your team knows how to safely work
Access Control | 265
with Git, you might need them “for a friend.” (It’s okay, I understand. And so doesAtlassian, which is why it built you these two nifty features.)
Once implemented, an error will be returned if someone tries to perform a restrictedaction. Example 11-3 shows an example of what happens when I tried to delete a pro‐tected branch named master.
Example 11-3. Error when deleting a locked branch
$ git push bitbucket master --deleteremote: permission denied to delete branch masterTo [email protected]:emmajane/gitforteams.git ! [remote rejected] locked (pre-receive hook declined)error: failed to push some refs to '[email protected]:emmajane/gitforteams.git'
If you do decide to implement access controls, make sure you clearly communicatethese restrictions to your team. This will help to avoid absolute frustration by devel‐opers who cannot figure out why they can’t push their code to the project repository.You don’t need to provide lengthy tomes no one will read, but you do need to givepeople the rationale for why decisions were made, and any gotchas that make yoursystem a unique and special snowflake to work with.
More information about Branch management is available from Bitbucket. You mayalso be interested to read Atlassian’s overview of working with Git’s hooks.
Pull RequestsFor your developers to add their work back into the project, they need to have access.If this access is not available (either through a social convention of completing a peerreview, or through an enforced access control), the developers will need to create apull request to have their work considered for inclusion in the main project.
The official documentation from Atlassian on working with Bitbucket is exceptional.Work with pull requests covers a few extra features, and will be up to date if theinstructions I’ve covered in this section ever go stale.
Submitting a Pull RequestAfter completing your issue-specific work in your ticket branch, and pushing yourcode to the server, you are ready to issue a pull request to have your work incorpora‐ted into the main project repository. The interface options will vary slightly depend‐ing on which access control method you’ve chosen. The basic process, however, is asfollows:
1. Locate and click the sidebar icon Pull requests.
266 | Chapter 11: Private Team Work on Bitbucket

2. Locate and click the link Create pull request. A new form will appear for yourrequest (Figure 11-24).
3. Your current repository will be located on the left. From this option, select thebranch that has the change you would like to have incorporated into the mainproject.
4. The destination branch is located on the right. If your repository is a fork, youwill be able to choose the destination repository as well as the destination branch.
5. Add a title, and description for your pull request. Ideally, your description shouldreference the issue you are aiming to close.
6. If you would like someone specific to review your work, you can enter his or hername into the pull request.
7. You can optionally have Bitbucket do a little maintenance for you and delete theticket branch after the pull request has been accepted and the ticket is closed.
8. Finally, when the form is complete, click the button Create pull request.
Figure 11-24. The pull request creation form
As a developer, you must now wait for your work to be reviewed and accepted intothe project, or kicked back with requested updates.
Pull Requests | 267

Accepting a Pull RequestOnce a pull request has been submitted, it’s up to a reviewer to decide if the proposedchanges are worthy of inclusion in the main branch. Chapter 8 covered the reviewprocess in detail. The pull request summary page allows reviewers to comment on thework that is being proposed. The conversation may result in the pull request beingupdated, or it may confirm the work is complete, correct, and ready to be incorpora‐ted into the project.
Assuming there are no conflicts, you will be able to accept a pull request by clickingthe button Merge from the request itself.
If, however, there are going to be merge conflicts, the process is a bit more compli‐cated. Often the best person to resolve a conflict is the developer of the new code thatis being added. Typically what happens is that the code has become stale while wait‐ing for its review. Have the developer update her ticket branch so that it includes thelatest changes from its parent (or source) branch:
$ git pull --rebase=preserve
If the person who submitted the pull request is not available to resolve the mergeconflicts, you may need to complete this step yourself. Fortunately, Bitbucket givesyou some copy-paste commands for downloading the ticket branch and resolving theconflict.
Extending Bitbucket with Atlassian ConnectIn addition to all of the functions Bitbucket offers out of the box, there is also Atlas‐sian Connect, an API for add-ons that includes a marketplace of free and paid add-ons.
To find relevant add-ons for your project, complete the following steps:
1. Navigate to your account management page by clicking your user icon in the top-right corner of the page, then selecting Manage account.
2. From the left sidebar of your account, locate and click Find new add-ons. A listof all add-ons will appear in the main content area (Figure 11-25).
You can filter this list further by category. For example: Code analytics, Code quality,Collaboration, Deployment. This is a new service, so by the time you are reading thisbook, there will be a lot more add-ons to explore. A few to investigate include:
bitHoundRates your Javascript projects based on code quality, maintainability, and stabil‐ity. Paid service for closed source projects; free for open source projects.
268 | Chapter 11: Private Team Work on Bitbucket

Aerobatic HostingAllows you to deploy static websites, much like GitHub Pages, except from a pri‐vate Bitbucket repositories.
Pull Request Auto ReviewersAllows you to automatically assign reviewers to specific types of pull requests.
Figure 11-25. A list of available add-ons available through Atlassian Connect
In addition to the Connect add-ons, you can also install add-ons you’ve created froma custom URL. You can learn more about developing for Connect on the AtlassianDevelopers’ portal. Chances are good that if your extension is useful to your team, itwill be useful to other teams as well. As you are building it, consider making itabstract so that it can be shared with (or sold to) others in the marketplace.
SummaryThroughout this chapter, you learned how to use Atlassian’s popular code hosting sys‐tem, Bitbucket. You learned how to set up a personal repository, and share your repo‐sitories with others. To work successfully with a team on a private project, there areseveral points you learned about in this chapter, and which you should keep in mind:
• Get to know your tools by creating a personal, private repository first.
Summary | 269

• Prepare for new people to be added to your team by creating excellent onboard‐ing documentation that is easily accessible from the project repository.
• Use issue-based updates to your repository, describing all proposed changes inissues before creating new branches in the repository.
• Make decisions around access control clear and transparent. If you are limitingaccess, document the rationale for the decisions you’ve made.
Over the years I have been been repeatedly impressed by Atlassian as a company. Itconsistently provides a positive experience with easy-to-understand, organized docu‐mentation, and helpful staff. On the rare occassion when it has slipped up, it hastaken ownership of the problem in a mature and respectful way. A++, Atlassian!
270 | Chapter 11: Private Team Work on Bitbucket

CHAPTER 12
Self-Hosted Collaboration with GitLab
GitLab is an open source code hosting system for repository management. It allowsyou to track issues for your Git repository, conduct code reviews, and create supple‐mentary project documentation on wiki pages—in other words, it’s much the same asGitHub and Bitbucket. GitLab’s unique advantage is that as an open source product,you are able to install the software wherever you’d like, without paying licensing fees;and you are welcome to extend the software directly, instead of being restricted tocreating add-ons via APIs, and other hooks.
By the end of this chapter, you will be able to:
• Locate relevant install instructions for your setup• Create new projects, users, and groups• Configure access control for projects• Establish cross-project milestones
This chapter focuses on some of the unique tasks you can perform as an administra‐tor of a GitLab instance, as opposed to just using the software as a mere project lead.
Getting StartedIf you have followed the activities in this book from the beginning, you will havealready created an account, and played around with a GitLab repository on the pub‐licly available instance of GitLab at GitLab.com. (If you need a refresher, the instruc‐tions on using GitLab as a team of one are covered in Chapter 5.)
271

Installing GitLabTo take advantage of the administrative functions covered in the remainder of thischapter, you should create a local instance of GitLab so that you can log in as theAdministrative account holder. This chapter covers the Community Edition, not theEnterprise Edition of GitLab. The Enterprise Edition is available for a fee andincludes additional functionality, such as JIRA integration. You can read about thedifferences at the feature comparison list.
The recommended way to install GitLab is through one of its Omnibus installerpackages. These packages can be downloaded directly and placed onto a Linux server,or can be deployed via a one-click install on some provisioning services.
DigitalOcean offers a one-click install package for GitLab. This package uses theOmnibus installer for GitLab, which means you will be able to upgrade GitLab easilyif there are new features or security releases. At the time this was written,DigitalOcean was the only service offering a one-click installer for the Omnibuspackage. Bitnami and the AWS marketplace only offered deployments from sourcepackages, which cannot be upgraded once deployed. Read the descriptions carefullyto ensure you are not getting trapped into installing only a specific version.
To avoid the hosting fees while evaluating GitLab, you can also install it locally usingthe power of virtual machines. (It’s not as scary as it sounds.) Virtualbox and Vagrantare the easiest way that I have found to set up a Linux server on my Windows and OSX computers. The written documentation for Vagrant is phenomenal; however, if youprefer hands-on videos, I did put together a video series for a slightly older version ofVagrant. The basics haven’t changed.
Loosely, the steps are as follows:
1. Install Virtalbox.2. Install Vagrant.
If you are on OS X, there is already a brew recipe for Virtualbox and Vagrant; it isappropriate to use it.
With those two packages installed, you now have the capacity to have an Ubuntuserver running on your local machine. The virtual machine will not have GitLabinstalled, though. At this point, you could install GitLab using the Omnibus packagereferenced previously, but I found the following GitLab Installer really straightfor‐ward to use.
At the command line, complete the following steps:
1. Clone the installer project from GitHub:
272 | Chapter 12: Self-Hosted Collaboration with GitLab

$ git clone https://github.com/tuminoid/gitlab-installer.git
2. Inside the project repository, change the name of the Ruby configuration filefrom gitlab.rb.example to gitlab.rb.
3. Start the virtual machine:
$ vagrant up
The new virtual machine will be provisioned. The username and password will beprinted at the end of the startup message from Vagrant. If you can’t remember it, orhave closed the window, the information is also available at the end of the installscript.
Installing from Source
If you really prefer to install GitLab from source, there are instruc‐tions on how to proceed in the installation guide. This is stronglydiscouraged because GitLab releases a new version of its softwareevery month on the 22nd. Using packages will make it a lot easierto keep your instance of GitLab up to date.
Regardless of the installation method you choose, you will need to be able to log in asan administrator on your new GitLab instance to take advantage of the remainder ofthis chapter. Once you have logged in, you should be redirected to the welcomescreen shown in Figure 12-1.
Figure 12-1. The welcome screen for GitLab
Getting Started | 273

If you aren’t able to complete the installation, I encourage you to skim through therest of the chapter to see what would have been available to you so that you can verifyif it’s worth the effort to get it figured out.
Configuring the Administrative AccountYou may choose to keep the admin account generic, or use it as your own accountwhen developing software with your team. Out of habit, I tend to create an accountwith fewer privileges for daily use and maintain the root account for tasks such asinstalling new add-ons, upgrading the software, and other administrative tasks.
To configure your account, complete the following steps:
1. From the top menu, locate and click the icon profile settings (head and shouldersof a person).
2. From the left sidebar, review each of the profile settings pages:
ProfileName, and public details about yourself, such as Skype or Twitter.
AccountPrivate token, Two Factor Authentication, Username, and the ability todelete your account.
ApplicationsManage applications that can use GitLab as an OAuth provider, and applica‐tions that you’ve authorized to use your account.
EmailsPrimary email (avatar, commit credits), notification email, public email (dis‐played email). Any of these addresses can be used to connect a commit toyou.
PasswordReset your password.
NotificationsYour notification email as well as your notification level. By default, you willonly receive emails for related resources (your commits, your assets, etc).You may also choose from Watch (all notifications for a given project); Men‐tion (only when you are @referenced on an issue or comment); or Disabled(never receive a notification).
274 | Chapter 12: Self-Hosted Collaboration with GitLab
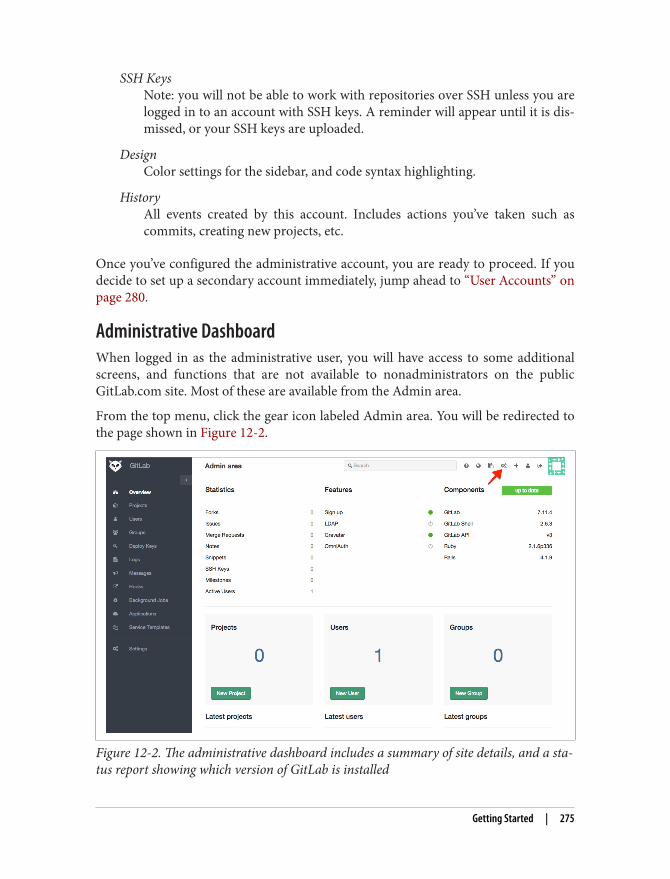
SSH KeysNote: you will not be able to work with repositories over SSH unless you arelogged in to an account with SSH keys. A reminder will appear until it is dis‐missed, or your SSH keys are uploaded.
DesignColor settings for the sidebar, and code syntax highlighting.
HistoryAll events created by this account. Includes actions you’ve taken such ascommits, creating new projects, etc.
Once you’ve configured the administrative account, you are ready to proceed. If youdecide to set up a secondary account immediately, jump ahead to “User Accounts” onpage 280.
Administrative DashboardWhen logged in as the administrative user, you will have access to some additionalscreens, and functions that are not available to nonadministrators on the publicGitLab.com site. Most of these are available from the Admin area.
From the top menu, click the gear icon labeled Admin area. You will be redirected tothe page shown in Figure 12-2.
Figure 12-2. The administrative dashboard includes a summary of site details, and a sta‐tus report showing which version of GitLab is installed
Getting Started | 275

This screen gives a summary of the components installed for this instance of GitLab,including the software version you have installed for GitLab, GitLab shell, GitLabAPI, Ruby, and Rails. There is also a list of all available features, with a status indica‐tor showing which ones are enabled. In Figure 12-2, you can see that Sign up andGravatar are enabled; LDAP and OmniAuth are disabled. Gloriously, they do not relyon color alone. The closed circle is green to indicate “on”; the “off ” symbol is the iconfor standby. Unfortunately these symbols are provided by CSS alone, and there doesnot currently appear to be a text equivalent.
Each of the options down the left sidebar are fairly self-explanatory:
OverviewThis is the screen you see in Figure 12-2. Provides a quick overview of stats forthe site, along with quick links to create new users, projects, and groups.
ProjectsSearch for projects within the site, including filters for per-user, in-active (noactivity in the last 6 months), and visibility level (private, internal, or public).
UsersSearch for accounts within the site. Includes fitlers for administrators, blockedaccounts, and people without projects.
GroupsSearch by name for groups or add a new group. There are no filters available forthis screen.
Deploy keysA list of all keys that are being used for deployments; you can also add new onesfrom this screen.
LogsThe last 2,000 lines for each of githost.log, application.log, production.log, and side‐kiq.log.
MessagesThe ability to add a timed broadcast message to all system accounts. Useful forscheduled maintenance, recent upgrades, and more.
System hooksA list of all existing system hooks. From the list of hooks, you can test a hook orremove it. You can also add new hooks (URLs) at this screen.
Background jobsA summary of background jobs running in sidekiq.
276 | Chapter 12: Self-Hosted Collaboration with GitLab

System OAuth applicationsA list of existing applications, and the ability to add new ones (fields for a title,and redirect URIs).
Service templatesService templates allow you to set default values for project services. Dependingon the service, different configuration options are available. For example, exter‐nal services such as Asana and Buildkite have fields for API keys. Some services,such as JIRA and Redmine also have configuration fields (Project URL, IssuesURL, New Issue URL). Some services, such as Emails on push, also have togglesfor the triggers (push events versus tag push events). This is a good screen toskim through if you want to integrate with third-party services.
Application settingsIncludes settings for default project settings and site-wide configuration options.
To lock down your instance of GitLab, you will need to use several of the options onthe Application settings screen. The settings on GitLab are fairly liberal. By default,the application is open to new registrants, who are restricted to 10 repositories, butthe default setting for a new repository is private.
The Features section includes the following settings (all are enabled by default):
SignupAllow people to create accounts.
SigninAllow people to authenticate themselves. If you wanted a read-only public reposi‐tory, it would be appropriate to use this option.
GravatarIntegration for user profile pictures—needs a connection to the Internet.
TwitterShow users a button to share their newly created public or internal projects onTwitter.
Version check enabledChecks to see if a newer version of GitLab is available.
Visibility and access control includes the following settings:
Default branch protectionOptions are:
• Not protected (developers and “masters” can push commits; delete branches;and force push new commits to a branch)
Getting Started | 277

• Partially protected (developers can only push new commits; masters canmake any changes)
• Fully protected (only “masters” can make changes to the repository).By default, Fully Protected is selected.
Default project visibilityOptions are:
• Private (project access must be granted explicitly for each user.)• Internal (the project can be cloned by any logged-in user.)• Public (the project can be cloned without any authentication).
Private is selected by default.
Default snippet visibilityOptions are Private, Internal, or Public. Private is selected by default.
Restricted visibility levelsSelected levels cannot be used by nonadmin users for projects or snippets.
Restricted domains for sign-upsOnly allow accounts to be created by those who hold email accounts for theselected domain names. Wildcards are allowed.
There are limit settings:
Default projects limitBy default, each account is only permitted to have 10 repositories; this includesthe private forks a developer may need to submit a merge request to a project. Ifdevelopers are working on several internal projects at once, this number mightneed to be increased.
Maximum attachment size (MB)By default, this is set to 10MB. This should be sufficient for most screenshots, butmay not be high enough if you are also attaching design assets to issues.
And finally, sign-in restrictions:
Home page URLThe URL people should be redirected to when they visit any page other than thesign-in page as a nonauthenticated user. If left unset, people will be redirected tothe sign-in page.
Sign in textThis text appears on the sign-in page, below the description of GitLab. Youshould begin with a heading to separate your text from the GitLab description.
278 | Chapter 12: Self-Hosted Collaboration with GitLab

By configuring each of these settings, you can create an appropriate starting point foryour instance of GitLab. For example, if you wanted to make it for official work onlyby approved individuals, you might adjust the settings as follows:
• Disable the signup feature.• Disable the Twitter feature (removes the button from the interface that encour‐
ages tweeting about projects).• Set the Restricted visibility levels so that public repositories and snippets are dis‐
abled (sign-in will be required to view all repositories).
If you wanted to make your instance a bit more open, you might adjust the settings asfollows:
• Enable the signup feature.• Disable the Twitter feature.• Disable public repositories for nonadmins.• Restrict domains for signups to your organization.
In addition to these settings, you can further customize the setup of each project tosuit your needs.
ProjectsYour organization probably already has a number of code projects, which may or maynot be versioned using Git. To begin your setup process within GitLab, you may wishto begin with people, or with projects. The advantage of starting with projects is thatthere’s something in place for people to engage with when they first log in. If you areworking with experienced Git users, you may want to grant access to a few earlyadopters first to set up the projects.
Creating a ProjectA project is effectively a repository with the accompanying support tools such as issuequeues and wiki pages. When creating a new project in GitLab, you will have theoption to import from GitHub, Bitbucket, Gitorious, Google Code, or any otherrepository that is available to your GitLab instance via a URL.
To create a new project, complete the following steps:
1. From the top menu, locate and click the icon New repository. This is a +. You willbe redirected to the project creation form.
2. Complete each of the fields for the new project as shown in Figure 12-3:
Projects | 279

Project pathThis will be the URL for your project page. Use lowercase letters andhyphens only.
NamespaceThe name of the account, or group, this project should belong to. By default,your own account is selected.
Import project fromIf the project already exists, you can import it from one of the listed services.GitLab must have access to the service in order to complete the import—inother words, you can’t be behind a firewall without access to the Internet;and you will need to enable OAuth access to the project. The instructions inthe pop-up window (Figure 12-4) will take you to the relevant documenta‐tion page for the service you want to connect to.
DescriptionInformation about your project to be used in listings. This is not a completeREADME.
Visibility LevelChoose between Private (only visible to authorized users), Internal (visible toall logged in users), or Public (visible to anyone visiting the site).
3. Locate and click the button Create project.
Your new project will be created. If you have selected the option to import from anexternal service, the repository, issues, and wiki pages will be imported if supported.You will be redirected to the new project page.
With the project imported, you are now able to add administrators and developers tothe project.
User AccountsGitLab allows you to create users with specific roles. These roles can be used to adjustread/write access to projects. If you are accustomed to Subversion’s branch locking,these access restrictions will feel familiar to you. In this section, you will learn how toset up individual user accounts and add people to projects.
280 | Chapter 12: Self-Hosted Collaboration with GitLab

Figure 12-3. New project creation form
Figure 12-4. After clicking the button GitHub, this pop-up window appears letting youknow GitLab does not have access to import from GitHub
Creating User AccountsTo create a new user account, you can begin from a number of different places. Theeasiest to access is via the Admin area overview:
1. From the top right, click the gear icon labeled Admin area. You will be redirectedto the admin area overview page.
2. Locate and click the button New user. You will be redirected to the new user cre‐ation form.
The form, as shown in Figure 12-5, is divided into three sections: Account, Access,and Profile.
User Accounts | 281

The fields in the Account section are all required:
NameDisplay name for this account.
UsernameLogin name for the account.
EmailThe email address for this account.
The default values for the Access details fields are typically appropriate:
Project limitThe default quantity is whatever you have previously set site-wide. GitLab shipswith a default of 10.
Can create groupThe ability to cluster projects. This functionality is referred to as a team or orga‐nization in other systems. This is enabled by default.
AdminAllow this person to administer the GitLab software. This is disabled by default.
Finally, there is the Profile section, which includes a field to upload a photo and socialmedia links:
• Avatar—if Gravatar is enabled, it may not be necessary to include a separate userprofile picture
• Skype• LinkedIn• Twitter• Website
Although you can take the time to fill in the Profile details, not all employees willwant to link their social media accounts to a work system. It may be more appropriateto leave them blank.
To create a user account, complete the following steps:
1. Fill in the Account details as described previously.2. Confirm the Access details are correct.3. Review the Profile details to ensure they should be left blank. Fill in any details
that are appropriate to add now.
282 | Chapter 12: Self-Hosted Collaboration with GitLab

4. Locate and click the button Create user.
Figure 12-5. The new user account creation form is divided into three sections: Account(required fields), Access, and Profile
The new user account has been created; and a notification email has been sent to theperson with a one-time login link she can use to set up her password.
In addition to this manual account creation, GitLab also offers LDAP and OmniAuthintegration. Setting up this type of access is covered in the GitLab documentation. As
User Accounts | 283

of the time of this writing, supported OmniAuth providers included GitHub, Twitter,and Google.
Adding People to ProjectsTo add people to a project, complete the following steps:
1. Navigate to the project page.2. From the sidebar, locate and click Settings.3. From the left sidebar, locate and click Members.4. Locate and click Add members. A new form will open (Figure 12-6).5. In the field labeled People, enter the username or email of the person you want to
add to this project.6. Adjust the field labeled Project Access to one of the following:
GuestAble to view the project, create issues, leave comments
ReporterAble to clone the repository, create code snippets
DeveloperAble to commit code to approved branches
MasterProject administrator
OwnerAble to remove the project
7. Locate and click Add users to project.
The accounts have been granted appropriate access to your new project. If the emailwas not already registered in this instance of GitLab, an invitation will have been sent,asking that person to register.
GroupsTo collect projects, you can use groups. You may choose to think of a Group as aDivision, Team, Organization, or Software Project (with subprojects). By default,Groups are private, and only members of that group may view projects in the group.
284 | Chapter 12: Self-Hosted Collaboration with GitLab

Anyone Can Create Groups
By default, anyone with an account on GitLab is permitted to createa group. You can disable this per-account when the account is cre‐ated, or from the account’s settings screen.
Figure 12-6. Adding users to projects; search for a person, and set the appropriate accesslevel
To create a new group, complete the following steps:
1. From the top menu bar, click the gear icon for Admin area.2. Locate and click New group. You will be redirected to the Group creation form
(Figure 12-7).3. Enter the details for each of the form fields:
Group pathThe URL fragment used for this group. You are limited to lowercase lettersand hyphens. In URLs, this will be used in the same way as the usernames.
DetailsA short description of your team, organization, software project—essentially“about” or “bio” field.
Group avatarThe display logo for this group.
Groups | 285
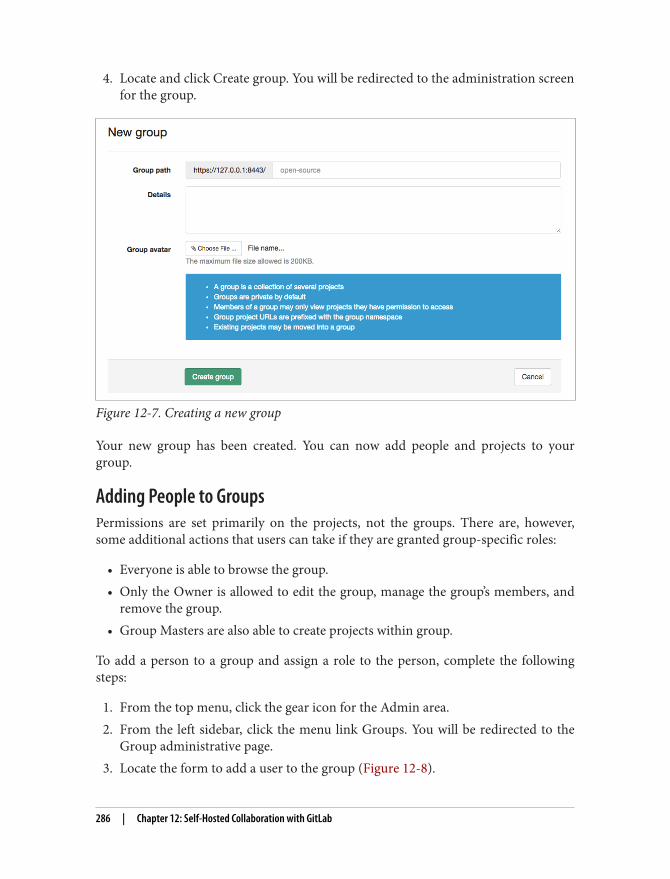
4. Locate and click Create group. You will be redirected to the administration screenfor the group.
Figure 12-7. Creating a new group
Your new group has been created. You can now add people and projects to yourgroup.
Adding People to GroupsPermissions are set primarily on the projects, not the groups. There are, however,some additional actions that users can take if they are granted group-specific roles:
• Everyone is able to browse the group.• Only the Owner is allowed to edit the group, manage the group’s members, and
remove the group.• Group Masters are also able to create projects within group.
To add a person to a group and assign a role to the person, complete the followingsteps:
1. From the top menu, click the gear icon for the Admin area.2. From the left sidebar, click the menu link Groups. You will be redirected to the
Group administrative page.3. Locate the form to add a user to the group (Figure 12-8).
286 | Chapter 12: Self-Hosted Collaboration with GitLab

4. Enter the details for each user you want to add to the group:
UsernameYou can add multiple people with the same role (Figure 12-9).
RoleChoose one of Guest, Reporter, Developer, Master, or Owner.
5. Click Add users to group.
Figure 12-8. Add a user to a group
The group will not be visible until there is at least one project added to it.
Adding Projects to GroupsAdding a project to a group is a simple matter of adjusting the namespace to be agroup, instead of an individual account.
To create a new project within a group, complete the following steps:
1. From the top menu, click the icon + with the label New project.2. Enter a Project path, using only lowercase letters and hyphens.3. Next to the label Namespace, click the down arrow and select the appropriate
group (Figure 12-10).4. Complete each of the fields as you did previously to create a new project.5. Click Create project.
The new project has been created and is available for development.
Groups | 287

Figure 12-9. You can add multiple people to a group at the same time as long as theyhave the same role
Figure 12-10. The project Sea of Possibilities has been added to the group NeverendingStory
If the project already existed, and you want to move it to a different namespace (indi‐vidual account, or group), complete the following steps:
1. In the top menu, click gear icon for the Admin area.2. From the left sidebar, click Projects.3. Locate the project you want to reassign and click its name. You will be redirected
to an admin summary for the project.4. Locate the transfer form (Figure 12-11).
288 | Chapter 12: Self-Hosted Collaboration with GitLab
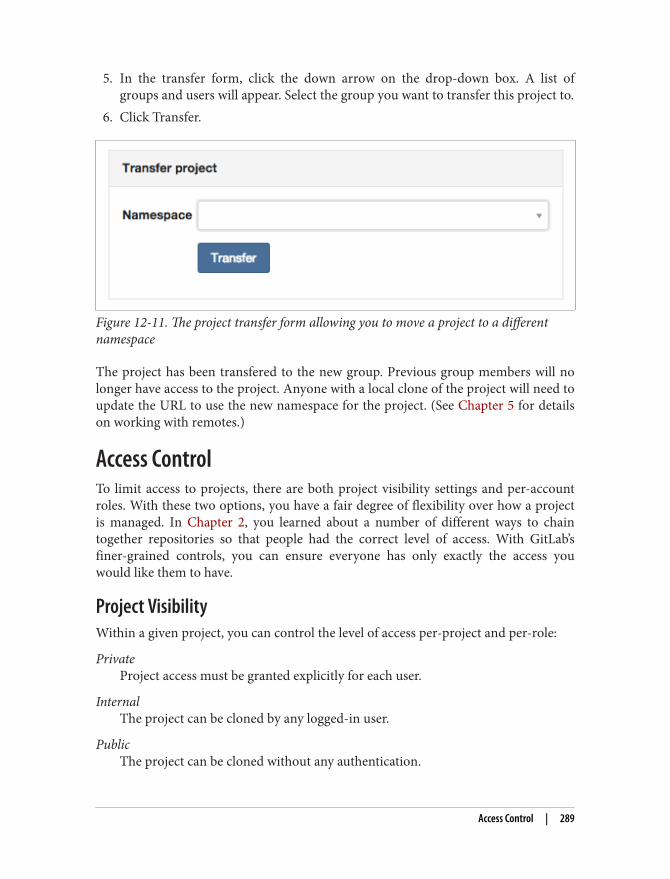
5. In the transfer form, click the down arrow on the drop-down box. A list ofgroups and users will appear. Select the group you want to transfer this project to.
6. Click Transfer.
Figure 12-11. The project transfer form allowing you to move a project to a differentnamespace
The project has been transfered to the new group. Previous group members will nolonger have access to the project. Anyone with a local clone of the project will need toupdate the URL to use the new namespace for the project. (See Chapter 5 for detailson working with remotes.)
Access ControlTo limit access to projects, there are both project visibility settings and per-accountroles. With these two options, you have a fair degree of flexibility over how a projectis managed. In Chapter 2, you learned about a number of different ways to chaintogether repositories so that people had the correct level of access. With GitLab’sfiner-grained controls, you can ensure everyone has only exactly the access youwould like them to have.
Project VisibilityWithin a given project, you can control the level of access per-project and per-role:
PrivateProject access must be granted explicitly for each user.
InternalThe project can be cloned by any logged-in user.
PublicThe project can be cloned without any authentication.
Access Control | 289

To adjust the project visibility settings, complete the following steps:
1. From the top menu, click the gear icon for Admin area.2. From the left sidebar, click Projects.3. Locate the project you wish to adjust and click its title.4. From the project admin summary page, locate and click the button edit.5. Locate the section of the form Visibility Level (Figure 12-12) and adjust the set‐
tings as appropriate for the access level you wish people to have (Private, Inter‐nal, or Public).
6. Locate and click Save changes.
Figure 12-12. Update the project visibility to one of Public, Internal, or Private
The visibility settings for your project have been adjusted.
Limiting Activities with Project RolesOnce users are able to see a project, you can further control the activities they canperform within the repository by assigning each person a specific role. A comprehen‐sive checklist of all permissions is available from within your GitLab installation fromhelp/permissions/permissions.
A quick summary of the functionality available to each role is as follows:
GuestAble to create new issues and leave comments, and that’s it! This role may beappropriate for stakeholders who do not need access to the code, but should beinvolved in the development of the project.
ReporterIn addition to the Guest permissions, a Reporter is able to clone the project andcreate code snippets. You may want to grant CTOs this role because they shouldnot be working on code anymore. (I’m mostly joking. I do think it’s great when
290 | Chapter 12: Self-Hosted Collaboration with GitLab

managers are able to jump in and help out; I also think that managers should befocusing on the outward-facing tasks only they can accomplish.)
DeveloperIn addition to all of the previous permissions, Developers can also create newbranches, create merge requests, push to nonprotected branches, add tags, writewiki pages, manage the issue tracker, and more! Most people on the team willlikely be assigned this role. You can still limit their access to specific branches, soit’s okay to be generous with permissions at this point.
MasterIn addition to the previous permissions, Masters are also able to create mile‐stones, add new team members, push to protected branches, add deploy keys tothe product, and edit the project itself. This role is appropriate for team leaders,and possibly savvy project managers who might need to change the team compo‐sition/access from time to time.
OwnerThe final role is also able to change the project visibility, transfer the project toanother namespace, and remove the project altogether. It is appropriate for non‐team administrators to have this role.
To update a person’s role within a group, complete the following steps:
1. From the top menu, click the gear icon for Admin area.2. From the left sidebar, click Projects.3. Locate the name of the project you want to update. Next to the name of the
project there is a button labeled edit. Click this button. You will be redirectedfrom the admin area to the project.
4. From the left sidebar, click Members.5. Locate and click Edit group members. The list of members will be converted into
a configuration list.6. Locate the person whose role you want to change, and click the pencil icon. A
new drop-down box will appear (Figure 12-13).7. Update the drop-down box so that it contains the appropriate role for this per‐
son.8. Click Save.
Access Control | 291

Figure 12-13. Update the role for a given team member
The new role has been applied.
Limiting Access with Protected BranchesThe final level of access that GitLab offers is a per-branch setting. By default, thebranch master is protected, and people with the role Developer cannot push to thisbranch. Instead, they are required to use the Merge Request process to have theirwork incorporated into the branch master for the repository. If you prefer having ashared access model, you can remove this protection.
To update which branches are protected within a given project, the branch mustalready exist. Once it exists within the repository, you can open or close the access.(Remember that when you first created the project you selected the default access set‐ting for new branches.)
To set up access control for a given branch, complete the following steps:
1. From the top menu, click the gear icon for Admin area.2. From the left sidebar, click Projects.3. Locate the project you wish to adjust, and click the button labeled edit next to its
name. This will take you to the project page, instead of the admin page.4. From the left sidebar, click Settings, then Protected branches.5. From the drop-down menu, select the branch you would like to protect
(Figure 12-14).6. Locate and click the button Protect.
292 | Chapter 12: Self-Hosted Collaboration with GitLab

Figure 12-14. Lock a branch so that it can only receive updates from accounts with theRole “Master” or “Owner” for this project or team
The branch can no longer be updated by the role Developer.
To remove this restriction, complete the following steps from the same screen:
1. Locate the section titled Already Protected (Figure 12-15).2. Locate the branch you would like to update.3. Click the button Unprotect.
Figure 12-15. Branches that have already been protected can be unprotected
Now people with the role Developer will be able to push commits to the branch youjust updated.
MilestonesWithin each project, you are able to create milestones. These can be used to collectissues, participants, and deadlines. If you are working in a Scrum fashion, you mayfind them useful for sprint loading. Milestones for projects that are shared by a groupcan also be seen from a single report page. This can make it easier to coordinatebetween projects; however, it is still per-repository so it is not as flexible as a full-featured project management tool, which allows you to collect all issues for differentcode bases into a single project for management purposes. If you use the same nameswithin a group across all of the projects, you can cheat a little and collate relateditems.
Milestones | 293

To create a new milestone for your project, complete the following steps:
1. Navigate to the project page.2. From the left sidebar, click Milestones.3. Locate and click the button New milestone.4. Complete the form fields for your new milestone (Figure 12-16):
• Title• Description, with optional files attached• Date
5. Locate and click the button Create milestone.
Figure 12-16. You can create date-based milestones for your project
Your new milestone has been created.
To see a list of all milestones for one of your groups, complete the following steps:
1. In the top-right corner on the screen, click your user avatar.2. From the left sidebar, click Groups.3. From the list of groups, click the name of the group you want to see the mile‐
stones for.
294 | Chapter 12: Self-Hosted Collaboration with GitLab

4. From the left sidebar, click Milestones.
You will be redirected to a list of all milestones for this group (Figure 12-17).
Figure 12-17. A list of all milestones for a given group
SummaryGitLab is a robust, open source code hosting system that rivals the functionalityoffered by GitHub and Bitbucket. It is available for you to install on your own net‐work free of charge.
• Access control can be customized per repository (visibility settings), per account(with role settings), and per branch (with branch protection).
• You can collect both Projects (repositories) and Users (people) into Groups foreasier management.
• If you do not want the responsibility of maintaining your own software, GitLabalso offers a free cloud hosting service at GitLab.com.
Summary | 295


APPENDIX A
Butter Tarts
In Git, branches can be used to maintain variations in code. These variations mightbe a work in progress, or they may be a completely different direction. Thesebranches can feel similiar to variations of family recipes. This appendix contains twovariations of a recipe from my family of a classic Canadian dessert: butter tarts. (Forthe non-Canadians reading this, the inclusions are what make this dessert controver‐sial. It’s like rebasing; but worse.)
Austin Butter TartsThis is my mother’s recipe, passed down to her from her grandmother, Granny Aus‐tin. It is always made with currants, and never anything else.
Pastry
• 2-½ cups flour• 1 cup shortening• Pinch salt• Ice water (enough to bind)
1. Cut shortening into flour.2. Add ice water (approximately ½ cup).3. Mix with fork.4. Roll out.5. Prick and bake in a muffin tin, unfilled, at 450° F for 12 minutes.
297

Filling
• 1 cup sugar• ½ cup soft butter• 3 eggs• 1 cup currants• 2 tablespoons sweet or sour cream
1. Mix together the filling ingredients.2. Bake in the pastry-filled muffin tin at 400° F for about 25 minutes.
van der Heyden Butter TartsThis is my aunt’s recipe, passed down to her from her mother, Pat van der Heyden. Itis usually without additions, but can have roasted nuts, chocolate chips, or raisins.
Filling
• ⅔ cup softened butter• 3 cups brown sugar• 3 cups corn syrup• 12 eggs
Cream together butter and sugar. Add corn syrup, then eggs. Mix well together. Usingyour favorite pastry recipe, roll out and cut into suitable size for your tart, like a muf‐fin tin. Using a fork, prick holes into the bottom of each pastry. Ladle in butter tartfilling. Bake at 400° F for 21 minutes (or thereabouts).
Options:
• Roasted nuts• Chocolate chips• Raisins
298 | Appendix A: Butter Tarts

Pastry
• 6 cups all-purpose flour• 3 cups shortening (Karin uses Crisco; her mother used lard)• 2 eggs• Splash of vinegar plus 2 cups cold water
Mix flour with shortening, leave it somewhat lumpy. Whisk eggs, add vinegar andwater. Add wet to dry until you get a workable consistency. Freeze any unused pastryin plastic for next time.
Butter Tarts | 299


APPENDIX B
Installing the Latest Version of Git
This book primarily covers the basics in Git, so there aren’t a lot of new features thatyou’ll be missing out on if you don’t upgrade. In general, I find newer versions of thesoftware to be increasingly more friendly to use. The error messages are clearer, andprovide better “next action” suggestions. The syntax of some tricky commands hasimproved, making the commands easier to remember. (For example, the ability todelete a remote branch using the parameter --delete, and not some weird syntaxinvolving a colon.)
So you think you have Git installed. Sweet!
But the version that ships with your operating system is 90% likely to be 100% old.“It’s all Git to me!” I hear you saying. I know, I know. I used to think the same thing:Git is old and complicated and hasn’t changed in a million Internet years. And then Iwent to a Git developer conference. At the conference, I met wonderful developerswho were friendly and welcoming and patient and funny and very much activelyengaged in making Git better. At the time, the maintainer of Git was Junio Hamano,and the Windows maintainer was Johannes Schindelin. They were both at the confer‐ence and were genuinely interested in making Git easier for you to use. You won’t seewhat the community has been up to if you don’t install the latest version!
You should always try to use the latest stable version of software, and you definitelyowe it to yourself to ensure you are using at least version 2.5 of Git. As of this versionof Git, the command git help is much more useful. I’m very excited about thischange as it was one of the things that bugged me about Git from the very first time Iused it. Then, at the Git developer conference, I made passing comment, whichturned into an unofficial bug report…and a few months later Sébastien Guimmaraand Eric Sunshine made my wish into the command you use today. Incredible!
301

I’m often a few patches out of date (e.g. if the latest version is 2.5.2, I might be on2.5.0), but I do make a careful effort to stay relatively current. If you don’t rememberhaving installed Git in the last few months, you will almost definitely want toupgrade. You may also need to install Git if it’s not already on your system (it’s nothard! there are installers you can use!).
Installing Git and UpgradingThere are human-friendly Git installers available for Windows and OS X. The instal‐ler will generally attempt to keep your settings in place when you upgrade Git.
These installers are available from:
http://git-scm.com/downloads
If you are on Linux or Unix, you probably already have Git installed, but you shouldupgrade to the latest version. Use your package manager to do this (tips in “Upgrad‐ing on *nix Systems” on page 303). OS X users may also want to use a package man‐ager to install Git and keep it up to date.
Finding the Command LineThis book is focused on using Git from the command line. I make no apologies aboutthis. There are two critical reasons I think you should give it a try:
1. It’s easier to copy and paste documentation that works on all operating systemswhen everyone is working from the command line.
2. You get better error messages when you’re working from the command line. In agraphical interface it’s harder to copy and paste the sequence of commands youran right before getting into the pickle you’re now in. By working from the com‐mand line, you will be able to get help faster from others when things go wrong.
As you gain comfort with the concepts in this book, I encourage you to transfer thatknowledge to graphical interfaces if you prefer.
OS X1. Open Spotlight. Spotlight is available from the magnifying glass in the top-right
corner of the menu bar, or by pressing Control + Space.2. Into the Spotlight search window, type terminal and press Return. A new termi‐
nal window will appear.
302 | Appendix B: Installing the Latest Version of Git

LinuxThe location of a terminal window will vary depending on which distribution ofLinux you are using, and the window manager you are using. If you don’t know howto open a terminal window for your version of Linux, a quick search with your favor‐ite search engine should be able to help out.
WindowsThe method you use will vary slightly depending on the version of Windows you arerunning.
Windows 7:
1. Click the button labeled “Start.”2. Select Program Files → Accessories → Command Prompt. A terminal window
will open.
Windows 8:
1. Navigate to the Apps screen (swipe up; or use a mouse and click the down arrowat the bottom of the screen).
2. Locate the section heading Windows System by swiping or scrolling to the right.3. Under Windows System, press or click Command Prompt.
Upgrading on *nix SystemsPackage managers are a great way to ensure you are using an up-to-date version ofGit on your system. On Linux and Unix-variants, you will upgrade Git using the samepackage manager that you used to install Git previously (well, Git was probablyalready installed, and you might have needed to upgrade).
Homebrew Is a Package Manager for OS X.
If you are using OS X, and already have Homebrew installed, youshould use this package manager to keep Git up to date.
When working with a package manager, you need to remember to keep your list ofpackages up to date. Generally this is with the subcommand update for your packagemanager. For example, on Ubuntu I would use apt-get update, on Fedora I woulduse yum check-update, and on OS X, I would use brew update.
Installing the Latest Version of Git | 303

Once the list of packages is up to date, you can install the latest packaged version ofthe software for your system. This is typically done with the subcommand install orupgrade.
OS X:
$ brew install git
Ubuntu, and Linux distributions using the package manager apt:
$ apt-get install git
Fedora, and Linux distributions using the package manager yum:
$ yum install git
To ensure your packages are kept up to date, you can upgrade them individually oron demand (Example B-1). This is typically done with the subcommand upgrade,although running the install command again will generally also work to upgradethe software if a newer package is available.
Upgrade with Caution.
Careful! Package managers are only mostly awesome, and some‐times upgrading everything isn’t the smartest thing when you’rerunning towards a deadline.
Example B-1. Update packages with Brew
OS X upgrade only Git:
$ brew upgrade git
OS X upgrade all packages installed via Homebrew:
$ brew upgrade
OS X GotchasWhen I started getting more involved in the Git community, I began working withcustom builds instead of using installers so that I could test out neat new features andupgraded documentation. When I tried to push code to remote repositories, I some‐times ran into the following error:
git: 'credential-osxkeychain' is not a git command. See 'git --help'.
For some reason, my environment variable for $PATH wasn’t behaving quite the way Ianticipated. After getting tired of trying to sort it out, I downloaded another copy ofthe keychain helper and put it in a known location on my hard drive.
304 | Appendix B: Installing the Latest Version of Git

It is Unlikely You’ve Lost Your Keychain.
I very, very highly doubt you will ever need to take advantage ofthis section. It’s mostly a love note to my future self on how I solvedthis problem previously. (Yes, I use my own books as reference. Iwrite down the important stuff so that I don’t have to store it all inmy own head.)
First, verify that you have the correct authentication tool set up in your global Gitconfiguration file. This file is located at ~/.gitconfig and should contain the followingsettings:
[credential] helper = osxkeychain useHttpPath = true
If this is not visible in the configuration file, set it up now by running the followingcommand:
$ git config --global credential.helper osxkeychain
Check to see if this solved the problem by running the following command:
$ git credential-osxkeychain
You should not receive the error message you had been receiving previously.
If you do receive the error message again, proceed with the following instructions.You will download and “install” a copy of the helper application osxkeychain:
$ curl -s -O http://github-media-downloads.s3.amazonaws.com/ osx/git-credential-osxkeychain
Adjust the permissions so that you are able to run the program:
$ chmod u+x git-credential-osxkeychain
Move the helper program to the application folder for Unix-y programs. This pro‐gram is run as root, so you will need to enter your OS X login password to run thecommand:
$ sudo mv git-credential-osxkeychain /usr/local/git/bin
Now when you run the following command, you shouldn’t get the error you receivedpreviously about a missing command:
$ git credential-osxkeychain
This documentation is adapted from the instructions at “Beginner’s Setup Guide forGit & Github on Mac OS X”. Chris Chernoff, if you ever read this, thank you! Yourtips saved me from having to enter the 42-character random password I’d set up eachtime I wanted to push updated branches for this book to the Atlas build server whilerunning custom builds of Git.
Installing the Latest Version of Git | 305
Accessing Git Help at the Command LineGit includes built-in documentation from the command line. This information isaccessible by running the following command:
$ git help
You can read all of the available documentation for a given topic by specifying thetopic name:
$ git help topic
To navigate the help page, you can can use your keyboard’s arrow keys to scroll upand down. When you are finished reading the documentation page, press q to exit.
For a list of all topics, use the following command:
$ git help --all
A handy glossary of Git terms is also available:
$ git help glossary
306 | Appendix B: Installing the Latest Version of Git

APPENDIX C
Configuring Git
Over time, you will find little shortcuts that help you use Git at the command line.Personally I’ve found those who are the most frustrated with it are the ones with theleast amount of customization. There are two types of configuration settings you willbe making when working with Git: global settings, which apply to all repositories thatyou work on; and local settings, which only apply to the current repository. An exam‐ple of a global setting might be your name, whereas your email might be customizedbased on personal projects and work projects.
Global settings are stored in the file ~/.gitconfig, and local settings are stored in thefile .git/config for the specific repository you are working in. You will always be able togo back and edit your settings if you want to.
You can check to see what value is set. For example, Example C-1 shows you how tocheck what your name is set to.
Example C-1. Display a configured value
$ git config --get user.name
You can also get list of all values currently set (Example C-2).
Example C-2. Display all configuration values currently set
$ git config --list
A list of all variables is available from the command page for config. This is also avail‐able by running the command:
$ git help config
307

Identifying YourselfIn order to get credit for your work, you will need to tell Git who you are. We willstore your name (Example C-3) and email (Example C-4) globally. Because it’s aglobal setting, you don’t need to be in a specific repository to make the change.
Example C-3. Configure your name
$ git config --global user.name 'Your Name'
Example C-4. Configure your email address
$ git config --global user.email '[email protected]'
It might be appropriate to use specific email addresses for some repositories (forexample, if you are working on a work versus personal project). You can specify thechanges should only be applied to a specific repository by completing the followingsteps:
1. Navigate to the directory that holds the repository you want to configure.2. Apply the configuration command, substituting --global for --local.
For example:
$ git config --local user.email '[email protected]'
Changing the Commit Message EditorBy default, Git will use the system editor. On OS X and Linux, this is typically Vim. Ireally like Vim, so that’s what I use. It is a bit hardcore though, so you might want tochange your editor to something else.
Check to see which editor Git will use by running the following command:
$ git config --get core.editor
You Must Quit to Commit
The commit will only be stored in Git when you quit the editor, notjust save the commit message. This may affect your choice of texteditors.
308 | Appendix C: Configuring Git

If you would like to use Textmate, use the following command:
$ git config --global core.editor mate -w
If you would prefer to use Sublime, use the following command:
$ git config --global core.editor subl -n -w
If you want to change the editor for Windows, you will need to include the full pathto the application file. As applications are typically installed in the folder C:\ProgramFiles, you will need to wrap the path in quotes. Additionally, when you use Bash tocall git config, you must quote the value, resulting in a double quoted string:
$ git config --global core.editor '"C:\Program Files\Vim\gvim.exe" --nofork'
For additional editors, check the configuration instructions for your editor of choice.
Adding ColorReading huge walls of text can be difficult. Add some color helpers to your commandline to make it easier to see what Git is doing:
$ git config --global color.ui true$ git config --global diff.ui auto
Customize Your Command PromptIf you are working from the command line, you get zero clues about what is going onwith your files, until you explicitly ask Git about them. This is tedious to keep havingto ask. It’s like when you were eight and sat in the back of the car whining at thedriver saying, “Are we almost there yet?”
Instead of having to explicitly ask, I’ve modified my command-line prompt to tell mewhich branch I currently have checked out and whether or not I’ve made changes toany of the files in my repository. This is a fairly common hack, but every developerwill have their own little quirks on how they implement it. Searching the Web for“bash prompt git status” will yield lots of results. My own prompt is fairly simple, butothers have added a lot more details to their prompt. For example: Show your git sta‐tus and branch (in color) at the command prompt or local file status. As with allthings technical, the more you add initially, the more you will need to debug if it doesnot work right away.
I have found the fancy prompts to be quite fussy to set up, and ended up giving up onthe really detailed ones. I recommend starting with something really simple and thenadding to it if you really need more information. The simple change in color, alongwith the name of the branch, actually suits me just fine and is less distracting withoutall the extra information.
Configuring Git | 309

Ignoring System FilesWe have all done it: accidentally added one of OS X’s .DS_Store system files, or a tem‐porary .swp text editor file. You can save yourself a little embarrassment by setting upa global ignore file so that Git prevents these files from being committed to any localrepository you create or work on. A comprehensive list of files to ignore is available.Pick and choose the most appropriate for your system and your projects.
Once you have a list of the files you want to ignore, complete the following steps:
1. Create a new text file named .gitignore_global and place it in your home direc‐tory.
2. Notify Git of the configuration file to use by running the following command:
$ git config --global core.excludesfile ~/.gitignore_global
You may also have project-specific files, or even output directories (such as builddirectories), that you don’t want to commit to your repository. For each repository,you can have a custom “ignore” file that will further limit which files can be trackedby Git:
1. Create a new text file named .gitignore and place it in the root directory for yourrepository.
2. To this file add the names of the files you want Git to never add to the repository.Each filename should have its own line. You can use pattern matching as well,such as *.swp for temporary editor files.
This change will need a new commit in your Git repository:
$ git add .gitignore$ git commit -m "Adding list of files to be ignored."
Line EndingsThis section is especially important if you work on a cross-platform team with devel‐opers on OS X, Linux, and Windows.
You should set the line endings globally, but adding the setting to each repository aswell will ensure greater success for those who may not have explicitly set line endings:
$ git config --global core.autocrlf input
To explicitly have all contributors use the right line endings, you will need to adda .gitattributes file to your repository that identifies the correct line ending, text filesthat should be corrected, and binary files that should never be modified.
310 | Appendix C: Configuring Git
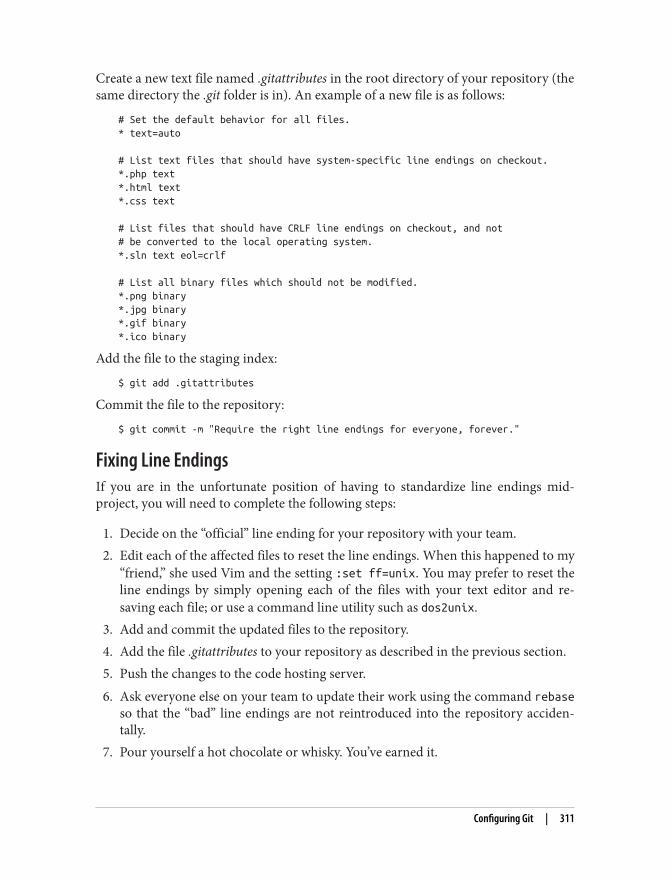
Create a new text file named .gitattributes in the root directory of your repository (thesame directory the .git folder is in). An example of a new file is as follows:
# Set the default behavior for all files.* text=auto
# List text files that should have system-specific line endings on checkout.*.php text*.html text*.css text
# List files that should have CRLF line endings on checkout, and not# be converted to the local operating system.*.sln text eol=crlf
# List all binary files which should not be modified.*.png binary*.jpg binary*.gif binary*.ico binary
Add the file to the staging index:
$ git add .gitattributes
Commit the file to the repository:
$ git commit -m "Require the right line endings for everyone, forever."
Fixing Line EndingsIf you are in the unfortunate position of having to standardize line endings mid-project, you will need to complete the following steps:
1. Decide on the “official” line ending for your repository with your team.2. Edit each of the affected files to reset the line endings. When this happened to my
“friend,” she used Vim and the setting :set ff=unix. You may prefer to reset theline endings by simply opening each of the files with your text editor and re-saving each file; or use a command line utility such as dos2unix.
3. Add and commit the updated files to the repository.4. Add the file .gitattributes to your repository as described in the previous section.5. Push the changes to the code hosting server.6. Ask everyone else on your team to update their work using the command rebase
so that the “bad” line endings are not reintroduced into the repository acciden‐tally.
7. Pour yourself a hot chocolate or whisky. You’ve earned it.
Configuring Git | 311


APPENDIX D
SSH Keys
SSH keys allow you to make a connection to a remote machine without having toenter a password every time. The keys themselves come in pairs: a public-facing keyand a private key. The private key should be treated like a password, and never sharedwith anyone. The public-facing key will be “installed” elsewhere, such as a code host‐ing system.
Create Your Own SSH KeysTo create an SSH key, you will need to run a program, which will save a pair of files.The necessary software is already installed on *nix-based systems, but Windows userswill need to download additional (free) software.
Linux, OS X, and Unix-variantsTo generate a key pair, run the following command:
$ ssh-keygen -t rsa -b 4096 -C "[email protected]"
You will be prompted for the following information:
File locationAccept the default location by pressing Return to continue.
PasswordIt’s optional, but you really should have one. Make it memorable or store it in avery secure password keeper that you use regularly.
The fingerprint for your key will be printed to the screen, and the key pair will besaved to the appropriate location in ~/.ssh/.
You will now need to register this key with your system so that you can begin using it.
313

This is where things get a little secret agent. You need to register your keys with thelocal “agent” (using OS X? think “keychain,” but different). Begin the ssh-agent appli‐cation and redirect it to use a Bourne shell:
$ eval "$(ssh-agent -s)"
Register your SSH key with the agent:
$ ssh-add ~/.ssh/id_rsa
Your key has been registered.
If you need to use the key immediately, skip ahead to “Retrieving Your Public SSHKey” on page 315.
WindowsTo generate an SSH key-pair on Windows you will need to use the software, PuTTY‐gen:
1. Locate the latest binary for PuTTY from the PuTTY Download Page. The file isnamed puttygen.exe.
2. Right-click the link puttygen.exe and choose “Save link as.” The text may varyslightly depending on your browser.
3. When prompted, select a folder that you can find easily (for example, your desk‐top folder).
4. Locate the PuTTYgen application on your desktop. Double-click the icon to runthe program.
5. At the bottom of the window, below “Type of key to generate,” select SSH-2 RSA.6. Locate and click the button “Generate.”7. Wiggle your mouse. Seriously. You’ll be making random data (noise), which
helps with the key-generation process. Continue doing so until the progress baris full.
8. You will be prompted for a passphrase. It’s optional, but you should add one.9. Locate and click the button “Save private key.”
10. Locate and click the button “Save public key.”
This should save the keys to the appropriate location in ~/.ssh/.
If you are ready to use the SSH key immediately, complete the following steps as well:
1. Locate the heading “Public key for pasting into OpenSSH authorized_keys file.”2. Right-click the random string below the heading.
314 | Appendix D: SSH Keys

3. Choose “Select all,” and then “Copy.”
Your public key has been copied to the clipboard. You are ready to proceed.
Retrieving Your Public SSH KeyWhen your code hosting system asks for your “Public SSH Key,” it needs the contentsof the file id_rsa.pub. This file is usually stored in a hidden folder of your home direc‐tory: .ssh. To locate this file, and copy its contents to your clipboard, complete thecommands outlined next as is relevant for your operating system. By working fromthe command line, you can avoid trying to find an editor that recognizes a .pub file.It’s just text, but the text editors you have installed probably don’t know that.
OS X:
1. Open a terminal window.2. Run the following command: cat ~/.ssh/id_rsa.pub | pbcopy
Linux:
1. Open a terminal window.2. Run the following command: cat ~/.ssh/id_rsa.pub. You should have a very
long string of characters printed to the screen. It should stretch the entire widthof the terminal, and it should not include the words “PRIVATE KEY.” If the file isnot found, you will need to create an SSH key first.
3. Copy all of the text that was printed to the screen.
Windows:
1. Open a Git Bash window.2. Run the following command: clip < ~/.ssh/id_rsa.pub. This will copy your
public SSH key to the clipboard.
Your public SSH key is now copied to the clipboard and you are ready to paste it intothe configuration screen for your code hosting system of choice.
SSH Keys | 315

Index
Symbols*nix systems
SSH key creation on, 313upgrading Git on, 303
.NET, 17
Aaccess control
Bitbucket, 262-266GitLab, 289-293per-developer forks, 264protected branches, 264
access models, 20-31collocated contributor repositories, 25-28custom, 30dispersed contributor, 22-25shared maintenance, 28
account creationBitbucket, 242-245GitHub, 212-215
add command, 105, 146--patch [filename], 105add files, 104
Aerobatic Hosting, 269Agile environment, 3, 58Android, 188Ansible, 3antisocial coding, 241Apache, 18, 19Apache License, 18Apache Software Foundation, 188Asana, 277Atlas, 70, 181Atlassian, 265
Atlassian Connect, 268automated gatekeepers, 187automated self-check, 186
Bbackward compatibility (see semantic version‐
ing)ball-and-chain diagrams, 36Balsamiq, 59Benevolent Dictator For Life (BDFL) gover‐
nance model, 19benevolent dictators, 187BFG Repo Cleaner, 146bisect command, 206-208bisect inefficiencies, 137Bitbucket, 146
access control in, 262-266account creation for, 242-245and Atlassian Connect, 268creating private project with, 245-249editing files in repository, 251-254exploring your project on, 249-251getting started with, 242-254per-developer forks, 264private team work on, 241-270project documentation in wiki pages,
255-257project governance for nonpublic projects
on, 241project setup with, 254-260protected branches, 264pull requests, 266-268shared access, 263tracking changes with issues, 258-260
317

bitHound, 188, 268blame command, 203-206branch command, 13
--contains, 148delete branches, 146delete branches, -D, 146list all branches, 104list branches, 104list remote branches, 104
branch deploymentadvantages, 38disadvantages, 39
branch types, 177branch, create (see checkout command)branch-per-feature deployment, 39-42
advantages, 41disadvantages, 42
branchesbutter tart recipe example, 13, 297-299creating new, 88-90defined, 33for experimental work, 110for teams of one, 85-90keeping up to date, 167-170listing, 86unmerging, 135-137, 138-144updating list of remote branches, 87using different, 87working with, 85-90
branching strategies, 33-56and review process, 196branch-per-feature deployment, 39-42conventions for, 35mainline branch development, 36-39scheduled deployment, 45-51state branching, 42-45updating branches, 51-55
Brew, 175broken branches, 201Brown, Sunni, 7browser-based text editor
for Bitbucket files, 251-254for quick commits, 221-224
bugs, finding and fixing (see debugging)Buildkite, 277butter tart recipes (forking/branching exam‐
ple), 13, 297-299
Ccached parameter, 129Canonical, 17cd shell command, 104cd [directory name] shell command, 104Chacon, Scott, 40changes, proposed
applying, 189-194reviewing, 189
checkout command, 146checkout branch, 104checkout [commit], 146create branch, -b, 105, 146tracking branch, 104
Chef, 3, 17Chernoff, Chris, 305cherry-pick command, 123
cherry-pick [commit], 146clone command, 158, 162
clone [URL], 104, 146clones, zipped packages vs., 158cloning (see git clone [URL] command)cloning repositories, 12co-maintainership, 235-236Code of Conduct (CoC) document, 20code reviews, software for, 187Coder, 188codes of conduct, 19coding teams, 3collaboration, 3collocated contributor repositories access
model, 22, 25-28color, adding to Git, 309command and control, 15-31
access models, 20-31project governance, 16-20
command prompt customization, 309commands (see individual command names)commit command, 146
--amend, 105-m, 104
commit messageschanging editor for, 308detailed, 95
commit process, 13commitment meetings, 9commits
altering with interactive rebasing, 130-134amending, 126
318 | Index

and rollbacks, 126-137combining with reset, 127-129publishing perfect, 163-167reverting, 137unmerging a branch, 135-137via Web, 221-224
company-wide stand-up meetings, 10configuration, Git, 307-311
adding color, 309command prompt customization, 309ignoring system files, 310line endings, 310user name/email configuration, 308
consensus shepherds, 187consensus-driven development, 3consensus-driven, leader-approved governance
model, 19consumers
contributors vs., 157-163developers as, 158-160
continuous delivery, 37Continuous Delivery (Humble and Farley), 39continuous deployment, 37continuous integration, 37contractors
copyright and, 16untrusted developers with independent
quality assurance, 183contributors
consumers vs., 157-163developers as, 160
conventions, branching strategy, 35copyright agreements, 16creating clones, 12Creative Commons license, 17, 18creative thinking, 4custom access models, 30CVS, 20
Ddebugging, 197-208
comparative studies of historical records,201-203
file ancestry with blame command, 203-206historical reenactment with bisect com‐
mand, 206-208stash command for emergency fixes,
198-200decision thinking, 6
default branches, 36deleted file, mid-rebase conflict from, 115-118deployment, 39design critique, 186detached HEAD state, 52developers
as consumers, 158-160as contributors, 160as maintainers, 161-163setup for multi-person teams, 157-163trusted, with no peer review, 181-183trusted, with peer review, 64untrusted, with independent quality assur‐
ance, 183untrusted, with QA gatekeepers, 66
developmentby teams of more than one, 163-177keeping branches up to date, 167-170publishing perfect commits, 163-167publishing work, 176resolving merge conflicts, 174-175reviewing work, 170-173sprint-based workflow, 177-181untrusted developers with independent
quality assurance, 183with trusted developers with no peer review,
181-183Dia, 59diff command, 192diff program, 22DigitalOcean, 272dir shell command, 104directed acyclic graph (DAG), 36discreet repositories, 241dispersed contributor access model, 22-25distributed version control, 15distribution licenses, 18Docker, 2documentation
in Bitbucket wiki pages, 255-257of encoded decisions, 59of workflow process, 58README file for, 156
Driessen, Vincent, 45Drupal, 19Drupal Code of Conduct, 20Drupal Project module, 59Dymitruk, Adam, 40
Index | 319

EEaton, Jeff, 198empathy, cultivating, 10encoded decisions, documentation of, 59Etsy, 39experimental work, branches for, 110
FFacebook, 39Farley, David, 39Fedora, upgrading Git on, 303feedback (review process), 194fetch command, 13, 70, 153, 158, 171, 181files, restoring, 124filter-branch command, 145, 148Flickr, 20, 39forks/forking, 12
butter tart recipe example, 13, 297-299for public projects on GitHub, 230Git vs. GitHub terminology, 27issue tracking, 230per-developer (Bitbucket), 264
Free Libre Open Source Software (FLOSS), 16freelancers, copyright and, 16
GGamestorming (Gray, Brown, Macanufo), 7gc command
--prune, 148Gerrit, 188Git
adding color to, 309command prompt customization, 309commit message editor changes, 308configuring, 307-311configuring to ignore system files, 310converting an existing project to, 81-83finding command line for, 302GitHub terminology vs., 27installers for, 302installing latest version of, 301-305line ending configuration, 310OS X installation issues, 304teamwork in terms of, 12-14upgrading on *nix systems, 303user name/email configuration, 308
git command (see individual command names)git commands, summary, 104, 146
Git for Knitters, 13Git for Teams, 226Git Fundamentals for Web Developers (Mitch‐
ell), 177Git hosting
open source projects on GitHub, 211-239private team work with Bitbucket, 241-270self-hosted collaboration with GitLab,
271-295git-imerge, 175GitFlow
and sprint-based workflow, 177for release schedule workflow, 67scheduled deployment branching with,
45-51GitHub
account creation on, 212-215contributing to projects, 230-233downloading repository snapshots, 225forking, 230getting started on, 212-224Git terminology vs., 27granting co-maintainership, 235-236open source projects on, 211-239organization creating on, 215personal repositories on, 216-224public projects on, 224-230pull request initiation, 232-233pull requests with merge conflicts, 237repository creation for, 234reviewing/accepting pull requests, 236running your own project, 234-238SSH keys for, 213tracking changes with issues, 230-230working locally, 226-230
GitHub Flow, 40gitk command, 193GitLab, 77
access control, 289-293adding people to groups, 286-287adding people to projects, 284-284adding projects to groups, 287-289administrative account configuration, 274administrative dashboard, 275-279creating a project with, 279creating user accounts, 281-284getting started with, 271-279groups, 284-289installing, 272-274
320 | Index

limiting access with protected branches, 292limiting activities with project roles, 290milestones, 293project visibility, 289projects, 279self-hosted collaboration with, 271-295user accounts for, 280-284
GitLab Flow, 42Gitorious, 279Google, 100, 283Google Calendar, 9, 17Google Code, 279Google Docs, 179Google Hangouts, 9GoToMeeting, 9governance (see project governance)governance models, 19GPL, 18Gravatar, 277Gray, Dave, 7
HHamano, Junio, 301Harmony Agreements, 17history
comparative studies of historical records,201-203
file ancestry with blame command, 203-206reenactment with bisect command, 206-208removing completely, 144-146reviewing, 84-85rewriting, 164
history undoing shared (see shared history,undoing)
Homebrew, 303hotfixes
branch creation for, 181post-launch, 69prioritizing, 48, 180
Humanitarian ID Code of Conduct, 20Humble, Jez, 39
Iideation meetings, 7init command, 104Inkscape, 59integration branches, 44interactive rebasing, 130-134issue tracking
Bitbucket, 258-260GitHub, 230-230
issue-based version control, 76-78
JJenkins instance, 65JIRA, 59, 241, 277jQuery, 18junior developers, benefits to, 187junior reviewers, benefits to, 187
KKaizens, 58Kaleidoscope, 193kickoff meetings, 8
LLDAP, 283Lead and Succeed in 4 Different Dimensions
(program), 4leadership models, 19leadership training programs, 4licensing, 156line endings, Git configuration for, 310LinkedIn, 188Linux, 18
finding Git command line with, 303SSH key creation on, 313SSH key retrieval on, 315upgrading Git on, 303
list parameter, 86local repositories
connecting to personal GitHub repository,220
converting an existing project to Git, 81-83creating, for teams of one, 78-85downloading an existing project to, 80initializing an empty project on, 83reviewing project history, 84-85
log command, 104, 146--graph, 148--oneline, 104, 148
ls -a shell command, 104Lullabot, 10
MMacanufo
James, 7
Index | 321

mainline branch method, 36-39maint (maintenance) integration branch, 44maintainers
developers as, 161-163granting co-maintainership, 235-236
Managing Chaos (Welchman), 19master integration branch, 44meetings
and empathy, 10for teams, 7-12for tracking progress, 8kickoff, 8wrap-up/retrospective, 11
mentoring, 3merge command, 13, 105, 146merge conflicts
mid-rebase conflict, 118-120pull requests with, 237resolving, 174-175
merge requests, 25, 27merge, rebase vs., 168Microsoft, 16mistakes, undoing (see rollbacks)MIT License, 18Mitchell, Lorna, 177mkdir shell command, 104
Nnext integration branch, 44nonpublic projects (Bitbucket), 241NuGet, 18
OOmniAuth, 283Omnibus, 272OmniGraffle, 59one-on-one meetings, 10open source projects, GitHub, 211-239
account creation on, 212-215and personal repositories, 216-224contributing to projects, 230-233downloading repository snapshots, 225forking, 230getting started on, 212-224granting co-maintainership, 235-236organization creating on, 215public projects on, 224-230pull request initiation, 232-233pull requests with merge conflicts, 237
repository creation for, 234reviewing/accepting pull requests, 236running your own project, 234-238SSH keys for, 213tracking changes with issues, 230-230working locally, 226-230
OpenStack, 188operations teams, 2organizations (GitHub), 215origin command, 153OS X
finding Git command line with, 302SSH key creation on, 313SSH key retrieval on, 315upgrading Git on, 303
overcategorization, avoiding, 61
Ppatch files, 22patch parameter, 93Payment Card Industry (PCI), 242peer reviews, 2
defined, 186trusted developers, 64
Pencil, 59permissions, establishing, 151personal repositories, GitHub, 216-224
connecting a local repository, 220creating project on, 216-219importing a repository, 219making quick commits via the Web,
221-224publishing changes to, 221updating local repository, 224
Pivotal Tracker, 59private projects (see nonpublic projects)private teams (Bitbucket), 241-270product backlog, 60Product Owner (see team composition)progress, tracking, 8project deep dive meetings, 9project governance, 16-20
codes of conduct, 19copyright and contributor agreements, 16distribution licenses, 18for nonpublic projects on Bitbucket, 241leadership models, 19
Project Management CommitteePMC, 19
322 | Index

project setupcreating new project, 150developer setup, 157-163documentation in README, 156establishing permissions, 151for teams of more than one, 150-156uploading project repository, 152-155with Bitbucket, 254-260
protected branches, 264pu integration branch, 44public projects, GitHub, 224-230
contributing to projects, 230-233downloading repository snapshots, 225forking, 230granting co-maintainership, 235-236pull request initiation, 232-233pull requests with merge conflicts, 237repository creation for, 234reviewing/accepting pull requests, 236running your own project, 234-238tracking changes with issues, 230-230working locally, 226-230
public SSH key, retrieving, 315pull command, 13, 169pull request auto reviewers, 269pull requests
accepting (Bitbucket), 268Bitbucket, 266-268, 266for public projects on GitHub, 232-233GitHub and, 160reviewing and accepting, 236with collocated contributor repositories
model, 25, 27with merge conflicts, 237
PullReview, 188Puppet, 3, 17push
delete branch, --delete, 105push command, 13, 105, 153
--set-upstream, 105
Qquality assurance (QA) teams, 2quality assurance testing, 186
RRails, 18README files, 156reasonable restraint, 17
rebase command, 114, 126, 168--abort, 120--continue, 115, 146--interactive, 130, 146
rebasing, 52, 113-120altering commits with interactive rebasing,
130-134beginning, 114mid-rebase conflict from deleted file,
115-118mid-rebase conflict from single file merge
conflict, 118-120Redmine, 59, 277reflog command, 146
expire, 148release schedules
and ongoing development, 68and post-launch hotfix, 69stable release publication, 67workflow for, 67-69
remote branches, updating list of, 87remote command
--verbose, 105add, 105
remote repositoriesbranch maintenance, 103connecting to, 99-103creating new projects, 100pushing changes to, 102second remote connection for, 100
repositories, 12-13adding changes to, 90-97adding partial file changes to, 93branch maintenance, 103cloning, 12collocated contributor model, 25-28committing partial changes to, 94connecting to remote, 99-103creating, 234creating new projects, 100detailed commit messages, 95downloading snapshots of, 225ignoring files, 96local, for teams of one, 78-85personal, 216-224pushing changes to, 102removing file from stage, 94removing history of, 144-146second remote connection for, 100
Index | 323

reset command, 124, 127-129, 146--hard HEAD, 146--merge, 146HEAD, 105, 146
restoring files, 124restraint of trade clause, 17retrospective meetings, 11reverse engineering, 17revert command, 126, 137, 148
--mainline, 148--no-commit, 148
Review Board (software), 188review process, 185-196
applying proposed changes, 189-194completion of, 195evaluation submission, 194feedback preparation, 194reviews of proposed changes, 189software for code reviews, 187types of reviewers, 186types of reviews, 186
rollbacks, 107-148altering commits with interactive rebasing,
130-134amending commits, 126best practices for, 108-113combining commits with reset, 127-129command reference for, 146-148commits and, 126-137describing your problem, 108-110locating lost work, 120-124removing history completely, 144-146restoring files, 124undoing shared history, 137-144unmerging a branch, 135-137unmerging a shared branch, 138-144using branches for experimental work, 110
Sscheduled deployment branching, 45-51
advantages, 50disadvantages, 51
Schindelin, Johannes, 301Scrum, 60ScrumMaster (see team composition)Sculpin, 12, 226security reviews, 2self-managing teams, 3semantic versioning, 43
senior developers, benefits to, 187senior reviewers, benefits to, 187shared branches, unmerging, 138-144shared history, undoing, 137-144
reverting a previous commit, 137unmerging a shared branch, 138-144
shared maintenance access model, 22, 28shell commands, 104show command
[commit], 105[tag], 105
sidekiq, 276single repository, shared access model, 22Skype, 274social coding, 241solo developers (see teams (one member))sprint demo meetings, 9sprint planning meetings, 8sprint-based workflow, 177-181sprints, 37SSH keys, 213, 313-315
creating your own, 313-315retrieving your public key, 315
staged parameter, 129staging changes, 129stand-ups (see commitment meetings)stash
about, 13crafter analogy for, 13for emergency bug fixes, 198-200for side projects, 36
state branching, 42-45advantages, 45disadvantages, 45
status command, 104Subversion, 18, 20, 264system files, ignoring, 310
Ttab completion, 91tag command, 105tags
for teams of more than one, 97for teams of one, 97-99working with, 97-99
team compositionarchitects, 3backend developers, 3business analysts, 3
324 | Index

designers, 3frontend developers, 3Product Owner, 3project managers, 3ScrumMaster, 3
teams (multiple-member), 149-183and empathy, 10creating new project, 150developer setup for, 157-163establishing permissions, 151for nonsoftware projects, 69kickoff meetings, 8meetings for, 7-12members of, 2participating in development, 163-177progress-tracking meetings, 8project setup, 150-156sample workflows for, 177-183teamwork in terms of Git, 12-14thinking strategies for, 3-7trusted developers with no peer review,
181-183uploading project repository, 152-155working in, 1-14wrap-up/retrospective meetings, 11
teams (one-member), 75-106adding changes to a repository, 90-97commands for, 103-105connecting to remote repositories, 99-103creating local repositories for, 78-85issue-based version control, 76-78tags for, 97-99
technical architecture review, 186technical review board governance model, 19testing process, 2testing teams, 2text editor, browser-based
for Bitbucket files, 251-254for quick commits, 221-224
thinking strategies, 3-7ticket progression, 59ticket-based peer code review, 186ticketing systems, 59touch shell command, 104track command, 13tracking progress, meetings for, 8true merges, 103trusted developers
with no peer review, 181-183
with peer review, 64Twitter, 100, 274, 277Typo3, 188
UUbuntu
Git upgrades with, 303GitLab and, 272
Ubuntu Code of Conduct, 20understanding thinking, 5undo methods, 109undoing (see rollbacks)Unfuddle, 59Unix
SSH key creation on, 313upgrading Git on, 303
unmerging a branch, 135-137untracked changes, 128untrusted developers
with independent quality assurance, 183with QA gatekeepers, 66
updating branches, 51-55upstream branch, 227upstream project, 25urgent (term), 49user acceptance testing, 186
VVagrant, 2, 272vendor branch, 227Vim
alternatives to, 308key commands for, 96
Virtalbox, 272
Wweb editor
for Bitbucket files, 251-254for quick commits, 221-224
Welchman, Lisa, 19Wiele, Bob, 4wiki pages, Bitbucket, 255-257Windows
finding Git command line with, 303SSH key creation on, 314SSH key retrieval on, 315
WordPress, 18, 28work for hire copyright arrangements, 16
Index | 325

work, reviewing, 170-173workflow
and teamwork in terms of Git, 12-14basic example, 62-67branching strategies, 33-56command and control, 15-31debugging, 197-208effective styles, 57-71encoded decision documentation, 59evolving, 57-60for ongoing development, 68for releasing software according to schedule,
67-69for teams of more than one, 1-14, 149-183for teams of one, 75-106nonsoftware projects, 69ongoing development, 68post-launch hotfix, 69process documentation, 58
review process, 185-196rollbacks, 107-148sprint-based, 177-181stable release publication, 67ticket progression, 59trusted developers with peer review, 64untrusted developers with QA gatekeepers,
66working branches, 201wrap-up meetings, 11write access, 27
YYelp, 188
Zzipped packages, clones vs., 158
326 | Index

About the AuthorEmma Jane Hogbin Westby has been developing websites since 1996—initially as adeveloper, and now as a team leader. She has been teaching web-related technologiessince 2002 and has delivered over 100 conference presentations, courses, and work‐shops around the world on frontend web development, accessibility standards, dis‐tributed version control, virtualization, and change management. She has previouslyauthored two books on web development.
Emma encourages nontraditional participation in technology through craft, and is anamateur beekeeper. You can follow her on Twitter at @emmajanehw.
ColophonThe animals on the cover of Git for Teams are the pied wagtail (Motacilla alba), thegrey wagtail (Motacilla cinerea), and the yellow wagtail (Motacilla flava).
The genus name Motacilla means “moving tail,” and as their common name suggests,these small, energetic birds are known for fanning their long tails up and down,though the reasons for this behavior are not certain. On average, these birds measure6 inches long and weigh up to .8 ounces.
The wagtail feeds on small insects and occasionally forages near groups of cattle inorder to capture the insects they disturb. It also nests on the ground, laying 4–7 eggsat a time.
Wagtails are widely distributed, breeding throughout Europe and Asia and some‐times migrating to tropical areas of Africa. They favor open country, such as farm‐lands and grasslands. However, all three species have suffered severe declines inrecent years, possibly due to changes in agriculture.
Many of the animals on O’Reilly covers are endangered; all of them are important tothe world. To learn more about how you can help, go to animals.oreilly.com.
The cover image is from Wood’s Illustrated Natural History. The cover fonts are URWTypewriter and Guardian Sans. The text font is Adobe Minion Pro; the heading fontis Adobe Myriad Condensed; and the code font is Dalton Maag’s Ubuntu Mono.


