Embed Size (px)
Citation preview

Agricultural Extension Service
4-H Youth Development
University of Minnesota
I
4-H M-19 I
I


ARTS ALIVE Through the arts we can become:
Alive to Ourselves, ... Alive to Others, and ... Alive to the World.
We become alive to ourselves through a creative experience. We may create something more effective and beautiful than we expected whenever we paint a picture, perform a dance, write a poem, or make an object. Our strong and joyful statements may not be beautiful. However, we understand ourselves better each time we reject or accept our own expression.
Children have a right to participate in the expressive arts. As youth leaders we must help children move from spontaneous and uncontrolled activity to a meaningful expression of value to the child. We must help them become alive to themselves and give them opportunities to give form to their feelings.
Within our youth groups we have boys and girls with mixed abilities. Success for each child requires respect for what he or she has the ability to become, not for the ability to compete. Children feel more free to develop their own capacities in a non-competitive environment because they respect each other's limitations.
We can find many ways to do things together. We get to know one another by singing, putting on a play, or painting a mural together. Build a caring group by sharing with the elderly or with hospitalized children. Give service through the arts in day care centers, homes for retarded, or in nursing homes. We become alive to ourselves, to one another, and to the world through growth and concern for others.
THE ART SONG
When the artist is alive in any person, whatever his kind of work may be, he becomes an inventive, searching, daring, self-expressing creature. He becomes interested in other people. He disturbs, upsets, enlightens, and he opens ways for a better understanding. Where those who are not artists are trying to close the book, he opens it, shows there are stiff more pages possible. The world would stagnate without him, and the world would be beautiful with him; for he is interesting to himself and he is interesting to others. He does not have to be a painter or sculptor to be an artist. He can work in any medium. He simply has to find the gain in the work itself, not outside it.
Robert Henri
Prepared for 4-H Art and Drama Workshops for Youth Leaders 1976-1977
Funds for publication of this workbook have been provided by Cargill, Inc., of Minneapolis. We express our thanks to Cargill for their continued support of the 4-H expressive arts program.
cs

CENTURY Ill CREATIVE AND PERFORMING ARTS, LEISURE EDUCATION AND COMMUNICATIONS Automation and labor-saving devices have resulted in longer vacations, mobility, and affluence. This new era demands increased community recreation and leisure-time services. Studies consistantly show that "problem youth" have almost no special leisure interests or recreational skills. Community recreation and leisure education are needed to instill in young people constructive attitudes, sound values, ways of learning and communicating, and concepts of society that accommodate effective and constructive use of leisure time.
4-H programs in creative and performing arts and leisure education should continue to be designed and implemented to provide youth the necessary knowledge and skills which can contribute to an improved quality of lif~(Recommendation 26).
Effective communication skills are essential in a democratic society. 4-H programs currently offer excellent learning-by-doing opportunities for youth to develop skills in speaking and listening. However, 4-H communication programs need increased efforts in the areas of group interaction and interpersonal commun ication-(Recommendation 27).
Extension Committee on Organization and Policy
4-H EXPRESSIVE ARTS PROGRAM The 4-H Expressive Arts are tools for total human growth. "A child's experiences in art affect his social well-being, influence his intellectual faculties, and above all help him utilize and refine his perceptions and his emotional sensitivities." 1
The arts express human experiences. Expression may be in the form of dance, drama, music, writing, or visual arts. The arts emphasize individual interpretation and expression. For the child, art is primarily a means of expression. Young people can have an opportunity to give form and meaning to life in informal educational settings through the 4-H Expressive Arts2
Program.
Visual arts express creativity through line, color, form, pattern, and textur~two-and three-
1Pizzat, J., Background Information For Developing An Art
Program, Southwest Minnesota State College, Marshall, Minnesota, 1969.
2 Lowenfeld, V., L. Brittain, Creative and Mental Growth,
McMillan Publishing Company, Inc., New York, 1975. 3

dimensional structuring. These include sculpture, painting, and print making.
Music expresses creativity through vocal and instrumental sounds in practiced or spontaneous rhythm and harmony. Drama and dance express creativity through voice, gestures, and rhythmic and harmonizing body movement in spontaneous or practiced role playing, elocution, mime, and staged presentations. Inscriptive Arts, such as expository, poetry, and prose, express ideas through words and phrases in free form or in rhythm with a beat.
Objectives of the 4-H Expressive Arts Program
CHILD
I. ART AWARENESS
Rationale The arts offer the personal dimension of emotions, sensitivity, empathy, and expression. This balances educational programs in 4-H that put primary emphasis on the objective mental operations required in science and technical studies.
The arts help children reach self-realization by assisting them in perceiving their world, reacting to what they see, and interpreting their emotions and insights. The arts help them develop positive attitudes toward human interaction, respect for human interaction, respect for human values, and openness to ideas and works of others.
TEENAGER/YOUNG ADULT
Overall Objective: Assist individuals to enhance the quality of their lives through enjoyment, appreciation, and self-expression of the expressive arts. A. Finds satisfaction and pleasure in A. Experiences fulfillment in
creative forms of leisure activity. creative leisure activities
B. Becomes aware of artists and their contributions by having an opportunity to see them at work.
C. Perceives and understands artistic relationships as they occur within the environment.
II. SELF-AWARENESS
and continues to improve the quality of leisure.
B. Explores career alternatives and educational opportunities in the arts.
C. Has knowledge and skills needed to adapt to his environment and desired change.
Objective: Assist individuals to use knowledge of self as a major element in making decisions which enhance the quality of their lives through the expressive arts.
A. Feels satisfaction and greater A. Understands and values his own self-worth as a creative and unique ideas, feelings, uniqueness, and individual; is able to make art judgments creative abilities; developing a and think, feel, and act creatively. positive self-concept as well as
appreciating these qualities in 4 others.
The arts help people understand their changing environment. Artists may reflect a desire to improve society through their chosen art form. The unique community- and family-centered 4-H structure allows individualized instruction, peer teaching, and volunteer leadership. The arts can offer an opportunity for recognition of developmental levels, maturation, achievement, interests, and needs of each young person. Diversity and individuality can be encouraged. Emphasis can be placed on the learner and the learning experience rather than on the product. 4-H art projects can be experienced in a voluntary, non-competitive, non-threatening atmosphere.

Ill. DECISIONMAKING Objective: Assist individuals to plan their expressive arts experiences to achieve qualitative goals.
A. Engages in problem-solving activities A. Develops discipline in an art form that increase flexibility, resourcefulness, that will improve skills needed fluency, inventiveness, originality, for self-expression and performance. and awareness.
IV. SOCIAL INTERACTION
B. Evaluates the results of arts decisions and their outcomes; modifies performance on that basis.
Objective: Assist individuals to interact and relate to others through expressive arts in ways compatible with their goals.
A. Enjoys participation in creative activities and shares the pleasure with others.
V. ART SKILLS
A. Applies the language, process, heritage, and discipline of an art form to improve the quality of his life and others.
Objective: Assist individuals to live up to their own potential for acquisition and use of expressive arts skills to reach their leisure goals.
A. Explores and participates in a wide variety of art forms and media according to readiness and ability.
B. Becomes aware of a variety of art forms of the past and responds to the arts openly and receptively. Attends concerts, visits galleries, talks with artists.
A. Is able to select an art form and art medium specifically suited to his needs for self-expression.
B. Acquires a knowledge of art heritage and uses this knowledge to examine his own values, and those of society.
An interim report of the National Leisure Education Developmental Committee
RELEVANCY OF THE EXPRESSIVE ARTS The expressive arts help children interpret their feelings and realize their full potential.
• The expressive arts can help release fears, troubles, anger, tensions, happiness, joys, and sorrow. Emotional problems can find an outlet in meaningful expression.
• Through creative activities the child can discover his uniqueness, deepen trust in himself, and accept himself as a person with potential.
To become what I can;
To be now what/am;
To be present where I am;
To be conscious while I can;
To be aware of who I am and who you are;
To reach out for my potential;
To find fulfillment in a blade of grass or a certain smile or a simple touch
Because Another has enabled me to be,
I became all these things
And even more.
• The expressive arts enable a young person to become aware and observant of his environment. Art can help a child enjoy all the colors, textures, shapes, sounds, and scents in his environment as his senses are awakened. He can accept, reject, and change his surroundings based on his own capabilities to decide.
"Art is a natural, right from an early age. The child's garden (of art) is missing in America today. A child should begin to work with materials just as soon as he is able to hold a ball. By holding a ball, a child gets a sense of the universe and there is a closeness to God. The ball or sphere leads the child to other geometric shapesthe cone, the triangle and cylinder. He is now on the threshold of nature itself. When a child begins to work with materials and begins to create ... a new world is opened to him."
Frank Lloyd Wright
5

6
ROLES AND RESPONSIBILITIES OF A YOUTH LEADER IN VISUAL ARTS
As teachers and leaders of children we should:
• have a sincere interest and dedication to the young member we are guiding toward personal development. Art activities teamed with an understanding teacher can develop selfpotential and self-understanding and change behavior.
• study and understand the objectives and philosophy of the 4-H Visual Arts Project Program Review. We should be prepared to interpret the 4-H Art program to the public.
• develop a flexible program for the year based on the number, age level, needs, and interests of your group. For convenience in touring by car, using small meeting rooms, and giving personal attention, six or seven members are recommended per leader.
• carefully prepare an environment and share a philosophy conducive to art. In volunteer youth organizations we have the unique experience of teaching in a variety of classrooms, such as a church basement, back yard, kitchen, community center, or city hall. Our students often seek us out with great expectations. The environment we provide should be visually
stimulating, give a sense of belonging, and provide great freedom of choice and expression. We can develop creativity by being friendly, allowing for self-discovery and experimentation, and avoiding authoritarian direction. We should add variety and change the environment often.
• search for qualified resource people to help us. We cannot be expected to have every skill needed for a meaningful art program, but there are many people qualified and willing to assist us. We must be certain that the person we involve is more concerned with the child and his experience than the final product.
• acquire necessary equipment and materials based on the proposed activity and budget. Dues qould be collected from the members, gifts of useful supplies accepted, and money raising events held. After a period of time, a stockpile of basic supplies will be built up. Children should not be expected to use scrap materials or undesirable supplies. Exciting materials can stimulate ideas and creativity.
• demonstrate challenging processes to our group. We should develop a criteria for choosing art activities based on their problemsolving qualities and the skills demanded of the child. If the activity does not foster educational growth, it is not valid in our program. Demonstrations should be stimulating, well prepared, and brief.
• stimulate expression by attempting to surface thoughts and feelings. Utilize poetry, literature, discussion about experiences, body movement, objects, art materials, films, games, smells, tastes, touch, etc., preceding the art experience.
• help the child develop an awareness of design principles and visual elements found in nature through first hand experiences in nature or with natural materials used in art. Look for the same elements in manmade objects and discuss how we can use these artists' tools to communicate with others.
• give equal recognition in art. We should help each child understand that he is unique and creative and can express himself in his own way. His work should not be compared with that of others but should be acknowledged as his personal statement at this moment in his life. We should reward creative behavior.
•· talk with each memberabout his work. Evaluation of a child's work should be a continuous process. Evaluation should be a joint effort between the member and leader. It should be a positive experience that allows the teachers to know where help is needed. Evaluation could be made on the following points:
• Has the child been inventive and original in his work?
• Has he discovered new ways to express himself through experimentation?
• Has he worked at his own maturity level in organizing visual elements?
• Has he worked with skill with materials and tools?
• allow and encourage visits and involvement by parents and friends. Suggest ways for them to encourage and show appreciation of their child's creative work.
• hold small exhibitions regularly for family, other club members, and the public. These can be held in the living room, in the back yard, at club meetings, at county events, in store windows, in shopping centers, at P.T.A., or wherever you have a group of people gathered. Keep a portfolio of each member's work and let him choose what he wishes to share from that collection. Every child should have the opportunity to exhibit in a competitive-free climate.
• get articles, pictures, stories, etc. into the local papers.
• use discretion in involving students in public service activities such as poster making, scenery painting, and competitive art contests, etc. Seek other ways for community service that allow the student to develop leadership, solve qualitative problems, and meet the needs of others through his skills in art.
• organize tours of galleries, artists' studios, and other community art resources.
• join community art groups, search out educational experiences for personal growth. Local school districts, junior colleges, and art centers offer art classes for adults. Read new art books and periodicals and continue to grow and develop creatively. We teachers are the most important part of the educational en vi ron ment.

QUALIFICATIONS OF A VOLUNTEER LEADER IN VISUAL ARTS We, as teacher-leaders, are the most important factor in the art program as we attempt to help a child become sensitive and aware. We should: • be friendly, warm, and democratic in order for
the child to gain confidence in self-expression. We should be prepared to guide through suggestion, to respect the opinions and judgments of children, and to have fun with our group. Studies prove greater productivity takes place in a democratic climate with a friendly teacher. Children should feel free to express individual differences. When our thinking is regimented, we lose our ability to express ourselves creatively. ·
• be flexible, as art expression changes as rapidly as experiences ch.ange. We must be willing to put away our plans and help the child form his present enthusiasm for an idea into an art product.
• be aware of the child's feelings about his work, his need for support, his problems involved in expression, and his self-confidence. We should know how a child looks at things, what he imagines, and how he perceives things. What is important to us may not be exciting or relevant to the child. Help the child gain confidence in expressing himself by reliving the experience with him. Help him be more sensitive to others. If he continually leaves out some part of his drawing, give him an experience that will make him aware of the omitted part. Share the child's satisfaction of accomplishment and do not criticize his techniques. Place importance on each piece of work. '
• be creative and feel competent in some area of expression. If we have not experienced bringing order out of our materials and producing something meaningful, we cannot promote it in the children we teach. Viktor Lowenfenfeld has written, "It's like love: I can give you a lecture about love, but unless you have been shaken by love and been deeply in love, once in your life at least, you won't know what it means. Now the same is true of the creative process." If we are artistic ourselves, we can more effectively motivate our members.
• be competent and enthusiastic. The technical knowledge necessary at the secondary school level is not needed for the elementary age group. It is necessary to understand the developmental growth of children in art and to know how to encourage children to perform at successively higher levels as they progress in their work. We must have ways of stimulating, selecting, guiding, and evaluating art experiences. We should know the value of the visual arts for children and have experimented with many two- .and three-dimensional materials and processes suitable for children's art experiences.
• be self-actualized. We experience growth and fulfillment only after a certain amount of effort, struggle, commitment, and time.
"Maslow, who was really devoted to the subject, made a study of 'self-actualized' people. The self-actualized individual, he found, is someone who has the ability to see life clearly, as it is rather than as she wishes it to be; she is decisive but
ENVIRONMENT FOR CREATIVE TEACHING The effectiveness of the art program is directly related to the quality of the environment provided by the leader. Afterschool art activities should parallel the finest public school art program. ThE! most vital part of the creative environment is the contact between leader and group member.
All the fine equipment, costly supplies, and spacious rooms are not as important as a
humble-willing to listen to others and to learn; is qedicated to some job or vocation which she finds exciting and pleasurable, one that she does well; she is creative, willing to take risks to create something worthwhile and spontaneous; is a hard worker, rarely in conflict with herself; she respects herself, enjoys others but is selfreliant and does not really need them; and she is both selfish and unselfish, since helping others gives her genuine (selfish) pleasure."
from a Glamour Editorial, "What's Wrong With Self-Fulfillment"
All things affect the child as a total human being. If a child is unloved or lacks security in one area of his life, it will show in his art expression. As 4-H art leaders we can help him unite his thinking with his feelings. Without love, there is no education: Perhaps art will be the beginning of further education for and development of full potential and self-confidence in the children we teach.
sensitive leader. We can develop excellent programs with makeshift conditions if we respect the time and purposes of children.
"A child cannot create out of a vacuum. He must have something to say and be fired to say it." Cole
• A child's art work is the result of an emotional, intellectual, or environmental experience. We should enlarge a child's world to stimulate his need to communicate his feelings.
• Encourage children to hold living creatures, pick up worms, roll in the grass, climb trees, 7
8
crawl through ditches, and walk in the mud or rain. Awaken all of their senses-touch, sight, sound, and smell. Share their enthusiasm for new discoveries.
• Motivational topics should relate to the child's interest and stage of development. As soon as the child becomes interested, be prepared to move quickly into the art experience. Do not over-motivate; allow the child's imagination and enthusiasm to take over. Ask questions that will help him picture in his mind the action (What?), the environment (Where?), the people involved (Who?), and the actual movement involved (How?).
• Have the materials ready for the creative art experience so the excitement of the moment is not lost. The materials should be of the best quality possible, clean and in order, and appropriate for the age level of the child and the tasks he has chosen.
• Creativity thrives in an environment where the child feels free to be himself and express himself in his own way. Too much direction deprives children of the chance to solve their own problems or try out their own ideas.
• Allow enough time for the child to become comfortable with the technique and media. Give him time to experiment with new ideas. Give him encouragement and guidance, but let him solve the problems himself.
• Set the stage for discovery. Children should discover techniques rather than be told what to do. Self-expression does not mean "anything goes," however, as guidance is necessary for a disciplined approach to work.
• Help the children appreciate their own uniqueness. Bring out the individual differences that make up a child's personality. Be responsive to individual needs. Each child has his own natural mode of expression and his art is highly individual.
• Visually pleasing displays in the work area such as banners, bulletin boards, work of other artists, and books can stimulate creativity in our students. Our wearing apparel-jewelry, hand-crafted belts, etc.-can create interest in working with materials. Provide a visual treat for each meeting.
• Children all over the world develop at progressive stages in art. A child can better understand and appreciate the "Family of
Man" as he speaks to others through a common language of visual symbolism.
• Art is for all young people, not for a select group. Art activities stimulate creativity, imagination, perception, and selectivity so necessary for future lives as business people, engineers, teachers, homemakers, and sci€ntists. In this technological era we need people prepared for imaginative, yet disciplined approaches to problem solving.
"Too often, the arts have been thought of as nice, but a rather non-essential part of education. When we give our children the chance to explore and develop their own creativity, we encourage the sensitivity and ability of self-expression that is so crucial a part of the well-informed, well-educated person."
Robert F. Kennedy
• Many children are overscheduled and have very little time to live quietly, dream, or think their own thoughts. The environment for creative activity can provide quiet places and times for reflection and renewal.
• Every child needs greater opportunity to express emotions and thoughts. Through music, art, and movement he can speak a universal language. Art crosses all differences of time and language.
• A child can find personal enjoyment in the attempt to interpret and order his world. Art provides an opportunity to focus on personal satisfaction within a larger scope of education where emphasis is often placed on external evaluation and awards. In art, emphasis is on the child's own feelings of success or failure, rather than on the opinions of the teacher or other children. The final judgment should be his own.
"Is Achievement Only a Matter Of . .. doing better than another? striving always for the 'best'? leading the whole group? passing every test? gaining all the praise? winning every prize? seeking the acclaim in another person's eyes?
OR Is It Also ...
the feeling deep inside,
the glow, the promise and the pride of helping another's world to grow, of working together that we may know
the joy of understanding the deep self-giving the world enriched and more beautiful living!"
Jayne D. Gahagan
• Vary the setting for the art experience. As youth leaders we are not confined to one classroom, the whole community can become the teaching environment. Weaving can be done in the woods with natural materials, sand casting at the beach, and wood sculpture in the neighbor's cabinet shop surrounded by the aroma of new wood.
• Develop an environmental awareness and sensitivity to the space that surrounds us. Help the children look critically at their surroundings and move toward thinking and working in new ways. Teams can create murals, gardens, new display areas at county fairs, and facelift their meeting rooms.
• Maintain an environment free of forced competition where prizes are given as rewards. Encourage the child to improve upon his own accomplishments and compare himself with his own standards.
ALL I WANTED WAS TO SING
When I was in first grade /loved to sing. When it was my turn I'd stand up clearly and
happily, thoroughly enjoying myself. My teacher declared me singing champion ...
Why did something as innocent and joyful as the music
of small children have to be turned into a contest?
The voices should have been sources of joy, not pride or shame.
But my first grade teacher thought that my talent should be
brandished in front of my peers ...
My joy became a mixture of pride and shame and as time went
on shame overshadowed pride ... My teacher was the one who wanted a champion; All I wanted was to sing.
Mary Wilke

ART IN THE PARK Meeting Needs of Young Children and Teens
For most of us it has been a long time since we lived in a world where table tops were out of our view, where we had to reach up to hold hands with an adult, and where interesting things were to be looked at and not touched. A small child's day at a county or state fair means loud noises, a tired body, uncomfortable heat, crowds of moving legs, and frustrating curiosity about things not understood. 4-H programming begins with the needs of people; Art In The Park meets the needs of many
young children at the Minnesota State Fair and at a growing number of county fairs. Most children discover this quiet oasis of creativity in the midst of great confusion and have difficulty believing it is just for them. It is usually free due to the commitment of the Minnesota State Fair Administration, county fair boards, and the Agricultural Extension Service.
Children discover costumed teenagers sitting under trees in a centrally located park. The teens offer success-filled art activities that result in many original treasures to take home. One parent said the art work from last year is still brought out to show visitors. Others remarked that Art In The Park is the only activity remembered when fair plans are made each year.
Some children choose to design wood sculptures of new wood scrap from a local cabinetmaker. It
may be the first time the young designer has used hammer, nails, and glue. Others may learn to make simple jewelry by stringing a variety of beautiful beans soaked in water or by gluing feathers, seeds, parts of pine cones, and other natural materials to a thin slice of birch wood. A hole can be drilled to hang the creation on a plastic cord. The button machine can lock their own designs within plastic and metal for them to wear.
Children appreciate the color and texture of natural items used in seed mosaics, nature creatures, and sand painting.
Miles of murals can be painted with huge brushes and bright temperas. Parents and grandparents may be seen on their knees painting alongside the children. Water colors, crayons, chalk, ink, and dyes can be applied to a variety of surfaces in intriguing ways. Scratch Art and Poly Print usually are new materials to the children.
The children can adapt heritage arts such as quilling, corn husk dolls, origami, and stitchery to their own skill levels and imagination.
Activities vary each year. Many children return to find their old favorites and are excited by new activities. Old games and toys such as the willow whistle, buzz saw, and pin wheel were revived for the Bicentennial, The children are surrounded by groups of teens performing just for them. The young children can enter a world of make-believe by watching mime, dancing, acting, and puppetry and listening to the music of a 4-H band and chorus. A wandering minstrel with banjo, autoharp, or guitar may appear.
Approximately 2-3,000 children have participated in the 2-hour state fair program each year. Parents usually rest and enjoy watching their children. Families often return for 2 more hours.
The Minnesota teens involved in Art In The Park have contributed a great deal to the young children. They have helped children realize their uniqueness and creative potential. They also have gained self-understanding and communication skills. In many instances, the experience has influenced their career choices. They have learned to prepare a stimulating teaching environment, to organize materials, to inspire new ideas in children, and to encourage originality and problem solving. 9

10
nl ... J a~· a~!
THE ARTS-IN The Minnesota 4-H Arts-In is a successful, innovative short-term art course for teens held on the Minnesota State Fairgrounds. The Cargill Company has joined financial resources with the educational resources of the Agricultural Extension Service's 4-H and Youth Development Program to bring young men and women together for a weeklong live-in experience in the arts. Additional resources of equipment, materials, and moral support come from cooperating business firms and other friends of youth. Directors are assisted by students selected because of exhibited leadership abilities and skills in the arts.
Some Arts-In participants come from small towns where they may have to search for an opportunity to be in a play, take an art class, or join a band. Some come from large suburban schools where often only the most talented are chosen. Some are reluctant to come while others have been anxiously waiting until they were old enough to be accepted. Whatever their backgrounds, the individuals become a caring, supporting, creative force. To describe the Arts-In experience in the words of some of the 150 to 200 teens who participate each year: "The Arts-In atmosphere was a good healthy kind of place. I don't have to strain to remember the long hours we put in but it felt good and it feels good to work under pressure for very long hours when I'm doing something I like."
"I have reopened to a new confidence which I have to thank the Arts-In for. My ideas and dreams would still be in the lower level if not for such a start."
"The Arts-In influenced my career expectations. I have been thinking about going into Art Education since working with the younger children in Art In The Park."
"You made me reach, and touch limits and goals that have set a precedent for me in my life."
"Working with others at the Arts-In pulled my feelings together."

"It took beautiful people to do it and that was the most beautiful thing about the Arts-ln."
"Before my first year of the Arts-In I thought not too many kids my age had a real interest in art forms and that it was something you didn't really want to show." "I think the self-understanding I experienced at the Arts-In motivated me to more higher degrees of art-related experiences." No time is squandered on second thoughts. The pre-registered participants immediately get involved. They paint murals with their feet; transform their visual character with stage makeup; build an environment in the park, using miles of binder twine and every available tree and bush, to house the picnic supper; or inflate a polyurethane balloon big enough to hold the entire group. They climb ladders and scaffolding with paints and brushes to work along with 150 other novices on a pre-designed super graphic half a block long and 12 feet high. A trip on a paddlewheeler down the Mississippi with a Dixieland band and a folk singer promotes a feeling of comradeship before the first day ends. For this 1 week the entire Minneapolis/St. Paul community becomes the classroom for selfmotivated learning. The theatre stages, art galleries, costume houses, sound studios, college art classes, artists' studios, and specialized museums make each participant aware of the supporting roles and the myriad job opportunities found in the field of art. Community artists, musicians, actors, directors, and other resource people conduct seminars, workshops, and demonstrations. The artists become "real people" rather than a name on a theatre program or on the brass plate of a sculpture. As they share themselves with the group in small informal sessions, the discipline and struggles involved in achieving success in the arts become a reality. Goals, time schedules, and labor divisions are established early in the week. Within 1 week a band, a chorus, and small combos are ready to perform for the most discriminating audience, their peers. The dance and theatre groups have designed and rehearsed their acts and are ready to don a few of the 150 costumes designed and sewn by the costume department. A newspaper is published, including taking and processing all photos. The stage and lighting, with exciting new sets and effects, has been prepared by the technical crew to be used by the Arts-In
performers as well as for the 4-H Dress Revue and Share-the-Fun programs during the State Fair. The visual arts group designs and produces an aesthetically appealing environment for the 1200 4-H State Fair exhibits. Inspired ideas and surfaced latent talents find practical application during this week. Feelings of cooperation and appreciation abound as each person realizes he needs the other members to accomplish group goals. There is a personal commitment to high standards of production. The directors are prepared to help achieve the self-determined standards. Techniques, design principles, quality craftsmanship, and sensory perception are developed as the challenges of the job demand their use. Instruction is sought after and selfsatisfaction and approval from the Arts-In community is the reward.
A deadline forces the pressure of time to become an ally. All performances must be costumed and ready on a stage for the open house on the last afternoon. University staff, parents, State Fair personnel, and friends will be viewing and critiquing the banners, wall murals, mobiles, and new exhibit units. The first issue of the newspaper hot off the press is eagerly awaited. Their efforts will be shared with thousands of State Fair visitors a few days later. After several days at home, the group returns to the Minnesota State Fair. Once again they face exhausting rehearsals, dozens of performaAces, and new responsibilities in assisting the 1200 Share-the-Fun performers. The photo corps takes to the grounds to record the action. The costume department is on hand to repair and clean the costumes. The visual arts participants carry their art supplies into the quiet, shaded corners of a noisy fairgrounds and share their love of art with srnall children who didn't expect to make such interesting things at the fair. The Arts-In performers join them in the park. The contribution of the participants and their newly acquired knowledge and skills in the arts justifies the existence of the Arts-ln. However, the Arts-In is only a tool to help each young person reach greater self-awareness, learn problemsolving skills, interact socially, and reach full potential as a person. Could there be a better union than a self-actualized human being in harmony with his fellow beings through participation in the arts?
AESTHETIC JUDGMENT Most of the children involved in the 4-H Art Project will view rather than produce art as adults. We can help them learn to look critically at what they have seen and to describe it. We also can help them find greater meaning in art. Our art programs could be more exciting and richer if we would: 1. Plan trips to art galleries, artists' studios, local
architectural landmarks, or community art shows. Decide with the group the specific purpose for each trip and inform the tour guide or docent of this purpose and the group's background before the visit.
2. Plan periods for discussing examples of original art done in the medium the group members are involved in at the time.
3. Encourage children to share objects they find at home or out-of-doors. Give them a special time to discuss these discoveries at project meetings. Help them verbalize their aesthetic feelings about everyday happenings.
4. Bring artists in to visit with the group about their lives and art and how their ideas are translated into an art form.
4-H members can become critics of their own work as well as the work of others if they learn how to view and describe works of art. The following process may be used: 1. Describe the subject matter. Is it a painting,
craft, sculpture, print, drawing, etc.? Describe the materials and techniques used; for example, silk-screen print, wood carving, or oil painting. Describe the representation used, such as people, animals, atmosphere, natural elements, and whether it is realistic or abstract. Is the event represented based on history, mythology, or imagination? What symbols indicate when it was created?
2. Describe the art elements and principles. What lines, shapes, textures, and colors are used? How has the artist put these elements together to achieve harmony, proportion, rhythm, and balance in the work?
3. Describe the expressive qualities of the art work. What moods, emotions, and feelings are expressed? 11

4. Describe the aesthetic merit of the work. How do you feel about the artist's interpretation of the subject matter, the use of the elements and principles of art, and the expressive quatities of the work?
Developing aesthetic awareness can be exciting for children. They should be encouraged to discuss and respond to art works freely. Help them learn the vocabulary necessary to articulate their feelings. Give them the opportunity to hear well informed art critics make aesthetic judgments. Bring the children in contact with artists, critics, and galleries to better understand their own art work and that of others.
MEASURING ARTISTIC SKILLS How do we know if the 4-H members are growing in aesthetic awareness and in skills? The growth often cannot be evaluated in their art work, but may be seen in their attitudes and behavior. Ask yourself the following questions frequently as you work with the children. 1. Are the members enthusiastic and confident in
expressing their ideas with materials? Do they use imagination and experiment with new combinations of materials?
2. Are they aware of shapes, colors, and textures around them? Do they try new colors? Do they use a variety of shapes in their work? Do they show an understanding of perspective and space?
3. Do they willingly discuss their ideas and the ideas expressed by others in art?
4. Do they move readily into solving problems and are they inventive in their work?
5. Do they become fully involved in their work and work for longer periods of time? Do they stick to their work until it is finished?
6. Are they flexible and resourceful? Are they willing to try new ideas?
7. Is there a sensitivity to others shown in their art?
8. Is there greater skill shown in controlling the tools and materials?
The effectiveness of the 4-H Art Project is entirely dependent on the leaders. The following suggestions may help those who are teaching art to children. 1. Exhibit all of the children's work. Do not
choose the work of a few or impose adult standards. Do not compare the children's art work.
2. Encourage children to do their own work. Avoid step-by-step instructions that force all children to produce the same object with little variation.
3. Encourage creativity ;md originality. Teach the children to be independent and solve their own problems. Do not use copying, tracing, pattern books, or other imitative methods.
4. Encourage children to experiment with materials. Express excitement over discoveries and do not be critical of the art work. They should not always be expected to make beautiful pictures.
5. Encourage completion of work and provide ample time and opportunity for the art experience. It should not be a "time filler" or "busy work."
6. Teach children to respect and care for their materials. Do not use the same materials repeatedly. Good materials are necessary and worth the money spent. Any material can be used expressively, but a program conducted with scrap materials only could indicate a low priority project. The children deserve fine materials for their serious expression.
7. Encourage children to express their thoughts and emotions. Help them search for the strongest way to tell what they understand and wish to express. Their work should reflect personal and unique interpretations of the subject chosen.
8. Motivate the children based on the art experience objectives. Very few children are self-motivated. Use body movement, poetry, film, stories, and discussion to stimulate ideas. Interesting materials and processes have motivational qualities also.
9. Remember that each child is unique and very special. His self-concept and selfunderstanding should be enhanced through the art experience.

COLLAGE Collage offers a wide range of possibilities limited only by the artist's imagination and can be a highly personal means of expression.
There are, broadly speaking, two general approaches to collage. One approach allows for no alteration of size or shape of material. The size of the collage is determined by the size of the objects. The second method allows for altering the materials by changing their shape, size, and texture, and combining the materials with drawing, painting, and other art forms.
Collage is the method of composing a work of art by combining a variety of unrelated materials so the materials fit together and the shapes, lines, textures, patterns, and planes are organized into a form of expression. In collage, materials are often combined in an unexpected way.
Some points to consider: 1. Think carefully about subject and choose color
scheme.
2. Sketch main shapes and outlines on background paper.
3. Plan the background shapes carefully so design is considered as a whole.
4. Build up the larger areas first. Overlap papers and use smaller shapes of similar color rather than large areas of one color.
5. Contrast plam and highly decorative areas.
6. Allow the color, pattern, and shapes to be of prime mterest rather than proportion, perspective, and a real1st1c portrayal.
7. Add smaller pieces of paper or fabric, seeds, beads, etc. to develop some areas of 1nterest1ng textures and details.
The word collage is derived from the French verb coller meaning to stick. The adhesive for a collage should be carefully chosen for strength, depending on the materials used. Rubber cement allows for changes throughout the design process. White casein glue such as "Elmer's" glue is clear drying and very strong.
Materials
• paper (12 by 18 inches or larger) The paper should be heavy enough to support the shapes that will be pasted on it (construction paper, cover paper, tag board).
• plywood or bristol board for heavy materials such as carpet, wood, or stones.
• construction paper
• magazines
• rug samples
• tile or linoleum
• interesting scraps of paper, etc.
• white glue
• rubber cement • glue sticks-eliminate smears and
accidental spills
• all-purpose flooring glue-use for heavy items glued to wood
Lamination
Lammate an arrangement of pressed, thin, dry, natural materials between two pieces of flexible v1nyl. Vmyl 1s recognizable by its bluish color. It will fuse together when heat is applied
by a dry mounting press or household iron. Protect the vinyl by placing a piece of paper between it and the iron. As it cools, smooth any existing wrinkles with a cloth. Trim the edges with a paper cutter or scissors. The lamination could hang freely if a hole is punched with a hot sharp tool and nylon filament attached.
Contact Paper
Cut transparent contact paper to desired size. Peel off backing and press adhesive back onto a selected magazine picture. Rub the contact paper with a smooth wooden stick or scissors handle. Soak in warm water for a few minutes. Peel off the paper and the ink will remain on the contact paper making a transparency. Seal with a second sheet of contact. Use in a stained glass window with a black paper frame, as a place mat, or in a collage. A small child's book could be made with this process also.
Paper Molas
The mola is a reverse applique technique used by the Cuna Indians living off the eastern coast of Panama. This fabric art can be duplicated in paper. Draw a design on a sheet of paper and remove spaces with a sharp knife. Spread rubber cement around the cut-out areas on the back of the design. Adhere papers of different colors over the openings 1n the original piece. Cut away new shapes and repeat the process. Cont1nue to cut away more intricate designs. The paper designs can be very colorful and expressive. 13

14
Straw Collage
Create a design on plywood, masonite, or any rigid background material. Cut paper drinking straws into different lengths and glue them down to the background. Stand some straws on ends, some on sides, horizontally, vertically, or diagonally.
Bas-Relief
• Create a low relief design by selecting, cutting, arranging, and gluing several thicknesses of cardboard to a heavier cardboard base. Example: A low relief of a person may have the following layers:
• The base including the sky and background scene desired.
• First layer might include the body, trees, sun and its rays.
• Second thickness may be the person's clothing, leaves on the tree, rocks, fences, etc.
• Third layer may be buttons, hat brim, and other smaller details.
• The entire cardboard low relief can be painted. It could also be covered with aluminum foil, which should be smoothed out with fingers or flat wooden sticks. Paint with India ink and rub off ink when almost dry leaving some darker areas.
One Significant Word
Think of one word that can be illustrated by the use of colored construction paper only. The paper can be cut, torn, crumpled, or folded in order to create the effect needed to represent the word chosen. The word can be printed directly on the collage or cut from magazines and used within the collage. Glue paper design and chosen word to a 9- by 12-inch paper. Share creations to see how uniquely each artist has worked with the same material and problem.
I want, by understanding myself, to understand others. I want to be all that I am capable of becoming .. This all sounds very strenuous and serious. But now that I have wrestled with it, it's no longer so. I feel happy-deep down. All is well.
Carpet Tapestry
Katherine Mansfield
Design a giant size tapestry with carpet samples from local carpet dealers. A historical theme may suggest subject area content. Example: "The Wild 'Colonial America' West". Simplify a mural design and enlarge it to the desired tapestry size on paper. Cut the design into pieces and trace each piece on the back of a carpet sample. Cut the carpet with a mat knife and glue each piece firmly in place to a plywood backing. All-purpose flooring glue can be purchased from a tile store. The varied textures and colors of the carpet samples can dictate their use within the collage. Perhaps this art product could be inexpensive, large, dramatic, and colorful enough for use as a county fair backdrop.
Tape and Tissue
Self-sticking tapes are enjoyable to work with, offer experiences in eye-hand coordination, and insure a successful art experience. The child can make a picture with tape alone on a background paper or combine tissue paper forms with tape to add varied texture and color. No paste is needed, there is little cleanup necessary, and the work area need not be large. It could be a useful project at camp where time and space are at a premium.
Design directly on the background paper by cutting off and placing each piece of tape as picture is developed. A scissors is the only tool required. If tissue paper is used, the cut tissue shape is fastened down by placing tape around the edges.
Paper-Cuts
Paper cutting is a rich decorative art usually associated with Poland. The same folding and cutting process can be the basis for the inventive and original work of children. Symmetrical designs cut from thin strong paper with sharp fine scissors can be mounted on papers of contrasting colors. To further involve the artist, crayons, markers, or paint could be used to further enrich the cut-out design.
Fold a square, rectangle, or circle of paper into single, double, triple, or multiple folds. Hold the paper firmly and cut shapes both large and small from the folded edges. Iron the paper to remove creases and glue to background paper. Paint or color the cut paper itself (positive space) or draw, paint, or color in between the cut paper design (negative space). The papercuts are an excellent design base for drawing, painting, or coloring.

Collage in Miniature-Slides
Colorful miniature collages can be made into transparencies and projected on a screen or wall. Miniatures always require careful attention to detail so this experience may be more successful for children 10 and older. Design the collage of magazine pictures cut up and rearranged on a 2114- by 2114-inch piece of newsprint. Adhere all of the small carefully cut and butted pieces to the newsprint with a small drop of rubber cement (just enough to hold them together for the next step). Remove the back from a 2114- by 2114-inch piece of selfadhesive transparent vinyl (contact paper) and place adhesive side down on the face of the magazine picture collage. Avoid wrinkles and bubbles by burnishing with a fingernail, flat wooden stick, or spoon back. Soak the plasticized miniature collage in warm water until the paper is saturated. The paper should separate easily from the plastic leaving the ink image transferred to the plastic. Remove the white residue by wiping carefully with finger or soft wet cloth. Place a 2%- by 2114-inch piece of clear or colored acetate over the inked side of the collage and place within a #127 Cardboard slide frame. Seal the edges of the frame with a warm iron.
Variations may include the addition of lettering with felt-tip markers or pen and India ink, natural dried materials, translucent paint, and other materials between the two pieces of acetate. Slide shows can be entertaining and educational and can be developed on varied themes and design concepts. The anticipation in the lift process and the final viewing makes this an exciting art form.
<Q><Q>~
Let Me Walk In Beauty, and make my eyes ever behold the red and purple sunset. Make My Hands respect the things you have made and my ears sharp to hear your voice.
Make Me Wise so that I may understand the things you have taught my people. Let Me Learn the lessons you have hidden in every leaf and rock. I Seek Strength, not to be greater than my brother, but to fight my greatest enemy-myself.
from an Indian Prayer
Benzine Transfer
Place a pad of newspaper under drawing paper. Brush benzine on drawing paper using a stiff-bristl.ed brush. Place magazine picture on wet paper and add more benzine. Rub with end of brush, add more benzine, and continue rubbing until the image appears on the drawing paper. Superimpose one picture over another or overlap transfers. Use pencil, charcoal, or black crayon to further express the idea begun in the collage. Avoid open flames and have good ventilation for this activity. Artist Robert Rauschenberg used transfer images from the printed page and uses this method in lithographs. Naz-Dar Cleaning Solvent, paint thinner, lacquer thinner, lighter fluid, and other solvents will work for transferring printed images. The weight, thickness, and type of magazine page used determines the success. Experimentation is necessary.
Silhouette Collage
One art experience that may help the leader and members understand individual human differences may be the collage portrait. Tape a large sheet of plain newsprint or white paper on the wall and position a person between a spot light and the paper so there is a sharp facial outline cast on the paper. Carefully draw around the silhouette. Students can help each other accomplish this. Lay this pattern on black or colored paper and cut around the pattern. The basis for the collage is the colored silhouette.
Attempt to show as much about likes, dislikes, and current concerns as possible by finding magazine pictures to use in the collage. Cut the pictures out, arranging them with the silhouette and gluing them to a piece of construction paper. Overlap, superimpose, and use size and color contrast. The position of the silhouette, the colors chosen, and the pictures will reveal something about the artist's personality.
Tissue and Texture
Collect a variety of natural textures in leaves, weeds, and plants. Press them in catalogs or
books for several days. Arrange tissue cut into interesting shapes on a piece of white tag or construction paper. Paint a film of liquid starch over the tissue. The starch will soak through the tissue and the colors will blend. Place the natural materials over the wet tissue in a design that allows each piece of natural material to have a special place of its own but also an interrelationship with other parts of the composition. As a final touch place a piece of white tissue the same size as the white background paper over the entire collage. Seal the plant materials into the collage by giving the entire paper another coat of starch. When the collage is dry the tissue will be transparent. The collage may need to be pressed flat.
Everything that happens to you is part of your awakening.
Baba Ram Dass
Newspaper Collage
Use the vertical columns of newspapers as a guide and tear the columns into strips. As you move from the top down, move from right to lett also, repeating the pattern as it develops.· Fold some of the strips and tear spaces out of the folded edges. Lay all columns flat and glue to a cardboard backing. Tear narrow strips of blotter paper and glue over parts of the newspaper strips. Overlap colored tissue shapes over newsprint and blotter paper. Use watery glue over the colored tissue. Brush the bleeding tissue into the blotter paper and newspaper. When the collage is dry, pen and India ink could be used to draw on the composition carrying out the theme or idea suggested by the color and shapes.
Surrealism in Collage
Search magazines for pictures that can be arranged in absurd and weird ways. A . strawberry instead of an eye on a man's face, tree growing out of a frosted cake, or a woman smoking a banana may suggest improbable images. The purpose is to shock and awaken 15

16
the imaginative processes using magazine picture collage methods.
Cut many pictures, large and small, from magazines. Lay them out on a large sheet of heavy paper starting with the larger pictures first. Move the pictures around, overlap, and rearrange until an interesting surrealistic design develops. Glue the pictures to the background paper. Choose three colors that would extend the fantastical theme and complete the collage when painted around the contours of each picture. Some paint may overlap the pictures giving the collage unity.
Tissue Collage
Explore your feelings and moods and express those feelings in color. Cut or tear pieces of colored tissue paper and place them on heavy cardboard. Paint over them with thinned glue. When the glue is dry you may draw with pen and ink or print on the surface allowing the texture and accidental design in the tissue to inspire your design. Add magazine photos or words to the tissue collage as tissue is applied. Use calligraphy to make a personal statement within the collage.
The gloom of the world is but a shadow. Behind it, yet within reach, is joy. There is radiance and glory in the darkness, could we but see, and to see, we have only to look. I beseech you to look.
Rubbings
Fra Giovanni 1513A.D.
Become aware of texture by capturing the raised surfaces of wood, sidewalks, stone, brick, and leaves. Place a thin sheet of paper over the textured surface and rub it with a crayon or pencil. Cut sections from the rubbings and use them in a collage.
Trace Montage
Discover the expressiveness of the human face by making a photo montage of faces. Show warmth, peace, pain, loneliness, anger, and curiosity. Cut some pictures apart and combine them into new images contrasting size, color, and mood. Attempt to express your own emotions.
Opposites
Break logical relationships by cutting out pictures of two objects ordinarily not thought of as being compatible. Glue them into place and form new, perhaps unthought-of relationships. Example: A runner dashing across a bed or a chicken roasting on the top of the World Trade Center.
The pod by nature opens upward to the sun So does man by trust.
Brokering
Cut-up Pictures
Cut any interesting magazine picture into geometric shapes. Glue the picture back together with slight variations. Some pieces may be slightly overlapped or offset, creating an amusing image.
Vary the cut-out image idea by cutting two identical pictures into strips and glue back down in their logical order. Glue down two strips of the same kind in place of one. Offsetting slightly will produce a trick mirror effect.
Cut up two different photos of different things and interchange the strips, perhaps a city and country picture or a man and woman.
Parchment
Tear off a long piece of wax paper (grocery store) and cut a light colored tissue the exact size of the wax paper. Cover the entire surface of the wax paper with a half and half mixture of white glue and water. Use a cloth or brush for the glue application.
Cut out designs from bright colored tissue paper and arrange the pieces on the glued wax paper. Cover the entire design with the large sheet of light colored tissue .. Apply glue mixture to the entire top of the tissue. The glue will soak through the tissue and the tissue will wrinkle slightly giving a textural quality to the composition. Allow to dry for several hours. Place between several sheets of wax paper and cover with brown wrapping paper to protect the iron. Press with a hot iron. Peel off the outside sheets of wax paper and brown paper and the parchment should be ready to use for mobiles, note paper, place mats, or decorative boxes.
Vary the results by drawing on the large sheet of tissue with waterproof ink before placing it on the designed wax paper. You can also draw on the parchment after it is dry.
Though critics may bow to art, and I am its own true lover,
It is not art, but heart, which wins the wide world over.
Though smooth be the heartless prayer, no ear in Heaven will mind it,
And the finest phrase falls dead, if there is no feeling behind it.
Though perfect the player's touch, little if any he sways us,
Unless we feel his heart throb through the music he plays us.
Though the poet may spend his life in skillfully rounding a measure,
Unless he writes from a full warm heart, he gives us little pleasure.
So it is not the speech which tells, but the impulse which goes with the saying,
And it is not the words of the prayer, but the yearning back of the praying.
It is not the artist's skill, which into our soul comes stealing
With a joy that is almost pain, but it is the player's feeling.
And it is not the poet's song, though sweeter than sweet bells chiming,
Which thrills us through and through, but the heart which beats under the rhyming.
And therefore I say again, though I am art's own true lover,
That it is not art, but heart, which wins the wide world over.
Ella Wheeler Wilcox

-- .. --...,
Pictured Words
Draw or cut out pictures of people speaking-a close-up of their faces. Depict the words they say by gluing pictures of objects in place of words as if the object was projected from the mouth. Create unexpected relationships such as a burly wrestler with a dainty flower or butterfly spilling out
Face Mural
Cut a photograph of a super star, public official, or any meaningful individual into squares. Distribute the squares to members of your group. Each person should enlarge his small section of the photograph to a 2- by 2-foot size on a piece of paper using a magic marker. Reassemble the enlarged face on the wall. Different colors of magic markers could be used.
Extend a Picture
Cut out several pictures on the same theme that are interesting to you. Glue the pictures down on a sheet of construction paper. Using crayons, pencils, or markers, create a total picture using the cutout magazine pictures as the inspiration.
Use your imagination to make the picture complete. Decide what is around and behind the picture and draw it into the scene.
Eraser Drawing
Cut a large picture of a human face from a magazine. Glue the picture to a piece of colored paper. A pencil eraser will remove the ink from the magazine picture. Change the appearance of the picture by dividing the face
into large sections by erasing lines. Design each section of the face with more detailed lines and removal of shapes. Emphasize design with India ink drawings.
Nail Drawing
Draw a design by hammering 1-inch headed nails into a board. The nails should protrude about 112 inch from the board and be about 1 inch apart Design the nail board by weaving string or yarn around and between the nails. Add twigs seed pods, feathers, or leaves as the weaving proceeds. Unwind the parts if you want to change your design and start again.
Portrait studies and profile drawings
Work in pairs interchanging the role of model. Encourage touching the facial contour as the drawings are rendered.
Observation of natural materials
Observe living and non-living things in the natural environment and develop an awareness and appreciation of their value, beauty, and interrelationships by drawing and sketching what is observed.
Symbolic Language Drawings
Choose one word from your heritage that reflects what you are today and draw a symbol for that word. Example: musical instrument or note if your life reflects music. Do the drawings freely with pencil using the symbol within the drawing. Squeeze rubber cement over the lines in the pencil drawing using your finger to spread the cement in some places. Allow drying time. Draw and rub pastels and charcoal over the dried glue for color and sparkle. The texture of the glue adds an exciting dimension to the drawing.
Pantomime Drawings
It takes courage to draw a figure in action. Confidence can be gained and an awareness of body movement can be developed through
pantomime. Rigid figure representation can be abandoned by playing a guessing game before drawing. As the spectators guess what the performer is doing-pantomiming pitching a ball, dancing, combing hair, planting a garden, or playing golf-attention is given to the positions of the body parts, bending of joints, and movement of muscles. Drawings will show more action and the involvement is fun.
The Circle
Draw or paint a picture using a large colorful flat button as the starting point Use a button as a motivational tactic to stimulate the imagination and as a means of developing a greater awareness of one of three basic shapes, the circle. Discover natural and manmade circular shapes. Define a circle. It has no corners, no sides, no top, no bottom, is round, and is an endless line. Examine a large variety of buttons. Choose one and glue it firmly in place on paper. What idea does the button suggest? Choose a coloring media and develop the picture around the button.
<Q"><Q"><Q'><Q>
Truly the light is sweet, and a pleasant thing is for the eyes to behold the sun.
Craypa Line Design
Look for lines all around us-veins in a leaf, branches of a tree, telephone wires, lines in a person's face. Look for lines in the work of well known artists. Discuss the many kinds of lines-straight, spiral, coiled, broken, heavy, delicate, zigzag, curved, jagged. Lines are used to outline or define shapes, show motion in a drawing, tie two parts of a painting together, decorate, or 9reate a mood.
Draw many types of lines on scratch paper and include the most beautiful line in the world. Invent lines by combining those we know. Select favorite lines from all that are drawn and draw them horizontally across brightly colored paper covering the entire paper. Use magic markers for drawing and fill in spaces with more designs made with lines. Complete the composition by adding color to the spaces with craypas. 17

18
Oil Pastel Batik
Figure drawing can stimulate imaginative drawings when the student model is costumed as a bandit, country western star, or Spanish dancer. Provide props tor models and have young people make several large continuous line drawings of the models on newsprint. Select the one that would make the best composition and blacken the back with graphite. Trace the figure on 18 inch by 24 inch white drawing paper. Complete the space around the figure, as well as the larger areas in the drawing itself, with geometric shapes. You may use stripes, circles, triangles, etc. Go over all lines with a black marker. Color in all areas but do not go over the inked lines. Use a few oil pastel colors.
It an assignment is made that requires only warm or cool colors, the design becomes abstracted which may be more interesting than natural colors. Brush drawing ink over the entire pastel figure composition. Wash it ott under running water and the drawing will look similar to batik.
Sketching From Life Artistic expression in drawing or in ·any art media can be enriched when living creatures can be explored preceding the art experience. Animals and birds can inspire beauty in sketches and paintings it the young artist is able to touch fur and feathers and see the patterns in shells and skin at close range. Bring a raccoon, owl, snake, frog, puppy, or parrot into the art project meeting and discuss the repetition and contrast in color, the movement of the animal or bird.
Chalk Technique Stir 2 tablespoons of sugar into 1 cup of water. Soak broken pieces of colored chalk in this solution, then use chalk, as usual, tor drawing. Colors will not rub ott or smear and will be brighter.
Hidden Objects A design problem concerned with color balance may be started with objects most
familiar to the 4-H member. Look carefully at the art supplies, scissors, ruler, paint brush, crayon box, pencils, etc., and enlarge them in drawings on paper. Repeat the shapes throughout the drawing. Connect all shapes with curved or straight lines, attempting to hide the original recognizable objects. Fill in all areas with craypas repeating colors throughout the abstract composition. Discuss the direction of the eye when repetition of color and shape is used in two-dimensional design.
Scratch Paper Drawing
Scratch paper is a heavy-weight paper inked on one side with black. When the surface is scratched another color will be exposed. A wooden tool is usually included in the package of scratch paper. Scratch board tools can be purchased, and other sharp instruments and large needles can be used.
The basic technique involves removing parts of the blackened area carefully in short scratched lines. It a bad scratch needs to be "erased" the area can be re-inked with black drawing ink.
Etching-Crayon
Spread a thick layer of light colored crayon: yellow, green, light blue, or orange on white construction paper. Over this first layer color a second thick layer in a dark color: brown, dark blue, dark green, purple, or black. Draw the design on the dark crayon using a sharp object (pencil, nail, tile, pointed wooden stick). The lighter color will be visible through the darker colored surface.
I am often conscious of beautiful flowers and birds and laughing children where to my seeing associates there is nothing. They skeptically declare that I see "fight that never was on sea or land." But I know that their mystic sense is dormant, and that is why there are so many barren places in their lives. They prefer "facts" to vision.
Helen Keller
Collective Nouns-Stencils
How can you get a gaggle from a single goose? Have the 4-H members list singular nouns and their collective counte-rparts. Example:
bird flock lion pride fish school hen brood pony string cow herd
A single stencil can be used to reproduce a given shape many times. Choose a single object and make it part of a collective group. One tree may become a forest. Cut the single shape from the center of stencil paper, being careful not to destroy the outer frame of the stencil. Use chalk to outline and fill in the stencil shape. Rub the chalk from the outside to the center with a tissue or paper towel. Overlap and connect single objects with stripes, designs, and solid colors. Use a spray fixative to preserve the chalk drawings.
Pastel Drawing
Soft pastels of many colors, standard white drawing paper, kneaded erasers, and matte fixative are the basic materials tor drawing with pastels. Begin with darker colors and build up to the light. Black may not be the best choice for darker areas as it often becomes muddy and gray. A blue line, rather than black, may accent a dark area when there is a lot of orange in the drawing. A red added to green for a shadow is more vibrant than adding brown or black. An understanding of how colors complement and dull each other will help in drawing with pastels.
TextlJres are a major part of pastel drawings. The side of the pastel can be used for wide strokes, the blunt end for narrow strokes, and clean sharp lines can be made by sharpening the pastel. Blending can be done with fingers or with a chamois.
Determine stroke directions by determining what objects are doing. Is the grass growing, fabric flowing or stretched, wheel turning?
Choose subjects and still life objects that interest the group. Your group may be

interested in taxidermy specimens and hunting and camping equipment, or hanging pots, candles, and musical instruments. Pastels are suitable for field trips, also.
Human Figure Drawing
By the age of 9, children are concerned about portraying the human figure in a more realistic way. They are beginning to see the figure as ever-moving, ever-changing and want drawings to correspond to nature. At this point a live model should be introduced. The children can take turns posing as a runner, jumper, etc. while the moving parts of the body are pointed out. A drawing experience can begin by using torn construction paper. Tear one piece to represent the head, one for the torso, and three for the leg or arm. As the model changes position the children can rearrange the torn paper shapes to represent the poses. One pose can be selected to glue onto a contrasting piece of paper. Complete the picture by discussing where the figure is and add the appropriate surroundings.
Figure Drawing
Look and trust your eyes. One child can serve as model while all study various poses. Observe the body from position of head to neck to shoulder and on to feet. Let your pencil or chalk obey your eyes as you move along the edge of the figure. The modeling can create fun and excitement as each child takes a turn and each pose becomes more challenging. Every pose is a new drawing and each drawing should be done quickly and in a spirit of discovery and freedom.
Perspective Drawing
Perspective is a mechanical way of showing three dimensions on a two-dimensional surface. Correctly drawn, perspective should show objects in true relationship to their surroundings and will give an illusion of depth.
Some young people can draw their environments with accuracy. Mechanical perspective often adds restrictions and frustrations. Sometimes adapting an exacting set of rules may diminish creativity.
If a young person depends on mechanical perspective totally, he may loose any quality of expression he may have had. Perspective drawing may become a crutch and he will not see his visual surroundings.
·<..1»<..1»<-t»<.t»·
Life is TOO GREAT To Let Even One Drop Of It Slip Away UNCELEBRATED.
Discover Texture Through Rubbing
Abbey Press
Textures can be studied visually and collected by using the "rubbing" process. Put a paper over the texture, rub with a crayon or pencil, and the image will appear on the paper. This is a rubbing.
The rubbing process is simple and is purely a mechanical activity. It could be a test of perception and an exciting discovery of texture if every child in the group is given a number of 4-inch squares and asked to make a rubbing on each. Cut all of these into even size squares and assemble side by side. Invite the children to identify the source of each rubbing. This exercise will encourage visual discrimination of surroundings.
Line Game
Stretch a large piece of paper on a bulletin board or wall. Provide a large black crayon or black marker. Have a child draw a line from top to bottom of the paper. Give the crayon to the next child and tell him he will be drawing a different line right next to the first. Each line must differ from the rest and by the time the paper is covered, the task becomes quite a challenge and line has been discovered.
Fabric Crayon
Draw design on white paper using Crayola Craft fabric crayons. Color heavily in most of the area.
Brush excess crayon specks from the draw1ng. Choose a fabric for the print. Synthetic fabric
must be used if permanency is desired. Place fabric on ironing pad constructed of several layers of newspaper topped with unprinted white paper. Lay paper design face down onto fabric. Use cotton setting on iron for best results. Use a clean sheet of paper between iron and paper design. If pattern is to be transferred to the front of a shirt, dress, or other wearing apparel, a number of sheets of paper must be inserted between the front and back before ironing off pattern. Iron with steady pressure over entire design until its image becomes slightly visible through the back of paper. Make sure iron does not scorch fabric. Do not move iron excessively or design may blur. Remove design carefully. The image will remain on the fabric. Pattern can be reused if color is reapplied. Decorated articles can be machine washed using warm water and gentle action. Do not use bleach or dry in a dryer.
Adjective-Noun Drawing
With your group make a list of 30 descriptive adjectives. Next to the adjectives make a list of 30 types of people or objects. Each member can choose a combination of an adjective and noun and draw it. How would you draw an intellectual nurse or an exhilarated minister?
Contour Drawing
To ease the self-conscious attitude often expressed in figure drawing, make reality an impossibility by not allowing the young artist's eye to rest on his drawing until it is completed.
Use group members to take turns modeling, perhaps suggesting a mood in the way they pose. Draw with your eye resting only on the person. Move your hand slowly in a continuous line, never lifting your pencil or looking at your paper. Believe that the pencil is actually touching the contour. Never mind how distorted the drawing is. It is looking that is important as you steadily express the outer contours of the object and respond to every variation of form and direction as well as texture. The inside contours may make it necessary to glance at your paper to begin again, but do not draw while looking. 19

20
Take A Walk With A Line
Start with your pencil or felt-tipped pen in the upper left-hand corner of your paper. Take a walk with a line, allowing your hand to move evenly, not jerkily, in and out and round the paper, crossing over the lines and eventually returning to your starting point. Touch the outside edge of the frame from time to time and make some compositions that are tangled and thick, others with large slow curves, some with straight lines and angles, but always return to the starting point. Out of the tangle of irregular shapes, find shapes resembling people. Shade them in using ink or pencil. Try to have a satisfied balance of line and shape as you select single shapes to shade.
Gesture Drawing
Let your pencil or pen swing freely around your paper expressing the action you feel in watching a figure in action or a model who holds a pose for a minute or less and changes without pause to the next. Draw rapidly without stopping from top to bottom of paper, around and around, without lifting your pencil. Draw what the figure is doing and keep the whole drawing going at once. The drawings will look strange but quite expressive and the children will be relaxed as realism is not required. Continue the drawings with other models.
In some way, however small and secret, each of us is a little mad ... Everyone is lonely at bottom and cries to be understood; but we can never entirely understand someone else, and each of us remains part stranger even to those who love us . . . It is the weak who are cruel; gentleness is to be expected only from the strong . . . Those who do not know fear are not really brave, for courage is the capacity to confront what can be imagined . . . You can understand people better if you look at them-no matter how old or impressive they may be-as if they are children. For most of us never mature; we simply grow taller ... Happiness comes only when we push our brains and hearts to the farthest reaches of which we are capable . . . The purpose of life is to matter-to count, to stand for something, to have it make some difference that we lived at all.
PAINTING Painting can be the most enjoyable and meaningful part of the 4-H member's life if he can express his own ideas in a spontaneous, uninhibited way. Discovery is thrilling and the child may discover himself and his environment as he creates with paint. He can discover new ways to say something that is important to himwhat he has seen, heard, done, or dreamed of doing. As he paints, he observes, investigates, selects, rejects, and organizes. He develops life skills through communicating his own ideas.
As 4-H leaders we can provide the time, materials, and location for this to take place. Encourage experimentation with techniques, helping the member discover those that seem to work best for expressing his own ideas. Provide a variety of materials and tools and demonstrate the use and care of each. Activities and problems should be appropriate for the age level. Include motivational activities preceding each art activity and be enthusiastic and complimentary in reaction to the serious creative efforts of each child. The following activities can be adapted to informal educational settings. The large variety of activities in this book will allow selection and creativity in program planning based on the needs of specific children and groups.
Suggestions for 4-H Painters • Provide good quality paper, paints, and both
large and small brushes. Organization of supplies and equipment is essential in all art activities. 4-H members should acquire respect for tools and materials.
• Encourage large free painting but remember that there are those who want to work with
precise detail and great care and this should be permitted.
• Provide an opportunity for experimentation with unusual tools and methods as a warm-up to a painting experience.
• As children mature they often become more critical of their painting. This may appear to be disinterest but is often a fear of failing technically. Be ready to give technical help and encouragement but do not impose personal interpretations.
• Offer a wide variety of ideas and subjects for painting. Relate their paintings to their interests. Work of other artists, field trips, discussions, models, and work of other members could provide stimulation and motivation.
• Opportunity for all children to have their work displayed is a motivational force for continued growth. Provide exhibit possibilities on a noncompetitive basis and let each child choose the work he wishes to have shown.
• Give recognition in the form of comments about individual discoveries and interpretations. Help everyone understand that no two individuals will interpret or achieve in the same way.
Painting Supplies Brushes-Good quality is the best economy. Brushes may be purchased from school supply dealers, artists' supply stores, or hardware stores. The displays and the supplier can help in choosing the correct type of brush for the specific painting experience.
A brush used with a water-base media should be washed in cold water until it is thoroughly clean; hot or warm water damages the hair. If necessary, mild soap may be used.
An oil paint brush must be cleaned in turpentine or paint thinner until all paint is removed. Rinse in mild soapy water.
Shellac brushes should be cleaned in denatured alcohol. Enamel, oil stain, and varnish can be cleaned in turpentine or paint thinner. Lacquer brushes must be cleaned with lacquer thinner or solvent. Brushes should be cleaned immediately after use and stored with the bristle up. Water color

brushes should be separated from oil brushes when stored. Paper-Most paintings can be done on a good quality drawing paper. Manila paper is less expensive yet absorbent and is useable for all water-base paints. Construction paper has a smoother surface and is more desirable for general purpose use. Water color paper, printing paper, and finger painting paper are designed for specific purposes. Butcher paper comes in large rolls and can be used for mural painting. Newsprint is least expensive and available in large sheets. Tagboard is stiff, smooth, and good for mounting.
Containers and Trays-Paint pans may be made by cutting the bottoms out of waxy milk or cream cartons. Styrofoam egg cartons are convenient throw away containers for small amounts of paint. Plastic covers from coffee cans and frozen food containers are handy palettes.
Good habits in the care and use of materials and equipment can eliminate frustration and add to a successful painting experience. Proper storage of materials and equipment makes painting easier and more enjoyable.
Themes
"Paint anything you want" can be a frightening experience for most of us and certainly for a child. Perhaps a theme could be suggested that is timely and worth the child's concentration. When he is presented with a theme he can concentrate his energies on developing it, rather than being concerned with narrowing down the whole world into one idea. A theme could develop through group discussion and his involvement may be deeper and his experience more meaningful. If we suggest "what" to our 4-H members, they may be better able to concentrate on the "how" to express their understandings in their own unique ways.
Water Colors
Water colors are available in cakes, tubes, or powders. Cake is the least expensive and the least complicated to use. A pan of eight cakes is adequate for most beginning painters. Begin using inexpensive newsprint or shelving paper. Water color papers come in many sizes, types,
and weights. The lighter the weight, the less the cost, but the heavier weights are more absorbent and have greater texture. Soak the water color paper in water for over 30 minutes. Attach all sides of the paper to a board with gummed paper tape. Allow to dry completely. Do not remove the paper from the board until the painting is finished and the water colors have dried. Water colors are transparent and delicate. They are difficult to control and not easy to correct. Experiment with water color on dry paper to get a hard-edged stroke or soak the paper with a sponge and produce free-flowing effects. The colors will bleed and create patterns. India ink and pen can be used to accent certain areas and define shapes after the painting is dry.
Acrylics
Acrylics are made of acrylic polymer and pigments. They are applied with water just as are water colors and tempera. They can be opaque or thinned out to a wash. They dry rapidly and become waterproof. They can be painted on canvas, cloth, concrete, plastic, wood, paper, and most other surfaces. A liquid medium may be added to give a dull or shiny appearance. Any texture can be achieved by adding pastes and extenders. Acrylics blend and mistakes can be covered. Canvases can be rolled and acrylics will not chip or peel. The paints are odorless and fadeproof and brushes are easily cleaned in water.
Tempera Painting
Tempera paint is water soluble, clings to any nonoily surface, dries quickly with a flat finish, colors blend easily, and it can be thinned to be used as a translucent water color. It can be covered with varnish or acrylic glazes for depth of tone and a permanent finish. It is excellent for young children, is inexpensive, and is usually applied to paper.
The longer I live the more my mind dwells upon the beauty and the wonder of the world.
John B':moughs
Blot Painting Blot pictures can be a stimulus for the imagination. Fold a piece of paper vertically and open it like a book. Drop paint on one side of the paper and fold the other side over the paint. Gently rub the closed paper and open. Look carefully at the picture. What can you discover? Lines can be added with markers, crayon, or pencil to produce the image suggested by the blot.
Blot and Blow
Saturate the entire surface of drawing paper with clear water by making long lengthwise brush strokes. Brush water colors over the wet surface. Dry and use this paper as the surface for blow painting. Drop large drops of drawing ink on the paper and move the drops around into linear shapes by blowing at it through a soda straw. Unusual figures can be discovered in this experimental painting experience. Blots and lines can be changed into meaningful figures by drawing or painting over the accidents.
<b-<b'-o.Q><b>
YOU CAN FLY but that cocoon has to go.
Tina
Finger and Hand Painting
Use a paper with a glossy surface, such as shelf paper, butcher paper, manila paper, or commercial finger paint paper. Thoroughly dampen both sides of the paper and place on newspaper or plastic-covered work surface. A clothes sprinkler or sponge can be used to wet the paper. Dry tempera sprinkled into a spoonful of Media Mixer or liquid starch can be mixed and distributed over the paper with hands and fingers. Commercial finger paint and liquid tempera mixed with a few drops of liquid soap can be used, also. Play with the paint utilizing fingers, thumb, whole hand, palm, or a variety of tools. Develop interesting textures, designs, and rhythms. The experience is exciting because the design changes quickly with only a light touch. 21

22
Ink Painting
Experiment with India ink and several brushes of varying sizes and shapes. India ink is an intensely black, waterproof ink which dries quickly and can be used with pens or brushes. Because it is waterproof, water colors can be washed over it. Interesting effects also can be achieved by drawing with ink on wet paper.
Painting to Music
Listen to music, discuss the story and the moods. How did the music make you feel? Composers repeat patterns in music as artists repeat patterns in color and design. Can you discover the musical patterns of sound? Paint the way the music affects you. Express what the music says to you.
Sand Painting
On stiff cardboard paint a small part of the design with white glue. Sprinkle the sand from sprinklers made of baby food jars with holes punched in the cover. Design the darker colored areas first. Shake off the excess sand after each application. Continue until the entire board is covered. Fine white sand can be colored by shaking powdered tempera with the sand in a tightly sealed can. Show pictures of the fine sand paintings done by the Indians of the Southwest and discuss the purposes of these paintings before painting begins.
.q,~.q,
Sight is a faculty, seeing an art.
.q,.q,~
India Ink and Tempera
A new process can stimulate personal expression and the development of creative design. The following technique may be the motivating force needed. Choose a tempera color that will contrast with black India ink. Paint the design with bold, strong strokes on white Manila paper. Add the detailed lines needed to complete the design. Clean the brush and when the painted design is dry, fill in the unpainted spaces with India ink. Paint freely and cover entire paper, overlapping the paint. When the ink is dry, wash off the poster paint. Don't rub too hard or soak too long.
A great artist can paint a great picture on a small canvas.
Transparent Shapes
Bring bottles and vases of all shapes and sizes that have a transparent quality. Arrange them so they overlap and the colors and shapes show through. Fold newspaper and cut tour symmetrical bottle shapes to use as patterns tor an exercise in color mixing. Arrange the four patterns on a background so there is overlapping and so that some appear lower in the space than others. Trace lightly around each shape.
Assign primary colors (red, blue, yellow) to three of the shapes. Choose a secondary color tor the remaining shape. Paint the shapes the designated colors except tor the overlapping areas. Paint these the secondary colors of their overlapping primaries (orange, green, violet). It more than two shapes overlap at the same place, paint the space in a mixture of the colors overlapping. The background can be painted black, brown, or gray.
This exercise may help students mix colors and experience a hard-edge flat painting technique. Water colors, temperas, or acrylics could be used.
The Art Mystery
Children's imaginations can paint great pictures when charged with a mystery to solve. A great hat of flowers, ribbons, and net could provide that mystery. Who wore the hat? (Age, size, personality). What did she wear with the hat? (Gloves, purse, coat, pantsuit.) Where was she going? (Parade, funeral, church, party.) Paint the lady and her hat as you believe she was. We have only her hat to give us a clue to her description. You fill in the rest, including her surroundings. Make the subject important.
Stimulate thinking and feeling with questions and be sure the group can identify with the object · chosen. It could be a white cane, a very worn suitcase, or an old fur piece. Whatever the object, you found it and have no clues to the owner.
How did you feel when . . . . . . ?
Children should start to be sensitive to the feelings of others. They can express this
awareness through the colors and movements in painting. Feelings can surface through poetry, stories, films, or discussion; example: film "Cipher in the Snow." Have tempera paint, sponges, brushes, water, rags, etc. ready when the child is ready to express his ideas. Let each child choose the size of paper he wants as some children enjoy painting large free forms while others prefer to work in detail. Encourage the discovery of new colors and combinations of color. Suggest painting or drawing over the dry painting with pens, chalk, or crayon. Encourage the use of the whole arm over the entire paper. It the painting is not pleasing the child, encourage him to begin again. He may return to the other paper for experimentation later. Dry most papers flat so the paint will not run. Talk about the paintings when all are finished and return to paint often.
~.q,.q,
When I arrived at Matisse's home/ was not only late but exhausted. The exuberant artist listened good-humoredly"My friend, you must find the artichokes in your life." I was frankly baffled-Then Matisse, motioning to follow him, stepped outside. We walked through the garden until we came to the artichokes. "Every morning, after having worked for a stretch, I come here," he said, "and watch the play of light and shade on the leaves. Though I have painted over 2000 canvases, I always find here new combinations of colors and fantastic patterns. No one is allowed to disturb me in this ritual of discovery; it gives me fresh inspiration," necessary
relaxation and a new perspective toward my work." This struck me forcefully, for Matisse was telling me gently that every
day should have its moments of silence and
contemplation,
He was saying that thoughts may wither and actions go stale if we were not wise
enough to pause now and then to restore the mental and psychic fuel burned in the course of the day.
Andre Kostelanetz

Smoke Drawings
Allow the smoke from a candle or a kerosene or oil lamp to form a design of illusive beauty. Rotate, wave, slant, flicker, dip, or twist a piece of heavy paper over the smoke to produce a drawing to stimulate imagination. After experimentation, the smoke and paper can be controlled to create desired images rather than accidental ones. Interpretations of the smoke drawings may be a stimulus for poetry and thoughtful sharing. Preserve the creations with a fine spray fixative.
I AM A SPECIAL PERSON
I AM one with the earth. Every leaf, grain of sand, or flake of snow has its
own unique characteristics. As Mother Nature has given birth to differences in
everything she created, she too made me one of a kind.
My experiences and my environment cause me to see things in a special way.
No one else can love as I love or share as I share. I AM one with my brother. Because I am unique I have a special way of
communicating with others. No one else can express himself in exactly the same
way. My drawings and paintings are natural for me at this
time. It is my way of showing you what I understand the
world to be. Please don't take this from me by encouraging me to
follow rules in my expression or allowing me to imitate or use patterns.
You can help me become a very special person by appreciating my creativity and teaching me to become aware of my world and my /:Jrother.
Then I would be able to say I AM. June Schultz
Canned Art
Clean up! Paint up! Collect unsightly, mutilated beverage cans and flatten those that aren't already flat. Wash them and use steel wool to remove the rough spots.
Concentrate on the can. Turn it around and upside down. What imaginary person, animal, or object can you see? Some of those folded areas could be a rumpled hat or coat. What does the can remind you of? A bent old woman, a ball player, a witch. Use acrylic paint to make the cans colorful. Paint in every detail, shade and blend colors, and paint the backs so the can becomes three-dimensional. Canned art costs little or nothing to make. Our environment will be better for it.
Center Patterns
Design for paintings may begin in the center of the paper and grow from there. Much growth from nature and many manmade creations burst, radiate, or expand from a center point. 1. Spiral-a continuous line radiating in
increasingly larger circles from a center point, like a snail, seashell, some animal horns, or a circular staircase.
2. Concentric-lines radiating from a center point in ever increasing circles, like ripples made by throwing a stone in water. Examples would be growing rings on a tree, growth layers of an onion, eyes, and archery targets.
3. Radial-lines radiating out from a center point, like the spokes of a wheel. Examples would be many flowers, spider webs, snow flakes, starfish, and the spokes of an umbrella.
Use the examples found in nature to develop a design that grows f_rom the center out. Judge the balance with your eye but work freely in a natural manner, not overly concerned with precision or symmetry.
Start in the center with a small shape such as a triangle, circle, or rectangle. Let the pattern grow from this original shape.
Simulated Leather
Before the Indians had a written language they drew stories about the important things in their lives. They drew symbols for home, ·family, environment, and activities with natural dyes on tanned hides. This early method of recording history could be adapted to materials available to us today and could be an opportunity to develop an
understanding of a part of the Indian heritage. One way to simulate animal hide drawings would be to tear a large piece of brown wrapping paper into the shape of a hide. Tell the story with pencil first. Color heavily over the drawing with crayons, using earth and berry colors familiar to the early Indian. Crumple the paper until it is very wrinkled. Smooth it out and wet it all over. Spread it out on newspaper and sprinkle it with brown powdered tempera paint. Spread the paint with fingers over the entire paper. While the paper is still wet, use a rag to rub the excess from the center to the outer edge of "skin". Hang on a clothesline to dry. This enjoyable art experience could be concluded by a story telling time for the entire group. Each person could use his "hide" to tell his special story.
<-0->~<.Q->
The glory of God is man fully alive. St. lrenaeus of Lyons
<-0-><-0->~
Plastic Painting
Make a pencil sketch and tape it to the back side of a small piece of plastic so the design is showing through. This sketch serves as a guide for the acrylic painting on the upper surface of the plastic. When the painted-on design has dried, apply sections of colored tissue to the under side with a gently brushed on mixture of glue and water. The acrylic painting of the design could be done in black and the tissue would provide the color, but those choices should be made by the young artists. The plastic paintings can be mounted for use on a table top by making supports of small wooden blocks with a slot cut through the center. They could also be hung in the window.
Paste, Paper, and Paint
Breaking up the painting surface with a cut paper design before painting may be an effective way to "get started". Relieve the emptiness of a painting area by cutting out a design, abstract or realistic, from colored construction paper. Glue each piece of the design to a sheet of white construction or Manila paper. Complete the composition by brushing tempera paint into those areas you want painted. The paper shapes and painted areas can complement one another in an exciting way. 23

24
Fold and Dye
Use a soft absorbent paper such as paper toweling, block printing paper, Japanese papers, or a commercial paper developed for dyeing purposes called Dippity Dye. The paper can be dyed with food dye, fabric dye, India ink, or Dippity Dye. Fold the paper in accordion pleats and then into triangular shapes, or in any way that will result in a very small folded package. Dip each corner into the dye. If yellow, red, and blue are used, color mixing will be discovered. Dye from light color to dark color. Place the folded paper between layers of newspaper placed on the floor. Step on the folded paper, unfold, and enjoy. The results will all be different depending on the folding, on whether the dye colors are overlapped, how long the paper is left in the dye, and how hard the foot pressure is on the paper.
Seed Painting
Draw the basic lines of the design on a hard board backing. Place white glue in one section and scatter seeds or place them with a tweezer or toothpick. Continue to glue and arrange seeds over entire surface of board. Brush diluted white glue over the finished panel. Natural colored seeds and small beans and peas can be purchased in farm seed supply stores. Help the children discover the beautiful colors, patterns, and shapes in natural materials.
Glue Painting
Squeeze a line design directly on cardboard with the tip of a bottle of white glue. When the glue is dry, paint or drip watercolor onto the design. Spray fixative will give it a shine.
Rock Painting
Rock painting is perhaps the oldest form of art known. Prehistoric culture was recorded through rock painting.
Body Painting
Have the children lie on a large piece of white or brown butcher paper. Have a partner draw around the figure with a crayon. Have him cut out the drawn figure and paint clothing, shoes, hair,
facial features, and anything real or imaginary that will express his character.
Fluorescent Crayon Painting
Draw a thick fluorescent crayon drawing. Wash the drawing with thin black poster paint with big sweeping strokes. The fluorescent colors will show through the black background because the crayon will resist the paint.
Yarn Painting
An introduction to the beautiful, brilliant wool paintings of the Huichal Indians of Guadalajara, Mexico, may serve as inspiration for our own paintings in wool. Yarn painting can be done on a background of thick paper, masonite, tag board, canvas, cardboard, or coarse fabric. White glue is a strong safe adhesive which dries quickly and clearly. Each person will develop his own way of gluing the yarn to the background.
Provide a large variety of yarns of many colors and textures. Colorful buttons may inspire designs also. The yarn drawing may be representational but you could experiment with filling space in abstract textural designs. A design may come from selecting one small part of a large pencil scribble drawing. Take a wal,k with a line from one side of the paper to another. Allow the lines to meander in, over, and around each other. Make a small view finder by cutting a frame of paper. Move the frame over the scribble design until you discover a balanced composition. Draw around that portion of the drawing and cut it out. Remove or add lines and trace the completed designs onto the background material. Apply the yarn to each section so the entire board is covered.
Young children should be encouraged to fill the space freely without the pre-designed patterns. They may later use yarn to draw a picture but the space filling exercises are enjoyable and important in the artistic development of a child.
Margaret Lonnquist <Q-. ..q,..q,..q,
To see a world in a grain of sand And a heaven in a wild flower, Hold infinity in the palm of your hand And eternity in an hour.
William Blake
(
\
Rock Portraits and Weathered Wood Designs
A young person's introduction to acrylics should be an exciting and challenging experience. The added stimulus of applying acrylics to unusual surfaces, such as rock and weathered wood, creates an opportunity for you to introduce additional skills and techniques.
Make the first session with acrylics a 'what if adventure. Start by having each person create their own color wheel .... You are learning hues. Select a hue. 'What if' you gradually add small amounts of its complementary color? You are becoming acquainted with chroma. 'What if' you lighten and darken with small amounts of black and then with white? You are creating values. 'What if' you add an adjacent hue? Applied to a piece of tagboard, these adventures in mixing acrylics could be saved as a reference for many sessions of rock portraits, nature painting on weathered wood, still lites, and landscapes done outdoors. Continue to emphasize some facet of color composition at each painting session while they are preparing their palettes and can see and feel what happens as they mix the colors.
Glass, enamel trays, plastic sheets provide the best surface for your palette. Acrylic paints should be thinned only with water and/or a gloss or matte medium. The matte medium acts as an extender and increases the transparency of the paint and is best used with an equal ampunt of water. The gloss medium increases the transparency and gloss of the paint and can be used as a final varnish and for glazing. Keep brushes wet while working. The value of painting portraits on rocks and painting nature designs on weathered wood is

not, and should not be, in the finished product. The value is in the exposure to the exciting possibilities inherent in the mixing of color; becoming familiar with color definitions such as hue, chroma, and values; the actual "feel" of the brush and paint on different surfaces; how the viscosity of the paint on rock and weathered wood leads to decisionmaking on methods of brush technique; observing and analyzing the drying process, and seeing how the texture of the surface you choose to paint on becomes a part of and influences the final appearance of your painting.
Carol Shields
Happening of Happy Accidents
The "happening" is done in a spirit of exploration, freedom, and fun and often causes screams of excitement. The student does not have an image in mind and usually achieves effects by accident.
Create an environment that suggests action at first glance. Each table has all the materials needed. After mini-demonstrations of what could possibly happen at each table, allow the students to choose and circulate. This sounds like chaos, but 140 children can work over 6 hours, with a break for lunch and a film, happily and successfully. Twelve or fifteen adult leaders should be on hand encouraging, appreciating, and cleaning up the mess left so another eager artist can begin. Ideas can be suggested by such things as rubber boots and umbrellas hanging from the ceiling, pussy willows and puppets leaning against a stuffed pheasant, fish in a bowl, or natural materials. The "happy accidents" may be the beginning of many successful and interesting paintings. The second step encourages creativity and imagination to make the work meaningful to the student. What do the blotted lines, colorful washes, splashed and streaked paint, and marbelized patterns suggest to you? What can you see? What can you add or remove to make it more realistic? A few of the techniques possible for the accidental effect are listed below, as well as a list of some combinations possible for the second step.
The subjects for many exciting project meetings can be created by combining the material
available and encouraging invention. Time is often short at project meetings and you may find your contribution is cropping and mounting or matting to give additional importance to each effort.
SURFACE HAPPENINGS First Step-(Sometimes the first step is all you want) • Line a cake pan with aluminum foil and fill half
full of water. Using sticks, drip enamel paint (wet-look paint is brilliant) into the water. The paint will float and can be swirled about. When a design appears that you like, drop a piece of paper into the water and wipe it across the water. You have captured a pattern! Enamel dries slowly.
• Wet paper and drop or brush food coloring, water colors, or ink onto the paper. Tip the paper to allow the colors to run. You could put the ink or paint into a plastic squeeze bottle. If primary colors are used, secondary colors will be discovered.
• Coat a piece of cardboard with thick tempera paint. Crush a piece of paper (newsprint) and open and press against the paint. Press the crumpled paper against a piece of paper of contrasting color. Try white paint against black paper.
• Squirt ink from a squeeze bottle across the top edge of a paper and hold at an angle. You may try bending paper up on corners or crumpling paper first. Let it run.
• Dip household string in India ink. Fasten one end to table or board with tack and hold other end firmly across paper not touching paper. Pull center of string slightly upward like a taut bowstring and let go. Snap! Do it over from all directions.
• Mix white glue with black tempera powder until glue is black. Smear it thickly over poster board and cover with white thick tempera while the glue is still wet. Allow t.o dry for several hours. Strange designs result.
• Coat poster board with a thick coat of household cement. Quickly apply a coat of black tempera paint and allow to dry for several hours.
• Use a flit gun (spray gun) and spray thin tempera paint at a paper.
• Fill an oil can with paint and shoot the paint at the paper.
• Place drops of paint or ink on the paper and blow at it through a straw.
• Fold a paper and put drops of paint on one side and press the other side over. Presto-twins!
• Dip household string in tempera paint, holding on to one end. Drop it onto a paper and let one end of string hang out. Place another paper over. Place a flat surface (book) over this and hold it down. Pull on the string. Try two or three strings of different colors.
• Coat poster board with white glue in a large circular motion. While glue is wet, apply India ink in big circles. Allow to dry. Outer space?
• Shave off pieces of crayon onto a cardboard surface and melt with a heat lamp. Allow the liquid crayon to run by tipping the paper as the heat lamp is on.
• Close your eyes and place pencil in center of paper. Let your pencil wander aimlessly and do not think about Clirection it is taking. Open eyes and look for familiar objects. Paint or color interesting shapes or images.
• Place tissue paper shapes and crayon shavings between pieces of wax paper. Press with warm iron to melt crayon.
• Cover paper with liquid starch and place shapes torn from tissue paper on the wet surface. Remove some of the shapes and a painted surface will remain.
OVERLAY-PLANNED AS RESULT OF HAPPENING Second Step-(These experiences could be first steps also.) • Dip heavy white household string into black
tempera paint and carefully lower onto a water color surface. Pick it up and do it again.
• Drop drawing ink with dropper onto surface and blow in desired directions with a straw.
• Use any print process over painted surface.
• Draw with brush, pen, felt-tipped markers, or crayon identifying images seen in painted surface.
• Cut silhouette from black construction paper and glue over painted surface.
• Mix a small amount of water with powdered tempera and soap flakes on a cookie sheet. 25
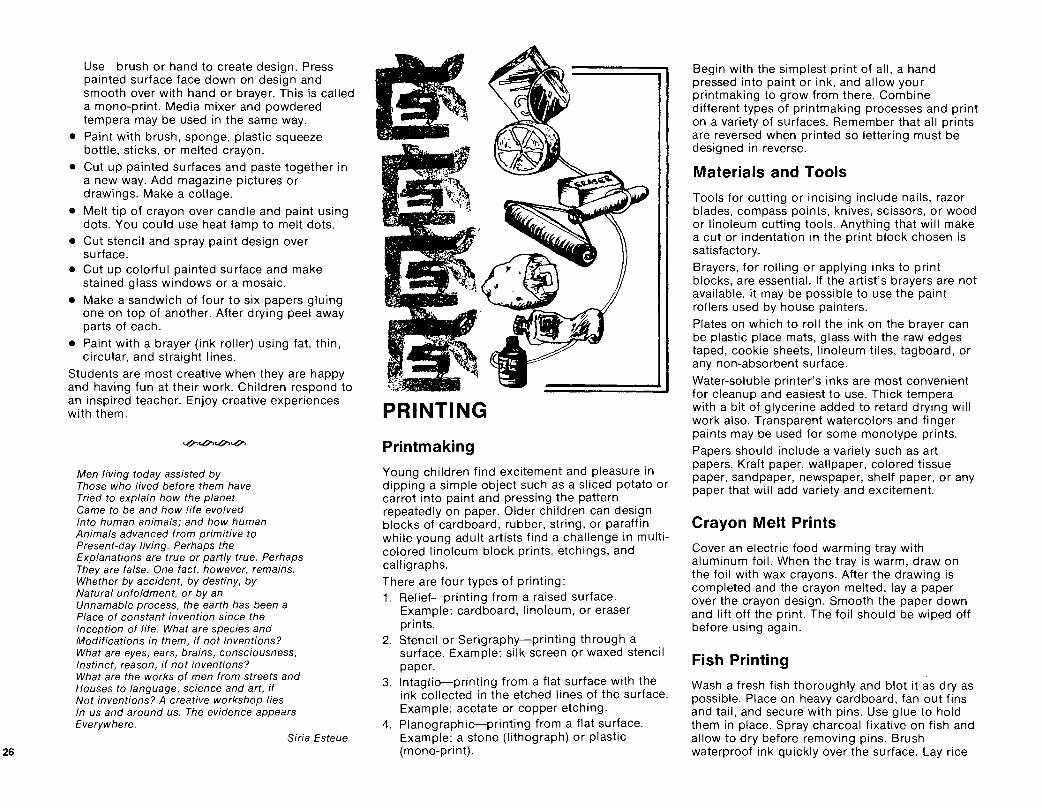
26
Use brush or hand to create design. Press painted surface face down on design and smooth over with hand or brayer. This is called a mono-print. Media mixer and powdered tempera may be used in the same way.
• Paint with brush, sponge, plastic squeeze bottle, sticks, or melted crayon.
• Cut up painted surfaces and paste together in a new way. Add magazine pictures or drawings. Make a collage.
• Melt tip of crayon over candle and paint using dots. You could use heat lamp to melt dots.
• Cut stencil and spray paint design over surface.
• Cut up colorful painted surface and make stained glass windows or a mosaic.
• Make a sandwich of four to six papers gluing one on top of another. After drying peel away parts of each.
• Paint with a brayer (ink roller) using fat, thin, circular, and straight lines.
Students are most creative when they are happy and having fun at their work. Children respond to an inspired teacher. Enjoy creative experiences with them.
Men living today assisted by Those who lived before them have Tried to explain how the planet Came to be and how life evolved Into human animals; and how human Animals advanced from primitive to Present-day Jiving. Perhaps the Explanations are true or partly true. Perhaps They are false. One fact, however, remains. Whether by accident, by destiny, by Natural unfoldment, or by an Unnamable process, the earth has been a Place of constant invention since the Inception of life. What are species and Modifications in them, if not inventions? What are eyes, ears, brains, consciousness, Instinct, reason, if not inventions? What are the works of men from streets and Houses to language, science and art, if Not inventions? A creative workshop lies In us and around us. The evidence appears Everywhere.
Siria Esteue
PRINTING
Printmaking
Young children find excitement and pleasure in dipping a simple object such as a sliced potato or carrot into paint and pressing the pattern repeatedly on paper. Older children can design blocks of cardboard, rubber, string, or paraffin while young adult artists find a challenge in multicolored linoleum block prints, etchings, and calligraphs. There are four types of printing: 1. Relief~printing from a raised surface.
Example: cardboard, linoleum, or eraser prints.
2. Stencil or Serigraphy~printing through a surface. Example: silk screen or waxed stencil paper.
3. lntaglio~printing from a flat surface with the ink collected in the etched lines of the surface. Example: acetate or copper etching.
4. Planographic~printing from a flat surface. Example: a stone (lithograph) or plastic (mono-print).
Begin with the simplest print of all, a hand pressed into paint or ink, and allow your printmaking to grow from there. Combine different types of printmaking processes and print on a variety of surfaces. Remember that all prints are reversed when printed so lettering must be designed in reverse.
Materials and Tools
Tools for cutting or incising include nails, razor blades, compass points, knives, scissors, or wood or linoleum cutting tools. Anything that will make a cut or indentation in the print block chosen is satisfactory.
Brayers, for rolling or applying inks to print blocks, are essential. If the artist's brayers are not available, it may be possible to use the paint rollers used by house painters.
Plates on which to roll the ink on the brayer can be plastic place mats, glass with the raw edges taped, cookie sheets, linoleum tiles, tagboard, or any non-absorbent surface.
Water-soluble printer's inks are most convenient for cleanup and easiest to use. Thick tempera with a bit of glycerine added to retard drying will work also. Transparent watercolors and finger paints may be used for some monotype prints.
Papers should include a variety such as art papers, Kraft paper, wallpaper, colored tissue paper, sandpaper, newspaper, shelf paper, or any paper that will add variety and excitement.
Crayon Melt Prints
Cover an electric food warming tray with aluminum foil. When the tray is warm, draw on the foil with wax crayons. After the drawing is completed and the crayon melted, lay a paper over the crayon design. Smooth the paper down and lift off the print. The foil should be wiped off before using again.
Fish Printing
Wash a fresh fish thoroughly and blot it as dry as possible. Place on heavy cardboard, fan out fins and tail, and secure with pins. Use glue to hold them in place. Spray charcoal fixative on fish and allow to dry before removing pins. Brush waterproof ink quickly over the surface. Lay rice

paper carefully over the inked fish and rub paper gently with fingers. Place a second piece of paper over the first to absorb excess ink seeping through the first paper. Rub the paper with a ball of facial tissue or a cloth.
Balsawood Printing
Glue cut-out designs from balsawood to a large spool or cork. Use as a printing stamp.
Tin Can Printing
Cut out both ends of a tin can and apply an adhesive to the outside of the can. Use rubber cement, white glue, or cement glue to attach string, yarn, felt, or burlap to the sides of the can. Paint the string and other fibers and print by rolling the can over the paper. Water-base printer's ink could be rolled out on a nonabsorbent surface and the can could be rolled through the ink.
Copper Foil Printing
Raise the surface of copper foil by pressing the design in with wooden tools. Ink the raised surface of the foil and print. Each side of the foil will give an interesting print.
Corrugated Cardboard Printing
Remove the top layer of cardboard covering the corrugation. Cut and glue corrugated cardboard shapes to another piece of flat cardboard. Ink and print.
Clay Printing
Make a printing tool by working modeling clay into a moderate sized ball. Shape one side of the ball into a handle. Flatten the ball of clay by slapping it against a hard surface. Design the flat surface by impressing hard objects into the clay and removing. Brush this relief surface with tempera paint mixed with a few drops of liquid soap. Use a cushion of newspaper beneath the printing paper. Press the clay printing tool firmly against the paper. Recharge the clay with tempera paint before each print. Experiment with metallic and fluorescent paints on tissue collage and other surfaces.
Colored Chalk Printing
Make a heavy chalk drawing on construction paper. Take another sheet of paper of the same size and cover with a coat of Prong Media Mixer. Sprinkle powdered tempera paint over the media mixer and create a design or areas of color with a brush. Place the chalk drawing on the painted surface and pat gently. Pull the two papers apart and you will have two prints.
Bleach Vegetable Prints
Capture the beautiful designs of a pepper, loose cabbage head, or onion by placing the cut side of the vegetable in a flat pan of household bleach. Blot the excess on paper towels and press down firmly on dark tissue paper. Experiment with the tissue paper as some types will not bleach and others have an interesting delayed action.
Paraffin Block Printing
Buy paraffin blocks in the grocery store. To smooth the surface of the block, cover it with aluminum foil and iron lightly with a warm iron. Carve it with linoleum cutting tools. Remember to draw all letters backwards. Squeeze water-base printer's ink onto a non-absorbent surface. Roll the brayer over the ink and onto the paraffin block. Place the paper over the block and rub with the back of the wooden spoon. Lift off the print.
<$><.0'><..0'><..0'>
What is beautiful is good, and who is good will soon be beautiful.
<$><$><$><$>
Collagraphs
Print blocks may be built up by gluing materials to any rigid backing such as scrap wood, masonite, heavy cardboard, or plexiglass. These print blocks are usually called collagraphs. Cut out shapes from cardboard, corrugated board, string, crumpled foil, lace, plastic scraps, inner tubes, cellophane, fabric, or any material that has a raised texture. If the block will be used many times, the entire block should be sealed with acrylic gel or a strong, waterproof adhesive. After the surface is built up and sealed, apply printer's ink with a brayer and print by placing the paper
on the collagraph plate. Apply pressure with a clean brayer or the back of a large wooden spoon.
Monoprinting
Monoprinting, as the name implies, produces only one print. It is a process which involves the removal of ink with a blunt instrument instead of cutting away material.
Any theme, landscape, still life, or abstract motifs and figures, can be used. Work can be developed from sketches or created spontaneously.
Roll water-base printer's ink, poster colors, oil paints, or finger paints onto a sheet of glass, plastic, or metal. Sketch a design into the inked surface with a paint mixing stick, the back of a brush, or any blunt instrument. Remove the ink to produce the lines of the design. Use the sides of the instrumeJlt to remove areas instead of lines. Add swirls, textures, and patterns with found objects.
Carefully place a sheet of paper over the design on the glass or metal sheet. Smooth the paper out with your hand. Gently remove the paper and set aside to dry.
For variety, place a piece of paper over the inked surface and sketch with a pen or pencil on the paper. The lines will be black against a white surface in place of white against black as in the first technique.
Potato Stamp Printing
The stamp is the simplest type of printmaking. Potato stamps are easily made by cutting into the end of a firm potato, leaving the design to stand out in relief. Apply poster paint and use the potato like an ordinary rubber stamp.
Cardboard Printing
Cardboard printing blocks are simple to make and inexpensive. Use two pieces of cardboard the same size. Cut the designs from one piece and attach securely to the second piece. Leave very small spaces between the cardboard shapes so the ink does not go into the open areas and spoil the print. Geometric shapes cut and expanded are often more successful than figurative shapes. Squeeze printer's ink out on non-absorbent 27

28
surface. Ink the brayer and roll it over the cardboard until the ink sticks to the surface. Move the card plate to a clean surface and put a piece of paper on top of inked plate. Rub with a spoon.
Leaf Rubbing and Spraying
Rubbing is one way children can discover the shape and veining of a leaf. Place the leaf beneath white construction paper vein side up. Rub the side of a crayon over the paper until the veins become distinct. Some leaves make better rubbings than others. Vary the color and move the leaf so one leaf shape is superimposed on top of the other.
Choose one leaf and pin it over the rubbing to some kind of bulletin board or to the side of a box. Spray a mixture of food color and water against the leaf. Move the leaf and spray with another color. The food color will make the crayon rubbing brilliant.
Carbon Paper Printing
Unique monoprints can be made by cutting or tearing pencil carbon paper into desired shapes. Place a white or colored paper on top of a 1-inch pad of folded newspapers. Place the carbon paper shape, with the carbon side down, on the paper. Cover the carbon paper shape with a piece of clean paper towel. Press over the paper towel with a iron on the lowest heat setting (270°). A clear carbon print will result. Use inexpensive carbon that rubs off on your fingers. Vary the basic technique by wrinkling the carbon paper shape and pressing it flat, or repeat shapes by moving them and pressing again for a lighter image. Collages can be made by allowing some carbon paper to remain on the paper, draw into the carbon design or use the carbon print over a fabric collage. The carbon print is waxy al1d will resist paint. Brush the print with acrylic glazes, watercolor, tempera, or colored ink. Prepare the paper with crayon, crayon shavings, or oil pastels and press the carbon design over it.
Foam Tray Printing
For an inexpensive, safe, printing experience use the foam trays found in meat packaging in
grocery stores. Trim off the raised edges. The child can easily draw a design on the foam by scratching or pressing heavily with a pencil or other sharp object. Ink the foam printing plate by rolling an ink-filled brayer over it. Acrylic paints may also be used. The ink should not be in the indentations, only on the flat surface. Place the inked foam drawing over paper and apply pressure. Peel the foam from the paper.
Milk-Carton Printing
Intaglio printing is printing from engraved lines. Many intaglio processes require expensive materials, but there are a few found materials that cost nothing that make intaglio printing possible for children.
Cut a side from a wax-coated milk carton. A gallon milk container gives the largest printing surface. Develop a line design using wavy, jag.ged, thick, thin, and broken lines. The sketched design should be as large as the milk carton side.
Transfer the sketch to the side of the milk carton printing plate by painting the milk carton with India ink and let dry. Rub white chalk on the back of the design, then trace design on the blackened surface of the plate. Scratch out the design with sharp tools such as a compass point or a needle. After the design has been engraved, spread water-base soluble printer's ink or creamy tempera paint over the plate. The edge of a piece of cardboard or rubber kitchen scraper can be used to spread the ink. Scrape excess ink off plate's surface leaving only ink that has settled into scratched out areas. Lay soft absorbent paper over top of plate and rub with the back of a wooden spoon. Pull the print from the plate.
Leaf Printing
Collect leaves of various sizes and press overnight. Discuss the shapes, colors, lines, and textures. Choose white or colored paper for the background. Roll water-base printer's ink over the veined side of the leaf using a rubber brayer. Another method is to paint the reverse side of the leaf with tempera paint using a brush. Place the leaf face down on the background paper. Place
scrap paper on top and press with fingers, the back of a wooden spoon, or clean brayer. Repeat the leaf printing several times on the same paper.
Evaluate the completed print by deciding if the amount of ink or paint was too much or too little, if the pressure was too light or too heavy, and if the composition was interesting.
<Q><Q><Q><Q>
Life is a sculptor and shapes all living things; an artist that designs every leaf of every tree, that colours the flowers, the apple, the forest, and the plumage of the bird of paradiseLife is a musician and has taught each bird to sing its Jove songs, the insects to call each other in the music of their multitudinous sounds-Life is a chemist that gives taste to our fruits and spices and perfume to the rose. Life synthesizes new substances which Nature has not yet provided to balance its processes and to destroy invading life.
A. Cressy Morrison
Eraser Printing
Cut 1" square rubber erasers in half. Carve a design on the larger surface using an X-Acto knife with a small, narrow blade. Print by pressing the carved surface of the eraser on an ink pad and then on paper. This miniature print block can be used for gift tags, monograms on stationery, or border designs, as well as compositions with a repeated motif.
Inner Tube Printing
Discarded inner tubes obtained from a local gasoline station can be used for an exciting printmaking experience. One inner tube can be cut into rectangler shapes and could be enough for a large group of printmakers. The design should be drawn on the tube and cut out. The design could be made in one piece or as a composition of many pieces with spaces left between each piece. Mount the design on a piece of scrap wood with white glue. When the design is firmly adhered to the wood, apply the waterbase printer's ink with a brayer. Print like a rubber stamp. The design can be printed in a

variety of colors by washing the print block after each color is printed. Overlapping colors after each color is dry will produce interesting results also. A group of printmakers could make a large composite mural by printing each print block on one large paper.
Glue Printing
Prepare a print plate by dripping, trailing, or building up areas of fast-drying cement, white glue, or silicone sealer (hardware store) on a rigid plate. Stress the use of line in the design. Dry thoroughly, ink with a brayer, and print.
Foil Printing
Cut a piece of heavy-duty foil larger than the backing (wood, cardboard, etc.) Create a variety of lines and textures by pinching, bunching, and crumpling the foil and glue it to the backing. Ink and print.
For a healthy mind, could you bring all of your goals into harmony?
Desiring to maintain a healthy body, could you embrace life as a child does?
Can you keep in touch with your original nature, even when you are grown?
Can you guide by example, rather than by contest of will?
Can you be flexible in the way you interact? Can you interact with nature, without inter
fering, or trying to change what you find? Can you receive as well as give?
listen as well as speak? If you can bring forth new life-
and nourish the child which is born-If you can paint the way by your own exampleIf you can lead without insisting that
you be followed-If you can give without attachmentThen you have reached the core of life.
Lao Tzu 2500 years ago
Fruit Printing
Cut lemons, oranges, or limes in half and press on an absorbent pad of folded paper towels saturated with food color. Print on greeting cards, recipe cards, name tags, collage, posters, or food displays.
Hand Printing
Roll water-base printer's ink on non-absorbent surface with a brayer. Place hand palm down on ink and print on paper. Use hand prints on storage boxes, posters, or greeting cards.
Finger Printing
Mix together V2 cup of flour, V4 cup of water, and V2 cup of liquid detergent or liquid laundry starch. Add food coloring or tempera paint for color. Ink thumb or fingers and press down on paper. Study the prints when they are dry and see what creatures they suggest. Add simple lines to make tails, ears, eyes, whiskers, fins, feathers, or beaks. An ink pad could replace the paint.
Found Object Printing
Press bottle bottoms, cork, tape holders, spools, flash bulbs, bottle caps, wire whip, and many other objects on a pad of absorbent, paint-filled materials. Paper toweling could be folded and placed in bottom of flat dish with liquid tempera paint mixed with a few drops of liquid soap. Then use like a rubber stamp.
Diazo Printing
Diazo paper is a light-sensitive paper used by architects and draftsmen. It has a magical quality that fascinates children and adults. Light and household ammonia can make an image appear in rich, velvety blue. This is a process borrowed from modern technology and adapted for use as a way to appreciate and discover designs found in nature. Collect many interesting leaves, flowers, butterflies, grasses, and seed pods. Press them in catalogs and telephone directories. Purchase the diazo paper from firms that sell architectural supplies. One company is: Copy
Equipment Company, 1010 West 79th Street, Minneapolis, Minnesota 55420. The diazo paper is packaged in 250- or 500-sheet packages and is wrapped in heavy black paper to keep out the light. Two hundred and fifty sheets are less than $5.00 and should be an adequate amount as it loses its light sensitivity in 6 months or less. Keep the paper in the package until ready to be exposed. Time is very important, so have the arrangement of dry materials designed before taking the paper out of the package. Keep the package shut at all times. Remove one sheet and quickly arrange the material on the yellow side of the paper. Hold a 150-watt flood or spot light a few inches from the paper. Move it around the paper until the larger part has turned white (from 4 to 6 minutes.) Quickly shake off the dry materials and place the paper face up in an air tight box that contains a dish of fresh household ammonia. It will be developed by the fumes of the ammonia. A handy container for the developing is a plastic sweater box with two flat dishes of ammonia on the bottom and a wire rack made of a coat hanger placed over the dishes. The paper rests on the rack and the plastic cover allows you to view the developing process. Remove the paper from the box when the transformation has taken place. This is usually less than 3 or 4 minutes. Change the ammonia when it seems to lose strength. There are many variables, so experiment. The distance of the light from the paper, the timing, and even the temperature and age of the paper make a difference. These blue sheets can be used as booklet or program covers, backdrops for exhibits, in collage, or framed for hanging. Any object or cutout design that will block out the light can be used in place of natural material.
Smoke Printing
Cover white typing paper with lard or vegetable shortening. Use a very small amount and rub it over a surface a little larger than a leaf chosen to be printed. Light a candle and smoke the greased part of the paper by moving it back and forth over the flame. Keep the paper moving so it will not burn. Blacken the surface and place the soot side up. Place a leaf vein side down upon the soot. Put another sheet of typing paper over the leaf 29

30
and rub every part of the leaf. The leaf will be inked with the soot and shortening. Place the inked side of the leaf down on white paper. Place another sheet of paper on the leaf and rub every part of the leaf. Every detail of the leaf will be printed with smoke.
Encaustic Sandpaper Printing
Color a design on fine textured sandpaper with crayons. Press hard and use as much crayon as possible. Turn the completed design face down on piece of paper and press with a hot iron to get an intriguing encaustic transfer. Experimentation will reveal the amount of crayon and degree of temperature necessary.
Chalk and Crayon Printing
Select three colors of chalk and randomly cover white, heavy duty construction paper. The chalk should cover the entire paper but the colors must not mix. Cover chalked paper completely with a light colored crayon. Repeat with a dark crayon. If the crayon is not applied thickly enough, the chalk will appear through the wax. If the crayon flakes, the student is pressing too hard. To make the print, place white drawing paper on top of chalk-crayon plate. Draw a scene or design with pencil. Shade over half of total area by pressing down and allowing the print to pick up color. Leave a small unpenciled margin between two shaded areas which are side by side. Peek at the drawing as it is being done to see what effects are appearing. Pull the print off the plate. Experimentation can lead to many variations.
Intaglio Printing With Acetate
In intaglio printing the design is cut or scratched into a metal plate with a needle-like tool. i.,.ines engraved below the surface of the plate receive the ink to make the print. Intaglio printing usually requires expensive materials and equipment. With the use of acetate, some of the expenses can be reduced. Acetate is available in many plastic supply stores in varied thicknesses that will not crack or bend. Draw the design on the desired size of paper first. Place the transparent acetate over the paper and trace with a sharp instrument such as a scissors,
compass point, or burin. Tape can hold the acetate on the paper. After the basic lines have been etched into the acetate, place the acetate on black paper. The contrast will make the etched lines more visible and the remaining details can be cut in. After etching, squeeze water-base printer's ink onto the acetate plate. Rub the ink into the etched-in lines with a finger. Wipe off all ink on the unlined surface of the plate. Do not remove ink from the engraved sections. Unique shading and texture can be achieved by wiping the plate in a variety of ways.
Thoroughly wet ordinary drawing paper. Blot it until it is damp. Place plate face down on damp paper. Put a piece of oak tag on each side of plate and paper and roll through a press. If you are not able to use a printer's flatbed press with rollers, a clothes wringer will work.
Drawings made from live models or still life arrangments can be the basis for the acetate print composition.
DREAMS FOR CELEBRATION
A litany-Today the Lord steps into the air once more to taste its color and feel its songs. He inhales the thoughts of children, the breath of yesterday, the fantasies of tomorrow, and he wonders whether his children are too old to celebrate their dreams. Let us spin him our dreams: Someday soon people will celebrate life every
day. But we would like to do it now, wet and wild
and risen with our Lord. Someday soon people will send up balloons in
church. Turn tired old cathedrals into cafeterias. Paint gravestones as bright as the sun Know they are beautiful, black, red or white. Glimpse the face of God in their patient
parents Use the eyes of friends in place of mirrors. Bounce through the mountain on beachballs. Write their Christian names in the sunset. Become as free as that man called Jesus the
Christ. Play kickball with cripples in the park. Sing for their supper in asylums. Sink their teeth into politics for peace. Airlift food and life to the starving. Have senses in their soul as sharp as radar. Love a man because he is a man. Grow flowers in their garbage can. Cover their cars with foam rubber. Turn all bombs into boomerangs. All bullets into blanks And switchblades into tubes of finger paint. Slow down and wait for God. Run through the White House with muddy feet. Laugh with the falling spring leaves. Dance in the falling summer snow. Baptize their babies with love before birth. Celebrate Easter as angels do below. And hang Christmas banners from the moon. Yes, someday soon people will live like that,
but we plan to start right now Right now, Lord, Right now. Amen, Lord, Right now
Habel
Make thy life better than thy work. Too oft Our artists spend their skill in rounding soft Fair curves upon their statues, While the rough And ragged edges of the unhewn stuff In their natures startle and offend The eye of critic and the heart of friend.

Silk Screen
Silk screening is a method of applying a design to paper or fabric by using a squeegee to press pigment through a stencil. The design is limited in size by the size of the frame but it is a fast and efficient way to print a design many times. Repeats of a design are easily achieved. The process may be used to duplicate a very simple design in one color or a complicated one involving several colors.
MATERIALS NEEDED
• Silk screen film (directions are for solventadhering film)
• Cutting tool (stencil knife or single edge razor blade)
• Frame with silk screen • Squeegee (size must be slightly larger than
design to be printed) • Paint or printing medium • Film adherent • Cotton balls • Paper or cloth on which to print • Turpentine or mineral spirits • Masking tape • Newspapers or magazines • (Organdy if preparing own frame. Nylon
preferred for clearer printing. Avoid red or pink as it is difficult to see adhered film on it.)
FRAME
Frames can be purchased readymade with mesh already attached or a frame can be handmade. In choosing a size, a 1-inch margin all around is needed and at least 3 inches on each short side must be reserved for the paint or ink. Commercial frames are sold by the inside measurements and have a removable mesh.
To make your own frame, choose wood at least 2 inches by 1 inch thick and lengths suitable to make the size you need. Miter corners and reinforce the joints with glue and nails or screws. Sand wood smooth and finish with a coat of varnish to make it easier to clean. Silk purchased from art supply stores is generally used for the mesh. It is long wearing and gives a crisp, clean design. Nylon organdy is satisfactory
for this purpose and is usually less expensive. Avoid cotton organdy as it has a tendency to run and will not last as long as silk or nylon, but it can be used.
Cut the screen fabric about 2 inches larger overall than the frame. Taking care to align the straight edge of the grain, position the silk on the top edge of frame. Staple in the center of one short end of the frame close to the inside edge of the wood. Pull fabric taut and staple center of the short end. Turn frame and staple centers of long edges, keeping the fabric tightly stretched. Continue stapling in this alternate pattern all the way around the frame about Y2 inch apart. Trim edges of fabric evenly with outside edge of frame. Screen can be tightened by washing with a little detergent and warm water (silk or cotton). When dry, apply a coat or two of shellac to the wood frame and over the cut edge of the fabric to prevent raveling, over staples, and V2 inch in on the fabric to make it water tight. Allow to dry thoroughly.
Use masking tape to block off a 1-inch margin around each edge of the screen on the outside. On the short ends, block off at least 2 inches or more as a reservoir for the printing medium.
PREPARATION OF THE FILM
Note: Adhesive-backed paper, such as contact, can be used for short printing runs. Apply directly to the outside of the screen. However, the printing process will typically be the reverse of film as this method prints around the design. Film usually prints the design itself. Draw or select a design suitable for the silk screen process. Almost any kind of thin, nonabsorbent paper such as tracing or typewriter bond paper will work. For each color used, a new sheet of paper will be needed. Place register marks on sides of the paper to help line up the design. Tape the design to the back or parchment side of the film, design side up next to parchment of film. Tack or tape film to a smooth cutting surface.
Cut out those parts of the film to be printed just to the backing parchment or paper to which the film is attached. Avoid cutting the backing sheet. A very sharp knife and very light pressure must be used.
After a little part of the design has been cut, peel the film off the backing sheet with the cutting
tool and finger. Continue cutting the film until the design is completed on the film.
Separate design taped to back.
ADHERE FILM TO SCREEN
Take care not to dissolve film by using too much adherent.
a. Lay screen on film with organdy side down so that film is centered on frame. Anchor with masking tape. Design should appear as it will be printed.
b. Working with a small ball of absorbent cotton dipped in adhering liquid, squeeze out excess and rub film from top side of frame. With other hand, dry with absorbent cotton. Repeat in small areas until entire surface is covered. Dry a few minutes.
c. Remove parchment or backing. Pull in a diagonal direction on lines and printed areas.
d. Fill in open areas around design with masking tape, overlapping rows of tape a bit to prevent paint leakage. Tape inside pf frame along edges for easier cleaning, in addition to entire back around design.
Pour paint into printing frame. For best results, paint should barely pour.
Center design over paper to be painted. Position register tape marks so run is consistent. Try several practice runs before beginning. Draw squeegee across inside with firm, even pressure.
Lift frame. Remove print to dry.
CLEANING THE SCREEN AND SQUEEGEE
Depending on type of paint used (on solventadhering film), use turpentine or mineral spirits to clean oil-base paint. Use water to clean tempera type paint.
REMOVING FILM FROM SCREEN
Use solvent or solvent-adhering film. Film will dissolve.
SOURCES OF SUPPLIES-NAZ-DAR (order from catalogue), 1087 N. Branch St., Chicago Ill., 60622 ; ART-SIGN, 2501 26th Ave. So., Minneapolis
Shirley Barber 31

32
THE GIVING TREE
And after a long time the boy came back again. "I am sorry, Boy," said the tree. "But I have nothing left to give you-
My apples are gone." "My teeth are too weak for apples," said the boy. "My branches are gone," said the tree. "You cannot swing on them-" "I am too old to swing on branches," said the boy. "My trunk is gone," said the tree. "You cannot climb-" "I am too tired to climb," said the boy. "I am sorry," sighed the tree. "I wish that I could give you something ... but I have nothing left. I am just an old stump. I am sorry . . . " "I don't need very much now," said the boy. "just a quiet place to sit and rest. I am very tired." "Well," said the tree, straightening herself up as much as she could, "Well, an old stump is good for sitting and resting. Come, Boy, sit down. Sit down and rest." And the boy did. And the tree was happy.
By She/ Silverstein Harper & Row, Publishers
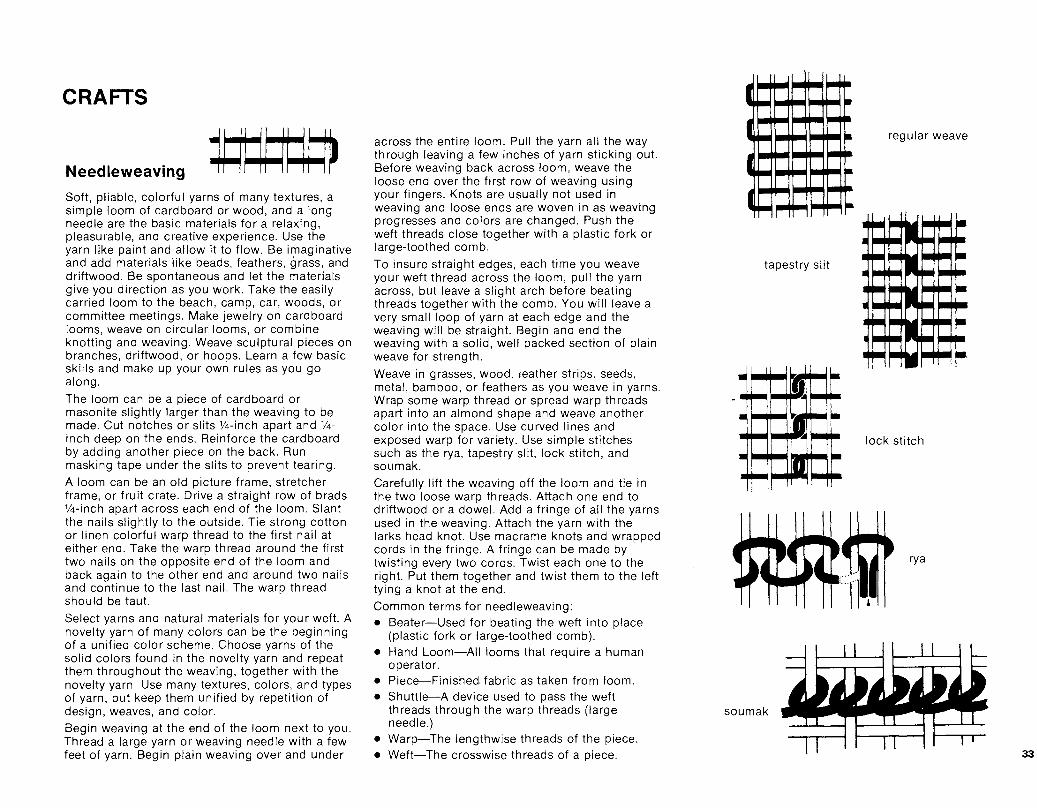
CRAFTS
Needleweaving
Soft, pliable, colorful yarns of many textures, a simple loom of cardboard or wood, and a long needle are the basic materials for a relaxing, pleasurable, and creative experience. Use the yarn like paint and allow it to flow. Be imaginative and add materials like beads, feathers, grass, and driftwood. Be spontaneous and let the materials give you direction as you work. Take the easily carried loom to the beach, camp, car, woods, or committee meetings. Make jewelry on cardboard looms, weave on circular looms, or combine knotting and weaving. Weave sculptural pieces on branches, driftwood, or hoops. Learn a few basic skills and make up your own rules as you go along. The loom can be a piece of cardboard or masonite slightly larger than the weaving to be made. Cut notches or slits 1/4-inch apart and Y4-inch deep on the ends. Reinforce the cardboard by adding another piece on the back. Run masking tape under the slits to prevent tearing. A loom can be an old picture frame, stretcher frame, or fruit crate. Drive a straight row of brads 1/4-inch apart across each end of the loom. Slant the nails slightly to the outside. Tie strong cotton or linen colorful warp thread to the first nail at either end. Take the warp thread around the first two nails on the opposite end of the loom and back again to the other end and around two nails and continue to the last nail. The warp thread should be taut. Select yarns and natural materials for your weft. A novelty yarn of many colors can be the beginning of a unified color scheme. Choose yarns of the solid colors found in the novelty yarn and repeat them throughout the weaving, together with the novelty yarn. Use many textures, colors, and types of yarn, but keep them unified by repetition of design, weaves, and color. Begin weaving at the end of the loom next to you. Thread a large yarn or weaving needle with a few feet of yarn. Begin plain weaving over and under
across the entire loom. Pull the yarn all the way through leaving a few inches of yarn sticking out. Before weaving back across loom, weave the loose end over the first row of weaving using your fingers. Knots are usually. not used in weaving and loose ends are woven in as weaving progresses and colors are changed. Push the weft threads close together with a plastic fork or large-toothed comb. To insure straight edges, each time you weave your weft thread across the loom, pull the yarn across, but leave a slight arch before beating threads together with the comb. You will leave a very small loop of yarn at each edge and the weaving will be straight. Begin and end the weaving with a solid, well packed section of plain weave for strength. Weave in grasses, wood, leather strips, seeds, metal, bamboo, or feathers as you weave in yarns. Wrap some warp thread or spread warp threads apart into an almond shape and weave another color into the space. Use curved lines and exposed warp for variety. Use simple stitches such as the rya, tapestry slit, lock stitch, and soumak. Carefully lift the weaving off the loom and tie in the two loose warp threads. Attach one end to driftwood or a dowel. Add a fringe of all the yarns used in the weaving. Attach the yarn with the larks head knot. Use macrame knots and wrapped cords in the fringe. A fringe can be made by twisting every two cords. Twist each one to the right. Put them together and twist them to the left tying a knot at the end. Common terms for needleweaving: • Beater-Used for beating the weft into place
(plastic fork or large-toothed comb). • Hand Loom-All looms that require a human
operator. • Piece-Finished fabric as taken from loom. • Shuttle-A device used to pass the weft
threads through the warp threads (large needle.)
• Warp-The lengthwise threads of the piece. • Weft-The crosswise threads of a piece.
regular weave
tapestry slit
lock stitch
rya
soumak
33
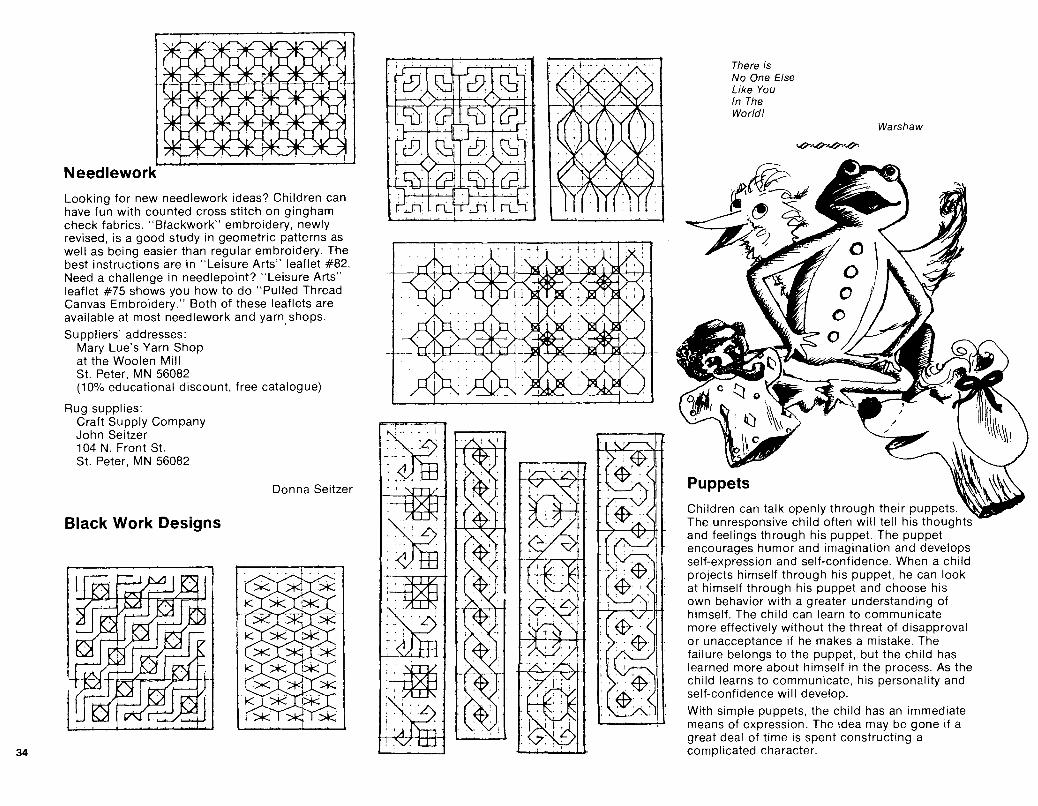
34
Needlework
Looking for new needlework ideas? Children can have fun with counted cross stitch on gingham check fabrics. "Biackwork" embroidery, newly revised, is a good study in geometric patterns as well as being easier than regular embroidery. The best instructions are in "Leisure Arts" leaflet #82. Need a challenge in needlepoint? "Leisure Arts" leaflet #75 shows you how to do "Pulled Thread Canvas Embroidery." Both of these leaflets are available at most needlework and yarn. shops.
Suppliers' addresses: Mary Lue's Yarn Shop at the Woolen Mill St. Peter, MN 56082 (10% educational discount, free catalogue)
Rug supplies: Craft Supply Company John Seitzer 104 N. Front St. St. Peter, MN 56082
Black Work Designs
Donna Seitzer
There is No One Else Like You In The World!
Puppets
Warshaw
Children can talk openly through their puppets. The unresponsive child often will tell his thoughts and feelings through his puppet. The puppet encourages humor and imagination and develops self-expression and self-confidence. When a child projects himself through his puppet, he can look at himself through his puppet and choose his own behavior with a greater understanding of himself. The child can learn to communicate more effectively without the threat of disapproval or unacceptance if he makes a mistake. The failure belongs to the puppet, but the child has learned more about himself in the process. As the child learns to communicate, his personality and self-confidence will develop.
With simple puppets, the child has an immediate means of expression. The idea may be gone if a great deal of time is spent constructing a complicated character.

WAX HAND PUPPETS
Carve and mold a 3-inch styrofoam ball into a puppet head that expresses the character of your choice. Cut a hole large enough and long enough for your index finger in the spot where the neck will be. A finger stall could be made of rolled tag board and masking tape if desired. Insert into the finger hole. Cut another ball into pieces and mold eyeballs, ears, lips, nose, and hats. Attach all of these securely with round wooden tooth picks. Place a dowel or pencil in the neck hole temporarily. This will be the handle for dipping the puppet head into wax. Melt candle wax or paraffin in a deep cooker or in a coffee can placed in heated water. The heat must remain even; keep the wax in liquid form but not steaming. Add candle color or colored wax crayons to the wax. Put many layers of newspaper under the heater and keep small children away from the hot wax. Dip the styrofoam head quickly into the wax. Dip it immediately into a pail of cold water to cool and back into the wax. Continue to build up about six layers of wax on the head. Eyes, mouth, and cheek color can be added with acrylic paint. Theatrical crepe hair can be stretched out and glued to the head.
The puppet shirt should be about an 8-inch to 10-inch square body with two arms extending. Cut two and sew them together. Leave a 1-inch hole at the neck for your index finger to extend through the hole into the neck of the puppet. Your thumb becomes one arm and your little finger is the other arm. Your hand is the puppet's body.
BATIK BANNERS
Banners made of pelion can be quite sizeable, colorful, flowing pendants useable in large spaces. Repeating colors and shapes of banners throughout a large exhibit area can draw the viewer's eyes to the farthest corner of the display. Pelion allows the light to penetrate and is very light weight. Large lettered words for identification or theme can be used also. Determine the size and shape of banner and design with pencil. Melt the wax (2/3 candle wax and V3 batik wax) in the fry pan, keeping the temperature just below smoke stage. Brush the wax on areas chosen to remain white. Do not try to clean brushes. Crackle the cooled waxed areas by crushing between your fingers. Mix dyes quite strong and brush dye on . Colors can be changed as desired and even mixed on banner as painting progresses. All wax can remain on pelion if it is a once used display in which time is a consideration and stiffness is needed. If the banners are to be viewed closely, the wax can be removed by pressing pelion between newspapers using a warm iron. Continue to change newspapers as wax is taken up.
Badge-A-Mi nit
Students can create and design their own 2%inch button in pen and ink, water color, black printing, pencil, felt markers, crayons, or collage. The Badge-A-Minit hand press will encase the design within a permanent plastic-coated metal button. Information and materials are available from:
NASCO 901 Janesville Avenue Fort Atkinson, Wisconsin 53538
Copper Repousse and Nature Materials: •driftwood
•36-gauge copper
•pencil
•newspapers
•wooden tool
•steel wool
•liver sulphur
•nails
•epoxy glue
•lacquer Nature cannot be copied, but can become an inspiration for design. Sensitivity can be
increased through the study of beautiful forms, colors, rhythms, and texture found in nature.
Interesting shapes in driftwood can be combined with relief modeling in copper. The copper repousse design can be an abstract interpretation of a seed pod, berry, pine cone, or leaf. Examine the wood with your fingers and eyes and determine where to place the copper pieces. Make paper patterns to fit the parts of the wood to be covered with copper. Use the design of the wood or the design suggested by other natural materials such as a leaf, stones, branches, shells, etc., to help you draw a design on the paper. · Consider the shape of the paper pattern and fit your design into the whole piece. When the drawing is ready, place the pattern over 36-gauge copper and trace over the drawing with a pencil. Place the copper on a stack of newspaper and with a blunt wooden stick press out slowly and carefully from back side. Turn the copper over and continue to tool the front. Working from front to back the copper becomes very strong and stretches from V4 to Y2 inches without breaking. When tooling is complete, clean the copper with steel wool and use it to apply liver sulphur dissolved in water. When dry, sand surface with steel wool, removing black coating as desired. Attach to wood with nails or epoxy glue. Rub edges close to wood with wooden tools. Finish with lacquer finish. Small copper pieces can be mounted on wood and used for jewelry hung on leather cord.
Pariscraft Creative work in crafts must be meaningful to have educational value. If the project is done for the sake of doing it or for acquiring specific skills, it is of questionable value. Masks would be an opportune craft for developing better understanding of the African, Eskimo, or Indian cultures as masks played a significant part in their lives. Masks are a great means of personal expression also. Plan each project to broaden the horizons of the children. Perhaps masks could be carried into a drama that the children develop themselves. The masks can be mounted on long sticks painted black and exciting plays could be worked out against a black background with simple lighting. "Pariscraft" masks can be very effective as moods or feelings can be expressed because the original armature of foil is flexible as 35

36
well as the wet "pariscraft". Cut an oval shape 4-or 5-inches larger than a human face of very heavy duty foil or two thicknesses of heavy foil. Shape it around the face, pushing in eye sockets, around nose, mouth, etc., and around edge of head. Do not overwork as the foil loses its strength. Place on table and support with wadded newspaper. Cover with narrow strips of "pariscraft" that have been dipped in warm water. Overlap strips that are applied across mask. Place second layer running opposite way. Reinforce edges. When "pariscraft" is dry (6 to 10 minutes) remove foil and check by holding up to light to see where more "pariscraft" is needed. Paint imaginatively with tempera or acrylic paints. Spray with a fixative or shellac. The face can be ornamented with feathers, fur, cotton, raffia, yarns, wood shavings, steel wool, etc.
An excellent film to accompany mask making would be "The Loon's Necklace".
ENTHUSIASM
Enthusiasm for the universe, in knowing as well as in creating, also answers the question of doubt and meaning. Doubt is the necessary tool of knowledge. And meaninglessness is not threat as long as enthusiasm for the universe and for man as its center is alive.
Copper Enamel Pendant
Paul Tillich
Clean the copper piece by filing off rough edges and roughen the top surface with emery cloth. Do not touch the cleaned copper with fingers. Flux does not have to be used; however, the enamel colors will have more depth and body if flux is used first. Attach a piece of nylon stocking over the top of the flux jar with a rubber band. Apply agar solution to copper and dust on the flux. If you do the dusting over a clean piece of paper, you can pour the excess flux back into the jar. Place the copper piece in the center of kiln and put the cover down. When the surface of the copper is smooth, remove from the kiln. Apply agar solution over fired flux. Apply the color by
dusting the powder through a piece of nylon placed over the top of the jar of enamel color. Break the glass chunks into very small pieces with a plier. Place the chunks and glass threads on the powdered enamel. Be careful not to disturb the powder. Place the copper piece in the center of the kiln and close cover. When the chunks have melted down and the powder is smooth, remove from kiln. Place copper pieces on an asbestos pad. When cool, file off the edges. Brush and clean a redwood chip (normally used for landscaping purposes). Drill a hole at the top and cut a depression in the front surface of the bark the size of the copper piece. dlue copper into place with epoxy glue and apply acrylic gel medium to the wood. Thread a thin leather strip through the hole in the wood.
Instant Batik
Lightly sketch a design on washed cotton fabric. Peel off paper and break crayon into muffin pans. Use bright colors. Add V2-inch cube of paraffin to each cup. Do not attempt to clean the brushes. Use a different one for each color.
There are several ways of melting the crayon. If small pieces are to be used the paper should be removed from the crayons and they should be separated by color and placed in muffin tin sections. The muffin tin can be placed over a cake pan partially filled with water and heated over a hot plate. A safe heating device can be made of a 2-gallon rectangular can, possibly found in a service station. Cut a hole, large enough to hold the muffin tin, in one of the larger sides of the can. Punch a hole about %-inch in diameter through the cap or through the end of the can. Insert an electrical cord through the hole and attach a socket and 100 or 150-watt light bulb to one end and an electric plug to the other. Rest the light bulb on a nest of crushed aluminum foil. The heat from the light bulb is enough to melt the crayon and keep it liquid as it is being used.
Place the fabric square on several thicknesses of newspaper. Brush the melted crayon on the
design leaving V4-inch space between colors. Be sure that wax penetrates fabric. If it doesn't, turn fabric over and paint other side with wax. Let wax dry and place it in cold water, crushing it gently between your fingers. This will give a cracked look after dyeing. Place the fabric in a strong fabric dye solution of a very dark color. The dye must be cool. Leave for about 10 minutes and roll between sheets of paper toweling. Carefully remove wax by ironing fabric placed between two sheets of newspaper. Remove a small amount of wax at first and do not push iron across newsprint. Press iron straight down and quickly remove. Continue to change paper and press until very little color shows on the paper. Allow the raw edges of the batik to be exposed when matting the painting. Place cloth over mat rather than under. Batiks could be framed in an embroidery hoop and hung in a window or could also be hung on sticks or dowels.
Slide Making (Without a Camera)
Slide making is a creative art form that is inexpensive and entertaining. Concern should be given design qualities and originality. Slides can be an educational teaching tool also. The concepts learned can be shared with others. It can be a group project when each member works out slides around a chosen theme.
Slides can be made as you make a sandwich. One cover of the sandwich will be a piece of clear or colored acetate (acetate page protectors are available where stationery supplies are sold). The other cover of the sandwich is a piece of acetate with an adhesive back (shelf contact or clear contact sheets from stationery supply stores). Both covers will be enclosed in a 2-inch by 2-inch #127 slide mount (photo shops) so all acetate papers should be cut to the exact size of the inside of the slide mount. The acetate must not cover the seal strip inside the slide mount.
A variety of materials can be sandwiched between the two covers of acetate. Cut out shapes of colored acetates, stretch out steel wool or nylon net, paint with translucent paint like "Crystal Craze" or "Fun Film", or encase dried translucent natural materials between the acetate pieces. Draw with acetate pens or India ink.
It is possible to lift pictures or letters from a magazine and make a transparency of the picture.

Cut a piece of adhesive backed acetate to the slide mount size. Peel off the adhesive and place the sticky side of the adhesive on the face of the chosen picture. Rub the acetate with a wooden stick or blunt instrument. Cut the magazine page off around the acetate. Place the acetate piece into a dish of warm water with a few drops of detergent added. Within several minutes the paper can be removed very gently and the inked picture will remain on the acetate. Some magazine pictures work better than others so experiment. Carefully rub off any of the cloudiness and dry. Add drawings, printing, or other types of materials if desired. Cover the sticky side of the picture with another smooth piece of acetate. Put completed slide sandwich into the folded frame of the slide mount and carefully press the outside edge of the slide mount with a warm iron to seal shut.
Seed Jewelry
Wash and soak large beans and melon, pumpkin, and squash seeds over night. Make a necklace by stringing them on button cord with a needle. String macaroni or short sections of soda straws on button cord. Color beads with water color if desired.
Life is the art of drawing without an eraser.
Pinatas
Pinatas are used in Spain, Mexico, and South America at parties and other special occasions. The pinata is made in many forms, filled with candy and other good things to eat, hung from the ceiling, and broken at party time. Children are blindfolded, turned around several times, and encouraged to break the pinata with a stick. A pinata can be made by covering several inflated balloons with several layers of paper strips (approximately 2-inch by 6-inch) and wall paper paste. After the paper has dried, the paper balloon shapes can be attached to one another with masking tape and more paper strips and paste. The body and head can be joined and ears, nose, legs, and tail can be added with crushed
newspaper, cardboard tubes, and shaped tag board. Cut a partial circle in the top of the pinata, fold back the cover and fill with wrapped candies, unshelled peanuts, small boxes of raisins, and other snacks. Wrap a very strong cord harness around the body. Leave a long cord at the top of the pinata for hanging. Cover the whole pinata with one more layer of paper strips and finally a crepe paper fringe. Fold tissue and cut 10- to 12-inch strips 3 inches from the fold. Fringe the strip by cutting from the folded edge to within 11/z-inches of open side. These slashes are Vs-inch apart. Cut a number of fringes at once. Unfold fringe and reverse the
fold. Glue both open edges together to the pinata starting from the bottom and overlapping each fringe. Cover the pinata completely.
Margaret Lonnquist
Bread Dough Sculpture
The folk artist has often used found materials. He would create with whatever he had available. The South American Indians of Ecuador used bread dough as a substitute for clay centuries ago. They made bread dough ornaments for religious festivals. Use bread dough in a creative way. It can be kneaded, cut, indented, and molded. It can pick up impressions from any textured or carved surface. It can be colored, stained, lacquered, or varnished.
Materials:
• 6 slices of bread • 6 full teaspoons of white glue • Vz teaspoon of liquid detergent • scissors (small curved) • glue for additions • water • tempera paint or vegetable coloring • wax paper • rolling pins • plastic bags. • tools to make impressions Remove the bread crusts and crumble bread into a bowl or place on wax paper. Add glue and detergent. Stir the mixture for a few seconds and knead it in your hands. It will be sticky at first. When it is no longer sticky and begins to form a ball, it is ready to use. If it seems dry, add more glue. Keep it in a plastic bag when not using. If coloring is desired, divide the dough into 1-inch balls and flatten, spread paint or food coloring on surface, and mix with hands. Paint can be painted on dried piece also.
Shape figure (small creatures or food shapes are best), gluing parts together, and brush finished piece with glue mixed with equal amount of water. Allow to air dry on waxed paper for about 12 hours. 37
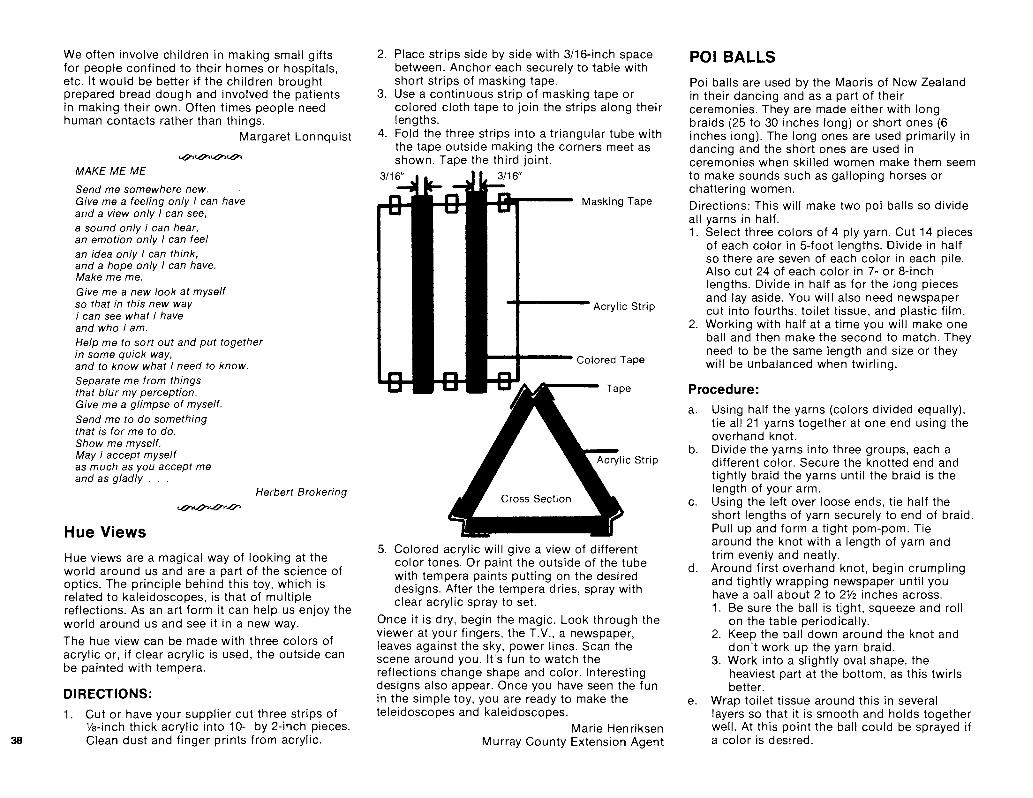
38
We often involve children in making small gifts for people confined to their homes or hospitals, etc. It would be better if the children brought prepared bread dough and involved the patients in making their own. Often times people need human contacts rather than things.
Margaret Lonnquist
.q..q..qxq.
MAKE ME ME
Send me somewhere new. Give me a feeling only I can have and a view only I can see, a sound only I can hear, an emotion only I can feel an idea only I can think, and a hope only I can have. Make me me. Give me a new look at myself so that in this new way I can see what I have and who I am. Help me to sort out and put together in some quick way, and to know what I need to know. Separate me from things that blur my perception. Give me a glimpse of myself. Send me to do something that is for me to do. Show me myself. May I accept myself as much as you accept me and as gladly . . .
Hue Views
Herbert Brokering
Hue views are a magical way of looking at the world around us and are a part of the science of optics. The principle behind this toy, which is related to kaleidoscopes, is that of multiple reflections. As an art form it can help us enjoy the world around us and see it in a new way. The hue view can be made with three colors of acrylic or, if clear acrylic is used, the outside can be painted with tempera.
DIRECTIONS:
1. Cut or have your supplier cut three strips of Va-inch thick acrylic into 10- by 2-inch pieces. Clean dust and finger prints from acrylic.
2. Place strips side by side with 3/16-inch space between. Anchor each securely to table with short strips of masking tape.
3. Use a continuous strip of masking tape or colored cloth tape to join the strips along their lengths.
4. Fold the three strips into a triangular tube with the tape outside making the corners meet as shown. Tape the third joint.
3/16" 3/16"
Masking Tape
-1----- Acrylic Strip
1--....j.,._ ___ Colored Tape
Tape
ic Strip
5. Colored acrylic will give a view of different color tones. Or paint the outside of the tube with tempera paints putting on the desired designs. After the tempera dries, spray with clear acrylic spray to set.
Once it is dry, begin the magic. Look through the viewer at your fingers, the T.V., a newspaper, leaves against the sky, power lines. Scan the scene around you. It's fun to watch the reflections change shape and color. Interesting designs also appear. Once you have seen the fun in the simple toy, you are ready to make the teleidoscopes and kaleidoscopes.
Marie Henriksen Murray County Extension Agent
POl BALLS
Poi balls are used by the Maoris of New Zealand in their dancing and as a part of their ceremonies. They are made either with long braids (25 to 30 inches long) or short ones (6 inches long). The long ones are used primarily in dancing and the short ones are used in ceremonies when skilled women make them seem to make sounds such as galloping horses or chattering women. Directions: This will make two poi balls so divide all yarns in half. 1. Select three colors of 4 ply yarn. Cut 14 pieces
of each color in 5-foot lengths. Divide in half so there are seven of each color in each pile. Also cut 24 of each color in 7- or 8-inch lengths. Divide in half as for the long pieces and lay aside. You will also need newspaper cut into fourths, toilet tissue, and plastic film.
2. Working with half at a time you will make one ball and then make the second to match. They need to be the same length and size or they will be unbalanced when twirling.
Procedure:
a. Using half the yarns (colors divided equally), tie all 21 yarns together at one end using the overhand knot.
b. Divide the yarns into three groups, each a different color. Secure the knotted end and tightly braid the yarns until the braid is the length of your arm.
c. Using the left over loose ends, tie half the short lengths of yarn securely to end of braid. Pull up and form a tight pom-pom. Tie around the knot with a length of yarn and trim evenly and neatly.
d. Around first overhand knot, begin crumpling and tightly wrapping newspaper until you have a ball about 2 to 2Y2 inches across. 1. Be sure the ball is tight, squeeze and roll
on the table periodically. 2. Keep the ball down around the knot and
don't work up the yarn braid. 3. Work into a slightly oval. shape, the
heaviest part at the bottom, as this twirls better.
e. Wrap toilet tissue around this in several layers so that it is smooth and holds together well. At this point the ball could be sprayed if a color is desired.

f. Wrap a sheet of poly-film smoothly around the ball and pull up tightly around yarn. Wrap between braid and ball with a strong cord such as linen or crochet cotton and tie film on securely. Trim excess film away.
When both balls are made young people can have a great deal of fun learning to twirl them in different patterns. Skill is necessary to move the balls around spinning continually and not get them twisted together. The entire spinning action is in the wrist, so hold the balls by the tassels and begin to twirl. When several can handle this a regular chorus line can be worked out.
Basketry
BUTTERICK PUBLISHING A DIVISION OF AMERICAN CAN CO. 1975
Marie Henriksen
• Fibers are soft, pliable materials sold by weight or length. Such materials require no preparation and are worked dry. Look for cotton, silk, wool, linen, jute, sisal, rayon, synthetics, mohair, and horsehair as well as rope, twine roving, cording, yarn, and thread.
• Grasses are hard, stiff materials found fresh or bought by the pound. Fresh materials require careful preparation and drying. All grasses are soaked and worked wet. Look for reeds, willow, palm, seagrass, sedge, kelp, cattails, rushes, corn husks, pine needles, bamboo, straw, raffia, caning, wood splints, and splines.
• Decorative elements include dyes, paint, feathers, beads, bones, buttons, seashells, bells, and found objects.
• Needles, pliers, scissors, masking tape, and white glue are useful in some basketry situations.
BASKETS BY COILING
• Warp, called "core" or "coil", is the spiral foundation of a basket. The weft yarn wraps a coil and stitches over the coils to hold them together.
BEGINNING THE COIL
Taper the end of coil. Overlap the weft on the first turn, then wrap the weft around the coil. Thread the weft into a needle.
Pull the core into a hook and put the weft through the center. Catch the end and wrap tightly.
When the end is secured by wrapping, push the needle through the center.
Start to spiral core around the center.
Use the Lazy Stitch, Figure Eight Stitch, or Lace Stitch to hold the coil together. Mark the beginning of the coil with a colored thread. Begin each new row at the same point for a symmetrical coil.
LAZY STITCH A stitch that spans two or more coils and creates a visible pattern.
Wrap from front to back. Bring weft from behind the coil into the center. Adjust work so that the long section of the stitch is visible and the pattern it makes ~n be controlled.
Hold the coil in one hand and wrap with the other. As the coil becomes larger, wrap a longer area of the core between stitches and, instead of passing stitch through the center, pass the stitch between the coils.
39

40
LACE STITCH
A stitch that creates a negative area (opening) between coils and has a lacy appearance.
Make a lazy stitch but do not pull tight. Pass needle under long stitch.
Wrapping the weft yarn around itself on the long stitch, separate the coils. Wrap weft two times for greater separation.
FIGURE EIGHT STITCH
A stitch worked around the core without making a visible pattern. The figure eight is stronger than the lazy stitch. Wrap core from back to front. For the figure eight stitch, pass needle underneath the adjacent coil.
Bring needle through and pass it between the coils. Wrap core.
SHAPING
A flat coil is made by placing all coils parallel on the same level. Basket shapes such as cubes, cones, cylinders, spheres, and free forms are made by positioning one core on the other to gradually create the shape desired. The core is flexible and the shape possibilities are endless. Complex shapes may be assembled from basket parts.
ADDING WEFT
There are no set rules for adding weft. Many imaginative and inventive methods including knotting are possible.
When 2 inches of a weft remain, thread a new weft and place end on the core. Wrap the new end with 1 inch of remaining weft.
Then, begin wrapping with the new weft. Wrap over the end of the completed weft. Wrap this area very tightly to avoid a bump.
CHANGING COLORS
Use wrapping technique of adding weft to change color.
Color wefts can be carried along under the wrapping.
Lazy stitch or figure eight stitch taken in a new color to bind coils together will introduce that color to the coil it crosses.
Wrap with two different wefts at the same time for color or textural effects.
Attach fringe to the coil by holding the middle section of cut lengths next to the core and wrapping with the weft.
ADDING CORE
For heavy rope core, secure with glue or stitching and wrap tightly.
~ 'Q- f::;y
~ For soft fiber core like roving, twist core ends together and wrap tightly.
For grasses like cane and willow, taper ends for 2 or more inches fitting the ends together and continue wrapping.

FINISHING
Finish coil directly over the beginning point of the coil. Taper the end of the coil. Place a needle next to the core and wrap over it. Continue with binding stitch.
Thread weft end into needle and pull through. Pliers may be helpful. Decorative additions of feathers, buttons, beads, or embroidery stitches could be added to finish the coil.
Practice an art for love and the happiness of your lifeyou will find it outlasts almost everything but breath.
Katherine Anne Porter
BASKETS BY TWINING AND WEAVING
Twining makes a solid basket structure. Use either soft fibers or stiff grasses.
Weaving does not result in a solid structure and works best in stiff grasses rather than soft fibers.
BASKET BASE
Weave a base of individual or grouped warps. In basketry terms, the warps are called "spokes."
Push warps close together to form a sturdy base for the basket.
WEFT
Begin weft in the middle of a warp group instead of at the corner. Beginning at a corner can create a hole. Attach yarn to warp. Use twining, plain weave, twill weave, or variations and combinations of these techniques for weft pattern.
SHAPING
To narrow basket shape, pass weft over more than two warps at a time. This is called decreasing. Pulling weft tighter in some areas will also narrow basket, but not as noticeably as decreasing.
To widen basket shape, add warps or spokes. Push warp end against the weft and twine or weave it into the weft pattern. Pull weft very tightly to hold new warps. Warps can also be added by pulling the warp end through the basket and knotting. With this method, .the knotting becomes a decorative element while it secures the warp.
Decreasing or adding warp evenly around a basket shapes the basket symmetrically. Decreasing or adding warp randomly around a basket shapes the basket into a free form.
FINISHING
When a twined or woven basket is completed the warp must be finished in a way to secure the weft. One way is to bend each warp over to the adjacent warp and push it into the weft. Overlap warps so that a loop secures the weft. Decorative variations include adding beads, feathers, or fringe to the warp loops.
COLOR
In twined baskets, the weft pair may be one color or different colors. The way the wefts cross influence the color pattern. Cross wefts the same way for solid color and in opposite directions to change color. Stripes in woven and twined baskets occur when weft colors are arranged in rows.
The man who cannot wonder is but a pair of spectacles behind which there are no eyes.
Thomas Carlyle
41

42
I, who cannot see, find hundreds of things to interest me through mere touch. I feel the delicate symmetry of a leaf. I pass my hands lovingly about the smooth skin of a silver birch, or the rough shaggy bark of a pine-/ feel the delightful, velvety texture of a
flower, and discover its remarkable convolutions; and something of the miracle of Nature is revealed to me. Occasionally, if I am very fortunate, I place my hand gently on a small tree and feel the happy quiver of a bird in full song-At times my heart cries out with longing to see these things. If I can get so much pleasure from mere touch, how much more beauty must be revealed by sight. Yet those who have eyes apparently see little. The pan·orama of color and action which fills the world is taken for grantedIt is a great pity that, in the world of light, the gift of sight is used only as a mere convenience rather than as a means of adding fullness to life.
Helen Keller
Quilling
Quilling, also known as paper filigree, paper lace, or paper mosaic, is the art of rolling thin strips of paper into various shapes and using the shapes to form designs. A possible origin for the term "quilling" is suggested by Webster's definition of quilling as a "band of material fluted into small ruffles so as to resemble a row of quills." Fluting formed an important part of the design in many early American paper fifigree pieces. Since quilling was never a major art form, there is not a great deal of information available. Quillwork probably originated in the elaborate filigree work of lacy scrolls, arabesques, and leaves found in ancient Egyptian, Greek, and Etruscan tombs. The history of quillwork is also closely connected with the history and availability of paper. Travelers in Europe have reported seeing elaborate paper work in old churches where the paper forms were adapted to the styles of mosaic and filigree to replace expensive metals. A minor revival of the art in the early 18th century produced many fine examples of work found in
the Metropolitian Museum of Art in New York, The Art Institute of Chicago, Henry Ford Museum, and the Essex Institute at Salem, Mass., and in the homes of collectors across the United States. Paper work adorned inkstands, trays, oval firescreens, tea caddies, picture frames, small table tops, even cribbage boards, coats of arms framed with wreaths, and sconces, to mention a few. Quilling is just now enjoying its modern revival. New objects are being created all the time. An inexpensive craft, the only limitations are your imagination. The growth of interest in quilling has led to the availability of quilling supplies in most craft shops and craft departments in many stores. Precut quilling paper is one of the least expensive materials for creative and beautiful designs. Although today's craftsman's tools and materials have changed from quill to toothpick or pin and an infinite variety of paper is now available, the craft remains essentially the same. There are only three basic tools needed to learn to quill: paper strips, a tool on which to roll the paper, and glue. There is only one basic step to master-rolling the coils. The choice of paper is determined by personal preference and the desired finished appearance of your project. Quilling paper 1/8 inch wide is most widely used and sold. For a more delicate look 1/16 inch strips could be used, or widths up to an inch for a massive appearance. Paper strips can be cut by hand or with a hand paper cutter if desired. Paper of varying weights can also be colored with dyes, water colors, or sprayed with gilt paints to produce the effect you wish and then be cut by hand. Experiment for a totally original look! You may prefer one quilling tool over another, the thing to remember is that each tool gives you a different looking coil. The larger the tool, the larger the hole in the center of the quilled piece. A very delicate coil should be rolled with a corsage pin, for example, while a wooden toothpick or even a knitting needle produces a large, loosely coiled center which may be desired for the quilling design. All quilled pieces need glue to hold their shape and to attach the quills to each other. A small drop of clear-drying white craft glue applied with the tip of a pin or toothpick is adequate. This same glue is also used for attaching the finished design to a backing.
MATERIALS AND SUPPLIES NEEDED:
Quilling strips, corsage pin or round toothpick, glue, straight pins, ruler, egg carton or muffin tin, quilling workboard (styrofoam or other soft material covered with wax paper). Quilling pattern may be slipped under the wax paper to serve as design guide. Quills will be pinned in place over it while the glue dries. Optional: Sponge, palette knife or spatula, clear acrylic spray, small scissors, graph paper, tweezers.
Let's start quilling. Tight Roll-Roll a strip of paper tightly around a corsage pin. Glue the loose end and hold until set. Remove the pin. (Use a 5 3/4-inch strip for large roll and 3-inch strip for a small one.)
Loose Roll-Roll a strip; remove the pin and allow the cylinder to uncoil until the roll is the desired size. Glue the loose end.
Tear Drop-Make a loose roll; then tightly pinch the glued end into a point. Allow the opposite side to remain round.
Marquise or Oval-Make a loose roll. Tightly pinch the glued end into a point. Then pinch the opposite side into a point.
Pressed Heart-Make a loose roll; pinch together at the bottom and indent at the top.
Pressed Square-Make a loose roll; pinch together at four points.
TYPES OF QUILLS
0 Tight Roll
Loose Roll
Tear Drop
Marquise or Oval
Pressed Heart
Pressed Square

"S" Shape-Loosely roll one end of a strip of paper and then loosely roll the other end in the opposite direction. Do not glue. Use 3-inch length for small "S" and 1 V2-inch length for tiny "s".
"S" Shape
Scroll-Loosely roll each end to the center of a paper strip. Do not glue. Practice with a 2-inch length. Scroll
Open Heart-Fold a strip of paper in the center. Loosely roll each end inward to form a heart shape. Do not glue. Use 3-inch length for practice. Open Heart
Open Scroll or "V"-Fold a strip of paper in the center. Loosely roll each end outward to form a "V". Do not glue. Use 3-inch length for practice.
Because I Loved You I Gave ...
I gave you my imagination
Open Scroll or "V"
Carol Shields
so you would paint images in the sky. I gave you my ambition
so you could climb steep walls and build bridges into unchallenged minds.
I gave you dedication to achievement that gives you little rest.
I gave you my sensitivity so you could feel a pea under a mattress and hear a tear drop in the ocean.
I gave you my courage so you would dare to be as unique as a plug in a field of graceful seahorses.
You have left me now ... taking from me what you could use.
I Am Not Empty ...
I am discovering buried dreams, unused strengths, mature passions, and the power to touch that only life can give.
You must give me the freedom to develop my unnurtured self.
Give me your support and love so that I can soar with my unused wings.
I want to become all that you are today.
My Beautiful Children. June C. Schultz
(
.o1~ ~ ~ ht ;·kllHrtn
ABCDEFQ-ffJ KLMN ROMAN CAPITALS, C-2
Calligraphy
Calligraphy, "the art of oeautiful writing". Done with a square-edged pen tip, the effect achieved with the thick and thin strokes is one of classic beauty which has lasted for centuries. Calligraphic writing is now in the midst of a world-wide revival. Its influence can be seen in beautiful greeting cards, posters, official proclamations, advertising copy, and even "quotes on rocks". Until recently, we associated calligraphic writing primarily with church publications, but now imaginative use of the alphabets has no limits. Properly used, they can enhance many artand craft experiences and add a distinctive appearance to poster printing.
The tools and materials needed for calligraphic writing are relatively inexpensive. A pen holder, several sizes of Italic square-edge dip pen nibs (such as Speedball C-0, C-2, and C-4), and a 43

44
bottle of India ink or fountain pen ink will cost you less than $3. Properly cared for the nibs and holder will give you many years of ~se. Italic fountain pens are also available with !nterchangeable nib-units and require a thinner mk made especially for them. They are convenient to carry with you without worrying about the bottle of ink required for the dip pen.
For practicing, a smooth paper such as bond or even a good grade of typing paper can be used. Experiment with many kinds of paper. The results can be surprising. Stationery and art supply stores carry a large selection of paper stock for use with India ink and calligraphic pens. Ranging from a few cents a sheet to $8 or more, you can sel_ect what is appropriate for the project you are domg. If you have questions, ask for help. Most employees are knowledgeable and will be glad to advise you.
Buy at least one good reference book. It is important to always have a good model alphabet for reference. Many books are now available especially excellent self-teaching manuals th,at contain several different alphabets. Your library is also an e~cellent source for books on calligraphy and lettenng. What could be nicer than a book of Shakespeare's sonnets done in Italic to inspire the beginning scribe?
"The essential qualities of lettering are legibility, beauty, and character." Edward Johnston
<Q'>~
To live is to be slowly born.
<Q'i<Q'><Q'><Q'i
Transparencies
Carol Shields
Saint-Exupery
!t is not difficult to develop attractive, bright, and mformative transparencies. Few materials are needed: transparency film, permanent ink marking pens (bright, non-fading, non-smearing colors), color adhesive film, and mounting frames (optional). Additional materials that add to the appearance of your transparencies are rub-on tra~sfer let!ers, symbols, and color tapes (in a vanety of s1zes and designs).
These materials are available at most office supply stores, art supply stores, and stationery stores. Instructional books are also available
(some free) from the manufacturers of transparency materials. Start a collection of clip art from any source ~elevant to your teaching subject. This is an Immense help in stimulating ideas and for doing sketches both for transparencies and posters.
We are educated by what we see. We learn 11 percent of what we hear and 83 percent of what we see. T~e use of transparencies in reaching and teachmg could be an important part of your program when done creatively and imaginatively.
Carol Shields
Posters Posters are used primarily to announce events or to give specific information. Effective and interesting posters can be created by remembering four main elements: An attention-getting heading. Tempt the viewer to read the rest of your message. Lettering done on the heading should be bold and neat. The use of extra-large felt tip pens, steel brushes or flat !ettering brushes used with India ink or poster mk, and cut-out stencil letters will improve the appearance and speed the execution of the !ettering. Be sure the letters are large enough, 1 mch for every 25 feet of viewing distance. Illustrations, if they add to the appearance of the poster without cluttering it. Many media are appropriate, such as tissue collage, print processes (potato, eraser, carbon, and vegetable pnnts), print lifts, magazine cutouts, photos, etc. If 1t 1s colorful and interesting it will reinforce the heading. Brief message to the viewer. Keep this short so the lettering can be as large as possible. No more than two styles of lettering should be used and be sure the styles are appropriate for the poster content. Generally it is easier to read copy in lower case if there is a large amount. Your signature identifies your organization and should appear on the poster. When you have organized the four elements in your poster, make several quick layout sketches on paper to determine if your design, through clar~ty and proper emphasis, will appeal to the aud1ence ~ou w1sh_to reach. Start by lightly penc1l1ng 1n gu1delmes for all lettering. Block in areas for illustrations. You are now ready for the f1nal lettering on your poster.
Carol Shields
Because the fired stars move so well together with such high grace, we do not see them. ' Because the red water of our veins strives so faithfully for our fingers we do not feel it. We never miss what does not fit. We are visionaries of violence, and so servants of it. We are experts at what goes wrong, and so disheartened. The dragon we fear in guilt is the child of our boredom. We are blind to the harmonies of minor life and so ruthless with all other.
If, for example, sunrise were an accident, a one time eccentricity, dawn would find us ga_thered on the beach murmuring, cameras ready, m1crophoned. But the sun is no accident, neither is blood, nor top-soil, nor playground basketball nor spring, nor low laughter, nor rain. ' It is all grace dancing. We were given nerve to notice. We were given legs to dance along
Author Unknown
BIBLIOGRAPHY Albenda, Pauline, Creative Painting With Tempera Van
Nostrand Reinhold Co., New York, 1970. '
Alkema, Chester, Alkema's Complete Guide to Creative Art for Young People, Sterling Pub. Co. New York 1971. ' '
Brommer, Gerald, F., Transparent Watercolor Davis Publications, Inc., Worcester, Massachusetts, 1973.
Brooks, Walter, Acrylic Painting, Wester Pub. Co. Inc., Racine, Wisconsin, 1974.
Brow, Francis, Collage, Pitman Pub. Corp. New York 1963. ' '
Coplan,_ Kate, Poster Ideas & Bulletin Board Techniques: For Llbranes and Schools, Oceana Publications Inc Dobbs Ferry, N.Y., 1973. ' .,
Cutler, Merritt, How to Cut Drawings On Scratchboard Watson-Guptill Pub., New York, 1960. '
Dendel, ~sther Warner, Needleweaving, Easy As Embroidery, Countryside Press, Philadelphia, 1972.
Eager, Fred, The Italic Way to Beautiful Handwriting, Curs1ve and Call1graph1c, New York: Macmillan, 1974.
Eisner, Elliot, Educating Artistic Vision, Macmillan Co. New York, 1972. '
Ellender, Raphael, Basic Drawing, Doubleday & Co., Inc., New York, ·1964.

Evarts, Susan, The Art and Craft of Greeting Cards, Van Nostrand Reinhold Co., New York, 1975.
Gordon, Maggie, Alphabets and Images, Charles Scribner's Sons, New York, 1974.
Harvey, Virginia, The Techniques of Basketry, Van Nostrand Reinhold Co., New York, 1972.
Hill, Adrian, You Can Draw, Hart Publishing Co., Inc., New•York, 1974.
Horowitz, Betty-Lewis, Hilda, Understanding Children's Art for Better Teaching, Charles E. Merrill Books, Inc., Columbus, Ohio, 1967.
Jameson, Kenneth, Art and the Young Child, The Viking Press, New York, 1968.
Jameson, Kenneth, Primary School Art, Van Nostrand Reinhold Co., New York, 1971.
Kampmann, Lothar, Creating With Found Objects, Van Nostrand Reinhold Co., New York, 1971.
Kampmann, Lothar, Creating With Poster Paints, Reinhold Book Corp., New York, 1967.
Kampmann, Lothar, Creating With Printing Material, Van Nostrand Reinhold Co., New York, 1968.
Laliberte, Norman, Painting With Crayons, Reinhold Publishing Corp., New York, 1967.
Lehman, Charles, Italic Handwriting, Pentalic Corp., New York, 1973.
Lettering: Speedball Textbook; Hunt Mfg. Co., 1405 Locust Strtlet, Philadelphia, Pa. 19102.
Linderman, Earl W.-Herberholz, Donald, Developing Artistic and Perceptual Awareness, William C. Brown Co .•• Pub., 1974.
Lindsay, Zaidee, Art and the Handicapped Child, Van Nostrand Reinhold Co., New York, 1972.
Lowenfeld, Viktor-Brittain, Lambert, Creative and Mental Growth, Macmillan Pub. Co., Inc., New York, 1975.
MacDonald, Byron J., Calligraphy; the art of lettering with the broad pen, New York: Pentalic, 1966.
Meyer, Hans, 150 Techniques In Art, Reinhold Book Crop., New York, 19,61.
Newman, Thelma, Paper As Art and Craft, Crown Publishers, Inc., New York, 1973.
Nicolaides, Kimon, The Natural Way to Draw, Houghton Mifflin Co., Boston, MA, 1941.
Pluckrose, Henry, Introducing Crayon Techniques, Watson-Guptill Pub., New York, 1972.
Portchmouth, Secondary School Art, Van Nostrand Reinhold Co., New York, 1971.
Priolo, Joan B., Ideas for Collage, Sterling Publishing Co., New York, 1972.
Rainey, Sarita-Wasserman, Burton, Basic Silkscreen Printmaking, Davis Publications, Inc., Worcester, Massachusetts, 1971.
Rainey, Sarita R., Weaving Without A Loom, Davis Publications, Inc., Worcester, Massachusetts, 1966.
Reynolds, Lloyd J., Italic handwriting; exercises and text. New York: Pentalic, 1969.
Rottger, Ernst-Kiante, Dieter, Creative Drawing, Point and Line, Van Nostrand Reinhold Co., New York, 1963.
Schools Council, Children's Growth Through Creative Experience, Van Nostrand Reinhold Co., New York, 1974.
Seyd, Mary, Designing With String, Watson-Guptill Pub., New York, 1972.
Speedball Textbook: for pen and brush lettering (latest ed.), Statesville, N.C.: Hunt Mfg. Co., 1972.
Steffen, Bernard, Silk Screen, Pitman Publishing Corp., New York, 1963.
Stonham, E.H., Painting and Printmaking With Rollers, Van Nostrand Reinhold Co., New York, 1972.
Stribling, Mary Lou, Art From Found Materials, Crown Publishers, Inc., New York, 1970.
Taubes, Frederic, The Quickest Way to Draw Well, The Viking Press, New York, 1975.
Art Education Periodicals Art Erfucation, Journal of the National Art Education
Association, 1916 Association Drive, Reston, Virginia 22091. $15 a year for non-members.
Arts and Activities, The Teacher's Arts and Crafts Guide, 8150 Central Park Avenue, Skokie, Illinois 60076. $9 a year.
School Arts, The Art Education Magazine for Teachers, 50 Portland St., Worcester, MA 01608. $9 a year.
Beautiful young people are accidents of nature; but beautiful old people are works of art.
~.q.
45

46
Hello, Hello!
Hel - lo. Hel - lo (o), and wel-come to our show (o),. and if you'll let us, we'll show you we're glad ya came. We're set to
go (o), so if you're feel-in' low (o), be - gin-nin' now, we II show you how to play the
Follow with 18 beats during which everyone acts and ticks like a clock. Then back to the beginning. Take it through ... play the game. Stay on knees for four beats after the song is done, then everyone jump up and yell "Hello".
Movements
• Begin with group split in half, separated, facing center.
• "Hello, Hello, and welcome to our show" Group moves to center, bending up and down from the waist, shaking their up-stage hands as if they have straw hats. When the two groups get to center, everyone faces forward.
• "And if you'll let us, We'll" Everyone points at themselves.
• "Show you" Point to audience.
• "We're glad" Extend right hands.
• "Ya came" Extend left hands.
• "We're set to go" Cross arms Indian style, leaning heads first right, then left, right, left.
• "Uh!" Heads thrust forward.
• "So if you're feelin low" Put right arms above heads, let hands droop, and gradually sink at the knees.
game. 0 -pen
• "Beginnin' now we'll show you how" Gradually stand up straight.
• "To play" Extend right hands.
• "The game" Extend left hands.
• "Open the curtain" Everyone faces center, pretending they are pulling on the curtain. Take a step back on each syllable.
• "Fill the empty time" Everyone acts as clocks for 18 beats.
• "Hello. Hello, and welcome to our show" (Same as beginning)
• "And if you'll let us, We'll" (Same)

• "Show you" (Same)
• "We're glad" (Same)
• "Ya came" (Same)
• "We're set to go" (Same)
• "Uh" (Same)
• "So if you're feelin' low" (Same)
• "Beginnin' now, we'll show you how" (Same)
• "To play" Extend right arms. If there is one row, everyone goes down on left knees. If there are two rows, add the second bending over from the waist. If there are three rows, stand straight with right arms stretched higb.
• "The" Extend left arms.
• "Game" Both together
• After four counts, jump up and yell "Hello".' (taken from Gary Parker)
If you believe Within your heart you'll know That no one can change The path that you must go. Believe what you feel And know you're right because The time will come around When you'll say it's yours. Believe that you can go home Believe you can float on air Then click your heels three times If you believe, then you'll be there. Believe in yourself right from the start Believe in the magic that's inside your heart Believe all these things Not because I told you to But believe in yourself If you believe in yourself Just believe in yourself As I believe in you.
Charlie Smalls
NO MOLD FOR EDUCATION The uniqueness of the individual is a great asset in youth development. Henry M. Wriston, professor emeritus of Brown University, believes this and has some suggestions for educators. "Again there is hue and cry in the search for a 'relevant' general education. Along with a modicum of wisdom are large portions of naive speculation, false and deceptive measurements, meaningless statistics and exceedingly bad history.
"No such viable pattern ever existed; the notion is as unrealistic as that of a golden age. Education and standardization constitute a perfect example of a contradiction in terms. Human chemistry is such that no two pe.rsons of like ability, so far as that is possible to identify, exposed to the same curriculum, taught by the same teachers, reading identical texts would achieve the same educational results. "Teach them to read, induce them to write, give them enough mathematics to manipulate a handheld calculator. Those are the basics. Then open the widest possible opportunities.
"Some will read avidly, insatiably. Others will master the mysteries of science, and some will find a home in the laboratory. Verbal skill may not flourish among some, but they will do magical things in art, in music, the dance-an infinite variety of careers.
"Let us cease to long for that educational cookiecutter designed to shape our youth. Instead, let us rejoice and be exceedingly glad that human diversity is literally infinite-in the most exact meaning of that unique word. Open doors, reveal opportunities and release a myriad of talents. Fertilize minds, let them grow as they (not we) will.
''There is no pot of gold at the end of the rainbow. But across its spectrum there are diverse aptitudes waiting for a chance to find expression."
To Life, To Life, L'chaiim. L'chaiim, L'chaiim, To Life.
Sheldon Harnick
INCREASE MY FEELINGS
I like to live. I have a lot of feeling for things and people. There's a lot going on I don't seem to see. I need to know where the real life is, where the joy is, where the peace is. I want to get all I can out of life; and I want to give it back. Keep me curious in all my senses. Don't let me quit having a lot of feeling
for what's going on, here and anywhere. Make me more aware as I get older. Increase my feelings. Bring me to my senses.
Author Unknown
WHY DRAMATICS? Oreative drama, theatre, and performing permeate all areas of life. "A basic definition of drama might be simply 'to practice living'. The same definition might well be both adequate and precise as a definition of education; for this reason it is suggested that opportunities for drama should be provided tor every child and should be the concern of every teacher."
Activities in the arts, in this case drama, prepare participants to be creative, responsible, problemsolving individuals. It any member of the community cannot see this as an end relating to the general well being and development of the child, he is sure to acknowledge it as an asset for the "society'' of the future. For these attributes are of increasing importance as we look toward the day when today's youth are the controlling and producing citizens of the world.
As important as contributing to the development of our future society, however, is the contribution we make to the "person" that is developing. It might be said that existence did not place men in shells. It wrapped them in sensitive skin. Our goal then is also to develop a group of sensitive, perceptive, and feeling young people.
"The answer to many simple questions might take one of two forms-either that of information or else that of direct experience; the former answer belongs to the category of academic education, 47

48
the latter to drama. For example, the question might be 'What is a blind person?' The reply could be 'A blind person is a person who cannot see'. Alternatively, the reply could be 'Close your eyes and, keeping them closed all the time, try to find your way out of this room'. The first answer contains concise and accurate information; the mind is possibly satisfied. But the second answer leads the inquirer to moments of direct experience, transcending mere knowledge, enriching the imagination, possibly touching the heart and soul as well as the mind."
A leader of dramatics should: • Have a full, generous, and compassionate
interest in children, irrespective of academic ability.
"Drama is concerned with the development of intuition, which is no less important than intellect and is part of the essence of full enrichment of life both for those who have intellectual gifts and those who have not; intuition, like intellect, needs training. With intuition, all individual differences are developed to their full; there is no single criteria of what is right or wrong, or good or bad."
• Be understanding and accepting of each child and his resulting work. Encourage individuality.
"Education is concerned with individuals; drama is concerned with the individuality of individuals, with the uniqueness of each human essence. Indeed this is one of the reasons for its intangibility and its immeasurability, 'No two people are alike' may well be an accepted truism of physical appearance, but it is equally true of emotion and imagination, which comprise the root of full individuality, and yet are often the anthithesis of academic education, which inevitably (because of tests and examinations) tends to be concerned with the sameness rather than the differences of people. The differences are often most clearly reflected through the arts, and opportunity for actually 'doing' the arts is sometimes the wisest way of developing individuality."
• Believe in the reasons for involving youth in these activities. We must be sincere in this belief. If it is not important to us, it will not be of importance to the young people
participating. Remember, we are trying to: provide a controlled, emotional outlet for youth; provide an avenue for self-expression; encourage and guide the child's creative imagination; give young people opportunities to grow in social understanding and cooperation; and give youth experience in thinking and expressing ideas fearlessly.
• Be prepared and equipped with many ideas. Also, be willing and flexible enough to accept suggestions and modify plans, if appropriate for the situation.
• Be honest and straightforward, not an authority who is controller and dictator, but a congenial, understanding leader with ideas and suggestions.
"One false idea of drama and the approach to developing people through drama is the notion that the activity is free, implying that the participants are left to swim in the limbo of self-experience without assistance. It is important to remember that in the early stages of all creative work the participants experience a kind of fear of freedom, which can be a total uncertainty as to what to do; ideas either don't come or are self-rejected as inadequate. There is a need for someone to give a start."
The essential technique in this drama activity is the leader's use of open-ended questions to allow the participants to solve the situations and problems in their own creative ways.
The leader should remember that the "playing" is a means, not an end, but that it should never be carelessly done. Leaders help youth make use of their own resources and give form and substance to their feelings and ideas. The experience can (and should) be a rewarding and satisfying one for the participants.
The leader's function is not that of imposing a whole new set of factors upon participants, but of starting with the facets of human life that exist in all people-emotion, intellect, concentration, the senses, the physical self, and the imagination. With these, and some guidance, anything is possible.
Also, we can think of ourselves as breeders of individual thought and discrimination. For if every person is helped to enjoy and to know what it feels like to use the creative part of themselves when they are young, their eventual appreciation
of the arts is greater, without depending on someone else's tastes. Their discovery of the creative part of themselves may be likened to the discovery of a hidden gift, and there are untold numbers of gifts awaiting discovery.
(quotes from Development Through Drama, by Brian Way)
~/a~! CREATIVE DRAMATICS AND THEATRE GAMES Play is children's business. It embraces the use of imagination, is creative, and offers an opportunity for learning by discovery.
The dramatic activities that follow can be used in many contexts. Perhaps with groups of young children at a camp, at club meetings, as warmups to working on stage performances or mime and pantomime, or as brainstorming to develop ideas for plays.
No line can be drawn where creative dramatic activities stop and theatre games begin. Generally, creative dramatics are done with younger children; theatre games with older children and teens. Any age will find the creative dramatics activities enjoyable and useful, the degree of sophistication will depend on the age of the group. Older children and teens are capable of doing both creative dramatics and theatre games. For younger children, activities

should be in the creative drama area unless the youth progress through a series of the introductory activities and are ready for more sophisticated activities. In all dramatic activities it is useful to be conscious of, look for, and plan for three progressions. The progressions move from: 1. Non-verbal to verbal activities. 2. Group to individual activities. 3. Directed to non-directed activities.
..q..q-..q-..q-.
All the turtles of all the Tomorrows are hidden in the Shells of Today.
Creative Dramatics
SPARKLERS
J. Monahan
Use very active music for this activity. Establish that the environment is completely dark. When the music starts, everyone turns into sparklers, and they must fill up as much of the space with light as possible. Movements should be up and down, back and forth, and around and around. This activity is excellent to release an initial burst of energy.
MUSIC BALLOONS
For this activity use soft billowing instrumental music, with eventual builds if possible. As the music begins have the children pretend they are balloons and the music is the air that is filling them up. As they become full and begin to float, have them look below. Ask questions such as, "What is on the ground?", "What kind of a day is it?", "Are you happy or sad?", "What color are you?". Eventually have the music decrease in volume, and have the air trickle out of the balloons.
MUSIC FREEZES Use a variety of musical styles for this activity. Have the participants begin in a frozen position. When the music begins they should begin moving the way the music makes them feel. When the music stops they should freeze, and begin moving when the music begins again. The excerpts should be short and interesting.
MUSIC STATUES
Taking "musical freezes" a step further is fun. Use the same freeze/go technique with the music. Allow more time during the pauses, however, and have the children think of a character or person. When the music begins again they should move and be that character.
OBJECTS
A ball will be the example, but many other objects can be used. Begin by having the group throw a ball back and forth. After they establish the size, have it get bigger and smaller, then lighter and heavier. Have them throw it very fast, then in slow motion.
THE FACE
Begin with the group facing you, so they won't worry about seeing each other. The children will mask the emotion you tell them. Emotions such as hate, fear, anger, love, surprise, pain, joy, embarrassed, etc. Their cue to "mask" the word you throw them will be when you say "go". Tell them to relax after each mask. You may want to invent emotional situations rather than specific words to add variety.
THINGS IN THE HOUSE
Divide the group into teams. Select a room in the house, and ask each team to think of an object from that room and act it out. You will see toasters, can openers, radios, T.V.'s, clocks, faucets, etc. Have each group share with the others.
FOODS
Again in teams, have each group think of a specific food to act out for the other teams to guess. Foods with action will work bestpopcorn, toast in the toaster, Rice Krispies, eggs and bacon sizzling, bread being cut, a banana being peeled. Other possibilities might be jello, spaghetti, pie, and a bunch of grapes. They will think of many more.
ANIMAL TAG
The players move as whatever animal "it"' names. Each new "it"' calls out a different animal. Any player whom "it"' observes not moving as the animal automatically becomes "it"'. The leader
may have to interject animal changes if everyone is moving correctly for a long period of time.
WHAT AM I DOING?
Have one person think of an action to perform for the rest of the group, and have the group guess the action. Have them answer the questions, "Where are you?" and "Who are you?". Games and sports offer many ideas, but so do everyday activities and occupations.
MAKING MACHINES
Divide the groups into teams. Have each group decide on a real machine. Have each person become part of the machine, making appropriate sounds and movements. Make no attempt to guess what the machine is at first but react to the images it evokes. An alternative would be to create a machine that really makes something, such as doughnuts, toast, or popcorn.
SEASONAL IDEAS
The time of year is a boundless source of inspiration.
1. Prepare the soil, plant seeds, weed, and water the garden. The children could even become the plants.
2. Be a bird building a nest. Sit on the eggs, then become the young bird who carefully tries to stand and stretch.
3. Paint the house and wash the car. 4. Pack a picnic lunch. 5. Have fun in the sand at the beach. 6. Rake leaves. 7. Make a jack-o'-lantern. 8. Build a snowman. 9. Wrap a gift.
10. Practice a trick on ice skates.
USING AN ACTUAL STORY AND MUSIC
A very convenient and effective source of inspiration is an actual story, with a musical background if possible. Recordings of stories would also work well. The steps are: 1. Read the story, for example the "Nutcracker",
playing the music. 2. Have the participants decide on who will play
which role. 49

50
3. Make very general plans for how characters will enter and place themselves.
4. Read the story and play the music again, with the actors performing with the reading.
If possible, have the entire group involved in the presentation. You will note that there is no audience, it is completely for the involvement and enjoyment of the children. Other specific ideas might include: "Peter and the Wolf", a circus story with Calliope music, or Dr. Seuss recordings.
TO RELAX
When it comes time to end or there is a need to calm down, there are several techniques that naturally diminish the zest of the young dramatists as they act.
Have them become: •flames that are flickering and going out. •a snowman melting. •an ice cube in the hot sun. •a glass of milk that someone is drinking.
Either/Or
The following activities could be used in creative dramatics, as warm-ups for theatre games, or work in pantomime and mime.
1. Pretend that you are walking: through very deep snow; on marbles; through fallen leaves.
2. Pretend to eat: an ice-cream cone; a potato chip; a lollipop; a pickle; a toasted marshmallow; cotton candy; a lemon.
3. With another person or in a circle of people pretend to toss back and forth: a baseball; a basketball; a chunk of ice; a feather; a porcupine; a pillow; a very hot potato.
4. Show what you would do if: you had just walked 5 miles; the temperature is 95° in the shade; you tried to lift some barbells; you had a blister on your heel but were late for school; you had a cinder in your eye; you had to carry a full pail of water without spilling any.
5. Without using any objects, show how you: brush your teeth in the morning; nail two boards together; put on a pullover sweater.
6. Read aloud from one of your schoolbooks, pretending that you have a mouthful: of marbles; of peanut butter.
Show how you feel when: 7. you get a phone call: someone invites you to
a party.
8. you get a phone call: the dentist tells you that you have an appointment this afternoon.
9. you are looking out a window and see a little bird hit the glass and fall to the ground.
10. you look out the window and see it's raining hard (a) on the day of the game; (b) on the day of your school picnic.
11. you see a large dog running toward you.
12. you open a large present.
13. you find (a) a pretty stone; (b) a butterfly; (c) a bird's nest.
To laugh often and much; To win the respect of intelligent people and
the affection of children; To earn the appreciation of honest critics and
endure the betrayal of false friends; To appreciate beauty; To find the best in others: To leave the world a bit better, whether by
a healthy child, a garden patch, or a redeemed social condition;
To know even one life has breathed easier because you lived;
THIS is to have succeeded.
Ralph Waldo Emerson
~~~~
Theatre Games
PASS THE MASK
Begin by doing the "The Face" activity already described. Then have participants sit in a circle. The first person contorts face into a mask without the use of hands. He then turns to the person on the right. The next takes on the facial expression, as if turning into a mirror image of the first. When the second person has completed the mirror image, he changes the mask into his own, as he turns to his right, to pass his mask on to the next person, etc.
THE UNFOLDING FACE
This is a variation of mask activities. Rather than having participants react to one emotion, have them react to statements and stories that suggest changing emotions, and thus changing facial expressions. The result is a Jekyll-Hyde effect that shows great contrast in emotional representation through the face.
This activity allows for great individuality of response. Some emotional changes might reflect: hate/love, surprise/fear, joy/sadness, indecision/rei ief, passive/excited, confident/embarrassed, etc.
PASSING OBJECTS
Have the group stand in a circle, and begin by having them do the "objects" activity already mentioned. Have them then move to passing an object from one person to another. The object should change as it changes hands. The participants should not draw the object in the air, but rather use it to show the person next to him what it is. Once around the group begin again, passing objects that have a lot of texture (a soft baby, gum, a pin cushion, a hot potato, etc.). Next time around add sounds as the objects are made and used. Next time add more and larger movements. This exercise is fun, and a logical introduction to pantomime and mime.
BODY SCULPTURES
Call out a word that represents an emotion or feeling. Have four members of the group (one at a time, but in quick succession) move forward to create a sculpture of that feeling. Each person should be touching at least one other person in the sculpture. Have the sculpture freeze. Then have the rest of the group name the sculpture and speculate as to what may have happened directly before, and what will happen from this point on.

BODY METAPHORS
In small teams, have the participants act out the following phrases and cliches for the rest of the group. Head in the clouds Head in the sand Hot-headed Hair-raising Nose out of joint Sink your teeth into it Eat your words Lump in your throat
Get it off your chest Butterflies in your stomach Ants in your pants Twist his arm Fight tooth and nail Uptight Blow your mind Walk a straight line
If you want to be original, be yourself; God never made two people exactly alike.
Music As Inspiration For Action
Use music that has three definite feelings: tranquility, excitement, and surprise or resolution. Play the music for the group. After playing through it once tell them where the action for the short scene will take place. The only information you provide is the location. Possibilities could be the dentist's office, an art gallery, a store, or the kitchen. Play the music through again as the small groups of 2-4 listen, now knowing where the location is. Then have them decide who the characters will be, and how the action will proceed. The "William Tell Overture" is a possibility, and you will be able to find many short spans within other pieces of classical music. The action usually progresses as follows: 1. During the "tranquil" part of the music the
place and characters are established. 2. During the "excited" portion of the music
some conflict or a chase develops. 3. During the "surprise" or "resolved" music
(whichever you choose), the action comes to a climax or is resolved in some way.
The possibilities here are endless, and sometimes offer funny results.
Leisure is the time for doing something useful.
More on Creative Dramatics
Everyone is creative-anywhere, anytime, anyplace! Creativity needs only to be practiced and encouraged. It is limited only by the extent of the imagination. Any restrictions of time, space, conditions, and numbers involved call for more creativity. In creative dramatic activities, whether for recreation, group mixers, or a production, the process is as important as the product in the educational sense. The process involves decisionmaking, working together cooperatively, and having fun.
The following creative dramatic activities can be used for recreation, workshops, mixers, or as exercises to loosen up a group that may be planning to develop a production or play. Because there are always some members who are more inhibited or embarrassed about 'letting loose', it is best to begin with everyone in the group doing the same thing. Another suggestion is to start with the non-verbal activities and work toward the verbal (the easiest form of verbal being group singing).
There are some simple tips for working with a group. First, explain that you will be using two terms-"take space", meaning to make sure everyone has some room around them in which to move, and "freeze", meaning to freeze in that position and stop talking. Second, briefly talk about the ESP's of Drama. This will give you some simple terminology to use during the course of the activities, pointing out the examples of good use as you observe them. • E=exaggeration, energy, enthusiasm,
emphasis, enunciation • S=spirit, splash, sensitivity, sincerity • P=pizzaz, polish, practice, pride in
performance, projection These ESP's, when used in producing a play, musical number, Share-the-Fun 4-H act, county Arts-In Show, church drama presentation, or for just the immediate experience of recreation, will serve as simple guides for the participants. The leader's main responsibility for these activities is to be enthusiastic, to enjoy, to 'let your child come out and play', so to speak. The leader's attitude will be caught by the entire group.
Two men looked out through prison bars, One saw mud; the other stars.
LOOSEN UP THE GROUP!
Oscar Wilde
Ask everyone to stand like a chicken, feet apart, knees bent. Add the 'wings' by putting your hands under the armpit and flapping. Now for the 'crow', "Er-er-er-er-Errrrrrr"! The crow becomes the chorus for the director's line. For example:
Director, "In the morning the rooster crows" Chorus, "Er-er-er-er-Errrrrrr!"
Director, "He gets us up and on our toes" Chorus, (repeat crow)
Director, "Today he crows as if he's froze" (Chorus)
"I think that's ice upon his nose" (Chorus) The director can make up lines to fit the occasion. Perhaps take the group to the zoo, add other animals with characteristic sounds and body stances. In the process of this exercise, the director relates the ESP's, character development, etc.
NON-VERBAL ACTIVITIES "Take Space"
• Shake and loosen the face • "Mirror-Mirror on my neighbor"; "Pass the
Mask" (in partners) • Move as a character (young child, elderly,
cowboy, etc.) • Pass an object around the circle: pantomime
size, weight, etc. • Be an object from the kitchen: divide group
into groups of three or four. They each have a few minutes to 'become' as a group an appliance, object, or item from the kitchen. Show the rest of the group. Repeat being something from inside the refrigerator; another room in the house.
ADD PROPS TO SUPPLEMENT
Use a simple prop (for example, open-mesh paper meat trays, one for each person in the group, and have each person use it as a different prop). It might be a tennis racket, an egg carton, a sieve, a car radiator, etc. Have members 'freeze' with prop and then use in a different way, 'freeze' and repeat. 51

52
PROPS PLUS MUSIC
Use a jazz music selection and have members select an item from a 'prop bag' you have put together. (Might include ice cream buckets, poles, hats, wrapping paper tubes, pieces of fabric, paper plates, cups, etc). As music plays, each person uses prop as some item in scene from the Mardi g ras or parade. Stop music, 'freeze', exchange prop with person near you, start music, and repeat several times.
VERBAL ACTIVITIES
Start by re-emphasizing the ESP's! These are as important when singing as when speaking or pantomiming. Action songs are an easy place to start. The PEANUT BUTTER SONG can be turned into an opera by setting the stage and asking all to sing it as if they were opera singers. Each person assumes the attitude, stance, and character of an opera singer. The director can serve as the concert master, I isten ing to the 'pitch', etc. If space allows, set the stage with chairs for members to stand on, blocking group into interesting levels and stage positions. If using for club activity or recreation, divide the group into smaller groups and have one sing the song as if an opera singer, as if a pre-schooler, cowboy, movie star, elderly person, etc.
The CRAWDAD song is another simple song to learn and allows for simple characterization, swinging partners, hand clapping, prop improvising.
HELLO-HELLO would be an ideal opening number to quickly choreograph with the group and could be used at county events, program openings, etc. The energy, enthusiasm, and exaggeration of the song, enunciated clearly, will be more important starting points for vocal verbalization than the musical quality. The important thing to remember is to get everyone involved, to have fun, and encourage an awareness of how the ESP's lead to Exciting Showmanship in Performance if creative dramatic activity leads to producing a show or act for public performance.
PEANUT BUTTER SONG
Peanut, peanut butter, jelly "
First you take the peanuts And you dig 'em (5 times) Then you smash 'em (5 times) Then you spread 'em (5 times)
Peanut, peanut butter, jelly "
Then you take the berries And you pick 'em (5 times) And you smash 'em (5 times) Then you spread 'em (5 times)
You get Peanut, peanut butter, jelly
II II II II
Then you take the sandwich And you bite it (5 times) And you chew it (5 times) And you swallow it (5 times)
You get (pantomime a stuck together mouth while humming first two lines)
GOPHER GIRLS AND GUYS
We are the gopher girls, We always go-fer boys They never go for us We always go-fer them
But when we go-fer them, They always go-fer home We are the gopher girls Please go-fer us! (Can insert guys for girls and girls for guys)
Melody: Ta-Ra-Ra-Boom-D~e-Aye Carole Bonesho
CRAWDAD SONG
You get a line and I'll get a pole, Honey.
You get a line and I'll get a pole, Babe.
You get a line and I'll get a pole We'll all go down to the crawdad hole, Honey, oh, babe of mine.
(2) Yonder comes a man with a sack on his back (fi II).
Got more crawdads than he can pack. (3) Stuck my hook in a crawdad hole.
Couldn't get it out to save my soul.
(repeat first verse for ending)
Do more than exist-live Do more than touch-feel Do more than look-observe Do more than hear-listen Do more than listen-understand Do more than talk-say something.
John Rhoades
PANTOMIME AND MIME "In the age of noise we live in, it is sometimes wise to listen to what silence has to tell us."
Samuel Avital
Mime
David Alberts says, "The words· 'mime' and 'pantomime' (meaning the art) are often used alternatively, yet they are not synonymous. In simplest terms, a pantomime is an illustration of a story. It depends heavily upon accurately described objects, actions, situations, and events to tell the story. Mime, on the other hand, may tell a story, and relies upon a more implicit, more abstract approach to the theme, which is of greater importance in mime than the means of presentation. Pantomime is explicit, whereas mime is ambiguous. But to be ambiguous is not necessarily detrimental. In mime there is no right or wrong interpretation. There is less questioning of motivations and situations in pantomime than in mime.

"A pantomime can cover any subject, from an ant to the universe, with reasonably equal success. Mime takes this basic concept one step further. It deals not only with the physical aspects of the ant and the universe, but also with any underlying motivation, question, or implication in its existence, function, or merit. Mime also presents situations that otherwise could not or might not exist for the express purpose of posing questions or offering a perusal and perspective of that which could or might happen. Pantomime deals with the physical world. Mime deals with the physical world, its implications, and its interpretations-a much broader and less conclusive range or subject matter." When reduced even further, pantomime is the substitution of a gesture for a word, a specific word, represented by a specific action. In formal pantomime there is very explicit indication of character and communication as a narrator introduces and makes transitions between the characters involved. Mime reaches further into the emotional involvement of situations, extends beyond language and direct substitution of words for actions, and the story it tells is dedicated to an objective.
Speaking to the little prince about love and life, the fox says:
''And now here is my secret, a very simple secret: It is only with the heart that one can see rightly; What is essential is invisible to the eye".
Exercises
Antoine de Saint-Exupery The Little Prince
The exercises which follow prepare for and lead into movements that can be used in pantomimes and mimes. When doing them, keep thinking of what the intention or purpose· of the exercise might be. You may come up with some good ideas to incorporate into a mime or pantomime.
The greatest unexplored area lies under your hat.
FACE
Abbey Press
1. Pretend you have a thousand strings attached to all the muscles, pores, even hairs of your face. A force outside of yourself pulls from above. Every part of your face should snap up, lips, eyebrows, nose, cheeks. Do the same with the force pulling from the the left, right, and down. Practice rotating into four positions, holding each 2 seconds. 2. Practice standard expressions of joy (everything up, especially corners of mouth}, sorrow (everything down), surprise (everything open, think of being whacked unexpectedly in the face), anger (everything tight, teeth clenched but bared and eyes focusing directly forward}. Think up more of your own. Work only on face. Keep body relaxed. It is important to be able to isolate your head movement from your body. 3. Scrunch face tight, then explode on handclap (or any other signal} to wide open. 4. Practice focusing eyes on a distant object, then focus slowly in to about 6 inches in front of your face. This is an important technique when you start to work on 'the wall'. 5. Rotate the eyes in circles first clockwise, then counterclockwise, keeping them as wide open as possible. Stick out the tongue and add it to the rotation.
BODY
1. Rotate shoulders, with arms hanging loosely at your sides, forward 1 o· times, then backward 10 times. Rotate one shoulder forward while rotating other shoulder backward. Reverse. 2. Move head from side to side while facing forward. 3. Lift rib cage up and out from rest of torso and move from left to right with arms stretched straight out from your shoulders. 4. Rotate hips without moving rest of your body. Feet should be approximately 18 inches apart, knees slightly bent. 5. Rotate one foot at the ankle while standing on the other foot. Keep leg straight and lead with
pointed toes to form perfect circles. Make sure you do both clockwise and counterclockwise. Repeat with other foot. 6. Pretend you're a marionette. Let outside force yank up body parts (one at a time, hold 2 seconds each}. Start in loosely bent-over position, head resting on chest, knees together and bent slightly, toes toward each other. Yank up head, shoulders, elbows, wrists, hands, fingers, rear, chest, knees (to start you walking, stay loose). Always do a shoulder, elbow, etc., at a time. Reverse process until you're back to your original position. 7. Make believe your fingers are dominoes. Hold hands out in front of you, fingers spread, palms away from you. Let thumb hit second finger, second finger next hit third finger, and so on. As each finger pits next finger let previous finger snap back into place. Reverse process by starting with little finger. 8. In standing position stick arms straight out in front of you, palms away from your body, fingers spread, and snap shoulders back and forward. Great technique for coming up against a flat surface. 9. Still in same position, rotate arms in large full circles while crunching your hands into a fist and then exploding them into an open position. Get the hands opening and closing as fast as possib.le. Think of sending out large spurts of energy. 10. In same position with palms down and fingers together but straight, move hands slowly forward while bending fingers a knuckle at a time starting with the tips of the fingers. Excellent technique for exploring the edges of surfaces (tables, walls, etc.).
"Mime is like moving in water, has the rhythm of fire, and is bound to the earth."
Samuel Avital Undulate in a free form, keeping the image of water. Think fluidity and stay relaxed.
FRONT UNDULATION To begin have: • Knees straight • Straight back, bending slightly from the waist • Head in straight line with back In succession, as if being pulled by a string, bring: Knees-forward 53

54
Hips-forward Chest-forward Head-back, gradually springing forward as the original position is assumed. Activities utilizing this movement include: serving a tennis ball, smoking, horseback riding, a cowboy drawing a gun. When practicing, have everyone think of many more and share them.
REVERSE UNDULATION To begin, have: • Knees bent • Back curved (rounded) • Head directed at toes In succession, as if being pulled by a string, bring: Knees-back (straighten) Hips-forward Back-straight (to stand) Then reverse: Knees-forward Hips-Back Back-curved (collapse from waist to shoulders)
Activities utilizing this movement include: flipping a penny, getting shot, smoking.
SIDE UNDULATION
To begin have: • Feet slightly spread apart, weight evenly
distributed • Back straight • Arms directly out to sides, from shoulders
In succession, as if being pulled by a string, bring: The right knee-directly right, staying straight The right hip-directly right, staying straight The right side of the torso-directly right The right shoulder-will follow to the right The head will lean to the opposite direction. Return to center, repeat to left.
Activities using this movement include: flying a kite, pulling a rope, walking a dog, a baseball swing, a golf swing.
Rules There are three important rules to remember when working with imaginary objects and using
energy to create something from nothing. Maintain: 1. A fixed point or focus. It must be obvious at all times where the eyes are looking. The mime must focus there, on that point, and not gaze randomly.
2. Diction of Movement: There must be no wasted movement to distract from the important action. All actions must be specific, clear, and purposeful.
3. P-C-D (Preparation, Contraction, Decontraction): In other words, every time the mime grasps an object or touches something he must:
a. Prepare to take it with his hand perpendicular to the object and his wrist.
b. Take it or do it (contraction). c. Release it or move away. Again with the
hand perpendicular to the object.
If you practice and employ these rules, your mime and pantomime movements will be clear, direct, and understandable. Most important, don't be sloppy.
MINI-MAXIMS FOR MY GODSON
-when I was a Boy Scout, I had a troop leader who would take us on hikes not saying a word, and then challenge us to describe what we had observed: trees, plants, birds, wildlife, everything. Invariably we hadn't seen a quarter as much as he had, nor half enough to satisfy him. "Creation is all around you," he would cry, waving his arms in vast inclusive circles. "But you're keeping out-Stop wearing your raincoat in the shower." I've never forgotten the ludicrous image of a person standing in a shower booth with a raincoat buttoned up to his chin. It was a memorable exhortation to heightened awareness.
The best way to discard the raincoat, I've found,
is to expose yourself to new experiences. It's routine that dulls the eye and deadens
the ear ... Get rid of that raincoat and let creation in.
Arthur Gordon
Specific Movements
The following basic movements are used again and again in building mimes and pantomimes. It is important to encourage beginning mimes to go beyond these movements to develop and practice whatever moves are necessary for the stories they wish to tell. They have the tools they need in the exercises and their imaginations.
MIME WALK #1
This walk is used as a traveling walk, begin with legs together to show the mime is covering ground. Then: • Put left leg forward with foot flat on the floor.
Also swing the right arm forward. Weight will be on right foot.
• Pull the left foot back, flat along the floor, and bring back right arm.
• Think of having a tightly coiled spring under the heel of right foot. As the left leg comes back even with the right, the spring pops up forcing you to switch the weight over to left foot and right foot arches.
• Put right leg forward with foot flat on the floor. Also swing left arm forward. Repeat sequence.
When walking, the shoulders should remain on one level and focus should be on the line of the horizon.
MIME WALK#2
This walk is used when the mime wishes to show the weight of a burden on his back, to appear to run, or to appear to skate.
Begin bent over slightly from waist, have weight on the ball of left foot with knee bent; right foot flat on the floor, perpendicular to the left. Then: • Roll weight to heel of left foot. • As this happens, the right foot crosses behind
the left. • Bring right foot back to its original position,
transferring weight to the ball of right foot, bending right knee. Repeat procedure.
THE WALL
This effective illusion is the basis of many mimes. The three rules are important to remember here.

Begin with feet slightly spread apart, slightly bent over from waist, and knees slightly bent. Then: • Let one hand snap on the wall with fingers
spread. Be sure to indicate it as a point of visual focus.
• Let other hand snap onto the wall with fingers spread, and focus on it.
• Pull first hand away. It may be helpful to think of pulling it away from a sticky surface. Be sure not to move one hand before establishing the next place on the wall.
This technique can also be used to create windows by looking through the wall instead of at it. To cover ground and move along the wall, side undulations work best. Do them only after both hands are established. Remember to keep hands at the same depth (so wall doesn't look uneven), and do not tilt them forward or back.
These moves are also used to create the illusion of being inside a box that is growing or shrinking in size. Also think about touching and moving along rounded objects
THE CORNER
This technique is used to create a corner for a wall or building. We will build a corner to the right. • Create the side of the building with "The Wall".
• Move along with side undulations to the right until edge of the building is reached.
• Leave left hand on the building directly in front of body.
• Place right hand perpendicular to the left (around the corner).
• Do one more side undulation to the right and appear to be looking down the street.
THE LADDER
To begin have: • Feet placed evenly on floor. • Back straight. Then: • Bend right knee. • Establish two fixed points with your hands.
(These will be the sides of the ladder so they should be an appropriate distance apart and the hands should maintain the shape of the
ladder.) These points should be above shoulder level.
• Simultaneously, as the hands are pulled down to chest level, the weight shifts to the ball of left foot, and left knee bends. Repeat.
THE STEPS
Going up steps is similar to "The Ladder", except that we establish a banister off to the side. To begin have: • Back straight. • Right arm elevated slightly and right hand
establishing the height and shape of the banister, forward of the body.
• Left knee bent, weight on the ball of left foot. Then: • Bring right hand down along the banister in a
straight diagonal line, to slightly behind the body.
• Simultaneously, transfer weight from left foot to ball of right foot. Right knee will be bent.
• Move right hand forward of the body, establishing the banister again, and repeat the procedure transferring weight back and forth.
The Rope
This movement is also useful for flying a kite and walking a dog.
To begin have: • Back straight. • Feet 18 inches apart. Then: • Turn upper part of body to the left. • Reach over body with right hand, grab rope. • Grab further out with left hand while leaning to
the right (by bending the right knee slightly inward).
• Pull rope from left to right across body at waist level using a side undulation movement. There should be no reason for your feet to move unless you're being pulled.
All the wonders you seek are within yourself.
Sir Thomas Browne
Come on, ease on down, ease on down the road. Don't you carry nothin' that might be a load. Come on, ease on down, ease on down the road. Cause there may be times when you think
you've lost your mind and the steps you've taken leave you there
four steps behind. Just you keep on keepin' on the road that
you choose and don't give up walkin' cause you gave up
shoes. Come on, ease on down, ease on down the road.
Charlie Smalls
Pantomime Activities
1. Go around the group having everyone perform actions that are direct substitutions for words. Possibilities include: "Oh Wow!", "No, No", "Shame", "Darn", "Ish", "Give me!", "Love", etc.
2. Have everyone perform a formal pantomime with two characters and a narrator. Procedure:
a. Mime stands center, as narrator, and mimes, "I speak, you listen." b. Narrator gestures, "Here" and moves to one side. c. The mime takes on the appearance and movement of the first character and establishes it. No action takes place. d. Again, as narrator, the mime gestures "Here" and moves to the opposite side. e. The mime then takes on the appearance and movement of the second character and establishes it. No action takes place. f. Resuming the first character, after the narrator again gestures "Here", begin the action between the two characters, passing the sequence of .events and each character's reactions from one to the other.
3. Have mimes in pairs having an argument. One is trying to convince the other the world is flat, and the other is trying to convince the first that the world is round. Give participants some time to consider how they will deal with the problem. Have them first perform the argument in normal pantomime "conversation". Then have them exaggerate the movements first as if they were across a lake (big), and second as if they were very close (minute). 55

56
Ideas for Mimes/Pantomimes 1. Solve the problem: You are carrying a suitcase in one hand, and your rain coat is over your arm. You have an umbrella in the other hand. It is closed. It begins to rain, and you want to put on your coat, and open the umbrella. You cannot set the suitcase down on the ground. 2. Think of situations which employ the basic mime movements you know and weave a story. 3. Think of situations involving a discovery that will lead to an abrupt change of emotion (result should be an obvious body and facial change). Think in opposites. Love/jealousy, trust/anger, joy/sorrow. 4. Be an animal with subtle human qualities. Try being a human character and then an animal. 5. With a partner, set up a situation in which one of you is an inanimate object (machine, tree, gum, etc.) acted upon by the other. Develop a story line. 6. Explore ideas from fantasies, famous quotes, current events. 7. Some further specific ideas to elaborate on might include: A cowboy-riding horse, adjusting hat, shooting, opening saloon doors. Riding a subway-starting and stopping, hanging onto cuff, getting bumped, reading paper. Being on a boat-walking the ramp, rising and falling with the waves, being sick. A burglar-moving along house, going up ladder, opening window, looking in jewelry box. A picnic-eating foods, spreading blankets, playing, having difficulty with insects. Sports-as the individuals, teams, or spectators. The artist-setting UIJ easel and canvas, squeezing out paints, painting, looking out the window at the view. The mirror-two mimes doing a mirror image of each other. A twist might include an irnage that doesn't follow the master. The park-people walking dogs and pushing carriages, fishing, children playing, gardeners, planting flowers. The above ideas are only beginnings. It is up to the performers to give the ideas life and develop story lines. The imagination of the mime is the best source for idea development.
Each living being is an important part in the life of every other living being, each :ninute atom of life is an important part of eternity, an unbroken chain of life and love that draws us together whether we be large or small, the perplexingly intricate or the purest essence of simplicity. We are all valuable to each other for if one link of this chain breaks it takes eons for the wound to heal. When one of our brethren suffers a part of us suffers too, that small voice inside of us is stilled in mourning. When a new life joins us, the quiet song becomes a loud symphony, echoing from the mountain tops and crashing down rocky rapids, declaring that the God of Light has drawn us closer to Him with the gentle yet commanding bond of Love. Let us, therefore, become welcoming symbols of this Life by spreading our Love over all the universe.
Mary Seabloom
DRAMATICS UTILIZING FOOD OR FOOD AND NUTRITION CONCEPTS Commercials-Pick the 10 commercials you consider "Best" in that they advertise what you consider to be a good product, portraying honest information in an honest way. Dramatize the commercials. • Commercials-Pick out products with
unfavorable points (perhaps no nutritional value, artificial sweetners, dangerous dyes, or artificial perservatives) and develop original (and perhaps humorous) commercials pointing out these factors. Research will be necessary
to insure correctness of information and results.
• Commercials-Develop original commercials pointing out preventative or remedial actions. They might relate to "Mr. Yuk" or antidotes for poisons and poisonous plants, bulging cans, etc. Again, research will be necessary.
• Home Remedies-Research old-fashioned home remedies (poultices, etc.) made of foods, why did they work? Or didn't they? Dramatize the preparation and use of the remedies.
• Fruit Face-Research the fruits, vegetables, and foods that are considered "beauty treatments." Why? Once you know which are considered "O.K." for your face, create an array with a variety of color. Then create an original "fruit makeup." Avocado, strawberry, and apricot makeup might be fun and good for your face (it won't last on stage). Maybe you'll want to try adding a wig made of corn husks, dried banana peels, or a variety of greens?
• Cultures-Select and research the food nurturing, processing, and/or preparation of a different culture or period of time and then dramatize it. Discuss nutritional values, differences.
• Role Playing-Select a location, situation, and characters with a purpose or problem. Then create an original impromptu drama. You may want to go through it more than once. Examples: Location: Kitchen Situation: Evening, family dinner over, dad not home. Characters: Mom-Interested in good, well
balanced diet for family. Grandma-Can't believe the newfangled kitchen conveniences. Father-Is home late because of work, missed dinner. Kids-One is a snacker, the other is on a diet.
Location: Park Situation: Picnic Characters: Sis-Trying to start grill and
having difficulty. She's trying to do all of the work so mom and dad can have a nice time. Little Sis-Trying to help having trouble with ants.

Mom-Playing frisbee with Dad, can't keep her mind off the girls.
The important factor is to use the beginning only as that-a beginning. Let the characters develop the situation as they go. You can think of many ideas of your own.
Brainstorming-One way to get ideas might be to brainstorm and list very quickly all of the things you can do with a: walnut, whole pepper corns, brown sugar, molasses, flour, Crisco (line of the Tin Man from "The Wiz". "Slide some oil to me, run it down my spine, if you don't have STP, Crisco will be just fine."), baking powder, a strainer, etc.
.q..q..q..q.
A generous heart dares to speak, it needs no preparation.
POETRY UTILIZING FOOD OR FOOD AND NUTRITION CONCEPTS Any thought or subject can offer inspiration for poetry. Foods can be the basis for funny, serious, or endearing poetry. Look at a food or think of an occasion when food was important and write a poem. Here are examples that took only a minute each: You appear a lovely orange, How succulent you feel. But, will I have a "sour" face When I get within your peel? Mama made it fresh today. Delicious blueberry jam. Be careful though, you'll get the stick, It melts in your mouth, but messes your hands.
Where are those golden days of the family turkey?
Different now, because of growing. Growing distances, Growing change, Growing apart. The fires of those days, have died, in many ways. But there need be no kindling, to make the mind blaze with warm memories.
KISS A FROG
Ever feel like a frog? Frogs feel slow, low, ugly, puffy, drooped, pooped. I know. One told me. The frog feeling comes when you want to be bright but feel dumb, when you want to share but are selfish, when you want to be thankful but feel resentment, when you want to be great but are small, when you want to care but are indifferent. Yes, at one time or another each of us has found himself on a lily pad floating down the great river of life. Frightened and disgusted, we are too froggish to budge. Once upon a time there was a frcg. But he really wasn't a frog. He was a princ.e who looked and felt like a frog. A wicked witch had cast a spell on him. Only the kiss of a beautiful maiden could save him. But since when do cute chicks kiss frogs? So there he sat, unkissed prince in frog form. But miracles happen. One day a beautiful maiden grabbed him up and gave him a big smack. Crash." Boom." Zap.'." There he was, a handsome prince. And you know the rest. They lived happily ever after. So what is our task? To kiss frogs, of course.
Wes Seeliger, Episcopal Priest
"FROG" PUPPET This frog puppet has many uses in teaching situations. Youngsters love talking to and answering puppets; it seems it's easier than talking to adults. "Frog" is a wonderful get-acquainted tool, but beyond that it serves as a vehicle to begin discussions in many subject areas. For example, a discussion of nutrition might begin by asking the question, "What do mothers feed their babies? and why?'" after having "Frog" tell this story.
THE BIG MOUTH BULLFROG There once was. a big mouth bullfrog. He went to the mama giraffe and asked, "MAMA GIRAFFE, WHAT DO YOU FEED YOUR BABIES?" And the mama giraffe said, "Milk." "OH, THAT'S NICE!" said the big mouth bullfrog. And he went to the mama lion and asked, "MAMA LION, WHAT DO YOU FEED YOUR BABIES?" And the mama Lion said, "Milk." "OH, THAT'S NICE!" said the big mouth bullfrog. And he went to the mama monkey and asked, "MAMA MONKEY, WHAT DO YOU FEED YOUR BABIES?" And the mama monkey said, "Milk." "OH, THAT'S NICE!" said the big mouth bullfrog. And he went to the mama alligator and asked, "MAMA ALLIGATOR, WHAT DO YOU FEED YOUR 'bABIES?" And the mama alligator said, "BIG MOUTH BULLFROGS." "oh, that's nice." said the big mouth bullfrog.
Construction of the puppet There are some patterns available for puppets. If not appropriate in size or character, perhaps they could be adapted. "Frog" is an original design, developed to be large enough to be an effective and colorful communicator. The steps in his design include: 1. Drawing a rough picture of the general appearance of the puppet desired. 2. Redrawing the puppet, isolating just the shape of the outer sewn edge. (This will be the basis for a "prototype puppet.") Try to anticipate where the design will need extra fullness for shape and allow for seams. 3. Using flexible fabric, cut a small version of the pattern, sew it, and determine where it needs to have additions or subtractions in fullness to get the shape desired. 4. Repeat #3 if changes are necessary. (Constructing a small version of the puppet may save much time and materials in the long run and there will be a baby puppet, tool) 57
Especially about "Frog"
Materials and construction: Soft, fuzzy material was used. The material in the front section of his stomach was reversed for some variety of color and texture. His head and front stomach section were lined with a very thin sheet of polyurethane to add body and strength. Pelion could be used also, and in many cases nothing is needed. The foam in this case meant the head needed no extra stuffing.
Felt was used for his mouth and offered strength with flexibility.
The stuffing used was cotton upholstery stuffing used in making toys. Polyester batting and foam also work well.
Elastic finger holders were sewn inside the mouth prior to the final sewing. These give the operator greater control.
If there are not appropriate eyes available, 58 buttons work very well.
THE HEAD -cut double -before sewing sides:
insert rear head piece along vertical cut along center back.
-insert mouth along horizontal cut in front, at points.
THE TUMMY
REAR HEAD -Cut single -insert in ver-
tical cut in head.
-cut single, not double -insert along a vertical
cut in the frog's body front for fullness

MOUTH -cut 2 pieces
All of the puppet pieces should be increased proportionately when making the pattern. Thus, any size can be achieved by using an opaque projector or multiplying the existing measurements by the number of times you would like the puppet enlarged. Any puckers left after easing pieces into slits will work out when puppet is stuffed.
-insert in horizontal cut in head piece.
59

60
5. Increase the small pattern 1-2-3 or however many times you wish to achieve the size you desire. (Frog's measurements were increased three times.) Draw the enlarged pattern on paper. (Tissue works well with a black pen or small tip marker.)
6. Lay out your pattern on your fabric and cut. Fabric for larger puppets may be somewhat heavier and less flexible, but keep weight and manipulation capabilities in mind.
7. Hand baste each section of your puppet before the final sewing. You may save yourself a lot of ripping.
8. Sew each section by machine. Pay careful attention to the progression of construction after the pieces are complete. Figure out what spot must be left open so the puppet can be turned out and stuffed.
9. Turn out and stuff puppet.
10. Hand sew the opening closed. (Don't sew your hand opening closed, however!)
life's music began as the puppet walked upon the stage held by the master's hands do what I command, my little wooden friend the puppeteer grunted I gave you life and by these strings only shall you live when the audience finds you tiresome I will cut your strings and discard you to the pile of trash for I will need you no more so be of good use to me as you live that coins shall jingle in my pocket
now a puppet is a puppet and a puppet has no choice
but you, my friend, are human and with this you can rejoice
Each soul must meet the morning sun, the sweet earth, and the Great Silence alone.
Walter Rinder
Dakota Indian
THE PERFORMING ARTS
The Value
Any form of expression is of great value in developing the minds and attitudes of young people. The expression could involve creating through art forms, literature, music, oration, drama, dance, or any related fields.
The experience of preparing and performing can be of great value in the development of what might be called a person's inner self. Any form of entertainment serves as an emotional outlet. Thus, it is I ikely that tense or frustrated energy could be directed toward a rewarding and productive end. As a vehicle for expression, performance involves the feeling of accomplishment that may be a result of giving form to an individual's ideas and feelings. Also, there is the satisfaction of seeing an extension of yourself praised and appreciated as enjoyable work well done. Satisfaction in any of these areas will encourage and may result in the willingness on the behalf of the participant to work on a similar task again. Performance experiences can contribute also to the development of a person's outer self, or what may be called "presence". An activity such as this gives the participant more experience in relation to capabilities, relationships to others, and performing. This naturally serves to build confidence and also increase poise. The idea of the participant's relationships to others brings us to the value of performing in developing the social self. This involves gaining a better understanding of the working, producing, and playing relationships with peers or with adults. Also related is the idea of being "sociable". The preparation of an act or play will assist in making a young person a more well-rounded and diverse individual.
Besides the influence performance may have on the development of the participant's "self", there are other developments which might be considered assets for the future. It takes a relatively organized effort to develop and present a program. This may increase the participant's realization of what goes into the coordination of such an effort. Also, what his part in the overall effort may be. This lets the participant get a feeling of being a part of a whole.
The comparison and judging that goes on in the minds of the participants bring us to another future asset of stage performance. This comparison will undoubtedly serve to develop the personal tastes and preferences of the youngster and also to develop his critical nature.
Somewhat related to the idea of the development of a critic is the development of an observer. Activities might be considered a seasoning ground for the potential audience of tomorrow. Experience on stage and in rehearsal will make the participants better listeners and a better educated audience.
It is not the critic who counts, not the man who points out how the strong man stumbled or where the doer of deeds could have done
better. The credit belongs to the man who is actually
in the arena; whose face is marred by dust and sweat and
blood; who strives valiantly, who errs, and comes short again and again-who knows the great enthusiasms, the great
devotions; who spends himself in a worthy cause; who at best knows in the end the triumph of high achievement and at the worst, if he fails, at least fails greatly so that his place shall never be with those timid souls who know neither victory or
defeat. Theodore Roosevelt
USING THE STAGE
When involved in a stage presentation, one concern is what is going to hold the attention of the audience, direct it to where it is wanted, and convey the message. Following are some factors that contribute to these ends.
MOVEMENT
There are a variety of reasons for the movement of a character from one place to another on stage. Some stem from inner meaning, as does body movement. Those reasons include: venting of emotions, telling the story, visualizing

interpersonal relationships, revealing the character to the audience, establishing mood, providing motivation for another actor's line.
There are also technical reasons for having an actor move. Three closely related ones are: opening of stage or doorway areas for action, linking two visual pictures that may exist on stage, and improving composition and restoring balance to the stage picture. Another group of technical reasons for movement relate more directly to the effect of the movement on the audience. Their purposes include: providing variety, developing rhythmic patterns, building climax, and getting laughs. Purposes relating directly to the actor include: keeping the actor open for good projection and visibility and helping the actor express his emotions.
With all of these purposes, and potential for the meaning of movement in mind, it is important to remember some guidelines for the execution of those moves. • All movements must have meaning and
motivation. There must be a reason for the movements the character makes. That reason can grow out of his line or the situation.
• If it is necessary to move an actor for a technical reason, such as clearing a doorway for action, and there is no movement indicated in the actor's line, there must be another motivation for the movement. Perhaps he goes to a table to light a cigarette or walks to a window to look out. This situation may involve some extra "stage business."
• Movement is usually a move toward or away from an object or character. The actor is wise to look for the direction by what may be implied in his lines.
• Movement before a line is delivered accentuates the line; movement after the line delivery accentuates the movement.
• Movement is often in relation to the furniture on stage. That is why each piece of furniture represents a motivational unit. The arrangement of these units should be such that the actors can move around them easily. A somewhat triangular pattern is often used.
• No movement should be unnatural. An actor should not back up or walk in reverse unless a comedy effect is desired.
• Avoid movements that are the same type at the same time, unless a comedy effect is desired.
Two actors should not walk in the same direction at the same speed nor should they sit down at the same time, nor get up at the same time.
An understanding of the playing areas of the stage may assist in decisions made in relation to movement. The stage is traditionally divided into nine blocks. The three horizontal divisions running from the front of the stage (downstage) to the back wall (upstage) are known as planes, and the three vertical divisions going from left to right are known as areas.
The center area downstage is the strongest playing portion of the stage. The (X) marks the strongest standing position on the stage. The shaded area indicates the most dominant area.
PLAYING AREAS OF THE STAGE
o.Q'>o.Q">o.Q">o.Q->
You can't control the length of your life, but you can control its use.
You can't control your facial appearance, but you can control its expression.
You can't control the weather, but you can control the moral atmosphere that surrounds you.
You can't control the distance of your head above the ground, but you can control the height of the contents in your head.
You can't control the other fellow's annoying faults, but you can see to it that you do not develop similar faults.
Why worry about the things you cannot control? Get busy controlling the things that depend on YOU.
BLOCKING
Triangularity is a basic and much used blocking pattern. One reason is because the arrangment is
flexible and dominance is easy to control. Therefore, furniture is often arranged in a triangular pattern. The apex of the triangle is the dominant position, and as the dominance changes from one character to another, the apex shifts.
In this picture, A has dominance as he is the apex of the triangle. Also, he is standing in an open body position, and the other characters are giving him focus, thus his position is strengthened even more.
Bady Position
The more of an actor's face the audience can see, the more attention he will command. The person at the apex has the other characters looking at him, therefore he has dominance.
This diagram shows the body positions an actor can assume. The arrows show which way the actor is facing.
A-full open, the strongest position. B-3/4ths open right. H-3/4ths open left, the second strongest
position. C-in right profile. G-in left profile. D-3/4ths closed facing right. 61

62
F-3/4ths closed facing left. E-facing full back. This, too, can be a very
strong position. If the actor has lines to deliver, however, you must be sure they will be heard.
FOCUS An actor can have attention in almost any position on the stage if he has focus. That involves the other characters directing their attention and eyes to that character. Focus will be strongest if, in addition, the actor is in a strong stage area.
SPACE Spatial dominance can be attained if an actor is separated from the rest of the cast, with a clear area of stage around him.
LEVELS The higher an actor is, the more dominant he is. Therefore standing on a platform is stronger than standing on the ground, standing is stronger than sitting, sitting is stronger than lying prone.
CONTRAST Contrast can be influential in making a character dominant. If everyone is standing, the character sitting will have dominance. If everyone else is facing the audience. the character with his back to the audience will be the strongest. If everyone is dressed in yellow, the character in blue will be dominant.
As you sit in silence on a lonely beach or a drifting sand dune, you discover the possibilities for a new world and a new self. The greatest thing a human soul ever does in this world is to see something and tell what it saw in a plain way. Hundreds of people can talk for one who can think, and thousands can think for one who can see. To see clearly is poetry, prophecy and religion-a// in one.
John Ruskin
If life hands you a lemon, make lemonade. ~..q...q.~
BODY MOVEMENT
Movement is a very important part of what happens on the stage in relation to drama. From the body movement of a character we can learn a great deal about him and his relationship to the rest of what is happening.
There are two basic influences on our human bet:lavior and thus our movement. One is biology, the other society. Biology is concerned with the physical welfare of man: his nutrition, growth, rest, reproduction, and general bodily comfort in relation to his environment. Rooted in primitive urges, it is often expressed in gross, sometimes violent movements such as running, leaping, struggling, chasing, fleeing.
We can say that the general purposes of movement stem from inner meanings. 1. To vent a strong emotion: When feeling a strong emotion, either happy or sad, a person's feeling is to express the emotion with bodily movement. 2. To tell the story: The entire story could be told with movement alone, as in dance. A story can be more powerful if embellished through movement in addition to pictures and words.
3. To visualize interpersonal relationships: A clue to the relationship between two characters is the distance between them and the type of movements they make toward or away from each other.
The social influence is concerned with man's adjustment to other men. This includes restraints imposed upon the primitive movements. In other words, "civilization" demanding control.
There are three sets of large movements that are the most important basic material for bodily movement and dance pantomime. They are rising, sinking; approaching, avoiding; nurturing, destroying.
The idea of rising and sinking comes from man's struggle with gravity. When a man is young and strong he stands erect. When old, sick, weary, he succumbs and unites himself with the earth. A basic human feeling is the yearning to be light and free of the earth, to fly.
Besides reflecting age and sickness, rising and falling movements are great reflectors of emotion. Downward: lines overcome by gravity suggest sadness, depression, and despair. These lines can be shown through facial expression; neck, shoulder, and arm position and movement; and back and torso position and movement. Emotion can also be shown in the amount of spring and uplift in a character's walk.
Upward: lines overcoming gravity have the opposite effect. They suggest happiness, joy, optimism. These feelings can be shown through upward line reflected in facial expression, a head that is held high, shoulders that are high and back, an upright back and torso, and springy steps. The arms can be uplifted or outstretched to contribute to the impression.
The second set of basic movements is approaching and avoiding. Besides reflecting physical conditions, it too shows emotions and feelings.
A movement toward, whether horizontal or vertical, suggests a desire to have contact. Some things are pleasant or beneficial, thus they are approached. It could be food, a friend, a person offering help, or perhaps even reaching for a deity.
A movement away suggests a desire to avoid or stay isolated. This reflects the avoidance of harmful or unpleasant objects. Possibly a harmful animal or an enemy with a gun.
Object
r Man----+ Object
Man---+ Object
1 Object
The third set of movements, nurturing/destroying, displays both the physical and emotional potential movement has for display.
Nurturing involves caring for or building up a "good" object or person. Related gestures are caressing and fondling. Destroying, on the other hand, involves tearing down a "bad" object or person and usually involves some type of struggle.
Movement and dance pantomime demand total involvement on the part of the performer. They may in turn elicit more response from the spectator.
Besides ... it's fun!
«7>«7>«7>«7>
FORTUNATE PEOPLE
For certain fortunate people there is something which transcends all classifications of behavior, and that is awareness; something which rises above the programming of the past, and that is spontaneity; and something that is more rewarding than games, and that is intimacy.
Eric Berne
Storytelling/Oral Interpretation
The most important thing about storytelling is to interject enough emotion to make the story come alive for the listener, and to relate and make sense out of the words on the printed page.
(Some of the following ideas are taken from Oral Interpretation of Fiction, Thompson and Fredericks.)
THE STORYTELLER AND THE MATERIAL
A dictionary says a story is a "narrative, either true or fictitious, ... designed to interest or amuse the hearer or reader; a tale." This definition covers informal stories told in daily life as well as artistic creations such as short stories or novels.
An effective story has a beginning, a middle, and an end. Its beginning is chosen to arouse interest. Its middle section is pointedly going somewhere. Its ending is a significant conclusion to all that
has gone before. The storyteller knows in advance how each of these parts of the story must be arranged in order to create the effect he intends. A story is a purposeful narrative. The selection of its details and their organization create excitement and concern in reader or listener. A successful storyteller shapes his material with purpose, passion, and pretense.
THE STORYTELLER AND THE LISTENER
The fundamental characteristic of a story is that it is based on an experience that will assume or be of interest to the listener. The storyteller can interest the listener only if he re-creates the event and his first response to the event. This will then stimulate the audience's ability to identify with what is happening.
The effective storyteller: • can suggest an air of expectancy. • can arouse and satisfy the listener's appetite
for suspense. • can, through physical and vocal
expressiveness, demonstrate the story's suspense and its development.
• is quick to detect changes in the story and reflect them to the listeners.
THE STORYTELLER AND THE AUTHOR
If the person relating the story to the listener is also the author, he is in an unusually convenient position, as he knows the precise attitude of the author When that is not the case, however, the storyteller must be sensitive to the attitude of the author.
He then becomes the interpretive reader, interpreting the words and thoughts of the author for the listener. One way to detect the attitude of the author is through word usage, another is writing style. It is important that the reader be aware of the author's attitude and tone of voice. It is also important that he grant the author the right to take that attitude and tone.
THE STORYTELLER AND THE PRESENTATION
As in any speaking presentation, it is important that the storyteller be heard. Unlike some speaking situations, however, the storyteller has an advantage in that he can use his voice and
body more freely to express what is being conveyed through the story. Because storytelling and oral interpretation are somewhere between public speaking and acting, they embellish a speaking situation with more dramatic voice variation and depth, body tension, and suggestive gestures. These activities further help the listener identify with what is happening in the story, and also convey the attitude of the author.
The purpose of storytelling is to engage the listener in an identifying, suspenseful response to a story. The potential is there, and it is the job of the storyteller to call up in the audience the experience of the story.
«7>«7>«7>«7>
Even if I knew the world were going to end tomorrow, I would still plant trees today.
To be able to love a butterfly,
St. Francis
we must care for a few caterpillars. ·«7>«7>«7>«7>
Scripting-Short Plays
The need is to come up with a play developed by young people, for presentation by young people, in a style that is both pleasing to the audience and within the realm of the group's performing ability.
The key to the entire situation is simplicity. The degree of simplicity will depend on the age of the group and the amount of time they have to prepare. In addition to the story, the setting, costumes, and makeup must be taken into consideration when beginning to make plans.
Keep in mind: • The play is being performed by young actors. • The play should involve easy settings. One, or,
if more than one, sets that can be changed easily and swiftly.
• The play may have to be performed in a variety of situations.
• Do you have time for elaborate costumes?
Whether the scripting is to be an individual or group project, the person or persons must be made to feel as though they have something to contribute. The atmosphere must encourage willingness to share their ideas. 63

64
Though an extremely creative effort, writing a short play does demand some discipline and structure. This structure need not be obvious at all times, but there are several factors to remember when planning and writing.
DRAMATIC QUESTION No matter what the subject or form of a play, it establishes a dramatic question. This is the question that seizes the audience in the beginning of the play. It may be as simple as: Who will win the battle between the sexes? or What is wrong with this fellow? This is a low level question. The plot may deal with a more specific version or part of the dramatic question.
STRUCTURE
The play should have: 1) a beginning which introduces the plot and the characters and lets us know something about them. 2) a middle section with continuity, yet conflict, action, and things happening. 3) an ending that has all conflicts resolved. (There are some instances, however, when rather than ending in a resolution, a play ends by asking a question.)
The action of the play includes the plot, the stage business, and the entrances and exits. All of these contribute to the theme, characterizations, and total effect of the play.
The writer must remember, too, many long speeches may result in static quality, lack of action, and meaningless stage business.
DIALOGUE Dialogue is the rehearsed line that should sound like conversation. This conversation must advance the play in some way. It can tell us about the story, the character, give us factual information, or provide revelations.
The tone and atmosphere of a play can be determined by the style of dialogue. Here are some reminders when planning and scripting: • Keep the speeches short. In general, keep
dialogue simple and to the point. • Let action do the talking. There should be a
great deal of physical action.
• Keep everything clear and easy to understand, both dialogue and action.
• There should be economy in the number of incidents that lead to the high point of the story or climax.
• Suspense can be effective. • There should be some sort of conflict. There
must be something we want to happen. • The characters should be made to seem real,
even if they are animals with human characteristics.
• The story should suit the interests and tastes of those who are going to play it.
<0>~~~
The world will never starve for wonders; but only for the want of wonder.
Gilbert K. Chesterton
~~
IDEAS
Ideas are not usually a problem when energetic playwrights get together. If stumped when they are started, though, have them think about: animals places special events nature people different situations
Also, they might recall instances in their own lives that could be a basis for a play. Other stories or plays that could be twisted or changed slightly might be the basis for a "spoof".
~~~~
There's a new world coming, and it's just around the bend, There's a new world coming, this one's coming to an end. There's a new voice calling, you can hear it if you try, and it's growing stronger with each day that passes by. There's a brand new morning rising clear and sweet and free, There's a new day dawning that belongs to you and me. Yes, a new world's coming, the one we've had visions of coming in peace, coming in joy, coming in love.
Barry Mann and Cynthia Wei/
Makeup
There are different purposes for makeup, and different types. They generally might be broken down into four areas: 1) Compensatory makeup-to compensate for the washed out effect that stage lights and distance have on facial features.
2) Corrective makeup-to correct the imperfections in the facial features of the actor.
3) Age makeup-to create the impression of age in the character. This could be middle age or old age.
4) Non-realistic makeup-this includes those makeups not covered in the other categories: animals, fairies, monsters, witches and trolls, clowns, and other non-realistic characters.
Compensatory makeup is the minimal amount that should go on a face to be under stagelights and/or any distance from the audience. Exaggeration distinguishes facial feat!Jres.
The facial areas to consider are: The eyes-define by using liner all the way
around, mascara on the lashes, and shadows on the lid. Also some highlighter in the hollows under the eye would be a good idea, as would the darkening of the eyebrows.

The cheeks-to put back facial color use rouge on the cheeks following the contour of the cheekbone.
The lips-lip rouge or lipstick is needed to restore the contour of the mouth.
Corrective makeup is for the actor who wants to look like himself, but better. This may involve some minor changes in the shape of his mouth or the curve of his eyebrows. For example: 1) If the forehead is too high it can be darkened near the hairline with a wide stripe of blended color. 2) If the nose is too long, it can be shortened by bringing a deeper color up over the tip. If too short, a highlight can be brought down under the tip. 3) If the chin is too long, the lower area can be shadowed, and thus reduced. If too short, the lower area can be highlighted.
Through shading, shadowing, and highlighting a nose can be made wider, wrinkles less obvious, and eyes further apart. The contour of the lips can also be modified.
Age makeups begin to show the combined effects that age, health, temperament, and environment have on a character.
In middle age, the color of the skin and hair change, muscles begin to sag, wrinkles form, curves become more harsh and angular, and hair falls out.
Most simply, middle age can be shown by the use of lighter and more yellow bases. This will vary from character to character depending upon conditions. Lines are indicated on the face. The laugh line from nose to chin should be drawn in, and wrinkles should be drawn in around the eyes, under the eyes, and on the forehead. Each line or shadow on the face must have a highlight above it. In reality you cannot have one without the other. There may also be some shadowing under the eyes and in the cheek hollows. (If for a woman, she would also have to incorporate her eye shadow, lipstick, and rouge.)
Old age makeup further exaggerates the lines and shadows suggested in middle age, and uses an even paler base color. The hollows of the face are more distinct, and must follow the actual features of the actor. These occur in the forehead, the cheeks, under the eyes, and sometimes under the lower lip. Remember these
hollows must have highlights where the bones protrude.
The lines and wrinkles are basically the same as in the context of middle age, just more exaggerated. An addition might be lines or wrinkles around the actor's mouth, drawn in as he purses his lips.
Graying hair can be suggested by using powder sprays, white powder, cornstarch. For graying temples, perhaps white shoe polish or white mascara.
Non-realistic makeup affords great opportunity for ingenuity and creativity. Some non-realistic characters will have mostly human features with only some modifications, such as pointed ears. There are situations that require complete departure from reality. In either case, instead of aiming for realistic accuracy, thoughts should be of line, color, and form to heighten, to clarify, to satirize, to amuse. Instead of photographs, look at works of art. Instead of hair and wigs, wool, yarn, wood shavings, feathers, plastic, or metal might be looked at for hair.
Purposes might range from the heightening of details for better definition, to strong exaggerations of line and color for dramatic effect. Those elements must be selected that make the most positive contribution to the projection of the character.
.q,.q,.q,.q,
So, don't waste your precious gift of laughter and immunize yourself from strife. Only a face made of plaster is immobilized to life. Oh no, face lines are a treasure. Be proud when yours begin to show. My goodness, what on earth good is a lovely cover if the inside could not show.
Lighting
Bobbie Soutar
In the places where acts are performed there are generally two types of lighting available. These include general overhead lighting and spotlights. In some of the facilities there are more available.
The type of lighting you consider using will vary according to what your act involves. A single
spot, effective for an instrumental solo, wouldn't work for a tumbling routine. The lighting will also vary according to your location on the stage, where and how quickly you move around the stage, and how many people are in the act.
Lighting is many times forgotten in the preparation of an act. It can be a great addition to the effectiveness of an act, so it might be worthwhile to think about it. As with any of the "technical trimmings," lighting is not what is most important. It is most important to work on the content of the act.
.q,.q,.q,.q,
The harshest winter finds an invincible summer in us.
Costuming
A. Camus
Costuming can be very elaborate, expensive, and effective. Or, it can be simple, inexpensive, and effective. Sometimes, the latter is even better than the first.
A period in history can be hinted at through simple modifications in clothing, through hats, and through the objects people carry. A good way to get ideas for these modifications is to refer to old books, papers, periodicals, or some of the many costume books that are available.
Things need not be done perfectly. The distance involved and the imagination of the audience can easily turn old material and netting into a lovely gown.
Scenery and Props
Generally a great deal of scenery is not necessary, or convenient. For many acts, specific scenery is not required. If it is required, for a skit or pantomime for example, just a hint of the room or place is enough. This makes it easier for the groups to prepare, while still filling the needs of the act. Again, with scenery, the distance and imagination of the audience. can easily turn a piece of painted shrubbery into a real bush.
The same is true for props. Easily made out of cardboard, wood, and paint, they can quickly change into a gun or a candelabra. 65

66
It is convenient for us that today's trend is toward suggestive, rather than very elaborate, scenery. This allows for a stylish presentation with easier preparation and better mobility.
Sound
Sound equipment is an important consideration when working up an act. The mikes you use should always be checked prior to the time you are going to use them. In fact, rehearse with the mikes, if possible. Don't be afraid of a mike. Remember what comes out of it is what you put in.
Other equipment that you may use should also be checked. This might include record players, tape recorders, or any other technical equipment. Learn to properly use and operate any equipment utilized in your act. If possible, test it in the facility where you will be giving your performances. Audio equipment, used for background music or special effects, many times contributes to the overall effectiveness of an act. It can serve many purposes. Music can support the movement on stage, assist in making smooth transitions, and set the mood, which will also give the audience clues as to what is happening on stage. Pantomimes are greatly assisted by the use of music and sound effects, even masters such as Marcel Marceau and Red Skelton use them. Numbers using records could explore the possibility of tape-recording the music and editing it to a proper length. Tape-recording solves the problem of timing, and saves the worry of finding the exact spot tor starting on the record.
WHATEVER YOUR GIFT
What is that you hold in your hand? Nothing you say? Look again. Every hand holds some special giftA hammer, a broom, a pen, A hoe, a scalpel, an artist's brush, A needle, a microscope, A violin's bow, a way with words. In the giving of faith and hope, What is that you hold in your hand? Whatever your gift may be, It can open your door to abundant lifeYou hold in your hand the key.
Helen Lowrie Marshall
Voice
The voices of the participants should be as clear as possible, as should their diction and enunciation. Nothing should be sloppy.
Volume, with the assistance of microphones, should be no problem. Everyone should project to maximum ability, however. This is true especially in cases where there is movement in an act and the performers may move out of the range of the microphone.
Those singing or speaking should direct their vocalization directly to the audience, even if far away. This will help to transmit warmth and a close feeling to the audience.
<Q><Q><Q><Q>
Even God cannot make two mountains without a valley between them.
<Q><Q>.q..q.
General Attitude
The importance of the attitude of the performers cannot be stressed enough. It is important that every performer look as though he is enjoying and involved in what he is doing. The group or individual must "sell" what they are doing to the audience. This takes showmanship.
The beginning of showmanship lies in the look of involvement and enjoyment of the performers. A pleasant facial expression or a smile transmits great vitality to the audience, as well as establishing rapport. People who won't become active and involved participants in the act are going to attract attention, and detract from the general effectiveness of the act. A "dead pan" can be a disaster, unless in a comedy routine.
Just remember these important attitude keys: interest, enjoyment, excitement, vitality, showmanship!
<Q><Q><Q><Q>
Oh, it's time to start living, time to take a little from the world we're given,
Time to take time, for Spring will turn to Fall,
In just No Time At All.
<Q><Q'><Q><Q>
The secret of life is not to do what you like, but to like what you do.
Leading Activities in the Performing Arts
One of the tasks of the leaders involved is to give shape and direction to an individual act, or show, as a whole. Directors, emcees, or club leaders should be aware of an effective plan that will show a group off at its best. The concept that generally seems to promote the best efforts involves a continual building of the act or show. This building can be done through excitement or variety. Ultimately, there should be a high point or climax in the act or show that will leave the audience with a feeling of elation and satisfaction.
It is difficult to generalize about being a leader. A good leader knows his own talents and those of the youth with whom he works and tries to utilize the best of both. Examples: Some leaders stand back and let the youth do everything. Some leaders have much technology, and are much like teachers. Some leaders are greatly involved in helping youth develop their own ideas.
A Plan to Follow In Putting on a Performance
1. Decide on an idea for your act. This, of course, will involve a number of considerations. The talents within the group, what they want to do, and what they have time to do.
2. If necessary, seek the information or person necessary to assist in planning the act. If the supervisor or director does not have the specific ability to give good direction, he should seek assistance in the form of literature or people.
3. Formulate specific plans of what is to be done. This will include answering the questions: What do you need? What do you want? What is available? The next step is to assign tasks.
4. Make a schedule for rehearsal and other work that needs to be done.
5. After a period of rehearsal, try the performance out on someone. Feedback is valuable.
6. Use the act as a tool in the development of the young people involved, as a joy in the community, and to share the 4-H story.

Share-the-Fun Suggestions
If your 4-H Club is interested in participating in Share-the-Fun, why not start with a variety of creative dramatic activities within your yearly club program? Share-the-Fun should not be Share-theWork, but rather a growing, enriching, and enjoyable program for all involved. Creative dramatic activities at club meetings, events, and recreational meetings can help give the background and encouragement to members before participating in Share-the-Fun, just as the project meetings do for members before participating in dress revues, animal shows, etc. in the rest of the 4-H program.
WHYSHARE~H&FUNFORYOURCLUB?
Start by determining as a club what your purposes are for participating. Each club is unique and at a different stage, depending upon the members and emphasis. • Do we want to develop club rapport and group
spirit through participation in Share-the-Fun? • Do we have particular talents and strengths
right now to share? • Do we want to develop something to share in
the community? • Do we want to use Share-the-Fun for
showcasing 4-H members in action as PR for the 4-H program in our area?
• Do we want to develop the kind of quality that we'd like to have considered for representation at the State Fair? If so, be willing to rehearse,
practice, and meet the time and number requirements as specified by State Fair.
• Do we want to 'do our own thing' without time and number requirements, and not be * concerned with State Fair participation? Allow a longer program to share within the community that includes all our members?
SET YOUR OWN PRIORITIES
After determining the purpose for your club, a committee of members and leaders are ready to brainstorm. All ideas are treated positively, written down, and saved. One idea may build on another, stimulating each other. No one should get 'locked in' to one idea before brainstorming is done. Ideas may be stimulated by records, children's books, musicals, current events, etc. ·
BE REALISTIC
What will work for our club? What are the ages of members who will be involved? What other conflicts in activities do we need to consider? This is an opportunity for leaders to help members through the decisionmaking process. "You can't make chocolate chip cookies without chocolate chips. You might have to make oatmeal-raisin." Encourage members to take a simple idea and build it into something well done rather than be frustrated by a grandiose idea they aren't able to follow through on. Be realistic in scheduling rehearsals, consider other events. It may be appropriate for the director to work with several small groups, then when the full group rehearses some of the 'kinks' are already worked out and the more inhibited member has had individual time to be encouraged.
BE A DIRECTOR
Members will learn by your example and catch your attitudes and enthusiasm. If you are conveying the attitude that this is only work and not enjoyment, they will feed it right back. Being a director doesn't mean being a dictator. Establish room in the early stages of planning for members to feed in their ideas and opinions. When a final plan is established, direct it to its completion. Encourage members to see that the first 1 0 seconds on stage are crucial. If they are confident and enthusiastic during those first 10 seconds, the audience will catch that and react in a way that gives confidence to the performers.
FOR THOSE WHO AREN'T STAGE-STRUCK
If there are members who would rather work on props, costumes, makeup, staging, publicity, etc. help them to see that these areas are equally as important as being on stage.
YOU DON'T HAVE TO DO IT ALL ALONE
Involve other leaders, mothers, fathers, and community members when you need them. Share-the-Fun can be an excellent way to use the talents of all. The main requirement for the director in seeking the help of others is the belief that this can be a good learning experience for the members and a real opportunity for communication and development for all involved.
The greatest gift one can give to another person Is a Deeper Understanding of Life and the Ability to Love and Believe in Self.
Carole Bonesho
Chantal
67

68
BIBLIOGRAPHY Alberts, David. Pantomime: elements and exercises.
Lawrence, Kansas: The University Press of Kansas, 1971.
Avital, Samuel. LeCentre du Silence Work Book. Boulder, Colorado: Aleph-Beith Publishers, 1975.
Barlin, Anne, and Paul. The Art of Learning Through Movement. Los Angeles, California: The Ward Ritchie Press, 1973.
Bloomstein. Teaching About Spaceship Earth. New York, New York: Intercom, 1972.
Chesler, Mark, and Robert Fox. Role-Playing Methods in the Classroom. Chicago, Illinois: Science Research Associates, Inc., 1966.
Conrad, and Van Dyke. History on the Stage. New York, New York: Van Nostrand Reinhold Company, 1971.
Corey, Irene. The Mask of Reality. Anchorage, Kentucky: The Anchorage Press, 1968.
Corson, Richard. Stage Makeup. New York, New York: Appleton-Century-Crofts, 1967.
Cothrell, June. Teaching With Creative Dramatics. Skokie, Illinois: National Textbook Co., 1975.
Dezseran, Louis John. The Student Actor's Handbook. Mayfield Publishing Co., 1975.
Gillies, Emily. Creative Dramatics For All Children. Association for Childhood Education International, 1973.
Hodgson, and Richards. Improvisation. London: Methuen & Co. Ltd., 1966.
King, Nancy. Giving Form to Feeling. New York, New York: Drama Book Specialists/Publishers, 1975.
Kipnis, Claude. The Mime Book. New York, New York: Harper & Row, Publishers, 1974.
Markun, Patricia Maloney. Play: Children's Business. Association for Childhood Education International, 1963.
Mearnes, Huges. Creative Power. New York, New York: Dover Publications, Inc. 1929.
Spolin, Viola. Improvisation for the Theatre. Evanston, Illinois: Northwestern University Press, 1963.
Spolin, Viola. Theater Game File. St. Louis, Missouri: CEMREL, Inc., 1975.
Ward, Winifred. Playmaking with Children. New York, New York: Appleton-Century-Crofts 1957.
Way, Brian. Development Through Drama. New York, New York: Humanities Press, 1967.
-"Why does man have creativity? Why can man think of many things in his mind and choose, then bring forth something that other people can taste, smell, feel, hear and see? Because man was created in the image of a Creator. Man was created that he might create. But in creativity choice is involved. We start with an idea, or a number of ideas. Something comes into our minds. We have a flow of ideas, sometimes a tremendous flow of ideas, at times in one direction, or at other times in another direction; or perhaps even ten directions at once. And we have to make a choice. We cannot do everything that comes into our imaginations. There is a choice involved in the very simplest form of creativity, because as any set of alternatives comes into our minds, we have to choose. This is a particularly important concept in the field of art. Creative people are people who can find alternatives. There are no dead ends if you are full of alternatives."
Author Unknown
DANCES
Seven Jumps
Use the "Seven Jumps" record.
Directions: Join hands in a circle. Take 14 short running steps to the left, reverse and take 14 short running steps to the right. Lift right knee.
Repeat above actions and add-lift left knee.
Repeat above actions and add-kneel on right knee.
Repeat above actions and add-kneel on both knees.
Repeat above actions and add-place elbow on floor.
Repeat above actions and add-place both elbows on floor.
Repeat above actions and add-bend down and touch forehead on floor.
Repeat running steps to left and right then bow at waist.
Patty Cake Polka
Use the "Little Brown Jug" record.
Directions: Form a circle. Partners join hands (men with backs to center of circle facing ladies). Both extend the counterclockwise foot forward and touch heel to floor (man left; lady right). Bring same foot back, touching toe to floor beside other foot. Repeat. ' Take four slide steps counterclockwise around circle.
Repeat above instructions in clockwise direction with clockwise foot (man right, lady left.).
Drop partner's hand. Clap hands together, then right hand with partner; clap hands together, then left hands with partner; clap hands together, both hands with partner; clap hands together and clap own thighs.
Link right elbows and skip in a tight turn with man moving out of his turn on to the next lady on his left who becomes his new partner. Taken from "A World of Fun" book.
Records may be obtained from World Wide Games, Inc. Box 450 Delaware, Ohio 43015
Salty Dog Rag (American Couple Dance)
Formation: Double circle: Couples facing line-of-dance (CCW), a woman on partner's right.
Starting position: Skater's position: Right hands joined over left, in front. Right foot free.
MUSIC 4/4 PART I
Step sideward right on right foot (count 1), cross and step on left foot in back of right (count 2), step sideward right on right foot (count 3), hop on right foot (OR brush left foot across in front of right) (count 4).
2 REPEAT pattern of measure 1 reversing direction and footwork. 69

70
3-4 Four step-hops (OR eight walking steps) forward starting with right foot.
5-8 REPEAT pattern of measures 1-4. Finish facing partner, man facing line-of-dance.
9 Releasing right hands, REPEAT pattern of measure 1.
10 Releasing left hands, one left-face roll turning counterclockwise once around with three steps (Left, right, left) and moving left (man toward center, woman reverse) (counts 1-3), hop on left foot (count 4)
11-12 Joining right hands, REPEAT pattern of measures 3-4 turning clockwise once around.
13-16 REPEAT pattern of measures 9-12.
PART II
17 Touch right heel forward (count 1), close and step on right foot beside left (count 2), touch left heel forward (count 3), close and step on left foot beside right (count 4).
18 With weight on both feet, spread heels apart (count 1), click heels together (count 2), touch right heel forward (count 3), touch ball of right foot beside left (count 4).
19-20 REPEAT pattern of measures 3-4. 21-24 REPEAT pattern of measures 17-20.
25-32 REPEAT pattern of measures 9-16. (NOTE: There are a few minor variations to this dance.)
The Tarantella
"Tarantella No. 1" is a wedding Tarantella, and is still performed by the wedding party at some Italian weddings. The old story says the dance originated when a person, bitten by a great tarantula, danced to sweat the spider's poison out of his body. An original drama could even be woven around the idea incorporating the dance. 1. The group stands in a circle with hands on
waists.
2. The basic step: • Stand with feet slightly apart.
• With pointed toe, extend the right leg out and touch the floor directly forward. Hop as it is done.
• Extend the right leg, touching the floor in front of left foot directly across from the first toe touch point. Hop as it is done.
• Bring leg back to the original standing position. Hop as it is done.
• Each hop should take up three beats of the fast moving music.
• Reverse the step using the left foot. Once the basic step has been completed twice with each foot, the first ~epeat of the music will have been reached and the theme of the song played once.
• Repeat the theme again doing the same steps.
3. The travel step: • Using three beats of the music, lead with the
right foot and take a short step to the right. Bring the left foot to meet the right in a horizontal motion. (This is all in three beats.)
• Repeat the above step three times. Thus, four series of steps to the right will be made.
• Repeat the above four times to the left. • Repeat to the right. • Repeat to the left. At this point the second
theme will have been heard once. • Repeat the entire "Travel Step" series to the
theme a second time. 4. Swings: • Have two people from opposite sides of the
circle quickly move to the center of the circle locking right arms and swinging to the right; then turning and locking left arms and swinging to the left. This should utilize 20 beats of the music.
• Have a total of four couples do this. 5. Basic step: • Repeat the step as outlined under #1. Music for the dance can be found in.
World's Favorite Italian Music Albert Gamse Ashley Publications New York, New York 1968
.q,..q,..q,..q,
Who walks with Beauty has no need of fear; The sun and moon and stars keep pace with him.
David Morton
ORGANIZATION
The Calf ,Path by Sam Walter Foss
One day through the primeval wood A calf walked home as good calves should; But made a trail all bent askew, A crooked trail as calves all do. Since then three hundred years. have fled, And I infer the calf is dead. But still he left behind his trail, And thereby hangs my moral tale. The trail was taken up next day By a lone dog that passed that way; And then a wise bellwether sheep Pursued the trail o'er vale and steep And drew the flock behind him, too As good bellwethers always do. And from that day, o'er hill and glade, Through those old woods a path was made And many men wound in and out, And dodged and turned and bent about, And uttered words of righteous wrath Because 'twas such a crooked path; But still they followed-do not laughThe first migrations of that calf. This forest path became a lane, That bent and turned and turned again; This crooked lane became a road. Where many a poor horse with his load Toiled on beneath the burning sun And traveled some three miles in one. And thus a century and a half They trod the footsteps of that calf. The years passed on in swiftness fleet; The road became a village street; And this, before men were aware, A city's crowded thoroughfare. And soon the central street was this Of a renowned metropolis. And men two centuries and a half. Trod in the footsteps of that calf. A hundred thousand men were led By one calf near three centuries dead. For men are prone to go it blind Along the calfpaths of the mind And work away from sun to sun To do what other men have done. They follow in the beaten track And out and in, and forth and back,

And still their devious course pursue, To keep the path that others do. They keep the path a sacred groove Along which all their lives they move, But how the wise old wood gods laugh Who saw the first primeval calf.
We Know What We Are But Not What We May Be.
Programing Success
Stan Meinen
Shakespeare
The greatest stumbling blocks to success are the limits we put on ourselves. These limits develop from our interpretation of our selfworth and abilities from messages we receive from those close to us and society in general. We develop preconceived notions that things should go a certain way or we should act in a certain manner. These may or may not be true. They only become reality as we give them power. I often hear youth leaders say when given an opportunity to try an art experience, "I don't have talent for art", "My kids can do better than 1", "I'm afraid it won't look right", etc. We have a tendency to develop false ideas of what things should be like which often lead us to set standards so high that we are afraid to even try because we fear we won't do it right.
Here are some hangups that put limits on successful activity: The number one hangup is worry. Anxieties zoom up as we fret about all the things that could go wrong. What a waste of energy! It doesn't help us get on with the activity. Worry, as my daughter so aptly pointed out to me one day, is ingratitude in advance. Think about that statement, ingratitude in advance. We are being ungrateful by thinking about all the things that could go wrong instead of being grateful for all of the things that can go right. Being grateful and anticipating success sends us down the road of getting on with the successful activity. Other blocks to success include: • WWPT -A great idea dies on the vine because
we let What Will People Think get in our way.
• WHNDTB-Supports WWPT because We Have Never Done That Before. It is scary to try something new because it is a departure from the past. But oh what fun it can be to bring new ideas and new ways of doing things.
• WDWDL Y-ls another creativity stopper. What Did We Do Last Year? is a real crutch. The tried and true is comfortable, but what a rut it may be!
• I can't, I should, I ought to, I have to are all stoppers contrasted to I can, I choose to as starters.
• IWW-It Won't Work is a sure stopper in contrast to a starter It Will Work.
• AAA- could be interpreted as a car starter in the winter time, but it is also a person starter if you interpret it as Always Anticipate Achievement. Certainly that is better than anticipating failure. Once we begin to anticipate achievement we are on our way. Trusting our inner strengths, letting our creativity come out, and trusting others paves the road to any successful endeavor. The following New Year's resolution taken from the Ramsey County 4-H Newsletter sums up how mental attitude can lead to success or failure.
RESOLUTIONS
ENOUGH of the same old New Year's resolutions about losing five pounds which we always regain a week later, about earning a five-dollar raise, which we always spend before we have it, about watching less television which obviously is beyond our power anyway. Let's have instead some resolutions that will do our souls some real good: Resolved to lose some mental weight, rather than physical; to get rid of the heavy, downcast thoughts which anchor us in the same old place and keep our spirits from soaring; Resolved to earn a raise in self-esteem; Resolved to spend more time each day watching the needs of others and less time studying our own; Resolved to spend more time outside the walls and other limitations, real or imagined; Resolved to make less noise and more sense; Resolved to look up and stand with our backs straight;
Resolved to spend less time scheming and more time doing; Resolved to quit being afraid of troubles that haven't even shown up yet; and finally, Resolved to have these same resolutions next year, only bigger. Thought is powerful. We become what our thoughts are.
<Q-• ..q-,..q-,<.('.;n
We can build a beautiful city. Yes we can. Yes we can. We can build a beautiful city. Call it out, And call it the city of man.
Films • Johnny Lingo-24 min., Color, 7S1050
God spell
According to island custom, Johnny Lingo bargains for a bride, considered by her father to be of little value. Johnny voluntarily pays an unprecedented amount for the woman he loves. His acceptance and encouragement foster a transformation of the woman into a person confident of her beauty.
• University of Minnesota Minneapolis Campus Audio Visual Library
• Augsburg College Audio Visual Library U.S. Art-The Gift of Ourselves tells the story of art in America and how it has evolved during the past two centuries. It is a look at the painters, poets, musicians, authors, and all others who have found this young nation a fertile field for their talents.
A Sears Roebuck Foundation Film Available from the Association-Sterling Films 6420 West Lake Street St. Louis Park, Minn. 55426
The following films are available from: Audio Visual Library Agricultural Extension Service Room 1, Coffey Hall University of Minnesota St. Paul, Minnesota 55108
Creativity-10 min., Color, USDA. (TV--$3.00) A mood-setting film in which color, motion, and shapes have been combined with statements of the world's greatest philosophers. It is a very effective piece of work 71

72
intended to set the mental stage for conferences or meetings in which individual responsibility or "creativity" is to be stressed. Be sure to preview this film before you show it to an audience. 1958.
Adventures of An Asterisk (R 69)-10 min.-colorMcGraw-Hill. Animated drawing depicts the maturing process of man, symbolized by the figure from child to adult. Unable to react freely to the world, the adult neither sees nor finds pleasure in new things until, through his own child, he is reborn and sees the world anew.
Art, People, Feelings-15 min.-color-Pyramid Films. This film demonstrates man's interdependence with his feelings and the visual arts he creates. In the opening sequence, a series of closeups of faces at the beach reveals a universal variety of human emotions establishing the concept that feelings are basic to mankind and are expressed in many ways. Then rich visual statements and musical poetry combine to give insights into the visual arts as a medium for expressing individual feelings. Many styles, periods, and art media illustrate the artist's approach in both historical and contemporary art.
Changing Art in a Changing World-21 min.-color. Through a wide range of visual experiences this film shows that the entire world in which we live is in a constant state of change. The artist is responsive to the changes so is continually studying the subject and looking for fresh solutions to visual problems. Adults, older youth, and junior high youth could gain appreciation of art and how art reflects changes in attitudes toward contemporary life through viewing this film.
Cipher in the Snow-24 min.-color-Brigham Young University. Cliff Evans dies mysteriously. The teacher who Cliff remarked as being his favorite is assigned to write the obituary for the school paper. Barely remembering Cliff, he finds that quiet, sensitive Cliff had been gradually "erased" by his family, teachers, and schoolmates. A very powerful film which has broad implications. Should be previewed before using. Discussion opportunities should follow. For use with youth and adults.
Crayon-15 min.-color-ACI Products-1967. "Crayon" is an exciting art education film and a practical teaching aid for creative arts project leaders. It shows the versatile qualities of crayon, which, when used by itself or combined with other techniques, offers the student a wide range of possible ways of expressing his ideas. Techniques demonstrated include: crayon carving, graffito, lamination, encaustic, and batik. Because the film places emphasis on expression of an idea and points out that different people work in different ways, it is adaptable to various age groups. The film should be followed by actual experiences with crayon.
Discovering Color-16 min.-color-Film Associates of California-1966. Shows how colors differ in hue, value, and intensity. Demonstrates clearly the techniques of color mixing and points out the great variety of color in the world around us. It stresses the fact that the more we know about color, the more we can see, create, and appreciate.
Discovering Creative Pattern-17 min.-color-Film Associates of California-1965. Film explains that pattern is visual organization composed of five elements: line, darks and lights, colors, textures, and shapes. Pattern enriches surfaces and should never be more important than the object it is enriching. Pattern is visual movement as music is patterned sound. Film points out how man has incorporated natural pattern in all of his handiwork. Appropriate for youth and adult audiences interested in art, home furnishings, creative arts. Study guide included.
Discovering Ideas for Art-151!2 min.-color-Film Associates of California-1965. Film develops viewer awareness of the things around him that can lend to ideas for art. What are the things we need to look for? Look at the varieties of the same object. Look at each part of an object, i.e., shape, color, line, texture, pattern, dark and light areas. Looking is only the beginning. We must develop inventive uses for what we see. Appropriate for adults and youth interested in the applied arts and looking for design ideas. A study guide is included.
Discovering Line-17 min.-color-Film Associates of California-1966. This film illustrates the way in which line records movement. Throughout the film, the viewer is led to an increased awareness of the visual beauty and function of line in clothing. Suitable for any audience of teenagers or others with an interest in art.
Discovering Perspective-14 min.-color-Film Associates of California-1967. Shows how we can create the appearance of distance on a flat surface by using perspective. Overlapping, vertical position, graying colors, varying detail, varying size, and converging lines are techniques used. A very good film for home economics groups. Gives understanding of how we develop perspective.
Discovering Texture-17 min.-color-Film Associates of California-1967. Shows how every surface has texture. The film explains that we learn about texture by touching the surfaces of objects and looking at the way light reflects from these surfaces. Shows that textures are natural or manmade and how man uses paints, tools, and materials to change the texture of surfaces. Can be used as an introduction to an in-depth study on this topic.
Jars Full of ldeas-8 min.-color-sound film produced by the Closure Committee of the Glass Container
Manufactures Institute in cooperation with 4-H. This film is about constructive creative activities and the role a leader can play in them. All "Jars Full of Ideas" projects are based on re-use and re-cycling. They require "ecological" and economical thinking. All make use of glass containers and their caps or closures and other things people tend to have on hand. Excellent for creative arts, camp crafts, home environment projects. The film could be used effectively to analyze leadership and the style the leader uses to guide and encourage her group.
Leo Beuerman-13 min.-color-Centron Educational Films. The story of one extremely handicapped man who adapted to his situation and has given himself much freedom under his handicap. He makes a living selling pencils and other simple items. People who are afraid of handicaps of any sort should view it. Although they may be repelled at first, they probably will gain insight into themselves. Could be used in helping agents and youth understand physical handicaps and as the basis for a discussion on personal development. 1972.
Painting is Loving-19 min.-color-Charles Conrad Films. Film is designed for adults and older youth to help them develop an appreciation for art. Retarded children are helped to gain self-confidence and recognition through the love and attention of the teacher who uses the painting media.
Movies-Available from The University of MinnesotaMinneapolis Campus Film Library (The Fable is the only one available from St. Paul Campus)
Mime of Marcel Marceau 7L0641, color, 23 min., $10. 90, 1972 The man behind many masks, the great French mime Marcel Marceau, speaks as a philosopher, an artist, and a teacher through words and movement. Classes conducted by Marceau and the teachers at his school showing the necessary training in body movement, gymnastics, dance, fencing, and mime are intercut with related scenes of Marceau in performance. These performances are sequences from his theatrical repertoire and include "The Mask Maker," "The Painter," and "The Creation". A routine from Marceau's Bip character, called "Bip in The Modern and Future Life" ends the film; it is a visualization of concepts about man and the future that Marceau, the philosopher, has just described in words. ijsca (1 092/1 092) Pantomime-The Language of the Heart (An Introduction to Mime) 3F0701
The Creation of the World 3F0702 Youth, Maturity, Old Age, Death 3F0703 The Painter 3F070 The Maskmaker 3F0705 The Dream 3F0706
The Hands 3F0707 The Sideshow 3F0708 The Cage 3F0709 Bip as a Skater 3F071 0 Bip as a Soldier 5F0711 Bip at a Society Party 5F0712 Bip Hunts Butterflies 3F0713
A Fable 5L0693, color, 17 min., $9.50, 1973 This is an outstanding film classic shot on location near a 14th century village near Rome. It features the famous French pantomimist Marcel Marceau with a cast representing 10 countries. Accompanied by an original musical score by the Royal Orchestra of London, Marceau mimes the story of a man who builds a wall around his bit of paradise only to discover his paradise has become his prison. The film can be used for 4-H Federation meetings as a discussion starter, for youth planning international exchange trips, and for 4-H Junior Leader Workshops. Film should be previewed and ideas about its specific use outlined to be most effective. pijsca (1304/1018)
Three Looms Waiting 1L0643, color, 50 min., $19.50, 1972 Dorothy Heathcote describes her theory and techniques for drama education. Comments are interspersed with demonstration classes with students of all ages and ability levels. Students analyze and evaluate their own classroom experience in improvised drama. In the candid interview scenes, Heathcote discusses her definition of drama, theatre, and the value of teacher education. ca (1 089/1180)
RESOURCE PEOPLE
June Schultz Extension Specialist 4-H Youth Development State 4-H Office 475 Coffey Hall University of Minnesota St. Paul, Minnesota 55108 Stan Meinen Extension Specialist 4-H Youth Development State 4-H Office 4 75 Coffey Hall University of Minnesota St. Paul, Minnesota 55108 Lianne Anderson Extension Specialist 4-H Youth Development State 4-H Office 475 Coffey Hall University of Minnesota St. Paul, Minnesota 55108 Margaret Lonnquist 144 72 15th Street Stillwater, Minnesota 55082
Carole Bonesho 523 lona Lane St. Paul, Minnesota 55113
Carol Shields 1788 Kennard Street St. Paul, Minnesota 55109 John Seitzer 122 North Front Street St. Peter, Minnesota 56082
Donna Seitzer 122 North Front Street St. Peter, Minnesota 56082 Harley Flathers Executive Secretary Southeastern Minnesota Regional Arts Council 916 7th Avenue S.W. Rochester, Minnesota 55901 Ken Kuemmerlein Extension Specialist Art and Art Education University of Wisconsin 610 Langdon Street Madison, Wisconsin 53706 Veryl Cashman Center For Youth Development & Research 325 Haecker Hall University of Minnesota St. Paul, Minnesota 55108 Georgina McGillivray Advertising Production Manager Cargill Incorporated P.O. Box 9300 Minneapolis, Minnesota 55440
73

Page VISUAL ARTS . . . . . . . . . . . . . . . . . .. . . . . . . . . . . . 3 June C. Schultz
Century Ill Statement ......................... 3 4-H Expressive Arts Program ................. 3 Relevancy of the Expressive Arts ............. 5 Roles and Responsibilities of a Youth Leader .. 6 Qualifications of a Volunteer Leader .......... 7 Environment for Creative Teaching ........... 7 Art in the Park ............................... 9 The Arts-In .................................. 1 0 Aesthetic Judgment .......................... 11 Measuring Artistic Skills ...................... 12 Collage ..................................... 13 Drawing ..................................... 17 Painting ..................................... 20 Printing ..................................... 26 Crafts ....................................... 33 Bibliography ................................ .44
PERFORMING ARTS ...................... .46 Lianne M. Anderson
Hello, Hello ................................. .46 No Mold for Education ...................... .47 Why Dramatics? ............................ .47 Creative Dramatics, Theatre Games,
Role Playing ............................. .48 Pantomime and, Mime ........................ 52 Drama and Poetry Utilizing Food and
Nutrition Concepts ........................ 56 "Frog" Puppet ............................... 57 The Performing Arts ......................... 60
Values ................................... 60 Techniques ............................... 60 Planning ................................. 66
Share-the-Fun Suggestions ................... 67 Bibliography ................................. 68
RECREATION .............................. 69 Stan Meinen
Dances ...................................... 69 The Calf Path ................................ 70 Programming Success ....................... 71 Films ........................................ 71 Resource People ............................ 73
Cover Design: Dale Reed
74 Illustrations: Carol Shields

The world reveals itself to those in love enough to accept its gifts .
.q,~.q,

·- --- ----~- ---- UNIVERSITY OFWNNESOTA
\\111111111111111~~ 3 1951 003 292487 7
The information given in this publication is for educational purposes only. Reference to commercial products or trade names is made with the understanding that no discrimination is intended and no endorsement by the Minnesota Agricultural Extension Service is implied.
Issued in furtherance of cooperative extension work in agriculture and home economics, acts of May 8 and June 30, 1914, in cooperation with the U.S. Department of Agriculture. Roland H. Abraham, Director of Agricultural Extension Service, Un.iversity of Minnesota, St. Paul, Minnesota 55108. We offer our programs and facilities to all persons without regard to race, creed, color, sex, age, or national origin.


