Embed Size (px)
Citation preview
.:The Dreamcast Doc:. BETA Version
.:Introduction .:GD-ROM Disc Layout .:Methods of Copy -Copy a GD with a CDROM .:Burn-It on a CD -Custom Logos -Translating Games -Modify Ingame Soundtracks -Downsizing the Video and Audio -Make it selfbootable .:Final Information .:Acknowledgements
.:Introduction:.
Hi everybody and welcome to the Dreamcast Doc!!! This document is intended for people who want to copy and personalize their original games. This document will teach you how to successfully copy a Dreamcast game, put your own logo in the boot sequence, change the music in the game, how to downsample music and video files and how to make the game selfbootable! All of the tools used for these processes are in a utility pack which I have over at my webpage (except for Cool Edit Pro and Soundforge of course seeing as how big the files are and how limited my monthly bandwidth is :( ). The further you read this the more you start to realize that this document was basically a copy and paste of various documents which I found and compiled in this document.
.:GD-ROM Disc Layout:. The Sega Dreamcast CD's are actually GD-ROMs, sort for Gigabyte Disc, holding a maximum 1 GB of Data instead of the standard 650-700 Mb. Developed by Yamaha, the GD-ROM is a proprietary format which works by packing the pits on the disc closer together to store more data. Along with more storage the GD-ROMs provide an extra level of Copy Protection as they cannot be reproduced using a standard CD-Writer, at least not directly like you would copy a PSX game anyway…
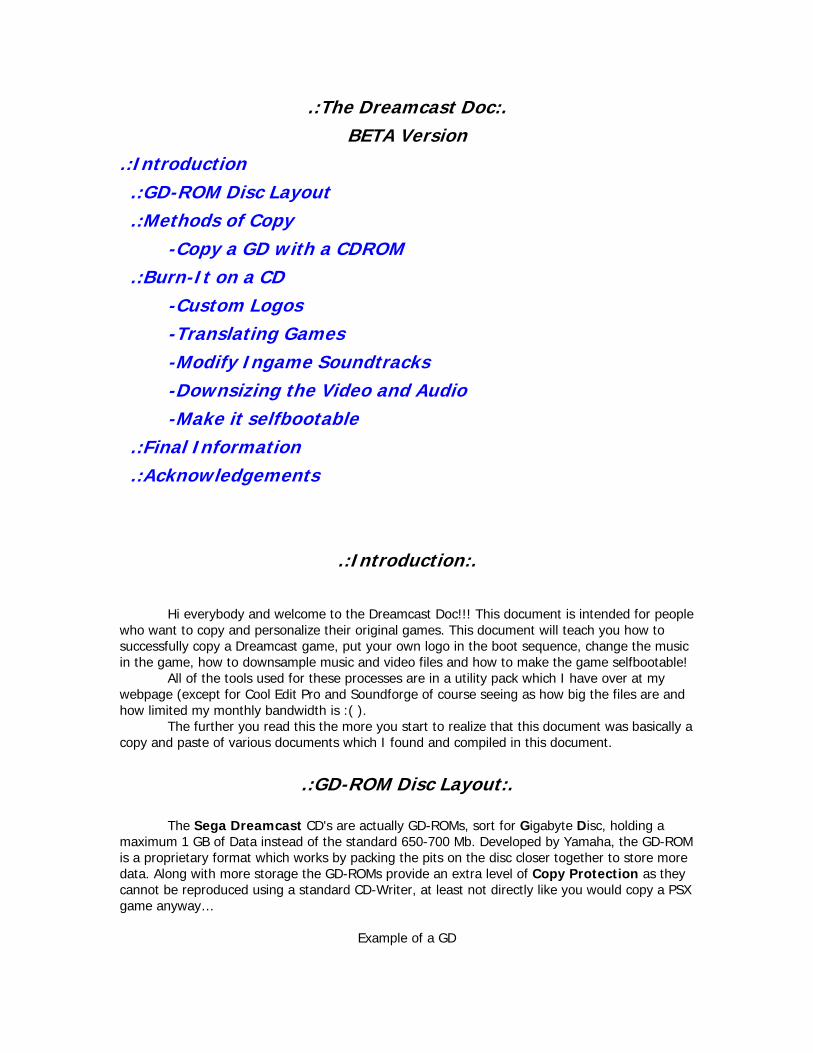
Example of a GD
The are 3 distinct area's when you look at the bottom of a GD-ROM disc. The low-density inner track (dark gray) contains about 35 Mb (4 mins) DATA which is accessible by normal CD-Readers. The outer track (light gray) contains about 1 Gb (112 mins) DATA but is written in a high density format. The area between the two tracks (black) doesn't contain DATA and acts like a border. In this ring the following texts can be read:
• Produced by or under license from sega enterprises LTDs • Trademark SEGA
A normal CD-Reader will only read the first, inner track and won't read past the black area. The details of the high-density region really aren't known, but there are two popular hypotheses. The most popular is that the high-density region has minimal error correction information that's even worse than regular CD audio. Support for this can be found with Sega's unusually excessive warnings on their discs "Handle with care. Scratched discs will not play." Unfortunately if that were true, then all of the discs at Hollywood Video would be broken. The other hypothesis is that the data is stored in CAV/CLV format much like laserdiscs.
.:Methods of Copy:.
This section contains information on how to copy the Gds. So far there are about seven ways to copy Dreamcast games to the harddrive, many of which you have to connect the computer to the Dreamcast, but with my favorite method of copy you can rip the GD right off of your very own CDROM (or DVD of course), the GD in CDROM method ;) !!
.:How to Copy a GD with a CDROM:.
1 Introduction 1.1 Preparing the Drive
2 Tools:
2.1 CDRWin 2.2 GD Lister 2.3 Extract 2.4 Isofix 2.5 Isobuster 2.6 CloneCD
3 122 Minute TOCs 3.1 Data TOC 3.2 Audio TOC
4 Explaining the Method
4.1 Extracting the TOC 4.2 Extracting the Data Tracks 4.3 Extracting the Audio Tracks 4.4 Extracting the ip.bin
1. Introduction.
This method consists of a "swap-trick", it’s more or less the same method used on the Saturn or PSX before the existence of mod-chips, it basically consists on cheating the drive so it doesn't detect we've changed the CD. GD-ROMs are nothing more than regular CDs with a higher data density, that is, the data is recorded closer together, but they're not made of any special material nor recorded in any different way than a normal CD-R would, so... How do we get 1 gigabyte capacity? Simple, by eliminating error correction and redundance, this makes it possible to use only a single byte of space in order to save a single byte of data on disc. Being that GDs are nothing more than regular CD media, it is understandable that a CD/DVD drive would be capable of reading them without a problem, as we'll soon find out. 1.1 Preparing the Drive.
The first thing we need is a CD-R drive, buy a cheap one, something you won't mind taking apart. Also, it MUST be capable of reading 80 min CDs/CD-RW without a problem and with digital audio extraction. Although I haven't tried this out with a DVD drive yet, it should do even better, because the laser autoadjusts to read different formats. The drive I'm using is an Artec 50x, another one that works is the Acer 32x. OK, once we have our drive, we need to adapt it. The first thing to do is to take off the drive's cover (the outer shell), both the upper and lower plates and if necessary, freeing the CD bay (take off the disc tray). Once we have our "naked" drive, we take off the magnetic sheet, which fixes and centers the CD within the drive, in my case (Artec 50x), it's the strip that goes over the drive from one end to the other with a circle in the center, this circle is magnetized. Right, we take off the screws and keep this sheet aside, it should be easy to take off whenever we like. We finally have
our drive ready, no need to say we should have full access to the top of the CD whenever we need, so don't shove the drive inside your computer case. 2. Tools.
Here, I shall describe the necessary tools for extracting files from a GD-ROM. I'll only give a brief description of each tool, their specific use shall be unveiled once we get to the part where they are needed. 2.1 CDRWin
Probably the best CD burning software there is, it's the key to our method. We'll need it to read the GD-ROM, because of its capability to extract sectors. 2.2 GD Lister
This program, created by Yursoft and translated by me (StateS), is used to detect where each track within the disc starts and ends, parting from an ip.bin file or an ISO image containing a GD-ROM TOC. Very useful! 2.3 Extract.
With this application, we'll be able to extract the specified files from any ISO image, using its TOC. 2.4 Isofix.
This tool will prove very useful if we've been capable (a rare case indeed) of creating a complete GD-ROM image, even if it's split in two parts. It assigns LBA values to an image file. 2.5 Isobuster.
Just in case you don't know what this does, I'll explain a bit: It extracts individual files from a buttload of image file formats, including .ISO... In our case, it fulfills the same functions as Extract. 2.6 CloneCD
We'll need this to make the 122 minute ISOs and burn them on cd's. 3. 122 Minute TOCs.
Right, as I've explained before, the method consists of a swap-trick. We need to fool the drive so it thinks it's reading a CD-ROM, NOT a GD-ROM. A GD-ROM has 1GB data capacity, 549150 sectors, 122 minutes, and has the following track structure: Dummy data track (sectors 0-x) Audio track (sectors x-y) (there may be none, as well) Valid data track (sectors y-549150) Knowing this, and keeping in mind that the max capacity for a regular CD-ROM is 80 minutes, we could be driving ourselves crazy with one simple question “How do we extract the sectors where all of the data is held?”.
The solution is... CloneCD images include a .ccd file that is the equivalent to CDRWin's .cue files. That is, it tells where each track within a CD starts and where it ends. OK, this file may be modified using whatever text editor you like, so with a little bit of know-how, we'll be able to modify certain data and convert a 72 minute TOC into a 122 minute TOC. Along with this tutorial you will find a 122 minute data TOC and an audio TOC, but it's interesting to know how to modify a TOC in order to achieve this. 3.1 Data TOCs.
To create a data TOC, we need a Mode 1 image made with CloneCD; CloneCD images are composed of 3 files: a .ccd, a .img and a .sub, the one we need is the .ccd, which, despite its file extension, is no more than a Windows .ini file. The file is divided into sections, the first two sections contain settings relative to the software version and disc structure, and then we have as many sections as we do tracks within the image. The one we're interested in is entry number 2: more specifically, the PLBA field of this entry, we must modify the value of this field and change it to 549150, which is the exact number of sectors in a GD-ROM. It should end up looking like this: [Entry 2] Session=1 Point=0xa2 ADR=0x01 Control=0x04 TrackNo=0 AMin=0 ASec=0 AFrame=0 ALBA=-150 Zero=0 PMin=122 PSec=4 PFrame=01 PLBA=549150 <-- Once we've modified the .ccd, we burn the image using CloneCD. This will give us an error message, stating that the image's TOC is incorrect and will offer the choice of fixing it or leaving it intact. It's quite evident we should tell the application to keep using the current TOC without making any modifications; let it keep its fixes to itself... Once the image is burned, we now have a "Trap Disc" which lets us read all the way to sector 549150, so now we'll be able to extract the full GD! 3.2 Audio TOCs.
Evidently, with the image we have right now we can only extract data in Mode 1 (2048), so now we need a "Trap Disc" for audio extraction. The process and modifications are exactly the same, only with a CloneCD image in Audio format. 4. Explaining the Method.
Now that we have both our modified TOCs, CDRWin and the rest of the tools, we can
start ripping GDs! My tests were made with DreamON 10, which is a SEGA demo disc. Before we go on, make sure you have easy access to your “naked” drive; once we have our system ready, Windows running, and our drive detected, we can start the process. 4.1 Extracting the TOC.
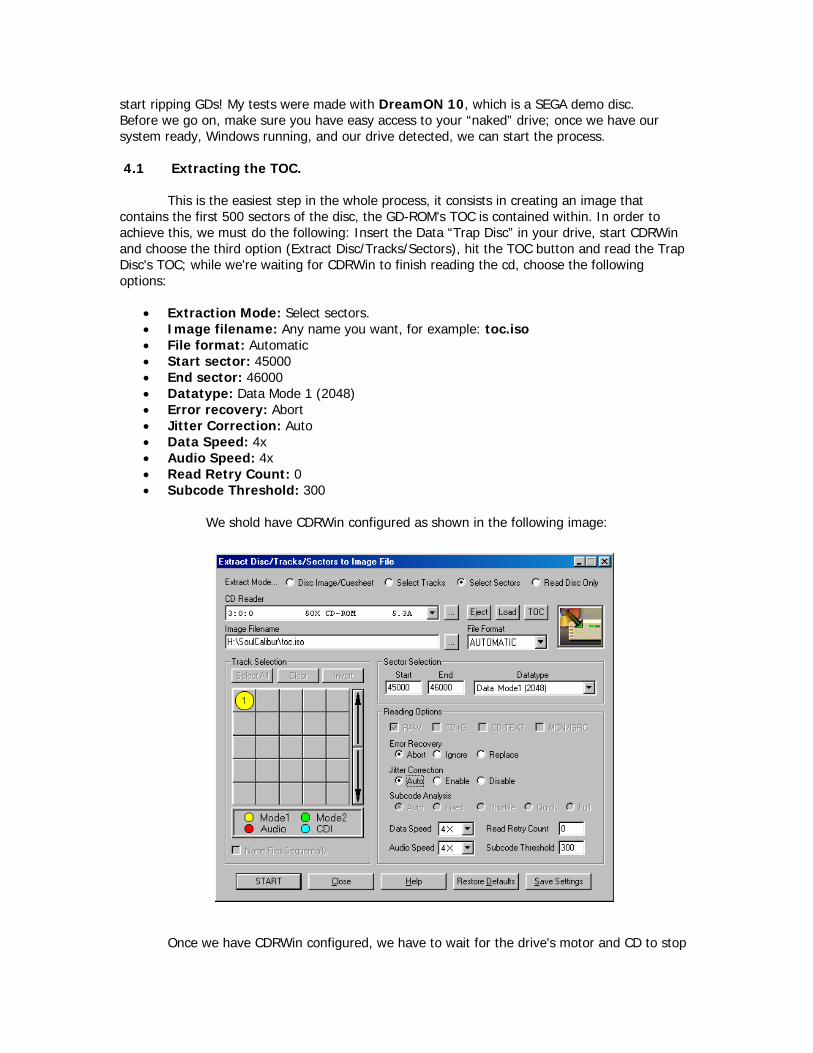
This is the easiest step in the whole process, it consists in creating an image that contains the first 500 sectors of the disc, the GD-ROM's TOC is contained within. In order to achieve this, we must do the following: Insert the Data “Trap Disc” in your drive, start CDRWin and choose the third option (Extract Disc/Tracks/Sectors), hit the TOC button and read the Trap Disc's TOC; while we're waiting for CDRWin to finish reading the cd, choose the following options:
• Extraction Mode: Select sectors. • Image filename: Any name you want, for example: toc.iso • File format: Automatic • Start sector: 45000 • End sector: 46000 • Datatype: Data Mode 1 (2048) • Error recovery: Abort • Jitter Correction: Auto • Data Speed: 4x • Audio Speed: 4x • Read Retry Count: 0 • Subcode Threshold: 300
We shold have CDRWin configured as shown in the following image:
Once we have CDRWin configured, we have to wait for the drive's motor and CD to stop
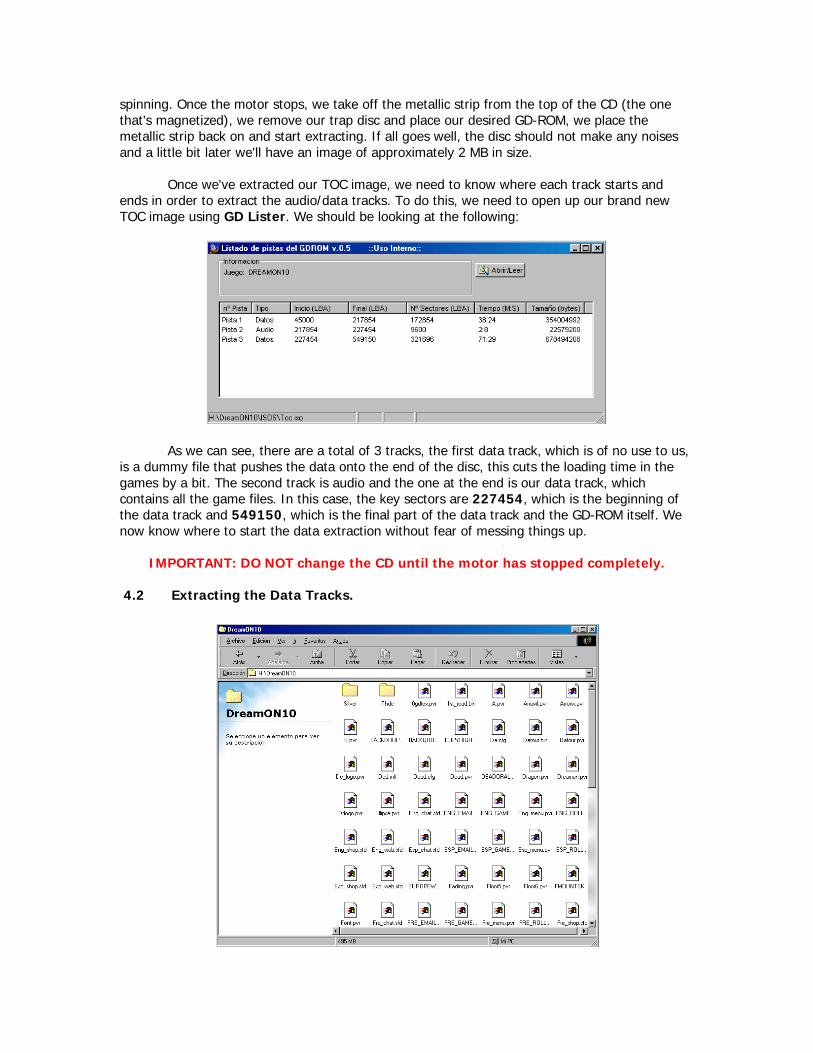
spinning. Once the motor stops, we take off the metallic strip from the top of the CD (the one that's magnetized), we remove our trap disc and place our desired GD-ROM, we place the metallic strip back on and start extracting. If all goes well, the disc should not make any noises and a little bit later we'll have an image of approximately 2 MB in size. Once we've extracted our TOC image, we need to know where each track starts and ends in order to extract the audio/data tracks. To do this, we need to open up our brand new TOC image using GD Lister. We should be looking at the following:
As we can see, there are a total of 3 tracks, the first data track, which is of no use to us, is a dummy file that pushes the data onto the end of the disc, this cuts the loading time in the games by a bit. The second track is audio and the one at the end is our data track, which contains all the game files. In this case, the key sectors are 227454, which is the beginning of the data track and 549150, which is the final part of the data track and the GD-ROM itself. We now know where to start the data extraction without fear of messing things up.
IMPORTANT: DO NOT change the CD until the motor has stopped completely.
4.2 Extracting the Data Tracks.
Once we know the beginning sector of the data track, the only thing we need to do is tell CDRWin to extract from that sector and all the way to the end of the disc. I don't know why, but if the data track starts before sector 370000 (more or less), we have to split it into two, otherwise, the drive won't extract the data all the way to the end. In this case, we split the image into TWO images: one that goes from 227454 to 369999 and another one from 370000 to 549150. To extract these images, we use the same configuration we used when extracting the TOC. Just like before, if the GD-ROM doesn't make any weird noises, then everything's fine. If we're capable of extracting all the way to sector 549150, then we're almost done... Now we have two .ISO files with no TOC and on top of that: split! I know this doesn't look too good, but we can merge the two isos into one and still use the TOC we extracted as the resulting iso's own TOC. To merge both pieces, we use a simple DOS command called copy with the following syntax:
copy /b img_pc01.iso+img_pc02.iso new_img.iso After a little while, we'll have ourselves a complete ISO named new_img.iso. The ISO is STILL missing the TOC, so we can't extract any files with ISOBuster yet... What we're gonna do now is: use our extract tool to use our first TOC as the merged ISOs own TOC. Here are the syntaxes needed (in DOS):
extract toc.iso new_img.iso 227604 (227454+150) This particular command will extract all the files from the ISO which contains the data image we extracted earlier; we must add 150 sectors because extract doesn't count the sectors assigned to the TOC. Once extract finishes, we should have a folder with all the files from the GD-ROM, here are the files and folders from the DreamON 10 Demo Disc: And that's it! We've succesfully extracted all the files from our GD-ROM. All we need to take care of now are the audio tracks, if there are any... Don't worry, the process is somewhat easier than extracting the data tracks... 4.3 Extracting the Audio Tracks.
Once we have the data from our GD-ROM, we can start ripping audio tracks. First of all we need to write down where each audio track starts and where it ends, using our GD Lister to read the respective TOC. Only after this do we take out our GD-ROM and place our audio "Trap Disc" into the drive and make CDRWin read it's TOC; once our drive's motor and disc come to a stop, we take out our trap disc and insert our GD-ROM once more, reuse the options used to extract the data track except for the following options in CDRWin: – File Format: WAVE – Jitter correction: Auto – Datatype: Audio (2352)
We specify the start and end sectors for each track and proceed to extract each one individually; once finsihed, we'll have as many .WAV files as the number of audio tracks in our GD-ROM.
4.4 Extracting the ip.bin.
We're almost done! We just need to take care of one more thing: extracting the ip.bin, which is the bootstrap in all our DreamCast games and it indicates which file should be executed first, driver/video mode compatibility, game manufacturer and some other stuff. This file is essential in order to make any Dreamcast game work. If we're lucky, the file will be included as another file among the ones we extracted before, if not, then we've got work to do... Although it's not the isofix's primary function, this program can extract a game's ip.bin when applied on an image file containing the game's TOC: it extracts into a file named boot.bin. When we start up this program, it asks for the image file we wish to patch, as well as the LBA value from which we want to start the procedure; this value is 45000. Once isofix finishes, we'll have two files: a tmp.iso - which we don't care for, and a boot.bin - which we need to rename to ip.bin and use as a boot sequence for the game we want to burn.
.:Burn It on a CD:.
In this section you will learn how to make custom logos, donwsample the audio and video, how to translate Jap games to English, as well as learn how to change the in-game music to your liking, how would you like to listen to busta ryhms, or Drowning Pool in your copied version of Capcom Vs. Marvel 2? Enjoy!
.:Custom Logos:.
You must have an image that consists of 320width x 90height pixels (1,750 x 0,492 inches or 4,444 x 1,250 centimeters if you prefer) and must be no more then 128 colors. It also must be saved either in BMP, GIF or the PNG format. Conversion If you saved the image in either the BMP or the GIF formats you must use the bmp2png.exe (BMP to PNG) or gif2png.exe (GIF to PNG) respectively. Here are the syntaxes to perform the conversions for each format:
bmp2png.exe logo.bmp (considering of course that you image was named logo.bmp) gif2png.exe logo.gif (considering of course that you image was named logo.gif)
You must convert the PNG file into a MR file using the pngtomr.exe (PNG to MR) utility that comes with the DC Toolkit. If I wanted to convert a picture by the name of logo.png into logo.mr I would type this at a DOS Prompt: pngtomr.exe logo.png logo.mr Inserting Logo After that is done, use the loginsrt.exe utility that also comes with logo tools to insert the MR file (Image) into the ip.bin of your game, like this:
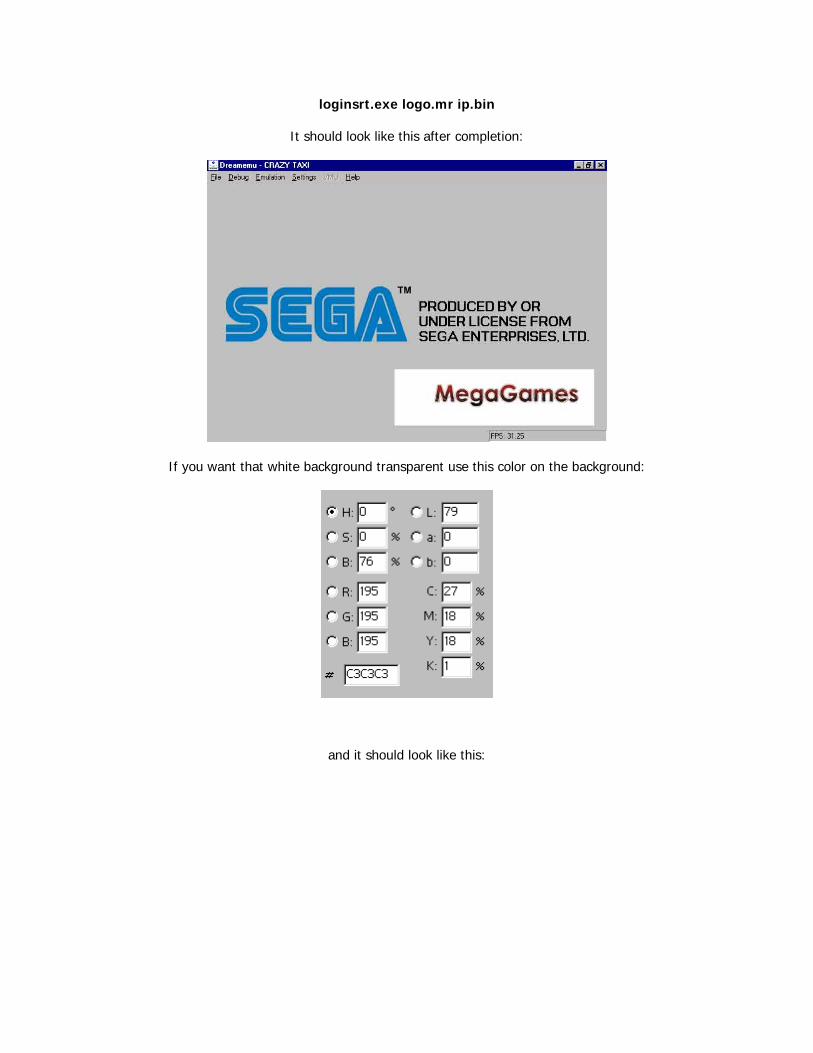
loginsrt.exe logo.mr ip.bin
It should look like this after completion:
If you want that white background transparent use this color on the background:
and it should look like this:
I used the Dreamemu (Dreamcast Emulator) to test it before burning, you can get this emulator at http://www.zophar.net/
Dreamer is another, I haven't used it before here's the url: http://www.zophar.net/
.:How-To Translate Games:.
Since it is almost impossible to recompile binaries with new string data, the only way to 'translate' the game is to replace the Japanese character strings with normal alphabet strings.
The Japanese characters are (in most cases) refered to with the JIS standard. This is a two byte code to refer to a Japanese character. This JIS characterset contains Kanji, Katakana, Hiragana, various aplhabets and a whole bunch of tokens. The first byte of a JIS code is bigger than 0x80. It does not mean that this full set is included in the binary. In some cases only the characters used in the game are included and the other characters are left out. I don't know if the DC main rom contains a full Japanese character set. In most cases however, the full alphabet is included, since this is mainly used for usernames etc. So how can we give it a go? Step 1: Determine if the text used in the game is stored somewhere and that it is not encoded. The easiest way is to create an image (for educational purpose of course :P ) or to copy the files to you harddisk of your PC. Use a editor like Ultraedit. It has a hard time reading a full image because it always copies the file to a temporary file first. But after it's finished copying, it is fairly fast. Use the 'find' option to locate a unique string out of the game. Preferably a normal alphabet-string. Be aware that JIS also has 2-bytes codes to refer to alphabet characters but these are in most cases as wide as the Japanese characters (that is half as wide as normal alphabet characters). Also be aware that some text strings can be actually pictures and thus will not show up in your binary. In some cases the text is encoded and in that case is is really hard to find. In most games, the text used in menus and in the actual games is seperatly stored in various files.
If you use Ultraedit to search a string in a (hex) binary, make sure to select the option 'Search ASCII', else it will not search properly. If you found your unique string, you can like if you can locate more alphabet text fragments. Most strings will be seperated by one ore more 0x00 bytes. The easiest part is to just select a portion of the data before and after the location your unique string showed up and paste it into another file. Change this file into a HTML file by adding: .html Include you copied section heren and do not forget at the end of the file. Use a standard browser with Japanese language support to load the file we just created. Make sure the character coding is set to Japanese SJIS. IE will start whining immediately when you don't have Japanese support and make you download it. You can now see is some more Japanese text is around the location where you found the unique string. If it is there, then we are in the right location. If not, then you'll have to continue searching. In case only the second byte of a JIS character is copied, a strange characte is show in most cases. Step 2: Now we have found some Japanese text (maybe not all of it), we can test if we can alter this text. replace all the text (maybe leave the zero's unchanged) by the complete alphabet and all other characters on your keyboard. Replace a much strings as possible. Save your image and burn it again to CD. (There is no DC emulator unfortunately so we can't try the image on our harddisk directly). Go/play to the position where you're unique string (you used to search previously) should be show. If the text you just replaced the original strings with, shows up, then we can be sure we can change the file without any problem. Some programs use a CRC or other checking mechanism to prevent people tinkering with their work. In that case the binary neesds to be dissasembled in order to disbale that check (that's quite difficult). Step 3: Get a 'fresh' image with the original strings in it. Located your unique string again and start working from there. Locate and note every start and end position of an original string. Remember that they are seperated by zeros in many cases. The most easy way is to copy the original string to an HTML file (like we just made) and note the positions of is in the same HTML file. You get entries like: 1c12e4-1c1303 Japanese text you will get a long list of these entries, and you can also see if the parts you copy will also make sense. If you also load this HTML file in a webbrowser, then you will only have to save the file when you add something and then you can hit the reload button of the browser too look. Step 4: After locating the strings, we can translate them. Step 5: Since we can only replace, we have to make sure that our translation fits in the original location. Because of the 2 byte JIS coding, you will in most cases have twice as much space for the normal alphabet. Always leave the zeros untouched since these are used as seperators. You can enter the translations by hand. But if you have al lot to enter, , make (or find on the internet?) a program to inject your translation in the specified location. A 'space' is 0x20 and you can use this to remove unwanted characters. Step 6: Burn the patched image to CD and check if you replaced and translated all strings. Repeat the last steps until you are satisfied or can't find an other text to translated. Be prepared to ruin quite a few CD's. For a simple translation like the CVS2 fandisk, I spend over 5 CD's to fully translate the CVS2 fandisk. If you translate for example a fighting-game, try to get hold of a good FAQ where the original japanese terms are used. For a good online dictionary, try http://www.alc.co.jp/ You can just cut and paste text into it (do not forget to set it to Japanese
English). If some text is impossible to translate, just try to translate it as close as possible. But if you just translate 90% of the text, it will be more than enough for non-japanese speakers to understand. It's not an easy task, and takes quite some time.
.:Modify In-Game Music:.
NON-Selfbootable version
Before I start explaining anything I want to warn you that this method was tested with Capcom Vs. Marvel 2 Jap non-bootable and bootable versions, it could work with other games (haven’t tried yet, but I’m really sure it can work). Now that that’s out, let’s get cracking at modifying that game’s music. Things you will need: 1. Firstly, you must own the original MvC2 GD-ROM (yeah, right...) 2. This game is made of .bin files so it must be reburned with CDRwin or Discjuggler 3. You must have a CD-W(riteable) and a CD-R 4. You must have a backup copy of a japMvC2 (selfboot copy owners read the end of this post) 5. The music you're gonna add (.wav format) 6. WINRAR or 7-zip (I preffer 7-zip cause it has better compression) Step 1 Time to set the folders. Create 4 folders: - adxencd - Cinepack - Isobuster - MvC2 Put the last 3 wherever you want, but the adxencd folder must be in your hard drive like this: C:\adxencd <--- If you don't know how to do this then don't even try what's next.... Once you have that folder there, create a new one inside it. Name it "wav". Ok, now, you need to copy all of the MvC2 cd's contents in one folder. To do this, insert the MvC2 cd into your CD drive and open Isobuster. In Isobuster select the CDROM drive which contains the MvC2 cd, now select everything and copy it to the folder "MvC2". Ok, now you have your MvC2 in your HD, now let's proceed. Step 2 To change the music you'll need to know which songs are played in each stage, so here's a list of the stages and songs: ADX_Sxxx.BIN <-- the xxx are for the entries below. SELC- Select screen 000 - The Pirate Ship Stage 010 - Desert 020 - Inside the factory 030 - Carnival Stage
040 - Bridge stage 050 - Blue Underground Cave 060 - Clock Tower 070 - Ice Boat Stage 080 - Abyss 1 090 - Abyss 2 0A0 - Abyss 3 0B0 - Training MAKE SURE THE MUSIC YOU ARE GOING TO REPLACE THE STAGE’S MUSIC WITH IS A .WAV FILE!!! Once you have the songs which you want to replace in the game and selected the stage you want, you need to rename your tracks like this: ADX_Sxxx example: you have "song1.wav" and you want it to be the BGM of the Bridge Stage, so you rename it like this: ADX_S040.wav <--- Don't bother about the extensions.. yet. The name must be all in CAPS and notice the 0 <-- zeros not O's And it must be like the example with the underscore (“_” for all of you geniuses out there) When you are done move the music files into the “wav” directory. Step 3 Now i hope you have a decent IQ to understand what i'm going to say: To change the .wav files to .adx you need to use adxencd (no... really???)--> yes, but the problem is it must be used via a MS DOS prompt. To you smart guys here's how to do that: -Press the Start button, click on run, and type command for all of you Windows 2000 buffs out there it’s cmd. A window will pop, it will say C:\WINDOWS (or something like that anyway) now type cd.. until you reach C:. Next type cd adxencd and press return, it should now say C:\adxencd, if not, then the folder "adxencd" is not in your hard drive, so go and fix it. Now with the C:\adxencd on screen, its time to change the wavs to adxs. To do that you need to type "adxencd" and the name of the wav, hit return. Example: C:\adxencd>adxencd ADX_S040.wav Some info will appear. Now check the "adxencd" folder to see your brand new adx file. Do the same with the rest of the songs you want to convert. Note: I hope you used long songs cause they won't loop. If you want them to loop over and over and over... you must read the following: ExtraStep: Looping songs (optional)
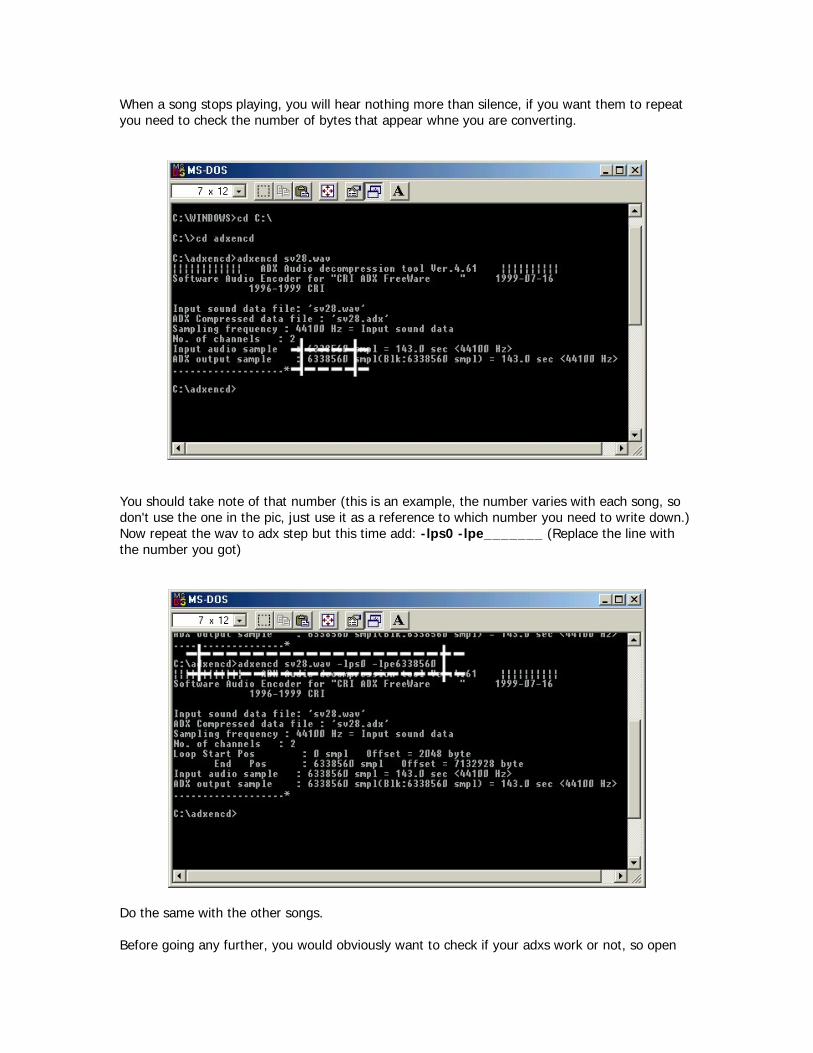
When a song stops playing, you will hear nothing more than silence, if you want them to repeat you need to check the number of bytes that appear whne you are converting.
You should take note of that number (this is an example, the number varies with each song, so don't use the one in the pic, just use it as a reference to which number you need to write down.) Now repeat the wav to adx step but this time add: -lps0 -lpe_______ (Replace the line with the number you got)
Do the same with the other songs. Before going any further, you would obviously want to check if your adxs work or not, so open
the "Cinepack" folder and open Cinepack (duh!). Select the file you want to listen to and open it. If they work, you're free to continue, if not repeat the Step 3. Step 4 Now you have your adx files, so you can delete the wavs. Time to give them the ".BIN" extension I like to explain things in the longest methods possible seeing it’s less likely for you to screw up. Open the "adxencd" folder and keep it open to see your adx files. Now open your Control Panel (Start, Configuration, Control Panel) and open up the Folder options. Click the "View" tab and make sure that the box that says "Hide file extensions for known file types" is unchecked. After it's unchecked, the extensions of all files will be shown in the folder. Now just replace the ".adx" for ".BIN" (capital or not, it's the same thing). Ignore the warning and click yes, don't worry, the file is still usable. When you finish, copy all of your glorious .BIN files to the folder "MvC2" and paste them there. Click replace all, because you're replacing of course. Warning: If you renamed the files incorrectly don't expect them to play. Step 5 All done. Time to burn it again. Check the Final Notes section if you want some special DC loading treatment. Open CDRwin and click the second to last option to the right (file backup and tools), then select Build an ISO9660 image. Click the directory option on the upper mid part of the page and select the "MvC2" folder, then press add. You will see 2 boxes checked, one says Recurse Subdirectories and the other says Preserve Full Pathnames. Uncheck the Preserve Full Pathnames, leave the other one as it is. Then you will see an option called output folder. Put this ISO right in the "MvC2" folder and call it mvc2e. This will take about a minute to produce, so you may go to the bathroom. When you look in the "MvC2" folder, at the end you will see a file that says mvc2e.iso now open Discjuggler and select CD Image to CD Recorder. Click the image under the Source option and look for your new technomusic ISO. Select the destination and hit Start. Now go somewhere else and spam a little till the cd is finished. This game needs the Bootcd, so do the traditional booting method and pop in your new fresh MvC2E. Enjoy. Final Notes -If you have a selfboot copy you can go on ahead and try this method, but i'm not sure if it works with it, but i'm sure the result won't be selfbootable even if the original one is. -The DC is a great console, but CD-Rs won't do it any good, so the best you can do is to add a dummyfile to the "MvC2" folder before Step 5. This will make the game to have better load times and a smoother performance. You can get this dummyfile here(get the dummy.rar, it's 300+mb rared in a 175kb file!!!!O_o). Just be sure the whole folder (dummyfile included) is smaller than 650mb if you're using a 74min CD-R, if the CD-R is 80min it needs to be smaller than 700mb. Else = failure. ^_^ -I hope this biggie thread helps your restless soul, ppl. ^_^ - This can be done with any non selfbootable game that has similar files to those of MvC2. - This can be done to a US MvC2 game as well. (non self bootable of course) - If you want to do it to a self bootable game, you need to do the steps above but you need to make the game selfbootable again. Else it won't work.
- The selfboot tutorial is somewhere out there, so don't ask me for it cause i don't know how it works or where to find it. - Done. PS For all selfboot owners: Gimme some time to try a selfbootable game, that's if you want of course. If i succeed, i'll post how to do it later. Yours truly eidrian "da majik man" Things you'll need: 1. DC selfbooting pack 2. A selfbootable game, in this case MvC2. 3. A CD-W and a CD-R 4. CDRWIN <--- no other. Step 1 Unzip all that crap in a folder calles selfboot in your HD, like this: C:\selfboot Step 2 Ok, now do all the other steps for changing music except creating the ISO and of course burning it.. (For selfbootable games just extract the 2nd session,using ISOBUSTER of course, ignore the first one). Step 3 Once you have all that done, select all files from the MvC2 folder (the one you have with your music changed) and move them to the selfboot directory, there should be a datafolder there so move the entire folder there. Step 4 Once its finished, you need to burn your 1st session track. To do this fire up CDRWIN and select the first option Record Disc. Then click the Load Tracks, then click Add. Change the type of file option so it should say something like this All files *.*, so now browse until you get to your selfbootdirectory and select the AUDIO.RAW file. Click OK. Then before hitting the START RECORDING button be sure that the box Open New Session is checked. Otherwise all this you're doing will be useless and you'll only waste a beautiful CD-R. Once it's done click START RECORDING. Now wait till it's finished. And leave the cd in the tray. You'll use it in the next step. Step 5 Once the cd is done you need to find out your SCSI Bus ID# of your CD-W. (Insert quote: What the fuck is that??) It's not an inhuman thingy, you can do it, well...... you must do it if you want this to work, hehe... So pay attention: Open a MSDOS window and change it to the selfboot directory: cd C:\selfboot
Now run this: cdrecord -scanbus It should pop your CD-W info and some values. Write down the values cause you'll be needing them. Now, run this: cdrecord -dev=x,x,x -msinfo Beware!!!! Replace the "x,x,x" with the values the scanbus gave you, for example: Scan bus gave you these: 0,1,0 <-- so you put these instead of the "x,x,x". The values differ so be sure to be sure of this, or it won't work. I'll refer them as "x,x,x" from now on. After that command is done it will pop another number, write them down. (Be sure that the CD with the 1st session burned is still in your CD-W). Example: 0,11700 <-- write these, you'll need them later.(the second one is your msinfo value) Step 6 Now that you have your MvC2 in the data folder open it and look for these two files: 1ST_READ.BIN IP.BIN So cut them off there and paste them in the root directory (the selfboot one, for those unenlightened). So you should have a bunch of weird looking applications plus a 1ST_READ.BIN and IP.BIN files in the selfboot directory. Note: You have to delete them from the data directory, they should only be in the selfboot directory. Open a MSDOS command window and type this: cd c:\selfboot It should say now: C:\selfboot . Now type this: binhack.exe It will prompt you for the name of binary, so type: 1ST_READ.BIN, now it will ask for the name of the boot sector so type: IP.BIN. After that it will ask for the MSINFO value (remember this?)so type only the second number msinfo gave you, for example: 0,11700<--- you only need the 11700 Once it's finished, copy your new 1ST_READ.BIN to the data directory (where all MvC2 files are). NOTE: You only need the 1ST_READ.BIN file in the data dir, leave the IP.BIN where it is. Step 7 Now, time to make your iso!!! In the MSDOS window type:
mkisofs -C x,y -V ECHELON -l -o data.iso data "x,y" <<--- are your MSINFO values. Example: 0,11700 Wait for your ISO to be created. Step 8 Once its done you'll have a data.iso sitting in your selfboot directory. Time to hack it!!!!! ^_^ In a MSDOS windows run: IPINS.EXE It will prompt you for the Bootsector filename, so choose: IP.BIN. It will now ask for the ISO filename, so type data.iso. It will patch the IP.BIN as the bootsector in data.iso [B[Step 9[/b] Time to burn. Fire up CDRWIN again and choose File Backup and Tools. So for Backup Tool/Operation: Select Record an ISO9660 Image File. For Image Filename choose data.iso in your selfboot directory. For recording options select these: Disc Type: CDROM-XA Track Mode: MODE 2 Speed: any Finalize/Close Session: Yes Write Postgap: Yes Open New Session: No Test Mode: No Verify Recorded Image: No Click the Start button and wait. Once it's finished, eject the CD and try it in your DC. Now you have a selfbootable MvC2 with tour own selection of music. Enjoy!!!
.:Downsizing Video and Audio:.
Downsample Audio Some games use WAV/PCM/RAW audio files, an example of a game with this type of audio is Soul Calibur, the files have these respective extensions, *.p16 and *.p08 which can be opened by CoolEdit Pro and Soundforge, and since I don't have soundforge I'll explain how to listen to these files with CoolEdit Pro: 1. First start CoolEdit Pro. 2. Press F12 to switch to the Multitrack view if it isn't already in that view. 3. Rightclick the area with the horizontal scrollbar and select “Insert” and then “Wave from file” then select any of the wave files with the corresponding extensions which I wrote up there.
4. If the file you chose had a *.p16 extension then: 4.1. Use a 44000 sample rate, set the channels to either mono of stereo (the only difference is the legnth and speed of the music), and set the resolution to 16 bits, after that another screen should appear, choose either the 16-bit Intel PCM (LSB, MSB) or 16-bit Motorola PCM (MSB, LSB), if you choose the first one put the offset input data to +0, if you chose the other one the set that value to +1.
5. If you chose a file with a *.p08 extension then: 5.1. Use a 44000 sample rate, set the channels to either mono of stereo (the only difference is the legnth and speed of the music), and set the resolution to 16 bits, after that another screen should appear, choose 8-bit Signed if you set the resolution to 8 bits, if not choose either 16-bit Intel PCM (LSB, MSB) or 16-bit Motorola PCM (MSB, LSB) and set whichever offset input data that you wish, it doesn't matter.
Other games, such as Sonic Adventures, use ADX files, now to downsample these files we're going to need:
• Cinepak • ADX Loop Calculator v1.27 (it includes adxencd) • DC Movie Maker (use only if the ADX files do not loop)
IF THE SONG LOOPS: Open the target ADX with cinepak and convert it to WAV
then with then just run the ADX Loop Calculator (in the directory where you have the ADX and the WAV version of that ADX), this will result in a batch file which tells adxencd to loop the musics in a certain position, now here comes the downsampling part. In that batch file there are command line options, what we’re going to do is add two more commands which are –sf22050 (which will lower the downsampling rate to 22050) and –ch3 (which will change the channel format from stereo to monaural) right between the adxencd.exe whatever.wav <other commands go here> –lpsXXX –lpeXXX (where XXX is the start and end positions for the looping of the music) like this:
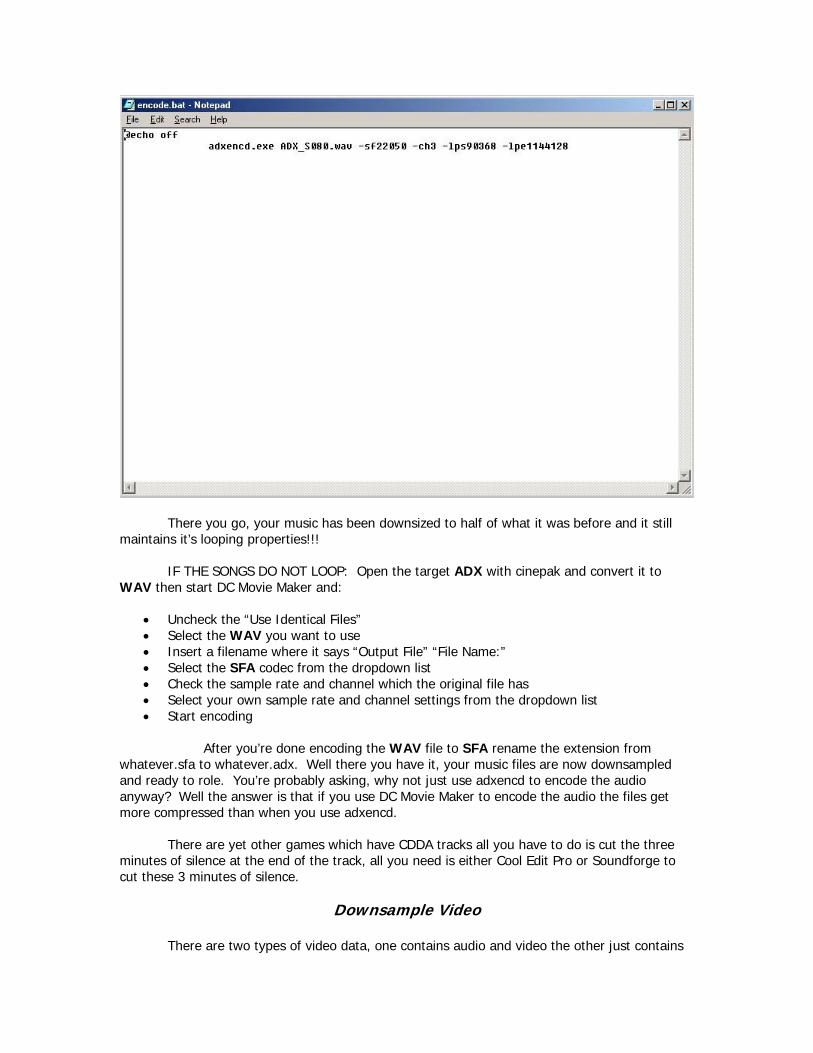
There you go, your music has been downsized to half of what it was before and it still maintains it’s looping properties!!! IF THE SONGS DO NOT LOOP: Open the target ADX with cinepak and convert it to WAV then start DC Movie Maker and:
• Uncheck the “Use Identical Files” • Select the WAV you want to use • Insert a filename where it says “Output File” “File Name:” • Select the SFA codec from the dropdown list • Check the sample rate and channel which the original file has • Select your own sample rate and channel settings from the dropdown list • Start encoding
After you’re done encoding the WAV file to SFA rename the extension from
whatever.sfa to whatever.adx. Well there you have it, your music files are now downsampled and ready to role. You’re probably asking, why not just use adxencd to encode the audio anyway? Well the answer is that if you use DC Movie Maker to encode the audio the files get more compressed than when you use adxencd.
There are yet other games which have CDDA tracks all you have to do is cut the three minutes of silence at the end of the track, all you need is either Cool Edit Pro or Soundforge to cut these 3 minutes of silence.
Downsample Video
There are two types of video data, one contains audio and video the other just contains
video data.
.:Selfboot Tutorial:.
Introduction:
Since we find it a bit stupid to re-release nearly 200 DC titles over again, and waste the bandwidth of FTP's and end-users, We thought we would release a tutorial & toolset with which you can convert all of your old Utopia loader games to the newer self-boot format.
Limitations:
Self-Boot and Multisession code requires 3 Minutes of Overhead on the CD you are burning. So, if you are burning to an 80 Minute CD, Your data must be approximately 77 Minutes, If you are burning to a 74 Minute CD, Your data must be approximately 71 Minutes. If the data is over this size, Your burn will fail. Many end-users claimed they could easily rip games and downsize them, but didn't know to read in GD-ROMs. So here is your chance to prove your theories, Go ahead and rip down the games you are trying to burn by 3 Minutes if they are Full CDs.
Tutorial for games without CDDA:
Make a directory on your hard-disk called "selfboot" Insert the Utopia Boot-CD version of the game into your CD-ROM drive, Copy over the IP.BIN
and 1ST_READ.BIN from the CD over to the "selfboot" directory on your hard disk. (Note 1: IP.BIN cannot be found on Accession releases, therefore Accession releases cannot be made self-boot from this method.) (Note 2: 1ST_READ.BIN might not be the exact name of the boot filename, If you want to check what the boot filename really is on some games, open up IP.BIN in a hex or text editor. Look on the top, It should say something similar to: "V.001XXXXXXXX BLAH.BIN". If it says this, That means that BLAH.BIN is the boot-filename, and this is the file that you should copy over. If the game is using WinCE this filename will be 0WINCEOS.BIN. This file will be referred to as BOOT.BIN from here-on. Please make sure you don't think that BOOT.BIN is an actual file, It is just a alias as this file can be named many things.)
OK, So now in your "selfboot" directory, you should have this tutorial unzipped, cdrecord and all related cdrecord tools, and you should also have copied over the IP.BIN and BOOT.BIN from the game that you are working on.
Make a subdirectory called "data" inside your "selfboot" directory and copy ALL game data files from the Utopia-BootCD game into this directory. Also, delete the file IP.BIN from the "data" directory if you already have it in the root of your "selfboot" tree. Also delete the BOOT.BIN (generally 1ST_READ.BIN) from your data tree if you have already put this file in the root of your "selfboot" tree. (Note: All files that you copy from a CD will have Read-Only attributes, You must take these off before continuing.)
Now, you have 2 ways of achieving the same thing for this step, I will go over both ways and you can choose whichever you want. To start off for both methods, insert a blank disk into your CD-Recorder.
CDRWIN Method: Fire up CDRWIN.
Goto the first icon on the top left: "Record Disc" Click the icon in the top right corner: "Load tracks" Click add, then choose the file AUDIO.RAW in your "selfboot" dir. This file is
included in the DC Toolkit archive. Click the tab "Open New Session" near the bottom. Burn this CD.
CDRECORD Method: If your CD-Recorder cannot use the "Open New Session" option in CDRWIN,
You have one more way to do it, that may or may not work. In the "selfboot" directory you should have the cdrecord toolset unzipped.
You should see files such as cdrecord.exe, mkisofs.exe, and cygwin1.dll. Run the following command from a DOS Prompt: cdrecord -scanbus This should show you a list of CD-ROM and CD-Recorder units installed in
your system. Look for your CD-Recorder and find the SCSI Bus ID#. It will be in format x,x,x. It will also be referred to as x,x,x for the rest of this tutorial.
In your "selfboot" directory, run the following command to record the 1st session of the disk: cdrecord -dev=x,x,x -multi -audio audio.raw You can optionally include "speed=x" after -audio, Where x is the maximum speed that your CD-Recorder can record at.
OK, Now that you have the first session burned, it's time to move onto the second. This is the crucial part so make sure you pay attention and follow things closely. You should already have all game data files in the subdirectory "data", except for BOOT.BIN and IP.BIN.
Read over the CDRECORD burn instructions. Find out the SCSI Bus ID# of your CD-Recorder If you have not done so already. Run the following command: cdrecord -dev=x,x,x -msinfo It will spit out a number in the form x,y. Normal values are 0,11700 or 0,11702 for a CD which only has AUDIO.RAW burned on the 1st session.
Run a DOS Prompt and goto your "selfboot" directory, You should have an executable there called "BINHACK.EXE". In addition you should have the BOOT.BIN (generally called 1ST_READ.BIN) and IP.BIN in this directory. Run the program BINHACK.EXE. When it prompts you for the Binary file to modify, Pick the BOOT.BIN. If it detects that the BOOT.BIN is a Windows CE Exectuable (0WINCEOS.BIN), It will not modify the 0WINCEOS.BIN. If it detects that this Executable is a normal Katana Executable, It will ask you for the the -msinfo number that CDRECORD gave you in the last step. It will then modify the BOOT.BIN according to the number that cdrecord -msinfo gave you. Next, It will ask you for the filename of the Bootsector. Here, you should input IP.BIN. It will hack the IP.BIN for self-boot purposes. (Side Note: Only input the 2nd Number that MSINFO gave you, Ex. If it gave you: 0,163012, Input 163012 when BINHACK prompts you for the MSINFO number.)
Once the changes are made with BINHACK.EXE to the BOOT.BIN file, Copy the BOOT.BIN over to the "data" directory's root. Please make sure that you did not rename the file to actually be called BOOT.BIN. It should still be called the original filename that you found out from Step 5.
Now, you should have in your "data" directory, All game data files, including BOOT.BIN, But it should not have IP.BIN. If you want to dummy this CD, You must make a dummy now. You must make a normal file dummy. Name this dummy "000DUMMY.DAT" and place it
into the "data" directory. Please note the overhead limitations of Multi-Session & Self-Booting that were mentioned at the beginning of the tutorial, and size your dummy accordingly. Your next step is to run MKISOFS and make a ISO out of these files. Run the following command while you are in your "selfboot" root directory: mkisofs -C x,y -V ECHELON -l -o data.iso data "x,y" should be the numbers outputted to you from cdrecord -msinfo earlier.
Run "IPINS.EXE" from the "selfboot" directory, In a DOS Prompt. It will prompt you for the Bootsector filename, Choose IP.BIN. It will then prompt you for the ISO filename, Choose the file "data.iso" which you just generated in the last step. It will patch IP.BIN as the bootsector on data.iso.
You should now have a fairly large sized data.iso file sitting in your "selfboot" directory tree now. It is time to burn this file. You should still have the disk you burned the audio session to earlier inserted in your CD-Recorder. You can do this with either CDRWIN or CDRECORD, Just as the Audio Session Burning.
CDRWIN Method Fire up CDRWIN. Click the 2nd Icon from the Top Left: "File Backup and Tools". For Backup Tool/Operation: Select "Record an ISO9660 Image File". For Image Filename, Choose data.iso in your "selfboot" directory. Under Recording Options, Select your CD-Recorder. Check the following
options accordingly: Disc Type: CDROM-XA Track Mode: MODE2 SPEED: Whatever You Want Finalize/Close Session: Yes Write Postgap: Yes Open New Session: No Test Mode: No Verify Recorded Image: No
Click the start button and you are burning. CDRECORD Method
In the "selfboot" directory you should have the cdrecord toolset unzipped. You should see files such as cdrecord.exe, mkisofs.exe and cygwin1.dll.
Run the following command from a DOS Prompt: cdrecord -scanbus This should show you a list of CD-ROM and CD-Recorder units installed in
your system. Look for your CD-Recorder and find the SCSI Bus ID#. It will be in format x,x,x.
In your "selfboot" directory, run the following command to record the 2nd session of the disk: cdrecord -dev=x,x,x -xa1 data.iso You can optionally include "speed=x" after -audio, Where x is the maximum speed that your CD-Recorder can record at.
You are done! Eject the disk and try it in your Dreamcast.
Tutorial for games with CDDA:
Make a directory on your hard-disk called "selfboot" Insert the Utopia Boot-CD version of the game into your CD-ROM drive, Copy over the IP.BIN
and 1ST_READ.BIN from the CD over to the "selfboot" directory on your hard disk. (Note 1: IP.BIN cannot be found on Accession releases, therefore Accession releases cannot be made self-boot from this method.) (Note 2: 1ST_READ.BIN might not be the exact name of the boot filename, If you want to check what the boot filename really is on some games, open up IP.BIN in a hex or text editor. Look on the top, It should say something similar to: "V.001XXXXXXXX BLAH.BIN". If it says this, That means that BLAH.BIN is the boot-filename, and this is the file that you should copy over. If the game is using WinCE this filename will be 0WINCEOS.BIN. This file will be referred to as BOOT.BIN from here-on.
OK, So now in your "selfboot" directory, you should have this tutorial unzipped, cdrecord and all related cdrecord tools, and you should also have copied over the IP.BIN and BOOT.BIN from the game that you are working on.
Make a subdirectory called "data" inside your "selfboot" directory and copy ALL game data files from the Utopia-BootCD game into this directory. Also, delete the file IP.BIN from the "data" directory if you already have it in the root of your "selfboot" tree. Also delete the BOOTFILENAME.BIN (generally 1ST_READ.BIN) from your data tree if you have already put this file in the root of your "selfboot" tree. (Note: All files that you copy from a CD will have Read-Only attributes, You must take these off before continuing.)
Make a subdirectory called "cdda" inside your "selfboot" directory tree. Fire up CDRWIN and click the Middle Icon on the top row called "Extract Disc/Tracks/Sectors". Choose your CD Reader in which the original Utopia Boot-CD Game is inserted. Choose the Select Tracks option at the top. As you will see in the Track Selection box at the left, Audio tracks are represented by Red Circles. Click on Tracks 2 - X, where X is the last CDDA track. As you click on them they should be outlined in black. For image filename input: "C:\selfbootcdda rack", Where C:\selfbootcdda is the "cdda" directory inside your "selfboot" tree.
The above step should have read in CDDA tracks 2 -> End and placed them as WAV files named trackxx.wav inside your "cdda" directory. They should start with track02.wav and go up to trackxx.wav where xx is the last CDDA track on the CD.
Open up a DOS Prompt and switch to your "cdda" directory. Type in the following command: copy track03.wav track01.wav After doing this, You should have generated Tracks 1 - 3, You should now have 3 4-second dummy tracks as Tracks 1 - 3, and have real CDDA from 4 -> End.
Now, you have 2 ways of achieving the same thing for this step, I will go over both ways and you can choose whichever you want. To start off for both methods, insert a blank disk into your CD-Recorder.
CDRWIN Method: Fire up CDRWIN.
Goto the first icon on the top left: "Record Disc" Click the icon in the top right corner: "Load tracks" Click add, then choose ALL trackxx.wav files in your "cdda" directory.
Arrange them in order so they go from track01.wav to the end. Click OK
to add them to your disc layout. Click the tab "Open New Session" near the bottom. Burn this CD.
CDRECORD Method: If your CD-Recorder cannot use the "Open New Session" option in CDRWIN,
You have one more way to do it, that may or may not work. In the "selfboot" directory you should have the cdrecord toolset unzipped.
You should see files such as cdrecord.exe, mkisofs.exe and cygwin1.dll. Run the following command from a DOS Prompt: cdrecord -scanbus This should show you a list of CD-ROM and CD-Recorder units installed in
your system. Look for your CD-Recorder and find the SCSI Bus ID#. It will be in format x,x,x. It will also be referred to as x,x,x for the rest of this tutorial.
In your "selfboot" directory, run the following command to record the 1st session of the disk: cdrecord -dev=x,x,x -multi -audio \cdda rack01.wav cdda rack02.wav etc. Continue going with your track list until you have input all tracks in order. If this whole command does not fit into your DOS Prompt, make a batch file with this long command and run the batch file. You can optionally include "speed=x" after -audio, Where x is the maximum speed that your CD-Recorder can record at.
OK, Now that you have the first session (CDDA) burned, it's time to move onto the second. This is the crucial part so make sure you pay attention and follow things closely. You should already have all game data files in the subdirectory "data", besides the BOOT.BIN and IP.BIN.
Read over the CDRECORD burn instructions. Find out the SCSI Bus ID# of your CD-Recorder If you have not done so already. Run the following command: cdrecord -dev=x,x,x -msinfo It will spit out a number in the form x,y. Values differ enormously for games that have different amounts of CDDA burned to the first session. Make sure you get the correct value.
Run a DOS Prompt and goto your "selfboot" directory, You should have an executable there called "BINHACK.EXE". In addition you should have the BOOT.BIN (generally called 1ST_READ.BIN) and IP.BIN in this directory. Run the program BINHACK.EXE. When it prompts you for the Binary file to modify, Pick the BOOT.BIN. If it detects that the BOOT.BIN is a Windows CE Exectuable (0WINCEOS.BIN), It will not modify the 0WINCEOS.BIN. If it detects that this Executable is a normal Katana Executable, It will ask you for the the -msinfo number that CDRECORD gave you in the last step. It will then modify the BOOT.BIN according to the number that cdrecord -msinfo gave you. Next, It will ask you for the filename of the Bootsector. Here, you should input IP.BIN. It will hack the IP.BIN for self-boot purposes. (Side Note: Only input the 2nd Number that MSINFO gave you, Ex. If it gave you: 0,163012, Input 163012 when BINHACK prompts you for the MSINFO number.)
Once the changes are made with BINHACK.EXE to the BOOT.BIN file, Copy the BOOT.BIN over to the "data" directory's root. Please make sure that you did not rename the file to actually be called BOOT.BIN. It should still be called the original filename that you found out from Step 5.
Now, you should have in your "data" directory, All game data files, including BOOT.BIN, But it should not have IP.BIN. If you want to dummy this CD, You must make a dummy now. You must make a normal file dummy. Name this dummy "000DUMMY.DAT" and place it into the "data" directory. Please note the overhead limitations of Multi-Session & Self-Booting that were mentioned at the beginning of the tutorial, and size your dummy accordingly. Your next step is to run MKISOFS and make a ISO out of these files. Run the following command while you are in your "selfboot" root directory: mkisofs -C x,y -V ECHELON -l -o data.iso data "x,y" should be the numbers outputted to you from cdrecord -msinfo earlier.
Run "IPINS.EXE" from the "selfboot" directory, In a DOS Prompt. It will prompt you for the Bootsector filename, Choose IP.BIN. It will then prompt you for the ISO filename, Choose the file "data.iso" which you just generated in the last step. It will patch IP.BIN as the bootsector on data.iso.
You should now have a fairly large sized data.iso file sitting in your "selfboot" directory tree now. It is time to burn this file. You should still have the disk you burned the audio session to earlier inserted in your CD-Recorder. You can do this with either CDRWIN or CDRECORD, Just as the Audio Session Burning.
CDRWIN Method Fire up CDRWIN. Click the 2nd Icon from the Top Left: "File Backup and Tools". For Backup Tool/Operation: Select "Record an ISO9660 Image File". For Image Filename, Choose data.iso in your "selfboot" directory. Under Recording Options, Select your CD-Recorder. Check the following
options accordingly: Disc Type: CDROM-XA Track Mode: MODE2 SPEED: Whatever You Want Finalize/Close Session: Yes Write Postgap: Yes Open New Session: No Test Mode: No
Verify Recorded Image: No Click the start button and you are burning.
CDRECORD Method In the "selfboot" directory you should have the cdrecord toolset unzipped.
You should see files such as cdrecord.exe, mkisofs.exe and cygwin1.dll. Run the following command from a DOS Prompt: cdrecord -scanbus This should show you a list of CD-ROM and CD-Recorder units installed in
your system. Look for your CD-Recorder and find the SCSI Bus ID#. It will be in format x,x,x.
In your "selfboot" directory, run the following command to record the 2nd session of the disk: cdrecord -dev=x,x,x -xa1 data.iso You can optionally include "speed=x" after -audio, Where x is the maximum speed that your CD-Recorder can record at.
You are done! Eject the disk and try it in your Dreamcast.
.:Final Information:. Hope you like this document because you wouldn't believe the trouble I had making it, I had to go through Spanish, Italian, French and English sites and documents (yeah ok I know the English sites and documents were no problem, but I had to go through them anyway, heheheh) just to suply this information for you people, but I think it was worth it, don't you? See you in my next document, until then goodbye and farewell reader!!!
.:Acknowledgements:.
This document would not be possible if not for the efforts of: vagrantcharly – if he didn't translate the “Ripping Tutorial v1” by inetd I wouldn't compile this
document at all!!! cammel_spit - for the downsampling information.
Yursoft - for all of his wonderful tools!!! Echelon - for his wonderful and very useful selboot tutorial.
eirian – from Gamecombos.com forums for the in-game music mod info!!! BaSs – he made the dreamcast translation doc.
Netography: http://www.geocities.com/cammel_spit/tutorial.htm http://it.geocities.com/drrandazziso/rip.txt
http://www.yursoft.com/
http://www.crackmanworld.com/dreamcast/util.htm
http://www.hackemate.com.ar/ezines/netsearch/ns007/ns7-0x17/ns7-0x17.htm
Translation of “GD to CD Method” done by: vagrantcharly
Compilation and document editing done by: StateS
Visit: http://www.wiseallec.net.ms for more tech tutorials! Everything from backup faqs to
Multimedia editing!
(site under MAJOR construction)