Embed Size (px)
Citation preview
LizardTech™
User Manual
Copyrights
Copyright © 2009–2010 Celartem Inc. dba LizardTech. All rights reserved. Information in this doc-ument is subject to change without notice. The software described in this document is furnishedunder a license agreement or nondisclosure agreement. The softwaremay be used or copied only inaccordance with the terms of those agreements. No part of this publicationmay be reproduced,stored in a retrieval system, or transmitted in any form or any means electronic or mechanical, includ-ing photocopying and recording for any purpose other than the purchaser's personal use without thewritten permission of LizardTech.
LizardTech acknowledges and thanks themany individuals and organizations whose efforts havemade our products possible. A full list of copyright, trademark and credit information is available in thedocument "Copyrights Trademarks and Credits" installed automatically with your product.
LizardTech1008Western Avenue, Suite 200Seattle, Washington, U.S.A. 98104206.652.5211www.lizardtech.com
Table of Contents
Chapter 1: Introduction 1Why Compress LiDAR Data? 1System Requirements 2
Chapter 2: Getting Started 3Installing LiDAR Compressor 3Licensing LiDAR Compressor 3The LiDAR Compressor User Interface 4
Chapter 3: Working with LiDAR Data 7Supported Formats 7Adding Files to Compress 7Setting Basic Compression Options 8Setting Advanced Options 9Viewing Input 12Running Jobs 15Viewing Output Information 16Viewing Format Version of MrSID Files 17
Chapter 4: Using LiDAR Compressor's Command Line Tools 21Viewing File Information 21Decompressing MG4 Files 23
Chapter 5: Setting Preferences 27Chapter 6: Troubleshooting and Support 29Getting Help 29Finding Your LiDAR Compressor Version Number 30
Appendix 31About LizardTech 31Other LizardTech Products 31
Index 33
- iii -

Chapter 1: IntroductionThank you for using LizardTech™ LiDAR Compressor.We’re confident that you will find LiDAR Com-pressor to be everything you need tomake themost of your LiDAR data. Whether you're com-pressing individual LAS or text LiDAR files or creating LiDAR mosaics frommultiple LAS, text orMG4 files, LiDAR Compressor makes it fast, easy and intuitive.
The purpose of this user manual is to introduce you to LiDAR Compressor and give you quick infor-mation about how to use it. To access this documentation as WebHelp within the application, clickthe questionmark icon on the toolbar.
If you have not yet installed LiDAR Compressor, see "Installing LiDAR Compressor" on page 3. For aquick visual overview of the user interface, see "The LiDAR Compressor User Interface" on page 4.Compression options and other procedures are covered in other chapters.
Why Compress LiDAR Data?
More Value from Your LiDAR Data
If the size of your raw data has meant that you only take delivery of DEMs or contours rather thanyour entire point cloud, we’ve got good news! LizardTech™ LiDAR Compressor enables you to com-press the whole point cloud toMrSID and then use that compressed file to create your own deriv-atives, eliminating the need to return to your vendor for new products. Why not use all of the elevationdata that you paid for?
Lossless LiDAR File Compression
Numerically lossless compression with Lizard-Tech LiDAR Compressor enables you to reduceLiDAR file sizes by 75 percent or more while retaining all of your points and all of the precision andaccuracy of your point data. If storage requirements are critical, you can reduce your LiDAR file sizesby 90 percent or more by choosing a higher compression ratio and letting LiDAR Compressor selectthe best way to reach a desired file size (lossy compression).
The Assurance of Using the MrSID Format
LiDAR Compressor compresses your LiDAR data to the industry standardMrSID format, trusted asa raster format by geospatial professionals since 1992 and supported in virtually all GIS applications.With the release of LiDAR Compressor LizardTech unveils a new and improved version of the format,MrSID Generation 4 (MG4). It’s still LizardTech and it’s still MrSID, so you know you’re using the high-est quality file format with themost advanced compression technology available. MG4 enables you toview and access your LiDAR data faster.
Support in Many Different Applications
Previous versions of theMrSID format have been supported in all major GIS applications. Likewise,MG4 is already supported in Global Mapper, MARS and ArcGIS 3D Analyst, andmore third-party sup-port is on the way, so you won’t need to change your workflow. There are no plug-ins or add-ons toinstall. Just import your compressed files into your viewing application and keep working. MG4 files
- 1 -
LizardTech LiDAR Compressor User Manual
are also viewable in LizardTech’s standaloneGeoViewer, available as a free download at www.l-izardtech.com.
Easy Workflow and Minimal Training
LiDAR Compressor is an easy-to-use application with a straightforward workflow. You don’t have todeal with a lot of confusing options. In most cases, simply load your files, preview, and encode. Youcan be compressing LiDAR data toMG4 from both LAS and text files in a few minutes.
System RequirementsThe following system is recommended for installing and running LiDAR Compressor:
l One of the following operating systems:o Microsoft Windows XP, 32-bit, Service Pack 3o Microsoft Windows XP, 64-bit, Service Pack 2o Microsoft Windows Vista, 32-bit, Service Pack 1o Microsoft Windows Vista, 64-bit, Service Pack 1o Microsoft Windows 7, 32- or 64-bit
l Microsoft .NET Framework 3.5, Service Pack 1 (included)l 1-GHz processorl DVD drivel 2 gigabytes (GB) RAM (4GB recommended)
In order to use LiDAR Compressor's viewer, your systemmust also be runningMicrosoft DirectX9.0c. LiDAR Compressor's installation process prompts you to install it from the DVD. LiDAR Com-pressor will still compress data without DirectX but the View tab will not be operational.
As a guideline, a 1-terabyte (TB) input file requires 250GB (or 0.25 TB) of disk space for the outputfile.This is in addition to the temp spacementioned below.
LiDAR Compressor comes in both 32-bit and 64-bit versions. You cannot run the 32-bit version on a64-bit system or vice versa.
Temp Space Requirement
As a guideline, a 1-terabyte (TB) input file requires 250GB (or 0.25 TB) of temp space during com-pression. You should set your temp directory to a folder that you know can accommodate your tempspace requirements.
To specify your temporary directory:
1. Open the application and click theSet preferences button on the Application toolbar. The Pref-erences dialog appears.
2. Select theApplication tab.3. Browse for or enter a path to the desired directory, then click OK.
- 2 -
Chapter 2: Getting StartedThis chapter covers how to install and license your LiDAR Compressor software and gives you a tourof its user interface.
Installing LiDAR CompressorBefore installing LiDAR Compressor, log on to your computer with the appropriate administrator per-missions. OnWindows platforms youmust install and license the software as an administrative user.You do not need administrative privileges to run the software once it is installed and licensed.
NOTE: If you are upgrading from a previous version of LiDAR Compressor, youmust first uninstallthe old version. We recommendmaking a note of any custom fields you have defined or other impor-tant preferences, since they will not be preserved.
To install LiDAR Compressor:
1. Insert the LiDAR Compressor DVD-ROM into your DVD drive.2. Navigate to and run the file setup.exe. The InstallationWizard appears.3. Follow the instructions in the InstallationWizard. You will have an opportunity to specify a des-
tination location for the installed files. The default location is "C:\Program Files\L-izardTech\LiDAR Compressor".
4. When you are done click Finish.
If you have installed a trial version and wish to continue using LiDAR Compressor beyond the 30 daytrial period, youmust license your product (see "Licensing LiDAR Compressor" on page 3).
TIP: LizardTech's free standalone viewer, GeoViewer 4.0, views compressed LiDAR data in MrSIDformat. GeoViewer can be downloaded at http://www.lizardtech.com/download/.
Licensing LiDAR CompressorLiDAR Compressor runs for 30 days as a trial version. In order to continue using the product beyondthat time youmust license it.
To license your version of LiDAR Compressor:
1. Click theSet preferences icon . The Preferences dialog appears.2. Select the Licensing tab.3. Make a note of the locking code, which has the pattern XX-XXXXX (alternatively, click the
Copy license information to clipboard button, then paste the text into a text editor) and theserial number found inside your DVD case. Note: if you purchase LiDAR Compressor as aweb download your serial number is sent to you via email.
4. Activate your product:a. Determine which activation page you need:
l If you are using a trial copy and have not yet purchased LiDAR Compressor, goto https://www.lizardtech.com/purchase/lidar.php.
- 3 -
LizardTech LiDAR Compressor User Manual
l If you have already purchased LiDAR Compressor, go to https://ww-w.lizardtech.com/support/activation.php.
b. Fill out the form, entering the locking code and serial number in their fields. You willreceive your license code via email.
c. Copy and paste the license code (including the asterisk and pound sign) into theLicense Code field on the Licensing tab of the Preferences dialog.
d. Click OK.
The next time you run LiDAR Compressor it will run as a licensed version.
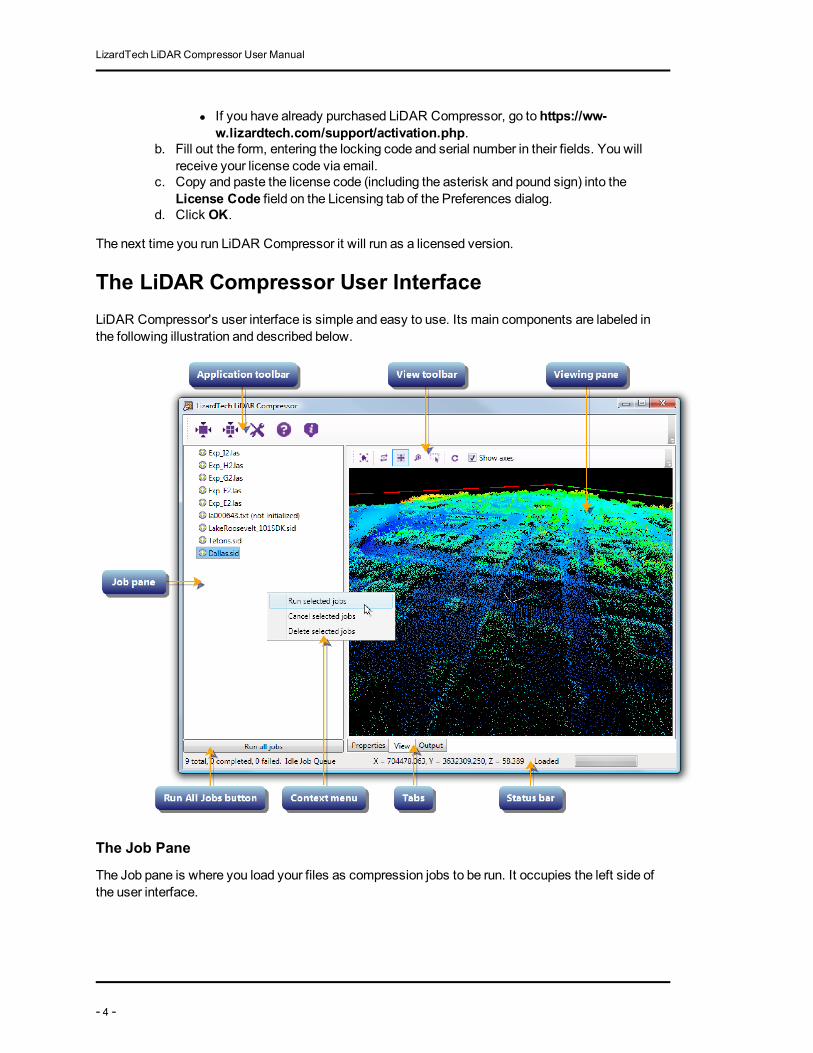
The LiDAR Compressor User InterfaceLiDAR Compressor's user interface is simple and easy to use. Its main components are labeled inthe following illustration and described below.
The Job Pane
The Job pane is where you load your files as compression jobs to be run. It occupies the left side ofthe user interface.
- 4 -
Chapter 2: Getting Started
Eachmosaic job and each file added as an individual job is given an icon identifying its state of read-iness (for more information, see "Running Jobs" on page 15). Files that are added as part of amosaicjob are not given an icon.
The Application Toolbar
The Application toolbar is located at the top of the user interface above the Job pane (there is a sep-arate toolbar for navigation on the View tab – see "Viewing Input" on page 12). The toolbar offers toolsidentified by the following icons:
Add file(s) to com-press individually
Enables you to browse for a file or multiple files to add for com-pression as individual jobs
Add files to com-press as amosaic
Enables you to browse for files to add for compression as amosaicjob
Set preferencesDisplays the Preferences dialog, where you can set user interface,performance and text parsing preferences, change defaults, andfind licensing information
Help Opens this WebHelp documentation
About LiDAR Com-pressor Displays LiDAR Compressor version and copyright information
Application Toolbar Icons
The Tabs
Three tabs – Properties, View andOutput – share the right side of the user interface.
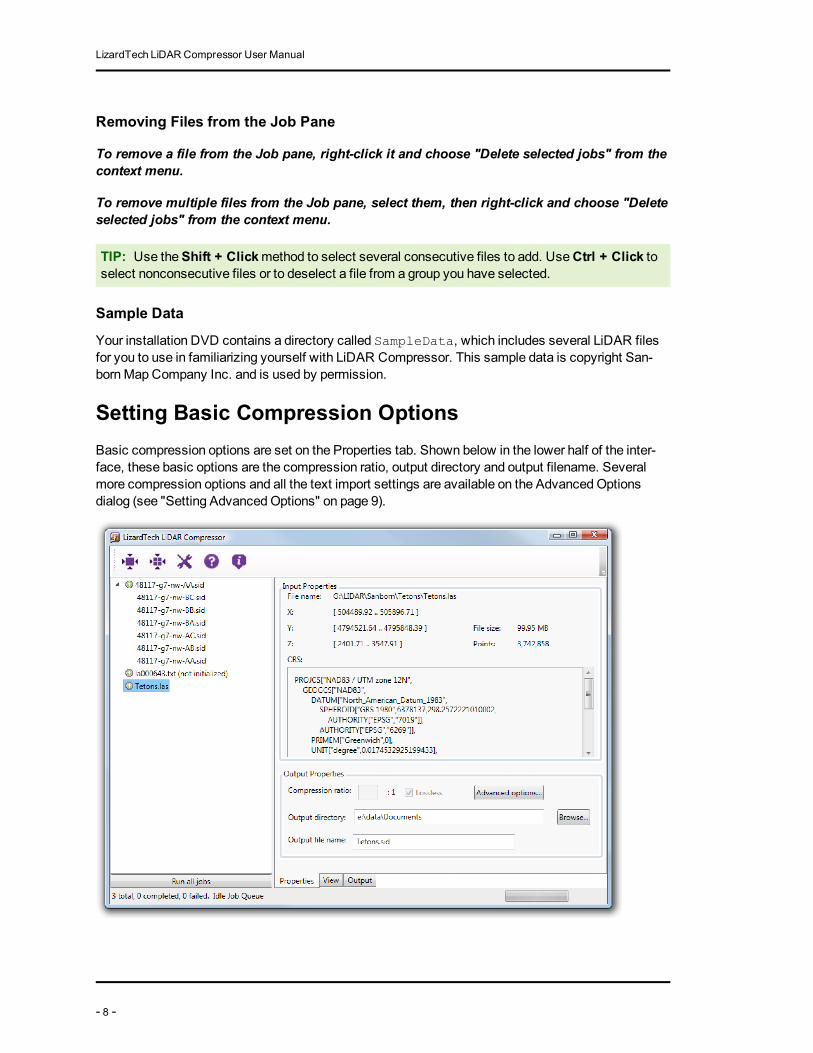
The Properties tab displays the input properties (filename, file size, number of points in the file, andextents if they are available) and enables you specify output properties such as compression ratio,output directory and output file name. If the file has a coordinate reference system (CRS), LiDARCompressor displays it as a well known text string (WKT) in the large box in the center of the tab. TheProperties tab is displayed by default when you open the application. For more information see "Set-ting Basic Compression Options" on page 8.
The View tab displays the job selected in the Job pane. The View tab is shown in the above illus-tration. Above the Viewing pane on this tab is a View toolbar with a number of navigation tool icons forexploring your LiDAR data three-dimensionally. The coordinates of your focal point (identified by theshort white axis markings) are displayed on the status bar along the bottom of the application window.For more information see "Viewing Input" on page 12.
- 5 -
LizardTech LiDAR Compressor User Manual
TheOutput tab enables you to view the progress and log information of jobs that are being com-pressed, or consult the log information for jobs that have already been run. For more information see"Viewing Output Information" on page 16.
The Run All Jobs Button
The Run All Jobs button is located below the Job pane. It runs all ready jobs in the list.
The Context Menu
Right-clicking anywhere in the Job pane displays the context menu. A context menu (sometimescalled a “right-click” or “pop-up” menu) offers quick access to common actions.
The Status Bar
The Status bar runs along the bottom of the application window. The Status bar tells you whether jobsare running and how many jobs have completed and how many failed. It also displays the coordinatesof your focal point (identified by the short white axis markings on the view tab). When you refreshpoints, a progress indicator at the right end of the Status bar tells you that points are loading.
- 6 -
Chapter 3: Working with LiDAR DataThis chapter tells you how to add and view input files, set your encode options, run your jobs andmon-itor the output information.
Supported FormatsLiDAR Compressor supports the following input formats:
l LAS 1.0, 1.1 and 1.2 (including all four "point data record" types)l MrSID Generation 4 (MG4)l ASCII
LiDAR Compressor outputs MG4 files.
Adding Files to CompressYou can add LiDAR files for compression as individual files or for mosaicking. Once a file or group offiles is loaded into LiDAR Compressor we refer to it as a "job". You can also remove jobs you haveadded.
If you are adding a text file such as an ASCII file, youmay have to tell LiDAR Compressor how toparse the data (see "Setting Basic Compression Options" on page 8).
Adding Files to the Job Pane
You can have both individual andmosaic jobs, as well as files of LAS, text andMrSID formats, in theJob pane at the same time.
To add files for individual compression do one of the following:
l Click theAdd file(s) to compress individually icon , browse for a file or files, and clickOpen.
l Drag a file or files from aWindows Explorer folder into the Job pane.
To add files for mosaicking do one of the following:
l Click theAdd files to compress as a mosaic icon , browse for a file or files, and clickOpen.
l If you wish to add a file to an existingmosaic job, drag it from aWindows Explorer and drop itinto that mosaic group on the Job pane.
When you add files to compress as amosaic, a mosaic group is automatically created in the Jobpane. Themosaic file takes its name from the first file loaded as part of that mosaic job.
Jobs that are ready to be run are identified in the Job pane with the Ready icon . For more infor-mation about the various states of job readiness, see "Running Jobs" on page 15.
- 7 -
LizardTech LiDAR Compressor User Manual
Removing Files from the Job Pane
To remove a file from the Job pane, right-click it and choose "Delete selected jobs" from thecontext menu.
To remove multiple files from the Job pane, select them, then right-click and choose "Deleteselected jobs" from the context menu.
TIP: Use theShift + Clickmethod to select several consecutive files to add. UseCtrl + Click toselect nonconsecutive files or to deselect a file from a group you have selected.
Sample Data
Your installation DVD contains a directory called SampleData, which includes several LiDAR filesfor you to use in familiarizing yourself with LiDAR Compressor. This sample data is copyright San-bornMapCompany Inc. and is used by permission.
Setting Basic Compression OptionsBasic compression options are set on the Properties tab. Shown below in the lower half of the inter-face, these basic options are the compression ratio, output directory and output filename. Severalmore compression options and all the text import settings are available on the AdvancedOptionsdialog (see "Setting AdvancedOptions" on page 9).
- 8 -
Chapter 3:Working with LiDAR Data
The default compression ratio is lossless (1:1), whichmeans that no information is discarded and noaccuracy is lost. Clear the Lossless checkbox if you wish to enter a higher compression ratio. A com-pression ratio of 10:1means that the output file will be smaller by a factor of 10 than the input file. Dec-imal values such as 3.6 are valid entries in the compression ratio field.
By default, your output directory is your Documents folder. You can enter a path to or browse for a dif-ferent folder if you wish. If you wish to specify a different default directory, you can do that on the Pref-erences dialog (see "Chapter 5: Setting Preferences" on page 27).
By default the filenamematches the name in the Job pane except that the original file extension isreplaced with theMrSID (.sid) extension. Again, you can enter a different filename if you wish.
TIP: You can change the defaults for many of the compression and text import settings so that youdon't have to set them for each job (see "Chapter 5: Setting Preferences" on page 27).
Setting Advanced OptionsBy clickingAdvanced options on the Properties tab you can set further compression options suchas block size, number of levels, whether or not your LAS file's custommetadata should be omittedfrom the output file, and options for text file parsing.
TIP: You can change the defaults for many of the compression and text import settings so that youdon't have to set them for each job (see "Chapter 5: Setting Preferences" on page 27).
Advanced Compression Options
WARNING: Lowering block size or number of levels values will reducememory usage but will slowdown the compression process and in lossy compressionmay result in less accuracy in the outputdata.
Block size is the number of points that are processed and stored at a time during compression. Therange of valid values is 2048 to 131072. The default is 4096.
Number of levels refers to the number of wavelet decomposition levels for each channel. By default,LiDAR Compressor uses the number of points and the block size to determine the optimal number oflevels.
The LAS specification includes several variable length records (VLRs), which are arbitrary binarydata. Your LAS file may also include custom VLRs. LiDAR Compressor always preserves metadataoutlined by the LAS specification (georeferencing information and the classification lookup table), butby default does not carry over any custom user metadata contained in a LAS file.
To specify advanced encode options:
1. If it is not already open, click theAdvanced Options button on theProperties Tab.2. Click theCompression tab.3. [Optional and not recommended] Specify block size.4. [Optional and not recommended] Clear theDetermine automatically checkbox, then enter a
value in theNumber of levels field.
- 9 -
LizardTech LiDAR Compressor User Manual
5. If there is custommetadata you wish to preserve, for example copyright information, clear theOmit custom LAS VLR metadata from output checkbox.
6. Click OK.
Text Parsing Options
In order for LiDAR Compressor to properly read text data such as ASCII files, data columns must bespecified for the x, y and z axes. If any of these axes are unassigned when you load a text file intoLiDAR Compressor, you are prompted to assign them via the Text Parsing tab of the AdvancedOptions dialog. You can also set many of the text import options at any time after loading your textfiles.
NOTE: LiDAR Compressor cannot tell you which column should be the x, y, or z axis. Youmustknow which columnmaps to which axis. If you do not know, consult your data provider, but here aresome clues: if a file has only three columns, they aremost likely x, y, and z, and inmost cases thedata in x and y will bemore similar to each other than either will be to the data in z; furthermore, thedata in the z column tend to be smaller numbers because it is elevation data, although this is notalways the case. Some files contain commented header lines that tell you how tomap the columns.LiDAR Compressor displays these upon import, but youmust skip them before running the job.
The following procedure is a general one for setting text parsing options. See below for notes on thevarious options.
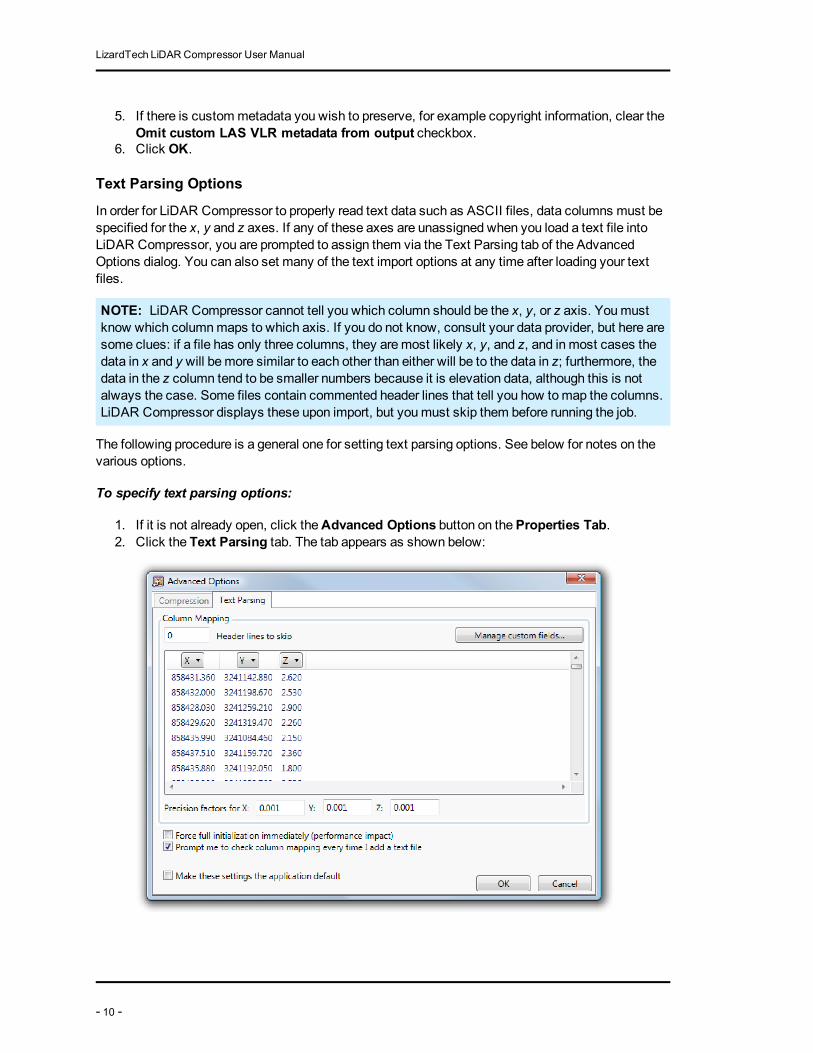
To specify text parsing options:
1. If it is not already open, click theAdvanced Options button on theProperties Tab.2. Click the Text Parsing tab. The tab appears as shown below:
- 10 -
Chapter 3:Working with LiDAR Data
3. Assign x, y and z headings to the appropriate columns using the drop-downmenus above eachcolumn. Youmay also assign headings to other available columns as desired.
4. Make other changes as desired.5. If you wish tomake these settings the defaults, select theMake these settings the appli-
cation default checkbox.6. Click OK.
Skipping Header Lines
The Text Parsing tab displays the columns of data in your text file. Theremay be descriptive headerinformation that you can instruct LiDAR Compressor to skip when listing the column data. By defaultLiDAR Compressor skips zero (0) lines (shows all of the header lines), but if you want to skip one ormore lines, you can enter a number in theHeader lines to skip field.
Text File Column Mapping Prompt
If you want to add text files to the Job pane without being prompted to check columnmapping, clearthePrompt me to check column mapping every time I add a text file checkbox. If columnmap-ping for an added job is invalid, the job will bemarked with an exclamation point in the Job pane sothat you canmap columns later.
Forcing Full Initialization
You can choose whether you want LiDAR Compressor to initialize your text file immediately or waituntil it is being run as a job. Initializing the file requires reading all the data and could takemany hoursdepending on the size of source file. If you want to go ahead and initialize right away, select the Forcefull initialization immediately checkbox. By default this checkbox is cleared.
Specifying Precision Factor
When a job is run, each number in the data columns is represented by an offset and the default pre-cision factor of .001. ThePrecision factor fields enable you to change the factor by which the data inany or all three axis columns will be represented to account for the number of significant decimalplaces in those columns.
Managing Custom Fields
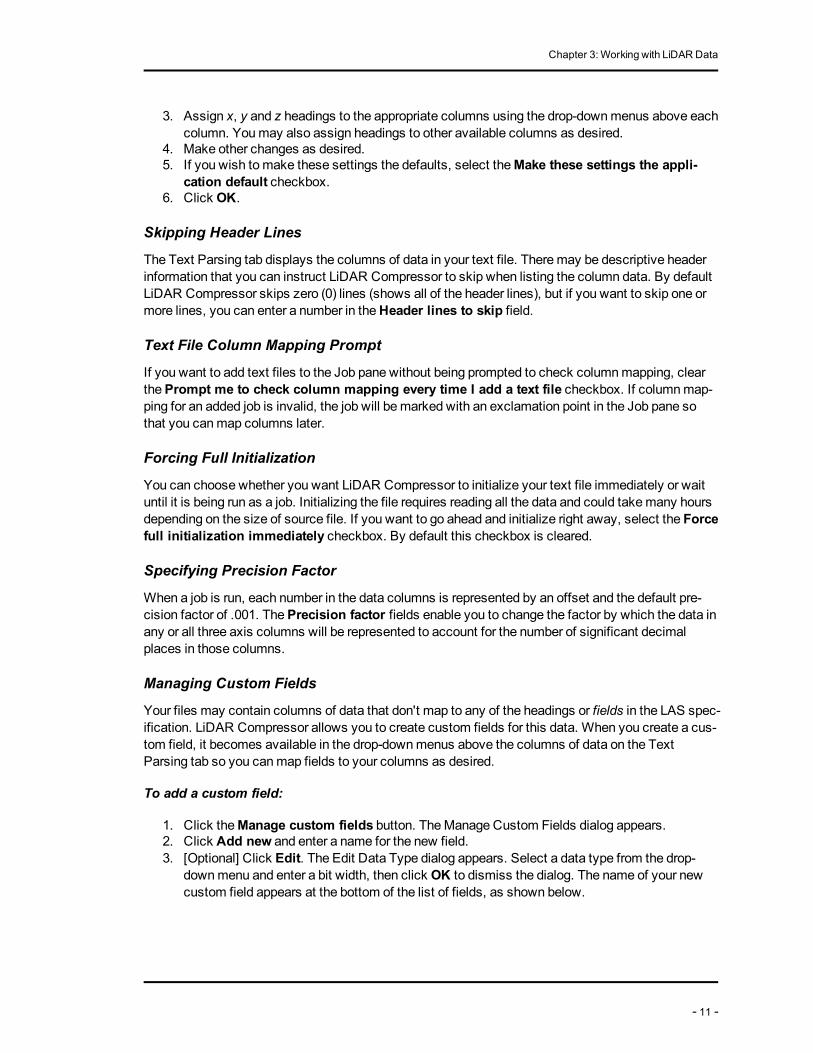
Your files may contain columns of data that don't map to any of the headings or fields in the LAS spec-ification. LiDAR Compressor allows you to create custom fields for this data. When you create a cus-tom field, it becomes available in the drop-downmenus above the columns of data on the TextParsing tab so you canmap fields to your columns as desired.
To add a custom field:
1. Click theManage custom fields button. TheManage Custom Fields dialog appears.2. Click Add new and enter a name for the new field.3. [Optional] Click Edit. The Edit Data Type dialog appears. Select a data type from the drop-
downmenu and enter a bit width, then click OK to dismiss the dialog. The name of your newcustom field appears at the bottom of the list of fields, as shown below.
- 11 -
LizardTech LiDAR Compressor User Manual
4. Click OK. Your custom field is now available in the drop-downmenus above the column data.
You can also edit, change the name of, or delete any existing custom fields using theManage Cus-tom Fields dialog.
Viewing InputOnce a file is loaded into LiDAR Compressor, you can orbit, pan and zoom the data in three dimen-sions (3D) by clicking the View tab and using the navigation toolbar above the Viewing pane. Thesetools are identified in the following table and described below.
Restore originalview
Repositions your viewpoint to its original position zoomed out alongyour z axis.
Orbit focal point Moves your viewpoint in an orbit around your focal point.
Pan data "Moves" the data from side to side or up and down.
Zoom in and out Enables you to zoom in or out by clicking andmoving themouseback or forward
Select zoomregion
Enables you to zoom in by clicking and dragging to specify a regionof interest.
Navigation Toolbar Icons
- 12 -
Chapter 3:Working with LiDAR Data
Refresh points Freshly displays a configurable number of points that fall within thecurrent view.
When you first view a job on the View tab:
l the Pan tool is selectedl your viewpoint is positioned at the "top" of your z axis
Navigating in Three Dimensions
Imagine that when you view your data, you are looking at the center of a sphere. Let's call it the orbitalsphere. The outer surface of the orbital sphere represents the infinite possible positions your view-point can occupy. Your focal point is always the center of an orbital sphere nomatter how you navi-gate. (On LiDAR Compressor's View tab, you can show or hide the axis marks that indicate yourfocal point – just click Show Axes.) When you first view your data on the View tab, that data is cen-tered where the focal point is, but it is important to recognize that the data and the focal point are notbound together.
When you orbit the data, your viewpoint is essentially revolving around the focal point, and if you havenot yet panned the data, your viewpoint is also revolving around the center of the body of data. Imag-ine your viewpoint swirling around on the surface of the orbital sphere like a camera on a sphericalscaffold. Relative to the viewpoint, your data appears to turn and roll around according to your orbitingmovements.
Panning the data is different in that the viewpoint does not move along the surface of the sphere, butup and down or sideways on the plane tangential to the sphere. This makes the entire body of dataappear to move sideways or up or down, regardless of what angle you are viewing it from. What isactually happening is that your focal point is shifting as you pan, relative to the data, so that your view-point now rests on the surface of a new orbital sphere.
With all this in mind, we recommend that you simply take the navigation tools for a test drive. You willnotice several things right away.
l Zooming in reduces the diameter of your orbital sphere. You can zoom in to the "space" occupied by the data points so far that you can then use the orbit tool to revolve in a very tightcircle, so that the data appears to revolve behind you. In fact you are still orbiting the focalpoint, but at amuch tighter radius.
l You cannot zoom in past your focal point. If your focal point is in themiddle of the body of data,it may be "in the air" above a building or other item you wish to view, and you cannot zoom inany closer to the object behind it. In this case, you should zoom back out a little, orbit so thatyou can see the relationship of your target to your focal point (make sure axes are showing)and then use the Pan tool to "move" the data so that your focal point is behind your target.
l If you pan far enough, it is possible to "move" your data so that it no longer lies in your orbitalsphere at all.
In a very short time, you will develop patterns of panning, zooming and orbiting that best suit yourworkflow. To start out, youmay want to pan a little, zoom a little, then orbit a little to explore the data,
- 13 -

LizardTech LiDAR Compressor User Manual
then repeat the process, panning again as necessary to place your focal point properly in relation tothe data you wish to view more closely.
Showing and Hiding Axes
Your focal point is identified by three short axis markings that form what looks like a corner. They helpyou orient your viewpoint among the data. Youmay choose not to display the axes.
To show or hide the axes click the "Show axes" button on the Navigation toolbar.
NOTE: The location of your focal point is displayed on the Status bar.
Zooming In and Out
You can zoom into and out of your LiDAR data in any of the following ways (Note: see also "Key-board Shortcuts" below):
l Select the Zoom tool , then click andmove your mouse backward or forward to zoom in orout.
l If your mouse has a scroll wheel, move the scroll wheel forward (away from you) to zoom inand backward (toward you) to zoom out; you can do this nomatter which tool is selected.
l Select theSelect Zoom Region tool , then click and drag on the Viewing pane to define theregion you wish to zoom to.
l Click theRestore Original View button to reposition your viewpoint on the z axis, zoomedout so that all of your data points lie within the Viewing pane.
TIP: You cannot zoom in beyond the focal point. If your focal point is in front of your target, zoomout again and pan to reposition it so that it lies behind your target.
Keyboard Shortcuts
There are several keyboard shortcuts (sometimes called hotkeys) that enable easier navigation in theview tab. The keyboard shortcuts are as follows:
l While holding down theCtrl key, click and drag up or down to zoom smoothly out or in.l While holding down theShift key, click and drag in any direction to rotate the view.l While holding down both theCtrl andShift keys, click and drag to define the region you wish
to zoom to.
Refreshing Points
The Viewing pane shows 500,000 points of data by default. You can change this number on the View-ing tab of the Preferences dialog. When you first open your data in the Viewing pane, those points aredistributed over the entire volume of the data. When you zoom in among the data points, shapes andcontours may be harder to see and the datamay appear "thinner". You can increase the density ofpoints in your area of interest by clicking the Refresh Points button .
When you refresh the points, LiDAR Compressor again displays 500,000 points, but all of the pointsdisplayed after the refresh command are located within your current view, whichmakes for greaterdensity in the region you are inspecting.
- 14 -
Chapter 3:Working with LiDAR Data
TIP: Refreshing points is more effective if you are viewing perpendicular to the earth or other foun-dational surface in your data when you refresh. If your view tilts upward toward a "horizon", then abroader region will be included and the points will be distributed evenly throughout it. A good rule ofthumb is to zoom in closely over your target while viewing perpendicular to the ground, then refreshyour points, then orbit to explore the data.
Restoring Original View
If you get lost, or you pan your data right out of the Viewing pane and can't find it, or for any other rea-son you need to start your viewing over again, click theRestore Original View button . This repo-sitions your viewpoint on the z axis, zoomed out so that all of your data points lie within the Viewingpane as they were when you first viewed the job.
Running JobsYou can run any or all ready jobs. See the table below for job state icons.
To run all jobs, click the Run all jobs button below the Job pane.
To run selected jobs, select the job or jobs you want to run in the Job pane, then right-clickto access the context menu and choose Run selected jobs.
NOTE: Not ready jobs and jobs already running cannot be run.
Canceling Jobs
You can cancel jobs using the context menu or the cancel button on theOutput tab.
To cancel all jobs queued to run, click "Cancel all" on the Output tab.
To cancel a selected job or jobs, select the job or jobs in the Job pane, then right-click andchoose "Cancel selected jobs" from the context menu.
The following table shows the icons that identify the state of each job.
Ready Job is ready to be run
Not Ready
Job is not ready to be run, either because it is not yet fully loaded orbecause it failed to initialize. The reason a loaded file might fail to ini-tialize is usually because it is a text file and the columnmapping isinvalid (see "Setting Basic Compression Options" on page 8).
Waiting Job is in the queue to be run
Job State Icons
- 15 -
LizardTech LiDAR Compressor User Manual
Running Job is currently being run
Finished Job has been successfully run
Canceled Job has been canceled
Monitoring Job Progress
While a job is running, its individual progress is indicated by a percentage next to its name in the Jobpane. Jobs run simultaneously, not sequentially, so you will see the percentages for several jobschanging at the same time if you runmore than one job.
When you run jobs, the Output tab is displayed and the progress bar shows how many jobs have beencompleted of the total number of jobs. For more information see "Viewing Output Information" on page16.
Because youmay wish to return to the Properties or View tab while jobs are running, the Status baralso shows a summary of the job progress. The Status bar is always visible.
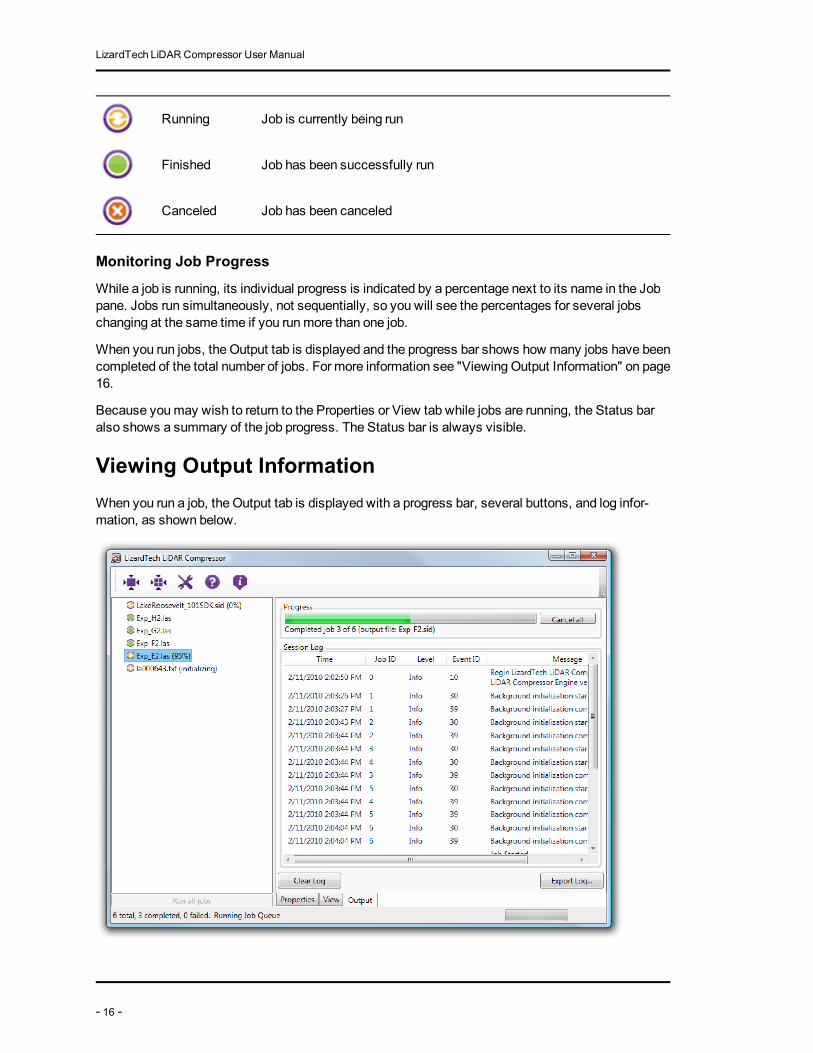
Viewing Output InformationWhen you run a job, the Output tab is displayed with a progress bar, several buttons, and log infor-mation, as shown below.
- 16 -
Chapter 3:Working with LiDAR Data
The progress bar shows you how many jobs are completed out of the total number.
The "Cancel all" button enables you to cancel all jobs in the queue.
Below the progress bar and is the session log, which contains information about jobs that are beingrun or have already been run during this session. The session log can be sorted by any column. Thecolumns are:
l Timel Job IDl Levell Event IDl Message
To sort by a column click the heading of that column.
To sort in the reverse order, click the heading again.
To clear the log information and start with a new session log, click "Clear Log".
You can view the session log any time by selecting the Output tab.
Exporting Log Information
You can export the log as a comma separated value (.csv) file or as a text file for later viewing in yourfavorite spreadsheet application.
To export log information:
1. Click Export Log. The Export Log dialog appears.2. Specify a directory and file name, then click Save.
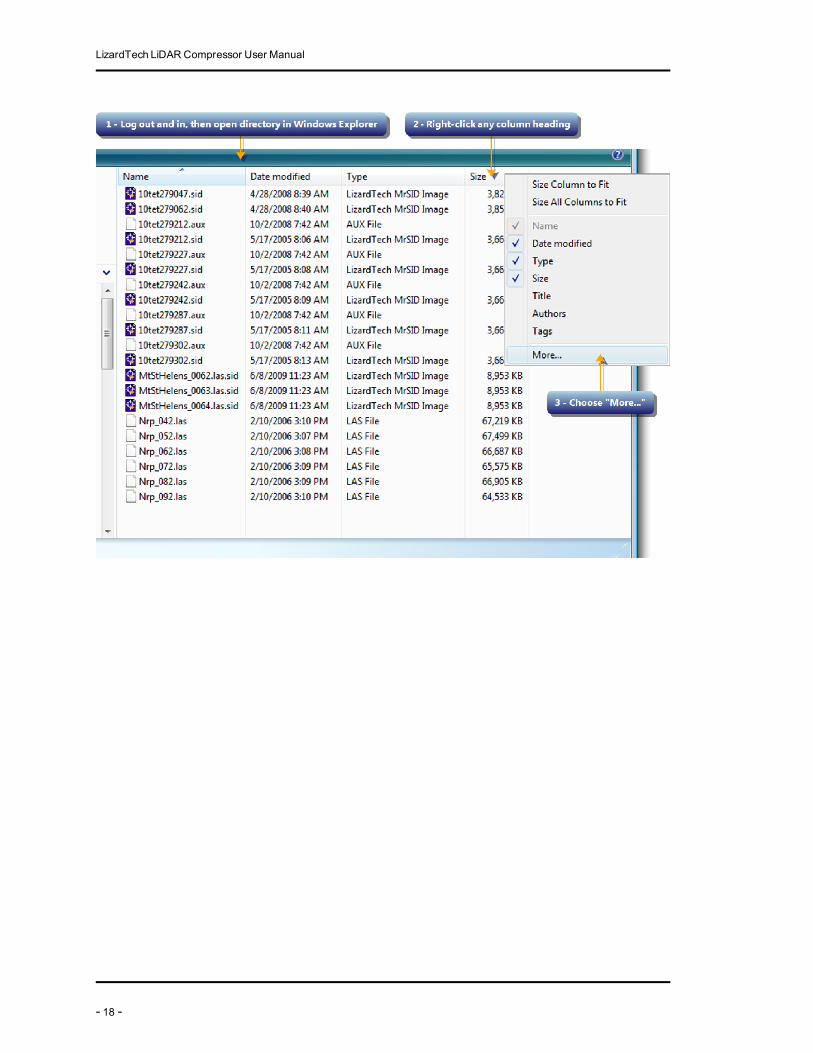
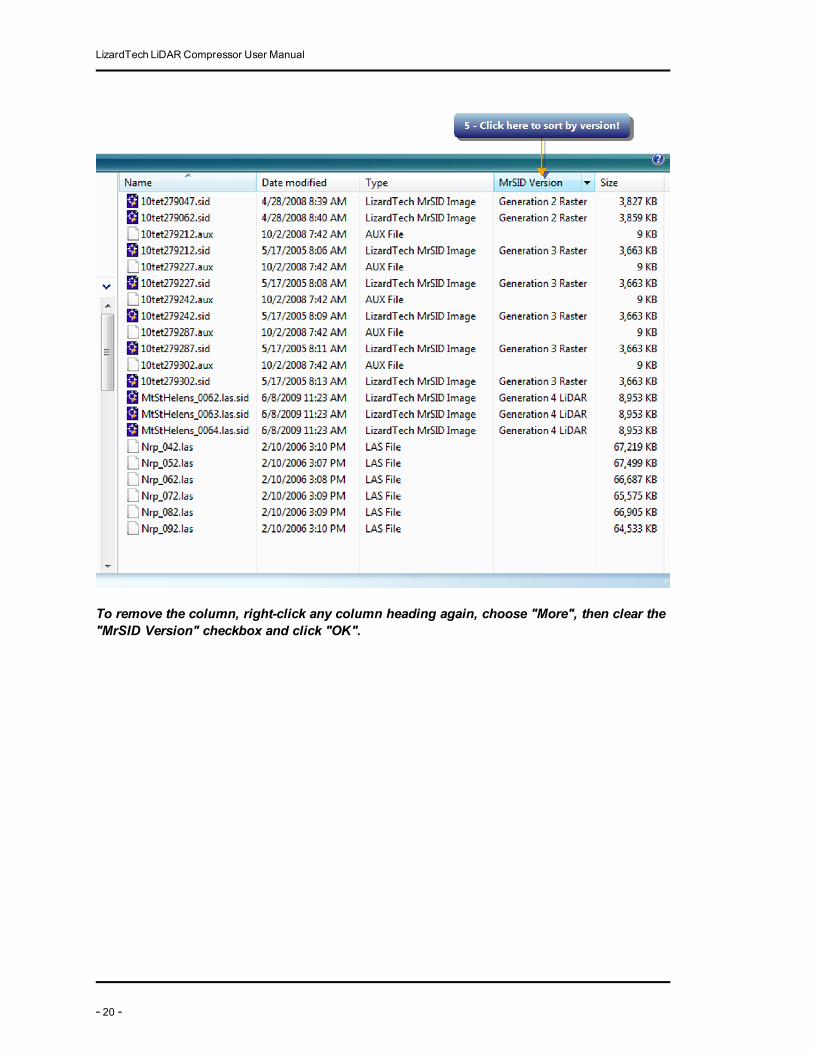
Viewing Format Version of MrSID FilesLiDAR Compressor's installation includes aWindows Explorer shell extension that enables you toadd to any Windows Explorer directory a column that identifies MrSID files by their format versionand tells you whether a file is a raster image or a LiDAR file.
To enable the MrSID Version column after installation of LiDAR Compressor:
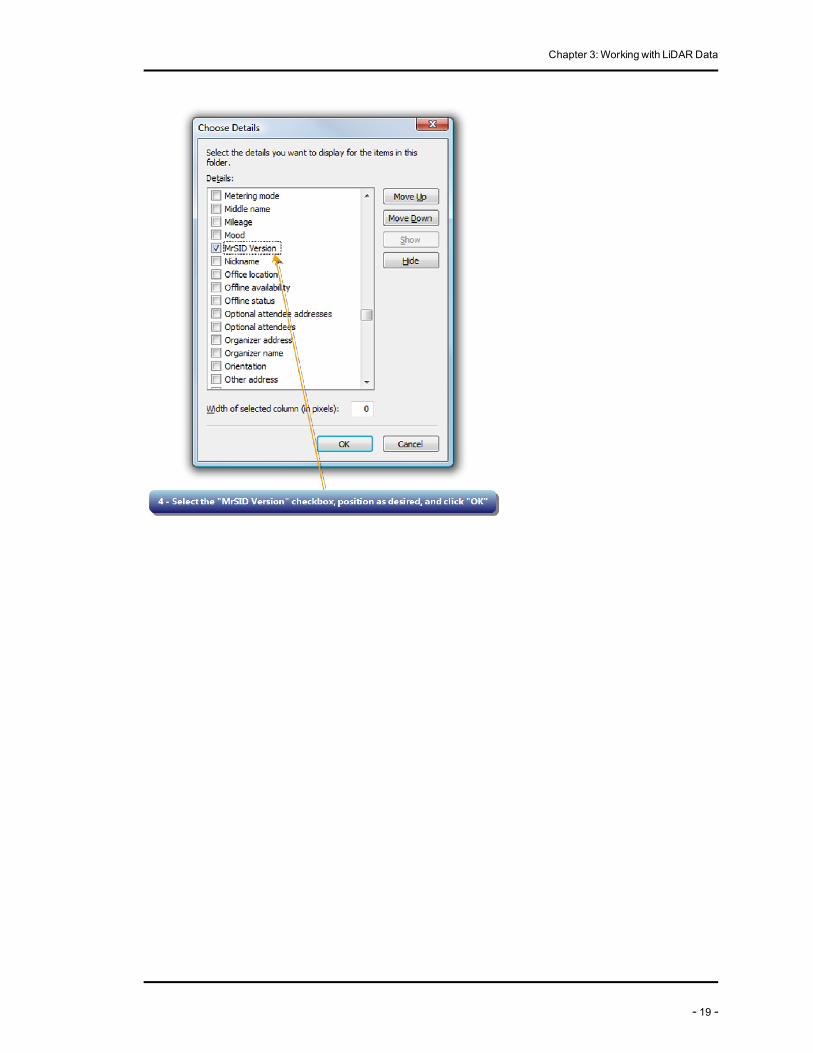
1. Log out and back in, then open the desired directory inWindows Explorer.2. Right-click any column heading. A context menu appears.3. ChooseMore. The Choose Details dialog box appears.4. Scroll to find theMrSID Version checkbox and select it. Use theMove Up andMove Down
buttons to position the column as desired among the other selected columns, then click OK.5. The new column is now visible in the directory. You can click the column heading to sort the
contents of the directory by MrSID version.
The illustrations below demonstrate the steps above.
- 17 -
LizardTech LiDAR Compressor User Manual
- 18 -
Chapter 3:Working with LiDAR Data
- 19 -
LizardTech LiDAR Compressor User Manual
To remove the column, right-click any column heading again, choose "More", then clear the"MrSID Version" checkbox and click "OK".
- 20 -
Chapter 4: Using LiDAR Compressor's CommandLine ToolsYour installation of LizardTech LiDAR Compressor includes several command line tools youmay finduseful for decompressingMrSID Generation 4 (MG4) files or viewing information about MG4, LAS ortext LiDAR files. These tools are located in your installation's Bin directory.
Viewing File InformationYour installation of LizardTech LiDAR Compressor includes a command line tool called lidarinfo.Located in your installation's Bin directory, lidardinfo enables you to view the information in LASor text files in text form.
Usage
The only required parameter for LAS files is -inputFile (or -i), which specifies the input file name.Text input files also require the -parse (or -p) parameter, which describes the order of the fields.
Youmay add other options and parameters as described in the table of switches below. The order ofthe switches in the syntax has no bearing on the output.
For examples of how to form a command, see "Example" on page 23.
- 21 -
LizardTech LiDAR Compressor User Manual
lidarinfo Switches
-inputFile (-i) string (Required) Specifies the name of the inputfile.
-parse (-p) string (Required for text input) Parse format that describesthe fields in a text input file. Valid values are:
x - x point valuesy - y point valuesz - z point valuesi - intensityr - return numbern - number of returnsd - scan directione - edge of flight linea - scan anglec - class idp - source idu - user datat - GPS timeR - redG - greenB - blues - skip this column
Example:If you have five fields in the order GPS time, inten-sity, x, y and z and you only want the time and thepoint values, then specify -parse tsxyz, whichskips the second (intensity) column and correctlylabels the other four.
-metadata (-m) Tells lidarinfo to display all metadata.-bounds (-b) Tells lidarinfo to determine the extents
of the data by reading the data itselfinstead of reading min and max valuesreported in the header.
-skipHeader (-skip) unsignedinteger
Tells lidarinfo to skip the first n lines oftext input files.
-h (-?) Displays a short usage message.-help Displays a detailed usage message.
Continued >-version (-v) Displays version information.-verbose (-V) Tells lidarinfo to display more verbose
lidarinfo Switches
- 22 -
Chapter 4: Using LiDAR Compressor'sCommand Line Tools
error messages.-returns (-r) Decodes the points and displays a his-
togram of the number of points per returnvalue.
-classification (-c)
Decodes the points and displays a his-togram of the number of points per clas-sification.
-credits Displays credits and copyrights.
Example
The command
lidarinfo -i \\data\Lidar\pugetsoundlidar.ess.washi gton.edu\sids\-LakeRoosevelt_2.sid
returns the following information:
Basic LiDAR Info:Format: MG4 4.0.0.1Number of Points: 3144893399Bounds Min: 408841.780000 5370276.770000 391.350000Bounds Max: 447234.600000 5422959.680000 1188.890000Scale: 0.001 0.001 0.001Offset: 408841.780000 5370276.770000 391.350000Supported Fields: GPSTime X Y Z Intensity ReturnNum NumReturns
ClassId ScanDir ScanAngle UserData SourceIdSpatial Reference: None
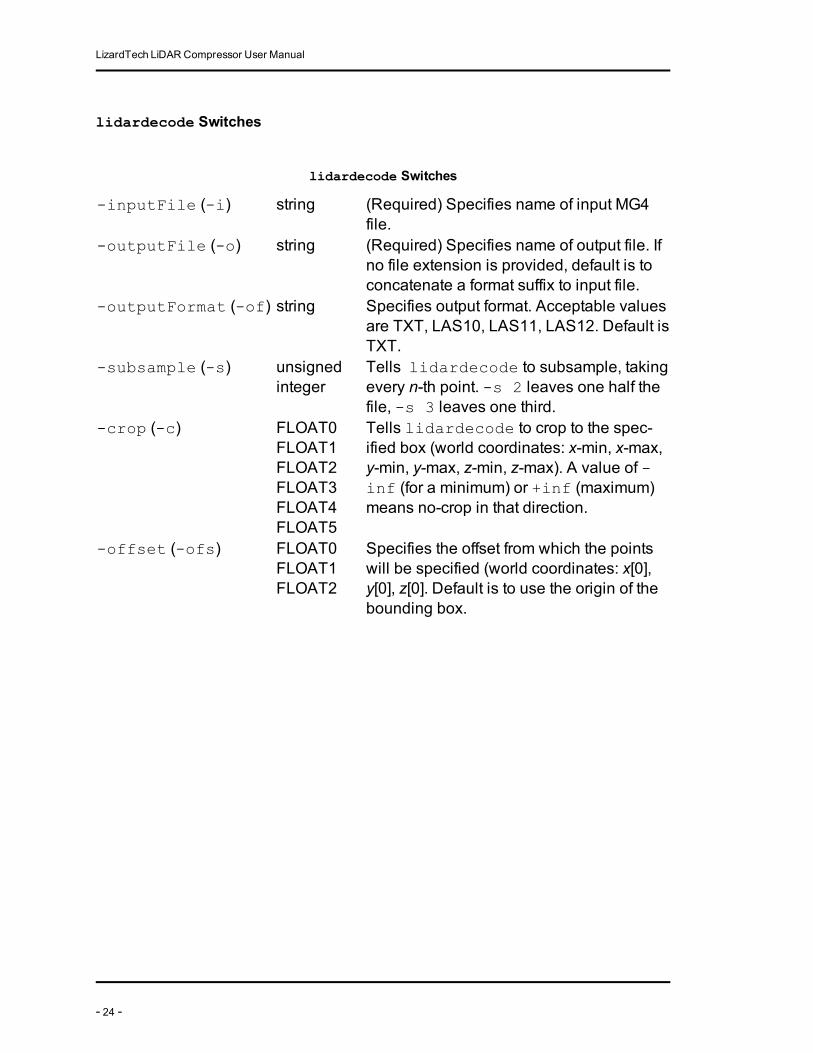
Decompressing MG4 FilesYour installation of LizardTech LiDAR Compressor includes a command line tool called lidar-decode. Located in your installation's Bin directory, lidardecode enables you to decompressMG4 files to LAS or text files.
Usage
The only required parameters are -inputFile (or -i), which specifies the input file name, and -outputFile (or -o), which specifies the output file name.
If no output format (-outputFormat or -of) is specified, the file extension specified in the -out-putFile parameter is used as the output format.
If no output format (-outputFormat or -of) is specified and no file extension is specified in the out-put file name , then lidardecode decodes the file to the default format (text) and appends thedefault suffix (.txt) to the output file name.
Youmay add other options and parameters as described in the table of switches below. The order ofthe switches in the syntax has no bearing on the output.
For examples of how to form a command, see "Examples" on page 25.
- 23 -
LizardTech LiDAR Compressor User Manual
lidardecode Switches
-inputFile (-i) string (Required) Specifies name of input MG4file.
-outputFile (-o) string (Required) Specifies name of output file. Ifno file extension is provided, default is toconcatenate a format suffix to input file.
-outputFormat (-of) string Specifies output format. Acceptable valuesare TXT, LAS10, LAS11, LAS12. Default isTXT.
-subsample (-s) unsignedinteger
Tells lidardecode to subsample, takingevery n-th point. -s 2 leaves one half thefile, -s 3 leaves one third.
-crop (-c) FLOAT0FLOAT1FLOAT2FLOAT3FLOAT4FLOAT5
Tells lidardecode to crop to the spec-ified box (world coordinates: x-min, x-max,y-min, y-max, z-min, z-max). A value of -inf (for a minimum) or +inf (maximum)means no-crop in that direction.
-offset (-ofs) FLOAT0FLOAT1FLOAT2
Specifies the offset from which the pointswill be specified (world coordinates: x[0],y[0], z[0]. Default is to use the origin of thebounding box.
lidardecode Switches
- 24 -
Chapter 4: Using LiDAR Compressor'sCommand Line Tools
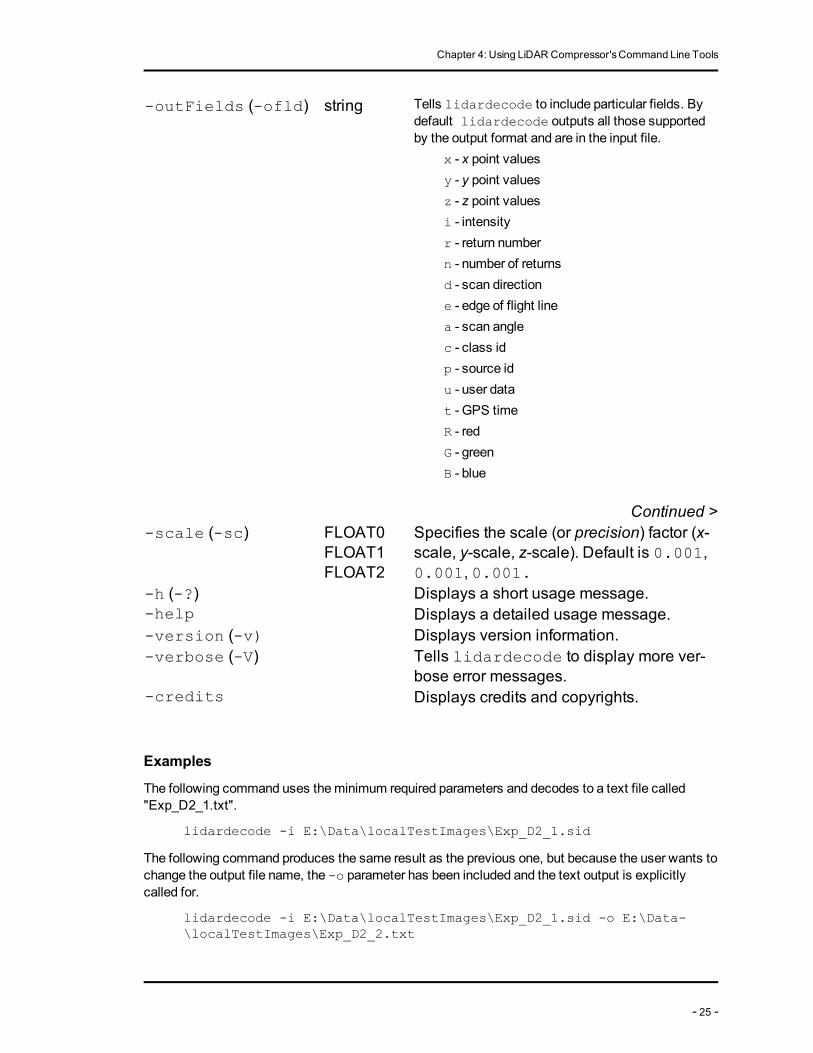
-outFields (-ofld) string Tells lidardecode to include particular fields. Bydefault lidardecode outputs all those supportedby the output format and are in the input file.
x - x point valuesy - y point valuesz - z point valuesi - intensityr - return numbern - number of returnsd - scan directione - edge of flight linea - scan anglec - class idp - source idu - user datat - GPS timeR - redG - greenB - blue
Continued >-scale (-sc) FLOAT0
FLOAT1FLOAT2
Specifies the scale (or precision) factor (x-scale, y-scale, z-scale). Default is 0.001,0.001, 0.001.
-h (-?) Displays a short usage message.-help Displays a detailed usage message.-version (-v) Displays version information.-verbose (-V) Tells lidardecode to display more ver-
bose error messages.-credits Displays credits and copyrights.
Examples
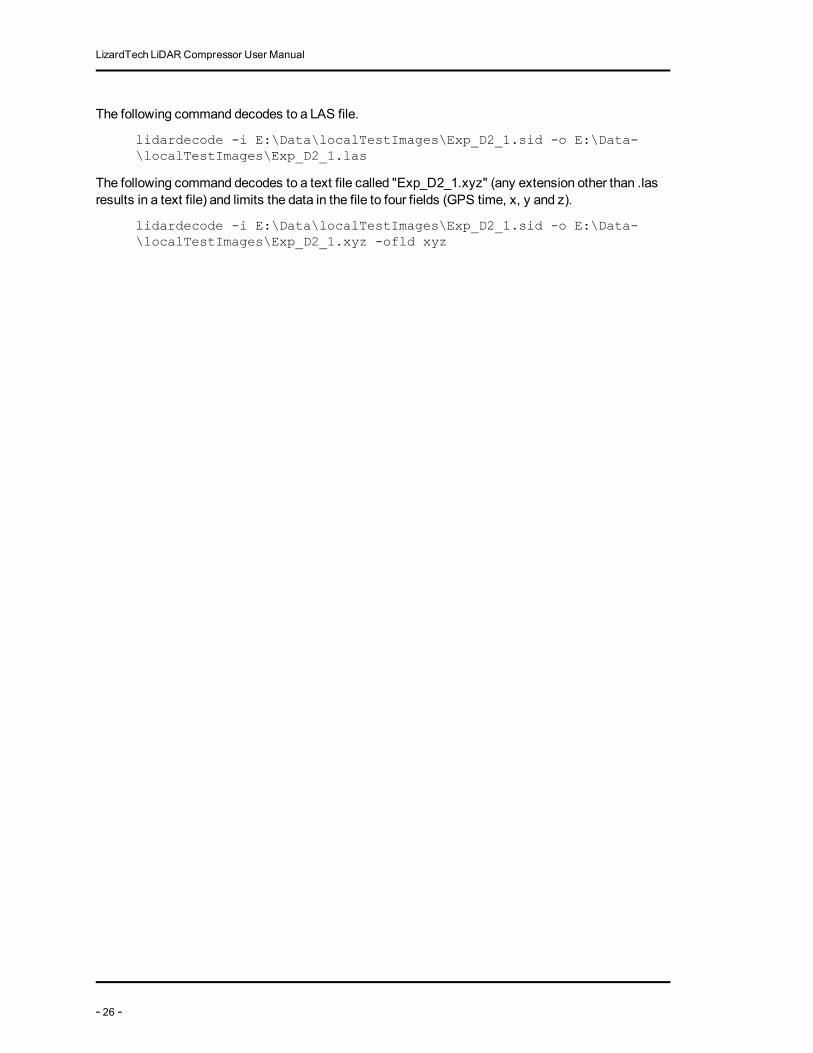
The following command uses theminimum required parameters and decodes to a text file called"Exp_D2_1.txt".
lidardecode -i E:\Data\localTestImages\Exp_D2_1.sid
The following command produces the same result as the previous one, but because the user wants tochange the output file name, the -o parameter has been included and the text output is explicitlycalled for.
lidardecode -i E:\Data\localTestImages\Exp_D2_1.sid -o E:\Data-\localTestImages\Exp_D2_2.txt
- 25 -
LizardTech LiDAR Compressor User Manual
The following command decodes to a LAS file.
lidardecode -i E:\Data\localTestImages\Exp_D2_1.sid -o E:\Data-\localTestImages\Exp_D2_1.las
The following command decodes to a text file called "Exp_D2_1.xyz" (any extension other than .lasresults in a text file) and limits the data in the file to four fields (GPS time, x, y and z).
lidardecode -i E:\Data\localTestImages\Exp_D2_1.sid -o E:\Data-\localTestImages\Exp_D2_1.xyz -ofld xyz
- 26 -

Chapter 5: Setting PreferencesYou can change the defaults for many of the compression and text import settings so that you don'thave to set them for each job. Of course, you can still change the settings for any job even if you haveset them in your preferences.
To change your preferences:
1. Click thePreferences icon on the toolbar. The Preferences dialog appears.2. Select a tab andmake changes as desired.3. Click OK.
Following are some notes about the settings you can change on the various tabs of the Preferencesdialog and their default values.
Compression Preferences
WARNING: Lowering block size or number of levels values will reducememory usage but will slowdown the compression process and in lossy compressionmay result in less accuracy in the outputdata.
Block size is the number of points that are processed and stored at a time during compression.LiDAR Compressor's factory default is 4096. The range of valid values is 2048 to 131,072.
Number of levels refers to the number of wavelet decomposition levels for each channel. By factorydefault, LiDAR Compressor uses the number of points and the block size to determine the optimalnumber of levels. You can clear the "Determine automatically" checkbox and enter a number of lev-els.
Compression ratio is the ratio at which the data is compressed. The factory default ratio of 1:1meansa lossless compression (no data will be discarded). A ratio of 10:1means that the output file will besmaller by a factor of 10 than the input file, but the accuracy of point placement will be degraded.
By default, your output directory is your Documents folder and the path to that folder is listed on theProperties tab. For any individual job, you can always change the output directory on the Propertiestab, but if you want a different folder to be the default output directory, specify that folder here.
The LAS specification includes several variable length records (VLRs), which are arbitrary binarydata. Your LAS file may also include custom VLRs. LiDAR Compressor always preserves metadataoutlined by the LAS specification (georeferencing information and the classification lookup table), butby default theOmit custom LAS VLR metadata from output checkbox is selected and LiDARCompressor does not carry over any custom user metadata contained in a LAS file.
Viewing Preferences
By default LiDAR Compressor displays 500,000 points in a given view. You canmake the defaultnumber higher or lower. Lower numbers will display more quickly. Higher numbers of points takelonger to display but reveal greater detail.
- 27 -
LizardTech LiDAR Compressor User Manual
Text Parsing Preferences
You can choose whether LiDAR Compressor initializes your text file immediately or waits until it isbeing run as a job. Initializing the file requires reading all the data and could take a long time. If youwant LiDAR Compressor to initialize the file immediately by default, select the Force full initial-ization immediately checkbox. By factory default, this checkbox is cleared. You can still force initial-ization for any individual job.
If you want to add text files to the Job pane without being prompted to check columnmapping, clearthePrompt me to check column mapping every time I add a text file checkbox. If columnmap-ping for an added job is invalid, the job will bemarked with an exclamation point in the Job pane sothat you canmap columns later.
Manage Custom Fields
Youmay add, delete or edit custom fields either as part of an individual job or as a default setting. Formore information see "Managing Custom Fields" on page 11.
Application Preferences
Themaximum number of jobs that can be run concurrently, by default, is onemore than the number ofcentral processing units (CPUs) detected. You can specify a different number, but performancemaysuffer.
By default the temporary file directory is <user>\AppData\Local\Temp\. You can change this toany desired folder.
IMPORTANT: As a guideline, a 1-terabyte (TB) input file requires 250GB (or 0.25 TB) of tempspace during compression. You should set your temp directory to a folder that you know can accom-modate your temp space requirements.
Licensing Preferences
The Licensing tab tells you whether your version of LiDAR Compressor is licensed or running in Trialmode. A locking code is displayed that youmust use to license your application.
Once your license code has been returned and you have activated your license, a serial number isalso displayed for troubleshooting with LizardTech Support.
- 28 -

Chapter 6: Troubleshooting and SupportThe following topics will help you get the help you need when things don't go the way they're sup-posed to.
Getting HelpMost technical issues can be resolved using the various resources you have available. In addition tothe product documentation and the README file, LizardTech offers a knowledge base and productupdates on the LizardTech website.
Knowledge Base
http://www.lizardtech.com/support/kb/
The LizardTech Knowledge Base contains articles about known technical and usage issues and isfrequently updated.
Community Forums
http://www.lizardtech.com/forums/
The forums comprise a place to engage in intelligent discourse with the geospatial community. Askquestions, provide answers, and share product usage tips with other LizardTech customers aroundthe world.
Support Plans
http://www.lizardtech.com/purchase/other.php
Protect your investment in LizardTech software by participating in a LizartTech support plan. Formore details, please contact your regional LizardTech office.
Contacting Technical Support
http://www.lizardtech.com/support
To contact technical support, visit the website at the above URL and use the Contact link on the leftnavigation pane.
In an emergency, call 206-902-2845 between the hours of 8 AM and 5 PM Pacific Time.
IMPORTANT: Please have the following information available to assist LizardTech Technical Sup-port in resolving your problem:
l Which version of LiDAR Compressor you are running (see "Finding Your LiDAR CompressorVersion Number" on page 30)
l Other LizardTech products you have installedl Which operating system you usel How much free hard drive space your computer hasl How much RAM your computer has
- 29 -
LizardTech LiDAR Compressor User Manual
l The type and size of file you are encodingl The task you were working on when the problem occurredl The command you typed prior to the problem, if applicablel The exact error message, if applicablel Whether you have restarted the computer and attempted to reproduce the probleml Any other information you feel is relevant
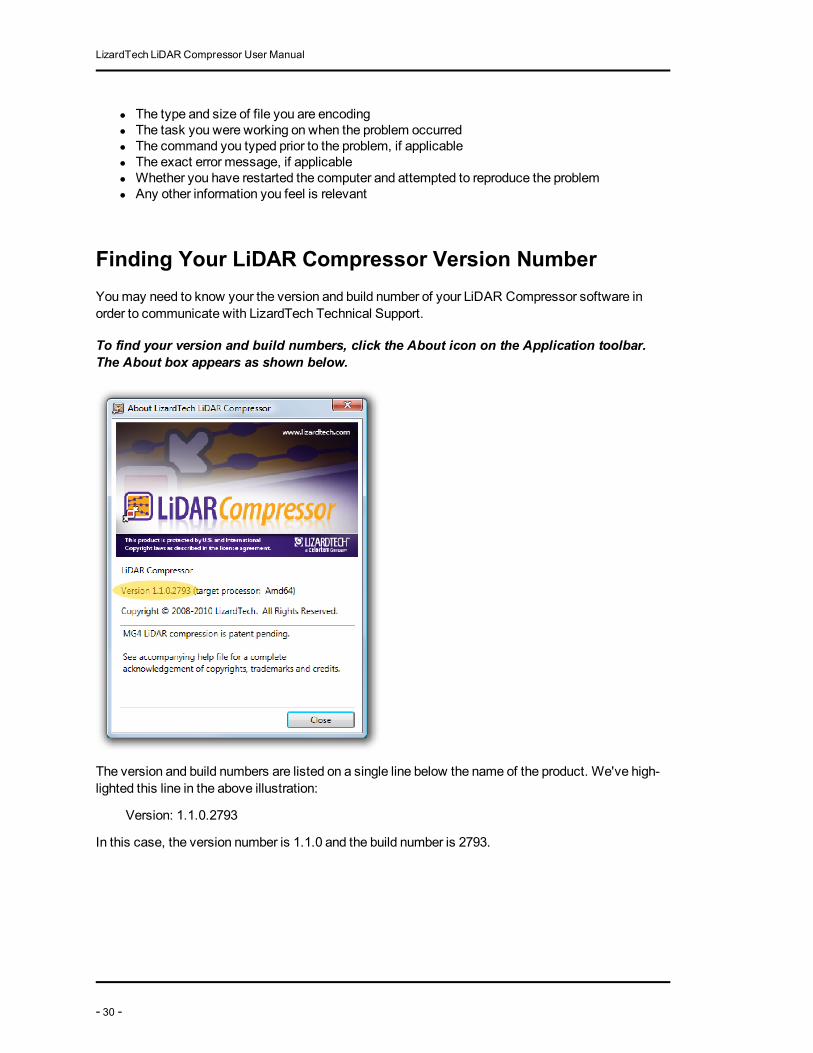
Finding Your LiDAR Compressor Version NumberYoumay need to know your the version and build number of your LiDAR Compressor software inorder to communicate with LizardTech Technical Support.
To find your version and build numbers, click the About icon on the Application toolbar.The About box appears as shown below.
The version and build numbers are listed on a single line below the name of the product. We've high-lighted this line in the above illustration:
Version: 1.1.0.2793
In this case, the version number is 1.1.0 and the build number is 2793.
- 30 -
Appendix
About LizardTechSince 1992, LizardTech has delivered state-of-the-art software products for managing and distributingmassive, high-resolution geospatial data such as aerial and satellite imagery and LiDAR data. Lizard-Tech pioneeredMrSID® (Multiresolution Seamless Image Database) technology, a powerful wavelet-based image encoder, viewer, and file format, and sits on the Technical Committee of the OpenGeos-patial Consortium (OGC) for the purpose of extending the capabilities of JPEG 2000 to geospatialapplications, driving cross-platform interoperability and rapid Internet distribution for geospatialimagery. LizardTech has offices in Seattle, London and Tokyo and is a division of Celartem Tech-nology Inc., (Hercules: 4330). For more information about LizardTech, visit www.lizardtech.com.
Other LizardTech ProductsThank you for using LizardTech™ LiDAR Compressor. We at LizardTech are glad to have you as acustomer. While you’re “in the shop,” explore LizardTech’s other products for managing high-qualityimages and LiDAR data.
GeoViewer
Efficient Viewing and Exporting of MrSID and JPEG 2000 Layers
GeoViewer is LizardTech's free, standalone application for viewing geospatial imagery, vector over-lays and LiDAR data. GeoViewer enables you to combine, view and export visual layers from variedsources, such as local repositories, Express Server catalogs, andWMS and JPIP servers. Geo-Viewer supports a wide range of input formats and exports to GeoTIFF, PNG and JPEG. It's themostefficient means of viewingMrSID and JPEG 2000 files.
For more information about GeoViewer visit http://www.lizardtech.com/download/.
ExpressView Browser Plug-in
Fast Network Viewing of Large Images and Data Sets
If you like the features in GeoViewer, consider ExpressView Browser Plug-in. ExpressView enablesyou to view, navigate and print MrSID and JPEG 2000 files in Internet Explorer or Firefox. Like Geo-Viewer, ExpressView enables you to save a portion of a file in a number of other formats. Express-View Browser Plug-in is quickly downloaded, easily installed, and free for individual use. It's themostconvenient way to view MrSID and JPEG 2000 files over networks!
For more information about ExpressView Browser Plug-in visithttp://www.lizardtech.com/download/.
- 31 -
LizardTech LiDAR Compressor User Manual
GeoExpress
The Industry’s Best Image Manipulation and Compression Software
With powerful tools for reprojecting, color balancing, mosaicking, andmore, GeoExpress is the indus-try’s choice for manipulating and compressing geospatial imagery to industry standard formats. Youcan also configure Express Server and Spatial Express directly from GeoExpress, whichmakes itthe ideal command center for your storage and distribution workflows.
For more information about GeoExpress visit www.lizardtech.com/solutions/geo/.
Express Server
Image Delivery Software for Geospatial Workflows
LizardTech Express Server is the best solution for distributing imagery in MrSID or JPEG 2000 for-mat. With Express Server, users on any device access imagery faster, even over low-bandwidth con-nections. Express Server is faster, more stable and easier to use than any other solution for deliveringhigh-resolution raster imagery.
Express Server catalogs andmanages the distribution of imagery, enabling you to integrate theworld’s best raster delivery technology with geospatial data stores anywhere. Express Serverstreams compressed images for the fastest possible delivery, whether conventionally to broadbanddevices and desktops or wirelessly to field personnel using low-bandwidth connections.
For more information about Express Server visit www.lizardtech.com/solutions/exp/.
Spatial Express
Database Storage and Retrieval Tools for Massive Geospatial Imagery
Spatial Express enables you to store, manage, and access massive image datasets efficiently usingyour Oracle Spatial database. Whether you want to maximize return on your database investment bystoring raster image data hundreds of gigabytes in size, or reduce storage space requirements for thatimagery by up to 95 percent while retaining image quality, or view the imagery in your geospatial appli-cations, Spatial Express is the key link between your imagery, your database, and your users.
For more information about Spatial Express visit www.lizardtech.com/solutions/spatial/.
- 32 -
Index
A
Adding files to compress 7
Advanced compression options 9
Application preferences 28
Application toolbar 5
Axismarkings 14
C
Canceling jobs 15
Command line tools 21
Compression preferences 27
Context menu 6
Copyrights, trademarksand credits ii
Custom fields 11
D
DecompressingMG4 files 23
E
Exporting log information 17
F
Forcing full initialization 11
Formats 7
Forums 29
G
Getting help 29
I
Initializing files 11
Installing LiDAR Compressor 3
Introduction 1
J
Job pane 4
Job state icons 15
- 33 -
Jobs
adding 7
canceling 15
monitoring progress 16
K
Keyboard shortcuts 14
Knowledge base 29
L
Licensing LiDAR Compressor 3
LIcensing preferences 28
LiDAR Compressor user interface 4
LiDAR Compressor version information 30
lidardecode 23
lidarinfo 21
Logging information 16
M
Managing custom fields 11
Menu 6
Monitoring Job Progress 16
MrSID format version 17
N
Navigation in three dimensions 13
O
Options
advanced 9
basic compression 8
Other LizardTech products 31
Output information 16
Output tab 5
LizardTech LiDAR Compressor User Manual
P
Points
number displayed at once 27
refreshing 14
Precision factor 11
Preferences 27
Progress 16
Properties tab 5
R
Refreshing points 14
Removing files from the Job pane 8
Restoring original view 15
Run All Jobsbutton 6
Running jobs 15
S
Sample data 8
Setting advanced options 9
Setting basic compression options 8
Setting preferences 27
Showing and hiding axes 14
Skipping header lines 11
Specifying precision factor 11
Statusbar 6
Supported formats 7
System requirements 2
T
Tabs 5
Technical support 29
Text file columnmapping prompt 11
Text parsing options 10
Text parsting preferences 28
Toolbar
application 5
V
Version number, finding 30
View tab 5
Viewing file information 21
Viewing format version of MrSID files 17
Viewing input 12
Viewing output information 16
Viewing preferences 27
W
WhycompressLiDAR data? 1
Z
Zooming in and out 14
- 34 -


