Embed Size (px)
Citation preview
G A R D E N I N G S E R I E S
MASTER GARDENERThe Science of Planting Trees 7.833by D. Whiting, J. Bousselot, R. Cox, and C. O’Meara1
© Colorado State University Cooperative Extension. 11/05.
www.ext.colostate.edu
Outline. . . Planting Steps for Rapid Root RengenerationStep 1 - Check the Depth of Tree in Root Ball, page 2Step 2 - Dig Saucer-shaped Hole, page 4Step 3 - Set Tree in Place, page 7Step 4 - Pack Around Base, page 7Step 5 - Remove Root Ball Wrapping, page 8Step 6 - Check for Potential Girdling Roots, page 8Step 7 - Backfill, page 8Step 8 - Staking or Underground Stabilization (if needed), page 10Step 9 - Watering to Settle Soil, page 12Step 10 - Final Grade, page 12Step 11 - Mulching, page 12Summary, page 12Post-planting Care, page 13Reference / Supplemental Reading, page 14
Colorado
The average life of a tree in the landscape is only eight years due to poor design and planting techniques. This fact sheet covers the planting process. For additional details on design and selection, refer to fact sheets 7.831, Tree Placement and 7.832, Tree Selection.
Planting Steps for Rapid Root RegenerationRoots only grow where there is adequate levels of soil oxygen. Tree root
systems are typically shallow and spreading. Sinker roots follow natural openings into deeper soils where oxygen levels permit. Fine feeder roots are present near the surface throughout the root system.
It is difficult to predict the root spread of any tree. Under good soil conditions, 90 to 95 percent of the roots are typically in the top 36 inches, with 50 percent in the top 12 inches. Tree roots typically spread 2 to 3 times the tree height or canopy spread. On compacted soils, roots will be shallower with a wider spread.
Based on nursery standards, a field-grown Balled & Burlapped (B&B) or container-grown tree contains only 5 to 20 percent of the fine, absorbing roots of the same sized tree in the field.
Figure 1. The science of planting trees is to promote rapid root growth (regeneration) to quickly reduce the water stress imposed by the planting process.
Post-planting stress (transplant shock) is the stress factors induced by the reduced root system.
Impact of Incorrect Planting DepthsIn the landscape, more trees are killed by planting too deep than any
outbreak of insects or diseases!Low soil oxygen levels are the most limiting growth factor for trees.
When tree are planted too deep, root growth will be slowed or halted by lower levels of soil oxygen. Due to planting depth issues, many trees fail to establish and simply decline over time.
When planted too deep, many tree species have a strong tendency to develop girdling roots. The tree may establish and put on significant growth only to go into decline followed by death just as the tree begins to reach a functional size with several years of growth. Since the girdling roots may be below the soil surface, diagnosis of the decline may be impossible without a root collar excavation.
Planting too deep may also predispose trees to root and collar rots on susceptible species.
When planted too shallow, roots may be killed by hot or cold surface soil temperatures and dry soil conditions.
Step 1 – Check Depth of Tree in Root BallGenerally, at least two structural roots should be within the top 1 to 3
inches of the soil surface, measured 3 to 4 inches from the trunk. There may be exceptions.
This standard was developed by an industry-wide working group to develop a consensus on a complex national issue: tree decline and death in the landscape resulting from excessive amounts of soil over the root system. Working group members and researchers noted that there may be some exceptions to the general procedure, for example:
• In some species, roots regenerated after transplanting can grow back towards the trunk and become girdling roots. On these species, top structural roots should be within the top 1 inch of the root ball soil. Species with this modification include the following:
- Crabapple - Littleleaf Linden - Green Ash - Poplar - Hackberry - Red Maple - And possible other species with aggressive root systems• Some species may develop more strongly descending root systems. In
this situation, look for structural roots near the trunk.• On landscapes with poorly drained soils (common in many soils
around Colorado) there may be a need to raise structural roots slightly.• Additional exceptions and clarifications may be identified with future
research.Thus the planting hole depth should be 2 to 4 inches less than the height
of the root ball (depending on the root ball size). If the hole is dug too deep, refill to proper depth and pack the soil.
Low soil oxygen levels are the primary factor limiting root growth. If the root ball is below grade, water can puddle over the root ball reducing soil oxygen. If backfill soil is placed over the root ball, the change in soil texture between the backfill soil and the root ball creates a soil texture line that restricts movement of water and air across the texture change.
Locating Structural Roots in the Root BallDon’t assume the tree was planted at the proper depth at the nursery.
With mechanization of the industry, planting depth became an issue. Take the time to check.
The presence of the root flare is an indication of good planting depth. However, small trees may have minimal root flare development making it difficult to determine. Be careful not to mistake swelling of the trunk below the graft as the root flare.
A good way to evaluate planting depth in the root ball is with a surveyor’s chaining pin or similar tool such as a knitting needle, a barbeque skewer, or even a slender Phillips screwdriver. See Figure 4. Gently probe the root ball 3 to 4 inches out from the trunk to locate structural roots and determine
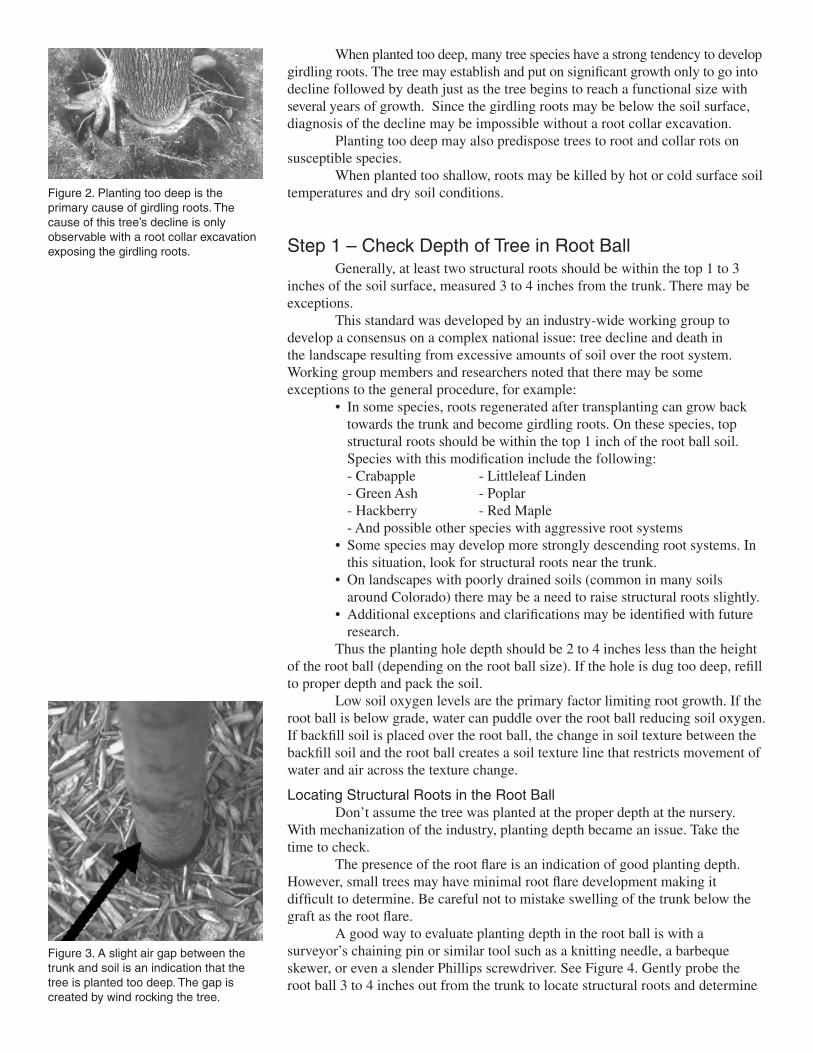
Figure 2. Planting too deep is the primary cause of girdling roots. The cause of this tree’s decline is only observable with a root collar excavation exposing the girdling roots.
Figure 3. A slight air gap between the trunk and soil is an indication that the tree is planted too deep. The gap is created by wind rocking the tree.
depth. Generally, at least two structural roots should be located within the top 1 to 3 inches of soil.
Remediation for trees planted too deep in the root ballTwo options exist in dealing with trees planted too deep in the root ball,
1) don’t purchase the tree or 2) correct it in transplanting.Don’t purchase – It takes time to correct the planting depth, so in a
contract installation (where labor cost is paramount) the best options may be to reject the tree. National standards (ANSI Z60.1, 2004) state that for B&B trees the “soil above the root flare… shall not be included in the ball depth measured and should be removed.” With the extra soil in the upper portion of the root ball and roots only in the lower portion, it also raises the question: is the root ball adequately sized for the tree?
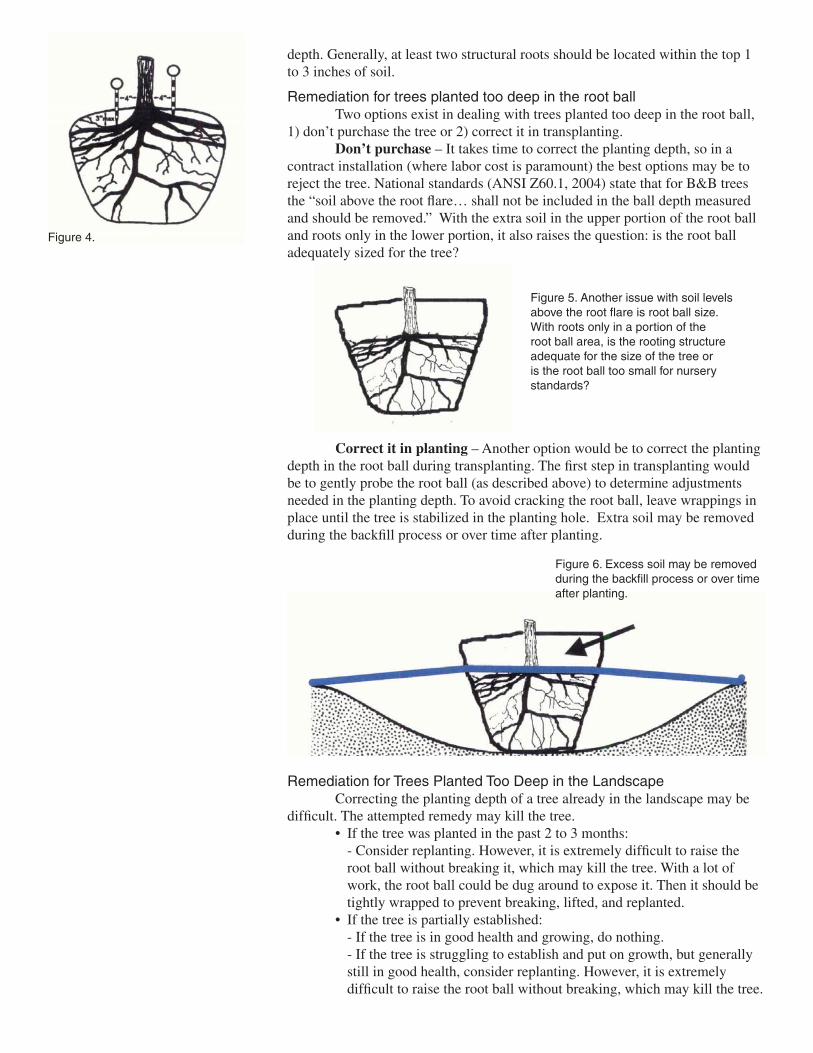
Correct it in planting – Another option would be to correct the planting depth in the root ball during transplanting. The first step in transplanting would be to gently probe the root ball (as described above) to determine adjustments needed in the planting depth. To avoid cracking the root ball, leave wrappings in place until the tree is stabilized in the planting hole. Extra soil may be removed during the backfill process or over time after planting.
Remediation for Trees Planted Too Deep in the LandscapeCorrecting the planting depth of a tree already in the landscape may be
difficult. The attempted remedy may kill the tree.• If the tree was planted in the past 2 to 3 months: - Consider replanting. However, it is extremely difficult to raise the
root ball without breaking it, which may kill the tree. With a lot of work, the root ball could be dug around to expose it. Then it should be tightly wrapped to prevent breaking, lifted, and replanted.
• If the tree is partially established: - If the tree is in good health and growing, do nothing. - If the tree is struggling to establish and put on growth, but generally
still in good health, consider replanting. However, it is extremely difficult to raise the root ball without breaking, which may kill the tree.
Figure 4.
Figure 5. Another issue with soil levels above the root flare is root ball size. With roots only in a portion of the root ball area, is the rooting structure adequate for the size of the tree or is the root ball too small for nursery standards?
Figure 6. Excess soil may be removed during the backfill process or over time after planting.
With a lot of work, the rooting area could be dug around to expose the newly developing rooting system. Tightly wrap the area to prevent breaking, lift, and replant at the correct depth. As an alternative, consider whether excess soil over the rooting area (not just the root ball) can be removed without creating a low spot where water puddles. Water puddling over the root ball leads to decline and death.
- If the tree is stressed it probably won’t tolerate the additional stress of replanting. Replace the tree.
• On established trees: - Can the excess soil over the rooting area be removed without creating
a situation where water puddles over the rooting area? Do not expose roots growing near the surface. Do remove potentially girdling roots.
Step 2 – Dig Saucer-shaped Planting Hole Three Times Root Ball Diameter
To support rapid root regeneration, research suggests a wide saucer-shaped planting hole. If the roots have difficulty penetrating compacted site soil, sloped sides direct roots to continue to grow towards the higher oxygen soil near the surface rather than being trapped in the planting hole. Roots that do penetrate the site soil will grow more slowly.
Water-logging concerns – In the wide saucer-shaped planting hole three times the root ball diameter, the upper half contains 85 percent of the back fill soil and the upper 1/4 contains 75 percent of the back fill soil. Water could saturate the lower three-fourths of the backfill soil and only affect 25 percent of the root system! The saucer-shaped planting hole actually gives the tree a larger margin for error in over-watering.
When the planting hole is dug with an auger, break down the sides with a shovel (see Figure 8) to help eliminate the glazing and create the preferred sloping sides. An alternative is to rototill a 12- to 24-inch ring of soil around the planting hole after planting.
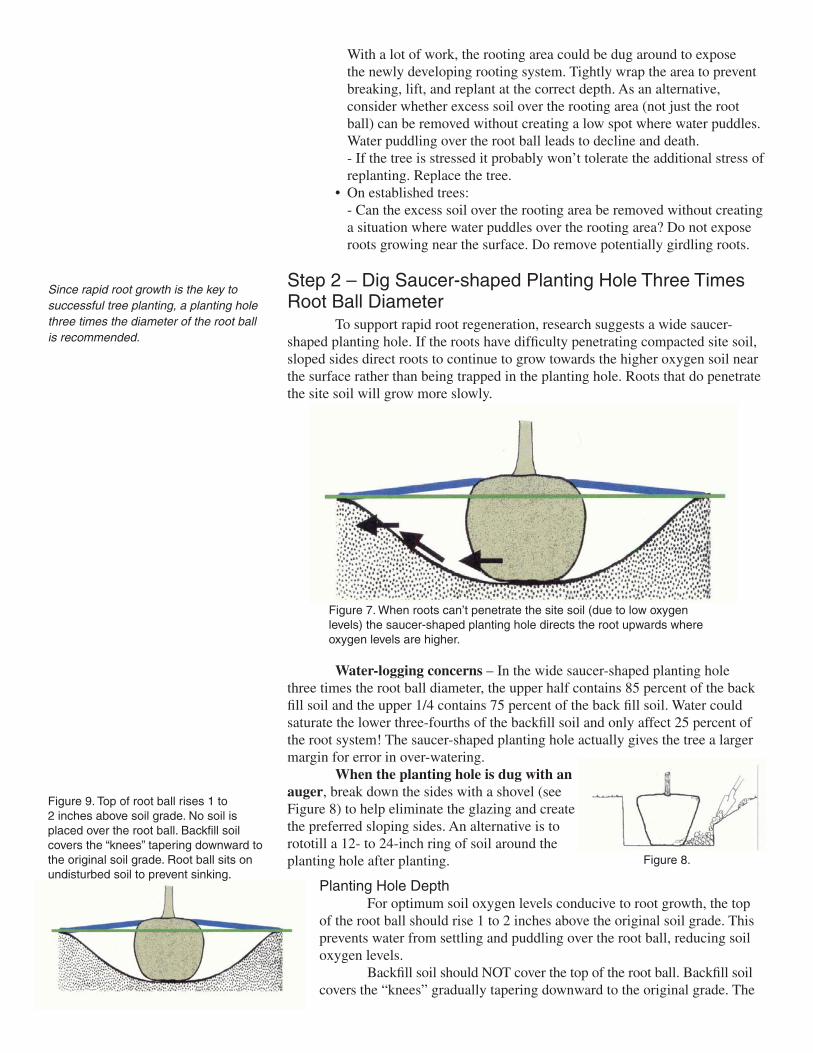
Planting Hole DepthFor optimum soil oxygen levels conducive to root growth, the top
of the root ball should rise 1 to 2 inches above the original soil grade. This prevents water from settling and puddling over the root ball, reducing soil oxygen levels.
Backfill soil should NOT cover the top of the root ball. Backfill soil covers the “knees” gradually tapering downward to the original grade. The
Since rapid root growth is the key to successful tree planting, a planting hole three times the diameter of the root ball is recommended.
Figure 7. When roots can’t penetrate the site soil (due to low oxygen levels) the saucer-shaped planting hole directs the root upwards where oxygen levels are higher.
Figure 8.
Figure 9. Top of root ball rises 1 to 2 inches above soil grade. No soil is placed over the root ball. Backfill soil covers the “knees” tapering downward to the original soil grade. Root ball sits on undisturbed soil to prevent sinking.
root ball should sit on undisturbed firm soil to prevent sinking and reduce rocking in wind.
The planting hole depth should be 1 to 2 inches less than the height of the root ball (adjusting for proper planting depth in the root ball as described above). If the hole is dug too deep, backfill and pack the bottom to the proper depth.
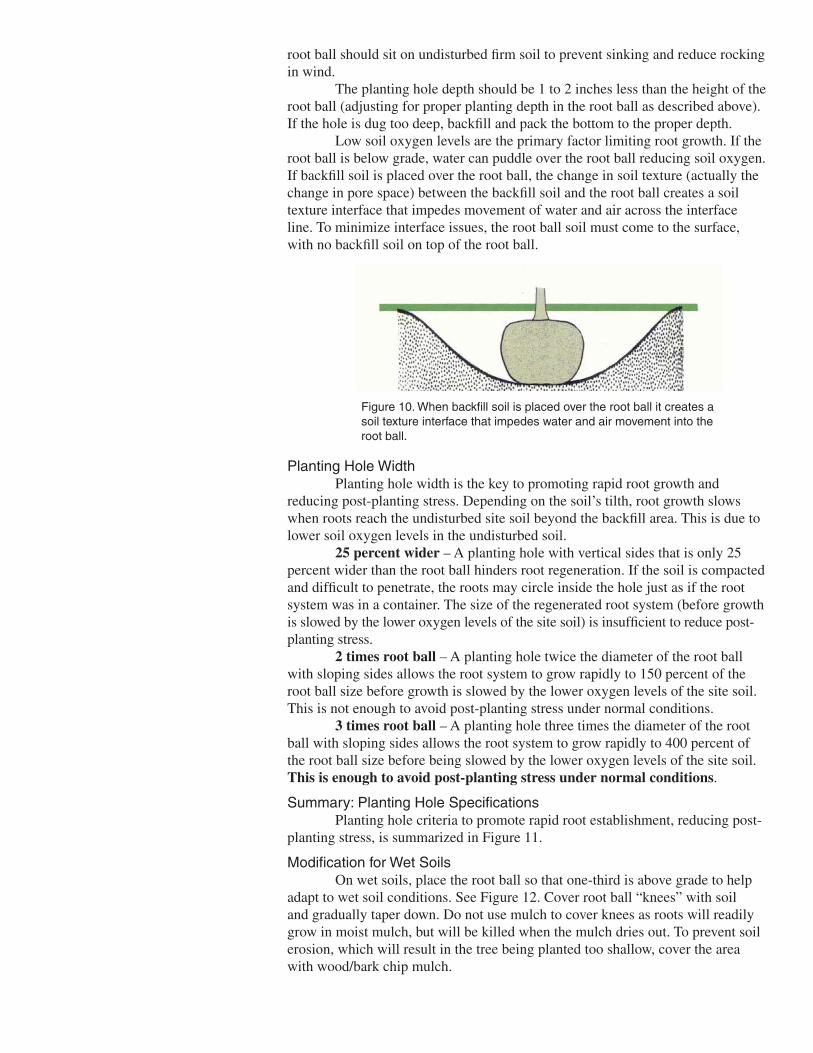
Low soil oxygen levels are the primary factor limiting root growth. If the root ball is below grade, water can puddle over the root ball reducing soil oxygen. If backfill soil is placed over the root ball, the change in soil texture (actually the change in pore space) between the backfill soil and the root ball creates a soil texture interface that impedes movement of water and air across the interface line. To minimize interface issues, the root ball soil must come to the surface, with no backfill soil on top of the root ball.
Planting Hole WidthPlanting hole width is the key to promoting rapid root growth and
reducing post-planting stress. Depending on the soil’s tilth, root growth slows when roots reach the undisturbed site soil beyond the backfill area. This is due to lower soil oxygen levels in the undisturbed soil.
25 percent wider – A planting hole with vertical sides that is only 25 percent wider than the root ball hinders root regeneration. If the soil is compacted and difficult to penetrate, the roots may circle inside the hole just as if the root system was in a container. The size of the regenerated root system (before growth is slowed by the lower oxygen levels of the site soil) is insufficient to reduce post-planting stress.
2 times root ball – A planting hole twice the diameter of the root ball with sloping sides allows the root system to grow rapidly to 150 percent of the root ball size before growth is slowed by the lower oxygen levels of the site soil. This is not enough to avoid post-planting stress under normal conditions.
3 times root ball – A planting hole three times the diameter of the root ball with sloping sides allows the root system to grow rapidly to 400 percent of the root ball size before being slowed by the lower oxygen levels of the site soil. This is enough to avoid post-planting stress under normal conditions.
Summary: Planting Hole SpecificationsPlanting hole criteria to promote rapid root establishment, reducing post-
planting stress, is summarized in Figure 11.
Modification for Wet SoilsOn wet soils, place the root ball so that one-third is above grade to help
adapt to wet soil conditions. See Figure 12. Cover root ball “knees” with soil and gradually taper down. Do not use mulch to cover knees as roots will readily grow in moist mulch, but will be killed when the mulch dries out. To prevent soil erosion, which will result in the tree being planted too shallow, cover the area with wood/bark chip mulch.
Figure 10. When backfill soil is placed over the root ball it creates a soil texture interface that impedes water and air movement into the root ball.
Modification for Compacted SoilsOn extremely compacted soils, it may help to
rototill a ring around the backfill area to a width of 4 to 5 times, or more, the root ball diameter. (Figure 13.) This should be done after planting is completed so the soil is not recompacted by foot traffic in the planting process.
Planting Bare-root TreesFor bare-root trees, spread roots over a mound of packed
soil, as illustrated in Figure 14.
Planting on a SlopeWhen planting on a slope, plant “out of the hill” by
adjusting the surface grade around the planting hole as illustrated below. See Figure 15.
When planted “into the hill” (Figure 16.) roots on the uphill side will be too deep, slowing root establishment and growth. Do not plant this way.
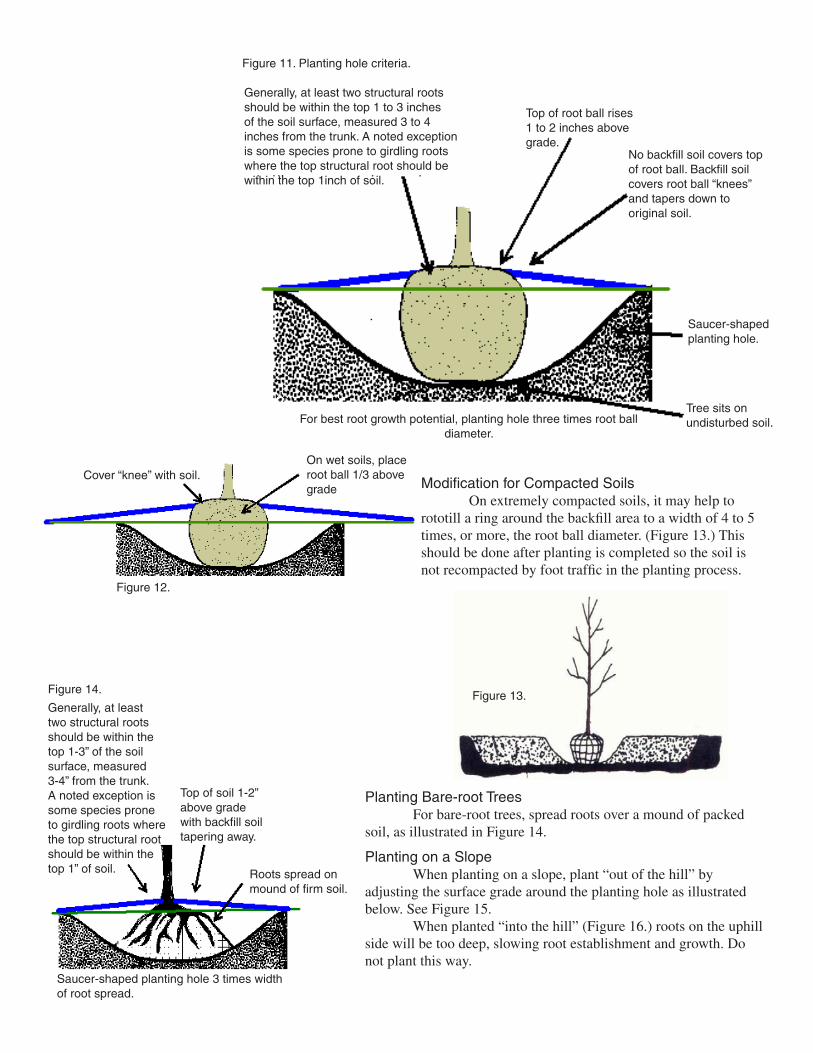
Generally, at least two structural roots should be within the top 1 to 3 inches of the soil surface, measured 3 to 4 inches from the trunk. A noted exception is some species prone to girdling roots where the top structural root should be within the top 1inch of soil.
Top of root ball rises 1 to 2 inches above grade.
No backfill soil covers top of root ball. Backfill soil covers root ball “knees” and tapers down to original soil.
Saucer-shaped planting hole.
Tree sits on undisturbed soil.For best root growth potential, planting hole three times root ball
diameter.
Figure 11. Planting hole criteria.
Cover “knee” with soil.On wet soils, place root ball 1/3 above grade
Figure 12.
Figure 13.Generally, at least two structural roots should be within the top 1-3” of the soil surface, measured 3-4” from the trunk. A noted exception is some species prone to girdling roots where the top structural root should be within the top 1” of soil.
Top of soil 1-2” above grade with backfill soil tapering away.
Roots spread on mound of firm soil.
Saucer-shaped planting hole 3 times width of root spread.
Figure 14.
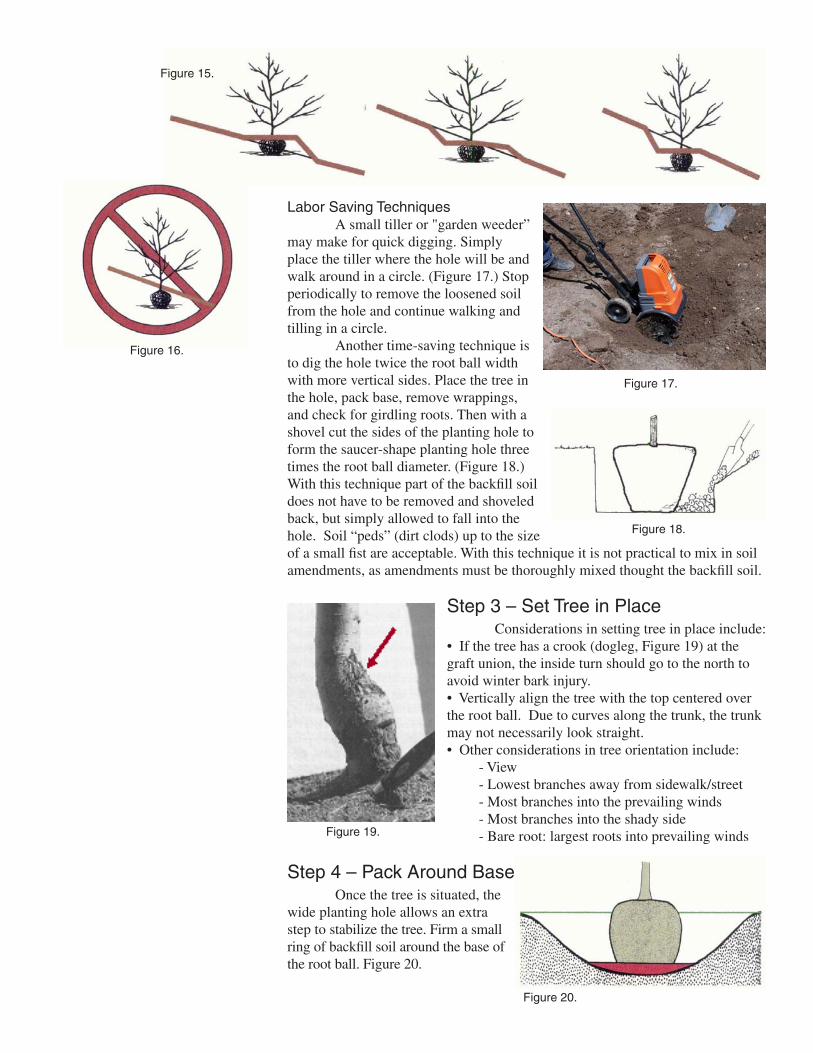
Labor Saving TechniquesA small tiller or "garden weeder”
may make for quick digging. Simply place the tiller where the hole will be and walk around in a circle. (Figure 17.) Stop periodically to remove the loosened soil from the hole and continue walking and tilling in a circle.
Another time-saving technique is to dig the hole twice the root ball width with more vertical sides. Place the tree in the hole, pack base, remove wrappings, and check for girdling roots. Then with a shovel cut the sides of the planting hole to form the saucer-shape planting hole three times the root ball diameter. (Figure 18.) With this technique part of the backfill soil does not have to be removed and shoveled back, but simply allowed to fall into the hole. Soil “peds” (dirt clods) up to the size of a small fist are acceptable. With this technique it is not practical to mix in soil amendments, as amendments must be thoroughly mixed thought the backfill soil.
Step 3 – Set Tree in PlaceConsiderations in setting tree in place include:
• If the tree has a crook (dogleg, Figure 19) at the graft union, the inside turn should go to the north to avoid winter bark injury.• Vertically align the tree with the top centered over the root ball. Due to curves along the trunk, the trunk may not necessarily look straight.• Other considerations in tree orientation include: - View - Lowest branches away from sidewalk/street - Most branches into the prevailing winds - Most branches into the shady side - Bare root: largest roots into prevailing winds
Step 4 – Pack Around BaseOnce the tree is situated, the
wide planting hole allows an extra step to stabilize the tree. Firm a small ring of backfill soil around the base of the root ball. Figure 20.
Figure 15.
Figure 16.
Figure 17.
Figure 18.
Figure 19.
Figure 20.
Step 5 – Remove Root Ball WrappingAn advantage of the wider planting hole is that it gives room for the
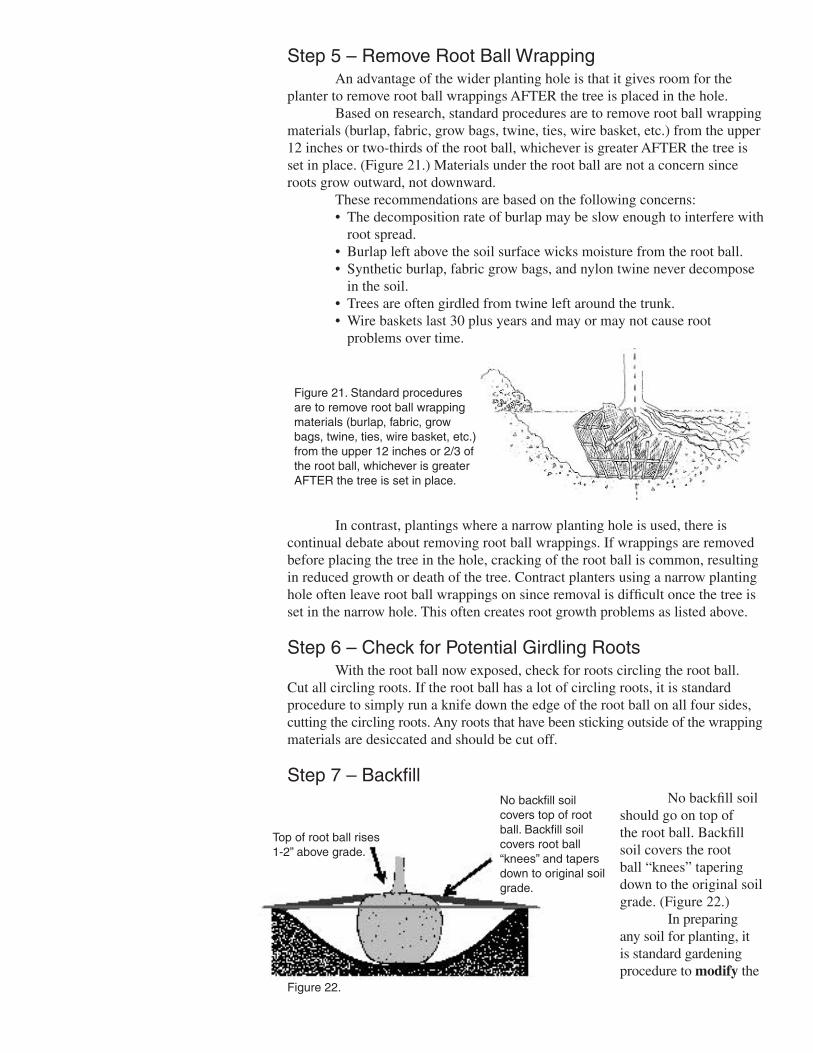
planter to remove root ball wrappings AFTER the tree is placed in the hole. Based on research, standard procedures are to remove root ball wrapping
materials (burlap, fabric, grow bags, twine, ties, wire basket, etc.) from the upper 12 inches or two-thirds of the root ball, whichever is greater AFTER the tree is set in place. (Figure 21.) Materials under the root ball are not a concern since roots grow outward, not downward.
These recommendations are based on the following concerns:• The decomposition rate of burlap may be slow enough to interfere with
root spread.• Burlap left above the soil surface wicks moisture from the root ball.• Synthetic burlap, fabric grow bags, and nylon twine never decompose
in the soil.• Trees are often girdled from twine left around the trunk.• Wire baskets last 30 plus years and may or may not cause root
problems over time.
In contrast, plantings where a narrow planting hole is used, there is continual debate about removing root ball wrappings. If wrappings are removed before placing the tree in the hole, cracking of the root ball is common, resulting in reduced growth or death of the tree. Contract planters using a narrow planting hole often leave root ball wrappings on since removal is difficult once the tree is set in the narrow hole. This often creates root growth problems as listed above.
Step 6 – Check for Potential Girdling RootsWith the root ball now exposed, check for roots circling the root ball.
Cut all circling roots. If the root ball has a lot of circling roots, it is standard procedure to simply run a knife down the edge of the root ball on all four sides, cutting the circling roots. Any roots that have been sticking outside of the wrapping materials are desiccated and should be cut off.
Step 7 – BackfillNo backfill soil
should go on top of the root ball. Backfill soil covers the root ball “knees” tapering down to the original soil grade. (Figure 22.)
In preparing any soil for planting, it is standard gardening procedure to modify the
Figure 21. Standard procedures are to remove root ball wrapping materials (burlap, fabric, grow bags, twine, ties, wire basket, etc.) from the upper 12 inches or 2/3 of the root ball, whichever is greater AFTER the tree is set in place.
Top of root ball rises 1-2” above grade.
No backfill soil covers top of root ball. Backfill soil covers root ball “knees” and tapers down to original soil grade.
Figure 22.
soil structure (i.e., loosen the soil) by cultivating. It is also routine to amend the soil by adding organic matter to improve water-holding capacity of sandy soils or to increase large pore space in clayey soils. Modifying and amending, while related, are not the same process and serve different purposes in improving the soil tilth for plant growth. A soil may be modified without amending.
Ideally, soils in a tree’s entire potential rooting area would be modified and amended. However, this is generally not practical. In most tree plantings, we are primarily concerned with backfill soil in the planting hole.
Modifying the Backfill When planting trees, soil in the planting hole is modified (loosened-
up) by digging the hole. Due to lower levels of soil oxygen in the site soil, root growth slows as roots reach the undisturbed site soil beyond the backfill. A saucer-shaped planting hole three times the diameter of the root ball supports rapid root growth, reducing post-planting stress.
Amending backfill soil in a narrow planting hole will not substitute for modifying soil in the early rooting area of the wider planting hole!
For backfill, soil “peds” (dirt clods) up to the size of a small fist are acceptable. The soil does not need to be totally pulverized. In clayey soils, totally pulverizing the soil will destroy all structure and may lead to excessive re-compaction with minimal large pore space.
Amending the BackfillAmending the soil just in the planting hole is a very complex issue.
Amended backfill soil may be more supportive to root growth in the planting hole during the first two years. However, the amended soil in the hole may also hinder root growth beyond the planting hole.
In tree planting, it is a common procedure to amend backfill soil with organic matter. It is a good marketing technique for the nursery to recommend soil amendments with the sale of a tree.
Arborists are divided on the benefits and needs of amending the backfill soil. Too many soil-related variables play into this amended planting pit for a simple directive. B&B trees, being field grown, will typically have soils lower in organic matter. Soil texture will depend on the site where the trees were grown; and may be somewhat like the site soil. Container-grown trees are typically in a coarse soil (for drainage) with higher organic content (to hold water and nutrients). Some arborists believe that there is a greater benefit to amend backfill soils when planting container-grown trees than with B&B trees.
In amending the soil, the organic matter needs to be thoroughly mixed with the backfill soil. Never backfill with organic matter in layers or clumps as this creates additional texture interface lines.
Amendments should be well aged. Never use fresh, unfinished compost or fresh manure as it may burn tender roots. For additional details on soil amendments refer to these other CSU Cooperative Extension fact sheets:
• 7.235, Choosing A Soil Amendment • 7.741, Soil Amendments • 7.743, Using Compost • 7.742, Using Manure
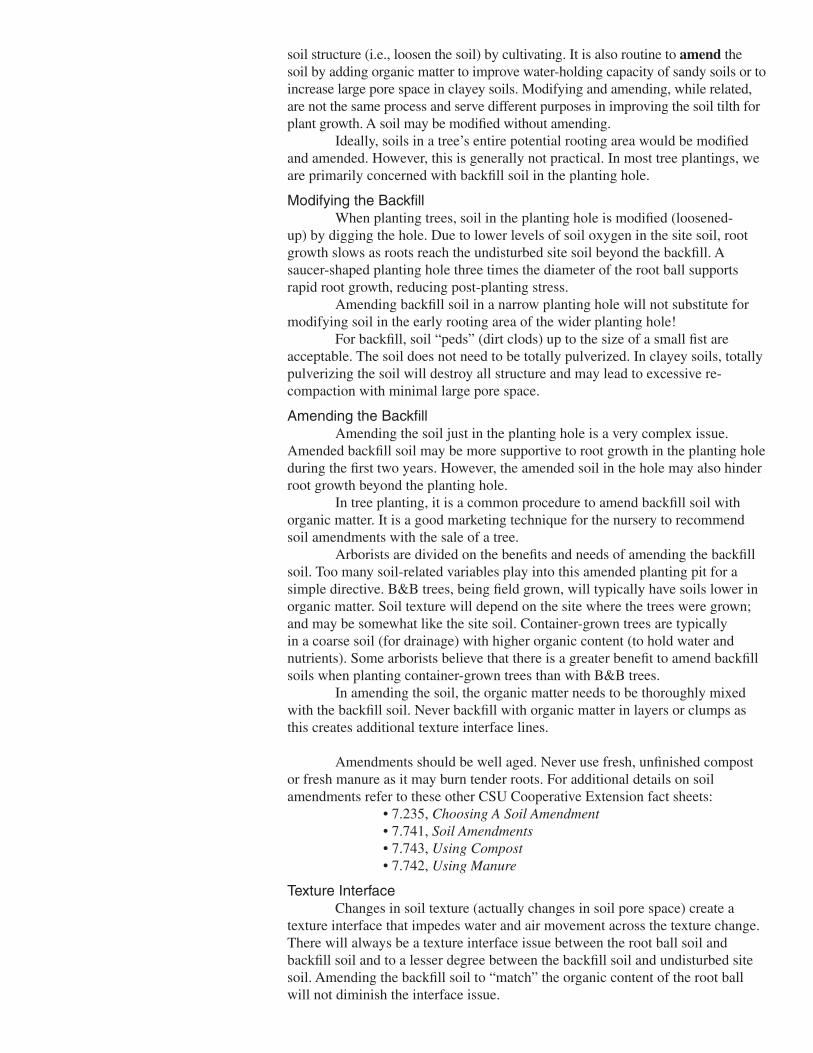
Texture InterfaceChanges in soil texture (actually changes in soil pore space) create a
texture interface that impedes water and air movement across the texture change. There will always be a texture interface issue between the root ball soil and backfill soil and to a lesser degree between the backfill soil and undisturbed site soil. Amending the backfill soil to “match” the organic content of the root ball will not diminish the interface issue.
To deal with the interface issue make sure that the root ball soil comes to the surface (no backfill soil covers the top of the root ball) as discussed above. If backfill soil covers the root ball soil, the interface between the root ball and backfill soil will impede water and air movement into the root ball. (Figure 23.)
Summary on Modifying and AmendingContrary to popular belief, amending the backfill soil will not
compensate for poor planting techniques. While amending the backfill is routine, attention to planting hole width and depth is far more important in promoting rapid root regeneration.
The key to rapid root regeneration is to use a wide planting hole where soil is modified by the digging process. Attention to correct planting depth (generally at least two structural roots in the top 1 to 3 inches in the root ball, with the root ball 1 to 2 inches above grade and no backfill soil over the top of the root ball) is more important.
Step 8 – Staking or Underground Stabilization (if needed)Staking became a routine procedure when trees were planted in deep
holes and the trees sunk and tilted as the soil settled. In the Science of Planting Trees, where trees are set on undisturbed soil and a ring of soil is firmed around the base before backfilling, staking is not needed in many landscape settings.
The Consequences of Staking • Tree grows taller faster.• Staking (the lack of tree movement) slows root spread. • Tree has less growth in trunk caliper near the ground but more near
the top support ties. Staking often produces a reverse trunk taper that increases the potential for storm damage.
• Staked trees experience more wind damage than unstaked trees of equal height because the top of the tree is not free to bend in the wind.
• Bark is often damaged by the ties. In a survey of 10,000 street trees, 90 percent were damaged by the ties.
• If the stake is close to the trunk, it can develop uneven xylem growth (where the stake shades the trunk) making the trunk tilt to the side. Keep stakes at least 6 inches away from the trunk.
Purposes for Staking No staking – In many landscape settings, no staking is often needed if
the tree is set on undisturbed soil (where it can’t sink and tilt) with soil firmed around the base of the root ball before backfilling. Exceptions include the three types of staking below.
To minimize texture interface issues, the root ball soil must come to the soil surface with no backfill over top of the root ball.
Changes in soil texture (actually soil pore space) create a texture interface that impedes water and air movement. There will always be a texture interface difference between the root ball and backfill soils, and the backfill soil and the undisturbed site soil.
Figure 23.
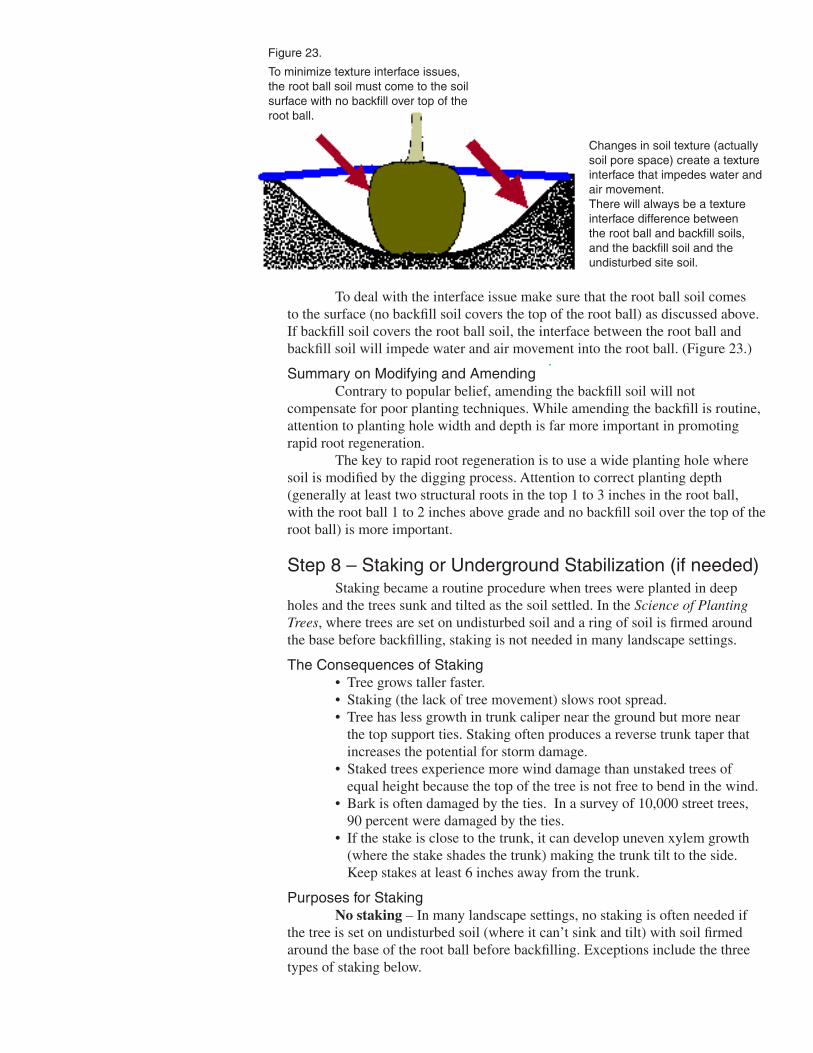
Protection staking is used where the tree needs protection from human activities, such as the football game on the front lawn or from passersby along a street planting.
Protection staking may include standard staking techniques with 3 to 4 posts and straps or may include a structure surrounding the tree but not actually touching the tree trunk.
Anchor staking – In areas of high winds, anchor staking may be needed. When anchor staking small trees, use 2 or 3 straps along the trunk about 18 inches above the ground.
Support staking – If the tree has a floppy trunk that is not self-supporting, support staking will be needed. Straps should be located 6 inches above the point where the tree will stand upright, but at least 3 feet below the terminal leader.
Staking Procedures When staking, use flat grommeted
straps because they spread the pressure over a wider area and reduce the potential for bark damage. Straps should lay flat against the trunk and should not be bunched up or twisted. Straps may be spaced a few inches apart along the trunk. Two or three straps are routinely used in tree staking.
Straps may tie back to wood or metal posts or to anchors in the ground. Place posts 15 to 18 inches from the trunk. Never tie a post to the trunk, as the shading will cause the trunk to curve.
With guy-lines and ground anchors, place the guy-line at a 45 degree angle. Flag the guy-lines to help people see them and prevent injury. In Figure 27, the anchor on the left may be more secure than the anchor on the right.
In any staking system, it’s best if the tree trunk has a little flexibility. Some movement in wind encourages root growth and trunk taper development.
Underground Stabilization MethodsSeveral methods for underground stabilization are effective.• 2 to 3 wood dowels driven into the ground at edge of root ball. The
dowels will decompose over time. (Figure 28.)• 2-by-2 wood triangle screwed into 2-by-2 wood stakes driven into
the ground at edge of the root ball. The wood will decompose over time. (Figure 28.)
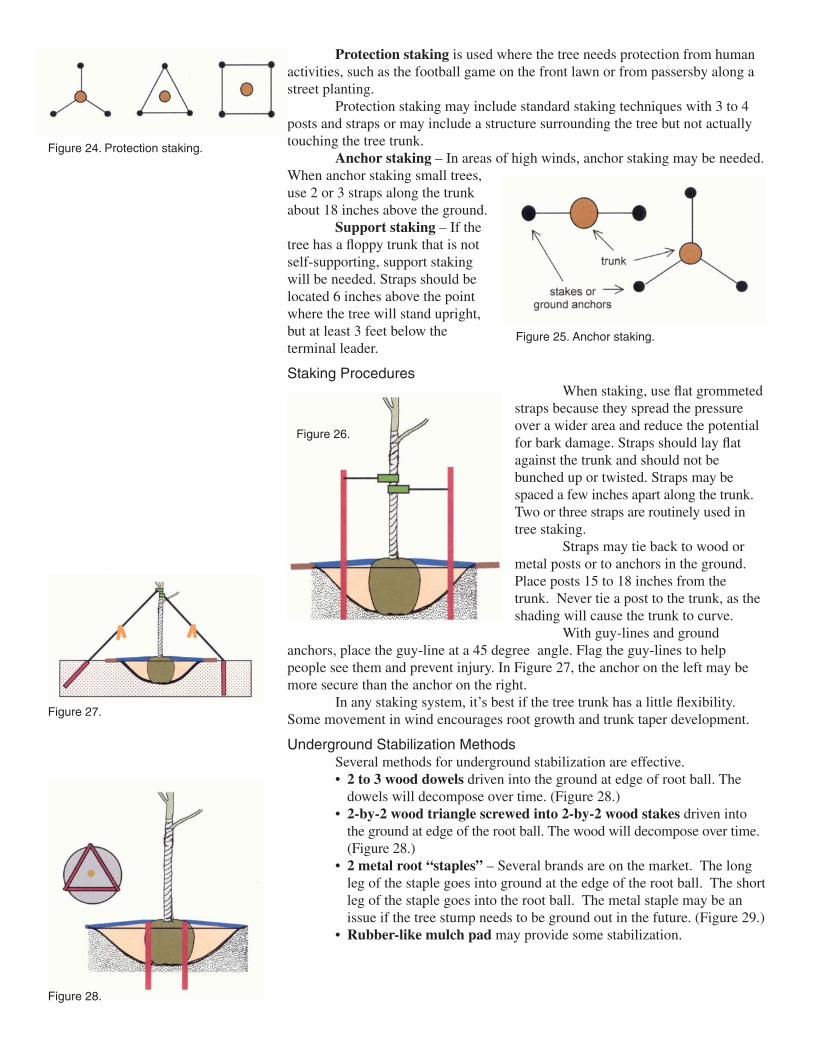
• 2 metal root “staples” – Several brands are on the market. The long leg of the staple goes into ground at the edge of the root ball. The short leg of the staple goes into the root ball. The metal staple may be an issue if the tree stump needs to be ground out in the future. (Figure 29.)
• Rubber-like mulch pad may provide some stabilization.
Figure 24. Protection staking.
Figure 25. Anchor staking.
Figure 26.
Figure 27.
Figure 28.
Step 9 – Watering to Settle SoilWatering is done after staking so the gardener doesn’t compact the
wet soil installing the stakes. Watering is a tool to settle the soil without overly packing it.
Step 10 – Final GradeIn the wider planting hole, the backfill soil may settle a little in watering.
Final grading may be needed after watering.
Step 11 – MulchingA mulch ring of bark/wood chips is suggested around all trees to help
protect the trunks from lawnmower damage. On newly planted trees, an organic mulch can increase fine root development by 400 percent compared to grass competition. This results in 20 percent faster top growth.
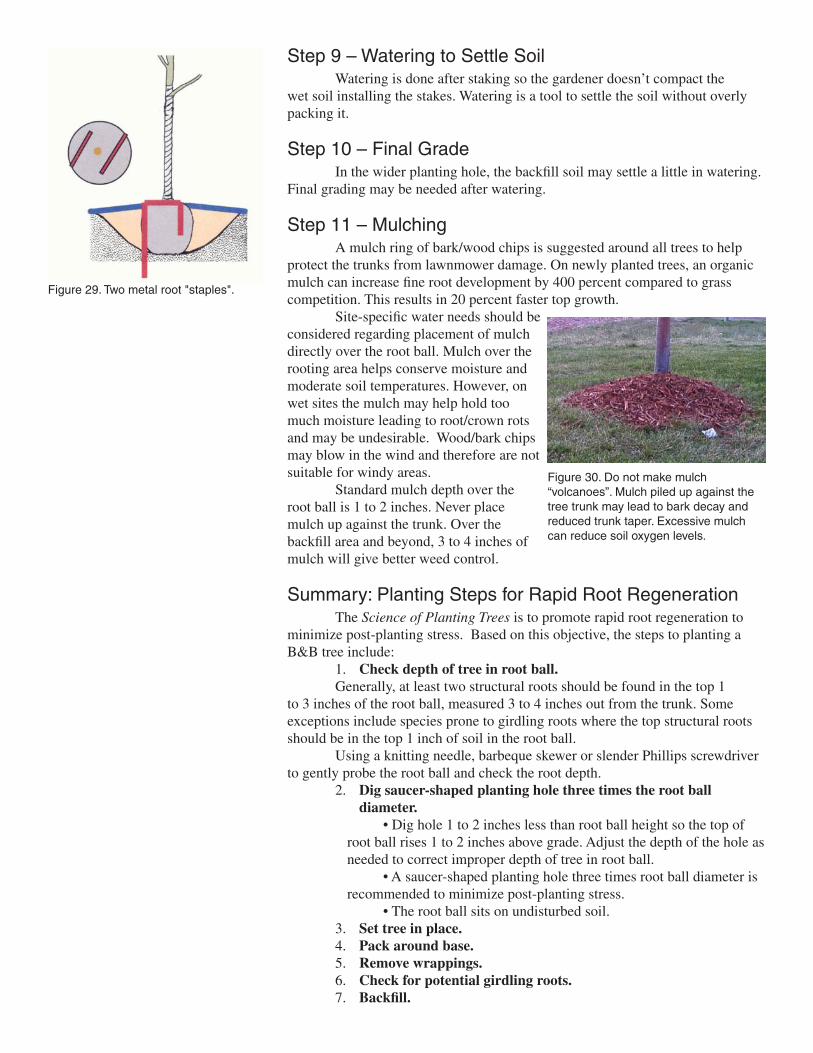
Site-specific water needs should be considered regarding placement of mulch directly over the root ball. Mulch over the rooting area helps conserve moisture and moderate soil temperatures. However, on wet sites the mulch may help hold too much moisture leading to root/crown rots and may be undesirable. Wood/bark chips may blow in the wind and therefore are not suitable for windy areas.
Standard mulch depth over the root ball is 1 to 2 inches. Never place mulch up against the trunk. Over the backfill area and beyond, 3 to 4 inches of mulch will give better weed control.
Summary: Planting Steps for Rapid Root RegenerationThe Science of Planting Trees is to promote rapid root regeneration to
minimize post-planting stress. Based on this objective, the steps to planting a B&B tree include:
1. Check depth of tree in root ball.Generally, at least two structural roots should be found in the top 1
to 3 inches of the root ball, measured 3 to 4 inches out from the trunk. Some exceptions include species prone to girdling roots where the top structural roots should be in the top 1 inch of soil in the root ball.
Using a knitting needle, barbeque skewer or slender Phillips screwdriver to gently probe the root ball and check the root depth.
2. Dig saucer-shaped planting hole three times the root ball diameter.
• Dig hole 1 to 2 inches less than root ball height so the top of root ball rises 1 to 2 inches above grade. Adjust the depth of the hole as needed to correct improper depth of tree in root ball.
• A saucer-shaped planting hole three times root ball diameter is recommended to minimize post-planting stress.
• The root ball sits on undisturbed soil.3. Set tree in place. 4. Pack around base.5. Remove wrappings. 6. Check for potential girdling roots.7. Backfill.
Figure 29. Two metal root "staples".
Figure 30. Do not make mulch “volcanoes”. Mulch piled up against the tree trunk may lead to bark decay and reduced trunk taper. Excessive mulch can reduce soil oxygen levels.
8. Stake/stabilization (if needed).9. Water.10. Final grade.11. Mulch.
Post-planting Care
WateringWhen roots are drought stressed, they mature rapidly, decreasing growth
and water/mineral absorption. • Mild drought stress (defined in a research study as 10 days or less)
slows root growth temporarily. Once water becomes available, it may take 1 to 5 weeks for growth to resume.
• Longterm water stress (defined in a research study as 22 days and longer) can reduce root growth for the current season and the following season!
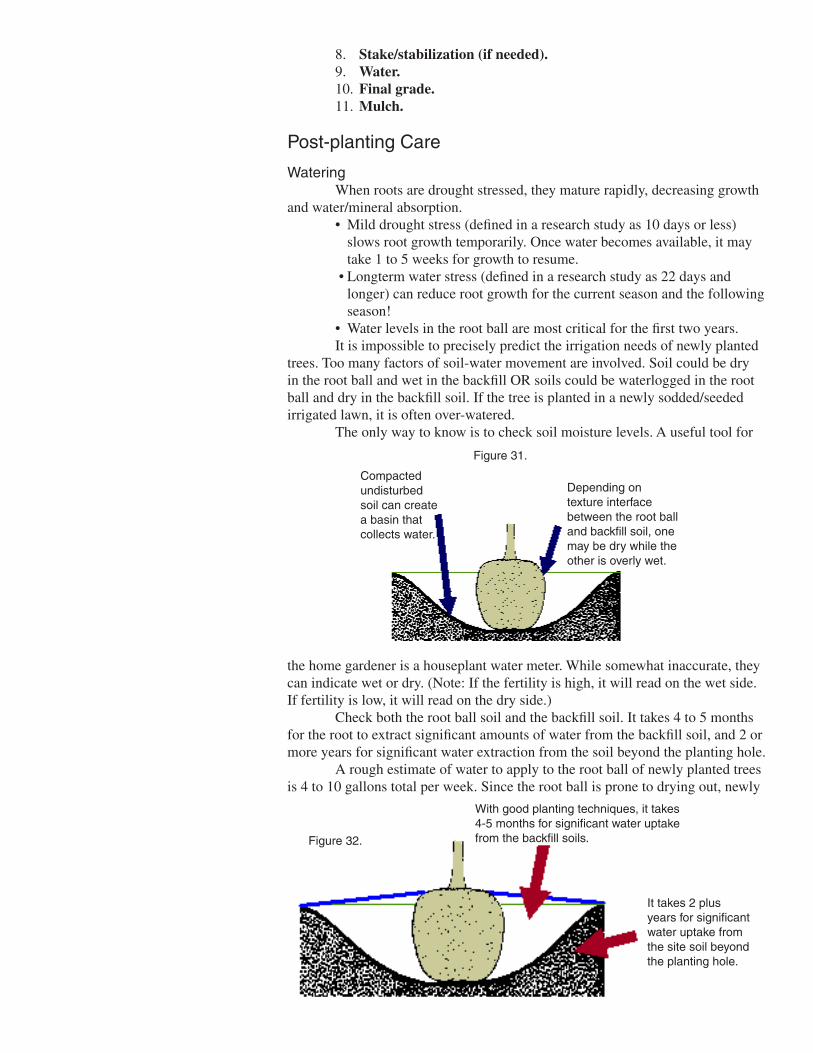
• Water levels in the root ball are most critical for the first two years. It is impossible to precisely predict the irrigation needs of newly planted
trees. Too many factors of soil-water movement are involved. Soil could be dry in the root ball and wet in the backfill OR soils could be waterlogged in the root ball and dry in the backfill soil. If the tree is planted in a newly sodded/seeded irrigated lawn, it is often over-watered.
The only way to know is to check soil moisture levels. A useful tool for
the home gardener is a houseplant water meter. While somewhat inaccurate, they can indicate wet or dry. (Note: If the fertility is high, it will read on the wet side. If fertility is low, it will read on the dry side.)
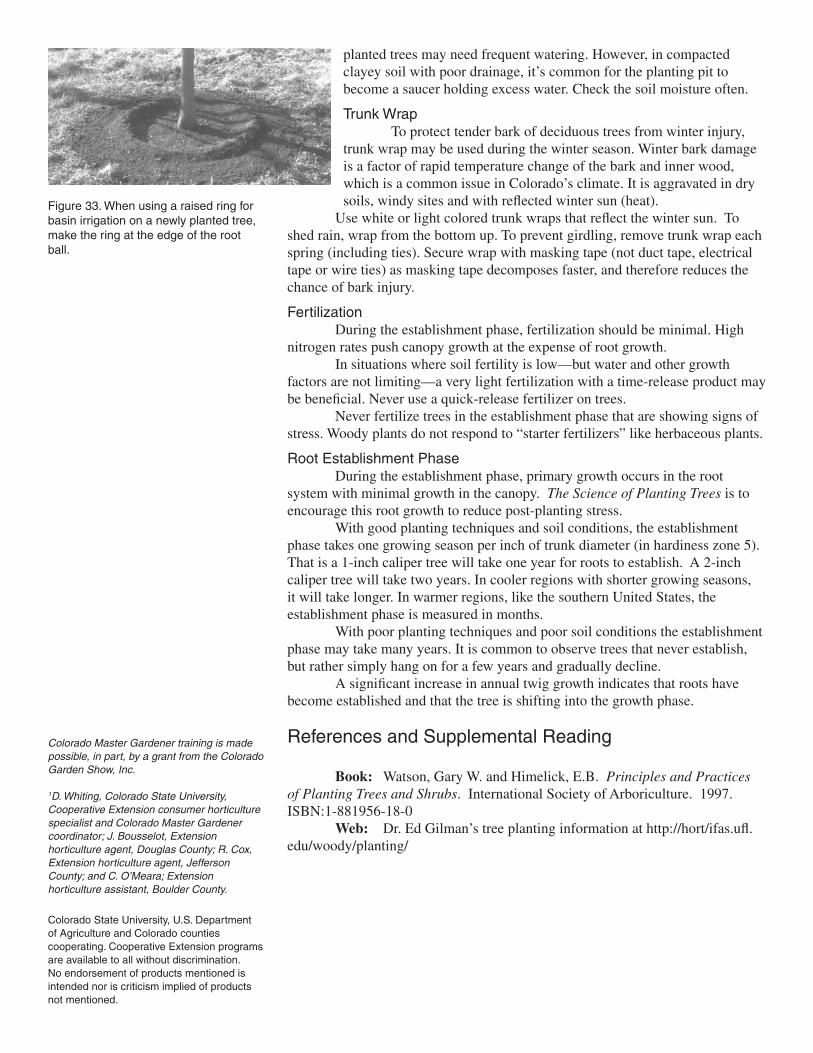
Check both the root ball soil and the backfill soil. It takes 4 to 5 months for the root to extract significant amounts of water from the backfill soil, and 2 or more years for significant water extraction from the soil beyond the planting hole.
A rough estimate of water to apply to the root ball of newly planted trees is 4 to 10 gallons total per week. Since the root ball is prone to drying out, newly
Compacted undisturbed soil can create a basin that collects water.
Depending on texture interface between the root ball and backfill soil, one may be dry while the other is overly wet.
Figure 31.
With good planting techniques, it takes 4-5 months for significant water uptake from the backfill soils.
It takes 2 plus years for significant water uptake from the site soil beyond the planting hole.
Figure 32.
planted trees may need frequent watering. However, in compacted clayey soil with poor drainage, it’s common for the planting pit to become a saucer holding excess water. Check the soil moisture often.
Trunk WrapTo protect tender bark of deciduous trees from winter injury,
trunk wrap may be used during the winter season. Winter bark damage is a factor of rapid temperature change of the bark and inner wood, which is a common issue in Colorado’s climate. It is aggravated in dry soils, windy sites and with reflected winter sun (heat).
Use white or light colored trunk wraps that reflect the winter sun. To shed rain, wrap from the bottom up. To prevent girdling, remove trunk wrap each spring (including ties). Secure wrap with masking tape (not duct tape, electrical tape or wire ties) as masking tape decomposes faster, and therefore reduces the chance of bark injury.
FertilizationDuring the establishment phase, fertilization should be minimal. High
nitrogen rates push canopy growth at the expense of root growth. In situations where soil fertility is low—but water and other growth
factors are not limiting—a very light fertilization with a time-release product may be beneficial. Never use a quick-release fertilizer on trees.
Never fertilize trees in the establishment phase that are showing signs of stress. Woody plants do not respond to “starter fertilizers” like herbaceous plants.
Root Establishment PhaseDuring the establishment phase, primary growth occurs in the root
system with minimal growth in the canopy. The Science of Planting Trees is to encourage this root growth to reduce post-planting stress.
With good planting techniques and soil conditions, the establishment phase takes one growing season per inch of trunk diameter (in hardiness zone 5). That is a 1-inch caliper tree will take one year for roots to establish. A 2-inch caliper tree will take two years. In cooler regions with shorter growing seasons, it will take longer. In warmer regions, like the southern United States, the establishment phase is measured in months.
With poor planting techniques and poor soil conditions the establishment phase may take many years. It is common to observe trees that never establish, but rather simply hang on for a few years and gradually decline.
A significant increase in annual twig growth indicates that roots have become established and that the tree is shifting into the growth phase.
References and Supplemental Reading
Book: Watson, Gary W. and Himelick, E.B. Principles and Practices of Planting Trees and Shrubs. International Society of Arboriculture. 1997. ISBN:1-881956-18-0
Web: Dr. Ed Gilman’s tree planting information at http://hort/ifas.ufl.edu/woody/planting/
Figure 33. When using a raised ring for basin irrigation on a newly planted tree, make the ring at the edge of the root ball.
Colorado State University, U.S. Department of Agriculture and Colorado counties cooperating. Cooperative Extension programs are available to all without discrimination. No endorsement of products mentioned is intended nor is criticism implied of products not mentioned.
Colorado Master Gardener training is made possible, in part, by a grant from the Colorado Garden Show, Inc.
1D. Whiting, Colorado State University, Cooperative Extension consumer horticulture specialist and Colorado Master Gardener coordinator; J. Bousselot, Extension horticulture agent, Douglas County; R. Cox, Extension horticulture agent, Jefferson County; and C. O’Meara; Extension horticulture assistant, Boulder County.


