Embed Size (px)
Citation preview

Developing a simple application using steps "User Decision" and "Mail"
Basic terminology used in the workflow:
The workflow definition is the set of rules that determine the path that the process takes. For example, how a purchase requisition is processed, from the initial request to the creation of the purchase order

A Workflow Instance, which is often simply referred to as the workflow, is a single workflow run. For example, the processing of a single purchase requisition for computers.
The Tasks are the steps in the process, which have to be performed either by people or automatically by the software. For example, to check for the availability of the spare computers in the company.
A Work item is the task instance that is performed as a single workflow step. For example, check that there are no spare computers available in the company.
Agents are the people who process the tasks (via the work items). For example, requisitioner and a member of the purchasing department.
Container is the place where all the data used in the workflow is collected.
Binding is the set of rules that define which data is passed to which part of the process.
Building a simple workflow application
The central tool for creating, displaying and processing a workflow is the workflow builder (Transaction SWDD). Within the workflow builder you can create all components of a workflow, including all the containers you need for getting the data from one step to another.
Generally, most of the workflows are started by an event (for example, when a material is created or when a new purchase requisition arrives). You define which data from this event needs to be passed to the workflow via binding.
However you can also start any workflow directly. Let us create a simple workflow and start the workflow directly, using the testing tools.
Call transaction SWDD. When the workflow builder is called for the first time, a newly created initial workflow definition appears or else last created workflow appears. In such cases you can opt to create a new workflow by pressing “Create New Workflow”(ctrl + shft + F5). The following screen appears.

The initial workflow screen has the following parts:
a. The start of the workflow definition, indicated by .
b. The end of the workflow definition, indicated by .
c. The area in which you insert the new workflow definition is indicated by .
Now select the undefined step and select Create step or double click the undefined step. Now among the different steps chose the User Decision by double clicking on it.

Now enter the title for the user decision “ Please make a decision”. Also enter the decision texts as Approve and Reject. On pressing enter, the outcome values default to the Decision texts but you can specify your own names, if desired. Now we need to select the agent. Agent is the person to whom the work item needs to be sent.. Since this is just a beginning, we would hardcode the user name. Select the User from the drop down list and enter the user name to whom the work item needs to be sent. In general, this type of agent assignment is not done. Agents are generally assigned using the expression, agent assignment rule or organization object (job, position etc.).

Now select Transfer and to graphic button. Following screen appears:

Now we need to include a mail step to be sent to the requestor. Now select the line “Approve” and do a right click. Different options on shown on the context menu. Select Create.
Now select the step “Send Mail” from the list.

Now enter the subject and the body of the message for the mail to be sent.
Do not change the recipients. Our mail is intended for the persons who triggered this workflow. &_WF_INITIATOR& contains the value who executed the workflow. Since this is a test object, we are using &_WF_INITIATOR&. But we wouldn’t be using this variable in real time scenarios. We would discuss about this in the coming documents.
Now select Transfer and to graphic button.
A popup appears requesting for the abbreviation and the name for this task. Enter the same and press enter.

Now enter the package as local object and press enter.
Follow the steps 5 through 9 for the step “Reject”. The following screen appears:
Press SAVE to save the workflow application. You need to enter an abbreviation and name for your workflow as shown below. You can change any of these at any later point. After saving, a number is assigned to your workflow starting with WS, as shown below.

To execute the workflow, activate it by choosing the activate button.
Test the workflow by choosing Test. The following screen appears.
Now choose Execute to start the workflow.
Now the recipient would receive a work item in his SAP® inbox (Transaction SBWP).

Now execute the work item by pressing “Execute”. The following screen appears:

Choose one among Approve or Reject as part of the user decision. He can select the third option to retain the work item in his inbox and make the decision later. Now suppose that the recipient has chosen one of the first options. Now a mail would be sent to the requestor with the status of his request.
Including custom text in the step "User Decision"Whenever we create a step “User Decision” provide with our own options like approve or reject, the work item would appear as follows:

As marked in green in the above screenshot, the description available in the work item is a default one provided by SAP. In case we need to add our own text, do the following:
1. Identify the task being used in the step “User Decision”.
In the step “User Decision”, click on the tab “Control”:
In the tab “Control”, the standard task that is being used is displayed. In this case, the standard task that is being used is “TS00008267”.

2. Go to transaction PFTC_COP to copy the standard task. Select “Standard task” in the task type and enter the task number (without the prefix “TS”) in the “Task”.
Click on “Copy task”.
3. Enter the abbreviation and the name as required.
Click on “Copy Task”.
4. Enter the package name as required.

5. A new task would be created. Please note the task number that is created now.
6. To change the task description, you can use the transaction PFTC.
7. Now go back to workflow definition, transaction SWDD.
8. Click on “User decision” and then click on the tab “Control”.
9. Here replace the standard task number with the custom task created above.
10. Do the agent assignment and generate the same.
It is always advisable not to change any of the standard texts. The change would reflect in all the workflow definitions the task is being used.
Sending multiple attachment in user decision step of workflow
By Lokesh Tripathi, Infosys
Business Requirement
This document describes how to send multiple attachments in the user decision step of the workflow.User can see multiple attachments and based on that take the necessary required decision.
This method would be helpful in business processes where user wants to introduce approval step before processing or accepting any finance report or other document.
Functional Specification
User will execute the custom report/transaction that will trigger the workflow (we can associate starting event also to this workflow).Workflow will send mail having multiple attachments to SAP Inbox as a user decision.Based on user decision rest logic would happen.
Workflow Flow Diagram Technical Specification
For adding attachments in the user decision steps method EVENT_RAISED of interface IF_SWF_IFS_WORKITEM_EXIT needs to be implemented and it is used as a Function Exit in the user decision step.

Go to SE24, implement method EVENT_RAISED of interface IF_SWF_IFS_WORKITEM_EXITZTEST_WFATTACH is created for the same.
In this method code for inserting attachments needs to be implemented (Please use below code for the same)First check whether workflow container already have any attachments or not to avoid any duplications.
* Fetch the workflow work item IdCALL METHOD IM_WORKITEM_CONTEXT->GET_WORKITEM_ID RECEIVING RE_WORKITEM = LV_ID.
* Fetch ContainerCALL METHOD IM_WORKITEM_CONTEXT->GET_WI_CONTAINER RECEIVING RE_CONTAINER = LV_CONTAINER.* Read attachment to confirm that there is no duplicationCLEAR LV_OBJ_RECORD.CALL METHOD LV_CONTAINER->GET EXPORTING NAME = '_ATTACH_OBJECTS' IMPORTING VALUE = LV_ATTACH.IF LV_ATTACH IS INITIAL.
If there are no prior attachments then identify the folder id based on sy-user
CALL FUNCTION 'SO_FOLDER_ROOT_ID_GET' EXPORTING OWNER = SY-UNAME REGION = 'B'
IMPORTING FOLDER_ID = LV_FOLDER_ID.
In this scenario we are converting spool output to PDF and attaching the same PDF in the user decision step
Give spool number in LV_SPOOL field
CALL FUNCTION 'CONVERT_ABAPSPOOLJOB_2_PDF' EXPORTING SRC_SPOOLID = LV_SPOOL NO_DIALOG = '' PDF_DESTINATION = 'X' IMPORTING PDF_BYTECOUNT = LA_BYTE_COUNT TABLES PDF = GT_PDF EXCEPTIONS ERR_NO_ABAP_SPOOLJOB = 1 ERR_NO_SPOOLJOB = 2 ERR_NO_PERMISSION = 3 ERR_CONV_NOT_POSSIBLE = 4 ERR_BAD_DESTDEVICE = 5 USER_CANCELLED = 6 ERR_SPOOLERROR = 7 ERR_TEMSEERROR = 8 ERR_BTCJOB_OPEN_FAILED = 9 ERR_BTCJOB_SUBMIT_FAILED = 10 ERR_BTCJOB_CLOSE_FAILED = 11 OTHERS = 12.
LOOP AT GT_PDF INTO LWA_PDFLINE. ASSIGN LWA_PDFLINE TO <L_XLINE> CASTING. CONCATENATE PDF_XSTRING <L_XLINE> INTO PDF_XSTRING IN BYTE MODE.ENDLOOP.
* Create and set documentIT_SOLIX_TAB1 = CL_DOCUMENT_BCS=>XSTRING_TO_SOLIX (PDF_XSTRING).
Creating First attachment
LV_DATA-OBJ_NAME = 'Test Sending Attachments'. LV_DATA-OBJ_DESCR = 'Attachment 1'. LV_DATA-OBJ_LANGU = SY-LANGU. LV_DATA-SENSITIVTY = 'P'. LV_DATA-DOC_SIZE = LA_BYTE_COUNT.
CALL FUNCTION 'SO_DOCUMENT_INSERT_API1' EXPORTING FOLDER_ID = LV_FOLDER_ID DOCUMENT_DATA = LV_DATA DOCUMENT_TYPE = 'PDF' IMPORTING DOCUMENT_INFO = WA_DOCUMENT_INFO

TABLES CONTENTS_HEX = IT_SOLIX_TAB1 EXCEPTIONS FOLDER_NOT_EXIST = 1 DOCUMENT_TYPE_NOT_EXIST = 2 OPERATION_NO_AUTHORIZATION = 3 PARAMETER_ERROR = 4 X_ERROR = 5 ENQUEUE_ERROR = 6 OTHERS = 7.* Populate object type and object key for create an instanceLV_OBJTYPE = 'SOFM'.LV_OBJKEY = WA_DOCUMENT_INFO-DOC_ID.
Creating SOFM object
CALL FUNCTION 'SWO_CREATE' EXPORTING OBJTYPE = LV_OBJTYPE OBJKEY = LV_OBJKEY IMPORTING OBJECT = LV_SOFM RETURN = LV_RETURN EXCEPTIONS NO_REMOTE_OBJECTS = 1 OTHERS = 2.
* Prepare for attaching the object to containerLV_OBJJECT-HEADER = 'OBJH'.LV_OBJECT-TYPE = 'SWO'.LV_OBJECT-HANDLE = LV_SOFM.APPEND LV_OBJECT to TB_OBJ.
Similarly prepare other attachments and append their details to tb_obj internal table.Finally send the attachment details in the task container
CALL METHOD LV_TAKS_CONTAINER->SET EXPORTING NAME = '_ATTACH_OBJECTS' VALUE = TB_OBJ[].
* Commit the changesCALL METHOD IM_WORKITEM_CONTEXT->DO_COMMIT_WORK.
Now create the workflow in SWDD and in the user decision step give class ZTEST_WFATTACH as a program exit.
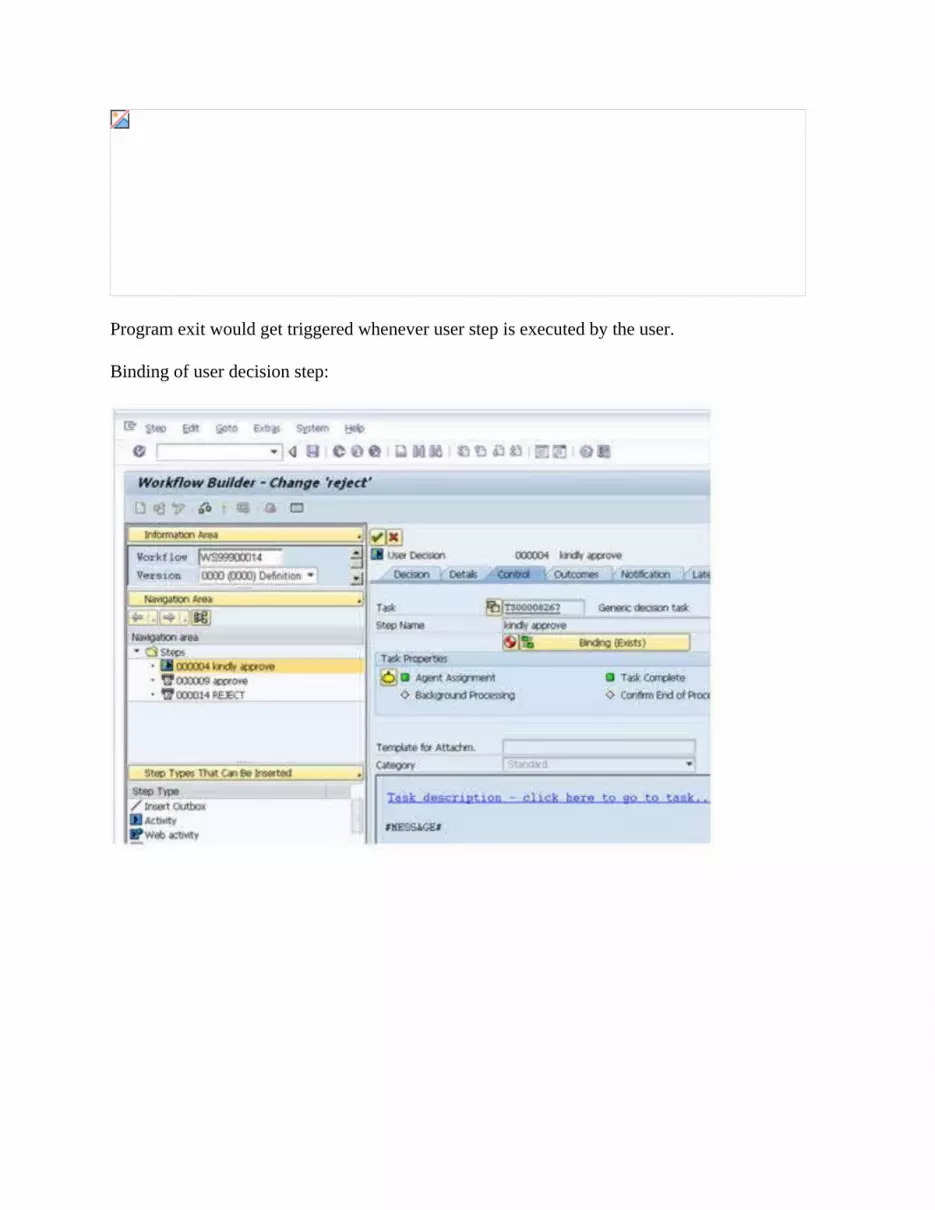
Program exit would get triggered whenever user step is executed by the user.
Binding of user decision step:

Execution:
Once workflow is created you can associate with any event or you can directly execute it to check the result.
After reviewing the document user can take the necessary decision.


