Embed Size (px)
Citation preview
National Aeronautics and Space Administration
OH, WHAT A PANE!
��
�
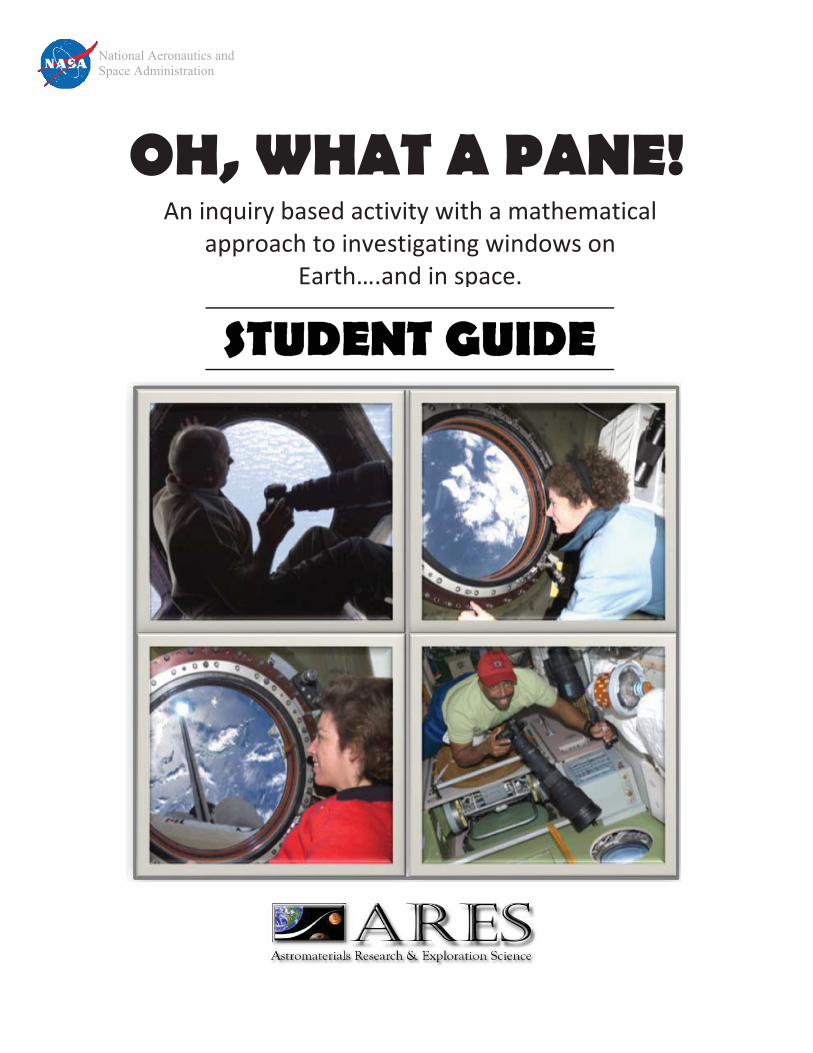
An�inquiry�based�activity�with�a�mathematical�approach�to�investigating�windows�on�
Earth….and�in�space.
National Aeronautics and Space Administration
OH, WHAT A PANE! Written�and�Developed�for�the�Expedition�Earth�and�Beyond�Education�Program�
Astromaterials�Research�and�Exploration�Science�(ARES)�Directorate�ARES�Education�Program,�NASA�Johnson�Space�Center�JACOBS���Engineering�Science�Contract�Group�(ESCG)��
Written�by:�
Marshalyn�Baker,�Classroom�Teacher���Michele�Mailhot,�Mathematics�Education�Specialist�
Paige�Valderrama�Graff,�ARES�Science�Education�Specialist��
Edited�by�the�following�educators,�scientists,�and�staff�within�the��Astromaterials�Research�and�Exploration�Science�(ARES)�Directorate��
at�the�NASA�Johnson�Space�Center:��
Trevor�Graff,�Planetary�Scientist�Patricia�Huynh,�Administrative�Specialist�
Charles�Lindgren,�Classroom�Teacher�Timothy�McCollum,�Classroom�Teacher�
Susan�Runco,�Physical�Scientist�William�Stefanov,�Senior�Geoscientist�
Kim�Willis,�Principal�Geoscientist�
Front�Cover�Images�courtesy�of�NASA���
©�2010�Astromaterials�Research�and�Exploration�Science�(ARES)�Education�Program.���All�rights�reserved.��This�document�may�be�freely�distributed�for�non�commercial�use�only.
National Aeronautics and Space Administration
Expedition�Earth�and�Beyond:��Astromaterials�Research�and�Exploration�Science�(ARES)�Education�–�Version�1.0�NASA�Johnson�Space�Center�
OH, WHAT A PANE! 5�E�Activity�–�Teacher’s�Guide�
�Goal:� Students�will�use�mathematics�to�investigate�windows�and�astronaut�photographs.��Objectives:��Students�will:�
� Identify�shapes�of�windows�and�their�functions.�� Investigate�and�calculate�area,�cost,�and�cost�analysis�for�various�window�shapes.�� Analyze�data�from�NASA�astronaut�photography.�� Interpret�lens�size�and�area�of�coverage�information.�� Mathematically�describe�astronaut�photographs.�
�Grade�Level:� 5� –� 10� (Unit� begins� at� a� fifth� grade� level� and� the� mathematics� becomes� progressively�more�difficult�ending�at�the�tenth�grade�level.)��Time�Requirements:� Unit�does�not�have�to�be�completed�all�at�once.�Teachers�can�be�flexible�with�the�time�and�use�of�the�unit.��Estimated�total�time�of�entire�unit:�3�–�4�hours.��Materials:� �
� Student�Guide�Booklet�� Pattern�Blocks�or�Tangrams�� Oh,�What�A�Vision!�handout�� Oh,�What�A�Cupola!�handout�(optional�extension)�
�National�Mathematics�Standards�(NCTM)�Addressed:�Number�and�Operations:��
� Understand�numbers,�ways�of�representing�numbers,�and�relationships�among�numbers.�� Compute�fluently.�
Geometry:�� Analyze�characteristics�and�properties�of�two��and�three�dimensional�geometric�shapes.�� Use�visualization,�spatial�reasoning,�and�geometric�modeling�to�solve�problems.�
Measurement:�� Apply�appropriate�techniques,�tools,�and�formulas�to�determine�measurements.�
Data�Analysis:�� Formulate�questions�that�can�be�addressed�with�data�and�collect,�organize,�and�display�relevant�
data�to�answer�them.�� Develop�and�evaluate�inferences�and�predictions�that�are�based�on�data.�
Connections:�� Recognize�and�apply�mathematics�in�contexts�outside�of�mathematics.�
�
National Aeronautics and Space Administration
Expedition�Earth�and�Beyond:��Astromaterials�Research�and�Exploration�Science�(ARES)�Education�–�Version�1.0�NASA�Johnson�Space�Center�
Common�Core�State�Mathematics�Standards�(CCSS)�Addressed:�Grade�5�Number�and�Operations�in�Base�Ten�
� Perform�operations�with�multi�digit�whole�numbers�and�with�decimals�to�hundredths.�Measurement�and�Data�
� Convert�like�measurement�units�within�a�given�measurement�system.�Geometry�
� Classify�two�dimensional�figures�into�categories�based�on�their�properties.��
Grade�6� �The�Number�System�
� Compute�fluently�with�multi�digit�numbers.�Geometry�
� Solve�real�world�and�mathematical�problems�involving�area,�surface�area,�and�volume.��
Grade�7�The�Number�System�
� Apply�and�extend�previous�understandings�of�operations�with�fractions�to�add,�subtract,�multiply,�and�divide�rational�numbers.�
Geometry�� Solve�real�life�and�mathematical�problems�involving�angle�measure,�area,�surface�area,�and�
volume.��
Grade�8�The�Number�System�
� Know�that�there�are�numbers�that�are�not�rational,�and�approximate�them�by�rational�numbers.�Geometry�
� Understand�and�apply�the�Pythagorean�Theorem.��
High�School�Geometry�
� Make�geometric�constructions.�� Apply�geometric�concepts�in�modeling�situations.�
Statistics�and�Probability�� Making�inferences�and�justifying�conclusions.���
�Useful�Websites�for�Additional�Background�Knowledge:���
� NASA�Gateway�to�Astronaut�Photography�homepage:��http://eol.jsc.nasa.gov���� NASA� Earth� Observatory� webpage� with� featured� articles,� images,� news,� and� global� maps� of�
Earth:��http://earthobservatory.nasa.gov/�� NASA�ARES�Expedition�Earth�and�Beyond�webpage:�
http://ares.jsc.nasa.gov/ares/eeab/index.cfm�� The�Art�Glass�Association:��http://www.thestorefinder.com/glass/library/history.html�
National Aeronautics and Space Administration
Expedition�Earth�and�Beyond:��Astromaterials�Research�and�Exploration�Science�(ARES)�Education�–�Version�1.0�NASA�Johnson�Space�Center�
� Focal�Length�Information:��http://www.photoaxe.com/understanding�the�lens�focal�length�and�aperture�
�References,�Resources�and�Acknowledgements:��
� Runco,�M.,�Eppler,�D.,�Scott,�K.P.,�and�Runco,�S.�Earth�Science�and�Remote�Sensing�Capabilities�of� the� International� Space� Station:� The� Destiny� Module� Science� Window� and� the� Window�Observational�Research�Facility.�
� Elm�City�Photo,�Waterville,�Maine�� Hammond�Lumber�Company,�Belgrade,�Maine�
�Printing� Alternative:� � As� your� resources� permit,� you� can� download� the� pdf� of� the� Student� Guide� on�your�student�computers�and�have�students�fill�in�answers�to�questions,�save�their�work,�and�continue�each�day�without�printing�anything.� �You�will�need�to�have�a�program/software�that�will�enable�this.��One�recommendation�is�FoxIt�Reader.��FoxIt�Reader�allows�you�to�open�pdfs,�type�in�answers,�and�save�your� work.� � It� is� a� free� download� available� at� http://www.foxitsoftware.com/pdf/reader.� � You� may�want�to�check�to�make�sure�documents�save�correctly�before�students�finish�their�work.��Adobe�reader�will� not� save� typed� in�work.� � Other� alternatives� may� be�available.� � For� sketches,� you� might� ask� your�students� to�hand�draw�those�on�a� separate�piece�of�paper�or� they�can�draw�them�on� the�computer�using�“Paint”�and�insert�their�sketch�into�the�document.����Adaptations,�Extensions,�and�Enrichment:�Oh,�What�Do�You�See?�
� If�there�is�not�a�lot�of�variety�in�windows�in�your�locale,�bring�in�pictures�from�magazines.��You�could�also�use�the�Internet�to�find�pictures�to�have�available.�
� Traditionally� windows� in� the� US� are� sold� in� customary� units.� � You� might� want� to� rework� the�initial�part�of�this�activity�with�dimensions�for�the�windows�being�given�in�metric�units.�
�Oh,�But�the�Cost!�
� Explore�the�costs�of�windows�in�your�community.��Visit�a�local�business�and�compare�the�prices�of�windows.��If�you�don't�have�that�opportunity,�you�can�explore�pricing�on�line.�
� Students�can�create�paper/tissue�paper�stained�glass�windows.��Have�them�find�the�area�of�each�color.�
� Assign�a�cost�per�square�unit,�and�have�students�calculate�the�cost�of�each�color.��Oh,�What�a�View!�
� Visit� the� Gateway� to� Astronaut� Photography� of� Earth� website� (http://eol.jsc.nasa.gov).� � Have�students�explore�the�website�and�discuss�ways�in�which�mathematical�information�is�used.�
� Have� students� conduct� a� mathematical� investigation� using� astronaut� photographs.� � As� part� of�the�Expedition�Earth�and�Beyond�program,�students�can�conduct�an�investigation�and�request�a�new�astronaut�photograph�as�part�of� their� investigation.� �For�more� information�check�out� the�Expedition�Earth�and�Beyond�website�(http://ares.jsc.nasa.gov/ares/eeab/index.cfm)�
�Oh,�What�a�Cupola!�–�OPTIONAL�ACTIVITY�INCLUDED�AT�THE�END�OF�THE�TEACHER�GUIDE�
� Using�Google�Earth,�create�a�model�of�the�Cupola.��
National Aeronautics and Space Administration
Expedition�Earth�and�Beyond:��Astromaterials�Research�and�Exploration�Science�(ARES)�Education�–�Version�1.0�NASA�Johnson�Space�Center�
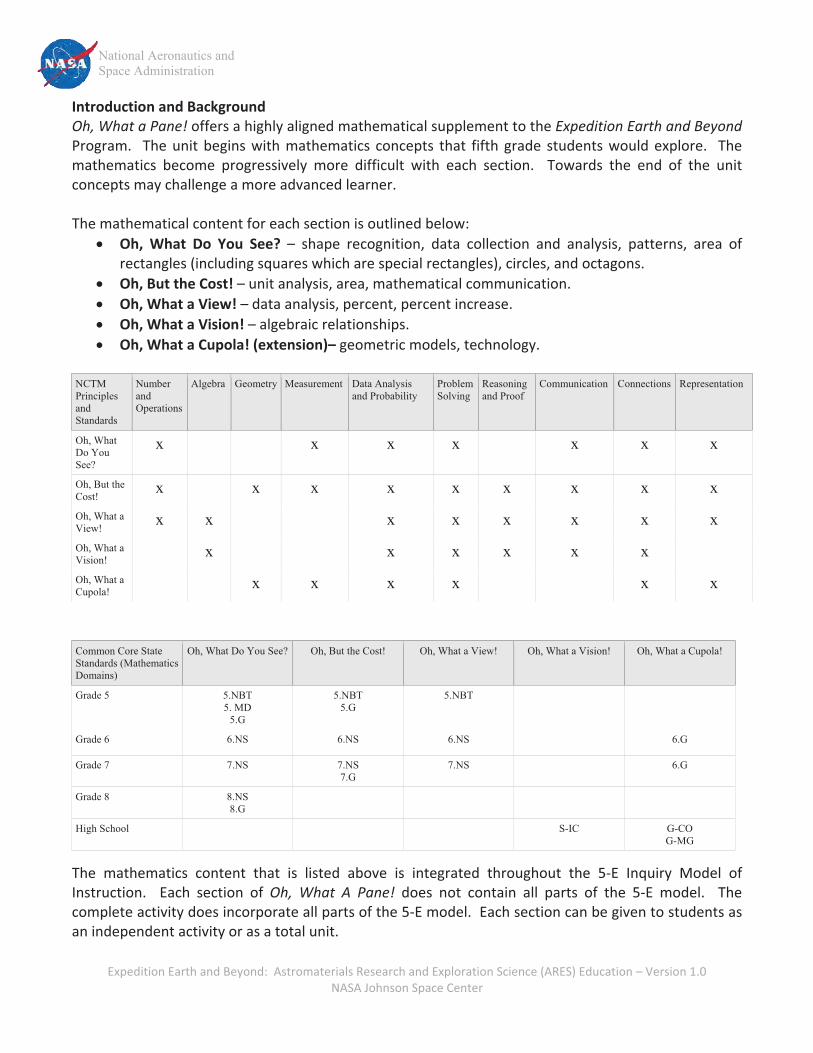
Introduction�and�Background�Oh,�What�a�Pane!�offers�a�highly�aligned�mathematical�supplement�to�the�Expedition�Earth�and�Beyond�Program.� � The� unit� begins� with� mathematics� concepts� that� fifth� grade� students� would� explore.� � The�mathematics� become� progressively� more� difficult� with� each� section.� � Towards� the� end� of� the� unit�concepts�may�challenge�a�more�advanced�learner.��The�mathematical�content�for�each�section�is�outlined�below:�
� Oh,� What� Do� You� See?� –� shape� recognition,� data� collection� and� analysis,� patterns,� area� of�rectangles�(including�squares�which�are�special�rectangles),�circles,�and�octagons.�
� Oh,�But�the�Cost!�–�unit�analysis,�area,�mathematical�communication.�� Oh,�What�a�View!�–�data�analysis,�percent,�percent�increase.�� Oh,�What�a�Vision!�–�algebraic�relationships.�� Oh,�What�a�Cupola!�(extension)–�geometric�models,�technology.�
�NCTM PrinciplesandStandards
Number andOperations
Algebra Geometry Measurement Data Analysis and Probability
Problem Solving
Reasoningand Proof
Communication Connections Representation
Oh, What Do You See?
x x x x x x x
Oh, But the Cost!
x x x x x x x x x
Oh, What a View!
x x x x x x x x
Oh, What a Vision!
x x x x x x
Oh, What a Cupola!
x x x x x x
��Common Core State Standards (Mathematics Domains)
Oh, What Do You See? Oh, But the Cost! Oh, What a View! Oh, What a Vision! Oh, What a Cupola!
Grade 5 5.NBT 5. MD
5.G
5.NBT 5.G
5.NBT
Grade 6 6.NS 6.NS 6.NS 6.G
Grade 7 7.NS 7.NS7.G
7.NS 6.G
Grade 8 8.NS8.G
High School S-IC G-CO G-MG
The� mathematics� content� that� is� listed� above� is� integrated� throughout� the� 5�E� Inquiry� Model� of�Instruction.� � Each� section� of�Oh,� What� A� Pane!� does� not� contain� all� parts� of� the� 5�E� model.� � The�complete�activity�does�incorporate�all�parts�of�the�5�E�model.��Each�section�can�be�given�to�students�as�an�independent�activity�or�as�a�total�unit.�
National Aeronautics and Space Administration
Expedition�Earth�and�Beyond:��Astromaterials�Research�and�Exploration�Science�(ARES)�Education�–�Version�1.0�NASA�Johnson�Space�Center�
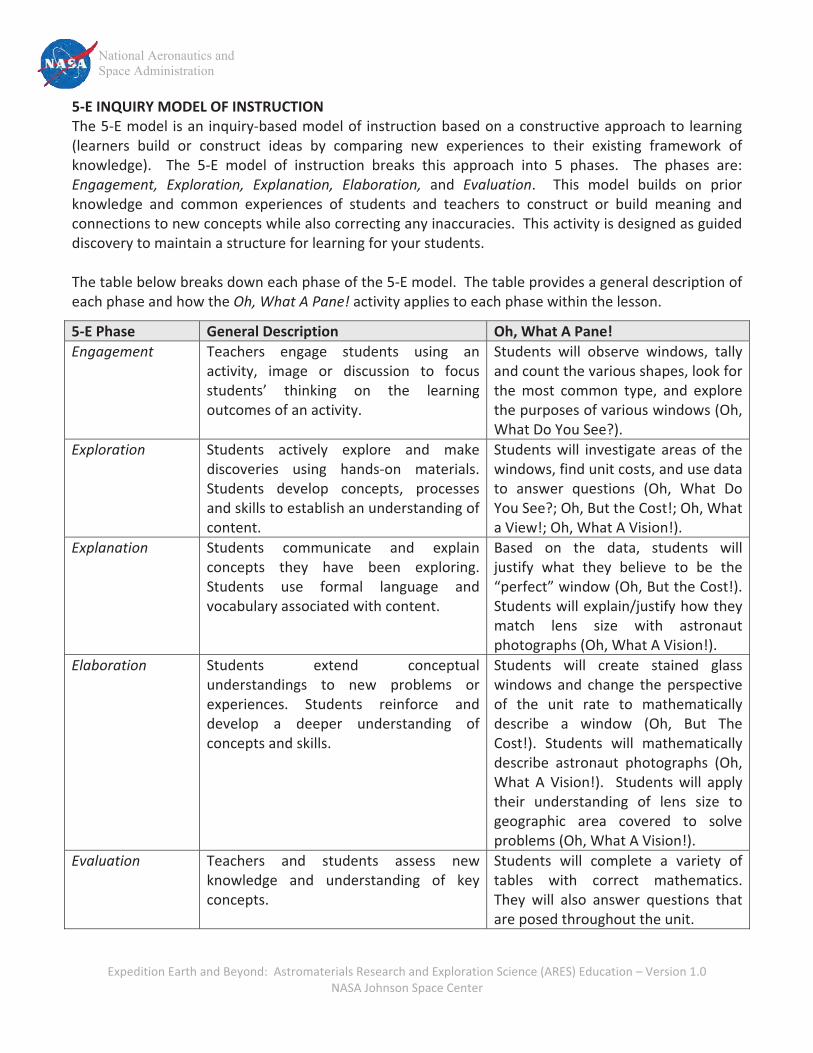
5�E�INQUIRY�MODEL�OF�INSTRUCTION��The�5�E�model� is�an�inquiry�based�model�of� instruction�based�on�a�constructive�approach�to�learning�(learners� build� or� construct� ideas� by� comparing� new� experiences� to� their� existing� framework� of�knowledge).� � The� 5�E� model� of� instruction� breaks� this� approach� into� 5� phases.� � The� phases� are:�Engagement,� Exploration,� Explanation,� Elaboration,� and� Evaluation.� � This� model� builds� on� prior�knowledge� and� common� experiences� of� students� and� teachers� to� construct� or� build� meaning� and�connections�to�new�concepts�while�also�correcting�any�inaccuracies.��This�activity�is�designed�as�guided�discovery�to�maintain�a�structure�for�learning�for�your�students.���The�table�below�breaks�down�each�phase�of�the�5�E�model.��The�table�provides�a�general�description�of�each�phase�and�how�the�Oh,�What�A�Pane!�activity�applies�to�each�phase�within�the�lesson.��
5�E�Phase� General�Description�� Oh,�What�A�Pane!�Engagement� Teachers� engage� students� using� an�
activity,� image� or� discussion� to� focus�students’� thinking� on� the� learning�outcomes�of�an�activity.�
Students� will� observe� windows,� tally�and�count�the�various�shapes,�look�for�the� most� common� type,� and� explore�the�purposes�of�various�windows�(Oh,�What�Do�You�See?).�
Exploration� Students� actively� explore� and� make�discoveries� using� hands�on� materials.��Students� develop� concepts,� processes�and�skills�to�establish�an�understanding�of�content.�
Students� will� investigate� areas� of� the�windows,�find�unit�costs,�and�use�data�to� answer� questions� (Oh,� What� Do�You�See?;�Oh,�But�the�Cost!;�Oh,�What�a�View!;�Oh,�What�A�Vision!).�
Explanation� Students� communicate� and� explain�concepts� they� have� been� exploring.�Students� use� formal� language� and�vocabulary�associated�with�content.�
Based� on� the� data,� students� will�justify� what� they� believe� to� be� the�“perfect”�window�(Oh,�But�the�Cost!).�Students�will�explain/justify�how�they�match� lens� size� with� astronaut�photographs�(Oh,�What�A�Vision!).�
Elaboration� Students� extend� conceptual�understandings� to� new� problems� or�experiences.� Students� reinforce� and�develop� a� deeper� understanding� of�concepts�and�skills.�
Students� will� create� stained� glass�windows� and� change� the� perspective�of� the� unit� rate� to� mathematically�describe� a� window� (Oh,� But� The�Cost!).� Students� will� mathematically�describe� astronaut� photographs� (Oh,�What� A� Vision!).� � Students� will� apply�their� understanding� of� lens� size� to�geographic� area� covered� to� solve�problems�(Oh,�What�A�Vision!).��
Evaluation� Teachers� and� students� assess� new�knowledge� and� understanding� of� key�concepts.�
Students� will� complete� a� variety� of�tables� with� correct� mathematics.�They� will� also� answer� questions� that�are�posed�throughout�the�unit.�
�
National Aeronautics and Space Administration
Expedition�Earth�and�Beyond:��Astromaterials�Research�and�Exploration�Science�(ARES)�Education�–�Version�1.0�NASA�Johnson�Space�Center�
ACTIVITY�PROCEDURE�This� activity� procedure� is� provided� as� a� suggested� guide� for� the� Oh,� What� A� Pane!� activity.� This�procedure� includes� sample� answers� and� thumbnails� of� student� pages� for� each� section� for� your�reference. The�Student�Guide�is�set�up�to�allow�a�student(s)�to�work�independently�through�the�unit.��You� may� decide� to� use� the� activity� as� a� whole� class� activity,� providing� a� myriad� of� discussion�opportunities.� � You� may� have� students� work� in� pairs,� small� groups,� or� independently.� � Alternatively,�you�may�consider�using�the�activity�as�enrichment.��Based�on�your�student�needs,�feel�free�to�provide�additional� instruction� on� finding� the� area� of� various� shapes,� additional� work� with� unit� cost� and� unit�analysis,�or�other�mathematical�topics�presented�in�the�unit.��As� students� work� through� the� activity,� the� first� 2� sections� (Oh,�What�Do� You� See?� and�Oh,� But� The�Cost!),�students�will�explore�windows�and�determine�the�“perfect”�window.��As�the�activity�progresses,�students� will� make� continual� connections� between� mathematics,� windows,� and� astronaut�photographs.���
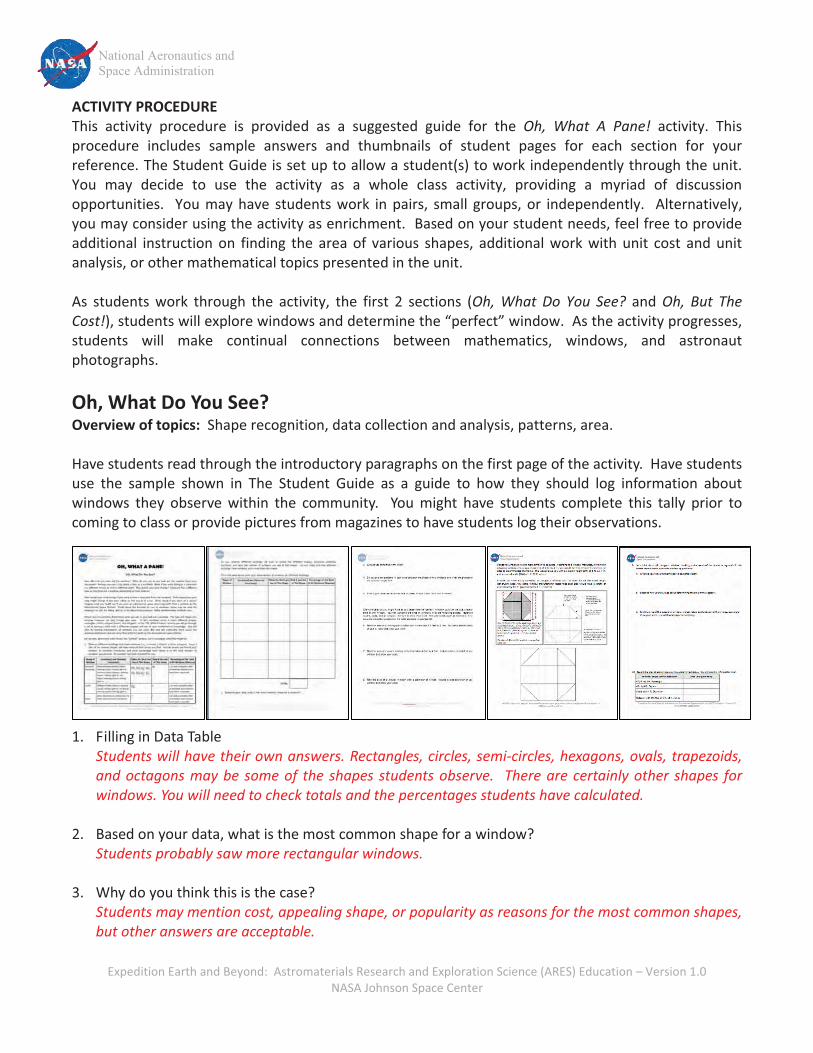
Oh,�What�Do�You�See?�Overview�of�topics:��Shape�recognition,�data�collection�and�analysis,�patterns,�area.��Have�students�read�through�the�introductory�paragraphs�on�the�first�page�of�the�activity.��Have�students�use� the� sample� shown� in� The� Student� Guide� as� a� guide� to� how� they� should� log� information� about�windows� they� observe� within� the� community.� � You� might� have� students� complete� this� tally� prior� to�coming�to�class�or�provide�pictures�from�magazines�to�have�students�log�their�observations.������������
�1. Filling�in�Data�Table�
Students�will�have�their�own�answers.�Rectangles,�circles,�semi�circles,�hexagons,�ovals,�trapezoids,�and�octagons�may�be�some�of� the�shapes�students�observe.� �There�are�certainly�other�shapes� for�windows.�You�will�need�to�check�totals�and�the�percentages�students�have�calculated.�
�2. Based�on�your�data,�what�is�the�most�common�shape�for�a�window?���
Students�probably�saw�more�rectangular�windows.���
3. Why�do�you�think�this�is�the�case?�Students�may�mention�cost,�appealing�shape,�or�popularity�as�reasons�for�the�most�common�shapes,�but�other�answers�are�acceptable.��
National Aeronautics and Space Administration
Expedition�Earth�and�Beyond:��Astromaterials�Research�and�Exploration�Science�(ARES)�Education�–�Version�1.0�NASA�Johnson�Space�Center�
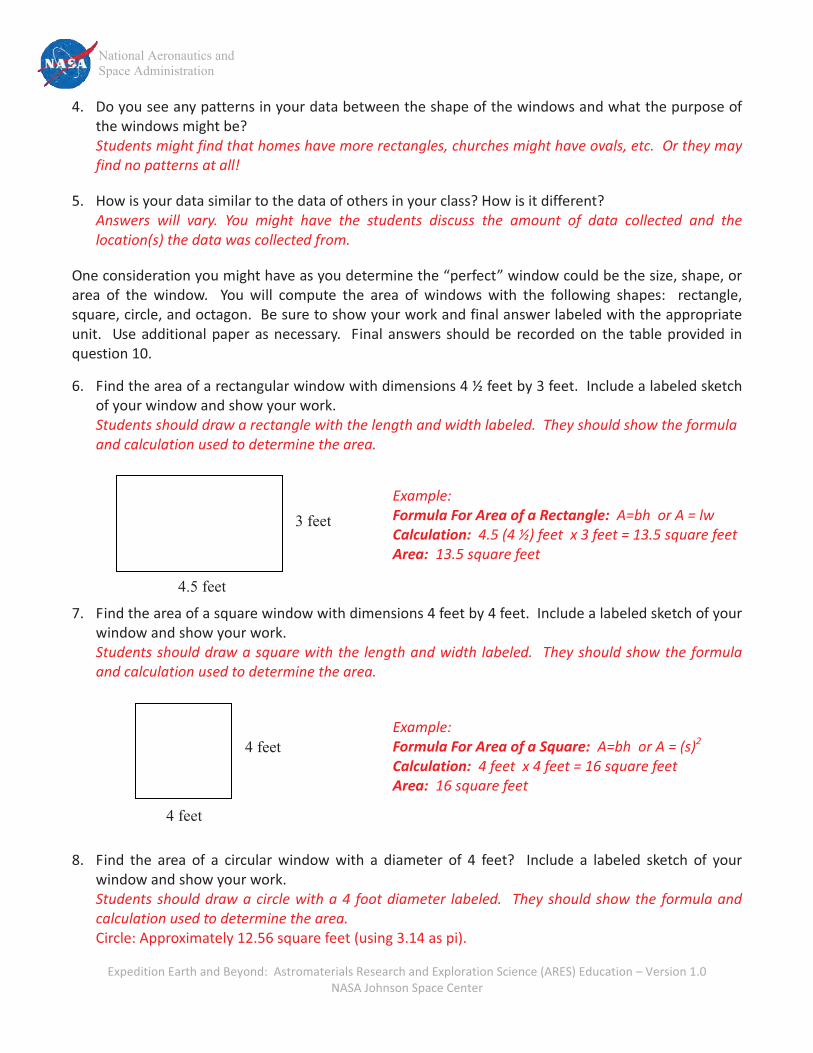
4. Do�you�see�any�patterns�in�your�data�between�the�shape�of�the�windows�and�what�the�purpose�of�the�windows�might�be?�Students�might�find�that�homes�have�more�rectangles,�churches�might�have�ovals,�etc.��Or�they�may�find�no�patterns�at�all!��
5. How�is�your�data�similar�to�the�data�of�others�in�your�class?�How�is�it�different?�Answers� will� vary.� You� might� have� the� students� discuss� the� amount� of� data� collected� and� the�location(s)�the�data�was�collected�from.�
�One�consideration�you�might�have�as�you�determine�the�“perfect”�window�could�be�the�size,�shape,�or�area� of� the� window.� � You� will� compute� the� area� of� windows� with� the� following� shapes:� � rectangle,�square,�circle,�and�octagon.��Be�sure�to�show�your�work�and�final�answer�labeled�with�the�appropriate�unit.� �Use�additional�paper�as�necessary.� �Final�answers�should�be�recorded�on� the� table�provided� in�question�10.�
�
6. Find�the�area�of�a�rectangular�window�with�dimensions�4�½�feet�by�3�feet.��Include�a�labeled�sketch�of�your�window�and�show�your�work.�Students�should�draw�a�rectangle�with�the�length�and�width�labeled.��They�should�show�the�formula�and�calculation�used�to�determine�the�area.����������������
�
7. Find�the�area�of�a�square�window�with�dimensions�4�feet�by�4�feet.��Include�a�labeled�sketch�of�your�window�and�show�your�work.�Students�should�draw�a�square�with�the�length�and�width�labeled.� �They�should�show�the�formula�and�calculation�used�to�determine�the�area.�����������
�8. Find� the� area� of� a� circular� window� with� a� diameter� of� 4� feet?� � Include� a� labeled� sketch� of� your�
window�and�show�your�work.�Students�should�draw�a�circle�with�a�4� foot�diameter� labeled.� �They�should�show�the� formula�and�calculation�used�to�determine�the�area.���Circle:�Approximately�12.56�square�feet�(using�3.14�as�pi).��
4.5 feet
3 feet Example:���Formula�For�Area�of�a�Rectangle:��A=bh��or�A�=�lw��Calculation:��4.5�(4�½)�feet��x�3�feet�=�13.5�square�feet�Area:��13.5�square�feet�
Example:���Formula�For�Area�of�a�Square:��A=bh��or�A�=�(s)2�Calculation:��4�feet��x�4�feet�=�16�square�feet�Area:��16�square�feet�
4 feet
4 feet
National Aeronautics and Space Administration
Expedition�Earth�and�Beyond:��Astromaterials�Research�and�Exploration�Science�(ARES)�Education�–�Version�1.0�NASA�Johnson�Space�Center�
�
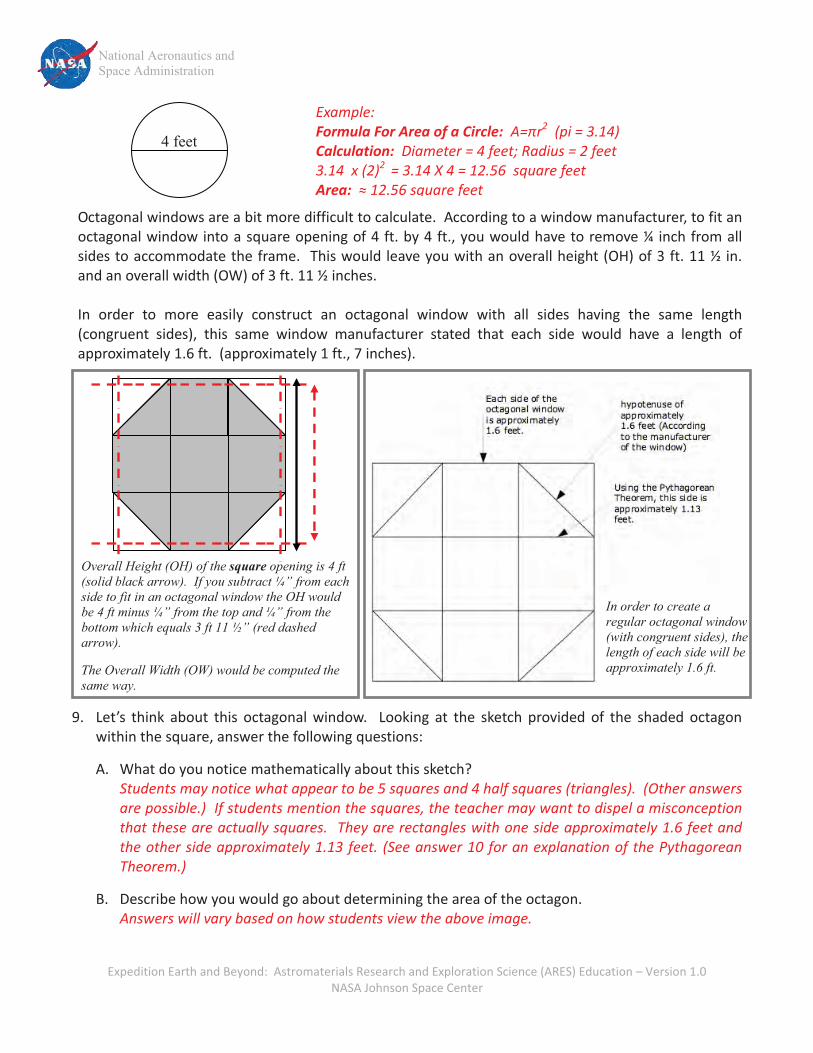
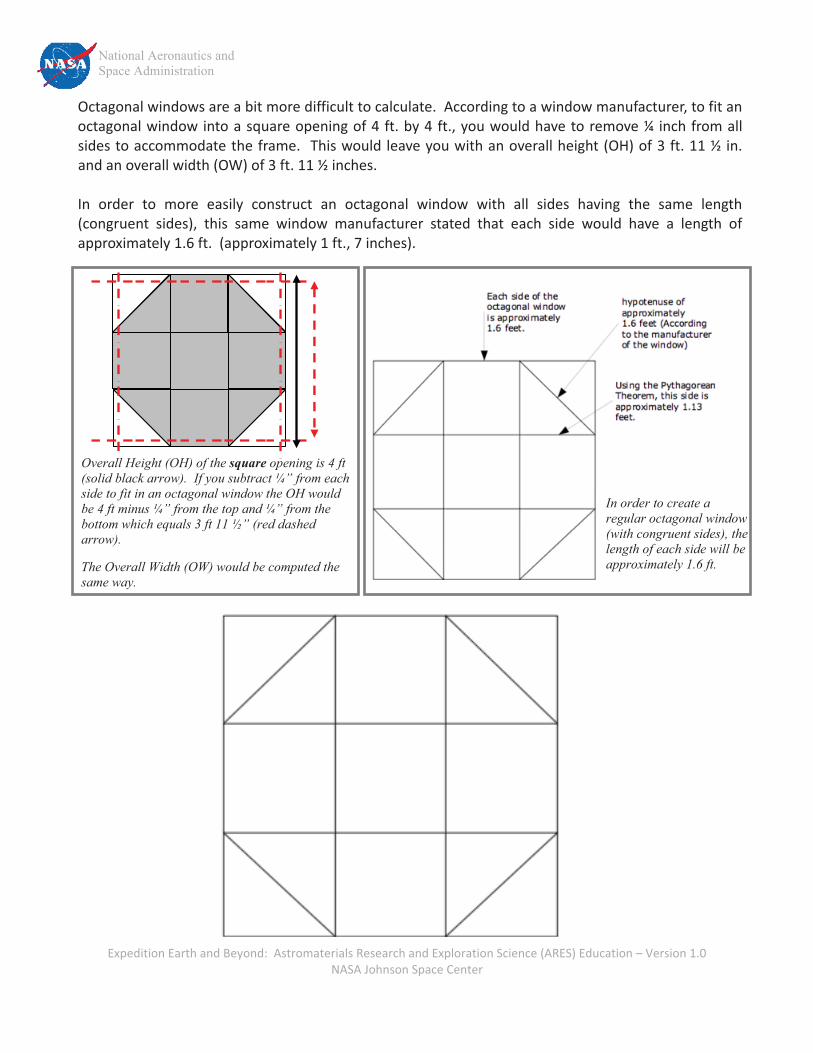
�����Octagonal�windows�are�a�bit�more�difficult�to�calculate.��According�to�a�window�manufacturer,�to�fit�an�octagonal�window�into�a�square�opening�of�4�ft.�by�4�ft.,�you�would�have�to�remove�¼� inch�from�all�sides�to�accommodate�the�frame.� �This�would�leave�you�with�an�overall�height�(OH)�of�3�ft.�11�½�in.�and�an�overall�width�(OW)�of�3�ft.�11�½�inches.���In� order� to� more� easily� construct� an� octagonal� window� with� all� sides� having� the� same� length�(congruent� sides),� this� same� window� manufacturer� stated� that� each� side� would� have� a� length� of�approximately�1.6�ft.��(approximately�1�ft.,�7�inches).�
������
������
���������������������������������������������������������������
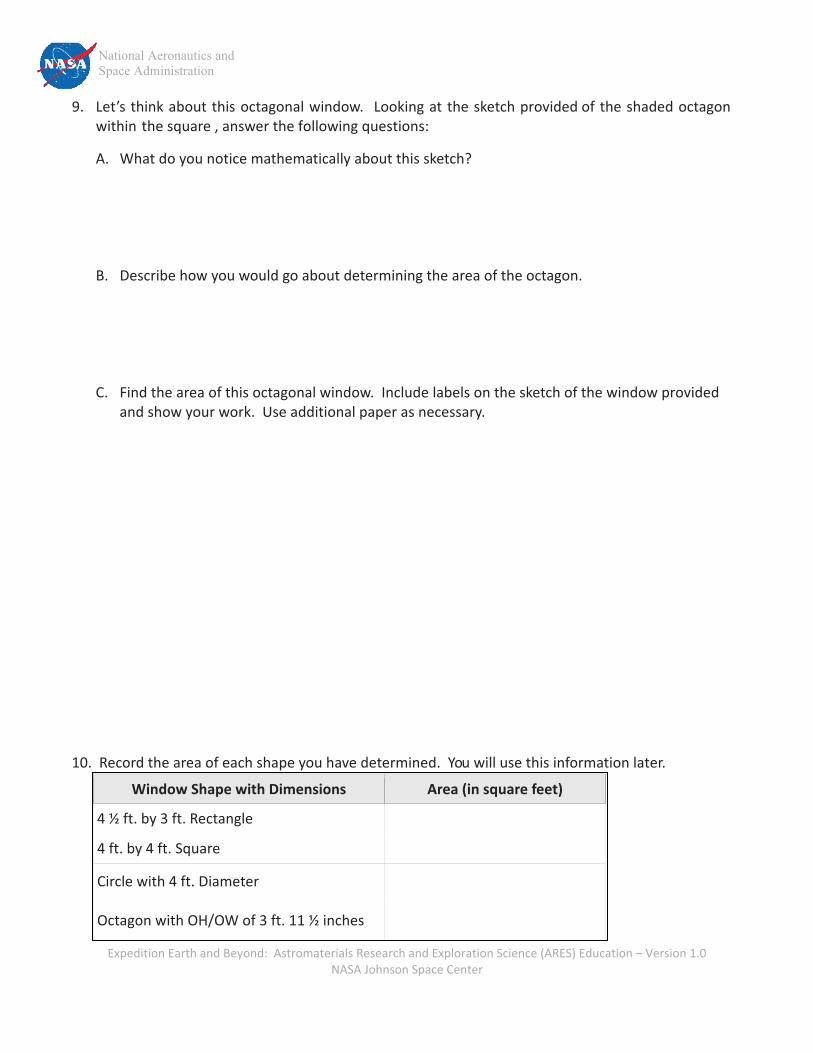
9. Let’s� think� about� this� octagonal� window.� � Looking� at� the� sketch� provided� of� the� shaded� octagon�within�the�square,�answer�the�following�questions:�
�
A. What�do�you�notice�mathematically�about�this�sketch?�Students�may�notice�what�appear�to�be�5�squares�and�4�half�squares�(triangles).��(Other�answers�are�possible.)��If�students�mention�the�squares,�the�teacher�may�want�to�dispel�a�misconception�that�these�are�actually�squares.� �They�are�rectangles�with�one�side�approximately�1.6�feet�and�the�other�side�approximately�1.13�feet.� (See�answer�10�for�an�explanation�of�the�Pythagorean�Theorem.)�
�
B. Describe�how�you�would�go�about�determining�the�area�of�the�octagon.���Answers�will�vary�based�on�how�students�view�the�above�image.�
�
4 feet
Example:���Formula�For�Area�of�a�Circle:��A=�r2���(pi�=�3.14)�Calculation:��Diameter�=�4�feet;�Radius�=�2�feet�3.14��x�(2)2��=�3.14�X�4�=�12.56��square�feet�Area: �� 12.56�square�feet
Overall Height (OH) of the square opening is 4 ft (solid black arrow). If you subtract ¼” from each side to fit in an octagonal window the OH would be 4 ft minus ¼” from the top and ¼” from the bottom which equals 3 ft 11 ½” (red dashed arrow).
The Overall Width (OW) would be computed the same way.
In order to create a regular octagonal window (with congruent sides), the length of each side will be approximately 1.6 ft.
National Aeronautics and Space Administration
Expedition�Earth�and�Beyond:��Astromaterials�Research�and�Exploration�Science�(ARES)�Education�–�Version�1.0�NASA�Johnson�Space�Center�
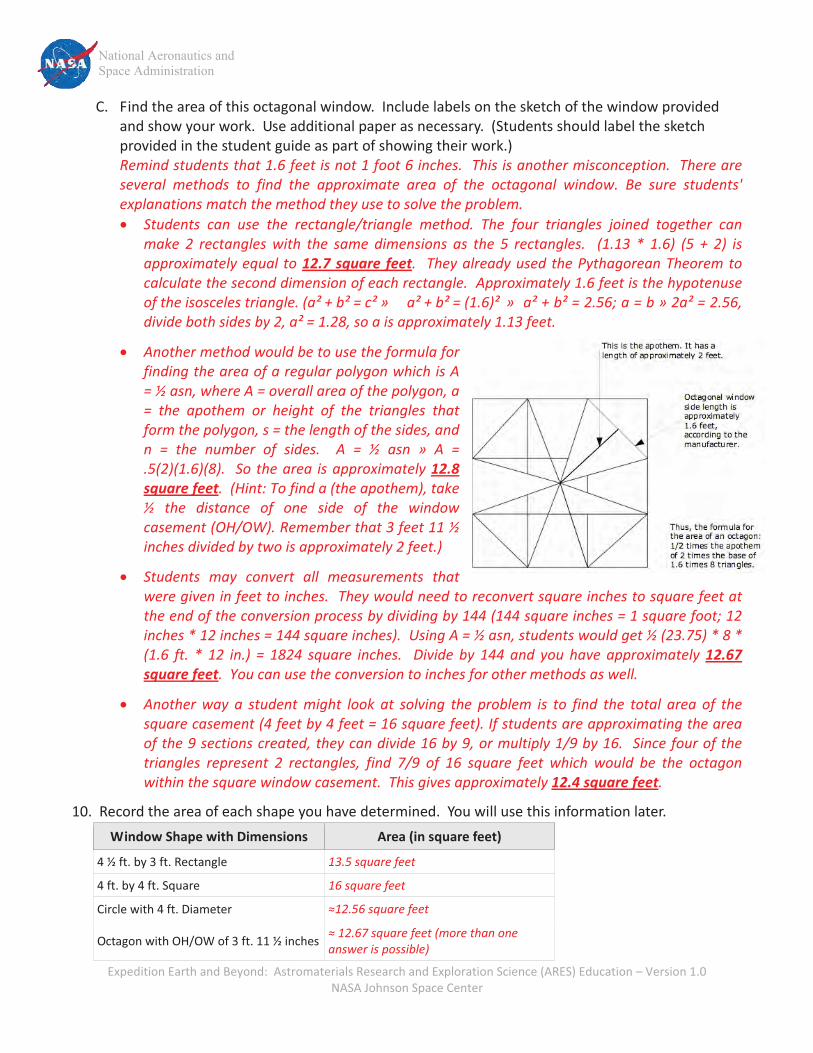
C. Find�the�area�of�this�octagonal�window.��Include�labels�on�the�sketch�of�the�window�provided�and�show�your�work.��Use�additional�paper�as�necessary.��(Students�should�label�the�sketch�provided�in�the�student�guide�as�part�of�showing�their�work.)�Remind�students�that�1.6�feet�is�not�1�foot�6�inches.��This�is�another�misconception.��There�are�several� methods� to� find� the� approximate� area� of� the� octagonal� window.� Be� sure� students'�explanations�match�the�method�they�use�to�solve�the�problem.��� Students� can� use� the� rectangle/triangle� method.� The� four� triangles� joined� together� can�
make� 2� rectangles�with� the� same� dimensions� as� the� 5� rectangles.� � (1.13� *� 1.6)� (5� +� 2)� is�approximately�equal� to�12.7�square� feet.� �They�already�used�the�Pythagorean�Theorem�to�calculate�the�second�dimension�of�each�rectangle.��Approximately�1.6�feet�is�the�hypotenuse�of�the�isosceles�triangle.�(a²�+�b²�=�c²�»�� a²�+�b²�=�(1.6)²��»��a²�+�b²�=�2.56;�a�=�b�»�2a²�=�2.56,�divide�both�sides�by�2,�a²�=�1.28,�so�a�is�approximately�1.13�feet.��
� Another�method�would�be�to�use�the�formula�for�finding�the�area�of�a�regular�polygon�which�is�A�=�½�asn,�where�A�=�overall�area�of�the�polygon,�a�=� the� apothem� or� height� of� the� triangles� that�form�the�polygon,�s�=�the�length�of�the�sides,�and�n� =� the� number� of� sides.� � A� =� ½� asn� »� A� =�.5(2)(1.6)(8).� �So�the�area� is�approximately�12.8�square�feet.��(Hint:�To�find�a�(the�apothem),�take�½� the� distance� of� one� side� of� the� window�casement�(OH/OW).�Remember�that�3�feet�11�½�inches�divided�by�two�is�approximately�2�feet.)��
� Students� may� convert� all� measurements� that�were�given�in�feet�to�inches.��They�would�need�to�reconvert�square�inches�to�square�feet�at�the�end�of�the�conversion�process�by�dividing�by�144�(144�square�inches�=�1�square�foot;�12�inches�*�12�inches�=�144�square�inches).��Using�A�=�½�asn,�students�would�get�½�(23.75)�*�8�*�(1.6� ft.� *� 12� in.)� =� 1824� square� inches.� �Divide� by� 144�and� you�have�approximately�12.67�square�feet.��You�can�use�the�conversion�to�inches�for�other�methods�as�well.�
�
� Another�way� a� student�might� look� at� solving� the� problem� is� to� find� the� total� area� of� the�square�casement�(4�feet�by�4�feet�=�16�square�feet).�If�students�are�approximating�the�area�of�the�9�sections�created,�they�can�divide�16�by�9,�or�multiply�1/9�by�16.� �Since�four�of�the�triangles� represent� 2� rectangles,� find� 7/9� of� 16� square� feet� which� would� be� the� octagon�within�the�square�window�casement.��This�gives�approximately�12.4�square�feet.�
�
10.��Record�the�area�of�each�shape�you�have�determined.��You�will�use�this�information�later.�
�������
Window�Shape�with�Dimensions� Area�(in�square�feet)�
4�½�ft.�by�3�ft.�Rectangle� 13.5�square�feet
4�ft.�by�4�ft.�Square� 16�square�feet
Circle�with�4�ft.�Diameter� �12.56�square�feet
Octagon�with�OH/OW�of�3�ft.�11�½�inches�� 12.67 square�feet (more�than�one�answer�is�possible)�
National Aeronautics and Space Administration
Expedition�Earth�and�Beyond:��Astromaterials�Research�and�Exploration�Science�(ARES)�Education�–�Version�1.0�NASA�Johnson�Space�Center�
Oh,�But�the�Cost!�Overview�of�topics:��Unit�analysis,�area,�mathematical�communication.��
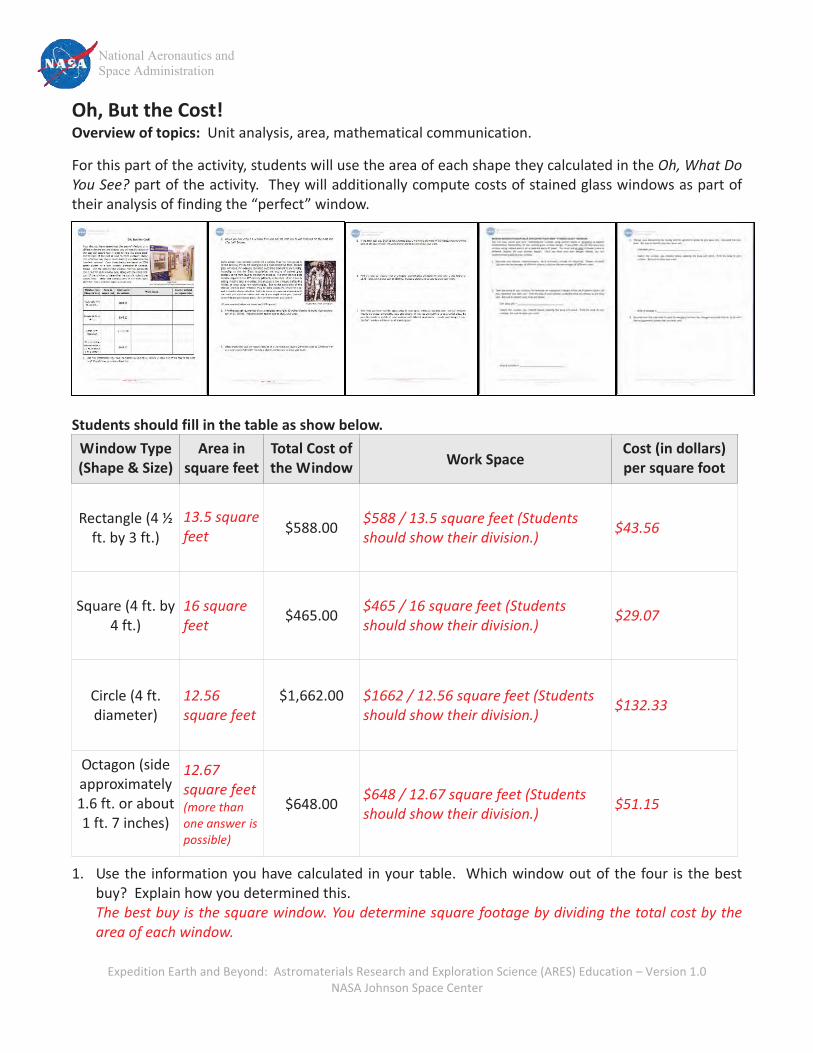
For�this�part�of�the�activity,�students�will�use�the�area�of�each�shape�they�calculated�in�the�Oh,�What�Do�You�See?�part�of�the�activity.��They�will�additionally�compute�costs�of�stained�glass�windows�as�part�of�their�analysis�of�finding�the�“perfect”�window.����
���
������ �
��
Students�should�fill�in�the�table�as�show�below.���
Window�Type�(Shape�&�Size)�
Area�in�square�feet�
Total�Cost�of�the�Window� Work�Space�
Cost�(in�dollars)�per�square�foot�
Rectangle�(4�½�ft.�by�3�ft.)�
�13.5�square�feet��
$588.00�$588�/�13.5�square�feet�(Students�should�show�their�division.)�
$43.56�
Square�(4�ft.�by�4�ft.)�
�16�square�feet��
$465.00�$465�/�16�square�feet�(Students�should�show�their�division.)�
$29.07�
Circle�(4�ft.�diameter)�
�12.56�square�feet��
$1,662.00��
$1662�/�12.56�square�feet�(Students�should�show�their�division.)�
$132.33�
Octagon�(side�approximately�1.6�ft.�or�about�1�ft.�7�inches)�
12.67�square�feet�(more�than�one�answer�is�possible)�
$648.00�$648�/�12.67�square�feet�(Students�should�show�their�division.)�
$51.15�
�
1. Use�the�information�you�have�calculated�in�your�table.� �Which�window�out�of�the�four� is�the�best�buy?��Explain�how�you�determined�this.�The�best�buy�is�the�square�window.�You�determine�square�footage�by�dividing�the�total�cost�by�the�area�of�each�window.��
National Aeronautics and Space Administration
Expedition�Earth�and�Beyond:��Astromaterials�Research�and�Exploration�Science�(ARES)�Education�–�Version�1.0�NASA�Johnson�Space�Center�
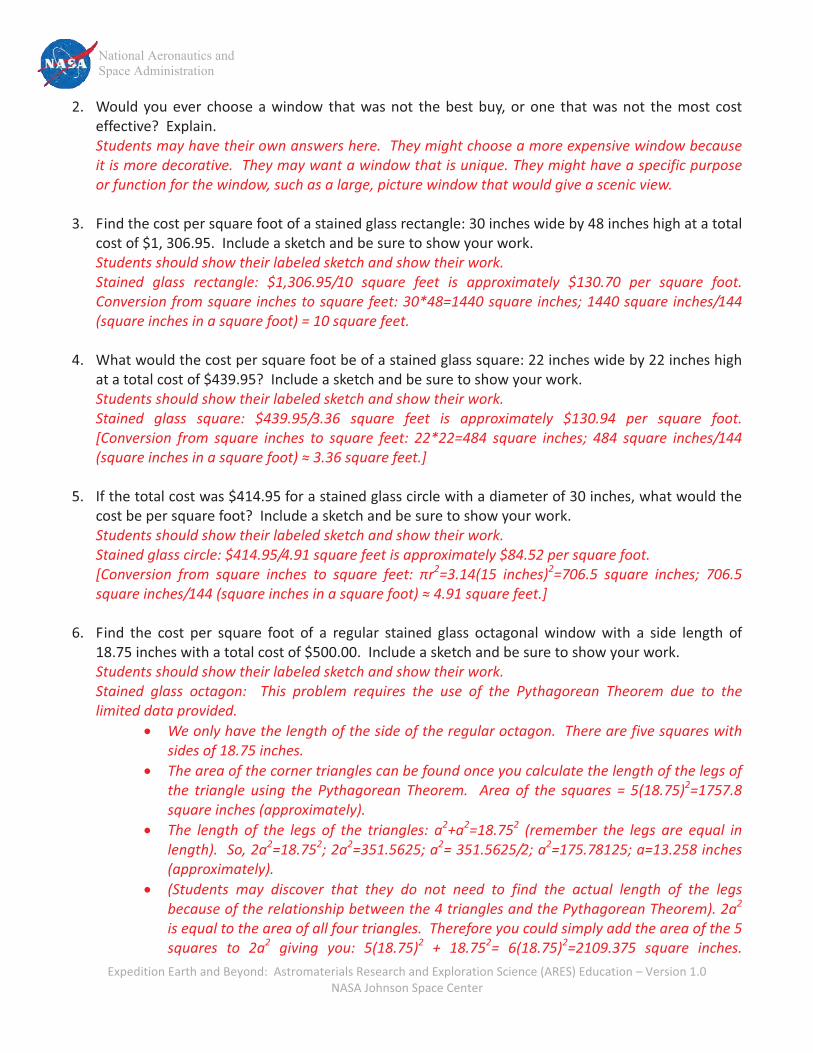
2. Would� you� ever� choose� a� window� that� was� not� the� best� buy,� or� one� that� was� not� the� most� cost�effective?��Explain.�Students�may�have�their�own�answers�here.��They�might�choose�a�more�expensive�window�because�it�is�more�decorative.��They�may�want�a�window�that�is�unique.�They�might�have�a�specific�purpose�or�function�for�the�window,�such�as�a�large,�picture�window�that�would�give�a�scenic�view.�
�3. Find�the�cost�per�square�foot�of�a�stained�glass�rectangle:�30�inches�wide�by�48�inches�high�at�a�total�
cost�of�$1,�306.95.��Include�a�sketch�and�be�sure�to�show�your�work.���Students�should�show�their�labeled�sketch�and�show�their�work.���Stained� glass� rectangle:� $1,306.95/10� square� feet� is� approximately� $130.70� per� square� foot.��Conversion�from�square�inches�to�square�feet:�30*48=1440�square�inches;�1440�square�inches/144�(square�inches�in�a�square�foot)�=�10�square�feet.�
�4. What�would�the�cost�per�square�foot�be�of�a�stained�glass�square:�22�inches�wide�by�22�inches�high�
at�a�total�cost�of�$439.95?��Include�a�sketch�and�be�sure�to�show�your�work.���Students�should�show�their�labeled�sketch�and�show�their�work.���Stained� glass� square:� $439.95/3.36� square� feet� is� approximately� $130.94� per� square� foot.�[Conversion� from� square� inches� to� square� feet:� 22*22=484� square� inches;� 484� square� inches/144�(square�inches�in�a�square�foot)���3.36�square�feet.]�
�5. If�the�total�cost�was�$414.95�for�a�stained�glass�circle�with�a�diameter�of�30�inches,�what�would�the�
cost�be�per�square�foot?��Include�a�sketch�and�be�sure�to�show�your�work.���Students�should�show�their�labeled�sketch�and�show�their�work.���Stained�glass�circle:�$414.95/4.91�square�feet�is�approximately�$84.52�per�square�foot.��[Conversion� from� square� inches� to� square� feet:� �r2=3.14(15� inches)2=706.5� square� inches;� 706.5�square�inches/144�(square�inches�in�a�square�foot)���4.91�square�feet.]�
�6. Find� the� cost� per� square� foot� of� a� regular� stained� glass� octagonal� window� with� a� side� length� of�
18.75�inches�with�a�total�cost�of�$500.00.��Include�a�sketch�and�be�sure�to�show�your�work.���Students�should�show�their�labeled�sketch�and�show�their�work.���Stained� glass� octagon:� � This� problem� requires� the� use� of� the� Pythagorean� Theorem� due� to� the�limited�data�provided.��
� We�only�have�the�length�of�the�side�of�the�regular�octagon.��There�are�five�squares�with�sides�of�18.75�inches.��
� The�area�of�the�corner�triangles�can�be�found�once�you�calculate�the�length�of�the�legs�of�the� triangle� using� the� Pythagorean� Theorem.� � Area�of� the� squares� =� 5(18.75)2=1757.8�square�inches�(approximately).��
� The� length� of� the� legs� of� the� triangles:� a2+a2=18.752� (remember� the� legs� are� equal� in�length).��So,�2a2=18.752;�2a2=351.5625;�a2=�351.5625/2;�a2=175.78125;�a=13.258�inches�(approximately).��
� (Students� may� discover� that� they� do� not� need� to� find� the� actual� length� of� the� legs�because�of�the�relationship�between�the�4�triangles�and�the�Pythagorean�Theorem).�2a2�is�equal�to�the�area�of�all�four�triangles.��Therefore�you�could�simply�add�the�area�of�the�5�squares� to� 2a2� giving� you:� 5(18.75)2� +� 18.752=� 6(18.75)2=2109.375� square� inches.��
National Aeronautics and Space Administration
Expedition�Earth�and�Beyond:��Astromaterials�Research�and�Exploration�Science�(ARES)�Education�–�Version�1.0�NASA�Johnson�Space�Center�
Remember�to�divide�by�144�square�inches�to�convert�to�square�feet;�2109.375/144=14.65�square�feet.��To�find�the�cost�per�square�foot�divide:�$500/14.65�square�feet�=�$34.13�per�square�foot�(approximately).�
�7. Now�that�you�have�had�the�opportunity�to�investigate�windows,�describe�which�of�these�would�be�
your�“perfect”�window.��Include�the�shape,�dimensions,�cost,�and�whether�or�not�you�are�planning�to� use� stained� glass.� � Be� sure� to� include� a� sketch� of� your� window� with� labeled� dimensions.� � Also�describe�the�purpose�of�your�“perfect”�window.���Students�will�have�their�own�individual�descriptions�of�their�windows.�
�MAKING�AND�MATHEMATICALLY�EXPLORING�YOUR�OWN�“STAINED�GLASS”�WINDOW�1. Describe� your� window� mathematically.� � At� a� minimum,� include� the� following:� � Shapes� used,�
calculate�the�percentages�of�different�shapes,�calculate�the�percentages�of�different�colors.�Students� create� their� own� windows.� � You� would� need� to� give� suggestions� on� the� types� of�mathematics�you�wish�for�the�students�to�give�and�check�their�answers�individually.�
�2. Take�one�piece�of�your�window,�for�example�an�equilateral�triangle�in�the�set�of�pattern�blocks.�Let�
this�represent�one�base�unit.��Find�the�area�of�your�window,�using�the�piece�you�choose�as�one�base�unit.��Be�sure�to�identify�your�base�unit�below.��
� One�base�unit�=�__________________________________��
Sketch� the� window� you� created� below,� labeling� the� base� unit� piece.� � Find� the� area� of� your�window.��Be�sure�to�show�your�work.�
�
������Area�of�window�=�__________________________________��
Answers�will�vary�based�on�student�window�design�and�base�unit�used.��
3. Change�your�perspective�by�having�another�geometric�piece�be�one�base�unit.� �Calculate�the�new�area.���Be�sure�to�identify�your�new�base�unit.��
� One�base�unit�=�__________________________________��
Sketch� the� window� you� created� below,� labeling� the� base� unit� piece.� � Find� the� area� of� your�window.��Be�sure�to�show�your�work.�
�
������Area�of�window�=�__________________________________��
Answers�will�vary�based�on�student�window�design�and�base�unit�used.��4. Describe�how�the�total�area�for�your�stained�glass�window�has�changed�and�what�this�has�to�do�with�
the�two�geometric�pieces�that�you�have�used.�If�students�chose�a�larger�piece�for�the�base�unit,�their�overall�area�would�be�less.� � If�they�chose�a�smaller�piece�for�the�base�unit,�their�overall�area�would�increase.�
��
National Aeronautics and Space Administration
Expedition�Earth�and�Beyond:��Astromaterials�Research�and�Exploration�Science�(ARES)�Education�–�Version�1.0�NASA�Johnson�Space�Center�
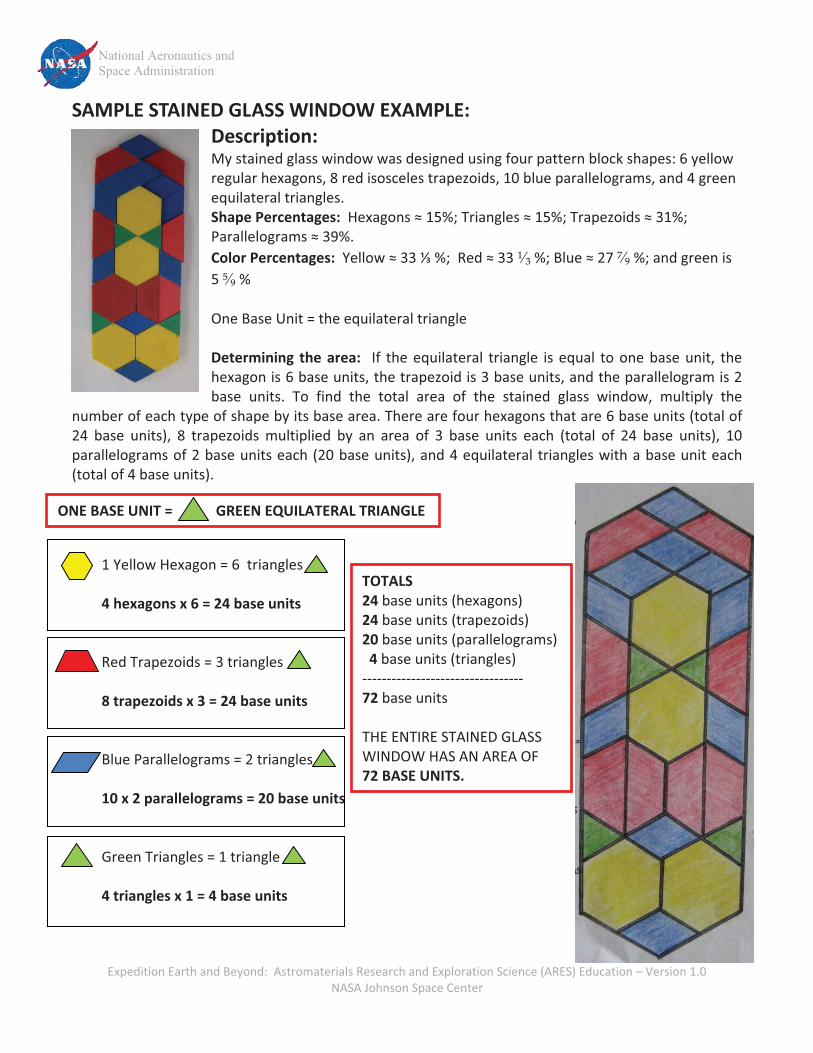
SAMPLE�STAINED�GLASS�WINDOW�EXAMPLE:�Description:���My�stained�glass�window�was�designed�using�four�pattern�block�shapes:�6�yellow�regular�hexagons,�8�red�isosceles�trapezoids,�10�blue�parallelograms,�and�4�green�equilateral�triangles.���Shape�Percentages:��Hexagons���15%;�Triangles���15%;�Trapezoids���31%;�Parallelograms���39%.���Color�Percentages:��Yellow���33���%;��Red���33����%;�Blue���27�����%;�and�green�is���5�����%������One�Base�Unit�=�the�equilateral�triangle��Determining� the� area:� � If� the� equilateral� triangle� is� equal� to� one� base� unit,� the�hexagon�is�6�base�units,�the�trapezoid�is�3�base�units,�and�the�parallelogram�is�2�base� units.� To� find� the� total� area� of� the� stained� glass� window,� multiply� the�
number�of�each�type�of�shape�by�its�base�area.�There�are�four�hexagons�that�are�6�base�units�(total�of�24� base� units),� 8� trapezoids� multiplied� by� an� area� of� 3� base� units� each� (total� of� 24� base� units),� 10�parallelograms�of�2�base�units�each�(20�base�units),�and�4�equilateral� triangles�with�a�base�unit�each�(total�of�4�base�units).���
�����
1�Yellow�Hexagon�=�6��triangles���4�hexagons�x�6�=�24�base�units���Red�Trapezoids�=�3�triangles���8�trapezoids�x�3�=�24�base�units���Blue�Parallelograms�=�2�triangles��10�x�2�parallelograms�=�20�base�units���Green�Triangles�=�1�triangle��4�triangles�x�1�=�4�base�units�
ONE�BASE�UNIT�=������������GREEN�EQUILATERAL�TRIANGLE�
TOTALS�24�base�units�(hexagons)�24�base�units�(trapezoids)�20�base�units�(parallelograms)���4�base�units�(triangles)�����������������������������������72�base�units��THE�ENTIRE�STAINED�GLASS�WINDOW�HAS�AN�AREA�OF��72�BASE�UNITS.
National Aeronautics and Space Administration
Expedition�Earth�and�Beyond:��Astromaterials�Research�and�Exploration�Science�(ARES)�Education�–�Version�1.0�NASA�Johnson�Space�Center�
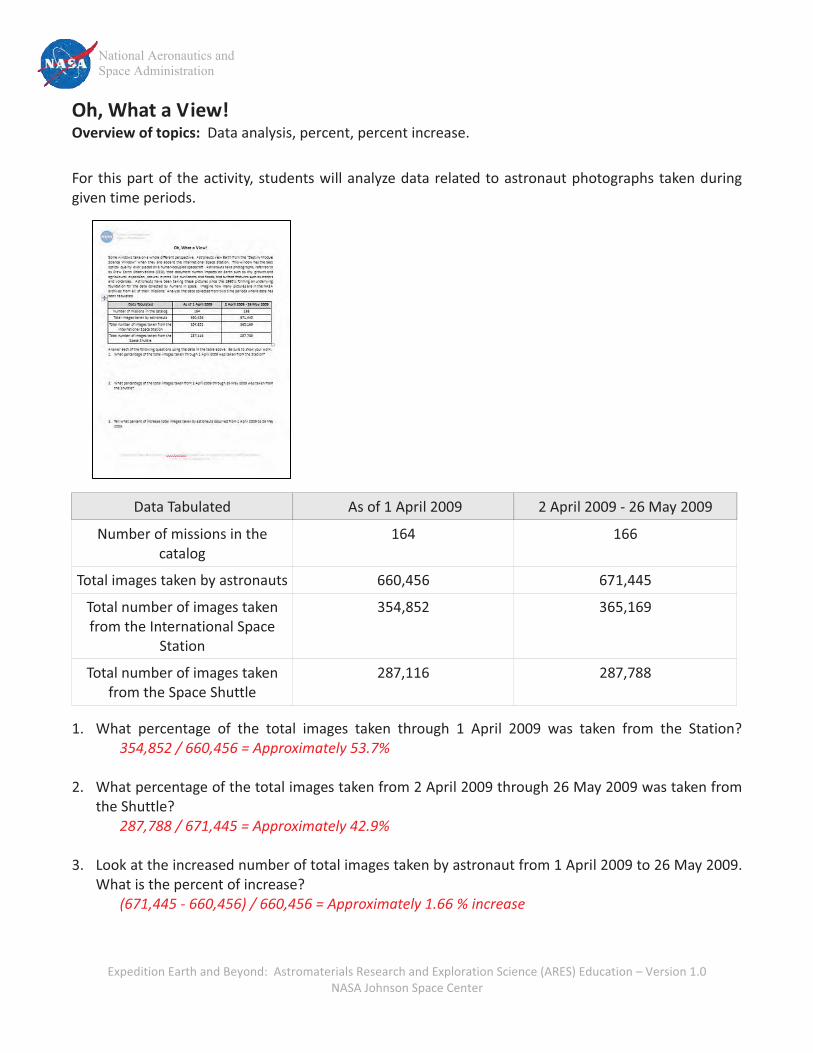
Oh,�What�a�View!�Overview�of�topics:��Data�analysis,�percent,�percent�increase.�
�For�this�part�of�the�activity,�students�will�analyze�data�related�to�astronaut�photographs�taken�during�given�time�periods.����
��������������
Data�Tabulated� �As�of�1�April�2009� 2�April�2009���26�May�2009�
Number�of�missions�in�the�catalog�
164� 166�
Total�images�taken�by�astronauts� 660,456� 671,445�
Total�number�of�images�taken�from�the�International�Space�
Station�
354,852� 365,169�
Total�number�of�images�taken�from�the�Space�Shuttle�
287,116� 287,788�
�
1. What� percentage� of� the� total� images� taken� through� 1� April� 2009� was� taken� from� the� Station?��� 354,852�/�660,456�=�Approximately�53.7%��
�2. What�percentage�of�the�total�images�taken�from�2�April�2009�through�26�May�2009�was�taken�from�
the�Shuttle?�� � 287,788�/�671,445�=�Approximately�42.9%��3. Look�at�the�increased�number�of�total�images�taken�by�astronaut�from�1�April�2009�to�26�May�2009.��
What�is�the�percent�of�increase?���� (671,445���660,456)�/�660,456�=�Approximately�1.66�%�increase�
�
�
National Aeronautics and Space Administration
Expedition�Earth�and�Beyond:��Astromaterials�Research�and�Exploration�Science�(ARES)�Education�–�Version�1.0�NASA�Johnson�Space�Center�
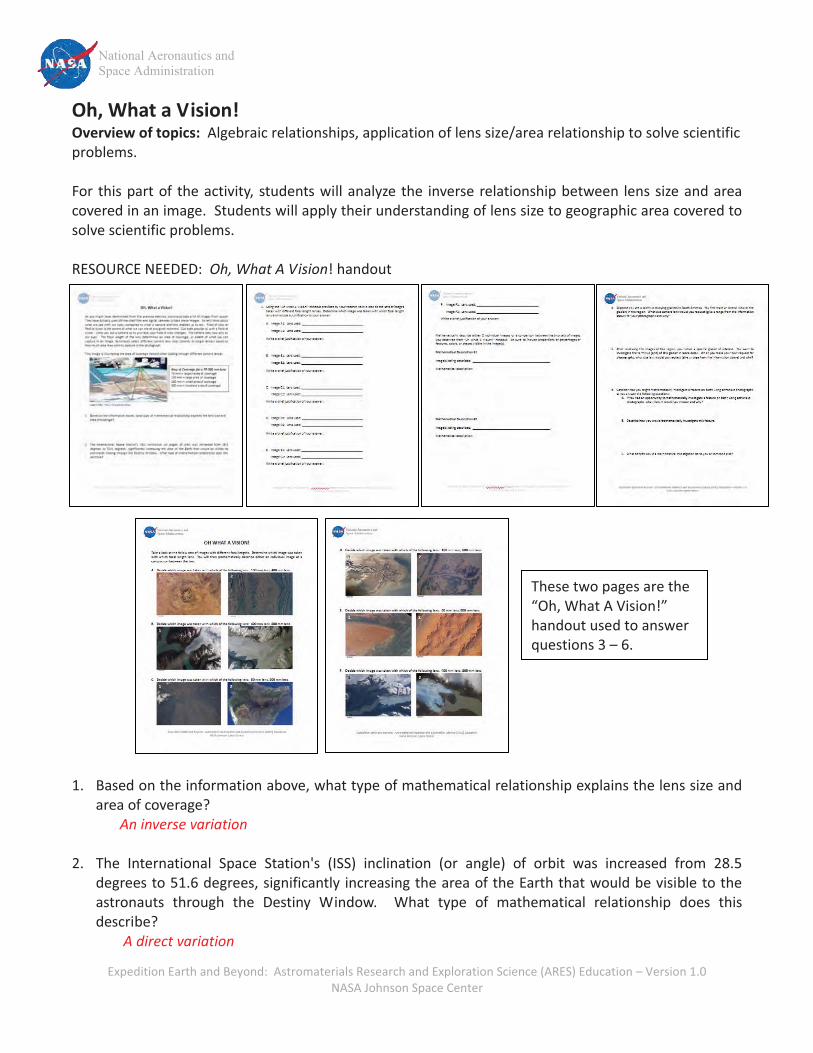
Oh,�What�a�Vision!�Overview�of�topics:��Algebraic�relationships,�application�of�lens�size/area�relationship�to�solve�scientific�problems.���For� this�part�of� the�activity,�students�will�analyze�the� inverse�relationship�between� lens�size�and�area�covered�in�an�image.��Students�will�apply�their�understanding�of�lens�size�to�geographic�area�covered�to�solve�scientific�problems.������RESOURCE�NEEDED:��Oh,�What�A�Vision!�handout��� ���������������������1. Based�on�the�information�above,�what�type�of�mathematical�relationship�explains�the�lens�size�and�
area�of�coverage?��� An�inverse�variation�
�2. The� International� Space� Station's� (ISS)� inclination� (or� angle)� of� orbit� was� increased� from� 28.5�
degrees�to�51.6�degrees,�significantly�increasing�the�area�of�the�Earth�that�would�be�visible�to�the�astronauts� through� the� Destiny� Window.� � What� type� of� mathematical� relationship� does� this�describe?�� �A�direct�variation�
These�two�pages�are�the�“Oh,�What�A�Vision!”�handout�used�to�answer�questions�3�–�6.�
National Aeronautics and Space Administration
Expedition�Earth�and�Beyond:��Astromaterials�Research�and�Exploration�Science�(ARES)�Education�–�Version�1.0�NASA�Johnson�Space�Center�
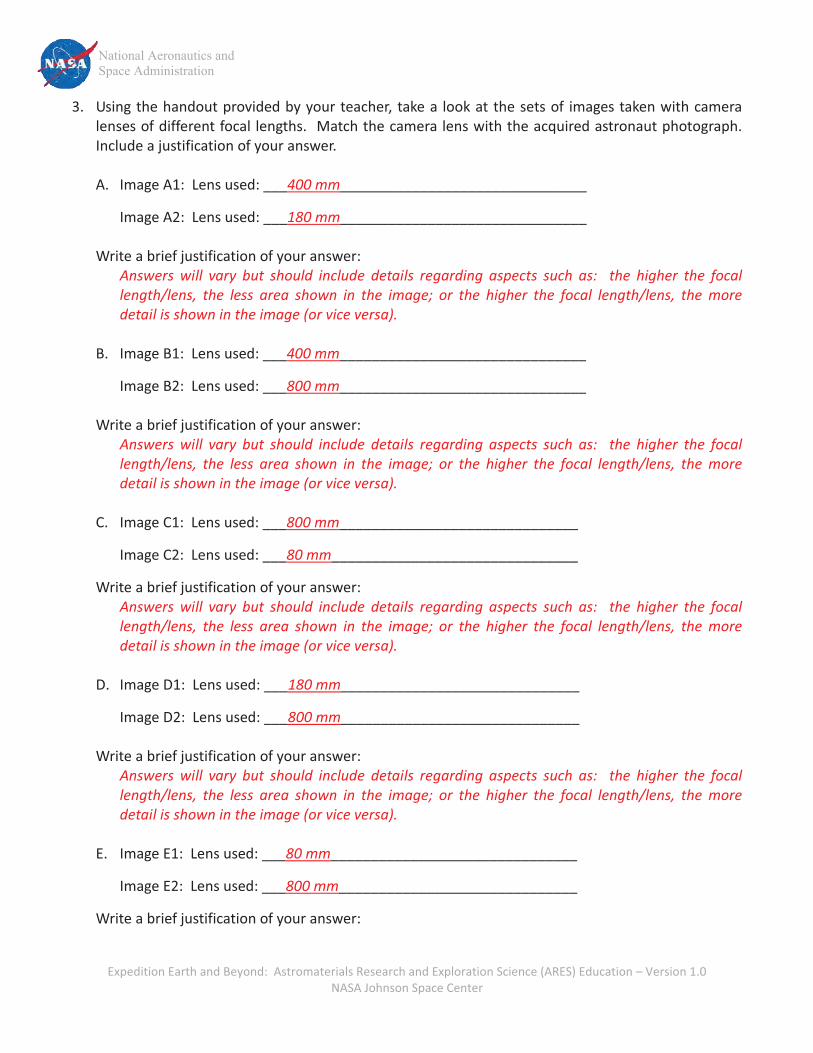
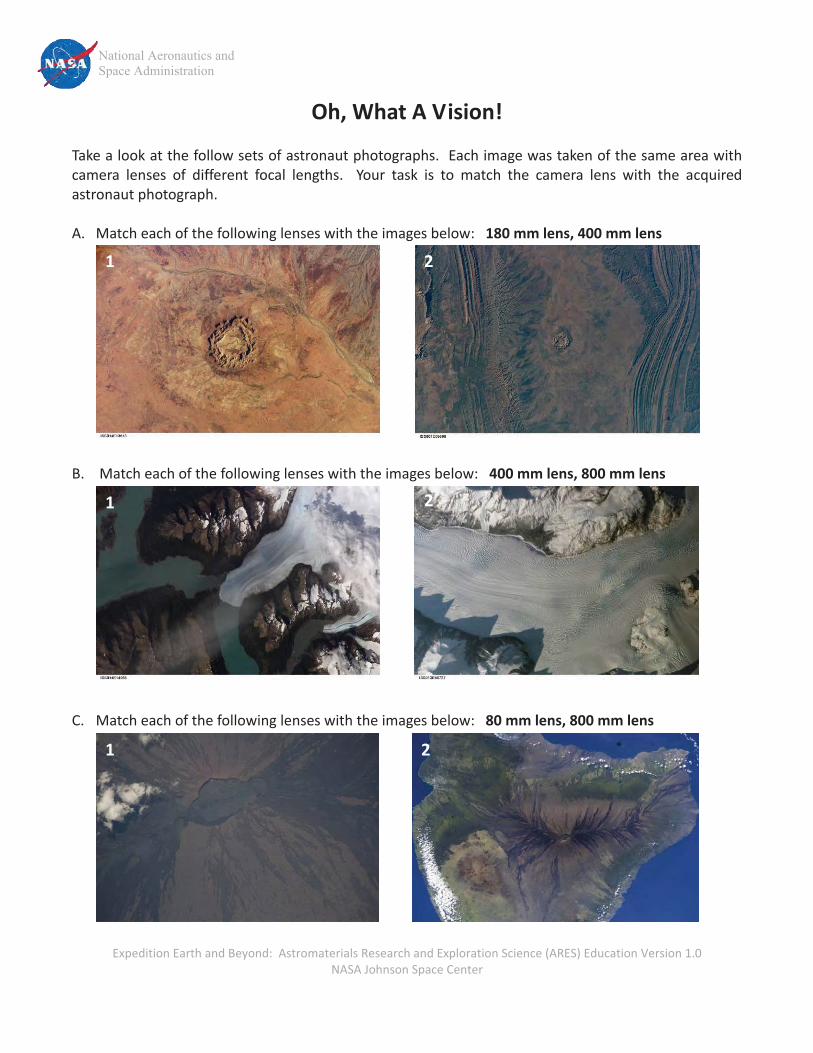
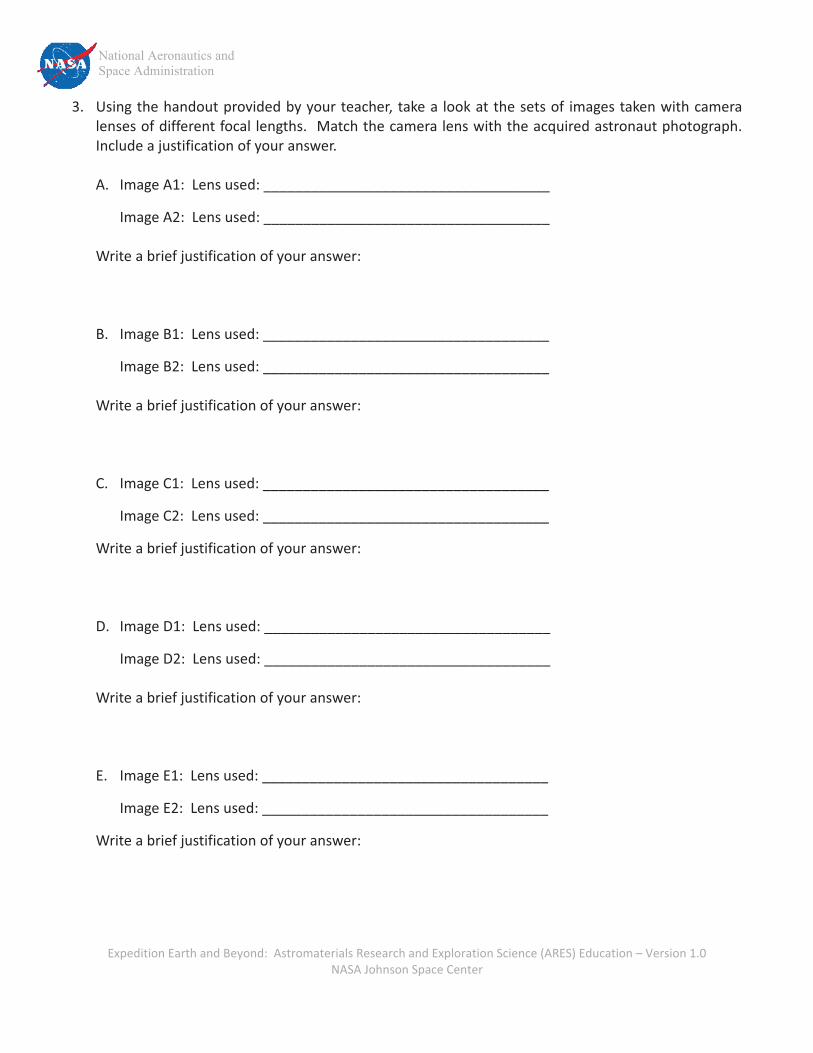
3. Using�the�handout�provided�by�your�teacher,�take�a� look�at�the�sets�of� images�taken�with�camera�lenses�of�different�focal� lengths.� �Match�the�camera�lens�with�the�acquired�astronaut�photograph.��Include�a�justification�of�your�answer.�����
�A. Image�A1:��Lens�used:�___400�mm_______________________________�
�
� � Image�A2:��Lens�used:�___180�mm_______________________________��� Write�a�brief�justification�of�your�answer:�
Answers�will� vary� but� should� include� details� regarding� aspects� such� as:� � the� higher� the� focal�length/lens,� the� less� area� shown� in� the� image;� or� the� higher� the� focal� length/lens,� the�more�detail�is�shown�in�the�image�(or�vice�versa).�
�B. Image�B1:��Lens�used:�___400�mm_______________________________�
�
� � Image�B2:��Lens�used:�___800�mm_______________________________��� Write�a�brief�justification�of�your�answer:�
Answers�will� vary� but� should� include� details� regarding� aspects� such� as:� � the� higher� the� focal�length/lens,� the� less� area� shown� in� the� image;� or� the� higher� the� focal� length/lens,� the�more�detail�is�shown�in�the�image�(or�vice�versa).�
�C. Image�C1:��Lens�used:�___800�mm______________________________�
� �
� � Image�C2:��Lens�used:�___80�mm_______________________________��
� Write�a�brief�justification�of�your�answer:�Answers�will� vary� but� should� include� details� regarding� aspects� such� as:� � the� higher� the� focal�length/lens,� the� less� area� shown� in� the� image;� or� the� higher� the� focal� length/lens,� the�more�detail�is�shown�in�the�image�(or�vice�versa).�
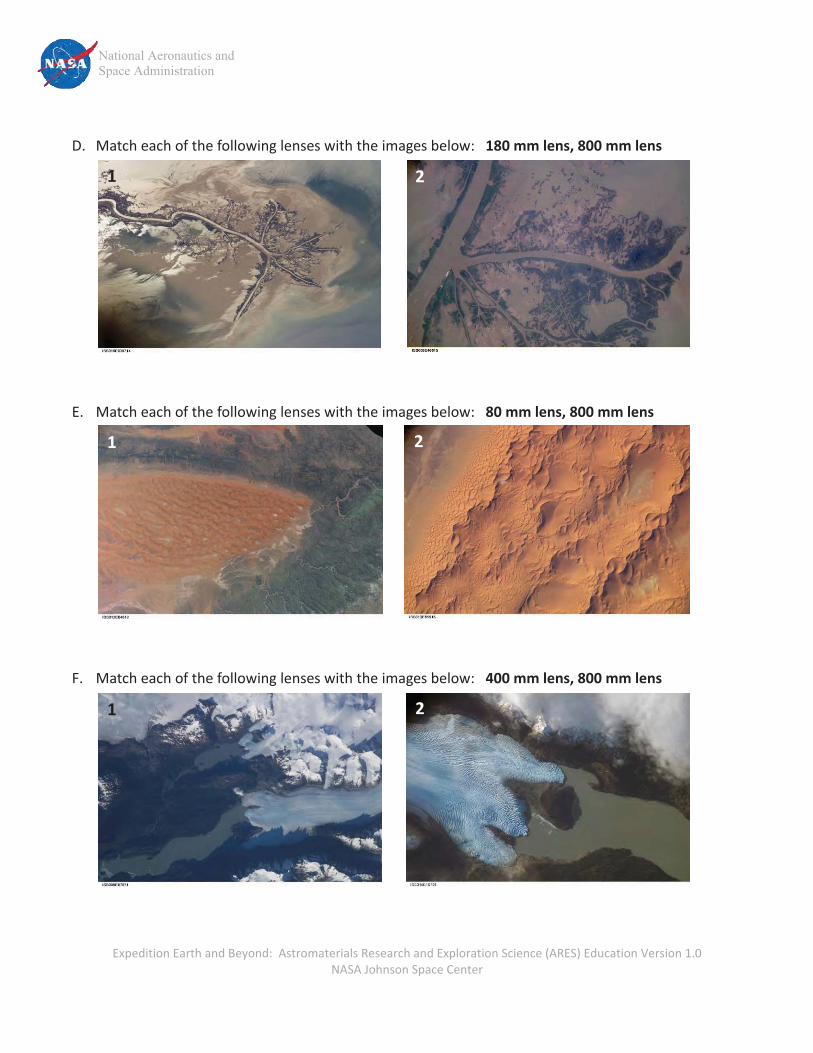
�D. Image�D1:��Lens�used:�___180�mm______________________________�
�
� � Image�D2:��Lens�used:�___800�mm______________________________��
� Write�a�brief�justification�of�your�answer:�Answers�will� vary� but� should� include� details� regarding� aspects� such� as:� � the� higher� the� focal�length/lens,� the� less� area� shown� in� the� image;� or� the� higher� the� focal� length/lens,� the�more�detail�is�shown�in�the�image�(or�vice�versa).�
�E. Image�E1:��Lens�used:�___80�mm_______________________________�
�
� � Image�E2:��Lens�used:�___800�mm______________________________��
� Write�a�brief�justification�of�your�answer:�
National Aeronautics and Space Administration
Expedition�Earth�and�Beyond:��Astromaterials�Research�and�Exploration�Science�(ARES)�Education�–�Version�1.0�NASA�Johnson�Space�Center�
Answers� will� vary� but� should� include� details� regarding� aspects� such� as:� � the� higher� the� focal�length/lens,� the� less� area� shown� in� the� image;� or� the� higher� the� focal� length/lens,� the� more�detail�is�shown�in�the�image�(or�vice�versa).�
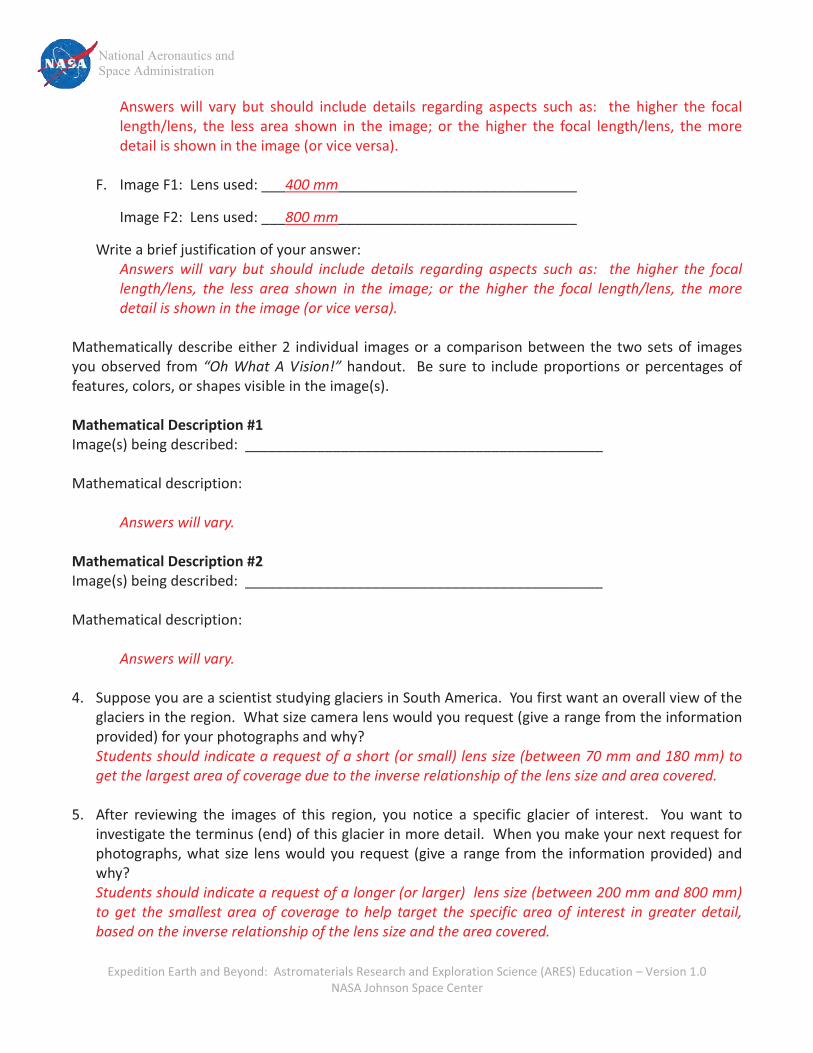
�F. Image�F1:��Lens�used:�___400�mm______________________________�
�
� � Image�F2:��Lens�used:�___800�mm______________________________��
� Write�a�brief�justification�of�your�answer:�Answers�will� vary� but� should� include� details� regarding� aspects� such� as:� � the� higher� the� focal�length/lens,� the� less� area� shown� in� the� image;� or� the� higher� the� focal� length/lens,� the�more�detail�is�shown�in�the�image�(or�vice�versa).�
�Mathematically�describe�either�2� individual� images�or�a�comparison�between�the�two�sets�of� images�you� observed� from�“Oh�What�A�Vision!”� handout.� � Be� sure� to� include�proportions� or� percentages� of�features,�colors,�or�shapes�visible�in�the�image(s).��Mathematical�Description�#1�Image(s)�being�described:��_____________________________________________��Mathematical�description:����� Answers�will�vary.��Mathematical�Description�#2�Image(s)�being�described:��_____________________________________________��Mathematical�description:����� Answers�will�vary.�
�4. Suppose�you�are�a�scientist�studying�glaciers�in�South�America.��You�first�want�an�overall�view�of�the�
glaciers�in�the�region.��What�size�camera�lens�would�you�request�(give�a�range�from�the�information�provided)�for�your�photographs�and�why?�Students�should�indicate�a�request�of�a�short�(or�small)�lens�size�(between�70�mm�and�180�mm)�to�get�the�largest�area�of�coverage�due�to�the�inverse�relationship�of�the�lens�size�and�area�covered.��
�5. After� reviewing� the� images� of� this� region,� you� notice� a� specific� glacier� of� interest.� � You� want� to�
investigate�the�terminus�(end)�of�this�glacier�in�more�detail.��When�you�make�your�next�request�for�photographs,�what�size� lens�would�you�request� (give�a�range� from�the� information�provided)�and�why?�Students�should�indicate�a�request�of�a�longer�(or�larger)��lens�size�(between�200�mm�and�800�mm)�to� get� the� smallest� area�of� coverage� to� help� target� the� specific� area�of� interest� in� greater� detail,�based�on�the�inverse�relationship�of�the�lens�size�and�the�area�covered.��
National Aeronautics and Space Administration
Expedition�Earth�and�Beyond:��Astromaterials�Research�and�Exploration�Science�(ARES)�Education�–�Version�1.0�NASA�Johnson�Space�Center�
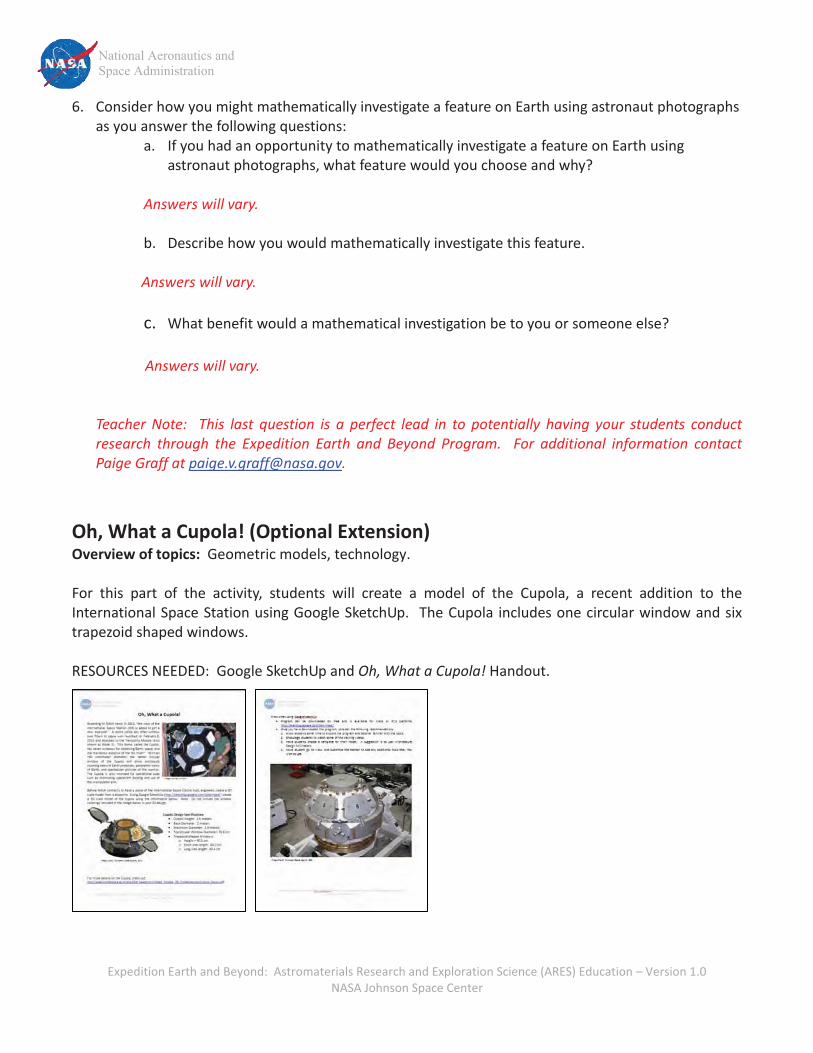
6. Consider�how�you�might�mathematically�investigate�a�feature�on�Earth�using�astronaut�photographs�as�you�answer�the�following�questions:�
a. If�you�had�an�opportunity�to�mathematically�investigate�a�feature�on�Earth�using�astronaut�photographs,�what�feature�would�you�choose�and�why?���
�Answers�will�vary.��b. Describe�how�you�would�mathematically�investigate�this�feature.���
�� ������Answers�will�vary.��
c. What�benefit�would�a�mathematical�investigation�be�to�you�or�someone�else?������� ������Answers�will�vary.���Teacher�Note:� � This� last� question� is� a� perfect� lead� in� to� potentially� having� your� students� conduct�research� through� the� Expedition� Earth� and� Beyond� Program.� � For� additional� information� contact�Paige�Graff�at�[email protected].��
�Oh,�What�a�Cupola!�(Optional�Extension)�Overview�of�topics:��Geometric�models,�technology.��For� this� part� of� the� activity,� students� will� create� a� model� of� the� Cupola,� a� recent� addition� to� the�International�Space�Station�using�Google�SketchUp.� �The�Cupola� includes�one�circular�window�and�six�trapezoid�shaped�windows.����RESOURCES�NEEDED:��Google�SketchUp�and�Oh,�What�a�Cupola!�Handout.��
National Aeronautics and Space Administration
Expedition�Earth�and�Beyond:��Astromaterials�Research�and�Exploration�Science�(ARES)�Education�Version�1.0�NASA�Johnson�Space�Center�
Oh,�What�A�Vision!��Take�a�look�at�the�follow�sets�of�astronaut�photographs.��Each�image�was�taken�of�the�same�area�with�camera� lenses� of� different� focal� lengths.� � Your� task� is� to� match� the� camera� lens� with� the� acquired�astronaut�photograph.������A. Match�each�of�the�following�lenses�with�the�images�below:���180�mm�lens,�400�mm�lens�
�
����������
�B. �Match�each�of�the�following�lenses�with�the�images�below:���400�mm�lens,�800�mm�lens�
�
����������
�C. Match�each�of�the�following�lenses�with�the�images�below:���80�mm�lens,�800�mm�lens�
�
����������
1� 2
1�
1�
2
2
National Aeronautics and Space Administration
Expedition�Earth�and�Beyond:��Astromaterials�Research�and�Exploration�Science�(ARES)�Education�Version�1.0�NASA�Johnson�Space�Center�
� ��D. Match�each�of�the�following�lenses�with�the�images�below:���180�mm�lens,�800�mm�lens��
����������������E. Match�each�of�the�following�lenses�with�the�images�below:���80�mm�lens,�800�mm�lens��
����������������F. Match�each�of�the�following�lenses�with�the�images�below:���400�mm�lens,�800�mm�lens��
����������������
1�
1�
1� 2
2
2
National Aeronautics and Space Administration
Expedition�Earth�and�Beyond:��Astromaterials�Research�and�Exploration�Science�(ARES)�Education�Version�1.0�NASA�Johnson�Space�Center�
Oh,�What�a�Cupola!��
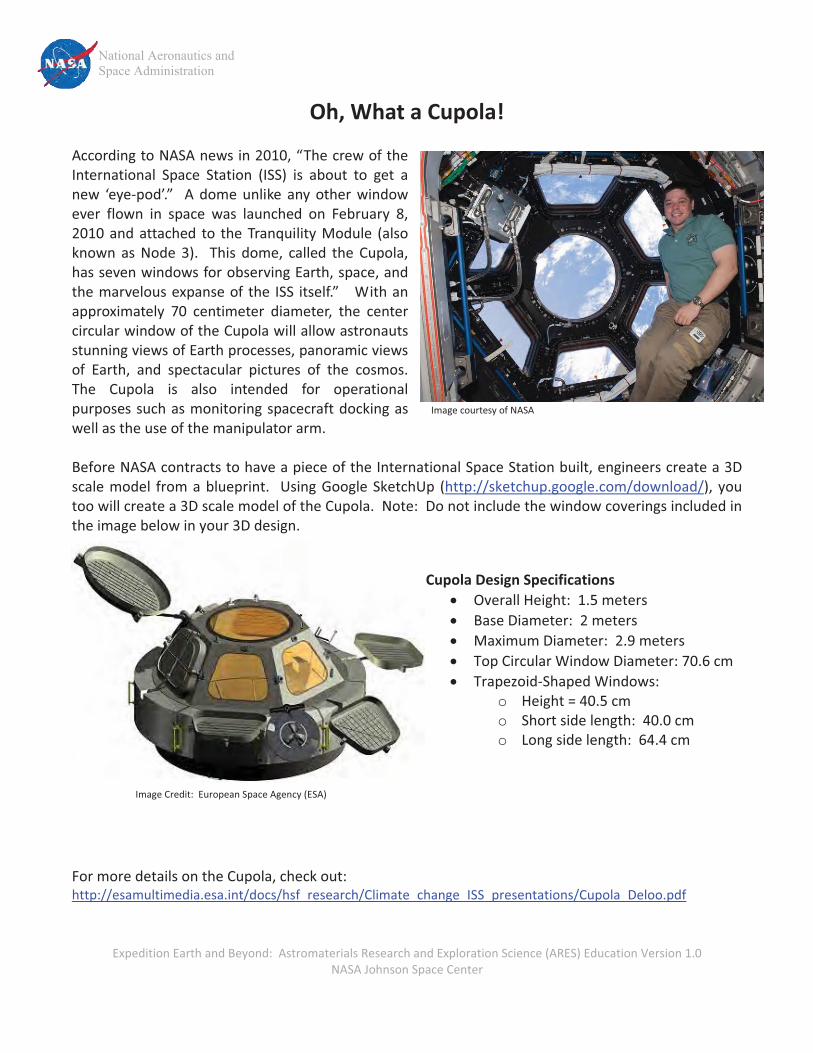
According�to�NASA�news�in�2010,�“The�crew�of�the�International� Space� Station� (ISS)� is� about� to� get� a�new� ‘eye�pod’.”� � A� dome� unlike� any� other� window�ever� flown� in� space� was� launched� on� February� 8,�2010� and� attached� to� the� Tranquility� Module� (also�known� as� Node� 3).� � This� dome,� called� the� Cupola,�has�seven�windows�for�observing�Earth,�space,�and�the�marvelous�expanse�of� the� ISS� itself.”� � �With�an���approximately� 70� centimeter� diameter,� the� center�circular�window�of�the�Cupola�will�allow�astronauts�stunning�views�of�Earth�processes,�panoramic�views�of� Earth,� and� spectacular� pictures� of� the� cosmos.��The� Cupola� is� also� intended� for� operational�purposes�such�as�monitoring�spacecraft�docking�as�well�as�the�use�of�the�manipulator�arm.��Before�NASA�contracts�to�have�a�piece�of�the�International�Space�Station�built,�engineers�create�a�3D�scale�model� from�a�blueprint.� �Using�Google�SketchUp� (http://sketchup.google.com/download/),� you�too�will�create�a�3D�scale�model�of�the�Cupola.��Note:��Do�not�include�the�window�coverings�included�in�the�image�below�in�your�3D�design.��
�������������
����For�more�details�on�the�Cupola,�check�out:��http://esamultimedia.esa.int/docs/hsf_research/Climate_change_ISS_presentations/Cupola_Deloo.pdf����
Image�courtesy�of�NASA
Image�Credit:��European�Space�Agency�(ESA)�
Cupola�Design�Specifications�� Overall�Height:��1.5�meters��� Base�Diameter:��2�meters�� Maximum�Diameter:��2.9�meters��� Top�Circular�Window�Diameter:�70.6�cm�� Trapezoid�Shaped�Windows:���
o Height�=�40.5�cm�o Short�side�length:��40.0�cm�o Long�side�length:��64.4�cm�
National Aeronautics and Space Administration
Expedition�Earth�and�Beyond:��Astromaterials�Research�and�Exploration�Science�(ARES)�Education�Version�1.0�NASA�Johnson�Space�Center�
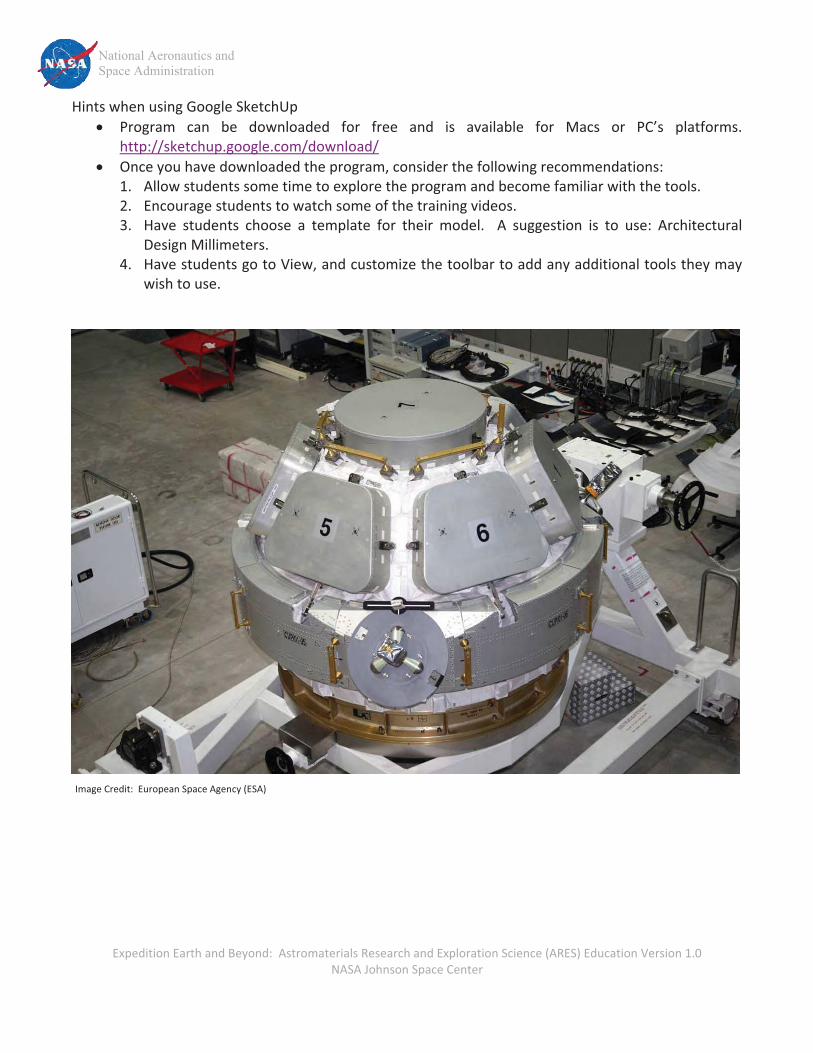
Hints�when�using�Google�SketchUp�� Program� can� be� downloaded� for� free� and� is� available� for� Macs� or� PC’s� platforms.�
http://sketchup.google.com/download/�� Once�you�have�downloaded�the�program,�consider�the�following�recommendations:�
1. Allow�students�some�time�to�explore�the�program�and�become�familiar�with�the�tools.�2. Encourage�students�to�watch�some�of�the�training�videos.�3. Have� students� choose� a� template� for� their� model.� � A� suggestion� is� to� use:� Architectural�
Design�Millimeters.�4. Have�students�go�to�View,�and�customize�the�toolbar�to�add�any�additional�tools�they�may�
wish�to�use.�
�Image�Credit:��European�Space�Agency�(ESA)�
National Aeronautics and Space Administration
OH, WHAT A PANE!
��
�
An�inquiry�based�activity�with�a�mathematical�approach�to�investigating�windows�on�
Earth….and�in�space.

National Aeronautics and Space Administration
OH, WHAT A PANE! Written�and�Developed�for�the�Expedition�Earth�and�Beyond�Education�Program�
Astromaterials�Research�and�Exploration�Science�(ARES)�Directorate�ARES�Education�Program,�NASA�Johnson�Space�Center�JACOBS���Engineering�Science�Contract�Group�(ESCG)��
Written�by:�
Marshalyn�Baker,�Classroom�Teacher���Michele�Mailhot,�Mathematics�Education�Specialist�
Paige�Valderrama�Graff,�ARES�Science�Education�Specialist��
Edited�by�the�following�educators,�scientists,�and�staff�within�the��Astromaterials�Research�and�Exploration�Science�(ARES)�Directorate��
at�the�NASA�Johnson�Space�Center:��
Trevor�Graff,�Planetary�Scientist�Patricia�Huynh,�Administrative�Specialist�
Charles�Lindgren,�Classroom�Teacher�Timothy�McCollum,�Classroom�Teacher�
Susan�Runco,�Physical�Scientist�William�Stefanov,�Senior�Geoscientist�
Kim�Willis,�Principal�Geoscientist�
Front�Cover�Images�courtesy�of�NASA���
©�2010�Astromaterials�Research�and�Exploration�Science�(ARES)�Education�Program.���All�rights�reserved.��This�document�may�be�freely�distributed�for�non�commercial�use�only.
National Aeronautics and Space Administration
Expedition�Earth�and�Beyond:��Astromaterials�Research�and�Exploration�Science�(ARES)�Education�–�Version�1.0�NASA�Johnson�Space�Center�
OH, WHAT A PANE! �
Oh,�What�Do�You�See?��How� often� do� you� look� out� the� window?� � What� do� you� see� as� you� look� out� the� window� from� your�classroom?��Perhaps�you�see�a�city�street,�a�lake,�or�a�cornfield.��What�if�you�were�sitting�in�a�classroom�in�a�different�school,�or�even�a�different�state?��How�would�your�view�change?��Everyone�has�a�different�view�as�they�look�out�a�window,�depending�on�their�location.��How�would�your�view�change�if�you�were�to�take�a�step�back�from�the�window?��Think�about�how�your�view� might� change� if� you� were� riding� on� the� bus� or� in� a� car.� � What� about� if� you� were� on� a� plane?��Imagine�what�you�might�see�if�you�were�an�astronaut�in�space�observing�Earth�from�a�window�on�the�International� Space� Station!� � Think� about� the� function� or� use� of� windows.� Some� may� be� used� for�viewing�in�or�out,�for�letting�light�in,�or�for�decorative�purposes.��Many�windows�have�multiple�uses.��Where�you�are�certainly�determines�what�you�see�as�you�look�out�a�window.��The�type�and�shape�of�a�window,� however,� can� also� change� your� view.� � � In� fact,� windows� come� in� many� different� shapes:�rectangles,�circles,�ellipses�(ovals),�and�octagons.��In�the�“Oh,�What�A�Pane!”�activity�you�will�go�through�a� set�of�exercises,�each�with�a�different�purpose�and�use� of�your�mathematical� knowledge.� �You�will�start� by� making� observations� of� windows� you� see� every� day� and� will� eventually� think� about� the�windows�astronauts�look�out�of�as�they�orbit�the�Earth�on�the�International�Space�Station.����
For�starters,�determine�what�makes�the�“perfect”�window.�Let's�investigate�what�that�might�be.��
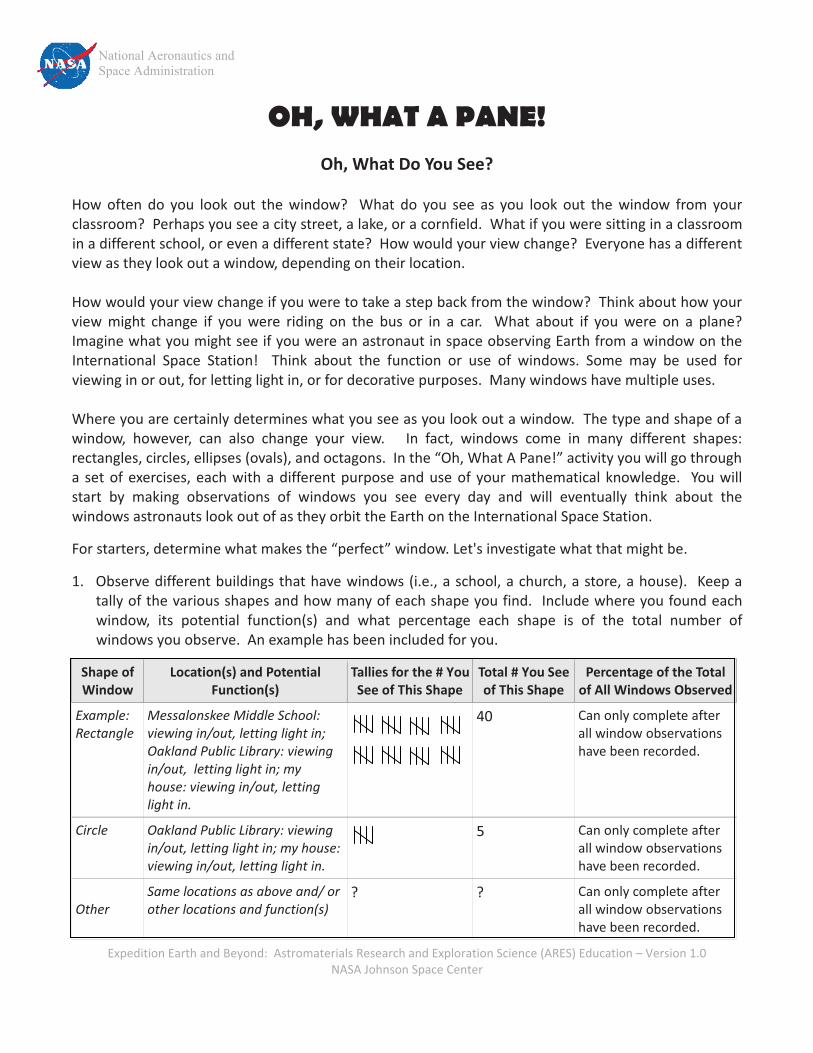
1. Observe�different�buildings�that�have�windows�(i.e.,�a�school,�a�church,�a�store,�a�house).� �Keep�a�tally�of�the�various�shapes�and�how�many�of�each�shape�you�find.�� Include�where�you�found�each�window,� its� potential� function(s)� and� what� percentage� each� shape� is� of� the� total� number� of�windows�you�observe.��An�example�has�been�included�for�you.��
�
Shape�of�Window�
Location(s)�and�Potential�Function(s)�
Tallies�for�the�#�You �See�of�This�Shape�
Total�#�You See�of�This�Shape�
Percentage�of�the�Total�of�All�Windows�Observed
Example:��Rectangle�
Messalonskee�Middle�School:�viewing�in/out,�letting�light�in;�Oakland�Public�Library:�viewing�in/out,��letting�light�in;�my�house:�viewing�in/out,�letting�light�in.�
� 40� Can�only�complete�after�all�window�observations�have�been�recorded.�
Circle� Oakland�Public�Library:�viewing�in/out,�letting�light�in;�my�house:�viewing�in/out,�letting�light�in.�
� 5� Can�only�complete�after�all�window�observations�have�been�recorded.�
�Other��
Same�locations�as�above�and/�or�other�locations�and�function(s)�
?� ?� Can�only�complete�after�all�window�observations�have�been�recorded.�
National Aeronautics and Space Administration
Expedition�Earth�and�Beyond:��Astromaterials�Research�and�Exploration�Science�(ARES)�Education�–�Version�1.0�NASA�Johnson�Space�Center�
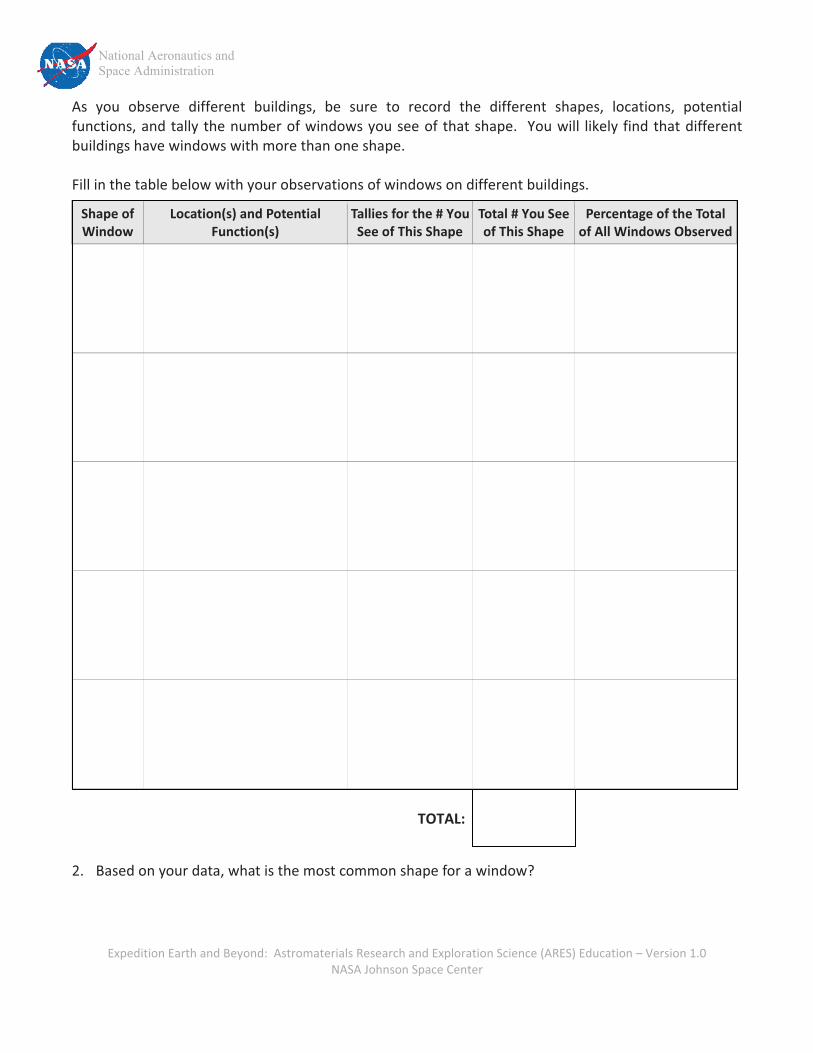
As� you� observe� different� buildings,� be� sure� to� record� the� different� shapes,� locations,� potential�functions,�and�tally� the�number�of�windows�you�see�of�that�shape.� �You�will� likely�find�that�different�buildings�have�windows�with�more�than�one�shape.��Fill�in�the�table�below�with�your�observations�of�windows�on�different�buildings.��
Shape�of�Window�
Location(s)�and�Potential�Function(s)�
Tallies�for�the�#�You �See�of�This�Shape�
Total�#�You See�of�This�Shape�
Percentage�of�the�Total�of�All�Windows�Observed
� � � � �����
�����
� � � �
�����
� � � �
�����
� � � �
�����
� � � �
�� � � � � � � ���TOTAL:���� � � �����������
2. Based�on�your�data,�what�is�the�most�common�shape�for�a�window?������
National Aeronautics and Space Administration
Expedition�Earth�and�Beyond:��Astromaterials�Research�and�Exploration�Science�(ARES)�Education�–�Version�1.0�NASA�Johnson�Space�Center�
3. Why�do�you�think�this�is�the�case?�����
4. Do�you�see�any�patterns�in�your�data�between�the�shape�of�the�windows�and�what�the�purpose�of�the�windows�might�be?����
5. How�is�your�data�similar�to�the�data�of�others�in�your�class?��How�is�it�different?�����
One�consideration�you�might�have�as�you�determine�the�“perfect”�window�could�be�the�size,�shape,�or�area� of� the� window.� � You� will� compute� the� area� of� windows� with� the� following� shapes:� � rectangle,�square,�circle,�and�octagon.��Be�sure�to�show�your�work�and�final�answer�labeled�with�the�appropriate�unit.� �Use�additional�paper�as�necessary.� �Final�answers�should�be� recorded�on� the� table�provided� in�question�10.�
�6. Find�the�area�of�a�rectangular�window�with�dimensions�4�½�feet�by�3�feet.��Include�a�labeled�sketch�
of�your�window�and�show�your�work.�������7. Find�the�area�of�a�square�window�with�dimensions�4�feet�by�4�feet.��Include�a�labeled�sketch�of�your�
window�and�show�your�work.��
��
���
8. Find� the� area� of� a� circular� window� with� a� diameter� of� 4� feet.� � Include� a� labeled� sketch� of� your�window�and�show�your�work.��
National Aeronautics and Space Administration
Expedition�Earth�and�Beyond:��Astromaterials�Research�and�Exploration�Science�(ARES)�Education�–�Version�1.0�NASA�Johnson�Space�Center�
Octagonal�windows�are�a�bit�more�difficult�to�calculate.��According�to�a�window�manufacturer,�to�fit�an�octagonal�window�into�a�square�opening�of�4�ft.�by�4�ft.,�you�would�have�to�remove�¼� inch�from�all�sides�to�accommodate�the�frame.� �This�would�leave�you�with�an�overall�height�(OH)�of�3�ft.�11�½�in.�and�an�overall�width�(OW)�of�3�ft.�11�½�inches.���In� order� to� more� easily� construct� an� octagonal� window� with� all� sides� having� the� same� length�(congruent� sides),� this� same� window� manufacturer� stated� that� each� side� would� have� a� length� of�approximately�1.6�ft.��(approximately�1�ft.,�7�inches).��
��
��������
������������������������
Overall Height (OH) of the square opening is 4 ft (solid black arrow). If you subtract ¼” from each side to fit in an octagonal window the OH would be 4 ft minus ¼” from the top and ¼” from the bottom which equals 3 ft 11 ½” (red dashed arrow).
The Overall Width (OW) would be computed the same way.
In order to create a regular octagonal window (with congruent sides), the length of each side will be approximately 1.6 ft.
National Aeronautics and Space Administration
Expedition�Earth�and�Beyond:��Astromaterials�Research�and�Exploration�Science�(ARES)�Education�–�Version�1.0�NASA�Johnson�Space�Center�
9. Let’s�think�about�this�octagonal�window.� �Looking�at�the�sketch�provided of�the�shaded�octagon�within�the square ,�answer�the following questions:��
A. What�do�you�notice�mathematically�about�this�sketch?������
B. Describe�how�you�would�go�about�determining�the�area�of�the�octagon.��������
C. Find�the�area�of�this�octagonal�window.��Include�labels�on�the�sketch�of�the�window�provided �and show�your�work.��Use�additional�paper�as�necessary.�
�����������������10.��Record�the�area�of�each�shape�you�have�determined.��You�will use this�information�later.�
������
Window�Shape�with�Dimensions� Area�(in�square�feet)�
4�½�ft.�by�3�ft.�Rectangle� �
4�ft.�by�4�ft.�Square� �
Circle�with�4�ft.�Diameter� �
Octagon�with�OH/OW�of�3�ft.�11�½�inches� �
National Aeronautics and Space Administration
Expedition�Earth�and�Beyond:��Astromaterials�Research�and�Exploration�Science�(ARES)�Education�–�Version�1.0�NASA�Johnson�Space�Center�
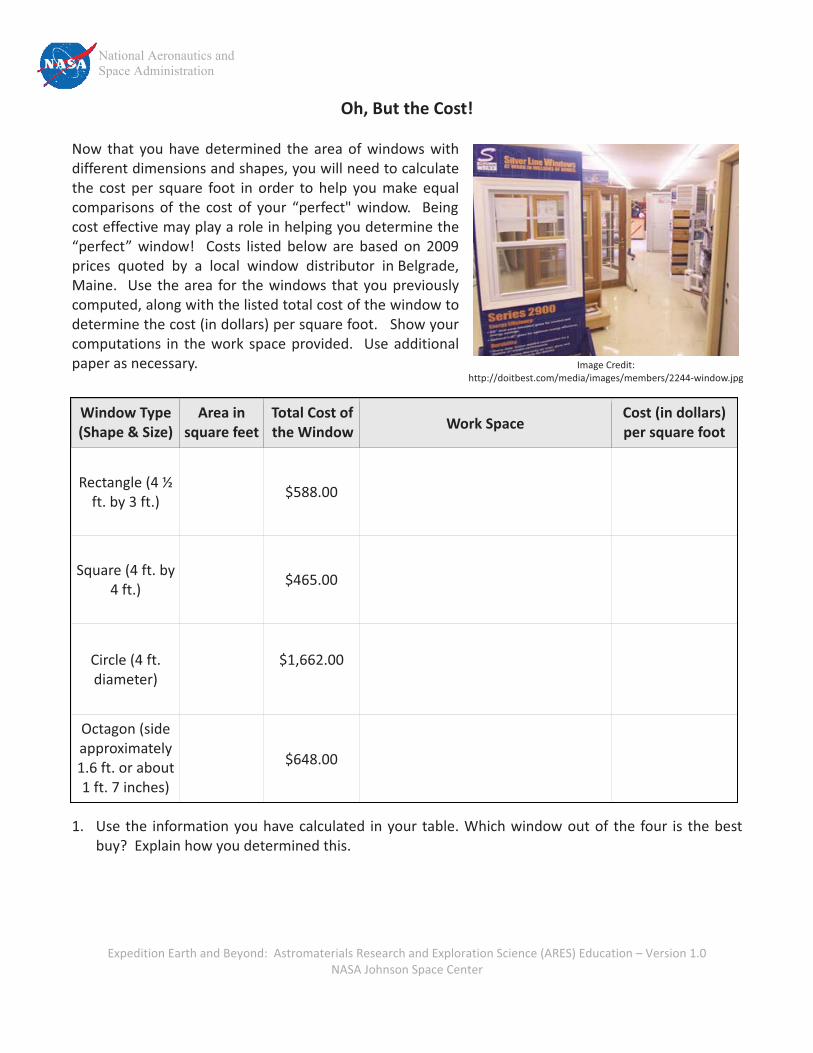
Oh,�But�the�Cost!��Now� that� you� have� determined� the� area� of� windows� with�different�dimensions�and�shapes,�you�will�need�to�calculate�the� cost� per� square� foot� in� order� to� help� you� make� equal�comparisons� of� the� cost� of� your� “perfect"� window.� � Being�cost�effective�may�play�a�role�in�helping�you�determine�the�“perfect”� window!� � Costs� listed� below� are� based� on� 2009�prices� quoted� by� a� local� window� distributor� in�Belgrade, �Maine.� �Use� the�area� for� the�windows� that�you�previously�computed,�along�with�the�listed�total�cost�of�the�window�to�determine�the�cost�(in�dollars)�per�square�foot.���Show�your�computations� in� the� work� space� provided.� � Use� additional�paper�as�necessary.���
Window�Type�(Shape�&�Size)�
Area�in�square�feet�
Total�Cost of�the�Window� Work�Space�
Cost�(in�dollars)�per�square�foot�
Rectangle�(4�½�ft.�by�3�ft.)�
����
$588.00�
� �
Square�(4�ft.�by�4�ft.)�
����
$465.00�
� �
Circle�(4�ft.�diameter)�
����
$1,662.00��
� �
Octagon�(side�approximately�1.6�ft.�or�about�1�ft.�7�inches)�
��� $648.00�
� �
�
1. Use�the� information�you�have�calculated� in�your� table.�Which�window�out�of� the� four� is� the�best�buy?��Explain�how�you�determined�this.����
Image�Credit:��http://doitbest.com/media/images/members/2244�window.jpg
National Aeronautics and Space Administration
Expedition�Earth�and�Beyond:��Astromaterials�Research�and�Exploration�Science�(ARES)�Education�–�Version�1.0�NASA�Johnson�Space�Center�
2. Would� you� ever� choose� a� window� that� was� not� the� best� buy� or� one� that� was� not� the� most� cost�effective?��Explain.�
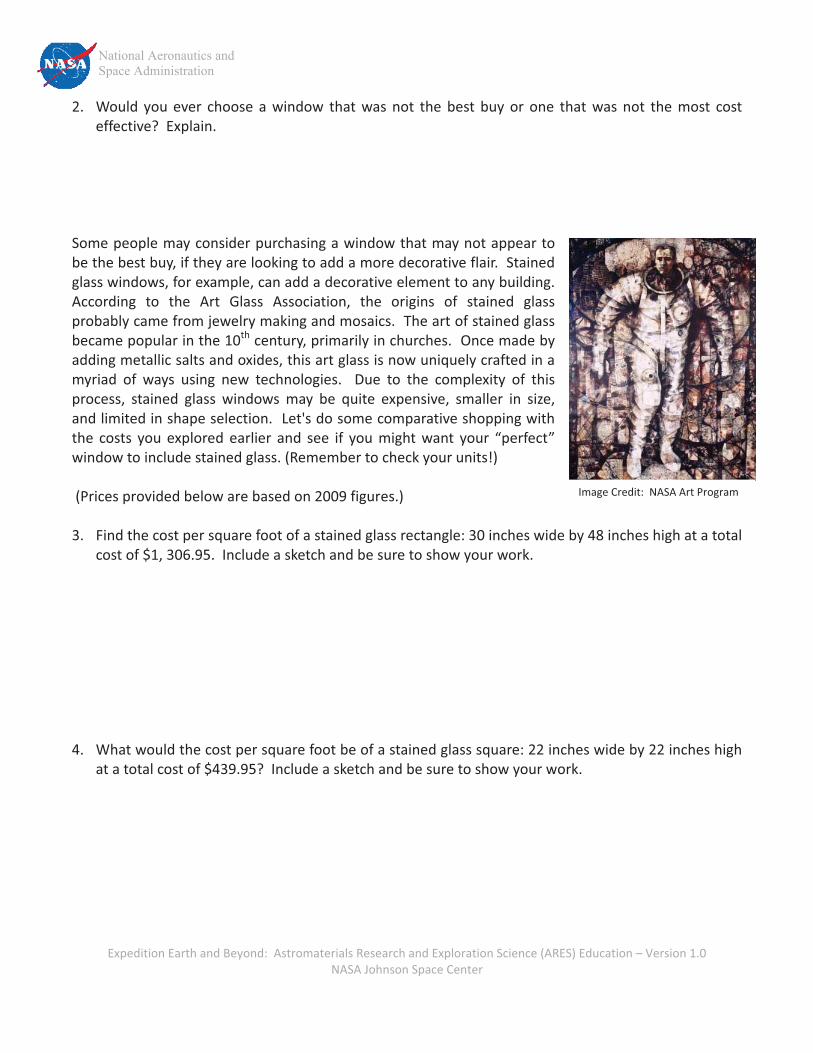
�����Some�people�may�consider�purchasing�a�window�that�may�not�appear�to�be�the�best�buy,�if�they�are�looking�to�add�a�more�decorative�flair.��Stained�glass�windows,�for�example,�can�add�a�decorative�element�to�any�building.��According� to� the� Art� Glass� Association,� the� origins� of� stained� glass�probably�came�from�jewelry�making�and�mosaics.��The�art�of�stained�glass�became�popular�in�the�10th�century,�primarily�in�churches.��Once�made�by�adding�metallic�salts�and�oxides,�this�art�glass�is�now�uniquely�crafted�in�a�myriad� of� ways� using� new� technologies.� � Due� to� the� complexity� of� this�process,� stained� glass� windows� may� be� quite� expensive,� smaller� in� size,�and�limited�in�shape�selection.��Let's�do�some�comparative�shopping�with�the� costs� you� explored� earlier� and� see� if� you� might� want� your� “perfect”�window�to�include�stained�glass.�(Remember�to�check�your�units!)�
��(Prices�provided�below�are�based�on�2009�figures.)��3. Find�the�cost�per�square�foot�of�a�stained�glass�rectangle:�30�inches�wide�by�48�inches�high�at�a�total�
cost�of�$1,�306.95.��Include�a�sketch�and�be�sure�to�show�your�work.������������4. What�would�the�cost�per�square�foot�be�of�a�stained�glass�square:�22�inches�wide�by�22�inches�high�
at�a�total�cost�of�$439.95?��Include�a�sketch�and�be�sure�to�show�your�work.����
������
�
Image�Credit:��NASA�Art�Program�
National Aeronautics and Space Administration
Expedition�Earth�and�Beyond:��Astromaterials�Research�and�Exploration�Science�(ARES)�Education�–�Version�1.0�NASA�Johnson�Space�Center�
5. If�the�total�cost�was�$414.95�for�a�stained�glass�circle�with�a�diameter�of�30�inches,�what�would�the�cost�be�per�square�foot?��Include�a�sketch�and�be�sure�to�show�your�work.�������
�����
6. Find� the� cost� per� square� foot� of� a� regular� stained� glass� octagonal� window� with� a� side� length� of�18.75�inches�with�a�total�cost�of�$500.00.��Include�a�sketch�and�be�sure�to�show�your�work.�����������
�7. Now�that�you�have�had�the�opportunity�to�investigate�windows,�describe�which�of�these�would�be�
your�“perfect”�window.��Include�the�shape,�dimensions,�cost,�and�whether�or�not�you�are�planning�to�use�stained�glass.� �Be� sure� to� include�a� sketch�of�your� window�with� labeled�dimensions.� � Also�describe�the�purpose�of�your�“perfect”�window.��������������������
National Aeronautics and Space Administration
Expedition�Earth�and�Beyond:��Astromaterials�Research�and�Exploration�Science�(ARES)�Education�–�Version�1.0�NASA�Johnson�Space�Center�
MAKING�AND�MATHEMATICALLY�EXPLORING�YOUR�OWN�“STAINED�GLASS”�WINDOW�You� will� now� create� your� own� “stained�glass”� window� using� pattern� blocks� or� tangrams� to� explore�mathematical�relationships�of�your�stained�glass�window�design.��If�you�prefer,�you�can�also�draw�your�window�using�colored�pencils�on�a�separate�piece�of�paper.��You�must�use�at�least�6�shapes�(same�or�different� shapes)� for� your� window� design.� � Once� you� have� your� own� design� created,� you� will�mathematically�explore�your�window.��1. Describe� your� window� mathematically.� � At� a� minimum,� include� the� following:� � Shapes�used, �
calculate�the�percentages�of�different�shapes,�calculate�the�percentages�of�different�colors.��������
2. Take�one�piece�of�your�window,�for�example�an�equilateral�triangle�in�the�set�of�pattern�blocks.�Let�this�represent�one�base�unit.��Find�the�area�of�your�window,�using�the�piece�you�choose�as�one�base�unit.��Be�sure�to�identify�your�base�unit�below.��� One�base�unit�=�__________________________________��
Sketch� the� window� you� created� below,� labeling� the� base� unit� piece.� � Find� the� area� of� your�window.��Be�sure�to�show�your�work.�
�� ��������������������Area�of�window�=�__________________________________��
�
National Aeronautics and Space Administration
Expedition�Earth�and�Beyond:��Astromaterials�Research�and�Exploration�Science�(ARES)�Education�–�Version�1.0�NASA�Johnson�Space�Center�
3. Change�your�perspective�by�having�another�geometric�piece�be�one�base�unit.� �Calculate�the�new�area.���Be�sure�to�identify�your�new�base�unit.��� One�base�unit�=�__________________________________��
Sketch� the� window� you� created� below,� labeling� the� base� unit� piece.� � Find� the� area� of� your�window.��Be�sure�to�show�your�work.�
�� ��������������������Area�of�window�=�__________________________________�
�4. Describe� how� the� total� area� for� your� stained� glass� window� has� changed� and� what� this� has� to� do�
with�the�two�geometric�pieces�that�you�have�used.����������
��
�����
National Aeronautics and Space Administration
Expedition�Earth�and�Beyond:��Astromaterials�Research�and�Exploration�Science�(ARES)�Education�–�Version�1.0�NASA�Johnson�Space�Center�
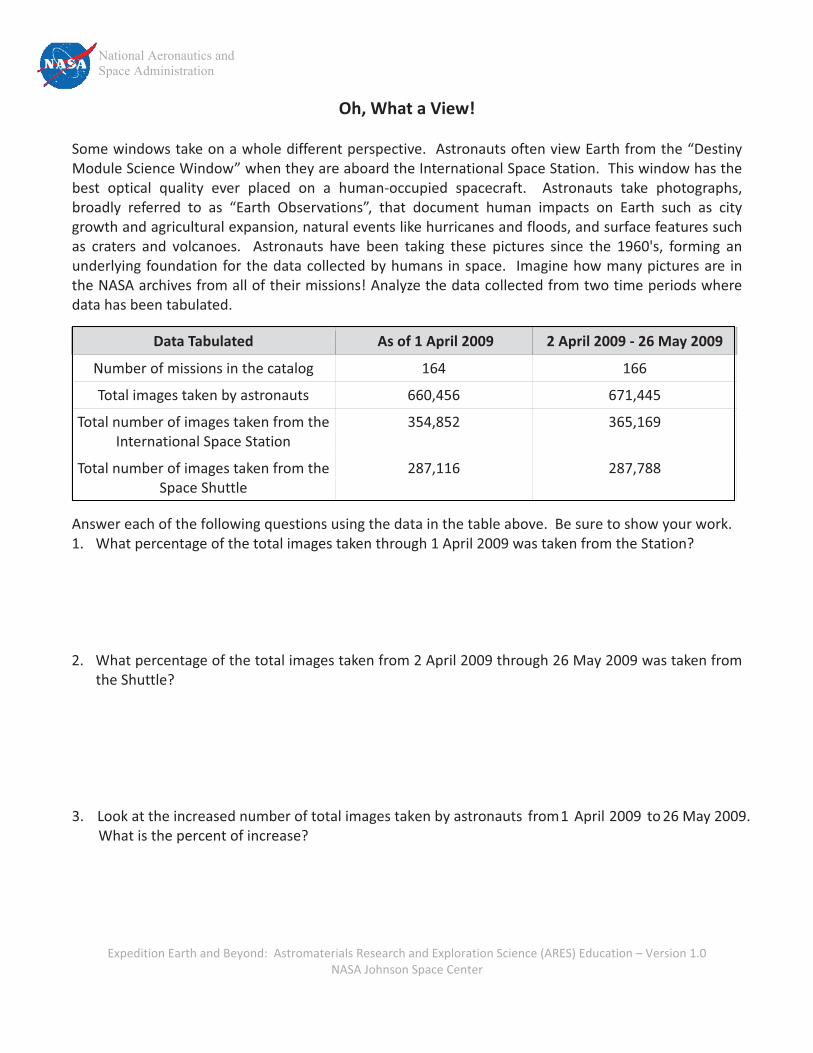
Oh,�What�a�View!��Some�windows�take�on�a�whole�different�perspective.��Astronauts�often�view�Earth�from�the�“Destiny�Module�Science�Window”�when�they�are�aboard�the�International�Space�Station.��This�window�has�the�best� optical� quality� ever� placed� on� a� human�occupied� spacecraft.� � Astronauts� take� photographs,�broadly� referred� to� as� “Earth� Observations”,� that� document� human� impacts� on� Earth� such� as� city�growth�and�agricultural�expansion,�natural�events�like�hurricanes�and�floods,�and�surface�features�such�as� craters� and� volcanoes.� � Astronauts� have� been� taking� these� pictures� since� the� 1960's,� forming� an�underlying�foundation�for�the�data�collected�by�humans� in�space.� � Imagine�how�many�pictures�are� in�the�NASA�archives�from�all�of�their�missions!�Analyze�the�data�collected�from�two�time�periods�where�data�has�been�tabulated.���
�
Data�Tabulated� �As�of�1�April�2009� 2�April�2009���26�May�2009�
Number�of�missions�in�the�catalog� 164� 166�
Total�images�taken�by�astronauts� 660,456� 671,445�
Total�number�of�images�taken�from�the�International�Space�Station�
354,852� 365,169�
Total�number�of�images�taken�from�the�Space�Shuttle�
287,116� 287,788�
�
Answer�each�of�the�following�questions�using�the�data�in�the�table�above.��Be�sure�to�show�your�work.�1. What�percentage�of�the�total�images�taken�through�1�April�2009�was�taken�from�the�Station?���
��
���
2. What�percentage�of�the�total�images�taken�from�2�April�2009�through�26�May�2009�was�taken�from�the�Shuttle?��
��
���
3. Look at the increased number of total images taken by astronauts� from� 1� April� 2009� to 26 May�2009. What is the percent of increase? �
�
National Aeronautics and Space Administration
Expedition�Earth�and�Beyond:��Astromaterials�Research�and�Exploration�Science�(ARES)�Education�–�Version�1.0�NASA�Johnson�Space�Center�
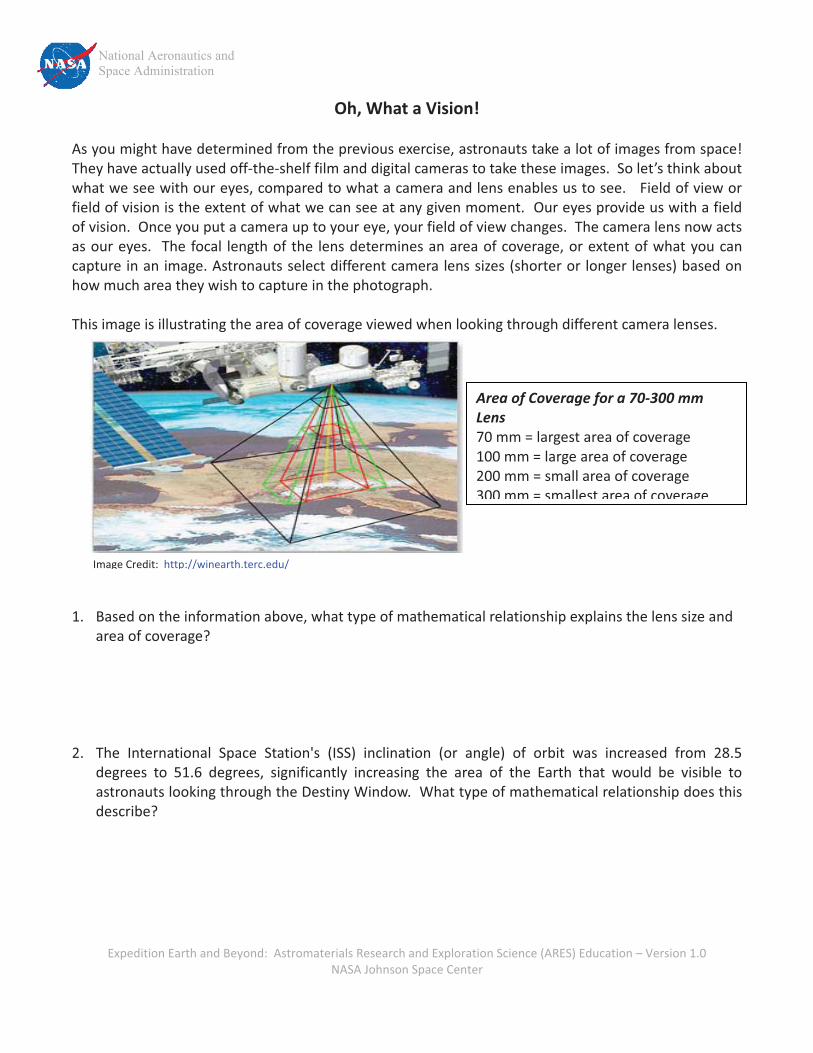
Oh,�What�a�Vision!��As�you�might�have�determined�from�the�previous�exercise,�astronauts�take�a�lot�of�images�from�space!��They�have�actually�used�off�the�shelf�film�and�digital�cameras�to�take�these�images.��So�let’s�think�about�what�we�see�with�our�eyes,�compared�to�what�a�camera�and�lens�enables�us�to�see.���Field�of�view�or�field�of�vision�is�the�extent�of�what�we�can�see�at�any�given�moment.��Our�eyes�provide�us�with�a�field�of�vision.��Once�you�put�a�camera�up�to�your�eye,�your�field�of�view�changes.��The�camera�lens�now�acts�as�our�eyes.� �The�focal� length�of�the� lens�determines�an�area�of�coverage,�or�extent�of�what�you�can�capture�in�an�image.�Astronauts�select�different�camera�lens�sizes�(shorter�or�longer�lenses)�based�on�how�much�area�they�wish�to�capture�in�the�photograph.���This�image�is�illustrating�the�area�of�coverage�viewed�when�looking�through�different�camera�lenses.�
����������
��1. Based�on�the�information�above,�what�type�of�mathematical�relationship�explains�the�lens�size�and�
area�of�coverage?���
���
�2. The� International� Space� Station's� (ISS)� inclination� (or� angle)� of� orbit� was� increased� from� 28.5�
degrees� to� 51.6� degrees,� significantly� increasing� the� area� of� the� Earth� that� would� be� visible� to�astronauts�looking�through�the�Destiny�Window.��What�type�of�mathematical�relationship�does�this�describe?�
�����
Image�Credit:��http://winearth.terc.edu/��
Area�of�Coverage�for�a�70�300�mm�Lens�70�mm�=�largest�area�of�coverage�100�mm�=�large�area�of�coverage��200�mm�=�small�area�of�coverage�300 mm = smallest area of coverage
National Aeronautics and Space Administration
Expedition�Earth�and�Beyond:��Astromaterials�Research�and�Exploration�Science�(ARES)�Education�–�Version�1.0�NASA�Johnson�Space�Center�
3. Using�the�handout�provided�by�your�teacher,�take�a� look�at�the�sets�of� images�taken�with�camera�lenses�of�different�focal� lengths.� �Match�the�camera�lens�with�the�acquired�astronaut�photograph.��Include�a�justification�of�your�answer.�����
�A. Image�A1:��Lens�used:�____________________________________�
�
� � Image�A2:��Lens�used:�____________________________________��� Write�a�brief�justification�of�your�answer:����
B. Image�B1:��Lens�used:�____________________________________��
� � Image�B2:��Lens�used:�____________________________________��� Write�a�brief�justification�of�your�answer:����
C. Image�C1:��Lens�used:�____________________________________�� �
� � Image�C2:��Lens�used:�____________________________________��
� Write�a�brief�justification�of�your�answer:����
D. Image�D1:��Lens�used:�____________________________________��
� � Image�D2:��Lens�used:�____________________________________��
� Write�a�brief�justification�of�your�answer:����
E. Image�E1:��Lens�used:�____________________________________��
� � Image�E2:��Lens�used:�____________________________________��
� Write�a�brief�justification�of�your�answer:�����
National Aeronautics and Space Administration
Expedition�Earth�and�Beyond:��Astromaterials�Research�and�Exploration�Science�(ARES)�Education�–�Version�1.0�NASA�Johnson�Space�Center�
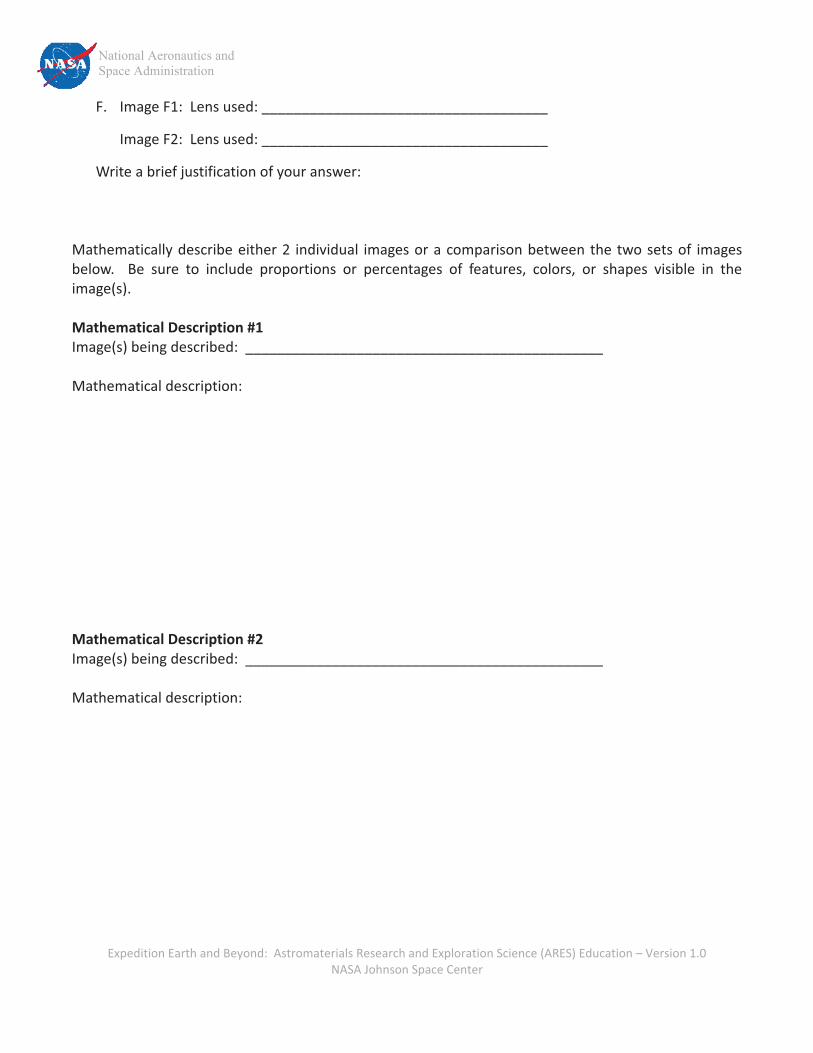
F. Image�F1:��Lens�used:�____________________________________��
� � Image�F2:��Lens�used:�____________________________________��
� Write�a�brief�justification�of�your�answer:����Mathematically�describe�either�2� individual� images�or�a�comparison�between�the�two�sets�of� images�below.� � Be� sure� to� include� proportions� or� percentages� of� features,� colors,� or� shapes� visible� in� the�image(s).��Mathematical�Description�#1�Image(s)�being�described:��_____________________________________________��Mathematical�description:���������������Mathematical�Description�#2�Image(s)�being�described:��_____________________________________________��Mathematical�description:�������������
National Aeronautics and Space Administration
Expedition�Earth�and�Beyond:��Astromaterials�Research�and�Exploration�Science�(ARES)�Education�–�Version�1.0�NASA�Johnson�Space�Center�
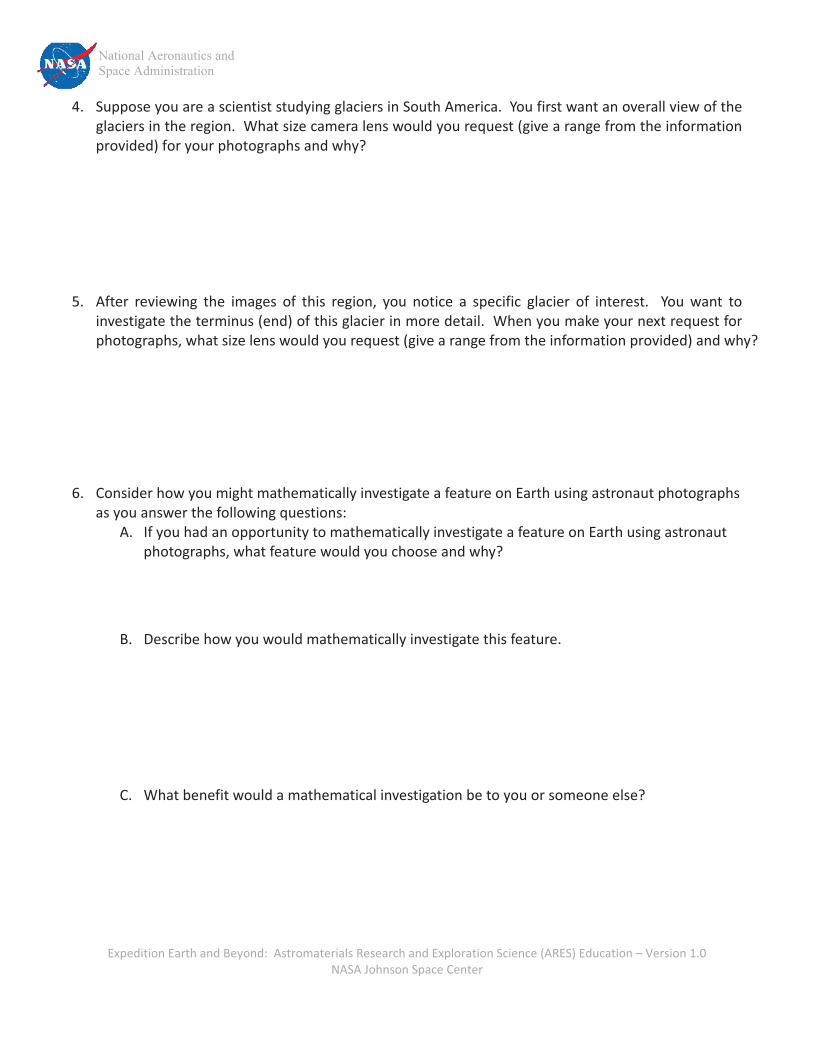
4. Suppose�you�are�a�scientist�studying�glaciers�in�South�America.��You�first�want�an�overall�view�of�the�glaciers�in�the�region.��What�size�camera�lens�would�you�request�(give�a�range�from�the�information�provided)�for your photographs and why?�
�������5. After� reviewing� the� images� of� this� region,� you� notice� a� specific� glacier� of� interest.� � You� want� to�
investigate�the�terminus�(end)�of�this�glacier�in�more�detail.��When�you�make�your�next�request�for�photographs,�what�size�lens�would�you�request�(give�a�range�from�the�information�provided)�and�why?�
��
����
6. Consider�how�you�might�mathematically�investigate�a�feature�on�Earth�using�astronaut�photographs�as�you�answer�the�following�questions:�
A. If�you�had�an�opportunity�to�mathematically�investigate�a�feature�on�Earth�using�astronaut�photographs,�what�feature�would�you�choose�and�why?������
B. Describe�how�you�would�mathematically�investigate�this�feature.���������
C. What�benefit�would�a�mathematical�investigation�be�to�you�or�someone�else?��������
�


