Embed Size (px)
Citation preview
Oracle® Communications Convergent Charging Controller Installation Guide
Release 12.0.0
December 2017

ii Installation Guide
Copyright
Copyright © 2017, Oracle and/or its affiliates. All rights reserved.
This software and related documentation are provided under a license agreement containing restrictions on use and disclosure and are protected by intellectual property laws. Except as expressly permitted in your license agreement or allowed by law, you may not use, copy, reproduce, translate, broadcast, modify, license, transmit, distribute, exhibit, perform, publish, or display any part, in any form, or by any means. Reverse engineering, disassembly, or decompilation of this software, unless required by law for interoperability, is prohibited.
The information contained herein is subject to change without notice and is not warranted to be error-free. If you find any errors, please report them to us in writing.
If this is software or related documentation that is delivered to the U.S. Government or anyone licensing it on behalf of the U.S. Government, then the following notice is applicable:
U.S. GOVERNMENT END USERS: Oracle programs, including any operating system, integrated software, any programs installed on the hardware, and/or documentation, delivered to U.S. Government end users are "commercial computer software" pursuant to the applicable Federal Acquisition Regulation and agency-specific supplemental regulations. As such, use, duplication, disclosure, modification, and adaptation of the programs, including any operating system, integrated software, any programs installed on the hardware, and/or documentation, shall be subject to license terms and license restrictions applicable to the programs. No other rights are granted to the U.S. Government.
This software or hardware is developed for general use in a variety of information management applications. It is not developed or intended for use in any inherently dangerous applications, including applications that may create a risk of personal injury. If you use this software or hardware in dangerous applications, then you shall be responsible to take all appropriate fail-safe, backup, redundancy, and other measures to ensure its safe use. Oracle Corporation and its affiliates disclaim any liability for any damages caused by use of this software or hardware in dangerous applications.
Oracle and Java are registered trademarks of Oracle and/or its affiliates. Other names may be trademarks of their respective owners.
Intel and Intel Xeon are trademarks or registered trademarks of Intel Corporation. All SPARC trademarks are used under license and are trademarks or registered trademarks of SPARC International, Inc. AMD, Opteron, the AMD logo, and the AMD Opteron logo are trademarks or registered trademarks of Advanced Micro Devices. UNIX is a registered trademark of The Open Group.
This software or hardware and documentation may provide access to or information about content, products, and services from third parties. Oracle Corporation and its affiliates are not responsible for and expressly disclaim all warranties of any kind with respect to third-party content, products, and services unless otherwise set forth in an applicable agreement between you and Oracle. Oracle Corporation and its affiliates will not be responsible for any loss, costs, or damages incurred due to your access to or use of third-party content, products, or services, except as set forth in an applicable agreement between you and Oracle.

iii
Contents
About This Document .................................................................................................................. v Document Conventions .............................................................................................................. vi
Chapter 1
Convergent Charging Controller Installation Overview ..................... 1
Overview ...................................................................................................................................... 1 Convergent Charging Controller Installed Components Overview ............................................. 1 Convergent Charging Controller Installation Procedure Overview ............................................. 3 Ensuring a Successful Installation ............................................................................................... 4
Chapter 2
Planning Your Convergent Charging Controller Installation ............. 5
Overview ...................................................................................................................................... 5 About Planning Your Convergent Charging Controller Installation ............................................. 5 Detailed Planning ........................................................................................................................ 6
Chapter 3
Convergent Charging Controller System Requirements .................... 9
Overview ...................................................................................................................................... 9 Network Requirements ................................................................................................................ 9 Memory Requirements ..............................................................................................................11 Storage Requirements...............................................................................................................12 Software and Hardware Requirements .....................................................................................17 Preparing the System ................................................................................................................19 Setting the Time Zone ...............................................................................................................21
Chapter 4
Advanced Storage and Memory Sizing ............................................. 25
Overview ....................................................................................................................................25 Types of Implementations .........................................................................................................25 Small Production System Example ...........................................................................................26 Medium Production System Example .......................................................................................32 Large Production System Example ...........................................................................................36 Node-Specific Users ..................................................................................................................40
Chapter 5
Convergent Charging Controller Pre-Installation Tasks .................. 45
Overview ....................................................................................................................................45 Preparing the System for Installation ........................................................................................45 Creating Users ...........................................................................................................................52 Installing a Browser ...................................................................................................................56 Installing and Configuring Oracle Database ..............................................................................56 Installing and Configuring BRM SDK ........................................................................................62

iv Installation Guide
Chapter 6
Installing Convergent Charging Controller ....................................... 63
Overview .................................................................................................................................... 63 Convergent Charging Controller Installation Options ................................................................ 63 Installing Convergent Charging Controller in Silent Mode ........................................................ 75 About Installation Logs .............................................................................................................. 76
Chapter 7
Post-Installation Tasks ....................................................................... 79
Overview .................................................................................................................................... 79 About Post-Installation Tasks .................................................................................................... 79 Post-Installation Initial Configuration ......................................................................................... 81 Setting Up CDR Storage ........................................................................................................... 86 Setting Up Voucher Storage ...................................................................................................... 87 Enabling SSL Connections to the Database ............................................................................. 87
Chapter 8
Verifying the Convergent Charging Controller Installation ............. 99
Overview .................................................................................................................................... 99 About Verifying the Installation .................................................................................................. 99 About Collecting Diagnostic Data with RDA HCVE ................................................................. 100
Appendix A
Convergent Charging Controller OUI Installer Screens ................. 103
Overview .................................................................................................................................. 103 Convergent Charging Controller OUI Installer Screens .......................................................... 103
Appendix B
Unusable scripts on remote database ............................................ 109
Glossary of Terms ............................................................................ 111
Index .................................................................................................. 121
v
About This Document
Audience
This guide is for system administrators who install or uninstall Oracle Communications Convergent Charging Controller.
Prerequisites
Before installing or uninstalling Convergent Charging Controller, you should have an understanding of UNIX, Oracle Solaris, and a familiarity with IN concepts as well as an understanding of Oracle databases, SQL, and PL/SQL.
This guide describes system tasks that should be carried out only by suitably trained operators.
Related Documents
See the following documents for related information about Convergent Charging Controller:
Concepts System Administrator's Guide Configuration User's Guide Security Guide
vi Installation Guide
Document Conventions
Typographical Conventions
The following terms and typographical conventions are used in the Oracle Communications Convergent Charging Controller documentation.
Formatting Convention Type of Information
Special Bold Items you must select, such as names of tabs. Names of database tables and fields.
Italics Name of a document, chapter, topic or other publication. Emphasis within text.
Button The name of a button to click or a key to press. Example: To close the window, either click Close, or press Esc.
Key+Key Key combinations for which the user must press and hold down one key and then press another. Example: Ctrl+P or Alt+F4.
Monospace Examples of code or standard output. Monospace Bold Text that you must enter. variable Used to indicate variables or text that should be replaced with an
actual value. menu option > menu option > Used to indicate the cascading menu option to be selected.
Example: Operator Functions > Report Functions hypertext link Used to indicate a hypertext link. Specialized terms and acronyms are defined in the glossary at the end of this guide.

Chapter 1, Convergent Charging Controller Installation Overview 1
Chapter 1
Convergent Charging Controller Installation Overview
Overview
Introduction
This chapter describes the Oracle Communications Convergent Charging Controller installed components and provides an overview of the Convergent Charging Controller installation procedure.
In this chapter
This chapter contains the following topics.
Convergent Charging Controller Installed Components Overview................................................ 1 Supporting Multi-Byte UTF-8 Character Sets ................................................................................ 4 Ensuring a Successful Installation ................................................................................................. 4
Convergent Charging Controller Installed Components Overview
About Convergent Charging Controller Installed Components
During the Convergent Charging Controller installation process, you install and configure the following components:
Oracle Database BRM SDK if your Convergent Charging Controller system will communicate with Oracle
Communications Billing and Revenue Management (BRM) when using the BRM Portal Communications Protocol (PCP) interface
Convergent Charging Controller software packages
Convergent Charging Controller Software
The following table describes the Convergent Charging Controller software sub-components installed by their respective software packages.
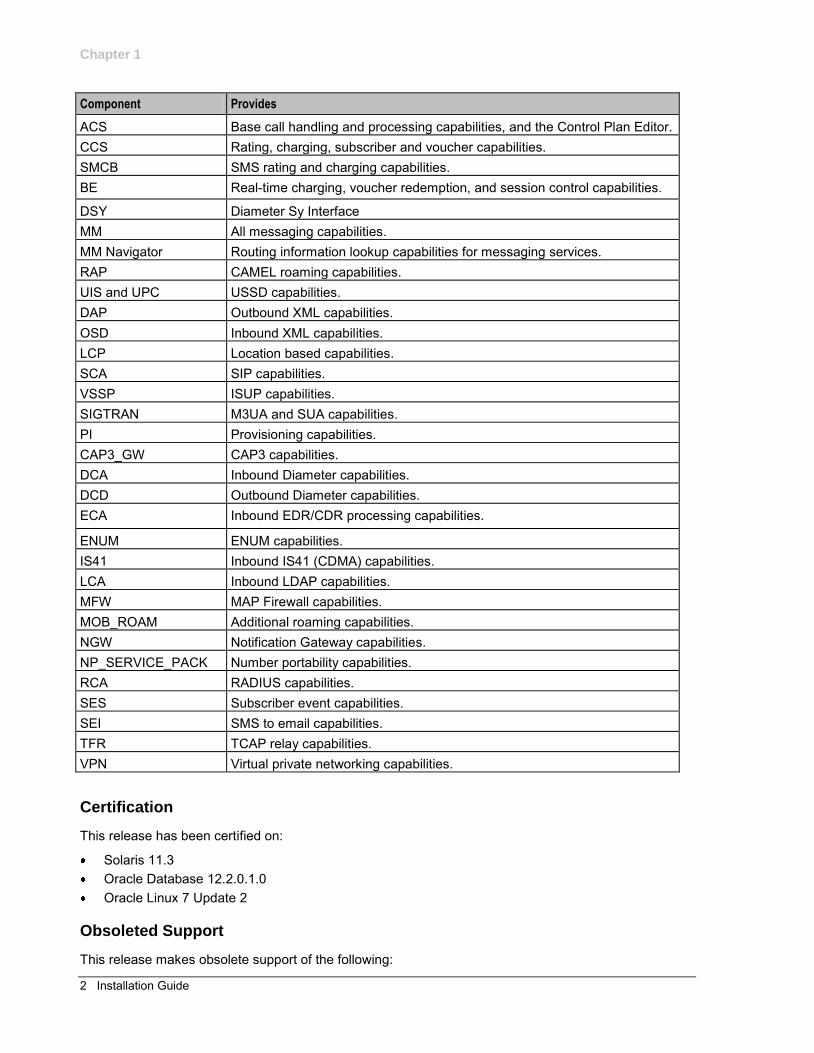
Component Provides
SMS Service Management System (SMS) support for all other components. For example:
Data replication. Statistics and alarm collection. Security (users and permissions). Report generation.
SLEE The Service Logic Execution Environment (SLEE) for the Voucher and Wallet Server (VWS) and Service Logic Controller (SLC) nodes.
Chapter 1
2 Installation Guide
Component Provides
ACS Base call handling and processing capabilities, and the Control Plan Editor. CCS Rating, charging, subscriber and voucher capabilities. SMCB SMS rating and charging capabilities. BE Real-time charging, voucher redemption, and session control capabilities.
DSY Diameter Sy Interface MM All messaging capabilities. MM Navigator Routing information lookup capabilities for messaging services. RAP CAMEL roaming capabilities. UIS and UPC USSD capabilities. DAP Outbound XML capabilities. OSD Inbound XML capabilities. LCP Location based capabilities. SCA SIP capabilities. VSSP ISUP capabilities. SIGTRAN M3UA and SUA capabilities. PI Provisioning capabilities. CAP3_GW CAP3 capabilities. DCA Inbound Diameter capabilities. DCD Outbound Diameter capabilities. ECA Inbound EDR/CDR processing capabilities.
ENUM ENUM capabilities. IS41 Inbound IS41 (CDMA) capabilities. LCA Inbound LDAP capabilities. MFW MAP Firewall capabilities. MOB_ROAM Additional roaming capabilities. NGW Notification Gateway capabilities. NP_SERVICE_PACK Number portability capabilities. RCA RADIUS capabilities. SES Subscriber event capabilities. SEI SMS to email capabilities. TFR TCAP relay capabilities. VPN Virtual private networking capabilities.
Certification
This release has been certified on:
Solaris 11.3 Oracle Database 12.2.0.1.0 Oracle Linux 7 Update 2
Obsoleted Support
This release makes obsolete support of the following:

Chapter 1
Chapter 1, Convergent Charging Controller Installation Overview 3
Solaris 10 Oracle Database 10.2 Oracle Database 11g Oracle Database 11g Client Java 1.6 Java 1.7
Convergent Charging Controller Installation Procedure Overview
Overview of the Installation Procedure
You install Convergent Charging Controller on each Service Management System (SMS), Voucher and Wallet Server (VWS), and Service Logic Controller (SLC) node. The installation procedure follows these steps:
Step Action
1 Plan your installation. When planning your installation, you will need to: Determine the scale of your implementation, for example, whether it is a small
test system or a large production system. Determine how many physical machines you need. Plan the system topology, for example, which SMS, VWS, or SLC nodes will run
on which machines.
2 Review the following system requirements: Hardware requirements, such as disk space and memory size Software requirements, such as operating system version, file system layout, and
file sizes Information requirements, such as IP addresses and host names
3 Perform pre-installation tasks: Perform system preparation tasks such as disabling services and configuring the
location of log files. Install and configure the Oracle database on local or remote server. Install and configure additional third-party software.
4 Install the Convergent Charging Controller product software on all nodes and optionally install service templates.
Note: If the database is on a remote server, ensure the required table spaces are added. See Advanced Storage and Memory Sizing (on page 25) for more details.
5 Perform mandatory post-installation configuration tasks. 6 Verify the installation.
Installation Options
You install Convergent Charging Controller by using the Convergent Charging Controller Oracle Universal Installer (the installer). Using the installer, you can perform either a GUI installation or a silent installation using response files, similar to Oracle database installation.
Chapter 1
4 Installation Guide
Supporting Multi-Byte UTF-8 Character Sets
Convergent Charging Controller uses the AL32UTF8 database character set that supports multi-byte UTF-8 and traditional character sets. The Convergent Charging Controller Installation Manager automatically sets the character set to AL32UTF8 when you install Convergent Charging Controller.
Ensuring a Successful Installation
Introduction
The Convergent Charging Controller installation should be performed only by qualified personnel. You must be familiar with the Oracle Solaris operating system, Linux operating system, and Oracle Database software. You should be experienced with installing Solaris packages. It is recommended that the installation and configuration of the Oracle database be performed by an experienced database administrator.
Installation Guidelines
Follow these guidelines:
As you install each component (for example, Oracle Database), verify that the component is installed successfully before continuing the installation process.
Pay close attention to the system requirements. Before you begin installing the software, make sure your system has the required base software. In addition, make sure that you know all of the required configuration values, such as host names and port numbers.
As you create new configuration values, write them down. In some cases, you might need to re-enter configuration values later in the procedure.

Chapter 2, Planning Your Convergent Charging Controller Installation 5
Chapter 2
Planning Your Convergent Charging Controller Installation
Overview
Introduction
This chapter explains how to plan an Oracle Communications Convergent Charging Controller installation.
In this chapter
This chapter contains the following topics.
About Planning Your Convergent Charging Controller Installation ............................................... 5 Detailed Planning .......................................................................................................................... 6
About Planning Your Convergent Charging Controller Installation
Planning Your Convergent Charging Controller Installation
When planning your Convergent Charging Controller installation, you will need to decide:
How many Service Management System (SMS), Voucher and Wallet Server (VWS), and Service Logic Controller (SLC) nodes to install
Which node to install on which server If external storage is used, how to connect each server to the external storage If databases will be co-located at nodes or located remotely How to connect Convergent Charging Controller servers together in your network How to connect Convergent Charging Controller servers with the rest of your network How to integrate the Convergent Charging Controller solution into the telco infrastructure
Before installing Convergent Charging Controller, you should create an implementation plan that includes the following elements:
A logical and physical overview of the solution, listing all nodes used in the solution and how they interact (for example: protocols used, and so on). If the solution is deployed geographically across multiple sites, then this should be reflected here.
Hardware details for each node, including connected hardware such as external storage Rack mounting and cabling details Storage and database details IP network details Telco network integration details
For an overview of the Convergent Charging Controller architecture, see the discussion about the Convergent Charging Controller system architecture in Convergent Charging Controller Concepts.
Chapter 2
6 Installation Guide
About Cohosting Convergent Charging Controller Nodes
Cohosting multiple Convergent Charging Controller nodes on a single physical server is only supported in combination with virtualization technologies, such as the following:
Oracle VM Server for SPARC or Oracle VM for Linux Hardware partitioning such as dynamic domains
Each node should have its own operating system, database instance, and storage layout. You could also use an existing database available on a remote server. See Installing the Oracle Database Software (on page 56) for details.
Detailed Planning
Storage Planning
Document the storage configuration. For each SMS, VWS, and SLC node, include the following information:
How the internal disks will be organized Whether disks will be managed by a volume manager or a RAID controller or both What data will be stored on each disk or disk group How the external storage will be organized; for example, what are the Logical Unit Numbers (LUN),
RAID groups, and so on How the servers will be connected to the storage and how you will make this access redundant Details of any specific parameters that will be set in the external storage, volume manager, and file
systems
Database Planning
Document all database parameters for each SMS, VWS, and SLC node, including the following:
Where the different database elements (such as data files, redo logs, archive logs, and so on) will be stored
The values defined for the oracle environment variables (such as ORACLE_SID, ORACLE_BASE, ORACLE_HOME, and so on)
The System Global Area (SGA) parameters Any other specific instance parameters you will use
Network Planning
To plan the network implementation:
Document the different internal and external IP networks that will be used and create a schematic overview of these networks. Use this overview to describe which nodes have access to which networks.
Document the physical configuration of the network. For example, document which Network Interface Card (NIC) ports will be used for which networks.
Document how redundancy will be achieved; for example, through IP network multipathing (IPMP). Document Network Time Protocol (NTP) configuration. Either list existing NTP servers or define
which nodes will be configured as NTP servers. Create a host register containing details of all IP addresses and netmasks for all nodes and
networks.
Chapter 2
Chapter 2, Planning Your Convergent Charging Controller Installation 7
Integration Planning
Plan for integration with the telco environment by documenting at least the following items:
How the SLC nodes will be integrated into the telco environment. Create a schematic overview and use this overview to describe the interaction between the SLC nodes and the telco infrastructure (for example: MSC Signaling Gateways, IPs, and so on).
Which transport and application protocols will be used in which scenarios (for example: M3UA, SUA, INAP, Camel, MAP, and so on).
How traffic will be routed to and from the SLC nodes. For example, record details of SCCP/SUA routing, including SCCP addressing parameters, global title addresses, subsystems, and so on.
How traffic will be load-balanced across the SLC nodes. Any protocol specific details for each application protocol. For example, for INAP or Camel, record
which subsystem numbers and service keys will be used and which type of service will be invoked for each protocol.
A detailed call-flow for each call scenario, showing the signaling units and signaling unit parameters being received and returned by the SLC nodes.
OSD Configuration Planning
You configure Open Services Development (OSD) to enable SLC nodes to receive HTTP/SOAP requests. The requests trigger control plans on the SLC. When configuring OSD, you should determine:
How many OSD interfaces will run on each SLC The IP address and TCP port that each interface will use to listen for incoming connections
The SMS and VWS nodes also send HTTP/SOAP requests to the SLC nodes in order to submit SMS notifications. This means that at a minimum, you must configure OSD interfaces as targets for the SMS and VWS nodes.
Tip: You should use an:
Internal LAN (if available) for the HTTP/SOAP traffic sent from the VWS and SMS nodes to the SLC nodes.
External LAN for the HTTP/SOAP traffic coming from external systems
You should document the OSD configuration in a table and keep this information available for reference during the installation and configuration process.
OSD Configuration Example
The following table lists example OSD configuration for SMS notification requests.
SLC nodes OSD interface Sample IP:port values
Source nodes Scenario
SLC1 osdInterface 10.1.0.10:2222 SMS, VWS1, VWS2 SMS Notification request
SLC2 osdInterface 10.1.0.20:2222 SMS, VWS1, VWS2 SMS Notification request
Replication Planning
You should document all replication elements, node IDs, and IP addresses in a table. This information will be needed when you configure replication following the installation.

Chapter 2
8 Installation Guide
Replication Reference Table Example
The Replication columns in the following table show the type of information you will need when configuring replication.
Node Replication UpdateRequester ID
Name Type Node ID Internal IP Address
Alarms AVD Stats Other ID
test_SMS SMS 1 10.0.0.10 - - - - test_SLC1 SLC 301 10.0.0.11 601 - 701 901 test_SLC2 SLC 302 10.0.0.12 602 - 702 902 test_VWS1 VWS 351 10.0.0.21 651 611 751 951 test_VWS2 VWS 352 10.0.0.22 652 612 752 952
The table headings map to the following configuration fields:
Name is the Description Node ID is the Node Number Internal IP Address is the Primary Node IP Address
See the chapter on replication in Service Management System Technical Guide for information on replication and node numbering standards.
Chapter 3, Convergent Charging Controller System Requirements 9
Chapter 3
Convergent Charging Controller System Requirements
Overview
Introduction
This chapter describes the hardware and software requirements for Oracle Communications Convergent Charging Controller.
In this chapter
This chapter contains the following topics.
Network Requirements .................................................................................................................. 9 Memory Requirements ................................................................................................................ 11 Storage Requirements ................................................................................................................. 12 Software and Hardware Requirements ....................................................................................... 17 Preparing the System .................................................................................................................. 19
Network Requirements
Introduction
All Convergent Charging Controller nodes require IP network connectivity to communicate with each other, as well as with other network elements such as management clients, provisioning systems, or telephony signaling transfer points. A typical Convergent Charging Controller implementation comprises the following logical networks:
Management Billing Internal communication Signaling
IP Networks
The following table describes the logical IP networks and their Convergent Charging Controller implementation.
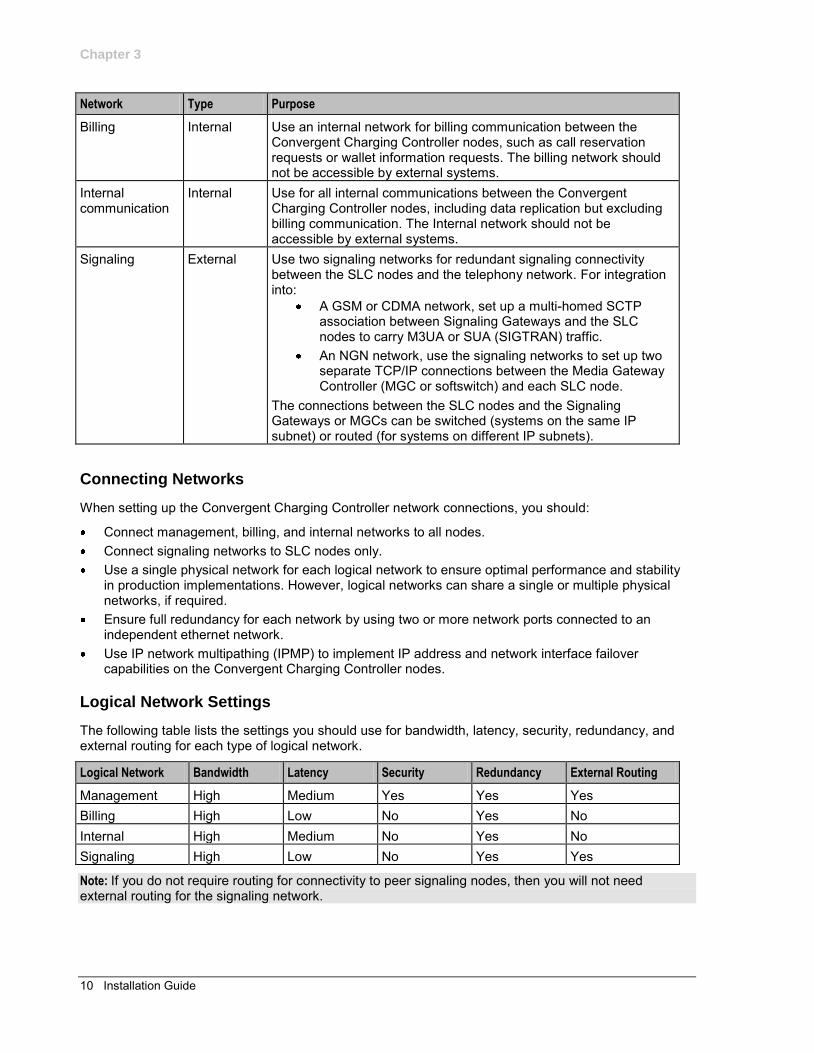
Network Type Purpose
Management External Provides external component access to the Convergent Charging Controller nodes; for example, to UIs for performing operations, to provisioning systems for creating subscriber accounts and recharging accounts, to a data warehouse for collecting event detail record (EDRs), and so on. It also allows the nodes to transmit data to peripheral systems, such as network management systems (as SNMP traps).
Chapter 3
10 Installation Guide
Network Type Purpose
Billing Internal Use an internal network for billing communication between the Convergent Charging Controller nodes, such as call reservation requests or wallet information requests. The billing network should not be accessible by external systems.
Internal communication
Internal Use for all internal communications between the Convergent Charging Controller nodes, including data replication but excluding billing communication. The Internal network should not be accessible by external systems.
Signaling External Use two signaling networks for redundant signaling connectivity between the SLC nodes and the telephony network. For integration into:
A GSM or CDMA network, set up a multi-homed SCTP association between Signaling Gateways and the SLC nodes to carry M3UA or SUA (SIGTRAN) traffic.
An NGN network, use the signaling networks to set up two separate TCP/IP connections between the Media Gateway Controller (MGC or softswitch) and each SLC node.
The connections between the SLC nodes and the Signaling Gateways or MGCs can be switched (systems on the same IP subnet) or routed (for systems on different IP subnets).
Connecting Networks
When setting up the Convergent Charging Controller network connections, you should:
Connect management, billing, and internal networks to all nodes. Connect signaling networks to SLC nodes only. Use a single physical network for each logical network to ensure optimal performance and stability
in production implementations. However, logical networks can share a single or multiple physical networks, if required.
Ensure full redundancy for each network by using two or more network ports connected to an independent ethernet network.
Use IP network multipathing (IPMP) to implement IP address and network interface failover capabilities on the Convergent Charging Controller nodes.
Logical Network Settings
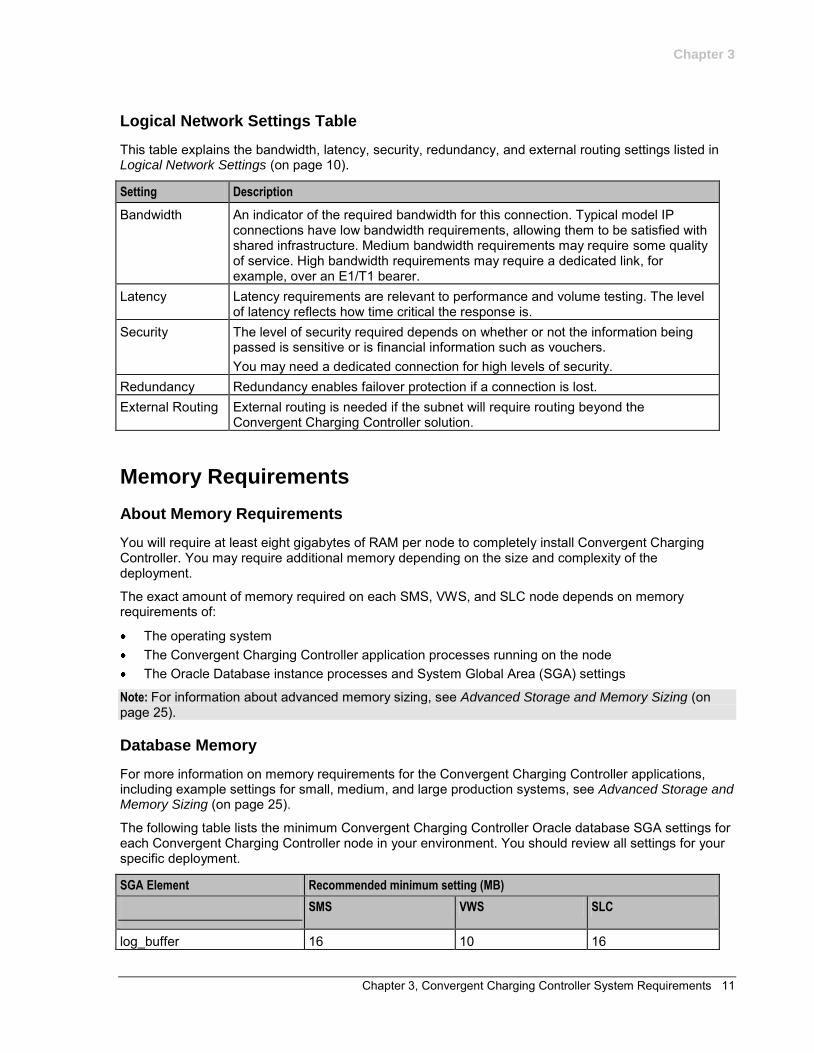
The following table lists the settings you should use for bandwidth, latency, security, redundancy, and external routing for each type of logical network.
Logical Network Bandwidth Latency Security Redundancy External Routing
Management High Medium Yes Yes Yes Billing High Low No Yes No Internal High Medium No Yes No Signaling High Low No Yes Yes
Note: If you do not require routing for connectivity to peer signaling nodes, then you will not need external routing for the signaling network.
Chapter 3
Chapter 3, Convergent Charging Controller System Requirements 11
Logical Network Settings Table
This table explains the bandwidth, latency, security, redundancy, and external routing settings listed in Logical Network Settings (on page 10).
Setting Description
Bandwidth An indicator of the required bandwidth for this connection. Typical model IP connections have low bandwidth requirements, allowing them to be satisfied with shared infrastructure. Medium bandwidth requirements may require some quality of service. High bandwidth requirements may require a dedicated link, for example, over an E1/T1 bearer.
Latency Latency requirements are relevant to performance and volume testing. The level of latency reflects how time critical the response is.
Security The level of security required depends on whether or not the information being passed is sensitive or is financial information such as vouchers. You may need a dedicated connection for high levels of security.
Redundancy Redundancy enables failover protection if a connection is lost. External Routing External routing is needed if the subnet will require routing beyond the
Convergent Charging Controller solution.
Memory Requirements
About Memory Requirements
You will require at least eight gigabytes of RAM per node to completely install Convergent Charging Controller. You may require additional memory depending on the size and complexity of the deployment.
The exact amount of memory required on each SMS, VWS, and SLC node depends on memory requirements of:
The operating system The Convergent Charging Controller application processes running on the node The Oracle Database instance processes and System Global Area (SGA) settings
Note: For information about advanced memory sizing, see Advanced Storage and Memory Sizing (on page 25).
Database Memory
For more information on memory requirements for the Convergent Charging Controller applications, including example settings for small, medium, and large production systems, see Advanced Storage and Memory Sizing (on page 25).
The following table lists the minimum Convergent Charging Controller Oracle database SGA settings for each Convergent Charging Controller node in your environment. You should review all settings for your specific deployment.
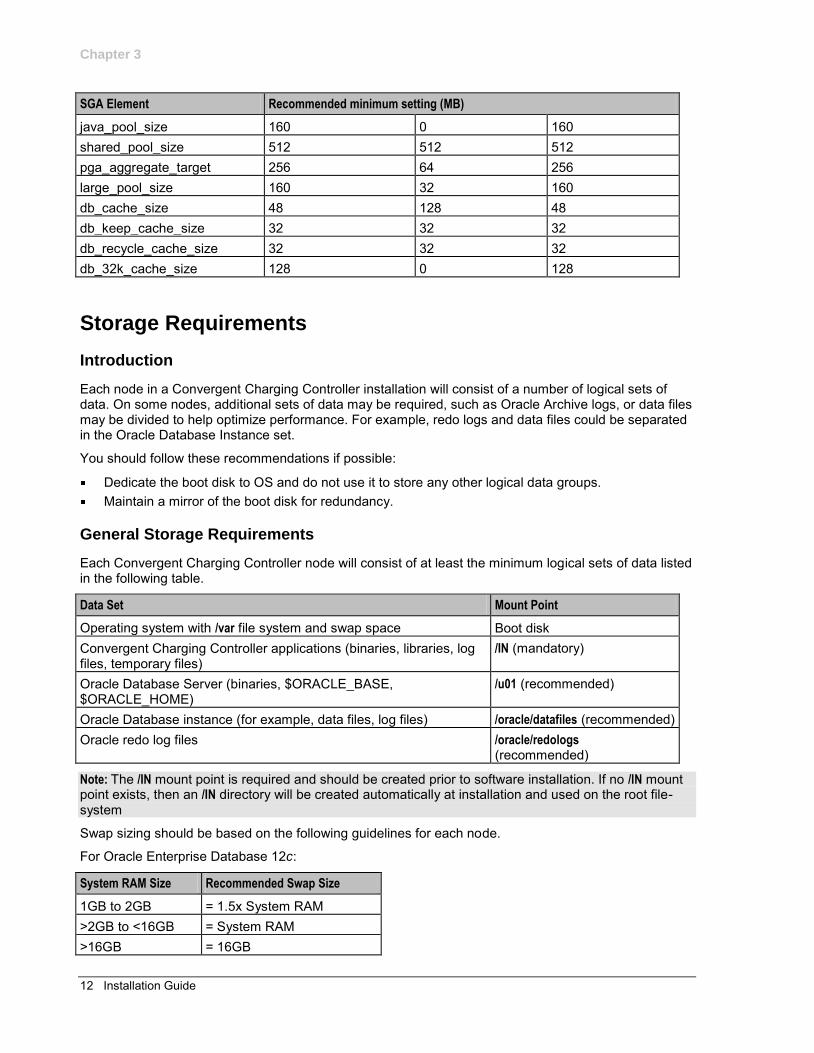
SGA Element Recommended minimum setting (MB)
SMS VWS SLC
log_buffer 16 10 16
Chapter 3
12 Installation Guide
SGA Element Recommended minimum setting (MB)
java_pool_size 160 0 160 shared_pool_size 512 512 512 pga_aggregate_target 256 64 256 large_pool_size 160 32 160 db_cache_size 48 128 48 db_keep_cache_size 32 32 32 db_recycle_cache_size 32 32 32 db_32k_cache_size 128 0 128
Storage Requirements
Introduction
Each node in a Convergent Charging Controller installation will consist of a number of logical sets of data. On some nodes, additional sets of data may be required, such as Oracle Archive logs, or data files may be divided to help optimize performance. For example, redo logs and data files could be separated in the Oracle Database Instance set.
You should follow these recommendations if possible:
Dedicate the boot disk to OS and do not use it to store any other logical data groups. Maintain a mirror of the boot disk for redundancy.
General Storage Requirements
Each Convergent Charging Controller node will consist of at least the minimum logical sets of data listed in the following table.
Data Set Mount Point
Operating system with /var file system and swap space Boot disk Convergent Charging Controller applications (binaries, libraries, log files, temporary files)
/IN (mandatory)
Oracle Database Server (binaries, $ORACLE_BASE, $ORACLE_HOME)
/u01 (recommended)
Oracle Database instance (for example, data files, log files) /oracle/datafiles (recommended) Oracle redo log files /oracle/redologs
(recommended)
Note: The /IN mount point is required and should be created prior to software installation. If no /IN mount point exists, then an /IN directory will be created automatically at installation and used on the root file-system
Swap sizing should be based on the following guidelines for each node.
For Oracle Enterprise Database 12c:
System RAM Size Recommended Swap Size
1GB to 2GB = 1.5x System RAM >2GB to <16GB = System RAM >16GB = 16GB
Chapter 3
Chapter 3, Convergent Charging Controller System Requirements 13
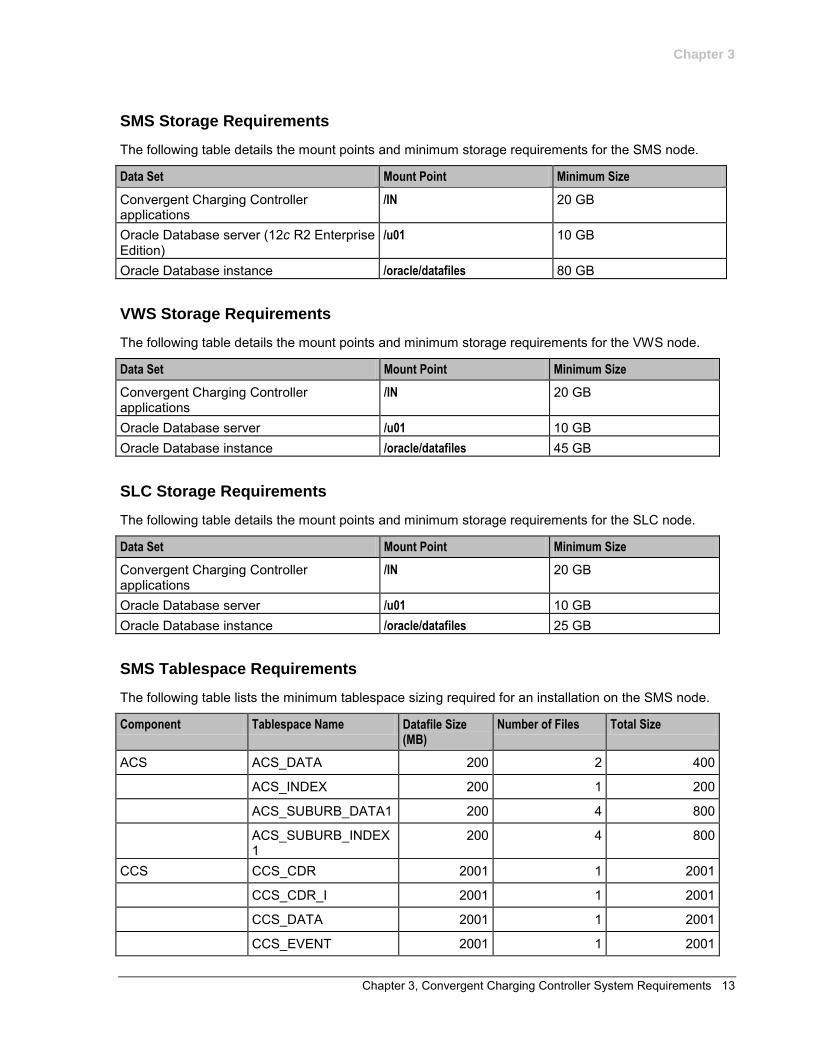
SMS Storage Requirements
The following table details the mount points and minimum storage requirements for the SMS node.
Data Set Mount Point Minimum Size
Convergent Charging Controller applications
/IN 20 GB
Oracle Database server (12c R2 Enterprise Edition)
/u01 10 GB
Oracle Database instance /oracle/datafiles 80 GB
VWS Storage Requirements
The following table details the mount points and minimum storage requirements for the VWS node.
Data Set Mount Point Minimum Size
Convergent Charging Controller applications
/IN 20 GB
Oracle Database server /u01 10 GB Oracle Database instance /oracle/datafiles 45 GB
SLC Storage Requirements
The following table details the mount points and minimum storage requirements for the SLC node.
Data Set Mount Point Minimum Size
Convergent Charging Controller applications
/IN 20 GB
Oracle Database server /u01 10 GB Oracle Database instance /oracle/datafiles 25 GB
SMS Tablespace Requirements
The following table lists the minimum tablespace sizing required for an installation on the SMS node.
Component Tablespace Name Datafile Size (MB)
Number of Files Total Size
ACS ACS_DATA 200 2 400
ACS_INDEX 200 1 200
ACS_SUBURB_DATA1 200 4 800
ACS_SUBURB_INDEX1
200 4 800
CCS CCS_CDR 2001 1 2001
CCS_CDR_I 2001 1 2001
CCS_DATA 2001 1 2001
CCS_EVENT 2001 1 2001

Chapter 3
14 Installation Guide
Component Tablespace Name Datafile Size (MB)
Number of Files Total Size
CCS_EVENT_I 2001 1 2001
CCS_INDEX 2001 1 2001
CCS_SUBS 2001 1 2001
CCS_SUBS_I 2001 1 2001
CCS_VOUCHERS 2001 1 2001
CCS_VOUCHERS_I 2001 1 2001
CCS_XDB 2001 1 2001
ENUM EN_DATA 200 1 200
EN_INDEX 200 1 200
EN_SUBS 200 1 200
EN_SUBS_I 200 1 200
LCP LCP_DATA 200 1 200
LCP_INDEX 200 1 200
MM MMX_DATA 200 1 200
MMX_INDEX 200 1 200
NP_SERVICE_PACK
NP_DATA 200 1 200
NP_INDEX 200 1 200
NP_SUBS 200 1 200
NP_SUBS_I 200 2 400
OSD OSD_DATA 200 1 200
OSD_INDEX 200 1 200
PI PI_DATA 200 1 200
PI_INDEX 200 1 200
RCA RCA_DATA 200 1 200
RCA_INDEX 200 1 200
SES SES_DATA 200 1 200
SES_INDEX 200 1 200
SMS REP_DATA 2001 1 2001
SMF_ALARMS 2001 1 2001
SMF_ALARMS_I 2001 1 2001
SMF_AUD 2001 2 4002
SMF_AUD_I 2001 1 2001
SMF_DATA 200 2 400
SMF_INDEX 200 1 200
Chapter 3
Chapter 3, Convergent Charging Controller System Requirements 15
Component Tablespace Name Datafile Size (MB)
Number of Files Total Size
SMF_STATS 2001 1 2001
SMF_STATS_I 2001 1 2001
SYSAUX 2001 1 2001
SYSTEM 512 1 512
TOOLS 2001 1 2001
UNDOTBS2 2001 5 10005
USERS 2001 1 2001
UIS UIS_CDR 200 1 200
UIS_CDR_I 200 1 200
UIS_DATA 200 1 200
UIS_INDEX 200 1 200
UPC UPC_DATA 200 1 200
UPC_INDEX 200 1 200
VPN VPN_DATA 200 1 200
VPN_INDEX 200 1 200
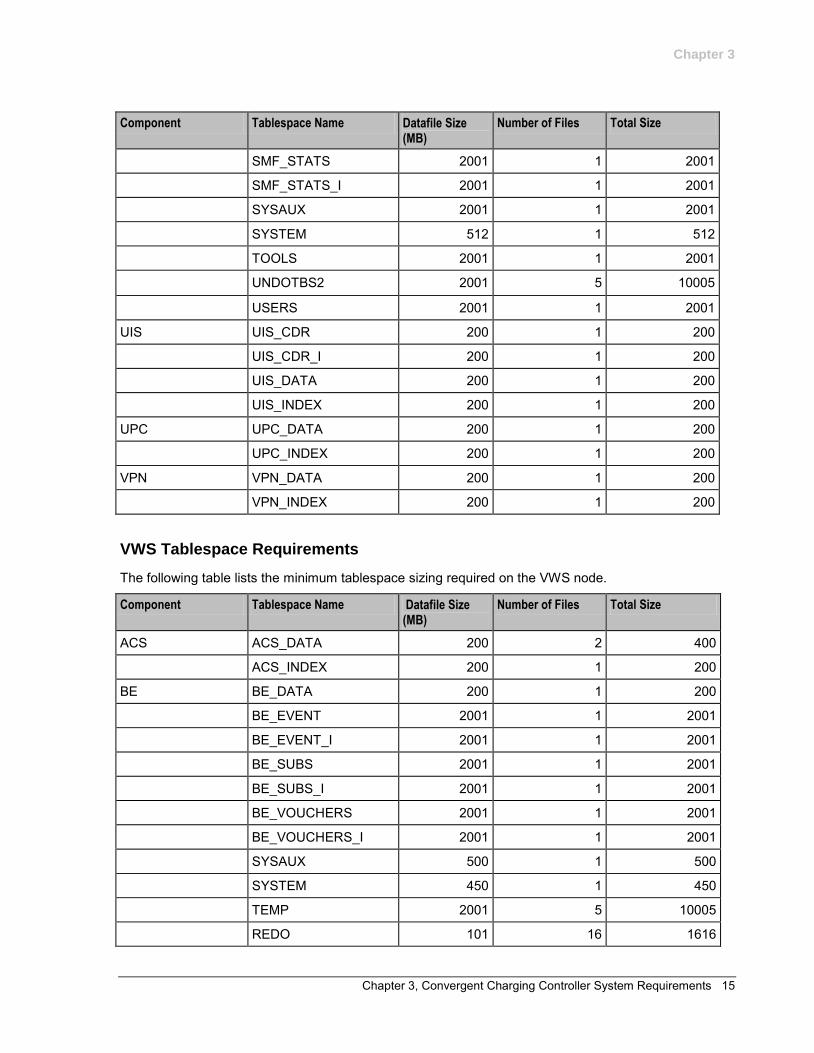
VWS Tablespace Requirements
The following table lists the minimum tablespace sizing required on the VWS node.
Component Tablespace Name Datafile Size (MB)
Number of Files Total Size
ACS ACS_DATA 200 2 400
ACS_INDEX 200 1 200
BE BE_DATA 200 1 200
BE_EVENT 2001 1 2001
BE_EVENT_I 2001 1 2001
BE_SUBS 2001 1 2001
BE_SUBS_I 2001 1 2001
BE_VOUCHERS 2001 1 2001
BE_VOUCHERS_I 2001 1 2001
SYSAUX 500 1 500
SYSTEM 450 1 450
TEMP 2001 5 10005
REDO 101 16 1616
Chapter 3
16 Installation Guide
Component Tablespace Name Datafile Size (MB)
Number of Files Total Size
TOOLS 200 1 200
UNDO 2001 5 10005
USERS 200 1 200
CCS CCS_DATA 200 1 200
CCS_INDEX 200 1 200
CCS_SUBS 2001 1 2001
CCS_SUBS_I 2001 1 2001
CCS_VOUCHERS 2001 1 2001
CCS_VOUCHERS_I 2001 1 2001
SMS SMF_DATA 100 1 100
SMF_INDEX 100 1 100
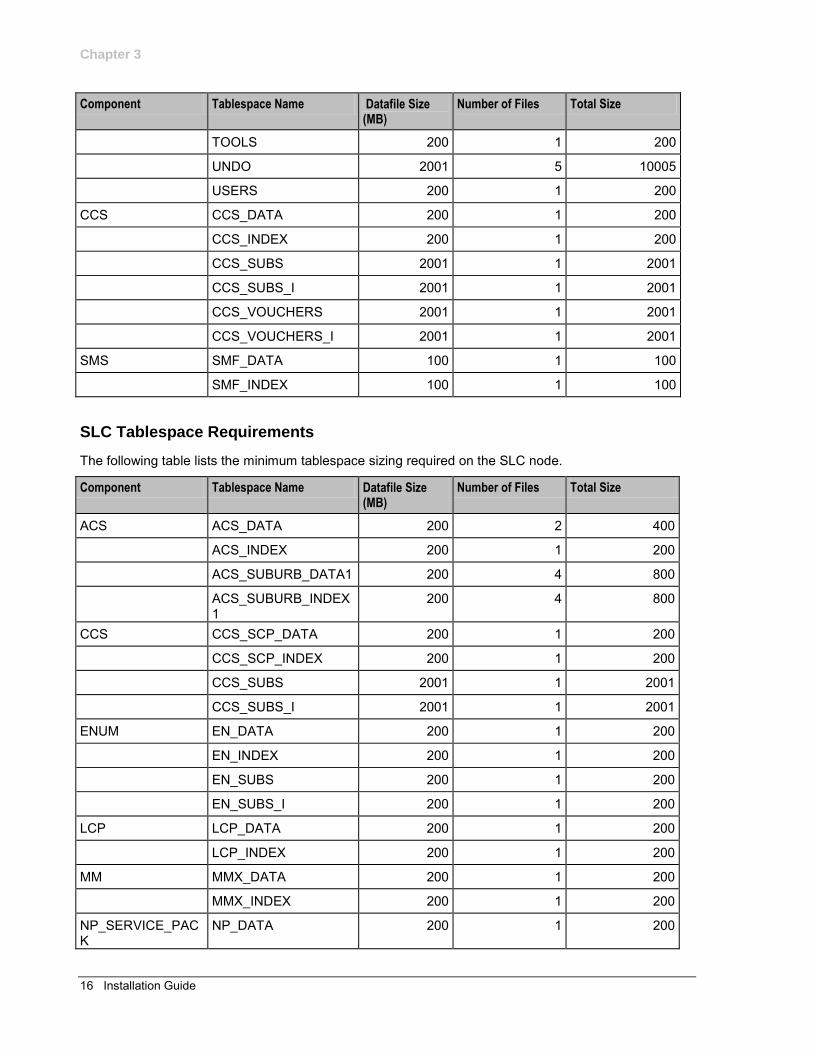
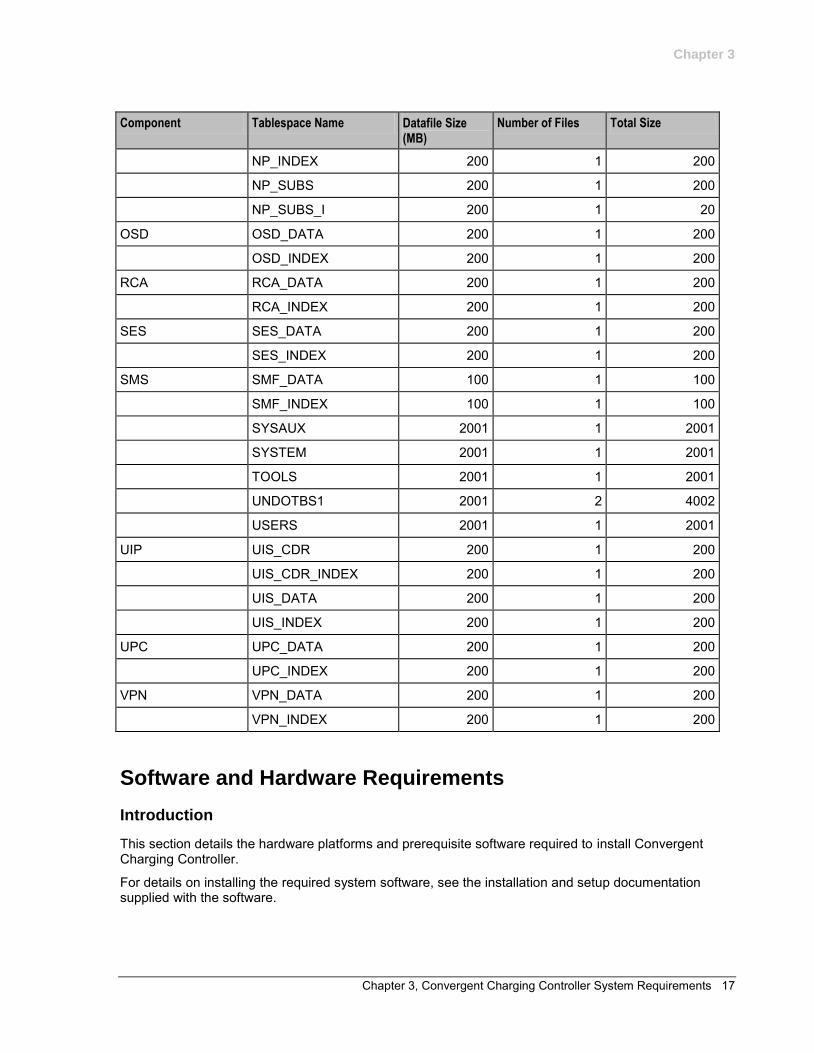
SLC Tablespace Requirements
The following table lists the minimum tablespace sizing required on the SLC node.
Component Tablespace Name Datafile Size (MB)
Number of Files Total Size
ACS ACS_DATA 200 2 400
ACS_INDEX 200 1 200
ACS_SUBURB_DATA1 200 4 800
ACS_SUBURB_INDEX1
200 4 800
CCS CCS_SCP_DATA 200 1 200
CCS_SCP_INDEX 200 1 200
CCS_SUBS 2001 1 2001
CCS_SUBS_I 2001 1 2001
ENUM EN_DATA 200 1 200
EN_INDEX 200 1 200
EN_SUBS 200 1 200
EN_SUBS_I 200 1 200
LCP LCP_DATA 200 1 200
LCP_INDEX 200 1 200
MM MMX_DATA 200 1 200
MMX_INDEX 200 1 200
NP_SERVICE_PACK
NP_DATA 200 1 200
Chapter 3
Chapter 3, Convergent Charging Controller System Requirements 17
Component Tablespace Name Datafile Size (MB)
Number of Files Total Size
NP_INDEX 200 1 200
NP_SUBS 200 1 200
NP_SUBS_I 200 1 20
OSD OSD_DATA 200 1 200
OSD_INDEX 200 1 200
RCA RCA_DATA 200 1 200
RCA_INDEX 200 1 200
SES SES_DATA 200 1 200
SES_INDEX 200 1 200
SMS SMF_DATA 100 1 100
SMF_INDEX 100 1 100
SYSAUX 2001 1 2001
SYSTEM 2001 1 2001
TOOLS 2001 1 2001
UNDOTBS1 2001 2 4002
USERS 2001 1 2001
UIP UIS_CDR 200 1 200
UIS_CDR_INDEX 200 1 200
UIS_DATA 200 1 200
UIS_INDEX 200 1 200
UPC UPC_DATA 200 1 200
UPC_INDEX 200 1 200
VPN VPN_DATA 200 1 200
VPN_INDEX 200 1 200
Software and Hardware Requirements
Introduction
This section details the hardware platforms and prerequisite software required to install Convergent Charging Controller.
For details on installing the required system software, see the installation and setup documentation supplied with the software.
Chapter 3
18 Installation Guide
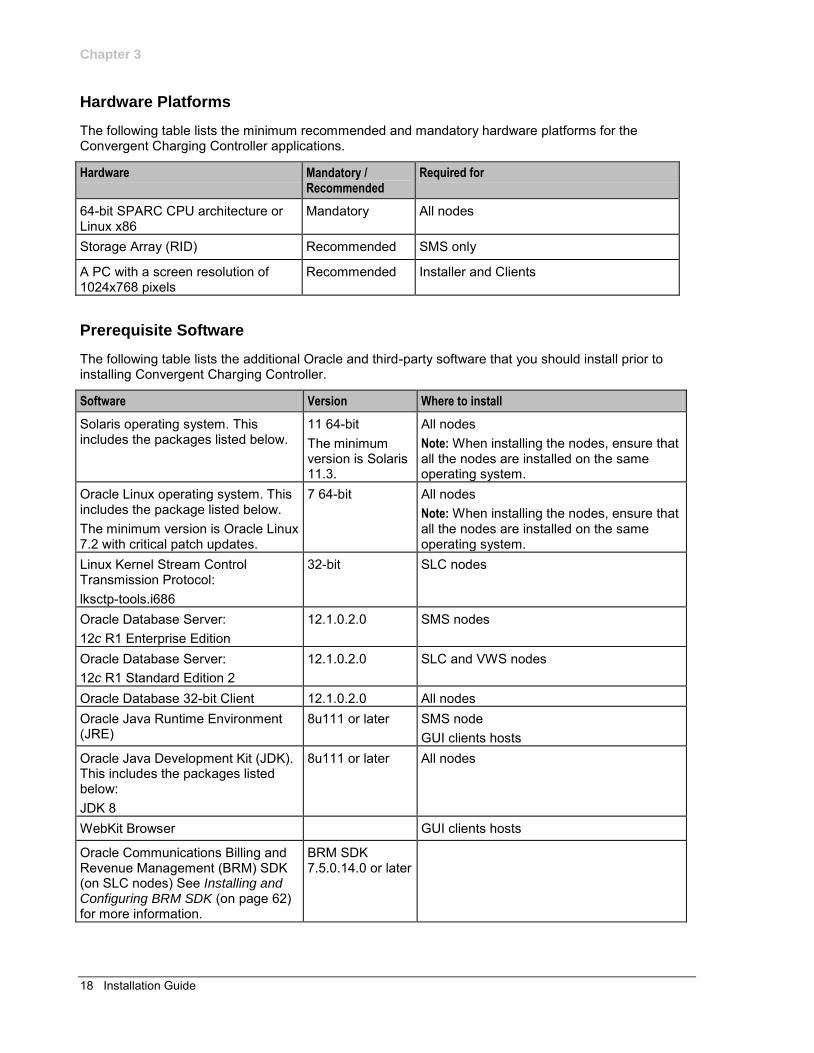
Hardware Platforms
The following table lists the minimum recommended and mandatory hardware platforms for the Convergent Charging Controller applications.
Hardware Mandatory / Recommended
Required for
64-bit SPARC CPU architecture or Linux x86
Mandatory All nodes
Storage Array (RID) Recommended SMS only
A PC with a screen resolution of 1024x768 pixels
Recommended Installer and Clients
Prerequisite Software
The following table lists the additional Oracle and third-party software that you should install prior to installing Convergent Charging Controller.
Software Version Where to install
Solaris operating system. This includes the packages listed below.
11 64-bit The minimum version is Solaris 11.3.
All nodes Note: When installing the nodes, ensure that all the nodes are installed on the same operating system.
Oracle Linux operating system. This includes the package listed below. The minimum version is Oracle Linux 7.2 with critical patch updates.
7 64-bit All nodes Note: When installing the nodes, ensure that all the nodes are installed on the same operating system.
Linux Kernel Stream Control Transmission Protocol: lksctp-tools.i686
32-bit SLC nodes
Oracle Database Server: 12c R1 Enterprise Edition
12.1.0.2.0 SMS nodes
Oracle Database Server: 12c R1 Standard Edition 2
12.1.0.2.0 SLC and VWS nodes
Oracle Database 32-bit Client 12.1.0.2.0 All nodes Oracle Java Runtime Environment (JRE)
8u111 or later SMS node GUI clients hosts
Oracle Java Development Kit (JDK). This includes the packages listed below: JDK 8
8u111 or later All nodes
WebKit Browser GUI clients hosts
Oracle Communications Billing and Revenue Management (BRM) SDK (on SLC nodes) See Installing and Configuring BRM SDK (on page 62) for more information.
BRM SDK 7.5.0.14.0 or later
Chapter 3
Chapter 3, Convergent Charging Controller System Requirements 19
Software Version Where to install
xinetd daemon N/A SMS nodes Note: This daemon is a prerequisite for running the cmnPushFiles and cmnReceiveFiles processes.
Preparing the System
Introduction
Check the kernel parameters on the system to ensure the system is optimally configured.
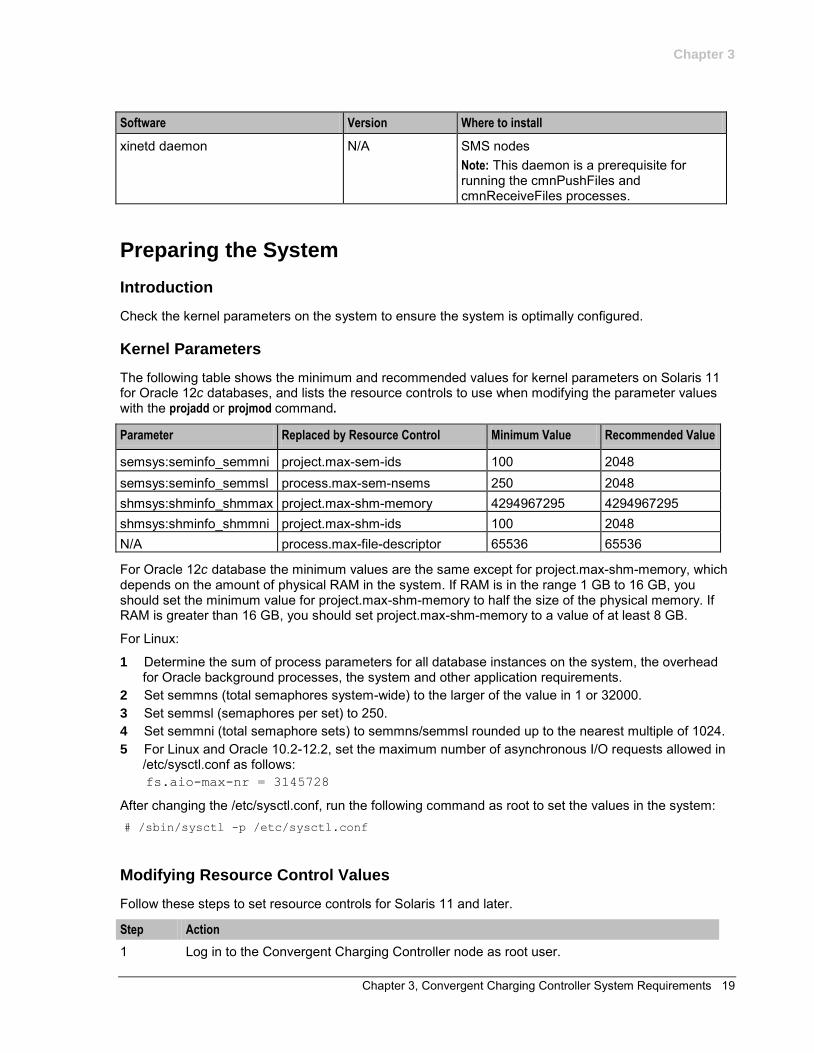
Kernel Parameters
The following table shows the minimum and recommended values for kernel parameters on Solaris 11 for Oracle 12c databases, and lists the resource controls to use when modifying the parameter values with the projadd or projmod command.
Parameter Replaced by Resource Control Minimum Value Recommended Value
semsys:seminfo_semmni project.max-sem-ids 100 2048 semsys:seminfo_semmsl process.max-sem-nsems 250 2048 shmsys:shminfo_shmmax project.max-shm-memory 4294967295 4294967295 shmsys:shminfo_shmmni project.max-shm-ids 100 2048 N/A process.max-file-descriptor 65536 65536
For Oracle 12c database the minimum values are the same except for project.max-shm-memory, which depends on the amount of physical RAM in the system. If RAM is in the range 1 GB to 16 GB, you should set the minimum value for project.max-shm-memory to half the size of the physical memory. If RAM is greater than 16 GB, you should set project.max-shm-memory to a value of at least 8 GB.
For Linux:
1 Determine the sum of process parameters for all database instances on the system, the overhead for Oracle background processes, the system and other application requirements.
2 Set semmns (total semaphores system-wide) to the larger of the value in 1 or 32000. 3 Set semmsl (semaphores per set) to 250. 4 Set semmni (total semaphore sets) to semmns/semmsl rounded up to the nearest multiple of 1024. 5 For Linux and Oracle 10.2-12.2, set the maximum number of asynchronous I/O requests allowed in
/etc/sysctl.conf as follows: fs.aio-max-nr = 3145728
After changing the /etc/sysctl.conf, run the following command as root to set the values in the system: # /sbin/sysctl -p /etc/sysctl.conf
Modifying Resource Control Values
Follow these steps to set resource controls for Solaris 11 and later.
Step Action
1 Log in to the Convergent Charging Controller node as root user.
Chapter 3
20 Installation Guide
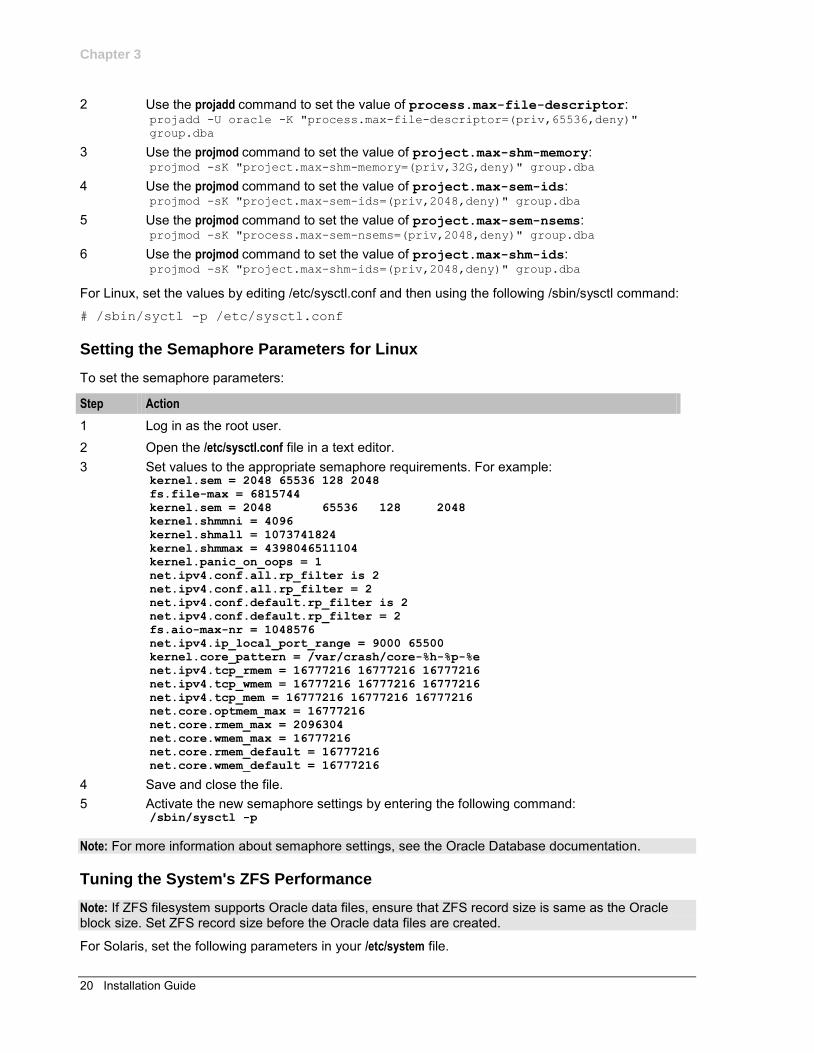
2 Use the projadd command to set the value of process.max-file-descriptor: projadd -U oracle -K "process.max-file-descriptor=(priv,65536,deny)"
group.dba
3 Use the projmod command to set the value of project.max-shm-memory: projmod -sK "project.max-shm-memory=(priv,32G,deny)" group.dba
4 Use the projmod command to set the value of project.max-sem-ids: projmod -sK "project.max-sem-ids=(priv,2048,deny)" group.dba
5 Use the projmod command to set the value of project.max-sem-nsems: projmod -sK "process.max-sem-nsems=(priv,2048,deny)" group.dba
6 Use the projmod command to set the value of project.max-shm-ids: projmod -sK "project.max-shm-ids=(priv,2048,deny)" group.dba
For Linux, set the values by editing /etc/sysctl.conf and then using the following /sbin/sysctl command:
# /sbin/syctl -p /etc/sysctl.conf
Setting the Semaphore Parameters for Linux
To set the semaphore parameters:
Step Action
1 Log in as the root user. 2 Open the /etc/sysctl.conf file in a text editor. 3 Set values to the appropriate semaphore requirements. For example:
kernel.sem = 2048 65536 128 2048
fs.file-max = 6815744
kernel.sem = 2048 65536 128 2048
kernel.shmmni = 4096
kernel.shmall = 1073741824
kernel.shmmax = 4398046511104
kernel.panic_on_oops = 1
net.ipv4.conf.all.rp_filter is 2
net.ipv4.conf.all.rp_filter = 2
net.ipv4.conf.default.rp_filter is 2
net.ipv4.conf.default.rp_filter = 2
fs.aio-max-nr = 1048576
net.ipv4.ip_local_port_range = 9000 65500
kernel.core_pattern = /var/crash/core-%h-%p-%e
net.ipv4.tcp_rmem = 16777216 16777216 16777216
net.ipv4.tcp_wmem = 16777216 16777216 16777216
net.ipv4.tcp_mem = 16777216 16777216 16777216
net.core.optmem_max = 16777216
net.core.rmem_max = 2096304
net.core.wmem_max = 16777216
net.core.rmem_default = 16777216
net.core.wmem_default = 16777216
4 Save and close the file. 5 Activate the new semaphore settings by entering the following command:
/sbin/sysctl -p
Note: For more information about semaphore settings, see the Oracle Database documentation.
Tuning the System's ZFS Performance
Note: If ZFS filesystem supports Oracle data files, ensure that ZFS record size is same as the Oracle block size. Set ZFS record size before the Oracle data files are created.
For Solaris, set the following parameters in your /etc/system file.
Chapter 3
Chapter 3, Convergent Charging Controller System Requirements 21
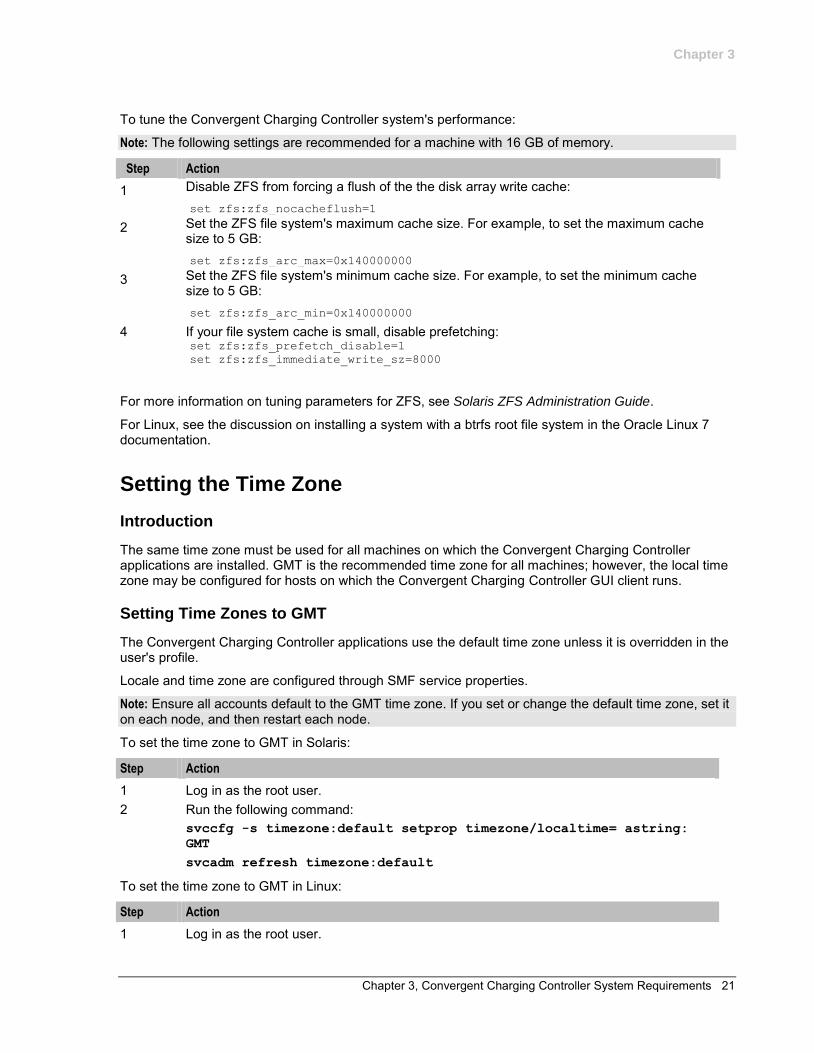
To tune the Convergent Charging Controller system's performance:
Note: The following settings are recommended for a machine with 16 GB of memory.
Step Action
1 Disable ZFS from forcing a flush of the the disk array write cache: set zfs:zfs_nocacheflush=1
2 Set the ZFS file system's maximum cache size. For example, to set the maximum cache size to 5 GB: set zfs:zfs_arc_max=0x140000000
3 Set the ZFS file system's minimum cache size. For example, to set the minimum cache size to 5 GB: set zfs:zfs_arc_min=0x140000000
4 If your file system cache is small, disable prefetching: set zfs:zfs_prefetch_disable=1
set zfs:zfs_immediate_write_sz=8000
For more information on tuning parameters for ZFS, see Solaris ZFS Administration Guide.
For Linux, see the discussion on installing a system with a btrfs root file system in the Oracle Linux 7 documentation.
Setting the Time Zone
Introduction
The same time zone must be used for all machines on which the Convergent Charging Controller applications are installed. GMT is the recommended time zone for all machines; however, the local time zone may be configured for hosts on which the Convergent Charging Controller GUI client runs.
Setting Time Zones to GMT
The Convergent Charging Controller applications use the default time zone unless it is overridden in the user's profile.
Locale and time zone are configured through SMF service properties.
Note: Ensure all accounts default to the GMT time zone. If you set or change the default time zone, set it on each node, and then restart each node.
To set the time zone to GMT in Solaris:
Step Action
1 Log in as the root user. 2 Run the following command:
svccfg -s timezone:default setprop timezone/localtime= astring:
GMT svcadm refresh timezone:default
To set the time zone to GMT in Linux:
Step Action
1 Log in as the root user.
Chapter 3
22 Installation Guide
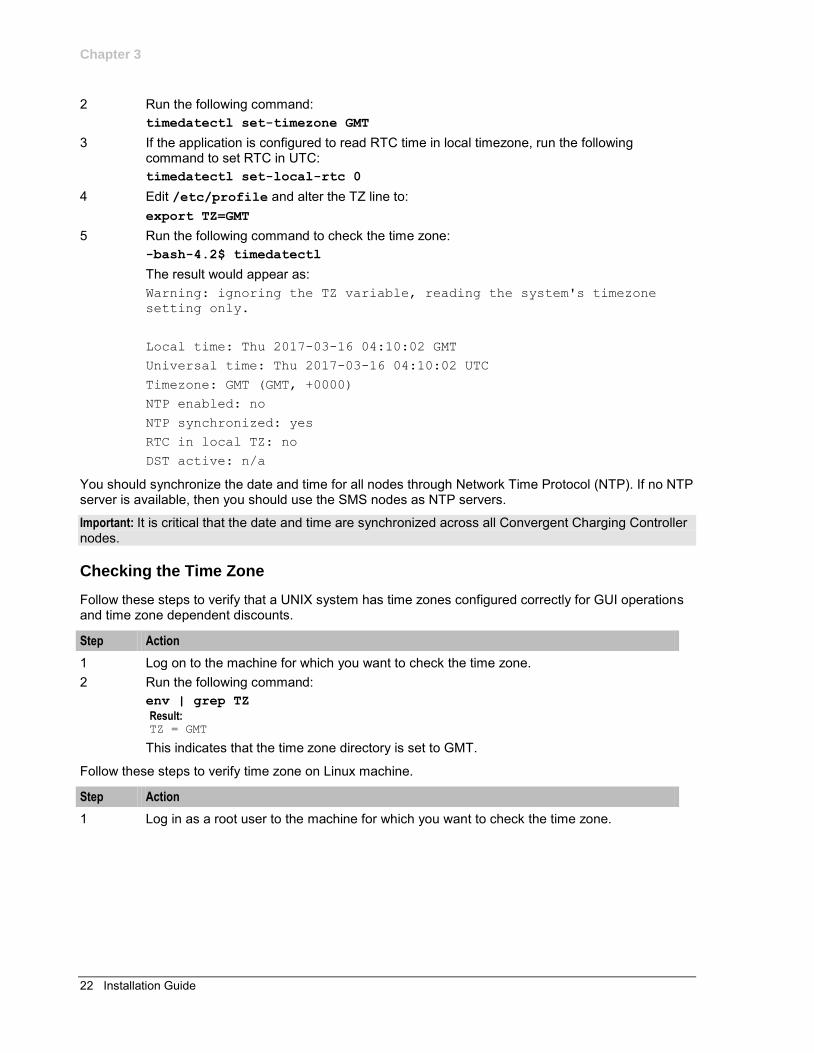
2 Run the following command: timedatectl set-timezone GMT
3 If the application is configured to read RTC time in local timezone, run the following command to set RTC in UTC: timedatectl set-local-rtc 0
4 Edit /etc/profile and alter the TZ line to: export TZ=GMT
5 Run the following command to check the time zone: -bash-4.2$ timedatectl
The result would appear as: Warning: ignoring the TZ variable, reading the system's timezone
setting only. Local time: Thu 2017-03-16 04:10:02 GMT Universal time: Thu 2017-03-16 04:10:02 UTC Timezone: GMT (GMT, +0000) NTP enabled: no NTP synchronized: yes RTC in local TZ: no DST active: n/a
You should synchronize the date and time for all nodes through Network Time Protocol (NTP). If no NTP server is available, then you should use the SMS nodes as NTP servers.
Important: It is critical that the date and time are synchronized across all Convergent Charging Controller nodes.
Checking the Time Zone
Follow these steps to verify that a UNIX system has time zones configured correctly for GUI operations and time zone dependent discounts.
Step Action
1 Log on to the machine for which you want to check the time zone. 2 Run the following command:
env | grep TZ Result: TZ = GMT
This indicates that the time zone directory is set to GMT.
Follow these steps to verify time zone on Linux machine.
Step Action
1 Log in as a root user to the machine for which you want to check the time zone.
Chapter 3
Chapter 3, Convergent Charging Controller System Requirements 23
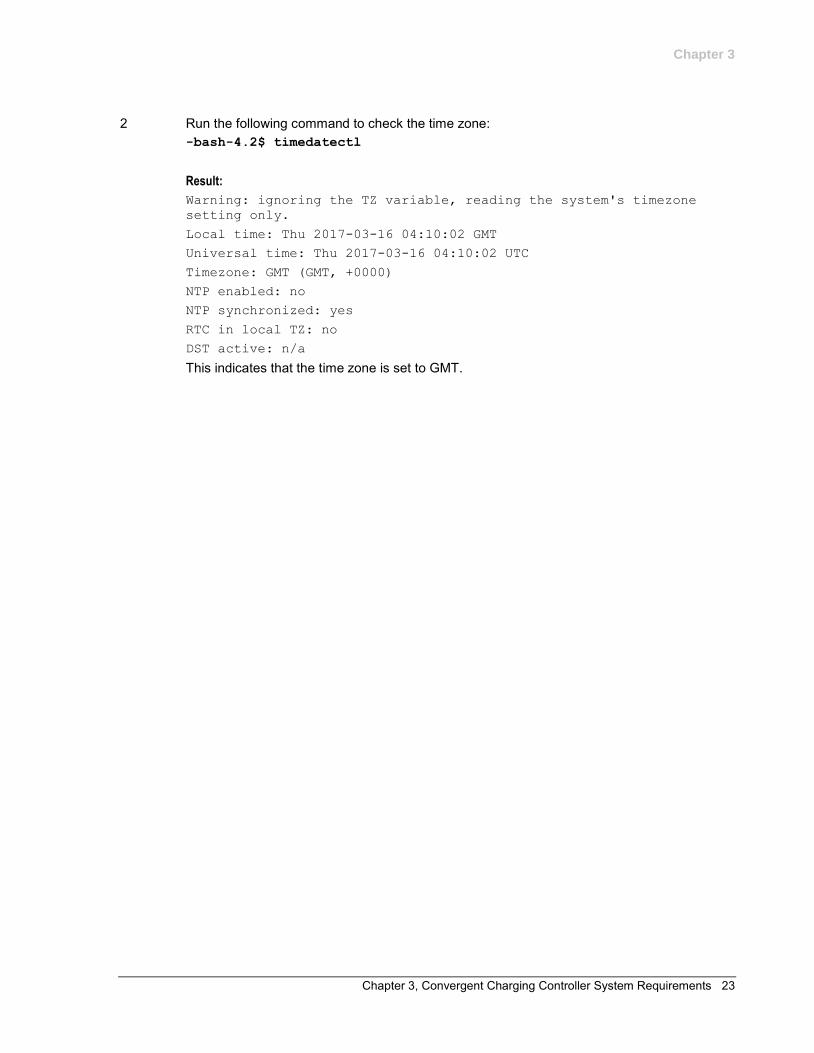
2 Run the following command to check the time zone: -bash-4.2$ timedatectl Result: Warning: ignoring the TZ variable, reading the system's timezone
setting only. Local time: Thu 2017-03-16 04:10:02 GMT Universal time: Thu 2017-03-16 04:10:02 UTC Timezone: GMT (GMT, +0000) NTP enabled: no NTP synchronized: yes RTC in local TZ: no DST active: n/a This indicates that the time zone is set to GMT.

Chapter 4, Advanced Storage and Memory Sizing 25
Chapter 4
Advanced Storage and Memory Sizing
Overview
Introduction
Precise storage and memory requirements depend on too many factors to be predicted accurately. This chapter provides estimate requirements for a number of example deployment scenarios of Oracle Communications Convergent Charging Controller.
In this chapter
This chapter contains the following topics.
Types of Implementations ........................................................................................................... 25 Small Production System Example ............................................................................................. 26 Medium Production System Example ......................................................................................... 32 Large Production System Example ............................................................................................. 36 Node-Specific Users .................................................................................................................... 40
Types of Implementations
Introduction
This section provides estimated storage and memory requirements for a number of example deployment scenarios.
Example Size Scenarios
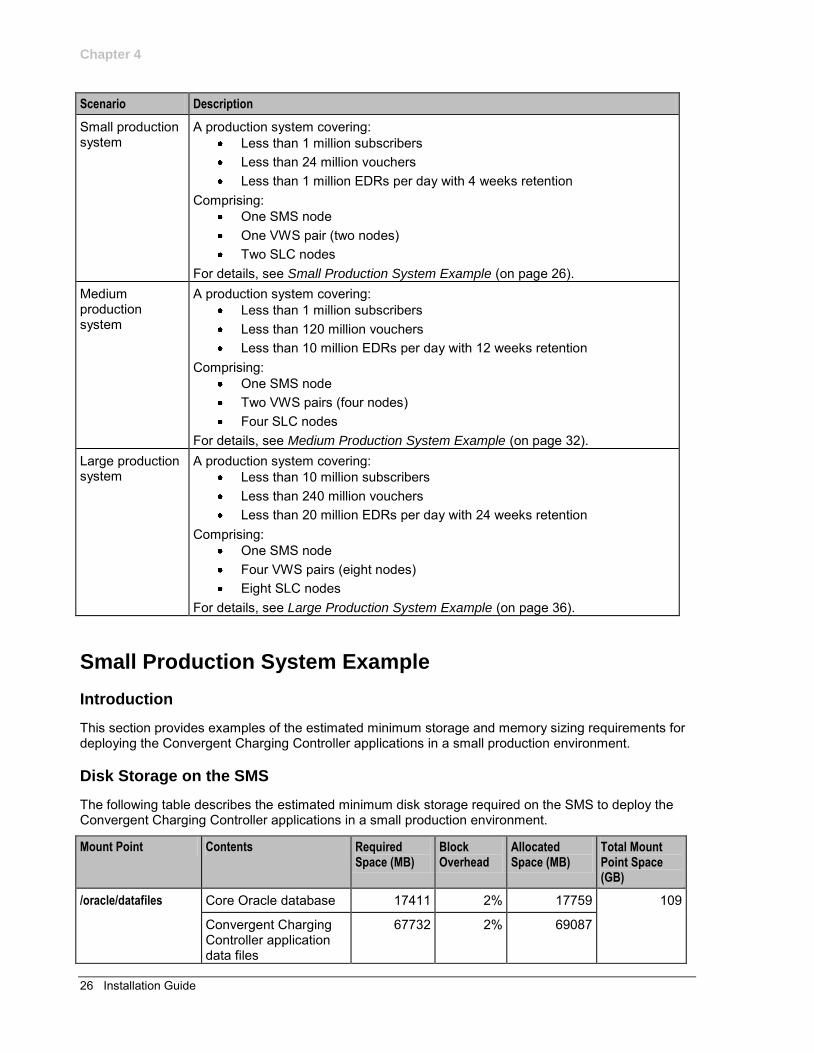
The following table describes the different scenarios for which sizing information is provided.
Scenario Description
Test system This is the basic system installed as a minimum using the Convergent Charging Controller Installer. It comprises:
One SMS node One VWS pair (two nodes) One SLC node
This system corresponds to the minimum storage requirements detailed in Storage Requirements (on page 12).
Chapter 4
26 Installation Guide
Scenario Description
Small production system
A production system covering: Less than 1 million subscribers Less than 24 million vouchers Less than 1 million EDRs per day with 4 weeks retention
Comprising: One SMS node One VWS pair (two nodes) Two SLC nodes
For details, see Small Production System Example (on page 26). Medium production system
A production system covering: Less than 1 million subscribers Less than 120 million vouchers Less than 10 million EDRs per day with 12 weeks retention
Comprising: One SMS node Two VWS pairs (four nodes) Four SLC nodes
For details, see Medium Production System Example (on page 32). Large production system
A production system covering: Less than 10 million subscribers Less than 240 million vouchers Less than 20 million EDRs per day with 24 weeks retention
Comprising: One SMS node Four VWS pairs (eight nodes) Eight SLC nodes
For details, see Large Production System Example (on page 36).
Small Production System Example
Introduction
This section provides examples of the estimated minimum storage and memory sizing requirements for deploying the Convergent Charging Controller applications in a small production environment.
Disk Storage on the SMS
The following table describes the estimated minimum disk storage required on the SMS to deploy the Convergent Charging Controller applications in a small production environment.
Mount Point Contents Required Space (MB)
Block Overhead
Allocated Space (MB)
Total Mount Point Space (GB)
/oracle/datafiles Core Oracle database 17411 2% 17759 109
Convergent Charging Controller application data files
67732 2% 69087
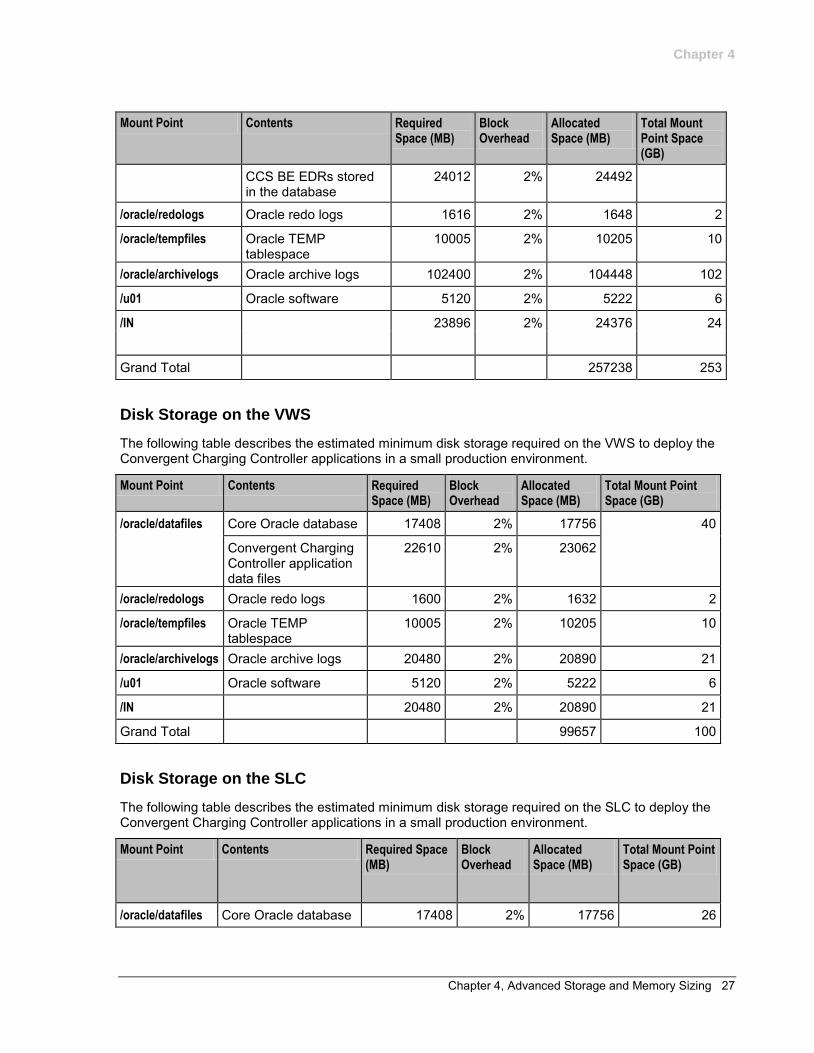
Chapter 4
Chapter 4, Advanced Storage and Memory Sizing 27
Mount Point Contents Required Space (MB)
Block Overhead
Allocated Space (MB)
Total Mount Point Space (GB)
CCS BE EDRs stored in the database
24012 2% 24492
/oracle/redologs Oracle redo logs 1616 2% 1648 2
/oracle/tempfiles Oracle TEMP tablespace
10005 2% 10205 10
/oracle/archivelogs Oracle archive logs 102400 2% 104448 102
/u01 Oracle software 5120 2% 5222 6
/IN 23896 2% 24376 24
Grand Total 257238 253
Disk Storage on the VWS
The following table describes the estimated minimum disk storage required on the VWS to deploy the Convergent Charging Controller applications in a small production environment.
Mount Point Contents Required Space (MB)
Block Overhead
Allocated Space (MB)
Total Mount Point Space (GB)
/oracle/datafiles Core Oracle database 17408 2% 17756 40 Convergent Charging
Controller application data files
22610 2% 23062
/oracle/redologs Oracle redo logs 1600 2% 1632 2
/oracle/tempfiles Oracle TEMP tablespace
10005 2% 10205 10
/oracle/archivelogs Oracle archive logs 20480 2% 20890 21
/u01 Oracle software 5120 2% 5222 6
/IN 20480 2% 20890 21
Grand Total 99657 100
Disk Storage on the SLC
The following table describes the estimated minimum disk storage required on the SLC to deploy the Convergent Charging Controller applications in a small production environment.
Mount Point Contents Required Space (MB)
Block Overhead
Allocated Space (MB)
Total Mount Point Space (GB)
/oracle/datafiles Core Oracle database 17408 2% 17756 26
Chapter 4
28 Installation Guide
Convergent Charging Controller application data files
7702 2% 7856
/oracle/redologs Oracle redo logs 1600 2% 1632 2
/oracle/tempfiles Oracle TEMP tablespace
10005 2% 10205 10
/u01 Oracle software 5120 2% 5222 6
/IN 20480 2% 20890 21
Grand Total 63561 65
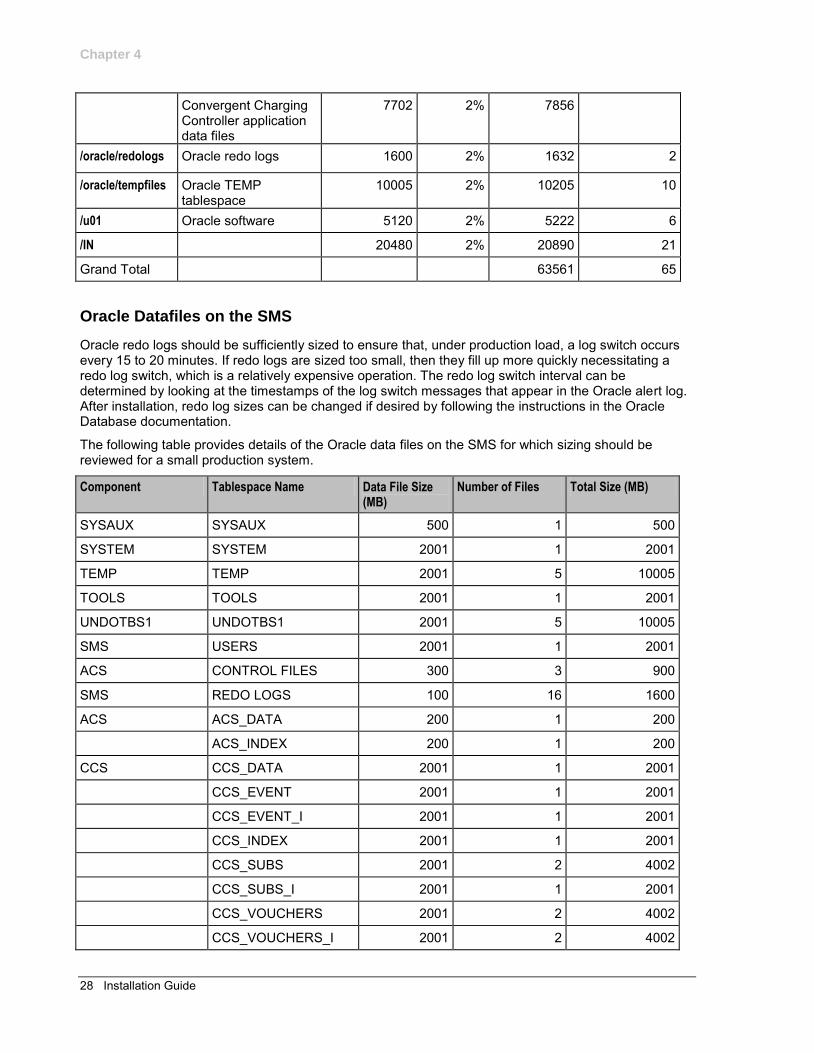
Oracle Datafiles on the SMS
Oracle redo logs should be sufficiently sized to ensure that, under production load, a log switch occurs every 15 to 20 minutes. If redo logs are sized too small, then they fill up more quickly necessitating a redo log switch, which is a relatively expensive operation. The redo log switch interval can be determined by looking at the timestamps of the log switch messages that appear in the Oracle alert log. After installation, redo log sizes can be changed if desired by following the instructions in the Oracle Database documentation.
The following table provides details of the Oracle data files on the SMS for which sizing should be reviewed for a small production system.
Component Tablespace Name Data File Size (MB)
Number of Files Total Size (MB)
SYSAUX SYSAUX 500 1 500
SYSTEM SYSTEM 2001 1 2001
TEMP TEMP 2001 5 10005
TOOLS TOOLS 2001 1 2001
UNDOTBS1 UNDOTBS1 2001 5 10005
SMS USERS 2001 1 2001
ACS CONTROL FILES 300 3 900
SMS REDO LOGS 100 16 1600
ACS ACS_DATA 200 1 200
ACS_INDEX 200 1 200
CCS CCS_DATA 2001 1 2001
CCS_EVENT 2001 1 2001
CCS_EVENT_I 2001 1 2001
CCS_INDEX 2001 1 2001
CCS_SUBS 2001 2 4002
CCS_SUBS_I 2001 1 2001
CCS_VOUCHERS 2001 2 4002
CCS_VOUCHERS_I 2001 2 4002
Chapter 4
Chapter 4, Advanced Storage and Memory Sizing 29
Component Tablespace Name Data File Size (MB)
Number of Files Total Size (MB)
CCS_XDB 2001 1 2001
LCP LCP_DATA 200 1 200
LCP_INDEX 200 1 200
MM MMX_DATA 300 1 300
MMX_INDEX 300 1 300
OSD OSD_DATA 300 1 300
OSD_INDEX 200 1 200
PI PI_DATA 200 1 200
PI_INDEX 200 1 200
SMS REP_DATA 2001 1 2001
SMF_ALARMS 2001 3 6003
SMF_ALARMS_I 2001 2 4002
SMF_AUD 2001 7 14007
SMF_AUD_I 2001 1 2001
SMF_DATA 2001 1 2001
SMF_INDEX 200 2 400
SMF_STATS 2001 1 2001
SMF_STATS_I 2001 2 4002
UIP UIS_CDR 2001 1 2001
UIS_CDR_I 2001 1 2001
UIS_DATA 200 1 200
UIS_INDEX 200 1 200
UPC UPC_DATA 200 1 200
UPC_INDEX 200 1 200
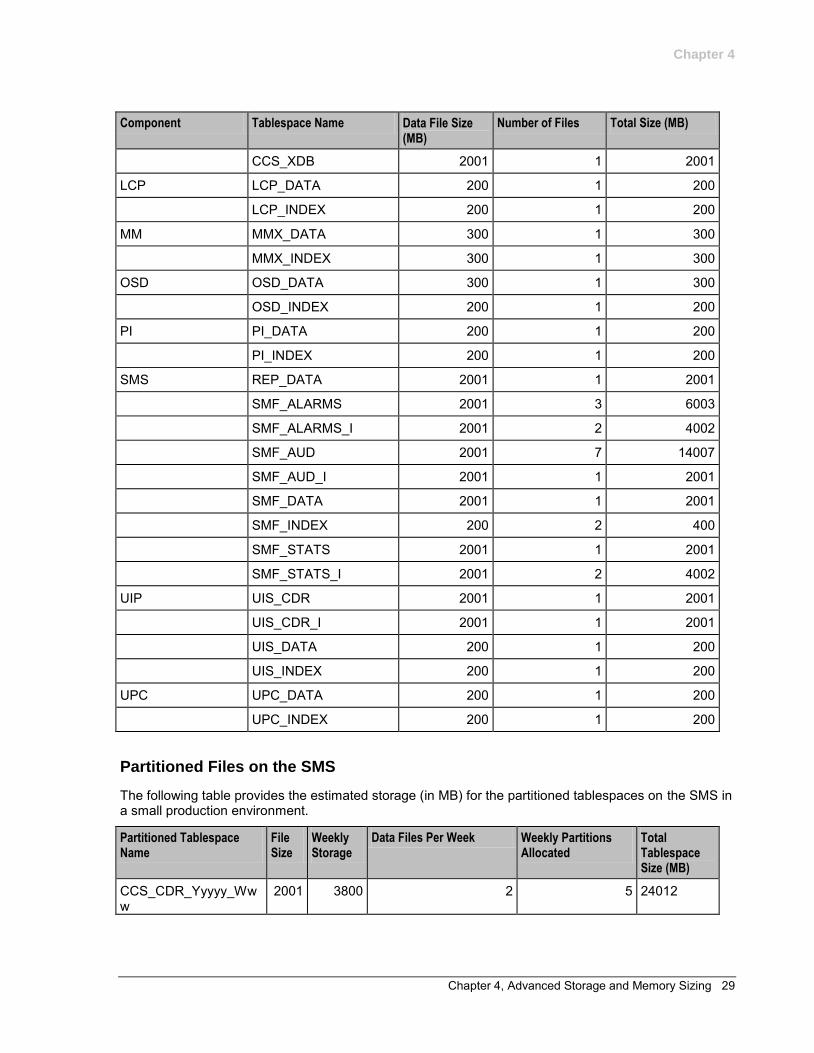
Partitioned Files on the SMS
The following table provides the estimated storage (in MB) for the partitioned tablespaces on the SMS in a small production environment.
Partitioned Tablespace Name
File Size
Weekly Storage
Data Files Per Week Weekly Partitions Allocated
Total Tablespace Size (MB)
CCS_CDR_Yyyyy_Www
2001 3800 2 5 24012
Chapter 4
30 Installation Guide
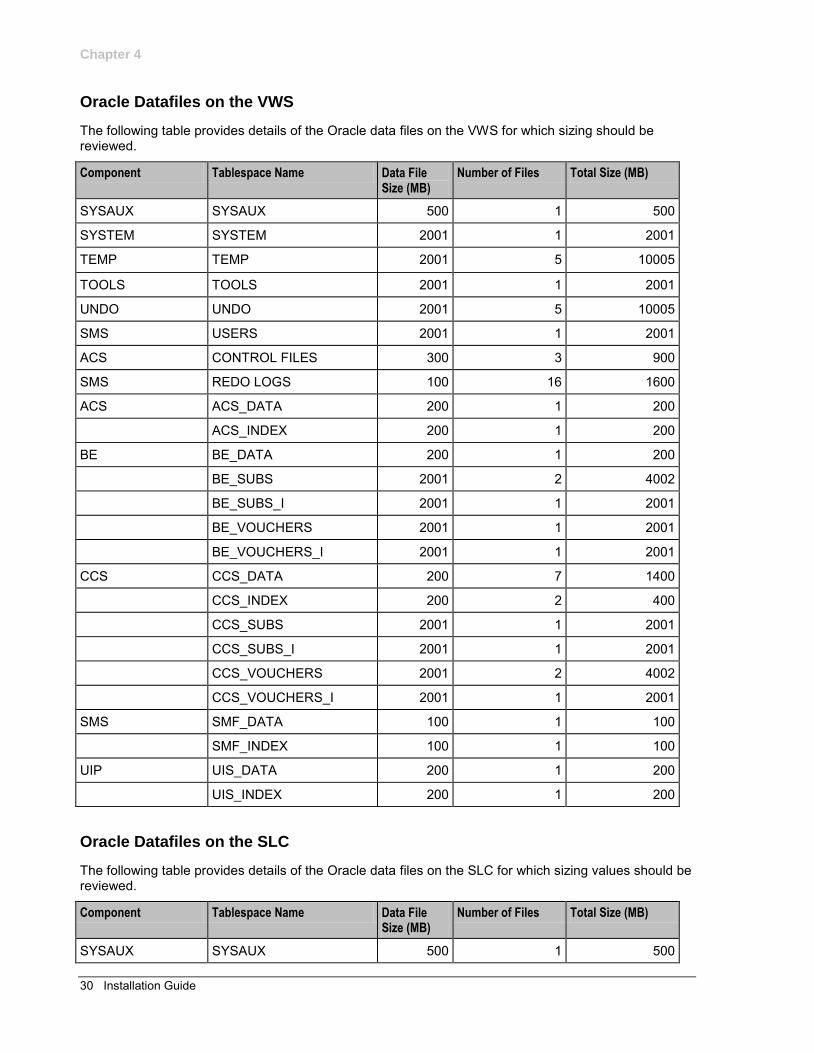
Oracle Datafiles on the VWS
The following table provides details of the Oracle data files on the VWS for which sizing should be reviewed.
Component Tablespace Name Data File Size (MB)
Number of Files Total Size (MB)
SYSAUX SYSAUX 500 1 500
SYSTEM SYSTEM 2001 1 2001
TEMP TEMP 2001 5 10005
TOOLS TOOLS 2001 1 2001
UNDO UNDO 2001 5 10005
SMS USERS 2001 1 2001
ACS CONTROL FILES 300 3 900
SMS REDO LOGS 100 16 1600
ACS ACS_DATA 200 1 200
ACS_INDEX 200 1 200
BE BE_DATA 200 1 200
BE_SUBS 2001 2 4002
BE_SUBS_I 2001 1 2001
BE_VOUCHERS 2001 1 2001
BE_VOUCHERS_I 2001 1 2001
CCS CCS_DATA 200 7 1400
CCS_INDEX 200 2 400
CCS_SUBS 2001 1 2001
CCS_SUBS_I 2001 1 2001
CCS_VOUCHERS 2001 2 4002
CCS_VOUCHERS_I 2001 1 2001
SMS SMF_DATA 100 1 100
SMF_INDEX 100 1 100
UIP UIS_DATA 200 1 200
UIS_INDEX 200 1 200
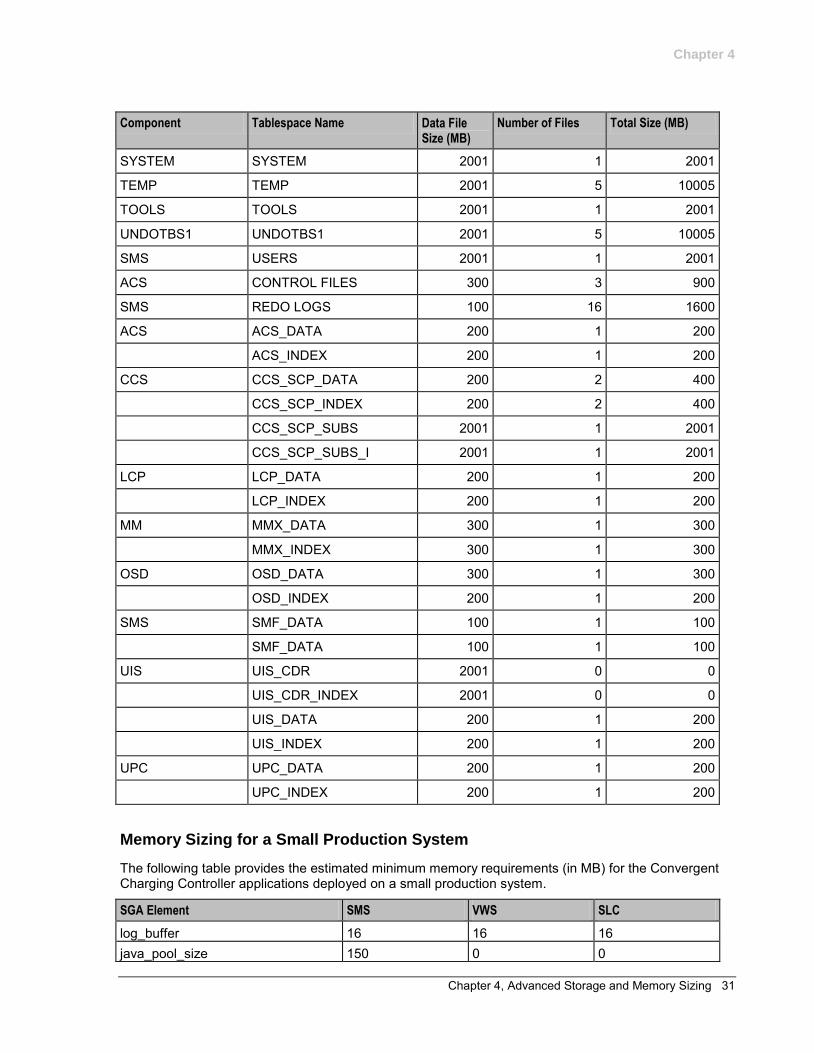
Oracle Datafiles on the SLC
The following table provides details of the Oracle data files on the SLC for which sizing values should be reviewed.
Component Tablespace Name Data File Size (MB)
Number of Files Total Size (MB)
SYSAUX SYSAUX 500 1 500
Chapter 4
Chapter 4, Advanced Storage and Memory Sizing 31
Component Tablespace Name Data File Size (MB)
Number of Files Total Size (MB)
SYSTEM SYSTEM 2001 1 2001
TEMP TEMP 2001 5 10005
TOOLS TOOLS 2001 1 2001
UNDOTBS1 UNDOTBS1 2001 5 10005
SMS USERS 2001 1 2001
ACS CONTROL FILES 300 3 900
SMS REDO LOGS 100 16 1600
ACS ACS_DATA 200 1 200
ACS_INDEX 200 1 200
CCS CCS_SCP_DATA 200 2 400
CCS_SCP_INDEX 200 2 400
CCS_SCP_SUBS 2001 1 2001
CCS_SCP_SUBS_I 2001 1 2001
LCP LCP_DATA 200 1 200
LCP_INDEX 200 1 200
MM MMX_DATA 300 1 300
MMX_INDEX 300 1 300
OSD OSD_DATA 300 1 300
OSD_INDEX 200 1 200
SMS SMF_DATA 100 1 100
SMF_DATA 100 1 100
UIS UIS_CDR 2001 0 0
UIS_CDR_INDEX 2001 0 0
UIS_DATA 200 1 200
UIS_INDEX 200 1 200
UPC UPC_DATA 200 1 200
UPC_INDEX 200 1 200
Memory Sizing for a Small Production System
The following table provides the estimated minimum memory requirements (in MB) for the Convergent Charging Controller applications deployed on a small production system.
SGA Element SMS VWS SLC
log_buffer 16 16 16 java_pool_size 150 0 0

Chapter 4
32 Installation Guide
SGA Element SMS VWS SLC
shared_pool_size 512 128 128 pga_aggregate_target 512 128 128 large_pool_size 256 32 0 db_cache_size 256 128 32 db_keep_cache_size 4096 5012 2048 db_recycle_cache_size 2048 2048 0 db_32k_cache_size 2048 0 0 Convergent Charging Controller applications
4096 4096 4096
Medium Production System Example
Introduction
This section provides examples of the minimum storage and memory sizing requirements for deploying the Convergent Charging Controller applications in a medium sized production environment.
Disk Storage on the SMS
The following table describes the estimated minimum disk storage required on the SMS to deploy the Convergent Charging Controller applications in a medium sized production environment.
Mount Point Contents Required Space (MB)
Block Overhead
Allocated Space (MB)
Total Mount Point Space (GB)
/oracle/datafiles Core Oracle database
37418 2% 38166 677
Convergent Charging Controller application data files
109753 2% 111948
CCS BE EDRs stored in database
532266 2% 542911
/oracle/redologs Oracle redo logs 1600 2% 1632 2
/oracle/tempfiles Oracle TEMP tablespace
30015 2% 30615 30
/u01 Oracle software 120 2% 5222 6
/oracle/archivelogs Oracle archive logs 102400 2% 104448 102
/IN Convergent Charging Controller application
20480 2% 20890 55
Incoming & processed EDR flat files
34180 2% 34863
Grand Total 890696 872
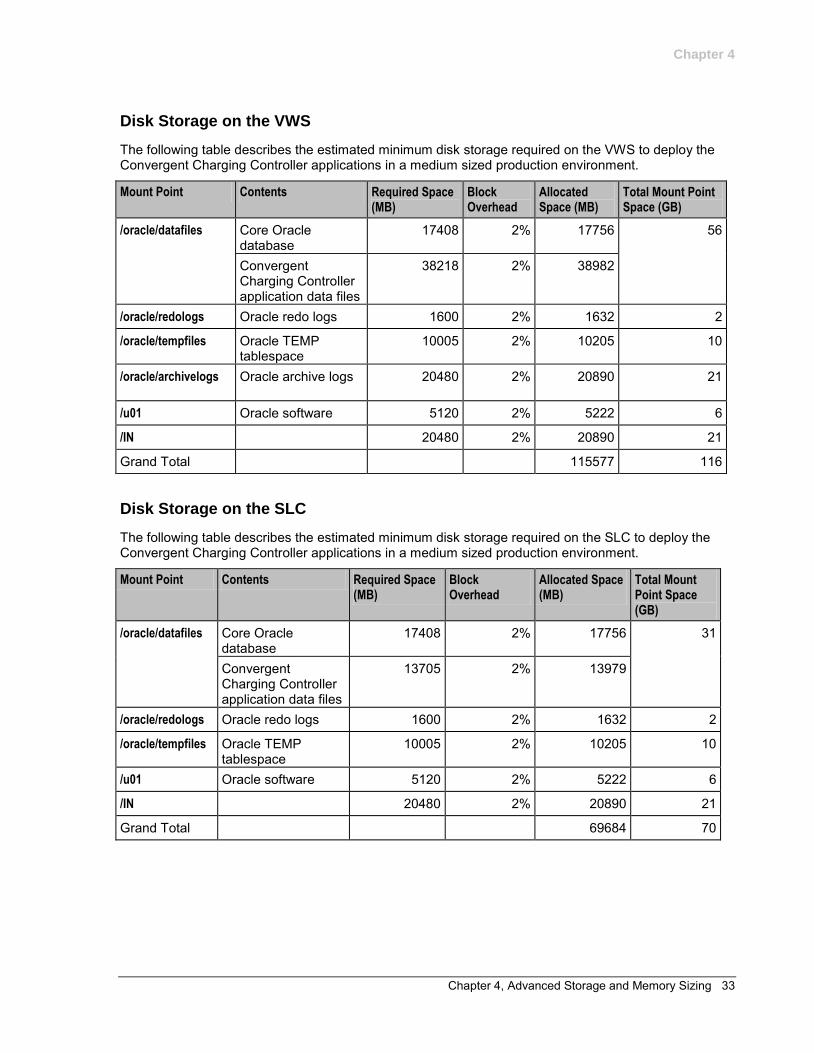
Chapter 4
Chapter 4, Advanced Storage and Memory Sizing 33
Disk Storage on the VWS
The following table describes the estimated minimum disk storage required on the VWS to deploy the Convergent Charging Controller applications in a medium sized production environment.
Mount Point Contents Required Space (MB)
Block Overhead
Allocated Space (MB)
Total Mount Point Space (GB)
/oracle/datafiles Core Oracle database
17408 2% 17756 56
Convergent Charging Controller application data files
38218 2% 38982
/oracle/redologs Oracle redo logs 1600 2% 1632 2
/oracle/tempfiles Oracle TEMP tablespace
10005 2% 10205 10
/oracle/archivelogs Oracle archive logs 20480 2% 20890 21
/u01 Oracle software 5120 2% 5222 6
/IN 20480 2% 20890 21
Grand Total 115577 116
Disk Storage on the SLC
The following table describes the estimated minimum disk storage required on the SLC to deploy the Convergent Charging Controller applications in a medium sized production environment.
Mount Point Contents Required Space (MB)
Block Overhead
Allocated Space (MB)
Total Mount Point Space (GB)
/oracle/datafiles Core Oracle database
17408 2% 17756 31
Convergent Charging Controller application data files
13705 2% 13979
/oracle/redologs Oracle redo logs 1600 2% 1632 2
/oracle/tempfiles Oracle TEMP tablespace
10005 2% 10205 10
/u01 Oracle software 5120 2% 5222 6
/IN 20480 2% 20890 21
Grand Total 69684 70
Chapter 4
34 Installation Guide
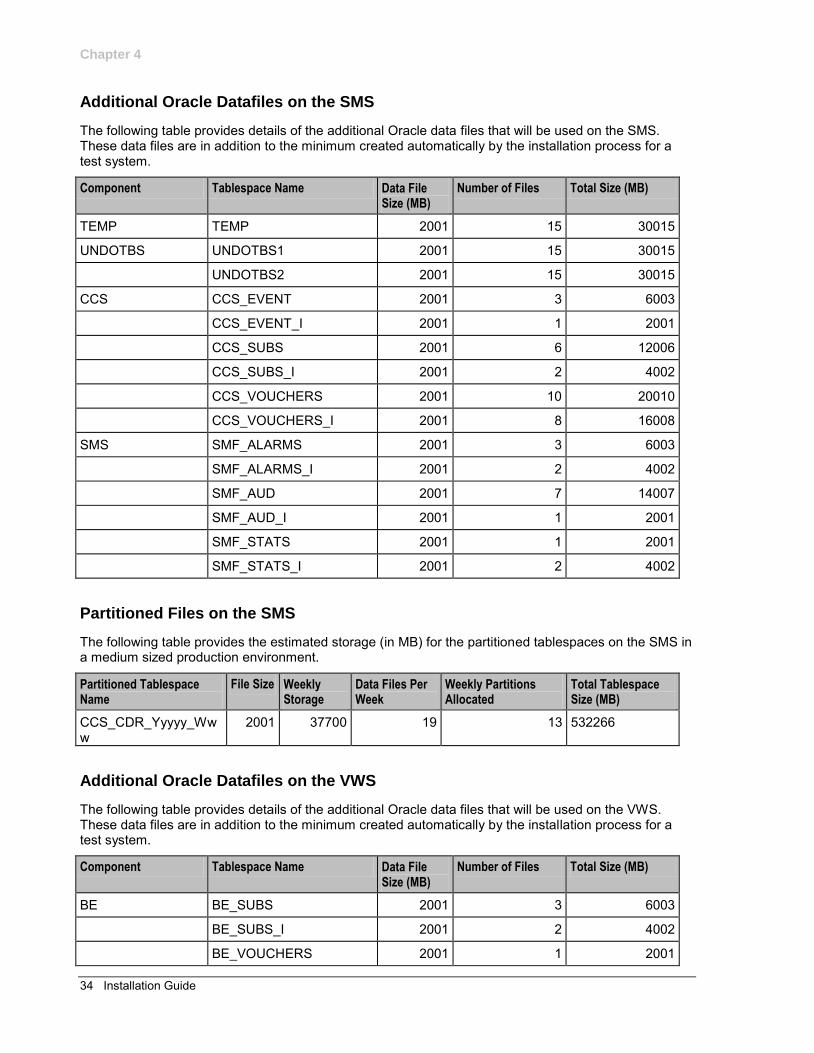
Additional Oracle Datafiles on the SMS
The following table provides details of the additional Oracle data files that will be used on the SMS. These data files are in addition to the minimum created automatically by the installation process for a test system.
Component Tablespace Name Data File Size (MB)
Number of Files Total Size (MB)
TEMP TEMP 2001 15 30015
UNDOTBS UNDOTBS1 2001 15 30015
UNDOTBS2 2001 15 30015
CCS CCS_EVENT 2001 3 6003
CCS_EVENT_I 2001 1 2001
CCS_SUBS 2001 6 12006
CCS_SUBS_I 2001 2 4002
CCS_VOUCHERS 2001 10 20010
CCS_VOUCHERS_I 2001 8 16008
SMS SMF_ALARMS 2001 3 6003
SMF_ALARMS_I 2001 2 4002
SMF_AUD 2001 7 14007
SMF_AUD_I 2001 1 2001
SMF_STATS 2001 1 2001
SMF_STATS_I 2001 2 4002
Partitioned Files on the SMS
The following table provides the estimated storage (in MB) for the partitioned tablespaces on the SMS in a medium sized production environment.
Partitioned Tablespace Name
File Size Weekly Storage
Data Files Per Week
Weekly Partitions Allocated
Total Tablespace Size (MB)
CCS_CDR_Yyyyy_Www
2001 37700 19 13 532266
Additional Oracle Datafiles on the VWS
The following table provides details of the additional Oracle data files that will be used on the VWS. These data files are in addition to the minimum created automatically by the installation process for a test system.
Component Tablespace Name Data File Size (MB)
Number of Files Total Size (MB)
BE BE_SUBS 2001 3 6003
BE_SUBS_I 2001 2 4002
BE_VOUCHERS 2001 1 2001

Chapter 4
Chapter 4, Advanced Storage and Memory Sizing 35
Component Tablespace Name Data File Size (MB)
Number of Files Total Size (MB)
BE_VOUCHERS_I 2001 1 2001
CCS CCS_DATA 200 5 1000
CCS_INDEX 200 2 400
CCS_SUBS 2001 4 8004
CCS_SUBS_I 2001 1 2001
CCS_VOUCHERS 2001 4 8004
CCS_VOUCHERS_I 2001 2 4002
Additional Oracle Datafiles on the SLC
The following table provides details of the additional Oracle data files that will be used on the SLC in a medium production environment. These data files are in addition to the minimum created automatically by the installation process for test system.
Component Tablespace Name Data File Size (MB) Number of Files Total Size (MB)
CCS CCS_SCP_DATA 200 2 400
CCS_SCP_INDEX 200 2 400
CCS_SUBS 2001 4 8004
CCS_SUBS_I 2001 1 2001
Memory Sizing for a Medium Production System
The following table provides the estimated minimum memory requirements (in MB) for the Convergent Charging Controller applications deployed in a medium sized production environment.
SGA Element SMS VWS SLC
log_buffer 16 16 16
java_pool_size 150 0 0
shared_pool_size 512 128 128
pga_aggregate_target 512 128 128
large_pool_size 512 32 0
db_cache_size 512 128 32
db_keep_cache_size 8192 12960 6464
db_recycle_cache_size 8192 2048 0
db_32k_cache_size 8192 0 0
Convergent Charging Controller applications
8192 8192 8192
Chapter 4
36 Installation Guide
Large Production System Example
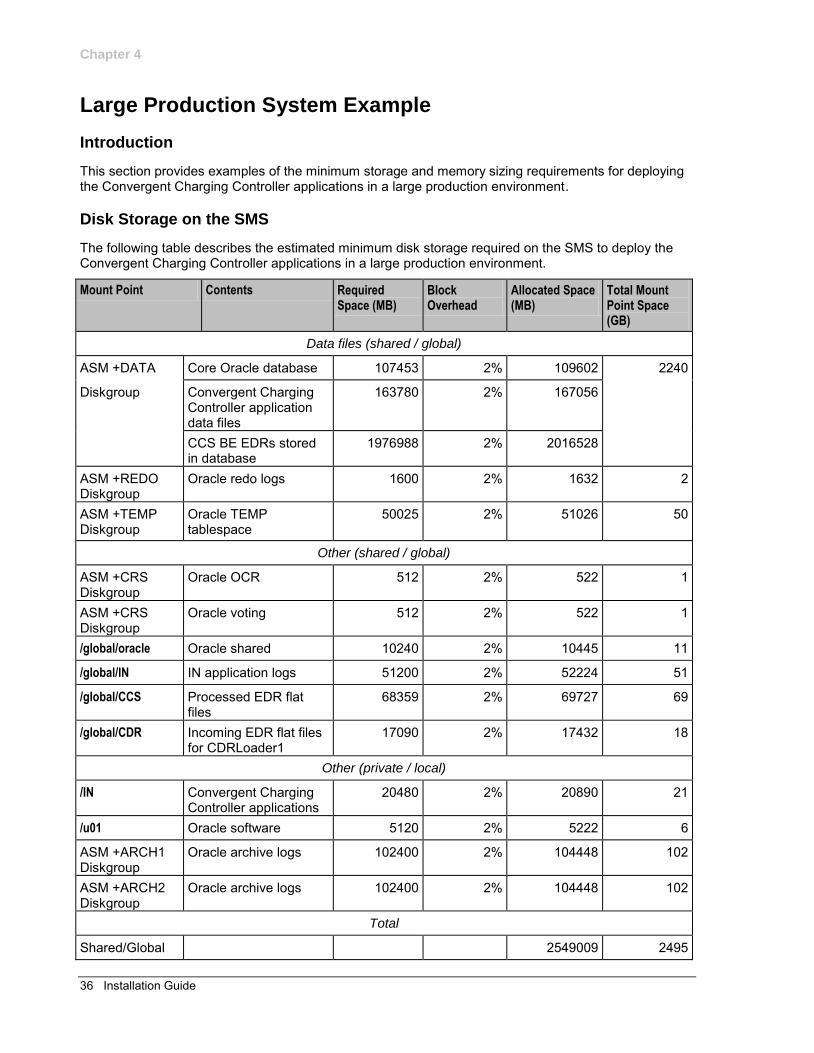
Introduction
This section provides examples of the minimum storage and memory sizing requirements for deploying the Convergent Charging Controller applications in a large production environment.
Disk Storage on the SMS
The following table describes the estimated minimum disk storage required on the SMS to deploy the Convergent Charging Controller applications in a large production environment.
Mount Point Contents Required Space (MB)
Block Overhead
Allocated Space (MB)
Total Mount Point Space (GB)
Data files (shared / global)
ASM +DATA Core Oracle database 107453 2% 109602 2240
Diskgroup Convergent Charging Controller application data files
163780 2% 167056
CCS BE EDRs stored in database
1976988 2% 2016528
ASM +REDO Diskgroup
Oracle redo logs 1600 2% 1632 2
ASM +TEMP Diskgroup
Oracle TEMP tablespace
50025 2% 51026 50
Other (shared / global)
ASM +CRS Diskgroup
Oracle OCR 512 2% 522 1
ASM +CRS Diskgroup
Oracle voting 512 2% 522 1
/global/oracle Oracle shared 10240 2% 10445 11
/global/IN IN application logs 51200 2% 52224 51
/global/CCS Processed EDR flat files
68359 2% 69727 69
/global/CDR Incoming EDR flat files for CDRLoader1
17090 2% 17432 18
Other (private / local)
/IN Convergent Charging Controller applications
20480 2% 20890 21
/u01 Oracle software 5120 2% 5222 6
ASM +ARCH1 Diskgroup
Oracle archive logs 102400 2% 104448 102
ASM +ARCH2 Diskgroup
Oracle archive logs 102400 2% 104448 102
Total
Shared/Global 2549009 2495
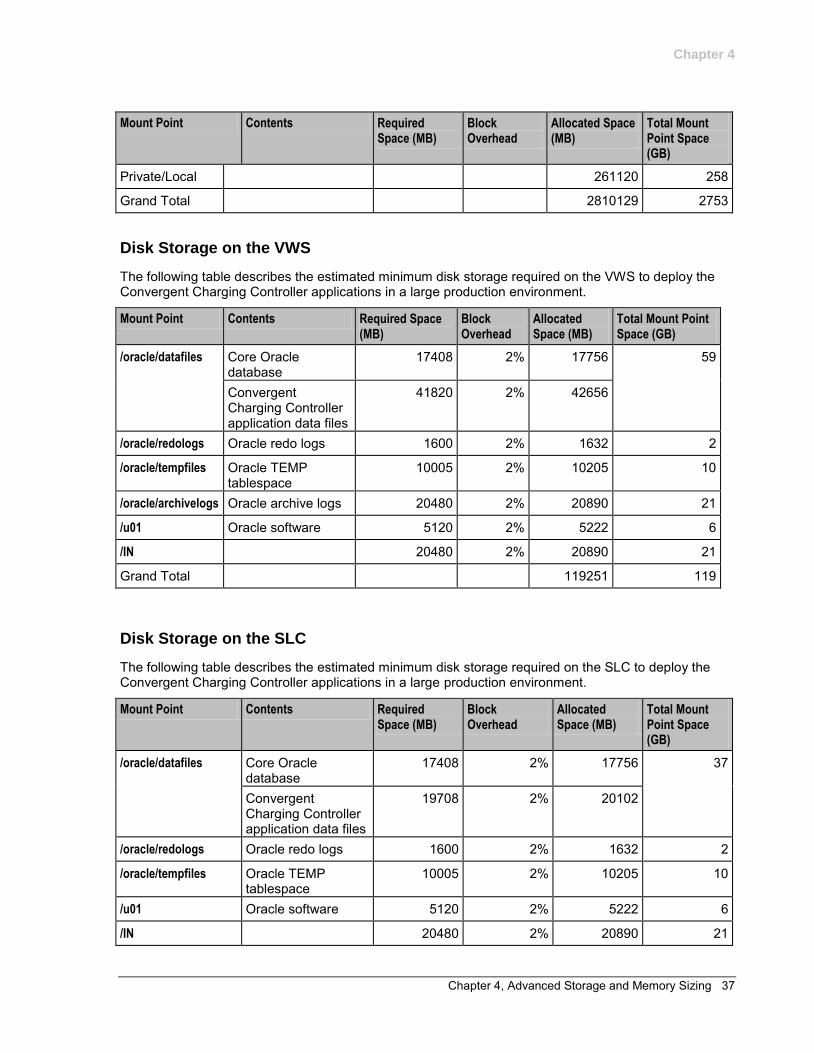
Chapter 4
Chapter 4, Advanced Storage and Memory Sizing 37
Mount Point Contents Required Space (MB)
Block Overhead
Allocated Space (MB)
Total Mount Point Space (GB)
Private/Local 261120 258
Grand Total 2810129 2753
Disk Storage on the VWS
The following table describes the estimated minimum disk storage required on the VWS to deploy the Convergent Charging Controller applications in a large production environment.
Mount Point Contents Required Space (MB)
Block Overhead
Allocated Space (MB)
Total Mount Point Space (GB)
/oracle/datafiles Core Oracle database
17408 2% 17756 59
Convergent Charging Controller application data files
41820 2% 42656
/oracle/redologs Oracle redo logs 1600 2% 1632 2
/oracle/tempfiles Oracle TEMP tablespace
10005 2% 10205 10
/oracle/archivelogs Oracle archive logs 20480 2% 20890 21
/u01 Oracle software 5120 2% 5222 6
/IN 20480 2% 20890 21
Grand Total 119251 119
Disk Storage on the SLC
The following table describes the estimated minimum disk storage required on the SLC to deploy the Convergent Charging Controller applications in a large production environment.
Mount Point Contents Required Space (MB)
Block Overhead
Allocated Space (MB)
Total Mount Point Space (GB)
/oracle/datafiles Core Oracle database
17408 2% 17756 37
Convergent Charging Controller application data files
19708 2% 20102
/oracle/redologs Oracle redo logs 1600 2% 1632 2
/oracle/tempfiles Oracle TEMP tablespace
10005 2% 10205 10
/u01 Oracle software 5120 2% 5222 6
/IN 20480 2% 20890 21
Chapter 4
38 Installation Guide
Mount Point Contents Required Space (MB)
Block Overhead
Allocated Space (MB)
Total Mount Point Space (GB)
/oracle/datafiles Core Oracle database
17408 2% 17756 37
Convergent Charging Controller application data files
19708 2% 20102
/oracle/redologs Oracle redo logs 1600 2% 1632 2
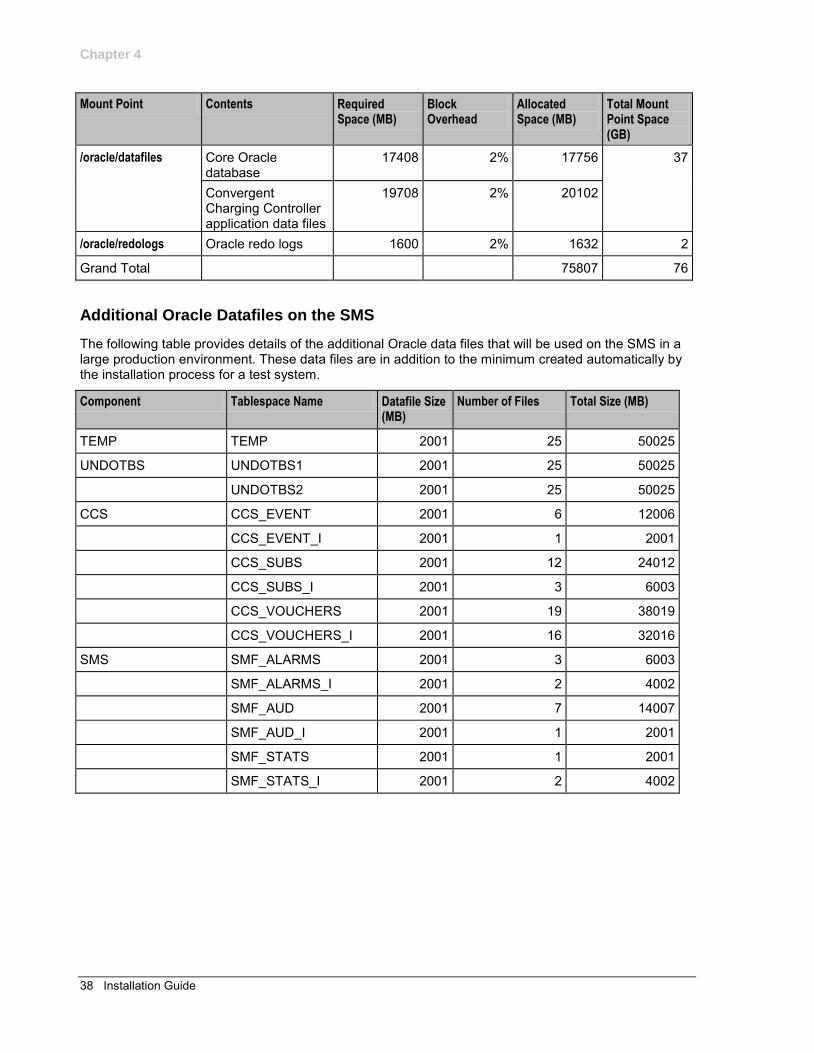
Grand Total 75807 76
Additional Oracle Datafiles on the SMS
The following table provides details of the additional Oracle data files that will be used on the SMS in a large production environment. These data files are in addition to the minimum created automatically by the installation process for a test system.
Component Tablespace Name Datafile Size (MB)
Number of Files Total Size (MB)
TEMP TEMP 2001 25 50025
UNDOTBS UNDOTBS1 2001 25 50025
UNDOTBS2 2001 25 50025
CCS CCS_EVENT 2001 6 12006
CCS_EVENT_I 2001 1 2001
CCS_SUBS 2001 12 24012
CCS_SUBS_I 2001 3 6003
CCS_VOUCHERS 2001 19 38019
CCS_VOUCHERS_I 2001 16 32016
SMS SMF_ALARMS 2001 3 6003
SMF_ALARMS_I 2001 2 4002
SMF_AUD 2001 7 14007
SMF_AUD_I 2001 1 2001
SMF_STATS 2001 1 2001
SMF_STATS_I 2001 2 4002
Chapter 4
Chapter 4, Advanced Storage and Memory Sizing 39
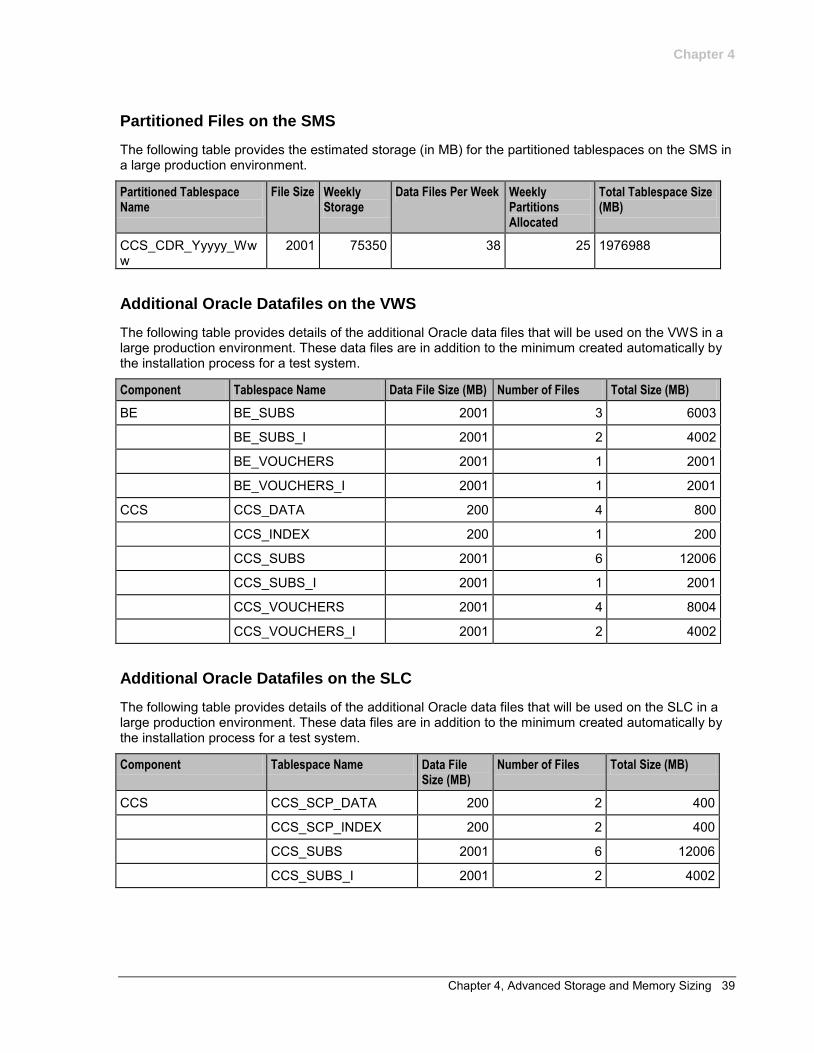
Partitioned Files on the SMS
The following table provides the estimated storage (in MB) for the partitioned tablespaces on the SMS in a large production environment.
Partitioned Tablespace Name
File Size Weekly Storage
Data Files Per Week Weekly Partitions Allocated
Total Tablespace Size (MB)
CCS_CDR_Yyyyy_Www
2001 75350 38 25 1976988
Additional Oracle Datafiles on the VWS
The following table provides details of the additional Oracle data files that will be used on the VWS in a large production environment. These data files are in addition to the minimum created automatically by the installation process for a test system.
Component Tablespace Name Data File Size (MB) Number of Files Total Size (MB)
BE BE_SUBS 2001 3 6003
BE_SUBS_I 2001 2 4002
BE_VOUCHERS 2001 1 2001
BE_VOUCHERS_I 2001 1 2001
CCS CCS_DATA 200 4 800
CCS_INDEX 200 1 200
CCS_SUBS 2001 6 12006
CCS_SUBS_I 2001 1 2001
CCS_VOUCHERS 2001 4 8004
CCS_VOUCHERS_I 2001 2 4002
Additional Oracle Datafiles on the SLC
The following table provides details of the additional Oracle data files that will be used on the SLC in a large production environment. These data files are in addition to the minimum created automatically by the installation process for a test system.
Component Tablespace Name Data File Size (MB)
Number of Files Total Size (MB)
CCS CCS_SCP_DATA 200 2 400
CCS_SCP_INDEX 200 2 400
CCS_SUBS 2001 6 12006
CCS_SUBS_I 2001 2 4002
Chapter 4
40 Installation Guide
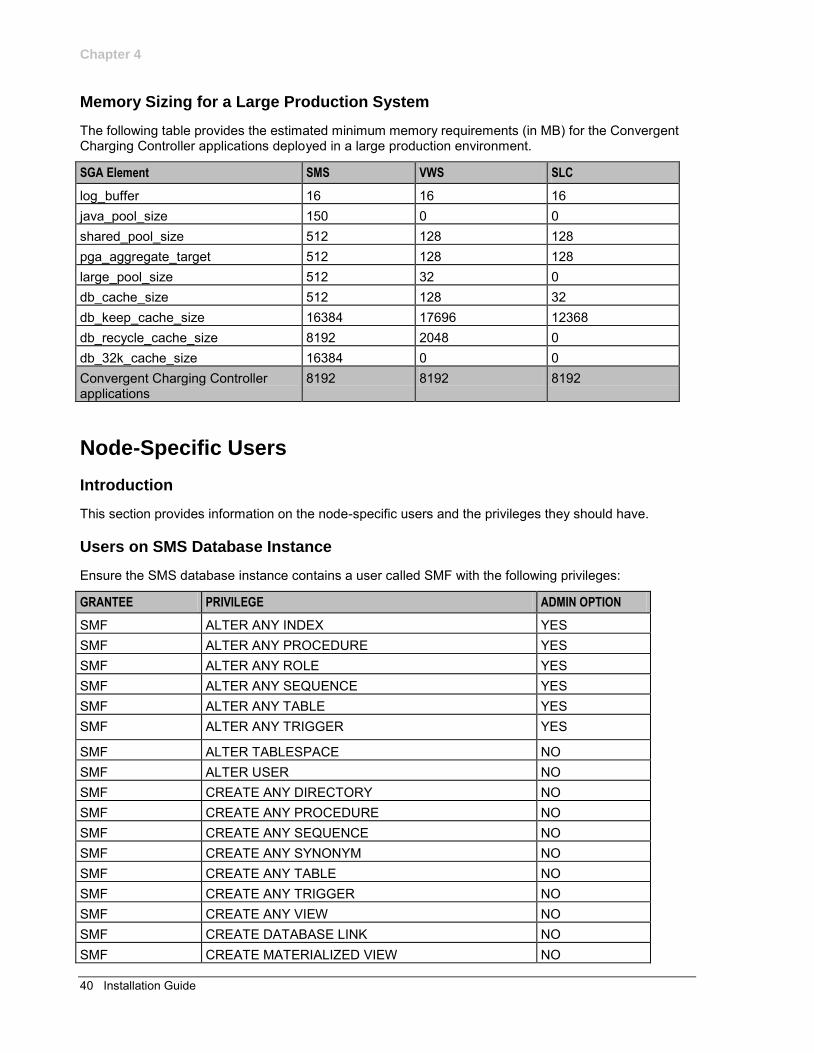
Memory Sizing for a Large Production System
The following table provides the estimated minimum memory requirements (in MB) for the Convergent Charging Controller applications deployed in a large production environment.
SGA Element SMS VWS SLC
log_buffer 16 16 16 java_pool_size 150 0 0 shared_pool_size 512 128 128 pga_aggregate_target 512 128 128 large_pool_size 512 32 0 db_cache_size 512 128 32 db_keep_cache_size 16384 17696 12368 db_recycle_cache_size 8192 2048 0 db_32k_cache_size 16384 0 0 Convergent Charging Controller applications
8192 8192 8192
Node-Specific Users
Introduction
This section provides information on the node-specific users and the privileges they should have.
Users on SMS Database Instance
Ensure the SMS database instance contains a user called SMF with the following privileges:
GRANTEE PRIVILEGE ADMIN OPTION
SMF ALTER ANY INDEX YES SMF ALTER ANY PROCEDURE YES SMF ALTER ANY ROLE YES SMF ALTER ANY SEQUENCE YES SMF ALTER ANY TABLE YES SMF ALTER ANY TRIGGER YES
SMF ALTER TABLESPACE NO SMF ALTER USER NO SMF CREATE ANY DIRECTORY NO SMF CREATE ANY PROCEDURE NO SMF CREATE ANY SEQUENCE NO SMF CREATE ANY SYNONYM NO SMF CREATE ANY TABLE NO SMF CREATE ANY TRIGGER NO SMF CREATE ANY VIEW NO SMF CREATE DATABASE LINK NO SMF CREATE MATERIALIZED VIEW NO
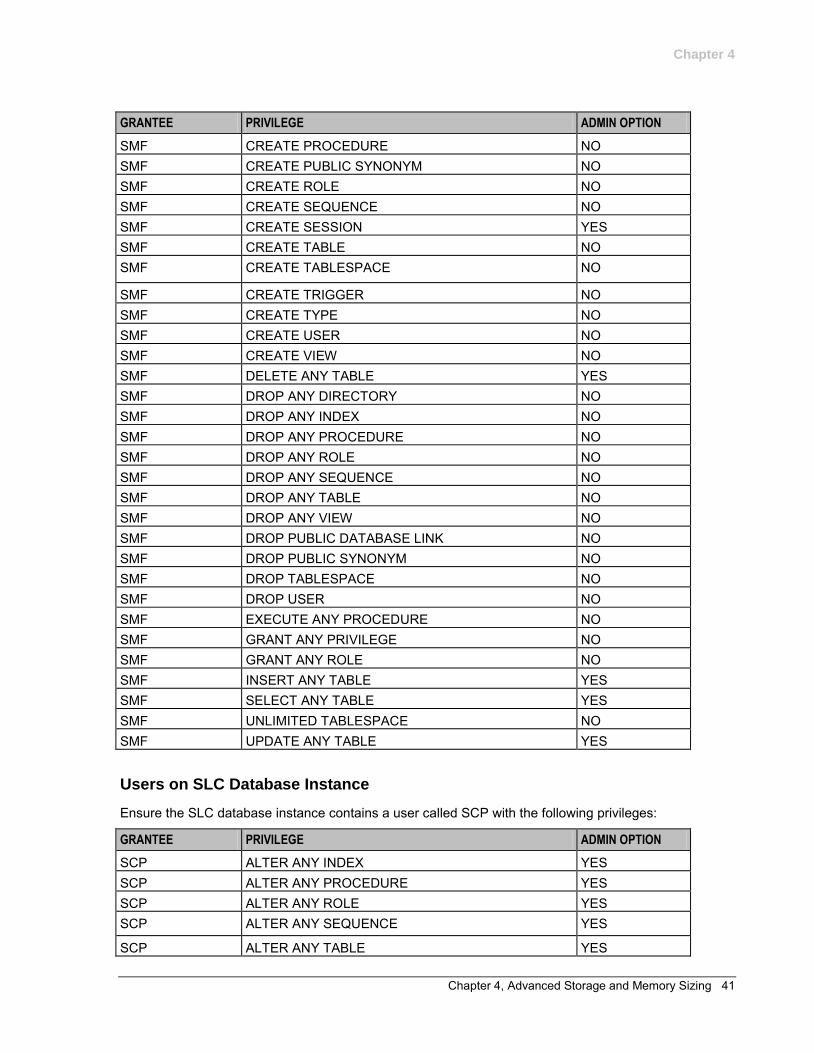
Chapter 4
Chapter 4, Advanced Storage and Memory Sizing 41
GRANTEE PRIVILEGE ADMIN OPTION
SMF CREATE PROCEDURE NO SMF CREATE PUBLIC SYNONYM NO SMF CREATE ROLE NO SMF CREATE SEQUENCE NO SMF CREATE SESSION YES SMF CREATE TABLE NO SMF CREATE TABLESPACE NO
SMF CREATE TRIGGER NO SMF CREATE TYPE NO SMF CREATE USER NO SMF CREATE VIEW NO SMF DELETE ANY TABLE YES SMF DROP ANY DIRECTORY NO SMF DROP ANY INDEX NO SMF DROP ANY PROCEDURE NO SMF DROP ANY ROLE NO SMF DROP ANY SEQUENCE NO SMF DROP ANY TABLE NO SMF DROP ANY VIEW NO SMF DROP PUBLIC DATABASE LINK NO SMF DROP PUBLIC SYNONYM NO SMF DROP TABLESPACE NO SMF DROP USER NO SMF EXECUTE ANY PROCEDURE NO SMF GRANT ANY PRIVILEGE NO SMF GRANT ANY ROLE NO SMF INSERT ANY TABLE YES SMF SELECT ANY TABLE YES SMF UNLIMITED TABLESPACE NO SMF UPDATE ANY TABLE YES
Users on SLC Database Instance
Ensure the SLC database instance contains a user called SCP with the following privileges:
GRANTEE PRIVILEGE ADMIN OPTION
SCP ALTER ANY INDEX YES SCP ALTER ANY PROCEDURE YES SCP ALTER ANY ROLE YES SCP ALTER ANY SEQUENCE YES
SCP ALTER ANY TABLE YES

Chapter 4
42 Installation Guide
GRANTEE PRIVILEGE ADMIN OPTION
SCP ALTER ANY TRIGGER YES SCP ALTER TABLESPACE NO SCP ALTER USER NO SCP CREATE ANY DIRECTORY NO SCP CREATE ANY PROCEDURE NO SCP CREATE ANY SEQUENCE NO SCP CREATE ANY SYNONYM NO SCP CREATE ANY TABLE NO SCP CREATE ANY TRIGGER NO SCP CREATE ANY VIEW NO SCP CREATE DATABASE LINK NO SCP CREATE MATERIALIZED VIEW NO SCP CREATE PROCEDURE NO SCP CREATE PUBLIC SYNONYM NO SCP CREATE ROLE NO SCP CREATE SEQUENCE NO SCP CREATE SESSION YES SCP CREATE TABLE NO SCP CREATE TABLESPACE NO SCP CREATE TRIGGER NO SCP CREATE USER NO SCP CREATE VIEW NO SCP DELETE ANY TABLE YES SCP DROP ANY INDEX NO SCP DROP ANY PROCEDURE NO SCP DROP ANY ROLE NO SCP DROP ANY SEQUENCE NO SCP DROP ANY TABLE NO SCP DROP PUBLIC DATABASE LINK NO SCP DROP PUBLIC SYNONYM NO SCP DROP TABLESPACE NO SCP DROP USER NO SCP EXECUTE ANY PROCEDURE NO SCP GRANT ANY PRIVILEGE NO SCP GRANT ANY ROLE NO SCP INSERT ANY TABLE YES SCP SELECT ANY TABLE YES SCP UNLIMITED TABLESPACE NO SCP UPDATE ANY TABLE YES
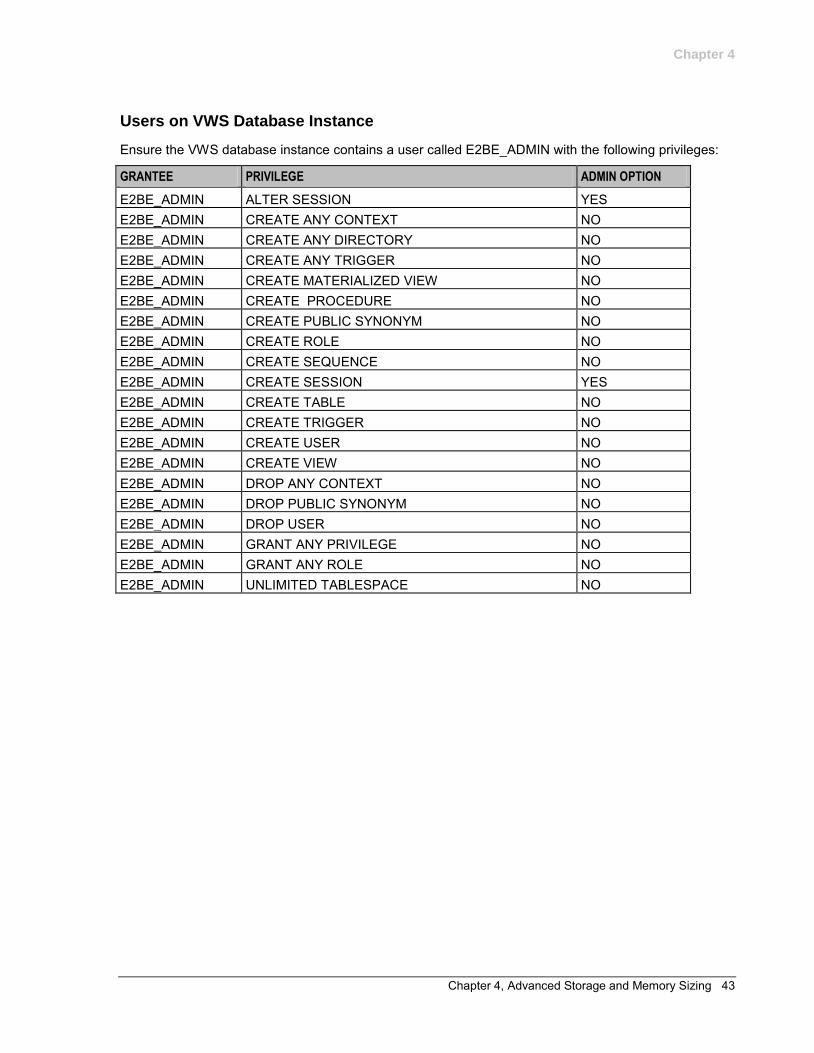
Chapter 4
Chapter 4, Advanced Storage and Memory Sizing 43
Users on VWS Database Instance
Ensure the VWS database instance contains a user called E2BE_ADMIN with the following privileges:
GRANTEE PRIVILEGE ADMIN OPTION
E2BE_ADMIN ALTER SESSION YES E2BE_ADMIN CREATE ANY CONTEXT NO E2BE_ADMIN CREATE ANY DIRECTORY NO E2BE_ADMIN CREATE ANY TRIGGER NO E2BE_ADMIN CREATE MATERIALIZED VIEW NO E2BE_ADMIN CREATE PROCEDURE NO E2BE_ADMIN CREATE PUBLIC SYNONYM NO E2BE_ADMIN CREATE ROLE NO E2BE_ADMIN CREATE SEQUENCE NO E2BE_ADMIN CREATE SESSION YES E2BE_ADMIN CREATE TABLE NO E2BE_ADMIN CREATE TRIGGER NO E2BE_ADMIN CREATE USER NO E2BE_ADMIN CREATE VIEW NO E2BE_ADMIN DROP ANY CONTEXT NO E2BE_ADMIN DROP PUBLIC SYNONYM NO E2BE_ADMIN DROP USER NO E2BE_ADMIN GRANT ANY PRIVILEGE NO E2BE_ADMIN GRANT ANY ROLE NO E2BE_ADMIN UNLIMITED TABLESPACE NO


Chapter 5, Convergent Charging Controller Pre-Installation Tasks 45
Chapter 5
Convergent Charging Controller Pre-Installation Tasks
Overview
Introduction
This chapter explains the tasks you should perform before installing Oracle Communications Convergent Charging Controller.
In this chapter
This chapter contains the following topics.
Preparing the System for Installation .......................................................................................... 45 About Checking Prerequisite Requirements ............................................................................... 54 Installing a Browser ..................................................................................................................... 56 Installing and Configuring Oracle Database ................................................................................ 56 Installing and Configuring BRM SDK .......................................................................................... 62
Preparing the System for Installation
About Preparing the System
To prepare the system before you install Convergent Charging Controller, you log in to each node in turn as the root user, and perform the following tasks:
Disable automount for the top directory of the mount point for all entries in the auto_home map file. See Disabling automount for the Home Directory (on page 46).
Enable remote login for the root user. See Enabling Remote Login (on page 46). Configure the log notice alarms. See Configuring Where to Log Notice Alarms (on page 46). Configure the directory to use for reporting core dumps and storing core files. See Configuring Core
Dump Reporting. Disable any unnecessary system services. See Disabling System Services. Open ports to Convergent Charging Controller in your Linux firewall. See Opening Ports in Your
Linux Firewall (on page 48). Ensure machines automatically boot following a temporary power loss. See Configuring Machines to
Boot Automatically (on page 50). Enable the SSH root login. See Enabling SSH Root Login (on page 50). Ensure Java 1.8 is installed. See the Oracle Java documentation. Generate and exchange SSH keys to allow automatic login to different machines. See Generating
and Exchanging SSH Keys (on page 50). Configure the SSH SMF service. See Configuring the SSH SMF Service (on page 51). Configure the /etc/system file to make buffer-overflow attacks more difficult. See Preventing Buffer
Overflow Attacks (on page 51).
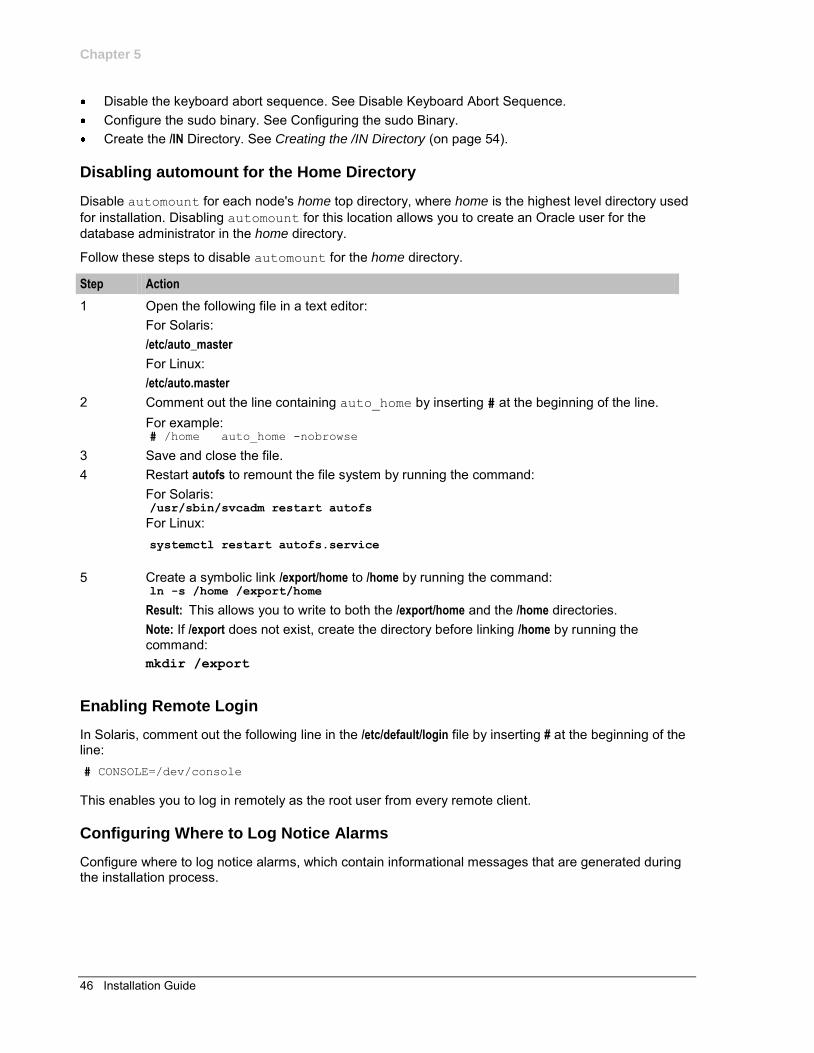
Chapter 5
46 Installation Guide
Disable the keyboard abort sequence. See Disable Keyboard Abort Sequence. Configure the sudo binary. See Configuring the sudo Binary. Create the /IN Directory. See Creating the /IN Directory (on page 54).
Disabling automount for the Home Directory
Disable automount for each node's home top directory, where home is the highest level directory used for installation. Disabling automount for this location allows you to create an Oracle user for the database administrator in the home directory.
Follow these steps to disable automount for the home directory.
Step Action
1 Open the following file in a text editor: For Solaris: /etc/auto_master For Linux: /etc/auto.master
2 Comment out the line containing auto_home by inserting # at the beginning of the line. For example: # /home auto_home -nobrowse
3 Save and close the file. 4 Restart autofs to remount the file system by running the command:
For Solaris: /usr/sbin/svcadm restart autofs
For Linux: systemctl restart autofs.service
5 Create a symbolic link /export/home to /home by running the command: ln -s /home /export/home
Result: This allows you to write to both the /export/home and the /home directories. Note: If /export does not exist, create the directory before linking /home by running the command: mkdir /export
Enabling Remote Login
In Solaris, comment out the following line in the /etc/default/login file by inserting # at the beginning of the line: # CONSOLE=/dev/console
This enables you to log in remotely as the root user from every remote client.
Configuring Where to Log Notice Alarms
Configure where to log notice alarms, which contain informational messages that are generated during the installation process.
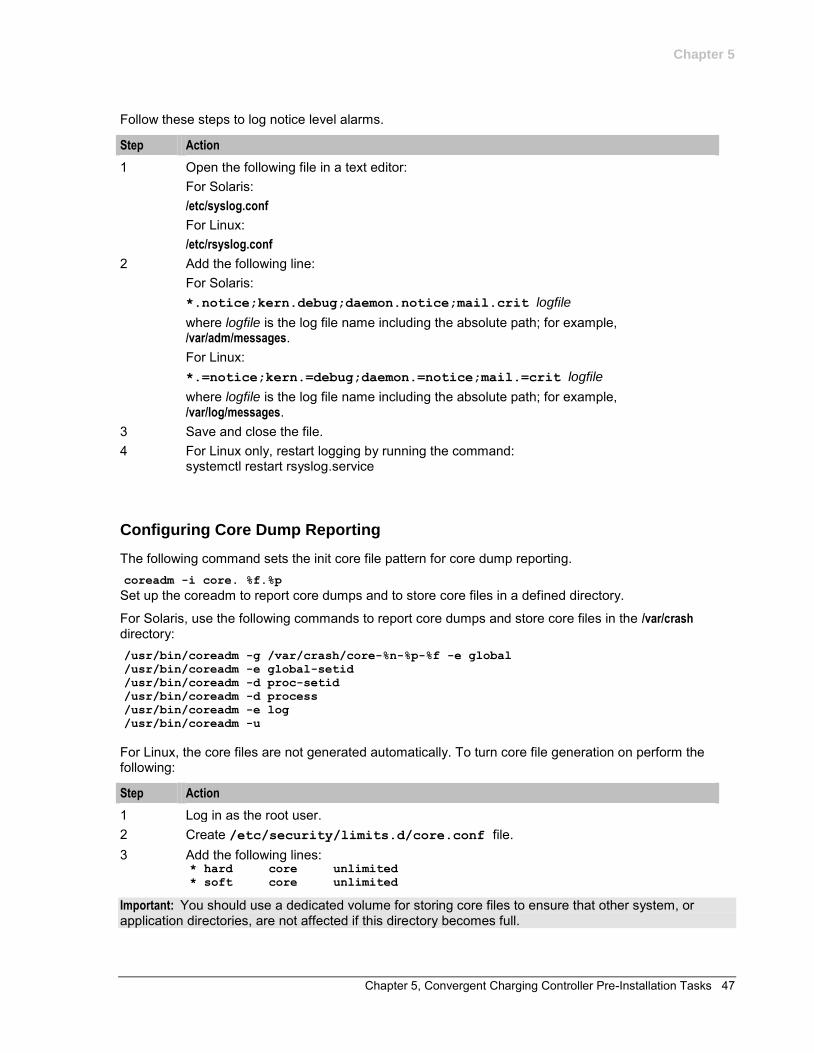
Chapter 5
Chapter 5, Convergent Charging Controller Pre-Installation Tasks 47
Follow these steps to log notice level alarms.
Step Action
1 Open the following file in a text editor: For Solaris: /etc/syslog.conf For Linux: /etc/rsyslog.conf
2 Add the following line: For Solaris: *.notice;kern.debug;daemon.notice;mail.crit logfile where logfile is the log file name including the absolute path; for example, /var/adm/messages. For Linux: *.=notice;kern.=debug;daemon.=notice;mail.=crit logfile where logfile is the log file name including the absolute path; for example, /var/log/messages.
3 Save and close the file. 4 For Linux only, restart logging by running the command:
systemctl restart rsyslog.service
Configuring Core Dump Reporting
The following command sets the init core file pattern for core dump reporting. coreadm -i core. %f.%p
Set up the coreadm to report core dumps and to store core files in a defined directory.
For Solaris, use the following commands to report core dumps and store core files in the /var/crash directory: /usr/bin/coreadm -g /var/crash/core-%n-%p-%f -e global
/usr/bin/coreadm -e global-setid
/usr/bin/coreadm -d proc-setid
/usr/bin/coreadm -d process
/usr/bin/coreadm -e log
/usr/bin/coreadm -u
For Linux, the core files are not generated automatically. To turn core file generation on perform the following:
Step Action
1 Log in as the root user. 2 Create /etc/security/limits.d/core.conf file. 3 Add the following lines:
* hard core unlimited
* soft core unlimited
Important: You should use a dedicated volume for storing core files to ensure that other system, or application directories, are not affected if this directory becomes full.
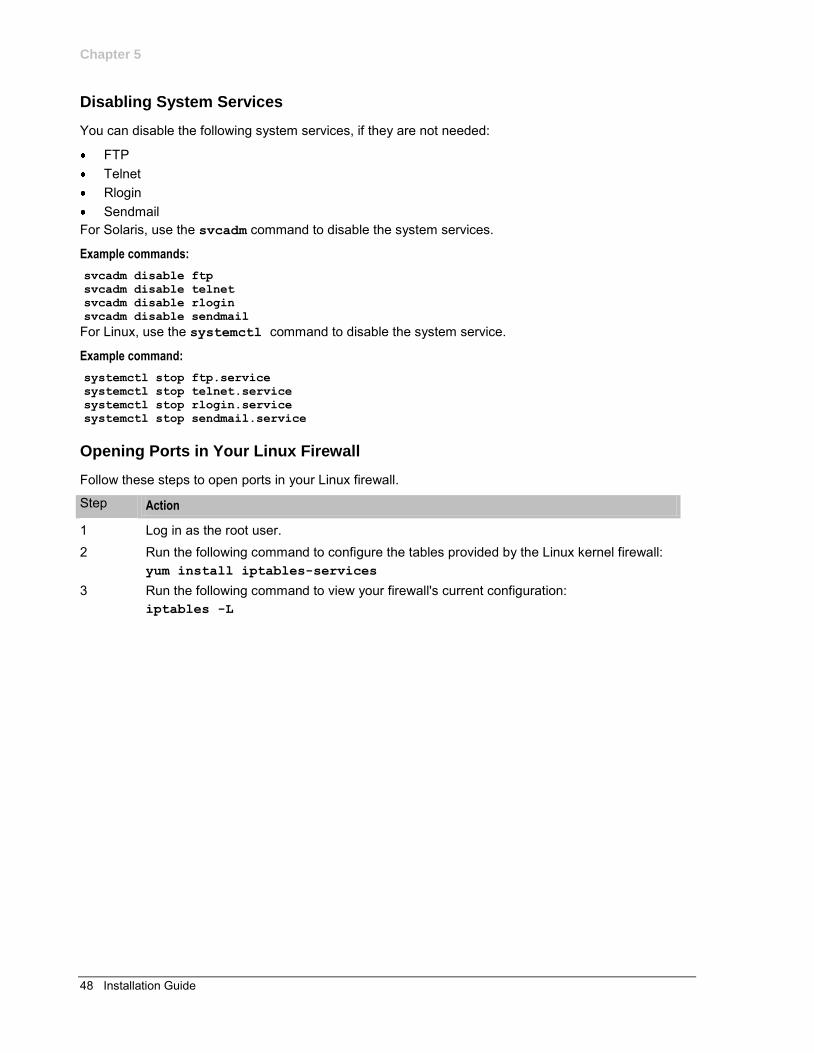
Chapter 5
48 Installation Guide
Disabling System Services
You can disable the following system services, if they are not needed:
FTP Telnet Rlogin Sendmail
For Solaris, use the svcadm command to disable the system services.
Example commands: svcadm disable ftp
svcadm disable telnet
svcadm disable rlogin
svcadm disable sendmail
For Linux, use the systemctl command to disable the system service.
Example command: systemctl stop ftp.service
systemctl stop telnet.service
systemctl stop rlogin.service
systemctl stop sendmail.service
Opening Ports in Your Linux Firewall
Follow these steps to open ports in your Linux firewall.
Step Action
1 Log in as the root user. 2 Run the following command to configure the tables provided by the Linux kernel firewall:
yum install iptables-services 3 Run the following command to view your firewall's current configuration:
iptables -L
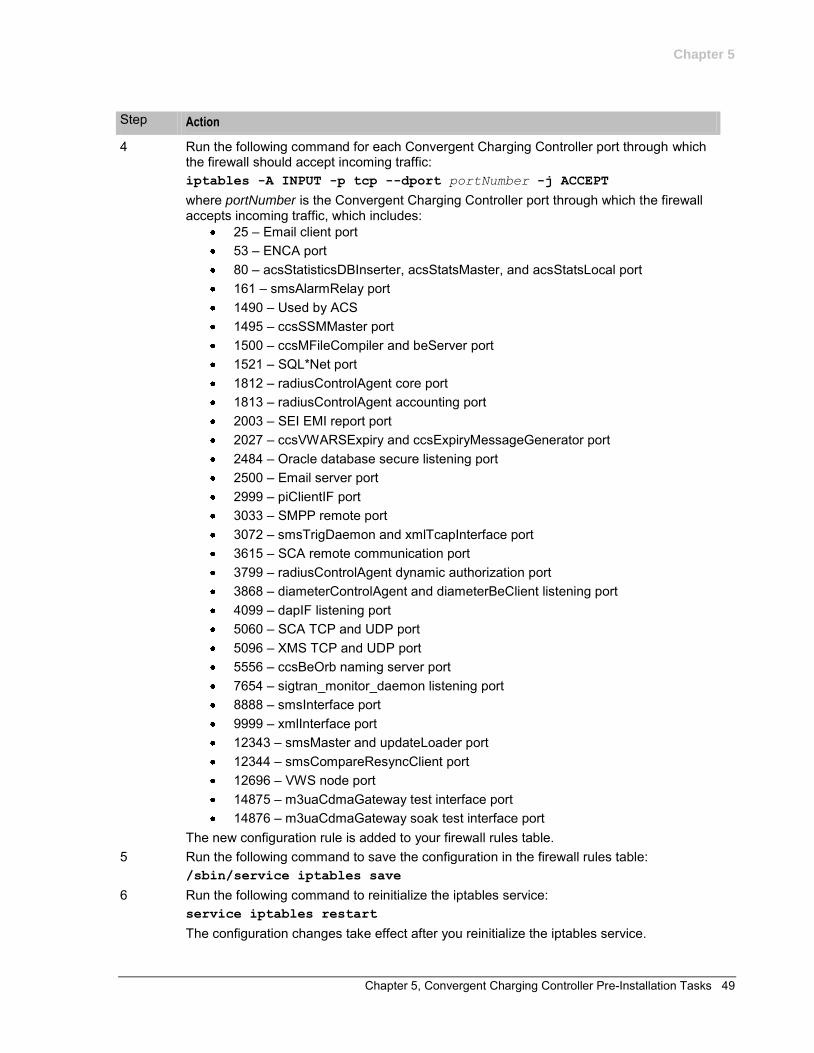
Chapter 5
Chapter 5, Convergent Charging Controller Pre-Installation Tasks 49
Step Action
4 Run the following command for each Convergent Charging Controller port through which the firewall should accept incoming traffic: iptables -A INPUT -p tcp --dport portNumber -j ACCEPT where portNumber is the Convergent Charging Controller port through which the firewall accepts incoming traffic, which includes:
25 – Email client port 53 – ENCA port 80 – acsStatisticsDBInserter, acsStatsMaster, and acsStatsLocal port 161 – smsAlarmRelay port 1490 – Used by ACS 1495 – ccsSSMMaster port 1500 – ccsMFileCompiler and beServer port 1521 – SQL*Net port 1812 – radiusControlAgent core port 1813 – radiusControlAgent accounting port 2003 – SEI EMI report port 2027 – ccsVWARSExpiry and ccsExpiryMessageGenerator port 2484 – Oracle database secure listening port 2500 – Email server port 2999 – piClientIF port 3033 – SMPP remote port 3072 – smsTrigDaemon and xmlTcapInterface port 3615 – SCA remote communication port 3799 – radiusControlAgent dynamic authorization port 3868 – diameterControlAgent and diameterBeClient listening port 4099 – dapIF listening port 5060 – SCA TCP and UDP port 5096 – XMS TCP and UDP port 5556 – ccsBeOrb naming server port 7654 – sigtran_monitor_daemon listening port 8888 – smsInterface port 9999 – xmlInterface port 12343 – smsMaster and updateLoader port 12344 – smsCompareResyncClient port 12696 – VWS node port 14875 – m3uaCdmaGateway test interface port 14876 – m3uaCdmaGateway soak test interface port
The new configuration rule is added to your firewall rules table. 5 Run the following command to save the configuration in the firewall rules table:
/sbin/service iptables save 6 Run the following command to reinitialize the iptables service:
service iptables restart The configuration changes take effect after you reinitialize the iptables service.
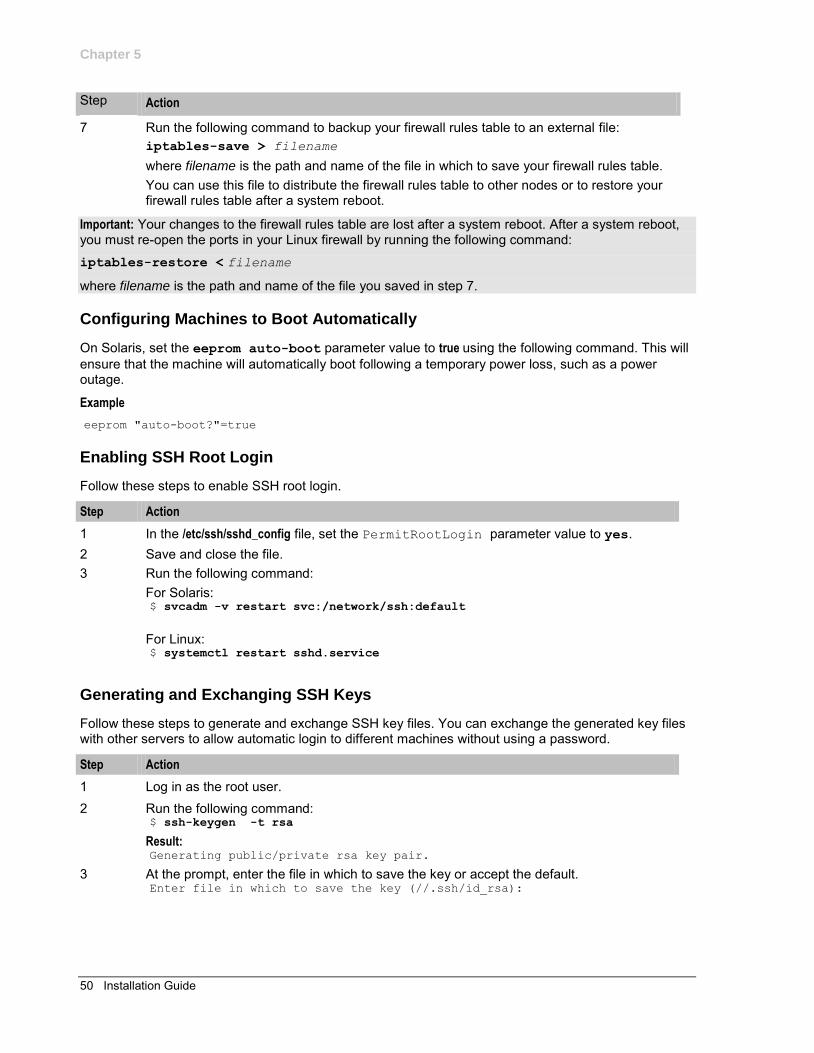
Chapter 5
50 Installation Guide
Step Action
7 Run the following command to backup your firewall rules table to an external file: iptables-save > filename where filename is the path and name of the file in which to save your firewall rules table. You can use this file to distribute the firewall rules table to other nodes or to restore your firewall rules table after a system reboot.
Important: Your changes to the firewall rules table are lost after a system reboot. After a system reboot, you must re-open the ports in your Linux firewall by running the following command: iptables-restore < filename
where filename is the path and name of the file you saved in step 7.
Configuring Machines to Boot Automatically
On Solaris, set the eeprom auto-boot parameter value to true using the following command. This will ensure that the machine will automatically boot following a temporary power loss, such as a power outage.
Example eeprom "auto-boot?"=true
Enabling SSH Root Login
Follow these steps to enable SSH root login.
Step Action
1 In the /etc/ssh/sshd_config file, set the PermitRootLogin parameter value to yes. 2 Save and close the file. 3 Run the following command:
For Solaris: $ svcadm -v restart svc:/network/ssh:default
For Linux: $ systemctl restart sshd.service
Generating and Exchanging SSH Keys
Follow these steps to generate and exchange SSH key files. You can exchange the generated key files with other servers to allow automatic login to different machines without using a password.
Step Action
1 Log in as the root user. 2 Run the following command:
$ ssh-keygen -t rsa
Result: Generating public/private rsa key pair.
3 At the prompt, enter the file in which to save the key or accept the default. Enter file in which to save the key (//.ssh/id_rsa):
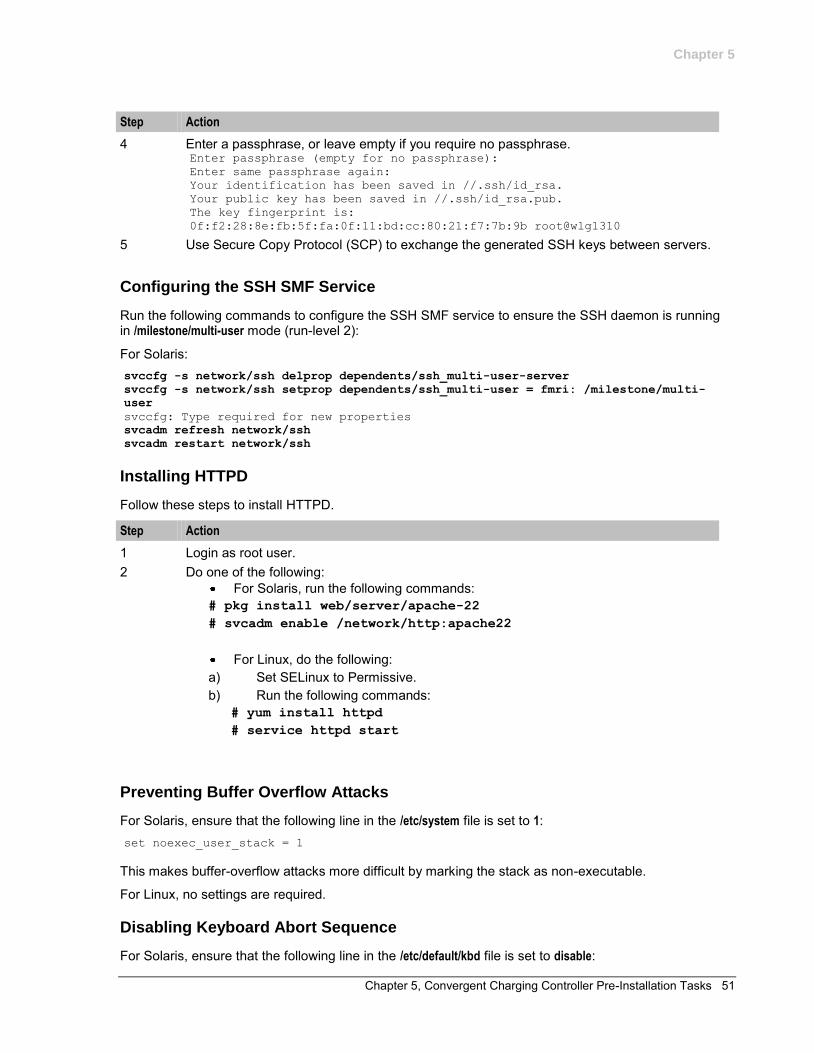
Chapter 5
Chapter 5, Convergent Charging Controller Pre-Installation Tasks 51
Step Action
4 Enter a passphrase, or leave empty if you require no passphrase. Enter passphrase (empty for no passphrase):
Enter same passphrase again:
Your identification has been saved in //.ssh/id_rsa.
Your public key has been saved in //.ssh/id_rsa.pub.
The key fingerprint is:
0f:f2:28:8e:fb:5f:fa:0f:11:bd:cc:80:21:f7:7b:9b root@wlg1310
5 Use Secure Copy Protocol (SCP) to exchange the generated SSH keys between servers.
Configuring the SSH SMF Service
Run the following commands to configure the SSH SMF service to ensure the SSH daemon is running in /milestone/multi-user mode (run-level 2):
For Solaris: svccfg -s network/ssh delprop dependents/ssh_multi-user-server
svccfg -s network/ssh setprop dependents/ssh_multi-user = fmri: /milestone/multi-
user
svccfg: Type required for new properties
svcadm refresh network/ssh
svcadm restart network/ssh
Installing HTTPD
Follow these steps to install HTTPD.
Step Action
1 Login as root user. 2 Do one of the following:
For Solaris, run the following commands: # pkg install web/server/apache-22 # svcadm enable /network/http:apache22
For Linux, do the following:
a) Set SELinux to Permissive. b) Run the following commands:
# yum install httpd # service httpd start
Preventing Buffer Overflow Attacks
For Solaris, ensure that the following line in the /etc/system file is set to 1: set noexec_user_stack = 1
This makes buffer-overflow attacks more difficult by marking the stack as non-executable.
For Linux, no settings are required.
Disabling Keyboard Abort Sequence
For Solaris, ensure that the following line in the /etc/default/kbd file is set to disable:

Chapter 5
52 Installation Guide
KEYBOARD_ABORT=disable
This permanently changes the software default effect of the keyboard abort sequence.
For Linux, no settings are required.
Configuring the sudo Binary
When the install process runs sudo, it uses the /IN/bin/sudo script to check whether the user set the sudo location by using the OUI_SYSTEM_SUDO environmental variable. If this environment variable is not set, the script uses a default location of /usr/local/bin/sudo.
The sudo binary can be stored in different directories on different server builds. To set a different sudo location, the user installing Convergent Charging Controller must set the OUI_SYSTEM_SUDO environmental variable to the desired location. For example:
setenv OUI_SYSTEM_SUDO /usr/bin/sudo
Creating Users
The following sections explain the procedures to create users and groups in each Convergent Charging Controller node.
Creating esg group for Each Node
Follow these steps to create esg group for each Convergent Charging Controller Node:
Step Action
1 Login as root user. 2 Run the following command to create the esg group:
/usr/sbin/groupadd -g gid esg where gid is a unique group id for the operating system
Adding Users to the Groups
Follow these steps to add users to the groups:
Step Action
1 Login as root user. 2 Run the following command to add a user to the esg and dba group:
For Solaris: usermod -G esg,dba -S files InstallUserName usermod -G esg,dba -S files oracle For Linux: usermod -G esg,dba InstallUserName usermod -G esg,dba oracle where InstallUserName is the user installing Convergent Charging Controller with sudo access
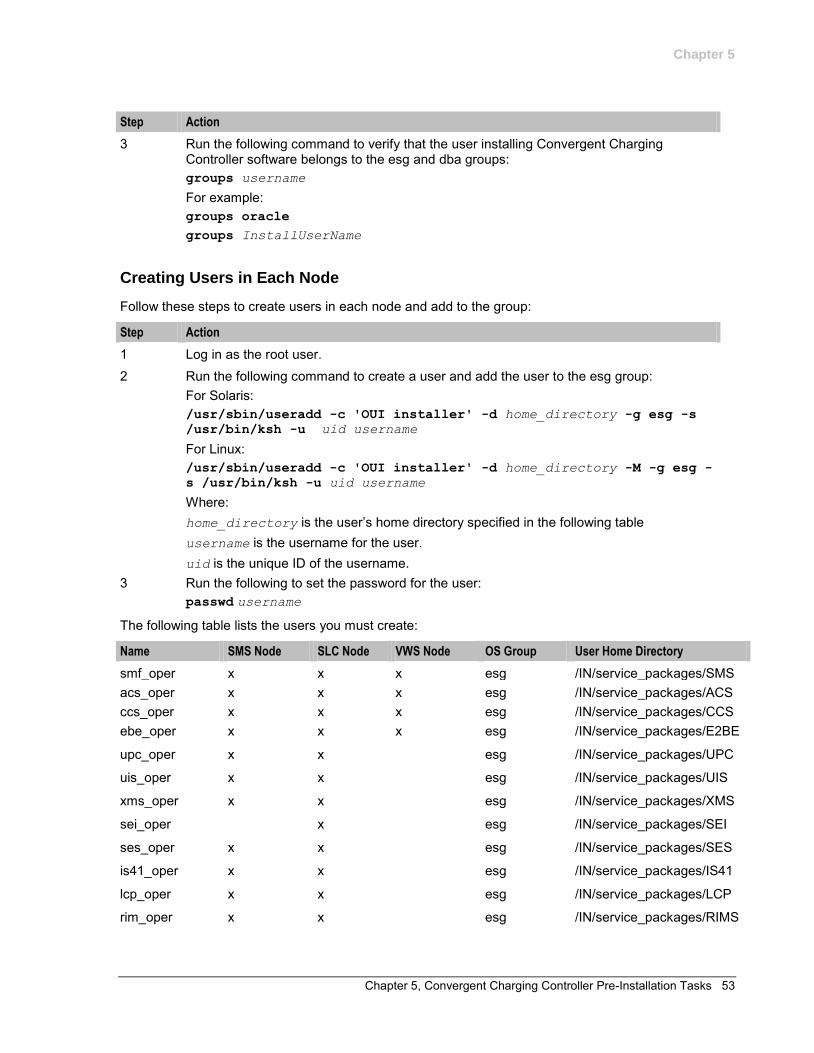
Chapter 5
Chapter 5, Convergent Charging Controller Pre-Installation Tasks 53
Step Action
3 Run the following command to verify that the user installing Convergent Charging Controller software belongs to the esg and dba groups: groups username For example: groups oracle groups InstallUserName
Creating Users in Each Node
Follow these steps to create users in each node and add to the group:
Step Action
1 Log in as the root user. 2 Run the following command to create a user and add the user to the esg group:
For Solaris: /usr/sbin/useradd -c 'OUI installer' -d home_directory -g esg -s
/usr/bin/ksh -u uid username For Linux: /usr/sbin/useradd -c 'OUI installer' -d home_directory -M -g esg -
s /usr/bin/ksh -u uid username Where: home_directory is the user’s home directory specified in the following table username is the username for the user. uid is the unique ID of the username.
3 Run the following to set the password for the user: passwd username
The following table lists the users you must create:
Name SMS Node SLC Node VWS Node OS Group User Home Directory
smf_oper x x x esg /IN/service_packages/SMS acs_oper x x x esg /IN/service_packages/ACS ccs_oper x x x esg /IN/service_packages/CCS ebe_oper x x x esg /IN/service_packages/E2BE
upc_oper x x esg /IN/service_packages/UPC
uis_oper x x esg /IN/service_packages/UIS
xms_oper x x esg /IN/service_packages/XMS
sei_oper x esg /IN/service_packages/SEI
ses_oper x x esg /IN/service_packages/SES
is41_oper x x esg /IN/service_packages/IS41
lcp_oper x x esg /IN/service_packages/LCP
rim_oper x x esg /IN/service_packages/RIMS
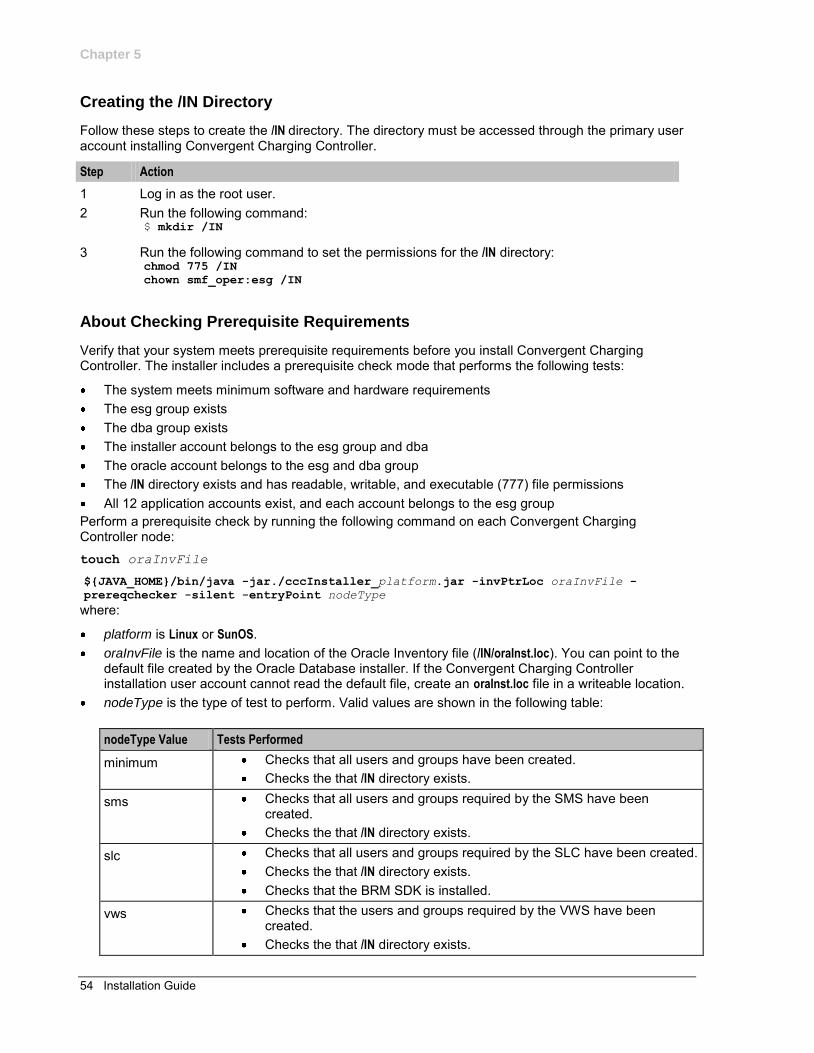
Chapter 5
54 Installation Guide
Creating the /IN Directory
Follow these steps to create the /IN directory. The directory must be accessed through the primary user account installing Convergent Charging Controller.
Step Action
1 Log in as the root user. 2 Run the following command:
$ mkdir /IN
3 Run the following command to set the permissions for the /IN directory: chmod 775 /IN
chown smf_oper:esg /IN
About Checking Prerequisite Requirements
Verify that your system meets prerequisite requirements before you install Convergent Charging Controller. The installer includes a prerequisite check mode that performs the following tests:
The system meets minimum software and hardware requirements The esg group exists The dba group exists The installer account belongs to the esg group and dba The oracle account belongs to the esg and dba group The /IN directory exists and has readable, writable, and executable (777) file permissions All 12 application accounts exist, and each account belongs to the esg group
Perform a prerequisite check by running the following command on each Convergent Charging Controller node: touch oraInvFile ${JAVA_HOME}/bin/java -jar./cccInstaller_platform.jar -invPtrLoc oraInvFile -
prereqchecker -silent -entryPoint nodeType
where:
platform is Linux or SunOS. oraInvFile is the name and location of the Oracle Inventory file (/IN/oraInst.loc). You can point to the
default file created by the Oracle Database installer. If the Convergent Charging Controller installation user account cannot read the default file, create an oraInst.loc file in a writeable location.
nodeType is the type of test to perform. Valid values are shown in the following table: nodeType Value Tests Performed
minimum Checks that all users and groups have been created. Checks the that /IN directory exists.
sms Checks that all users and groups required by the SMS have been created.
Checks the that /IN directory exists.
slc Checks that all users and groups required by the SLC have been created. Checks the that /IN directory exists. Checks that the BRM SDK is installed.
vws Checks that the users and groups required by the VWS have been created.
Checks the that /IN directory exists.
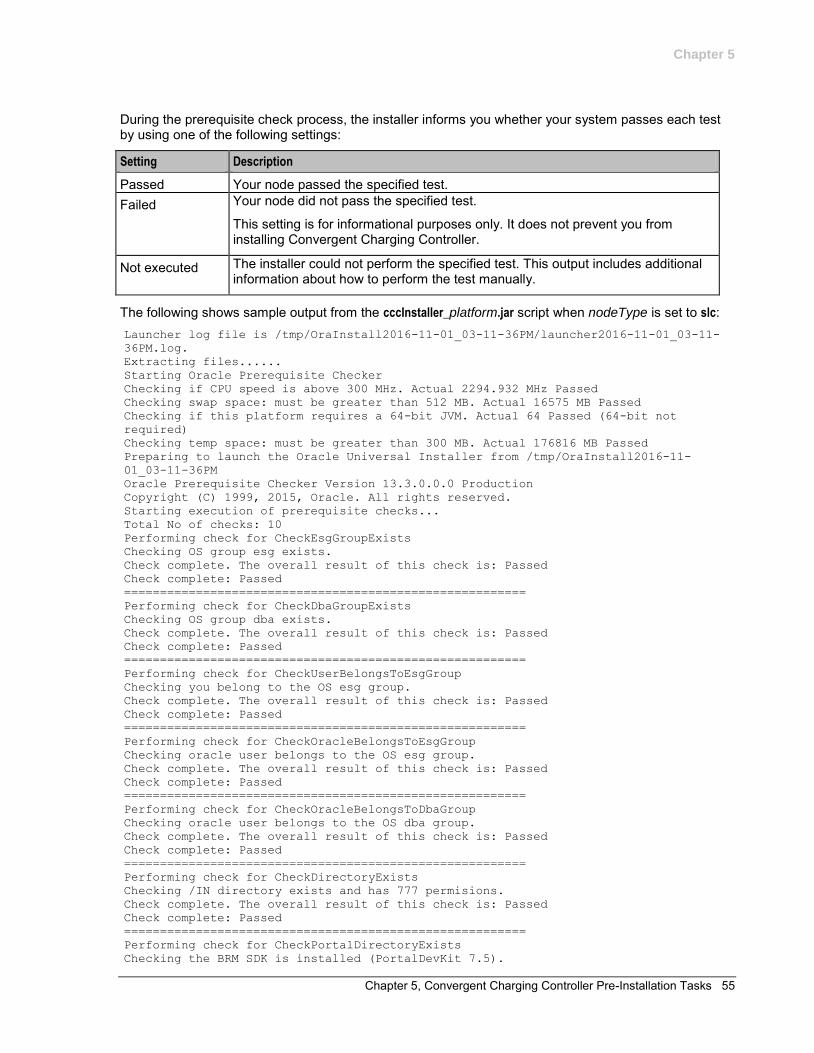
Chapter 5
Chapter 5, Convergent Charging Controller Pre-Installation Tasks 55
During the prerequisite check process, the installer informs you whether your system passes each test by using one of the following settings:
Setting Description
Passed Your node passed the specified test. Failed Your node did not pass the specified test.
This setting is for informational purposes only. It does not prevent you from installing Convergent Charging Controller.
Not executed The installer could not perform the specified test. This output includes additional information about how to perform the test manually.
The following shows sample output from the cccInstaller_platform.jar script when nodeType is set to slc: Launcher log file is /tmp/OraInstall2016-11-01_03-11-36PM/launcher2016-11-01_03-11-
36PM.log.
Extracting files......
Starting Oracle Prerequisite Checker
Checking if CPU speed is above 300 MHz. Actual 2294.932 MHz Passed
Checking swap space: must be greater than 512 MB. Actual 16575 MB Passed
Checking if this platform requires a 64-bit JVM. Actual 64 Passed (64-bit not
required)
Checking temp space: must be greater than 300 MB. Actual 176816 MB Passed
Preparing to launch the Oracle Universal Installer from /tmp/OraInstall2016-11-
01_03-11-36PM
Oracle Prerequisite Checker Version 13.3.0.0.0 Production
Copyright (C) 1999, 2015, Oracle. All rights reserved.
Starting execution of prerequisite checks...
Total No of checks: 10
Performing check for CheckEsgGroupExists
Checking OS group esg exists.
Check complete. The overall result of this check is: Passed
Check complete: Passed
========================================================
Performing check for CheckDbaGroupExists
Checking OS group dba exists.
Check complete. The overall result of this check is: Passed
Check complete: Passed
========================================================
Performing check for CheckUserBelongsToEsgGroup
Checking you belong to the OS esg group.
Check complete. The overall result of this check is: Passed
Check complete: Passed
========================================================
Performing check for CheckOracleBelongsToEsgGroup
Checking oracle user belongs to the OS esg group.
Check complete. The overall result of this check is: Passed
Check complete: Passed
========================================================
Performing check for CheckOracleBelongsToDbaGroup
Checking oracle user belongs to the OS dba group.
Check complete. The overall result of this check is: Passed
Check complete: Passed
========================================================
Performing check for CheckDirectoryExists
Checking /IN directory exists and has 777 permisions.
Check complete. The overall result of this check is: Passed
Check complete: Passed
========================================================
Performing check for CheckPortalDirectoryExists
Checking the BRM SDK is installed (PortalDevKit 7.5).
Chapter 5
56 Installation Guide
Check complete. The overall result of this check is: Passed
Check complete: Passed
========================================================
Performing check for CheckNawkExists
Checking nawk is installed on the OS.
Check complete. The overall result of this check is: Passed
Check complete: Passed
========================================================
Performing check for CheckSudo
Checking you have sudo access rights.
Check complete. The overall result of this check is: Not executed <<<<
Check complete: Not executed <<<<
Recommendation: Grant sudo access rights to your account.
========================================================
Performing check for CheckUserAccountsSLC
Checking all application accounts have been created.
Check complete. The overall result of this check is: Passed
Check complete: Passed
========================================================
PrereqChecks complete
Logs are located here: /tmp/OraInstall2016-11-01_03-11-36PM.
Installing a Browser
Browser and Java for Convergent Charging Controller UI
To enable you to access the Convergent Charging Controller UI, ensure that the required Java version and the browser listed in the following table are installed on your client system.
Note: Convergent Charging Controller supports client systems that use Windows XP or higher.
Browser/Java Description
Java Java 8u144 or later Browser Any browser supporting the required Java version, such as IE 8 or higher
Installing and Configuring Oracle Database
About Installing and Configuring Oracle Database
You need to install Oracle Database Server on all nodes:
Enterprise Edition for SMS Standard Edition for all other nodes (SLC, VWS1, VWS2)
Installing the Oracle Database Software
You can install Oracle database for Convergent Charging Controller in the following ways:
Install Oracle database on remote host. Install Oracle database on local host.
Step 1. Install Oracle Enterprise Database Server 12c Release 2
Step 2. Install Oracle Database 32-bit client 12c Release 2
For detailed installation instructions, see Database Installation Guide for Oracle Solaris.

Chapter 5
Chapter 5, Convergent Charging Controller Pre-Installation Tasks 57
Oracle Database Software Installation Guidelines
Follow these guidelines when installing Oracle Enterprise Database software.
Installation Entity Guideline Value
Oracle Software Owner User Username: oracle Home directory: /home/oracle
OSDBA Group dba Oracle Base Directory (ORACLE_BASE)
/u01/app/oracle
(Oracle 12c database only) Oracle 12c Home Directory (ORACLE_HOME)
/u01/app/oracle/product/12.2.0
Oracle 12c 32-bit Client Home Directory (ORACLE_CLIENT32_HOME)
/u01/app/oracle/product/12.2.0_client32
Oracle database datafile directory
/oracle/datafiles
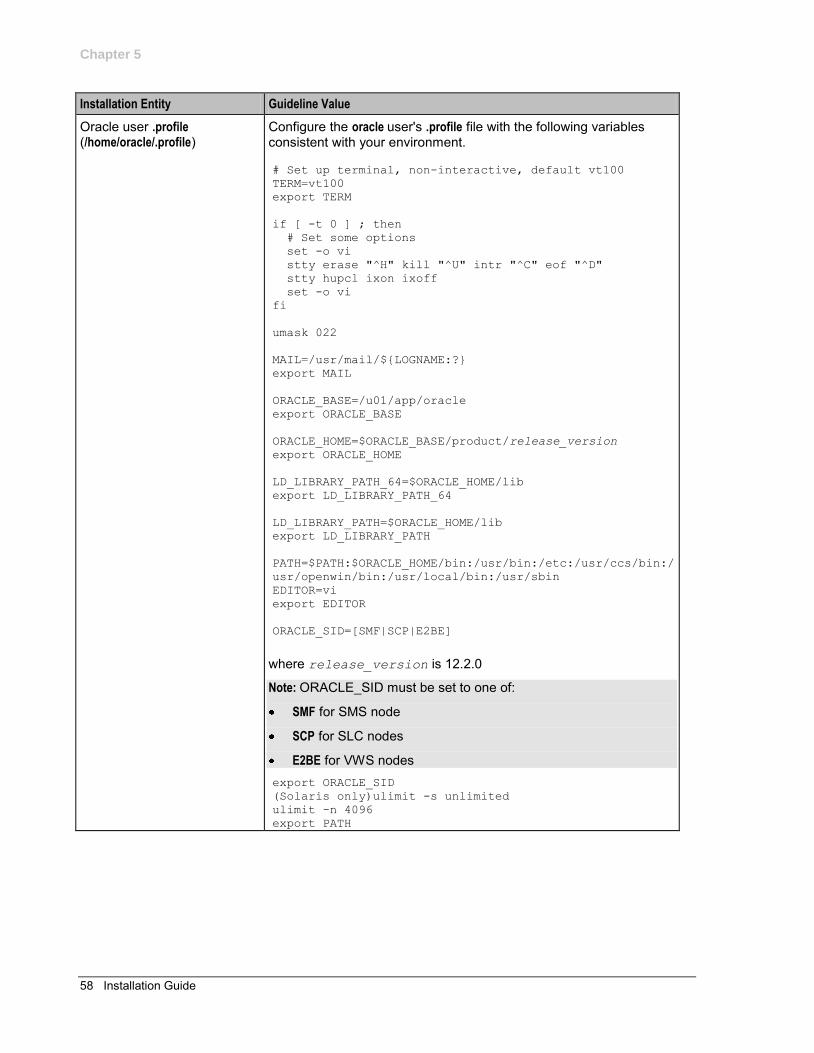
Chapter 5
58 Installation Guide
Installation Entity Guideline Value
Oracle user .profile (/home/oracle/.profile)
Configure the oracle user's .profile file with the following variables consistent with your environment.
# Set up terminal, non-interactive, default vt100
TERM=vt100
export TERM
if [ -t 0 ] ; then
# Set some options
set -o vi
stty erase "^H" kill "^U" intr "^C" eof "^D"
stty hupcl ixon ixoff
set -o vi
fi
umask 022
MAIL=/usr/mail/${LOGNAME:?}
export MAIL
ORACLE_BASE=/u01/app/oracle
export ORACLE_BASE
ORACLE_HOME=$ORACLE_BASE/product/release_version
export ORACLE_HOME
LD_LIBRARY_PATH_64=$ORACLE_HOME/lib
export LD_LIBRARY_PATH_64
LD_LIBRARY_PATH=$ORACLE_HOME/lib
export LD_LIBRARY_PATH
PATH=$PATH:$ORACLE_HOME/bin:/usr/bin:/etc:/usr/ccs/bin:/
usr/openwin/bin:/usr/local/bin:/usr/sbin
EDITOR=vi
export EDITOR
ORACLE_SID=[SMF|SCP|E2BE]
where release_version is 12.2.0
Note: ORACLE_SID must be set to one of:
SMF for SMS node
SCP for SLC nodes
E2BE for VWS nodes export ORACLE_SID
(Solaris only)ulimit -s unlimited
ulimit -n 4096
export PATH
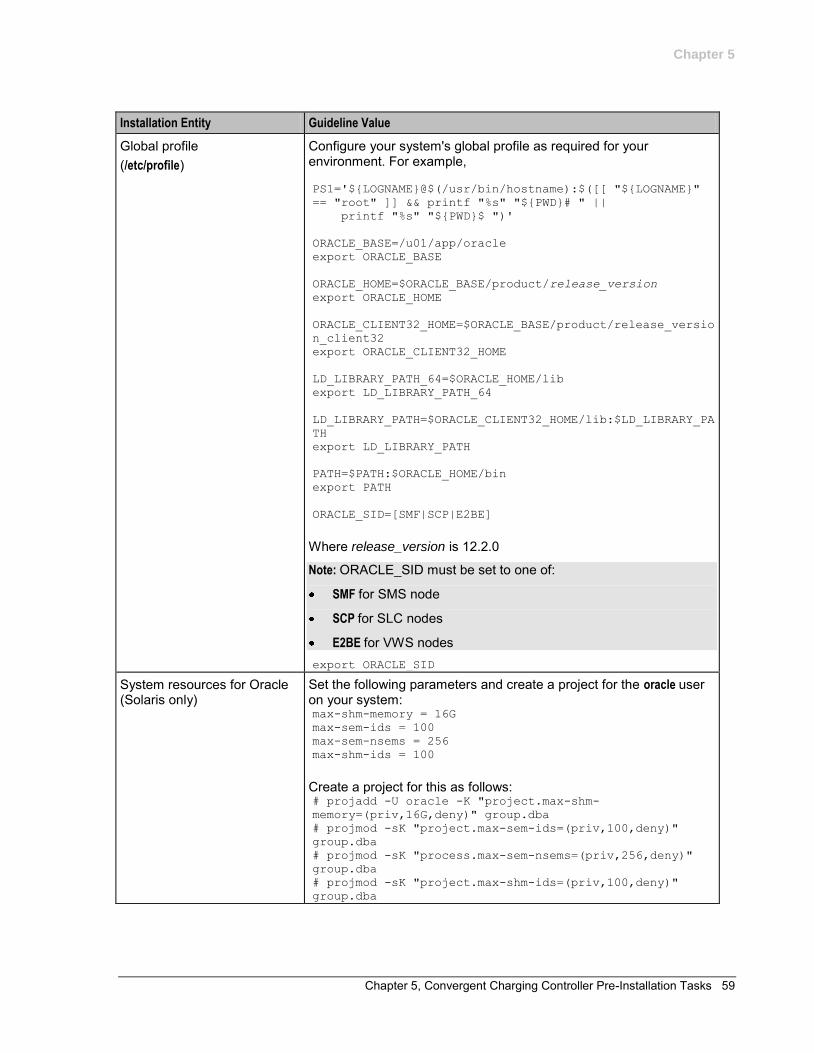
Chapter 5
Chapter 5, Convergent Charging Controller Pre-Installation Tasks 59
Installation Entity Guideline Value
Global profile (/etc/profile)
Configure your system's global profile as required for your environment. For example,
PS1='${LOGNAME}@$(/usr/bin/hostname):$([[ "${LOGNAME}"
== "root" ]] && printf "%s" "${PWD}# " ||
printf "%s" "${PWD}$ ")'
ORACLE_BASE=/u01/app/oracle
export ORACLE_BASE
ORACLE_HOME=$ORACLE_BASE/product/release_version
export ORACLE_HOME
ORACLE_CLIENT32_HOME=$ORACLE_BASE/product/release_versio
n_client32
export ORACLE_CLIENT32_HOME
LD_LIBRARY_PATH_64=$ORACLE_HOME/lib
export LD_LIBRARY_PATH_64
LD_LIBRARY_PATH=$ORACLE_CLIENT32_HOME/lib:$LD_LIBRARY_PA
TH
export LD_LIBRARY_PATH
PATH=$PATH:$ORACLE_HOME/bin
export PATH
ORACLE_SID=[SMF|SCP|E2BE]
Where release_version is 12.2.0
Note: ORACLE_SID must be set to one of:
SMF for SMS node
SCP for SLC nodes
E2BE for VWS nodes export ORACLE_SID
System resources for Oracle (Solaris only)
Set the following parameters and create a project for the oracle user on your system: max-shm-memory = 16G
max-sem-ids = 100
max-sem-nsems = 256
max-shm-ids = 100
Create a project for this as follows: # projadd -U oracle -K "project.max-shm-
memory=(priv,16G,deny)" group.dba
# projmod -sK "project.max-sem-ids=(priv,100,deny)"
group.dba
# projmod -sK "process.max-sem-nsems=(priv,256,deny)"
group.dba
# projmod -sK "project.max-shm-ids=(priv,100,deny)"
group.dba
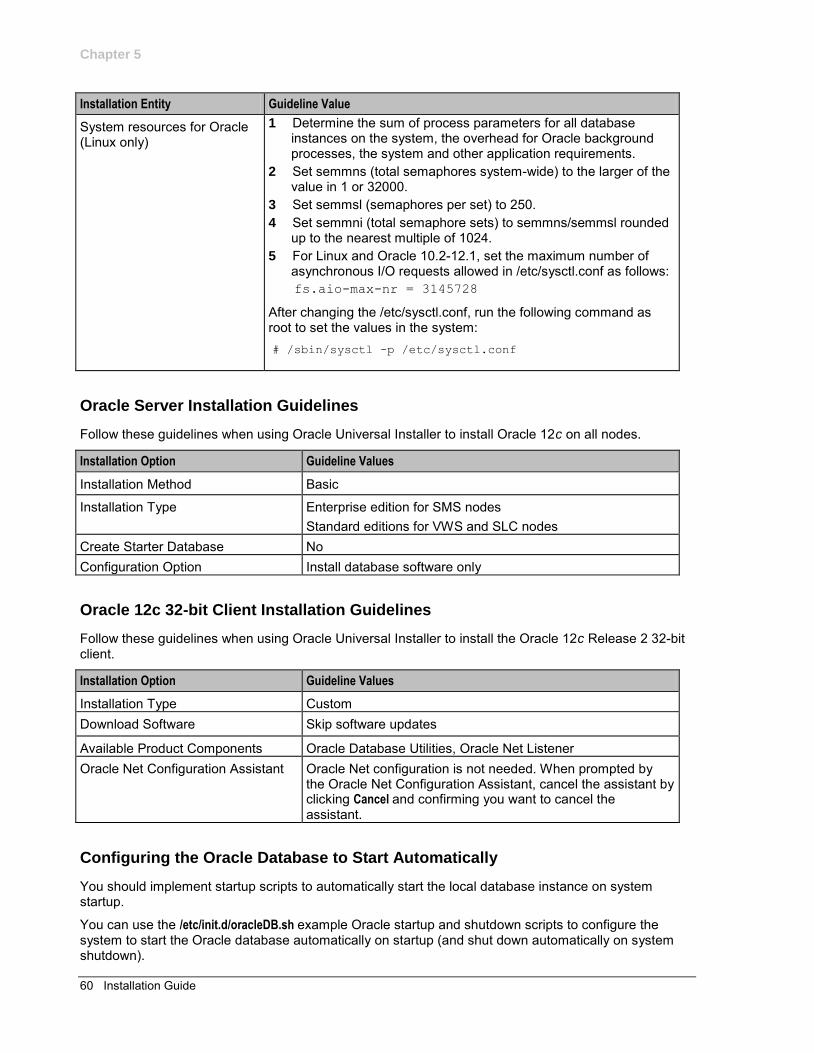
Chapter 5
60 Installation Guide
Installation Entity Guideline Value
System resources for Oracle (Linux only)
1 Determine the sum of process parameters for all database instances on the system, the overhead for Oracle background processes, the system and other application requirements.
2 Set semmns (total semaphores system-wide) to the larger of the value in 1 or 32000.
3 Set semmsl (semaphores per set) to 250. 4 Set semmni (total semaphore sets) to semmns/semmsl rounded
up to the nearest multiple of 1024. 5 For Linux and Oracle 10.2-12.1, set the maximum number of
asynchronous I/O requests allowed in /etc/sysctl.conf as follows: fs.aio-max-nr = 3145728
After changing the /etc/sysctl.conf, run the following command as root to set the values in the system: # /sbin/sysctl -p /etc/sysctl.conf
Oracle Server Installation Guidelines
Follow these guidelines when using Oracle Universal Installer to install Oracle 12c on all nodes.
Installation Option Guideline Values
Installation Method Basic
Installation Type Enterprise edition for SMS nodes Standard editions for VWS and SLC nodes
Create Starter Database No Configuration Option Install database software only
Oracle 12c 32-bit Client Installation Guidelines
Follow these guidelines when using Oracle Universal Installer to install the Oracle 12c Release 2 32-bit client.
Installation Option Guideline Values
Installation Type Custom Download Software Skip software updates
Available Product Components Oracle Database Utilities, Oracle Net Listener Oracle Net Configuration Assistant Oracle Net configuration is not needed. When prompted by
the Oracle Net Configuration Assistant, cancel the assistant by clicking Cancel and confirming you want to cancel the assistant.
Configuring the Oracle Database to Start Automatically
You should implement startup scripts to automatically start the local database instance on system startup.
You can use the /etc/init.d/oracleDB.sh example Oracle startup and shutdown scripts to configure the system to start the Oracle database automatically on startup (and shut down automatically on system shutdown).
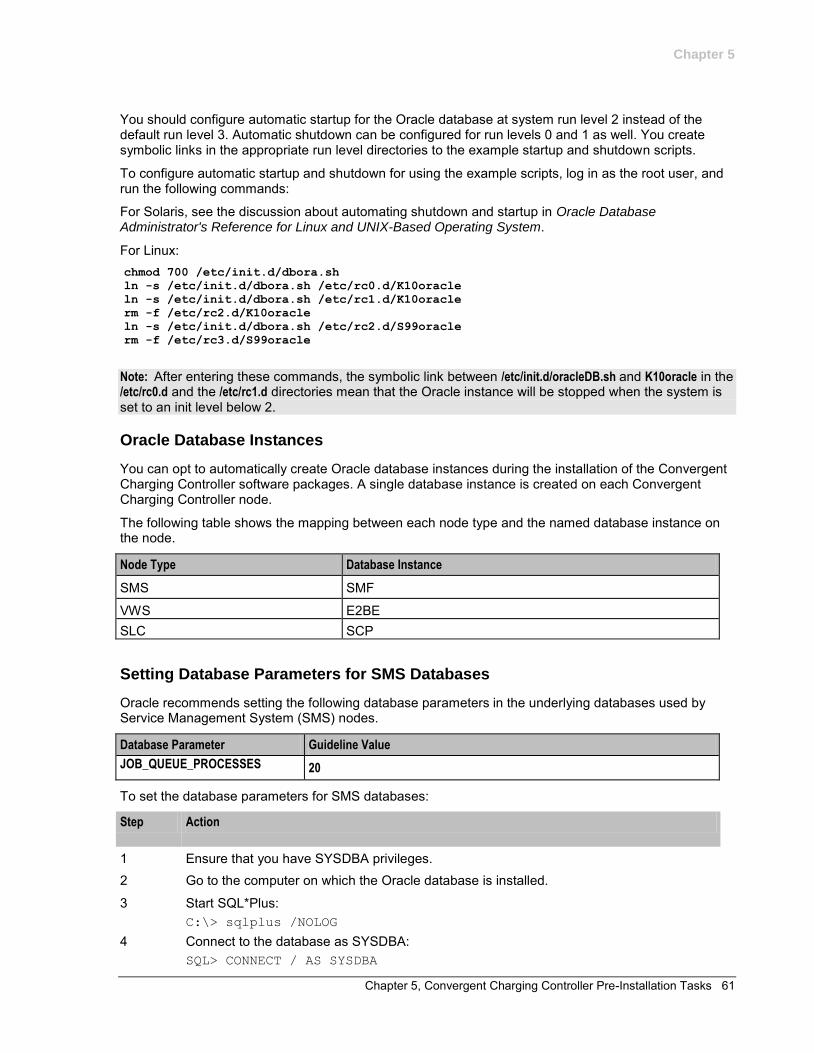
Chapter 5
Chapter 5, Convergent Charging Controller Pre-Installation Tasks 61
You should configure automatic startup for the Oracle database at system run level 2 instead of the default run level 3. Automatic shutdown can be configured for run levels 0 and 1 as well. You create symbolic links in the appropriate run level directories to the example startup and shutdown scripts.
To configure automatic startup and shutdown for using the example scripts, log in as the root user, and run the following commands:
For Solaris, see the discussion about automating shutdown and startup in Oracle Database Administrator's Reference for Linux and UNIX-Based Operating System.
For Linux: chmod 700 /etc/init.d/dbora.sh
ln -s /etc/init.d/dbora.sh /etc/rc0.d/K10oracle
ln -s /etc/init.d/dbora.sh /etc/rc1.d/K10oracle
rm -f /etc/rc2.d/K10oracle
ln -s /etc/init.d/dbora.sh /etc/rc2.d/S99oracle
rm -f /etc/rc3.d/S99oracle
Note: After entering these commands, the symbolic link between /etc/init.d/oracleDB.sh and K10oracle in the /etc/rc0.d and the /etc/rc1.d directories mean that the Oracle instance will be stopped when the system is set to an init level below 2.
Oracle Database Instances
You can opt to automatically create Oracle database instances during the installation of the Convergent Charging Controller software packages. A single database instance is created on each Convergent Charging Controller node.
The following table shows the mapping between each node type and the named database instance on the node.
Node Type Database Instance
SMS SMF
VWS E2BE SLC SCP
Setting Database Parameters for SMS Databases
Oracle recommends setting the following database parameters in the underlying databases used by Service Management System (SMS) nodes.
Database Parameter Guideline Value
JOB_QUEUE_PROCESSES 20
To set the database parameters for SMS databases:
Step Action
1 Ensure that you have SYSDBA privileges. 2 Go to the computer on which the Oracle database is installed.
3 Start SQL*Plus: C:\> sqlplus /NOLOG
4 Connect to the database as SYSDBA: SQL> CONNECT / AS SYSDBA
Chapter 5
62 Installation Guide
Step Action
5 Set the JOB_QUEUE_PROCESSES initialization parameter to: ALTER SYSTEM SET JOB_QUEUE_PROCESSES=20 SCOPE=BOTH
6 Shut down Oracle database: SQL> SHUTDOWN
7 Restart Oracle database: SQL> STARTUP
8 Exit SQL*Plus: SQL> EXIT
Installing and Configuring BRM SDK
The Oracle Communications Billing and Revenue Management (BRM) SDK must be installed before installing Convergent Charging Controller. This is not delivered with Convergent Charging Controller and must be installed separately. See Convergent Charging Controller BRM Charging Driver Technical Guide for details.

Chapter 6, Installing Convergent Charging Controller 63
Chapter 6
Installing Convergent Charging Controller
Overview
Introduction
This chapter describes how to install Oracle Communications Convergent Charging Controller. Before you install Convergent Charging Controller, read the following chapters:
Convergent Charging Controller Installation Overview Planning Your Convergent Charging Controller Installation Convergent Charging Controller System Requirements Advanced Storage and Memory Sizing Convergent Charging Controller Pre-Installation Tasks
In this chapter
This chapter contains the following topics.
Convergent Charging Controller Installation Options .................................................................. 63 Convergent Charging Controller Installation Types .................................................................... 63 Installing Convergent Charging Controller on the SMS Node Using the GUI ............................. 64 Installing Convergent Charging Controller on the SLC Node Using the GUI .............................. 67 Installing Convergent Charging Controller on the SLC with Testing Tools Node Using the GUI 69 Installing Convergent Charging Controller on the VWS Node Using the GUI ............................. 72 Installing Convergent Charging Controller in Silent Mode .......................................................... 75 About Installation Logs ................................................................................................................ 76 Removing Files After a Failed Installation ................................................................................... 76
Convergent Charging Controller Installation Options
You can install Convergent Charging Controller in the GUI mode (using Oracle Universal Installer) or in silent mode.
GUI mode: Use the GUI mode when you want to interact with the Installer during installation. See Installation Types.
Silent mode: Use the silent mode when you are installing Convergent Charging Controller using the same configuration repeatedly. The silent mode does not use the GUI and it runs in the background. See Installing Convergent Charging Controller in Silent Mode for more information.
Convergent Charging Controller Installation Types
When installing Convergent Charging Controller in the GUI mode, you can select the type of installation:

Chapter 6
64 Installation Guide
SMS Node: Service Management System (SMS) installs the Convergent Charging Controller SMS application and the SMS database. See Installing Convergent Charging Controller on the SMS Node Using the GUI (on page 64).
SLC Node: Service Logic Controller (SLC) installs the Convergent Charging Controller SLC application and the SLC database. See Installing Convergent Charging Controller on the SLC Node Using the GUI (on page 67).
SLC With Test Tools: Service Logic Controller (SLC) installs the Convergent Charging Controller SLC application, the SLC Test Tools, and the SLC database. See Installing Convergent Charging Controller on the SLC with Testing Tools Node Using the GUI (on page 69).
VWS Node: Voucher and Wallet Server (VWS) installs the Convergent Charging Controller application, the VWS database, and the VWS application. See Installing Convergent Charging Controller on the VWS Node Using the GUI (on page 72).
Installing Convergent Charging Controller on the SMS Node Using the GUI
Install Convergent Charging Controller on either an Oracle Solaris 11.3 (64-bit) server or an Oracle Linux 7.3 server.
To install Convergent Charging Controller on an SMS node:
Step Action
1 Log in as the root user. 2 Create a CCC sub-directory in the /var/spool/pkg directory:
cd /var/spool/pkg mkdir CCC
Note: The amount of space available in this directory must be at least three times the size of the archive. For example, if the archive is 500 MB, the temporary directory should be at least 1500 MB.
3 Go to the Oracle software delivery Web site: http://edelivery.oracle.com/ and download the CCC_v12_0_0_platform.zip software pack to the /var/spool/pkg/CCC directory, where platform is Linux or SunOS.
4 Go to the /var/spool/pkg/CCC directory and unzip the CCC_v12_0_0_platform.zip file: unzip CCC_v12_0_0_platform.zip
5 Log in as the user (non-root) installing Convergent Charging Controller.
Note: Ensure that the non-root user installing Convergent Charging Controller has access to the esg and dba groups and also has sudo access without timeout.
6 Run the following commands: export DISPLAY=IP_address:0 export JAVA_HOME=Java_home where: IP_address is the IP address of the computer on which you run the SMS GUI. Java_home is the directory in which JDK 1.8 is installed.
7 Ensure that the SMS node meets all prerequisites by running the following commands: touch /IN/oraInst.loc
${JAVA_HOME}/bin/java -jar./cccInstaller_platform.jar -invPtrLoc
/IN/oraInst.loc -prereqchecker -silent -entryPoint sms
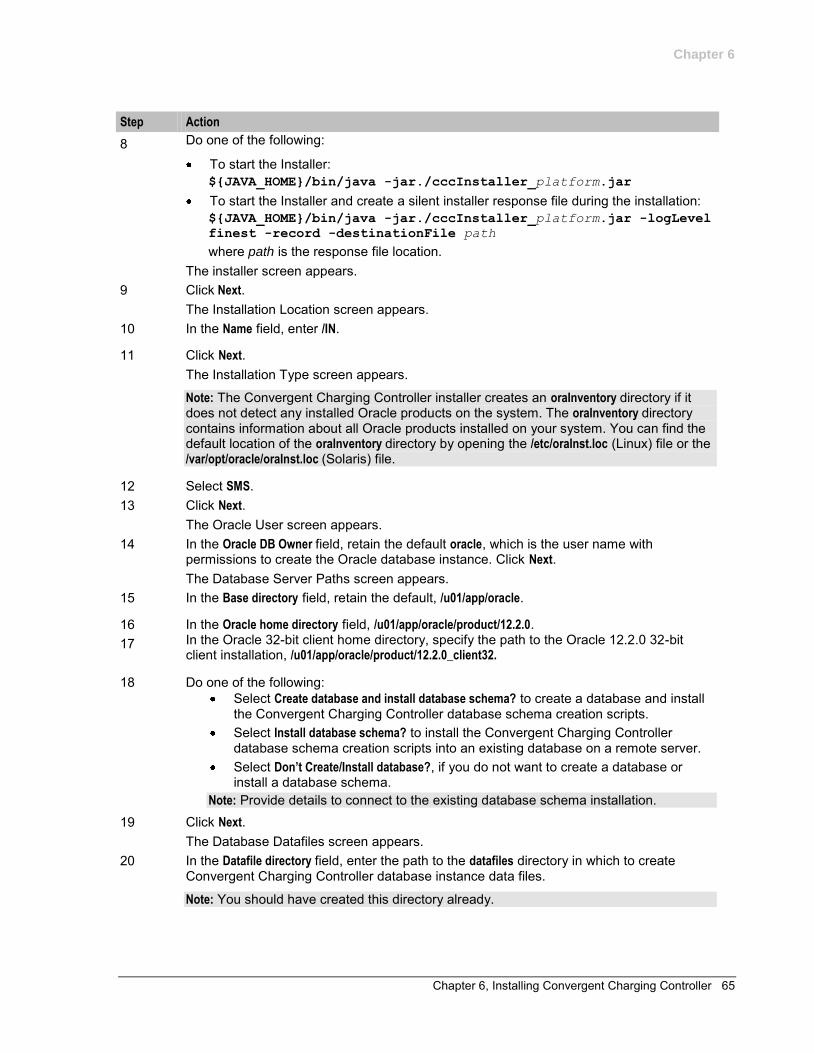
Chapter 6
Chapter 6, Installing Convergent Charging Controller 65
Step Action
8 Do one of the following:
To start the Installer: ${JAVA_HOME}/bin/java -jar./cccInstaller_platform.jar
To start the Installer and create a silent installer response file during the installation: ${JAVA_HOME}/bin/java -jar./cccInstaller_platform.jar -logLevel
finest -record -destinationFile path where path is the response file location.
The installer screen appears. 9 Click Next.
The Installation Location screen appears. 10 In the Name field, enter /IN.
11 Click Next. The Installation Type screen appears.
Note: The Convergent Charging Controller installer creates an oraInventory directory if it does not detect any installed Oracle products on the system. The oraInventory directory contains information about all Oracle products installed on your system. You can find the default location of the oraInventory directory by opening the /etc/oraInst.loc (Linux) file or the /var/opt/oracle/oraInst.loc (Solaris) file.
12 Select SMS. 13 Click Next.
The Oracle User screen appears. 14 In the Oracle DB Owner field, retain the default oracle, which is the user name with
permissions to create the Oracle database instance. Click Next. The Database Server Paths screen appears.
15 In the Base directory field, retain the default, /u01/app/oracle.
16 In the Oracle home directory field, /u01/app/oracle/product/12.2.0. 17 In the Oracle 32-bit client home directory, specify the path to the Oracle 12.2.0 32-bit
client installation, /u01/app/oracle/product/12.2.0_client32.
18 Do one of the following: Select Create database and install database schema? to create a database and install
the Convergent Charging Controller database schema creation scripts. Select Install database schema? to install the Convergent Charging Controller
database schema creation scripts into an existing database on a remote server. Select Don’t Create/Install database?, if you do not want to create a database or
install a database schema. Note: Provide details to connect to the existing database schema installation.
19 Click Next. The Database Datafiles screen appears.
20 In the Datafile directory field, enter the path to the datafiles directory in which to create Convergent Charging Controller database instance data files.
Note: You should have created this directory already.

Chapter 6
66 Installation Guide
Step Action
21 In the Redolog directory field, enter the path to the redolog directory in which to create Convergent Charging Controller database redo log files.
Note: The Redolog directory field is required only if you install the database schema files.
22 Click Next. The Database Password screen appears.
Note: The database password is required only if you install the database schema files.
23 In the Oracle database password field, enter the password for the Oracle database administrative accounts.
24 In the Confirm password field, enter the password again to confirm.
Note: If the password is less than 8 characters, a warning appears. You can click OK to proceed.
25 Click Next. The Oracle Client screen appears.
26 In the Oracle client home field, enter the full path to the Oracle database client home directory. Click Next. The SMS GUI screen appears.
27 In the Screen superuser password field, enter the password for the SMS GUI administrator account.
Note: The password must match the password for the Oracle database installed on the SMS node.
28 In the Confirm password field, enter the password again to confirm. 29 In the Timezone field, enter the timezone in which the date and time are displayed in the
SMS GUI. 30 Click Next.
The PI Admin screen appears. 31 In the PI admin password field, enter the password for the PI administrator user account. 32 In the Confirm password field, enter the password again to confirm. 33 Click Next.
The SMS EDR Paths screen appears. 34 In the CDR Loader Input directory field, retain the default path to the directory of a single
system to store CDR input files. 35 In the CDR Loader Output directory field, retain the default path to the directory of a single
system to store CDR output files. 36 Click Next.
The System Currency Details screen appears. 37 Set the following fields:
Base Value - default is 100 Big Symbol - default is $ Little Symbol - default is c Separator - default is .
38 Click Next. The Java Home Location screen appears.
39 In the Java Home field, enter the path to the directory where Java is installed.
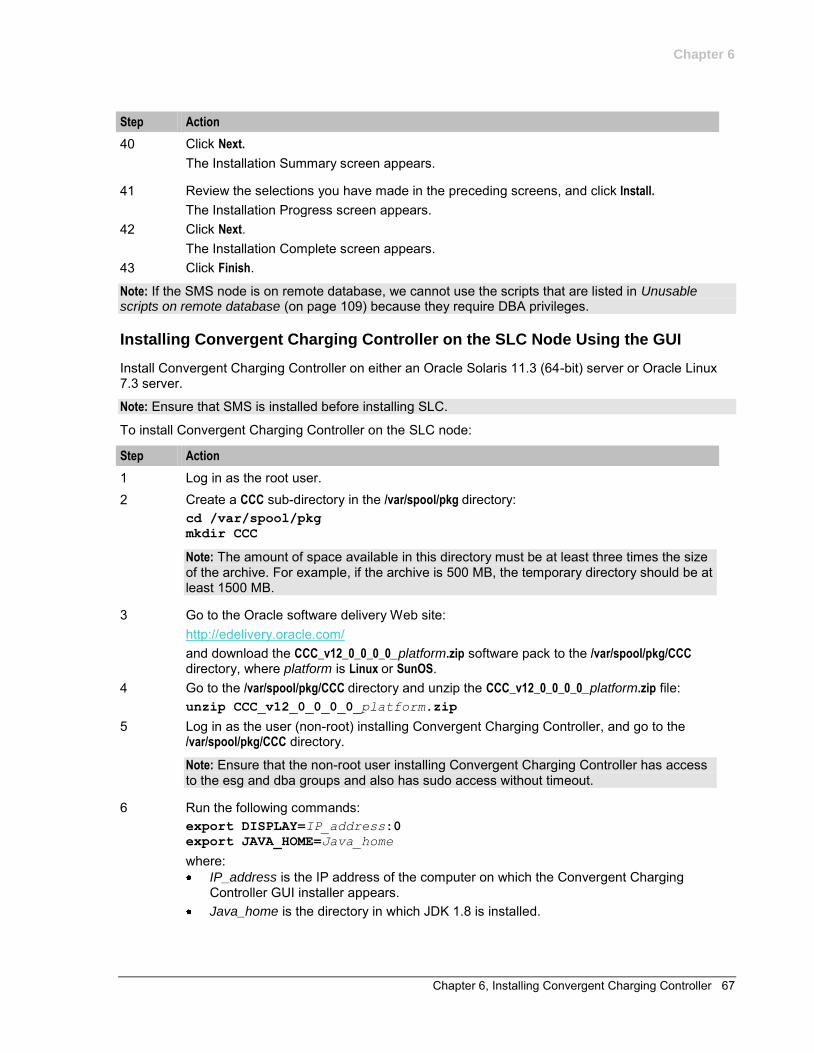
Chapter 6
Chapter 6, Installing Convergent Charging Controller 67
Step Action
40 Click Next. The Installation Summary screen appears.
41 Review the selections you have made in the preceding screens, and click Install. The Installation Progress screen appears.
42 Click Next. The Installation Complete screen appears.
43 Click Finish.
Note: If the SMS node is on remote database, we cannot use the scripts that are listed in Unusable scripts on remote database (on page 109) because they require DBA privileges.
Installing Convergent Charging Controller on the SLC Node Using the GUI
Install Convergent Charging Controller on either an Oracle Solaris 11.3 (64-bit) server or Oracle Linux 7.3 server.
Note: Ensure that SMS is installed before installing SLC.
To install Convergent Charging Controller on the SLC node:
Step Action
1 Log in as the root user. 2 Create a CCC sub-directory in the /var/spool/pkg directory:
cd /var/spool/pkg mkdir CCC
Note: The amount of space available in this directory must be at least three times the size of the archive. For example, if the archive is 500 MB, the temporary directory should be at least 1500 MB.
3 Go to the Oracle software delivery Web site: http://edelivery.oracle.com/ and download the CCC_v12_0_0_0_0_platform.zip software pack to the /var/spool/pkg/CCC directory, where platform is Linux or SunOS.
4 Go to the /var/spool/pkg/CCC directory and unzip the CCC_v12_0_0_0_0_platform.zip file: unzip CCC_v12_0_0_0_0_platform.zip
5 Log in as the user (non-root) installing Convergent Charging Controller, and go to the /var/spool/pkg/CCC directory.
Note: Ensure that the non-root user installing Convergent Charging Controller has access to the esg and dba groups and also has sudo access without timeout.
6 Run the following commands: export DISPLAY=IP_address:0 export JAVA_HOME=Java_home where: IP_address is the IP address of the computer on which the Convergent Charging
Controller GUI installer appears. Java_home is the directory in which JDK 1.8 is installed.
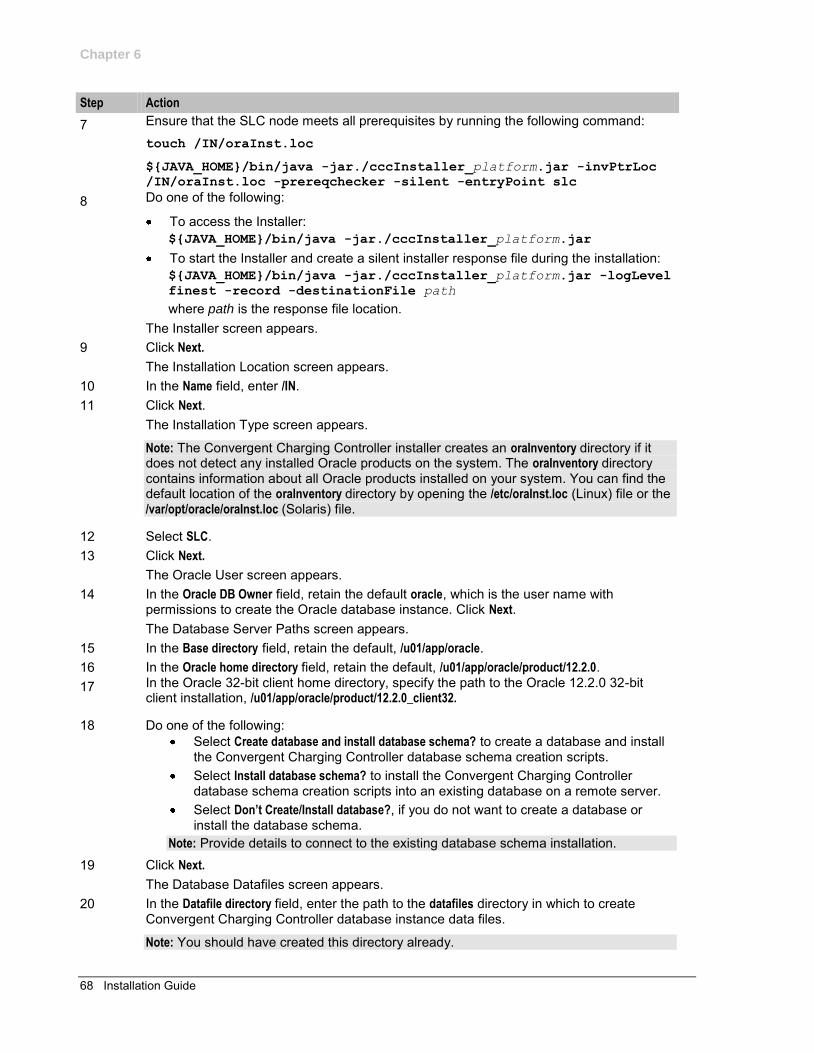
Chapter 6
68 Installation Guide
Step Action
7 Ensure that the SLC node meets all prerequisites by running the following command: touch /IN/oraInst.loc
${JAVA_HOME}/bin/java -jar./cccInstaller_platform.jar -invPtrLoc
/IN/oraInst.loc -prereqchecker -silent -entryPoint slc 8 Do one of the following:
To access the Installer: ${JAVA_HOME}/bin/java -jar./cccInstaller_platform.jar
To start the Installer and create a silent installer response file during the installation: ${JAVA_HOME}/bin/java -jar./cccInstaller_platform.jar -logLevel
finest -record -destinationFile path where path is the response file location.
The Installer screen appears. 9 Click Next.
The Installation Location screen appears. 10 In the Name field, enter /IN. 11 Click Next.
The Installation Type screen appears.
Note: The Convergent Charging Controller installer creates an oraInventory directory if it does not detect any installed Oracle products on the system. The oraInventory directory contains information about all Oracle products installed on your system. You can find the default location of the oraInventory directory by opening the /etc/oraInst.loc (Linux) file or the /var/opt/oracle/oraInst.loc (Solaris) file.
12 Select SLC. 13 Click Next.
The Oracle User screen appears. 14 In the Oracle DB Owner field, retain the default oracle, which is the user name with
permissions to create the Oracle database instance. Click Next. The Database Server Paths screen appears.
15 In the Base directory field, retain the default, /u01/app/oracle. 16 In the Oracle home directory field, retain the default, /u01/app/oracle/product/12.2.0. 17 In the Oracle 32-bit client home directory, specify the path to the Oracle 12.2.0 32-bit
client installation, /u01/app/oracle/product/12.2.0_client32.
18 Do one of the following: Select Create database and install database schema? to create a database and install
the Convergent Charging Controller database schema creation scripts. Select Install database schema? to install the Convergent Charging Controller
database schema creation scripts into an existing database on a remote server. Select Don’t Create/Install database?, if you do not want to create a database or
install the database schema. Note: Provide details to connect to the existing database schema installation.
19 Click Next. The Database Datafiles screen appears.
20 In the Datafile directory field, enter the path to the datafiles directory in which to create Convergent Charging Controller database instance data files.
Note: You should have created this directory already.

Chapter 6
Chapter 6, Installing Convergent Charging Controller 69
Step Action
21 In the Redolog directory field, enter the path to the redolog directory in which to create Convergent Charging Controller database redo log files.
Note: The Redolog directory field is required only if you install the database schema files.
22 Click Next. The Database Password screen appears.
Note: The database password is required only if you install the database schema files.
23 In the Oracle database password field, enter the password for the Oracle database administrative accounts.
24 In the Confirm password field, enter the password again to confirm.
Note: If the password is less than 8 characters, a warning appears. Click OK to proceed.
25 Click Next. The Oracle Client screen appears.
26 In the Oracle client home field, enter the full path to the Oracle database client home directory. Click Next. The Replication screen appears.
27 In the Node number field, enter a unique identification number for the node. The node number that is used as a replication ID should be between 1 and 99.
Note: If 1 is entered, the SLC is given the replication ID of 301. If 2 is entered, the SLC is given the replication ID of 302, and so on.
28 In the SMS Host name field, enter the qualified hostname for the SMS server used to configure the clients that will connect to the SMS server.
29 Click Next. The Java Home Location screen appears.
30 In the Java Home field, enter the path to the directory where Java is installed. 31 Click Next.
The Installation Summary screen appears. 32 Review the selections you have made in the preceding screens, and click Install.
The Installation Progress screen appears. 33 Click Next.
The Installation Complete screen appears. 34 Click Finish.
Installing Convergent Charging Controller on the SLC with Testing Tools Node Using the GUI
Install Convergent Charging Controller on either an Oracle Solaris 11.3 (64-bit) server or an Oracle Linux 7.3 server.
Note: Ensure that SMS is installed before installing SLC with Test Tools.
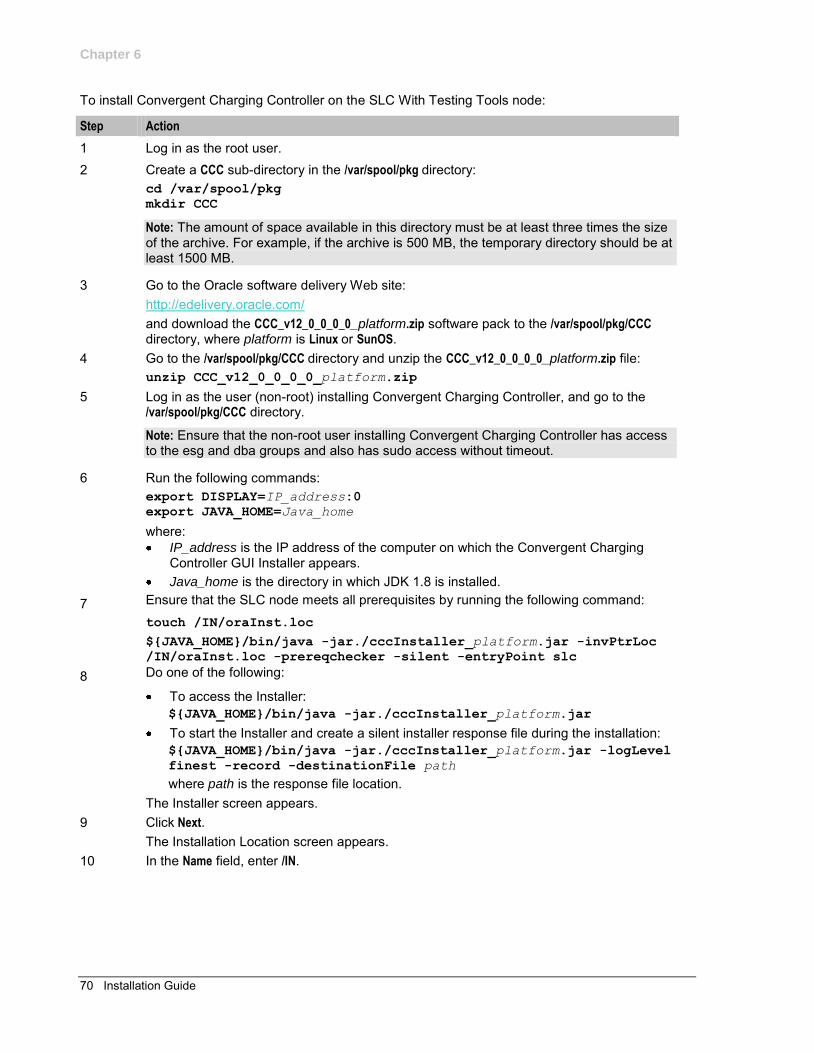
Chapter 6
70 Installation Guide
To install Convergent Charging Controller on the SLC With Testing Tools node:
Step Action
1 Log in as the root user. 2 Create a CCC sub-directory in the /var/spool/pkg directory:
cd /var/spool/pkg mkdir CCC
Note: The amount of space available in this directory must be at least three times the size of the archive. For example, if the archive is 500 MB, the temporary directory should be at least 1500 MB.
3 Go to the Oracle software delivery Web site: http://edelivery.oracle.com/ and download the CCC_v12_0_0_0_0_platform.zip software pack to the /var/spool/pkg/CCC directory, where platform is Linux or SunOS.
4 Go to the /var/spool/pkg/CCC directory and unzip the CCC_v12_0_0_0_0_platform.zip file: unzip CCC_v12_0_0_0_0_platform.zip
5 Log in as the user (non-root) installing Convergent Charging Controller, and go to the /var/spool/pkg/CCC directory.
Note: Ensure that the non-root user installing Convergent Charging Controller has access to the esg and dba groups and also has sudo access without timeout.
6 Run the following commands: export DISPLAY=IP_address:0 export JAVA_HOME=Java_home where: IP_address is the IP address of the computer on which the Convergent Charging
Controller GUI Installer appears. Java_home is the directory in which JDK 1.8 is installed.
7 Ensure that the SLC node meets all prerequisites by running the following command: touch /IN/oraInst.loc ${JAVA_HOME}/bin/java -jar./cccInstaller_platform.jar -invPtrLoc
/IN/oraInst.loc -prereqchecker -silent -entryPoint slc 8 Do one of the following:
To access the Installer: ${JAVA_HOME}/bin/java -jar./cccInstaller_platform.jar
To start the Installer and create a silent installer response file during the installation: ${JAVA_HOME}/bin/java -jar./cccInstaller_platform.jar -logLevel
finest -record -destinationFile path where path is the response file location.
The Installer screen appears. 9 Click Next.
The Installation Location screen appears. 10 In the Name field, enter /IN.
Chapter 6
Chapter 6, Installing Convergent Charging Controller 71
Step Action
11 Click Next. The Installation Type screen appears.
Note: The Convergent Charging Controller installer creates an oraInventory directory if it does not detect any installed Oracle products on the system. The oraInventory directory contains information about all Oracle products installed on your system. You can find the default location of the oraInventory directory by opening the /etc/oraInst.loc (Linux) file or the /var/opt/oracle/oraInst.loc (Solaris) file.
12 Select SLC With Test Tools to install the SLC application, the SLC WIth Testing Tools, and the SLC database.
13 Click Next. The Oracle User screen appears.
14 In the Oracle DB Owner field, retain the default oracle, which is the user name with permissions to create the Oracle database instance. Click Next. The Database Server Paths screen appears.
15 In the Base directory field, retain the default, /u01/app/oracle. 16 In the Oracle home directory field, enter /u01/app/oracle/product/12.2.0. 17 In the Oracle 32-bit client home directory, specify the path to the Oracle 12.2.0 32-bit
client installation, /u01/app/oracle/product/12.2.0_client32. 18 Do one of the following:
Select Create database and install database schema? to create a database and install the Convergent Charging Controller database schema creation scripts.
Select Install database schema? to install the Convergent Charging Controller database schema creation scripts into an existing database on a remote server.
Select Don’t Create/Install database?, if you do not want to create a database or install the database schema.
Note: Provide details to connect to the existing database schema installation. 19 Click Next.
The Database Datafiles screen appears. 20 In the Datafile directory field, enter the path to the datafiles directory in which to create
Convergent Charging Controller database instance data files.
Note: You should have created this directory already.
21 In the Redolog directory field, enter the path to the redolog directory in which to create Convergent Charging Controller database redo log files.
Note: The Redolog directory field is required only if you install the database schema files.
22 Click Next. The Database Password screen appears.
Note: The database password is required only if you install the database schema files.
23 In the Oracle database password field, enter the password for the Oracle database administrative accounts.
24 In the Confirm password field, enter the password again to confirm.
Note: If the password is less than 8 characters, a warning appears. You can click OK to proceed.
Chapter 6
72 Installation Guide
Step Action
25 Click Next. The Oracle Client screen appears.
26 In the Oracle client home field, enter the full path to the Oracle database client home directory. Click Next. The Replication screen appears.
27 In the Node number field, enter a unique identification number for the node. The Node number that is used as a replication ID should be between 1 and 99.
Note: If 1 is entered, the SLC is given the replication ID of 301. If 2 is entered, the SLC is given the replication ID of 302, and so on.
28 In the SMS Host name field, enter the qualified hostname for the SMS server used to configure the clients that will connect to the SMS server.
29 Click Next. The Java Home Location screen appears.
30 In the Java Home field, enter the path to the directory where Java is installed. 31 Click Next.
The Installation Summary screen appears. 32 Review the selections you have made in the preceding screens, and click Install.
The Installation Progress screen appears. 33 Click Next.
The Installation Complete screen appears. 34 Click Finish.
Installing Convergent Charging Controller on the VWS Node Using the GUI
Install Convergent Charging Controller on either an Oracle Solaris 11.3 (64-bit) server or an Oracle Linux 7.3 server.
Note: Ensure that SMS is installed before installing VWS.
To install Convergent Charging Controller on a VWS node:
Step Action
1 Log in as the root user. 2 Create a CCC sub-directory in the /var/spool/pkg directory:
cd /var/spool/pkg mkdir CCC
Note: The amount of space available in this directory must be at least three times the size of the archive. For example, if the archive is 500 MB, the temporary directory should be at least 1500 MB.
3 Go to the Oracle software delivery Web site: http://edelivery.oracle.com/ and download the CCC_v12_0_0_0_0_platform.zip software pack to the /var/spool/pkg/CCC directory, where platform is Linux or SunOS.
4 Go to the /var/spool/pkg/CCC directory and unzip the CCC_v12_0_0_0_0_platform.zip file: unzip CCC_v12_0_0_0_0_platform.zip
Chapter 6
Chapter 6, Installing Convergent Charging Controller 73
Step Action
5 Log in as the user (non-root) installing Convergent Charging Controller, and go to the /var/spool/pkg/CCC directory.
Note: Ensure that the non-root user installing Convergent Charging Controller has access to the esg and dba groups and also has sudo access without timeout.
6 Run the following commands: export DISPLAY=IP_address:0 export JAVA_HOME=Java_home where: IP_address is the IP address of the computer on which the CCC GUI appears. Java_home is the directory in which JDK 1.8 is installed.
7 Ensure that the VWS node meets all prerequisites by running the following command: touch /IN/oraInst.loc ${JAVA_HOME}/bin/java -jar./cccInstaller_platform.jar -invPtrLoc
/IN/oraInst.loc -prereqchecker -silent -entryPoint vws 8 Do one of the following:
To access the Installer: ${JAVA_HOME}/bin/java -jar./cccInstaller_platform.jar
To start the Installer and create a silent installer response file during the installation: ${JAVA_HOME}/bin/java -jar./cccInstaller_platform.jar -logLevel
finest -record -destinationFile path where path is the response file location.
The Installer screen appears. 9 Click Next.
The Installation Location screen appears. 10 In the Name field, enter /IN. 11 Click Next.
The Installation Type screen appears.
Note: The Convergent Charging Controller installer creates an oraInventory directory if it does not detect any installed Oracle products on the system. The oraInventory directory contains information about all Oracle products installed on your system. You can find the default location of the oraInventory directory by opening the /etc/oraInst.loc (Linux) file or the /var/opt/oracle/oraInst.loc (Solaris) file.
12 Select VWS. 13 Click Next.
The Oracle User screen appears. 14 In the Oracle DB Owner field, retain the default oracle, which is the user name with
permissions to create the Oracle database instance. Click Next. The Database Server Paths screen appears.
15 In the Base directory field, retain the default, /u01/app/oracle.
16 In the Oracle home directory field, retain the default, /u01/app/oracle/product/12.2.0.
17 In the Oracle 32-bit client home directory, specify the path to the Oracle 12.2.0 32-bit client installation, /u01/app/oracle/product/12.2.0_client32.

Chapter 6
74 Installation Guide
Step Action
18 Do one of the following: Select Create database and install database schema? to create a database and install
the Convergent Charging Controller database schema creation scripts. Select Install database schema? to install the Convergent Charging Controller
database schema creation scripts into an existing database on a remote server. Select Don’t Create/Install database?, if you do not want to create a database or
install a database schema. Note: Provide details to connect to the existing database schema installation.
19 Click Next. The Database Datafiles screen appears.
20 In the Datafile directory field, enter the path to the datafiles directory in which to create Convergent Charging Controller database instance data files.
Note: You should have created this directory already.
21 In the Redolog directory field, Enter the path to the redolog directory in which to create Convergent Charging Controller database redo log files.
Note: The Redolog directory field is required only if you install the database schema files.
22 Click Next. The Database Password screen appears.
Note: The database password is required only if you install the database schema files.
23 In the Oracle database password field, enter the password for the Oracle database administrative accounts.
24 In the Confirm password field, enter the password again to confirm.
Note: If the password is less than 8 characters, a warning appears. You can click OK to proceed.
25 Click Next. The Oracle Client screen appears.
26 In the Oracle client home field, enter the full path to the Oracle database client home directory. Click Next. The Replication screen appears.
27 In the Node number field, enter a unique identification number for the node. The Node number that is used as a replication ID should be between 1 and 99.
Note: If 1 is entered, the VWS is given the replication ID of 351, if 2 is entered, the VWS will be given the replication ID of 352, and so on.
28 In the SMS Host name field, enter the qualified hostname for the SMS server used to configure the clients that will connect to the SMS server.
29 Click Next. The VWS Config screen appears.
30 Enter the information for VWS configuration. 31 In the SMS EDR Input directory field, enter the full name and path to the directory to store
SMS EDR input files. 32 Select the Primary VWS node check box to install the primary node of a VWS pair.

Chapter 6
Chapter 6, Installing Convergent Charging Controller 75
Step Action
33 Click Next. The Java Home Location screen appears.
34 In the Java Home field, enter the path to the directory where Java is installed. 35 Click Next.
The Installation Summary screen appears. 36 Review the selections you have made in the preceding screens, and click Install.
The Installation Progress screen appears. 37 Click Next.
The Installation Complete screen appears. 38 Click Finish.
Installing Convergent Charging Controller in Silent Mode
Use silent install mode when you are installing Convergent Charging Controller using the same configuration repeatedly. Silent install mode does not use the GUI, and it runs in the background.
About the Response File
A response file contains answers to installation questions that you would otherwise provide in an interactive installation session. Each answer is stored as a value for a variable identified in the response file.
You can generate a response file that contains the parameters and values during the Convergent Charging Controller GUI installation.
To generate a complete response file, run the following command to launch the Installer in the GUI mode: ${JAVA_HOME}/bin/java -jar./cccInstaller_platform.jar -logLevel finest -record -
destinationFilePath
where destinationFilePath is the response file location.
Note: The generated response file does not have a user password for security reasons. You must add the following parameters manually to the response file: ORACLE_DATABASE_PASSWORD ORACLE_DATABASE_PASSWORD_CONFIRM NCC_SCREENS_SU_PASSWORD NCC_SCREENS_SU_PASSWORD_CONFIRM PI_ADMIN_PASSWORD PI_ADMIN_PASSWORD_CONFIRM
where:
password is the password for the Oracle database, Convergent Charging Controller screens, and PI Admin.
password_confirm is the same password entered for the Oracle database, Convergent Charging Controller screens, and PI Admin.
Chapter 6
76 Installation Guide
Installing Convergent Charging Controller in Silent Mode
To install Convergent Charging Controller in silent mode:
Step Action
1 Create a copy of the response file that was generated during the GUI installation and open it in a text editor.
2 Enter the values in the parameters to reflect the Convergent Charging Controller installation requirements. Note: In silent install mode, the Convergent Charging Controller installer treats incorrect context, format, or type values within a response file as if no value were specified.
3 Save and close the file. 4 Go to the /IN directory and run the following command:
${JAVA_HOME}/bin/java -jar./cccInstaller_Platform.jar -logLevel
finest -silent -responseFile path, where path is the Convergent Charging Controller response file name and location. For example: ${JAVA_HOME}/bin/java -jar./cccInstaller_Linux.jar -logLevel
finest -silent -responseFile /tmp/smsinstallresponse.rsp The installation runs silently in the background.
About Installation Logs
You can check the log files in the oraInventory/logs directory. The default location of the oraInventory directory is in the /IN/oraInst.loc file.
Use the following log files to monitor installation and post-installations:
installActionTimeStamp.log oraInstallTimeStamp.err oraInstallTimeStamp.out silentInstallTimeStamp.log (for the silent mode installation)
where TimeStamp is the date and time the log file was created.
The database schema installation log files for Convergent Charging Controller are available in /IN/logs directory.
Removing Files After a Failed Installation
If cccInstaller_platform.jar fails during the installation process, some Convergent Charging Controller files may remain on your system.
Follow these steps to remove any Convergent Charging Controller files that remain on your system after a failed installation.
Step Action
1 Log in as the user (non-root) that installed Convergent Charging Controller.
Note: Ensure that the non-root user installing Convergent Charging Controller has access to the esg and dba groups and also has sudo access without timeout.
2 Go to the /IN/bin directory.

Chapter 6
Chapter 6, Installing Convergent Charging Controller 77
Step Action
3 Remove any remaining Convergent Charging Controller files by running the following command: sudo ./removeDatabase.sh sudo ./removeApplication.sh

Chapter 7, Post-Installation Tasks 79
Chapter 7
Post-Installation Tasks
Overview
Introduction
This chapter describes the post-installation tasks you must perform after installing Oracle Communications Convergent Charging Controller.
In this chapter
This chapter contains the following topics.
About Post-Installation Tasks ...................................................................................................... 79 Post-Installation Initial Configuration ........................................................................................... 81 Setting Up CDR Storage ............................................................................................................. 86 Setting Up Voucher Storage ........................................................................................................ 87 Enabling SSL Connections to the Database ............................................................................... 87
About Post-Installation Tasks
Post Installation Initial Configuration Tasks
The post-installation configuration tasks set the initial configuration for each Convergent Charging Controller node. You should perform these tasks after completing the Convergent Charging Controller installation on all nodes.
See Post-Installation Initial Configuration (on page 81) for more information.
About CDR Storage Configuration Tasks
The call data records (CDRs) generated by the system will be stored in the database. On production deployments, you should configure table partitioning for the CCS_BE_CDR table to define the following:
The number of files needed each week to store CDR data The number of weeks to hold CDR data before it is purged from the database The location for the CDR data files
For details on CDR table partitioning configuration, see Setting Up CDR Storage (on page 86).
Note: For more information on CDR and EDR records, and how they are generated, see Event Detail Record Reference Guide.
Chapter 7
80 Installation Guide
About SSL Configuration Tasks
Convergent Charging Controller supports secure network logins through Secure Socket Layer (SSL) connections from the Convergent Charging Controller UI to the database. You specify whether SSL connections to the database are enabled on your system by setting the jnlp.sms.EncryptedSSLConnection Java application property in JNLP files. At installation, this property is set to true, and SSL connections to the database are enabled by default. To disable SSL connections to the database, set jnlp.sms.EncryptedSSLConnection to false. See Disabling SSL
Connections to the SMS Database (on page 80) for more information.
If you plan to use SSL connections to the database, you must perform a number of additional configuration tasks. See Enabling SSL Connections to the Database (on page 87) for more information.
Disabling SSL Connections to the SMS Database
Follow these steps to disable SSL connections to the database.
Step Action
1 Open the sms.jnlp, acs.jnlp, vpn.jnlp, and ccp.jnlp files on the SMS node. The sms.jnlp, acs.jnlp, and vpn.jnlp files are located in the /IN/html directory. The ccp.jnlp file is located in the /IN/html/ccp directory.
2 Set the jnlp.sms.EncryptedSSLConnection property to false by adding the following entry:
<property name="jnlp.sms.EncryptedSSLConnection" value="false" />
3 Save and close the file.
To test without configuring secure login, turn off the security checking in the screen JNLP files. For example, set the following in the sms.jnlp file: <property name="jnlp.sms.EncryptedSSLConnection" value="false" />
Configuring Password-less SSH Logins
Configure password-less SSH logins to connect to all the servers.
To configure password-less SSH logins:
Step Action
1 Log in the SMS as an LDAP install user. 2 Run the following command:
For Solaris: ssh-keygen -t rsa For Linux: ssh-keygen If the ~/.ssh/id_rsa.pub' and ' ~/.ssh/authorized_keys files do not contain the same data, link the two files by running the following command: ln -s ~/.ssh/id_rsa.pub ~/.ssh/authorized_keys
Chapter 7
Chapter 7, Post-Installation Tasks 81
Step Action
3 Append the key to the ~/.ssh/known_hosts file on all servers by running the following commands: For Solaris: ssh-keyscan –t rsa <server hostname> <server hostname> <server
hostname> >> ~/.ssh/known_hosts For Linux: ssh-keyscan <server hostname> <server hostname> <server hostname>
>> ~/.ssh/known_hosts
4 Verify that the LDAP user can ssh to the SLC and VWS servers from SMS without using a password and that a path to sudo exists: ssh <server hostname> "which sudo" Note: If sudo not found on the target server, the path needs to be updated in the LDAP user's default shell.
5 Distribute the smf_key to all servers using the following command: /var/spool/pkg/CCC/smf_key_distribute.sh <SMS hostname> <SLC
hostname> <VWS1 hostname> <VWS2 hostname>
Post-Installation Initial Configuration
About Initial Configuration Tasks
Perform the following initial configuration tasks after completing the Convergent Charging Controller installation on all nodes:
Set SSH StrictHostKeyChecking for user smf_oper on each node. See Setting SSH
StrictHostKeyChecking (on page 82). Set up IP addresses and hostnames to servers. See Setting IP Addresses and Hostnames (on page
82). Update the tablespace storage allocation on each node in accordance with system implementation
type. For example, a large production system will require greater storage allocation than a small production system. See Update Oracle Tablespace Storage (on page 83).
Update Oracle SGA parameters on each node. See Update Oracle SGA Parameters (on page 83). Update the Oracle cpu_count parameter. See Update Oracle cpu_count Parameter (on page 83). Update the Oracle Database default profile password for life time. See Update Oracle Database
Default Profile Password Life Time (on page 83). Set shared memory limits for the Convergent Charging Controller system. See Setting Shared
Memory Limits (on page 84). Set the number of database connections. See Setting the Number of Connections to the Database
(on page 84). If you want to use Internet Protocol verison 6 (IPv6) addresses, update the eserv.config file with the
configuration for CORBA services. See About CORBA Services Configuration for IPv6 (on page 85).
Chapter 7
82 Installation Guide
Setting SSH StrictHostKeyChecking
Follow these steps on each node to set SSH StrictHostKeyChecking for the smf_oper user.
Step Action
1 Log in to the SMS as the smf_oper user. 2 Using a text editor, create the /IN/service_packages/SMS/.ssh/config file. 3 Include these lines:
Host *
StrictHostKeyChecking no
4 Save the config file. 5 Repeat these steps for the SLC and VWS nodes, logging on as the smf_oper user each
time.
Setting IP Addresses and Hostnames
Ensure that the /etc/hosts file on all nodes includes entries for all hosts and their aliases. Some host aliases are automatically defined when you install Convergent Charging Controller. Therefore, you should include at least the following predefined host entries in the /etc/hosts file.
sms_host sms usms usms.CdrPush be_host_1 be1 scp_host scp uas1 acsStatsMaster uas.ccsSSMMaster be_host_2 be2
where:
sms_host is the IP address for the SMS node be_host_1 is the IP address for the primary VWS node scp_host is the IP address for the SLC node be_host_2 is the IP address for the secondary VWS node
Perform these steps on each node to set up IP addresses and hostnames for the servers.
Step Action
1 Log in to the node. 2 Configure all network interfaces in the /etc/hosts file. Refer to your network plan for
configuration values. See Network Planning (on page 6) for more information. Example /etc/hosts file
localhost 127.0.0.1 localhost 192.68.44.136 be1 192.68.44.130 sms usms usms.CdrPush 192.68.44.133 scp uas1 acsStatsMaster
uas.ccsSSMMaster 192.68.44.139 be2
Chapter 7
Chapter 7, Post-Installation Tasks 83
Step Action
3 For platforms that are built on a zone server, modify the loop-back interface (lo0) and localhost entries to remove any association with the server hostname.
For example, change the following entry from:
::1 pte69-zone1 localhost 127.0.0.1 pte69-zone1 localhost loghost to this:
::1 localhost 127.0.0.1 localhost loghost
4 On the SMS node, restart the smsMaster process.
Update Oracle Tablespace Storage
On each node in turn, update the tablespace storage allocation on the database instance on the node, to suit your deployment. Add or resize data files as required. See your Oracle Database administrator for information on resizing your tablespaces.
Update Oracle SGA Parameters
On each node in turn, update the Oracle SGA parameters for the database instance on the node to suit your deployment.
Update Oracle cpu_count Parameter cpu_count specifies the number of CPUs available for Oracle Database to use. This parameter greatly affects the size of Startup Overhead In Shared Pool and is therefore set to 4 in the default init.ora files installed by Convergent Charging Controller.
The cpu_count parameter may either be unset allowing Oracle Database to use all CPUs be tuned for a specific target system. Because this may increase the size of Startup Overhead In Shared Pool, the shared_pool_size parameter must be updated accordingly. The recommended initial value for shared_pool_size is Startup Overhead In Shared Pool + 256M.
The current size of the Startup Overhead In Shared Pool can be retrieved with the following SQL query: select * from v$sgainfo where name = 'Startup overhead in Shared Pool';
See the chapter on configuring memory manually in Oracle Database Administrator's Guide for more information about specifying the shared pool size for your database.
Update Oracle Database Default Profile Password Life Time
An Oracle database user is created for each Convergent Charging Controller user based on the default user profile in the database. The default profile includes a password expiration duration of 180 DAYS for Oracle 12c databases.
When using Oracle 12c databases, set the default profile PASSWORD_LIFE_TIME parameter to UNLIMITED before creating Convergent Charging Controller users to avoid login errors due to expired passwords. If your security policy requires user password changes at regular intervals you must implement a procedure allowing users to change their passwords before expiration to prevent access failure. See Oracle Database Security Guide for the version of Oracle database you are using for a detailed description of how to use password management and protection.

Chapter 7
84 Installation Guide
Setting Shared Memory Limits
On Solaris, follow these steps on each node to set shared memory limits for the Convergent Charging Controller system.
Step Action
1 Log in as the root user. 2 Add the esg project group and set the shared memory limits for it by running the following
commands: projadd -G esg -c "esg group project" -K "project.max-shm-
memory=(priv,4G,deny)" group.esg
projmod -sK "project.max-sem-ids=(priv,2048,deny)" group.esg
projmod -sK "process.max-sem-nsems=(priv,2048,deny)" group.esg
projmod -sK "project.max-shm-ids=(priv,2048,deny)" group.esg
On Linux, follow these steps on each node to set shared memory limits for the Convergent Charging Controller system.
1 Determine the sum of process parameters for all database instances on the system, the overhead for Oracle background processes, the system and other application requirements.
2 Set semmns (total semaphores system-wide) to the larger of the value in 1 or 32000. 3 Set semmsl (semaphores per set) to 250. 4 Set semmni (total semaphore sets) to semmns/semmsl rounded up to the nearest multiple of 1024. 5 For Linux and Oracle 10.2-12.1, set the maximum number of asynchronous I/O requests allowed in
/etc/sysctl.conf as follows: fs.aio-max-nr = 3145728
After changing the /etc/sysctl.conf, run the following command as root to set the values in the system: # /sbin/sysctl -p /etc/sysctl.conf
Setting the Number of Connections to the Database
Oracle database static parameters are defined in the initSMF.ora file located in the $ORACLE_HOME/dbs directory.
The processes parameter in the Static Parameters section of initSMF.ora defines the maximum number of connections allowed to the Oracle database. For a Convergent Charging Controller installation, set this parameter to 400 or a higher.
Example configuration in initSMF.ora # Static Parameters
####################
....
processes = 400
...
Setting the beServiceTrigger User and Password
beServiceTrigger sends BPL requests to the Convergent Charging Controller Open Services Development (OSD) application for event processing. The beServiceTrigger user allows beServiceTrigger to access external systems, such as a client ASP that is accessed through OSD during event processing. beServiceTrigger retrieves the user credentials (username and password) from a secure credentials vault on the SMS node. The credentials vault is used for storing user names and passwords securely and for authorizing users. For more information about beServiceTrigger, see Voucher and Wallet Server Technical Guide.
Chapter 7
Chapter 7, Post-Installation Tasks 85
If you want to use beServiceTrigger for sending real time wallet notifications to OSD, set the beServiceTrigger user credentials by using the beServiceTriggerUser utility. To enable beServiceTrigger to connect to the OSD interface on the SLC, set the user and password for beServiceTrigger and the OSD client ASP to be the same.
Follow these steps to set the beServiceTrigger username and password.
Step Action
1 Log in to the SMS as smf_oper user. 2 Go to the directory where the beServiceTriggerUser utility is located. 3 Run the following command to set the username and password for beServiceTrigger:
beServiceTriggerUser [-d user/password] [-u st_user] [-p
st_password] where:
user/password is the login ID for the Oracle database. The login specified in the oracleUserAndPassword parameter is used if you omit the -d option. If this is not set, "/" is used.
st_user is the remote login name for the beServiceTrigger user. If you omit the -u option, beServiceTriggerUser prompts for a name.
st_password is the new password for the beServiceTrigger user. If you omit the -p option, beServiceTriggerUser prompts for a password.
4 Restart the SLEE on the VWS by running the following command as ebe_oper user: /IN/service_packages/SLEE/bin/slee-ctrl restart
About CORBA Services Configuration for IPv6
The /IN/service_packages/eserv.config file on the SMS defines configuration for Convergent Charging Controller.
/IN/service_packages/eserv.config
If you are using IP version 6 addresses, you must include the CorbaServices section in the eserv.config file. If you are using only IP version 4 addresses, the procedure in this section is optional.
The CorbaServices section in the eserv.config configuration file on the SMS node defines common connection parameters for CORBA services. The CorbaServices configuration overrides the default and command-line values specified for CORBA listen ports and addresses. You configure the CorbaServices section of the eserv.config file on the SMS by using the following syntax: CorbaServices = {
AddressInIOR = "hostname"
smsTaskAgentOrbListenPort = port
smsReportDaemonOrbListenPort = port
smsTrigDaemonOrbListenPort = port
ccsBeOrbListenPort = port
OrbListenAddresses = [
"ip_address1",
"ip_address2",
] } where: hostname is the hostname or IP address to place in the IOR (Interoperable Object Reference) for
the CORBA service.
Chapter 7
86 Installation Guide
port is the number of the port on which the CORBA service will listen. ip_address1,ip_address2 list the IP addresses on which CORBA services listen for incoming
requests. The list of IP addresses in the OrbListenAddresses parameter can include both IP version 6 and IP version 4 addresses. If the OrbListenAddresses parameter is not set, or you do not specify any IP addresses, the CORBA service listens on all the IP addresses available on the host. Loopback IP addresses and special IP addresses, as defined in RFC 5156, are excluded.
For more information about configuring CORBA services, see Convergent Charging Controller Service Management System Technical Guide.
Example CORBA Services Configuration on the SMS
The following example shows the CorbaServices configuration section in the eserv.config file for CORBA services on the SMS node. CorbaServices = {
AddressInIOR = "sms_machine.oracle.com"
OrbListenAddresses = [
"2001:db8:0:1050:0005:ffff:ffff:326b"
"192.0.2.0"
smsTaskAgentOrbListenPort = 6332
smsReportDaemonListenPort = 6333
smsTrigDaemonOrbListenPort = 6334
ccsBeOrbListenPort = 6335
}
Setting Up CDR Storage
About CDR Storage Configuration
If you installed Convergent Charging Controller in a production environment, configure CDR table (CCS_BE_CDR) partitioning to define how CDRs will be stored.
Note: We cannot partition CDR table if the SMS node is on remote database because partitioning requires DBA privilege.
Setting Up CDR Table Partitioning
Follow these steps to set up CDR table partitioning for CDR storage.
Step Action
1 As the root user on the SMS node, edit the /IN/service_packages/CCSPART/etc/ccspart.cfg file. 2 Specify appropriate values for these parameters:
WEEKLY_DATAFILE_COUNT: Specify the number of 200 MB data files required per week to hold CDR data. Note: CDR data files may contain multiple CDR records, potentially of different types.
WEEKS_TO_KEEP_PARTITION: Specify the number of weeks CDR data should remain available on the SMS node before being purged from the database.
DATAFILE_PATH: Specify the location on the disk where CDR data files will be created.
Chapter 7
Chapter 7, Post-Installation Tasks 87
Setting Up Voucher Storage
About Voucher Storage Configuration
If you installed Convergent Charging Controller in a production environment, configure voucher table (CCS_VOUCHER_REFERENCE) partitioning to define how vouchers will be stored.
Note: You cannot partition voucher table if the SMS node is on remote database because partitioning requires DBA privilege.
Setting Up Voucher Table Partitioning
Follow these steps to set up voucher table partitioning for voucher storage.
Step Action
1 As the root user on the SMS node, edit the /IN/service_packages/CCSVCHRPART/etc/ccs_voucher_reference_part.cfg file.
2 Specify appropriate values for these parameters: WEEKLY_DATAFILE_COUNT: Specify the number of 200 MB data files required per
week to hold voucher data. Note: Voucher data files may contain multiple voucher records, potentially of different types.
WEEKS_TO_KEEP_PARTITION: Specify the number of weeks voucher data should remain available on the SMS node before being purged from the database.
DATAFILE_PATH: Specify the location on the disk where voucher data files will be created.
Enabling SSL Connections to the Database
About SSL Connections to the Database
Convergent Charging Controller supports secure network logins through Secure Socket Layer (SSL) connections from the Convergent Charging Controller UI to the database.
To configure SSL connections to the database, perform the following steps on the SMS node:
Step Action
1 Create the Oracle wallet that identifies the database server. See About Creating the Oracle Wallet (on page 88).
2 Update the listener.ora file to define the location of the Oracle wallet and the listen port for SSL connections to the database. See Updating the listener.ora file (on page 91).
3 Update the sqlnet.ora file to define the location of the Oracle wallet. See Updating the sqlnet.ora file (on page 93).
4 The Convergent Charging Controller installation automatically sets the Java application properties to enable SSL connections to the database. Check the configuration in your JNLP files to ensure that configuration has been set correctly. See About Java Applet Configuration (on page 96).
5 Clear the temporary Internet files from the Java cache.

Chapter 7
88 Installation Guide
About Creating the Oracle Wallet
The Oracle wallet is the single-sign-on wallet that is used when connecting securely to the database and that contains certificate information for identifying the Oracle server. You must create the Oracle wallet if you are using SSL connections to the database.
You create the Oracle wallet by running the setupOracleWallet.sh script. The script prompts you to enter the following information:
Oracle wallet base directory. Specify the base directory to use for the Oracle root and Oracle server wallets. The default location for the Oracle wallet base directory is: /u01/app/wallets/oracle
ISO country code. Specify the two-letter international country code for your country. The wallet passwords to use for the root CA wallet and the server wallet. You will be prompted for
the password each time the wallet is accessed. The wallet passwords have length and content validity checks applied to them. Generally, passwords should have a minimum length of eight characters and contain alphabetic characters combined with numbers and special characters.
When you run setupOracleWallet.sh, you specify whether you want to use self-signed certificates. If you will be using:
Self-signed certificates, the script completes after creating the Oracle wallet and self-signed certificate. You must then update the Java keystore on client PCs with the trusted certificates.
Certificates signed by a commercial CA, the script initially completes after creating the certificate-signing request. You must send the certificate signing request to the commercial CA for signing. When the commercial CA returns the signed certificate, you re-run setupOracleWallet.sh to add the trusted CA certificate and the signed CA certificate to the Oracle server wallet.
After creating the Oracle wallet, the script prints details of the additional configuration that you must set in the Oracle listener.ora and sqlnet.ora files.
For more information about the Oracle wallet and for information about setupOracleWallet.sh, see SMS Technical Guide.
Setting Up the Oracle Wallet to Use Self-Signed Certificates
Follow these steps to set up the Oracle server wallet to use self-signed certificates by using setupOracleWallet.sh.
Step Action
1 Log in to the SMS as oracle user. 2 Run the following command:
/IN/service_packages/SMS/bin/setupOracleWallet.sh
3 Answer y to the following prompt: Do you wish to proceed with the configuration (y/n):
4 When requested, enter the following information: The base directory for the Oracle wallet The two-letter international country (ISO) code for your country The wallet password to use for the root CA wallet and the server wallet. You will
be prompted for the password each time the wallet is accessed.
Note: Wallet passwords have length and content validity checks applied to them. Generally, passwords should have a minimum length of eight characters and contain alphabetic characters combined with numbers and special characters.
Chapter 7
Chapter 7, Post-Installation Tasks 89
Step Action
5 Answer y to the following prompt: Would you like to use a self-signed root certificate to sign the
SMS server certificate? When processing completes, the self-signed root certificate is exported to the following file:
./root/b64certificate.txt
./root is a sub-directory of the base directory for the Oracle wallet. You must import this certificate into the Java lib\security\cacerts file on each client PC.
Adding Trusted Certificates to the Keystore on Client PCs
If you are using self-signed certificates, update the keystore on client PCs to trust certificates from the SMS server that have been signed by the root CA.
Note: Certificates signed by a commercial CA are already trusted by definition, therefore update the keystore on client PCs only if you are using self-signed certificates.
Follow these steps to add a trusted certificate for the SMS server to the Java keystore on a client PC.
Step Action
1 Copy the root CA certificate ./root/b64certificate.txt to the client PC. 2 As an Administrator user on the client PC, open the command tool window and run the
following command: keytool -importcert -keystore
"\cacerts_path\java\lib\security\cacerts" -alias SMS -file
"\path\\b64certificate.txt" where cacerts_path is the path to the java\lib\security\cacerts file and path is the location of the certificate file on the client PC.
3 When prompted, enter the password for the keystore.
Note: The Java installation sets the keystore password to changeit by default.
4 Answer yes to the following prompt: Trust this certificate? [no]: Oracle keytool updates the keystore on the client PC to trust certificates from the SMS server that have been signed with the root CA.
Setting Up the Oracle Wallet to Use CA-Signed Certificates
Note: This procedure assumes that the commercial CA's own root certificate is available in the following file:
./root/b64certificate.txt
./root is a sub-directory of the base directory for the Oracle wallet.
Follow these steps to set up the Oracle server wallet to use certificates signed by a commercial CA by using setupOracleWallet.sh.
Step Action
1 Log in to SMS as the oracle user.
Chapter 7
90 Installation Guide
Step Action
2 Run the following command: /IN/service_packages/SMS/bin/setupOracleWallet.sh
3 Answer y to the following prompt: Do you wish to proceed with the configuration (y/n):
4 When requested, enter the following information:
The base directory for the Oracle wallet The two-letter international country (ISO) code for your country The password to use for the server wallet. You will be prompted for the password
each time the wallet is accessed.
Note: Wallet passwords have length and content validity checks applied to them. Generally, passwords should have a minimum length of eight characters and contain alphabetic characters combined with numbers and special characters.
5 Answer n to the following prompt: Would you like to use a self-signed root certificate to sign the
SMS server certificate? The script creates the server auto login wallet and exports the certificate-signing request to the following file:
./server/creq.txt
./server is a sub-directory of the base directory for the Oracle wallet. 6 Send the certificate-signing request to the commercial CA for signing. 7 When the commercial CA returns the signed certificate, place the signed certificate in the
following file: ./server/cert.txt
8 Place the root certificate from the commercial CA in the following file: ./root/b64certificate.txt
9 Log in as the oracle user on the SMS and run the following command:
/IN/service_packages/SMS/bin/setupOracleWallet.sh -s ./server/cert.txt -t
./root/b64certificate.txt -w wallet_base_directory
./server/cert.txt specifies the location of the signed server certificate ./root/b64certificate.txt specifies the location of the root certificate from
the commercial CA wallet_base_directory specifies the Oracle wallet base directory
The setupOracleWallet.sh script completes by adding the trusted CA certificate and the CA-signed certificate to the server wallet.
Chapter 7
Chapter 7, Post-Installation Tasks 91
Updating the listener.ora file
Follow these steps to configure the Oracle listener.
Step Action
1 Log in to SMS as the oracle user, or run the following command from a root login to become the user oracle: su - oracle
Note: Logging in as the oracle user ensures that the path to all of the Oracle binaries is correct and that file ownership for Oracle files is preserved.
2 Go to the directory containing the listener.ora file. The location of the listener.ora file depends on the version of Oracle Database installed and the options selected at installation. It is located in one of the following directories by default: ORACLE_HOME/network/admin
/var/opt/oracle/
where ORACLE_HOME is the directory in which your Oracle Database is installed. 3 Edit the listener.ora file by using a text editor such as vi; for example:
vi listener.ora 4 Add a new description to the listener description list that specifies the protocol and port to
use for secure SSL connections to the database. You must set PROTOCOL to TCPS and PORT to 2484 for secure SSL connections. Use the following syntax:
LISTENER=
(DESCRIPTION_LIST =
(DESCRIPTION=(ADDRESS_LIST=
(ADDRESS=
(PROTOCOL=TCPS)
(HOST=hostname)
(PORT=2484)
)))
)
where hostname is the hostname of the SMS node. Note: The standard Oracle listener TCP port is 1521. However, SSL connections use the standard port for the TCPS protocol, port 2484, instead. The TCPS protocol entry in the listener.ora file must appear after the TCP protocol entry.
Note: If there is a firewall between screen clients and the SMS, you must open port 2484 in the firewall.
Chapter 7
92 Installation Guide
Step Action
Example: The following example shows DESCRIPTION_LIST configuration for an SMS node called “hostSMP”:
LISTENER=
(DESCRIPTION_LIST =
(DESCRIPTION=(ADDRESS_LIST=
(ADDRESS=
(PROTOCOL=IPC)
(KEY=SMF)
)))
(DESCRIPTION=(ADDRESS_LIST=
(ADDRESS=
(PROTOCOL=TCP)
(HOST=hostSMP)
(PORT=1521)
)))
(DESCRIPTION=(ADDRESS_LIST=
(ADDRESS=
(PROTOCOL=TCPS)
(HOST=hostSMP)
(PORT=2484)
)))
)
)
Note: For the SMF database, ORACLE_SID has been set to SMF. The listener can be made aware of this by adding an ADDRESS entry to ADDRESS_LIST.
5 Add a new WALLET_LOCATION entry that specifies the directory that contains the server wallet that was created by setupOracleWallet.sh. Use the following syntax:
WALLET_LOCATION =
(SOURCE =
(METHOD = FILE)
(METHOD_DATA = (DIRECTORY = directory_name))
)
where directory_name is the Oracle server directory. Example
The following example shows a WALLET_LOCATION configuration for the Oracle server wallet created in the directory named /u01/app/wallets/oracle/server
WALLET_LOCATION =
(SOURCE =
(METHOD = FILE)
(METHOD_DATA = (DIRECTORY =/u01/app/wallets/oracle/server))
)

Chapter 7
Chapter 7, Post-Installation Tasks 93
Step Action
6 Add the following entries:
SSL_CLIENT_AUTHENTICATION=FALSE
SSL_CIPHER_SUITES=(TLS_RSA_WITH_AES_128_CBC_SHA)
Notes: You must also:
Configure the same entries for WALLET_LOCATION, SSL_CLIENT_AUTHENTICATION, and SSL_CIPHER_SUITES in the sqlnet.ora file.
Set the jnlp.sms.sslCipherSuites Java application property in your JNLP files and the SSL_CIPHER_SUITES parameter to the same value.
7 Save and close the file. 8 Stop and restart the listener using the updated configuration by running the following
commands: lsnrctl stop lsnrctl start
Updating the sqlnet.ora file
Follow these steps to configure the Oracle sqlnet.ora file for SSL connections to the database.
Note: You must configure new entries for WALLET_LOCATION, SSL_CLIENT_AUTHENTICATION, and SSL_CIPHER_SUITES in the sqlnet.ora file that are the same as those configured in the listener.ora file.
Step Action
1 Log in to the SMS as the oracle user, or run the following command from a root login to become the oracle user: su - oracle
Note: Logging in as the oracle user ensures that the path to all Oracle binaries is correct and that file ownership for Oracle files is preserved.
2 Go to the directory containing the sqlnet.ora file. The location of the sqlnet.ora file depends on the version of Oracle database installed and the options selected at installation. It is located in one of the following directories by default: ORACLE_HOME/network/admin /var/opt/oracle/ where ORACLE_HOME is the directory in which the Oracle database is installed.
3 Edit the sqlnet.ora file by using a text editor such as vi; for example: vi sqlnet.ora
4 Add a new WALLET_LOCATION entry that specifies the directory of the server wallet that was created by setupOracleWallet.sh. Use the following syntax: WALLET_LOCATION =
(SOURCE =
(METHOD = FILE)
(METHOD_DATA = (DIRECTORY = directory_name))
)
where directory_name is the Oracle server directory.
Chapter 7
94 Installation Guide
Step Action
Example The following example shows a WALLET_LOCATION configuration for the Oracle server wallet created in the directory named /u01/app/wallets/oracle/server
WALLET_LOCATION =
(SOURCE =
(METHOD = FILE)
(METHOD_DATA = (DIRECTORY =/u01/app/wallets/oracle/server))
)
5 Add the following new entries: SSL_CLIENT_AUTHENTICATION=FALSE
SSL_CIPHER_SUITES=(TLS_RSA_WITH_AES_128_CBC_SHA)
6 Save and close the file.
Updating the eserv.config File
Follow these steps to modify eserv.config file.
Step Action
1 Log in to each node as the smf_oper user, or run the following command from a root login to become the smf_oper user: su - smf_oper
2 Go to the directory containing the eserv.config file. cd /IN/service_packages
3 Edit the eserv.config file by using a text editor such as vi; for example: vi eserv.config
4 Search for the following line: ${OUI_value}
where value is the name of the value required to configure the SMS, SLC, or VWS nodes. Example: The following example shows BE.serverId configuration for the VWS node where the value required is BE_SERVER_ID: BE = {
# BE shared items
serverId = ${OUI_BE_SERVER_ID}
# amPrimary = true
.
.
.
}
5 Replace ${OUI_BE_SERVER_ID} with a valid value.
Example: The following example shows BE.serverId configuration for the VWS node: BE = {
# BE shared items
serverId = 1
# amPrimary = true
.
.
.
}
6 Save and close the file.
Chapter 7
Chapter 7, Post-Installation Tasks 95
Step Action
7 Do the following to restart the Convergent Charging Controller service daemons on all nodes: For Solaris:
a) As the root user, edit the /etc/inittab file. b) Comment the Convergent Charging Controller application processes.
Note: The Convergent Charging Controller application process lines include respawn:/IN/service_packages.
c) Enter the following command to stop the inittab processes: init q
d) As the root user, edit the /etc/inittab file e) Uncomment the Convergent Charging Controller application processes
commented earlier. f) Enter the following command to restart the inittab processes:
init q or use kill commands to kill the Convergent Charging Controller service daemons.
For Linux: a) Run the following command:
/IN/bin/OUI_systemctl.sh restart
Configure SEI in the SLC Node
(Optional) Configure SEI in the SLC node. See the discussion about SEI configuration in SMS Email Interface Technical Guide.
Configuring Replication and Table Nodes
To configure replication nodes and tables, see the discussion about replication nodes in Service Management System User Guide.
Note: Replicate the smf_normalization, smf_denormalization, and smf_seed tables on the SLC and VWS nodes for the slee processes to load Credential Vault data.
Configuring Secondary VWS Replication Ids
You are required to check the replication IDs in the secondary VWS node to make the replication IDs unique.
For example: replicationIF.sh (SLEE/bin) - 952
smsAlarmDaemonStartup.sh (SMS/bin) - 652
smsStatsDaemonStartup.sh (SMS/bin) - 752
updateLoaderWrapperStartup.sh (CCS/bin) - 352
Define the System Currency
When setting up the system for the first time, set the default currency after configuring VWS and before configuring the rest of the system.
Step Action
1 Select the Services menu from the SMS main screen.
Chapter 7
96 Installation Guide
Step Action
2 Select Convergent Charging > Service Management The screen displays the following message:
FATAL ERROR: No System Currency Defined 3 Click Define Now to define the required currency. 4 Click Save.
Creating an ACS Customer
To create an ACS customer, see the discussion about creating an ACS customer in Advanced Control Services User Guide.
Creating a Domain
To create a domain, see the discussion about domain in Charging Control Services User Guide. After creating a new domain, restart the SMS screen and create replication.config file. To create replication.config file, see the discussion about Table Replication in Charging and Control
Service Management System User's Guide.
Creating a MFILE
To create the MFILE, see the discussion about MFILE generation in Charging Control Services User Guide.
About Java Applet Configuration
To enable secure SSL connections to the database, the following Java application configuration must be set in the acs.jnlp, ccp.jnlp, sms.jnlp, and vpn.jnlp files.
Follow these steps to configure the Java applet parameters for the secure SSL connections to the database if they have not been configured by the installation.
Step Action
1 Log in as the root user. 2 Edit the acs.jnlp, ccp.jnlp, sms.jnlp, and vpn.jnlp files by using a text editor such as vi; for
example: vi /IN/html/sms.jnlp The acs.jnlp, sms.jnlp, and vpn.jnlp files are located in the /IN/html/ directory. The ccp.jnlp file is located in the /IN/html/ccp directory.
3 Configure the secureConnectionDatabaseHost Java property value in the resources section of the .jnlp file. Set PROTOCOL to TCPS and set PORT to 2484. The property values must be all on one line in the .jnlp file:
<property name="jnlp.sms.secureConnectionDatabaseHost"
value="(DESCRIPTION= (ADDRESS_LIST= (ADDRESS=(PROTOCOL=TCPS)
(HOST=host_ip_addr)(PORT=2484))) (CONNECT_DATA= (SERVICE_NAME=db_sid )))"
/>
where: host_ip_addr is the host name or IP address of the SMS node db_sid is the database SID

Chapter 7
Chapter 7, Post-Installation Tasks 97
Step Action
4 Set the EncryptedSSLConnection property in the resources section of the .jnlp file to true: <property name="jnlp.sms.EncryptedSSLConnection" value="true" />
5 Set the sslCipherSuites property in the resources section of the .jnlp file to TLS_RSA_WITH_AES_128_CBC_SHA: <property name = "jnlp.sms.sslCipherSuites"
value="(TLS_RSA_WITH_AES_128_CBC_SHA)" />
6 Save and close the file.


Chapter 8, Verifying the Convergent Charging Controller Installation 99
Chapter 8
Verifying the Convergent Charging Controller Installation
Overview
Introduction
This chapter explains how to verify that the Oracle Communications Convergent Charging Controller applications work correctly following the installation.
In this chapter
This chapter contains the following topics.
About Verifying the Installation .................................................................................................... 99 About Collecting Diagnostic Data with RDA HCVE ................................................................... 100
About Verifying the Installation
Introduction
Verify the Convergent Charging Controller installation to ensure the system works correctly after installation. This chapter describes how to set up Convergent Charging Controller and the tests that you should run to verify the installation. These tests cover the basic features of the installation.
Prerequisites
Before you start verifying the installation, you must ensure that all:
Nodes are running Post-installation tasks are completed
Note: If you have the Application Management Pack for Communications available in your Oracle Enterprise Manager installation, the availability test will be automatically reported after discovery of the nodes. Otherwise the following manual steps can be performed:
On the SMS Node
Check that the SMS processes are running by runniing the following commands: ps -ef | grep smsNamingServer
ps -ef | grep smsTaskAgent
ps -ef | grep smsMaster
ps -ef | grep ccsBeOrb
Check the Oracle listener is running by running the following command: lsnrctl status
Chapter 8
100 Installation Guide
To verify the SLC and VWS nodes on SMS:
Step Action
1 Log into SMS as the root user. 2 Click the Operators tab and select Node Management. 3 In the All Nodes screen, enter the node details in the Node Name field. The node name can
be either SLC or VWS. 4 In the Replication Nodes screen, enter the node number in the Node Number field. 5 Click Find.
The Find Replication Node dialogue box appears. 6 Click Search.
Result: The available nodes details are displayed.
On the SLC Node
Check that the SLC processes are running by running the following commands: ps -ef | grep slee_acs
ps -ef | grep replicationIF
ps -ef | grep diameterBeClient
ps -ef | grep BeClient
On VWS Node
Check that the SLC processes are running by running the following commands: ps -ef | grep beServer
ps -ef | grep beVWARS
ps -ef | grep beSync
ps -ef | grep beGroveller
About Collecting Diagnostic Data with RDA HCVE
Overview
Remote Diagnostic Agent (RDA) is an Oracle standard tool that you use to collect diagnostic data about your Convergent Charging Controller system. When you submit a service request (SR) to Oracle Technical Support, you must also provide an RDA output file. The RDA output file provides a comprehensive view of your system configuration and contains diagnostic data used by Oracle Technical Support to diagnose problems. This minimizes the number of requests from Oracle Technical Support for additional information, which can reduce the service request resolution time.
RDA includes a Health Check Validation Engine (HCVE) module that checks your Convergent Charging Controller installation for known issues and common practices that impact performance, availability, and functionality. When you run HCVE, it generates a detailed report in both HTML and text formats that detail possible issues it has found on your system. You can then use the report for preventive maintenance to avoid any service disruption.
HCVE Validations on Convergent Charging Controller Systems
RDA HCVE performs a variety of checks of your Convergent Charging Controller system, such as ensuring that:
Sufficient memory and disk space is available.

Chapter 8
Chapter 8, Verifying the Convergent Charging Controller Installation 101
The appropriate packages and scripts are installed and are configured correctly. The appropriate flags and parameters are set. acsDbCleanup.sh is configured correctly. The log files are set up correctly. The Convergent Charging Controller system is configured to startup and shutdown the Oracle
database appropriately. The appropriate permissions for running scripts are set correctly.


Appendix A, Convergent Charging Controller OUI Installer Screens 103
Appendix A
Convergent Charging Controller OUI Installer Screens
Overview
This appendix describes the information you need to provide for each screen when you install Oracle Communications Convergent Charging Controller in interactive mode. You can also access the information by clicking Help during installation.
Note: This document does not substitute for Convergent Charging Controller installation instructions. You should read all chapters in Convergent Charging Controller Installation Guide in preparation for installing Convergent Charging Controller, including "Convergent Charging Controller System Requirements (on page 9)" for information you need to collect in preparation for installation, and "Installing Convergent Charging Controller (on page 63)" for installation procedures.
Convergent Charging Controller OUI Installer Screens
Installation Inventory
Specify the name and location of the directory where all Oracle installations are done.
Field Description
Inventory Directory Enter the name and the full path to the directory where all Oracle installations are done.
Operating System Group
Select the primary Oracle inventory group.
Installation Location
Specify the name and location of the directory in which to install Convergent Charging Controller.
Field Description
Name Enter the name and the full path to the /IN directory in which to install Convergent Charging Controller.
Installation Type
Select the installation type.
Field Description
SMS Installs the Convergent Charging Controller Service Management System (SMS) application and the SMS database. You use the SMS GUI to configure and manage Convergent Charging Controller.
104 Installation Guide
Field Description
SLC Installs the Convergent Charging Controller Service Logic Controller (SLC) application and the SLC database. You use SLC to provide the logic to manage the calls, sessions, messages in Convergent Charging Controller. Note: Ensure that SMS is installed before installing SLC.
SLC With Test Tools
Installs the Convergent Charging Controller Service Logic Controller (SLC) application, the SLC database, and the SLC test tools. Note: Ensure that SMS is installed before installing SLC With Test Tools.
VWS Installs the Convergent Charging Controller Voucher and Wallet Server (VWS) application and VWS database. The Voucher and Wallet Server manages charging, vouchers, balances, and subscribers. Note: Ensure that SMS is installed before installing VWS.
Oracle User
Enter the Oracle database user details.
Field Description
Oracle DB Owner Retain the default, oracle, which is the user name with permissions to create the Oracle database instance.
Database Paths
Enter the paths to the Oracle database path details to install Convergent Charging Controller DB schema scripts.
Field Description
Base directory Enter the name and the full path to the oracle base directory in which the database creation scripts are installed. The oracle base directory is the directory in which the Oracle database is installed.
Oracle home Enter name and the full path to the Oracle Database home directory in which Oracle 12c database is installed.
Create database and install database schema
Select this option if you want to create database and install the Convergent Charging Controller database schema creation scripts.
Install database schema?
Select this option if you want to install the Convergent Charging Controller database schema creation scripts into an existing database on a remote server.
Don’t Create/Install database
Select this option if you do not want to create database or install database schema. Provide connection details for the existing database schema installation.
Database Datafiles
Specify the location of the datafile and redo log directories.
Field Description
Datafile directory Enter the full path to the directory where the oracle datafiles are stored. Redo log directory Enter the full path to the directory to store the database redo log files.
Appendix A, Convergent Charging Controller OUI Installer Screens 105
Database Password
Enter the previously existing Oracle database password administrative account.
Field Description
Oracle database password
Enter the password for the Oracle database administrative accounts.
Confirm password Enter the password again for confirmation.
Note: If the password is less than 8 characters, a warning appears. You can click OK to proceed.
Oracle Client
Enter information about the Oracle database client.
Field Description
Oracle client home Enter the full path to the Oracle database client home directory in which Oracle Database Client is installed.
SMS GUI
Enter the information for SMS GUI.
Field Description
Screen superuser password
Enter the password for the SMS GUI administrator user account. Note: The password must match with the Oracle password defined for the Oracle database installed on the SMS node.
Confirm password Enter the password again for confirmation. Timezone Enter the time zone in which the date and time are displayed in the SMS GUI.
PI Admin
Enter the information for Provisioning Interface (PI) configuration.
Field Description
PI admin password Enter the password for PI administrator user account. Confirm password Enter the password again for confirmation.
SMS EDR Paths
Enter the path to the directories in which the SMS event data record (EDR) files are stored.
Field Description
CDR Loader Input directory
Retain the default path to the directory of a single file system to store CDR input files.
CDR Loader Output directory
Retain the default path to the directory of a single file system to store CDR output files.

106 Installation Guide
Default Template
Select the option to install default template.
Field Description
Install PCST Check the box to install Prepaid Charging Service Template (PCST).
Default Currency
Enter the details of default system currency.
Field Description
System Currency Select the currency name from the Name drop down box. Note: Only valid currency names are available from the list.
Base Value Enter the ratio of subunits to main units of currency in the Base field. Example: 100 cents per euro = a ratio of 100.
Big Symbol Enter the symbol that represents the main unit of the currency in the Big Symbol field (for example, € for euros).
Little Symbol Enter the symbol that represents the subunit of the currency in the Little Symbol field (for example, c for cents).
Seperator Enter the separator used to separate the main unit from the subunit of the currency in the Separator field. Example: In the currency of: Euros - the separator is a comma (for example, 3,20) Dollars - the separator is a decimal point (for example, $4.00)
Replication
Enter the information of the SMS host from which the current node is replicated.
Field Description
Node number Enter a unique identification number for the node. The Node number that is used as a replication ID should be between 1 and 99. Note: If 1 is entered, the VWS will be given the replication ID of 351, if 2 is entered, the VWS will be given the replication ID of 352, and so on.
SMS Host name Enter the qualified hostname for the SMS server used to configure the clients that will connect to the SMS server.
VWS Config
Enter the information Voucher and Wallet Server (VWS) configuration.
Field Description
SMS EDR Input directory
Enter the name and the full path to the directory in which the SMS event data record (EDR) input files are stored.
Appendix A, Convergent Charging Controller OUI Installer Screens 107
Field Description
Primary VWS node Select to install the primary node of a VWS pair.
Java Home Location
Specify the location of the directory where Java is installed.
Field Description
Java home Enter the full path to the directory where Java is installed.

Appendix B, Unusable scripts on remote database 109
Appendix B
Unusable scripts on remote database
If the SMS node is on remote database, we cannot use the following scripts which require DBA privileges to run:
smsAddArchiveLog.sh hotbackup.sh archbackup.sh oraLockMonitor.sh fragmentation_install_oui.sh CCSPART_uninstall.sh CCSPART_create_schema.sh CCSPART_maintenance.sh CCSPART_statistics.sh CCSPART_capacity_monitor.sh CCSCPART_check_oracle.sh CCSCPART_statistics.sh CCSCPART_add_week.sh CCSCPART_capacity_monitor.sh CCSCPART_restart_job_processes.sh CCSCPART_install.sh CCSCPART_rman_exclude.sh CCSCPART_maintenance.sh CCSCPART_uninstall.sh CCSCPART_drop_week.sh CCSCPART_list_partitions.sh CCSVCHRPART_uninstall.sh CCSVCHRPART_statistics.sh CCSVCHRPART_capacity_monitor.sh CCSVCHRPART_maintenance.sh CCSVCHRPART_create_schema.sh CCSCVCHRPART_uninstall.sh CCSCVCHRPART_drop_week.sh CCSCVCHRPART_list_partitions.sh CCSCVCHRPART_add_week.sh CCSCVCHRPART_statistics.sh CCSCVCHRPART_capacity_monitor.sh CCSCVCHRPART_install.sh CCSCVCHRPART_check_oracle.sh CCSCVCHRPART_restart_job_processes.sh CCSCVCHRPART_rman_exclude.sh CCSCVCHRPART_maintenance.sh

Glossary 111
Glossary of Terms
AAA
Authentication, Authorization, and Accounting. Specified in Diameter RFC 3588.
ACS
Advanced Control Services configuration platform.
API
Application Programming Interface
ASP
Application Service Provider, or Application Server Process. An IP based instance of an AS. An ASP implements a SCTP
connection between 2 platforms.
Base Directory
This manual assumes that the application was installed into the default directory, and with the default directory structure.
If you have installed the application into a non-standard directory or directory structure, you will have to amend some of the instructions where a full directory path has been supplied.
Note: It is not recommended to install the application in anywhere other than the default directory, and with the default directory structure.
CAMEL
Customized Applications for Mobile network Enhanced Logic
This is a 3GPP (Third Generation Partnership Project) initiative to extend traditional IN services found in fixed networks into mobile networks. The architecture is similar to that of traditional IN, in that the control functions and switching functions are remote. Unlike the fixed IN environment, in mobile networks the subscriber may roam into another PLMN (Public Land Mobile Network), consequently the controlling function must interact with a switching function in a foreign network. CAMEL specifies the agreed information flows that may be passed between these networks.
CCS
1) Charging Control Services component.
2) Common Channel Signalling. A signalling system used in telephone networks that separates signalling information from user data.
CDMA
Code Division Multiple Access is a method for describing physical radio channels. Data intended for a specific channel is modulated with that channel's code. These are typically pseudo-random in nature, and possess favourable correlation properties to ensure physical channels are not confused with one another.
112 Installation Guide
CDR
Call Data Record
Note: The industry standard for CDR is EDR (Event Detail Record).
Connection
Transport level link between two peers, providing for multiple sessions.
Convergent
Also “convergent billing”. Describes the scenario where post-paid and pre-paid calls are handed by the same service platform and the same billing system. Under strict converged billing, post-paid subscribers are essentially treated as “limited credit pre-paid”.
CORBA
Common Object Request Broker Architecture. It is a framework that provides interoperability between objects built in different programming languages, running on different physical machines perhaps on different networks. It specifies an Interface Definition Language, and API that allows client / server interaction with the ORB.
CPU
Central Processing Unit
cron
Unix utility for scheduling tasks.
DAP
Data Access Pack. An extension module for ACS which allows control plans to make asynchronous requests to external systems over various protocols including XML and LDAP.
DB
Database
Diameter
A feature rich AAA protocol. Utilises SCTP and TCP transports.
DTMF
Dual Tone Multi-Frequency - system used by touch tone telephones where one high and one low frequency, or tone, is assigned to each touch tone button on the phone.
EMI
Exchange Message Interface protocol
ENUM
E.164 Number Mapping.
Glossary 113
FTP
File Transfer Protocol - protocol for electronic transfer of files
GPRS
General Packet Radio Service - employed to connect mobile cellular users to PDN (Public Data Network- for example the Internet).
GSM
Global System for Mobile communication.
It is a second generation cellular telecommunication system. Unlike first generation systems, GSM is digital and thus introduced greater enhancements such as security, capacity, quality and the ability to support integrated services.
GUI
Graphical User Interface
HLR
The Home Location Register is a database within the HPLMN (Home Public Land Mobile Network). It provides routing information for MT calls and SMS. It is also responsible for the maintenance of user subscription information. This is distributed to the relevant VLR, or SGSN (Serving GPRS Support Node) through the attach process and mobility management procedures such as Location Area and Routing Area updates.
HPLMN
Home PLMN
HTML
HyperText Markup Language, a small application of SGML used on the World Wide Web.
It defines a very simple class of report-style documents, with section headings, paragraphs, lists, tables, and illustrations, with a few informational and presentational items, and some hypertext and multimedia.
HTTP
Hypertext Transport Protocol is the standard protocol for the carriage of data around the Internet.
IN
Intelligent Network
INAP
Intelligent Network Application Part - a protocol offering real time communication between IN elements.
114 Installation Guide
IOR
Inter-operable Object Reference. A reference that is used in the CORBA world that clients can use to send their requests to a particular process executing on a particular machine. Every CORBA based server has an IOR that uniquely identifies it within a distributed computing platform. IOR consists of information such as the IP address of the machine on which the process is executing, or the port number to which it is listening. This IOR is usually exported/sent to some form of central registry when the process is started up. Clients can then retrieve this information, that is, IORs, from the central registry if they want to send a request to a server.
IP
1) Internet Protocol
2) Intelligent Peripheral - This is a node in an Intelligent Network containing a Specialized Resource Function (SRF).
IP address
Internet Protocol Address - network address of a card on a computer.
ISDN
Integrated Services Digital Network - set of protocols for connecting ISDN stations.
ISUP
ISDN User Part - part of the SS7 protocol layer and used in the setting up, management, and release of trunks that carry voice and data between calling and called parties.
LCP
Location Capabilities Pack - set of software components used by other applications to look up the location of mobile devices.
M3UA
MTP3 User Adaptation. The equivalent of MTP in the SIGTRAN suite.
MAP
Mobile Application Part - a protocol which enables real time communication between nodes in a mobile cellular network. A typical usage of the protocol would be for the transfer of location information from the VLR to the HLR.
Messaging Manager
The Messaging Manager service and the Short Message Service components of Oracle Communications Convergent Charging Controller product. Component acronym is MM (formerly MMX).
MGC
Media Gateway Controller
MM
Messaging Manager. Formerly MMX, see also XMS (on page 119) and Messaging Manager (on page 114).
Glossary 115
MS
Mobile Station
MSC
Mobile Switching Centre. Also known as a switch.
MT
Mobile Terminated
MTP
Message Transfer Part (part of the SS7 protocol stack).
MTP3
Message Transfer Part - Level 3.
NP
Number Portability
ORB
Object Request Broker. Within an Object based communication system, an ORB keeps track of the actual addresses of all defined objects and thus is used to route traffic to the correct destination. The CORBA defines the ORB in a series of standards enabling different platforms to share common information.
PC
Point Code. The Point Code is the address of a switching point.
Peer
Remote machine, which for our purposes is capable of acting as a Diameter agent.
PI
Provisioning Interface - used for bulk database updates/configuration instead of GUI based configuration.
PL/SQL
Oracle's Procedural Language for stored procedures and packages.
PLMN
Public Land Mobile Network
RADIUS
Remote Authentication Dial-In User Service - a system of distributed security that secures remote access to networks and network services against unauthorised access.
116 Installation Guide
RIMS
Routing Information for Mobile Services. Used to cache HLR lookup information.
Note: Now known as "Messaging Manager Navigator".
SCA
1) Service Centre Address
2) Session Control Agent for Session Initiation Protocol (SIP)
SCCP
Signalling Connection Control Part (part of the SS7 protocol stack).
SCP
Service Control Point. Also known as SLC.
SCTP
Stream Control Transmission Protocol. A transport-layer protocol analogous to the TCP or User Datagram Protocol (UDP). SCTP provides some similar services as TCP (reliable, in-sequence transport of messages with congestion control) but adds high availability.
SES
Subscriber Event Service is an application that enables a service provider to send text messages to roaming subscribers (both their own and foreign subscribers) when they roam in and out of their network.
Session
Diameter exchange relating to a particular user or subscriber access to a provided service (for example, a telephone call).
SGML
Standard Generalized Markup Language. The international standard for defining descriptions of the structure of different types of electronic document.
SGSN
Serving GPRS Support Node
SIP
Session Initiation Protocol - a signaling protocol for Internet conferencing, telephony, event notification and instant messaging. (IETF)
SLC
Service Logic Controller (formerly UAS).
SLEE
Service Logic Execution Environment
Glossary 117
SMPP
Short Message Peer-to-Peer protocol
SMS
Depending on context, can be:
Service Management System hardware platform Short Message Service Service Management System platform Convergent Charging Controller Service Management System application
SN
Service Number
SNMP
Simple Network Management Protocol. Usually responsible for notifying faults on a network.
SOAP
Simple Object Access Protocol. An XML-based messaging protocol.
SQL
Structured Query Language is a database query language.
SRF
Specialized Resource Function – This is a node on an IN which can connect to both the SSP and the SLC and delivers additional special resources into the call, mostly related to voice data, for example play voice announcements or collect DTMF tones from the user. Can be present on an SSP or an Intelligent Peripheral (IP).
SS7
A Common Channel Signalling system is used in many modern telecoms networks that provides a suite of protocols which enables circuit and non-circuit related information to be routed about and between networks. The main protocols include MTP, SCCP and ISUP.
SSL
Secure Sockets Layer protocol
SSP
Service Switching Point
SUA
Signalling Connection Control Part User Adaptation Layer
System Administrator
The person(s) responsible for the overall set-up and maintenance of the IN.
118 Installation Guide
TCAP
Transaction Capabilities Application Part – layer in protocol stack, message protocol.
TCP
Transmission Control Protocol. This is a reliable octet streaming protocol used by the majority of applications on the Internet. It provides a connection-oriented, full-duplex, point to point service between hosts.
Telco
Telecommunications Provider. This is the company that provides the telephone service to customers.
Telecommunications Provider
See Telco.
TFR
TCAP Filter Relay
TLS
Transport Layer Security. Cryptographic protocol used to provide secure communications. Evolved from SSL.
UIS
USSD Interactive Services
UPC
USSD Portal Components
USSD
Unstructured Supplementary Service Data - a feature in the GSM MAP protocol that can be used to provide subscriber functions such as Balance Query.
VLR
Visitor Location Register - contains all subscriber data required for call handling and mobility management for mobile subscribers currently located in the area controlled by the VLR.
VPN
The Virtual Private Network product is an enhanced services capability enabling private network facilities across a public telephony network.
VSSP
Virtual SSP
VWS
Oracle Voucher and Wallet Server (formerly UBE).

Glossary 119
XML
eXtensible Markup Language. It is designed to improve the functionality of the Web by providing more flexible and adaptable information identification.
It is called extensible because it is not a fixed format like HTML. XML is a `metalanguage' — a language for describing other languages—which lets you design your own customized markup languages for limitless different types of documents. XML can do this because it's written in SGML.
XMS
Three letter code used to designate some components and path locations used by the Oracle Communications Convergent Charging Controller Messaging Manager (on page 114) service and the Short Message Service. The published code is MM (on page 114) (formerly MMX).

Index 121
Index
A
AAA • 111 About CDR Storage Configuration • 86 About CDR Storage Configuration Tasks • 79 About Checking Prerequisite Requirements • 54 About Cohosting Convergent Charging
Controller Nodes • 6 About Collecting Diagnostic Data with RDA
HCVE • 100 About Convergent Charging Controller Installed
Components • 1 About CORBA Services Configuration for IPv6 •
81, 85 About Creating the Oracle Wallet • 87, 88 About Initial Configuration Tasks • 81 About Installation Logs • 76 About Installing and Configuring Oracle
Database • 56 About Java Applet Configuration • 87, 96 About Memory Requirements • 11 About Planning Your Convergent Charging
Controller Installation • 5 About Post-Installation Tasks • 79 About Preparing the System • 45 About SSL Configuration Tasks • 80 About SSL Connections to the Database • 87 About the Response File • 75 About This Document • v About Verifying the Installation • 99 About Voucher Storage Configuration • 87 ACS • 111 Adding Trusted Certificates to the Keystore on
Client PCs • 89 Adding Users to the Groups • 52 Additional Oracle Datafiles on the SLC • 35, 39 Additional Oracle Datafiles on the SMS • 34, 38 Additional Oracle Datafiles on the VWS • 34, 39 Advanced Storage and Memory Sizing • 3, 11,
25 API • 111 ASP • 111 Audience • v
B
Base Directory • 111 Browser and Java for Convergent Charging
Controller UI • 56
C
CAMEL • 111 CCS • 111 CDMA • 111 CDR • 112 Certification • 2
Checking the Time Zone • 22 Configure SEI in the SLC Node • 95 Configuring Core Dump Reporting • 47 Configuring Machines to Boot Automatically •
45, 50 Configuring Password-less SSH Logins • 80 Configuring Replication and Table Nodes • 95 Configuring Secondary VWS Replication Ids •
95 Configuring the Oracle Database to Start
Automatically • 60 Configuring the SSH SMF Service • 45, 51 Configuring the sudo Binary • 52 Configuring Where to Log Notice Alarms • 45,
46 Connecting Networks • 10 Connection • 112 Convergent • 112 Convergent Charging Controller Installation
Options • 63 Convergent Charging Controller Installation
Overview • 1 Convergent Charging Controller Installation
Procedure Overview • 3 Convergent Charging Controller Installation
Types • 63 Convergent Charging Controller Installed
Components Overview • 1 Convergent Charging Controller OUI Installer
Screens • 103 Convergent Charging Controller Pre-Installation
Tasks • 45 Convergent Charging Controller Software • 1 Convergent Charging Controller System
Requirements • 9, 103 Copyright • ii CORBA • 112 CPU • 112 Creating a Domain • 96 Creating a MFILE • 96 Creating an ACS Customer • 96 Creating esg group for Each Node • 52 Creating the /IN Directory • 46, 54 Creating Users • 52 Creating Users in Each Node • 53 cron • 112
D
DAP • 112 Database Datafiles • 104 Database Memory • 11 Database Password • 105 Database Paths • 104 Database Planning • 6 DB • 112 Default Currency • 106 Default Template • 106
122 Installation Guide
Define the System Currency • 95 Detailed Planning • 6 Diameter • 112 Disabling automount for the Home Directory •
45, 46 Disabling Keyboard Abort Sequence • 51 Disabling SSL Connections to the SMS
Database • 80 Disabling System Services • 48 Disk Storage on the SLC • 27, 33, 37 Disk Storage on the SMS • 26, 32, 36 Disk Storage on the VWS • 27, 33, 37 Document Conventions • vi DTMF • 112
E
EMI • 112 Enabling Remote Login • 45, 46 Enabling SSH Root Login • 45, 50 Enabling SSL Connections to the Database •
80, 87 Ensuring a Successful Installation • 4 ENUM • 112 Example CORBA Services Configuration on the
SMS • 86 Example Size Scenarios • 25
F
FTP • 113
G
General Storage Requirements • 12 Generating and Exchanging SSH Keys • 45, 50 GPRS • 113 GSM • 113 GUI • 113
H
Hardware Platforms • 18 HCVE Validations on Convergent Charging
Controller Systems • 100 HLR • 113 HPLMN • 113 HTML • 113 HTTP • 113
I
IN • 113 INAP • 113 Installation Guidelines • 4 Installation Inventory • 103 Installation Location • 103 Installation Options • 3 Installation Type • 103 Installing a Browser • 56 Installing and Configuring BRM SDK • 18, 62
Installing and Configuring Oracle Database • 56 Installing Convergent Charging Controller • 63,
103 Installing Convergent Charging Controller in
Silent Mode • 63, 75, 76 Installing Convergent Charging Controller on
the SLC Node Using the GUI • 64, 67 Installing Convergent Charging Controller on
the SLC with Testing Tools Node Using the GUI • 64, 69
Installing Convergent Charging Controller on the SMS Node Using the GUI • 64
Installing Convergent Charging Controller on the VWS Node Using the GUI • 64, 72
Installing HTTPD • 51 Installing the Oracle Database Software • 6, 56 Integration Planning • 7 Introduction • 4, 9, 12, 17, 19, 21, 25, 26, 32,
36, 40, 99 IOR • 114 IP • 114 IP address • 114 IP Networks • 9 ISDN • 114 ISUP • 114
J
Java Home Location • 107
K
Kernel Parameters • 19
L
Large Production System Example • 26, 36 LCP • 114 Logical Network Settings • 10, 11 Logical Network Settings Table • 11
M
M3UA • 114 MAP • 114 Medium Production System Example • 26, 32 Memory Requirements • 11 Memory Sizing for a Large Production System •
40 Memory Sizing for a Medium Production
System • 35 Memory Sizing for a Small Production System •
31 Messaging Manager • 114, 119 MGC • 114 MM • 114, 119 Modifying Resource Control Values • 19 MS • 115 MSC • 115 MT • 115

Index 123
MTP • 115 MTP3 • 115
N
Network Planning • 6, 82 Network Requirements • 9 Node-Specific Users • 40 NP • 115
O
Obsoleted Support • 2 On the SLC Node • 100 On the SMS Node • 99 On VWS Node • 100 Opening Ports in Your Linux Firewall • 45, 48 Oracle 12c 32-bit Client Installation Guidelines •
60 Oracle Client • 105 Oracle Database Instances • 61 Oracle Database Software Installation
Guidelines • 57 Oracle Datafiles on the SLC • 30 Oracle Datafiles on the SMS • 28 Oracle Datafiles on the VWS • 30 Oracle Server Installation Guidelines • 60 Oracle User • 104 ORB • 115 OSD Configuration Example • 7 OSD Configuration Planning • 7 Overview • 1, 5, 9, 25, 45, 63, 79, 99, 100, 103 Overview of the Installation Procedure • 3
P
Partitioned Files on the SMS • 29, 34, 39 PC • 115 Peer • 115 PI • 115 PI Admin • 105 PL/SQL • 115 Planning Your Convergent Charging Controller
Installation • 5 PLMN • 115 Post Installation Initial Configuration Tasks • 79 Post-Installation Initial Configuration • 79, 81 Post-Installation Tasks • 79 Preparing the System • 19 Preparing the System for Installation • 45 Prerequisite Software • 18 Prerequisites • v, 99 Preventing Buffer Overflow Attacks • 45, 51
R
RADIUS • 115 Related Documents • v Removing Files After a Failed Installation • 76 Replication • 106
Replication Planning • 7 Replication Reference Table Example • 8 RIMS • 116
S
SCA • 116 SCCP • 116 SCP • 116 SCTP • 116 SES • 116 Session • 116 Setting Database Parameters for SMS
Databases • 61 Setting IP Addresses and Hostnames • 81, 82 Setting Shared Memory Limits • 81, 84 Setting SSH StrictHostKeyChecking • 81, 82 Setting the beServiceTrigger User and
Password • 84 Setting the Number of Connections to the
Database • 81, 84 Setting the Semaphore Parameters for Linux •
20 Setting the Time Zone • 21 Setting Time Zones to GMT • 21 Setting Up CDR Storage • 79, 86 Setting Up CDR Table Partitioning • 86 Setting Up the Oracle Wallet to Use CA-Signed
Certificates • 89 Setting Up the Oracle Wallet to Use Self-Signed
Certificates • 88 Setting Up Voucher Storage • 87 Setting Up Voucher Table Partitioning • 87 SGML • 116 SGSN • 116 SIP • 116 SLC • 116 SLC Storage Requirements • 13 SLC Tablespace Requirements • 16 SLEE • 116 Small Production System Example • 26 SMPP • 117 SMS • 117 SMS EDR Paths • 105 SMS GUI • 105 SMS Storage Requirements • 13 SMS Tablespace Requirements • 13 SN • 117 SNMP • 117 SOAP • 117 Software and Hardware Requirements • 17 SQL • 117 SRF • 117 SS7 • 117 SSL • 117 SSP • 117 Storage Planning • 6 Storage Requirements • 12, 25

124 Installation Guide
SUA • 117 Supporting Multi-Byte UTF-8 Character Sets • 4 System Administrator • 117
T
TCAP • 118 TCP • 118 Telco • 118 Telecommunications Provider • 118 TFR • 118 TLS • 118 Tuning the System's ZFS Performance • 20 Types of Implementations • 25 Typographical Conventions • vi
U
UIS • 118 Unusable scripts on remote database • 67, 109 UPC • 118 Update Oracle cpu_count Parameter • 81, 83 Update Oracle Database Default Profile
Password Life Time • 81, 83 Update Oracle SGA Parameters • 81, 83 Update Oracle Tablespace Storage • 81, 83 Updating the eserv.config File • 94 Updating the listener.ora file • 87, 91 Updating the sqlnet.ora file • 87, 93 Users on SLC Database Instance • 41 Users on SMS Database Instance • 40 Users on VWS Database Instance • 43 USSD • 118
V
Verifying the Convergent Charging Controller Installation • 99
VLR • 118 VPN • 118 VSSP • 118 VWS • 118 VWS Config • 106 VWS Storage Requirements • 13 VWS Tablespace Requirements • 15
X
XML • 119 XMS • 114, 119


