Embed Size (px)
Citation preview
2k15_export_chev_corvette_KTA-8801_3_GB.ai
(Country = United Kingdom)
Spine = Adjust Spine Please - Only Est.
Color = Black
Date = 09/18/14
KTA-8801/3-GB 09/2014
Owner Manual
Black plate (1,1)Chevrolet Corvette Owner Manual - 2015 - CRC - 9/16/14
2015 Chevrolet Corvette Owner Manual M
In Brief . . . . . . . . . . . . . . . . . . . . . . . . 1-1Instrument Panel . . . . . . . . . . . . . . 1-2Initial Drive Information . . . . . . . . 1-4Vehicle Features . . . . . . . . . . . . . 1-15Performance andMaintenance . . . . . . . . . . . . . . . . 1-17
Keys, Doors, andWindows . . . . . . . . . . . . . . . . . . . . 2-1Keys and Locks . . . . . . . . . . . . . . . 2-1Doors . . . . . . . . . . . . . . . . . . . . . . . . . 2-11Vehicle Security. . . . . . . . . . . . . . 2-13Exterior Mirrors . . . . . . . . . . . . . . . 2-17Interior Mirrors . . . . . . . . . . . . . . . . 2-18Windows . . . . . . . . . . . . . . . . . . . . . 2-19Roof . . . . . . . . . . . . . . . . . . . . . . . . . . 2-21
Seats and Restraints . . . . . . . . . 3-1Head Restraints . . . . . . . . . . . . . . . 3-2Front Seats . . . . . . . . . . . . . . . . . . . . 3-2Safety Belts . . . . . . . . . . . . . . . . . . . . 3-8Airbag System . . . . . . . . . . . . . . . . 3-14Child Restraints . . . . . . . . . . . . . . 3-26
Storage . . . . . . . . . . . . . . . . . . . . . . . 4-1Storage Compartments . . . . . . . . 4-1Additional Storage Features . . . 4-4
Instruments and Controls . . . . 5-1Controls . . . . . . . . . . . . . . . . . . . . . . . 5-2Warning Lights, Gauges, andIndicators . . . . . . . . . . . . . . . . . . . . 5-7
Information Displays . . . . . . . . . . 5-25Vehicle Messages . . . . . . . . . . . . 5-31Vehicle Personalisation . . . . . . . 5-42
Lighting . . . . . . . . . . . . . . . . . . . . . . . 6-1Exterior Lighting . . . . . . . . . . . . . . . 6-1Interior Lighting . . . . . . . . . . . . . . . . 6-6Lighting Features . . . . . . . . . . . . . . 6-7
Infotainment System . . . . . . . . . 7-1Introduction . . . . . . . . . . . . . . . . . . . . 7-1Performance DataRecorder (PDR) . . . . . . . . . . . . . . 7-1
Climate Controls . . . . . . . . . . . . . 8-1Climate Control Systems . . . . . . 8-1Air Vents . . . . . . . . . . . . . . . . . . . . . . . 8-4Maintenance . . . . . . . . . . . . . . . . . . . 8-5
Driving and Operating . . . . . . . . 9-1Driving Information . . . . . . . . . . . . . 9-2Starting and Operating . . . . . . . 9-14Engine Exhaust . . . . . . . . . . . . . . 9-19Manual Gearbox . . . . . . . . . . . . . . 9-20Brakes . . . . . . . . . . . . . . . . . . . . . . . 9-23Ride Control Systems . . . . . . . . 9-26Cruise Control . . . . . . . . . . . . . . . . 9-36Driver Assistance Systems . . . 9-39Fuel . . . . . . . . . . . . . . . . . . . . . . . . . . 9-41Trailer Towing . . . . . . . . . . . . . . . . 9-44Conversions and Add-Ons . . . 9-45
Vehicle Care . . . . . . . . . . . . . . . . . 10-1General Information . . . . . . . . . . 10-2Vehicle Checks . . . . . . . . . . . . . . . 10-5Headlamp Aiming . . . . . . . . . . . 10-36Bulb Replacement . . . . . . . . . . 10-36Electrical System . . . . . . . . . . . . 10-37Wheels and Tyres . . . . . . . . . . . 10-45Jump Starting . . . . . . . . . . . . . . . 10-70
Black plate (2,1)Chevrolet Corvette Owner Manual - 2015 - CRC - 9/16/14
2015 Chevrolet Corvette Owner Manual M
Towing the Vehicle . . . . . . . . . . 10-73Appearance Care . . . . . . . . . . . 10-74
Service and Maintenance . . . 11-1General Information . . . . . . . . . . 11-1Scheduled Maintenance . . . . . . 11-1Recommended Fluids,Lubricants, and Parts . . . . . . . 11-4
Technical Data . . . . . . . . . . . . . . . 12-1Vehicle Identification . . . . . . . . . 12-1Vehicle Data . . . . . . . . . . . . . . . . . . 12-3
Customer Information . . . . . . . 13-1Customer Information . . . . . . . . 13-1Vehicle Data Recording andPrivacy. . . . . . . . . . . . . . . . . . . . . . 13-2
Index . . . . . . . . . . . . . . . . . . . . . i-1
Black plate (3,1)Chevrolet Corvette Owner Manual - 2015 - CRC - 9/16/14
Introduction iii
The names, logos, emblems,slogans, vehicle model names, andvehicle body designs appearing inthis manual including, but not limitedto, GM, the GM logo, CHEVROLET,the CHEVROLET Emblem, andCORVETTE are trademarks and/orservice marks of General MotorsLLC, its subsidiaries, affiliates,or licensors.
This manual describes features thatmay or may not be on the vehiclebecause of optional equipment thatwas not purchased on the vehicle,model variants, countryspecifications, features/applicationsthat may not be available in yourregion or changes subsequent tothe printing of this owner manual.
Refer to the purchasedocumentation relating to yourspecific vehicle to confirm thefeatures.
Keep this manual in the vehicle forquick reference.
Using this ManualTo quickly locate information aboutthe vehicle, use the Index in theback of the manual. It is analphabetical list of what is in themanual and the page number whereit can be found.
Danger, Warnings, andCautionsWarning messages found on vehiclelabels and in this manual describehazards and what to do to avoid orreduce them.
{ Danger
Danger indicates a hazard with ahigh level of risk which will resultin serious injury or death.
{ Warning
Warning indicates a hazard thatcould result in injury or death.
{ Caution
Caution indicates a hazard thatcould result in property or vehicledamage.
Black plate (4,1)Chevrolet Corvette Owner Manual - 2015 - CRC - 9/16/14
iv Introduction
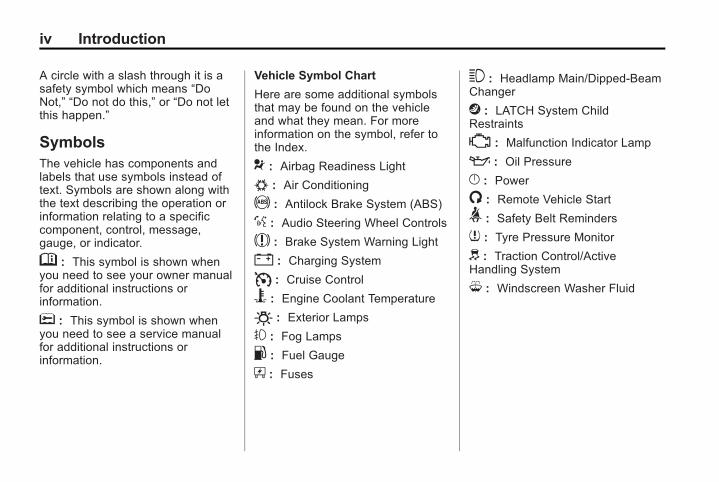
A circle with a slash through it is asafety symbol which means “DoNot,” “Do not do this,” or “Do not letthis happen.”
SymbolsThe vehicle has components andlabels that use symbols instead oftext. Symbols are shown along withthe text describing the operation orinformation relating to a specificcomponent, control, message,gauge, or indicator.
M : This symbol is shown whenyou need to see your owner manualfor additional instructions orinformation.
* : This symbol is shown whenyou need to see a service manualfor additional instructions orinformation.
Vehicle Symbol Chart
Here are some additional symbolsthat may be found on the vehicleand what they mean. For moreinformation on the symbol, refer tothe Index.
9 : Airbag Readiness Light
# : Air Conditioning
! : Antilock Brake System (ABS)
% : Audio Steering Wheel Controls
$ : Brake System Warning Light
" : Charging System
I : Cruise Control
B : Engine Coolant Temperature
O : Exterior Lamps
# : Fog Lamps
. : Fuel Gauge
+ : Fuses
3 : Headlamp Main/Dipped-BeamChanger
j : LATCH System ChildRestraints
* : Malfunction Indicator Lamp
: : Oil Pressure
} : Power
/ : Remote Vehicle Start
> : Safety Belt Reminders
7 : Tyre Pressure Monitor
d : Traction Control/ActiveHandling System
M : Windscreen Washer Fluid
Black plate (1,1)Chevrolet Corvette Owner Manual (GMNA-Localizing-Europe-8087687) -2015 - CRC - 9/16/14
In Brief 1-1
In Brief
Instrument PanelInstrument Panel . . . . . . . . . . . . . . 1-2
Initial Drive InformationInitial Drive Information . . . . . . . . 1-4Remote Keyless Entry (RKE)System . . . . . . . . . . . . . . . . . . . . . . 1-4
Door Locks . . . . . . . . . . . . . . . . . . . 1-5Boot Release . . . . . . . . . . . . . . . . . 1-6Windows . . . . . . . . . . . . . . . . . . . . . . 1-7Seat Adjustment . . . . . . . . . . . . . . 1-8Memory Features . . . . . . . . . . . . . 1-9Heated and VentilatedSeats . . . . . . . . . . . . . . . . . . . . . . . . 1-9
Safety Belts . . . . . . . . . . . . . . . . . . 1-10Passenger SensingSystem . . . . . . . . . . . . . . . . . . . . . 1-10
Mirror Adjustment . . . . . . . . . . . . 1-10Steering WheelAdjustment . . . . . . . . . . . . . . . . . 1-11
Interior Lighting . . . . . . . . . . . . . . 1-11Exterior Lighting . . . . . . . . . . . . . 1-12Windscreen Wiper/Washer . . . 1-12Climate Controls . . . . . . . . . . . . . 1-13Transmission . . . . . . . . . . . . . . . . 1-14
Vehicle FeaturesInfotainment System . . . . . . . . . 1-15Steering Wheel Controls . . . . . 1-15Cruise Control . . . . . . . . . . . . . . . 1-15Driver InformationCentre (DIC) . . . . . . . . . . . . . . . 1-16
Rear VisionCamera (RVC) . . . . . . . . . . . . . 1-16
Power Outlets . . . . . . . . . . . . . . . 1-16Roof Panel . . . . . . . . . . . . . . . . . . 1-16Convertible . . . . . . . . . . . . . . . . . . 1-17
Performance and MaintenanceTraction Control/ElectronicStability Control . . . . . . . . . . . . 1-17
Tyre Pressure Monitor . . . . . . . 1-18Performance VehicleFeatures . . . . . . . . . . . . . . . . . . . 1-18
Engine Oil Life System . . . . . . 1-19Car Wash Guidelines . . . . . . . . 1-19Driving for Better FuelEconomy . . . . . . . . . . . . . . . . . . . 1-19
Black plate (2,1)Chevrolet Corvette Owner Manual (GMNA-Localizing-Europe-8087687) -2015 - CRC - 9/16/14
1-2 In Brief
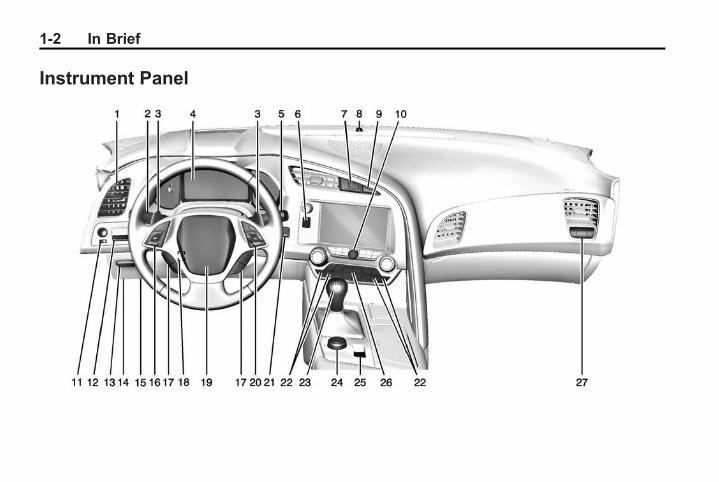
Instrument Panel
Black plate (3,1)Chevrolet Corvette Owner Manual (GMNA-Localizing-Europe-8087687) -2015 - CRC - 9/16/14
In Brief 1-3
1. Air Vents on page 8-4.
2. Indicator Lever. See Indicatorand Lane-Change Signals onpage 6-5.
Exterior Lamp Controls onpage 6-1.
3. Active Rev Match Paddles (IfEquipped). See Active RevMatch on page 9-22.
4. Instrument Cluster on page 5-8.
5. Windscreen Wiper/Washer onpage 5-3.
6. Instrument Panel StorageButton. See Instrument PanelStorage on page 4-1.
7. Passenger Airbag StatusIndicator. See PassengerSensing System on page 3-20.
8. Light Sensor. See AutomaticHeadlamp System on page 6-3.
9. Hazard Warning Flashers onpage 6-5.
10. Infotainment on page 7-1.
11. Power Mirrors on page 2-17.
12. Head-Up Display Controls (IfEquipped). See Head-UpDisplay (HUD) on page 5-27.
13. Hatch/Boot Release Button.See Hatch (Boot) onpage 2-11.
Intrusion and InclinationSensors Disable Switch. SeeVehicle Alarm System onpage 2-13.
14. Data Link Connector (DLC)(Out of View). See MalfunctionIndicator Lamp on page 5-16.
15. Bonnet Release (Out of View).See Bonnet on page 10-6.
16. Cruise Control on page 9-36.
17. Steering Wheel Controls onpage 5-2.
18. Steering Wheel Adjustment onpage 5-2.
19. Horn on page 5-2.
20. Bluetooth Controls. SeeSteering Wheel Controls onpage 5-2.
Voice Recognition Controls.See Steering Wheel Controlson page 5-2.
Driver Information Centre (DIC)Controls. See DriverInformation Centre (DIC) onpage 5-25.
21. Keyless Ignition. See IgnitionPositions on page 9-15.
22. Driver and RedundantPassenger Heated andVentilated Seat Controls (IfEquipped). See Heated andVentilated Front Seats onpage 3-7.
23. Shift Lever. See ManualGearbox on page 9-20.
24. Driver Mode Selector. SeeCompetitive Driving Mode onpage 9-32.
Black plate (4,1)Chevrolet Corvette Owner Manual (GMNA-Localizing-Europe-8087687) -2015 - CRC - 9/16/14
1-4 In Brief
25. Electric Handbrake onpage 9-24.
26. Dual Automatic Climate ControlSystem on page 8-1.
27. Passenger TemperatureControls. See Dual AutomaticClimate Control System onpage 8-1.
Passenger Heated andVentilated Seat Controls (IfEquipped). See Heated andVentilated Front Seats onpage 3-7.
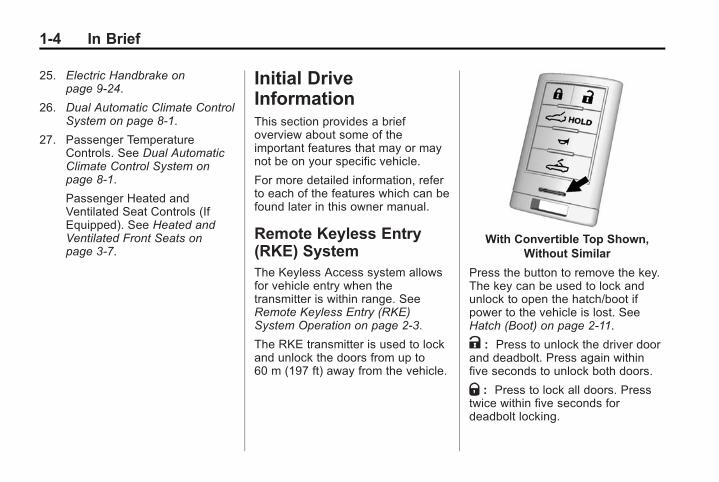
Initial DriveInformationThis section provides a briefoverview about some of theimportant features that may or maynot be on your specific vehicle.
For more detailed information, referto each of the features which can befound later in this owner manual.
Remote Keyless Entry(RKE) SystemThe Keyless Access system allowsfor vehicle entry when thetransmitter is within range. SeeRemote Keyless Entry (RKE)System Operation on page 2-3.
The RKE transmitter is used to lockand unlock the doors from up to60 m (197 ft) away from the vehicle.
With Convertible Top Shown,Without Similar
Press the button to remove the key.The key can be used to lock andunlock to open the hatch/boot ifpower to the vehicle is lost. SeeHatch (Boot) on page 2-11.
K : Press to unlock the driver doorand deadbolt. Press again withinfive seconds to unlock both doors.
Q : Press to lock all doors. Presstwice within five seconds fordeadbolt locking.
Black plate (5,1)Chevrolet Corvette Owner Manual (GMNA-Localizing-Europe-8087687) -2015 - CRC - 9/16/14
In Brief 1-5
s : Press and hold to releasethe hatch/boot.
M : If equipped, press andrelease K and then immediately
press and holdM continuously toopen the convertible top all the way.Release the button to stopmovement. This button will onlyopen the convertible top.
See Convertible Top on page 2-25.
L : Press and release once toinitiate vehicle locater. Press andhold for three seconds to sound thepanic alarm. Press again or start thevehicle to stop panic alarm.
See Keys on page 2-1 and RemoteKeyless Entry (RKE) SystemOperation on page 2-3.
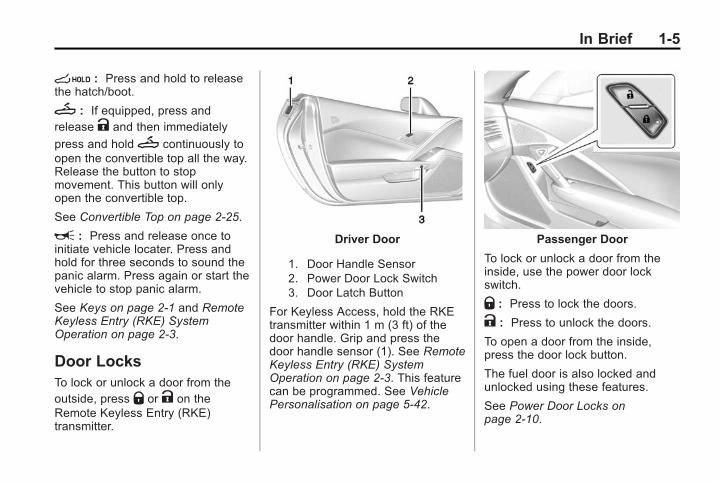
Door LocksTo lock or unlock a door from theoutside, press Q or K on theRemote Keyless Entry (RKE)transmitter.
Driver Door
1. Door Handle Sensor2. Power Door Lock Switch3. Door Latch Button
For Keyless Access, hold the RKEtransmitter within 1 m (3 ft) of thedoor handle. Grip and press thedoor handle sensor (1). See RemoteKeyless Entry (RKE) SystemOperation on page 2-3. This featurecan be programmed. See VehiclePersonalisation on page 5-42.
Passenger Door
To lock or unlock a door from theinside, use the power door lockswitch.
Q : Press to lock the doors.
K : Press to unlock the doors.
To open a door from the inside,press the door lock button.
The fuel door is also locked andunlocked using these features.
See Power Door Locks onpage 2-10.
Black plate (6,1)Chevrolet Corvette Owner Manual (GMNA-Localizing-Europe-8087687) -2015 - CRC - 9/16/14
1-6 In Brief
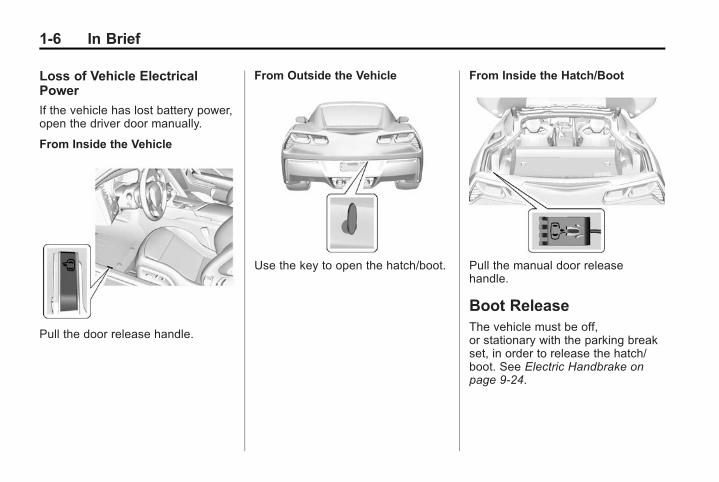
Loss of Vehicle ElectricalPower
If the vehicle has lost battery power,open the driver door manually.
From Inside the Vehicle
Pull the door release handle.
From Outside the Vehicle
Use the key to open the hatch/boot.
From Inside the Hatch/Boot
Pull the manual door releasehandle.
Boot ReleaseThe vehicle must be off,or stationary with the parking breakset, in order to release the hatch/boot. See Electric Handbrake onpage 9-24.
Black plate (7,1)Chevrolet Corvette Owner Manual (GMNA-Localizing-Europe-8087687) -2015 - CRC - 9/16/14
In Brief 1-7
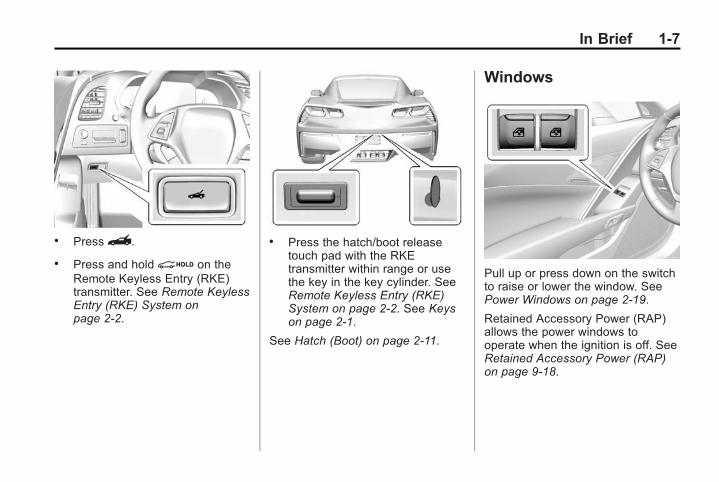
. Press}.
. Press and holdi on theRemote Keyless Entry (RKE)transmitter. See Remote KeylessEntry (RKE) System onpage 2-2.
. Press the hatch/boot releasetouch pad with the RKEtransmitter within range or usethe key in the key cylinder. SeeRemote Keyless Entry (RKE)System on page 2-2. See Keyson page 2-1.
See Hatch (Boot) on page 2-11.
Windows
Pull up or press down on the switchto raise or lower the window. SeePower Windows on page 2-19.
Retained Accessory Power (RAP)allows the power windows tooperate when the ignition is off. SeeRetained Accessory Power (RAP)on page 9-18.
Black plate (8,1)Chevrolet Corvette Owner Manual (GMNA-Localizing-Europe-8087687) -2015 - CRC - 9/16/14
1-8 In Brief
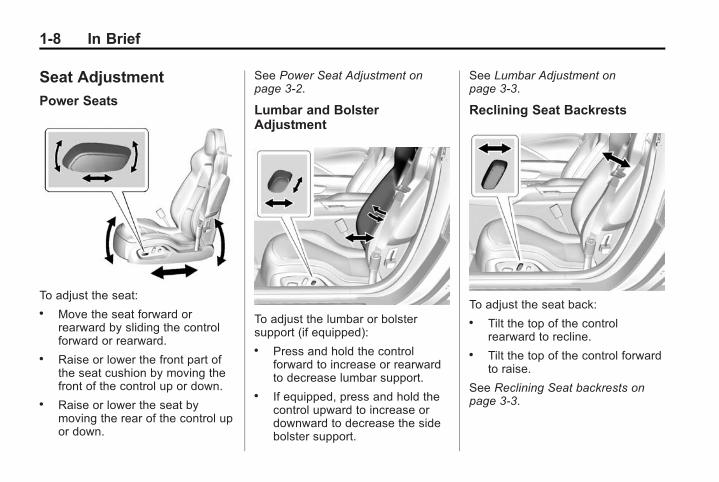
Seat Adjustment
Power Seats
To adjust the seat:. Move the seat forward or
rearward by sliding the controlforward or rearward.
. Raise or lower the front part ofthe seat cushion by moving thefront of the control up or down.
. Raise or lower the seat bymoving the rear of the control upor down.
See Power Seat Adjustment onpage 3-2.
Lumbar and BolsterAdjustment
To adjust the lumbar or bolstersupport (if equipped):. Press and hold the control
forward to increase or rearwardto decrease lumbar support.
. If equipped, press and hold thecontrol upward to increase ordownward to decrease the sidebolster support.
See Lumbar Adjustment onpage 3-3.
Reclining Seat Backrests
To adjust the seat back:. Tilt the top of the control
rearward to recline.. Tilt the top of the control forward
to raise.
See Reclining Seat backrests onpage 3-3.
Black plate (9,1)Chevrolet Corvette Owner Manual (GMNA-Localizing-Europe-8087687) -2015 - CRC - 9/16/14
In Brief 1-9
Memory Features
If equipped, the "1," "2," SET, and S(Exit) buttons on the driver door areused to manually save and recallmemory settings for the driver seat,outside mirrors, and power tilt andtelescoping steering column.
See Memory Seats on page 3-4 andVehicle Personalisation onpage 5-42.
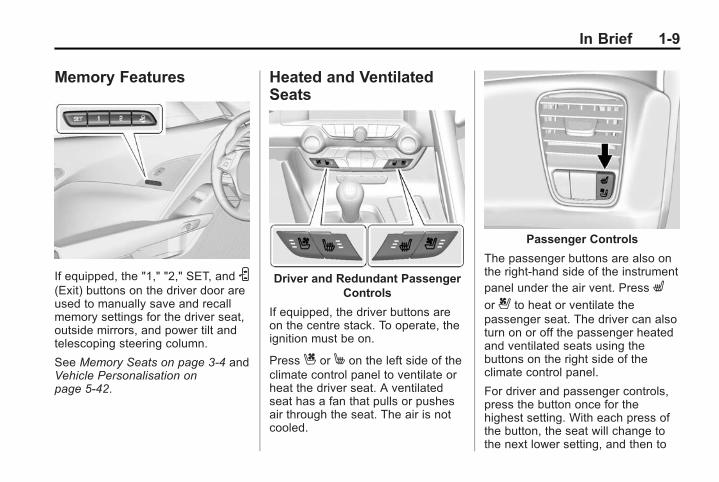
Heated and VentilatedSeats
Driver and Redundant PassengerControls
If equipped, the driver buttons areon the centre stack. To operate, theignition must be on.
Press C or M on the left side of theclimate control panel to ventilate orheat the driver seat. A ventilatedseat has a fan that pulls or pushesair through the seat. The air is notcooled.
Passenger Controls
The passenger buttons are also onthe right-hand side of the instrumentpanel under the air vent. Press L
or { to heat or ventilate thepassenger seat. The driver can alsoturn on or off the passenger heatedand ventilated seats using thebuttons on the right side of theclimate control panel.
For driver and passenger controls,press the button once for thehighest setting. With each press ofthe button, the seat will change tothe next lower setting, and then to
Black plate (10,1)Chevrolet Corvette Owner Manual (GMNA-Localizing-Europe-8087687) -2015 - CRC - 9/16/14
1-10 In Brief
the off setting. The indicator lightsshow three for the highest settingand one for the lowest. If the heatedseats are on high, the level mayautomatically be lowered afterapproximately 30 minutes.
See Heated and Ventilated FrontSeats on page 3-7.
Safety Belts
Refer to the following sections forimportant information on how to usesafety belts properly:. Safety Belts on page 3-8.
. How to Wear Safety BeltsProperly on page 3-9.
. Lap-Shoulder Belt on page 3-10.
. ISOFIX Child Restraint Systemson page 3-36
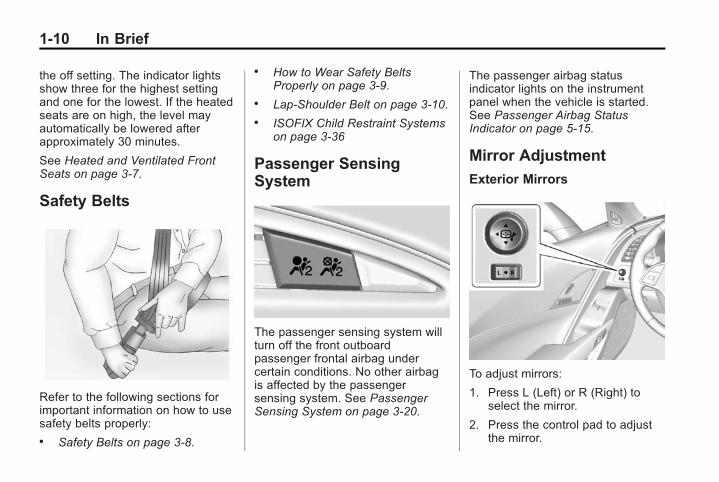
Passenger SensingSystem
The passenger sensing system willturn off the front outboardpassenger frontal airbag undercertain conditions. No other airbagis affected by the passengersensing system. See PassengerSensing System on page 3-20.
The passenger airbag statusindicator lights on the instrumentpanel when the vehicle is started.See Passenger Airbag StatusIndicator on page 5-15.
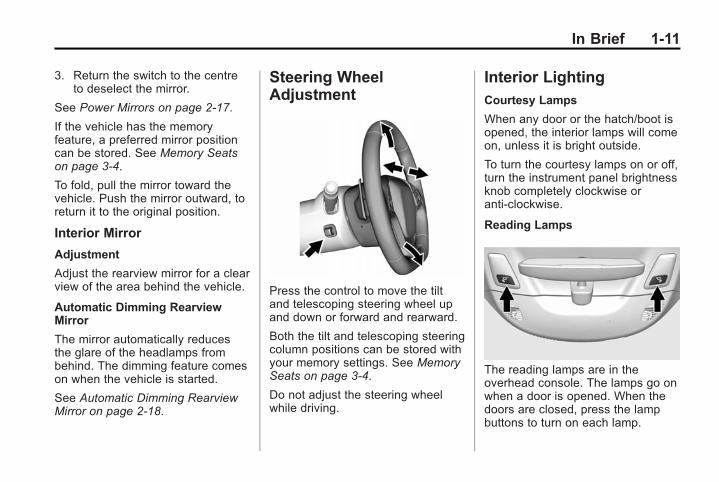
Mirror Adjustment
Exterior Mirrors
To adjust mirrors:
1. Press L (Left) or R (Right) toselect the mirror.
2. Press the control pad to adjustthe mirror.
Black plate (11,1)Chevrolet Corvette Owner Manual (GMNA-Localizing-Europe-8087687) -2015 - CRC - 9/16/14
In Brief 1-11
3. Return the switch to the centreto deselect the mirror.
See Power Mirrors on page 2-17.
If the vehicle has the memoryfeature, a preferred mirror positioncan be stored. See Memory Seatson page 3-4.
To fold, pull the mirror toward thevehicle. Push the mirror outward, toreturn it to the original position.
Interior Mirror
Adjustment
Adjust the rearview mirror for a clearview of the area behind the vehicle.
Automatic Dimming RearviewMirror
The mirror automatically reducesthe glare of the headlamps frombehind. The dimming feature comeson when the vehicle is started.
See Automatic Dimming RearviewMirror on page 2-18.
Steering WheelAdjustment
Press the control to move the tiltand telescoping steering wheel upand down or forward and rearward.
Both the tilt and telescoping steeringcolumn positions can be stored withyour memory settings. See MemorySeats on page 3-4.
Do not adjust the steering wheelwhile driving.
Interior LightingCourtesy Lamps
When any door or the hatch/boot isopened, the interior lamps will comeon, unless it is bright outside.
To turn the courtesy lamps on or off,turn the instrument panel brightnessknob completely clockwise oranti-clockwise.
Reading Lamps
The reading lamps are in theoverhead console. The lamps go onwhen a door is opened. When thedoors are closed, press the lampbuttons to turn on each lamp.
Black plate (12,1)Chevrolet Corvette Owner Manual (GMNA-Localizing-Europe-8087687) -2015 - CRC - 9/16/14
1-12 In Brief
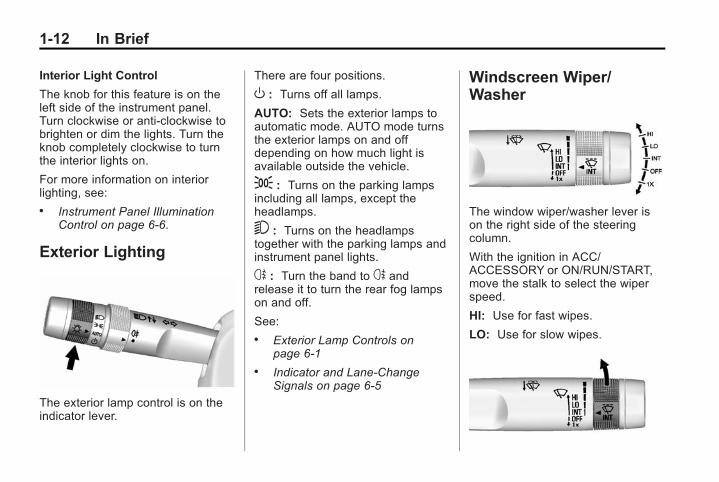
Interior Light Control
The knob for this feature is on theleft side of the instrument panel.Turn clockwise or anti-clockwise tobrighten or dim the lights. Turn theknob completely clockwise to turnthe interior lights on.
For more information on interiorlighting, see:. Instrument Panel Illumination
Control on page 6-6.
Exterior Lighting
The exterior lamp control is on theindicator lever.
There are four positions.
O : Turns off all lamps.
AUTO: Sets the exterior lamps toautomatic mode. AUTO mode turnsthe exterior lamps on and offdepending on how much light isavailable outside the vehicle.
; : Turns on the parking lampsincluding all lamps, except theheadlamps.
5 : Turns on the headlampstogether with the parking lamps andinstrument panel lights.
s : Turn the band to s andrelease it to turn the rear fog lampson and off.
See:. Exterior Lamp Controls on
page 6-1. Indicator and Lane-Change
Signals on page 6-5
Windscreen Wiper/Washer
The window wiper/washer lever ison the right side of the steeringcolumn.
With the ignition in ACC/ACCESSORY or ON/RUN/START,move the stalk to select the wiperspeed.
HI: Use for fast wipes.
LO: Use for slow wipes.
Black plate (13,1)Chevrolet Corvette Owner Manual (GMNA-Localizing-Europe-8087687) -2015 - CRC - 9/16/14
In Brief 1-13
INT: Move the lever up to INT forintermittent wipes, then turnthex INT band up for morefrequent wipes or down for lessfrequent wipes.
OFF: Use to turn the wipers off.
1X : For a single wipe, briefly movethe stalk down. For several wipes,hold the stalk down.
nL : Pull the stalk toward you tospray windscreen washer fluid andactivate the wipers.
See Windscreen Wiper/Washer onpage 5-3.
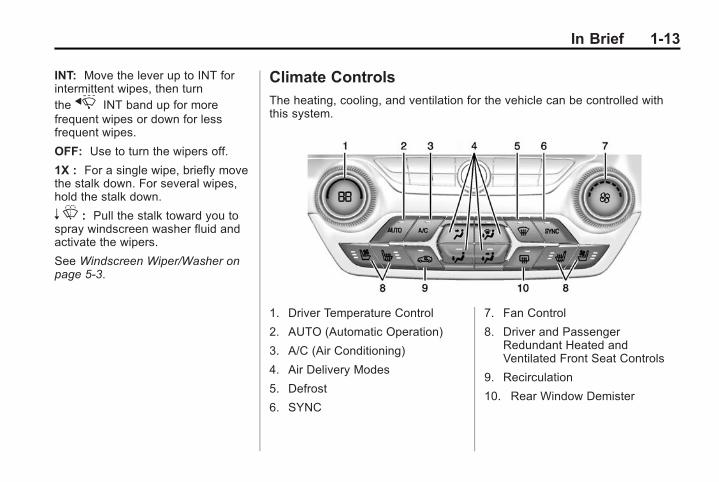
Climate ControlsThe heating, cooling, and ventilation for the vehicle can be controlled withthis system.
1. Driver Temperature Control
2. AUTO (Automatic Operation)
3. A/C (Air Conditioning)
4. Air Delivery Modes
5. Defrost
6. SYNC
7. Fan Control
8. Driver and PassengerRedundant Heated andVentilated Front Seat Controls
9. Recirculation
10. Rear Window Demister
Black plate (14,1)Chevrolet Corvette Owner Manual (GMNA-Localizing-Europe-8087687) -2015 - CRC - 9/16/14
1-14 In Brief
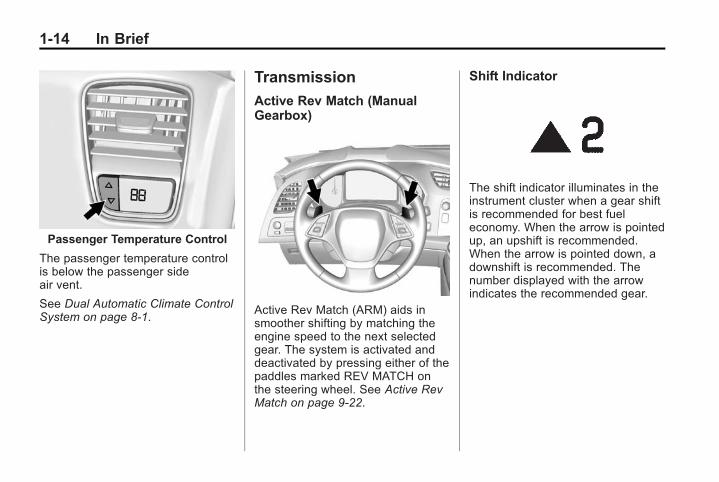
Passenger Temperature Control
The passenger temperature controlis below the passenger sideair vent.
See Dual Automatic Climate ControlSystem on page 8-1.
Transmission
Active Rev Match (ManualGearbox)
Active Rev Match (ARM) aids insmoother shifting by matching theengine speed to the next selectedgear. The system is activated anddeactivated by pressing either of thepaddles marked REV MATCH onthe steering wheel. See Active RevMatch on page 9-22.
Shift Indicator
The shift indicator illuminates in theinstrument cluster when a gear shiftis recommended for best fueleconomy. When the arrow is pointedup, an upshift is recommended.When the arrow is pointed down, adownshift is recommended. Thenumber displayed with the arrowindicates the recommended gear.
Black plate (15,1)Chevrolet Corvette Owner Manual (GMNA-Localizing-Europe-8087687) -2015 - CRC - 9/16/14
In Brief 1-15
Vehicle Features
Infotainment SystemSee the infotainment manual forinformation on the radio, audioplayers, phone, and navigationsystem. It also includes informationon settings.
Steering Wheel ControlsThe infotainment system can beoperated by using the steeringwheel controls. See "SteeringWheel Controls" in the infotainmentmanual.
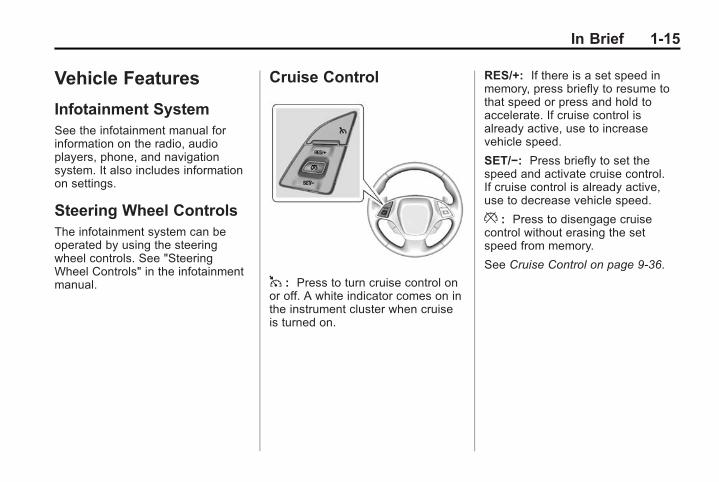
Cruise Control
1 : Press to turn cruise control onor off. A white indicator comes on inthe instrument cluster when cruiseis turned on.
RES/+: If there is a set speed inmemory, press briefly to resume tothat speed or press and hold toaccelerate. If cruise control isalready active, use to increasevehicle speed.
SET/−: Press briefly to set thespeed and activate cruise control.If cruise control is already active,use to decrease vehicle speed.
* : Press to disengage cruisecontrol without erasing the setspeed from memory.
See Cruise Control on page 9-36.
Black plate (16,1)Chevrolet Corvette Owner Manual (GMNA-Localizing-Europe-8087687) -2015 - CRC - 9/16/14
1-16 In Brief
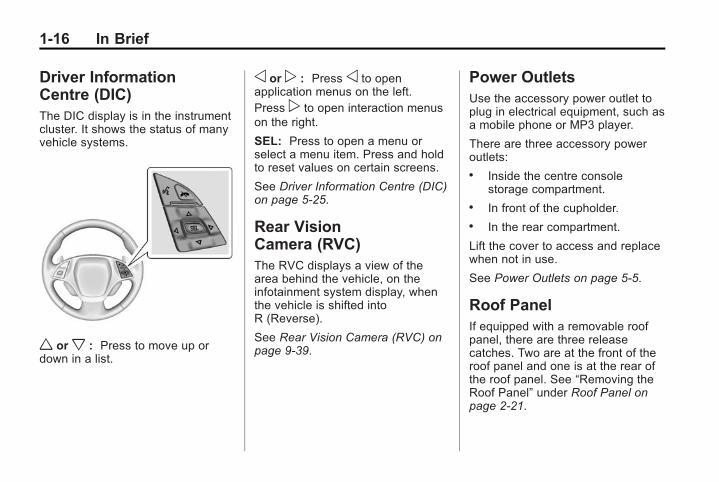
Driver InformationCentre (DIC)The DIC display is in the instrumentcluster. It shows the status of manyvehicle systems.
w orx : Press to move up ordown in a list.
o or p : Press o to openapplication menus on the left.Press p to open interaction menuson the right.
SEL: Press to open a menu orselect a menu item. Press and holdto reset values on certain screens.
See Driver Information Centre (DIC)on page 5-25.
Rear VisionCamera (RVC)The RVC displays a view of thearea behind the vehicle, on theinfotainment system display, whenthe vehicle is shifted intoR (Reverse).
See Rear Vision Camera (RVC) onpage 9-39.
Power OutletsUse the accessory power outlet toplug in electrical equipment, such asa mobile phone or MP3 player.
There are three accessory poweroutlets:. Inside the centre console
storage compartment.. In front of the cupholder.. In the rear compartment.
Lift the cover to access and replacewhen not in use.
See Power Outlets on page 5-5.
Roof PanelIf equipped with a removable roofpanel, there are three releasecatches. Two are at the front of theroof panel and one is at the rear ofthe roof panel. See “Removing theRoof Panel” under Roof Panel onpage 2-21.

Black plate (17,1)Chevrolet Corvette Owner Manual (GMNA-Localizing-Europe-8087687) -2015 - CRC - 9/16/14
In Brief 1-17
Help may be needed to remove theroof panel. Always store the roofpanel properly in the rear storagecompartment.
For more information:. See “Storing the Roof Panel”
under Roof Panel on page 2-21.. See “Installing the Roof Panel”
under Roof Panel on page 2-21.
ConvertibleIf equipped, the convertible top canbe automatically opened andclosed. For step-by-stepinstructions, see Convertible Top onpage 2-25.
Performance andMaintenance
Traction Control/Electronic StabilityControlThe traction control system limitswheel spin. The system turns onautomatically every time the vehicleis started.
StabiliTrak is a computer controlledsystem that helps the drivermaintain directional control of thevehicle in difficult driving conditions.This is accomplished by selectivelyapplying any one of the vehicle'sbrakes. The system turns onautomatically every time the vehicleis started.. To turn off traction control,
press and release the TCS/StabiliTrak g button on the
centre console. i illuminates inthe instrument cluster.
. To turn off both traction controland StabiliTrak, press and holdthe TCS/StabiliTrak g button,
until the Traction Off Light iand the StabiliTrak OFF Light gilluminate in the instrumentcluster.
. Press and release the TCS/StabiliTrak g button again toturn on both systems.
See Traction Control/ElectronicStability Control on page 9-26.
The vehicle has Driver ModeControl and may have CompetitiveDriving Mode. See Driver ModeControl on page 9-29 andCompetitive Driving Mode onpage 9-32.
Black plate (18,1)Chevrolet Corvette Owner Manual (GMNA-Localizing-Europe-8087687) -2015 - CRC - 9/16/14
1-18 In Brief
Tyre Pressure MonitorThis vehicle may have a TyrePressure Monitor System (TPMS).
The low tyre pressure warning lightalerts to a significant loss inpressure of one of the vehicle'styres. If the warning light comes on,stop as soon as possible and inflatethe tyres to the recommendedpressure shown on the Tyre andLoading Information label. SeeVehicle Load Limits on page 9-12.The warning light will remain on untilthe tyre pressure is corrected.
The low tyre pressure warning lightmay come on in cool weather whenthe vehicle is first started, and thenturn off as the vehicle is driven. Thismay be an early indicator that the
tyre pressures are getting low andthe tyres need to be inflated to theproper pressure.
The TPMS does not replace normalmonthly tyre maintenance. Maintainthe correct tyre pressures.
See Tyre Pressure Monitor Systemon page 10-50.
Performance VehicleFeaturesChecking Engine Oil
Your vehicle may have a highperformance dry sump lubricationsystem. This system operatesdifferently than a standard enginelubrication system. See Engine Oilon page 10-10.
Check the oil level only after theengine has been thoroughly warmedup and then check between five and10 minutes of shutoff. This ensuresthat the oil level reading obtainedwill be accurate.
Brake Noise
Under certain weather or operatingconditions, occasional brake squealmay be heard with the vehicle'sperformance braking system. Thisbrake system is designed forsuperior fade resistance andconsistent operation using highperformance brake pads. Brakesqueal is normal and does not affectsystem performance.
Tyre Chatter/Hop
When driving at slow speeds and invery tight turns, the vehicle mayhave tyre chatter/hop. This conditionis normal and the vehicle does notrequire service.
Road Imperfections/Crown Effects
The vehicle's precise steering andhandling make it very responsive toroad surface feedback. A slight pullmay be felt in the steeringdepending on the crown of the roadand/or other road surface variations
Black plate (19,1)Chevrolet Corvette Owner Manual (GMNA-Localizing-Europe-8087687) -2015 - CRC - 9/16/14
In Brief 1-19
such as troughs or ruts. This isnormal and the vehicle does notrequire service.
Engine Oil Life SystemThe engine oil life system calculatesengine oil life based on vehicle useand displays CHANGE ENGINE OILSOON message when it is time tochange the engine oil and filter. Theoil life system should be reset to100% only following an oil change.
Resetting the Oil Life System
After you change the oil, the oil lifesystem will need to be reset. Seeyour dealer for service.
See Engine Oil Life System onpage 10-16.
Car Wash Guidelines
{ Caution
Some automatic car washes cancause damage to the vehicle,wheels, or convertible top,if equipped. Automatic carwashes are not recommended,due to lack of clearance for theundercarriage and/or wide reartyres and wheels. See "Washingthe Vehicle" under Exterior Careon page 10-74
Driving for Better FuelEconomyDriving habits can affect fuelmileage. Here are some driving tipsto get the best fuel economypossible.. Avoid fast starts and accelerate
smoothly.. Brake gradually and avoid
abrupt stops.. Avoid idling the engine for long
periods of time.. When road and weather
conditions are appropriate, usecruise control.
. Always follow posted speedlimits or drive more slowly whenconditions require.
Black plate (20,1)Chevrolet Corvette Owner Manual (GMNA-Localizing-Europe-8087687) -2015 - CRC - 9/16/14
1-20 In Brief
. Keep vehicle tyres properlyinflated.
. Combine several trips into asingle trip.
. Replace the vehicle's tyres withthe same TPC Spec numbermoulded into the tyre's sidewallnear the size.
. Follow recommended scheduledmaintenance.
. Select Eco mode for improvedfuel economy. This will result inbetter Active Fuel Management(AFM) operation. See ActiveFuel Management® onpage 9-19.
. For recommended shift speeds,see Manual Gearbox onpage 9-20.
Premium Fuel
Premium fuel is recommended. SeeFuel on page 9-41.
Black plate (1,1)Chevrolet Corvette Owner Manual (GMNA-Localizing-Europe-8087687) -2015 - CRC - 9/16/14
Keys, Doors, and Windows 2-1
Keys, Doors, andWindows
Keys and LocksKeys . . . . . . . . . . . . . . . . . . . . . . . . . . 2-1Remote Keyless Entry (RKE)System . . . . . . . . . . . . . . . . . . . . . . 2-2
Remote Keyless Entry (RKE)System Operation . . . . . . . . . . . 2-3
Door Locks . . . . . . . . . . . . . . . . . . . 2-8Power Door Locks . . . . . . . . . . . 2-10Delayed Locking . . . . . . . . . . . . . 2-10Automatic Door Locks . . . . . . . 2-10Lockout Protection . . . . . . . . . . . 2-11
DoorsHatch (Boot) . . . . . . . . . . . . . . . . . 2-11
Vehicle SecurityVehicle Security . . . . . . . . . . . . . . 2-13Vehicle Alarm System . . . . . . . 2-13Anti-theft Locking System . . . . 2-15Immobiliser . . . . . . . . . . . . . . . . . . 2-16Immobiliser Operation . . . . . . . 2-16
Exterior MirrorsConvex Mirrors . . . . . . . . . . . . . . 2-17Power Mirrors . . . . . . . . . . . . . . . . 2-17Folding Mirrors . . . . . . . . . . . . . . . 2-18Heated Mirrors . . . . . . . . . . . . . . . 2-18Automatic Dimming Mirror . . . 2-18Reverse Tilt Mirrors . . . . . . . . . . 2-18
Interior MirrorsInterior Rearview Mirrors . . . . . 2-18Automatic Dimming RearviewMirror . . . . . . . . . . . . . . . . . . . . . . . 2-18
WindowsWindows . . . . . . . . . . . . . . . . . . . . . 2-19Power Windows . . . . . . . . . . . . . 2-19Sun Visors . . . . . . . . . . . . . . . . . . . 2-21
RoofRoof Panel . . . . . . . . . . . . . . . . . . 2-21Convertible Top . . . . . . . . . . . . . . 2-25
Keys and Locks
Keys
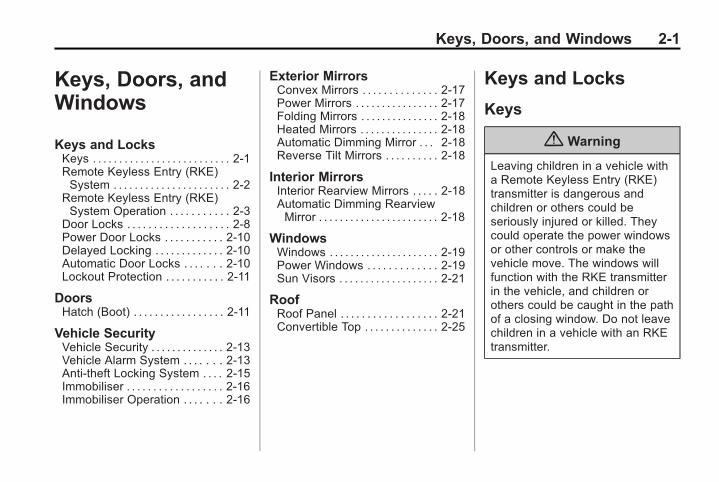
{ Warning
Leaving children in a vehicle witha Remote Keyless Entry (RKE)transmitter is dangerous andchildren or others could beseriously injured or killed. Theycould operate the power windowsor other controls or make thevehicle move. The windows willfunction with the RKE transmitterin the vehicle, and children orothers could be caught in the pathof a closing window. Do not leavechildren in a vehicle with an RKEtransmitter.
Black plate (2,1)Chevrolet Corvette Owner Manual (GMNA-Localizing-Europe-8087687) -2015 - CRC - 9/16/14
2-2 Keys, Doors, and Windows
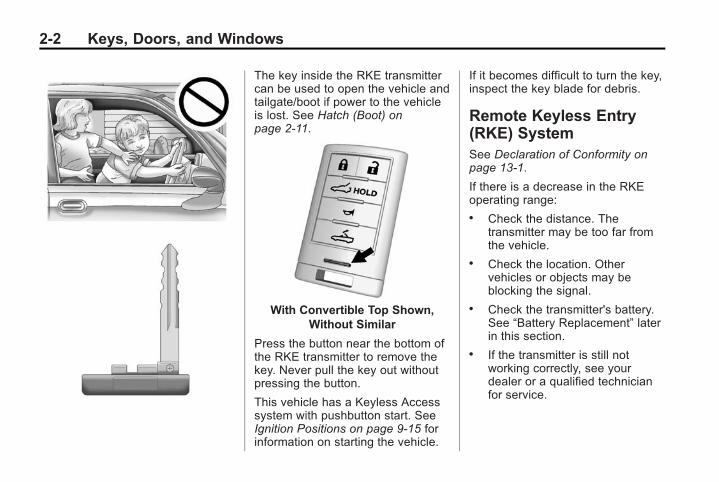
The key inside the RKE transmittercan be used to open the vehicle andtailgate/boot if power to the vehicleis lost. See Hatch (Boot) onpage 2-11.
With Convertible Top Shown,Without Similar
Press the button near the bottom ofthe RKE transmitter to remove thekey. Never pull the key out withoutpressing the button.
This vehicle has a Keyless Accesssystem with pushbutton start. SeeIgnition Positions on page 9-15 forinformation on starting the vehicle.
If it becomes difficult to turn the key,inspect the key blade for debris.
Remote Keyless Entry(RKE) SystemSee Declaration of Conformity onpage 13-1.
If there is a decrease in the RKEoperating range:. Check the distance. The
transmitter may be too far fromthe vehicle.
. Check the location. Othervehicles or objects may beblocking the signal.
. Check the transmitter's battery.See “Battery Replacement” laterin this section.
. If the transmitter is still notworking correctly, see yourdealer or a qualified technicianfor service.
Black plate (3,1)Chevrolet Corvette Owner Manual (GMNA-Localizing-Europe-8087687) -2015 - CRC - 9/16/14
Keys, Doors, and Windows 2-3
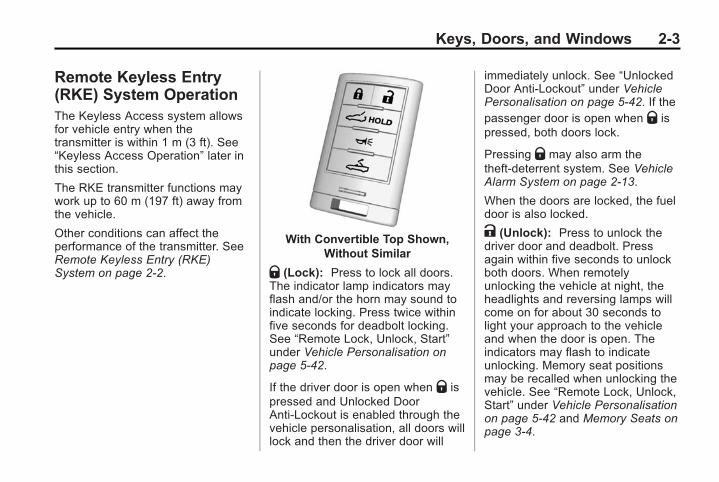
Remote Keyless Entry(RKE) System OperationThe Keyless Access system allowsfor vehicle entry when thetransmitter is within 1 m (3 ft). See“Keyless Access Operation” later inthis section.
The RKE transmitter functions maywork up to 60 m (197 ft) away fromthe vehicle.
Other conditions can affect theperformance of the transmitter. SeeRemote Keyless Entry (RKE)System on page 2-2.
With Convertible Top Shown,Without Similar
Q (Lock): Press to lock all doors.The indicator lamp indicators mayflash and/or the horn may sound toindicate locking. Press twice withinfive seconds for deadbolt locking.See “Remote Lock, Unlock, Start”under Vehicle Personalisation onpage 5-42.
If the driver door is open when Q ispressed and Unlocked DoorAnti-Lockout is enabled through thevehicle personalisation, all doors willlock and then the driver door will
immediately unlock. See “UnlockedDoor Anti-Lockout” under VehiclePersonalisation on page 5-42. If thepassenger door is open when Q ispressed, both doors lock.
Pressing Q may also arm thetheft-deterrent system. See VehicleAlarm System on page 2-13.
When the doors are locked, the fueldoor is also locked.
K (Unlock): Press to unlock thedriver door and deadbolt. Pressagain within five seconds to unlockboth doors. When remotelyunlocking the vehicle at night, theheadlights and reversing lamps willcome on for about 30 seconds tolight your approach to the vehicleand when the door is open. Theindicators may flash to indicateunlocking. Memory seat positionsmay be recalled when unlocking thevehicle. See “Remote Lock, Unlock,Start” under Vehicle Personalisationon page 5-42 and Memory Seats onpage 3-4.
Black plate (4,1)Chevrolet Corvette Owner Manual (GMNA-Localizing-Europe-8087687) -2015 - CRC - 9/16/14
2-4 Keys, Doors, and Windows
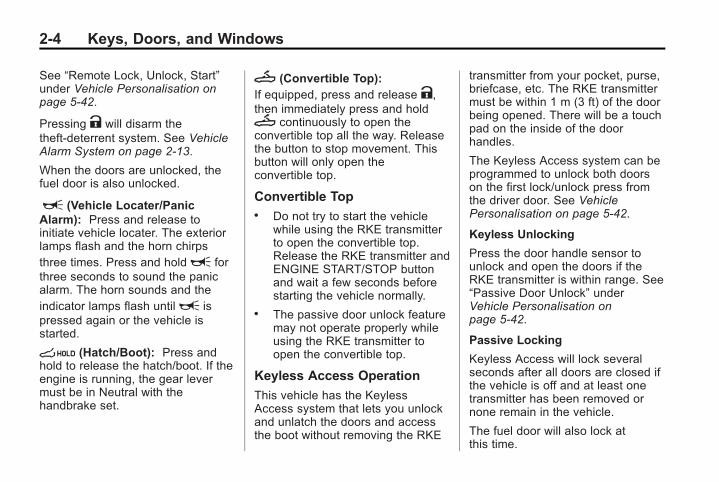
See “Remote Lock, Unlock, Start”under Vehicle Personalisation onpage 5-42.
Pressing K will disarm thetheft-deterrent system. See VehicleAlarm System on page 2-13.
When the doors are unlocked, thefuel door is also unlocked.
L (Vehicle Locater/PanicAlarm): Press and release toinitiate vehicle locater. The exteriorlamps flash and the horn chirpsthree times. Press and holdL forthree seconds to sound the panicalarm. The horn sounds and theindicator lamps flash untilL ispressed again or the vehicle isstarted.
s (Hatch/Boot): Press andhold to release the hatch/boot. If theengine is running, the gear levermust be in Neutral with thehandbrake set.
M (Convertible Top):If equipped, press and release K,then immediately press and holdM continuously to open theconvertible top all the way. Releasethe button to stop movement. Thisbutton will only open theconvertible top.
Convertible Top. Do not try to start the vehicle
while using the RKE transmitterto open the convertible top.Release the RKE transmitter andENGINE START/STOP buttonand wait a few seconds beforestarting the vehicle normally.
. The passive door unlock featuremay not operate properly whileusing the RKE transmitter toopen the convertible top.
Keyless Access Operation
This vehicle has the KeylessAccess system that lets you unlockand unlatch the doors and accessthe boot without removing the RKE
transmitter from your pocket, purse,briefcase, etc. The RKE transmittermust be within 1 m (3 ft) of the doorbeing opened. There will be a touchpad on the inside of the doorhandles.
The Keyless Access system can beprogrammed to unlock both doorson the first lock/unlock press fromthe driver door. See VehiclePersonalisation on page 5-42.
Keyless Unlocking
Press the door handle sensor tounlock and open the doors if theRKE transmitter is within range. See“Passive Door Unlock” underVehicle Personalisation onpage 5-42.
Passive Locking
Keyless Access will lock severalseconds after all doors are closed ifthe vehicle is off and at least onetransmitter has been removed ornone remain in the vehicle.
The fuel door will also lock atthis time.
Black plate (5,1)Chevrolet Corvette Owner Manual (GMNA-Localizing-Europe-8087687) -2015 - CRC - 9/16/14
Keys, Doors, and Windows 2-5
The indicators may flash and thehorn may chirp to indicate that thevehicle is not deadbolt locked.
If other electronic devices interferewith the RKE transmitter signal, thevehicle may not detect the RKEtransmitter inside the vehicle.If passive locking is enabled, thedoors may lock with the RKEtransmitter inside the vehicle. Donot leave the RKE transmitter in anunattended vehicle.
To customise whether the doorsautomatically lock when exiting thevehicle, see “Passive Door Lock”under Vehicle Personalisation onpage 5-42.
Temporary Disable PassiveLocking Feature
Temporarily disable the passivelocking by pressing and holding Kon the interior door switch with adoor open for at least four seconds,or until three chimes are heard.
Passive locking will then remaindisabled until Q on the interior dooris pressed, or until the vehicle isswitched on.
To customise the doors toautomatically lock when exiting thevehicle, see “Remote Lock, Unlock,Start>” under VehiclePersonalisation on page 5-42.
Remote Left in Vehicle Alert
When the vehicle is turned off and aremote is left in the vehicle, the hornwill chirp three times after bothdoors are closed. To turn on or offsee “Remote Left in Vehicle Alert”under Vehicle Personalisation onpage 5-42.
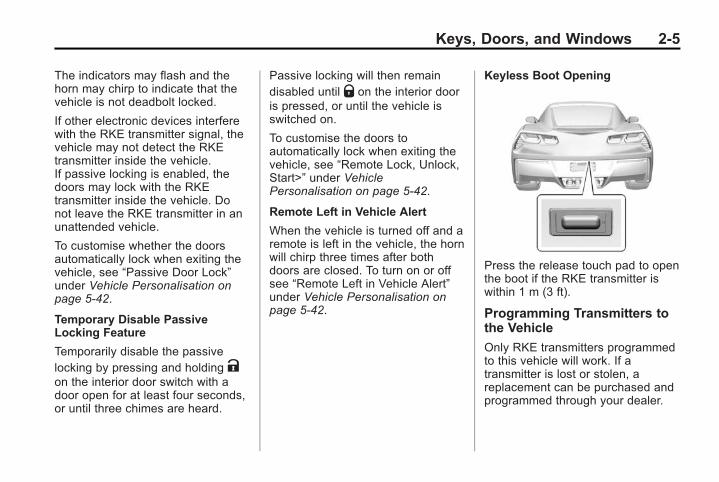
Keyless Boot Opening
Press the release touch pad to openthe boot if the RKE transmitter iswithin 1 m (3 ft).
Programming Transmitters tothe Vehicle
Only RKE transmitters programmedto this vehicle will work. If atransmitter is lost or stolen, areplacement can be purchased andprogrammed through your dealer.
Black plate (6,1)Chevrolet Corvette Owner Manual (GMNA-Localizing-Europe-8087687) -2015 - CRC - 9/16/14
2-6 Keys, Doors, and Windows
When the replacement transmitter isprogrammed to this vehicle allremaining transmitters must also beprogrammed. Any lost or stolentransmitters will no longer workonce the new transmitter isprogrammed. Each vehicle canhave up to eight transmittersprogrammed to it. See your dealerto program transmitters to thisvehicle.
Starting the Vehicle with a LowTransmitter Battery
If the transmitter battery is weak or ifthere is interference with the signal,the DIC may display a NO REMOTEDETECTED or NO REMOTE KEYWAS DETECTED PLACE KEY INTRANSMITTER POCKET THENSTART THE VEHICLE. messagewhen you try to start the vehicle.See Key and Lock Messages onpage 5-36.
{ Caution
When replacing the battery, donot touch any of the circuitry onthe transmitter. Static from yourbody could damage thetransmitter.
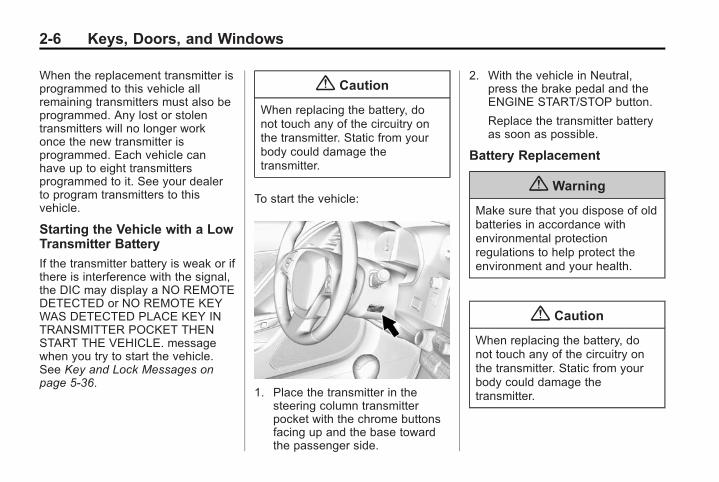
To start the vehicle:
1. Place the transmitter in thesteering column transmitterpocket with the chrome buttonsfacing up and the base towardthe passenger side.
2. With the vehicle in Neutral,press the brake pedal and theENGINE START/STOP button.
Replace the transmitter batteryas soon as possible.
Battery Replacement
{ Warning
Make sure that you dispose of oldbatteries in accordance withenvironmental protectionregulations to help protect theenvironment and your health.
{ Caution
When replacing the battery, donot touch any of the circuitry onthe transmitter. Static from yourbody could damage thetransmitter.
Black plate (7,1)Chevrolet Corvette Owner Manual (GMNA-Localizing-Europe-8087687) -2015 - CRC - 9/16/14
Keys, Doors, and Windows 2-7
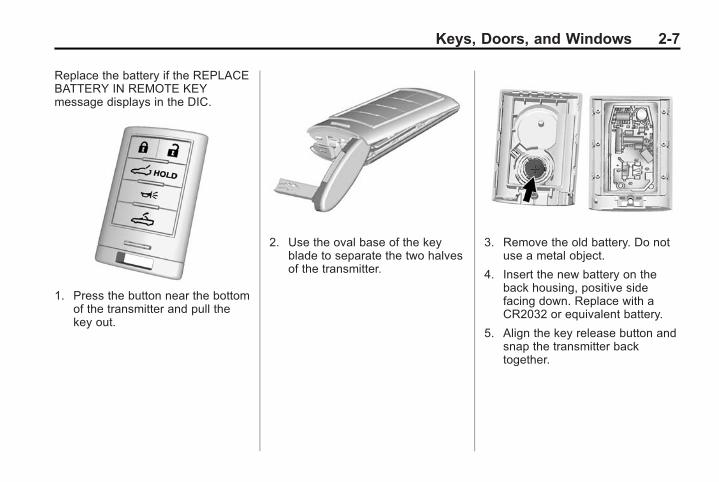
Replace the battery if the REPLACEBATTERY IN REMOTE KEYmessage displays in the DIC.
1. Press the button near the bottomof the transmitter and pull thekey out.
2. Use the oval base of the keyblade to separate the two halvesof the transmitter.
3. Remove the old battery. Do notuse a metal object.
4. Insert the new battery on theback housing, positive sidefacing down. Replace with aCR2032 or equivalent battery.
5. Align the key release button andsnap the transmitter backtogether.
Black plate (8,1)Chevrolet Corvette Owner Manual (GMNA-Localizing-Europe-8087687) -2015 - CRC - 9/16/14
2-8 Keys, Doors, and Windows
Door Locks
{ Warning
Unlocked doors can bedangerous.
. Passengers - especiallychildren - can easily open thedoors and fall out of a movingvehicle. When a door islocked it will not open. Youincrease the chance of beingthrown out of the vehicle in acrash if the doors are notlocked. So, wear seat beltsproperly and lock the doorswhenever you drive.
. Young children who get intounlocked vehicles may beunable to get out. A child canbe overcome by extreme heatand can suffer permanentinjuries or even death fromheat stroke. Always lock yourvehicle whenever youleave it.
(Continued)
Warning (Continued)
. Outsiders can easily enterthrough an unlocked doorwhen you slow down or stopyour vehicle. Locking yourdoors can help prevent thisfrom happening.
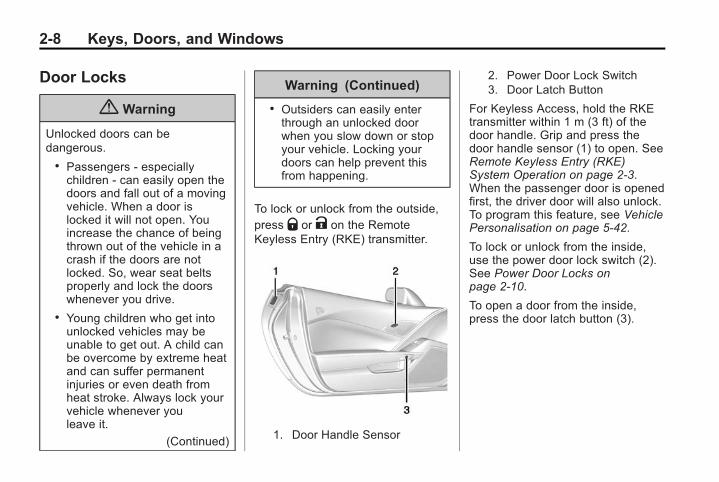
To lock or unlock from the outside,press Q or K on the RemoteKeyless Entry (RKE) transmitter.
1. Door Handle Sensor
2. Power Door Lock Switch3. Door Latch Button
For Keyless Access, hold the RKEtransmitter within 1 m (3 ft) of thedoor handle. Grip and press thedoor handle sensor (1) to open. SeeRemote Keyless Entry (RKE)System Operation on page 2-3.When the passenger door is openedfirst, the driver door will also unlock.To program this feature, see VehiclePersonalisation on page 5-42.
To lock or unlock from the inside,use the power door lock switch (2).See Power Door Locks onpage 2-10.
To open a door from the inside,press the door latch button (3).
Black plate (9,1)Chevrolet Corvette Owner Manual (GMNA-Localizing-Europe-8087687) -2015 - CRC - 9/16/14
Keys, Doors, and Windows 2-9
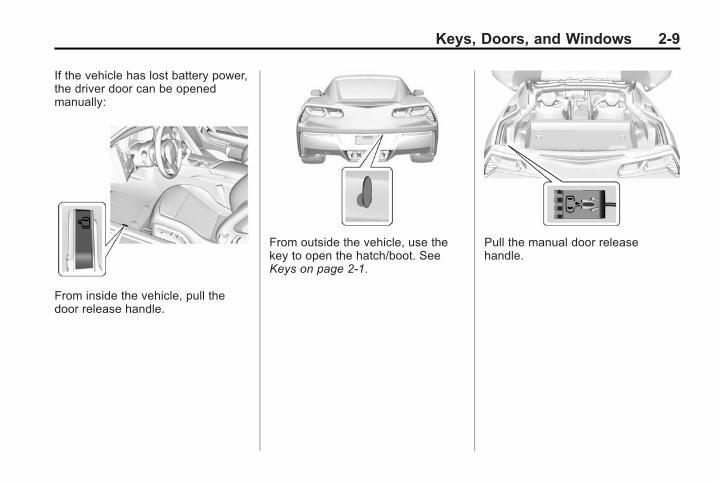
If the vehicle has lost battery power,the driver door can be openedmanually:
From inside the vehicle, pull thedoor release handle.
From outside the vehicle, use thekey to open the hatch/boot. SeeKeys on page 2-1.
Pull the manual door releasehandle.
Black plate (10,1)Chevrolet Corvette Owner Manual (GMNA-Localizing-Europe-8087687) -2015 - CRC - 9/16/14
2-10 Keys, Doors, and Windows
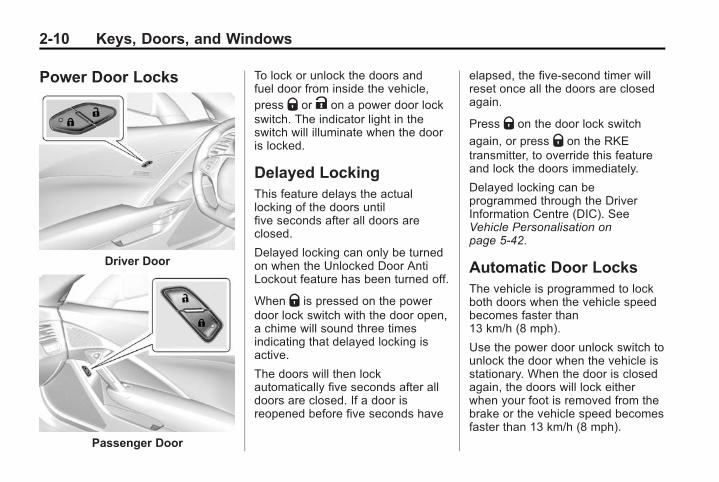
Power Door Locks
Driver Door
Passenger Door
To lock or unlock the doors andfuel door from inside the vehicle,press Q or K on a power door lockswitch. The indicator light in theswitch will illuminate when the dooris locked.
Delayed LockingThis feature delays the actuallocking of the doors untilfive seconds after all doors areclosed.
Delayed locking can only be turnedon when the Unlocked Door AntiLockout feature has been turned off.
When Q is pressed on the powerdoor lock switch with the door open,a chime will sound three timesindicating that delayed locking isactive.
The doors will then lockautomatically five seconds after alldoors are closed. If a door isreopened before five seconds have
elapsed, the five-second timer willreset once all the doors are closedagain.
Press Q on the door lock switch
again, or press Q on the RKEtransmitter, to override this featureand lock the doors immediately.
Delayed locking can beprogrammed through the DriverInformation Centre (DIC). SeeVehicle Personalisation onpage 5-42.
Automatic Door LocksThe vehicle is programmed to lockboth doors when the vehicle speedbecomes faster than13 km/h (8 mph).
Use the power door unlock switch tounlock the door when the vehicle isstationary. When the door is closedagain, the doors will lock eitherwhen your foot is removed from thebrake or the vehicle speed becomesfaster than 13 km/h (8 mph).
Black plate (11,1)Chevrolet Corvette Owner Manual (GMNA-Localizing-Europe-8087687) -2015 - CRC - 9/16/14
Keys, Doors, and Windows 2-11
Automatic Door Locks can beconfigured, see VehiclePersonalisation on page 5-42.
Automatic Door Unlock
The vehicle is programmed tounlock both doors when the ignitionis turned off or is in RetainedAccessory Power (RAP).
Lockout ProtectionIf the vehicle is in ACC/ACCESSORY or ON/RUN/START,and the power door lock switch ispressed with the driver door open,the doors will lock and only thedriver door will unlock.
If the vehicle is off and UnlockedDoor Anti Lockout is turned on, thedriver door is open, and doorlocking is requested using a doorlock switch or the RKE transmitter,both doors will lock and only thedriver door will unlock. TheUnlocked Door Anti Lockout featurecan be turned on or off using thevehicle personalisation menus.
See Vehicle Personalisation onpage 5-42.
Lockout protection can be manuallyoverridden with the driver door openby pressing and holding Q on thepower door lock switch.
Doors
Hatch (Boot)
{ Warning
Exhaust gases can enter thevehicle if it is driven with thetailgate, hatch/boot open, or withany objects that pass through theseal between the body and thehatch/boot or tailgate. Engineexhaust contains carbonmonoxide (CO) which cannot beseen or smelled. It can causeunconsciousness and even death.
If the vehicle must be driven withthe tailgate or hatch/boot open:
. Close all of the windows.
. Fully open the air outlets onor under the instrumentpanel.
(Continued)
Black plate (12,1)Chevrolet Corvette Owner Manual (GMNA-Localizing-Europe-8087687) -2015 - CRC - 9/16/14
2-12 Keys, Doors, and Windows
Warning (Continued)
. Adjust the climate controlsystem to a setting thatbrings in only outside air andset the fan speed to thehighest setting. See “ClimateControl Systems” in theIndex.
. If the vehicle is equipped witha power tailgate, disable thepower tailgate function.
For more information aboutcarbon monoxide, see EngineExhaust on page 9-19.
Hatch/Boot Release
The vehicle must be off,or stationary with the handbrake set.See Electric Handbrake onpage 9-24.
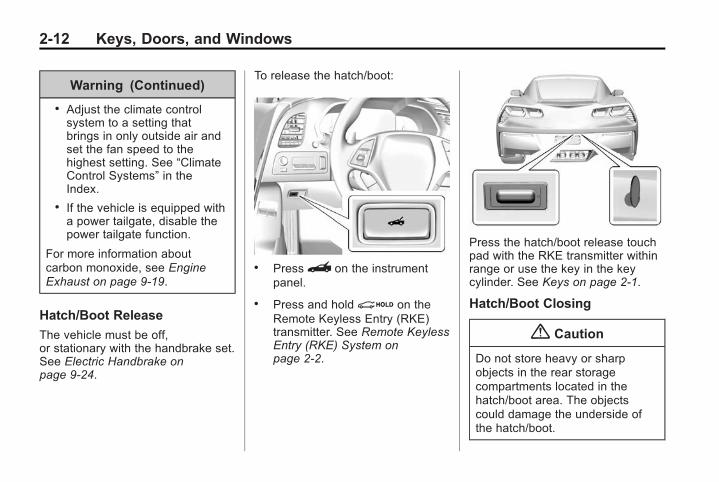
To release the hatch/boot:
. Press} on the instrumentpanel.
. Press and holdi on theRemote Keyless Entry (RKE)transmitter. See Remote KeylessEntry (RKE) System onpage 2-2.
Press the hatch/boot release touchpad with the RKE transmitter withinrange or use the key in the keycylinder. See Keys on page 2-1.
Hatch/Boot Closing
{ Caution
Do not store heavy or sharpobjects in the rear storagecompartments located in thehatch/boot area. The objectscould damage the underside ofthe hatch/boot.
Black plate (13,1)Chevrolet Corvette Owner Manual (GMNA-Localizing-Europe-8087687) -2015 - CRC - 9/16/14
Keys, Doors, and Windows 2-13
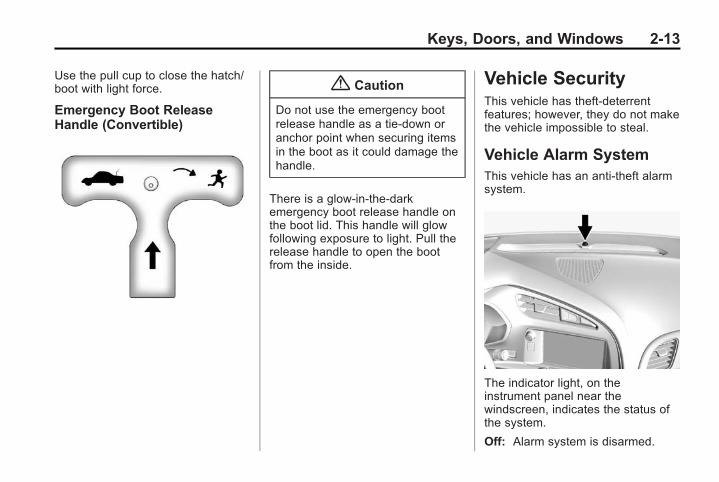
Use the pull cup to close the hatch/boot with light force.
Emergency Boot ReleaseHandle (Convertible)
{ Caution
Do not use the emergency bootrelease handle as a tie-down oranchor point when securing itemsin the boot as it could damage thehandle.
There is a glow-in-the-darkemergency boot release handle onthe boot lid. This handle will glowfollowing exposure to light. Pull therelease handle to open the bootfrom the inside.
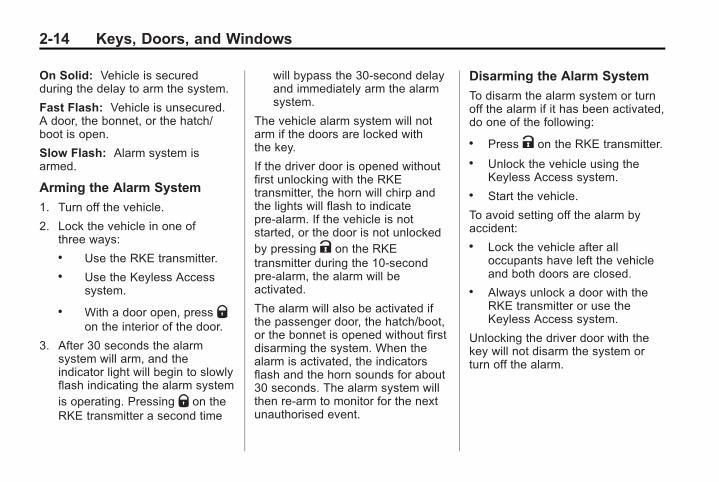
Vehicle SecurityThis vehicle has theft-deterrentfeatures; however, they do not makethe vehicle impossible to steal.
Vehicle Alarm SystemThis vehicle has an anti-theft alarmsystem.
The indicator light, on theinstrument panel near thewindscreen, indicates the status ofthe system.
Off: Alarm system is disarmed.
Black plate (14,1)Chevrolet Corvette Owner Manual (GMNA-Localizing-Europe-8087687) -2015 - CRC - 9/16/14
2-14 Keys, Doors, and Windows
On Solid: Vehicle is securedduring the delay to arm the system.
Fast Flash: Vehicle is unsecured.A door, the bonnet, or the hatch/boot is open.
Slow Flash: Alarm system isarmed.
Arming the Alarm System
1. Turn off the vehicle.
2. Lock the vehicle in one ofthree ways:. Use the RKE transmitter.. Use the Keyless Access
system.
. With a door open, press Qon the interior of the door.
3. After 30 seconds the alarmsystem will arm, and theindicator light will begin to slowlyflash indicating the alarm systemis operating. Pressing Q on theRKE transmitter a second time
will bypass the 30-second delayand immediately arm the alarmsystem.
The vehicle alarm system will notarm if the doors are locked withthe key.
If the driver door is opened withoutfirst unlocking with the RKEtransmitter, the horn will chirp andthe lights will flash to indicatepre-alarm. If the vehicle is notstarted, or the door is not unlockedby pressing K on the RKEtransmitter during the 10-secondpre-alarm, the alarm will beactivated.
The alarm will also be activated ifthe passenger door, the hatch/boot,or the bonnet is opened without firstdisarming the system. When thealarm is activated, the indicatorsflash and the horn sounds for about30 seconds. The alarm system willthen re-arm to monitor for the nextunauthorised event.
Disarming the Alarm System
To disarm the alarm system or turnoff the alarm if it has been activated,do one of the following:
. Press K on the RKE transmitter.
. Unlock the vehicle using theKeyless Access system.
. Start the vehicle.
To avoid setting off the alarm byaccident:. Lock the vehicle after all
occupants have left the vehicleand both doors are closed.
. Always unlock a door with theRKE transmitter or use theKeyless Access system.
Unlocking the driver door with thekey will not disarm the system orturn off the alarm.
Black plate (15,1)Chevrolet Corvette Owner Manual (GMNA-Localizing-Europe-8087687) -2015 - CRC - 9/16/14
Keys, Doors, and Windows 2-15
How to Detect a TamperCondition
If K is pressed on the transmitterand the horn chirps three times, aprevious alarm occurred while thesystem was armed.
If the alarm has been activated, amessage will appear on the DIC.See Security Messages onpage 5-39.
Power Sounder, InclinationSensor and Intrusion Sensor
In addition to the standardtheft-deterrent system features, thissystem also has an inclinationsensor and intrusion sensor.
The power sounder provides anaudible alarm which is different fromthe vehicle's horn. It has its ownpower source, and can sound analarm when the vehicle's battery iscompromised.
The inclination sensor can set offthe alarm if it senses movement ofthe vehicle, such as a change invehicle orientation.
The intrusion sensor monitors thevehicle interior, and can activate thealarm if it senses unauthorised entryinto the vehicle's interior. Do notallow passengers or pets to remainin the vehicle when the intrusionsensor is activated.
Before arming the theft-deterrentsystem and activating the intrusionsensor:. Make sure both doors and
windows are completely closed.. Secure any loose items such as
sunshades.. Make sure there are no
obstructions blocking thesensors.
Intrusion and InclinationSensors Disable Switch
It is recommended that the intrusionand inclination sensors bedeactivated if pets are left in thevehicle or the vehicle is beingtransported.
With the vehicle turned off, pressdto the right of the tailgate/bootrelease button. The indicator lightwill come on momentarily, indicatingthat these sensors have beendisabled for the next alarm systemarming cycle.
Anti-theft Locking SystemThe vehicle is equipped with adeadbolt locking feature in additionto the standard door locks.
The deadbolt is engaged wheneveryou press Q on the RKE transmittertwice within five seconds with alldoors closed and the vehicle off.The deadbolt lock can also beengaged with the Keyless Accesssystem. See “Keyless Access
Black plate (16,1)Chevrolet Corvette Owner Manual (GMNA-Localizing-Europe-8087687) -2015 - CRC - 9/16/14
2-16 Keys, Doors, and Windows
Operation” under Remote KeylessEntry (RKE) System Operation onpage 2-3.
When the doors are secured withthe deadbolt, they cannot beunlocked or opened using thecontrols or handles inside thevehicle.
Press K on the transmitter once toopen the deadbolt and unlock thedriver door. Pressing the buttonagain within five seconds will unlockall of the doors.
ImmobiliserSee Declaration of Conformity onpage 13-1.
Immobiliser OperationThe vehicle has a passivetheft-deterrent system.
The security light comes on in theinstrument cluster if there is aproblem with arming or disarmingthe theft-deterrent system. This lightalso comes on briefly when theengine is started.
The system is automatically armedwhen the ignition is turned off.
The immobilisation system isdisarmed when the ignition is placedin ACC/ACCESSORY or ON/RUN/START and a valid transmitter isfound in the vehicle.
You do not have to manually arm ordisarm the system.
The system has one or more RKEtransmitters that are matched to animmobilizer control unit in thevehicle. Only a correctly matched
RKE transmitter starts the vehicle.The vehicle may not start if the RKEtransmitter is damaged.
If the engine does not start and thesecurity light comes on, there maybe a problem with the immobilisersystem. Press the ENGINE START/STOP button again.
If the vehicle does not start and theRKE transmitter appears to beundamaged, try another RKEtransmitter. Or, place the transmitterin the transmitter pocket. See “NOREMOTE DETECTED” under Keyand Lock Messages on page 5-36.Check the fuse. See Fuses onpage 10-38. If the engine still doesnot start with the other transmitter,the vehicle needs service. If theengine does start, the firsttransmitter may be faulty. See yourdealer or have a new RKEtransmitter programmed to thevehicle.
Black plate (17,1)Chevrolet Corvette Owner Manual (GMNA-Localizing-Europe-8087687) -2015 - CRC - 9/16/14
Keys, Doors, and Windows 2-17
The immobilizer system can learnnew or replacement RKEtransmitters. Up to eight RKEtransmitters can be programmed forthe vehicle. To program additionaltransmitters, see “ProgrammingTransmitters to the Vehicle” underRemote Keyless Entry (RKE)System Operation on page 2-3.
Do not leave the key or device thatdisarms or deactivates thetheft-deterrent system in the vehicle.
Exterior Mirrors
Convex Mirrors
{ Warning
A convex mirror can make things,like other vehicles, look fartheraway than they really are. If youcut too sharply into the right lane,you could hit a vehicle on theright. Check the inside mirror orglance over your shoulder beforechanging lanes.
The driver and passenger sidemirrors are convex shaped.A convex mirror's surface is curvedso more can be seen from thedriver seat.
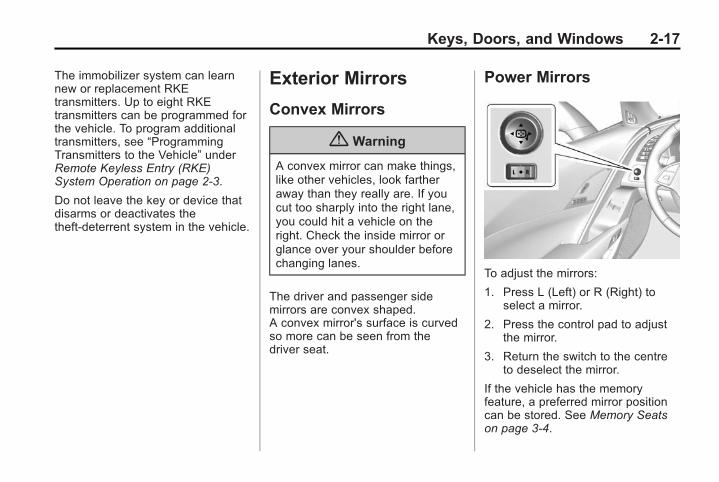
Power Mirrors
To adjust the mirrors:
1. Press L (Left) or R (Right) toselect a mirror.
2. Press the control pad to adjustthe mirror.
3. Return the switch to the centreto deselect the mirror.
If the vehicle has the memoryfeature, a preferred mirror positioncan be stored. See Memory Seatson page 3-4.
Black plate (18,1)Chevrolet Corvette Owner Manual (GMNA-Localizing-Europe-8087687) -2015 - CRC - 9/16/14
2-18 Keys, Doors, and Windows
Folding MirrorsTo fold, pull the mirror toward thevehicle. Push the mirror outward toreturn it to the original position.
Heated MirrorsFor vehicles with heated mirrors:
1 (Rear Window Demister):Press to heat the mirrors.
See “Rear Window Demister” underDual Automatic Climate ControlSystem on page 8-1.
Automatic DimmingMirrorThe driver outside mirrorautomatically adjusts for the glare ofheadlamps from behind.
Reverse Tilt MirrorsIf equipped with memory seats, thepassenger and/or driver mirror tiltsto a preselected position when thevehicle is in R (Reverse). Thisallows the kerb to be seen whenparallel parking.
The mirror(s) return to the originalposition when:. The vehicle is shifted out of
R (Reverse), or remains inR (Reverse) for about30 seconds.
. The ignition is turned off.
. The vehicle is driven inR (Reverse) above a set speed.
To turn this feature on or off, seeVehicle Personalisation onpage 5-42.
Interior Mirrors
Interior Rearview MirrorsAdjust the rearview mirror for a clearview of the area behind yourvehicle.
Do not spray glass cleaner directlyon the mirror. Use a soft toweldampened with water.
Automatic DimmingRearview MirrorThe rearview mirror automaticallydims to reduce the glare of theheadlamps from behind. Thisfeature comes on when the vehicleis started.
Black plate (19,1)Chevrolet Corvette Owner Manual (GMNA-Localizing-Europe-8087687) -2015 - CRC - 9/16/14
Keys, Doors, and Windows 2-19
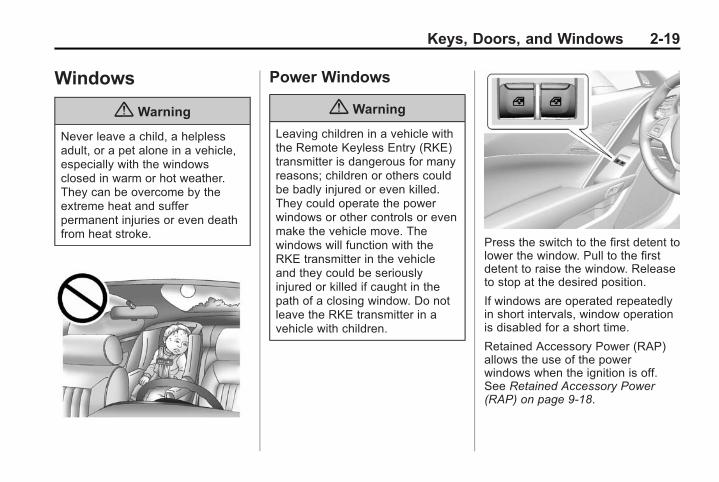
Windows
{ Warning
Never leave a child, a helplessadult, or a pet alone in a vehicle,especially with the windowsclosed in warm or hot weather.They can be overcome by theextreme heat and sufferpermanent injuries or even deathfrom heat stroke.
Power Windows
{ Warning
Leaving children in a vehicle withthe Remote Keyless Entry (RKE)transmitter is dangerous for manyreasons; children or others couldbe badly injured or even killed.They could operate the powerwindows or other controls or evenmake the vehicle move. Thewindows will function with theRKE transmitter in the vehicleand they could be seriouslyinjured or killed if caught in thepath of a closing window. Do notleave the RKE transmitter in avehicle with children.
Press the switch to the first detent tolower the window. Pull to the firstdetent to raise the window. Releaseto stop at the desired position.
If windows are operated repeatedlyin short intervals, window operationis disabled for a short time.
Retained Accessory Power (RAP)allows the use of the powerwindows when the ignition is off.See Retained Accessory Power(RAP) on page 9-18.
Black plate (20,1)Chevrolet Corvette Owner Manual (GMNA-Localizing-Europe-8087687) -2015 - CRC - 9/16/14
2-20 Keys, Doors, and Windows
Express Window Operation
This feature allows the window toautomatically open or close fully.. To activate express-down, press
the switch fully to the seconddetent and release.
. To activate express-up, pull theswitch fully to the second detentand release.
. To stop window movement,press or pull the switch briefly.
Obstacle Detection
This feature is active duringexpress-up movements in ON/RUN/START, or when the engine is offand RAP is active. Obstacledetection also works with RAP whenthe switch is held up.
If the window encounters an objectduring closing, it will stop and opento a predetermined distance.
Conditions such as severe cold orice may cause the window toauto-reverse. The window will returnto normal operation once thecondition or object is removed.
If conditions prevent a window fromclosing and the window continues toauto-reverse, it is possible to closethe window while in ON/RUN byholding the window switch in thefirst or second detent until thewindow is closed.
Window Operation withConvertible Top
Windows automatically lower fullywhen the convertible top is loweredor raised. See Convertible Top onpage 2-25. To raise the windows,pull the switch to the second detentand release.
Window Indexing
Indexing automatically lowers thewindow a small amount when thedoor is opened. When the door isclosed, the window will raise to itsfull up position. If either window
does not index properly, it could bedue to loss of power. Beforereturning to the dealer for service,perform the window indexing resetprocedure.
Window Indexing andExpress-Up Reset
Window indexing may be required ifthe vehicle battery has beenrecharged or disconnected, or is notworking. Express-up and theconvertible top will not function untilthe windows are reset. After batterypower is restored, a messagedisplays in the Driver InformationCentre. See Driver InformationCentre (DIC) on page 5-25.
Once power is restored:
1. Close the doors.
2. Start the vehicle.
3. Hold the window switch up to thefully closed position.
Black plate (21,1)Chevrolet Corvette Owner Manual (GMNA-Localizing-Europe-8087687) -2015 - CRC - 9/16/14
Keys, Doors, and Windows 2-21
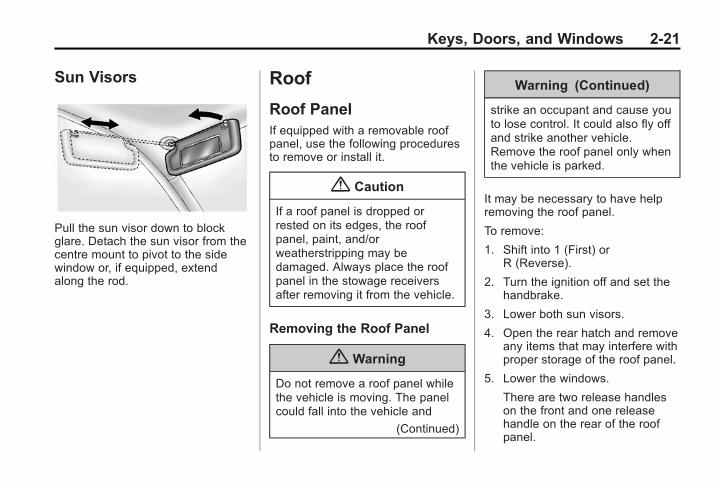
Sun Visors
Pull the sun visor down to blockglare. Detach the sun visor from thecentre mount to pivot to the sidewindow or, if equipped, extendalong the rod.
Roof
Roof PanelIf equipped with a removable roofpanel, use the following proceduresto remove or install it.
{ Caution
If a roof panel is dropped orrested on its edges, the roofpanel, paint, and/orweatherstripping may bedamaged. Always place the roofpanel in the stowage receiversafter removing it from the vehicle.
Removing the Roof Panel
{ Warning
Do not remove a roof panel whilethe vehicle is moving. The panelcould fall into the vehicle and
(Continued)
Warning (Continued)
strike an occupant and cause youto lose control. It could also fly offand strike another vehicle.Remove the roof panel only whenthe vehicle is parked.
It may be necessary to have helpremoving the roof panel.
To remove:
1. Shift into 1 (First) orR (Reverse).
2. Turn the ignition off and set thehandbrake.
3. Lower both sun visors.
4. Open the rear hatch and removeany items that may interfere withproper storage of the roof panel.
5. Lower the windows.
There are two release handleson the front and one releasehandle on the rear of the roofpanel.
Black plate (22,1)Chevrolet Corvette Owner Manual (GMNA-Localizing-Europe-8087687) -2015 - CRC - 9/16/14
2-22 Keys, Doors, and Windows
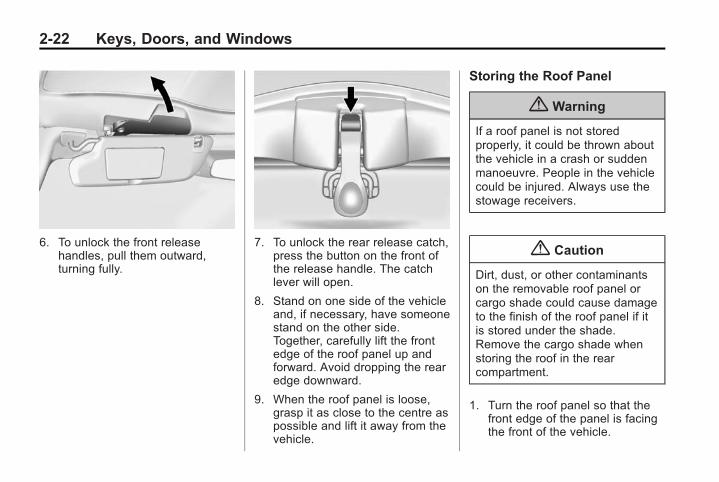
6. To unlock the front releasehandles, pull them outward,turning fully.
7. To unlock the rear release catch,press the button on the front ofthe release handle. The catchlever will open.
8. Stand on one side of the vehicleand, if necessary, have someonestand on the other side.Together, carefully lift the frontedge of the roof panel up andforward. Avoid dropping the rearedge downward.
9. When the roof panel is loose,grasp it as close to the centre aspossible and lift it away from thevehicle.
Storing the Roof Panel
{ Warning
If a roof panel is not storedproperly, it could be thrown aboutthe vehicle in a crash or suddenmanoeuvre. People in the vehiclecould be injured. Always use thestowage receivers.
{ Caution
Dirt, dust, or other contaminantson the removable roof panel orcargo shade could cause damageto the finish of the roof panel if itis stored under the shade.Remove the cargo shade whenstoring the roof in the rearcompartment.
1. Turn the roof panel so that thefront edge of the panel is facingthe front of the vehicle.
Black plate (23,1)Chevrolet Corvette Owner Manual (GMNA-Localizing-Europe-8087687) -2015 - CRC - 9/16/14
Keys, Doors, and Windows 2-23
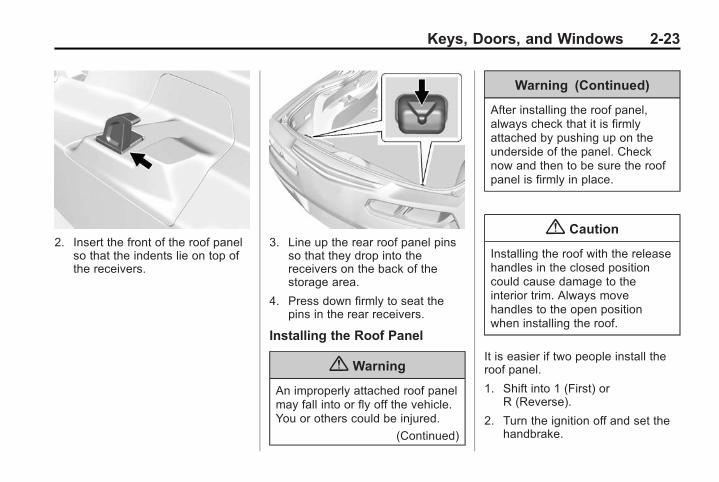
2. Insert the front of the roof panelso that the indents lie on top ofthe receivers.
3. Line up the rear roof panel pinsso that they drop into thereceivers on the back of thestorage area.
4. Press down firmly to seat thepins in the rear receivers.
Installing the Roof Panel
{ Warning
An improperly attached roof panelmay fall into or fly off the vehicle.You or others could be injured.
(Continued)
Warning (Continued)
After installing the roof panel,always check that it is firmlyattached by pushing up on theunderside of the panel. Checknow and then to be sure the roofpanel is firmly in place.
{ Caution
Installing the roof with the releasehandles in the closed positioncould cause damage to theinterior trim. Always movehandles to the open positionwhen installing the roof.
It is easier if two people install theroof panel.
1. Shift into 1 (First) orR (Reverse).
2. Turn the ignition off and set thehandbrake.
Black plate (24,1)Chevrolet Corvette Owner Manual (GMNA-Localizing-Europe-8087687) -2015 - CRC - 9/16/14
2-24 Keys, Doors, and Windows
3. To remove the roof panel, pull upon the rear edge and remove itfrom the storage area.
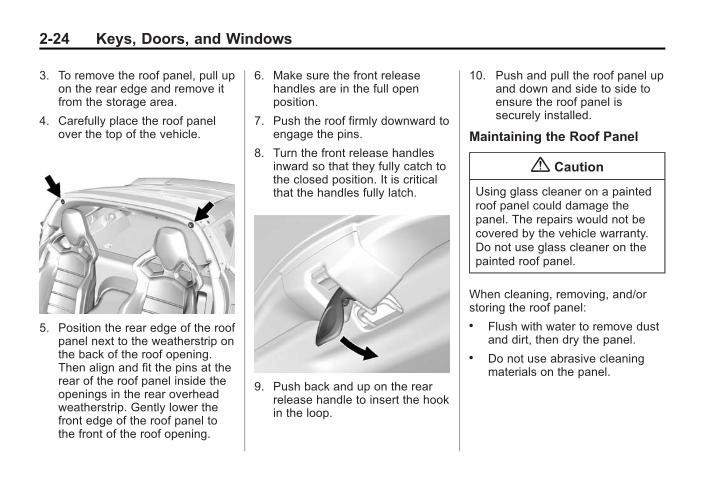
4. Carefully place the roof panelover the top of the vehicle.
5. Position the rear edge of the roofpanel next to the weatherstrip onthe back of the roof opening.Then align and fit the pins at therear of the roof panel inside theopenings in the rear overheadweatherstrip. Gently lower thefront edge of the roof panel tothe front of the roof opening.
6. Make sure the front releasehandles are in the full openposition.
7. Push the roof firmly downward toengage the pins.
8. Turn the front release handlesinward so that they fully catch tothe closed position. It is criticalthat the handles fully latch.
9. Push back and up on the rearrelease handle to insert the hookin the loop.
10. Push and pull the roof panel upand down and side to side toensure the roof panel issecurely installed.
Maintaining the Roof Panel
{ Caution
Using glass cleaner on a paintedroof panel could damage thepanel. The repairs would not becovered by the vehicle warranty.Do not use glass cleaner on thepainted roof panel.
When cleaning, removing, and/orstoring the roof panel:. Flush with water to remove dust
and dirt, then dry the panel.. Do not use abrasive cleaning
materials on the panel.
Black plate (25,1)Chevrolet Corvette Owner Manual (GMNA-Localizing-Europe-8087687) -2015 - CRC - 9/16/14
Keys, Doors, and Windows 2-25
Convertible TopIf equipped with a convertible top,review the following beforeoperating:
{ Warning
While opening or closing theconvertible top, people can beinjured by the moving parts of thetonneau cover or convertible top.Maintain visual contact with thetop while it is being operated.
{ Caution
Follow these guidelines whenoperating the convertible top ordamage can occur:
. Remove all items from theroof, boot lid, or tonneaucover before operating.
(Continued)
Caution (Continued)
. Remove all objects from theboot that may contact theconvertible top when it isoperated.
. Do not leave the vehicle withthe convertible top open.
. Do not exceed 50 km/h(31 mph) until the top hascompletely closed or opened.
. Do not open or close the topwhile driving in high windconditions.
. Do not operate theconvertible top multiple timesin a short period of timewithout starting the engine toavoid draining the vehiclebattery.
(Continued)
Caution (Continued)
. Do not open or store theconvertible top when it is dirtyor wet. This could result instains, mildew, or otherdamage.
. Only store the vehicle withthe top fully closed.
Opening the Convertible Top —Instrument Panel Switch
1. Remove all objects from the topof the tonneau cover andforward of the partition. Placethe partition in the rear storagearea in the upright position.Fasten both sides of the partitionto the posts just below thetonneau cover. See RearStorage on page 4-2.
2. Close the boot.
3. Start the vehicle or place it inACC/ACCESSORY.
Black plate (26,1)Chevrolet Corvette Owner Manual (GMNA-Localizing-Europe-8087687) -2015 - CRC - 9/16/14
2-26 Keys, Doors, and Windows
4. When possible, operate theconvertible top when the vehicleis stopped. The top can beoperated while driving below50 km/h (31 mph) and will stop ifthat speed is exceeded. The topoperation will take approximately25 seconds. Make sure the topoperation can be completedbefore that speed is reached.
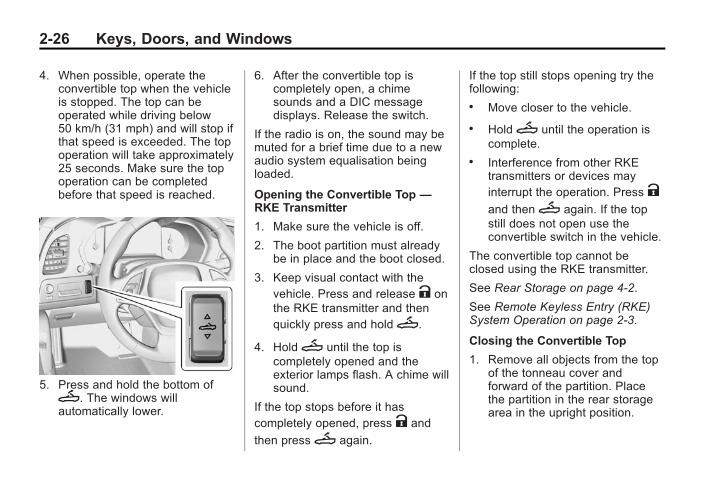
5. Press and hold the bottom ofM. The windows willautomatically lower.
6. After the convertible top iscompletely open, a chimesounds and a DIC messagedisplays. Release the switch.
If the radio is on, the sound may bemuted for a brief time due to a newaudio system equalisation beingloaded.
Opening the Convertible Top —RKE Transmitter
1. Make sure the vehicle is off.
2. The boot partition must alreadybe in place and the boot closed.
3. Keep visual contact with thevehicle. Press and release K onthe RKE transmitter and thenquickly press and holdM.
4. HoldM until the top iscompletely opened and theexterior lamps flash. A chime willsound.
If the top stops before it hascompletely opened, press K and
then pressM again.
If the top still stops opening try thefollowing:. Move closer to the vehicle.
. HoldM until the operation iscomplete.
. Interference from other RKEtransmitters or devices mayinterrupt the operation. Press Kand thenM again. If the topstill does not open use theconvertible switch in the vehicle.
The convertible top cannot beclosed using the RKE transmitter.
See Rear Storage on page 4-2.
See Remote Keyless Entry (RKE)System Operation on page 2-3.
Closing the Convertible Top
1. Remove all objects from the topof the tonneau cover andforward of the partition. Placethe partition in the rear storagearea in the upright position.
Black plate (27,1)Chevrolet Corvette Owner Manual (GMNA-Localizing-Europe-8087687) -2015 - CRC - 9/16/14
Keys, Doors, and Windows 2-27
Fasten both sides of the partitionto the posts just below thetonneau cover. See RearStorage on page 4-2.
2. Close the boot.
3. Start the vehicle or place it inACC/ACCESSORY.
4. When possible, operate theconvertible top when the vehicleis stopped. The top can beoperated while driving below50 km/h (31 mph) and will stop ifthat speed is exceeded. The topoperation will take approximately25 seconds. Make sure the topoperation can be completedbefore that speed is reached.
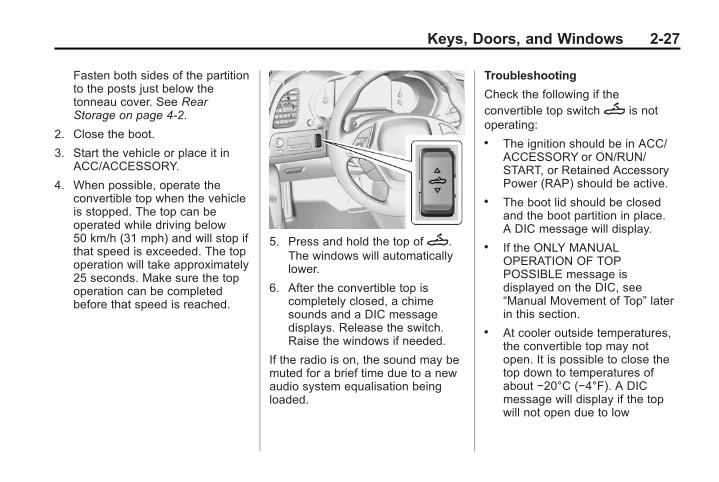
5. Press and hold the top ofM.The windows will automaticallylower.
6. After the convertible top iscompletely closed, a chimesounds and a DIC messagedisplays. Release the switch.Raise the windows if needed.
If the radio is on, the sound may bemuted for a brief time due to a newaudio system equalisation beingloaded.
Troubleshooting
Check the following if theconvertible top switchM is notoperating:. The ignition should be in ACC/
ACCESSORY or ON/RUN/START, or Retained AccessoryPower (RAP) should be active.
. The boot lid should be closedand the boot partition in place.A DIC message will display.
. If the ONLY MANUALOPERATION OF TOPPOSSIBLE message isdisplayed on the DIC, see“Manual Movement of Top” laterin this section.
. At cooler outside temperatures,the convertible top may notopen. It is possible to close thetop down to temperatures ofabout −20°C (−4°F). A DICmessage will display if the topwill not open due to low
Black plate (28,1)Chevrolet Corvette Owner Manual (GMNA-Localizing-Europe-8087687) -2015 - CRC - 9/16/14
2-28 Keys, Doors, and Windows
temperature. If necessary, movethe vehicle to a heated indoorarea to operate the top.
. If the top has recently beencycled repeatedly or left in anintermediate state, it will betemporarily disabled. A DICmessage displays. Normaloperation will be restored within10 minutes after the system hascooled.
. If the vehicle battery is low, thepower top operation may bedisabled. Try to start the vehicle.A DIC message displays.
. If the battery has recently beenreconnected or if the vehicle hasbeen jump started, the top maynot operate until the powerwindows have been indexed.Complete the power windowindexing procedure. See PowerWindows on page 2-19.
See Convertible Top Messages onpage 5-32.
Other features may be affectedwhile operating the convertible top:. The boot can only be opened
with the key until the convertibletop is completely opened orclosed.
. Do not try to start the vehiclewhile opening the top with theRKE transmitter. A DIC messagemay display. Release bothbuttons and wait a few secondsbefore starting the vehiclenormally.
. The passive door unlock featuremay not operate properly whileusing the RKE transmitter toopen the convertible top.
. The windows cannot close whilethe top is moving.
. When driving with the top notfully secured, chimes can beheard above 80 km/h (50 mph).
If the vehicle battery has beendisconnected and reconnected,the fuses were pulled or replaced,or a jump start was performed, the
TOP NOT SECURE message maydisplay. Press and holdM toopen/close the top until thismessage is cleared.
See Convertible Top Messages onpage 5-32.
Partial Top Cycling
If the convertible top operation isstopped before completion, the topwill temporarily hold its position.If the ignition is in ACC/ACCESSORY or ON/RUN/START,the top will be held for up tofive minutes. If the vehicle is movingor off, the amount of time will varyfrom a few seconds to about aminute.
Beeps and DIC messages will bedisplayed before the top will move.When this occurs, immediately finishthe convertible top operation bypressing the button again until itcompletes.
Black plate (29,1)Chevrolet Corvette Owner Manual (GMNA-Localizing-Europe-8087687) -2015 - CRC - 9/16/14
Keys, Doors, and Windows 2-29
If the top cannot be secured, keepclear of the top components. Insome conditions the top may movequickly.
Do not drive with the convertible topin an unsecured position. The topcomponents may moveunexpectedly. In some cases thetop may not be able to be poweroperated. If this occurs, follow theDIC messages displayed.
If the tonneau cover is not securedand latched, and the vehicle ismoving above 10 km/h (6 mph), thetonneau cover may automaticallymove to a stable position.
See Convertible Top Messages onpage 5-32.
Manual Movement of Top
If the DIC displays the ONLYMANUAL OPERATION OF TOPPOSSIBLE message, follow thesesteps.
1. PressM to either open orclose the top. Press the switchin the opposite direction if onedoes not work.
2. If the top moves, continuepressing the switch in thatdirection for at leastfive seconds. The top shouldthen work normally.
If the top does not respond in eitherdirection, use the followingprocedure to manually adjust theconvertible top and tonneau cover ifthey are retracted but not latched.This requires more than one person.
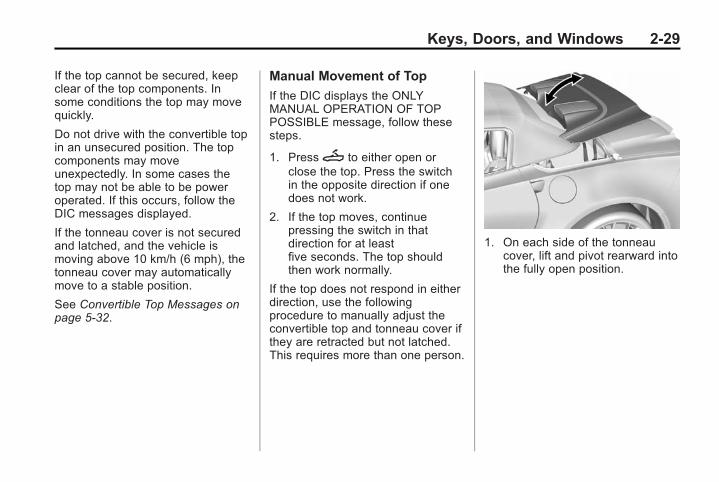
1. On each side of the tonneaucover, lift and pivot rearward intothe fully open position.
Black plate (30,1)Chevrolet Corvette Owner Manual (GMNA-Localizing-Europe-8087687) -2015 - CRC - 9/16/14
2-30 Keys, Doors, and Windows
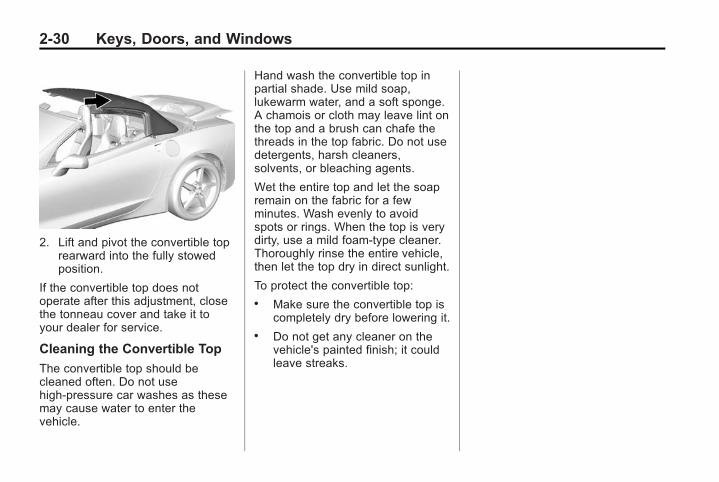
2. Lift and pivot the convertible toprearward into the fully stowedposition.
If the convertible top does notoperate after this adjustment, closethe tonneau cover and take it toyour dealer for service.
Cleaning the Convertible Top
The convertible top should becleaned often. Do not usehigh-pressure car washes as thesemay cause water to enter thevehicle.
Hand wash the convertible top inpartial shade. Use mild soap,lukewarm water, and a soft sponge.A chamois or cloth may leave lint onthe top and a brush can chafe thethreads in the top fabric. Do not usedetergents, harsh cleaners,solvents, or bleaching agents.
Wet the entire top and let the soapremain on the fabric for a fewminutes. Wash evenly to avoidspots or rings. When the top is verydirty, use a mild foam-type cleaner.Thoroughly rinse the entire vehicle,then let the top dry in direct sunlight.
To protect the convertible top:. Make sure the convertible top is
completely dry before lowering it.. Do not get any cleaner on the
vehicle's painted finish; it couldleave streaks.
Black plate (1,1)Chevrolet Corvette Owner Manual (GMNA-Localizing-Europe-8087687) -2015 - CRC - 9/16/14
Seats and Restraints 3-1
Seats andRestraints
Head RestraintsHead Restraints . . . . . . . . . . . . . . . 3-2
Front SeatsPower Seat Adjustment . . . . . . . 3-2Lumbar Adjustment . . . . . . . . . . . 3-3Reclining Seat Backrests . . . . . 3-3Memory Seats . . . . . . . . . . . . . . . . 3-4Seat-Back Latches . . . . . . . . . . . . 3-6Heated and Ventilated FrontSeats . . . . . . . . . . . . . . . . . . . . . . . . 3-7
Safety BeltsSafety Belts . . . . . . . . . . . . . . . . . . . 3-8How to Wear Safety BeltsProperly . . . . . . . . . . . . . . . . . . . . . 3-9
Lap-Shoulder Belt . . . . . . . . . . . 3-10Safety Belt Use DuringPregnancy . . . . . . . . . . . . . . . . . . 3-13
Safety System Check . . . . . . . . 3-13Safety Belt Care . . . . . . . . . . . . . 3-13Replacing Safety Belt SystemParts after a Crash . . . . . . . . . 3-13
Airbag SystemAirbag System . . . . . . . . . . . . . . . 3-14Where Are the Airbags? . . . . . 3-16When Should an AirbagInflate? . . . . . . . . . . . . . . . . . . . . . 3-17
What Makes an AirbagInflate? . . . . . . . . . . . . . . . . . . . . . 3-18
How Does an AirbagRestrain? . . . . . . . . . . . . . . . . . . . 3-18
What Will You See after anAirbag Inflates? . . . . . . . . . . . . 3-18
Passenger SensingSystem . . . . . . . . . . . . . . . . . . . . . 3-20
Servicing the Airbag-EquippedVehicle . . . . . . . . . . . . . . . . . . . . . 3-24
Adding Equipment to theAirbag-Equipped Vehicle . . . 3-25
Airbag System Check . . . . . . . . 3-25Replacing Airbag SystemParts after a Crash . . . . . . . . . 3-26
Child RestraintsOlder Children . . . . . . . . . . . . . . . 3-26Infants and YoungChildren . . . . . . . . . . . . . . . . . . . . 3-28
Child Restraint Systems . . . . . 3-30Where to Put the Restraint . . . 3-32ISOFIX Child RestraintSystems . . . . . . . . . . . . . . . . . . . . 3-36
Securing Child Restraints . . . . 3-36

Black plate (2,1)Chevrolet Corvette Owner Manual (GMNA-Localizing-Europe-8087687) -2015 - CRC - 9/16/14
3-2 Seats and Restraints
Head RestraintsThe vehicle's front seats have headrestraints in the outboard seatingpositions that cannot be adjusted.
The front seat outboard headrestraints are not removable.
Front Seats
Power Seat Adjustment
{ Warning
You can lose control of thevehicle if you try to adjust a driverseat while the vehicle is moving.Adjust the driver seat only whenthe vehicle is not moving.
To adjust the seat:. Move the seat forward or
rearward by sliding the controlforward or rearward.
. Raise or lower the front part ofthe seat cushion by moving thefront of the control up or down.
. Raise or lower the seat bymoving the rear of the control upor down.
To adjust the seatback, seeReclining Seatbacks on page 3-3.
To adjust the lumbar support, seeLumbar Adjustment on page 3-3.
Seat Travel Limit
If a seat is moved all the way to therear and/or the seatback is reclinedso that it makes contact with thecarpet, all rearward seat movementwill stop. Normal operation of theseat will resume when the seatbackis no longer in contact with thecarpet. This is normal.
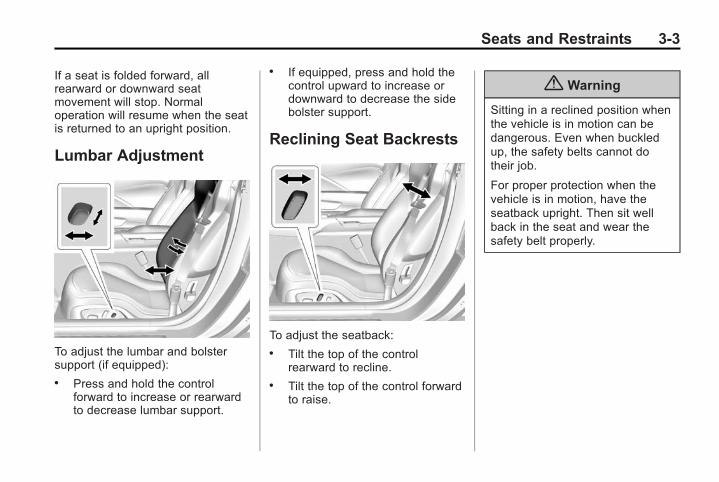
Black plate (3,1)Chevrolet Corvette Owner Manual (GMNA-Localizing-Europe-8087687) -2015 - CRC - 9/16/14
Seats and Restraints 3-3
If a seat is folded forward, allrearward or downward seatmovement will stop. Normaloperation will resume when the seatis returned to an upright position.
Lumbar Adjustment
To adjust the lumbar and bolstersupport (if equipped):. Press and hold the control
forward to increase or rearwardto decrease lumbar support.
. If equipped, press and hold thecontrol upward to increase ordownward to decrease the sidebolster support.
Reclining Seat Backrests
To adjust the seatback:. Tilt the top of the control
rearward to recline.. Tilt the top of the control forward
to raise.
{ Warning
Sitting in a reclined position whenthe vehicle is in motion can bedangerous. Even when buckledup, the safety belts cannot dotheir job.
For proper protection when thevehicle is in motion, have theseatback upright. Then sit wellback in the seat and wear thesafety belt properly.
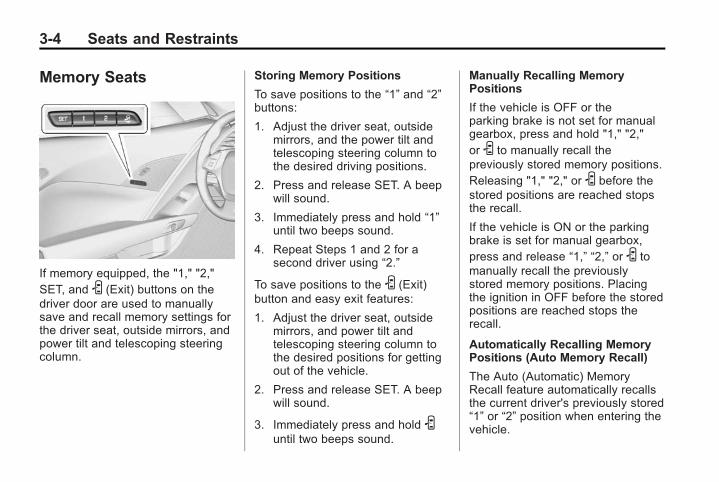
Black plate (4,1)Chevrolet Corvette Owner Manual (GMNA-Localizing-Europe-8087687) -2015 - CRC - 9/16/14
3-4 Seats and Restraints
Memory Seats
If memory equipped, the "1," "2,"SET, and S (Exit) buttons on thedriver door are used to manuallysave and recall memory settings forthe driver seat, outside mirrors, andpower tilt and telescoping steeringcolumn.
Storing Memory Positions
To save positions to the “1” and “2”buttons:
1. Adjust the driver seat, outsidemirrors, and the power tilt andtelescoping steering column tothe desired driving positions.
2. Press and release SET. A beepwill sound.
3. Immediately press and hold “1”until two beeps sound.
4. Repeat Steps 1 and 2 for asecond driver using “2.”
To save positions to the S (Exit)button and easy exit features:
1. Adjust the driver seat, outsidemirrors, and power tilt andtelescoping steering column tothe desired positions for gettingout of the vehicle.
2. Press and release SET. A beepwill sound.
3. Immediately press and hold Suntil two beeps sound.
Manually Recalling MemoryPositions
If the vehicle is OFF or theparking brake is not set for manualgearbox, press and hold "1," "2,"or S to manually recall thepreviously stored memory positions.Releasing "1," "2," or S before thestored positions are reached stopsthe recall.
If the vehicle is ON or the parkingbrake is set for manual gearbox,press and release “1,” “2,” or S tomanually recall the previouslystored memory positions. Placingthe ignition in OFF before the storedpositions are reached stops therecall.
Automatically Recalling MemoryPositions (Auto Memory Recall)
The Auto (Automatic) MemoryRecall feature automatically recallsthe current driver's previously stored“1” or “2” position when entering thevehicle.
Black plate (5,1)Chevrolet Corvette Owner Manual (GMNA-Localizing-Europe-8087687) -2015 - CRC - 9/16/14
Seats and Restraints 3-5
Depending upon the Auto MemoryRecall feature enabled in the vehiclepersonalisation menu, memory “1”or “2” positions are recalled asfollows:
To activate the recall when theignition is off, and “On - Driver DoorOpen” is selected in the vehiclepersonalisation menu:
. Press K on the RKE transmitterand open the door.
. Press the lock/unlock button onthe outside driver door handleand open the driver door. TheRKE transmitter must be presentfor the recall to activate.
. If the driver door is alreadyopen, press K on the RKEtransmitter to activate the recall.
To activate the recall at ignition ON,the parking brake must be set formanual gearbox, and “On - AtIgnition On” selected in the vehiclepersonalisation menu:. Place the ignition in ON/RUN/
START.
See Vehicle Personalisation onpage 5-42.
To stop recall movement, press oneof the memory, power mirror,or power seat controls, or press thepower tilt and telescoping steeringcolumn control. If On - At IgnitionOn is selected in the vehiclepersonalisation menu, placing theignition in OFF stops the recall.
Easy Exit Recall
If programmed on in the vehiclepersonalisation menu, the easy exitfeature automatically moves thedriver seat, power tilt andtelescoping steering column, andoutside mirrors on some vehicles tothe memory positions previouslysaved to the S (Exit) button. See
“Storing Memory Positions” listedpreviously. See also VehiclePersonalisation on page 5-42.
Easy exit recall automaticallyactivates when one of the followingoccurs:. The vehicle is turned off and the
driver door is opened within ashort time.
. The vehicle is turned off with thedriver door open.
Seat Travel Limit
If the seat is folded forward ormoved rearward into contact withthe carpet, the seat must bereturned to an upright position ormoved forward off the carpet toregain operation.
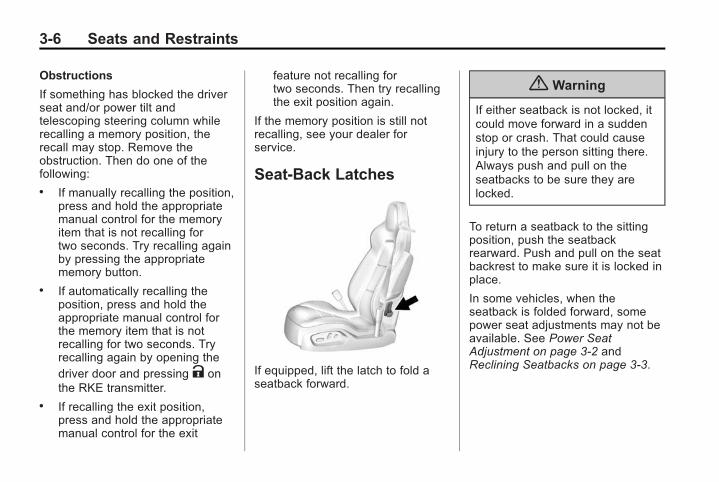
Black plate (6,1)Chevrolet Corvette Owner Manual (GMNA-Localizing-Europe-8087687) -2015 - CRC - 9/16/14
3-6 Seats and Restraints
Obstructions
If something has blocked the driverseat and/or power tilt andtelescoping steering column whilerecalling a memory position, therecall may stop. Remove theobstruction. Then do one of thefollowing:. If manually recalling the position,
press and hold the appropriatemanual control for the memoryitem that is not recalling fortwo seconds. Try recalling againby pressing the appropriatememory button.
. If automatically recalling theposition, press and hold theappropriate manual control forthe memory item that is notrecalling for two seconds. Tryrecalling again by opening thedriver door and pressing K onthe RKE transmitter.
. If recalling the exit position,press and hold the appropriatemanual control for the exit
feature not recalling fortwo seconds. Then try recallingthe exit position again.
If the memory position is still notrecalling, see your dealer forservice.
Seat-Back Latches
If equipped, lift the latch to fold aseatback forward.
{ Warning
If either seatback is not locked, itcould move forward in a suddenstop or crash. That could causeinjury to the person sitting there.Always push and pull on theseatbacks to be sure they arelocked.
To return a seatback to the sittingposition, push the seatbackrearward. Push and pull on the seatbackrest to make sure it is locked inplace.
In some vehicles, when theseatback is folded forward, somepower seat adjustments may not beavailable. See Power SeatAdjustment on page 3-2 andReclining Seatbacks on page 3-3.
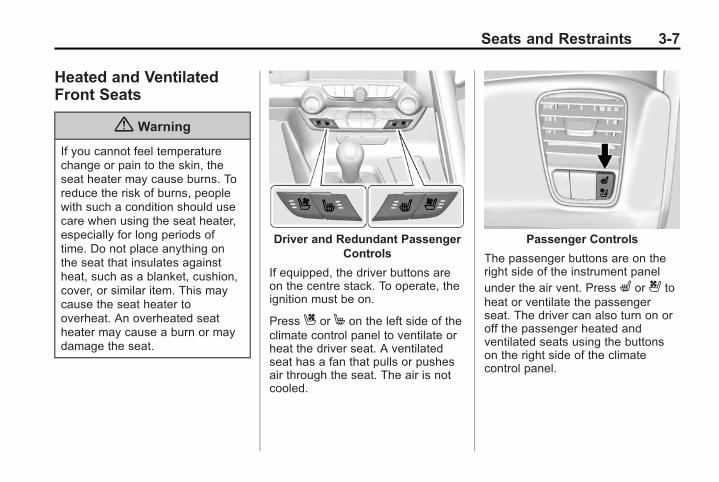
Black plate (7,1)Chevrolet Corvette Owner Manual (GMNA-Localizing-Europe-8087687) -2015 - CRC - 9/16/14
Seats and Restraints 3-7
Heated and VentilatedFront Seats
{ Warning
If you cannot feel temperaturechange or pain to the skin, theseat heater may cause burns. Toreduce the risk of burns, peoplewith such a condition should usecare when using the seat heater,especially for long periods oftime. Do not place anything onthe seat that insulates againstheat, such as a blanket, cushion,cover, or similar item. This maycause the seat heater tooverheat. An overheated seatheater may cause a burn or maydamage the seat.
Driver and Redundant PassengerControls
If equipped, the driver buttons areon the centre stack. To operate, theignition must be on.
Press C or M on the left side of theclimate control panel to ventilate orheat the driver seat. A ventilatedseat has a fan that pulls or pushesair through the seat. The air is notcooled.
Passenger Controls
The passenger buttons are on theright side of the instrument panelunder the air vent. Press L or { toheat or ventilate the passengerseat. The driver can also turn on oroff the passenger heated andventilated seats using the buttonson the right side of the climatecontrol panel.
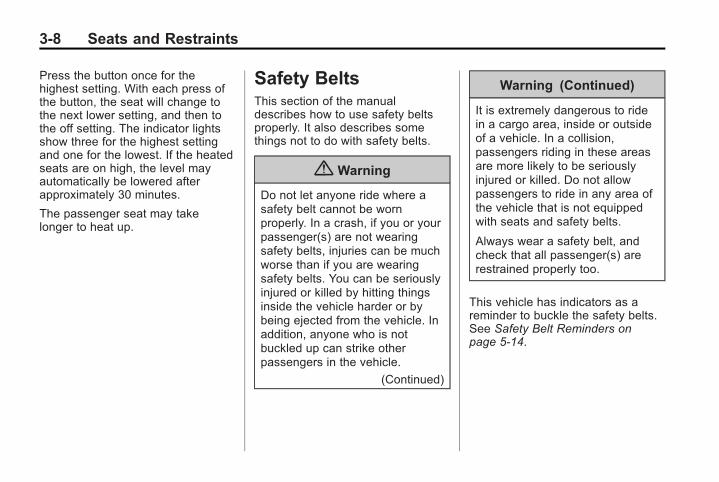
Black plate (8,1)Chevrolet Corvette Owner Manual (GMNA-Localizing-Europe-8087687) -2015 - CRC - 9/16/14
3-8 Seats and Restraints
Press the button once for thehighest setting. With each press ofthe button, the seat will change tothe next lower setting, and then tothe off setting. The indicator lightsshow three for the highest settingand one for the lowest. If the heatedseats are on high, the level mayautomatically be lowered afterapproximately 30 minutes.
The passenger seat may takelonger to heat up.
Safety BeltsThis section of the manualdescribes how to use safety beltsproperly. It also describes somethings not to do with safety belts.
{ Warning
Do not let anyone ride where asafety belt cannot be wornproperly. In a crash, if you or yourpassenger(s) are not wearingsafety belts, injuries can be muchworse than if you are wearingsafety belts. You can be seriouslyinjured or killed by hitting thingsinside the vehicle harder or bybeing ejected from the vehicle. Inaddition, anyone who is notbuckled up can strike otherpassengers in the vehicle.
(Continued)
Warning (Continued)
It is extremely dangerous to ridein a cargo area, inside or outsideof a vehicle. In a collision,passengers riding in these areasare more likely to be seriouslyinjured or killed. Do not allowpassengers to ride in any area ofthe vehicle that is not equippedwith seats and safety belts.
Always wear a safety belt, andcheck that all passenger(s) arerestrained properly too.
This vehicle has indicators as areminder to buckle the safety belts.See Safety Belt Reminders onpage 5-14.
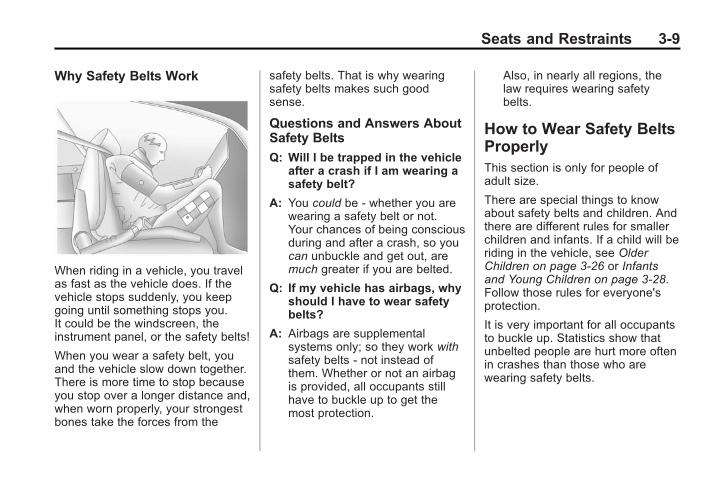
Black plate (9,1)Chevrolet Corvette Owner Manual (GMNA-Localizing-Europe-8087687) -2015 - CRC - 9/16/14
Seats and Restraints 3-9
Why Safety Belts Work
When riding in a vehicle, you travelas fast as the vehicle does. If thevehicle stops suddenly, you keepgoing until something stops you.It could be the windscreen, theinstrument panel, or the safety belts!
When you wear a safety belt, youand the vehicle slow down together.There is more time to stop becauseyou stop over a longer distance and,when worn properly, your strongestbones take the forces from the
safety belts. That is why wearingsafety belts makes such goodsense.
Questions and Answers AboutSafety Belts
Q: Will I be trapped in the vehicleafter a crash if I am wearing asafety belt?
A: You could be - whether you arewearing a safety belt or not.Your chances of being consciousduring and after a crash, so youcan unbuckle and get out, aremuch greater if you are belted.
Q: If my vehicle has airbags, whyshould I have to wear safetybelts?
A: Airbags are supplementalsystems only; so they work withsafety belts - not instead ofthem. Whether or not an airbagis provided, all occupants stillhave to buckle up to get themost protection.
Also, in nearly all regions, thelaw requires wearing safetybelts.
How to Wear Safety BeltsProperlyThis section is only for people ofadult size.
There are special things to knowabout safety belts and children. Andthere are different rules for smallerchildren and infants. If a child will beriding in the vehicle, see OlderChildren on page 3-26 or Infantsand Young Children on page 3-28.Follow those rules for everyone'sprotection.
It is very important for all occupantsto buckle up. Statistics show thatunbelted people are hurt more oftenin crashes than those who arewearing safety belts.
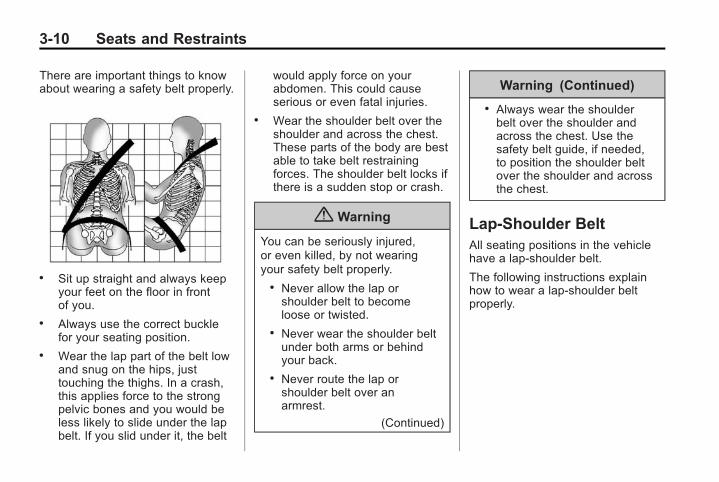
Black plate (10,1)Chevrolet Corvette Owner Manual (GMNA-Localizing-Europe-8087687) -2015 - CRC - 9/16/14
3-10 Seats and Restraints
There are important things to knowabout wearing a safety belt properly.
. Sit up straight and always keepyour feet on the floor in frontof you.
. Always use the correct bucklefor your seating position.
. Wear the lap part of the belt lowand snug on the hips, justtouching the thighs. In a crash,this applies force to the strongpelvic bones and you would beless likely to slide under the lapbelt. If you slid under it, the belt
would apply force on yourabdomen. This could causeserious or even fatal injuries.
. Wear the shoulder belt over theshoulder and across the chest.These parts of the body are bestable to take belt restrainingforces. The shoulder belt locks ifthere is a sudden stop or crash.
{ Warning
You can be seriously injured,or even killed, by not wearingyour safety belt properly.
. Never allow the lap orshoulder belt to becomeloose or twisted.
. Never wear the shoulder beltunder both arms or behindyour back.
. Never route the lap orshoulder belt over anarmrest.
(Continued)
Warning (Continued)
. Always wear the shoulderbelt over the shoulder andacross the chest. Use thesafety belt guide, if needed,to position the shoulder beltover the shoulder and acrossthe chest.
Lap-Shoulder BeltAll seating positions in the vehiclehave a lap-shoulder belt.
The following instructions explainhow to wear a lap-shoulder beltproperly.
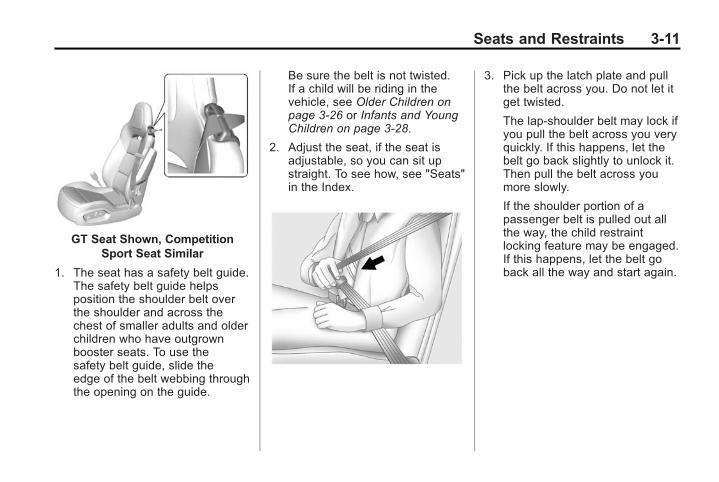
Black plate (11,1)Chevrolet Corvette Owner Manual (GMNA-Localizing-Europe-8087687) -2015 - CRC - 9/16/14
Seats and Restraints 3-11
GT Seat Shown, CompetitionSport Seat Similar
1. The seat has a safety belt guide.The safety belt guide helpsposition the shoulder belt overthe shoulder and across thechest of smaller adults and olderchildren who have outgrownbooster seats. To use thesafety belt guide, slide theedge of the belt webbing throughthe opening on the guide.
Be sure the belt is not twisted.If a child will be riding in thevehicle, see Older Children onpage 3-26 or Infants and YoungChildren on page 3-28.
2. Adjust the seat, if the seat isadjustable, so you can sit upstraight. To see how, see "Seats"in the Index.
3. Pick up the latch plate and pullthe belt across you. Do not let itget twisted.
The lap-shoulder belt may lock ifyou pull the belt across you veryquickly. If this happens, let thebelt go back slightly to unlock it.Then pull the belt across youmore slowly.
If the shoulder portion of apassenger belt is pulled out allthe way, the child restraintlocking feature may be engaged.If this happens, let the belt goback all the way and start again.
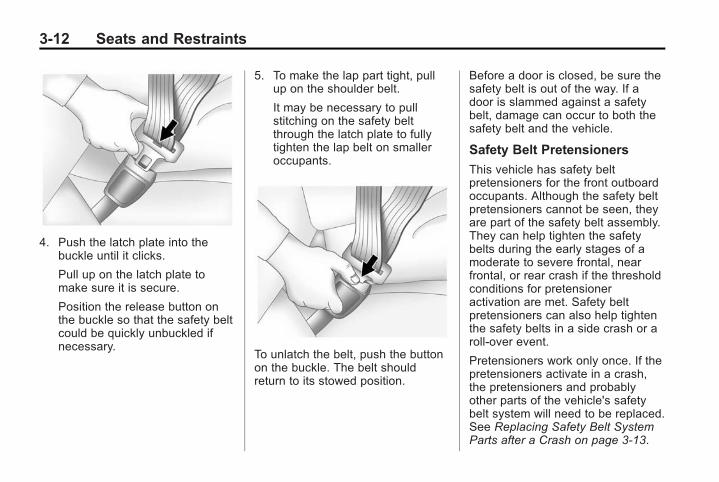
Black plate (12,1)Chevrolet Corvette Owner Manual (GMNA-Localizing-Europe-8087687) -2015 - CRC - 9/16/14
3-12 Seats and Restraints
4. Push the latch plate into thebuckle until it clicks.
Pull up on the latch plate tomake sure it is secure.
Position the release button onthe buckle so that the safety beltcould be quickly unbuckled ifnecessary.
5. To make the lap part tight, pullup on the shoulder belt.
It may be necessary to pullstitching on the safety beltthrough the latch plate to fullytighten the lap belt on smalleroccupants.
To unlatch the belt, push the buttonon the buckle. The belt shouldreturn to its stowed position.
Before a door is closed, be sure thesafety belt is out of the way. If adoor is slammed against a safetybelt, damage can occur to both thesafety belt and the vehicle.
Safety Belt Pretensioners
This vehicle has safety beltpretensioners for the front outboardoccupants. Although the safety beltpretensioners cannot be seen, theyare part of the safety belt assembly.They can help tighten the safetybelts during the early stages of amoderate to severe frontal, nearfrontal, or rear crash if the thresholdconditions for pretensioneractivation are met. Safety beltpretensioners can also help tightenthe safety belts in a side crash or aroll-over event.
Pretensioners work only once. If thepretensioners activate in a crash,the pretensioners and probablyother parts of the vehicle's safetybelt system will need to be replaced.See Replacing Safety Belt SystemParts after a Crash on page 3-13.
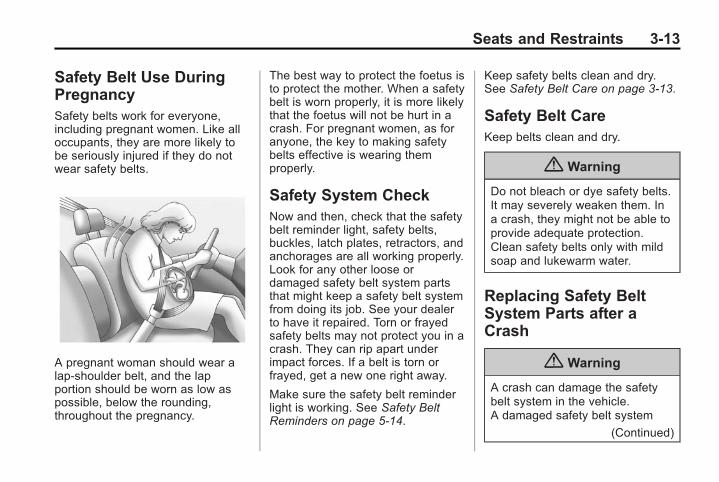
Black plate (13,1)Chevrolet Corvette Owner Manual (GMNA-Localizing-Europe-8087687) -2015 - CRC - 9/16/14
Seats and Restraints 3-13
Safety Belt Use DuringPregnancySafety belts work for everyone,including pregnant women. Like alloccupants, they are more likely tobe seriously injured if they do notwear safety belts.
A pregnant woman should wear alap-shoulder belt, and the lapportion should be worn as low aspossible, below the rounding,throughout the pregnancy.
The best way to protect the foetus isto protect the mother. When a safetybelt is worn properly, it is more likelythat the foetus will not be hurt in acrash. For pregnant women, as foranyone, the key to making safetybelts effective is wearing themproperly.
Safety System CheckNow and then, check that the safetybelt reminder light, safety belts,buckles, latch plates, retractors, andanchorages are all working properly.Look for any other loose ordamaged safety belt system partsthat might keep a safety belt systemfrom doing its job. See your dealerto have it repaired. Torn or frayedsafety belts may not protect you in acrash. They can rip apart underimpact forces. If a belt is torn orfrayed, get a new one right away.
Make sure the safety belt reminderlight is working. See Safety BeltReminders on page 5-14.
Keep safety belts clean and dry.See Safety Belt Care on page 3-13.
Safety Belt CareKeep belts clean and dry.
{ Warning
Do not bleach or dye safety belts.It may severely weaken them. Ina crash, they might not be able toprovide adequate protection.Clean safety belts only with mildsoap and lukewarm water.
Replacing Safety BeltSystem Parts after aCrash
{ Warning
A crash can damage the safetybelt system in the vehicle.A damaged safety belt system
(Continued)
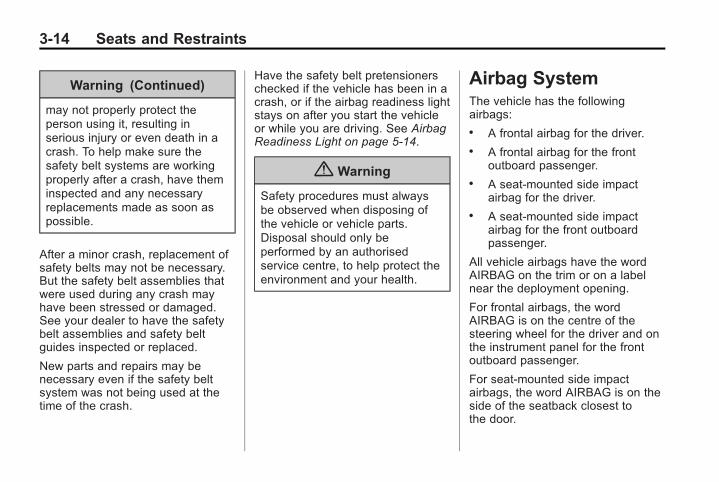
Black plate (14,1)Chevrolet Corvette Owner Manual (GMNA-Localizing-Europe-8087687) -2015 - CRC - 9/16/14
3-14 Seats and Restraints
Warning (Continued)
may not properly protect theperson using it, resulting inserious injury or even death in acrash. To help make sure thesafety belt systems are workingproperly after a crash, have theminspected and any necessaryreplacements made as soon aspossible.
After a minor crash, replacement ofsafety belts may not be necessary.But the safety belt assemblies thatwere used during any crash mayhave been stressed or damaged.See your dealer to have the safetybelt assemblies and safety beltguides inspected or replaced.
New parts and repairs may benecessary even if the safety beltsystem was not being used at thetime of the crash.
Have the safety belt pretensionerschecked if the vehicle has been in acrash, or if the airbag readiness lightstays on after you start the vehicleor while you are driving. See AirbagReadiness Light on page 5-14.
{ Warning
Safety procedures must alwaysbe observed when disposing ofthe vehicle or vehicle parts.Disposal should only beperformed by an authorisedservice centre, to help protect theenvironment and your health.
Airbag SystemThe vehicle has the followingairbags:. A frontal airbag for the driver.. A frontal airbag for the front
outboard passenger.. A seat-mounted side impact
airbag for the driver.. A seat-mounted side impact
airbag for the front outboardpassenger.
All vehicle airbags have the wordAIRBAG on the trim or on a labelnear the deployment opening.
For frontal airbags, the wordAIRBAG is on the centre of thesteering wheel for the driver and onthe instrument panel for the frontoutboard passenger.
For seat-mounted side impactairbags, the word AIRBAG is on theside of the seatback closest tothe door.
Black plate (15,1)Chevrolet Corvette Owner Manual (GMNA-Localizing-Europe-8087687) -2015 - CRC - 9/16/14
Seats and Restraints 3-15
Airbags are designed to supplementthe protection provided by safetybelts. Even though today's airbagsare also designed to help reducethe risk of injury from the force of aninflating bag, all airbags must inflatevery quickly to do their job.
Here are the most important thingsto know about the airbag system:
{ Warning
You can be severely injured orkilled in a crash if you are notwearing your safety belt, evenwith airbags. Airbags aredesigned to work with safetybelts, not replace them. Also,airbags are not designed to inflatein every crash. In some crashessafety belts are the only restraint.See When Should an AirbagInflate? on page 3-17.
(Continued)
Warning (Continued)
Wearing your safety belt during acrash helps reduce the chance ofhitting things inside the vehicle orbeing ejected from it. Airbags are“supplemental restraints” to thesafety belts. Everyone in thevehicle should wear a safety beltproperly, whether or not there isan airbag for that person.
{ Warning
Because airbags inflate with greatforce and faster than the blink ofan eye, anyone who is upagainst, or very close to, anairbag when it inflates can beseriously injured or killed. Do notsit unnecessarily close to anyairbag, as you would be if sittingon the edge of the seat or leaningforward. Safety belts help keep
(Continued)
Warning (Continued)
you in position before and duringa crash. Always wear the safetybelt, even with airbags. The drivershould sit as far back as possiblewhile still maintaining control ofthe vehicle.
Occupants should not lean on orsleep against the door or sidewindows in seating positions withseat-mounted airbags.
{ Warning
Children who are up against,or very close to, any airbag whenit inflates can be seriously injuredor killed. Always secure childrenproperly in the vehicle. To readhow, see Older Children onpage 3-26 or Infants and YoungChildren on page 3-28.
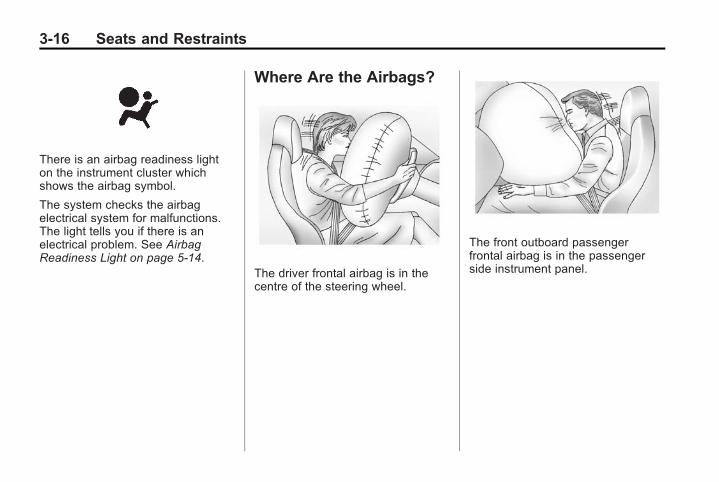
Black plate (16,1)Chevrolet Corvette Owner Manual (GMNA-Localizing-Europe-8087687) -2015 - CRC - 9/16/14
3-16 Seats and Restraints
There is an airbag readiness lighton the instrument cluster whichshows the airbag symbol.
The system checks the airbagelectrical system for malfunctions.The light tells you if there is anelectrical problem. See AirbagReadiness Light on page 5-14.
Where Are the Airbags?
The driver frontal airbag is in thecentre of the steering wheel.
The front outboard passengerfrontal airbag is in the passengerside instrument panel.
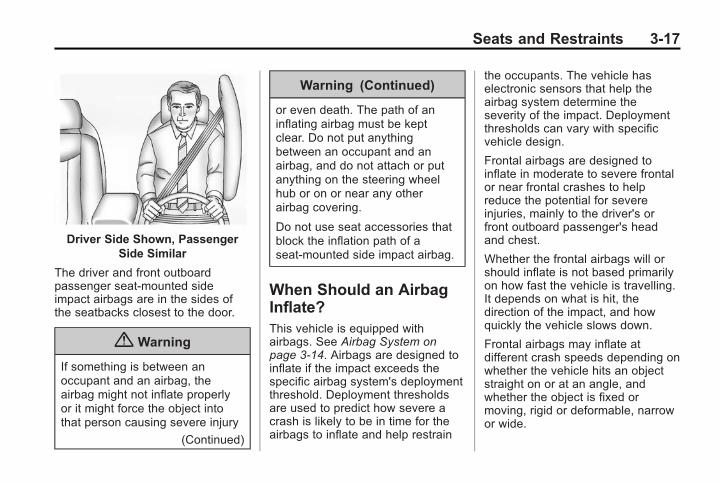
Black plate (17,1)Chevrolet Corvette Owner Manual (GMNA-Localizing-Europe-8087687) -2015 - CRC - 9/16/14
Seats and Restraints 3-17
Driver Side Shown, PassengerSide Similar
The driver and front outboardpassenger seat-mounted sideimpact airbags are in the sides ofthe seatbacks closest to the door.
{ Warning
If something is between anoccupant and an airbag, theairbag might not inflate properlyor it might force the object intothat person causing severe injury
(Continued)
Warning (Continued)
or even death. The path of aninflating airbag must be keptclear. Do not put anythingbetween an occupant and anairbag, and do not attach or putanything on the steering wheelhub or on or near any otherairbag covering.
Do not use seat accessories thatblock the inflation path of aseat-mounted side impact airbag.
When Should an AirbagInflate?This vehicle is equipped withairbags. See Airbag System onpage 3-14. Airbags are designed toinflate if the impact exceeds thespecific airbag system's deploymentthreshold. Deployment thresholdsare used to predict how severe acrash is likely to be in time for theairbags to inflate and help restrain
the occupants. The vehicle haselectronic sensors that help theairbag system determine theseverity of the impact. Deploymentthresholds can vary with specificvehicle design.
Frontal airbags are designed toinflate in moderate to severe frontalor near frontal crashes to helpreduce the potential for severeinjuries, mainly to the driver's orfront outboard passenger's headand chest.
Whether the frontal airbags will orshould inflate is not based primarilyon how fast the vehicle is travelling.It depends on what is hit, thedirection of the impact, and howquickly the vehicle slows down.
Frontal airbags may inflate atdifferent crash speeds depending onwhether the vehicle hits an objectstraight on or at an angle, andwhether the object is fixed ormoving, rigid or deformable, narrowor wide.
Black plate (18,1)Chevrolet Corvette Owner Manual (GMNA-Localizing-Europe-8087687) -2015 - CRC - 9/16/14
3-18 Seats and Restraints
Frontal airbags are not intended toinflate during vehicle rollovers, inrear impacts, or in many sideimpacts.
In addition, the vehicle hasadvanced technology frontalairbags. Advanced technologyfrontal airbags adjust the restraintaccording to crash severity.
Seat-mounted side impact airbagsare designed to inflate in moderateto severe side crashes dependingon the location of the impact.Seat-mounted side impact airbagsare not designed to inflate in frontalimpacts, near frontal impacts,rollovers, or rear impacts.A seat-mounted side impact airbagis designed to inflate on the side ofthe vehicle that is struck.
In any particular crash, no one cansay whether an airbag should haveinflated simply because of thevehicle damage or repair costs.
What Makes an AirbagInflate?In a deployment event, the sensingsystem sends an electrical signaltriggering a release of gas from theinflator. Gas from the inflator fills theairbag causing the bag to break outof the cover. The inflator, the airbag,and related hardware are all part ofthe airbag module.
For airbag locations, see Where Arethe Airbags? on page 3-16.
How Does an AirbagRestrain?In moderate to severe frontal ornear frontal collisions, even beltedoccupants can contact the steeringwheel or the instrument panel. Inmoderate to severe side collisions,even belted occupants can contactthe inside of the vehicle.
Airbags supplement the protectionprovided by safety belts bydistributing the force of the impactmore evenly over theoccupant's body.
But airbags would not help in manytypes of collisions, primarilybecause the occupant's motion isnot toward those airbags. See WhenShould an Airbag Inflate? onpage 3-17 for more information.
Airbags should never be regardedas anything more than a supplementto safety belts.
What Will You See afteran Airbag Inflates?After the frontal and seat-mountedside impact airbags inflate, theyquickly deflate, so quickly that somepeople may not even realise theairbags inflated. Some componentsof the airbag module may be hot forseveral minutes. For location of theairbag modules, see What Makesan Airbag Inflate? on page 3-18.
Black plate (19,1)Chevrolet Corvette Owner Manual (GMNA-Localizing-Europe-8087687) -2015 - CRC - 9/16/14
Seats and Restraints 3-19
The parts of the airbag that comeinto contact with you may be warm,but not too hot to touch. There maybe some smoke and dust comingfrom the vents in the deflatedairbags. Airbag inflation does notprevent the driver from seeing out ofthe windscreen or being able tosteer the vehicle, nor does it preventpeople from leaving the vehicle.
{ Warning
When an airbag inflates, theremay be dust in the air. This dustcould cause breathing problemsfor people with a history ofasthma or other breathing trouble.To avoid this, everyone in thevehicle should get out as soon asit is safe to do so. If you havebreathing problems but cannotget out of the vehicle after anairbag inflates, then get fresh airby opening a window or a door.If you experience breathing
(Continued)
Warning (Continued)
problems following an airbagdeployment, you should seekmedical attention.
The vehicle has a feature that mayautomatically unlock the doors, turnthe interior lamps on, turn on thehazard warning flashers and shut offthe fuel system after the airbagsinflate. The feature may alsoactivate, without airbag inflation,after an event that exceeds apredetermined threshold. You canlock the doors, turn the interiorlamps off and turn the hazardwarning flashers off by using thecontrols for those features.
{ Warning
A crash severe enough to inflatethe airbags may have alsodamaged important functions in
(Continued)
Warning (Continued)
the vehicle, such as the fuelsystem, brake and steeringsystems, etc. Even if the vehicleappears to be drivable after amoderate crash, there may beconcealed damage that couldmake it difficult to safely operatethe vehicle.
Use caution if you should attemptto restart the engine after a crashhas occurred.
In many crashes severe enough toinflate the airbag, windscreens arebroken by vehicle deformation.Additional windscreen breakagemay also occur from the frontpassenger airbag.. Airbags are designed to inflate
only once. After an airbaginflates, you will need some newparts for the airbag system.If you do not get them, theairbag system will not be there
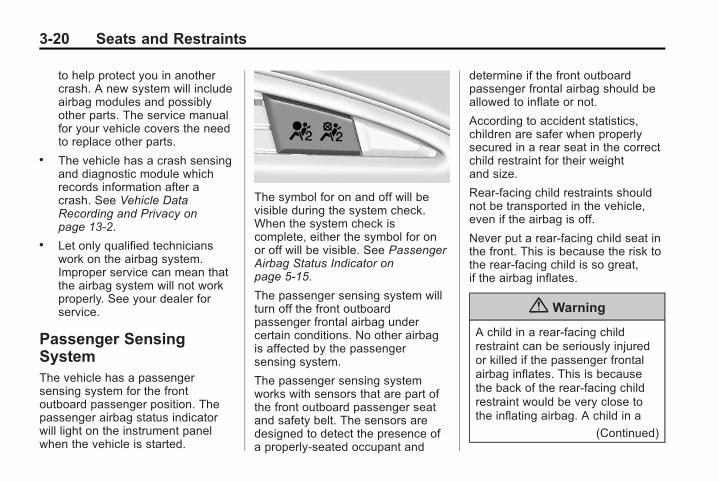
Black plate (20,1)Chevrolet Corvette Owner Manual (GMNA-Localizing-Europe-8087687) -2015 - CRC - 9/16/14
3-20 Seats and Restraints
to help protect you in anothercrash. A new system will includeairbag modules and possiblyother parts. The service manualfor your vehicle covers the needto replace other parts.
. The vehicle has a crash sensingand diagnostic module whichrecords information after acrash. See Vehicle DataRecording and Privacy onpage 13-2.
. Let only qualified technicianswork on the airbag system.Improper service can mean thatthe airbag system will not workproperly. See your dealer forservice.
Passenger SensingSystemThe vehicle has a passengersensing system for the frontoutboard passenger position. Thepassenger airbag status indicatorwill light on the instrument panelwhen the vehicle is started.
The symbol for on and off will bevisible during the system check.When the system check iscomplete, either the symbol for onor off will be visible. See PassengerAirbag Status Indicator onpage 5-15.
The passenger sensing system willturn off the front outboardpassenger frontal airbag undercertain conditions. No other airbagis affected by the passengersensing system.
The passenger sensing systemworks with sensors that are part ofthe front outboard passenger seatand safety belt. The sensors aredesigned to detect the presence ofa properly-seated occupant and
determine if the front outboardpassenger frontal airbag should beallowed to inflate or not.
According to accident statistics,children are safer when properlysecured in a rear seat in the correctchild restraint for their weightand size.
Rear-facing child restraints shouldnot be transported in the vehicle,even if the airbag is off.
Never put a rear-facing child seat inthe front. This is because the risk tothe rear-facing child is so great,if the airbag inflates.
{ Warning
A child in a rear-facing childrestraint can be seriously injuredor killed if the passenger frontalairbag inflates. This is becausethe back of the rear-facing childrestraint would be very close tothe inflating airbag. A child in a
(Continued)

Black plate (21,1)Chevrolet Corvette Owner Manual (GMNA-Localizing-Europe-8087687) -2015 - CRC - 9/16/14
Seats and Restraints 3-21
Warning (Continued)
forward-facing child restraint canbe seriously injured or killed if thepassenger frontal airbag inflatesand the passenger seat is in aforward position.
Even if the passenger sensingsystem has turned off thepassenger frontal airbag, nosystem is fail-safe. No one canguarantee that an airbag will notinflate under some unusualcircumstance, even though theairbag is off.
Secure rear-facing child restraintsin a rear seat, even if the airbagis off. If you secure aforward-facing child restraint inthe front outboard passengerseat, always move the seat as farback as it will go. It is better tosecure the child restraint in arear seat.
The passenger sensing system isdesigned to turn off the frontoutboard passenger frontal airbag if:. The front outboard passenger
seat is unoccupied.. The system determines an infant
is present in a child restraint.. A front outboard passenger
takes his/her weight off of theseat for a period of time.
. There is a critical problem withthe airbag system or thepassenger sensing system.
When the passenger sensingsystem has turned off the frontoutboard passenger frontal airbag,the off indicator will light and stay litas a reminder that the airbag is off.See Passenger Airbag StatusIndicator on page 5-15.
The passenger sensing system isdesigned to turn on the frontoutboard passenger frontal airbaganytime the system senses that a
person of adult size is sittingproperly in the front outboardpassenger seat.
When the passenger sensingsystem has allowed the airbag to beenabled, the on indicator will lightand stay lit as a reminder that theairbag is active.
For some children, includingchildren in child restraints, and forvery small adults, the passengersensing system may or may not turnoff the front outboard passengerfrontal airbag, depending upon theperson's seating posture and bodybuild. Everyone in the vehicle whohas outgrown child restraints shouldwear a safety belt properly -whether or not there is an airbag forthat person.
{ Warning
If the airbag readiness light evercomes on and stays on, it meansthat something may be wrong
(Continued)
Black plate (22,1)Chevrolet Corvette Owner Manual (GMNA-Localizing-Europe-8087687) -2015 - CRC - 9/16/14
3-22 Seats and Restraints
Warning (Continued)
with the airbag system. To helpavoid injury to yourself or others,have the vehicle serviced rightaway. See Airbag ReadinessLight on page 5-14 for moreinformation, including importantsafety information.
If the On Indicator Is Lit for aChild Restraint
The passenger sensing system isdesigned to turn off the frontoutboard passenger airbag if thesystem determines that an infant ispresent in a child restraint. If a childrestraint has been installed and theon indicator is lit:
1. Turn the vehicle off.
2. Remove the child restraint fromthe vehicle.
3. Remove any additional itemsfrom the seat such as blankets,cushions, seat covers, seatheaters, or seat massagers.
4. Reinstall the child restraintfollowing the directions providedby the child restraintmanufacturer and refer toSecuring Child Restraints onpage 3-36. Even if the childrestraint is equipped with asafety belt lock-off, make surethe safety belt retractor is lockedby pulling the shoulder belt allthe way out of the retractorbefore tightening the safety belt.When the retractor lock is set,the belt can be tightened but notpulled out of the retractor.
5. If, after reinstalling the childrestraint and restarting thevehicle, the on indicator is still lit,turn the vehicle off. Then slightlyrecline the vehicle seatback andadjust the seat cushion,if adjustable, to make sure thatthe vehicle seatback is notpushing the child restraint intothe seat cushion.
6. Restart the vehicle.
The passenger sensing system mayor may not turn off the airbag for achild in a child restraint dependingupon the child's size. It is better tosecure the child restraint in arear seat.
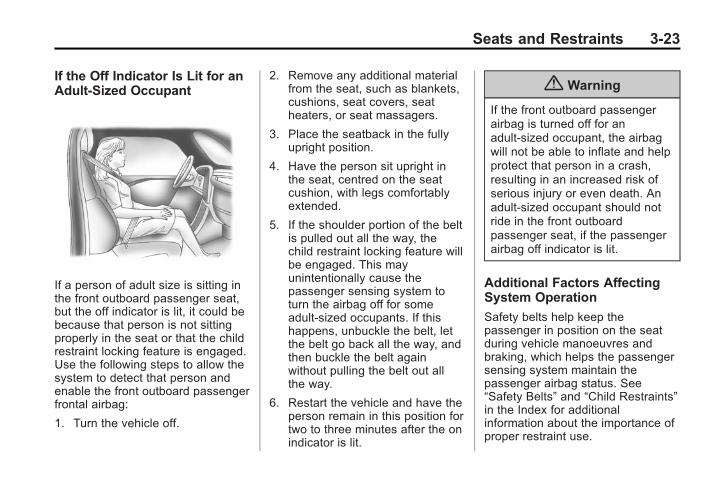
Black plate (23,1)Chevrolet Corvette Owner Manual (GMNA-Localizing-Europe-8087687) -2015 - CRC - 9/16/14
Seats and Restraints 3-23
If the Off Indicator Is Lit for anAdult-Sized Occupant
If a person of adult size is sitting inthe front outboard passenger seat,but the off indicator is lit, it could bebecause that person is not sittingproperly in the seat or that the childrestraint locking feature is engaged.Use the following steps to allow thesystem to detect that person andenable the front outboard passengerfrontal airbag:
1. Turn the vehicle off.
2. Remove any additional materialfrom the seat, such as blankets,cushions, seat covers, seatheaters, or seat massagers.
3. Place the seatback in the fullyupright position.
4. Have the person sit upright inthe seat, centred on the seatcushion, with legs comfortablyextended.
5. If the shoulder portion of the beltis pulled out all the way, thechild restraint locking feature willbe engaged. This mayunintentionally cause thepassenger sensing system toturn the airbag off for someadult-sized occupants. If thishappens, unbuckle the belt, letthe belt go back all the way, andthen buckle the belt againwithout pulling the belt out allthe way.
6. Restart the vehicle and have theperson remain in this position fortwo to three minutes after the onindicator is lit.
{ Warning
If the front outboard passengerairbag is turned off for anadult-sized occupant, the airbagwill not be able to inflate and helpprotect that person in a crash,resulting in an increased risk ofserious injury or even death. Anadult-sized occupant should notride in the front outboardpassenger seat, if the passengerairbag off indicator is lit.
Additional Factors AffectingSystem Operation
Safety belts help keep thepassenger in position on the seatduring vehicle manoeuvres andbraking, which helps the passengersensing system maintain thepassenger airbag status. See“Safety Belts” and “Child Restraints”in the Index for additionalinformation about the importance ofproper restraint use.
Black plate (24,1)Chevrolet Corvette Owner Manual (GMNA-Localizing-Europe-8087687) -2015 - CRC - 9/16/14
3-24 Seats and Restraints
A thick layer of additional material,such as a blanket or cushion,or aftermarket equipment such asseat covers, seat heaters, and seatmassagers can affect how well thepassenger sensing systemoperates. We recommend that younot use seat covers or otheraftermarket equipment except whenapproved by GM for your specificvehicle. See Adding Equipment tothe Airbag-Equipped Vehicle onpage 3-25 for more informationabout modifications that can affecthow the system operates.
The on indicator may be lit if anobject, such as a briefcase,handbag, grocery bag, laptop,or other electronic device, is put onan unoccupied seat. If this is notdesired, remove the object fromthe seat.
{ Warning
Stowing of articles under thepassenger seat or between thepassenger seat cushion andseatback may interfere with theproper operation of the passengersensing system.
Servicing theAirbag-Equipped VehicleAirbags affect how the vehicleshould be serviced. There are partsof the airbag system in severalplaces around the vehicle. Yourdealer and the service manual haveinformation about servicing thevehicle and the airbag system.
{ Warning
For up to 10 seconds after thevehicle is turned off and thebattery is disconnected, an airbag
(Continued)
Warning (Continued)
can still inflate during improperservice. You can be injured if youare close to an airbag when itinflates. Avoid yellow connectors.They are probably part of theairbag system. Be sure to followproper service procedures, andmake sure the person performingwork for you is qualified to do so.
{ Warning
Safety procedures must alwaysbe observed when disposing ofthe vehicle or vehicle parts.Disposal should only beperformed by an authorisedservice centre, to help protect theenvironment and your health.
Black plate (25,1)Chevrolet Corvette Owner Manual (GMNA-Localizing-Europe-8087687) -2015 - CRC - 9/16/14
Seats and Restraints 3-25
Adding Equipment to theAirbag-Equipped VehicleAdding accessories that change thevehicle's frame, bumper system,height, front end or side sheetmetal, may keep the airbag systemfrom working properly. Theoperation of the airbag system canalso be affected by changing ormoving any parts of the front seats,safety belts, the airbag sensing anddiagnostic module, steering wheel,instrument panel, front sensors,or airbag wiring.
Your dealer and the service manualhave information about the locationof the airbag sensors, sensing anddiagnostic module, and airbagwiring.
In addition, the vehicle has apassenger sensing system for thefront outboard passenger position,which includes sensors that are partof the passenger seat. Thepassenger sensing system may notoperate properly if the original seattrim is replaced with non-GM
covers, upholstery or trim, or withGM covers, upholstery or trimdesigned for a different vehicle. Anyobject, such as an aftermarket seatheater or a comfort enhancing pador device, installed under or on topof the seat fabric, could alsointerfere with the operation of thepassenger sensing system. Thiscould either prevent properdeployment of the passengerairbag(s) or prevent the passengersensing system from properlyturning off the passenger airbag(s).See Passenger Sensing System onpage 3-20.
If you have to modify your vehiclebecause you have a disability andhave questions about whether themodifications will affect the vehicle'sairbag system, or if you havequestions about whether the airbagsystem will be affected if the vehicleis modified for any other reason,see your dealer.
Airbag System CheckThe airbag system does not needregularly scheduled maintenance orreplacement. Make sure the airbagreadiness light is working. SeeAirbag Readiness Light onpage 5-14.
{ Caution
If an airbag covering is damaged,opened, or broken, the airbagmay not work properly. Do notopen or break the airbagcoverings. If there are anyopened or broken airbagcoverings, have the airbagcovering and/or airbag modulereplaced. For the location of theairbags, see Where Are theAirbags? on page 3-16. See yourdealer for service.
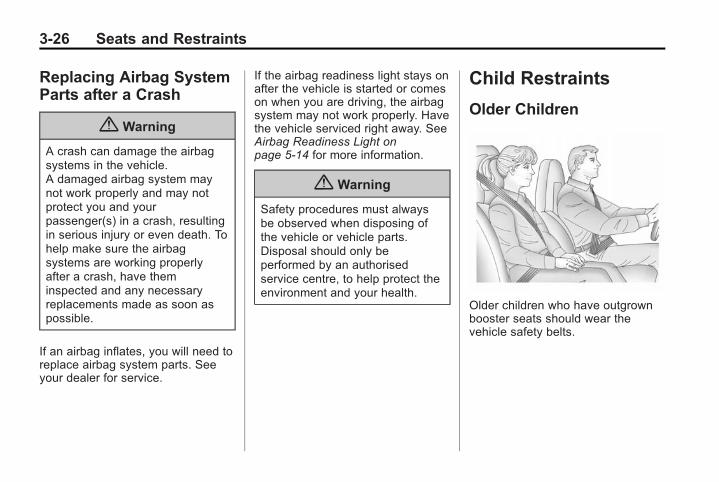
Black plate (26,1)Chevrolet Corvette Owner Manual (GMNA-Localizing-Europe-8087687) -2015 - CRC - 9/16/14
3-26 Seats and Restraints
Replacing Airbag SystemParts after a Crash
{ Warning
A crash can damage the airbagsystems in the vehicle.A damaged airbag system maynot work properly and may notprotect you and yourpassenger(s) in a crash, resultingin serious injury or even death. Tohelp make sure the airbagsystems are working properlyafter a crash, have theminspected and any necessaryreplacements made as soon aspossible.
If an airbag inflates, you will need toreplace airbag system parts. Seeyour dealer for service.
If the airbag readiness light stays onafter the vehicle is started or comeson when you are driving, the airbagsystem may not work properly. Havethe vehicle serviced right away. SeeAirbag Readiness Light onpage 5-14 for more information.
{ Warning
Safety procedures must alwaysbe observed when disposing ofthe vehicle or vehicle parts.Disposal should only beperformed by an authorisedservice centre, to help protect theenvironment and your health.
Child Restraints
Older Children
Older children who have outgrownbooster seats should wear thevehicle safety belts.
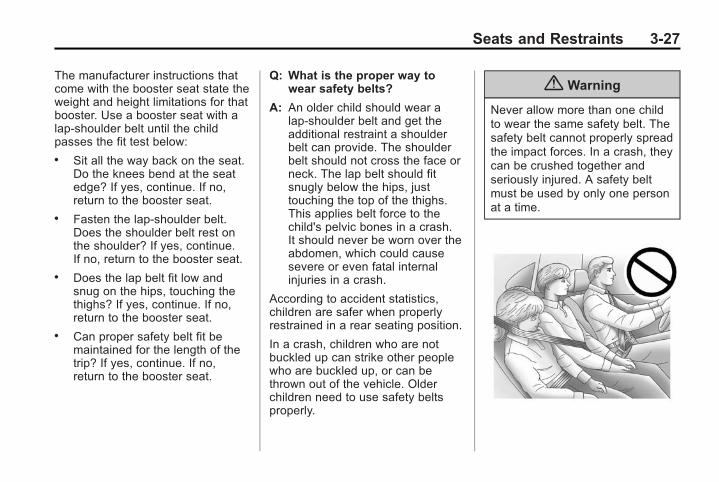
Black plate (27,1)Chevrolet Corvette Owner Manual (GMNA-Localizing-Europe-8087687) -2015 - CRC - 9/16/14
Seats and Restraints 3-27
The manufacturer instructions thatcome with the booster seat state theweight and height limitations for thatbooster. Use a booster seat with alap-shoulder belt until the childpasses the fit test below:. Sit all the way back on the seat.
Do the knees bend at the seatedge? If yes, continue. If no,return to the booster seat.
. Fasten the lap-shoulder belt.Does the shoulder belt rest onthe shoulder? If yes, continue.If no, return to the booster seat.
. Does the lap belt fit low andsnug on the hips, touching thethighs? If yes, continue. If no,return to the booster seat.
. Can proper safety belt fit bemaintained for the length of thetrip? If yes, continue. If no,return to the booster seat.
Q: What is the proper way towear safety belts?
A: An older child should wear alap-shoulder belt and get theadditional restraint a shoulderbelt can provide. The shoulderbelt should not cross the face orneck. The lap belt should fitsnugly below the hips, justtouching the top of the thighs.This applies belt force to thechild's pelvic bones in a crash.It should never be worn over theabdomen, which could causesevere or even fatal internalinjuries in a crash.
According to accident statistics,children are safer when properlyrestrained in a rear seating position.
In a crash, children who are notbuckled up can strike other peoplewho are buckled up, or can bethrown out of the vehicle. Olderchildren need to use safety beltsproperly.
{ Warning
Never allow more than one childto wear the same safety belt. Thesafety belt cannot properly spreadthe impact forces. In a crash, theycan be crushed together andseriously injured. A safety beltmust be used by only one personat a time.
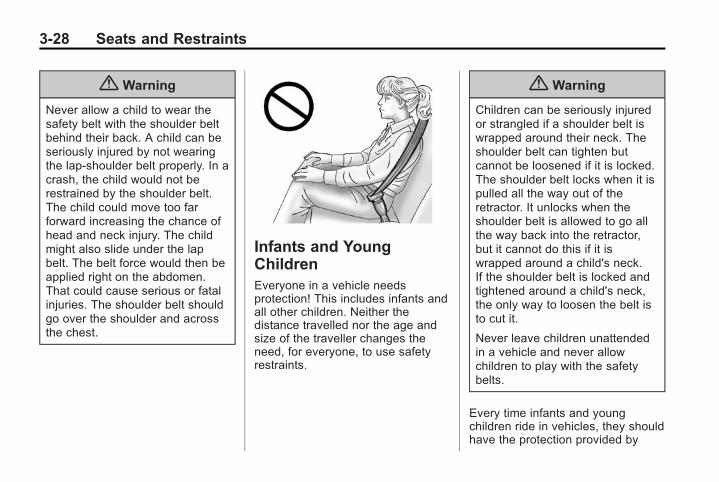
Black plate (28,1)Chevrolet Corvette Owner Manual (GMNA-Localizing-Europe-8087687) -2015 - CRC - 9/16/14
3-28 Seats and Restraints
{ Warning
Never allow a child to wear thesafety belt with the shoulder beltbehind their back. A child can beseriously injured by not wearingthe lap-shoulder belt properly. In acrash, the child would not berestrained by the shoulder belt.The child could move too farforward increasing the chance ofhead and neck injury. The childmight also slide under the lapbelt. The belt force would then beapplied right on the abdomen.That could cause serious or fatalinjuries. The shoulder belt shouldgo over the shoulder and acrossthe chest.
Infants and YoungChildrenEveryone in a vehicle needsprotection! This includes infants andall other children. Neither thedistance travelled nor the age andsize of the traveller changes theneed, for everyone, to use safetyrestraints.
{ Warning
Children can be seriously injuredor strangled if a shoulder belt iswrapped around their neck. Theshoulder belt can tighten butcannot be loosened if it is locked.The shoulder belt locks when it ispulled all the way out of theretractor. It unlocks when theshoulder belt is allowed to go allthe way back into the retractor,but it cannot do this if it iswrapped around a child's neck.If the shoulder belt is locked andtightened around a child's neck,the only way to loosen the belt isto cut it.
Never leave children unattendedin a vehicle and never allowchildren to play with the safetybelts.
Every time infants and youngchildren ride in vehicles, they shouldhave the protection provided by
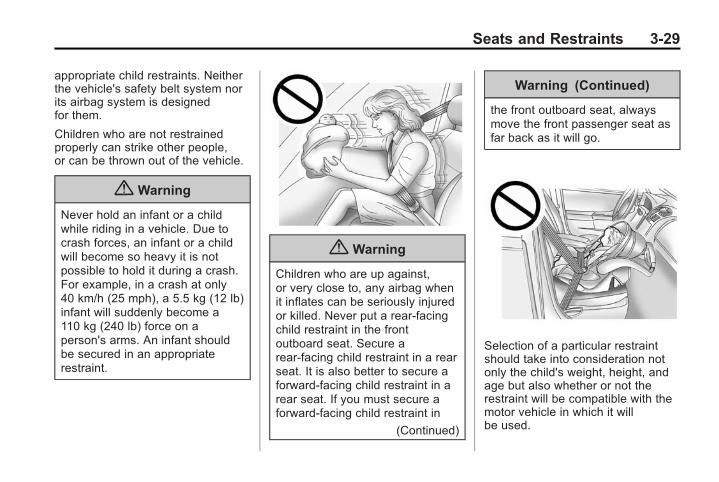
Black plate (29,1)Chevrolet Corvette Owner Manual (GMNA-Localizing-Europe-8087687) -2015 - CRC - 9/16/14
Seats and Restraints 3-29
appropriate child restraints. Neitherthe vehicle's safety belt system norits airbag system is designedfor them.
Children who are not restrainedproperly can strike other people,or can be thrown out of the vehicle.
{ Warning
Never hold an infant or a childwhile riding in a vehicle. Due tocrash forces, an infant or a childwill become so heavy it is notpossible to hold it during a crash.For example, in a crash at only40 km/h (25 mph), a 5.5 kg (12 lb)infant will suddenly become a110 kg (240 lb) force on aperson's arms. An infant shouldbe secured in an appropriaterestraint.
{ Warning
Children who are up against,or very close to, any airbag whenit inflates can be seriously injuredor killed. Never put a rear-facingchild restraint in the frontoutboard seat. Secure arear-facing child restraint in a rearseat. It is also better to secure aforward-facing child restraint in arear seat. If you must secure aforward-facing child restraint in
(Continued)
Warning (Continued)
the front outboard seat, alwaysmove the front passenger seat asfar back as it will go.
Selection of a particular restraintshould take into consideration notonly the child's weight, height, andage but also whether or not therestraint will be compatible with themotor vehicle in which it willbe used.
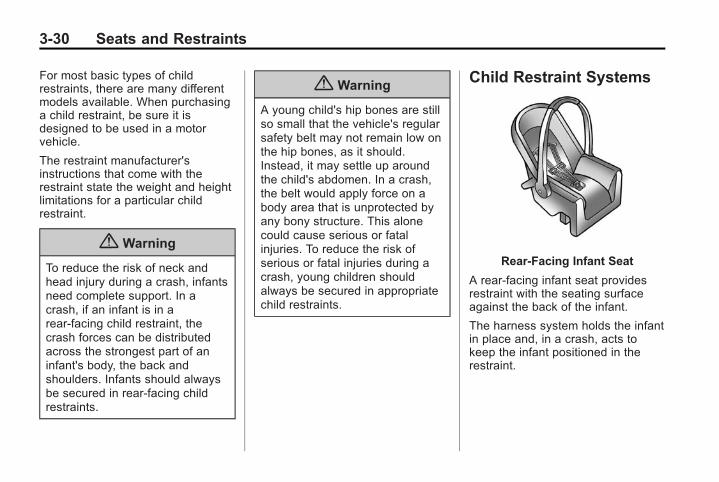
Black plate (30,1)Chevrolet Corvette Owner Manual (GMNA-Localizing-Europe-8087687) -2015 - CRC - 9/16/14
3-30 Seats and Restraints
For most basic types of childrestraints, there are many differentmodels available. When purchasinga child restraint, be sure it isdesigned to be used in a motorvehicle.
The restraint manufacturer'sinstructions that come with therestraint state the weight and heightlimitations for a particular childrestraint.
{ Warning
To reduce the risk of neck andhead injury during a crash, infantsneed complete support. In acrash, if an infant is in arear-facing child restraint, thecrash forces can be distributedacross the strongest part of aninfant's body, the back andshoulders. Infants should alwaysbe secured in rear-facing childrestraints.
{ Warning
A young child's hip bones are stillso small that the vehicle's regularsafety belt may not remain low onthe hip bones, as it should.Instead, it may settle up aroundthe child's abdomen. In a crash,the belt would apply force on abody area that is unprotected byany bony structure. This alonecould cause serious or fatalinjuries. To reduce the risk ofserious or fatal injuries during acrash, young children shouldalways be secured in appropriatechild restraints.
Child Restraint Systems
Rear-Facing Infant Seat
A rear-facing infant seat providesrestraint with the seating surfaceagainst the back of the infant.
The harness system holds the infantin place and, in a crash, acts tokeep the infant positioned in therestraint.
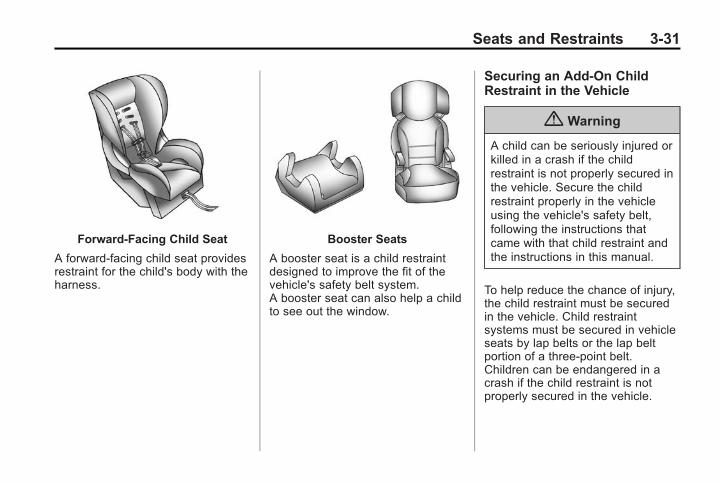
Black plate (31,1)Chevrolet Corvette Owner Manual (GMNA-Localizing-Europe-8087687) -2015 - CRC - 9/16/14
Seats and Restraints 3-31
Forward-Facing Child Seat
A forward-facing child seat providesrestraint for the child's body with theharness.
Booster Seats
A booster seat is a child restraintdesigned to improve the fit of thevehicle's safety belt system.A booster seat can also help a childto see out the window.
Securing an Add-On ChildRestraint in the Vehicle
{ Warning
A child can be seriously injured orkilled in a crash if the childrestraint is not properly secured inthe vehicle. Secure the childrestraint properly in the vehicleusing the vehicle's safety belt,following the instructions thatcame with that child restraint andthe instructions in this manual.
To help reduce the chance of injury,the child restraint must be securedin the vehicle. Child restraintsystems must be secured in vehicleseats by lap belts or the lap beltportion of a three-point belt.Children can be endangered in acrash if the child restraint is notproperly secured in the vehicle.
Black plate (32,1)Chevrolet Corvette Owner Manual (GMNA-Localizing-Europe-8087687) -2015 - CRC - 9/16/14
3-32 Seats and Restraints
When securing an add-on childrestraint, refer to the instructionsthat come with the restraint whichmay be on the restraint itself or in abooklet, or both, and to this manual.The child restraint instructions areimportant, so if they are notavailable, obtain a replacementcopy from the manufacturer.
Keep in mind that an unsecuredchild restraint can move around in acollision or sudden stop and injurepeople in the vehicle. Be sure toproperly secure any child restraint inthe vehicle - even when no child isin it.
Securing the Child within theChild Restraint
{ Warning
A child can be seriously injured orkilled in a crash if the child is notproperly secured in the childrestraint. Secure the childproperly following the instructionsthat came with that child restraint.
Where to Put theRestraintAccording to accident statistics,children and infants are safer whenproperly restrained in a childrestraint system or infant restraintsystem secured in a rear seatingposition.
Whenever possible, children age12 and under should be secured ina rear seating position.
{ Warning
Do not use a rearward facingchild restraint on a seat protectedby an airbag in front of it!
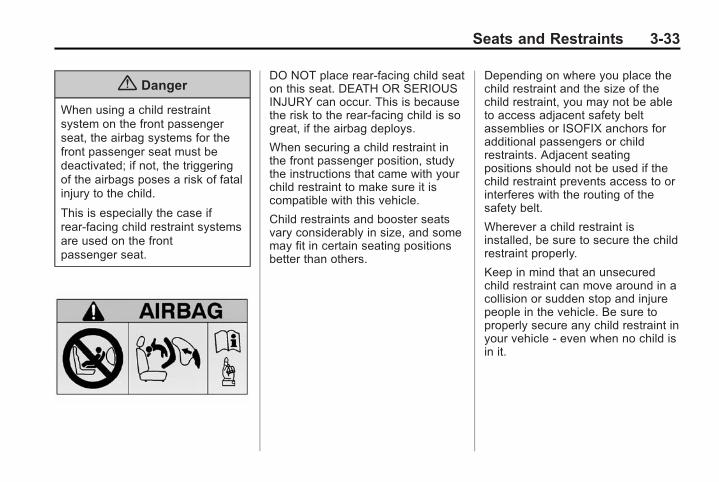
Black plate (33,1)Chevrolet Corvette Owner Manual (GMNA-Localizing-Europe-8087687) -2015 - CRC - 9/16/14
Seats and Restraints 3-33
{ Danger
When using a child restraintsystem on the front passengerseat, the airbag systems for thefront passenger seat must bedeactivated; if not, the triggeringof the airbags poses a risk of fatalinjury to the child.
This is especially the case ifrear-facing child restraint systemsare used on the frontpassenger seat.
DO NOT place rear-facing child seaton this seat. DEATH OR SERIOUSINJURY can occur. This is becausethe risk to the rear-facing child is sogreat, if the airbag deploys.
When securing a child restraint inthe front passenger position, studythe instructions that came with yourchild restraint to make sure it iscompatible with this vehicle.
Child restraints and booster seatsvary considerably in size, and somemay fit in certain seating positionsbetter than others.
Depending on where you place thechild restraint and the size of thechild restraint, you may not be ableto access adjacent safety beltassemblies or ISOFIX anchors foradditional passengers or childrestraints. Adjacent seatingpositions should not be used if thechild restraint prevents access to orinterferes with the routing of thesafety belt.
Wherever a child restraint isinstalled, be sure to secure the childrestraint properly.
Keep in mind that an unsecuredchild restraint can move around in acollision or sudden stop and injurepeople in the vehicle. Be sure toproperly secure any child restraint inyour vehicle - even when no child isin it.
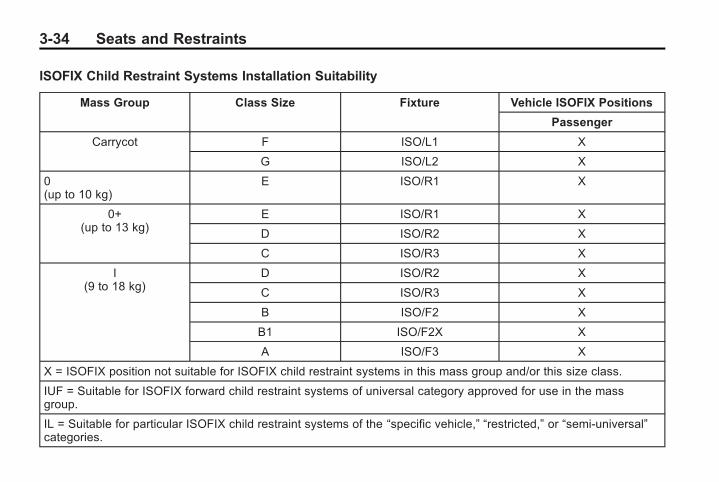
Black plate (34,1)Chevrolet Corvette Owner Manual (GMNA-Localizing-Europe-8087687) -2015 - CRC - 9/16/14
3-34 Seats and Restraints
ISOFIX Child Restraint Systems Installation Suitability
Mass Group Class Size Fixture Vehicle ISOFIX Positions
Passenger
Carrycot F ISO/L1 X
G ISO/L2 X
0(up to 10 kg)
E ISO/R1 X
0+(up to 13 kg)
E ISO/R1 X
D ISO/R2 X
C ISO/R3 X
I(9 to 18 kg)
D ISO/R2 X
C ISO/R3 X
B ISO/F2 X
B1 ISO/F2X X
A ISO/F3 X
X = ISOFIX position not suitable for ISOFIX child restraint systems in this mass group and/or this size class.
IUF = Suitable for ISOFIX forward child restraint systems of universal category approved for use in the massgroup.
IL = Suitable for particular ISOFIX child restraint systems of the “specific vehicle,” “restricted,” or “semi-universal”categories.
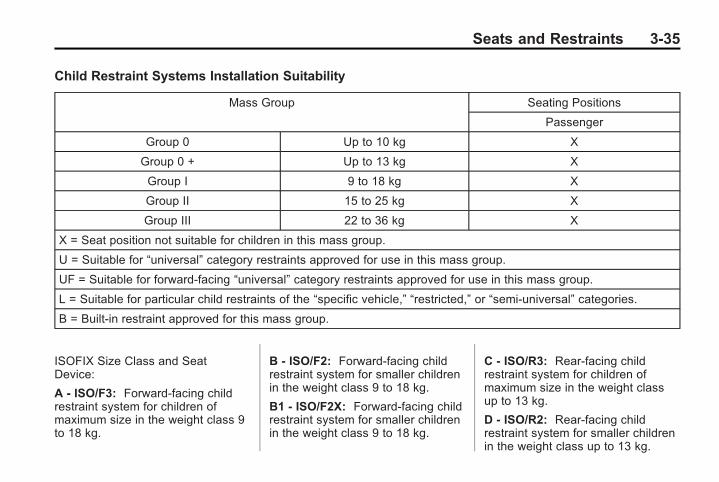
Black plate (35,1)Chevrolet Corvette Owner Manual (GMNA-Localizing-Europe-8087687) -2015 - CRC - 9/16/14
Seats and Restraints 3-35
Child Restraint Systems Installation Suitability
Mass Group Seating Positions
Passenger
Group 0 Up to 10 kg X
Group 0 + Up to 13 kg X
Group I 9 to 18 kg X
Group II 15 to 25 kg X
Group III 22 to 36 kg X
X = Seat position not suitable for children in this mass group.
U = Suitable for “universal” category restraints approved for use in this mass group.
UF = Suitable for forward-facing “universal” category restraints approved for use in this mass group.
L = Suitable for particular child restraints of the “specific vehicle,” “restricted,” or “semi-universal” categories.
B = Built-in restraint approved for this mass group.
ISOFIX Size Class and SeatDevice:
A - ISO/F3: Forward-facing childrestraint system for children ofmaximum size in the weight class 9to 18 kg.
B - ISO/F2: Forward-facing childrestraint system for smaller childrenin the weight class 9 to 18 kg.
B1 - ISO/F2X: Forward-facing childrestraint system for smaller childrenin the weight class 9 to 18 kg.
C - ISO/R3: Rear-facing childrestraint system for children ofmaximum size in the weight classup to 13 kg.
D - ISO/R2: Rear-facing childrestraint system for smaller childrenin the weight class up to 13 kg.
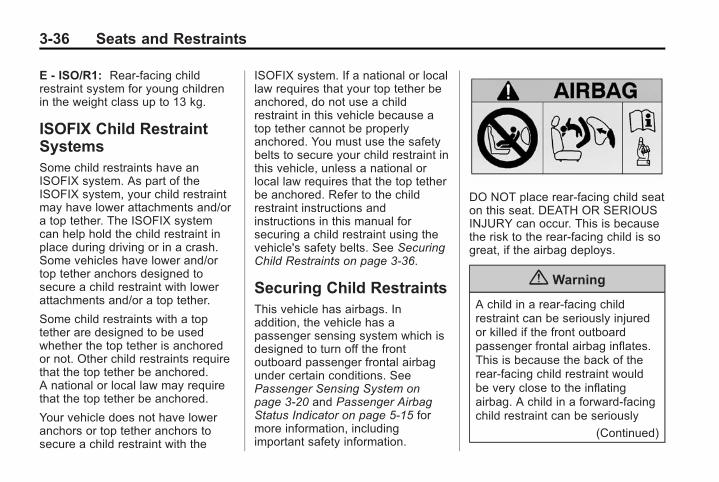
Black plate (36,1)Chevrolet Corvette Owner Manual (GMNA-Localizing-Europe-8087687) -2015 - CRC - 9/16/14
3-36 Seats and Restraints
E - ISO/R1: Rear-facing childrestraint system for young childrenin the weight class up to 13 kg.
ISOFIX Child RestraintSystemsSome child restraints have anISOFIX system. As part of theISOFIX system, your child restraintmay have lower attachments and/ora top tether. The ISOFIX systemcan help hold the child restraint inplace during driving or in a crash.Some vehicles have lower and/ortop tether anchors designed tosecure a child restraint with lowerattachments and/or a top tether.
Some child restraints with a toptether are designed to be usedwhether the top tether is anchoredor not. Other child restraints requirethat the top tether be anchored.A national or local law may requirethat the top tether be anchored.
Your vehicle does not have loweranchors or top tether anchors tosecure a child restraint with the
ISOFIX system. If a national or locallaw requires that your top tether beanchored, do not use a childrestraint in this vehicle because atop tether cannot be properlyanchored. You must use the safetybelts to secure your child restraint inthis vehicle, unless a national orlocal law requires that the top tetherbe anchored. Refer to the childrestraint instructions andinstructions in this manual forsecuring a child restraint using thevehicle's safety belts. See SecuringChild Restraints on page 3-36.
Securing Child RestraintsThis vehicle has airbags. Inaddition, the vehicle has apassenger sensing system which isdesigned to turn off the frontoutboard passenger frontal airbagunder certain conditions. SeePassenger Sensing System onpage 3-20 and Passenger AirbagStatus Indicator on page 5-15 formore information, includingimportant safety information.
DO NOT place rear-facing child seaton this seat. DEATH OR SERIOUSINJURY can occur. This is becausethe risk to the rear-facing child is sogreat, if the airbag deploys.
{ Warning
A child in a rear-facing childrestraint can be seriously injuredor killed if the front outboardpassenger frontal airbag inflates.This is because the back of therear-facing child restraint wouldbe very close to the inflatingairbag. A child in a forward-facingchild restraint can be seriously
(Continued)
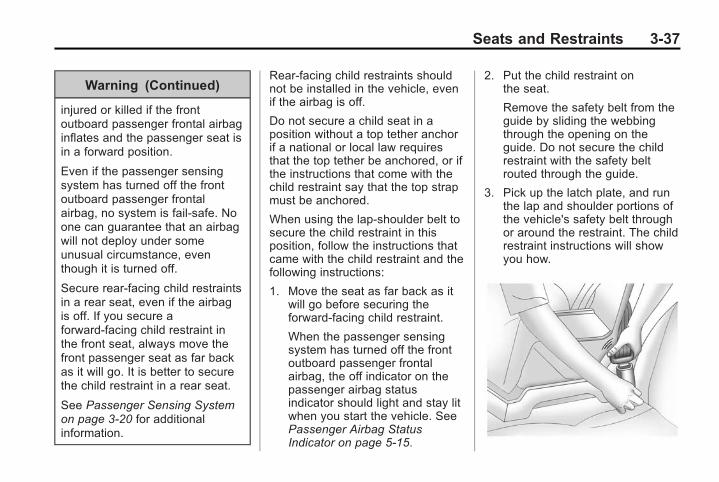
Black plate (37,1)Chevrolet Corvette Owner Manual (GMNA-Localizing-Europe-8087687) -2015 - CRC - 9/16/14
Seats and Restraints 3-37
Warning (Continued)
injured or killed if the frontoutboard passenger frontal airbaginflates and the passenger seat isin a forward position.
Even if the passenger sensingsystem has turned off the frontoutboard passenger frontalairbag, no system is fail-safe. Noone can guarantee that an airbagwill not deploy under someunusual circumstance, eventhough it is turned off.
Secure rear-facing child restraintsin a rear seat, even if the airbagis off. If you secure aforward-facing child restraint inthe front seat, always move thefront passenger seat as far backas it will go. It is better to securethe child restraint in a rear seat.
See Passenger Sensing Systemon page 3-20 for additionalinformation.
Rear-facing child restraints shouldnot be installed in the vehicle, evenif the airbag is off.
Do not secure a child seat in aposition without a top tether anchorif a national or local law requiresthat the top tether be anchored, or ifthe instructions that come with thechild restraint say that the top strapmust be anchored.
When using the lap-shoulder belt tosecure the child restraint in thisposition, follow the instructions thatcame with the child restraint and thefollowing instructions:
1. Move the seat as far back as itwill go before securing theforward-facing child restraint.
When the passenger sensingsystem has turned off the frontoutboard passenger frontalairbag, the off indicator on thepassenger airbag statusindicator should light and stay litwhen you start the vehicle. SeePassenger Airbag StatusIndicator on page 5-15.
2. Put the child restraint onthe seat.
Remove the safety belt from theguide by sliding the webbingthrough the opening on theguide. Do not secure the childrestraint with the safety beltrouted through the guide.
3. Pick up the latch plate, and runthe lap and shoulder portions ofthe vehicle's safety belt throughor around the restraint. The childrestraint instructions will showyou how.
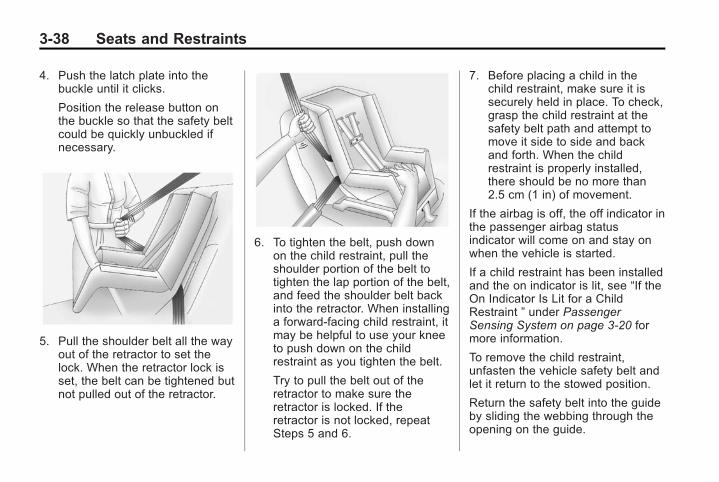
Black plate (38,1)Chevrolet Corvette Owner Manual (GMNA-Localizing-Europe-8087687) -2015 - CRC - 9/16/14
3-38 Seats and Restraints
4. Push the latch plate into thebuckle until it clicks.
Position the release button onthe buckle so that the safety beltcould be quickly unbuckled ifnecessary.
5. Pull the shoulder belt all the wayout of the retractor to set thelock. When the retractor lock isset, the belt can be tightened butnot pulled out of the retractor.
6. To tighten the belt, push downon the child restraint, pull theshoulder portion of the belt totighten the lap portion of the belt,and feed the shoulder belt backinto the retractor. When installinga forward-facing child restraint, itmay be helpful to use your kneeto push down on the childrestraint as you tighten the belt.
Try to pull the belt out of theretractor to make sure theretractor is locked. If theretractor is not locked, repeatSteps 5 and 6.
7. Before placing a child in thechild restraint, make sure it issecurely held in place. To check,grasp the child restraint at thesafety belt path and attempt tomove it side to side and backand forth. When the childrestraint is properly installed,there should be no more than2.5 cm (1 in) of movement.
If the airbag is off, the off indicator inthe passenger airbag statusindicator will come on and stay onwhen the vehicle is started.
If a child restraint has been installedand the on indicator is lit, see “If theOn Indicator Is Lit for a ChildRestraint ” under PassengerSensing System on page 3-20 formore information.
To remove the child restraint,unfasten the vehicle safety belt andlet it return to the stowed position.
Return the safety belt into the guideby sliding the webbing through theopening on the guide.
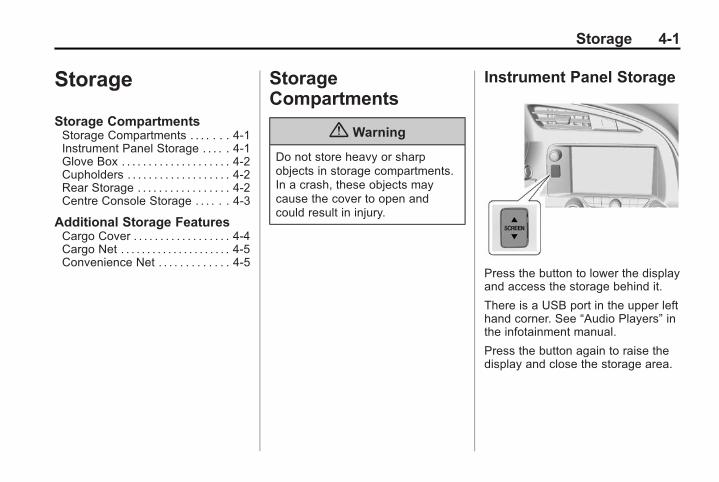
Black plate (1,1)Chevrolet Corvette Owner Manual (GMNA-Localizing-Europe-8087687) -2015 - CRC - 9/16/14
Storage 4-1
Storage
Storage CompartmentsStorage Compartments . . . . . . . 4-1Instrument Panel Storage . . . . . 4-1Glove Box . . . . . . . . . . . . . . . . . . . . 4-2Cupholders . . . . . . . . . . . . . . . . . . . 4-2Rear Storage . . . . . . . . . . . . . . . . . 4-2Centre Console Storage . . . . . . 4-3
Additional Storage FeaturesCargo Cover . . . . . . . . . . . . . . . . . . 4-4Cargo Net . . . . . . . . . . . . . . . . . . . . . 4-5Convenience Net . . . . . . . . . . . . . 4-5
StorageCompartments
{ Warning
Do not store heavy or sharpobjects in storage compartments.In a crash, these objects maycause the cover to open andcould result in injury.
Instrument Panel Storage
Press the button to lower the displayand access the storage behind it.
There is a USB port in the upper lefthand corner. See “Audio Players” inthe infotainment manual.
Press the button again to raise thedisplay and close the storage area.
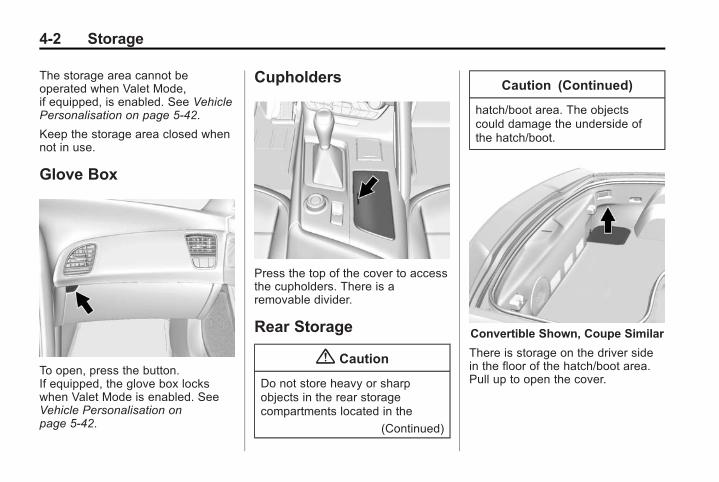
Black plate (2,1)Chevrolet Corvette Owner Manual (GMNA-Localizing-Europe-8087687) -2015 - CRC - 9/16/14
4-2 Storage
The storage area cannot beoperated when Valet Mode,if equipped, is enabled. See VehiclePersonalisation on page 5-42.
Keep the storage area closed whennot in use.
Glove Box
To open, press the button.If equipped, the glove box lockswhen Valet Mode is enabled. SeeVehicle Personalisation onpage 5-42.
Cupholders
Press the top of the cover to accessthe cupholders. There is aremovable divider.
Rear Storage
{ Caution
Do not store heavy or sharpobjects in the rear storagecompartments located in the
(Continued)
Caution (Continued)
hatch/boot area. The objectscould damage the underside ofthe hatch/boot.
Convertible Shown, Coupe Similar
There is storage on the driver sidein the floor of the hatch/boot area.Pull up to open the cover.
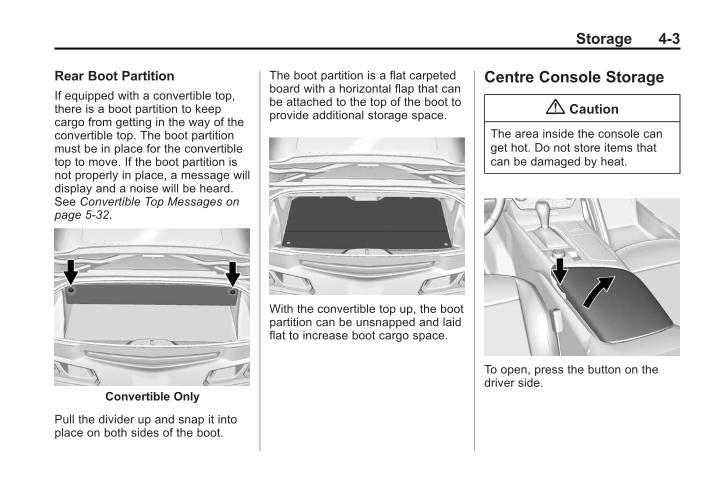
Black plate (3,1)Chevrolet Corvette Owner Manual (GMNA-Localizing-Europe-8087687) -2015 - CRC - 9/16/14
Storage 4-3
Rear Boot Partition
If equipped with a convertible top,there is a boot partition to keepcargo from getting in the way of theconvertible top. The boot partitionmust be in place for the convertibletop to move. If the boot partition isnot properly in place, a message willdisplay and a noise will be heard.See Convertible Top Messages onpage 5-32.
Convertible Only
Pull the divider up and snap it intoplace on both sides of the boot.
The boot partition is a flat carpetedboard with a horizontal flap that canbe attached to the top of the boot toprovide additional storage space.
With the convertible top up, the bootpartition can be unsnapped and laidflat to increase boot cargo space.
Centre Console Storage
{ Caution
The area inside the console canget hot. Do not store items thatcan be damaged by heat.
To open, press the button on thedriver side.
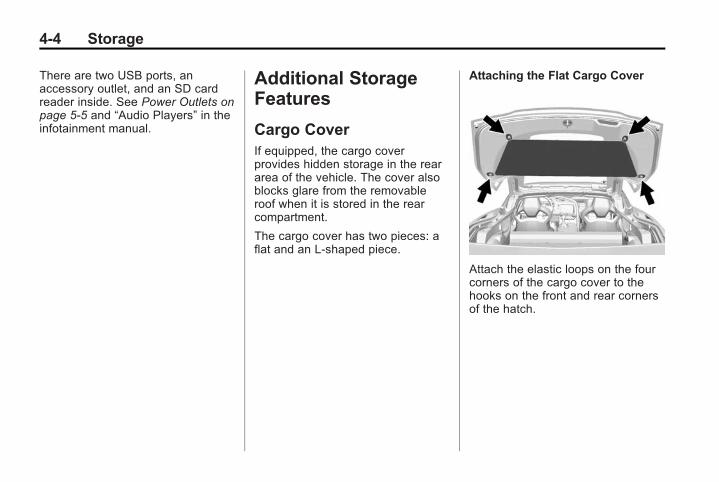
Black plate (4,1)Chevrolet Corvette Owner Manual (GMNA-Localizing-Europe-8087687) -2015 - CRC - 9/16/14
4-4 Storage
There are two USB ports, anaccessory outlet, and an SD cardreader inside. See Power Outlets onpage 5-5 and “Audio Players” in theinfotainment manual.
Additional StorageFeatures
Cargo CoverIf equipped, the cargo coverprovides hidden storage in the reararea of the vehicle. The cover alsoblocks glare from the removableroof when it is stored in the rearcompartment.
The cargo cover has two pieces: aflat and an L-shaped piece.
Attaching the Flat Cargo Cover
Attach the elastic loops on the fourcorners of the cargo cover to thehooks on the front and rear cornersof the hatch.
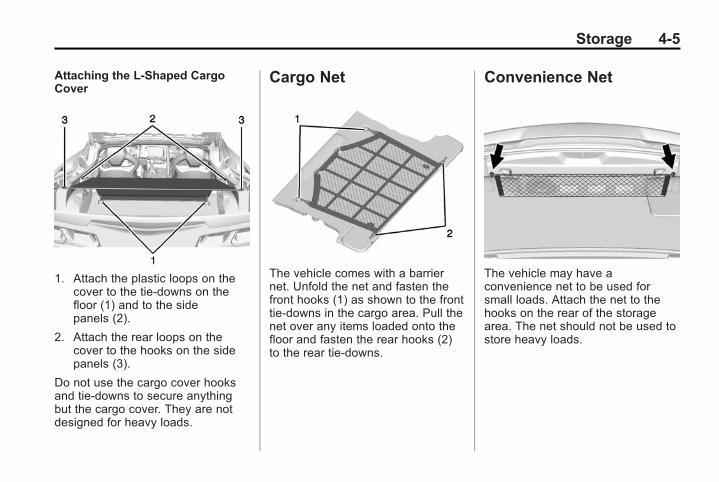
Black plate (5,1)Chevrolet Corvette Owner Manual (GMNA-Localizing-Europe-8087687) -2015 - CRC - 9/16/14
Storage 4-5
Attaching the L-Shaped CargoCover
1. Attach the plastic loops on thecover to the tie-downs on thefloor (1) and to the sidepanels (2).
2. Attach the rear loops on thecover to the hooks on the sidepanels (3).
Do not use the cargo cover hooksand tie-downs to secure anythingbut the cargo cover. They are notdesigned for heavy loads.
Cargo Net
The vehicle comes with a barriernet. Unfold the net and fasten thefront hooks (1) as shown to the fronttie-downs in the cargo area. Pull thenet over any items loaded onto thefloor and fasten the rear hooks (2)to the rear tie-downs.
Convenience Net
The vehicle may have aconvenience net to be used forsmall loads. Attach the net to thehooks on the rear of the storagearea. The net should not be used tostore heavy loads.

Black plate (6,1)Chevrolet Corvette Owner Manual (GMNA-Localizing-Europe-8087687) -2015 - CRC - 9/16/14
4-6 Storage
2 NOTES
Black plate (1,1)Chevrolet Corvette Owner Manual (GMNA-Localizing-Europe-8087687) -2015 - CRC - 9/16/14
Instruments and Controls 5-1
Instruments andControls
ControlsSteering Wheel Adjustment . . . 5-2Steering Wheel Controls . . . . . . 5-2Horn . . . . . . . . . . . . . . . . . . . . . . . . . . 5-2Windscreen Wiper/Washer . . . . 5-3Headlamp Washer . . . . . . . . . . . . 5-4Clock . . . . . . . . . . . . . . . . . . . . . . . . . 5-4Power Sockets . . . . . . . . . . . . . . . . 5-5Cigarette Lighter . . . . . . . . . . . . . . 5-6Ashtrays . . . . . . . . . . . . . . . . . . . . . . 5-7
Warning Lights, Gauges, andIndicatorsWarning Lights, Gauges, andIndicators . . . . . . . . . . . . . . . . . . . . 5-7
Instrument Cluster . . . . . . . . . . . . 5-8Speedometer . . . . . . . . . . . . . . . . 5-12Mileometer . . . . . . . . . . . . . . . . . . . 5-12Trip Odometer . . . . . . . . . . . . . . . 5-12Rev Counter . . . . . . . . . . . . . . . . . 5-12Fuel Gauge . . . . . . . . . . . . . . . . . . 5-13Engine Coolant TemperatureGauge . . . . . . . . . . . . . . . . . . . . . . 5-13
Seat Belt Reminders . . . . . . . . . 5-14
Airbag Readiness Light . . . . . . 5-14Passenger Airbag StatusIndicator . . . . . . . . . . . . . . . . . . . . 5-15
Charging System Light . . . . . . 5-16MalfunctionIndicator Lamp . . . . . . . . . . . . . 5-16
Brake System WarningLight . . . . . . . . . . . . . . . . . . . . . . . 5-19
Electric Parking BrakeLight . . . . . . . . . . . . . . . . . . . . . . . 5-19
Service Electric Parking BrakeLight . . . . . . . . . . . . . . . . . . . . . . . 5-20
Antilock Brake System (ABS)Warning Light . . . . . . . . . . . . . . 5-20
Gear Shifting Light . . . . . . . . . . . 5-20Traction Off Light . . . . . . . . . . . . 5-21StabiliTrak® OFF Light . . . . . . . 5-21Traction Control System(TCS)/StabiliTrak® Light . . . . 5-21
Engine Coolant TemperatureWarning Light . . . . . . . . . . . . . . 5-22
Tyre Pressure Light . . . . . . . . . . 5-22Engine Oil Pressure Light . . . . 5-23Low Fuel Warning Light . . . . . . 5-23Security Light . . . . . . . . . . . . . . . . 5-24Main-Beam On Light . . . . . . . . . 5-24Rear Fog Lamp Light . . . . . . . . 5-24
Lamps On Reminder . . . . . . . . . 5-24Cruise Control Light . . . . . . . . . 5-24Door Ajar Light . . . . . . . . . . . . . . 5-25
Information DisplaysDriver InformationCentre (DIC) . . . . . . . . . . . . . . . 5-25
Head-Up Display (HUD) . . . . . 5-27
Vehicle MessagesVehicle Messages . . . . . . . . . . . 5-31Battery Voltage and ChargingMessages . . . . . . . . . . . . . . . . . . 5-31
Brake System Messages . . . . 5-32Compass Messages . . . . . . . . . 5-32Convertible Top Messages . . . 5-32Cruise Control Messages . . . . 5-34Door Ajar Messages . . . . . . . . . 5-34Engine Cooling SystemMessages . . . . . . . . . . . . . . . . . . 5-34
Engine Oil Messages . . . . . . . . 5-35Engine Power Messages . . . . 5-35Fuel System Messages . . . . . . 5-35Key and Lock Messages . . . . . 5-36Lamp Messages . . . . . . . . . . . . . 5-36Ride Control SystemMessages . . . . . . . . . . . . . . . . . . 5-36
Airbag System Messages . . . . 5-39Security Messages . . . . . . . . . . 5-39
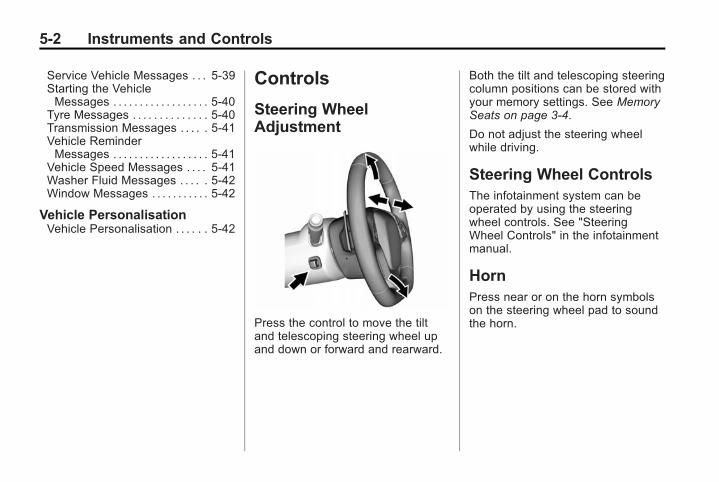
Black plate (2,1)Chevrolet Corvette Owner Manual (GMNA-Localizing-Europe-8087687) -2015 - CRC - 9/16/14
5-2 Instruments and Controls
Service Vehicle Messages . . . 5-39Starting the VehicleMessages . . . . . . . . . . . . . . . . . . 5-40
Tyre Messages . . . . . . . . . . . . . . 5-40Transmission Messages . . . . . 5-41Vehicle ReminderMessages . . . . . . . . . . . . . . . . . . 5-41
Vehicle Speed Messages . . . . 5-41Washer Fluid Messages . . . . . 5-42Window Messages . . . . . . . . . . . 5-42
Vehicle PersonalisationVehicle Personalisation . . . . . . 5-42
Controls
Steering WheelAdjustment
Press the control to move the tiltand telescoping steering wheel upand down or forward and rearward.
Both the tilt and telescoping steeringcolumn positions can be stored withyour memory settings. See MemorySeats on page 3-4.
Do not adjust the steering wheelwhile driving.
Steering Wheel ControlsThe infotainment system can beoperated by using the steeringwheel controls. See "SteeringWheel Controls" in the infotainmentmanual.
HornPress near or on the horn symbolson the steering wheel pad to soundthe horn.
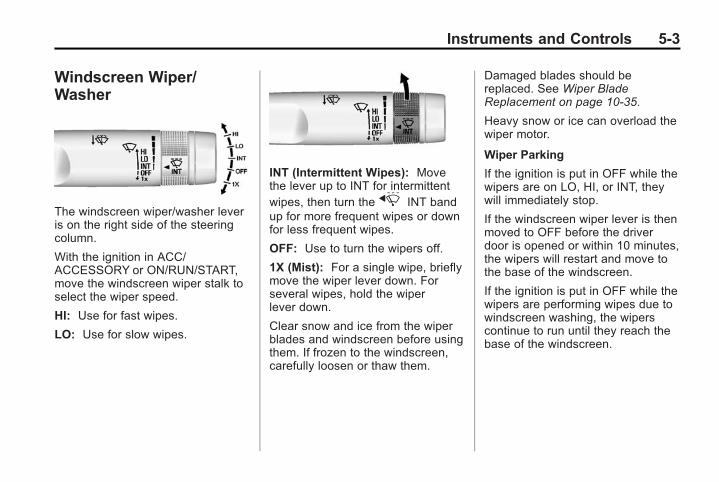
Black plate (3,1)Chevrolet Corvette Owner Manual (GMNA-Localizing-Europe-8087687) -2015 - CRC - 9/16/14
Instruments and Controls 5-3
Windscreen Wiper/Washer
The windscreen wiper/washer leveris on the right side of the steeringcolumn.
With the ignition in ACC/ACCESSORY or ON/RUN/START,move the windscreen wiper stalk toselect the wiper speed.
HI: Use for fast wipes.
LO: Use for slow wipes.
INT (Intermittent Wipes): Movethe lever up to INT for intermittentwipes, then turn thex INT bandup for more frequent wipes or downfor less frequent wipes.
OFF: Use to turn the wipers off.
1X (Mist): For a single wipe, brieflymove the wiper lever down. Forseveral wipes, hold the wiperlever down.
Clear snow and ice from the wiperblades and windscreen before usingthem. If frozen to the windscreen,carefully loosen or thaw them.
Damaged blades should bereplaced. See Wiper BladeReplacement on page 10-35.
Heavy snow or ice can overload thewiper motor.
Wiper Parking
If the ignition is put in OFF while thewipers are on LO, HI, or INT, theywill immediately stop.
If the windscreen wiper lever is thenmoved to OFF before the driverdoor is opened or within 10 minutes,the wipers will restart and move tothe base of the windscreen.
If the ignition is put in OFF while thewipers are performing wipes due towindscreen washing, the wiperscontinue to run until they reach thebase of the windscreen.
Black plate (4,1)Chevrolet Corvette Owner Manual (GMNA-Localizing-Europe-8087687) -2015 - CRC - 9/16/14
5-4 Instruments and Controls
nL (Windscreen Washer): Pullthe windscreen wiper lever towardyou to spray washer fluid andactivate the wipers. The wipers willcontinue until the lever is releasedor the maximum wash time isreached. When the stalk isreleased, additional wipes mayoccur depending on how long thewindscreen washer had beenactivated. See Washer Fluid onpage 10-25 for information on fillingthe windscreen washer fluidreservoir.
{ Warning
In freezing weather, do not usethe washer until the windscreen iswarmed. Otherwise the washerfluid can form ice on thewindscreen, blocking your vision.
Headlamp WasherThe headlamp washers are on thefront fascia forward of theheadlamps.
The headlamps must be on in orderto use the headlamp washers. If theheadlamps are not on, only thewindscreen will be washed.
Pull the wiper lever toward you andhold briefly to activate. Theheadlamp washers will spray once,pause, and spray again. Theheadlamp washer will spray againafter five windscreen wash cycles.
To refill the windscreen washer fluid,see Washer Fluid on page 10-25.
ClockThe infotainment system controlsare used to access the time anddate settings through the menusystem. See “Home Page” in theinfotainment manual for informationabout how to use the menu system.
Setting the Time
To set the time:
1. From the Home Page, press theSETTINGS screen button andpress Time and Date.
2. Press Set Time and press + or −to increase or decrease hours,minutes, and AM or PM. Press12Hr or 24Hr for 12 or 24 hourclock.
3. Press } to go back to theprevious menu.
Black plate (5,1)Chevrolet Corvette Owner Manual (GMNA-Localizing-Europe-8087687) -2015 - CRC - 9/16/14
Instruments and Controls 5-5
If auto timing is set, the timedisplayed on the clock may notupdate immediately when drivinginto a new time zone.
To set the date:
1. Press the SETTINGS screenbutton and press Time and Date.
2. Press Set Date and press + or −to increase or decrease month,day, or year.
3. Press } to go back to theprevious menu.
To set the clock display:
1. Press the SETTINGS screenbutton and press Time and Date.
2. Press Clock Display and pressOFF or ON to turn the clockdisplay off or on.
3. Press } to go back to theprevious menu.
Power SocketsUse the accessory power outlet toplug in electrical equipment, such asa mobile phone or MP3 player.
There are three accessory poweroutlets:. In front of the cupholder. Open
the door compartment to access.. Inside the centre console
storage compartment.. In the rear compartment.
Lift the cover to access and replacewhen not in use.
The power outlets in front of thecupholder and inside the centreconsole storage compartment arepowered when the ignition is in ON/RUN/START or ACC/ACCESSORY,or until the driver door is openedwithin 10 minutes of turning off thevehicle. See Retained AccessoryPower (RAP) on page 9-18.
The rear compartment power outletis powered at all times. Thevehicle's battery may run down ifthe power outlet is used while theignition is in Stopping the Engine/OFF. Use this power outlet forplugging in the battery maintainer,if equipped.
{ Warning
Power is always supplied to theboot outlet. Do not leave electricalequipment plugged in when thevehicle is not in use because thevehicle could catch fire and causeinjury or death.
Black plate (6,1)Chevrolet Corvette Owner Manual (GMNA-Localizing-Europe-8087687) -2015 - CRC - 9/16/14
5-6 Instruments and Controls
{ Caution
Leaving electrical equipmentplugged in for an extended periodof time while the vehicle is off willdrain the battery. Always unplugelectrical equipment when not inuse and do not plug in equipmentthat exceeds the maximum20 amp rating.
Certain electrical accessories maynot be compatible with theaccessory power outlet and couldoverload vehicle or adapter fuses.If a problem is experienced, seeyour dealer.
When adding electrical equipment,ensure that you follow the properinstallation instructions included withthe equipment. See Add-OnElectrical Equipment on page 9-45.
It is recommended that a qualifiedtechnician or dealer be seen for theproper installation of yourequipment.
{ Caution
Hanging heavy equipment fromthe power outlet can causedamage not covered by thevehicle warranty. The poweroutlets are designed foraccessory power plugs only, suchas mobile phone charge cords.
Cigarette LighterIf equipped, push the cigarettelighter all the way in and let go.When it is ready, it will pop back outby itself.
{ Caution
Holding a cigarette lighter in whileit is heating does not let thelighter back away from theheating element when it is hot.Damage from overheating canoccur to the lighter or heatingelement, or a fuse could beblown. Do not hold a cigarettelighter in while it is heating.
Black plate (7,1)Chevrolet Corvette Owner Manual (GMNA-Localizing-Europe-8087687) -2015 - CRC - 9/16/14
Instruments and Controls 5-7
AshtraysIf equipped, the ashtray is locatedon the instrument panel, in front ofthe gear lever. To use the ashtray,press on the indentation at the topof the door.
{ Caution
If papers, pins, or otherflammable items are put in theashtray, hot cigarettes or othersmoking materials could ignitethem and possibly damage thevehicle. Never put flammableitems in the ashtray.
Loose objects, such as paper clips,can lodge behind and beneath theashtray lid and prevent movement ofthe lid. You should avoid puttingsmall, loose objects near theashtray.
Warning Lights,Gauges, andIndicatorsWarning lights and gauges cansignal that something is wrongbefore it becomes serious enoughto cause an expensive repair orreplacement. Paying attention to thewarning lights and gauges couldprevent injury.
Warning lights come on when therecould be a problem with a vehiclefunction. Some warning lights comeon briefly when the engine is startedto indicate they are working.
Gauges can indicate when therecould be a problem with a vehiclefunction. Often gauges and warninglights work together to indicate aproblem with the vehicle.
When one of the warning lightscomes on and stays on whiledriving, or when one of the gaugesshows there may be a problem,check the section that explains whatto do. Waiting to do repairs can becostly and even dangerous.
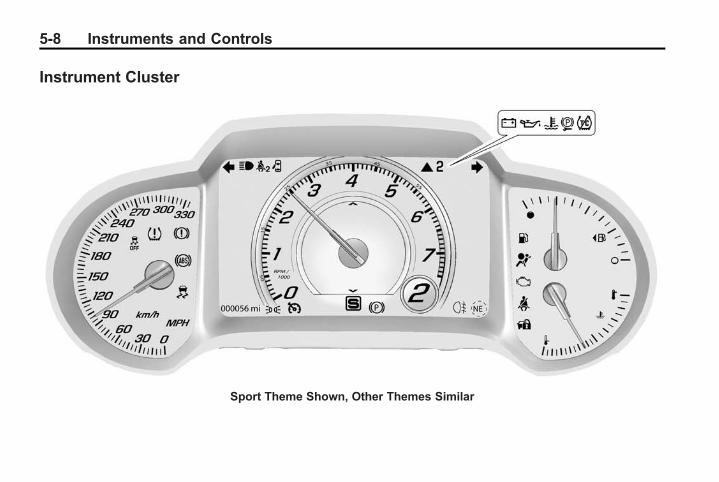
Black plate (8,1)Chevrolet Corvette Owner Manual (GMNA-Localizing-Europe-8087687) -2015 - CRC - 9/16/14
5-8 Instruments and Controls
Instrument Cluster
Sport Theme Shown, Other Themes Similar
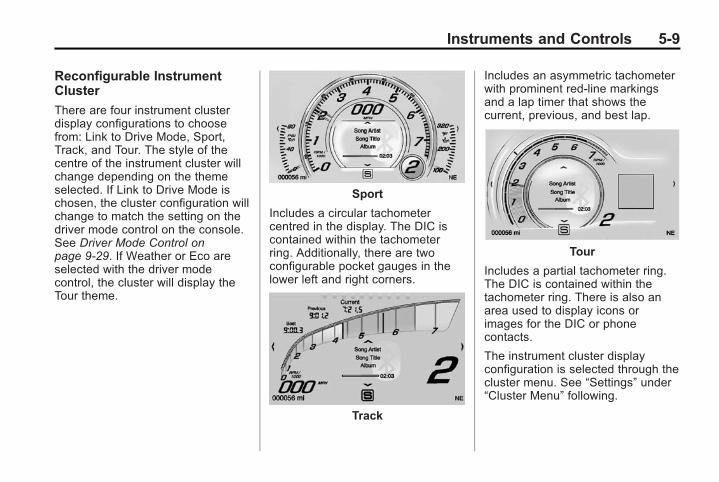
Black plate (9,1)Chevrolet Corvette Owner Manual (GMNA-Localizing-Europe-8087687) -2015 - CRC - 9/16/14
Instruments and Controls 5-9
Reconfigurable InstrumentCluster
There are four instrument clusterdisplay configurations to choosefrom: Link to Drive Mode, Sport,Track, and Tour. The style of thecentre of the instrument cluster willchange depending on the themeselected. If Link to Drive Mode ischosen, the cluster configuration willchange to match the setting on thedriver mode control on the console.See Driver Mode Control onpage 9-29. If Weather or Eco areselected with the driver modecontrol, the cluster will display theTour theme.
Sport
Includes a circular tachometercentred in the display. The DIC iscontained within the tachometerring. Additionally, there are twoconfigurable pocket gauges in thelower left and right corners.
Track
Includes an asymmetric tachometerwith prominent red-line markingsand a lap timer that shows thecurrent, previous, and best lap.
Tour
Includes a partial tachometer ring.The DIC is contained within thetachometer ring. There is also anarea used to display icons orimages for the DIC or phonecontacts.
The instrument cluster displayconfiguration is selected through thecluster menu. See “Settings” under“Cluster Menu” following.

Black plate (10,1)Chevrolet Corvette Owner Manual (GMNA-Localizing-Europe-8087687) -2015 - CRC - 9/16/14
5-10 Instruments and Controls
Cluster Menu
There is an interactive display areain the centre of the instrumentcluster.
Use the right steering wheel controlto open and scroll through thedifferent items and displays.
Press o to access the cluster
applications. Usew orx to scrollthrough the list of applications.. Info. This is where you can view
the Driver Information Centre(DIC) displays. See DriverInformation Centre (DIC) onpage 5-25.
. Performance
. Audio
. Phone
. Navigation (If Equipped)
. Settings
Performance
Press SEL to enter the Performancemenu. Usew orx to scrollthrough the available items.
G-force: Gives the driver anindication of the vehicleperformance in cornering. TheG-force is displayed in the centre ofthe DIC as a numerical value.
Friction Bubble: A four quadrantvisual display, indicative of the fourcorners of the car, with a “bubble”showing where the most inertia isbeing exerted on the vehicle.
Performance Timer: Press pwhen Performance Timer isdisplayed to enter the menu.Press p while Set Start Speed is
highlighted then usew orx toenter the start speed. Press SEL tosave it. Press p while Set End
Speed is highlighted then useworx to enter the end speed. PressSEL to save it. After the start andend speeds have been entered,press o to return to the DIC andfollow the on-screen instructions.On the next acceleration, theperformance time will record thetime. To reset the timer, highlightReset on the performance timermenu and press SEL.
Black plate (11,1)Chevrolet Corvette Owner Manual (GMNA-Localizing-Europe-8087687) -2015 - CRC - 9/16/14
Instruments and Controls 5-11
Lap Timer: Press p when LapTimer is displayed to start, stop,or reset the lap timer. A stopwatchicon will be displayed when the laptimer is active. Press SEL while theLap Timer page is active to start thetimer. If the lap timer is active,pressing SEL on any page will stopthe current lap timer and start a newlap. Also, pressing and holding SELon any page will stop the lap timer.
Coolant Temperature: Shows thecurrent coolant temperature in eitherdegrees Celsius (°C) or degreesFahrenheit (°F).
Oil Temperature: Shows thecurrent oil temperature in eitherdegrees Celsius (°C) or degreesFahrenheit (°F).
Oil Pressure: Shows the current oilpressure in either kilopascal (kPa)or in pounds per square inch (psi).
Battery Voltage: Shows thecurrent battery voltage.
Transmission FluidTemperature: Shows thetemperature of the transmission fluidin either degrees Celsius (°C) ordegrees Fahrenheit (°F).
Tyre Temperature: Shows tyretemperature status as either Cold,Warm, or Hot. Warm is typical fornormal driving while Hot is typicalfor aggressive driving. Unknownmay be displayed if tyre temperatureinformation is unavailable.
eLSD and Wheel Slip: Displayswhen the Electronic Limited SlipDifferential (eLSD) is active andintervening with the vehicle's normaloperation. The display also displaysslip percentage in a range of low,medium, and high. See Limited-SlipDifferential (Except Z51) onpage 9-36 or Limited-SlipDifferential (Z51 Only) onpage 9-36.
Audio
While the audio app is open, useworx to change the radio station orseek to the next or previous track,depending on the current audiosource. Press SEL to enter theAudio menu. In the Audio menubrowse for music, select from thefavourites, or change the audiosource.
Phone
Press SEL to enter the Phonemenu. In the Phone menu, if there isno active phone call, view recentcalls, or scroll through contacts.If there is an active call, mute orunmute the phone or switch tohandset or hands-free operation.
Navigation
If equipped, press SEL to enter theNavigation menu. Displays a map orturn by turn directions. If there is noactive route, press p to resume thelast route and turn the voiceprompts on/off. If there is an active
Black plate (12,1)Chevrolet Corvette Owner Manual (GMNA-Localizing-Europe-8087687) -2015 - CRC - 9/16/14
5-12 Instruments and Controls
route, press SEL to cancel routeguidance or turn the voice promptson/off.
Settings
Press SEL to enter the Settingsmenu. Usew orx to scrollthrough items in the Settings menu.
Units: Press p while Units isdisplayed to enter the Units menu.Choose US or Metric units bypressing SEL while the desired itemis highlighted.
Display Theme: Press p to enterthe Display Theme menu. Selectfrom Link to Drive Mode, Track,Sport, or Tour for the cluster theme.
Speed Warning: The SpeedWarning display allows the driver toset a speed that they do not want toexceed. To set the Speed Warning,press p when Speed Warning isdisplayed. Enable the speedwarning and then usew orx toadjust the value. Press SEL to setthe speed. Once the speed is set,
this feature can be turned off bypressing SEL while viewing thispage. If the selected speed limit isexceeded, a pop-up warning isdisplayed with a chime.
Pocket Gauges: Press p whilePocket Gauges is displayed to enterthe menu and select gauges thatcan be displayed for the Sporttheme on the left or right of thedisplay area. Choose from OilPressure Gauge, Oil TemperatureGauge, Battery Voltage, GearboxFluid Temperature Gauge,Horsepower or a blank gauge.
Software Info: Displays opensource software information.
SpeedometerThe speedometer shows thevehicle's speed in either kilometresper hour (km/h) or miles perhour (mph).
MileometerThe odometer shows how far thevehicle has been driven, in eitherkilometres or miles.
Trip OdometerThe trip odometer shows how farthe vehicle has been driven sincethe trip odometer was last reset.
The trip odometer is accessed andreset through the Driver InformationCentre (DIC). See DriverInformation Centre (DIC) onpage 5-25.
Rev CounterThe tachometer displays the enginespeed in revolutions perminute (rpm).
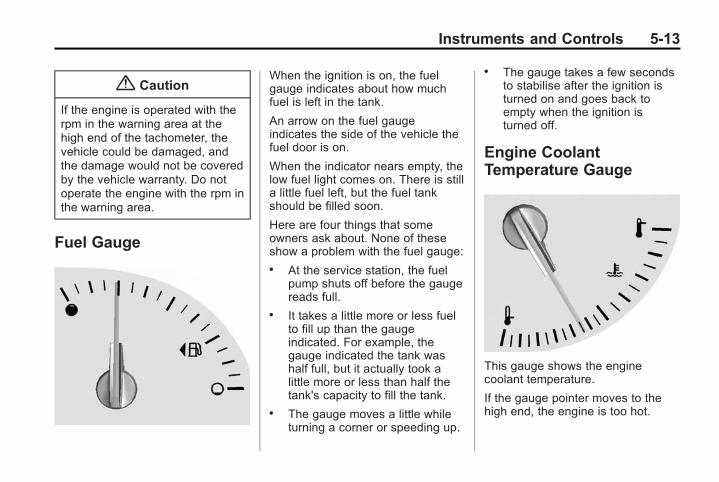
Black plate (13,1)Chevrolet Corvette Owner Manual (GMNA-Localizing-Europe-8087687) -2015 - CRC - 9/16/14
Instruments and Controls 5-13
{ Caution
If the engine is operated with therpm in the warning area at thehigh end of the tachometer, thevehicle could be damaged, andthe damage would not be coveredby the vehicle warranty. Do notoperate the engine with the rpm inthe warning area.
Fuel Gauge
When the ignition is on, the fuelgauge indicates about how muchfuel is left in the tank.
An arrow on the fuel gaugeindicates the side of the vehicle thefuel door is on.
When the indicator nears empty, thelow fuel light comes on. There is stilla little fuel left, but the fuel tankshould be filled soon.
Here are four things that someowners ask about. None of theseshow a problem with the fuel gauge:. At the service station, the fuel
pump shuts off before the gaugereads full.
. It takes a little more or less fuelto fill up than the gaugeindicated. For example, thegauge indicated the tank washalf full, but it actually took alittle more or less than half thetank's capacity to fill the tank.
. The gauge moves a little whileturning a corner or speeding up.
. The gauge takes a few secondsto stabilise after the ignition isturned on and goes back toempty when the ignition isturned off.
Engine CoolantTemperature Gauge
This gauge shows the enginecoolant temperature.
If the gauge pointer moves to thehigh end, the engine is too hot.
Black plate (14,1)Chevrolet Corvette Owner Manual (GMNA-Localizing-Europe-8087687) -2015 - CRC - 9/16/14
5-14 Instruments and Controls
This reading indicates the samething as the warning light. It meansthat the engine coolant hasoverheated. If the vehicle has beenoperating under normal drivingconditions, pull off the road, stop thevehicle, and turn off the engine assoon as possible. See EngineOverheating on page 10-24.
Seat Belt Reminders
Driver Safety Belt ReminderLight
There is a driver safety beltreminder light on the instrumentcluster.
When the vehicle is started, thislight flashes and a chime may comeon to remind the driver to fastentheir safety belt. Then the light stays
on solid until the belt is buckled.This cycle may continue severaltimes if the driver remains orbecomes unbuckled while thevehicle is moving.
If the driver safety belt is buckled,neither the light nor chimecomes on.
Passenger Seat Belt ReminderLight
There is a passenger safety beltreminder light on the instrumentpanel cluster.
When the vehicle is started this lightflashes and a chime may come onto remind passengers to fasten theirsafety belt. Then the light stays onsolid until the belt is buckled. Thiscycle continues several times if the
passenger remains or becomesunbuckled while the vehicle ismoving.
If the passenger safety belt isfastened, neither the chime nor thelight comes on.
The front passenger seat beltreminder light and chime may turnon if an object is put on the seatsuch as a briefcase, handbag,shopping bag, laptop or otherelectronic device. To turn off thereminder light and/or chime, removethe object from the seat or bucklethe safety belt.
Airbag Readiness LightThis light shows if there is anelectrical problem with the airbagsystem. The system check includesthe airbag sensor(s), passengersensing system, the pretensioners,the airbag modules, the wiring, andthe crash sensing and diagnosticmodule. For more information on theairbag system, see Airbag Systemon page 3-14.
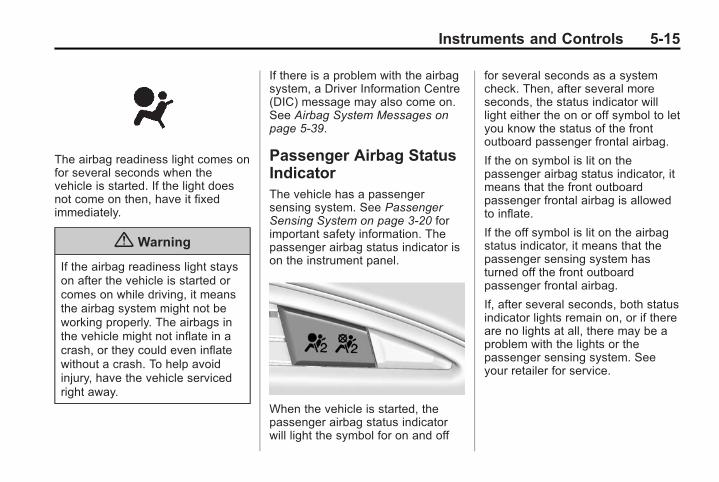
Black plate (15,1)Chevrolet Corvette Owner Manual (GMNA-Localizing-Europe-8087687) -2015 - CRC - 9/16/14
Instruments and Controls 5-15
The airbag readiness light comes onfor several seconds when thevehicle is started. If the light doesnot come on then, have it fixedimmediately.
{ Warning
If the airbag readiness light stayson after the vehicle is started orcomes on while driving, it meansthe airbag system might not beworking properly. The airbags inthe vehicle might not inflate in acrash, or they could even inflatewithout a crash. To help avoidinjury, have the vehicle servicedright away.
If there is a problem with the airbagsystem, a Driver Information Centre(DIC) message may also come on.See Airbag System Messages onpage 5-39.
Passenger Airbag StatusIndicatorThe vehicle has a passengersensing system. See PassengerSensing System on page 3-20 forimportant safety information. Thepassenger airbag status indicator ison the instrument panel.
When the vehicle is started, thepassenger airbag status indicatorwill light the symbol for on and off
for several seconds as a systemcheck. Then, after several moreseconds, the status indicator willlight either the on or off symbol to letyou know the status of the frontoutboard passenger frontal airbag.
If the on symbol is lit on thepassenger airbag status indicator, itmeans that the front outboardpassenger frontal airbag is allowedto inflate.
If the off symbol is lit on the airbagstatus indicator, it means that thepassenger sensing system hasturned off the front outboardpassenger frontal airbag.
If, after several seconds, both statusindicator lights remain on, or if thereare no lights at all, there may be aproblem with the lights or thepassenger sensing system. Seeyour retailer for service.
Black plate (16,1)Chevrolet Corvette Owner Manual (GMNA-Localizing-Europe-8087687) -2015 - CRC - 9/16/14
5-16 Instruments and Controls
{ Warning
If the airbag readiness light evercomes on and stays on, it meansthat something may be wrongwith the airbag system. To helpavoid injury to yourself or others,have the vehicle serviced rightaway. See Airbag ReadinessLight on page 5-14 for moreinformation, including importantsafety information.
Charging System Light
The charging system light comes onbriefly when the ignition is turnedon, but the engine is not running, as
a check to show the light is working.It should go out when the engine isstarted.
If the light stays on or comes onwhile driving, there may be aproblem with the electrical chargingsystem. Have it checked by yourdealer. Driving while this light is oncould drain the battery.
When this light comes on, the DriverInformation Centre (DIC) alsodisplays a message.
See Battery Voltage and ChargingMessages on page 5-31.
If a short distance must be drivenwith the light on, be sure to turn offall accessories, such as the radioand air conditioner.
MalfunctionIndicator LampA computer system called OBD II(On-Board Diagnostics-SecondGeneration) monitors the operationof the vehicle to ensure emissionsare at acceptable levels, helping to
maintain a clean environment. Themalfunction indicator lamp comeson when the vehicle is placed inService Only Mode, as a check toshow it is working. If it does not,have the vehicle serviced by yourdealer. See Ignition Positions onpage 9-15.
If the malfunction indicator lampcomes on while the engine isrunning, this indicates that there isan OBD II problem and diagnosisand service might be required.
Malfunctions often are indicated bythe system before any problem isapparent. Being aware of the lightcan prevent more serious damageto the vehicle. This system alsoassists the service technician incorrectly diagnosing anymalfunction.
Black plate (17,1)Chevrolet Corvette Owner Manual (GMNA-Localizing-Europe-8087687) -2015 - CRC - 9/16/14
Instruments and Controls 5-17
{ Caution
If the vehicle is continually drivenwith this light on, the emissioncontrols might not work as well,the vehicle fuel economy mightnot be as good, and the enginemight not run as smoothly. Thiscould lead to costly repairs thatmight not be covered by thevehicle warranty.
{ Caution
Modifications made to the engine,transmission, exhaust, intake,or fuel system of the vehicle orthe replacement of the originaltyres with other than those of thesame Tyre Performance Criteria(TPC) can affect the vehicle'semission controls and can causethis light to come on.Modifications to these systems
(Continued)
Caution (Continued)
could lead to costly repairs notcovered by the vehicle warranty.This could also result in a failureto pass a required EmissionInspection/Maintenance test. SeeAccessories and Modifications onpage 10-2.
This light comes on during amalfunction in one of two ways:
Light Flashing: A misfire conditionhas been detected. A misfireincreases vehicle emissions andcould damage the emission controlsystem on the vehicle. Diagnosisand service might be required.
To prevent more serious damage tothe vehicle:. Reduce vehicle speed.. Avoid hard accelerations.. Avoid steep uphill grades.
If the light continues to flash, stopand park the vehicle. Turn thevehicle off, wait at least 10 seconds,and restart the engine. If the light isstill flashing, follow the previoussteps and see your dealer forservice as soon as possible.
Light On Steady: An emissioncontrol system malfunction hasbeen detected on the vehicle.Diagnosis and service might berequired.
The following may correct anemission control systemmalfunction:. If fuel has been added to the
vehicle using the capless funneladapter, make sure the caplessfunnel adapter is removed. See“Filling the Tank with a PortableGas Can” under Filling the Tankon page 9-42. The diagnosticsystem can detect if the adapterhas been left installed in thevehicle, allowing fuel toevaporate into the atmosphere.
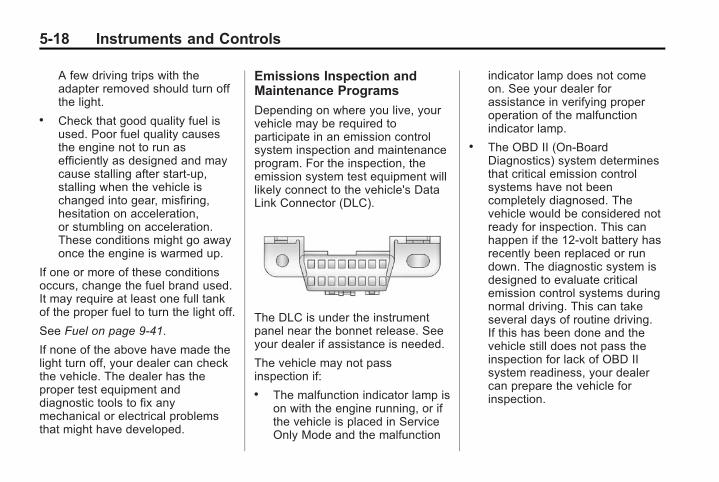
Black plate (18,1)Chevrolet Corvette Owner Manual (GMNA-Localizing-Europe-8087687) -2015 - CRC - 9/16/14
5-18 Instruments and Controls
A few driving trips with theadapter removed should turn offthe light.
. Check that good quality fuel isused. Poor fuel quality causesthe engine not to run asefficiently as designed and maycause stalling after start-up,stalling when the vehicle ischanged into gear, misfiring,hesitation on acceleration,or stumbling on acceleration.These conditions might go awayonce the engine is warmed up.
If one or more of these conditionsoccurs, change the fuel brand used.It may require at least one full tankof the proper fuel to turn the light off.
See Fuel on page 9-41.
If none of the above have made thelight turn off, your dealer can checkthe vehicle. The dealer has theproper test equipment anddiagnostic tools to fix anymechanical or electrical problemsthat might have developed.
Emissions Inspection andMaintenance Programs
Depending on where you live, yourvehicle may be required toparticipate in an emission controlsystem inspection and maintenanceprogram. For the inspection, theemission system test equipment willlikely connect to the vehicle's DataLink Connector (DLC).
The DLC is under the instrumentpanel near the bonnet release. Seeyour dealer if assistance is needed.
The vehicle may not passinspection if:. The malfunction indicator lamp is
on with the engine running, or ifthe vehicle is placed in ServiceOnly Mode and the malfunction
indicator lamp does not comeon. See your dealer forassistance in verifying properoperation of the malfunctionindicator lamp.
. The OBD II (On-BoardDiagnostics) system determinesthat critical emission controlsystems have not beencompletely diagnosed. Thevehicle would be considered notready for inspection. This canhappen if the 12-volt battery hasrecently been replaced or rundown. The diagnostic system isdesigned to evaluate criticalemission control systems duringnormal driving. This can takeseveral days of routine driving.If this has been done and thevehicle still does not pass theinspection for lack of OBD IIsystem readiness, your dealercan prepare the vehicle forinspection.
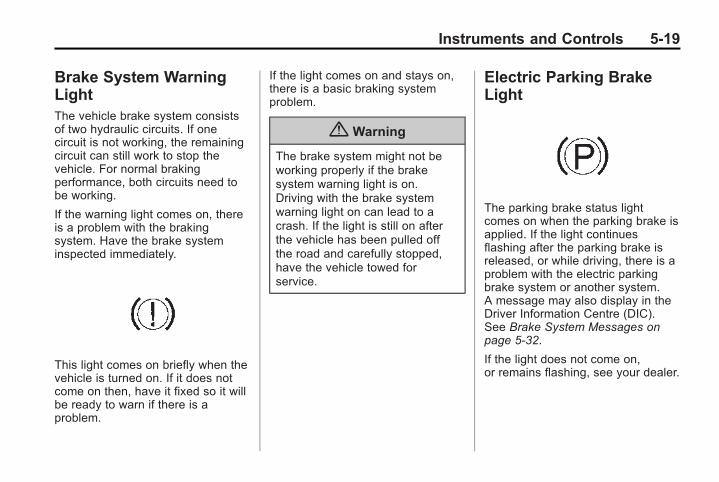
Black plate (19,1)Chevrolet Corvette Owner Manual (GMNA-Localizing-Europe-8087687) -2015 - CRC - 9/16/14
Instruments and Controls 5-19
Brake System WarningLightThe vehicle brake system consistsof two hydraulic circuits. If onecircuit is not working, the remainingcircuit can still work to stop thevehicle. For normal brakingperformance, both circuits need tobe working.
If the warning light comes on, thereis a problem with the brakingsystem. Have the brake systeminspected immediately.
This light comes on briefly when thevehicle is turned on. If it does notcome on then, have it fixed so it willbe ready to warn if there is aproblem.
If the light comes on and stays on,there is a basic braking systemproblem.
{ Warning
The brake system might not beworking properly if the brakesystem warning light is on.Driving with the brake systemwarning light on can lead to acrash. If the light is still on afterthe vehicle has been pulled offthe road and carefully stopped,have the vehicle towed forservice.
Electric Parking BrakeLight
The parking brake status lightcomes on when the parking brake isapplied. If the light continuesflashing after the parking brake isreleased, or while driving, there is aproblem with the electric parkingbrake system or another system.A message may also display in theDriver Information Centre (DIC).See Brake System Messages onpage 5-32.
If the light does not come on,or remains flashing, see your dealer.

Black plate (20,1)Chevrolet Corvette Owner Manual (GMNA-Localizing-Europe-8087687) -2015 - CRC - 9/16/14
5-20 Instruments and Controls
Service Electric ParkingBrake Light
The service electric parking brakelight should come on briefly whenthe vehicle is in ON/RUN. If it doesnot come on, have the vehicleserviced by your dealer.
If this light stays on, there is aproblem with a system on thevehicle that is causing the parkingbrake system to work at a reducedlevel. The vehicle can still be driven,but should be taken to a dealer assoon as possible. See ElectricParking Brake on page 9-24. If amessage displays in the DriverInformation Centre (DIC), see BrakeSystem Messages on page 5-32.
Antilock Brake System(ABS) Warning Light
This light comes on briefly when theengine is started.
If the light does not come on, have itfixed so it will be ready to warn ifthere is a problem.
If the light comes on while driving,stop as soon as it is safely possibleand turn off the vehicle. Then startthe engine again to reset thesystem. If the ABS light stays on,or comes on again while driving, thevehicle needs service. A chime mayalso sound when the light comes onsteady.
If the ABS light is the only light on,the vehicle has regular brakes, butthe anti-lock brakes are notfunctioning.
If both the ABS and the brakesystem warning light are on, thevehicle's anti-lock brakes are notfunctioning and there is a problemwith the regular brakes. See yourretailer for service.
See Brake System Warning Light onpage 5-19 and Brake SystemMessages on page 5-32.
Gear Shifting Light
This light comes on when a gearshift is recommended for best fueleconomy. When the arrow is pointedup, an upshift is recommended.
Black plate (21,1)Chevrolet Corvette Owner Manual (GMNA-Localizing-Europe-8087687) -2015 - CRC - 9/16/14
Instruments and Controls 5-21
When the arrow is pointed down, adownshift is recommended. Thenumber displayed with the arrowindicates the recommended gear.
Traction Off Light
This light comes on briefly whilestarting the engine. If it does not,have the vehicle serviced by yourdealer. If the system is workingnormally, the indicator light thenturns off.
The traction off light comes on whenthe Traction Control System (TCS)has been turned off by pressing andreleasing the TCS/StabiliTrakbutton.
This light and the StabiliTrak OFFlight come on when StabiliTrak isturned off.
If the TCS is off, wheel spin is notlimited. Adjust driving accordingly.
See Traction Control/ElectronicStability Control on page 9-26.
StabiliTrak® OFF Light
This light comes on briefly whilestarting the engine. If it does not,have the vehicle serviced by yourdealer.
This light comes on when theStabiliTrak system is turned off.If StabiliTrak is off, the TractionControl System (TCS) is also off.
If the StabiliTrak and TCS are off,the system does not assist incontrolling the vehicle. Turn on theTCS and the StabiliTrak systemsand the warning light turns off.
See Traction Control/ElectronicStability Control on page 9-26.
Traction Control System(TCS)/StabiliTrak® Light
This light comes on briefly when theengine is started.
If the light does not come on, havethe vehicle serviced by your dealer.If the system is working normally,the indicator light turns off.
If the light is on and not flashing, theTCS and potentially the StabiliTraksystem have been disabled. A DICmessage may display. Check theDIC messages to determine whichfeature(s) is no longer functioningand whether the vehicle requiresservice.
Black plate (22,1)Chevrolet Corvette Owner Manual (GMNA-Localizing-Europe-8087687) -2015 - CRC - 9/16/14
5-22 Instruments and Controls
If the indicator/warning light is onand flashing, the TCS and/or theStabiliTrak system is activelyworking.
See Traction Control/ElectronicStability Control on page 9-26.
Engine CoolantTemperature WarningLight
This light comes on briefly whilestarting the vehicle.
If it does not, have the vehicleserviced by your dealer. If thesystem is working normally theindicator light goes off.
{ Caution
The engine coolant temperaturewarning light indicates that thevehicle has overheated. Drivingwith this light on can damage theengine and it may not be coveredby the vehicle warranty. SeeEngine Overheating onpage 10-24.
The engine coolant temperaturewarning light comes on when theengine has overheated.
If this happens, pull over and turnoff the engine as soon as possible.See Engine Overheating onpage 10-24.
Tyre Pressure Light
For vehicles with the Tyre PressureMonitor System (TPMS), this lightcomes on briefly when the engine isstarted. It provides informationabout tyre pressures and the TPMS.
When the Light Is On Steady
This indicates that one or more ofthe tyres are significantlyunderinflated.
A Driver Information Centre (DIC)tyre pressure message may alsodisplay. See Tyre Messages onpage 5-40. Stop as soon aspossible, and inflate the tyres to thepressure value shown on the Tyreand Loading Information label. SeeTyre Pressure on page 10-48.
Black plate (23,1)Chevrolet Corvette Owner Manual (GMNA-Localizing-Europe-8087687) -2015 - CRC - 9/16/14
Instruments and Controls 5-23
When the Light Flashes First andThen Is On Steady
If the light flashes for about a minuteand then stays on, there may be aproblem with the TPMS. If theproblem is not corrected, the lightwill come on at every ignition cycle.See Tyre Pressure MonitorOperation on page 10-52.
Engine Oil Pressure Light
{ Caution
Lack of proper engine oilmaintenance can damage theengine. Driving with the engineoil low can also damage theengine. The repairs would not becovered by the vehicle warranty.Check the oil level as soon aspossible. Add oil if required, but ifthe oil level is within the operatingrange and the oil pressure is stilllow, have the vehicle serviced.Always follow the maintenanceschedule for changing engine oil.
This light should come on briefly asthe engine is started. If it does notcome on, have the vehicle servicedby your dealer.
If the light comes on and stays on, itmeans that oil is not flowing throughthe engine properly. The vehiclecould be low on oil and might havesome other system problem. Seeyour dealer.
Low Fuel Warning Light
This light is near the fuel gauge andcomes on briefly when the ignition isturned on as a check to show it isworking.
It also comes on when the fuel tankis low on fuel. The light turns offwhen fuel is added. If it does not,have the vehicle serviced.
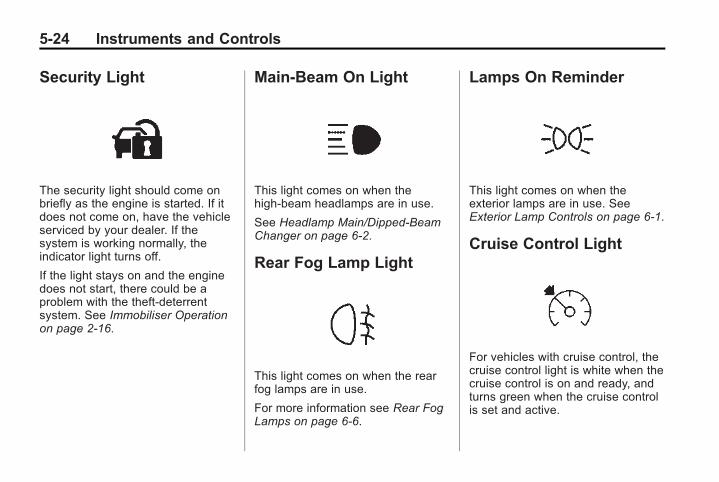
Black plate (24,1)Chevrolet Corvette Owner Manual (GMNA-Localizing-Europe-8087687) -2015 - CRC - 9/16/14
5-24 Instruments and Controls
Security Light
The security light should come onbriefly as the engine is started. If itdoes not come on, have the vehicleserviced by your dealer. If thesystem is working normally, theindicator light turns off.
If the light stays on and the enginedoes not start, there could be aproblem with the theft-deterrentsystem. See Immobiliser Operationon page 2-16.
Main-Beam On Light
This light comes on when thehigh-beam headlamps are in use.
See Headlamp Main/Dipped-BeamChanger on page 6-2.
Rear Fog Lamp Light
This light comes on when the rearfog lamps are in use.
For more information see Rear FogLamps on page 6-6.
Lamps On Reminder
This light comes on when theexterior lamps are in use. SeeExterior Lamp Controls on page 6-1.
Cruise Control Light
For vehicles with cruise control, thecruise control light is white when thecruise control is on and ready, andturns green when the cruise controlis set and active.
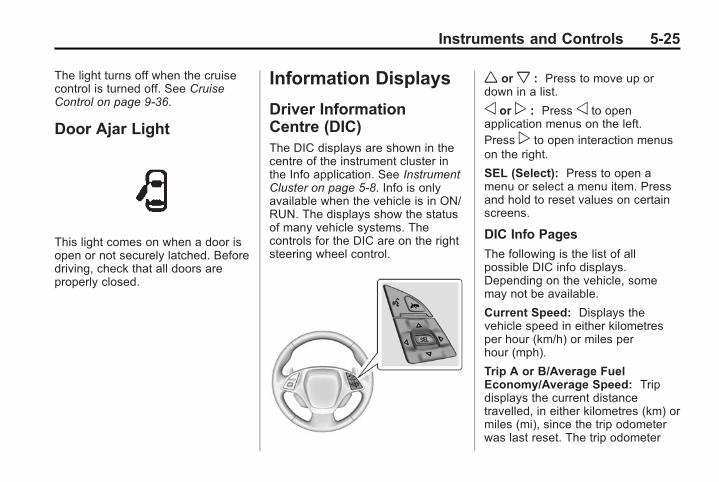
Black plate (25,1)Chevrolet Corvette Owner Manual (GMNA-Localizing-Europe-8087687) -2015 - CRC - 9/16/14
Instruments and Controls 5-25
The light turns off when the cruisecontrol is turned off. See CruiseControl on page 9-36.
Door Ajar Light
This light comes on when a door isopen or not securely latched. Beforedriving, check that all doors areproperly closed.
Information Displays
Driver InformationCentre (DIC)The DIC displays are shown in thecentre of the instrument cluster inthe Info application. See InstrumentCluster on page 5-8. Info is onlyavailable when the vehicle is in ON/RUN. The displays show the statusof many vehicle systems. Thecontrols for the DIC are on the rightsteering wheel control.
w orx : Press to move up ordown in a list.
o or p : Press o to openapplication menus on the left.Press p to open interaction menuson the right.
SEL (Select): Press to open amenu or select a menu item. Pressand hold to reset values on certainscreens.
DIC Info Pages
The following is the list of allpossible DIC info displays.Depending on the vehicle, somemay not be available.
Current Speed: Displays thevehicle speed in either kilometresper hour (km/h) or miles perhour (mph).
Trip A or B/Average FuelEconomy/Average Speed: Tripdisplays the current distancetravelled, in either kilometres (km) ormiles (mi), since the trip odometerwas last reset. The trip odometer
Black plate (26,1)Chevrolet Corvette Owner Manual (GMNA-Localizing-Europe-8087687) -2015 - CRC - 9/16/14
5-26 Instruments and Controls
can be reset by pressing andholding SEL while this display isactive.
Average Fuel Economy displays theapproximate average litres per100 kilometres (L/100 km) or milesper gallon (mpg). This number iscalculated based on the number ofL/100 km (mpg) recorded since thelast time this menu item was reset.This number reflects only theapproximate average fuel economythat the vehicle has right now, andwill change as driving conditionschange. The Average FuelEconomy can be reset by pressingand holding SEL while this displayis active.
Average Speed displays theaverage speed of the vehicle inkilometres per hour (km/h) or milesper hour (mph). This average iscalculated based on the variousvehicle speeds recorded since thelast reset of this value. The averagespeed can be reset by pressing andholding SEL while this display isactive.
Fuel Range/Instantaneous FuelEconomy: Fuel Range displays theapproximate distance the vehiclecan be driven without refuelling.LOW will be displayed when thevehicle is low on fuel. The fuelrange estimate is based on anaverage of the vehicle's fueleconomy over recent driving historyand the amount of fuel remaining inthe fuel tank.
Instantaneous Fuel Economydisplays the current fuel economy ineither litres per 100 kilometres(L/100 km) or miles per gallon(mpg). This number reflects only theapproximate fuel economy that thevehicle has right now and changesfrequently as driving conditionschange.
This display may also show thenumber of cylinders the vehicle isrunning on. See Active FuelManagement® on page 9-19.
Oil Life: Displays an estimate ofthe oil's remaining useful life.If REMAINING OIL LIFE 99% isdisplayed, that means 99% of thecurrent oil life remains.
When the remaining oil life is low,the CHANGE ENGINE OIL SOONmessage will appear on the display.See Engine Oil Messages onpage 5-35. The oil should bechanged as soon as possible. SeeEngine Oil on page 10-10. Inaddition to the engine oil life systemmonitoring the oil life, additionalmaintenance is recommended in theMaintenance Schedule booklet.
The Oil Life display must be resetafter each oil change. It will notreset itself. Do not reset the Oil Lifedisplay accidentally at any timeother than when the oil has justbeen changed. It cannot be resetaccurately until the next oil change.To reset the engine oil life system,press and hold SEL for severalseconds while the Oil Life display isactive. See Engine Oil Life Systemon page 10-16.
Black plate (27,1)Chevrolet Corvette Owner Manual (GMNA-Localizing-Europe-8087687) -2015 - CRC - 9/16/14
Instruments and Controls 5-27
Tyre Pressure: Displays theapproximate pressures of all fourtyres. Tyre pressure is displayed ineither kilopascal (kPa) or in poundsper square inch (psi). If the pressureis low, the value for that tyre isshown in amber. See Tyre PressureMonitor System on page 10-50 andTyre Pressure Monitor Operation onpage 10-52.
Best Average Fuel Economy:Displays the average fuel economy,the best fuel economy over theselected distance, and a bar graphshowing instantaneous fueleconomy. Press p to change theselected distance.
Fuel Used/Timer: Displays theapproximate litres (L) orgallons (gal) of fuel that have beenused since last reset. The fuel usedcan be reset by pressing andholding SEL while this display isactive.
This display can also be used asa timer. To start/stop the timer,press p while this display is active
and then SEL to start/stop the timer.The display will show the amount oftime that has passed since the timerwas last reset. To reset the timer tozero, press and hold SEL or use pto access the menu while thisdisplay is active.
ECO Index: Aids the driver indetermining how efficiently they aredriving.
This display may also show thenumber of cylinders the vehicle isrunning on. See Active FuelManagement® on page 9-19.
Speed Limit: Displays signinformation, which comes from aroadway database in the onboardnavigation.
Engine Hours/Lifetime Revs:Displays the total number of hoursthe engine has run. It also showstotal engine revolutions divided by10,000.
Head-Up Display (HUD)
{ Warning
If the HUD image is too bright ortoo high in your field of view, itmay take you more time to seethings you need to see when it isdark outside. Be sure to keep theHUD image dim and placed low inyour field of view.
If the vehicle is equipped with HUD,some information concerning theoperation of the vehicle is projectedonto the windscreen.
The HUD information appears as animage focused out toward the frontof the vehicle.
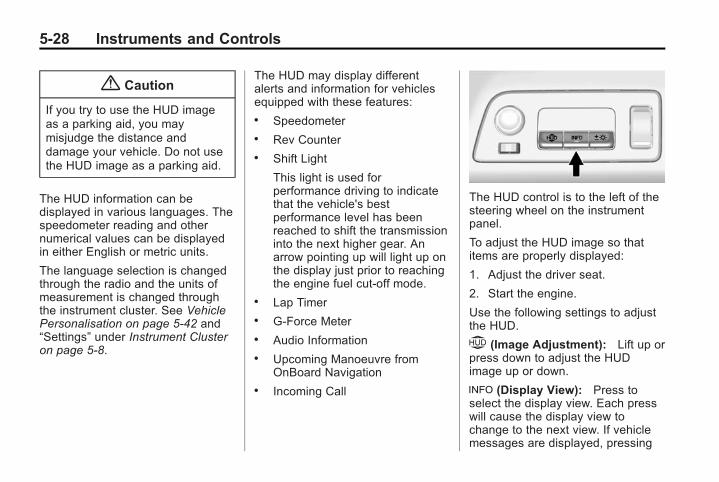
Black plate (28,1)Chevrolet Corvette Owner Manual (GMNA-Localizing-Europe-8087687) -2015 - CRC - 9/16/14
5-28 Instruments and Controls
{ Caution
If you try to use the HUD imageas a parking aid, you maymisjudge the distance anddamage your vehicle. Do not usethe HUD image as a parking aid.
The HUD information can bedisplayed in various languages. Thespeedometer reading and othernumerical values can be displayedin either English or metric units.
The language selection is changedthrough the radio and the units ofmeasurement is changed throughthe instrument cluster. See VehiclePersonalisation on page 5-42 and“Settings” under Instrument Clusteron page 5-8.
The HUD may display differentalerts and information for vehiclesequipped with these features:. Speedometer. Rev Counter. Shift Light
This light is used forperformance driving to indicatethat the vehicle's bestperformance level has beenreached to shift the transmissioninto the next higher gear. Anarrow pointing up will light up onthe display just prior to reachingthe engine fuel cut-off mode.
. Lap Timer
. G-Force Meter
. Audio Information
. Upcoming Manoeuvre fromOnBoard Navigation
. Incoming Call
The HUD control is to the left of thesteering wheel on the instrumentpanel.
To adjust the HUD image so thatitems are properly displayed:
1. Adjust the driver seat.
2. Start the engine.
Use the following settings to adjustthe HUD.
$ (Image Adjustment): Lift up orpress down to adjust the HUDimage up or down.
! (Display View): Press toselect the display view. Each presswill cause the display view tochange to the next view. If vehiclemessages are displayed, pressing
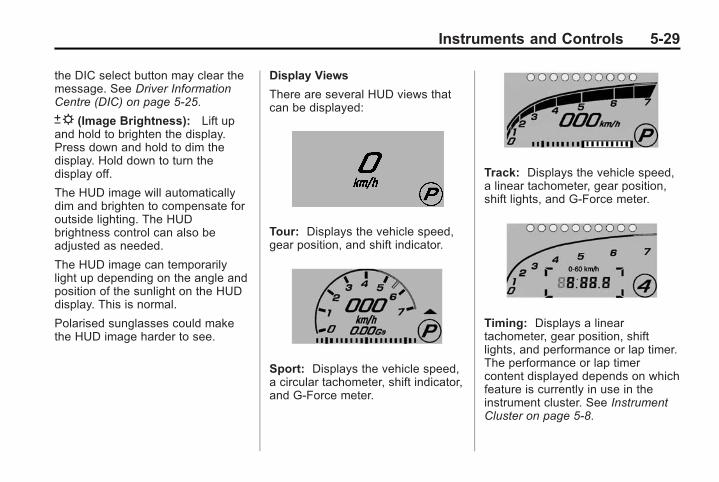
Black plate (29,1)Chevrolet Corvette Owner Manual (GMNA-Localizing-Europe-8087687) -2015 - CRC - 9/16/14
Instruments and Controls 5-29
the DIC select button may clear themessage. See Driver InformationCentre (DIC) on page 5-25.
D (Image Brightness): Lift upand hold to brighten the display.Press down and hold to dim thedisplay. Hold down to turn thedisplay off.
The HUD image will automaticallydim and brighten to compensate foroutside lighting. The HUDbrightness control can also beadjusted as needed.
The HUD image can temporarilylight up depending on the angle andposition of the sunlight on the HUDdisplay. This is normal.
Polarised sunglasses could makethe HUD image harder to see.
Display Views
There are several HUD views thatcan be displayed:
Tour: Displays the vehicle speed,gear position, and shift indicator.
Sport: Displays the vehicle speed,a circular tachometer, shift indicator,and G-Force meter.
Track: Displays the vehicle speed,a linear tachometer, gear position,shift lights, and G-Force meter.
Timing: Displays a lineartachometer, gear position, shiftlights, and performance or lap timer.The performance or lap timercontent displayed depends on whichfeature is currently in use in theinstrument cluster. See InstrumentCluster on page 5-8.
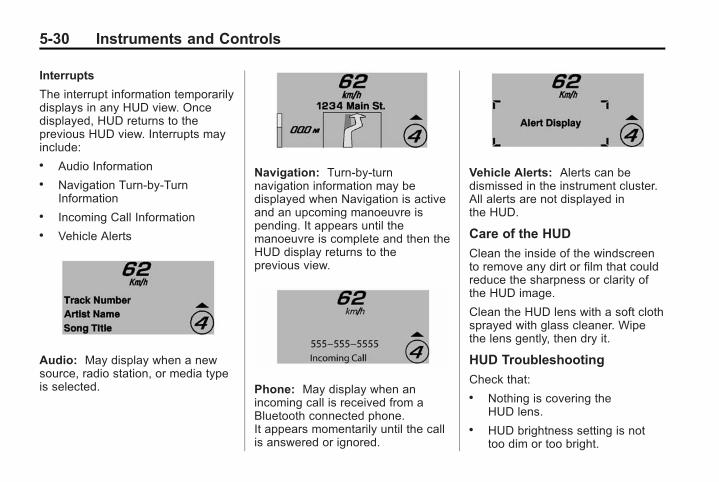
Black plate (30,1)Chevrolet Corvette Owner Manual (GMNA-Localizing-Europe-8087687) -2015 - CRC - 9/16/14
5-30 Instruments and Controls
Interrupts
The interrupt information temporarilydisplays in any HUD view. Oncedisplayed, HUD returns to theprevious HUD view. Interrupts mayinclude:. Audio Information. Navigation Turn-by-Turn
Information. Incoming Call Information. Vehicle Alerts
Audio: May display when a newsource, radio station, or media typeis selected.
Navigation: Turn-by-turnnavigation information may bedisplayed when Navigation is activeand an upcoming manoeuvre ispending. It appears until themanoeuvre is complete and then theHUD display returns to theprevious view.
Phone: May display when anincoming call is received from aBluetooth connected phone.It appears momentarily until the callis answered or ignored.
Vehicle Alerts: Alerts can bedismissed in the instrument cluster.All alerts are not displayed inthe HUD.
Care of the HUD
Clean the inside of the windscreento remove any dirt or film that couldreduce the sharpness or clarity ofthe HUD image.
Clean the HUD lens with a soft clothsprayed with glass cleaner. Wipethe lens gently, then dry it.
HUD Troubleshooting
Check that:. Nothing is covering the
HUD lens.. HUD brightness setting is not
too dim or too bright.
Black plate (31,1)Chevrolet Corvette Owner Manual (GMNA-Localizing-Europe-8087687) -2015 - CRC - 9/16/14
Instruments and Controls 5-31
. HUD is adjusted to the properheight.
. Polarised sunglasses arenot worn.
. Windscreen and HUD lens areclean.
If the HUD image is not correct,contact your dealer.
The windscreen is part of the HUDsystem. See WindscreenReplacement on page 10-35.
Vehicle MessagesMessages displayed on the DICindicate the status of the vehicle orsome action that may be needed tocorrect a condition. Multiplemessages may display one after theother.
The messages that do not requireimmediate action can beacknowledged and cleared bypressing SEL. The messages thatrequire immediate action cannot becleared until that action isperformed. All messages should betaken seriously and clearing themessages does not correct theproblem.
The following are some of thevehicle messages that may bedisplayed depending on the vehiclecontent.
Battery Voltage andCharging Messages
BATTERY SAVER ACTIVE
This message displays when thevehicle has detected that the batteryvoltage is dropping beyond areasonable point. The battery saversystem starts reducing features ofthe vehicle that may be noticed. Atthe point that features are disabled,this message displays. Turn offunnecessary accessories to allowthe battery to recharge.
LOW BATTERY
This message is displayed when thebattery voltage is low. See Batteryon page 10-28.
SERVICE BATTERYCHARGING SYSTEM
This message is displayed whenthere is a fault in the batterycharging system. Take the vehicle toyour dealer for service.
Black plate (32,1)Chevrolet Corvette Owner Manual (GMNA-Localizing-Europe-8087687) -2015 - CRC - 9/16/14
5-32 Instruments and Controls
Brake System Messages
BRAKE FLUID LOW
This message is displayed when thebrake fluid level is low. See BrakeFluid on page 10-27.
RELEASE PARKING BRAKE
This message is displayed if theElectric Parking Brake is on whilethe vehicle is in motion. See ElectricParking Brake on page 9-24.
SERVICE BRAKE ASSIST
This message may be displayedwhen there is a problem with thebrake boost assist system. Whenthis message is displayed, the brakeboost assist motor might be heardoperating and you might noticepulsation in the brake pedal. This isnormal under these conditions. Takethe vehicle to your dealer forservice.
SERVICE PARKING BRAKE
This message is displayed whenthere is a problem with the parkingbrake. Take the vehicle to yourdealer for service.
STEP ON BRAKE TORELEASE PARK BRAKE
This message is displayed if youattempt to release the ElectricParking Brake without the brakepedal applied. See Electric ParkingBrake on page 9-24.
Compass MessagesDashes may be displayed if thevehicle temporarily losescommunication with the GlobalPositioning System (GPS).
Convertible TopMessagesThe following messages are forvehicles with a powerconvertible top.
ATTACH TRUNK PARTITIONTO OPERATE TOP
This message displays and a soundwill be heard if the boot partition isnot in place. Open the hatch/bootand make sure the boot partition issecure and no objects are on theboot partition.
BATTERY VOLTAGE TOOLOW – TOP DISABLED
This message displays when thebattery voltage is too low to operatethe convertible top.
CLOSE BOOT TO MOVE TOP
This message displays if the boot isopen while you are trying to operatethe convertible top. Make sure theboot is closed before operating theconvertible top.
FOLDING TOP MOTIONCOMPLETE
This message displays when the topsuccessfully completes an open/close cycle.
Black plate (33,1)Chevrolet Corvette Owner Manual (GMNA-Localizing-Europe-8087687) -2015 - CRC - 9/16/14
Instruments and Controls 5-33
FOLDING TOP NOT SECURECOMPLETE TOP MOTION
This message occurs if the top isnot secure. Several beeps willsound. Complete the power open orpower close cycle for the top. If it isnot possible to move the top to afully open or fully closed position,make sure that all objects are clearof the path of the top systemcomponents.
ONLY MANUAL OPERATIONOF TOP POSSIBLE
This message indicates that theposition of the top cannot be fullydetermined by the power convertibletop controls. Try moving the top inthe other direction. This messagewill also be displayed if a fault isdetected by the convertible topcontrols. See “Manual Movement ofTop” under Convertible Top onpage 2-25.
REDUCE VEHICLE SPEED TOOPERATE TOP
This message is displayed when thevehicle speed exceeds or isapproaching the convertible topspeed cut off.
TEMPERATURE TOO LOW –TOP DISABLED
This message displays and a soundwill be heard when the powerconvertible top button is pressedand it is too cold to operate thepower convertible top. Move thevehicle to a warmer location andwait for the vehicle temperature torise. This may take several hoursdepending on the initial vehicletemperature and the temperature ofthe new location.
TOP NOT SECURE
This message displays when thepower convertible top is notcompletely opened or closed. Pressand hold the convertible top buttonuntil the top is fully opened orclosed. This is indicated by the
FOLDING TOP MOTIONCOMPLETE message beingdisplayed and an audible indicator.
TOP POWERING DOWNCOMPLETE TOP MOTION
This message displays when thepower convertible top can no longerhold the top in an intermediateposition. Top system componentsmay move during this time based onexternal forces. Keep objects clearfrom the normal path of movementfor the top system components.
TOP SYSTEM OVERHEATED,PLEASE WAIT
This message displays and a soundwill be heard when the powerconvertible top button is pressedand the power convertible top pumpmotor temperature is overheated.Wait for the power convertible toppump motor to cool down beforeusing the power convertible top.
Black plate (34,1)Chevrolet Corvette Owner Manual (GMNA-Localizing-Europe-8087687) -2015 - CRC - 9/16/14
5-34 Instruments and Controls
VALET SWITCH ACTIVE – TOPDISABLED
This message displays when ValetMode is active.
Cruise Control Messages
CRUISE SET TO XXX
This message displays when thecruise control is set and shows thespeed it was set to. See CruiseControl on page 9-36.
Door Ajar Messages
DOOR OPEN
A door open symbol will display onthe DIC showing which door isopen. The DOOR OPEN messagemay also display if the vehicle startsto move. Close the door completely.
BONNET OPEN
This message will display along witha bonnet open symbol when thebonnet is open. Close the bonnetcompletely.
BOOT LID OPEN
This message will display along witha symbol when the boot is open.Close the boot completely.
Engine Cooling SystemMessages
A/C OFF DUE TO HIGHENGINE TEMP
This message displays when theengine coolant becomes hotter thanthe normal operating temperature.To avoid added strain on a hotengine, the air conditioningcompressor automatically turns off.When the coolant temperaturereturns to normal, the airconditioning compressor turns backon. The vehicle can continue to bedriven.
If this message continues to appear,have the system repaired by yourdealer as soon as possible to avoiddamage to the engine.
ENGINE OVERHEATING —IDLE ENGINE
This message displays when theengine coolant temperature is toohot. Stop and allow the vehicle toidle until it cools down.
ENGINE OVERHEATED —TURN VEHICLE OFF
This message displays and acontinuous chime sounds if theengine cooling system reachesunsafe temperatures for operation.Stop and turn off the vehicle assoon as it is safe to do so to avoidsevere damage. This messageclears when the engine has cooledto a safe operating temperature.
Black plate (35,1)Chevrolet Corvette Owner Manual (GMNA-Localizing-Europe-8087687) -2015 - CRC - 9/16/14
Instruments and Controls 5-35
Engine Oil Messages
CHANGE ENGINE OIL SOON
This message displays when theengine oil needs to be changed.When you change the engine oil, besure to reset the Oil Life System.See Engine Oil Life System onpage 10-16, Driver InformationCentre (DIC) on page 5-25, EngineOil on page 10-10, and theMaintenance Schedule booklet.
ENGINE OIL HOT, IDLEENGINE
This message displays when theengine oil temperature is too hot.Stop and allow the vehicle to idleuntil it cools down.
ENGINE OIL LOW — ADD OIL
On some vehicles, this messagedisplays when the engine oil levelmay be too low. Check the oil levelbefore filling to the recommendedlevel. If the oil is not low and this
message remains on, take thevehicle to your dealer for service.See Engine Oil on page 10-10.
OIL PRESSURE LOW — STOPENGINE
This message displays if low oilpressure levels occur. Stop thevehicle as soon as safely possibleand do not operate it until the causeof the low oil pressure has beencorrected. Check the oil as soon aspossible and have the vehicleserviced by your dealer.
OIL STARVATION MODEACTIVE
This message indicates the enginecontrols have taken action toprevent an oil starvation condition.This may reduce the availableengine power.
Engine Power Messages
ENGINE POWER IS REDUCED
This message displays when thevehicle's engine power is reduced.Reduced engine power can affectthe vehicle's ability to accelerate.If this message is on, but there is noreduction in performance, proceedto your destination. Theperformance may be reduced thenext time the vehicle is driven. Thevehicle may be driven at a reducedspeed while this message is on, butmaximum acceleration and speedmay be reduced. Anytime thismessage stays on, the vehicleshould be taken to your dealer forservice as soon as possible.
Fuel System Messages
FUEL LEVEL LOW
This message displays when thevehicle is low on fuel. Refuel assoon as possible.
Black plate (36,1)Chevrolet Corvette Owner Manual (GMNA-Localizing-Europe-8087687) -2015 - CRC - 9/16/14
5-36 Instruments and Controls
Key and Lock Messages
NO REMOTE DETECTED
This message displays when thetransmitter battery may be weak.See “Starting the Vehicle with a LowTransmitter Battery” under RemoteKeyless Entry (RKE) SystemOperation on page 2-3.
NO REMOTE KEY WASDETECTED PLACE KEY INTRANSMITTER POCKET THENSTART YOUR VEHICLE
This message displays when tryingto start the vehicle if an RKEtransmitter is not detected. Thetransmitter battery may be weak.See “Starting the Vehicle with a LowTransmitter Battery” under RemoteKeyless Entry (RKE) SystemOperation on page 2-3.
NO REMOTE PRESS BRAKETO RESTART
This message displays if the RKEtransmitter is no longer detected inthe vehicle. Press the brake pedalto restart the vehicle.
NUMBER OF KEYSPROGRAMMED
This message displays whenprogramming new keys to thevehicle.
REMOTE LEFT IN VEHICLE
This message displays whenleaving the vehicle with the RKEtransmitter still inside.
REPLACE BATTERY INREMOTE KEY
This message displays when thebattery in the RKE transmitter needsto be replaced.
Lamp Messages
AUTOMATIC LIGHT CONTROLON/OFF
This message is displayed when theautomatic light control has beenturned on or off. See AutomaticHeadlamp System on page 6-3.
INDICATOR ON
This message is displayed if theindicator has been left on. Turn offthe indicator.
Ride Control SystemMessages
MAXIMUM SPEED 129 km/h(80 MPH)
This message displays when amalfunction is present in theMagnetic Ride Control system. Thevehicle speed will be limited to avalue determined by the vehiclewhen the shock absorber systemhas failed and the shocks are in
Black plate (37,1)Chevrolet Corvette Owner Manual (GMNA-Localizing-Europe-8087687) -2015 - CRC - 9/16/14
Instruments and Controls 5-37
their full soft mode. Have the vehicleserviced by your dealer as soon aspossible.
To acknowledge the message, pressthe SEL button. The messagereappears every 10 minutes untilthis condition changes.
PERF TRAC 1 – WET ACTIVEHANDLING ON
This message displays and a soundwill be heard when this PerformanceTraction Management mode isselected. The instrument clusterlight will also be on when this modeis selected. Launch Control isavailable when this mode isselected. In this mode the TractionControl and StabiliTrak system areavailable but intended for use onwet race track conditions. Adjustyour driving accordingly. Thissystem is available only on modelswith FE4 – Z51 PerformancePackage and Magnetic RideControl. See “Performance Traction
Management” and “Launch Control”under Competitive Driving Mode onpage 9-32 for more informationabout the use of this mode.
PERF TRAC 2 – DRY ACTIVEHANDLING ON
This message displays and a soundwill be heard when this PerformanceTraction Management mode isselected. The instrument clusterlight will also be on when this modeis selected. Launch Control isavailable when this mode isselected. In this mode the TractionControl and StabiliTrak system areavailable but intended for use on dryrace track conditions. Adjust yourdriving accordingly. This system isavailable only on models with FE4.See “Performance TractionManagement” and “Launch Control”under Competitive Driving Mode onpage 9-32 for more informationabout the use of this mode.
PERF TRAC 3 – SPORTACTIVE HANDLING ON
This message displays and a soundwill be heard when this PerformanceTraction Management mode isselected. The instrument clusterlight will also be on when this modeis selected. Launch Control isavailable when this mode isselected. In this mode the TractionControl and StabiliTrak system areavailable but intended for use on dryrace track conditions. Adjust yourdriving accordingly. This system isavailable only on models with FE4.See “Performance TractionManagement” and “Launch Control”under Competitive Driving Mode onpage 9-32 for more informationabout the use of this mode.
PERF TRAC 4 – SPORTACTIVE HANDLING OFF
This message displays and a soundwill be heard when this PerformanceTraction Management mode isselected. The instrument clusterlight will also be on when this mode
Black plate (38,1)Chevrolet Corvette Owner Manual (GMNA-Localizing-Europe-8087687) -2015 - CRC - 9/16/14
5-38 Instruments and Controls
is selected. Launch Control isavailable when this mode isselected. In this mode the TractionControl is available but intended foruse on dry race track conditions.The StabiliTrak system is disabledwhen this mode is selected. Thismode will require more driver skillthan modes 1-3. Adjust your drivingaccordingly. This system is availableonly on models with FE4. See“Performance TractionManagement” and “Launch Control”under Competitive Driving Mode onpage 9-32 for more informationabout the use of this mode.
PERF TRAC 5 – RACE ACTIVEHANDLING OFF
This message displays and a soundwill be heard when this PerformanceTraction Management mode isselected. The instrument clusterlight will also be on when this modeis selected. Launch Control isavailable when this mode isselected. In this mode the TractionControl is available but intended for
use on dry race track conditions.The StabiliTrak system is disabledwhen this mode is selected. Thismode will require more driver skillthan modes 1-4. Adjust your drivingaccordingly. This system is availableonly on models with FE4. See“Performance TractionManagement” and “Launch Control”under Competitive Driving Mode onpage 9-32 for more informationabout the use of this mode.
REAR AXLE OFF
If this message is displayed, theElectronic Limited-Slip Rear (ifequipped) is not operational. Drivewith caution. Avoid high speeds,aggressive driving, and sharpcornering. The system could beoverheated. Allow the system tocool. If this message remains on,see your dealer for service. Thevehicle is safe to drive, however,continue to drive with caution.
When this message is displayed,the vehicle's handling capabilitieswill be reduced during severe
manoeuvres. StabiliTrak will beaffected. See Traction Control/Electronic Stability Control onpage 9-26.
SERVICE STABILITRAK
This message displays if there is aproblem with the StabiliTrak systemand the vehicle needs service. TheStabiliTrak system light on theinstrument cluster also turns on anda sound will be heard. See yourdealer. When this message isdisplayed, the system is notworking. Adjust your drivingaccordingly. See Traction Control/Electronic Stability Control onpage 9-26.
SERVICE TRACTION SYSTEM
If this message displays when youare driving, there is a problem withthe Traction Control System (TCS)and the vehicle needs service. Seeyour dealer. When this message isdisplayed, the system will not limitwheel spin. Adjust your drivingaccordingly.
Black plate (39,1)Chevrolet Corvette Owner Manual (GMNA-Localizing-Europe-8087687) -2015 - CRC - 9/16/14
Instruments and Controls 5-39
The TCS light on the instrumentcluster will also turn on and a soundwill be heard.
When this message is displayed,the computer controlled systems willnot assist the driver in controllingthe vehicle. Have the systemrepaired by your dealer as soon aspossible. Adjust your drivingaccordingly. See Traction Control/Electronic Stability Control onpage 9-26.
To acknowledge the message, pressthe SEL button.
SHOCKS INOPERATIVE
This message displays when amalfunction is present in theMagnetic Ride Control system,which is causing the shocks to be intheir full soft mode. This is awarning to the driver that the vehiclehandling may be affected. Have thevehicle serviced by your dealer assoon as possible.
To acknowledge the message, pressthe SEL button. The messagereappears every 10 minutes untilthis condition changes.
STABILITRAKCOMPETITIVE MODE
This message displays and a soundwill be heard when the CompetitiveDriving mode is selected. Theinstrument cluster light will be onwhen the Competitive Driving modeis selected. Launch Control isavailable when this mode isselected. The Traction ControlSystem (TCS) will not be operatingwhile in the Competitive Drivingmode. Adjust your drivingaccordingly. See CompetitiveDriving Mode on page 9-32,including the “Launch Control”information.
Airbag System Messages
SERVICE AIRBAG
This message displays if there is aproblem with the airbag system.Take the vehicle to your dealer forservice.
Security Messages
THEFT ATTEMPTED
This message displays if the vehicledetects a tamper condition.
Service Vehicle Messages
PROGRAM CLUSTER
This message is displayed if there isa problem with the instrumentcluster. Take the vehicle to yourdealer for service.
Black plate (40,1)Chevrolet Corvette Owner Manual (GMNA-Localizing-Europe-8087687) -2015 - CRC - 9/16/14
5-40 Instruments and Controls
SERVICE POWER STEERING
This message is displayed if there isa problem with the power steeringsystem and a chime may sound.Take the vehicle to your dealer forservice.
SERVICE REAR AXLE
If there is a problem detected withthe Electronic Limited-Slip RearAxle, this message displays. Whendisplayed, the system is notoperational and driving should beadjusted accordingly. Take thevehicle to your dealer for service assoon as possible.
When this message is displayed,the vehicle's handling capabilitieswill be reduced during severemanoeuvres. StabiliTrak will beaffected. See Traction Control/Electronic Stability Control onpage 9-26.
SERVICE VEHICLE SOON
This message is displayed if there isa problem with the vehicle. Take thevehicle to your dealer for service.
Starting the VehicleMessages
PRESS CLUTCH TO START
This message is displayed whenattempting to start a manualgearbox equipped vehicle withoutfirst pressing the clutch pedal.
SERVICE KEYLESS STARTSYSTEM
This message is displayed if there isa problem with the pushbutton startsystem. Take the vehicle to yourdealer for service.
Tyre Messages
SERVICE TYRE MONITORSYSTEM
This message displays if there is aproblem with the Tyre PressureMonitor System (TPMS). See TyrePressure Monitor Operation onpage 10-52.
TYRE LEARNING ACTIVE
This message displays when thesystem is learning new tyres. SeeTyre Pressure Monitor Operation onpage 10-52.
TYRE LOW ADD AIR TO TYRE
This message displays when thepressure in one or more of the tyresis low.
This message also displays LEFTFRONT, RIGHT FRONT, LEFTREAR, or RIGHT REAR to indicatethe location of the low tyre.
The low tyre pressure warning lightwill also come on. See TyrePressure Light on page 5-22.
Black plate (41,1)Chevrolet Corvette Owner Manual (GMNA-Localizing-Europe-8087687) -2015 - CRC - 9/16/14
Instruments and Controls 5-41
If a tyre pressure message appearson the DIC, stop as soon as youcan. Inflate the tyres by adding airuntil the tyre pressure is equal to thevalues shown on the Tyre andLoading Information label. SeeTyres on page 10-45, Vehicle LoadLimits on page 9-12, and TyrePressure on page 10-48.
You can receive more than one tirepressure message at a time. TheDIC also shows the tire pressurevalues. See Driver InformationCentre (DIC) on page 5-25.
Transmission Messages
1-4 SHIFT
This message displays on a manualgearbox vehicle when you can onlyshift from 1 (First) to 4 (Fourth)instead of 1 (First) to 2 (Second).
SERVICE TRANSMISSION
This message displays if there is aproblem with the transmission. Seeyour dealer.
SHIFT DENIED
This message displays whenattempting to shift to a gear notappropriate for the vehicle speedand engine revolutions perminute (rpm).
TRANSMISSION HOT — IDLEENGINE
This message displays and a chimesounds if the transmission fluid inthe vehicle gets hot. Driving with thetransmission fluid temperature highcan cause damage to the vehicle.Stop the vehicle and let it idle toallow the transmission to cool. Thismessage clears when the fluidtemperature reaches a safe level.
If this message is displayed duringnormal vehicle operation on flatroads, the vehicle may needservice. See your retailer for aninspection.
Vehicle ReminderMessages
ICE POSSIBLE DRIVEWITH CARE
This message is displayed when iceconditions are possible.
TURN WIPER CONTROL TOINTERMITTENT FIRST
This message is displayed whenattempting to adjust the intermittentwiper speed without intermittentselected on the wiper control. SeeWindscreen Wiper/Washer onpage 5-3.
Vehicle Speed Messages
SPEED LIMIT EXCEEDED
This message is displayed when thevehicle speed is greater than thespeed warning speed. See "SpeedWarning" under Instrument Clusteron page 5-8.
Black plate (42,1)Chevrolet Corvette Owner Manual (GMNA-Localizing-Europe-8087687) -2015 - CRC - 9/16/14
5-42 Instruments and Controls
SPEED LIMIT SET TO XXX
This message is displayed when thespeed warning is set. See "SpeedWarning" under Instrument Clusteron page 5-8.
Washer Fluid Messages
WASHER FLUID LOW ADDFLUID
This message may display when thewasher fluid level is low. Fill thewindscreen washer reservoir assoon as possible. See EngineCompartment Overview onpage 10-7 for the location of thewindscreen washer reservoir. Also,see Washer Fluid on page 10-25.
Window Messages
OPEN, THEN CLOSE DRIVER/PASSENGER WINDOW
This message is displayed when thewindow needs to be reprogrammed.If the vehicle's battery has beenrecharged or disconnected, you willneed to program each front windowfor the express-up feature to work.See Power Windows on page 2-19.
VehiclePersonalisationUse the audio system controls toaccess the personalisation menusfor customising vehicle features.
The following are all possiblepersonalisation features. Dependingon the vehicle, some may not beavailable.
Infotainment System AudioSystem Controls
To access thepersonalisation menu:
1. Press SETTINGS on the HomePage on the infotainment systemdisplay.
2. Press the desired feature todisplay a list of availableoptions.
3. Press to select the desiredfeature setting.
4. Press o BACK on the faceplateor press the Back screen buttonto return to the previous menu.
Black plate (43,1)Chevrolet Corvette Owner Manual (GMNA-Localizing-Europe-8087687) -2015 - CRC - 9/16/14
Instruments and Controls 5-43
Personalisation Menus
The following list of menu items maybe available:. Time and Date. Driving Mode. Language (Language). Valet Mode. Radio. Vehicle. Bluetooth. Voice. Display. Rear Camera. Return to Factory Settings. Software Information
Each menu is detailed in thefollowing information.
Time and Date
Manually set the time and date. SeeClock on page 5-4.
Driving Mode
Select and the following may bedisplayed:. Engine Sound Management. Steering
Engine Sound Management
This allows the Engine SoundManagement feature to be turnedon or off.
Select Auto (Mode Selector) or Off.
Steering
This allows the Steering feature tobe turned on or off.
Select Auto (Mode Selector), Tour,Sport, or Track.
Language (Language)
Select Language [Language], thenselect from the availablelanguage(s).
The selected language will displayon the system, and voicerecognition will reflect the selectedlanguage.
Valet Mode (If Equipped)
This will lock the infotainmentsystem and steering wheel controls.It may also limit top speed, power,and access to vehicle storagelocations (if equipped).
To enable Valet Mode:
1. Enter a four-digit code on thekeypad.
2. Press Enter to go to theconfirmation screen.
3. Re-enter the four-digit code.
Press LOCK or UNLOCK to lock orunlock the system. Press Back to goback to the previous menu.
Radio
Press to display the Radio Menuand the following may displayed:. Manage Favourites. Number of Favourites Shown. Audible Touch Feedback. Bose AudioPilot. Maximum Start Up Volume
Black plate (44,1)Chevrolet Corvette Owner Manual (GMNA-Localizing-Europe-8087687) -2015 - CRC - 9/16/14
5-44 Instruments and Controls
Manage Favourites
This allows favourites to be edited.See “Manage Favourites” in“Settings” under “Radio” in theinfotainment manual.
Number of Favourites Shown
Press to set the number offavourites to display.
Select the desired number or selectAuto and the infotainment systemwill automatically adjust the numberof favourites shown.
Audible Touch Feedback
This allows Audible TouchFeedback to be turned on or off.
Select Off or On.
Bose AudioPilot
This feature adjusts the volumebased on the noise in the vehicle.See “Bose AudioPilot NoiseCompensation Technology” under“Infotainment System Settings” inthe infotainment manual.
Maximum Start Up Volume
This feature sets the maximumstartup volume. If the vehicle isstarted and the volume is greaterthan this level, the volume isadjusted to this level. To set themaximum startup volume, press +or − to increase or decrease.
Vehicle
Select and the following may bedisplayed:. Climate and Air Quality. Comfort and Convenience. Lighting. Power Door Locks. Remote Lock, Unlock, Start
Climate and Air Quality
Select and the following may bedisplayed:. Auto Fan Max Speed. Auto Demist
Auto Fan Max Speed
This feature will set the maximumauto fan speed.
Select Low, Medium, or High.
Auto Demist
When set to On, the front demist willautomatically react to temperatureand humidity conditions that maycause fogging.
Select Off or On.
Comfort and Convenience
Select and the following may bedisplayed:. Auto Memory Recall. Easy Exit Options. Chime Volume. Reverse Tilt Mirror
Auto Memory Recall
This feature automatically recallsthe current driver's previously stored1 or 2 button positions whenentering the vehicle. See MemorySeats on page 3-4.
Black plate (45,1)Chevrolet Corvette Owner Manual (GMNA-Localizing-Europe-8087687) -2015 - CRC - 9/16/14
Instruments and Controls 5-45
Select Off or On. On some vehiclesselect Off, On - Driver Door Open,or On - At Ignition On.
Easy Exit Options
This feature automatically recallsthe current driver's previously storedExit button position when exiting thevehicle. See Memory Seats onpage 3-4.
Select Off or On.
Chime Volume
This allows the selection of thechime volume level.
Press + or − to adjust the volume.
Reverse Tilt Mirror
This allows the feature to be turnedon or off.
Select Off, On - Driver andPassenger, On - Driver, or On -Passenger.
Lighting
Select and the following may bedisplayed:. Vehicle Locator Lights. Exit Lighting
Vehicle Locator Lights
This feature will flash the exteriorlamps when K on the RemoteKeyless Entry (RKE) transmitter ispressed to locate the vehicle.
Select Off or On.
Exit Lighting
This allows the selection of howlong the exterior lamps stay onwhen leaving the vehicle when it isdark outside.
Select Off, 30 Seconds, 60Seconds, or 120 Seconds.
Power Door Locks
Select and the following may bedisplayed:. Unlocked Door Anti-Lockout
. Auto Door Lock
. Delayed Door Lock
Unlocked Door Anti-Lockout
When on, this feature will keep thedriver door from locking when thedoor is open. If Off is selected, theDelayed Door Lock menu will beavailable.
Select Off or On.
Auto Door Lock
When on, the doors willautomatically lock when the vehicleexceeds 13 km/h (8 mph).
Select Off or On.
Delayed Door Lock
When on, this feature will delay thelocking of the doors. To override thedelay, press the power door lockswitch on the door.
Select Off or On.
Black plate (46,1)Chevrolet Corvette Owner Manual (GMNA-Localizing-Europe-8087687) -2015 - CRC - 9/16/14
5-46 Instruments and Controls
Remote Lock, Unlock, Start
Select and the following may bedisplayed:. Remote Unlock Light Feedback. Remote Lock Feedback. Remote Door Unlock. Passive Door Unlock. Passive Door Lock. Remote Left in Vehicle Alert
Remote Unlock Light Feedback
When on, the exterior lamps willflash when unlocking the vehiclewith the RKE transmitter.
Select Off or On.
Remote Lock Feedback
This allows selection of what type offeedback is given when locking thevehicle with the RKE transmitter.
Select Off, Lights and Horn, LightsOnly, or Horn Only.
Remote Door Unlock
This allows selection of which doorswill unlock when pressing K on theRKE transmitter.
Select All Doors or Driver Door.
Passive Door Unlock
This allows the selection of whatdoors will unlock when using thebutton on the driver door to unlockthe vehicle.
Select All Doors or Driver Door.
Passive Door Lock
This feature can be turned on or off,or can be used to select feedbackwhen using the button on the driverdoor to lock the vehicle. SeeRemote Keyless Entry (RKE)System Operation on page 2-3.
Select Off, On with HornChirp, or On.
Remote Left in Vehicle Alert
This feature sounds an alert whenthe RKE transmitter is left in thevehicle.
Select Off or On.
Bluetooth
Select and the following may bedisplayed:. Pair New Device. Device Management. Ringtones. Voice Mail Numbers
Pair New Device
Select to pair a new device. See“Pairing” in “Infotainment Controls”under “Bluetooth' in the infotainmentmanual.
Device Management
Select to connect to a differentphone source, disconnect a phone,or delete a phone.
Ringtones
Press to change the ring tone forthe specific phone. The phone doesnot need to be connected to changethe ring.
Black plate (47,1)Chevrolet Corvette Owner Manual (GMNA-Localizing-Europe-8087687) -2015 - CRC - 9/16/14
Instruments and Controls 5-47
Voice Mail Numbers
This feature displays the voice mailnumber for all connected phones.To change the voice mail number,select EDIT or press the EDITbutton. Type a new number, thenselect SAVE or press the SAVEbutton.
Voice
Select and the following may bedisplayed:. Confidence Threshold. Prompt Length. Audio Feedback Speed
Confidence Threshold
This feature allows the adjustmentof the sensitivity of the speechrecognition system.
Select Confirm More orConfirm Less.
Prompt Length
This feature adjusts the voiceprompt length.
Select Short or Long.
Audio Feedback Speed
This feature adjusts the audiofeedback speed.
Select Slow, Medium, or Fast.
Display
Select and the following may bedisplayed:. Mode. Calibrate Touchscreen. Turn Display Off
Mode
Select to change the display screenfor day or night driving.
Select Auto, Day, or Night.
Calibrate Touchscreen
Select to calibrate the touchscreen,then follow the prompts.
Turn Display Off
Select to turn the display off. Pressanywhere on the display area or anyfaceplate button to turn thedisplay on.
Rear Camera
Select and the following may bedisplayed:. Guidance Lines
Guidance Lines
Select to turn Off or On. See RearVision Camera (RVC) on page 9-39.
Return to Factory Settings
Select and the following may bedisplayed:. Restore Vehicle Settings. Clear All Private Data. Restore Radio Settings
Restore Vehicle Settings
This allows selection of restoringvehicle settings.
Select Cancel or Restore.
Black plate (48,1)Chevrolet Corvette Owner Manual (GMNA-Localizing-Europe-8087687) -2015 - CRC - 9/16/14
5-48 Instruments and Controls
Clear All Private Data
This allows selection to clear allprivate information from the vehicle.
Select Cancel or Delete.
Restore Radio Settings
This allows selection to restoreradio settings.
Select Cancel or Restore.
Software Information
Select to view the infotainmentsystem current software information.
Black plate (1,1)Chevrolet Corvette Owner Manual (GMNA-Localizing-Europe-8087687) -2015 - CRC - 9/16/14
Lighting 6-1
Lighting
Exterior LightingExterior Lamp Controls . . . . . . . . 6-1Exterior Lamps OffReminder . . . . . . . . . . . . . . . . . . . . 6-2
Headlamp Main/Dipped-BeamChanger . . . . . . . . . . . . . . . . . . . . . 6-2
Flash-to-Pass . . . . . . . . . . . . . . . . . 6-2Daytime RunningLamps (DRL) . . . . . . . . . . . . . . . . 6-2
Automatic HeadlampSystem . . . . . . . . . . . . . . . . . . . . . . 6-3
Twilight Sentinel . . . . . . . . . . . . . . 6-4Hazard Lights . . . . . . . . . . . . . . . . . 6-5Turn and Lane-ChangeSignals . . . . . . . . . . . . . . . . . . . . . . 6-5
Rear Fog Lamps . . . . . . . . . . . . . . 6-6
Interior LightingInstrument Panel IlluminationControl . . . . . . . . . . . . . . . . . . . . . . 6-6
Courtesy Lamps . . . . . . . . . . . . . . 6-6Reading Lamps . . . . . . . . . . . . . . . 6-7
Lighting FeaturesEntry Lighting . . . . . . . . . . . . . . . . . 6-7Exit Lighting . . . . . . . . . . . . . . . . . . . 6-7Battery Power Protection . . . . . . 6-7Exterior Lighting BatterySaver . . . . . . . . . . . . . . . . . . . . . . . . 6-8
Exterior Lighting
Exterior Lamp Controls
The exterior lamp control is on theindicator lever.
There are four positions:
O (Off): Turns off all lamps.
AUTO (Automatic): Sets theexterior lamps to automatic mode.AUTO mode turns the exteriorlamps on and off depending on howmuch light is available outside thevehicle.
To override AUTO mode, turn thecontrol to off.
Black plate (2,1)Chevrolet Corvette Owner Manual (GMNA-Localizing-Europe-8087687) -2015 - CRC - 9/16/14
6-2 Lighting
To reset to AUTO mode turn thecontrol to exterior lamps and thenback to AUTO. Automatic mode alsoresets when the vehicle is turned offand then back on again if the controlis left in the AUTO position.
; (Parking Lamps): Turns on theparking lamps including all lamps,except the headlamps.
The handbrake indicator light comeson and stays on when the parkinglamps are on with the engine off andthe ignition in ACC/ACCESSORY.
5 (Headlamps): Turns on theheadlamps together with the parkinglamps and instrument panel lights.
Exterior Lamps OffReminderA warning chime will sound if theexterior lamp control is left on ineither the headlight or parking lightposition and the driver door isopened with the ignition off.
Headlamp Main/Dipped-Beam ChangerPush the indicator lever away fromyou and release to turn the mainbeams on. To return to dippedbeams, push the stalk again or pullit toward you and release.
This indicator light turns on in theinstrument cluster when thehigh-beam headlamps are on.
Flash-to-PassTo use the flash-to-pass feature,briefly pull the turn signal levertoward you. The main-beamindicator flashes to indicate to theother driver that you intend to pass.
Daytime RunningLamps (DRL)DRL can make it easier for others tosee the front of your vehicle duringthe day.
The DRL system makes thededicated lamps come on when thefollowing conditions are met:. It is still daylight and the ignition
is on.. The exterior lamp control is in
the AUTO position.. The handbrake is off.
When DRL are on, only the frontlamps will be on. The parkinglamps, tail lamps, instrument panellights, or other exterior lamps willnot be on when the DRL arebeing used.
When it is dark enough outside, thefront lamps dim to parking lampsand the normal dipped beamheadlamps turn on.

Black plate (3,1)Chevrolet Corvette Owner Manual (GMNA-Localizing-Europe-8087687) -2015 - CRC - 9/16/14
Lighting 6-3
When it is bright enough outside,the regular lamps go off, and thefront DRL lamps will take over. If thevehicle is started in a dark garage,the automatic headlamp systemcomes on immediately. Once thevehicle leaves the garage, it takesapproximately one minute for theautomatic headlamp system tochange to DRL if it is light outside.During that delay, the instrumentcluster may not be as bright asusual. Make sure the instrumentpanel brightness knob is in the fullbright position. See InstrumentPanel Illumination Control onpage 6-6.
If it is dark enough outside and theexterior lamp control is off, a DriverInformation Centre (DIC) messagemay display. See Lamp Messageson page 5-36.
Turning the exterior lamp control tooff a second time, or turning on theheadlamps will remove the DICmessage. If the parking lamps wereturned on instead, the DIC messagewill continue to be displayed.
The regular headlamp systemshould be turned on when needed.
Automatic HeadlampSystemWhen the exterior lamp control isset to AUTO and it is dark enoughoutside, the headlamps and parkinglamps come on automatically.
There is a light sensor on top of theinstrument panel. Do not cover thesensor; otherwise the headlampswill come on when they are notneeded.
The system may also turn on theheadlamps and parking lamps whendriving through a parking garage ortunnel.
If the vehicle is started in a darkgarage, the automatic headlampsystem comes on immediately. If itis light outside when the vehicleleaves the garage, there is a slightdelay before the automatic headlightsystem changes to the DRL. Duringthat delay, the instrument clustermay not be as bright as usual. Makesure the instrument panel brightnesscontrol is in the full bright position.See Instrument Panel IlluminationControl on page 6-6.
When it is bright enough outside,the headlamps and parking lampswill turn off or may change toDaytime Running Lamps (DRL).
The automatic headlamp systemturns off when the exterior lampcontrol is turned to O or the ignitionis off.
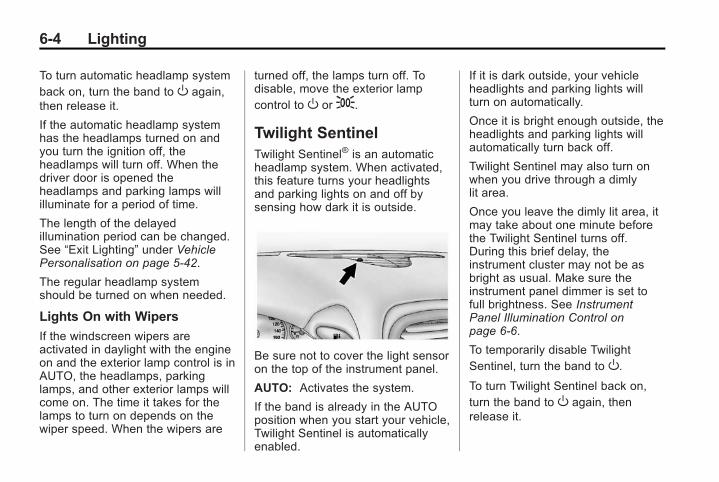
Black plate (4,1)Chevrolet Corvette Owner Manual (GMNA-Localizing-Europe-8087687) -2015 - CRC - 9/16/14
6-4 Lighting
To turn automatic headlamp systemback on, turn the band to O again,then release it.
If the automatic headlamp systemhas the headlamps turned on andyou turn the ignition off, theheadlamps will turn off. When thedriver door is opened theheadlamps and parking lamps willilluminate for a period of time.
The length of the delayedillumination period can be changed.See “Exit Lighting” under VehiclePersonalisation on page 5-42.
The regular headlamp systemshould be turned on when needed.
Lights On with Wipers
If the windscreen wipers areactivated in daylight with the engineon and the exterior lamp control is inAUTO, the headlamps, parkinglamps, and other exterior lamps willcome on. The time it takes for thelamps to turn on depends on thewiper speed. When the wipers are
turned off, the lamps turn off. Todisable, move the exterior lampcontrol to O or;.
Twilight SentinelTwilight Sentinel® is an automaticheadlamp system. When activated,this feature turns your headlightsand parking lights on and off bysensing how dark it is outside.
Be sure not to cover the light sensoron the top of the instrument panel.
AUTO: Activates the system.
If the band is already in the AUTOposition when you start your vehicle,Twilight Sentinel is automaticallyenabled.
If it is dark outside, your vehicleheadlights and parking lights willturn on automatically.
Once it is bright enough outside, theheadlights and parking lights willautomatically turn back off.
Twilight Sentinel may also turn onwhen you drive through a dimlylit area.
Once you leave the dimly lit area, itmay take about one minute beforethe Twilight Sentinel turns off.During this brief delay, theinstrument cluster may not be asbright as usual. Make sure theinstrument panel dimmer is set tofull brightness. See InstrumentPanel Illumination Control onpage 6-6.
To temporarily disable TwilightSentinel, turn the band to O.To turn Twilight Sentinel back on,turn the band to O again, thenrelease it.

Black plate (5,1)Chevrolet Corvette Owner Manual (GMNA-Localizing-Europe-8087687) -2015 - CRC - 9/16/14
Lighting 6-5
If the Twilight Sentinel has theheadlights turned on and you turnthe ignition off, the headlights willstay on for a period of time whileyou leave the vehicle.
Use the Driver Information Centre toturn Twilight Sentinel on or off andto increase or decrease the lengthof the delayed illumination period.See “Personal Options” underVehicle Personalisation onpage 5-42.
The regular headlamp systemshould be turned on when needed.
Lights On with Wipers
If the windscreen wipers areactivated in daylight with the engineon, and the exterior lamp control isin AUTO, the headlamps, parkinglamps, and other exterior lampscome on. The transition time for thelamps coming on varies based onwiper speed. When the wipers arenot operating, these lamps turn off.Move the exterior lamp control toPor; to disable this feature.
Hazard Lights
The hazard warning flashers warnothers that you have a problem. Thebutton is near the centre of theinstrument panel.
| (Hazard Warning Indicators):Press to make the front and rearturn signal lamps flash on and off.Press again to turn the flashers off.
The hazard warning flashers workno matter what mode the ignition isin, even if the ignition is turned off.
When the hazard warning flashersare on, the turn signals willnot work.
Turn and Lane-ChangeSignals
Move the lever all the way up ordown to signal a turn.
An arrow on the instrument clusterflashes in the direction of the turn orlane change.
Raise or lower the lever until thearrow starts to flash to signal a lanechange. Release the lever and theturn signal automatically flashesthree times. If more flashes aredesired, continue to hold the lever.
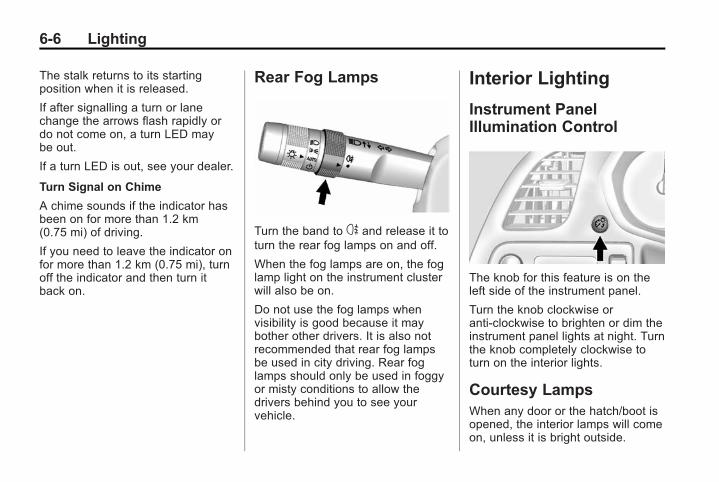
Black plate (6,1)Chevrolet Corvette Owner Manual (GMNA-Localizing-Europe-8087687) -2015 - CRC - 9/16/14
6-6 Lighting
The stalk returns to its startingposition when it is released.
If after signalling a turn or lanechange the arrows flash rapidly ordo not come on, a turn LED maybe out.
If a turn LED is out, see your dealer.
Turn Signal on Chime
A chime sounds if the indicator hasbeen on for more than 1.2 km(0.75 mi) of driving.
If you need to leave the indicator onfor more than 1.2 km (0.75 mi), turnoff the indicator and then turn itback on.
Rear Fog Lamps
Turn the band to s and release it toturn the rear fog lamps on and off.
When the fog lamps are on, the foglamp light on the instrument clusterwill also be on.
Do not use the fog lamps whenvisibility is good because it maybother other drivers. It is also notrecommended that rear fog lampsbe used in city driving. Rear foglamps should only be used in foggyor misty conditions to allow thedrivers behind you to see yourvehicle.
Interior Lighting
Instrument PanelIllumination Control
The knob for this feature is on theleft side of the instrument panel.
Turn the knob clockwise oranti-clockwise to brighten or dim theinstrument panel lights at night. Turnthe knob completely clockwise toturn on the interior lights.
Courtesy LampsWhen any door or the hatch/boot isopened, the interior lamps will comeon, unless it is bright outside.
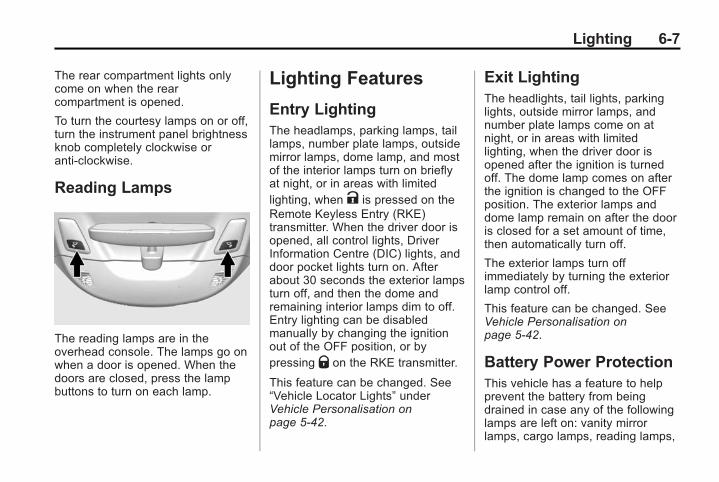
Black plate (7,1)Chevrolet Corvette Owner Manual (GMNA-Localizing-Europe-8087687) -2015 - CRC - 9/16/14
Lighting 6-7
The rear compartment lights onlycome on when the rearcompartment is opened.
To turn the courtesy lamps on or off,turn the instrument panel brightnessknob completely clockwise oranti-clockwise.
Reading Lamps
The reading lamps are in theoverhead console. The lamps go onwhen a door is opened. When thedoors are closed, press the lampbuttons to turn on each lamp.
Lighting Features
Entry LightingThe headlamps, parking lamps, taillamps, number plate lamps, outsidemirror lamps, dome lamp, and mostof the interior lamps turn on brieflyat night, or in areas with limitedlighting, when K is pressed on theRemote Keyless Entry (RKE)transmitter. When the driver door isopened, all control lights, DriverInformation Centre (DIC) lights, anddoor pocket lights turn on. Afterabout 30 seconds the exterior lampsturn off, and then the dome andremaining interior lamps dim to off.Entry lighting can be disabledmanually by changing the ignitionout of the OFF position, or bypressing Q on the RKE transmitter.
This feature can be changed. See“Vehicle Locator Lights” underVehicle Personalisation onpage 5-42.
Exit LightingThe headlights, tail lights, parkinglights, outside mirror lamps, andnumber plate lamps come on atnight, or in areas with limitedlighting, when the driver door isopened after the ignition is turnedoff. The dome lamp comes on afterthe ignition is changed to the OFFposition. The exterior lamps anddome lamp remain on after the dooris closed for a set amount of time,then automatically turn off.
The exterior lamps turn offimmediately by turning the exteriorlamp control off.
This feature can be changed. SeeVehicle Personalisation onpage 5-42.
Battery Power ProtectionThis vehicle has a feature to helpprevent the battery from beingdrained in case any of the followinglamps are left on: vanity mirrorlamps, cargo lamps, reading lamps,
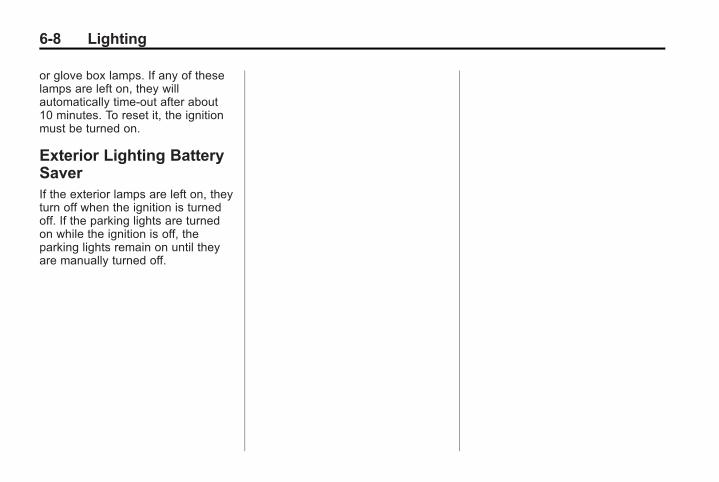
Black plate (8,1)Chevrolet Corvette Owner Manual (GMNA-Localizing-Europe-8087687) -2015 - CRC - 9/16/14
6-8 Lighting
or glove box lamps. If any of theselamps are left on, they willautomatically time-out after about10 minutes. To reset it, the ignitionmust be turned on.
Exterior Lighting BatterySaverIf the exterior lamps are left on, theyturn off when the ignition is turnedoff. If the parking lights are turnedon while the ignition is off, theparking lights remain on until theyare manually turned off.
Black plate (1,1)Chevrolet Corvette Owner Manual (GMNA-Localizing-Europe-8087687) -2015 - CRC - 9/16/14
Infotainment System 7-1
InfotainmentSystem
IntroductionInfotainment . . . . . . . . . . . . . . . . . . . 7-1
Performance DataRecorder (PDR)Performance DataRecorder (PDR) . . . . . . . . . . . . . 7-1
Introduction
InfotainmentSee the infotainment manual forinformation on the radio, audioplayers, phone, and navigationsystem. It also includes informationon settings.
Performance DataRecorder (PDR)If equipped, the PDR icon displayson the Home screen.
The PDR records video, audio, andvehicle data. This data is stored ona removable SD card in theglovebox.
The recorded data is not storedanywhere else and is onlyaccessible from the SD card.
To begin, insert a FAT32 formattedSD card, Class 10 preferred, intothe glovebox SD card reader.
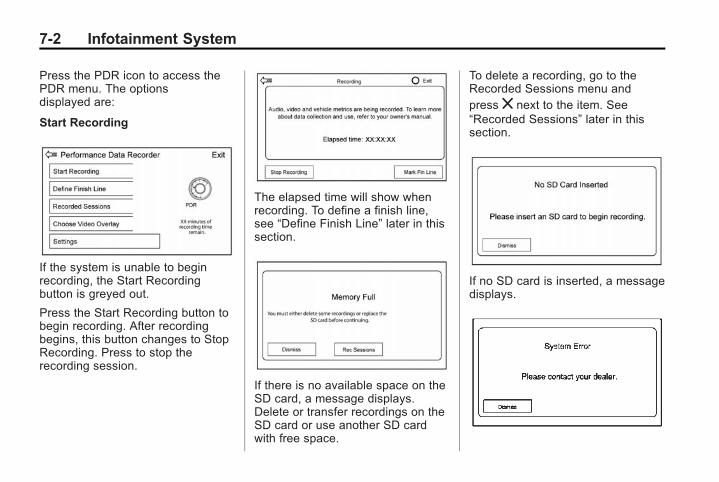
Black plate (2,1)Chevrolet Corvette Owner Manual (GMNA-Localizing-Europe-8087687) -2015 - CRC - 9/16/14
7-2 Infotainment System
Press the PDR icon to access thePDR menu. The optionsdisplayed are:
Start Recording
If the system is unable to beginrecording, the Start Recordingbutton is greyed out.
Press the Start Recording button tobegin recording. After recordingbegins, this button changes to StopRecording. Press to stop therecording session.
The elapsed time will show whenrecording. To define a finish line,see “Define Finish Line” later in thissection.
If there is no available space on theSD card, a message displays.Delete or transfer recordings on theSD card or use another SD cardwith free space.
To delete a recording, go to theRecorded Sessions menu andpress z next to the item. See“Recorded Sessions” later in thissection.
If no SD card is inserted, a messagedisplays.
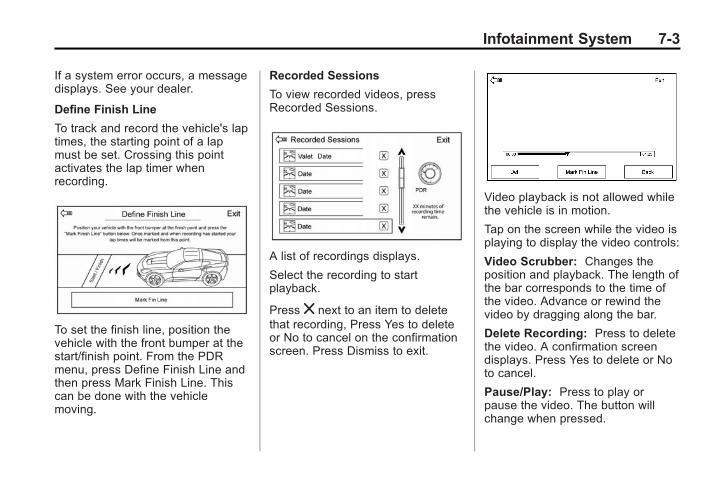
Black plate (3,1)Chevrolet Corvette Owner Manual (GMNA-Localizing-Europe-8087687) -2015 - CRC - 9/16/14
Infotainment System 7-3
If a system error occurs, a messagedisplays. See your dealer.
Define Finish Line
To track and record the vehicle's laptimes, the starting point of a lapmust be set. Crossing this pointactivates the lap timer whenrecording.
To set the finish line, position thevehicle with the front bumper at thestart/finish point. From the PDRmenu, press Define Finish Line andthen press Mark Finish Line. Thiscan be done with the vehiclemoving.
Recorded Sessions
To view recorded videos, pressRecorded Sessions.
A list of recordings displays.
Select the recording to startplayback.
Press z next to an item to deletethat recording, Press Yes to deleteor No to cancel on the confirmationscreen. Press Dismiss to exit.
Video playback is not allowed whilethe vehicle is in motion.
Tap on the screen while the video isplaying to display the video controls:
Video Scrubber: Changes theposition and playback. The length ofthe bar corresponds to the time ofthe video. Advance or rewind thevideo by dragging along the bar.
Delete Recording: Press to deletethe video. A confirmation screendisplays. Press Yes to delete or Noto cancel.
Pause/Play: Press to play orpause the video. The button willchange when pressed.

Black plate (4,1)Chevrolet Corvette Owner Manual (GMNA-Localizing-Europe-8087687) -2015 - CRC - 9/16/14
7-4 Infotainment System
Back: Press to display the previousscreen.
Exit: Press to exit the currentdisplay.
Choose Video Overlay
Press the Choose Video Overlayscreen button to display the menuscreen.
Select one:. No Overlay. Sport. Track. Performance Timing
No Overlay:
No vehicle data displays on top ofthe recorded video. Vehicle data isstill available with the video whenaccessed in the toolbox software.
Sport:
Displays these vehicle metrics:. Vehicle Speed: Up to three digits
are displayed in km/h or MPHdepending on vehicle settings.
. Engine Rotations Per Minute(RPMs): The vertical line andtriangle show current RPMs. Asthe RPMs increase, the greenbackfill follows.
. Transmission State (CurrentGear): Displays (1, 2, etc), N forNeutral and R for Reverse.
. Lateral G-Force Graphic: Leftand Right G-Forces aredisplayed. The graphic fills to theleft or the right depending on themeasure value. The measuredG-Force displays as a number atthe top of the graphic.
Track:
Displays these vehicle metrics:. Vehicle Speed: Same as Sport.. GPS Tracking Map: Shows the
vehicle's current position relativeto a known route.
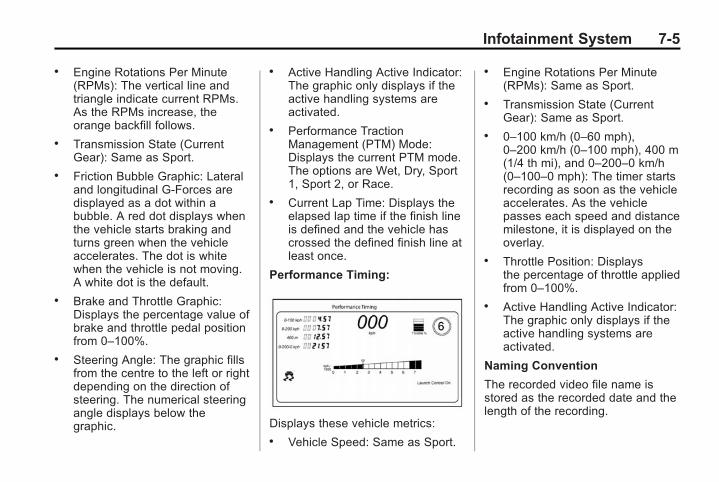
Black plate (5,1)Chevrolet Corvette Owner Manual (GMNA-Localizing-Europe-8087687) -2015 - CRC - 9/16/14
Infotainment System 7-5
. Engine Rotations Per Minute(RPMs): The vertical line andtriangle indicate current RPMs.As the RPMs increase, theorange backfill follows.
. Transmission State (CurrentGear): Same as Sport.
. Friction Bubble Graphic: Lateraland longitudinal G-Forces aredisplayed as a dot within abubble. A red dot displays whenthe vehicle starts braking andturns green when the vehicleaccelerates. The dot is whitewhen the vehicle is not moving.A white dot is the default.
. Brake and Throttle Graphic:Displays the percentage value ofbrake and throttle pedal positionfrom 0–100%.
. Steering Angle: The graphic fillsfrom the centre to the left or rightdepending on the direction ofsteering. The numerical steeringangle displays below thegraphic.
. Active Handling Active Indicator:The graphic only displays if theactive handling systems areactivated.
. Performance TractionManagement (PTM) Mode:Displays the current PTM mode.The options are Wet, Dry, Sport1, Sport 2, or Race.
. Current Lap Time: Displays theelapsed lap time if the finish lineis defined and the vehicle hascrossed the defined finish line atleast once.
Performance Timing:
Displays these vehicle metrics:. Vehicle Speed: Same as Sport.
. Engine Rotations Per Minute(RPMs): Same as Sport.
. Transmission State (CurrentGear): Same as Sport.
. 0–100 km/h (0–60 mph),0–200 km/h (0–100 mph), 400 m(1/4 th mi), and 0–200–0 km/h(0–100–0 mph): The timer startsrecording as soon as the vehicleaccelerates. As the vehiclepasses each speed and distancemilestone, it is displayed on theoverlay.
. Throttle Position: Displaysthe percentage of throttle appliedfrom 0–100%.
. Active Handling Active Indicator:The graphic only displays if theactive handling systems areactivated.
Naming Convention
The recorded video file name isstored as the recorded date and thelength of the recording.
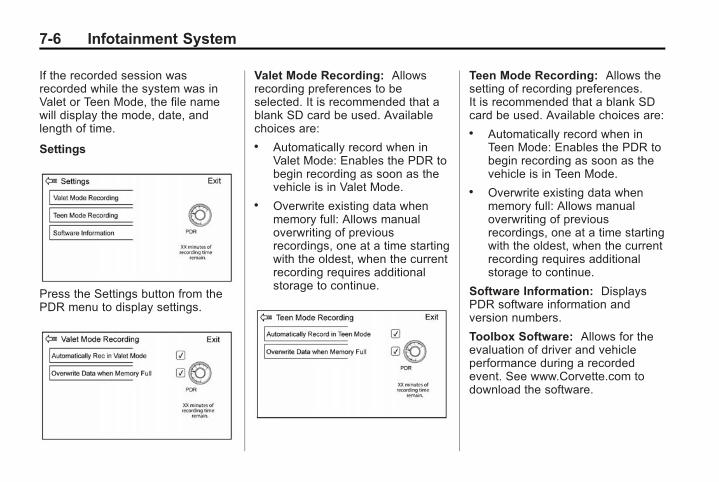
Black plate (6,1)Chevrolet Corvette Owner Manual (GMNA-Localizing-Europe-8087687) -2015 - CRC - 9/16/14
7-6 Infotainment System
If the recorded session wasrecorded while the system was inValet or Teen Mode, the file namewill display the mode, date, andlength of time.
Settings
Press the Settings button from thePDR menu to display settings.
Valet Mode Recording: Allowsrecording preferences to beselected. It is recommended that ablank SD card be used. Availablechoices are:. Automatically record when in
Valet Mode: Enables the PDR tobegin recording as soon as thevehicle is in Valet Mode.
. Overwrite existing data whenmemory full: Allows manualoverwriting of previousrecordings, one at a time startingwith the oldest, when the currentrecording requires additionalstorage to continue.
Teen Mode Recording: Allows thesetting of recording preferences.It is recommended that a blank SDcard be used. Available choices are:. Automatically record when in
Teen Mode: Enables the PDR tobegin recording as soon as thevehicle is in Teen Mode.
. Overwrite existing data whenmemory full: Allows manualoverwriting of previousrecordings, one at a time startingwith the oldest, when the currentrecording requires additionalstorage to continue.
Software Information: DisplaysPDR software information andversion numbers.
Toolbox Software: Allows for theevaluation of driver and vehicleperformance during a recordedevent. See www.Corvette.com todownload the software.
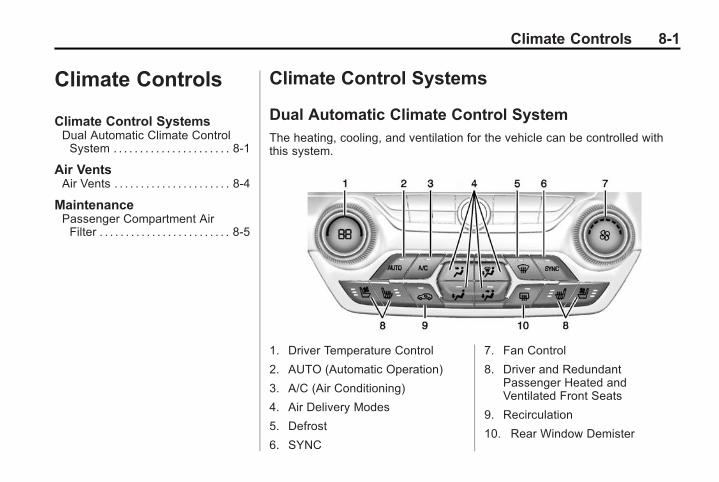
Black plate (1,1)Chevrolet Corvette Owner Manual (GMNA-Localizing-Europe-8087687) -2015 - CRC - 9/16/14
Climate Controls 8-1
Climate Controls
Climate Control SystemsDual Automatic Climate ControlSystem . . . . . . . . . . . . . . . . . . . . . . 8-1
Air VentsAir Vents . . . . . . . . . . . . . . . . . . . . . . 8-4
MaintenancePassenger Compartment AirFilter . . . . . . . . . . . . . . . . . . . . . . . . . 8-5
Climate Control Systems
Dual Automatic Climate Control SystemThe heating, cooling, and ventilation for the vehicle can be controlled withthis system.
1. Driver Temperature Control
2. AUTO (Automatic Operation)
3. A/C (Air Conditioning)
4. Air Delivery Modes
5. Defrost
6. SYNC
7. Fan Control
8. Driver and RedundantPassenger Heated andVentilated Front Seats
9. Recirculation
10. Rear Window Demister
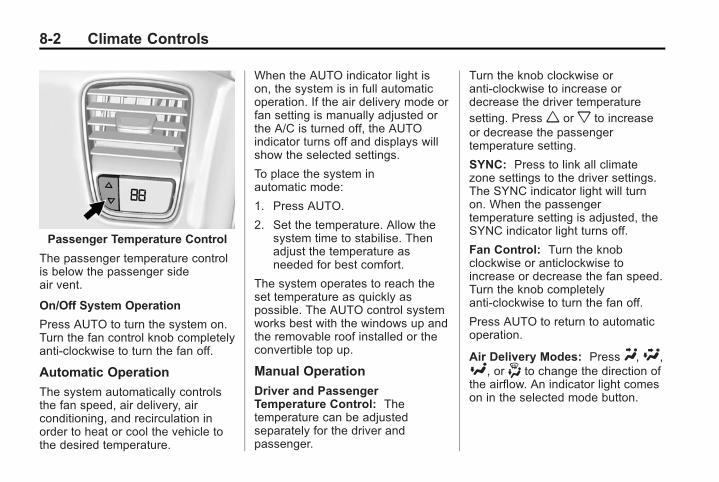
Black plate (2,1)Chevrolet Corvette Owner Manual (GMNA-Localizing-Europe-8087687) -2015 - CRC - 9/16/14
8-2 Climate Controls
Passenger Temperature Control
The passenger temperature controlis below the passenger sideair vent.
On/Off System Operation
Press AUTO to turn the system on.Turn the fan control knob completelyanti-clockwise to turn the fan off.
Automatic Operation
The system automatically controlsthe fan speed, air delivery, airconditioning, and recirculation inorder to heat or cool the vehicle tothe desired temperature.
When the AUTO indicator light ison, the system is in full automaticoperation. If the air delivery mode orfan setting is manually adjusted orthe A/C is turned off, the AUTOindicator turns off and displays willshow the selected settings.
To place the system inautomatic mode:
1. Press AUTO.
2. Set the temperature. Allow thesystem time to stabilise. Thenadjust the temperature asneeded for best comfort.
The system operates to reach theset temperature as quickly aspossible. The AUTO control systemworks best with the windows up andthe removable roof installed or theconvertible top up.
Manual Operation
Driver and PassengerTemperature Control: Thetemperature can be adjustedseparately for the driver andpassenger.
Turn the knob clockwise oranti-clockwise to increase ordecrease the driver temperaturesetting. Pressw orx to increaseor decrease the passengertemperature setting.
SYNC: Press to link all climatezone settings to the driver settings.The SYNC indicator light will turnon. When the passengertemperature setting is adjusted, theSYNC indicator light turns off.
Fan Control: Turn the knobclockwise or anticlockwise toincrease or decrease the fan speed.Turn the knob completelyanti-clockwise to turn the fan off.
Press AUTO to return to automaticoperation.
Air Delivery Modes: PressY,\,[, or- to change the direction ofthe airflow. An indicator light comeson in the selected mode button.

Black plate (3,1)Chevrolet Corvette Owner Manual (GMNA-Localizing-Europe-8087687) -2015 - CRC - 9/16/14
Climate Controls 8-3
Changing the mode cancels theautomatic operation and the systemgoes into manual mode. PressAUTO to return to automaticoperation.
Y (Vent): Air is directed to theinstrument panel outlets.
[ (Floor): Air is directed to thefloor outlets.
\ (Bi-Level): Air is directed to theinstrument panel outlets and thefloor outlets.
- (Demist): Air is directed to thewindscreen and floor outlets to clearthe windows of mist or moisture.The recirculation mode cannot beselected while in the demist mode.
0 (Defrost): Press to clear thewindscreen of mist or frost morequickly. Air is directed to thewindshield and side window outlets.The recirculation mode cannot beselected while in defrost mode.
For best results, clear all snow andice from the windscreen beforedefrosting.
Do not drive the vehicle until all thewindows are clear.
A/C (Air Conditioning): Press toturn the air conditioning on or off.If the fan is turned off the airconditioner will not run and theindicator light may turn off.
Press AUTO to return to automaticoperation and the air conditionerruns as needed. When the indicatorlight is on, the air conditioner runsautomatically to cool the air insidethe vehicle or to dry the air asneeded to demist the windscreenfaster.
A slight change in engineperformance may be noticed whenthe air conditioning compressorshuts off and turns on again. This isnormal. The system is designed tomake adjustments to help with fueleconomy while still maintaining theselected temperature.
If the A/C is turned off, automaticoperation is cancelled.
/ (Recirculation): Press toturn on recirculation. An indicatorlight comes on. Air is recirculated toquickly cool the inside of the vehicleor reduce the entry of outside airand odours. Recirculation mode isnot available in defrost ordefog mode.
Rear Window Demister
= (Rear Window Demister):Press to turn the rear windowdemister on or off. An indicator lighton the button comes on to show thatthe rear window demister is on.
The demister only works when theignition is in ON/RUN. The demisterturns off if the ignition is in the ACC/ACCESSORY or LOCK/OFFposition.
If equipped with heated outsiderearview mirrors, they turn on withthe rear window demister and helpto clear fog or frost from the surfaceof the mirror. See Heated Mirrors onpage 2-18.

Black plate (4,1)Chevrolet Corvette Owner Manual (GMNA-Localizing-Europe-8087687) -2015 - CRC - 9/16/14
8-4 Climate Controls
If equipped with a power convertibletop, the rear window demister andheated mirrors are automaticallydisabled when the power convertibletop is moving or down.
{ Caution
Using a razor blade or sharpobject on the inside rear windowcan damage the aerial ordemister. Repairs would not becovered by the vehicle warranty.Do not stick anything to the rearwindow.
z / { (Driver and PassengerHeated and Ventilated Seats, IfEquipped): Press to heat orventilate the seat. See Heated andVentilated Front Seats on page 3-7.
Sensors
The interior cabin air temperatureand solar sensor on top of theinstrument panel near the
windscreen monitors the solar heatand measures the initial interiorcabin temperature.
The climate control system uses thesensor information to adjust thetemperature, fan speed,recirculation, and air delivery modefor best comfort.
The humidity and windscreentemperature sensor is on thewindscreen glass inside surfacenear the rearview mirror. Theautomatic climate control systemuses this sensor to receiveinformation to determine the needfor demisting.
If any of these sensors are blockedor covered, the automatic climatecontrol system may not workproperly.
There is also a sensor behind thefront bumper. This sensor reads theoutside air temperature and helps tomaintain the temperature inside thevehicle. Any cover on the front ofthe vehicle could give a falsereading in the temperature.
Air VentsUse the tab on the air outlets tochange the direction of the airflow.
Operation Tips. Clear away any ice, snow,
or leaves from the air inlets atthe base of the windscreen thatmay block the flow of air into thevehicle.
. Use of non-GM approved hooddeflectors may adversely affectthe performance of the system.
. Keep the area around the baseof the instrument panel consoleand air path under the seatsclear of objects to help circulatethe air inside of the vehicle moreeffectively.
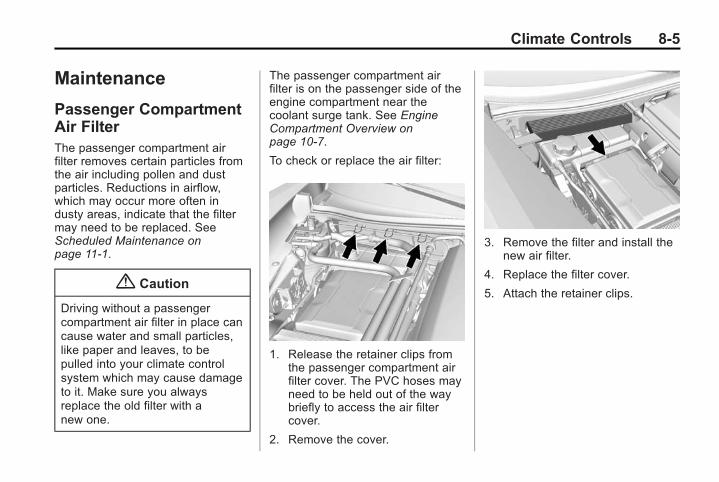
Black plate (5,1)Chevrolet Corvette Owner Manual (GMNA-Localizing-Europe-8087687) -2015 - CRC - 9/16/14
Climate Controls 8-5
Maintenance
Passenger CompartmentAir FilterThe passenger compartment airfilter removes certain particles fromthe air including pollen and dustparticles. Reductions in airflow,which may occur more often industy areas, indicate that the filtermay need to be replaced. SeeScheduled Maintenance onpage 11-1.
{ Caution
Driving without a passengercompartment air filter in place cancause water and small particles,like paper and leaves, to bepulled into your climate controlsystem which may cause damageto it. Make sure you alwaysreplace the old filter with anew one.
The passenger compartment airfilter is on the passenger side of theengine compartment near thecoolant surge tank. See EngineCompartment Overview onpage 10-7.
To check or replace the air filter:
1. Release the retainer clips fromthe passenger compartment airfilter cover. The PVC hoses mayneed to be held out of the waybriefly to access the air filtercover.
2. Remove the cover.
3. Remove the filter and install thenew air filter.
4. Replace the filter cover.
5. Attach the retainer clips.

Black plate (6,1)Chevrolet Corvette Owner Manual (GMNA-Localizing-Europe-8087687) -2015 - CRC - 9/16/14
8-6 Climate Controls
2 NOTES
Black plate (1,1)Chevrolet Corvette Owner Manual (GMNA-Localizing-Europe-8087687) -2015 - CRC - 9/16/14
Driving and Operating 9-1
Driving andOperating
Driving InformationDefensive Driving . . . . . . . . . . . . . 9-2Control of a Vehicle . . . . . . . . . . . 9-2Braking . . . . . . . . . . . . . . . . . . . . . . . 9-2Steering . . . . . . . . . . . . . . . . . . . . . . . 9-2Off-Road Recovery . . . . . . . . . . . . 9-3Loss of Control . . . . . . . . . . . . . . . . 9-3Track Events and CompetitiveDriving . . . . . . . . . . . . . . . . . . . . . . . 9-4
Driving on Wet Roads . . . . . . . . . 9-8Hill and Mountain Roads . . . . . . 9-9Winter Driving . . . . . . . . . . . . . . . 9-10If the Vehicle Is Stuck . . . . . . . . 9-11Vehicle Load Limits . . . . . . . . . . 9-12
Starting and OperatingNew Vehicle Run-In . . . . . . . . . . 9-14Front Air Dam . . . . . . . . . . . . . . . 9-14Carbon Fibre . . . . . . . . . . . . . . . . 9-14Ignition Positions . . . . . . . . . . . . 9-15Starting the Engine . . . . . . . . . . 9-16
Retained AccessoryPower (RAP) . . . . . . . . . . . . . . . 9-18
Parking . . . . . . . . . . . . . . . . . . . . . . 9-18Parking over ThingsThat Burn . . . . . . . . . . . . . . . . . . 9-18
Active Fuel Management® . . . 9-19
Engine ExhaustEngine Exhaust . . . . . . . . . . . . . . 9-19Running the Vehicle WhileParked . . . . . . . . . . . . . . . . . . . . . 9-20
Manual GearboxManual Gearbox . . . . . . . . . . . . . 9-20Active Rev Match . . . . . . . . . . . . 9-22
BrakesAntilock BrakeSystem (ABS) . . . . . . . . . . . . . . 9-23
Electric Parking Brake . . . . . . . 9-24Brake Assist . . . . . . . . . . . . . . . . . 9-26
Ride Control SystemsTraction Control/ElectronicStability Control . . . . . . . . . . . . 9-26
Driver Mode Control . . . . . . . . . 9-29
Competitive Driving Mode . . . 9-32Limited-Slip Differential(Except Z51) . . . . . . . . . . . . . . . 9-36
Limited-Slip Differential(Z51 Only) . . . . . . . . . . . . . . . . . . 9-36
Cruise ControlCruise Control . . . . . . . . . . . . . . . 9-36
Driver Assistance SystemsRear VisionCamera (RVC) . . . . . . . . . . . . . 9-39
FuelFuel . . . . . . . . . . . . . . . . . . . . . . . . . 9-41Fuel Additives . . . . . . . . . . . . . . . 9-42Filling the Tank . . . . . . . . . . . . . . 9-42Filling a Portable FuelContainer . . . . . . . . . . . . . . . . . . . 9-44
Trailer TowingGeneral TowingInformation . . . . . . . . . . . . . . . . . 9-44
Conversions and Add-OnsAdd-On ElectricalEquipment . . . . . . . . . . . . . . . . . 9-45
Black plate (2,1)Chevrolet Corvette Owner Manual (GMNA-Localizing-Europe-8087687) -2015 - CRC - 9/16/14
9-2 Driving and Operating
Driving Information
Defensive DrivingDefensive driving means "alwaysexpect the unexpected." The firststep in driving defensively is to wearthe safety belt. See Safety Belts onpage 3-8.. Assume that other road users
(pedestrians, bicyclists, andother drivers) are going to becareless and make mistakes.Anticipate what they might doand be ready.
. Allow enough following distancebetween you and the driver infront of you.
. Focus on the task of driving.
Control of a VehicleBraking, steering, and acceleratingare important factors in helping tocontrol a vehicle while driving.
BrakingBraking action involves perceptiontime and reaction time. Deciding topush the brake pedal is perceptiontime. Actually doing it isreaction time.
Average driver reaction time isabout three-quarters of a second. Inthat time, a vehicle moving at100 km/h (60 mph) travels 20 m(66 ft), which could be a lot ofdistance in an emergency.
Helpful braking tips to keep in mindinclude:. Keep enough distance between
you and the vehicle in frontof you.
. Avoid needless heavy braking.
. Keep pace with traffic.
If the engine ever stops while thevehicle is being driven, brakenormally but do not pump thebrakes. Doing so could make thepedal harder to push down. If theengine stops, there will be some
power brake assist but it will beused when the brake is applied.Once the power assist is used up, itcan take longer to stop and thebrake pedal will be harder to push.
Steering
Electric Power Steering
The vehicle has electric powersteering. It does not have powersteering fluid. Regular maintenanceis not required.
If power steering assist is lost dueto a system malfunction, the vehiclecan be steered, but may requireincreased effort.
See your dealer if there is aproblem.
If the steering wheel is turned until itreaches the end of its travel and isheld against that position for anextended period of time, powersteering assist may be reduced.
If the steering assistance is used foran extended period of time, powerassistance may be reduced.
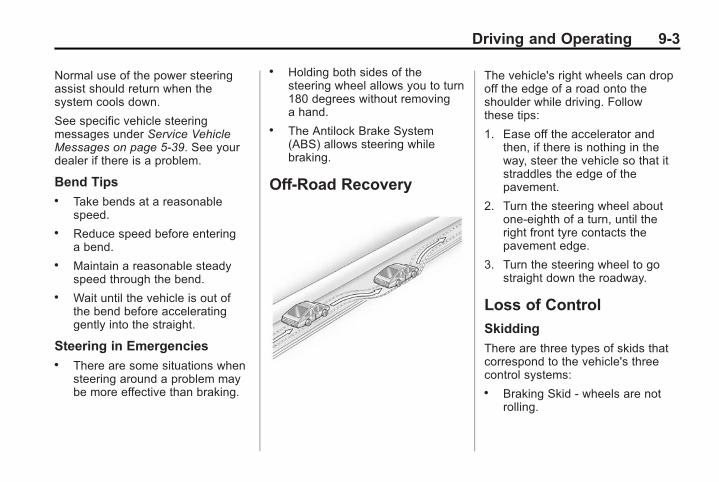
Black plate (3,1)Chevrolet Corvette Owner Manual (GMNA-Localizing-Europe-8087687) -2015 - CRC - 9/16/14
Driving and Operating 9-3
Normal use of the power steeringassist should return when thesystem cools down.
See specific vehicle steeringmessages under Service VehicleMessages on page 5-39. See yourdealer if there is a problem.
Bend Tips. Take bends at a reasonable
speed.. Reduce speed before entering
a bend.. Maintain a reasonable steady
speed through the bend.. Wait until the vehicle is out of
the bend before acceleratinggently into the straight.
Steering in Emergencies. There are some situations when
steering around a problem maybe more effective than braking.
. Holding both sides of thesteering wheel allows you to turn180 degrees without removinga hand.
. The Antilock Brake System(ABS) allows steering whilebraking.
Off-Road Recovery
The vehicle's right wheels can dropoff the edge of a road onto theshoulder while driving. Followthese tips:
1. Ease off the accelerator andthen, if there is nothing in theway, steer the vehicle so that itstraddles the edge of thepavement.
2. Turn the steering wheel aboutone-eighth of a turn, until theright front tyre contacts thepavement edge.
3. Turn the steering wheel to gostraight down the roadway.
Loss of Control
Skidding
There are three types of skids thatcorrespond to the vehicle's threecontrol systems:. Braking Skid - wheels are not
rolling.
Black plate (4,1)Chevrolet Corvette Owner Manual (GMNA-Localizing-Europe-8087687) -2015 - CRC - 9/16/14
9-4 Driving and Operating
. Steering or Cornering Skid - toomuch speed or steering in abend causes tyres to slip andlose cornering force.
. Acceleration Skid - too muchthrottle causes the drivingwheels to spin.
Defensive drivers avoid most skidsby taking reasonable care suited toexisting conditions, and by notoverdriving those conditions. Butskids are always possible.
If the vehicle starts to slide, followthese suggestions:. Ease your foot off the
accelerator pedal and steer theway you want the vehicle to go.The vehicle may straighten out.Be ready for a second skid if itoccurs.
. Slow down and adjust yourdriving according to weatherconditions. Stopping distancecan be longer and vehiclecontrol can be affected whentraction is reduced by water,snow, ice, gravel, or other
material on the road. Learn torecognise warning clues - suchas enough water, ice, or packedsnow on the road to make amirrored surface - and slowdown when you have any doubt.
. Try to avoid sudden steering,acceleration, or braking,including reducing vehicle speedby shifting to a lower gear. Anysudden changes could causethe tyres to slide.
Remember: Antilock brakes helpavoid only the braking skid.
Track Events andCompetitive DrivingParticipating in track events or othercompetitive driving without followingthe instructions provided may affectthe vehicle warranty. See thewarranty manual before using thevehicle for racing or othercompetitive driving.
Refer to Competitive Driving Modeon page 9-32.
Be sure to follow all serviceprocedures before driving thevehicle at track events orcompetitively.
Engine Oil
{ Caution
If the vehicle is used for trackevents and competitive driving,the engine may use more oil thanit would with normal use. Low oillevels can damage the engine.Check the oil level often andmaintain the proper level. SeeEngine Oil on page 10-10.
{ Caution
Not changing the engine oil to15W-50 may cause enginedamage. Engine oil must bechanged to 15W-50 synthetic.See Capacities and Specificationson page 12-3.
Black plate (5,1)Chevrolet Corvette Owner Manual (GMNA-Localizing-Europe-8087687) -2015 - CRC - 9/16/14
Driving and Operating 9-5
Check the oil level often during trackevents and competitive driving andkeep the level at or near 0.5 L(0.5 qt) above the upper mark thatshows the proper operating rangeon the engine oil dipstick. After thecompetitive driving, remove excessoil so that the level on the dipstick isnot above the upper mark thatshows the proper operating range.
Brake Fluid
Replace existing brake fluid with aqualified high performance brakefluid from a sealed container. Brakefluid with a dry boiling point >279°C(534°F) is qualified. If highperformance brake fluid is used,replace it with GM approved brakefluid before driving on public roads.If high performance brake fluid is inthe vehicle and the age of the brakefluid is over a month old orunknown, replace the brake fluidbefore track events and competitivedriving. Do not use silicone orDOT-5 brake fluids.
Load Limit
Limit vehicle load to the driver only,with no other cargo; inflate tyres to180 kPa (26 psi); and drive at amaximum speed of 280 km/h(174 mph).
Wheel Alignment
{ Caution
Using these wheel alignmentsettings may cause excessivetyre wear. Only use these wheelalignment settings for racing orcompetitive driving. Excessivetyre wear is not covered underthe vehicle warranty.
The racing and competitive drivingwheel alignment settings should beset as follows:
Alignment should only be done byadjusting the lower control arm cambolts and not by removing thewashers between the upper controlarms and frame.
Alignment values are targets. Seeyour retailer for tolerances.
FRONT (per corner). Caster: +7.0 degrees. Camber: -2.0 degrees. Toe: 0.05 degrees toe in
REAR (per corner). Caster: 0 degrees. Camber: -2.0 degrees. Toe: 0.05 degrees toe in
Thrust Angle: 0 degrees
Rear Axle Fluid
{ Caution
During a first time track or racingevent, high rear axletemperatures can occur. Damagecould be caused to the rear axleand would not be covered by thevehicle warranty. Do not drive as
(Continued)
Black plate (6,1)Chevrolet Corvette Owner Manual (GMNA-Localizing-Europe-8087687) -2015 - CRC - 9/16/14
9-6 Driving and Operating
Caution (Continued)
long or as fast the first time thevehicle is driven on the track orraced.
The rear axle fluid temperaturesmay be higher than when driving insevere conditions. Drain and refillwith new fluid after the first racing orcompetitive driving event, and thenafter every 24 hours of racing orcompetitive driving. SeeRecommended Fluids andLubricants on page 11-4.
General Information
If reduced performance isexperienced during track events orcompetitive driving, turning off theA/C will help to improve engineperformance.
Maintain a mixture of 40%DEX-COOL coolant and 60% clean,drinkable water to optimise engineperformance.
The front number plate bracket oraero panel should be removed fortrack events and competitive drivingto improve engine performance.
Rotor Cooling Ring
The following installation procedureis only to be used if the vehicle isequipped with front dual cast brakediscs along with the supplied brakecooling ring kit. See your retailer forinformation.
If the vehicle is equipped with aone-piece brake disc, a cooling ringis not required.
{ Caution
Do not leave rotor cooling ringsinstalled after a track event, asthis can cause corrosion withlong-term use. Rotor cooling ringsare for track use only. Trackdriving without the rotor coolingrings may result in brakepedal fade.
Installation:
1. Remove the front wheels.
2. Cut three 150 mm (6 in) lengthsof safety wire specified to T304Stainless Steel, 0.041 in nominaldiameter, not included.
3. Form each into a U shape with a20 mm (0.75 in) flat area in thecentre of the wire.
4. Place the rotor ring in the gapbetween the rotor brake plateand rotor hat, with the holes oneach side of the rotor spoke onthe outboard side of the rotor.
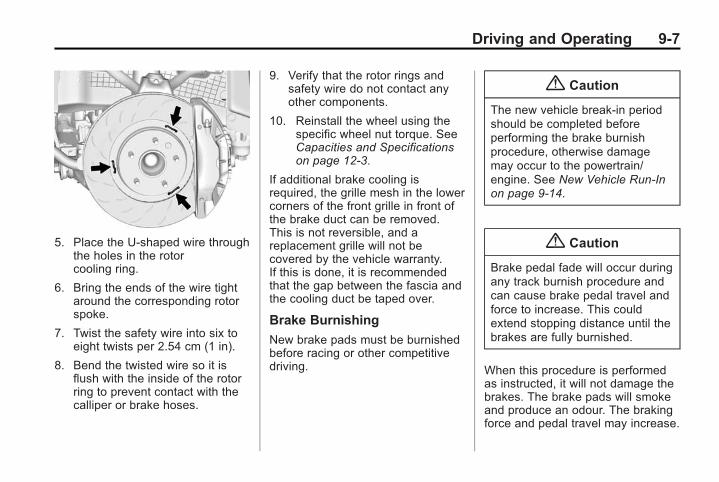
Black plate (7,1)Chevrolet Corvette Owner Manual (GMNA-Localizing-Europe-8087687) -2015 - CRC - 9/16/14
Driving and Operating 9-7
5. Place the U-shaped wire throughthe holes in the rotorcooling ring.
6. Bring the ends of the wire tightaround the corresponding rotorspoke.
7. Twist the safety wire into six toeight twists per 2.54 cm (1 in).
8. Bend the twisted wire so it isflush with the inside of the rotorring to prevent contact with thecalliper or brake hoses.
9. Verify that the rotor rings andsafety wire do not contact anyother components.
10. Reinstall the wheel using thespecific wheel nut torque. SeeCapacities and Specificationson page 12-3.
If additional brake cooling isrequired, the grille mesh in the lowercorners of the front grille in front ofthe brake duct can be removed.This is not reversible, and areplacement grille will not becovered by the vehicle warranty.If this is done, it is recommendedthat the gap between the fascia andthe cooling duct be taped over.
Brake Burnishing
New brake pads must be burnishedbefore racing or other competitivedriving.
{ Caution
The new vehicle break-in periodshould be completed beforeperforming the brake burnishprocedure, otherwise damagemay occur to the powertrain/engine. See New Vehicle Run-Inon page 9-14.
{ Caution
Brake pedal fade will occur duringany track burnish procedure andcan cause brake pedal travel andforce to increase. This couldextend stopping distance until thebrakes are fully burnished.
When this procedure is performedas instructed, it will not damage thebrakes. The brake pads will smokeand produce an odour. The brakingforce and pedal travel may increase.
Black plate (8,1)Chevrolet Corvette Owner Manual (GMNA-Localizing-Europe-8087687) -2015 - CRC - 9/16/14
9-8 Driving and Operating
After the procedure, the brake padsmay appear white at the rotorcontact.
Perform this procedure only on drypavement and in a safe manner andin compliance with all local andstate ordinances/laws regardingmotor vehicle operation.
Brake Burnish Procedure
1. Apply the brakes 25 timesstarting at 100 km/h (60 mph) to50 km/h (30 mph) whiledecelerating at 0.4 g. This is amedium brake application. Drivefor at least 1 km (0.6 mi)between applying the brakes.This first step may be skipped ifthere are more than 320 km(200 mi) on the brake pads.
2. Repeatedly apply the brakesfrom 100 km/h (60 mph) to25 km/h (15 mph) whiledecelerating at 0.8 g. This is ahard brake application, withoutactivating the Antilock BrakeSystem (ABS). Drive for at least1 km (0.6 mi) between stops.
Repeat until the brake pedaltravel starts to increase.Depending on conditions, thisshould take no longer than25 brake applications.
3. Cool down: Drive at 100 km/h(60 mph) for approximately15 km (10 mi) without using thebrakes.
4. Apply the brakes 25 times from100 km/h (60 mph) to 50 km/h(30 mph) while decelerating at0.4 g. This is a medium brakeapplication. Drive for at least1 km (0.6 mi) betweenapplications.
Driving on Wet RoadsRain and wet roads can reducevehicle traction and affect yourability to stop and accelerate.Always drive slower in these typesof driving conditions and avoiddriving through large puddles anddeep-standing or flowing water.
{ Warning
Wet brakes can cause crashes.They might not work as well in aquick stop and could causepulling to one side. You couldlose control of the vehicle.
After driving through a largepuddle of water or a car/vehiclewash, lightly apply the brakepedal until the brakes worknormally.
Flowing or rushing water createsstrong forces. Driving throughflowing water could cause thevehicle to be carried away. If thishappens, you and other vehicleoccupants could drown. Do notignore police warnings and bevery cautious about trying to drivethrough flowing water.
Black plate (9,1)Chevrolet Corvette Owner Manual (GMNA-Localizing-Europe-8087687) -2015 - CRC - 9/16/14
Driving and Operating 9-9
Aquaplaning
Aquaplaning is dangerous. Watercan build up under the vehicle'styres so they actually ride on thewater. This can happen if the road iswet enough and you are going fastenough. When the vehicle isaquaplaning, it has little or nocontact with the road.
There is no hard and fast rule aboutaquaplaning. The best advice is toslow down when the road is wet.
Other Rainy Weather Tips
Besides slowing down, other wetweather driving tips include:. Allow extra following distance.. Overtake with caution.. Keep windscreen wiping
equipment in good condition.. Keep the windscreen washer
fluid reservoir filled.. Have good tyres with proper
tread depth. See Tyres onpage 10-45.
. Turn off cruise control.
Hill and Mountain RoadsDriving on steep hills or throughmountains is different than drivingon flat or rolling terrain. Tips fordriving in these conditions include:. Keep the vehicle serviced and in
good shape.. Check all fluid levels and brakes,
tyres, cooling system, andtransmission.
. Shift to a lower gear when goingdown steep or long hills.
{ Warning
Using the brakes to slow thevehicle on a long downhill slopecan cause brake overheating, canreduce brake performance, andcould result in a loss of braking.Shift the transmission to a lowergear to let the engine assist thebrakes on a steep downhill slope.
{ Warning
Coasting downhill in N (Neutral)or with the ignition off isdangerous. This can causeoverheating of the brakes andloss of steering. Always have theengine running and the vehiclein gear.
. Stay in your own lane. Do notswing wide or cut across thecentre of the road. Drive atspeeds that let you stay in yourown lane.
. Be alert on top of hills;something could be in your lane(stalled car, accident).
. Pay attention to special roadsigns (falling rocks area, windingroads, long grades, overtaking orno-overtaking zones) and takeappropriate action.
Black plate (10,1)Chevrolet Corvette Owner Manual (GMNA-Localizing-Europe-8087687) -2015 - CRC - 9/16/14
9-10 Driving and Operating
Winter Driving
Driving on Snow or Ice
Drive carefully when there is snowor ice between the tyres and theroad, creating less traction or grip.Wet ice can occur at about 0°C(32°F) when freezing rain begins tofall, resulting in even less traction.Avoid driving on wet ice or infreezing rain until roads can betreated with salt or sand.
Drive with caution, whatever thecondition. Accelerate gently sotraction is not lost. Accelerating tooquickly causes the wheels to spinand makes the surface under thetyres slick, so there is even lesstraction.
If equipped, Traction Control shouldbe turned on. See Traction Control/Electronic Stability Control onpage 9-26.
The Antilock Brake System (ABS)on page 9-23 improves vehiclestability during hard stops onslippery roads, but apply the brakessooner than when on dry pavement.
Allow greater following distance onany slippery road and watch forslippery spots. Icy patches canoccur on otherwise clear roads inshaded areas. The surface of acurve or an overpass can remain icywhen the surrounding roads areclear. Avoid sudden steeringmanoeuvres and braking whileon ice.
Turn off cruise control on slipperysurfaces.
Blizzard Conditions
Being stuck in snow can be aserious situation. Stay with thevehicle unless there is help nearby.To get help and keep everyone inthe vehicle safe:. Turn on the hazard warning
lights.
. Tie a red cloth to an outsidemirror.
{ Warning
Snow can trap engine exhaustunder the vehicle. This maycause exhaust gases to getinside. Engine exhaust containscarbon monoxide (CO) whichcannot be seen or smelled. It cancause unconsciousness and evendeath.
If the vehicle is stuck in the snow:. Clear away snow from aroundthe base of your vehicle,especially any that is blockingthe exhaust pipe.
. Check again from time totime to be sure snow doesnot collect there.
. Open a window about 5 cm(2 in) on the side of thevehicle that is away from thewind to bring in fresh air.
(Continued)
Black plate (11,1)Chevrolet Corvette Owner Manual (GMNA-Localizing-Europe-8087687) -2015 - CRC - 9/16/14
Driving and Operating 9-11
Warning (Continued)
. Fully open the air outlets onor under the instrumentpanel.
. Adjust the climate controlsystem to a setting thatcirculates the air inside thevehicle and set the fan speedto the highest setting. See“Climate Control Systems.”
For more information aboutcarbon monoxide, see EngineExhaust on page 9-19.
To save fuel, run the engine for onlyshort periods as needed to warmthe vehicle and then shut the engineoff and close the window most ofthe way to save heat. Repeat thisuntil help arrives but only when youfeel really uncomfortable from thecold. Moving about to keep warmalso helps.
If it takes some time for help toarrive, now and then when you runthe engine, push the acceleratorpedal slightly so the engine runsfaster than the idle speed. Thiskeeps the battery charged to restartthe vehicle and to signal for helpwith the headlamps. Do this as littleas possible to save fuel.
If the Vehicle Is StuckSlowly and cautiously spin thewheels to free the vehicle whenstuck in sand, mud, ice, or snow.
If stuck too severely for the tractionsystem to free the vehicle, turn thetraction system off and use therocking method. See TractionControl/Electronic Stability Controlon page 9-26.
{ Warning
If the vehicle's tyres spin at highspeed, they can explode, and youor others could be injured. The
(Continued)
Warning (Continued)
vehicle can overheat, causing anengine compartment fire or otherdamage. Spin the wheels as littleas possible and avoid goingabove 56 km/h (35 mph).
Rocking the Vehicle to Getit Out
Turn the steering wheel left andright to clear the area around thefront wheels. Turn off any tractionsystem. Shift back and forthbetween R (Reverse) and a lowforward gear, spinning the wheelsas little as possible. To preventtransmission wear, wait until thewheels stop spinning before shiftinggears. Release the acceleratorpedal while shifting, and presslightly on the accelerator pedalwhen the transmission is in gear.Slowly spinning the wheels in theforward and reverse directionscauses a rocking motion that couldfree the vehicle. If that does not get
Black plate (12,1)Chevrolet Corvette Owner Manual (GMNA-Localizing-Europe-8087687) -2015 - CRC - 9/16/14
9-12 Driving and Operating
the vehicle out after a few tries, itmight need to be towed out. If thevehicle does need to be towed out,see Towing the Vehicle onpage 10-73.
Vehicle Load Limits
{ Warning
Things you put inside thevehicle can strike and injurepeople in a sudden stop orturn or in a crash.
. Put things in the cargoarea of the vehicle. Try tospread the weight evenly.
. Never stack heavierthings, like suitcases,inside the vehicle so thatsome of them are abovethe tops of the seats.
(Continued)
Warning (Continued)
. Do not leave anunsecured child restraintin the vehicle.
. When you carry somethinginside the vehicle, secureit whenever you can.
. Do not leave a seat foldeddown unless you need to.
It is very important to know howmuch weight your vehicle cancarry.
The Vehicle Capacity Weightincludes the weight of alloccupants, cargo and all nonfactory-installed options.
{ Caution
Overloading the vehicle maycause damage. Repairs would notbe covered by the vehiclewarranty. Do not overload thevehicle.
{ Warning
Do not load the vehicle anyheavier than the GrossVehicle Weight Rating(GVWR), or either themaximum front or rear GrossAxle Weight Rating (GAWR).This can cause systems tobreak and change the way thevehicle handles. This couldcause loss of control and acrash. Overloading can alsoshorten the life of the vehicle.
Black plate (13,1)Chevrolet Corvette Owner Manual (GMNA-Localizing-Europe-8087687) -2015 - CRC - 9/16/14
Driving and Operating 9-13
Tyre and Loading InformationLabel (If Equipped)
Label Example
This label shows the size of thevehicle's original equipmenttyres (3) and the recommendedtyre inflation pressures (4). Formore information on tyres andinflation see Tyres onpage 10-45 and Tyre Pressureon page 10-48.
The label is attached to thecentre pillar (B-pillar) of thevehicle. With the driver dooropen, you will find the labelattached below the door lock.This label also shows thenumber of occupant seatingpositions (1), and the maximumvehicle capacity weight (2) inkilogrammes and pounds. Thisfigure includes the weight of alloccupants, cargo and allnon-factory-installed options.
Do not exceed the maximumvehicle capacity weight whenloading your vehicle.
Certification/Tyre Label
This label is located on the rightside centre pillar (B-pillar).It shows the Gross VehicleWeight Rating (GVWR), which isthe maximum permissibleloaded weight of the vehicle.It includes the weight of thevehicle, all occupants, fuel andcargo. The label also shows themaximum weight for the frontand rear axles, called GrossAxle Weight Rating (GAWR) andthe headlamp aim values.
Black plate (14,1)Chevrolet Corvette Owner Manual (GMNA-Localizing-Europe-8087687) -2015 - CRC - 9/16/14
9-14 Driving and Operating
Starting andOperating
New Vehicle Run-InFollow these recommendedguidelines during the first 2.414 km(1.500 mi) of driving this vehicle.Parts have a running-in period andperformance will be better in thelong run.
For the first 322 km (200 mi):. To run in new tyres, drive at
moderate speeds and avoid hardcornering for the first 322 km(200 mi).
. New brake linings also need abreak- in period. Avoid brakinghard during the first 322 km(200 mi). This is recommendedevery time brake linings arereplaced.
For the first 800 km (500 mi):. Avoid full throttle starts and
abrupt stops.
. Do not exceed 4000 rpm.
. Avoid driving at any oneconstant speed, fast or slow,including the use of cruisecontrol.
. Avoid downshifting to brake orslow the vehicle when theengine speed will exceed4000 rpm.
. Do not let the engine labour.Never lug the engine. With amanual gearbox, shift to the nextlower gear. This rule applies atall times, not just during therunning-in period.
For the first 2.414 km (1.500 mi):. Do not participate in track
events, sport driving schools,or similar activities during thefirst 2 414 km (1,500 mi).
. Check engine oil with everyrefuelling and add if necessary.Oil and fuel consumption may behigher than normal during thefirst 2.414 km (1.500 mi).
Front Air DamIf equipped, the front air dam hasminimal ground clearance.
Under normal operation, thecomponents will occasionallycontact some road surfaces (speedbumps, driveway ramps, etc.). Thiscan be heard inside the vehicle as ascraping noise. This is normal anddoes not indicate a problem.
Use care when approaching bumpsor objects on road surfaces andavoid them when possible.
Carbon FibreThis vehicle may be equipped withcarbon fibre parts. Retailer-installedaccessories may also containcarbon fibre. Some vehicles have acarbon fibre splitter and rockerextension. Do not stand on therocker extension or use it as a step,as it could break.
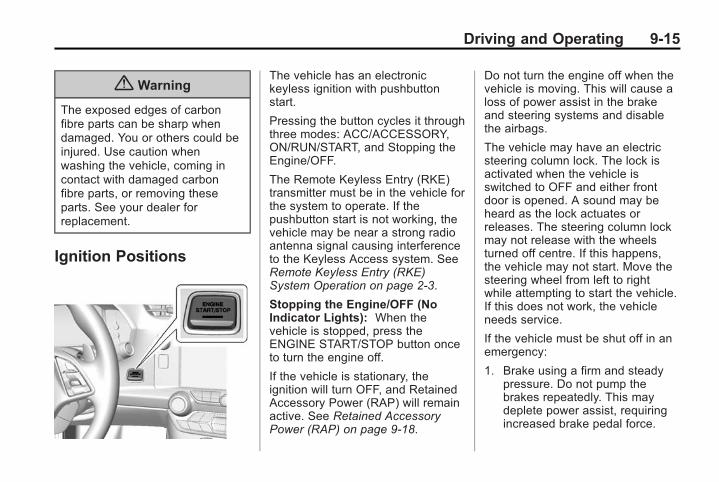
Black plate (15,1)Chevrolet Corvette Owner Manual (GMNA-Localizing-Europe-8087687) -2015 - CRC - 9/16/14
Driving and Operating 9-15
{ Warning
The exposed edges of carbonfibre parts can be sharp whendamaged. You or others could beinjured. Use caution whenwashing the vehicle, coming incontact with damaged carbonfibre parts, or removing theseparts. See your dealer forreplacement.
Ignition Positions
The vehicle has an electronickeyless ignition with pushbuttonstart.
Pressing the button cycles it throughthree modes: ACC/ACCESSORY,ON/RUN/START, and Stopping theEngine/OFF.
The Remote Keyless Entry (RKE)transmitter must be in the vehicle forthe system to operate. If thepushbutton start is not working, thevehicle may be near a strong radioantenna signal causing interferenceto the Keyless Access system. SeeRemote Keyless Entry (RKE)System Operation on page 2-3.
Stopping the Engine/OFF (NoIndicator Lights): When thevehicle is stopped, press theENGINE START/STOP button onceto turn the engine off.
If the vehicle is stationary, theignition will turn OFF, and RetainedAccessory Power (RAP) will remainactive. See Retained AccessoryPower (RAP) on page 9-18.
Do not turn the engine off when thevehicle is moving. This will cause aloss of power assist in the brakeand steering systems and disablethe airbags.
The vehicle may have an electricsteering column lock. The lock isactivated when the vehicle isswitched to OFF and either frontdoor is opened. A sound may beheard as the lock actuates orreleases. The steering column lockmay not release with the wheelsturned off centre. If this happens,the vehicle may not start. Move thesteering wheel from left to rightwhile attempting to start the vehicle.If this does not work, the vehicleneeds service.
If the vehicle must be shut off in anemergency:
1. Brake using a firm and steadypressure. Do not pump thebrakes repeatedly. This maydeplete power assist, requiringincreased brake pedal force.
Black plate (16,1)Chevrolet Corvette Owner Manual (GMNA-Localizing-Europe-8087687) -2015 - CRC - 9/16/14
9-16 Driving and Operating
2. Shift the vehicle to Neutral. Thiscan be done while the vehicle ismoving. After shifting to Neutral,firmly apply the brakes and steerthe vehicle to a safe location.
3. Come to a complete stop. Shiftto Neutral with a manualgearbox. Turn the ignition toLOCK/OFF.
4. Apply the parking brake. SeeElectric Parking Brake onpage 9-24.
{ Warning
Turning off the vehicle whilemoving may cause loss of powerassistance in the brake andsteering systems and disable theairbags. While driving, only shutthe vehicle off in an emergency.
If the vehicle cannot be pulled over,and must be shut off while driving,press and hold the ENGINE START/
STOP button for longer thantwo seconds, or press twice withinfive seconds.
ACC/ACCESSORY (AmberIndicator Light): This mode allowsthe use of some electricalaccessories when the engine is off.
With the ignition off, pressing thebutton once without the brake pedalapplied will place the ignition systemin ACC/ACCESSORY.
The ignition will switch from ACC/ACCESSORY to OFF afterfive minutes to prevent batteryrundown.
ON/RUN/START (Green IndicatorLight): This mode is for driving andstarting. With the ignition off, andthe brake pedal applied, pressingthe button once will place theignition system in ON/RUN/START.Once engine cranking begins,release the button. Engine crankingwill continue until the engine starts.See Starting the Engine onpage 9-16. The ignition will thenremain in ON/RUN.
Service Only Mode
This power mode is available forservice and diagnostics, and toverify the proper operation of themalfunction indicator lamp as maybe required for emission inspectionpurposes. With the vehicle off, andthe brake pedal not applied,pressing and holding the button formore than five seconds will placethe vehicle in Service Only Mode.The instruments and audio systemswill operate as they do in ON/RUN,but the vehicle will not be able to bedriven. The engine will not start inService Only Mode. Press thebutton again to turn the vehicle off.
Starting the Engine
{ Caution
If you add electrical parts oraccessories, you could changethe way the engine operates. Anyresulting damage would not be
(Continued)
Black plate (17,1)Chevrolet Corvette Owner Manual (GMNA-Localizing-Europe-8087687) -2015 - CRC - 9/16/14
Driving and Operating 9-17
Caution (Continued)
covered by the vehicle warranty.See Add-On Electrical Equipmenton page 9-45.
The vehicle can be started inNeutral or any other gear as long asthe clutch pedal is pressed. Torestart a vehicle with a manualgearbox when it is already moving,use the Neutral position only.
The RKE transmitter must be insidethe vehicle for the ignition to work.
Cell phone chargers can interferewith the operation of the KeylessAccess system. Battery chargersshould not be plugged in whenstarting or turning off the engine.
To start the vehicle:
1. Press the clutch pedal first, thenpress the ENGINE START/STOP button.
If there is no RKE transmitter inthe vehicle or if there issomething causing interferencewith it, the DIC will display amessage. See Key and LockMessages on page 5-36.
2. When the engine beginscranking, let go of the button andthe engine cranks automaticallyuntil it starts. If the battery in theRKE transmitter is weak, theDIC will display a message. Thevehicle can still be driven.
See “Starting the Vehicle with aLow Transmitter Battery” underRemote Keyless Entry (RKE)System Operation on page 2-3.If the remote transmitter batteryis dead, insert it into the steeringcolumn transmitter pocket toenable engine starting. See “NOREMOTE KEY WASDETECTED PLACE KEY INTRANSMITTER POCKET THENSTART YOUR VEHICLE” underKey and Lock Messages onpage 5-36.
3. Do not race the engineimmediately after starting it.Operate the engine andtransmission gently until the oilwarms up and lubricates allmoving parts.
4. If the engine does not start andno DIC message is displayed,wait 15 seconds before tryingagain to let the cranking motorcool down.
If the engine does not start afterfive to 10 seconds, especially invery cold weather (below -18°Cor 0°F), it could be flooded withtoo much petrol. Try pushing theaccelerator pedal all the way tothe floor while cranking for up to15 seconds maximum. Wait atleast 15 seconds between eachtry, to allow the cranking motorto cool down. When the enginestarts, let go of the accelerator.If the vehicle starts briefly butthen stops again, repeat thesesteps. This clears the extrapetrol from the engine.
Black plate (18,1)Chevrolet Corvette Owner Manual (GMNA-Localizing-Europe-8087687) -2015 - CRC - 9/16/14
9-18 Driving and Operating
{ Caution
Cranking the engine for longperiods of time, by returning theignition to the START positionimmediately after cranking hasended, can overheat and damagethe cranking motor, and drain thebattery. Wait at least 15 secondsbetween each try, to let thecranking motor cool down.
Stopping the Engine
Move the gear lever to R (Reverse)and set the handbrake after you turnoff the engine by pressing andholding the ENGINE START/STOPbutton.
If the RKE transmitter is notdetected inside the vehicle when itis turned to off, the DIC displays amessage.
See Key and Lock Messages onpage 5-36.
Retained AccessoryPower (RAP)These vehicle accessories can beused for up to 10 minutes after theengine is turned off:. Audio System. Power Windows
These features continue to work upto 10 minutes after the engine isturned off or until either door isopened. If a door is opened, thepower windows and audio systemwill shut off.
ParkingBefore exiting the vehicle, move thegear lever into 1 (First) orR (Reverse), and apply thehandbrake. Once the gear lever hasbeen placed into 1 (First) orR (Reverse) with the clutch pedalpressed in, turn the ignition off andrelease the clutch.
Parking over ThingsThat Burn
{ Warning
Things that can burn could touchhot exhaust parts under thevehicle and ignite. Do not parkover papers, leaves, dry grass,or other things that can burn.
Black plate (19,1)Chevrolet Corvette Owner Manual (GMNA-Localizing-Europe-8087687) -2015 - CRC - 9/16/14
Driving and Operating 9-19
Active Fuel Management®
This system allows the engine tooperate on either all or half of itscylinders, depending on the drivingconditions. With a manual gearbox,the system is only active in EcoMode. See Driver Mode Control onpage 9-29.
When less power is required, suchas cruising at a constant vehiclespeed, the system will operate inthe half cylinder mode, allowing thevehicle to achieve better fueleconomy. When greater powerdemands are required, such asaccelerating from a stop, overtaking,or merging onto a freeway, thesystem will maintain full-cylinderoperation.
Engine Exhaust
{ Warning
Engine exhaust contains carbonmonoxide (CO) which cannot beseen or smelled. Exposure to COcan cause unconsciousness andeven death.
Exhaust may enter the vehicle if:. The vehicle idles in areaswith poor ventilation (parkinggarages, tunnels, deep snowthat may block underbodyairflow or exhaust pipes).
. The exhaust smells orsounds strange or different.
. The exhaust system leaksdue to corrosion or damage.
. The vehicle exhaust systemhas been modified, damaged,or improperly repaired.
(Continued)
Warning (Continued)
. There are holes or openingsin the vehicle body fromdamage or aftermarketmodifications that are notcompletely sealed.
If unusual fumes are detected orif it is suspected that exhaust iscoming into the vehicle:
. Drive it only with the windowscompletely down.
. Have the vehicle repairedimmediately.
Never park the vehicle with theengine running in an enclosedarea such as a garage or abuilding that has no fresh airventilation.
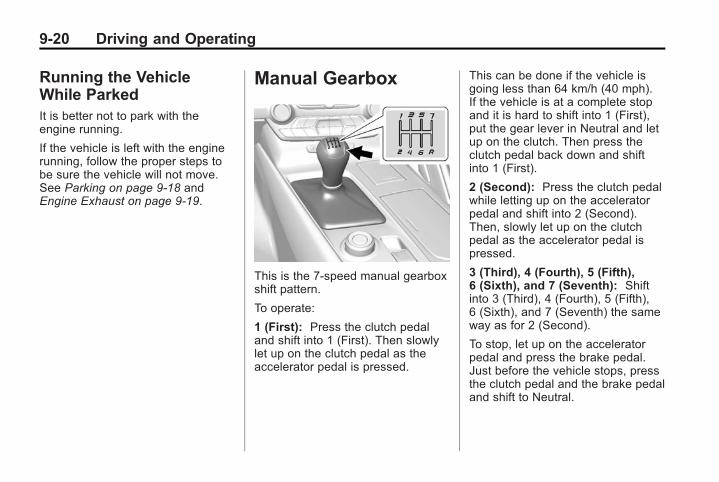
Black plate (20,1)Chevrolet Corvette Owner Manual (GMNA-Localizing-Europe-8087687) -2015 - CRC - 9/16/14
9-20 Driving and Operating
Running the VehicleWhile ParkedIt is better not to park with theengine running.
If the vehicle is left with the enginerunning, follow the proper steps tobe sure the vehicle will not move.See Parking on page 9-18 andEngine Exhaust on page 9-19.
Manual Gearbox
This is the 7-speed manual gearboxshift pattern.
To operate:
1 (First): Press the clutch pedaland shift into 1 (First). Then slowlylet up on the clutch pedal as theaccelerator pedal is pressed.
This can be done if the vehicle isgoing less than 64 km/h (40 mph).If the vehicle is at a complete stopand it is hard to shift into 1 (First),put the gear lever in Neutral and letup on the clutch. Then press theclutch pedal back down and shiftinto 1 (First).
2 (Second): Press the clutch pedalwhile letting up on the acceleratorpedal and shift into 2 (Second).Then, slowly let up on the clutchpedal as the accelerator pedal ispressed.
3 (Third), 4 (Fourth), 5 (Fifth),6 (Sixth), and 7 (Seventh): Shiftinto 3 (Third), 4 (Fourth), 5 (Fifth),6 (Sixth), and 7 (Seventh) the sameway as for 2 (Second).
To stop, let up on the acceleratorpedal and press the brake pedal.Just before the vehicle stops, pressthe clutch pedal and the brake pedaland shift to Neutral.
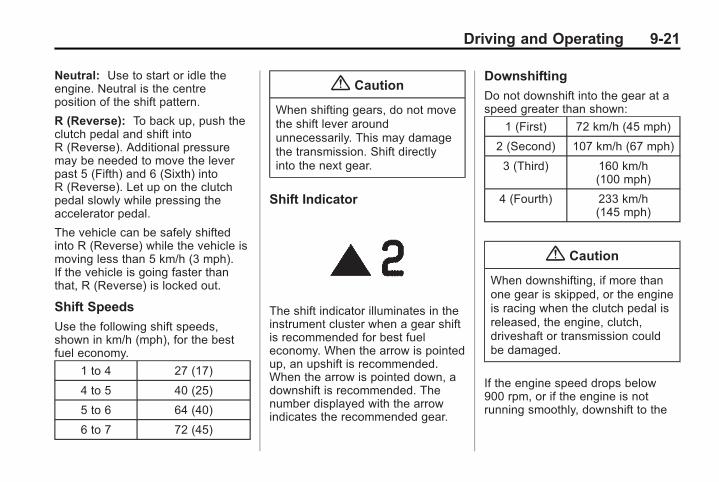
Black plate (21,1)Chevrolet Corvette Owner Manual (GMNA-Localizing-Europe-8087687) -2015 - CRC - 9/16/14
Driving and Operating 9-21
Neutral: Use to start or idle theengine. Neutral is the centreposition of the shift pattern.
R (Reverse): To back up, push theclutch pedal and shift intoR (Reverse). Additional pressuremay be needed to move the leverpast 5 (Fifth) and 6 (Sixth) intoR (Reverse). Let up on the clutchpedal slowly while pressing theaccelerator pedal.
The vehicle can be safely shiftedinto R (Reverse) while the vehicle ismoving less than 5 km/h (3 mph).If the vehicle is going faster thanthat, R (Reverse) is locked out.
Shift Speeds
Use the following shift speeds,shown in km/h (mph), for the bestfuel economy.
1 to 4 27 (17)
4 to 5 40 (25)
5 to 6 64 (40)
6 to 7 72 (45)
{ Caution
When shifting gears, do not movethe shift lever aroundunnecessarily. This may damagethe transmission. Shift directlyinto the next gear.
Shift Indicator
The shift indicator illuminates in theinstrument cluster when a gear shiftis recommended for best fueleconomy. When the arrow is pointedup, an upshift is recommended.When the arrow is pointed down, adownshift is recommended. Thenumber displayed with the arrowindicates the recommended gear.
Downshifting
Do not downshift into the gear at aspeed greater than shown:
1 (First) 72 km/h (45 mph)
2 (Second) 107 km/h (67 mph)
3 (Third) 160 km/h(100 mph)
4 (Fourth) 233 km/h(145 mph)
{ Caution
When downshifting, if more thanone gear is skipped, or the engineis racing when the clutch pedal isreleased, the engine, clutch,driveshaft or transmission couldbe damaged.
If the engine speed drops below900 rpm, or if the engine is notrunning smoothly, downshift to the
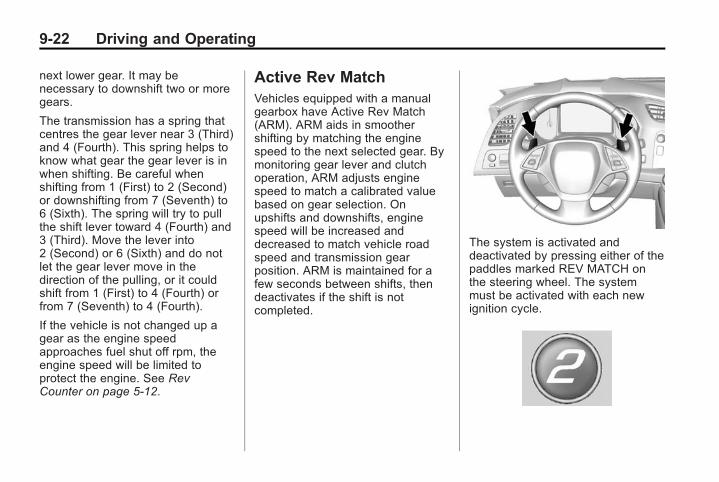
Black plate (22,1)Chevrolet Corvette Owner Manual (GMNA-Localizing-Europe-8087687) -2015 - CRC - 9/16/14
9-22 Driving and Operating
next lower gear. It may benecessary to downshift two or moregears.
The transmission has a spring thatcentres the gear lever near 3 (Third)and 4 (Fourth). This spring helps toknow what gear the gear lever is inwhen shifting. Be careful whenshifting from 1 (First) to 2 (Second)or downshifting from 7 (Seventh) to6 (Sixth). The spring will try to pullthe shift lever toward 4 (Fourth) and3 (Third). Move the lever into2 (Second) or 6 (Sixth) and do notlet the gear lever move in thedirection of the pulling, or it couldshift from 1 (First) to 4 (Fourth) orfrom 7 (Seventh) to 4 (Fourth).
If the vehicle is not changed up agear as the engine speedapproaches fuel shut off rpm, theengine speed will be limited toprotect the engine. See RevCounter on page 5-12.
Active Rev MatchVehicles equipped with a manualgearbox have Active Rev Match(ARM). ARM aids in smoothershifting by matching the enginespeed to the next selected gear. Bymonitoring gear lever and clutchoperation, ARM adjusts enginespeed to match a calibrated valuebased on gear selection. Onupshifts and downshifts, enginespeed will be increased anddecreased to match vehicle roadspeed and transmission gearposition. ARM is maintained for afew seconds between shifts, thendeactivates if the shift is notcompleted.
The system is activated anddeactivated by pressing either of thepaddles marked REV MATCH onthe steering wheel. The systemmust be activated with each newignition cycle.
Black plate (23,1)Chevrolet Corvette Owner Manual (GMNA-Localizing-Europe-8087687) -2015 - CRC - 9/16/14
Driving and Operating 9-23
A gear indicator in the instrumentcluster displays the current gearselected:. When ARM is activated, the
gear number is amber.. When ARM is deactivated, the
gear number is white.. A white dash indicates that
service is required. ARM will bedisabled, and the malfunctionindicator lamp will be on. SeeMalfunction Indicator Lamp onpage 5-16. The clutch andmanual gearbox will continue tooperate normally.
ARM will also:. Be active above 32 km/h
(20 mph).. Match engine speed up to
5400 rpm.. Not operate when the
accelerator pedal is applied.. Be disabled when the coolant
temperature is below 0°C (32°F).
Brakes
Antilock BrakeSystem (ABS)This vehicle has ABS, an advancedelectronic braking system that helpsprevent a braking skid.
When the vehicle begins to driveaway, ABS checks itself.A momentary motor or clicking noisemight be heard while this test isgoing on, and it might even benoticed that the brake pedal movesa little. This is normal.
If there is a problem with ABS, thiswarning light stays on. See AntilockBrake System (ABS) Warning Lighton page 5-20.
If driving safely on a wet road and itbecomes necessary to slam on thebrakes and continue braking toavoid a sudden obstacle, acomputer senses the wheels areslowing down. If one of the wheelsis about to stop rolling, the computerwill separately work the brakes ateach wheel.
ABS can change the brake pressureto each wheel, as required, fasterthan any driver could. This can helpyou steer around the obstacle whilebraking hard.
As the brakes are applied, thecomputer keeps receiving updateson wheel speed and controlsbraking pressure accordingly.
Remember: ABS does not changethe time needed to get a foot up tothe brake pedal or always decreasestopping distance. If you get tooclose to the vehicle in front of you,there will not be enough time toapply the brakes if that vehicle
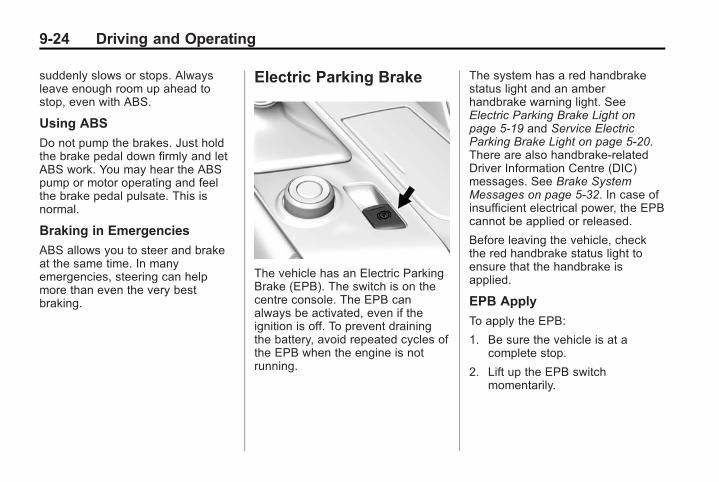
Black plate (24,1)Chevrolet Corvette Owner Manual (GMNA-Localizing-Europe-8087687) -2015 - CRC - 9/16/14
9-24 Driving and Operating
suddenly slows or stops. Alwaysleave enough room up ahead tostop, even with ABS.
Using ABS
Do not pump the brakes. Just holdthe brake pedal down firmly and letABS work. You may hear the ABSpump or motor operating and feelthe brake pedal pulsate. This isnormal.
Braking in Emergencies
ABS allows you to steer and brakeat the same time. In manyemergencies, steering can helpmore than even the very bestbraking.
Electric Parking Brake
The vehicle has an Electric ParkingBrake (EPB). The switch is on thecentre console. The EPB canalways be activated, even if theignition is off. To prevent drainingthe battery, avoid repeated cycles ofthe EPB when the engine is notrunning.
The system has a red handbrakestatus light and an amberhandbrake warning light. SeeElectric Parking Brake Light onpage 5-19 and Service ElectricParking Brake Light on page 5-20.There are also handbrake-relatedDriver Information Centre (DIC)messages. See Brake SystemMessages on page 5-32. In case ofinsufficient electrical power, the EPBcannot be applied or released.
Before leaving the vehicle, checkthe red handbrake status light toensure that the handbrake isapplied.
EPB Apply
To apply the EPB:
1. Be sure the vehicle is at acomplete stop.
2. Lift up the EPB switchmomentarily.
Black plate (25,1)Chevrolet Corvette Owner Manual (GMNA-Localizing-Europe-8087687) -2015 - CRC - 9/16/14
Driving and Operating 9-25
The red handbrake status light willflash and then stay on once theEPB is fully applied. If the redhandbrake status light flashescontinuously, then the EPB is onlypartially applied or there is aproblem with the EPB. A DICmessage will display. Release theEPB and try to apply it again. If thelight does not come on, or keepsflashing, have the vehicle serviced.Do not drive the vehicle if the redhandbrake status light is flashing.See your dealer. See ElectricParking Brake Light on page 5-19.
If the amber handbrake warninglight is on, lift up on the EPB switchand hold it up. Continue to hold theswitch until the red handbrakestatus light remains on. If the amberhandbrake warning light remains on,see your dealer.
If the EPB is applied while thevehicle is moving, the vehicle willdecelerate as long as the switch isheld up. If the switch is held up untilthe vehicle comes to a stop, theEPB will remain applied.
The vehicle may automatically applythe EPB in some situations whenthe vehicle is not moving. This isnormal, and is done to periodicallycheck the correct operation of theEPB system.
If the EPB fails to apply, the rearwheels should be blocked toprevent vehicle movement.
EPB Release
To release the EPB:
1. Place the ignition in the ACC/ACCESSORY or ON/RUNposition.
2. Apply and hold the brake pedal.
3. Push down momentarily on theEPB switch.
The EPB is released when the redhandbrake status light is off.
If the amber handbrake warninglight is on, release the EPB bypushing down on the EPB switchand holding it down. Continue tohold the switch until the redhandbrake status light is off. If eitherlight stays on after release isattempted, see your dealer.
{ Caution
Driving with the parking brake oncan overheat the brake systemand cause premature wear ordamage to brake system parts.Make sure that the parking brakeis fully released and the brakewarning light is off before driving.
Black plate (26,1)Chevrolet Corvette Owner Manual (GMNA-Localizing-Europe-8087687) -2015 - CRC - 9/16/14
9-26 Driving and Operating
Automatic EPB Release
The EPB will automatically release ifthe vehicle is running, placed intogear and an attempt is made todrive away. Avoid rapid accelerationwhen the EPB is applied, topreserve parking brake lining life.
The EPB can also be used toprevent roll back for vehicles with amanual gearbox starting on a hill.When no roll back is desired, anapplied EPB will allow both feet tobe used for the clutch andaccelerator pedals in preparation forstarting the vehicle moving in theintended direction. In this case,there is no need to push the switchto release the EPB.
Brake AssistThe Brake Assist feature isdesigned to assist the driver instopping or decreasing vehiclespeed in emergency driving
conditions. This feature uses thestability system hydraulic brakecontrol module to supplement thepower brake system underconditions where the driver hasquickly and forcefully applied thebrake pedal in an attempt to quicklystop or slow down the vehicle. Thestability system hydraulic brakecontrol module increases brakepressure at each corner of thevehicle until the ABS activates.Minor brake pedal pulsation orpedal movement during this time isnormal and the driver shouldcontinue to apply the brake pedal asthe driving situation dictates. TheBrake Assist feature willautomatically disengage when thebrake pedal is released or brakepedal pressure is quicklydecreased.
Ride Control Systems
Traction Control/Electronic StabilityControlThe vehicle has a Traction ControlSystem (TCS) and a StabiliTraksystem. These systems help limitwheel spin and assist the driver inmaintaining control, especially onslippery road conditions.
TCS activates if it senses that therear wheels are spinning too muchor are beginning to lose traction.When this happens, TCS appliesthe brakes to the spinning wheeland reduces engine power (byclosing the throttle and managingengine spark) to limit wheel spin.
StabiliTrak activates when thevehicle senses a difference betweenthe intended path and the directionthe vehicle is actually travelling.StabiliTrak selectively appliesbraking pressure to any one of the
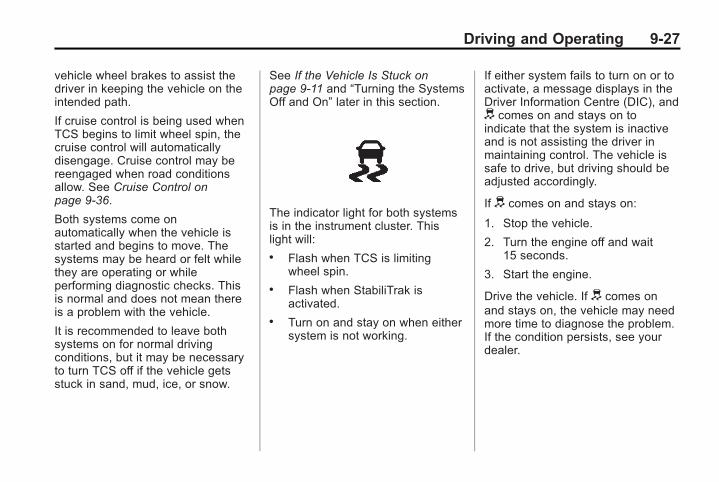
Black plate (27,1)Chevrolet Corvette Owner Manual (GMNA-Localizing-Europe-8087687) -2015 - CRC - 9/16/14
Driving and Operating 9-27
vehicle wheel brakes to assist thedriver in keeping the vehicle on theintended path.
If cruise control is being used whenTCS begins to limit wheel spin, thecruise control will automaticallydisengage. Cruise control may bereengaged when road conditionsallow. See Cruise Control onpage 9-36.
Both systems come onautomatically when the vehicle isstarted and begins to move. Thesystems may be heard or felt whilethey are operating or whileperforming diagnostic checks. Thisis normal and does not mean thereis a problem with the vehicle.
It is recommended to leave bothsystems on for normal drivingconditions, but it may be necessaryto turn TCS off if the vehicle getsstuck in sand, mud, ice, or snow.
See If the Vehicle Is Stuck onpage 9-11 and “Turning the SystemsOff and On” later in this section.
The indicator light for both systemsis in the instrument cluster. Thislight will:. Flash when TCS is limiting
wheel spin.. Flash when StabiliTrak is
activated.. Turn on and stay on when either
system is not working.
If either system fails to turn on or toactivate, a message displays in theDriver Information Centre (DIC), andd comes on and stays on toindicate that the system is inactiveand is not assisting the driver inmaintaining control. The vehicle issafe to drive, but driving should beadjusted accordingly.
If d comes on and stays on:
1. Stop the vehicle.
2. Turn the engine off and wait15 seconds.
3. Start the engine.
Drive the vehicle. If d comes onand stays on, the vehicle may needmore time to diagnose the problem.If the condition persists, see yourdealer.
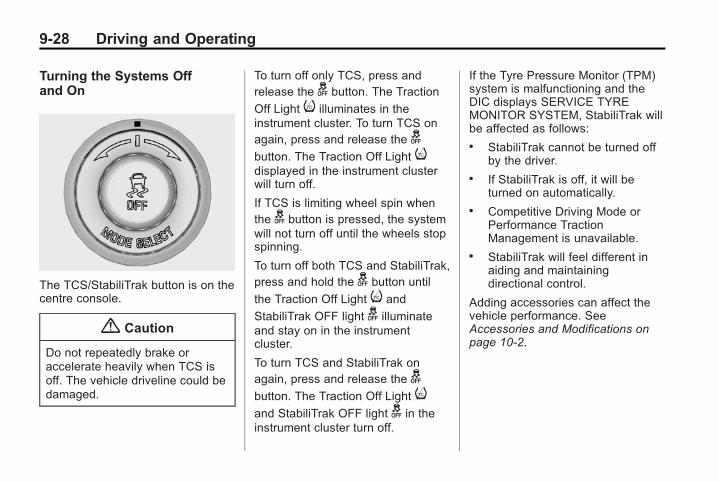
Black plate (28,1)Chevrolet Corvette Owner Manual (GMNA-Localizing-Europe-8087687) -2015 - CRC - 9/16/14
9-28 Driving and Operating
Turning the Systems Offand On
The TCS/StabiliTrak button is on thecentre console.
{ Caution
Do not repeatedly brake oraccelerate heavily when TCS isoff. The vehicle driveline could bedamaged.
To turn off only TCS, press andrelease the g button. The Traction
Off Light i illuminates in theinstrument cluster. To turn TCS onagain, press and release the gbutton. The Traction Off Light idisplayed in the instrument clusterwill turn off.
If TCS is limiting wheel spin whenthe g button is pressed, the systemwill not turn off until the wheels stopspinning.
To turn off both TCS and StabiliTrak,press and hold the g button until
the Traction Off Light i and
StabiliTrak OFF light g illuminateand stay on in the instrumentcluster.
To turn TCS and StabiliTrak onagain, press and release the gbutton. The Traction Off Light iand StabiliTrak OFF light g in theinstrument cluster turn off.
If the Tyre Pressure Monitor (TPM)system is malfunctioning and theDIC displays SERVICE TYREMONITOR SYSTEM, StabiliTrak willbe affected as follows:. StabiliTrak cannot be turned off
by the driver.. If StabiliTrak is off, it will be
turned on automatically.. Competitive Driving Mode or
Performance TractionManagement is unavailable.
. StabiliTrak will feel different inaiding and maintainingdirectional control.
Adding accessories can affect thevehicle performance. SeeAccessories and Modifications onpage 10-2.
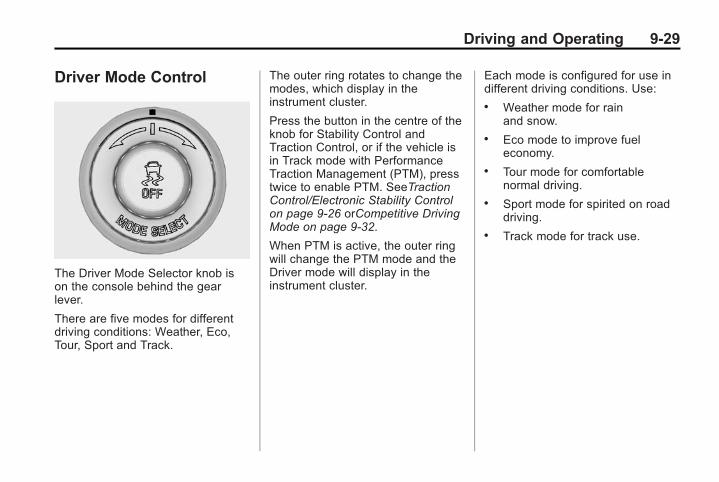
Black plate (29,1)Chevrolet Corvette Owner Manual (GMNA-Localizing-Europe-8087687) -2015 - CRC - 9/16/14
Driving and Operating 9-29
Driver Mode Control
The Driver Mode Selector knob ison the console behind the gearlever.
There are five modes for differentdriving conditions: Weather, Eco,Tour, Sport and Track.
The outer ring rotates to change themodes, which display in theinstrument cluster.
Press the button in the centre of theknob for Stability Control andTraction Control, or if the vehicle isin Track mode with PerformanceTraction Management (PTM), presstwice to enable PTM. SeeTractionControl/Electronic Stability Controlon page 9-26 orCompetitive DrivingMode on page 9-32.
When PTM is active, the outer ringwill change the PTM mode and theDriver mode will display in theinstrument cluster.
Each mode is configured for use indifferent driving conditions. Use:. Weather mode for rain
and snow.. Eco mode to improve fuel
economy.. Tour mode for comfortable
normal driving.. Sport mode for spirited on road
driving.. Track mode for track use.
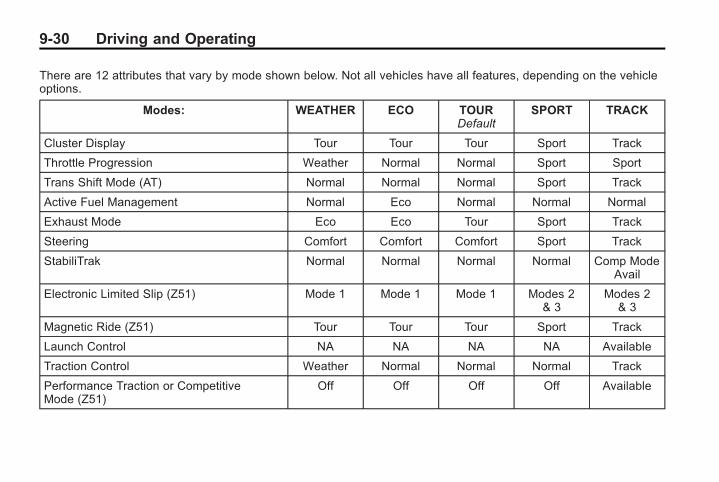
Black plate (30,1)Chevrolet Corvette Owner Manual (GMNA-Localizing-Europe-8087687) -2015 - CRC - 9/16/14
9-30 Driving and Operating
There are 12 attributes that vary by mode shown below. Not all vehicles have all features, depending on the vehicleoptions.
Modes: WEATHER ECO TOURDefault
SPORT TRACK
Cluster Display Tour Tour Tour Sport Track
Throttle Progression Weather Normal Normal Sport Sport
Trans Shift Mode (AT) Normal Normal Normal Sport Track
Active Fuel Management Normal Eco Normal Normal Normal
Exhaust Mode Eco Eco Tour Sport Track
Steering Comfort Comfort Comfort Sport Track
StabiliTrak Normal Normal Normal Normal Comp ModeAvail
Electronic Limited Slip (Z51) Mode 1 Mode 1 Mode 1 Modes 2& 3
Modes 2& 3
Magnetic Ride (Z51) Tour Tour Tour Sport Track
Launch Control NA NA NA NA Available
Traction Control Weather Normal Normal Normal Track
Performance Traction or CompetitiveMode (Z51)
Off Off Off Off Available
Black plate (31,1)Chevrolet Corvette Owner Manual (GMNA-Localizing-Europe-8087687) -2015 - CRC - 9/16/14
Driving and Operating 9-31
Driver Mode Selector AttributesAffected
The Gauge Cluster Display isconfigured for each mode whenlinked (default):. Tour: Modern theme which
features displays for audio.. Sport: Classic easy to read
Sports Car gauges.. Track: Gauges design based on
Corvette Racing display with laptimer.
Throttle Progression
Adjusts throttle sensitivity byselecting how quick or slow thethrottle reacts to input.
Transmission Shift Mode − PaddleShift Automatic. Adjusts to either a smoother or
firmer shift.. Sport – Performance Algorithm
Liftfoot (PAL) recognisesaggressive throttle manoeuvresand holds lower gears for
greater engine braking andenhanced vehicle control whennot using paddles. (available insport or track mode).
. Track – Performance AlgorithmShift (PAS) recognisesaggressive cornering, heavybraking, and high acceleration toselect and hold lower gearswhen not using paddles.
Active Fuel Management (enginecylinder shuts off)4-Cylinder Mode. The engine uses 8-cylinder
mode when accelerating, butchanges to 4-cylinder modewhen coasting.
. Active Fuel Management is onlyactive in Eco Mode.
. Eco keeps the engine in4-cylinder mode unless heavyacceleration is needed.
Exhaust (variable mode exhaustsystem)
Changes when the variable exhaustvalves open.
Steering (Assist Effort)
Adjusts from a lighter steering feelto reduced assist for moresteering feel.
Magnetic Ride Control (Z51)
Adjusts the shock dampeningfirmness based on drivingconditions to improve comfort andperformance.
Launch Control
Available only in Track mode formaximum “off–the–line” accelerationwhen in Competitive or PTM modes.
Stability Control. Competitive mode allows less
computer control to permit someslide and drift and is selectedwith the g button – onlyavailable in Track mode.
Black plate (32,1)Chevrolet Corvette Owner Manual (GMNA-Localizing-Europe-8087687) -2015 - CRC - 9/16/14
9-32 Driving and Operating
. StabiliTrak can be turned off bypressing and holding the gbutton for 10 seconds.
PTM (Performance TractionManagement) (Z51). Available in Track mode.. There are five selectable
settings if Competitive mode isactivated.
Competitive Driving ModeIf equipped, Competitive DrivingMode, Performance TractionManagement, and Launch Controlare systems designed to allowincreased performance whileaccelerating and/or cornering. Thisis accomplished by regulating andoptimising the engine, brakes andsuspension performance. Thesemodes are for use at a closedcourse race track and are notintended for use on public roads.They will not compensate for driverinexperience or lack of familiaritywith the race track. Drivers who
prefer to allow the system to havemore control of the engine, brake,and suspension are advised to turnthe normal traction control andStabiliTrak systems on.
{ Caution
Attempting to shift when the drivewheels are spinning and do nothave traction may cause damageto the transmission. Damagecaused by misuse of the vehicleis not covered by the vehiclewarranty. Do not attempt to shiftwhen the drive wheels do nothave traction.
Competitive Driving Mode(Except Z51 with MagneticRide Control)
Competitive Driving Mode allows fullengine power while StabiliTrakhelps maintain directional control ofthe vehicle by selective brakeapplication. In this mode, TCS is offand Launch Control is available.
Adjust your driving style to accountfor the available engine power. See“Launch Control” later in thissection.
These lights are on when thevehicle is in the CompetitiveDriving Mode.
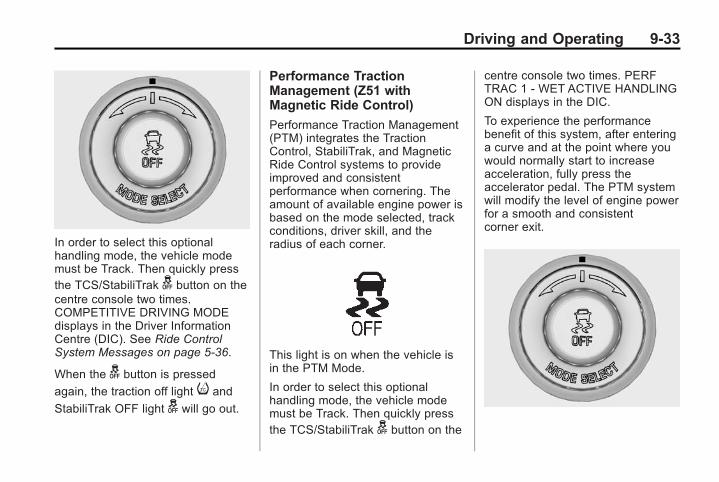
Black plate (33,1)Chevrolet Corvette Owner Manual (GMNA-Localizing-Europe-8087687) -2015 - CRC - 9/16/14
Driving and Operating 9-33
In order to select this optionalhandling mode, the vehicle modemust be Track. Then quickly pressthe TCS/StabiliTrak g button on thecentre console two times.COMPETITIVE DRIVING MODEdisplays in the Driver InformationCentre (DIC). See Ride ControlSystem Messages on page 5-36.
When the g button is pressed
again, the traction off light i and
StabiliTrak OFF light g will go out.
Performance TractionManagement (Z51 withMagnetic Ride Control)
Performance Traction Management(PTM) integrates the TractionControl, StabiliTrak, and MagneticRide Control systems to provideimproved and consistentperformance when cornering. Theamount of available engine power isbased on the mode selected, trackconditions, driver skill, and theradius of each corner.
This light is on when the vehicle isin the PTM Mode.
In order to select this optionalhandling mode, the vehicle modemust be Track. Then quickly pressthe TCS/StabiliTrak g button on the
centre console two times. PERFTRAC 1 - WET ACTIVE HANDLINGON displays in the DIC.
To experience the performancebenefit of this system, after enteringa curve and at the point where youwould normally start to increaseacceleration, fully press theaccelerator pedal. The PTM systemwill modify the level of engine powerfor a smooth and consistentcorner exit.
Black plate (34,1)Chevrolet Corvette Owner Manual (GMNA-Localizing-Europe-8087687) -2015 - CRC - 9/16/14
9-34 Driving and Operating
To select a mode while in PTM, turnthe Magnetic Ride Control/Performance Traction ManagementMODE SELECT knob on the centreconsole.
The PTM system contains fivemodes. These modes are selectedby turning the Magnetic RideControl/Performance TractionManagement MODE SELECT knobon the centre console. Scroll up ordown through modes 1–5 by turningthe MODE SELECT knob to theright or left.
The following is a DIC displaydescription and the recommendedusage of each mode:
PERF TRAC 1 – WET ACTIVEHANDLING ON. Intended for all driver skill levels.. Wet or damp conditions only -
not intended for use in heavyrain or standing water.
. StabiliTrak is on and enginepower is reduced based onconditions.
PERF TRAC 2 – DRY ACTIVEHANDLING ON. For use by less experienced
drivers or while learning a newtrack.
. Dry conditions only.
. StabiliTrak is on and enginepower is slightly reduced.
PERF TRAC 3 – SPORTACTIVE HANDLING ON. For use by drivers who are
familiar with the track.. Dry conditions only.. Requires more driving skill than
mode 2.. StabiliTrak is on and more
engine power is available than inmode 2.
PERF TRAC 4 – SPORTACTIVE HANDLING OFF. For use by drivers who are
familiar with the track.. Dry conditions only.
. Requires more driving skill thanmodes 2 or 3.
. StabiliTrak is off and availableengine power is the same asmode 3.
PERF TRAC 5 – RACE ACTIVEHANDLING OFF. For use by experienced drivers
who are familiar with the track.. Dry conditions only.. Requires more driving skill than
in other modes.. StabiliTrak is off and engine
power is available for maximumcornering speed.
Press and release the TCS/StabiliTrak g button to turn offPerformance Traction Managementand return to the traction control andStabiliTrak systems. The traction offlight i and StabiliTrak OFF light gwill go out.
Black plate (35,1)Chevrolet Corvette Owner Manual (GMNA-Localizing-Europe-8087687) -2015 - CRC - 9/16/14
Driving and Operating 9-35
Launch Control (TrackMode Only)
A Launch Control feature isavailable, within Competitive DrivingMode (except Z51 with MagneticRide Control) or PerformanceTraction Management (Z51 withMagnetic Ride Control), on allvehicles to allow the driver toachieve high levels of vehicleacceleration in a straight line.Launch Control is a form of tractioncontrol that manages tyre spin whilelaunching the vehicle. This featureis intended for use during closedcourse race events whereconsistent zero to 60 and quartermile times are desirable.
Launch Control is only availablewhen the following criteria are met:. Competitive Driving Mode is
selected (except Z51 withMagnetic Ride Control) or any ofthe Performance TractionManagement modes areselected (Z51 with MagneticRide Control). The TCS lightcomes on the instrument paneland the appropriate DICmessage displays.
. The vehicle is not moving.
. The steering wheel is pointingstraight.
. The clutch is pressed and thevehicle is in 1 (First) gear.
. The accelerator pedal is rapidlyapplied to wide open throttle.
The Launch Control feature willinitially limit engine speed as thedriver rapidly applies the accelerator
pedal to wide open throttle. Allowthe engine rpm to stabilise.A smooth, quick release of theclutch, while maintaining the fullypressed accelerator pedal, willmanage wheel slip. Complete shiftsas described in Manual Gearbox onpage 9-20.
After the vehicle is launched, thesystem continues in CompetitiveMode (except Z51 with MagneticRide Control) or PerformanceTraction Management (Z51 withMagnetic Ride Control).
Competitive Driving Mode,Performance Traction Management,and Launch Control are systemsdesigned for a closed course racetrack and not intended for use onpublic roads. The systems are notintended to compensate for lack ofdriver experience or familiarity withthe race track.
Black plate (36,1)Chevrolet Corvette Owner Manual (GMNA-Localizing-Europe-8087687) -2015 - CRC - 9/16/14
9-36 Driving and Operating
Limited-Slip Differential(Except Z51)If equipped, the mechanicallimited-slip differential can give moretraction on snow, mud, ice, sand,or gravel. It works like a standardaxle most of the time, but whentraction is low, this feature allowsthe drive wheel with the mosttraction to move the vehicle. Forvehicles with limited slip differential,driven under severe conditions, therear axle fluid should be changed.See Competitive Driving Mode onpage 9-32.
Limited-Slip Differential(Z51 Only)If equipped, the Electronic LimitedSlip Differential (ELSD) isautomatically activated. ELSDactively monitors vehicle sensorsand driver inputs to determine theamount of change for theconditions. With ELSD, thevehicle has:. Enhanced high-speed control.. Improved traction through
corners, allowing moreacceleration.
. More precise steering.
. Increased vehicle agility.
. Integration with StabiliTrak.
For vehicles with limited slipdifferential, driven under severeconditions, the rear axle fluid shouldbe changed. See CompetitiveDriving Mode on page 9-32.
Cruise ControlWith cruise control, a speed ofabout 40 km/h (25 mph) or morecan be maintained without keepingyour foot on the accelerator. Cruisecontrol does not work at speedsbelow about 40 km/h (25 mph).
{ Warning
Cruise control can be dangerouswhere you cannot drive safely ata steady speed. Do not usecruise control on winding roads orin heavy traffic.
Cruise control can be dangerouson slippery roads. On such roads,fast changes in tyre traction cancause excessive wheel slip, andyou could lose control. Do not usecruise control on slippery roads.
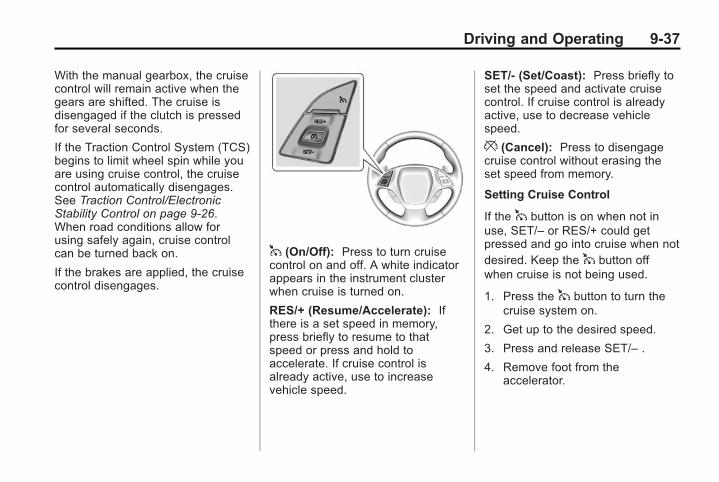
Black plate (37,1)Chevrolet Corvette Owner Manual (GMNA-Localizing-Europe-8087687) -2015 - CRC - 9/16/14
Driving and Operating 9-37
With the manual gearbox, the cruisecontrol will remain active when thegears are shifted. The cruise isdisengaged if the clutch is pressedfor several seconds.
If the Traction Control System (TCS)begins to limit wheel spin while youare using cruise control, the cruisecontrol automatically disengages.See Traction Control/ElectronicStability Control on page 9-26.When road conditions allow forusing safely again, cruise controlcan be turned back on.
If the brakes are applied, the cruisecontrol disengages.
1 (On/Off): Press to turn cruisecontrol on and off. A white indicatorappears in the instrument clusterwhen cruise is turned on.
RES/+ (Resume/Accelerate): Ifthere is a set speed in memory,press briefly to resume to thatspeed or press and hold toaccelerate. If cruise control isalready active, use to increasevehicle speed.
SET/- (Set/Coast): Press briefly toset the speed and activate cruisecontrol. If cruise control is alreadyactive, use to decrease vehiclespeed.
* (Cancel): Press to disengagecruise control without erasing theset speed from memory.
Setting Cruise Control
If the 1 button is on when not inuse, SET/– or RES/+ could getpressed and go into cruise when notdesired. Keep the 1 button offwhen cruise is not being used.
1. Press the 1 button to turn thecruise system on.
2. Get up to the desired speed.
3. Press and release SET/– .
4. Remove foot from theaccelerator.
Black plate (38,1)Chevrolet Corvette Owner Manual (GMNA-Localizing-Europe-8087687) -2015 - CRC - 9/16/14
9-38 Driving and Operating
The cruise control indicator on theinstrument cluster turns green aftercruise control has been set to thedesired speed. See InstrumentCluster on page 5-8.
Resuming a Set Speed
If the cruise control is set at adesired speed and then the brakesare applied or* is pressed, thecruise control is disengaged withouterasing the set speed from memory.
Once the vehicle reaches about40 km/h (25 mph) or more, brieflypress the RES/+ button. The vehiclereturns to the previous set speed.
Increasing Speed While UsingCruise Control
If the cruise control system isalready activated:. Press and hold RES/+ until the
desired speed is reached, thenrelease it.
. To increase vehicle speed insmall increments, briefly pressRES/+. For each press, thevehicle goes about 1.6 km/h(1 mph) faster.
The speedometer reading can bedisplayed in either English or metricunits. See Instrument Cluster onpage 5-8. The increment value useddepends on the units displayed.
Reducing Speed While UsingCruise Control
If the cruise control system isalready activated:. Press and hold SET/– until the
desired lower speed is reached,then release it.
. To decrease the vehicle speed insmall increments, briefly pressSET/–. For each press, thevehicle goes about 1.6 km/h(1 mph) slower.
The speedometer reading can bedisplayed in either English or metricunits. See Instrument Cluster onpage 5-8. The increment value useddepends on the units displayed.
Overtaking Another Vehicle WhileUsing Cruise Control
Use the accelerator pedal toincrease the vehicle speed. Whenyou take your foot off the pedal, thevehicle will slow down to thepreviously set cruise speed.
While pressing the accelerator pedalor shortly following the release tooverride cruise control, brieflypressing SET/– will result in cruiseset to the current vehicle speed.
Using Cruise Control on Hills
How well the cruise control workson hills depends upon the vehiclespeed, load and the steepness ofthe hills. When going up steep hills,you might have to apply theaccelerator pedal to maintain yourspeed. When going downhill, youmight have to brake or shift to a
Black plate (39,1)Chevrolet Corvette Owner Manual (GMNA-Localizing-Europe-8087687) -2015 - CRC - 9/16/14
Driving and Operating 9-39
lower gear to keep your speeddown. If the brake pedal is applied,cruise control will disengage.
Ending Cruise Control. Step lightly on the brake pedal.. Press the clutch pedal for
several seconds or shift toNeutral to disengage cruisecontrol.
. Press*.
. To turn off cruise control,press 1.
Erasing Speed Memory
The cruise control set speedmemory is erased from memory if 1is pressed or if the ignition isturned off.
Driver AssistanceSystems
Rear VisionCamera (RVC)The RVC system can assist thedriver when reversing by displayinga view of the area behind thevehicle.
{ Warning
The RVC system does not displaychildren, pedestrians, bicyclists,crossing traffic, animals, or anyother object located outside thecamera's field of view, below thebumper, or under the vehicle.Perceived distances may bedifferent from actual distances.Do not reverse the vehicle usingonly the RVC screen. Failure touse proper care before reversingmay result in injury, death,
(Continued)
Warning (Continued)
or vehicle damage. Always checkbehind and around the vehiclebefore reversing.
An image appears on theinfotainment screen when thevehicle is shifted into R (Reverse).The infotainment screen goes to theprevious screen after approximately10 seconds once the vehicle isshifted out of R (Reverse).
To return to the previous screensooner, do one of the following:. Press a hard key on the
infotainment system.. Reach a vehicle speed of
8 km/h (5 mph).
Guidelines
The RVC system may have aguideline overlay that can help thedriver align the vehicle whenreversing into a parking spot.
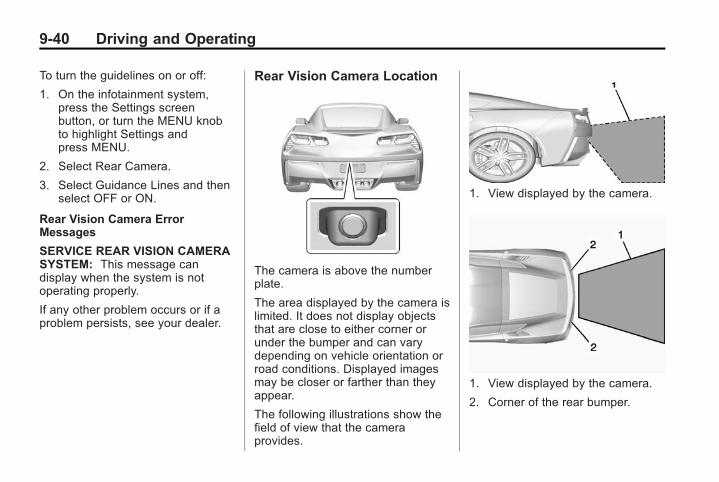
Black plate (40,1)Chevrolet Corvette Owner Manual (GMNA-Localizing-Europe-8087687) -2015 - CRC - 9/16/14
9-40 Driving and Operating
To turn the guidelines on or off:
1. On the infotainment system,press the Settings screenbutton, or turn the MENU knobto highlight Settings andpress MENU.
2. Select Rear Camera.
3. Select Guidance Lines and thenselect OFF or ON.
Rear Vision Camera ErrorMessages
SERVICE REAR VISION CAMERASYSTEM: This message candisplay when the system is notoperating properly.
If any other problem occurs or if aproblem persists, see your dealer.
Rear Vision Camera Location
The camera is above the numberplate.
The area displayed by the camera islimited. It does not display objectsthat are close to either corner orunder the bumper and can varydepending on vehicle orientation orroad conditions. Displayed imagesmay be closer or farther than theyappear.
The following illustrations show thefield of view that the cameraprovides.
1. View displayed by the camera.
1. View displayed by the camera.
2. Corner of the rear bumper.
Black plate (41,1)Chevrolet Corvette Owner Manual (GMNA-Localizing-Europe-8087687) -2015 - CRC - 9/16/14
Driving and Operating 9-41
When the System Does NotSeem to Work Properly
The RVC system may not workproperly or display a clear image if:. It is dark.. The sun or the beam of
headlamps are shining directlyinto the camera lens.
. Ice, snow, mud, or anything elsebuilds up on the camera lens.Clean the lens, rinse it withwater, and wipe it with a softcloth.
. The back of the vehicle is in anaccident. The position andmounting angle of the cameracan change or the camera canbe affected. Be sure to have thecamera and its position andmounting angle checked at yourdealer.
FuelUse the recommended fuel forproper vehicle maintenance.
Use premium unleaded gasolinewith a posted octane rating of 97RON or higher. Regular unleadedpetrol rated at 95 RON or highercan be used, but acceleration andfuel economy will be reduced, andan audible knocking noise may beheard. If this occurs, use a petrolrated at 97 RON or higher as soonas possible. Otherwise, the enginecould be damaged. If heavyknocking is heard when using petrolrated at 97 RON or higher, theengine needs service.
Use of Seasonal Fuels
Use summer and winter fuels in theappropriate season. The fuelsindustry automatically modifies thefuel for the appropriate season.If fuel is left in the vehicle tank forlong periods of time, driving orstarting could be affected. Drive the
vehicle until the fuel is at one-halftank or less, then refuel with thecurrent seasonal fuel.
Prohibited Fuels
Petrol containing oxygenates suchas ethers and ethanol, as well asreformulated petrol, is available insome cities. If these petrols complywith the previously describedspecification, then they areacceptable to use. However, E85(85% ethanol) and other fuelscontaining more than 15% ethanolmust be used only in FlexFuelvehicles.
{ Caution
Do not use fuel containingmethanol. It can corrode metalparts in the fuel system and alsodamage plastic and rubber parts.That damage would not becovered under the vehiclewarranty.
Black plate (42,1)Chevrolet Corvette Owner Manual (GMNA-Localizing-Europe-8087687) -2015 - CRC - 9/16/14
9-42 Driving and Operating
Some petrol, mainly high octaneracing petrol, can contain anoctane-enhancing additive calledmethylcyclopentadienyl manganesetricarbonyl (MMT). Do not use petroland/or fuel additives with MMT asthey can reduce spark plug life andaffect emission control systemperformance. The malfunctionindicator lamp may turn on. If thisoccurs, see your dealer for service.
Fuel AdditivesPetrol should contain detergentadditives that help prevent engineand fuel system deposits fromforming. Clean fuel injectors andintake valves will allow the emissioncontrol system to work properly.Some petrol does not containsufficient quantities of additive tokeep fuel injectors and intake valvesclean. To make up for this lack ofdetergency, add Fuel SystemTreatment PLUS to the fuel tank atevery engine oil change or every15.000 km, whichever occurs first.It is available at your dealer.
Filling the Tank
{ Warning
Fuel vapours and fuel fires burnviolently and can cause injury ordeath.
. To help avoid injuries to youand others, read and followall the instructions on the fuelpump island.
. Turn off the engine whenrefuelling.
. Keep sparks, flames, andsmoking materials awayfrom fuel.
. Do not leave the fuel pumpunattended.
. Do not reenter the vehiclewhile pumping fuel.
. Keep children away from thefuel pump and never letchildren pump fuel.
(Continued)
Warning (Continued)
. Fuel can spray out if therefuelling nozzle is insertedtoo quickly. This spray canhappen if the tank is nearlyfull, and is more likely in hotweather. Insert the refuellingnozzle slowly and wait forany hiss noise to stop prior tobeginning to flow fuel
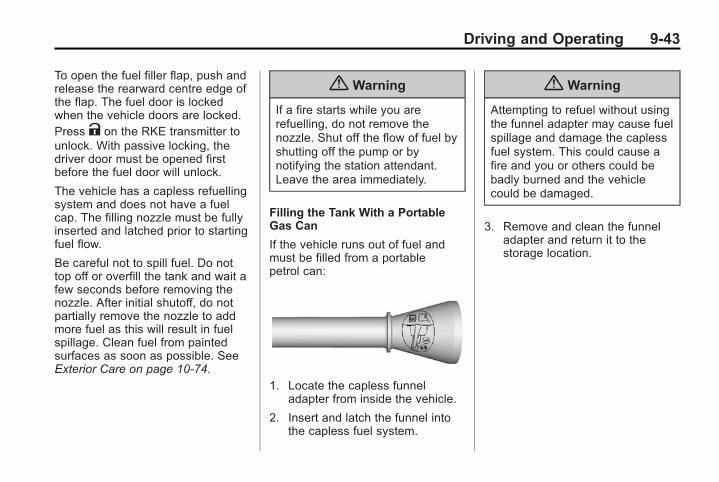
Black plate (43,1)Chevrolet Corvette Owner Manual (GMNA-Localizing-Europe-8087687) -2015 - CRC - 9/16/14
Driving and Operating 9-43
To open the fuel filler flap, push andrelease the rearward centre edge ofthe flap. The fuel door is lockedwhen the vehicle doors are locked.Press K on the RKE transmitter tounlock. With passive locking, thedriver door must be opened firstbefore the fuel door will unlock.
The vehicle has a capless refuellingsystem and does not have a fuelcap. The filling nozzle must be fullyinserted and latched prior to startingfuel flow.
Be careful not to spill fuel. Do nottop off or overfill the tank and wait afew seconds before removing thenozzle. After initial shutoff, do notpartially remove the nozzle to addmore fuel as this will result in fuelspillage. Clean fuel from paintedsurfaces as soon as possible. SeeExterior Care on page 10-74.
{ Warning
If a fire starts while you arerefuelling, do not remove thenozzle. Shut off the flow of fuel byshutting off the pump or bynotifying the station attendant.Leave the area immediately.
Filling the Tank With a PortableGas Can
If the vehicle runs out of fuel andmust be filled from a portablepetrol can:
1. Locate the capless funneladapter from inside the vehicle.
2. Insert and latch the funnel intothe capless fuel system.
{ Warning
Attempting to refuel without usingthe funnel adapter may cause fuelspillage and damage the caplessfuel system. This could cause afire and you or others could bebadly burned and the vehiclecould be damaged.
3. Remove and clean the funneladapter and return it to thestorage location.
Black plate (44,1)Chevrolet Corvette Owner Manual (GMNA-Localizing-Europe-8087687) -2015 - CRC - 9/16/14
9-44 Driving and Operating
Filling a Portable FuelContainer
{ Warning
Filling a portable fuel containerwhile it is in the vehicle can causefuel vapours that can ignite eitherby static electricity or othermeans. You or others could bebadly burned and the vehiclecould be damaged. Always:
. Use approved fuelcontainers.
. Remove the container fromthe vehicle, boot, or pickupbed before filling.
. Place the container on theground.
. Place the nozzle inside the fillopening of the containerbefore dispensing fuel, and
(Continued)
Warning (Continued)
keep it in contact with the fillopening until filling iscomplete.
. Fill the container no morethan 95% full to allow forexpansion.
. Do not smoke, light matches,or use lighters whilepumping fuel.
. Avoid using mobile phones orother electronic devices.
Trailer Towing
General TowingInformationThe vehicle is neither designed norintended to tow a trailer.
Black plate (45,1)Chevrolet Corvette Owner Manual (GMNA-Localizing-Europe-8087687) -2015 - CRC - 9/16/14
Driving and Operating 9-45
Conversions andAdd-Ons
Add-On ElectricalEquipment
{ Caution
Some electrical equipment candamage the vehicle or causecomponents to not work andwould not be covered by thewarranty. Always check with yourdealer before adding electricalequipment.
Add-on equipment can drain thevehicle's 12-volt battery, even if thevehicle is not operating.
The vehicle has an airbag system.Before attempting to add anythingelectrical to the vehicle, seeServicing the Airbag-EquippedVehicle on page 3-24 and AddingEquipment to the Airbag-EquippedVehicle on page 3-25.
Black plate (46,1)Chevrolet Corvette Owner Manual (GMNA-Localizing-Europe-8087687) -2015 - CRC - 9/16/14
9-46 Driving and Operating
2 NOTES
Black plate (1,1)Chevrolet Corvette Owner Manual (GMNA-Localizing-Europe-8087687) -2015 - CRC - 9/16/14
Vehicle Care 10-1
Vehicle Care
General InformationGeneral Information . . . . . . . . . . 10-2Accessories andModifications . . . . . . . . . . . . . . . 10-2
Lifting the Vehicle . . . . . . . . . . . . 10-3
Vehicle ChecksDoing Your OwnService Work . . . . . . . . . . . . . . . 10-5
Bonnet . . . . . . . . . . . . . . . . . . . . . . . 10-6Engine CompartmentOverview . . . . . . . . . . . . . . . . . . . 10-7
Engine Oil . . . . . . . . . . . . . . . . . . 10-10Engine Oil Life System . . . . . 10-16Manual Gearbox Fluid . . . . . . 10-16Hydraulic Clutch . . . . . . . . . . . . 10-16Engine Air Cleaner/Filter . . . . 10-17Cooling System (Engine) . . . 10-19Cooling System (AeroPanel) . . . . . . . . . . . . . . . . . . . . . 10-20
Engine Coolant . . . . . . . . . . . . . 10-21Engine Overheating . . . . . . . . 10-24Washer Fluid . . . . . . . . . . . . . . . 10-25Brakes . . . . . . . . . . . . . . . . . . . . . 10-26Brake Fluid . . . . . . . . . . . . . . . . . 10-27Battery . . . . . . . . . . . . . . . . . . . . . 10-28
Rear Axle . . . . . . . . . . . . . . . . . . 10-34Starter Switch Check . . . . . . . 10-34Wiper BladeReplacement . . . . . . . . . . . . . . 10-35
WindscreenReplacement . . . . . . . . . . . . . . 10-35
Headlamp AimingHeadlamp Aiming . . . . . . . . . . 10-36
Bulb ReplacementBulb Replacement . . . . . . . . . . 10-36High Intensity Discharge(HID) Lighting . . . . . . . . . . . . . 10-36
LED Lighting . . . . . . . . . . . . . . . 10-36Number Plate Lamp . . . . . . . . 10-36Replacement Bulbs . . . . . . . . . 10-37
Electrical SystemElectrical SystemOverload . . . . . . . . . . . . . . . . . . 10-37
Fuses . . . . . . . . . . . . . . . . . . . . . . 10-38Engine Compartment FuseBlock . . . . . . . . . . . . . . . . . . . . . 10-38
Rear Compartment FuseBlock . . . . . . . . . . . . . . . . . . . . . 10-42
Wheels and TyresTyres . . . . . . . . . . . . . . . . . . . . . . . 10-45Winter Tyres . . . . . . . . . . . . . . . . 10-46
Run-Flat Tyres . . . . . . . . . . . . . 10-46Low-Profile Tyres . . . . . . . . . . . 10-47Summer Tyres . . . . . . . . . . . . . . 10-48Tyre Pressure . . . . . . . . . . . . . . 10-48Tyre Pressure forHigh-Speed Operation . . . . 10-50
Tyre Pressure MonitorSystem . . . . . . . . . . . . . . . . . . . 10-50
Tyre Pressure MonitorOperation . . . . . . . . . . . . . . . . . 10-52
Tyre Inspection . . . . . . . . . . . . . 10-54Tyre Rotation . . . . . . . . . . . . . . . 10-54When It Is Time for NewTyres . . . . . . . . . . . . . . . . . . . . . . 10-56
Buying New Tyres . . . . . . . . . . 10-56Different Size Tyres andWheels . . . . . . . . . . . . . . . . . . . 10-58
Wheel Alignment and TyreBalance . . . . . . . . . . . . . . . . . . . 10-59
Wheel Replacement . . . . . . . . 10-59Tyre Chains . . . . . . . . . . . . . . . . 10-60If a Tyre Goes Flat . . . . . . . . . 10-61Tyre Sealant andCompressor Kit . . . . . . . . . . . 10-62
Storing the Tyre Sealant andCompressor Kit . . . . . . . . . . . 10-69
Jump StartingJump Starting . . . . . . . . . . . . . . 10-70
Black plate (2,1)Chevrolet Corvette Owner Manual (GMNA-Localizing-Europe-8087687) -2015 - CRC - 9/16/14
10-2 Vehicle Care
Towing the VehicleTowing the Vehicle . . . . . . . . . 10-73Recreational VehicleTowing . . . . . . . . . . . . . . . . . . . . 10-74
Appearance CareExterior Care . . . . . . . . . . . . . . . 10-74Interior Care . . . . . . . . . . . . . . . . 10-79Floor Mats . . . . . . . . . . . . . . . . . . 10-82
General InformationFor service and parts needs, visityour dealer. You will receivegenuine parts and trained andsupported service people.
Accessories andModificationsAdding non-dealer accessories ormaking modifications to the vehiclecan affect vehicle performance andsafety, including such things asairbags, braking, stability, ride andhandling, emissions systems,aerodynamics, durability, andelectronic systems like anti-lockbrakes, traction control, and stabilitycontrol. These accessories ormodifications could even causemalfunction or damage not coveredby the vehicle warranty.
Damage to vehicle componentsresulting from modifications or theinstallation or use of non-GMcertified parts, including controlmodule or software modifications, isnot covered under the terms of thevehicle warranty and may affectremaining warranty coverage foraffected parts.
GM Accessories are designed tocomplement and function with othersystems on the vehicle. See yourdealer to accessorise the vehicleusing genuine GM Accessoriesinstalled by a dealer technician.
Also, see Adding Equipment to theAirbag-Equipped Vehicle onpage 3-25.
Black plate (3,1)Chevrolet Corvette Owner Manual (GMNA-Localizing-Europe-8087687) -2015 - CRC - 9/16/14
Vehicle Care 10-3
Lifting the Vehicle
{ Warning
Lifting a vehicle can cause aninjury. The vehicle can slip off thejack and roll over you or otherpeople. You and they could bebadly injured. Find a level placeto lift your vehicle. To helpprevent the vehicle from moving:
1. Apply the parking brakefirmly.
2. Put an automatictransmission in P (Park) or amanual gearbox in 1 (First)or R (Reverse).
3. Turn off the engine.
To be even more certain thevehicle will not move, put chocksin front of and behind the wheels.
{ Warning
Getting under a vehicle when it islifted on a jack is dangerous.If the vehicle slips off the jack,you could be badly injured orkilled. Never get under a vehiclewhen it is supported only bya jack.
{ Warning
Raising the vehicle with the jackimproperly positioned candamage the vehicle or the vehiclemay fall and cause injury to youor others.
If a jack is used to lift the vehicle,follow the instructions that camewith the jack, and be sure to use thecorrect lifting points to avoiddamaging the vehicle.
{ Caution
Lifting the vehicle improperly candamage it and result in costlyrepairs not covered by the vehiclewarranty. To lift the vehicleproperly and prevent vehicledamage:
. Be sure to place a block orpad between the jack and thevehicle.
. Lift only in the areas shown inthe following illustrations.
For additional information, seeyour dealer and the ChevroletCorvette service manual.
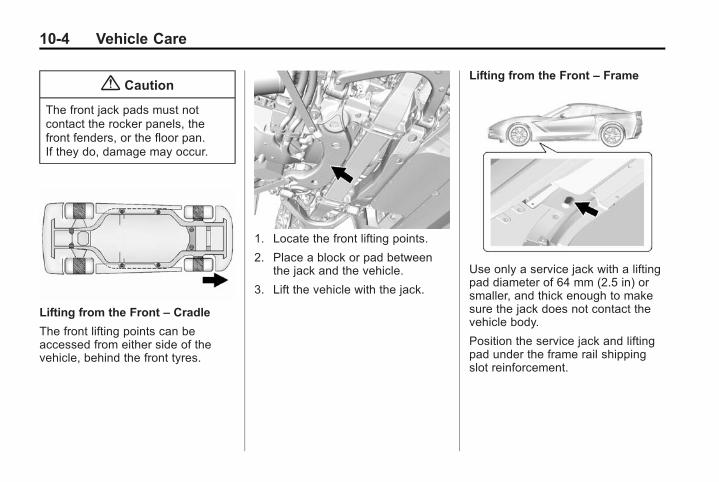
Black plate (4,1)Chevrolet Corvette Owner Manual (GMNA-Localizing-Europe-8087687) -2015 - CRC - 9/16/14
10-4 Vehicle Care
{ Caution
The front jack pads must notcontact the rocker panels, thefront fenders, or the floor pan.If they do, damage may occur.
Lifting from the Front – Cradle
The front lifting points can beaccessed from either side of thevehicle, behind the front tyres.
1. Locate the front lifting points.
2. Place a block or pad betweenthe jack and the vehicle.
3. Lift the vehicle with the jack.
Lifting from the Front – Frame
Use only a service jack with a liftingpad diameter of 64 mm (2.5 in) orsmaller, and thick enough to makesure the jack does not contact thevehicle body.
Position the service jack and liftingpad under the frame rail shippingslot reinforcement.
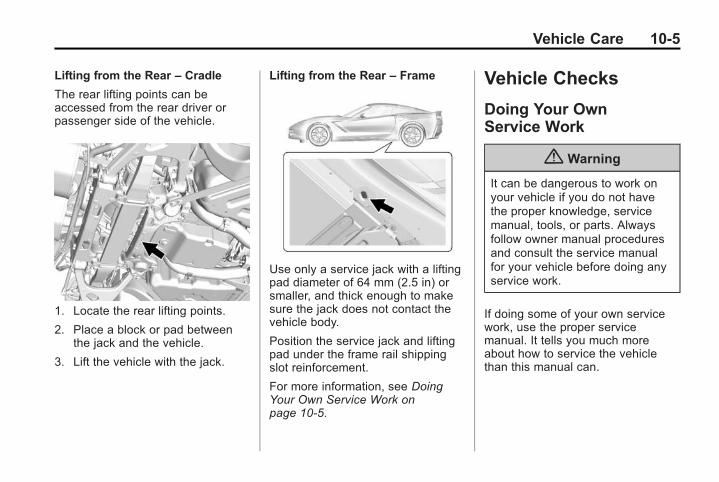
Black plate (5,1)Chevrolet Corvette Owner Manual (GMNA-Localizing-Europe-8087687) -2015 - CRC - 9/16/14
Vehicle Care 10-5
Lifting from the Rear – Cradle
The rear lifting points can beaccessed from the rear driver orpassenger side of the vehicle.
1. Locate the rear lifting points.
2. Place a block or pad betweenthe jack and the vehicle.
3. Lift the vehicle with the jack.
Lifting from the Rear – Frame
Use only a service jack with a liftingpad diameter of 64 mm (2.5 in) orsmaller, and thick enough to makesure the jack does not contact thevehicle body.
Position the service jack and liftingpad under the frame rail shippingslot reinforcement.
For more information, see DoingYour Own Service Work onpage 10-5.
Vehicle Checks
Doing Your OwnService Work
{ Warning
It can be dangerous to work onyour vehicle if you do not havethe proper knowledge, servicemanual, tools, or parts. Alwaysfollow owner manual proceduresand consult the service manualfor your vehicle before doing anyservice work.
If doing some of your own servicework, use the proper servicemanual. It tells you much moreabout how to service the vehiclethan this manual can.
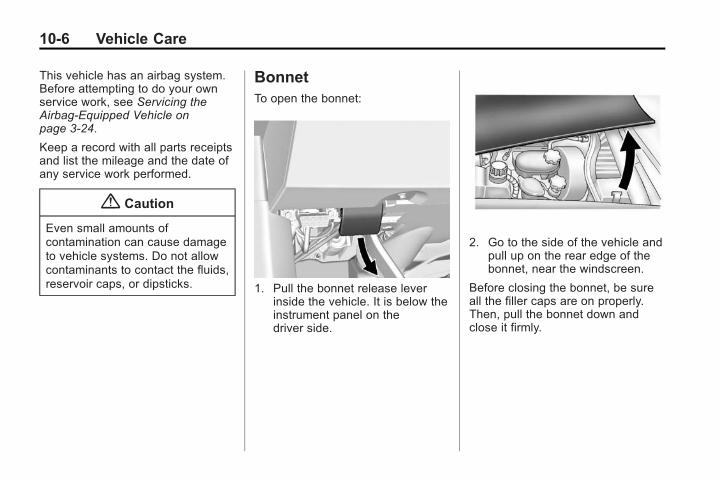
Black plate (6,1)Chevrolet Corvette Owner Manual (GMNA-Localizing-Europe-8087687) -2015 - CRC - 9/16/14
10-6 Vehicle Care
This vehicle has an airbag system.Before attempting to do your ownservice work, see Servicing theAirbag-Equipped Vehicle onpage 3-24.
Keep a record with all parts receiptsand list the mileage and the date ofany service work performed.
{ Caution
Even small amounts ofcontamination can cause damageto vehicle systems. Do not allowcontaminants to contact the fluids,reservoir caps, or dipsticks.
BonnetTo open the bonnet:
1. Pull the bonnet release leverinside the vehicle. It is below theinstrument panel on thedriver side.
2. Go to the side of the vehicle andpull up on the rear edge of thebonnet, near the windscreen.
Before closing the bonnet, be sureall the filler caps are on properly.Then, pull the bonnet down andclose it firmly.
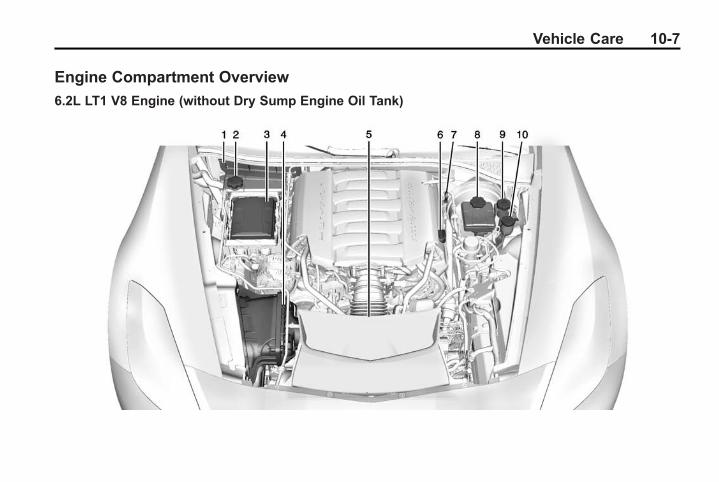
Black plate (7,1)Chevrolet Corvette Owner Manual (GMNA-Localizing-Europe-8087687) -2015 - CRC - 9/16/14
Vehicle Care 10-7
Engine Compartment Overview
6.2L LT1 V8 Engine (without Dry Sump Engine Oil Tank)
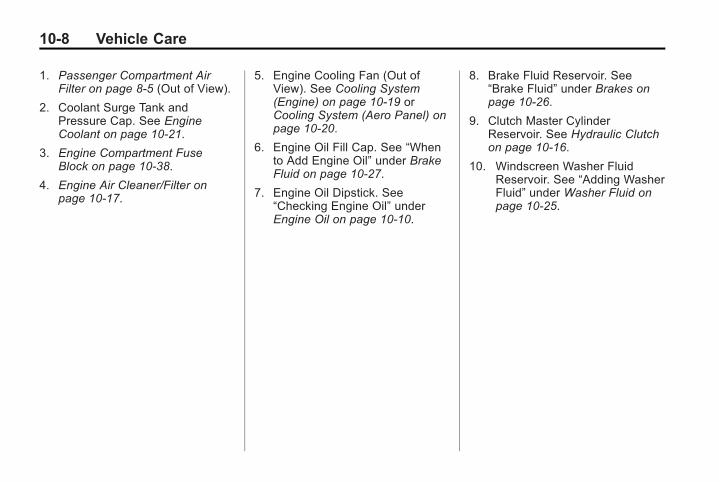
Black plate (8,1)Chevrolet Corvette Owner Manual (GMNA-Localizing-Europe-8087687) -2015 - CRC - 9/16/14
10-8 Vehicle Care
1. Passenger Compartment AirFilter on page 8-5 (Out of View).
2. Coolant Surge Tank andPressure Cap. See EngineCoolant on page 10-21.
3. Engine Compartment FuseBlock on page 10-38.
4. Engine Air Cleaner/Filter onpage 10-17.
5. Engine Cooling Fan (Out ofView). See Cooling System(Engine) on page 10-19 orCooling System (Aero Panel) onpage 10-20.
6. Engine Oil Fill Cap. See “Whento Add Engine Oil” under BrakeFluid on page 10-27.
7. Engine Oil Dipstick. See“Checking Engine Oil” underEngine Oil on page 10-10.
8. Brake Fluid Reservoir. See“Brake Fluid” under Brakes onpage 10-26.
9. Clutch Master CylinderReservoir. See Hydraulic Clutchon page 10-16.
10. Windscreen Washer FluidReservoir. See “Adding WasherFluid” under Washer Fluid onpage 10-25.
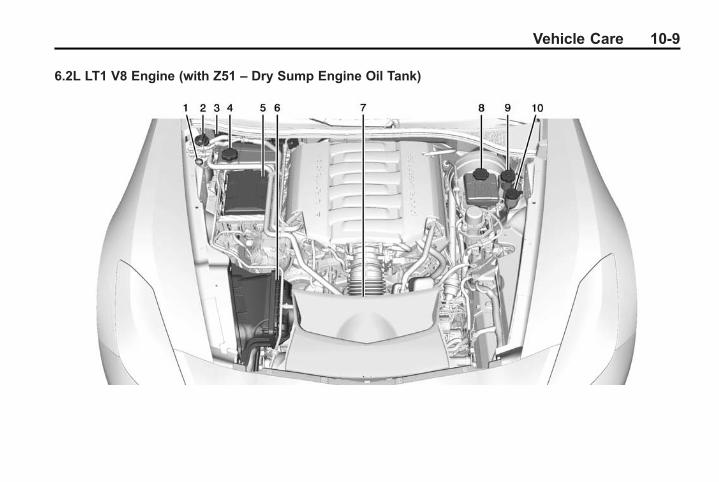
Black plate (9,1)Chevrolet Corvette Owner Manual (GMNA-Localizing-Europe-8087687) -2015 - CRC - 9/16/14
Vehicle Care 10-9
6.2L LT1 V8 Engine (with Z51 – Dry Sump Engine Oil Tank)

Black plate (10,1)Chevrolet Corvette Owner Manual (GMNA-Localizing-Europe-8087687) -2015 - CRC - 9/16/14
10-10 Vehicle Care
1. Engine Oil Dipstick. See“Checking Engine Oil” underEngine Oil on page 10-10.
2. Dry Sump Engine Oil Tank FillCap. See “Changing Engine Oiland Filter” Engine Oil onpage 10-10.
3. Passenger Compartment AirFilter on page 8-5 (Out of View).
4. Coolant Surge Tank andPressure Cap. See EngineCoolant on page 10-21.
5. Engine Compartment FuseBlock on page 10-38.
6. Engine Air Cleaner/Filter onpage 10-17.
7. Engine Cooling Fan (Out ofView). See Cooling System(Engine) on page 10-19 orCooling System (Aero Panel) onpage 10-20.
8. Brake Fluid Reservoir. See“Brake Fluid” under Brakes onpage 10-26.
9. Clutch Master CylinderReservoir. See Hydraulic Clutchon page 10-16.
10. Windscreen Washer FluidReservoir. See “Adding WasherFluid” under Washer Fluid onpage 10-25.
Engine OilTo ensure proper engineperformance and long life, carefulattention must be paid to engine oil.Following these simple, butimportant steps will help protectyour investment:. Always use engine oil approved
to the proper specification and ofthe proper viscosity grade. See“Selecting the Right Engine Oil”in this section.
. Check the engine oil levelregularly and maintain theproper oil level. See “CheckingEngine Oil” and “When to AddEngine Oil” in this section.
. Change the engine oil at theappropriate time. See Engine OilLife System on page 10-16.
. Always dispose of engine oilproperly. See “What to Do withUsed Oil” in this section.
Checking Engine Oil(Except Z51)
If the ENGINE OIL LOW - ADD OILmessage displays on the DriverInformation Centre (DIC), check theengine oil level right away. For moreinformation, see Engine OilMessages on page 5-35. Check theengine oil level regularly; this is anadded reminder.
It is a good idea to check the engineoil level at each fuel fill. In order toget an accurate reading, the vehiclemust be on level ground. Theengine oil dipstick handle is a loop.See Engine Compartment Overviewon page 10-7 for the location of theengine oil dipstick.
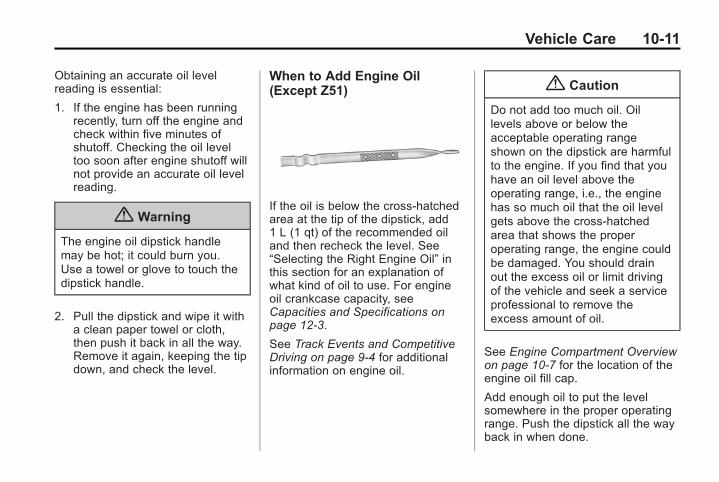
Black plate (11,1)Chevrolet Corvette Owner Manual (GMNA-Localizing-Europe-8087687) -2015 - CRC - 9/16/14
Vehicle Care 10-11
Obtaining an accurate oil levelreading is essential:
1. If the engine has been runningrecently, turn off the engine andcheck within five minutes ofshutoff. Checking the oil leveltoo soon after engine shutoff willnot provide an accurate oil levelreading.
{ Warning
The engine oil dipstick handlemay be hot; it could burn you.Use a towel or glove to touch thedipstick handle.
2. Pull the dipstick and wipe it witha clean paper towel or cloth,then push it back in all the way.Remove it again, keeping the tipdown, and check the level.
When to Add Engine Oil(Except Z51)
If the oil is below the cross-hatchedarea at the tip of the dipstick, add1 L (1 qt) of the recommended oiland then recheck the level. See“Selecting the Right Engine Oil” inthis section for an explanation ofwhat kind of oil to use. For engineoil crankcase capacity, seeCapacities and Specifications onpage 12-3.
See Track Events and CompetitiveDriving on page 9-4 for additionalinformation on engine oil.
{ Caution
Do not add too much oil. Oillevels above or below theacceptable operating rangeshown on the dipstick are harmfulto the engine. If you find that youhave an oil level above theoperating range, i.e., the enginehas so much oil that the oil levelgets above the cross-hatchedarea that shows the properoperating range, the engine couldbe damaged. You should drainout the excess oil or limit drivingof the vehicle and seek a serviceprofessional to remove theexcess amount of oil.
See Engine Compartment Overviewon page 10-7 for the location of theengine oil fill cap.
Add enough oil to put the levelsomewhere in the proper operatingrange. Push the dipstick all the wayback in when done.
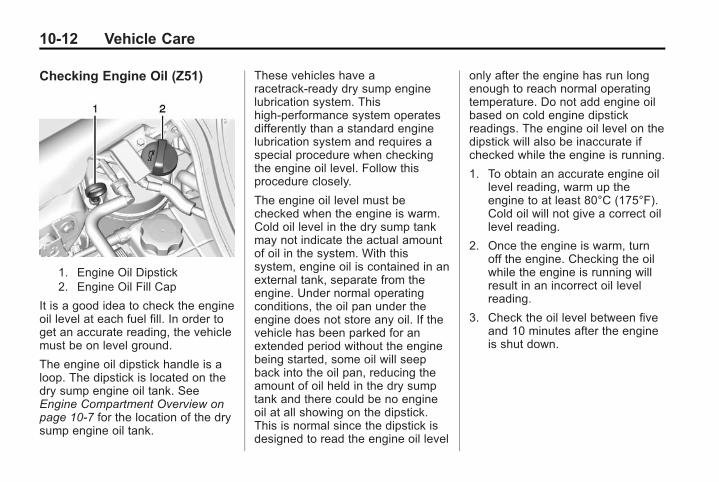
Black plate (12,1)Chevrolet Corvette Owner Manual (GMNA-Localizing-Europe-8087687) -2015 - CRC - 9/16/14
10-12 Vehicle Care
Checking Engine Oil (Z51)
1. Engine Oil Dipstick2. Engine Oil Fill Cap
It is a good idea to check the engineoil level at each fuel fill. In order toget an accurate reading, the vehiclemust be on level ground.
The engine oil dipstick handle is aloop. The dipstick is located on thedry sump engine oil tank. SeeEngine Compartment Overview onpage 10-7 for the location of the drysump engine oil tank.
These vehicles have aracetrack-ready dry sump enginelubrication system. Thishigh-performance system operatesdifferently than a standard enginelubrication system and requires aspecial procedure when checkingthe engine oil level. Follow thisprocedure closely.
The engine oil level must bechecked when the engine is warm.Cold oil level in the dry sump tankmay not indicate the actual amountof oil in the system. With thissystem, engine oil is contained in anexternal tank, separate from theengine. Under normal operatingconditions, the oil pan under theengine does not store any oil. If thevehicle has been parked for anextended period without the enginebeing started, some oil will seepback into the oil pan, reducing theamount of oil held in the dry sumptank and there could be no engineoil at all showing on the dipstick.This is normal since the dipstick isdesigned to read the engine oil level
only after the engine has run longenough to reach normal operatingtemperature. Do not add engine oilbased on cold engine dipstickreadings. The engine oil level on thedipstick will also be inaccurate ifchecked while the engine is running.
1. To obtain an accurate engine oillevel reading, warm up theengine to at least 80°C (175°F).Cold oil will not give a correct oillevel reading.
2. Once the engine is warm, turnoff the engine. Checking the oilwhile the engine is running willresult in an incorrect oil levelreading.
3. Check the oil level between fiveand 10 minutes after the engineis shut down.
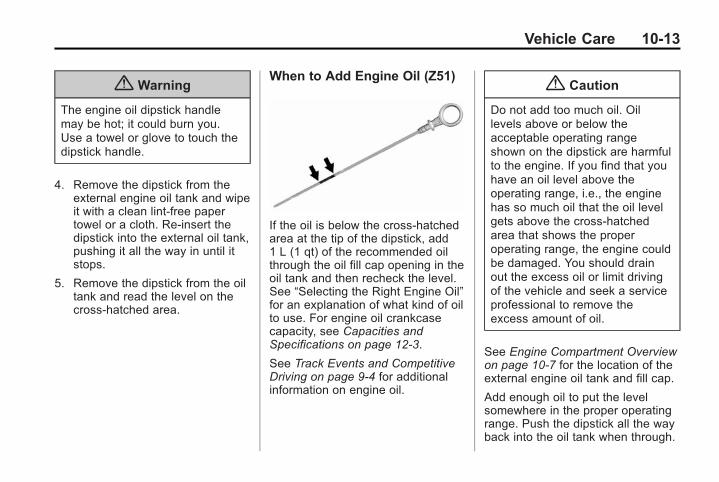
Black plate (13,1)Chevrolet Corvette Owner Manual (GMNA-Localizing-Europe-8087687) -2015 - CRC - 9/16/14
Vehicle Care 10-13
{ Warning
The engine oil dipstick handlemay be hot; it could burn you.Use a towel or glove to touch thedipstick handle.
4. Remove the dipstick from theexternal engine oil tank and wipeit with a clean lint-free papertowel or a cloth. Re-insert thedipstick into the external oil tank,pushing it all the way in until itstops.
5. Remove the dipstick from the oiltank and read the level on thecross-hatched area.
When to Add Engine Oil (Z51)
If the oil is below the cross-hatchedarea at the tip of the dipstick, add1 L (1 qt) of the recommended oilthrough the oil fill cap opening in theoil tank and then recheck the level.See “Selecting the Right Engine Oil”for an explanation of what kind of oilto use. For engine oil crankcasecapacity, see Capacities andSpecifications on page 12-3.
See Track Events and CompetitiveDriving on page 9-4 for additionalinformation on engine oil.
{ Caution
Do not add too much oil. Oillevels above or below theacceptable operating rangeshown on the dipstick are harmfulto the engine. If you find that youhave an oil level above theoperating range, i.e., the enginehas so much oil that the oil levelgets above the cross-hatchedarea that shows the properoperating range, the engine couldbe damaged. You should drainout the excess oil or limit drivingof the vehicle and seek a serviceprofessional to remove theexcess amount of oil.
See Engine Compartment Overviewon page 10-7 for the location of theexternal engine oil tank and fill cap.
Add enough oil to put the levelsomewhere in the proper operatingrange. Push the dipstick all the wayback into the oil tank when through.
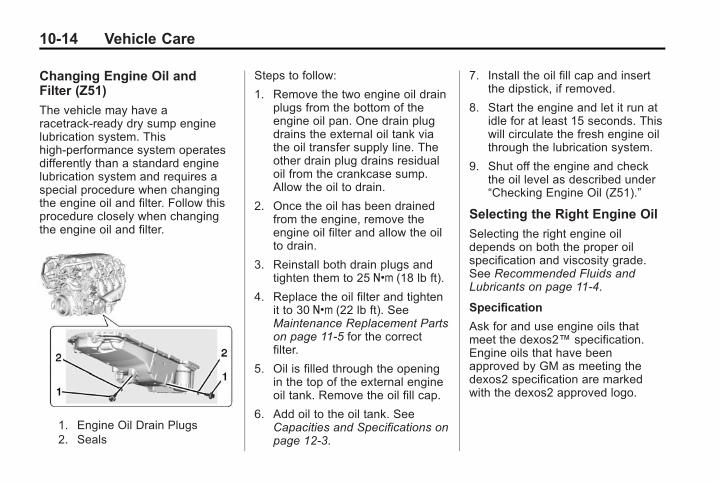
Black plate (14,1)Chevrolet Corvette Owner Manual (GMNA-Localizing-Europe-8087687) -2015 - CRC - 9/16/14
10-14 Vehicle Care
Changing Engine Oil andFilter (Z51)
The vehicle may have aracetrack-ready dry sump enginelubrication system. Thishigh-performance system operatesdifferently than a standard enginelubrication system and requires aspecial procedure when changingthe engine oil and filter. Follow thisprocedure closely when changingthe engine oil and filter.
1. Engine Oil Drain Plugs2. Seals
Steps to follow:
1. Remove the two engine oil drainplugs from the bottom of theengine oil pan. One drain plugdrains the external oil tank viathe oil transfer supply line. Theother drain plug drains residualoil from the crankcase sump.Allow the oil to drain.
2. Once the oil has been drainedfrom the engine, remove theengine oil filter and allow the oilto drain.
3. Reinstall both drain plugs andtighten them to 25Y (18 lb ft).
4. Replace the oil filter and tightenit to 30Y (22 lb ft). SeeMaintenance Replacement Partson page 11-5 for the correctfilter.
5. Oil is filled through the openingin the top of the external engineoil tank. Remove the oil fill cap.
6. Add oil to the oil tank. SeeCapacities and Specifications onpage 12-3.
7. Install the oil fill cap and insertthe dipstick, if removed.
8. Start the engine and let it run atidle for at least 15 seconds. Thiswill circulate the fresh engine oilthrough the lubrication system.
9. Shut off the engine and checkthe oil level as described under“Checking Engine Oil (Z51).”
Selecting the Right Engine Oil
Selecting the right engine oildepends on both the proper oilspecification and viscosity grade.See Recommended Fluids andLubricants on page 11-4.
Specification
Ask for and use engine oils thatmeet the dexos2™ specification.Engine oils that have beenapproved by GM as meeting thedexos2 specification are markedwith the dexos2 approved logo.
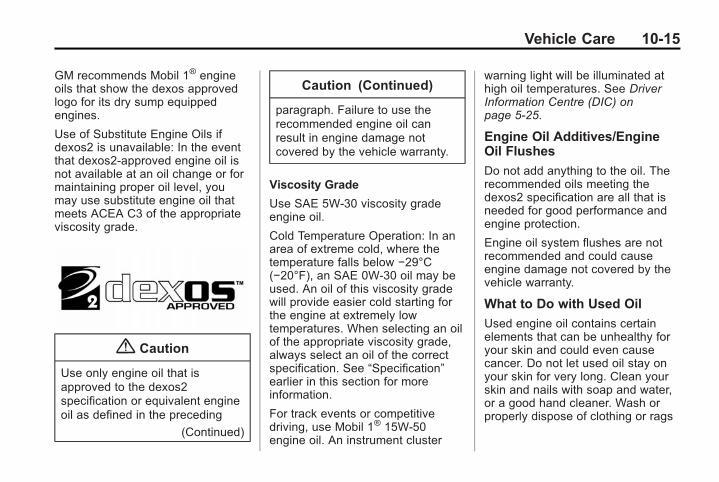
Black plate (15,1)Chevrolet Corvette Owner Manual (GMNA-Localizing-Europe-8087687) -2015 - CRC - 9/16/14
Vehicle Care 10-15
GM recommends Mobil 1® engineoils that show the dexos approvedlogo for its dry sump equippedengines.
Use of Substitute Engine Oils ifdexos2 is unavailable: In the eventthat dexos2-approved engine oil isnot available at an oil change or formaintaining proper oil level, youmay use substitute engine oil thatmeets ACEA C3 of the appropriateviscosity grade.
{ Caution
Use only engine oil that isapproved to the dexos2specification or equivalent engineoil as defined in the preceding
(Continued)
Caution (Continued)
paragraph. Failure to use therecommended engine oil canresult in engine damage notcovered by the vehicle warranty.
Viscosity Grade
Use SAE 5W-30 viscosity gradeengine oil.
Cold Temperature Operation: In anarea of extreme cold, where thetemperature falls below −29°C(−20°F), an SAE 0W-30 oil may beused. An oil of this viscosity gradewill provide easier cold starting forthe engine at extremely lowtemperatures. When selecting an oilof the appropriate viscosity grade,always select an oil of the correctspecification. See “Specification”earlier in this section for moreinformation.
For track events or competitivedriving, use Mobil 1® 15W-50engine oil. An instrument cluster
warning light will be illuminated athigh oil temperatures. See DriverInformation Centre (DIC) onpage 5-25.
Engine Oil Additives/EngineOil Flushes
Do not add anything to the oil. Therecommended oils meeting thedexos2 specification are all that isneeded for good performance andengine protection.
Engine oil system flushes are notrecommended and could causeengine damage not covered by thevehicle warranty.
What to Do with Used Oil
Used engine oil contains certainelements that can be unhealthy foryour skin and could even causecancer. Do not let used oil stay onyour skin for very long. Clean yourskin and nails with soap and water,or a good hand cleaner. Wash orproperly dispose of clothing or rags
Black plate (16,1)Chevrolet Corvette Owner Manual (GMNA-Localizing-Europe-8087687) -2015 - CRC - 9/16/14
10-16 Vehicle Care
containing used engine oil. See themanufacturer's warnings about theuse and disposal of oil products.
Used oil can be a threat to theenvironment. If you change yourown oil, be sure to drain all the oilfrom the filter before disposal. Neverdispose of oil by putting it in thetrash or pouring it on the ground,into sewers, or into streams orbodies of water. Recycle it by takingit to a place that collects used oil.
Engine Oil Life System
When to Change Engine Oil
This vehicle has a computer systemthat indicates when to change theengine oil and filter. This is basedon a combination of factors whichinclude engine revolutions, enginetemperature, and miles driven.Based on driving conditions, themileage at which an oil change isindicated can vary considerably. Forthe oil life system to work properly,the system must be reset every timethe oil is changed.
When the system has calculatedthat oil life has been diminished, itindicates that an oil change isnecessary. A CHANGE ENGINEOIL SOON message comes on. SeeEngine Oil Messages on page 5-35.Change the oil as soon as possiblewithin the next 1 000 km (600 mi).It is possible that, if driving underthe best conditions, the oil lifesystem might indicate that an oilchange is not necessary for up to ayear. The engine oil and filter mustbe changed at least once a yearand, at this time, the system mustbe reset. Your dealer has trainedservice people who will perform thiswork and reset the system. It is alsoimportant to check the oil regularlyover the course of an oil draininterval and keep it at the properlevel.
If the system is ever resetaccidentally, the oil must bechanged at 5 000 km (3,000 mi)since the last oil change.Remember to reset the oil lifesystem whenever the oil is changed.
After you change the oil, the oil lifemonitor will need to be reset. Seeyour dealer for service.
See “Oil Life” under DriverInformation Centre (DIC) onpage 5-25 for information on theengine oil life monitor.
Manual Gearbox FluidIt is not necessary to check themanual gearbox fluid level.A transmission fluid leak is the onlyreason for fluid loss. If a leakoccurs, take the vehicle to thedealer and have it repaired as soonas possible. See RecommendedFluids and Lubricants on page 11-4for the proper fluid to use.
Hydraulic ClutchIt is not necessary to regularlycheck clutch fluid unless yoususpect there is a leak in thesystem. Adding fluid will not correcta leak. A fluid loss in this systemcould indicate a problem. Have thesystem inspected and repaired.

Black plate (17,1)Chevrolet Corvette Owner Manual (GMNA-Localizing-Europe-8087687) -2015 - CRC - 9/16/14
Vehicle Care 10-17
When to Check and Whatto Use
The hydraulic clutch fluid reservoircap has this symbol on it. SeeEngine Compartment Overview onpage 10-7 for reservoir location.
Refer to the Recommended Fluidsand Lubricants on page 11-4 for theproper fluid to use. The fluidrequires changing. See theScheduled Maintenance onpage 11-1.
How to Check and Add Fluid
Visually check the clutch fluidreservoir to make sure the fluid levelis at the MIN (minimum) line on theside of the reservoir. The hydraulicclutch fluid system should be closedand sealed.
Do not remove the cap to check thefluid level or to top-off the fluid level.Remove the cap only whennecessary to add the proper fluiduntil the level reaches the MIN line.
Engine Air Cleaner/FilterSee Engine Compartment Overviewon page 10-7 for the location of theengine air cleaner/filter.
If cleaning the vehicle with thebonnet open, take care not to spraywater directly near the filter openingof the air cleaner, as shown in theillustration, as this could damagethe vehicle's engine.
When to Inspect the Engine AirCleaner/Filter
Inspect or replace the air cleaner/filter at the scheduled maintenanceintervals listed in ScheduledMaintenance on page 11-1. If drivingin dusty/dirty conditions, inspect thefilter at each engine oil change.
How to Inspect the Engine AirCleaner/Filter
To inspect the air cleaner/filter,remove the filter from the vehicleand lightly shake the filter to releaseloose dust and dirt. If the filterremains covered with dirt, a newfilter is required.
To remove the bonnet extractor ductto gain access:
1. Bolts (4)2. Bonnet Extractor Duct
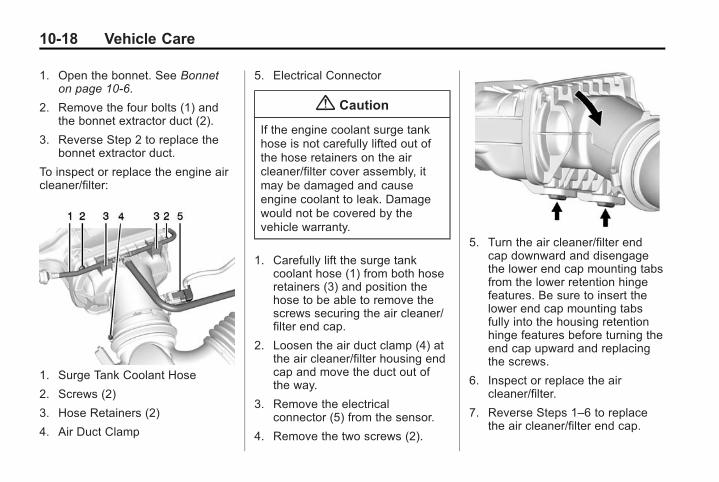
Black plate (18,1)Chevrolet Corvette Owner Manual (GMNA-Localizing-Europe-8087687) -2015 - CRC - 9/16/14
10-18 Vehicle Care
1. Open the bonnet. See Bonneton page 10-6.
2. Remove the four bolts (1) andthe bonnet extractor duct (2).
3. Reverse Step 2 to replace thebonnet extractor duct.
To inspect or replace the engine aircleaner/filter:
1. Surge Tank Coolant Hose
2. Screws (2)
3. Hose Retainers (2)
4. Air Duct Clamp
5. Electrical Connector
{ Caution
If the engine coolant surge tankhose is not carefully lifted out ofthe hose retainers on the aircleaner/filter cover assembly, itmay be damaged and causeengine coolant to leak. Damagewould not be covered by thevehicle warranty.
1. Carefully lift the surge tankcoolant hose (1) from both hoseretainers (3) and position thehose to be able to remove thescrews securing the air cleaner/filter end cap.
2. Loosen the air duct clamp (4) atthe air cleaner/filter housing endcap and move the duct out ofthe way.
3. Remove the electricalconnector (5) from the sensor.
4. Remove the two screws (2).
5. Turn the air cleaner/filter endcap downward and disengagethe lower end cap mounting tabsfrom the lower retention hingefeatures. Be sure to insert thelower end cap mounting tabsfully into the housing retentionhinge features before turning theend cap upward and replacingthe screws.
6. Inspect or replace the aircleaner/filter.
7. Reverse Steps 1–6 to replacethe air cleaner/filter end cap.
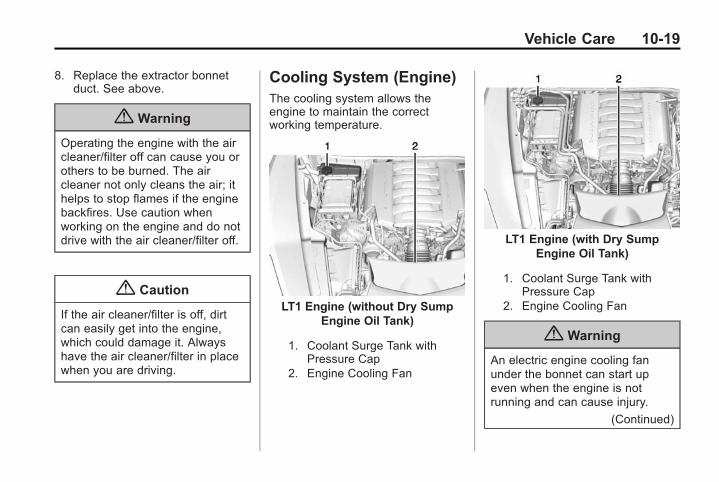
Black plate (19,1)Chevrolet Corvette Owner Manual (GMNA-Localizing-Europe-8087687) -2015 - CRC - 9/16/14
Vehicle Care 10-19
8. Replace the extractor bonnetduct. See above.
{ Warning
Operating the engine with the aircleaner/filter off can cause you orothers to be burned. The aircleaner not only cleans the air; ithelps to stop flames if the enginebackfires. Use caution whenworking on the engine and do notdrive with the air cleaner/filter off.
{ Caution
If the air cleaner/filter is off, dirtcan easily get into the engine,which could damage it. Alwayshave the air cleaner/filter in placewhen you are driving.
Cooling System (Engine)The cooling system allows theengine to maintain the correctworking temperature.
LT1 Engine (without Dry SumpEngine Oil Tank)
1. Coolant Surge Tank withPressure Cap
2. Engine Cooling Fan
LT1 Engine (with Dry SumpEngine Oil Tank)
1. Coolant Surge Tank withPressure Cap
2. Engine Cooling Fan
{ Warning
An electric engine cooling fanunder the bonnet can start upeven when the engine is notrunning and can cause injury.
(Continued)
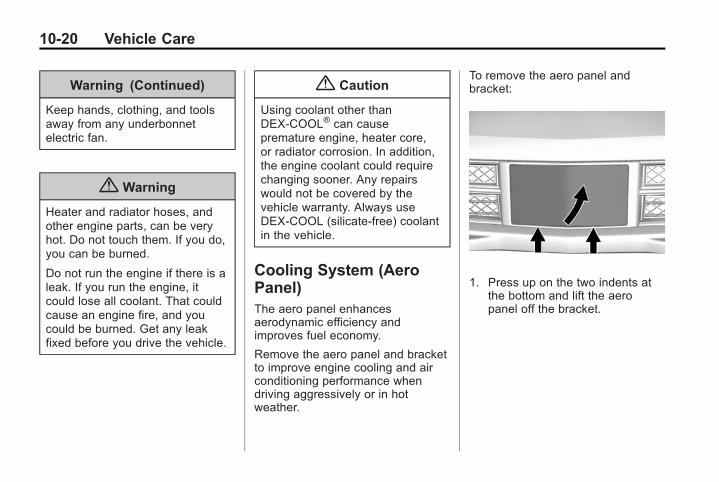
Black plate (20,1)Chevrolet Corvette Owner Manual (GMNA-Localizing-Europe-8087687) -2015 - CRC - 9/16/14
10-20 Vehicle Care
Warning (Continued)
Keep hands, clothing, and toolsaway from any underbonnetelectric fan.
{ Warning
Heater and radiator hoses, andother engine parts, can be veryhot. Do not touch them. If you do,you can be burned.
Do not run the engine if there is aleak. If you run the engine, itcould lose all coolant. That couldcause an engine fire, and youcould be burned. Get any leakfixed before you drive the vehicle.
{ Caution
Using coolant other thanDEX-COOL® can causepremature engine, heater core,or radiator corrosion. In addition,the engine coolant could requirechanging sooner. Any repairswould not be covered by thevehicle warranty. Always useDEX-COOL (silicate-free) coolantin the vehicle.
Cooling System (AeroPanel)The aero panel enhancesaerodynamic efficiency andimproves fuel economy.
Remove the aero panel and bracketto improve engine cooling and airconditioning performance whendriving aggressively or in hotweather.
To remove the aero panel andbracket:
1. Press up on the two indents atthe bottom and lift the aeropanel off the bracket.

Black plate (21,1)Chevrolet Corvette Owner Manual (GMNA-Localizing-Europe-8087687) -2015 - CRC - 9/16/14
Vehicle Care 10-21
2. Unscrew the two fasteners thatsecure the bracket.
3. Gently pull the bracket awayfrom the grille.
To replace the bracket and aeropanel:
1. Position the bracket over thegrille.
2. Secure the bracket by pushingthe two fasteners into place.
3. Snap the aero panel into place.
Engine CoolantThe cooling system in the vehicle isfilled with DEX-COOL® enginecoolant. See Recommended Fluidsand Lubricants on page 11-4. Thefluid requires changing at certainintervals. See ScheduledMaintenance on page 11-1.
The following explains the coolingsystem and how to check and addcoolant when it is low. If there is aproblem with engine overheating,see Engine Overheating onpage 10-24.
What to Use
{ Warning
Adding only plain water or someother liquid to the cooling systemcan be dangerous. Plain waterand other liquids, can boil beforethe proper coolant mixture will.The vehicle's coolant warningsystem is set for the proper
(Continued)
Warning (Continued)
coolant mixture. With plain wateror the wrong mixture, the enginecould get too hot but you wouldnot get the overheat warning. Theengine could catch fire and you orothers could be burned. Use amixture of 40% DEX-COOLcoolant and 60% clean, drinkablewater.
Use a mixture of 40% DEX-COOLcoolant and 60% clean, drinkablewater. If using this mixture, nothingelse needs to be added. Thismixture:. Gives freezing protection down
to -28°C (-18°F), outsidetemperature.
. Gives boiling protection up to129°C (265°F), enginetemperature.
. Protects against rust andcorrosion.
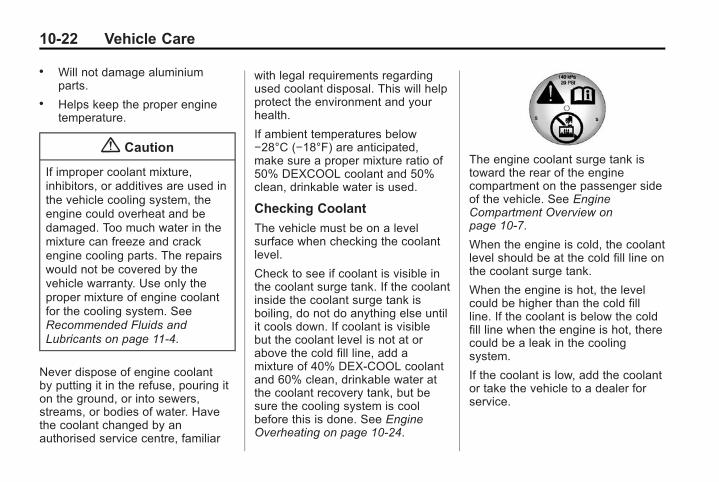
Black plate (22,1)Chevrolet Corvette Owner Manual (GMNA-Localizing-Europe-8087687) -2015 - CRC - 9/16/14
10-22 Vehicle Care
. Will not damage aluminiumparts.
. Helps keep the proper enginetemperature.
{ Caution
If improper coolant mixture,inhibitors, or additives are used inthe vehicle cooling system, theengine could overheat and bedamaged. Too much water in themixture can freeze and crackengine cooling parts. The repairswould not be covered by thevehicle warranty. Use only theproper mixture of engine coolantfor the cooling system. SeeRecommended Fluids andLubricants on page 11-4.
Never dispose of engine coolantby putting it in the refuse, pouring iton the ground, or into sewers,streams, or bodies of water. Havethe coolant changed by anauthorised service centre, familiar
with legal requirements regardingused coolant disposal. This will helpprotect the environment and yourhealth.
If ambient temperatures below−28°C (−18°F) are anticipated,make sure a proper mixture ratio of50% DEXCOOL coolant and 50%clean, drinkable water is used.
Checking Coolant
The vehicle must be on a levelsurface when checking the coolantlevel.
Check to see if coolant is visible inthe coolant surge tank. If the coolantinside the coolant surge tank isboiling, do not do anything else untilit cools down. If coolant is visiblebut the coolant level is not at orabove the cold fill line, add amixture of 40% DEX-COOL coolantand 60% clean, drinkable water atthe coolant recovery tank, but besure the cooling system is coolbefore this is done. See EngineOverheating on page 10-24.
The engine coolant surge tank istoward the rear of the enginecompartment on the passenger sideof the vehicle. See EngineCompartment Overview onpage 10-7.
When the engine is cold, the coolantlevel should be at the cold fill line onthe coolant surge tank.
When the engine is hot, the levelcould be higher than the cold fillline. If the coolant is below the coldfill line when the engine is hot, therecould be a leak in the coolingsystem.
If the coolant is low, add the coolantor take the vehicle to a dealer forservice.
Black plate (23,1)Chevrolet Corvette Owner Manual (GMNA-Localizing-Europe-8087687) -2015 - CRC - 9/16/14
Vehicle Care 10-23
How to Add Coolant to theCoolant Surge Tank
{ Warning
You can be burned if you spillcoolant on hot engine parts.Coolant contains ethylene glycoland it will burn if the engine partsare hot enough. Do not spillcoolant on a hot engine.
{ Warning
Steam and scalding liquids from ahot cooling system can blow outand burn you badly. Never turnthe cap when the cooling system,including the surge tank pressurecap, is hot. Wait for the coolingsystem and surge tank pressurecap to cool.
If coolant is needed, add the properDEX-COOL coolant mixture directlyto the surge tank but be sure thecooling system is cool before thisis done.
1. When the cooling system,including the coolant surge tankpressure cap and upper radiatorhose, is no longer hot, removethe pressure cap.
Turn the pressure cap slowlyanticlockwise about one-quarterturn and then stop.
If a hiss is heard, wait for that tostop. A hiss means there is stillsome pressure left.
2. Keep turning the pressure capslowly and remove it.
3. Fill the coolant surge tank withthe proper DEX-COOL coolantmixture until the level insidestabilises at the cold fill line onthe front of the surge tank.
4. With the coolant surge tankpressure cap off, start theengine and let it run until theupper radiator hose can be feltgetting hot. Any time during thisprocedure, watch out for theengine cooling fan.
By this time, the coolant levelinside the coolant surge tankmay be lower. If the level islower, add more of the propermixture to the coolant surge tankuntil the level stabilises at thecold fill line on the coolantsurge tank.
5. Replace the pressure cap tightly.
Check the level in the surge tankwhen the system has cooleddown. If the coolant is not at theproper level, repeat Steps 1−4,then reinstall the pressure cap.If the coolant is not at the properlevel when the system coolsdown again, see the dealer.
Black plate (24,1)Chevrolet Corvette Owner Manual (GMNA-Localizing-Europe-8087687) -2015 - CRC - 9/16/14
10-24 Vehicle Care
{ Caution
If the pressure cap is not tightlyinstalled, coolant loss andpossible engine damage mayoccur. Be sure the cap is properlyand tightly secured.
Engine OverheatingThe vehicle has several indicatorsto warn of engine overheating.
There is an engine coolanttemperature gauge on theinstrument cluster. See EngineCoolant Temperature Gauge onpage 5-13. The vehicle may alsodisplay a message on the DriverInformation Centre (DIC). SeeEngine Cooling System Messageson page 5-34.
If the decision is made not to lift thebonnet but to get service helpright away.
If the decision is made to lift thebonnet, make sure the vehicle isparked on a level surface.
Then check to see if the enginecooling fan is running. If the engineis overheating, the fan should berunning. If it is not, do not continueto run the engine and have thevehicle serviced.
{ Caution
Running the engine withoutcoolant may cause damage or afire. Vehicle damage would not becovered by the vehicle warranty.
If Steam Is Coming from theEngine
{ Warning
Steam from an overheated enginecan burn you badly, even if youjust open the bonnet. Stay away
(Continued)
Warning (Continued)
from the engine if you see or hearsteam coming from it. Just turn itoff and get everyone away fromthe vehicle until it cools down.Wait until there is no sign ofsteam or coolant before you openthe bonnet.
If you keep driving when theengine is overheated, the liquidsin it can catch fire. You or otherscould be badly burned. Stop theengine if it overheats, and get outof the vehicle until the engineis cool.
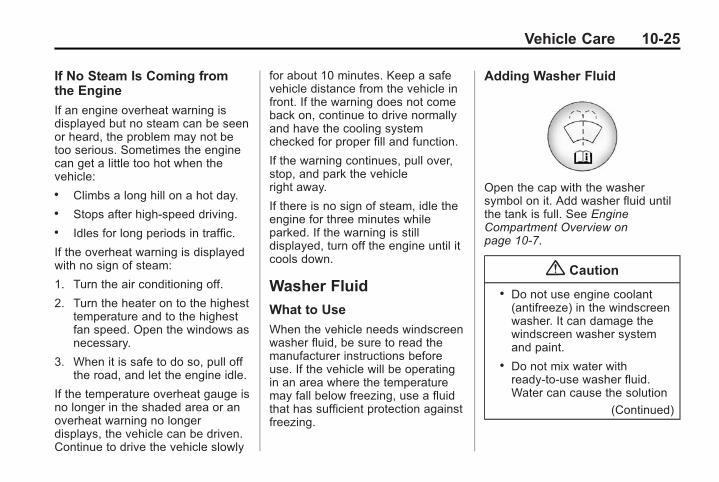
Black plate (25,1)Chevrolet Corvette Owner Manual (GMNA-Localizing-Europe-8087687) -2015 - CRC - 9/16/14
Vehicle Care 10-25
If No Steam Is Coming fromthe Engine
If an engine overheat warning isdisplayed but no steam can be seenor heard, the problem may not betoo serious. Sometimes the enginecan get a little too hot when thevehicle:. Climbs a long hill on a hot day.. Stops after high-speed driving.. Idles for long periods in traffic.
If the overheat warning is displayedwith no sign of steam:
1. Turn the air conditioning off.
2. Turn the heater on to the highesttemperature and to the highestfan speed. Open the windows asnecessary.
3. When it is safe to do so, pull offthe road, and let the engine idle.
If the temperature overheat gauge isno longer in the shaded area or anoverheat warning no longerdisplays, the vehicle can be driven.Continue to drive the vehicle slowly
for about 10 minutes. Keep a safevehicle distance from the vehicle infront. If the warning does not comeback on, continue to drive normallyand have the cooling systemchecked for proper fill and function.
If the warning continues, pull over,stop, and park the vehicleright away.
If there is no sign of steam, idle theengine for three minutes whileparked. If the warning is stilldisplayed, turn off the engine until itcools down.
Washer Fluid
What to Use
When the vehicle needs windscreenwasher fluid, be sure to read themanufacturer instructions beforeuse. If the vehicle will be operatingin an area where the temperaturemay fall below freezing, use a fluidthat has sufficient protection againstfreezing.
Adding Washer Fluid
Open the cap with the washersymbol on it. Add washer fluid untilthe tank is full. See EngineCompartment Overview onpage 10-7.
{ Caution
. Do not use engine coolant(antifreeze) in the windscreenwasher. It can damage thewindscreen washer systemand paint.
. Do not mix water withready-to-use washer fluid.Water can cause the solution
(Continued)
Black plate (26,1)Chevrolet Corvette Owner Manual (GMNA-Localizing-Europe-8087687) -2015 - CRC - 9/16/14
10-26 Vehicle Care
Caution (Continued)
to freeze and damage thewasher fluid tank and otherparts of the washer system.
. When using concentratedwasher fluid, follow themanufacturer instructions foradding water.
. Fill the washer fluid tank onlythree-quarters full when it isvery cold. This allows for fluidexpansion if freezing occurs,which could damage the tankif it is completely full.
BrakesDisc brake pads have built-in wearindicators that make a high-pitchedwarning sound when the brake padsare worn and new pads are needed.The sound can come and go or beheard all the time the vehicle ismoving, except when applying thebrake pedal firmly.
{ Warning
The brake wear warning soundmeans that soon the brakes willnot work well. That could lead toa crash. When the brake wearwarning sound is heard, have thevehicle serviced.
{ Caution
Continuing to drive with worn-outbrake pads could result in costlybrake repair.
Some driving conditions or climatescan cause a brake squeal when thebrakes are first applied or lightlyapplied. This does not meansomething is wrong with the brakes.
Properly torqued wheel nuts arenecessary to help prevent brakepulsation. When tyres are rotated,inspect brake pads for wear andevenly tighten wheel nuts in the
proper sequence to torquespecifications in Capacities andSpecifications on page 12-3.
Brake linings should always bereplaced as complete axle sets.
Brake Pedal Travel
See your dealer if the brake pedaldoes not return to normal height,or if there is a rapid increase inpedal travel. This could be a signthat brake service may be required.
Replacing Brake System Parts
Always replace brake system partswith new, approved replacementparts. If this is not done, the brakesmay not work properly. The brakingperformance expected can changein many other ways if the wrongreplacement brake parts areinstalled or parts are improperlyinstalled.
Black plate (27,1)Chevrolet Corvette Owner Manual (GMNA-Localizing-Europe-8087687) -2015 - CRC - 9/16/14
Vehicle Care 10-27
Brake Fluid
The brake master cylinder reservoiris filled with DOT 3 brake fluid asindicated on the reservoir cap. SeeEngine Compartment Overview onpage 10-7 for the location of thereservoir.
There are only two reasons why thebrake fluid level in the reservoirmight go down:. The brake fluid level goes down
because of normal brake liningwear. When new linings areinstalled, the fluid level goesback up.
. A fluid leak in the brakehydraulic system can also causea low fluid level. Have the brake
hydraulic system fixed, since aleak means that sooner or laterthe brakes will not work well.
Do not top off the brake fluid.Adding fluid does not correct a leak.If fluid is added when the linings areworn, there will be too much fluidwhen new brake linings areinstalled. Add or remove brake fluid,as necessary, only when work isdone on the brake hydraulic system.
{ Warning
If too much brake fluid is added, itcan spill on the engine and burn,if the engine is hot enough. Youor others could be burned, andthe vehicle could be damaged.Add brake fluid only when work isdone on the brake hydraulicsystem.
When the brake fluid falls to a lowlevel, the brake warning light comeson. See Brake System WarningLight on page 5-19.
What to Add
Use only new DOT 3 brake fluidfrom a sealed container. SeeRecommended Fluids andLubricants on page 11-4.
Always clean the brake fluidreservoir cap and the area aroundthe cap before removing it. Thishelps keep dirt from entering thereservoir.
{ Warning
With the wrong kind of fluid in thebrake hydraulic system, thebrakes might not work well. Thiscould cause a crash. Always usethe proper brake fluid.
{ Caution
. Using the wrong fluid canbadly damage brakehydraulic system parts. For
(Continued)
Black plate (28,1)Chevrolet Corvette Owner Manual (GMNA-Localizing-Europe-8087687) -2015 - CRC - 9/16/14
10-28 Vehicle Care
Caution (Continued)
example, just a few drops ofmineral-based oil, such asengine oil, in the brakehydraulic system can damagebrake hydraulic system partsso badly that they will have tobe replaced. Do not letsomeone put in the wrongkind of fluid.
. If brake fluid is spilled on thevehicle's painted surfaces,the paint finish can bedamaged. Be careful not tospill brake fluid on thevehicle. If you do, wash it offimmediately.
BatteryThe original equipment battery ismaintenance free. Do not removethe cap and do not add fluid.
Refer to the replacement number onthe original battery label when anew battery is needed.
For battery replacement, see yourdealer or the service manual.
{ Warning
Batteries should not be disposedof with regular refuse. Make surethat you dispose of old batteriesin accordance with environmentalprotection regulations to helpprotect the environment and yourhealth.
{ Warning
Do not use a match or flame neara vehicle's battery. If you needmore light, use a torch.
Do not smoke near a vehicle'sbattery.
When working around a vehicle'sbattery, shield your eyes withprotective glasses.
Keep children away from vehiclebatteries.
{ Warning
Batteries have acid that can burnyou and gas that can explode.You can be hurt badly if you arenot careful.
Follow instructions carefully whenworking around a battery.
(Continued)

Black plate (29,1)Chevrolet Corvette Owner Manual (GMNA-Localizing-Europe-8087687) -2015 - CRC - 9/16/14
Vehicle Care 10-29
Warning (Continued)
Battery posts, terminals andrelated accessories contain leadand lead compounds which cancause cancer and reproductiveharm. Wash hands after handling.
Vehicle Storage
Some vehicles have a batterymaintainer package. Follow theinstructions provided with the
battery maintainer package to keepthe battery charged when thevehicle is not in use. Plug thebattery maintainer into the rearAccessory Power Outlet (APO) only.The front APO turns off after theIgnition is off.
For vehicles without a batterymaintainer, see the followinginformation.
Infrequent Usage: Remove theblack, negative (-) cable from thebattery to keep the battery fromrunning down.
See “Window Indexing” in PowerWindows on page 2-19.
Extended Storage: It isrecommended that the batterymaintainer package be used.However, if not, remove the black,negative (−) cable from the battery.All vehicle memory settings willneed to be reset when batterypower is restored.
Battery Charger/Maintainer
For lead-acid batteries up to120 Ah
INTRODUCTION
Please read and follow theinstructions carefully.
SAFETY. The charger is designed for
charging 12V lead-acid batteries.Do not use the charger for anyother purpose.
. Battery acid is corrosive. Rinseimmediately with water if acidcomes into contact with skin oreyes and seek immediatemedical advice.
. Ensure that the cabling liesstraight and does not come intocontact with hot surfaces orsharp edges.
Black plate (30,1)Chevrolet Corvette Owner Manual (GMNA-Localizing-Europe-8087687) -2015 - CRC - 9/16/14
10-30 Vehicle Care
. A charging battery could emitexplosive gases, which is why itis important to prevent sparksclose to the battery. Whenbatteries are reaching the end oftheir life cycle, internal sparksmay occur.
. Always provide for properventilation during charging.
. Avoid covering the charger.
. Ensure that the mains cable isnot exposed to water.
. Never charge a frozen battery.
. Never charge a damagedbattery.
. Never place the charger on topof the battery when charging.
. Connection to the mains supplymust be in accordance with thenational regulations for electricalinstallations.
. Check the charger cables priorto use. Ensure that no crackshave occurred in the cables or inthe bend protection. A chargerwith damaged cables must notbe used.
. Always check that the chargerhas switched to maintenancecharging mode before leavingthe charger unattended andconnected for long periods. If thecharger has not switched tomaintenance charging within72 hours, this is an indication ofan error. In such cases thecharger must be disconnectedmanually.
. If a battery fails during charging,the charger's advancedtechnology will take care of mostproblems but some rare errors inthe battery could still exist. Don'tleave a battery connected to thecharger unattended for a longerperiod of time.
. Store and use the batterycharger out of the reach ofchildren and ensure that childrencannot play with the charger.
. Batteries consume water duringuse and charging. For batterieswhere water can be added, thewater level should be checkedregularly. If the water level is lowadd distilled water.
BATTERY TYPES AND SETTINGS
The charger is suitable for use withthe battery supplied in your vehicle.If you replace the original battery,observe the battery manufacturer'sguidelines. See which battery sizesthat the various charger models aresuitable for under “TECHNICALSPECIFICATIONS.”
Black plate (31,1)Chevrolet Corvette Owner Manual (GMNA-Localizing-Europe-8087687) -2015 - CRC - 9/16/14
Vehicle Care 10-31
The table explains the variouslamps:
CHARGING
Connection of the charger tobatteries that are fitted invehicles:
1. Connecting the XS 3600Corvette (model XS 3600)
- Connecting the equipment to abattery fitted in the vehicle.
2. When the rear Accessory PowerOutlet (APO) is being connectedor disconnected, the plug of
the XS 3600 Corvette (modelXS 3600) must be disconnectedfrom the power socket.
3. Connect charger to therear APO.
4. Connect the AC cord to the wallsocket.
START CHARGING
1. After the APO has beenconnected to the vehicle,connect the charger to the wallsocket.
2. XS 3600 Corvette (modelXS 3600) starts charging assoon as the mains supply isconnected.
3. Normal charging will beindicated by the lamp for bulkcharge or the lamp formaintenance charge. When thelamp for maintenance charge islit, it means that the battery isfully charged. The charge willrestart again if the voltage drops.
4. Charging can be stopped at anytime by disconnecting the mainssupply. Always disconnect thecable from the wall socketbefore disconnecting the APO.
5. If the charging lamp and themaintenance charger lamp areflashing alternately:
If the lamps are flashing a fewtimes per second this could bedue to a poor contact betweenthe charger and the battery orthat the battery is sulphated.Check the connection to thebattery. If the lamps flash formore than 60 minutes, thisindicates that the battery isdamaged and needs to bereplaced. If the lamps flash at afew minute intervals, the batteryhas a high self discharge andmay need replacing.
CHARGING STEPS
The charger has a four step, fullyautomatic charging cycle. At thestart of charging, the battery chargerdelivers maximum current to the
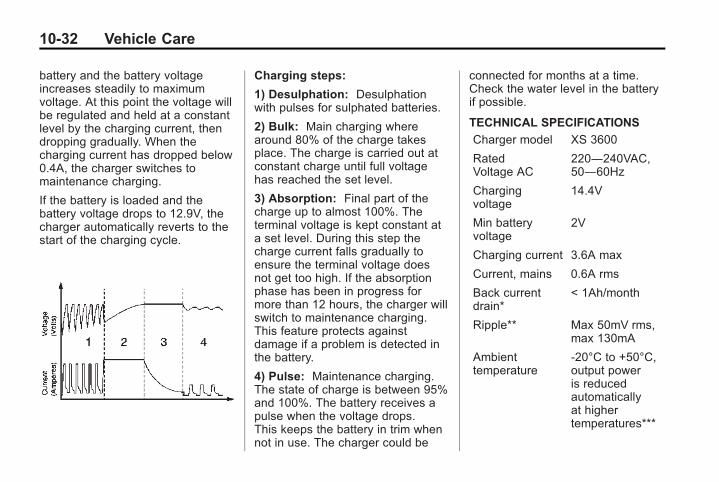
Black plate (32,1)Chevrolet Corvette Owner Manual (GMNA-Localizing-Europe-8087687) -2015 - CRC - 9/16/14
10-32 Vehicle Care
battery and the battery voltageincreases steadily to maximumvoltage. At this point the voltage willbe regulated and held at a constantlevel by the charging current, thendropping gradually. When thecharging current has dropped below0.4A, the charger switches tomaintenance charging.
If the battery is loaded and thebattery voltage drops to 12.9V, thecharger automatically reverts to thestart of the charging cycle.
Charging steps:
1) Desulphation: Desulphationwith pulses for sulphated batteries.
2) Bulk: Main charging wherearound 80% of the charge takesplace. The charge is carried out atconstant charge until full voltagehas reached the set level.
3) Absorption: Final part of thecharge up to almost 100%. Theterminal voltage is kept constant ata set level. During this step thecharge current falls gradually toensure the terminal voltage doesnot get too high. If the absorptionphase has been in progress formore than 12 hours, the charger willswitch to maintenance charging.This feature protects againstdamage if a problem is detected inthe battery.
4) Pulse: Maintenance charging.The state of charge is between 95%and 100%. The battery receives apulse when the voltage drops.This keeps the battery in trim whennot in use. The charger could be
connected for months at a time.Check the water level in the batteryif possible.
TECHNICAL SPECIFICATIONS
Charger model XS 3600
RatedVoltage AC
220―240VAC,50―60Hz
Chargingvoltage
14.4V
Min batteryvoltage
2V
Charging current 3.6A max
Current, mains 0.6A rms
Back currentdrain*
< 1Ah/month
Ripple** Max 50mV rms,max 130mA
Ambienttemperature
-20°C to +50°C,output poweris reducedautomaticallyat highertemperatures***
Black plate (33,1)Chevrolet Corvette Owner Manual (GMNA-Localizing-Europe-8087687) -2015 - CRC - 9/16/14
Vehicle Care 10-33
Cooling Naturalconvection
Charger type 4 step, fullyautomaticcharging cycle
Battery types All types of 12Vlead-acidbatteries (Wet,Ca/Ca, MF,VRLA, AGMand GEL)
Battery capacity 14―120Ah
Dimensions 142 x 51 x36mm(L x W x H)
Insulation class IP65****
Weight 0.5kg
Plug: CEE 7/4,TYPE F, notgrounded*****
*) Back current drain is the currentthat drains the battery if the chargeris not connected to the mains. TheXS 3600 Corvette charger has avery low back current.
**) The quality of the chargingvoltage and charging current is veryimportant. A high current rippleheats up the battery which has anageing effect on the positiveelectrode. High voltage ripple couldharm other equipment that isconnected to the batteries. TheXS 3600 Corvette battery chargerproduce very clean voltage andcurrent with very low ripple.
***) Only for indoor use in Finland:0°C to +50°C applies.
****) If connection to the mains is bythe flat Euro connector, the batterycharger has the IP63 insulationclass except for in Switzerlandwhere IP65 applies.
*****) For Switzerland and UnitedKingdom an adapter is required.
TEMPERATURE PROTECTION
The charger is protected againstoverheating. The power is reducedwhen the ambient temperatureincreases.
The charger may be perceived asbeing hot during charging. This iscompletely normal, although youshould avoid placing it on asensitive surface.
MAINTENANCE
The charger is maintenance free.Please note that dismantling thecharger is not permitted and willvoid the warranty. A defective mainscable must be replaced. Keep yourcharger clean.
Wipe it with a soft tissue and mildcleaning liquid. The charger must bedisconnected before cleaning.
BATTERY CABLES
The XS 3600 Corvette (modelXS 3600) is equipped with anAuxiliary Power Outlet forconnecting to the vehicle.
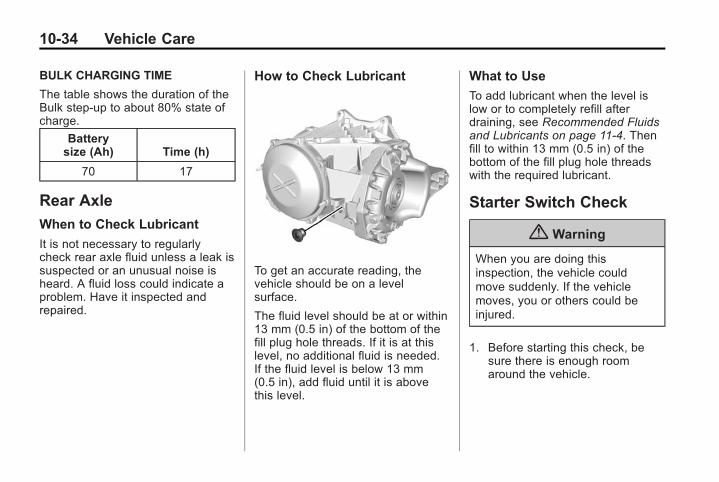
Black plate (34,1)Chevrolet Corvette Owner Manual (GMNA-Localizing-Europe-8087687) -2015 - CRC - 9/16/14
10-34 Vehicle Care
BULK CHARGING TIME
The table shows the duration of theBulk step-up to about 80% state ofcharge.
Batterysize (Ah) Time (h)
70 17
Rear Axle
When to Check Lubricant
It is not necessary to regularlycheck rear axle fluid unless a leak issuspected or an unusual noise isheard. A fluid loss could indicate aproblem. Have it inspected andrepaired.
How to Check Lubricant
To get an accurate reading, thevehicle should be on a levelsurface.
The fluid level should be at or within13 mm (0.5 in) of the bottom of thefill plug hole threads. If it is at thislevel, no additional fluid is needed.If the fluid level is below 13 mm(0.5 in), add fluid until it is abovethis level.
What to Use
To add lubricant when the level islow or to completely refill afterdraining, see Recommended Fluidsand Lubricants on page 11-4. Thenfill to within 13 mm (0.5 in) of thebottom of the fill plug hole threadswith the required lubricant.
Starter Switch Check
{ Warning
When you are doing thisinspection, the vehicle couldmove suddenly. If the vehiclemoves, you or others could beinjured.
1. Before starting this check, besure there is enough roomaround the vehicle.
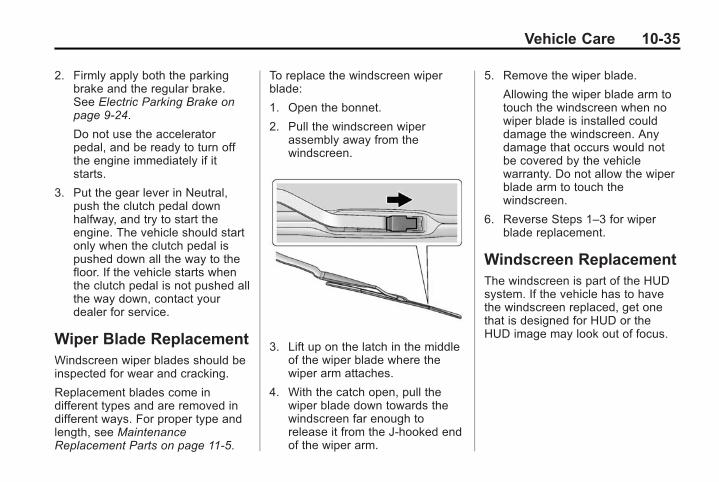
Black plate (35,1)Chevrolet Corvette Owner Manual (GMNA-Localizing-Europe-8087687) -2015 - CRC - 9/16/14
Vehicle Care 10-35
2. Firmly apply both the parkingbrake and the regular brake.See Electric Parking Brake onpage 9-24.
Do not use the acceleratorpedal, and be ready to turn offthe engine immediately if itstarts.
3. Put the gear lever in Neutral,push the clutch pedal downhalfway, and try to start theengine. The vehicle should startonly when the clutch pedal ispushed down all the way to thefloor. If the vehicle starts whenthe clutch pedal is not pushed allthe way down, contact yourdealer for service.
Wiper Blade ReplacementWindscreen wiper blades should beinspected for wear and cracking.
Replacement blades come indifferent types and are removed indifferent ways. For proper type andlength, see MaintenanceReplacement Parts on page 11-5.
To replace the windscreen wiperblade:
1. Open the bonnet.
2. Pull the windscreen wiperassembly away from thewindscreen.
3. Lift up on the latch in the middleof the wiper blade where thewiper arm attaches.
4. With the catch open, pull thewiper blade down towards thewindscreen far enough torelease it from the J-hooked endof the wiper arm.
5. Remove the wiper blade.
Allowing the wiper blade arm totouch the windscreen when nowiper blade is installed coulddamage the windscreen. Anydamage that occurs would notbe covered by the vehiclewarranty. Do not allow the wiperblade arm to touch thewindscreen.
6. Reverse Steps 1–3 for wiperblade replacement.
Windscreen ReplacementThe windscreen is part of the HUDsystem. If the vehicle has to havethe windscreen replaced, get onethat is designed for HUD or theHUD image may look out of focus.
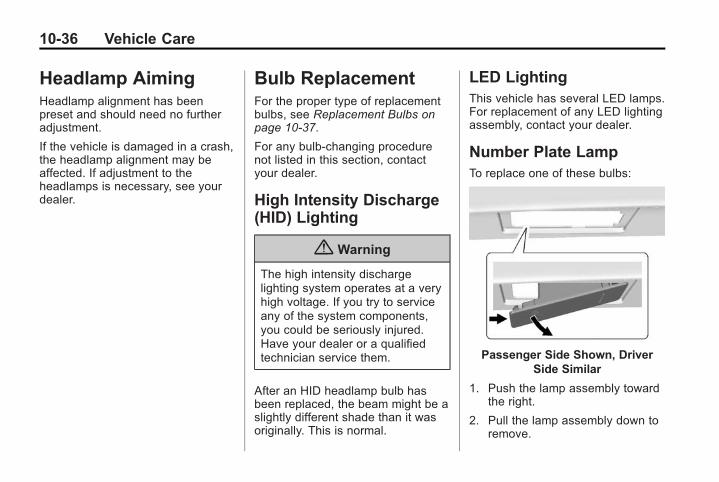
Black plate (36,1)Chevrolet Corvette Owner Manual (GMNA-Localizing-Europe-8087687) -2015 - CRC - 9/16/14
10-36 Vehicle Care
Headlamp AimingHeadlamp alignment has beenpreset and should need no furtheradjustment.
If the vehicle is damaged in a crash,the headlamp alignment may beaffected. If adjustment to theheadlamps is necessary, see yourdealer.
Bulb ReplacementFor the proper type of replacementbulbs, see Replacement Bulbs onpage 10-37.
For any bulb-changing procedurenot listed in this section, contactyour dealer.
High Intensity Discharge(HID) Lighting
{ Warning
The high intensity dischargelighting system operates at a veryhigh voltage. If you try to serviceany of the system components,you could be seriously injured.Have your dealer or a qualifiedtechnician service them.
After an HID headlamp bulb hasbeen replaced, the beam might be aslightly different shade than it wasoriginally. This is normal.
LED LightingThis vehicle has several LED lamps.For replacement of any LED lightingassembly, contact your dealer.
Number Plate LampTo replace one of these bulbs:
Passenger Side Shown, DriverSide Similar
1. Push the lamp assembly towardthe right.
2. Pull the lamp assembly down toremove.
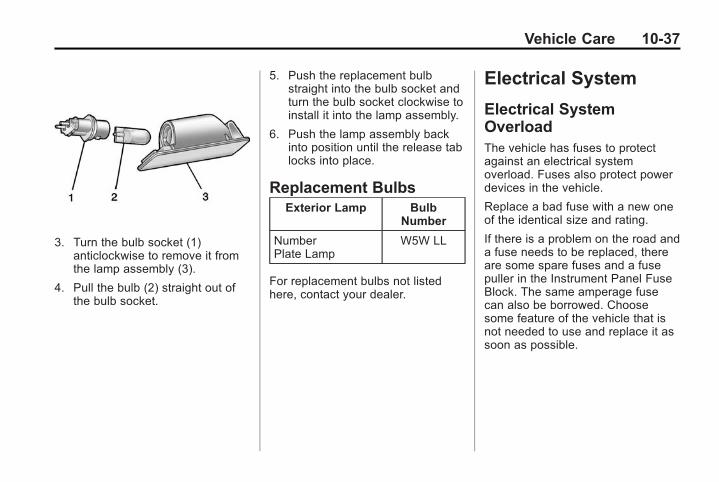
Black plate (37,1)Chevrolet Corvette Owner Manual (GMNA-Localizing-Europe-8087687) -2015 - CRC - 9/16/14
Vehicle Care 10-37
3. Turn the bulb socket (1)anticlockwise to remove it fromthe lamp assembly (3).
4. Pull the bulb (2) straight out ofthe bulb socket.
5. Push the replacement bulbstraight into the bulb socket andturn the bulb socket clockwise toinstall it into the lamp assembly.
6. Push the lamp assembly backinto position until the release tablocks into place.
Replacement BulbsExterior Lamp Bulb
Number
NumberPlate Lamp
W5W LL
For replacement bulbs not listedhere, contact your dealer.
Electrical System
Electrical SystemOverloadThe vehicle has fuses to protectagainst an electrical systemoverload. Fuses also protect powerdevices in the vehicle.
Replace a bad fuse with a new oneof the identical size and rating.
If there is a problem on the road anda fuse needs to be replaced, thereare some spare fuses and a fusepuller in the Instrument Panel FuseBlock. The same amperage fusecan also be borrowed. Choosesome feature of the vehicle that isnot needed to use and replace it assoon as possible.
Black plate (38,1)Chevrolet Corvette Owner Manual (GMNA-Localizing-Europe-8087687) -2015 - CRC - 9/16/14
10-38 Vehicle Care
Windscreen Wipers
If the wiper motor overheats due toheavy snow or ice, the windscreenwipers will stop until the motor coolsand will then restart.
Although the circuit is protectedfrom electrical overload, overloaddue to heavy snow or ice maycause wiper linkage damage.Always clear ice and heavy snowfrom the windscreen before usingthe windscreen wipers.
If the overload is caused by anelectrical problem and not snow orice, be sure to get it fixed.
FusesThe wiring circuits in the vehicle areprotected from short circuits byfuses. This greatly reduces thechance of fires caused by electricalproblems.
Look at the silver-coloured bandinside the fuse. If the band is brokenor melted, replace the fuse. Be sureyou replace a bad fuse with a newone of the identical size and rating.
Fuses of the same amperage canbe temporarily borrowed fromanother fuse location, if a fuse goesout. Replace the fuse as soon asyou can.
Engine CompartmentFuse BlockThere is one fuse block in theengine compartment on thepassenger side of the vehicle. SeeEngine Compartment Overview onpage 10-7 for more information onlocation.
{ Caution
Spilling liquid on any electricalcomponent on the vehicle maydamage it. Always keep thecovers on any electricalcomponent.
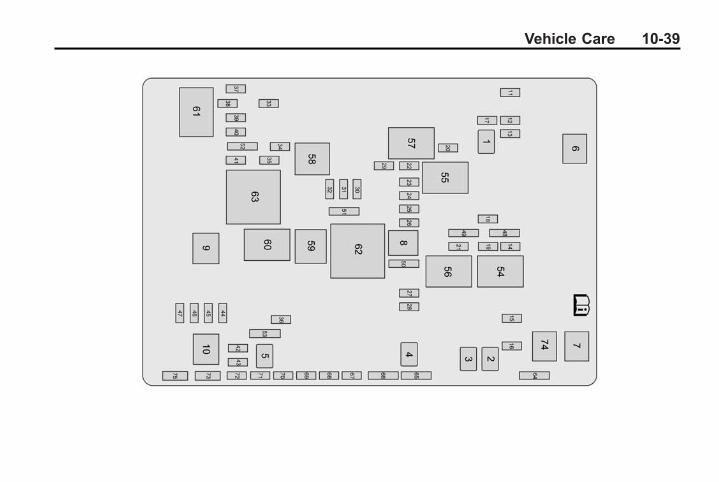
Black plate (39,1)Chevrolet Corvette Owner Manual (GMNA-Localizing-Europe-8087687) -2015 - CRC - 9/16/14
Vehicle Care 10-39
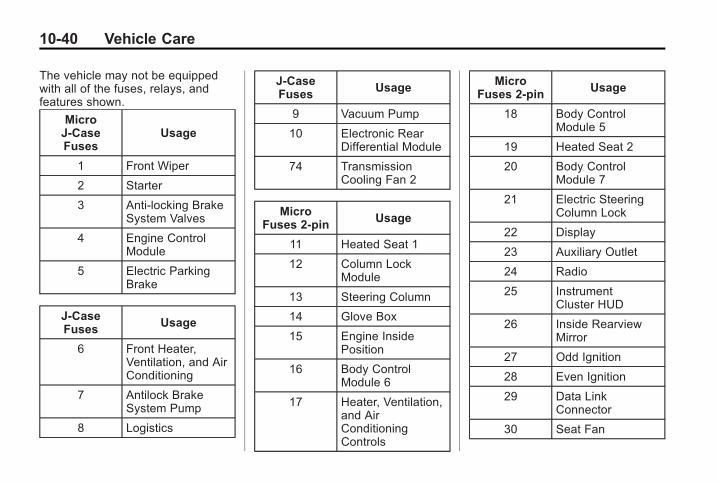
Black plate (40,1)Chevrolet Corvette Owner Manual (GMNA-Localizing-Europe-8087687) -2015 - CRC - 9/16/14
10-40 Vehicle Care
The vehicle may not be equippedwith all of the fuses, relays, andfeatures shown.
MicroJ-CaseFuses
Usage
1 Front Wiper
2 Starter
3 Anti-locking BrakeSystem Valves
4 Engine ControlModule
5 Electric ParkingBrake
J-CaseFuses
Usage
6 Front Heater,Ventilation, and AirConditioning
7 Antilock BrakeSystem Pump
8 Logistics
J-CaseFuses
Usage
9 Vacuum Pump
10 Electronic RearDifferential Module
74 TransmissionCooling Fan 2
MicroFuses 2-pin
Usage
11 Heated Seat 1
12 Column LockModule
13 Steering Column
14 Glove Box
15 Engine InsidePosition
16 Body ControlModule 6
17 Heater, Ventilation,and AirConditioningControls
MicroFuses 2-pin
Usage
18 Body ControlModule 5
19 Heated Seat 2
20 Body ControlModule 7
21 Electric SteeringColumn Lock
22 Display
23 Auxiliary Outlet
24 Radio
25 InstrumentCluster HUD
26 Inside RearviewMirror
27 Odd Ignition
28 Even Ignition
29 Data LinkConnector
30 Seat Fan
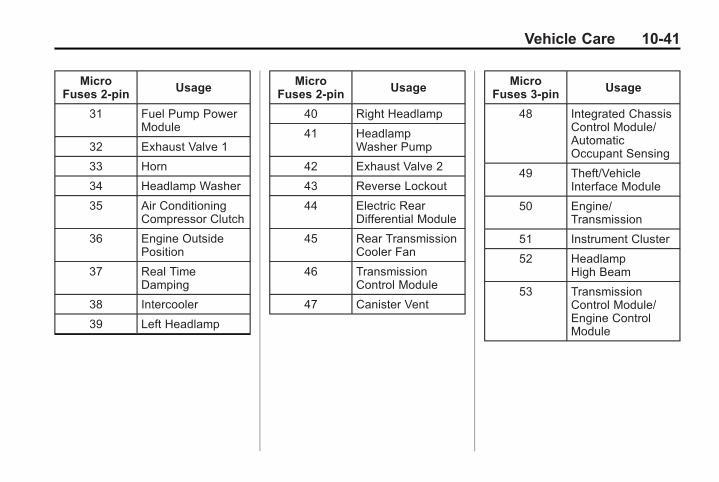
Black plate (41,1)Chevrolet Corvette Owner Manual (GMNA-Localizing-Europe-8087687) -2015 - CRC - 9/16/14
Vehicle Care 10-41
MicroFuses 2-pin
Usage
31 Fuel Pump PowerModule
32 Exhaust Valve 1
33 Horn
34 Headlamp Washer
35 Air ConditioningCompressor Clutch
36 Engine OutsidePosition
37 Real TimeDamping
38 Intercooler
39 Left Headlamp
MicroFuses 2-pin
Usage
40 Right Headlamp
41 HeadlampWasher Pump
42 Exhaust Valve 2
43 Reverse Lockout
44 Electric RearDifferential Module
45 Rear TransmissionCooler Fan
46 TransmissionControl Module
47 Canister Vent
MicroFuses 3-pin
Usage
48 Integrated ChassisControl Module/AutomaticOccupant Sensing
49 Theft/VehicleInterface Module
50 Engine/Transmission
51 Instrument Cluster
52 HeadlampHigh Beam
53 TransmissionControl Module/Engine ControlModule
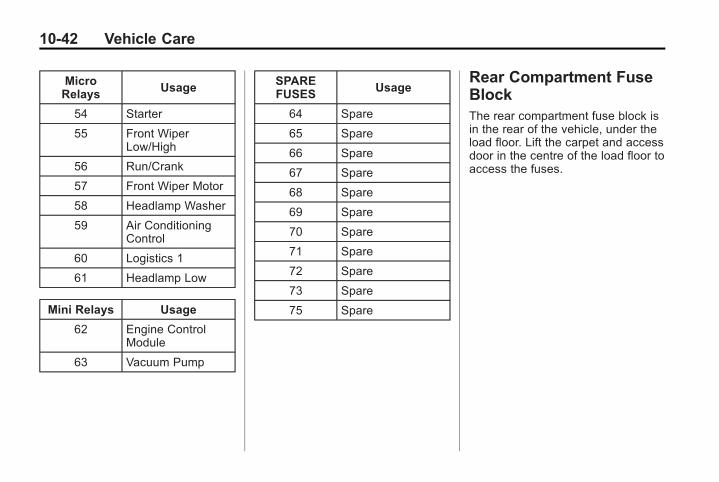
Black plate (42,1)Chevrolet Corvette Owner Manual (GMNA-Localizing-Europe-8087687) -2015 - CRC - 9/16/14
10-42 Vehicle Care
MicroRelays
Usage
54 Starter
55 Front WiperLow/High
56 Run/Crank
57 Front Wiper Motor
58 Headlamp Washer
59 Air ConditioningControl
60 Logistics 1
61 Headlamp Low
Mini Relays Usage
62 Engine ControlModule
63 Vacuum Pump
SPAREFUSES
Usage
64 Spare
65 Spare
66 Spare
67 Spare
68 Spare
69 Spare
70 Spare
71 Spare
72 Spare
73 Spare
75 Spare
Rear Compartment FuseBlockThe rear compartment fuse block isin the rear of the vehicle, under theload floor. Lift the carpet and accessdoor in the centre of the load floor toaccess the fuses.
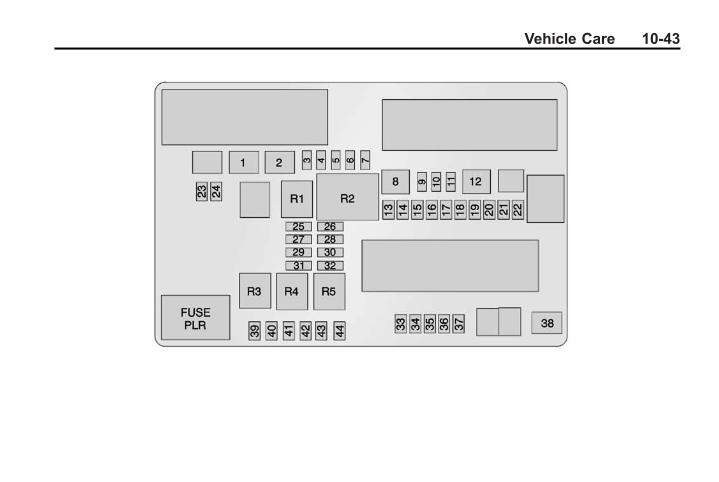
Black plate (43,1)Chevrolet Corvette Owner Manual (GMNA-Localizing-Europe-8087687) -2015 - CRC - 9/16/14
Vehicle Care 10-43
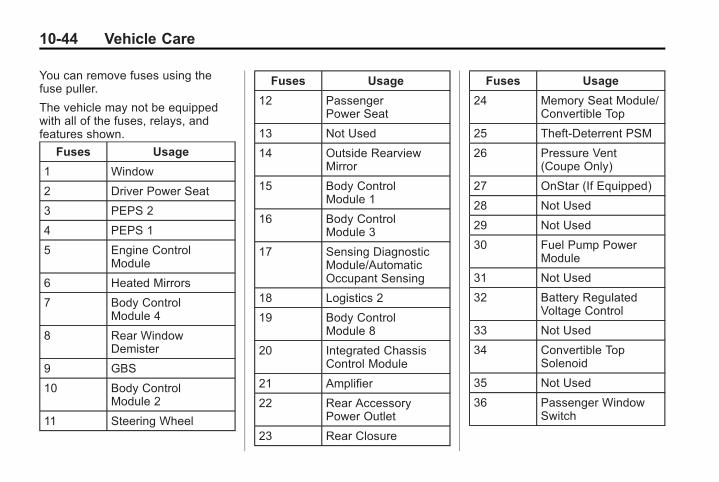
Black plate (44,1)Chevrolet Corvette Owner Manual (GMNA-Localizing-Europe-8087687) -2015 - CRC - 9/16/14
10-44 Vehicle Care
You can remove fuses using thefuse puller.
The vehicle may not be equippedwith all of the fuses, relays, andfeatures shown.
Fuses Usage
1 Window
2 Driver Power Seat
3 PEPS 2
4 PEPS 1
5 Engine ControlModule
6 Heated Mirrors
7 Body ControlModule 4
8 Rear WindowDemister
9 GBS
10 Body ControlModule 2
11 Steering Wheel
Fuses Usage
12 PassengerPower Seat
13 Not Used
14 Outside RearviewMirror
15 Body ControlModule 1
16 Body ControlModule 3
17 Sensing DiagnosticModule/AutomaticOccupant Sensing
18 Logistics 2
19 Body ControlModule 8
20 Integrated ChassisControl Module
21 Amplifier
22 Rear AccessoryPower Outlet
23 Rear Closure
Fuses Usage
24 Memory Seat Module/Convertible Top
25 Theft-Deterrent PSM
26 Pressure Vent(Coupe Only)
27 OnStar (If Equipped)
28 Not Used
29 Not Used
30 Fuel Pump PowerModule
31 Not Used
32 Battery RegulatedVoltage Control
33 Not Used
34 Convertible TopSolenoid
35 Not Used
36 Passenger WindowSwitch
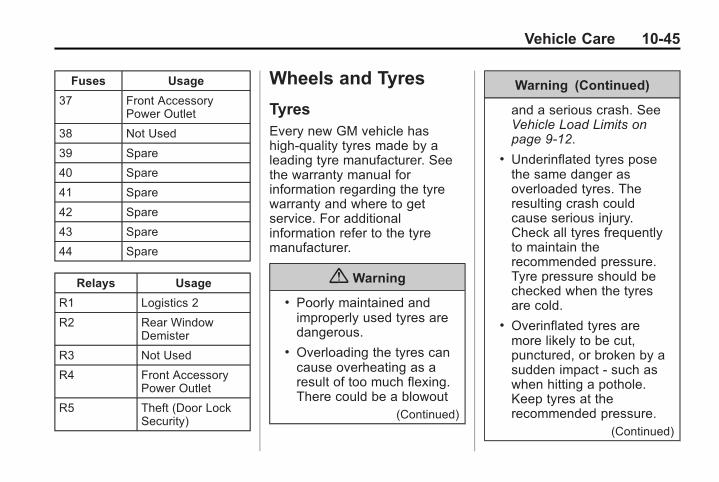
Black plate (45,1)Chevrolet Corvette Owner Manual (GMNA-Localizing-Europe-8087687) -2015 - CRC - 9/16/14
Vehicle Care 10-45
Fuses Usage
37 Front AccessoryPower Outlet
38 Not Used
39 Spare
40 Spare
41 Spare
42 Spare
43 Spare
44 Spare
Relays Usage
R1 Logistics 2
R2 Rear WindowDemister
R3 Not Used
R4 Front AccessoryPower Outlet
R5 Theft (Door LockSecurity)
Wheels and Tyres
TyresEvery new GM vehicle hashigh-quality tyres made by aleading tyre manufacturer. Seethe warranty manual forinformation regarding the tyrewarranty and where to getservice. For additionalinformation refer to the tyremanufacturer.
{ Warning
. Poorly maintained andimproperly used tyres aredangerous.
. Overloading the tyres cancause overheating as aresult of too much flexing.There could be a blowout
(Continued)
Warning (Continued)
and a serious crash. SeeVehicle Load Limits onpage 9-12.
. Underinflated tyres posethe same danger asoverloaded tyres. Theresulting crash couldcause serious injury.Check all tyres frequentlyto maintain therecommended pressure.Tyre pressure should bechecked when the tyresare cold.
. Overinflated tyres aremore likely to be cut,punctured, or broken by asudden impact - such aswhen hitting a pothole.Keep tyres at therecommended pressure.
(Continued)
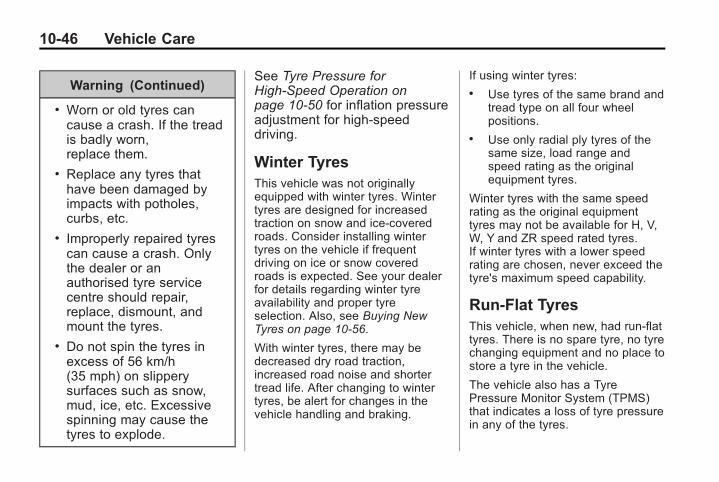
Black plate (46,1)Chevrolet Corvette Owner Manual (GMNA-Localizing-Europe-8087687) -2015 - CRC - 9/16/14
10-46 Vehicle Care
Warning (Continued)
. Worn or old tyres cancause a crash. If the treadis badly worn,replace them.
. Replace any tyres thathave been damaged byimpacts with potholes,curbs, etc.
. Improperly repaired tyrescan cause a crash. Onlythe dealer or anauthorised tyre servicecentre should repair,replace, dismount, andmount the tyres.
. Do not spin the tyres inexcess of 56 km/h(35 mph) on slipperysurfaces such as snow,mud, ice, etc. Excessivespinning may cause thetyres to explode.
See Tyre Pressure forHigh-Speed Operation onpage 10-50 for inflation pressureadjustment for high-speeddriving.
Winter TyresThis vehicle was not originallyequipped with winter tyres. Wintertyres are designed for increasedtraction on snow and ice-coveredroads. Consider installing wintertyres on the vehicle if frequentdriving on ice or snow coveredroads is expected. See your dealerfor details regarding winter tyreavailability and proper tyreselection. Also, see Buying NewTyres on page 10-56.
With winter tyres, there may bedecreased dry road traction,increased road noise and shortertread life. After changing to wintertyres, be alert for changes in thevehicle handling and braking.
If using winter tyres:. Use tyres of the same brand and
tread type on all four wheelpositions.
. Use only radial ply tyres of thesame size, load range andspeed rating as the originalequipment tyres.
Winter tyres with the same speedrating as the original equipmenttyres may not be available for H, V,W, Y and ZR speed rated tyres.If winter tyres with a lower speedrating are chosen, never exceed thetyre's maximum speed capability.
Run-Flat TyresThis vehicle, when new, had run-flattyres. There is no spare tyre, no tyrechanging equipment and no place tostore a tyre in the vehicle.
The vehicle also has a TyrePressure Monitor System (TPMS)that indicates a loss of tyre pressurein any of the tyres.
Black plate (47,1)Chevrolet Corvette Owner Manual (GMNA-Localizing-Europe-8087687) -2015 - CRC - 9/16/14
Vehicle Care 10-47
{ Warning
If the low tyre warning lightdisplays on the instrument cluster,the handling capabilities will bereduced during severemanoeuvres. Driving too fastcould cause loss of control andyou or others could be injured. Donot drive over 80 km/h (50 mph)when the low tyre warning light isdisplayed. Drive cautiously andcheck the tyre pressures as soonas possible.
Run-flat tyres can be driven on withno air pressure. There is no need tostop on the side of the road tochange the tyre. Continue driving;however, do not drive too far or toofast. Driving on the tyre may not bepossible if there is permanentdamage. To prevent permanentdamage, the tyre can be driven withno air pressure for up to 80 km(50 mi) at speeds slower than80 km/h (50 mph). As soon as
possible, contact the nearestauthorised GM or run-flat servicingfacility for inspection and repair orreplacement.
When driving on a deflated run-flattyre, avoid potholes and other roadhazards that could damage the tyreand/or wheel beyond repair. When atyre has been damaged, or if drivenany distance while deflated, checkwith an authorised run-flat tyreservice centre to determine whetherthe tyre can be repaired or shouldbe replaced. To maintain the run-flatfeature, all replacement tyres mustbe run-flat tyres.
To locate the nearest GM or run-flatservicing facility, call CustomerAssistance.
The valve stems on run-flat tyreshave sensors that are part of theTPMS. See Tyre Pressure MonitorSystem on page 10-50. Thesesensors contain batteries that aredesigned to last for 10 years under
normal driving conditions. See yourdealer for wheel or sensorreplacement.
{ Caution
Using liquid sealants can damagethe tyre valves and tyre pressuremonitor sensors in the run-flattyres. This damage is not coveredby the vehicle warranty. Do notuse liquid sealants in run-flattyres.
Low-Profile Tyres
Low-Profile Performance Tyre
The original equipment tyres onthis vehicle are classified aslow-profile performance tyres.These tyres are designed forvery responsive driving on wetor dry metalled roads, however,may produce more road noiseand tend to wear faster.
Black plate (48,1)Chevrolet Corvette Owner Manual (GMNA-Localizing-Europe-8087687) -2015 - CRC - 9/16/14
10-48 Vehicle Care
{ Caution
Low-profile tyres are moresusceptible to damage from roadhazards or curb impact thanstandard profile tyres. Tyre and/orwheel assembly damage canoccur when coming into contactwith road hazards like potholes,or sharp edged objects, or whensliding into a kerb. The warrantydoes not cover this type ofdamage. Keep tyres set to thecorrect inflation pressure andwhen possible, avoid contact withkerbs, potholes, and other roadhazards.
Summer TyresHigh Performance Summer Tyres
This vehicle may come with highperformance summer tyres. Thesetyres have a special tread andcompound that are optimised formaximum dry and wet roadperformance. This special tread andcompound will have decreasedperformance in cold climates, andon ice and snow. We recommendinstalling winter tyres on the vehicleif frequent driving at temperaturesbelow approximately 5°C (40°F) oron ice or snow covered roads isexpected. See Winter Tyres onpage 10-46.
{ Caution
High performance summer tyreshave rubber compounds that loseflexibility and may developsurface cracks in the tread areaat temperatures below -7°C
(Continued)
Caution (Continued)
(20°F). Always store highperformance summer tyresindoors and at temperaturesabove -7°C (20°F) when not inuse. If the tyres have beensubjected to -7°C (20°F) or less,let them warm up in a heatedspace to at least 5°C (40°F) for24 hours or more before beinginstalled or driving a vehicle onwhich they are installed. Do notapply heat or blow heated airdirectly on the tyres. Alwaysinspect tyres before use. SeeTyre Inspection on page 10-54.
Tyre PressureTyres need the correct amountof air pressure to operateeffectively.
Black plate (49,1)Chevrolet Corvette Owner Manual (GMNA-Localizing-Europe-8087687) -2015 - CRC - 9/16/14
Vehicle Care 10-49
{ Caution
Neither tyre underinflation noroverinflation is good.Underinflated tyres, or tyresthat do not have enough air,can result in:
. Tyre overloading andoverheating which couldlead to a blowout.
. Premature orirregular wear.
. Poor handling.
. Reduced fuel economy.
Overinflated tyres, or tyresthat have too much air, canresult in:
. Unusual wear.
. Poor handling.
. Rough ride.
. Needless damage fromroad hazards.
The Tyre and LoadingInformation label on the vehicleindicates the original equipmenttyres and the correct cold tyreinflation pressures. Therecommended pressure is theminimum air pressure needed tosupport the vehicle's maximumload carrying capacity.
For additional informationregarding how much weight thevehicle can carry, and anexample of the Tyre andLoading Information label, seeVehicle Load Limits onpage 9-12. How the vehicle isloaded affects vehicle handlingand ride comfort. Never load thevehicle with more weight than itwas designed to carry.
When to Check
Check the tyres once a monthor more.
How to Check
Use a good quality pocket-typegauge to check the tyrepressure. Proper tyre inflationcannot be determined by lookingat the tyre. Check the tyreinflation pressure when the tyresare cold, meaning the vehiclehas not been driven for at leastthree hours or no more than1.6 km (1 mi).
Remove the valve cap from thetyre valve stem. Press the tyregauge firmly onto the valve toget the pressure measurement.If the cold tyre inflation pressurematches the recommendedpressure on the Tyre andLoading Information label, nofurther adjustment is necessary.
If the inflation pressure is low,add air until the recommendedpressure is reached. If theinflation pressure in high, presson the metal stem in the centre
Black plate (50,1)Chevrolet Corvette Owner Manual (GMNA-Localizing-Europe-8087687) -2015 - CRC - 9/16/14
10-50 Vehicle Care
of the tyre valve to release air.Re-check the tyre pressure withthe tyre gauge.
Return the valve caps on thevalve stems to keep out dirt andmoisture and prevent leaks.
Tyre Pressure forHigh-Speed Operation
{ Warning
Driving at high speeds, 160 km/h(100 mph) or higher, puts anadditional strain on tyres.Sustained high-speed drivingcauses excessive heat build-upand can cause sudden tyrefailure. You could have a crashand you or others could be killed.Some high-speed rated tyresrequire inflation pressureadjustment for high-speedoperation. When speed limits androad conditions are such that a
(Continued)
Warning (Continued)
vehicle can be driven at highspeeds, make sure the tyres arerated for high-speed operation, inexcellent condition, and set to thecorrect cold tyre inflation pressurefor the vehicle load.
The tyres require inflation pressureadjustment when driving the vehicleat speeds of 160 km/h (100mph) orhigher, where it is legal. Set the coldinflation pressure to the maximuminflation pressure shown on the tyresidewall, or 265 kPa (38 psi),whichever is lower. See theexample following. Return the tyresto the recommended cold tyreinflation pressure when high-speeddriving has ended. See VehicleLoad Limits on page 9-12.
Example:
The maximum load and inflationpressure moulded on the tyresidewall, in small letters, near the
rim flange. It will read something likethis: Maximum load 690 kg(1521 lbs) 300 kPa (44 psi) Max.Press.
For this example, set the inflationpressure for high-speed driving to265 kPa (38 psi).
Racing or other competitive drivingmay affect the warranty coverage ofthe vehicle. See the warrantybooklet for more information.
Tyre Pressure MonitorSystem
{ Caution
Modifications made to the TyrePressure Monitor System (TPMS)by anyone other than anauthorised service facility mayvoid authorisation to use thesystem.
Black plate (51,1)Chevrolet Corvette Owner Manual (GMNA-Localizing-Europe-8087687) -2015 - CRC - 9/16/14
Vehicle Care 10-51
The Tyre Pressure Monitor System(TPMS) uses radio and sensortechnology to check tyre pressurelevels. The TPMS sensors monitorthe air pressure in your vehicle'styres and transmit tyre pressurereadings to a receiver located in thevehicle.
Each tyre, including the spare (ifprovided), should be checkedmonthly when cold and inflated tothe inflation pressure recommendedby the vehicle manufacturer on thevehicle placard or tyre inflationpressure label. (If your vehicle hastyres of a different size than the sizeindicated on the vehicle placard ortyre inflation pressure label, youshould determine the proper tyreinflation pressure for those tyres.)
As an added safety feature, yourvehicle has been equipped with atyre pressure monitoring system(TPMS) that illuminates a low tyrepressure telltale when one or moreof your tyres is significantlyunder-inflated.
Accordingly, when the low tyrepressure telltale illuminates, youshould stop and check your tyres assoon as possible, and inflate themto the proper pressure. Driving on asignificantly under-inflated tyrecauses the tyre to overheat and canlead to tyre failure. Under-inflationalso reduces fuel efficiency and tyretread life, and may affect thevehicle's handling and stoppingability.
Please note that the TPMS is not asubstitute for proper tyremaintenance, and it is the driver'sresponsibility to maintain correcttyre pressure, even if under-inflationhas not reached the level to triggerillumination of the TPMS low tyrepressure telltale.
Your vehicle has also beenequipped with a TPMS malfunctionindicator to indicate when thesystem is not operating properly.The TPMS malfunction indicator iscombined with the low tyre pressuretelltale. When the system detects amalfunction, the telltale will flash for
approximately one minute and thenremain continuously illuminated.This sequence will continue uponsubsequent vehicle start-ups aslong as the malfunction exists.
When the malfunction indicator isilluminated, the system may not beable to detect or signal low tyrepressure as intended. TPMSmalfunctions may occur for a varietyof reasons, including the installationof replacement or alternate tyres orwheels on the vehicle that preventthe TPMS from functioning properly.Always check the TPMS malfunctiontelltale after replacing one or moretyres or wheels on your vehicle toensure that the replacement oralternate tyres and wheels allow theTPMS to continue to functionproperly.
See Tyre Pressure MonitorOperation on page 10-52 foradditional information.
See Declaration of Conformity onpage 13-1.
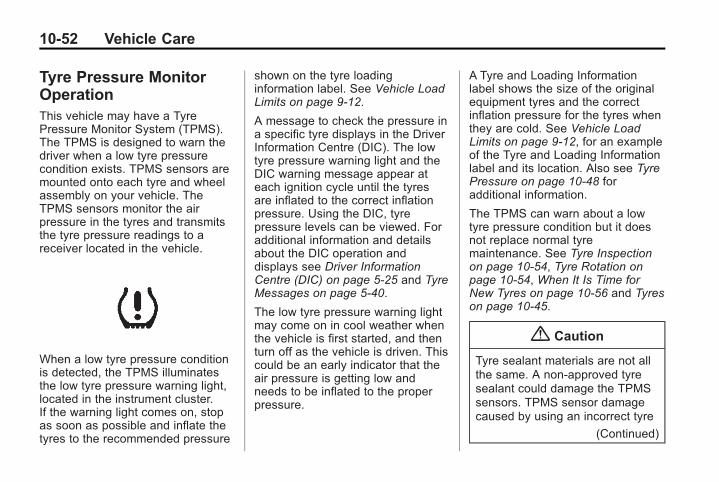
Black plate (52,1)Chevrolet Corvette Owner Manual (GMNA-Localizing-Europe-8087687) -2015 - CRC - 9/16/14
10-52 Vehicle Care
Tyre Pressure MonitorOperationThis vehicle may have a TyrePressure Monitor System (TPMS).The TPMS is designed to warn thedriver when a low tyre pressurecondition exists. TPMS sensors aremounted onto each tyre and wheelassembly on your vehicle. TheTPMS sensors monitor the airpressure in the tyres and transmitsthe tyre pressure readings to areceiver located in the vehicle.
When a low tyre pressure conditionis detected, the TPMS illuminatesthe low tyre pressure warning light,located in the instrument cluster.If the warning light comes on, stopas soon as possible and inflate thetyres to the recommended pressure
shown on the tyre loadinginformation label. See Vehicle LoadLimits on page 9-12.
A message to check the pressure ina specific tyre displays in the DriverInformation Centre (DIC). The lowtyre pressure warning light and theDIC warning message appear ateach ignition cycle until the tyresare inflated to the correct inflationpressure. Using the DIC, tyrepressure levels can be viewed. Foradditional information and detailsabout the DIC operation anddisplays see Driver InformationCentre (DIC) on page 5-25 and TyreMessages on page 5-40.
The low tyre pressure warning lightmay come on in cool weather whenthe vehicle is first started, and thenturn off as the vehicle is driven. Thiscould be an early indicator that theair pressure is getting low andneeds to be inflated to the properpressure.
A Tyre and Loading Informationlabel shows the size of the originalequipment tyres and the correctinflation pressure for the tyres whenthey are cold. See Vehicle LoadLimits on page 9-12, for an exampleof the Tyre and Loading Informationlabel and its location. Also see TyrePressure on page 10-48 foradditional information.
The TPMS can warn about a lowtyre pressure condition but it doesnot replace normal tyremaintenance. See Tyre Inspectionon page 10-54, Tyre Rotation onpage 10-54, When It Is Time forNew Tyres on page 10-56 and Tyreson page 10-45.
{ Caution
Tyre sealant materials are not allthe same. A non-approved tyresealant could damage the TPMSsensors. TPMS sensor damagecaused by using an incorrect tyre
(Continued)
Black plate (53,1)Chevrolet Corvette Owner Manual (GMNA-Localizing-Europe-8087687) -2015 - CRC - 9/16/14
Vehicle Care 10-53
Caution (Continued)
sealant is not covered by thevehicle warranty. Always use onlythe GM approved tyre sealantavailable through your dealer orincluded in the vehicle.
Factory-installed Tyre Inflator Kitsuse a GM approved liquid tyresealant. Using non-approved tyresealants could damage the TPMSsensors. See Tyre Sealant andCompressor Kit on page 10-62 forinformation regarding the inflator kitmaterials and instructions.
TPMS Malfunction Light andMessage
The TPMS will not function properlyif one or more of the TPMS sensorsare missing or inoperable. When thesystem detects a malfunction, the
low tyre warning light flashes forabout one minute and then stays onfor the remainder of the ignitioncycle. A DIC warning message alsodisplays. The malfunction light andDIC warning message come on ateach ignition cycle until the problemis corrected. Some of the conditionsthat can cause these to comeon are:. The TPMS sensor matching
process was not done or notcompleted successfully. Themalfunction light and the DICmessage should go off aftersuccessfully completing thesensor matching process.
. One or more TPMS sensors aremissing or damaged. Themalfunction light and the DICmessage should go off when theTPMS sensors are installed andthe sensor matching process isperformed successfully.
. Replacement tyres or wheels donot match the original equipmenttyres or wheels. Tyres andwheels other than thoserecommended could prevent theTPMS from functioning properly.See Buying New Tyres onpage 10-56.
. Operating electronic devices orbeing near facilities using radiowave frequencies similar to theTPMS could cause the TPMSsensors to malfunction.
If the TPMS is not functioningproperly, it cannot detect or signal alow tyre condition. See your dealerfor service if the TPMS malfunctionlight and DIC message come onand stays on.
Black plate (54,1)Chevrolet Corvette Owner Manual (GMNA-Localizing-Europe-8087687) -2015 - CRC - 9/16/14
10-54 Vehicle Care
TPMS Sensor MatchingProcess — Auto LearnFunction
Each TPMS sensor has a uniqueidentification code. The identificationcode needs to be matched to a newtyre/wheel position after rotating thetyres or replacing one or more of theTPMS sensors. When a tyre isinstalled, the vehicle must bestationary for about 20 minutesbefore the system recalculates. Thefollowing relearn process takes upto 10 minutes, driving at a minimumspeed of 19 km/h (12 mph).A dash (-) or pressure value willdisplay in the DIC. See DriverInformation Centre (DIC) onpage 5-25 and Tyre Messages onpage 5-40. A warning messagedisplays in the DIC if a problemoccurs during the relearn process.
Tyre InspectionWe recommend that the tyres,including the spare tyre, if thevehicle has one, be inspectedfor signs of wear or damage atleast once a month.
Replace the tyre if:. The indicators at three or
more places around the tyrecan be seen.
. There is cord or fabricshowing through the tyre'srubber.
. The tread or sidewall iscracked, cut, or snaggeddeep enough to show cord orfabric.
. The tyre has a bump, bulge,or split.
. The tyre has a puncture, cut,or other damage that cannotbe repaired well because ofthe size or location of thedamage.
Tyre RotationThe tyres should be rotated atthe intervals specified in theMaintenance Schedule. SeeScheduled Maintenance onpage 11-1.
Tyres are rotated to achieveuniform wear for all tyres. Thefirst rotation is the mostimportant.
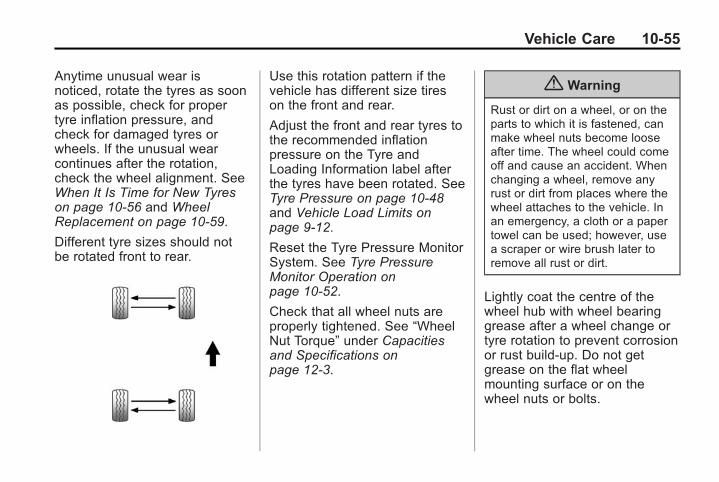
Black plate (55,1)Chevrolet Corvette Owner Manual (GMNA-Localizing-Europe-8087687) -2015 - CRC - 9/16/14
Vehicle Care 10-55
Anytime unusual wear isnoticed, rotate the tyres as soonas possible, check for propertyre inflation pressure, andcheck for damaged tyres orwheels. If the unusual wearcontinues after the rotation,check the wheel alignment. SeeWhen It Is Time for New Tyreson page 10-56 and WheelReplacement on page 10-59.
Different tyre sizes should notbe rotated front to rear.
Use this rotation pattern if thevehicle has different size tireson the front and rear.
Adjust the front and rear tyres tothe recommended inflationpressure on the Tyre andLoading Information label afterthe tyres have been rotated. SeeTyre Pressure on page 10-48and Vehicle Load Limits onpage 9-12.
Reset the Tyre Pressure MonitorSystem. See Tyre PressureMonitor Operation onpage 10-52.
Check that all wheel nuts areproperly tightened. See “WheelNut Torque” under Capacitiesand Specifications onpage 12-3.
{ Warning
Rust or dirt on a wheel, or on theparts to which it is fastened, canmake wheel nuts become looseafter time. The wheel could comeoff and cause an accident. Whenchanging a wheel, remove anyrust or dirt from places where thewheel attaches to the vehicle. Inan emergency, a cloth or a papertowel can be used; however, usea scraper or wire brush later toremove all rust or dirt.
Lightly coat the centre of thewheel hub with wheel bearinggrease after a wheel change ortyre rotation to prevent corrosionor rust build-up. Do not getgrease on the flat wheelmounting surface or on thewheel nuts or bolts.
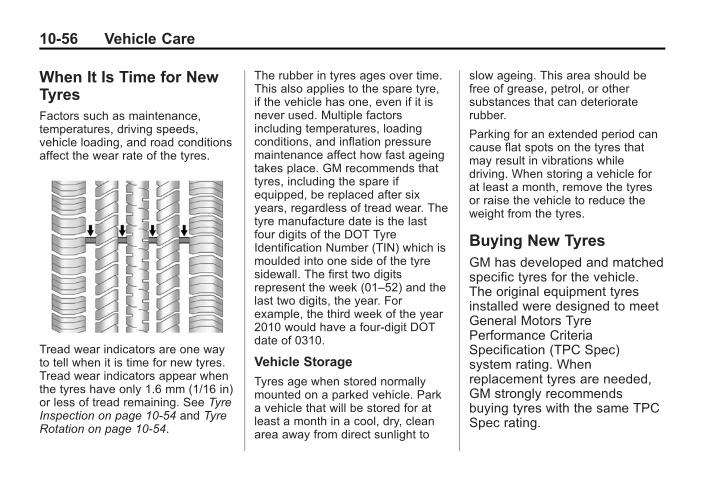
Black plate (56,1)Chevrolet Corvette Owner Manual (GMNA-Localizing-Europe-8087687) -2015 - CRC - 9/16/14
10-56 Vehicle Care
When It Is Time for NewTyresFactors such as maintenance,temperatures, driving speeds,vehicle loading, and road conditionsaffect the wear rate of the tyres.
Tread wear indicators are one wayto tell when it is time for new tyres.Tread wear indicators appear whenthe tyres have only 1.6 mm (1/16 in)or less of tread remaining. See TyreInspection on page 10-54 and TyreRotation on page 10-54.
The rubber in tyres ages over time.This also applies to the spare tyre,if the vehicle has one, even if it isnever used. Multiple factorsincluding temperatures, loadingconditions, and inflation pressuremaintenance affect how fast ageingtakes place. GM recommends thattyres, including the spare ifequipped, be replaced after sixyears, regardless of tread wear. Thetyre manufacture date is the lastfour digits of the DOT TyreIdentification Number (TIN) which ismoulded into one side of the tyresidewall. The first two digitsrepresent the week (01–52) and thelast two digits, the year. Forexample, the third week of the year2010 would have a four-digit DOTdate of 0310.
Vehicle Storage
Tyres age when stored normallymounted on a parked vehicle. Parka vehicle that will be stored for atleast a month in a cool, dry, cleanarea away from direct sunlight to
slow ageing. This area should befree of grease, petrol, or othersubstances that can deterioraterubber.
Parking for an extended period cancause flat spots on the tyres thatmay result in vibrations whiledriving. When storing a vehicle forat least a month, remove the tyresor raise the vehicle to reduce theweight from the tyres.
Buying New TyresGM has developed and matchedspecific tyres for the vehicle.The original equipment tyresinstalled were designed to meetGeneral Motors TyrePerformance CriteriaSpecification (TPC Spec)system rating. Whenreplacement tyres are needed,GM strongly recommendsbuying tyres with the same TPCSpec rating.
Black plate (57,1)Chevrolet Corvette Owner Manual (GMNA-Localizing-Europe-8087687) -2015 - CRC - 9/16/14
Vehicle Care 10-57
GM's exclusive TPC Specsystem considers over a dozencritical specifications that impactthe overall performance of thevehicle, including brake systemperformance, ride and handling,traction control, and tyrepressure monitoringperformance. GM's TPC Specnumber is moulded onto thetyre's sidewall near the tyre size.If the tyres have an all-seasontread design, the TPC Specnumber will be followed by MSfor mud and snow.
GM recommends replacing worntyres in complete sets of four.Uniform tread depth on all tyreswill help to maintain theperformance of the vehicle.Braking and handlingperformance may be adverselyaffected if all the tyres are notreplaced at the same time.If proper rotation andmaintenance have been done,
all four tyres should wear out atabout the same time. See TyreRotation on page 10-54 forinformation on proper tyrerotation. However, if it isnecessary to replace only oneaxle set of worn tyres, place thenew tyres on the rear axle.
{ Warning
Tyres could explode duringimproper service. Attemptingto mount or dismount a tyrecould cause injury or death.Only your dealer or authorisedtyre service centre shouldmount or dismount the tyres.
Winter tyres with the samespeed rating as the originalequipment tyres may not beavailable for H, V, W, Y and ZRspeed rated tyres. Never exceed
the winter tyres maximum speedcapability when using wintertyres with a lower speed rating.
{ Warning
Never drive faster than the speedthe tyres are rated, regardless ofthe legal speed limit. Whenfrequently driving the vehicle athigh speeds and/or for prolongedperiods of time, check with yourvehicle/tyre dealer for the propertype of tyres to use for thespecific driving and weatherconditions.
{ Warning
Mixing tyres of different sizes(other than those originallyinstalled on the vehicle), brands,or types may cause loss ofcontrol of the vehicle, resulting in
(Continued)
Black plate (58,1)Chevrolet Corvette Owner Manual (GMNA-Localizing-Europe-8087687) -2015 - CRC - 9/16/14
10-58 Vehicle Care
Warning (Continued)
a crash or other vehicle damage.Use the correct size, brand, andtype of tyre on all four wheels.
{ Warning
Using bias-ply tyres on thevehicle may cause the wheelrim flanges to develop cracksafter many miles of driving.A tyre and/or wheel could failsuddenly and cause a crash.Use only radial-ply tyres withthe wheels on the vehicle.
If the vehicle tyres must bereplaced with a tyre that doesnot have a TPC Spec number,make sure they are the samesize, load range, speed rating,and construction type (radial) asthe original tyres.
Vehicles that have a tyrepressure monitoring systemcould give an inaccuratelow-pressure warning if non-TPCSpec rated tyres are installed.See Tyre Pressure MonitorOperation on page 10-52.
The Tyre and LoadingInformation label indicates theoriginal equipment tyres on thevehicle. See Vehicle Load Limitson page 9-12, for the labellocation and more informationabout the Tyre and LoadingInformation label.
Different Size Tyres andWheelsIf wheels or tyres are installed thatare a different size than the originalequipment wheels and tyres, vehicleperformance, including its braking,ride and handling characteristics,stability, and resistance to rollovermay be affected. If the vehicle haselectronic systems such as antilock
brakes, rollover airbags, tractioncontrol, electronic stability control,or All-Wheel Drive, the performanceof these systems can also beaffected.
{ Warning
If different sized wheels are used,there may not be an acceptablelevel of performance and safety iftyres not recommended for thosewheels are selected. Thisincreases the chance of a crashand serious injury. Only use GMspecific wheel and tyre systemsdeveloped for the vehicle, andhave them properly installed by aGM certified technician.
See Buying New Tyres onpage 10-56 and Accessories andModifications on page 10-2.
Black plate (59,1)Chevrolet Corvette Owner Manual (GMNA-Localizing-Europe-8087687) -2015 - CRC - 9/16/14
Vehicle Care 10-59
Wheel Alignment andTyre BalanceThe tyres and wheels were alignedand balanced at the factory toprovide the longest tyre life and bestoverall performance. Adjustments towheel alignment and tyre balancingare not necessary on a regularbasis. Consider an alignment checkif there is unusual tyre wear. If thevehicle is vibrating when driving ona smooth road, the tyres and wheelsmay need to be rebalanced. Seeyour dealer for proper diagnosis.
Road Imperfections/Crown Effects
The vehicle's precise steering andhandling make it very responsive toroad surface feedback. A slight pullmay be felt in the steeringdepending on the crown of the roadand/or other road surface variationssuch as troughs or ruts. This isnormal and the vehicle does notrequire service.
Tyre Chatter/Hop
When driving at slow speeds and invery tight turns, the vehicle mayhave tyre chatter/hop. This isnormal and the vehicle does notrequire service.
Wheel ReplacementReplace any wheel that is bent,cracked, or badly rusted orcorroded. If wheel nuts keep comingloose, the wheel, wheel bolts, andwheel nuts should be replaced.If the wheel leaks air, replace it.Some aluminium wheels can berepaired. See your dealer if any ofthese conditions exist.
Your dealer will know the kind ofwheel that is needed.
Each new wheel should have thesame load-carrying capacity,diameter, width, offset, and bemounted the same way as the one itreplaces.
Replace wheels, wheel bolts,or wheel nuts with new GM originalequipment parts.
{ Warning
Using the wrong replacementwheels, wheel bolts, or wheelnuts can be dangerous. It couldaffect the braking and handling ofthe vehicle. Tyres can lose air,and cause loss of control, causinga crash. Always use the correctwheel, wheel bolts, and wheelnuts for replacement.
{ Warning
Replacing a wheel with a usedone is dangerous. How it hasbeen used or how far it has beendriven may be unknown. It couldfail suddenly and cause a crash.When replacing wheels, use anew GM original equipmentwheel.
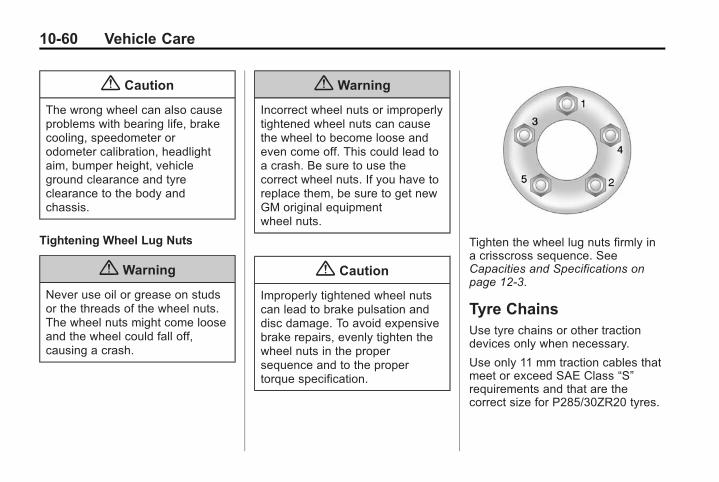
Black plate (60,1)Chevrolet Corvette Owner Manual (GMNA-Localizing-Europe-8087687) -2015 - CRC - 9/16/14
10-60 Vehicle Care
{ Caution
The wrong wheel can also causeproblems with bearing life, brakecooling, speedometer orodometer calibration, headlightaim, bumper height, vehicleground clearance and tyreclearance to the body andchassis.
Tightening Wheel Lug Nuts
{ Warning
Never use oil or grease on studsor the threads of the wheel nuts.The wheel nuts might come looseand the wheel could fall off,causing a crash.
{ Warning
Incorrect wheel nuts or improperlytightened wheel nuts can causethe wheel to become loose andeven come off. This could lead toa crash. Be sure to use thecorrect wheel nuts. If you have toreplace them, be sure to get newGM original equipmentwheel nuts.
{ Caution
Improperly tightened wheel nutscan lead to brake pulsation anddisc damage. To avoid expensivebrake repairs, evenly tighten thewheel nuts in the propersequence and to the propertorque specification.
Tighten the wheel lug nuts firmly ina crisscross sequence. SeeCapacities and Specifications onpage 12-3.
Tyre ChainsUse tyre chains or other tractiondevices only when necessary.
Use only 11 mm traction cables thatmeet or exceed SAE Class “S”requirements and that are thecorrect size for P285/30ZR20 tyres.
Black plate (61,1)Chevrolet Corvette Owner Manual (GMNA-Localizing-Europe-8087687) -2015 - CRC - 9/16/14
Vehicle Care 10-61
Install them on the rear tyres only,as tightly as possible, with the endssecurely fastened.
{ Caution
Do not install traction devices onthe front tyres.
Drive slowly and follow the cablemanufacturer's instructions. If thecables contact the vehicle, stop andretighten them. If the contactcontinues, slow down until it stops.
{ Caution
To help avoid damage to thevehicle, drive slowly, do not spinthe wheels, and readjust orremove the device if it contactsthe vehicle.
If a Tyre Goes FlatIt is unusual for a tyre to blow outwhile driving, especially if the tyresare maintained properly. If air goesout of a tyre, it is much more likelyto leak out slowly. See Tyres onpage 10-45 for additionalinformation. But if there ever is ablowout, here are a few tips aboutwhat to expect and what to do:
If a front tyre fails, the flat tyrecreates a drag that pulls the vehicletoward that side. Take your foot offthe accelerator pedal and grip thesteering wheel firmly. Steer tomaintain lane position, and thengently brake to a stop, well off theroad, if possible.
A rear blowout, particularly on acurve, acts much like a skid andmay require the same correction asused in a skid. Stop pressing theaccelerator pedal and steer tostraighten the vehicle. It may bevery bumpy and noisy. Gently braketo a stop, well off the road,if possible.
The vehicle has no spare tyre, notyre changing equipment and noplace to store a tyre.
If the vehicle has run-flat tyres,there is no need to stop on the sideof the road to change a flat tyre.See Run-Flat Tyres on page 10-46.
{ Warning
Special tools and procedures arerequired to service a run-flat tyre.If these special tools andprocedures are not used, injury orvehicle damage may occur.Always be sure the proper toolsand procedures, as described inthe service manual, are used.
If this vehicle does not have run-flattyres and a tyre goes flat, avoidfurther tyre and wheel damage bydriving slowly to a level place, welloff the road, if possible. Turn on thehazard warning flashers. SeeHazard Warning Flashers onpage 6-5.
Black plate (62,1)Chevrolet Corvette Owner Manual (GMNA-Localizing-Europe-8087687) -2015 - CRC - 9/16/14
10-62 Vehicle Care
1. Turn on the hazard warningflashers.
2. Apply the parking brake firmly.
3. Put an automatic transmission inP (Park) or a manual gearbox in1 (First) or R (Reverse).
4. Turn off the ignition.
5. Inspect the flat tyre.
{ Warning
Driving on a flat tyre will causepermanent damage to the tyre.Re-inflating a tyre after it hasbeen driven on while severelyunderinflated or flat may cause ablowout and a serious crash.Never attempt to re-inflate a tyrethat has been driven on whileseverely underinflated or flat.Have your dealer or an authorisedtyre service centre repair orreplace the flat tyre as soon aspossible.
If this vehicle has a tyre sealant kitand the tyre has been separatedfrom the wheel, has damagedsidewalls, or has a puncture largerthan 6 mm (0.25 in), the tyre is tooseverely damaged for the tyresealant and compressor kit to beeffective. If the tyre has a punctureless than 6 mm (0.25 in) in the treadarea of the tyre, see Tyre Sealantand Compressor Kit on page 10-62.
Tyre Sealant andCompressor Kit
{ Warning
Idling a vehicle in an enclosedarea with poor ventilation isdangerous. Engine exhaust mayenter the vehicle. Engine exhaustcontains carbon monoxide (CO)which cannot be seen or smelled.It can cause unconsciousnessand even death. Never run theengine in an enclosed area that
(Continued)
Warning (Continued)
has no fresh air ventilation. Formore information, see EngineExhaust on page 9-19.
{ Warning
Overinflating a tyre could causethe tyre to rupture and you orothers could be injured. Be sureto read and follow the tyre sealantand compressor kit instructionsand inflate the tyre to itsrecommended pressure. Do notexceed the recommendedpressure.
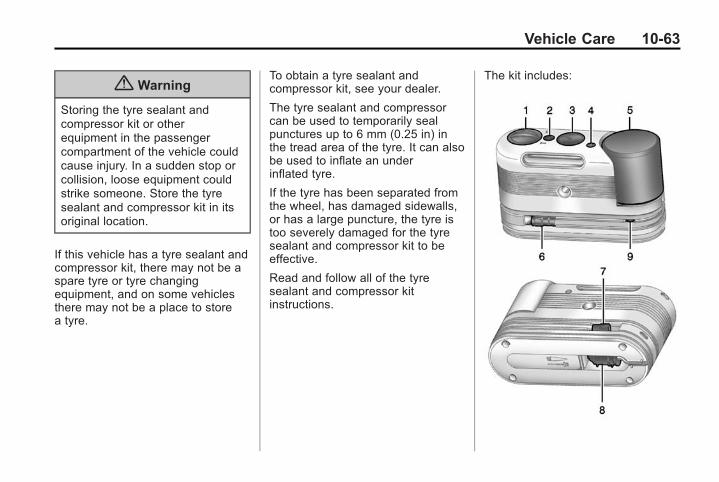
Black plate (63,1)Chevrolet Corvette Owner Manual (GMNA-Localizing-Europe-8087687) -2015 - CRC - 9/16/14
Vehicle Care 10-63
{ Warning
Storing the tyre sealant andcompressor kit or otherequipment in the passengercompartment of the vehicle couldcause injury. In a sudden stop orcollision, loose equipment couldstrike someone. Store the tyresealant and compressor kit in itsoriginal location.
If this vehicle has a tyre sealant andcompressor kit, there may not be aspare tyre or tyre changingequipment, and on some vehiclesthere may not be a place to storea tyre.
To obtain a tyre sealant andcompressor kit, see your dealer.
The tyre sealant and compressorcan be used to temporarily sealpunctures up to 6 mm (0.25 in) inthe tread area of the tyre. It can alsobe used to inflate an underinflated tyre.
If the tyre has been separated fromthe wheel, has damaged sidewalls,or has a large puncture, the tyre istoo severely damaged for the tyresealant and compressor kit to beeffective.
Read and follow all of the tyresealant and compressor kitinstructions.
The kit includes:
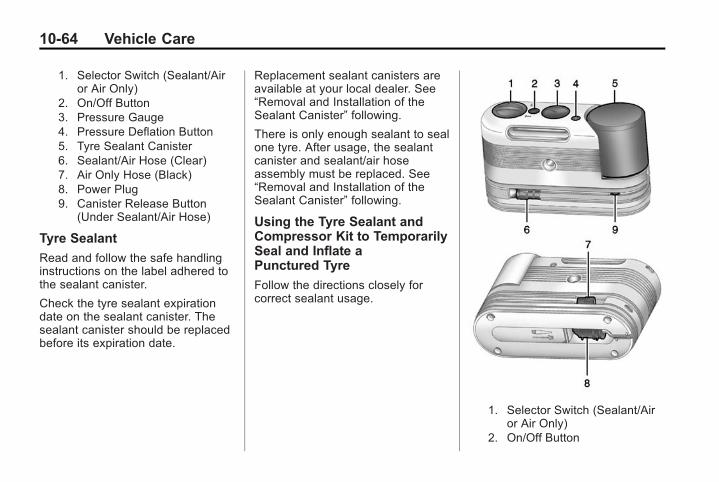
Black plate (64,1)Chevrolet Corvette Owner Manual (GMNA-Localizing-Europe-8087687) -2015 - CRC - 9/16/14
10-64 Vehicle Care
1. Selector Switch (Sealant/Airor Air Only)
2. On/Off Button3. Pressure Gauge4. Pressure Deflation Button5. Tyre Sealant Canister6. Sealant/Air Hose (Clear)7. Air Only Hose (Black)8. Power Plug9. Canister Release Button
(Under Sealant/Air Hose)
Tyre Sealant
Read and follow the safe handlinginstructions on the label adhered tothe sealant canister.
Check the tyre sealant expirationdate on the sealant canister. Thesealant canister should be replacedbefore its expiration date.
Replacement sealant canisters areavailable at your local dealer. See“Removal and Installation of theSealant Canister” following.
There is only enough sealant to sealone tyre. After usage, the sealantcanister and sealant/air hoseassembly must be replaced. See“Removal and Installation of theSealant Canister” following.
Using the Tyre Sealant andCompressor Kit to TemporarilySeal and Inflate aPunctured Tyre
Follow the directions closely forcorrect sealant usage.
1. Selector Switch (Sealant/Airor Air Only)
2. On/Off Button
Black plate (65,1)Chevrolet Corvette Owner Manual (GMNA-Localizing-Europe-8087687) -2015 - CRC - 9/16/14
Vehicle Care 10-65
3. Pressure Gauge4. Pressure Deflation Button5. Tyre Sealant Canister6. Sealant/Air Hose (Clear)7. Air Only Hose (Black)8. Power Plug9. Canister Release Button
(Under Sealant/Air Hose)
When using the tyre sealant andcompressor kit during coldtemperatures, warm the kit in aheated environment for five minutes.This will help to inflate the tyrefaster.
If a tyre goes flat, avoid further tyreand wheel damage by driving slowlyto a level place. Turn on the hazardwarning flashers. See HazardWarning Flashers on page 6-5.
See If a Tyre Goes Flat onpage 10-61 for other importantsafety warnings.
Do not remove any objects thathave penetrated the tyre.
1. Remove the tyre sealant andcompressor kit from its storagelocation. See Storing the TyreSealant and Compressor Kit onpage 10-69.
2. Unwrap the sealant/air hose (6)and the power plug (8).
3. Place the kit on the ground.
Make sure the tyre valve stem ispositioned close to the groundso the hose will reach it.
4. Remove the valve stem cap fromthe flat tyre by turning itanticlockwise.
5. Attach the sealant/air hose (6)onto the tyre valve stem. Turn itclockwise until it is tight.
6. Plug the power plug (8) into theaccessory power outlet in thevehicle. Unplug all items fromother accessory power outlets.See Power Outlets on page 5-5.
If the vehicle has an accessorypower outlet, do not use thecigarette lighter.
If the vehicle only has a cigarettelighter, use the cigarette lighter.
Do not pinch the power plugcord in the door or window.
7. Start the vehicle. The vehiclemust be running while using theair compressor.
8. Press and turn the selectorswitch (1) anticlockwise to theSealant + Air position.
9. Press the on/off button (2) toturn the tyre sealant andcompressor kit on.
The compressor will injectsealant and air into the tyre.
The pressure gauge (3) willinitially show a high pressurewhile the compressor pushes thesealant into the tyre. Once thesealant is completely dispersedinto the tyre, the pressure will
Black plate (66,1)Chevrolet Corvette Owner Manual (GMNA-Localizing-Europe-8087687) -2015 - CRC - 9/16/14
10-66 Vehicle Care
quickly drop and start to riseagain as the tyre inflates withair only.
10. Inflate the tyre to therecommended inflationpressure using the pressuregauge (3). The recommendedinflation pressure can be foundon the Tyre and LoadingInformation label. See TyrePressure on page 10-48.
The pressure gauge (3) mayread higher than the actual tyrepressure while the compressoris on. Turn the compressor offto get an accurate reading. Thecompressor may be turned on/off until the correct pressure isreached.
{ Caution
If the recommended pressurecannot be reached afterapproximately 25 minutes, thevehicle should not be driven
(Continued)
Caution (Continued)
farther. The tyre is too severelydamaged and the tyre sealantand compressor kit cannot inflatethe tyre. Remove the power plugfrom the accessory power outletand unscrew the inflating hosefrom the tyre valve.
11. Press the on/off button (2) toturn the tyre sealant andcompressor kit off.
The tyre is not sealed and willcontinue to leak air until thevehicle is driven and thesealant is distributedin the tyre, therefore,Steps 12–18 must be doneimmediately after Step 11.
Be careful while handling thetyre sealant and compressor kitas it could be warm afterusage.
12. Unplug the power plug (8) fromthe accessory power outlet inthe vehicle.
13. Turn the sealant/air hose (6)anticlockwise to remove it fromthe tyre valve stem.
14. Replace the tyre valvestem cap.
15. Replace the sealant/air hose(6), and the power plug (8)back in their original location.
16. If the flat tyre was able toinflate to the recommendedinflation pressure, remove themaximum speed label from thesealant canister (5) and place itin a highly visible location. Donot exceed the speed on thislabel until the damaged tyre isrepaired or replaced.
Black plate (67,1)Chevrolet Corvette Owner Manual (GMNA-Localizing-Europe-8087687) -2015 - CRC - 9/16/14
Vehicle Care 10-67
17. Return the equipment to itsoriginal storage location in thevehicle.
18. Immediately drive the vehicle8 km (5 mi) to distribute thesealant in the tyre.
19. Stop at a safe location andcheck the tyre pressure. Referto Steps 1–11 under “Using theTyre Sealant and CompressorKit without Sealant to Inflate aTyre (Not Punctured).”
If the tyre pressure has fallenmore than 68 kPa (10 psi)below the recommendedinflation pressure, stop drivingthe vehicle. The tyre is tooseverely damaged and the tyresealant cannot seal the tyre.
If the tyre pressure has notdropped more than 68 kPa(10 psi) from the recommendedinflation pressure, inflate thetyre to the recommendedinflation pressure.
20. Wipe off any sealant from thewheel, tyre and vehicle.
21. Dispose of the used sealantcanister (5) and sealant/airhose (6) assembly at a localdealer or in accordance withlocal state codes and practices.
22. Replace with a new canisterassembly available from yourdealer.
23. After temporarily sealing thetyre using the tyre sealant andcompressor kit, take thevehicle to an authorised dealerwithin 161 km (100 mi) ofdriving to have the tyrerepaired or replaced.
Using the Tyre Sealant andCompressor Kit withoutSealant to Inflate a Tyre (NotPunctured)
To use the air compressor to inflatea tyre with air only and not sealant:
1. Selector Switch (Sealant/Airor Air Only)
2. On/Off Button
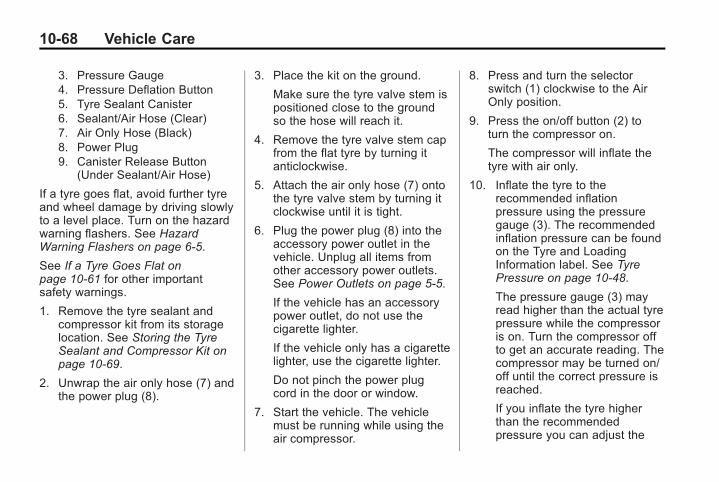
Black plate (68,1)Chevrolet Corvette Owner Manual (GMNA-Localizing-Europe-8087687) -2015 - CRC - 9/16/14
10-68 Vehicle Care
3. Pressure Gauge4. Pressure Deflation Button5. Tyre Sealant Canister6. Sealant/Air Hose (Clear)7. Air Only Hose (Black)8. Power Plug9. Canister Release Button
(Under Sealant/Air Hose)
If a tyre goes flat, avoid further tyreand wheel damage by driving slowlyto a level place. Turn on the hazardwarning flashers. See HazardWarning Flashers on page 6-5.
See If a Tyre Goes Flat onpage 10-61 for other importantsafety warnings.
1. Remove the tyre sealant andcompressor kit from its storagelocation. See Storing the TyreSealant and Compressor Kit onpage 10-69.
2. Unwrap the air only hose (7) andthe power plug (8).
3. Place the kit on the ground.
Make sure the tyre valve stem ispositioned close to the groundso the hose will reach it.
4. Remove the tyre valve stem capfrom the flat tyre by turning itanticlockwise.
5. Attach the air only hose (7) ontothe tyre valve stem by turning itclockwise until it is tight.
6. Plug the power plug (8) into theaccessory power outlet in thevehicle. Unplug all items fromother accessory power outlets.See Power Outlets on page 5-5.
If the vehicle has an accessorypower outlet, do not use thecigarette lighter.
If the vehicle only has a cigarettelighter, use the cigarette lighter.
Do not pinch the power plugcord in the door or window.
7. Start the vehicle. The vehiclemust be running while using theair compressor.
8. Press and turn the selectorswitch (1) clockwise to the AirOnly position.
9. Press the on/off button (2) toturn the compressor on.
The compressor will inflate thetyre with air only.
10. Inflate the tyre to therecommended inflationpressure using the pressuregauge (3). The recommendedinflation pressure can be foundon the Tyre and LoadingInformation label. See TyrePressure on page 10-48.
The pressure gauge (3) mayread higher than the actual tyrepressure while the compressoris on. Turn the compressor offto get an accurate reading. Thecompressor may be turned on/off until the correct pressure isreached.
If you inflate the tyre higherthan the recommendedpressure you can adjust the
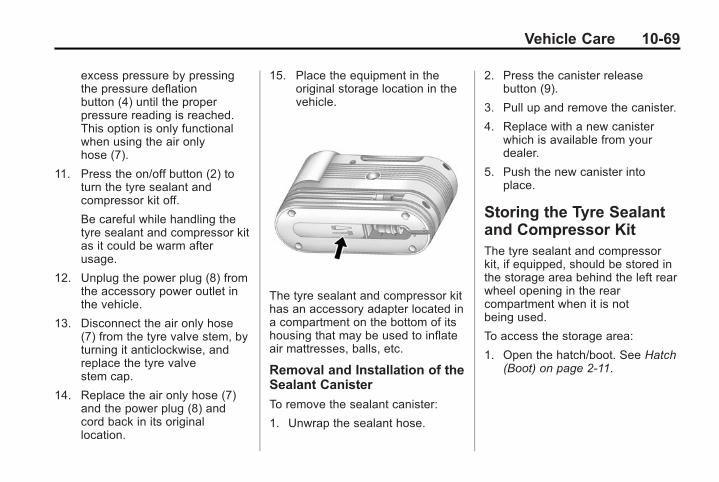
Black plate (69,1)Chevrolet Corvette Owner Manual (GMNA-Localizing-Europe-8087687) -2015 - CRC - 9/16/14
Vehicle Care 10-69
excess pressure by pressingthe pressure deflationbutton (4) until the properpressure reading is reached.This option is only functionalwhen using the air onlyhose (7).
11. Press the on/off button (2) toturn the tyre sealant andcompressor kit off.
Be careful while handling thetyre sealant and compressor kitas it could be warm afterusage.
12. Unplug the power plug (8) fromthe accessory power outlet inthe vehicle.
13. Disconnect the air only hose(7) from the tyre valve stem, byturning it anticlockwise, andreplace the tyre valvestem cap.
14. Replace the air only hose (7)and the power plug (8) andcord back in its originallocation.
15. Place the equipment in theoriginal storage location in thevehicle.
The tyre sealant and compressor kithas an accessory adapter located ina compartment on the bottom of itshousing that may be used to inflateair mattresses, balls, etc.
Removal and Installation of theSealant Canister
To remove the sealant canister:
1. Unwrap the sealant hose.
2. Press the canister releasebutton (9).
3. Pull up and remove the canister.
4. Replace with a new canisterwhich is available from yourdealer.
5. Push the new canister intoplace.
Storing the Tyre Sealantand Compressor KitThe tyre sealant and compressorkit, if equipped, should be stored inthe storage area behind the left rearwheel opening in the rearcompartment when it is notbeing used.
To access the storage area:
1. Open the hatch/boot. See Hatch(Boot) on page 2-11.
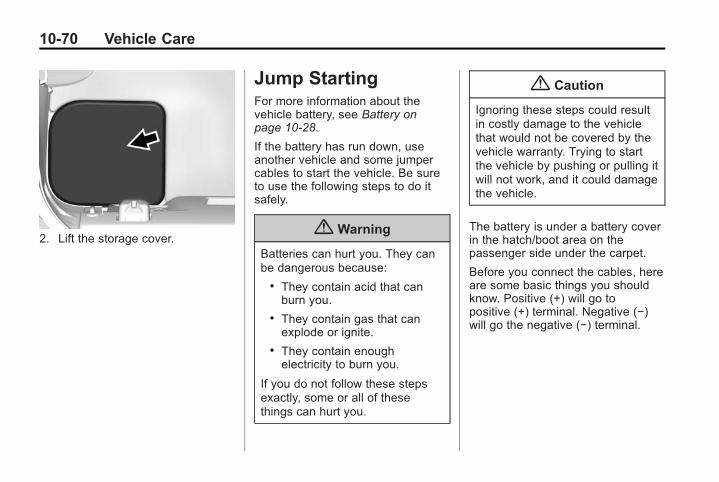
Black plate (70,1)Chevrolet Corvette Owner Manual (GMNA-Localizing-Europe-8087687) -2015 - CRC - 9/16/14
10-70 Vehicle Care
2. Lift the storage cover.
Jump StartingFor more information about thevehicle battery, see Battery onpage 10-28.
If the battery has run down, useanother vehicle and some jumpercables to start the vehicle. Be sureto use the following steps to do itsafely.
{ Warning
Batteries can hurt you. They canbe dangerous because:
. They contain acid that canburn you.
. They contain gas that canexplode or ignite.
. They contain enoughelectricity to burn you.
If you do not follow these stepsexactly, some or all of thesethings can hurt you.
{ Caution
Ignoring these steps could resultin costly damage to the vehiclethat would not be covered by thevehicle warranty. Trying to startthe vehicle by pushing or pulling itwill not work, and it could damagethe vehicle.
The battery is under a battery coverin the hatch/boot area on thepassenger side under the carpet.
Before you connect the cables, hereare some basic things you shouldknow. Positive (+) will go topositive (+) terminal. Negative (−)will go the negative (−) terminal.
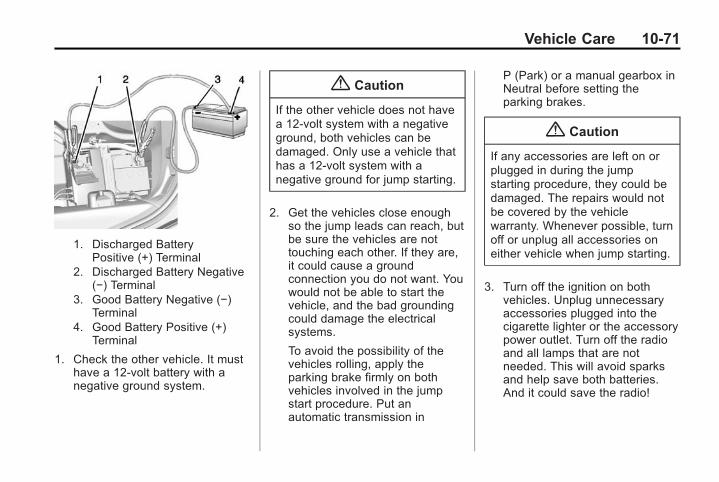
Black plate (71,1)Chevrolet Corvette Owner Manual (GMNA-Localizing-Europe-8087687) -2015 - CRC - 9/16/14
Vehicle Care 10-71
1. Discharged BatteryPositive (+) Terminal
2. Discharged Battery Negative(−) Terminal
3. Good Battery Negative (−)Terminal
4. Good Battery Positive (+)Terminal
1. Check the other vehicle. It musthave a 12-volt battery with anegative ground system.
{ Caution
If the other vehicle does not havea 12-volt system with a negativeground, both vehicles can bedamaged. Only use a vehicle thathas a 12-volt system with anegative ground for jump starting.
2. Get the vehicles close enoughso the jump leads can reach, butbe sure the vehicles are nottouching each other. If they are,it could cause a groundconnection you do not want. Youwould not be able to start thevehicle, and the bad groundingcould damage the electricalsystems.
To avoid the possibility of thevehicles rolling, apply theparking brake firmly on bothvehicles involved in the jumpstart procedure. Put anautomatic transmission in
P (Park) or a manual gearbox inNeutral before setting theparking brakes.
{ Caution
If any accessories are left on orplugged in during the jumpstarting procedure, they could bedamaged. The repairs would notbe covered by the vehiclewarranty. Whenever possible, turnoff or unplug all accessories oneither vehicle when jump starting.
3. Turn off the ignition on bothvehicles. Unplug unnecessaryaccessories plugged into thecigarette lighter or the accessorypower outlet. Turn off the radioand all lamps that are notneeded. This will avoid sparksand help save both batteries.And it could save the radio!
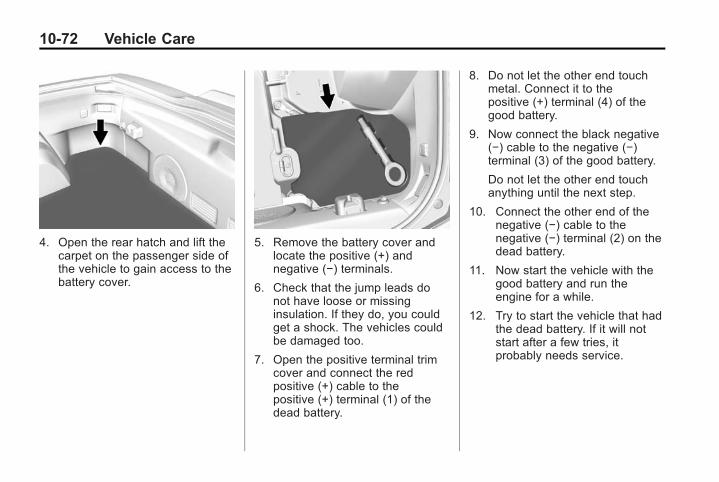
Black plate (72,1)Chevrolet Corvette Owner Manual (GMNA-Localizing-Europe-8087687) -2015 - CRC - 9/16/14
10-72 Vehicle Care
4. Open the rear hatch and lift thecarpet on the passenger side ofthe vehicle to gain access to thebattery cover.
5. Remove the battery cover andlocate the positive (+) andnegative (−) terminals.
6. Check that the jump leads donot have loose or missinginsulation. If they do, you couldget a shock. The vehicles couldbe damaged too.
7. Open the positive terminal trimcover and connect the redpositive (+) cable to thepositive (+) terminal (1) of thedead battery.
8. Do not let the other end touchmetal. Connect it to thepositive (+) terminal (4) of thegood battery.
9. Now connect the black negative(−) cable to the negative (−)terminal (3) of the good battery.
Do not let the other end touchanything until the next step.
10. Connect the other end of thenegative (−) cable to thenegative (−) terminal (2) on thedead battery.
11. Now start the vehicle with thegood battery and run theengine for a while.
12. Try to start the vehicle that hadthe dead battery. If it will notstart after a few tries, itprobably needs service.
Black plate (73,1)Chevrolet Corvette Owner Manual (GMNA-Localizing-Europe-8087687) -2015 - CRC - 9/16/14
Vehicle Care 10-73
{ Caution
If the jump leads are connectedor removed in the wrong order,electrical shorting may occur anddamage the vehicle. The repairswould not be covered by thevehicle warranty. Always connectand remove the jump leads in thecorrect order, making sure thatthe cables do not touch eachother or other metal.
Jump Lead Removal
Reverse the sequence exactly whenremoving the jump leads.
The power windows may need to beinitialised. See “Window Indexing”under Power Windows onpage 2-19.
Towing the Vehicle
{ Caution
Incorrectly towing a disabledvehicle may cause damage. Thedamage would not be covered bythe vehicle warranty. Do not lashor hook to any suspensioncomponents — including thecontrol arms, stabiliser bars, andlinks — during towing andrecovery of a disabled vehicle,or when securing the vehicle to aflatbed car carrier. For towing andrecovery of a disabled vehicle,use the proper hooks in thecorrect locations on the front andrear sub-frames. Use the propernylon strap harnesses around thetyres to secure them to theflatbed car carrier.
Have the vehicle towed on a flatbedcar carrier. A wheel lift tow truckcould damage the vehicle.
Consult your dealer or aprofessional towing service if thedisabled vehicle must be towed.
Use the tow eye for towing adisabled vehicle or loading it onto aflatbed car carrier. The tow eyeshould not be used to recover avehicle from an off road situation.
{ Caution
Improper use of the tow eye cancause vehicle damage. Usecaution and low speeds toprevent damage to the vehicle.
The front tow eye socket isaccessible through the grilleopening.
The rear tow eye socket is behind acover in the rear fascia. Carefullyopen the cover by using the smallnotch.
Black plate (74,1)Chevrolet Corvette Owner Manual (GMNA-Localizing-Europe-8087687) -2015 - CRC - 9/16/14
10-74 Vehicle Care
Install the tow eye into the socket byturning it clockwise until it stops.When the tow eye is removed,reinstall the cover with the notch inthe original position.
To tow the vehicle behind anothervehicle for recreational purposes,such as behind a motor home, see“Recreational Vehicle Towing” in thissection.
Recreational VehicleTowing
{ Caution
Dolly towing or dinghy towing thevehicle may cause damagebecause of reduced groundclearance. Always put the vehicleon a flatbed truck or trailer.
The vehicle was neither designednor intended to be towed with any ofits wheels on the ground. If thevehicle must be towed, see Towingthe Vehicle on page 10-73.
Appearance Care
Exterior Care
Locks
Locks are lubricated at the factory.Use a de-icing agent only whenabsolutely necessary, and have thelocks greased after using. SeeRecommended Fluids andLubricants on page 11-4.
Washing the Vehicle
To preserve the vehicle's finish,wash it often and out of directsunlight.
{ Caution
Do not use petroleum-based,acidic, or abrasive cleaningagents as they can damage thevehicle's paint, metal, or plasticparts. If damage occurs, it wouldnot be covered by the vehiclewarranty. Approved cleaning
(Continued)
Caution (Continued)
products can be obtained fromyour dealer. Follow allmanufacturer directions regardingcorrect product usage, necessarysafety precautions, andappropriate disposal of anyvehicle care product.
{ Caution
Avoid using high-pressurewashers closer than 30 cm (12 in)to the surface of the vehicle. Useof power washers exceeding8,274 kPa (1,200 psi) can resultin damage or removal of paintand decals.
Thee symbol is on anyunderbonnet compartment electricalcentre that should not be power
Black plate (75,1)Chevrolet Corvette Owner Manual (GMNA-Localizing-Europe-8087687) -2015 - CRC - 9/16/14
Vehicle Care 10-75
washed. This could cause damagethat would not be covered by thevehicle warranty.
If using an automatic car wash,comply with the car washinstructions. The windscreen wipermust be off. Remove anyaccessories that may be damagedor interfere with the car washequipment.
Rinse the vehicle well, beforewashing and after, to remove allcleaning agents completely. If theyare allowed to dry on the surface,they could stain.
Dry the finish with a soft, cleanchamois or an all-cotton towel toavoid surface scratches and waterspotting.
Finish Care
Application of aftermarket clearcoatsealant/wax materials is notrecommended. If painted surfacesare damaged, see your dealer tohave the damage assessed andrepaired. Foreign materials such as
calcium chloride and other salts, icemelting agents, road oil and tar, treesap, bird droppings, chemicals fromindustrial chimneys, etc., candamage the vehicle's finish if theyremain on painted surfaces. Washthe vehicle as soon as possible.If necessary, use non-abrasivecleaners that are marked safe forpainted surfaces to remove foreignmatter.
Occasional hand waxing or mildpolishing should be done to removeresidue from the paint finish. Seeyour dealer for approved cleaningproducts.
Do not apply waxes or polishes touncoated plastic, vinyl, rubber,decals, simulated wood, or flat paintas damage can occur.
{ Caution
Machine compounding oraggressive polishing on a basecoat/clear coat paint finish may
(Continued)
Caution (Continued)
damage it. Use only non-abrasivewaxes and polishes that aremade for a base coat/clear coatpaint finish on the vehicle.
To keep the paint finish looking new,keep the vehicle garaged orcovered whenever possible.
Protecting Exterior Bright MetalMouldings
{ Caution
Failure to clean and protect thebright metal mouldings can resultin a hazy white finish or pitting.This damage would not becovered by the vehicle warranty.
Black plate (76,1)Chevrolet Corvette Owner Manual (GMNA-Localizing-Europe-8087687) -2015 - CRC - 9/16/14
10-76 Vehicle Care
The bright metal mouldings on thevehicle are aluminium and stainlesssteel. To prevent damage alwaysfollow these cleaning instructions:. Be sure the moulding is cool to
the touch before applying anycleaning solution.
. Use a cleaning solutionapproved for aluminium andstainless steel. Some cleanersare highly acidic or containalkaline substances and candamage the mouldings.
. Always dilute a concentratedcleaner according to themanufacturer's instructions.
. Do not use chrome cleaners.
. Do not use cleaners that are notintended for automotive use.
. Use a nonabrasive wax on thevehicle after washing to protectand extend the moulding finish.
Convertible Top Care
Frequently hand wash convertibletops with mild car wash soap. Neveruse a stiff brush, steam, bleach,or aggressive cleaners.If necessary, a soft brush can beused to remove dirt. When finishedcleaning, thoroughly rinse the fabric.Avoid automatic car washes withoverhead brushes or veryhigh-pressure sprays as they cancause damage and leaking.
Only lower the top when it iscompletely dry and avoid leavingthe top lowered for extendedperiods of time to prevent excessiveinterior weathering.
Avoid leaving large amounts ofsnow on the top for extendedperiods of time as damage may alsooccur.
Carbon Fibre Panels
Carbon fibre panels can be washedand waxed like any other panels.
For exposed weave carbon fibre,use a clear or black pigmented waxon the inner bonnet carbon fibrepanel.
Cleaning Exterior Lamps/Lenses, Emblems, Decals andStripes
Use only lukewarm or cold water, asoft cloth, and a car washing soapto clean exterior lamps, lenses,emblems, decals and stripes. Followinstructions under "Washing theVehicle" previously in this section.
Lamp covers are made of plastic,and some have a UV protectivecoating. Do not clean or wipe themwhile they are dry.
Do not use any of the following onlamp covers:. Abrasive or caustic agents.. Washer fluids and other cleaning
agents in higher concentrationsthan suggested by themanufacturer.
Black plate (77,1)Chevrolet Corvette Owner Manual (GMNA-Localizing-Europe-8087687) -2015 - CRC - 9/16/14
Vehicle Care 10-77
. Solvents, alcohols, fuels,or other harsh cleaners.
. Ice scrapers or other hard items.
. Aftermarket appearance caps orcovers while the lamps areilluminated, due to excessiveheat generated.
{ Caution
Failure to clean lamps properlycan cause damage to the lampcover that would not be coveredby the vehicle warranty.
{ Caution
Using wax on low gloss blackfinish stripes can increase thegloss level and create anon-uniform finish. Clean lowgloss stripes with soap andwater only.
Air Intakes
Clear debris from the air intakes,between the bonnet andwindscreen, when washing thevehicle.
Windscreen and Wiper Blades
Clean the outside of the windscreenwith glass cleaner.
Clean rubber blades using lint-freecloth or paper towel soaked withwindscreen washer fluid or a milddetergent. Wash the windscreenthoroughly when cleaning theblades. Insects, road grime, sap,and a build-up of vehicle wash/waxtreatments may cause wiperstreaking.
Replace the wiper blades if they areworn or damaged. Damage can becaused by extreme dustyconditions, sand, salt, heat, sun,snow, and ice.
Weatherstrips
Apply Dielectric silicone grease onweatherstrips to make them lastlonger, seal better, and not stick orsqueak. Lubricate weatherstrips atleast once a year. Hot, dry climatesrequire more frequent application.Black marks from rubber material onpainted surfaces can be removed byrubbing with a clean cloth. SeeRecommended Fluids andLubricants on page 11-4.
Tyres
Use a stiff brush with tyre cleaner toclean the tyres.
{ Caution
Using petroleum-based tyredressing products on the vehiclemay damage the paint finish and/or tyres. When applying a tyredressing, always wipe off anyoverspray from all paintedsurfaces on the vehicle.
Black plate (78,1)Chevrolet Corvette Owner Manual (GMNA-Localizing-Europe-8087687) -2015 - CRC - 9/16/14
10-78 Vehicle Care
Wheels and Trim - Aluminiumor Chrome
Use a soft, clean cloth with mildsoap and water to clean the wheels.After rinsing thoroughly with cleanwater, dry with a soft, clean towel.A wax may then be applied.
{ Caution
Chrome wheels and other chrometrim may be damaged if thevehicle is not washed after drivingon roads that have been sprayedwith magnesium, calcium,or sodium chloride. Thesechlorides are used on roads forconditions such as ice and dust.Always wash the chrome withsoap and water after exposure.
{ Caution
To avoid surface damage, do notuse strong soaps, chemicals,abrasive polishes, cleaners,brushes, or cleaners that containacid on aluminium orchrome-plated wheels. Use onlyapproved cleaners. Also, neverdrive a vehicle with aluminium orchrome-plated wheels through anautomatic car wash that usessilicone carbide tyre cleaningbrushes. Damage could occurand the repairs would not becovered by the vehicle warranty.
Steering, Suspension, andChassis Components
Visually inspect steering,suspension, and chassiscomponents for damaged, loose,or missing parts or signs of wear atleast once a year.
Inspect power steering for properhook-up, binding, leaks, cracks,chafing, etc.
Visually check constant velocity jointboots and axle seals for leaks.
Body Component Lubrication
Lubricate all key lock cylinders,bonnet hinges and tailgate hinges,unless the components are plastic.Applying silicone grease onweatherstrips with a clean cloth willmake them last longer, seal better,and not stick or squeak.
Underbody Maintenance
At least twice a year, spring andautumn use plain water to flush anycorrosive materials from theunderbody. Take care to thoroughlyclean any areas where mud andother debris can collect.
Black plate (79,1)Chevrolet Corvette Owner Manual (GMNA-Localizing-Europe-8087687) -2015 - CRC - 9/16/14
Vehicle Care 10-79
Composite Springs
{ Caution
Do not use acidic or corrosivecleaning products, enginedegreasers, or aluminiumcleaning agents on fibreglasssprings as it may cause damage.The repairs would not be coveredby the vehicle warranty. Use onlyapproved cleaners.
Body Damage
If the vehicle is damaged andrequires sheet metal repair orreplacement, make sure the bodyrepair shop applies anti-corrosionmaterial to parts repaired orreplaced to restore corrosionprotection.
Original manufacturer replacementparts will provide the corrosionprotection while maintaining thevehicle warranty.
Finish Damage
Quickly repair minor chips andscratches with touch-up materialsavailable from your dealer. Largerareas of finish damage can becorrected in your dealer's body andpaint shop.
Chemical Paint Spotting
Airborne pollutants can fall uponand attack painted vehicle surfacescausing blotchy, ring-shapeddiscolourations, and small, irregulardark spots etched into the paintsurface. Refer to Finish Carepreviously in this section.
Interior CareTo prevent dirt particle abrasions,regularly clean the vehicle's interior.Immediately remove any soiling.Note that newspapers or darkgarments that can transfer colour tohome furnishings can alsopermanently transfer colour to thevehicle's interior.
Use a soft bristle brush to removedust from knobs and crevices on theinstrument cluster. Using a mildsoap solution, immediately removehand lotions, sunscreen, and insectrepellent from all interior surfaces orpermanent damage may result.
Your dealer may have products forcleaning the interior. Use cleanersspecifically designed for thesurfaces being cleaned to preventpermanent damage. Apply allcleaners directly to the cleaningcloth. Do not spray cleaners directlyon any switches or controls.Cleaners should be removedquickly. Never allow cleaners toremain on the surface beingcleaned for extended periodsof time.
Cleaners may contain solvents thatcan become concentrated in theinterior. Before using cleaners, readand adhere to all safety instructionson the label. While cleaning theinterior, maintain adequateventilation by opening the doors andwindows.
Black plate (80,1)Chevrolet Corvette Owner Manual (GMNA-Localizing-Europe-8087687) -2015 - CRC - 9/16/14
10-80 Vehicle Care
To prevent damage, do not cleanthe interior using the followingcleaners or techniques:. Never use a razor or any other
sharp object to remove a soilfrom any interior surface.
. Never use a brush with stiffbristles.
. Never rub any surfaceaggressively or with excessivepressure.
. Do not use laundry detergents ordishwashing soaps withdegreasers. For liquid cleaners,use approximately 20 drops per3.8 L (1 gal) of water.A concentrated soap solution willleave a residue that createsstreaks and attracts dirt. Do notuse solutions that contain strongor caustic soap.
. Do not heavily saturate theupholstery when cleaning.
. Do not use solvents or cleanerscontaining solvents.
Interior Glass
To clean, use a terry cloth fabricdampened with water. Wipe dropletsleft behind with a clean dry cloth.Commercial glass cleaners may beused, if necessary, after cleaningthe interior glass with plain water.
{ Caution
To prevent scratching, never useabrasive cleaners on automotiveglass. Abrasive cleaners oraggressive cleaning may damagethe rear window defogger.
Cleaning the windscreen with waterduring the first three to six monthsof ownership will reduce tendencyto fog.
Speaker Covers
Vacuum around a speaker covergently, so that the speaker will notbe damaged. Clean spots with justwater and mild soap.
Coated Mouldings
Coated mouldings should becleaned.. When lightly soiled, wipe with a
sponge or soft lint-free clothdampened with water.
. When heavily soiled, use warmsoapy water.
Fabric/Carpet/Suede/Sueded-Microfiber
Start by vacuuming the surfaceusing a soft brush attachment. If arotating brush attachment is beingused during vacuuming, only use iton the floor carpet. Before cleaning,gently remove as much of the soilas possible using one of thefollowing techniques:. Gently blot liquids with a paper
towel. Continue blotting until nomore soil can be removed.
. For solid soil, remove as muchas possible prior to vacuuming.
Black plate (81,1)Chevrolet Corvette Owner Manual (GMNA-Localizing-Europe-8087687) -2015 - CRC - 9/16/14
Vehicle Care 10-81
To clean:
1. Saturate a clean lint-freecolourfast cloth with water.Microfiber cloth is recommendedto prevent lint transfer to thefabric or carpet.
2. Remove excess moisture bygently wringing until water doesnot drip from the cleaning cloth.
3. Start on the outside edge of thesoil and gently rub toward thecentre. Fold the cleaning cloth toa clean area frequently toprevent forcing the soil in to thefabric.
4. Continue gently rubbing thesoiled area until there is nolonger any colour transfer fromthe soil to the cleaning cloth.
5. If the soil is not completelyremoved, use a mild soapsolution followed only by plainwater.
If the soil is not completelyremoved, it may be necessary touse a commercial upholstery
cleaner or spot lifter. Test a smallhidden area for colourfastnessbefore using a commercialupholstery cleaner or spot lifter.If ring formation occurs, clean theentire fabric or carpet.
Following the cleaning process, apaper towel can be used to blotexcess moisture.
Cleaning High Gloss Surfacesand Vehicle Information andRadio Displays
For vehicles with high glosssurfaces or vehicle displays, use amicrofibre cloth to wipe surfaces.Before wiping the surface with themicrofibre cloth, use a soft bristlebrush to remove dirt that couldscratch the surface. Then use themicrofibre cloth by gently rubbing toclean. Never use window cleanersor solvents. Periodically hand washthe microfibre cloth separately,using mild soap. Do not use bleachor fabric softener. Rinse thoroughlyand air dry before next use.
{ Caution
Do not attach a device with asuction cup to the display. Thismay cause damage and wouldnot be covered by the vehiclewarranty.
Instrument Panel, Leather,Vinyl, Other Plastic Surfaces,Low Gloss Paint Surfaces andNatural Open Pore WoodSurfaces
Use a soft microfiber clothdampened with water to removedust and loose dirt. For a morethorough cleaning, use a softmicrofiber cloth dampened with amild soap solution.
Black plate (82,1)Chevrolet Corvette Owner Manual (GMNA-Localizing-Europe-8087687) -2015 - CRC - 9/16/14
10-82 Vehicle Care
{ Caution
Soaking or saturating leather,especially perforated leather, aswell as other interior surfaces,may cause permanent damage.Wipe excess moisture from thesesurfaces after cleaning and allowthem to dry naturally. Never useheat, steam, or spot removers. Donot use cleaners that containsilicone or wax-based products.Cleaners containing thesesolvents can permanently changethe appearance and feel ofleather or soft trim, and are notrecommended.
Do not use cleaners that increasegloss, especially on the instrumentpanel. Reflected glare can decreasevisibility through the windscreenunder certain conditions.
{ Caution
Use of air fresheners may causepermanent damage to plasticsand painted surfaces. If an airfreshener comes in contact withany plastic or painted surface inthe vehicle, blot immediately andclean with a soft cloth dampenedwith a mild soap solution.Damage caused by air freshenerswould not be covered by thevehicle warranty.
Cargo Cover andConvenience Net
Wash with warm water and milddetergent. Do not use chlorinebleach. Rinse with cold water, andthen dry completely.
Care of Safety Belts
Keep belts clean and dry.
{ Warning
Do not bleach or dye safety belts.It may severely weaken them. Ina crash, they might not be able toprovide adequate protection.Clean safety belts only with mildsoap and lukewarm water.
Floor Mats
{ Warning
If a floor mat is the wrong size oris not properly installed, it caninterfere with the pedals.Interference with the pedals cancause unintended accelerationand/or increased stoppingdistance which can cause a crashand injury. Make sure the floormat does not interfere with thepedals.
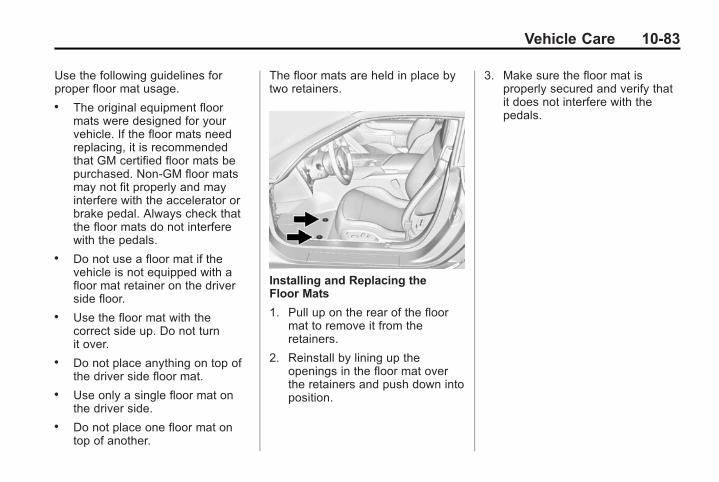
Black plate (83,1)Chevrolet Corvette Owner Manual (GMNA-Localizing-Europe-8087687) -2015 - CRC - 9/16/14
Vehicle Care 10-83
Use the following guidelines forproper floor mat usage.. The original equipment floor
mats were designed for yourvehicle. If the floor mats needreplacing, it is recommendedthat GM certified floor mats bepurchased. Non-GM floor matsmay not fit properly and mayinterfere with the accelerator orbrake pedal. Always check thatthe floor mats do not interferewith the pedals.
. Do not use a floor mat if thevehicle is not equipped with afloor mat retainer on the driverside floor.
. Use the floor mat with thecorrect side up. Do not turnit over.
. Do not place anything on top ofthe driver side floor mat.
. Use only a single floor mat onthe driver side.
. Do not place one floor mat ontop of another.
The floor mats are held in place bytwo retainers.
Installing and Replacing theFloor Mats
1. Pull up on the rear of the floormat to remove it from theretainers.
2. Reinstall by lining up theopenings in the floor mat overthe retainers and push down intoposition.
3. Make sure the floor mat isproperly secured and verify thatit does not interfere with thepedals.
Black plate (84,1)Chevrolet Corvette Owner Manual (GMNA-Localizing-Europe-8087687) -2015 - CRC - 9/16/14
10-84 Vehicle Care
2 NOTES
Black plate (1,1)Chevrolet Corvette Owner Manual (GMNA-Localizing-Europe-8087687) -2015 - CRC - 9/16/14
Service and Maintenance 11-1
Service andMaintenance
General InformationGeneral Information . . . . . . . . . . 11-1
Scheduled MaintenanceScheduled Maintenance . . . . . 11-1
Recommended Fluids,Lubricants, and PartsRecommended Fluids andLubricants . . . . . . . . . . . . . . . . . . 11-4
Maintenance ReplacementParts . . . . . . . . . . . . . . . . . . . . . . . 11-5
General InformationIt is essential that your vehiclereceives the maintenance outlinedon the following pages to retain thesafety, reliability and performanceoriginally built into your vehicle.
When your odometer reaches themileage indicated on the followingpages, or the corresponding timeinterval has been reached, takeyour vehicle, preferably to anauthorised dealer and/or repairer,who will provide the proper partsand service.
Once maintenance has beenperformed, have the authoriseddealer and/or repairer fill out andstamp the appropriate box in thisbooklet to serve as yourmaintenance record which may beneeded for warranty repairs. It willalso show future owners how wellyour vehicle has been maintained.
ScheduledMaintenanceEngine Oil Change
When the CHANGE ENGINE OILSOON message displays, have theengine oil and filter changed withinthe next 1000 km/600 mi. If drivenunder the best conditions, theengine oil life system may notindicate the need for vehicle servicefor up to a year. The engine oil andfilter must be changed at least oncea year and the oil life system mustbe reset. Your trained dealertechnician can perform this work.If the engine oil life system is resetaccidentally, service the vehiclewithin 5 000 km/3,000 mi since thelast service. Reset the oil lifesystem when the oil is changed.
Inspection Every 15 000 km or1 Year. Change engine oil and filter.
Reset oil life system.. Engine coolant level check.
Black plate (2,1)Chevrolet Corvette Owner Manual (GMNA-Localizing-Europe-8087687) -2015 - CRC - 9/16/14
11-2 Service and Maintenance
. Engine cooling systeminspection. Visual inspection ofhoses, pipes, fittings, andclamps and replacement,if needed.
. Windscreen washer fluid levelcheck.
. Windscreen wiper bladeinspection for wear, cracking,or contamination andwindscreen and wiper bladecleaning, if contaminated. Wornor damaged wiper bladereplacement.
. Tyre inflation pressures check.
. Tyre wear inspection.
. Fluids visual leak check. A leakin any system must be repairedand the fluid level checked.
. Engine air cleaner filterinspection.
. Brake system inspection.
. Steering and suspensioninspection. Visual inspection fordamaged, loose, or missingparts or signs of wear.
. Body hinges and latches, keylock cylinders, folding seathardware, and rearcompartment, bonnet, andconsole door hinges and latcheslubrication. More frequentlubrication may be requiredwhen the vehicle is exposed to acorrosive environment. Applyingsilicone grease on weatherstripswith a clean cloth makes themlast longer, seal better, and notstick or squeak.
. Restraint system componentcheck.
. Fuel system inspection fordamage or leaks.
. Exhaust system and nearby heatshields inspection for loose ordamaged components.
. Accelerator pedal check fordamage, high effort, or binding.
. Bonnet/Deck lid/Tailgate/Liftglass Support Gas Strut Service:Visually inspect gas strut,if equipped, for signs of wear,cracks, or other damage. Checkthe hold open ability of the gasstrut. Contact your authorisedrepairer if service is required.
. Road Test. Check all systems forcorrect function/performance.
. To maintain air conditioningefficiency, have an authorisedrepairer check the system atleast once each year.
. Underbody flushing service.
. Tyre sealant and compressor kit(if equipped with tyre sealantand compressor kit), checksealant expiration date.
Black plate (3,1)Chevrolet Corvette Owner Manual (GMNA-Localizing-Europe-8087687) -2015 - CRC - 9/16/14
Service and Maintenance 11-3
Additional Maintenance Every30 000 km or 2 Years
In addition to the items listed under“Inspection every 15 000 km or1 year” the following items shouldbe carried out every 30 000 km or2 years (whichever occurs first):. Passenger compartment air
filter — replace.. Engine Air Filter Replacement.
Additional Maintenance Every72 000 km. Rear axle fluid change.. Replace brake fluid (or every
three years, whichever occursfirst).
. Replace clutch fluid (or everythree years, whichever occursfirst).
. Manual gearbox fluid change(severe operation).
Additional Maintenance Every150 000 km or if Necessary. Spark plugs — replace
Additional Maintenance Every240 000 km. Engine cooling system drain and
refill (or every five years,whichever occurs first).
Conditions Requiring MoreFrequent Maintenance (SevereService). Extreme temperatures.. Heavy city traffic.. Hilly or mountainous terrain.. Dusty, muddy or off-road
conditions.. Commercial use.. Most trips less than 6 km
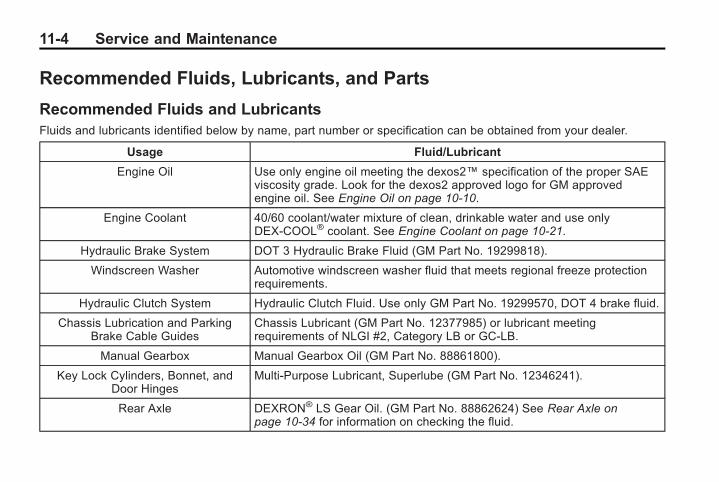
Black plate (4,1)Chevrolet Corvette Owner Manual (GMNA-Localizing-Europe-8087687) -2015 - CRC - 9/16/14
11-4 Service and Maintenance
Recommended Fluids, Lubricants, and Parts
Recommended Fluids and LubricantsFluids and lubricants identified below by name, part number or specification can be obtained from your dealer.
Usage Fluid/Lubricant
Engine Oil Use only engine oil meeting the dexos2™ specification of the proper SAEviscosity grade. Look for the dexos2 approved logo for GM approvedengine oil. See Engine Oil on page 10-10.
Engine Coolant 40/60 coolant/water mixture of clean, drinkable water and use onlyDEX-COOL® coolant. See Engine Coolant on page 10-21.
Hydraulic Brake System DOT 3 Hydraulic Brake Fluid (GM Part No. 19299818).
Windscreen Washer Automotive windscreen washer fluid that meets regional freeze protectionrequirements.
Hydraulic Clutch System Hydraulic Clutch Fluid. Use only GM Part No. 19299570, DOT 4 brake fluid.
Chassis Lubrication and ParkingBrake Cable Guides
Chassis Lubricant (GM Part No. 12377985) or lubricant meetingrequirements of NLGI #2, Category LB or GC-LB.
Manual Gearbox Manual Gearbox Oil (GM Part No. 88861800).
Key Lock Cylinders, Bonnet, andDoor Hinges
Multi-Purpose Lubricant, Superlube (GM Part No. 12346241).
Rear Axle DEXRON® LS Gear Oil. (GM Part No. 88862624) See Rear Axle onpage 10-34 for information on checking the fluid.
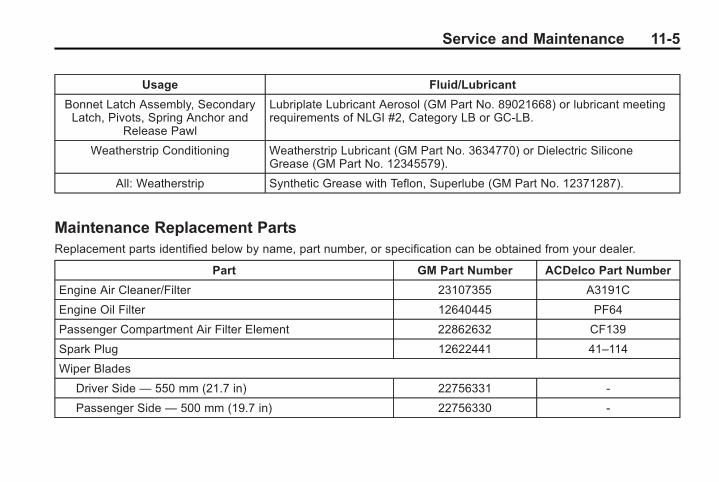
Black plate (5,1)Chevrolet Corvette Owner Manual (GMNA-Localizing-Europe-8087687) -2015 - CRC - 9/16/14
Service and Maintenance 11-5
Usage Fluid/Lubricant
Bonnet Latch Assembly, SecondaryLatch, Pivots, Spring Anchor and
Release Pawl
Lubriplate Lubricant Aerosol (GM Part No. 89021668) or lubricant meetingrequirements of NLGI #2, Category LB or GC-LB.
Weatherstrip Conditioning Weatherstrip Lubricant (GM Part No. 3634770) or Dielectric SiliconeGrease (GM Part No. 12345579).
All: Weatherstrip Synthetic Grease with Teflon, Superlube (GM Part No. 12371287).
Maintenance Replacement PartsReplacement parts identified below by name, part number, or specification can be obtained from your dealer.
Part GM Part Number ACDelco Part Number
Engine Air Cleaner/Filter 23107355 A3191C
Engine Oil Filter 12640445 PF64
Passenger Compartment Air Filter Element 22862632 CF139
Spark Plug 12622441 41–114
Wiper Blades
Driver Side — 550 mm (21.7 in) 22756331 -
Passenger Side — 500 mm (19.7 in) 22756330 -

Black plate (6,1)Chevrolet Corvette Owner Manual (GMNA-Localizing-Europe-8087687) -2015 - CRC - 9/16/14
11-6 Service and Maintenance
2 NOTES
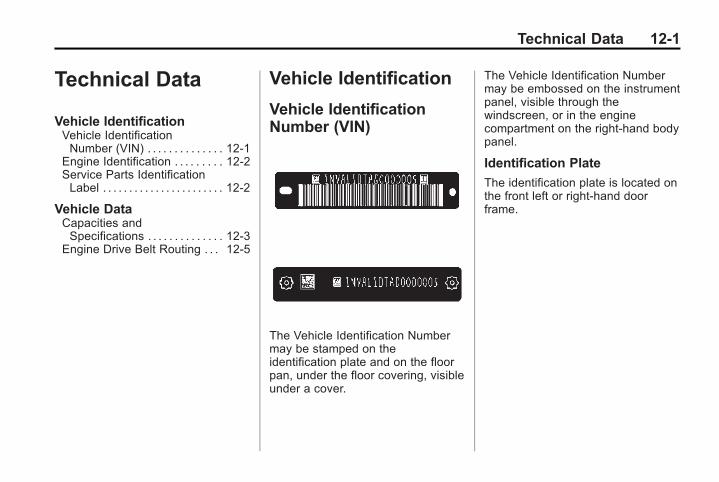
Black plate (1,1)Chevrolet Corvette Owner Manual (GMNA-Localizing-Europe-8087687) -2015 - CRC - 9/16/14
Technical Data 12-1
Technical Data
Vehicle IdentificationVehicle IdentificationNumber (VIN) . . . . . . . . . . . . . . 12-1
Engine Identification . . . . . . . . . 12-2Service Parts IdentificationLabel . . . . . . . . . . . . . . . . . . . . . . . 12-2
Vehicle DataCapacities andSpecifications . . . . . . . . . . . . . . 12-3
Engine Drive Belt Routing . . . 12-5
Vehicle Identification
Vehicle IdentificationNumber (VIN)
The Vehicle Identification Numbermay be stamped on theidentification plate and on the floorpan, under the floor covering, visibleunder a cover.
The Vehicle Identification Numbermay be embossed on the instrumentpanel, visible through thewindscreen, or in the enginecompartment on the right-hand bodypanel.
Identification Plate
The identification plate is located onthe front left or right-hand doorframe.
Black plate (2,1)Chevrolet Corvette Owner Manual (GMNA-Localizing-Europe-8087687) -2015 - CRC - 9/16/14
12-2 Technical Data
Engine IdentificationThe eighth character in the VIN isthe engine code. This codeidentifies the vehicle's engine,specifications, and replacementparts. See “Engine Specifications”under Capacities and Specificationson page 12-3 for the vehicle'sengine code.
Service PartsIdentification LabelThis label, under the carpet in thehatch/boot area on the passengerside, has the following information:. Vehicle Identification
Number (VIN).. Model designation.
. Paint information.
. Production options and specialequipment.
Do not remove this label from thevehicle.
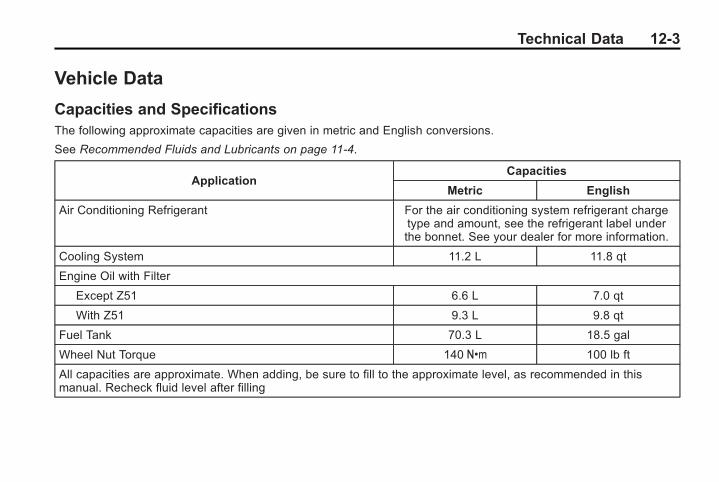
Black plate (3,1)Chevrolet Corvette Owner Manual (GMNA-Localizing-Europe-8087687) -2015 - CRC - 9/16/14
Technical Data 12-3
Vehicle Data
Capacities and SpecificationsThe following approximate capacities are given in metric and English conversions.
See Recommended Fluids and Lubricants on page 11-4.
ApplicationCapacities
Metric English
Air Conditioning Refrigerant For the air conditioning system refrigerant chargetype and amount, see the refrigerant label underthe bonnet. See your dealer for more information.
Cooling System 11.2 L 11.8 qt
Engine Oil with Filter
Except Z51 6.6 L 7.0 qt
With Z51 9.3 L 9.8 qt
Fuel Tank 70.3 L 18.5 gal
Wheel Nut Torque 140Y 100 lb ft
All capacities are approximate. When adding, be sure to fill to the approximate level, as recommended in thismanual. Recheck fluid level after filling
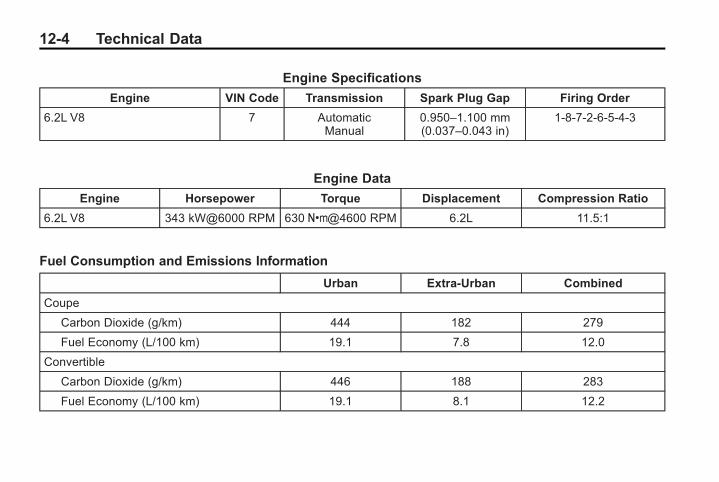
Black plate (4,1)Chevrolet Corvette Owner Manual (GMNA-Localizing-Europe-8087687) -2015 - CRC - 9/16/14
12-4 Technical Data
Engine Specifications
Engine VIN Code Transmission Spark Plug Gap Firing Order
6.2L V8 7 AutomaticManual
0.950–1.100 mm(0.037–0.043 in)
1-8-7-2-6-5-4-3
Engine Data
Engine Horsepower Torque Displacement Compression Ratio
6.2L V8 343 kW@6000 RPM 630Y@4600 RPM 6.2L 11.5:1
Fuel Consumption and Emissions Information
Urban Extra-Urban Combined
Coupe
Carbon Dioxide (g/km) 444 182 279
Fuel Economy (L/100 km) 19.1 7.8 12.0
Convertible
Carbon Dioxide (g/km) 446 188 283
Fuel Economy (L/100 km) 19.1 8.1 12.2
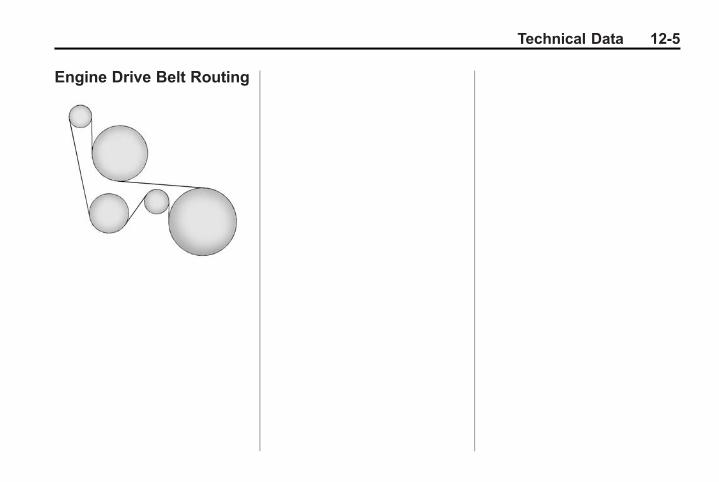
Black plate (5,1)Chevrolet Corvette Owner Manual (GMNA-Localizing-Europe-8087687) -2015 - CRC - 9/16/14
Technical Data 12-5
Engine Drive Belt Routing

Black plate (6,1)Chevrolet Corvette Owner Manual (GMNA-Localizing-Europe-8087687) -2015 - CRC - 9/16/14
12-6 Technical Data
2 NOTES
Black plate (1,1)Chevrolet Corvette Owner Manual (GMNA-Localizing-Europe-8087687) -2015 - CRC - 9/16/14
Customer Information 13-1
CustomerInformation
Customer InformationRadio FrequencyIdentification (RFID) . . . . . . . . 13-1
Declaration of Conformity . . . . 13-1
Vehicle Data Recording andPrivacyVehicle Data Recording andPrivacy . . . . . . . . . . . . . . . . . . . . . 13-2
Infotainment System . . . . . . . . . 13-2
Customer Information
Radio FrequencyIdentification (RFID)Radio Frequency Identification(RFID) technology is used in somevehicles for functions such as tyrepressure monitoring and ignitionsystem security. It is also used inconnection with conveniences suchas Remote Keyless Entry (RKE)transmitters for remote door locking/unlocking and starting, andin-vehicle transmitters for garagedoor openers. RFID technology inCorvette vehicles does not use orrecord personal information or linkwith any other Corvette systemcontaining personal information.
Declaration of ConformityThis vehicle has systems thattransmit and/or receive radio wavessubject to Directive 1999/5/EC.These systems are in compliancewith the essential requirements andother relevant provisions ofDirective 1999/5/EC. Copies of theoriginal Declarations of Conformitycan be obtained on our website.
Black plate (2,1)Chevrolet Corvette Owner Manual (GMNA-Localizing-Europe-8087687) -2015 - CRC - 9/16/14
13-2 Customer Information
Vehicle DataRecording andPrivacyEvent Data Recorders
Data Storage Modules in theVehicle
A large number of electroniccomponents of your vehicle containdata storage modules temporarily orpermanently storing technical dataabout the condition of the vehicle,events, and errors. In general, thistechnical information documents thecondition of parts, modules,systems, or the environment:. Operating conditions of system
components (e.g., filling levels).. Status messages of the vehicle
and its single components (e.g.,number of wheel revolutions/rotational speed, deceleration,lateral acceleration).
. Dysfunctions and defects inimportant system components.
. Vehicle reactions in particulardriving situations (e.g., inflationof an airbag, activation of thestability regulation system).
. Environmental concerns (e.g.,temperature).
This data is exclusively technicaland helps identify and correct errorsas well as optimise vehiclefunctions.
Motion profiles indicating travelledroutes cannot be created withthis data.
If services are used (e.g., repairworks, service processes, warrantycases, quality assurance),employees of the service network(manufacturer included) are able toread out this technical informationfrom the event and error datastorage modules applying specialdiagnostic devices. If required, youwill receive further information atthese dealers. After an error hasbeen corrected, the data is deletedfrom the error storage module orconstantly overwritten.
When using the vehicle, situationsmay occur in which this technicaldata related to other information(accident report, damages on thevehicle, witness statements, etc.)may be associated with a specificperson — possibly, with theassistance of an expert.
Additional functions contractuallyagreed upon with the client (e.g.,vehicle location in emergencycases) allow the transmission ofparticular vehicle data from thevehicle.
Infotainment SystemIf the vehicle is equipped with anavigation system as part of theinfotainment system, use of thesystem may result in the storage ofdestinations, addresses, telephonenumbers, and other trip information.See the infotainment manual forinformation on stored data and fordeletion instructions.
Black plate (1,1)Chevrolet Corvette Owner Manual - 2015 - CRC - 9/16/14
INDEX i-1
AAccessories andModifications . . . . . . . . . . . . . . . . . 10-2
Accessory Power . . . . . . . . . . . . . . 9-18Active Fuel Management® . . . . . 9-19Active Rev Match . . . . . . . . . . . . . . 9-22Add-On ElectricalEquipment . . . . . . . . . . . . . . . . . . . 9-45
AdjustmentsLumbar, Front Seats . . . . . . . . . . . 3-3
Air Cleaner/Filter, Engine . . . . . 10-17Air Dam, Front . . . . . . . . . . . . . . . . . 9-14Air Filter, PassengerCompartment . . . . . . . . . . . . . . . . . 8-5
Air Vents . . . . . . . . . . . . . . . . . . . . . . . 8-4Airbag SystemCheck . . . . . . . . . . . . . . . . . . . . . . . .3-25How Does an AirbagRestrain? . . . . . . . . . . . . . . . . . . .3-18
Passenger SensingSystem . . . . . . . . . . . . . . . . . . . . . .3-20
What Makes an AirbagInflate? . . . . . . . . . . . . . . . . . . . . . .3-18
Airbag System (cont'd)What Will You See after anAirbag Inflates? . . . . . . . . . . . . .3-18
When Should an AirbagInflate? . . . . . . . . . . . . . . . . . . . . . .3-17
Where Are the Airbags? . . . . . .3-16AirbagsAdding Equipment to theVehicle . . . . . . . . . . . . . . . . . . . . . .3-25
Passenger Status Indicator . . .5-15Readiness Light . . . . . . . . . . . . . .5-14Servicing Airbag-EquippedVehicles . . . . . . . . . . . . . . . . . . . . .3-24
System Check . . . . . . . . . . . . . . . .3-14AlarmVehicle Security . . . . . . . . . . . . . .2-13
Anti-theftLocking System . . . . . . . . . . . . . .2-15
Antilock BrakeSystem (ABS) . . . . . . . . . . . . . . . . 9-23Warning Light . . . . . . . . . . . . . . . . .5-20
Appearance CareExterior . . . . . . . . . . . . . . . . . . . . . 10-74Interior . . . . . . . . . . . . . . . . . . . . . . 10-79
Ashtrays . . . . . . . . . . . . . . . . . . . . . . . . 5-7
AutomaticDimming Mirrors . . . . . . . . . . . . . .2-18Door Locks . . . . . . . . . . . . . . . . . . .2-10Headlamp System . . . . . . . . . . . . . 6-3
Axle, Rear . . . . . . . . . . . . . . . . . . . . 10-34
BBattery . . . . . . . . . . . . . . . . . . . . . . . 10-28Exterior Lighting BatterySaver . . . . . . . . . . . . . . . . . . . . . . . . 6-8
Jump Starting . . . . . . . . . . . . . . . 10-70Power Protection . . . . . . . . . . . . . . 6-7Voltage and ChargingMessages . . . . . . . . . . . . . . . . . . .5-31
Blade Replacement, Wiper . . . 10-35Bonnet . . . . . . . . . . . . . . . . . . . . . . . . 10-6BrakeParking, Electric . . . . . . . . . . . . . .9-24System Warning Light . . . . . . . .5-19
Brakes . . . . . . . . . . . . . . . . . . . . . . . . 10-26Antilock . . . . . . . . . . . . . . . . . . . . . . .9-23Assist . . . . . . . . . . . . . . . . . . . . . . . . .9-26Fluid . . . . . . . . . . . . . . . . . . . . . . . . 10-27System Messages . . . . . . . . . . . .5-32
Braking . . . . . . . . . . . . . . . . . . . . . . . . . 9-2
Black plate (2,1)Chevrolet Corvette Owner Manual - 2015 - CRC - 9/16/14
i-2 INDEX
Bulb Replacement . . . . . . . . . . . . 10-37Headlamp Aiming . . . . . . . . . . . 10-36Headlamps . . . . . . . . . . . . . . . . . 10-36High Intensity Discharge(HID) Lighting . . . . . . . . . . . . . 10-36
Number Plate Lamps . . . . . . . 10-36Buying New Tyres . . . . . . . . . . . . 10-56
CCameraRear Vision (RVC) . . . . . . . . . . . .9-39
Capacities andSpecifications . . . . . . . . . . . . . . . . 12-3
Carbon Fibre . . . . . . . . . . . . . . . . . . 9-14Carbon MonoxideEngine Exhaust . . . . . . . . . . . . . . .9-19Hatch . . . . . . . . . . . . . . . . . . . . . . . . . 2-11Winter Driving . . . . . . . . . . . . . . . .9-10
CargoCover . . . . . . . . . . . . . . . . . . . . . . . . . . 4-4
Cargo Net . . . . . . . . . . . . . . . . . . . . . . 4-5Cautions, Danger, andWarnings . . . . . . . . . . . . . . . . . . . . . . . . iii
Centre Console Storage . . . . . . . . 4-3Chains, Tyre . . . . . . . . . . . . . . . . . . 10-60Charging System Light . . . . . . . . 5-16
CheckEngine Light . . . . . . . . . . . . . . . . . .5-16
Child RestraintsInfants and YoungChildren . . . . . . . . . . . . . . . . . . . . .3-28
ISOFIX . . . . . . . . . . . . . . . . . . . . . . .3-36Older Children . . . . . . . . . . . . . . . .3-26Securing . . . . . . . . . . . . . . . . . . . . . .3-36Systems . . . . . . . . . . . . . . . . . . . . . .3-30
Cigarette Lighter . . . . . . . . . . . . . . . . 5-6CleaningExterior Care . . . . . . . . . . . . . . . 10-74Interior Care . . . . . . . . . . . . . . . . 10-79
Climate Control SystemsDual Automatic . . . . . . . . . . . . . . . . 8-1
Clock . . . . . . . . . . . . . . . . . . . . . . . . . . . 5-4Cluster, Instrument . . . . . . . . . . . . . 5-8Clutch, Hydraulic . . . . . . . . . . . . . 10-16CompartmentsStorage . . . . . . . . . . . . . . . . . . . . . . . . 4-1
CompassMessages . . . . . . . . . . . . . . . . . . . .5-32
Competitive Driving Mode . . . . . 9-32Compressor Kit, TyreSealant . . . . . . . . . . . . . . . . . . . . . . 10-62
ConformityDeclaration of . . . . . . . . . . . . . . . . .13-1
ControlTraction and ElectronicStability . . . . . . . . . . . . . . . . . . . . .9-26
Control of a Vehicle . . . . . . . . . . . . . 9-2Convenience Net . . . . . . . . . . . . . . . 4-5Convertible Top . . . . . . . . . . . . . . . . 2-25Messages . . . . . . . . . . . . . . . . . . . .5-32
Convex Mirrors . . . . . . . . . . . . . . . . 2-17CoolantEngine . . . . . . . . . . . . . . . . . . . . . . 10-21Engine TemperatureGauge . . . . . . . . . . . . . . . . . . . . . .5-13
Engine TemperatureWarning Light . . . . . . . . . . . . . . .5-22
Cooling System . . . . . . . .10-19, 10-20Engine Messages . . . . . . . . . . . .5-34
Courtesy Lamps . . . . . . . . . . . . . . . . 6-6CoverCargo . . . . . . . . . . . . . . . . . . . . . . . . . . 4-4
Cruise Control . . . . . . . . . . . . . . . . . 9-36Light . . . . . . . . . . . . . . . . . . . . . . . . . .5-24Messages . . . . . . . . . . . . . . . . . . . .5-34
Cupholders . . . . . . . . . . . . . . . . . . . . . 4-2
Black plate (3,1)Chevrolet Corvette Owner Manual - 2015 - CRC - 9/16/14
INDEX i-3
DDanger, Warnings, andCautions . . . . . . . . . . . . . . . . . . . . . . . . iii
Data RecorderPerformance . . . . . . . . . . . . . . . . . . . 7-1
Daytime RunningLamps (DRL) . . . . . . . . . . . . . . . . . . 6-2
Declaration of Conformity . . . . . . 13-1Defensive Driving . . . . . . . . . . . . . . . 9-2Delayed Locking . . . . . . . . . . . . . . . 2-10Differential, Limited-Slip . . . . . . . 9-36DoorAjar Light . . . . . . . . . . . . . . . . . . . . .5-25Ajar Messages . . . . . . . . . . . . . . .5-34Delayed Locking . . . . . . . . . . . . . .2-10Locks . . . . . . . . . . . . . . . . . . . . . . . . . . 2-8Power Locks . . . . . . . . . . . . . . . . . .2-10
Drive Belt Routing, Engine . . . . . 12-5Driver InformationCentre (DIC) . . . . . . . . . . . . . . . . . 5-25
Driver Mode Control . . . . . . . . . . . 9-29DrivingDefensive . . . . . . . . . . . . . . . . . . . . . . 9-2For Better Fuel Economy . . . . .1-19Hill and Mountain Roads . . . . . . . 9-9If the Vehicle is Stuck . . . . . . . . . 9-11
Driving (cont'd)Loss of Control . . . . . . . . . . . . . . . . 9-3Off-Road Recovery . . . . . . . . . . . . 9-3Track Events andCompetitive . . . . . . . . . . . . . . . . . . 9-4
Vehicle Load Limits . . . . . . . . . . .9-12Wet Roads . . . . . . . . . . . . . . . . . . . . 9-8Winter . . . . . . . . . . . . . . . . . . . . . . . .9-10
Driving ModeCompetitive . . . . . . . . . . . . . . . . . . .9-32
Dual Automatic ClimateControl System . . . . . . . . . . . . . . . . 8-1
EElectric Parking Brake . . . . . . . . . 9-24Electric Parking Brake Light . . . 5-19Electrical Equipment,Add-On . . . . . . . . . . . . . . . . . . . . . . 9-45
Electrical SystemEngine CompartmentFuse Block . . . . . . . . . . . . . . . . 10-38
Fuses . . . . . . . . . . . . . . . . . . . . . . 10-38Overload . . . . . . . . . . . . . . . . . . . 10-37Rear Compartment FuseBlock . . . . . . . . . . . . . . . . . . . . . . 10-42
EngineAir Cleaner/Filter . . . . . . . . . . . 10-17Check and Service EngineSoon Light . . . . . . . . . . . . . . . . . .5-16
Compartment Overview . . . . . . .10-7Coolant . . . . . . . . . . . . . . . . . . . . . 10-21Coolant TemperatureGauge . . . . . . . . . . . . . . . . . . . . . .5-13
Coolant TemperatureWarning Light . . . . . . . . . . . . . . .5-22
Cooling System . . . . . . 10-19, 10-20Cooling System Messages . . .5-34Drive Belt Routing . . . . . . . . . . . .12-5Exhaust . . . . . . . . . . . . . . . . . . . . . .9-19Oil Life System . . . . . . . . . . . . . 10-16Oil Messages . . . . . . . . . . . . . . . . .5-35Overheating . . . . . . . . . . . . . . . . 10-24Power Messages . . . . . . . . . . . . .5-35Pressure Light . . . . . . . . . . . . . . . .5-23Running While Parked . . . . . . . .9-20Starting . . . . . . . . . . . . . . . . . . . . . . .9-16
Engine Identification . . . . . . . . . . . 12-2Entry Lighting . . . . . . . . . . . . . . . . . . . 6-7Exit Lighting . . . . . . . . . . . . . . . . . . . . 6-7Exterior Lamp Controls . . . . . . . . . 6-1
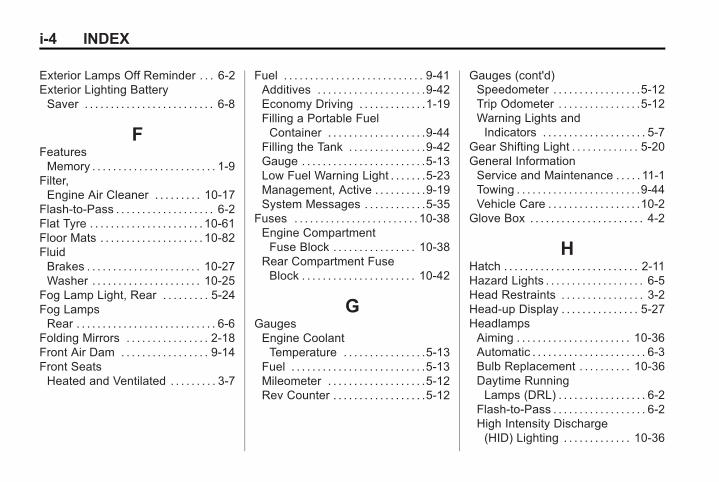
Black plate (4,1)Chevrolet Corvette Owner Manual - 2015 - CRC - 9/16/14
i-4 INDEX
Exterior Lamps Off Reminder . . . 6-2Exterior Lighting BatterySaver . . . . . . . . . . . . . . . . . . . . . . . . . 6-8
FFeaturesMemory . . . . . . . . . . . . . . . . . . . . . . . . 1-9
Filter,Engine Air Cleaner . . . . . . . . . 10-17
Flash-to-Pass . . . . . . . . . . . . . . . . . . . 6-2Flat Tyre . . . . . . . . . . . . . . . . . . . . . . 10-61Floor Mats . . . . . . . . . . . . . . . . . . . . 10-82FluidBrakes . . . . . . . . . . . . . . . . . . . . . . 10-27Washer . . . . . . . . . . . . . . . . . . . . . 10-25
Fog Lamp Light, Rear . . . . . . . . . 5-24Fog LampsRear . . . . . . . . . . . . . . . . . . . . . . . . . . . 6-6
Folding Mirrors . . . . . . . . . . . . . . . . 2-18Front Air Dam . . . . . . . . . . . . . . . . . 9-14Front SeatsHeated and Ventilated . . . . . . . . . 3-7
Fuel . . . . . . . . . . . . . . . . . . . . . . . . . . . 9-41Additives . . . . . . . . . . . . . . . . . . . . .9-42Economy Driving . . . . . . . . . . . . .1-19Filling a Portable FuelContainer . . . . . . . . . . . . . . . . . . .9-44
Filling the Tank . . . . . . . . . . . . . . .9-42Gauge . . . . . . . . . . . . . . . . . . . . . . . .5-13Low Fuel Warning Light . . . . . . .5-23Management, Active . . . . . . . . . .9-19System Messages . . . . . . . . . . . .5-35
Fuses . . . . . . . . . . . . . . . . . . . . . . . . 10-38Engine CompartmentFuse Block . . . . . . . . . . . . . . . . 10-38
Rear Compartment FuseBlock . . . . . . . . . . . . . . . . . . . . . . 10-42
GGaugesEngine CoolantTemperature . . . . . . . . . . . . . . . .5-13
Fuel . . . . . . . . . . . . . . . . . . . . . . . . . .5-13Mileometer . . . . . . . . . . . . . . . . . . .5-12Rev Counter . . . . . . . . . . . . . . . . . .5-12
Gauges (cont'd)Speedometer . . . . . . . . . . . . . . . . .5-12Trip Odometer . . . . . . . . . . . . . . . .5-12Warning Lights andIndicators . . . . . . . . . . . . . . . . . . . . 5-7
Gear Shifting Light . . . . . . . . . . . . . 5-20General InformationService and Maintenance . . . . . 11-1Towing . . . . . . . . . . . . . . . . . . . . . . . .9-44Vehicle Care . . . . . . . . . . . . . . . . . .10-2
Glove Box . . . . . . . . . . . . . . . . . . . . . . 4-2
HHatch . . . . . . . . . . . . . . . . . . . . . . . . . . 2-11Hazard Lights . . . . . . . . . . . . . . . . . . . 6-5Head Restraints . . . . . . . . . . . . . . . . 3-2Head-up Display . . . . . . . . . . . . . . . 5-27HeadlampsAiming . . . . . . . . . . . . . . . . . . . . . . 10-36Automatic . . . . . . . . . . . . . . . . . . . . . . 6-3Bulb Replacement . . . . . . . . . . 10-36Daytime RunningLamps (DRL) . . . . . . . . . . . . . . . . . 6-2
Flash-to-Pass . . . . . . . . . . . . . . . . . . 6-2High Intensity Discharge(HID) Lighting . . . . . . . . . . . . . 10-36
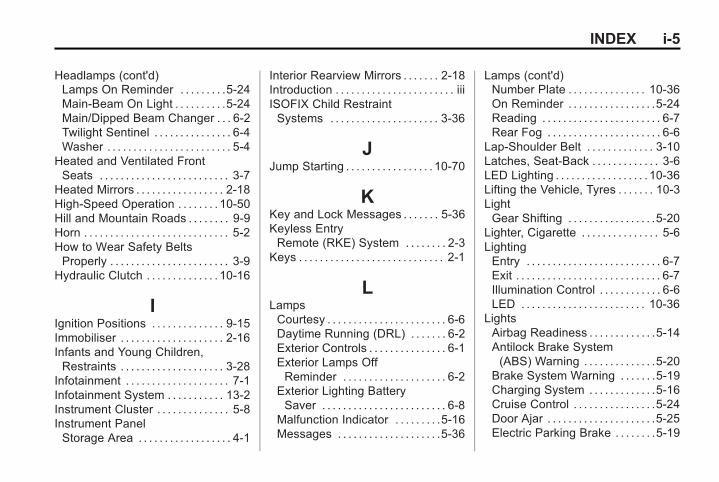
Black plate (5,1)Chevrolet Corvette Owner Manual - 2015 - CRC - 9/16/14
INDEX i-5
Headlamps (cont'd)Lamps On Reminder . . . . . . . . .5-24Main-Beam On Light . . . . . . . . . .5-24Main/Dipped Beam Changer . . . 6-2Twilight Sentinel . . . . . . . . . . . . . . . 6-4Washer . . . . . . . . . . . . . . . . . . . . . . . . 5-4
Heated and Ventilated FrontSeats . . . . . . . . . . . . . . . . . . . . . . . . . 3-7
Heated Mirrors . . . . . . . . . . . . . . . . . 2-18High-Speed Operation . . . . . . . . 10-50Hill and Mountain Roads . . . . . . . . 9-9Horn . . . . . . . . . . . . . . . . . . . . . . . . . . . . 5-2How to Wear Safety BeltsProperly . . . . . . . . . . . . . . . . . . . . . . . 3-9
Hydraulic Clutch . . . . . . . . . . . . . . 10-16
IIgnition Positions . . . . . . . . . . . . . . 9-15Immobiliser . . . . . . . . . . . . . . . . . . . . 2-16Infants and Young Children,Restraints . . . . . . . . . . . . . . . . . . . . 3-28
Infotainment . . . . . . . . . . . . . . . . . . . . 7-1Infotainment System . . . . . . . . . . . 13-2Instrument Cluster . . . . . . . . . . . . . . 5-8Instrument PanelStorage Area . . . . . . . . . . . . . . . . . . 4-1
Interior Rearview Mirrors . . . . . . . 2-18Introduction . . . . . . . . . . . . . . . . . . . . . . . iiiISOFIX Child RestraintSystems . . . . . . . . . . . . . . . . . . . . . 3-36
JJump Starting . . . . . . . . . . . . . . . . . 10-70
KKey and Lock Messages . . . . . . . 5-36Keyless EntryRemote (RKE) System . . . . . . . . 2-3
Keys . . . . . . . . . . . . . . . . . . . . . . . . . . . . 2-1
LLampsCourtesy . . . . . . . . . . . . . . . . . . . . . . . 6-6Daytime Running (DRL) . . . . . . . 6-2Exterior Controls . . . . . . . . . . . . . . . 6-1Exterior Lamps OffReminder . . . . . . . . . . . . . . . . . . . . 6-2
Exterior Lighting BatterySaver . . . . . . . . . . . . . . . . . . . . . . . . 6-8
Malfunction Indicator . . . . . . . . .5-16Messages . . . . . . . . . . . . . . . . . . . .5-36
Lamps (cont'd)Number Plate . . . . . . . . . . . . . . . 10-36On Reminder . . . . . . . . . . . . . . . . .5-24Reading . . . . . . . . . . . . . . . . . . . . . . . 6-7Rear Fog . . . . . . . . . . . . . . . . . . . . . . 6-6
Lap-Shoulder Belt . . . . . . . . . . . . . 3-10Latches, Seat-Back . . . . . . . . . . . . . 3-6LED Lighting . . . . . . . . . . . . . . . . . . 10-36Lifting the Vehicle, Tyres . . . . . . . 10-3LightGear Shifting . . . . . . . . . . . . . . . . .5-20
Lighter, Cigarette . . . . . . . . . . . . . . . 5-6LightingEntry . . . . . . . . . . . . . . . . . . . . . . . . . . 6-7Exit . . . . . . . . . . . . . . . . . . . . . . . . . . . . 6-7Illumination Control . . . . . . . . . . . . 6-6LED . . . . . . . . . . . . . . . . . . . . . . . . 10-36
LightsAirbag Readiness . . . . . . . . . . . . .5-14Antilock Brake System(ABS) Warning . . . . . . . . . . . . . .5-20
Brake System Warning . . . . . . .5-19Charging System . . . . . . . . . . . . .5-16Cruise Control . . . . . . . . . . . . . . . .5-24Door Ajar . . . . . . . . . . . . . . . . . . . . .5-25Electric Parking Brake . . . . . . . .5-19
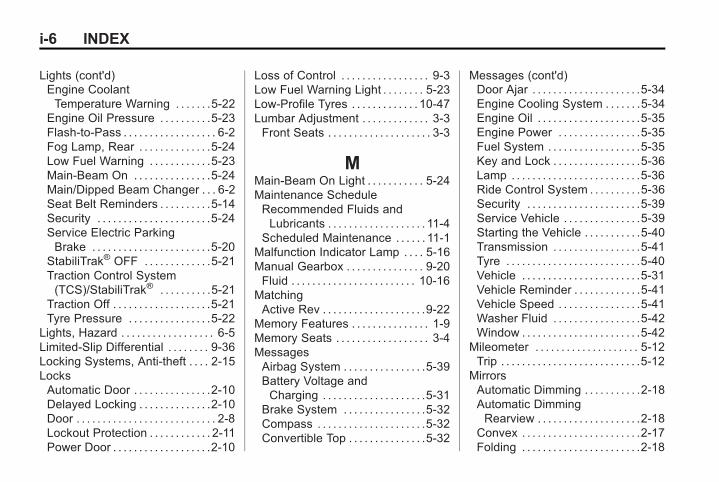
Black plate (6,1)Chevrolet Corvette Owner Manual - 2015 - CRC - 9/16/14
i-6 INDEX
Lights (cont'd)Engine CoolantTemperature Warning . . . . . . .5-22
Engine Oil Pressure . . . . . . . . . .5-23Flash-to-Pass . . . . . . . . . . . . . . . . . . 6-2Fog Lamp, Rear . . . . . . . . . . . . . .5-24Low Fuel Warning . . . . . . . . . . . .5-23Main-Beam On . . . . . . . . . . . . . . .5-24Main/Dipped Beam Changer . . . 6-2Seat Belt Reminders . . . . . . . . . .5-14Security . . . . . . . . . . . . . . . . . . . . . .5-24Service Electric ParkingBrake . . . . . . . . . . . . . . . . . . . . . . .5-20
StabiliTrak® OFF . . . . . . . . . . . . .5-21Traction Control System(TCS)/StabiliTrak® . . . . . . . . . .5-21
Traction Off . . . . . . . . . . . . . . . . . . .5-21Tyre Pressure . . . . . . . . . . . . . . . .5-22
Lights, Hazard . . . . . . . . . . . . . . . . . . 6-5Limited-Slip Differential . . . . . . . . 9-36Locking Systems, Anti-theft . . . . 2-15LocksAutomatic Door . . . . . . . . . . . . . . .2-10Delayed Locking . . . . . . . . . . . . . .2-10Door . . . . . . . . . . . . . . . . . . . . . . . . . . . 2-8Lockout Protection . . . . . . . . . . . . 2-11Power Door . . . . . . . . . . . . . . . . . . .2-10
Loss of Control . . . . . . . . . . . . . . . . . 9-3Low Fuel Warning Light . . . . . . . . 5-23Low-Profile Tyres . . . . . . . . . . . . . 10-47Lumbar Adjustment . . . . . . . . . . . . . 3-3Front Seats . . . . . . . . . . . . . . . . . . . . 3-3
MMain-Beam On Light . . . . . . . . . . . 5-24Maintenance ScheduleRecommended Fluids andLubricants . . . . . . . . . . . . . . . . . . . 11-4
Scheduled Maintenance . . . . . . 11-1Malfunction Indicator Lamp . . . . 5-16Manual Gearbox . . . . . . . . . . . . . . . 9-20Fluid . . . . . . . . . . . . . . . . . . . . . . . . 10-16
MatchingActive Rev . . . . . . . . . . . . . . . . . . . .9-22
Memory Features . . . . . . . . . . . . . . . 1-9Memory Seats . . . . . . . . . . . . . . . . . . 3-4MessagesAirbag System . . . . . . . . . . . . . . . .5-39Battery Voltage andCharging . . . . . . . . . . . . . . . . . . . .5-31
Brake System . . . . . . . . . . . . . . . .5-32Compass . . . . . . . . . . . . . . . . . . . . .5-32Convertible Top . . . . . . . . . . . . . . .5-32
Messages (cont'd)Door Ajar . . . . . . . . . . . . . . . . . . . . .5-34Engine Cooling System . . . . . . .5-34Engine Oil . . . . . . . . . . . . . . . . . . . .5-35Engine Power . . . . . . . . . . . . . . . .5-35Fuel System . . . . . . . . . . . . . . . . . .5-35Key and Lock . . . . . . . . . . . . . . . . .5-36Lamp . . . . . . . . . . . . . . . . . . . . . . . . .5-36Ride Control System . . . . . . . . . .5-36Security . . . . . . . . . . . . . . . . . . . . . .5-39Service Vehicle . . . . . . . . . . . . . . .5-39Starting the Vehicle . . . . . . . . . . .5-40Transmission . . . . . . . . . . . . . . . . .5-41Tyre . . . . . . . . . . . . . . . . . . . . . . . . . .5-40Vehicle . . . . . . . . . . . . . . . . . . . . . . .5-31Vehicle Reminder . . . . . . . . . . . . .5-41Vehicle Speed . . . . . . . . . . . . . . . .5-41Washer Fluid . . . . . . . . . . . . . . . . .5-42Window . . . . . . . . . . . . . . . . . . . . . . .5-42
Mileometer . . . . . . . . . . . . . . . . . . . . 5-12Trip . . . . . . . . . . . . . . . . . . . . . . . . . . .5-12
MirrorsAutomatic Dimming . . . . . . . . . . .2-18Automatic DimmingRearview . . . . . . . . . . . . . . . . . . . .2-18
Convex . . . . . . . . . . . . . . . . . . . . . . .2-17Folding . . . . . . . . . . . . . . . . . . . . . . .2-18
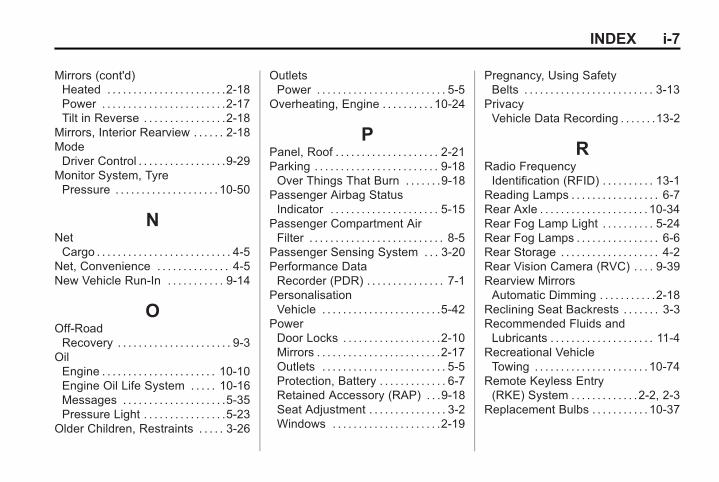
Black plate (7,1)Chevrolet Corvette Owner Manual - 2015 - CRC - 9/16/14
INDEX i-7
Mirrors (cont'd)Heated . . . . . . . . . . . . . . . . . . . . . . .2-18Power . . . . . . . . . . . . . . . . . . . . . . . .2-17Tilt in Reverse . . . . . . . . . . . . . . . .2-18
Mirrors, Interior Rearview . . . . . . 2-18ModeDriver Control . . . . . . . . . . . . . . . . .9-29
Monitor System, TyrePressure . . . . . . . . . . . . . . . . . . . . 10-50
NNetCargo . . . . . . . . . . . . . . . . . . . . . . . . . . 4-5
Net, Convenience . . . . . . . . . . . . . . 4-5New Vehicle Run-In . . . . . . . . . . . 9-14
OOff-RoadRecovery . . . . . . . . . . . . . . . . . . . . . . 9-3
OilEngine . . . . . . . . . . . . . . . . . . . . . . 10-10Engine Oil Life System . . . . . 10-16Messages . . . . . . . . . . . . . . . . . . . .5-35Pressure Light . . . . . . . . . . . . . . . .5-23
Older Children, Restraints . . . . . 3-26
OutletsPower . . . . . . . . . . . . . . . . . . . . . . . . . 5-5
Overheating, Engine . . . . . . . . . . 10-24
PPanel, Roof . . . . . . . . . . . . . . . . . . . . 2-21Parking . . . . . . . . . . . . . . . . . . . . . . . . 9-18Over Things That Burn . . . . . . .9-18
Passenger Airbag StatusIndicator . . . . . . . . . . . . . . . . . . . . . 5-15
Passenger Compartment AirFilter . . . . . . . . . . . . . . . . . . . . . . . . . . 8-5
Passenger Sensing System . . . 3-20Performance DataRecorder (PDR) . . . . . . . . . . . . . . . 7-1
PersonalisationVehicle . . . . . . . . . . . . . . . . . . . . . . .5-42
PowerDoor Locks . . . . . . . . . . . . . . . . . . .2-10Mirrors . . . . . . . . . . . . . . . . . . . . . . . .2-17Outlets . . . . . . . . . . . . . . . . . . . . . . . . 5-5Protection, Battery . . . . . . . . . . . . . 6-7Retained Accessory (RAP) . . .9-18Seat Adjustment . . . . . . . . . . . . . . . 3-2Windows . . . . . . . . . . . . . . . . . . . . .2-19
Pregnancy, Using SafetyBelts . . . . . . . . . . . . . . . . . . . . . . . . . 3-13
PrivacyVehicle Data Recording . . . . . . .13-2
RRadio FrequencyIdentification (RFID) . . . . . . . . . . 13-1
Reading Lamps . . . . . . . . . . . . . . . . . 6-7Rear Axle . . . . . . . . . . . . . . . . . . . . . 10-34Rear Fog Lamp Light . . . . . . . . . . 5-24Rear Fog Lamps . . . . . . . . . . . . . . . . 6-6Rear Storage . . . . . . . . . . . . . . . . . . . 4-2Rear Vision Camera (RVC) . . . . 9-39Rearview MirrorsAutomatic Dimming . . . . . . . . . . .2-18
Reclining Seat Backrests . . . . . . . 3-3Recommended Fluids andLubricants . . . . . . . . . . . . . . . . . . . . 11-4
Recreational VehicleTowing . . . . . . . . . . . . . . . . . . . . . . 10-74
Remote Keyless Entry(RKE) System . . . . . . . . . . . . .2-2, 2-3
Replacement Bulbs . . . . . . . . . . . 10-37
Black plate (8,1)Chevrolet Corvette Owner Manual - 2015 - CRC - 9/16/14
i-8 INDEX
Replacement PartsAirbags . . . . . . . . . . . . . . . . . . . . . . .3-26Maintenance . . . . . . . . . . . . . . . . . . 11-5
Replacing Airbag System . . . . . . 3-26Replacing Safety BeltSystem Parts after a Crash . . . 3-13
RestraintsWhere to Put . . . . . . . . . . . . . . . . .3-32
Retained AccessoryPower (RAP) . . . . . . . . . . . . . . . . . 9-18
Rev Counter . . . . . . . . . . . . . . . . . . . 5-12Reverse Tilt Mirrors . . . . . . . . . . . . 2-18Ride Control SystemsEnhanced TractionSystem (ETS) . . . . . . . . . . . . . . .9-36
Messages . . . . . . . . . . . . . . . . . . . .5-36RoadsDriving, Wet . . . . . . . . . . . . . . . . . . . 9-8
Roof Panel . . . . . . . . . . . . . . . . . . . . 2-21Rotation, Tyres . . . . . . . . . . . . . . . 10-54Routing, Engine Drive Belt . . . . . 12-5Run-Flat Tyres . . . . . . . . . . . . . . . . 10-46Running the Vehicle WhileParked . . . . . . . . . . . . . . . . . . . . . . . 9-20
Running-In, New Vehicle . . . . . . 9-14
SSafety Belts . . . . . . . . . . . . . . . . . . . . 3-8Care . . . . . . . . . . . . . . . . . . . . . . . . . .3-13How to Wear Safety BeltsProperly . . . . . . . . . . . . . . . . . . . . . . 3-9
Lap-Shoulder Belt . . . . . . . . . . . .3-10Replacing after a Crash . . . . . .3-13Use During Pregnancy . . . . . . . .3-13
Safety System Check . . . . . . . . . . 3-13Scheduled Maintenance . . . . . . . 11-1Sealant Kit, Tyre . . . . . . . . . . . . . . 10-62Seat BeltsReminders . . . . . . . . . . . . . . . . . . . .5-14
Seat-Back Latches . . . . . . . . . . . . . 3-6SeatsHead Restraints . . . . . . . . . . . . . . . 3-2Heated and Ventilated Front . . . 3-7Lumbar Adjustment, Front . . . . . 3-3Memory . . . . . . . . . . . . . . . . . . . . . . . . 3-4Power Adjustment, Front . . . . . . 3-2Reclining Seat Backrests . . . . . . 3-3
Securing Child Restraints . . . . . . 3-36SecurityLight . . . . . . . . . . . . . . . . . . . . . . . . . .5-24Messages . . . . . . . . . . . . . . . . . . . .5-39
Security (cont'd)Vehicle . . . . . . . . . . . . . . . . . . . . . . .2-13Vehicle Alarm . . . . . . . . . . . . . . . . .2-13
ServiceAccessories andModifications . . . . . . . . . . . . . . . .10-2
Doing Your Own Work . . . . . . . .10-5Engine Soon Light . . . . . . . . . . . .5-16Maintenance, GeneralInformation . . . . . . . . . . . . . . . . . . 11-1
Parts Identification Label . . . . .12-2Vehicle Messages . . . . . . . . . . . .5-39
Service Electric ParkingBrake Light . . . . . . . . . . . . . . . . . . . 5-20
Servicing the Airbag . . . . . . . . . . . 3-24Signals, Turn andLane-Change . . . . . . . . . . . . . . . . . 6-5
Specifications andCapacities . . . . . . . . . . . . . . . . . . . . 12-3
Speedometer . . . . . . . . . . . . . . . . . . 5-12StabiliTrakOFF Light . . . . . . . . . . . . . . . . . . . . .5-21
Starter Switch Check . . . . . . . . . 10-34Starting the Engine . . . . . . . . . . . . 9-16Starting the VehicleMessages . . . . . . . . . . . . . . . . . . . . 5-40
Black plate (9,1)Chevrolet Corvette Owner Manual - 2015 - CRC - 9/16/14
INDEX i-9
Steering . . . . . . . . . . . . . . . . . . . . . . . . 9-2Wheel Adjustment . . . . . . . . . . . . . 5-2Wheel Controls . . . . . . . . . . . . . . . . 5-2
StorageRear . . . . . . . . . . . . . . . . . . . . . . . . . . . 4-2
Storage AreasCargo Cover . . . . . . . . . . . . . . . . . . . 4-4Centre Console . . . . . . . . . . . . . . . . 4-3Convenience Net . . . . . . . . . . . . . . 4-5Glove Box . . . . . . . . . . . . . . . . . . . . . 4-2Instrument Panel . . . . . . . . . . . . . . 4-1
Storage Compartments . . . . . . . . . 4-1Storing the Tyre Sealantand Compressor Kit . . . . . . . . . 10-69
Stuck Vehicle . . . . . . . . . . . . . . . . . . 9-11Summer Tyres . . . . . . . . . . . . . . . . 10-48Sun Visors . . . . . . . . . . . . . . . . . . . . . 2-21Symbols . . . . . . . . . . . . . . . . . . . . . . . . . . ivSystemInfotainment . . . . . . . . . . . . . 7-1, 13-2
TTheft-Deterrent Systems . . . . . . . 2-16Immobiliser . . . . . . . . . . . . . . . . . . .2-16
Time . . . . . . . . . . . . . . . . . . . . . . . . . . . . 5-4TowingGeneral Information . . . . . . . . . .9-44Recreational Vehicle . . . . . . . . 10-74Vehicle . . . . . . . . . . . . . . . . . . . . . 10-73
Track Events andCompetitive Driving . . . . . . . . . . . 9-4
TractionControl System (TCS)/StabiliTrak® Light . . . . . . . . . . . .5-21
Limited-Slip Differential . . . . . . .9-36Off Light . . . . . . . . . . . . . . . . . . . . . .5-21
Traction Control/ElectronicStability Control . . . . . . . . . . . . . . 9-26
TransmissionFluid, Manual . . . . . . . . . . . . . . . 10-16Messages . . . . . . . . . . . . . . . . . . . .5-41
Trip Odometer . . . . . . . . . . . . . . . . . 5-12Turn and Lane-ChangeSignals . . . . . . . . . . . . . . . . . . . . . . . . 6-5
Twilight Sentinel . . . . . . . . . . . . . . . . 6-4
Tyres . . . . . . . . . . . . . . . . . . . . . . . . . 10-45Buying New Tyres . . . . . . . . . . 10-56Chains . . . . . . . . . . . . . . . . . . . . . . 10-60Different Size . . . . . . . . . . . . . . . 10-58If a Tyre Goes Flat . . . . . . . . . . 10-61Inflation Monitor System . . . . 10-52Inspection . . . . . . . . . . . . . . . . . . 10-54Lifting the Vehicle . . . . . . . . . . . . .10-3Low Profile . . . . . . . . . . . . . . . . . 10-47Messages . . . . . . . . . . . . . . . . . . . .5-40Pressure . . . . . . . . . . . . . . . . . . . . 10-50Pressure Light . . . . . . . . . . . . . . . .5-22Pressure Monitor System . . . 10-50Rotation . . . . . . . . . . . . . . . . . . . . 10-54Run-Flat . . . . . . . . . . . . . . . . . . . . 10-46Sealant andCompressor Kit . . . . . . . . . . . 10-62
Sealant and CompressorKit, Storing . . . . . . . . . . . . . . . . 10-69
Wheel Alignment andTyre Balance . . . . . . . . . . . . . . 10-59
Wheel Replacement . . . . . . . . 10-59When It Is Time for NewTyres . . . . . . . . . . . . . . . . . . . . . . 10-56
Winter . . . . . . . . . . . . . . . . . . . . . . 10-46
Black plate (10,1)Chevrolet Corvette Owner Manual - 2015 - CRC - 9/16/14
i-10 INDEX
UUsing This Manual . . . . . . . . . . . . . . . . iii
VVehicleAlarm System . . . . . . . . . . . . . . . .2-13Control . . . . . . . . . . . . . . . . . . . . . . . . 9-2IdentificationNumber (VIN) . . . . . . . . . . . . . . .12-1
Load Limits . . . . . . . . . . . . . . . . . . .9-12Messages . . . . . . . . . . . . . . . . . . . .5-31Personalisation . . . . . . . . . . . . . . .5-42Reminder Messages . . . . . . . . . .5-41Security . . . . . . . . . . . . . . . . . . . . . .2-13Speed Messages . . . . . . . . . . . . .5-41Towing . . . . . . . . . . . . . . . . . . . . . . 10-73
Vehicle CareStoring the Tyre Sealantand Compressor Kit . . . . . . . 10-69
Tyre Pressure . . . . . . . . . . . . . . 10-48Vehicle Data Recording andPrivacy . . . . . . . . . . . . . . . . . . . . . . . 13-2
Ventilation, Air . . . . . . . . . . . . . . . . . . 8-4Visors . . . . . . . . . . . . . . . . . . . . . . . . . 2-21
WWarningBrake System Light . . . . . . . . . . .5-19
Warning Lights, Gauges, andIndicators . . . . . . . . . . . . . . . . . . . . . 5-7
Warnings . . . . . . . . . . . . . . . . . . . . . . . . . iiiCautions and Danger . . . . . . . . . . . . iiiHazard Lights . . . . . . . . . . . . . . . . . . 6-5
Washer Fluid . . . . . . . . . . . . . . . . . 10-25Messages . . . . . . . . . . . . . . . . . . . .5-42
Washer, Headlamps . . . . . . . . . . . . 5-4WheelsAlignment and TyreBalance . . . . . . . . . . . . . . . . . . . 10-59
Different Size . . . . . . . . . . . . . . . 10-58Replacement . . . . . . . . . . . . . . . 10-59
When It Is Time for NewTyres . . . . . . . . . . . . . . . . . . . . . . . . 10-56
Where to Put the Restraint . . . . 3-32Windows . . . . . . . . . . . . . . . . . . . . . . 2-19Messages . . . . . . . . . . . . . . . . . . . .5-42Power . . . . . . . . . . . . . . . . . . . . . . . .2-19
WindscreenReplacement . . . . . . . . . . . . . . . 10-35Wiper/Washer . . . . . . . . . . . . . . . . . 5-3
WinterDriving . . . . . . . . . . . . . . . . . . . . . . . .9-10
Winter Tyres . . . . . . . . . . . . . . . . . . 10-46Wiper Blade Replacement . . . . 10-35


