Embed Size (px)
Citation preview
Participant Handbook
Sector
Apparel, Made-Ups, Home
Furnishing
Sub-Sector Apparel
Occupation
Designing
Reference ID: AMH/Q 1210, Version 1.0
NSQF level: 4
Assistant
Fashion Designer

Published by
Rachna Sagar Pvt. Ltd.
4583/15, Daryaganj, New Delhi -110 022, PO Box 7226
Phone: 011 – 4358 5858, 2328 5568 Fax 011 – 2324 3519, 4311 5858
Email: [email protected], [email protected]
Website: www.rachnasagar.in
All Rights Reserved,
First Edition,
ISBN: 978-93-86620-59-0
Printed in India
Copyright
Apparel Made-Up's and Home Furnishing Sector Skill Council
Indian Buildings Congress, 1st Floor, Sector-6, R K Puram,
Kama Koti Marg, New Delhi-110 022
E-mail: [email protected]
Website: www.sscamh.com
Disclaimer
The information contained herein has been obtained from sources reliable to AMHSSC. AMHSSC
disclaims all warranties to the accuracy, completeness or adequacy of such information. AMHSSC shall
have no liability for errors, omissions, or inadequacies, in the information contained herein, or for
interpretations thereof. Every effort has been made to trace the owners of the copyright material
included in the book. The publishers would be grateful for any omissions brought to their notice for
acknowledgements in future editions of the book. No entity in AMHSSC shall be responsible for any loss
whatsoever, sustained by any person who relies on this material. The material in this publication is
copyrighted by AMHSSC. No parts of this publication may be reproduced, stored or distributed in any
form or by any means either on paper or electronic media, unless authorized by the AMHSSC

Shri Narendra Modi Prime Minister of India
Skilling is building a better India.
If we have to move India towards
Development then Skill Development
Should be our mission.
i

Certificate
COMPLIANCE TO
QUALIFICATION PACK – NATIONAL OCCUPATIONAL
STANDARDS is hereby issued by the
APPAREL MADE-UPS HOME FURNISHING SECTOR SKILL COUNCIL
for
SKILLING CONTENT: PARTICIPANT HANDBOOK
Complying to National Occupational Standards of
Job Role/Qualification Pack: ‘Assistant Fashion Designer’ QP No. ‘AMH/Q 1210, NSQF Level 4’
Date of Issuance: February 11th, 2019
Valid up to: April 11th, 2023
*Valid up to the next review date of the Qualification Pack
Authorized Signatory
(Apparel Made- Ups &Home Furnishing Sector Skill Council)
ii

Acknowledgements
We are thankful to all organizations and individuals who have helped us in preparation of this
Participant Handbook.
We are especially thankful to M/S. New Times Group, M/S. Cantabil Retail India Ltd, M/S. Tulip
India, M/S. The Textile Workshop, M/S. R. R Production and M/S. Rosanature Pvt. Ltd. for their kind
support in development of this handbook.
iii

Assistant Fashion Designer
About this Book
This Participant Handbook is designed to enable training for the Assistant Fashion Designer
Qualification Pack (QP). Each National Occupational (NOS) is covered across Unit/s.
Key Learning Objectives for the specific NOS mark the beginning of the Unit/s for that NOS.
AMH/N1210 Plan and prepare design collections of garments for a season
AMH/N1211 Develop proto and fit samples
AMH/N1222 Evaluate the proto sample developed related to specific product class
AMH/N1223 Maintain health, safety and security in the designing department
AMH/N0104 Comply with industry, regulatory and organizational requirements
Symbols Used
Key Learning
Outcomes Steps Time Tips Notes Unit
Objectives
iv
iv
Participant Handbook
Table of Contents
S.No. Modules and Units Page No.
1. Introduction and Orientation 1
Unit 1.1- Introduction to the Garment Industry 3
Unit 1.2- Process Flow in Garment Industry 8
Unit 1.3- Organizational Structure in Quality Department 11
Unit 1.4– Roles and Responsibilities of a Assistant Fashion Designer 18
2. Plan and prepare design collections of garments for a season (AMH/N1210) 20
Unit 2.1 - Tools and equipment’s required 22
Unit 2.2 – Design Understanding 28
Unit 2.3 - Garment Understanding 35
Unit 2.4 – Garment Style Lines 63
Unit 2.5 – Surface Development in Garment 72
Unit 2.6 - Trend Research 80
Unit 2.7 – Garment Draping 94
Unit 2.8 – Types of Specialized Sewing Machine 98
Unit 2.9 – Pattern Making 105
Unit 2.10 – Garment Construction 118
Unit 2.11 – CAD/CAM 173
Unit 2.12 – Design Creation 175
3. Develop proto and fit samples (AMH/N 1211) 185
Unit 3.1- Tech pack 187
Unit 3.2.- Design Process 192
Unit 3.3.- Proto Sample 195
Unit 3.4.- Fit Sample 199
Unit 3.5 – Garment Costing 202
4. Evaluate the proto sample developed related to specific product class
(AMH/N 1222) 214
Unit 4.1 – Prototype Analysis 216
5. Maintain health, safety and security in the designing department
(AMH/N1223) 223
Unit 5.1 – Maintain Health, Safety and Security in the Production Line 225
6. Comply with industry, regulatory and organizational requirements
(AMH/N0104) 244
v
Assistant Fashion Designer
Unit 6.1 – Comply with industry, regulatory and organizational requirements 245
7. Soft Skills 261
Unit 7.1 - Introduction to the Soft Skills 263
Unit 7.2 - Effective Communication 266
Unit 7.3 - Grooming and Hygiene 271
Unit 7.4 - Interpersonal Skill Development 281
Unit 7.5 - Social Interaction 292
Unit 7.6 - Group Interaction 297
Unit 7.7 - Time Management 301
Unit 7.8 - Resume Preparation 303
Unit 7.9 - Interview Preparation 309
8. First Aid and CPR 312
Unit 8.1 – First Aid and CPR 314
9. IT Skills 328
Unit 9.1 - Introduction to Computer 330
Unit 9.2 - Basic Computer Knowledge 332
Unit 9.3 - Components of Computer 335
Unit 9.4 - Concept of Operating System 337
Unit 9.5 - MS Word 347
Unit 9.6 - MS PowerPoint 360
Unit 9.7 - MS Excel 370
Unit 9.8 - Internet Concepts 389
10 Employability and Entrepreneurship Skills 395
Unit 10.1 – Personal Strengths and Value Systems 400
Unit 10.2 – Digital Literacy: A Recap 423
Unit 10.3 – Money Matters 428
Unit 10.4 – Preparing for Employment and Self-Employment 439
Unit 10.5 – Understanding Entrepreneurship 451
Unit 10.6 – Preparing to be an Entrepreneur 475
vi

Participant Handbook
1. Introduction
Unit 1.1 – Introduction to the Garment Industry
Unit 1.2 – Process Flow in Garment Manufacturing
Unit 1.3 – Quality Standards in Apparel Industry
Unit 1.4 – Employment Opportunities for a Fashion Designer

Assistant Fashion Designer
Key Learning Outcomes
At the end of this module, participants will be able to:
• Familiarize with the basics of a garment industry
• Identify the process flow in a garment industry
• Discuss about the garment quality standards
• Identify the roles and responsibilities of a Assistant Fashion Designer
2
Participant Handbook
UNIT 1.1: Introduction to the Garment industry
Unit Objectives
At the end of this unit, participants will be able to:
• Discuss where is Indian garment industry stands
• Familiarize with the basics about how the industry operates
• Discuss about the garment industry
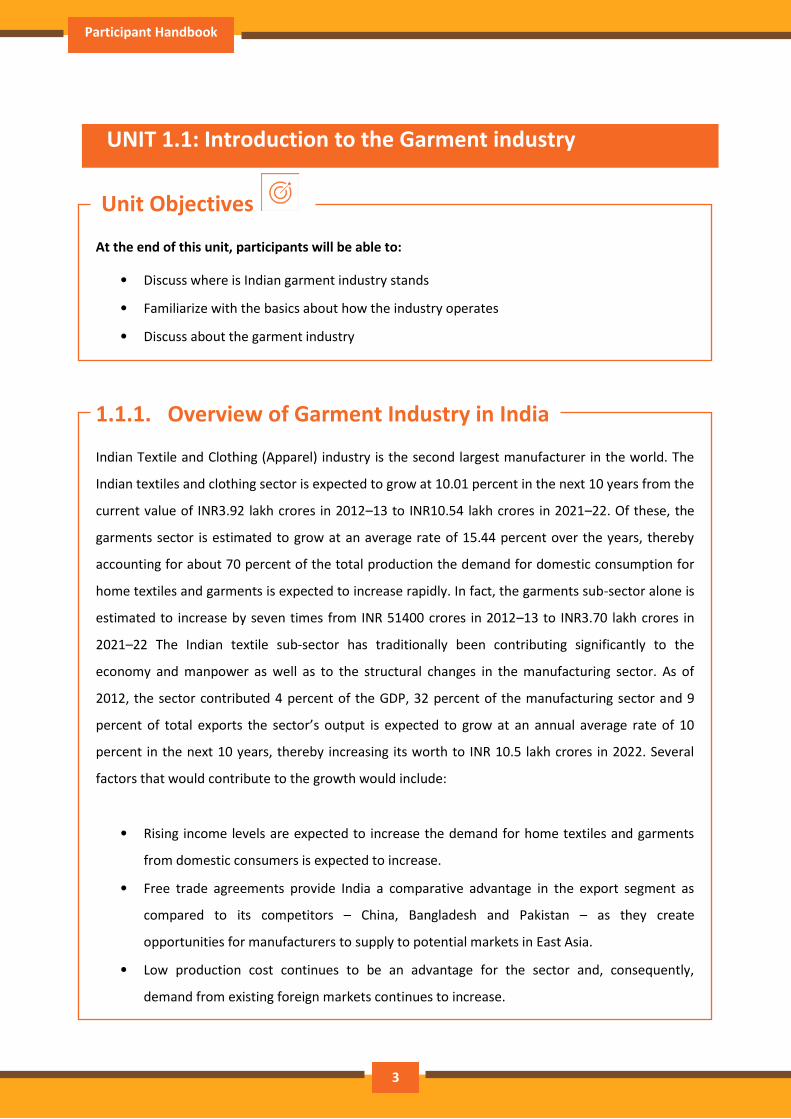
1.1.1. Overview of Garment Industry in India
Indian Textile and Clothing (Apparel) industry is the second largest manufacturer in the world. The
Indian textiles and clothing sector is expected to grow at 10.01 percent in the next 10 years from the
current value of INR3.92 lakh crores in 2012–13 to INR10.54 lakh crores in 2021–22. Of these, the
garments sector is estimated to grow at an average rate of 15.44 percent over the years, thereby
accounting for about 70 percent of the total production the demand for domestic consumption for
home textiles and garments is expected to increase rapidly. In fact, the garments sub-sector alone is
estimated to increase by seven times from INR 51400 crores in 2012–13 to INR3.70 lakh crores in
2021–22 The Indian textile sub-sector has traditionally been contributing significantly to the
economy and manpower as well as to the structural changes in the manufacturing sector. As of
2012, the sector contributed 4 percent of the GDP, 32 percent of the manufacturing sector and 9
percent of total exports the sector’s output is expected to grow at an annual average rate of 10
percent in the next 10 years, thereby increasing its worth to INR 10.5 lakh crores in 2022. Several
factors that would contribute to the growth would include:
• Rising income levels are expected to increase the demand for home textiles and garments
from domestic consumers is expected to increase.
• Free trade agreements provide India a comparative advantage in the export segment as
compared to its competitors – China, Bangladesh and Pakistan – as they create
opportunities for manufacturers to supply to potential markets in East Asia.
• Low production cost continues to be an advantage for the sector and, consequently,
demand from existing foreign markets continues to increase.
3
Assistant Fashion Designer
• Structural changes in the sector, with a shift from vertically disintegrated to integrated large
firms, with automated machines for yarn and fabric production
• Increased spending on research and development to enter the specialized fabrics and
technical textiles sector
• Favourable policy environment to support domestic and foreign investments and the
implementation of schemes to enhance the production capacity and improve technology
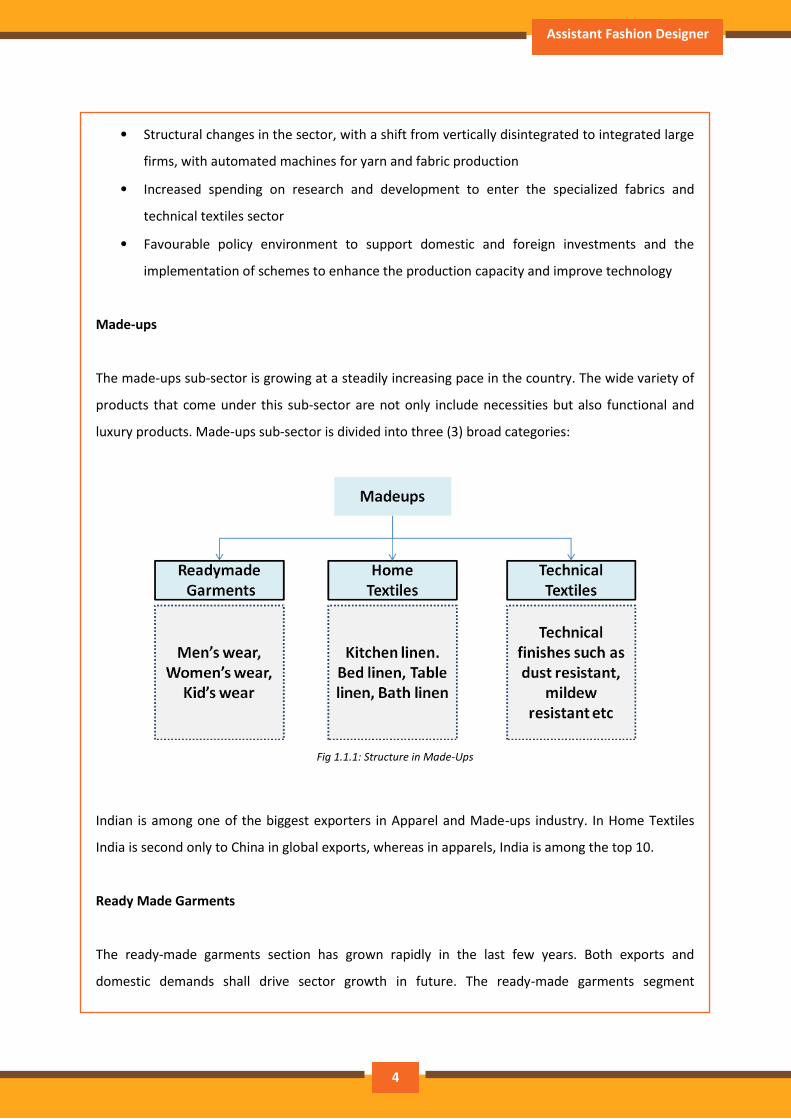
Made-ups
The made-ups sub-sector is growing at a steadily increasing pace in the country. The wide variety of
products that come under this sub-sector are not only include necessities but also functional and
luxury products. Made-ups sub-sector is divided into three (3) broad categories:
Fig 1.1.1: Structure in Made-Ups
Indian is among one of the biggest exporters in Apparel and Made-ups industry. In Home Textiles
India is second only to China in global exports, whereas in apparels, India is among the top 10.
Ready Made Garments
The ready-made garments section has grown rapidly in the last few years. Both exports and
domestic demands shall drive sector growth in future. The ready-made garments segment
4
Participant Handbook
comprises men’s, women’s and kid’s clothing, which may be used for either private (home/office
wear) or commercial (uniforms for school, waiters and flight crew) purposes.
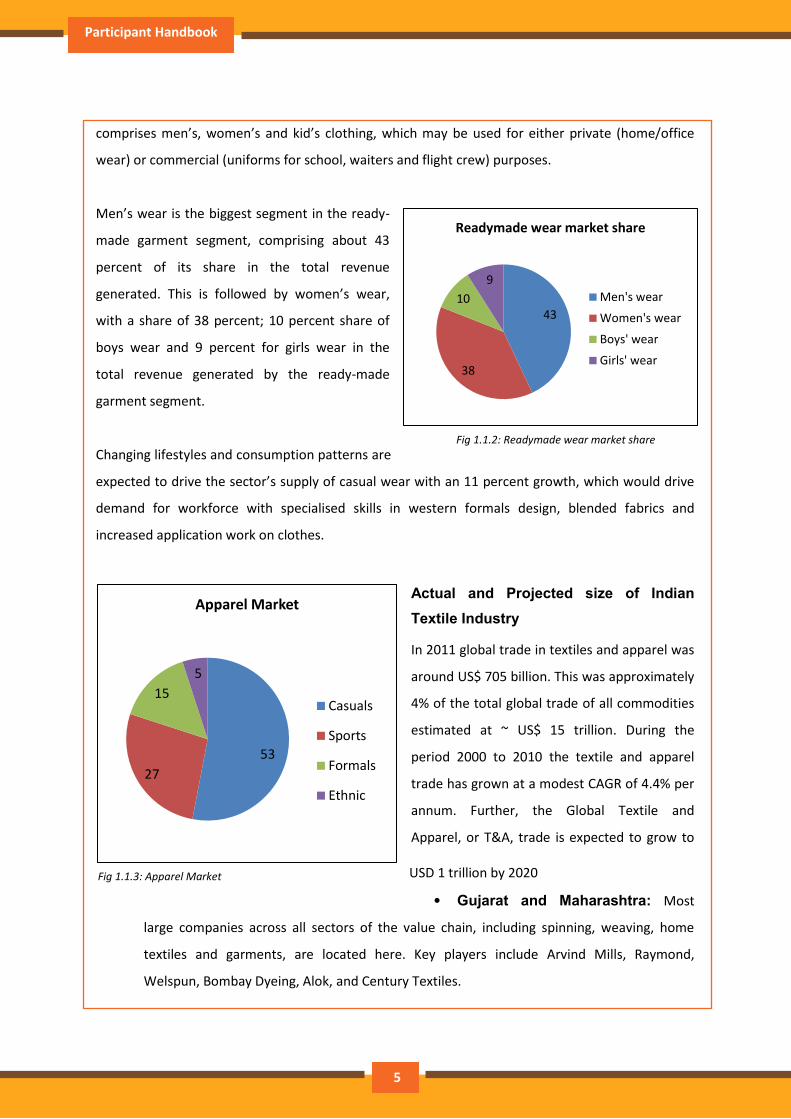
Men’s wear is the biggest segment in the ready-
made garment segment, comprising about 43
percent of its share in the total revenue
generated. This is followed by women’s wear,
with a share of 38 percent; 10 percent share of
boys wear and 9 percent for girls wear in the
total revenue generated by the ready-made
garment segment.
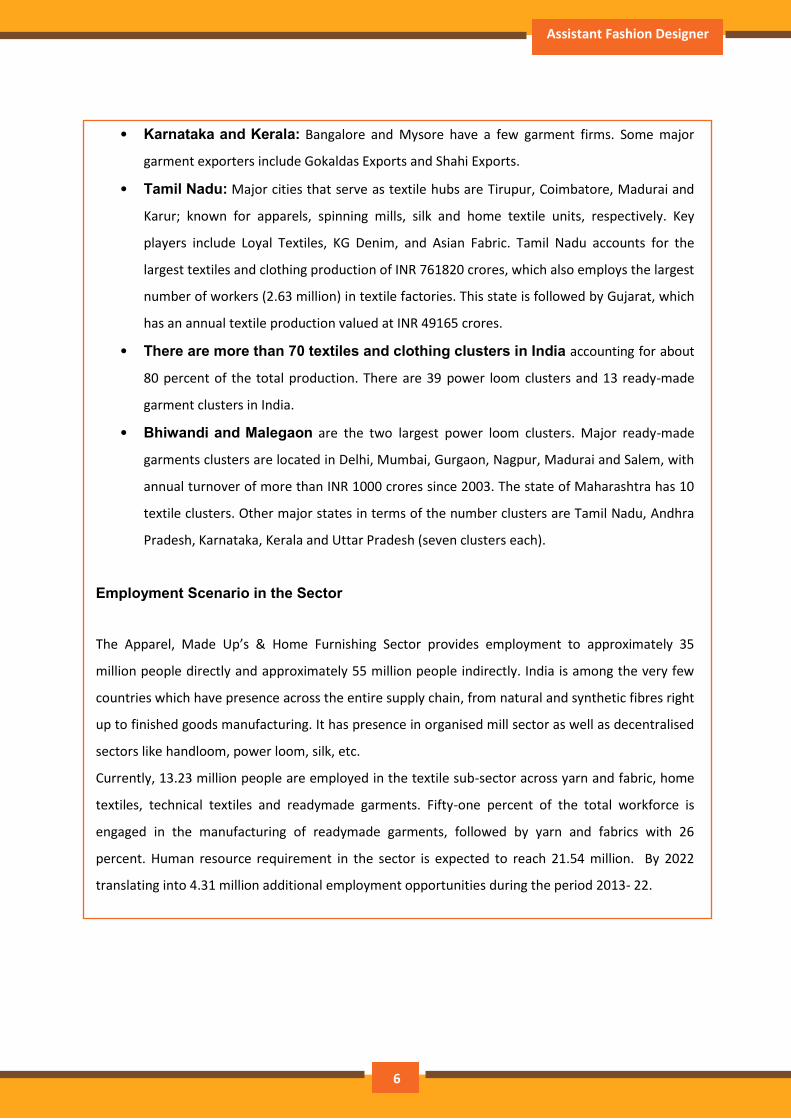
Changing lifestyles and consumption patterns are
expected to drive the sector’s supply of casual wear with an 11 percent growth, which would drive
demand for workforce with specialised skills in western formals design, blended fabrics and
increased application work on clothes.
Actual and Projected size of Indian
Textile Industry
In 2011 global trade in textiles and apparel was
around US$ 705 billion. This was approximately
4% of the total global trade of all commodities
estimated at ~ US$ 15 trillion. During the
period 2000 to 2010 the textile and apparel
trade has grown at a modest CAGR of 4.4% per
annum. Further, the Global Textile and
Apparel, or T&A, trade is expected to grow to
USD 1 trillion by 2020
• Gujarat and Maharashtra: Most
large companies across all sectors of the value chain, including spinning, weaving, home
textiles and garments, are located here. Key players include Arvind Mills, Raymond,
Welspun, Bombay Dyeing, Alok, and Century Textiles.
43
38
10
9
Readymade wear market share
Men's wear
Women's wear
Boys' wear
Girls' wear
53
27
15
5
Apparel Market
Casuals
Sports
Formals
Ethnic
Fig 1.1.2: Readymade wear market share
Fig 1.1.3: Apparel Market
5
Assistant Fashion Designer
• Karnataka and Kerala: Bangalore and Mysore have a few garment firms. Some major
garment exporters include Gokaldas Exports and Shahi Exports.
• Tamil Nadu: Major cities that serve as textile hubs are Tirupur, Coimbatore, Madurai and
Karur; known for apparels, spinning mills, silk and home textile units, respectively. Key
players include Loyal Textiles, KG Denim, and Asian Fabric. Tamil Nadu accounts for the
largest textiles and clothing production of INR 761820 crores, which also employs the largest
number of workers (2.63 million) in textile factories. This state is followed by Gujarat, which
has an annual textile production valued at INR 49165 crores.
• There are more than 70 textiles and clothing clusters in India accounting for about
80 percent of the total production. There are 39 power loom clusters and 13 ready-made
garment clusters in India.
• Bhiwandi and Malegaon are the two largest power loom clusters. Major ready-made
garments clusters are located in Delhi, Mumbai, Gurgaon, Nagpur, Madurai and Salem, with
annual turnover of more than INR 1000 crores since 2003. The state of Maharashtra has 10
textile clusters. Other major states in terms of the number clusters are Tamil Nadu, Andhra
Pradesh, Karnataka, Kerala and Uttar Pradesh (seven clusters each).
Employment Scenario in the Sector
The Apparel, Made Up’s & Home Furnishing Sector provides employment to approximately 35
million people directly and approximately 55 million people indirectly. India is among the very few
countries which have presence across the entire supply chain, from natural and synthetic fibres right
up to finished goods manufacturing. It has presence in organised mill sector as well as decentralised
sectors like handloom, power loom, silk, etc.
Currently, 13.23 million people are employed in the textile sub-sector across yarn and fabric, home
textiles, technical textiles and readymade garments. Fifty-one percent of the total workforce is
engaged in the manufacturing of readymade garments, followed by yarn and fabrics with 26
percent. Human resource requirement in the sector is expected to reach 21.54 million. By 2022
translating into 4.31 million additional employment opportunities during the period 2013- 22.
6
Participant Handbook
Exercise
1) Indian Textile and Clothing industry is the second largest manufacturer in the world?
a) Yes
b) No
2) Madeups sector comprises of readymade garments, Home Textiles and Technical Textiles?
a) Yes
b) No
3) Which among the following is the biggest sector in the ready-made garments segment?
a) Men’s wear
b) Women’s wear
c) Kid’s wear
d) None of these
4) Which among the following is the two largest power loom cluster?
a) Bhiwandi and Malegaon
b) Gurgaon and Nagpur
c) Karnataka and Kerala
d) Delhi and Mumbai
5) Which among the following categories has the largest share in the market?
a) Casuals
b) Formals
c) Ethnic
d) Active wear
7
Assistant Fashion Designer
UNIT 1.2: Process Flow in Garment industry
Unit Objectives
At the end of this unit, participants will be able to:
• Identify own role in the garment manufacturing process flow
• Summarize the process flow in a Garment Manufacturing Unit
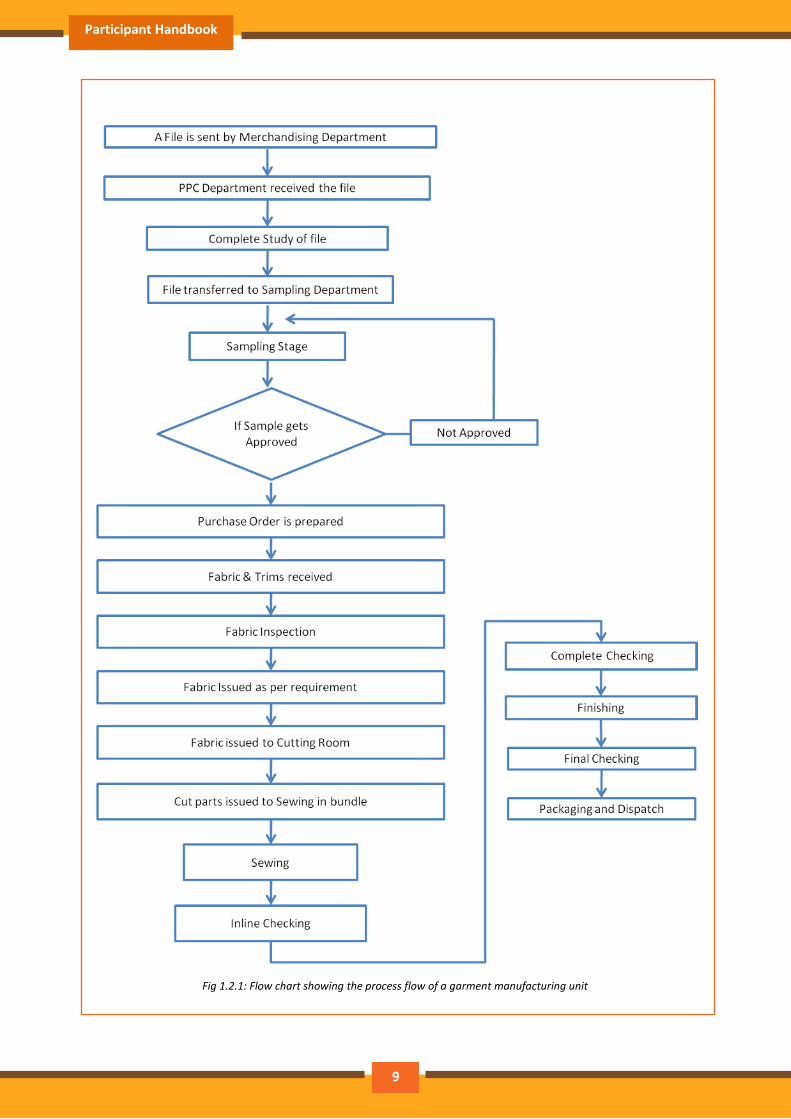
1.2.1. Process Flow of a Garment Industry
Garment manufacturing involves several processes from receiving an order to dispatching the same.
A process flow chart is an easy diagrammatic way of showing how raw materials are moved from
one process to another until we get the final desired product.
Widely the whole apparel process flow can be divided into three broad categories:
Pre-production processes: This includes sampling, sourcing of raw materials, approvals, PP
meetings etc.
Production processes: These basically include cutting and sewing
Post-production processes: This includes thread trimming, pressing, folding and packing,
shipment inspection etc.
There are various departments in an Apparel Manufacturing unit, who play a pivotal role in the
entire production process. The departments are mentioned below:
i) Fabric Store
ii) Trim Store and Packing
Warehouse
iii) Textile Testing
Laboratory
iv) Sampling Department
v) CAD Department
vi) Cutting Department
vii) Sewing Department
viii) Design Department
ix) Quality Assurance
Department
x) Pressing Department
xi) Final Inspection
Department
xii) Packaging Department
xiii) Industrial Engineering
Department
xiv) Human Resource
Department
xv) Accounts and Costing
Department
xvi) Excise and Export
Documentation
Department
xvii) Shipping Department
xviii) Maintenance
Department
8
Participant Handbook
Fig 1.2.1: Flow chart showing the process flow of a garment manufacturing unit
9
Assistant Fashion Designer
Exercise
1) Which among the following production stages include cutting and sewing?
a) Pre-production
b) Post-Production
c) Shipment
d) Testing
2) Which among the following is an action taken in the post-production process?
a) Sewing
b) Fabric Spreading
c) Thread-trimming
d) None of these
3) Sourcing of raw materials is done in which stage of production?
a) Pre-production
b) During Production
c) Post Production
d) Any of these
10
Participant Handbook
UNIT 1.3: Quality standards in garment industry
Unit Objectives
At the end of this unit, participants will be able to:
• Know the quality standards of the industry
1.3.1. Organizational Structure in Quality Department
Garment Factories generally have a dedicated quality department which is lead by a Quality Head.
There are quality executives stationed in each department to ensure quality in each department.
Quality Control Department plays an important role in producing quality garment right first time.
Structure of quality control department and activities of various quality personnel in a garment
export house are explained
In garment manufacturing quality personnel are appointed in each section (department) to ensure
quality output at end of each process.
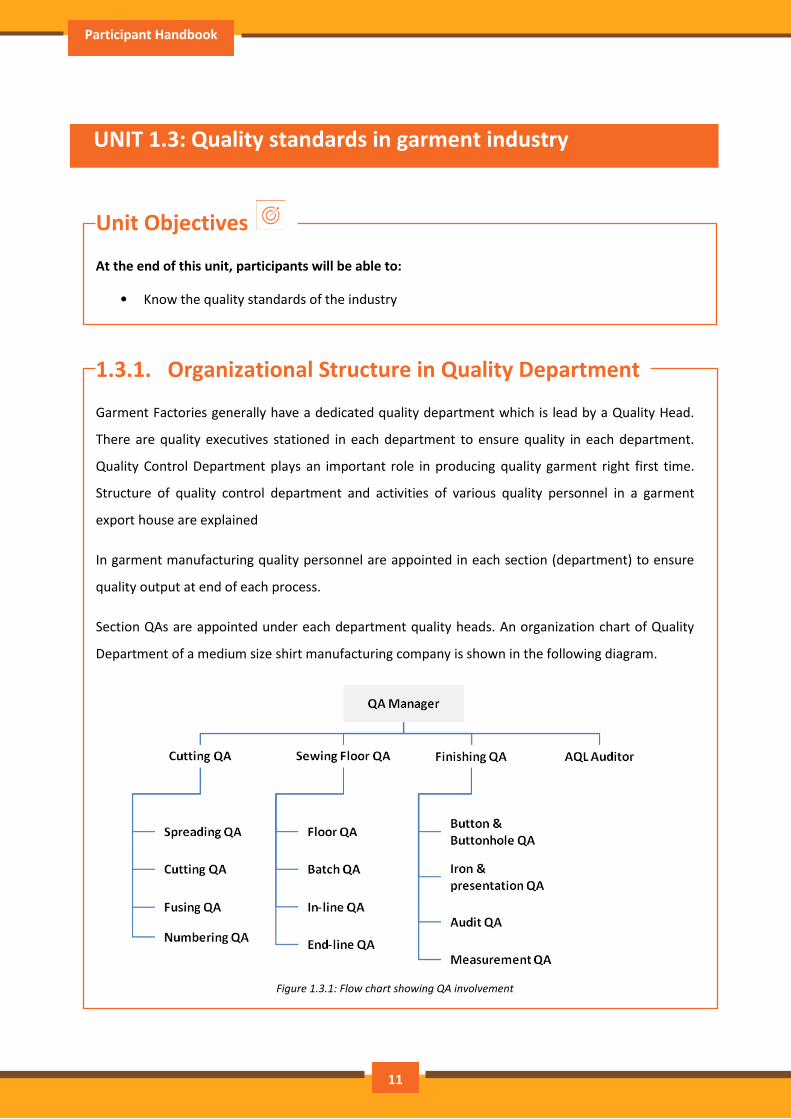
Section QAs are appointed under each department quality heads. An organization chart of Quality
Department of a medium size shirt manufacturing company is shown in the following diagram.
Figure 1.3.1: Flow chart showing QA involvement
11
Assistant Fashion Designer
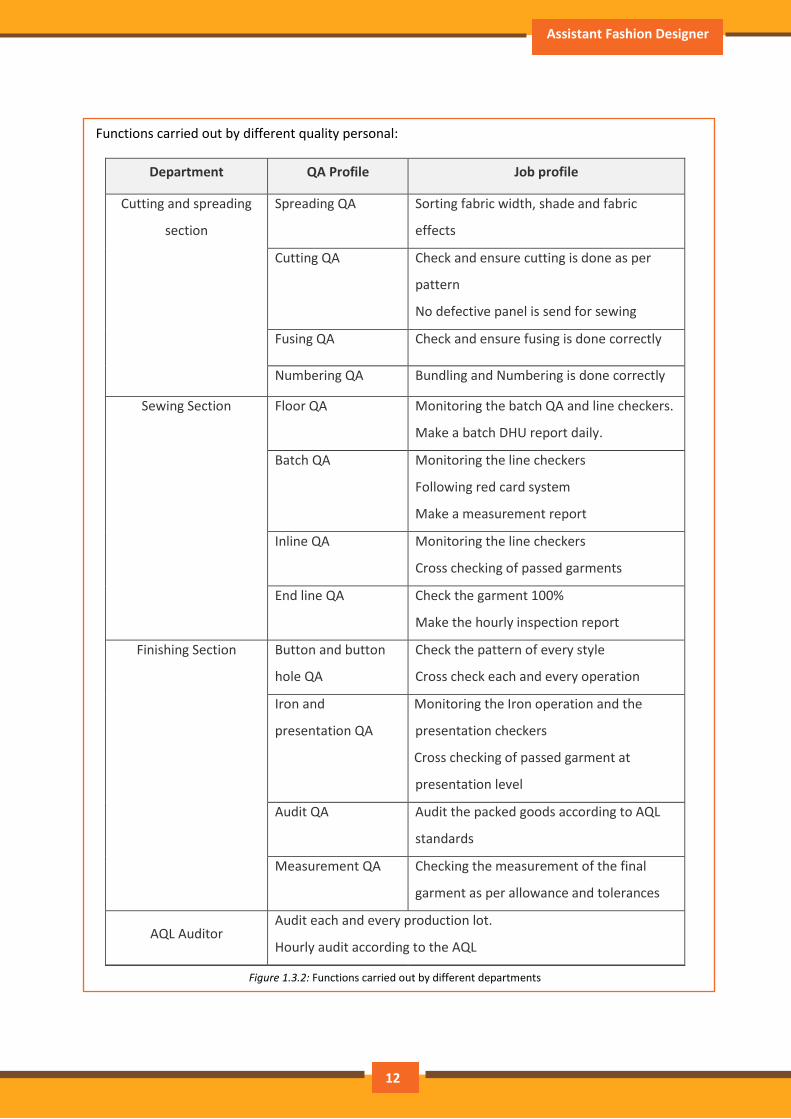
Functions carried out by different quality personal:
Department QA Profile Job profile
Cutting and spreading
section
Spreading QA
Sorting fabric width, shade and fabric
effects
Cutting QA Check and ensure cutting is done as per
pattern
No defective panel is send for sewing
Fusing QA Check and ensure fusing is done correctly
Numbering QA Bundling and Numbering is done correctly
Sewing Section
Floor QA Monitoring the batch QA and line checkers.
Make a batch DHU report daily.
Batch QA
Monitoring the line checkers
Following red card system
Make a measurement report
Inline QA
Monitoring the line checkers
Cross checking of passed garments
End line QA
Check the garment 100%
Make the hourly inspection report
Finishing Section
Button and button
hole QA
Check the pattern of every style
Cross check each and every operation
Iron and
presentation QA
Monitoring the Iron operation and the
presentation checkers
Cross checking of passed garment at
presentation level
Audit QA
Audit the packed goods according to AQL
standards
Measurement QA Checking the measurement of the final
garment as per allowance and tolerances
AQL Auditor Audit each and every production lot.
Hourly audit according to the AQL
Figure 1.3.2: Functions carried out by different departments
14
12
Participant Handbook
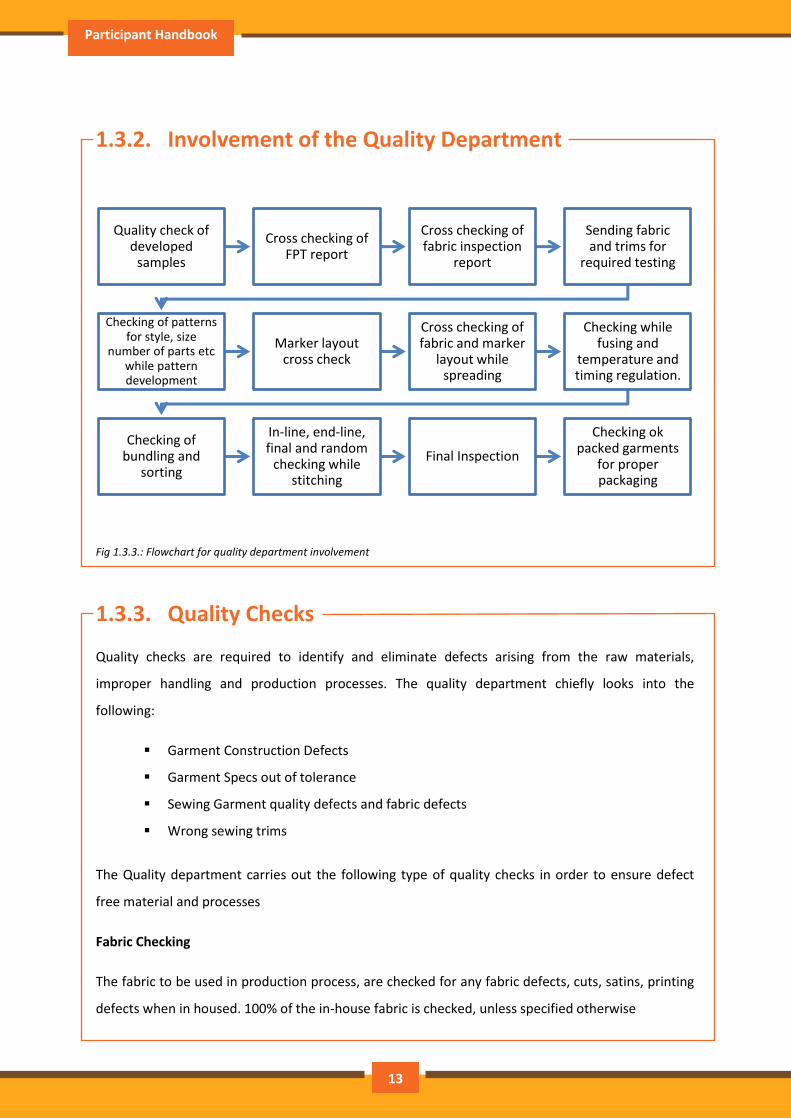
1.3.2. Involvement of the Quality Department
Fig 1.3.3.: Flowchart for quality department involvement
1.3.3. Quality Checks
Quality checks are required to identify and eliminate defects arising from the raw materials,
improper handling and production processes. The quality department chiefly looks into the
following:
Garment Construction Defects
Garment Specs out of tolerance
Sewing Garment quality defects and fabric defects
Wrong sewing trims
The Quality department carries out the following type of quality checks in order to ensure defect
free material and processes
Fabric Checking
The fabric to be used in production process, are checked for any fabric defects, cuts, satins, printing
defects when in housed. 100% of the in-house fabric is checked, unless specified otherwise
Quality check of developed
samples
Cross checking of FPT report
Cross checking of fabric inspection
report
Sending fabric and trims for
required testing
Checking of patterns for style, size
number of parts etc while pattern development
Marker layout cross check
Cross checking of fabric and marker
layout while spreading
Checking while fusing and
temperature and timing regulation.
Checking of bundling and
sorting
In-line, end-line, final and random
checking while stitching
Final Inspection
Checking ok packed garments
for proper packaging
13
Assistant Fashion Designer
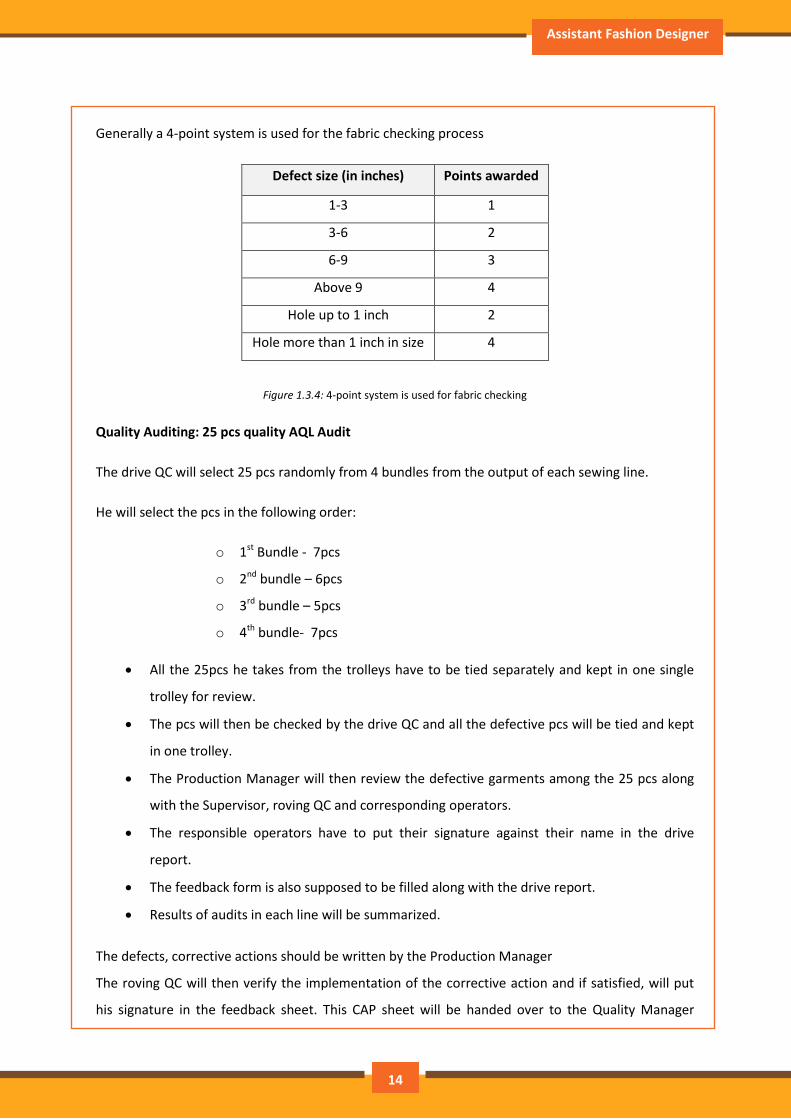
Generally a 4-point system is used for the fabric checking process
Defect size (in inches) Points awarded
1-3 1
3-6 2
6-9 3
Above 9 4
Hole up to 1 inch 2
Hole more than 1 inch in size 4
Figure 1.3.4: 4-point system is used for fabric checking
Quality Auditing: 25 pcs quality AQL Audit
The drive QC will select 25 pcs randomly from 4 bundles from the output of each sewing line.
He will select the pcs in the following order:
o 1st Bundle - 7pcs
o 2nd bundle – 6pcs
o 3rd bundle – 5pcs
o 4th bundle- 7pcs
All the 25pcs he takes from the trolleys have to be tied separately and kept in one single
trolley for review.
The pcs will then be checked by the drive QC and all the defective pcs will be tied and kept
in one trolley.
The Production Manager will then review the defective garments among the 25 pcs along
with the Supervisor, roving QC and corresponding operators.
The responsible operators have to put their signature against their name in the drive
report.
The feedback form is also supposed to be filled along with the drive report.
Results of audits in each line will be summarized.
The defects, corrective actions should be written by the Production Manager
The roving QC will then verify the implementation of the corrective action and if satisfied, will put
his signature in the feedback sheet. This CAP sheet will be handed over to the Quality Manager
14
Participant Handbook
within an hour after the meeting. The feedback sheet will then be verified by the Quality Manager
and he will also put his signature after the verification.
Sewing Quality Audit
The audit report will be submitted to the Quality Assurance manager/Production manager to take
necessary actions after drive audit of each line. The summary of audits for the day will be submitted
to Quality Assurance Manager next day morning. The issues faced in the assembly lines will be
discussed and sorted out with the help of Technical manager and QA Manager.GM-QA will be
informed if they were not able to sort out the issue.
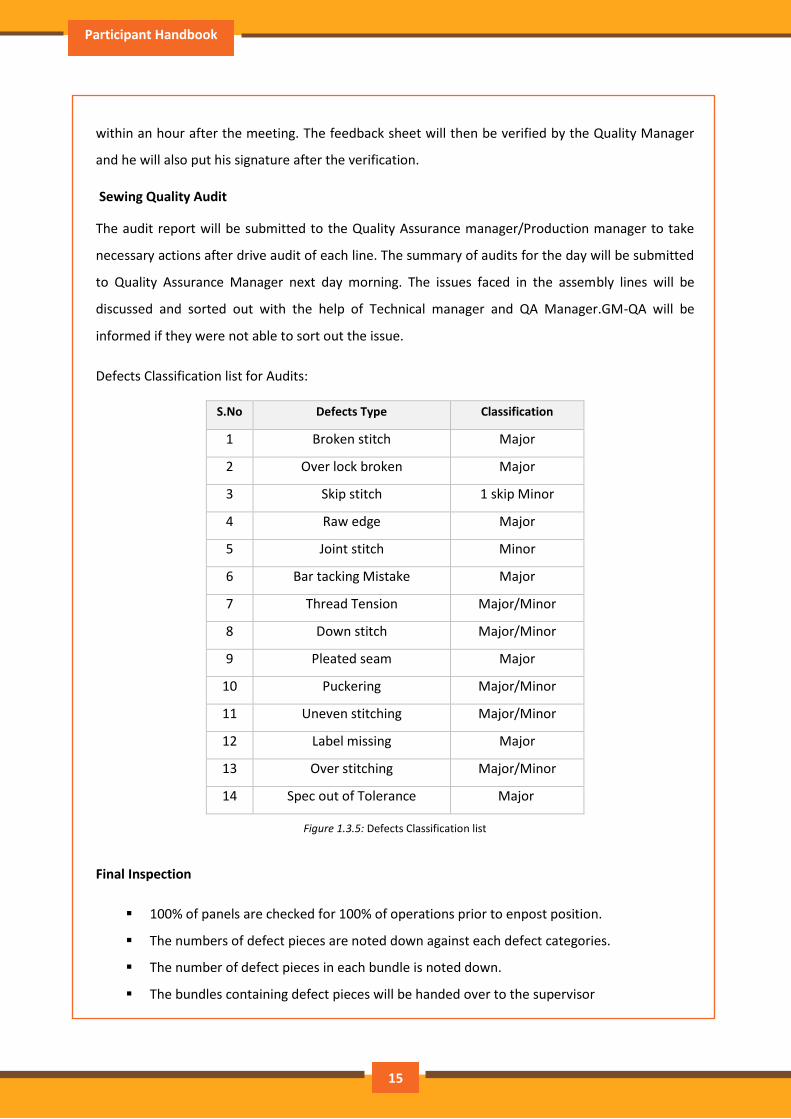
Defects Classification list for Audits:
S.No Defects Type Classification
1 Broken stitch Major
2 Over lock broken Major
3 Skip stitch 1 skip Minor
4 Raw edge Major
5 Joint stitch Minor
6 Bar tacking Mistake Major
7 Thread Tension Major/Minor
8 Down stitch Major/Minor
9 Pleated seam Major
10 Puckering Major/Minor
11 Uneven stitching Major/Minor
12 Label missing Major
13 Over stitching Major/Minor
14 Spec out of Tolerance Major
Figure 1.3.5: Defects Classification list
Final Inspection
100% of panels are checked for 100% of operations prior to enpost position.
The numbers of defect pieces are noted down against each defect categories.
The number of defect pieces in each bundle is noted down.
The bundles containing defect pieces will be handed over to the supervisor
15
Assistant Fashion Designer
The time of sending the defect pieces as well as time of receiving will be noted down
Ensure that the defect pieces are attended promptly.
All specs will be checked and noted down for 2 pieces each in all bundles checked.
Roving Inspection
Roving QC will be inspecting 5 pcs per bundle in all the operation randomly and finds any defects,
needs to control and eliminate the problems/defects instead further producing in the line causing
more defective garments. Hence we will get the confidence of getting better quality in the sewing
process.
Roving QC should have the technical meeting report before starting cutting / sewing of a new
style
He needs to have correct measurement sheet for the style.
Quality specification sheet should be prepared and hang in front of sewing machine operator
before the production starts.
Follow operation /operator wise and set the required quality standards as per the buyer
requirement
The operators are identified by his quality index number.
Operator will be selected from the random Index number table.
Roving QC will note down the name of the operator and operation. He will check a sample of 5
pcs from the just completed bundle.
If he finds 1-defect pieces, he will stop checking and hoist the “Green Flag” to the operator.
The bundle will be handed over to the supervisor. He has to get the pieces corrected by the
operator and hand over to the roving QC.
The roving QC will check five pcs in that bundle plus sample of each randomly in 3 subsequent
bundles to ensure the problem is actually corrected.
The Green Flag will be lowered.
Measurement should be taken covering all the sizes daily to verify spec are within tolerance.
Quality monitoring board should be filled with defect details and poor quality operators list of
the line.
16
Participant Handbook
Exercise
1. Which among the following QA would be working in the Cutting Department?
a) Spreading QA
b) Cutting QA
c) Fusing QA
d) All of these
2. Which among the following QA checks the garment 100%?
a) Inline QA
b) End line QA
c) Floor QA
d) Batch QA
3. Which among the following QA is responsible for checking that the garments are as per allowance
and tolerances?
a) Measurement QA
b) Batch QA
c) Floor QA
d) Inline QA
17
Assistant Fashion Designer
UNIT 1.4: Roles and Responsibilities of an Assistant Fashion
Designer
Unit Objectives
At the end of this unit, participants will be able to:
• Know who is Assistant Fashion Designer
• List the roles and responsibilities of an Assistant Fashion Designer
1.4.1. Job Description and Attributes
An Assistant Fashion Designer should have the skills and knowledge to develop fashion design briefs
and manage the development of design concepts for commercial production. The Initial process
includes conducting market research and trend analysis for the particular season and identifying a
theme for the collection; then creating a mood board and color board based on the theme, develop
an entire range according to the business plan and as per the theme board. After finalization on the
range with the team, create the techpack for each style. Work with different teams to create a
prototype design based on the techpack. Evaluation of the sample and documentation of the same
is also done by the designer.
This job requires the individual to visualize and create the design by hand or using illustration
software (Corel Draw, Illustrator, Photoshop etc.). A designer should be up to date with emerging
fashion trends, as well as general trends relating to fabrics, colours and shapes. He/she should also
have good communication skills, good sense of aesthetics, sound knowledge of sewing and pattern
making
1.4.2. Roles and responsibilities of a Assistant Fashion
Designer
The key roles and responsibilities of an Assistant Fashion Designer:
Conduct fashion design research
18
Participant Handbook
Determine key criteria for design brief
Confirm design brief
Specify design processes
Implement design processes
Evaluate design development process
Complete documentation
Exercise
1. Which among the following aspects of design does an assistant fashion designer work on?
a) Color
b) Fabric
c) Shape
d) All of these
2. What are the duties and responsibilities of Assistant Fashion Designer?
__________________________________________________________________________________
__________________________________________________________________________________
__________________________________________________________________________________
__________________________________________________________________________________
__________________________________________________________________________________
__________________________________________________________________________________
19
Assistant Fashion Designer
2. Prepare to Make a
Design Collection
Unit 2.1 – Tools and Equipment Required
Unit 2.2 – Design Understanding
Unit 2.3 – Garment Understanding
Unit 2.4 – Garment Style Lines
Unit 2.5 – Surface development in Garment
Unit 2.6 - Trend Research
Unit 2.7 – Type of Sewing Machine
Unit 2.8 – Pattern Making
Unit 2.9 – Garment Construction
Unit 2.10 – Garment Costing
Unit 2.11 – CAD/ CAM
Unit 2.12 – Design Creation
AMH/N 1210
24

Participant Handbook
Key Learning Outcomes
At the end of this module, participants will be able to:
• Identify different tools and equipment’s involved in sewing, finishing and pattern making
• Identify the Elements and Principle of design
• Discuss and make use of the color wheel
21
Assistant Fashion Designer
UNIT 2.1: Tool and Equipment’s required
Unit Objectives
At the end of this unit, participants will be able to:
• Identify tools used in pattern making, sewing and finishing
• Make use of tools used in pattern making, sewing and finishing
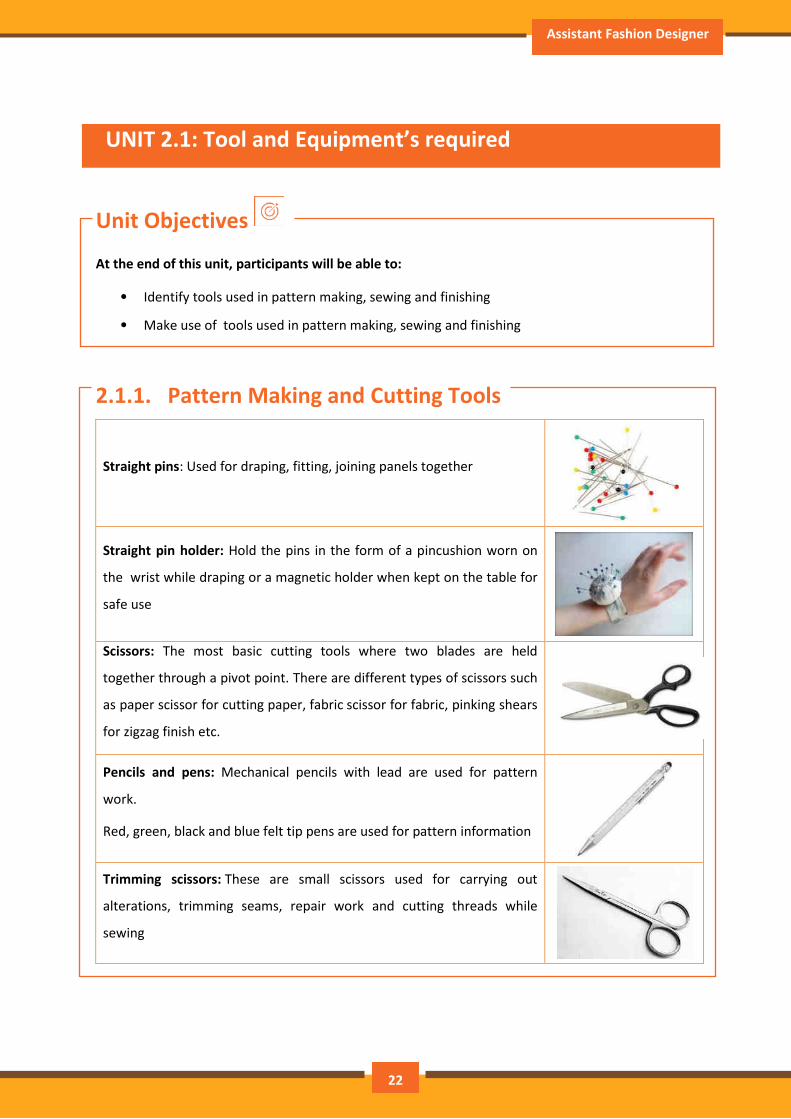
2.1.1. Pattern Making and Cutting Tools
Straight pins: Used for draping, fitting, joining panels together
Straight pin holder: Hold the pins in the form of a pincushion worn on
the wrist while draping or a magnetic holder when kept on the table for
safe use
Scissors: The most basic cutting tools where two blades are held
together through a pivot point. There are different types of scissors such
as paper scissor for cutting paper, fabric scissor for fabric, pinking shears
for zigzag finish etc.
Pencils and pens: Mechanical pencils with lead are used for pattern
work.
Red, green, black and blue felt tip pens are used for pattern information
Trimming scissors: These are small scissors used for carrying out
alterations, trimming seams, repair work and cutting threads while
sewing
22
Participant Handbook
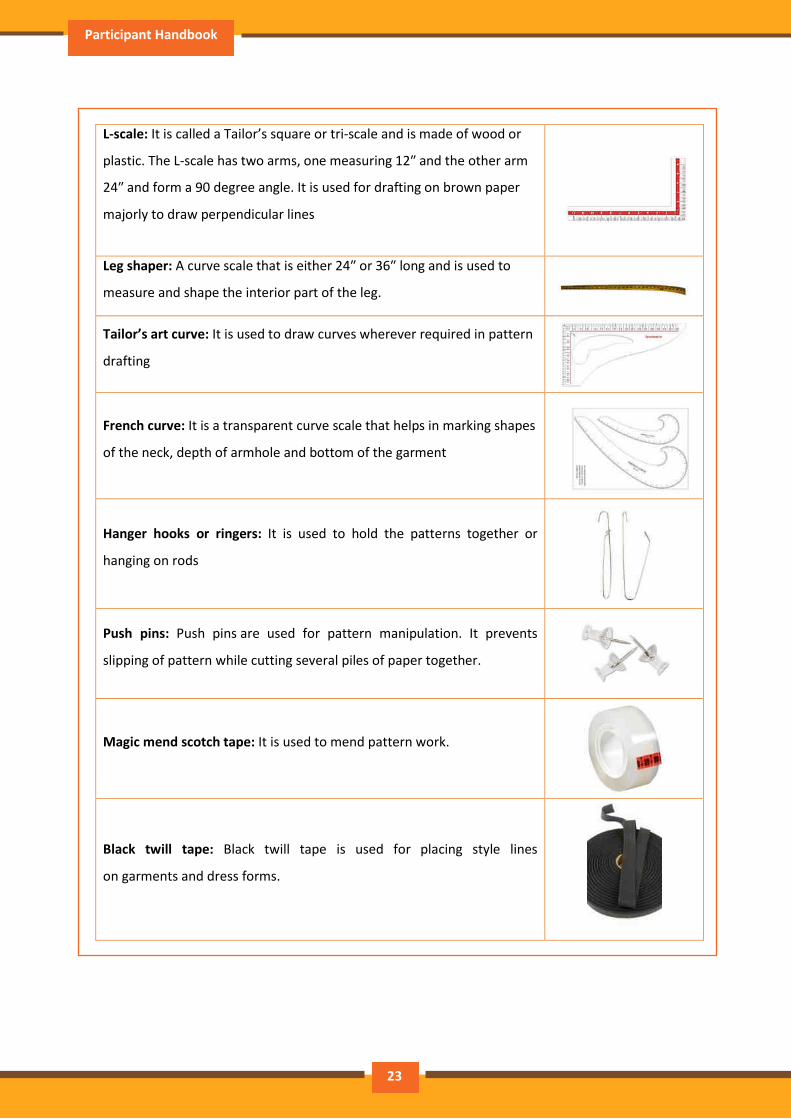
L-scale: It is called a Tailor’s square or tri-scale and is made of wood or
plastic. The L-scale has two arms, one measuring 12″ and the other arm
24″ and form a 90 degree angle. It is used for drafting on brown paper
majorly to draw perpendicular lines
Leg shaper: A curve scale that is either 24″ or 36″ long and is used to
measure and shape the interior part of the leg.
Tailor’s art curve: It is used to draw curves wherever required in pattern
drafting
French curve: It is a transparent curve scale that helps in marking shapes
of the neck, depth of armhole and bottom of the garment
Hanger hooks or ringers: It is used to hold the patterns together or
hanging on rods
Push pins: Push pins are used for pattern manipulation. It prevents
slipping of pattern while cutting several piles of paper together.
Magic mend scotch tape: It is used to mend pattern work.
Black twill tape: Black twill tape is used for placing style lines
on garments and dress forms.
23
Assistant Fashion Designer
.
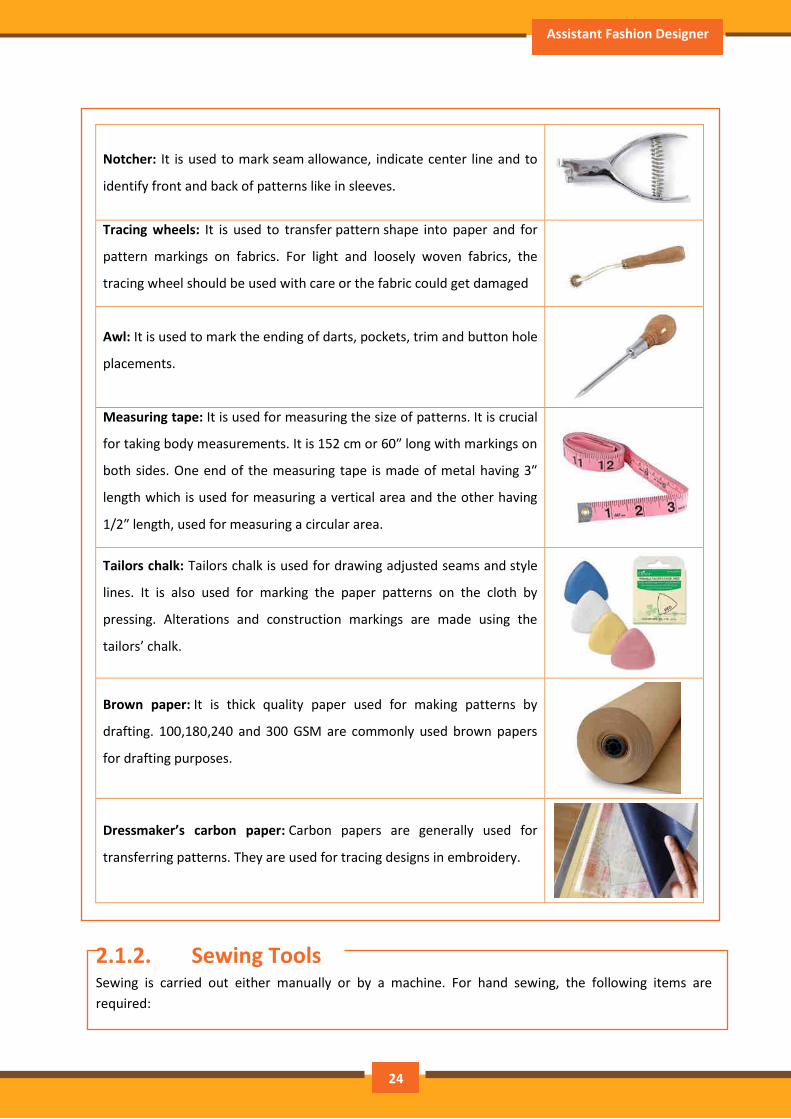
Notcher: It is used to mark seam allowance, indicate center line and to
identify front and back of patterns like in sleeves.
Tracing wheels: It is used to transfer pattern shape into paper and for
pattern markings on fabrics. For light and loosely woven fabrics, the
tracing wheel should be used with care or the fabric could get damaged
Awl: It is used to mark the ending of darts, pockets, trim and button hole
placements.
Measuring tape: It is used for measuring the size of patterns. It is crucial
for taking body measurements. It is 152 cm or 60″ long with markings on
both sides. One end of the measuring tape is made of metal having 3″
length which is used for measuring a vertical area and the other having
1/2″ length, used for measuring a circular area.
Tailors chalk: Tailors chalk is used for drawing adjusted seams and style
lines. It is also used for marking the paper patterns on the cloth by
pressing. Alterations and construction markings are made using the
tailors’ chalk.
Brown paper: It is thick quality paper used for making patterns by
drafting. 100,180,240 and 300 GSM are commonly used brown papers
for drafting purposes.
Dressmaker’s carbon paper: Carbon papers are generally used for
transferring patterns. They are used for tracing designs in embroidery.
2.1.2. Sewing Tools Sewing is carried out either manually or by a machine. For hand sewing, the following items are
required:
24
Participant Handbook
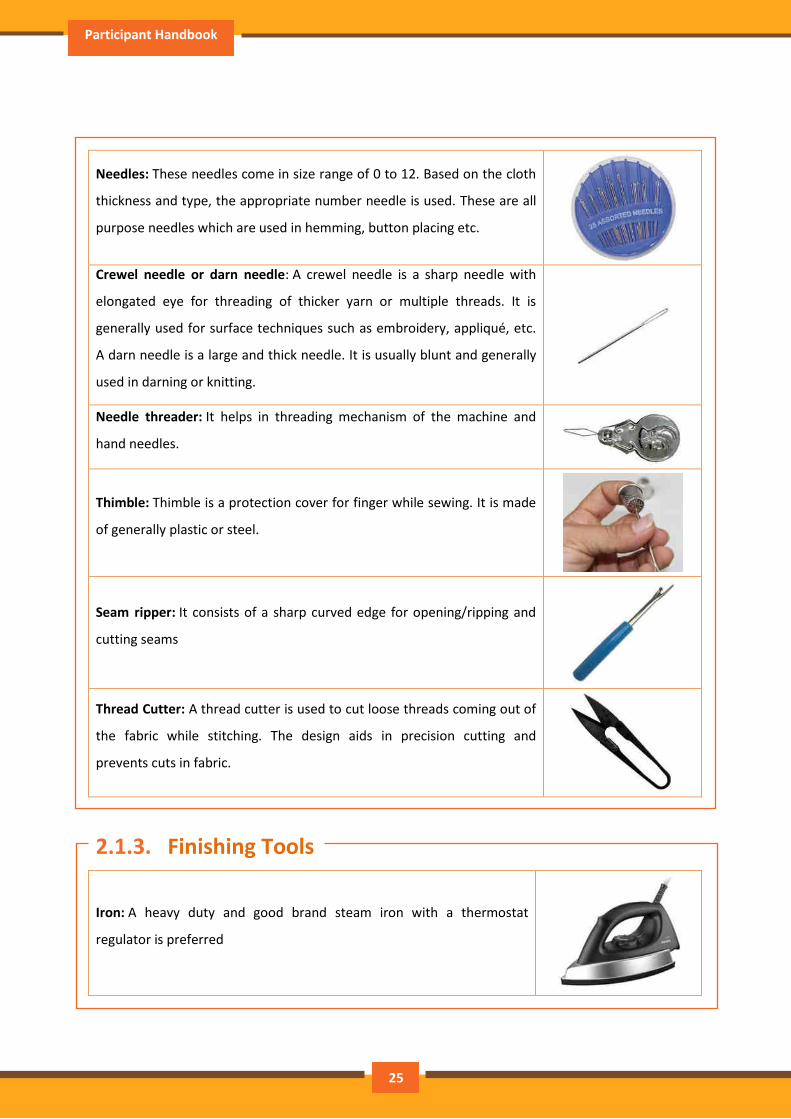
Needles: These needles come in size range of 0 to 12. Based on the cloth
thickness and type, the appropriate number needle is used. These are all
purpose needles which are used in hemming, button placing etc.
Crewel needle or darn needle: A crewel needle is a sharp needle with
elongated eye for threading of thicker yarn or multiple threads. It is
generally used for surface techniques such as embroidery, appliqué, etc.
A darn needle is a large and thick needle. It is usually blunt and generally
used in darning or knitting.
Needle threader: It helps in threading mechanism of the machine and
hand needles.
Thimble: Thimble is a protection cover for finger while sewing. It is made
of generally plastic or steel.
Seam ripper: It consists of a sharp curved edge for opening/ripping and
cutting seams
Thread Cutter: A thread cutter is used to cut loose threads coming out of
the fabric while stitching. The design aids in precision cutting and
prevents cuts in fabric.
2.1.3. Finishing Tools
Iron: A heavy duty and good brand steam iron with a thermostat
regulator is preferred
25
Assistant Fashion Designer
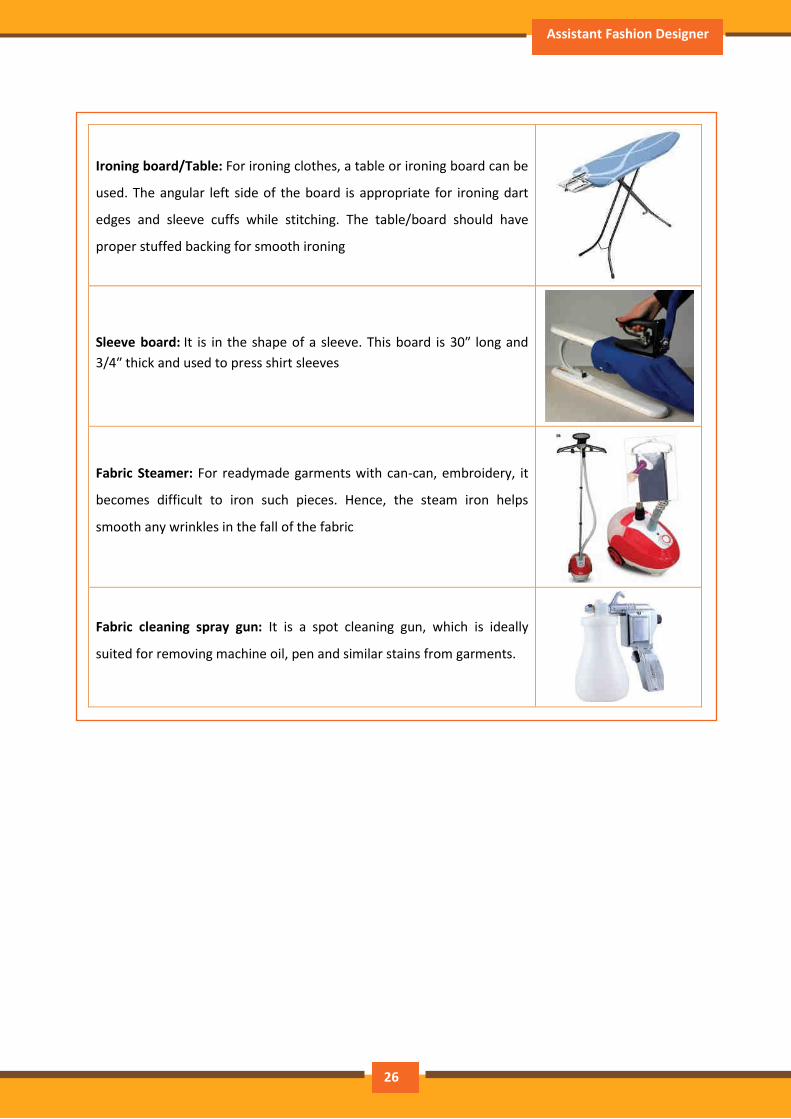
Ironing board/Table: For ironing clothes, a table or ironing board can be
used. The angular left side of the board is appropriate for ironing dart
edges and sleeve cuffs while stitching. The table/board should have
proper stuffed backing for smooth ironing
Sleeve board: It is in the shape of a sleeve. This board is 30″ long and 3/4″ thick and used to press shirt sleeves
Fabric Steamer: For readymade garments with can-can, embroidery, it
becomes difficult to iron such pieces. Hence, the steam iron helps
smooth any wrinkles in the fall of the fabric
Fabric cleaning spray gun: It is a spot cleaning gun, which is ideally
suited for removing machine oil, pen and similar stains from garments.
26
Participant Handbook
Exercise
1. Which among the following is intended to hold pins?
a) Pin Holder
b) Pin cushion
c) Both of these
d) None of these
2. Which among the following is a sewing tool?
a) Thimble
b) Tracing Wheel
c) Notcher
d) None of these
3. Which among the following is used to press shirt sleeves?
a) Iron-board
b) Sleeve-board
c) Leg-board
d) Tapered-board
4. Name at least five of each of the following:
a) Cutting Tools
b) Sewing Tools
c) Finishing Tools
__________________________________________________________________________________
__________________________________________________________________________________
__________________________________________________________________________________
__________________________________________________________________________________
__________________________________________________________________________________
__________________________________________________________________________________
__________________________________________________________________________________
__________________________________________________________________________________
27
Assistant Fashion Designer
UNIT 2.2: Design Understanding
Unit Objectives
At the end of this unit, participants will be able to:
• Know the elements of design
• Discuss the Principle of Design
• Make use of the color wheel
2.2.1. Elements of Design
One of the important aspects in design creation is the interaction of components with the element
of design. The element and principles of design are flexible and should be interpreted within the
context of current fashion. A design can be defined as an arrangement of lines, shape, colors and
texture that create a visual image. The principles of design are the rates that govern how elements
are combined. The elements are therefore the raw materials that must be combined successfully.
Color: It is the first element to which consumers respond, often selecting or rejecting a garment
because of its color appeal. Therefore, designers must consider their customers and provide colors
that are both appealing and flattering. People connect certain colors with holidays and seasons.
They expect to see earth tones in fall clothing, jewel colors for the holidays, the pastels of flowers in
the early spring, and refreshing white for the summer. All manufacturers include some of these
colors in their lines.
Fabric: Color is interpreted in the medium of the fabric. Fabrics are the designer’s artistic medium,
in that fashion design is essentially sculpture in fabric in relation to the body. Fabric selection is the
selection or creation of an appropriate style for a fabric, or the reverse, the selection of the right
fabric for the design. Next to understanding the needs of the customer and interpreting trends for
them, choosing the fabric suitable for a particular style is one of the most important aspects of
designing.
28
Participant Handbook
The designer chooses fabrics on the basis of fashion trends, quality, performance, price, and
suitability. Fabrics themselves inspire garment design. For example, the softness and drivability of
jersey might inspire gather in a dress. Other designers work the other way around, first getting an
idea, perhaps developing it in a sketch, and then finding the appropriate fabric for it. However the
designer works, he or she must ultimately decide which fabric will work best with a design, or vice
versa. Designers must develop the ability to picture a design already made up in the fabric, this
ability comes through observation and experience.
Line: After selecting the fabric, the designer must consider the other elements of good design. In
this section, the term line refers to the direction of visual interest in a garment created by
construction details such as seams, openings, pleats, gathers, tucks, topstitching, and trims. When
lines combine, space is enclosed and forms and shapes are defined. Lines offer a path of vision for
the eyes when is wearing an object/outfit.
The arrangement of lines in clothing design can cause to appear broader or thinner than what
actually. Lines within a garment are created by darts seams and decorative details. Each kind of line
produces its own special effect. Straight lines and shapes denote force and strength and have a
masculine quality; curved lines are the line of nature, they are graceful give a feminine effect. Lines
are the greatest devices of fashion designers. Since line creates the illusion of height and width, they
can be used to one’s requirement to tone down or exaggerate a particular figure type.
Shapes: It describes the outer dimensions or contour of an object. The shape also encloses space
and imparts a certain character to the object viewed. Through clothing design, the shape of the
human body is often revealed in a natural way, but sometimes even distorted. The shape of clothing
on a human body, communicates silently, the messages about the wearer.
Every fashion period, a shape emerges slowly or evolved suddenly, whatever it is, every period has a
specific shape of garment which once determined can be modified and restyled for variation in
design without changing the basic shape of the garment, it is either are or tight, circular or straight,
a line or raglan. It has been observed that an easy fitting shape of the garment is easily accepted and
largely vitiated as well as has a longevity of style, whereas a tight-fitting garment is generally short-
lived since it is suitable to only perfected figure types. It is therefore advisable that the designer
chooses an easy silhouette to keep on creating for a longer duration.
29
Assistant Fashion Designer
2.2.2. Principle of Design
The principles of design are essential to the development and production of clothing used by
individuals around the world. Each principle has a specific role in creating an aesthetically pleasing
garment or ensemble. The principles of design consist of: balance, proportion (also referred to as
scale), emphasis, and rhythm. When a garment or ensemble uses the elements and principles of
design to create a visual unity, harmony is achieved. Garments often integrate more than one
principle, while drawing from the elements of design to create a cohesive look.
Balance: It implies that there is an equilibrium or uniformity among the parts of a design to achieve
balance, a garment or ensemble should have equal visual weight throughout the design. The use of
structural features, added embellishments, or decorations to a garment contributes to the
appearance of a garment or ensemble being balanced or not. A clothing designer can utilize surface
designs on fabric to construct a garment creating visual balance. Further, color, line, and texture
can impact the balance of a design. For example, cool and light colors have less visual weight than
dark, warm colors. If an individual is wearing a small amount of a dark, warm color it can be
balanced out with a larger amount of cool, light colors. Balance used in clothing design can be
categorized into two groups:
o Formal Balance: When a garment or ensemble has equal visual weight on either side, or is
symmetrical, formal balanced is achieved. The presence of identical details placed equal
distance from the center, such as pockets, seams, pleats, or tucks are good examples of how
formal balance is used in uniforms, blazers, blue jeans, and other common garments.
Formal balance is the most common and inexpensive application of the principles of design
o Informal Balance: To achieve informal balance, a garment is created using asymmetrical
features such as line, color, shapes, and textures. The most common use of informal
balance is when a garment is constructed using fabric that has a diagonal line design or
closures that are off-centered such as a zipper or neckline. Accessories used in an ensemble
can create informal balance that brings interest to a solid color garment
Proportion/Scale: Proportion is the spatial or size relationship of all parts of a design to each other
and the whole garment or ensemble. The design of clothing for the human body requires unequal
parts or garments to be used. A good illustration of this is a dress. The bodice of a dress can be
30
Participant Handbook
smaller than the portion of the dress that goes from the waist to the knee, calf, or ankle. In order
for clothing to have visual appeal on the human body, it is recommended that it flatter the natural
shape of the body of the wearer.
The design details found in clothing can contribute to the overall proportion of an ensemble. Details
such as yokes, collars, pockets, accessories, buttons, and trimmings should be in proportion to the
overall size of a garment. Overall, when all of the parts of a garment or outfit work well together
the result is a well-proportioned look.
Emphasis: It is used to create interest in a garment or to draw attention to a certain part of an
ensemble. When emphasis is used by an individual or a designer, one feature of the ensemble is
visually more prominent in a design than others.
For example, a bright necktie that is contrasting to the color of a men’s dress shirt draws the eye to
the tie rather than the shirt. Therefore, the eye is drawn to an item of emphasis first rather than
other features in the garment or outfit. Examples of items used to create emphasis are: a bow,
appliqué, a monogram, accessories, belts, scarves, neckties, jewelry, decorative trimmings, tucks
gathers, ruffles, and buttons. Color, line, and texture can also be used to draw attention to parts of
the body such as the waist, chest, arms, one shoulder, etc.
Rhythm: Rhythm creates a sense of movement in a design. The eye moves from one feature on the
body to another with the use of this principle. Further, a pattern or texture is created with the
application of rhythm to the surface design of fabrics used in the construction of clothing items or
products. Specific applications of rhythm are classified in the following categories: Gradation,
Opposition, Radical Arrangement, Repetition, and Transition.
Harmony: Harmony occurs when the overall design, garment, or ensemble achieves visual unity.
Wolfe (2011) asserted that when the elements of design (color, shape, line, and texture) are used
effectively within the parameters of the principles of design (balance, proportion, emphasis, and
rhythm) harmony is created. Another consideration of the designer or individual when creating or
choosing clothing is the shape and form of the body. Harmony cannot be achieved unless the
clothing or dress complements the wearer. All parts of the ensemble need to work together to
achieve the desired look. Whether an ensemble is harmonious or not depends upon the subjective
opinion of the observer.
31
Assistant Fashion Designer
The principles of design serve as guidelines for applying the elements of design to a design-related
task. Clothing and fabric designers utilize these guidelines in order to achieve a visually pleasing or
harmonious design that the consumers will integrate into their personal wardrobes. Whether
designing clothing or mixing and matching clothing in a personal wardrobe, the principles of design
can be a useful tool to simplify the process of looking one’s best.
2.2.3. Color Wheel
The color wheel is a basic guide to clothing color matching. While it is acceptable and fashion
forward to embrace the bright block tones and color clashes on the ramp, it's important to
understand how to mix and match colors to ensure a flattering looks. Understanding colors is the
key. The natural order of color is red, orange, yellow, green, and blue, indigo, violet. If the two ends
of this list are connected, the traditional color wheel is created. This is the easiest way to
understand how different colors work together, thus, ensuring your outfits are perfectly matched.
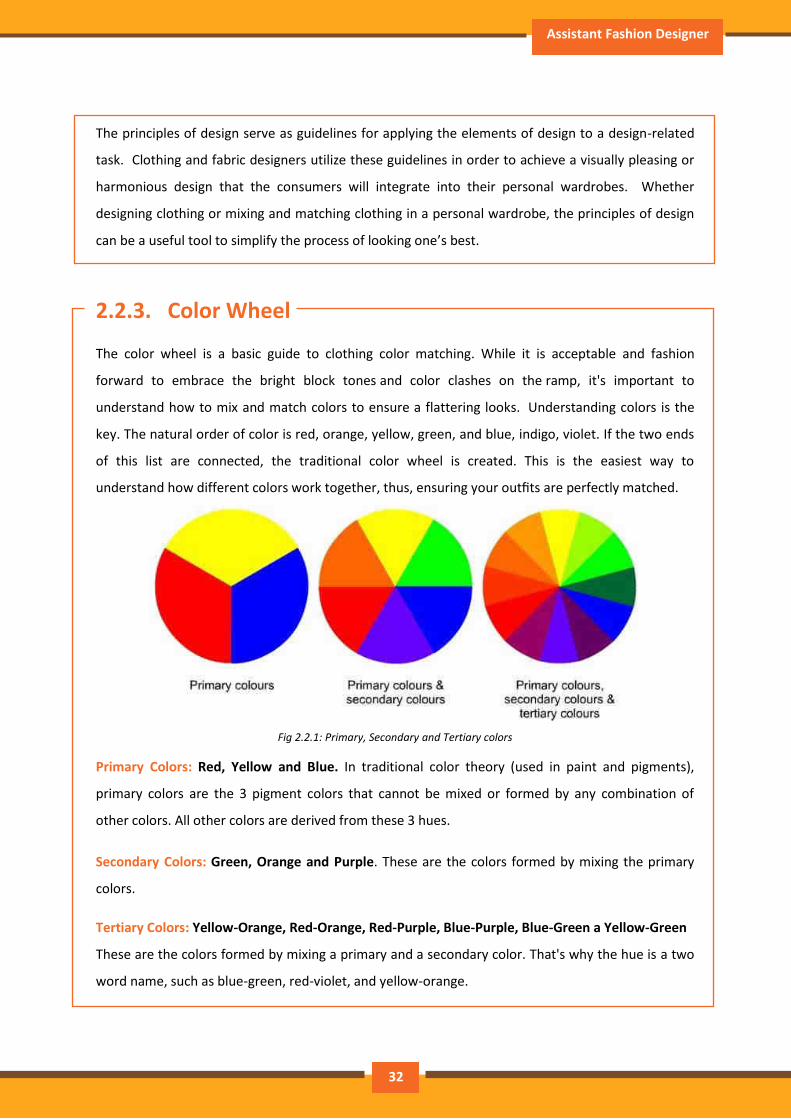
Fig 2.2.1: Primary, Secondary and Tertiary colors
Primary Colors: Red, Yellow and Blue. In traditional color theory (used in paint and pigments),
primary colors are the 3 pigment colors that cannot be mixed or formed by any combination of
other colors. All other colors are derived from these 3 hues.
Secondary Colors: Green, Orange and Purple. These are the colors formed by mixing the primary
colors.
Tertiary Colors: Yellow-Orange, Red-Orange, Red-Purple, Blue-Purple, Blue-Green a Yellow-Green
These are the colors formed by mixing a primary and a secondary color. That's why the hue is a two
word name, such as blue-green, red-violet, and yellow-orange.
32
Participant Handbook
2.2.4. Color Harmony
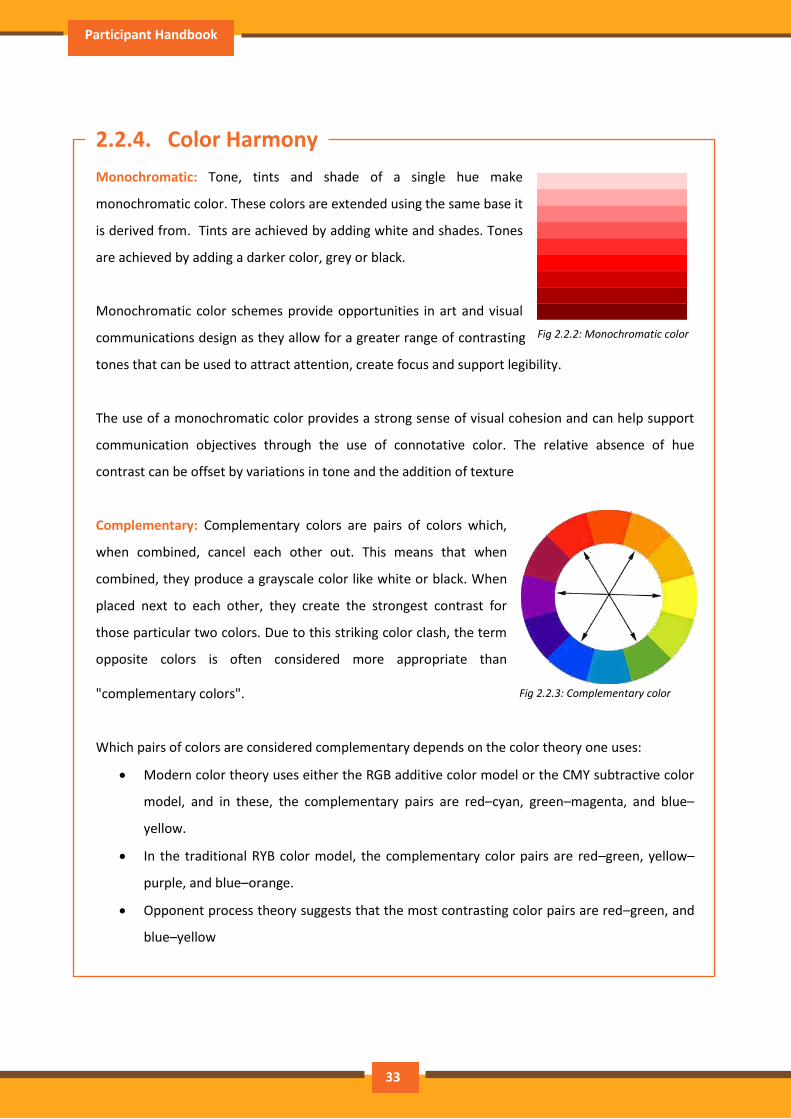
Monochromatic: Tone, tints and shade of a single hue make
monochromatic color. These colors are extended using the same base it
is derived from. Tints are achieved by adding white and shades. Tones
are achieved by adding a darker color, grey or black.
Monochromatic color schemes provide opportunities in art and visual
communications design as they allow for a greater range of contrasting
tones that can be used to attract attention, create focus and support legibility.
The use of a monochromatic color provides a strong sense of visual cohesion and can help support
communication objectives through the use of connotative color. The relative absence of hue
contrast can be offset by variations in tone and the addition of texture
Complementary: Complementary colors are pairs of colors which,
when combined, cancel each other out. This means that when
combined, they produce a grayscale color like white or black. When
placed next to each other, they create the strongest contrast for
those particular two colors. Due to this striking color clash, the term
opposite colors is often considered more appropriate than
"complementary colors".
Which pairs of colors are considered complementary depends on the color theory one uses:
Modern color theory uses either the RGB additive color model or the CMY subtractive color
model, and in these, the complementary pairs are red–cyan, green–magenta, and blue–
yellow.
In the traditional RYB color model, the complementary color pairs are red–green, yellow–
purple, and blue–orange.
Opponent process theory suggests that the most contrasting color pairs are red–green, and
blue–yellow
Fig 2.2.2: Monochromatic color
Fig 2.2.3: Complementary color
33
Assistant Fashion Designer
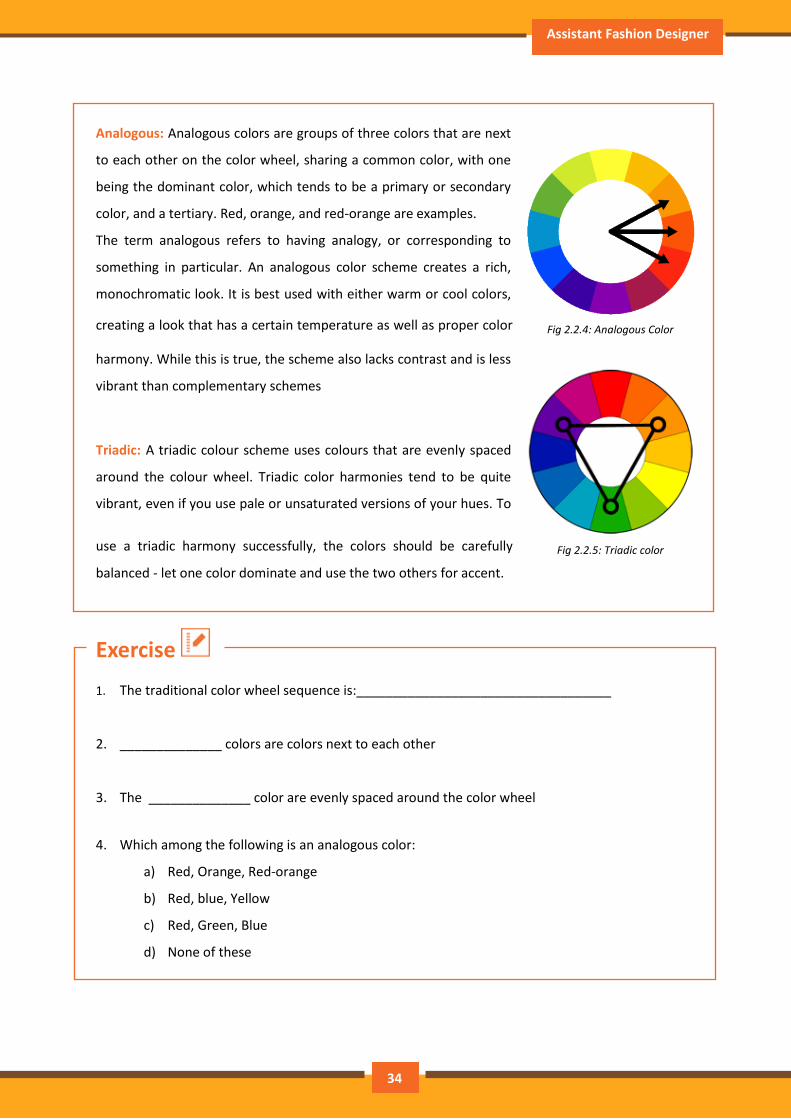
Analogous: Analogous colors are groups of three colors that are next
to each other on the color wheel, sharing a common color, with one
being the dominant color, which tends to be a primary or secondary
color, and a tertiary. Red, orange, and red-orange are examples.
The term analogous refers to having analogy, or corresponding to
something in particular. An analogous color scheme creates a rich,
monochromatic look. It is best used with either warm or cool colors,
creating a look that has a certain temperature as well as proper color
harmony. While this is true, the scheme also lacks contrast and is less
vibrant than complementary schemes
Triadic: A triadic colour scheme uses colours that are evenly spaced
around the colour wheel. Triadic color harmonies tend to be quite
vibrant, even if you use pale or unsaturated versions of your hues. To
use a triadic harmony successfully, the colors should be carefully
balanced - let one color dominate and use the two others for accent.
Exercise
1. The traditional color wheel sequence is:___________________________________
2. ______________ colors are colors next to each other
3. The ______________ color are evenly spaced around the color wheel
4. Which among the following is an analogous color:
a) Red, Orange, Red-orange
b) Red, blue, Yellow
c) Red, Green, Blue
d) None of these
Fig 2.2.4: Analogous Color
Fig 2.2.5: Triadic color
34
Participant Handbook
UNIT 2.3: Garment Understanding
.
Unit Objectives
At the end of this unit, participants will be able to:
• Identify different parts a garment
• Identify different components of a garment
2.3.1. Garment Parts
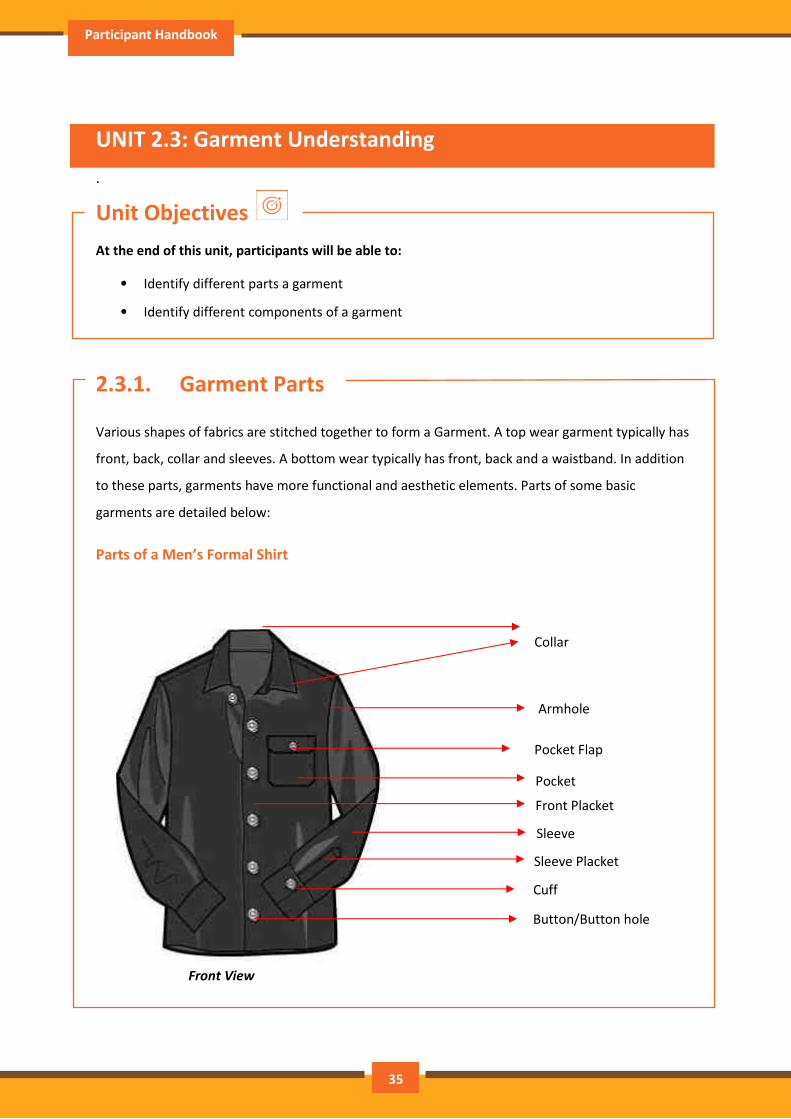
Various shapes of fabrics are stitched together to form a Garment. A top wear garment typically has
front, back, collar and sleeves. A bottom wear typically has front, back and a waistband. In addition
to these parts, garments have more functional and aesthetic elements. Parts of some basic
garments are detailed below:
Parts of a Men’s Formal Shirt
Collar
Armhole
Front Placket
Sleeve
Cuff
Pocket Flap
Sleeve Placket
Front View
Button/Button hole
35
Assistant Fashion Designer
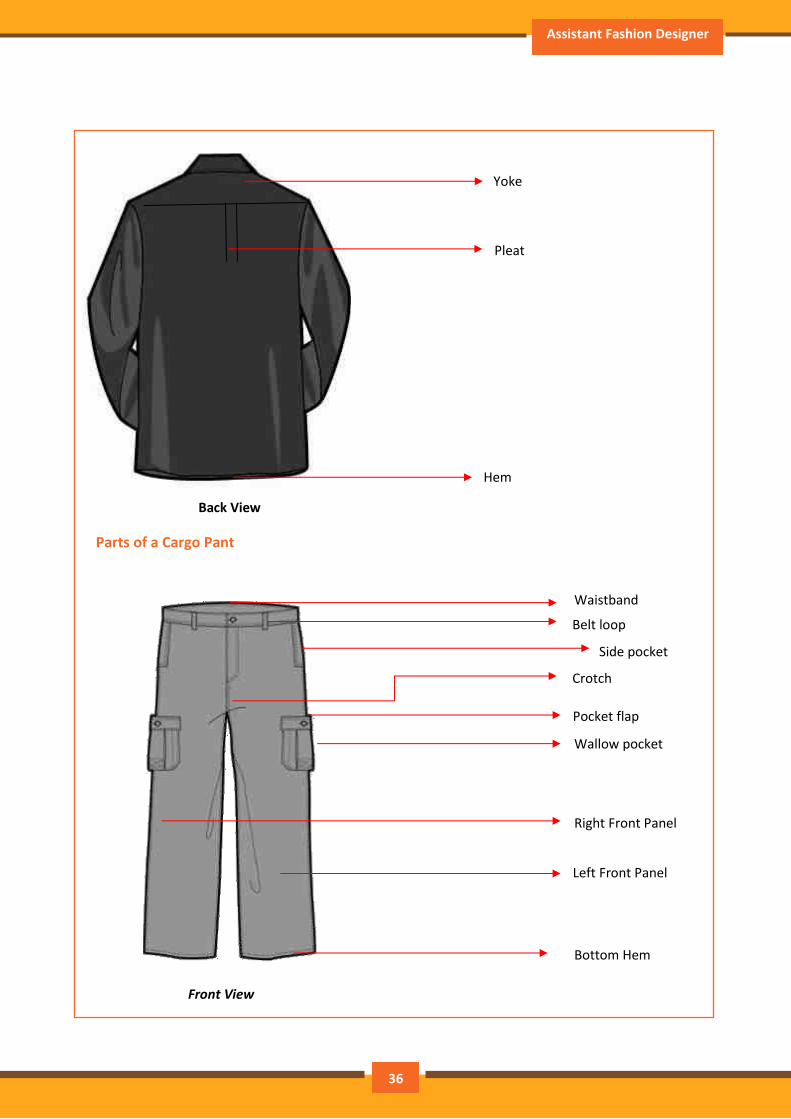
Back View
Parts of a Cargo Pant
Yoke
Pleat
Hem
Side pocket
Belt loop
Waistband
Crotch
Pocket flap
Wallow pocket
Right Front Panel
Left Front Panel
Front View
Bottom Hem
36

Participant Handbook
Parts of A Basic 5-Pocket Jeans
Pocket flap
Back Rise
Back View
Waistband
Moon pocket
Fly
Crotch
Coin pocket
Front View
Bottom
Hem
37

Assistant Fashion Designer
Parts of a Formal Trouser
Belt loop
Back Rise
Patch pocket
Left Back
Panel
Right Back
Panel
Back View
Back Yolk
Belt loop
Zipper
Fly opening
Front pocket
Crotch
Inseam
Side seam
Front View
Waist Band
38
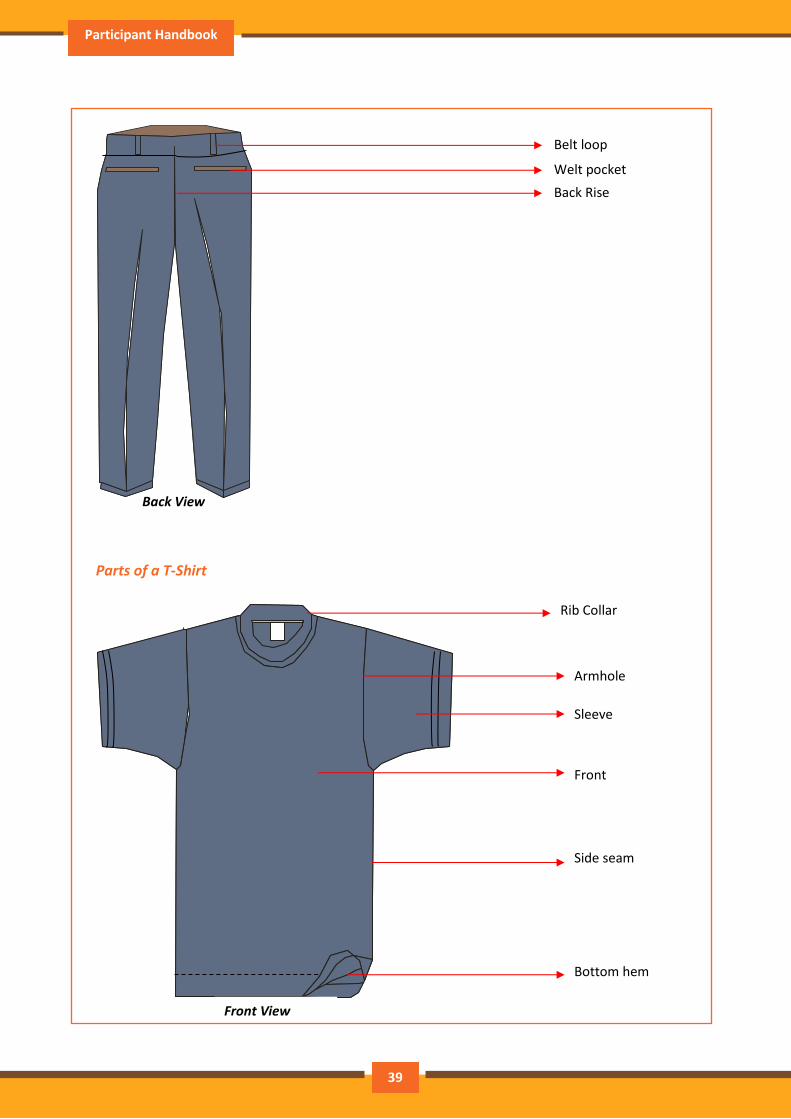
Participant Handbook
Parts of a T-Shirt
Belt loop
Welt pocket
Back Rise
Back View
Armhole
Front
Side seam
Sleeve
Rib Collar
Front View
Bottom hem
39
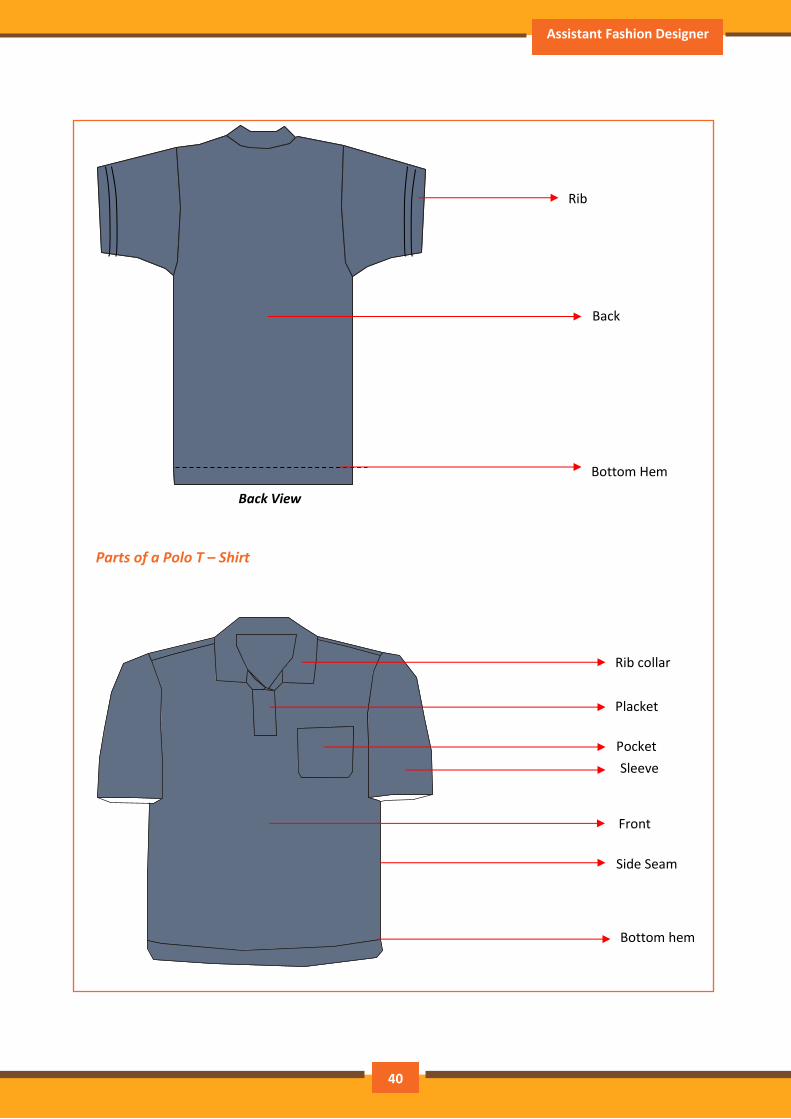
Assistant Fashion Designer
Parts of a Polo T – Shirt
Back
Rib
Bottom Hem
Back View
Rib collar
Placket
Sleeve
Side Seam
Bottom hem
Front
40
Participant Handbook
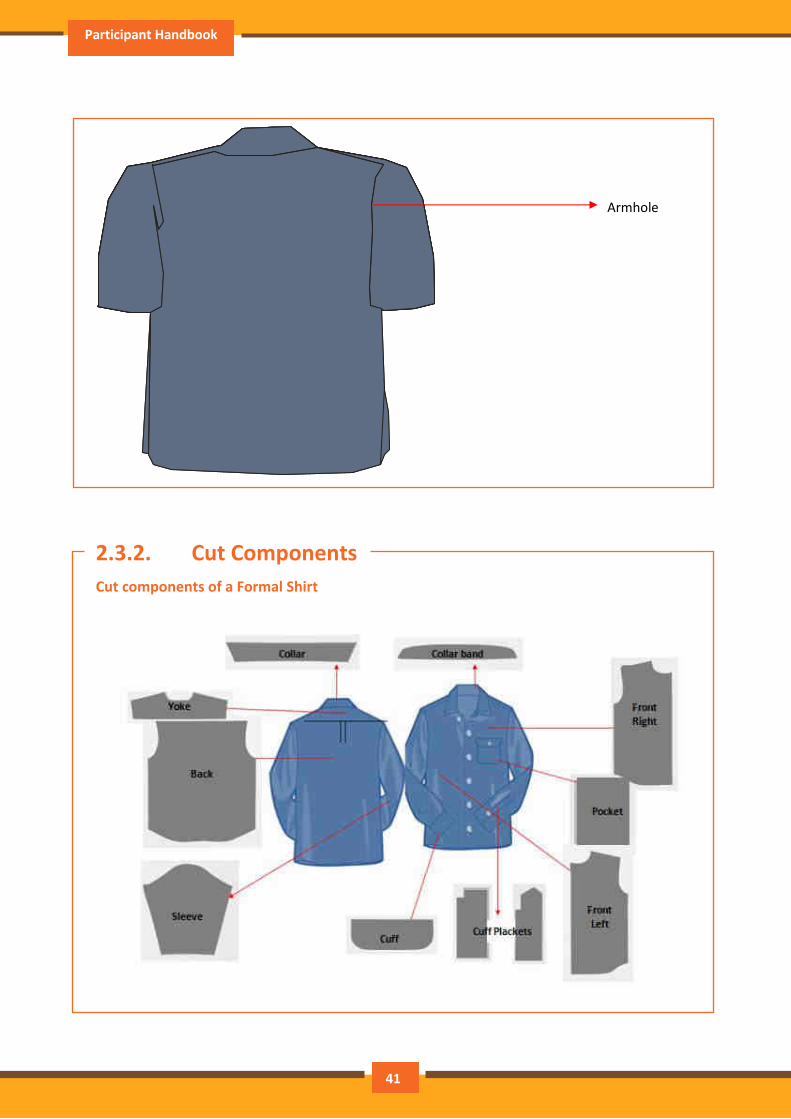
2.3.2. Cut Components
Cut components of a Formal Shirt
Armhole
41
Assistant Fashion Designer
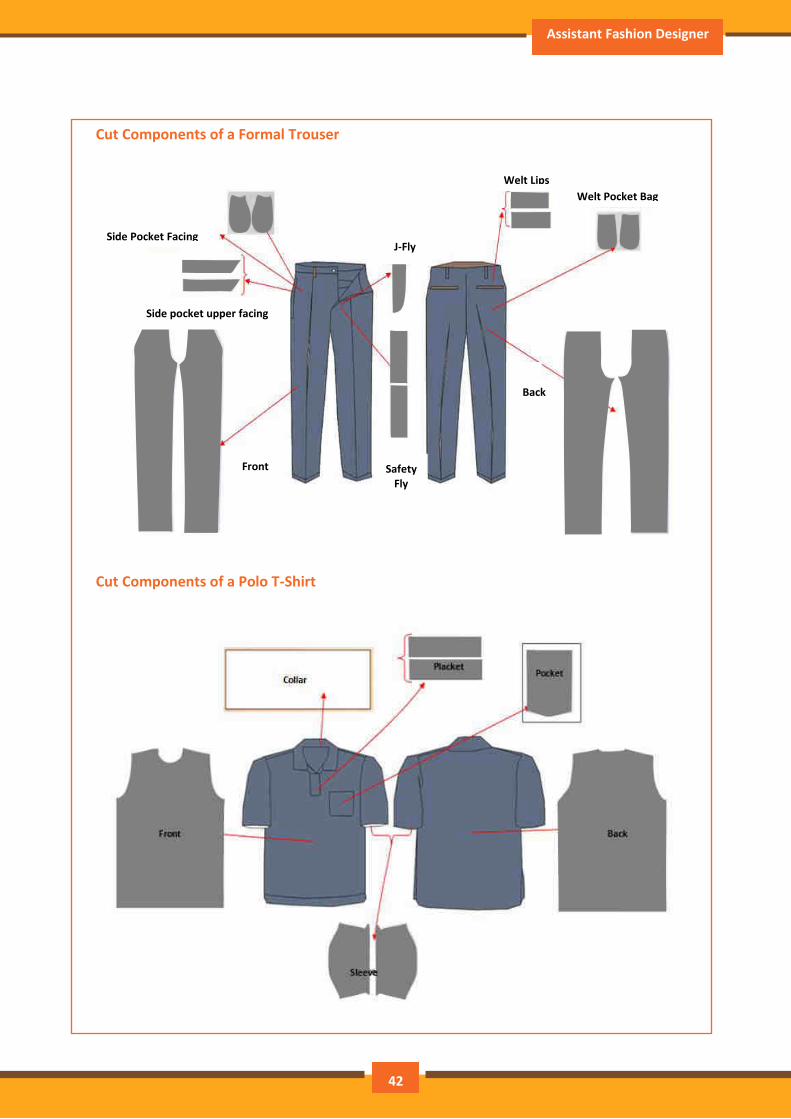
Cut Components of a Formal Trouser
Cut Components of a Polo T-Shirt
Welt Pocket Bag Welt Lips
Side Pocket Facing
Side pocket upper facing
Front Safety Fly
Back
J-Fly
42

Participant Handbook
2.3.3. Parts of a Dress Form
Fig 2.3.1: Parts of a Dress form
Centre Front (CF): A vertical line that runs throughout the centre dissecting the dress form into
halves
Centre Back (CB): A vertical line that runs throughout the centre dissecting the dress form into
halves
Princess Line: A pair of lines running between CF and SS over the bust level dividing the shoulder
into halves
Princess Line: A pair of lines running between CB and SS throughout the back
Waistline: A uniform central band
Armhole: for both the arms
43
Assistant Fashion Designer
Armhole ridge: a slightly raised portion where the arm plate and shoulder line join
Arm plate: Plates attached at the end of each armhole
Side Seam (SS): Runs laterally on both the sides. It starts from under the armhole throughout the
dress form
Apex/ Bust Points (BP): It is the highest point on the bust line
Neck Band: also called as neck line encircles the neck
Shoulder Line (SH): as the name suggests runs from the neckline to the armhole
Horizontal Balance Line (HBL): These lines run parallel to the floor
Bust Line: A line running across the bust from over the apex
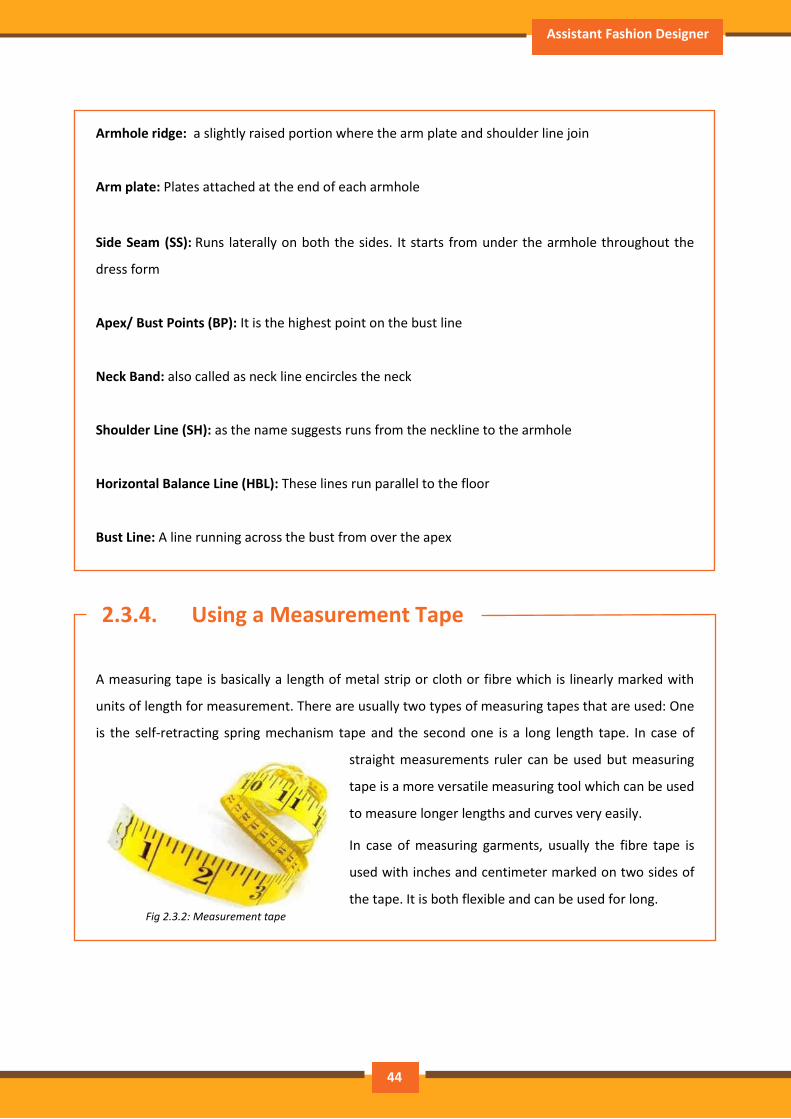
2.3.4. Using a Measurement Tape
A measuring tape is basically a length of metal strip or cloth or fibre which is linearly marked with
units of length for measurement. There are usually two types of measuring tapes that are used: One
is the self-retracting spring mechanism tape and the second one is a long length tape. In case of
straight measurements ruler can be used but measuring
tape is a more versatile measuring tool which can be used
to measure longer lengths and curves very easily.
In case of measuring garments, usually the fibre tape is
used with inches and centimeter marked on two sides of
the tape. It is both flexible and can be used for long.
44
Fig 2.3.2: Measurement tape
Participant Handbook
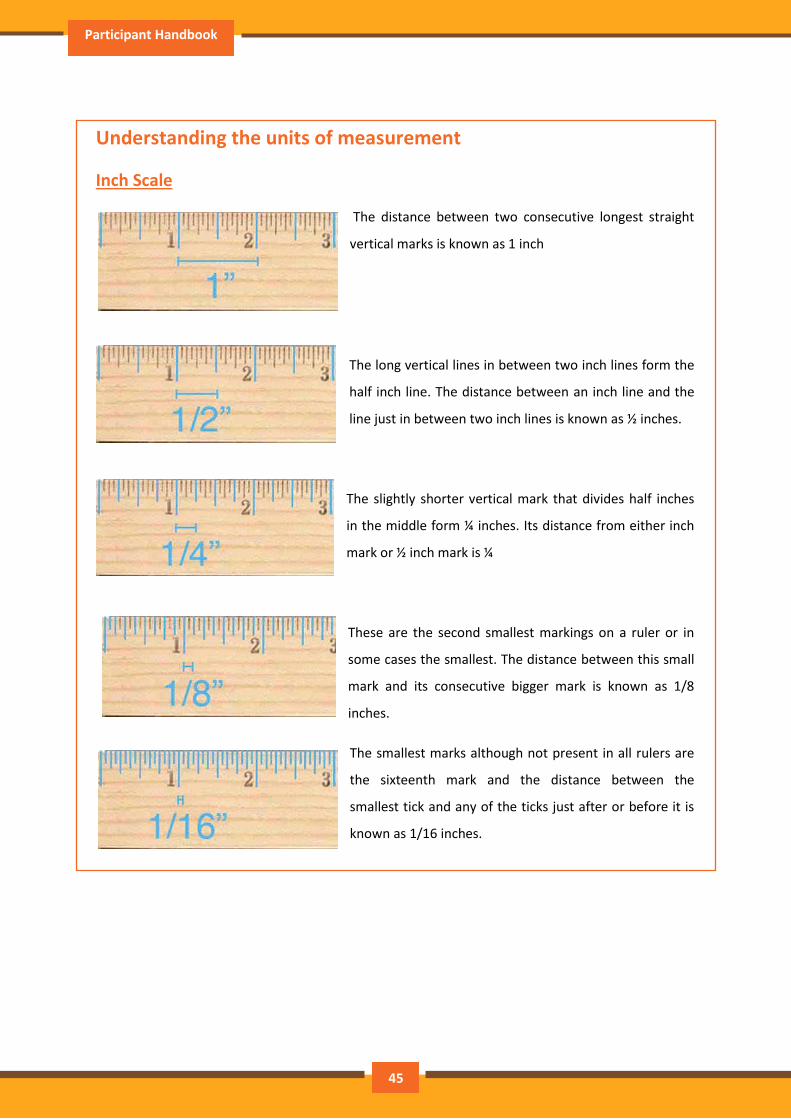
Understanding the units of measurement
Inch Scale
The distance between two consecutive longest straight
vertical marks is known as 1 inch
The long vertical lines in between two inch lines form the
half inch line. The distance between an inch line and the
line just in between two inch lines is known as ½ inches.
The slightly shorter vertical mark that divides half inches
in the middle form ¼ inches. Its distance from either inch
mark or ½ inch mark is ¼
These are the second smallest markings on a ruler or in
some cases the smallest. The distance between this small
mark and its consecutive bigger mark is known as 1/8
inches.
The smallest marks although not present in all rulers are
the sixteenth mark and the distance between the
smallest tick and any of the ticks just after or before it is
known as 1/16 inches.
45

Assistant Fashion Designer
Metric Scale
Metric scales have markings in centimeter and millimeter.
The larger markings in a metric scale represent centimeter.
The smaller ticks on a metric ruler represent a millimeter.
There are 10 millimeters in a centimeter so there will be 9
marking in between two centimeter markings.
Conversion Table:
Units 1m 1m 1cm 1m 1m 1ft 1in 1in
Conversion 100cm 1000mm 10mm 3.28ft 39.97in 12in 25.4mm 2.54cm
As we can see from the conversion table, it is also possible to measure in one unit and convert it to
any desired unit of measurement.
For example:
1 inch = 2.54 cm
So, 5 inches = 5 x 2.54 cm = 12.7 cm
Similarly,
1cm = 10 mm
So, 2cm = 2 x 10 mm = 20 mm
The reverse is also true,
30mm = 30 / 10 cm = 3 cm
46
Participant Handbook
A B
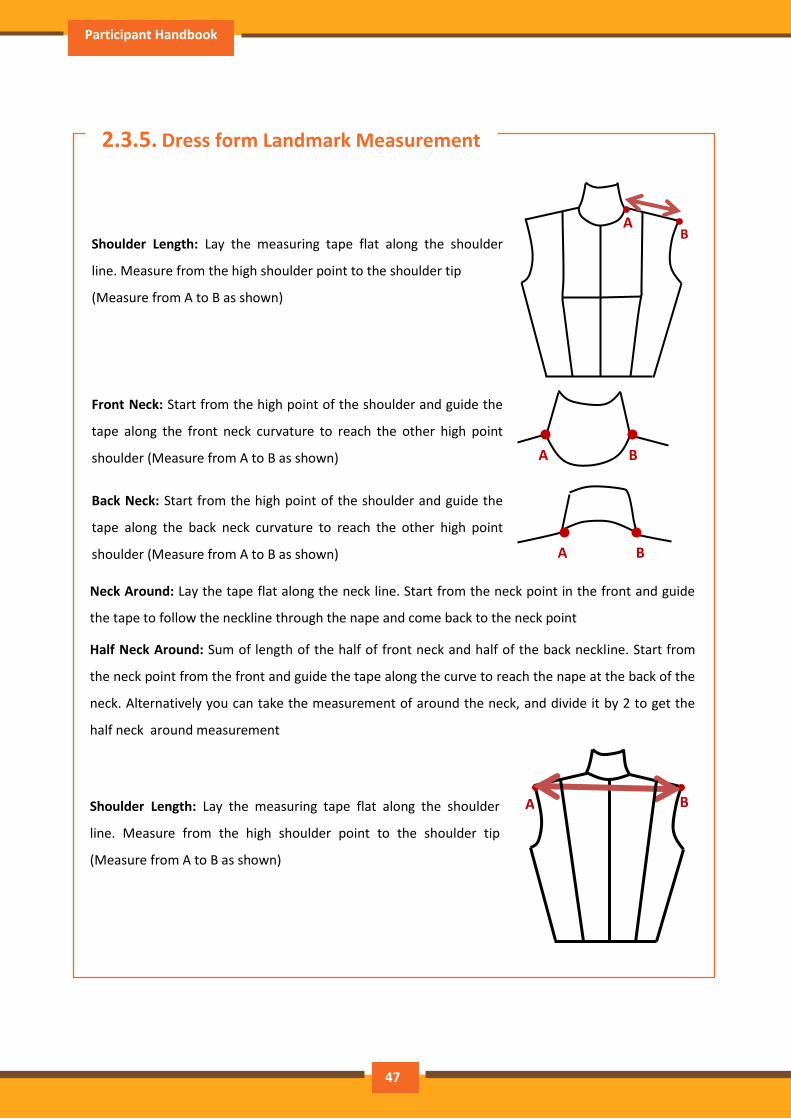
2.3.5. Dress form Landmark Measurement
Shoulder Length: Lay the measuring tape flat along the shoulder
line. Measure from the high shoulder point to the shoulder tip
(Measure from A to B as shown)
Front Neck: Start from the high point of the shoulder and guide the
tape along the front neck curvature to reach the other high point
shoulder (Measure from A to B as shown)
Back Neck: Start from the high point of the shoulder and guide the
tape along the back neck curvature to reach the other high point
shoulder (Measure from A to B as shown)
Neck Around: Lay the tape flat along the neck line. Start from the neck point in the front and guide
the tape to follow the neckline through the nape and come back to the neck point
Half Neck Around: Sum of length of the half of front neck and half of the back neckline. Start from
the neck point from the front and guide the tape along the curve to reach the nape at the back of the
neck. Alternatively you can take the measurement of around the neck, and divide it by 2 to get the
half neck around measurement
Shoulder Length: Lay the measuring tape flat along the shoulder
line. Measure from the high shoulder point to the shoulder tip
(Measure from A to B as shown)
A B
A B
A B
47
Assistant Fashion Designer
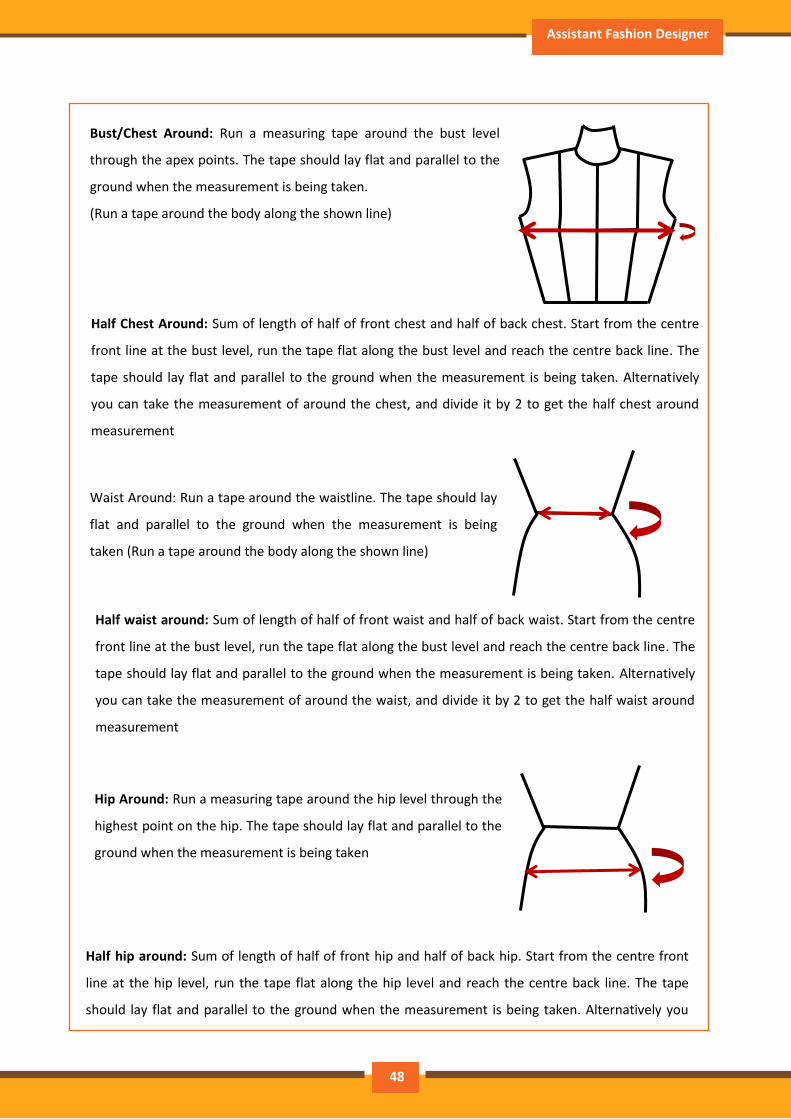
Bust/Chest Around: Run a measuring tape around the bust level
through the apex points. The tape should lay flat and parallel to the
ground when the measurement is being taken.
(Run a tape around the body along the shown line)
Half Chest Around: Sum of length of half of front chest and half of back chest. Start from the centre
front line at the bust level, run the tape flat along the bust level and reach the centre back line. The
tape should lay flat and parallel to the ground when the measurement is being taken. Alternatively
you can take the measurement of around the chest, and divide it by 2 to get the half chest around
measurement
Waist Around: Run a tape around the waistline. The tape should lay
flat and parallel to the ground when the measurement is being
taken (Run a tape around the body along the shown line)
Half waist around: Sum of length of half of front waist and half of back waist. Start from the centre
front line at the bust level, run the tape flat along the bust level and reach the centre back line. The
tape should lay flat and parallel to the ground when the measurement is being taken. Alternatively
you can take the measurement of around the waist, and divide it by 2 to get the half waist around
measurement
Hip Around: Run a measuring tape around the hip level through the
highest point on the hip. The tape should lay flat and parallel to the
ground when the measurement is being taken
Half hip around: Sum of length of half of front hip and half of back hip. Start from the centre front
line at the hip level, run the tape flat along the hip level and reach the centre back line. The tape
should lay flat and parallel to the ground when the measurement is being taken. Alternatively you
48

Participant Handbook
can take the measurement of around the hip, and divide it by 2 to get the half hip around
measurement
Shoulder blade: Run a measuring tape across the shoulder blade (on
the back of the dress form) level from the ridge of one arm plate to
the other. Shoulder blade is at the 1/3rd of the total back length
(Measure from A to B as shown)
Front length: Run a tape from the front neck intersection, guide it
through the centre front line and measure till the waist line (Measure
from A to B as shown)
.
Back length: Run a tape from the back neck intersection or the nape
point, guide it through the centre front line and measure till the waist
line (Measure from A to B as shown)
A B
A
B
A
B
55
49
Assistant Fashion Designer
.
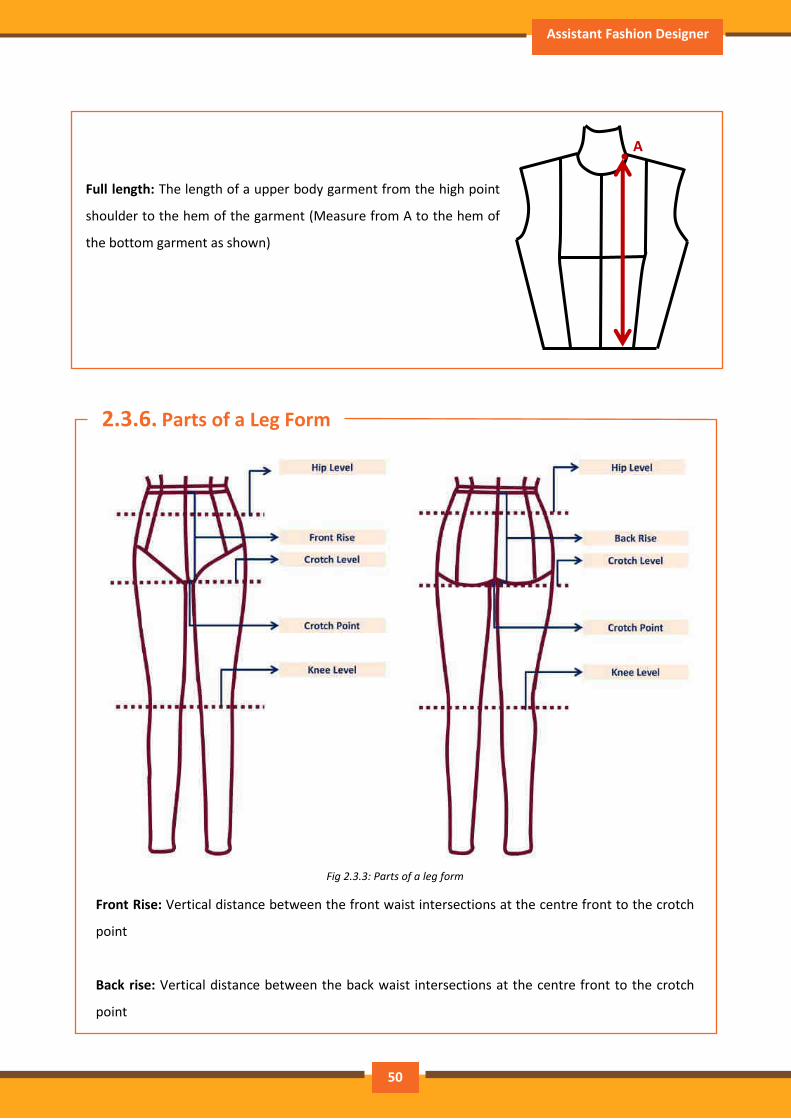
Full length: The length of a upper body garment from the high point
shoulder to the hem of the garment (Measure from A to the hem of
the bottom garment as shown)
2.3.6. Parts of a Leg Form
Fig 2.3.3: Parts of a leg form
Front Rise: Vertical distance between the front waist intersections at the centre front to the crotch
point
Back rise: Vertical distance between the back waist intersections at the centre front to the crotch
point
A
50
Participant Handbook
Crotch level: Level parallel to the crotch point
Crotch Point: Point of intersection of front rise and back rise
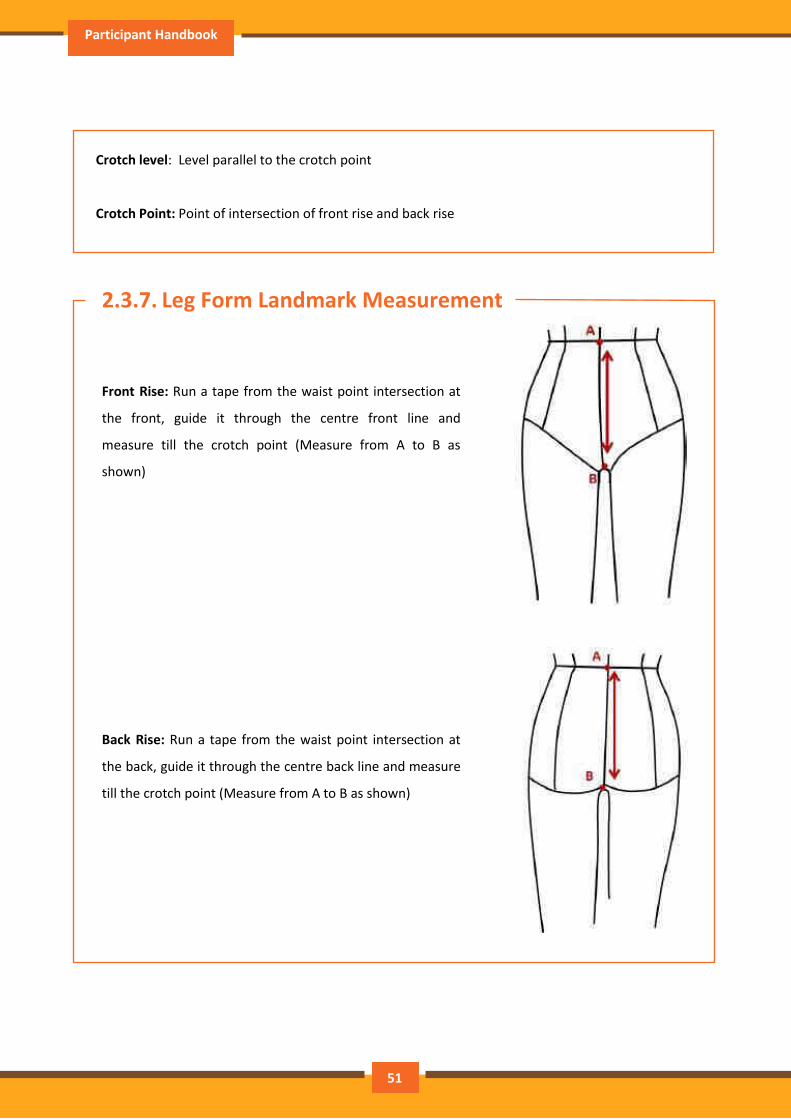
2.3.7. Leg Form Landmark Measurement
Front Rise: Run a tape from the waist point intersection at
the front, guide it through the centre front line and
measure till the crotch point (Measure from A to B as
shown)
Back Rise: Run a tape from the waist point intersection at
the back, guide it through the centre back line and measure
till the crotch point (Measure from A to B as shown)
51
Assistant Fashion Designer
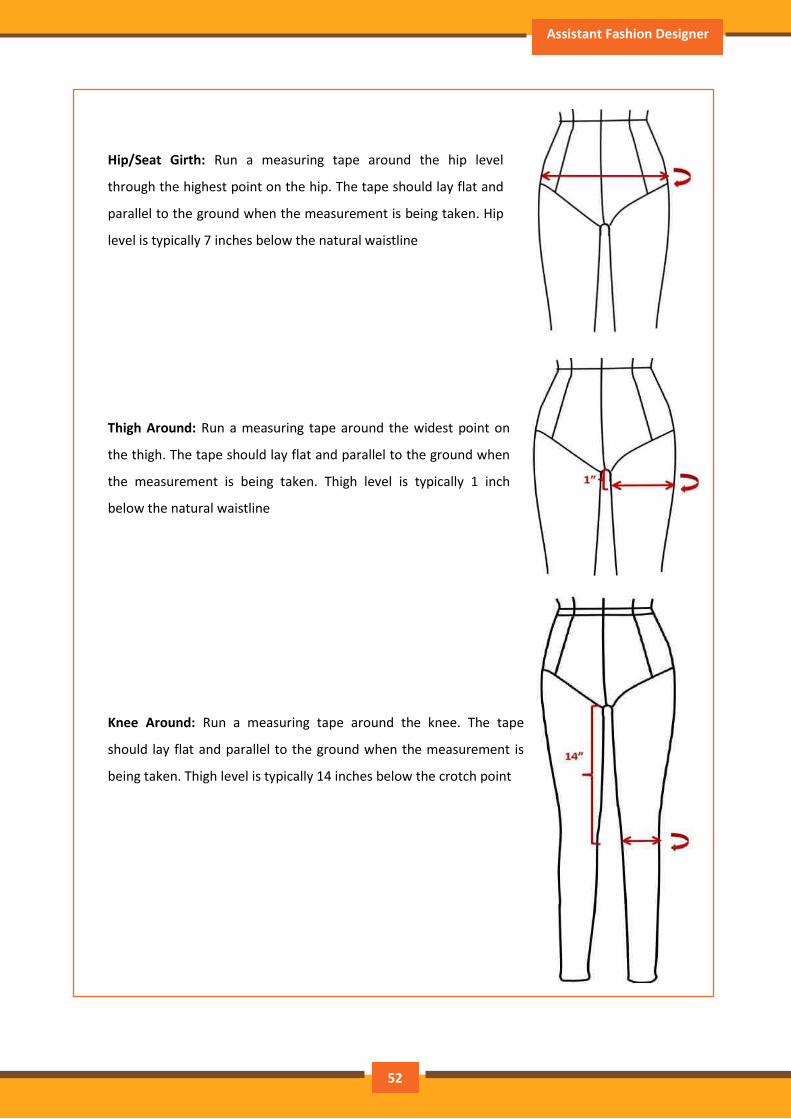
Hip/Seat Girth: Run a measuring tape around the hip level
through the highest point on the hip. The tape should lay flat and
parallel to the ground when the measurement is being taken. Hip
level is typically 7 inches below the natural waistline
Thigh Around: Run a measuring tape around the widest point on
the thigh. The tape should lay flat and parallel to the ground when
the measurement is being taken. Thigh level is typically 1 inch
below the natural waistline
Knee Around: Run a measuring tape around the knee. The tape
should lay flat and parallel to the ground when the measurement is
being taken. Thigh level is typically 14 inches below the crotch point
52
Participant Handbook
2.3.8. Classification of Garments
Garments could be classified based on several aspects as there is no standard classification system
available. However, the garments could be classified based on the gender as male or female, or age
as children’s garments. Generally, based on use, style and material, different varieties of garments
show different styles.
Presently, the garments are classified based on the following aspects:
Type of fabric:
o Knit (T-shirt, sweater)
o Woven (shirt, suiting and denim)
o Nonwoven (diaper, socks)
Season:
o Winter (jacket)
o Summer (tank top)
o Spring (singlet)
o Autumn (shirt)
Events:
o Party (fashion wear)
o Active (regular wear)
o Evening gown (outfit)
Application:
o Formal (collar shirt)
o Swimwear (bikini, cover ups)
o Sportswear (trouser)
o Lingerie (inner wear, sleep wear)
Method of manufacture:
o Readymade (complete)
o Tailored (measurement)
o Furnishing (automated)
Gender and age:
o Women’s
o Men’s
o Kid’s
53
Assistant Fashion Designer
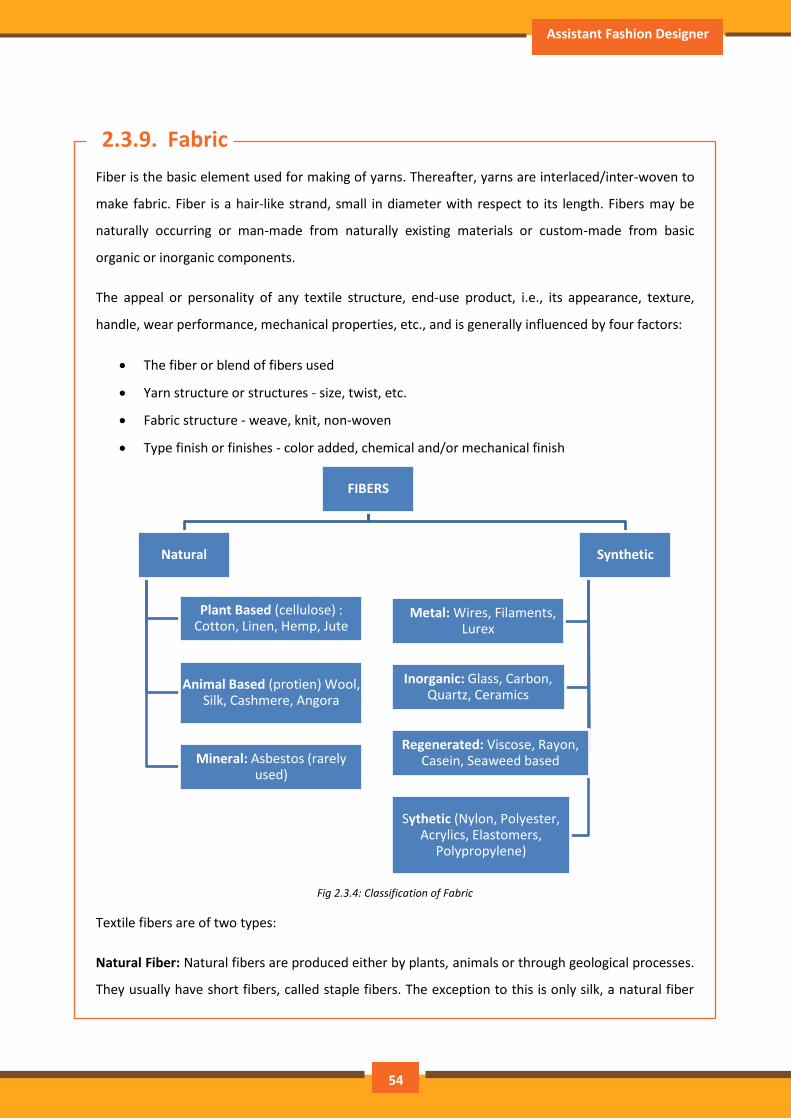
2.3.9. Fabric
Fiber is the basic element used for making of yarns. Thereafter, yarns are interlaced/inter-woven to
make fabric. Fiber is a hair-like strand, small in diameter with respect to its length. Fibers may be
naturally occurring or man-made from naturally existing materials or custom-made from basic
organic or inorganic components.
The appeal or personality of any textile structure, end-use product, i.e., its appearance, texture,
handle, wear performance, mechanical properties, etc., and is generally influenced by four factors:
The fiber or blend of fibers used
Yarn structure or structures - size, twist, etc.
Fabric structure - weave, knit, non-woven
Type finish or finishes - color added, chemical and/or mechanical finish
Fig 2.3.4: Classification of Fabric
Textile fibers are of two types:
Natural Fiber: Natural fibers are produced either by plants, animals or through geological processes.
They usually have short fibers, called staple fibers. The exception to this is only silk, a natural fiber
FIBERS
Natural
Plant Based (cellulose) : Cotton, Linen, Hemp, Jute
Animal Based (protien) Wool, Silk, Cashmere, Angora
Mineral: Asbestos (rarely used)
Synthetic
Metal: Wires, Filaments, Lurex
Inorganic: Glass, Carbon, Quartz, Ceramics
Regenerated: Viscose, Rayon, Casein, Seaweed based
Sythetic (Nylon, Polyester, Acrylics, Elastomers,
Polypropylene)
54

Participant Handbook
whose continuous filaments are up to one kilometer in length. Based on their origin natural fibers
are further classified into:
Vegetable Fibers: From plants and vegetables
Animal Fibers: From animals
Mineral Fibers: From Minerals
Sources of Natural Fiber:
Cotton from the cotton plant
Linen from the flax plant
Wool from sheep
Silk from silkworms
Man-made Fiber: Man-made fibers are made artificially. These fibers are also known as
manufactured fibers. These fibers have high strength, strong when wet with low moisture
absorption property. Rayon, nylon, polyester are some of the examples of man-made fibers. They
are continuous filament fibers, which means the fibers are long and do not always have to be spun
into yarn.
Sources of synthetic fiber
Viscose comes from pine trees or petrochemicals.
Acrylic, nylon and polyester come from oil and coal
Types of Fabrics: There are plenty of fabrics available in the market and a professional in the
fashion, apparel & textile industry must know which fabric to choose for which style/order.
55

Assistant Fashion Designer
Below are some fabrics and their properties for better understanding and that are used across the
world
.
Silk Broadcloth A fine, closely woven silk
Buckram Strong, heavy woven fabric used for
stiffening
Chiffon
Sheer, light fabric made out of silk, cotton
or synthetic fibres. The twist in the fibres
gives it a somewhat rough feel, and the
mesh-like weave contributes to its see
through properties
Satin Characterized with its glossy surface and a
dull back
Georgette
Semi- sheer fabric. Originally made with silk
but today majorly produced using synthetic
fibres. Its light, crinkly, slightly rough feel is
what it’s known for, plus the range of colors
it is dyed in
Cotton
Fabric made up of Plant based staple length
fibres. Cotton boasts of its comfort when
worn and can be blended with a number of
natural and man-made fibres to achieve
different products
56
Participant Handbook
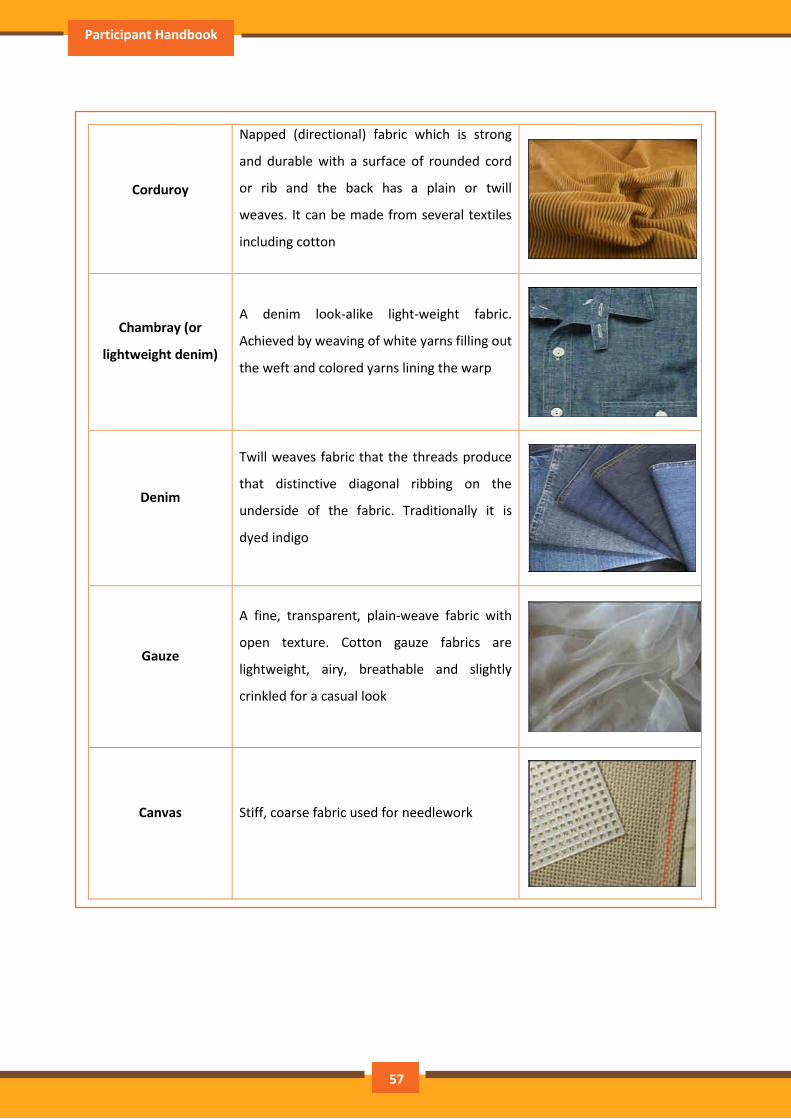
.
Corduroy
Napped (directional) fabric which is strong
and durable with a surface of rounded cord
or rib and the back has a plain or twill
weaves. It can be made from several textiles
including cotton
Chambray (or
lightweight denim)
A denim look-alike light-weight fabric.
Achieved by weaving of white yarns filling out
the weft and colored yarns lining the warp
Denim
Twill weaves fabric that the threads produce
that distinctive diagonal ribbing on the
underside of the fabric. Traditionally it is
dyed indigo
Gauze
A fine, transparent, plain-weave fabric with
open texture. Cotton gauze fabrics are
lightweight, airy, breathable and slightly
crinkled for a casual look
Canvas Stiff, coarse fabric used for needlework
57
Assistant Fashion Designer
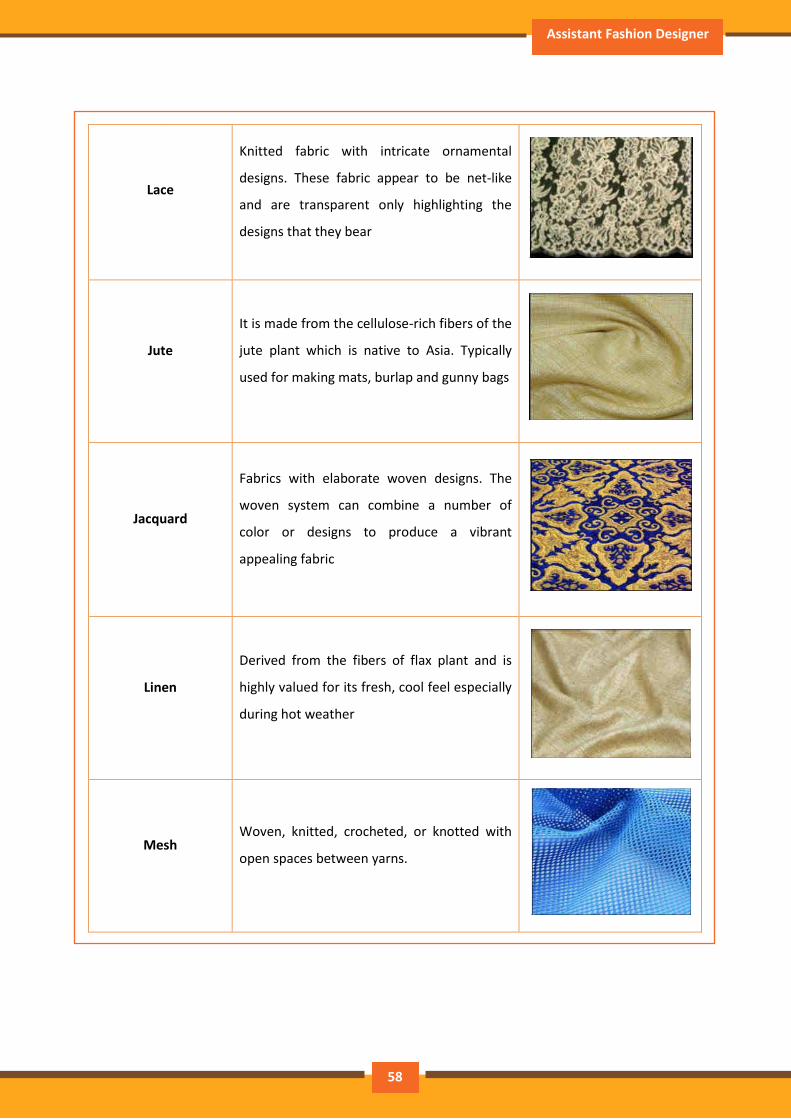
.
Lace
Knitted fabric with intricate ornamental
designs. These fabric appear to be net-like
and are transparent only highlighting the
designs that they bear
Jute
It is made from the cellulose-rich fibers of the
jute plant which is native to Asia. Typically
used for making mats, burlap and gunny bags
Jacquard
Fabrics with elaborate woven designs. The
woven system can combine a number of
color or designs to produce a vibrant
appealing fabric
Linen
Derived from the fibers of flax plant and is
highly valued for its fresh, cool feel especially
during hot weather
Mesh Woven, knitted, crocheted, or knotted with
open spaces between yarns.
58
Participant Handbook
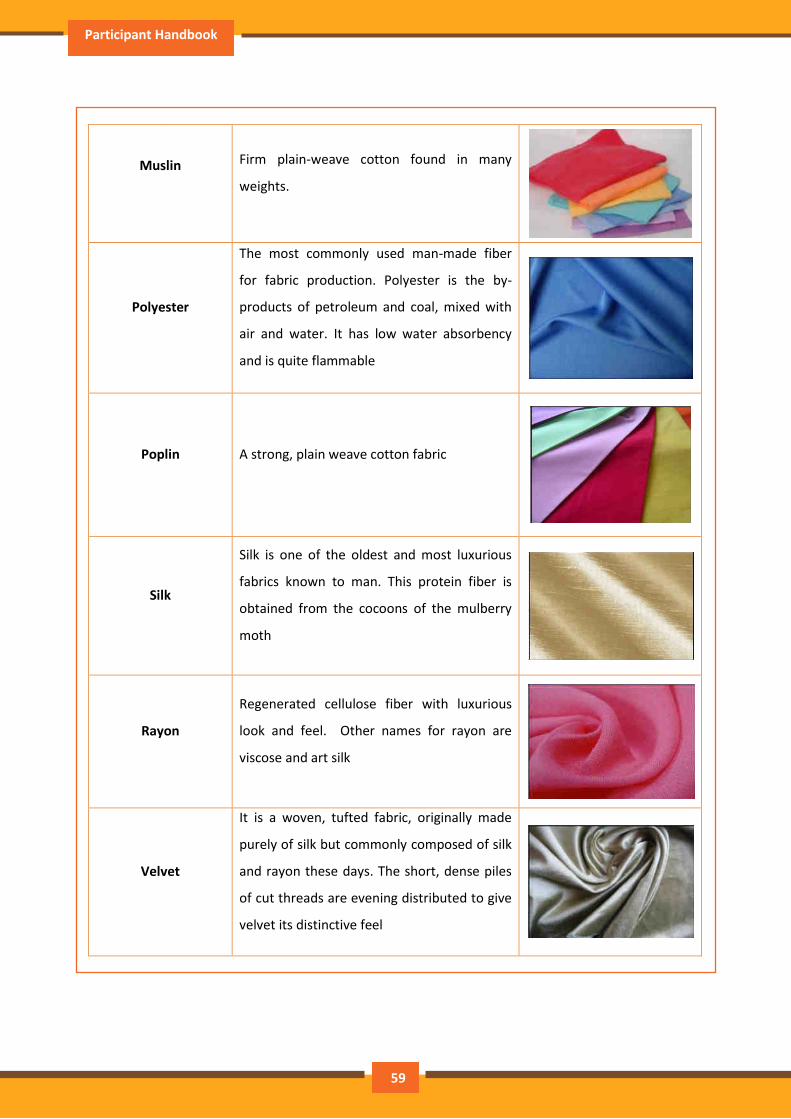
.
.
Muslin Firm plain-weave cotton found in many
weights.
Polyester
The most commonly used man-made fiber
for fabric production. Polyester is the by-
products of petroleum and coal, mixed with
air and water. It has low water absorbency
and is quite flammable
Poplin A strong, plain weave cotton fabric
Silk
Silk is one of the oldest and most luxurious
fabrics known to man. This protein fiber is
obtained from the cocoons of the mulberry
moth
Rayon
Regenerated cellulose fiber with luxurious
look and feel. Other names for rayon are
viscose and art silk
Velvet
It is a woven, tufted fabric, originally made
purely of silk but commonly composed of silk
and rayon these days. The short, dense piles
of cut threads are evening distributed to give
velvet its distinctive feel
59
Assistant Fashion Designer
.
.
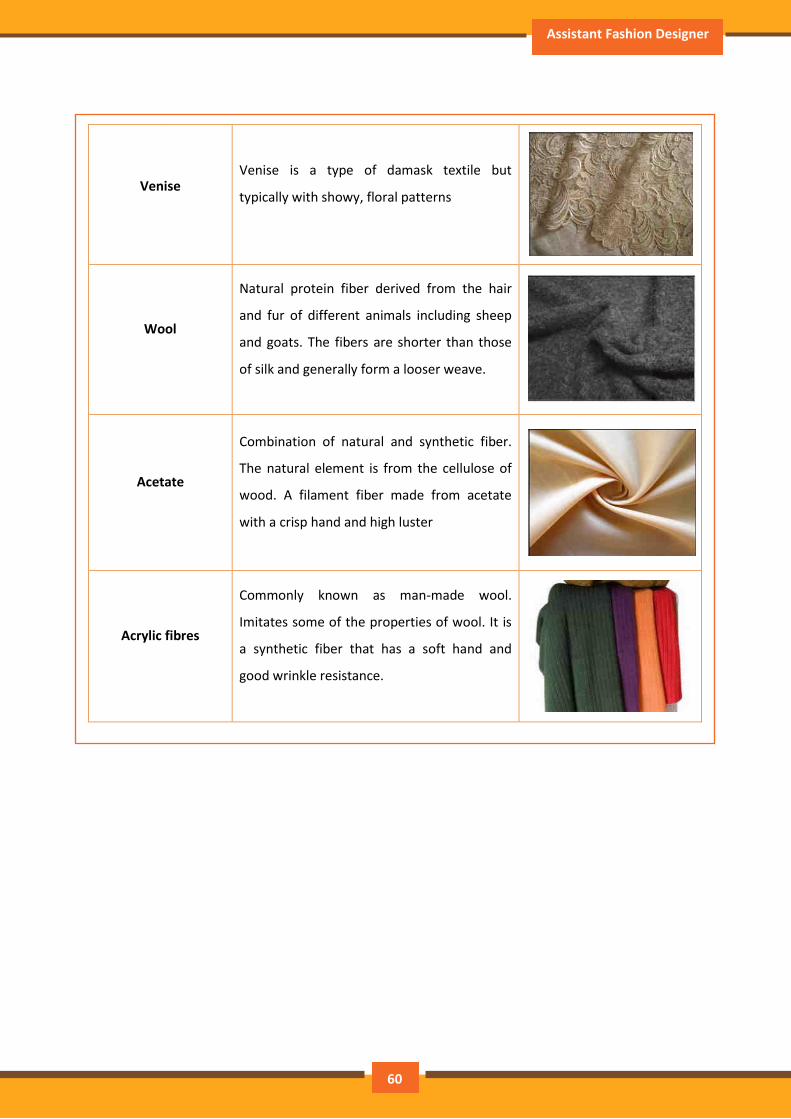
Venise Venise is a type of damask textile but
typically with showy, floral patterns
Wool
Natural protein fiber derived from the hair
and fur of different animals including sheep
and goats. The fibers are shorter than those
of silk and generally form a looser weave.
Acetate
Combination of natural and synthetic fiber.
The natural element is from the cellulose of
wood. A filament fiber made from acetate
with a crisp hand and high luster
Acrylic fibres
Commonly known as man-made wool.
Imitates some of the properties of wool. It is
a synthetic fiber that has a soft hand and
good wrinkle resistance.
60

Participant Handbook
2.3.10. Trims and Accessories
Sewing Thread Button Zipper Lining
Snap Button Lace Elastic Label
Shoulder Pad Hook and Eye Twill Tape Velcro
Hanger Hang Tag Clip Carton
61
Assistant Fashion Designer
Exercise
1. Which among the following fibres is also commonly known as man-made wool?
a) Viscose
b) Rayon
c) Polyester
d) Acrylic
2. Which among the following fabric is known for its intricate artistic details?
a) Lace
b) Jacquard fabrics
c) Both of these
d) None of these
3. Which among the following trims can be used in a formal shirt?
a) Zipper
b) Hook and Eye
c) Velcro
d) Brand Tag
4. Name at least five trims
__________________________________________________________________________________
__________________________________________________________________________________
_________________________________________________________________________________
5. Name at least 5 fabrics and their distinctive properties
__________________________________________________________________________________
__________________________________________________________________________________
__________________________________________________________________________________
__________________________________________________________________________________
__________________________________________________________________________________
__________________________________________________________________________________
_________________________________________________________________________________
62
Participant Handbook
UNIT 2.4: Garment Style lines
Unit Objectives
At the end of this unit, participants will be able to:
• Identify various garment silhouettes
• Identify and name different garment elements
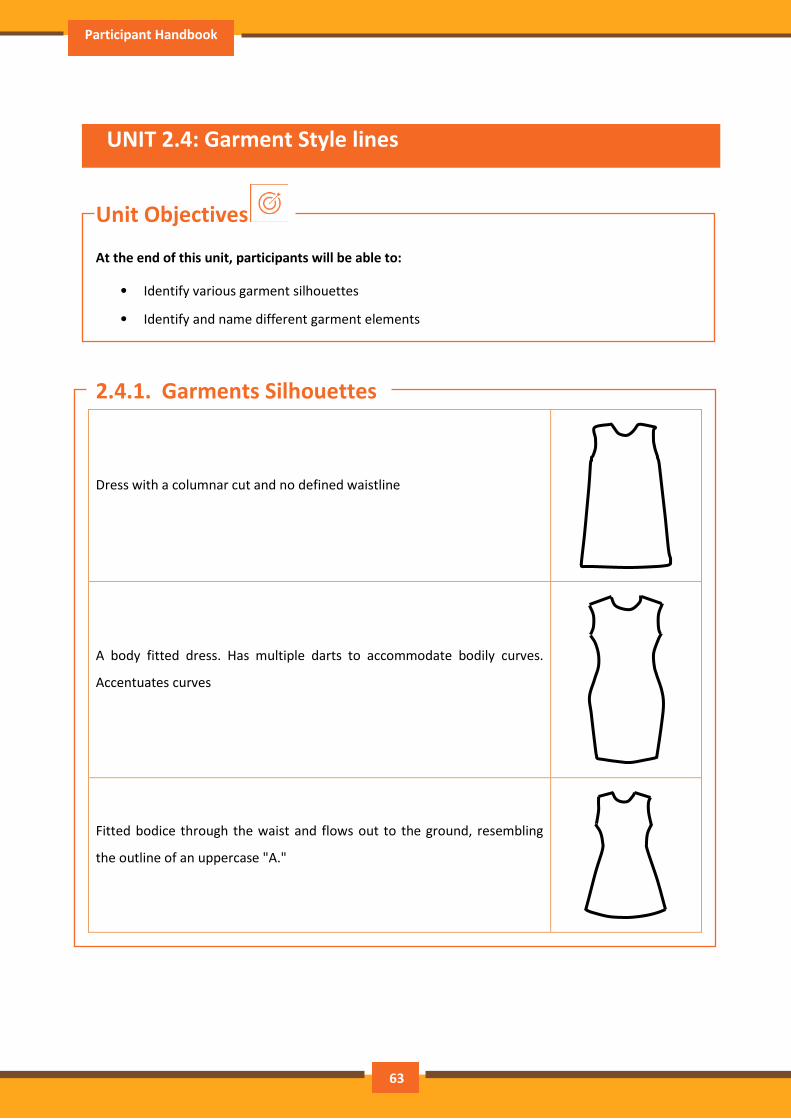
2.4.1. Garments Silhouettes
Dress with a columnar cut and no defined waistline
A body fitted dress. Has multiple darts to accommodate bodily curves.
Accentuates curves
Fitted bodice through the waist and flows out to the ground, resembling
the outline of an uppercase "A."
63

Assistant Fashion Designer
.
A loose-fitting dress that is narrow at the shoulders. Flares out from the
armhole and had and very wide at the hem, having no waistline or darts
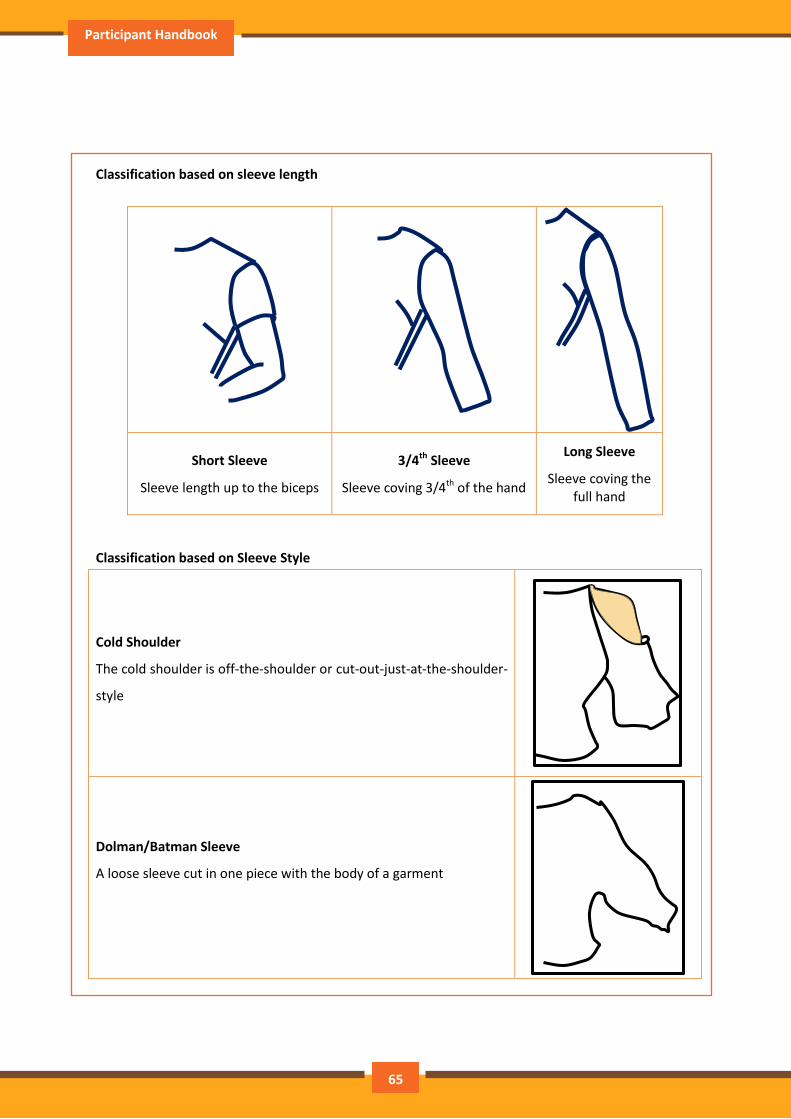
2.4.2. Types of Sleeve
Sleeves are classified based on the following:
Stitching Style
Sleeve Length
Sleeve Style
Classification based on stitching style
Set-in Sleeve
A sleeve joined to the body of a garment at the shoulder and
having a seam along the armhole
Raglan Sleeve
The sleeve is attached to the body from high point shoulder
to the armhole point
64
Participant Handbook
Classification based on sleeve length
Short Sleeve
Sleeve length up to the biceps
3/4th Sleeve
Sleeve coving 3/4th of the hand
Long Sleeve
Sleeve coving the
full hand
Classification based on Sleeve Style
Cold Shoulder
The cold shoulder is off-the-shoulder or cut-out-just-at-the-shoulder-
style
Dolman/Batman Sleeve
A loose sleeve cut in one piece with the body of a garment
65
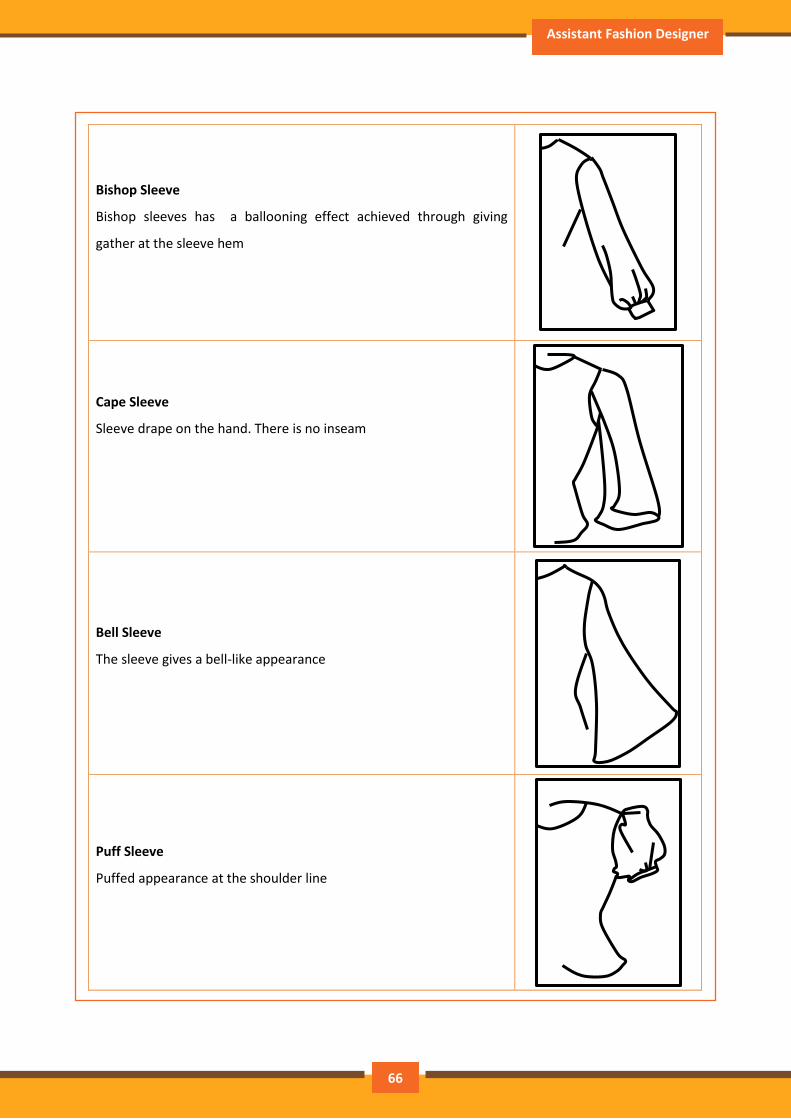
Assistant Fashion Designer
.
Bishop Sleeve
Bishop sleeves has a ballooning effect achieved through giving
gather at the sleeve hem
Cape Sleeve
Sleeve drape on the hand. There is no inseam
Bell Sleeve
The sleeve gives a bell-like appearance
Puff Sleeve
Puffed appearance at the shoulder line
66
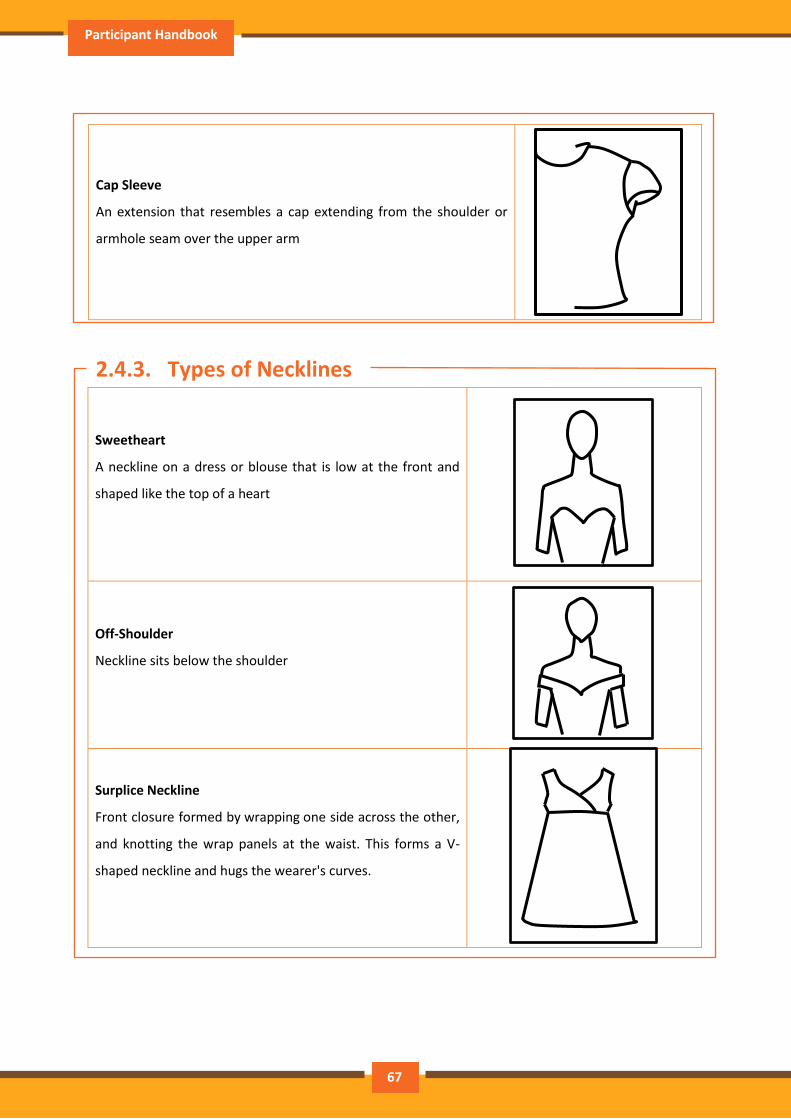
Participant Handbook
.
Cap Sleeve
An extension that resembles a cap extending from the shoulder or
armhole seam over the upper arm
2.4.3. Types of Necklines
Sweetheart
A neckline on a dress or blouse that is low at the front and
shaped like the top of a heart
Off-Shoulder
Neckline sits below the shoulder
Surplice Neckline
Front closure formed by wrapping one side across the other,
and knotting the wrap panels at the waist. This forms a V-
shaped neckline and hugs the wearer's curves.
67
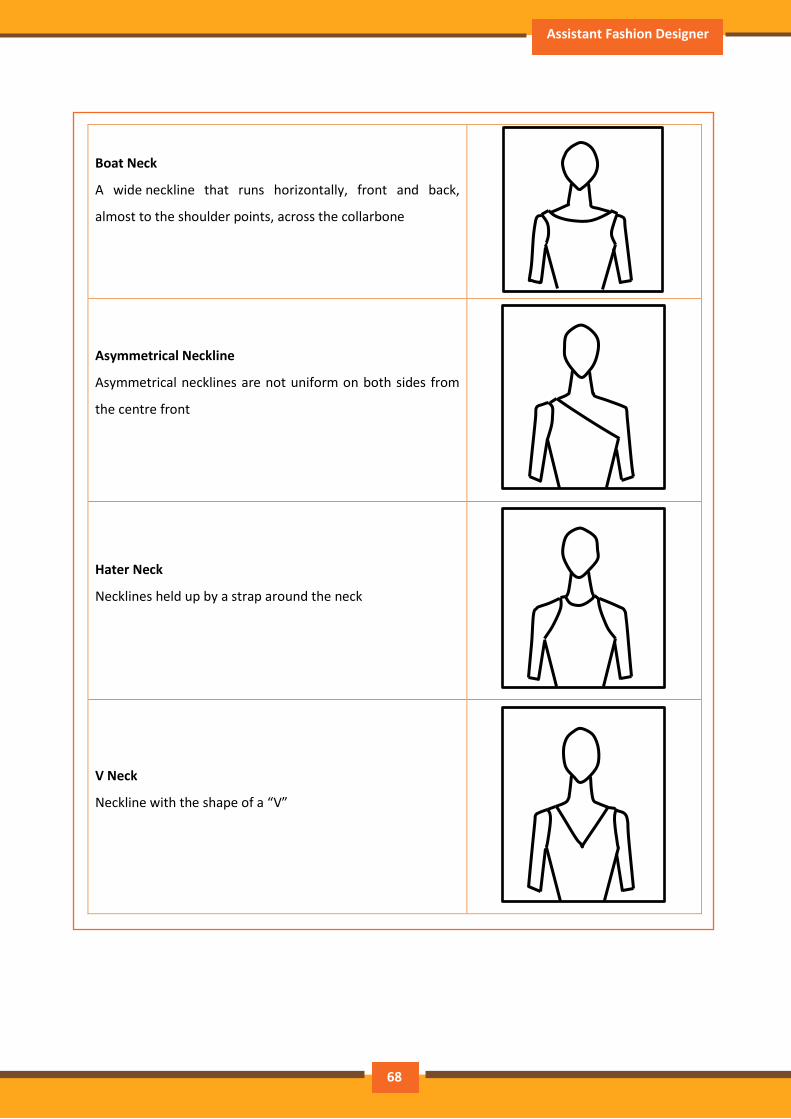
Assistant Fashion Designer
.
Boat Neck
A wide neckline that runs horizontally, front and back,
almost to the shoulder points, across the collarbone
Asymmetrical Neckline
Asymmetrical necklines are not uniform on both sides from
the centre front
Hater Neck
Necklines held up by a strap around the neck
V Neck
Neckline with the shape of a “V”
68
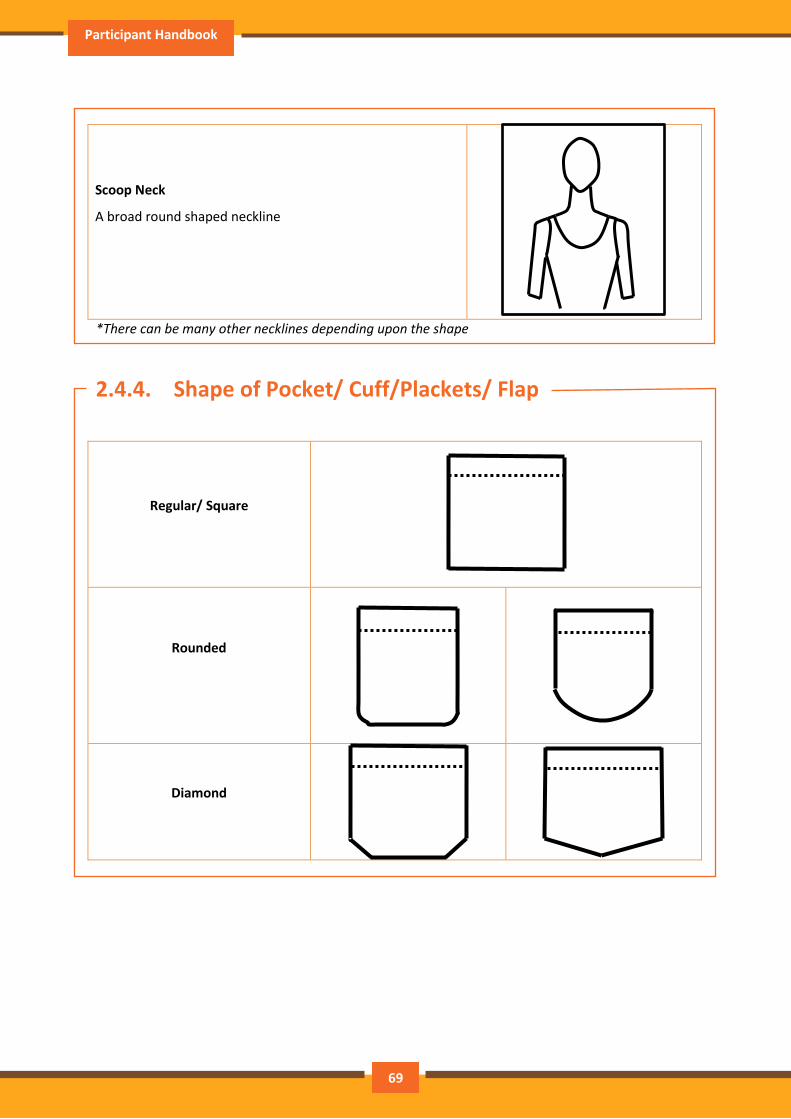
Participant Handbook
.
Scoop Neck
A broad round shaped neckline
*There can be many other necklines depending upon the shape
2.4.4. Shape of Pocket/ Cuff/Plackets/ Flap
Regular/ Square
Rounded
Diamond
69
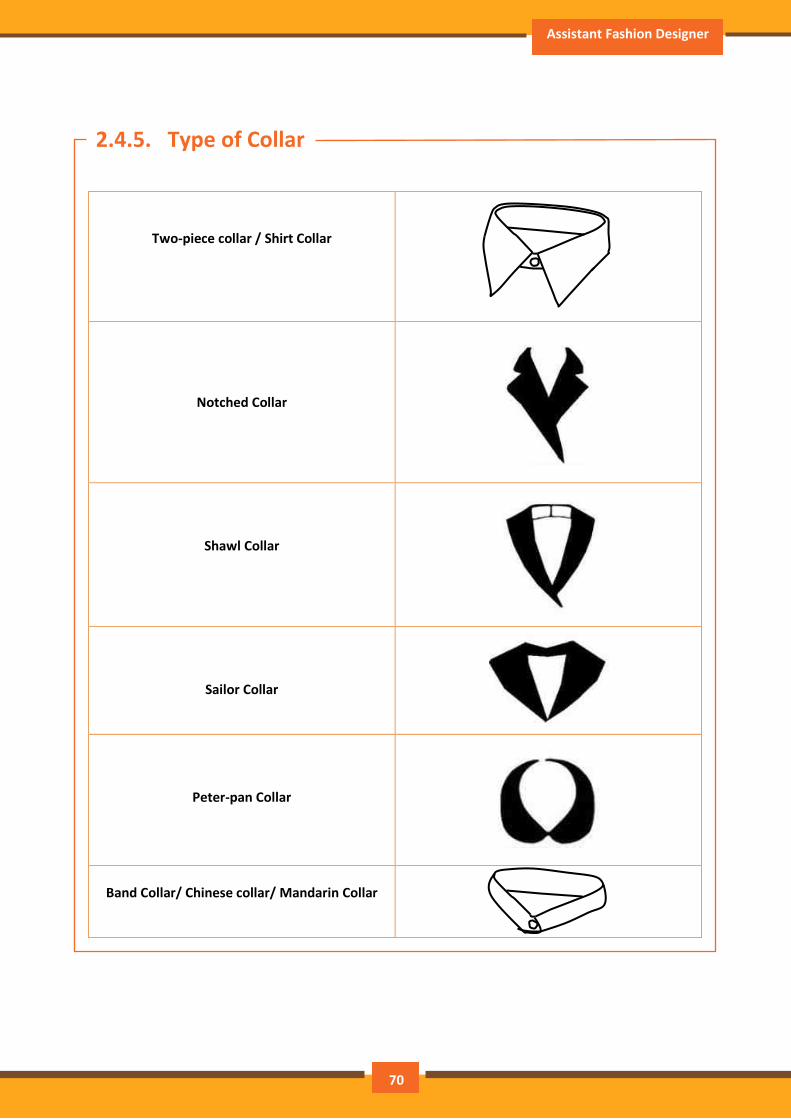
Assistant Fashion Designer
2.4.5. Type of Collar
.
Two-piece collar / Shirt Collar
Notched Collar
Shawl Collar
Sailor Collar
Peter-pan Collar
Band Collar/ Chinese collar/ Mandarin Collar
70
Participant Handbook
Exercise
1. List down and draw at least 5 designs of neckline?
__________________________________________________________________________________
__________________________________________________________________________________
__________________________________________________________________________________
__________________________________________________________________________________
__________________________________________________________________________________
__________________________________________________________________________________
__________________________________________________________________________________
2. Which among the following is a body-fitted silhouette?
a) Shift
b) Sheath
c) Tent
d) A-line
3. A Shirt collar is also called _____________________
a) One piece collar
b) Two piece collar
c) Shawl collar
d) Notch collar
71

Assistant Fashion Designer
UNIT 2.5: Surface Development in Garment
Unit Objectives
At the end of this unit, participants will be able to:
• Identify different methods of surface development
• List the Fabric and Garment Dyeing and printing
• Discuss the different methods of fabric dyeing
• Discuss the different methods of printing on fabric
• Identify different Embroidery stitch and styles
2.5.1. Surface Development Modes
Surface development is a method of imparting a texture or ornamentation to the surface of textile
to make it more aesthetically pleasing
Print: Printing on the garment or textile surface through
manual or mechanic means. The printing can be done both at
the fabric or garment stage
Embroidery: Embroidery is the craft of decorating fabric or
other materials using a needle to apply thread or yarn.
Embroidery may also incorporate other materials such
as pearls, beads, quills, and sequins. In modern days,
embroidery is usually seen on caps, hats, coats, blankets,
dress shirts, denim, dresses, stockings, and golf shirts.
Embroidery is available with a wide variety of thread or
yarn color.
72
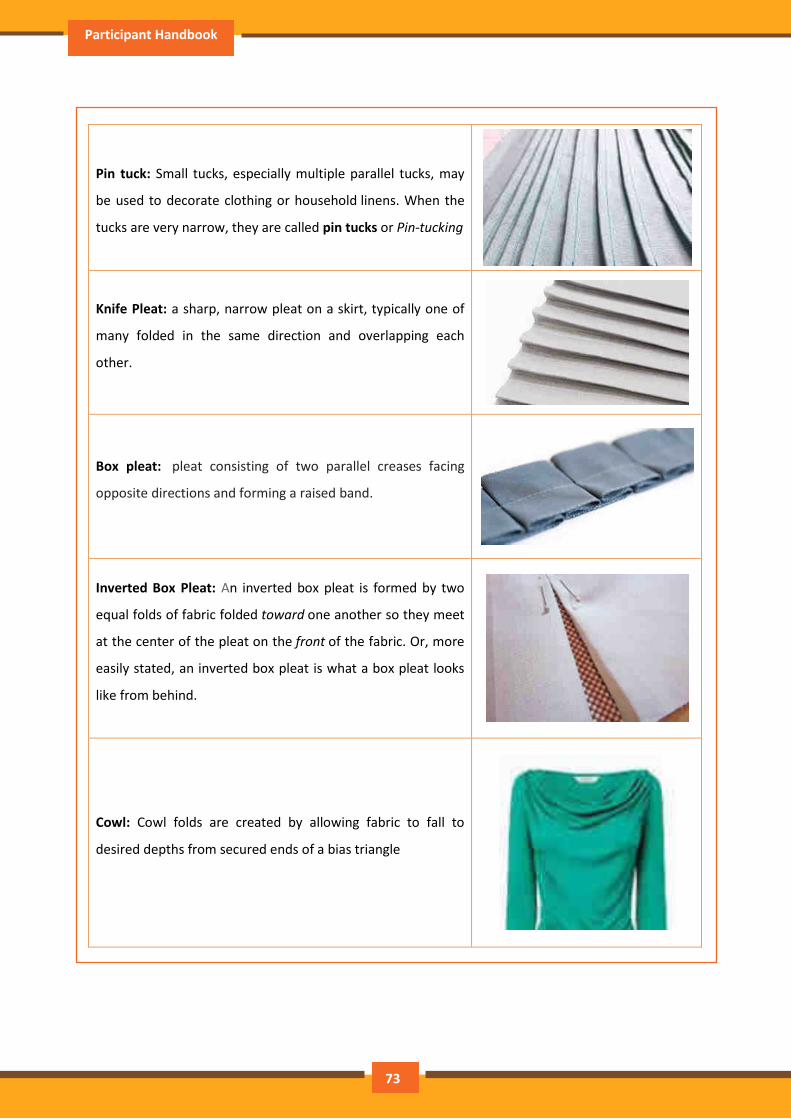
Participant Handbook
.
Pin tuck: Small tucks, especially multiple parallel tucks, may
be used to decorate clothing or household linens. When the
tucks are very narrow, they are called pin tucks or Pin-tucking
Knife Pleat: a sharp, narrow pleat on a skirt, typically one of
many folded in the same direction and overlapping each
other.
Box pleat: pleat consisting of two parallel creases facing
opposite directions and forming a raised band.
Inverted Box Pleat: An inverted box pleat is formed by two
equal folds of fabric folded toward one another so they meet
at the center of the pleat on the front of the fabric. Or, more
easily stated, an inverted box pleat is what a box pleat looks
like from behind.
Cowl: Cowl folds are created by allowing fabric to fall to
desired depths from secured ends of a bias triangle
73
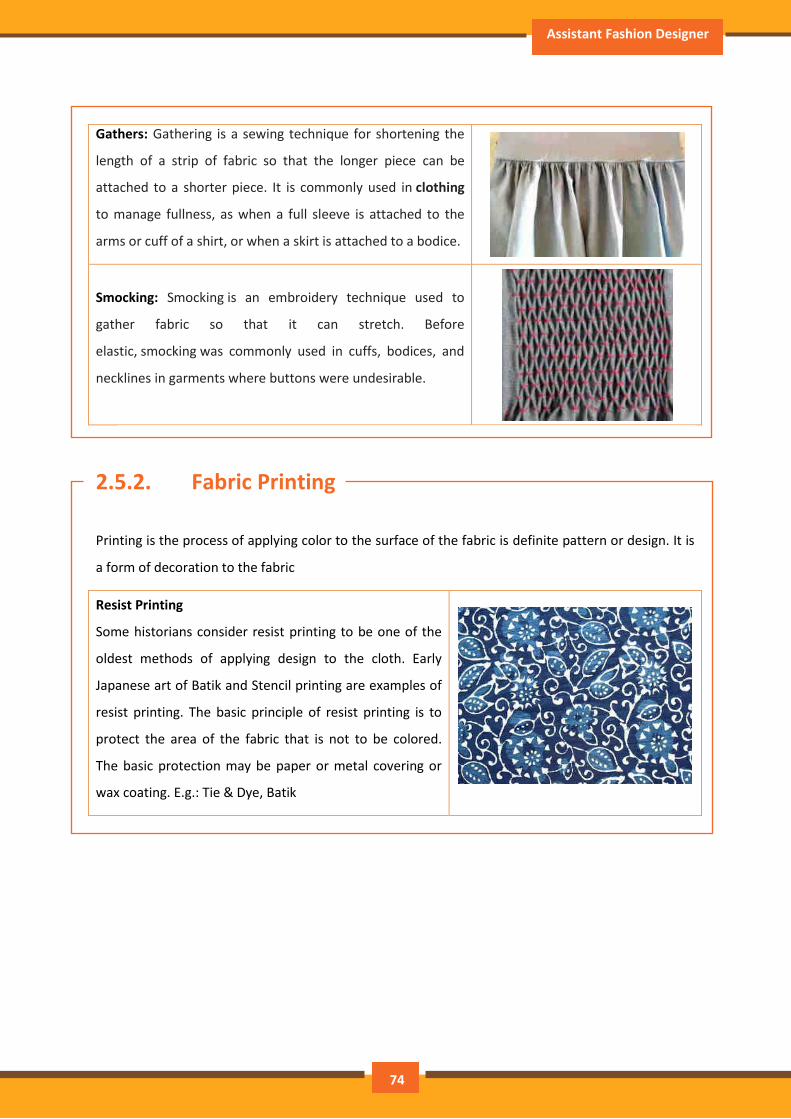
Assistant Fashion Designer
Gathers: Gathering is a sewing technique for shortening the
length of a strip of fabric so that the longer piece can be
attached to a shorter piece. It is commonly used in clothing
to manage fullness, as when a full sleeve is attached to the
arms or cuff of a shirt, or when a skirt is attached to a bodice.
Smocking: Smocking is an embroidery technique used to
gather fabric so that it can stretch. Before
elastic, smocking was commonly used in cuffs, bodices, and
necklines in garments where buttons were undesirable.
2.5.2. Fabric Printing
Printing is the process of applying color to the surface of the fabric is definite pattern or design. It is
a form of decoration to the fabric
Resist Printing
Some historians consider resist printing to be one of the
oldest methods of applying design to the cloth. Early
Japanese art of Batik and Stencil printing are examples of
resist printing. The basic principle of resist printing is to
protect the area of the fabric that is not to be colored.
The basic protection may be paper or metal covering or
wax coating. E.g.: Tie & Dye, Batik
74
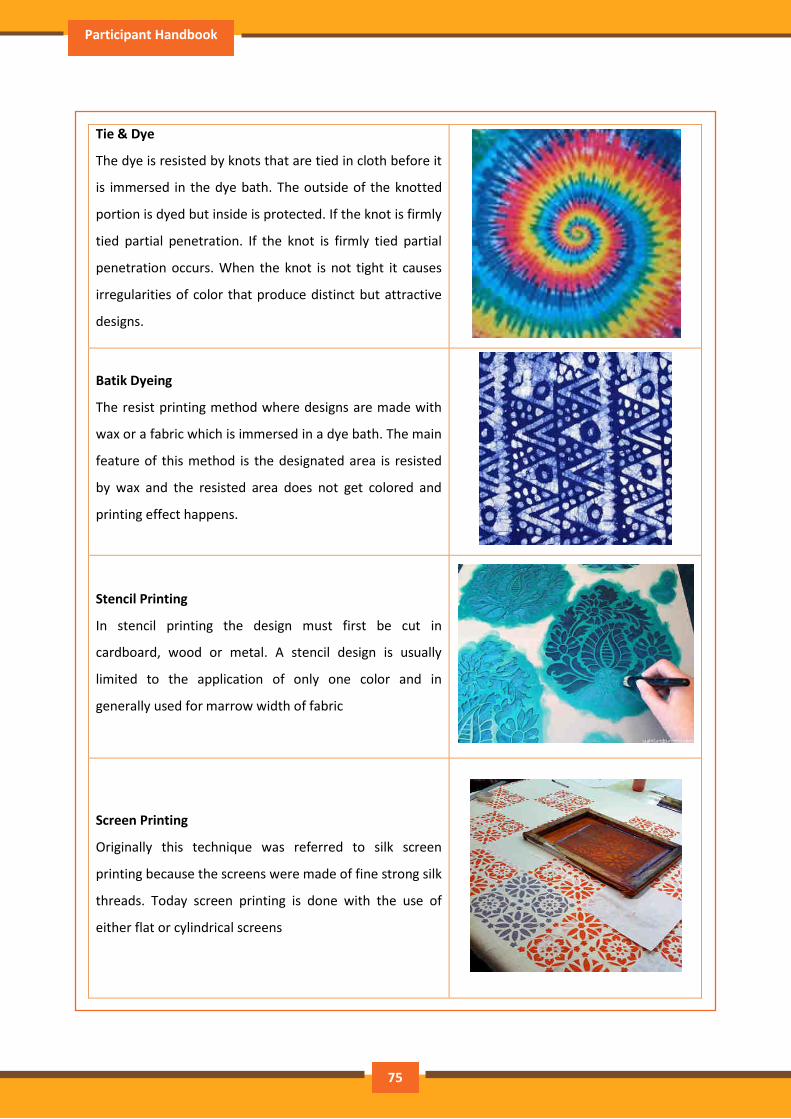
Participant Handbook
Tie & Dye
The dye is resisted by knots that are tied in cloth before it
is immersed in the dye bath. The outside of the knotted
portion is dyed but inside is protected. If the knot is firmly
tied partial penetration. If the knot is firmly tied partial
penetration occurs. When the knot is not tight it causes
irregularities of color that produce distinct but attractive
designs.
Batik Dyeing
The resist printing method where designs are made with
wax or a fabric which is immersed in a dye bath. The main
feature of this method is the designated area is resisted
by wax and the resisted area does not get colored and
printing effect happens.
Stencil Printing
In stencil printing the design must first be cut in
cardboard, wood or metal. A stencil design is usually
limited to the application of only one color and in
generally used for marrow width of fabric
Screen Printing
Originally this technique was referred to silk screen
printing because the screens were made of fine strong silk
threads. Today screen printing is done with the use of
either flat or cylindrical screens
75
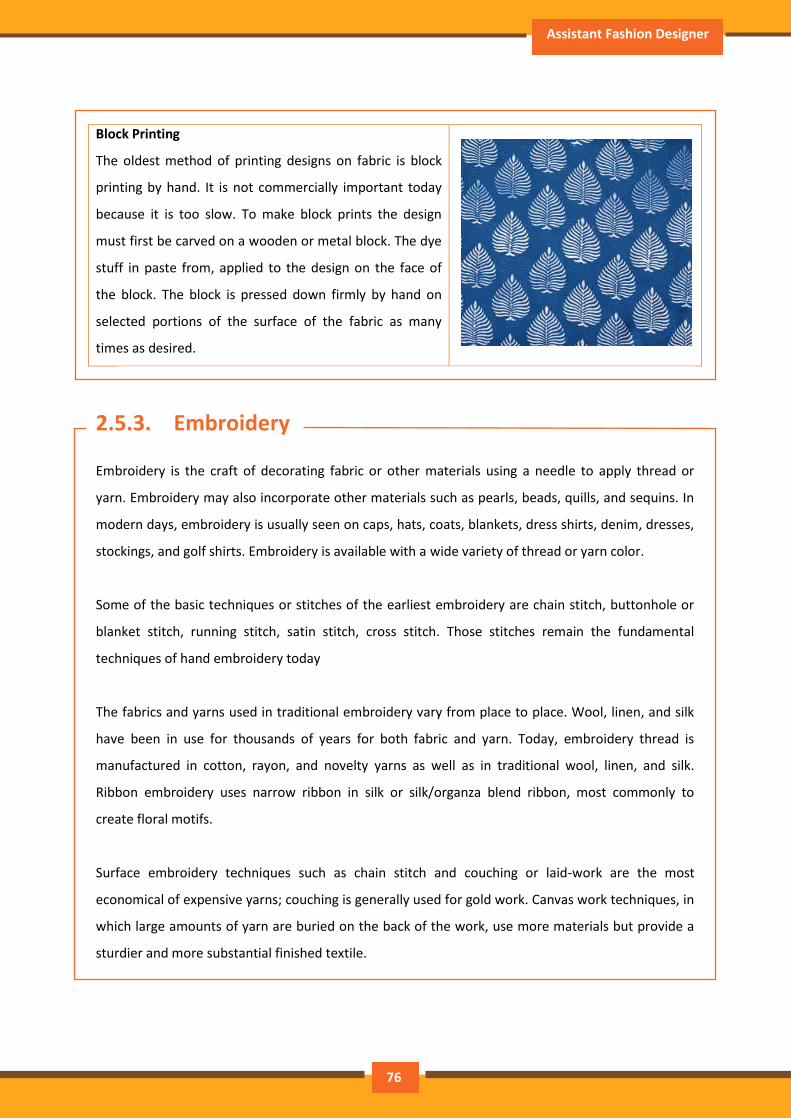
Assistant Fashion Designer
Block Printing
The oldest method of printing designs on fabric is block
printing by hand. It is not commercially important today
because it is too slow. To make block prints the design
must first be carved on a wooden or metal block. The dye
stuff in paste from, applied to the design on the face of
the block. The block is pressed down firmly by hand on
selected portions of the surface of the fabric as many
times as desired.
2.5.3. Embroidery
Embroidery is the craft of decorating fabric or other materials using a needle to apply thread or
yarn. Embroidery may also incorporate other materials such as pearls, beads, quills, and sequins. In
modern days, embroidery is usually seen on caps, hats, coats, blankets, dress shirts, denim, dresses,
stockings, and golf shirts. Embroidery is available with a wide variety of thread or yarn color.
Some of the basic techniques or stitches of the earliest embroidery are chain stitch, buttonhole or
blanket stitch, running stitch, satin stitch, cross stitch. Those stitches remain the fundamental
techniques of hand embroidery today
The fabrics and yarns used in traditional embroidery vary from place to place. Wool, linen, and silk
have been in use for thousands of years for both fabric and yarn. Today, embroidery thread is
manufactured in cotton, rayon, and novelty yarns as well as in traditional wool, linen, and silk.
Ribbon embroidery uses narrow ribbon in silk or silk/organza blend ribbon, most commonly to
create floral motifs.
Surface embroidery techniques such as chain stitch and couching or laid-work are the most
economical of expensive yarns; couching is generally used for gold work. Canvas work techniques, in
which large amounts of yarn are buried on the back of the work, use more materials but provide a
sturdier and more substantial finished textile.
76
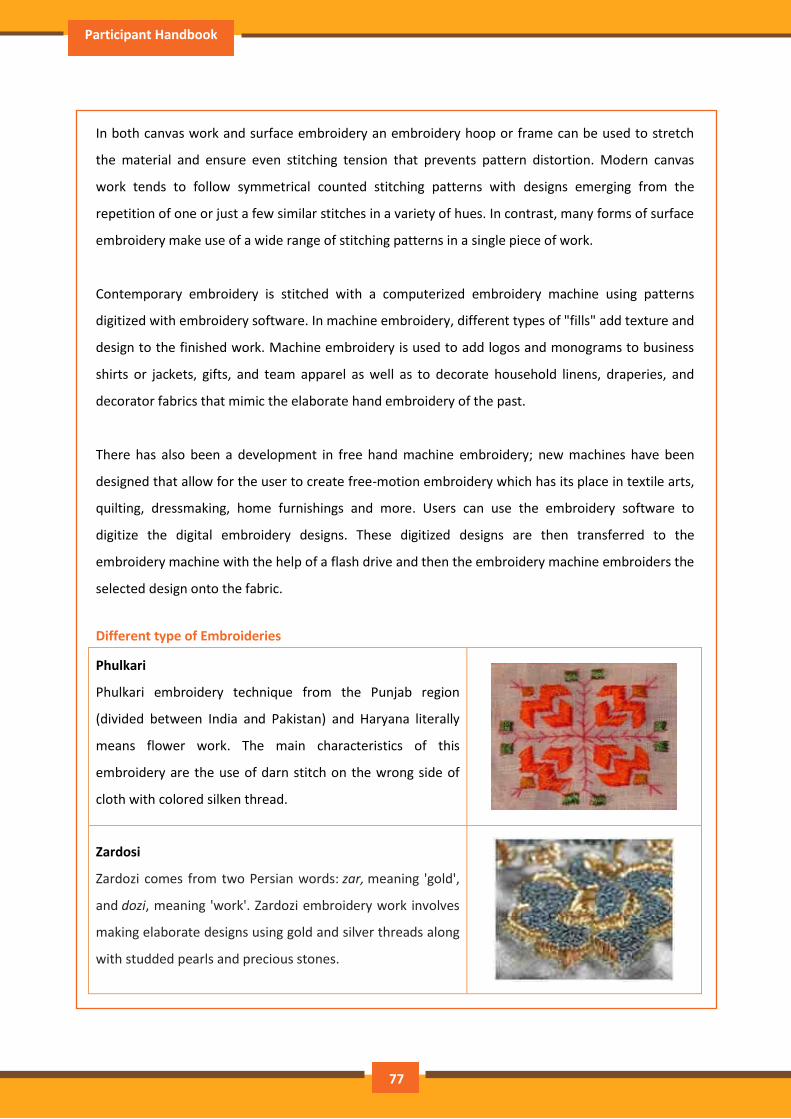
Participant Handbook
In both canvas work and surface embroidery an embroidery hoop or frame can be used to stretch
the material and ensure even stitching tension that prevents pattern distortion. Modern canvas
work tends to follow symmetrical counted stitching patterns with designs emerging from the
repetition of one or just a few similar stitches in a variety of hues. In contrast, many forms of surface
embroidery make use of a wide range of stitching patterns in a single piece of work.
Contemporary embroidery is stitched with a computerized embroidery machine using patterns
digitized with embroidery software. In machine embroidery, different types of "fills" add texture and
design to the finished work. Machine embroidery is used to add logos and monograms to business
shirts or jackets, gifts, and team apparel as well as to decorate household linens, draperies, and
decorator fabrics that mimic the elaborate hand embroidery of the past.
There has also been a development in free hand machine embroidery; new machines have been
designed that allow for the user to create free-motion embroidery which has its place in textile arts,
quilting, dressmaking, home furnishings and more. Users can use the embroidery software to
digitize the digital embroidery designs. These digitized designs are then transferred to the
embroidery machine with the help of a flash drive and then the embroidery machine embroiders the
selected design onto the fabric.
Different type of Embroideries
Phulkari
Phulkari embroidery technique from the Punjab region
(divided between India and Pakistan) and Haryana literally
means flower work. The main characteristics of this
embroidery are the use of darn stitch on the wrong side of
cloth with colored silken thread.
Zardosi
Zardozi comes from two Persian words: zar, meaning 'gold',
and dozi, meaning 'work'. Zardozi embroidery work involves
making elaborate designs using gold and silver threads along
with studded pearls and precious stones.
77
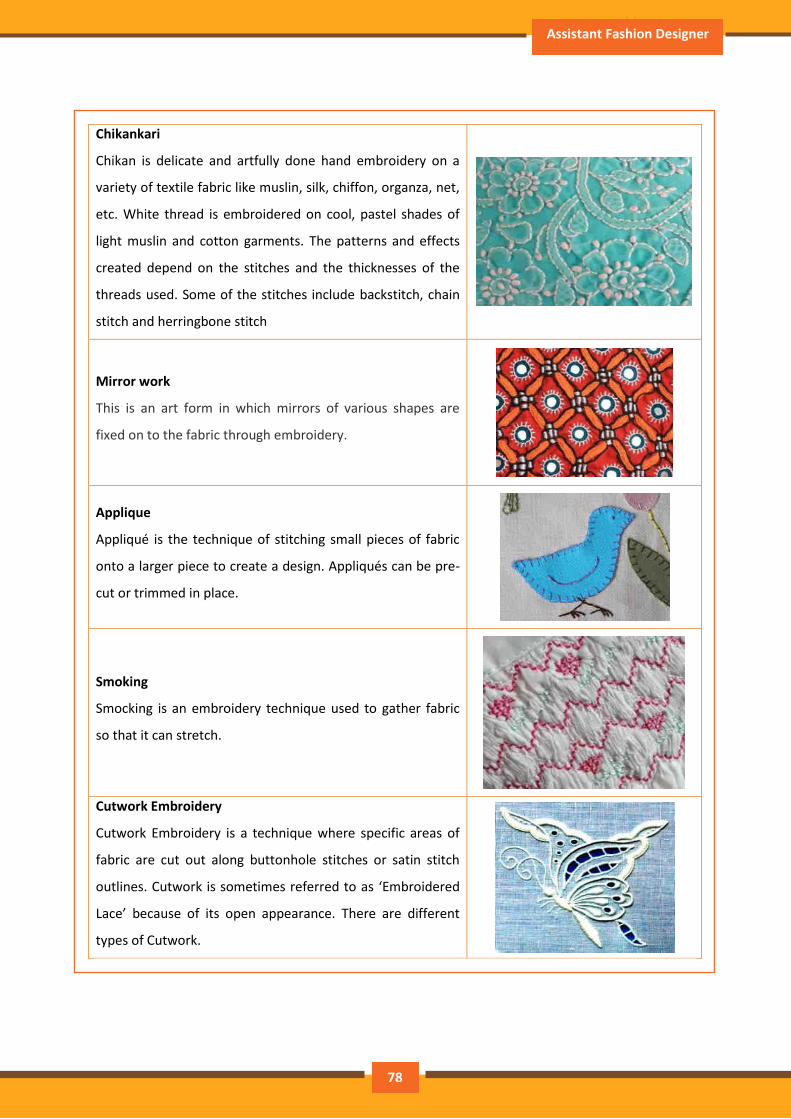
Assistant Fashion Designer
Chikankari
Chikan is delicate and artfully done hand embroidery on a
variety of textile fabric like muslin, silk, chiffon, organza, net,
etc. White thread is embroidered on cool, pastel shades of
light muslin and cotton garments. The patterns and effects
created depend on the stitches and the thicknesses of the
threads used. Some of the stitches include backstitch, chain
stitch and herringbone stitch
Mirror work
This is an art form in which mirrors of various shapes are
fixed on to the fabric through embroidery.
Applique
Appliqué is the technique of stitching small pieces of fabric
onto a larger piece to create a design. Appliqués can be pre-
cut or trimmed in place.
Smoking
Smocking is an embroidery technique used to gather fabric
so that it can stretch.
Cutwork Embroidery
Cutwork Embroidery is a technique where specific areas of
fabric are cut out along buttonhole stitches or satin stitch
outlines. Cutwork is sometimes referred to as ‘Embroidered
Lace’ because of its open appearance. There are different
types of Cutwork.
78
Participant Handbook
Exercise
1. Which among the following is created by allowing fabric to fall to desired depths from secured
ends of a bias triangle?
a) Pleats
b) Cowls
c) Smoking
d) Embroidery
2. Which among the following embroidery style uses gold and silver wires?
a) Cutwork
b) Zardosi
c) Applique
d) Kashidakari
3. Which among the following are the different methods of Surface development?
a) Printing
b) Embroidery
c) Pleats
d) All of these
79
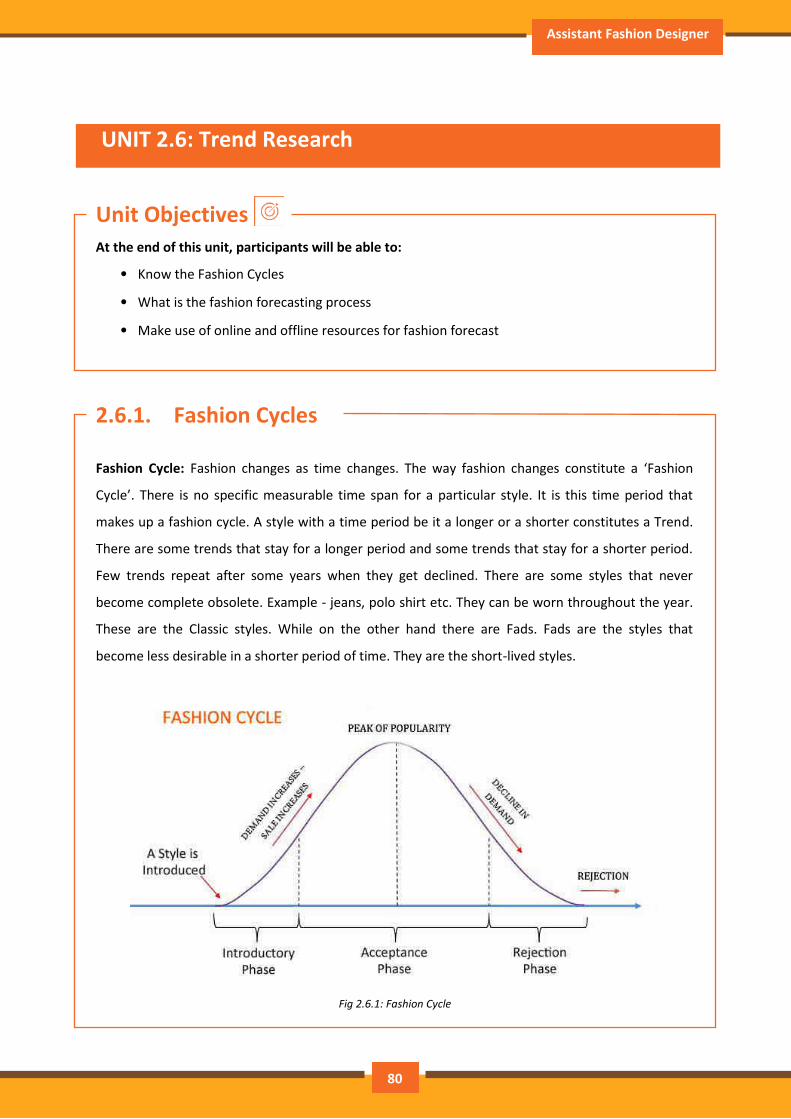
Assistant Fashion Designer
UNIT 2.6: Trend Research
Unit Objectives
At the end of this unit, participants will be able to:
• Know the Fashion Cycles
• What is the fashion forecasting process
• Make use of online and offline resources for fashion forecast
2.6.1. Fashion Cycles
Fashion Cycle: Fashion changes as time changes. The way fashion changes constitute a ‘Fashion
Cycle’. There is no specific measurable time span for a particular style. It is this time period that
makes up a fashion cycle. A style with a time period be it a longer or a shorter constitutes a Trend.
There are some trends that stay for a longer period and some trends that stay for a shorter period.
Few trends repeat after some years when they get declined. There are some styles that never
become complete obsolete. Example - jeans, polo shirt etc. They can be worn throughout the year.
These are the Classic styles. While on the other hand there are Fads. Fads are the styles that
become less desirable in a shorter period of time. They are the short-lived styles.
Fig 2.6.1: Fashion Cycle
80
Participant Handbook
A fashion cycle is a bell shaped curve. This curve comprises the five stages of the fashion cycle:
Introduction
Rise in popularity
Peak
Decline and
Rejection.
Consumers are exposed to multiple styles every year. Some styles are accepted by the consumers at
retail level while some are rejected.
Stages of fashion cycle
Stage 1 – Introduction of style: When a style is introduced to the masses, it is the Introduction of a
style. During Introduction phase, a fashion leader introduces new styles to the public. These styles
may or may not appeal to the masses. The consumers determine the acceptance of the new style.
This new style is made in lesser quantity to test its acceptance. The fashion leaders, the introducers
of the new styles to the public, wear these styles. They are usually the actors, athletes, and
celebrities who can grab media attention and stand out from the rest.
Stage 2 – Rise in popularity explanation: Increase in popularity. These styles gain popularity as they
were worn by the famous personality. So these styles grab attention of the people and the press.
The manufacturers make the adaptations in lesser prices for the mass production.
Stage 3 – Peak in popularity: At this stage of fashion cycle, style is most popular. It is the time when
the production of the style is in volume. And all it seeks is the mass acceptance. The time for which
a style gets accepted determines whether it is a classic or a fad.
Stage 4 – Decline in popularity. At this stage people get tired of the style and start searching for a
new style. It is the time for the new styles to be launched. Old styles at the retail stored are retailed
at a discounted rates.
Stage 5 – Rejection: Manufactures stop the production of the style, as it no longer interests the
consumers. Since the style goes out of fashion, the rejection or the discarding of the style is known
as the consumer obsolescence. It is now time for new cycle to begin.
81
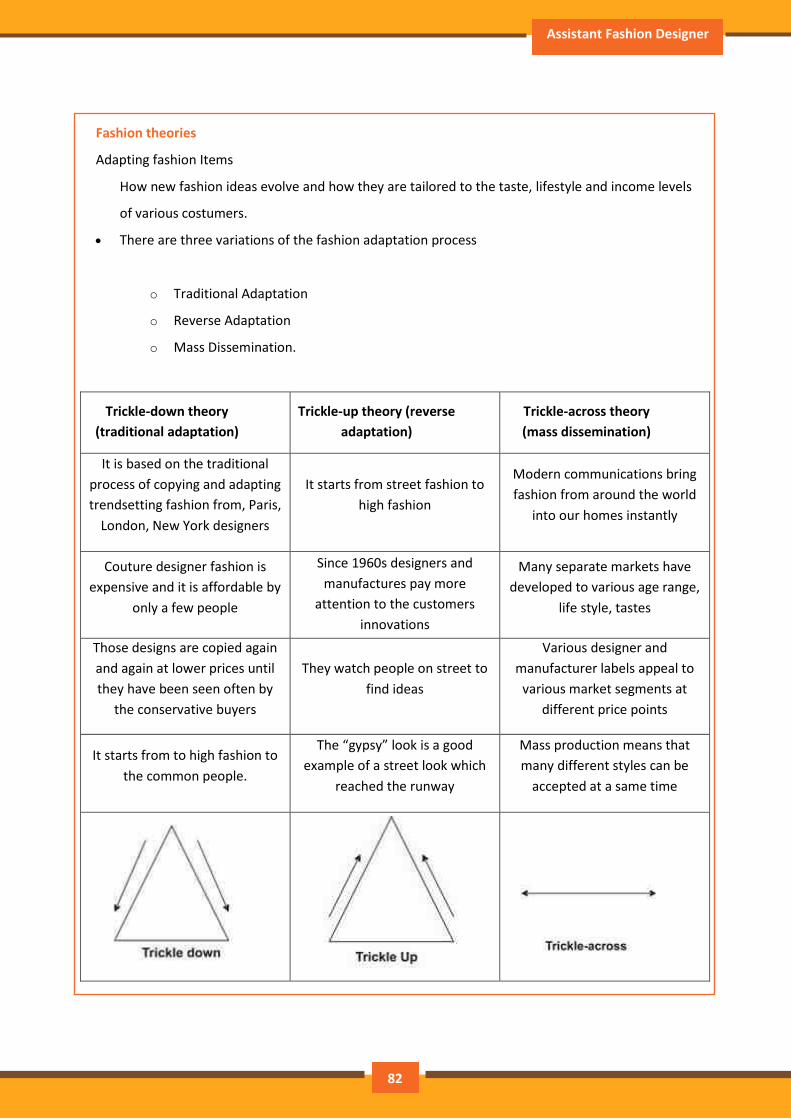
Assistant Fashion Designer
Fashion theories
Adapting fashion Items
How new fashion ideas evolve and how they are tailored to the taste, lifestyle and income levels
of various costumers.
There are three variations of the fashion adaptation process
o Traditional Adaptation
o Reverse Adaptation
o Mass Dissemination.
Trickle-down theory
(traditional adaptation)
Trickle-up theory (reverse
adaptation)
Trickle-across theory
(mass dissemination)
It is based on the traditional
process of copying and adapting
trendsetting fashion from, Paris,
London, New York designers
It starts from street fashion to
high fashion
Modern communications bring
fashion from around the world
into our homes instantly
Couture designer fashion is
expensive and it is affordable by
only a few people
Since 1960s designers and
manufactures pay more
attention to the customers
innovations
Many separate markets have
developed to various age range,
life style, tastes
Those designs are copied again
and again at lower prices until
they have been seen often by
the conservative buyers
They watch people on street to
find ideas
Various designer and
manufacturer labels appeal to
various market segments at
different price points
It starts from to high fashion to
the common people.
The “gypsy” look is a good
example of a street look which
reached the runway
Mass production means that
many different styles can be
accepted at a same time
82
Participant Handbook
2.6.2. Fashion Forecast
Fashion forecasting is more of an art than a science; it’s a predictive service that entire careers and
companies are built upon. It’s not easy to break through the industry noise and find what’s truly
going to resonate with customer bases, especially with the timelines we keep in turning out “new”
for every season. Yes, product testing and choice modeling based on historical sales data help, but
the fickle behaviors of shoppers can’t always be predicted. That’s where the art comes in and
consistently wins –– something that inspires and resonates with shoppers can become the next big
thing overnight. After all, design is based in emotion, not data. Taste is deeply personal, if people
“love” something, they’re going to buy it. Hopefully the tactics above will help you balance the art
and science of your own trend-driven product development process.
Follow the Forecasters: Our industry is extremely lucky to have fantastic forecasting companies that
scour the globe looking for what’s about to happen next in fashion. They are present at every
fashion week, cultural event, and keep pace with the blogosphere so designers and brands don’t
have to. WGSN, Fashion Snoops, Promostyl, The Trend Council, Design Seeds, Trend Hunter,
Pantone, and Trend stop are fantastic resources to discover what’s coming next in any consumer
facing retail vertical. While many of these services have subscription fees, all of them have blogs and
offer free previews of their work online. These sites provide information on the materials, colors,
style inspiration and foundational information that trends are based on. Their Pinterest boards are
filled with finished, usable trend ideas as well.
Follow Industry News and Attend Trade Events: Another advantage our industry has is extremely
intelligent media outlets that have built their business on covering runway, trade, and overall retail
trends. For fashion, outlets like Women’s Wear Daily (WWD), The Business of Fashion and Trend
Spotter should be your go-to sources for trends that are starting to happen, as well as finding trends
that are here now. Put them on your weekly online reading list (as we all know that WWD, even
though it’s a weekly now, stacks up on our desks). For interiors design and home, DWELL,
Architectural Digest, and Interior magazine are your go-to sources.
Also, the trade shows you attend, whether you are exhibiting, attending or just walking through,
often have multiple trend presentation workshops you can attend. These workshops and
presentations are usually put on by the trend forecasting companies listed above, so make time to
sit in on them and make even better use of your market participation. For books you can buy as one-
83

Assistant Fashion Designer
offs online, Mode Info, a UK-based online fashion bookstore, offers trend publications geared
towards specific industry niches.
Use Consumer Magazines and Media: Consumer facing magazines are your best friend for finding
major trends that are hot for the next two or three seasons. Magazines operate on longer lead times
so the editorial they create provides some market longevity. Elle offers trends reports, Who What
Wear is fantastic at showing single and category accessories trends, Vogue offers an entire
library coupled with the best runway coverage in the business, and Refinery29 has the most up to
date coverage of millennial fashion trends on the web. Elle Decor, MyDomaine, Design
Sponge, People Style Watch, Daily Look and In Style –– look to the books! No matter who your
customer is, look at the publications your shoppers read to see what trends are happening in their
regions, fit their general lifestyle, and personal interests. You can coordinate collections accordingly.
Be inspired by the Influencers and Trendsetters: Another tried and true method for discovering the
latest trends is to follow the influencers and trendsetters on the internet. Your favorite bloggers are
at the forefront of what’s hot next, as well other industry figures like Hollywood costume designers.
In the blog world, a simple Google search for “best {enter your type of} bloggers” will result in great
search results. You can narrow your list down to a specific location or product niche. For
example, Adam Gallagher is a go-to resource for men’s trends (especially in timepieces),
and Garance Dore is a go-to for women’s trends. You can also look for social network-specific
influencers (like YouTube/Instagram stars) or micro influencers depending on what sort of
inspiration you’re seeking. In the home space, Apartment Therapy, Decorist and Domino are staples.
Outside of the fashion blog world, you can and should look to Hollywood for inspiration. Whether
we like it or not, what shoppers wear is heavily influenced by the television shows and movies they
watch. Characters are dressed by costume designers, many of whom maintain websites and social
media presences. Want to see a piece that was embroidered on a dress from Game of
Thrones? Michele Carragher maintains an entire online gallery of her work. Want to know what
former True Blood turned Netflix costume designer Audrey Fisher is cooking up? Her Instagram is full
of inspiration and sneak peeks. Use IMDB to look up top rated shows, look for the costume designer,
and do a simple search on his or her name to find out how to follow them online. For home decor,
the same can be said of set designers (ArchDaily has dedicated section).
84

Participant Handbook
Let The Big Brands Do The Heavy Lifting: In this industry, it’s also okay to look to the brands for
inspiration. High, low or mass, brands like Mr. Porter, Zara, H&M, Target, Daily
Look and MissGuided have the budgets to produce trend-related content designed to help drive
sales. For other industry professionals, that content serves as great trend inspiration. Don’t be afraid
to use it and apply the ideas it generates for you to your collections. What’s more, the brands you’re
looking at have the big, paid subscription to the trend services listed above. You benefit no matter
how the information is accessed! In the home space, look to Anthropologie, West Elm, Free People
and CB2.
Utilize The Technologies and Their Data: Both Pinterest, Instagram and Google regularly offer up
trend information based on the data found from their users. When it comes to retail, it’s gold. Use it
regularly to help balance what’s inspiring your collections to what will help better sell your
collections.
Leading Fashion Magazines and Blogs
Fashion Magazines
Harper's Bazaar: Harper's has images of shows, reviews, and articles about designers and
trends.
New York Times Fashion & Style: Ongoing fashion and style news and reviews, along with
Bill Cunningham's On the Street, slide shows and other multimedia.
Style.com: Up-to-the-minute coverage of the world of fashion. Comprehensive runway
reviews, images, videos, beauty, and more. Search by season or designer!
Suzy Menkes at Vogue UK: Vogue International Editor Suzy Menkes is the best-known
fashion journalist in the world. After 25 years commenting on fashion for the International
Herald Tribune (rebranded recently as The International New York Times), Suzy Menkes now
writes exclusively for Vogue online, covering fashion worldwide.
Vogue: Vogue has images of recent and past shows, reviews, and mainstream articles about
designers and trends.
85
Assistant Fashion Designer
Fashion Blogs
Business of Fashion: Publishing articles on fashion news and analysis from an insider's
perspective in the industry.
The Cut: New York magazine's fashion blog. With new-fangled shoots from rising
photographers, zoomable celebrity images, truly global street coverage, sharp commentary,
intimate confessionals, reports from the sexual front lines, and more, The Cut is fashion,
forward.
Refinery29: An American-based fashion, style and beauty website that follows a newsletter
format. Click the "fashion" link to explore more.
Style Rookie: Though it's now defunct, Style Rookie is a great example of a fashion blog that
mixes outfit posts and fashion commentary. Tavi Gevinson started the blog when she was 11
and over time became a fashion superstar.
Women's Wear Daily: Women's Wear Daily brings you breaking news about the fashion
industry, designers, celebrity trend setters, and extensive coverage of fashion week.
Fashion Shows
Paris fashion Week
New York Fashion Week
London Fashion Week
Milan Fashion Week
Lakme Fashion Week
Wills Lifestyle Fashion Week
Indian Couture Fashion Week
2.6.3 Finding Inspiration
Open yourself up to inspiration
As we all know, inspiration can come when we least expect it, and at times, from the most
unexpected place. Opening oneself up to the world around can become a difficult thing when we
find ourselves in routines such as work, school, having the same conversations with the same
people. As a creative person, the world looks to you to find new ways to interpret the world around
86

Participant Handbook
them. One can search for inspiration in the places such as: museums, movies, and books, but the
element that makes one’s work stand out is your personal interpretation of various scenarios
Compile imagery
Whatever your creative medium; fashion, interiors, film etc., try to take pictures of anything and
everything that interests you. If you’re more tactile, you can use magazine tears, fabric swatches
and other found objects that relate to your inspiration. If you prefer to create your mood board
digitally, it’s best to collect everything into one large folder and let the ideas simmer before the
editing process begins.
Categorize your ideas
Make sub folders for imagery that pertains to target customer, color story, silhouette, primary
inspiration and secondary inspiration.
“Target Customer” - These are images that convey the ideal customer. Her age, her style, her
interests. Is she a tomboy or is she a girl’s girl? Is she in her twenties or in her forties? Is she a stay at
home mom? Is she a student? What other brands does she wear? These are all important questions
you need to answer to identify with who you’re aiming to dress and what they really want from you.
It’s important to define the difference between the intended consumer and the actual consumer. In
the fashion industry, it’s a joke that we all aim to dress gallery owners and magazine editors. But
believe me, they have enough clothes.
“Color Story” - Images that convey the color story you want throughout your collection.
“Silhouette” - Images of the kind of form and shape you’d like your collection to have. Is it slim and
slouchy? Is it full and feminine? Knowing the silhouette you want will help you design a cohesive
collection and will give you some boundaries to design within.
87
Assistant Fashion Designer
“Primary Inspiration” - Images pertaining to the main source of inspiration. For example, if the main
inspiration is Frida Khalo, one should have examples of her artwork and what she stood for, imagery
of her as an icon, florals, traditional Mexican clothing, and modern interpretations of Frida. A well
rounded collection of imagery will help in forming a balanced inspiration.
“Secondary Inspiration” - Sometimes it’s best to juxtapose two different inspirations together in
order to create a collection that feels fresh and less literal. This is why it can be good to have a
secondary inspiration to contrast the primary.
Research past the original inspiration, topics, color story
Throughout the gathering process, there will be key themes and ideas that gradually becoming
prominent in the process. It may be a certain color story or silhouette that the designer is drawn to,
so use this knowledge as the foundation for the collection. Moving past a literal translation will help
explore various creative channels
Put the inspiration into words and create a back story for your collection
Once you can put your inspiration into words, it will be much easier to relate to it and stay focused
on the design.
2.6.4. Constructing the Mood Board
Building a mood board
A mood board should include: Fabrics, videos, trims, texts etc. The mood board should be put
together in such a way that’s not just beautiful but intriguing. Use more than just imagery; include
fabrics and trims that you want to use as part of your collection as well as found objects that evoke
emotions and a mood.
88
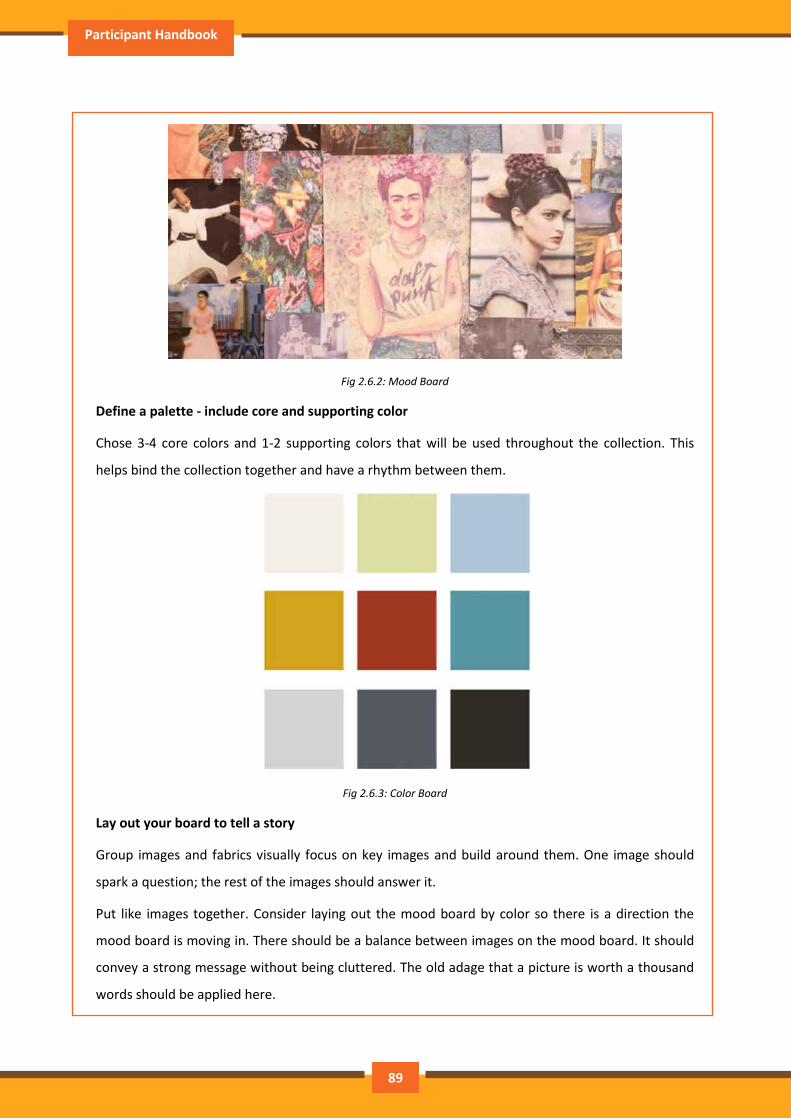
Participant Handbook
Fig 2.6.2: Mood Board
Define a palette - include core and supporting color
Chose 3-4 core colors and 1-2 supporting colors that will be used throughout the collection. This
helps bind the collection together and have a rhythm between them.
Fig 2.6.3: Color Board
Lay out your board to tell a story
Group images and fabrics visually focus on key images and build around them. One image should
spark a question; the rest of the images should answer it.
Put like images together. Consider laying out the mood board by color so there is a direction the
mood board is moving in. There should be a balance between images on the mood board. It should
convey a strong message without being cluttered. The old adage that a picture is worth a thousand
words should be applied here.
89
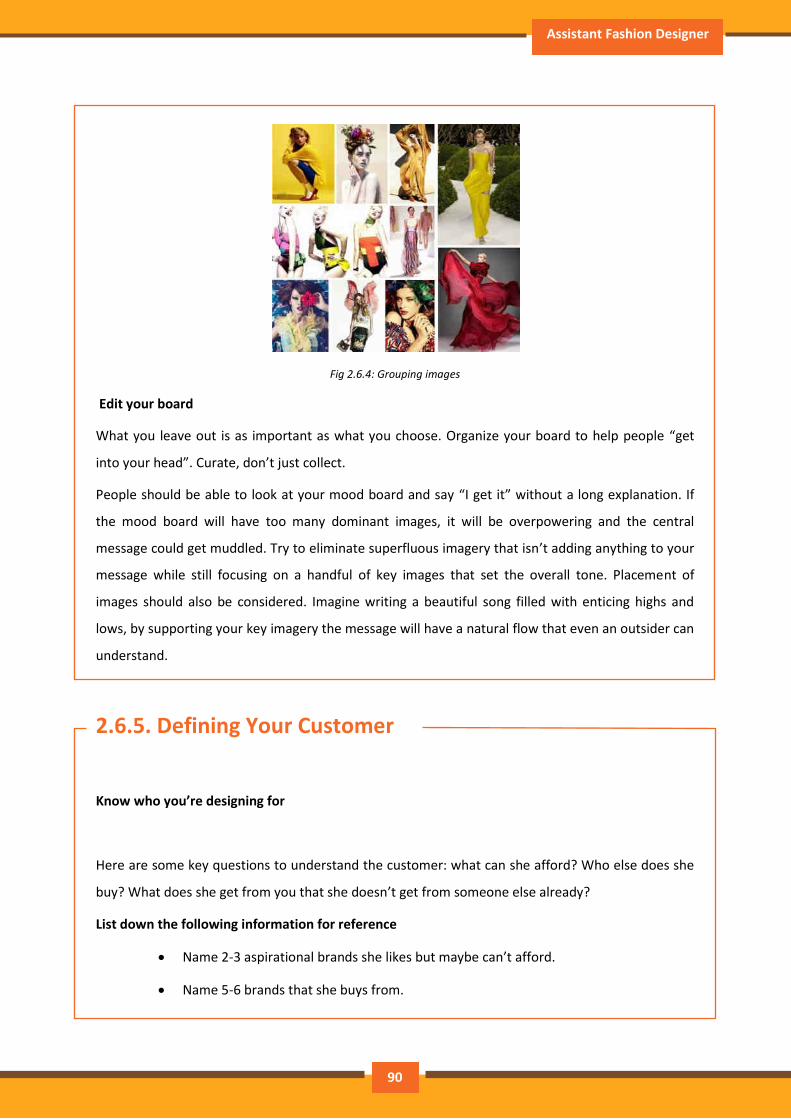
Assistant Fashion Designer
Fig 2.6.4: Grouping images
Edit your board
What you leave out is as important as what you choose. Organize your board to help people “get
into your head”. Curate, don’t just collect.
People should be able to look at your mood board and say “I get it” without a long explanation. If
the mood board will have too many dominant images, it will be overpowering and the central
message could get muddled. Try to eliminate superfluous imagery that isn’t adding anything to your
message while still focusing on a handful of key images that set the overall tone. Placement of
images should also be considered. Imagine writing a beautiful song filled with enticing highs and
lows, by supporting your key imagery the message will have a natural flow that even an outsider can
understand.
2.6.5. Defining Your Customer
Know who you’re designing for
Here are some key questions to understand the customer: what can she afford? Who else does she
buy? What does she get from you that she doesn’t get from someone else already?
List down the following information for reference
Name 2-3 aspirational brands she likes but maybe can’t afford.
Name 5-6 brands that she buys from.
90
Participant Handbook
What do those brands stand for? (example: Daniel Vosovic dresses the chic tomboy
every day, not just for special occasions)
What do you stand for that’s different?
Define your personal point of view
What is your signature?
Example: Helmut Lang’s signature is asymmetrical draping. This is something that is carried through
every collection they create, no matter the inspiration, color, fabric, etc.
Define what your signature is. It should be something that can be carried through season to season
as inspiration changes.
Know that market
Stay aware of what others are doing to help you hone your own message.
Know what’s going on around you, such as current trends and noteworthy style moments. If several
other designers are currently doing camo print, don’t do a camo print. Or if you’re dead set on doing
it, find a way to make it so new and original that it’s worthwhile for the customer. Remember, it’s
not just who did it first, but who did it best! It’s important to be up to date on the latest trends and
what’s in stores so you can stay current. It’s a good idea to go out and do some market research at
this stage. Go shopping at stores that carry brands similar to what you envision your line to be and
see what made it to the sales floor. What are the clear cut trends you can see on the floor?
2.6.6. Translating Ideas into Design
Move beyond a literal translation
Disseminate mood, textures and silhouettes from the mood board to create a strong foundation to
build upon. Once the mood board is completed, proceed to designing! Decide which attributes from
the mood board is to be translated into clothing. Once the designing is started, one idea can evolve
into the next, but keep a common thread throughout your collection. A simple trick to work is the
91
Assistant Fashion Designer
50/5 rule. From 50 ft. away, what’s her 360 degree silhouette? From 5 ft. away, what are some of
the interesting details that draw you closer?
Return home
Throughout the design process, return to the mood board to keep the focus around the central idea.
There will come a point in the design process where there can be too many ideas. Narrow them
down, and really start to flush out a few ideas fully rather than moving forward with too many
unfinished ideas. Look back to the mood board to regain the focus.
Stay flexible
If direction shifts while designing, consider updating what imagery is no longer relevant.
There’s nothing wrong with shifting direction a bit mid design. If you find yourself veering in a
direction that you really love, just update your mood board with the appropriate new imagery.
Remember, design is an evolution of ideas and you’re not tied to anything.
92
Participant Handbook
Exercise \
1. Elaborate about the Fashion Cycle
_____________________________________________________________________________________
_____________________________________________________________________________________
_____________________________________________________________________________________
_____________________________________________________________________________________
_____________________________________________________________________________________
_____________________________________________________________________________________
_____________________________________________________________________________________
_____________________________________________________________________________________
_____________________________________________________________________________________
_____________________________________________________________________________________
2. Explain the trickle-down theory
_____________________________________________________________________________________
_____________________________________________________________________________________
_____________________________________________________________________________________
_____________________________________________________________________________________
_____________________________________________________________________________________
_____________________________________________________________________________________
_____________________________________________________________________________________
3. Enlist at least 5 methods of fashion forecasting.
_____________________________________________________________________________________
_____________________________________________________________________________________
_____________________________________________________________________________________
_____________________________________________________________________________________
_____________________________________________________________________________________
_____________________________________________________________________________________
_____________________________________________________________________________________
93
Assistant Fashion Designer
UNIT 2.7: Garment Draping
Unit Objectives
At the end of this unit, participants will be able to:
• Undertake draping
2.7.1. Introduction to draping
Draping is the 3-dimensional process, used in the fashion industry, to create a pattern for a
particular design. Designs can be draped in the actual end-use fabric or in a substitute fabric, but
most often they are draped in a fabric known as muslin.
The method of draping includes stitching the garment by the use of loosely hanging material to
create o flowing effect. Even it can create for a very impressive effect when finished appropriately.
Draping needs ability and practice to do exact fitting, fall and fullness.
Most of the designers choose to try out with the mode of fabric hangings but also there are
purpose-able ways to determine drape. Draping technique is generally used in making garments but
can also be used to develop skirts, blouses and pants.
Before starting your drape, remember to use black style tape to line the form at three key
points. These key points are:
o around the bust at the apex,
o around the narrowest part of the waist, and
o around the widest points of the hips
Remember to leave space in between the style tape and the form between the busts so that
your drape hits the largest measurement around this area. Leaving a space in between will
also allow you to drape your fabric onto this style tape if a necessary aspect of your design.
Remember to drape either to the top or bottom of each style tape line and keep this process
consistent throughout the process. For instance, if you drape and pin to the bottom of the
waist tape the first time, repeat each and every time.
94
Participant Handbook
When first starting your drape, remember to take accurate measurements of the form that
you are working with. Some key measurements to remember are for your X-point, mark 3/8
inches down from the neckline when doing collars especially so your end result is not too
tight in that area. Also for an accurate apex measurement, be sure to measure from the HPS
or high point shoulder down vertically to the Center Front line and then over the bust
horizontally and mark. You can then draw a mid-line across your draping block that
intersects with the side seam for accurate placement once you are working on the form.
After you have successfully measured the form on which you are draping, you should also
be sure to apply the pins you are using securely down the Center Front line so that all of
your key markings are lining up, such as the mid-line and the X-point and the fabric is stable
when shifted. If your pins were to come out, then all of your draping work would be for
naught because the garment would be off-balance from the beginning.
Now you should be off and running to the drape. Let your mind’s creations come to life as
you manipulate your fabric or muslin into pleats, tucks, darts, and ruffles. But be sure to
remember that as you smooth the fabric around the form, you adequately slash around
your construction details and the basic tenets of the form including the waist and the bust
or the hips and the butt to release tension which shows-up frequently in the form of
wrinkles and bumps that would not be flattering for any figure. The technical term for this
tip for these tricky construction points is called “bridging the hollows”.
Finally, you should be able to step-back and analyze your drape. This is a very important
step to remember before you sew up your design or transfer it to a pattern. The drape
should look as well-balanced as it does in your mind’s eye. Some things to think about are,
would the details you’ve added look symmetrical when displayed on both sides of the form
and when the pins are released from key points on the form such as the Center Front line,
the side-seam, or the apex. Although most of the pins are needed to provide stability while
draping, remember nothing will ever be pinned to an individual for whom you are designing.
So keep in mind how your design will look once the pins are removed from the form itself.
Also, when analyzing the drape remember in removing the pins from the form that you
should also pin all of the draped seams together to get an accurate picture of what the final
garment will look like when sewn. At this point, side-seams and princess seams can be
95

Assistant Fashion Designer
pinned together from a 360-degree vantage point on the form to demonstrate how the
newly constructed garment will hang. This is one of the main advantages of draping as a
method of garment construction and provides lots of visual stimulation to the creative
designer.
After you’ve completed your drape, if you are transferring the drape to a pattern remember
to true the pattern and add seam allowances. This can be a time-consuming but necessary
step in the process of garment construction with a drape. There is often an ability to modify
the drape according to the industry standards of sewing and patternmaking as well. We all
know it is fun to drape and creatively visualize your design; however, there is also an overlap
between design processes that is valuable to learn. Creating a perfect pattern of that
favorite dress, which incorporates all of your draping details and hard-work will be essential
when you want to sew it up again in a new fabric or modify it with an innovative and trendy
design feature.
Fig 2.7.1: Draping on dress form
96
Participant Handbook
Exercise \
1. Which among the following tools are required in the process of Draping
a) Fabric
b) Pins
c) Style tapes
d) All of these
2. List the critical steps in Draping
3. Draw a diagram with all the landmarks of the Dress form
97
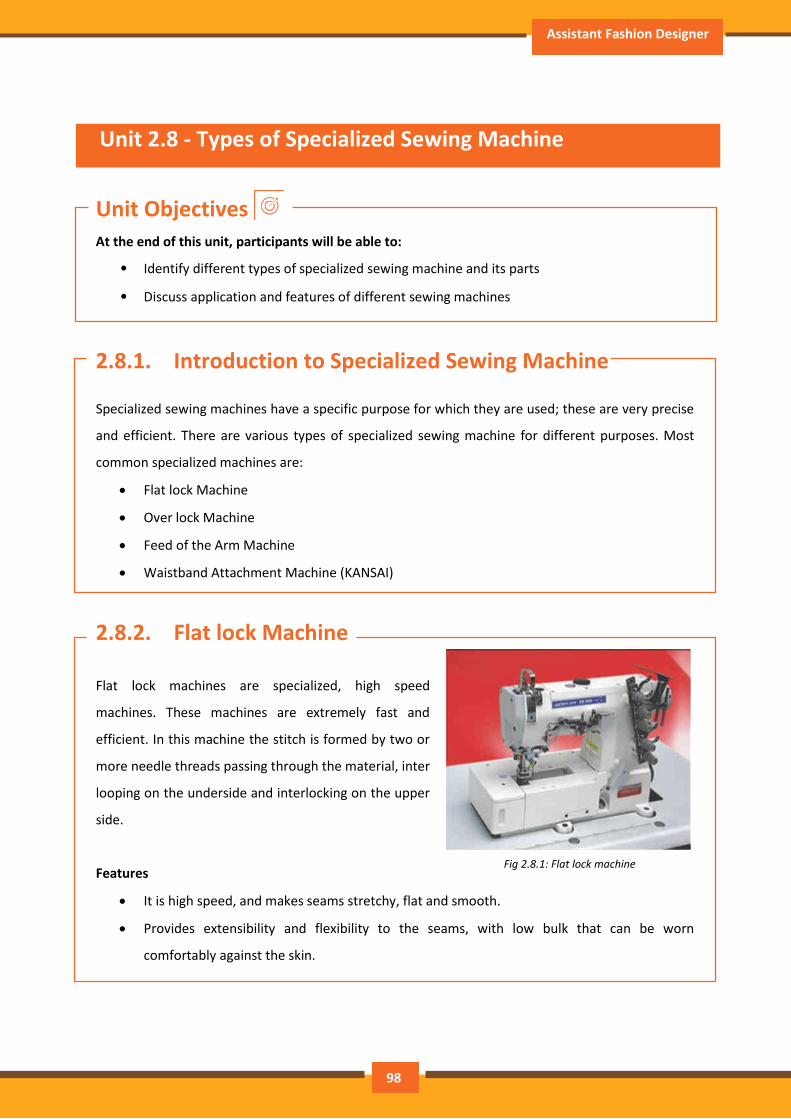
Assistant Fashion Designer
Unit 2.8 - Types of Specialized Sewing Machine
Unit Objectives
At the end of this unit, participants will be able to:
• Identify different types of specialized sewing machine and its parts
• Discuss application and features of different sewing machines
2.8.1. Introduction to Specialized Sewing Machine
Specialized sewing machines have a specific purpose for which they are used; these are very precise
and efficient. There are various types of specialized sewing machine for different purposes. Most
common specialized machines are:
Flat lock Machine
Over lock Machine
Feed of the Arm Machine
Waistband Attachment Machine (KANSAI)
2.8.2. Flat lock Machine
Flat lock machines are specialized, high speed
machines. These machines are extremely fast and
efficient. In this machine the stitch is formed by two or
more needle threads passing through the material, inter
looping on the underside and interlocking on the upper
side.
Features
It is high speed, and makes seams stretchy, flat and smooth.
Provides extensibility and flexibility to the seams, with low bulk that can be worn
comfortably against the skin.
Fig 2.8.1: Flat lock machine
98
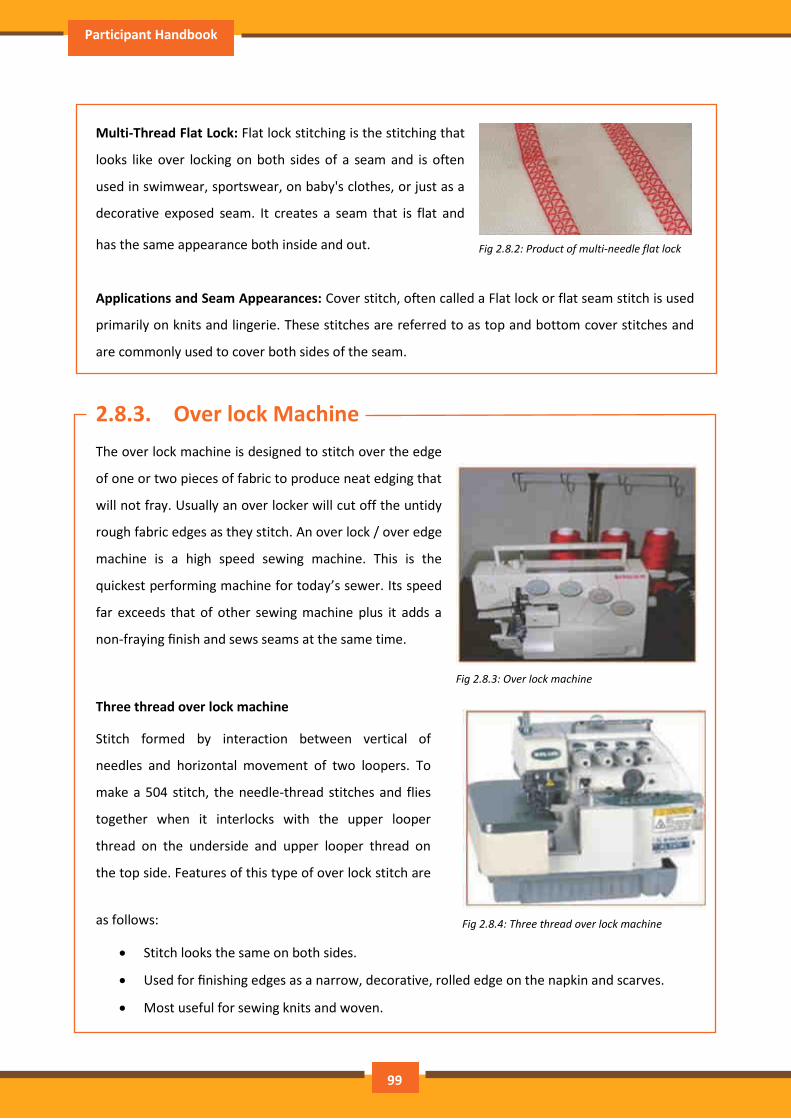
Participant Handbook
Multi-Thread Flat Lock: Flat lock stitching is the stitching that
looks like over locking on both sides of a seam and is often
used in swimwear, sportswear, on baby's clothes, or just as a
decorative exposed seam. It creates a seam that is flat and
has the same appearance both inside and out.
Applications and Seam Appearances: Cover stitch, often called a Flat lock or flat seam stitch is used
primarily on knits and lingerie. These stitches are referred to as top and bottom cover stitches and
are commonly used to cover both sides of the seam.
2.8.3. Over lock Machine
The over lock machine is designed to stitch over the edge
of one or two pieces of fabric to produce neat edging that
will not fray. Usually an over locker will cut off the untidy
rough fabric edges as they stitch. An over lock / over edge
machine is a high speed sewing machine. This is the
quickest performing machine for today’s sewer. Its speed
far exceeds that of other sewing machine plus it adds a
non-fraying finish and sews seams at the same time.
Three thread over lock machine
Stitch formed by interaction between vertical of
needles and horizontal movement of two loopers. To
make a 504 stitch, the needle-thread stitches and flies
together when it interlocks with the upper looper
thread on the underside and upper looper thread on
the top side. Features of this type of over lock stitch are
as follows:
Stitch looks the same on both sides.
Used for finishing edges as a narrow, decorative, rolled edge on the napkin and scarves.
Most useful for sewing knits and woven.
Fig 2.8.2: Product of multi-needle flat lock
Fig 2.8.3: Over lock machine
Fig 2.8.4: Three thread over lock machine
99
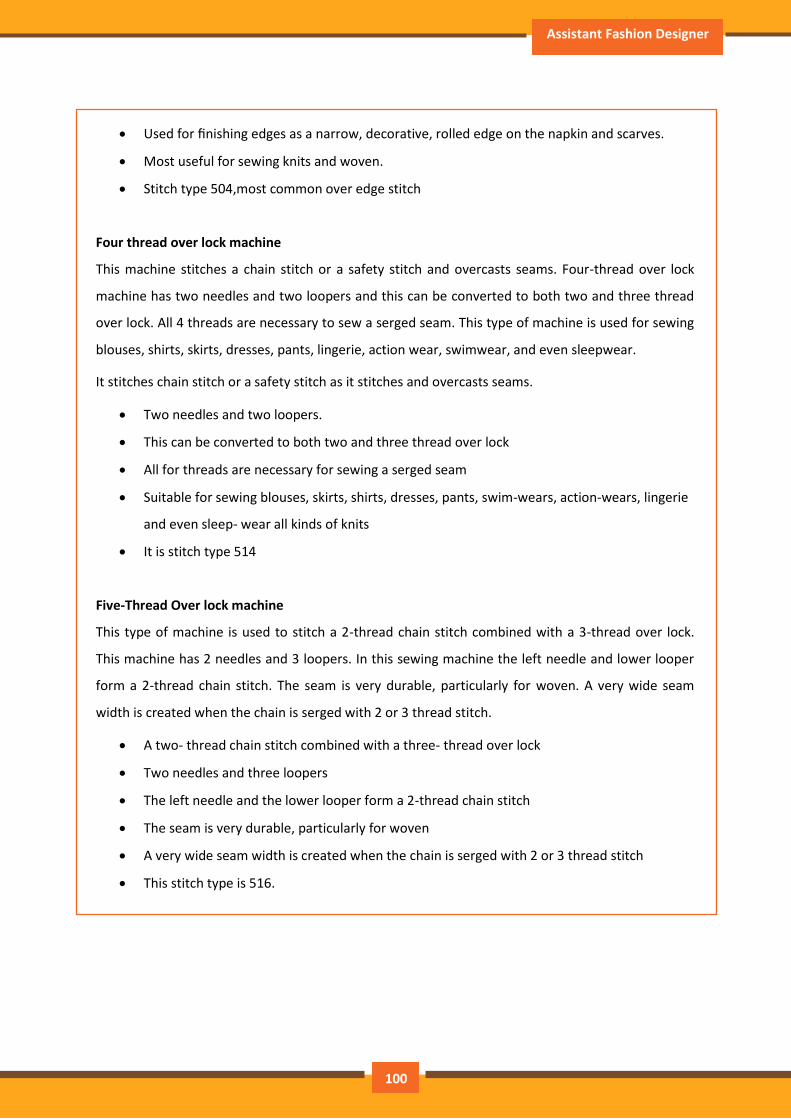
Assistant Fashion Designer
Used for finishing edges as a narrow, decorative, rolled edge on the napkin and scarves.
Most useful for sewing knits and woven.
Stitch type 504,most common over edge stitch
Four thread over lock machine
This machine stitches a chain stitch or a safety stitch and overcasts seams. Four-thread over lock
machine has two needles and two loopers and this can be converted to both two and three thread
over lock. All 4 threads are necessary to sew a serged seam. This type of machine is used for sewing
blouses, shirts, skirts, dresses, pants, lingerie, action wear, swimwear, and even sleepwear.
It stitches chain stitch or a safety stitch as it stitches and overcasts seams.
Two needles and two loopers.
This can be converted to both two and three thread over lock
All for threads are necessary for sewing a serged seam
Suitable for sewing blouses, skirts, shirts, dresses, pants, swim-wears, action-wears, lingerie
and even sleep- wear all kinds of knits
It is stitch type 514
Five-Thread Over lock machine
This type of machine is used to stitch a 2-thread chain stitch combined with a 3-thread over lock.
This machine has 2 needles and 3 loopers. In this sewing machine the left needle and lower looper
form a 2-thread chain stitch. The seam is very durable, particularly for woven. A very wide seam
width is created when the chain is serged with 2 or 3 thread stitch.
A two- thread chain stitch combined with a three- thread over lock
Two needles and three loopers
The left needle and the lower looper form a 2-thread chain stitch
The seam is very durable, particularly for woven
A very wide seam width is created when the chain is serged with 2 or 3 thread stitch
This stitch type is 516.
100

Participant Handbook
Fig 2.8.5: Feed of the arm machine
2.8.4. Feed of the Arm Machine
Feed of the arm machine is a chain stitch machine for chain
stitch designs working with sew and stitch. It contains looper
instead of bobbin. Main features of this machine are:
By this machine, multi thread chain stitch can be
produced on garments.
Stitch can be produced on heavy fabrics, like denim or
jeans; it has opportunity of stitching by folding the
fabrics.
Different sizes of needle and thread dresses should
be used in this machine depending on the thickness of fabric.
Application of Feed of the arm machine
For making garments of heavy fabric
Used in long seam of trousers
Frequently used for joining lace
Used for joining braid and elastic in the garments.
2.8.5. Waistband Attachment Machine (KANSAI)
Kansai special sewing machine is a multi-needle chain stitch
sewing machine. Kansai sewing machine is widely used in the
Apparel industries in different countries. A lot of types of needle
can be used as requirement. Kansai special sewing machine can
operate easily and smoothly because Kansai sewing machine
repair is very easy.
Application of Kansai machine
Sewing waist bands of high heavy to heavy material such as jeans pants, woven pants and
working pants.
Fig 2.8.5: Kansai Machine
101
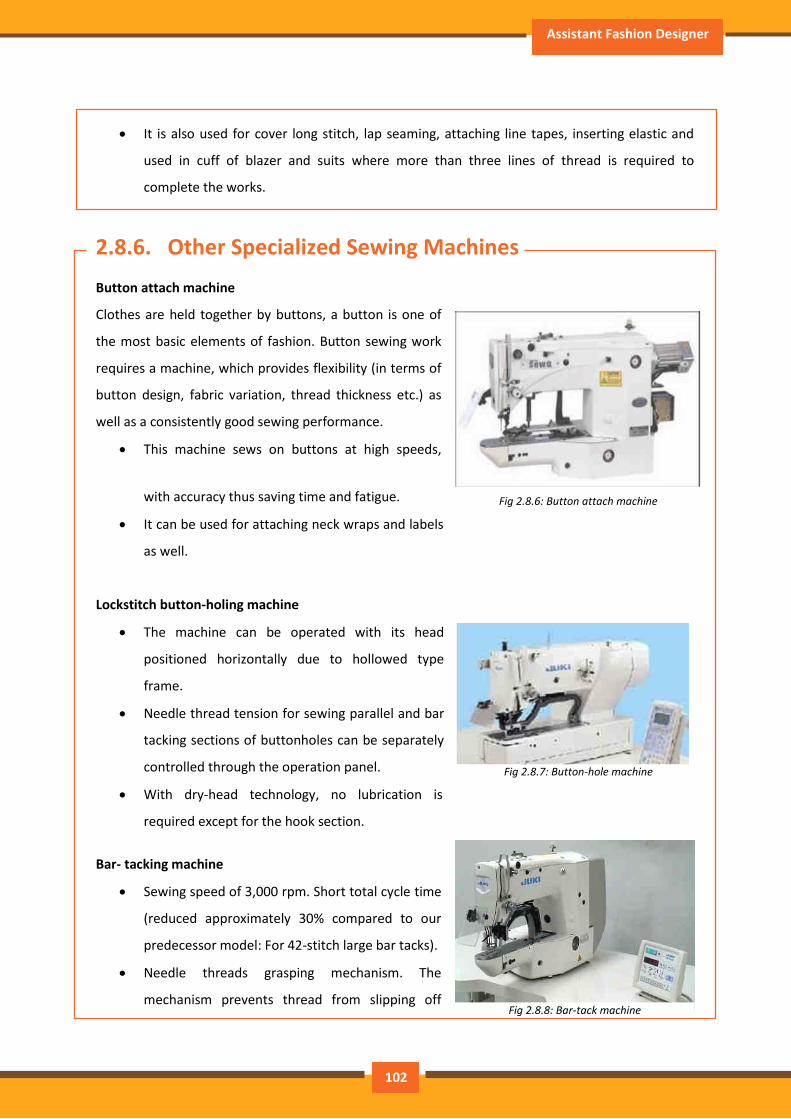
Assistant Fashion Designer
It is also used for cover long stitch, lap seaming, attaching line tapes, inserting elastic and
used in cuff of blazer and suits where more than three lines of thread is required to
complete the works.
2.8.6. Other Specialized Sewing Machines
Button attach machine
Clothes are held together by buttons, a button is one of
the most basic elements of fashion. Button sewing work
requires a machine, which provides flexibility (in terms of
button design, fabric variation, thread thickness etc.) as
well as a consistently good sewing performance.
This machine sews on buttons at high speeds,
with accuracy thus saving time and fatigue.
It can be used for attaching neck wraps and labels
as well.
Lockstitch button-holing machine
The machine can be operated with its head
positioned horizontally due to hollowed type
frame.
Needle thread tension for sewing parallel and bar
tacking sections of buttonholes can be separately
controlled through the operation panel.
With dry-head technology, no lubrication is
required except for the hook section.
Bar- tacking machine
Sewing speed of 3,000 rpm. Short total cycle time
(reduced approximately 30% compared to our
predecessor model: For 42-stitch large bar tacks).
Needle threads grasping mechanism. The
mechanism prevents thread from slipping off
Fig 2.8.6: Button attach machine
Fig 2.8.7: Button-hole machine
Fig 2.8.8: Bar-tack machine
102
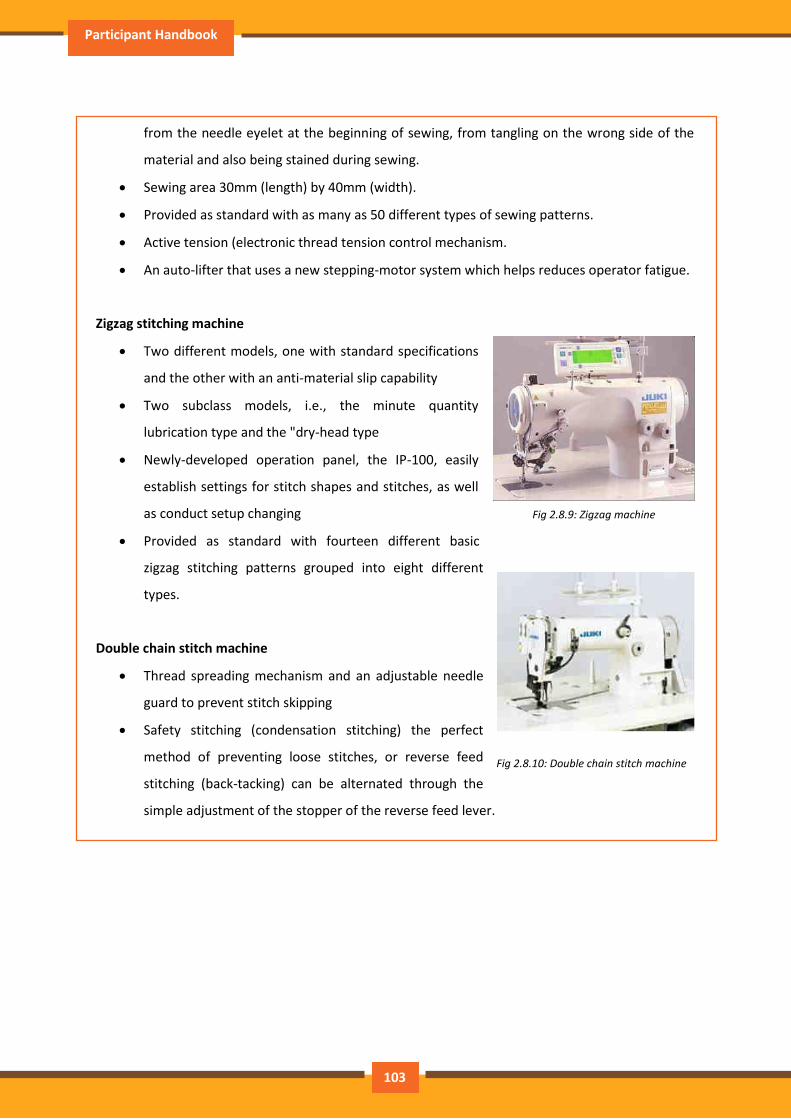
Participant Handbook
from the needle eyelet at the beginning of sewing, from tangling on the wrong side of the
material and also being stained during sewing.
Sewing area 30mm (length) by 40mm (width).
Provided as standard with as many as 50 different types of sewing patterns.
Active tension (electronic thread tension control mechanism.
An auto-lifter that uses a new stepping-motor system which helps reduces operator fatigue.
Zigzag stitching machine
Two different models, one with standard specifications
and the other with an anti-material slip capability
Two subclass models, i.e., the minute quantity
lubrication type and the "dry-head type
Newly-developed operation panel, the IP-100, easily
establish settings for stitch shapes and stitches, as well
as conduct setup changing
Provided as standard with fourteen different basic
zigzag stitching patterns grouped into eight different
types.
Double chain stitch machine
Thread spreading mechanism and an adjustable needle
guard to prevent stitch skipping
Safety stitching (condensation stitching) the perfect
method of preventing loose stitches, or reverse feed
stitching (back-tacking) can be alternated through the
simple adjustment of the stopper of the reverse feed lever.
Fig 2.8.9: Zigzag machine
Fig 2.8.10: Double chain stitch machine
103
Assistant Fashion Designer
Exercise \
1. List the different types of specialized sewing machines
________________________________________________________________________
________________________________________________________________________
________________________________________________________________________
________________________________________________________________________
________________________________________________________________________
________________________________________________________________________
________________________________________________________________________
________________________________________________________________________
________________________________________________________________________
________________________________________________________________________
2. Fill in the blanks:
a) The over lock machine is designed to stitch over the edge of one or two pieces of fabric to
produce neat edging that will not _____________________
b) Feed of the arm machine is a ______________________stitch machine
c) Needle thread tension for sewing parallel and bar tacking sections of buttonholes can be
separately controlled through the_____________________ panel
d) _____________________stitching is the perfect method of preventing loose stitches
e) Four-thread over lock machine has two needles and two ________________________
104
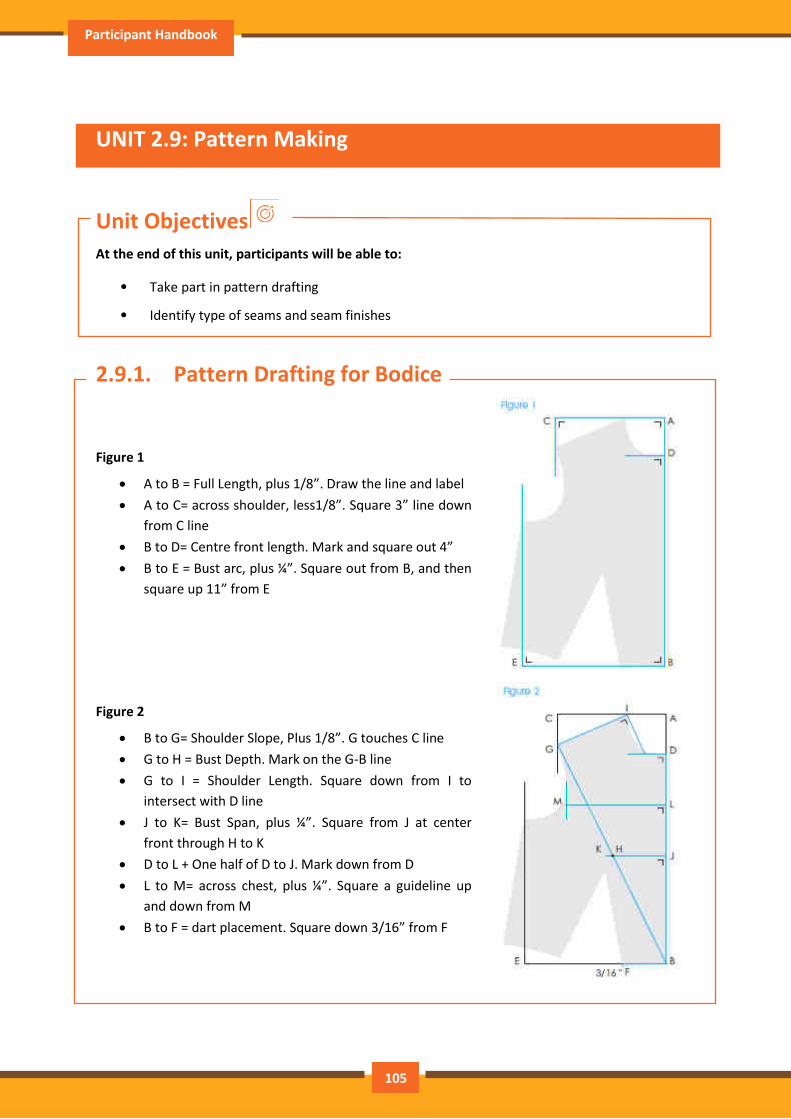
Participant Handbook
UNIT 2.9: Pattern Making
Unit Objectives
At the end of this unit, participants will be able to:
• Take part in pattern drafting
• Identify type of seams and seam finishes
2.9.1. Pattern Drafting for Bodice
Figure 1
A to B = Full Length, plus 1/8”. Draw the line and label
A to C= across shoulder, less1/8”. Square 3” line down
from C line
B to D= Centre front length. Mark and square out 4”
B to E = Bust arc, plus ¼”. Square out from B, and then
square up 11” from E
Figure 2
B to G= Shoulder Slope, Plus 1/8”. G touches C line
G to H = Bust Depth. Mark on the G-B line
G to I = Shoulder Length. Square down from I to
intersect with D line
J to K= Bust Span, plus ¼”. Square from J at center
front through H to K
D to L + One half of D to J. Mark down from D
L to M= across chest, plus ¼”. Square a guideline up
and down from M
B to F = dart placement. Square down 3/16” from F
105
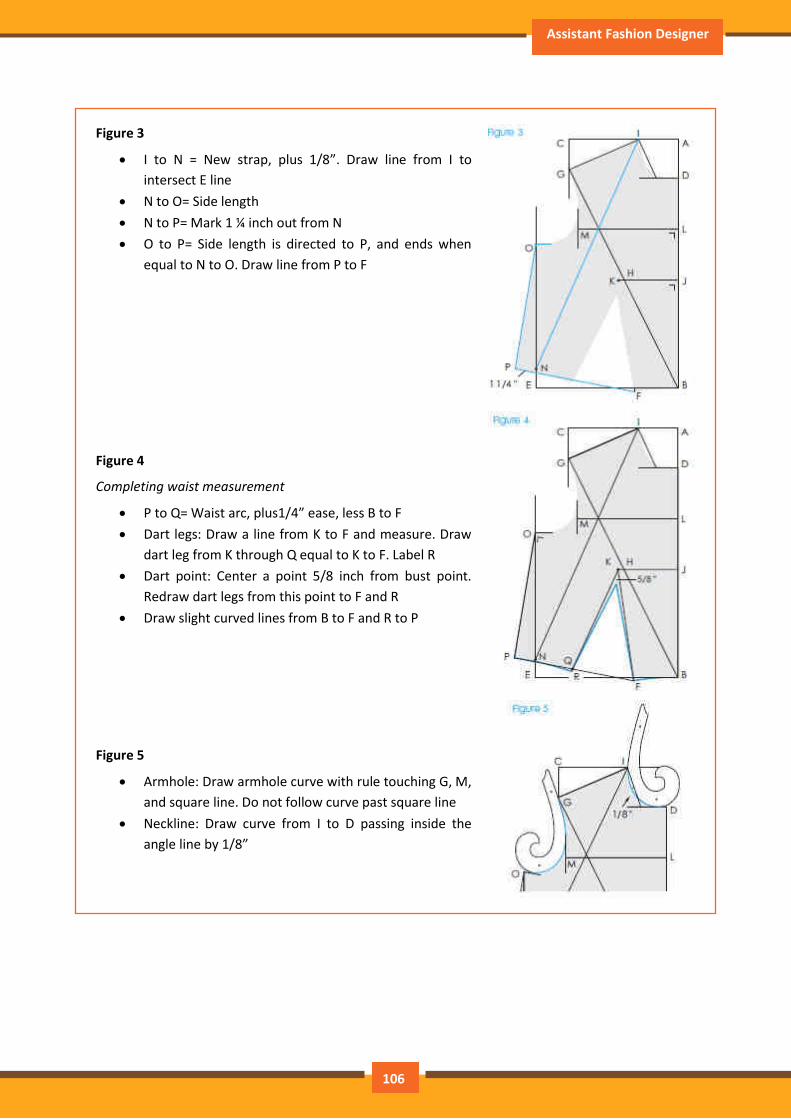
Assistant Fashion Designer
Figure 3
I to N = New strap, plus 1/8”. Draw line from I to
intersect E line
N to O= Side length
N to P= Mark 1 ¼ inch out from N
O to P= Side length is directed to P, and ends when
equal to N to O. Draw line from P to F
Figure 4
Completing waist measurement
P to Q= Waist arc, plus1/4” ease, less B to F
Dart legs: Draw a line from K to F and measure. Draw
dart leg from K through Q equal to K to F. Label R
Dart point: Center a point 5/8 inch from bust point.
Redraw dart legs from this point to F and R
Draw slight curved lines from B to F and R to P
Figure 5
Armhole: Draw armhole curve with rule touching G, M,
and square line. Do not follow curve past square line
Neckline: Draw curve from I to D passing inside the
angle line by 1/8”
106
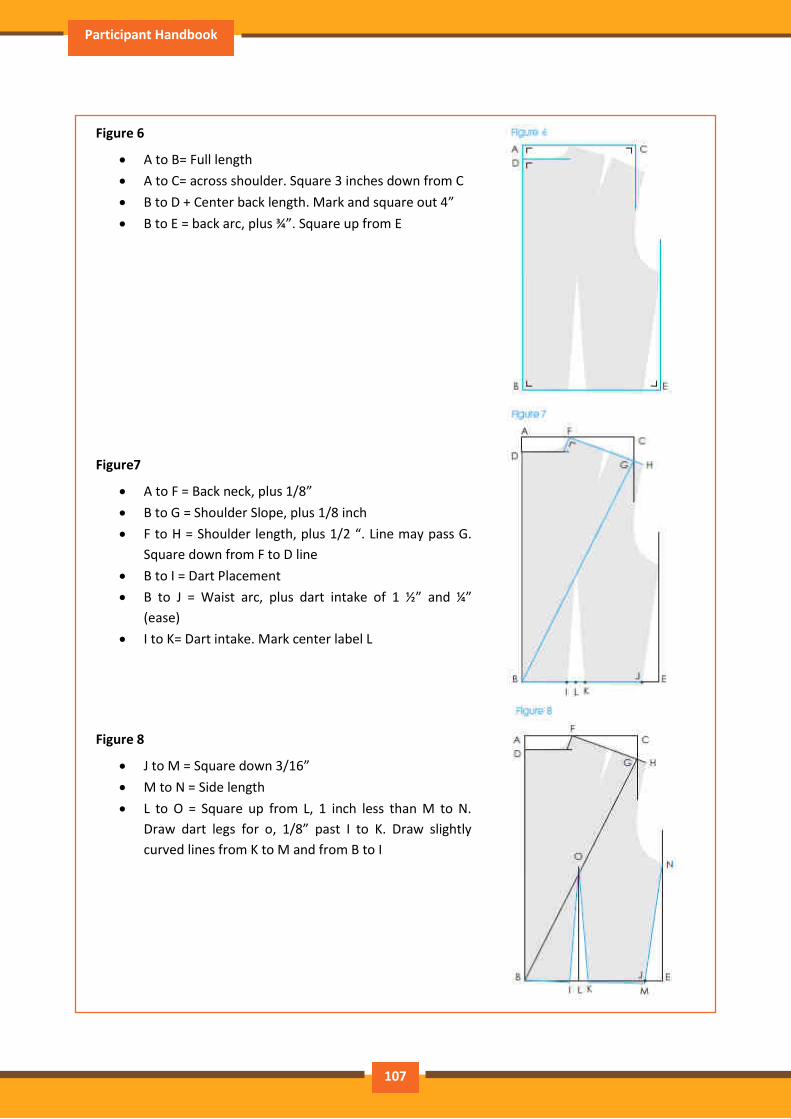
Participant Handbook
Figure 6
A to B= Full length
A to C= across shoulder. Square 3 inches down from C
B to D + Center back length. Mark and square out 4”
B to E = back arc, plus ¾”. Square up from E
Figure7
A to F = Back neck, plus 1/8”
B to G = Shoulder Slope, plus 1/8 inch
F to H = Shoulder length, plus 1/2 “. Line may pass G.
Square down from F to D line
B to I = Dart Placement
B to J = Waist arc, plus dart intake of 1 ½” and ¼”
(ease)
I to K= Dart intake. Mark center label L
Figure 8
J to M = Square down 3/16”
M to N = Side length
L to O = Square up from L, 1 inch less than M to N.
Draw dart legs for o, 1/8” past I to K. Draw slightly
curved lines from K to M and from B to I
107
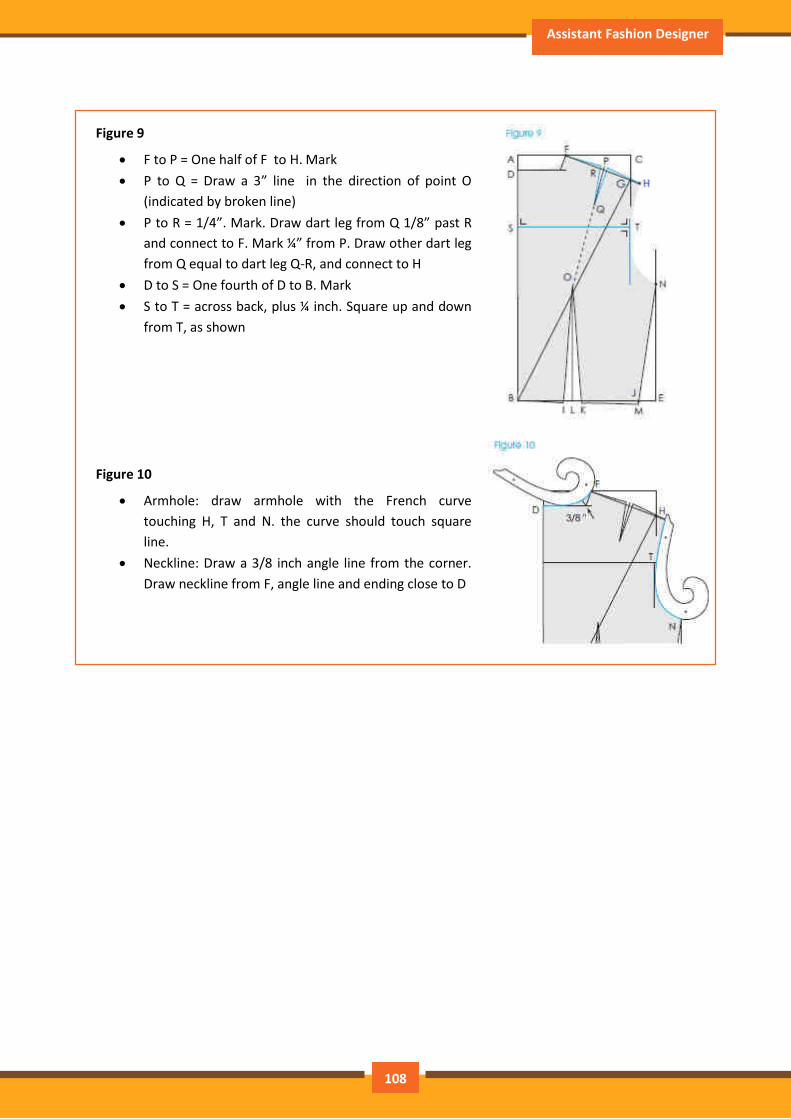
Assistant Fashion Designer
Figure 9
F to P = One half of F to H. Mark
P to Q = Draw a 3” line in the direction of point O
(indicated by broken line)
P to R = 1/4”. Mark. Draw dart leg from Q 1/8” past R
and connect to F. Mark ¼” from P. Draw other dart leg
from Q equal to dart leg Q-R, and connect to H
D to S = One fourth of D to B. Mark
S to T = across back, plus ¼ inch. Square up and down
from T, as shown
Figure 10
Armhole: draw armhole with the French curve
touching H, T and N. the curve should touch square
line.
Neckline: Draw a 3/8 inch angle line from the corner.
Draw neckline from F, angle line and ending close to D
108
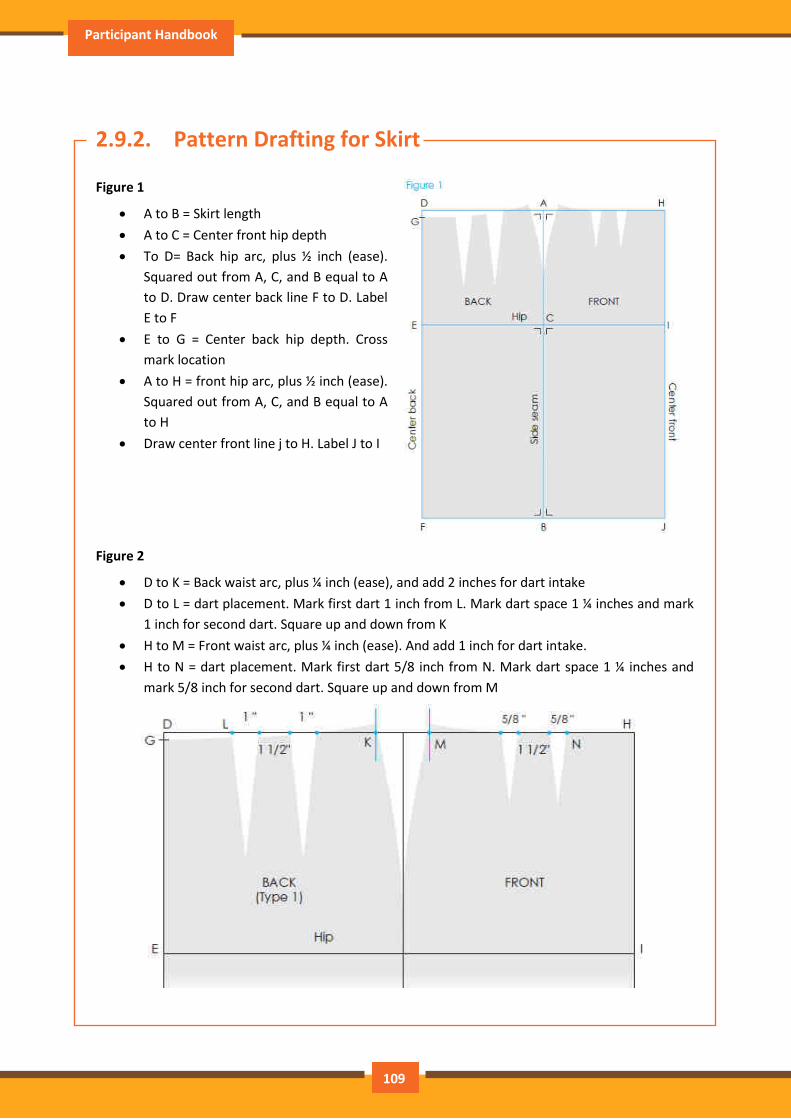
Participant Handbook
2.9.2. Pattern Drafting for Skirt
Figure 1
A to B = Skirt length
A to C = Center front hip depth
To D= Back hip arc, plus ½ inch (ease).
Squared out from A, C, and B equal to A
to D. Draw center back line F to D. Label
E to F
E to G = Center back hip depth. Cross
mark location
A to H = front hip arc, plus ½ inch (ease).
Squared out from A, C, and B equal to A
to H
Draw center front line j to H. Label J to I
Figure 2
D to K = Back waist arc, plus ¼ inch (ease), and add 2 inches for dart intake
D to L = dart placement. Mark first dart 1 inch from L. Mark dart space 1 ¼ inches and mark
1 inch for second dart. Square up and down from K
H to M = Front waist arc, plus ¼ inch (ease). And add 1 inch for dart intake.
H to N = dart placement. Mark first dart 5/8 inch from N. Mark dart space 1 ¼ inches and
mark 5/8 inch for second dart. Square up and down from M
109
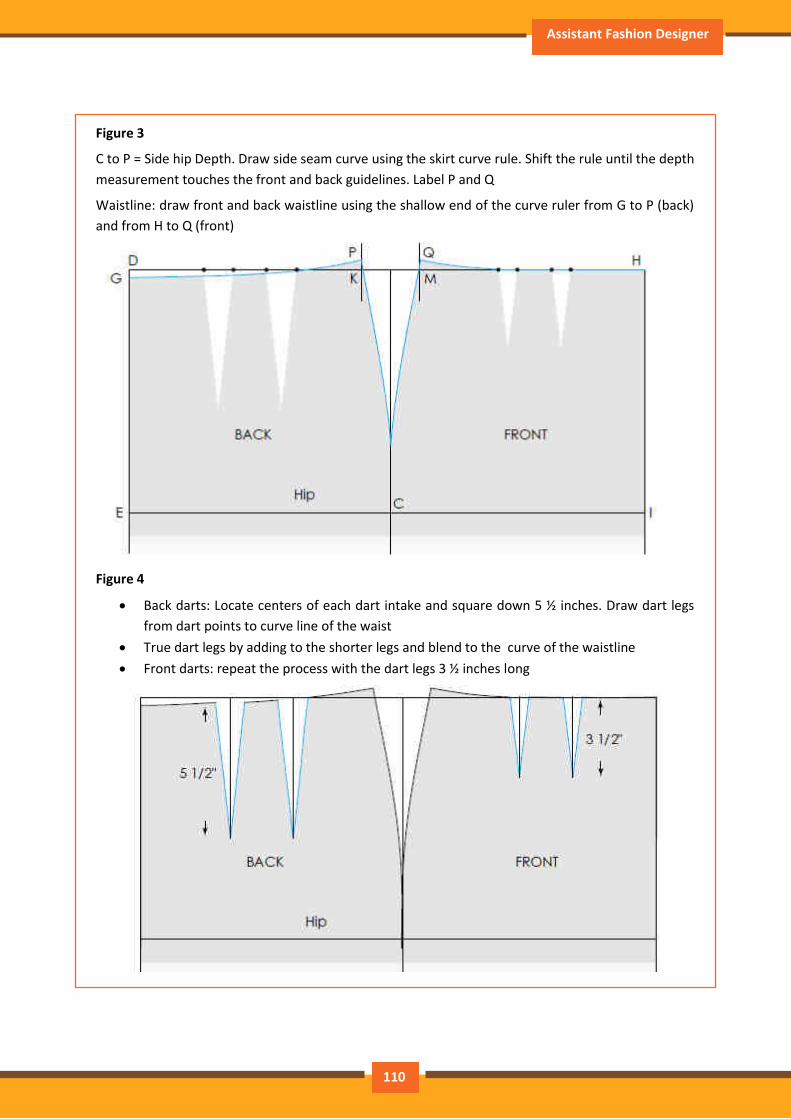
Assistant Fashion Designer
Figure 3
C to P = Side hip Depth. Draw side seam curve using the skirt curve rule. Shift the rule until the depth
measurement touches the front and back guidelines. Label P and Q
Waistline: draw front and back waistline using the shallow end of the curve ruler from G to P (back)
and from H to Q (front)
Figure 4
Back darts: Locate centers of each dart intake and square down 5 ½ inches. Draw dart legs
from dart points to curve line of the waist
True dart legs by adding to the shorter legs and blend to the curve of the waistline
Front darts: repeat the process with the dart legs 3 ½ inches long
110
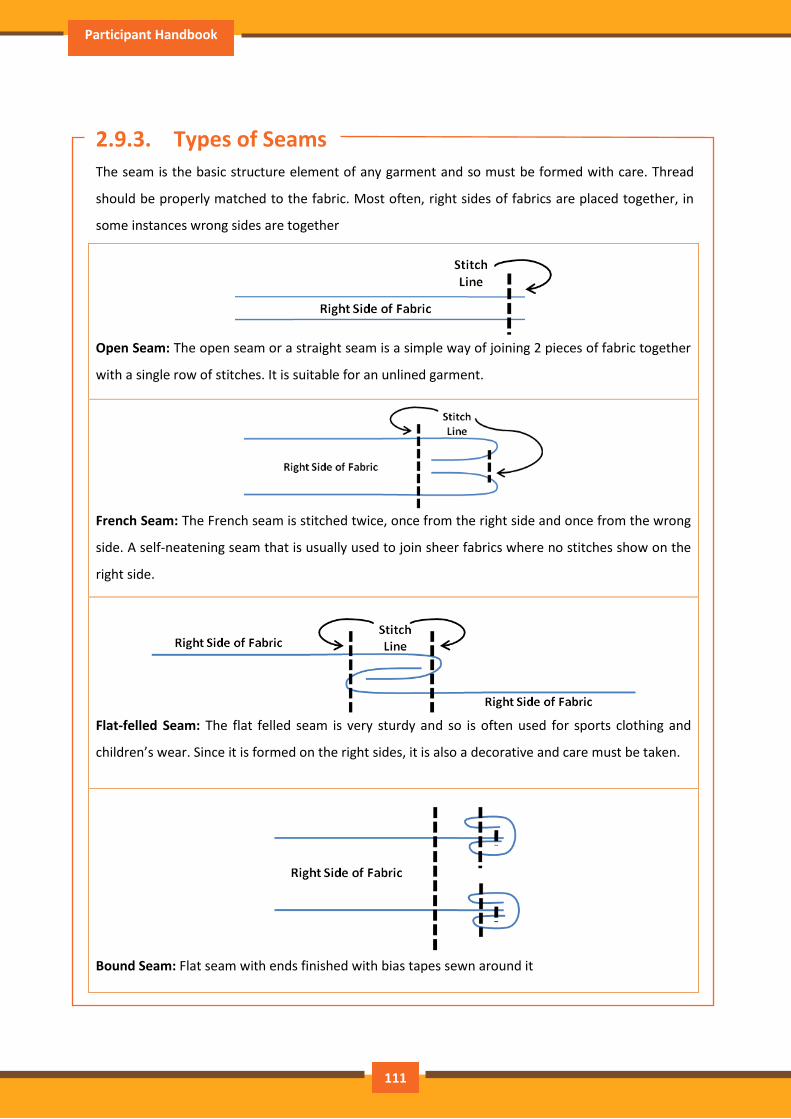
Participant Handbook
2.9.3. Types of Seams
The seam is the basic structure element of any garment and so must be formed with care. Thread
should be properly matched to the fabric. Most often, right sides of fabrics are placed together, in
some instances wrong sides are together
Open Seam: The open seam or a straight seam is a simple way of joining 2 pieces of fabric together
with a single row of stitches. It is suitable for an unlined garment.
French Seam: The French seam is stitched twice, once from the right side and once from the wrong
side. A self-neatening seam that is usually used to join sheer fabrics where no stitches show on the
right side.
Flat-felled Seam: The flat felled seam is very sturdy and so is often used for sports clothing and
children’s wear. Since it is formed on the right sides, it is also a decorative and care must be taken.
Bound Seam: Flat seam with ends finished with bias tapes sewn around it
111
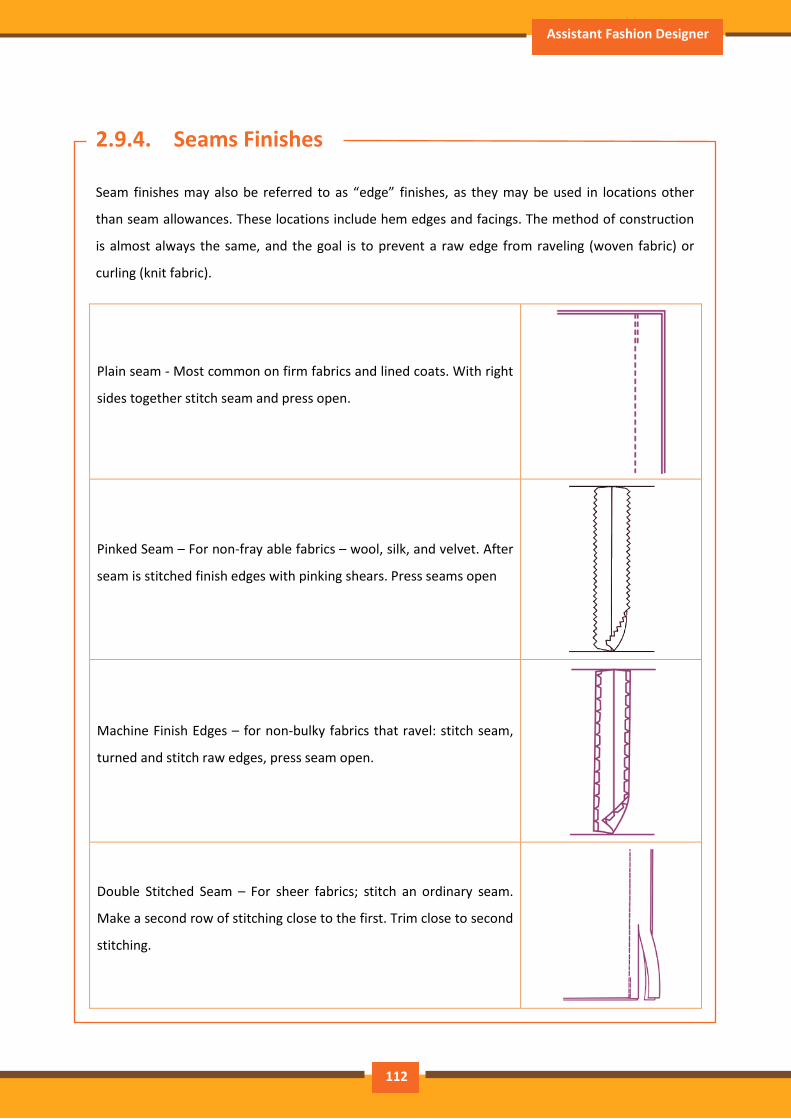
Assistant Fashion Designer
2.9.4. Seams Finishes
Seam finishes may also be referred to as “edge” finishes, as they may be used in locations other
than seam allowances. These locations include hem edges and facings. The method of construction
is almost always the same, and the goal is to prevent a raw edge from raveling (woven fabric) or
curling (knit fabric).
Plain seam - Most common on firm fabrics and lined coats. With right
sides together stitch seam and press open.
Pinked Seam – For non-fray able fabrics – wool, silk, and velvet. After
seam is stitched finish edges with pinking shears. Press seams open
Machine Finish Edges – for non-bulky fabrics that ravel: stitch seam,
turned and stitch raw edges, press seam open.
Double Stitched Seam – For sheer fabrics; stitch an ordinary seam.
Make a second row of stitching close to the first. Trim close to second
stitching.
112
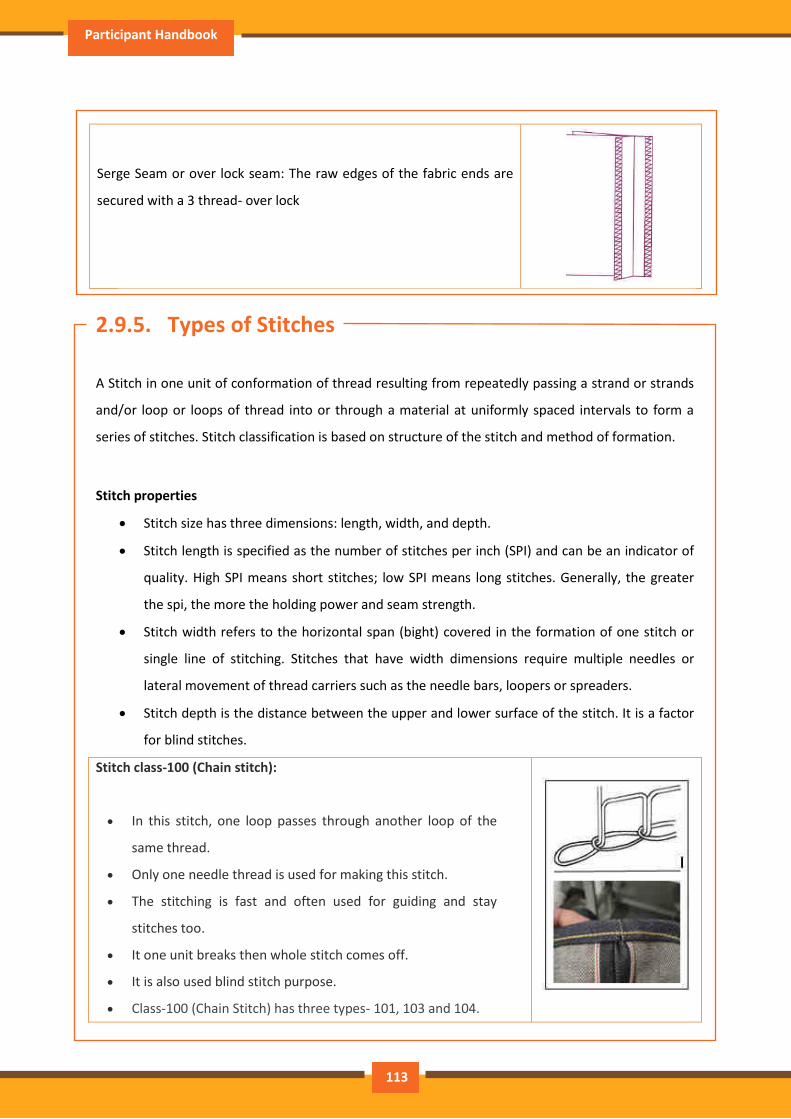
Participant Handbook
.
Serge Seam or over lock seam: The raw edges of the fabric ends are
secured with a 3 thread- over lock
2.9.5. Types of Stitches
A Stitch in one unit of conformation of thread resulting from repeatedly passing a strand or strands
and/or loop or loops of thread into or through a material at uniformly spaced intervals to form a
series of stitches. Stitch classification is based on structure of the stitch and method of formation.
Stitch properties
Stitch size has three dimensions: length, width, and depth.
Stitch length is specified as the number of stitches per inch (SPI) and can be an indicator of
quality. High SPI means short stitches; low SPI means long stitches. Generally, the greater
the spi, the more the holding power and seam strength.
Stitch width refers to the horizontal span (bight) covered in the formation of one stitch or
single line of stitching. Stitches that have width dimensions require multiple needles or
lateral movement of thread carriers such as the needle bars, loopers or spreaders.
Stitch depth is the distance between the upper and lower surface of the stitch. It is a factor
for blind stitches.
Stitch class-100 (Chain stitch):
In this stitch, one loop passes through another loop of the
same thread.
Only one needle thread is used for making this stitch.
The stitching is fast and often used for guiding and stay
stitches too.
It one unit breaks then whole stitch comes off.
It is also used blind stitch purpose.
Class-100 (Chain Stitch) has three types- 101, 103 and 104.
113
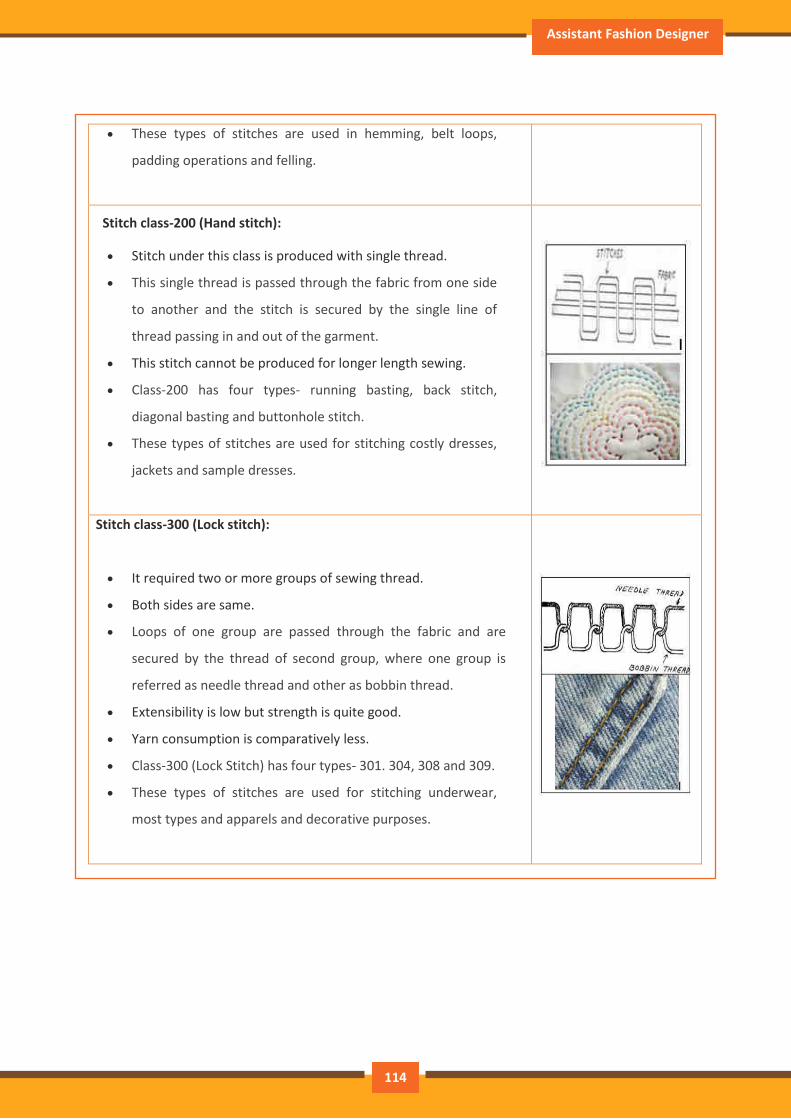
Assistant Fashion Designer
These types of stitches are used in hemming, belt loops,
padding operations and felling.
Stitch class-200 (Hand stitch):
Stitch under this class is produced with single thread.
This single thread is passed through the fabric from one side
to another and the stitch is secured by the single line of
thread passing in and out of the garment.
This stitch cannot be produced for longer length sewing.
Class-200 has four types- running basting, back stitch,
diagonal basting and buttonhole stitch.
These types of stitches are used for stitching costly dresses,
jackets and sample dresses.
Stitch class-300 (Lock stitch):
It required two or more groups of sewing thread.
Both sides are same.
Loops of one group are passed through the fabric and are
secured by the thread of second group, where one group is
referred as needle thread and other as bobbin thread.
Extensibility is low but strength is quite good.
Yarn consumption is comparatively less.
Class-300 (Lock Stitch) has four types- 301. 304, 308 and 309.
These types of stitches are used for stitching underwear,
most types and apparels and decorative purposes.
114
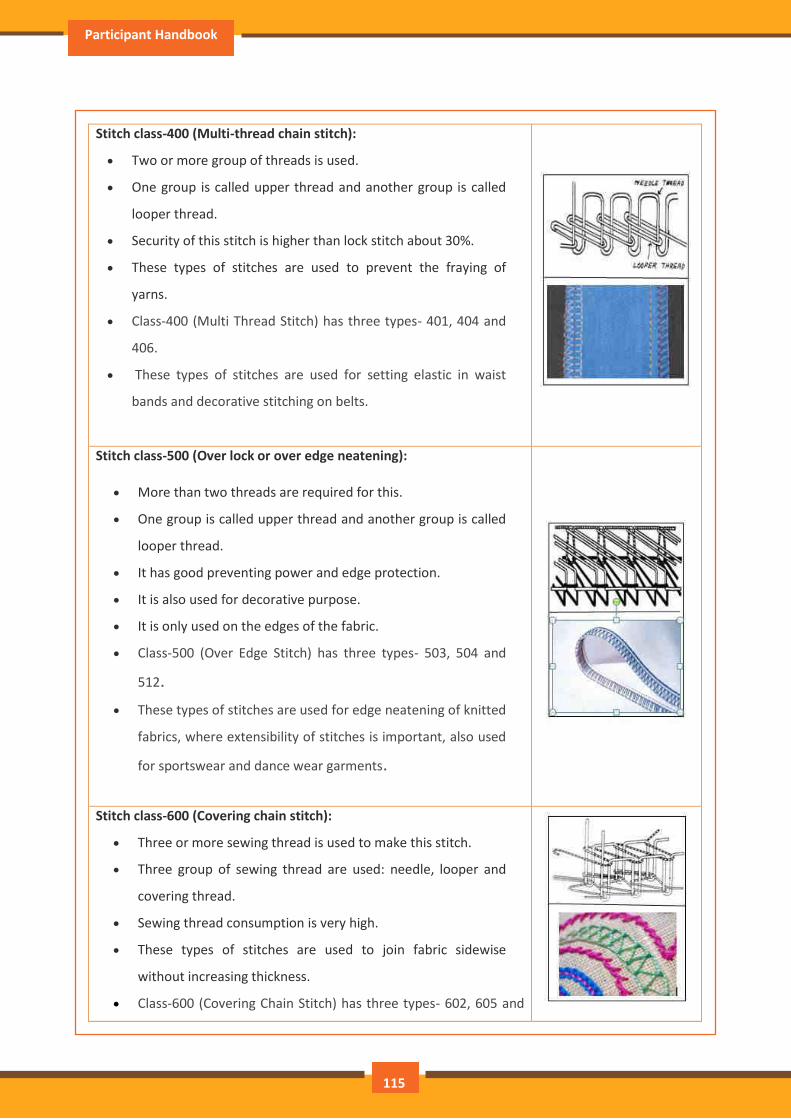
Participant Handbook
Stitch class-400 (Multi-thread chain stitch):
Two or more group of threads is used.
One group is called upper thread and another group is called
looper thread.
Security of this stitch is higher than lock stitch about 30%.
These types of stitches are used to prevent the fraying of
yarns.
Class-400 (Multi Thread Stitch) has three types- 401, 404 and
406.
These types of stitches are used for setting elastic in waist
bands and decorative stitching on belts.
Stitch class-500 (Over lock or over edge neatening):
More than two threads are required for this.
One group is called upper thread and another group is called
looper thread.
It has good preventing power and edge protection.
It is also used for decorative purpose.
It is only used on the edges of the fabric.
Class-500 (Over Edge Stitch) has three types- 503, 504 and
512.
These types of stitches are used for edge neatening of knitted
fabrics, where extensibility of stitches is important, also used
for sportswear and dance wear garments.
Stitch class-600 (Covering chain stitch):
Three or more sewing thread is used to make this stitch.
Three group of sewing thread are used: needle, looper and
covering thread.
Sewing thread consumption is very high.
These types of stitches are used to join fabric sidewise
without increasing thickness.
Class-600 (Covering Chain Stitch) has three types- 602, 605 and
115

Assistant Fashion Designer
607.
These types of stitches are used for knits, lingerie, binding
elastics, decoration, etc.
116
Participant Handbook
Exercise \
1. Which among the following class is a Covering Chain Stitch?
a) Class 100
b) Class 300
c) Class 500
d) Class 600
2. Which among the following is the most common type of seam on firm fabrics?
a) Open seam
b) Bound Seam
c) Pinked Seam
d) Serged seam
3. Which among the following is the most common type of seam on firm fabrics?
a) Open seam
b) Bound Seam
c) Pinked Seam
d) Serged seam
117

Assistant Fashion Designer
UNIT 2.10: Garment Construction
Unit Objectives
At the end of this unit, participants will be able to:
• Identify part of sewing machine
• Perform sewing operations of a trouser
• Perform sewing operations of a shirt
2.10.1. Sewing Machine and their parts
Fig 2.10.1: Sewing machine and their parts
Needle is one of the most important parts of the machine; it
carries thread through the fabric to the bobbin and
completes stitch formation.
118
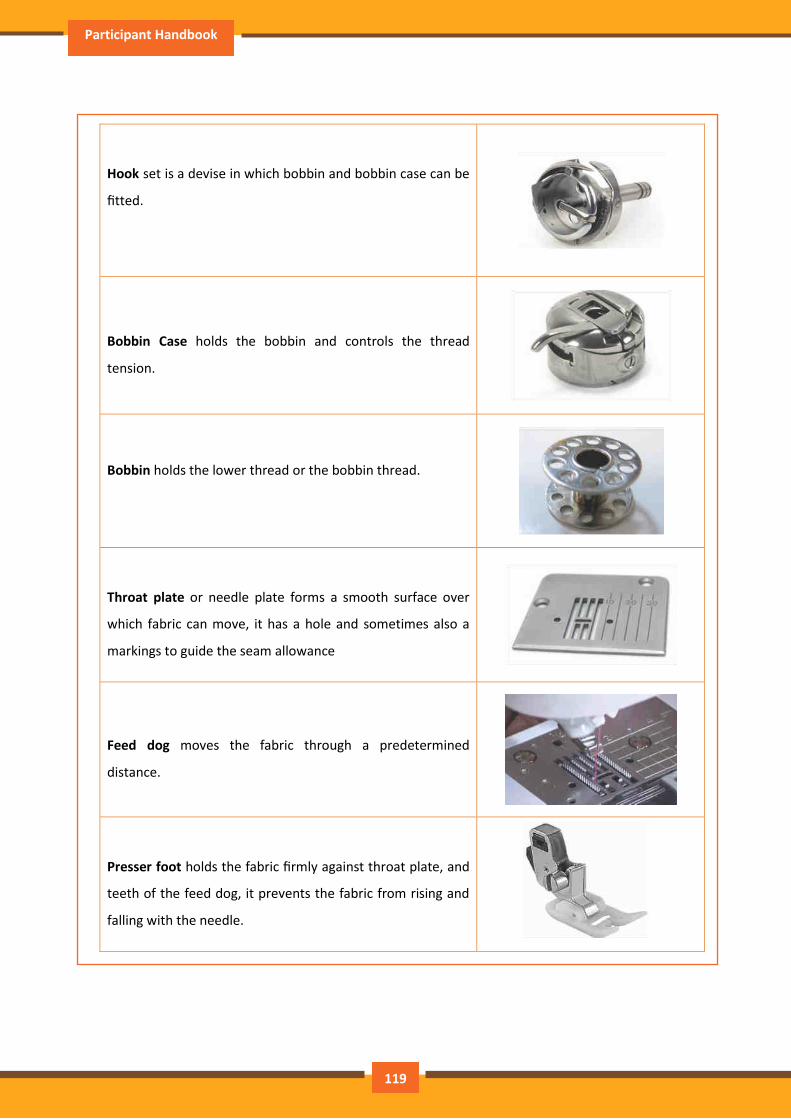
Participant Handbook
Hook set is a devise in which bobbin and bobbin case can be
fitted.
Bobbin Case holds the bobbin and controls the thread
tension.
Bobbin holds the lower thread or the bobbin thread.
Throat plate or needle plate forms a smooth surface over
which fabric can move, it has a hole and sometimes also a
markings to guide the seam allowance
Feed dog moves the fabric through a predetermined
distance.
Presser foot holds the fabric firmly against throat plate, and
teeth of the feed dog, it prevents the fabric from rising and
falling with the needle.
119
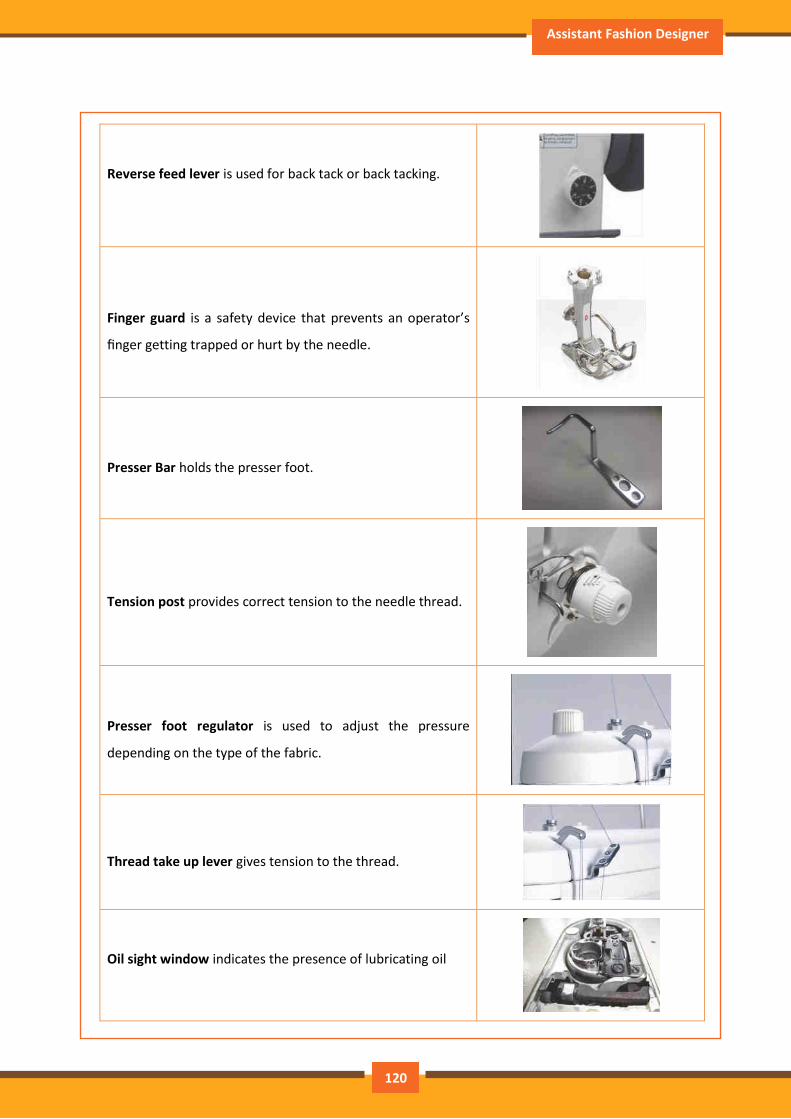
Assistant Fashion Designer
Reverse feed lever is used for back tack or back tacking.
Finger guard is a safety device that prevents an operator’s
finger getting trapped or hurt by the needle.
Presser Bar holds the presser foot.
Tension post provides correct tension to the needle thread.
Presser foot regulator is used to adjust the pressure
depending on the type of the fabric.
Thread take up lever gives tension to the thread.
Oil sight window indicates the presence of lubricating oil
120

Participant Handbook
Thread stand used for supporting the thread package like
spool bobbin etc.
Knee Lifter is used to lift the presser foot with the use of
knee.
Hand Lifter is used to lift the presser foot.
Bobbin Winder is used to wind thread in empty bobbin. It
may be located differently in different types of machines.
On-Off Switch: these are two switches, which are used to on
and off the machines. The RED button is for switching the
machine OFF and the BLACK/ GREEN button is for switching
the machine ON. Pedal: The machine does not start unless
the pedal is depressed, it is majorly used for controlling the
speed of the machine
121
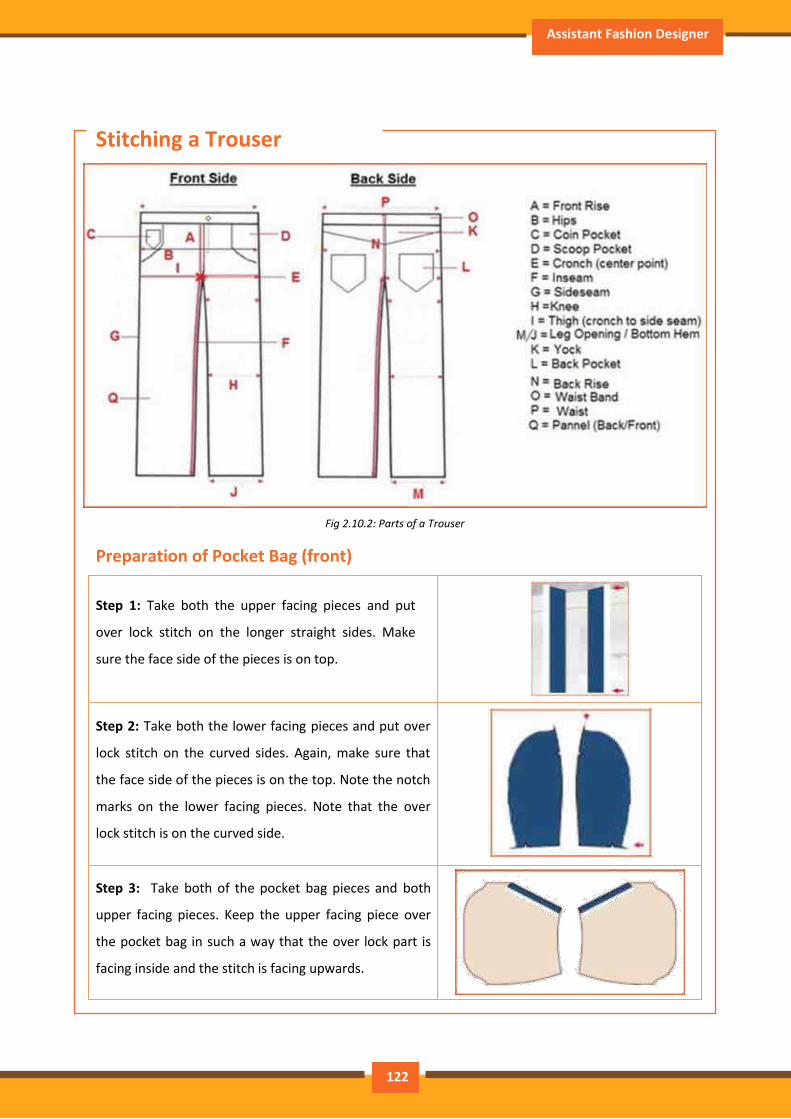
Assistant Fashion Designer
Stitching a Trouser
Fig 2.10.2: Parts of a Trouser
Preparation of Pocket Bag (front)
Step 1: Take both the upper facing pieces and put
over lock stitch on the longer straight sides. Make
sure the face side of the pieces is on top.
Step 2: Take both the lower facing pieces and put over
lock stitch on the curved sides. Again, make sure that
the face side of the pieces is on the top. Note the notch
marks on the lower facing pieces. Note that the over
lock stitch is on the curved side.
Step 3: Take both of the pocket bag pieces and both
upper facing pieces. Keep the upper facing piece over
the pocket bag in such a way that the over lock part is
facing inside and the stitch is facing upwards.
122
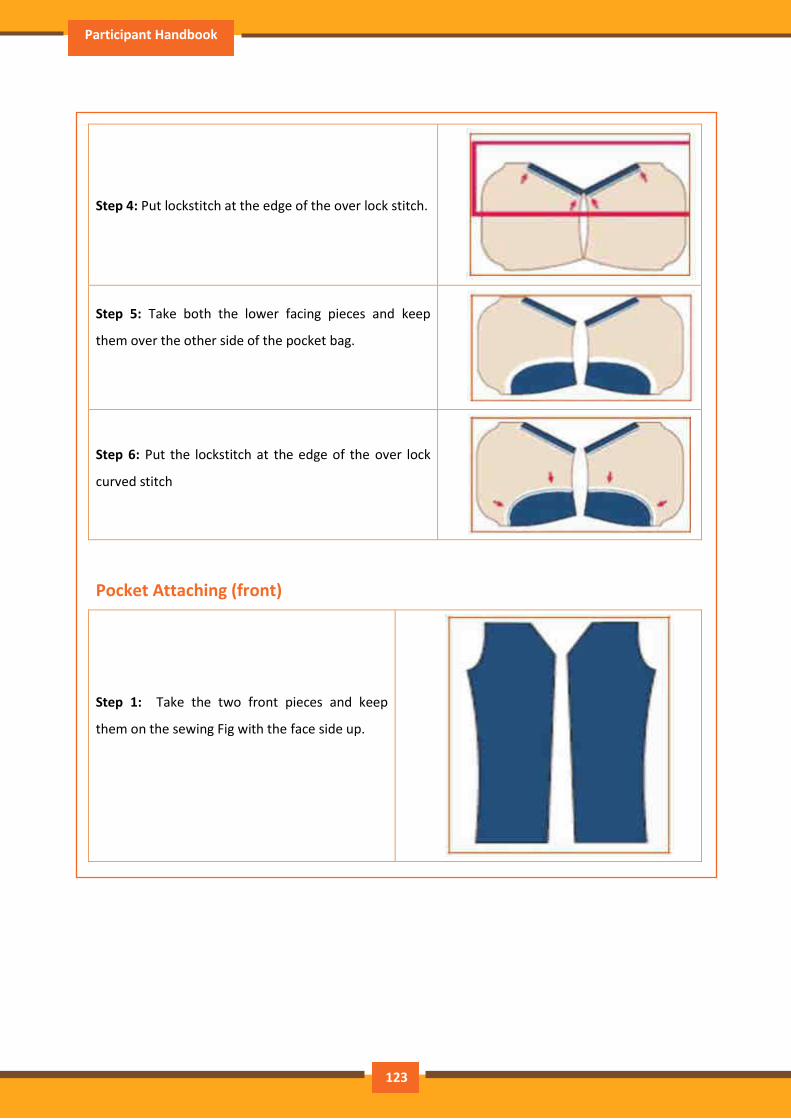
Participant Handbook
.
Step 4: Put lockstitch at the edge of the over lock stitch.
Step 5: Take both the lower facing pieces and keep
them over the other side of the pocket bag.
Step 6: Put the lockstitch at the edge of the over lock
curved stitch
Pocket Attaching (front)
Step 1: Take the two front pieces and keep
them on the sewing Fig with the face side up.
123
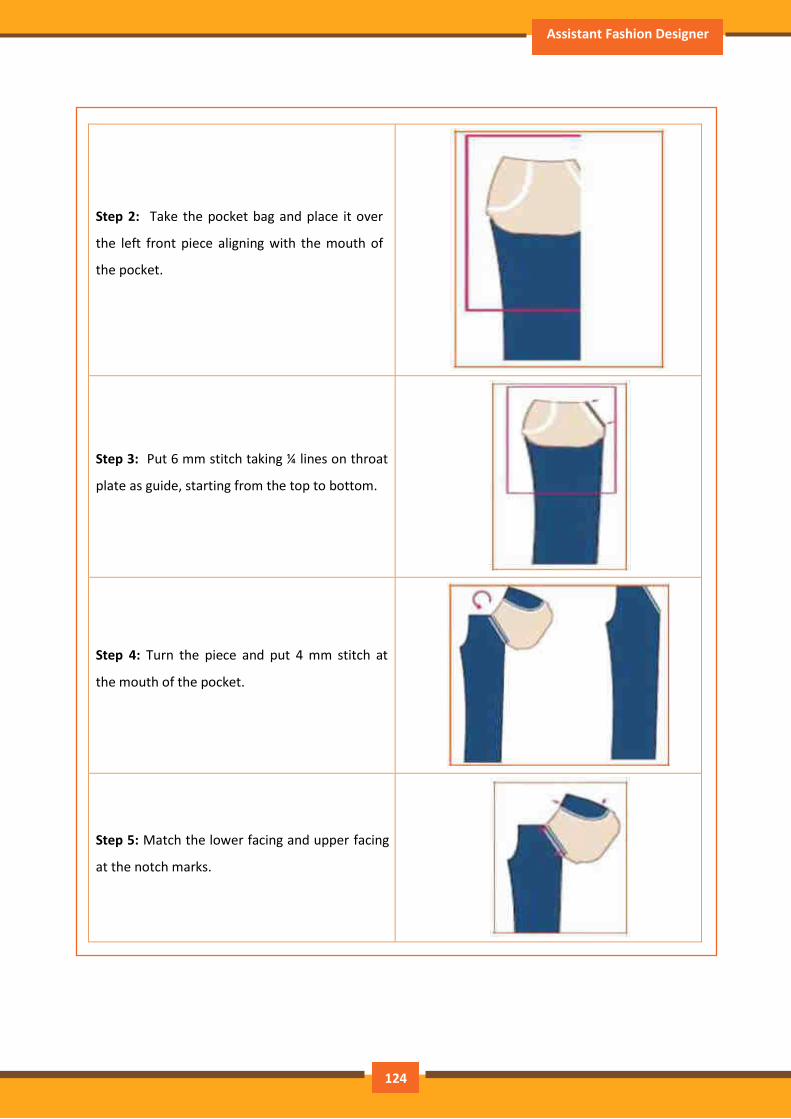
Assistant Fashion Designer
.
Step 2: Take the pocket bag and place it over
the left front piece aligning with the mouth of
the pocket.
Step 3: Put 6 mm stitch taking ¼ lines on throat
plate as guide, starting from the top to bottom.
Step 4: Turn the piece and put 4 mm stitch at
the mouth of the pocket.
Step 5: Match the lower facing and upper facing
at the notch marks.
124
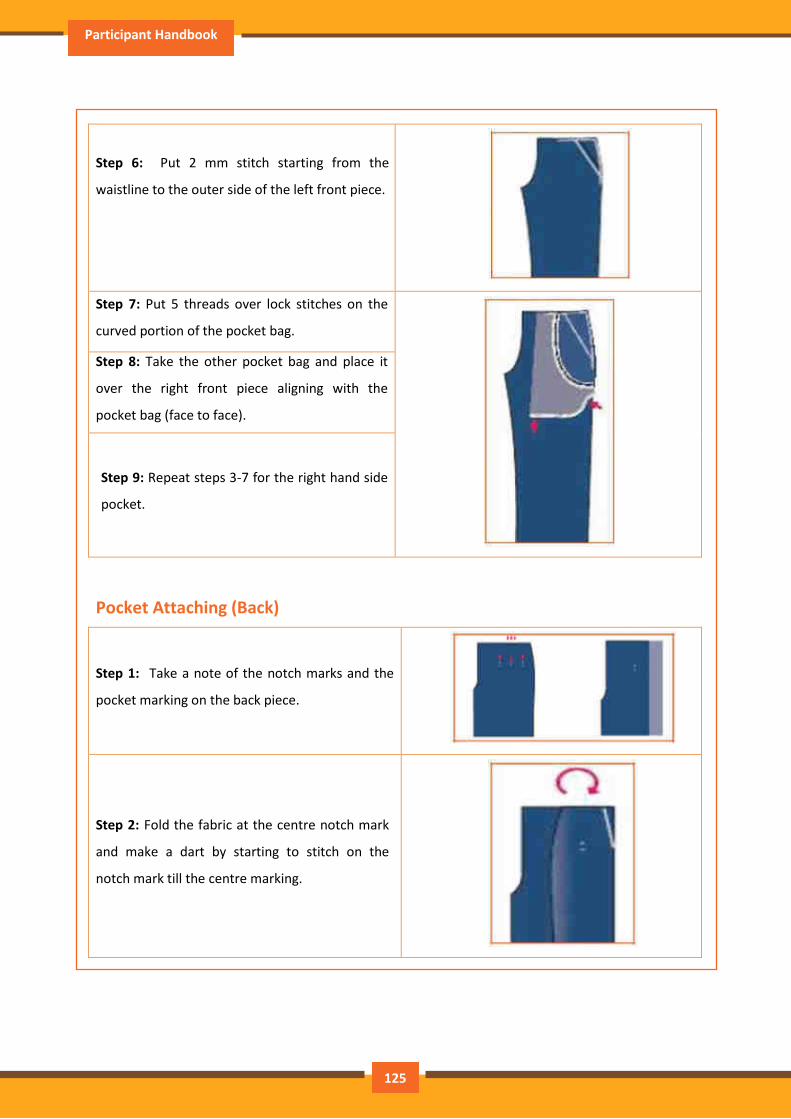
Participant Handbook
.
Step 6: Put 2 mm stitch starting from the
waistline to the outer side of the left front piece.
Step 7: Put 5 threads over lock stitches on the
curved portion of the pocket bag.
Step 8: Take the other pocket bag and place it
over the right front piece aligning with the
pocket bag (face to face).
Step 9: Repeat steps 3-7 for the right hand side
pocket.
Pocket Attaching (Back)
Step 1: Take a note of the notch marks and the
pocket marking on the back piece.
Step 2: Fold the fabric at the centre notch mark
and make a dart by starting to stitch on the
notch mark till the centre marking.
125
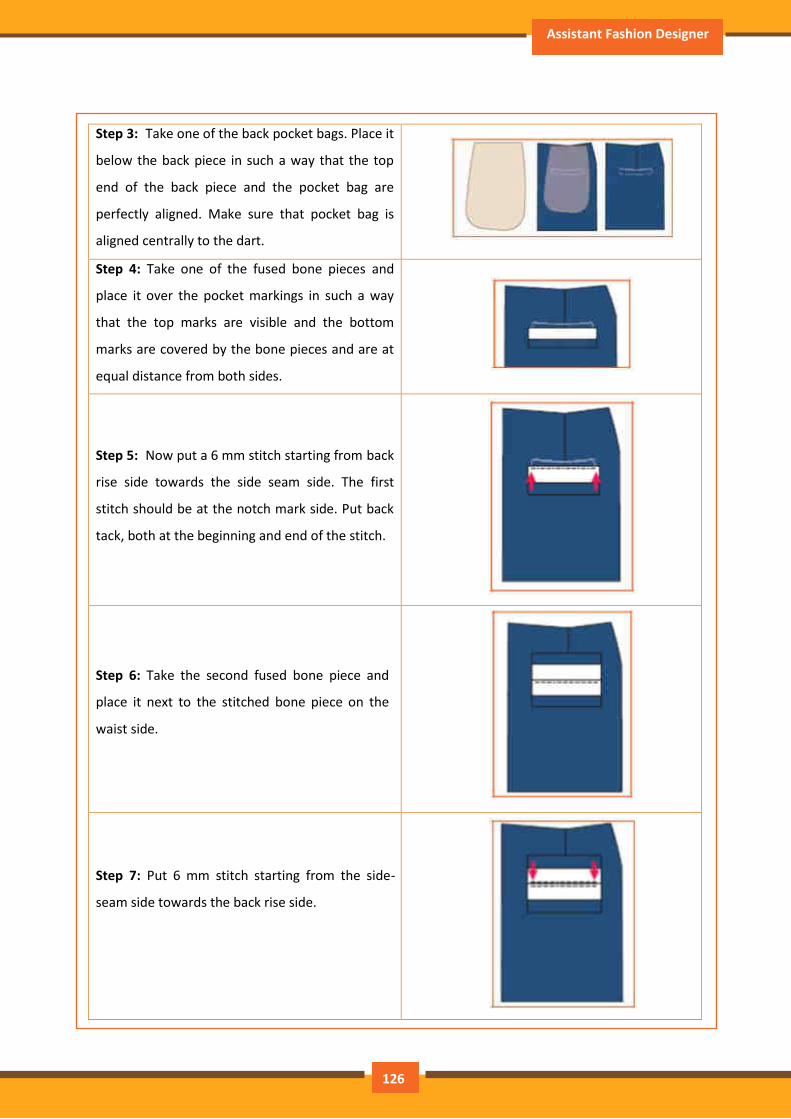
Assistant Fashion Designer
Step 3: Take one of the back pocket bags. Place it
below the back piece in such a way that the top
end of the back piece and the pocket bag are
perfectly aligned. Make sure that pocket bag is
aligned centrally to the dart.
Step 4: Take one of the fused bone pieces and
place it over the pocket markings in such a way
that the top marks are visible and the bottom
marks are covered by the bone pieces and are at
equal distance from both sides.
Step 5: Now put a 6 mm stitch starting from back
rise side towards the side seam side. The first
stitch should be at the notch mark side. Put back
tack, both at the beginning and end of the stitch.
Step 6: Take the second fused bone piece and
place it next to the stitched bone piece on the
waist side.
Step 7: Put 6 mm stitch starting from the side-
seam side towards the back rise side.
126
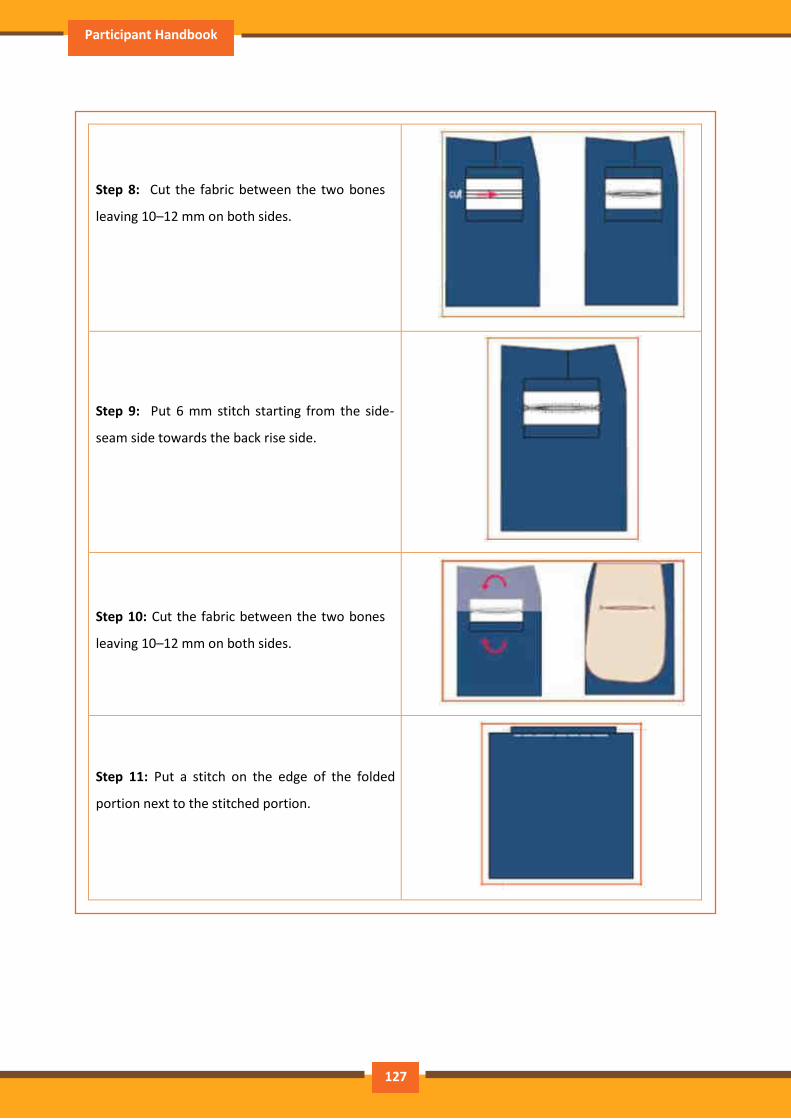
Participant Handbook
.
Step 8: Cut the fabric between the two bones
leaving 10–12 mm on both sides.
Step 9: Put 6 mm stitch starting from the side-
seam side towards the back rise side.
Step 10: Cut the fabric between the two bones
leaving 10–12 mm on both sides.
Step 11: Put a stitch on the edge of the folded
portion next to the stitched portion.
127
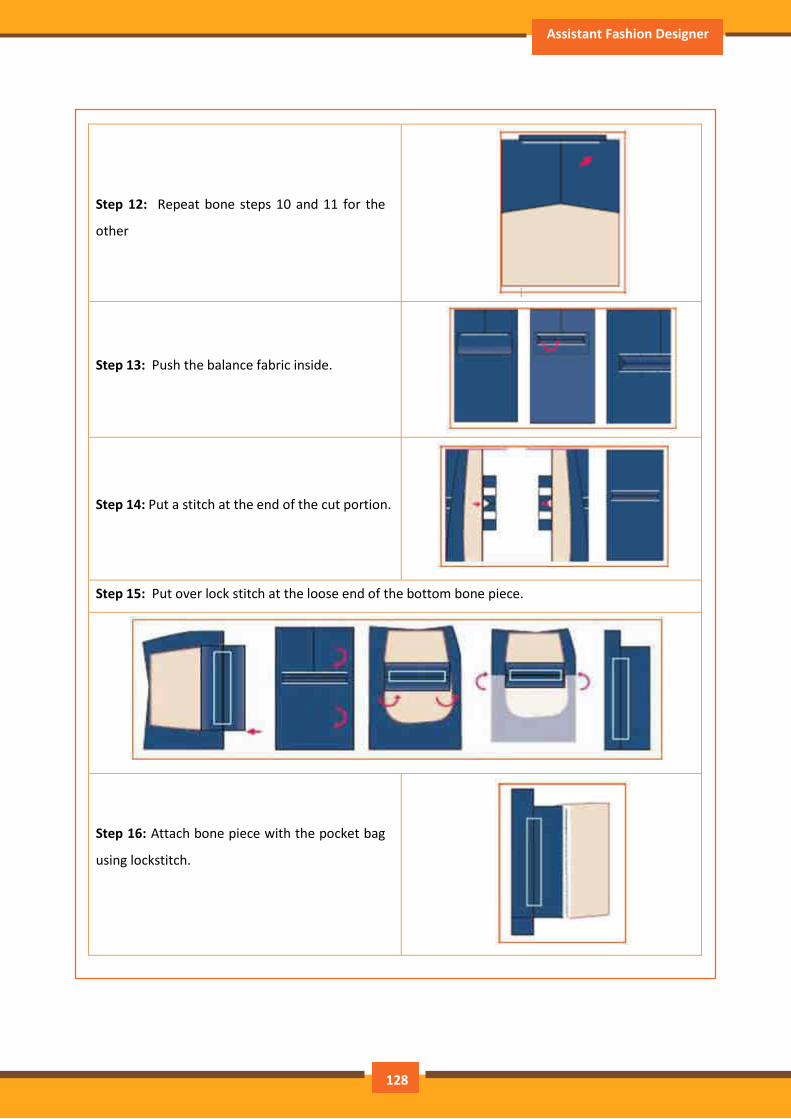
Assistant Fashion Designer
.
Step 12: Repeat bone steps 10 and 11 for the
other
Step 13: Push the balance fabric inside.
Step 14: Put a stitch at the end of the cut portion.
Step 15: Put over lock stitch at the loose end of the bottom bone piece.
Step 16: Attach bone piece with the pocket bag
using lockstitch.
128
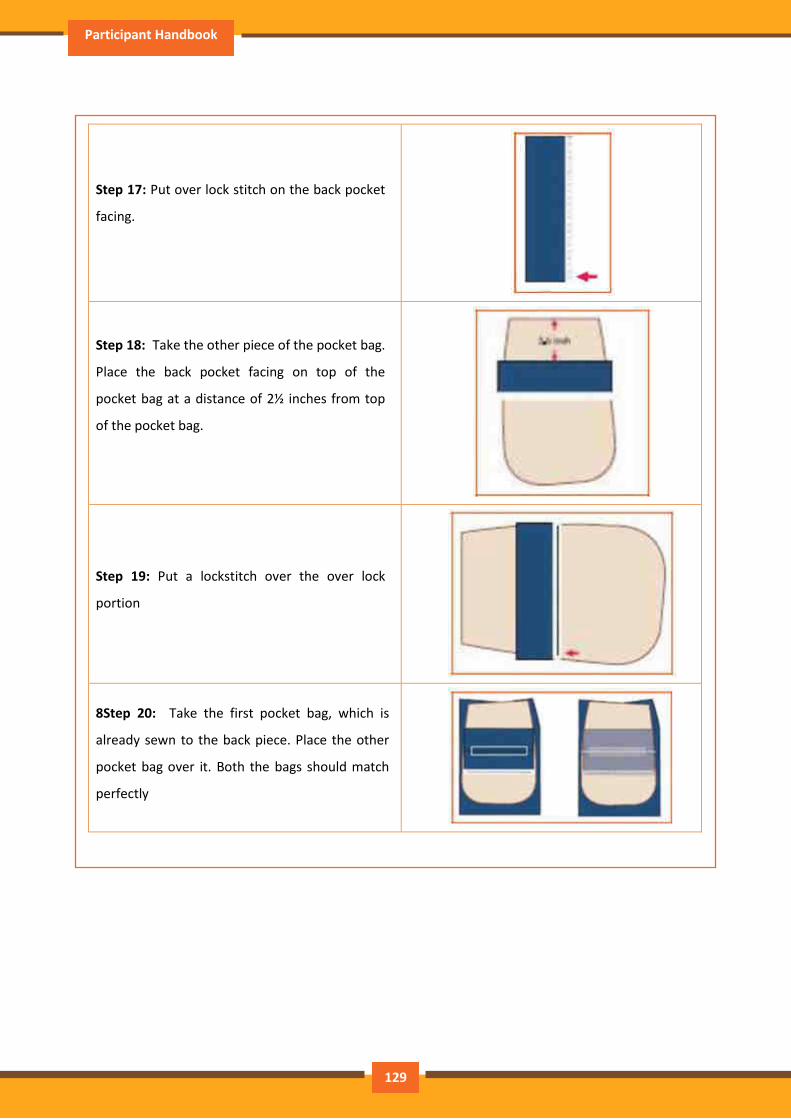
Participant Handbook
.
Step 17: Put over lock stitch on the back pocket
facing.
Step 18: Take the other piece of the pocket bag.
Place the back pocket facing on top of the
pocket bag at a distance of 2½ inches from top
of the pocket bag.
Step 19: Put a lockstitch over the over lock
portion
8Step 20: Take the first pocket bag, which is
already sewn to the back piece. Place the other
pocket bag over it. Both the bags should match
perfectly
129
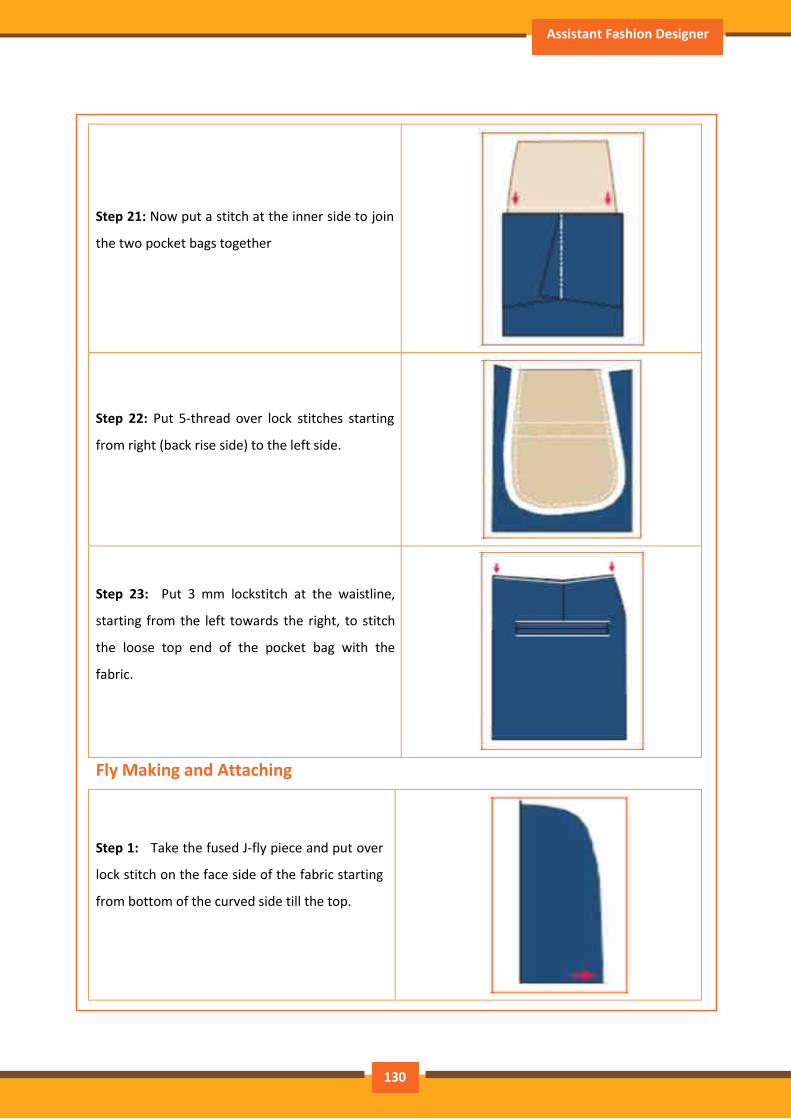
Assistant Fashion Designer
.
Step 21: Now put a stitch at the inner side to join
the two pocket bags together
Step 22: Put 5-thread over lock stitches starting
from right (back rise side) to the left side.
Step 23: Put 3 mm lockstitch at the waistline,
starting from the left towards the right, to stitch
the loose top end of the pocket bag with the
fabric.
Fly Making and Attaching
Step 1: Take the fused J-fly piece and put over
lock stitch on the face side of the fabric starting
from bottom of the curved side till the top.
130
130
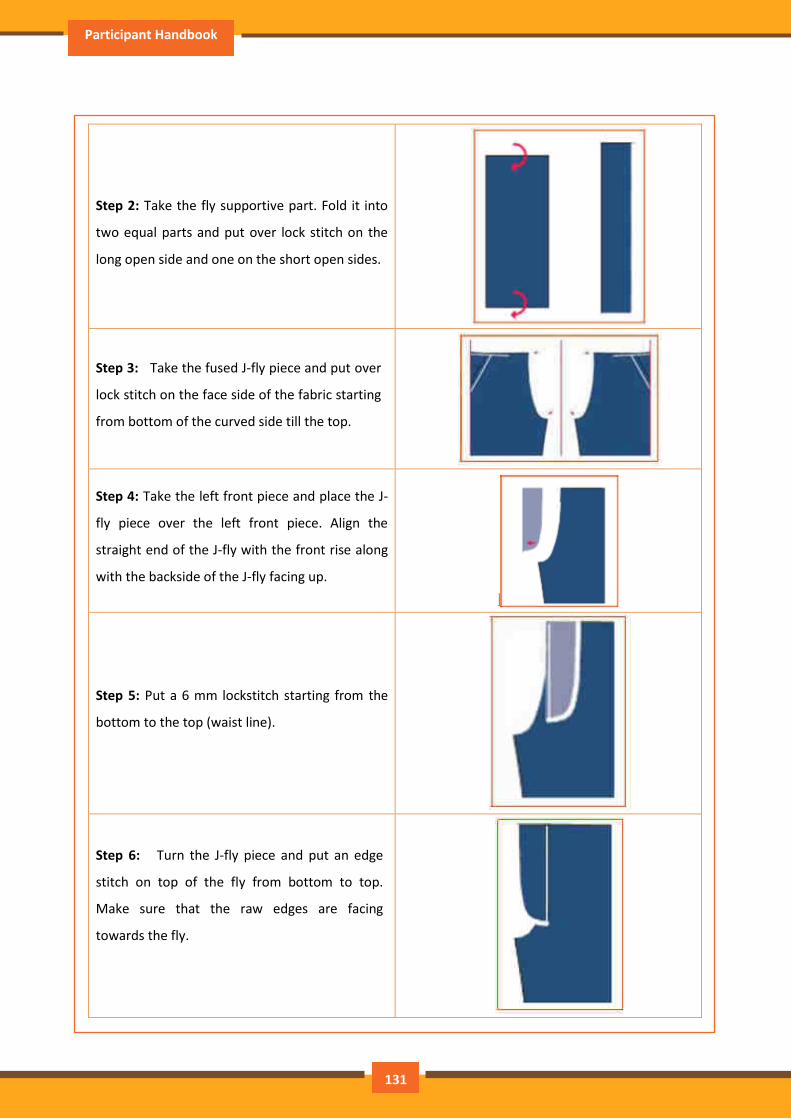
Participant Handbook
.
Step 2: Take the fly supportive part. Fold it into
two equal parts and put over lock stitch on the
long open side and one on the short open sides.
Step 3: Take the fused J-fly piece and put over
lock stitch on the face side of the fabric starting
from bottom of the curved side till the top.
Step 4: Take the left front piece and place the J-
fly piece over the left front piece. Align the
straight end of the J-fly with the front rise along
with the backside of the J-fly facing up.
Step 5: Put a 6 mm lockstitch starting from the
bottom to the top (waist line).
Step 6: Turn the J-fly piece and put an edge
stitch on top of the fly from bottom to top.
Make sure that the raw edges are facing
towards the fly.
131
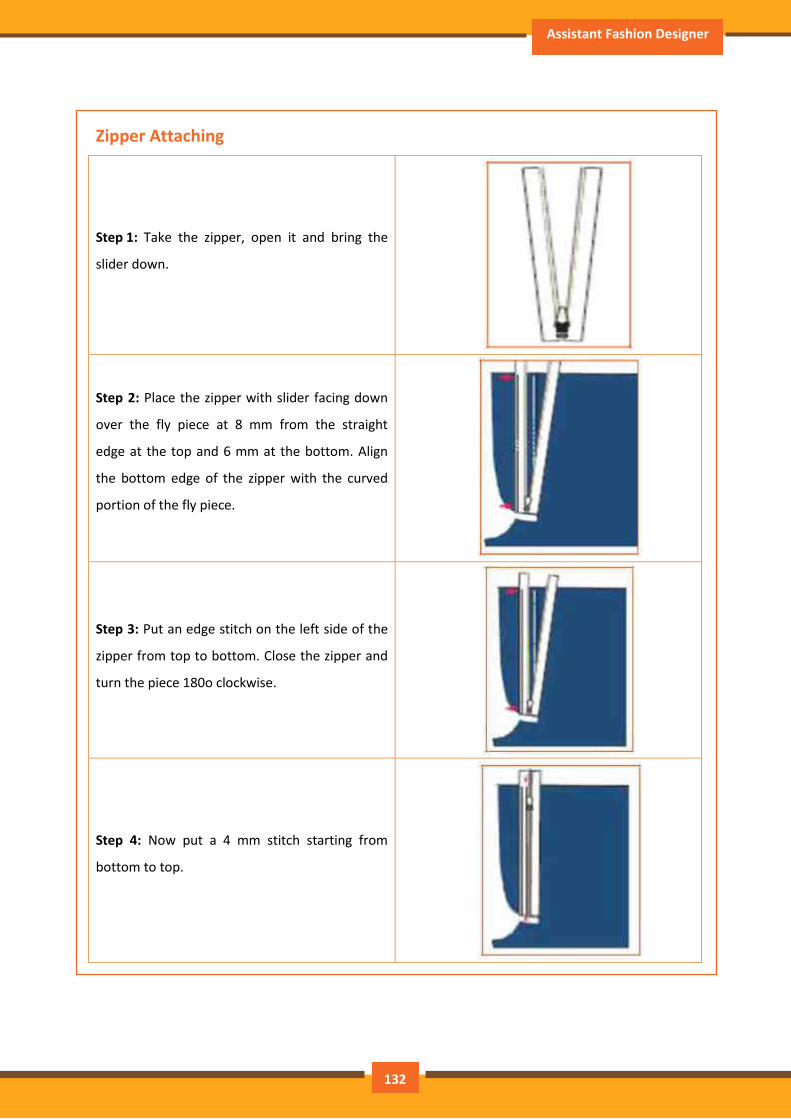
Assistant Fashion Designer
Zipper Attaching
Step 1: Take the zipper, open it and bring the
slider down.
Step 2: Place the zipper with slider facing down
over the fly piece at 8 mm from the straight
edge at the top and 6 mm at the bottom. Align
the bottom edge of the zipper with the curved
portion of the fly piece.
Step 3: Put an edge stitch on the left side of the
zipper from top to bottom. Close the zipper and
turn the piece 180o clockwise.
Step 4: Now put a 4 mm stitch starting from
bottom to top.
132
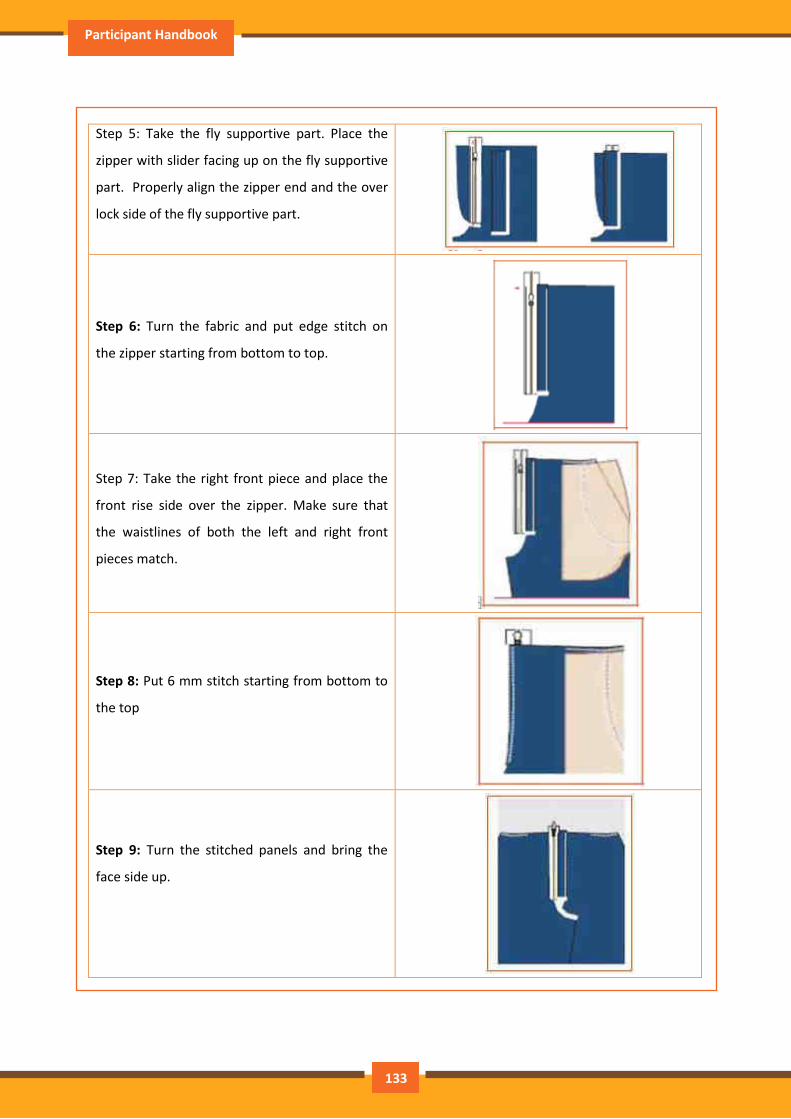
Participant Handbook
Step 5: Take the fly supportive part. Place the
zipper with slider facing up on the fly supportive
part. Properly align the zipper end and the over
lock side of the fly supportive part.
Step 6: Turn the fabric and put edge stitch on
the zipper starting from bottom to top.
Step 7: Take the right front piece and place the
front rise side over the zipper. Make sure that
the waistlines of both the left and right front
pieces match.
Step 8: Put 6 mm stitch starting from bottom to
the top
Step 9: Turn the stitched panels and bring the
face side up.
133
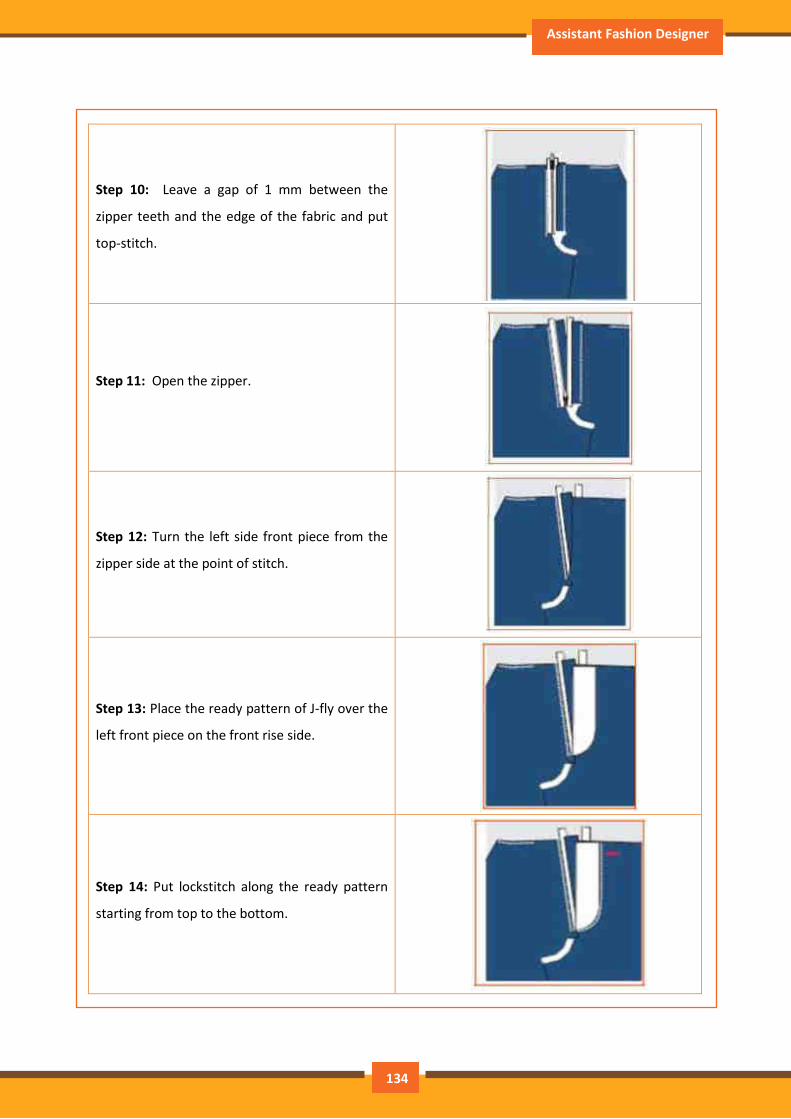
Assistant Fashion Designer
.
Step 10: Leave a gap of 1 mm between the
zipper teeth and the edge of the fabric and put
top-stitch.
Step 11: Open the zipper.
Step 12: Turn the left side front piece from the
zipper side at the point of stitch.
Step 13: Place the ready pattern of J-fly over the
left front piece on the front rise side.
Step 14: Put lockstitch along the ready pattern
starting from top to the bottom.
134
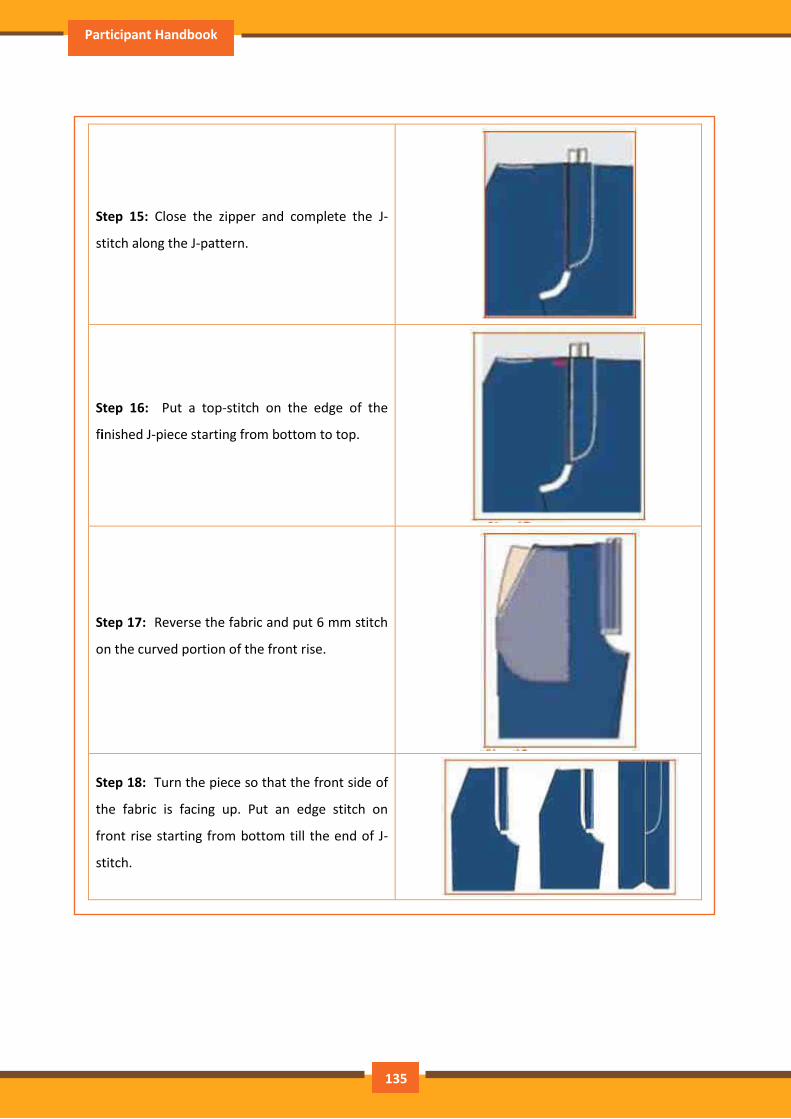
Participant Handbook
.
Step 15: Close the zipper and complete the J-
stitch along the J-pattern.
Step 16: Put a top-stitch on the edge of the
finished J-piece starting from bottom to top.
Step 17: Reverse the fabric and put 6 mm stitch
on the curved portion of the front rise.
Step 18: Turn the piece so that the front side of
the fabric is facing up. Put an edge stitch on
front rise starting from bottom till the end of J-
stitch.
135
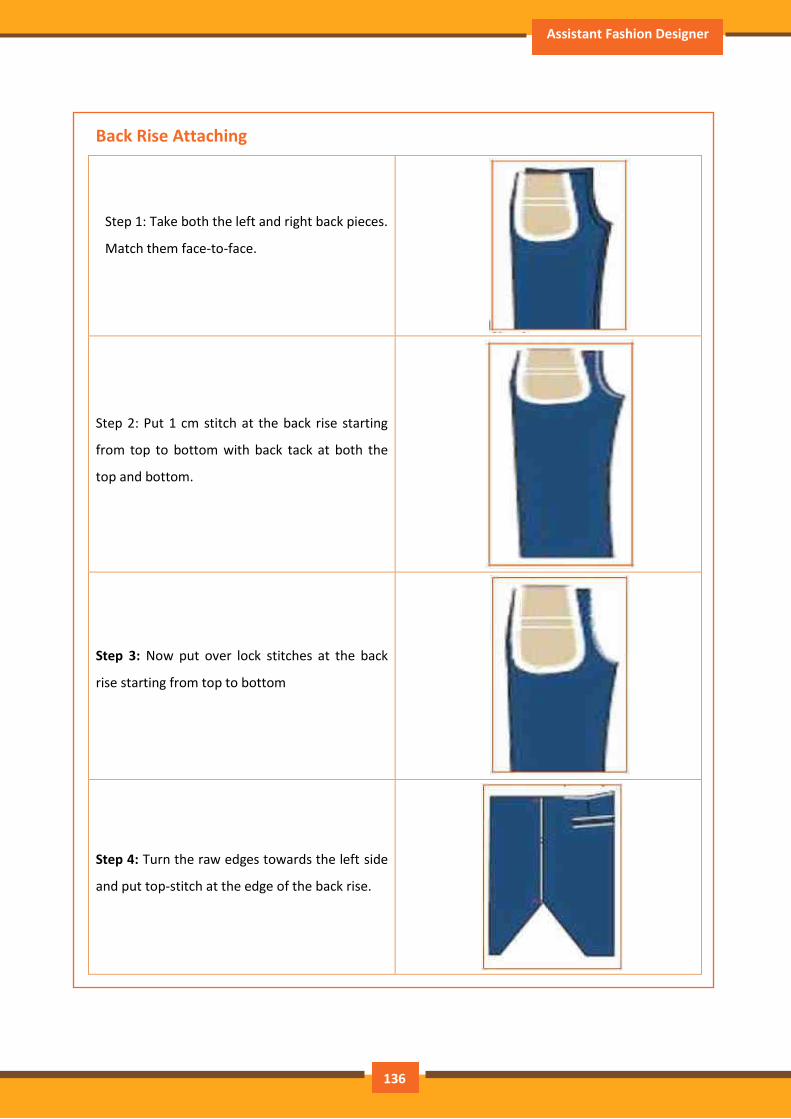
Assistant Fashion Designer
Back Rise Attaching
Step 1: Take both the left and right back pieces.
Match them face-to-face.
Step 2: Put 1 cm stitch at the back rise starting
from top to bottom with back tack at both the
top and bottom.
Step 3: Now put over lock stitches at the back
rise starting from top to bottom
Step 4: Turn the raw edges towards the left side
and put top-stitch at the edge of the back rise.
136
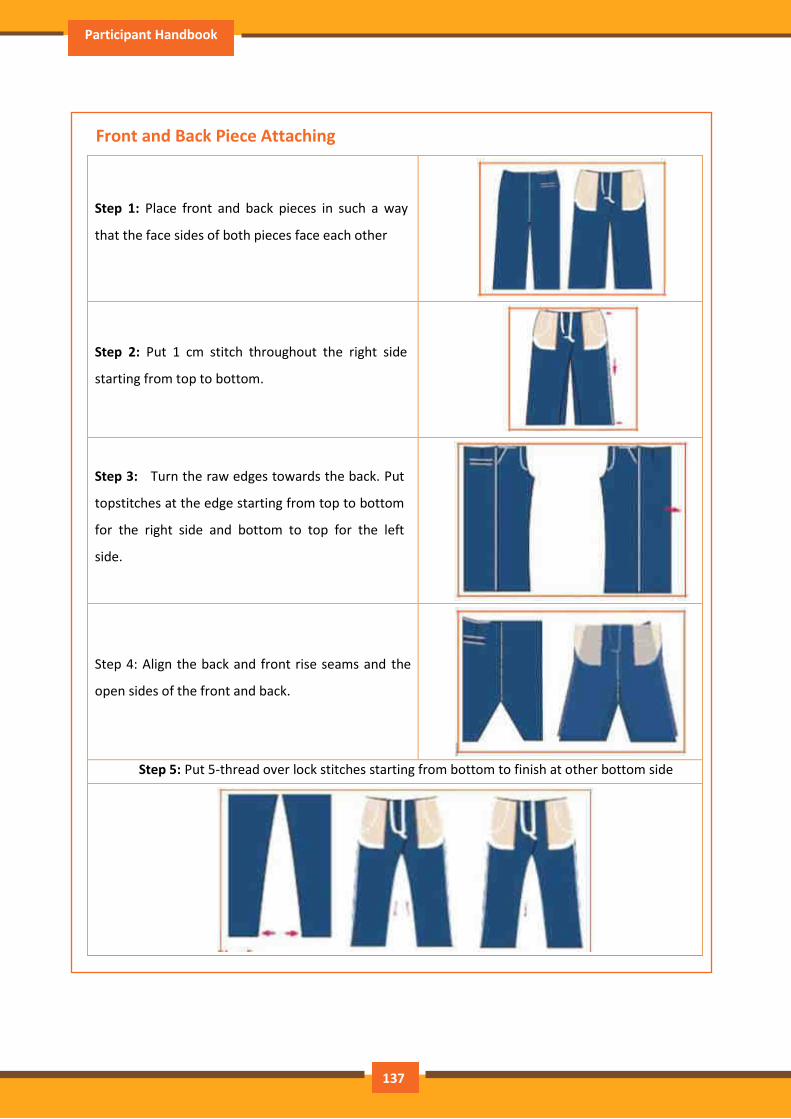
Participant Handbook
Front and Back Piece Attaching
Step 1: Place front and back pieces in such a way
that the face sides of both pieces face each other
Step 2: Put 1 cm stitch throughout the right side
starting from top to bottom.
Step 3: Turn the raw edges towards the back. Put
topstitches at the edge starting from top to bottom
for the right side and bottom to top for the left
side.
Step 4: Align the back and front rise seams and the
open sides of the front and back.
Step 5: Put 5-thread over lock stitches starting from bottom to finish at other bottom side
137
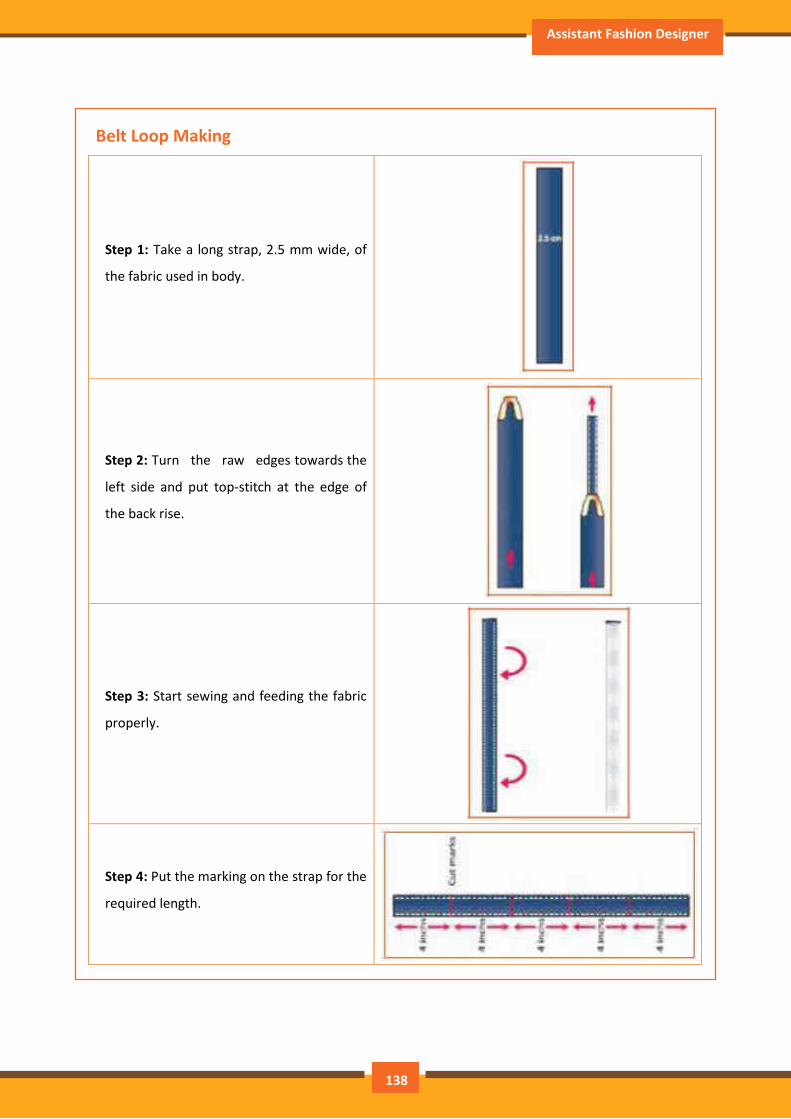
Assistant Fashion Designer
Belt Loop Making
Step 1: Take a long strap, 2.5 mm wide, of
the fabric used in body.
Step 2: Turn the raw edges towards the
left side and put top-stitch at the edge of
the back rise.
Step 3: Start sewing and feeding the fabric
properly.
Step 4: Put the marking on the strap for the
required length.
138
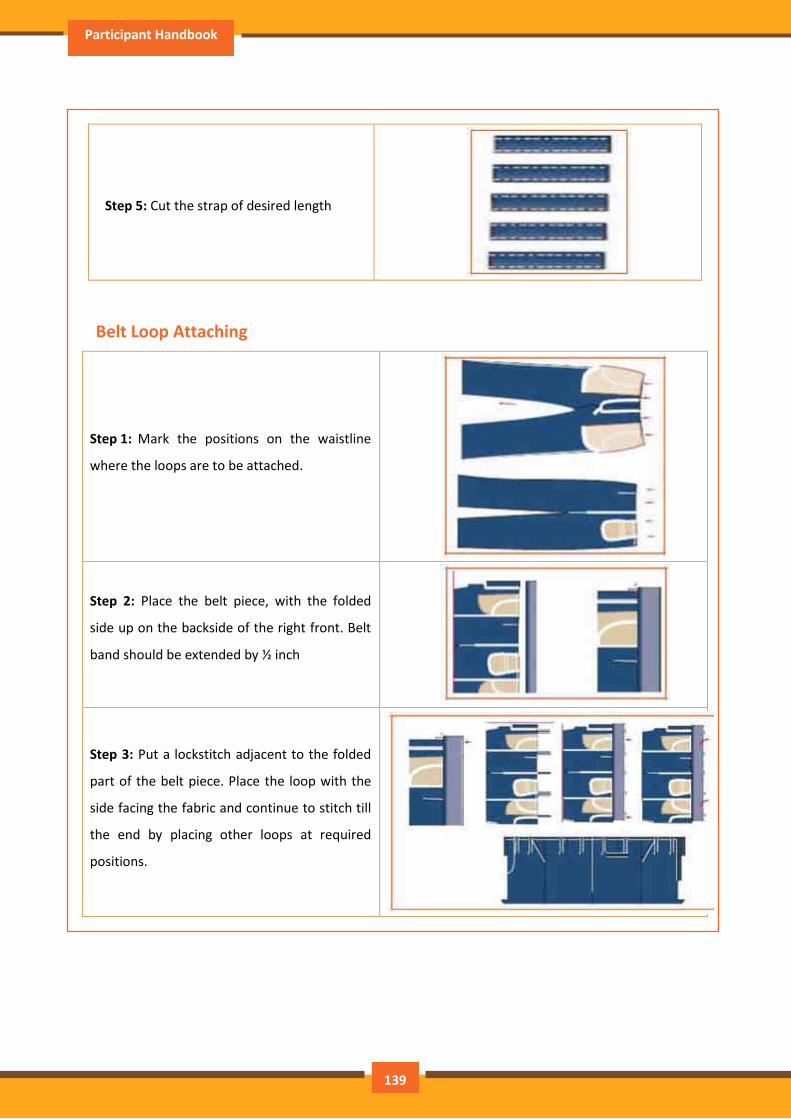
Participant Handbook
.
Step 5: Cut the strap of desired length
Belt Loop Attaching
Step 1: Mark the positions on the waistline
where the loops are to be attached.
Step 2: Place the belt piece, with the folded
side up on the backside of the right front. Belt
band should be extended by ½ inch
Step 3: Put a lockstitch adjacent to the folded
part of the belt piece. Place the loop with the
side facing the fabric and continue to stitch till
the end by placing other loops at required
positions.
139
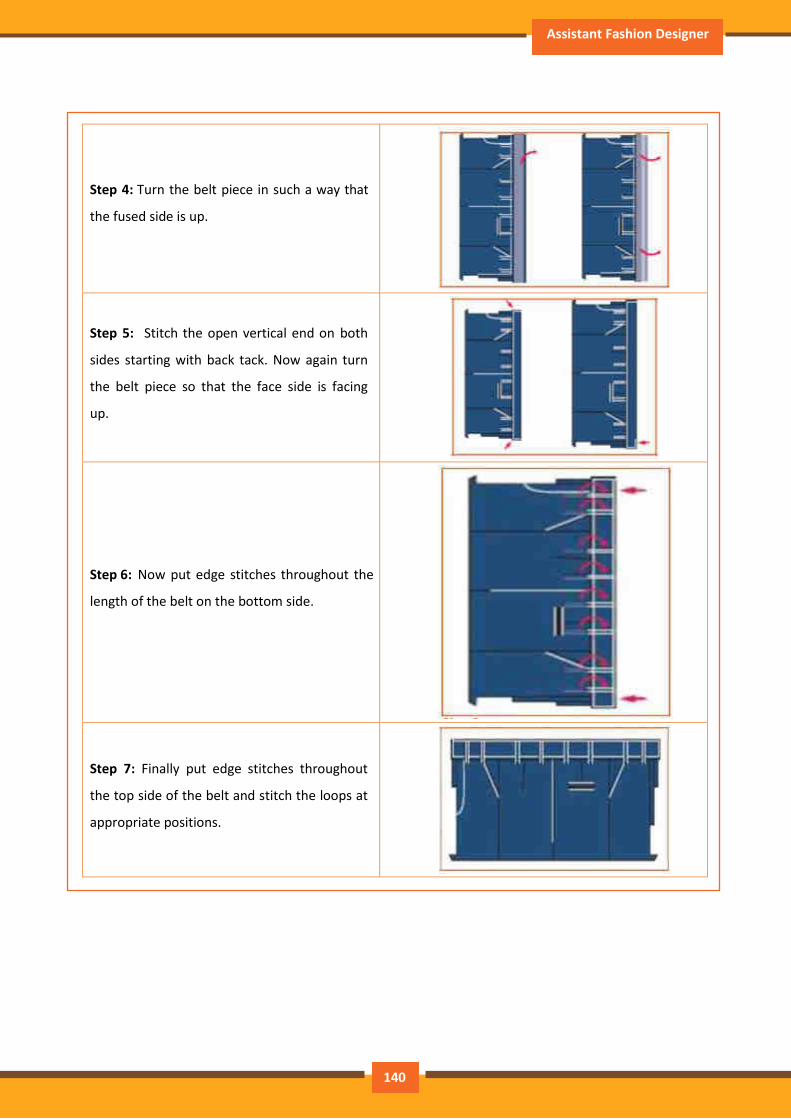
Assistant Fashion Designer
.
Step 4: Turn the belt piece in such a way that
the fused side is up.
Step 5: Stitch the open vertical end on both
sides starting with back tack. Now again turn
the belt piece so that the face side is facing
up.
Step 6: Now put edge stitches throughout the
length of the belt on the bottom side.
Step 7: Finally put edge stitches throughout
the top side of the belt and stitch the loops at
appropriate positions.
140
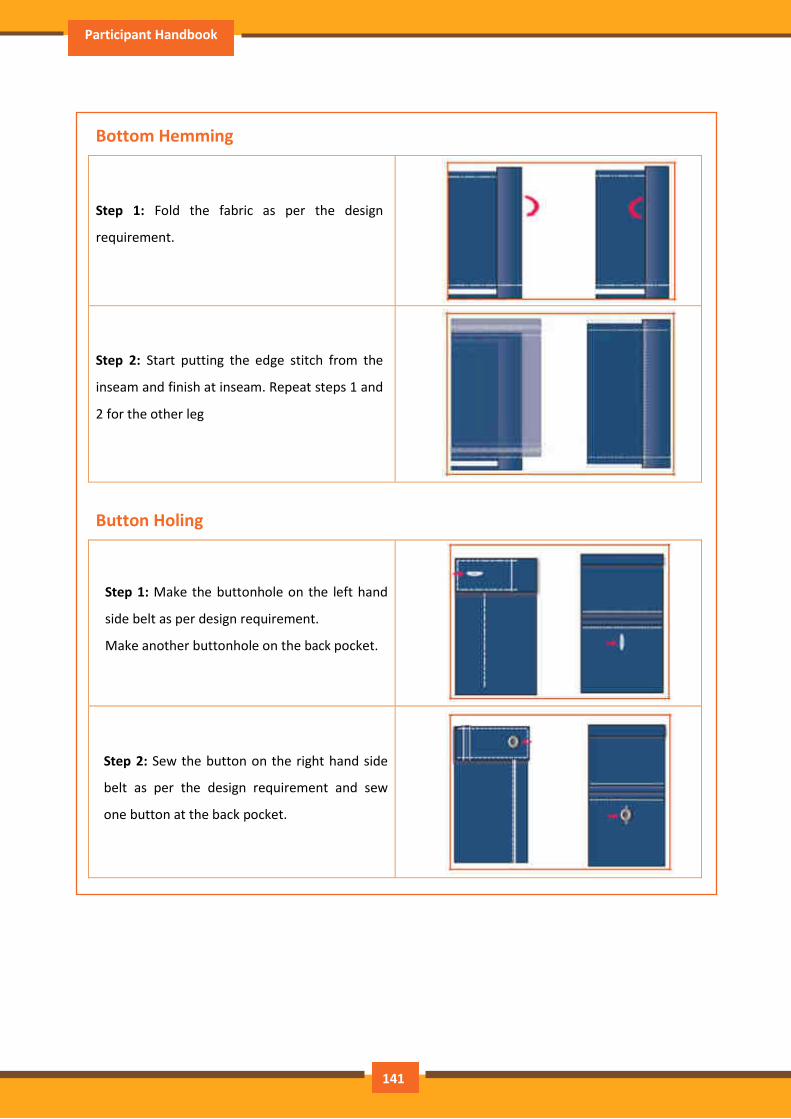
Participant Handbook
Bottom Hemming
Step 1: Fold the fabric as per the design
requirement.
Step 2: Start putting the edge stitch from the
inseam and finish at inseam. Repeat steps 1 and
2 for the other leg
Button Holing
Step 1: Make the buttonhole on the left hand
side belt as per design requirement.
Make another buttonhole on the back pocket.
Step 2: Sew the button on the right hand side
belt as per the design requirement and sew
one button at the back pocket.
141
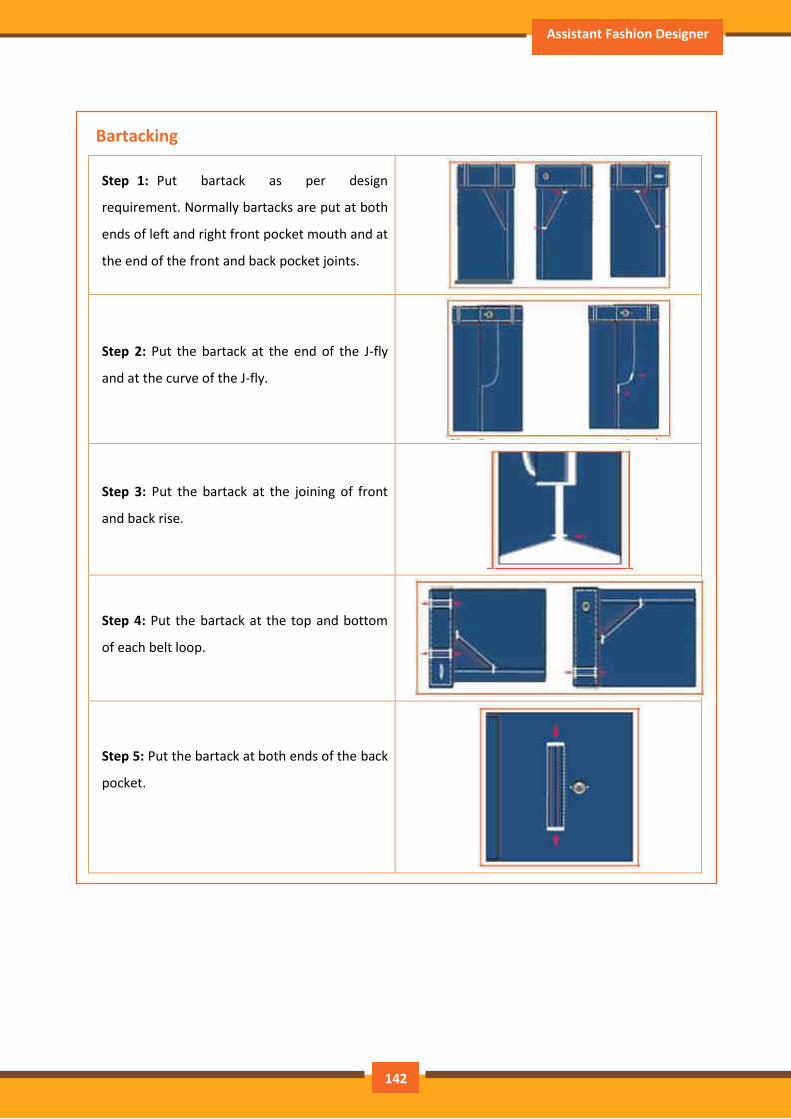
Assistant Fashion Designer
Bartacking
Step 1: Put bartack as per design
requirement. Normally bartacks are put at both
ends of left and right front pocket mouth and at
the end of the front and back pocket joints.
Step 2: Put the bartack at the end of the J-fly
and at the curve of the J-fly.
Step 3: Put the bartack at the joining of front
and back rise.
Step 4: Put the bartack at the top and bottom
of each belt loop.
Step 5: Put the bartack at both ends of the back
pocket.
]
142
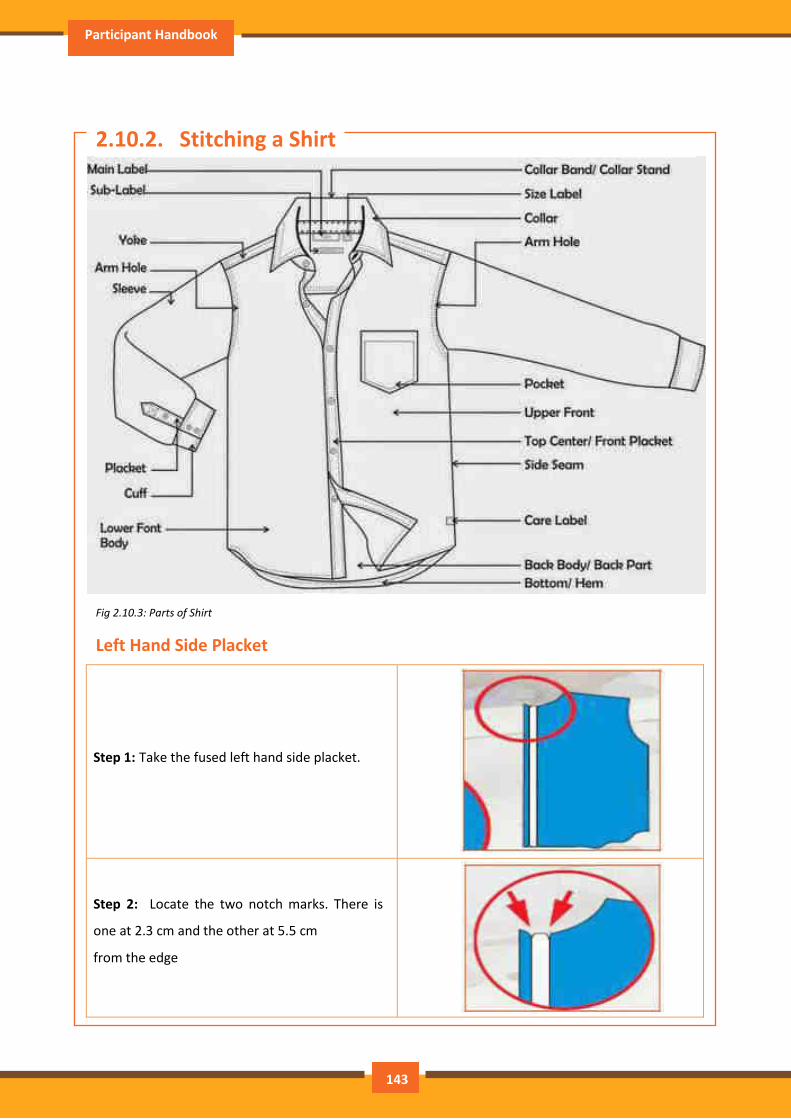
Participant Handbook
2.10.2. Stitching a Shirt
Fig 2.10.3: Parts of Shirt
Left Hand Side Placket
Step 1: Take the fused left hand side placket.
Step 2: Locate the two notch marks. There is
one at 2.3 cm and the other at 5.5 cm
from the edge
143
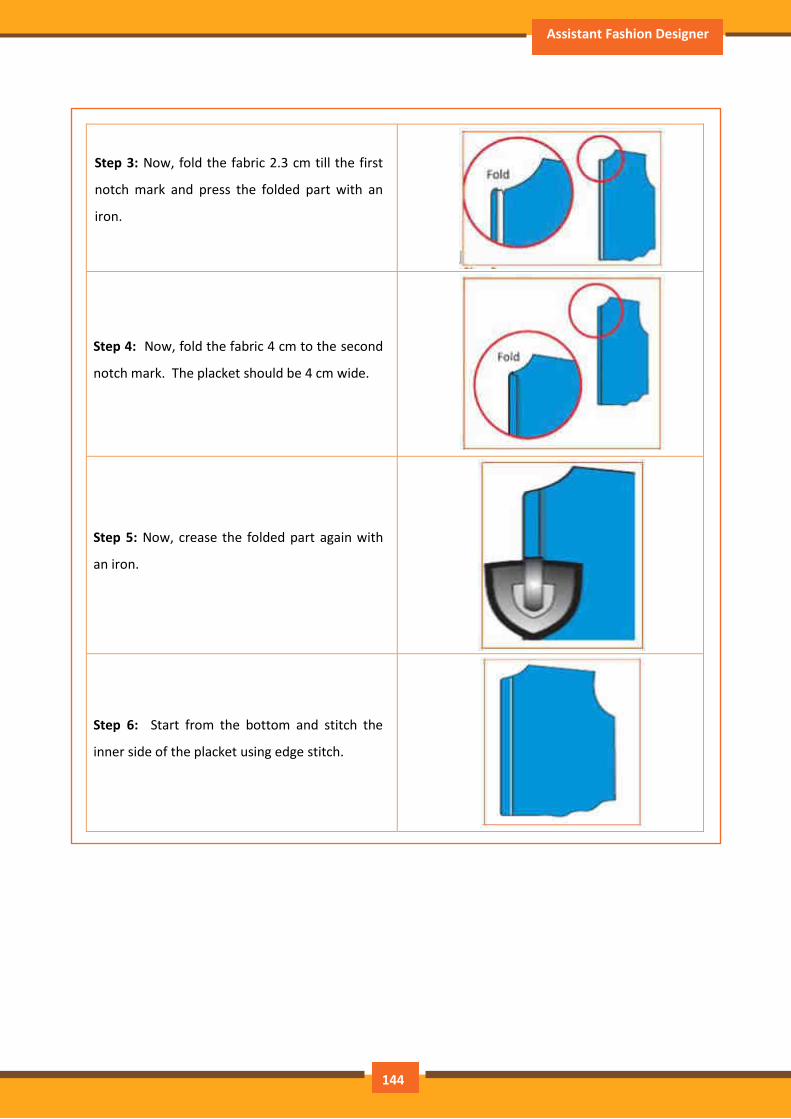
Assistant Fashion Designer
.
Step 3: Now, fold the fabric 2.3 cm till the first
notch mark and press the folded part with an
iron.
Step 4: Now, fold the fabric 4 cm to the second
notch mark. The placket should be 4 cm wide.
Step 5: Now, crease the folded part again with
an iron.
Step 6: Start from the bottom and stitch the
inner side of the placket using edge stitch.
144
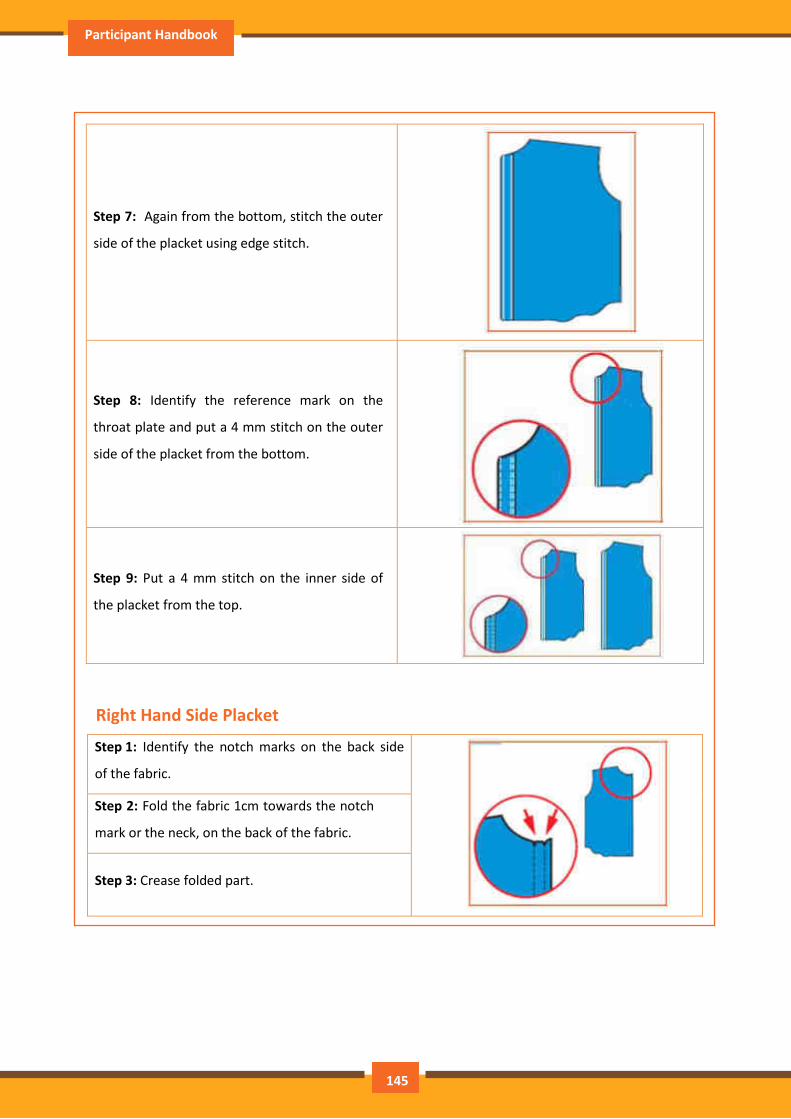
Participant Handbook
.
Step 7: Again from the bottom, stitch the outer
side of the placket using edge stitch.
Step 8: Identify the reference mark on the
throat plate and put a 4 mm stitch on the outer
side of the placket from the bottom.
Step 9: Put a 4 mm stitch on the inner side of
the placket from the top.
Right Hand Side Placket
Step 1: Identify the notch marks on the back side
of the fabric.
Step 2: Fold the fabric 1cm towards the notch
mark or the neck, on the back of the fabric.
Step 3: Crease folded part.
145
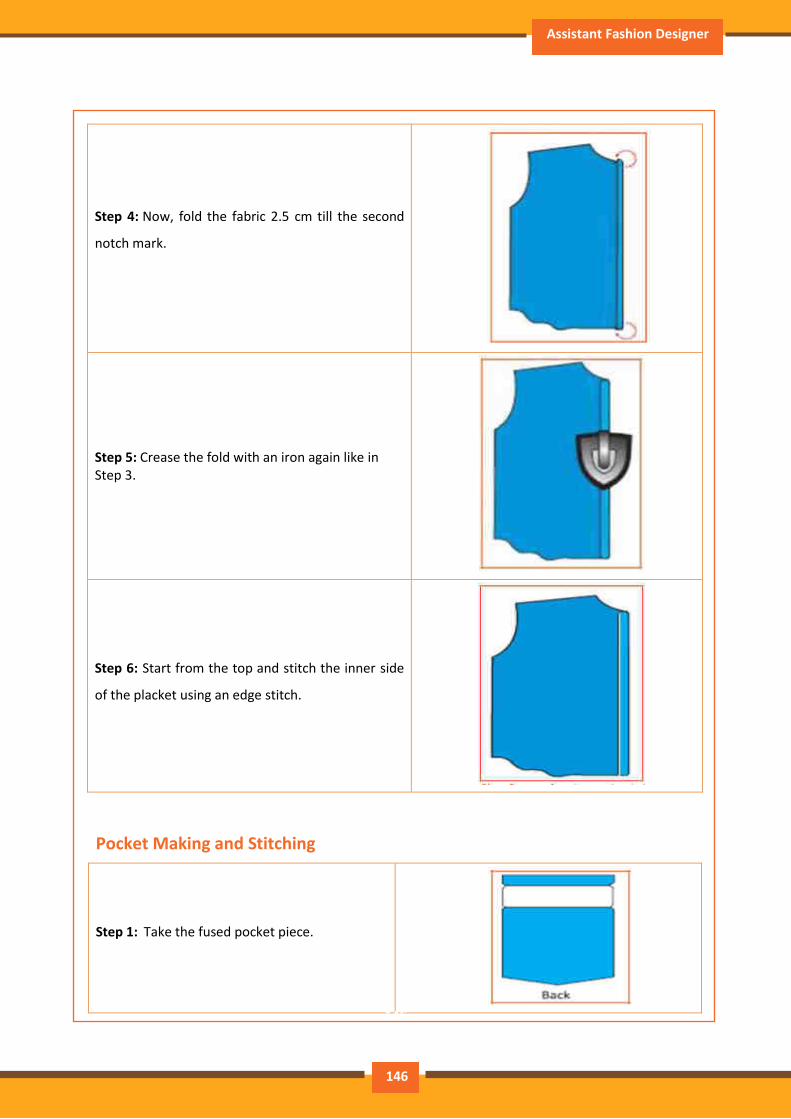
Assistant Fashion Designer
.
Step 4: Now, fold the fabric 2.5 cm till the second
notch mark.
Step 5: Crease the fold with an iron again like in
Step 3.
Step 6: Start from the top and stitch the inner side
of the placket using an edge stitch.
Pocket Making and Stitching .
Step 1: Take the fused pocket piece.
146
146
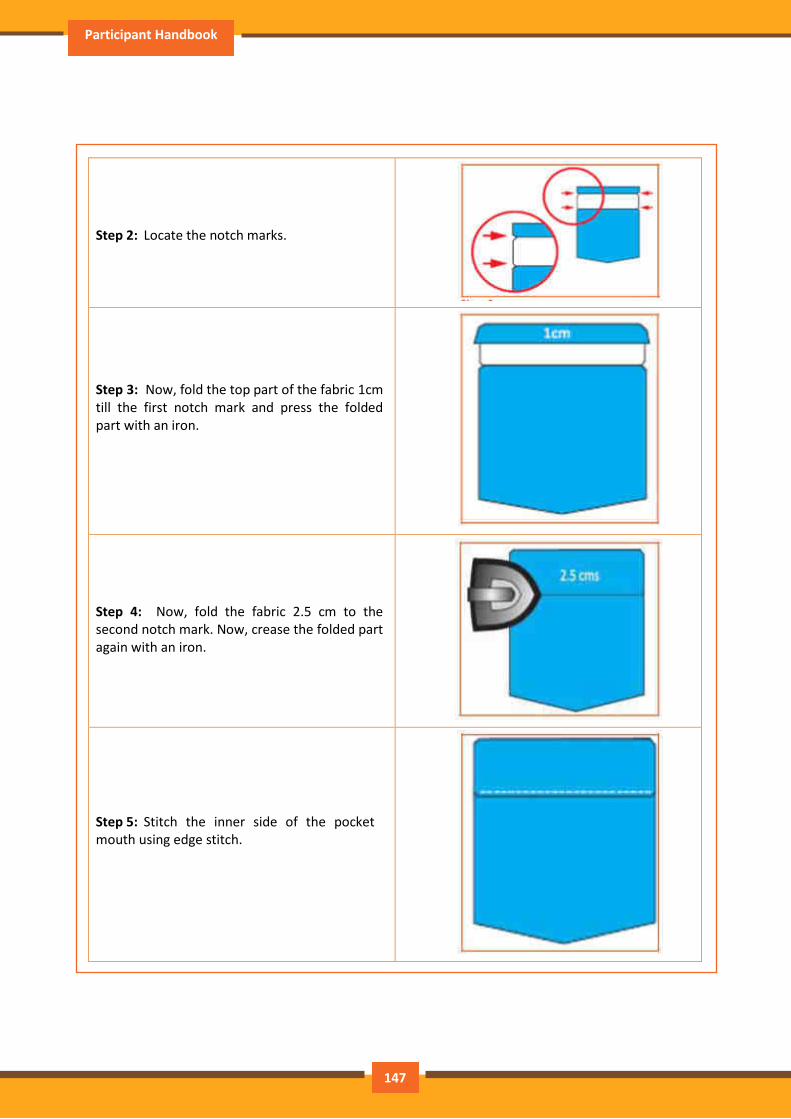
Participant Handbook
.
Step 2: Locate the notch marks.
Step 3: Now, fold the top part of the fabric 1cm
till the first notch mark and press the folded
part with an iron.
Step 4: Now, fold the fabric 2.5 cm to the
second notch mark. Now, crease the folded part
again with an iron.
Step 5: Stitch the inner side of the pocket
mouth using edge stitch.
147

Assistant Fashion Designer
.
Step 6: Take the ready pattern given and
place it over the pocket.
Step 7: Now, fold the three sides 1 cm each and crease them as you fold.
Step 8: The pocket is now ready to be attached.
Attaching the Pocket
Step 1: Place the pocket piece on the left half of
the shirt front.
148
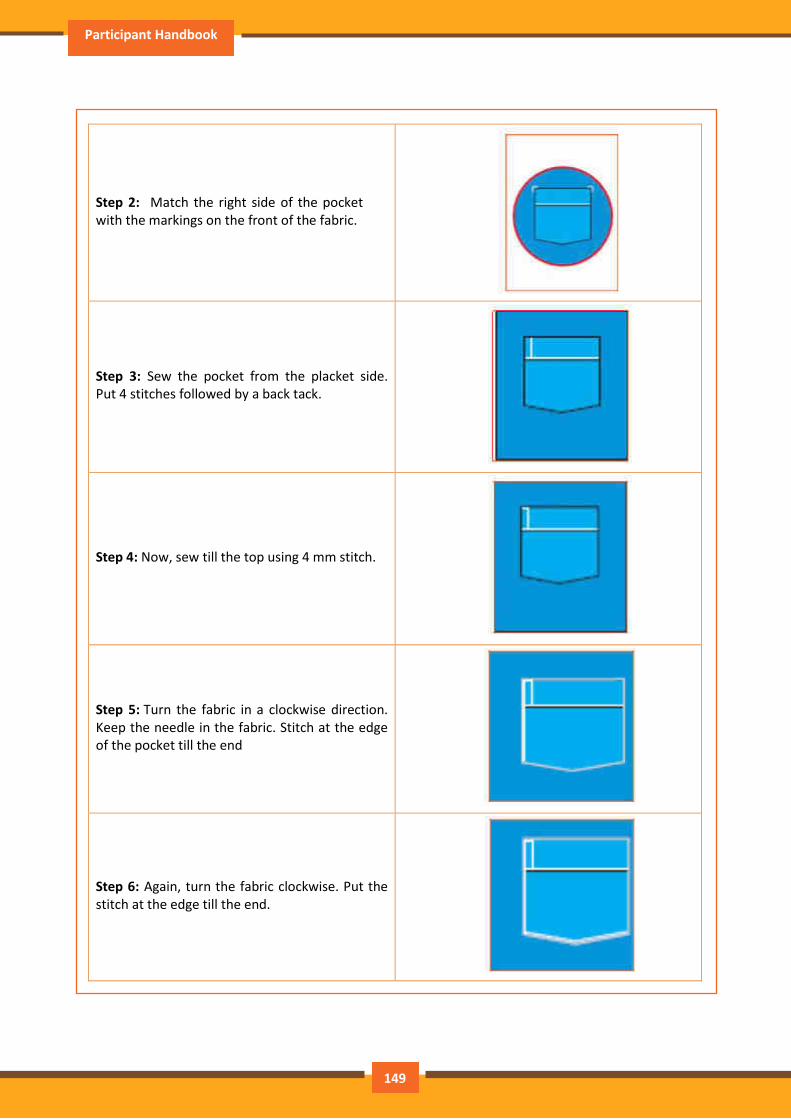
Participant Handbook
.
Step 2: Match the right side of the pocket
with the markings on the front of the fabric.
Step 3: Sew the pocket from the placket side.
Put 4 stitches followed by a back tack.
Step 4: Now, sew till the top using 4 mm stitch.
Step 5: Turn the fabric in a clockwise direction.
Keep the needle in the fabric. Stitch at the edge
of the pocket till the end
Step 6: Again, turn the fabric clockwise. Put the
stitch at the edge till the end.
149
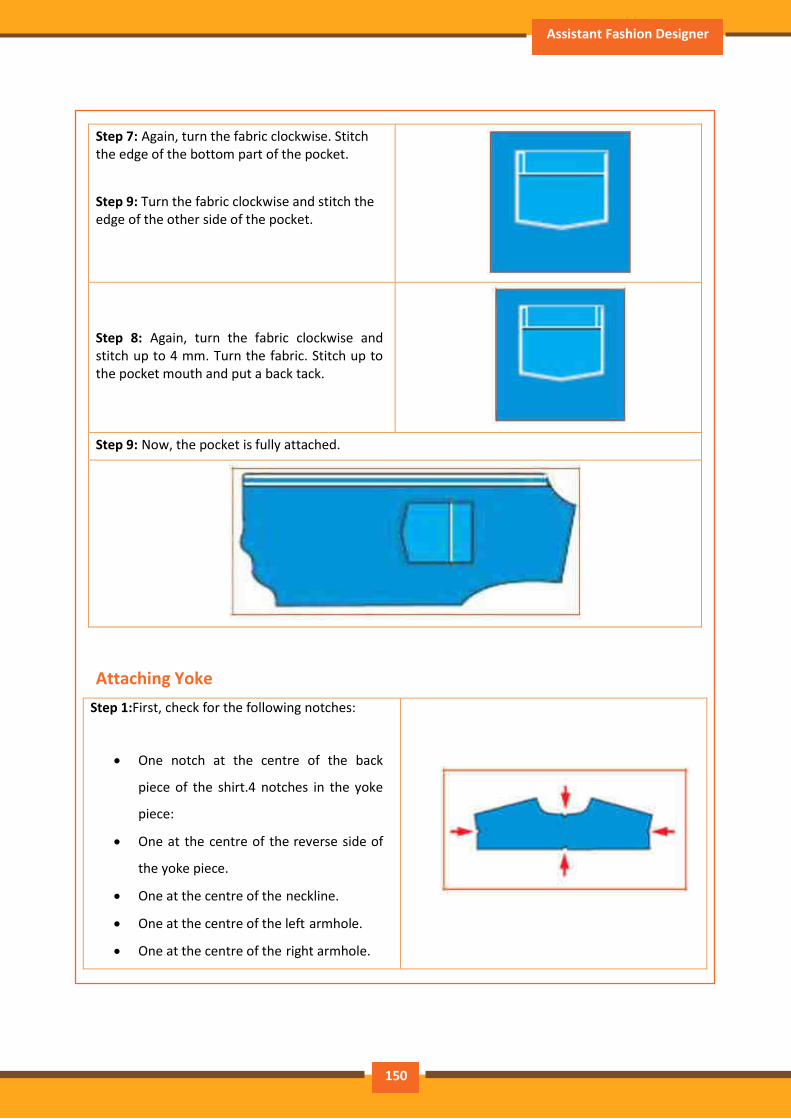
Assistant Fashion Designer
Step 7: Again, turn the fabric clockwise. Stitch
the edge of the bottom part of the pocket.
Step 9: Turn the fabric clockwise and stitch the
edge of the other side of the pocket.
Step 8: Again, turn the fabric clockwise and
stitch up to 4 mm. Turn the fabric. Stitch up to
the pocket mouth and put a back tack.
Step 9: Now, the pocket is fully attached.
Attaching Yoke
Step 1:First, check for the following notches:
One notch at the centre of the back
piece of the shirt.4 notches in the yoke
piece:
One at the centre of the reverse side of
the yoke piece.
One at the centre of the neckline.
One at the centre of the left armhole.
One at the centre of the right armhole.
150
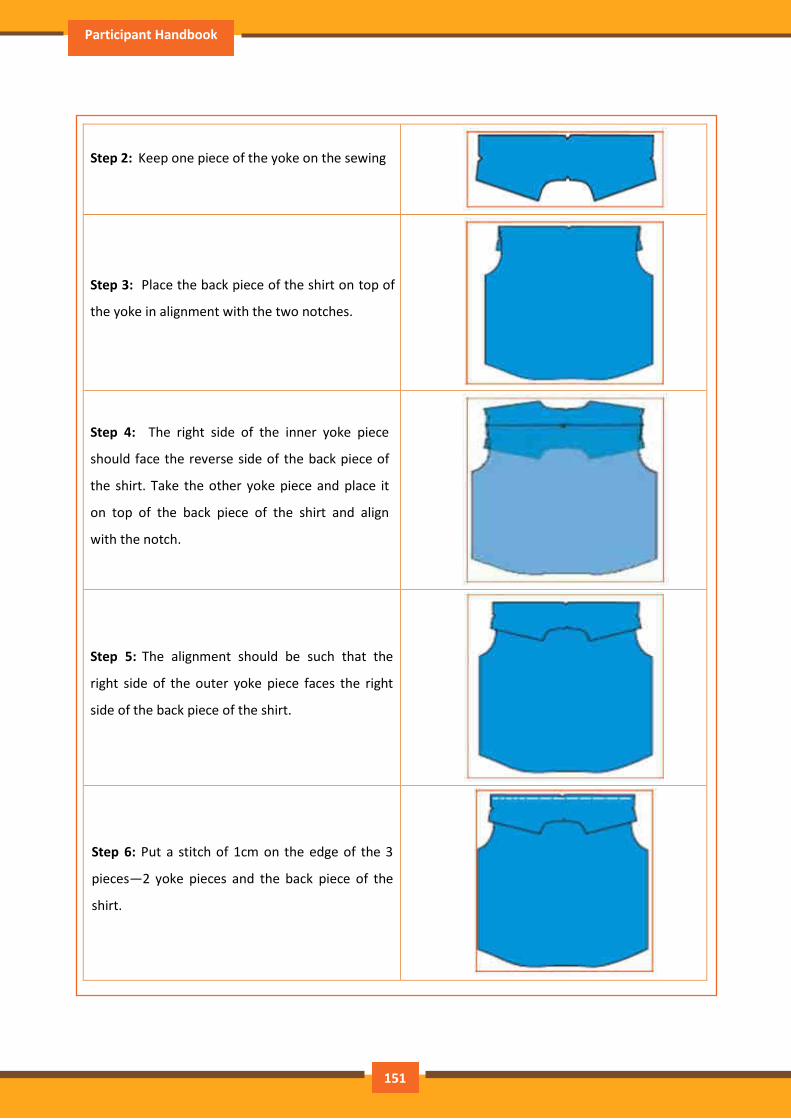
Participant Handbook
.
.
Step 2: Keep one piece of the yoke on the sewing
Step 3: Place the back piece of the shirt on top of
the yoke in alignment with the two notches.
Step 4: The right side of the inner yoke piece
should face the reverse side of the back piece of
the shirt. Take the other yoke piece and place it
on top of the back piece of the shirt and align
with the notch.
Step 5: The alignment should be such that the
right side of the outer yoke piece faces the right
side of the back piece of the shirt.
Step 6: Put a stitch of 1cm on the edge of the 3
pieces—2 yoke pieces and the back piece of the
shirt.
151
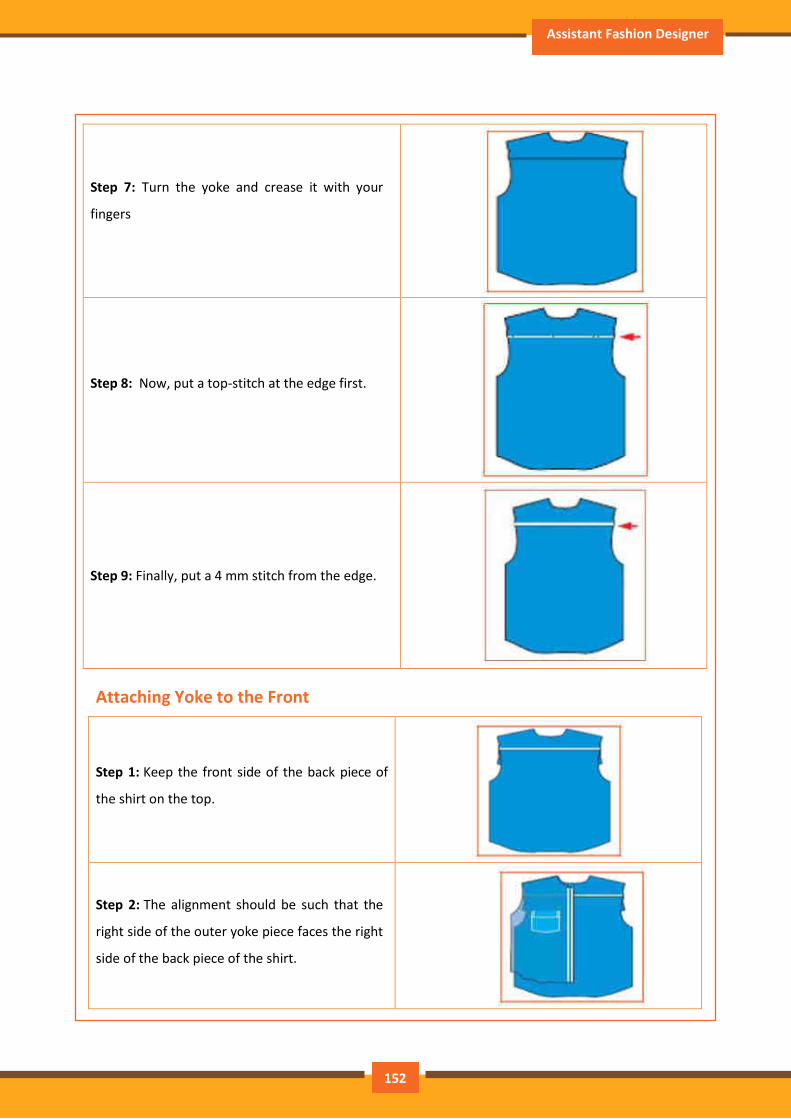
Assistant Fashion Designer
Step 7: Turn the yoke and crease it with your
fingers
Step 8: Now, put a top-stitch at the edge first.
Step 9: Finally, put a 4 mm stitch from the edge.
Attaching Yoke to the Front
Step 1: Keep the front side of the back piece of
the shirt on the top.
Step 2: The alignment should be such that the
right side of the outer yoke piece faces the right
side of the back piece of the shirt.
152
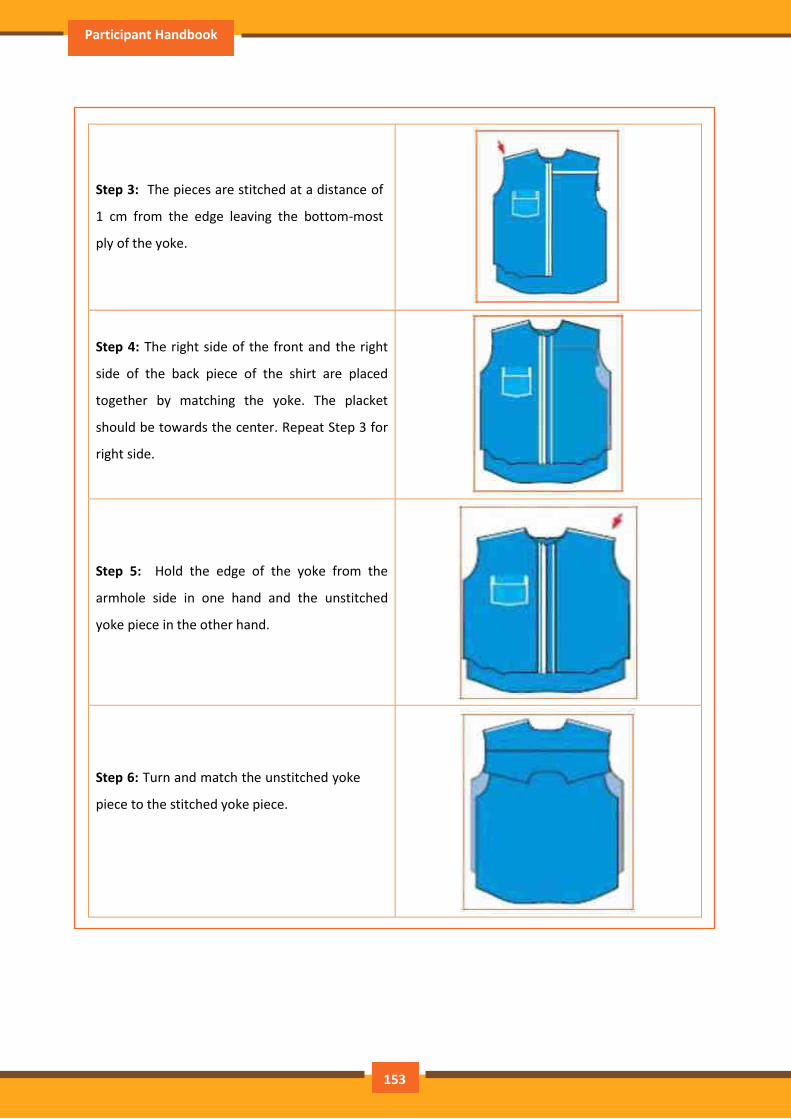
Participant Handbook
.
Step 3: The pieces are stitched at a distance of
1 cm from the edge leaving the bottom-most
ply of the yoke.
Step 4: The right side of the front and the right
side of the back piece of the shirt are placed
together by matching the yoke. The placket
should be towards the center. Repeat Step 3 for
right side.
Step 5: Hold the edge of the yoke from the
armhole side in one hand and the unstitched
yoke piece in the other hand.
Step 6: Turn and match the unstitched yoke
piece to the stitched yoke piece.
153

Assistant Fashion Designer
.
Step 7: Roll the body fabrics and insert it
between the two yoke pieces.
Step 8: Put a 1 cm stitch throughout
Step 9: Hold the front and the back pieces and
stretch them.
Step 10: Put a top-stitch at the edges on both
sides
Step 11: Finally, put a 4 mm stitch on both sides.
154
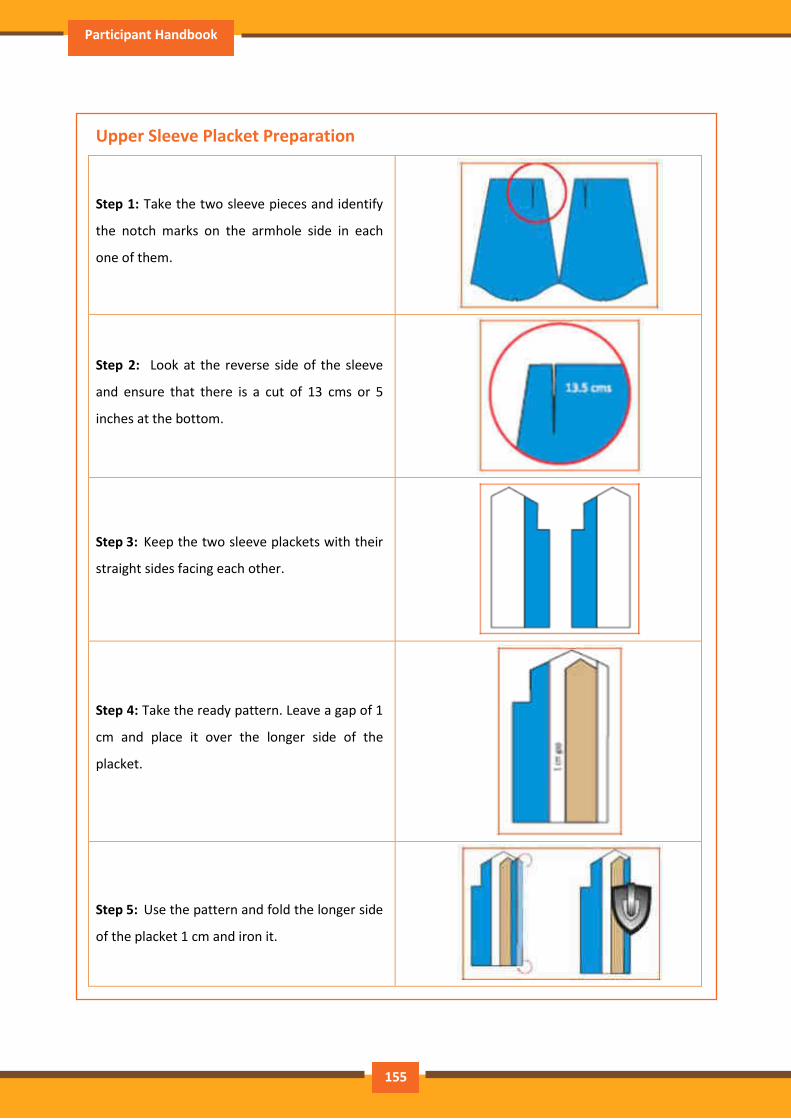
Participant Handbook
Upper Sleeve Placket Preparation
Step 1: Take the two sleeve pieces and identify
the notch marks on the armhole side in each
one of them.
Step 2: Look at the reverse side of the sleeve
and ensure that there is a cut of 13 cms or 5
inches at the bottom.
Step 3: Keep the two sleeve plackets with their
straight sides facing each other.
Step 4: Take the ready pattern. Leave a gap of 1
cm and place it over the longer side of the
placket.
Step 5: Use the pattern and fold the longer side
of the placket 1 cm and iron it.
155
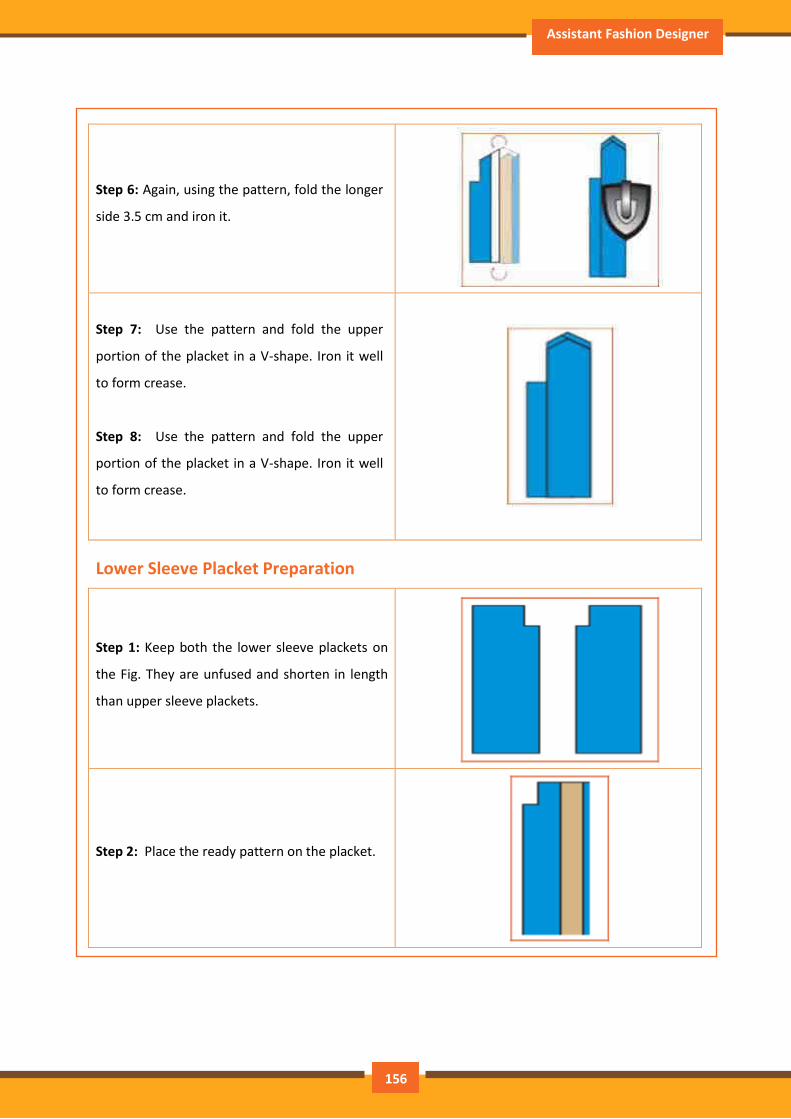
Assistant Fashion Designer
.
Step 6: Again, using the pattern, fold the longer
side 3.5 cm and iron it.
Step 7: Use the pattern and fold the upper
portion of the placket in a V-shape. Iron it well
to form crease.
Step 8: Use the pattern and fold the upper
portion of the placket in a V-shape. Iron it well
to form crease.
Lower Sleeve Placket Preparation
Step 1: Keep both the lower sleeve plackets on
the Fig. They are unfused and shorten in length
than upper sleeve plackets.
Step 2: Place the ready pattern on the placket.
156
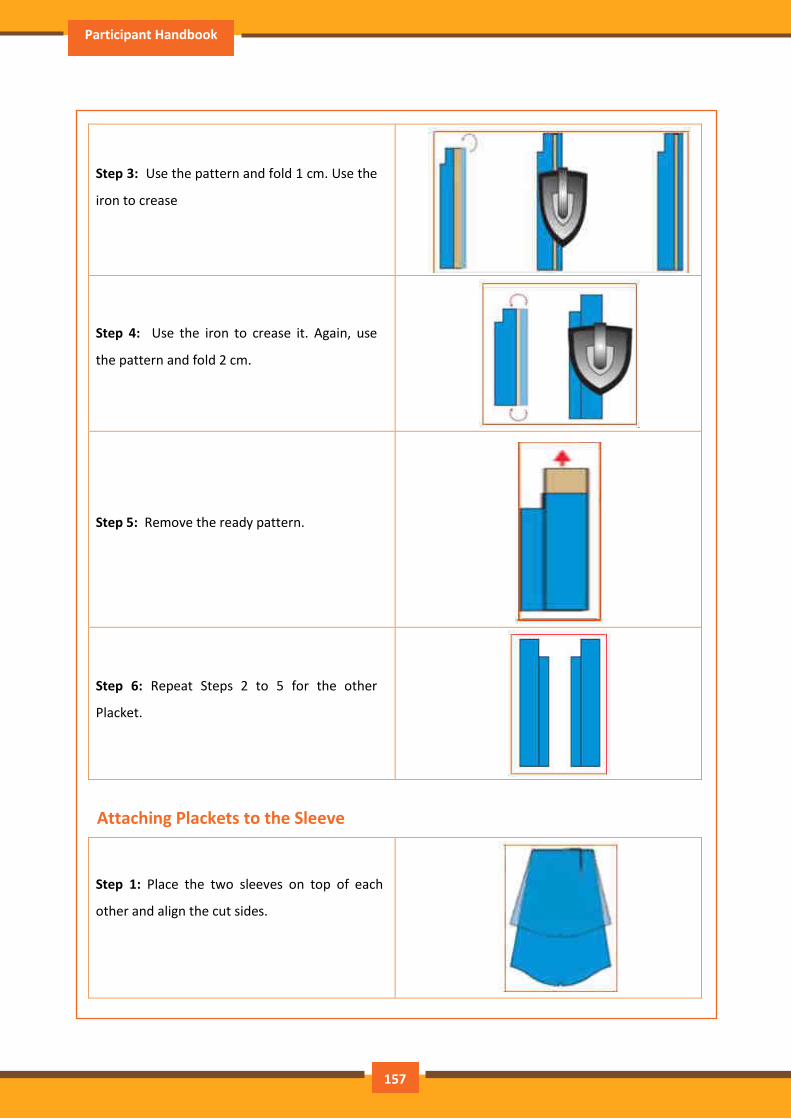
Participant Handbook
.
Step 3: Use the pattern and fold 1 cm. Use the
iron to crease
Step 4: Use the iron to crease it. Again, use
the pattern and fold 2 cm.
Step 5: Remove the ready pattern.
Step 6: Repeat Steps 2 to 5 for the other
Placket.
Attaching Plackets to the Sleeve
Step 1: Place the two sleeves on top of each
other and align the cut sides.
157
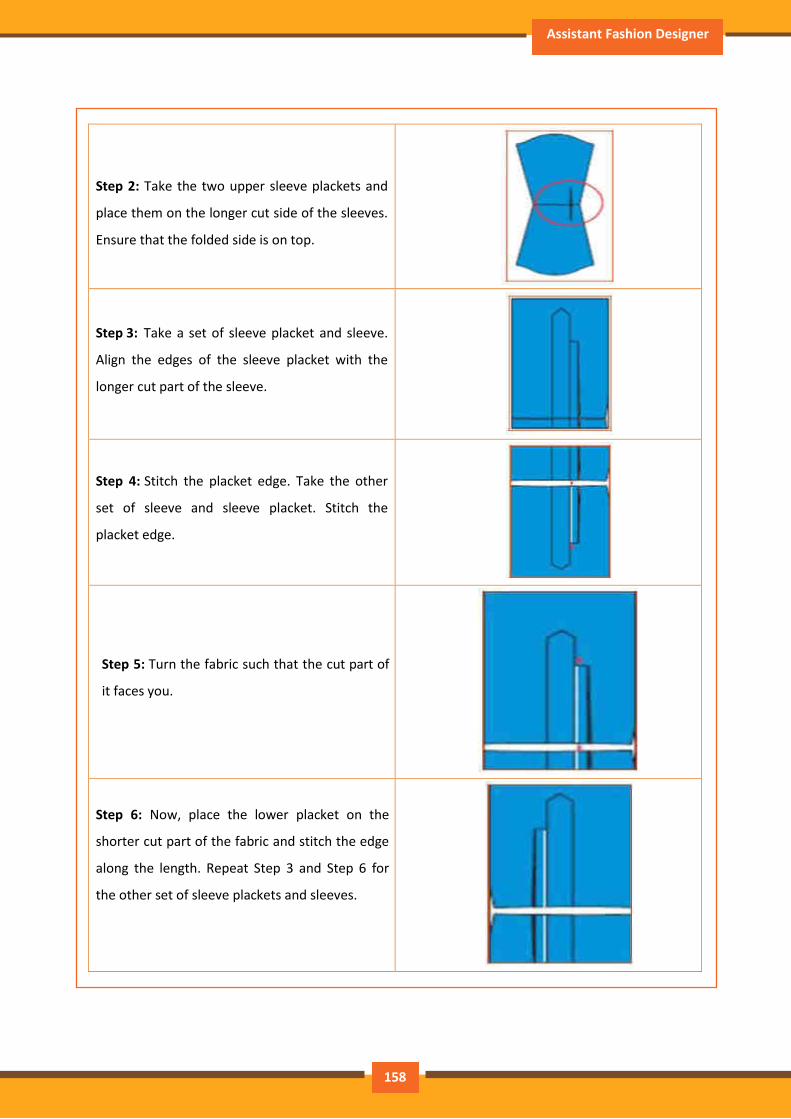
Assistant Fashion Designer
.
Step 2: Take the two upper sleeve plackets and
place them on the longer cut side of the sleeves.
Ensure that the folded side is on top.
Step 3: Take a set of sleeve placket and sleeve.
Align the edges of the sleeve placket with the
longer cut part of the sleeve.
Step 4: Stitch the placket edge. Take the other
set of sleeve and sleeve placket. Stitch the
placket edge.
Step 5: Turn the fabric such that the cut part of
it faces you.
Step 6: Now, place the lower placket on the
shorter cut part of the fabric and stitch the edge
along the length. Repeat Step 3 and Step 6 for
the other set of sleeve plackets and sleeves.
158
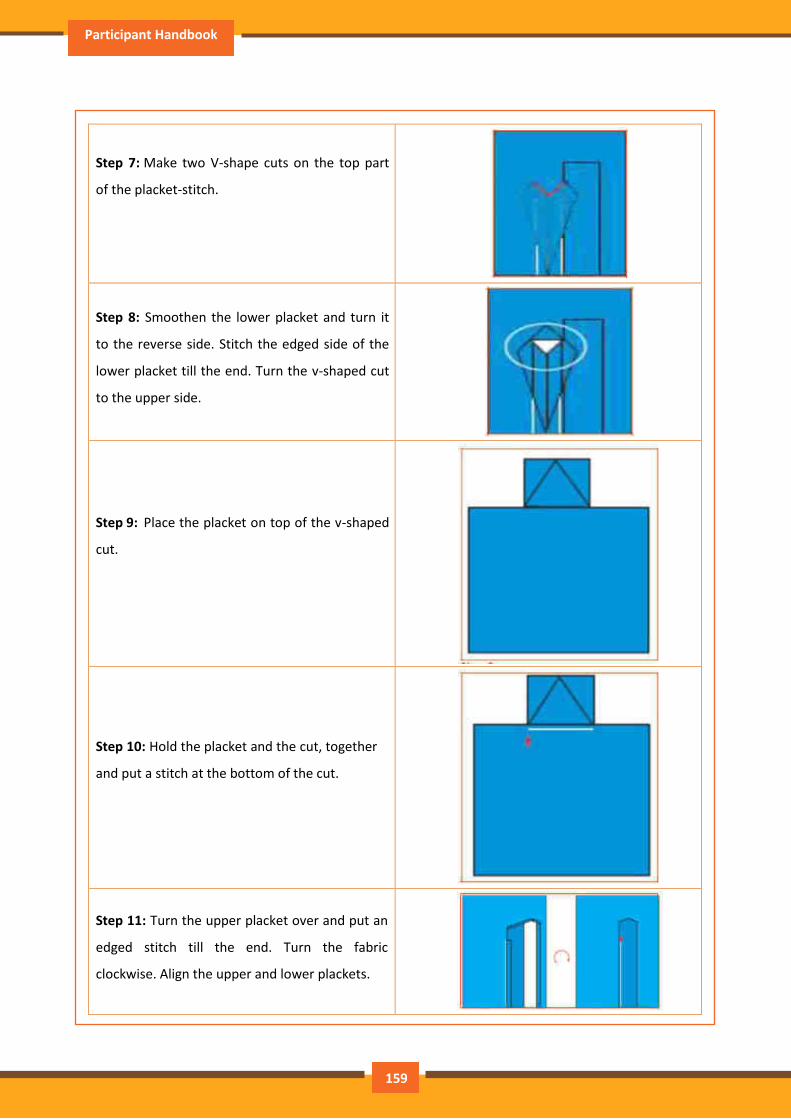
Participant Handbook
.
Step 7: Make two V-shape cuts on the top part
of the placket-stitch.
Step 8: Smoothen the lower placket and turn it
to the reverse side. Stitch the edged side of the
lower placket till the end. Turn the v-shaped cut
to the upper side.
Step 9: Place the placket on top of the v-shaped
cut.
Step 10: Hold the placket and the cut, together
and put a stitch at the bottom of the cut.
Step 11: Turn the upper placket over and put an
edged stitch till the end. Turn the fabric
clockwise. Align the upper and lower plackets.
159
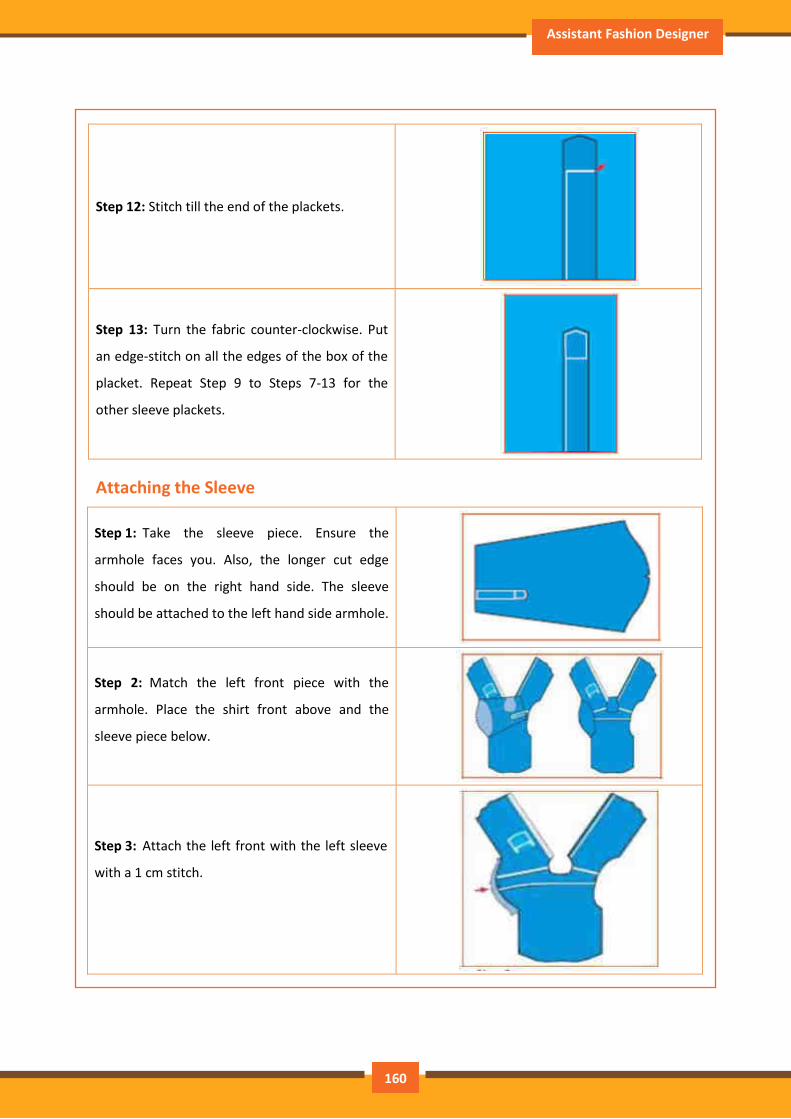
Assistant Fashion Designer
.
Step 12: Stitch till the end of the plackets.
Step 13: Turn the fabric counter-clockwise. Put
an edge-stitch on all the edges of the box of the
placket. Repeat Step 9 to Steps 7-13 for the
other sleeve plackets.
Attaching the Sleeve
Step 1: Take the sleeve piece. Ensure the
armhole faces you. Also, the longer cut edge
should be on the right hand side. The sleeve
should be attached to the left hand side armhole.
Step 2: Match the left front piece with the
armhole. Place the shirt front above and the
sleeve piece below.
Step 3: Attach the left front with the left sleeve
with a 1 cm stitch.
160
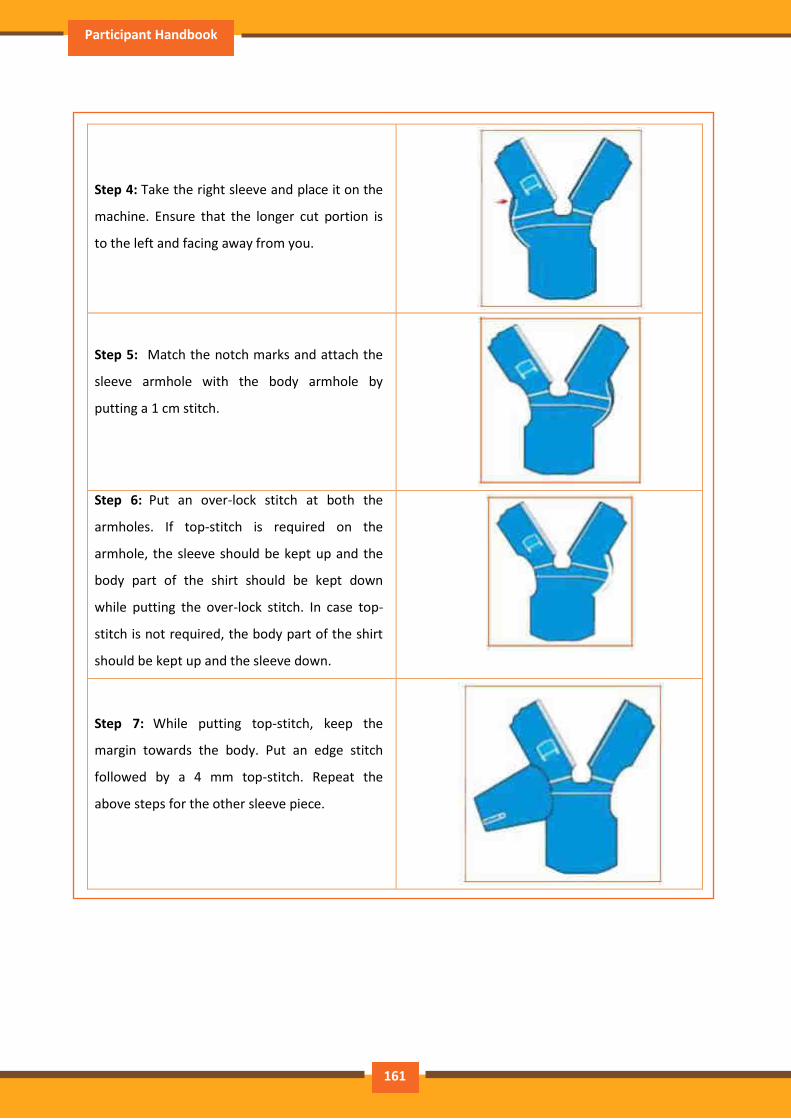
Participant Handbook
.
Step 4: Take the right sleeve and place it on the
machine. Ensure that the longer cut portion is
to the left and facing away from you.
Step 5: Match the notch marks and attach the
sleeve armhole with the body armhole by
putting a 1 cm stitch.
Step 6: Put an over-lock stitch at both the
armholes. If top-stitch is required on the
armhole, the sleeve should be kept up and the
body part of the shirt should be kept down
while putting the over-lock stitch. In case top-
stitch is not required, the body part of the shirt
should be kept up and the sleeve down.
Step 7: While putting top-stitch, keep the
margin towards the body. Put an edge stitch
followed by a 4 mm top-stitch. Repeat the
above steps for the other sleeve piece.
161
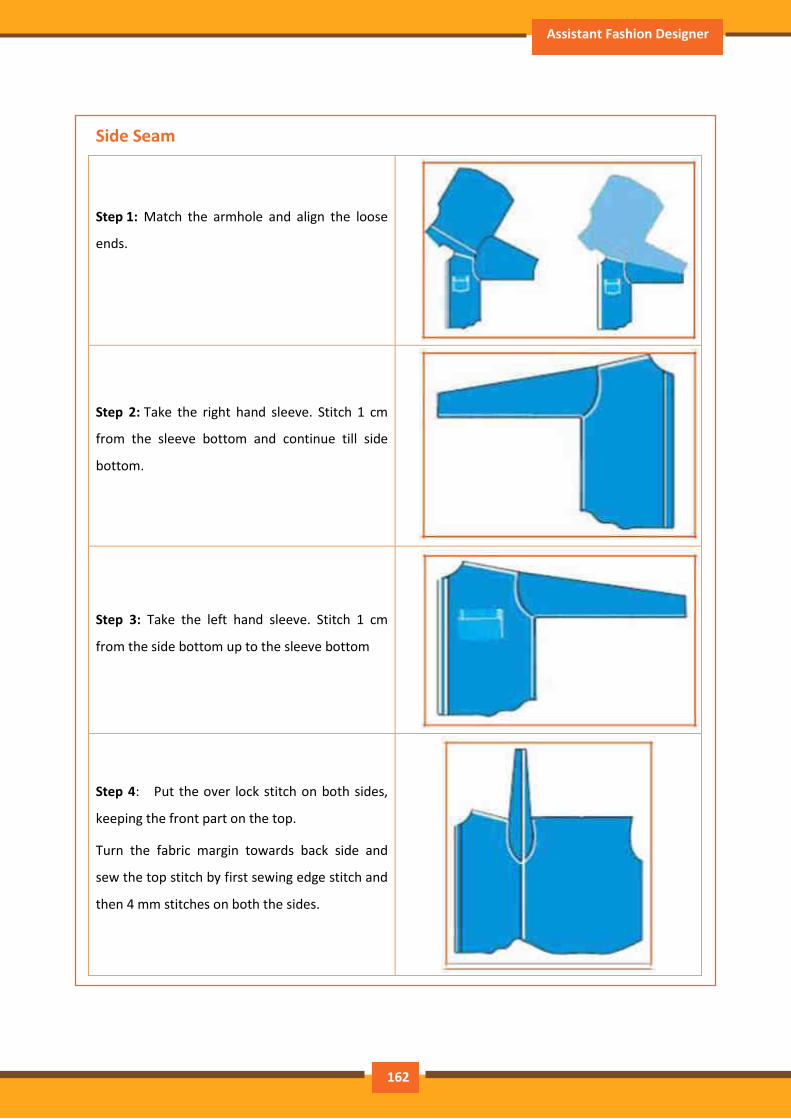
Assistant Fashion Designer
Side Seam
Step 1: Match the armhole and align the loose
ends.
Step 2: Take the right hand sleeve. Stitch 1 cm
from the sleeve bottom and continue till side
bottom.
Step 3: Take the left hand sleeve. Stitch 1 cm
from the side bottom up to the sleeve bottom
Step 4: Put the over lock stitch on both sides,
keeping the front part on the top.
Turn the fabric margin towards back side and
sew the top stitch by first sewing edge stitch and
then 4 mm stitches on both the sides.
162
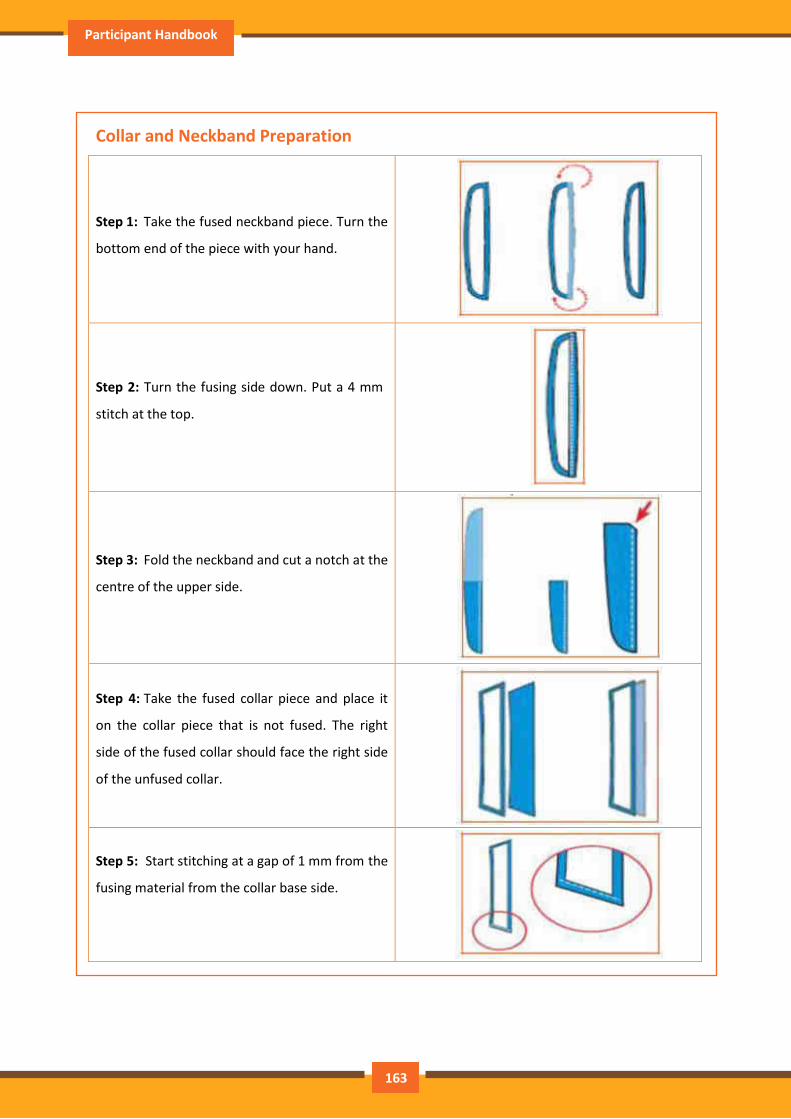
Participant Handbook
Collar and Neckband Preparation
Step 1: Take the fused neckband piece. Turn the
bottom end of the piece with your hand.
Step 2: Turn the fusing side down. Put a 4 mm
stitch at the top.
Step 3: Fold the neckband and cut a notch at the
centre of the upper side.
Step 4: Take the fused collar piece and place it
on the collar piece that is not fused. The right
side of the fused collar should face the right side
of the unfused collar.
Step 5: Start stitching at a gap of 1 mm from the
fusing material from the collar base side.
163
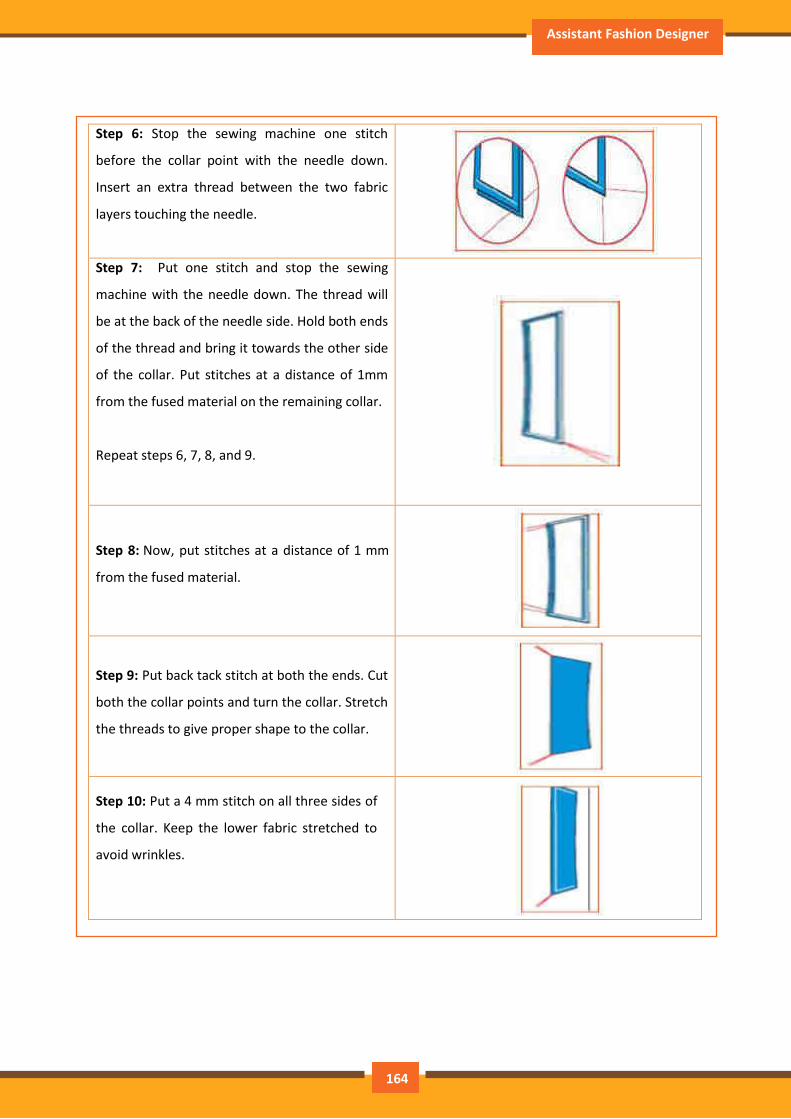
Assistant Fashion Designer
Step 6: Stop the sewing machine one stitch
before the collar point with the needle down.
Insert an extra thread between the two fabric
layers touching the needle.
Step 7: Put one stitch and stop the sewing
machine with the needle down. The thread will
be at the back of the needle side. Hold both ends
of the thread and bring it towards the other side
of the collar. Put stitches at a distance of 1mm
from the fused material on the remaining collar.
Repeat steps 6, 7, 8, and 9.
Step 8: Now, put stitches at a distance of 1 mm
from the fused material.
Step 9: Put back tack stitch at both the ends. Cut
both the collar points and turn the collar. Stretch
the threads to give proper shape to the collar.
Step 10: Put a 4 mm stitch on all three sides of
the collar. Keep the lower fabric stretched to
avoid wrinkles.
164
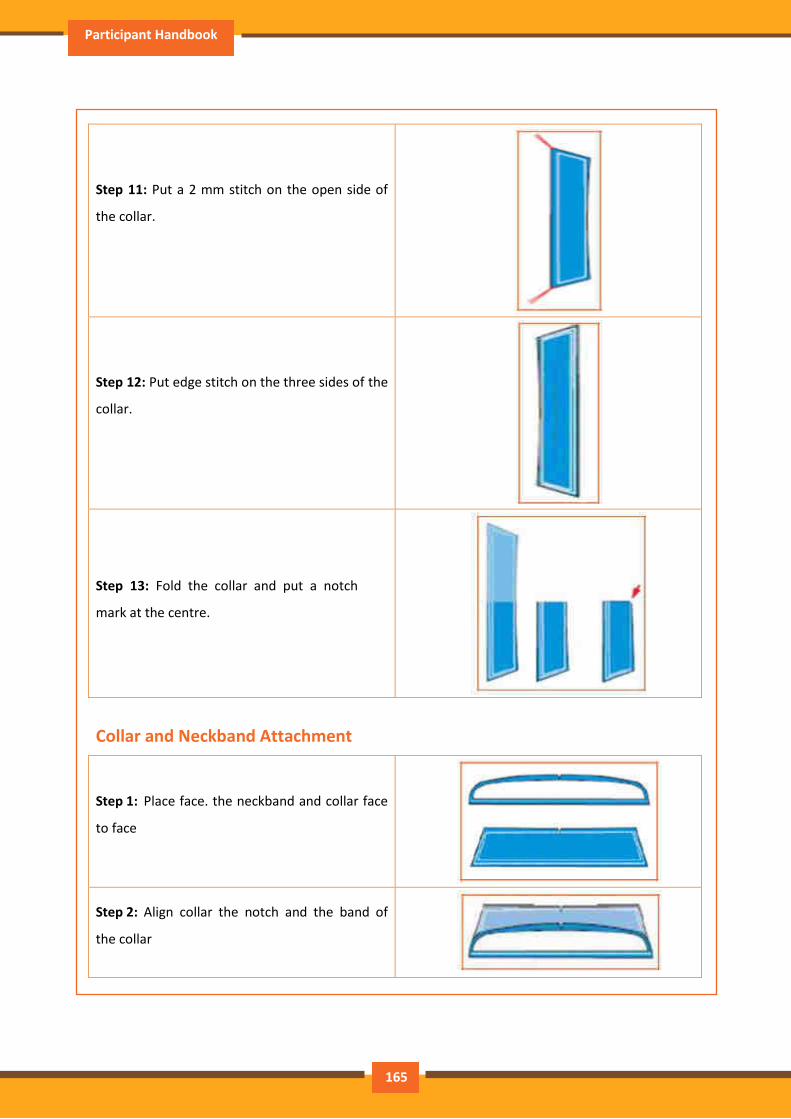
Participant Handbook
.
Step 11: Put a 2 mm stitch on the open side of
the collar.
Step 12: Put edge stitch on the three sides of the
collar.
Step 13: Fold the collar and put a notch
mark at the centre.
Collar and Neckband Attachment
Step 1: Place face. the neckband and collar face
to face
Step 2: Align collar the notch and the band of
the collar
165
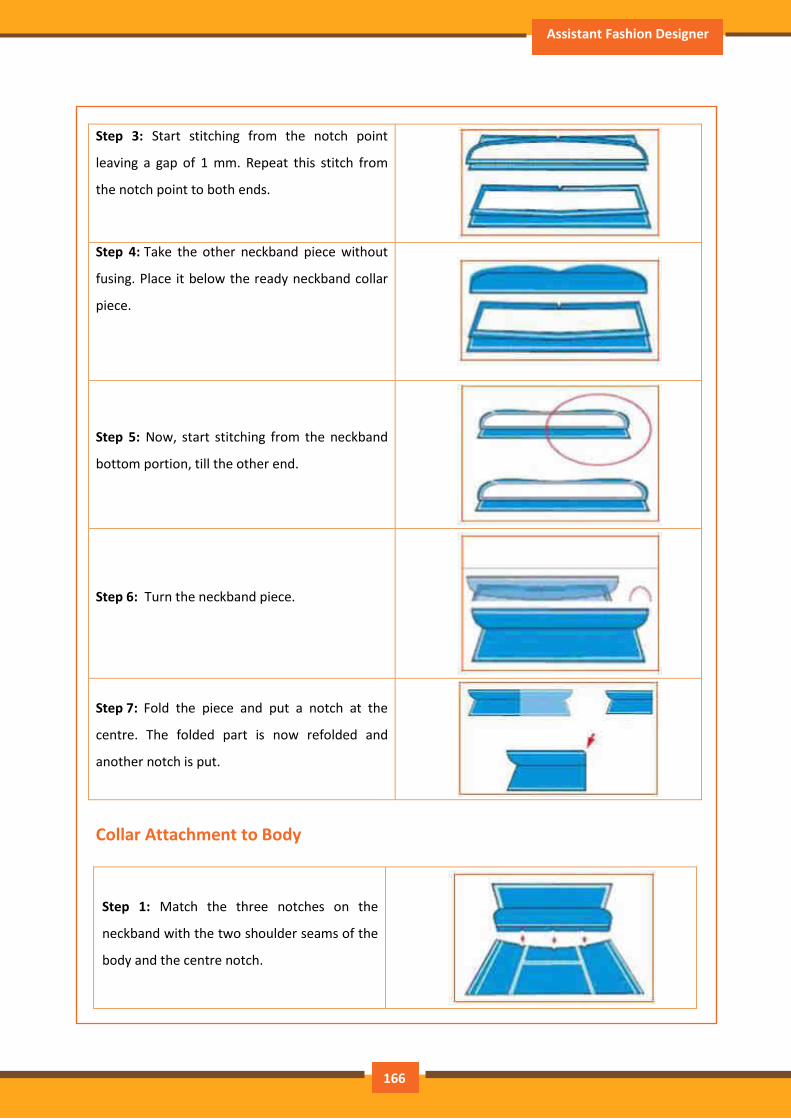
Assistant Fashion Designer
.
Step 3: Start stitching from the notch point
leaving a gap of 1 mm. Repeat this stitch from
the notch point to both ends.
Step 4: Take the other neckband piece without
fusing. Place it below the ready neckband collar
piece.
Step 5: Now, start stitching from the neckband
bottom portion, till the other end.
Step 6: Turn the neckband piece.
Step 7: Fold the piece and put a notch at the
centre. The folded part is now refolded and
another notch is put.
Collar Attachment to Body
Step 1: Match the three notches on the
neckband with the two shoulder seams of the
body and the centre notch.
166
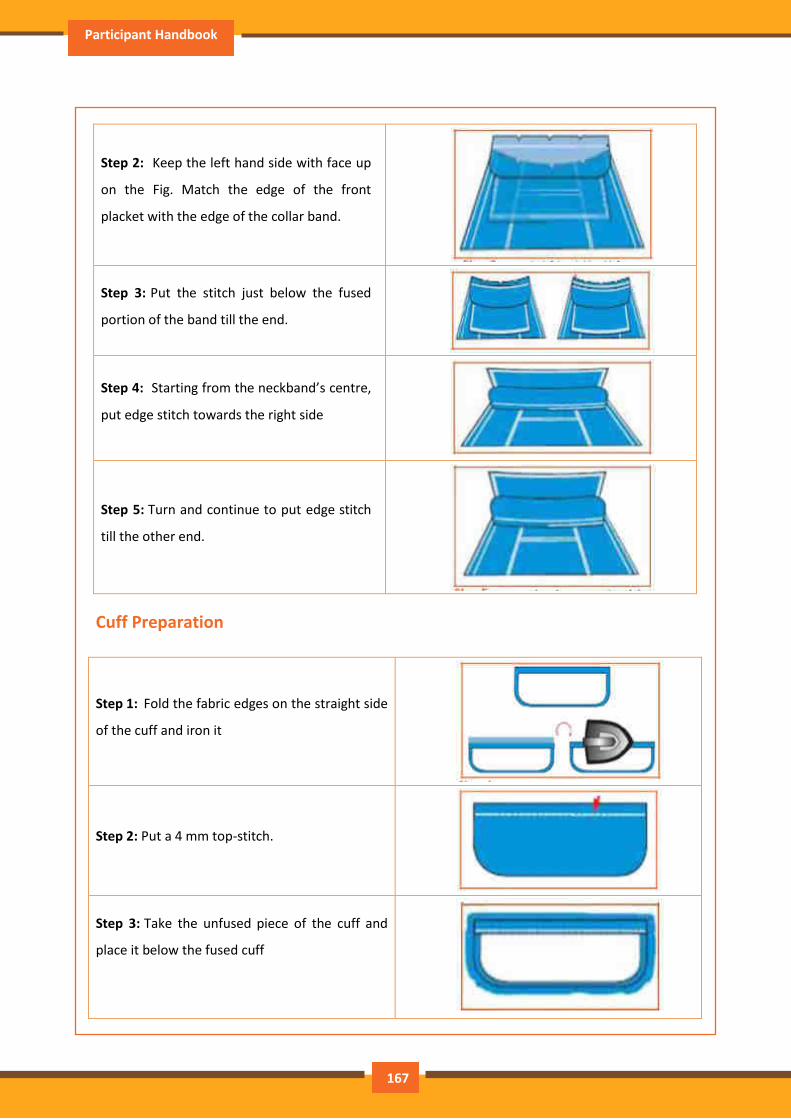
Participant Handbook
.
Step 2: Keep the left hand side with face up
on the Fig. Match the edge of the front
placket with the edge of the collar band.
Step 3: Put the stitch just below the fused
portion of the band till the end.
Step 4: Starting from the neckband’s centre,
put edge stitch towards the right side
Step 5: Turn and continue to put edge stitch
till the other end.
Cuff Preparation
Step 1: Fold the fabric edges on the straight side
of the cuff and iron it
Step 2: Put a 4 mm top-stitch.
Step 3: Take the unfused piece of the cuff and
place it below the fused cuff
167
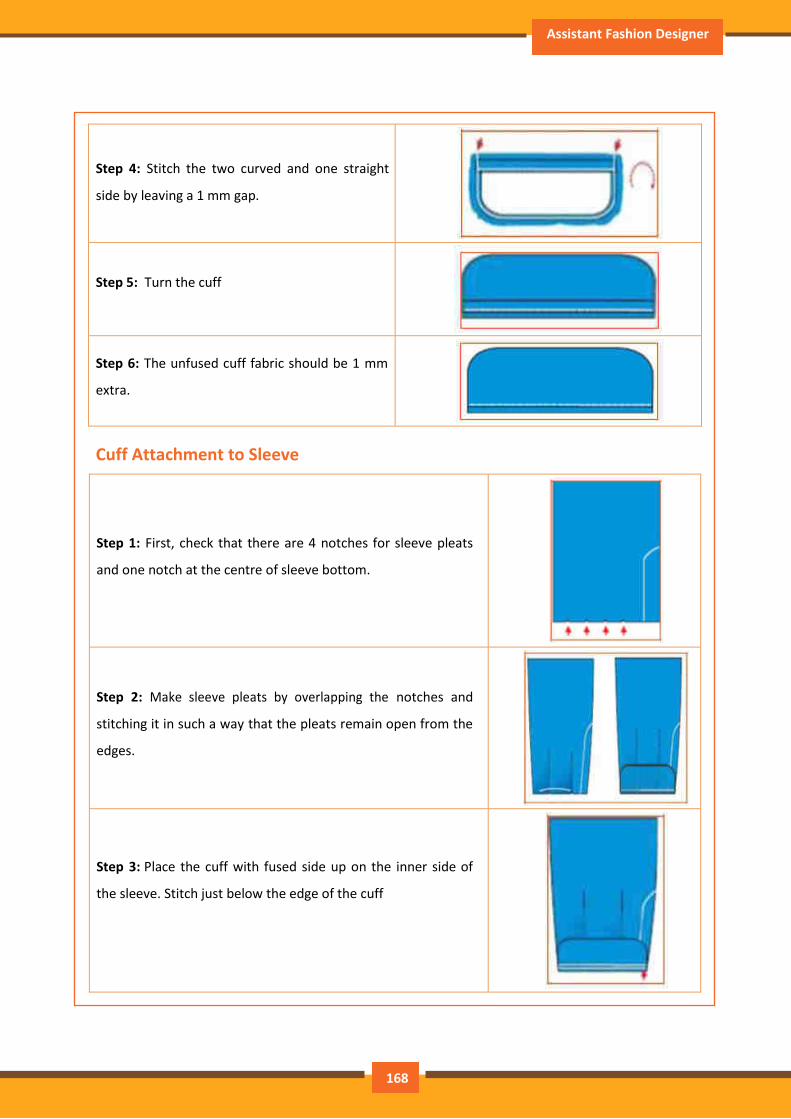
Assistant Fashion Designer
.
Step 4: Stitch the two curved and one straight
side by leaving a 1 mm gap.
Step 5: Turn the cuff
Step 6: The unfused cuff fabric should be 1 mm
extra.
Cuff Attachment to Sleeve
Step 1: First, check that there are 4 notches for sleeve pleats
and one notch at the centre of sleeve bottom.
Step 2: Make sleeve pleats by overlapping the notches and
stitching it in such a way that the pleats remain open from the
edges.
Step 3: Place the cuff with fused side up on the inner side of
the sleeve. Stitch just below the edge of the cuff
168
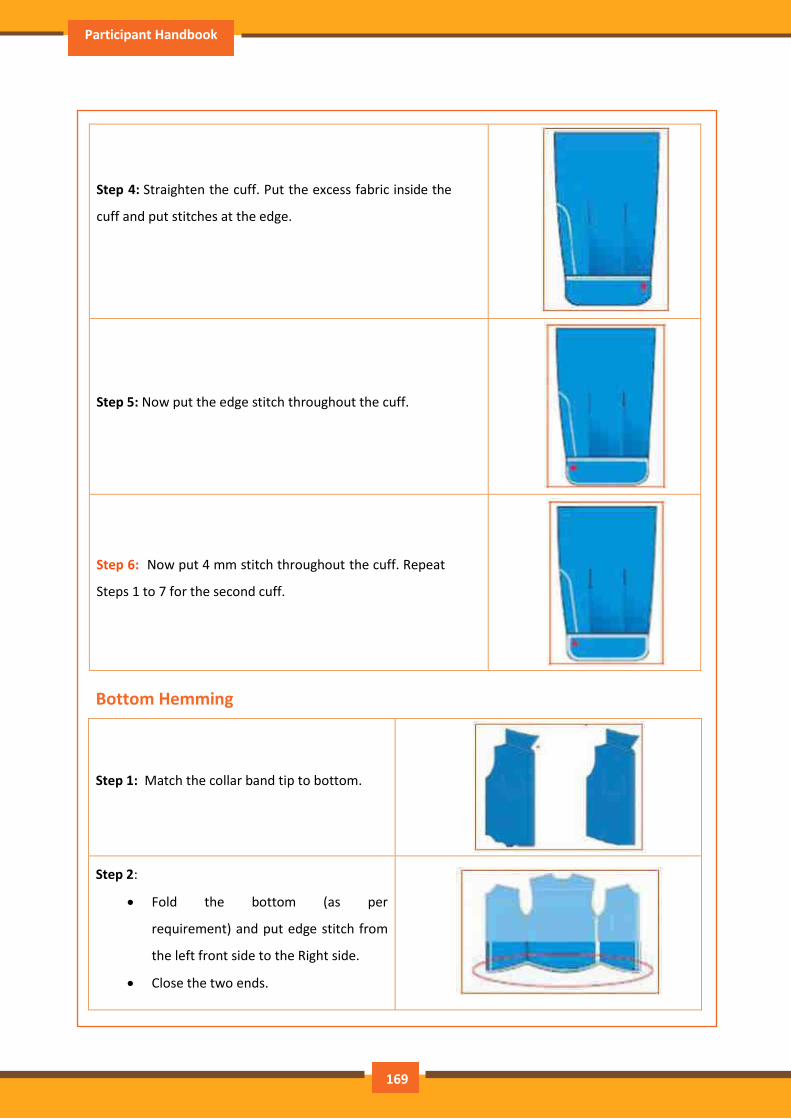
Participant Handbook
.
Step 4: Straighten the cuff. Put the excess fabric inside the
cuff and put stitches at the edge.
Step 5: Now put the edge stitch throughout the cuff.
Step 6: Now put 4 mm stitch throughout the cuff. Repeat
Steps 1 to 7 for the second cuff.
Bottom Hemming
Step 1: Match the collar band tip to bottom.
Step 2:
Fold the bottom (as per
requirement) and put edge stitch from
the left front side to the Right side.
Close the two ends.
169
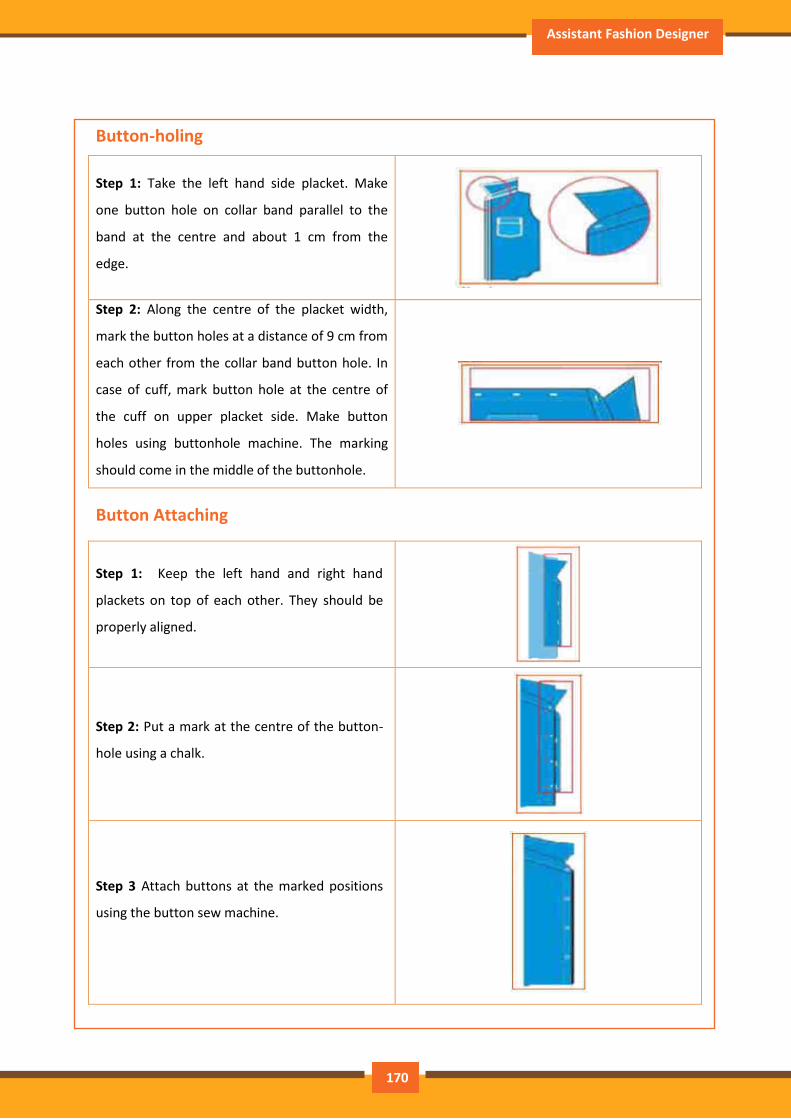
Assistant Fashion Designer
Button-holing
Step 1: Take the left hand side placket. Make
one button hole on collar band parallel to the
band at the centre and about 1 cm from the
edge.
Step 2: Along the centre of the placket width,
mark the button holes at a distance of 9 cm from
each other from the collar band button hole. In
case of cuff, mark button hole at the centre of
the cuff on upper placket side. Make button
holes using buttonhole machine. The marking
should come in the middle of the buttonhole.
Button Attaching
Step 1: Keep the left hand and right hand
plackets on top of each other. They should be
properly aligned.
Step 2: Put a mark at the centre of the button-
hole using a chalk.
.
Step 3 Attach buttons at the marked positions
using the button sew machine.
170

Participant Handbook
.
Step 4: Repeat the same procedure for the cuff.
171
Assistant Fashion Designer
Exercise \
1. List the critical steps in Shirt stitching
_____________________________________________________________________________________
_____________________________________________________________________________________
_____________________________________________________________________________________
_____________________________________________________________________________________
_____________________________________________________________________________________
_____________________________________________________________________________________
2. List the critical steps in Trouser stitching
_____________________________________________________________________________________
_____________________________________________________________________________________
_____________________________________________________________________________________
_____________________________________________________________________________________
_____________________________________________________________________________________
_____________________________________________________________________________________
_____________________________________________________________________________________
172
Participant Handbook
UNIT 2.11: CAD/CAM
Unit Objectives
At the end of this unit, participants will be able to:
• Use of CAD/CAM
• Identify the purpose of use of CAD/CAM in fashion
2.11.1. Introduction
CAD-CAM is software. It is used with computer systems. CAD (Computer Aided Design) is used for
the development, manipulation and optimization of a design to perfection. CAM (Computer Aided
Manufacturing) is used as an interface in controlling machines.
CAD has reached an astonishing place in almost every field. It has substituted all the manual
methods also, where the time and energy is saved. It can’t be put back by another method.
Introduction of CAD systems brought about a drastic change in the designing industry. CAD is a key
in the improvement and increase of manufacturing productivity and critical design requirements in
fashion industry. Companies are keen to opt for CAD-CAM systems as this will be a key to their
survival in the future.
Categories and manufacturing stages are:
Designing/ Range Planning: Before a fashion season starts, all the manufacturers of fashion brands
plan the range of products which they are planning to put in production. Buyers and brand owners,
being the closest to the client is responsible to undertake range planning; as it is easier for them to
understand the specific needs of their target market. In some cases the buyers or brand owners also
allow the manufacturer to undertake designing, based on their inputs in terms of fabric, color, style,
silhouette, target market etc.
Prototyping/ Sampling: Prototype or proto samples are developed once the designs have been
finalized. The prototype is used to check the look, feel, drape and fit of the garment. The prototype
also helps understanding the feasibility and scalability of the end product. In a study conducted by
173
Assistant Fashion Designer
an independent research agency, which monitored and observed the reasons of dissatisfaction or
returns of garments sold - fitting problems topped the dissatisfaction list.
A good fit is critical for garments and other fashion products. It is imperative for a manufacture to
achieve the best possible fit, in order to meet customer desires. Fit being a complex property to
achieve when incorporated using different fabrics, trims, sewing technique, is aided by the CAD
systems to create mock ups and foresee design and production errors
Mass Production: This is the most challenging part. Apparel production is a labor intensive process.
Unlike most other products, apparel manufacturing, even today very much depends on people
especially when it comes to tailoring or assembling of garment parts. An error at any stage, be it
prototyping, planning, cutting or assembling becomes very difficult and often impossible to
rectify. CAD systems are deployed in such cases, to deskill some of the processes involved in mass
manufacturing, namely the pre-production processes so that perfectly cut parts are fed to the
operators. Additionally, the fabric saved in bulk cutting while using a CAD system is enormous.
Retailing A 3D solution allows 3D files to be uploaded on to website for clients to choose from. 3D
files can be opened and viewed in any MS office application or Internet explorer.
Exercise
1. List the areas of use of CAD in the Fashion Industry
174
Participant Handbook
UNIT 2.12: Design Creation
Unit Objectives
At the end of this unit, participants will be able to:
• Discuss the design creation process
• Perform basic sketching
2.12.1. Basics of Sketching
Fashion designers create and sketch garments to communicate their ideas to their design teams,
pattern makers, sample machinists and buyers. Fashion designers need to be able to draw to make
their designs understood but they do not necessarily need to excel in fashion drawing. They usually
have very little time to produce fashion sketches and jot down fleeting ideas in order to capture
transient movements. For this reason, quick sketches to show ideas are mostly what are required of
fashion designers.
Figure Drawing
When fashion designers need to communicate ideas to buyers quickly, the ability of drawing the
idea in an attractive manner is a great asset. As designers, one must be able to see a style and
analyze the major points that make it visually successful. One must be able to quickly assess
proportion, silhouette and strong eye-catching details.
What are Fashion Trend and Fashion Proportions?
Fashion can influence how society sees the human body. In the 18th century, plumpness was seen
as a sign of prosperity and health and a thin person was seen as too poor to afford enough to eat. In
contrast, today’s obsession with thinness has spawned a $33 billion-a-year weight-loss industry and
has led to an epidemic of eating disorders such as anorexia and bulimia among young women
(Powers, 1996). Fashion designers need to spot new trends, emerge phenomenon and the market
needs for the tomorrow world. Demographic change, new technologies and new modes of living
impact significantly on the future. Today, the world is experiencing a massive population shift; it is
175

Assistant Fashion Designer
indisputable that the global demographic change is the aging population. The infant birth rate has
gone down and rates of aging group are increasing.
The aging population has been increasing rapidly since 1995 and such increase has been foreseen to
continue until the year 2050. Future elderly make up a huge market segment with a large saving,
provident fund and discretionary income. They will like to spend large amount of dollars on fashion
apparel that fits appropriately and appeals to them. The apparel industry and fashion retailers who
meet those needs will position themselves for success in the future. Fashion proportions, by the
very nature of fashion itself, are subject to change 55 depending on the look of the time, and these
changes do not alter the structure of the human figure. The easiest way to start to draw a fashion
figure is to use the head size as a measurement guide for the length and width of your figure.
Basic Proportions of Female Figure for Fashion Design Drawing
The typical female fashion figure is illustrated as slender with square shoulders, heads drawn
smaller, necks and legs longer than in the classical life drawing. In the average female’s body the
head is about seven to eight times smaller than that of the total height of the entire figure. For
fashion drawings, this increases to nine to ten times or more. Fashion drawings retain the basic
proportions of the human form from the head to the crotch. Extra length is added to the legs to give
dramatic, stylized look and to give clothing more dynamic appeal.
176
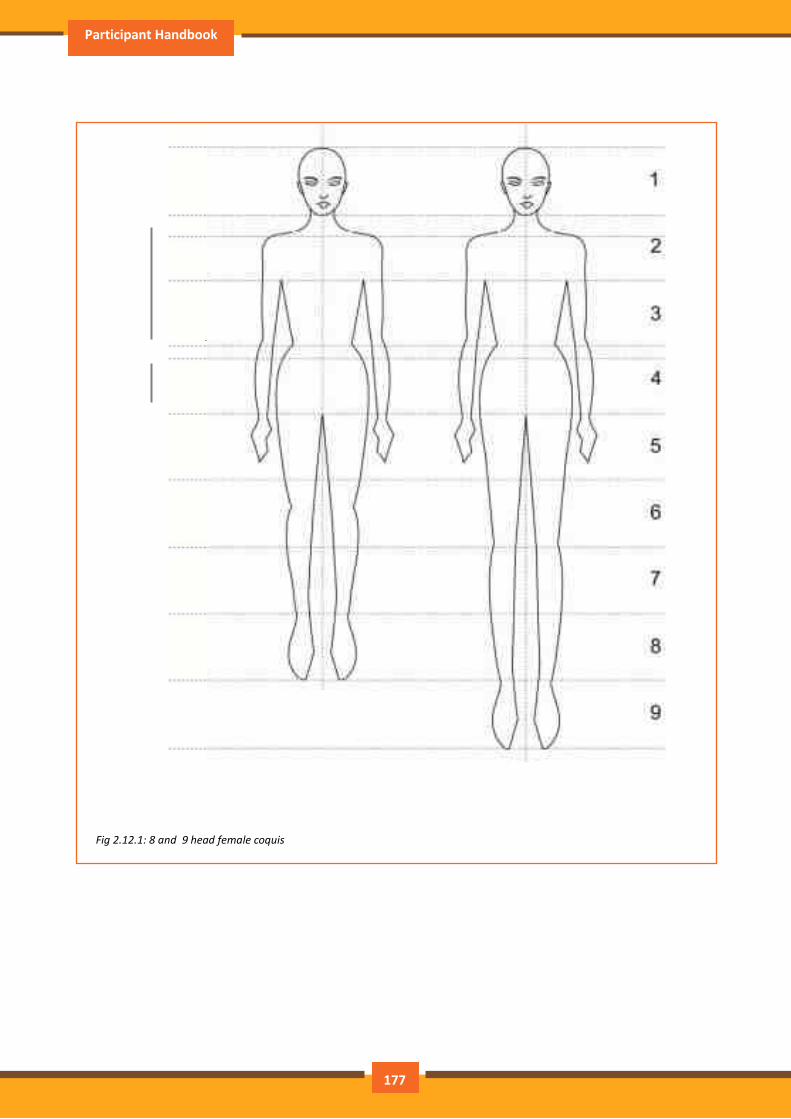
Participant Handbook
Fig 2.12.1: 8 and 9 head female coquis
Shoulder
Bust Point
Waist /elbow
High Hip
Crotch/ Wrist
Knee
Ankle
Upper
Lower
177
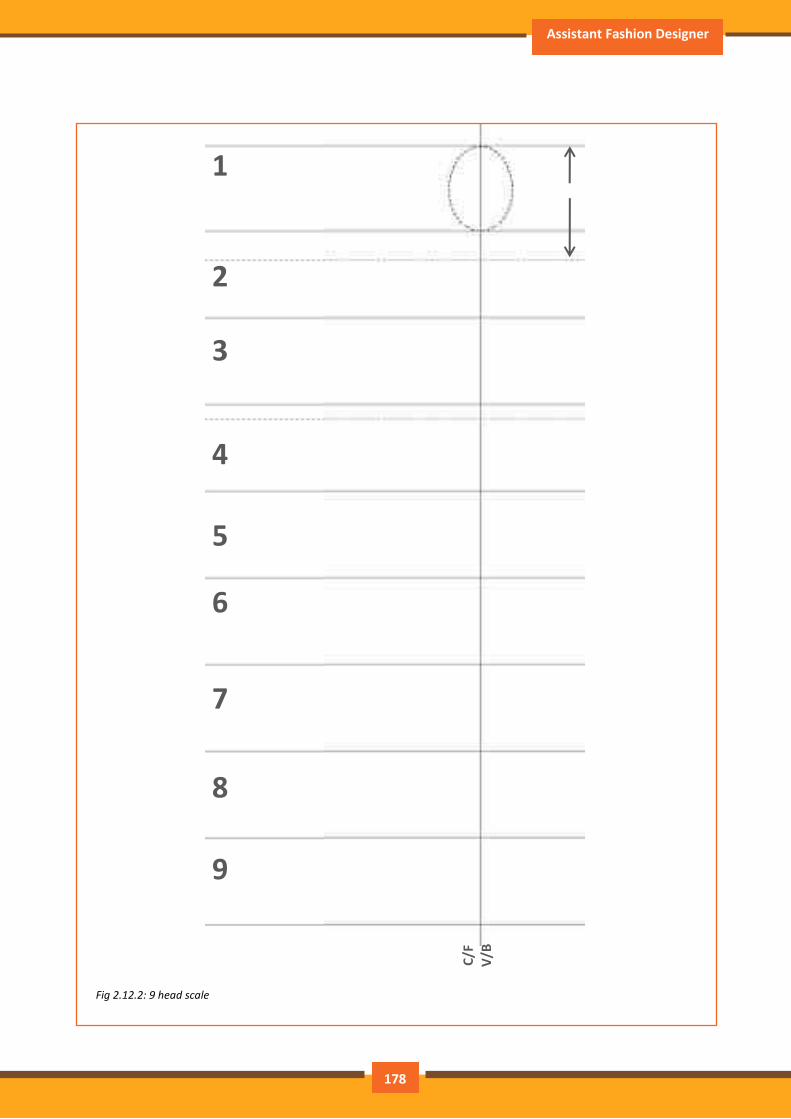
Assistant Fashion Designer
Fig 2.12.2: 9 head scale
1
2
3
4
5
6
7
8
9
Shoulder
Bust Point
Waist /elbow
High Hip
Crotch/ Wrist
Knee
Ankle
Toe
1 1/3
C/F
V
/B
178
Participant Handbook
What Makes a Good Fashion Drawing?
Composition and Well Planned Layout
The positioning of the drawing on the page and the relationship of one drawing to another are all
important because they help create a design image. Relate the sketch to the space and other
sketches around it so as to create an interesting, stimulating and harmonious total effect.
Individually, sketches can look flat and uninteresting but if all the right ingredients are grouped
together in a well-planned layout, the theme will be strong and extremely successful.
Right Purpose
The drawing should consider the purpose and objective of the presentation; it may be for a fashion
prediction board or fashion design board displaying the fashion trends. It could also be for a fashion
presentation board, forecasting drawing, promotional fashion illustration or advertisement for
magazines. The drawing should be created depending on the target market, project brief and the
purpose of the drawing board
Understanding Construction and Form
A design drawing is often an interpretation of a three-dimensional form in a two-dimensional way. It
is important that the structure of the three-dimensional form is clearly expressed and defined by the
use of tone and texture.
Awareness of Body Perspective and Proportion
Good drawings need not be photographically accurate. It is still essential to show how scale and
proportion are observed and re-create such factors in your drawings. Understanding body
perspective will also help you draw the correct proportion of the figure in various poses.
Rhythm of Line
The mood and shape of the design are developed by the thickness of lines. Drawing figures using
one continuous line, avoid the messy broken lines.
179
Assistant Fashion Designer
Effective Use of Paper and Media
Drawings should not only be done in pencil, the use of various media should be explored given that
these media help to make the ideas more explicit. Work on different colored papers, use various
colors for outlines and experiment with all media and combinations.
Evidence of Observation
Design drawing should show the ability to observe how a basic garment looks, showing many details
and embellishments are observed such as how a collar forms part of the neckline, how a
conventional garment looks, its zipper fastening and the proportion of the collar or cuffs to the rest
of the garment.
Evidence of Enquiry
Drawing is a form of exploration and how to explore and record ideas, forms, shapes and emotions.
Types of Fashion Drawing
There are four types of fashion drawing, namely fashion illustration, fashion sketch, stylization and
production drawing.
What is Fashion Illustration?
Richard Surger and Jenny Lidal (2006, pg.49) defined in their book the Fundamentals of Fashion
Design that fashion illustration is not so much about the design but about capturing the spirit of the
clothes. Illustration can be used to express a mood or give the clothes context by setting a scene
where the clothes might be worn or representing the kind of person who might wear the clothes
through styling, make up, hair and pose. Fashion illustration does not need to show the whole of a
garment unless it is used in a portfolio in which a design has not been made up into a real outfit or
garment. With the latter, the illustration takes the place of a photograph, showing how the garment
would look on the body. Mark making and the use of various art materials are much more important
in fashion illustration than in design. The best mark making is the one that is fluid and full of
movement and this is a skill that can be developed over time. One can also use multimedia art
materials for more layered, interesting images. Different types of art materials can also help express
180
Participant Handbook
different textures of fabric. As technology develops, fashion illustrators have the choice to work with
the craft such as pencil, pen, paintbrush, crayon, collage, paint, airbrush, ink, etc., or computer
artistry. The choice of focus and technique is as unlimited as an illustrator’s imagination.
What is Fashion Sketch?
Richard Surger and Jenny Lidal (2006, pg.49) also defined in their book the Fundamentals of Fashion
Design that fashion sketch is about communicating design ideas although it can also be about
capturing the spirit of the clothes. A fashion sketch is used to get ideas down, and does not need to
be fancy. What it does need is to be proportional. If the proportions of the drawing are too
abnormal, it will follow through to the proportions of the designs; what looks good on a figure that
has too-long legs will not necessarily look good on a real person. It is commonly conceived that
anything looks good on a person with long legs, which is why long legs work well on catwalks. A
fashion sketch also needs to be a fairly fast drawing. In an ideal world, creative ideas come rapidly
and need to be put down on paper quickly before they are forgotten given that human brain has a
habit of moving on to other ideas rather instantly. As one draws on his/her designs, try to put down
color and fabric references on the drawing as often as possible. The designs are not only about
silhouette and detail but also about color and fabric.
Stylization
The figures are elongated or a change in posture to give more elegance. However, the elongation is
only limited to the legs. The term stylization is understood as the exaggeration of the structure of
the body, reducing it to a few essential features. These are various ways of stylizing a figure. One of
the primary methods of stylization is to elongate the height of the model by one or two heads of
measure. The proportions remain unchanged while the length of the limbs and principal parts of the
body has been modified. The coquis design is elongated by more than one unit. The head is kept as
the same dimension of a normal coquis however the shoulders are made slightly broader in relation
to the pelvis and the neck is slightly elongated. The chest is also broadened while keeping the pelvic
region is shortened, thereby raising the pubic region. The waists are slimmed down for emphasis,
limbs are elongated while maintain the proportions with the upper body. The feet obviously follow
the extension of the body in length.
181
Assistant Fashion Designer
Production Drawing
Production drawings, also referred to as flat sketch, technical drawings, working drawings,
specification drawings and diagrammatic are explicit drawings of garment designs. They are drawn
to scale, showing construction lines and styling details. Production drawings are drawings with the
front and back views of garments; they are line drawings only but with structure and details and are
executed with clarity. Thicker boarders may be used for outlining seams, darts and details. Finer
pens can be used for outlining topstitches and special textures. The purpose of production drawings
is to allow production teams to facilitate the making up procedures which may include the
construction of patterns, sewing up of garments, inspection, etc. Thus, the drawings must be clear
with all the details well drawn. No colors should be used at this stage because the production
sketches may need to be photocopied. Production drawings should be visually in proper proportion
and easy to be understood of their style of drawing to prevent any misunderstanding from the part
of the viewers. Any misunderstanding may affect the accuracy during the course of the production
process of garments. Besides the front and back views, measurements and analytical diagrams of
special features should also be indicated. Any particular request can be indicated by designers
through production drawings. Many companies use production drawings as their primary visual
source to communicate and liaise with buyers, clients, sample machinists and pattern makers.
2.12.2. Allowances and Tolerances
Tolerances are a plus or minus measurement used on a specification sheet to determine whether a
product meets a specified quality standard. It is usually expressed as plus or minus. For example, for
a bust line may the tolerance is plus or minus 1/2″. This means that for each size (34, 36, and 38
etc.), the garment bust measure could be 33.5″-34.5″ for the size 34; 35.5″-36.5″ for the size 36, etc.
182
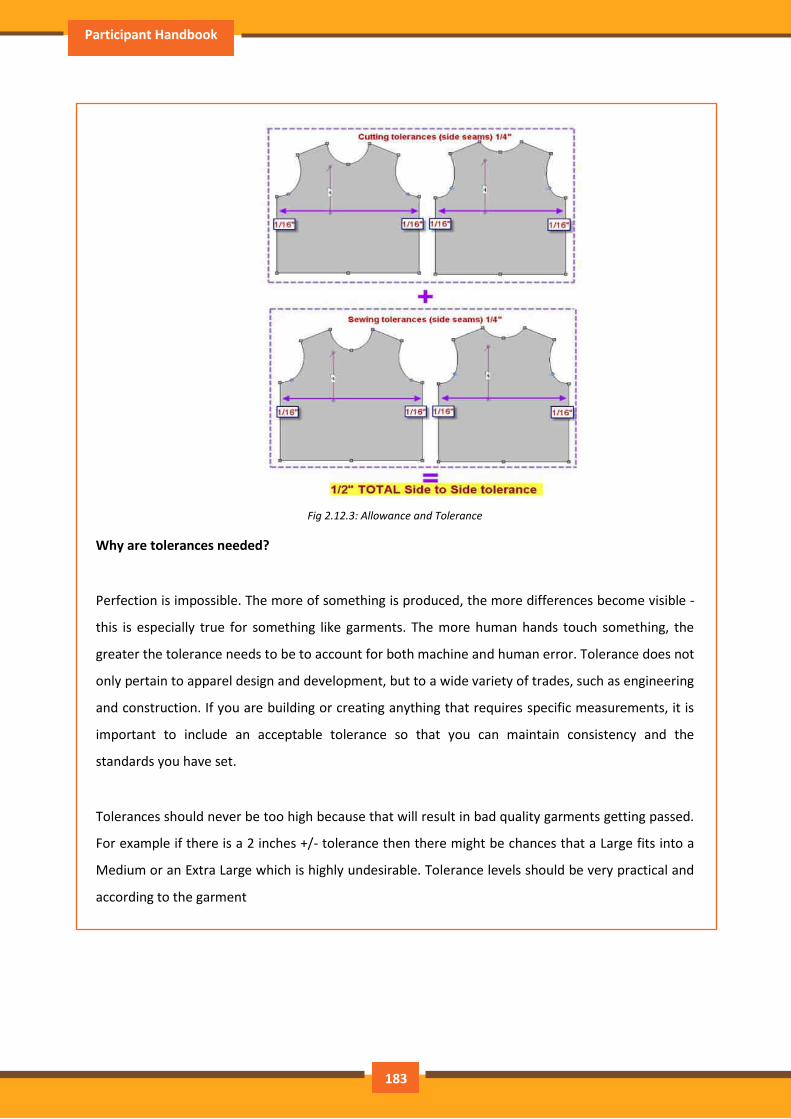
Participant Handbook
Fig 2.12.3: Allowance and Tolerance
Why are tolerances needed?
Perfection is impossible. The more of something is produced, the more differences become visible -
this is especially true for something like garments. The more human hands touch something, the
greater the tolerance needs to be to account for both machine and human error. Tolerance does not
only pertain to apparel design and development, but to a wide variety of trades, such as engineering
and construction. If you are building or creating anything that requires specific measurements, it is
important to include an acceptable tolerance so that you can maintain consistency and the
standards you have set.
Tolerances should never be too high because that will result in bad quality garments getting passed.
For example if there is a 2 inches +/- tolerance then there might be chances that a Large fits into a
Medium or an Extra Large which is highly undesirable. Tolerance levels should be very practical and
according to the garment
183
Assistant Fashion Designer
Exercise
1. Fill in the blanks:
a) _________________ are a plus or minus measurement used on a specification sheet
to determine whether a product meets a specified quality standard
b) A design drawing is often an interpretation of a three-dimensional form in a _________-
dimensional way
c) As designers, one must be able to see a style and ____________ the major points that make
it visually successful
d) The mood and shape of the design are developed by the _________________ of lines.
e) There are four types of fashion drawing, namely ______________________________,
fashion sketch, stylization and production drawing.
184

Participant Handbook
3. Develop proto and
fit samples
Unit 3.1- Tech Pack
Unit 3.2- Design Process
Unit 3.3- Prototype Development
Unit 3.4 – Fit Sample
AMH/N 1211 202

Assistant Fashion Designer
Key Learning Outcomes
At the end of this module, participants will be able to:
• Describe the Tech-Pack
• Elaborate the Design Process
• Discuss the Design Evaluation Process
AMH/N 1202
186
Participant Handbook
UNIT 3.1: Tech Pack
Unit Objectives
At the end of this unit, participants will be able to:
• Use of a tech pack
• Identify details in the tech pack
3.1.1. Sample Tech Pack
A tech pack can go by many different names, such as technical specification, specification pack, spec
pack, or GWS (garment work sheet). Essentially it is a document referred to by you or your garment
technician and the factory or person making your patterns and manufacturing the clothes. I find a
lot of my clients have heard of the term tech pack, but don't really know what it entails or why they
need one and often wonder if the factory should do it. This post is to explain what a tech pack is and
why you need it.
Why is a tech pack needed
A tech pack is the starting point of the garment manufacturing process. It provides all of the key
information that will determine factors like the cost of the garment, what fabrics and components
will need to be sourced and how long it will the completion of manufacturing take. This document
gets you to the first stage of production. Tech pack is used by the buyer r brand owners to procure
quotations from different manufactures and give them the opportunity to source the best fabrics
and components, prior to making a call on which factory to use. This is beneficial because the
factories will often quote a competitive price when competing against others and also because it
means that several people are out looking for the fabrics and trims required for the design, making
the chances of finding exact commodities better. At the sampling and production stages, the pattern
maker uses the measurements chart give o the tech pack to create the pattern and the machinist
will refer to the construction notes. The fabric and trims section becomes useful in understanding
the exact need of the buyer, and helps in identifying the vendors who can provide the specific items
187
Assistant Fashion Designer
A tech pack acts as a one point of reference when completing any documentation, or responding to
any queries about the product.
Tech pack helps in achieving consistency in fit of garments across the range. We all have
encountered such situations where we find garments of our fit in a size 8 in some brands and in a
size 16 in another. Well-designed specification sheets allow controlling the measurements of styles
and making sure they are relevant to your customer. It may be noted that different companies have
different sizing, the sizing of some companies is more generous than others; this is due to
companies having a different version of their ideal customer. This is another reason why spec sheets
and fit sessions are important, there's no such thing as a 'generic size 16', for instance, in retail and
you need to figure out what is suitable for your customer.
The most important reason to have a tech pack is for security. The manufacturer, supplier, vendors
all have to abide by what has been written in the tech pack. This means, aside from any slight
variances you have previously agreed, the bulk order you receive has to be as per the tech pack. Any
variances in fabric, construction, measurements, etc. could mean the factory have to pay a penalty,
fix the order at their expense or the order is cancelled, depending on how you want to proceed and
what you have included in your contract.
What to look out for in a tech pack
There are different ways to put tech packs together, key information that should be included is:
Measurements: specification sheet of each size
Size grading rules: comprises of the grading factor that has to be incorporated while
manipulating a base size to achieve the size set
Tolerance: comprises of notes about accepted deviation from specified measurements at
different garment landmarks
Construction notes: comprises of notes on types of seams to be used etc.
Fabric: comprises of detailed specifications about the various fabrics being used in the
design
comprises of how to measure different landmarks in the garment and the measurement
Trim: comprises of detailed specifications about the various fabrics being used in the design
Sample requirements: comprises of sampling plan for the design being produced
188
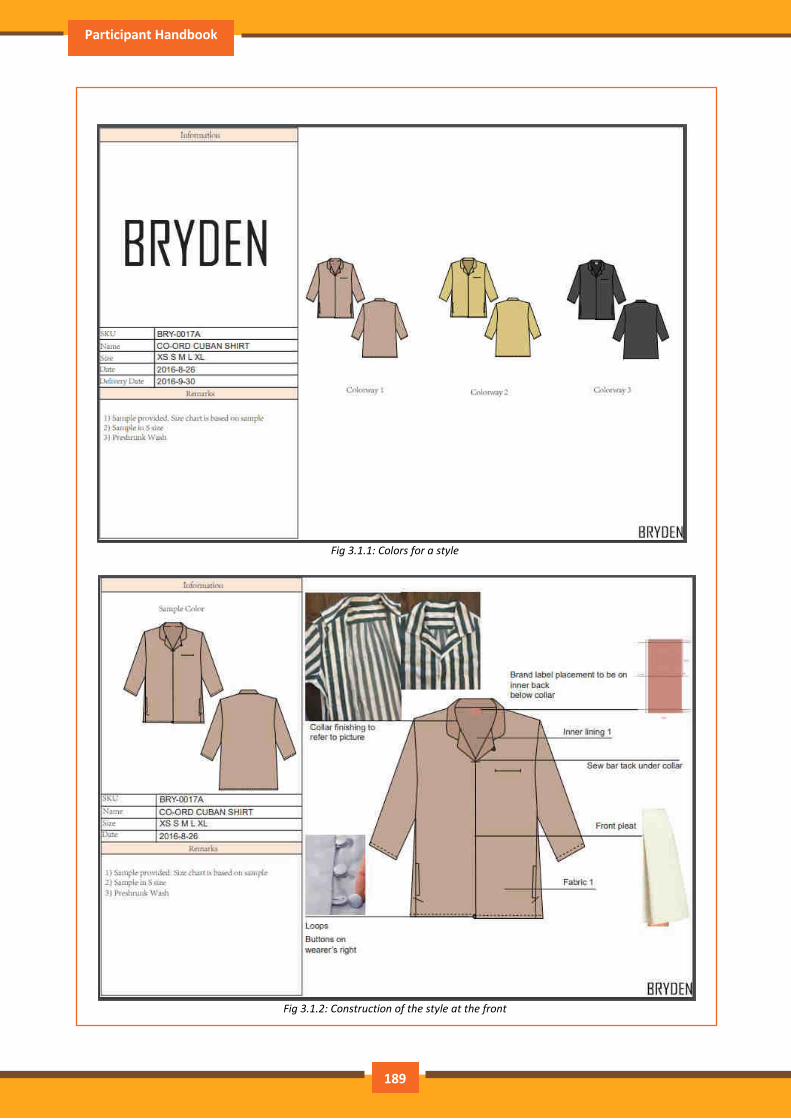
Participant Handbook
Fig 3.1.1: Colors for a style
Fig 3.1.2: Construction of the style at the front
189
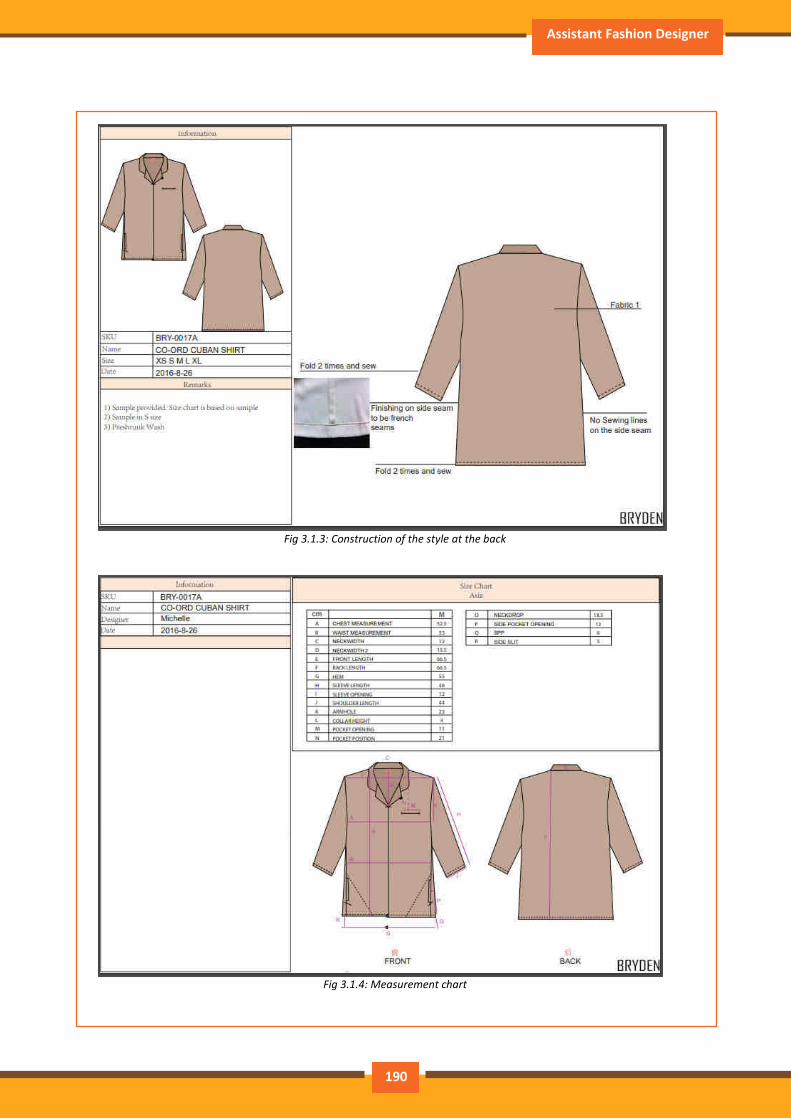
Assistant Fashion Designer
Fig 3.1.3: Construction of the style at the back
Fig 3.1.4: Measurement chart
190

Participant Handbook
Fig 3.1.5: Trim used in the style
210
191
Assistant Fashion Designer
UNIT 3.2: Design Process
Unit Objectives
At the end of this unit, participants will be able to:
• How to plan a garment sampling
3.2.1. Garment Sampling
There are mainly eight types of sample needed for completing a garment order. That are-
1. Proto sample,
2. Fit sample,
3. Size set sample,
4. Counter sample,
5. Salesman sample (SMS),
6. Pre-production sample (PPS),
7. Top over production sample (TOP),
8. Shipment sample.
All the above garments samples are discussed in the below:
Proto sample: Proto samples are the very first among the samples made in the sampling plan. This
ample is made as per the specification of buyer, primarily to achieve the look as specified. It is not
necessary to use the exact fabric and trims as specified in the tech pack for this sample.
Manufacturers use the fabrics and trims which have similar properties as of the specified ones to
achieve the look. A minimum of 2-3 sample are made at this stage, in which one is stored with the
manufacturer and the rest is sent to the buyer for evaluation.
Fit sample: Once the proto sample is approved, a fit sample is developed. The primary objective of
the fit sample is to observe if the manufacturer will be able to achieve the desired fit. The fit sample
has to adhere to the measurements set by the buyer without any deviation.
192

Participant Handbook
The use of specified fabric and trims are not necessary but advised. Fabric and trims with similar
properties can be used
Size set sample: After the fit sample is approved, the size set sample is developed based on the
approved samples. Patterns are developed and graded as per the grading guidelines and
measurements shared by the buyer. It is advised to make at least 2-3 sets, one of which remains
with the buyer for cross-referencing the changes suggested by the buyer once they evaluate the size
set received by them. Cutting is only started after the size set is approved
Counter sample: The sample prepared after incorporating the comments received from the buyer
on the size set
Salesman sample (SMS): Salesman sample is used by sales team of buyer to enhance the sales of
any garment. Buyer sends the sample by salesman in the market to receive market feedback from
the customers. It is done approximately 200-500pcs depending on the customers and season. The
main objects of SMS sample are to check market, feedback, Buyer’s design etc.
Pre-production sample (PPS): P.P sample should be made in actual production line by maintaining
all actual of an order specification. It is the main stage of a garments order where any sample may
be approved or rejected. If the sample will approve then can go for the rest of the process of that
order. But if rejected then there will be the revision of previous processes. PPC (Planning production
and control) department is also involved in this stage. Ones PPC department is involved then there’s
no way for accepting of any style change. It is the very critical stage than other’s stage. Extra care
must be needed here to confirm an order correctly.
Top of production sample (TOP): During running an order in production line, a few samples sent to
the buyer or buyers Q, C as TOP sample. TOP sample has a great importance in achieving
certification of whole order. If TOP sample failed to approve its required quality then whole order
will be resumed.
Shipment sample: Shipment sample is needed after completing final inspection, when goods are
ready for the shipment. It is a sample that reflects what buyers will receive down to Q.C, folding,
tagging, bagging, labeling and final packaging included.
193
Assistant Fashion Designer
3.2.2. Personal Involvement
A fashion designer would need to communicate and co-ordinate to the following role holder in the
apparel manufacturing factory to ensure that the design production is as per the tech pack and
troubleshoot problems, if any:
Merchandiser: Merchandiser is the key communicator between the production unit and the buyer.
Merchandiser is responsible for securing all the information and approvals from the buyer which is
required for the production process. The merchandiser is also involved in the sourcing process, for
which the fashion designer should closely monitor
Sampling Manager: Sampling Manager looks after the whole sampling process and ensures that the
requirement as stated by the buyer is met. The Sampling Manager is responsible to analyze the
samples once completed and guide the sampling tailor in the sample development process
Sampling Tailor: A tailor or sewing machine operator is someone whose job is to produce custom
clothing items such as suits, shirts, trousers and jackets, etc. for individual customers.
Pattern Master: A Pattern master is a person who creates pattern according to style, size as asked.
He also heads the tailoring team and provides instructions to tailors on how to divide the work and
overlooks sewing operations.
CAD/CAM designer: The CAD/CAM designer is responsible for the marker planning. The Fashion
designer needs to communicate effectively with the CAD/CAM designer so as to achieve highest
efficiency in the garment planning and ensure that the cut ratio etc. is being met
Material testing In-charge: Fabrics and trims needs to be tested for various properties as quoted by
the buyer and meet the specifications provide. The tests play a vital role in the approval of use of
fabric or trim being sourced
Quality Controller: Quality is an important part of the production process. The shipment may get
rejected if the quality requirement by the buyer is not met. The fashion designer should keep a
check on the quality of the production, suggest changes and troubleshoot if required
194
Participant Handbook
UNIT 3.3: Proto Sample
Unit Objectives
At the end of this unit, participants will be able to:
• Various important factors related to proto sample
• Identify the process flow for making a proto sample
3.3.1. Proto Sample
Proto sample is developed at very initial stage and normally order is confirmed to the
factory based on proto sample only
Normally, buyer send proto sample request to 2-3 factories.
The factory which submits the good quality and optimum price will get confirmation from
buyer.
Proto sample are normally prepared in similar fabric if actual fabric is not available.
Substitute Trims can be used on proto.
As proto sample is given first time to the factory to buyer, so to develop the proto sample
buyer need to provide necessary information along with the proto request. These are:
Specification Sheet (Tech Pack), Bill of Material, Development sample (optional), Paper
patterns (optional), Sample of novelty trims, Sample of fabric yardage (it may be send by
buyer or asked to develop), Details of Print or Embroidery, if any.
Generally proto request is responded within the 7-10 days by merchandiser.
Factory need to submit at least 4 proto samples (quantity may change buyer to buyer)
If buyer does not approve the proto sample, factory needs to submit the 2nd proto sample to
get approval.
Once proto get approved buyer asks to start working on fit sample
195
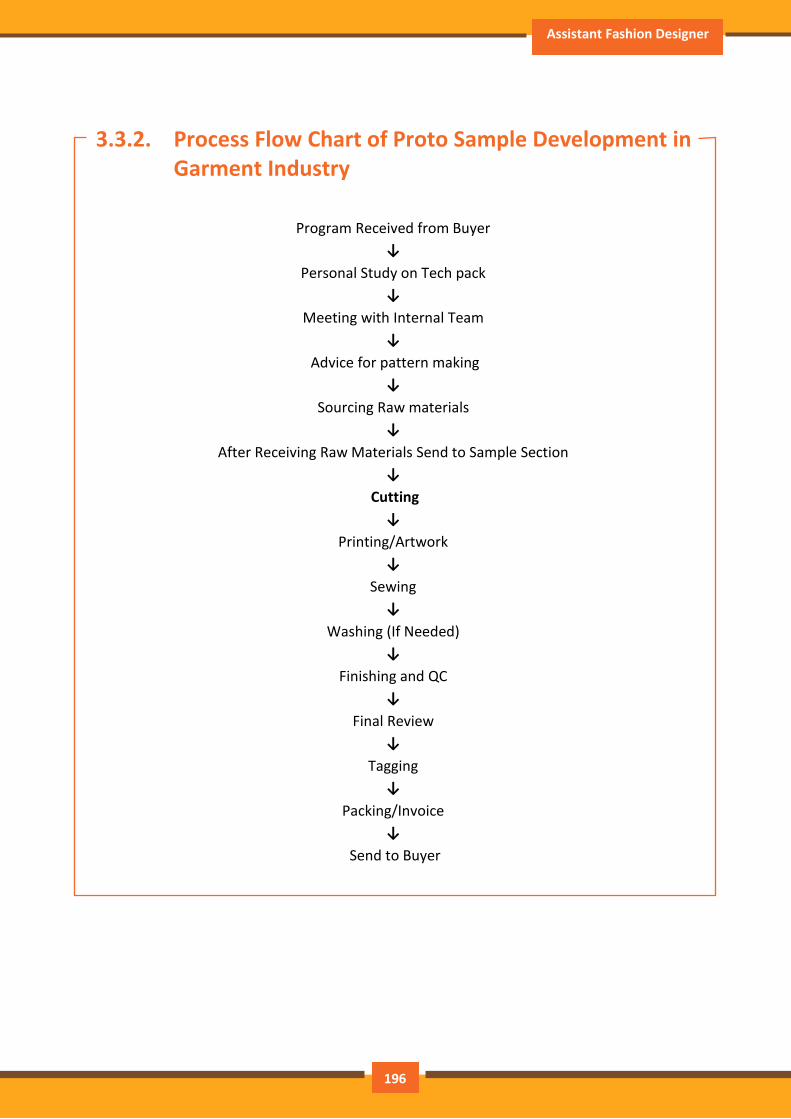
Assistant Fashion Designer
3.3.2. Process Flow Chart of Proto Sample Development in
Garment Industry
Program Received from Buyer
↓
Personal Study on Tech pack
↓
Meeting with Internal Team
↓
Advice for pattern making
↓
Sourcing Raw materials
↓
After Receiving Raw Materials Send to Sample Section
↓
Cutting
↓
Printing/Artwork
↓
Sewing
↓
Washing (If Needed)
↓
Finishing and QC
↓
Final Review
↓
Tagging
↓
Packing/Invoice
↓
Send to Buyer
196
Participant Handbook
All of the above parameters are discussed shortly:
Program Received from Buyer: First step of proto sample development is program receive from
buyer. Buyer gives us a tech pack to develop a proto sample. We collect all the details from buyer
regarding development program.
Personal Study on Tech Pack After receiving program we have to study on it. Because of to check
whether we are capable to develop a proto sample, to check how much requirement of buyer and
how much we have.
Meeting with Internal Team After case study on tech pack then arrange a meeting with internal
team who involved in this development program. In this meeting to discussed how much important
this program and what is the dead line also discussed we are capable or not for this program.
Advice for pattern Making: After complete a meeting now advice a team to make a pattern for
program.
Sourcing Raw materials: According to buyer requirement source raw materials from the supplier.
For sourcing we have to send mail to supplier with attaching all the details. Such as brand name,
style no, color, fabrication details, fabric description etc.
After Receiving Raw Materials Send to Sample Section: After receiving raw materials send to
sample section for make a proto sample. It is responsibility of merchandiser to keep communication
with sample section. So that, the sample make in time and better quality.
Cutting: Now fabric send to cutting section for cut the fabric according to pattern. Cutting is one of
the major process in proto sample development program
Printing/Artwork: If buyer has any requirement of printing or artwork then its place on
right place. This process is called artwork placement.
197
Assistant Fashion Designer
Sewing: All the parts of a garment are joined here to make a complete garment. Sewing process is
done by manually.
Washing (If needed): If buyer wants any washing in sample we have to apply it.
Finishing and QC: After washing we will get a complete garment which is treated with steam ironing
and also several finishing processes are done for example extra loose thread cutting etc.
Tagging: Tagging is very important in proto sample development program because if we do not keep
tagging against each style it is possible to mix with other style.
Packing/Invoice: According to buyer requirement packing all the garments.
Send to Buyer: After complete all the processes now send the sample to buyer and waiting for
approval.
198
Participant Handbook
UNIT 3.4: Fit Sample
Unit Objectives
At the end of this unit, participants will be able to:
• Identify the various important factors related to fit sample
• Process of checking fit sample
3.4.1. Fit Sample
Fit samples are samples produced by a manufacturer so that the company purchasing the product
can review the garments to make certain they fit properly to the human body. In other words, the
primary function of a fit sample is to evaluate fit.
A member of the company that is buying the product (buyer, merchandisers, designers, fit
technicians, or another member of the staff), will view the samples on either a fit model (a real
person) or on forms (mannequin for fitting garments). Many companies will evaluate fit on both a
form and a fit model (person).
If the purchasing company is a very small company, they may not utilize fit models for each
program. Scheduling a fitting with a fit model is not extremely expensive, but it is also generally not
free. Therefore, some companies may skip hiring a fit model. If fit models are not utilized and a
company does not have the appropriate forms, they will at the very least use a tape measure to
evaluate the garment to make certain that the measurements match the original size spec file. Also,
they may request samples in their own personal size and try the garment on themselves to review
fit. Most of the larger size companies will conduct fit sessions with fit models to determine if the
garment fits and drapes properly.
If the garment measures properly as per the size spec, but does NOT properly fit, the designer will
most likely alter the spec measurements to compensate. They will then issue a revised spec file to
the factory. The manufacturer will then produce another set of fit samples, and the review process
will begin again. After the designers are happy with the fit, they will approve the factory to proceed
to pre-production samples.
Note: Fit samples should be in the same type of fabric that is going to be used for production (same
fabric construction and same fabric weight). However, the fabric does not need to be dyed or
199
Assistant Fashion Designer
printed to match final colors. The purpose of fit samples is to review the fit. They do not need to be
reviewed for color, ticketing, labeling etc. Unless, the buyer requires everything to be submitted at
one time. Under normal circumstances, first buyers review fit samples, then pre-production
samples, and then final production
3.4.2. Evaluation of Fit
An evaluation of the garment fit is based on five classical elements. These are as follows:
1. Grain
2. Set
3. Line
4. Balance
5. Ease
Grain: To obtain a proper and good fit of the garment must he cut on the right grains or in other
words on grain. An on grain garment hangs evenly and appears symmetrical. If the garment is off
grain, it will not hang straight.
The garment and seam lines may twist or hang crooked because the fabric on each hole of the
garment behaves differently. Deviation in the grain line is a result of poor and wrong cutting or
securing or even due to a poor posture of the wearer or figure irregularities that may in her fare
with the grain of the garment as it hangs on the body.
Set: It refers to a very smooth fit without any undesirable wrinkles. Wrinkles caused by poor set
cannot be ironed out, but result from the way the garment fit the wearer. Set wrinkles usually occur
because the garment is too large or too small for the wearer and the garment hangs or sags when
worn by the customer.
Line: This refers to the alignment of the structural lines of the body side seams of the garment
should hang like a plumb line dam the center of the body. It should always be perpendicular to the
floor.
200
Participant Handbook
Darts and seams such as shoulder seams should visually appear to the vertical lines that follow the
human body portion are intended to fit. Other seam lines should be gradually curving lines like
Necklines, Waistlines, Hiplines and arm whole portion.
Full filled will be found due to poor design and construction of the specified garment and also
irregularities of human body can distort the lines of the garment.
Balance: The right side and the left side of the garment portions are to the appeared evenly
balanced or symmetrical while viewed the three dimensional view such as front, rear side portions.
Poor posture like stooping figure, Hunch back figure will create the back length is considerably lesser
than the front length while observing in side view portion.
Balance relates to grain and live in the garment. A garment is out of balance when it is cut off grain,
causing it to hang unevenly.
Ease: It refers to the amount of roominess in a specified garment. There are two kinds of ease
Fitting ease and Design ease. A garment must contain adequate ease beyond the actual
measurements of the wearer to allow room for ordinary human body movements like walking,
Sitting, riding and even breathing. Ease in this context is called Fitting ease. Design ease is the extra
style like fullness added to the fitting ease. All the garments have fitting ease but design ease is
optional as it is added purely for the sake of appearance and giving the garment its style.
Good fitting of any garment is started from the human body measuring techniques, observation of
the individual customers figure formation, influence of the fabric, cutting and its securing
constructions are to be prepared in a systematic manner to reach the best fitted garment according
to the human body’s structure.
201

Assistant Fashion Designer
UNIT 3.5: Garment Costing
Unit Objectives
At the end of this unit, participants will be able to:
• Garment costing
• Describe components in garment costing
Cost typically can be defined as’ the economic value placed upon the resources consumed to make a
product.’ Costing is the process of estimating and then determining the total cost of producing a
garment, including the cost of materials, labour and transportation as well as the general expenses
of the operating the business. Merchandiser has to have thorough understanding of costing. There
are several reasons where cost plays the vital role. Merchandiser does the costing mainly for two
purposes.
Prising of the garment: If manufacturer selling the garments directly to the end consumers then it’s
very important to estimate the cost very accurately. Prising of the garment can be done by
manufacturing cost added with estimated mark-up or profit % to it.
Order acceptance: If manufacturer is exporting the garment, the costing is base of the business. On
the basis of cost of manufacturing including wages, operating expenses and transportation and
freight charges, and profit margin of company, merchandiser claims the cost of unit garment. With
this cost merchandiser negotiates with buyer and decides whether to accept the order or not.
In order to do perfect garment costing, one must know about all the activities including purchase of
fabrics, sewing, packing, transport, overheads, etc. and also about their costs, procedures,
advantages and risk factors. Merchandiser must be aware that there are always fluctuations in the
costs of raw materials and accessories, charges of knitting, processing, finishing, sewing and packing,
charges of transport and conveyance. The method of making costing will vary from style to style, as
there are many different styles in garments.
Components of cost of garment:
In continuation of the other functions Production merchandiser is also required to do the costing of
the product. The costing is done by keeping in mind the cost of the various raw materials, operating
cost of the company, the competition and expected profit of the organization. At the same time, it is
202
Participant Handbook
necessary to keep in mind the buyers costing expectations. The components on which cost of
garment depends is as follows
Fabric
Trims
Cut Make and Trim charges
Value added services: printing, embroidery, washing, appliqué
Testing of the garment
Quality
Transportation and logistics cost
Profit of the manufacturing organization
All these components of garment cost depend upon certain parameters which drastically affects
above cost parameters. These parameters plays vital role when production merchandiser does the
costing of garment; as these parameters are very dynamic and keep fluctuating frequently.
The parameters that affect the garment cost mostly are; Unit of Measurement, MOQ, Inco term
decided between raw material vendor and garment manufacturer, order quantity, etc.
Fabric: Fabric is generally the most significant factor in costing of garment. Fabric accounts for 60 to
70% of the total cost of basic-styled garments .In many cases, evaluating the quality and the
quantity of fabric consumed in the garment indicates better than any other factor the cost of
producing it. The cost of fabric depends upon the type of fabric is going to be utilized in the
garment. Types of fabrics are
Woven/knitted fabric
Power loom/automatic loom fabric
Fibre/yarn/fabric dyed fabric
Fibre content of fabric i.e. cotton, wool, polyester, silk, blended fabric etc.
Type of dyeing and finish used
GSM/Weight of fabric.
Type of yarn used i.e. ring spun, open ended, or carded/combed etc.
The parameters that affect the fabric cost
203
Assistant Fashion Designer
UOM: Unit of Measurement (UOM) is a quantity used as a standard of measurement. The Unit of
Measurement for woven fabric is normally in meters or yard, while knitted fabric measured in
Kilograms or some time it is in yards also. Merchandiser should aware of unit of measurements
while finding out the cost of fabric. Sometimes buyer specifies the UOM of fabric.
MOQ: Fabric Minimum Order Quantity (MOQ) is nothing but the smallest quantity of a product that
a fabric manufacturer can supply. The MOQ depends on the type of fabric and on capacity of
vendor. The MOQ plays the important role while ordering the fabric as it directly affects the cost of
garment. If the order of fabric is below the estimated MOQ then vendor charges more cost as
compared to regular charges. Merchandisers need to keep the MOQ in mind while doing the costing
of small quantity orders.
Order quantity: The cost of fabric may vary with the order quantity, more the order quantity; cost of
fabric can be optimised till certain level. But this is again depends on the type of fabric required and
fabric manufacturer capacity along with negotiation between fabric buyer and supplier.
Inco term used: This factor makes the huge difference in fabric cost. While importing the fabric from
another country merchandiser need to deal with the supplier for delivery of the fabric on the basis
of incoterms like EXW, FOB, CIF, and DDP etc. based on which it will be decided that who will bear
the cost of transportation and risk. No matter which incoterm is used but all the cost needs to be
charged to buyer. If fabric is getting purchased by using EXW incoterm then merchandiser needs to
add the transportation cost along with the custom clearance charges along with the price of fabric
while calculating the garment cost.
The cost of fabric can be calculated by following way
Yarn cost + fabric manufacturing cost (knitting or woven) + dyeing cost + finishing cost= total
fabric manufacturing cost
204
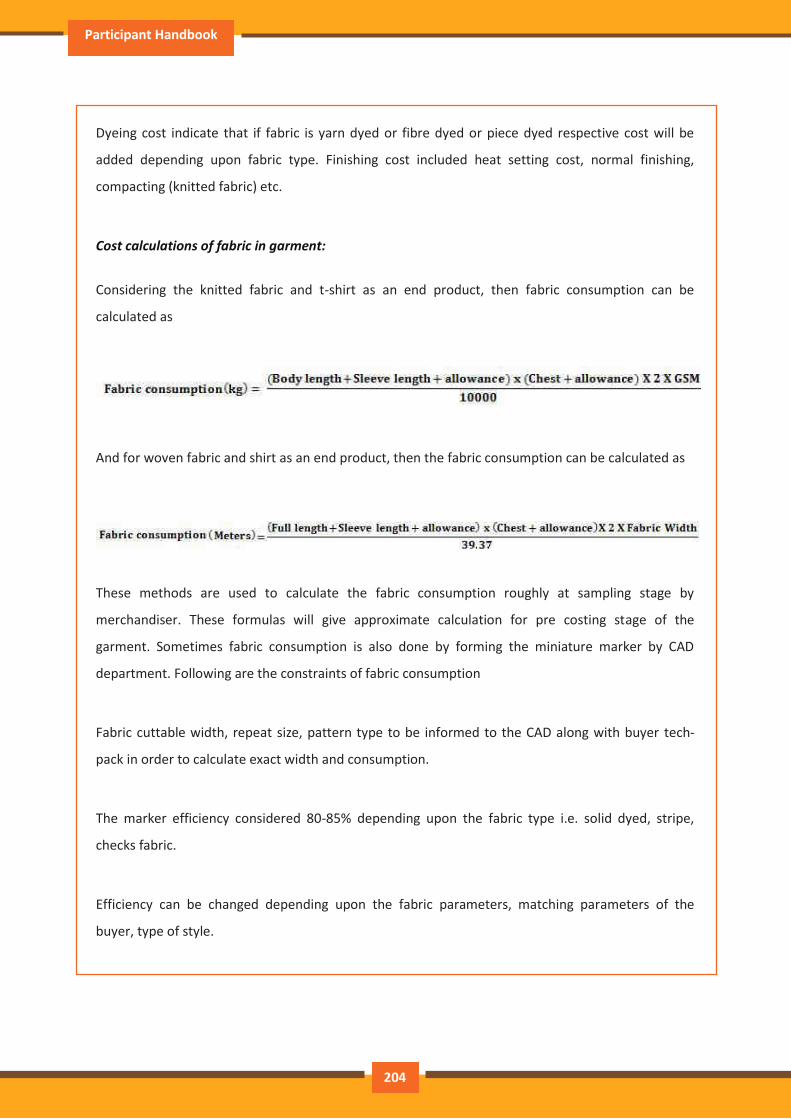
Participant Handbook
Dyeing cost indicate that if fabric is yarn dyed or fibre dyed or piece dyed respective cost will be
added depending upon fabric type. Finishing cost included heat setting cost, normal finishing,
compacting (knitted fabric) etc.
Cost calculations of fabric in garment:
Considering the knitted fabric and t-shirt as an end product, then fabric consumption can be
calculated as
And for woven fabric and shirt as an end product, then the fabric consumption can be calculated as
These methods are used to calculate the fabric consumption roughly at sampling stage by
merchandiser. These formulas will give approximate calculation for pre costing stage of the
garment. Sometimes fabric consumption is also done by forming the miniature marker by CAD
department. Following are the constraints of fabric consumption
Fabric cuttable width, repeat size, pattern type to be informed to the CAD along with buyer tech-
pack in order to calculate exact width and consumption.
The marker efficiency considered 80-85% depending upon the fabric type i.e. solid dyed, stripe,
checks fabric.
Efficiency can be changed depending upon the fabric parameters, matching parameters of the
buyer, type of style.
204
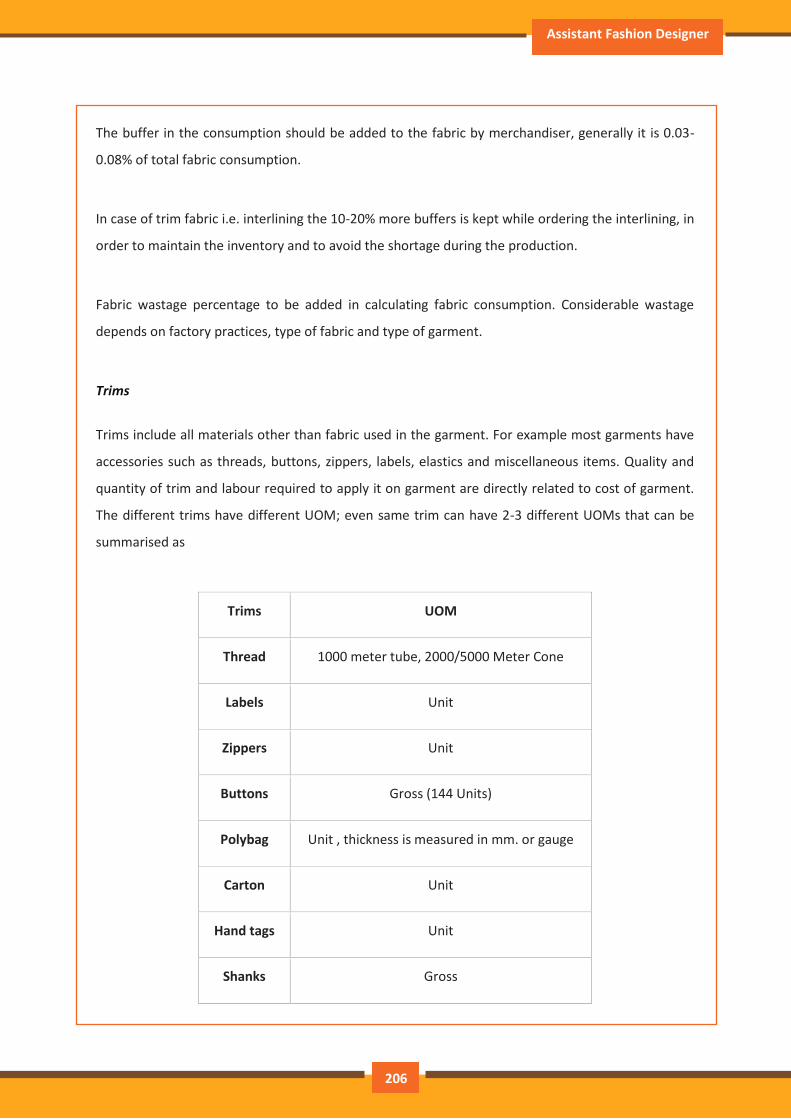
Assistant Fashion Designer
The buffer in the consumption should be added to the fabric by merchandiser, generally it is 0.03-
0.08% of total fabric consumption.
In case of trim fabric i.e. interlining the 10-20% more buffers is kept while ordering the interlining, in
order to maintain the inventory and to avoid the shortage during the production.
Fabric wastage percentage to be added in calculating fabric consumption. Considerable wastage
depends on factory practices, type of fabric and type of garment.
Trims
Trims include all materials other than fabric used in the garment. For example most garments have
accessories such as threads, buttons, zippers, labels, elastics and miscellaneous items. Quality and
quantity of trim and labour required to apply it on garment are directly related to cost of garment.
The different trims have different UOM; even same trim can have 2-3 different UOMs that can be
summarised as
Trims UOM
Thread 1000 meter tube, 2000/5000 Meter Cone
Labels Unit
Zippers Unit
Buttons Gross (144 Units)
Polybag Unit , thickness is measured in mm. or gauge
Carton Unit
Hand tags Unit
Shanks Gross
206
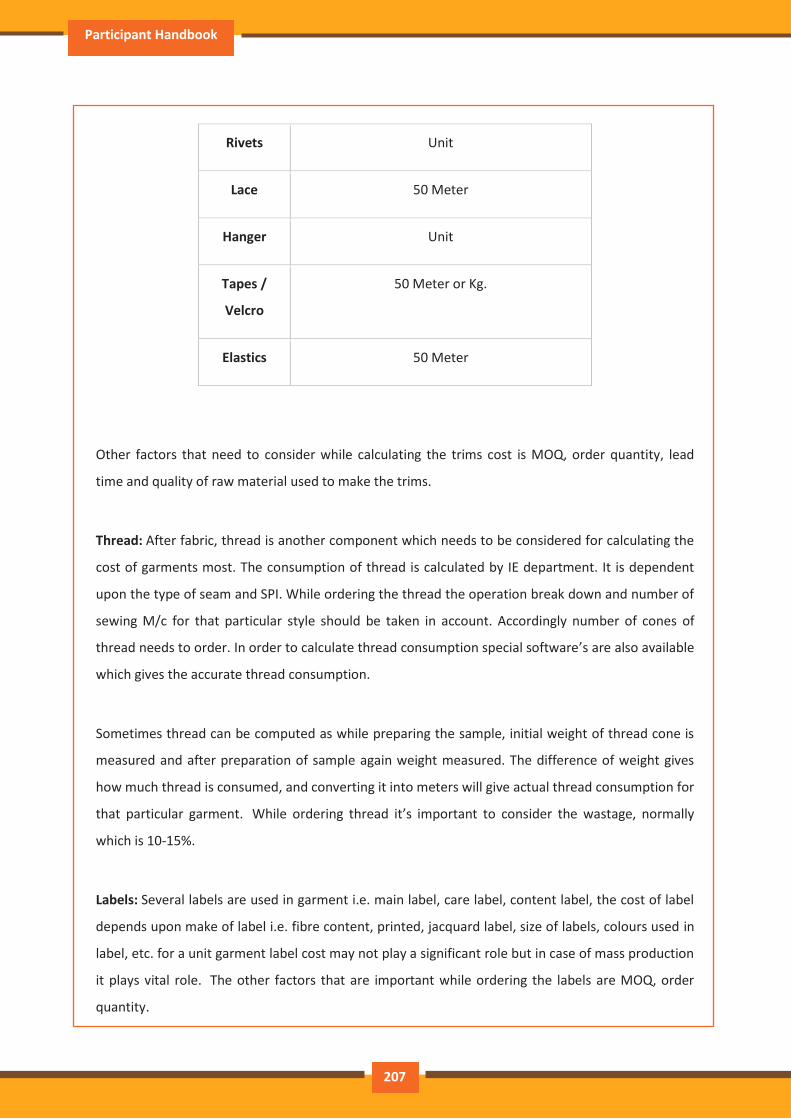
Participant Handbook
Rivets Unit
Lace 50 Meter
Hanger Unit
Tapes /
Velcro
50 Meter or Kg.
Elastics 50 Meter
Other factors that need to consider while calculating the trims cost is MOQ, order quantity, lead
time and quality of raw material used to make the trims.
Thread: After fabric, thread is another component which needs to be considered for calculating the
cost of garments most. The consumption of thread is calculated by IE department. It is dependent
upon the type of seam and SPI. While ordering the thread the operation break down and number of
sewing M/c for that particular style should be taken in account. Accordingly number of cones of
thread needs to order. In order to calculate thread consumption special software’s are also available
which gives the accurate thread consumption.
Sometimes thread can be computed as while preparing the sample, initial weight of thread cone is
measured and after preparation of sample again weight measured. The difference of weight gives
how much thread is consumed, and converting it into meters will give actual thread consumption for
that particular garment. While ordering thread it’s important to consider the wastage, normally
which is 10-15%.
Labels: Several labels are used in garment i.e. main label, care label, content label, the cost of label
depends upon make of label i.e. fibre content, printed, jacquard label, size of labels, colours used in
label, etc. for a unit garment label cost may not play a significant role but in case of mass production
it plays vital role. The other factors that are important while ordering the labels are MOQ, order
quantity.
207
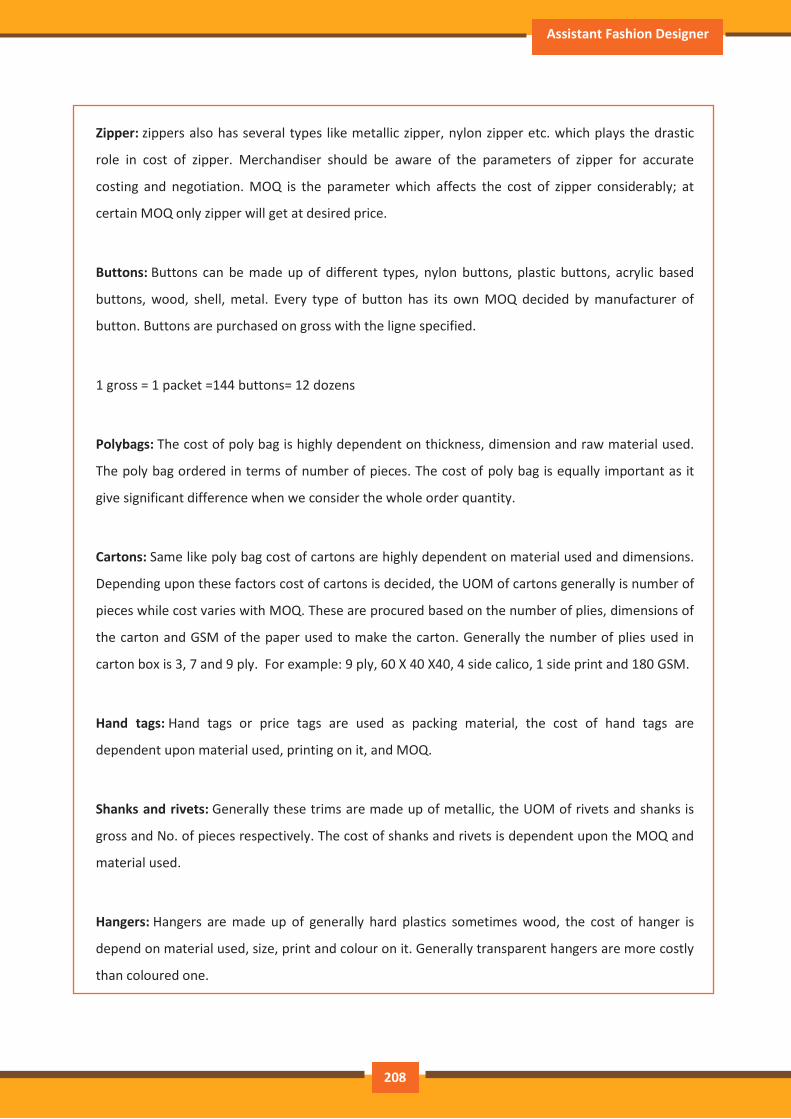
Assistant Fashion Designer
Zipper: zippers also has several types like metallic zipper, nylon zipper etc. which plays the drastic
role in cost of zipper. Merchandiser should be aware of the parameters of zipper for accurate
costing and negotiation. MOQ is the parameter which affects the cost of zipper considerably; at
certain MOQ only zipper will get at desired price.
Buttons: Buttons can be made up of different types, nylon buttons, plastic buttons, acrylic based
buttons, wood, shell, metal. Every type of button has its own MOQ decided by manufacturer of
button. Buttons are purchased on gross with the ligne specified.
1 gross = 1 packet =144 buttons= 12 dozens
Polybags: The cost of poly bag is highly dependent on thickness, dimension and raw material used.
The poly bag ordered in terms of number of pieces. The cost of poly bag is equally important as it
give significant difference when we consider the whole order quantity.
Cartons: Same like poly bag cost of cartons are highly dependent on material used and dimensions.
Depending upon these factors cost of cartons is decided, the UOM of cartons generally is number of
pieces while cost varies with MOQ. These are procured based on the number of plies, dimensions of
the carton and GSM of the paper used to make the carton. Generally the number of plies used in
carton box is 3, 7 and 9 ply. For example: 9 ply, 60 X 40 X40, 4 side calico, 1 side print and 180 GSM.
Hand tags: Hand tags or price tags are used as packing material, the cost of hand tags are
dependent upon material used, printing on it, and MOQ.
Shanks and rivets: Generally these trims are made up of metallic, the UOM of rivets and shanks is
gross and No. of pieces respectively. The cost of shanks and rivets is dependent upon the MOQ and
material used.
Hangers: Hangers are made up of generally hard plastics sometimes wood, the cost of hanger is
depend on material used, size, print and colour on it. Generally transparent hangers are more costly
than coloured one.
208
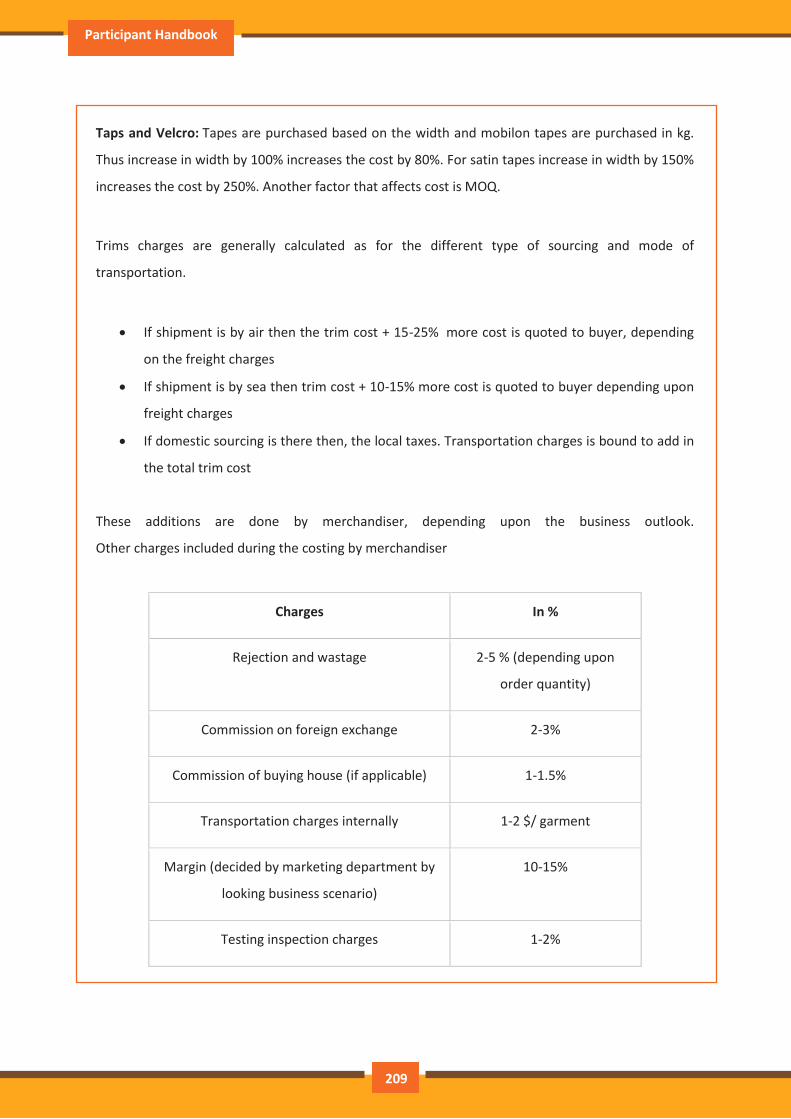
Participant Handbook
Taps and Velcro: Tapes are purchased based on the width and mobilon tapes are purchased in kg.
Thus increase in width by 100% increases the cost by 80%. For satin tapes increase in width by 150%
increases the cost by 250%. Another factor that affects cost is MOQ.
Trims charges are generally calculated as for the different type of sourcing and mode of
transportation.
If shipment is by air then the trim cost + 15-25% more cost is quoted to buyer, depending
on the freight charges
If shipment is by sea then trim cost + 10-15% more cost is quoted to buyer depending upon
freight charges
If domestic sourcing is there then, the local taxes. Transportation charges is bound to add in
the total trim cost
These additions are done by merchandiser, depending upon the business outlook.
Other charges included during the costing by merchandiser
Charges In %
Rejection and wastage 2-5 % (depending upon
order quantity)
Commission on foreign exchange 2-3%
Commission of buying house (if applicable) 1-1.5%
Transportation charges internally 1-2 $/ garment
Margin (decided by marketing department by
looking business scenario)
10-15%
Testing inspection charges 1-2%
209

Assistant Fashion Designer
CMT cost: The cost of making done “in house” is based on the total cost per hour multiplied by the
number of hours it takes to make the style and divided by the number of units produced if the
making is done by a contractor; the contractor adds profit on to this amount.
Labour cost per minute = (Monthly salary of an operators/Total minutes available in the month) at
100% efficiency CM cost = (SAM of the garment * Minute cost of the labour)/Line efficiency (%)
Value added services: This is cost added to special process like embroidery, printing, washing used
to impart the type of look buyers wants. These are associated cost of garment manufacturing are
wet processing chemicals, washing and contracted operations.
Items Consumption UOM* Rate ($) Amount ($) Remarks
1 2/60s single jersey 0.224 KGs 6.5 1.45
2 Cuff and collar ribs 0.08 KGs 5 0.4
3 Sewing thread 150 Meters 0.08 approx.
4 Buttons 3 Gross 0.04 approx.
5 Main label 1 Unit 0.02 approx.
6 Care label 1 Unit 0.02 approx.
7 Hang Tags 1 Unit 0.06 approx.
8 Price Tags 1 Unit 0.04 approx.
9 Poly bags 1 Unit 0.02 approx.
Total Cost 2.13
210

Participant Handbook
Wet processing chemicals include bleaches, detergents, softeners, neutralizers, wetting agents and
resins. Complicated wet process finishes contribute a significant amount to the price of a product.
Merchandiser must know in detail about each of these operations, sourcing, contracting
requirement and time involved. Cost of these varies depending on different styles. For example-
Embroidery costing requires derivation of thread consumption, additional cost of hand embroidery
is involved etc. printing cost is dependent on no. of colours for printing, MOQ, and type of print.
Example of garment costing:
The example of garment cost is given by assuming the following dimensions for polo neck T-shirt,
no. of pieces = 4000, salary of the operator =6000 Rs./month=120$/month no. of working days =
26, line efficiency considered= 50%, sewing SAM= 15 min., Cutting SAM= 7 min. 1$=50INR Chest =
60 cm, Length (HSP to waist) = 75 cm, Sleeve length = 25 cm Fabric used is 2/60s 100% cotton S/J
fabric. GSM is 180 the fabric consumption can be calculated as
= (75 + 25 + 2) X (60 +1) X2X 180/10000
= 0.224kg + 0.08(weight of cuff and collar)
CMT charges are calculated as: Total available capacity per month (in minute) = 26 working days*8
hours/day*60=12,480 minutes
Labour cost per minute = (Monthly salary of an operators/Total minutes available in the month) at
100% efficiency = 6000/12480 = 0.480 Rs.
Sewing cost = (SAM of the garment * Minute cost of the labour)/Line efficiency (%) =15* 0.480/50 =
0.288$
211
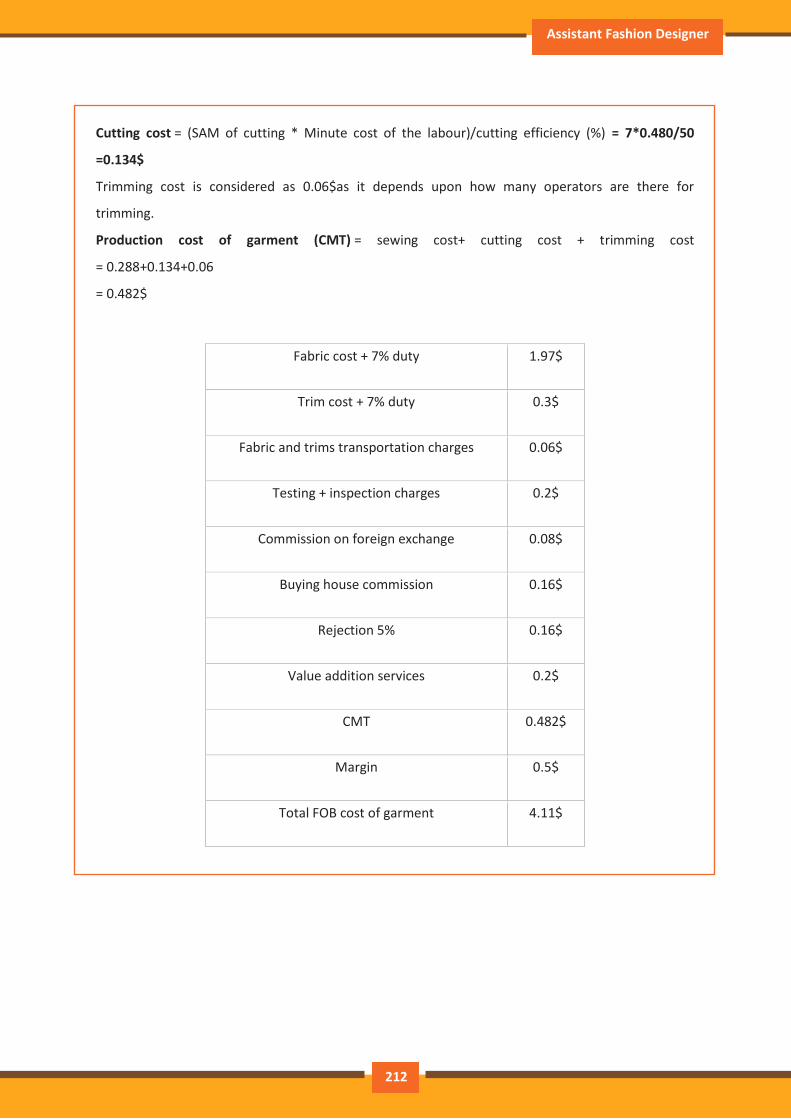
Assistant Fashion Designer
Cutting cost = (SAM of cutting * Minute cost of the labour)/cutting efficiency (%) = 7*0.480/50
=0.134$
Trimming cost is considered as 0.06$as it depends upon how many operators are there for
trimming.
Production cost of garment (CMT) = sewing cost+ cutting cost + trimming cost
= 0.288+0.134+0.06
= 0.482$
Fabric cost + 7% duty 1.97$
Trim cost + 7% duty 0.3$
Fabric and trims transportation charges 0.06$
Testing + inspection charges 0.2$
Commission on foreign exchange 0.08$
Buying house commission 0.16$
Rejection 5% 0.16$
Value addition services 0.2$
CMT 0.482$
Margin 0.5$
Total FOB cost of garment 4.11$
212

Participant Handbook
Exercise \
1. What is MOQ?
a) Maximum Order Quantity
b) Minimum Order Quantity
c) Median Order Quantity
d) Mode Order Quantity
2. List the various components of Garment costing
213

Assistant Fashion Designer
4. Evaluate the proto
sample developed related
to specific product class
Unit 4.1 – Prototype Analysis
AMH/N 1222

Participant Handbook
Key Learning Outcomes
At the end of this module, participants will be able to:
• Take part in prototype analysis
215
Assistant Fashion Designer
UNIT 4.1: Prototype Analysis
Unit Objectives
At the end of this unit, participants will be able to:
• Know the design creation process
4.1.1. Garment Analysis
Garment Analysis involves the following goals, processes, and limitations:
1. Products are examined from a business perspective with the goal or positioning products to
satisfy the needs of target customers
2. Decisions are made in the context of the product line and the firm’s strategic plan.
3. Products are developed and marketed to suit groups of target customers in terms of styling,
fit, fashion, quality, and value.
4. Sound technical knowledge of materials and garment assembly is needed to determine
product performance.
5. Alternative product development, production, and/or marketing processes are assessed.
6. The bottom line, the potential profitability of the product, is always considered in evaluating
alternatives.
7. Quality standards are based on perceptions of target customer’s exceptions.
8. Analysis standards are based on perceptions of target customer’s expectations.
9. The results of professional analysis determine what will be available to consumers of the
retail sales floor
Methods of Garment Analysis
Three different methods of analysis that could be used are these;
1. Visual inspection.
2. Augmented visual inspection, aided by simple tests, simple magnification and measuring
equipment, and/or home laundry equipment.
3. Laboratory analysis with standard test methods, specialized testing equipment, high-power
magnification, and highly calibrated measuring equipment.
216
Participant Handbook
Visual inspection
It is effective in evaluating overall garment appearance and aesthetics, estimating fabric quality,
identifying stitch and seam types, and estimating number of stitches (spi).
A skill person can conduct a quick and reasonably reliable assessment of these product
characteristics using visual inspection.
Experience in garment analysis develops the ability to see and feel quality products. Skills are
developed through comparing similar characteristics and performance of a wide variety of products.
Consumers and retail buyers, when viewing product lines for the first time, frequently use visual
inspection. The reliability of visual analysis is completely dependent on the skill of the individual
conducting the analysis.
Augmented visual inspection
Provides more information and increases the ability to reach reliable conclusions. Simple burning or
solubility tests might be used to verify fiber content. Use of microscopes or pic glasses increases the
details that can be observed in fabric structures relative to interlacing patterns, yarn types, yarn
twists, methods of color application, and so on.
Use of home laundry equipment can provide insight into latent defects such as color bleeding and
shrinkage.
Both visual inspection and augmented visual inspection can often be performed without destroying
the product. Use of standard tests and calibrated equipment increases the costs of the analysis but
also the amount of information available.
The most scientific garment analysis involves laboratory tests of the products and materials.
Laboratory tests with standard test methods endorsed by the American society for testing and
217
Assistant Fashion Designer
materials (ASTM). The American association of chemists and colorists (AATCC) or other professional
organizations and controlled laboratory conditions provide the most reliable results.
Shrinkage, strength, abrasion resistance, air-permeability, colorfastness, and shading, analysis of this
compatibility of materials and suitability to particular end uses.
Tests are frequently destructive, and extra materials and garments must be sampled according to
specified methods.
In –house testing is less time consuming but requires equipment, time, and personnel. Out-of-house
testing requires more lead time.
Process of Garment Analysis and specification development
Garment analysis conducted to meet particular business needs, may require extensive knowledge of
certain aspects of the apparel business.
Professional garment analysis works best conducted in small segments including the following:
Style description.
Positioning strategy.
Sizing and fit.
Materials inspection.
Component assembly.
Final assembly and finishing and
Style presentation.
Style –description: : The information necessary to communicate identity of the style to numerous
apparel professionals that will be using specifications includes brand, style number, merchandise
group, size ranges, and the person responsible for approval of the changes that may take place as
the garment is developed.
Work sheet-model:
1. BRAND
218
Participant Handbook
2. MERCHANDISE GROUP
3. BODY TYPE
4. SIZE-RANGE
5. SAMPLE SIZE
6. APPROVED BY
7. STYLE-DESCRIPTION
8. FABRIC
9. TRIM
10. DETAILED DRAWING OF THE GARMENT
Sizing and fit:
Consumers seek garments that provide an attractive appearance and comfort during wear, often
within whatever current fashion suggests as acceptable fit.
Manufacturers and retailers recognize that garments must be labeled in a manner that allows
customers to find the right size. However, the apparel industry has no mandated or universally used
sizing standards. Normally the garment size should be suit to their target customers.
Commonly used body types are infant, toddler, girls, boys, preteen, junior, misses, petite, women's
petite, women’s’, young men’s and men’s’. S.M.L and XL sizes are the general body size category.
Height is mentioned in women's readymade wear. Age is mentioned in the label of children's wear.
Bust girth along with cup size indicating the letter A,B,C,D,DD and DDD in the foundation upper
torso wear like corset, brassiere and in panties waist or hip girth is indicated in the label.
Materials Selection: Materials used in apparel manufacturing include fabrics and findings. Findings
include all the rest of materials required to complete the garments, including support/shaping,
materials, trims, closures, threads, labels, and accessories. Proper selection and consistent quality of
materials are important to apparel quality and performance. One inferior material can impart a
lower quality level to the entire garment. The quality of materials must also be consistent with the
product positioning strategy.
219
Assistant Fashion Designer
Yarn type and size, fabrication, count, weight, drapability, structural or applied design, color
application, finishes, care and material method of application are to be considered.
Garment Component Assembly: Garment structure is determined by the pattern shapes and
method of assembling materials into garments. Method of assembly defines the sequence of
processes and how each step in the assembly process is accomplished to create the garment
structure.
Two phases are
1. Garment components Assembly.
2. Final Garment Assembly.
Final garment assembly and finishing
Final Garment Assembly is:
1. Use methods appropriate to materials that will achieve consistent output.
2. Use methods that will achieve quality and performance standards.
3. Use appropriate work aids to reduce handling.
4. Minimize handling and number of operations.
5. Keep garment components so they will lay flat as long as possible.
6. Assemble small components before attaching to large components.
7. Operators are responsible for quality of their own work.
Descriptions of garment components:
1. Top front and top back, 2. Sleeves, 3.Plackets, 4.Collars and other neckline treatment, 5. Cuffs and
other sleeve treatments. 6. Pockets, 7. Waist band treatments.
Garment Finishing Processes:
Trimming, wet-processing, garment dyeing, post cure durable press, final pressing, ticketing, tagging
and packaging.
4.1.2. Textile testing
When you put on clothing, you want it to feel good against your skin. And you don't want it to
contain harmful substances. But how to we ensure textiles are safe? Textile companies and
consumer agencies conduct many kinds of analyses to make sure our clothes and the fabrics we use
220
Participant Handbook
in our homes won't harm us, will be comfortable and will stay colourful for a long time. These
processes are called textile testing.
Textile testing is the term for a whole series of tests that examine the physical, mechanical and
chemical properties of textiles. These tests are sometimes done before a textile goes into
widespread use, or they're done on textiles arriving from other countries for sale in US markets.
Countries like the United States have established standards for what should and should not be in
textile products. Tests can show whether companies making textiles are in compliance or not.
Why do such tests? They can ensure that a given textile is what a manufacturer or importer says it
is. Sometimes, testing is done while textiles are being manufactured, to identify problems or faults
in the machinery making them, and to double-check that materials being used for a specific textile
are appropriate.
Methods of Textile Testing
There are many textile tests. Some of them are physical tests, in which a sample of textile material
is examined closely for feel and appearance. Such tests are done on individual fibers or strands of
material and on yarns, threads made of several fibers twisted together. Textiles are also subjected
to light and other elements to see how they react. Some of these tests are done in a weather-
ometer, a machine that tests for weathering and light fastness of textiles. It's basically an enclosed
box. Textiles are placed inside and subjected to conditions replicated from the natural environment.
Mechanical tests are those in which textiles are subjected to different pressure and stressors,
usually in specialized testing machines. These include tests to measure breaking strength, the force
needed to break a fabric under tension. Such tests can ensure fabrics are strong enough to maintain
integrity even when under great stress. Other tests gauge tearing strength, or the strength required
to make an already existing rip or tear worse. And abrasion tests determine how quickly a textile
wears out when it's rubbed against another surface. Such tests make sure that fabrics used in
products like parachutes and car seat belts won't break when needed most to keep the user safe.
Still other tests are chemical tests, in which a textile is analysed through chemical means to
determine what it contains. These tests are often done in laboratories, and they're important to
determine whether textiles might have harmful substances in them like lead or other heavy metals,
banned chemical dyes or pesticides that could possibly endanger the consumer.
221
Assistant Fashion Designer
Specialized textile testing is also done to test for flammability, or how quickly a given textile burns.
Various methods of performance testing are done on textiles that must possess special qualities,
like be effectively bulletproof or provide a layer of filtering on construction projects. In short, there
are as many ways to test textiles as there are uses for textile products in our world.
Exercise
1. List the critical steps of garment analysis
222

Participant Handbook
5. Maintain Health, Safety
and Security at designing
department
Unit 5.1 - Maintain health, safety and security at designing
department
AMH/N 1223
Assistant Fashion Designer
Key Learning Outcomes
At the end of this module, participants will be able to:
• Comply with health and safety related instructions applicable to the workplace.
• Use and maintain personal protective equipment as per protocol.
• Maintain a healthy lifestyle and guard against dependency on intoxicants.
• Follow environment management system related procedures.
• Identify and correct if possible) malfunctions in machinery and equipment.
• Report any service malfunctions that cannot be recited.
• Store materials and equipment in line with manufacturer’s and organizational requirements.
• Safely handle and move waste and debris.
• Minimize health and safety risks to self and others due to own actions.
• Seek clarifications, from supervisors or other authorized personnel in case of perceived
risks.
• Monitor the workplace and work processes for potential risks and threats.
• Carryout periodic walk-through to keep work area free from hazards and obstructions, if
assigned.
• Report hazards and potential risks/threats to supervisors or other authorized personnel.
• Participate in mock drills/ evacuation procedures organized at the workplace.
• Undertake rest aid, fire-fighting and emergency response training, if asked to do so.
• Take action based on instructions in the event of fire.
• Follow organization procedures
224
Participant Handbook
UNIT 5.1: Maintain Health, Safety and Security in the designing
department
Unit Objectives
At the end of this unit, participants will be able to:
• Comply with health and safety related instructions applicable to the workplace.
• Use and maintain personal protective equipment as per protocol.
• Maintain a healthy lifestyle and guard against dependency on intoxicants.
• Follow environment management system related procedures.
• Identify and correct if possible) malfunctions in machinery and equipment.
• Report any service malfunctions that cannot be rectified.
• Store materials and equipment in line with manufacturer’s and organizational
requirements.
• Safely handle and move waste and debris.
• Minimize health and safety risks to self and others due to own actions.
• Seek clarifications, from supervisors or other authorized personnel in case of perceived
risks.
• Monitor the workplace and work processes for potential risks and threats.
• Carryout periodic walk-through to keep work area free from hazards and obstructions, if
assigned.
• Report hazards and potential risks/threats to supervisors or other authorized personnel.
• Participate in mock drills/ evacuation procedures organized at the workplace.
• Undertake rest aid, fire-fighting and emergency response training, if asked to do so.
• Take action based on instructions in the event of fire.
• Follow organization procedures.
225
225
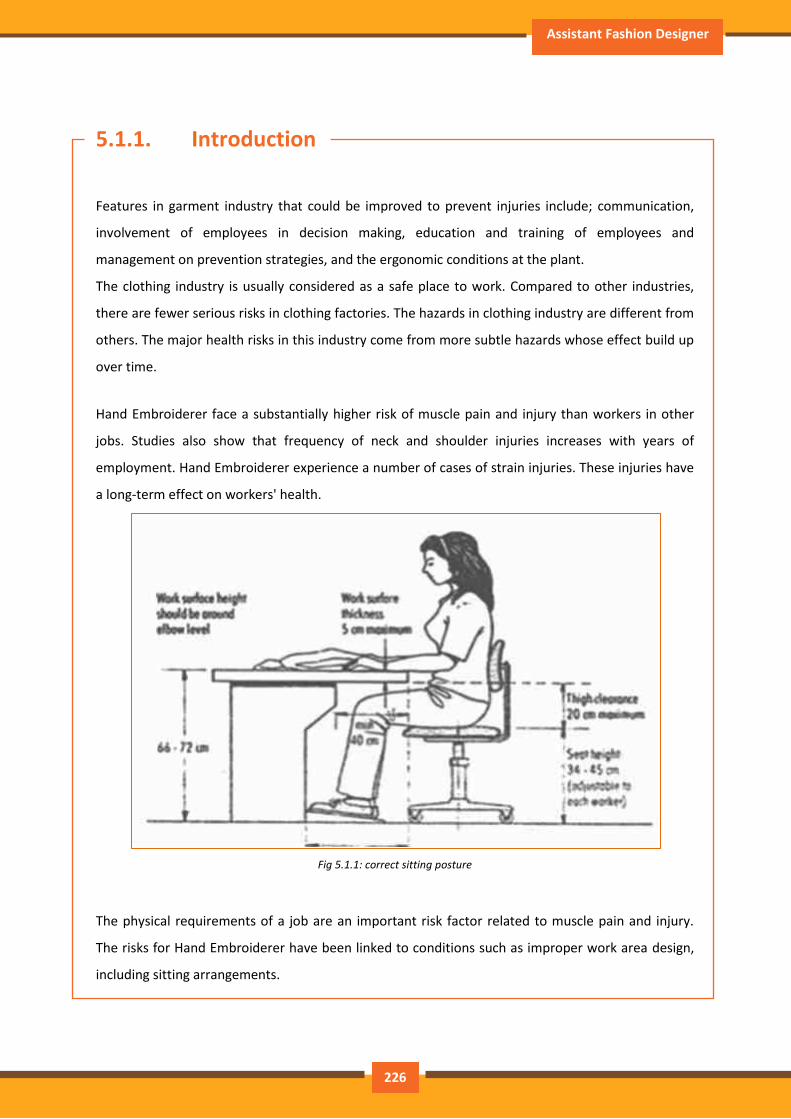
Assistant Fashion Designer
5.1.1. Introduction
Features in garment industry that could be improved to prevent injuries include; communication,
involvement of employees in decision making, education and training of employees and
management on prevention strategies, and the ergonomic conditions at the plant.
The clothing industry is usually considered as a safe place to work. Compared to other industries,
there are fewer serious risks in clothing factories. The hazards in clothing industry are different from
others. The major health risks in this industry come from more subtle hazards whose effect build up
over time.
Hand Embroiderer face a substantially higher risk of muscle pain and injury than workers in other
jobs. Studies also show that frequency of neck and shoulder injuries increases with years of
employment. Hand Embroiderer experience a number of cases of strain injuries. These injuries have
a long-term effect on workers' health.
Fig 5.1.1: correct sitting posture
The physical requirements of a job are an important risk factor related to muscle pain and injury.
The risks for Hand Embroiderer have been linked to conditions such as improper work area design,
including sitting arrangements.
226
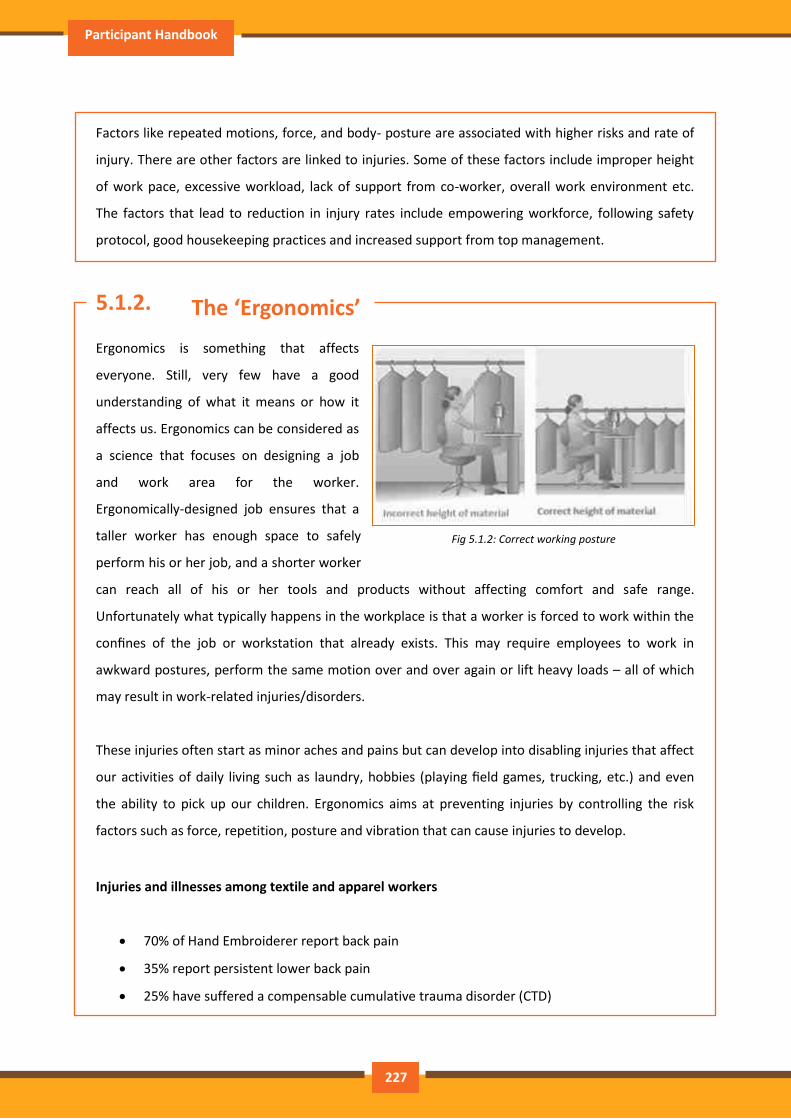
Participant Handbook
Factors like repeated motions, force, and body- posture are associated with higher risks and rate of
injury. There are other factors are linked to injuries. Some of these factors include improper height
of work pace, excessive workload, lack of support from co-worker, overall work environment etc.
The factors that lead to reduction in injury rates include empowering workforce, following safety
protocol, good housekeeping practices and increased support from top management.
5.1.2. The ‘Ergonomics’
Ergonomics is something that affects
everyone. Still, very few have a good
understanding of what it means or how it
affects us. Ergonomics can be considered as
a science that focuses on designing a job
and work area for the worker.
Ergonomically-designed job ensures that a
taller worker has enough space to safely
perform his or her job, and a shorter worker
can reach all of his or her tools and products without affecting comfort and safe range.
Unfortunately what typically happens in the workplace is that a worker is forced to work within the
confines of the job or workstation that already exists. This may require employees to work in
awkward postures, perform the same motion over and over again or lift heavy loads – all of which
may result in work-related injuries/disorders.
These injuries often start as minor aches and pains but can develop into disabling injuries that affect
our activities of daily living such as laundry, hobbies (playing field games, trucking, etc.) and even
the ability to pick up our children. Ergonomics aims at preventing injuries by controlling the risk
factors such as force, repetition, posture and vibration that can cause injuries to develop.
Injuries and illnesses among textile and apparel workers
70% of Hand Embroiderer report back pain
35% report persistent lower back pain
25% have suffered a compensable cumulative trauma disorder (CTD)
Fig 5.1.2: Correct working posture
227
Assistant Fashion Designer
81% reported CTDs to the wrist
14% reported CTDs to the elbow
5% reported CTDs to the shoulder
49% of workers experience neck pains
Absenteeism increases as working conditions worsens
Loss of worker force due to injuries or high turnover is associated with working conditions
Hand / and trimming are stressful to upper limbs
Embroidery tasks are associated with pain in the shoulders, wrists, and hands
Ironing by hand is associated with elbow pain
Fitting fabric in frames/adda tasks is associated with CTDs of the hands and wrists
Some fundamental ergonomic principals that should be followed in our workplaces are:
Proper tools: Tools should be appropriate for the specific tasks being performed. Your tools
should allow you to keep your hands and wrists straight – the position they would be in if
they were hanging relaxed at your side. The workers should bend the tool – not the wrist.
The tool should fit comfortably into your hand. If the grip size is too large or too small, it will
be uncomfortable and will increase the risk of injury. Tools should not have sharp edges,
create contact stresses in your hand, or vibrate.
Keep repetitive motions to a minimum: Workstations or tasks can often be redesigned to
reduce the number of repetitive motions that must be performed. Using a power-driven
screwdriver or tools with a ratchet device can reduce the number of twisting motions with
the arm. For prevention of ergonomic injuries, workers should be encouraged to change
work and take frequent but short breaks. Work stations should have enough space for the
given tasks and provide proper seating. Manufacturing tools and machinery should
incorporate ergonomic design principles and should not require an excessive amount of
force to operate. Some tasks can be automated or redesigned to eliminate repetitive
movements and musculoskeletal injuries.
Avoid awkward postures: Your job should not require you to work with your hands above
shoulder height on a regular basis. Arms should be kept low and close to your body. Bending
and twisting of your wrists, back and neck should also be avoided.
228
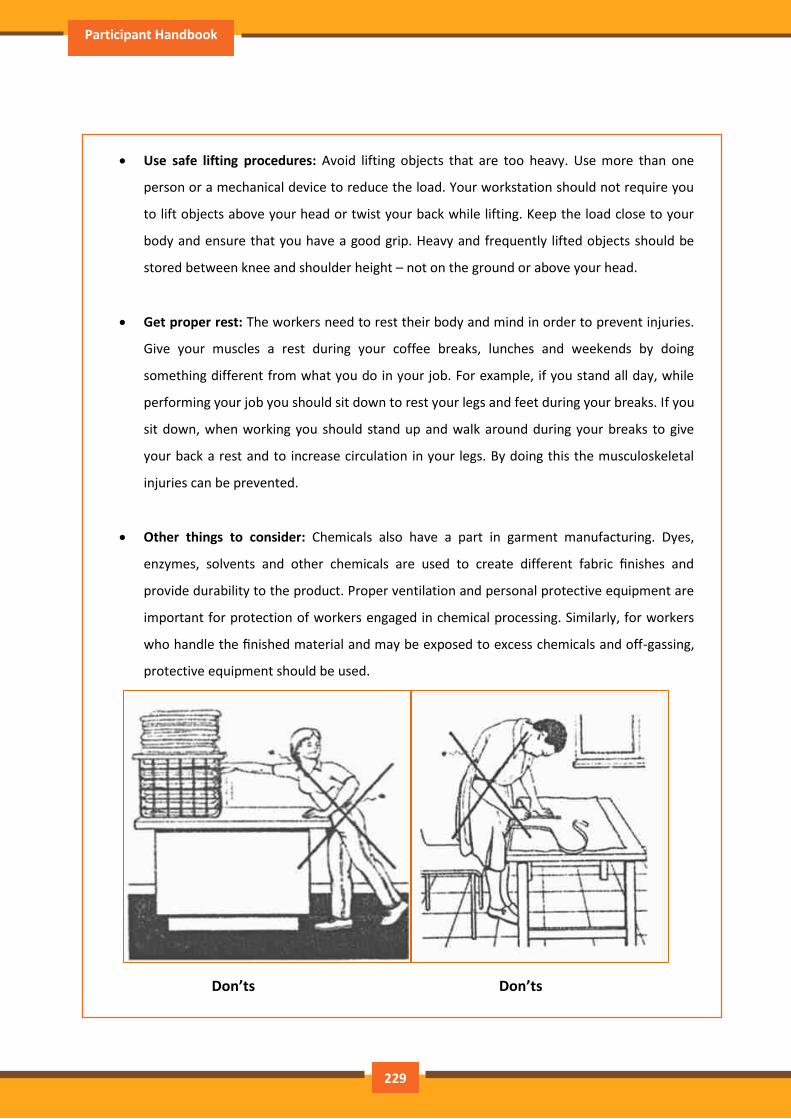
Participant Handbook
Use safe lifting procedures: Avoid lifting objects that are too heavy. Use more than one
person or a mechanical device to reduce the load. Your workstation should not require you
to lift objects above your head or twist your back while lifting. Keep the load close to your
body and ensure that you have a good grip. Heavy and frequently lifted objects should be
stored between knee and shoulder height – not on the ground or above your head.
Get proper rest: The workers need to rest their body and mind in order to prevent injuries.
Give your muscles a rest during your coffee breaks, lunches and weekends by doing
something different from what you do in your job. For example, if you stand all day, while
performing your job you should sit down to rest your legs and feet during your breaks. If you
sit down, when working you should stand up and walk around during your breaks to give
your back a rest and to increase circulation in your legs. By doing this the musculoskeletal
injuries can be prevented.
Other things to consider: Chemicals also have a part in garment manufacturing. Dyes,
enzymes, solvents and other chemicals are used to create different fabric finishes and
provide durability to the product. Proper ventilation and personal protective equipment are
important for protection of workers engaged in chemical processing. Similarly, for workers
who handle the finished material and may be exposed to excess chemicals and off-gassing,
protective equipment should be used.
Don’ts Don’ts
229
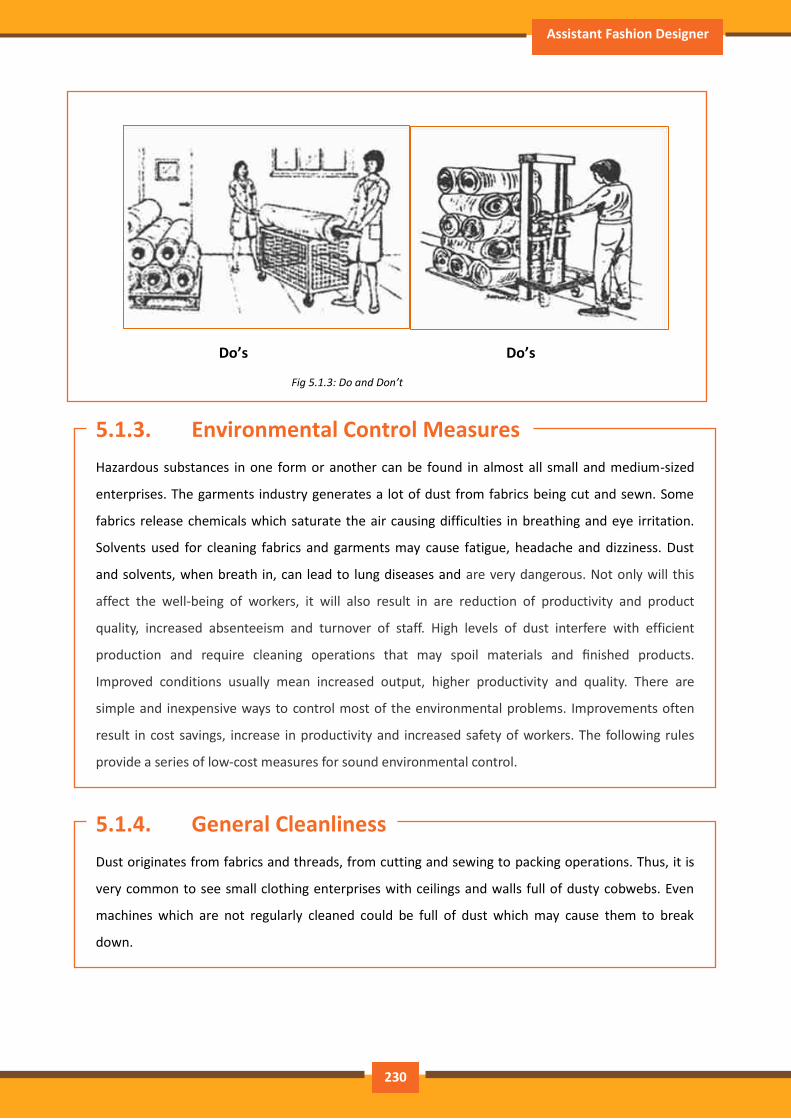
Assistant Fashion Designer
Fig 5.1.3: Do and Don’t
Do’s Do’s
5.1.3. Environmental Control Measures
Hazardous substances in one form or another can be found in almost all small and medium-sized
enterprises. The garments industry generates a lot of dust from fabrics being cut and sewn. Some
fabrics release chemicals which saturate the air causing difficulties in breathing and eye irritation.
Solvents used for cleaning fabrics and garments may cause fatigue, headache and dizziness. Dust
and solvents, when breath in, can lead to lung diseases and are very dangerous. Not only will this
affect the well-being of workers, it will also result in are reduction of productivity and product
quality, increased absenteeism and turnover of staff. High levels of dust interfere with efficient
production and require cleaning operations that may spoil materials and finished products.
Improved conditions usually mean increased output, higher productivity and quality. There are
simple and inexpensive ways to control most of the environmental problems. Improvements often
result in cost savings, increase in productivity and increased safety of workers. The following rules
provide a series of low-cost measures for sound environmental control.
5.1.4. General Cleanliness
Dust originates from fabrics and threads, from cutting and sewing to packing operations. Thus, it is
very common to see small clothing enterprises with ceilings and walls full of dusty cobwebs. Even
machines which are not regularly cleaned could be full of dust which may cause them to break
down.
230
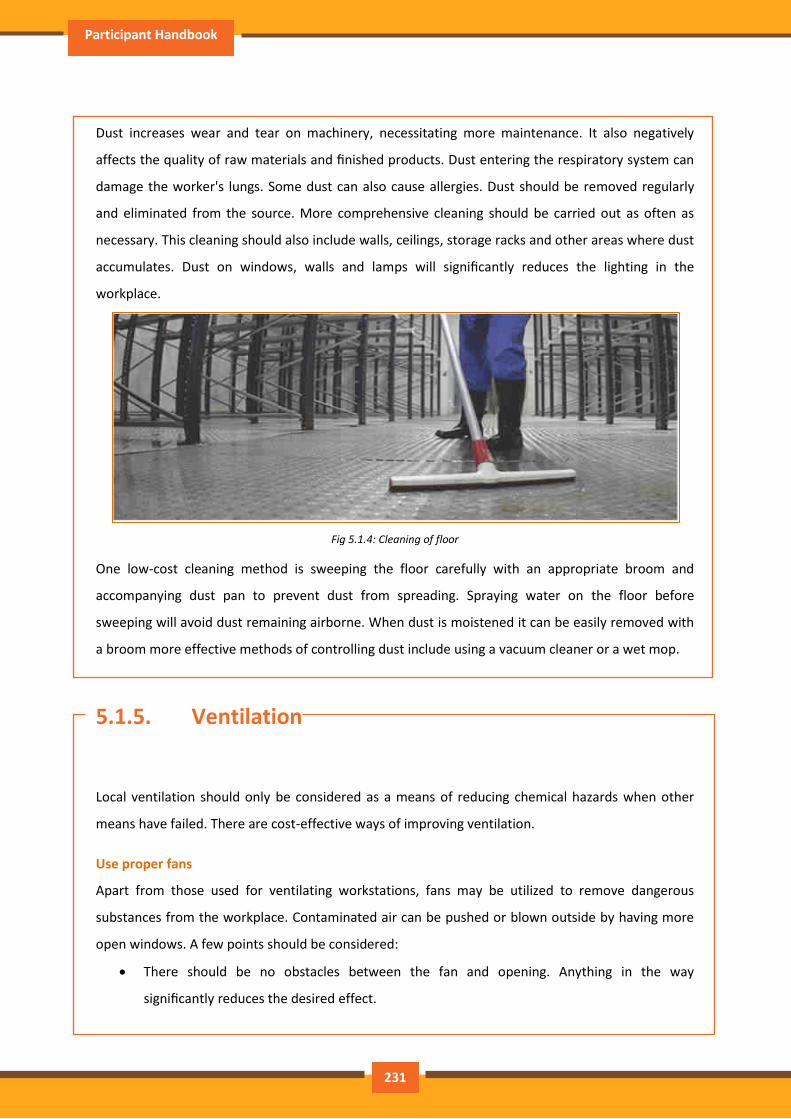
Participant Handbook
Dust increases wear and tear on machinery, necessitating more maintenance. It also negatively
affects the quality of raw materials and finished products. Dust entering the respiratory system can
damage the worker's lungs. Some dust can also cause allergies. Dust should be removed regularly
and eliminated from the source. More comprehensive cleaning should be carried out as often as
necessary. This cleaning should also include walls, ceilings, storage racks and other areas where dust
accumulates. Dust on windows, walls and lamps will significantly reduces the lighting in the
workplace.
Fig 5.1.4: Cleaning of floor
One low-cost cleaning method is sweeping the floor carefully with an appropriate broom and
accompanying dust pan to prevent dust from spreading. Spraying water on the floor before
sweeping will avoid dust remaining airborne. When dust is moistened it can be easily removed with
a broom more effective methods of controlling dust include using a vacuum cleaner or a wet mop.
5.1.5. Ventilation
Local ventilation should only be considered as a means of reducing chemical hazards when other
means have failed. There are cost-effective ways of improving ventilation.
Use proper fans
Apart from those used for ventilating workstations, fans may be utilized to remove dangerous
substances from the workplace. Contaminated air can be pushed or blown outside by having more
open windows. A few points should be considered:
There should be no obstacles between the fan and opening. Anything in the way
significantly reduces the desired effect.
231
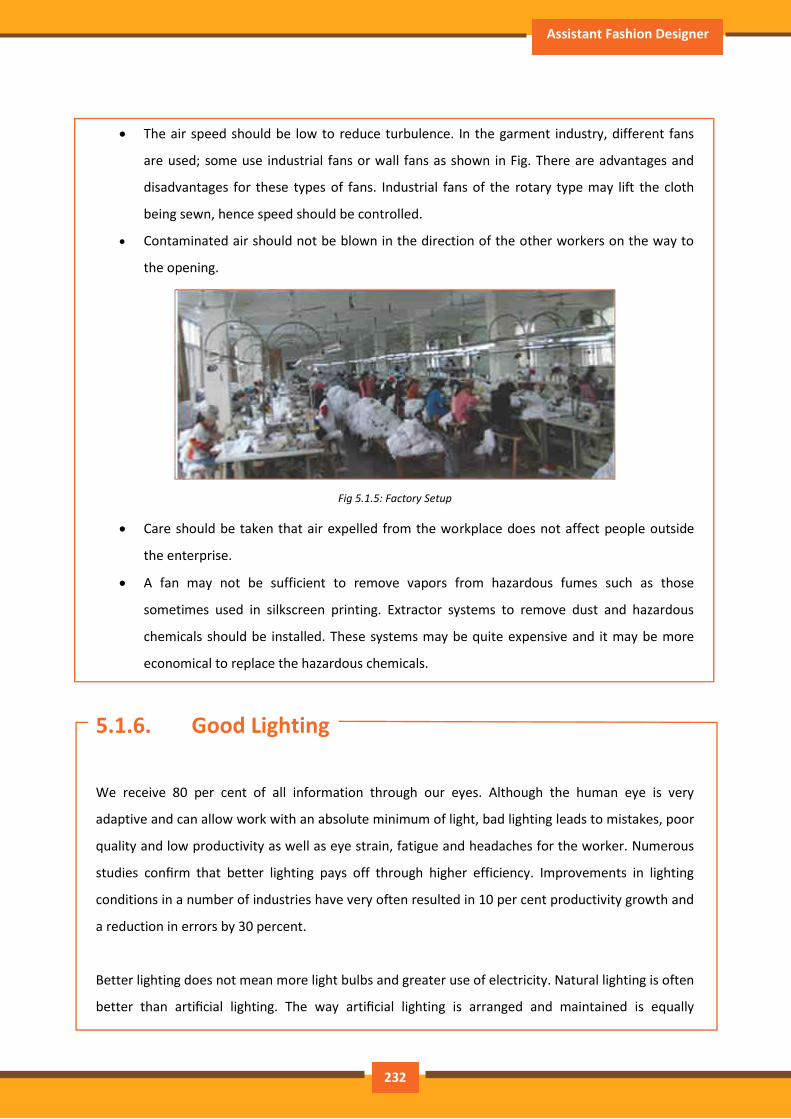
Assistant Fashion Designer
The air speed should be low to reduce turbulence. In the garment industry, different fans
are used; some use industrial fans or wall fans as shown in Fig. There are advantages and
disadvantages for these types of fans. Industrial fans of the rotary type may lift the cloth
being sewn, hence speed should be controlled.
Contaminated air should not be blown in the direction of the other workers on the way to
the opening.
Fig 5.1.5: Factory Setup
Care should be taken that air expelled from the workplace does not affect people outside
the enterprise.
A fan may not be sufficient to remove vapors from hazardous fumes such as those
sometimes used in silkscreen printing. Extractor systems to remove dust and hazardous
chemicals should be installed. These systems may be quite expensive and it may be more
economical to replace the hazardous chemicals.
5.1.6. Good Lighting
We receive 80 per cent of all information through our eyes. Although the human eye is very
adaptive and can allow work with an absolute minimum of light, bad lighting leads to mistakes, poor
quality and low productivity as well as eye strain, fatigue and headaches for the worker. Numerous
studies confirm that better lighting pays off through higher efficiency. Improvements in lighting
conditions in a number of industries have very often resulted in 10 per cent productivity growth and
a reduction in errors by 30 percent.
Better lighting does not mean more light bulbs and greater use of electricity. Natural lighting is often
better than artificial lighting. The way artificial lighting is arranged and maintained is equally
232
Participant Handbook
important. For example, a change in the visual background can enable a worker to perform a task
efficiently, which otherwise would require tripling the lighting level.
Lighting requirements are dependent on three main factors:
The nature of the task
The sharpness of the worker's eyesight
The environment of the working area
For example, a sewer needs concentrated light at needle point, so needle lights should always be
fitted. A worker packing garments requires more overall lighting; in many cases packers work on
special tiered work tops, where lights are built into the station. Age is also important: an older
worker may need twice as much light as a younger one.
These factors make it difficult to calculate the required level of lighting using instruments and Figs.
However, you can learn much from going around the workplace, observing the workers and asking
them about their visual problems. If you see workers adopting an awkward posture, with their eyes
very close to their work, it is very likely that there is a visual problem. It is important to identify the
cause. For example, if there is a naked light in the worker's field of view, it definately reduces his or
her work efficiency. Dark ceilings, walls and floors reflect less light than paler ones.
The improvements may not have much impact if the workers' eyesight is insufficient. One study
conducted in a factory discovered that 37 per cent of workers wearing glasses needed a new
prescription and 69 per cent of those without glasses needed them. The same may be true for your
enterprise. Therefore, an eyesight test for all workers should be carried out. Even if some workers
do not follow advice about acquiring glasses, you will be aware of the problem and a possible reason
for low efficiency.
With these ideas in mind, guidelines are provided below which will help you improve lighting in your
factory.
233

Assistant Fashion Designer
5.1.7. Make full use of day light
Natural light is the best and cheapest source of
illumination, but very often small enterprises do not
make full use of it. Measure the surface area of your
shop-floor and of the windows and skylights. If you
do not have at least one-third as much window
surface as floor surface, your workers are probably
not benefiting fully from natural light. Be careful,
however: windows and skylights provide heat as well as light in hot weather (and cause heat loss in
cold weather), and daylight varies depending on the season.
When thinking about fitting new windows and installing skylights, remember that the higher the
window, the more light it gives. Skylights can give double the light of a low window, and low
windows tend to get blocked by machines or storage containers. If your factory doesn't have
skylights, consider replacing one or more opaque roof panels with translucent plastic.
Well-chosen paint colors and finishes on the ceiling, walls and equipment can help to cut lighting
bills by one-quarter. At the same time, this helps to produce better visual conditions and a pleasant,
cheerful working environment which encourages high standards of cleanliness and organization.
Gains can be achieved from: lower losses of reflected light, better light diffusion and reduction of
brightness contrast. In order to spread reflected light diffusely and evenly throughout the interior,
ceilings should be as near white as possible. The matt finish of whitewash is very good. Many
enterprises are adopting white tile ceilings. To avoid harmful glare, don't use bright, shiny, gloss
paint for walls. Pale colors are better than white. A slightly darker colour below eye level is helpful.
Lack of regular cleaning can result in the loss of at least 10 to 20 per cent of light. Special care should
be taken to clean skylights, which are sometimes difficult to reach.
Fig 5.1.6: Make full use of daylight
234
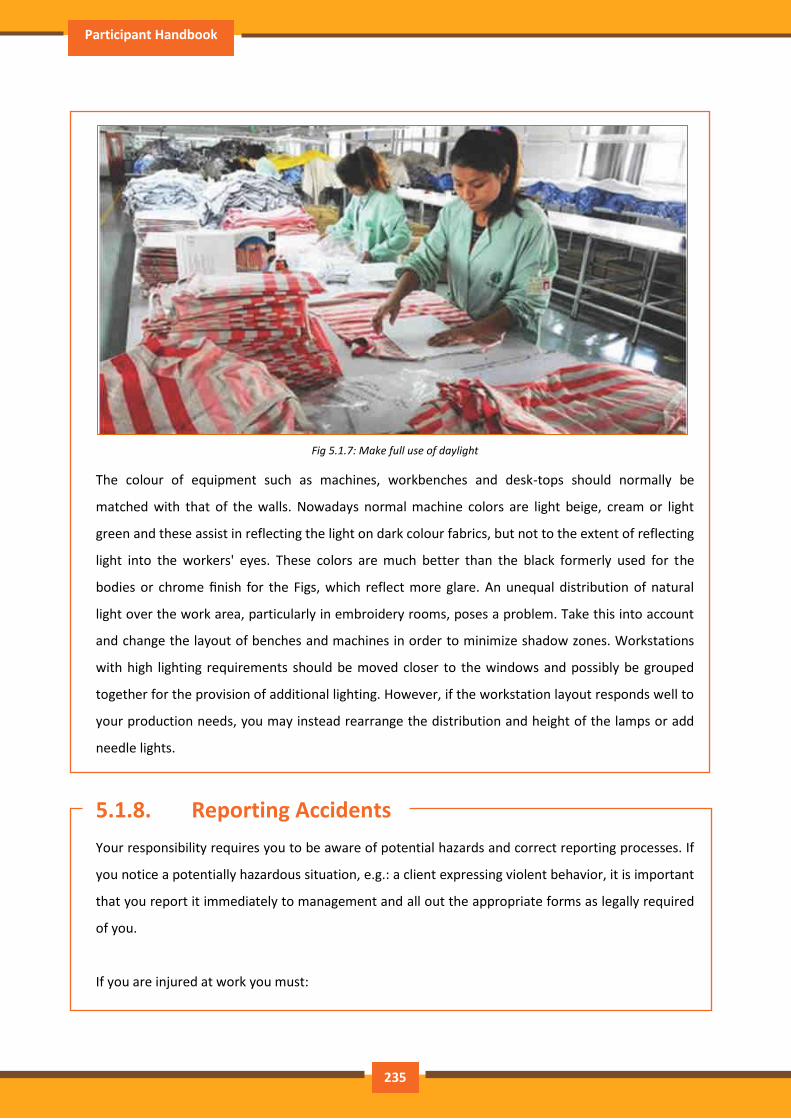
Participant Handbook
Fig 5.1.7: Make full use of daylight
The colour of equipment such as machines, workbenches and desk-tops should normally be
matched with that of the walls. Nowadays normal machine colors are light beige, cream or light
green and these assist in reflecting the light on dark colour fabrics, but not to the extent of reflecting
light into the workers' eyes. These colors are much better than the black formerly used for the
bodies or chrome finish for the Figs, which reflect more glare. An unequal distribution of natural
light over the work area, particularly in embroidery rooms, poses a problem. Take this into account
and change the layout of benches and machines in order to minimize shadow zones. Workstations
with high lighting requirements should be moved closer to the windows and possibly be grouped
together for the provision of additional lighting. However, if the workstation layout responds well to
your production needs, you may instead rearrange the distribution and height of the lamps or add
needle lights.
5.1.8. Reporting Accidents
Your responsibility requires you to be aware of potential hazards and correct reporting processes. If
you notice a potentially hazardous situation, e.g.: a client expressing violent behavior, it is important
that you report it immediately to management and all out the appropriate forms as legally required
of you.
If you are injured at work you must:
235
Assistant Fashion Designer
Report the injury to management as soon as possible and certainly within 24hours.
Seek proper treatment for your injury.
Always work in a safe manner to prevent accidents from occurring in the first place. Make sure that
you have been given adequate information and on-the-job training about the first aid facilities and
services available in your workplace, including:
Where to find first aid kits.
Location of first aid rooms.
Complete, up-to-date contact details of trained first aid officers in the workplace procedures
for critical accidents – such as who should be responsible for calling.
The ambulance/doctor/nurse and what is the best method of contact, measures for
evacuation of the injured person/s.
Emergency procedure for the elimination of life-threatening chemicals commonly used in
the workplace.
Universal precautions for the control of infection.
Who to contact for debriefing/psychological support.
Reporting of incidents and accidents is required under the Work Health and Safety (WHS) legislation.
Workplaces tend to have well developed reporting procedures in place, which aim to fully
understand the accident/incident and prevent any future occurrences through investment in injury
prevention, based upon accurate data. Reporting and recording should also facilitate costing and
associated financial loss.
Always report an accident to management immediately. There should be a form at each workplace
that you (or the person involved) and any witnesses can fill out, where possible, otherwise. The form
should cover the following areas:
Description of the occurrence: What was the event that occurred, which required this
report to be completed?
Nature of injury or disease: Select the most appropriate description from a range of
options. What injury or disease happened as a result of the occurrence?
236
Participant Handbook
First aid, medical treatment or hospital admission:
This section asks for a description of what was done
to treat the injury or disease.
Part of the body affected: Tick off which part or
parts of the body were affected as a result of the
occurrence.
Source of injury: What actually caused the person to
be injured or acquire a disease? This could be a piece
of machinery or other hazardous materials for
example.
Probable cause or causes of injury: How was the
source listed above actually responsible for the injury?
Investigation: This asks a series of questions that seek to find out why the person has been
injured or has acquired a disease.
Notification checklist: This checklist makes sure that everyone who should have been
contacted regarding the matter has been contacted and asks whether appropriate action
has been taken by the authorities.
Preventative action: This asks whether or not any action has been taken to prevent the
occurrence from happening again.
Witness details: This part is to be filled out if someone saw the occurrence happen. It is
essential if any sort of legal action is to be taken.
5.1.9. Mock Drill/ Evacuations
Fire safety and evacuation plans outline staff duties and responsibilities in time of emergency.
Ongoing training is required to help ensure that staff is aware of those duties and responsibilities.
Fire drills serve as an opportunity for staff members to demonstrate, under simulated fire
conditions, that they can perform those duties and responsibilities safely and efficiently. It’s also a
time for them to show that they are aware of defend-in-place strategies and can take advantage of
your facility’s fire safety features and egress facilities to protect the people in their care.
Fig 5.1.8: Safety Signage
237
Assistant Fashion Designer
Fire drills are more than an exercise designed to evaluate staff response to a simulated emergency.
They are also a test of your facility’s fire safety/evacuation plans and staff training programs. Not all
fire drills run smoothly. That’s okay, so long as staff and management learn from them and correct
mistakes made. It’s important, therefore, that there be a critique of each drill so that any problems
encountered can be addressed. Perhaps the problems are due to incomplete or outdated fire
safety/ evacuation plans. Perhaps there’s a need for additional staff training.
The two essential components of a fire preparedness plan are the following:
1. An emergency action plan, which details what to do when a fire occurs.
2. A fire prevention plan, which describes what to do to prevent a fire from occurring.
5.1.10. Work-related welfare facilities and benefits
Work-related welfare facilities are often ignored. Who cares about toilets, first-aid kits, lunch rooms
or lockers? What do they have to do with the hard realities of production?
One answer is that workers care. During each working day, workers need to drink water or some
other beverage, eat meals and snacks, and wash their hands, visit a lavatory, and rest to recover
from fatigue. This can be difficult or easy, unpleasant or comfortable, a health risk or an aid to
hygiene and nutrition. The essential facilities in your factory show whether you care about workers
more than you care about your machines. Worker dissatisfaction can be costly.
Another good reason is that extra efforts for better facilities are often appreciated far beyond the
time and money invested, Work-related facilities help workers to overcome problems which are
important to them. Let workers express their priorities for improvements and ask them to take
responsibility for the work which is required. You may be surprised at the results.
A small enterprise can be a community where workers are loyal, with good industrial relations and
high morale, it can also be a place where workers look for the first opportunity to leave and care
little about the owner's success. Which kind of enterprise do you want? The series of low-cost
facilities that follows will help to retain the best workers.
238
Participant Handbook
5.1.11. Essential Facilities
Drinking water
Drinking water is essential for all workers; if this is not provided, they become thirsty and gradually
dehydrated. This greatly increases fatigue and lowers productivity, especially in a hot environment.
Place water containers near each group of workers, or provide taps or fountains with clean water in
a central place. This will minimize the time lost in going to get a drink. However, drinking water
should not be placed in washrooms or toilets, near dangerous machines or other hazards, nor in
places where it can be contaminated by dust, chemicals or other substances.
If there is any doubt about contamination, water must be thoroughly boiled or properly filtered or
treated. Before starting to use a new water source for drinking purposes, it is advisable to have it
tested to make sure it conforms to the national standard for drinking water. The design,
construction and operation of deep wells for the extraction of ground water should be subjected to
the provisions of existing water codes. Piped water should only be used when a hygienic water
supply is guaranteed. A clear distinction between potable and non-potable water taps should be
made and a "Safe Drinking Water" sign should be put up near to each tap.
Drinking water vessels should be made from materials that can easily be cleaned, Even if the vessels
are filled with fresh water, the water inside, if kept for even a short time, can become unhygienic. It
should therefore be changed frequently.
It is also important to make sure that drinking water is cool. If a water cooler is too expensive, the
water vessels can be placed in the coolest place in the factory. They should not be left uncovered,
under the sun or in a hot place. Drinking fountains for production areas are very advantageous from
a hygienic point of view. They can be fitted with a jet or bubbler outlet and/or goose-neck or other
outlet for filling drinking cups. The fountain should be free from sharp angles and designed to
prevent unnecessary splashing. Water outlets should be above the rim of overflow level so that they
will not be contaminated with waste water. The water outlet should be shielded to prevent the lips
of a drinker from being placed on it. Drinking water containers should be attended by a designated
person. Containers should be made of impermeable materials. A cooling device would be an
advantage. (Unglazed pottery can be used, due to its unique cooling effect, in dust-free places.)
Containers should be provided with suitable covers, and kept in a cool place protected from the sun.
The water must be changed frequently.
239
Assistant Fashion Designer
To avoid the possible spread of infection, it is preferable to use disposable cups or to provide
separate cups for each worker and to arrange for regular washing. When containers are used, it is
important to clean them regularly. Cleaning and other necessary maintenance tasks should be
assigned to a specific person.
In addition, the provision of a facility for boiling water will enable people to make coffee or other
hot beverage during breaks. Hot water is required if the enterprise has a childcare facility.
5.1.12. Sanitary Facilities
There are several reasons why the provision of washing facilities is important:
Dirt and grime can be ingested and cause sickness or disease; they are, in any case,
unpleasant and de-motivating.
Washing is required for basic hygiene after using the toilet.
Washing is a necessity when women have their monthly periods.
Apart from the obvious basic need, sanitary facilities are required by law. Customers often create an
impression of an enterprise through the quality of its sanitary facilities.
There should be a sufficient number of sanitary facilities on the premises and each should be
conveniently located to avoid long walks, waiting and frustration. The law of your country must be
followed, but the following are the minimum requirements:
One toilet is required for up to 5 men; two toilets for six to 40 men
One separate toilet for up to 5 women and two toilets for six to 30 women
One wash-basin for every 15 workers
Ideally, there would be a separate toilet for men and women. These should be characterized as
follows:
The toilet bowl must be free from stain or odor and function properly
The walls of the toilet must be clean and tiles unstained
The ceiling of the toilet must be free from cobwebs and dust
240
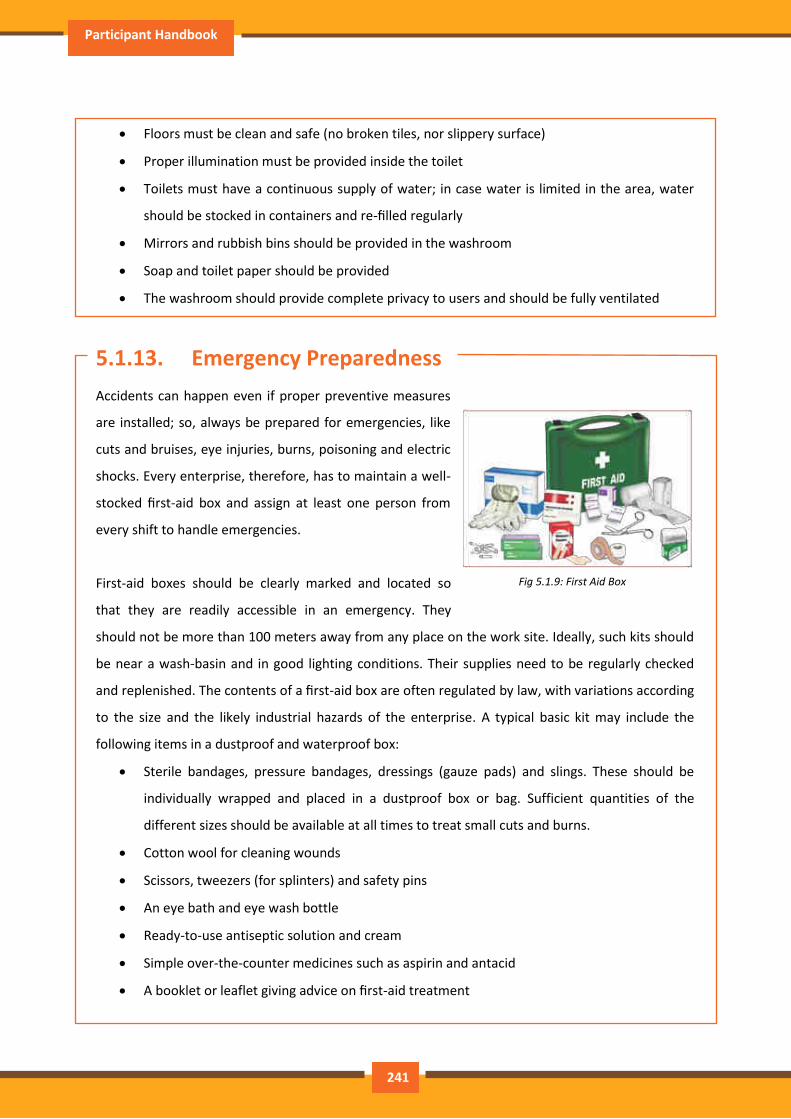
Participant Handbook
Floors must be clean and safe (no broken tiles, nor slippery surface)
Proper illumination must be provided inside the toilet
Toilets must have a continuous supply of water; in case water is limited in the area, water
should be stocked in containers and re-filled regularly
Mirrors and rubbish bins should be provided in the washroom
Soap and toilet paper should be provided
The washroom should provide complete privacy to users and should be fully ventilated
5.1.13. Emergency Preparedness
Accidents can happen even if proper preventive measures
are installed; so, always be prepared for emergencies, like
cuts and bruises, eye injuries, burns, poisoning and electric
shocks. Every enterprise, therefore, has to maintain a well-
stocked first-aid box and assign at least one person from
every shift to handle emergencies.
First-aid boxes should be clearly marked and located so
that they are readily accessible in an emergency. They
should not be more than 100 meters away from any place on the work site. Ideally, such kits should
be near a wash-basin and in good lighting conditions. Their supplies need to be regularly checked
and replenished. The contents of a first-aid box are often regulated by law, with variations according
to the size and the likely industrial hazards of the enterprise. A typical basic kit may include the
following items in a dustproof and waterproof box:
Sterile bandages, pressure bandages, dressings (gauze pads) and slings. These should be
individually wrapped and placed in a dustproof box or bag. Sufficient quantities of the
different sizes should be available at all times to treat small cuts and burns.
Cotton wool for cleaning wounds
Scissors, tweezers (for splinters) and safety pins
An eye bath and eye wash bottle
Ready-to-use antiseptic solution and cream
Simple over-the-counter medicines such as aspirin and antacid
A booklet or leaflet giving advice on first-aid treatment
Fig 5.1.9: First Aid Box
241
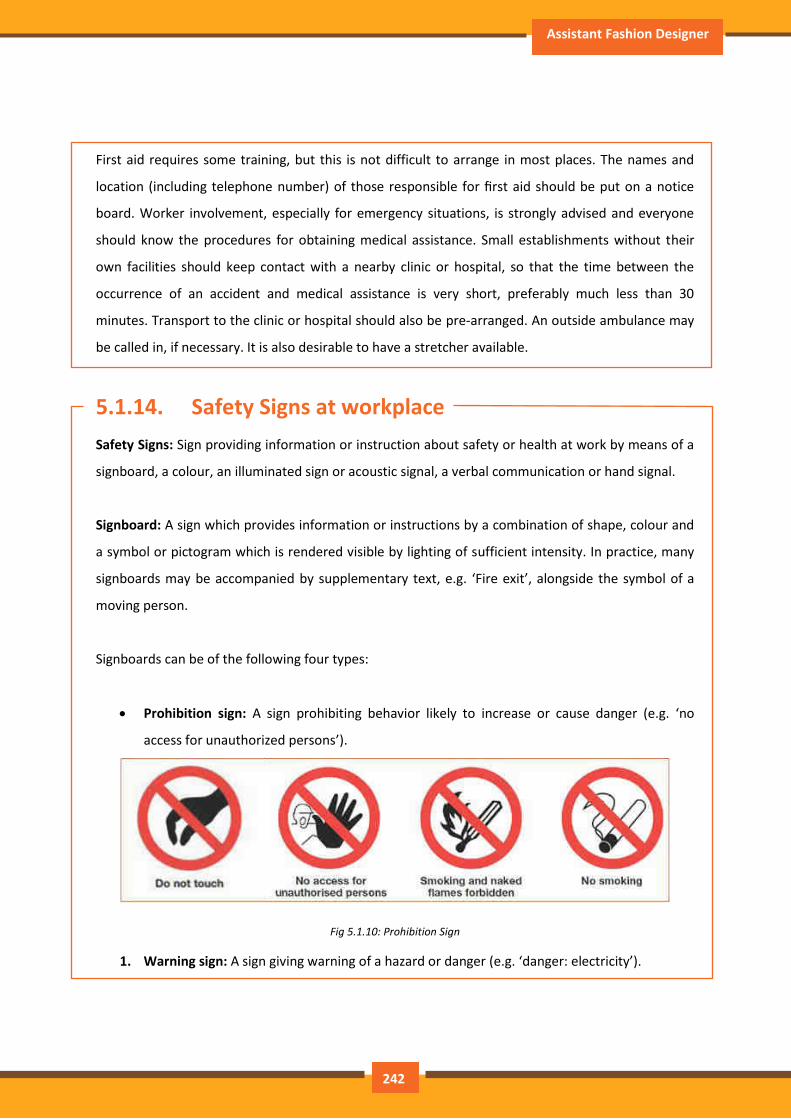
Assistant Fashion Designer
First aid requires some training, but this is not difficult to arrange in most places. The names and
location (including telephone number) of those responsible for first aid should be put on a notice
board. Worker involvement, especially for emergency situations, is strongly advised and everyone
should know the procedures for obtaining medical assistance. Small establishments without their
own facilities should keep contact with a nearby clinic or hospital, so that the time between the
occurrence of an accident and medical assistance is very short, preferably much less than 30
minutes. Transport to the clinic or hospital should also be pre-arranged. An outside ambulance may
be called in, if necessary. It is also desirable to have a stretcher available.
5.1.14. Safety Signs at workplace
Safety Signs: Sign providing information or instruction about safety or health at work by means of a
signboard, a colour, an illuminated sign or acoustic signal, a verbal communication or hand signal.
Signboard: A sign which provides information or instructions by a combination of shape, colour and
a symbol or pictogram which is rendered visible by lighting of sufficient intensity. In practice, many
signboards may be accompanied by supplementary text, e.g. ‘Fire exit’, alongside the symbol of a
moving person.
Signboards can be of the following four types:
Prohibition sign: A sign prohibiting behavior likely to increase or cause danger (e.g. ‘no
access for unauthorized persons’).
Fig 5.1.10: Prohibition Sign
1. Warning sign: A sign giving warning of a hazard or danger (e.g. ‘danger: electricity’).
242
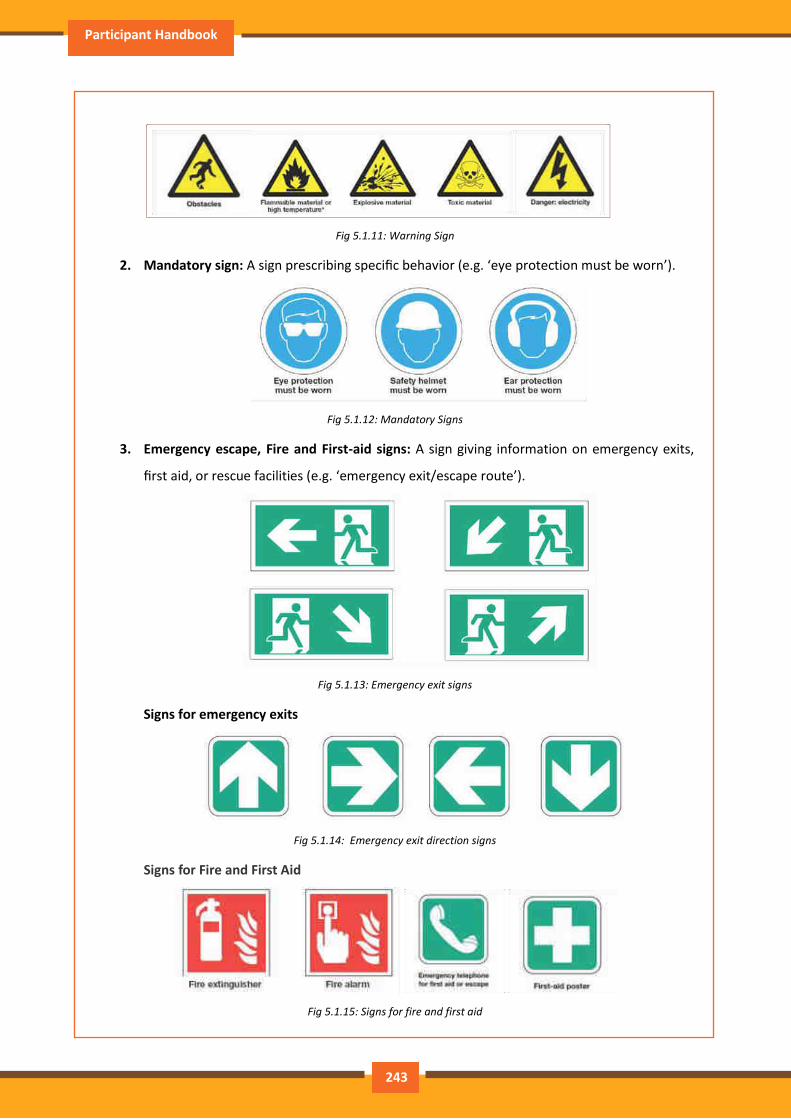
Participant Handbook
Fig 5.1.11: Warning Sign
2. Mandatory sign: A sign prescribing specific behavior (e.g. ‘eye protection must be worn’).
Fig 5.1.12: Mandatory Signs
3. Emergency escape, Fire and First-aid signs: A sign giving information on emergency exits,
first aid, or rescue facilities (e.g. ‘emergency exit/escape route’).
Fig 5.1.13: Emergency exit signs
Signs for emergency exits
Fig 5.1.14: Emergency exit direction signs
Signs for Fire and First Aid
Fig 5.1.15: Signs for fire and first aid
243

Assistant Fashion Designer
6. Comply with Industry, regulatory and organizational
requirements
Unit 6.1 – Comply with Industry, regulatory and Organisational
Requirements
AMH/N 0104
Participant Handbook
Fig 6.1.1: Compliance of Organization
UNIT 6.1: Comply with Industry, Regulatory and Organizational
Requirements
Unit Objectives
At the end of this unit, participants will be able to:
• Carryout work functions in accordance with legislation and regulations, organizational
guidelines and procedures.
• Seek and obtain clarifications on policies and procedures, from your supervisor or other
authorized personnel.
• Apply and follow these policies and procedures within your work practices.
• Provide support to your supervisor and team members in enforcing these considerations.
• Identify and report any possible deviation to these requirements.
6.1.1. Defining Compliance for Your Organization
According to Merriam Webster the dictionary definition of
compliance is as follows:
The act or process of complying to a desire, demand,
proposal, or regimen, or with coercion. Conformity in
fulfilling official requirements. A disposition to yield to
others. The ability of an object to yield elastically when a
force is applied.
Supervisory compliance for industries, world- wide falls under the second definition. There are
many managers, general councils, and policy officers that would consent in agreement at any of
the other definitions as well. Let’s discuss, what is compliance? Whether an organization is
confronting an external regulatory compliance from a government agency, or seeks to comply
with its own organizational mandates, policies or procedures, compliance in actuality means
conforming to requirements and a proof that your organization has done so. This is usually
attained by the scheming and development of managerial policies that will map out the
projected code of conduct.
245
Assistant Fashion Designer
From a policy’s point of view, there are many aspects that impact an organization’s policies,
including legislative and regulatory requirements, organizational best practices, and the market
demands. If we look at government/ public sector agencies, financial service businesses, and
healthcare providers - we find that they are controlled and must develop internal policies in
order to ensure compliance. The actual trial comes from the juncture of practice with the laid
policy.
After that, they must adopt ways to enforce those policies and measure their effectiveness.
Initially this may seem to be an easy and convenient task. But the dilemma is creating a policy –
without any mechanism, may it be manual, automated, or third-part, to measure and monitor
compliance of the policies is very difficult. In order to build effective policies, we must not only
have an understanding of the statutory requirements that will shape. The policy within our
organizations, but how these policies relate to the business practices, the workforce, the
methodologies of operations and the technologies within the corporation.
Irrespective of the requirements to which an organization must obey, a well-planned model is
essential which will be one that assimilates strategies with their people, processes, and
technology. This includes education, monitoring, and enforcement. Organizations should look to
use machineries and to develop procedures that make it easier to do the right thing or to simply
disregard the policy all together. In conducting performance audits, an assessment should be
made of compliance with applicable laws and regulations when necessary to satisfy the audit
objectives. The auditor should design the audit to provide reasonable assurance of detecting
illegal acts that could significantly affect audit objectives. The auditor also should be alert to
situations or transactions that could be indicative of illegal acts that may have an indirect effect
on the audit results.
6.1.2. Significance of Compliance in Indian Garment
Industry
Compliance is the standard for the product which ensures that it is aligned to its industry’s
qualitative demands. This also includes audits and inspections which are crucial to a proper and
formal work environment. Compliance and its demand are rapidly growing in today’s industrial
scene since globalization of manufacturing standards has also created a demand for ethically
246
Participant Handbook
created products. This standard of compliance is crucial because of the increase in export of
garments from India.
Social Compliance
The treatment of the employees by its business constitutes social compliance. This also includes
their environment and their personal perspective on social responsibility as an employee. The
treatment of employees regarding wages, work conditions and working hours. A compliance audit
is necessary in order to determine if the company meets standard environmental laws.
Compliance Audit
Process Safety Management, Risk Management Programs, and Process Security Management are
all organized and provided by audits and assessments. Compliance and its verification are carried
out with audits that focus particularly on these policies and procedures. The design and
implementation of these audits ensures this compliance. Additionally, all sorts of deficiencies can
be addressed and solved through corrective action.
In India, compliance audit consists of a thorough examination of orders, regulations, rules and
directions for dealing with prudence, legality, transparency and adequacy. It is the job of auditors
to collect information by reviewing documents, visually observing the site and staff interviews.
This data is cross checked with applicable regulations and permits to ensure how well the
operation is when sieved through applicable and required legalities.
There are three main phases of compliance audit in India:
Pre-audit: It includes planning and organizing the audit; establishing the audit objectives, scope
and etiquette; and reviewing the design of the program by inspecting documentation
On-site audit: It includes conducting personnel interviews, reviewing records, and making
observations to assess program implementation
Post-audit: It includes briefing the management on audit findings, and preparing a final report
Therefore, Indian apparel manufacturers need to follow Government guidelines, and social
compliance standards not only within their sphere of operations, but also insist their vendors,
distributors, and other collaborators involved in the supply chain to do the same.
247
Assistant Fashion Designer
6.1.3. Core Labor Standards
International labor standards have grown into a wide-ranging system of gadgets on work and
social policy, backed by an administrative system intended to address all sorts of complications in
their submission at the national level
Removal of Discernment in Employment and Occupation
Freedom of Association
Right to Collective Bargaining
Elimination of all Forms of Forced or Compulsory Labor
Effective Abolition of Child Labor
Apparel industry players would ensure that labor contractors don’t involve forced labor or child
labor and get the supply chain of the suppliers audited. Apparel Export Promotion Council
(AEPC), a top organization of Indian apparel exporters, has envisioned a garment factory
compliance program ‘Disha’ -Driving Industry towards Sustainable Human Capital Advancement.
The prime objective of this body is to make India a global benchmark for social compliance in
apparel Industrial. This Common Compliance Code design will prepare the Indian apparel
industry on a mutual platform towards a more social and ecologically compliant industrial
atmosphere.
6.1.4. India Adopting Universal Standards on Child Labor
The compliance level of garment factory is very high for Indian exporters. To ensure that all
standards are being complied with, the big international companies, mindful of their branding,
often generate and follow their own compliance standards. Numerous U.S. companies have
incorporated “child labor” in their code of conduct, due to tenacious signal of child exploitation
in the industry.
6.1.5. Common Compliance Code
There is compliance exhaustion in the Apparel Industry, although they are trading with the global
brands, the apparel sellers still don’t consent that compliance is an integral management
248
Participant Handbook
practice. The Indian apparel export industry has been indisputable to implement zero tolerance
on child labor and cleanse the supply chain.
“This common compliance code will not only give the opportunity for the industry to negate
international claims against child labor promotion in the garment industry, but will also help to
improve the image of the industry and win more international businesses,” as per PremalUdani,
Chairman, Apparel Export Promotion Council (AEPC).
6.1.6. AEPC-Disha
Apparel Export Promotion Council (AEPC), the peak body of Indian apparel exporters, has
launched an agenda, named it “DISHA” (Driving Industry towards Sustainable Human Capital
Advancement) with a primary objective to aid garment exporters comply with global standards
referring to child labor.
This program is directed to encourage members to follow better social practices. These practices
will give them a competitive edge in the global market. That market, where industrial compliance
code is progressively becoming an important factor in buying decision.
Responsibilities of Disha member factory
DISHA member factory is dedicated to stick to the DISHA common code of conduct (CCC)
Principle on child labor and takes the responsibility to:
Comprehend and classify applicable laws and acts.
Understand general industry practices and perception.
Establish management systems for nourishment and continual improvement.
Disha-CCC for child labor
The CCC- Common Code of Conduct is based on various central and state laws. Some of the laws
that stipulate situations on the subject of employment of children and young persons are as
follows:
No child who has not completed fourteenth year of age shall be required or allowed to work
in any occupation in the factory.
249
Assistant Fashion Designer
Fig 6.1.2: AEPC Logo
Persons who have completed fourteenth, but not eighteenth, year of age are not employed in
hazardous or dangerous operations.
No female young person shall be required or allowed to work in any factory except between
8.00 A.M. and 7.00 P.M.
Young people are required to work only after obtaining a ‘certificate of fitness’ from a government
medical officer not below the rank of an Assistant Surgeon. The fee for obtaining this certificate
would be borne by the factory.
It will be possible for the DISHA member’s factory to follow the Indian Law, re-frame policies and
better practice aimed to improved environmental and social impact on factories culture, by applying
DISHA CCC.
6.1.7. Role of AEPC in Indian Garment Industry
The apparel industry of India is one of the significant
export segments. It enjoys a good global ranking because
of its quality and price affordability. But there is an
emerging need to increase effectiveness in the social
domain as the industry faces various labor, compliance
and background situations.
Being a labor rigorous industry, social compliance is
becoming an integral issue for this sector. The apparel export
promotion council of India (AEPC) under the textiles ministry is plateful domestic textile.
Trade to follow the global norms through development and application of tools to help workshops
certify, monitor and improve universal standards.
AEPC’s assistance to garment exporters
AEPC brings about invaluable backing to Indian garment exporters and also the international buyers
who select India as their favored tracing terminus for garments. The body today has grown-up to
become the most powerful connotation for promotion and facilitation of garment exports. With an
250
Participant Handbook
Fig 6.1.3: Disha Logo
objective of structuring a strong ground for Indian exporters, AEPC is devoted to provide various
podiums which would help in increasing garment exports.
AEPC- Disha Initiative
AEPC in its unceasing efforts to make India a preferred sourcing end point plans to undertake a
series of activities to reinforce the compliance code volume in the Indian export garment industry.
The project DISHA has been originated with the aim to merge the Indian apparel manufacturers for
mutual co-operation, global configuration and resource optimization. It also focuses to create and
adopt management systems to address human and ecological encounters.
Purpose of Disha programme
To increase mindfulness among apparel
companies on social and environmental
standards based on applicable Indian laws.
To progress effectiveness of apparel
manufacturer.
To promote a management system oriented thinking and Approach for engaging with social
and environmental issues.
To promote a progression-based certification system that supports quantity of progress
towards adoption and upkeep of yardstick practices in the Disha Common Code of Conduct
(Disha-CCC).
Main components of Disha
Ecological, societal and security linked compliance issues are increasing importance in fabrics and
apparel sector. The competiveness in the sector moves to new embryonic markets. Improved social
sustainability of the industry and creating an atmosphere for improved compliance principles can
give India the mandatory edge over its competitors in the global market. Some of the major
mechanisms of the program Disha are:
Disha Certification: A Disha certificate shall be awarded to the factory by AEPC upon successful and
agreeable application of the social and biological management system.
Common Code of Conduct (CCC): AEPC-Disha’s common code of conduct is intended to lead the
Indian apparel manufacturers on legal, social and environmental issues. The program creates the
251
Assistant Fashion Designer
values for business responsibility, based on applicable Indian laws and International labor
organization (ILO) resolutions approved by the Government of India.
Factory Capacity Building and Training: The common code of conduct includes orientation for the
owners of apparel factories and capacity building for factory-nominated personnel on Disha-CCC
and towards applying the management systems for Disha-CCC.
Baseline and Impact Assessment: Initially, a factory shall undergo a pre interference baseline
evaluation for gap analysis against the Disha-Common Code of Conduct (CCC) ideologies and
benchmarks. Post intervention assessments on operationalization of the management systems in
the factory shall be undertaken.
6.1.8. Indian Garment Industry and Social Responsibility
The apparel industry of India is one of the biggest segments among the various industries
existing. It is also one of the oldest and an eminent industry in terms of output, investment and
employment. A sector which has a global market share and has earned reputation for its
permanence, worth and magnificence. The industry is growing at a fast pace with change in
customer taste and inclinations. There are numerous factors impacting a change in customer
preferences. Few of them are here:
Rise in disposable incomes
Government policy focused on fast-track growth
Convenience of shopping at departmental stores and shopping malls
Increasing demand for branded apparels and fashion accessories
Boom in the retail industry
6.1.9. International Labor Standards
The Indian apparel industry had established itself substantially not just in the domestic but global
market too. The improved density from international apparel buyers to comply with labor
principles and rights in Indian garment factories has resulted into a vast number of labels and
code of conduct.
252

Participant Handbook
6.1.10. Corporate Social Responsibility
Corporate social responsibility (CSR) fundamentally connotes that the establishment should work
in a principled way. It should work in the best interest of the parties associated with it. The
notion of social accountability and responsibilities in Indian apparel sector is fastening
acceptance. Increasing number of companies is tiresome to work in a mode to defend the
interests of the workforce, clients, contractors and the society.
6.1.11. Social Responsibility in the Garment Industry
Garment firms have social responsibility associated with workforce and the surroundings. Social
responsibility in the global clothing industry gives a deep examination of labor practices and
values. But the ways by which the various organizations take up to accomplish their social
accountability may be different. A garment factory can fulfill its social responsibility in the
following manner:
By creating and providing a challenging environment to the workforce.
Creation and provision of fair book of policies for any kind of employee dispute, if any.
Affirm a safe and positive working environment for the employees.
Prohibit child labor and abolish any kind of child abuse.
Provision of equal opportunities to the employees to voice their feedback and have an
effective policy for the solution of dispute.
Ensure ethical recruitment, training, remuneration, appraisal and other policies.
6.1.12. Indian Apparel Trade and Compliance Standards
The Indian garment industry is aiming to reach 7.5 billion by the end of 2012, a Fig. that is
practically double the size of the last profit intended by the Indian Chamber of Commerce (ICC).
With the increasing globalization, a lot of prominence has been placed on global compliance
standards in the garment industry. Factories involved in the international trade must keep a
proper check of the garment factory compliance at regular interludes. Therefore, every apparel
export business needs to have a proper understanding of compliance rules for foreign trade.
253
Assistant Fashion Designer
6.1.13. Why Code of Ethics is Required
The code of ethics is concerned with the quality of the products and services from the
workstations along with the working environment that should meet the provisions of audits and
assessments. If followed sincerely, these ethics will result into:
Cumulative national affordability in terms of social compliance.
Growing competitiveness of small scale industrialists.
Dropping burden on manufacturers
6.1.14. Working Hour and Wage Rate Compliance
Garment workshops should ensure a confirmation that employees should get minimum
wages as per the domestic law and according to their working hours spent by them in the
industry.
Employer should confirm an equal wages to both men and women employees who are
performing the same work or work of a similar nature.
Workforce employed for more than nine hours on any day or for more than 48 hours in any
week, shall be qualified to wages at premium legal rates for such overtime work.
Every employee must be entitled to one holiday in a week.
Whenever a worker is required to work on a weekly holiday, he is to be allowed a
compensatory holiday for each holiday so lost.
6.1.15. Workplace and Work Environment Compliance
Businesses units should see that they are providing a proper clean, hygienic, well-ventilation,
sufficient light and air to provide the workforce with standard work environment. A comfortable
workstation with a clean and neat workplace is a mandate.
Indian garment industries should ensure that the workers are given a comfortable sitting chair
with back support and proper leg space.
254
Participant Handbook
6.1.16. Non-discrimination Compliance
Under federal and state laws, it is in contradiction of the law for proprietors to differentiate
staffs and job applicants and/or harassment to occur with their organizations. It is also against
the law to treat people unethically or bother them because of the age, disability, homosexuality,
marital or domestic status, race, sex or transgender status of any relative, friend or colleague of
a job applicant or employee Employers, managers and supervisors must treat all their job
applicants and employees on the basis of their individual merit and not because of irrelevant
personal characteristics. They must also do their best to make sure that their employees are not
harassing any other job applicant or employee.
6.1.17. Social Compliance in India
Religion, community, culture or belief characteristics should never be the basis of distinction
among employees by the organization. All the terms and conditions of employment should be
based on a person’s ability to do the job. The mandate for social compliance is growing every
day. One can accomplish a dynamic and vigorous compliance system only when the workforce is
provided with an equal stand to voice their concern and have consultative instrument at the
workplace.
The Apparel Export Promotion Council of India (AEPC), a summit framework of Indian apparel
exporters, runs all social compliance services to meet international global standards. This council
trains and monitors industrial unit to upgrade the factory conditions and labor values and
standards.
6.1.18. Health and Safety Compliance in Indian Garment
Industry Apparel industry has won increased attention from consumers, social workers, welfare
organizations and trademarked international buyers. Many global players are demanding that
their “code of conduct” should be complied with, before entering into an agreement. Nowadays,
continuous observance to quality standards and employee contentment has become significant
bounds for gauging the company’s performance.
255
Assistant Fashion Designer
Apart from the growing quality of outputs that meet transnational recognized standards, it is
essential for the suppliers to improve safety and health compliance code and provide proper
working atmosphere in their work locations.
Numerous overseas countries have established various international compliance standards on
safety and health compliance. Exporters should follow these codes to live on in the global
market. One should not under-estimate the benefits drawn from regular drilling of compliance
codes of conduct which can bring higher price of yields, less employee turnover rate, smooth
trade relation as well as global image and status.
6.1.19. Need for Compliance Codes
There is prominent impact of social compliance on company’s economic outcomes. Companies
should adopt compliance code to protect their goodwill and brand name in the market. The
Indian apparel industry needs to be hard-hitting on compliance rather than opposing with other
developing countries manufacturing low-cost garments.
6.1.20. Compliance Code Guidelines
Apparel factories ought to contemplate the below mentioned guidelines when complying with
safety and health compliance code standards:
Trades should comply with international standard code, such as ISO or importing countries
standard code to become competitive in international markets.
It is necessary for workers involved in loading and unloading operations.
Young adults (between 15 to 18 years) are not allowed to work on any dangerous machine
without sufficient training and supervision.
Ear plugs or muffs should be given in places with excessive sound such as generator rooms
and embroidery rooms.
Factories should have effective fire extinguisher with proper usage instructions.
Eye-wear and face shields should be a must, providing in areas with danger of flying objects,
sparks, glare, hazardous liquids and excessive dust.
256
Participant Handbook
Code to protect their goodwill in the market
This industry needs to be tough on compliance rather than challenging with other developing
countries manufacturing inexpensive garments. In India, the Apparel Export Promotion Council
(AEPC) is committed to legal compliance and ethical business practices and encourages
members/exporters to comply with all applicable laws and regulations of the country to meet
international compliance standards.
The council has designed a garment factory compliance program ‘Disha’ (Driving Industry towards
Sustainable Human Capital Advancement) that aims to spread awareness regarding the
importance of compliance among apparel exporters.
6.1.21. Role of Apparel Export Promotion Council in India
In India, the Apparel Export Promotion Council (AEPC) is committed to legal compliance and
principled business Practices. It encourages members/exporters to comply with all applicable
laws and regulations of the country to meet international compliance standards. Further, the
council has designed a garment factory compliance program ‘Disha’ (Driving Industry towards
Sustainable Human Capital Advancement) that aims to spread awareness regarding the
importance of compliance among garment exporters.
6.1.22. Compliance Code Guidelines for Indian Garment
Industry
The Indian apparel industry supports considerably to India’s export earnings. India has
industrialized as a major following destination for various buyers. The USA and the EU endure to
be the most domineering markets for Indian apparel industry, bookkeeping for about two-third
of India’s textiles exports. These countries have been demanding upon compliance to certain
social, environmental and safety standards and norms by the manufacture units involved in
export business. Corporate codes of conduct that discourses labor standards vary from
corporation to corporation and location to location. Some of the common Indian Garment
industry compliance code guidelines are:
257
Assistant Fashion Designer
Exporters must not be intricate in unfair labor practices but limited to interferences in
matters regarding freedom of association.
Exporters shall recompense workforce for all hours operated. Workers on a piece rate
payment scheme or any other incentive scheme should be paid according to that.
Exporters shall not illogically restrain the liberty of movement of workers, including
movement in canteen during breaks, using toilets, accessing water, or to access necessary
medical attention, as a means to maintain work discipline.
Exporters are about to offer workers with paid annual leaves as required under local laws,
guidelines and processes. Exporters shall not impose any undue limitations on workers’ use
of annual leave or taking any type of sick or maternity leave.
There shall be no alterations in workers remuneration for work of equal value on the basis of
gender, race, religion, age, nationality, sexual orientation, social political opinion, disability or
ethnic origin.
Exporters shall not threaten female workers with firing or any other employment conclusion
that adversely distresses their service status in order to avert them from getting married or
becoming pregnant.
Exporters shall confirm that proper ventilation systems are installed within their premises to
prevent airborne exposures which may affect the health of workers.
Members shall not custom any form of physical or mental, emotional violence, threats,
harassment, or abuse against workers seeking to form organizations or participating in union
activities, including strikes.
Workers shall be permitted to at least 24 successive hours of rest in every seven-day period.
If workers must work on a rest day, another successive 24 hours rest day must be provided.
Exporters shall pay workers at least the legal minimum wage or the usual industry wage, the
one that is higher. This indeed is the most essential code of compliance for Indian Industry.
Garment exporters must ensure that the minimum age requirement to unsafe employment shall
not be less than 14 years. This is the most significant concern in the country. Each worker has
the right to enter into and to terminate their employment freely. Indian apparel makers need to
follow all the compliance rules to comply with global standards. Often companies adopt industry
compliance codes to project a positive image and protect their goodwill in the market. The
Indian garment industry needs to be strong on compliance instead of competing with other
developing countries manufacturing inexpensive garments.
258
Participant Handbook
Indian apparel makers need to follow all the compliance rules to comply with global standards.
Often companies adopt industry compliance codes to project a positive image and protect their
goodwill in the market. The Indian garment industry needs to be strong on compliance instead
of competing with other developing countries manufacturing inexpensive garments.
6.1.23. India Complying with International Standards on
Child Labor Child labor has been a grave crime in India. It still exists. Children are in poverty, ignorance, and
corruption due to illiteracy. Child labor superfluities under many conditions such as discernment
(based on gender, ethnic, or religious issues), inaccessibility of educational and other substitutes,
weak enforcement of child labor laws, etc. Large global firms, conscious of their image, often set
up their own compliance standards for the exporters to ensure that all standards are being
complied with.
Various companies of U.S originality have included child labor in their code of conduct, due to
tenacious evidence of child exploitation in the industry. In worldwide market, the buyer’s
compulsory requirement is to have an audit. As India is a leading garment exporter, the level of
garment factory compliance is very high for Indian exporters. The child labor issue is one of the
very important aspect that the audit checks. Therefore, all the export units must be highly
compliant on issues related to child labor.
6.1.24. Code of Conduct for Garment Exporters
Garment exporters must safeguard that the bottom limit of the age requirement to non-
hazardous employment should not be less than 14 years. Moreover, all young workers (between
14 to 18 years) must be sheltered from doing any work that is likely to be dangerous or that may
be injurious to their health and physical, mental, social, or moral development. Exporters must
detect all legal necessities for work being performed by lawful young workers.
Further, the trainees or occupational students shall not be under the legal age for employment
(as provided under the applicable laws). They cannot be used on regular production lines as long
as they are trainees and unless their pay and other benefits are at par with the regular workforce.
259

Assistant Fashion Designer
A proper process is followed for checking the age of the workers. The minimum certification and
credentials required to be maintained shall include- proof of age certificates by registered/
licensed dentists, birth certificate, school leaving certificate, national identity like passport,
driving license, voter card etc. or any other document required under the applicable laws.
Apparel industry players would now make sure that labor contractors don’t engage child labor
and get the supply chain of the suppliers audited. Apparel Export Promotion Council (AEPC) has
intended a garment factory compliance program ‘Disha’ (Driving Industry towards Sustainable
Human Capital Advancement) to make India a global benchmark for social acquiescence in
apparel manufacturing and export. This Common Compliance Code project will prepare the
Indian apparel industry on a mutual platform towards a more social and environmentally
accommodating industrial environment.
260
Participant Handbook
7. Soft Skills
Unit 7.1 - Introduction to the Soft Skills
Unit 7.2 - Effective Communication
Unit 7.3 - Grooming and Hygiene
Unit 7.4 - Interpersonal Skill Development
Unit 7.5 - Social Interaction
Unit 7.6 - Group Interaction
Unit 7.7 - Time Management
Unit 7.8 - Resume Preparation
Unit 7.9 - Interview Preparation

Assistant Fashion Designer
Key Learning Outcomes
At the end of this unit, participants will be able to:
• Know the Art of Effective Communication.
• Able to handle effective Communication with co-workers.
• Able to handle effective Communication with Peers/ colleagues.
• Discuss the basic reading and writing skills.
262
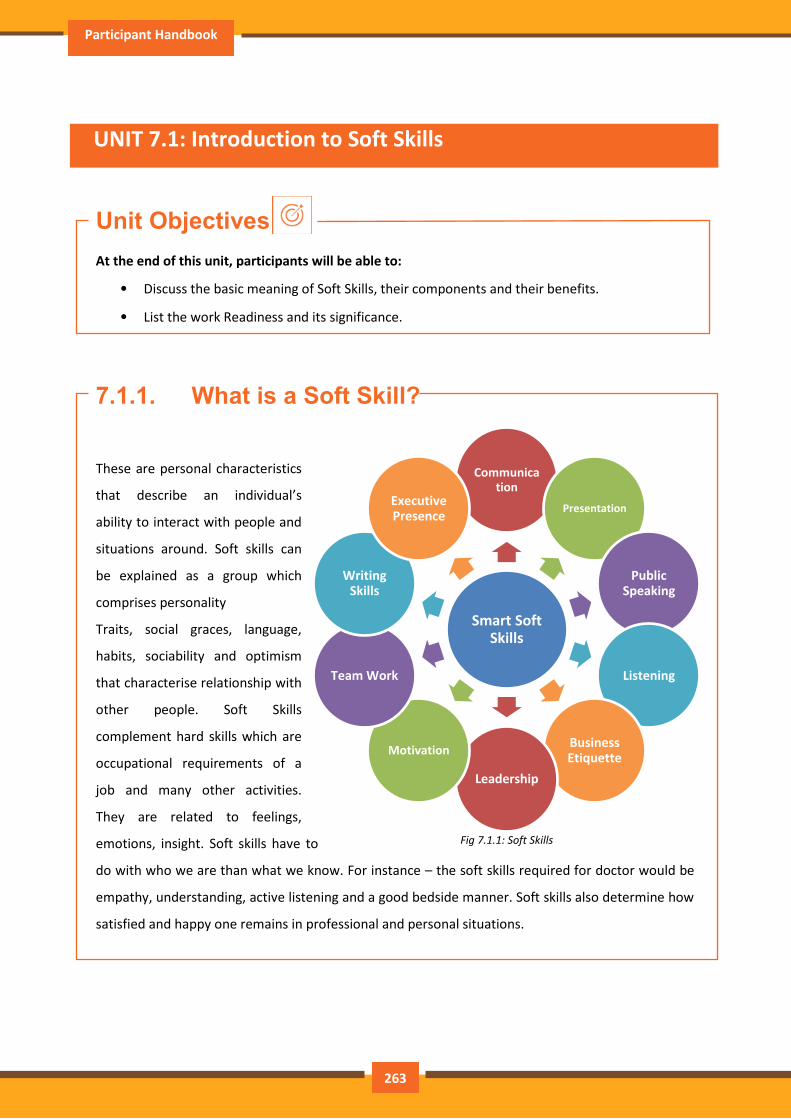
Participant Handbook
UNIT 7.1: Introduction to Soft Skills
Unit Objectives
At the end of this unit, participants will be able to:
• Discuss the basic meaning of Soft Skills, their components and their benefits.
• List the work Readiness and its significance.
7.1.1. What is a Soft Skill?
These are personal characteristics
that describe an individual’s
ability to interact with people and
situations around. Soft skills can
be explained as a group which
comprises personality
Traits, social graces, language,
habits, sociability and optimism
that characterise relationship with
other people. Soft Skills
complement hard skills which are
occupational requirements of a
job and many other activities.
They are related to feelings,
emotions, insight. Soft skills have to
do with who we are than what we know. For instance – the soft skills required for doctor would be
empathy, understanding, active listening and a good bedside manner. Soft skills also determine how
satisfied and happy one remains in professional and personal situations.
Smart Soft Skills
Communication
Presentation
Public Speaking
Listening
Business Etiquette
Leadership
Motivation
Team Work
Writing Skills
Executive Presence
Fig 7.1.1: Soft Skills
263
Assistant Fashion Designer
7.1.2. Components of Soft Skills
• Adaptability: It is the ability of an individual to manage change. It’s about how fast and
smoothly a person is able to blend in and be productive in a changed environment
• Emotional Strength: This involves managing mood and having control over it. An
emotionally strong person succeeds in directing his moods and emotions such as anger
frustration and excitement
• Leadership Quality: How one manages conflict in personal and professional situation and
convinces people reflects upon his leadership quality
• Team Playing Ability: It is the ability to manage different types of people and make them
work harmoniously with each other
• Decision Making: This reflects upon how one manages his time and other resources in
efficient and productive manner
• Interpersonal Communication: This is an individual’s ability to effective communication
with other and in the process creating a positive image of him
• Negotiation Skills: This is how one negotiates with others and reduces the level of stress in
work, professional and personal environment
7.1.3. Benefits of Soft Skills
Some of the benefits of Soft Skills are as:
• Increased credibility with customers
• Increased customer satisfaction
• More productive employees
• Out service the competition
• Recognition from the industry, employer and peers
• New employment opportunities
• Increased ability to perform on the job
264
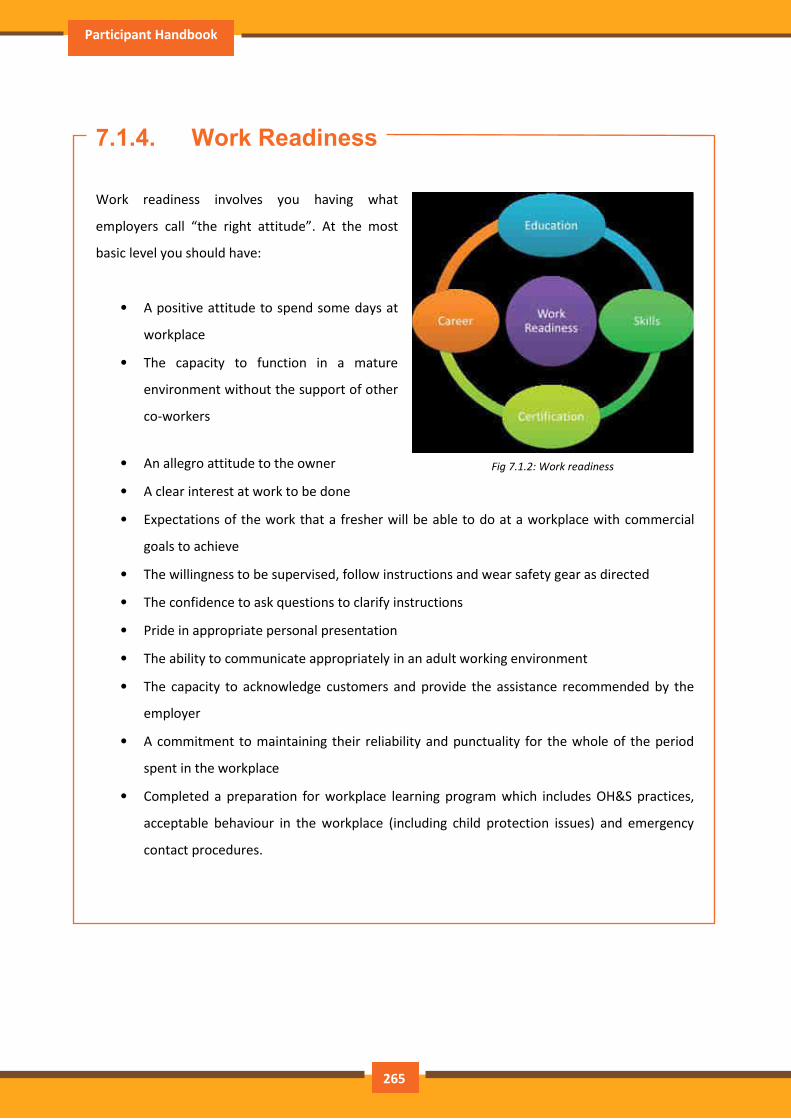
Participant Handbook
7.1.4. Work Readiness
Work readiness involves you having what
employers call “the right attitude”. At the most
basic level you should have:
• A positive attitude to spend some days at
workplace
• The capacity to function in a mature
environment without the support of other
co-workers
• An allegro attitude to the owner
• A clear interest at work to be done
• Expectations of the work that a fresher will be able to do at a workplace with commercial
goals to achieve
• The willingness to be supervised, follow instructions and wear safety gear as directed
• The confidence to ask questions to clarify instructions
• Pride in appropriate personal presentation
• The ability to communicate appropriately in an adult working environment
• The capacity to acknowledge customers and provide the assistance recommended by the
employer
• A commitment to maintaining their reliability and punctuality for the whole of the period
spent in the workplace
• Completed a preparation for workplace learning program which includes OH&S practices,
acceptable behaviour in the workplace (including child protection issues) and emergency
contact procedures.
Fig 7.1.2: Work readiness
265
Assistant Fashion Designer
UNIT 7.2: Effective Communication
Unit Objectives
At the end of this unit, participants will be able to:
• Do public speaking.
• Describe likes and dislikes of a person.
• Know basic etiquette of conversation.
7.2.1. Introduction
We are living in an information age where communication is an integral part of our lives. We have to
send, receive and process huge number of messages every day. But effective communication is
more than just passing information to each other. An effective communication is nothing but
understanding the emotion behind the information. Effective communication helps us develop
relationship at home, work, and in social situations by excavating our connections to others and
improving teamwork, problem solving and decision making.
Effective communication skill is a learned skill, it is more effective when it’s spontaneous than
formula.
7.2.2. The Communication Process
The process of conveying information through the exchange of thoughts, ideas, feelings, intentions,
attitude by speech, gesture, writing etc. is known as communication. It is the meaningful exchange
of information between two or more participants.
266
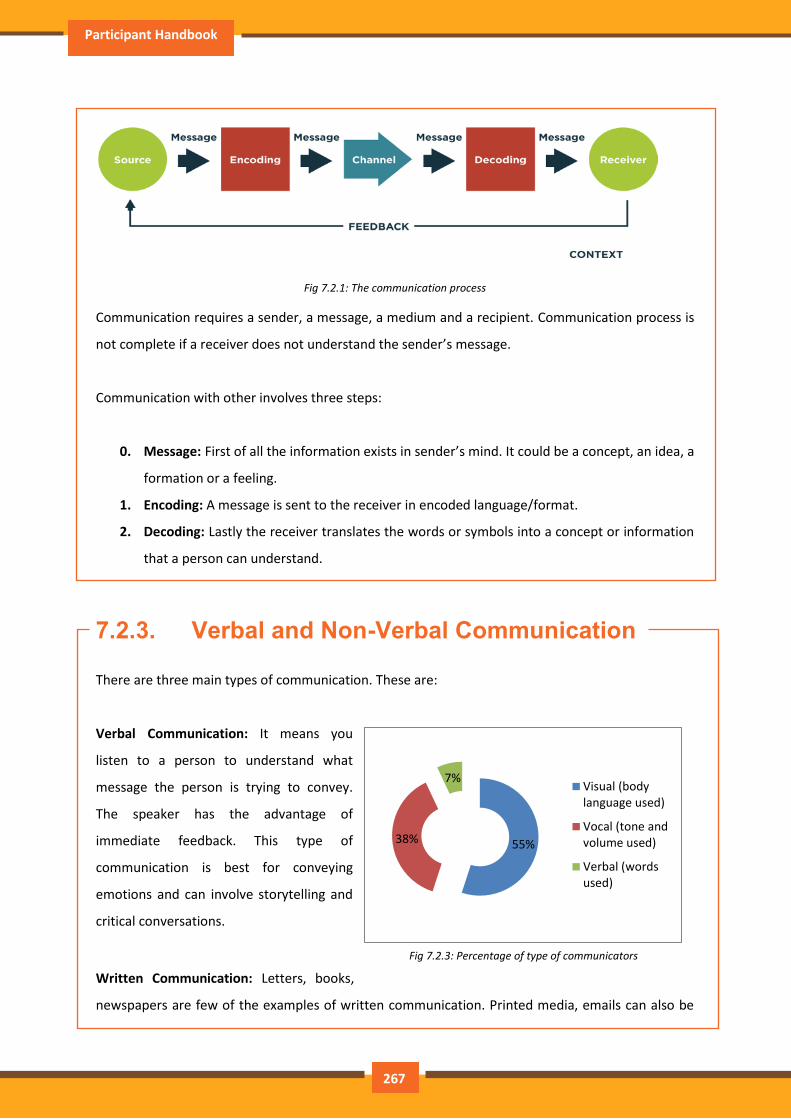
Participant Handbook
Fig 7.2.1: The communication process
Communication requires a sender, a message, a medium and a recipient. Communication process is
not complete if a receiver does not understand the sender’s message.
Communication with other involves three steps:
0. Message: First of all the information exists in sender’s mind. It could be a concept, an idea, a
formation or a feeling.
1. Encoding: A message is sent to the receiver in encoded language/format.
2. Decoding: Lastly the receiver translates the words or symbols into a concept or information
that a person can understand.
7.2.3. Verbal and Non-Verbal Communication
There are three main types of communication. These are:
Verbal Communication: It means you
listen to a person to understand what
message the person is trying to convey.
The speaker has the advantage of
immediate feedback. This type of
communication is best for conveying
emotions and can involve storytelling and
critical conversations.
Written Communication: Letters, books,
newspapers are few of the examples of written communication. Printed media, emails can also be
55% 38%
7% Visual (body
language used)
Vocal (tone and
volume used)
Verbal (words
used)
Fig 7.2.3: Percentage of type of communicators
267

Assistant Fashion Designer
categorised into this communication. They are asynchronous, can reach many readers and are best
for conveying information.
Nonverbal Communication: A nonverbal communication can also be called Body language because
this communication does not involve any verbal interaction but mere observation of the people
involved in the communication. Both verbal and written communications convey nonverbal
communication and are also supported by body language, eye contact, facial expression, posture,
touch and space.
According to a study only seven-member of a receiver’s comprehension of a message relies on
sender’s actual words, 38th relies on paralinguistic communication (tone, pace and volume of
speech) and 55th relies on nonverbal cues.
Research shows that once people are lying they're more doubtless to blink more frequently, shift
their weight and shrug.
7.2.4. Communicating Effectively
There are various reasons why communication is not effective and successful. These failures are
because of the barriers in communication which occurs at any stage in the communication process.
Barriers may lead to one’s message becoming misleading and therefore at risk of wasting both time
and money by causing confusion and misunderstanding. Effective communication involves
overcoming these barriers and conveying a flawless and concise message.
268
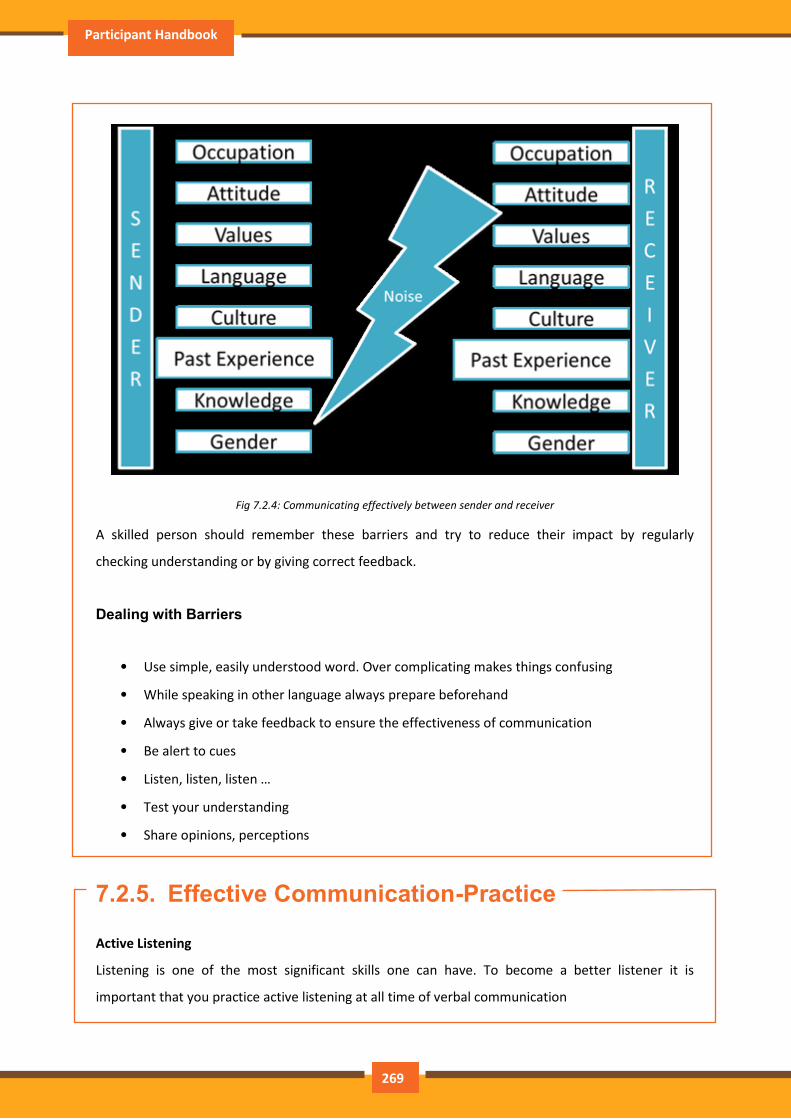
Participant Handbook
Fig 7.2.4: Communicating effectively between sender and receiver
A skilled person should remember these barriers and try to reduce their impact by regularly
checking understanding or by giving correct feedback.
Dealing with Barriers
• Use simple, easily understood word. Over complicating makes things confusing
• While speaking in other language always prepare beforehand
• Always give or take feedback to ensure the effectiveness of communication
• Be alert to cues
• Listen, listen, listen …
• Test your understanding
• Share opinions, perceptions
7.2.5. Effective Communication-Practice
Active Listening
Listening is one of the most significant skills one can have. To become a better listener it is
important that you practice active listening at all time of verbal communication
269
Assistant Fashion Designer
Some tips for active listening
• STEP 1: Concentrate what the person is talking about and not on noise or other external
distractions.
• STEP 2: Understand his emotions and you get it all right. Is the speaker angry, happy or plainly
inquisitive?
• STEP 3: When the speaker is saying or telling something, don’t break the chain of his thoughts.
• STEP 4: Don’t avoid completing sentences of the speaker. Let them speak and speak only after
they finish.
• STEP 5: It’s alright if you haven’t understood at first chance. Request to repeat the information.
• STEP 6: Practice makes a man perfect. Listen intently, focus and ignore other noises. Listen more
and talk when required.
It takes lots of concentration and determination to be active listener. Previous habits are arduous to
break and if you’re listening habits are not good then you have to break those. Start listening
deliberately and prompt yourself frequently that your goal is to hear truly what the other person is
saying.
270
Participant Handbook
UNIT 7.3: Grooming and Hygiene
Unit Objectives
At the end of this unit, participants will be able to:
• Maintain cleanliness and hygiene.
• Keep their dress clean and tidy.
• Maintain positive body language while speaking.
• Unable to perform more of the do’s than the don’ts.
• List the good eating habit and their impact on health.
• Avoiding bad things such as gutkha and alcohol.
• Know about AIDS and its prevention.
7.3.1. Personal Grooming
An art of keeping your body and mind clean is Personal Grooming. It is very important that everyone
should take care of their hygiene n cleanliness. Due to this, one would not just look good but feel
healthy to. Taking care of your body appearance is imperative. Once you enter your
store/department you need to be dressed in full uniform as per company standards, and also
properly groom yourself as per the service ethics.
Personal grooming not only makes us presentable but also makes us feel confident about ourselves.
Good personal hygiene is essential for good health. Habits that are considered personal grooming
include, bathing, dressing, applying makeup, hair removal and taking care of one’s teeth, nails and
skin.
Appearance
The front line person/team is the brand ambassador of the company, just like the face is to
your body. The customers visiting the stores are greeted by this team and lend their
assistance. Hence they are expected to present a neat and clean looks
271
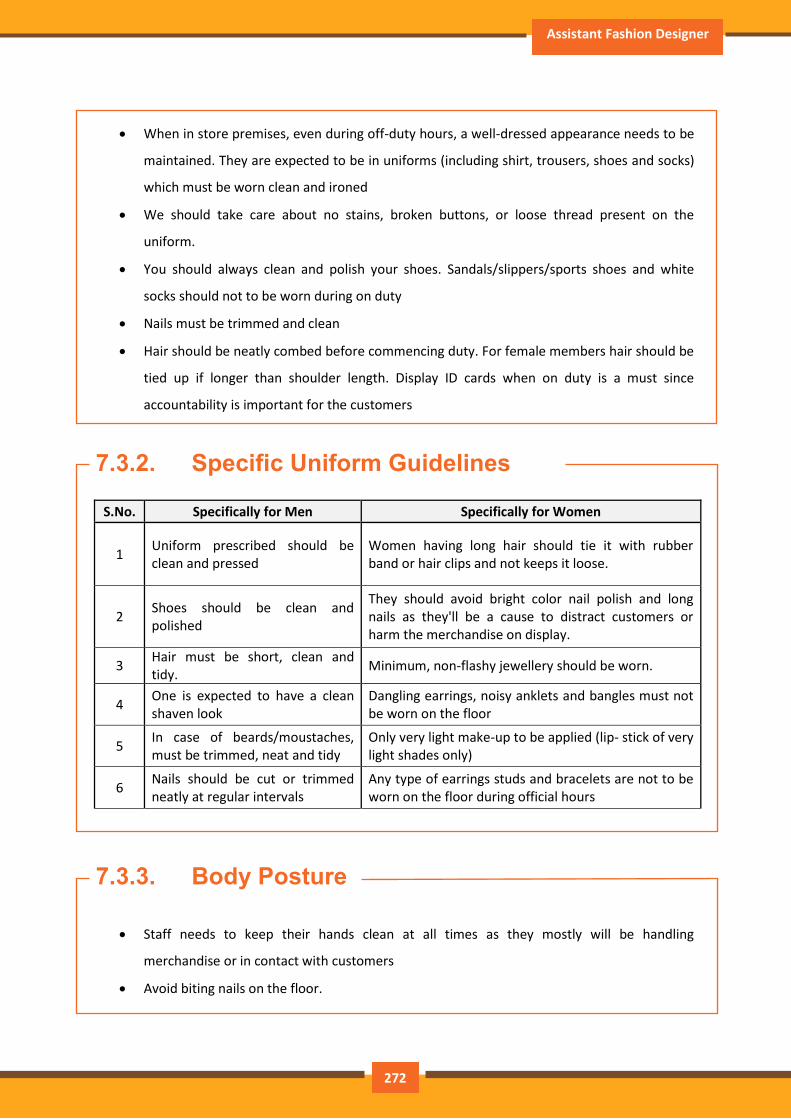
Assistant Fashion Designer
When in store premises, even during off-duty hours, a well-dressed appearance needs to be
maintained. They are expected to be in uniforms (including shirt, trousers, shoes and socks)
which must be worn clean and ironed
We should take care about no stains, broken buttons, or loose thread present on the
uniform.
You should always clean and polish your shoes. Sandals/slippers/sports shoes and white
socks should not to be worn during on duty
Nails must be trimmed and clean
Hair should be neatly combed before commencing duty. For female members hair should be
tied up if longer than shoulder length. Display ID cards when on duty is a must since
accountability is important for the customers
7.3.2. Specific Uniform Guidelines
S.No. Specifically for Men Specifically for Women
1 Uniform prescribed should be
clean and pressed
Women having long hair should tie it with rubber
band or hair clips and not keeps it loose.
2 Shoes should be clean and
polished
They should avoid bright color nail polish and long
nails as they'll be a cause to distract customers or
harm the merchandise on display.
3 Hair must be short, clean and
tidy. Minimum, non-flashy jewellery should be worn.
4 One is expected to have a clean
shaven look
Dangling earrings, noisy anklets and bangles must not
be worn on the floor
5 In case of beards/moustaches,
must be trimmed, neat and tidy
Only very light make-up to be applied (lip- stick of very
light shades only)
6 Nails should be cut or trimmed
neatly at regular intervals
Any type of earrings studs and bracelets are not to be
worn on the floor during official hours
7.3.3. Body Posture
Staff needs to keep their hands clean at all times as they mostly will be handling
merchandise or in contact with customers
Avoid biting nails on the floor.
272
Participant Handbook
Manage body odour and bad breath to be under control as they are offensive to the
customer.
Maintain straight and upright posture on the shop floor.
Slouching on the floor, hands in pockets, hands on the hips are not courteous to the
customer and hence should be avoided.
It just takes a few seconds for people to assess others when they meet for the first time. The other
person creates an opinion based on appearance, body language, mannerisms and how one is
dressed. For creating a first positive good impression always follow these things:
• Be on time
• Be yourself and be at ease
• Present yourself appropriately
• Always smile
• Be courteous and attentive
• Be positive
7.3.4. Positive Body Language
While meeting someone for the first time always remember that not only you should talk positively
but your body language also needs to be positive. There are some tips for positive body language as:
• Avoid your pockets. Keep your hands out of your pocket. Hand in pocket shows we are
uncomfortable and unsure of ourselves. Keeping our hand in open indicates confidence and
show that people has nothing to hide.
• Don’t Fidget. Fidgeting is a clear sign of nervousness. An individual who can’t keep still is an
individual who is worried, tense and not confident. Keep your gesture calm and under
control.
• Keep your eyes forward. This indicates that you are interested in communication with other.
• Stand up straight with your shoulders back. It communicates confidence.
• Take wide steps. It makes you seem purposeful and suggest a personal tranquillity and
denotes confidence.
273
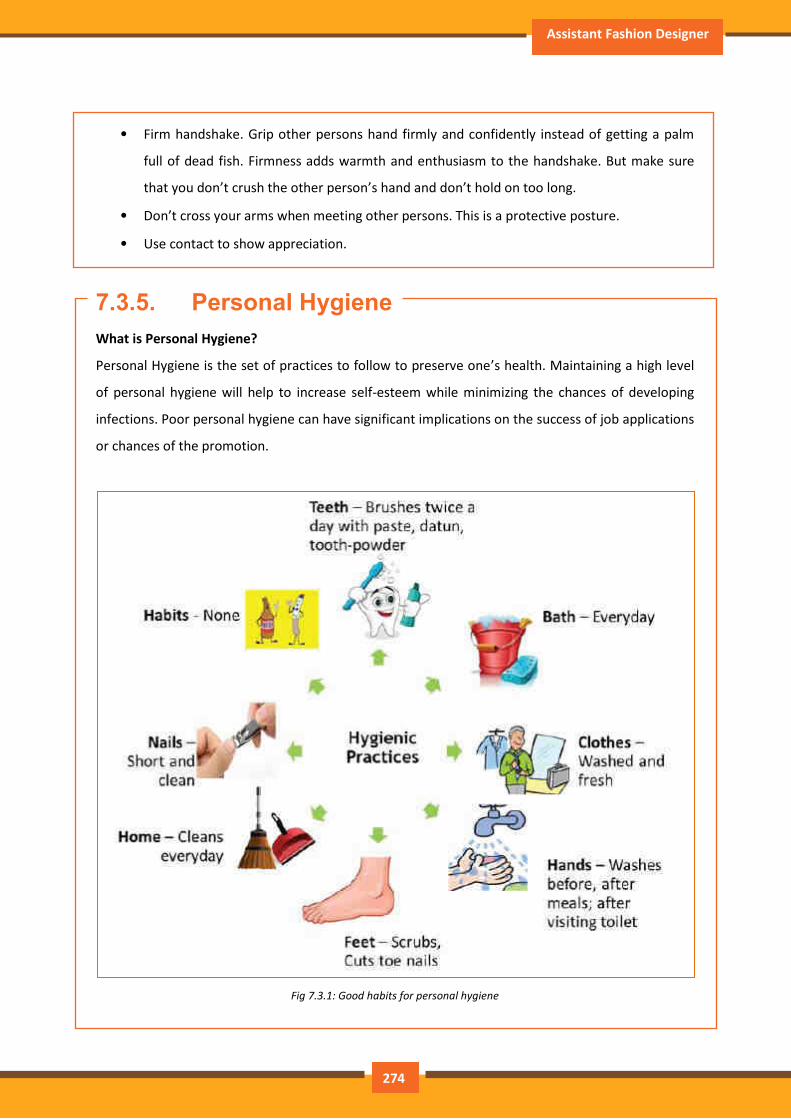
Assistant Fashion Designer
• Firm handshake. Grip other persons hand firmly and confidently instead of getting a palm
full of dead fish. Firmness adds warmth and enthusiasm to the handshake. But make sure
that you don’t crush the other person’s hand and don’t hold on too long.
• Don’t cross your arms when meeting other persons. This is a protective posture.
• Use contact to show appreciation.
7.3.5. Personal Hygiene
What is Personal Hygiene?
Personal Hygiene is the set of practices to follow to preserve one’s health. Maintaining a high level
of personal hygiene will help to increase self-esteem while minimizing the chances of developing
infections. Poor personal hygiene can have significant implications on the success of job applications
or chances of the promotion.
Fig 7.3.1: Good habits for personal hygiene
274
Participant Handbook
7.3.6. Physical Fitness
Apart from following these hygienic practices, one should also be physically fit. Physical fitness is an
outcome of regular exercise. Exercise may be of many different forms like jogging, morning-walk,
weight-lifting, gym, swimming, cycling, yoga and many more.
Advantages of Physical Fitness
• It maintains optimal body weight.
• It reduces risk of diseases.
• It boosts confidence and self-esteem.
• It reduces stress, anxiety and depression.
Healthy Eating
We can follow hygienic practices and exercise regularly, but what we eat has the biggest impact on
our health. To be healthy, one has to eat healthy. But what do we mean by eating healthy?
Eating a healthy, balanced diet provides nutrients to our body. These nutrients give us energy; keep
our brain active and our muscles working.
What are healthy eating habits?
• Always try to eat home-made food
• Avoid oily food
• Always cook and eat fresh food
• Avoid junk food like burgers, carbonated drinks etc.
• Eat fruits regularly
• Drink lot of water
Things to be avoided
There are certain habits that have severe ill-effects on one’s health. Such habits should be avoided
for a healthy life.
275
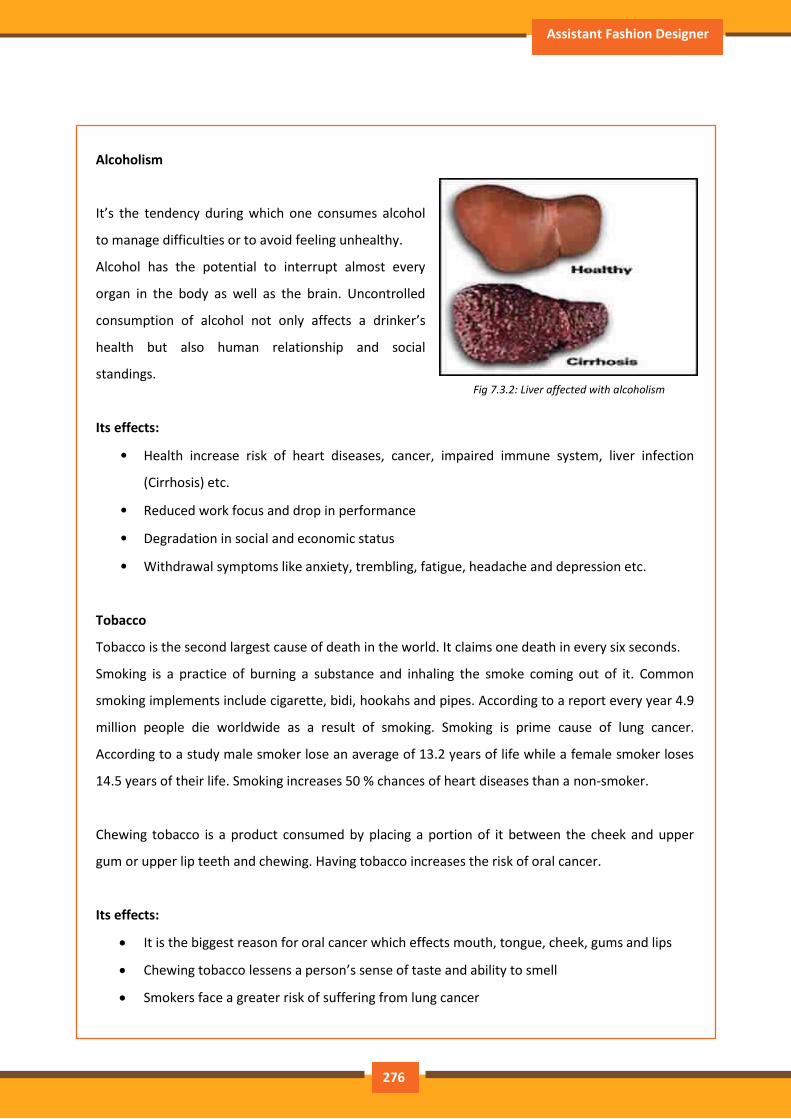
Assistant Fashion Designer
Alcoholism
It’s the tendency during which one consumes alcohol
to manage difficulties or to avoid feeling unhealthy.
Alcohol has the potential to interrupt almost every
organ in the body as well as the brain. Uncontrolled
consumption of alcohol not only affects a drinker’s
health but also human relationship and social
standings.
Its effects:
• Health increase risk of heart diseases, cancer, impaired immune system, liver infection
(Cirrhosis) etc.
• Reduced work focus and drop in performance
• Degradation in social and economic status
• Withdrawal symptoms like anxiety, trembling, fatigue, headache and depression etc.
Tobacco
Tobacco is the second largest cause of death in the world. It claims one death in every six seconds.
Smoking is a practice of burning a substance and inhaling the smoke coming out of it. Common
smoking implements include cigarette, bidi, hookahs and pipes. According to a report every year 4.9
million people die worldwide as a result of smoking. Smoking is prime cause of lung cancer.
According to a study male smoker lose an average of 13.2 years of life while a female smoker loses
14.5 years of their life. Smoking increases 50 % chances of heart diseases than a non-smoker.
Chewing tobacco is a product consumed by placing a portion of it between the cheek and upper
gum or upper lip teeth and chewing. Having tobacco increases the risk of oral cancer.
Its effects:
It is the biggest reason for oral cancer which effects mouth, tongue, cheek, gums and lips
Chewing tobacco lessens a person’s sense of taste and ability to smell
Smokers face a greater risk of suffering from lung cancer
Fig 7.3.2: Liver affected with alcoholism
276

Participant Handbook
Fig 7.3.3: Risks from smoking
Gutkha
Gutkha is extremely habit-forming and an acknowledged substance. Excessive use of gutkha can
cause loss of appetite; promote uncommon sleeping pattern and loss of concentration beside
different tobacco related issues. A gutkha user may be simply illustrious by prominently stained
teeth ranging from dirty yellow orange to scarlet black. The stains are powerful to remove by normal
brushing sometimes want the attention of dentist. According to a world adult tobacco survey 53.5%
of Indians use tobacco products. Gutkha's each sachet contains 4000 chemicals, including 50 that
cause cancer, Betel nut, Tobacco, Flavouring.
Impact of Gutkha on health
• Loss of sensation in tongue
• Disfigured mouth
• Increased sensitivity to heat, spices, cold and spices
• Inability to open the mouth
• Swelling, lumps, rough spots on gums or in other places inside the mouth
• Unexplained bleeding in mouth
• Difficulty in swallowing and finally Mouth Cancer
277
Assistant Fashion Designer
7.3.7. AIDS/HIV Awareness
The full form of AIDS is Acquired Immunodeficiency Syndrome. AIDS is
caused by HIV (Human immunodeficiency Virus). It is the last stage of the
HIV infection, if a person is HIV positive, he/she is suffering from AIDS.
According to a survey number of AIDS patients in India is between 2 to
3.1 million almost 50 % of total patients of AIDS. More men are HIV
positive than women. A total of population of 0.29% females are
suffering from AIDS while
0.43 % males are suffering.
AIDS is transmitted by:
• Unprotected sexual relationships
• Contaminated blood transfusion
• Hypodermic Needles
• From infected mother to child
As per studies in India HIV/AIDS is largely due to unsafe sex worker interactions. About 86 % HIV
incidents in the country is from unprotected sex. Migrant workers, truck drivers and majority of men
who have sex with men pose greater risk of infecting their spouse and unborn children. People
between 18-29 age groups accounts for 31 % of AIDS burden.
There are no medicines or vaccines for AIDS so far. The treatment and medicines which are available
in the market are expensive and have side effects.
AIDS is not a disease like cancer or malaria, but is a condition that weakens a person’s ability to fight
diseases (immune system).AIDS not only affects you, but also has severe impact on family and
friends. Even one mistake is enough to get HIV positive.
Fig 7.3.4: Aids awareness ribbon
278
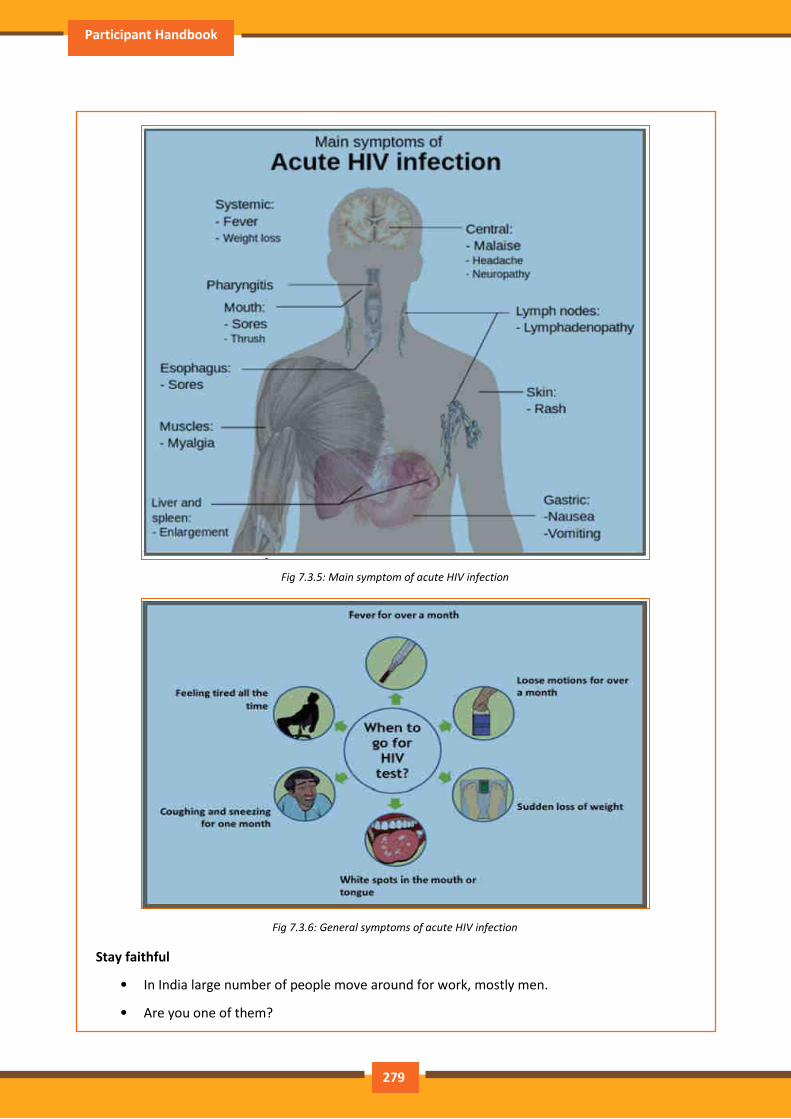
Participant Handbook
Fig 7.3.5: Main symptom of acute HIV infection
Fig 7.3.6: General symptoms of acute HIV infection
Stay faithful
• In India large number of people move around for work, mostly men.
• Are you one of them?
279
Assistant Fashion Designer
• Take care. See that you don’t catch any infection from AIDS.
• Even one visit to a sex worker may result in HIV infection.
• So it is advisable to avoid multiple sex-partners and always use protection (condoms/nirodh)
during intercourse.
AIDS does NOT spread through
• Sitting close
• Working together
• Hugging
• Touching hands
• Mosquito bite
• Saliva or cough
• Taking care
• Sharing clothes
• Eating together or sharing utensils
280
Participant Handbook
UNIT 7.4: Interpersonal Skill development
Unit Objectives
At the end of this unit, participants will be able to:
• Develop a positive attitude and behaviour
• Know the Goal Setting
• Motivated for team participation at work
• How to manage relations
• Discuss about Stress and anger management skills
• How to develop leadership qualities
7.4.1. Introduction
Interpersonal skill development is the blend of different traits of day to day life that play an
important role in creating our impression in other’s mind. It starts from inside. The role of
interpersonal skill development is to help us understand how to make choices about our attitudes
and actions. It enables us to understand:
• Where are we now?
• How change and growth occur successfully?
• How we can change our attitude to get results we want and to be more effective in work
and personal life?
One can learn to control over many aspects of our job and their environment by making appropriate
choices and responses.
These include various traits like:
• Positive Attitude
• Motivation
• Goal Setting
• Team Work
281
Assistant Fashion Designer
• Managing Relations
• Etiquette
• Stress and Anger Management
• Conflict Resolution
7.4.2. Positive Attitude
What is attitude?
• Our approach...
• Our outlook towards situations and others…
• The emotions we express towards others.
• Our attitude must be positive and hopeful.
Remember:
• Luck favours those who help themselves
• Don’t wait for things to happen make them happen
• Stay away from negative influences
• Start your day with something positive
• Learn to like the things that need to be done
• Positive attitude shows in the following ways:
• Positive thinking
• Constructive things
• Creative thinking
• Optimism
• The motivation and energy to accomplish goals.
• An approach of happiness
Positive attitude results in happiness as well as success. Positivity not only affects you and the way
you look at the world, but it also affects work environment and people around you.
282
Participant Handbook
Story of Carrot, Egg and Coffee Beans
Raju works as a Supervisor in a factory. He is not happy with his job. One day he spoke about his
dejection to his elderly friend, Prashant, who runs a small canteen for the factory workers.
“Prashant I am not satisfied with my job. There are so many problems in the factory. If I solve one,
another one crops up. The problems seem to be never ending. I am quite fed up and wish to quit.”
Prashant said nothing. He quietly put three pots with water on the stove. He put some carrots into
one pot, some eggs into another and coffee beans into the third pot. The water in the pots began to
boil. Raju wondered what was going on! “Oh, here I am with my tale of woes, and this illiterate cook
goes about his business!”
After some time, Prashant switched off the stove and put the carrots, eggs and the beans in
different bowls. He then said, “My friend, what do you see here?” “Carrots, eggs and coffee”, said
Raju irritably. “Of course! Now come and feel them one by one”, said Prashant. “Oh God!
What do you want to prove?” asked Raju controlling his anger. “The carrots have turned soft. The
egg is hard boiled beneath its shell and the coffee is stronger in aroma”. “Exactly” said Prashant
“Each of them faced the same degree of heat, but each reacted differently. The carrots that were so
hard before became soft and weak. The egg was fragile with its thin outer shell, but after boiling it
became hardened and the inner liquid portion became hard boiled. But the coffee beans are unique.
After boiling in water, they became stronger and richer. So my friend, tell me, are you the carrot, the
egg or the coffee bean? How do you respond to difficult situations? Are you like the carrot that is
hard to look at but with the slightest difficulty becomes weak and soft? Are you the egg born with a
soft heart but became tough and stiff after a difficult or a bitter experience? Or are you like the
coffee bean that gets stronger and tougher and reaches its peak in extreme adversity or difficulty?
When things get worse, you get better.
“Thank you Prashant. You’ve opened my eyes. I shall strive and do my best.”
7.4.3. Goal Setting
Goal setting is a powerful method for considering your ideal future. The method of setting goals
helps you to decide on where you wish to go in life.
Goal setting consists of establishment of specific, measurable, achievable, realistic and time
targeted aim. Goal setting helps individuals work towards their own objectives. Goals are a kind of
motivation that sets the standard for self-satisfaction with performance. Achieving the goal one has
283
Assistant Fashion Designer
for oneself is a measure of success and having the ability to satisfy job challenges is a way one
measures success in the workplace. Set SMART goals:
• S : Specific
• M: Measurable
• A: Attainment
• R: Relevant
• T: Time bound
Identify:
• What you want to achieve,
• Where you have to concentrate your efforts
• Also spot the distractions that can, lead you astray.
First create your “big picture” (the next 10 years):
• Identify the large-scale goals that you just wish to achieve.
• Then break these down into the smaller targets that you simply should hit to succeed in
your life goals.
• Once you have your plan, you begin working on it to achieve these goals.
Setting goal is important for an individual because:
• Goals narrow attention and direct efforts to goal related activities.
• Goals lead to more effort.
• One works through setbacks if he is pursuing a goal.
• It develops and changes individual’s behaviour.
Categorization of Goals
To give a broad balanced coverage of all important areas in your life set goals in all the important
categories of your life such as:
• Career: What level do you want to reach in your career or where you want to reach?
• Financial: How much you want to earn, by what stage? How it is related to your career
goals?
284

Participant Handbook
• Education: Is there any specific knowledge you want to acquire in life? What information
and skills you need to acquire in order to achieve your goals?
• Family: How you want to be seen by your spouse and family members?
• Health: Do you want to stay healthy in your old age? What are you planning to achieve this?
• Public Service: If you want to make the world a better place, what will you do?
7.4.4. Team Dynamics
A team is made up of a group of people associated to a common purpose. Teams are especially
made to conduct complex works. A team is an example where a people share a goal. This creates a
dynamic bond amongst the team members as they are dependent on one another for success. For
example a sports team wins or loses as a whole.
Team members need to learn:
• How to assist each other
• Realize their true potential
• Prepare the atmosphere that is familiar with each member to work beyond their strength.
Factors of Team Dynamics
• Tolerance and Cooperation
• Set aside feelings of caste, creed, profession
• Put up with each other
• Identify strengths of each
• Who can do what
In a team, there is no room for personal gains and definitely not betrayals. In a team:
• A single person cannot achieve a big task single handled.
• Big and difficult tasks can be accomplished only through collective effort, through teams.
• In a team, the team members stand by each other during good and bad times alike.
• Work together towards a common goal.
• Divide the task and share the burden.
285
Assistant Fashion Designer
• Help and accept help from others.
Story: Small Fishes and Big Fish
Once there was a shoal of tiny red fish living in the sea. One among them was a little different. His
name was Swimmy and he was black in colour. Swimmy was the fastest swimmer in the shoal. The
fish would swim around in the sea looking for food. One day when they were busy searching for
lunch, Swimmy who was far ahead of the others seeing a big fish coming in their direction. The big
fish was also looking for his lunch---smaller fish. Swimmy was scared! If the big fish would spot his
shoal, all of them would be eaten up. Swimmy thought hard of a way out and quickly came up with a
plan. He quickly swam back to his shoal and told all the fish about the big fish and also explained his
plan to escape from being eaten. When the big fish came closer he was shocked to see an even
bigger fish swimming in his direction with its huge jaws wide open. Frightened that he would get
eaten up, the big fish swam away. If he had looked carefully, he would have realised that the huge
fish was actually all the tiny red fish swimming very closely together in such a way that they looked
like one big fish. And little black Swimmy, being different, became the eye of the ‘huge’ fish!
7.4.5. Managing Relations
We all have different personalities, different desires and wishes, and different ways of showing our
emotions that affects people around us.
70% of the workplace learning is informal, once people discuss with each other at work they really
are learning to do their job better. Friendlier staff is effective communicators, more productive and
trustworthy more by employers and colleagues.
Tips for improving relations with people around us:
• Observe how you react to people such as do you reach to a conclusion before you know all
the facts.
• Look honestly how you think and interact with other people.
• Look at work environment. Do you seek attention for accomplishments or give chance to
others.
• Accept your weaknesses courageously and work on them.
• Take responsibility for your actions.
286
Participant Handbook
• If you think someone is hurt by you, apologise directly.
7.4.6. Etiquette
Etiquettes are rules to operating behaviour regarded as good and acceptable in personal and
professional life. Etiquette includes:
Making Positive Impression
• Stand straight, make eye contact and turn towards people when they are speaking and
genuinely smile at people.
• Follow the dress code prescribed by the organization.
• When meeting someone for the first time always shake hands with a gentle firmness.
• Always arrive early to work each day.
How you treat with people
• Think how you treat your supervisors and colleagues.
• Don’t make value judgments on people’s importance at workplace. Respect every individual
equally.
• Respect people’s personal space at workplace.
Communicating at Workspace
• Keep workspace professional and neat.
• Don’t interrupt other people on the workplace.
• Limit personal calls especially when you are working in a manufacturing unit.
• Eat and smoke to the designated areas only otherwise it may disturb other people.
Work etiquette tells the individual a way to behave when handling situations in an exceedingly
working environment however the trivial situation is. It also applies to co-worker interaction and
communication with colleagues.
Work Ethics
287
Assistant Fashion Designer
Work ethics is a value based on hard work and attentiveness. Work ethics include:
• Discipline: It takes a certain level of commitment to finish your tasks every day. Only with
discipline one can stay fixed on goals and determined to complete his assignment.
• Commitment to work: A strong sense of commitment to work affects how an individual
work and the amount of work he does. When a worker is committed to work he turns up on
time, puts in his best efforts and completes the projects to the best of his ability.
• Punctuality: It shows that you are dedicated to your work, interested in the work and
capable of handling responsibility. Being punctual shows your professionalism and
commitment to work.
• Ownership and responsibility: Ownership and responsibility stretches in all aspects of an
employee’s job. Co-workers value the employees’ ability to give honest feedback.
Supervisors rely on the high moral standards trusting him not create problems and being
responsible.
• Striving to excel: Keep yourself updated with new developments and knowledge of your
field. Learn new skills, techniques, methods required to uplift your career. Workers
exhibiting a good work ethic are usually selected for higher positions, increased
responsibility as well as promotion. Workers who do not exhibit good work ethic can be
regarded as incompetent and failing to provide a fair value to the employer for the salary.
7.4.7. Stress and Anger Management
Anger is a normal and a healthy emotion. Anger management may be critical for people who find it
difficult to keep it under control. There are many health issues related to an unresolved anger like
heart attack, high blood pressure, anxiety, depression, colds and flu/fever and digestive problems. If
your heart beats faster and you breathe quickly, tension in your shoulder or clinching your fists
bewares your body may be showing sign of anger, take steps to calm yourself down. Once you will
be able to recognize the signs of anger you can calm yourself down.
Always remember:
• Avoid unnecessary stress, learn to say no and take control of your environment
• Express your feelings instead of boiling them up
• Accept the things you can’t change
288
Participant Handbook
• Learn to forgive
• ANGER is only one letter away from DANGER
• Anger can destroy lives, destroy relationships
• Put yourself in other’s shoes
• Don’t react immediately
• Post pone for a few seconds whatever you wish to say or do
• Take a deep breath
• Speak when you have calmed down
7.4.8. Conflict Resolution
What is a Conflict?
A problem or a situation that may be difficult to understand or to deal with.
Why do we need to resolve conflicts?
If a problem is not solved or addressed at the right time it may blow out of proportion
An unsolved problem can be like Cancer which spreads and translates itself into all other
areas in life
Unsolved problems may lead to increased levels of bitterness and frustration
It may foster bad habits like back-biting, gossiping, etc.
Persons involved in conflict may lose focus and target each other’s character instead of the
specific behaviour to be modified
How to work out Conflicts?
STOP . . . before you lose your temper and make the conflict worse.
SAY . . . what you feel is the issue. What is the reason of disagreement? What do you like?
LISTEN . . . to others ideas and feelings.
THINK . . . of solutions that satisfy both the parties
If you still can't agree, ask someone else to help you work it out.
289
Assistant Fashion Designer
7.4.9. Leadership Skills
The ability to lead effectively depends on variety of key skills. These skills are extremely sought after
by employers as they involve managing a number of individuals in such a way on inspire, enthuse
and build respect. Some of the qualities that every good leader should possess are:
• Honesty: If you make honest and ethical behaviour a key value your team will follow the
suit.
• Ability to delegate: delegating task to one of the appropriate person is the one of the most
important skills that needs to be developed. The key to delegation is to identify the core
strengths of the team and capitalizing on them.
• Good communications skills: Being able to communicate clearly is quite important.
• Confidence: Keeps morale of the team high even in the tough times.
• Commitment: If you expect your team to work hard and produce quality content then you
should lead by example.
• Positive Attitude: Keeping teams motivated towards continued success of the company.
• Creativity: During the critical situations it is important to think out of the box solutions than
to prefer the set course of action.
• Be decisive: Plan for the unexpected and nothing will surprise you. If you have thought of
things go wrong in a particular task you will be able to make confident decisions on
corrective actions when necessary.
• Focus on the big picture: Plan future strategies for your department and communicate
them to supervisors and staff members. Set realistic and measurable individual and team
goals and communicate your expectations within the context of massive picture.
How to become a leader:
• Use initiative to act on opportunities. Become a frontrunner before other people view you
together.
• Take responsibility of own objectives, set priorities.
• Attempt to solve the matter instead of to pass on to others.
• Go the extra mile when asked to do tasks. Go beyond your job description.
• Show enthusiasm.
290

Participant Handbook
• Take ownership of the issues. Anticipate potential issues, take pre-emptive action and act
quickly to resolve the issues.
• Introduce enhancements to the ways in which things are done.
• Develop innovative practices. Value innovative thinking.
• Learn new skills that may enhance capability.
291
Assistant Fashion Designer
UNIT 7.5: Social Interaction
Unit Objectives
At the end of this unit, participants will be able to:
• Know the social interaction is and what social interaction behaviour is.
• Give a brief description about him/her in public.
• Follow daily duties.
• Cooperate with peers, family and other members in society.
7.5.1. Social Interaction
Social interaction is a process through which we respond to people talking with us. It includes acts
where people perform toward each other and responses they give in return. Social interaction has a
number of behaviours. Some of them are:
• Exchange: Exchange is the most elementary kind of social interaction. It’s a human process
by that social behaviour is exchanged for some kind of reward for equal or greater value.
• Competition: It’s a process by which two or more individuals plan to accomplish a goal that
just one can attain. It will lead to psychological stress, a lack of cooperation in social
relationship, difference and even conflict.
• Cooperation: It’s a process in which people work together to achieve shared goals. Task
cannot be completed without their cooperation.
• Conflict: Social conflict is the struggle for agency or power among a society to achieve
control of scarce resources. It happens when two or more individuals oppose each other in
social interaction to achieve incompatible goals.
• Coercion: People or teams are forced to provide in to the desire of other people or teams.
292
Participant Handbook
7.5.2. Self- Introduction
We all, in our lifetime, have to introduce ourselves to the others. The introduction usually lasts for
around 2 minutes to 3 minutes. It is very important that it gives the first impression to other about
us. It has a great impact on your self-esteem and self-confidence. It’s helpful in:
• Feeling better about yourself
• Boosting your confidence
• Building your self esteem
• Making friends
• Feeling in control
Points for Self-Introduction
Following are some self-introduction points:
• Wishes: It is the first thing that we need to do before addressing a gathering. At this point
we need to make effort to grab the attention of audience. You have to wish depending on
the time either, Good Morning, Good Afternoon or Good Evening.
o Good Morning! My dear friends
o Respected Sir! Good morning
o Special or lovely or cool morning to you all
• Purpose: We have to tell the purpose of coming in front of the audience. We can say I have
come here to tell you about myself.
• Name: Here you tell about your name….. . To grab the eye of the audience, you have got to
present your name differently. If you know you can tell the meaning of your name or nay
famous celebrity along with your name.
• Father’s Name: Here you have to say concerning your father’s name. begin your father
name as Mr. or Prof. or Dr.
• Family: It’s a good chance to inform about your family, therefore tell the small print what
you want to tell about them.
• Profession: Tell about your profession what you're doing at the moment.
• Location: Tell about your present location, wherever you're staying and if you would like
you can also tell with whom you're living. You can also tell about your native place. It is
better to describe about or tell about your place which is famous for.
293
Assistant Fashion Designer
• Hobbies/Habits: Hobbies means what you like in your leisure and habit means your regular
activities. This part tells about your nature and your life style, be careful while telling this.
• Life Aim: Tell about what is your aim in life, it will be good if your aim is high. You have to
think high and reach high.
• Achievements: Tell about what you achieve up to now, minimum it is good to tell about
three achievements and maximum five. Though achievements are small, tell them it shows
your confidence but don’t say I don’t have any achievements.
• Favourite Person’s or Ideal: It is good to say about your ideal persons.
• Favourite movies, things, colour, places etc.: if you want to tell your favourites, which tell
about your tastes and preferences to others.
• Your Strengths and Weakness: You can tell about your strengths and weaknesses. Make
sure your weakness should not be absurd or incorrigible.
• People you like and dislike: You have to tell what kind people you like or what kind of
people you dislike. Any turning point in your life How are you different from others
• Conclusion: In conclusion offer a memorable answer on the question the listeners probably
will have when they have listen to your public speaking speech. Tell how this aspect of your
life makes you what you are and who you are. It will be perfect ending to your self –
introduction.
• Finally say thank you.
You will have to maintain your speech according to the time, generally 3 minutes and you have to
make the speech depending on the section of people you are giving the speech and what you want
to reveal about yourself.
Improving self-introduction
There are a few things that you can do that helps in making your self-introduction better:
• Listen to what you are saying to yourself: Notice what your inner voice is saying. Take some
time to listen and even write down what you are thinking.
• Monitor you’re self-talk: Analyse that your self-talk is more positive than negative.
• Change your introduction: counter your negative thoughts with positive ones. Avoid
speaking negative and try to look for things that might add a better spin to a tough situation
294
Participant Handbook
7.5.3. Our Duties and Responsibilities
There are certain duties which are laid by the Constitution of India. These duties are very to be
fulfilled by every citizen of India. These are as follows:
• To bear by the Constitution and respect its ideals and establishments, the national flag and
also the national anthem.
• To encourage and respect the noble ideals that galvanized our national struggle for
freedom.
• To uphold and protect the sovereignty, unity and integrity of Republic of India.
• To defend the country and render national service once called upon to do so.
• To promote harmony and also the spirit of respect amongst all the people of the Republic of
India transcending religious, linguistic and regional diversities.
• To forbid practices derogative to the dignity of ladies.
• To preserve the rich and diversified heritage of our culture.
• To conserve the natural surroundings like forests, lakes, rivers and wild life, and to have
compassion for living creatures.
• To develop the scientific temper, humanism and the spirit of inquiry and reform.
• To safeguard public property and to retract violence.
• To try towards excellence altogether spheres of individual and collective activity so that the
nation perpetually rises to higher levels of endeavour and accomplishment.
These need to be followed by every citizen of India for development of the country.
7.5.4. Cooperation
The process of groups of organisms working or acting together for their mutual benefit is called
cooperation. Cooperation among family members, friends and peers is very common and healthy. It
is the backbone of any society.
Family cooperation provides an avenue for a family to come closer. It increases coping skills and
decision making. Some steps to promote family cooperation are:
295
Assistant Fashion Designer
• Plan things together: It calls for negotiation and compromise and teaches everyone to be
more tolerant and considerable to other’s viewpoint.
• Share responsibilities: Diving up necessary household responsibilities can be a good
exercise in family cooperation.
Peer support occurs once individuals give knowledge, experience, and emotional, social or sensible
help to each other. It’s a distinct state of social support in this the source of support may be a peer
an individual who is analogous in ways to the recipient of the support.
The effective peer support can be in form of:
• Social Support: In form of positive psychological interactions with others with whom there
is mutual trust and concern.
• Experiential Knowledge: contributes to solve problems and improve quality of life.
• Emotional support : Esteem, attachment and reassurance
• Instrumental Support: Product and services. How to be a cooperative person: For being a
cooperative person following things needs to be done:
• Listen carefully to others and make sure you perceive what they're expressing.
• Share when you have something those others would really like to have.
• Take Turns once there's something those no-one desires to do, or when more than one
person desires to do a similar factor.
• Compromise when you have a significant conflict.
• Do your part the very best that you just probably can. This can inspire others to do the
same.
• Show appreciation to people for what they contribute.
• Encourage people to do their best.
• Make people needed. Working together may be a lot more fun that manner.
• Don’t isolate or exclude anyone. Everyone has something valuable to offer, and nobody likes
being omitted.
296
Participant Handbook
UNIT 7.6: Group Interactions
Unit Objectives
At the end of this unit, participants will be able to:
• Participate in group discussions in the class
• Give speech in the public
• Identify the importance of team building and team work
7.6.1. Group Interaction
Every day we tend to meet with teams of individuals socially and professionally. However we
interact to play a big role in the impressions we tend to produce. Interaction that happens whereas
a group completes a cooperative task describes how the group works. For a successful and positive
group interaction these steps needs to be followed:
• Put your mobile phone away or place in silent mode.
• Greet everyone.
• Be friendly with everyone in the group.
• Show an interest in others by paying someone a compliment and listen carefully to what is
being discussed.
• Be proactive and introduce yourself to others in the group.
• Sit up straight. Poor body posture is an indication of low self-esteem.
• Focus your attention on the person talking.
• Don’t discount anyone’s comment. Remember everyone is different and have different the
ability to think.
• Think before you speak. Don’t be too quick to jump into the conversation.
• Be a respect listener and observer.
• Include everyone when talking. Be sure to share eye contact with each person in the group.
• Unless there is a clear indication don’t change the topic. Otherwise it will make people feel
you are not interested in the topic.
297
Assistant Fashion Designer
• Don’t start or participate in a side conversation. Don’t allow their mistake to prevent you
from being a good listener.
• Make sure to smile shake hands and embrace and use each person’s name when
conversation and the person’s name when the discussion is over.
Everything you are doing in a group setting makes an effect on everybody in the group. Don’t ever
suppose something doesn’t matter. Everything matters. Take every chance to take part in informal
and formal group interactions. Begin by creating small contributions to discussion, prepare an issue
to raise or accept as true with another person’s remark. Ask for other person’s opinion.
7.6.2. Importance of Group Interactions
As participant group interactions is important as:
• It helps you to get a subject more deeply
• It improves your strength to think positively
• It helps in solving a serious issue
• It helps the team to go on a final decision
• It provides you the chance to listen to others' ideas
• It improves your listening skills
• It increases your confidence in communications
• It can change your behaviour
As a moderator a group interaction helps in:
• Understanding member interpersonal skills
• Identifying if a member is able to work in a team
• Understanding ones behaviour
• Selecting a perspective member in a perspective methodology
298
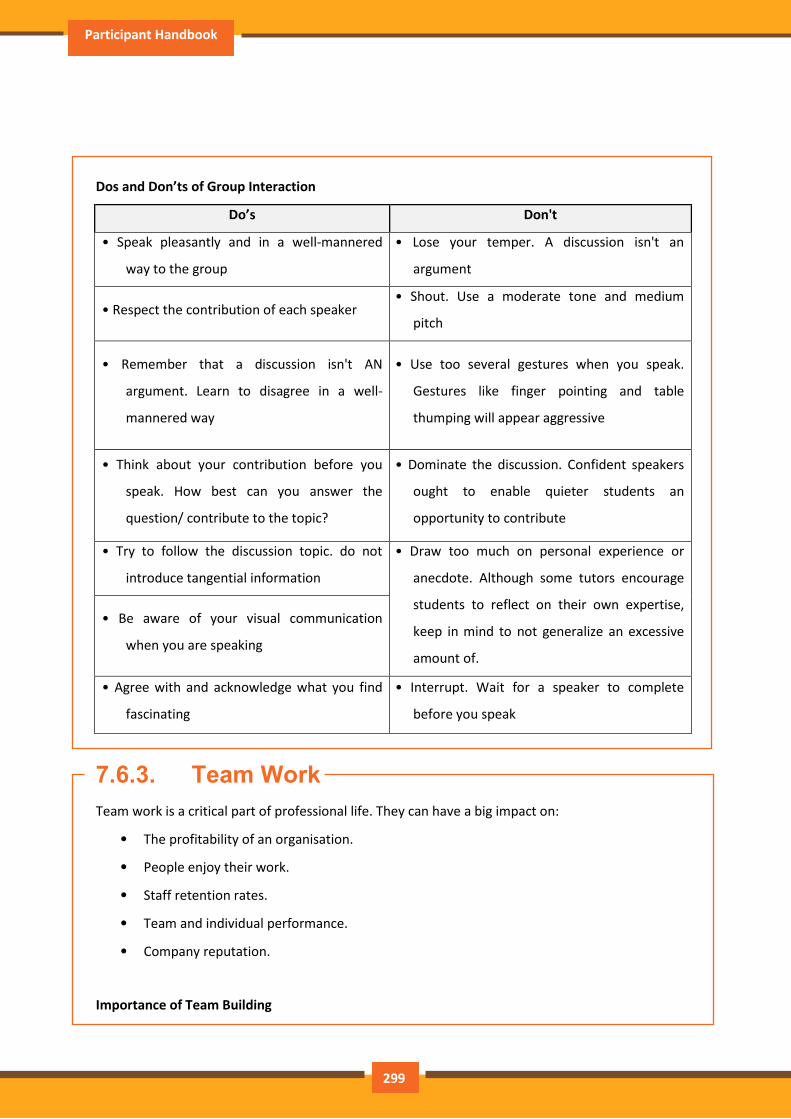
Participant Handbook
Dos and Don’ts of Group Interaction
Do’s Don't
• Speak pleasantly and in a well-mannered
way to the group
• Lose your temper. A discussion isn't an
argument
• Respect the contribution of each speaker • Shout. Use a moderate tone and medium
pitch
• Remember that a discussion isn't AN
argument. Learn to disagree in a well-
mannered way
• Use too several gestures when you speak.
Gestures like finger pointing and table
thumping will appear aggressive
• Think about your contribution before you
speak. How best can you answer the
question/ contribute to the topic?
• Dominate the discussion. Confident speakers
ought to enable quieter students an
opportunity to contribute
• Try to follow the discussion topic. do not
introduce tangential information
• Draw too much on personal experience or
anecdote. Although some tutors encourage
students to reflect on their own expertise,
keep in mind to not generalize an excessive
amount of.
• Be aware of your visual communication
when you are speaking
• Agree with and acknowledge what you find
fascinating
• Interrupt. Wait for a speaker to complete
before you speak
7.6.3. Team Work
Team work is a critical part of professional life. They can have a big impact on:
• The profitability of an organisation.
• People enjoy their work.
• Staff retention rates.
• Team and individual performance.
• Company reputation.
Importance of Team Building
299
Assistant Fashion Designer
Team building activities not only boost morale of the team members, but it can also increase the
success rate of the teams. Team building is an important activity as it:
• Facilitates better communication: Activities that create discussion results in open
communication among the employees, and among employees and management. This
improves office environment also the quality of work.
• Motivates employees: The more comfortable team members are to share their ideas and
opinions, the more confident they will be. This motivates them to take on new projects or
challenges.
• Promotes creativity: Working closely with other team members increase creativity and
promotes new ideas.
• Develops problem-solving skills: Team building activities that require team members to
work closely to solve problems improves the ability to think rationally and logically. Teams
that determine when a problem arises and knows the solution can work better when a real
problem occurs.
• Breaks the barrier: Team building increases trust among workers.
Do and Don’ts of working in a Team:
• Don’t argue in public: if you have a disagreement with someone in the team find a neutral
place to discuss the situation.
• Do encourage each other: when things get tough the tough gets going. Contribute to the
team in trying situation.
• Don’t talk behind the backs: if you have trouble with some team member don’t share with
others. Go directly to the person in a kind and compassionate manner and share what is in
your mind.
• Do lend a hand: if a team members is asking for help don’t hesitate in helping him.
• Don’t be the weakest link: Live up to your responsibilities, meet team expectations and
communicate effectively in the team.
• Give and receive feedback: As a part of growing team give and receive feedback respectfully
and graciously.
300
Participant Handbook
UNIT 7.7: Time Management
Unit Objectives
At the end of this unit, participants will be able to:
• List the importance of time management
• Develop time management skills
7.7.1. Time Management
Time management is the process of planning and practicing control over the time given to a specific
task, especially to increase effectiveness, efficiency and productivity. It is an activity with the goal to
increase the overall advantage of a set of activities within the limited condition of a limited time.
Some effective time management
Delegate tasks
Identify time wasters
Combine activities – Plan for them
Break down big tasks down to the smallest task possible
Accomplish them one by one
At the end of the day conduct a simple analysis to see which activity took time
7.7.2. Time Robbers
Time robbers are those activities which create interruption at the workplace. These activities create
a deviation from the objectives which needs to be achieved. Time Robbers could be:
• Poor personal planning and scheduling
• Interruptions by people without appointments
• Poor delegation
• Poor use of the media: Telephone, Mobile, e-mail, and fax, etc.
• Reading junk mail
301

Assistant Fashion Designer
• Lack of concern for god time management
• Lack of clear priorities
The Time Robbers can be avoided by:
• Be active all the time
• Develop and maintain an organized personal activity schedule
• Set your priorities
• Proper delegation
• Utilize modern technical media
302
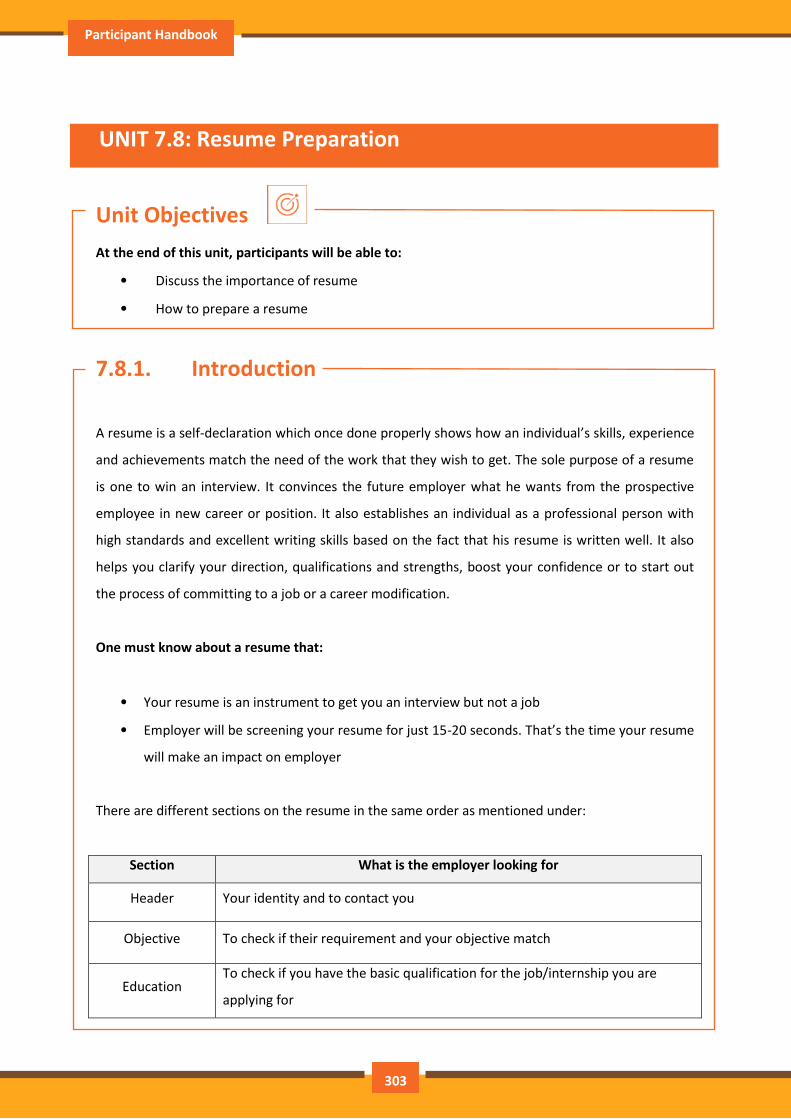
Participant Handbook
UNIT 7.8: Resume Preparation
Unit Objectives
At the end of this unit, participants will be able to:
• Discuss the importance of resume
• How to prepare a resume
7.8.1. Introduction
A resume is a self-declaration which once done properly shows how an individual’s skills, experience
and achievements match the need of the work that they wish to get. The sole purpose of a resume
is one to win an interview. It convinces the future employer what he wants from the prospective
employee in new career or position. It also establishes an individual as a professional person with
high standards and excellent writing skills based on the fact that his resume is written well. It also
helps you clarify your direction, qualifications and strengths, boost your confidence or to start out
the process of committing to a job or a career modification.
One must know about a resume that:
• Your resume is an instrument to get you an interview but not a job
• Employer will be screening your resume for just 15-20 seconds. That’s the time your resume
will make an impact on employer
There are different sections on the resume in the same order as mentioned under:
Section What is the employer looking for
Header Your identity and to contact you
Objective To check if their requirement and your objective match
Education To check if you have the basic qualification for the job/internship you are
applying for
303
Assistant Fashion Designer
Practical
Experience/
projects
To see if you have done anything that reflects your potential capability. Also to
see how different you are from your peers
Skills How equipped you are in terms of your personality traits as well as
occupational skills
Interests Professional aspects apart, how meaningful are your life?
Other Is there else significant and relevant you want to showcase, that will add value
to your resume
Preparation work and important tips
Before you start preparing your resume make sure to follow the checklist:
• Educational documents from class ten onwards to calculate scores
• Make list of all things that you need to add to your resume. Like internships, projects, part
time jobs, extracurricular activities, sports, training, skills, interests etc. the list doesn't need
to be complete, you'll always add to the list as you go.
Before preparing resume always remember:
• Every point in your resume should be specific and must be supported be supported by a
number of factual information.
• Use action verbs in all your points. They catch attention immediately and make your
sentences clear.
• Use bullets not paragraphs.
• Do not mention your responsibilities mention what you have accomplished.
• A common mistake we make while constructing the resume is to copy the format from our
friends resume and built it based on that.
Resume Header
Purpose: You have to provide some information about yourself, so that the employer can reach you.
Mandatory fields include: Name, current address, email id, phone number, and date of birth. Your
name should be written in bigger font.
Do Not:
• Include your photo
• Write RESUME as heading to the file
304
Participant Handbook
• Give details like family information, marital status, etc.
• Add these details to the bottom of your resume or occupy more space to fill up these details
Framing the Objective
Purpose: To convey the employer what goals you have. The focus should be towards getting a
particular position in a specific industry.
Always remember: Your objective should include the following:
• Position wanted
• Functional area
• Industry wanted
• Be specific and restrict it to minimum words.
• You objective should be different to each role you apply to
• While writing the objective, keep the employers requirement in mind. The objective is not
what you desire from the company, it’s about company’s need.
Education
The next session in your resume is to highlight your educational qualifications.
Purpose: For the employer to know whether you have basic qualification for the job for which you
are applying or not.
Always Remember:
• To write all educational qualifications from class 10 to highest education.
• For class 10 and 12 – include school/college name, Board, Stream/Specialization (If any),
year of study, Marks.
• For undergraduate – include College name, University name, Degree and Specialization, year
of study.
• Write all your qualifications in reverse chronological order, i.e. the latest qualification on
top.
• You may write the educational qualifications in a tabular format or in a simple one after the
other order.
Projects and Internships
The next part of your resume includes the hands on work that you have done, like projects,
internships, in-plant training, part time jobs, volunteering, starting up a company and other
305
Assistant Fashion Designer
initiatives. The number and the nature of initiatives taken define whether to keep one heading or
detail them under different headings.
Purpose: This is a mandatory part of a resume, as your hands on work and the initiatives you have
taken apart from your curriculum in what will reflect your real strength as well as separate your
resume from your peers.
Remember:
• The heading should be – title / project name, role, company/organisation name, -2 lines
description about
• The specific time period.
• Time period is must.
• The entries under each heading must be in reverse chronological order.
• Be very specific on what you have accomplished. Add numbers and facts wherever possible.
Do Not:
• Do not write simple statements. It does not give employer a clear picture of the work you
have done. Thus the employer can assume that you have done an internship for the
certificate.
Skills
Heading: You can have multiple headings under skills. Common heading can include:
• Soft Skills: must include, they showcase your personality traits.
• Core occupational skills: Optional include if you possess any core skills. These are skills you
possess relevant to the role you are applying for.
• IT Skills: Optional, suggestive to include if you are applying for IT/software related roles.
Remember:
• List your skill and add a point which supports your skill the best.
• Make specific points. Add numbers and facts wherever possible.
• Pick only three to four soft skills that describes you the best.
• Dig your past to discover the best of these skills you possess and the best example you can
quote to support it.
Interests
In this section of your resume carefully choose which of interests you want to showcase on your
resume so that they can make your life seem meaningful.
306
Participant Handbook
The interests you showcase talk about your character. These interests frequently come up as a
subject of discussions during the interviews; therefore sagely choose what to show.
Remember:
• List interests which are meaningful and display some learning.
• Support the interest you have listed
• Make points specific and add supporting fact to it.
• Do not just list random cluster of interests like: adventure, guitar, reading, environment
• Never include interests like partying, watching movies etc. they create wrong impression.
References
Give References
The very last thing on your resume ought to be a list of 2-4 professional references. These are all
those who you're not related to, but whom you have handled in a professional manner. You would
possibly think about previous leader, faculty member or volunteer coordinator to include on your
reference page.
• Include the name of the reference, their relationship to you, mailing address, e mail and
telephone number.
• The place you're applying to could contact these people, therefore always call them in
advance to allow them to understand that you are using them for a reference and are
presently applying for a job.
Points to Remember
• Make sure that the length of your resume doesn't exceed a pair of pages
• Does a thorough recheck and confirm there are fully no errors in your resume. No
grammatical errors, no spelling mistakes, no punctuation errors
• Run through your resume time and again for to create enhancements and phrasing
sentences better
• Choose a professional font in a size eleven or twelve. You can use multiple fonts for
different elements of resume, but try to limit it most of two fonts. Instead changing
between fonts, strive creating specific sections bold or italicized instead
• The font size of your header and the introduction to a part may be a size fourteen or sixteen
• Your text should be printed in solid black ink. Ensure to deactivate any hyperlinks so that
they don’t print in blue or other contrastive colour
307

Assistant Fashion Designer
• Your page ought to have one inch margin all the way around with 1.5 or 2 point line spacing.
The body of your resume ought to align left and your header should be centred at the top of
the page
308
Participant Handbook
UNIT 7.9: Interview Preparation
Unit Objectives
At the end of this unit, participants will be able to:
• Know the procedure of interview
• Go thorough mock interviews
• How to present them during an interview
• Motivated to work after the training period is over
7.9.1 Interview
An interview is a conversation between two or more individuals (the interviewer(s) and the
interviewee) wherever queries are asked by the interviewer to get information from the
interviewee. An interview is the first and last hurdle you need to cross in order to get employment.
Common Types of Interview
Traditional HR Interview: Most of the interviews are face to face interviews. The most traditional is
a one-tone conversation with the Human Resources Executive where the candidate’s focus should
be on the person asking question. You are advised to maintain good eye contact, listen keenly and
answer promptly.
Panel Interview: In this situation, there is more than one interviewer. A panel ranging from two to
ten members may conduct this part of the selection process. This is an ideal chance for you to
display group management and group presentation skills.
Technical interview: The objective of this interview is to basically evaluate technical knowledge.
Majority of the questions will be based on the skills sets mentioned in the candidate’s resume.
Telephonic Interview: Telephonic interviews are used for initial screening of candidates who live far
away from the job site.
309
Assistant Fashion Designer
Before going for an interview, it is important to have clarity of the role you are applying for. It’s also
important that for you to know where you are applying and whom will you be talking to. Your
answers should tell the employer that you are the match they are looking for.
This requires you to do a small research on the following fields:
• Company and Field
• Job Description
• Yourself (Skills, Values and Interests)
• Resume (Experience)
If you were an employer, you would have chosen a person who is sure of himself, calm and
confident. So it’s important that you are:
• Confident
• Relaxed
• Sure of yourself
• Prepared
• Before, during and after the interview, it is important for you to be prepared.
• Dress Professionally
It is important that you dress professionally. It is a proven fact that the way we dress makes a huge
difference in the way we are perceived. 90% of the way you communicate with other people is
through body language (gestures, expressions, etc.) and the first Impression we make. It is very
simple to make a great first impression.
For a good first impression it is important those we:
• Smell good
• Have a professional appearance
• Pay attention to your grooming
• Make eye contact
• Know what and how you speak
• Our overall personality contributes to our complete perception
310
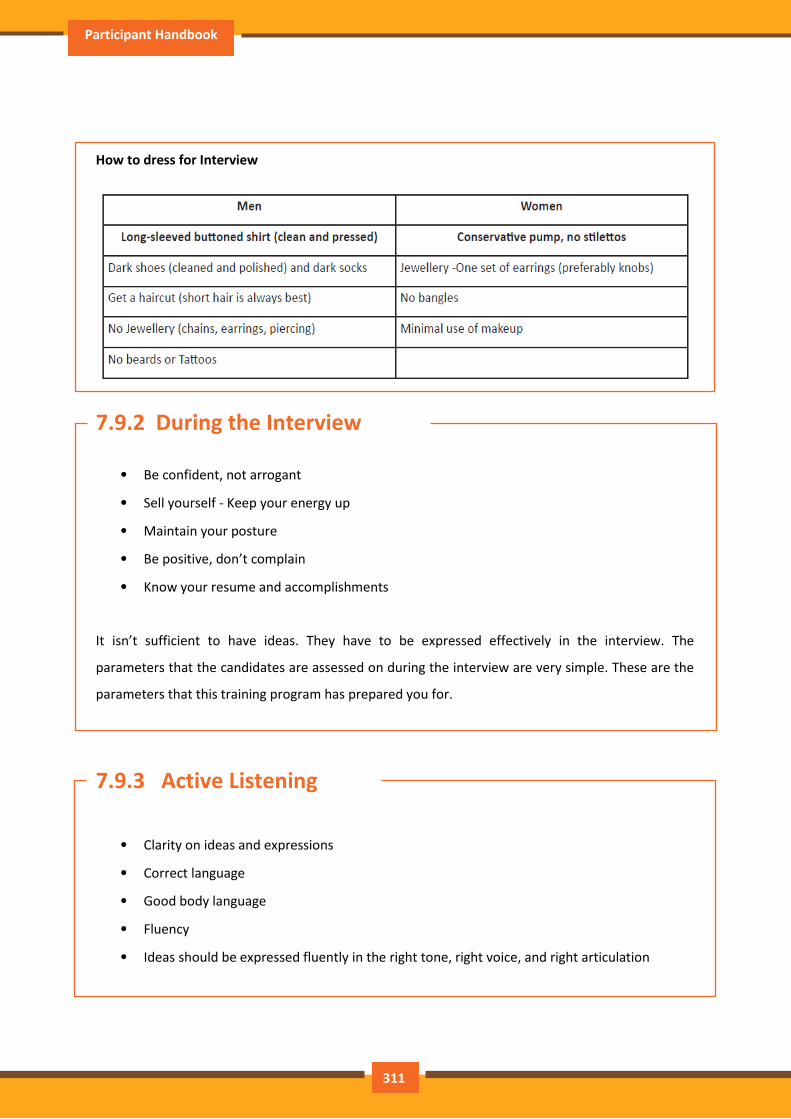
Participant Handbook
How to dress for Interview
7.9.2 During the Interview
• Be confident, not arrogant
• Sell yourself - Keep your energy up
• Maintain your posture
• Be positive, don’t complain
• Know your resume and accomplishments
It isn’t sufficient to have ideas. They have to be expressed effectively in the interview. The
parameters that the candidates are assessed on during the interview are very simple. These are the
parameters that this training program has prepared you for.
7.9.3 Active Listening
• Clarity on ideas and expressions
• Correct language
• Good body language
• Fluency
• Ideas should be expressed fluently in the right tone, right voice, and right articulation
311

Assistant Fashion Designer
8. First Aid and CPR
Unit 8.1 – First Aid and CPR

Participant Handbook
Key Learning Outcomes
At the end of the module, participants will be able to:
• Identify different methods of first aid
• Perform first aid
• Know the CPR
• Perform CPR in case of emergency
313
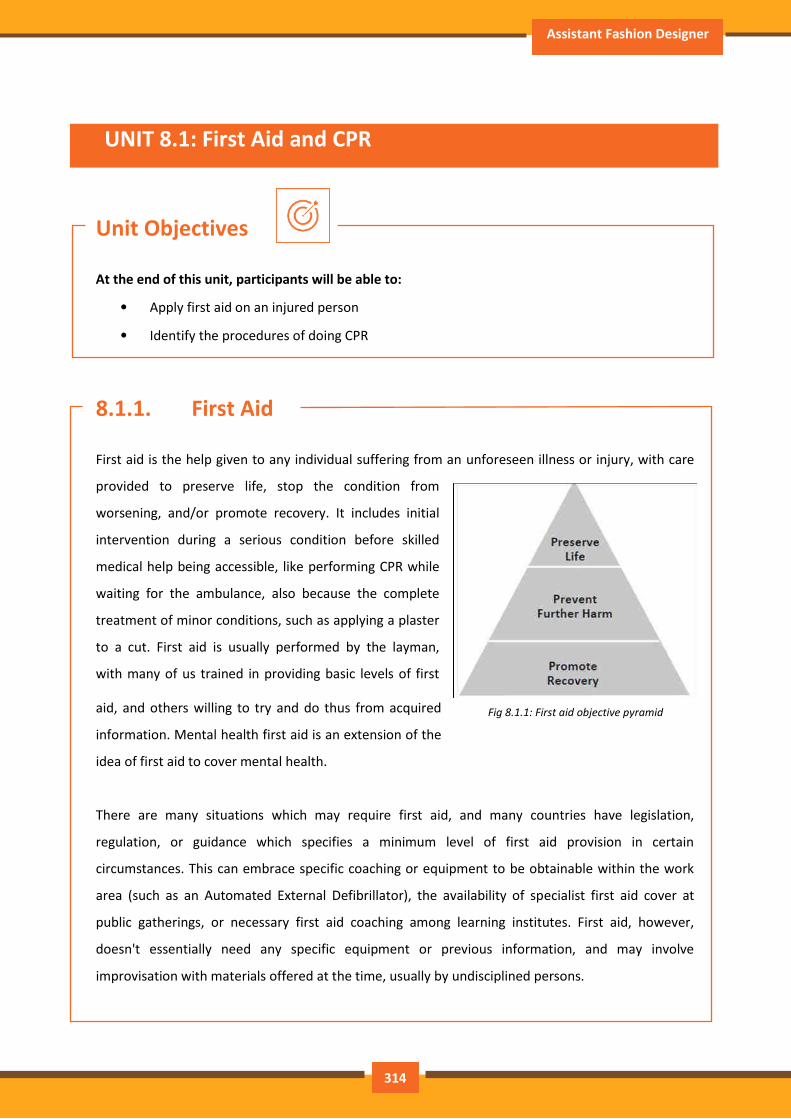
Assistant Fashion Designer
UNIT 8.1: First Aid and CPR
Unit Objectives
At the end of this unit, participants will be able to:
• Apply first aid on an injured person
• Identify the procedures of doing CPR
8.1.1. First Aid
First aid is the help given to any individual suffering from an unforeseen illness or injury, with care
provided to preserve life, stop the condition from
worsening, and/or promote recovery. It includes initial
intervention during a serious condition before skilled
medical help being accessible, like performing CPR while
waiting for the ambulance, also because the complete
treatment of minor conditions, such as applying a plaster
to a cut. First aid is usually performed by the layman,
with many of us trained in providing basic levels of first
aid, and others willing to try and do thus from acquired
information. Mental health first aid is an extension of the
idea of first aid to cover mental health.
There are many situations which may require first aid, and many countries have legislation,
regulation, or guidance which specifies a minimum level of first aid provision in certain
circumstances. This can embrace specific coaching or equipment to be obtainable within the work
area (such as an Automated External Defibrillator), the availability of specialist first aid cover at
public gatherings, or necessary first aid coaching among learning institutes. First aid, however,
doesn't essentially need any specific equipment or previous information, and may involve
improvisation with materials offered at the time, usually by undisciplined persons.
Fig 8.1.1: First aid objective pyramid
314

Participant Handbook
Vital Signs Good Poor
Heart beat 60-100 beats per minute <60 or >100 per minute
Respiration 14-16 breaths per minute <14 breaths per minute
Skin warm, pink, dry cool, pale, moist
Consciousness alert, oriented drowsy or unconscious
Awareness Assessment Action Aftercare
Observe Assess what is
required to be
done
Do what you can Once you have assisted
the victim, stay with
him/her till expert care
arrives
Stop to help Ask yourself 'Can I
do it?'
Call for expert
medical help
Take care of your
and the
bystander's safety
While delivering First Aid always remember:
• Prevent deterioration
• Act swiftly, deliberately and confidently
• Golden Hour – First 60 minutes following an accident
• Platinum Period – First 15 minutes following an accident
• Prevent shock and choking
• Stop bleeding
• Loosen victim’s clothes
• Regulate respiratory system
• Avoid crowding/over-crowding
• Arrange to take victim to safe place/hospital
• Attend to emergencies first with ease and without fear
• Do not overdo. Remember that the person giving first aid is not a doctor
315
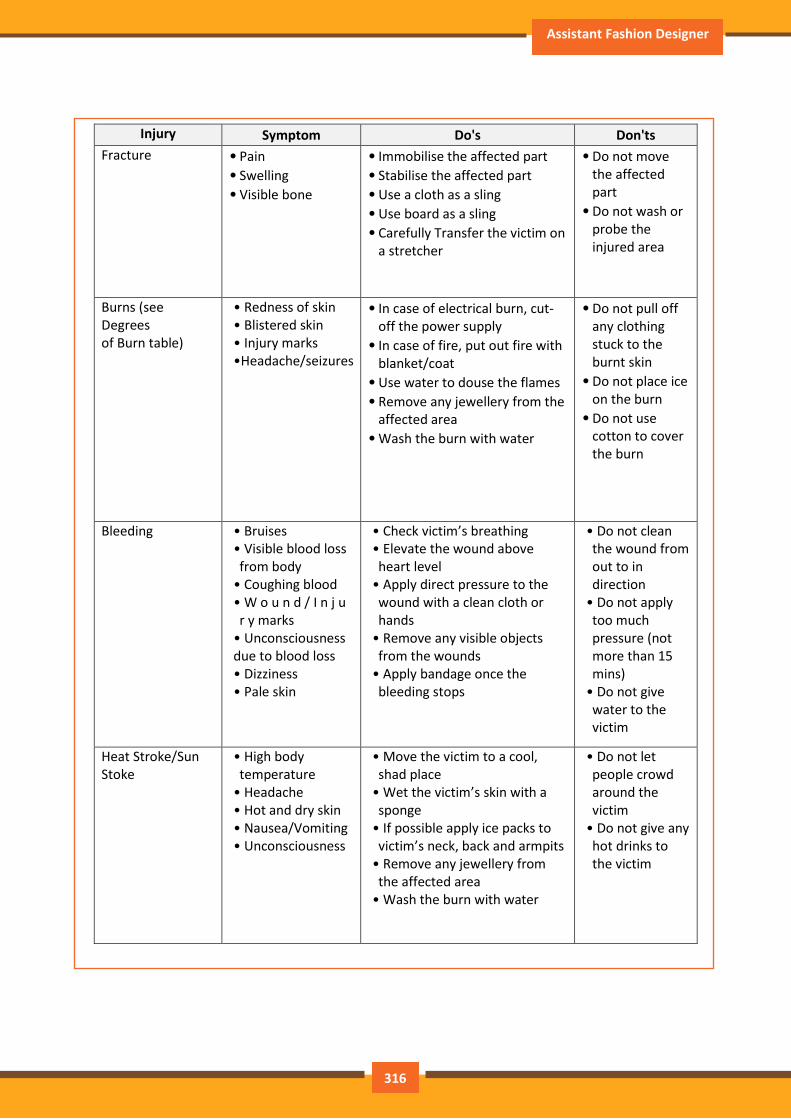
Assistant Fashion Designer
Injury Symptom Do's Don'ts
Fracture
• Pain
• Swelling
• Visible bone
• Immobilise the affected part
• Stabilise the affected part
• Use a cloth as a sling
• Use board as a sling
• Carefully Transfer the victim on
a stretcher
• Do not move
the affected
part
• Do not wash or
probe the
injured area
Burns (see
Degrees
of Burn table)
• Redness of skin
• Blistered skin
• Injury marks
•Headache/seizures
• In case of electrical burn, cut-
off the power supply
• In case of fire, put out fire with
blanket/coat
• Use water to douse the flames
• Remove any jewellery from the
affected area
• Wash the burn with water
• Do not pull off
any clothing
stuck to the
burnt skin
• Do not place ice
on the burn
• Do not use
cotton to cover
the burn
Bleeding
• Bruises
• Visible blood loss from body
• Coughing blood
• W o u n d / I n j u r y marks
• Unconsciousness
due to blood loss
• Dizziness
• Pale skin
• Check victim’s breathing
• Elevate the wound above
heart level
• Apply direct pressure to the wound with a clean cloth or
hands
• Remove any visible objects from the wounds
• Apply bandage once the bleeding stops
• Do not clean the wound from
out to in
direction
• Do not apply too much
pressure (not
more than 15
mins)
• Do not give water to the
victim
Heat Stroke/Sun
Stoke
• High body temperature
• Headache
• Hot and dry skin
• Nausea/Vomiting
• Unconsciousness
• Move the victim to a cool, shad place
• Wet the victim’s skin with a
sponge
• If possible apply ice packs to victim’s neck, back and armpits
• Remove any jewellery from the affected area
• Wash the burn with water
• Do not let people crowd
around the
victim
• Do not give any hot drinks to
the victim
316
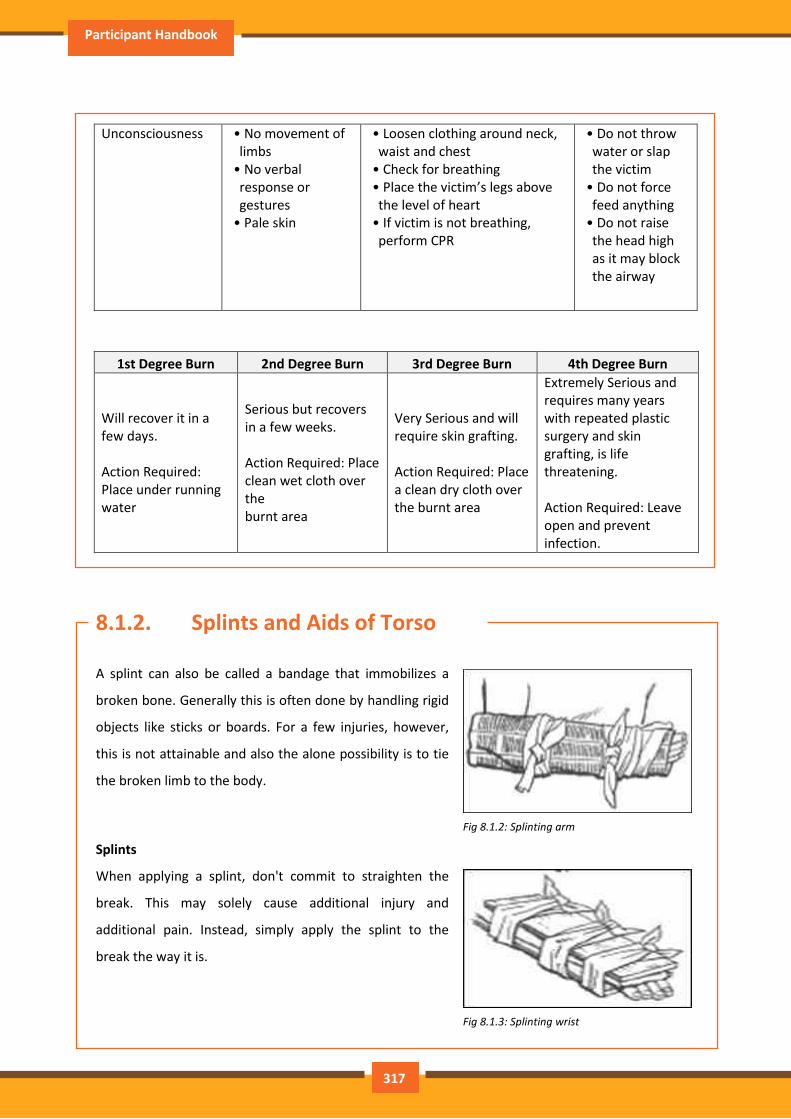
Participant Handbook
Unconsciousness
• No movement of limbs
• No verbal response or
gestures
• Pale skin
• Loosen clothing around neck, waist and chest
• Check for breathing
• Place the victim’s legs above
the level of heart
• If victim is not breathing, perform CPR
• Do not throw water or slap
the victim
• Do not force feed anything
• Do not raise the head high
as it may block
the airway
1st Degree Burn 2nd Degree Burn 3rd Degree Burn 4th Degree Burn
Will recover it in a
few days.
Action Required:
Place under running
water
Serious but recovers
in a few weeks.
Action Required: Place
clean wet cloth over
the
burnt area
Very Serious and will
require skin grafting.
Action Required: Place
a clean dry cloth over
the burnt area
Extremely Serious and
requires many years
with repeated plastic
surgery and skin
grafting, is life
threatening.
Action Required: Leave
open and prevent
infection.
8.1.2. Splints and Aids of Torso
A splint can also be called a bandage that immobilizes a
broken bone. Generally this is often done by handling rigid
objects like sticks or boards. For a few injuries, however,
this is not attainable and also the alone possibility is to tie
the broken limb to the body.
Splints
When applying a splint, don't commit to straighten the
break. This may solely cause additional injury and
additional pain. Instead, simply apply the splint to the
break the way it is.
Fig 8.1.2: Splinting arm
Fig 8.1.3: Splinting wrist
317

Assistant Fashion Designer
When using rigid material
Always use long enough items to reach the joints beyond the break. For
instance, once splinting a forearm, the fabric ought to be long enough to
touch each the wrist joint and therefore the elbow. This helps keep the
fabric in place and prevents an excessive amount of pressure from being
applied to the wound.
• Always place cushioning between the rigid material and the body
to stay the victim comfy. Tie knots between the rigid material and
the body (in mid-air) once doable. This makes them easier to untie.
If this can be impossible, tie knots over the rigid material
• To splint the forearm, surround the split with rigid material and snugly bandage it to the arm
with wide cloth strips. A newspaper or magazine, curled into a "U" form, works alright
• Splint the wrist joint within the same approach. The whole forearm needs to be immobilized
• To splint the elbow, use enough rigid material to travel from the armpit to the hand.
The entire arm ought to be immobilized. Don't plan to straighten or bend the elbow; splint it
in position
• To splint the upper leg, use long items
of rigid material which will reach from
the ankle joint to the armpit. On top of
the hips, tie long straps round the torso
to carry the top of the splint in place.
• To splint the lower leg, use rigid material long enough to
travel from the knee to the foot. The foot ought to be
immobilized and unable to turn. Make sure to use a lot
of cushioning, particularly round the ankle.
Fig.: Splint the lower leg
Fig 8.1.4: Splinting elbow
Fig 8.1.5: Splinting upper leg
Fig 8.1.6: Splinting lower leg
318
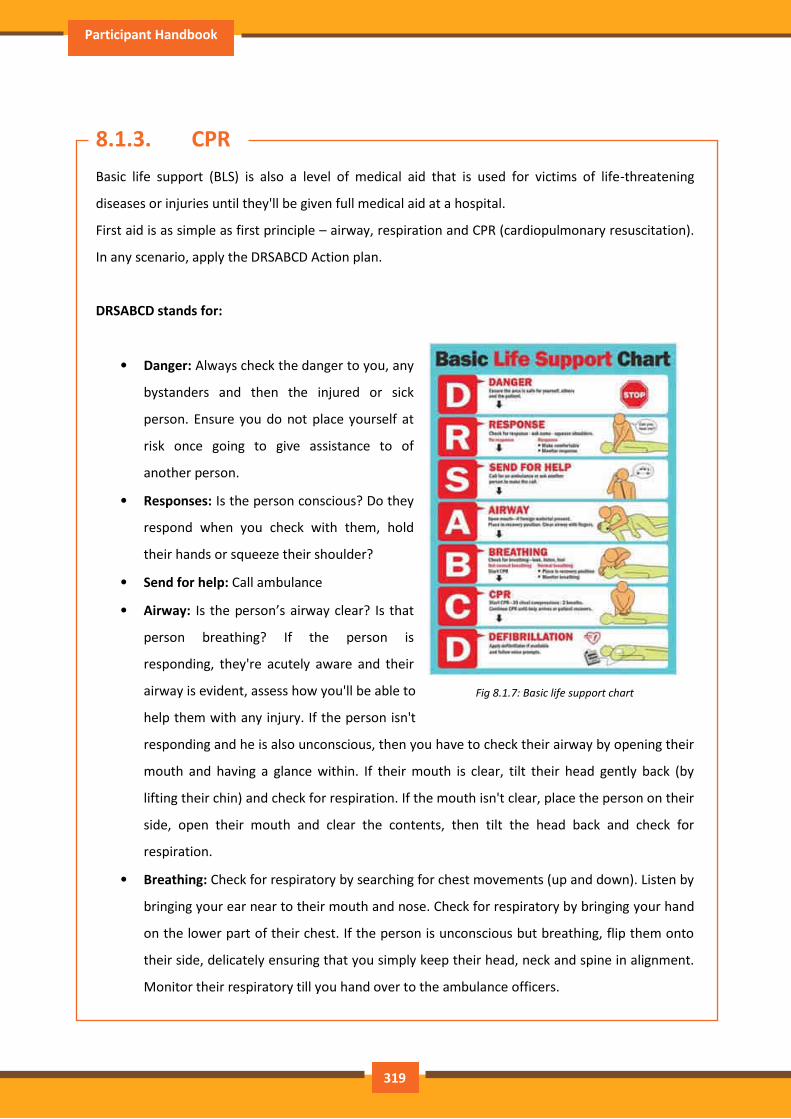
Participant Handbook
8.1.3. CPR
Basic life support (BLS) is also a level of medical aid that is used for victims of life-threatening
diseases or injuries until they'll be given full medical aid at a hospital.
First aid is as simple as first principle – airway, respiration and CPR (cardiopulmonary resuscitation).
In any scenario, apply the DRSABCD Action plan.
DRSABCD stands for:
• Danger: Always check the danger to you, any
bystanders and then the injured or sick
person. Ensure you do not place yourself at
risk once going to give assistance to of
another person.
• Responses: Is the person conscious? Do they
respond when you check with them, hold
their hands or squeeze their shoulder?
• Send for help: Call ambulance
• Airway: Is the person’s airway clear? Is that
person breathing? If the person is
responding, they're acutely aware and their
airway is evident, assess how you'll be able to
help them with any injury. If the person isn't
responding and he is also unconscious, then you have to check their airway by opening their
mouth and having a glance within. If their mouth is clear, tilt their head gently back (by
lifting their chin) and check for respiration. If the mouth isn't clear, place the person on their
side, open their mouth and clear the contents, then tilt the head back and check for
respiration.
• Breathing: Check for respiratory by searching for chest movements (up and down). Listen by
bringing your ear near to their mouth and nose. Check for respiratory by bringing your hand
on the lower part of their chest. If the person is unconscious but breathing, flip them onto
their side, delicately ensuring that you simply keep their head, neck and spine in alignment.
Monitor their respiratory till you hand over to the ambulance officers.
Fig 8.1.7: Basic life support chart
319
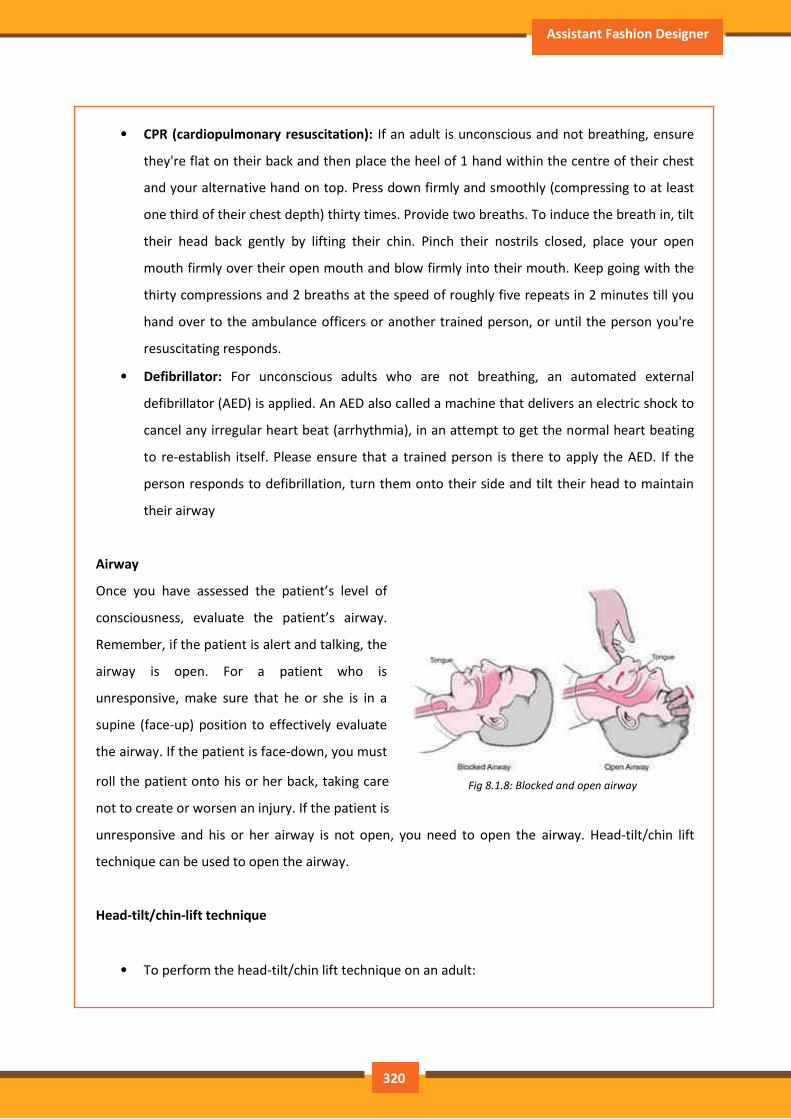
Assistant Fashion Designer
• CPR (cardiopulmonary resuscitation): If an adult is unconscious and not breathing, ensure
they're flat on their back and then place the heel of 1 hand within the centre of their chest
and your alternative hand on top. Press down firmly and smoothly (compressing to at least
one third of their chest depth) thirty times. Provide two breaths. To induce the breath in, tilt
their head back gently by lifting their chin. Pinch their nostrils closed, place your open
mouth firmly over their open mouth and blow firmly into their mouth. Keep going with the
thirty compressions and 2 breaths at the speed of roughly five repeats in 2 minutes till you
hand over to the ambulance officers or another trained person, or until the person you're
resuscitating responds.
• Defibrillator: For unconscious adults who are not breathing, an automated external
defibrillator (AED) is applied. An AED also called a machine that delivers an electric shock to
cancel any irregular heart beat (arrhythmia), in an attempt to get the normal heart beating
to re-establish itself. Please ensure that a trained person is there to apply the AED. If the
person responds to defibrillation, turn them onto their side and tilt their head to maintain
their airway
Airway
Once you have assessed the patient’s level of
consciousness, evaluate the patient’s airway.
Remember, if the patient is alert and talking, the
airway is open. For a patient who is
unresponsive, make sure that he or she is in a
supine (face-up) position to effectively evaluate
the airway. If the patient is face-down, you must
roll the patient onto his or her back, taking care
not to create or worsen an injury. If the patient is
unresponsive and his or her airway is not open, you need to open the airway. Head-tilt/chin lift
technique can be used to open the airway.
Head-tilt/chin-lift technique
• To perform the head-tilt/chin lift technique on an adult:
Fig 8.1.8: Blocked and open airway
320
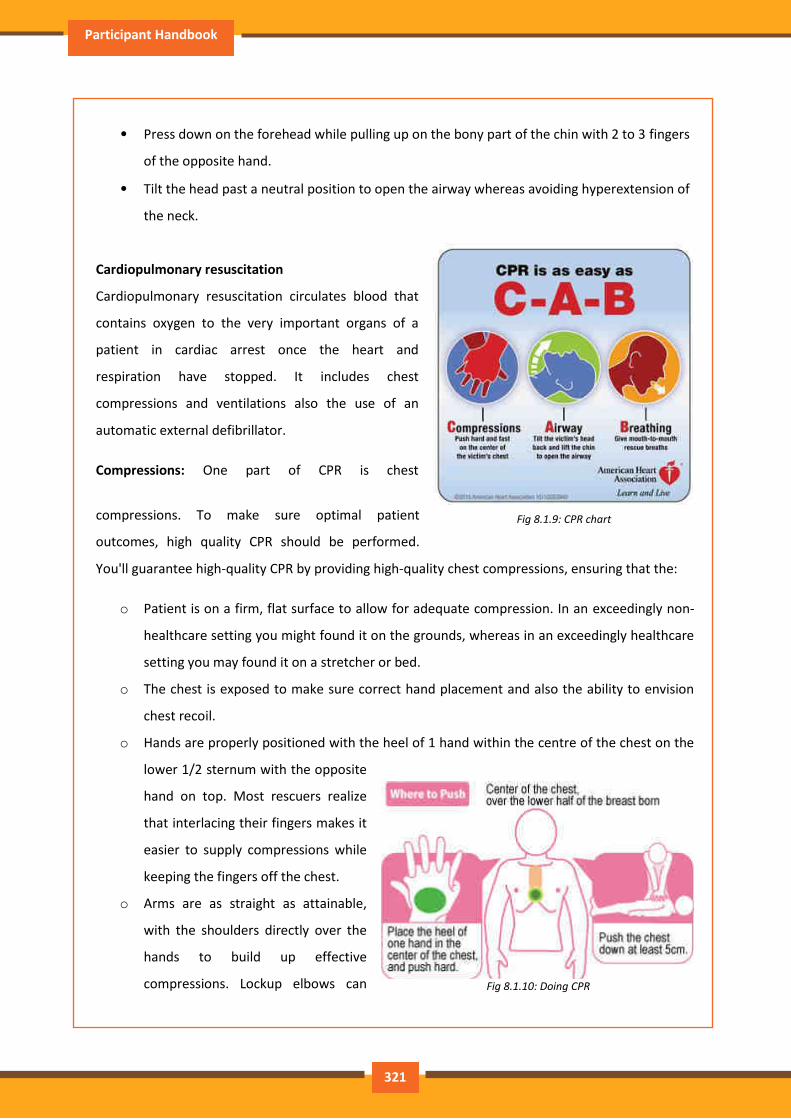
Participant Handbook
• Press down on the forehead while pulling up on the bony part of the chin with 2 to 3 fingers
of the opposite hand.
• Tilt the head past a neutral position to open the airway whereas avoiding hyperextension of
the neck.
Cardiopulmonary resuscitation
Cardiopulmonary resuscitation circulates blood that
contains oxygen to the very important organs of a
patient in cardiac arrest once the heart and
respiration have stopped. It includes chest
compressions and ventilations also the use of an
automatic external defibrillator.
Compressions: One part of CPR is chest
compressions. To make sure optimal patient
outcomes, high quality CPR should be performed.
You'll guarantee high-quality CPR by providing high-quality chest compressions, ensuring that the:
o Patient is on a firm, flat surface to allow for adequate compression. In an exceedingly non-
healthcare setting you might found it on the grounds, whereas in an exceedingly healthcare
setting you may found it on a stretcher or bed.
o The chest is exposed to make sure correct hand placement and also the ability to envision
chest recoil.
o Hands are properly positioned with the heel of 1 hand within the centre of the chest on the
lower 1/2 sternum with the opposite
hand on top. Most rescuers realize
that interlacing their fingers makes it
easier to supply compressions while
keeping the fingers off the chest.
o Arms are as straight as attainable,
with the shoulders directly over the
hands to build up effective
compressions. Lockup elbows can
Fig 8.1.9: CPR chart
Fig 8.1.10: Doing CPR
321
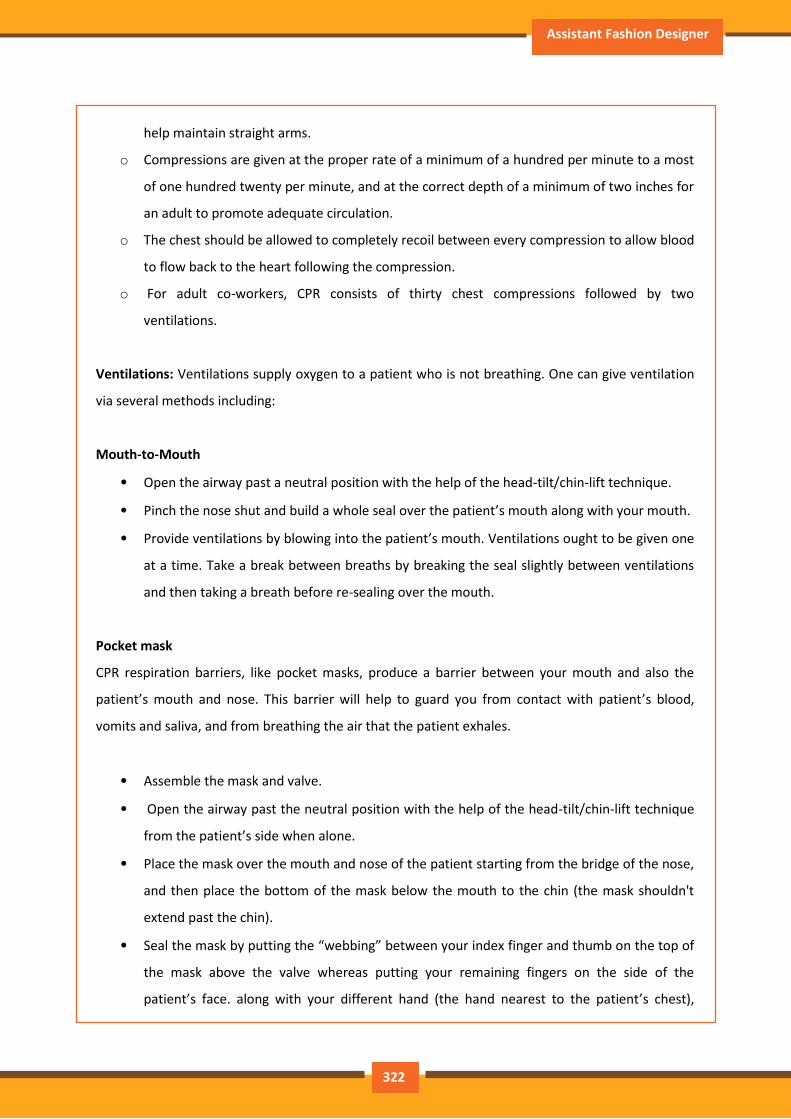
Assistant Fashion Designer
help maintain straight arms.
o Compressions are given at the proper rate of a minimum of a hundred per minute to a most
of one hundred twenty per minute, and at the correct depth of a minimum of two inches for
an adult to promote adequate circulation.
o The chest should be allowed to completely recoil between every compression to allow blood
to flow back to the heart following the compression.
o For adult co-workers, CPR consists of thirty chest compressions followed by two
ventilations.
Ventilations: Ventilations supply oxygen to a patient who is not breathing. One can give ventilation
via several methods including:
Mouth-to-Mouth
• Open the airway past a neutral position with the help of the head-tilt/chin-lift technique.
• Pinch the nose shut and build a whole seal over the patient’s mouth along with your mouth.
• Provide ventilations by blowing into the patient’s mouth. Ventilations ought to be given one
at a time. Take a break between breaths by breaking the seal slightly between ventilations
and then taking a breath before re-sealing over the mouth.
Pocket mask
CPR respiration barriers, like pocket masks, produce a barrier between your mouth and also the
patient’s mouth and nose. This barrier will help to guard you from contact with patient’s blood,
vomits and saliva, and from breathing the air that the patient exhales.
• Assemble the mask and valve.
• Open the airway past the neutral position with the help of the head-tilt/chin-lift technique
from the patient’s side when alone.
• Place the mask over the mouth and nose of the patient starting from the bridge of the nose,
and then place the bottom of the mask below the mouth to the chin (the mask shouldn't
extend past the chin).
• Seal the mask by putting the “webbing” between your index finger and thumb on the top of
the mask above the valve whereas putting your remaining fingers on the side of the
patient’s face. along with your different hand (the hand nearest to the patient’s chest),
322
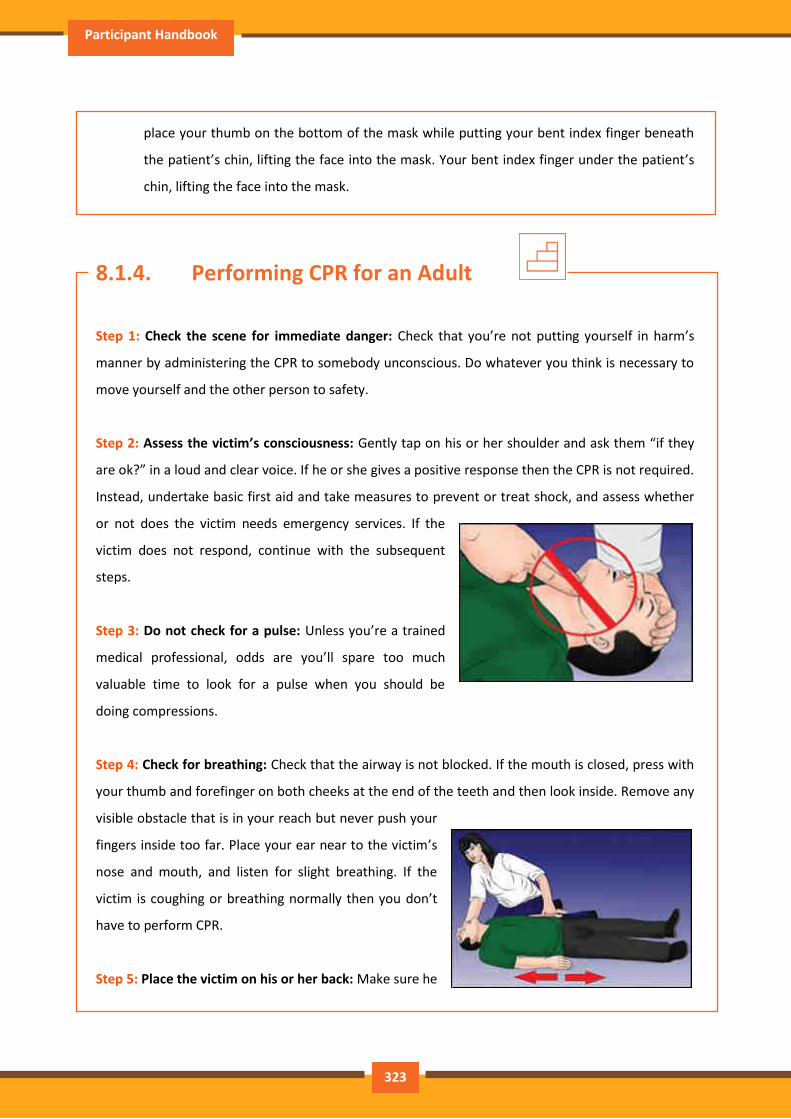
Participant Handbook
place your thumb on the bottom of the mask while putting your bent index finger beneath
the patient’s chin, lifting the face into the mask. Your bent index finger under the patient’s
chin, lifting the face into the mask.
8.1.4. Performing CPR for an Adult
Step 1: Check the scene for immediate danger: Check that you’re not putting yourself in harm’s
manner by administering the CPR to somebody unconscious. Do whatever you think is necessary to
move yourself and the other person to safety.
Step 2: Assess the victim’s consciousness: Gently tap on his or her shoulder and ask them “if they
are ok?” in a loud and clear voice. If he or she gives a positive response then the CPR is not required.
Instead, undertake basic first aid and take measures to prevent or treat shock, and assess whether
or not does the victim needs emergency services. If the
victim does not respond, continue with the subsequent
steps.
Step 3: Do not check for a pulse: Unless you’re a trained
medical professional, odds are you’ll spare too much
valuable time to look for a pulse when you should be
doing compressions.
Step 4: Check for breathing: Check that the airway is not blocked. If the mouth is closed, press with
your thumb and forefinger on both cheeks at the end of the teeth and then look inside. Remove any
visible obstacle that is in your reach but never push your
fingers inside too far. Place your ear near to the victim’s
nose and mouth, and listen for slight breathing. If the
victim is coughing or breathing normally then you don’t
have to perform CPR.
Step 5: Place the victim on his or her back: Make sure he
323
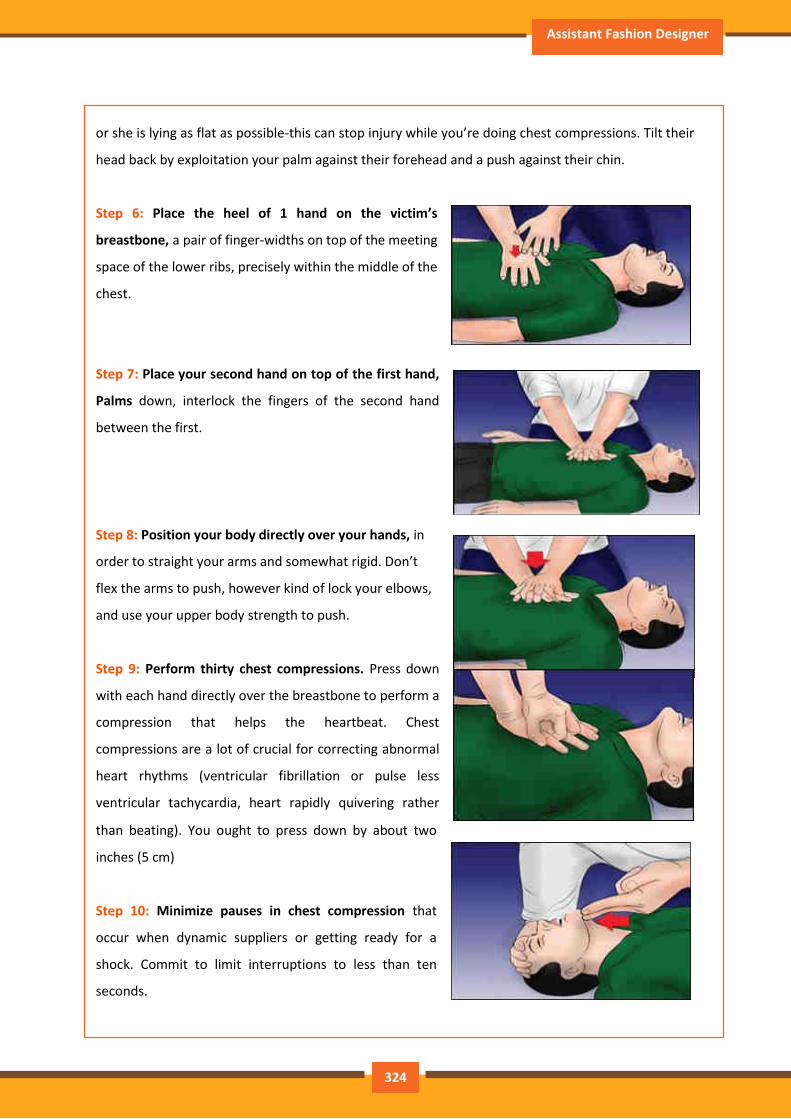
Assistant Fashion Designer
or she is lying as flat as possible-this can stop injury while you’re doing chest compressions. Tilt their
head back by exploitation your palm against their forehead and a push against their chin.
Step 6: Place the heel of 1 hand on the victim’s
breastbone, a pair of finger-widths on top of the meeting
space of the lower ribs, precisely within the middle of the
chest.
Step 7: Place your second hand on top of the first hand,
Palms down, interlock the fingers of the second hand
between the first.
Step 8: Position your body directly over your hands, in
order to straight your arms and somewhat rigid. Don’t
flex the arms to push, however kind of lock your elbows,
and use your upper body strength to push.
Step 9: Perform thirty chest compressions. Press down
with each hand directly over the breastbone to perform a
compression that helps the heartbeat. Chest
compressions are a lot of crucial for correcting abnormal
heart rhythms (ventricular fibrillation or pulse less
ventricular tachycardia, heart rapidly quivering rather
than beating). You ought to press down by about two
inches (5 cm)
Step 10: Minimize pauses in chest compression that
occur when dynamic suppliers or getting ready for a
shock. Commit to limit interruptions to less than ten
seconds.
324

Participant Handbook
Step 11: Make sure the airway is open. Place your
hand on the victim’s forehead and 2 fingers on their
chin and tilt the head back to open the airway. If you
find a neck injury, pull the jaw forward instead of
lifting the chin. If jaw thrust fails to open the airway,
do a careful head tilt and chin raise. If there are not
any signs of life, place a respiratory barrier (if
available) over the victim’s mouth.
Step 12: Give 2 rescue breaths (optional). If you're
trained in mouth-to-mouth resuscitation and totally
assured, provide 2 rescue breaths once your thirty
chest compressions are complete. If you’ve ne'er
done mouth-to-mouth resuscitation before, or you’re
trained however rusty, stick with solely chest
compressions.
Step 13: Repeat the cycle of thirty chest compressions. If you’re conjointly doing rescue breaths,
keep doing a cycle of thirty chest compressions, and then a pair of rescue breaths; repeat the thirty
compressions and a pair of a lot of breaths. You ought to do mouth-to-mouth resuscitation for two
minutes (5 cycles of compressions to breaths) before spend time checking for signs of life.
325
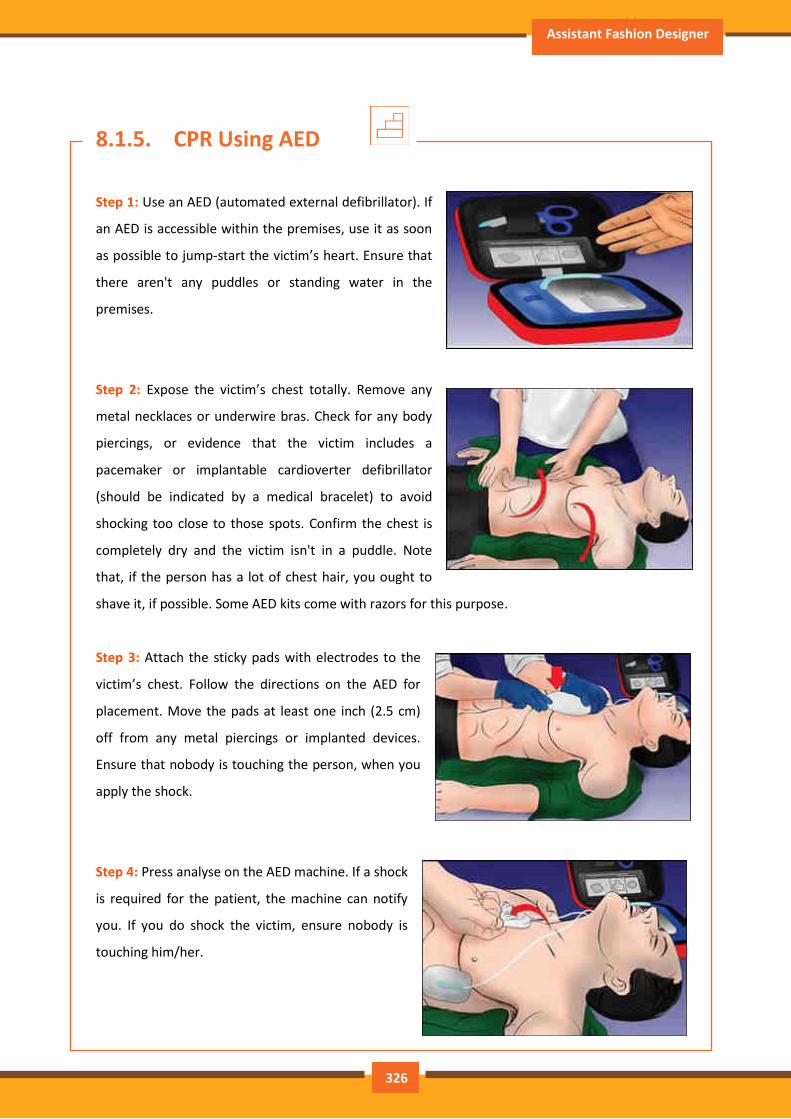
Assistant Fashion Designer
8.1.5. CPR Using AED
Step 1: Use an AED (automated external defibrillator). If
an AED is accessible within the premises, use it as soon
as possible to jump-start the victim’s heart. Ensure that
there aren't any puddles or standing water in the
premises.
Step 2: Expose the victim’s chest totally. Remove any
metal necklaces or underwire bras. Check for any body
piercings, or evidence that the victim includes a
pacemaker or implantable cardioverter defibrillator
(should be indicated by a medical bracelet) to avoid
shocking too close to those spots. Confirm the chest is
completely dry and the victim isn't in a puddle. Note
that, if the person has a lot of chest hair, you ought to
shave it, if possible. Some AED kits come with razors for this purpose.
Step 3: Attach the sticky pads with electrodes to the
victim’s chest. Follow the directions on the AED for
placement. Move the pads at least one inch (2.5 cm)
off from any metal piercings or implanted devices.
Ensure that nobody is touching the person, when you
apply the shock.
Step 4: Press analyse on the AED machine. If a shock
is required for the patient, the machine can notify
you. If you do shock the victim, ensure nobody is
touching him/her.
326
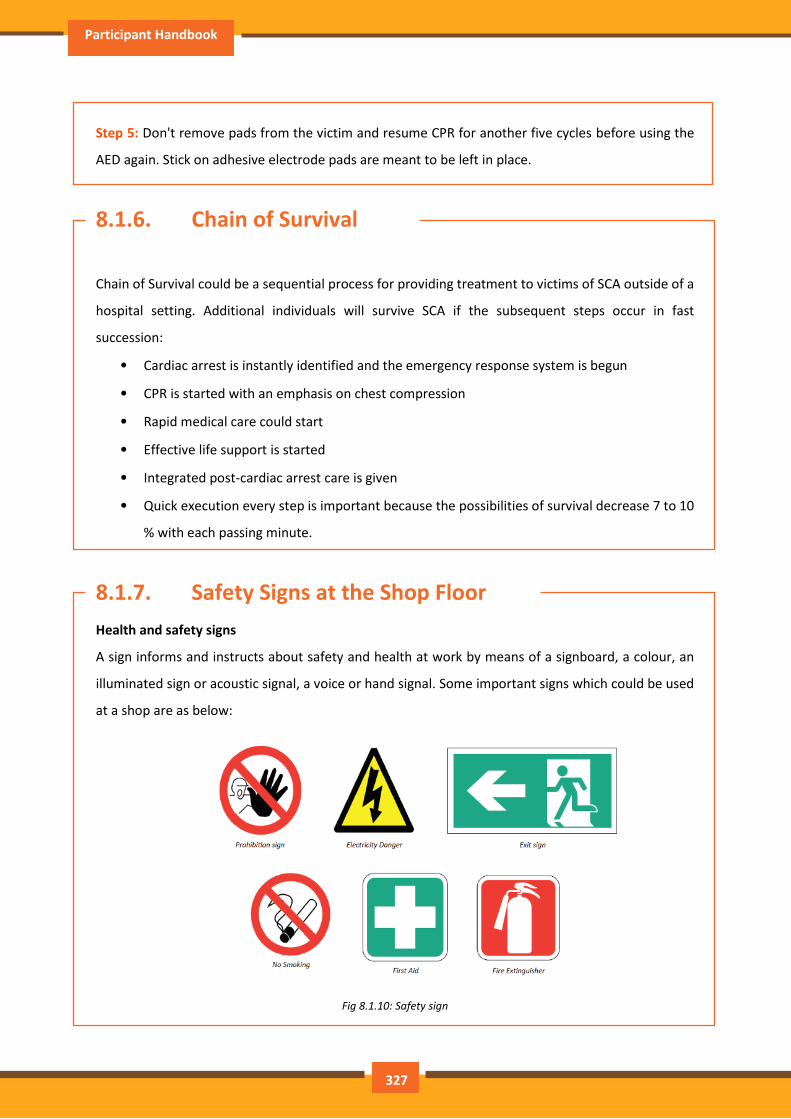
Participant Handbook
Step 5: Don't remove pads from the victim and resume CPR for another five cycles before using the
AED again. Stick on adhesive electrode pads are meant to be left in place.
8.1.6. Chain of Survival
Chain of Survival could be a sequential process for providing treatment to victims of SCA outside of a
hospital setting. Additional individuals will survive SCA if the subsequent steps occur in fast
succession:
• Cardiac arrest is instantly identified and the emergency response system is begun
• CPR is started with an emphasis on chest compression
• Rapid medical care could start
• Effective life support is started
• Integrated post-cardiac arrest care is given
• Quick execution every step is important because the possibilities of survival decrease 7 to 10
% with each passing minute.
8.1.7. Safety Signs at the Shop Floor
Health and safety signs
A sign informs and instructs about safety and health at work by means of a signboard, a colour, an
illuminated sign or acoustic signal, a voice or hand signal. Some important signs which could be used
at a shop are as below:
Fig 8.1.10: Safety sign
327
Assistant Fashion Designer
9. IT Skills
Unit 9.1 - Introduction to Computer
Unit 9.2 - Basic Computer Knowledge
Unit 9.3 - Components of Computer
Unit 9.4 - Concept of Operating System
Unit 9.5 - MS Word
Unit 9.6 - MS PowerPoint
Unit 9.7 - MS Excel
Unit 9.8 - Internet Concepts

Participant Handbook
Key Learning Outcomes
At the end of the module, participants will be able to:
• Familiarise with computers
• Identify and use basic uses of a computer
• Familiarise with a computer motherboard
• Familiarise with a computer operating system
• Use Microsoft Word, Excel and PowerPoint
• Familiarise with Internet and use e-mails
329
Assistant Fashion Designer
UNIT 9.1: Introduction to Computer
Unit Objectives
At the end of the unit, participants will be able to:
• Define the computer
• Recognise its various parts
• Differentiate the advantages and disadvantages of computer
9.1.1. What are computers?
Computer is one the greatest technologies of all times. An innovative electronic device that takes
raw data as input from the user and processes these data under the control of set of instructions
which is called program, to give the result the output. The first fully electronic computers,
announced in the 1940s, were huge machines. The computer of today’s time is thousands of times
faster and in any size you want. They can fit on your desk, on your lap, or even in your pocket.
Computers work through an interface of hardware and software. Computers work through an
interaction of hardware and software.
Hardware = Internal Devices + Peripheral Devices: All concrete parts of the computer (or everything
that we can touch) are known as hardware. The most significant piece of hardware is a tiny
quadrangular chip inside the computer called the central processing unit (CPU), or microprocessor.
It’s the “brain” of the computer— the part that interprets instructions and performs calculations.
Hardware items such as your monitor, keyboard, printer, mouse and other components are often
called hardware devices.
Software = Programs: Software provides “intelligence” to the computer. Software refers to the
instructions, or programs, that tell the hardware what to do. A word-processing program that you
can use to write letters on your computer is a type of software. The operating system (OS) is
software that manages your computer and the devices linked to it. Windows is a well-known
operating system.
330
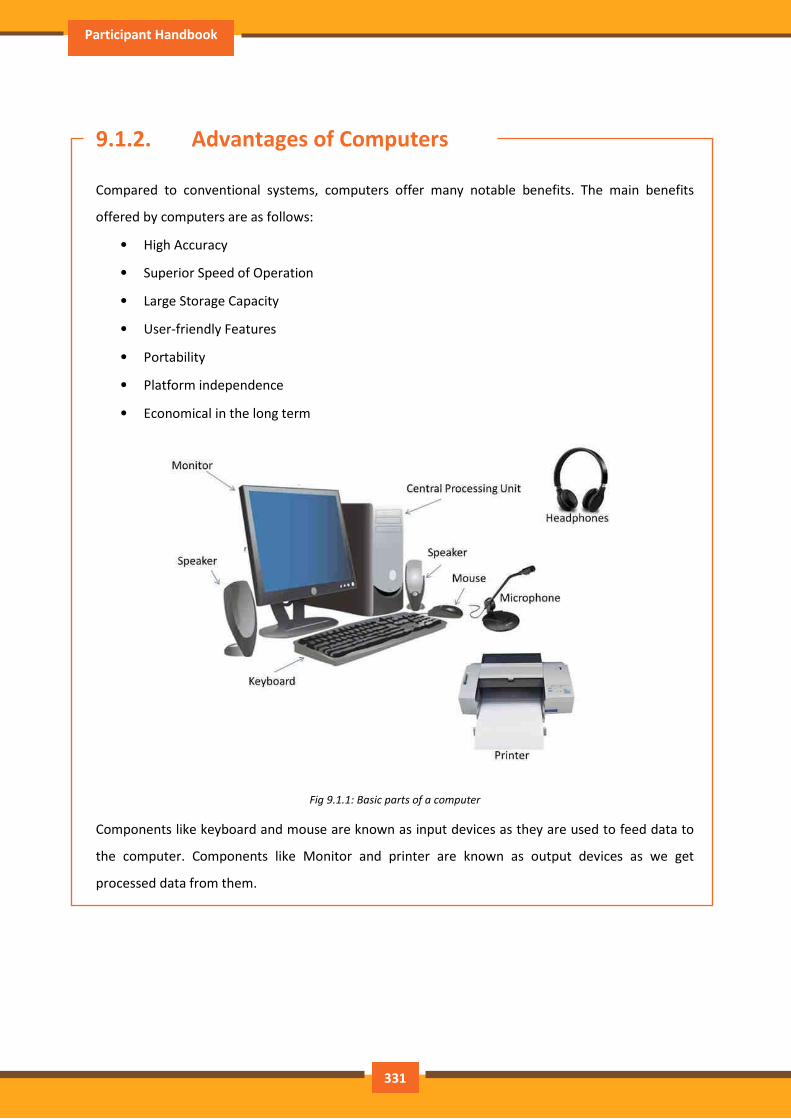
Participant Handbook
9.1.2. Advantages of Computers
Compared to conventional systems, computers offer many notable benefits. The main benefits
offered by computers are as follows:
• High Accuracy
• Superior Speed of Operation
• Large Storage Capacity
• User-friendly Features
• Portability
• Platform independence
• Economical in the long term
Fig 9.1.1: Basic parts of a computer
Components like keyboard and mouse are known as input devices as they are used to feed data to
the computer. Components like Monitor and printer are known as output devices as we get
processed data from them.
331
Assistant Fashion Designer
UNIT 9.2: Basic Computer Knowledge
Unit Objectives
At the end of the unit, participants will be able to:
• Use of computer.
• Use of web and email services
9.2.1. What can you do with computers?
In the workstation, many people use computers to keep chronicles, records, analyse data, do
research, and manage projects. At home, you can use computers to find information, track finances,
store pictures and music, play games, and connect with others—and those are just a few of the
opportunities. You can also use your computer to link to the Internet, a network that associates
computers around the world. With Internet access, you can interconnect with people all over the
world, communicate with them and find a vast amount of information. Some of the most prevalent
things we can do with computers are cited in this chapter.
9.2.2. The Web
The World Wide Web is an enormous warehouse of information. The web is the most prevalent part
of the Internet, partly because it exhibits most information in a visually pleasing format. Headlines,
text, and images can be combined on a single webpage—along with sounds and animation. A
website is a collection of interconnected Webpages. The web contains millions of websites and
billions of Webpages.
Surfing the web means reconnoitring or exploring it. You can find information on the web about
almost any topic possible. For example, you can read news stories and movie reviews, check airline
schedules, book a hotel, find places to dine, see street maps, search the route to reach a place, get
the weather forecast for your city, or research a health condition.
332

Participant Handbook
Fig 9.3.1: Google webpage
9.2.3. E-mail
Who writes letters these days? Email which is a
short form for electronic mail is the most
appropriate way to communicate with others to
date. When you send an e mail message, it arrives
almost instantly in the receiver’s email inbox. You
can send email to many people at the same time
and you can save, print, and forward email to
others. You can send almost any type of file in an
email message, including documents, pictures, and
music files.
9.2.4. Instant Messaging
Instant messaging is like having a real-
time conversation with another person or
a group of people. When you type and
send an instant message, the message is
instantly visible to all participants. Unlike
an email, all participants have to be online
(connected to the Internet) and in front of
Fig 9.3.2: Email services
Fig 9.3.3: Instant messaging services
333

Assistant Fashion Designer
their computers at the same time. Interaction by means of instant messaging is called chatting.
9.2.5. Pictures, Music and Movies
If you have a digital camera, you can move your images from
the camera to your computer. Then you can print them,
create slideshows, or share them with others by e mail or by
posting them on a website. You can also listen to music and
watch movies on your computer. Computer has become a
prominent source of entertainment.
Fig 9.3.4: Pictures, Music and Movies
334

Participant Handbook
UNIT 9.3: Components of Computer
Unit Objectives
At the end of the unit, participants will be able to:
• Know the different parts and components of computer.
9.3.1. Motherboard
The motherboard is the main element inside the case. It is a large rectangular board with combined
circuitry this connects the several parts of the computer as the CPU, RAM, Disk drives (CD, DVD,
Hard disk or any others) as well as any other peripherals linked via the ports or the expansion slots.
Components directly attached to the motherboard include the following.
The central processing unit (CPU)
The central processing unit (CPU) performs most of the calculations that allow a computer to
function and is sometimes referred to as the “brain” of the computer. It is usually cooled by a heat
sink and fan.
Fig 9.3.1: Components of a computer
335

Assistant Fashion Designer
The chip set
The chip set aids communication between the CPU and the other components of the system,
including main memory.
RAM (Random Access Memory)
RAM (Random Access Memory) stores all run processes (applications) and the current running OS.
The BIOS
The BIOS includes boot firmware and power management. The Basic Input Output System tasks are
handled by operating system drivers.
Internal Buses
Internal Buses connect the CPU to various internal components and to expansion cards for graphics
and sound.
Fig 9.3.2: Computer Hardware
336
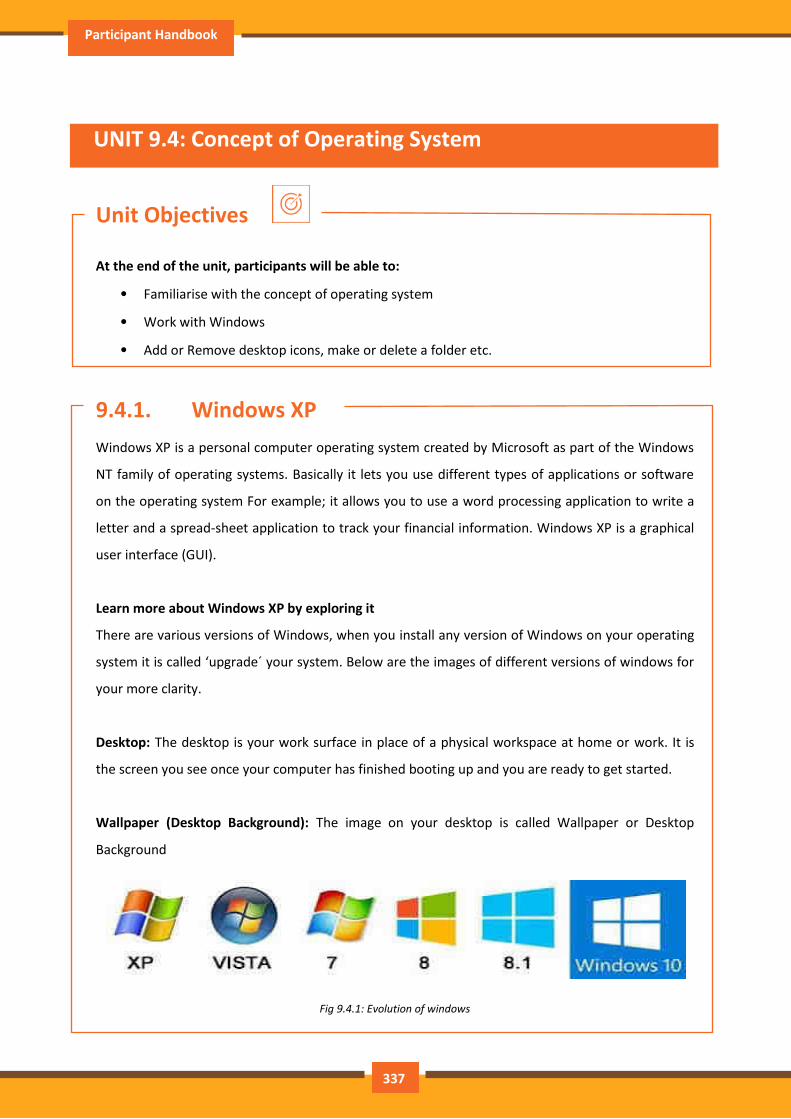
Participant Handbook
UNIT 9.4: Concept of Operating System
Unit Objectives
At the end of the unit, participants will be able to:
• Familiarise with the concept of operating system
• Work with Windows
• Add or Remove desktop icons, make or delete a folder etc.
9.4.1. Windows XP
Windows XP is a personal computer operating system created by Microsoft as part of the Windows
NT family of operating systems. Basically it lets you use different types of applications or software
on the operating system For example; it allows you to use a word processing application to write a
letter and a spread-sheet application to track your financial information. Windows XP is a graphical
user interface (GUI).
Learn more about Windows XP by exploring it
There are various versions of Windows, when you install any version of Windows on your operating
system it is called ‘upgrade´ your system. Below are the images of different versions of windows for
your more clarity.
Desktop: The desktop is your work surface in place of a physical workspace at home or work. It is
the screen you see once your computer has finished booting up and you are ready to get started.
Wallpaper (Desktop Background): The image on your desktop is called Wallpaper or Desktop
Background
Fig 9.4.1: Evolution of windows
337

Assistant Fashion Designer
9.4.2. Tools and Parts of an Operating System
Icons: The small pictures are shortcuts to programs called icons. Double-click icons to start a
program. Clicking the Start button also shows a list of programs and other options on the computer.
Taskbar: The blue bar across the bottom of the screen is called the Task Bar.
System Tray: It is an area where you can access programs that are running in the background. The
more programs you have in this area, the longer it takes for the computer to boot up. The system
tray of a desktop area has icons as shown in the image to indicate which programs are currently
running in the background. Once you single click on the left-facing arrow button you would be able
to open and see what else is there.
Fig 9.4.2: Desktop
Volume Controls: The speaker icon will open the volume controls. Once
you do the single click on an icon you can make a quick volume change.
Click and drag on the bar to raise or lower the overall volume, or click in
the check box to mute all sound as shown in the picture.
Fig 9.4.3: Volume controls
338
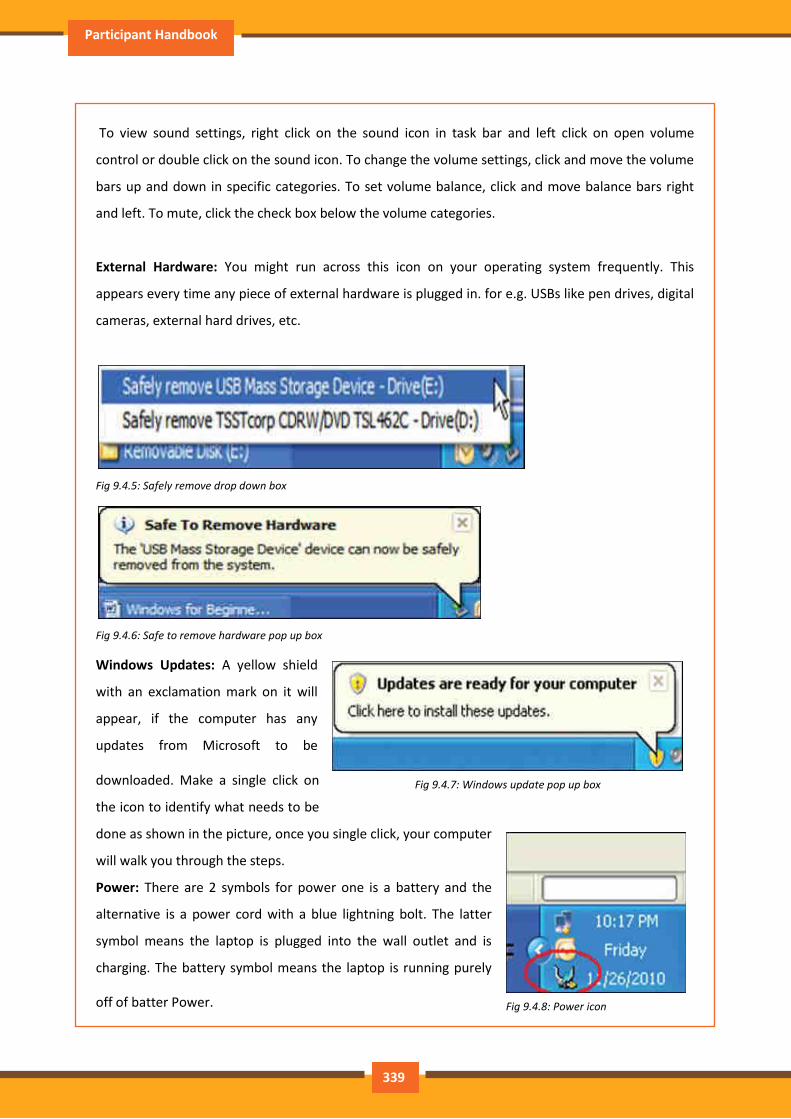
Participant Handbook
To view sound settings, right click on the sound icon in task bar and left click on open volume
control or double click on the sound icon. To change the volume settings, click and move the volume
bars up and down in specific categories. To set volume balance, click and move balance bars right
and left. To mute, click the check box below the volume categories.
External Hardware: You might run across this icon on your operating system frequently. This
appears every time any piece of external hardware is plugged in. for e.g. USBs like pen drives, digital
cameras, external hard drives, etc.
Fig 9.4.5: Safely remove drop down box
Fig 9.4.6: Safe to remove hardware pop up box
Windows Updates: A yellow shield
with an exclamation mark on it will
appear, if the computer has any
updates from Microsoft to be
downloaded. Make a single click on
the icon to identify what needs to be
done as shown in the picture, once you single click, your computer
will walk you through the steps.
Power: There are 2 symbols for power one is a battery and the
alternative is a power cord with a blue lightning bolt. The latter
symbol means the laptop is plugged into the wall outlet and is
charging. The battery symbol means the laptop is running purely
off of batter Power.
Fig 9.4.7: Windows update pop up box
Fig 9.4.8: Power icon
339
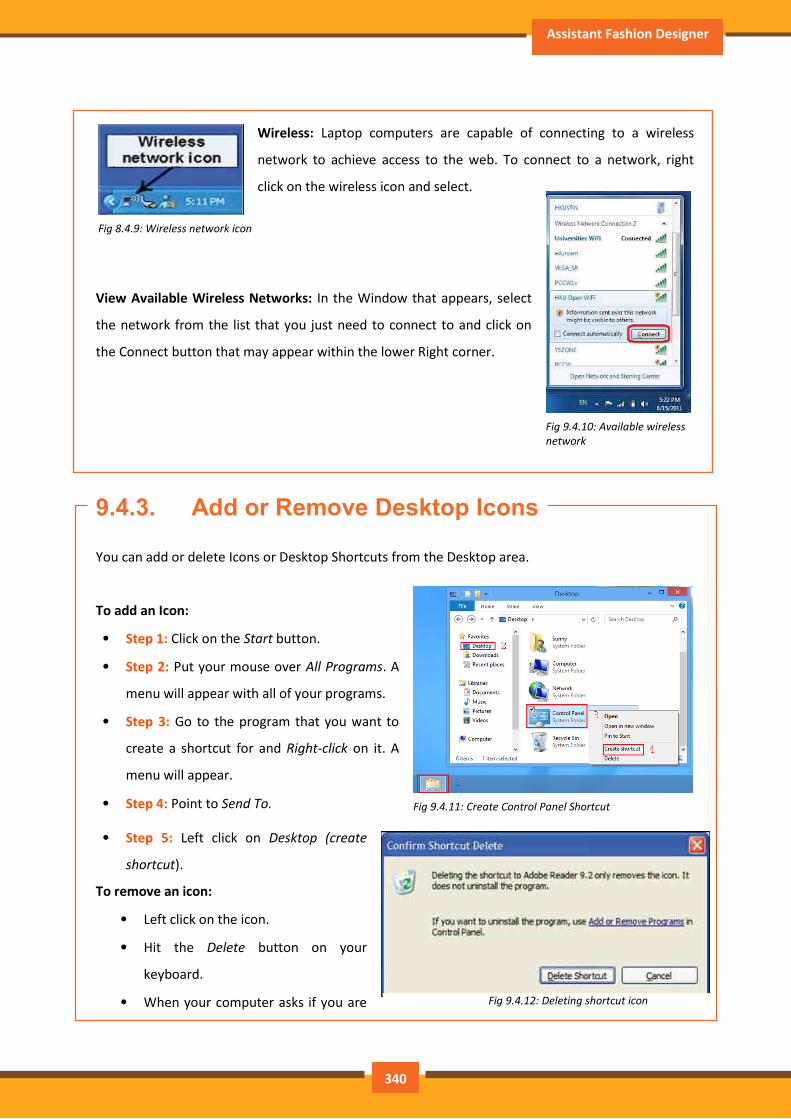
Assistant Fashion Designer
Wireless: Laptop computers are capable of connecting to a wireless
network to achieve access to the web. To connect to a network, right
click on the wireless icon and select.
View Available Wireless Networks: In the Window that appears, select
the network from the list that you just need to connect to and click on
the Connect button that may appear within the lower Right corner.
9.4.3. Add or Remove Desktop Icons
You can add or delete Icons or Desktop Shortcuts from the Desktop area.
To add an Icon:
• Step 1: Click on the Start button.
• Step 2: Put your mouse over All Programs. A
menu will appear with all of your programs.
• Step 3: Go to the program that you want to
create a shortcut for and Right-click on it. A
menu will appear.
• Step 4: Point to Send To.
• Step 5: Left click on Desktop (create
shortcut).
To remove an icon:
• Left click on the icon.
• Hit the Delete button on your
keyboard.
• When your computer asks if you are
Fig 8.4.9: Wireless network icon
Fig 9.4.10: Available wireless
network
Fig 9.4.11: Create Control Panel Shortcut
Fig 9.4.12: Deleting shortcut icon
340
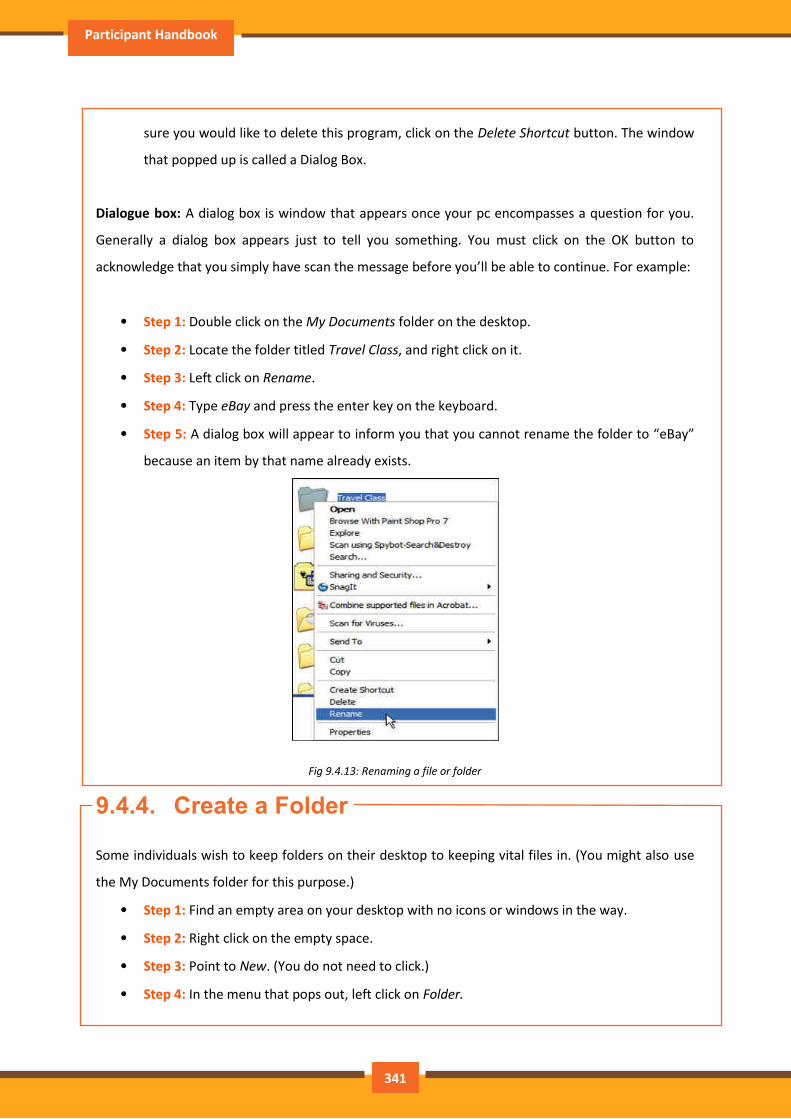
Participant Handbook
sure you would like to delete this program, click on the Delete Shortcut button. The window
that popped up is called a Dialog Box.
Dialogue box: A dialog box is window that appears once your pc encompasses a question for you.
Generally a dialog box appears just to tell you something. You must click on the OK button to
acknowledge that you simply have scan the message before you’ll be able to continue. For example:
• Step 1: Double click on the My Documents folder on the desktop.
• Step 2: Locate the folder titled Travel Class, and right click on it.
• Step 3: Left click on Rename.
• Step 4: Type eBay and press the enter key on the keyboard.
• Step 5: A dialog box will appear to inform you that you cannot rename the folder to “eBay”
because an item by that name already exists.
Fig 9.4.13: Renaming a file or folder
9.4.4. Create a Folder
Some individuals wish to keep folders on their desktop to keeping vital files in. (You might also use
the My Documents folder for this purpose.)
• Step 1: Find an empty area on your desktop with no icons or windows in the way.
• Step 2: Right click on the empty space.
• Step 3: Point to New. (You do not need to click.)
• Step 4: In the menu that pops out, left click on Folder.
341

Assistant Fashion Designer
• Step 5: Your new folder has been created and is waiting for a name. Don’t click! Just start
typing to give the folder a name.
• Step 6: When finished, hit the enter key on the keyboard or click beside the folder. Your
new folder is ready to receive files
9.4.5. Place Your Favourite Webpage as a Desktop
Icon
You can create a shortcut of your favourite web page directly on your
Desktop:
• Step 1: To create the shortcut, you must first open your Internet
browser. (Double click on the Internet Explorer icon.).
• Step 2: Type in the web address of the page you want to view
and hit the enter key on your keyboard.
• Step 3: Once the website is open, restore down the windows to
that you can view the Desktop space partially behind the opened
webpage.
• Step 4: Either, point your mouse at the icon to the left of the
web address in the address bar as shown below. Hold down your left mouse button and
drag the small icon onto empty space of your Desktop. Let go and a shortcut of your
webpage will be created on your Desktop.
8.4.6 Managing Multiple Windows
Your taskbar area shows that windows are open, if you
open a lot of windows from the same program; they’re
going to begin to stack up. Let’s open a lot of windows
and see what happens.
• Step 1: In Internet Explorer, click on the File
menu and then on New Window.
• Step 2: In the address bar type Yahoo.com and hit the enter key on the keyboard.
Fig 9.4.15: Icons on
desktop
Fig 9.4.16: Opening new window
342
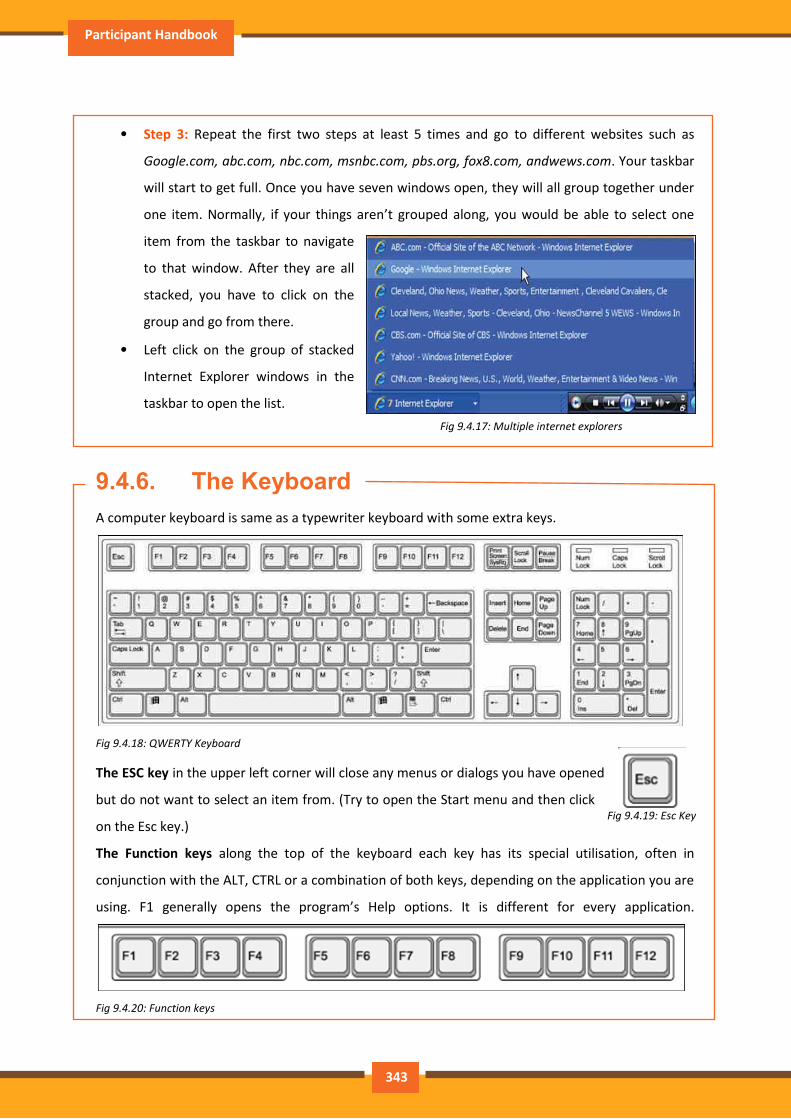
Participant Handbook
• Step 3: Repeat the first two steps at least 5 times and go to different websites such as
Google.com, abc.com, nbc.com, msnbc.com, pbs.org, fox8.com, andwews.com. Your taskbar
will start to get full. Once you have seven windows open, they will all group together under
one item. Normally, if your things aren’t grouped along, you would be able to select one
item from the taskbar to navigate
to that window. After they are all
stacked, you have to click on the
group and go from there.
• Left click on the group of stacked
Internet Explorer windows in the
taskbar to open the list.
9.4.6. The Keyboard
A computer keyboard is same as a typewriter keyboard with some extra keys.
Fig 9.4.18: QWERTY Keyboard
The ESC key in the upper left corner will close any menus or dialogs you have opened
but do not want to select an item from. (Try to open the Start menu and then click
on the Esc key.)
The Function keys along the top of the keyboard each key has its special utilisation, often in
conjunction with the ALT, CTRL or a combination of both keys, depending on the application you are
using. F1 generally opens the program’s Help options. It is different for every application.
Fig 9.4.20: Function keys
Fig 9.4.17: Multiple internet explorers
Fig 9.4.19: Esc Key
343
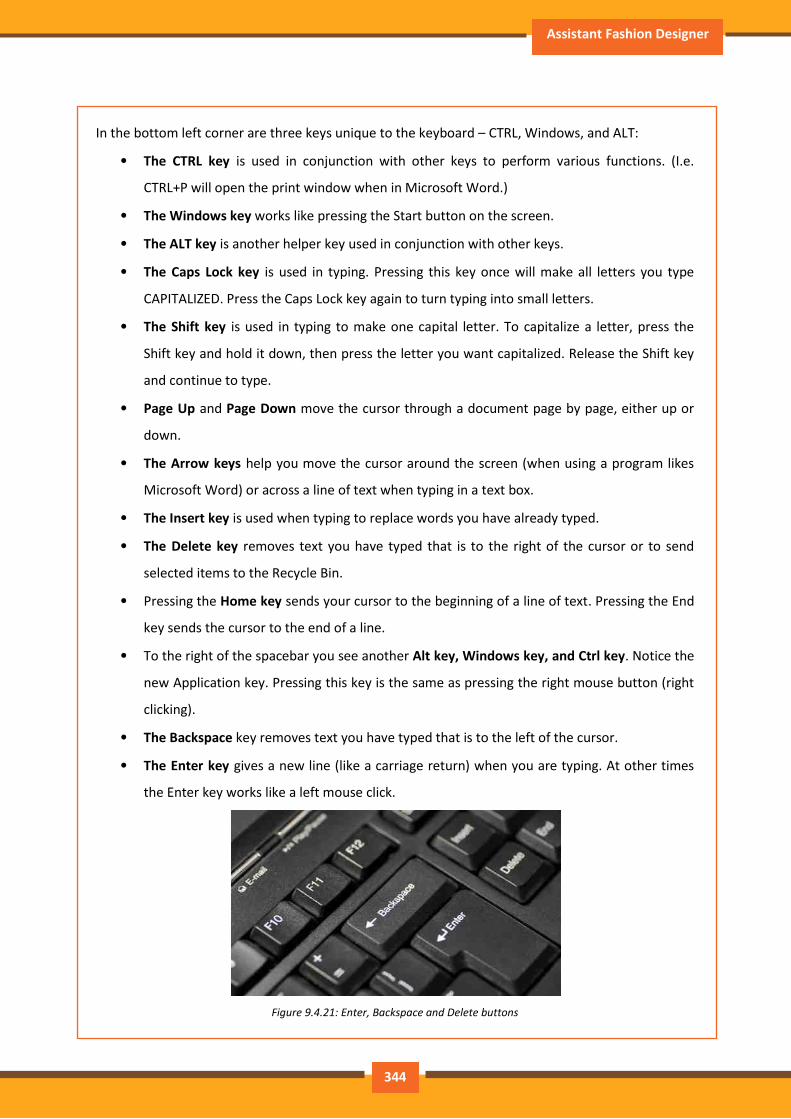
Assistant Fashion Designer
In the bottom left corner are three keys unique to the keyboard – CTRL, Windows, and ALT:
• The CTRL key is used in conjunction with other keys to perform various functions. (I.e.
CTRL+P will open the print window when in Microsoft Word.)
• The Windows key works like pressing the Start button on the screen.
• The ALT key is another helper key used in conjunction with other keys.
• The Caps Lock key is used in typing. Pressing this key once will make all letters you type
CAPITALIZED. Press the Caps Lock key again to turn typing into small letters.
• The Shift key is used in typing to make one capital letter. To capitalize a letter, press the
Shift key and hold it down, then press the letter you want capitalized. Release the Shift key
and continue to type.
• Page Up and Page Down move the cursor through a document page by page, either up or
down.
• The Arrow keys help you move the cursor around the screen (when using a program likes
Microsoft Word) or across a line of text when typing in a text box.
• The Insert key is used when typing to replace words you have already typed.
• The Delete key removes text you have typed that is to the right of the cursor or to send
selected items to the Recycle Bin.
• Pressing the Home key sends your cursor to the beginning of a line of text. Pressing the End
key sends the cursor to the end of a line.
• To the right of the spacebar you see another Alt key, Windows key, and Ctrl key. Notice the
new Application key. Pressing this key is the same as pressing the right mouse button (right
clicking).
• The Backspace key removes text you have typed that is to the left of the cursor.
• The Enter key gives a new line (like a carriage return) when you are typing. At other times
the Enter key works like a left mouse click.
Figure 9.4.21: Enter, Backspace and Delete buttons
344
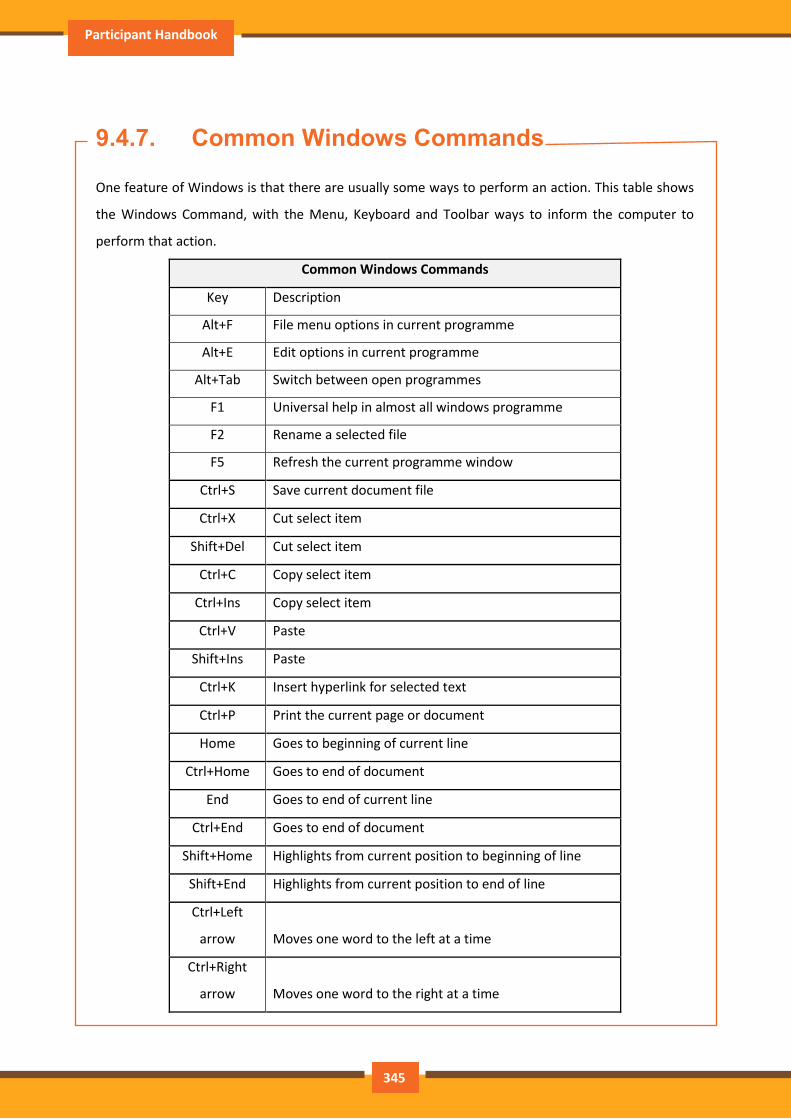
Participant Handbook
9.4.7. Common Windows Commands
One feature of Windows is that there are usually some ways to perform an action. This table shows
the Windows Command, with the Menu, Keyboard and Toolbar ways to inform the computer to
perform that action.
Common Windows Commands
Key Description
Alt+F File menu options in current programme
Alt+E Edit options in current programme
Alt+Tab Switch between open programmes
F1 Universal help in almost all windows programme
F2 Rename a selected file
F5 Refresh the current programme window
Ctrl+S Save current document file
Ctrl+X Cut select item
Shift+Del Cut select item
Ctrl+C Copy select item
Ctrl+Ins Copy select item
Ctrl+V Paste
Shift+Ins Paste
Ctrl+K Insert hyperlink for selected text
Ctrl+P Print the current page or document
Home Goes to beginning of current line
Ctrl+Home Goes to end of document
End Goes to end of current line
Ctrl+End Goes to end of document
Shift+Home Highlights from current position to beginning of line
Shift+End Highlights from current position to end of line
Ctrl+Left
arrow Moves one word to the left at a time
Ctrl+Right
arrow Moves one word to the right at a time
345

Assistant Fashion Designer
Ctrl+Esc Opens Start Menu
Ctrl+Shift+Esc Opens Windows Task manager
Alt+F4 Close the currently active programme
Alt+Enter Open the properties of the selected item
346
Participant Handbook
UNIT 9.5: MS Word
Unit Objectives
At the end of the unit, participants will be able to:
• Know the concept of and practice MS-Word.
• Format a document.
• Print a document etc.
9.5.1. Concepts of word processing - MS Word
Most people who use a computer daily use word processing skills. Word
processing skills enable us to prepare text documents like letters, memos,
and different correspondence. Most up-to-date word processing software
package permits us to create text documents that embody photos and
drawings.
9.5.2. Creating a Word Document
Once the document that has opened, type a short paragraph of why you are taking this mini-
session. For example, are you new to Microsoft Word 2007 or are you up your software your skills?
Keep in mind to purposely misspell some words. Later in the session you’ll use this paragraph to
learn the way to spell check and use basic Word 2007 functions.
Fig 8.5.1: MS Word icon
347

Assistant Fashion Designer
Fig 9.5.2: MS word blank page
The above image shows components of the Word window, that also contains a document in the
window. This view displays rulers at the top and along the left aspect that indicate the size of the
page.
Fig 9.5.3: Text area of MS word
348
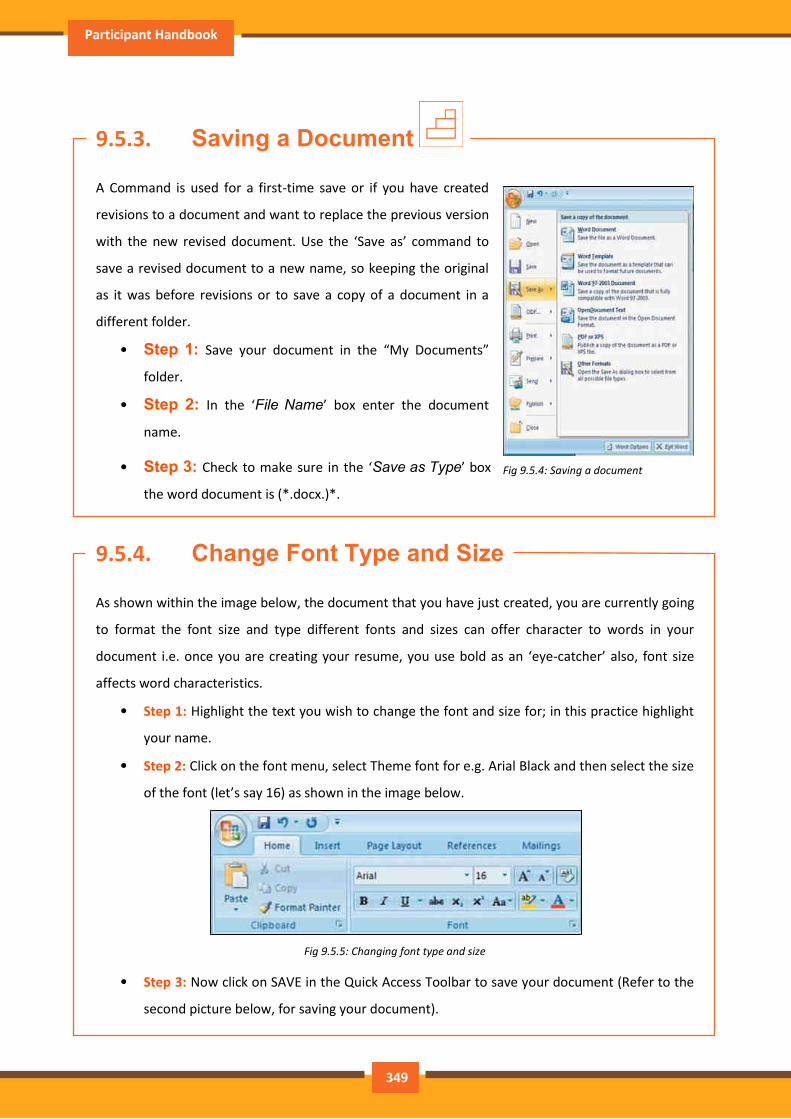
Participant Handbook
9.5.3. Saving a Document
A Command is used for a first-time save or if you have created
revisions to a document and want to replace the previous version
with the new revised document. Use the ‘Save as’ command to
save a revised document to a new name, so keeping the original
as it was before revisions or to save a copy of a document in a
different folder.
• Step 1: Save your document in the “My Documents”
folder.
• Step 2: In the ‘File Name’ box enter the document
name.
• Step 3: Check to make sure in the ‘Save as Type’ box
the word document is (*.docx.)*.
9.5.4. Change Font Type and Size
As shown within the image below, the document that you have just created, you are currently going
to format the font size and type different fonts and sizes can offer character to words in your
document i.e. once you are creating your resume, you use bold as an ‘eye-catcher’ also, font size
affects word characteristics.
• Step 1: Highlight the text you wish to change the font and size for; in this practice highlight
your name.
• Step 2: Click on the font menu, select Theme font for e.g. Arial Black and then select the size
of the font (let’s say 16) as shown in the image below.
Fig 9.5.5: Changing font type and size
• Step 3: Now click on SAVE in the Quick Access Toolbar to save your document (Refer to the
second picture below, for saving your document).
Fig 9.5.4: Saving a document
349
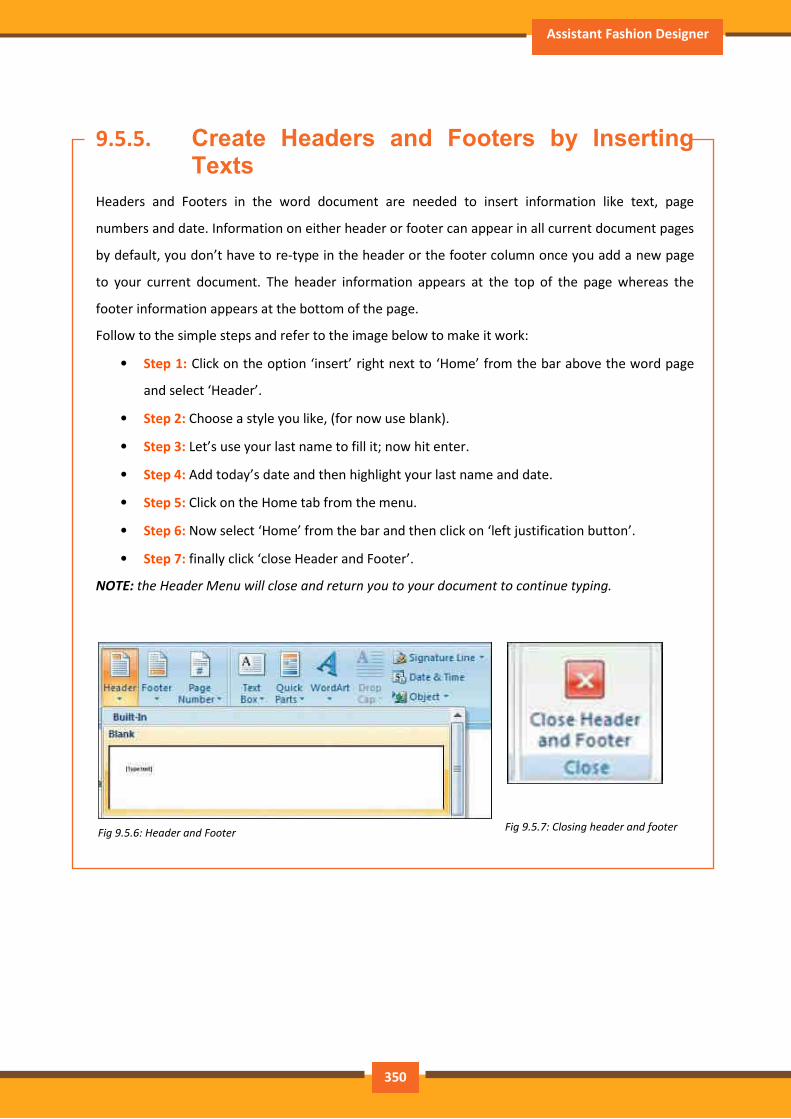
Assistant Fashion Designer
9.5.5. Create Headers and Footers by Inserting Texts
Headers and Footers in the word document are needed to insert information like text, page
numbers and date. Information on either header or footer can appear in all current document pages
by default, you don’t have to re-type in the header or the footer column once you add a new page
to your current document. The header information appears at the top of the page whereas the
footer information appears at the bottom of the page.
Follow to the simple steps and refer to the image below to make it work:
• Step 1: Click on the option ‘insert’ right next to ‘Home’ from the bar above the word page
and select ‘Header’.
• Step 2: Choose a style you like, (for now use blank).
• Step 3: Let’s use your last name to fill it; now hit enter.
• Step 4: Add today’s date and then highlight your last name and date.
• Step 5: Click on the Home tab from the menu.
• Step 6: Now select ‘Home’ from the bar and then click on ‘left justification button’.
• Step 7: finally click ‘close Header and Footer’.
NOTE: the Header Menu will close and return you to your document to continue typing.
Fig 9.5.7: Closing header and footer
Fig 9.5.6: Header and Footer
350
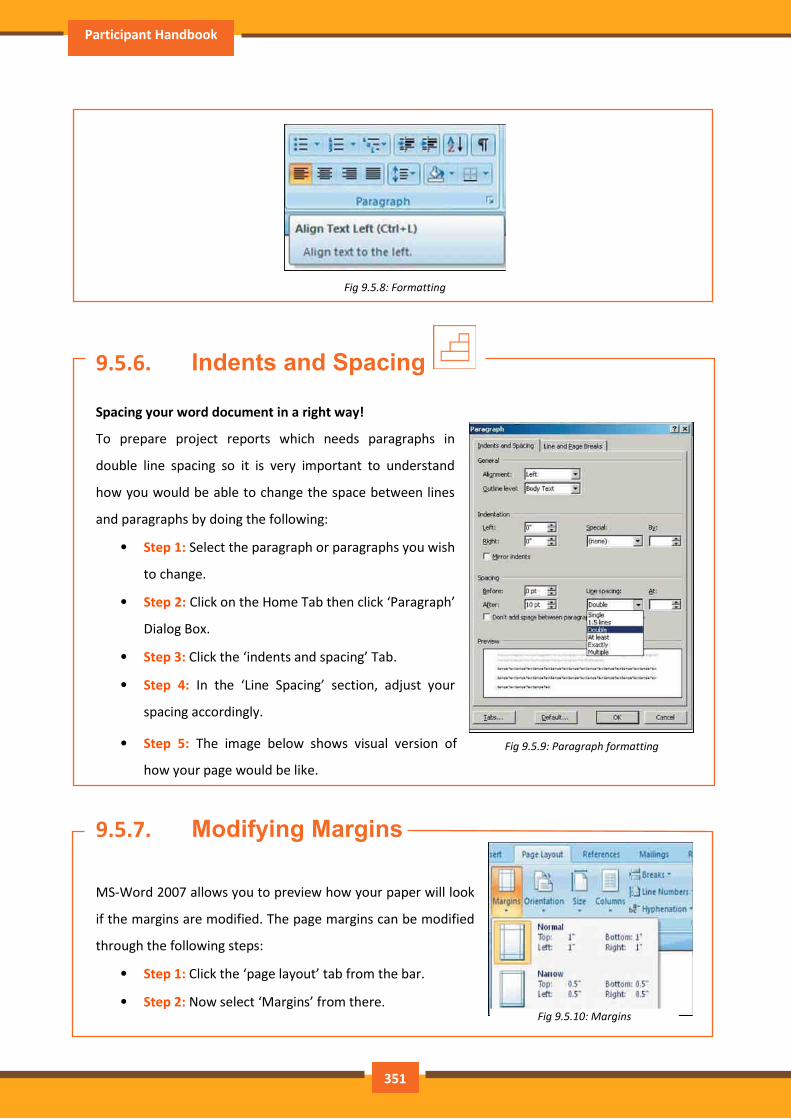
Participant Handbook
Fig 9.5.8: Formatting
9.5.6. Indents and Spacing
Spacing your word document in a right way!
To prepare project reports which needs paragraphs in
double line spacing so it is very important to understand
how you would be able to change the space between lines
and paragraphs by doing the following:
• Step 1: Select the paragraph or paragraphs you wish
to change.
• Step 2: Click on the Home Tab then click ‘Paragraph’
Dialog Box.
• Step 3: Click the ‘indents and spacing’ Tab.
• Step 4: In the ‘Line Spacing’ section, adjust your
spacing accordingly.
• Step 5: The image below shows visual version of
how your page would be like.
9.5.7. Modifying Margins
MS-Word 2007 allows you to preview how your paper will look
if the margins are modified. The page margins can be modified
through the following steps:
• Step 1: Click the ‘page layout’ tab from the bar.
• Step 2: Now select ‘Margins’ from there.
Fig 9.5.9: Paragraph formatting
Fig 9.5.10: Margins
351
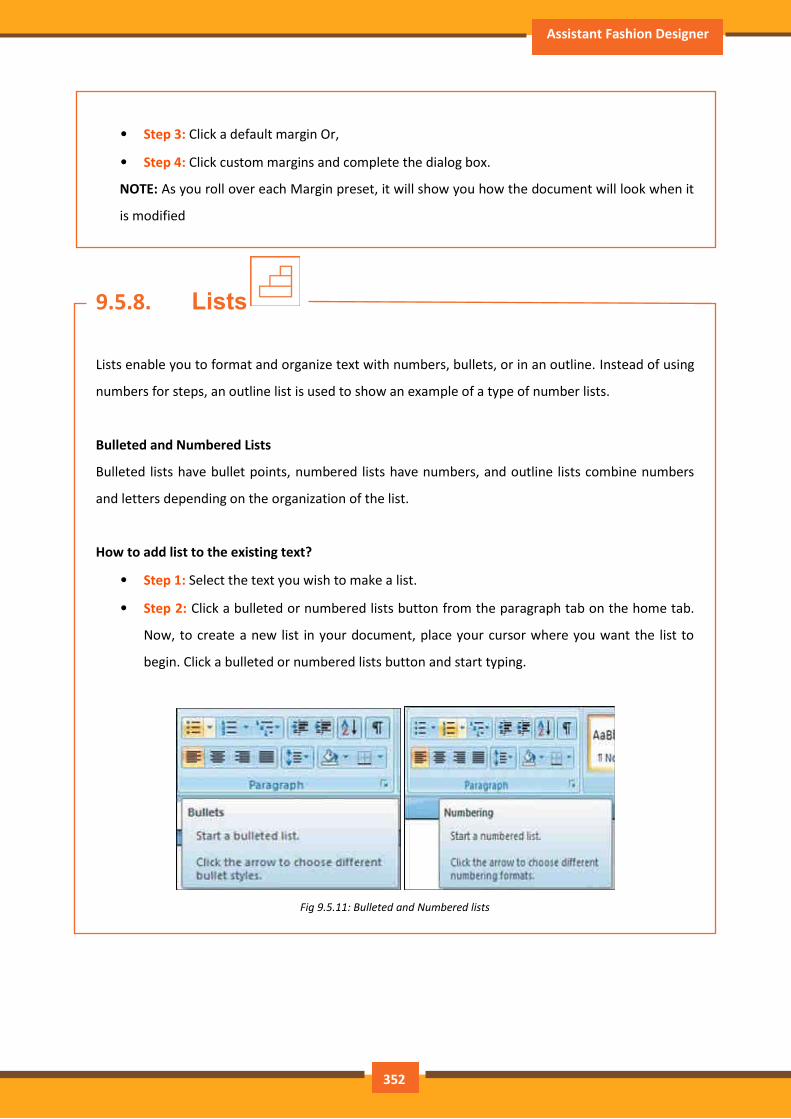
Assistant Fashion Designer
• Step 3: Click a default margin Or,
• Step 4: Click custom margins and complete the dialog box.
NOTE: As you roll over each Margin preset, it will show you how the document will look when it
is modified
9.5.8. Lists
Lists enable you to format and organize text with numbers, bullets, or in an outline. Instead of using
numbers for steps, an outline list is used to show an example of a type of number lists.
Bulleted and Numbered Lists
Bulleted lists have bullet points, numbered lists have numbers, and outline lists combine numbers
and letters depending on the organization of the list.
How to add list to the existing text?
• Step 1: Select the text you wish to make a list.
• Step 2: Click a bulleted or numbered lists button from the paragraph tab on the home tab.
Now, to create a new list in your document, place your cursor where you want the list to
begin. Click a bulleted or numbered lists button and start typing.
Fig 9.5.11: Bulleted and Numbered lists
352
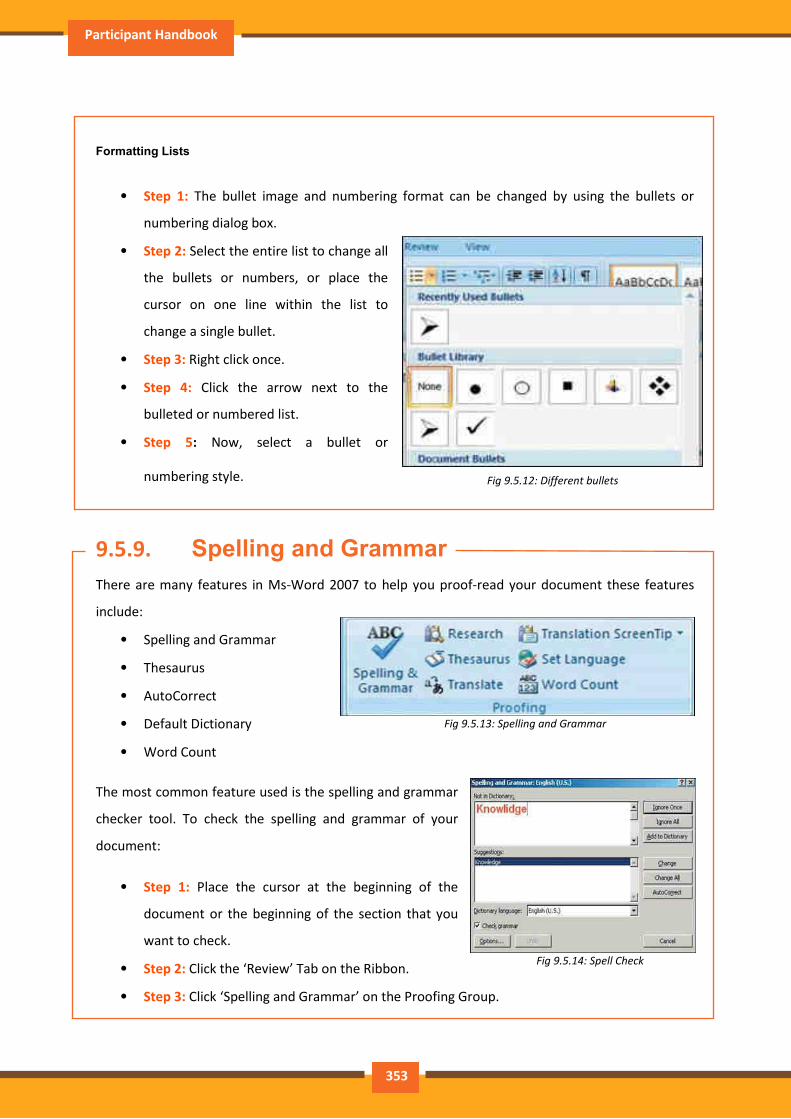
Participant Handbook
Formatting Lists
• Step 1: The bullet image and numbering format can be changed by using the bullets or
numbering dialog box.
• Step 2: Select the entire list to change all
the bullets or numbers, or place the
cursor on one line within the list to
change a single bullet.
• Step 3: Right click once.
• Step 4: Click the arrow next to the
bulleted or numbered list.
• Step 5: Now, select a bullet or
numbering style.
9.5.9. Spelling and Grammar
There are many features in Ms-Word 2007 to help you proof-read your document these features
include:
• Spelling and Grammar
• Thesaurus
• AutoCorrect
• Default Dictionary
• Word Count
The most common feature used is the spelling and grammar
checker tool. To check the spelling and grammar of your
document:
• Step 1: Place the cursor at the beginning of the
document or the beginning of the section that you
want to check.
• Step 2: Click the ‘Review’ Tab on the Ribbon.
• Step 3: Click ‘Spelling and Grammar’ on the Proofing Group.
Fig 9.5.12: Different bullets
Fig 9.5.13: Spelling and Grammar
Fig 9.5.14: Spell Check
353
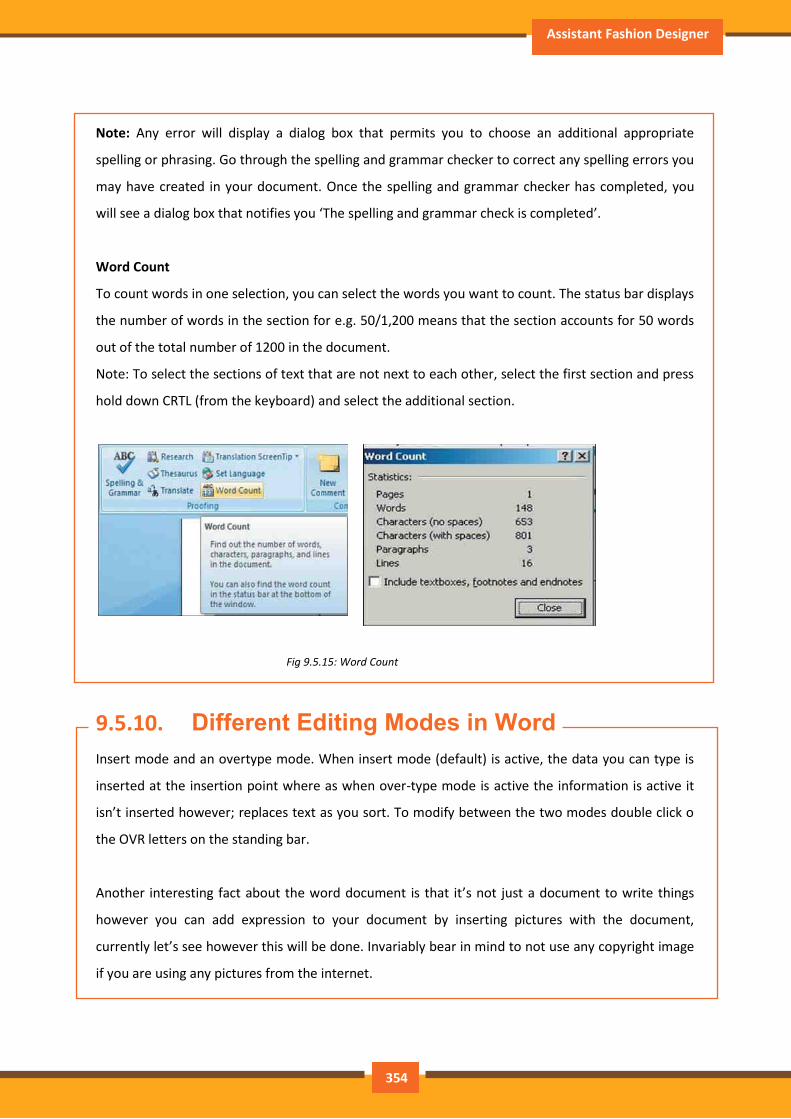
Assistant Fashion Designer
Note: Any error will display a dialog box that permits you to choose an additional appropriate
spelling or phrasing. Go through the spelling and grammar checker to correct any spelling errors you
may have created in your document. Once the spelling and grammar checker has completed, you
will see a dialog box that notifies you ‘The spelling and grammar check is completed’.
Word Count
To count words in one selection, you can select the words you want to count. The status bar displays
the number of words in the section for e.g. 50/1,200 means that the section accounts for 50 words
out of the total number of 1200 in the document.
Note: To select the sections of text that are not next to each other, select the first section and press
hold down CRTL (from the keyboard) and select the additional section.
9.5.10. Different Editing Modes in Word
Insert mode and an overtype mode. When insert mode (default) is active, the data you can type is
inserted at the insertion point where as when over-type mode is active the information is active it
isn’t inserted however; replaces text as you sort. To modify between the two modes double click o
the OVR letters on the standing bar.
Another interesting fact about the word document is that it’s not just a document to write things
however you can add expression to your document by inserting pictures with the document,
currently let’s see however this will be done. Invariably bear in mind to not use any copyright image
if you are using any pictures from the internet.
Fig 9.5.15: Word Count
354

Participant Handbook
The insert picture method supports graphics that may be are too large to fit on the clipboard. The
default setting for inserting or pasting pictures is “In Line With Text.” The Advanced Word options,
located in the office Button Commands Gallery, allow you to change the default settings to any of
the available text wrapping styles.
Fig 9.5.16: Sample Image
9.5.11. Inserting an Image and Table
• Step 1: Place the insertion point at the
location where the image has to be placed in
the document.
• Step 2: Select Insert tab>> illustrations
gallery.
• Step 3: Now select Insert picture.
• Step 4: Navigate to the appropriate location
where the image is stored.
• Step 5: Now select the appropriate image which you want to insert in the document by
doing a double click on the image.
Fig 9.5.17: Inserting an image
355
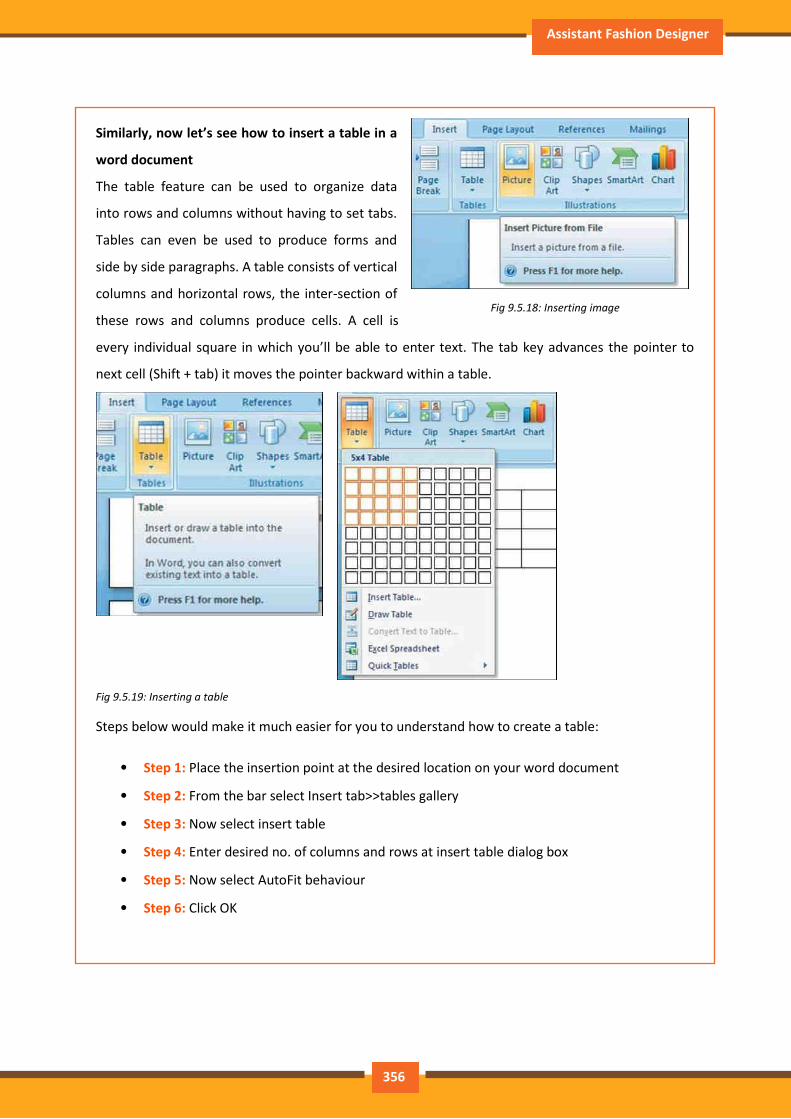
Assistant Fashion Designer
Similarly, now let’s see how to insert a table in a
word document
The table feature can be used to organize data
into rows and columns without having to set tabs.
Tables can even be used to produce forms and
side by side paragraphs. A table consists of vertical
columns and horizontal rows, the inter-section of
these rows and columns produce cells. A cell is
every individual square in which you’ll be able to enter text. The tab key advances the pointer to
next cell (Shift + tab) it moves the pointer backward within a table.
Fig 9.5.19: Inserting a table
Steps below would make it much easier for you to understand how to create a table:
• Step 1: Place the insertion point at the desired location on your word document
• Step 2: From the bar select Insert tab>>tables gallery
• Step 3: Now select insert table
• Step 4: Enter desired no. of columns and rows at insert table dialog box
• Step 5: Now select AutoFit behaviour
• Step 6: Click OK
Fig 9.5.18: Inserting image
356
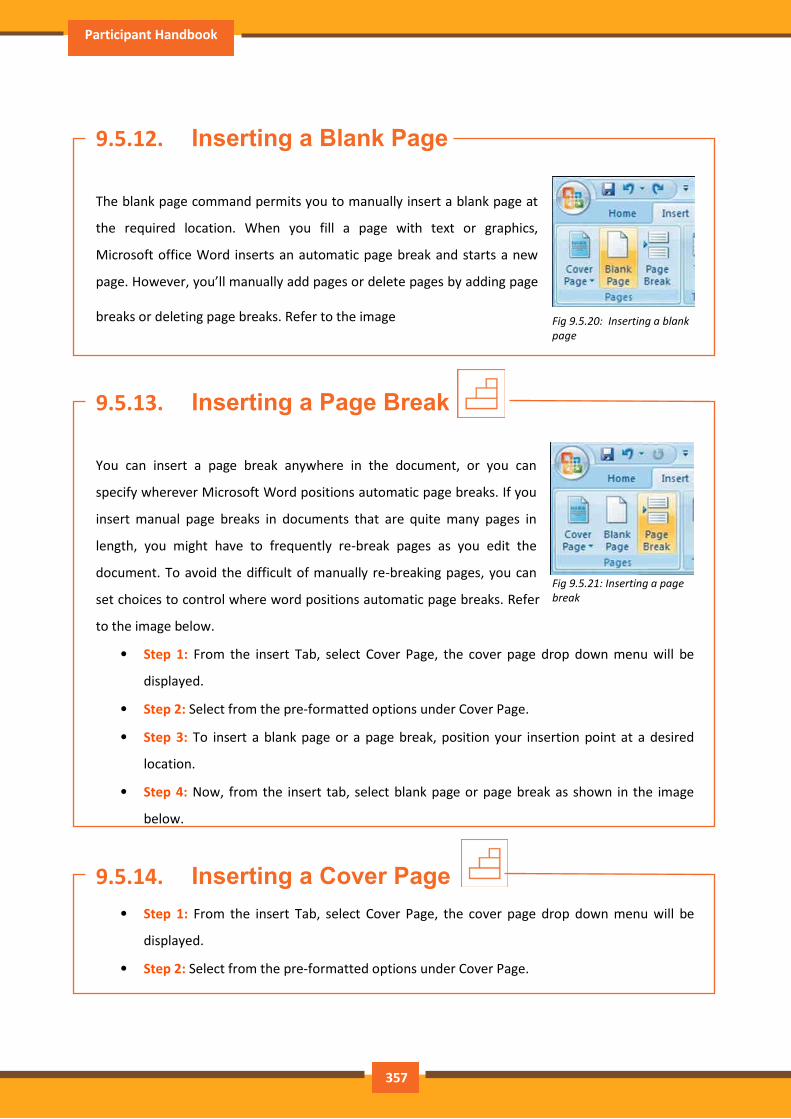
Participant Handbook
9.5.12. Inserting a Blank Page
The blank page command permits you to manually insert a blank page at
the required location. When you fill a page with text or graphics,
Microsoft office Word inserts an automatic page break and starts a new
page. However, you’ll manually add pages or delete pages by adding page
breaks or deleting page breaks. Refer to the image
9.5.13. Inserting a Page Break
You can insert a page break anywhere in the document, or you can
specify wherever Microsoft Word positions automatic page breaks. If you
insert manual page breaks in documents that are quite many pages in
length, you might have to frequently re-break pages as you edit the
document. To avoid the difficult of manually re-breaking pages, you can
set choices to control where word positions automatic page breaks. Refer
to the image below.
• Step 1: From the insert Tab, select Cover Page, the cover page drop down menu will be
displayed.
• Step 2: Select from the pre-formatted options under Cover Page.
• Step 3: To insert a blank page or a page break, position your insertion point at a desired
location.
• Step 4: Now, from the insert tab, select blank page or page break as shown in the image
below.
9.5.14. Inserting a Cover Page
• Step 1: From the insert Tab, select Cover Page, the cover page drop down menu will be
displayed.
• Step 2: Select from the pre-formatted options under Cover Page.
Fig 9.5.20: Inserting a blank
page
Fig 9.5.21: Inserting a page
break
357
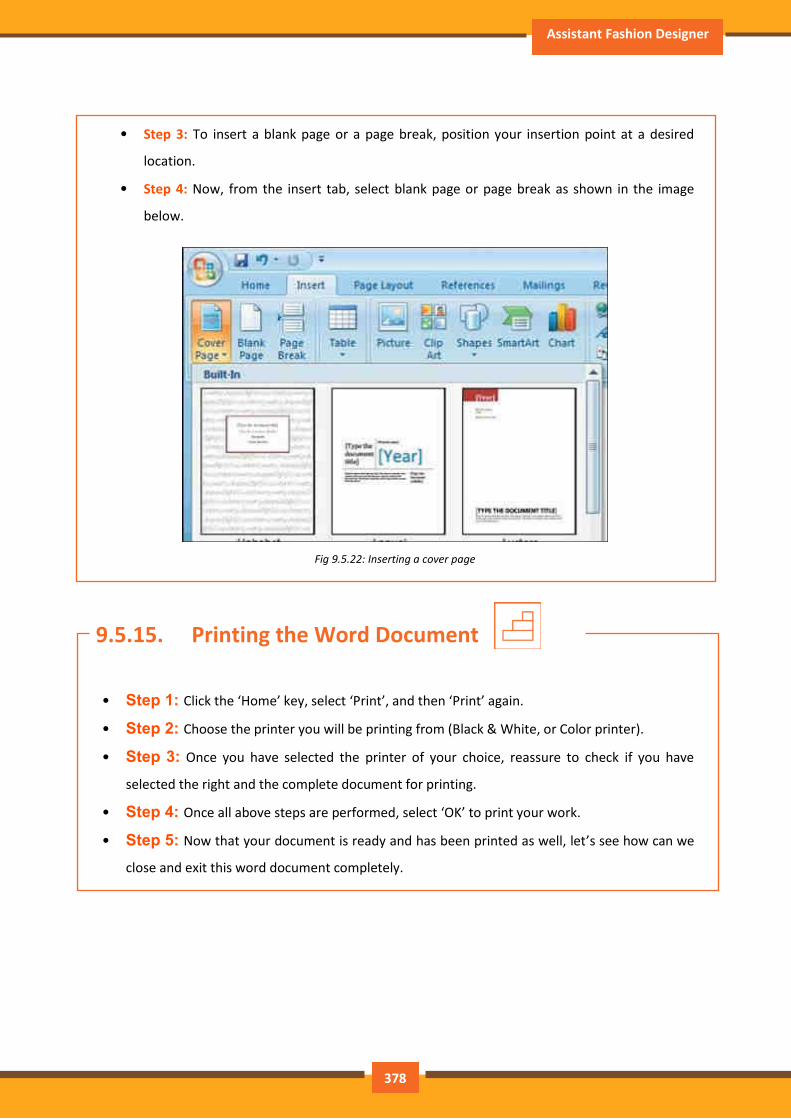
Assistant Fashion Designer
• Step 3: To insert a blank page or a page break, position your insertion point at a desired
location.
• Step 4: Now, from the insert tab, select blank page or page break as shown in the image
below.
Fig 9.5.22: Inserting a cover page
9.5.15. Printing the Word Document
• Step 1: Click the ‘Home’ key, select ‘Print’, and then ‘Print’ again.
• Step 2: Choose the printer you will be printing from (Black & White, or Color printer).
• Step 3: Once you have selected the printer of your choice, reassure to check if you have
selected the right and the complete document for printing.
• Step 4: Once all above steps are performed, select ‘OK’ to print your work.
• Step 5: Now that your document is ready and has been printed as well, let’s see how can we
close and exit this word document completely.
378
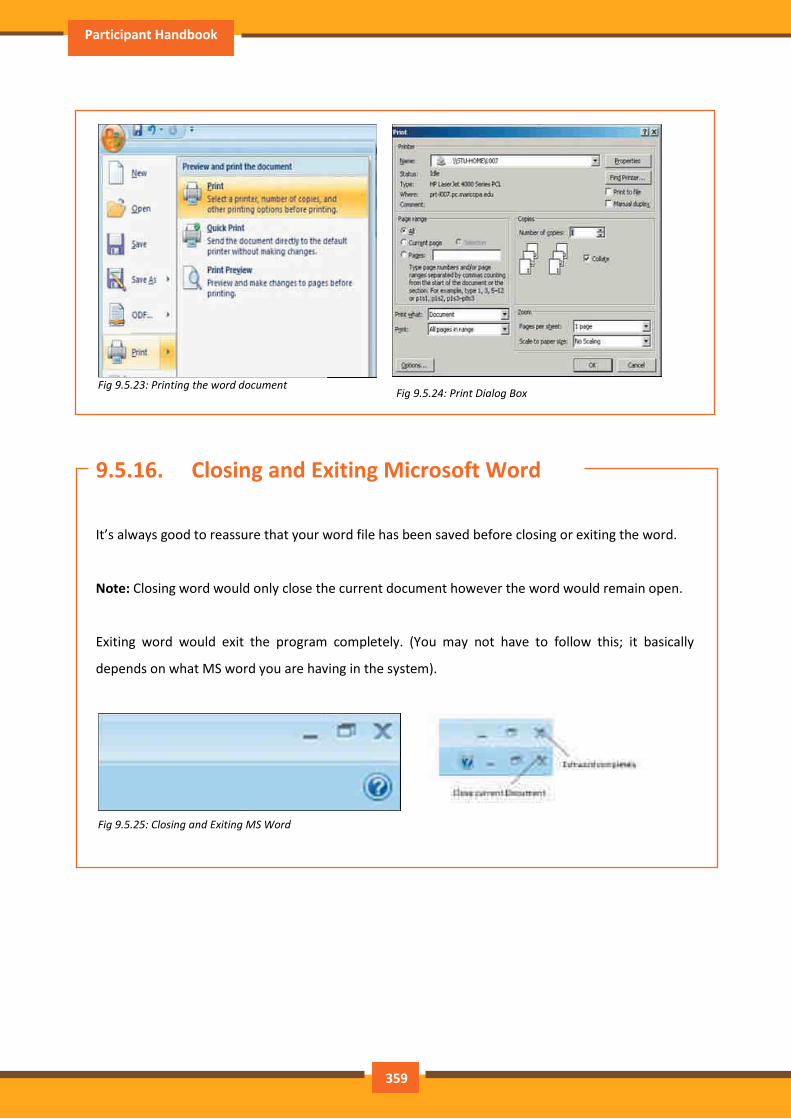
Participant Handbook
Fig 9.5.24: Print Dialog Box
9.5.16. Closing and Exiting Microsoft Word
It’s always good to reassure that your word file has been saved before closing or exiting the word.
Note: Closing word would only close the current document however the word would remain open.
Exiting word would exit the program completely. (You may not have to follow this; it basically
depends on what MS word you are having in the system).
Fig 9.5.23: Printing the word document
Fig 9.5.25: Closing and Exiting MS Word
359
Assistant Fashion Designer
UNIT 9.6: MS Power point
Unit Objectives
At the end of the unit, participants will be able to:
• Practice MS-Power point
• Make a new presentation
• Format a slide as well
PowerPoint is the presentation graphics software in the Microsoft Office suite. PowerPoint has
predefined layouts, themes, and templates to create dynamic and professional presentations.
9.6.1. Opening PowerPoint
To open PowerPoint in Windows, click on the:
• Step 1: Start button --> Programs --> Microsoft PowerPoint. OR
• Step 2: Double-click on the PowerPoint icon on the desktop.
When PowerPoint is opened, by default a blank Title slide appears as the first
slide in your new presentation. However, to change the layout of an open
slide, click on the Layout button in the Home tab.
Fig 9.6.1: MS
PowerPoint logo
360
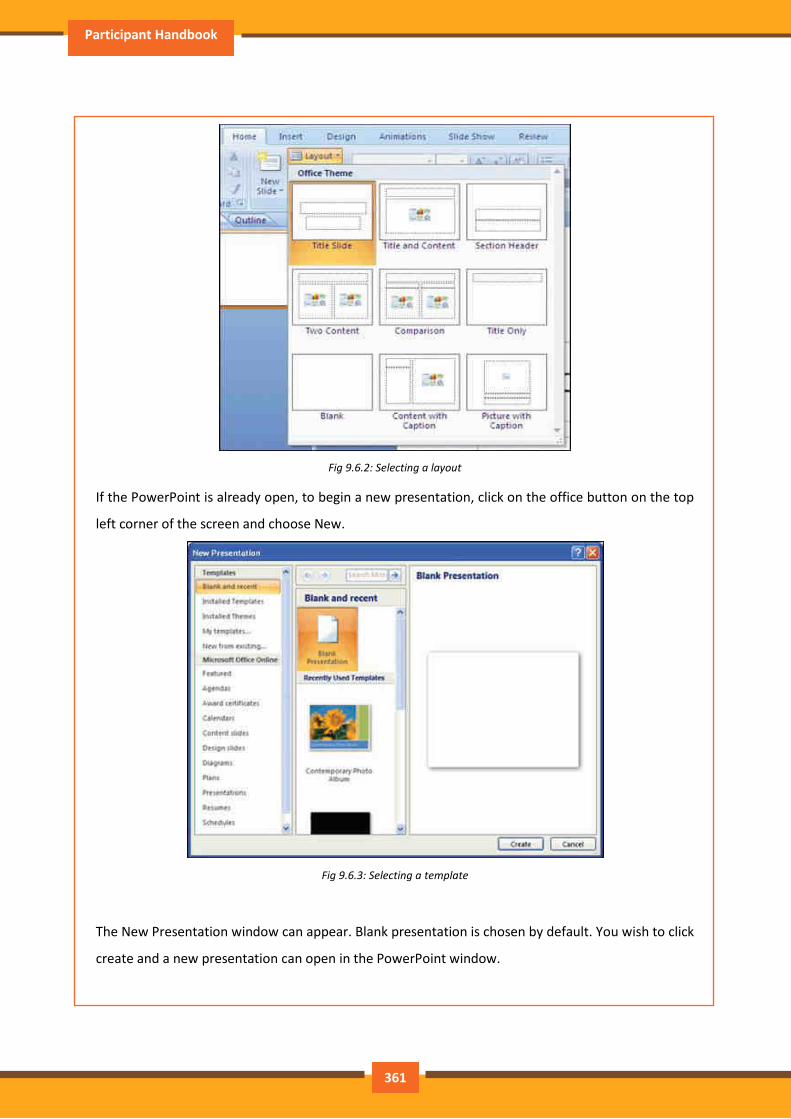
Participant Handbook
Fig 9.6.2: Selecting a layout
If the PowerPoint is already open, to begin a new presentation, click on the office button on the top
left corner of the screen and choose New.
Fig 9.6.3: Selecting a template
The New Presentation window can appear. Blank presentation is chosen by default. You wish to click
create and a new presentation can open in the PowerPoint window.
361
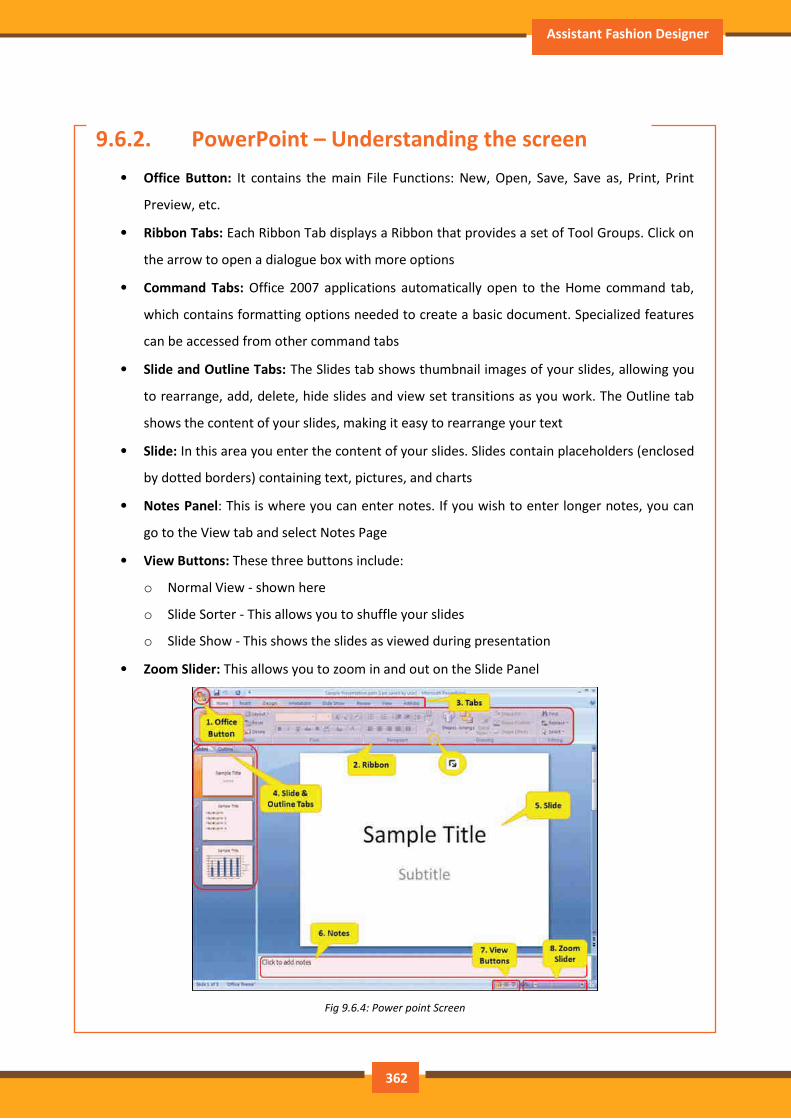
Assistant Fashion Designer
9.6.2. PowerPoint – Understanding the screen
• Office Button: It contains the main File Functions: New, Open, Save, Save as, Print, Print
Preview, etc.
• Ribbon Tabs: Each Ribbon Tab displays a Ribbon that provides a set of Tool Groups. Click on
the arrow to open a dialogue box with more options
• Command Tabs: Office 2007 applications automatically open to the Home command tab,
which contains formatting options needed to create a basic document. Specialized features
can be accessed from other command tabs
• Slide and Outline Tabs: The Slides tab shows thumbnail images of your slides, allowing you
to rearrange, add, delete, hide slides and view set transitions as you work. The Outline tab
shows the content of your slides, making it easy to rearrange your text
• Slide: In this area you enter the content of your slides. Slides contain placeholders (enclosed
by dotted borders) containing text, pictures, and charts
• Notes Panel: This is where you can enter notes. If you wish to enter longer notes, you can
go to the View tab and select Notes Page
• View Buttons: These three buttons include:
o Normal View - shown here
o Slide Sorter - This allows you to shuffle your slides
o Slide Show - This shows the slides as viewed during presentation
• Zoom Slider: This allows you to zoom in and out on the Slide Panel
Fig 9.6.4: Power point Screen
362
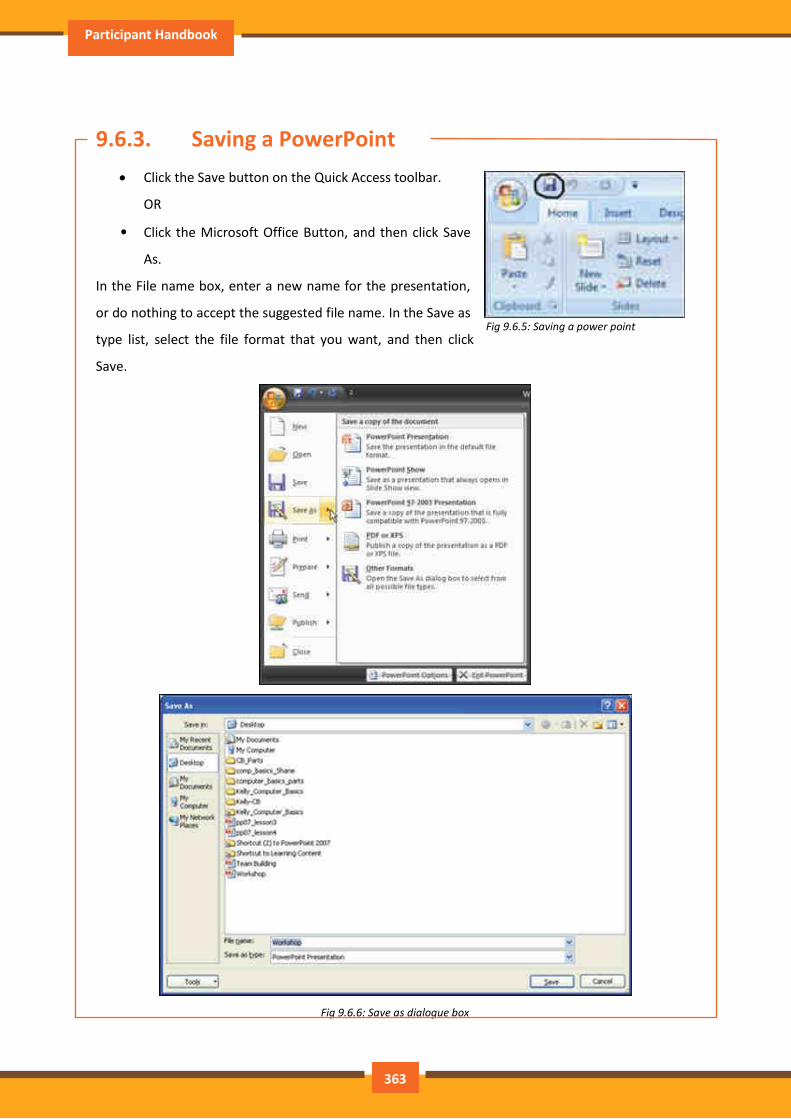
Participant Handbook
9.6.3. Saving a PowerPoint
Click the Save button on the Quick Access toolbar.
OR
• Click the Microsoft Office Button, and then click Save
As.
In the File name box, enter a new name for the presentation,
or do nothing to accept the suggested file name. In the Save as
type list, select the file format that you want, and then click
Save.
Fig 9.6.6: Save as dialogue box
Fig 9.6.5: Saving a power point
363
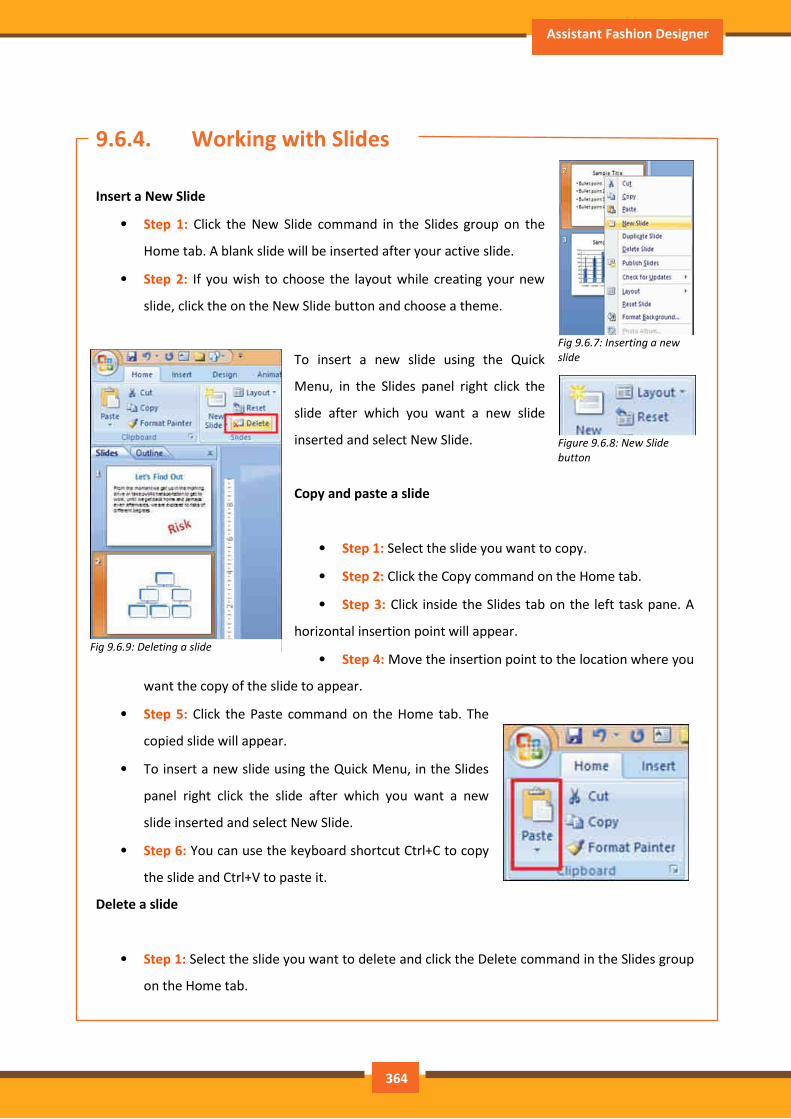
Assistant Fashion Designer
9.6.4. Working with Slides
Insert a New Slide
• Step 1: Click the New Slide command in the Slides group on the
Home tab. A blank slide will be inserted after your active slide.
• Step 2: If you wish to choose the layout while creating your new
slide, click the on the New Slide button and choose a theme.
To insert a new slide using the Quick
Menu, in the Slides panel right click the
slide after which you want a new slide
inserted and select New Slide.
Copy and paste a slide
• Step 1: Select the slide you want to copy.
• Step 2: Click the Copy command on the Home tab.
• Step 3: Click inside the Slides tab on the left task pane. A
horizontal insertion point will appear.
• Step 4: Move the insertion point to the location where you
want the copy of the slide to appear.
• Step 5: Click the Paste command on the Home tab. The
copied slide will appear.
• To insert a new slide using the Quick Menu, in the Slides
panel right click the slide after which you want a new
slide inserted and select New Slide.
• Step 6: You can use the keyboard shortcut Ctrl+C to copy
the slide and Ctrl+V to paste it.
Delete a slide
• Step 1: Select the slide you want to delete and click the Delete command in the Slides group
on the Home tab.
Fig 9.6.7: Inserting a new
slide
Figure 9.6.8: New Slide
button
Fig 9.6.9: Deleting a slide
364

Participant Handbook
Move a slide
• Step 1: On the Slides tab in the left task pane, select the slide you want to move.
• Step 2: Click and drag the slide to a new location. The insertion point will appear.
• Step 3: Release the mouse button.
• Step 4: The slide will appear in the new location.
9.6.5. View Tabs
Different views allow you to manage different
aspects of your presentation.
• Step 1: Normal View is the default view.
It splits the window into Slide Frame,
Notes, and the left frame where you can
choose either Slides Thumbnails or
Outline.
• Step 2: Slide Sorter is thumbnails view of all the slides in the presentation. The slides are
displayed horizontally
• Step 3: Slide Show plays the presentation from the beginning with animation.
9.6.6. Animating Text and Images
In PowerPoint, you can add animation to text and objects to draw the
audience's attention an add flair to your presentation.
• Step 1: Select the object or text box you wish to animate.
• Step 2: In the Animations tab under the Animations group,
select an option from the animate drop-down menu. As you
hover your mouse over each choice PowerPoint will preview the
Fig 9.6.10: Slide views
Fig 9.6.11: Text Animation
365
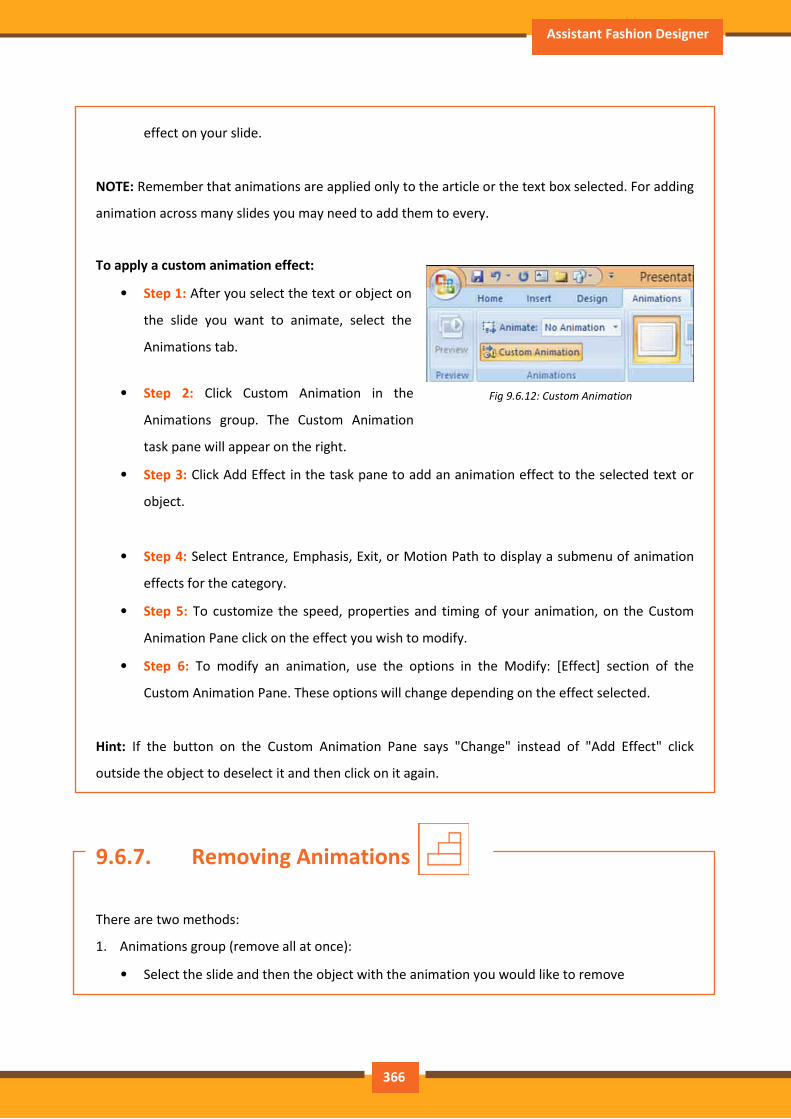
Assistant Fashion Designer
effect on your slide.
NOTE: Remember that animations are applied only to the article or the text box selected. For adding
animation across many slides you may need to add them to every.
To apply a custom animation effect:
• Step 1: After you select the text or object on
the slide you want to animate, select the
Animations tab.
• Step 2: Click Custom Animation in the
Animations group. The Custom Animation
task pane will appear on the right.
• Step 3: Click Add Effect in the task pane to add an animation effect to the selected text or
object.
• Step 4: Select Entrance, Emphasis, Exit, or Motion Path to display a submenu of animation
effects for the category.
• Step 5: To customize the speed, properties and timing of your animation, on the Custom
Animation Pane click on the effect you wish to modify.
• Step 6: To modify an animation, use the options in the Modify: [Effect] section of the
Custom Animation Pane. These options will change depending on the effect selected.
Hint: If the button on the Custom Animation Pane says "Change" instead of "Add Effect" click
outside the object to deselect it and then click on it again.
9.6.7. Removing Animations
There are two methods:
1. Animations group (remove all at once):
• Select the slide and then the object with the animation you would like to remove
Fig 9.6.12: Custom Animation
366
Participant Handbook
• In the Animations tab under the Animations group click on the Animate pull-down menu
and select No Animation
2. Custom Animation Pane (remove one by one):
• Select the slide with the animation you would like to remove
• If the Custom Animations pane is not visible, click on the Custom Animation button in the
Animations group on the Animations tab
• In the Modify: [Effect] list select the animation to be removed
• Click Remove
9.6.8. Working with Charts
A chart is a tool you can use to communicate your data graphically.
Chart elements
Let’s familiarize with different chart element:
• Titles: There are two types of titles:
o Chart Title placed above the chart (default).
o Axes Titles placed besides the axes (The vertical axis is referred to as the Y axis, while
the horizontal axis is referred to as the X axis.)
• Legend: The chart key, which displays captions (and/or color coding) to the series on the
chart.
• Data: This is the range of cells (displayed in excel) that make up a chart. The chart is updated
automatically whenever the information in these cells changes.
Inserting Charts
• Step 1: Select the Insert tab.
• Step 2: Click the Insert Chart command to open the Insert Chart dialog box.
• Step 3: Click a chart to select it.
367

Assistant Fashion Designer
• Step 4: The chart will appear on your slide, and Excel will open as a split screen with dummy
data already filled in.
• Step 5: You add your data and labels to the Excel spreadsheet and the chart will be
automatically updated on your slide.
Fig 8.6.13: Charts
• Step 6: When finished, click the Close Window in the upper right hand corner of Excel to
close the worksheet.
Changing To a Different Chart
• Step 1: You can change your present chart to a different format by right-click on the chart
and select Change Series Chart Type. This opens the Change Chart Type dialog.
• Step 2: Make a selection and press OK.
Edit source data
• Step 1: Select the chart
• Step 2: Select the Design tab
• Step 3: Click the Edit Data command. An Excel spreadsheet with the current source data will
appear
• Step 4: After you edit the data in the spreadsheet, the changes will appear on the slide
• Step 5: Close Excel without saving the spreadsheet
368

Participant Handbook
Modifying the chart layout
• Step 1: Select the chart
• Step 2: Click on the Design tab
• Step 3: Scroll through the options in the Chart
Layout group, or click the More drop-down arrow
to see all available chart layout options
• Step 4: Select a chart layout by clicking on it. The chart layout will change on the slide
Modify specific areas of the chart layout
• Step 1: Select the chart.
• Step 2: Select the Layout tab.
• Step 3: Locate the Labels group.
o Chart Title: Add, remove, or re-position the
chart title.
o Axis Titles: Add, remove, or re-position the text used to label each axis.
o Legend: Add, remove, or re-position the chart legend.
o Data Labels: Click this command to display or hide data values next to each chart
element.
o Data Table: Adds a table summarizing your data to the chart.
Fig 9.6.14: Chart Layout
Fig 9.6.14: Modify chart
369
Assistant Fashion Designer
UNIT 9.7: MS Excel
Unit Objectives
At the end of the unit, participants will be able to:
• Work on MS-Excel
• Format cells and cell content
• Use formulas
• Make Charts and Pivot Table
MS surpass stands for - Microsoft Excel is one of the foremost common electronic spreadsheet
applications supported by both Mac and computer platforms. As with a paper spreadsheet, you’ll be
able to use excel to prepare your data into rows and columns and to perform mathematical
calculations.
MS Excel helps in:
• Managing data online
• Creating visually persuasive charts, and thought‐provoking graphs
• Creating and expense reports
• Building formulas and editing them
• Balancing a check book
This tutorial teaches you how to create an Excel spreadsheet.
Before you start making spreadsheets in excel, you will need to line up your excel setting and
become familiar with many key tasks and options like a way to minimize and maximize the Ribbon,
configure the quick Access toolbar, switch page views, and access your excel choices.
9.7.1. Exploring the Excel Environment
The tabbed Ribbon menu system is however you navigate through Excel and access the assorted
excel commands. If you have used previous versions of excel, the Ribbon system replaces the
Fig 9.7.1: MS Excel
logo
370
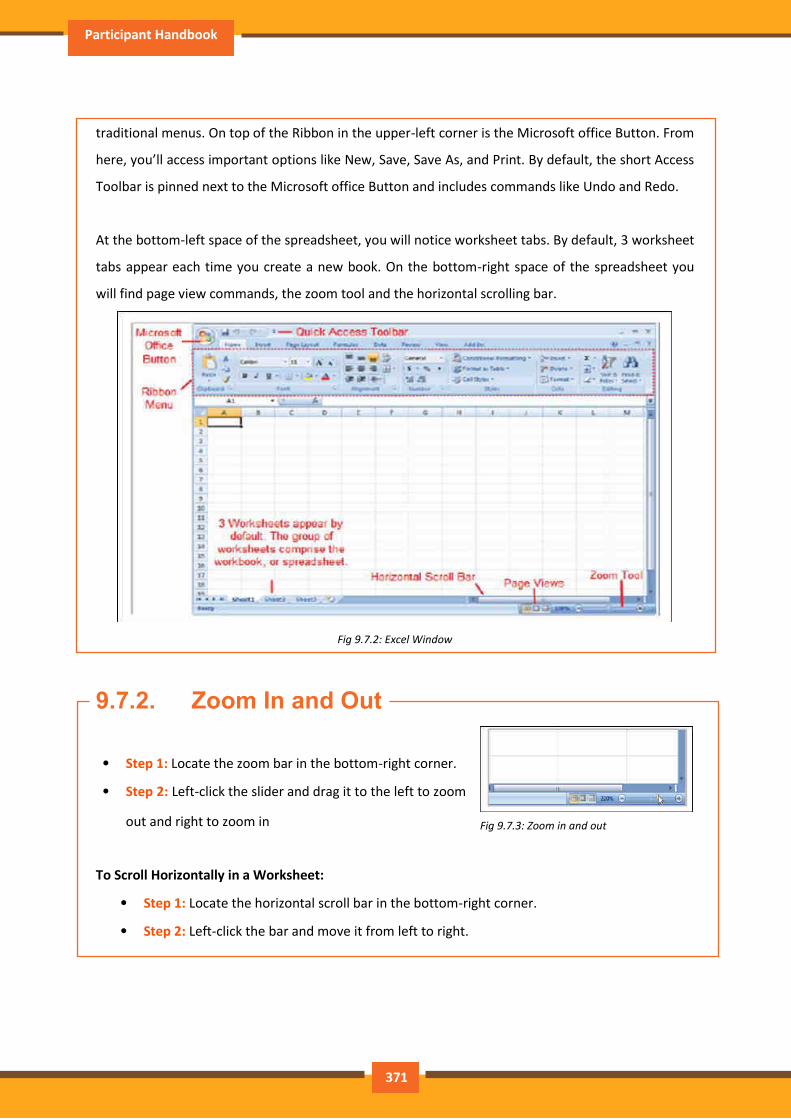
Participant Handbook
traditional menus. On top of the Ribbon in the upper-left corner is the Microsoft office Button. From
here, you’ll access important options like New, Save, Save As, and Print. By default, the short Access
Toolbar is pinned next to the Microsoft office Button and includes commands like Undo and Redo.
At the bottom-left space of the spreadsheet, you will notice worksheet tabs. By default, 3 worksheet
tabs appear each time you create a new book. On the bottom-right space of the spreadsheet you
will find page view commands, the zoom tool and the horizontal scrolling bar.
Fig 9.7.2: Excel Window
9.7.2. Zoom In and Out
• Step 1: Locate the zoom bar in the bottom-right corner.
• Step 2: Left-click the slider and drag it to the left to zoom
out and right to zoom in
To Scroll Horizontally in a Worksheet:
• Step 1: Locate the horizontal scroll bar in the bottom-right corner.
• Step 2: Left-click the bar and move it from left to right.
Fig 9.7.3: Zoom in and out
371
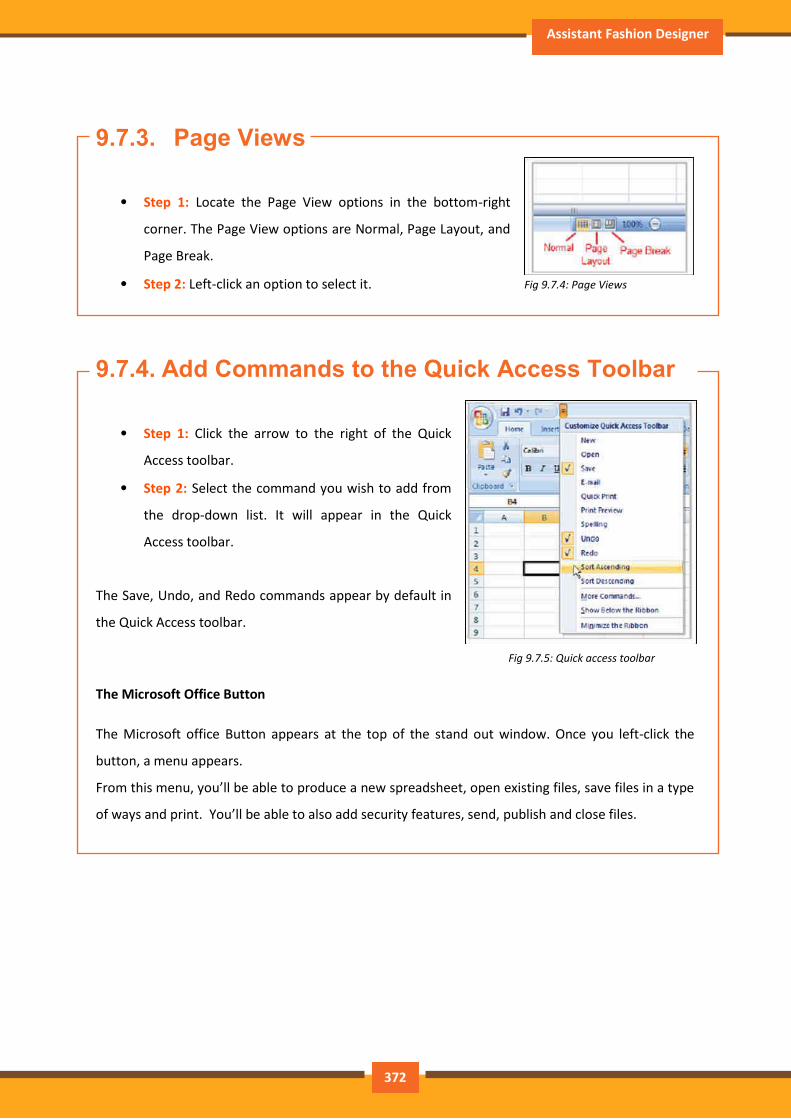
Assistant Fashion Designer
9.7.3. Page Views
• Step 1: Locate the Page View options in the bottom-right
corner. The Page View options are Normal, Page Layout, and
Page Break.
• Step 2: Left-click an option to select it.
9.7.4. Add Commands to the Quick Access Toolbar
• Step 1: Click the arrow to the right of the Quick
Access toolbar.
• Step 2: Select the command you wish to add from
the drop-down list. It will appear in the Quick
Access toolbar.
The Save, Undo, and Redo commands appear by default in
the Quick Access toolbar.
The Microsoft Office Button
The Microsoft office Button appears at the top of the stand out window. Once you left-click the
button, a menu appears.
From this menu, you’ll be able to produce a new spreadsheet, open existing files, save files in a type
of ways and print. You’ll be able to also add security features, send, publish and close files.
Fig 9.7.4: Page Views
Fig 9.7.5: Quick access toolbar
372
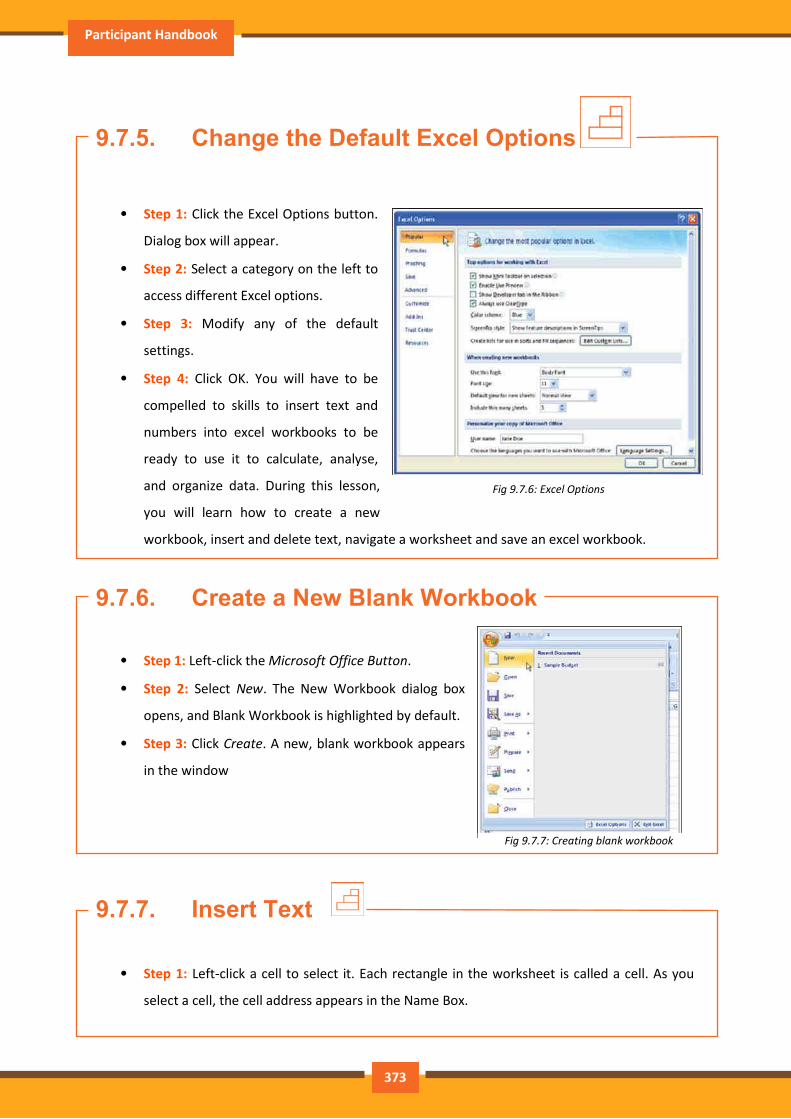
Participant Handbook
9.7.5. Change the Default Excel Options
• Step 1: Click the Excel Options button.
Dialog box will appear.
• Step 2: Select a category on the left to
access different Excel options.
• Step 3: Modify any of the default
settings.
• Step 4: Click OK. You will have to be
compelled to skills to insert text and
numbers into excel workbooks to be
ready to use it to calculate, analyse,
and organize data. During this lesson,
you will learn how to create a new
workbook, insert and delete text, navigate a worksheet and save an excel workbook.
9.7.6. Create a New Blank Workbook
• Step 1: Left-click the Microsoft Office Button.
• Step 2: Select New. The New Workbook dialog box
opens, and Blank Workbook is highlighted by default.
• Step 3: Click Create. A new, blank workbook appears
in the window
9.7.7. Insert Text
• Step 1: Left-click a cell to select it. Each rectangle in the worksheet is called a cell. As you
select a cell, the cell address appears in the Name Box.
Fig 9.7.6: Excel Options
Fig 9.7.7: Creating blank workbook
373
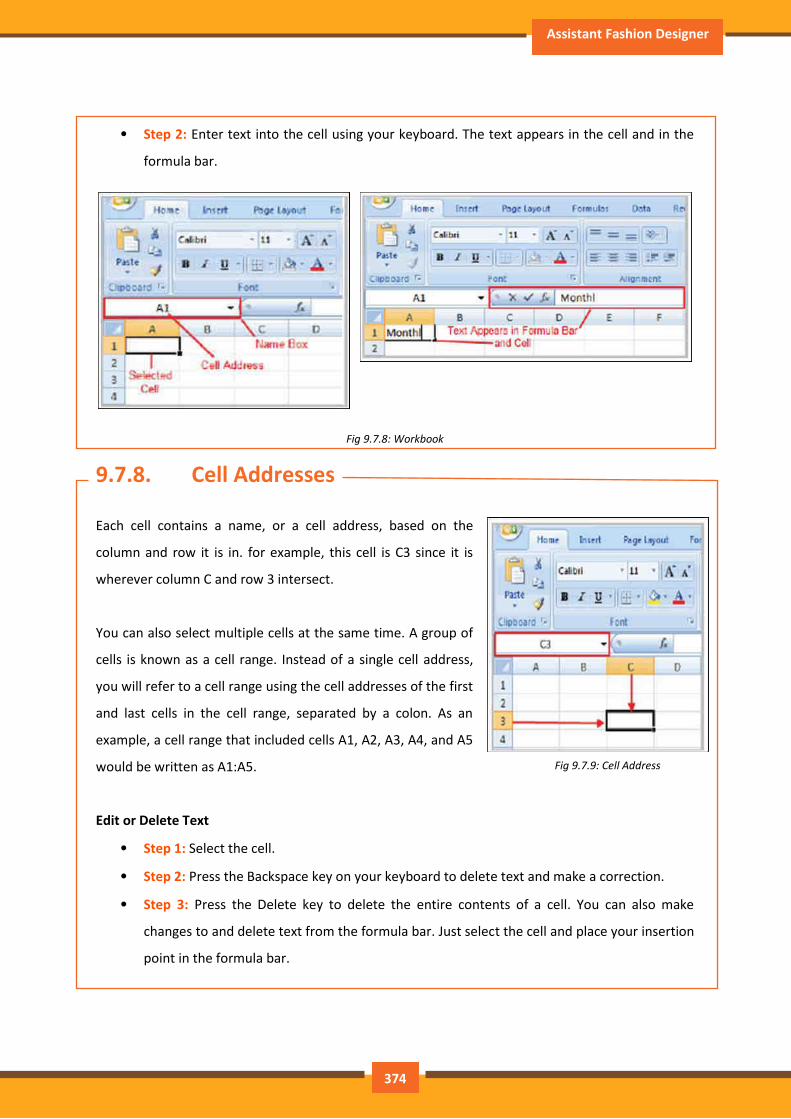
Assistant Fashion Designer
• Step 2: Enter text into the cell using your keyboard. The text appears in the cell and in the
formula bar.
Fig 9.7.8: Workbook
9.7.8. Cell Addresses
Each cell contains a name, or a cell address, based on the
column and row it is in. for example, this cell is C3 since it is
wherever column C and row 3 intersect.
You can also select multiple cells at the same time. A group of
cells is known as a cell range. Instead of a single cell address,
you will refer to a cell range using the cell addresses of the first
and last cells in the cell range, separated by a colon. As an
example, a cell range that included cells A1, A2, A3, A4, and A5
would be written as A1:A5.
Edit or Delete Text
• Step 1: Select the cell.
• Step 2: Press the Backspace key on your keyboard to delete text and make a correction.
• Step 3: Press the Delete key to delete the entire contents of a cell. You can also make
changes to and delete text from the formula bar. Just select the cell and place your insertion
point in the formula bar.
Fig 9.7.9: Cell Address
374
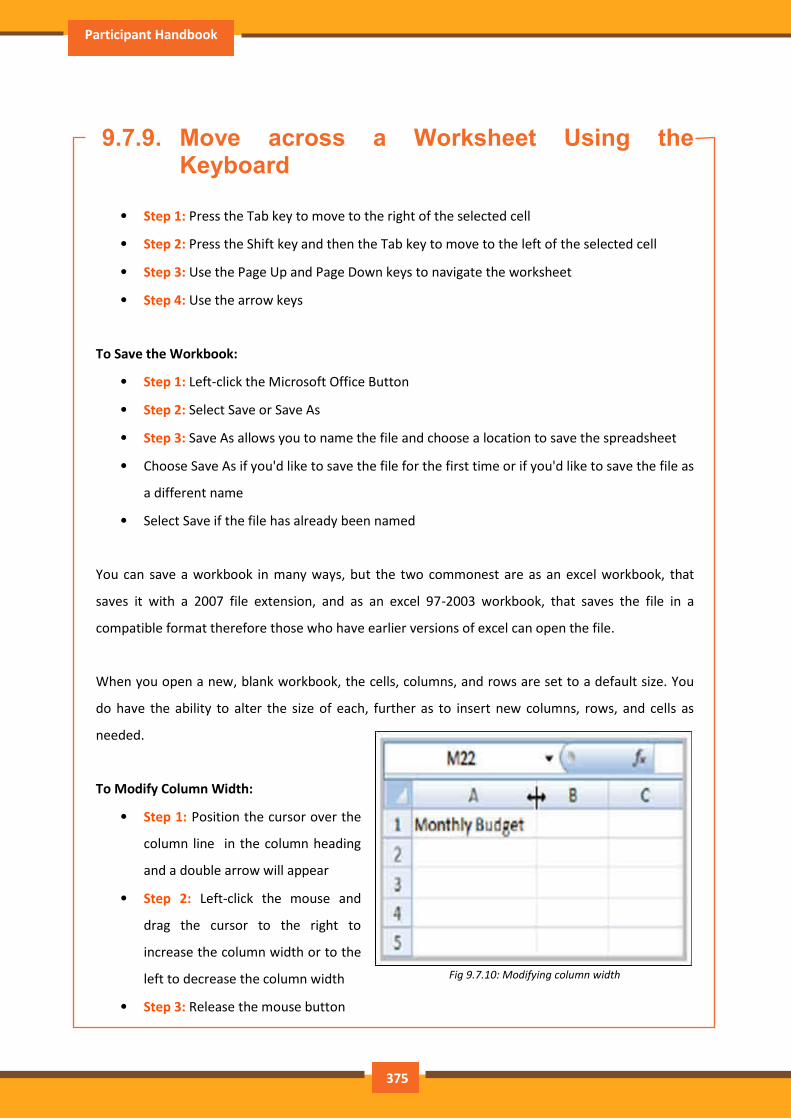
Participant Handbook
9.7.9. Move across a Worksheet Using the Keyboard
• Step 1: Press the Tab key to move to the right of the selected cell
• Step 2: Press the Shift key and then the Tab key to move to the left of the selected cell
• Step 3: Use the Page Up and Page Down keys to navigate the worksheet
• Step 4: Use the arrow keys
To Save the Workbook:
• Step 1: Left-click the Microsoft Office Button
• Step 2: Select Save or Save As
• Step 3: Save As allows you to name the file and choose a location to save the spreadsheet
• Choose Save As if you'd like to save the file for the first time or if you'd like to save the file as
a different name
• Select Save if the file has already been named
You can save a workbook in many ways, but the two commonest are as an excel workbook, that
saves it with a 2007 file extension, and as an excel 97-2003 workbook, that saves the file in a
compatible format therefore those who have earlier versions of excel can open the file.
When you open a new, blank workbook, the cells, columns, and rows are set to a default size. You
do have the ability to alter the size of each, further as to insert new columns, rows, and cells as
needed.
To Modify Column Width:
• Step 1: Position the cursor over the
column line in the column heading
and a double arrow will appear
• Step 2: Left-click the mouse and
drag the cursor to the right to
increase the column width or to the
left to decrease the column width
• Step 3: Release the mouse button
Fig 9.7.10: Modifying column width
375
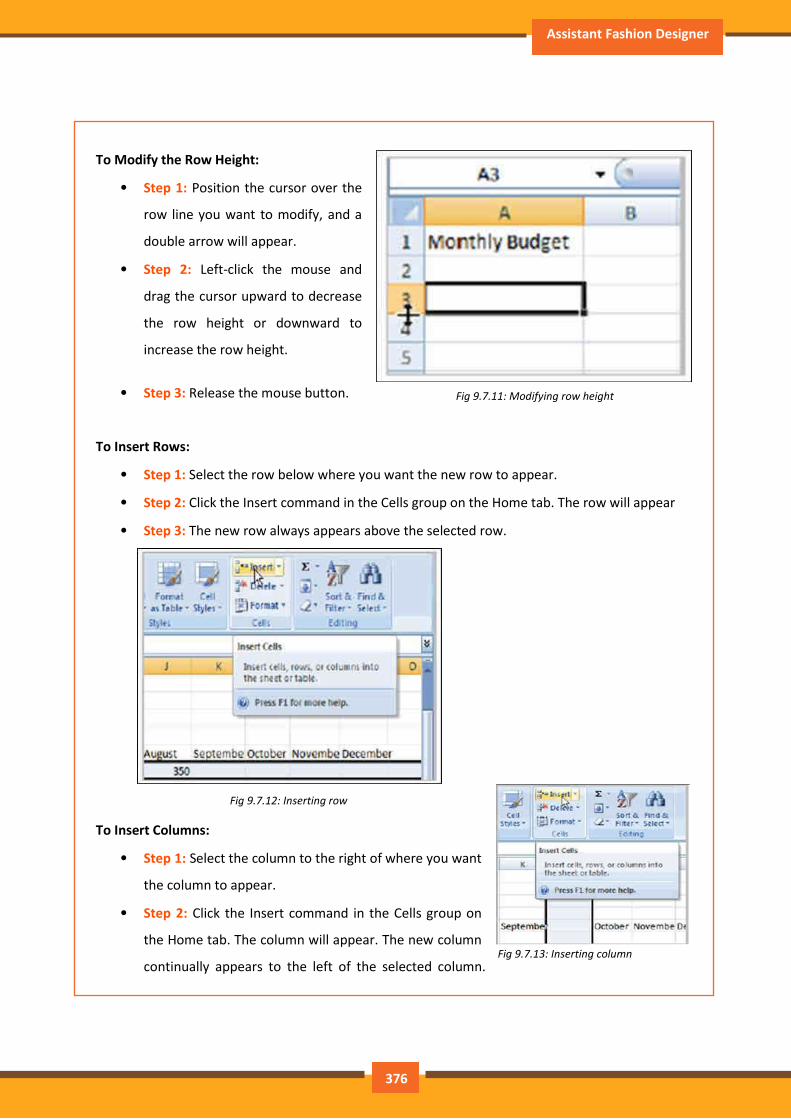
Assistant Fashion Designer
To Modify the Row Height:
• Step 1: Position the cursor over the
row line you want to modify, and a
double arrow will appear.
• Step 2: Left-click the mouse and
drag the cursor upward to decrease
the row height or downward to
increase the row height.
• Step 3: Release the mouse button.
To Insert Rows:
• Step 1: Select the row below where you want the new row to appear.
• Step 2: Click the Insert command in the Cells group on the Home tab. The row will appear
• Step 3: The new row always appears above the selected row.
Fig 9.7.12: Inserting row
To Insert Columns:
• Step 1: Select the column to the right of where you want
the column to appear.
• Step 2: Click the Insert command in the Cells group on
the Home tab. The column will appear. The new column
continually appears to the left of the selected column.
Fig 9.7.11: Modifying row height
Fig 9.7.13: Inserting column
376
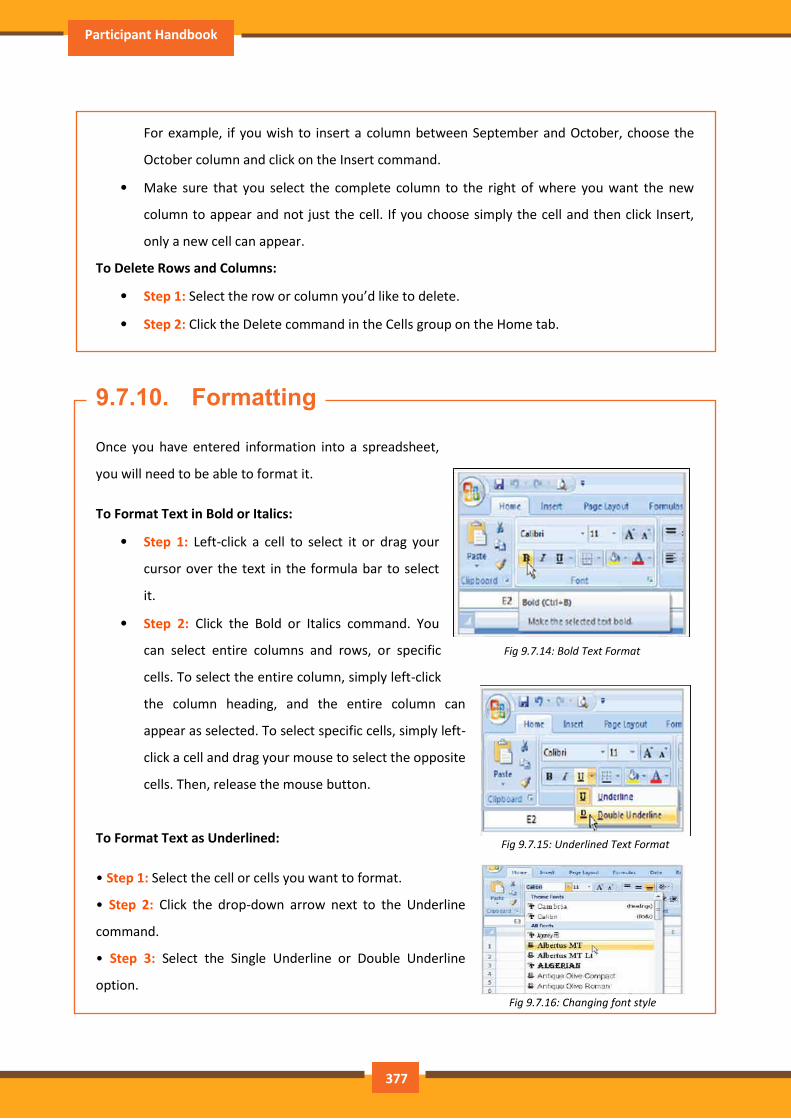
Participant Handbook
For example, if you wish to insert a column between September and October, choose the
October column and click on the Insert command.
• Make sure that you select the complete column to the right of where you want the new
column to appear and not just the cell. If you choose simply the cell and then click Insert,
only a new cell can appear.
To Delete Rows and Columns:
• Step 1: Select the row or column you’d like to delete.
• Step 2: Click the Delete command in the Cells group on the Home tab.
9.7.10. Formatting
Once you have entered information into a spreadsheet,
you will need to be able to format it.
To Format Text in Bold or Italics:
• Step 1: Left-click a cell to select it or drag your
cursor over the text in the formula bar to select
it.
• Step 2: Click the Bold or Italics command. You
can select entire columns and rows, or specific
cells. To select the entire column, simply left-click
the column heading, and the entire column can
appear as selected. To select specific cells, simply left-
click a cell and drag your mouse to select the opposite
cells. Then, release the mouse button.
To Format Text as Underlined:
• Step 1: Select the cell or cells you want to format.
• Step 2: Click the drop-down arrow next to the Underline
command.
• Step 3: Select the Single Underline or Double Underline
option.
Fig 9.7.14: Bold Text Format
Fig 9.7.15: Underlined Text Format
Fig 9.7.16: Changing font style
377
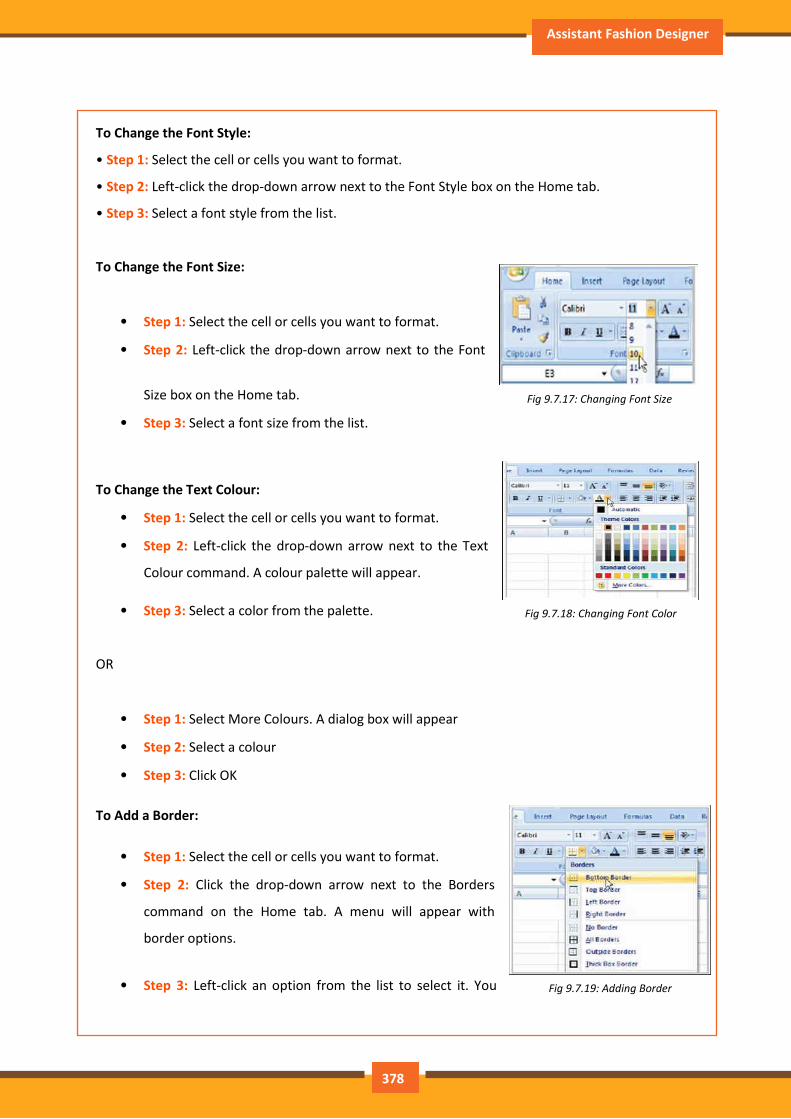
Assistant Fashion Designer
To Change the Font Style:
• Step 1: Select the cell or cells you want to format.
• Step 2: Left-click the drop-down arrow next to the Font Style box on the Home tab.
• Step 3: Select a font style from the list.
To Change the Font Size:
• Step 1: Select the cell or cells you want to format.
• Step 2: Left-click the drop-down arrow next to the Font
Size box on the Home tab.
• Step 3: Select a font size from the list.
To Change the Text Colour:
• Step 1: Select the cell or cells you want to format.
• Step 2: Left-click the drop-down arrow next to the Text
Colour command. A colour palette will appear.
• Step 3: Select a color from the palette.
OR
• Step 1: Select More Colours. A dialog box will appear
• Step 2: Select a colour
• Step 3: Click OK
To Add a Border:
• Step 1: Select the cell or cells you want to format.
• Step 2: Click the drop-down arrow next to the Borders
command on the Home tab. A menu will appear with
border options.
• Step 3: Left-click an option from the list to select it. You
Fig 9.7.17: Changing Font Size
Fig 9.7.18: Changing Font Color
Fig 9.7.19: Adding Border
378
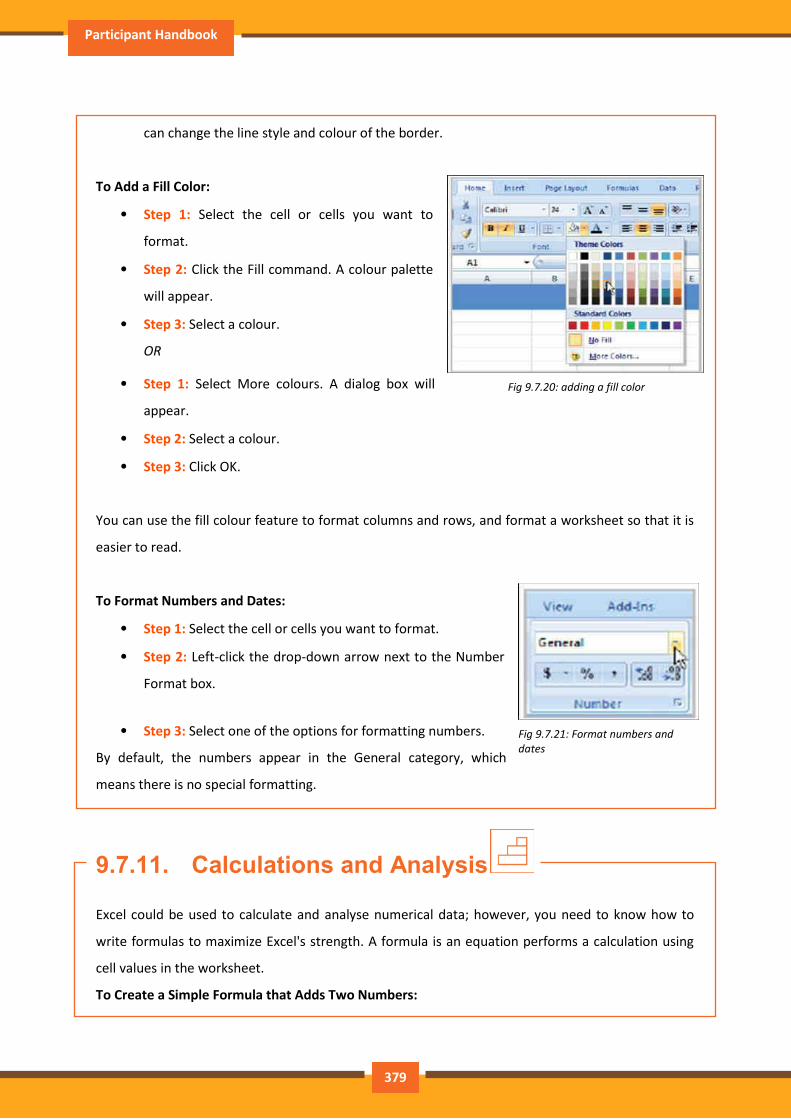
Participant Handbook
can change the line style and colour of the border.
To Add a Fill Color:
• Step 1: Select the cell or cells you want to
format.
• Step 2: Click the Fill command. A colour palette
will appear.
• Step 3: Select a colour.
OR
• Step 1: Select More colours. A dialog box will
appear.
• Step 2: Select a colour.
• Step 3: Click OK.
You can use the fill colour feature to format columns and rows, and format a worksheet so that it is
easier to read.
To Format Numbers and Dates:
• Step 1: Select the cell or cells you want to format.
• Step 2: Left-click the drop-down arrow next to the Number
Format box.
• Step 3: Select one of the options for formatting numbers.
By default, the numbers appear in the General category, which
means there is no special formatting.
9.7.11. Calculations and Analysis
Excel could be used to calculate and analyse numerical data; however, you need to know how to
write formulas to maximize Excel's strength. A formula is an equation performs a calculation using
cell values in the worksheet.
To Create a Simple Formula that Adds Two Numbers:
Fig 9.7.20: adding a fill color
Fig 9.7.21: Format numbers and
dates
379
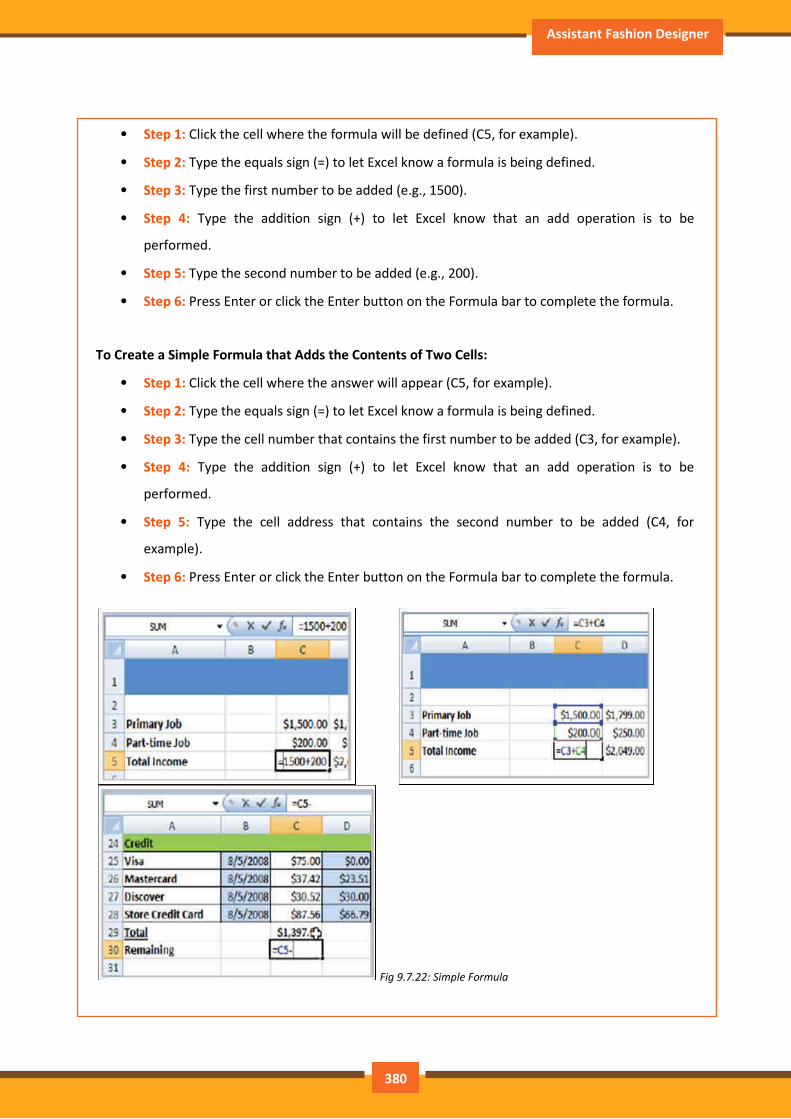
Assistant Fashion Designer
• Step 1: Click the cell where the formula will be defined (C5, for example).
• Step 2: Type the equals sign (=) to let Excel know a formula is being defined.
• Step 3: Type the first number to be added (e.g., 1500).
• Step 4: Type the addition sign (+) to let Excel know that an add operation is to be
performed.
• Step 5: Type the second number to be added (e.g., 200).
• Step 6: Press Enter or click the Enter button on the Formula bar to complete the formula.
To Create a Simple Formula that Adds the Contents of Two Cells:
• Step 1: Click the cell where the answer will appear (C5, for example).
• Step 2: Type the equals sign (=) to let Excel know a formula is being defined.
• Step 3: Type the cell number that contains the first number to be added (C3, for example).
• Step 4: Type the addition sign (+) to let Excel know that an add operation is to be
performed.
• Step 5: Type the cell address that contains the second number to be added (C4, for
example).
• Step 6: Press Enter or click the Enter button on the Formula bar to complete the formula.
Fig 9.7.22: Simple Formula
380
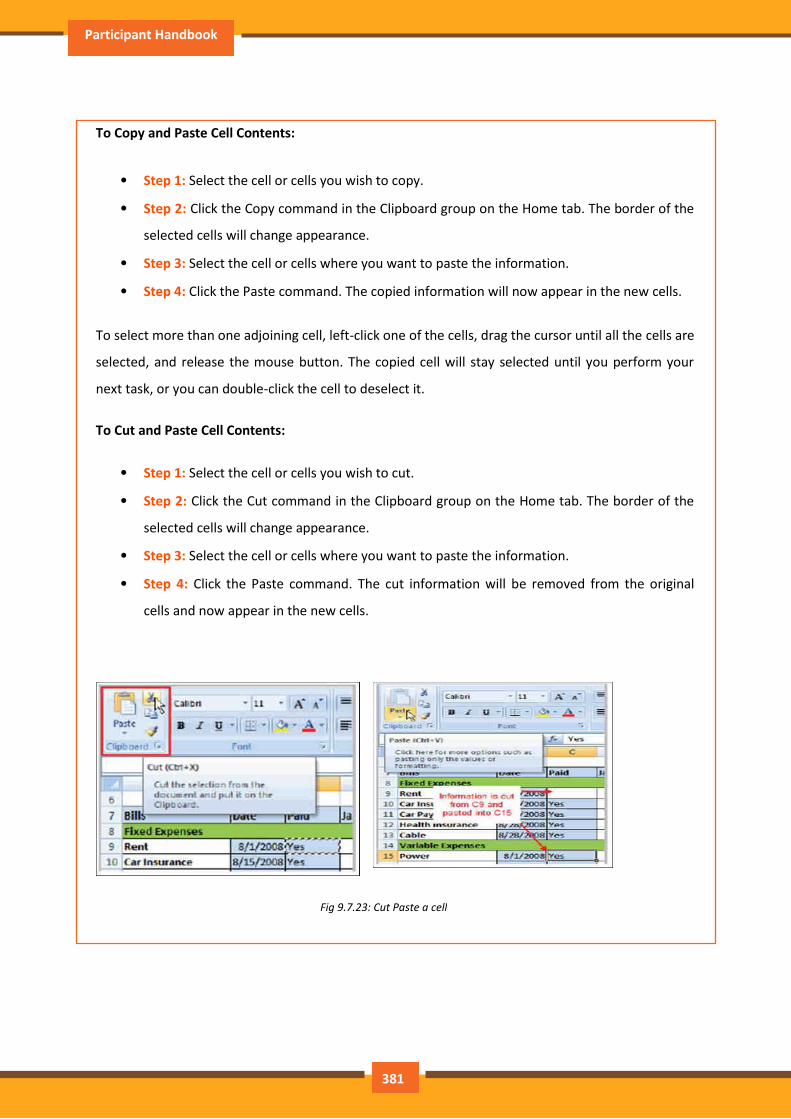
Participant Handbook
To Copy and Paste Cell Contents:
• Step 1: Select the cell or cells you wish to copy.
• Step 2: Click the Copy command in the Clipboard group on the Home tab. The border of the
selected cells will change appearance.
• Step 3: Select the cell or cells where you want to paste the information.
• Step 4: Click the Paste command. The copied information will now appear in the new cells.
To select more than one adjoining cell, left-click one of the cells, drag the cursor until all the cells are
selected, and release the mouse button. The copied cell will stay selected until you perform your
next task, or you can double-click the cell to deselect it.
To Cut and Paste Cell Contents:
• Step 1: Select the cell or cells you wish to cut.
• Step 2: Click the Cut command in the Clipboard group on the Home tab. The border of the
selected cells will change appearance.
• Step 3: Select the cell or cells where you want to paste the information.
• Step 4: Click the Paste command. The cut information will be removed from the original
cells and now appear in the new cells.
Fig 9.7.23: Cut Paste a cell
381
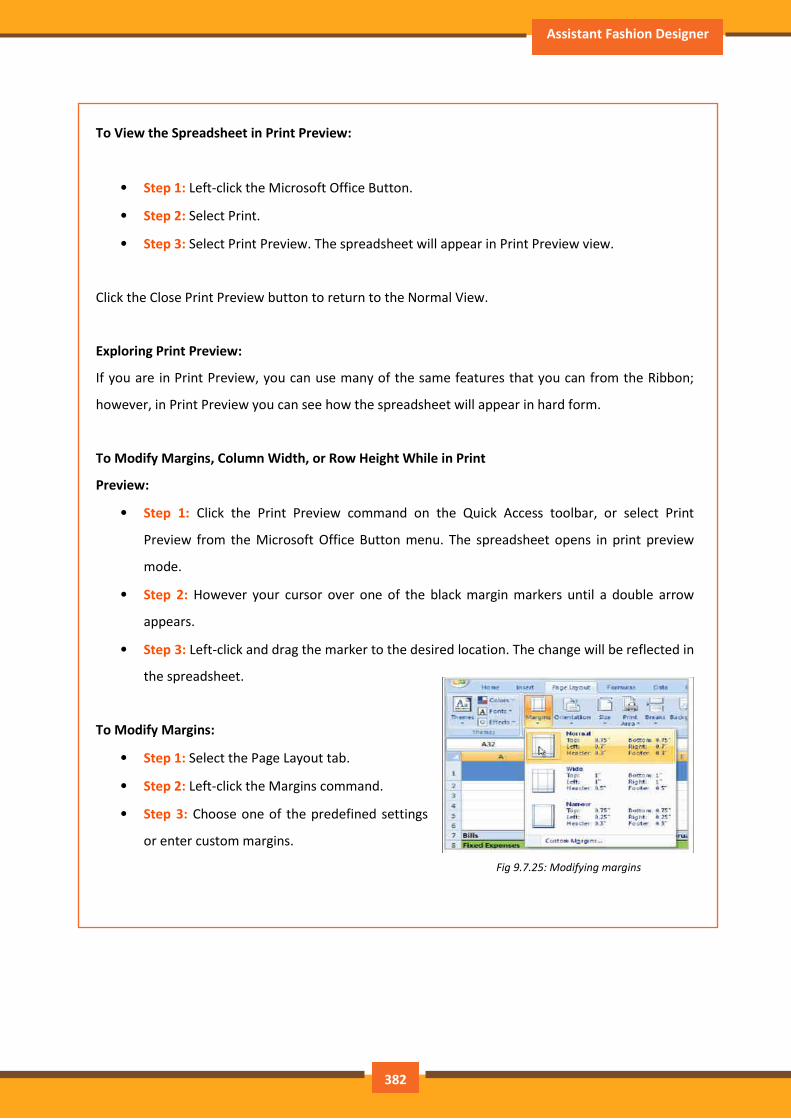
Assistant Fashion Designer
To View the Spreadsheet in Print Preview:
• Step 1: Left-click the Microsoft Office Button.
• Step 2: Select Print.
• Step 3: Select Print Preview. The spreadsheet will appear in Print Preview view.
Click the Close Print Preview button to return to the Normal View.
Exploring Print Preview:
If you are in Print Preview, you can use many of the same features that you can from the Ribbon;
however, in Print Preview you can see how the spreadsheet will appear in hard form.
To Modify Margins, Column Width, or Row Height While in Print
Preview:
• Step 1: Click the Print Preview command on the Quick Access toolbar, or select Print
Preview from the Microsoft Office Button menu. The spreadsheet opens in print preview
mode.
• Step 2: However your cursor over one of the black margin markers until a double arrow
appears.
• Step 3: Left-click and drag the marker to the desired location. The change will be reflected in
the spreadsheet.
To Modify Margins:
• Step 1: Select the Page Layout tab.
• Step 2: Left-click the Margins command.
• Step 3: Choose one of the predefined settings
or enter custom margins.
Fig 9.7.25: Modifying margins
382
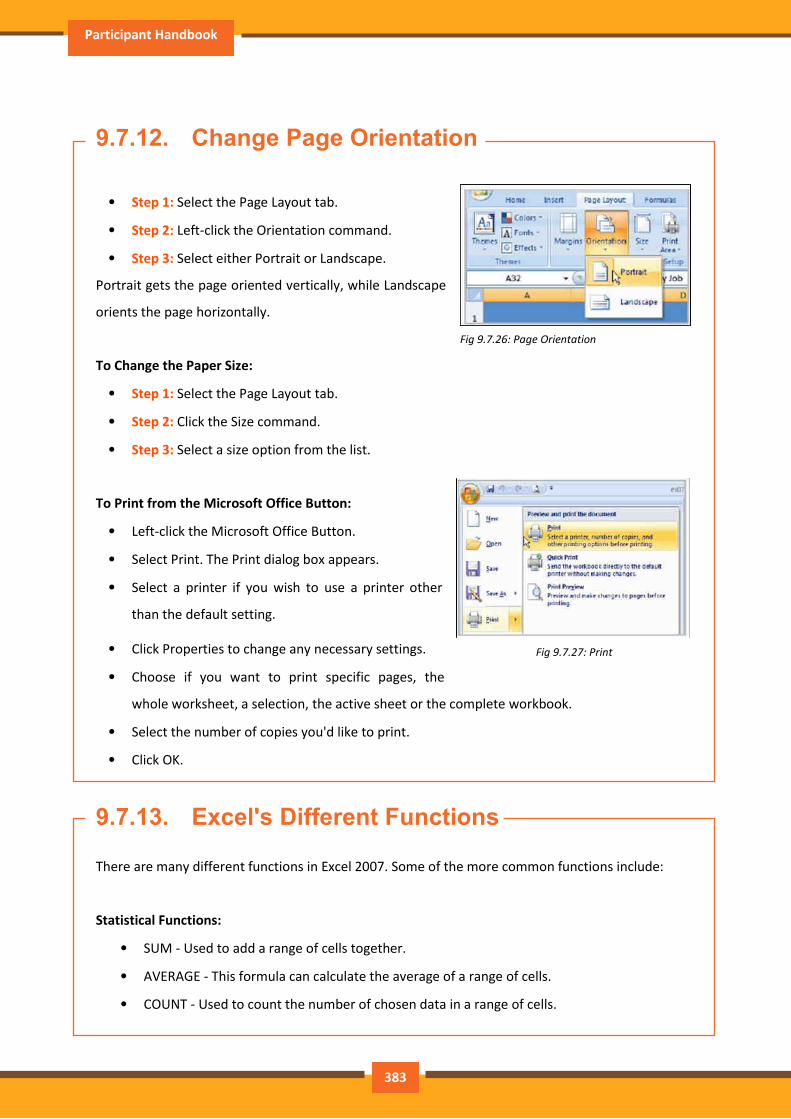
Participant Handbook
9.7.12. Change Page Orientation
• Step 1: Select the Page Layout tab.
• Step 2: Left-click the Orientation command.
• Step 3: Select either Portrait or Landscape.
Portrait gets the page oriented vertically, while Landscape
orients the page horizontally.
To Change the Paper Size:
• Step 1: Select the Page Layout tab.
• Step 2: Click the Size command.
• Step 3: Select a size option from the list.
To Print from the Microsoft Office Button:
• Left-click the Microsoft Office Button.
• Select Print. The Print dialog box appears.
• Select a printer if you wish to use a printer other
than the default setting.
• Click Properties to change any necessary settings.
• Choose if you want to print specific pages, the
whole worksheet, a selection, the active sheet or the complete workbook.
• Select the number of copies you'd like to print.
• Click OK.
9.7.13. Excel's Different Functions
There are many different functions in Excel 2007. Some of the more common functions include:
Statistical Functions:
• SUM - Used to add a range of cells together.
• AVERAGE - This formula can calculate the average of a range of cells.
• COUNT - Used to count the number of chosen data in a range of cells.
Fig 9.7.26: Page Orientation
Fig 9.7.27: Print
383
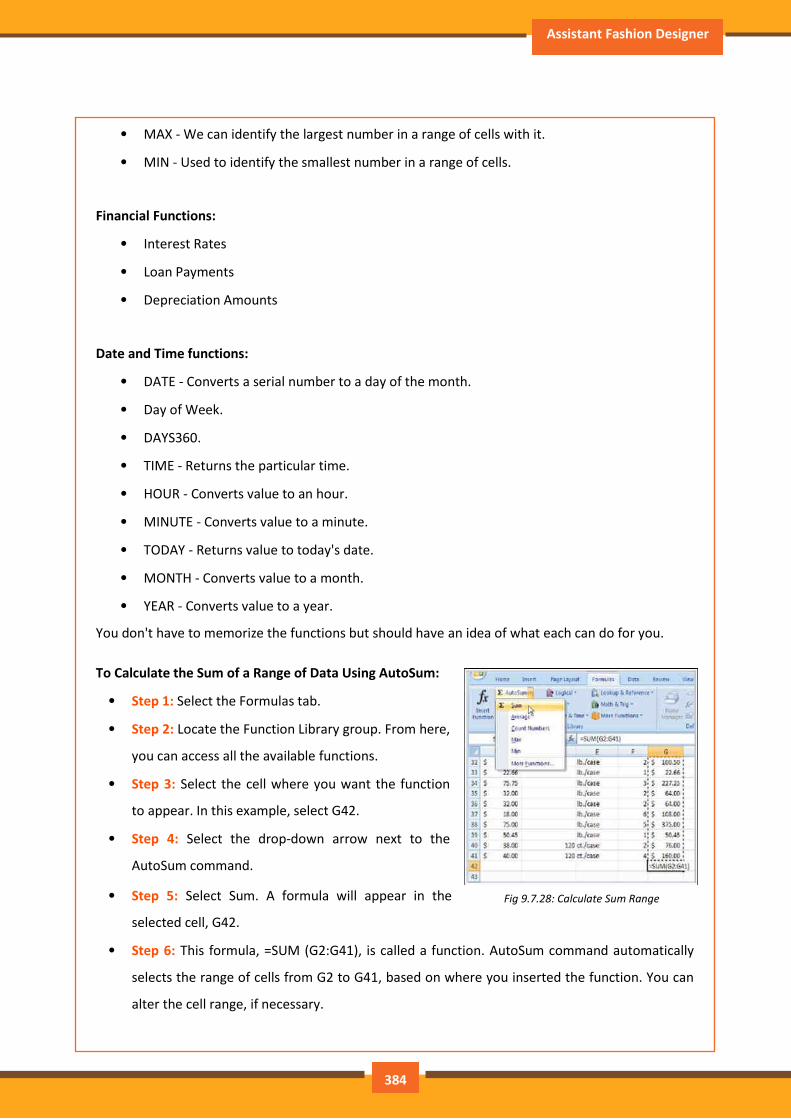
Assistant Fashion Designer
• MAX - We can identify the largest number in a range of cells with it.
• MIN - Used to identify the smallest number in a range of cells.
Financial Functions:
• Interest Rates
• Loan Payments
• Depreciation Amounts
Date and Time functions:
• DATE - Converts a serial number to a day of the month.
• Day of Week.
• DAYS360.
• TIME - Returns the particular time.
• HOUR - Converts value to an hour.
• MINUTE - Converts value to a minute.
• TODAY - Returns value to today's date.
• MONTH - Converts value to a month.
• YEAR - Converts value to a year.
You don't have to memorize the functions but should have an idea of what each can do for you.
To Calculate the Sum of a Range of Data Using AutoSum:
• Step 1: Select the Formulas tab.
• Step 2: Locate the Function Library group. From here,
you can access all the available functions.
• Step 3: Select the cell where you want the function
to appear. In this example, select G42.
• Step 4: Select the drop-down arrow next to the
AutoSum command.
• Step 5: Select Sum. A formula will appear in the
selected cell, G42.
• Step 6: This formula, =SUM (G2:G41), is called a function. AutoSum command automatically
selects the range of cells from G2 to G41, based on where you inserted the function. You can
alter the cell range, if necessary.
Fig 9.7.28: Calculate Sum Range
384
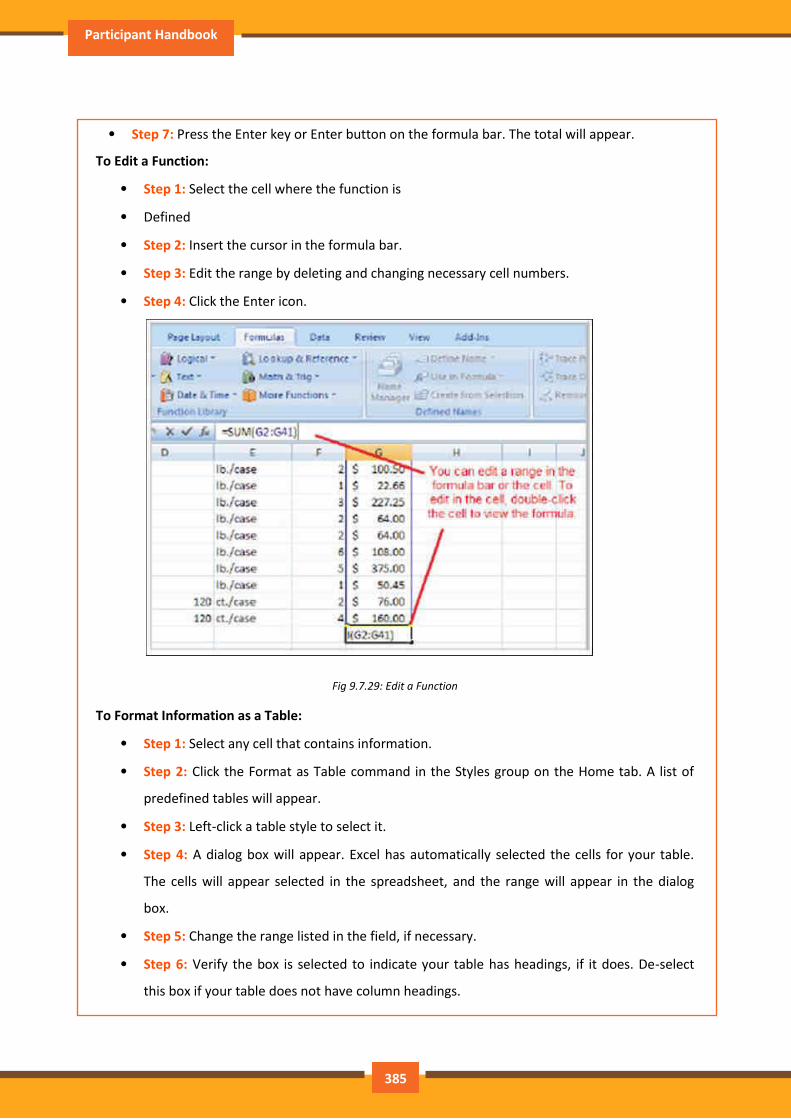
Participant Handbook
• Step 7: Press the Enter key or Enter button on the formula bar. The total will appear.
To Edit a Function:
• Step 1: Select the cell where the function is
• Defined
• Step 2: Insert the cursor in the formula bar.
• Step 3: Edit the range by deleting and changing necessary cell numbers.
• Step 4: Click the Enter icon.
Fig 9.7.29: Edit a Function
To Format Information as a Table:
• Step 1: Select any cell that contains information.
• Step 2: Click the Format as Table command in the Styles group on the Home tab. A list of
predefined tables will appear.
• Step 3: Left-click a table style to select it.
• Step 4: A dialog box will appear. Excel has automatically selected the cells for your table.
The cells will appear selected in the spreadsheet, and the range will appear in the dialog
box.
• Step 5: Change the range listed in the field, if necessary.
• Step 6: Verify the box is selected to indicate your table has headings, if it does. De-select
this box if your table does not have column headings.
385
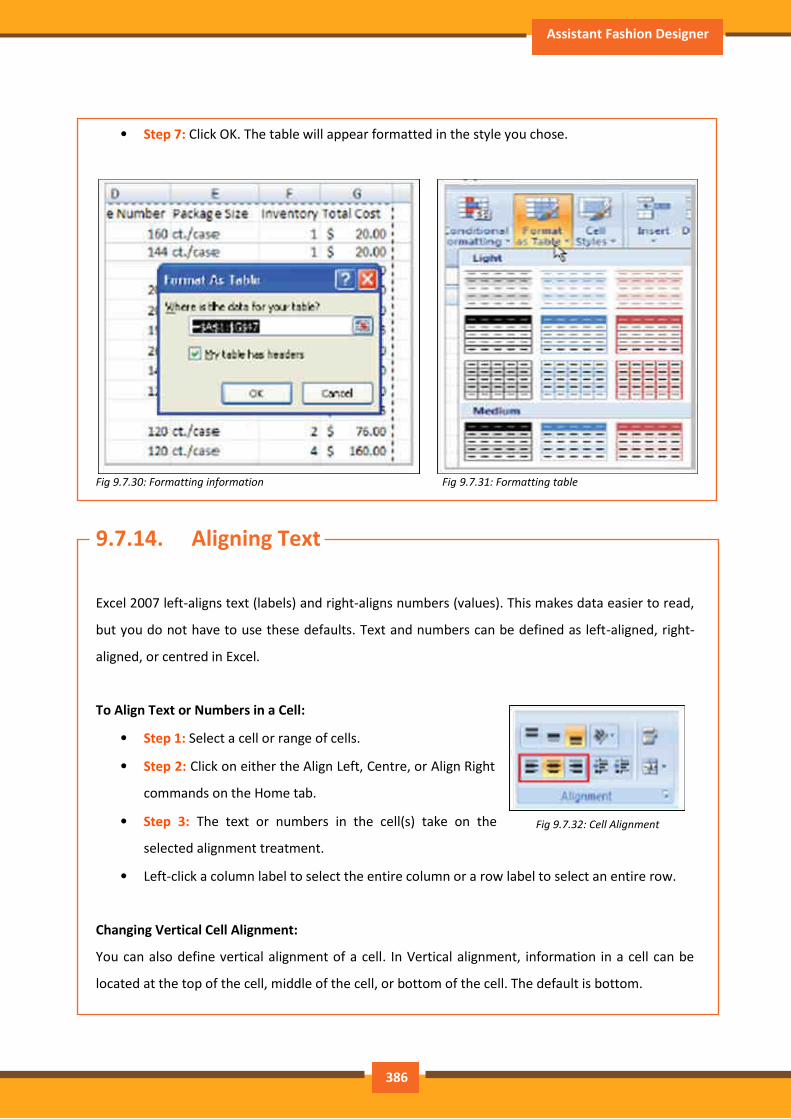
Assistant Fashion Designer
• Step 7: Click OK. The table will appear formatted in the style you chose.
Fig 9.7.30: Formatting information Fig 9.7.31: Formatting table
9.7.14. Aligning Text
Excel 2007 left-aligns text (labels) and right-aligns numbers (values). This makes data easier to read,
but you do not have to use these defaults. Text and numbers can be defined as left-aligned, right-
aligned, or centred in Excel.
To Align Text or Numbers in a Cell:
• Step 1: Select a cell or range of cells.
• Step 2: Click on either the Align Left, Centre, or Align Right
commands on the Home tab.
• Step 3: The text or numbers in the cell(s) take on the
selected alignment treatment.
• Left-click a column label to select the entire column or a row label to select an entire row.
Changing Vertical Cell Alignment:
You can also define vertical alignment of a cell. In Vertical alignment, information in a cell can be
located at the top of the cell, middle of the cell, or bottom of the cell. The default is bottom.
Fig 9.7.32: Cell Alignment
386
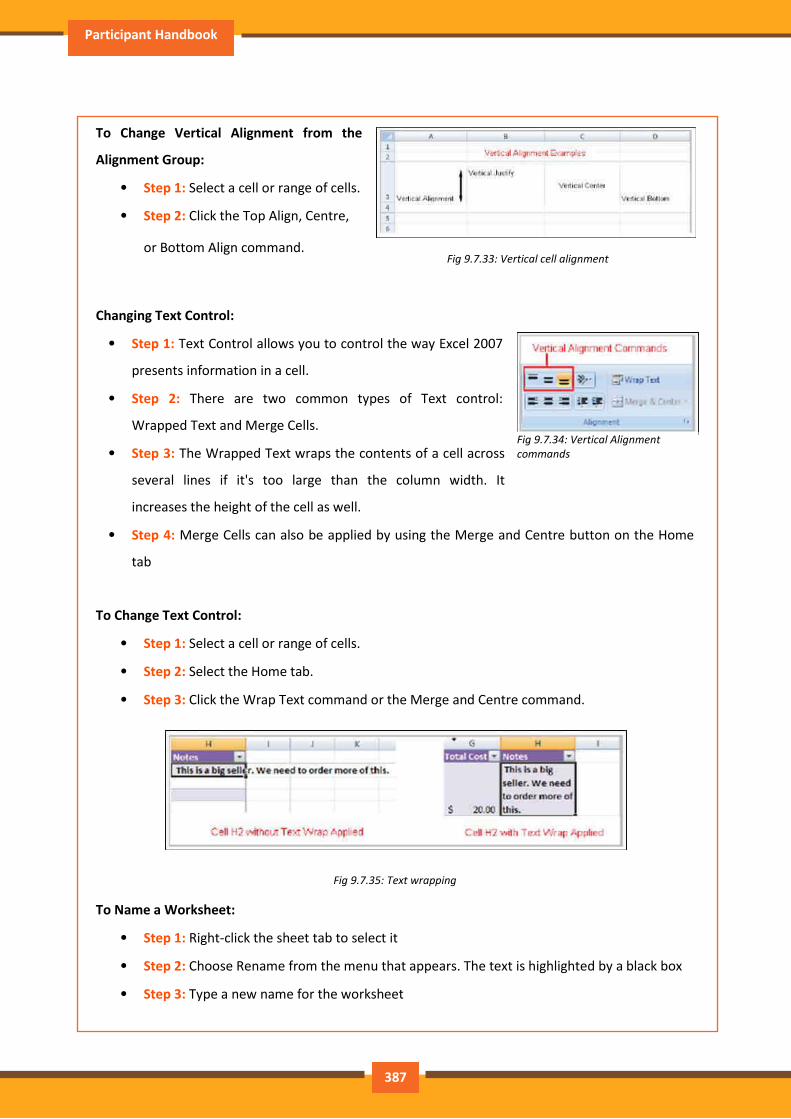
Participant Handbook
To Change Vertical Alignment from the
Alignment Group:
• Step 1: Select a cell or range of cells.
• Step 2: Click the Top Align, Centre,
or Bottom Align command.
Changing Text Control:
• Step 1: Text Control allows you to control the way Excel 2007
presents information in a cell.
• Step 2: There are two common types of Text control:
Wrapped Text and Merge Cells.
• Step 3: The Wrapped Text wraps the contents of a cell across
several lines if it's too large than the column width. It
increases the height of the cell as well.
• Step 4: Merge Cells can also be applied by using the Merge and Centre button on the Home
tab
To Change Text Control:
• Step 1: Select a cell or range of cells.
• Step 2: Select the Home tab.
• Step 3: Click the Wrap Text command or the Merge and Centre command.
Fig 9.7.35: Text wrapping
To Name a Worksheet:
• Step 1: Right-click the sheet tab to select it
• Step 2: Choose Rename from the menu that appears. The text is highlighted by a black box
• Step 3: Type a new name for the worksheet
Fig 9.7.33: Vertical cell alignment
Fig 9.7.34: Vertical Alignment
commands
387
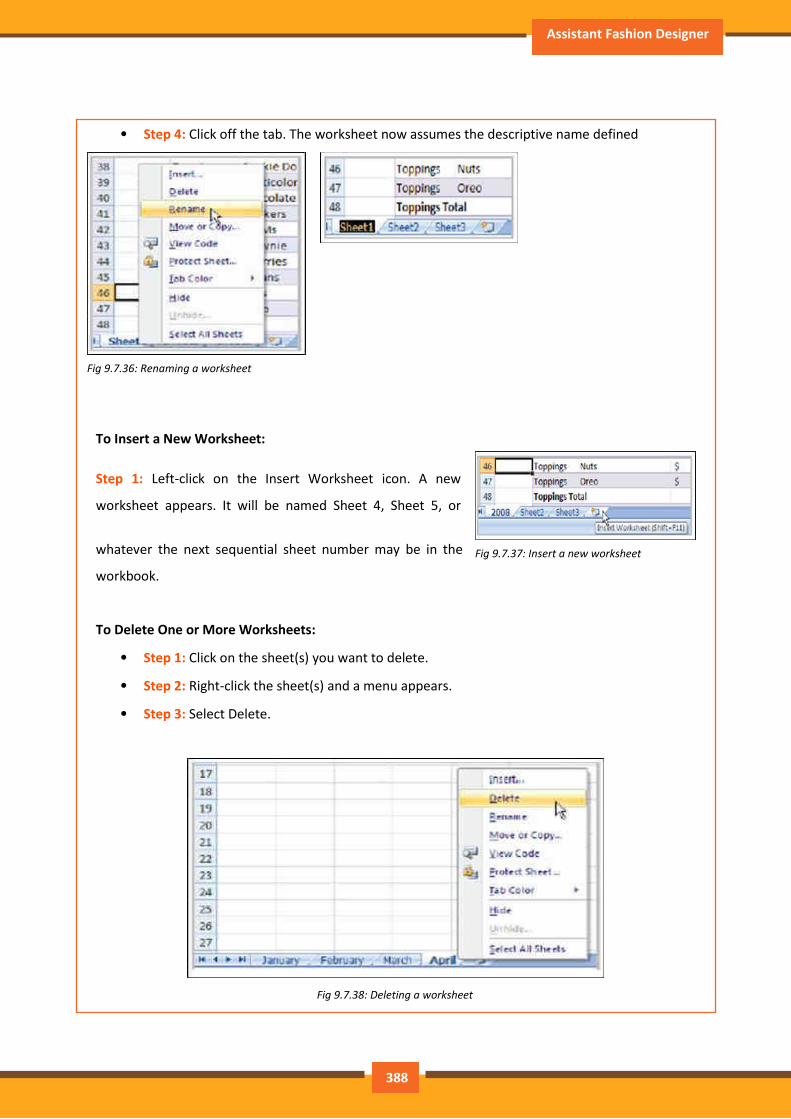
Assistant Fashion Designer
• Step 4: Click off the tab. The worksheet now assumes the descriptive name defined
To Insert a New Worksheet:
Step 1: Left-click on the Insert Worksheet icon. A new
worksheet appears. It will be named Sheet 4, Sheet 5, or
whatever the next sequential sheet number may be in the
workbook.
To Delete One or More Worksheets:
• Step 1: Click on the sheet(s) you want to delete.
• Step 2: Right-click the sheet(s) and a menu appears.
• Step 3: Select Delete.
Fig 9.7.38: Deleting a worksheet
Fig 9.7.36: Renaming a worksheet
Fig 9.7.37: Insert a new worksheet
388

Participant Handbook
UNIT 9.8: Internet Concepts
Unit Objectives
At the end of the unit, participants will be able to:
• Know the internet concepts
• Recognise the different types of URLs
• Use MS-Outlook
9.8.1. URL Concepts
The full form of URL is Uniform Resource Locator. It is the worldwide address of documents and
other resources on the World Wide Web. The URL is divided into two different elements. The
primary part of the URL is called a protocol identifier as it helps us distinguishing what protocol to
use. The second part of the URL is called a resource name and it indicates the IP address or the
domain name where the resource is located. The protocol identifier and the resource name are
separated by a colon and two forward slashes it is more clearly understood by looking in to the
following example: the two URLs below purpose two different files at the domain
pcwebopedia.com. Here the primary one specifies an executable file that should be fetched using
the FTP protocol; the second specifies a web page that should be fetched using the HTTP protocol:
1. ftp://www.pcwebopedia.com/stuff.exe
2. http://www.pcwebopedia.com/index.html
Different Kinds of URLs
There is a wide range of URLs, as well as different terms to describe what a URL looks like. Let’s have
a better understanding of various URLs and their types with an example:
• Messy: Such URL has many distorted and jumbled numbers, letters on it that makes slight
organizational sense i.e. http://www.example.com/woeiruwoei909305820580.
• Dynamic: Dynamic URLs are the end result of database queries that provide content output
based on the result of that query. The URL ends up looking quite mangled, alias “messy”,
which usually consist of the characters like: &, %, +, =, $. Dynamic URLs are often found as
389
Assistant Fashion Designer
part of consumer-driven websites: shopping, travel, or anything that requires changing
answers for many different user queries.
• Static: A static URL is the opposite of a dynamic URL. The URL is “hard-wired” into the Web
page’s HTML coding. Static URL does not alter or adjust; it cannot be compromised;
depending on what the user requests.
• Obfuscated: Obfuscated, or hidden, URLs are mostly used in phishing scams. Basically, a
familiar URL is distorted in some way to make it seem legitimate. As soon as the user clicks
on the obfuscated URL redirected to a malicious website.
There are a lot of clues and information that you can garnered from a simple URL, including:
• What kind of server the Web page is hosted on
• What kind of organization the Web page belongs to
• Where the Web page is located in the world
• The names of the directories on the website
By carefully looking at the different parts of any Web address, you can quickly determine quite a bit
of useful information. In addition, by simply deleting parts of the URL, you can learn more about the
website than what might be actually publicly accessible. For example:
• http://www.widget.com/blog/music/: This points to a resource online, and the URL tells
you that yes, indeed, it does point to an online resource. Let’s go further back.
• http://www.widget.com/blog/: By moving backwards in the URL from right to left, we can
see that we’re now at the blog section of this publication.
• http://www.widget.com: The home page of the website.
Of course, this is a very simple example. However, by dissecting complex URLs one step at a
time, quite a bit of information can be uncovered.
9.8.2. How to create Your E-mail account (Outlook)
You can create a new or additional Outlook account by following the same account creation wizard.
You can follow the steps listed below to configure your Microsoft Outlook Express email client to
work with your email account:
390

Participant Handbook
• Step 1: Open Outlook Express and select Tools E-mail Accounts from the main menu. The E-
mail Accounts wizard will appear.
• Step 2: Click Add a new e-mail account. Click Next.
• Step 3: Select the server type. Most ISPs and webmail services use POP3 servers. Click Next.
• Step 4: Enter your Name.
• Step 5: Enter your E-mail Address.
• Step 6: Enter the incoming mail server and outgoing mail server information you obtained
from your ISP or webmail service.
• Step 7: Enter your user name if it is different from the user name that automatically appears
in the wizard form.
• Step 8: Enter your password.
• Step 9: Click Test Account Settings to test the information you entered in the wizard and
confirm that it is valid.
• Step 10: Click Next.
• Step 11: Click Finish.
Note: If you do not have an Outlook email account, you can select Microsoft Office Outlook from
your computer's Start menu. The wizard will open, and you can follow the steps above to create an
Outlook account.
Fig 9.8.1: Creating E-mail account in Outlook
391
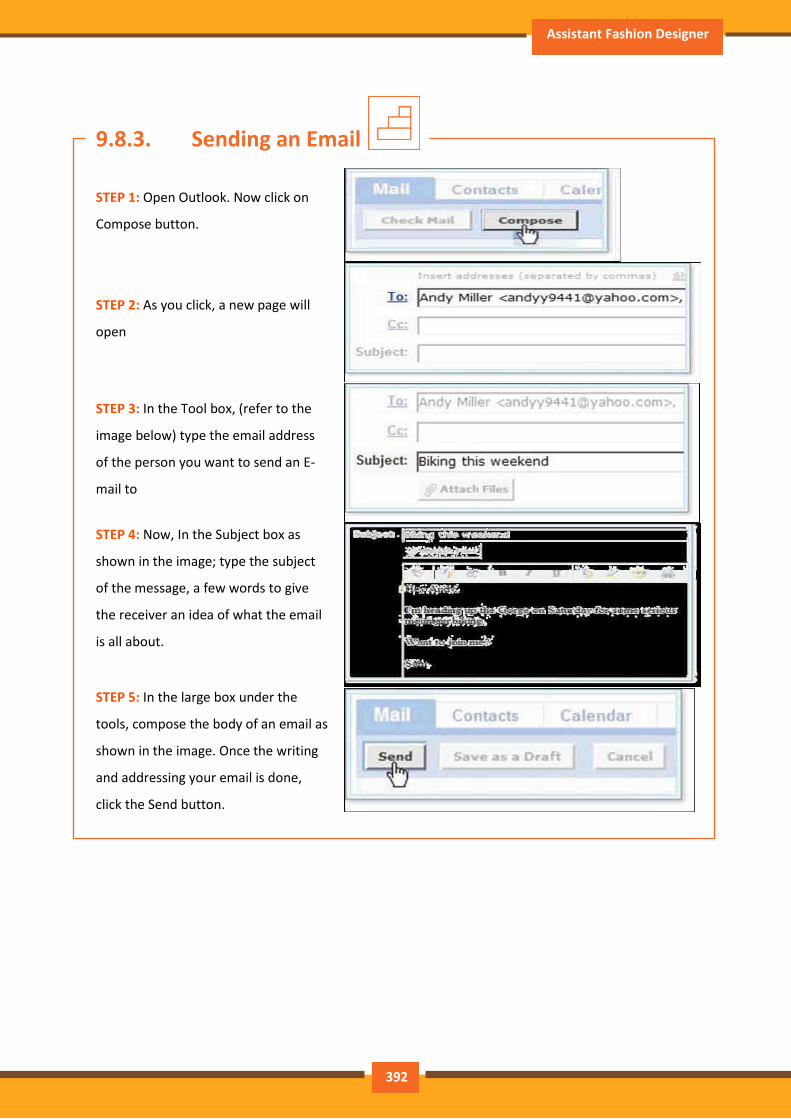
Assistant Fashion Designer
9.8.3. Sending an Email
STEP 1: Open Outlook. Now click on
Compose button.
STEP 2: As you click, a new page will
open
STEP 3: In the Tool box, (refer to the
image below) type the email address
of the person you want to send an E-
mail to
STEP 4: Now, In the Subject box as
shown in the image; type the subject
of the message, a few words to give
the receiver an idea of what the email
is all about.
STEP 5: In the large box under the
tools, compose the body of an email as
shown in the image. Once the writing
and addressing your email is done,
click the Send button.
392
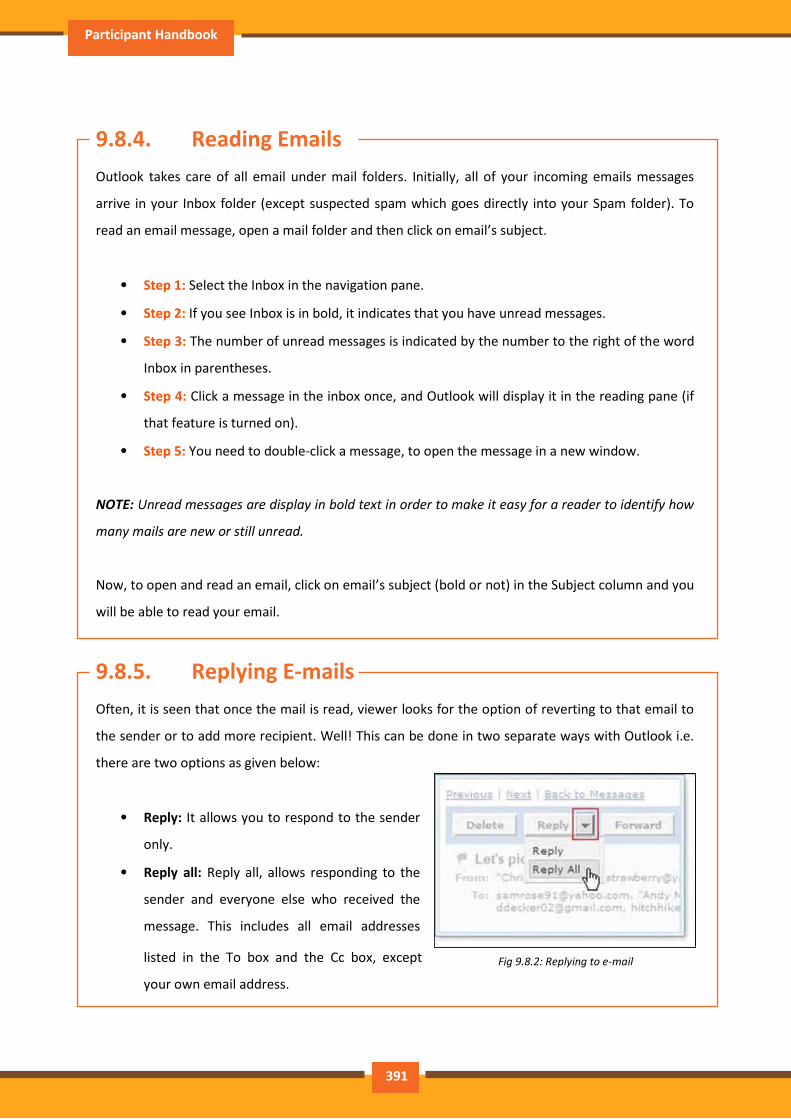
Participant Handbook
9.8.4. Reading Emails
Outlook takes care of all email under mail folders. Initially, all of your incoming emails messages
arrive in your Inbox folder (except suspected spam which goes directly into your Spam folder). To
read an email message, open a mail folder and then click on email’s subject.
• Step 1: Select the Inbox in the navigation pane.
• Step 2: If you see Inbox is in bold, it indicates that you have unread messages.
• Step 3: The number of unread messages is indicated by the number to the right of the word
Inbox in parentheses.
• Step 4: Click a message in the inbox once, and Outlook will display it in the reading pane (if
that feature is turned on).
• Step 5: You need to double-click a message, to open the message in a new window.
NOTE: Unread messages are display in bold text in order to make it easy for a reader to identify how
many mails are new or still unread.
Now, to open and read an email, click on email’s subject (bold or not) in the Subject column and you
will be able to read your email.
9.8.5. Replying E-mails
Often, it is seen that once the mail is read, viewer looks for the option of reverting to that email to
the sender or to add more recipient. Well! This can be done in two separate ways with Outlook i.e.
there are two options as given below:
• Reply: It allows you to respond to the sender
only.
• Reply all: Reply all, allows responding to the
sender and everyone else who received the
message. This includes all email addresses
listed in the To box and the Cc box, except
your own email address.
Fig 9.8.2: Replying to e-mail
391
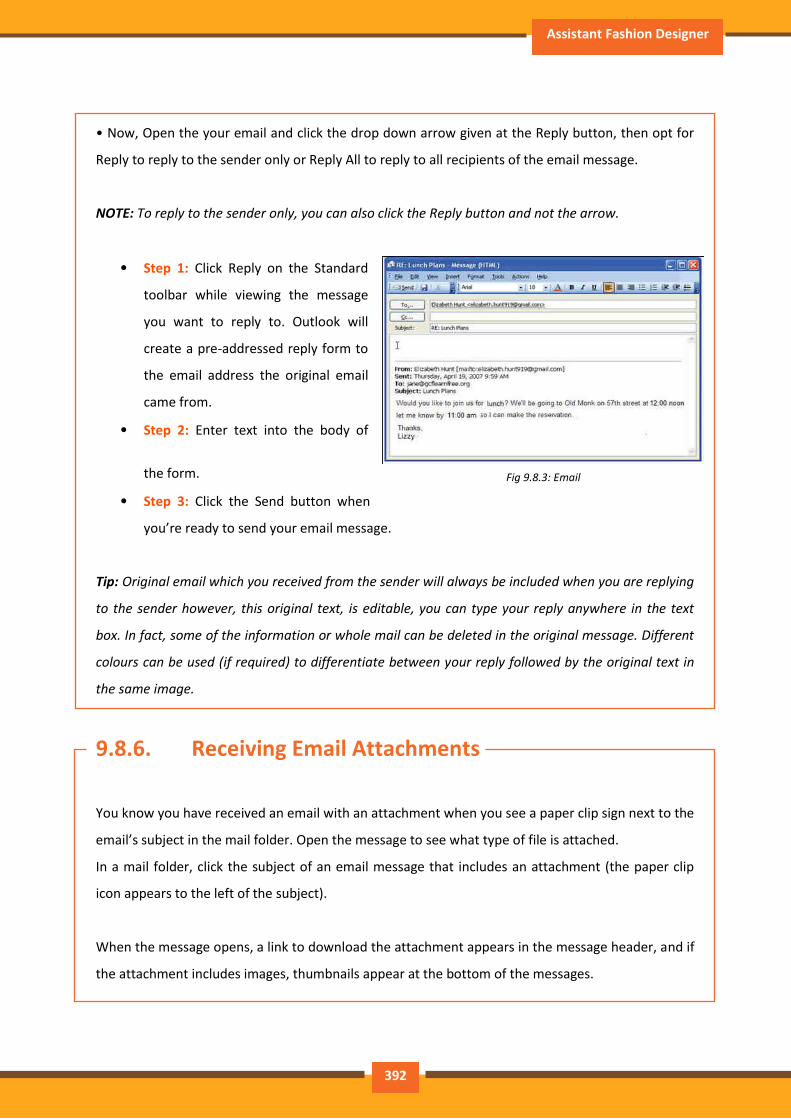
Assistant Fashion Designer
• Now, Open the your email and click the drop down arrow given at the Reply button, then opt for
Reply to reply to the sender only or Reply All to reply to all recipients of the email message.
NOTE: To reply to the sender only, you can also click the Reply button and not the arrow.
• Step 1: Click Reply on the Standard
toolbar while viewing the message
you want to reply to. Outlook will
create a pre-addressed reply form to
the email address the original email
came from.
• Step 2: Enter text into the body of
the form.
• Step 3: Click the Send button when
you’re ready to send your email message.
Tip: Original email which you received from the sender will always be included when you are replying
to the sender however, this original text, is editable, you can type your reply anywhere in the text
box. In fact, some of the information or whole mail can be deleted in the original message. Different
colours can be used (if required) to differentiate between your reply followed by the original text in
the same image.
9.8.6. Receiving Email Attachments
You know you have received an email with an attachment when you see a paper clip sign next to the
email’s subject in the mail folder. Open the message to see what type of file is attached.
In a mail folder, click the subject of an email message that includes an attachment (the paper clip
icon appears to the left of the subject).
When the message opens, a link to download the attachment appears in the message header, and if
the attachment includes images, thumbnails appear at the bottom of the messages.
Fig 9.8.3: Email
392
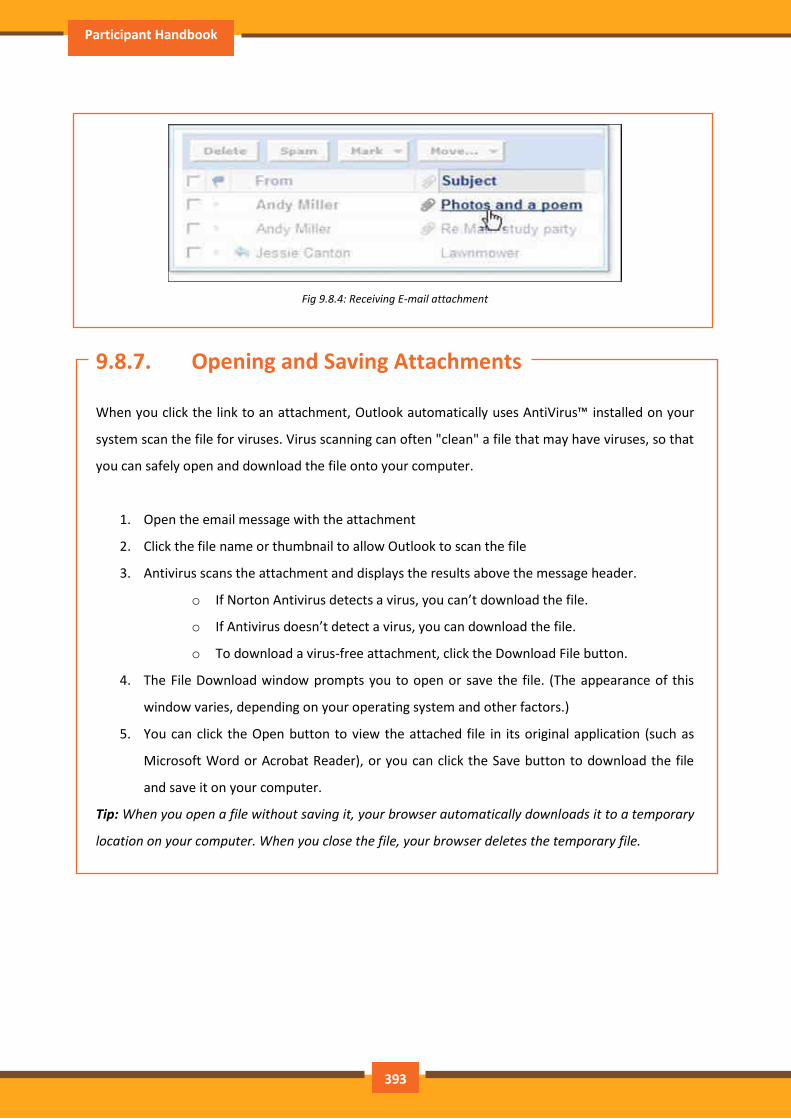
Participant Handbook
Fig 9.8.4: Receiving E-mail attachment
9.8.7. Opening and Saving Attachments
When you click the link to an attachment, Outlook automatically uses AntiVirus™ installed on your
system scan the file for viruses. Virus scanning can often "clean" a file that may have viruses, so that
you can safely open and download the file onto your computer.
1. Open the email message with the attachment
2. Click the file name or thumbnail to allow Outlook to scan the file
3. Antivirus scans the attachment and displays the results above the message header.
o If Norton Antivirus detects a virus, you can’t download the file.
o If Antivirus doesn’t detect a virus, you can download the file.
o To download a virus-free attachment, click the Download File button.
4. The File Download window prompts you to open or save the file. (The appearance of this
window varies, depending on your operating system and other factors.)
5. You can click the Open button to view the attached file in its original application (such as
Microsoft Word or Acrobat Reader), or you can click the Save button to download the file
and save it on your computer.
Tip: When you open a file without saving it, your browser automatically downloads it to a temporary
location on your computer. When you close the file, your browser deletes the temporary file.
393
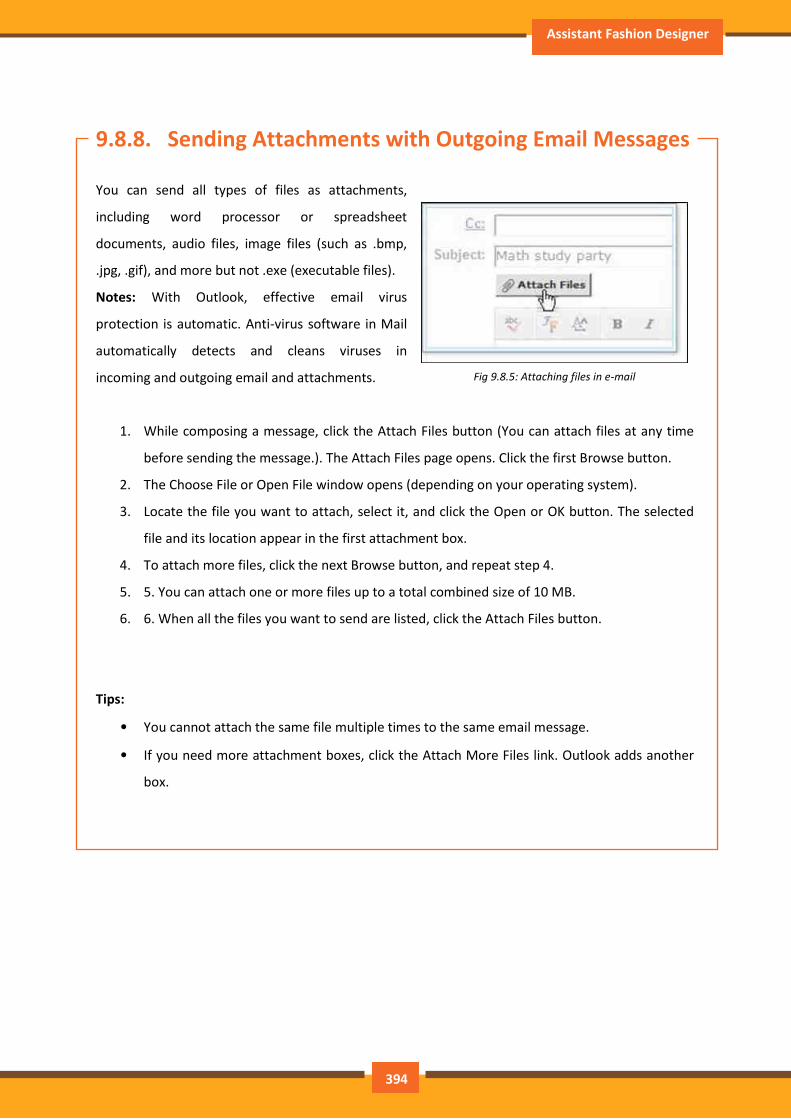
Assistant Fashion Designer
9.8.8. Sending Attachments with Outgoing Email Messages
You can send all types of files as attachments,
including word processor or spreadsheet
documents, audio files, image files (such as .bmp,
.jpg, .gif), and more but not .exe (executable files).
Notes: With Outlook, effective email virus
protection is automatic. Anti-virus software in Mail
automatically detects and cleans viruses in
incoming and outgoing email and attachments.
1. While composing a message, click the Attach Files button (You can attach files at any time
before sending the message.). The Attach Files page opens. Click the first Browse button.
2. The Choose File or Open File window opens (depending on your operating system).
3. Locate the file you want to attach, select it, and click the Open or OK button. The selected
file and its location appear in the first attachment box.
4. To attach more files, click the next Browse button, and repeat step 4.
5. 5. You can attach one or more files up to a total combined size of 10 MB.
6. 6. When all the files you want to send are listed, click the Attach Files button.
Tips:
• You cannot attach the same file multiple times to the same email message.
• If you need more attachment boxes, click the Attach More Files link. Outlook adds another
box.
Fig 9.8.5: Attaching files in e-mail
394

Participant Handbook
10. Employability and
Entrepreneurship Skills
Unit 10.1 - Personal Strengths and Value Systems
Unit 10.2 - Digital Literacy: A Recap
Unit 10.3 - Money Matters
Unit 10.4 - Preparing for Employment and Self-Employment
Unit 10.5 - Understanding Entrepreneurship
Unit 10.6 – Preparing to be an Entrepreneur
Assistant Fashion Designer
Key Learning Outcomes
At the end of this unit, participants will be able to:
• Discuss the meaning of health
• List common health issues
• List the tips to prevent common health issues
• Know the meaning of hygiene
• Know the purpose of Swacch Bharat Abhiyan
• Identify the meaning of habit
• Discuss ways to set up a safe work environment
• Discuss critical safety habits to be followed by employees
• List the importance of self-analysis
• Know the motivation with the help of Maslow’s Hierarchy of Needs
• Discuss the meaning of achievement motivation
• List the characteristics of entrepreneurs with achievement motivation
• List the different factors that motivate you
• Discuss how to maintain a positive attitude
• Discuss the role of attitude in self-analysis
• List your strengths and weaknesses
• Discuss the qualities of honest people
• Describe the importance of honesty in entrepreneurs
• Discuss the elements of a strong work ethic
• Discuss how to foster a good work ethic
• List the characteristics of highly creative people
• List the characteristics of highly innovative people
• Discuss the benefits of time management
• List the traits of effective time managers
• Describe effective time management technique
• Discuss the importance of anger management
• Describe anger management strategies
• Discuss tips for anger management
• Discuss the causes of stress
396
Participant Handbook
• Discuss the symptoms of stress
• Discuss tips for stress management
• Identify the basic parts of a computer
• Identify the basic parts of a keyboard
• Recall basic computer terminology
• Recall basic computer terminology
• Recall the functions of basic computer keys
• Discuss the main applications of MS Office
• Discuss the benefits of Microsoft Outlook
• Discuss the different types of e-commerce
• List the benefits of e-commerce for retailers and customers
• Discuss how the Digital India campaign will help boost e-commerce in India
• How you will sell a product or service on an e-commerce platform
• Discuss the importance of saving money
• Discuss the benefits of saving money
• Discuss the main types of bank accounts
• Describe the process of opening a bank account
• Differentiate between fixed and variable costs
• Describe the main types of investment options
• Describe the different types of insurance products
• Describe the different types of taxes
• Discuss the uses of online banking
• Discuss the main types of electronic funds transfers
• Discuss the steps to prepare for an interview
• Discuss the steps to create an effective Resume
• Discuss the most frequently asked interview questions
• Discuss how to answer the most frequently asked interview questions
• Discuss basic tailoring shop terminology
• Discuss the concept of entrepreneurship
• Discuss the importance of entrepreneurship
• Describe the characteristics of an entrepreneur
• Describe the different types of enterprises
397
Assistant Fashion Designer
• List the qualities of an effective leader
• Discuss the benefits of effective leadership
• List the traits of an effective team
• Discuss the importance of listening effectively
• Discuss how to listen effectively
• Discuss the importance of speaking effectively
• Discuss how to speak effectively
• Discuss how to solve problems
• List important problem solving traits
• Discuss ways to assess problem solving skills
• Discuss the importance of negotiation
• Discuss how to negotiate
• Discuss how to identify new business opportunities
• Discuss how to identify business opportunities within your business
• Identify the meaning of entrepreneur
• Describe the different types of entrepreneurs
• List the characteristics of entrepreneurs
• Recall entrepreneur success stories
• Discuss the entrepreneurial process
• Describe the entrepreneurship ecosystem
• Discuss the government’s role in the entrepreneurship ecosystem
• Discuss the current entrepreneurship ecosystem in India
• Know the purpose of the Make in India campaign
• Discuss the relationship between entrepreneurship and risk appetite
• Discuss the relationship between entrepreneurship and resilience
• Describe the characteristics of a resilient entrepreneur
• Discuss how to deal with failure
• Discuss how market research is carried out
• Describe the 4 Ps of marketing
• Discuss the importance of idea generation
• Recall basic business terminology
• Discuss the need for CRM
398
Participant Handbook
• Discuss the benefits of CRM
• Discuss the need for networking
• Discuss the benefits of networking
• Know the importance of setting goals
• Differentiate between short-term, medium-term and long-term goals
• Discuss how to write a business plan
• List the financial planning process
• Discuss ways to manage your risk
• Describe the procedure and formalities for applying for bank finance
• Discuss how to manage your own enterprise
• List important questions that every entrepreneur should ask before starting an enterprise
399
Assistant Fashion Designer
UNIT 10.1: Personal Strengths and Value Systems
Unit Objectives
At the end of this unit, participants will be able to:
• Discuss the meaning of health
• List common health issues
• Discuss tips to prevent common health issues
• know the meaning of hygiene
• Identify the purpose of Swacch Bharat Abhiyan
• Know the meaning of habit
• Discuss ways to set up a safe work environment
• Discuss critical safety habits to be followed by employees
• List the importance of self-analysis
• Know the motivation with the help of Maslow’s Hierarchy of Needs
• Discuss the meaning of achievement motivation
• List the characteristics of entrepreneurs with achievement motivation
• List the different factors that motivate you
• Discuss how to maintain a positive attitude
• Discuss the role of attitude in self-analysis
• List your strengths and weaknesses
• Discuss the qualities of honest people
• Describe the importance of honesty in entrepreneurs
• Discuss the elements of a strong work ethic
• List the characteristics of highly creative people
• List the characteristics of highly innovative people
• Discuss the benefits of time management
• List the traits of effective time managers
• Describe effective time management technique
• Discuss the importance of anger management
• Describe anger management strategies
• Describe stress management strategies
400
Participant Handbook
10.1.1. Health, Habits, Hygiene: What is Health
As per the World Health Organization (WHO), health is a “State of complete physical, mental, and
social well-being, and not merely the absence of disease or infirmity.” This means being healthy
does not simply mean not being unhealthy – it also means you need to be at peace emotionally, and
feel fit physically. For example, you cannot say you are healthy simply because you do not have any
physical ailments like a cold or cough. You also need to think about whether you are feeling calm,
relaxed and happy.
Common Health Issues
Allergies
Asthma
Skin Disorders
Depression and Anxiety
Diabetes
Cough, Cold, Sore Throat
Difficulty Sleeping
Obesity
Tips to Prevent Health Issues
Taking measures to prevent ill health is always better than curing a disease or sickness. You can stay
healthy by:
Eating healthy foods like fruits, vegetables and nuts
Cutting back on unhealthy and sugary foods
Drinking enough water everyday
Not smoking or drinking alcohol
Exercising for at least 30 minutes a day, 4-5 times a week
Taking vaccinations when required
Practicing yoga exercises and meditation
401
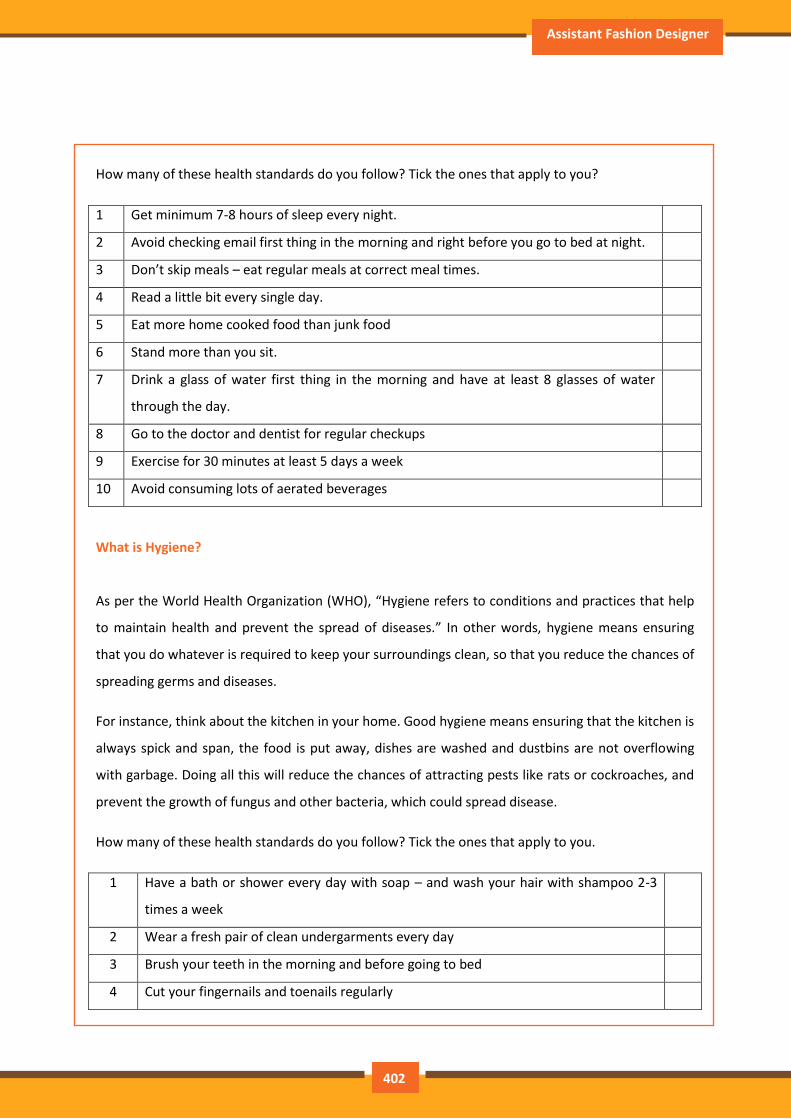
Assistant Fashion Designer
How many of these health standards do you follow? Tick the ones that apply to you?
1 Get minimum 7-8 hours of sleep every night.
2 Avoid checking email first thing in the morning and right before you go to bed at night.
3 Don’t skip meals – eat regular meals at correct meal times.
4 Read a little bit every single day.
5 Eat more home cooked food than junk food
6 Stand more than you sit.
7 Drink a glass of water first thing in the morning and have at least 8 glasses of water
through the day.
8 Go to the doctor and dentist for regular checkups
9 Exercise for 30 minutes at least 5 days a week
10 Avoid consuming lots of aerated beverages
What is Hygiene?
As per the World Health Organization (WHO), “Hygiene refers to conditions and practices that help
to maintain health and prevent the spread of diseases.” In other words, hygiene means ensuring
that you do whatever is required to keep your surroundings clean, so that you reduce the chances of
spreading germs and diseases.
For instance, think about the kitchen in your home. Good hygiene means ensuring that the kitchen is
always spick and span, the food is put away, dishes are washed and dustbins are not overflowing
with garbage. Doing all this will reduce the chances of attracting pests like rats or cockroaches, and
prevent the growth of fungus and other bacteria, which could spread disease.
How many of these health standards do you follow? Tick the ones that apply to you.
1 Have a bath or shower every day with soap – and wash your hair with shampoo 2-3
times a week
2 Wear a fresh pair of clean undergarments every day
3 Brush your teeth in the morning and before going to bed
4 Cut your fingernails and toenails regularly
402
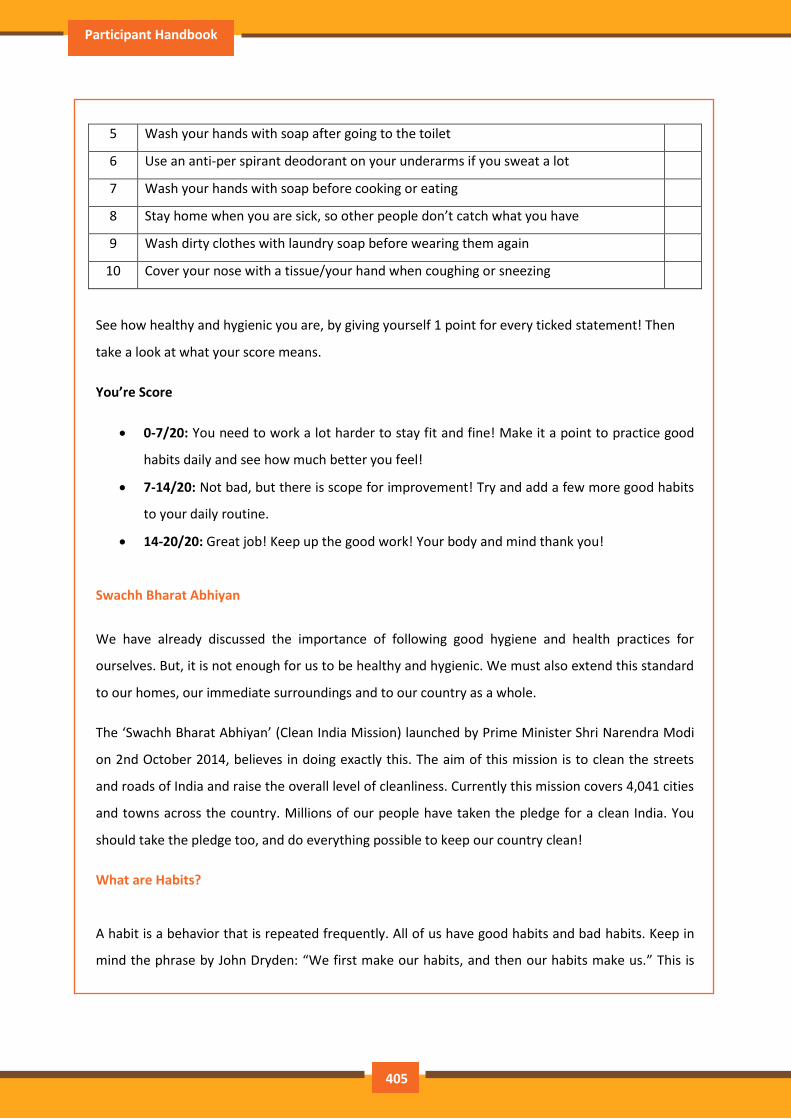
Participant Handbook
5 Wash your hands with soap after going to the toilet
6 Use an anti-per spirant deodorant on your underarms if you sweat a lot
7 Wash your hands with soap before cooking or eating
8 Stay home when you are sick, so other people don’t catch what you have
9 Wash dirty clothes with laundry soap before wearing them again
10 Cover your nose with a tissue/your hand when coughing or sneezing
See how healthy and hygienic you are, by giving yourself 1 point for every ticked statement! Then
take a look at what your score means.
You’re Score
0-7/20: You need to work a lot harder to stay fit and fine! Make it a point to practice good
habits daily and see how much better you feel!
7-14/20: Not bad, but there is scope for improvement! Try and add a few more good habits
to your daily routine.
14-20/20: Great job! Keep up the good work! Your body and mind thank you!
Swachh Bharat Abhiyan
We have already discussed the importance of following good hygiene and health practices for
ourselves. But, it is not enough for us to be healthy and hygienic. We must also extend this standard
to our homes, our immediate surroundings and to our country as a whole.
The ‘Swachh Bharat Abhiyan’ (Clean India Mission) launched by Prime Minister Shri Narendra Modi
on 2nd October 2014, believes in doing exactly this. The aim of this mission is to clean the streets
and roads of India and raise the overall level of cleanliness. Currently this mission covers 4,041 cities
and towns across the country. Millions of our people have taken the pledge for a clean India. You
should take the pledge too, and do everything possible to keep our country clean!
What are Habits?
A habit is a behavior that is repeated frequently. All of us have good habits and bad habits. Keep in
mind the phrase by John Dryden: “We first make our habits, and then our habits make us.” This is
405

Assistant Fashion Designer
why it is so important that you make good habits a way of life, and consciously avoid practicing bad
habits.
Some good habits that you should make part of your daily routine are:
Always having a positive attitude
Making exercise a part of your daily routine
Reading motivational and inspirational stories
Smiling! Make it a habit to smile as often as possible
Making time for family and friends
Going to bed early and waking up early
Some bad habits that you should quit immediately are:
Skipping breakfast
Snacking frequently even when you are not hungry
Eating too much fattening and sugary food
Smoking, drinking alcohol and doing drugs
Spending more money than you can afford
Worrying about unimportant issues
Staying up late and waking up late
Tips
Following healthy and hygienic practices every day will make you feel good mentally and physically.
Hygiene is two-thirds of health – so good hygiene will help you stay strong and healthy!
Negotiable Employee Safety Habits
Every employer is obligated to ensure that his tailoring shop follows the highest possible safety
protocol. When setting up a business, owners must make it a point to:
Immediately report unsafe conditions to a supervisor
Recognize and report safety hazards that could lead to slips, trips and falls
406
Participant Handbook
Report all injuries and accidents to a supervisor
Wear the correct protective equipment when required
Learn how to correctly use equipment provided for safety purposes
Be aware of and avoid actions that could endanger other people
Take rest breaks during the day and some time off from work during the week
10.1.2. Self-Analysis – Attitude, Achievement Motivation
To truly achieve your full potential, you need to take a deep look inside yourself and find out what
kind of person you really are. This attempt to understand your personality is known as self-analysis.
Assessing yourself in this manner will help you grow, and will also help you to identify areas within
yourself that need to be further developed, changed or eliminated. You can better understand
yourself by taking a deep look at what motivates you, what your attitude is like, and what your
strengths and weaknesses are.
What is Motivation?
Famous American psychologist Abraham Maslow wanted to understand what motivates people. He
believed that people have five types of needs, ranging from very basic needs (called physiological
needs) to more important needs that are required for self-growth (called self- actualization needs).
Between the physiological and self-actualization needs are three other needs – safety needs,
belongingness and love needs, and esteem needs. These needs are usually shown as a pyramid with
five levels and are known as Maslow’s Hierarchy of Needs.
407
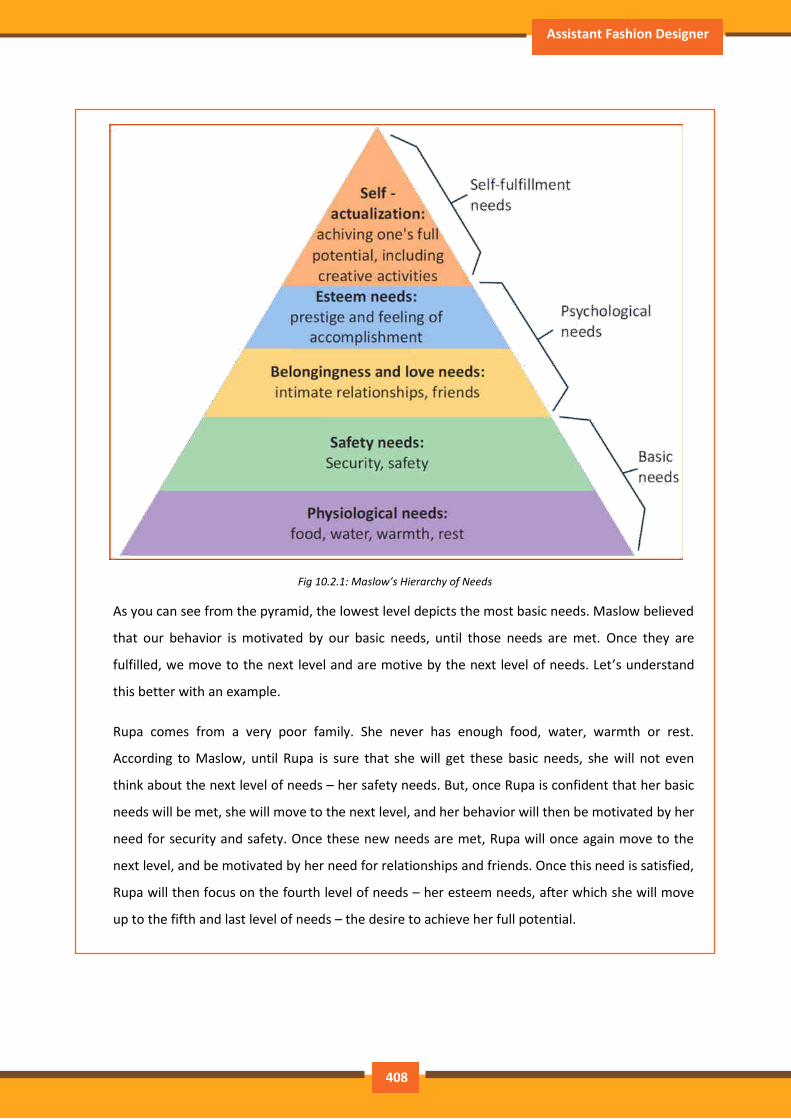
Assistant Fashion Designer
Fig 10.2.1: Maslow’s Hierarchy of Needs
As you can see from the pyramid, the lowest level depicts the most basic needs. Maslow believed
that our behavior is motivated by our basic needs, until those needs are met. Once they are
fulfilled, we move to the next level and are motive by the next level of needs. Let’s understand
this better with an example.
Rupa comes from a very poor family. She never has enough food, water, warmth or rest.
According to Maslow, until Rupa is sure that she will get these basic needs, she will not even
think about the next level of needs – her safety needs. But, once Rupa is confident that her basic
needs will be met, she will move to the next level, and her behavior will then be motivated by her
need for security and safety. Once these new needs are met, Rupa will once again move to the
next level, and be motivated by her need for relationships and friends. Once this need is satisfied,
Rupa will then focus on the fourth level of needs – her esteem needs, after which she will move
up to the fifth and last level of needs – the desire to achieve her full potential.
408
Participant Handbook
Understanding Achievement Motivation
We now know that people are motivated by basic, psychological and self-fulfillment needs.
However, certain people are also motivated by the achievement of highly challenging
accomplishments. This is known as Achievement Motivation, or ‘need for achievement’.
The level of motivation achievement in a person differs from individual to individual. It is important
that entrepreneurs have a high level of achievement motivation – a deep desire to accomplish
something important and unique. It is equally important that they hire people who are also highly
motivated by challenges and success.
What Motivates You?
What are the things that really motivate you? List down five things that really motivate you.
Remember to answer honestly!
I am motivated by:
__________________________________________________________________________________
__________________________________________________________________________________
__________________________________________________________________________________
__________________________________________________________________________________
__________________________________________________________________________________
__________________________________________________________________________________
__________________________________________________________________________________
__________________________________________________________________________________
__________________________________________________________________________________
__________________________________________________________________________________
__________________________________________________________________________________
__________________________________________________________________________________
__________________________________________________________________________________
__________________________________________________________________________________
__________________________________________________________________________________
__________________________________________________________________________________
409
Assistant Fashion Designer
Characteristics of Entrepreneurs with Achievement Motivation
Entrepreneurs with achievement motivation can be described as follows:
Unafraid to take risks for personal accomplishment
Love being challenged Future-oriented Flexible and adaptive
Value negative feedback more than positive feedback
Very persistent when it comes to achieving goals
Extremely courageous
Highly creative and innovative
Restless - constantly looking to achieve more
Feel personally responsible for solving problems
Think about it:
How many of these traits do you have?
Can you think of entrepreneurs who display these traits?
How to Cultivate a Positive Attitude
The good news is attitude is a choice. So it is possible to improve, control and change our attitude, if
we decide we want to! The following tips help foster a positive mindset:
Remember that you control your attitude, not the other way around
Devote at least 15 minutes a day towards reading, watching or listening to something
positive
Avoid negative people who only complain and stop complaining yourself
Expand your vocabulary with positive words and delete negative phrases from your mind
Be appreciative and focus on what’s good in yourself, in your life, and in others
Stop thinking of yourself as a victim and start being proactive
Imagine yourself succeeding and achieving your goals
410
Participant Handbook
10.1.3. What is Attitude?
Now that we understand why motivation is so important for self-analysis, let’s look at the role our
attitude plays in better understanding ourselves. Attitude can be described as your tendency
(positive or negative), to think and feel about someone or something. Attitude is the foundation for
success in every aspect of life. Our attitude can be our best friend or our worst enemy. In other
words:
“The only disability in life is a bad attitude.”
When you start a business, you are sure to encounter a wide variety of emotions, from difficult
times and failures to good times and successes. Your attitude is what will see you through the tough
times and guide you towards success. Attitude is also infectious. It affects everyone around you,
from your customers to your employees to your investors. A positive attitude helps build confidence
in the tailoring shop while a negative attitude is likely to result in the de-motivation of your people.
What Are Your Strengths and Weaknesses
Another way to analyze you is by honestly identifying your strengths and weaknesses. This will help
you use your strengths to your best advantage and reduce your weaknesses.
Note down all your strengths and weaknesses in the two columns below. Remember to be honest with
yourself!
Strengths Weaknesses
411
Assistant Fashion Designer
10.1.4. Honesty and Work Ethics: What is Honesty?
Honesty is the quality of being fair and truthful. It means speaking and acting in a manner that
inspires trust. A person who is described as honest is seen as truthful and sincere, and as someone
who isn’t deceitful or devious and doesn’t steal or cheat. There are two dimensions of honesty –
one is honesty in communication and the other is honesty in conduct.
Honesty is an extremely important trait because it results in peace of mind and builds relationships
that are based on trust. Being dishonest, on the other hand, results in anxiety and leads to
relationships full of distrust and conflict.
Qualities of Honest People
Honest individuals have certain distinct characteristics. Some common qualities among honest
people are:
They don’t worry about what others think of them. They believe in being themselves – they don’t
bother about whether they are liked or disliked for their personalities.
They stand up for their beliefs. They won’t think twice about giving their honest opinion, even if
they are aware that their point of view lies with the minority.
They are thinking skinned. This means they are not affected by others judging them harshly for their
honest opinions.
They forge trusting, meaningful and healthy friendships. Honest people usually surround themselves
with honest friends. They have faith that their friends will be truthful and upfront with them at all
times.
They are trusted by their peers. They are seen as people who can be counted on for truthful and
objective feedback and advice.
Honesty and employees: When entrepreneurs build honest relationships with their employees, it
leads to more transparency in the tailoring shop, which results in higher work performance and
better results.
Honesty and investors: For entrepreneurs, being honest with investor’s means not only sharing
strengths but also candidly disclosing current and potential weaknesses, problem areas and solution
strategies. Keep in mind that investors have a lot of experience with startups and are aware that all
new companies have problems. Claiming that everything is perfectly fine and running smoothly is a
red flag for most investors.
412
Participant Handbook
Honesty with oneself: The consequences of being dishonest with oneself can lead to dire results,
especially in the case of entrepreneurs. For entrepreneurs to succeed, it is critical that they remain
realistic about their situation at all times, and accurately judge every aspect of their enterprise for
what it truly is.
Importance of Honesty in Entrepreneurs
One of the most important characteristics of entrepreneurs is honesty. When entrepreneurs are
honest with their customers, employees and investors, it shows that they respect those that they
work with. It is also important that entrepreneurs remain honest with themselves. Let’s look at how
being honest would lead to great benefits for entrepreneurs.
Honesty and customers: When entrepreneurs are honest with their customers it leads to stronger
relationships, which in turn results in business growth and a stronger customer network.
10.1.5. What are Work Ethics?
Being ethical in the tailoring shop means displaying values like honesty, integrity and respect in all
your decisions and communications. It means not displaying negative qualities like lying, cheating
and stealing.
Tailoring Shop ethics play a big role in the profitability of a company. It is as crucial to an enterprise
as high morale and teamwork. This is why most companies lay down specific tailoring shop ethic
guidelines that must compulsorily be followed by their employees. These guidelines are typically
outlined in a company’s employee handbook.
Elements of a Strong Work Ethic
An entrepreneur must display strong work ethics, as well as hire only those individuals who believe
in and display the same level of ethical behavior in the tailoring shop. Some elements of a strong
work ethic are:
Professionalism: This involves everything from how you present yourself in a corporate setting to
the manner in which you treat others in the tailoring shop.
Respectfulness: This means remaining poised and diplomatic regardless of how stressful or volatile
a situation is.
413
Assistant Fashion Designer
Dependability: This means always keeping your word, whether it’s arriving on time for a meeting or
delivering work on time.
Dedication: This means refusing to quit until the designated work is done, and completing the work
at the highest possible level of excellence.
Determination: This means embracing obstacles as challenges rather than letting them stop you,
and pushing ahead with purpose and resilience to get the desired results.
Accountability: This means taking responsibility for your actions and the consequences of your
actions, and not making excuses for your mistakes.
Humility: This means acknowledging everyone’s efforts and had work, and sharing the credit for
accomplishments.
How to Foster a Good Work Ethic
As an entrepreneur, it is important that you clearly define the kind of behavior that you expect from
each and every team member in the tailoring shop. You should make it clear that you expect
employees to display positive work ethics like:
Honesty: All work assigned to a person should be done with complete honesty, without any deceit
or lies.
Good attitude: All team members should be optimistic, energetic, and positive.
Reliability: Employees should show up where they are supposed to be, when they are supposed to
be there.
Good work habits: Employees should always be well groomed, never use inappropriate language;
conduct themselves professionally at all times, etc.
Initiative: Doing the bare minimum is not enough. Every team member needs to be proactive and
show initiative.
Trustworthiness: Trust is non-negotiable. If an employee cannot be trusted, it’s time to let that
employee go.
Respect: Employees need to respect the company, the law, their work, their colleagues and
themselves.
Integrity: Each and every team member should be completely ethical and must display above board
behavior at all times.
Efficiency: Efficient employees help a company grow while inefficient employees result in a waste of
time and resources.
414
Participant Handbook
10.1.6. Creativity and Innovation
What is Creativity?
Creativity means thinking outside the box. It means viewing things in new ways or from different
perspectives, and then converting these ideas into reality. Creativity involves two parts: thinking and
producing. Simply having an idea makes you imaginative, not creative. However, having an idea and
acting on it makes you creative.
Characteristics of Highly Creative People
They are imaginative and playful
They see issues from different angles
They notice small details
They have very little tolerance for boredom
They detest rules and routine
They love to daydream
They are very curious
What is Innovation?
There are many different definitions of innovation. In simple terms, innovation means turning an
idea into a solution that adds value. It can also mean adding value by implementing a new product,
service or process, or significantly improving on an existing product, service or process.
Characteristics of Highly Innovative People
They embrace doing things differently
They don’t believe in taking shortcuts
They are not afraid to be unconventional
They are highly proactive and persistent
They are organized, cautious and risk-averse
415
Assistant Fashion Designer
Time Management
Time management is the process organizing your time, and deciding how to allocate your time
between different activities. Good time management is the difference between working smart
(getting more done in less time) and working hard (working for more time to get more done).
Effective time management leads to an efficient work output, even when you are faced with tight
deadlines and high pressure situations. On the other hand, not managing your time effectively
results in inefficient output and increases stress and anxiety.
Benefits of Time Management
Time management can lead to huge benefits like:
Greater productivity
Higher efficiency
Better professional reputation
Reduced stress
Higher chances for career advancement
Greater opportunities to achieve goals
Not managing time effectively can result in undesirable consequences like:
Missing deadlines
Inefficient work output
Substandard work quality
Poor professional reputation
Stalled career
Increase in stress and anxiety
Traits of Effective Time Managers
Some traits of effective time managers are:
They begin projects early
416
Participant Handbook
They set daily objectives
They modify plans if required, to achieve better results
They are flexible and open-minded
They inform people in advance if their help will be required
They know how to say no
They break tasks into steps with specific deadlines
They continually review long term goals
They think of alternate solutions if and when required
They ask for help when required They create backup plans
Effective Time Management Techniques
You can manage your time better by putting into practice certain time management techniques.
Some helpful tips are:
Plan out your day as well as plan for interruptions. Give yourself at least 30 minutes to figure out
your time plan. In your plan, schedule some time for interruptions.
Put up a “Do not disturb” sign when you absolutely have to complete a certain amount of work.
Close your mind to all distractions. Train yourself to ignore ringing phones, don’t reply to chat
messages and disconnect from social media sites.
Delegate your work. This will not only help your work get done faster, but will also show you the
unique skills and abilities of those around you.
Stop procrastinating. Remind yourself that procrastination typically arises due to the fear of failure
or the belief that you cannot do things as perfectly as you wish to do them.
Prioritize. List each task to be completed in order of its urgency or importance level. Then focus on
completing each task, one by one.
Maintain a log of your work activities. Analyze the log to help you understand how efficient you
are, and how much time is wasted every day.
Create time management goals to reduce time wastage.
10.1.7. Anger Management
Anger management is the process of:
Learning to recognize the signs that you, or someone else, is becoming angry
417
Assistant Fashion Designer
Taking the best course of action to calm down the situation in a positive way Anger
management does not mean suppressing anger
Importance of Anger Management
Anger is a perfectly normal human emotion. In fact, when managed the right way, anger can be
considered a healthy emotion. However, if it is not kept in check, anger can make us act
inappropriately and can lead to us saying or doing things that we will likely later regret.
Extreme anger can:
Hurt you physically: It leads to heart disease, diabetes, a weakened immune system,
insomnia, and high blood pressure.
Hurt you mentally: It can cloud your thinking and lead to stress, depression and mental
health issues.
Hurt your career: It can result in alienating your colleagues, bosses, clients and lead to the
loss of respect.
Hurt your relationships: It makes it hard for your family and friends to trust you, be honest
with you and feel comfortable around you.
This is why anger management, or managing anger appropriately, is so important.
Anger Management Strategies
Here are some strategies that can help you control your anger:
Strategy 1: Relaxation
Something as simple as breathing deeply and looking at relaxing images works wonders in
calming down angry feelings. Try this simple breathing exercise:
Take a deep breath from your diaphragm (don’t breathe from your chest)
Visualize your breath coming up from your stomach
Keep repeating a calming word like ‘relax’ or ‘take it easy’ (remember to keep breathing
deeply while repeating the word)
Picture a relaxing moment (this can be from your memory or your imagination)
418
Participant Handbook
Follow this relaxation technique daily, especially when you realize that you’re starting to feel
angry.
Strategy 2: Cognitive Restructuring
Cognitive restructuring means changing the manner in which you think. Anger can make you curse,
swear, exaggerate and act very dramatically. When this happens, force yourself to replace your
angry thoughts with more logical ones. For instance, instead of thinking ‘Everything is ruined’
change your mindset and tell yourself ‘It’s not the end of the world and getting angry won’t solve
this’.
Strategy 3: Problem Solving
Getting angry about a problem that you cannot control is a perfectly natural response. Sometimes,
try as you may, there may not be a solution to the difficulty you are faced with. In such cases, stop
focusing on solving the problem, and instead focus on handling and facing the problem. Remind
yourself that you will do your best to deal with the situation, but that you will not blame yourself if
you don’t get the solution you desire.
Strategy 4: Better Communication
When you’re angry, it is very easy to jump to inaccurate conclusions. In this case, you need to force
yourself to stop reacting, and think carefully about what you want to say, before saying it. Avoid
saying the first thing that enters your head. Force yourself to listen carefully to what the other
person is saying. Then think about the conversation before responding.
Strategy 5: Changing Your Environment
If you find that your environment is the cause of your anger, try and give yourself a break from your
surroundings. Make an active decision to schedule some personal time for yourself, especially on
days that are very hectic and stressful. Having even a brief amount of quiet or alone time is sure to
help calm you down.
419
Assistant Fashion Designer
Tips for Anger Management
The following tips will help you keep your anger in check:
Take some time to collect your thoughts before you speak out in anger.
Express the reason for your anger in an assertive, but non-confrontational manner once you
have calmed down.
Do some form of physical exercise like running or walking briskly when you feel yourself
getting angry?
Make short breaks part of your daily routine, especially during days that are stressful. Focus
on how to solve a problem that’s making you angry, rather than focusing on the fact that
the problem is making you angry.
10.1.8. Stress Management
We say we are ‘stressed’ when we feel overloaded and unsure of our ability to deal with the
pressures placed on us. Anything that challenges or threatens our well-being can be defending as a
stress. It is important to note that stress can be good and bad. While good stress keeps us going,
negative stress undermines our mental and physical health. This is why it is so important to manage
negative stress effectively.
Causes of Stress
Internal causes of stress:
Constant worry
Rigid thinking
Unrealistic expectations
Pessimism
Negative self-talk
All in or all out attitude
External causes of stress:
Major life changes
Difficulties with relationships
420
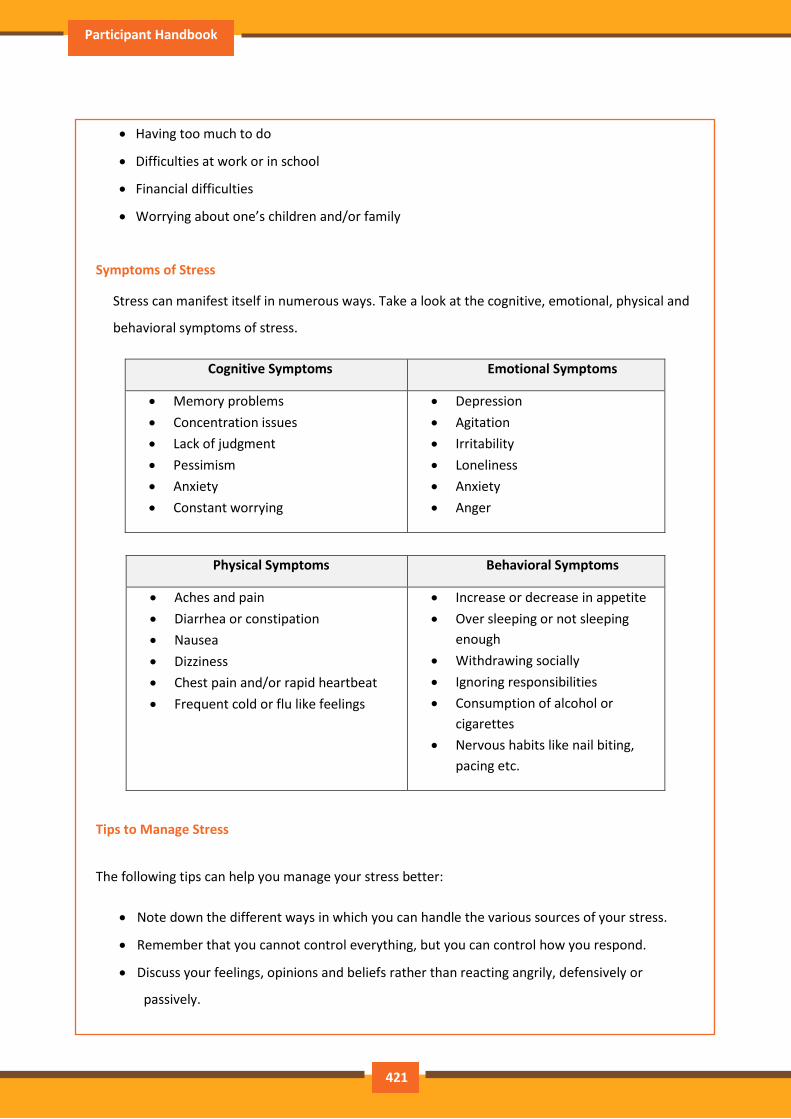
Participant Handbook
Having too much to do
Difficulties at work or in school
Financial difficulties
Worrying about one’s children and/or family
Symptoms of Stress
Stress can manifest itself in numerous ways. Take a look at the cognitive, emotional, physical and
behavioral symptoms of stress.
Cognitive Symptoms Emotional Symptoms
Memory problems
Concentration issues
Lack of judgment
Pessimism
Anxiety
Constant worrying
Depression
Agitation
Irritability
Loneliness
Anxiety
Anger
Physical Symptoms Behavioral Symptoms
Aches and pain
Diarrhea or constipation
Nausea
Dizziness
Chest pain and/or rapid heartbeat
Frequent cold or flu like feelings
Increase or decrease in appetite
Over sleeping or not sleeping
enough
Withdrawing socially
Ignoring responsibilities
Consumption of alcohol or
cigarettes
Nervous habits like nail biting,
pacing etc.
Tips to Manage Stress
The following tips can help you manage your stress better:
Note down the different ways in which you can handle the various sources of your stress.
Remember that you cannot control everything, but you can control how you respond.
Discuss your feelings, opinions and beliefs rather than reacting angrily, defensively or
passively.
421

Assistant Fashion Designer
Practice relaxation techniques like meditation, yoga or tai chi when you start feeling stressed.
Devote a part of your day towards exercise.
Eat healthy foods like fruits and vegetables. Avoid unhealthy foods especially those
containing large amounts of sugar.
Plan your day so that you can manage your time better, with less stress.
Say no to people and things when required.
Schedule time to pursue your hobbies and interests.
Ensure you get at least 7-8 hours of sleep.
Reduce your caffeine intake.
Increase the time spent with family and friends.
422
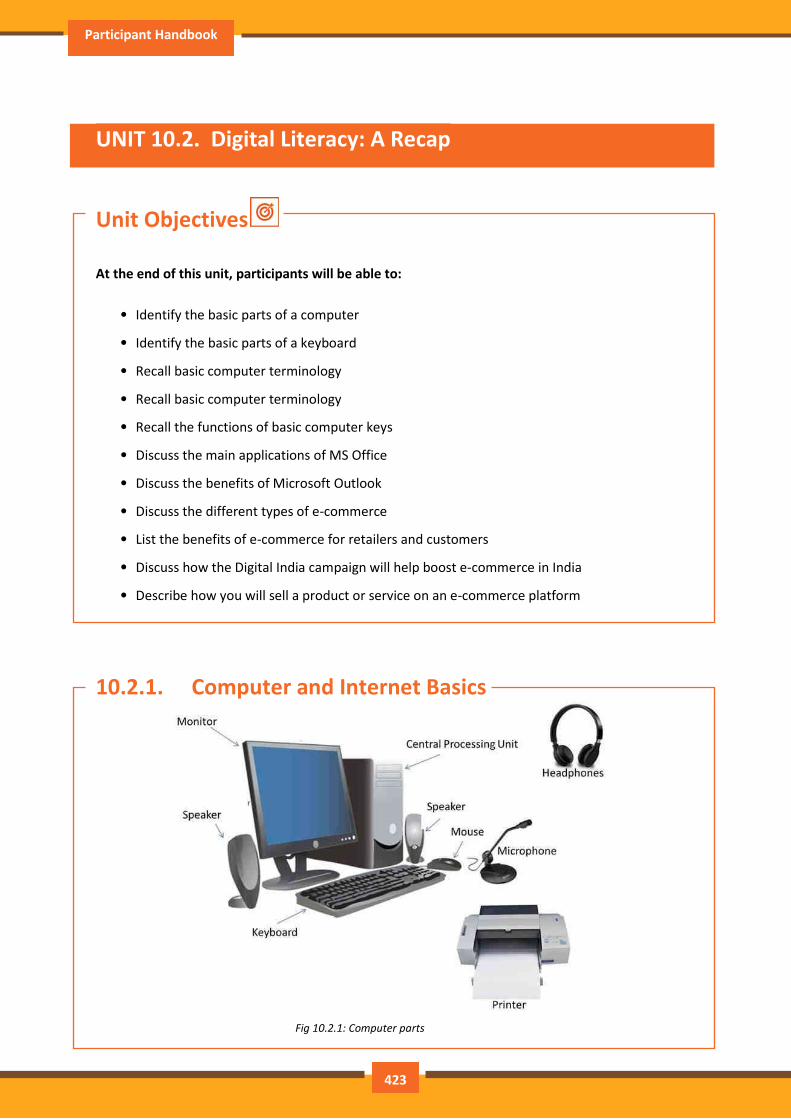
Participant Handbook
Fig 10.2.1: Computer parts
UNIT 10.2. Digital Literacy: A Recap
Unit Objectives
At the end of this unit, participants will be able to:
• Identify the basic parts of a computer
• Identify the basic parts of a keyboard
• Recall basic computer terminology
• Recall basic computer terminology
• Recall the functions of basic computer keys
• Discuss the main applications of MS Office
• Discuss the benefits of Microsoft Outlook
• Discuss the different types of e-commerce
• List the benefits of e-commerce for retailers and customers
• Discuss how the Digital India campaign will help boost e-commerce in India
• Describe how you will sell a product or service on an e-commerce platform
10.2.1. Computer and Internet Basics
423
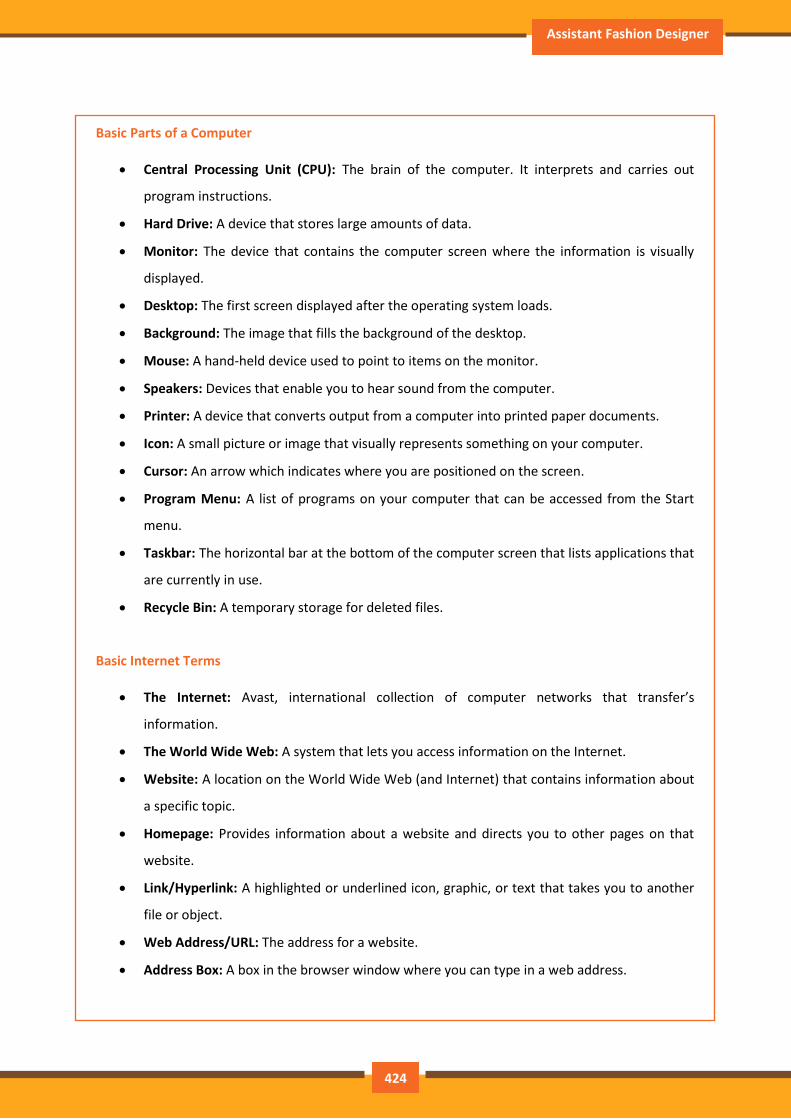
Assistant Fashion Designer
Basic Parts of a Computer
Central Processing Unit (CPU): The brain of the computer. It interprets and carries out
program instructions.
Hard Drive: A device that stores large amounts of data.
Monitor: The device that contains the computer screen where the information is visually
displayed.
Desktop: The first screen displayed after the operating system loads.
Background: The image that fills the background of the desktop.
Mouse: A hand-held device used to point to items on the monitor.
Speakers: Devices that enable you to hear sound from the computer.
Printer: A device that converts output from a computer into printed paper documents.
Icon: A small picture or image that visually represents something on your computer.
Cursor: An arrow which indicates where you are positioned on the screen.
Program Menu: A list of programs on your computer that can be accessed from the Start
menu.
Taskbar: The horizontal bar at the bottom of the computer screen that lists applications that
are currently in use.
Recycle Bin: A temporary storage for deleted files.
Basic Internet Terms
The Internet: Avast, international collection of computer networks that transfer’s
information.
The World Wide Web: A system that lets you access information on the Internet.
Website: A location on the World Wide Web (and Internet) that contains information about
a specific topic.
Homepage: Provides information about a website and directs you to other pages on that
website.
Link/Hyperlink: A highlighted or underlined icon, graphic, or text that takes you to another
file or object.
Web Address/URL: The address for a website.
Address Box: A box in the browser window where you can type in a web address.
424
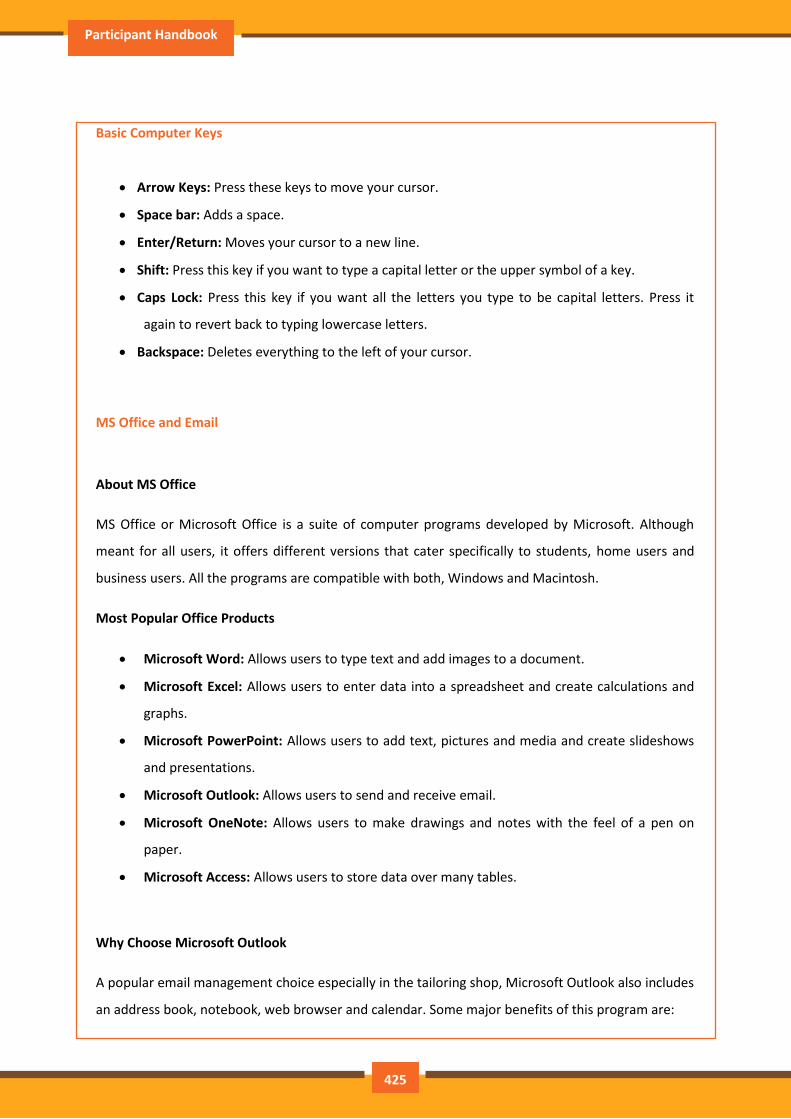
Participant Handbook
Basic Computer Keys
Arrow Keys: Press these keys to move your cursor.
Space bar: Adds a space.
Enter/Return: Moves your cursor to a new line.
Shift: Press this key if you want to type a capital letter or the upper symbol of a key.
Caps Lock: Press this key if you want all the letters you type to be capital letters. Press it
again to revert back to typing lowercase letters.
Backspace: Deletes everything to the left of your cursor.
MS Office and Email
About MS Office
MS Office or Microsoft Office is a suite of computer programs developed by Microsoft. Although
meant for all users, it offers different versions that cater specifically to students, home users and
business users. All the programs are compatible with both, Windows and Macintosh.
Most Popular Office Products
Microsoft Word: Allows users to type text and add images to a document.
Microsoft Excel: Allows users to enter data into a spreadsheet and create calculations and
graphs.
Microsoft PowerPoint: Allows users to add text, pictures and media and create slideshows
and presentations.
Microsoft Outlook: Allows users to send and receive email.
Microsoft OneNote: Allows users to make drawings and notes with the feel of a pen on
paper.
Microsoft Access: Allows users to store data over many tables.
Why Choose Microsoft Outlook
A popular email management choice especially in the tailoring shop, Microsoft Outlook also includes
an address book, notebook, web browser and calendar. Some major benefits of this program are:
425
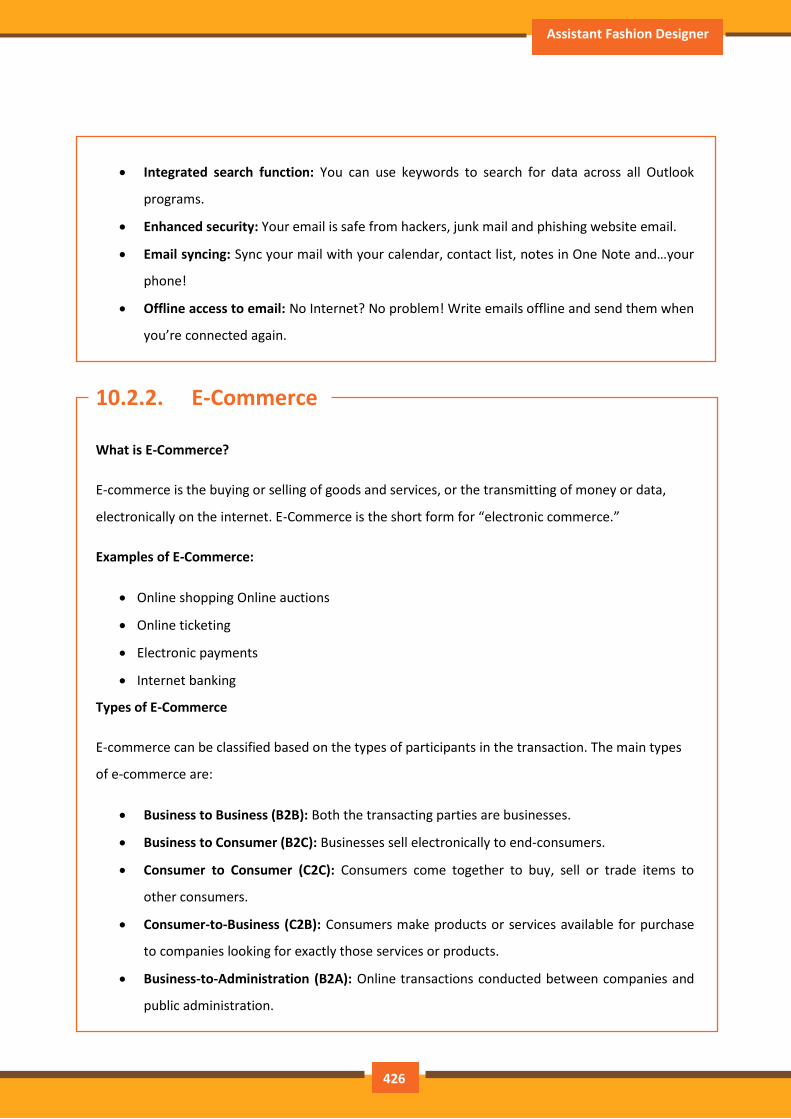
Assistant Fashion Designer
Integrated search function: You can use keywords to search for data across all Outlook
programs.
Enhanced security: Your email is safe from hackers, junk mail and phishing website email.
Email syncing: Sync your mail with your calendar, contact list, notes in One Note and…your
phone!
Offline access to email: No Internet? No problem! Write emails offline and send them when
you’re connected again.
10.2.2. E-Commerce
What is E-Commerce?
E-commerce is the buying or selling of goods and services, or the transmitting of money or data,
electronically on the internet. E-Commerce is the short form for “electronic commerce.”
Examples of E-Commerce:
Online shopping Online auctions
Online ticketing
Electronic payments
Internet banking
Types of E-Commerce
E-commerce can be classified based on the types of participants in the transaction. The main types
of e-commerce are:
Business to Business (B2B): Both the transacting parties are businesses.
Business to Consumer (B2C): Businesses sell electronically to end-consumers.
Consumer to Consumer (C2C): Consumers come together to buy, sell or trade items to
other consumers.
Consumer-to-Business (C2B): Consumers make products or services available for purchase
to companies looking for exactly those services or products.
Business-to-Administration (B2A): Online transactions conducted between companies and
public administration.
426
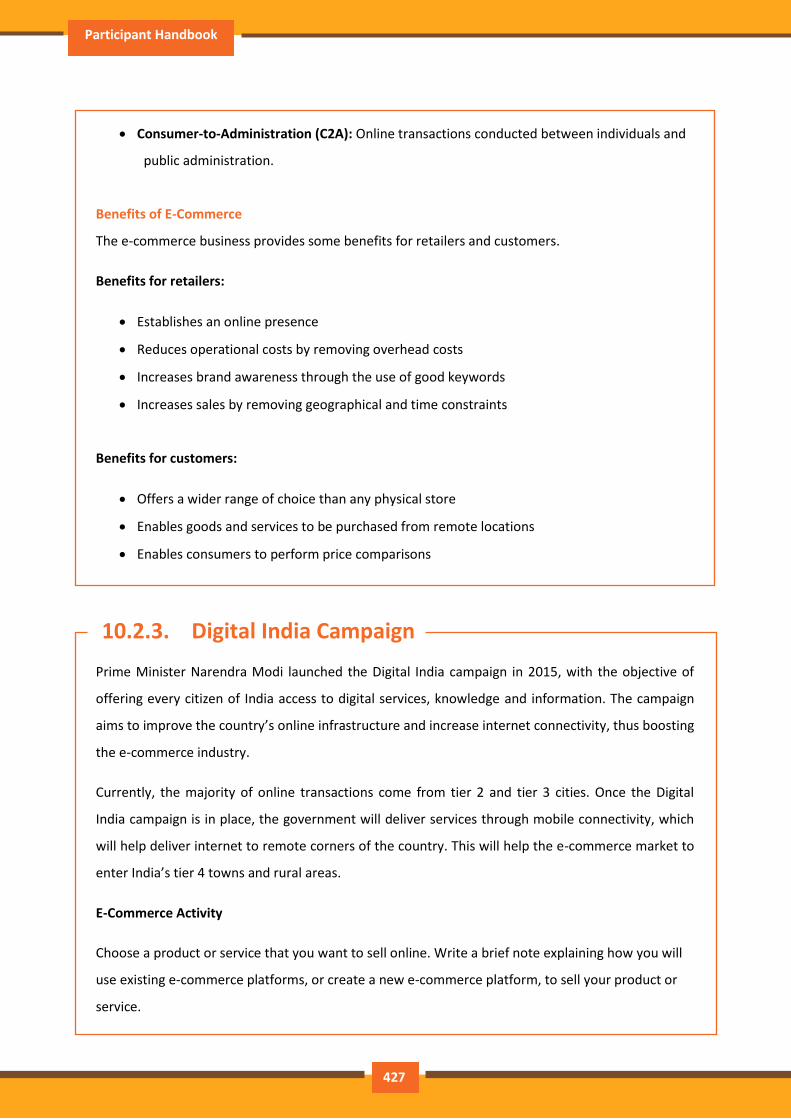
Participant Handbook
Consumer-to-Administration (C2A): Online transactions conducted between individuals and
public administration.
Benefits of E-Commerce
The e-commerce business provides some benefits for retailers and customers.
Benefits for retailers:
Establishes an online presence
Reduces operational costs by removing overhead costs
Increases brand awareness through the use of good keywords
Increases sales by removing geographical and time constraints
Benefits for customers:
Offers a wider range of choice than any physical store
Enables goods and services to be purchased from remote locations
Enables consumers to perform price comparisons
10.2.3. Digital India Campaign
Prime Minister Narendra Modi launched the Digital India campaign in 2015, with the objective of
offering every citizen of India access to digital services, knowledge and information. The campaign
aims to improve the country’s online infrastructure and increase internet connectivity, thus boosting
the e-commerce industry.
Currently, the majority of online transactions come from tier 2 and tier 3 cities. Once the Digital
India campaign is in place, the government will deliver services through mobile connectivity, which
will help deliver internet to remote corners of the country. This will help the e-commerce market to
enter India’s tier 4 towns and rural areas.
E-Commerce Activity
Choose a product or service that you want to sell online. Write a brief note explaining how you will
use existing e-commerce platforms, or create a new e-commerce platform, to sell your product or
service.
427
Assistant Fashion Designer
Unit 10.3: Money Matters
Unit Objectives At the end of this unit, participants will be able to:
• Discuss the importance of saving money
• Discuss the benefits of saving money
• Discuss the main types of bank accounts
• Describe the process of opening a bank account
• Differentiate between fixed and variable costs
• Describe the main types of investment options
• Describe the different types of insurance products
• Describe the different types of taxes
• Discuss the uses of online banking
• Discuss the main types of electronic funds transfers
10.3.1. Personal Finance – Why to Save
Importance of Saving
We all know that the future is unpredictable. You never know what will happen tomorrow, next
week or next year. That’s why saving money steadily through the years is so important. Saving
money will help improve your financial situation over time. But more importantly, knowing that you
have money stashed away for an emergency will give you peace of mind. Saving money also opens
the door to many more options and possibilities.
Benefits of Saving
Inculcating the habit of saving leads to a vast number of benefits. Saving helps you:
Become financially independent: When you have enough money saved up to feel secure you can
start making your choices, from taking a vacation whenever you want, to switching careers or
starting your own business.
428

Participant Handbook
Invest in yourself through education: Through saving, you can earn enough to pay up for courses
that will add to your professional experience and ultimately result in higher paying jobs.
Get out of debt: Once you have saved enough as a reserve fund, you can use your savings to pay off
debts like loans or bills that have accumulated over time.
Be prepared for surprise expenses: Having money saved enables you to pay for unforeseen
expenses like sudden car or house repairs, without feeling financially stressed.
Pay for emergencies: Saving helps you deal with emergencies like sudden health issues or
emergency trips without feeling financially burdened.
Afford large purchases and achieve major goals: Saving diligently makes it possible to place down
payments towards major purchases and goals, like buying a home or a car.
Retire: The money you have saved over the years will keep you comfortable when you no longer
have the income you would get from your job.
10.3.2. Types of Bank Accounts
In India, banks offer four main types of bank accounts. These are:
Current Accounts
Savings Accounts
Recurring Deposit Accounts
Fixed Deposit Accounts
Current Accounts
Current accounts offer the most liquid deposits and thus, are best suited for businessmen and
companies. As these accounts are not meant for investments and savings, there is no imposed limit
on the number or amount of transactions that can be made on any given day. Current account
429
Assistant Fashion Designer
holders are not paid any interest on the amounts held in their accounts. They are charged for certain
services offered on such accounts.
Savings Accounts
Savings accounts are meant to promote savings, and are therefore the number one choice for
salaried individuals, pensioners and students. While there is no restriction on the number and
amount of deposits made, there are usually restrictions on the number and amount of withdrawals.
Savings account holders are paid interest on their savings.
Recurring Deposit Accounts
Recurring Deposit accounts, also called RD accounts, are the accounts of choice for those who want
to save an amount every month, but are unable to invest a large sum at one time. Such account
holders deposit a small, fixed amount every month for a pre-determined period (minimum 6
months). Defaulting on a monthly payment results in the account holder being charged a penalty
amount. The total amount is repaid with interest at the end of the specified period.
Fixed Deposit Accounts
Fixed Deposit accounts, also called FD accounts, are ideal for those who wish to deposit their savings
for a long term in return for a high rate of interest. The rate of interest offered depends on the
amount deposited and the time period, and also differs from bank to bank. In the case of an FD, a
certain amount of money is deposited by the account holder for a fixed period of time. The money
can be withdrawn when the period expires. If necessary, the depositor can break the fixed deposit
prematurely. However, this usually attracts a penalty amount which also differs from bank to bank.
10.3.3. Opening a Bank Account
Opening a bank account is quite a simple process. Take a look at the steps to open an account of
your own:
Step 1: Fill in the Account Opening Form
This form requires you to provide the following information:
Personal details (name, address, phone number, date of birth, gender, occupation, address)
Method of receiving your account statement (hard copy/email)
430
Participant Handbook
Details of your initial deposit (cash/cherub)
Manner of operating your account (online/mobile banking/traditional via cheque, slip books
Ensure that you sign wherever required on the form.
Step 2: Affix your Photograph
Stick a recent photograph of yourself in the allotted space on the form.
Step 3: Provide your Know Your Customer (KYC) Details
KYC is a process that helps banks verifies the identity and address of their customers. To open an
account, every individual needs to submit certain approved documents with respect to photo
identity (ID) and address proof. Some Officially Valid Documents (OVDs) are:
Passport
Driving License
Voters’ Identity Card
PAN Card
UIDAI (Aadhaar) Card
Step 4: Submit All your Documents
Submit the completed Account Opening Form and KYC documents. Then wait until the forms are
processed and your account has been opened!
10.3.4. Costs: Fixed vs Variable
What are Fixed and Variable Costs?
Fixed costs and variable costs together make up a company’s total cost. These are the two types of
costs that companies have to bear when producing goods and services.
A fixed cost does not change with the volume of goods or services a company produces. It always
remains the same.
431
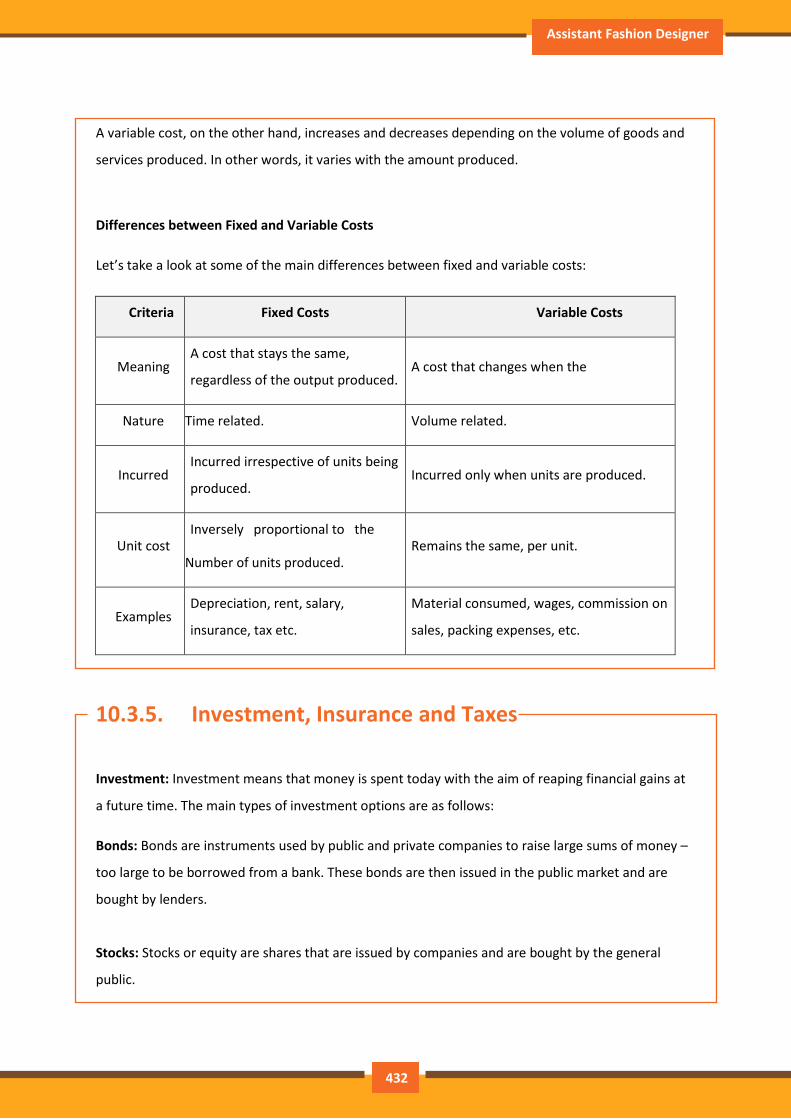
Assistant Fashion Designer
A variable cost, on the other hand, increases and decreases depending on the volume of goods and
services produced. In other words, it varies with the amount produced.
Differences between Fixed and Variable Costs
Let’s take a look at some of the main differences between fixed and variable costs:
Criteria Fixed Costs Variable Costs
Meaning A cost that stays the same,
regardless of the output produced. A cost that changes when the
Nature Time related. Volume related.
Incurred Incurred irrespective of units being
produced. Incurred only when units are produced.
Unit cost Inversely proportional to the
Number of units produced. Remains the same, per unit.
Examples Depreciation, rent, salary,
insurance, tax etc.
Material consumed, wages, commission on
sales, packing expenses, etc.
10.3.5. Investment, Insurance and Taxes
Investment: Investment means that money is spent today with the aim of reaping financial gains at
a future time. The main types of investment options are as follows:
Bonds: Bonds are instruments used by public and private companies to raise large sums of money –
too large to be borrowed from a bank. These bonds are then issued in the public market and are
bought by lenders.
Stocks: Stocks or equity are shares that are issued by companies and are bought by the general
public.
432
Participant Handbook
Small Savings Schemes: Small Savings Schemes are tools meant to save money in small amounts.
Some popular schemes are the Employees Provident Fund, Sukanya Samriddhi Scheme and National
Pension Scheme.
Mutual Funds: Mutual Funds are professionally managed financial instruments that invest money in
different securities on behalf of investors.
Fixed Deposits: A fixed amount of money is kept aside with a financial institution for a fixed amount
of time in return for interest on the money.
Real Estate: Loans are taken from banks to purchase real estate, which is then leased or sold with
the aim of making a profit on the appreciated property price.
Hedge Funds: Hedge funds invest in both financial derivatives and/or publicly traded securities.
Private Equity: Private Equity is trading in the shares of an operating company that is not publicly
listed and whose shares are not available on the stock market.
Venture Capital: Venture Capital involves investing substantial capital in a budding company in
return for stocks in that company.
Insurance: There are two types of insurance:
Life Insurance
Non-Life or General Insurance.
Life Insurance Products
The main life insurance products are:
Term Insurance: This is the simplest and cheapest form of insurance. It offers financial
protection for a specified tenure, say 15 to 20 years. In the case of your death, your family is
paid the sum assured. In the case of your surviving the term, the insurer pays nothing.
Endowment Policy: This offers the dual benefit of insurance and investment. Part of the
premium is allocated towards the sum assured, while the remaining premium gets invested
433
Assistant Fashion Designer
in equity and debt. It pays a lump sum amount after the specified duration or on the death
of the policyholder, whichever is earlier.
Unit-Linked Insurance Plan (ULIP): Here part of the premium is spent on the life cover,
while the remaining amount is invested in equity and debt. It helps develop a regular saving
habit.
Money Back Life Insurance: While the policyholder is alive, periodic payments of the partial
survival benefits are made during the policy tenure. On the death of the insured, the
insurance company pays the full sum assured along with survival benefits.
Whole Life Insurance: It offers the dual benefit of insurance and investment. It offers
insurance cover for the whole life of the person or up to 100 years whichever is earlier.
General Insurance
General Insurance deals with all insurance covering assets like animals, agricultural crops, goods,
factories, cars and so on.
General Insurance Products:
Motor Insurance: This can be divided into Four Wheeler Insurance and Two Wheeler
Insurance.
Health Insurance: The main types of health insurance are individual health insurance, family
floater health insurance, comprehensive health insurance and critical illness insurance.
Travel Insurance: This can be categorized into Individual Travel Policy, Family Travel Policy,
Student Travel Insurance and Senior Citizen Health Insurance.
Home Insurance: This protects the house and its contents from risk.
Marine Insurance: This insurance covers goods, freight, cargo etc. against loss or damage
during transit by rail, road, sea and/or air.
Taxes
There are two types of taxes:
Direct Taxes
Indirect Taxes
Direct Tax: Direct taxes are levied directly on an entity or a person and are non-transferrable. Some
examples of Direct Taxes are:
434
Participant Handbook
Income Tax: This tax is levied on your earning in a financial year. It is applicable to both,
individuals and companies.
Capital Gains Tax: This tax is payable whenever you receive a sizable amount of money. It is
usually of two types – short term capital gains from investments held for less than 36
months and long term capital gains from investments held for longer than 36 months.
Securities Transaction Tax: This tax is added to the price of a share. It is levied every time
you buy or sell shares.
Perquisite Tax: This tax is levied is on perks that have been acquired by a company or used
by an employee.
Corporate Tax: Corporate tax is paid by companies from the revenue they earn.
Indirect Tax: Indirect taxes are levied on goods or services. Some examples of Indirect Taxes are:
Sales Tax: Sales Tax is levied on the sale of a product.
Service Tax: Service Tax is added to services provided in India.
Value Added Tax: Value Added Tax is levied at the discretion of the state government. The
tax is levied on goods sold in the state. The tax amount is decided by the state.
Customs Duty & Octroi: Customs Duty is a charge that is applied on purchases that are
imported from another country. Octroi is levied on goods that cross state borders within
India.
Excise Duty: Excise Duty is levied on all goods manufactured or produced in India.
10.3.6. Online Banking, NEFT, RTGS etc.
What is Online Banking?
Internet or online banking allows account holders to access their account from a laptop at any
location. In this way, instructions can be issued. To access an account, account holders simply need
to use their unique customer ID number and password.
Internet banking can be used to:
Find out an account balance
Transfer amounts from one account to another
Arrange for the issuance of Cheques
435
Assistant Fashion Designer
Instruct payments to be made
Request for a cheque book
Request for a statement of accounts
Make a fixed deposit
Electronic Funds Transfers
Electronic funds transfer is a convenient way of transferring money from the comfort of one’s own
home, using integrated banking tools like internet and mobile banking.
Transferring funds via an electronic gateway is extremely convenient. With the help of online
banking, you can choose to:
Transfer funds into your own accounts of the same bank.
Transfer funds into different accounts of the same bank.
Transfer funds into accounts in different banks, using NEFT.
Transfer funds into other bank accounts using RTGS.
Transfer funds into various accounts using IMPS.
NEFT
NEFT stands for National Electronic Funds Transfer. This money transfer system allows you to
electronically transfer funds from your respective bank accounts to any other account, either in the
same bank or belonging to any other bank. NEFT can be used by individuals, forms and corporate
organizations to transfer funds between accounts.
In order to transfer funds via NEFT, two things are required:
A transferring bank
A destination bank
Before you can transfer funds through NEFT, you will need to register the beneficiary who
will be receiving the funds. In order to complete this registration, you will require the
following
Recipient’s name
Recipient’s account number
Recipient’s bank’s name
436
Participant Handbook
Recipient’s bank’s IFSC code
RTGS
RTGS stands for Real Time Gross Settlement. This is a real time funds transfer system which enables
you to transfer funds from one bank to another, in real time or on a gross basis. The transferred
amount is immediately deducted from the account of one bank, and instantly credited to the other
bank’s account. The RTGS payment gateway is maintained by the Reserve Bank of India. The
transactions between banks are made electronically.
RTGS can be used by individuals, companies and firms to transfer large sums of money. Before
remitting funds through RTGS, you will need to add the beneficiary and his bank account details via
your online banking account. In order to complete this registration, you will require the following
information:
Name of the beneficiary
Beneficiary’s account number
Beneficiary’s bank address
Bank’s IFSC code
IMPS
IMPS stands for Immediate Payment Service. This is a real-time, inter-bank, electronic funds transfer
system used to transfer money instantly within banks across India. IMPS enable users to make
instant electronic transfer payments using mobile phones through both, Mobile Banking and SMS. It
can also be used through ATMs and online banking. IMPS are available 24 hours a day and 7 days a
week. The system features a secure transfer gateway and immediately confirms orders that have
been fulfilled.
To transfer money through IMPS, you need to:
Register for IMPS with your bank
Receive a Mobile Money Identifier (MMID) from the bank
Receive a MPIN from the bank
Once you have both these, you can login or make a request through SMS to transfer a
particular amount to a beneficiary.
437
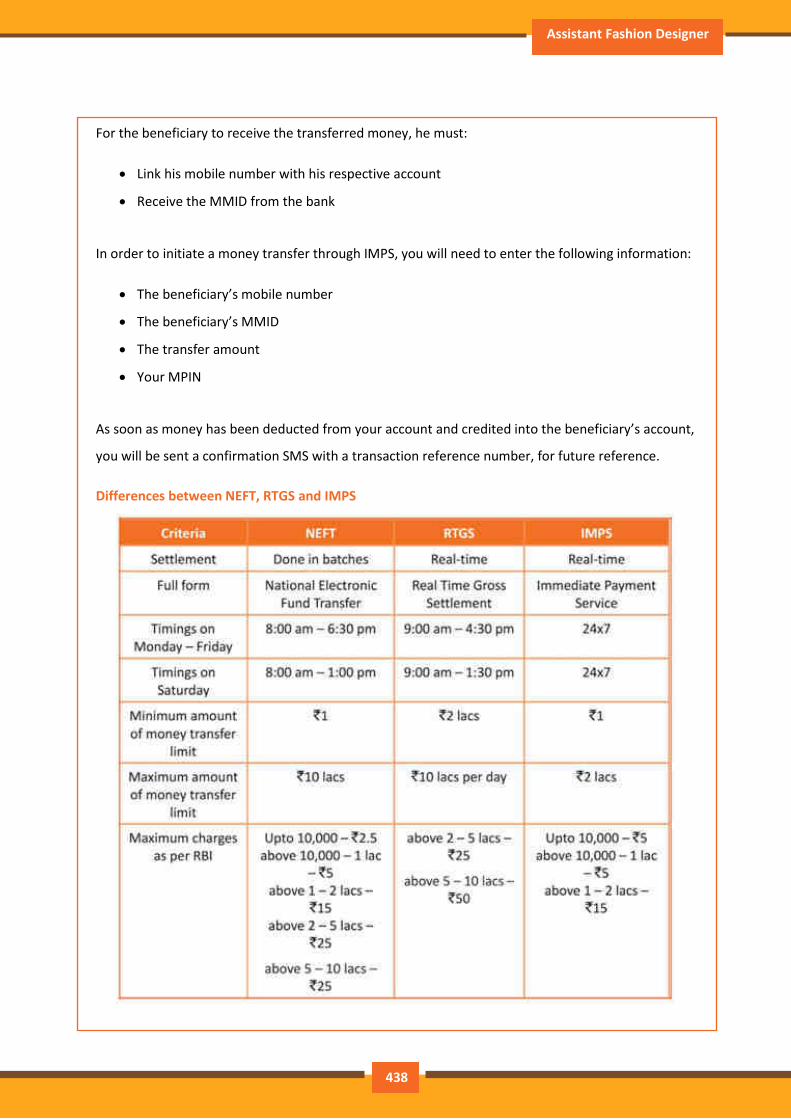
Assistant Fashion Designer
For the beneficiary to receive the transferred money, he must:
Link his mobile number with his respective account
Receive the MMID from the bank
In order to initiate a money transfer through IMPS, you will need to enter the following information:
The beneficiary’s mobile number
The beneficiary’s MMID
The transfer amount
Your MPIN
As soon as money has been deducted from your account and credited into the beneficiary’s account,
you will be sent a confirmation SMS with a transaction reference number, for future reference.
Differences between NEFT, RTGS and IMPS
438
Participant Handbook
UNIT 10.4: Preparing for Employment and Self-Employment
Unit Objectives
At the end of this unit, participants will be able to:
• Discuss the steps to prepare for an interview
• Discuss the steps to create an effective Resume
• Discuss the most frequently asked interview questions
• Discuss how to answer the most frequently asked interview questions
• Discuss basic tailoring shop terminology
10.4.1. Interview Preparation: How to Prepare for an
Interview
The success of your getting the job that you want depends largely on how well your interview for
that job goes. Therefore, before you go in for your interview, it is important that you prepare for it
with a fair amount of research and planning. Take a look at the steps to follow in order to be well
prepared for an interview:
Research the organization that you are having the interview with.
Studying the company beforehand will help you be more prepared at the time of the interview. Your
knowledge of the organization will help you answer questions at the time of the interview, and will
leave you looking and feeling more confident. This is sure to make you stand out from other, not as
well informed, candidates.
Look for background information on the company. Try and find an overview of the company and its
industry profile.
Visit the company website to get a good idea of what the company does. A company website offers
a wealth of important information. Read and understand the company’s mission statement. Pay
attention to the company’s products/services and client list. Read through any press releases to get
an idea of the company’s projected growth and stability.
Note down any questions that you have after your research has been completed.
Think about whether your skills and qualifications match the job requirements.
• Carefully read through and analyze the job description.
439
Assistant Fashion Designer
• Make a note of the knowledge, skills and abilities required to fulfill the job requirements.
Take a look at the organization hierarchy. Figure out where the position you are applying for
fits into this hierarchy.
Go through the most typical interview questions asked, and prepare your responses.
Remember, in most interviews a mix of resume-based, behavioral and case study questions
are asked.
Think about the kind of answers you would like to provide to typical questions asked in these
three areas.
Practice these answers until you can express them confidently and clearly.
Plan your attire for the interview.
It is always safest to opt for formal business attire, unless expressly informed to dress in
business casual (in which case you should use your best judgment).
Ensure that your clothes are clean and well-ironed. Pick neutral colors – nothing too bright or
flashy.
The shoes you wear should match your clothes, and should be clean and suitable for an
interview.
Remember, your aim is to leave everyone you meet with the impression that you are a
professional and highly efficient person.
Ensure that you have packed everything that you may require during the interview.
Carry a few copies of your resume. Use a good quality paper for your resume print outs.
Always take along a notepad and a pen.
Take along any information you may need to refer to, in order to fill out an application form.
Carry a few samples of your work, if relevant.
Remember the importance of non-verbal communication.
Practice projecting confidence. Remind yourself to smile and make eye contact. Practice
giving a firm handshake.
440
Participant Handbook
Keep in mind the importance of posture. Practice sitting up straight. Train yourself to stop
nervous gestures like fidgeting and foot-tapping.
Practice keeping your reactions in check. Remember, your facial expressions provide a good
insight into your true feelings. Practice projecting a positive image.
Make a list of questions to end the interview with.
Most interviews will end with the interviewer(s) asking if you have any questions. This is your
chance to show that you have done your research and are interested in learning more about the
company.
If the interviewer does not ask you this question, you can inform him/her that you have some
queries that you would like to discuss. This is the time for you to refer to the notes you made while
studying the company.
Some good questions to ask at this point are:
What do you consider the most important criteria for success in this job?
How will my performance be evaluated?
What are the opportunities for advancement?
What are the next steps in the
hiring process?
Remember to never ask for information that is easily available on the company website.
10.4.2. Preparing an Effective Resume
A resume is a formal document that lists a candidate’s work experience, education and skills. A good
resume gives a potential employer enough information to believe the applicant is worth
interviewing. That’s why it is so important to create a résumé that is effective. Take a look at the
steps to create an effective resume:
Step 1: Write the Address Section
The Address section occupies the top of your resume. It includes information like your name,
address, phone number and e-mail address. Insert a bold line under the section to separate it from
rest of your resume.
441
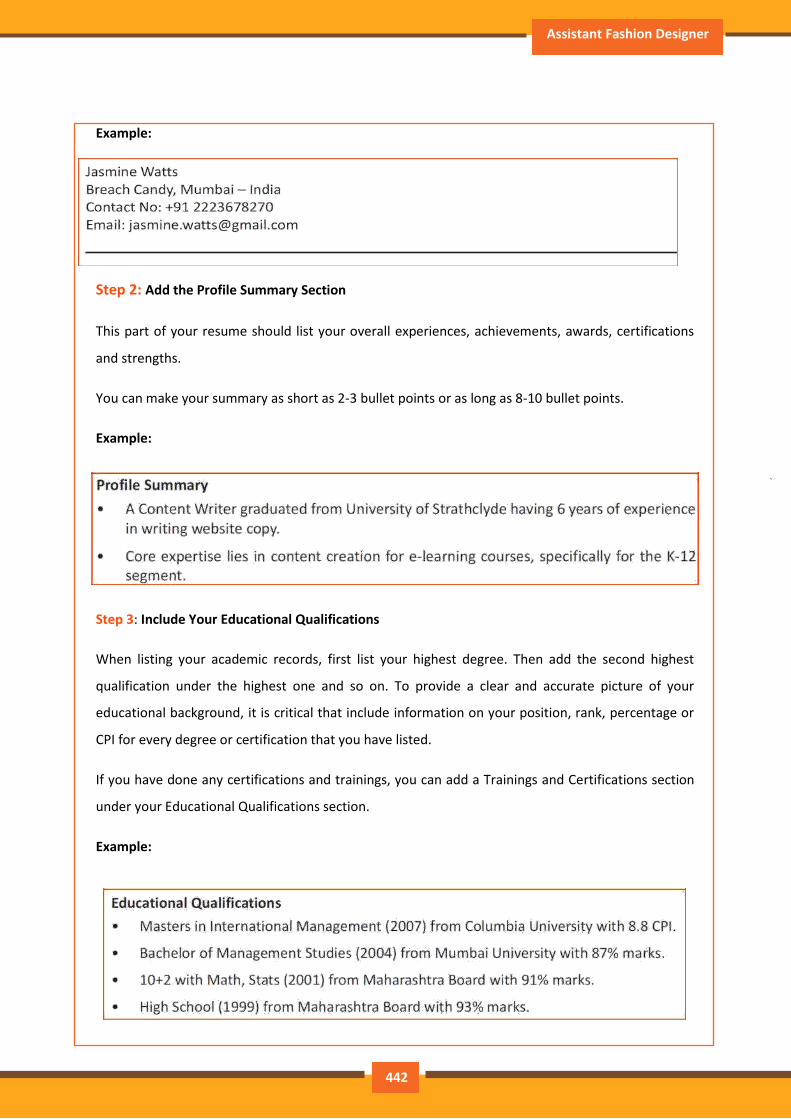
Assistant Fashion Designer
Example:
Step 2: Add the Profile Summary Section
This part of your resume should list your overall experiences, achievements, awards, certifications
and strengths.
You can make your summary as short as 2-3 bullet points or as long as 8-10 bullet points.
Example:
Step 3: Include Your Educational Qualifications
When listing your academic records, first list your highest degree. Then add the second highest
qualification under the highest one and so on. To provide a clear and accurate picture of your
educational background, it is critical that include information on your position, rank, percentage or
CPI for every degree or certification that you have listed.
If you have done any certifications and trainings, you can add a Trainings and Certifications section
under your Educational Qualifications section.
Example:
442
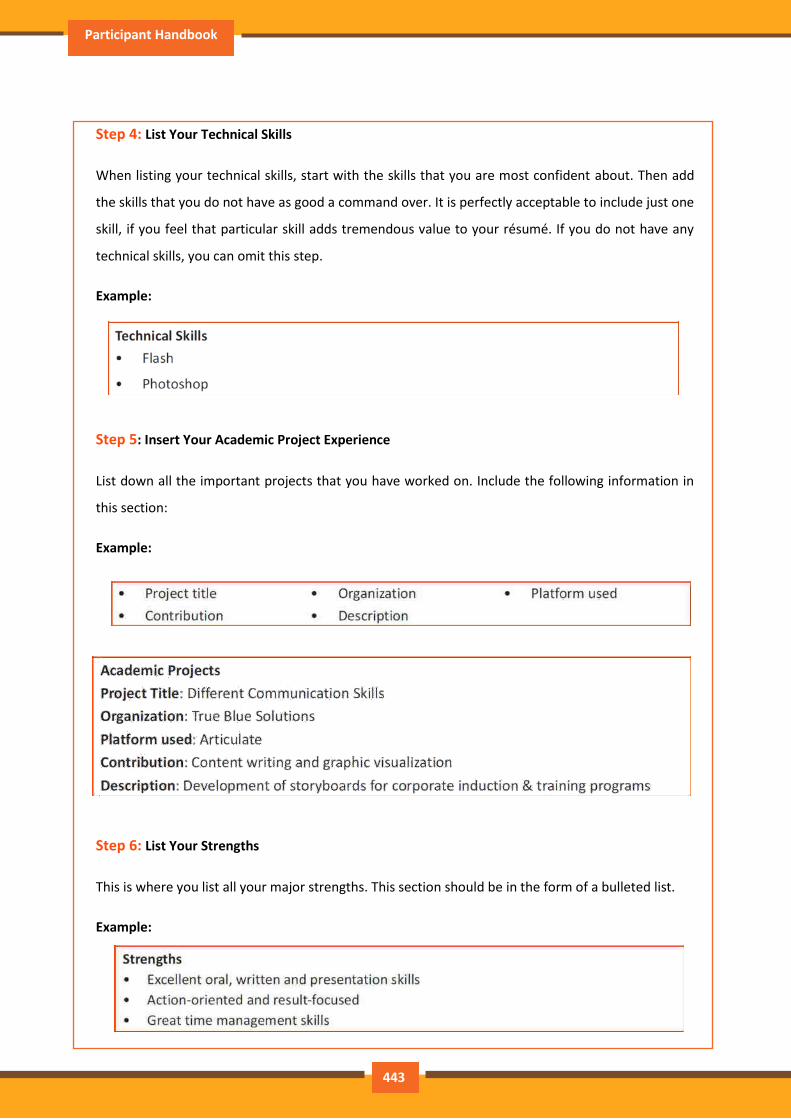
Participant Handbook
Step 4: List Your Technical Skills
When listing your technical skills, start with the skills that you are most confident about. Then add
the skills that you do not have as good a command over. It is perfectly acceptable to include just one
skill, if you feel that particular skill adds tremendous value to your résumé. If you do not have any
technical skills, you can omit this step.
Example:
Step 5: Insert Your Academic Project Experience
List down all the important projects that you have worked on. Include the following information in
this section:
Example:
Step 6: List Your Strengths
This is where you list all your major strengths. This section should be in the form of a bulleted list.
Example:
443

Assistant Fashion Designer
Step 7: List Your Extracurricular Activities
It is very important to show that you have diverse interests and that your life consists of more than
academics. Including your extracurricular activities can give you an added edge over other
candidates who have similar academic scores and project experiences. This section should be in the
form of a bulleted list.
Step 8: Write Your Personal Details
The last section of your résumé must include the following personal information:
Date of birth
Gender and marital status
Nationality
Languages known
Example:
10.4.3. Interview FAQs
Take a look at some of the most frequently asked interview questions, and some helpful tips on how
to answer them.
Can you tell me a little about yourself?
Tips to answer:
Don’t provide your full employment or personal history.
Offer 2-3 specific experiences that you feel are most valuable and relevant.
Conclude with how those experiences have made you perfect for this specific role.
444
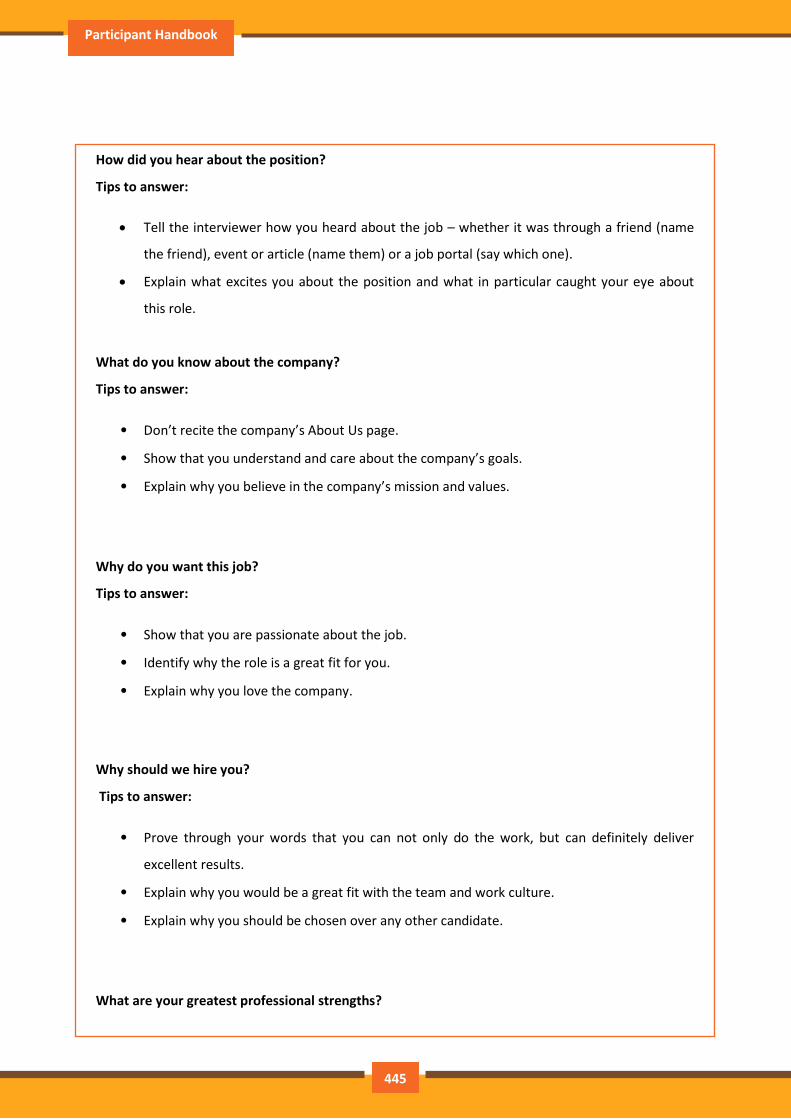
Participant Handbook
How did you hear about the position?
Tips to answer:
Tell the interviewer how you heard about the job – whether it was through a friend (name
the friend), event or article (name them) or a job portal (say which one).
Explain what excites you about the position and what in particular caught your eye about
this role.
What do you know about the company?
Tips to answer:
• Don’t recite the company’s About Us page.
• Show that you understand and care about the company’s goals.
• Explain why you believe in the company’s mission and values.
Why do you want this job?
Tips to answer:
• Show that you are passionate about the job.
• Identify why the role is a great fit for you.
• Explain why you love the company.
Why should we hire you?
Tips to answer:
• Prove through your words that you can not only do the work, but can definitely deliver
excellent results.
• Explain why you would be a great fit with the team and work culture.
• Explain why you should be chosen over any other candidate.
What are your greatest professional strengths?
445
Assistant Fashion Designer
Tips to answer:
• Be honest – share some of your real strengths, rather than give answers that you think sound
good.
• Offer examples of specific strengths that are relevant to the position you are applying for.
• Provide examples of how you’ve demonstrated these strengths.
What do you consider to be your weaknesses?
Tips to answer:
• The purpose of this question is to gauge your self-awareness and honesty.
• Give an example of a trait that you struggle with, but that you’re working on to improve.
What are your salary requirements?
Tips to answer:
• Do your research beforehand and find out the typical salary range for the job you are
applying for.
• Figure out where you lie on the pay scale based on your experience, education, and skills.
• Be flexible. Tell the interviewer that you know your skills are valuable, but that you want the
job and are willing to negotiate.
What do you like to do outside of work?
Tips to answer:
• The purpose of this question is to see if you will fit in with the company culture.
• Be honest – open up and share activities and hobbies that interest and excite you.
If you were an animal, which one would you want to be?
Tips to answer:
The purpose of this question is to see if you are able to think on your feet.
There’s no wrong answer – but to make a great impression try to bring out your strengths or
personality traits through your answer.
446
Participant Handbook
What do you think we could do better or differently?
Tips to answer:
• The purpose of this question is to see if you have done your research on the company, and to
test whether you can think critically and come up with new ideas.
• Suggest new ideas. Show how your interests and expertise would help you execute these
ideas.
Do you have any questions for us?
Tips to answer:
• Do not ask questions to which the answers can be easily found on the company website or
through a quick online search.
• Ask intelligent questions that show your ability to think critically.
10.4.4. Work Readiness – Terms and Terminologies
Every employee should be well versed in the following terms:
• Annual leave: Paid vacation leave given by employers to employees.
• Background Check: A method used by employers to verify the accuracy of the information
provided by potential candidates.
• Benefits: A part of an employee’s compensation package.
• Breaks: Short periods of rest taken by employees during working hours.
• Compensation Package: The combination of salary and benefits that an employer provides
to his/her employees.
• Compensatory Time (Comp Time): Time off in lieu of pay
• Contract Employee: An employee who works for one organization that sells said employee’s
services to another company, either on a project or time basis.
• Contract of Employment: When an employee is offered work in exchange for wages or
salary, and accepts the offer made by the employer, a contract of employment exists.
447
Assistant Fashion Designer
• Corporate Culture: The beliefs and values shared by all the members of a company, and
imparted from one generation of employees to another.
• Counter Offer/Counter Proposal: A negotiation technique used by potential candidates to
increase the amount of salary offered by a company.
• Cover Letter: A letter that accompanies a candidate’s resume. It emphasizes the important
points in the candidate’s resume and provides real examples that prove the candidate’s
ability to perform the expected job role.
• Curriculum Vitae (CV)/Resume: A summary of a candidate’s achievements, educational
background, work experience, skills and strengths.
• Declining Letter: A letter sent by an employee to an employer, turning down the job offer
made by the employer to the employee.
• Deductions: Amounts subtracted from an employee’s pay and listed on the employee’s pay
slip.
• Discrimination: The act of treating one person not as favorably as another person.
• Employee: A person who works for another person in exchange for payment.
• Employee Training: A workshop or in-house training that an employee is asked to attend by
his or her superior, for the benefit of the employer.
• Employment Gaps: Periods of unemployed time between jobs.
• Fixed-Term Contract: A contract of employment which gets terminated on an agreed-upon
date.
• Follow-Up: The act of contacting a potential employer after a candidate has submitted his
or her resume.
• Freelancer/Consultant/Independent Contractor: A person who works for him or herself and
pitches for temporary jobs and projects with different employers.
• Holiday: Paid time-off from work.
• Hourly Rate: The amount of salary or wages paid for 60 minutes of work.
• Internship: A job opportunity offered by an employer to a potential employee, called an
intern, to work at the employer’s company for a fixed, limited time period.
• Interview: A conversation between a potential employee and a representative of an
employer, in order to determine if the potential employee should be hired.
• Job Application: A form which asks for a candidate’s information like the candidate’s name,
address, contact details and work experience. The purpose of a candidate submitting a job
application is to show that candidate’s interest in working for a particular company.
448
Participant Handbook
• Job Offer: An offer of employment made by an employer to a potential employee.
• Job Search Agent: A program that enables candidates to search for employment
opportunities by selecting criteria listed in the program, for job vacancies.
• Lay Off: A lay off occurs when an employee is temporarily let go from his or her job, due to
the employer not having any work for that employee.
• Leave: Formal permission given to an employee, by his or her employer, to take a leave of
absence from work. Letter of Acceptance: A letter given by an employer to an employee,
confirming the offer of employment made by the employer, as well as the conditions of the
offer.
• Letter of Agreement: A letter that outlines the terms of employment.
• Letter of Recommendation: A letter written for the purpose of validating the work skills of a
person.
• Maternity Leave: Leave taken from work by women who are pregnant, or who have just
given birth.
• Mentor: A person who is employed at a higher level than you, who offers you advice and
guides you in your career.
• Minimum wage: The minimum wage amount paid on an hourly basis.
• Notice: An announcement made by an employee or an employer, stating that the
employment contract will end on a particular date.
• Offer of Employment: An offer made by an employer to a prospective employee that
contains important information pertaining to the job being offered, like the starting date,
salary, working conditions etc.
• Open-Ended Contract: A contract of employment that continues till the employer or
employee terminates it.
• Overqualified: A person who is not suited for a particular job because he or she has too
many years of work experience, or a level of education that is much higher than required for
the job, or is currently or was previously too highly paid.
• Part-Time Worker: An employee who works for fewer hours than the standard number of
hours normally worked.
• Paternity Leave: Leave granted to a man who has recently become a father.
• Recruiters/Headhunters/Executive Search Firms: Professionals who are paid by employers
to search for people to fill particular positions.
449

Assistant Fashion Designer
• Resigning/Resignations: When an employee formally informs his or her employer that he or
she is quitting his or her job.
• Self-Employed: A person who has his or her own business and does not work in the capacity
of an employee.
• Time Sheet: A form that is submitted to an employer, by an employee, that contains the
number of hours worked every day by the employee.
450

Participant Handbook
Unit 10.5: Understanding Entrepreneurship
Unit Objectives
At the end of this unit, participants will be able to:
• Discuss the concept of entrepreneurship
• Describe the different types of enterprises
• List the qualities of an effective leader
• Discuss the benefits of effective leadership
• List the traits of an effective team
• Discuss the importance of listening effectively
• Discuss how to listen effectively
• Discuss the importance of speaking effectively
• Discuss how to speak effectively
• List important problem solving traits
• Discuss ways to assess problem solving skills
• Discuss the importance of negotiation
• Discuss how to negotiate
• Discuss how to identify new business opportunities
• Discuss how to identify business opportunities within your business
• Know the meaning of entrepreneur
• Describe the different types of entrepreneurs
• List the characteristics of entrepreneurs
• Recall entrepreneur success stories
• Discuss the entrepreneurial process
• Describe the entrepreneurship ecosystem
• Discuss the government’s role in the entrepreneurship ecosystem
• Discuss the current entrepreneurship ecosystem in India
• Know the purpose of the Make in India campaign
• Discuss the relationship between entrepreneurship and risk appetite
• Discuss the relationship between entrepreneurship and resilience
• Describe the characteristics of a resilient entrepreneur
• Discuss how to deal with failure
451
Assistant Fashion Designer
10.5.1. Concept Introduction
Anyone who is determined to start a business, no matter what the risk, is an entrepreneur.
Entrepreneurs run their own start-up, take responsibility for the financial risks and use creativity,
innovation and vast reserves of self-motivation to achieve success. They dream big and are
determined to do whatever it takes to turn their idea into a viable offering. The aim of an
entrepreneur is to create an enterprise. The process of creating this enterprise is known as
entrepreneurship.
10.5.2. Importance of Entrepreneurship
Entrepreneurship is very important for the following reasons:
• It results in the creation of new organizations
• It brings creativity into the marketplace
• It leads to improved standards of living
• It helps develop the economy of a country
10.5.3. Characteristics of Entrepreneurs
All successful entrepreneurs have certain characteristics in common.
They are all:
• Extremely passionate about their work
• Confident in themselves
• Disciplined and dedicated
• Motivated and driven
• Highly creative
• Visionaries
• Open-minded
• Decisive
• Have a high risk tolerance
• Thoroughly plan everything
452
Participant Handbook
• Manage their money wisely
• Make their customers their priority
• Understand their offering and their market in detail
• Ask for advice from experts when required
• Know when to cut their losses
10.5.4. Examples of Famous Entrepreneurs
Some famous entrepreneurs are:
• Bill Gates (Founder of Microsoft)
• Steve Jobs (Co-founder of Apple)
• Mark Zuckerberg (Founder of Facebook)
• Pierre Omidyar (Founder of eBay)
10.5.5. Types of Enterprises
As an entrepreneur in India, you can own and run any of the following types of enterprises:
Sole Proprietorship
In a sole proprietorship, a single individual owns, manages and controls the enterprise. This type of
business is the easiest to form with respect to legal formalities. The business and the owner have no
separate legal existence. All profit belongs to the proprietor, as do all the losses- the liability of the
entrepreneur is unlimited.
Partnership
A partnership firm is formed by two or more people. The owners of the enterprise are called
partners. A partnership deed must be signed by all the partners. The firm and its partners have no
separate legal existence. The profits are shared by the partners. With respect to losses, the liability
of the partners is unlimited. A firm has a limited life span and must be dissolved when any one of
the partners dies, retires, claims bankruptcy or goes insane.
453
Assistant Fashion Designer
Limited Liability Partnership (LLP)
In a Limited Liability Partnership or LLP, the partners of the firm enjoy perpetual existence as well as
the advantage of limited liability. Each partner’s liability is limited to their agreed contribution to the
LLP. The partnership and its partners have a separate legal existence.
10.5.6. Leadership and Teamwork
Leadership means setting an example for others to follow. Setting a good example means t asking
someone to do something that you wouldn’t willingly want to do yourself. Leadership is about
figuring out what to do in order to win as a team, and as a company.
Leaders believe in doing the right things. They also believe in helping others to do the right things.
An effective leader is someone who:
• Creates an inspiring vision of the future
• Motivates and inspires his team to pursue that vision
Leadership Qualities That All Entrepreneurs Need
Building a successful enterprise is only possible if the entrepreneur in charge possesses excellent
leadership qualities. Some critical leadership skills that every entrepreneur must have are:
Pragmatism: This means having the ability to highlight all obstacles and challenges, in order to
resolve issues and reduce risks.
Humility: This means admitting to mistakes often and early, and being quick to take responsibility
for your actions. Mistakes should be viewed as challenges to overcome, not opportunities to point
blame.
Flexibility: It is critical for a good leader to be very flexible and quickly adapt to change. It is equally
critical to know when to adapt and when not to.
Authenticity: This means showing both, your strengths and your weaknesses. It means being human
and showing others that you are human.
454
Participant Handbook
Reinvention: This means refreshing or changing your leadership style when necessary. To do this,
it’s important to learn where your leadership gaps lie and find out what resources are required to
close them.
Awareness: This means taking the time to recognize how others view you. It means understanding
how your presence affects those around you.
Benefits of Effective Leadership
Effective leadership results in numerous benefits. Great leadership leads to the leader successfully:
• Gaining the loyalty and commitment of the team members
• Motivating the team to work towards achieving the company’s goals and objectives
• Building morale and instilling confidence in the team members
• Fostering mutual understanding and team-spirit among team members
• Convincing team members about the need to change when a situation requires adaptability
Teamwork and Teams
Teamwork occurs when the people in a tailoring shop combine their individual skills to pursue a
common goal. Effective teams are made up of individuals who work together to achieve this
common goal. A great team is one who holds themselves accountable for the end result.
Importance of Teamwork in Entrepreneurial Success
For an entrepreneurial leader, building an effective team is critical to the success of a venture. An
entrepreneur must ensure that the team he builds possesses certain crucial qualities, traits and
characteristics. An effective team is one which has:
Unity of purpose: All the team members should clearly understand and be equally committed to the
purpose, vision and goals of the team.
Great communication skills: Team members should have the ability to express their concerns, ask
questions and use diagrams, and charts to convey complex information.
The ability to collaborate: Every member should feel entitled to provide regular feedback on new
ideas.
455
Assistant Fashion Designer
Initiative: The team should consist of proactive individuals. The members should have the
enthusiasm to come up with new ideas, improve existing ideas, and conduct their own research.
Visionary members: The team should have the ability to anticipate problems and act on this
potential problem before they turn into real problems.
Great adaptability skills: The team must believe that change is a positive force. Change should be
seen as the chance to improve and try new things.
Excellent organizational skills: The team should have the ability to develop standard work
processes, balance responsibilities, properly plan projects, and set in place methods to measure
progress and ROI.
10.5.7. Communication Skills
Listening is the ability to correctly receive and understand messages during the process of
communication. Listening is critical for effective communication. Without effective listening skills,
messages can easily be misunderstood. This results in a communication breakdown and can lead to
the sender and the receiver of the message becoming frustrated or irritated.
It’s very important to note that listening is not the same as hearing. Hearing just refers to sounds
that you hear. Listening is a whole lot more than that. To listen, one requires focus. It means not
only paying attention to the story, but also focusing on how the story is relayed, the way language
and voice is used, and even how the speaker uses their body language. The ability to listen depends
on how effectively one can perceive and understand both, verbal and non-verbal cues.
How to Listen Effectively
To listen effectively you should:
• Stop talking
• Stop interrupting
• Focus completely on what is being said
• Nod and use encouraging words and gestures
• Be open-minded
• Think about the speaker’s perspective
• Be very, very patient
456
Participant Handbook
• Pay attention to the tone that is being used
• Pay attention to the speaker’s gestures, facial expressions and eye movements
• Not try and rush the person
• Not let the speaker’s mannerisms or habits irritate or distract you
How to Speak Effectively
To speak effectively you should:
Incorporate body language in your speech like eye contact, smiling, nodding, gesturing etc.
Build a draft of your speech before actually making your speech.
Ensure that all your emotions and feelings are under control.
Pronounce your words distinctly with the correct pitch and intensity. Your speech should be
crystal clear at all times.
Use a pleasant and natural tone when speaking. Your audience should not feel like you are
putting on an accent or being unnatural in any way.
Use precise and specific words to drive your message home. Ambiguity should be avoided at
all costs.
Ensure that your speech has a logical flow.
Be brief. Don’t add any unnecessary information.
Make a conscious effort to avoid irritating mannerisms like fidgeting, twitching etc.
Choose your words carefully and use simple words that the majority of the audience will
have no difficulty understanding.
Use visual aids like slides or a whiteboard.
Speak slowly so that your audience can easily understand what you’re saying. However, be
careful not to speak too slowly because this can come across as stiff, unprepared or even
condescending.
Remember to pause at the right moments.
10.5.8. Problem Solving and Negotiation skills
Solving a problem requires a level of rational thinking. Here are some logical steps to follow when
faced with an issue:
457
Assistant Fashion Designer
Step 1: Identify the problem
Step 2: Study the problem in detail
Step 3: List all possible solutions
Step 4: Select the best solution
Step 5: Implement the chosen solution
Step 6: Check that the problem has really been solved
Important Traits for Problem Solving
Highly developed problem solving skills are critical for both, business owners and their employees.
The following personality traits play a big role in how effectively problems are solved:
Being open minded
Asking the right questions
Being proactive
Not panicking
Having a positive attitude
Focusing on the right problem
As an entrepreneur, it would be a good idea to assess the level of problem solving skills of potential
candidates before hiring them. Some ways to assess this skill are through:
Application forms: Ask for proof of the candidate’s problem solving skills in the application
form.
Psychometric tests: Give potential candidates logical reasoning and critical thinking tests
and see how they fare.
Interviews: Create hypothetical problematic situations or raise ethical questions and see
how the candidates respond.
Technical questions: Give candidates examples of real life problems and evaluate their
thought process.
458
Participant Handbook
What is Negotiation?
Negotiation is a method used to settle differences. The aim of negotiation is to resolve differences
through a compromise or agreement while avoiding disputes. Without negotiation, conflicts are
likely to lead to resentment between people. Good negotiation skills help satisfy both parties and go
a long way towards developing strong relationships.
Why Negotiate
Starting a business requires many, many negotiations. Some negotiations are small while others are
critical enough to make or break a startup. Negotiation also plays a big role inside the tailoring shop.
As an entrepreneur, you need to know not only know how to negotiate yourself, but also how to
train employees in the art of negotiation.
How to Negotiate
Take a look at some steps to help you negotiate:
Step 1: Pre-Negotiation Preparation: Agree on where to meet to discuss the problem,
decide who all will be present and set a time limit for the discussion.
Step 2: Discuss the Problem: This involves asking questions, listening to the other side,
putting your views forward and clarifying doubts.
Step 3: Clarify the Objective: Ensure that both parties want to solve the same problem and
reach the same goal.
Step 4: Aim for a Win-Win Outcome: Try your best to be open minded when negotiating.
Compromise and offer alternate solutions to reach an outcome where both parties win.
Step 5: Clearly Define the Agreement: When an agreement has been reached, the details of
the agreement should be crystal clear to both sides, with no scope for misunderstandings.
Step 6: Implement the Agreed upon Solution: Agree on a course of action to set the solution
10.5.9. Business Opportunities Identification
“The entrepreneur always searches for change, responds to it and exploits it as an opportunity.” Peter Drucker The ability to identify business opportunities is an essential characteristic of an entrepreneur.
459
Assistant Fashion Designer
What is an Opportunity?
The word opportunity suggests a good chance or a favorable situation to do something offered by
circumstances.
A business opportunity means a good or favorable change available to run a specific business in a
given environment, at a given point of time.
Common Questions Faced by Entrepreneurs
A critical question that all entrepreneurs face is how to go about finding the business
opportunity that is right for them.
Some common questions that entrepreneurs constantly think about are:
Should the new enterprise introduce a new product or service based on an unmet need?
Should the new enterprise select an existing product or service from one market and offer it in
another where it may not be available?
Should the enterprise be based on a tried and tested formula that has worked elsewhere?
It is therefore extremely important that entrepreneurs must learn how to identify new and
existing business opportunities and evaluate their chances of success.
When is an Idea an Opportunity?
An idea is an opportunity when:
It creates or adds value to a customer
It solves a significant problem, removes a pain point or meets a demand
as a robust market and profit margin
Is a good fit with the founder and management team at the right
time and place
Factors to Consider When Looking for Opportunities
Consider the following when looking for business opportunities:
Economic trends Changes in funding
Changing relationships between vendors, partners and suppliers
Market trends
460
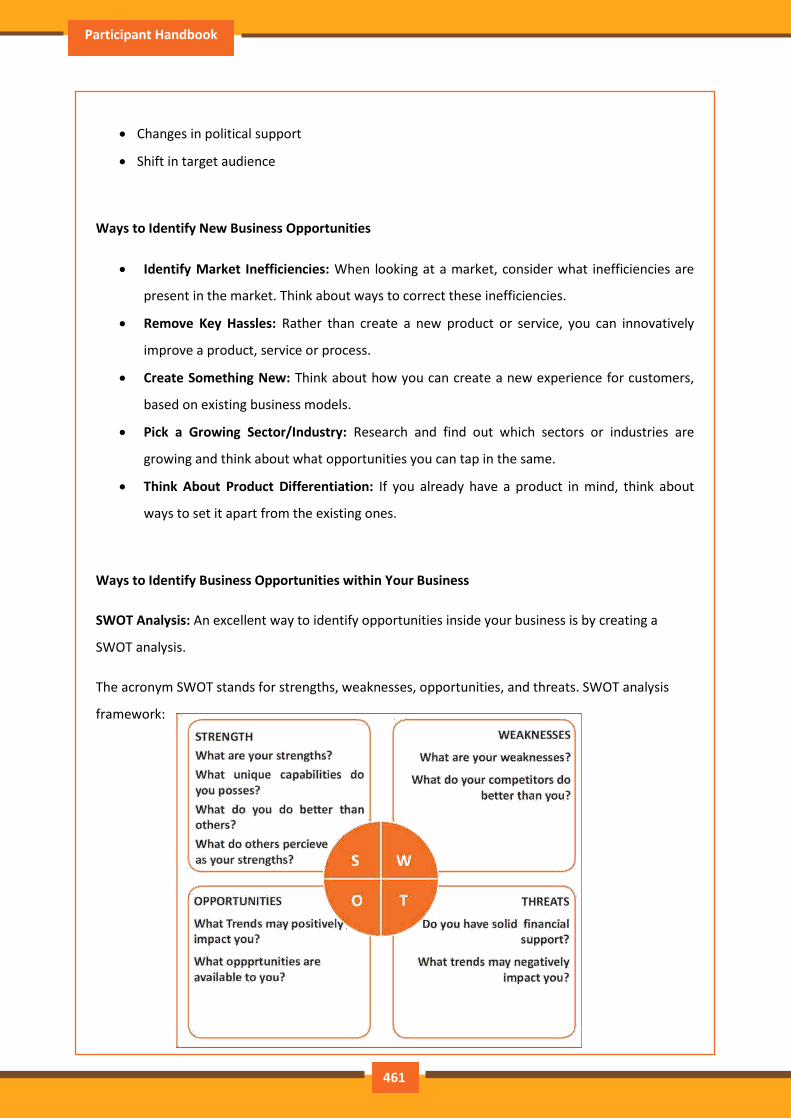
Participant Handbook
Changes in political support
Shift in target audience
Ways to Identify New Business Opportunities
Identify Market Inefficiencies: When looking at a market, consider what inefficiencies are
present in the market. Think about ways to correct these inefficiencies.
Remove Key Hassles: Rather than create a new product or service, you can innovatively
improve a product, service or process.
Create Something New: Think about how you can create a new experience for customers,
based on existing business models.
Pick a Growing Sector/Industry: Research and find out which sectors or industries are
growing and think about what opportunities you can tap in the same.
Think About Product Differentiation: If you already have a product in mind, think about
ways to set it apart from the existing ones.
Ways to Identify Business Opportunities within Your Business
SWOT Analysis: An excellent way to identify opportunities inside your business is by creating a
SWOT analysis.
The acronym SWOT stands for strengths, weaknesses, opportunities, and threats. SWOT analysis
framework:
461
Assistant Fashion Designer
Consider the following when looking for business opportunities:
By looking at yourself and your competitors using the SWOT framework, you can uncover
opportunities that you can exploit, as well as manage and eliminate threats that could derail your
success.
Establishing Your USP
Establish your USP and position yourself as different from your competitors. Identify why customers
should buy from you and promote that reason.
Opportunity Analysis
Once you have identified an opportunity, you need to analyze it. To analyze an opportunity, you
must:
Focus on the idea
Focus on the market of the idea
Talk to industry leaders in the same space as the idea
Talk to players in the same space as the idea
10.5.10. Entrepreneurship Support Eco-System
An entrepreneur is a person who:
Does not work for an employee
Runs a small enterprise
Assumes all the risks and rewards of the enterprise, idea, good or service
Types of Entrepreneurs
There are four main types of entrepreneurs:
The Traditional Entrepreneur: This type of entrepreneur usually has some kind of skill – they
can be a carpenter, mechanic, cook etc. They have businesses that have been around for
numerous years like restaurants, shops and carpenters. Typically, they gain plenty of
experience in a particular industry before they begin their own business in a similar field.
462
Participant Handbook
The Growth Potential Entrepreneur: The desire of this type of entrepreneur is to start an
enterprise that will grow, win many customers and make lots of money. Their ultimate aim
is to eventually sell their enterprise for a nice profit. Such entrepreneurs usually have a
science or technical background.
The Project-Oriented Entrepreneur: This type of entrepreneur generally has a background in
the Arts or psychology. Their enterprises tend to be focus on something that they are very
passionate about.
The Lifestyle Entrepreneur: This type of entrepreneur has usually worked as a teacher or a
secretary. They are more interested in selling something that people will enjoy, rather than
making lots of money.
Characteristics of an Entrepreneur
Successful entrepreneurs have the following characteristics:
They are highly motivated
They are creative and persuasive
They are mentally prepared to handle each and every task
They have excellent business skills – they know how to evaluate their cash flow, sales and
revenue
They are willing to take great risks
They are very proactive – this means they are willing to do the work themselves, rather than
wait for someone else to do it
They have a vision – they are able to see the big picture
They are flexible and open-minded
They are good at making decisions
Entrepreneur Success Stories
Dhiru Bhai Ambani
Dhirubhai Ambani began his entrepreneurial career by selling “bhajias” to pilgrims in Mount Girnar
on weekends. At 16, he moved to Yemen where he worked as a gas-station attendant, and as a clerk
in an oil company. He returned to India with Rs. 50,000 and started a textile trading company.
463
Assistant Fashion Designer
Reliance went on to become the first Indian company to raise money in global markets and the first
Indian company to feature in Forbes 500 list.
Dr. Karsanbhai Patel
Karsanbhai Patel made detergent powder in the backyard of his house. He sold his product door-to-
door and offered a money back guarantee with every pack that was sold. He charged Rs. 3 per kg
when the cheapest detergent at that time was Rs.13 per kg. Dr. Patel eventually started Nirma which
became a whole new segment in the Indian domestic detergent market.
10.5.11. The Entrepreneurial Process
Let’s take a look at the stages of the entrepreneurial process.
Stage 1: Idea Generation. The entrepreneurial process begins with an idea that has been
thought of by the entrepreneur. The idea is a problem that has the potential to be solved.
Stage 2: Germination or Recognition. In this stage a possible solution to the identified
problem is thought of.
Stage 3: Preparation or Rationalization. The problem is studied further and research is done
to find out how others have tried to solve the same problem.
Stage 4: Incubation or Fantasizing. This stage involves creative thinking for the purpose of
coming up with more ideas. Less thought is given to the problem areas.
Stage 5: Feasibility Study: The next step is the creation of a feasibility study to determine if
the idea will make a profit and if it should be seen through.
Stage 6: Illumination or Realization. This is when all uncertain areas suddenly become clear.
The entrepreneur feels confident that his idea has merit.
Stage 7: Verification or Validation. In this final stage, the idea is verified to see if it works
and if it is useful. Take a look at the diagram below to get a better idea of this process.
464
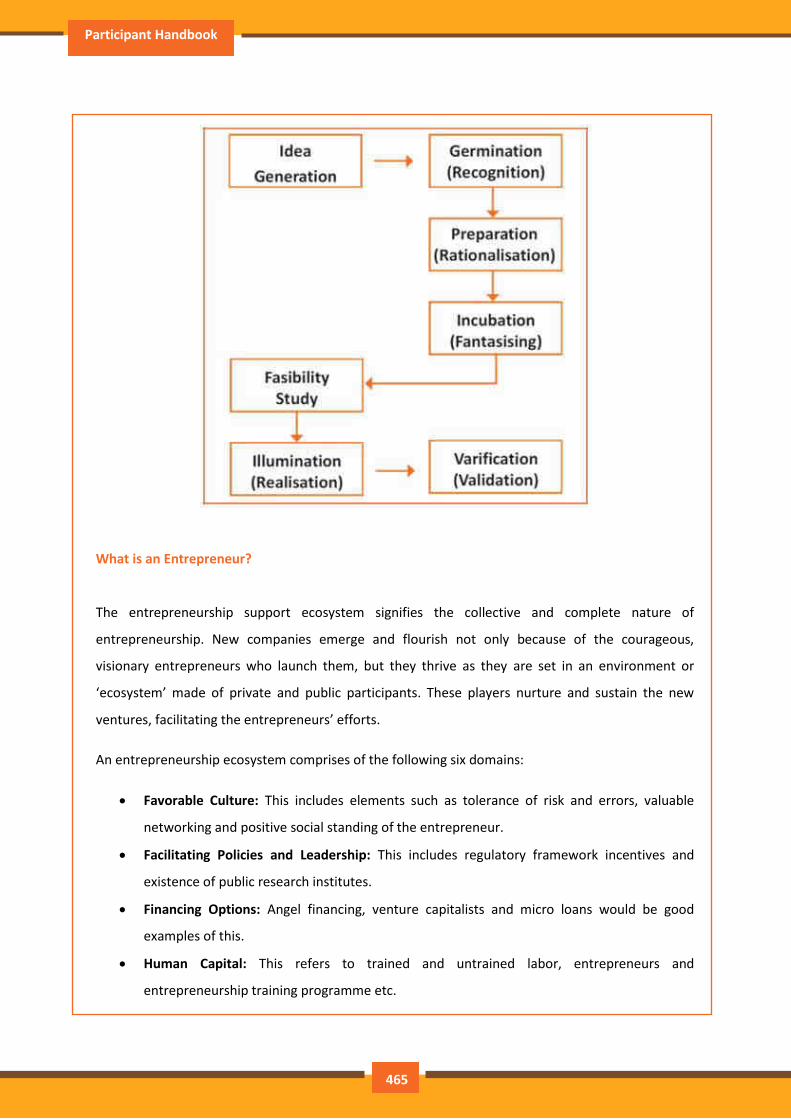
Participant Handbook
What is an Entrepreneur?
The entrepreneurship support ecosystem signifies the collective and complete nature of
entrepreneurship. New companies emerge and flourish not only because of the courageous,
visionary entrepreneurs who launch them, but they thrive as they are set in an environment or
‘ecosystem’ made of private and public participants. These players nurture and sustain the new
ventures, facilitating the entrepreneurs’ efforts.
An entrepreneurship ecosystem comprises of the following six domains:
Favorable Culture: This includes elements such as tolerance of risk and errors, valuable
networking and positive social standing of the entrepreneur.
Facilitating Policies and Leadership: This includes regulatory framework incentives and
existence of public research institutes.
Financing Options: Angel financing, venture capitalists and micro loans would be good
examples of this.
Human Capital: This refers to trained and untrained labor, entrepreneurs and
entrepreneurship training programme etc.
465

Assistant Fashion Designer
Conducive Markets for Products and Services: This refers to an existence or scope of
existence of a market for the product/service.
Institutional and Infrastructural Support: This includes legal and financing advisers,
telecommunications, digital and transportation infrastructure, and entrepreneurship
networking programme.
These domains indicate whether there is a strong entrepreneurship support ecosystem and what
actions should the government put in place to further encourage this ecosystem. The six domains
and their various elements have been graphically depicted.
466
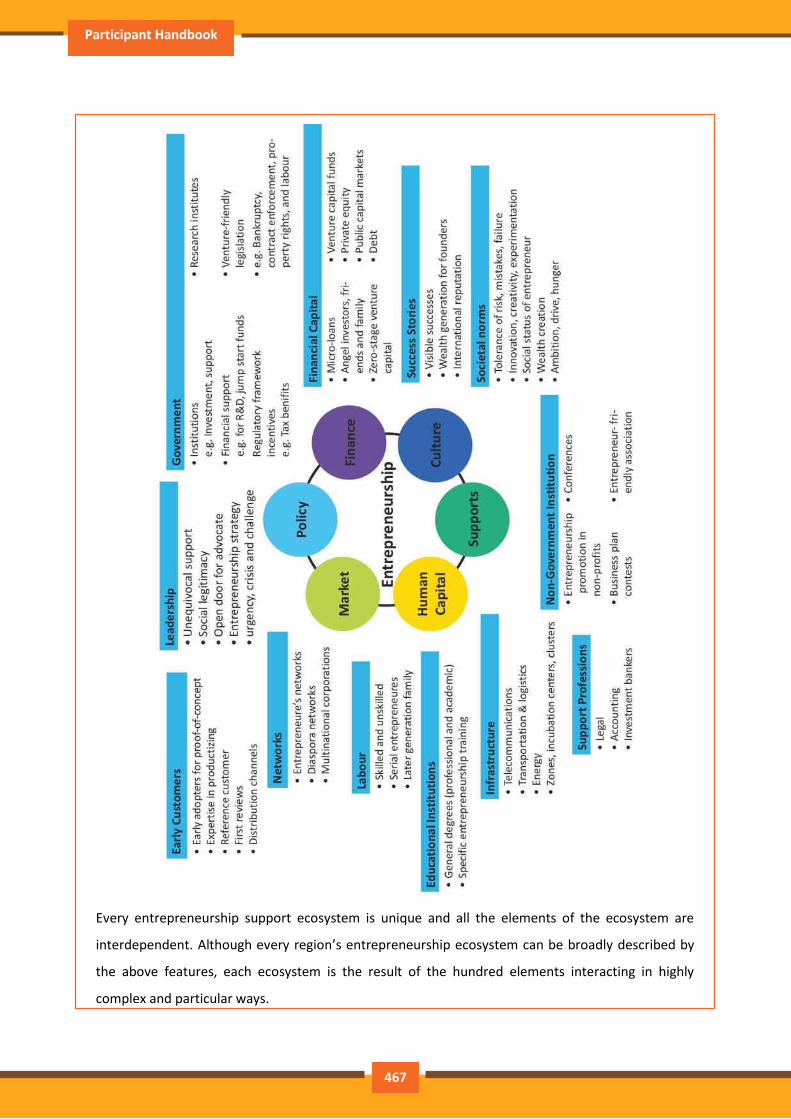
Participant Handbook
Every entrepreneurship support ecosystem is unique and all the elements of the ecosystem are
interdependent. Although every region’s entrepreneurship ecosystem can be broadly described by
the above features, each ecosystem is the result of the hundred elements interacting in highly
complex and particular ways.
467
Assistant Fashion Designer
Entrepreneurship ecosystems eventually become (largely) self-sustaining. When the six domains are
resilient enough, they are mutually beneficial. At this point, government involvement can and
should be significantly minimized. Public leaders do not need to invest a lot to sustain the
ecosystem. It is imperative that the entrepreneurship ecosystem incentives are formulated to be
self-liquidating, hence focusing on sustainability of the environment.
Government’s Role in the Entrepreneurship Ecosystem
Encouraging new ventures is a major focus for policymakers. Governments across the world are
recognizing that new businesses flourish in distinctive types of supportive environments.
Policymakers should study the scenario and take into account the following points whilst they
formulate policies and regulations that enable successful entrepreneurship support ecosystems.
Policymakers should avoid regulations that discourage new entrants and work towards building
efficient methods for business startups. Policies and regulations that favor existing, dominant firms
over entrepreneurial ventures restrict competition and obstruct entry for new companies.
Instead of developing policies conceptually intended to correct market failures, policymakers should
interact with entrepreneurs and understand the challenges faced by them. The feedback should be
used to develop policies that incite idea exploration, product development and increased rates of
deal flow.
Entrepreneurial supporters should create a database that enables identifying who the participants in
the ecosystem are and how they are connected. These ecosystem maps are useful tools in
developing engagement strategies.
Disruptions are unavoidable in economic and social life. However, it’s important to note that
economic disruption gives rise to entrepreneurial opportunities. Architects of the entrepreneurship
ecosystems (entrepreneurs, mentors, policymakers and consumers,) should anticipate these dips,
thus capitalizing on the opportunities they create.
The need for effective strategies to enable local entrepreneurship support ecosystems is a practical
one. Better understanding of the actual ecosystems provides a framework within which policy
makers can ask relevant questions, envisage more efficient approaches, and assess ensuing
outcomes.
468
Participant Handbook
Snapshot of the Entrepreneurship Ecosystem in India
Entrepreneurship has earned a newfound respect in India. Many Indians, with exposure to the world
of business, who traditionally would have opted for a job, are setting up their own ventures. Many
elements of the entrepreneurship ecosystem are beginning to come together. For example, increase
in venture capitalists, government schemes and incubators, academia industry linkages, and
emerging clusters and support to rural economy. All these initiatives are effective but there is a
need to scale up and enrich the ecosystem further in the following ways:
We need to review our attitude towards failures and accept them as learning experiences.
We must encourage the educated to become entrepreneurs and provide students in schools
and colleges with entrepreneurship skills.
Universities, research labs and the government need to play the role of enablers in the
entrepreneurship support ecosystem.
Policymakers need to focus on reducing the obstacles such as corruption, red tape and
bureaucracy.
We need to improve our legal systems and court international venture capital firms and
bring them to India.
We must devise policies and methods to reach the secondary and tertiary towns in India,
where people do not have access to the same resources available in the cities.
Today, there is a huge opportunity in this country to introduce innovative solutions that are
capable of scaling up, and collaborating within the ecosystem as well as enriching it.
10.5.12. Make in India Campaign
Every entrepreneur has certain needs. Some of their important needs are:
To easily get loans
To easily find investors
To get tax exemptions
To easily access resources and good infrastructure
To enjoy a procedure that is free of hassles and is quick
To be able to easily partner with other firms
The Make in India campaign, launched by Prime Minister Modi aims to satisfy all these
needs of young, aspiring entrepreneurs. Its objective is to:
469
Assistant Fashion Designer
Make investment easy
Support new ideas
Enhance skill development
Safeguard the ideas of entrepreneurs
Create state-of-the-art facilities for manufacturing goods
10.5.13. Risk Appetite and Resilience
Entrepreneurship and Risk
Entrepreneurs are inherently risk takers. They are path-makers not path-takers. Unlike a normal,
cautious person, an entrepreneur would not think twice about quitting his job (his sole income) and
taking a risk on himself and his idea.
An entrepreneur is aware that while pursuing his dreams, assumptions can be proven wrong and
unforeseen events may arise. He knows that after dealing with numerous problems, success is still
not guaranteed. Entrepreneurship is synonymous with the ability to take risks. This ability, called
risk-appetite, is an entrepreneurial trait that is partly genetic and partly acquired.
What is Risk Appetite?
Risk appetite is defending as the extent to which a company is equipped to take risk, in order to
achieve its objectives. Essentially, it refers to the balance, struck by the company, between possible
profits and the hazards caused by changes in the environment (economic ecosystem, policies, etc.).
Taking on more risk may lead to higher rewards but have a high probability of losses as well.
However, being too conservative may go against the company as it can miss out on good
opportunities to grow and reach their objectives.
The levels of risk appetite can be broadly categorized as “low”, “medium” and “high.” The
company’s entrepreneur(s) have to evaluate all potential alternatives and select the option most
likely to succeed. Companies have varying levels of risk appetites for different objectives. The levels
depend on:
The type of industry
Market pressures
Company objectives
470
Participant Handbook
For example, a startup with a revolutionary concept will have a very high risk appetite. The startup
can afford short term failures before it achieves longer term success. This type of appetite will not
remain constant and will be adjusted to account for the present circumstances of the company.
Risk Appetite Statement
Companies have to define and articulate their risk appetite in sync with decisions made about their
objectives and opportunities. The point of having a risk appetite statement is to have a framework
that clearly states the acceptance and management of risk in business. It sets risk taking limits
within the company. The risk appetite statement should convey the following:
The nature of risks the business faces.
Which risks the company is comfortable taking on and which risks are unacceptable.
How much risk to accept in all the risk categories.
The desired tradeoff between risk and reward.
Measures of risk and methods of examining and regulating risk exposures.
Entrepreneurship and Resilience
Entrepreneurs are characterized by a set of qualities known as resilience. These qualities play an
especially large role in the early stages of developing an enterprise. Risk resilience is an extremely
valuable characteristic as it is believed to protect entrepreneurs against the threat of challenges and
changes in the business environment.
What is Entrepreneurial Resilience?
Resilience is used to describe individuals who have the ability to overcome setbacks related to their
life and career aspirations. A resilient person is someone who is capable of easily and quickly
recovering from setbacks. For the entrepreneur, resilience is a critical trait. Entrepreneurial
resilience can be enhanced in the following ways:
By developing a professional network of coaches and mentors
By accepting that change is a part of life
By viewing obstacles as something that can be overcome
471

Assistant Fashion Designer
Characteristics of a Resilient Entrepreneur
The characteristics required to make an entrepreneur resilient enough to go the whole way in their
business enterprise are:
A strong internal sense of control
Strong social connections
Skill to learn from setbacks
Ability to look at the bigger picture
Ability to diversify and expand
Survivor attitude
Cash-flow conscious habits
Attention to detail
10.5.14. Success and Failures
Understanding Successes and Failures in Entrepreneurship
Shyam is a famous entrepreneur, known for his success story. But what most people don’t know is
that Shyam failed numerous times before his enterprise became a success. Read his interview to get
an idea of what entrepreneurship is really about, straight from an entrepreneur who has both, failed
and succeeded.
Interviewer: Shyam, I have heard that entrepreneurs are great risk-takers who are never afraid of
failing. Is this true?
Shyam: Ha ha, no of course it’s not true! Most people believe that entrepreneurs need to be
fearlessly enthusiastic. But the truth is, fear is a very normal and valid human reaction, especially
when you are planning to start your own business! In fact, my biggest fear was the fear of failing.
The reality is entrepreneurs fail as much as they succeed. The trick is to not allow the fear of failing
to stop you from going ahead with your plans. Remember, failures are lessons for future success!
Interviewer: What, according to you, is the reason that entrepreneurs fail?
Shyam: Well, there is no one single reason why entrepreneurs fail. An entrepreneur can fail due to
numerous reasons. You could fail because you have allowed your fear of failure to defeat you. You
472
Participant Handbook
could fail because you are unwilling to delegate (distribute) work. As the saying goes, “You can do
anything, but not everything!” You could fail because you gave up too easily – maybe you were not
persistent enough. You could fail because you were focusing your energy on small, insignificant
tasks and ignoring the tasks that were most important. Other reasons for failing are partnering with
the wrong people, not being able to sell your product to the right customers at the right time at the
right price… and many more reasons!
Interviewer: As an entrepreneur, how do you feel failure should be looked at?
Shyam: I believe we should all look at failure as an asset, rather than as something negative. The
way I see it, if you have an idea, you should try to make it work, even if there is a chance that you
will fail. That’s because not trying is failure right there, anyway! And failure is not the worst thing
that can happen. I think having regrets because of not trying and wondering ‘what if’ is far worse
than trying and actually failing.
Interviewer: How did you feel when you failed for the first time?
Shyam: I was completely heartbroken! It was a very painful experience. But the good news is you do
recover from the failure. And with every subsequent failure, the recovery process gets a lot easier.
That’s because you start to see each failure more as a lesson that will eventually help you succeed,
rather than as an obstacle that you cannot overcome. You will start to realize that failure has many
benefits.
Interviewer: Can you tell us about some of the benefits of failing?
Shyam: One of the benefits that I have experienced personally from failing is that the failure made
me see things in a new light. It gave me answers that I didn’t have before. Failure can make you a lot
stronger. It also helps keep your ego in control.
Interviewer: What advice would you give entrepreneurs who are about to start their own
enterprises?
Shyam: I would tell them to do their research and ensure that their product is something that is
actually wanted by customers. I’d tell them to pick their partners and employees very wisely and
cautiously. I’d tell them that it’s very important to be aggressive – push and market your product as
aggressively as possible. I would warn them that starting an enterprise is very expensive and that
they should be prepared for a situation where they run out of money.
473

Assistant Fashion Designer
I would tell them to create long term goals and put a plan in action to achieve that goal. I would tell
them to build a product that is truly unique. Be very careful and ensure that you are not copying
another startup. Lastly, I’d tell them that it’s very important that they find the right investors.
Interviewer: That’s some really helpful advice, Shyam! I’m sure this will help all entrepreneurs to be
more prepared before they begin their journey! Thank you for all your insight!
474
Participant Handbook
UNIT 10.6: Preparing to be an Entrepreneur
Unit Objectives
At the end of this unit, participants will be able to:
• Discuss how market research is carried out
• Describe the 4 Ps of marketing
• Discuss the importance of idea generation
• Recall basic business terminology
• Discuss the need for CRM
• Discuss the benefits of CRM
• Discuss the need for networking
• Discuss the benefits of networking
• List the importance of setting goals
• Differentiate between short-term, medium-term and long-term goals
• Discuss how to write a business plan
• List the financial planning process
• Discuss ways to manage your risk
• Describe the procedure and formalities for applying for bank finance
• Discuss how to manage your own enterprise
• List important questions that every entrepreneur should ask before starting an enterprise
10.6.1. Market Study / The 4 Ps of Marketing / Importance
of an IDEA
Understanding Market Research
Market research is the process of gathering, analyzing and interpreting market information on a
product or service that is being sold in that market. It also includes information on:
Past, present and prospective customers
Customer characteristics and spending habits
The location and needs of the target market
475
Assistant Fashion Designer
The overall industry
Relevant competitors
Market research involves two types of data:
Primary information. This is research collected by yourself or by someone hired by you.
Secondary information. This is research that already exists and is out there for you to find and
use.
Primary research
Primary research can be of two types:
Exploratory: This is open-ended and usually involves detailed, unstructured interviews.
Specific: This is precise and involves structured, formal interviews. Conducting specific
research is the more expensive than conducting exploratory research.
Secondary research
Secondary research uses outside information. Some common secondary sources are:
Public sources: These are usually free and have a lot of good information. Examples are
government departments, business departments of public libraries etc.
Commercial sources: These offer valuable information but usually require a fee to be paid.
Examples are research and trade associations, banks and other financial institutions etc.
Educational institutions: These offer a wealth of information. Examples are colleges,
universities, technical institutes etc.
10.6.2. The 4 Ps of Marketing
The 4 Ps of marketing is:
Product,
Price,
Promotion and
Place.
476
Participant Handbook
Let’s look at each of these 4 Ps in detail.
Product
A product can be:
A tangible good
An intangible service
Whatever your product is, it is critical that you have a clear understanding of what you are offering,
and what its unique characteristics are, before you begin with the marketing process. Some
questions to ask you are:
What does the customer want from the product/service?
What needs does it satisfy?
Are there any more features that can be added?
Does it have any expensive and unnecessary features?
How will customers use it?
What should it be called?
How is it different from similar products?
How much will it cost to produce?
Can it be sold at a profit?
Price
Once all the elements of Product have been established, the Price factor needs to be considered.
The Price of a Product will depend on several factors such as profit margins, supply, demand and the
marketing strategy. Some questions to ask you are:
What is the value of the product/service to customers?
Do local products/services have established price points?
Is the customer price sensitive?
Should discounts be offered?
How is your price compared to that of your competitors?
477
Assistant Fashion Designer
Promotion
Once you are certain about your Product and your Price, the next step is to look at ways to promote
it. Some key elements of promotion are advertising, public relations, social media marketing, email
marketing, search engine marketing, video marketing and more. Some questions to ask you are:
Where should you promote your product or service?
What is the best medium to use to reach your target audience?
When would be the best time to promote your product?
How are your competitors promoting their products?
Place
According to most marketers, the basis of marketing is about offering the right product, at the right
price, at the right place, at the right time. For this reason, selecting the best possible location is
critical for converting prospective clients into actual clients. Some questions to ask you are:
Will your product or service be looked for in a physical store, online or both?
What should you do to access the most appropriate distribution channels?
Will you require a sales force?
Where are your competitors offering their products or services?
Should you follow in your competitors’ footsteps?
Should you do something different from your competitors?
Importance of an IDEA
Ideas are the foundation of progress. An idea can be small or ground-breaking, easy to accomplish
or extremely complicated to implement. Whatever the case, the fact that it is an idea gives it merit.
Without ideas, nothing is possible. Most people are afraid to speak out their ideas, out for fear of
being ridiculed. However, if is an entrepreneur and want to remain competitive and innovative, you
need to bring your ideas out into the light. Some ways to do this are by:
Establishing a culture of brainstorming where you invite all interested parties to contribute
Discussing ideas out loud so that people can add their ideas, views, opinions to them
Being open minded and not limiting your ideas, even if the idea who have seems ridiculous
478
Participant Handbook
Not discarding ideas that you don’t work on immediately, but instead making a note of them
and shelving them so they can be revisited at a later date.
10.6.3. Business Entity Concepts: Basic Business
Terminology
If your aim is to start and run a business, it is crucial that you have a good understanding of basic
business terms. Every entrepreneur should be well versed in the following terms:
Accounting: A systematic method of recording and reporting financial transactions.
Accounts payable: Money owed by a company to its creditors.
Accounts Receivable: The amount a company is owed by its clients.
Assets: The value of everything a company owns and uses to conduct its business.
Balance Sheet: A snapshot of a company’s assets, liabilities and owner’s equity at a given
moment.
Bottom Line: The total amount a business has earned or lost at the end of a month.
Business: An organization that operates with the aim of making a profit.
Business to Business (B2B): A business that sells goods or services to another business.
Business to Consumer (B2C): A business that sells goods or services directly to the end user.
Capital: The money a business has in its accounts, assets and investments. The two main
types of capital are debt and equity.
Cash Flow: The overall movement of funds through a business each month, including
income and expenses.
Cash Flow Statement: A statement showing the money that entered and exited a business
during a specific period of time.
Contract: A formal agreement to do work for pay.
Depreciation: The degrading value of an asset over time.
Expense: The costs that a business incurs through its operations.
Finance: The management and allocation of money and other assets.
Financial Report: A comprehensive account of a business’ transactions and expenses.
Fixed Cost: A one-time expense.
Income Statement (Profit and Loss Statement): Shows the profitability of a business during
a period of time.
Liabilities: The value of what a business owes to someone else.
479
Assistant Fashion Designer
Marketing: The process of promoting, selling and distributing a product or service.
Net Income/Profit: Revenues minus expenses.
Net Worth: The total value of a business.
Payback Period: The amount of time it takes to recover the initial investment of a business.
Profit Margin: The ratio of profit, divided by revenue, displayed as a percentage.
Return on Investment (ROI): The amount of money a business gets as return from an
investment.
Revenue: The total amount of income before expenses is subtracted.
Sales Prospect: A potential customer.
Supplier: A provider of supplies to a business.
Target Market: A specific group of customers at which a company’s products and services
are aimed.
Valuation: An estimate of the overall worth of the business.
Variable Cost: Expenses that change in proportion to the activity of a business.
Working Capital: Calculated as current assets minus current liabilities.
10.6.4. CRM and Networking
What is CRM?
CRM stands for Customer Relationship Management. Originally the expression Customer
Relationship Management meant managing one’s relationship with customers. However, today it
refers to IT systems and software designed to help companies manage their relationships.
The Need for CRM
The better a company can manage its relationships with its customers, the higher the chances of the
company’s success. For any entrepreneur, the ability to successfully retain existing customers and
expand the enterprise is paramount. This is why IT systems that focus on addressing the problems of
dealing with customers on a daily basis are becoming more and more in demand.
Customer needs change over time, and technology can make it easier to understand what
customers really want. This insight helps companies to be more responsive to the needs of their
customers. It enables them to modify their business operations when required, so that their
customers are always served in the best manner possible. Simply put CRM helps companies
recognize the value of their clients and enables them to capitalize on improved customer relations.
480
Participant Handbook
Benefits of CRM
CRM has a number of important benefits:
It helps improve relations with existing customers which can lead to:
o Increased sales
o Identification of customer needs
o Cross-selling of products
It results in better marketing of one’s products or services
It enhances customer satisfaction and retention
It improves profitability by identifying and focusing on the most profitable customers
10.6.5. What is networking?
In business, networking means leveraging your business and personal connections in order to bring
in a regular supply of new business. This marketing method is effective as well as low cost. It is a
great way to develop sales opportunities and contacts. Networking can be based on referrals and
introductions, or can take place via phone, email, and social and business networking websites.
The Need for Networking
Networking is an essential personal skill for business people, but it is even more important for
entrepreneurs. The process of networking has its roots in relationship building. Networking results
in greater communication and a stronger presence in the entrepreneurial ecosystem. This helps
build strong relationships with other entrepreneurs.
Business networking events held across the globe play a huge role in connecting like-minded
entrepreneurs who share the same fundamental beliefs in communication, exchanging ideas and
converting ideas into realities. Such networking events also play a crucial role in connecting
entrepreneurs with potential investors. Entrepreneurs may have vastly different experiences and
backgrounds but they all have a common goal in mind – they all seek connection, inspiration, advice,
opportunities and mentors. Networking offers them a platform to do just that. Benefits of
Networking
Networking offers numerous benefits for entrepreneurs. Some of the major benefits are:
Getting high quality leads
Increased business opportunities
481
Assistant Fashion Designer
Good source of relevant connections
Advice from like-minded entrepreneurs
Gaining visibility and raising your profile
Meeting positive and enthusiastic people
Increased self-confidence
Satisfaction from helping others
Building strong and lasting friendships
10.6.6. Business Plan: Why Set Goals
Setting goals is important because it gives you long-term vision and short-term motivation. Goals
can be short term, medium term and long term.
Short-Term Goals
These are specific goals for the immediate future. Example: Repairing a machine that has
failed. Medium-Term Goals
These goals are built on your short term goals.
They do not need to be as specific as your short term goals.
Example: Arranging for a service contract to ensure that your machines don’t fail again.
Long-Term Goals
These goals require time and planning. They usually take a year or more to achieve.
Example: Planning your expenses so you can buy new machinery
Why Create a Business Plan
A business plan is a tool for understanding how your business is put together. It can be used to
monitor progress, foster accountable and control the fate of the business. It usually offers a 3-5 year
projection and outlines the plan that the company intends to follow to grow its revenues. A business
plan is also a very important tool for getting the interest of key employees or future investors. A
business plan typically comprises of eight elements.
482
Participant Handbook
10.6.7. Elements of a Business Plan
Executive Summary
The executive summary follows the title page. The summary should clearly state your desires as the
business owner in a short and businesslike way. It is an overview of your business and your plans.
Ideally this should not be more than 1-2 pages.
Your Executive Summary should include:
The Mission Statement: Explain what your business is all about.
Example: Nike’s Mission Statement
Nike’s mission statement is “To bring inspiration and innovation to every athlete in the world.”
Company Information: Provide information like when your business was formed, the
names and roles of the founders, the number of employees, your business location(s)
etc.
Growth Highlights: Mention examples of company growth. Use graphs and charts where
possible.
Your Products/Services: Describe the products or services provided.
Financial Information: Provide details on current bank and investors.
Summarize future plans: Describe where you see your business in the future.
Business Description
The second section of your business plan needs to provide a detailed review of the different
elements of your business. This will help potential investors to correctly understand your business
goal and the uniqueness of your offering.
Your Business Description should include:
A description of the nature of your business
The market needs that you are aiming to satisfy
The ways in which your products and services meet these needs
The specific consumers and organizations that you intend to serve
Your specific competitive advantages
483
Assistant Fashion Designer
Market Analysis
The market analysis section usually follows the business description. The aim of this section is to
showcase your industry and market knowledge. This is also the section where you should lay down
your research findings and conclusions.
Your Market Analysis should include:
Your industry description and outlook
Information on your target market
The needs and demographics of your target audience
The size of your target market
The amount of market share you want to capture
Your pricing structure
Your competitive analysis
Any regulatory requirements
Organization and Management
This section should come immediately after the Market Analysis. Your Organization and
Management section should include:
Your company’s organizational structure
Details of your company’s ownership
Details of your management team
Qualifications of your board of directors
Detailed descriptions of each division/department and its function
The salary and benefits package that you offer your people
The incentives that you offer
Service or Product Line
The next section is the service or product line section. This is where you describe your service or
product, and stress on their benefits to potential and current customers. Explain in detail why your
product of choice will fulfill the needs of your target audience.
484
Participant Handbook
Your Service or Product Line section should include:
A description of your product/service
A description of your product or service’s life cycle
A list of any copyright or patent flings. A description of any R&D activities that you are involved in or
planning
Marketing and Sales
Once the Service or Product Line section of your plan has been completed, you should start on the
description of the marketing and sales management strategy for your business.
Your Marketing section should include the following strategies:
Market penetration strategy: This strategy focuses on selling your existing products or
services in existing markets, in order to increase your market share.
Growth strategy: This strategy focuses on increasing the amount of market share, even if it
reduces earnings in the short-term.
Channels of distribution strategy: These can be wholesalers, retailers, distributors and even
the internet.
Communication strategy: These can be written strategies (e-mail, text, and chat), oral
strategies (phone calls, video chats, and face-to-face conversations), non-verbal strategies
(body language, facial expressions, tone of voice) and visual strategies (signs, web-pages,
illustrations).
Your Sales section should include the following information:
A sales force strategy: This strategy focuses on increasing the revenue of the enterprise.
A breakdown of your sales activities: This means detailing out how you intend to sell your products
or services – will you sell it offline or online, how many units do you intend to sell, what price do you
plan to sell each unit at, etc.
Funding Request
This section is specifically for those who require funding for their venture. The Funding Request
section should include the following information:
485

Assistant Fashion Designer
How much funding you currently require.
How much funding you will require over the next five years. This will depend on your long-
term goals.
The type of funding you wants and how you plan to use it. Do you want funding that can be
used only for a specific purpose, or funding that can be used for any kind of requirement?
Strategic plans for the future. This will involve detailing out your long-term plans – what
these plan are and how much money you will require to put these plans in motions.
Historical and prospective financial information. This can be done by creating and
maintaining all your financial records, right from the moment your enterprise started, to the
present day. Documents required for this are your balance sheet which contains details of
your company’s assets and liabilities, your income statement which lists your company’s
revenues, expenses and net income for the year, your tax returns (usually for the last three
years) and your cash flow budget which lists the cash that came in, the cash that went out
and states whether you had a cash deficit (negative balance) or surplus (positive balance) at
the end of each month.
Financial Planning
Before you begin building your enterprise, you need to plan your finances. Take a look at the
steps for financial planning:
Step 1: Create a financial plan. This should include your goals, strategies and timelines for
accomplishing these goals.
Step 2: Organize all your important financial documents. Maintain a file to hold your
investment details, bank statements, tax papers, credit card bills, insurance papers and any
other financial records.
Step 3: Calculate your net worth. This means figure out what you own (assets like your
house, bank accounts, investments etc.), and then subtract what you owe (liabilities like
loans, pending credit card amounts etc.) the amount you are left with is your net worth.
Step 4: Make a spending plan. This means write down in detail where your money will come
from, and where it will go.
Step 5: Build an emergency fund. A good emergency fund contains enough money to cover
at least 6 months’ worth of expenses.
486
Participant Handbook
Step 6: Set up your insurance. Insurance provides long term financial security and protects
you against risk.
Risk Management
As an entrepreneur, it is critical that you evaluate the risks involved with the type of enterprise that
you want to start, before you begin setting up your company. Once you have identified potential
risks, you can take steps to reduce them. Some ways to manage risks are:
Research similar business and find out about their risks and how they were minimized.
Evaluate current market trends and find out if similar products or services that launched a while ago
are still being well received by the public.
Think about whether you really have the required expertise to launch your product or service.
Examine your finances and see if you have enough income to start your enterprise.
Be aware of the current state of the economy, consider how the economy may change over time,
and think about how your enterprise will be affected by any of those changes.
10.6.8. Procedure and Formalities for Bank Finance
The Need for Bank Finance
For entrepreneurs, one of the most difficult challenges faced involves securing funds for startups.
With numerous funding options available, entrepreneurs need to take a close look at which funding
methodology works best for them. In India, banks are one of the largest funders of startups, offering
funding to thousands of startups every year.
What Information Should Entrepreneurs Offer Banks for Funding
When approaching a bank, entrepreneurs must have a clear idea of the different criteria that banks
use to screen, rate and process loan applications. Entrepreneurs must also be aware of the
importance of providing banks with accurate and correct information. It is now easier than ever for
financial institutions to track any default behavior of loan applicants. Entrepreneurs looking for
funding from banks must provide banks with information relating to their general credentials,
financial situation and guarantees or collaterals that can be offered.
487
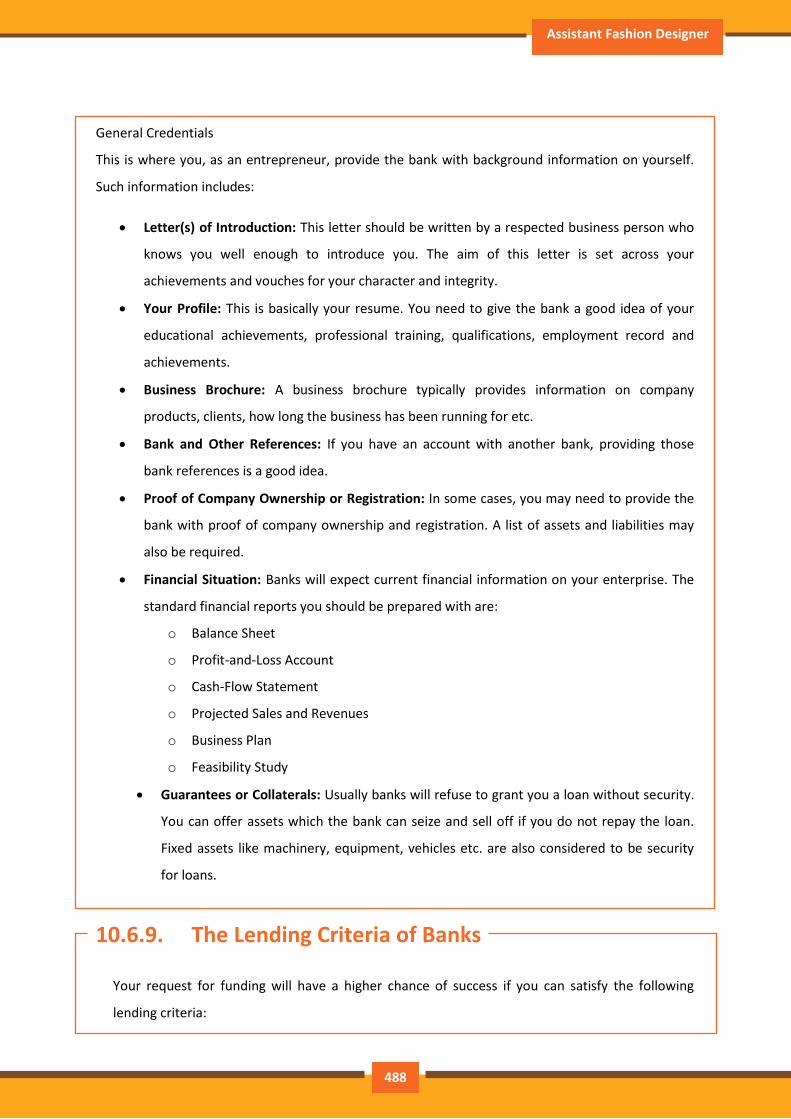
Assistant Fashion Designer
General Credentials
This is where you, as an entrepreneur, provide the bank with background information on yourself.
Such information includes:
Letter(s) of Introduction: This letter should be written by a respected business person who
knows you well enough to introduce you. The aim of this letter is set across your
achievements and vouches for your character and integrity.
Your Profile: This is basically your resume. You need to give the bank a good idea of your
educational achievements, professional training, qualifications, employment record and
achievements.
Business Brochure: A business brochure typically provides information on company
products, clients, how long the business has been running for etc.
Bank and Other References: If you have an account with another bank, providing those
bank references is a good idea.
Proof of Company Ownership or Registration: In some cases, you may need to provide the
bank with proof of company ownership and registration. A list of assets and liabilities may
also be required.
Financial Situation: Banks will expect current financial information on your enterprise. The
standard financial reports you should be prepared with are:
o Balance Sheet
o Profit-and-Loss Account
o Cash-Flow Statement
o Projected Sales and Revenues
o Business Plan
o Feasibility Study
Guarantees or Collaterals: Usually banks will refuse to grant you a loan without security.
You can offer assets which the bank can seize and sell off if you do not repay the loan.
Fixed assets like machinery, equipment, vehicles etc. are also considered to be security
for loans.
10.6.9. The Lending Criteria of Banks
Your request for funding will have a higher chance of success if you can satisfy the following
lending criteria:
488

Participant Handbook
Good cash flow
Adequate shareholders’ funds
Adequate security
Experience in business
Good reputation
The Procedure
To apply for funding the following procedure will need to be followed.
Submit your application form and all other required documents to the bank.
The bank will carefully assess your credit worthiness and assign ratings by analyzing your
business information with respect to parameters like management, financial, operational
and industry information as well as past loan performance.
The bank will make a decision as to whether or not you should be given funding.
10.6.10. Enterprise Management - An Overview
To manage your enterprise effectively you need to look at many different aspects, right from
managing the day-to-day activities to figuring out how to handle a large scale event. Let’s take a look
at some simple steps to manage your company effectively.
Step 1: Use your leadership skills and ask for advice when required.
Let’s take the example of Ramu, an entrepreneur who has recently started his own enterprise. Ramu
has good leadership skills – he is honest, communicates well, knows how to delegate work etc.
These leadership skills definitely help Ramu in the management of his enterprise. However,
sometimes Ramu comes across situations that he is unsure how to handle. What should Ramu do in
this case? One solution is for him to find a more experienced manager who is willing to mentor him.
Another solution is for Ramu to use his networking skills so that he can connect with managers from
other organizations, who can give him advice on how to handle such situations.
Step 2: Divide your work amongst others – realize that you cannot handle everything
yourself.
489
Assistant Fashion Designer
Even the most skilled manager in the world will not be able to manage every single task that an
enterprise will demand of him. A smart manager needs to realize that the key to managing his
enterprise lies in his dividing all his work between those around him. This is known as delegation.
However, delegating is not enough. A manager must delegate effectively if he wants to see results.
This is important because delegating, when done incorrectly, can result in you creating even more
work for yourself. To delegate effectively, you can start by making two lists. One list should contain
the things that you know you need to handle yourself. The second list should contain the things that
you are confident can be given to others to manage and handle. Besides incorrect delegation,
another issue that may arise is over-delegation. This means giving away too many of your tasks to
others. The problem with this is, the more tasks you delegate, the more time you will spend tracking
and monitoring the work progress of those you have handed the tasks to. This will leave you with
very little time to finish your own work.
Step 3: Hire the right people for the job.
Hiring the right people goes a long way towards effectively managing your enterprise. To hire the
best people suited for the job, you need to be very careful with your interview process. You should
ask potential candidates the right questions and evaluate their answers carefully. Carrying out
background checks is always a good practice. Running a credit check is also a good idea, especially if
the people you are planning to hire will be handling your money. Create a detailed job description
for each role that you want filled and ensure that all candidates have a clear and correct
understanding of the job description. You should also have an employee manual in place, where you
put down every expectation that you have from your employees. All these actions will help ensure
that the right people are approached for running your enterprise.
Step 4: Motivate your employees and train them well.
Your enterprise can only be managed effectively if your employees are motivated to work hard for
your enterprise. Part of being motivated involves your employees believing in the vision and mission
of your enterprise and genuinely wanting to make efforts towards pursuing the same. You can
motivate your employees with recognition, bonuses and rewards for achievements. You can also
motivate them by telling them about how their efforts have led to the company’s success. This will
help them feel pride and give them a sense of responsibility that will increase their motivation.
Besides motivating your people, your employees should be constantly trained in new practices and
490
Participant Handbook
technologies. Remember, training is not a one-time effort. It is a consistent effort that needs to be
carried out regularly.
Step 5: Train your people to handle your customers well.
Your employees need to be well-versed in the art of customer management. This means they should
be able to understand what their customers want, and also know how to satisfy their needs. For
them to truly understand this, they need to see how you deal effectively with customers. This is
called leading by example. Show them how you sincerely listen to your clients and the efforts that
you put into understand their requirements. Let them listen to the type of questions that you ask
your clients so they understand which questions are appropriate.
Step 6: Market your enterprise effectively.
Use all your skills and the skills of your employees to market your enterprise in an effective manner.
You can also hire a marketing agency if you feel you need help in this area.
Now that you know what is required to run your enterprise effectively, put these steps into play,
and see how much easier managing your enterprise becomes!
10.6.11. Considering Entrepreneurship
Questions to Ask Yourself before Considering Entrepreneurship
Why am I starting a business?
What problem am I solving?
Have others attempted to solve this problem before? Did they succeed or fail?
Do I have a mentor1 or industry expert that I can call on?
Who is my ideal customer2?
Who are my competitors3?
What makes my business idea different from other business ideas?
What are the key features of my product or service?
Have I done a SWOT4 analysis?
What is the size of the market that will buy my product or service?
What would it take to build a minimum viable product5 to test the market?
How much money do I need to get started?
491

Assistant Fashion Designer
Will I need to get a loan?
How soon will my products or services be available?
When will I break even6 or make a profit?
How will those who invest in my idea make a profit?
How should I set up the legal structure of my business?
What taxes will I need to pay?
What kind of insurance will I need?
Have I reached out to potential customers for feedback
Tips
It is very important to validate your business ideas before you invest significant time, money and
resources into it.
The more questions you ask yourself, the more prepared you will be to handle to highs and lows of
starting an enterprise.
Footnotes:
A mentor is a trusted and experienced person who is willing to coach and guide you.
A customer is someone who buys goods and/or services.
A competitor is a person or company that sells products and/or services similar to your
products and/or services.
SWOT stands for Strengths, Weaknesses, Opportunities and Threats. To conduct a SWOT
analysis of your company, you need to list down all the strengths and weaknesses of your
company, the opportunities that are present for your company and the threats faced by
your company.
A minimum viable product is a product that has the fewest possible features, that can be
sold to customers, for the purpose of getting feedback from customers on the product.
A company is said to break even when the profits of the company are equal to the costs.
492
Participant Handbook
Key Learning Outcomes
At the end of the module, you will be able to:
• Familiarise with computers
• Identify and use basic uses of a computer
• Familiarise with a computer motherboard
• Familiarise with a computer operating system
• Use Microsoft Word, Excel and PowerPoint
• Familiarise with Internet and use e-mails
Address: Indian Buildings Congress, 1st Floor, Sector 6, R K Puram, Kama
Koti Marg, New Delhi-110022
Email: [email protected]
Web: www.sscamh.com
Phone: 0124-2222222
CIN No.: 00000000
978-1-111-22222-45-7


