Embed Size (px)
Citation preview

PegaCALLCONFIGURATION AND OPERATIONS GUIDE FOR
CTI LINK ENGINE WITH GENESYS CTI
VERSION 7.1.3.3
© Copyright 2015Pegasystems Inc., Cambridge, MA
All rights reserved.
This document describes products and services of Pegasystems Inc. It may contain trade secrets and proprietaryinformation. The document and product are protected by copyright and distributed under licenses restricting their use,copying distribution, or transmittal in any form without prior written authorization of Pegasystems Inc.
This document is current as of the date of publication only. Changes in the document may bemade from time to time at thediscretion of Pegasystems. This document remains the property of Pegasystems andmust be returned to it upon request.This document does not imply any commitment to offer or deliver the products or services described.
This document may include references to Pegasystems product features that have not been licensed by your company. Ifyou have questions about whether a particular capability is included in your installation, please consult your Pegasystemsservice consultant.
For Pegasystems trademarks and registered trademarks, all rights reserved. Other brand or product names are trademarksof their respective holders.
Although Pegasystems Inc. strives for accuracy in its publications, any publicationmay contain inaccuracies ortypographical errors. This document or Help System could contain technical inaccuracies or typographical errors. Changesare periodically added to the information herein. Pegasystems Inc. may make improvements and/or changes in theinformation described herein at any time.
This document is the property of:Pegasystems Inc.One Rogers StreetCambridge, MA 02142-1209Phone: (617) 374-9600Fax: (617) 374-9620www.pega.com
Document: PegaCALLConfiguration andOperations GuideSoftware Version: 7.1.3.3
Updated: November 2015
Table of ContentsTable of Contents 2
PegaCALL Introduction 2
Traditional Contact Center Environment 2
Contact center environment with PegaCALL 4
PegaCALL Features 7
Adaptive Screen Pop 7
Data Prefetch 7
Desktop Telephony 7
Agent StateManagement 8
High-level Architecture 9
Supported CTI Platforms 10
PegaCALLComponents 11
PegaCALLCTI Link 11
PegaCALL rules 11
The PegaCALLDesktop 12
Implementing PegaCALL 13
Call Flow for PegaCALLCTI Link Engine with Genesys CIM 14
Call flow overview 14
System Requirements 16
Requirements for the PegaCALLCTI Link Engine 16
Other required components 16
CTI Link configuration on Pega 7 17
CTI Link types 18
Adding and configuring CTI Link(s) 19
Configuring CTI Link 19
Testing Connectivity 23
Using the Telephony Toolbar 24
Using the telephony toolbar 24
Enable the telephone toolbar in CPM 24
Using telephony within other Pega 7 applications 28
Enabling event delivery to your custom application 28
Adding the telephony toolbar to your custom application 29
Customizing and using the stateless soft phone 30
Enabling the soft phone 30
Working with the soft phone 33
Agent State: 33
Button options: 34
Call Handling: 34
Transferring CPM context with calls (Voice-Data Transfer) 35
Customizing the stateless soft phone 36
Using the Stateless Soft Phone in another Pega 7 application 36
PegaCALL Configuration Wizard 37
PegaCALLConfigurationWizard 37
Prerequisite steps 37
Using the wizard 37
Specify ruleset, version and CTI Link 38
Edit the access group 39
Verify CTI Link Details 39
Configure event delivery 40
Configure Telephony Capabilities 41
Select a call class 42
Map call properties 43
Select additional properties 44
Select properties for screen pop 45
Review and save 45
Configure User Telephony Capabilities 46
Enabling Desktop Event Delivery 48
Understanding desktop event delivery 48
No-Plugin mode 48
Plugins for Event Delivery 49
Network protocol and desktop port for event delivery 49
Desktops with multiple IP addresses (IP-address matching) 50
Configuring desktop event delivery 50
Configuring Pega 7 parameters for No-Plugin mode 53
Configuring your application server for No-Plugin mode 54
Varying presence agent configuration 54
Configuring call treatment and screen pops 55
Call Treatment rules 56
Configuring screen pops 56
Starting interaction processing automatically ("auto-accept") 57
No call processing 58
Answering calls 58
Modifying Call Treatment rules 59
Call types 59
Retrieving additional data 60
Configuring the telephony experience 61
Understanding telephony modes 61
Configuring telephony capabilities 61
The Phone login screen 63
Retrieving login information and automating the CTI login (single signon) 64
Telephony privileges and roles 65
Additional CTI Link configuration and High Availability 67
Creating a dial plan 67
CTI Link Reconnect and Failover 68
Running CTI Links in amulti-node environment 69
Pega 7 High Availability feature support 70
Multitenancy 70
Configuring Switch Capabilities 71
Agent State and Login Options 71
Call Options 73
Enabling Advanced Disconnect Detection Protocol (ADDP) 75
Enabling Genesys SDK tracing 77
PegaCALL Scheduled Agents 78
Deleting older call objects 78
Administering PegaCALL 80
Accessing the PegaCALL landing page 80
Administration & Configuration pages 80
Phone Toolbar 85
Configuring and managing remote CTI links 86
Understanding collocated and distributed CTI deployment models 87
CTI Link types 89
Configuring a remote CTI Link 90
Configuring failover for remote CTI links 93
Configuring local CTI links as peers 94
Peer CTI link roles 96
Standby modes 96
Configuring a remote CTI link with failover 96
Using telephony rules 99
Rulesets and class hierarchy 99
CTI requests 99
CTI events 99
Desktop events and Presence Agent ("ScreenPop Control") 99
Administration 99
Call class 99
Setting access to PegaCALL rules and custom rulesets 100
Customizing the call class and associated call data 100
PegaCALL pages on the clipboard 101
CTIPhone 101
CallInteraction 101
ScreenPopControlPort 101
Customizing the telephony toolbar 102
Customizing the login screen 103
Telephony functions: invoking CTI capabilities from your application 103
Attaching call data on telephony functions 103
Setting Genesys extensions and location 105
Activities for telephony control 105
Understanding event processing 107
Request and Response Events 109
Extension point for the OFFERING activity 109
Appendix: Developer and Debugging Tools 111
Configuring Logging for the CTI Link Engine 111
Common log configurations 114
Changing the current log level 115
Directing logging for a CTI link to a separate file 115
Desktop logging 116
Index 117

PegaCALLConfiguration andOperationsGuide 1
PegaCALL IntroductionPegaCALL™ for Pega 7 providesComputer Telephony Integration (CTI) to improve contact center operations.PegaCALL enhances telephone-based customer interactions such as service inquiries, telemarketing, sales,and collection efforts by integrating ProcessCommander-based business processmanagement capabilitieswith telephony infrastructures, increasing agent productivity and enhancing customer satisfaction.
This chapter describes the capabilities and high-level architecture of PegaCALL.
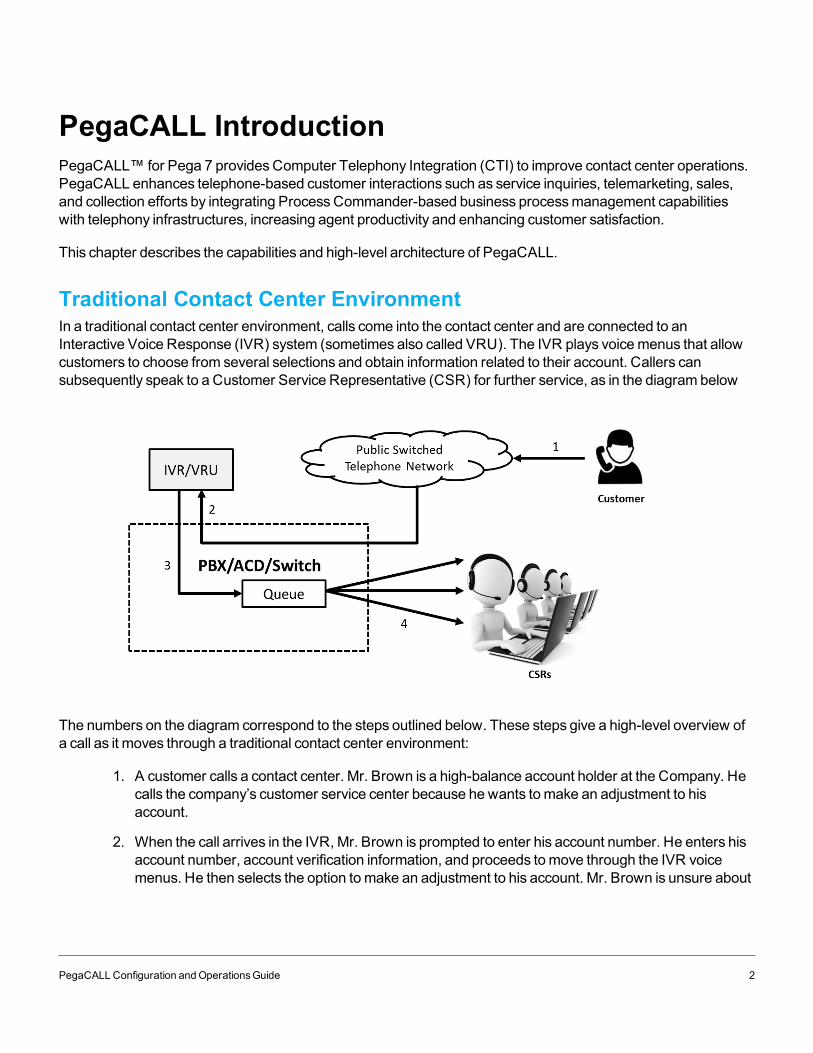
Traditional Contact Center EnvironmentIn a traditional contact center environment, calls come into the contact center and are connected to anInteractive Voice Response (IVR) system (sometimes also called VRU). The IVR plays voicemenus that allowcustomers to choose from several selections and obtain information related to their account. Callers cansubsequently speak to a Customer Service Representative (CSR) for further service, as in the diagram below
The numbers on the diagram correspond to the steps outlined below. These steps give a high-level overview ofa call as it moves through a traditional contact center environment:
1. A customer calls a contact center. Mr. Brown is a high-balance account holder at the Company. Hecalls the company’s customer service center because he wants tomake an adjustment to hisaccount.
2. When the call arrives in the IVR, Mr. Brown is prompted to enter his account number. He enters hisaccount number, account verification information, and proceeds tomove through the IVR voicemenus. He then selects the option tomake an adjustment to his account. Mr. Brown is unsure about
PegaCALLConfiguration andOperationsGuide 2
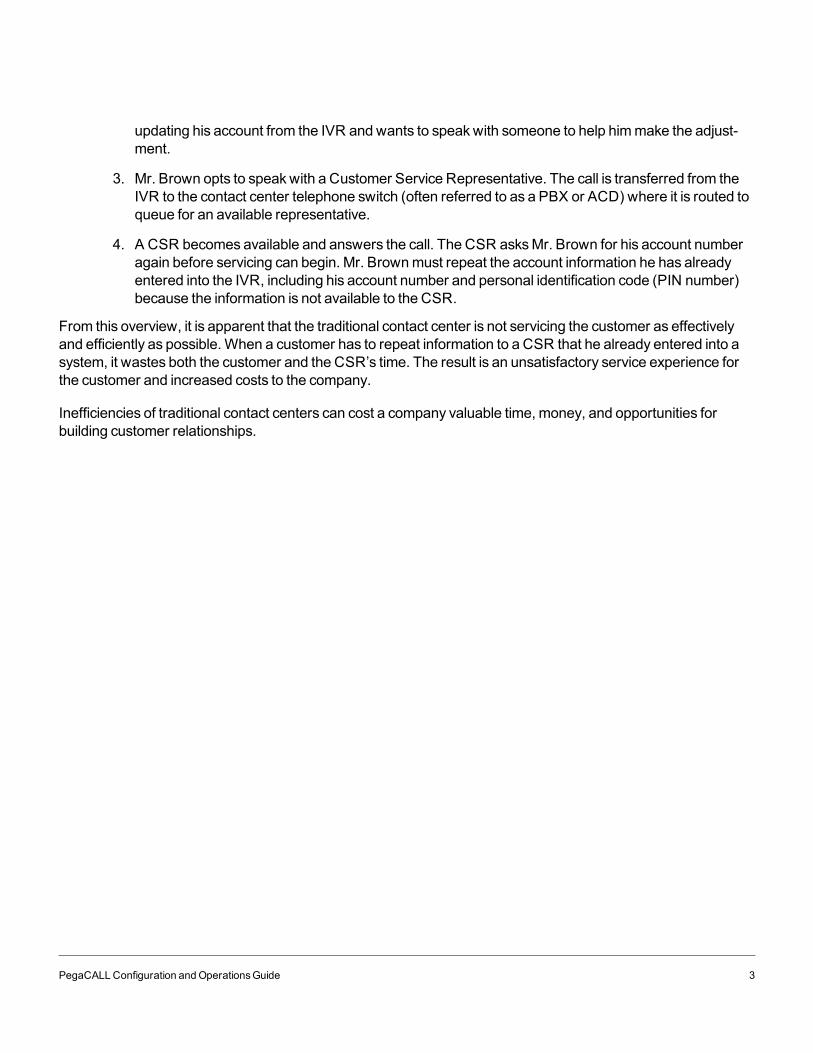
updating his account from the IVR and wants to speakwith someone to help himmake the adjust-ment.
3. Mr. Brown opts to speakwith a Customer Service Representative. The call is transferred from theIVR to the contact center telephone switch (often referred to as a PBX or ACD) where it is routed toqueue for an available representative.
4. A CSR becomes available and answers the call. The CSR asksMr. Brown for his account numberagain before servicing can begin. Mr. Brownmust repeat the account information he has alreadyentered into the IVR, including his account number and personal identification code (PIN number)because the information is not available to the CSR.
From this overview, it is apparent that the traditional contact center is not servicing the customer as effectivelyand efficiently as possible. When a customer has to repeat information to a CSR that he already entered into asystem, it wastes both the customer and the CSR’s time. The result is an unsatisfactory service experience forthe customer and increased costs to the company.
Inefficiencies of traditional contact centers can cost a company valuable time, money, and opportunities forbuilding customer relationships.
PegaCALLConfiguration andOperationsGuide 3
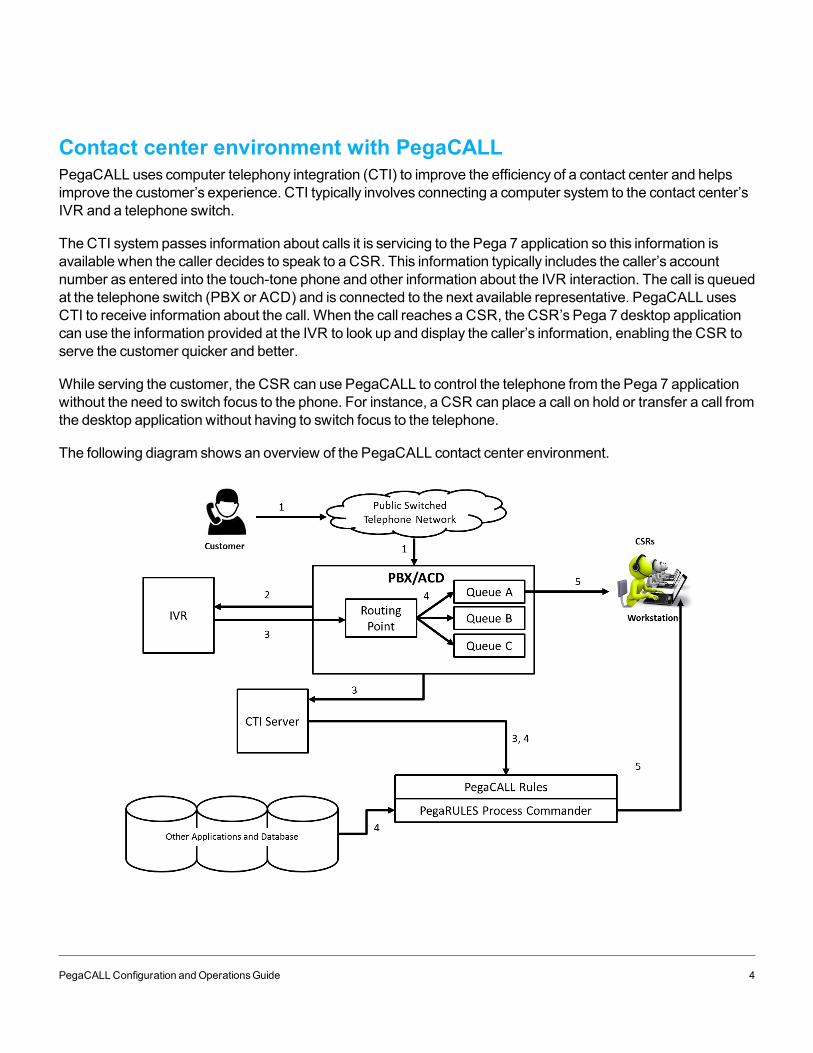
Contact center environment with PegaCALLPegaCALL uses computer telephony integration (CTI) to improve the efficiency of a contact center and helpsimprove the customer’s experience. CTI typically involves connecting a computer system to the contact center’sIVR and a telephone switch.
The CTI system passes information about calls it is servicing to the Pega 7 application so this information isavailable when the caller decides to speak to a CSR. This information typically includes the caller’s accountnumber as entered into the touch-tone phone and other information about the IVR interaction. The call is queuedat the telephone switch (PBX or ACD) and is connected to the next available representative. PegaCALL usesCTI to receive information about the call. When the call reaches a CSR, the CSR’s Pega 7 desktop applicationcan use the information provided at the IVR to look up and display the caller’s information, enabling the CSR toserve the customer quicker and better.
While serving the customer, the CSR can use PegaCALL to control the telephone from the Pega 7 applicationwithout the need to switch focus to the phone. For instance, a CSR can place a call on hold or transfer a call fromthe desktop application without having to switch focus to the telephone.
The following diagram shows an overview of the PegaCALL contact center environment.
PegaCALLConfiguration andOperationsGuide 4
The numbers on the diagram correspond to the steps outlined below. These steps give a high-level overview ofa call as it moves through the PegaCALL contact center environment:
1. A customer, Mr. Brown, calls a PegaCALL enabled contact center. Mr. Brown is a high-balanceaccount holder at The Company. He calls The Company’s customer service center because hewants tomake an adjustment on his account.
2. When the call arrives in the IVR, Mr. Brown is prompted to enter his account number. He enters hisaccount number, account verification information, and proceeds through the IVR voicemenus. Hethen selects the option tomake an adjustment on his account. Mr. Brown is not sure how to updatehis account from the IVR and wants to speakwith someone to help himmake the adjustment.
3. Mr. Brown opts to speakwith a CSR. The information gathered in the IVR, includingMr. Brown’saccount number, is now passed to PegaCALL, through the CTI Server.
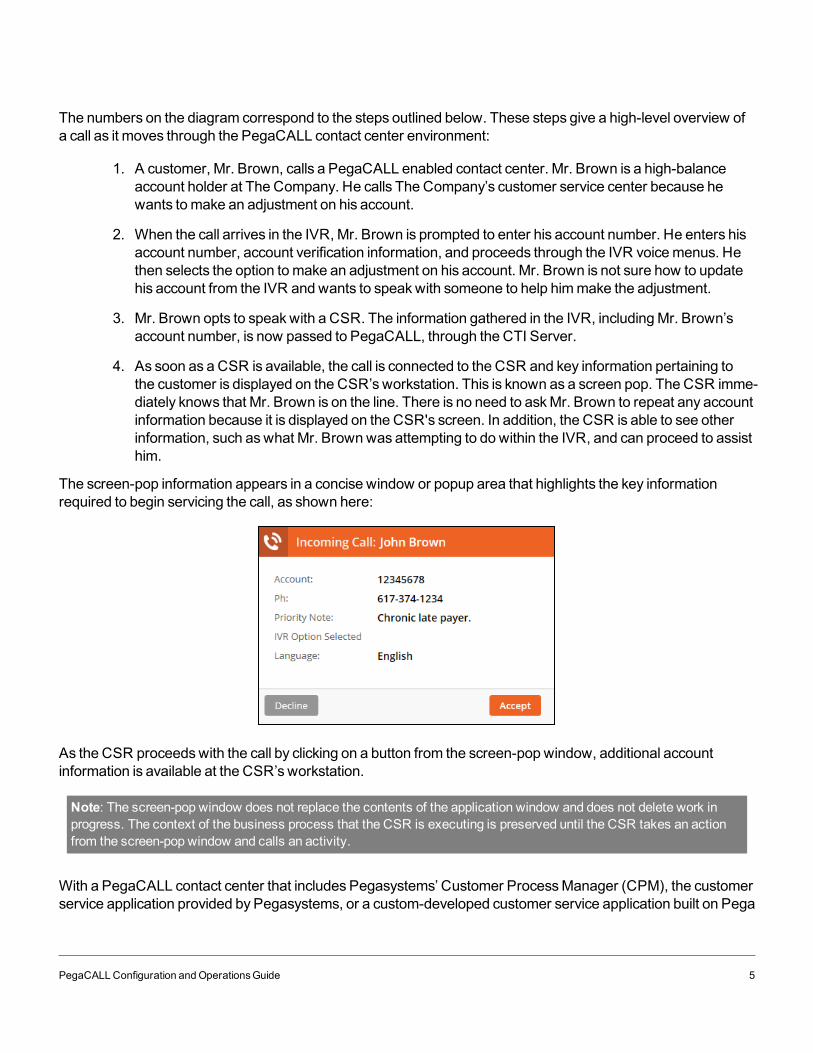
4. As soon as a CSR is available, the call is connected to the CSR and key information pertaining tothe customer is displayed on the CSR’s workstation. This is known as a screen pop. The CSR imme-diately knows that Mr. Brown is on the line. There is no need to askMr. Brown to repeat any accountinformation because it is displayed on the CSR's screen. In addition, the CSR is able to see otherinformation, such aswhat Mr. Brownwas attempting to do within the IVR, and can proceed to assisthim.
The screen-pop information appears in a concise window or popup area that highlights the key informationrequired to begin servicing the call, as shown here:
As the CSR proceedswith the call by clicking on a button from the screen-pop window, additional accountinformation is available at the CSR’s workstation.
Note: The screen-pop window does not replace the contents of the application window and does not delete work inprogress. The context of the business process that the CSR is executing is preserved until the CSR takes an actionfrom the screen-pop window and calls an activity.
With a PegaCALL contact center that includes Pegasystems’ Customer ProcessManager (CPM), the customerservice application provided by Pegasystems, or a custom-developed customer service application built on Pega
PegaCALLConfiguration andOperationsGuide 5
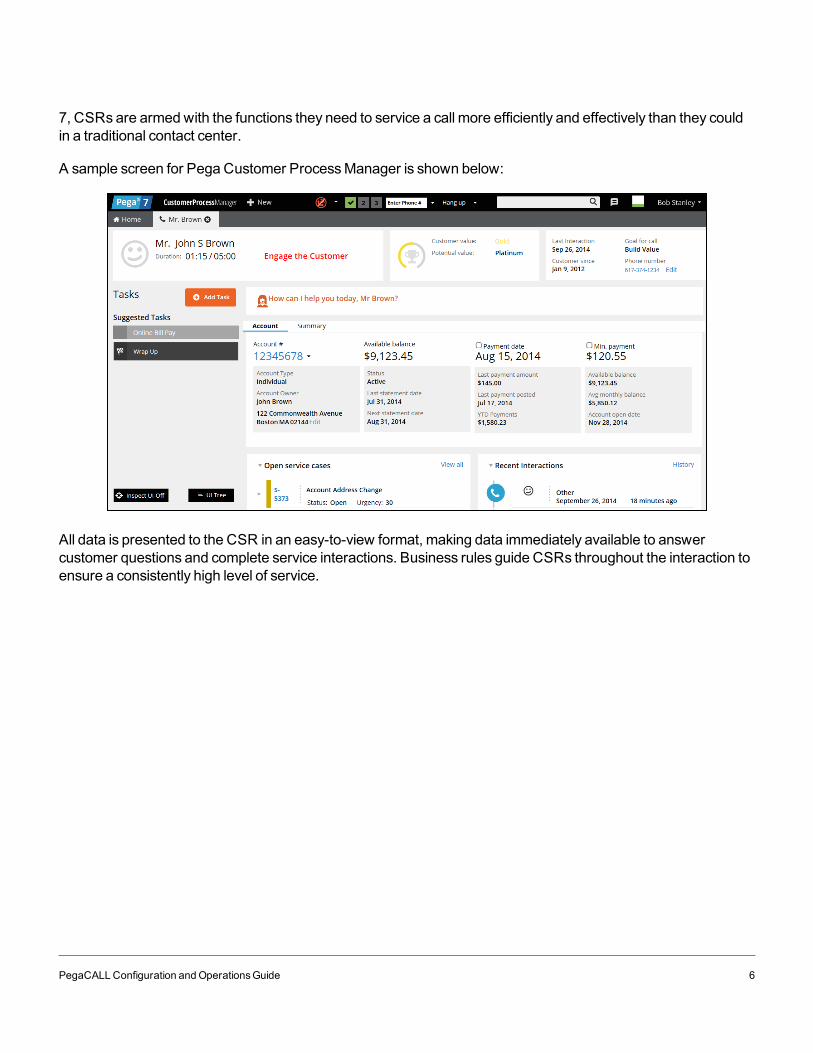
7, CSRs are armedwith the functions they need to service a call more efficiently and effectively than they couldin a traditional contact center.
A sample screen for Pega Customer ProcessManager is shown below:
All data is presented to the CSR in an easy-to-view format, making data immediately available to answercustomer questions and complete service interactions. Business rules guide CSRs throughout the interaction toensure a consistently high level of service.
PegaCALLConfiguration andOperationsGuide 6
PegaCALL FeaturesThe sections below describe themain features of PegaCALL at a high level. These are described in detailed insubsequent chapters.
Adaptive Screen PopThe PegaCALL screen pop functions coordinate the arrival of an incoming call with the display of callerinformation at the CSR workstation. This capability eliminates the need to have the CSR collect the callernumber or other identification information to retrieve customer informationmanually.
The type of screen-pop window and the information it displays is determined by evaluating the informationgathered about the caller. Examples of this include what the person requested at the IVR, language preference(so that bilingual operators can greet the caller in their native language), and qualification for promotion and/orcross-selling opportunities.
The screen-pop window displays key information about the caller and includes buttons andmessages that canlead the CSR into specific contact center business processes. All information about the call is then passed to thebusiness processes so servicing can begin.
Examples
A caller provides an account number to the IVR to check an account balance, but fails to provide thePIN number. After that person opts out to speak to a CSR, a customized screen pop can be presen-ted that prompts the CSR to verify the caller by requesting security information.
A caller enters information in the IVR and attempts to transfer money between two accounts. Thecaller has difficulty with the IVR and opts out to speakwith a CSR. A customized screen-pop windowcan display the account information collected in the IVR aswell as buttons that lead the CSR to theBalance Transfer window.
Data PrefetchData prefetch allows the system to gather customer information before the call reaches a CSR. The Pega 7application includes interfacing capabilities that can gather data from external systems based on informationcollected in the IVR.
As a caller moves through the IVR menus, information such as the account number is collected. This informationcan be used to look up or pre-fetch additional information about the caller before the call reaches a CSR.Information collected in thismanner may be used tomake call routing decisions, or may be provided to the Pega7 application as the call reaches a CSR.
Desktop TelephonyPegaCALL enablesCSRs to control their phones from their desktops, so they don’t need to switch focus to thephone. For example, a CSR may transfer a call to another queue or place a call on hold while he consults
PegaCALLConfiguration andOperationsGuide 7
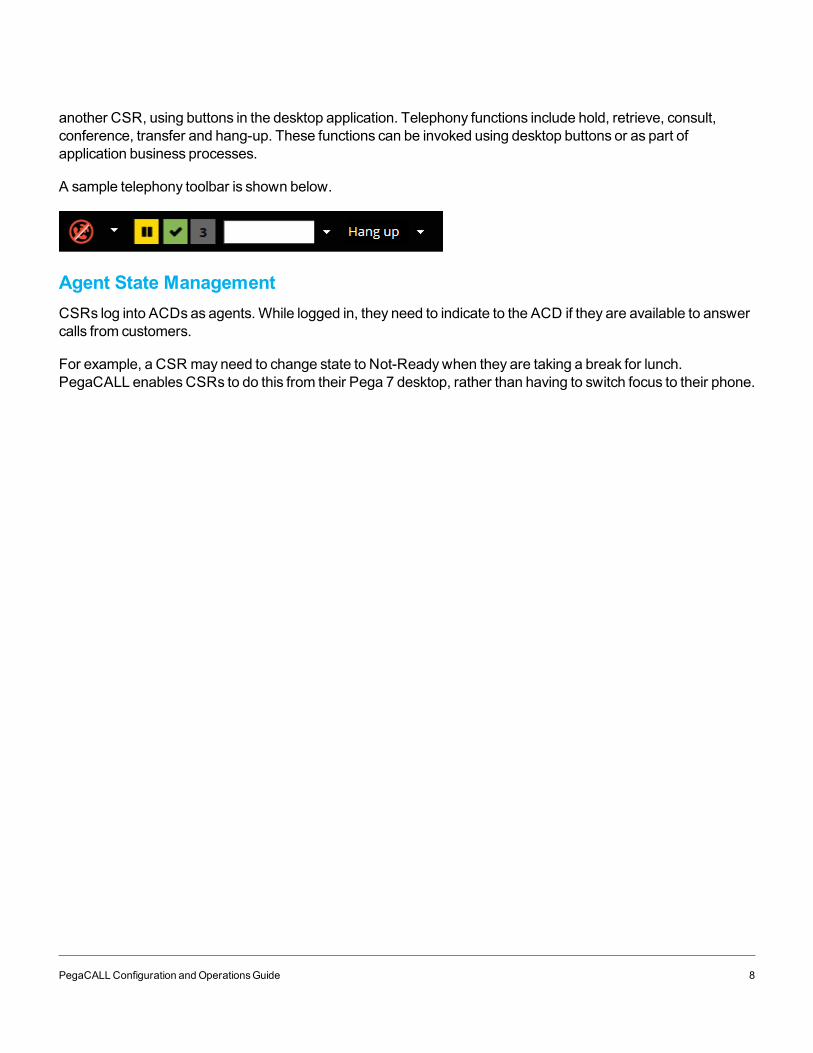
another CSR, using buttons in the desktop application. Telephony functions include hold, retrieve, consult,conference, transfer and hang-up. These functions can be invoked using desktop buttons or as part ofapplication business processes.
A sample telephony toolbar is shown below.
Agent State ManagementCSRs log into ACDs as agents. While logged in, they need to indicate to the ACD if they are available to answercalls from customers.
For example, a CSR may need to change state to Not-Readywhen they are taking a break for lunch.PegaCALL enablesCSRs to do this from their Pega 7 desktop, rather than having to switch focus to their phone.
PegaCALLConfiguration andOperationsGuide 8
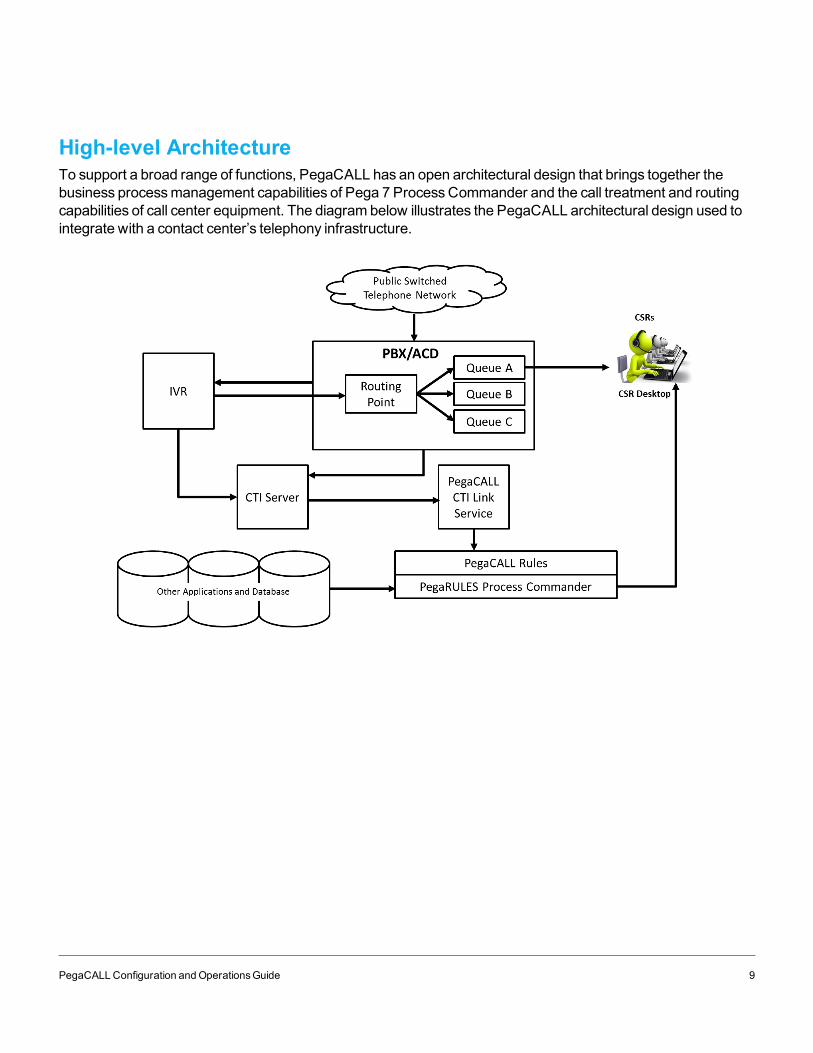
High-level ArchitectureTo support a broad range of functions, PegaCALL has an open architectural design that brings together thebusiness processmanagement capabilities of Pega 7 ProcessCommander and the call treatment and routingcapabilities of call center equipment. The diagram below illustrates the PegaCALL architectural design used tointegrate with a contact center’s telephony infrastructure.
PegaCALLConfiguration andOperationsGuide 9
Supported CTI PlatformsPegaCALL integrateswith a variety of telephony equipment (including IVRs, ACDs and PBXs) through one ormore CTI servers. The following CTI platforms are supported:
Avaya Aura™ Application Enablement Services (AES) for integration with Avaya Aura Com-municationsManager
Avaya Aura Contact Center (AACC) for use with Avaya Aura
Cisco Intelligent Contact Management (ICM) platform (including Cisco Unified Contact Center Enter-prise)
GenesysCustomer InteractionManagement (CIM) Platform
All classic CTI links (including Enghouse – formerly Syntellect) are deprecated.
PegaCALLConfiguration andOperationsGuide 10
PegaCALL ComponentsThe following section provides an overview of the primary components of the PegaCALL solution. Additionaldetails and information on each of these components can be found in subsequent chapters of this document.
PegaCALL consists of twomain components – PegaCALLCTI Link and a set of PegaCALL rules for Pega 7ProcessCommander. Depending on the specific CTI platform and configuration used, these componentsmayinterconnect using web services or Java.
PegaCALL CTI LinkThe PegaCALLCTI Link interfaces between Pega 7 and the CTI platform. The CTI Link translates telephonyevents from the CTI platform intomessages that are sent to PegaCALL rules for processing. In addition, the CTILink receives telephony requests fromPegaCALL rules and translates the requests into specific telephonyrequests for processing by the CTI platform.
For someCTI platforms, the CTI Link alsomonitors the routing point within the PBX/ACD and provides forenhanced call routing decisions.
Depending on your CTI platform, PegaCALLCTI Linkmay run on a separateWindows server or on a Pega 7node.WhenCTI Link is deployed on a separateWindowsServer, it is called a CTI Link Server. The CTI LinkServer communicateswith Pega 7 using the Simple Object Access Protocol (SOAP).
Note: CTI Link Server based configurations are deprecated.
When deployed on a Pega 7 node,a CTI Linkmay use Java or other interfaces (example, web services) tointegrate with the CTI platform. The Java layer supporting the CTI Link is called a CTI Link engine. CTI LinkEngines are provided for Avaya AES, Cisco ICM, andGenesysCIM.
PegaCALL also provides a remote deployment option for the CTI Link Engine, allowing for CTI Link capabilitiesfrom one Pega 7 server to be used from another Pega 7 server. For example, a Pega 7 server executing CTIcapabilitymay be located in geographic proximity to the CTI platform, while Pega 7 servers which CSRs log intomay be located centrally in a data center.
PegaCALL rulesPegaCALL includes several rulesets that are loaded onto your Pega 7 server. These rules process events fromPegaCALLCTI Link (example, provide a screen pop when notified of an incoming call to an agent) and passCTIrequests to CTI Link (for example, answer a call).
These ruleset also provide user interfaces for screen pop, telephony control and agent statemanagement on thecustomer service desktop. Details on PegaCALL rules are provided in subsequent chapters.
PegaCALLConfiguration andOperationsGuide 11

The PegaCALL DesktopPegaCALL provides variousUI elements that may be used as part of a Pega application. In some (deprecated)configurations, PegaCALLmay also load a plugin into the CSR’s browser to listen for events from the Pega 7server. The component called the Presence Agent, binds to a network port on the CSR’s desktop and receivesevents from the Pega 7 server. The events can then trigger changes on the desktop, including UI changes.
PegaCALLConfiguration andOperationsGuide 12
Implementing PegaCALLThis topic describes the architecture for a PegaCALL implementation with GenesysCustomer InteractionManagement (CIM) platform. In this architecture, PegaCALL connects to the Genesys TServer (rather thandirectly to your telephony equipment) to provide telephony services to your Pega 7 application. TheGenesysCIM platformmanages interfaceswith your telephony equipment including IVRs, PBXs and ACDs. The topicincludes descriptions of the components used in the implementation and their connectivity.
PegaCALL for Genesysmay be implemented as a CTI Link Engine as discussed in this guide. If you areimplementing a new PegaCALL system, you should use the CTI Link Engine. If you are using the CTI LinkServer, refer to the technical notes available on the Pega Developer Network (PDN).
Note: In this section, Genesys CIM refers to the overall Genesys Customer InteractionManagement platform whileGenesys TServer refers to the server that PegaCALL connects to, in order to provide telephony services.
PegaCALLConfiguration andOperationsGuide 13
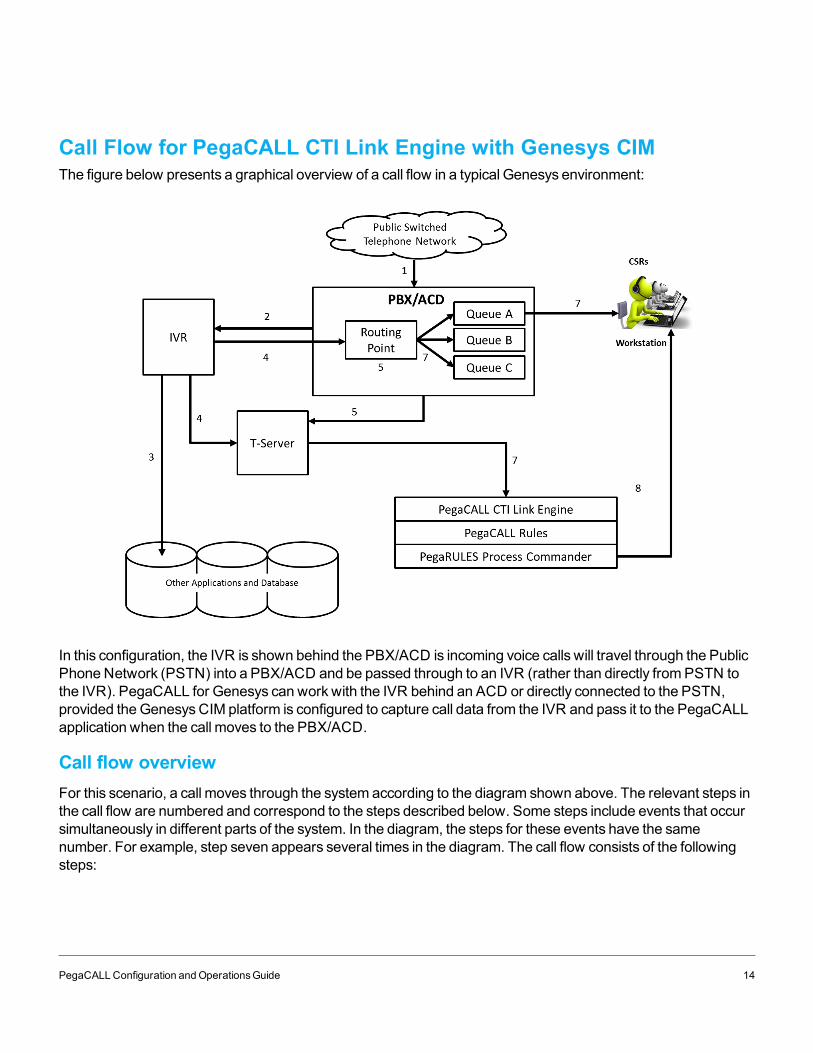
Call Flow for PegaCALL CTI Link Engine with Genesys CIMThe figure below presents a graphical overview of a call flow in a typical Genesys environment:
In this configuration, the IVR is shown behind the PBX/ACD is incoming voice calls will travel through the PublicPhone Network (PSTN) into a PBX/ACD and be passed through to an IVR (rather than directly fromPSTN tothe IVR). PegaCALL for Genesys can work with the IVR behind an ACD or directly connected to the PSTN,provided theGenesysCIM platform is configured to capture call data from the IVR and pass it to the PegaCALLapplication when the call moves to the PBX/ACD.
Call flow overviewFor this scenario, a call moves through the system according to the diagram shown above. The relevant steps inthe call flow are numbered and correspond to the steps described below. Some steps include events that occursimultaneously in different parts of the system. In the diagram, the steps for these events have the samenumber. For example, step seven appears several times in the diagram. The call flow consists of the followingsteps:
PegaCALLConfiguration andOperationsGuide 14
1. The call comes into the PBX/ACD from the PSTN.
2. As soon as the call arrives at the PBX/ACD, it is routed to the IVR (also called a VRU).
3. Caller identification, such as account number, is gathered in the IVR. The caller proceedswith auto-mated IVR inquiries, such as account balance. This information is typically obtained from variousback-end systems or databases.
4. When the caller chooses to speakwith an agent, or is forced out by the IVR, the IVR passes inform-ation about the call in progress to the Genesys system via the T-Server. This is commonly known asattaching data to the call. Typically, the information sent by the IVR includes:
Caller identification such as Account Number.
Indication of what the caller was doing when he “opted out” (for example, a BalanceInquiry). This is commonly referred to as “last action.”
Verify flag indicating whether the caller was successfully authenticated at the IVR. Forexample, by providing security information, such as a PIN number to the IVR.
Any other information that the IVR has that would be useful for routing the call or servingthe customer. For example, if the IVR menu includes an alternate language selection, itwould include the customer’s choice of language.
5. The call arrives at the PBX/ACD routing point. The ACD and/or Genesys platform execute their rout-ing logic to determine how to direct the incoming call.
6. The call is transferred to a queue where it waits for an available Customer Service Representative(CSR).
7. When a CSR becomes available, the PBX/ACD connects the call to the CSR. At the same time, thePBX/ACD sends amessage through the T-Server to the PegaCALLCTI Link Engine indicating thatthe call was connected. Thismessage is forwarded for processing to PegaCALL rules within Pega 7Themessage includes the PBX/ACD Call ID and the extension of the CSR where the call is beinganswered.
PegaCALLmaps the CSR’s extension to the workstation where the CSR is logged-in and sends amessage to that workstation.
8. At the desktop, the CSR is logged into the PegaCALL system and has loaded the PegaCALLScreenPop Presence Agent to receive PegaCALLmessages fromPega 7 .When the appropriatemessage is received, the desktop workswith Pega 7 to generate and display a screenpop withinformation about the call.
The screen pop is displayed at the workstation as a separate window alerting the CSR to the newcall. Clicking appropriate buttons in the screen-pop window allows the CSR to begin servicing thecall.
PegaCALLConfiguration andOperationsGuide 15
System RequirementsThis section describes the components required for a PegaCALL installation.
Requirements for the PegaCALL CTI Link EngineThe PegaCALLCTI Link Engine runswithin a Pega 7 application server. Each application server in the Pega 7node will need TCP/IP connectivity to the Genesys TServer(s) used. The engine for Genesys usesGenesys’PlatformSDK. You will need to obtain the SDK and deploy the Java libraries into Pega 7 , as described in theInstallation guide.
Other required componentsIn addition to the standard component requirements for the Pega 7 application, a PegaCALL implementationincludes the following requirements:
Pegasystems recommends installing a remote connectivity application, such as VPN, modem orRemote desktopmanagement software, to provide diagnostic capabilities.
For information on general hardware and software requirements for the Pega 7 application, see the Installationguide for the specific platform that you are using at your site.
For more information about installing the PegaCALL components, seePegaCALL Installation and UpgradeGuide.
PegaCALLConfiguration andOperationsGuide 16
CTI Link configuration on Pega 7This section describes basic configuration for the PegaCALLCTI Link.
Before you can use PegaCALL capabilities, you need to:
Configure the CTI Link
Check Link status to ensure connectivity to the CTI platform
PegaCALLConfiguration andOperationsGuide 17
CTI Link typesThere are four types of CTI Links:
Local: A local CTI link connects a Pega 7 server (or cluster) to a Genesys T-Server directly , andprovidesCTI services to users on that Pega 7 server. This section explains the configuration and useof local CTI links.
Remote: A remote CTI link connects a Pega 7 server (or cluster) to another Pega 7 server, fromwhich they accessCTI services. Remote CTI links are covered in a later section.
Classic: A classic CTI link connects a Pega 7 server (or cluster) to a PegaCALLCTI link server. Ifyou use classic CTI links, refer to thePegaCALL configuration and operations guide for the CTI LinkServer.
AACC: AACC CTI Links provide direct connectivity to the CCT server for AACC over SOAP.
PegaCALLConfiguration andOperationsGuide 18
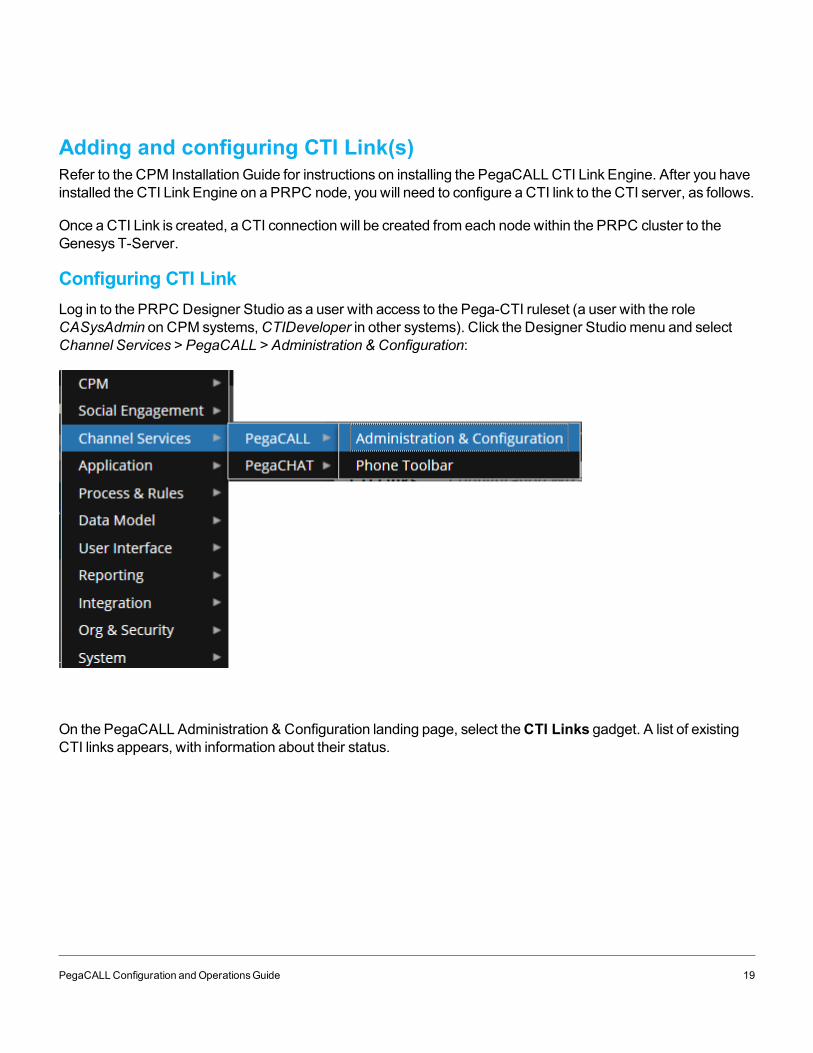
Adding and configuring CTI Link(s)Refer to the CPM Installation Guide for instructions on installing the PegaCALLCTI Link Engine. After you haveinstalled the CTI Link Engine on a PRPC node, you will need to configure a CTI link to the CTI server, as follows.
Once a CTI Link is created, a CTI connection will be created from each node within the PRPC cluster to theGenesys T-Server.
Configuring CTI LinkLog in to the PRPC Designer Studio as a user with access to the Pega-CTI ruleset (a user with the roleCASysAdmin on CPM systems,CTIDeveloper in other systems). Click the Designer Studiomenu and selectChannel Services > PegaCALL > Administration & Configuration:
On the PegaCALL Administration & Configuration landing page, select theCTI Links gadget. A list of existingCTI links appears, with information about their status.
PegaCALLConfiguration andOperationsGuide 19
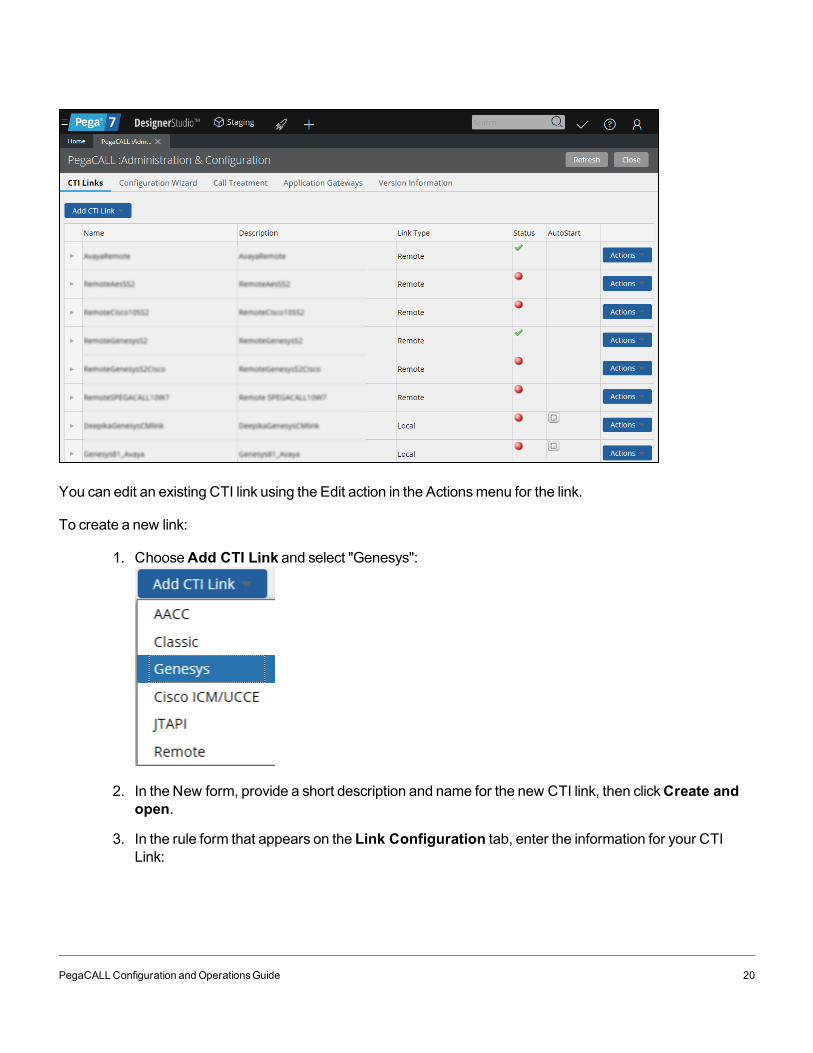
You can edit an existing CTI link using the Edit action in the Actionsmenu for the link.
To create a new link:
1. ChooseAdd CTI Link and select "Genesys":
2. In the New form, provide a short description and name for the new CTI link, then clickCreate andopen.
3. In the rule form that appears on the Link Configuration tab, enter the information for your CTILink:
PegaCALLConfiguration andOperationsGuide 20
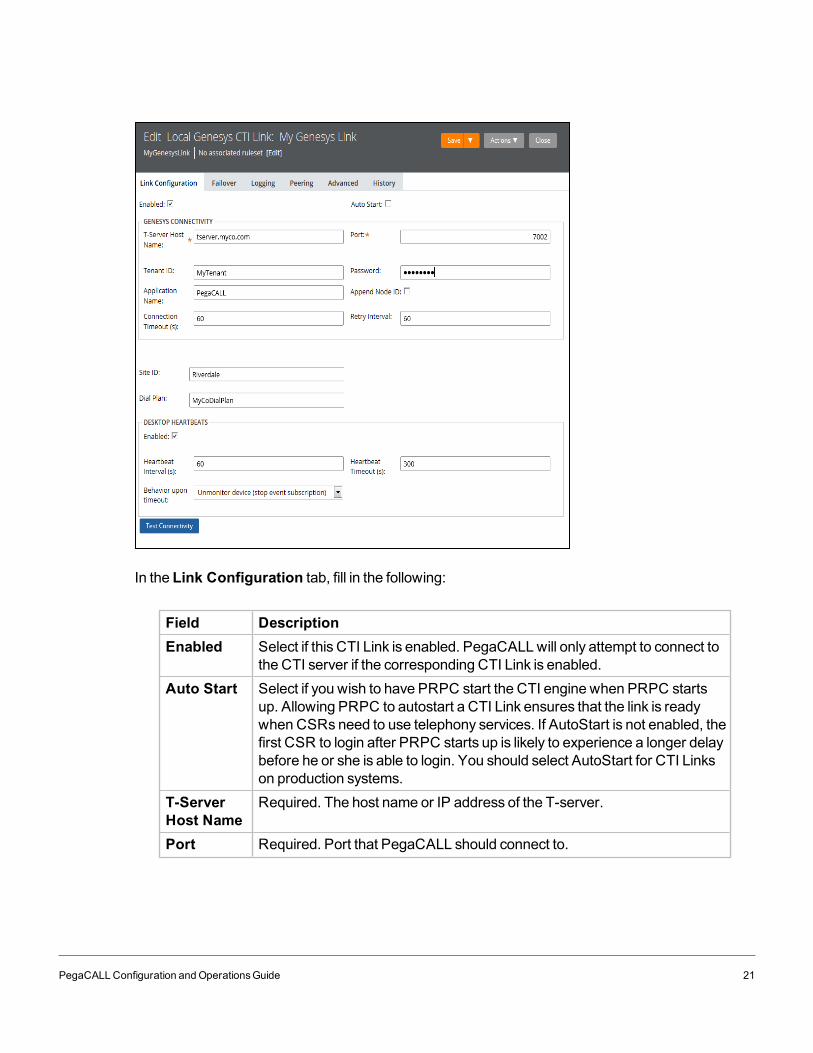
In the Link Configuration tab, fill in the following:
Field DescriptionEnabled Select if this CTI Link is enabled. PegaCALLwill only attempt to connect to
the CTI server if the corresponding CTI Link is enabled.Auto Start Select if you wish to have PRPC start the CTI engine when PRPC starts
up. Allowing PRPC to autostart a CTI Link ensures that the link is readywhen CSRs need to use telephony services. If AutoStart is not enabled, thefirst CSR to login after PRPC starts up is likely to experience a longer delaybefore he or she is able to login. You should select AutoStart for CTI Linkson production systems.
T-ServerHost Name
Required. The host name or IP address of the T-server.
Port Required. Port that PegaCALL should connect to.
PegaCALLConfiguration andOperationsGuide 21
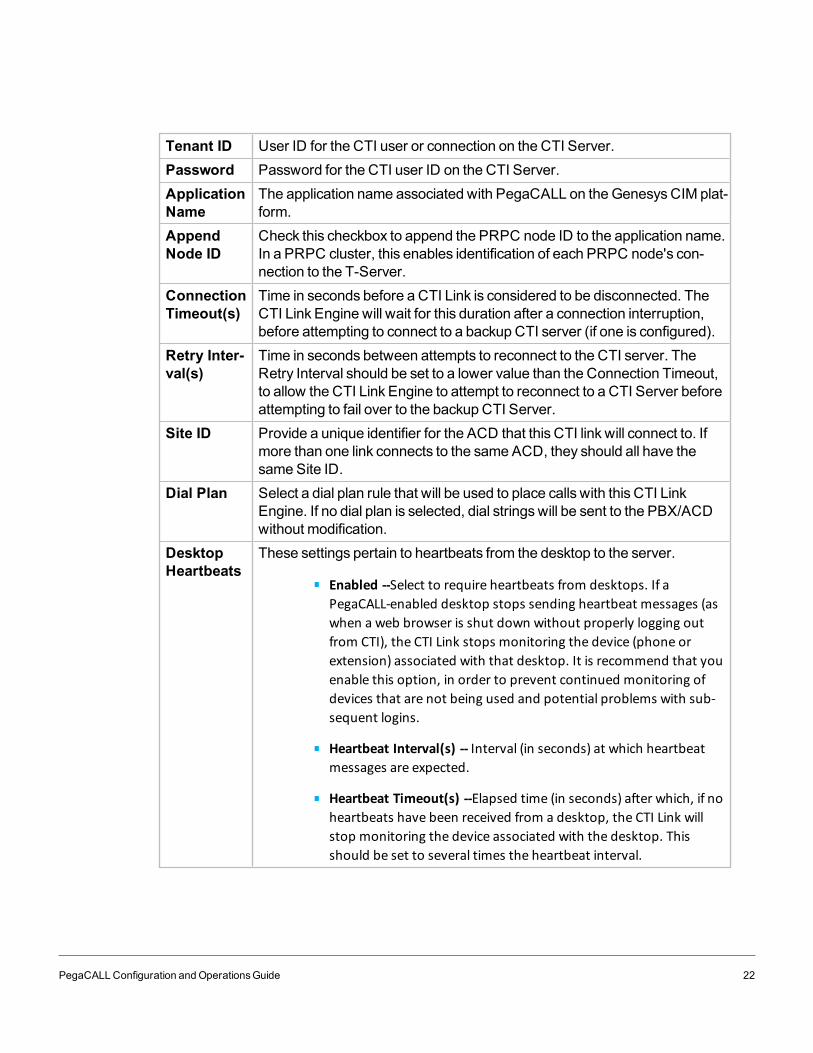
Tenant ID User ID for the CTI user or connection on the CTI Server.Password Password for the CTI user ID on the CTI Server.ApplicationName
The application name associated with PegaCALL on theGenesysCIM plat-form.
AppendNode ID
Check this checkbox to append the PRPC node ID to the application name.In a PRPC cluster, this enables identification of each PRPC node's con-nection to the T-Server.
ConnectionTimeout(s)
Time in seconds before a CTI Link is considered to be disconnected. TheCTI Link Engine will wait for this duration after a connection interruption,before attempting to connect to a backup CTI server (if one is configured).
Retry Inter-val(s)
Time in seconds between attempts to reconnect to the CTI server. TheRetry Interval should be set to a lower value than the Connection Timeout,to allow the CTI Link Engine to attempt to reconnect to a CTI Server beforeattempting to fail over to the backup CTI Server.
Site ID Provide a unique identifier for the ACD that this CTI link will connect to. Ifmore than one link connects to the same ACD, they should all have thesame Site ID.
Dial Plan Select a dial plan rule that will be used to place calls with this CTI LinkEngine. If no dial plan is selected, dial stringswill be sent to the PBX/ACDwithout modification.
DesktopHeartbeats
These settings pertain to heartbeats from the desktop to the server.
Enabled --Select to require heartbeats from desktops. If aPegaCALL-enabled desktop stops sending heartbeat messages (aswhen a web browser is shut down without properly logging outfrom CTI), the CTI Link stops monitoring the device (phone orextension) associated with that desktop. It is recommend that youenable this option, in order to prevent continued monitoring ofdevices that are not being used and potential problems with sub-sequent logins.
Heartbeat Interval(s) -- Interval (in seconds) at which heartbeatmessages are expected.
Heartbeat Timeout(s) --Elapsed time (in seconds) after which, if noheartbeats have been received from a desktop, the CTI Link willstop monitoring the device associated with the desktop. Thisshould be set to several times the heartbeat interval.
PegaCALLConfiguration andOperationsGuide 22
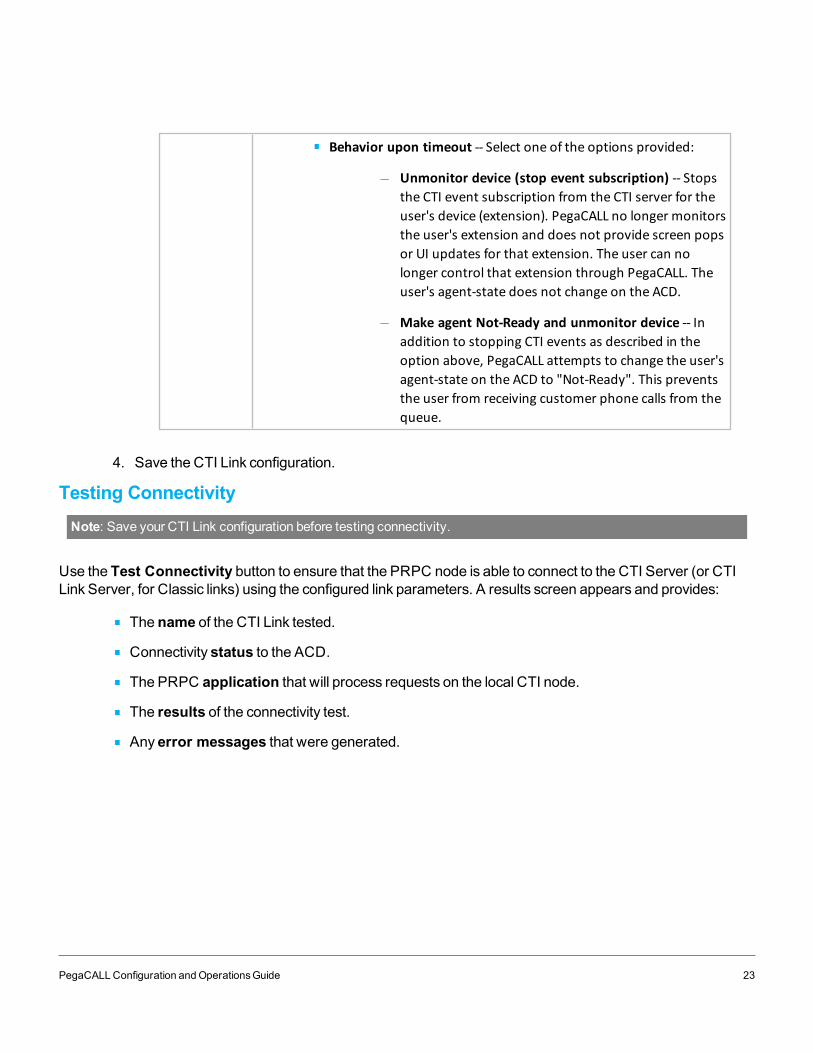
Behavior upon timeout -- Select one of the options provided:
Unmonitor device (stop event subscription) -- Stopsthe CTI event subscription from the CTI server for theuser's device (extension). PegaCALL no longer monitorsthe user's extension and does not provide screen popsor UI updates for that extension. The user can nolonger control that extension through PegaCALL. Theuser's agent-state does not change on the ACD.
Make agent Not-Ready and unmonitor device -- Inaddition to stopping CTI events as described in theoption above, PegaCALL attempts to change the user'sagent-state on the ACD to "Not-Ready". This preventsthe user from receiving customer phone calls from thequeue.
4. Save the CTI Link configuration.
Testing ConnectivityNote: Save your CTI Link configuration before testing connectivity.
Use the Test Connectivity button to ensure that the PRPC node is able to connect to the CTI Server (or CTILink Server, for Classic links) using the configured link parameters. A results screen appears and provides:
The name of the CTI Link tested.
Connectivity status to the ACD.
The PRPC application that will process requests on the local CTI node.
The results of the connectivity test.
Any error messages that were generated.
PegaCALLConfiguration andOperationsGuide 23
Using the Telephony ToolbarTheCPMportal includes a telephony toolbar that provides synchronized telephony control. This topic discusseshow to use and customize the toolbar.
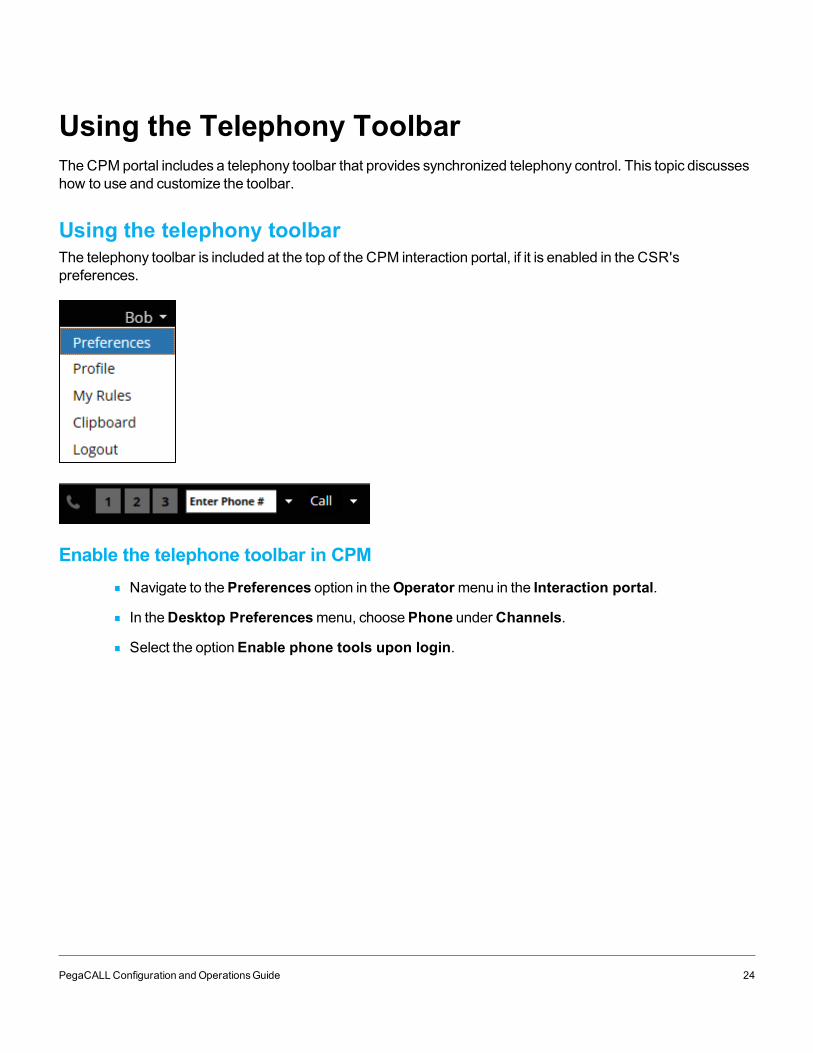
Using the telephony toolbarThe telephony toolbar is included at the top of the CPM interaction portal, if it is enabled in the CSR'spreferences.
Enable the telephone toolbar in CPMNavigate to thePreferences option in theOperatormenu in the Interaction portal.
In theDesktop Preferencesmenu, choosePhone underChannels.
Select the optionEnable phone tools upon login.
PegaCALLConfiguration andOperationsGuide 24
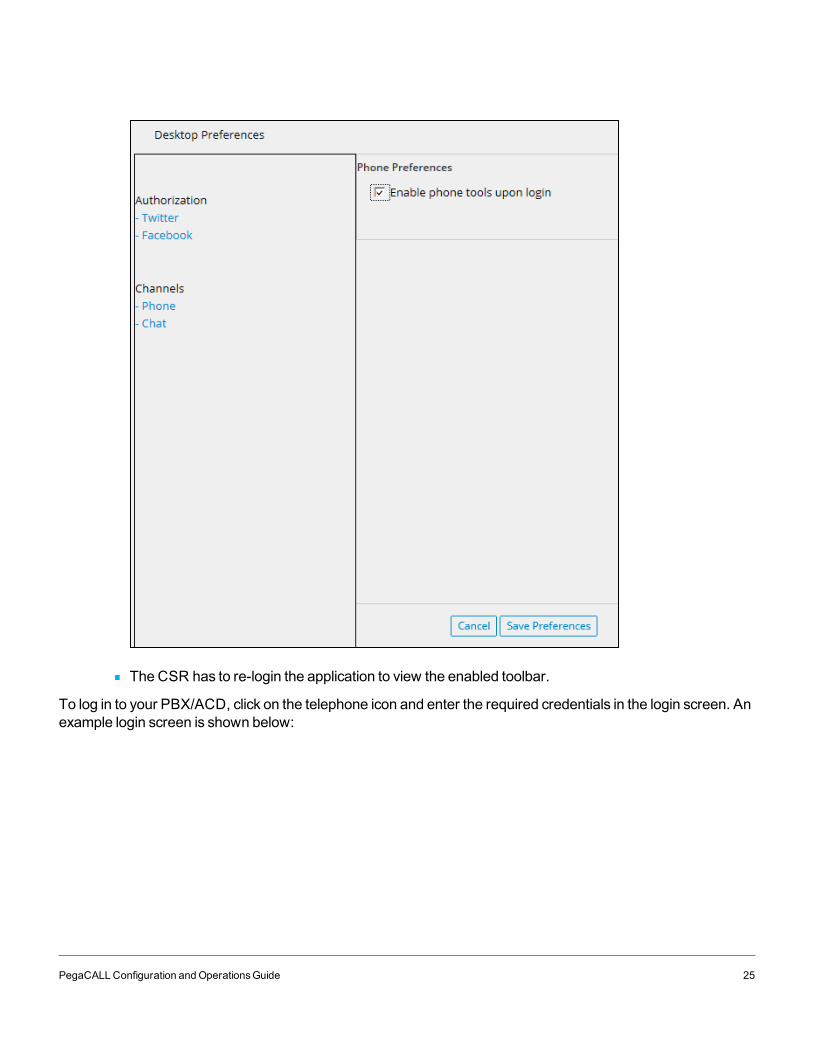
TheCSR has to re-login the application to view the enabled toolbar.
To log in to your PBX/ACD, click on the telephone icon and enter the required credentials in the login screen. Anexample login screen is shown below:
PegaCALLConfiguration andOperationsGuide 25
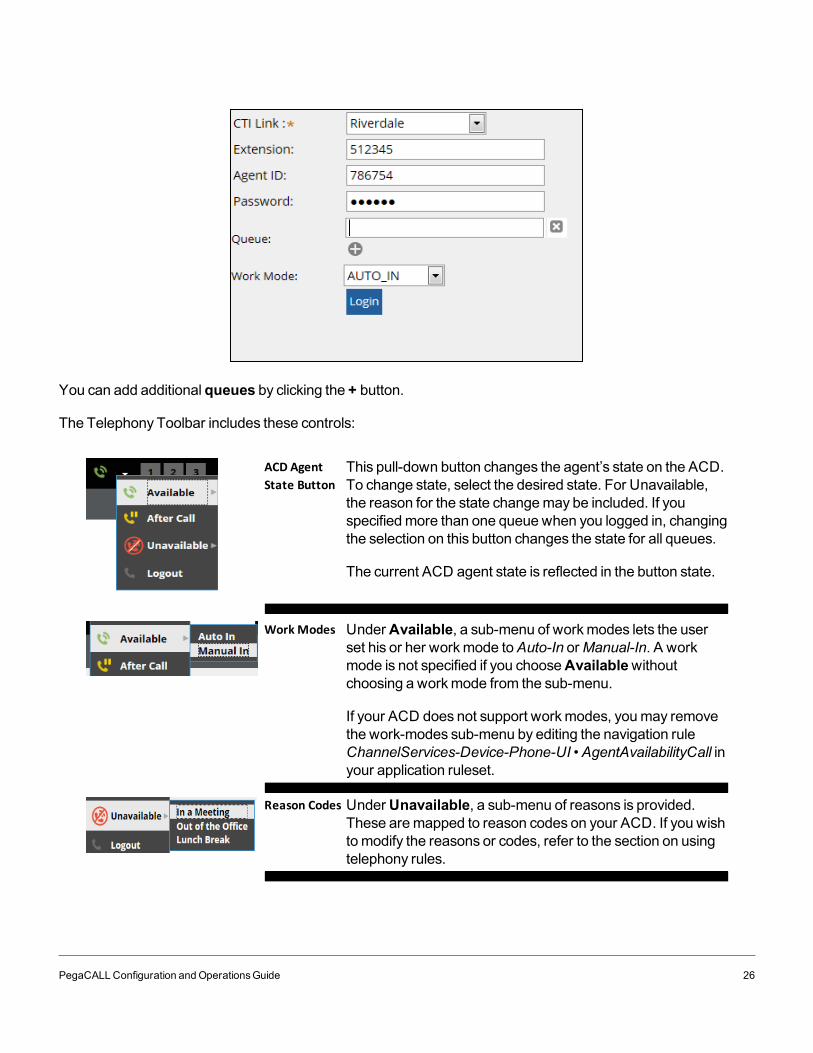
You can add additional queues by clicking the + button.
The Telephony Toolbar includes these controls:
ACD AgentState Button
This pull-down button changes the agent’s state on the ACD.To change state, select the desired state. For Unavailable,the reason for the state changemay be included. If youspecifiedmore than one queue when you logged in, changingthe selection on this button changes the state for all queues.
The current ACD agent state is reflected in the button state.
WorkModes UnderAvailable, a sub-menu of workmodes lets the userset his or her workmode toAuto-In orManual-In. A workmode is not specified if you chooseAvailablewithoutchoosing a workmode from the sub-menu.
If your ACD does not support workmodes, youmay removethe work-modes sub-menu by editing the navigation ruleChannelServices-Device-Phone-UI • AgentAvailabilityCall inyour application ruleset.
Reason Codes UnderUnavailable, a sub-menu of reasons is provided.These aremapped to reason codes on your ACD. If you wishtomodify the reasons or codes, refer to the section on usingtelephony rules.
PegaCALLConfiguration andOperationsGuide 26
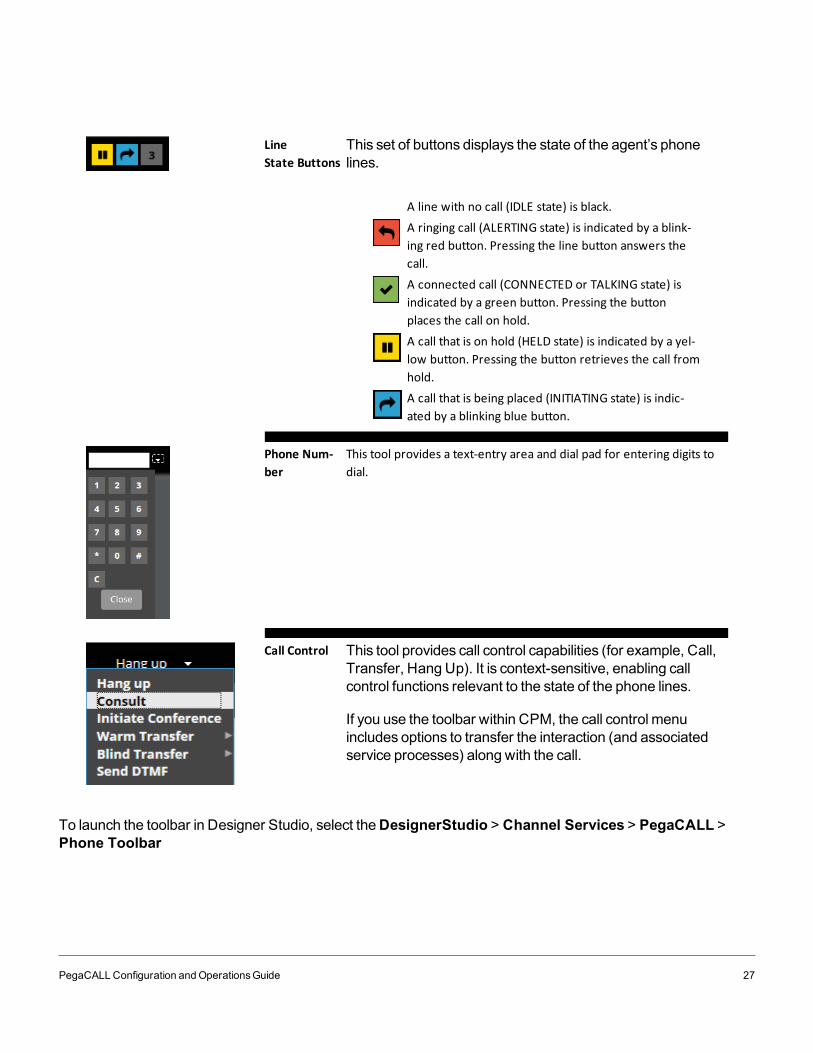
LineState Buttons
This set of buttons displays the state of the agent’s phonelines.
A line with no call (IDLE state) is black.A ringing call (ALERTING state) is indicated by a blink-ing red button. Pressing the line button answers thecall.A connected call (CONNECTED or TALKING state) isindicated by a green button. Pressing the buttonplaces the call on hold.A call that is on hold (HELD state) is indicated by a yel-low button. Pressing the button retrieves the call fromhold.A call that is being placed (INITIATING state) is indic-ated by a blinking blue button.
Phone Num-ber
This tool provides a text-entry area and dial pad for entering digits todial.
Call Control This tool provides call control capabilities (for example, Call,Transfer, Hang Up). It is context-sensitive, enabling callcontrol functions relevant to the state of the phone lines.
If you use the toolbar within CPM, the call control menuincludes options to transfer the interaction (and associatedservice processes) along with the call.
To launch the toolbar in Designer Studio, select theDesignerStudio > Channel Services > PegaCALL >Phone Toolbar
PegaCALLConfiguration andOperationsGuide 27
Using telephony within other Pega 7 applicationsYoumay use PegaCALL to provide telephony control in any Pega 7 application. Besides configuringPegaCALL, as described in prior chapters, youmust do the following to be able to use the telephony toolbar andscreen pops:
Embed controls to enable event delivery to your application.
If you wish to use the telephony tools, embed the telephony toolbar within your application. If you onlywant to use screen pops, you can skip this step.
Enabling event delivery to your custom applicationIf you are using PegaCALLwith a customPega 7 application, follow these steps to enable event delivery to yourapplication:
1. Identify a location in your application that will remain visible when the user is logged in (Example: theheader area).
2. InDesigner Studio, edit the UI element (Portal, Section or harness) for the location.
3. Insert the [email protected] (fromRuleSet Pega-CTI) in the UI element.
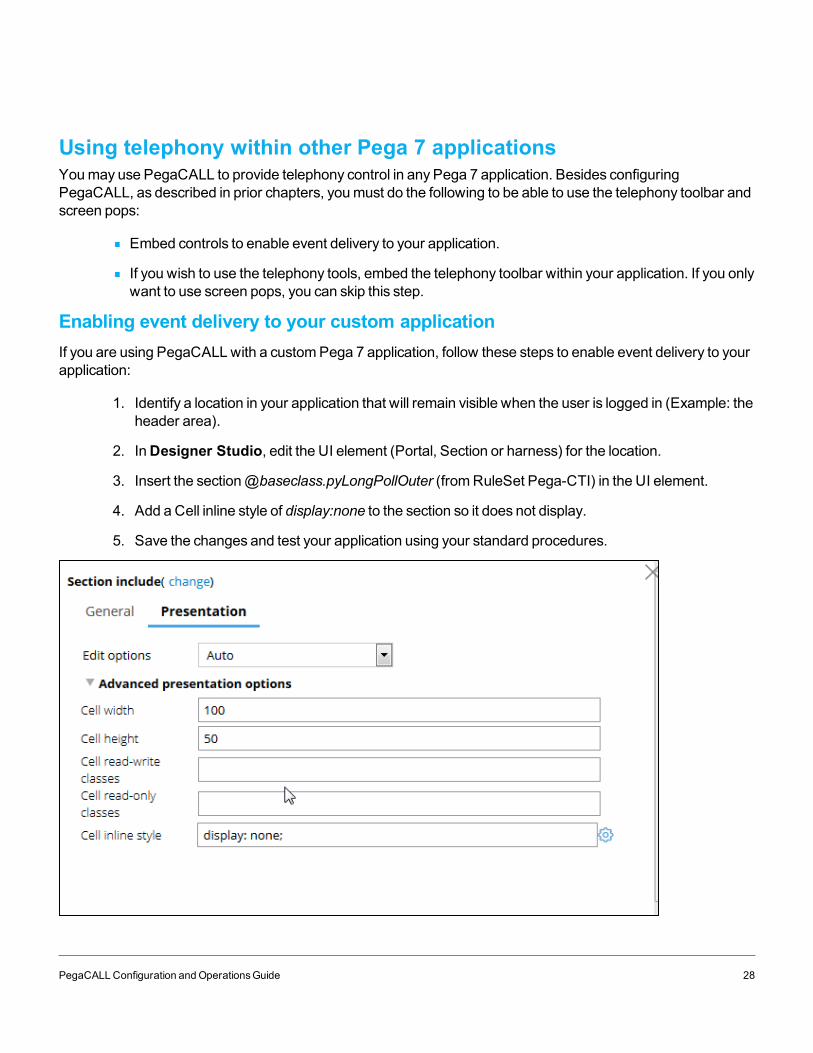
4. Add a Cell inline style of display:none to the section so it does not display.
5. Save the changes and test your application using your standard procedures.
PegaCALLConfiguration andOperationsGuide 28

Adding the telephony toolbar to your custom applicationIf you are using PegaCALLwith a customPega 7 application, youmay incorporate the PegaCALL telephonytoolbar into your application. The toolbar is in the Section PegaCallContainer (applies-to ChannelServices-Device-Phone-UI), as described earlier in this chapter.
PegaCALLConfiguration andOperationsGuide 29
Customizing and using the stateless soft phonePegaCALL includes a stateless soft phone option using the Pega-CTI ruleset. The soft phone
Allows the CSR to control phone calls and agent state fromPegaCALL.
Workswith all link types (classic, local, and remote).
Appears in its ownwindow, freeing up space on themain portal screen
The stateless soft phone workswith the Pega-CTI rulesets.
For most users, the synchronized telephony toolbar described earlier provides a better user experience.However, for environments that use a CTI Link server, the stateless soft phone provides an option that workswith the statelessCTI Link server aswell as the CTI Link engine.
Enabling the soft phoneFollow the steps below to enable and use the stateless soft phone in the CPM interaction portal:
PegaCALLConfiguration andOperationsGuide 30
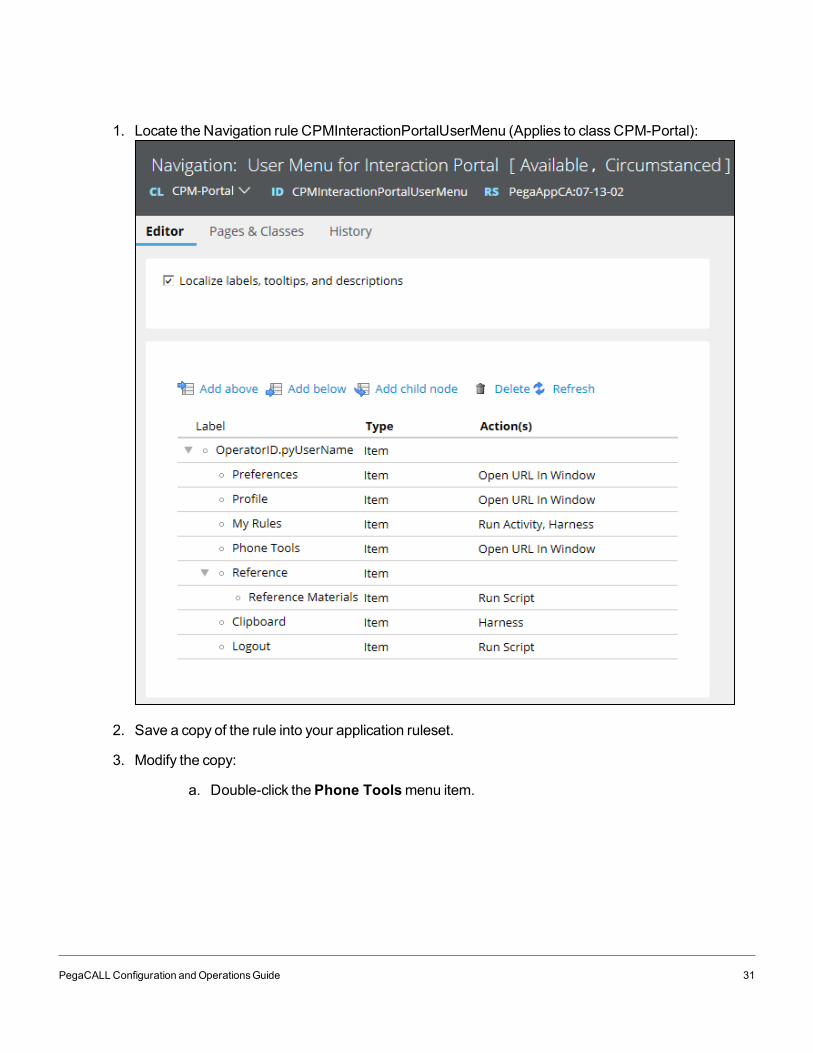
1. Locate the Navigation rule CPMInteractionPortalUserMenu (Applies to classCPM-Portal):
2. Save a copy of the rule into your application ruleset.
3. Modify the copy:
a. Double-click thePhone Toolsmenu item.
PegaCALLConfiguration andOperationsGuide 31

b. In theGeneral tab of the editing dialog that appears, change theWhen condition under"Visibility" from Never toAlways:
c. ClickOK to make the Phone Toolsmenu option available in the user menu.
d. In your copy of CPMInteractionPortalUserMenu , double click thePhonemenu item.
e. Change theWhen condition under "Show" to Never. Then clickOK.
f. Save your copy of CPMInteractionPortalUserMenu and close the rule.
PegaCALLConfiguration andOperationsGuide 32
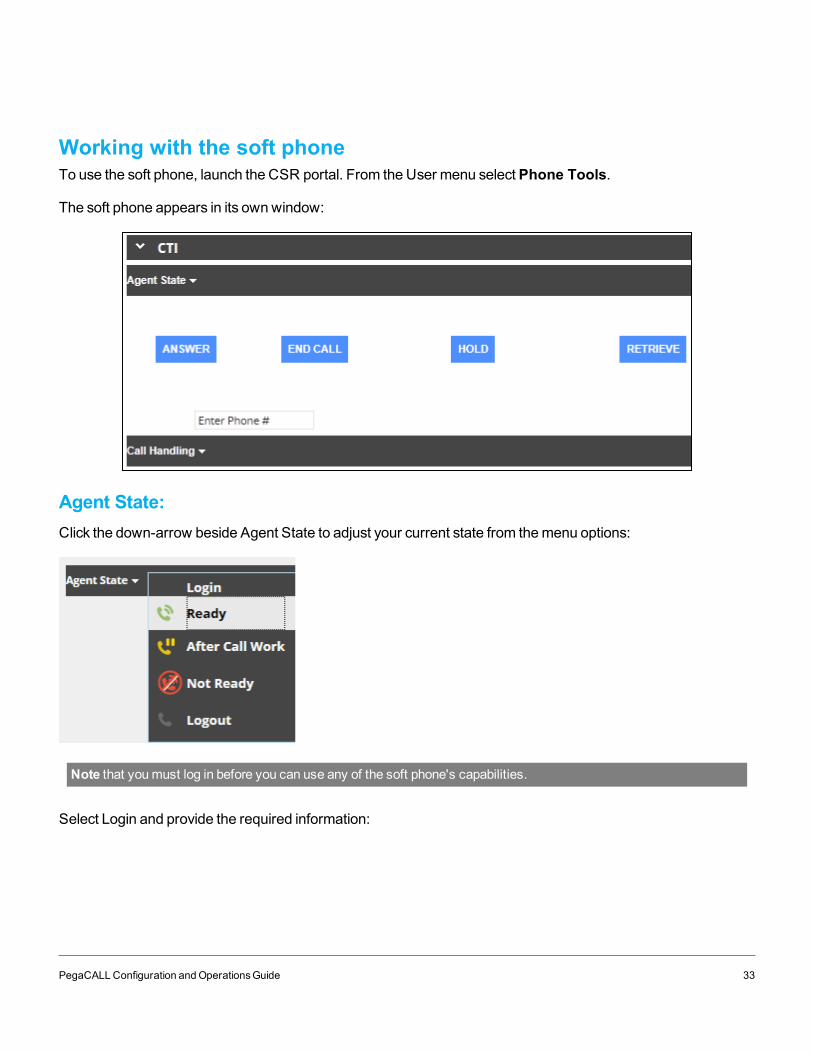
Working with the soft phoneTo use the soft phone, launch the CSR portal. From the User menu selectPhone Tools.
The soft phone appears in its ownwindow:
Agent State:Click the down-arrow beside Agent State to adjust your current state from themenu options:
Note that youmust log in before you can use any of the soft phone's capabilities.
Select Login and provide the required information:
PegaCALLConfiguration andOperationsGuide 33
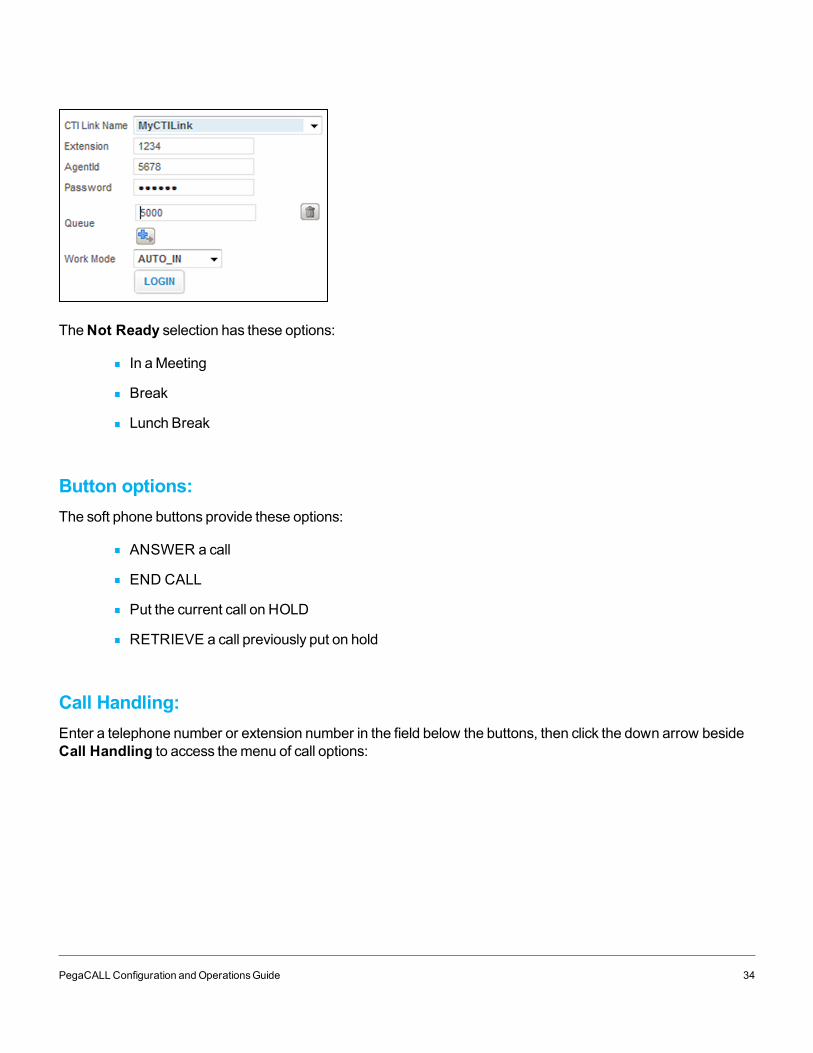
TheNot Ready selection has these options:
In aMeeting
Break
Lunch Break
Button options:The soft phone buttons provide these options:
ANSWER a call
END CALL
Put the current call on HOLD
RETRIEVE a call previously put on hold
Call Handling:Enter a telephone number or extension number in the field below the buttons, then click the down arrow besideCall Handling to access themenu of call options:
PegaCALLConfiguration andOperationsGuide 34
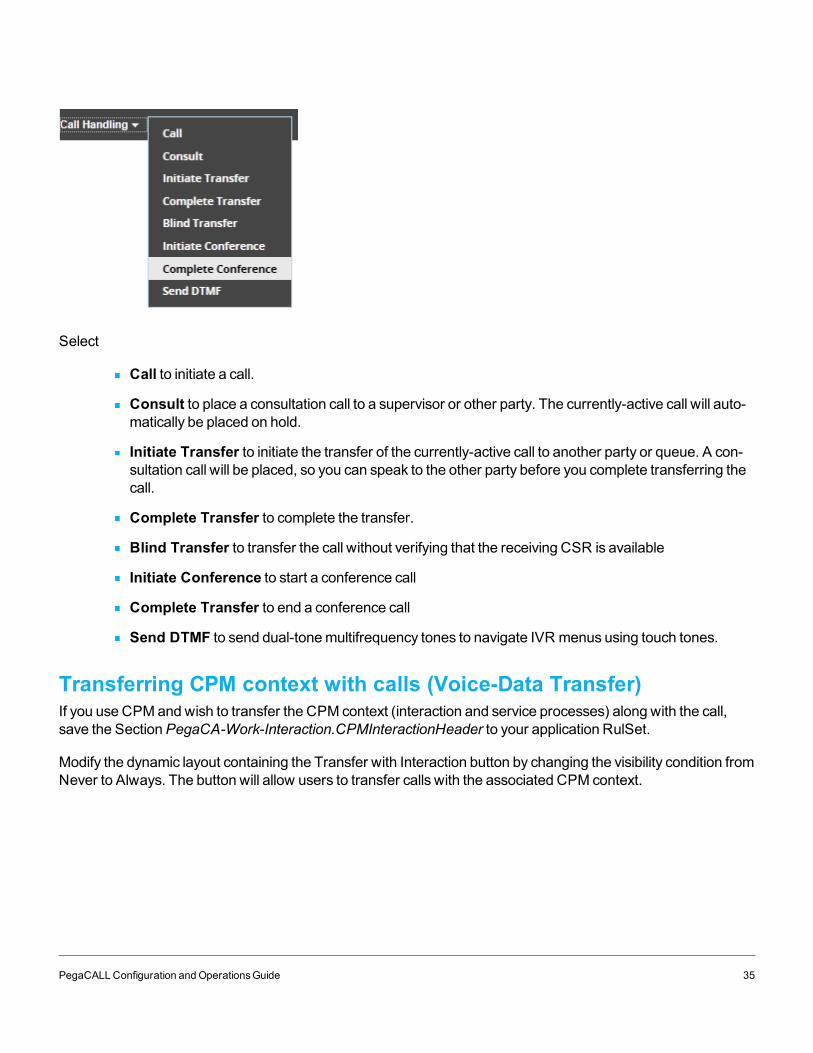
Select
Call to initiate a call.
Consult to place a consultation call to a supervisor or other party. The currently-active call will auto-matically be placed on hold.
Initiate Transfer to initiate the transfer of the currently-active call to another party or queue. A con-sultation call will be placed, so you can speak to the other party before you complete transferring thecall.
Complete Transfer to complete the transfer.
Blind Transfer to transfer the call without verifying that the receiving CSR is available
Initiate Conference to start a conference call
Complete Transfer to end a conference call
Send DTMF to send dual-tonemultifrequency tones to navigate IVR menus using touch tones.
Transferring CPM context with calls (Voice-Data Transfer)If you use CPMandwish to transfer the CPM context (interaction and service processes) along with the call,save the SectionPegaCA-Work-Interaction.CPMInteractionHeader to your application RulSet.
Modify the dynamic layout containing the Transfer with Interaction button by changing the visibility condition fromNever to Always. The button will allow users to transfer calls with the associated CPM context.
PegaCALLConfiguration andOperationsGuide 35
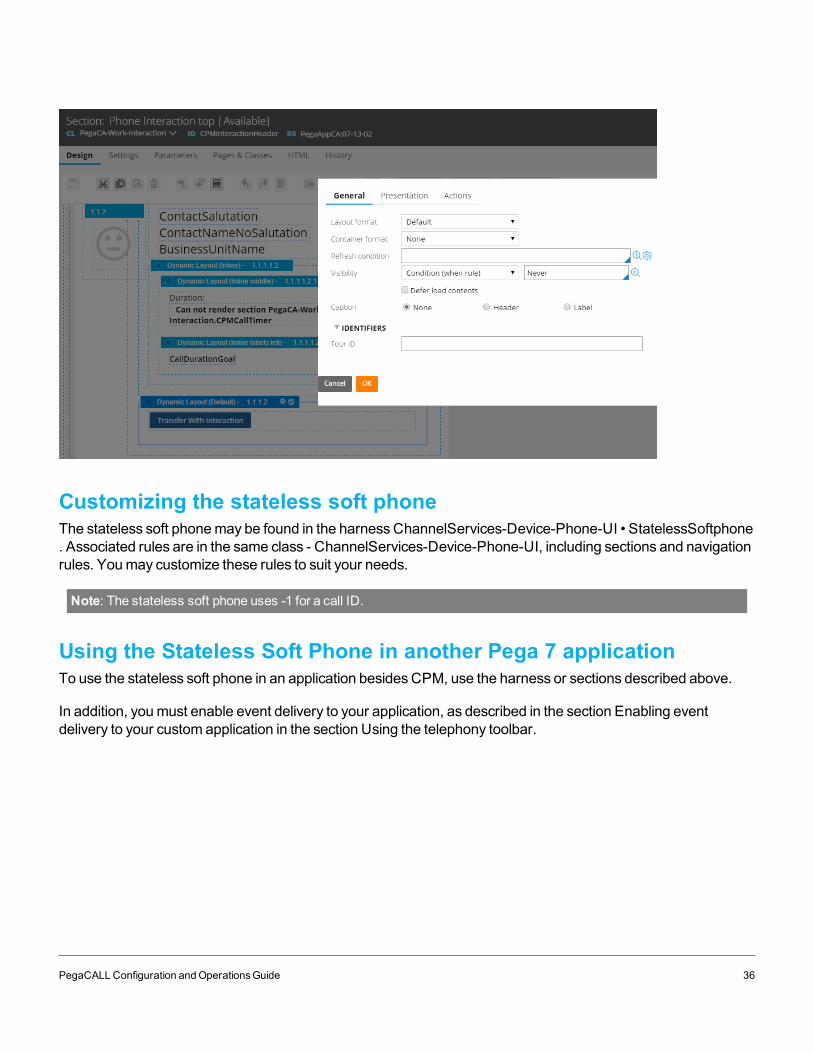
Customizing the stateless soft phoneThe stateless soft phonemay be found in the harnessChannelServices-Device-Phone-UI • StatelessSoftphone. Associated rules are in the same class - ChannelServices-Device-Phone-UI, including sections and navigationrules. Youmay customize these rules to suit your needs.
Note: The stateless soft phone uses -1 for a call ID.
Using the Stateless Soft Phone in another Pega 7 applicationTo use the stateless soft phone in an application besidesCPM, use the harness or sections described above.
In addition, youmust enable event delivery to your application, as described in the section Enabling eventdelivery to your custom application in the section Using the telephony toolbar.
PegaCALLConfiguration andOperationsGuide 36
PegaCALL Configuration Wizard
PegaCALL Configuration WizardThe PegaCALL configuration wizard will create the basic configuration for PegaCALL, including
Defining custom call classes
Configuring event delivery, and the ports used
Mapping call properties
Creating a custom section to be included in the screen pop
Once those basic settings are configured you canmakemore advanced configuration changesmanually.
The wizard also allows for maintenance of existing configurations by re-running the wizard against the sameruleset. Whenmaintaining an existing configuration, the wizard defaults to the previously selected values in theentry fields.
Prerequisite stepsComplete these steps before running the PegaCALLConfigurationWizard:
1. Configure a CTI Link instance.
2. Create or identify an open ruleset and version to be used for CTI configuration changes.
3. Optionally, identify an extension and agent login credentials to use for the test call evaluation. This isa validating step where the wizard inspects a call coming to a CSR's phone extension, retrieve asso-ciated data and allow the user to map call-associated data to Pega properties for use with PegaCS.
Using the wizardYou can use the PegaCALLConfigurationWizard to create a new configuration or to modify an existingconfiguration.When you are updating an existing configuration, the wizard detects and updates existing settingsin the specified ruleset.
To use the wizard:
1. Log in to the Pega 7 Designer Studio as a user with access to PegaCALL rulesets.
2. From the Designer Studiomenu, navigate toChannel Services > PegaCALL > Administration andConfiguration.
3. On the PegaCALLAdministration and Configuration landing page, navigate to the TelephonyExperience tab.
PegaCALLConfiguration andOperationsGuide 37
4. In the ConfigurationWizard section, Review the instructions and launch theStart ConfigurationWizard.
Navigate through the wizard screens by using theBack andNext buttons at the bottom of the screen. SelectCancel at any time to exit the wizard without saving your changes,
At certain points, the wizard displays the Pega 7 ‘Edit Rule’ icon next to a rule name or data field. Selecting the‘Edit Rule’ icon opens a rule form in Designer Studio. Once you edit and save the rule, you can use Pega 7navigation features to return to the wizard.
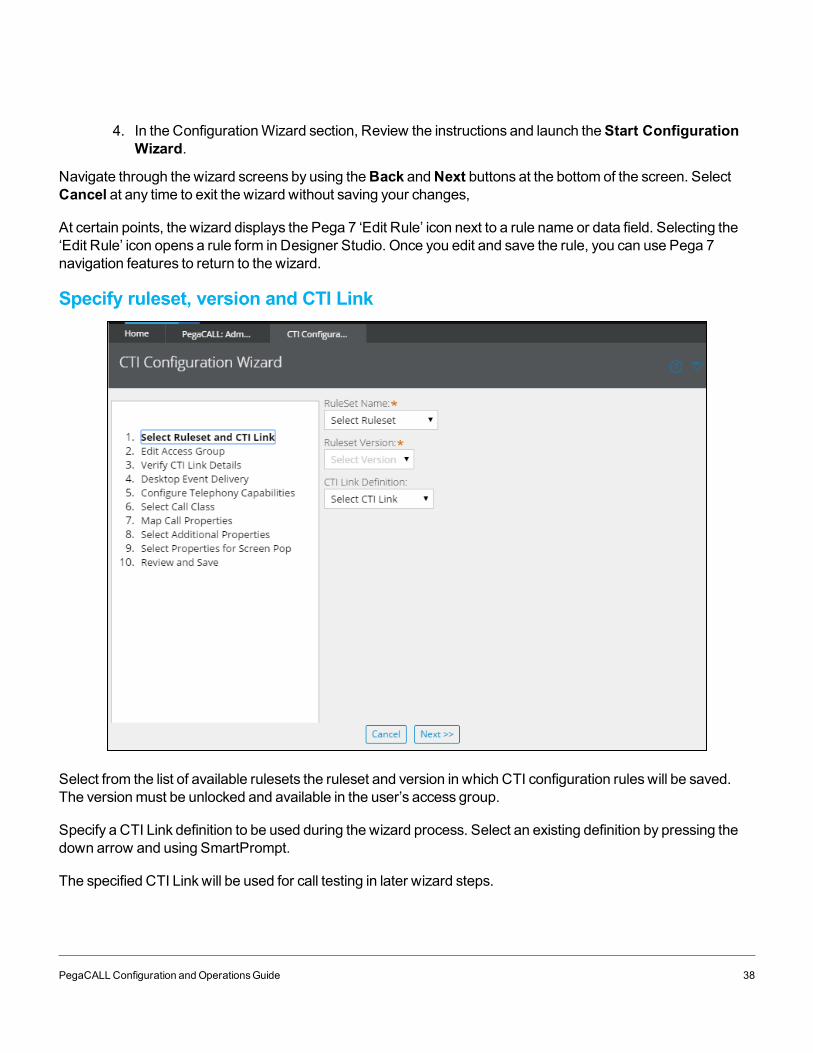
Specify ruleset, version and CTI Link
Select from the list of available rulesets the ruleset and version in which CTI configuration rules will be saved.The versionmust be unlocked and available in the user’s access group.
Specify a CTI Link definition to be used during the wizard process. Select an existing definition by pressing thedown arrow and using SmartPrompt.
The specified CTI Link will be used for call testing in later wizard steps.
PegaCALLConfiguration andOperationsGuide 38
Edit the access groupThewizard checks the access groups used for screen pop creation CTI event handling. The access groupdisplay varies depending on whether the CTI Link you specified is remote, local, or classic.
The ruleset you specified in Step 1must be included in those access groups for PegaCALL features to workproperly. If the wizard detects that the ruleset is not part of the correct access groups, it will not let you continueuntil the rulesets have been added. If the ruleset versions are available in the selected access groups, this stepdisplays amessage that "no additional changes are needed". Click theNext button to continue.
Note: if you update an access group on this screen, after saving the access group click theBack button in the wizardto return to the previous screen, and then click theNext button to return to this screen. This allows the wizard to refreshits view of the access groups.
Verify CTI Link DetailsReview the details of the CTI Link definition. If anything is incorrect, clickBack to return to the previous screen toselect or create a different CTI Link definition.
Click the Test Connectivity button to validate that the CTI link is functioning properly. A connectivity reportappears in a pop-up window. If the status isSUCCESS, all is well with the specified CTI Link definition.
PegaCALLConfiguration andOperationsGuide 39
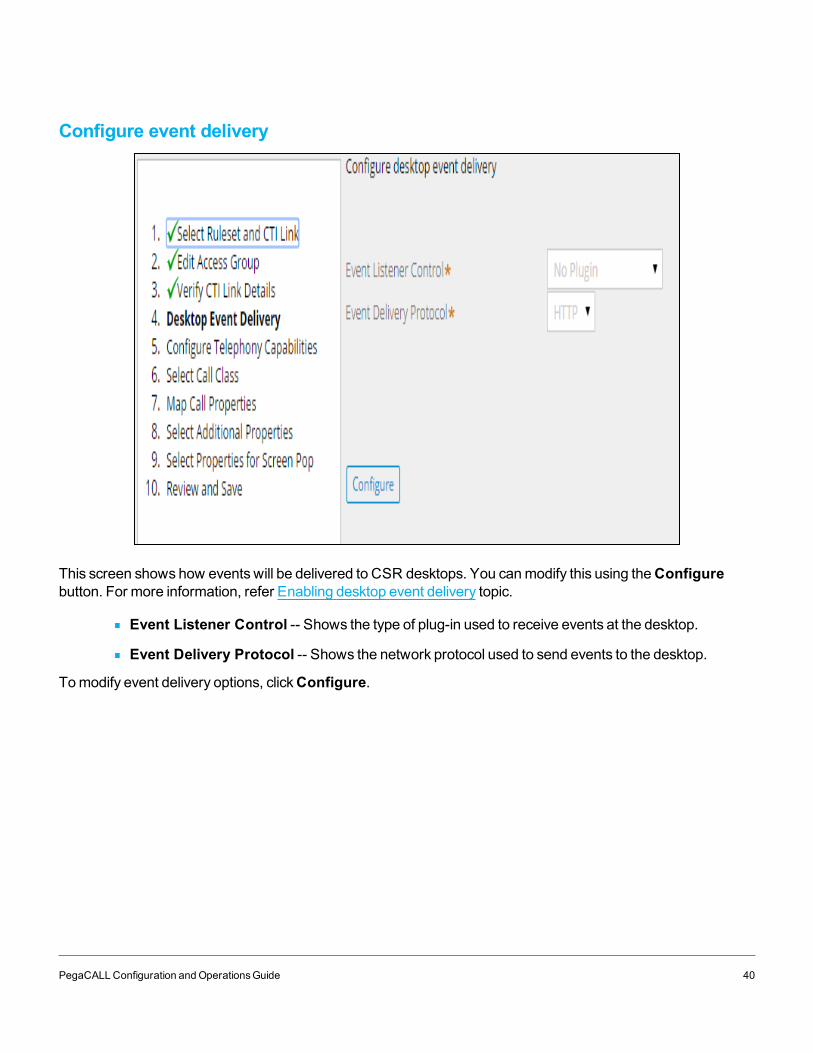
Configure event delivery
This screen shows how events will be delivered to CSR desktops. You canmodify this using theConfigurebutton. For more information, refer Enabling desktop event delivery topic.
Event Listener Control -- Shows the type of plug-in used to receive events at the desktop.
Event Delivery Protocol -- Shows the network protocol used to send events to the desktop.
Tomodify event delivery options, clickConfigure.
PegaCALLConfiguration andOperationsGuide 40

Configure Telephony Capabilities
On this screen, you can configure what telephony capabilities are available to users, Select one of the followingtelephonymodes:
Simple Telephony
Simple Telephonywith Agent-StateManagement
Full Telephony
By default, the Full Telephonymode is selected. For more information, referConfiguring the telephonyexperience topic.
PegaCALLConfiguration andOperationsGuide 41

Select a call class
Select a call class to be used for site specific CTI customizations.
Note: If you are using PegaCALLwith CPM, youmust select PegaCA-CTI-Call.
If you choose to use a custom call class, your classmust inherit fromChannelServices-Interaction-Call(PegaCA-CTI-Call if you use CPM).
Most customerswill not need a custom call class and should select one of the existing classes. Using a customcall classmay be useful in implementationswhere system architects choose to extend existing PegaCALLclasses rather than customize the rules in pre-existing classes. This allows architects additional flexibility tochange call handling and behaviors or specify different class inheritance for example.
Once the call class has been selected, the wizard can generate a test call that the to detect andmap call-dataelements to PegaCALL properties. Check the “Monitor a Test Agent for Inbound Call” checkbox to letPegaCALL attempt call inspection.
SelectNextwhen ready.
If you did not select theMonitor a Test Agent for Inbound Call, screens for the following two steps do notappear.
Enter extension details
When you first come to this screen, the PegaCALL presence agent is instantiated. If a security warning appears,accept it to install.
On this screen, provide the information required to log in an agent:
PegaCALLConfiguration andOperationsGuide 42

Place a test call
The system attempts to connect to the telephony environment using the agent and extension informationprovided. If successful, the screen shown below appears.
At this point, the system is waiting for a test call. Using a different phone than the one specified in the previousstep, place a test call to the extension. The call shouldmatch the calls in your production environment as closelyas possible in order to make sure the same types of call data will be attached aswill be attached on a real call.
When the screen pop appears, selectNext for PegaCALL to complete the call inspection process.
Map call propertiesThis step displays call properties that PegaCALLmaps automatically from properties detected on the test call’spayload of attached data (if any).
PegaCALLConfiguration andOperationsGuide 43
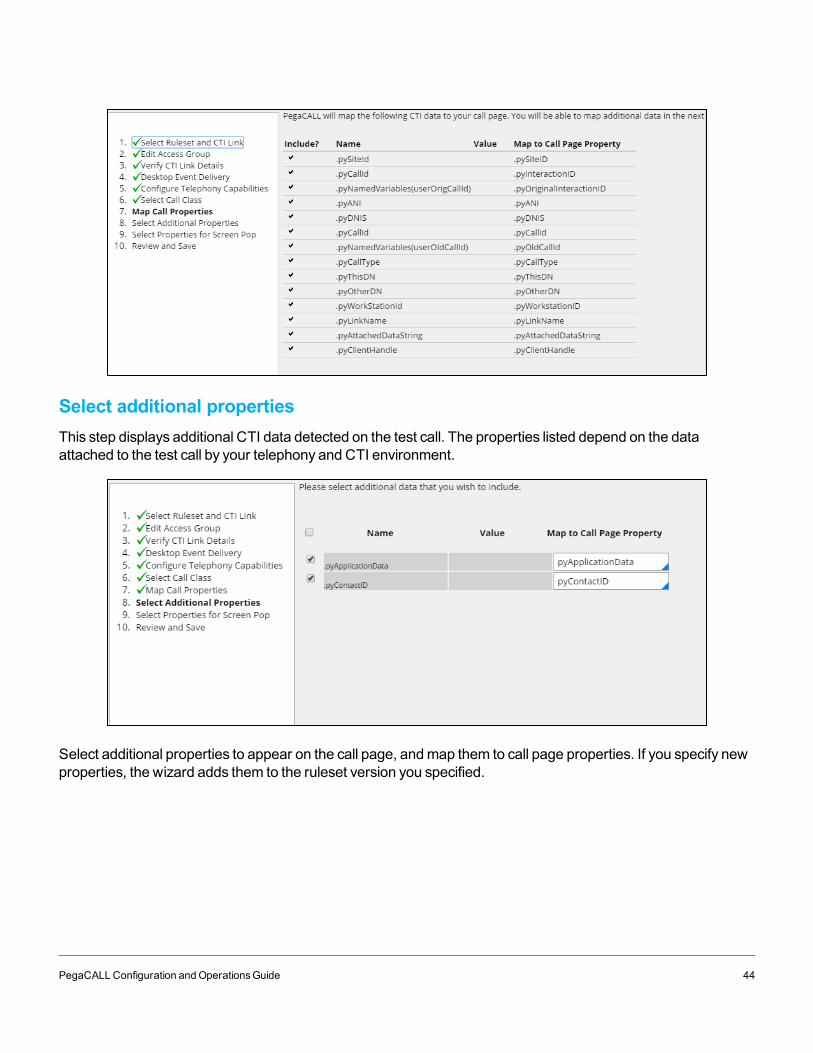
Select additional propertiesThis step displays additional CTI data detected on the test call. The properties listed depend on the dataattached to the test call by your telephony and CTI environment.
Select additional properties to appear on the call page, andmap them to call page properties. If you specify newproperties, the wizard adds them to the ruleset version you specified.
PegaCALLConfiguration andOperationsGuide 44
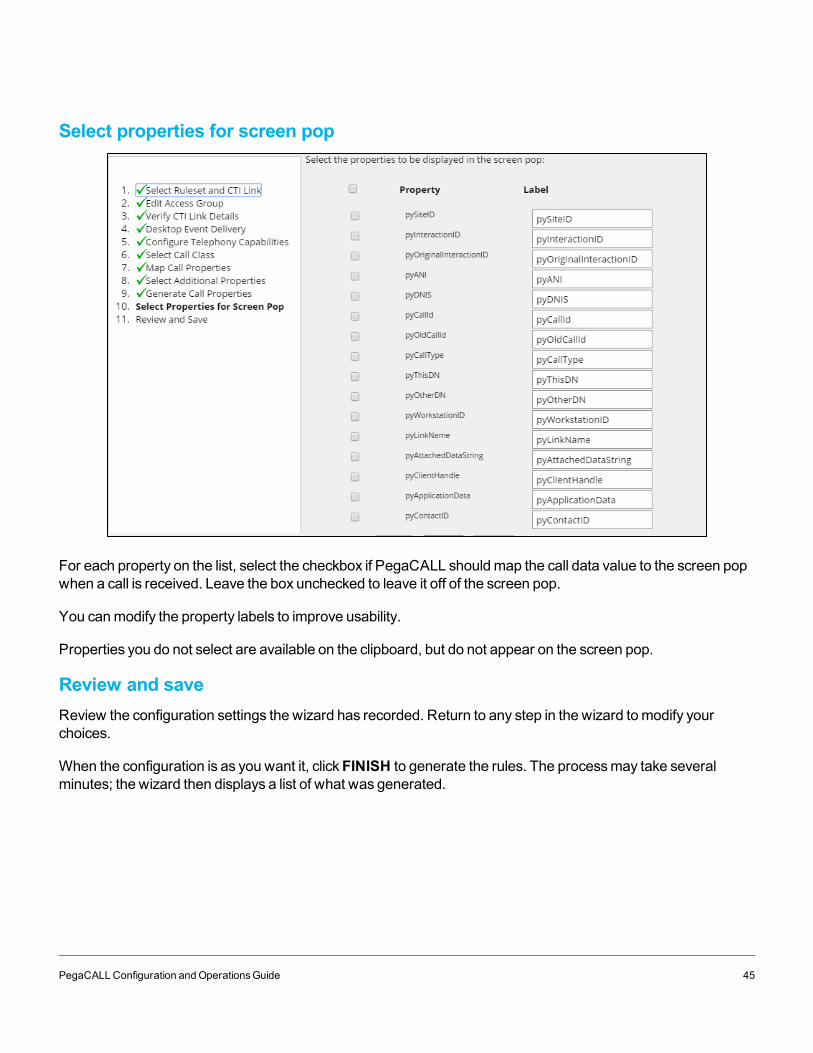
Select properties for screen pop
For each property on the list, select the checkbox if PegaCALL shouldmap the call data value to the screen popwhen a call is received. Leave the box unchecked to leave it off of the screen pop.
You canmodify the property labels to improve usability.
Properties you do not select are available on the clipboard, but do not appear on the screen pop.
Review and saveReview the configuration settings the wizard has recorded. Return to any step in the wizard tomodify yourchoices.
When the configuration is as you want it, clickFINISH to generate the rules. The processmay take severalminutes; the wizard then displays a list of what was generated.
PegaCALLConfiguration andOperationsGuide 45
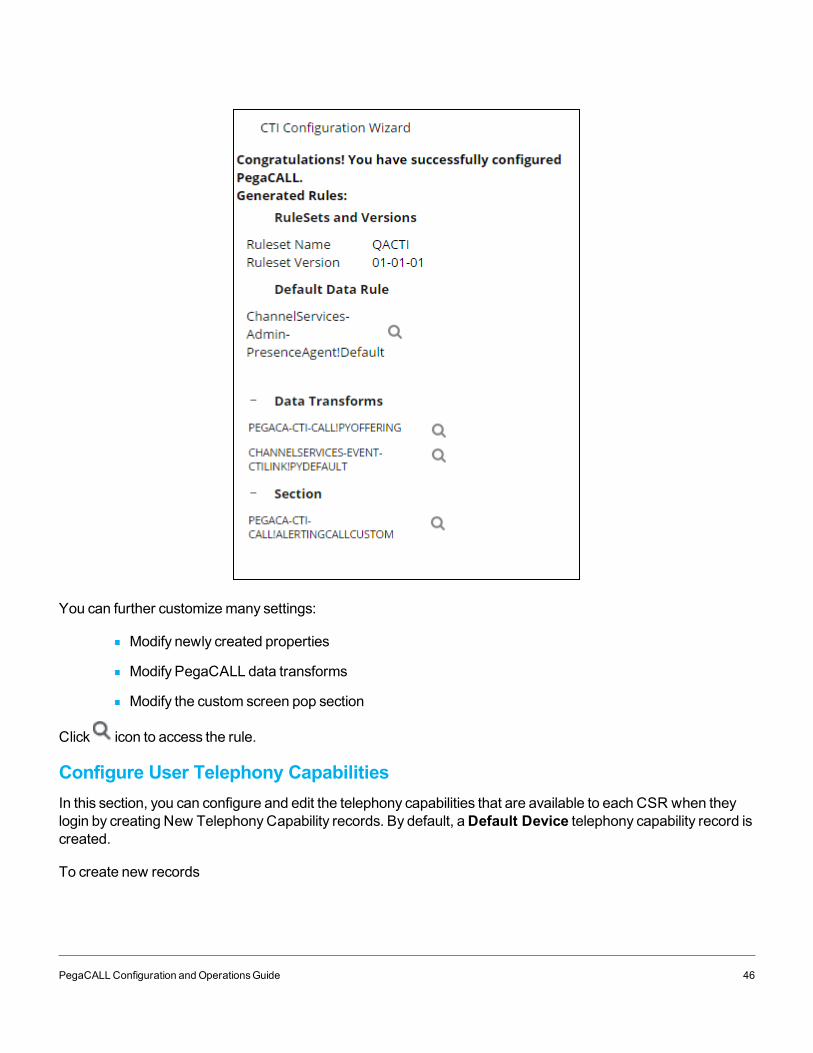
You can further customizemany settings:
Modify newly created properties
Modify PegaCALL data transforms
Modify the custom screen pop section
Click icon to access the rule.
Configure User Telephony CapabilitiesIn this section, you can configure and edit the telephony capabilities that are available to each CSR when theylogin by creating New TelephonyCapability records. By default, aDefault Device telephony capability record iscreated.
To create new records
PegaCALLConfiguration andOperationsGuide 46
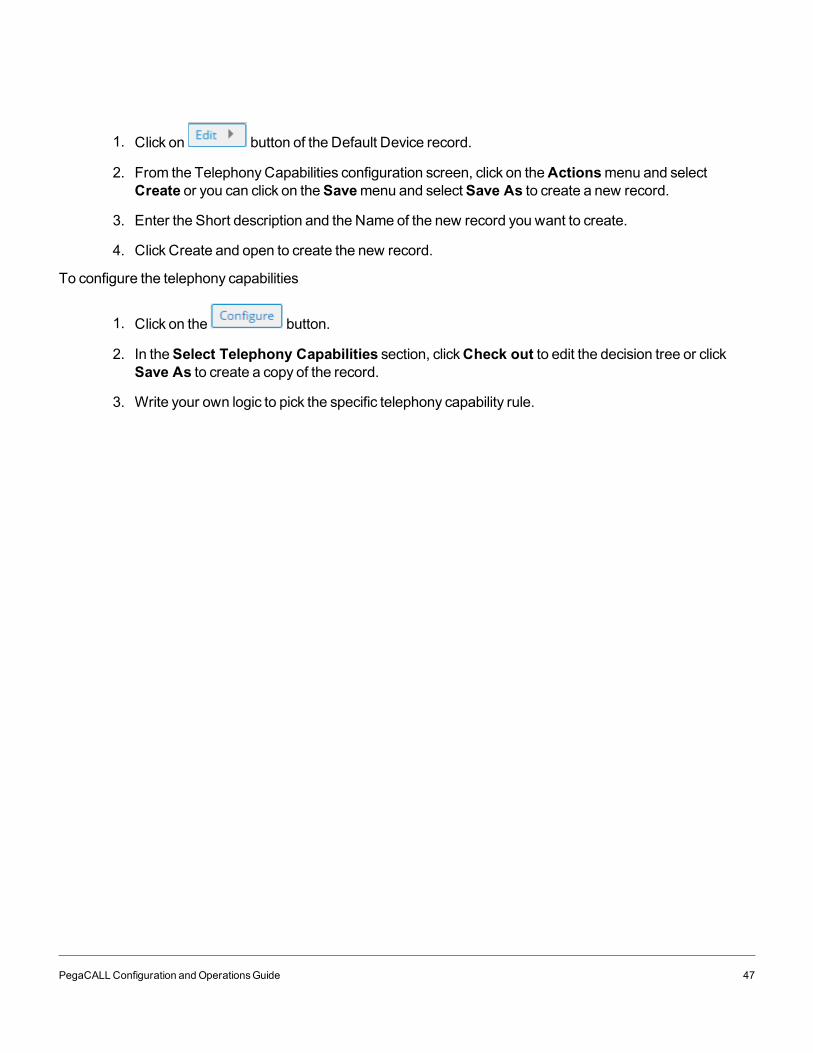
1. Click on button of the Default Device record.
2. From the TelephonyCapabilities configuration screen, click on theActionsmenu and selectCreate or you can click on theSavemenu and selectSave As to create a new record.
3. Enter the Short description and the Name of the new record you want to create.
4. Click Create and open to create the new record.
To configure the telephony capabilities
1. Click on the button.
2. In theSelect Telephony Capabilities section, clickCheck out to edit the decision tree or clickSave As to create a copy of the record.
3. Write your own logic to pick the specific telephony capability rule.
PegaCALLConfiguration andOperationsGuide 47
Enabling Desktop Event Delivery
Understanding desktop event deliveryPegaCALL receives and processes a variety of telephony events. Most of these events trigger changes on theCSR’s desktop. For example, changes in the state of a call on the CSR’s phone trigger changes in the telephonytoolbar displayed on the CSR’s desktop.
PegaCALL uses one of twomethods to deliver events to the desktop.
No-Pluginmode – In thismode, no plugin is required on the CSR’s browser. Events are deliveredusing the same protocol (http or https) used for web applications. Thismode works in all supportedbrowsers.
Pluginmode – In thismode, PegaCALL uses a plugin (applet or ActiveX control) in the CSR'sbrowser. The plugin listens on a network port and receives events from the Pega 7 server. Thismoderelies on the browser's support for the plugin technology.
The rest of this section provides additional information on thesemethods and provides details on how toconfigure each.
Notes:- No-plugin mode requires PRPC 7.1.8 or higher.- Plugin mode is deprecated. All new installations should use no-plugin mode.
No-Plugin modeWhen configured to use no plugins, the desktop leverages a technique known as “long polling” (also known asComet) to retrieve events. The browser requests events from the server at regular intervals using the standardhttp (or https) protocol. If there are no events at the time, a server may hold the http request for a period.
To use no-pluginmode, you should configure one or morePresenceAgent rules, as described later in thesectionConfiguring desktop event delivery on page 50. Youmay also need to configure http polling intervals andtimeouts as described later in this chapter.
Note: Check the application protocal provided to you. If it is http, then consider as http across the document, elseconsider it as https .
PegaCALLConfiguration andOperationsGuide 48
Plugins for Event DeliveryIn Pluginmode, PegaCALL uses a plugin that is loaded into the CSR's browser to listen for events from thePega 7 server. The plugin, called thePresence Agent, may be an applet or an ActiveX control. It binds to anetwork port on the CSR’s desktop and receives events from the Pega 7 server. The events can then triggerchanges on the desktop, including UI changes. Note that the presence agent does not provide UI elements fortelephony control; its role is limited to receiving asynchronous events and passing them on to other elements onthe CSR desktop.
Depending on the configuration of CSR desktops, youmay choose to use the applet or the ActiveX control forevent delivery. As ActiveX controls are supported only on Internet Explorer, you will need to choose the applet ifany of your CSRs are expected to use other web browsers to access PegaCALL functionality.
Youmust ensure that desktop firewalls and browser settings are configured to allow the plugin(applet or ActiveXcontrol) to run in the CSR’s browser and listen for network events. If you use the applet, youmust ensure thatthe Java Runtime Environment (JRE) version 1.7 or later is installed on each CSR desktop. To configure yourchoice of plugin used, you should configure one or morePresenceAgent rules, as described later in the sectionConfiguring desktop event delivery on page 50.
Network protocol and desktop port for event deliveryWhen used in pluginmode, PegaCALL is configured to use either TCP or UDP as a network protocol for eventdelivery fromPega 7 to CSR desktops. If you have a reliable network between the Pega 7 server and CSRdesktops, youmay use UDP for event delivery. UDP is supported only with the ActiveX desktop control, so youwill need to choose the ActiveX control in order to use UDP. For most environments, TCP is therecommended network protocol.
Youmay configure the network port(s) on the CSR desktop that will be used for event delivery. The PegaCALLdesktop control will open the port and listen for messages using the configured network protocol. If a single portmay not always be available (for example, in virtual desktop environments wheremanyCSRsmay share asingle IP address), youmay configure a range of ports that PegaCALLmay use.
To configure your choice of network protocol and desktop port(s), you should configure one or morePresence-Agent rules, as described later in the sectionConfiguring desktop event delivery on page 50.
Youmust configure your network and firewalls to ensure that Pega 7 can communicate with the CSR desktopusing the chosen network protocol.
If you choose UDP, the Pega 7 server(s) must be able to send UDPmessages to the chosen port(s)on each CSR desktop.
If you choose TCP, the Pega 7 server(s) must be able to open a TCP socket to the chosen port(s) oneach CSR desktop.
The Presence Agent capabilities and requirements are provided in the below table
PegaCALLConfiguration andOperationsGuide 49
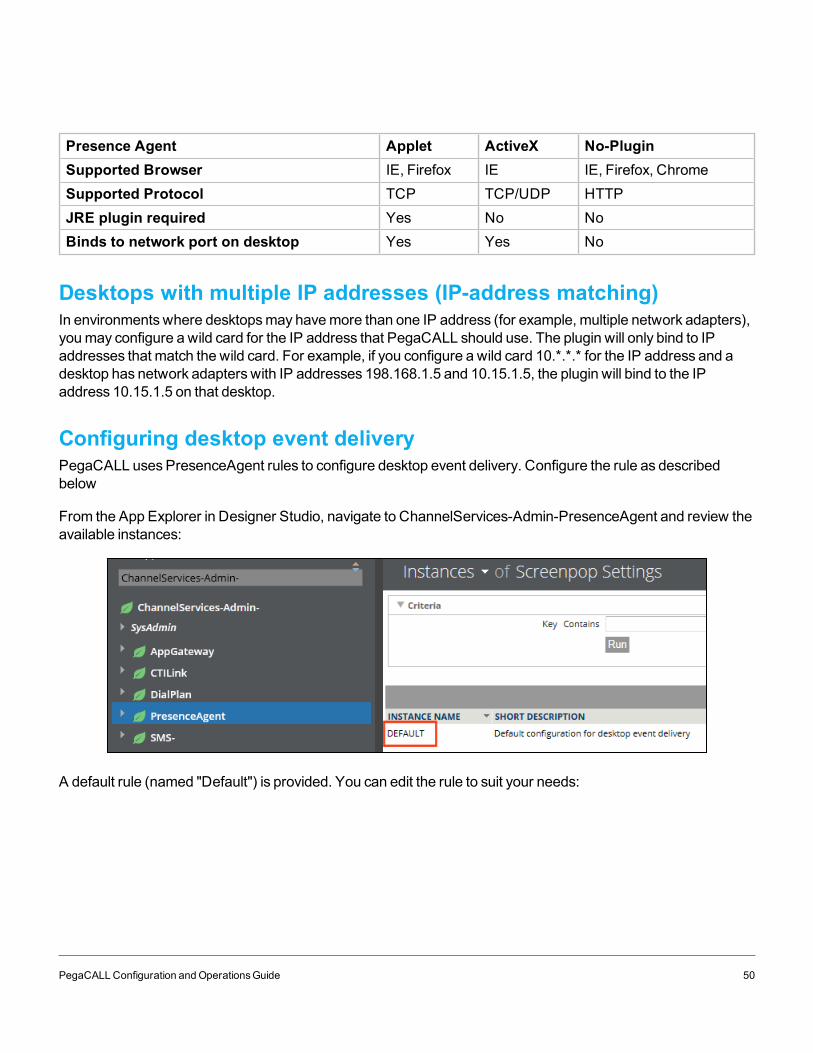
Presence Agent Applet ActiveX No-PluginSupported Browser IE, Firefox IE IE, Firefox, ChromeSupported Protocol TCP TCP/UDP HTTPJRE plugin required Yes No NoBinds to network port on desktop Yes Yes No
Desktops with multiple IP addresses (IP-address matching)In environments where desktopsmay havemore than one IP address (for example, multiple network adapters),youmay configure a wild card for the IP address that PegaCALL should use. The plugin will only bind to IPaddresses that match the wild card. For example, if you configure a wild card 10.*.*.* for the IP address and adesktop has network adapters with IP addresses 198.168.1.5 and 10.15.1.5, the plugin will bind to the IPaddress 10.15.1.5 on that desktop.
Configuring desktop event deliveryPegaCALL uses PresenceAgent rules to configure desktop event delivery. Configure the rule as describedbelow
From the App Explorer in Designer Studio, navigate to ChannelServices-Admin-PresenceAgent and review theavailable instances:
A default rule (named "Default") is provided. You can edit the rule to suit your needs:
PegaCALLConfiguration andOperationsGuide 50
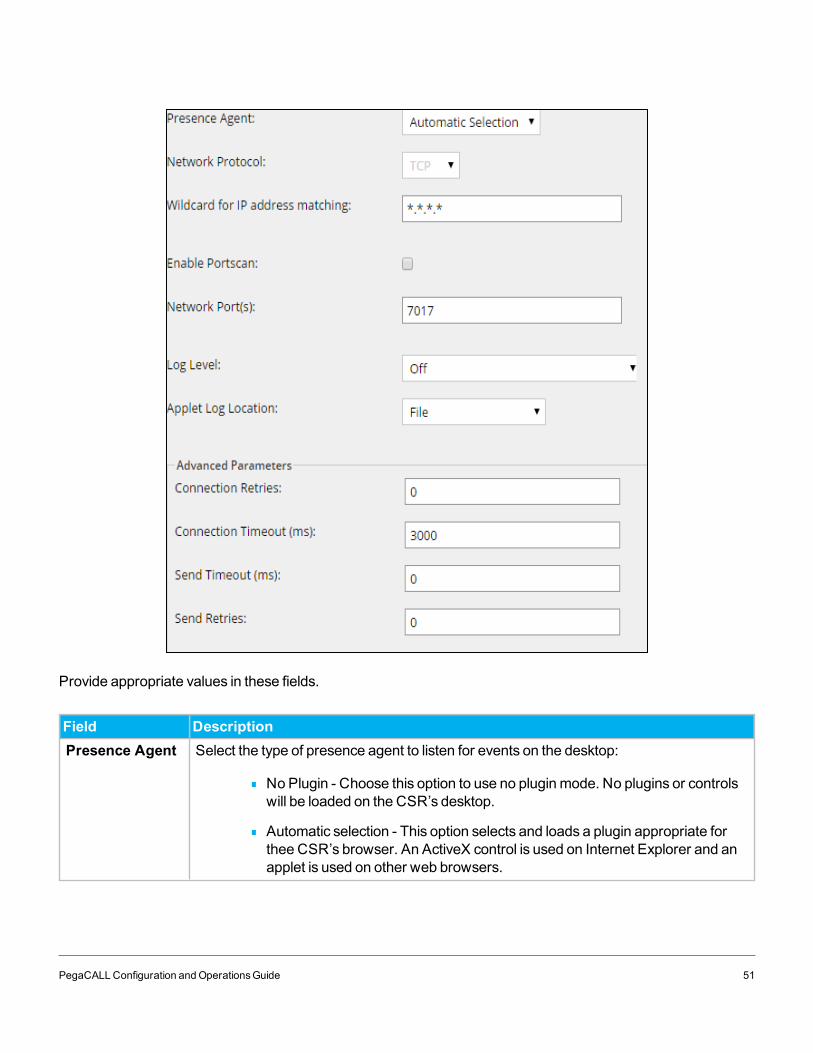
Provide appropriate values in these fields.
Field DescriptionPresence Agent Select the type of presence agent to listen for events on the desktop:
No Plugin - Choose this option to use no pluginmode. No plugins or controlswill be loaded on the CSR’s desktop.
Automatic selection - This option selects and loads a plugin appropriate forthee CSR’s browser. An ActiveX control is used on Internet Explorer and anapplet is used on other web browsers.
PegaCALLConfiguration andOperationsGuide 51
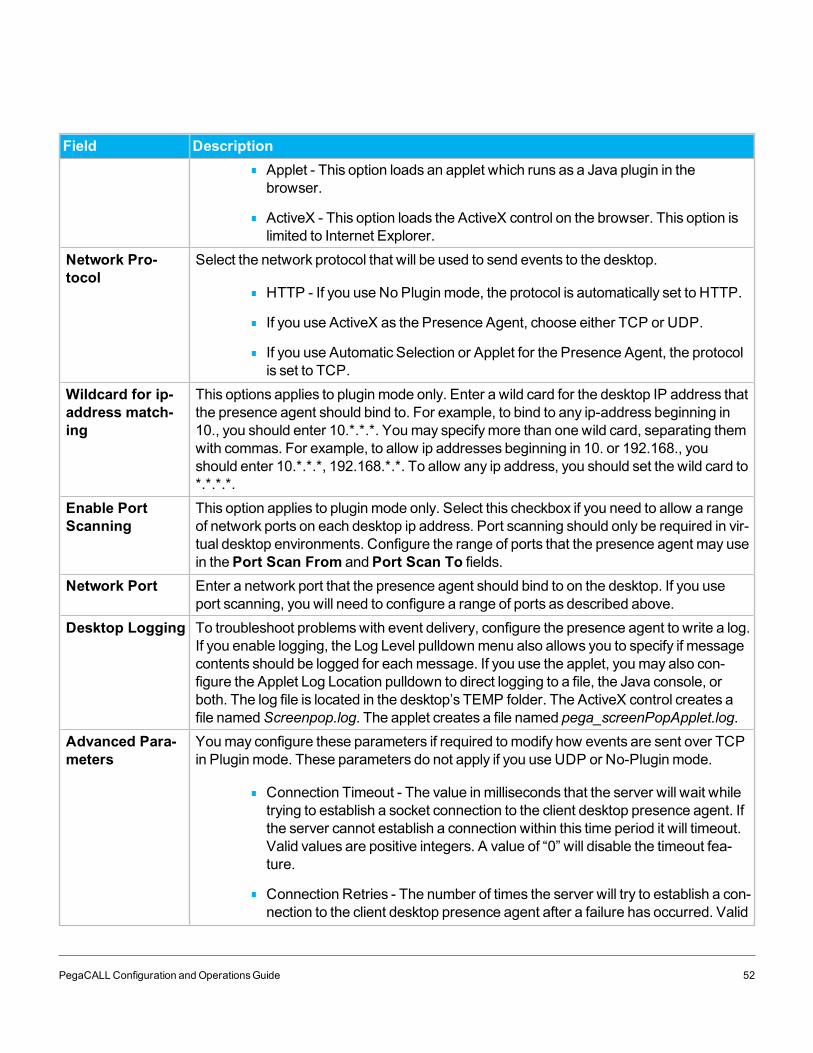
Field DescriptionApplet - This option loads an applet which runs as a Java plugin in thebrowser.
ActiveX - This option loads the ActiveX control on the browser. This option islimited to Internet Explorer.
Network Pro-tocol
Select the network protocol that will be used to send events to the desktop.
HTTP - If you use No Pluginmode, the protocol is automatically set to HTTP.
If you use ActiveX as the Presence Agent, choose either TCP or UDP.
If you use Automatic Selection or Applet for the Presence Agent, the protocolis set to TCP.
Wildcard for ip-address match-ing
This options applies to pluginmode only. Enter a wild card for the desktop IP address thatthe presence agent should bind to. For example, to bind to any ip-address beginning in10., you should enter 10.*.*.*. Youmay specifymore than one wild card, separating themwith commas. For example, to allow ip addresses beginning in 10. or 192.168., youshould enter 10.*.*.*, 192.168.*.*. To allow any ip address, you should set the wild card to*.*.*.*.
Enable PortScanning
This option applies to pluginmode only. Select this checkbox if you need to allow a rangeof network ports on each desktop ip address. Port scanning should only be required in vir-tual desktop environments. Configure the range of ports that the presence agent may usein thePort Scan From andPort Scan To fields.
Network Port Enter a network port that the presence agent should bind to on the desktop. If you useport scanning, you will need to configure a range of ports as described above.
Desktop Logging To troubleshoot problemswith event delivery, configure the presence agent to write a log.If you enable logging, the Log Level pulldownmenu also allows you to specify if messagecontents should be logged for eachmessage. If you use the applet, youmay also con-figure the Applet Log Location pulldown to direct logging to a file, the Java console, orboth. The log file is located in the desktop’s TEMP folder. The ActiveX control creates afile namedScreenpop.log. The applet creates a file named pega_screenPopApplet.log.
Advanced Para-meters
Youmay configure these parameters if required tomodify how events are sent over TCPin Pluginmode. These parameters do not apply if you use UDP or No-Pluginmode.
Connection Timeout - The value inmilliseconds that the server will wait whiletrying to establish a socket connection to the client desktop presence agent. Ifthe server cannot establish a connection within this time period it will timeout.Valid values are positive integers. A value of “0” will disable the timeout fea-ture.
Connection Retries - The number of times the server will try to establish a con-nection to the client desktop presence agent after a failure has occurred. Valid
PegaCALLConfiguration andOperationsGuide 52
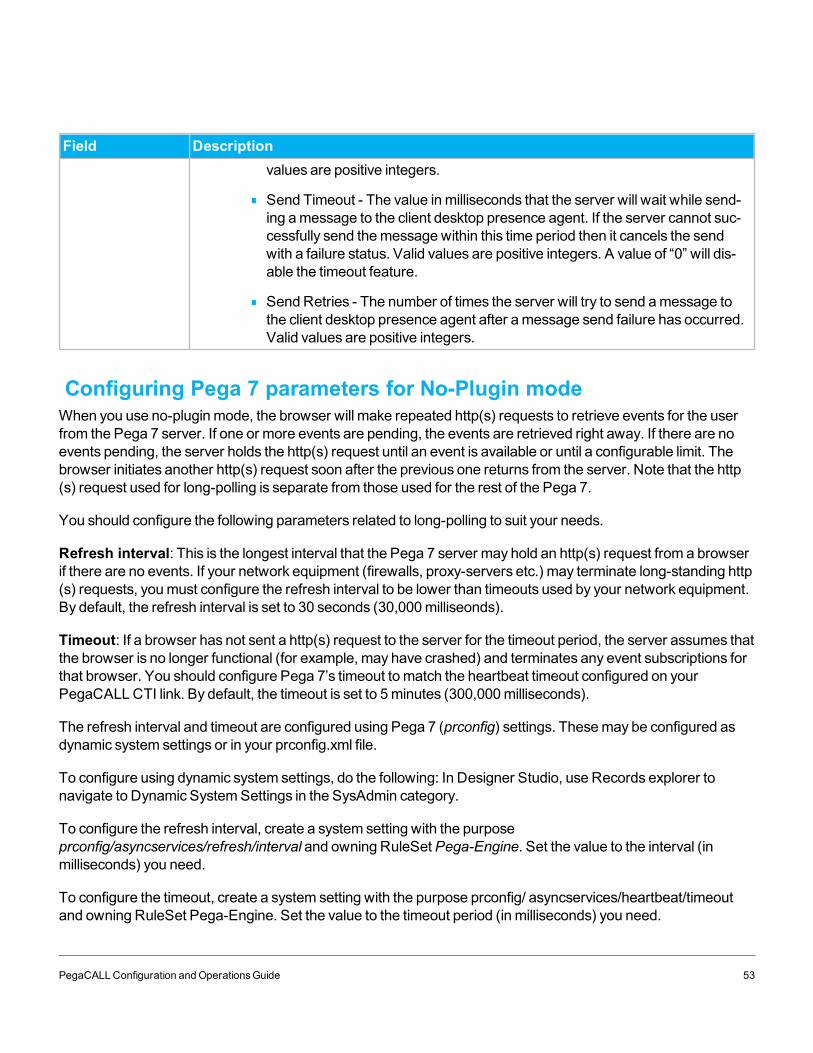
Field Descriptionvalues are positive integers.
Send Timeout - The value inmilliseconds that the server will wait while send-ing amessage to the client desktop presence agent. If the server cannot suc-cessfully send themessage within this time period then it cancels the sendwith a failure status. Valid values are positive integers. A value of “0” will dis-able the timeout feature.
Send Retries - The number of times the server will try to send amessage tothe client desktop presence agent after amessage send failure has occurred.Valid values are positive integers.
Configuring Pega 7 parameters for No-Plugin modeWhen you use no-pluginmode, the browser will make repeated http(s) requests to retrieve events for the userfrom the Pega 7 server. If one or more events are pending, the events are retrieved right away. If there are noevents pending, the server holds the http(s) request until an event is available or until a configurable limit. Thebrowser initiates another http(s) request soon after the previous one returns from the server. Note that the http(s) request used for long-polling is separate from those used for the rest of the Pega 7.
You should configure the following parameters related to long-polling to suit your needs.
Refresh interval: This is the longest interval that the Pega 7 server may hold an http(s) request from a browserif there are no events. If your network equipment (firewalls, proxy-servers etc.) may terminate long-standing http(s) requests, youmust configure the refresh interval to be lower than timeouts used by your network equipment.By default, the refresh interval is set to 30 seconds (30,000milliseonds).
Timeout: If a browser has not sent a http(s) request to the server for the timeout period, the server assumes thatthe browser is no longer functional (for example, may have crashed) and terminates any event subscriptions forthat browser. You should configure Pega 7’s timeout to match the heartbeat timeout configured on yourPegaCALLCTI link. By default, the timeout is set to 5minutes (300,000milliseconds).
The refresh interval and timeout are configured using Pega 7 (prconfig) settings. Thesemay be configured asdynamic system settings or in your prconfig.xml file.
To configure using dynamic system settings, do the following: In Designer Studio, use Records explorer tonavigate to Dynamic SystemSettings in the SysAdmin category.
To configure the refresh interval, create a system setting with the purposeprconfig/asyncservices/refresh/interval and owning RuleSetPega-Engine. Set the value to the interval (inmilliseconds) you need.
To configure the timeout, create a system setting with the purpose prconfig/ asyncservices/heartbeat/timeoutand owning RuleSet Pega-Engine. Set the value to the timeout period (in milliseconds) you need.
PegaCALLConfiguration andOperationsGuide 53
These settings take effect when you restart the Pega 7 server. For additional information on how to configuresettings including configuration using prconfig.xml, refer to the PRPC Online Help.
Configuring your application server for No-Plugin modeIn No-Pluginmode, Pega 7 holds onto the http(s) request used for long-polling. Application servers typically limitthe number of concurrent http(s) requests they accept and process. Youmay need to configure your applicationserver to increase the number of requests it accepts. As a rule, the application server should be configured toallow up to 2 http(s) requests for each user who will use PegaCALL in no-pluginmode.
Varying presence agent configurationYoumay configuremore than one presence agent rule if you need to vary the configuration for different sets ofusers. Youmay copy the Default presence agent rule andmodify it, or create new instances ofChannelServices-Admin-PresenceAgent as needed. Then override the decision treeChannelServices-Admin-PresenceAgent • pySelectpresenceAgent andmodify it to include your logic for selecting which PresenceAgentrule applies to each user.
A user’s configuration is loaded into a requestor-scope data pageD_ScreenPopControlSettingswhen his or herdesktop loads the presence agent.
PegaCALLConfiguration andOperationsGuide 54
Configuring call treatment and screen popsThis section describes the options related to the processing triggered when a phone call arrives at the CSR'sphone. You can specify:
that the CSR sees a popup window ("screen pop") with information about the call and caller, or thatCPM interaction processing starts automatically.
what happens if the CSR does not respond to a screen pop.
that PegaCALL answers the call on behalf of the user.
These options are configured inCall Treatment rules. Youmay circumstance these rules to process differentcall types (for example, consultation and transferred calls vs. incoming customer calls).
PegaCALLConfiguration andOperationsGuide 55
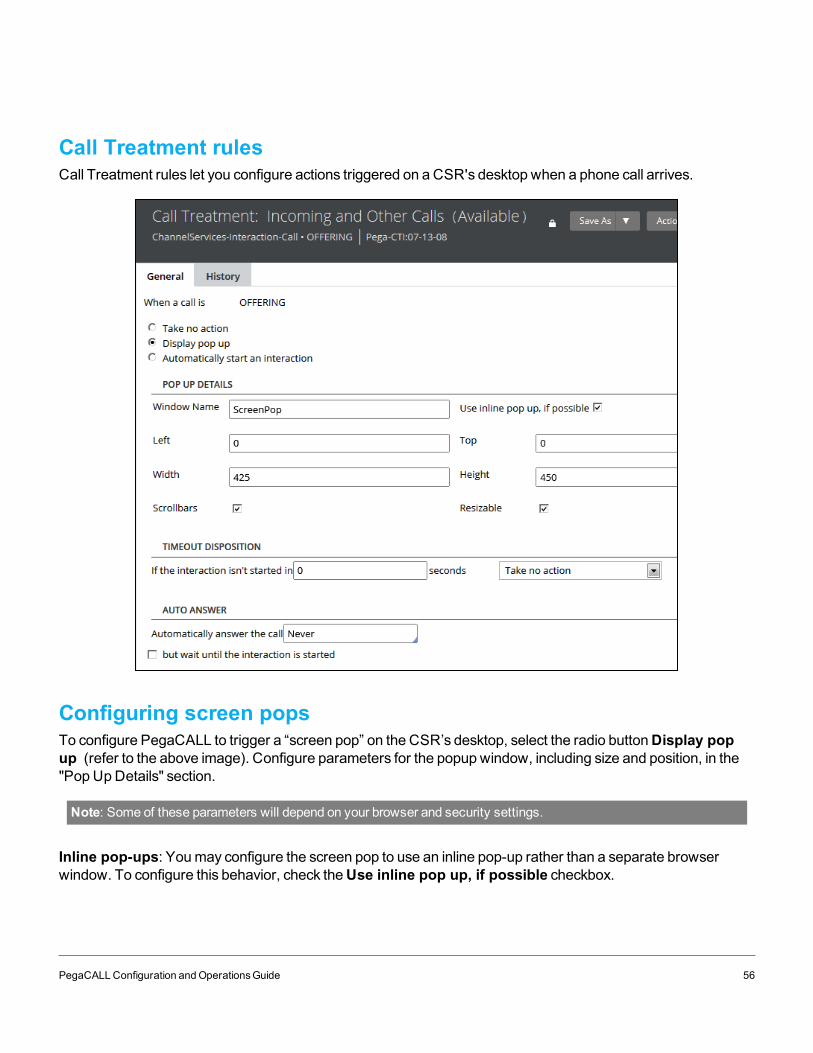
Call Treatment rulesCall Treatment rules let you configure actions triggered on a CSR's desktop when a phone call arrives.
Configuring screen popsTo configure PegaCALL to trigger a “screen pop” on the CSR’s desktop, select the radio buttonDisplay popup (refer to the above image). Configure parameters for the popup window, including size and position, in the"Pop UpDetails" section.
Note: Some of these parameters will depend on your browser and security settings.
Inline pop-ups: Youmay configure the screen pop to use an inline pop-up rather than a separate browserwindow. To configure this behavior, check theUse inline pop up, if possible checkbox.
PegaCALLConfiguration andOperationsGuide 56
This functionality is not supported when using the CPMCSR portal or when using the PegaCALLwithout CPM.It is only supported when PegaCALL is used with the CPM interaction portal.
Timeout Disposition: Youmay configure a timeout interval and behavior in the call treatment rule. If the CSRdoes not respond to the screen pop (does not click theAccept orDecline buttons in the popup window) withinthe timeout interval, the timeout behavior launches. The options for timeout behavior are:
Take no action – No action triggered by the timeout. Popup window remains open.
Close the window – Closes the popup window. No further processing is triggered for the call. Thisoption does not apply to inline pop-ups.
Set focus to the popup window – Depending on your browser and operating system, thismaybring the popup window to the foreground. This option does not apply to inline pop-ups.
Start the interaction – Starts CPM interaction processing for the call.
Screen Pop User Interface: The popup window displays the sectionOFFERING (applies to your call class –For example, ChannelServices-Interaction-Call or PegaCA-CTI-Call). To configure the UI elements andinformation displayed in the popup window, modify the section or its component rules in your application ruleset.Youmay circumstance the section based on call type, or include elements conditionally if you need differentinformation displayed for different types of call; the sample sections inChannelServices-Interaction-Call usecircumstancing and the sample section included in CPM (PegaCA-CTI-Call) uses conditional includes. If youuse the CPM interaction portal, you should customize the included sectionCPMToasterContent.
Starting interaction processing automatically ("auto-accept")If you use PegaCALLwith CPM, you can configure the call treatment rule to initiate CPM interaction processingfor the call automatically. No screen pop window displays in this case.
Select the radio buttonAutomatically start an interaction to configure this behavior:
PegaCALLConfiguration andOperationsGuide 57
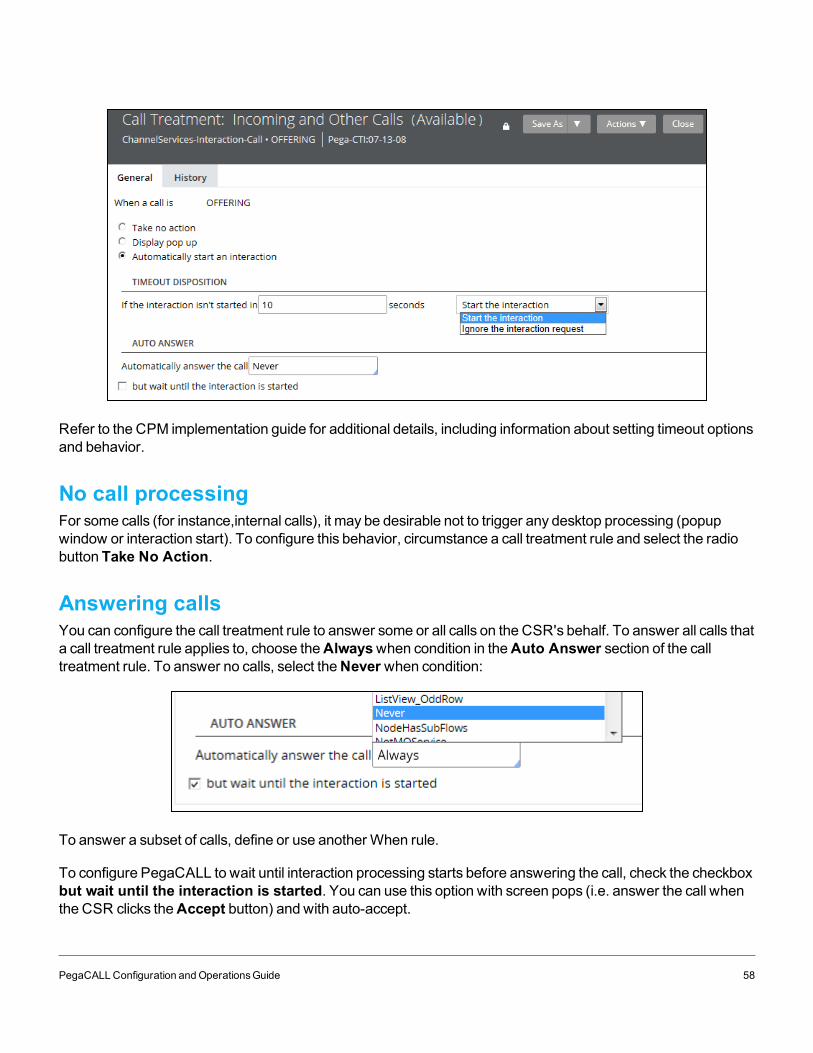
Refer to the CPM implementation guide for additional details, including information about setting timeout optionsand behavior.
No call processingFor some calls (for instance,internal calls), it may be desirable not to trigger any desktop processing (popupwindow or interaction start). To configure this behavior, circumstance a call treatment rule and select the radiobutton Take No Action.
Answering callsYou can configure the call treatment rule to answer some or all calls on the CSR's behalf. To answer all calls thata call treatment rule applies to, choose theAlwayswhen condition in theAuto Answer section of the calltreatment rule. To answer no calls, select theNever when condition:
To answer a subset of calls, define or use another When rule.
To configure PegaCALL to wait until interaction processing starts before answering the call, check the checkboxbut wait until the interaction is started. You can use this option with screen pops (i.e. answer the call whenthe CSR clicks theAccept button) and with auto-accept.
PegaCALLConfiguration andOperationsGuide 58

Notes:
If your telephone equipment is configured to automatically answer calls, you should not configurePegaCALL to answer calls.
You should not configure PegaCALL to answer consultation and transferred calls automatically.Thismay cause problems for blind-transferred calls.
Modifying Call Treatment rules
Youmay review andmodify Call Treatment rules from the PegaCALL administration landing page. From theDesigner Studiomenu, navigate toChannel Services > PegaCALL > Administration & Configuration.Select theCall Treatment tab to display a list of call treatment rules, along with the specific circumstance, classand ruleset version they apply to. The landing page displays only call treatment rules applicable to offeringevents. As a rule, you should onlymodify these.
PegaCALL includes several call treatment rules you can use as starting points. The rules are named for the CTIevents that trigger processing. Modify only the OFFERINGcall treatment rules.
To review or modify configuration details associated with a particular call treatment, click theDetails button forthe rule. Tomodify the rule, copy it to your application ruleset and thenmodify it to suit your needs. Make surethat the service package that processesCTI events (CTILinkEvent for local CTI links, CTILinkRemoteEvent forremote CTI links) has access to your ruleset.
Youmay circumstance theOFFERING rule to vary call treatment based on a property (for example,pyCallType). A circumstanced rule is included for consultation and transferred calls (pyCallType=CONSULT).
Call typesPegaCALL provides a call type that may be used to circumstance call treatment rules. The pyCallType propertyon the call page specifies call types, whichmay include:
INBOUND – Inbound calls including customer calls that are routed through an ACD queue.
CONSULT –Consultation and transferred calls.
PegaCALLConfiguration andOperationsGuide 59
OUTBOUND –Calls placed from the contact center or the CSR's phone to an external phone num-ber.
INTERNAL –Calls that are internal to the call center, such as calls from one CSR to another.
Retrieving additional dataWhen a call arrives, PegaCALL receivesCTI data that may have been gathered in the telephony system. If youneed to retrieve data from additional sources before a screen pop displays or call processing starts, override theactivity pyPrefetch in your call class (for example,ChannelServices-Interaction-Call or PegaCA-CTI-Call).PegaCALL executes pyPrefetchwhen a call arrives.
Youmay add properties to the call class or create a separate object to hold the additional data. Note that theactivity is executed from a service package (not the operator), so you should ensure that your application rulesetis accessible to the service package that processesCTI events.
PegaCALLConfiguration andOperationsGuide 60
Configuring the telephony experienceConfigure the user experience on telephony from the Telephony Experience tab of the PegaCALLAdministration and Configuration landing page. The ConfigurationWizard guides you to configure the varioustelephony features. The User TelephonyCapabilities section allows you to configure which telephonycapabilities are available to each operator.
Understanding telephony modesThe telephonymodes refer to the set of telephony capabilities presented to a user. PegaCALL supports thefollowing telephonymodes.
Simple Telephony
Simple telephonymode is intended for users who use a different tool for call control operations (for example,placing calls on hold, transferring calls) and agent-statemanagement (making themselves Available orUnavailable for customer calls). The user receives new call notifications (screen pop or automatic interaction-start) when calls arrive at their phone. CTI data associated with the call will be available for use within the Pegaapplication for screen pops and related processing. Agent statemanagement and call control features are notavailable on the Pega desktop.
Simple Telephony with Agent-State Management
Simple telephonymodewith Agent StateManagement is intended for users who use a separate phone(hardware or software) for call control operations, but need to perform agent-statemanagement from their Pegadesktop.When thismode is selected, the user canmanage their agent state (Available or Unavailable) from thePega desktop. In addition, call notificationswith CTI data are available in the Pega application. Call controlfeatures are not available from the Pega desktop.
Full Telephony
Full telephonymode is intended for users who perform all telephony functions from the Pega desktop.When thismode is selected, the user can control calls (for example, Hold, Retrieve, Transfer, Hangup) on their phone andmanage agent state from their Pega desktop. In addition, they receive call notifications the sameway as simpletelephonymode.
NOTE: Ensure that the user has the HasTelephony privilege that is required to view the telephony tools in the portal. Ifnot, the user will not see any telephony tools or capabilities.
Configuring telephony capabilitiesYou can configure telephony capabilities from the User TelephonyCapabilities section of the TelephonyExperience tab in the PegaCALL administration and configuration landing page.
PegaCALLConfiguration andOperationsGuide 61
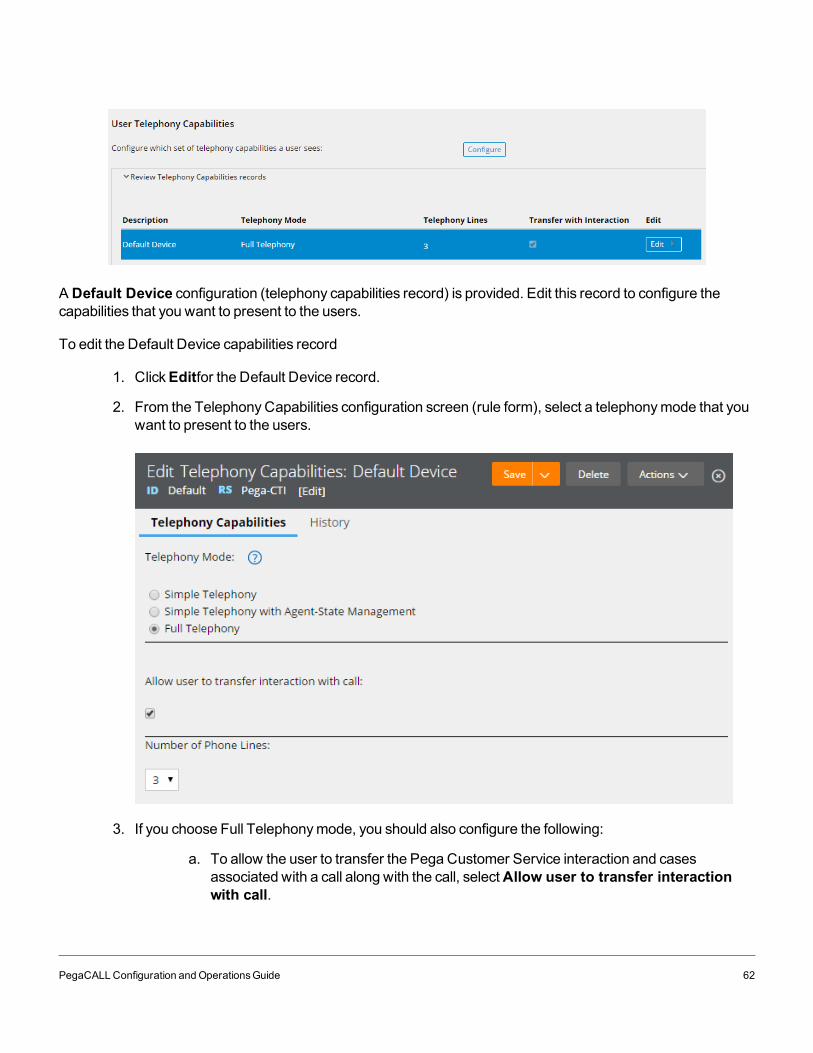
A Default Device configuration (telephony capabilities record) is provided. Edit this record to configure thecapabilities that you want to present to the users.
To edit the Default Device capabilities record
1. ClickEditfor the Default Device record.
2. From the TelephonyCapabilities configuration screen (rule form), select a telephonymode that youwant to present to the users.
3. If you choose Full Telephonymode, you should also configure the following:
a. To allow the user to transfer the Pega Customer Service interaction and casesassociated with a call along with the call, selectAllow user to transfer interactionwith call.
PegaCALLConfiguration andOperationsGuide 62
b. To change the number of phone lines that you want to show on the CSR's desktop,select theNumber of Phone Lines list. Theminimumnumber of phones that may beconfigured is 2 and themaximum is 4. This configurationmust match the capabilities ofthe user's phone.
NOTE:Ensure that the user has theHasTelephony privilege that is requried to view the telephony tools in the portal.Without this privilege, telephony tools will not be displayed in the Pega Customer Service interaction portal. To provideappropriate privileges, add thePegaCTI:CSR role to the user's access group.
To create additional telephony capabilities configuration
If there are different groups of users using different telephonymodes or configurations, youmust create oneTelephonyCapabilities record for each set of capabilities you need.
1. ClickEditfor the Default Device record.
2. ClickSave As from theSavemenu to create a new telephony capability record.
3. Enter theShort Description andName of the new record.
4. ClickCreate and Open to create the new record.
5. Edit the record to enable the desired capabilities.
6. Associate the telephony capabilities with the set of users.
To configure additional telephony capabilities for the users
1. ClickConfigure in the User TelephonyCapabilities section. The Select TelephonyCapabilitiesdecision-tree rule is displayed.
2. ClickCheck out to edit the decision tree or clickSave As to create a copy of the record in the appro-priate ruleset.
3. Write your own logic to select the specific telephony capability rule.
The Phone login screenCSRsmust log in to PegaCALL to be able to receive ScreenPops and control their telephones through theirdesktops. PegaCALL provides a login screen in the harnessChannelServices-Device-Phone-UI •StatefulSoftphoneLoginScreen and the included section ChannelServices-Device-Phone-UI • LoginScreen.The fields shown on the screen depend on the telephonymode, the CTI link type, and the telephony switchcapabilities. For example, if the telephony switch is Avaya, workmodes are displayed.
In simple telephonymode, because agent state ismanaged through another device or application, the agent IDand related fields are not displayed. Instead, PegaCALL requires only the extension as input. In this case, thephone login does not log an agent into the ACD. The phone login processmonitors the phone extension and
PegaCALLConfiguration andOperationsGuide 63
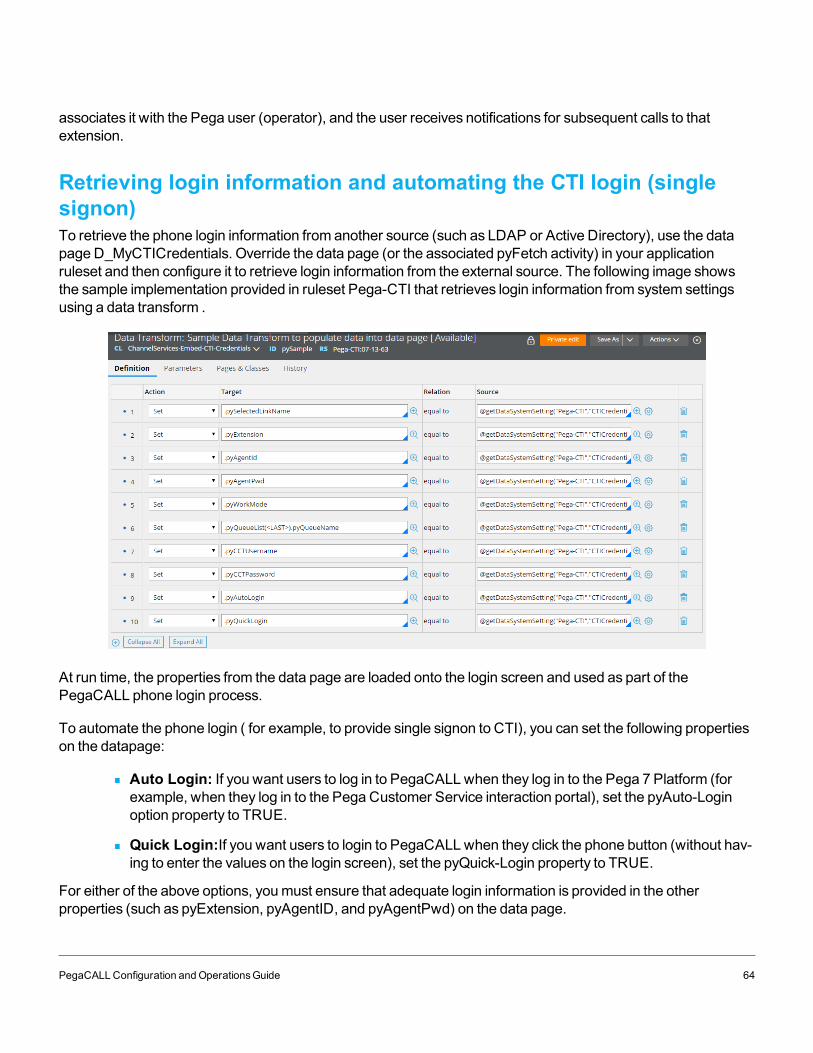
associates it with the Pega user (operator), and the user receives notifications for subsequent calls to thatextension.
Retrieving login information and automating the CTI login (singlesignon)To retrieve the phone login information from another source (such as LDAP or Active Directory), use the datapage D_MyCTICredentials. Override the data page (or the associated pyFetch activity) in your applicationruleset and then configure it to retrieve login information from the external source. The following image showsthe sample implementation provided in ruleset Pega-CTI that retrieves login information from system settingsusing a data transform .
At run time, the properties from the data page are loaded onto the login screen and used as part of thePegaCALL phone login process.
To automate the phone login ( for example, to provide single signon to CTI), you can set the following propertieson the datapage:
Auto Login: If you want users to log in to PegaCALLwhen they log in to the Pega 7 Platform (forexample, when they log in to the Pega Customer Service interaction portal), set the pyAuto-Loginoption property to TRUE.
Quick Login:If you want users to login to PegaCALLwhen they click the phone button (without hav-ing to enter the values on the login screen), set the pyQuick-Login property to TRUE.
For either of the above options, youmust ensure that adequate login information is provided in the otherproperties (such as pyExtension, pyAgentID, and pyAgentPwd) on the data page.
PegaCALLConfiguration andOperationsGuide 64
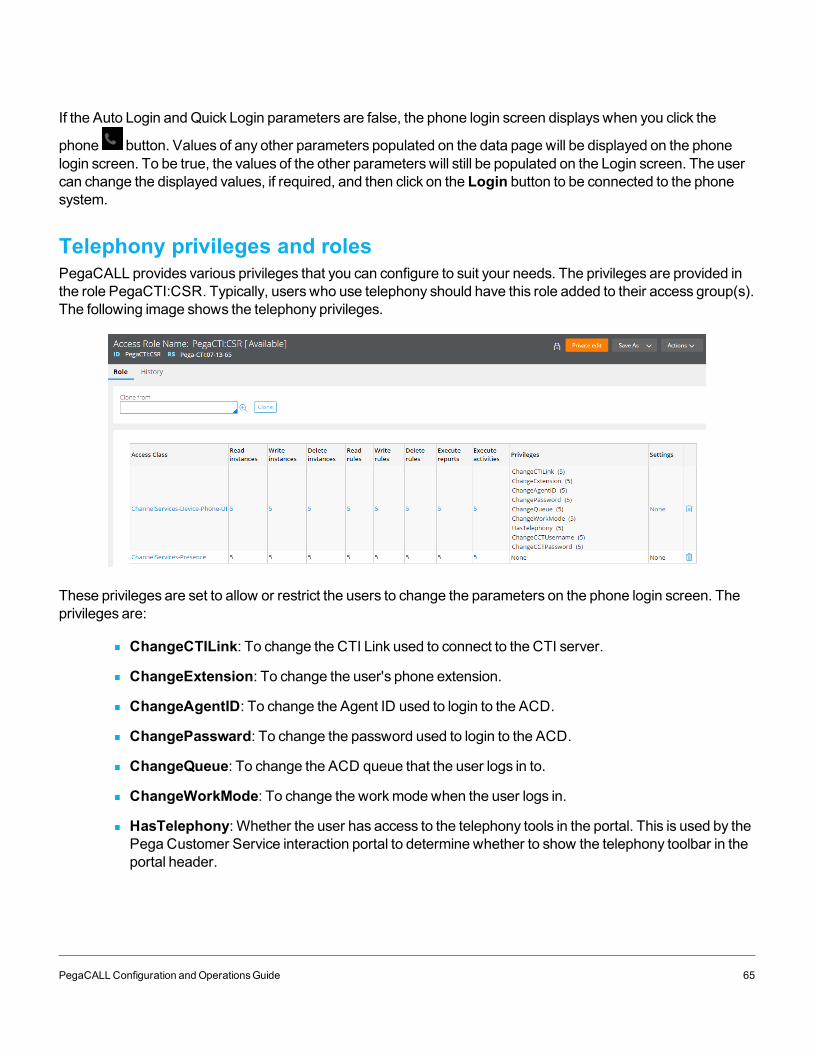
If the Auto Login andQuick Login parameters are false, the phone login screen displayswhen you click the
phone button. Values of any other parameters populated on the data page will be displayed on the phonelogin screen. To be true, the values of the other parameters will still be populated on the Login screen. The usercan change the displayed values, if required, and then click on the Login button to be connected to the phonesystem.
Telephony privileges and rolesPegaCALL provides various privileges that you can configure to suit your needs. The privileges are provided inthe role PegaCTI:CSR. Typically, users who use telephony should have this role added to their access group(s).The following image shows the telephony privileges.
These privileges are set to allow or restrict the users to change the parameters on the phone login screen. Theprivileges are:
ChangeCTILink: To change the CTI Link used to connect to the CTI server.
ChangeExtension: To change the user's phone extension.
ChangeAgentID: To change the Agent ID used to login to the ACD.
ChangePassward: To change the password used to login to the ACD.
ChangeQueue: To change the ACD queue that the user logs in to.
ChangeWorkMode: To change the workmodewhen the user logs in.
HasTelephony: Whether the user has access to the telephony tools in the portal. This is used by thePega Customer Service interaction portal to determine whether to show the telephony toolbar in theportal header.
PegaCALLConfiguration andOperationsGuide 65
ChangeCCTUserName: To change the user name used to connect to CCT. This is used only forAACC CTI links.
ChangeCCTPassword: To change the password used to connect to CCT. This is used only forAACC CTI links
NOTE: To restrict any of the above privileges for users using PegaCALL, ensure that the data page is configured toload the appropriate login information from another source as explained in the above sections.
PegaCALLConfiguration andOperationsGuide 66

Additional CTI Link configuration and HighAvailability
Creating a dial planThe PegaCALL dial planmay be used tomodify a telephone number to ensure that it can be dialed by theACD/PBX. For example, if your PBX requires that the number 9 be dialed to reach an external line beforeexternal callsmay be placed, the dial planmay be used to prefix the digit 9 before external telephone numbers.The dial plan is applied to all numbers called through PegaCALL, including extensions and external telephonenumbers, whether dialed as direct calls or as consult calls (as part of transfer and conference scenarios).
To create a dial plan, youmust write a decision-tree rule that applies to the ChannelServices-Admin-DialPlanclass in your own ruleset. The decision-tree needs tomodify the property .pyDialString. A sample rule calledSample is provided in the class.
In a distributedmodel, the dial plan rule is executed on the local CTI node. You should ensure that theCTILinkRequest service package has access to the custom ruleset in which you save your dial plan decision-tree rule.
PegaCALLConfiguration andOperationsGuide 67
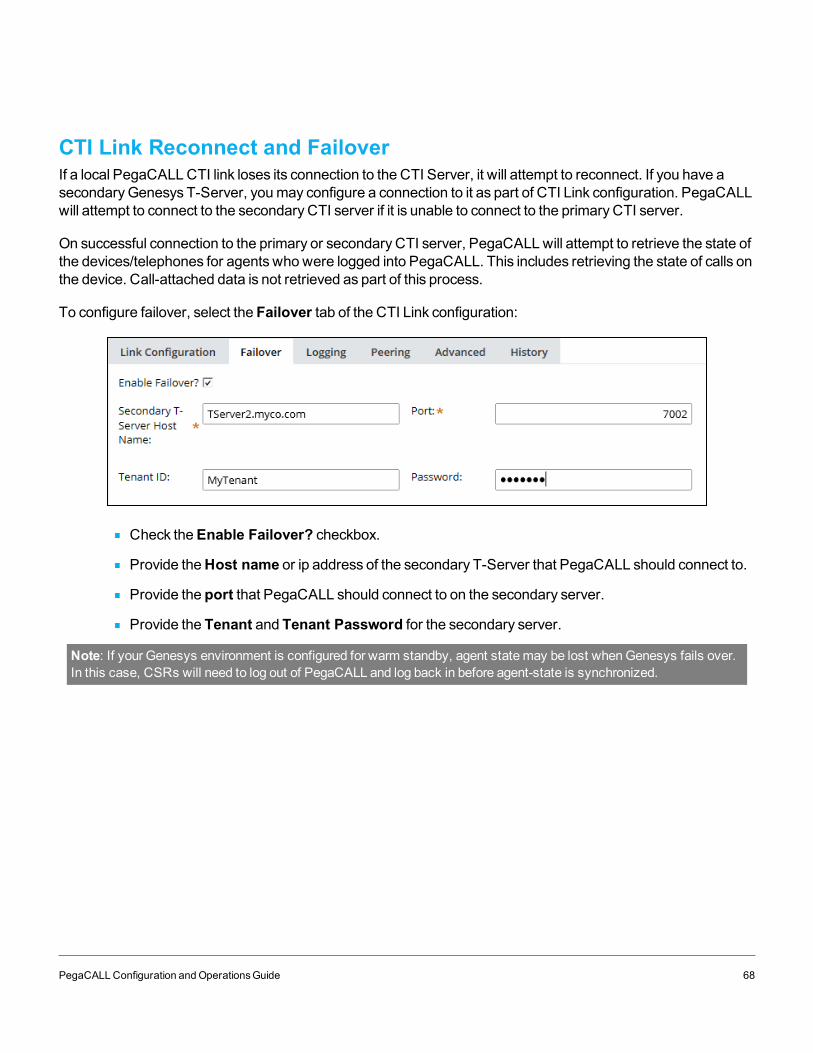
CTI Link Reconnect and FailoverIf a local PegaCALLCTI link loses its connection to the CTI Server, it will attempt to reconnect. If you have asecondaryGenesys T-Server, youmay configure a connection to it as part of CTI Link configuration. PegaCALLwill attempt to connect to the secondary CTI server if it is unable to connect to the primary CTI server.
On successful connection to the primary or secondary CTI server, PegaCALLwill attempt to retrieve the state ofthe devices/telephones for agents who were logged into PegaCALL. This includes retrieving the state of calls onthe device. Call-attached data is not retrieved as part of this process.
To configure failover, select the Failover tab of the CTI Link configuration:
Check theEnable Failover? checkbox.
Provide theHost name or ip address of the secondary T-Server that PegaCALL should connect to.
Provide the port that PegaCALL should connect to on the secondary server.
Provide the Tenant and Tenant Password for the secondary server.
Note: If your Genesys environment is configured for warm standby, agent state may be lost whenGenesys fails over.In this case, CSRs will need to log out of PegaCALL and log back in before agent-state is synchronized.
PegaCALLConfiguration andOperationsGuide 68
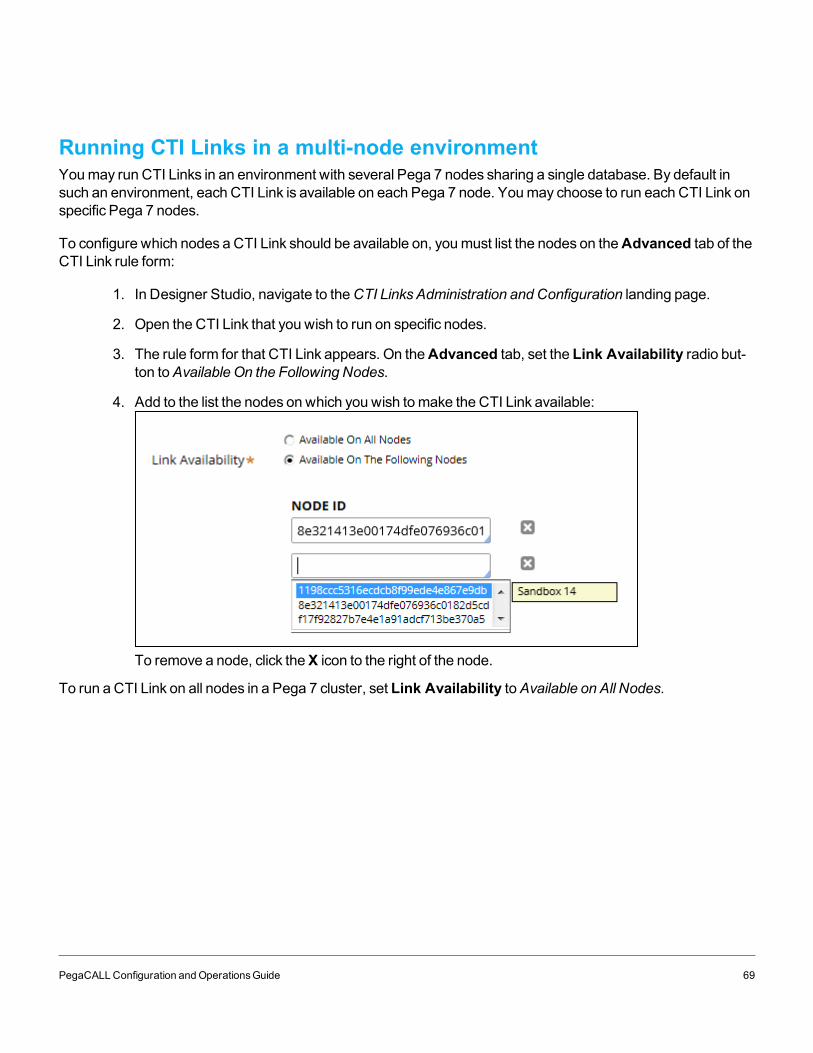
Running CTI Links in a multi-node environmentYoumay run CTI Links in an environment with several Pega 7 nodes sharing a single database. By default insuch an environment, each CTI Link is available on each Pega 7 node. Youmay choose to run each CTI Link onspecific Pega 7 nodes.
To configure which nodes a CTI Link should be available on, youmust list the nodes on theAdvanced tab of theCTI Link rule form:
1. In Designer Studio, navigate to theCTI Links Administration and Configuration landing page.
2. Open the CTI Link that you wish to run on specific nodes.
3. The rule form for that CTI Link appears. On theAdvanced tab, set the Link Availability radio but-ton toAvailable On the Following Nodes.
4. Add to the list the nodes on which you wish tomake the CTI Link available:
To remove a node, click theX icon to the right of the node.
To run a CTI Link on all nodes in a Pega 7 cluster, set Link Availability toAvailable on All Nodes.
PegaCALLConfiguration andOperationsGuide 69
Pega 7 High Availability feature supportNote: High Availability for remote CTI links is covered in the chapter "Configuring andmanaging remote CTI links".
Pega 7 provides features to support application server maintenance and crash recovery with minimal impact onservice levels.
Application server maintenance (Quiesce) - A Pega 7 application server that requiresmaintenancemay be"quiesced." Users on a server that has been quiesced are redirected to other servers in the Pega 7 cluster.PegaCALL attempts tomigrate users to other Pega 7 nodeswithout loss of CTI capability, by doing thefollowing:
Once quiesce has been initiated, PegaCALL attempts tomake all CSRswho are logged in Unavail-able (Not-Ready) on the ACD. Thisminimizes the possibility of customer calls reaching a CSR whois unable to serve them.
PegaCALL stopsmonitoring the CSR’s extension on the server being quiesced.
Once the user has been redirected to another node, PegaCALL attempts to reconnect to the CTIenvironment (monitor the CSR’s extension), synchronize the user's phone state and restore his orher prior agent state (Available or Unavailable).
As these requestsmay fail in the ACD/CTI environment, it is possible that a CSR may not have the correct agentstate when he or she logs back into another Pega 7 server.
Crash recovery – A user's PegaCALL state and login are not maintained if the Pega 7 server crashes. EachCSR whowas on the Pega 7 server will need to log in to CTI when they are connected to another Pega 7 server.
MultitenancyPegaCALLmay be installed and used in Pega 7 environments supportingmultitenancy. CTI links for eachtenant should be created by a tenant administrator in the tenant-specific layer.
PegaCALLConfiguration andOperationsGuide 70
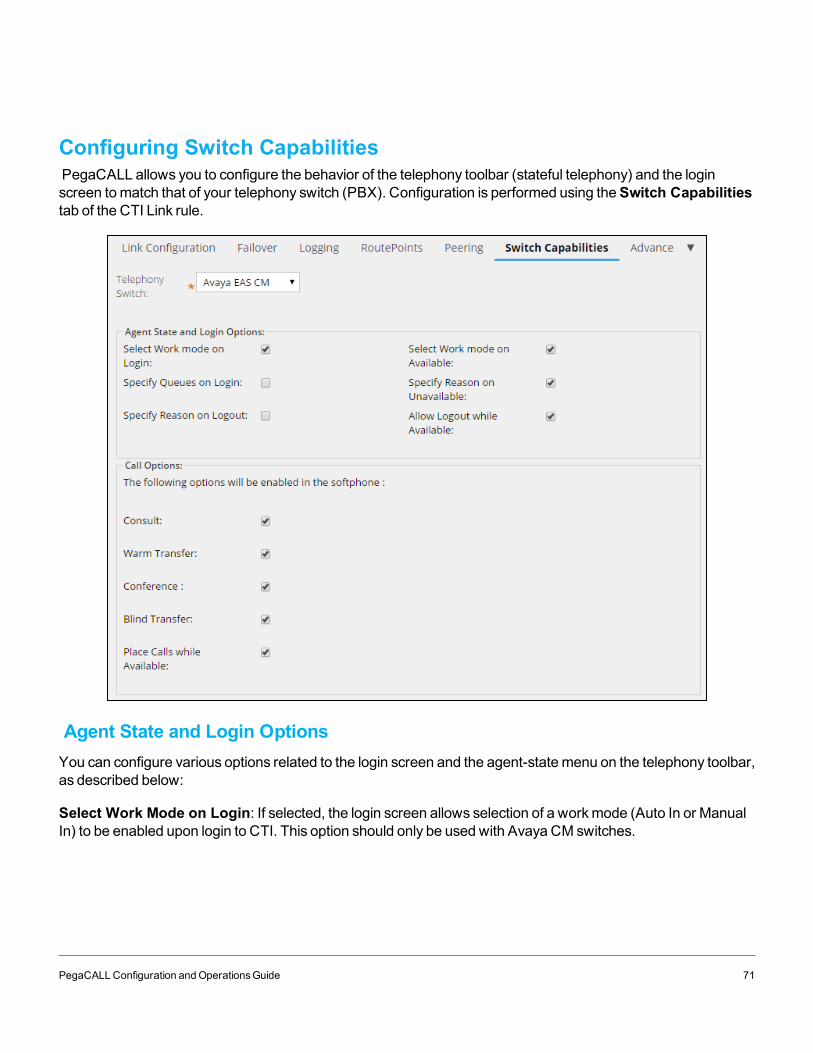
Configuring Switch CapabilitiesPegaCALL allows you to configure the behavior of the telephony toolbar (stateful telephony) and the loginscreen tomatch that of your telephony switch (PBX). Configuration is performed using theSwitch Capabilitiestab of the CTI Link rule.
Agent State and Login OptionsYou can configure various options related to the login screen and the agent-statemenu on the telephony toolbar,as described below:
Select Work Mode on Login: If selected, the login screen allows selection of a workmode (Auto In or ManualIn) to be enabled upon login to CTI. This option should only be used with Avaya CM switches.
PegaCALLConfiguration andOperationsGuide 71
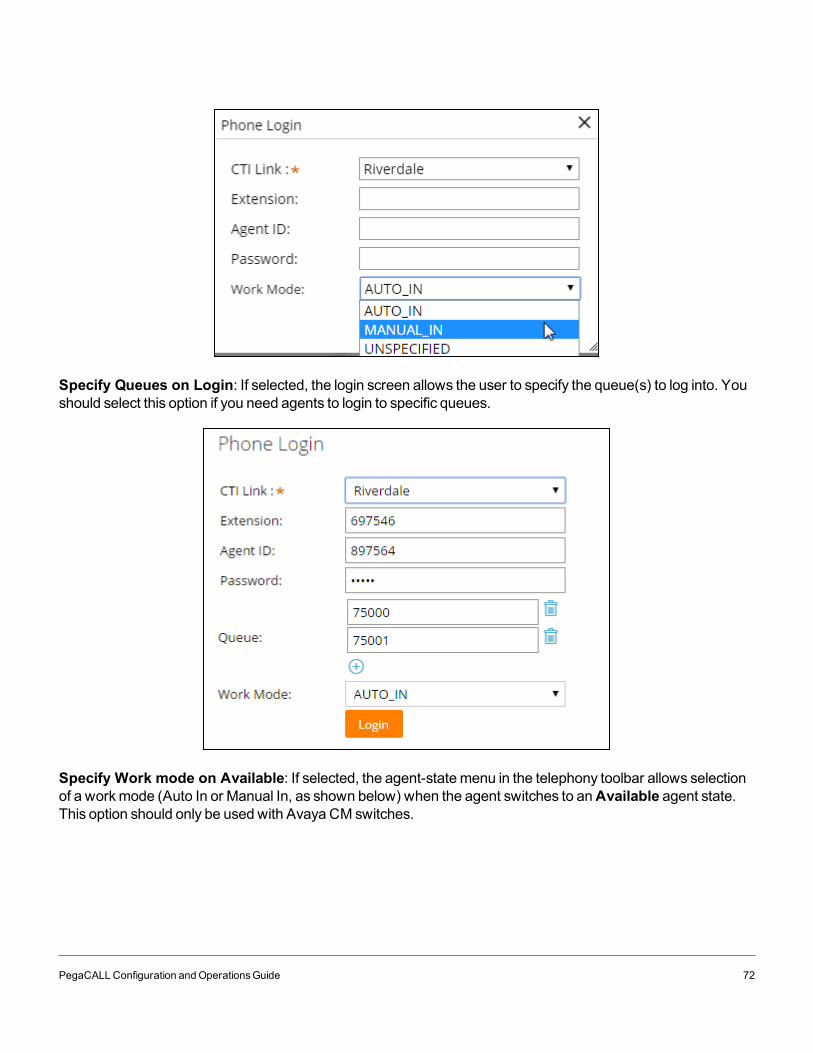
Specify Queues on Login: If selected, the login screen allows the user to specify the queue(s) to log into. Youshould select this option if you need agents to login to specific queues.
Specify Work mode on Available: If selected, the agent-statemenu in the telephony toolbar allows selectionof a workmode (Auto In or Manual In, as shown below) when the agent switches to anAvailable agent state.This option should only be used with Avaya CM switches.
PegaCALLConfiguration andOperationsGuide 72
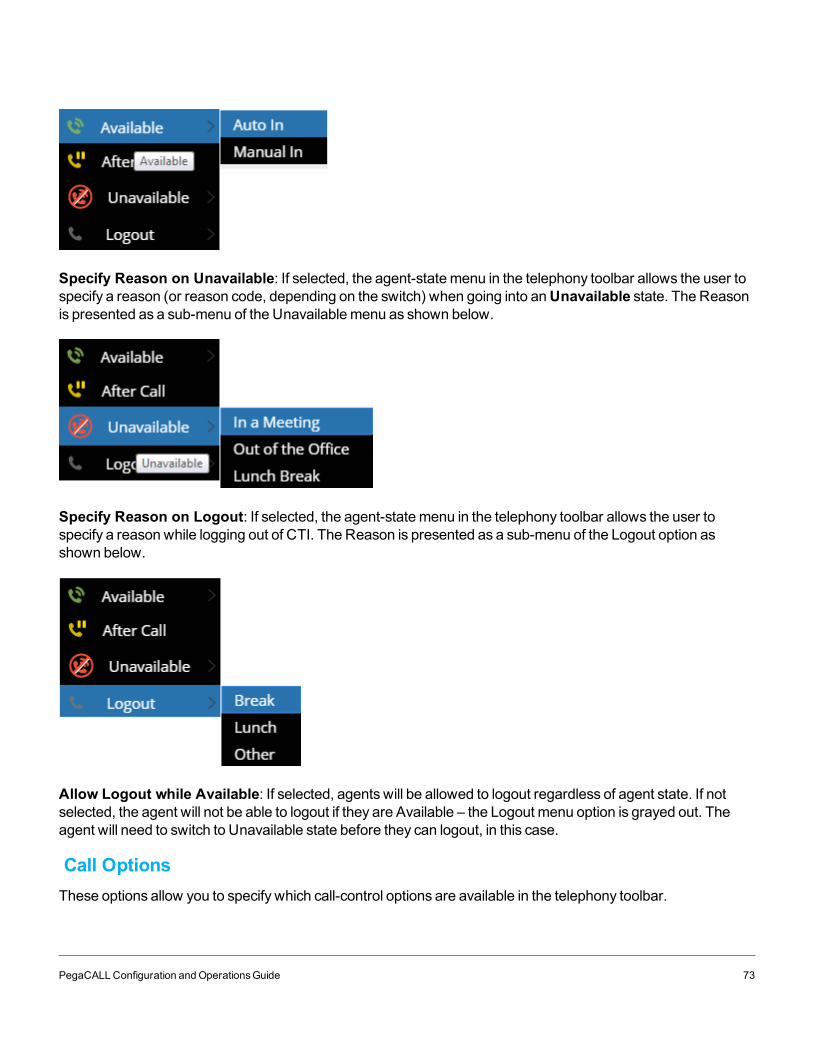
Specify Reason on Unavailable: If selected, the agent-statemenu in the telephony toolbar allows the user tospecify a reason (or reason code, depending on the switch) when going into anUnavailable state. The Reasonis presented as a sub-menu of the Unavailablemenu as shown below.
Specify Reason on Logout: If selected, the agent-statemenu in the telephony toolbar allows the user tospecify a reason while logging out of CTI. The Reason is presented as a sub-menu of the Logout option asshown below.
Allow Logout while Available: If selected, agents will be allowed to logout regardless of agent state. If notselected, the agent will not be able to logout if they are Available – the Logout menu option is grayed out. Theagent will need to switch to Unavailable state before they can logout, in this case.
Call OptionsThese options allow you to specify which call-control options are available in the telephony toolbar.
PegaCALLConfiguration andOperationsGuide 73
Consult: Select this option to allow users to be able to place consultation calls to other users. Consultation callsmay be ended by hanging up, transferring (complete a warm transfer) or conferencing.
Warm Transfer: Select this option to allow users to be able to initiate warm transfers.
Conference: Select this option to allow users to be able to initiate conferences.
Place Calls while Available: If enabled, this allows agents to place outbound calls while they are available totake customer calls (i.e. while their agent state is Available). Some ACDs require agents to be in an Unavailablestate before theymay place outbound calls; on these ACDs, this option should unchecked.
Blind Transfer: Select this option to allow users to be able to transfer calls to other users in a single-step(without consulting the receiving party).
PegaCALLConfiguration andOperationsGuide 74
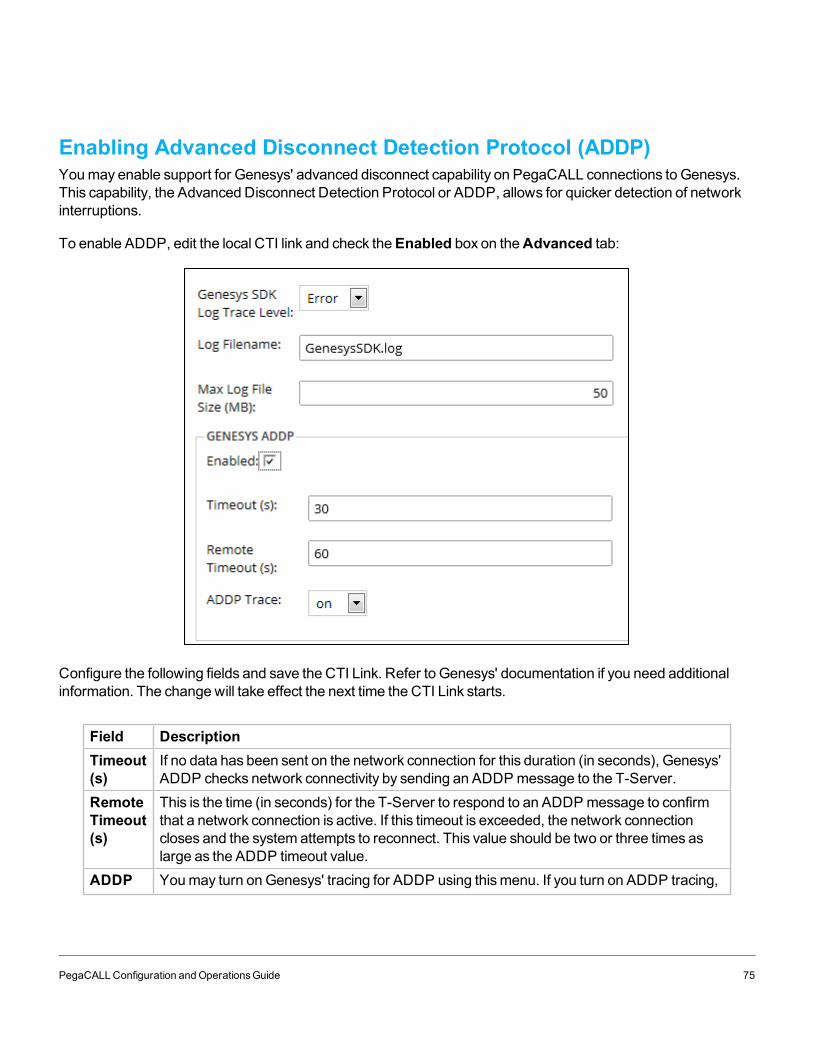
Enabling Advanced Disconnect Detection Protocol (ADDP)Youmay enable support for Genesys' advanced disconnect capability on PegaCALL connections to Genesys.This capability, the Advanced Disconnect Detection Protocol or ADDP, allows for quicker detection of networkinterruptions.
To enable ADDP, edit the local CTI link and check theEnabled box on theAdvanced tab:
Configure the following fields and save the CTI Link. Refer to Genesys' documentation if you need additionalinformation. The change will take effect the next time the CTI Link starts.
Field DescriptionTimeout(s)
If no data has been sent on the network connection for this duration (in seconds), Genesys'ADDP checks network connectivity by sending an ADDPmessage to the T-Server.
RemoteTimeout(s)
This is the time (in seconds) for the T-Server to respond to an ADDPmessage to confirmthat a network connection is active. If this timeout is exceeded, the network connectioncloses and the system attempts to reconnect. This value should be two or three times aslarge as the ADDP timeout value.
ADDP Youmay turn onGenesys' tracing for ADDP using thismenu. If you turn on ADDP tracing,
PegaCALLConfiguration andOperationsGuide 75
Trace youmust also configure Genesys SDK tracing as described in the next section. Chooseone of the following:
Off – ADDP tracing is off
On – ADDP tracing is turned on thePega 7 /PegaCALL server. Tracing is notturned on on theGenesys server.
Both - ADDP tracing is turned on thePega 7 /PegaCALL server and theGenesys server
PegaCALLConfiguration andOperationsGuide 76
Enabling Genesys SDK tracingTo assist with debugging, youmay enable tracing onGenesys' SDK. To enable SDK tracing, edit the local CTILink and configure SDK tracing on theAdvanced tab. Youmay configure the following parameters:
Genesys SDK TraceLevel
Set this toOff to turn off tracing. Youmay set the trace level to Fatal, Error,Warn,Info,Debug, Trace orAll in order to receive increasing levels of tracemessages.
Log Filename Specify a name for the log file. The file will be created in the same folder as thePega7 logs.
Max log file size Specify a limit to the size of the log file, in megabytes.
Any changes youmake will take effect the next time the CTI link starts. Refer to Genesys' documentation if youneed additional information.
PegaCALLConfiguration andOperationsGuide 77

PegaCALL Scheduled AgentsPegaCALL provides an Agents rule (in the Pega-CTI ruleset) that periodically performs various tasks. Bydefault, the agent runs once every 120 seconds and does one or more of the following:
Starts CTI links that are configured to AutoStart. For more information on configuring CTI links tostart automatically, see the chapterConfiguring a CTI link on Pega 7 .
Purges older call objects. See the following section.
To review this agent in the Records Explorer, selectSysAdmin > Agents and select the PegaCALL agentsrule (in the Pega-CTI ruleset). Tomake changes, edit the Agent Schedule rule (also under SysAdmin in theRecords Explorer) that the Agent rule generates. Youmay need to edit an Agent Schedule rule for each node inamulti-node Pega 7 system.
Deleting older call objectsFor each incoming call, PegaCALLwrites a call object to the Pega 7 database. This object includesCTI dataprovided by the CTI platform and is used to populate screen pops for incoming and transferred calls. Thedatabase key for the call object includes the CTI call ID
Over time, the call table can grow large enough that the display of screen pops becomes delayed. Also,depending on your CTI environment, CTI call IDsmay repeat, causing call data to be overwritten.
To prevent problems, purge older call objects from the database at regular intervals. You can use a third-partydatabasemanagement tool or the PegaCALL agents rule described earlier in the chapter.
To purge older call objects with the PegaCALL agent, create a dynamic system setting (Data-Admin-System-Setting) for themaximumage of the call objects you wish to retain. Objects older than the age you specify aredeleted the next time the agent runs. to create a dynamic system setting:
1. In the Records Explorer, select the SysAdmin group.
2. Right-click onDynamic System Settings and selectNew from the context menu.
3. For theOwning RuleSet, enter Pega-ChannelServices. In theSetting Purpose field enterPurgeCallObjects/CallAgeLimit/Default.
4. ClickCreate to create the rule.
5. Set the value inminutes. Objects older than the value you set will be deleted.
To enable call object purging, youmust enable the scheduled activity. Edit the Agent Schedule rule forPegaCALL agents (in the Pega-CTI ruleset), under SysAdmin in the Records Explorer. Set the Interval to avalue (in seconds) that is lower than the configured age. Older call objects will be deleted each time the agentexecutes.
PegaCALLConfiguration andOperationsGuide 78

Note: To configure how PegaCALL saves call objects, see the sectionCustomizing the call class and associated calldata in the chapterUsing Telephony Rules.
PegaCALLConfiguration andOperationsGuide 79
Administering PegaCALLPegaCALL provides several utilities to help you administer CTI Links and, that are useful in development andtroubleshooting. The utilities include a soft phone that may be used to test PegaCALL and utilities to administerand edit CTI Links and log out users.
Accessing the PegaCALL landing pageThe utilities are part of a "landing page" that provides quick access to CTI Link tools.
To use the landing page, youmust have the Pega-CTI ruleset in your access group.
To open the landing page, click the Designer Studiomenu, and then selectChannel Services > PegaCALL>Administration & Configuration.
Administration & Configuration pagesWhen you select Administration & Configuration, you have access to these pages:
CTI Links
ConfigurationWizard
Call Treatment
Application Gateways
Version Information
They are described in the following sections:
CTI Links
The CTI Links tab lists all available CTI Links, and gives information about their nature and current status.
PegaCALLConfiguration andOperationsGuide 80
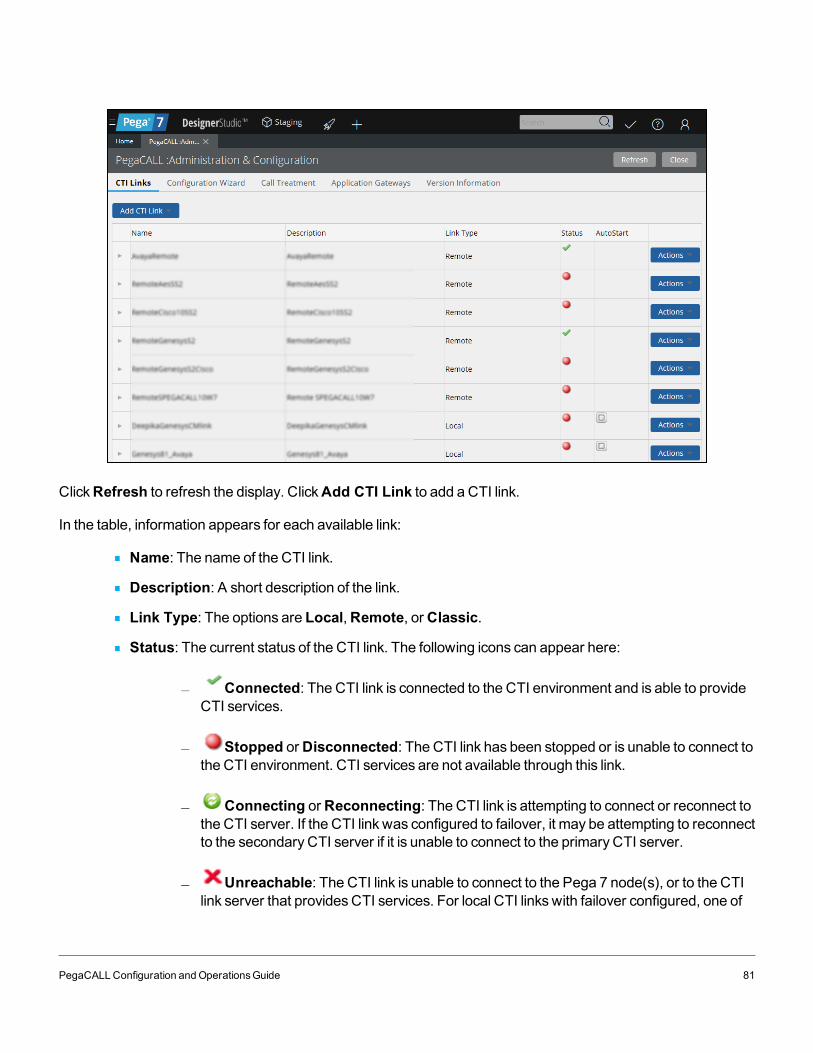
ClickRefresh to refresh the display. ClickAdd CTI Link to add a CTI link.
In the table, information appears for each available link:
Name: The name of the CTI link.
Description: A short description of the link.
Link Type: The options are Local,Remote, orClassic.
Status: The current status of the CTI link. The following icons can appear here:
Connected: The CTI link is connected to the CTI environment and is able to provideCTI services.
Stopped orDisconnected: The CTI link has been stopped or is unable to connect tothe CTI environment. CTI services are not available through this link.
Connecting orReconnecting: The CTI link is attempting to connect or reconnect tothe CTI server. If the CTI link was configured to failover, it may be attempting to reconnectto the secondary CTI server if it is unable to connect to the primary CTI server.
Unreachable: The CTI link is unable to connect to the Pega 7 node(s), or to the CTIlink server that providesCTI services. For local CTI links with failover configured, one of
PegaCALLConfiguration andOperationsGuide 81
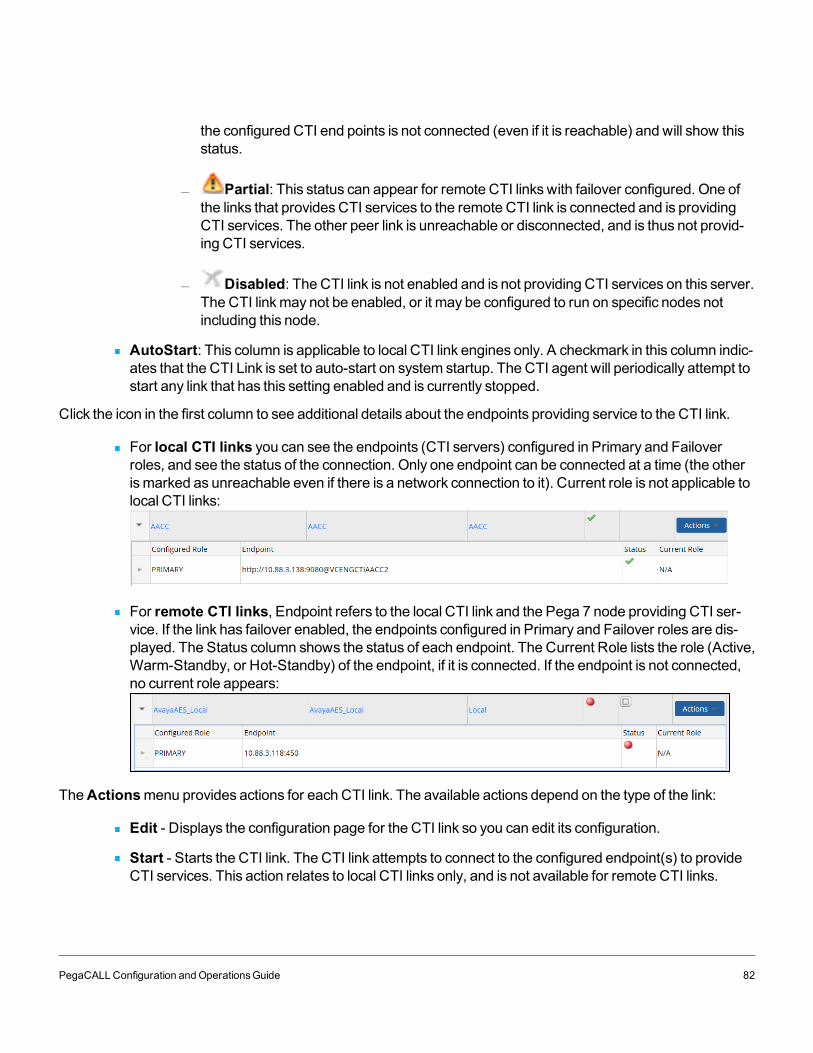
the configured CTI end points is not connected (even if it is reachable) and will show thisstatus.
Partial: This status can appear for remote CTI links with failover configured. One ofthe links that providesCTI services to the remote CTI link is connected and is providingCTI services. The other peer link is unreachable or disconnected, and is thus not provid-ing CTI services.
Disabled: The CTI link is not enabled and is not providing CTI services on this server.The CTI linkmay not be enabled, or it may be configured to run on specific nodes notincluding this node.
AutoStart: This column is applicable to local CTI link engines only. A checkmark in this column indic-ates that the CTI Link is set to auto-start on system startup. The CTI agent will periodically attempt tostart any link that has this setting enabled and is currently stopped.
Click the icon in the first column to see additional details about the endpoints providing service to the CTI link.
For local CTI links you can see the endpoints (CTI servers) configured in Primary and Failoverroles, and see the status of the connection. Only one endpoint can be connected at a time (the otherismarked as unreachable even if there is a network connection to it). Current role is not applicable tolocal CTI links:
For remote CTI links, Endpoint refers to the local CTI link and the Pega 7 node providing CTI ser-vice. If the link has failover enabled, the endpoints configured in Primary and Failover roles are dis-played. The Status column shows the status of each endpoint. The Current Role lists the role (Active,Warm-Standby, or Hot-Standby) of the endpoint, if it is connected. If the endpoint is not connected,no current role appears:
TheActionsmenu provides actions for each CTI link. The available actions depend on the type of the link:
Edit - Displays the configuration page for the CTI link so you can edit its configuration.
Start - Starts the CTI link. The CTI link attempts to connect to the configured endpoint(s) to provideCTI services. This action relates to local CTI links only, and is not available for remote CTI links.
PegaCALLConfiguration andOperationsGuide 82
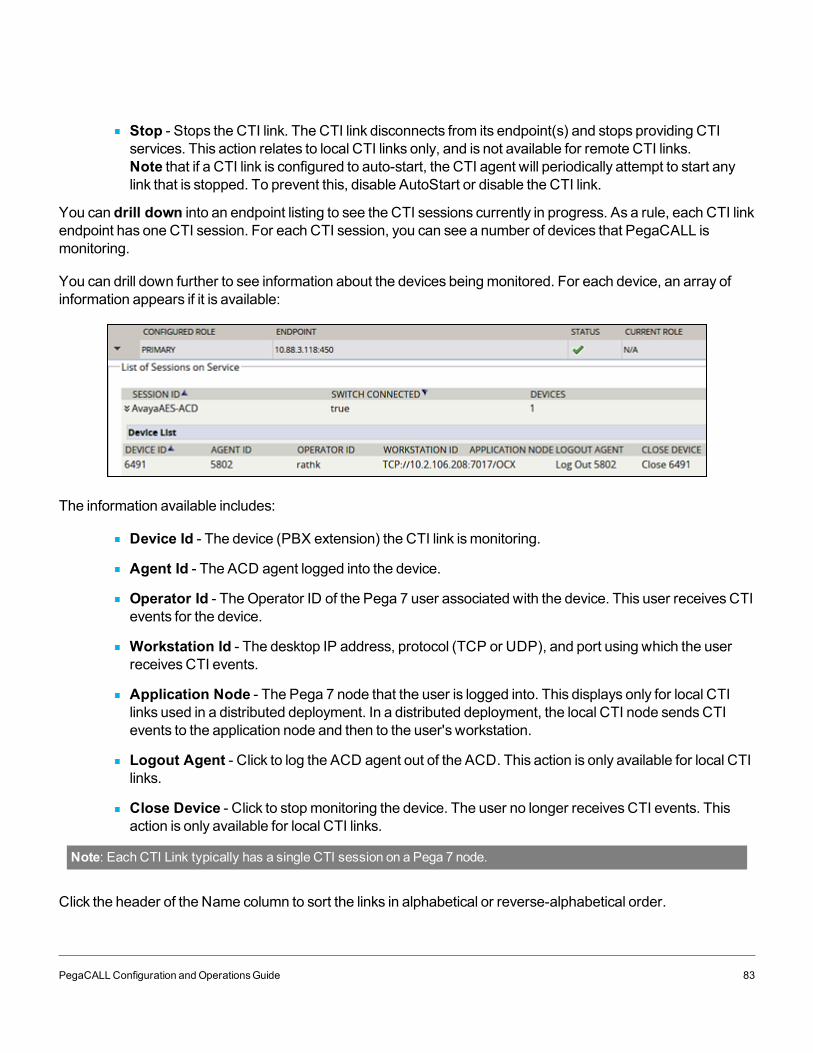
Stop - Stops the CTI link. The CTI link disconnects from its endpoint(s) and stops providing CTIservices. This action relates to local CTI links only, and is not available for remote CTI links.Note that if a CTI link is configured to auto-start, the CTI agent will periodically attempt to start anylink that is stopped. To prevent this, disable AutoStart or disable the CTI link.
You can drill down into an endpoint listing to see the CTI sessions currently in progress. As a rule, each CTI linkendpoint has one CTI session. For each CTI session, you can see a number of devices that PegaCALL ismonitoring.
You can drill down further to see information about the devices beingmonitored. For each device, an array ofinformation appears if it is available:
The information available includes:
Device Id - The device (PBX extension) the CTI link ismonitoring.
Agent Id - The ACD agent logged into the device.
Operator Id - TheOperator ID of the Pega 7 user associated with the device. This user receivesCTIevents for the device.
Workstation Id - The desktop IP address, protocol (TCP or UDP), and port using which the userreceivesCTI events.
Application Node - The Pega 7 node that the user is logged into. This displays only for local CTIlinks used in a distributed deployment. In a distributed deployment, the local CTI node sendsCTIevents to the application node and then to the user's workstation.
Logout Agent - Click to log the ACD agent out of the ACD. This action is only available for local CTIlinks.
Close Device - Click to stopmonitoring the device. The user no longer receivesCTI events. Thisaction is only available for local CTI links.
Note: Each CTI Link typically has a single CTI session on a Pega 7 node.
Click the header of the Name column to sort the links in alphabetical or reverse-alphabetical order.
PegaCALLConfiguration andOperationsGuide 83
Logging out ACD agents
Logging out a user logs the corresponding agent out from the ACD. That agent will stop receiving phone callsfromACD queues. Stopping devicemonitoring stops the flow of CTI events from the ACD to PegaCALL for thatdevice. If a user is using the device with PegaCALL, he or she will stop receiving screen pops and will be unableto use telephony controls and utilities. You should use these utilities only if you are unable to log the agent out ofthe ACD through other means (for example, through the agent’s telephone).
Go to the Administer CTI Links utility as described earlier in this chapter. From the list of CTI Links, select the CTILink for the ACD that the agent or device is connected to. Double-click the CTI session displayed in the lowerpart of the window. If there ismore than one CTI session, you will need to select the one that the device or agentis connected to. A list of devices and associated agents is displayed. The list also shows the Pega 7 operator andworkstation id (ip address and port) of the Pega 7 user who is logged into the device.
To log an agent out of the ACD and stop receiving events from the associated device, use the Logout Agentbutton. To stopmonitoring the device so PegaCALL stops receiving events from the ACD for that device, usetheClose Device button.
ConfigurationWizard
This tab provides a link to the configuration wizard.
Call Treatment
This tab displays a list of call treatment rules configured on your system. For each rule, the tab displays the rule'sdescription, circumstance, configured behavior, class, and ruleset version. Click theDetails button to reviewdetails or edit the rule.
Application Gateways
This tab provides administration of Cisco application gateways.
Version Information
The Version Information gadget provides detailed information on the PegaCALLCTI Link engine and third-partyCTI Java archives that are loaded into the system. This informationmay be useful if you experience problemswhile installing and configuring the system to connect to your CTI environment.
The PegaCALL enginemust be accessible and the channel services codeset must be set appropriately for CTIengines to function normally.
If third-party jar files for Avaya JTAPI or the Genesys voice platformSDK have been imported, they should belisted as accessible.
The gadget lists version information if it is available.
Note: it is normal for the Genesys version to be listed as "N/A", as in the image below:
PegaCALLConfiguration andOperationsGuide 84
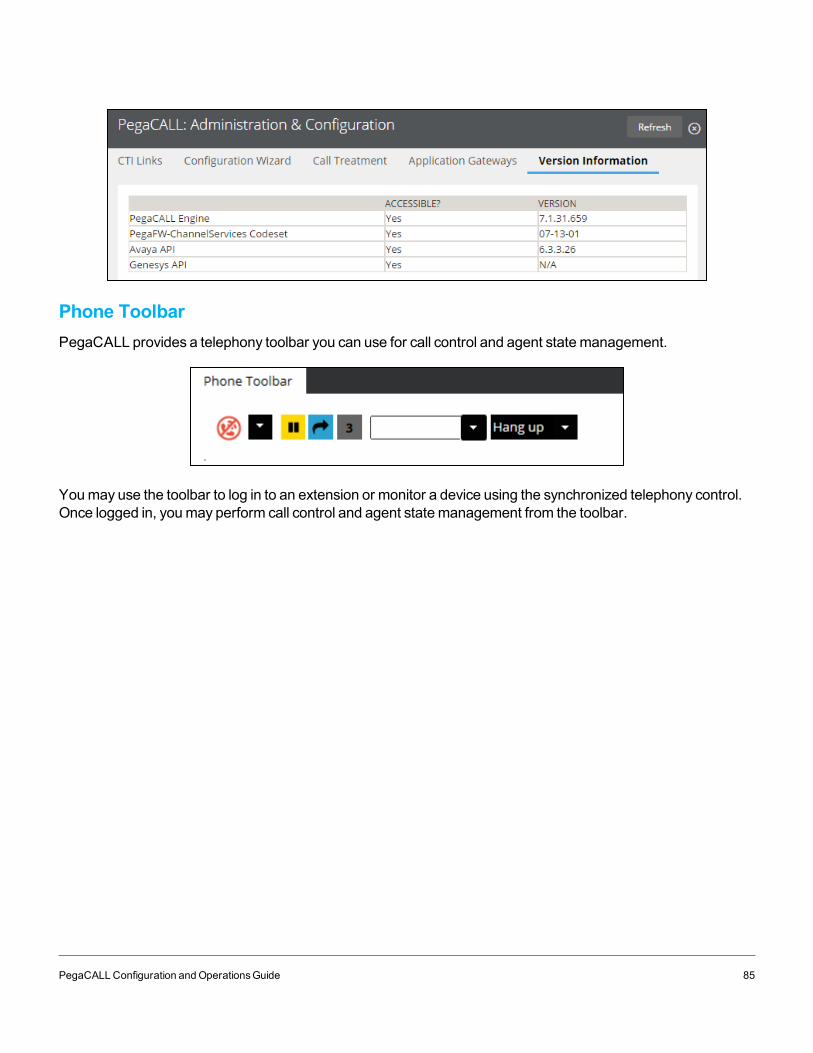
Phone ToolbarPegaCALL provides a telephony toolbar you can use for call control and agent statemanagement.
Youmay use the toolbar to log in to an extension or monitor a device using the synchronized telephony control.Once logged in, youmay perform call control and agent statemanagement from the toolbar.
PegaCALLConfiguration andOperationsGuide 85
Configuring and managing remote CTI linksTo configure andmanage remote CTI links, it is important to understand the deployment models for amulti-siteenvironment.
PegaCALLConfiguration andOperationsGuide 86
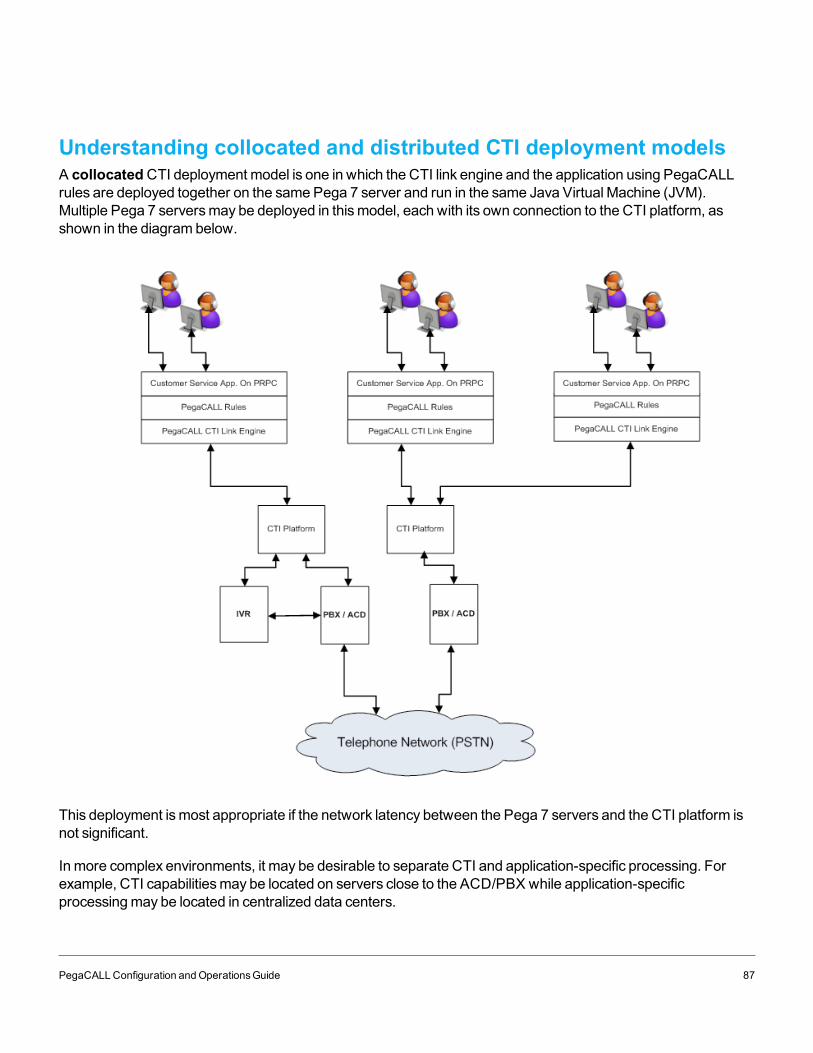
Understanding collocated and distributed CTI deployment modelsA collocatedCTI deployment model is one in which the CTI link engine and the application using PegaCALLrules are deployed together on the same Pega 7 server and run in the same Java Virtual Machine (JVM).Multiple Pega 7 serversmay be deployed in thismodel, each with its own connection to the CTI platform, asshown in the diagram below.
This deployment ismost appropriate if the network latency between the Pega 7 servers and the CTI platform isnot significant.
In more complex environments, it may be desirable to separate CTI and application-specific processing. Forexample, CTI capabilitiesmay be located on servers close to the ACD/PBX while application-specificprocessingmay be located in centralized data centers.
PegaCALLConfiguration andOperationsGuide 87
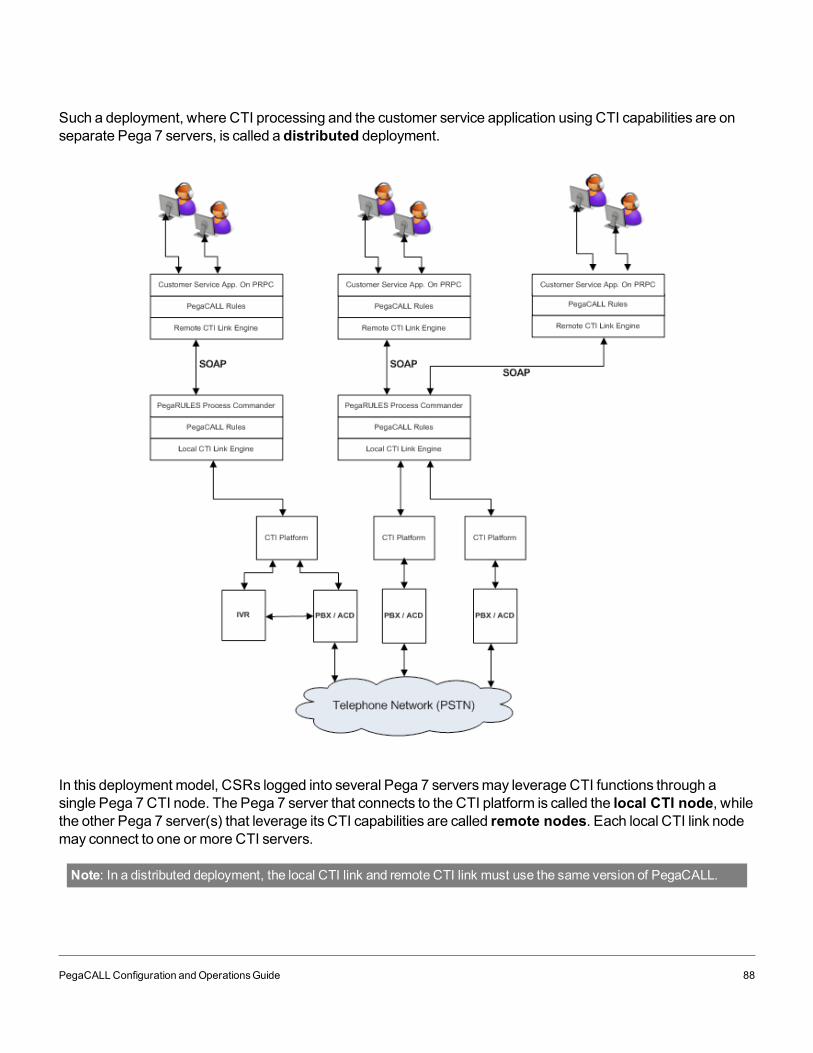
Such a deployment, where CTI processing and the customer service application using CTI capabilities are onseparate Pega 7 servers, is called a distributed deployment.
In this deployment model, CSRs logged into several Pega 7 serversmay leverage CTI functions through asingle Pega 7 CTI node. The Pega 7 server that connects to the CTI platform is called the local CTI node, whilethe other Pega 7 server(s) that leverage its CTI capabilities are called remote nodes. Each local CTI link nodemay connect to one or more CTI servers.
Note: In a distributed deployment, the local CTI link and remote CTI link must use the same version of PegaCALL.
PegaCALLConfiguration andOperationsGuide 88
CTI Link typesThere are four types of CTI Links:
Local: A local CTI link connects a Pega 7 server (or cluster) to a Genesys T-Server directly , andprovidesCTI services to users on that Pega 7 server. This section explains the configuration and useof local CTI links.
Remote: A remote CTI link connects a Pega 7 server (or cluster) to another Pega 7 server, fromwhich they accessCTI services. Remote CTI links are covered in a later chapter.
Classic: A classic CTI link connects a Pega 7 server (or cluster) to a PegaCALLCTI link server. Ifyou use classic CTI links, refer to thePegaCALL configuration and operations guide for the CTI LinkServer.
AACC: AACC CTI Links provide direct connectivity to the CCT server for AACC over SOAP.
PegaCALLConfiguration andOperationsGuide 89

Configuring a remote CTI LinkRemote CTI links are used in a distributed CTI deployment model. They enable a Pega 7 server (or cluster) toconnect to another Pega 7 server and use the CTI links on that server.
Configuring a distributed CTI deployment (such as the one illustrated above), is a 2-step process:
1. Configure and test local CTI link(s).
2. Configure and test remote CTI link(s), as described in this section.
Note: As a rule, Pega 7 servers hosting local CTI links should not share a database with Pega 7 servers hostingremote CTI links.
PegaCALLConfiguration andOperationsGuide 90
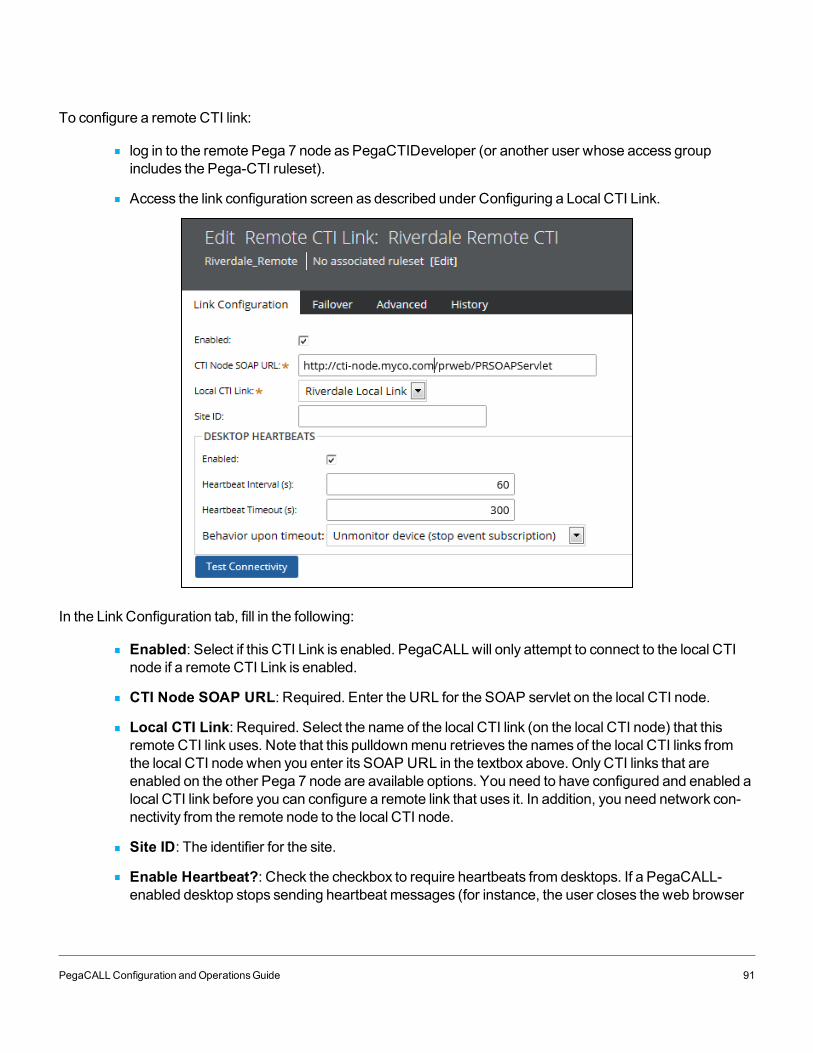
To configure a remote CTI link:
log in to the remote Pega 7 node as PegaCTIDeveloper (or another user whose access groupincludes the Pega-CTI ruleset).
Access the link configuration screen as described under Configuring a Local CTI Link.
In the Link Configuration tab, fill in the following:
Enabled: Select if this CTI Link is enabled. PegaCALLwill only attempt to connect to the local CTInode if a remote CTI Link is enabled.
CTI Node SOAP URL: Required. Enter the URL for the SOAP servlet on the local CTI node.
Local CTI Link: Required. Select the name of the local CTI link (on the local CTI node) that thisremote CTI link uses. Note that this pulldownmenu retrieves the names of the local CTI links fromthe local CTI node when you enter its SOAP URL in the textbox above. Only CTI links that areenabled on the other Pega 7 node are available options. You need to have configured and enabled alocal CTI link before you can configure a remote link that uses it. In addition, you need network con-nectivity from the remote node to the local CTI node.
Site ID: The identifier for the site.
Enable Heartbeat?: Check the checkbox to require heartbeats from desktops. If a PegaCALL-enabled desktop stops sending heartbeat messages (for instance, the user closes the web browser
PegaCALLConfiguration andOperationsGuide 91

without properly logging out from CTI), the CTI link stopsmonitoring the phone or extensions asso-ciated with that desktop. It is recommend that you enable this option to prevent continuedmonitoringof unused devices and to avoid problemswith subsequent logins.
Heartbeat Interval: The interval in seconds at which heartbeat messages are expected.
Heartbeat Timeout: The elapsed time in seconds after which, if no heartbeats have been receivedfrom a desktop, the CTI link stopsmonitoring the device associated with the laptop. This should beset to several times the heartbeat interval setting.
Once you have entered configuration information, save the CTI Link configuration. Then use the TestConnectivity button to ensure that the Pega 7 node is able to connect to the local CTI node using theconfigured link parameters.
PegaCALLConfiguration andOperationsGuide 92

Configuring failover for remote CTI linksYou can configure each remote CTI link to use two local CTI links, one in a primary role and the other in astandby role. Locate the local CTI links on separate Pega 7 nodes to provide fault tolerance in the event one ofthe nodes fails.
Local CTI links configured to work together to provide CTI services for one or more remote CTI links are calledpeer CTI links.
This diagram shows a remote CTI link using two local CTI links to provide failover coverage should themain linkfail.
To configure a remote CTI link with failover:
1. Configure and test two local CTI links, each connected to the sameCTI server(s) and ACD. If theservers hosting the local CTI links share a database, use the Advanced pane on the local CTI linkconfiguration to ensure that each CTI link runs on a separate Pega 7 server.
PegaCALLConfiguration andOperationsGuide 93
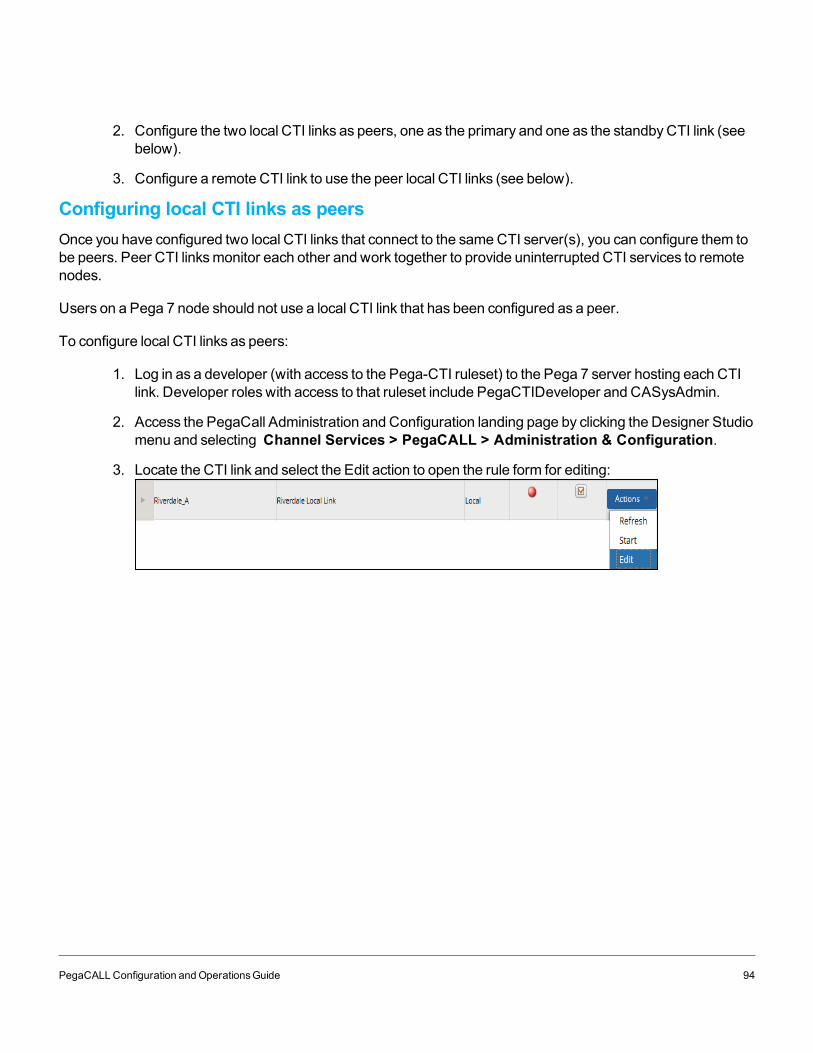
2. Configure the two local CTI links as peers, one as the primary and one as the standbyCTI link (seebelow).
3. Configure a remote CTI link to use the peer local CTI links (see below).
Configuring local CTI links as peersOnce you have configured two local CTI links that connect to the sameCTI server(s), you can configure them tobe peers. Peer CTI linksmonitor each other and work together to provide uninterrupted CTI services to remotenodes.
Users on a Pega 7 node should not use a local CTI link that has been configured as a peer.
To configure local CTI links as peers:
1. Log in as a developer (with access to the Pega-CTI ruleset) to the Pega 7 server hosting each CTIlink. Developer roles with access to that ruleset include PegaCTIDeveloper and CASysAdmin.
2. Access the PegaCall Administration and Configuration landing page by clicking the Designer Studiomenu and selecting Channel Services > PegaCALL > Administration & Configuration.
3. Locate the CTI link and select the Edit action to open the rule form for editing:
PegaCALLConfiguration andOperationsGuide 94

4. In thePeering tab, configure peering:
Enable Peer-ing?
Check this checkbox to configure the CTI link to be part of a pair towork as peers to provide fault tolerance for a remote CTI link.
This link'sdefault role
For one peer CTI link selectPrimary; for the other, select eitherWarm-Standby orHot-Standby(see below).
Poll Interval TheCTI link periodically polls its peer to check if the peer is con-nected to CTI and is functioning properly. In this field, enter theinterval in milliseconds between these checks.Note: too-frequentpolling can cause performance issues.
Peer LinkURL Enter the SOAP URL of the Pega 7 node that hosts the peer CTI
link.Link Name Select the name of the peer CTI link. Note that this pulldownmenu
retrieves the names of the local CTI links from the peer CTI nodewhen you enter its SOAP URL in the text box above. Only CTIlinks that are enabled on the other Pega 7 node are offered asoptions.
PegaCALLConfiguration andOperationsGuide 95
Peer CTI link rolesAt run time, only one of the peer CTI links actively provides service. That link is said to beActive: it is in theActive current role. The other link is said to be in theStandby current role. The second linkmonitors the first, andis ready to provide CTI services should the active link fail.
The peer CTI link you have given the Primary role becomes active when the peer links start up. From then on,either linkmay become active if its peer experiences a failure.
Standby modesThe peer CTI link that is in the Standby role can be configured to be in eitherWarm-Standby orHot-Standbymode.
Hot-Standby: The peer CTI link in Hot_Standbymonitors the extensions of the agents who log intothe remote CTI link. The local CTI link receives all events related to call and agent state from the CTIserver, but does not send events to the remote node that hosts the desktop application. Since it isalreadymonitoring agent extensions, a link in Hot-Standby canmore quickly provide CTI link ser-viceswhen it becomes active. However, thismode can cause additional load on the CTI server, as itneeds to send events to both peer links.
Warm-Standby: The peer link inWarm-Standbymaintains a list of extensions for the agents who loginto the remote CTI link. It does not monitor these extensions.When it becomes active, the peer CTIlink startsmonitoring the agent extensions and providing CTI services for those users. Thismodeplaces less load on the CTI server, but it can take longer before services are restored after a failure.
Configuring a remote CTI link with failoverOnce you have configured two local CTI links as peers, you can configure a remote CTI link to use them in afault-tolerant configuration:
1. Log in as a developer (with access to the Pega-CTI ruleset) to the Pega 7 server hosting the remoteCTI link. Developer roles with access to that ruleset include PegaCTIDeveloper and CASysAdmin.
2. Access the PegaCall Administration and Configuration landing page by clicking the Designer Studiomenu and selectingChannel Services > PegaCALL > Administration & Configuration.
3. Click theAdd CTI Link button and fill out the information requested on theGeneral tab of the ruleform, as described earlier in this chapter.
PegaCALLConfiguration andOperationsGuide 96
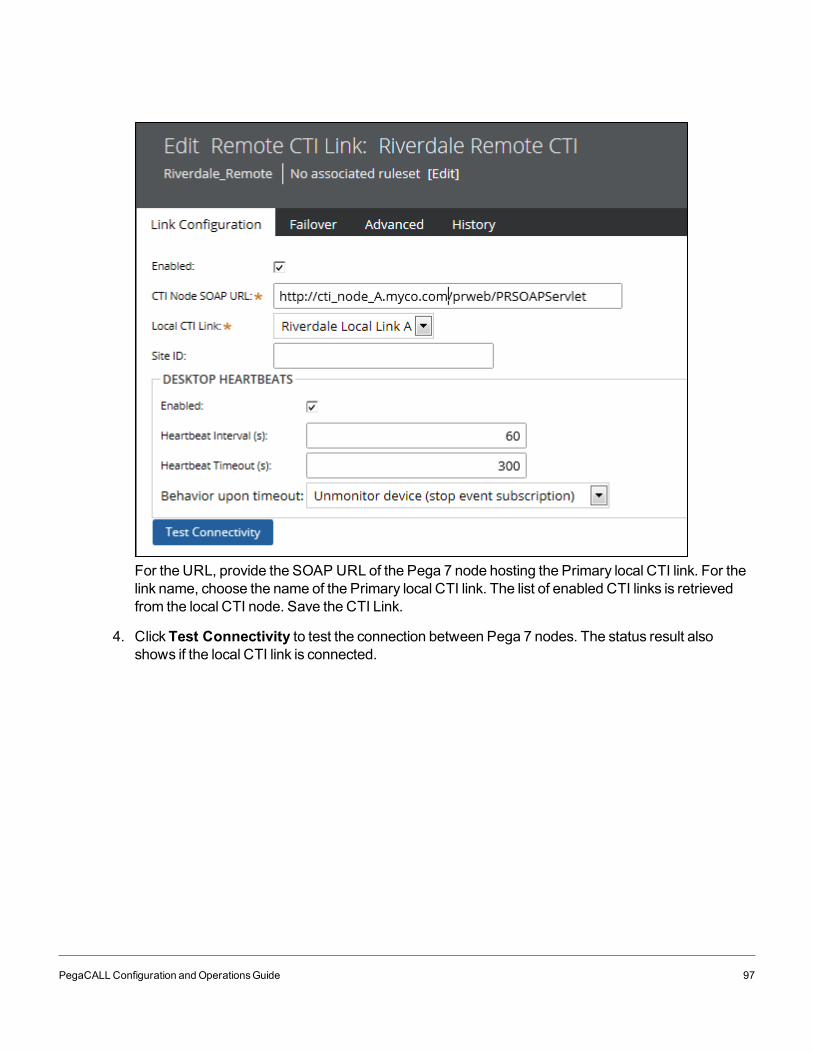
For the URL, provide the SOAP URL of the Pega 7 node hosting the Primary local CTI link. For thelink name, choose the name of the Primary local CTI link. The list of enabled CTI links is retrievedfrom the local CTI node. Save the CTI Link.
4. ClickTest Connectivity to test the connection between Pega 7 nodes. The status result alsoshows if the local CTI link is connected.
PegaCALLConfiguration andOperationsGuide 97
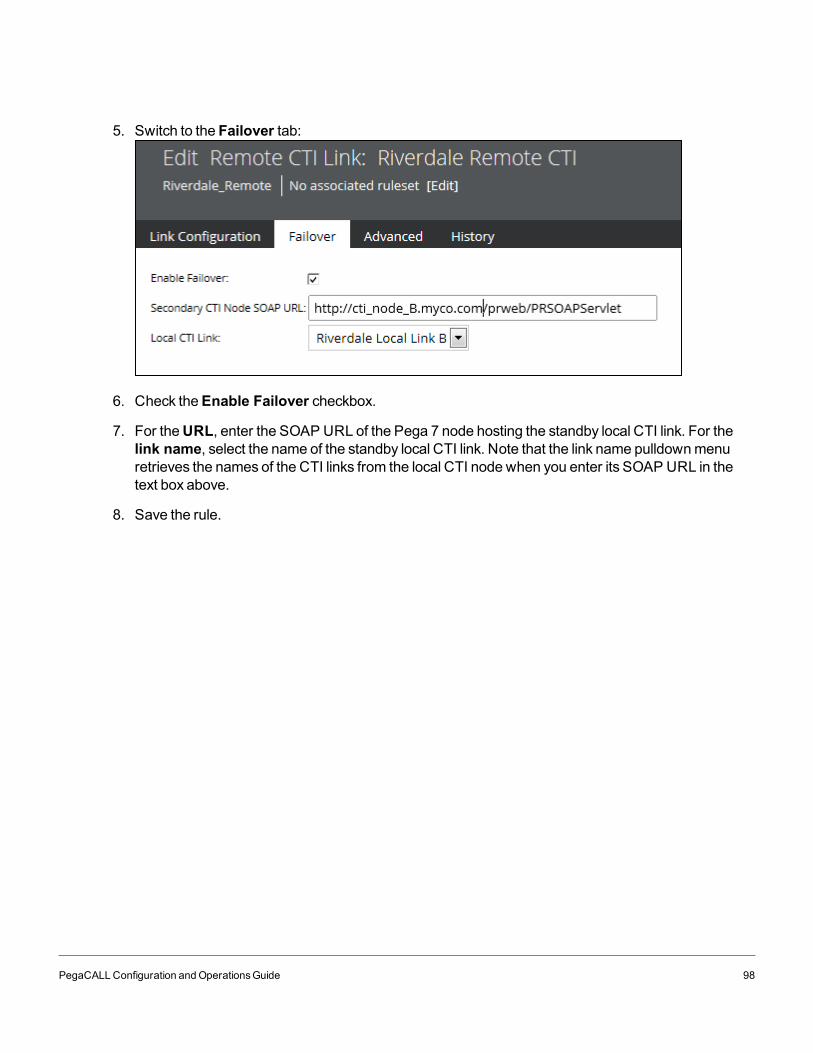
5. Switch to the Failover tab:
6. Check theEnable Failover checkbox.
7. For theURL, enter the SOAP URL of the Pega 7 node hosting the standby local CTI link. For thelink name, select the name of the standby local CTI link. Note that the link name pulldownmenuretrieves the names of the CTI links from the local CTI node when you enter its SOAP URL in thetext box above.
8. Save the rule.
PegaCALLConfiguration andOperationsGuide 98
Using telephony rulesThis section provides an overview of the rules provided by PegaCALL and how to use them in your application.This includes information you need while customizing or troubleshooting PegaCALL.
Note: Avoid overriding PegaCALL activities and JavaScript. Overriding activities and JavaScript makes it harder toupgrade PegaCALL and benefit from fixes and enhancements in future versions of the product. Where possible, use adata transform or extension point provided instead.
Rulesets and class hierarchyManyPegaCALL rules are included in the rulesetPega-CTI. Rules common to various channel services, suchasCTI and chat, are in the rulesetPega-ChannelServices.
PegaCALL and other channel services use the classChannelServices- as a base class for their classhierarchy.
Note: TheCTI- class hierarchy is deprecated and should not be used.
CTI requestsPegaCALL provides an API of activities in the classChannelServices-Device-Phonewhich youmay invokefrom other Pega 7 rules. Additional detail is included later in this chapter. Lower level request processing occursinChannelServices-Request-CTILink.
CTI eventsPegaCALL rules receive and process variousCTI events from the CTI Link. Event processing is handled inChannelServices-Event-CTILink and its subclasses. These rules are invoked from Java services (for localCTI links) or SOAP services (for remote and classic CTI links). Additional detail is included later in this chapter.
Desktop events and Presence Agent ("ScreenPop Control")Various rules related to desktop event delivery are in the classChannelServices-ScreenPop.
AdministrationLanding pages to administer PegaCALL are inChannelServices-Landing-PegaCTI. Rules for administeringCTI Links are inChannelServices-Admin-CTILink and in subclasses specific to each link type. ThePegaCALL configuration wizard is inChannelServices-Wizard-CTI-.
Call classCalls are represented by the classChannelServices-Interaction-Call. CPMuses the call classPegaCA-CTI-Callwhich inherits fromChannelServices-Interaction-Call. Additional details are included later in this
PegaCALLConfiguration andOperationsGuide 99
chapter.
Setting access to PegaCALL rules and custom rulesetsFor users who use the CTI capabilities, PegaCALL provides an Application rule calledPegaCTI and an accessgroupPegaCTIDeveloper. Youmay customize these access groups or create similar ones for your users. Youmust ensure that your access group provides access to custom rulesets required for your screenpops and anyother rules you customize.
If you use PegaCALLwith CPM, note that the default application and access groups provided with CPM includePegaCALL capabilities.
The PegaCALLCTI Engine sends telephony events to Pega 7 (local CTI node) through a Java service (Rule-Service-Java). The service package used for this is CTILinkEvent. Youmust ensure that the CTILinkEventservice package has access to any custom rulesets required for screenpops and other changes youmake totelephony event processing.
In a distributed deployment model, CTI requests from the remote node execute using the CTILinkRequestservice package on the local CTI node. Events from the local CTI node execute services on the remote nodeusing the CTILinkRemoteEvent service package. If you customize any request-processing rules ( activities), youwill need to ensure that the CTILinkRequest service package can access them. You should also ensure that theCTILinkRemoteEvent service package has access to screenpop and other custom rules.
Customizing the call class and associated call dataPegaCALL provides a call class ChannelServices-Interaction-Call in the Pega-CTI ruleset. Call objects aretypically created when a call arrives at a CSR desktop. CTI call data, for example data entered by the caller inthe IVR, is stored in properties in the call class. Youmay extend the call class or add properties to it to suit yourneeds.
The data transform pyOfferingmapsCTI data that PegaCALL receiveswith the Offering event (when a call isringing at the CSR’s phone) to properties in the Call class. You should customize the data transform and theproperties in the call class to suit your needs.
Call data provided by theGenesysCIM platform is stored in the value group .pyUserData in classChannelServices-Interaction-Call.
PegaCALL providesWhen records that determine when call objects are saved or updated in the database.These are defined on the call class ChannelServices-Interaction-Call:
pyOverwriteExisting - If set to true, PegaCALLwill overwrite a pre-existing call object if one is found.Any data in the older call object will be lost. If set to false, PegaCALLwill update the call page with thedata received from the CTI platform based on the data transform pyOffering. Properties that are notupdated will be retained from the older call object; this can be useful if another system or process (forexample, pre-fetch) creates call objects before PegaCALL receives an incoming call (OFFERING
PegaCALLConfiguration andOperationsGuide 100
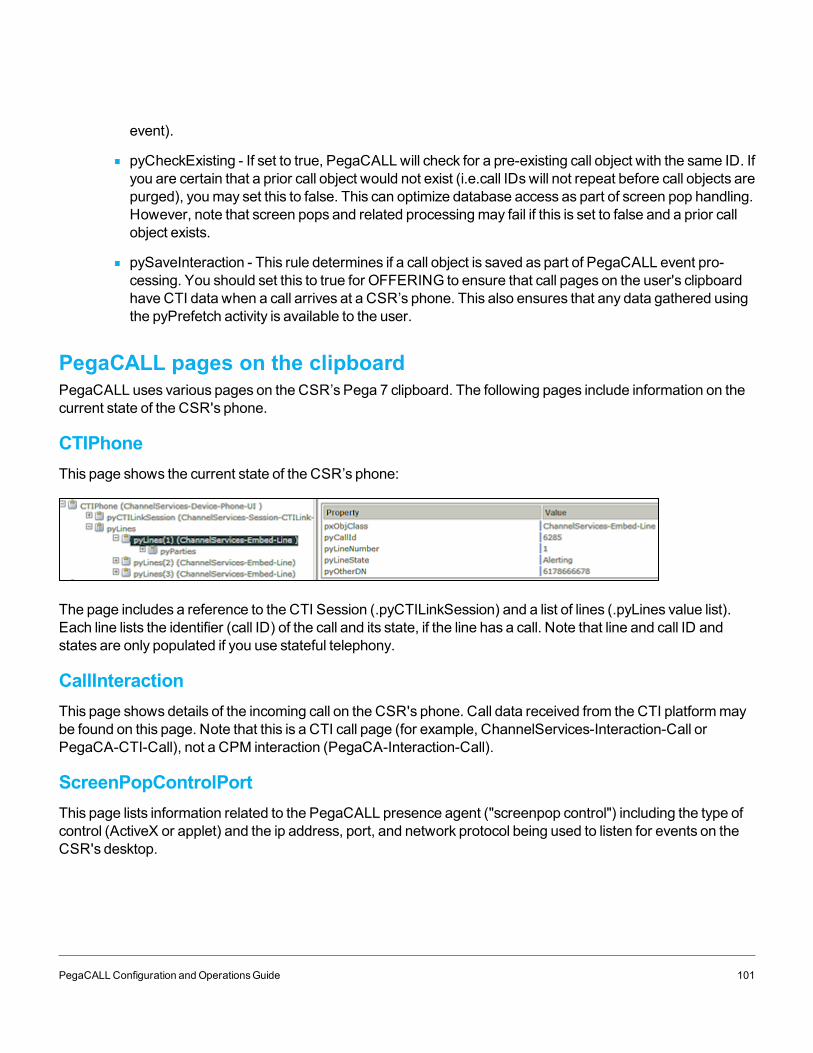
event).
pyCheckExisting - If set to true, PegaCALLwill check for a pre-existing call object with the same ID. Ifyou are certain that a prior call object would not exist (i.e.call IDswill not repeat before call objects arepurged), youmay set this to false. This can optimize database access as part of screen pop handling.However, note that screen pops and related processingmay fail if this is set to false and a prior callobject exists.
pySaveInteraction - This rule determines if a call object is saved as part of PegaCALL event pro-cessing. You should set this to true for OFFERING to ensure that call pages on the user's clipboardhave CTI data when a call arrives at a CSR’s phone. This also ensures that any data gathered usingthe pyPrefetch activity is available to the user.
PegaCALL pages on the clipboardPegaCALL uses various pages on the CSR’s Pega 7 clipboard. The following pages include information on thecurrent state of the CSR's phone.
CTIPhoneThis page shows the current state of the CSR’s phone:
The page includes a reference to the CTI Session (.pyCTILinkSession) and a list of lines (.pyLines value list).Each line lists the identifier (call ID) of the call and its state, if the line has a call. Note that line and call ID andstates are only populated if you use stateful telephony.
CallInteractionThis page shows details of the incoming call on the CSR's phone. Call data received from the CTI platformmaybe found on this page. Note that this is a CTI call page (for example, ChannelServices-Interaction-Call orPegaCA-CTI-Call), not a CPM interaction (PegaCA-Interaction-Call).
ScreenPopControlPortThis page lists information related to the PegaCALL presence agent ("screenpop control") including the type ofcontrol (ActiveX or applet) and the ip address, port, and network protocol being used to listen for events on theCSR's desktop.
PegaCALLConfiguration andOperationsGuide 101
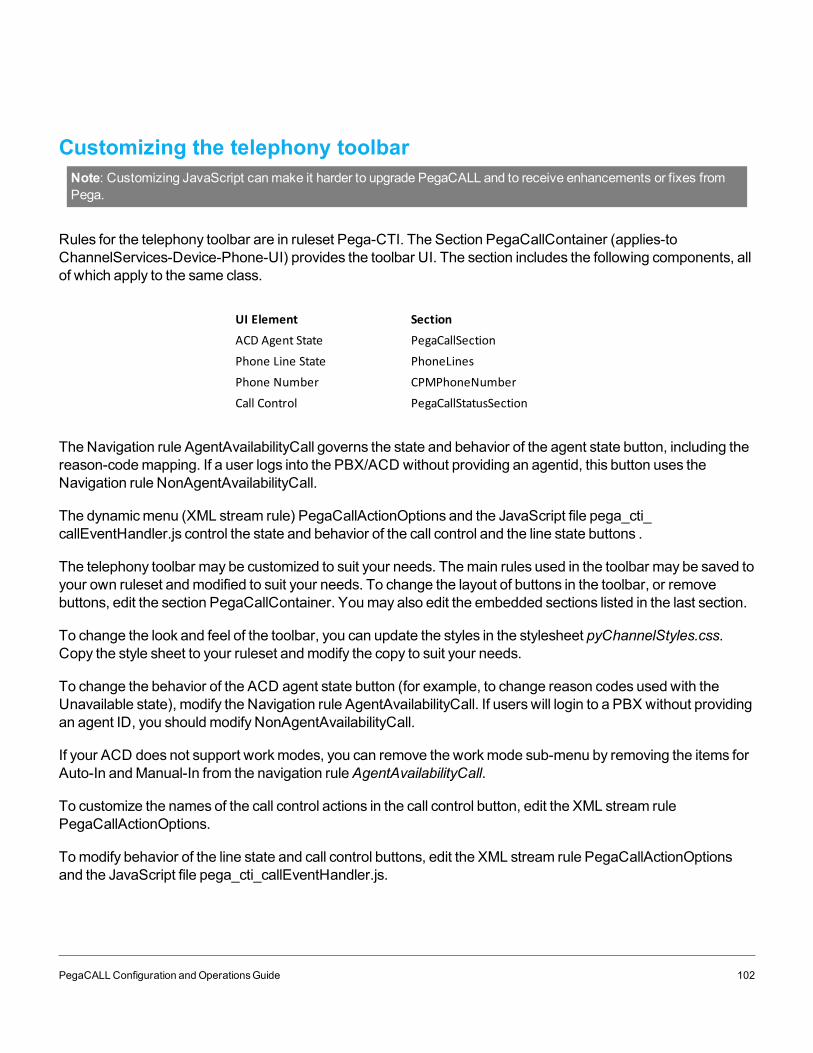
Customizing the telephony toolbarNote: Customizing JavaScript canmake it harder to upgrade PegaCALL and to receive enhancements or fixes fromPega.
Rules for the telephony toolbar are in ruleset Pega-CTI. The Section PegaCallContainer (applies-toChannelServices-Device-Phone-UI) provides the toolbar UI. The section includes the following components, allof which apply to the same class.
UI Element SectionACD Agent State PegaCallSectionPhone Line State PhoneLinesPhone Number CPMPhoneNumberCall Control PegaCallStatusSection
TheNavigation rule AgentAvailabilityCall governs the state and behavior of the agent state button, including thereason-codemapping. If a user logs into the PBX/ACD without providing an agentid, this button uses theNavigation rule NonAgentAvailabilityCall.
The dynamicmenu (XML stream rule) PegaCallActionOptions and the JavaScript file pega_cti_callEventHandler.js control the state and behavior of the call control and the line state buttons .
The telephony toolbar may be customized to suit your needs. Themain rules used in the toolbar may be saved toyour own ruleset andmodified to suit your needs. To change the layout of buttons in the toolbar, or removebuttons, edit the section PegaCallContainer. Youmay also edit the embedded sections listed in the last section.
To change the look and feel of the toolbar, you can update the styles in the stylesheet pyChannelStyles.css.Copy the style sheet to your ruleset andmodify the copy to suit your needs.
To change the behavior of the ACD agent state button (for example, to change reason codes used with theUnavailable state), modify the Navigation rule AgentAvailabilityCall. If users will login to a PBX without providingan agent ID, you shouldmodify NonAgentAvailabilityCall.
If your ACD does not support workmodes, you can remove the workmode sub-menu by removing the items forAuto-In andManual-In from the navigation ruleAgentAvailabilityCall.
To customize the names of the call control actions in the call control button, edit the XML stream rulePegaCallActionOptions.
Tomodify behavior of the line state and call control buttons, edit the XML stream rule PegaCallActionOptionsand the JavaScript file pega_cti_callEventHandler.js.
PegaCALLConfiguration andOperationsGuide 102
Customizing the login screenCSRsmust log in to PegaCALL to be able to receive ScreenPops and control their telephones through theirdesktops.
PegaCALL provides a login screen in the section ChannelServices-Device-Phone-UI •StatefulSoftphoneLoginScreen.
The Activity ChannelServices-Device-Phone-UI • DisplayLoginScreen is used to launch the login UI. Youmaycustomize the login screen and the login process bymodifying these rules.
Telephony functions: invoking CTI capabilities from your applicationPegaCALL provides an API of activities you can use to invoke telephony capabilities such as call control andagent statemanagement. For example, youmay call an activity to answer a phone call or make a CSR (agent)available to receive phone calls from customers.
These activities are used by the telephony toolbars. Youmay also invoke the activities fromwithin yourapplication and business processes. The activities are in classChannelServices-Device-Phone. Descriptions ofthese activities appear later in this chapter.
In most cases, call and agent state changes generate events from the CTI platform to PegaCALL. Eventprocessing is covered later in this chapter.
Attaching call data on telephony functionsYoumay associate data with a call when invoking call control requests that place, transfer, or conference calls.PegaCALL provides data transform rule(s) in classChannelServices-Request-CallOptions-Genesys for usewith local and remote CTI links that useGenesysCTI. Copy the relevant data transform to your applicationruleset andmodify it to set the data you need to associate with the call. Youmay review the sample datatransformChannelServices-Request-CallOptions-Genesys.MakeCall:
PegaCALLConfiguration andOperationsGuide 103

Use the value group pyNamedVariableswith the Genesys keys as the subscript. Source datamay includereferences to pages on the user's clipboard.
Genesys variable types
By default, PegaCALL variables are set as strings in Genesys call data. If you wish to use a different type, usethe value group pyNamedVariableDataType to map the variable-name to the required data type – "INTEGER","UTF-16", or "BINARY".
Named variable aliases
Pega 7 property names and the names of subscripts in value groups cannot use special characters – theymustuse Java variable naming conventions. If a Genesys key or variable name includes such a character (forexample, cpm.customerName includes a period character), youmay use an alias to represent the variablewithin Pega 7 . You should thenmap the alias to the Genesys variable name using the value grouppyNamedVariableAlias – thesemap the variable name used in pyNamedVariables (target) to the actualGenesys variable name (source).
Notes
If you use need to transfer the CPM interaction context with a call (i.e. if you use the voice-data transferfeature), youmust ensure that the data transforms PegaCallData andPegaAppData are invoked from thedata transforms BlindTransfer, TransferInitiate andConsultationCall in class ChannelServices-Request-CallOptions-Genesys.
Do not modify rules in theChannelServices-Request-CallOptions-Remote class. These are for internaluse only.
PegaCALLConfiguration andOperationsGuide 104
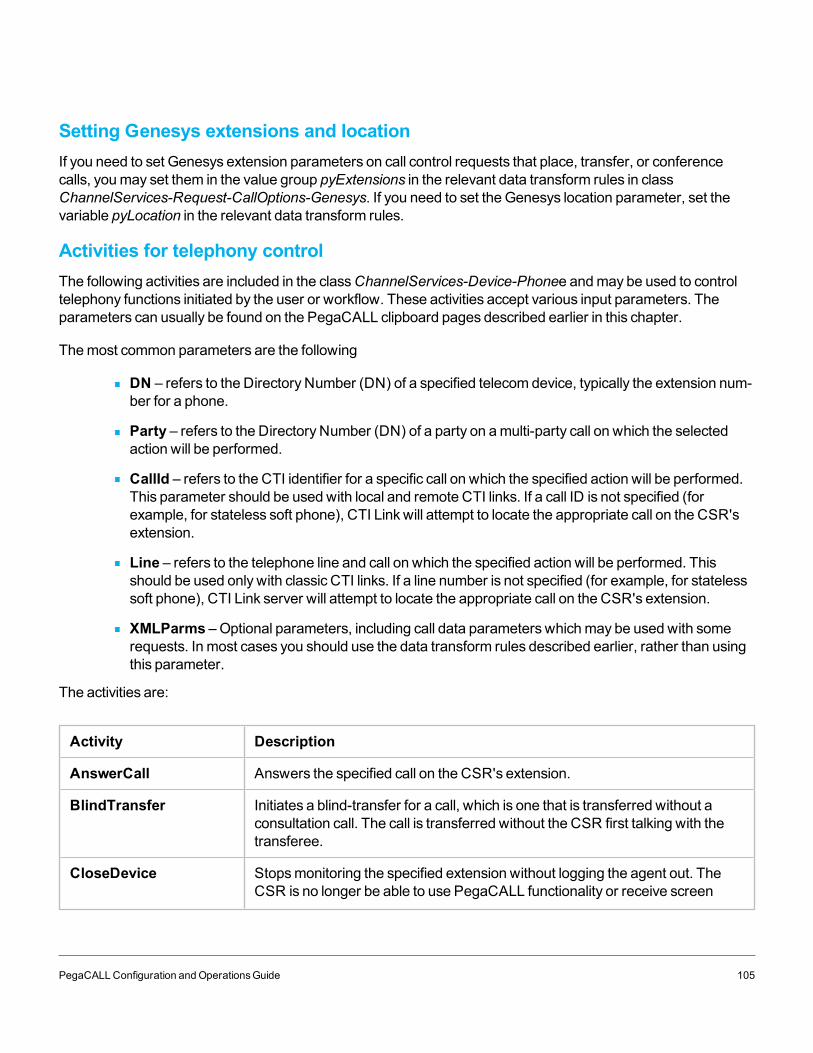
Setting Genesys extensions and locationIf you need to set Genesys extension parameters on call control requests that place, transfer, or conferencecalls, youmay set them in the value group pyExtensions in the relevant data transform rules in classChannelServices-Request-CallOptions-Genesys. If you need to set the Genesys location parameter, set thevariable pyLocation in the relevant data transform rules.
Activities for telephony controlThe following activities are included in the classChannelServices-Device-Phonee andmay be used to controltelephony functions initiated by the user or workflow. These activities accept various input parameters. Theparameters can usually be found on the PegaCALL clipboard pages described earlier in this chapter.
Themost common parameters are the following
DN – refers to the Directory Number (DN) of a specified telecom device, typically the extension num-ber for a phone.
Party – refers to the Directory Number (DN) of a party on amulti-party call on which the selectedaction will be performed.
CallId – refers to the CTI identifier for a specific call on which the specified action will be performed.This parameter should be used with local and remote CTI links. If a call ID is not specified (forexample, for stateless soft phone), CTI Link will attempt to locate the appropriate call on the CSR'sextension.
Line – refers to the telephone line and call on which the specified action will be performed. Thisshould be used only with classic CTI links. If a line number is not specified (for example, for statelesssoft phone), CTI Link server will attempt to locate the appropriate call on the CSR's extension.
XMLParms –Optional parameters, including call data parameters whichmay be used with somerequests. In most cases you should use the data transform rules described earlier, rather than usingthis parameter.
The activities are:
Activity Description
AnswerCall Answers the specified call on the CSR's extension.
BlindTransfer Initiates a blind-transfer for a call, which is one that is transferred without aconsultation call. The call is transferred without the CSR first talking with thetransferee.
CloseDevice Stopsmonitoring the specified extension without logging the agent out. TheCSR is no longer be able to use PegaCALL functionality or receive screen
PegaCALLConfiguration andOperationsGuide 105
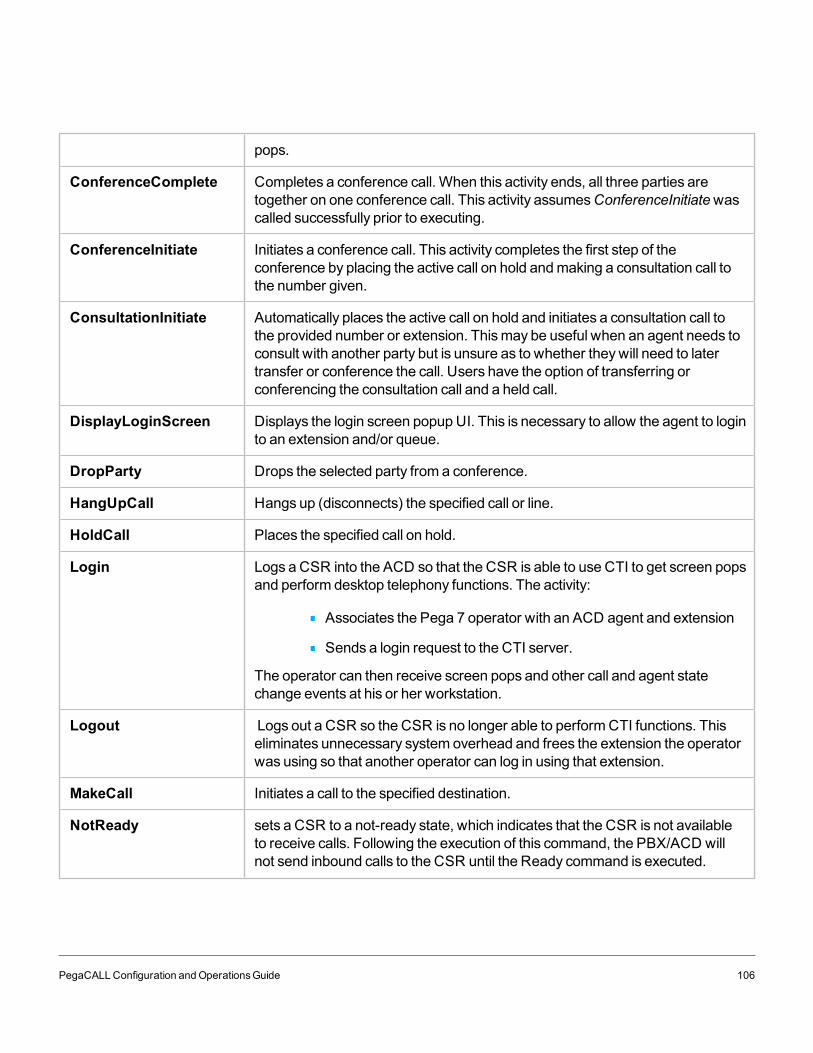
pops.
ConferenceComplete Completes a conference call. When this activity ends, all three parties aretogether on one conference call. This activity assumesConferenceInitiatewascalled successfully prior to executing.
ConferenceInitiate Initiates a conference call. This activity completes the first step of theconference by placing the active call on hold andmaking a consultation call tothe number given.
ConsultationInitiate Automatically places the active call on hold and initiates a consultation call tothe provided number or extension. Thismay be useful when an agent needs toconsult with another party but is unsure as to whether theywill need to latertransfer or conference the call. Users have the option of transferring orconferencing the consultation call and a held call.
DisplayLoginScreen Displays the login screen popup UI. This is necessary to allow the agent to loginto an extension and/or queue.
DropParty Drops the selected party from a conference.
HangUpCall Hangs up (disconnects) the specified call or line.
HoldCall Places the specified call on hold.
Login Logs a CSR into the ACD so that the CSR is able to use CTI to get screen popsand perform desktop telephony functions. The activity:
Associates the Pega 7 operator with an ACD agent and extension
Sends a login request to the CTI server.
The operator can then receive screen pops and other call and agent statechange events at his or her workstation.
Logout Logs out a CSR so the CSR is no longer able to performCTI functions. Thiseliminates unnecessary system overhead and frees the extension the operatorwas using so that another operator can log in using that extension.
MakeCall Initiates a call to the specified destination.
NotReady sets a CSR to a not-ready state, which indicates that the CSR is not availableto receive calls. Following the execution of this command, the PBX/ACD willnot send inbound calls to the CSR until the Ready command is executed.
PegaCALLConfiguration andOperationsGuide 106
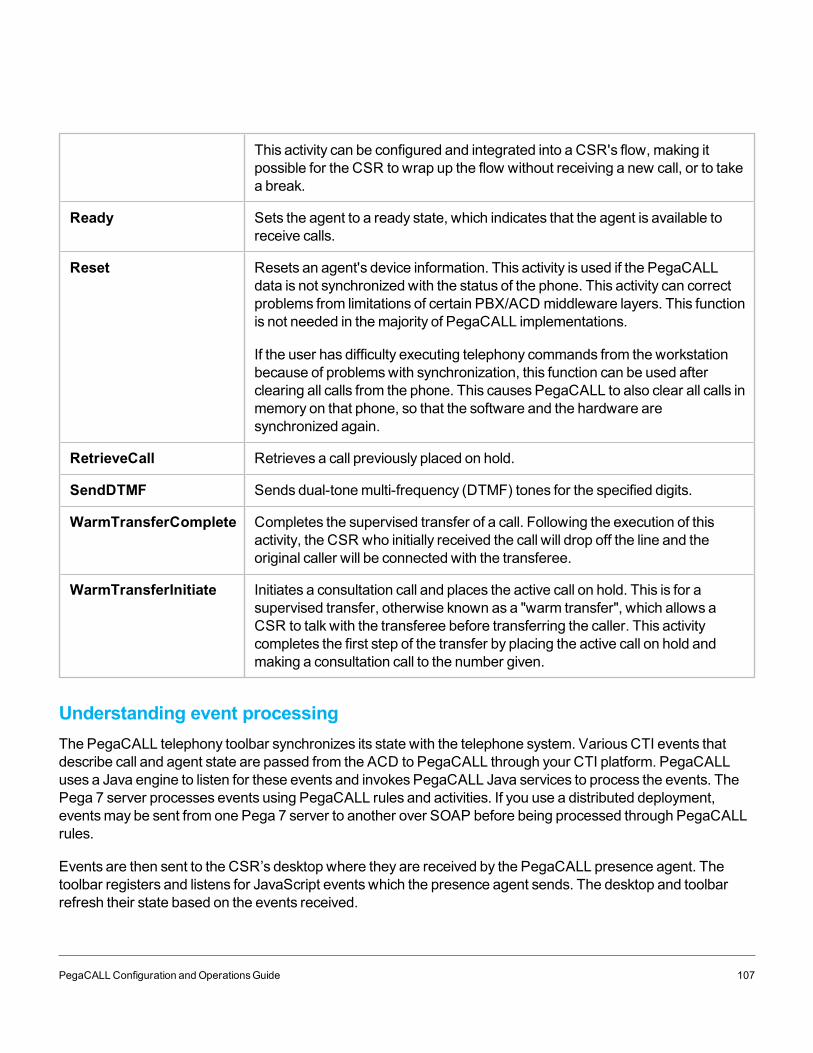
This activity can be configured and integrated into a CSR's flow, making itpossible for the CSR to wrap up the flow without receiving a new call, or to takea break.
Ready Sets the agent to a ready state, which indicates that the agent is available toreceive calls.
Reset Resets an agent's device information. This activity is used if the PegaCALLdata is not synchronized with the status of the phone. This activity can correctproblems from limitations of certain PBX/ACD middleware layers. This functionis not needed in themajority of PegaCALL implementations.
If the user has difficulty executing telephony commands from the workstationbecause of problemswith synchronization, this function can be used afterclearing all calls from the phone. This causes PegaCALL to also clear all calls inmemory on that phone, so that the software and the hardware aresynchronized again.
RetrieveCall Retrieves a call previously placed on hold.
SendDTMF Sends dual-tonemulti-frequency (DTMF) tones for the specified digits.
WarmTransferComplete Completes the supervised transfer of a call. Following the execution of thisactivity, the CSR who initially received the call will drop off the line and theoriginal caller will be connected with the transferee.
WarmTransferInitiate Initiates a consultation call and places the active call on hold. This is for asupervised transfer, otherwise known as a "warm transfer", which allows aCSR to talk with the transferee before transferring the caller. This activitycompletes the first step of the transfer by placing the active call on hold andmaking a consultation call to the number given.
Understanding event processingThe PegaCALL telephony toolbar synchronizes its state with the telephone system. VariousCTI events thatdescribe call and agent state are passed from the ACD to PegaCALL through your CTI platform. PegaCALLuses a Java engine to listen for these events and invokes PegaCALL Java services to process the events. ThePega 7 server processes events using PegaCALL rules and activities. If you use a distributed deployment,eventsmay be sent from one Pega 7 server to another over SOAP before being processed through PegaCALLrules.
Events are then sent to the CSR’s desktop where they are received by the PegaCALL presence agent. Thetoolbar registers and listens for JavaScript events which the presence agent sends. The desktop and toolbarrefresh their state based on the events received.
PegaCALLConfiguration andOperationsGuide 107
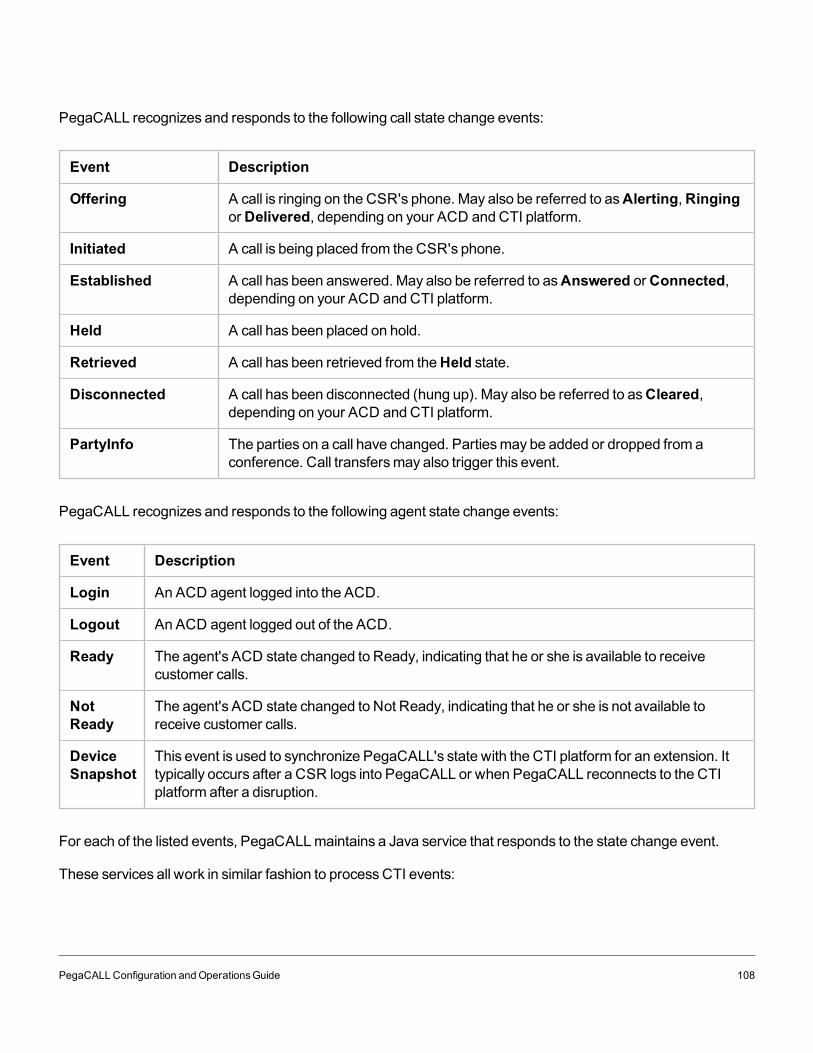
PegaCALL recognizes and responds to the following call state change events:
Event Description
Offering A call is ringing on the CSR's phone. May also be referred to asAlerting,RingingorDelivered, depending on your ACD andCTI platform.
Initiated A call is being placed from the CSR's phone.
Established A call has been answered. May also be referred to asAnswered orConnected,depending on your ACD andCTI platform.
Held A call has been placed on hold.
Retrieved A call has been retrieved from theHeld state.
Disconnected A call has been disconnected (hung up). May also be referred to asCleared,depending on your ACD andCTI platform.
PartyInfo The parties on a call have changed. Partiesmay be added or dropped from aconference. Call transfersmay also trigger this event.
PegaCALL recognizes and responds to the following agent state change events:
Event Description
Login An ACD agent logged into the ACD.
Logout An ACD agent logged out of the ACD.
Ready The agent's ACD state changed to Ready, indicating that he or she is available to receivecustomer calls.
NotReady
The agent's ACD state changed to Not Ready, indicating that he or she is not available toreceive customer calls.
DeviceSnapshot
This event is used to synchronize PegaCALL's state with the CTI platform for an extension. Ittypically occurs after a CSR logs into PegaCALL or when PegaCALL reconnects to the CTIplatform after a disruption.
For each of the listed events, PegaCALLmaintains a Java service that responds to the state change event.
These services all work in similar fashion to processCTI events:
PegaCALLConfiguration andOperationsGuide 108
Receive the event from the CTI Link. If you have a distributed telephony environment, the event maybe forwarded to the Pega 7 application node over a SOAP service.
Call a corresponding activity (named after the event – for example, Offering) defined in the eventclassChannelServices-Event-CTILink, which:
Formats data associated with the event according to a data transform defined in the eventclassChannelServices-Event-CTILink. The data transforms follow the naming con-vention SoftPhone_Event (for example, SoftPhone_Offering).
Sends amessage to the presence agent control with the event type and data.
Request and Response EventsIn addition to the CTI events (agent state, call state) received from the CTI platform, the toolbars use two eventsfor state change requests:
SoftphoneRequest Event: This event captures information related to a call control or agent state changerequest. The toolbar sends this event to invoke a corresponding call control or agent state change activity on thePega 7 server. These activities are described in the sectionDesktop Telephony Functions.
SoftphoneResponse Event: This event is a response to a SoftphoneRequest event. It indicates that therequested activity was invoked on the Pega 7 server. The event includes the result or error returned by theactivity. Note that a “Good” result only indicates that the activity was run – it does not indicate that the call oragent state was changed as requested. A separate agent or call state event should follow, indicating the statechange.
Extension point for the OFFERING activityAs a rule, you should not override any of the activities used to process PegaCALL events. If you need to performany additional processing when a call arrives at a CSR’s phone (i.e. as part of the event handling forOFFERING), youmay override the activity pyPrefetch in your call class (for example, ChannelServices-Interaction-Call or PegaCA-CTI-Call).
PegaCALLConfiguration andOperationsGuide 109

PegaCALLConfiguration andOperationsGuide 110
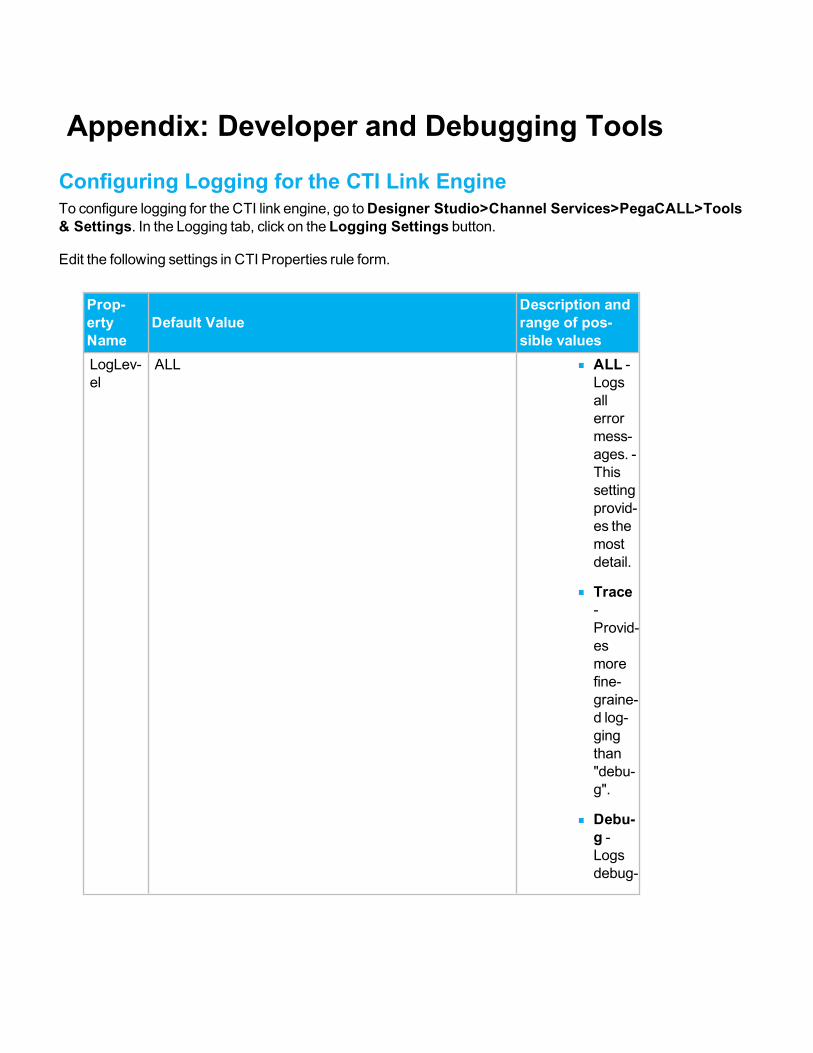
Appendix: Developer and Debugging Tools
Configuring Logging for the CTI Link EngineTo configure logging for the CTI link engine, go toDesigner Studio>Channel Services>PegaCALL>Tools& Settings. In the Logging tab, click on the Logging Settings button.
Edit the following settings in CTI Properties rule form.
Prop-ertyName
Default ValueDescription andrange of pos-sible values
LogLev-el
ALL ALL -Logsallerrormess-ages. -Thissettingprovid-es themostdetail.
Trace-Provid-esmorefine-graine-d log-gingthan"debu-g".
Debu-g -Logsdebug-

Prop-ertyName
Default ValueDescription andrange of pos-sible values
ginginform-ationto facil-itatetroubl-eshoo-ting.
Info -Logsinform-ationalmes-sagesin addi-tion towarn-ingsanderrormes-sages.
Warn- Logswarn-ingsanderrormes-sages.
Off -Turnsoff log-ging.
Fatal -Logs
PegaCALLConfiguration andOperationsGuide 112
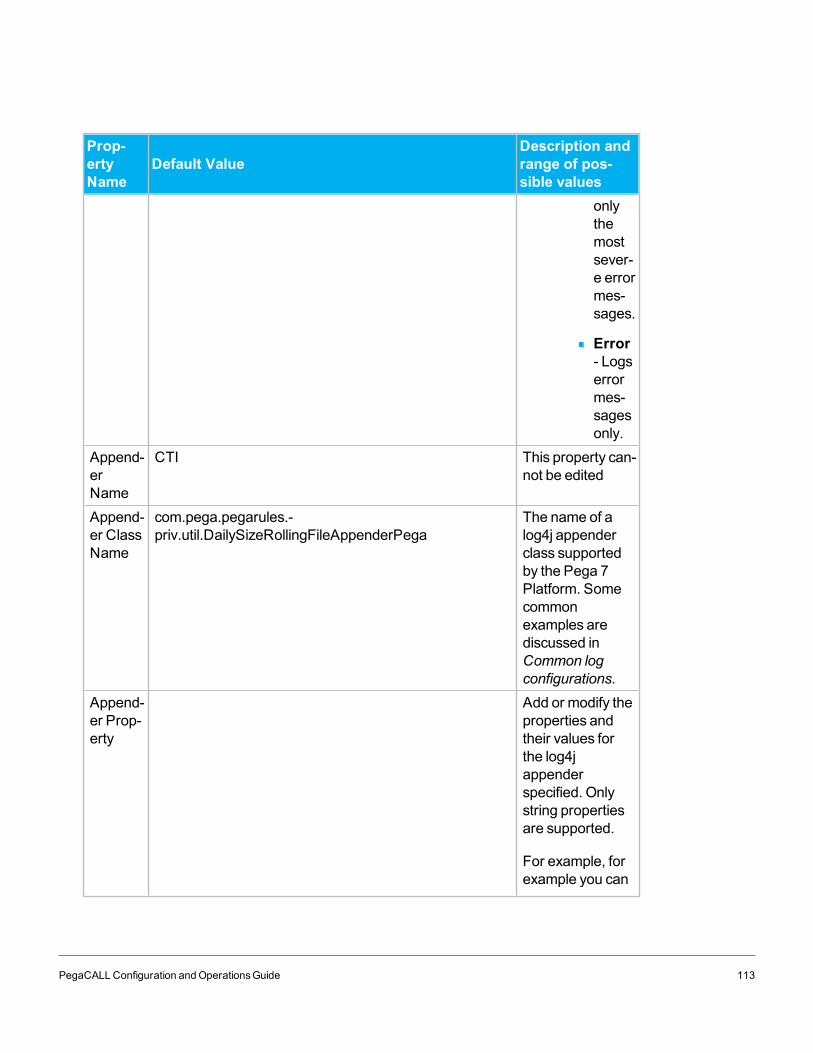
Prop-ertyName
Default ValueDescription andrange of pos-sible values
onlythemostsever-e errormes-sages.
Error- Logserrormes-sagesonly.
Append-erName
CTI This property can-not be edited
Append-er ClassName
com.pega.pegarules.-priv.util.DailySizeRollingFileAppenderPega
The name of alog4j appenderclass supportedby the Pega 7Platform. Somecommonexamples arediscussed inCommon logconfigurations.
Append-er Prop-erty
Add or modify theproperties andtheir values forthe log4jappenderspecified. Onlystring propertiesare supported.
For example, forexample you can
PegaCALLConfiguration andOperationsGuide 113
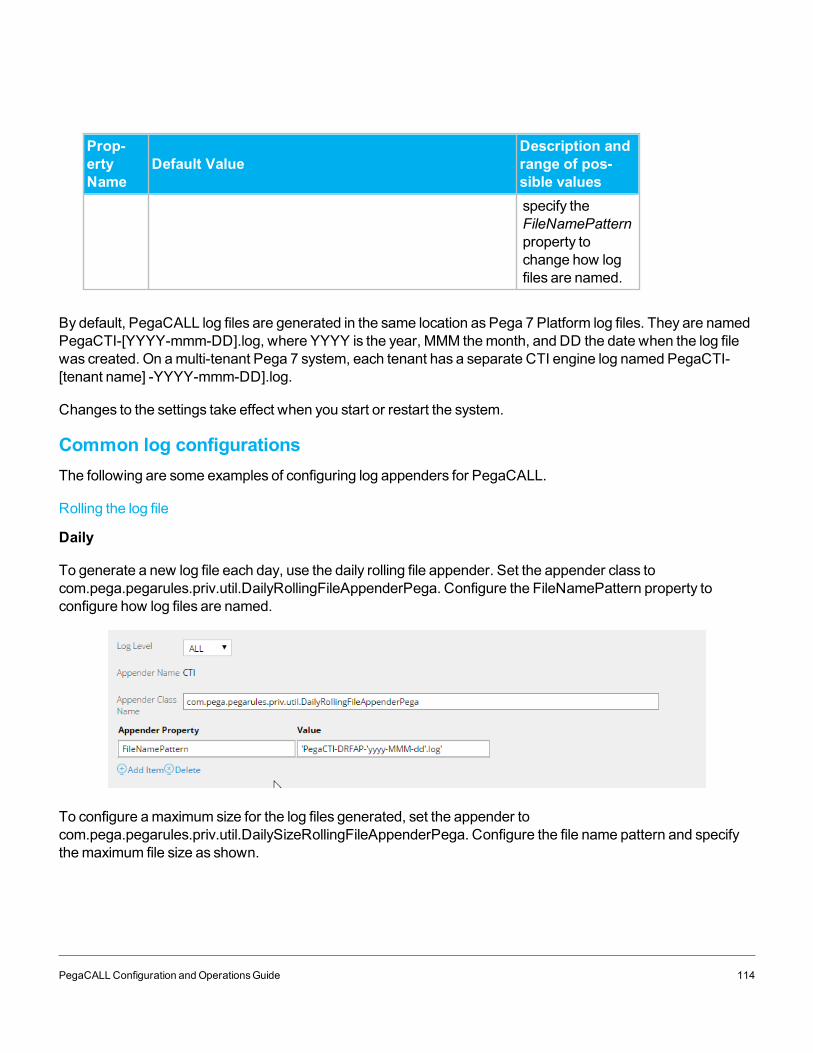
Prop-ertyName
Default ValueDescription andrange of pos-sible valuesspecify theFileNamePatternproperty tochange how logfiles are named.
By default, PegaCALL log files are generated in the same location as Pega 7 Platform log files. They are namedPegaCTI-[YYYY-mmm-DD].log, where YYYY is the year, MMM themonth, and DD the date when the log filewas created. On amulti-tenant Pega 7 system, each tenant has a separate CTI engine log named PegaCTI-[tenant name] -YYYY-mmm-DD].log.
Changes to the settings take effect when you start or restart the system.
Common log configurationsThe following are some examples of configuring log appenders for PegaCALL.
Rolling the log file
Daily
To generate a new log file each day, use the daily rolling file appender. Set the appender class tocom.pega.pegarules.priv.util.DailyRollingFileAppenderPega. Configure the FileNamePattern property toconfigure how log files are named.
To configure amaximum size for the log files generated, set the appender tocom.pega.pegarules.priv.util.DailySizeRollingFileAppenderPega. Configure the file name pattern and specifythemaximum file size as shown.
PegaCALLConfiguration andOperationsGuide 114
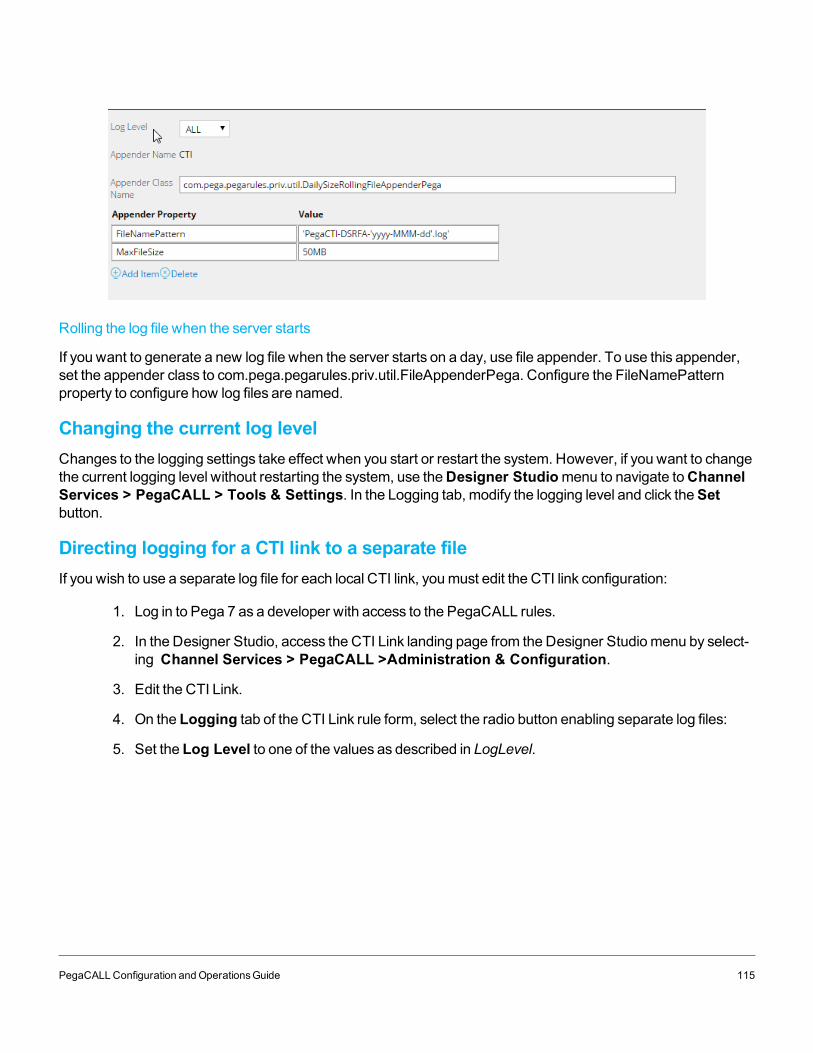
Rolling the log file when the server starts
If you want to generate a new log file when the server starts on a day, use file appender. To use this appender,set the appender class to com.pega.pegarules.priv.util.FileAppenderPega. Configure the FileNamePatternproperty to configure how log files are named.
Changing the current log levelChanges to the logging settings take effect when you start or restart the system. However, if you want to changethe current logging level without restarting the system, use theDesigner Studiomenu to navigate toChannelServices > PegaCALL > Tools & Settings. In the Logging tab, modify the logging level and click theSetbutton.
Directing logging for a CTI link to a separate fileIf you wish to use a separate log file for each local CTI link, youmust edit the CTI link configuration:
1. Log in to Pega 7 as a developer with access to the PegaCALL rules.
2. In the Designer Studio, access the CTI Link landing page from the Designer Studiomenu by select-ing Channel Services > PegaCALL >Administration & Configuration.
3. Edit the CTI Link.
4. On the Logging tab of the CTI Link rule form, select the radio button enabling separate log files:
5. Set the Log Level to one of the values as described in LogLevel.
PegaCALLConfiguration andOperationsGuide 115
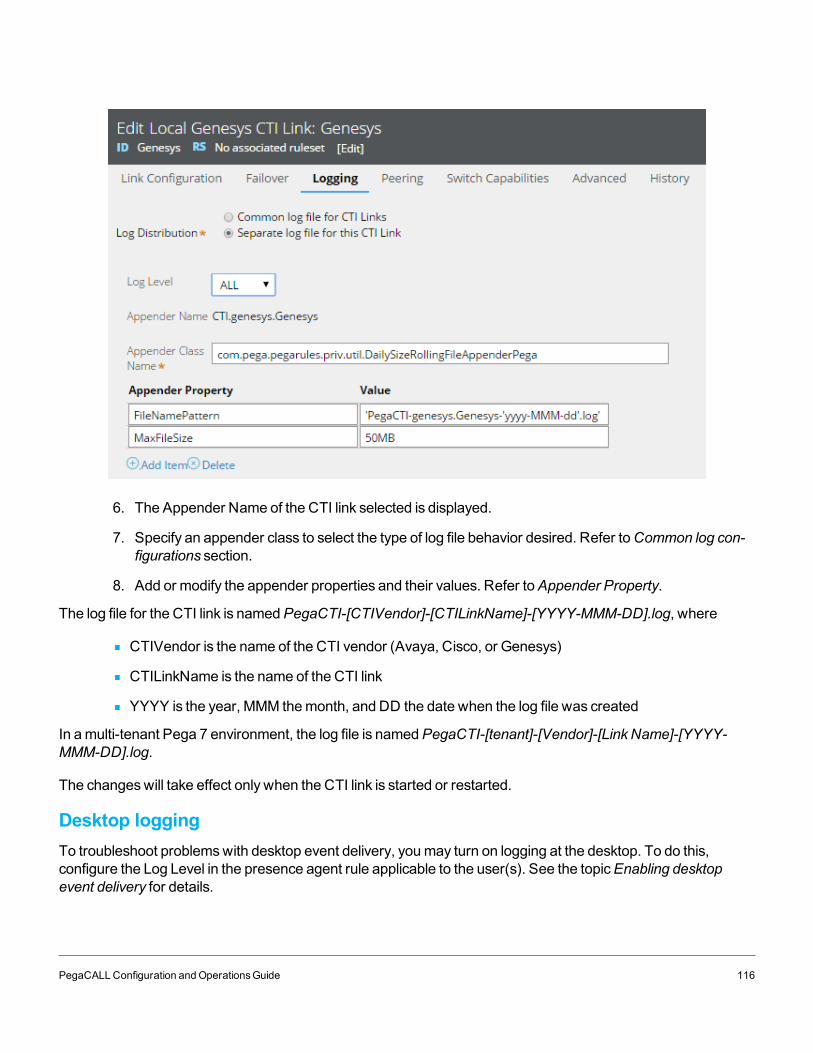
6. The Appender Name of the CTI link selected is displayed.
7. Specify an appender class to select the type of log file behavior desired. Refer toCommon log con-figurations section.
8. Add or modify the appender properties and their values. Refer toAppender Property.
The log file for the CTI link is namedPegaCTI-[CTIVendor]-[CTILinkName]-[YYYY-MMM-DD].log, where
CTIVendor is the name of the CTI vendor (Avaya, Cisco, or Genesys)
CTILinkName is the name of the CTI link
YYYY is the year, MMM themonth, and DD the date when the log file was created
In amulti-tenant Pega 7 environment, the log file is namedPegaCTI-[tenant]-[Vendor]-[Link Name]-[YYYY-MMM-DD].log.
The changeswill take effect only when the CTI link is started or restarted.
Desktop loggingTo troubleshoot problemswith desktop event delivery, youmay turn on logging at the desktop. To do this,configure the Log Level in the presence agent rule applicable to the user(s). See the topicEnabling desktopevent delivery for details.
PegaCALLConfiguration andOperationsGuide 116
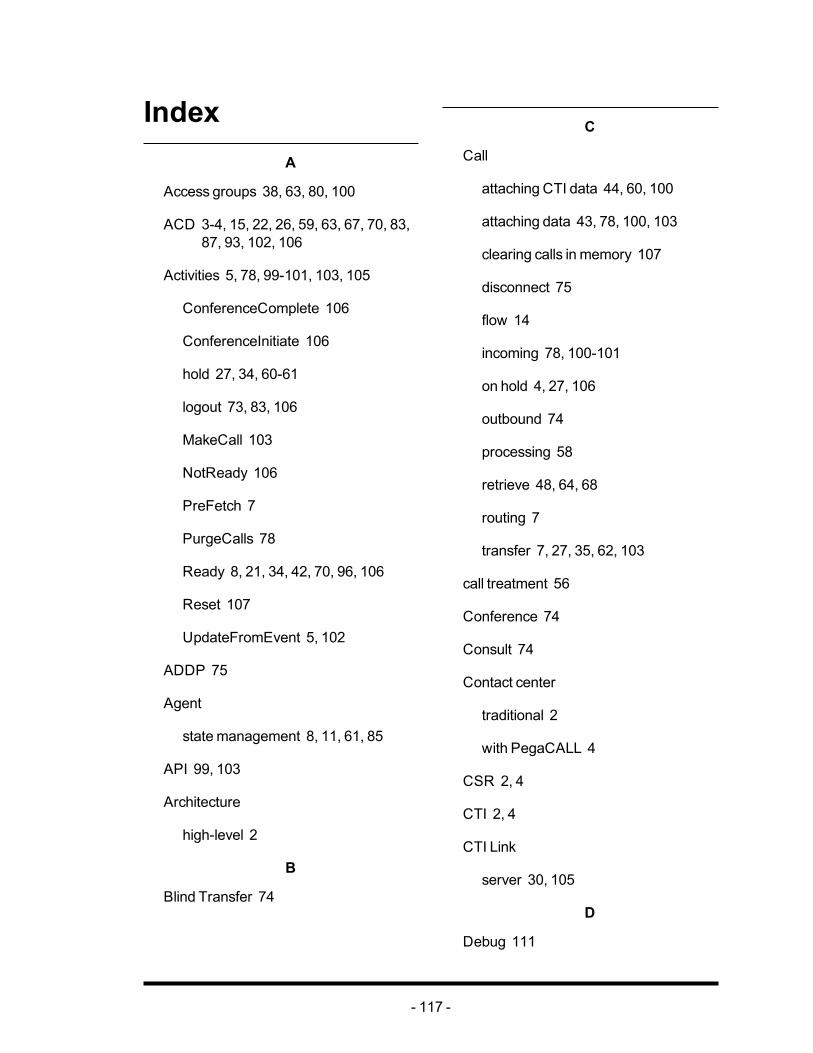
IndexA
Access groups 38, 63, 80, 100
ACD 3-4, 15, 22, 26, 59, 63, 67, 70, 83,87, 93, 102, 106
Activities 5, 78, 99-101, 103, 105
ConferenceComplete 106
ConferenceInitiate 106
hold 27, 34, 60-61
logout 73, 83, 106
MakeCall 103
NotReady 106
PreFetch 7
PurgeCalls 78
Ready 8, 21, 34, 42, 70, 96, 106
Reset 107
UpdateFromEvent 5, 102
ADDP 75
Agent
statemanagement 8, 11, 61, 85
API 99, 103
Architecture
high-level 2
B
Blind Transfer 74
C
Call
attaching CTI data 44, 60, 100
attaching data 43, 78, 100, 103
clearing calls in memory 107
disconnect 75
flow 14
incoming 78, 100-101
on hold 4, 27, 106
outbound 74
processing 58
retrieve 48, 64, 68
routing 7
transfer 7, 27, 35, 62, 103
call treatment 56
Conference 74
Consult 74
Contact center
traditional 2
with PegaCALL 4
CSR 2, 4
CTI 2, 4
CTI Link
server 30, 105
D
Debug 111
- 117 -
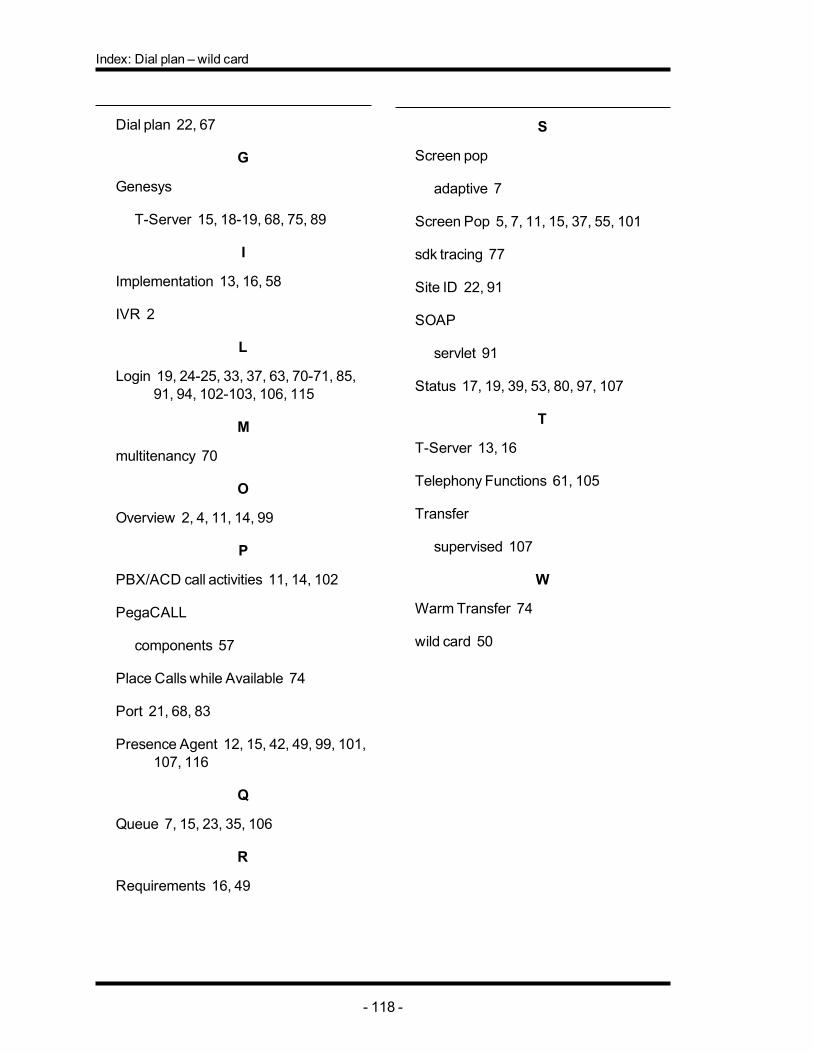
Index: Dial plan – wild card
Dial plan 22, 67
G
Genesys
T-Server 15, 18-19, 68, 75, 89
I
Implementation 13, 16, 58
IVR 2
L
Login 19, 24-25, 33, 37, 63, 70-71, 85,91, 94, 102-103, 106, 115
M
multitenancy 70
O
Overview 2, 4, 11, 14, 99
P
PBX/ACD call activities 11, 14, 102
PegaCALL
components 57
Place Calls while Available 74
Port 21, 68, 83
Presence Agent 12, 15, 42, 49, 99, 101,107, 116
Q
Queue 7, 15, 23, 35, 106
R
Requirements 16, 49
S
Screen pop
adaptive 7
Screen Pop 5, 7, 11, 15, 37, 55, 101
sdk tracing 77
Site ID 22, 91
SOAP
servlet 91
Status 17, 19, 39, 53, 80, 97, 107
T
T-Server 13, 16
Telephony Functions 61, 105
Transfer
supervised 107
W
WarmTransfer 74
wild card 50
- 118 -