Embed Size (px)
Citation preview
State Of Arizona
Pest Management Division 1688 W. Adams St. Phoenix, AZ 85007
“eTARF” System
(User’s Manual)

Contents
1 What is the “eTARF” System? 4
1.1 Included features: 4
2 Operating system, hardware and other requirements: 6
2.1 Windows: 6
2.2 Mac: 6
2.3 Linux: 6
2.4 Other requirements: 7
3 Obtaining your access information: 8
3.1 Accessing the “eTARF” system: 8
3.2 First time login: 9
4 eTARF’s Welcome Screen 12
5 Entering a new TARF record. 12
5.1 What happens when a new TARF record is recorded. 13
5.2 The TARF record entry screen. 13
5.3 Recording a “Wood Infestation Report” (WIR). 16
5.4 Recording a “Post‐construction Treatment” (PCT). 17
5.5 Recording a “Pre‐construction Treatment” (PRE) 18
5.6 New TARF report ‐ Initial error checking 19
5.7 Proceed to the TARF record “Save” page 19
5.8 Listing and\or editing recorded (but un‐submitted) TARF report(s). 21
5.9 Viewing recorded TARFs. 24
5.10 Deleting recorded TARFs. 25
5.11 How to pay and submit recorded TARF(s). 25
6 Searching and viewing submitted TARFs 29
6.1 Best way to search for TARF records. 30
7 eTARF’s TARF report screen 33
8 eTARF Administrator user account. 38
8.1 Duties and responsibilities of the eTARF administrator account owner 39
8.2 Adding user accounts. 39
8.3 Managing user accounts 40
8.4 Delete a user account. 40
8.5 Edit a user account. 41
8.6 Edit Submitted TARFs
8.7 Export submitted TARFs 42
9 Contact Information. 44
Introduction
1 Whatisthe“eTARF”System?
The “eTARF” system is a web‐based e‐commerce level computer system designed for managing
ALL aspects involved with the submission of “Termite Action Report form(s)” (TARFs) into the Pest
Management Division (PMD) as required by A.R.S. § 3‐3621(C)11. The “eTARF” software has been
designed with “usability in mind” and since it is a web‐based software application, it does not require any
software installation and or software updates at the client level. However, it does require a broadband
connection into the internet, a reasonably updated web browser and a valid email account. Please refer
to the “Minimum Requirements” section for details. The Arizona Pest Management Division (PMD)
designed and developed the “eTARF” system.
1.1 Includedfeatures:1) Meets the TARF related needs of FIVE distinct groups of “eTARF” users and\or clients.
a) PMD employee(s).
i) PMD “eTARF” Administrator(s) – In charge of administering any and all PMD user accounts
and their activities, i.e.;
(1) Create\delete\modify user accounts.
(2) Set account permission levels and capabilities (add, browse, submit and\or modify
records).
(3) Monitor, search and retrieve data entered by any\all PMD users.
(4) Capable of performing any\all functions afforded to a regular PMD user account as
outlined below.
ii) PMD User(s) – When permitted by PMD administrator, user can;
(1) Print and\or email notification letters for incomplete, invalid and\or late submissions as
well as track the progress of each.
(2) Search database for submitted TARFs to obtain detailed treatment information for the
purpose of providing historical information on a property, compliance verification,
conduct investigations and\or audits.
(3) Change\update own user account information.
(4) Download TARF record(s) in four different file formats(s) (xlsx, xls, tab delimited ascii
and dbf).
b) Third party data entry vendor(s) (Commercial data entry businesses hired by the PMD to record
TARF data submitted by pest control companies which is received in non‐electronic form).
i) Data entry administrator(s) – In charge of administering any and all data entry vendor user
accounts and their activities, i.e.;
(1) Create\delete\modify data entry user accounts.
(2) Set data entry user account permission levels and capabilities (add, browse, submit
and\or modify records).
(3) Monitor, search and retrieve data entered by any\all data entry users.
(4) Capable of performing any\all functions afforded to a regular PMD user account as
outlined below.
ii) Data entry User(s) – When allowed by data entry administrator, user can;
(1) Enter paper TARF records submitted by pest control companies.
(2) Make corrections to entered data not yet submitted into PMD.
(3) Submit previously entered, validated, paid TARF records directly into PMD.
(4) Change\update own non‐security related user account information.
c) General Public
i) The public at large, bank institutions, realtors, lawyers, etc. ‐ Conduct database searches to
obtain historical TARF related information on a property and\or structure, i.e.; Treatment
type (Pre‐construction, Wood Destroying Insect Inspections Reports or Post‐construction
treatment), treatment or inspection date, chemical used, pest control company and
individual that performed the work, etc.
d) Pest control (PC) businesses in Arizona licensed in the 2A, 2B categories
i) PC Administrator(s) – In charge of administering any and all user accounts and their
activities, i.e.;
(1) Create\delete\modify user accounts.
(2) Set user account permission levels and capabilities (add, browse, submit, pay and\or
modify records).
(3) Monitor, search and retrieve data entered by any\all authorized users. (4) Edit the address of submitted TARFs.
(5) Capable of performing any\all functions afforded to a regular user account as outlined
below.
ii) PC Authorized User(s) – When allowed by administrator, the user can;
(1) Enter TARF treatment and\or inspection information.
(2) Make corrections on previously submitted but rejected TARF record(s) and resubmit to
PMD as requested by the PMD.
(3) Make corrections to entered data not yet submitted to PMD.
(4) Submit and online pay for previously entered and validated TARF records directly to the
PMD.
(5) Change\update own user account information.
(6) Download company submitted TARFs in four different file formats(s) (xlsx, xls, tab
delimited ascii and dbf) for internal use.
e) Third party software vendor(s)
i) Organizations that sell\provide management software solutions to the pest control
industry – Provides the means to integrate the “TARFing” functionality within their own
software packages by eliminating double entry and thus adding value and convenience
to their customer base.
Minimum Requirements:
2 Operatingsystem,hardwareandotherrequirements:
Since this software is a web browser based system, the requirements revolve around the type of
browser you choose and how well it performs on your particular platform. Generally speaking, if you are
able to get acceptable performance when visiting other web pages on the internet, you should be able
to get equal performance from the “eTARF” system. The “eTARF” system was extensively tested using
Firefox version 3, therefore, we highly recommended it over any other browser. In general terms, you
should have at least;
2.1 Windows:1) Operating Systems:
a) Windows 10 +
2) Minimum Hardware:
a) Pentium 500 MHz (Recommended: Pentium 1GHz or greater)
b) 64 MB RAM (Recommended: 128 MB RAM or greater)
3) Web Browser:
a) Firefox
b) Microsoft Edge
c) Google Chrome
d) Other web browsers such as Opera, Safari may work but have not been tested for
proper functionality on the “eTARF” system.
2.2 Mac:1) Operating Systems:
a) Mac OS X 10.4 and later
2) Minimum Hardware:
a) Macintosh computer with an Intel x86 or PowerPC G3, G4, or G5 processor
b) 128 MB RAM (Recommended: 256 MB RAM or greater)
3) Web Browser:
a) Firefox
b) Google Chrome
c) Safari may work but has not been tested for proper functionality.
2.3 Linux:1) Recommendation:
a) Firefox
b) Google Chrome
c) Other browsers may work.
2.4 Otherrequirements:1) Broadband internet connection (cable modem, DSL, T‐1, T‐3, or Satellite. No Analog dial-up!)
2) Valid e‐mail account.
3) Javascript and Cookies enabled on your browser.
4) User ID and Password. PMD will assign an administrator account within your organization. This
account will be responsible to create, assign and maintain permission levels and capabilities for
all other user accounts within your organization. For pest control businesses, only the “Qualifying
Party” (QP) will be able to act as the “eTARF” administrator for his\her business.
5) 1024x768 minimum screen resolution on a 17” screen monitor.
Getting Started:
3 Obtainingyouraccessinformation:Initially, the PMD sent a mass mailing to all active 2A,2B licensed “Qualifying Party(ies)” (QP) announcing
the availability of the new “eTarf” system along with their login ID, password, URL address of the
“eTARF” system and some other basic information.
If you need a new Administrator account for a PC Business then contact PMD’s IT for your ID &
Password.
You can start using the “eTARF” system as soon as you receive your user Id and password from the PMD.
If you did not receive this information, you can call PMD’s IT department during normal working hours.
Access information will be provided ONLY to the ACTIVE QP(s) of each company. Be prepared to answer
personalized information proving your identity.
3.1 Accessingthe“eTARF”system:Before accessing the “eTARF” system make sure you meet the minimum requirements outlined in the
“Minimum Requirements” section. Generally, you have to have a broadband (fast) connection to the
internet and that your favorite web browser has been recently updated. Additionally, please make sure
that you have NOT disabled your browser’s “Javascript” functionality (enabled by default) and that you
are able to accept “cookies”. If you do not know what all of this means, try it and the “eTARF” system will
let you know! Next, launch your browser and type eTARF’s URL (https://etarf.azda.gov/index.php) in your
browser’s address box. You may bookmark this so that you can get to it easily next time.
Please see Figure 3‐1 for a representation of eTARF’s login screen. Please note that the login screen may
be changed periodically to make needed improvements.
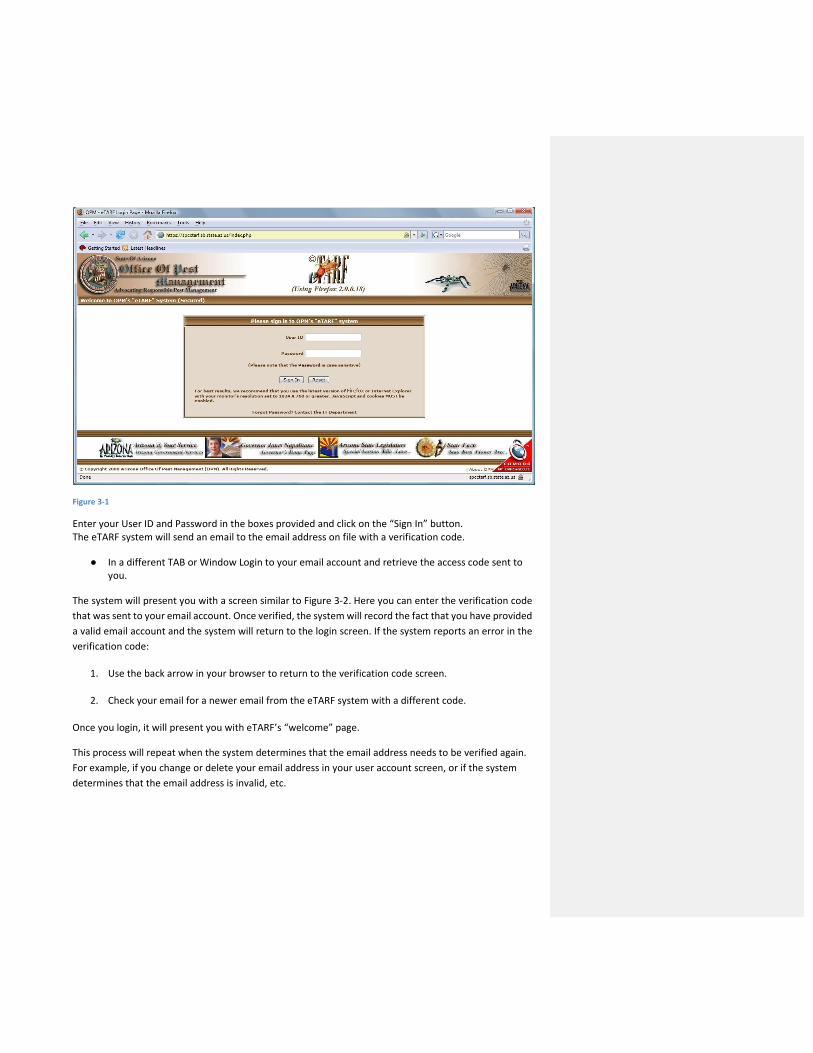
Figure 3‐1
Enter your User ID and Password in the boxes provided and click on the “Sign In” button. The eTARF system will send an email to the email address on file with a verification code.
● In a different TAB or Window Login to your email account and retrieve the access code sent to you.
The system will present you with a screen similar to Figure 3‐2. Here you can enter the verification code
that was sent to your email account. Once verified, the system will record the fact that you have provided
a valid email account and the system will return to the login screen. If the system reports an error in the
verification code:
1. Use the back arrow in your browser to return to the verification code screen.
2. Check your email for a newer email from the eTARF system with a different code.
Once you login, it will present you with eTARF’s “welcome” page.
This process will repeat when the system determines that the email address needs to be verified again.
For example, if you change or delete your email address in your user account screen, or if the system
determines that the email address is invalid, etc.

Figure 3‐2
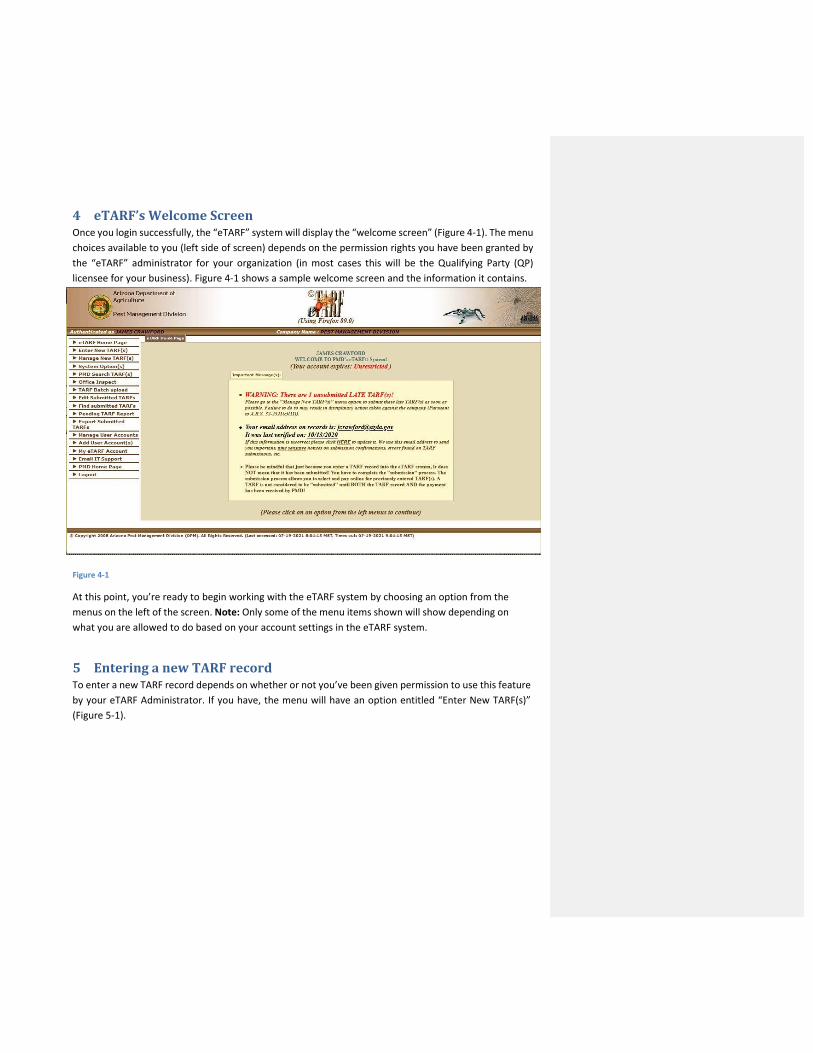
4 eTARF’sWelcomeScreenOnce you login successfully, the “eTARF” system will display the “welcome screen” (Figure 4‐1). The menu
choices available to you (left side of screen) depends on the permission rights you have been granted by
the “eTARF” administrator for your organization (in most cases this will be the Qualifying Party (QP)
licensee for your business). Figure 4‐1 shows a sample welcome screen and the information it contains.
Figure 4‐1
At this point, you’re ready to begin working with the eTARF system by choosing an option from the
menus on the left of the screen. Note: Only some of the menu items shown will show depending on
what you are allowed to do based on your account settings in the eTARF system.
5 EnteringanewTARFrecordTo enter a new TARF record depends on whether or not you’ve been given permission to use this feature
by your eTARF Administrator. If you have, the menu will have an option entitled “Enter New TARF(s)”
(Figure 5‐1).
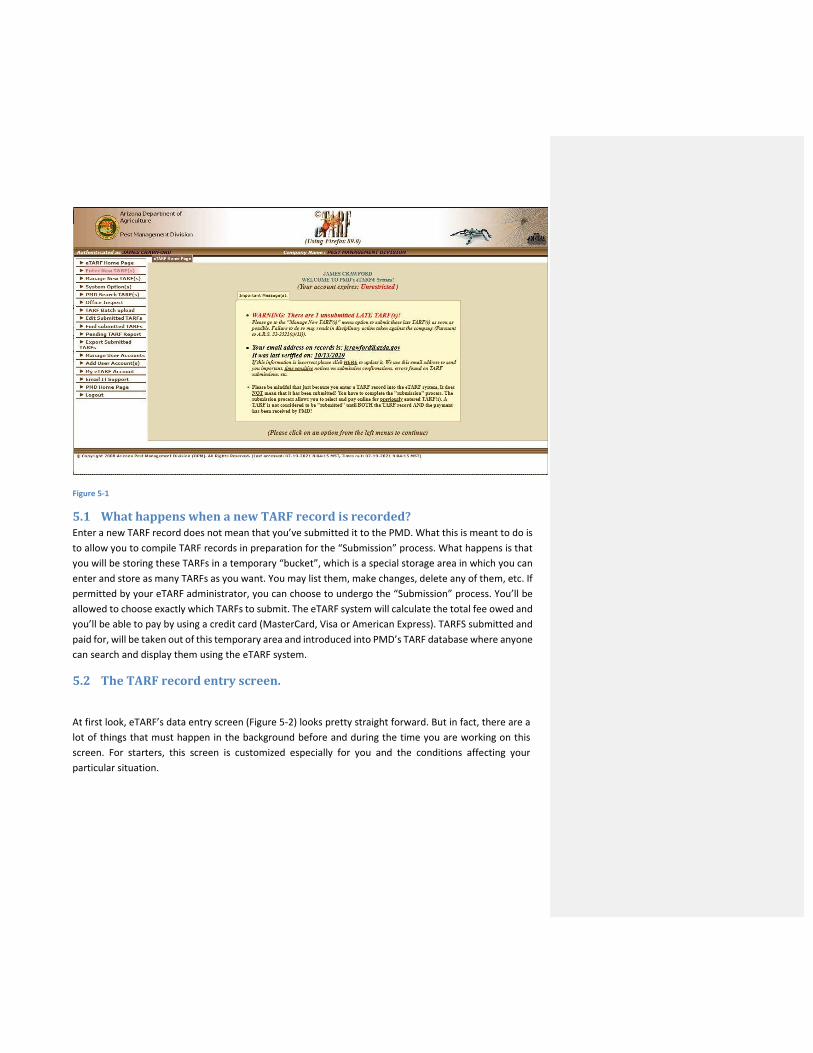
Figure 5‐1
5.1 WhathappenswhenanewTARFrecordisrecorded?Enter a new TARF record does not mean that you’ve submitted it to the PMD. What this is meant to do is
to allow you to compile TARF records in preparation for the “Submission” process. What happens is that
you will be storing these TARFs in a temporary “bucket”, which is a special storage area in which you can
enter and store as many TARFs as you want. You may list them, make changes, delete any of them, etc. If
permitted by your eTARF administrator, you can choose to undergo the “Submission” process. You’ll be
allowed to choose exactly which TARFs to submit. The eTARF system will calculate the total fee owed and
you’ll be able to pay by using a credit card (MasterCard, Visa or American Express). TARFS submitted and
paid for, will be taken out of this temporary area and introduced into PMD’s TARF database where anyone
can search and display them using the eTARF system.
5.2 TheTARFrecordentryscreen.
At first look, eTARF’s data entry screen (Figure 5‐2) looks pretty straight forward. But in fact, there are a
lot of things that must happen in the background before and during the time you are working on this
screen. For starters, this screen is customized especially for you and the conditions affecting your
particular situation.
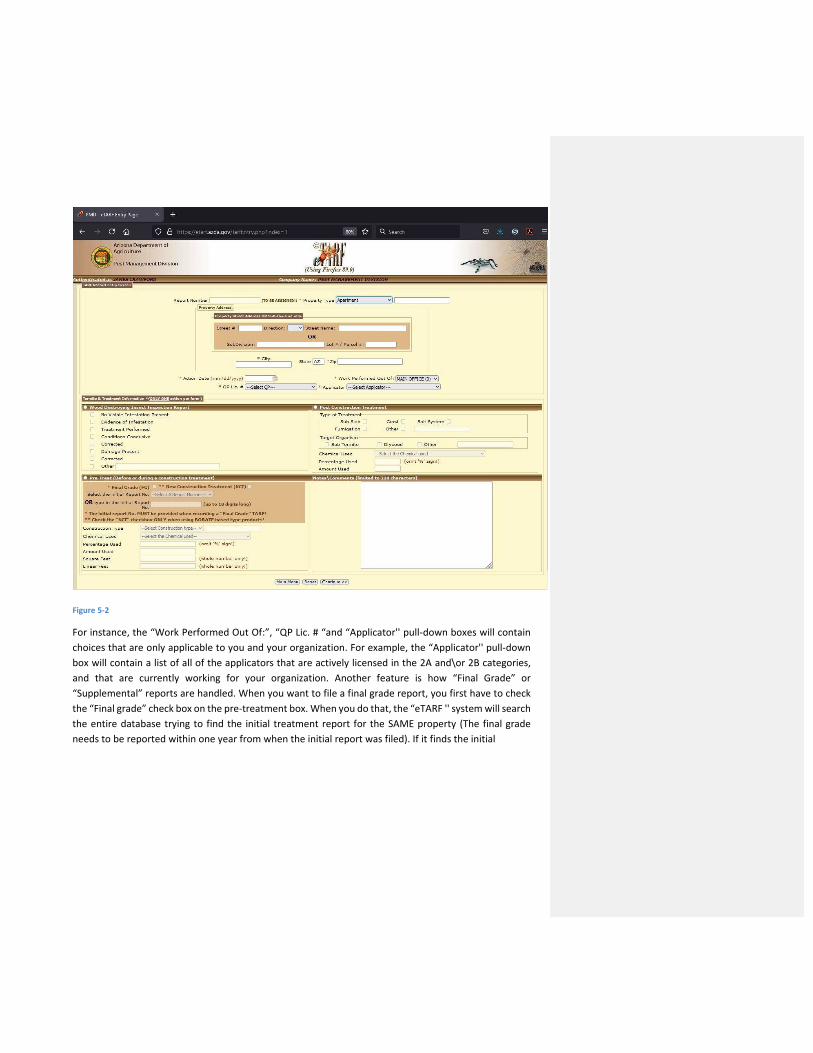
Figure 5‐2
For instance, the “Work Performed Out Of:”, “QP Lic. # “and “Applicator'' pull‐down boxes will contain
choices that are only applicable to you and your organization. For example, the “Applicator'' pull‐down
box will contain a list of all of the applicators that are actively licensed in the 2A and\or 2B categories,
and that are currently working for your organization. Another feature is how “Final Grade” or
“Supplemental” reports are handled. When you want to file a final grade report, you first have to check
the “Final grade” check box on the pre‐treatment box. When you do that, the “eTARF '' system will search
the entire database trying to find the initial treatment report for the SAME property (The final grade
needs to be reported within one year from when the initial report was filed). If it finds the initial
report(s), it will fill the “Select the initial Report No.” pull‐down box with the TARF report number so that
you can select it. If it does NOT find a matching initial report, it will let you enter the report number for
the initial treatment yourself in the “type in the initial Report No” box (Figure 5‐3).
Figure 5‐3
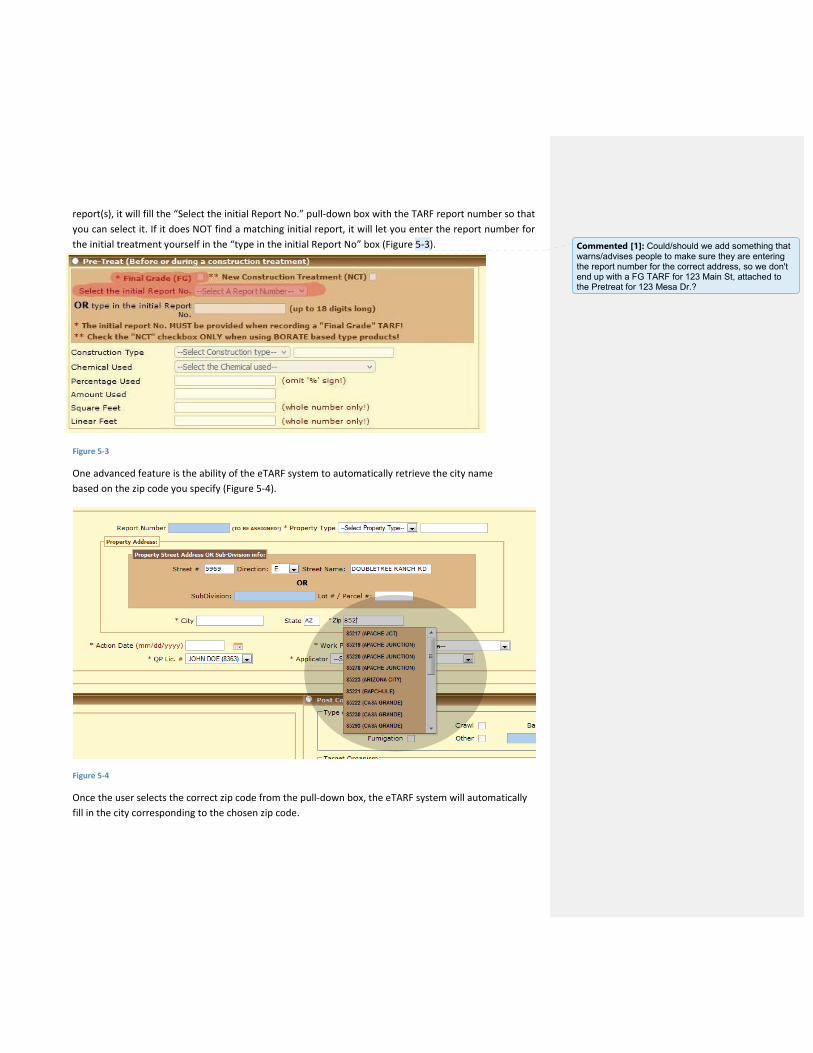
One advanced feature is the ability of the eTARF system to automatically retrieve the city name
based on the zip code you specify (Figure 5‐4).
Figure 5‐4
Once the user selects the correct zip code from the pull‐down box, the eTARF system will automatically
fill in the city corresponding to the chosen zip code.
Commented [1]: Could/should we add something that warns/advises people to make sure they are entering the report number for the correct address, so we don't end up with a FG TARF for 123 Main St, attached to the Pretreat for 123 Mesa Dr.?
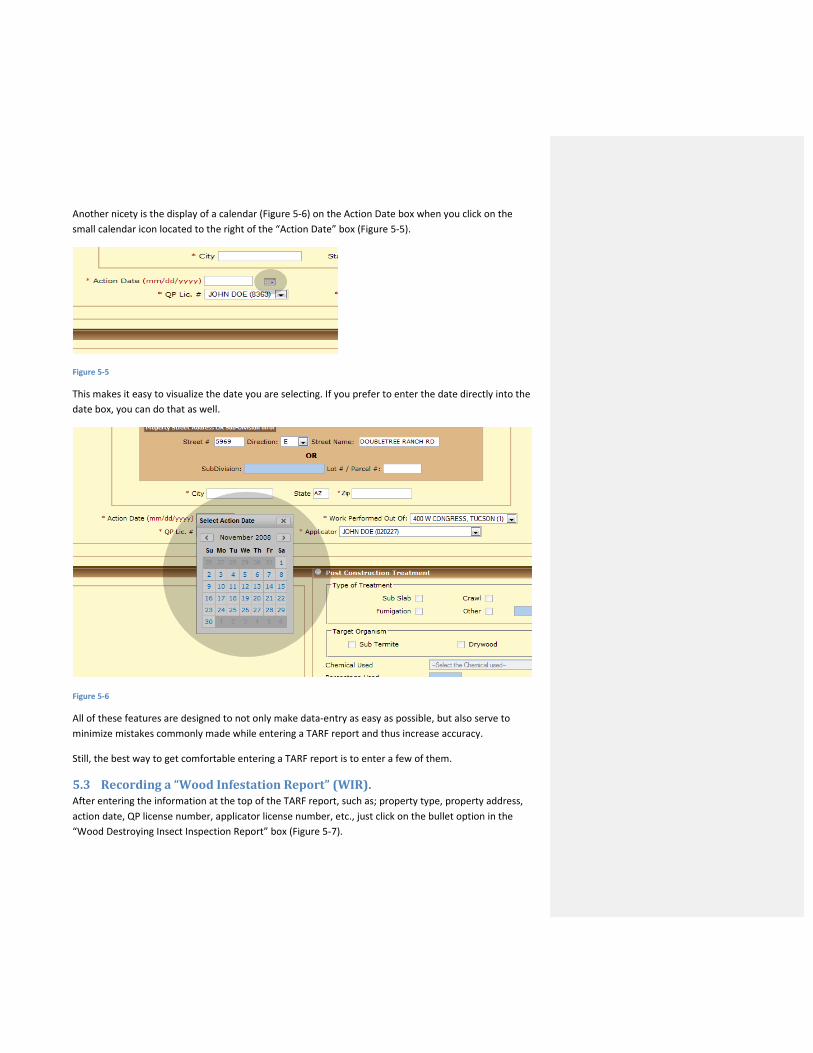
Another nicety is the display of a calendar (Figure 5‐6) on the Action Date box when you click on the
small calendar icon located to the right of the “Action Date” box (Figure 5‐5).
Figure 5‐5
This makes it easy to visualize the date you are selecting. If you prefer to enter the date directly into the
date box, you can do that as well.
Figure 5‐6
All of these features are designed to not only make data‐entry as easy as possible, but also serve to
minimize mistakes commonly made while entering a TARF report and thus increase accuracy.
Still, the best way to get comfortable entering a TARF report is to enter a few of them.
5.3 Recordinga“WoodInfestationReport”(WIR).After entering the information at the top of the TARF report, such as; property type, property address,
action date, QP license number, applicator license number, etc., just click on the bullet option in the
“Wood Destroying Insect Inspection Report” box (Figure 5‐7).
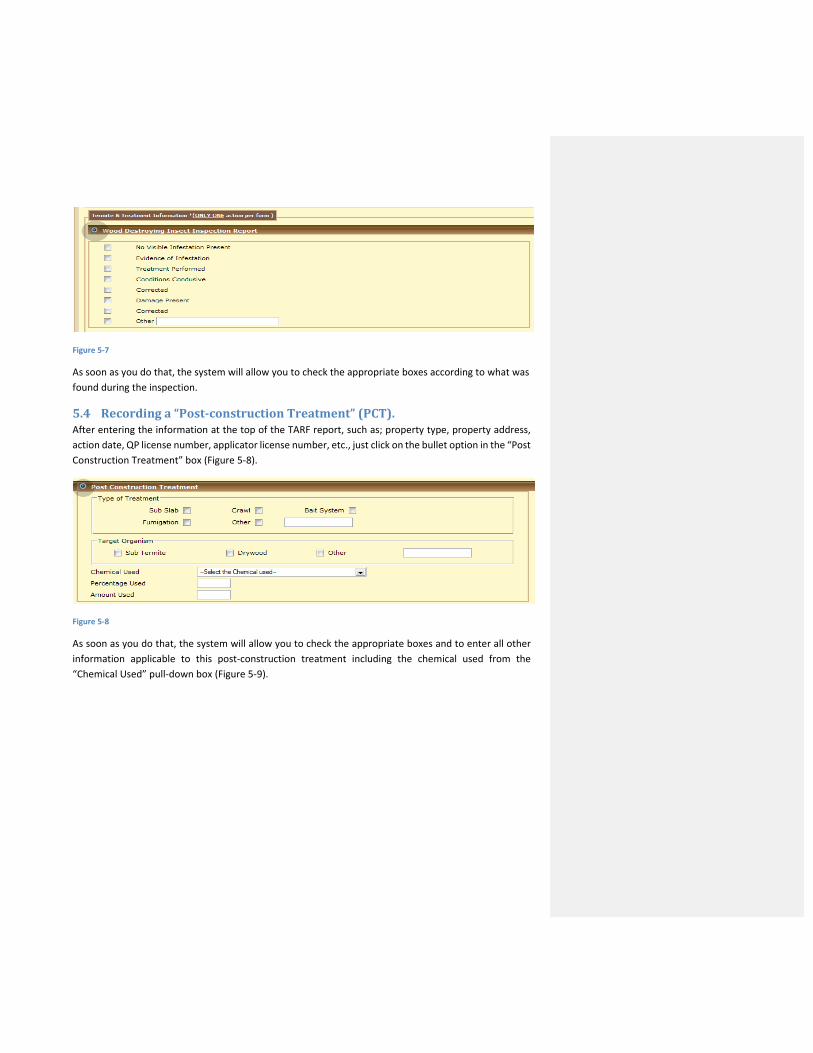
Figure 5‐7
As soon as you do that, the system will allow you to check the appropriate boxes according to what was
found during the inspection.
5.4 Recordinga“Post‐constructionTreatment”(PCT).After entering the information at the top of the TARF report, such as; property type, property address,
action date, QP license number, applicator license number, etc., just click on the bullet option in the “Post
Construction Treatment” box (Figure 5‐8).
Figure 5‐8
As soon as you do that, the system will allow you to check the appropriate boxes and to enter all other
information applicable to this post‐construction treatment including the chemical used from the
“Chemical Used” pull‐down box (Figure 5‐9).
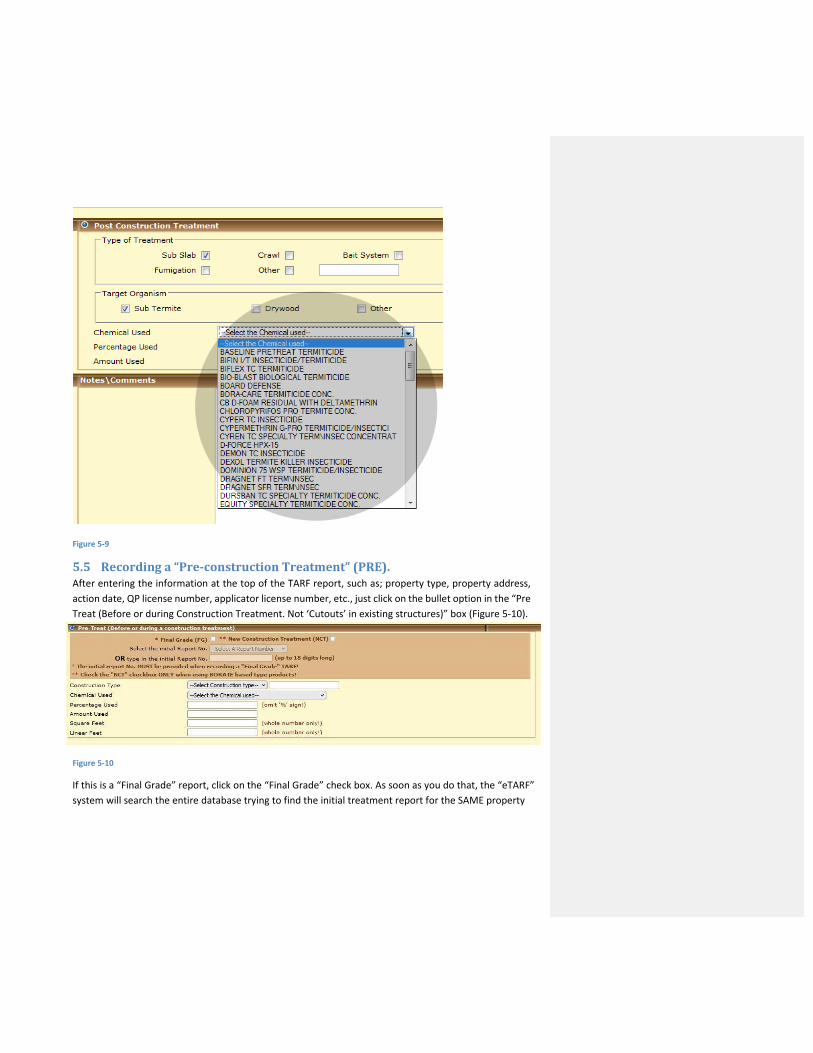
Figure 5‐9
5.5 Recordinga“Pre‐constructionTreatment”(PRE).After entering the information at the top of the TARF report, such as; property type, property address,
action date, QP license number, applicator license number, etc., just click on the bullet option in the “Pre
Treat (Before or during Construction Treatment. Not ‘Cutouts’ in existing structures)” box (Figure 5‐10).
Figure 5‐10
If this is a “Final Grade” report, click on the “Final Grade” check box. As soon as you do that, the “eTARF”
system will search the entire database trying to find the initial treatment report for the SAME property
(The final grade needs to be reported within one year from when the initial report was filed). If it finds the
initial report(s), it will fill the “Select the initial Report No.” pull‐down box with the TARF report number so
that you can select it. If it does NOT find a matching initial report, it will let you enter the report number
for the initial treatment yourself in the “type in the initial Report No” box. Select the construction type,
and chemical used from their respective pull‐down boxes. Fill in the rest of the boxes as needed.
If it is a “New Construction Treatment”, wood was treated with a Borate based product then check the
NCT box.
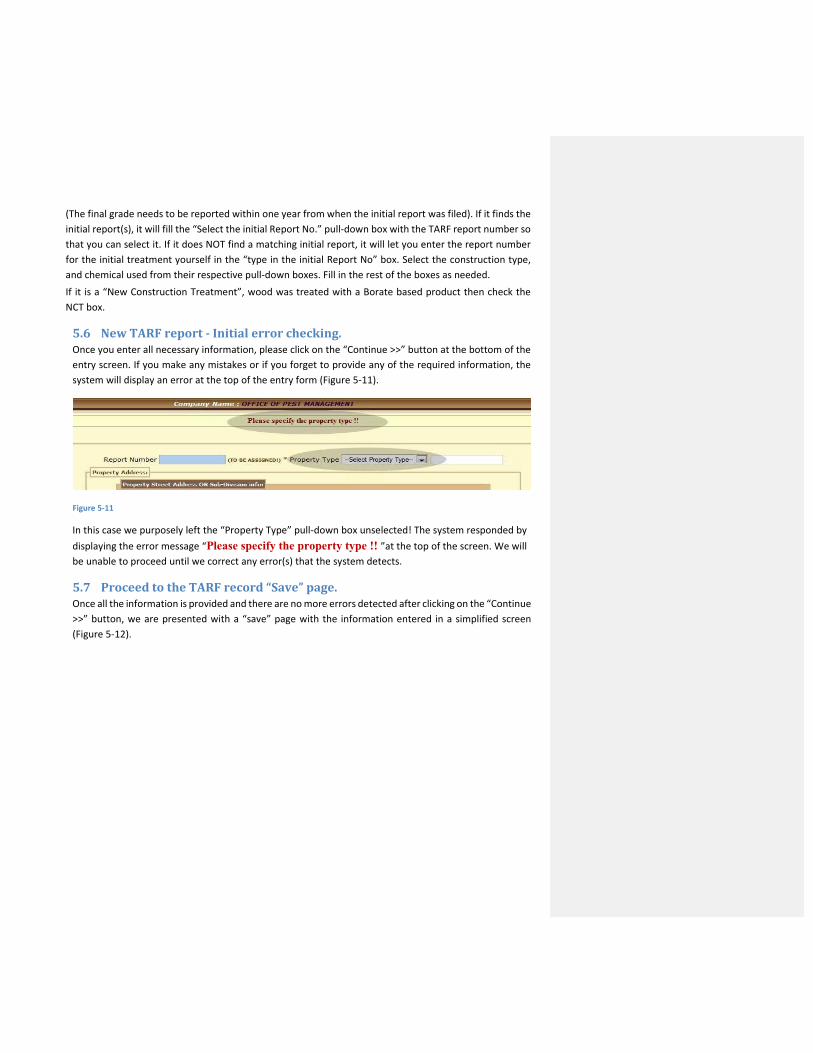
5.6 NewTARFreport‐Initialerrorchecking.Once you enter all necessary information, please click on the “Continue >>” button at the bottom of the
entry screen. If you make any mistakes or if you forget to provide any of the required information, the
system will display an error at the top of the entry form (Figure 5‐11).
Figure 5‐11
In this case we purposely left the “Property Type” pull‐down box unselected! The system responded by
displaying the error message “Please specify the property type !! ”at the top of the screen. We will
be unable to proceed until we correct any error(s) that the system detects.
5.7 ProceedtotheTARFrecord“Save”page.Once all the information is provided and there are no more errors detected after clicking on the “Continue
>>” button, we are presented with a “save” page with the information entered in a simplified screen
(Figure 5‐12).
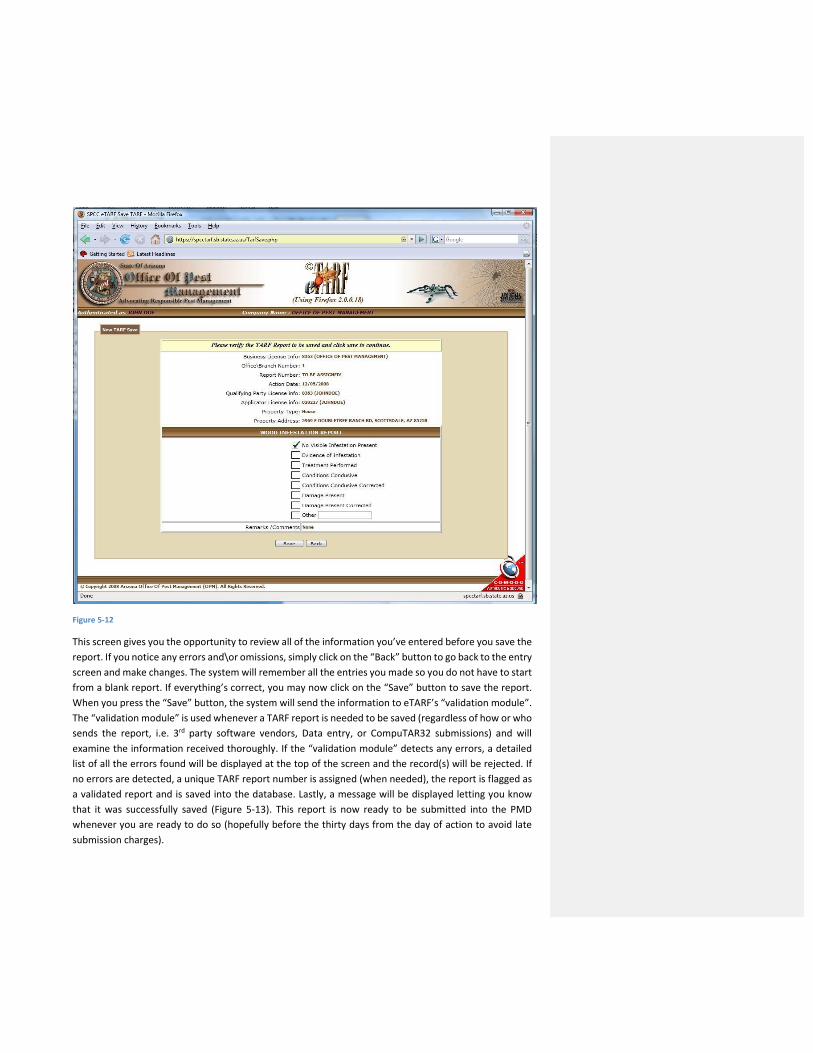
Figure 5‐12
This screen gives you the opportunity to review all of the information you’ve entered before you save the
report. If you notice any errors and\or omissions, simply click on the “Back” button to go back to the entry
screen and make changes. The system will remember all the entries you made so you do not have to start
from a blank report. If everything’s correct, you may now click on the “Save” button to save the report.
When you press the “Save” button, the system will send the information to eTARF’s “validation module”.
The “validation module” is used whenever a TARF report is needed to be saved (regardless of how or who
sends the report, i.e. 3rd party software vendors, Data entry, or CompuTAR32 submissions) and will
examine the information received thoroughly. If the “validation module” detects any errors, a detailed
list of all the errors found will be displayed at the top of the screen and the record(s) will be rejected. If
no errors are detected, a unique TARF report number is assigned (when needed), the report is flagged as
a validated report and is saved into the database. Lastly, a message will be displayed letting you know
that it was successfully saved (Figure 5‐13). This report is now ready to be submitted into the PMD
whenever you are ready to do so (hopefully before the thirty days from the day of action to avoid late
submission charges).
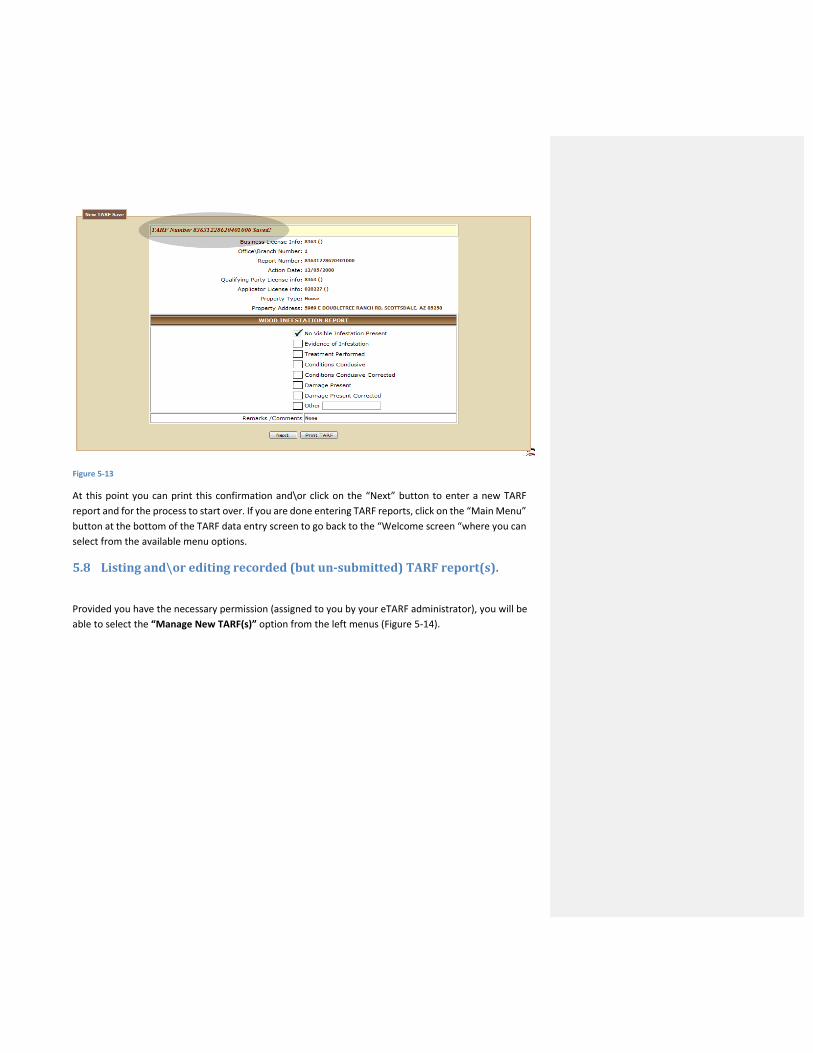
Figure 5‐13
At this point you can print this confirmation and\or click on the “Next” button to enter a new TARF
report and for the process to start over. If you are done entering TARF reports, click on the “Main Menu”
button at the bottom of the TARF data entry screen to go back to the “Welcome screen “where you can
select from the available menu options.
5.8 Listingand\oreditingrecorded(butun‐submitted)TARFreport(s).
Provided you have the necessary permission (assigned to you by your eTARF administrator), you will be
able to select the “Manage New TARF(s)” option from the left menus (Figure 5‐14).
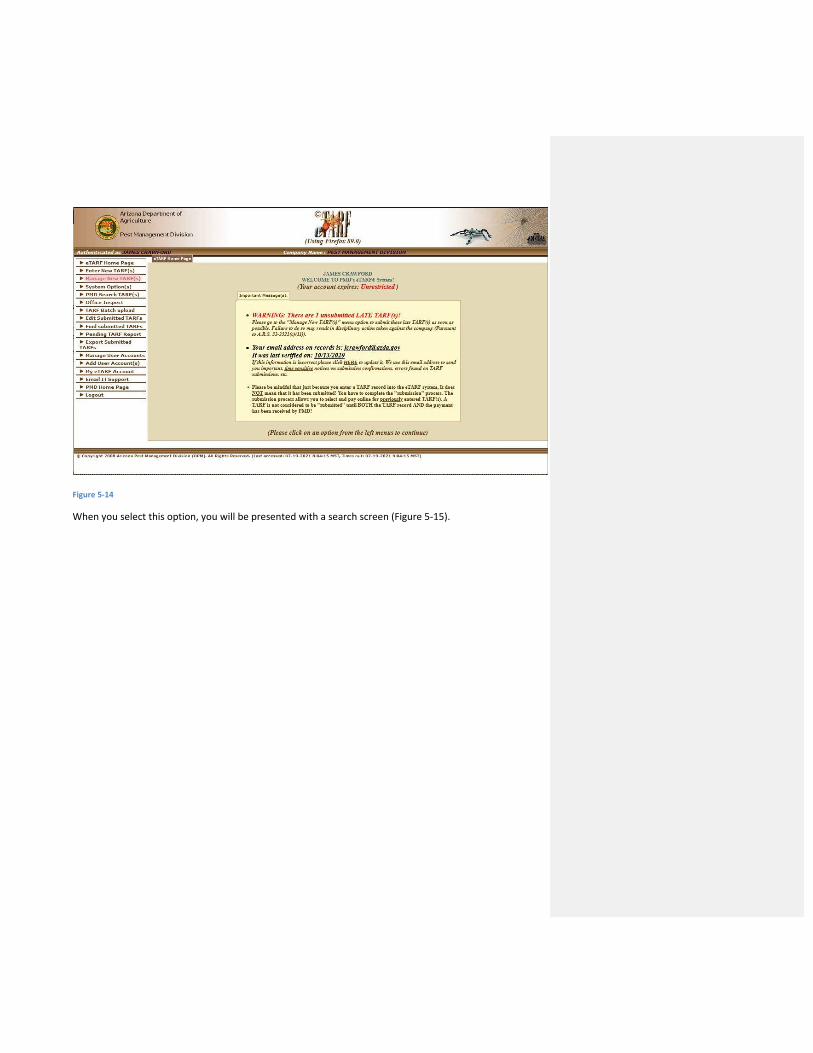
Figure 5‐14
When you select this option, you will be presented with a search screen (Figure 5‐15).
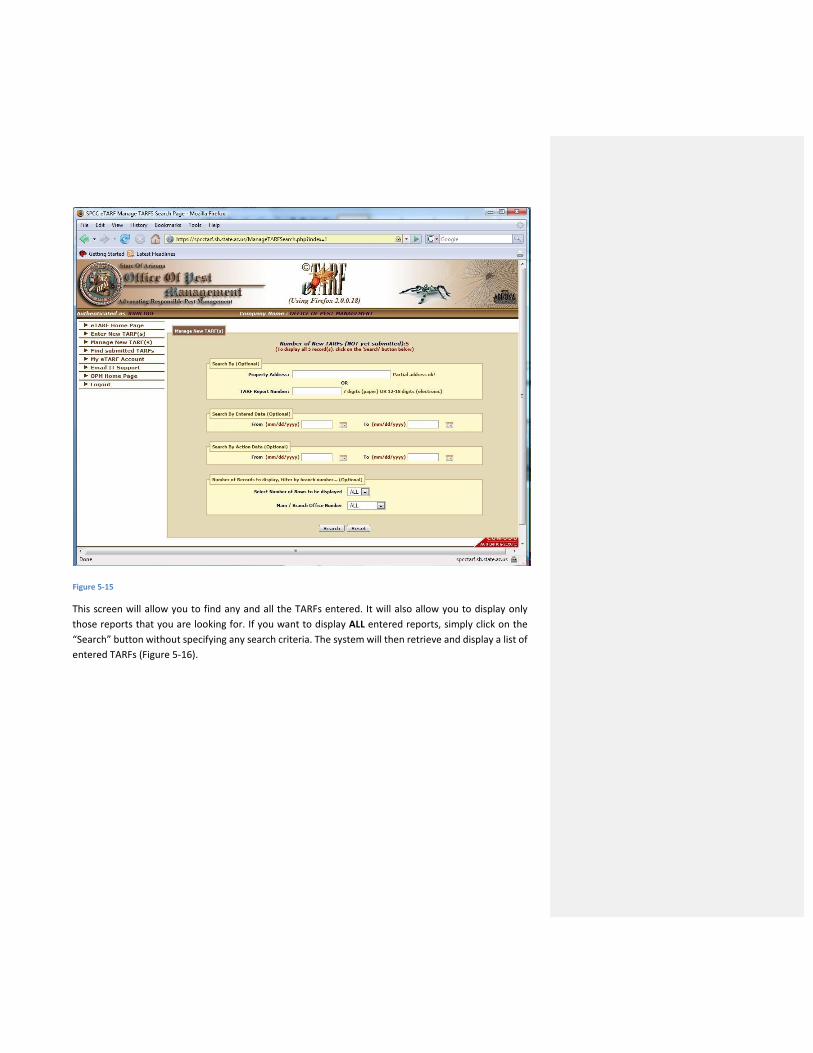
Figure 5‐15
This screen will allow you to find any and all the TARFs entered. It will also allow you to display only
those reports that you are looking for. If you want to display ALL entered reports, simply click on the
“Search” button without specifying any search criteria. The system will then retrieve and display a list of
entered TARFs (Figure 5‐16).
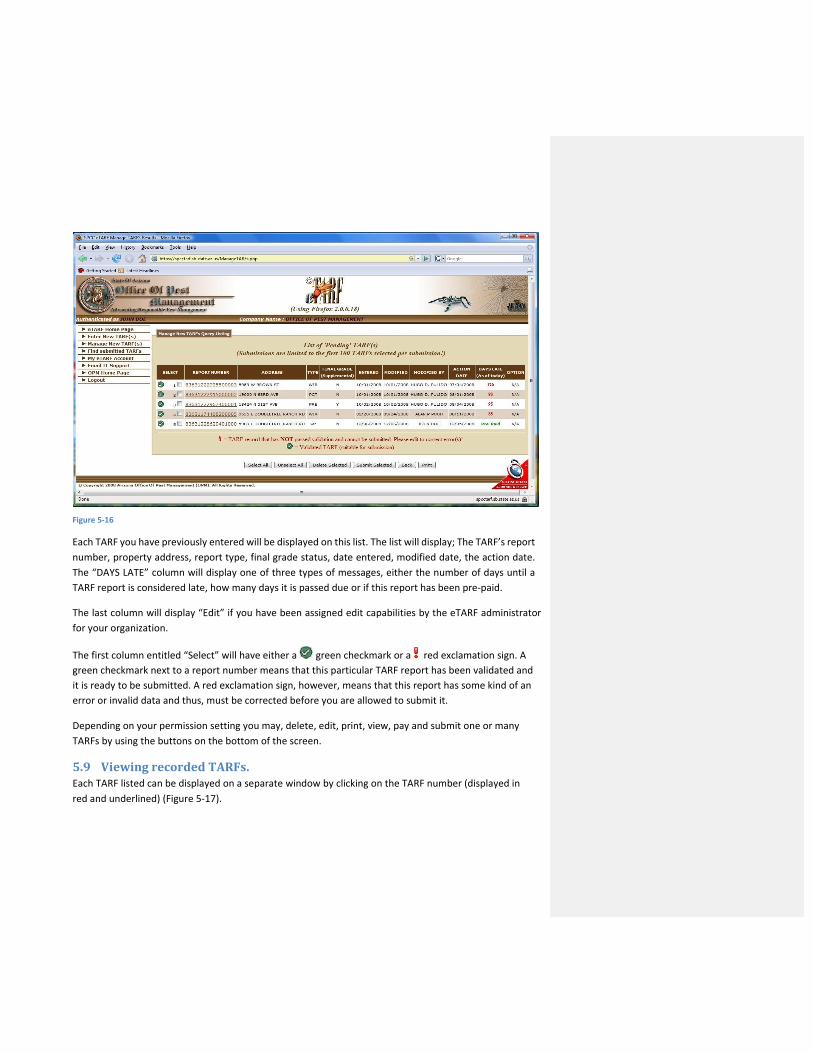
Figure 5‐16
Each TARF you have previously entered will be displayed on this list. The list will display; The TARF’s report
number, property address, report type, final grade status, date entered, modified date, the action date.
The “DAYS LATE” column will display one of three types of messages, either the number of days until a
TARF report is considered late, how many days it is passed due or if this report has been pre‐paid.
The last column will display “Edit” if you have been assigned edit capabilities by the eTARF administrator
for your organization.
The first column entitled “Select” will have either a green checkmark or a red exclamation sign. A
green checkmark next to a report number means that this particular TARF report has been validated and
it is ready to be submitted. A red exclamation sign, however, means that this report has some kind of an
error or invalid data and thus, must be corrected before you are allowed to submit it.
Depending on your permission setting you may, delete, edit, print, view, pay and submit one or many
TARFs by using the buttons on the bottom of the screen.
5.9 ViewingrecordedTARFs.Each TARF listed can be displayed on a separate window by clicking on the TARF number (displayed in
red and underlined) (Figure 5‐17).
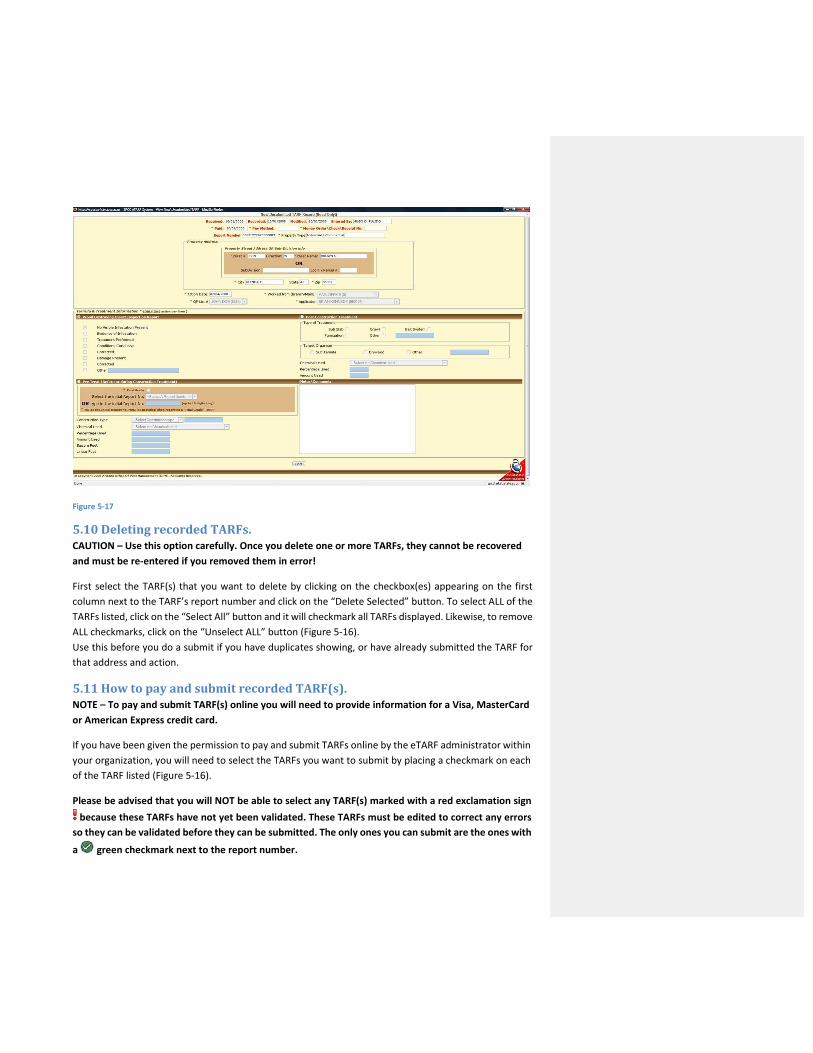
Figure 5‐17
5.10 DeletingrecordedTARFs.CAUTION – Use this option carefully. Once you delete one or more TARFs, they cannot be recovered
and must be re‐entered if you removed them in error!
First select the TARF(s) that you want to delete by clicking on the checkbox(es) appearing on the first
column next to the TARF’s report number and click on the “Delete Selected” button. To select ALL of the
TARFs listed, click on the “Select All” button and it will checkmark all TARFs displayed. Likewise, to remove
ALL checkmarks, click on the “Unselect ALL” button (Figure 5‐16).
Use this before you do a submit if you have duplicates showing, or have already submitted the TARF for
that address and action.
5.11 HowtopayandsubmitrecordedTARF(s).NOTE – To pay and submit TARF(s) online you will need to provide information for a Visa, MasterCard
or American Express credit card.
If you have been given the permission to pay and submit TARFs online by the eTARF administrator within
your organization, you will need to select the TARFs you want to submit by placing a checkmark on each
of the TARF listed (Figure 5‐16).
Please be advised that you will NOT be able to select any TARF(s) marked with a red exclamation sign
because these TARFs have not yet been validated. These TARFs must be edited to correct any errors
so they can be validated before they can be submitted. The only ones you can submit are the ones with
a green checkmark next to the report number.
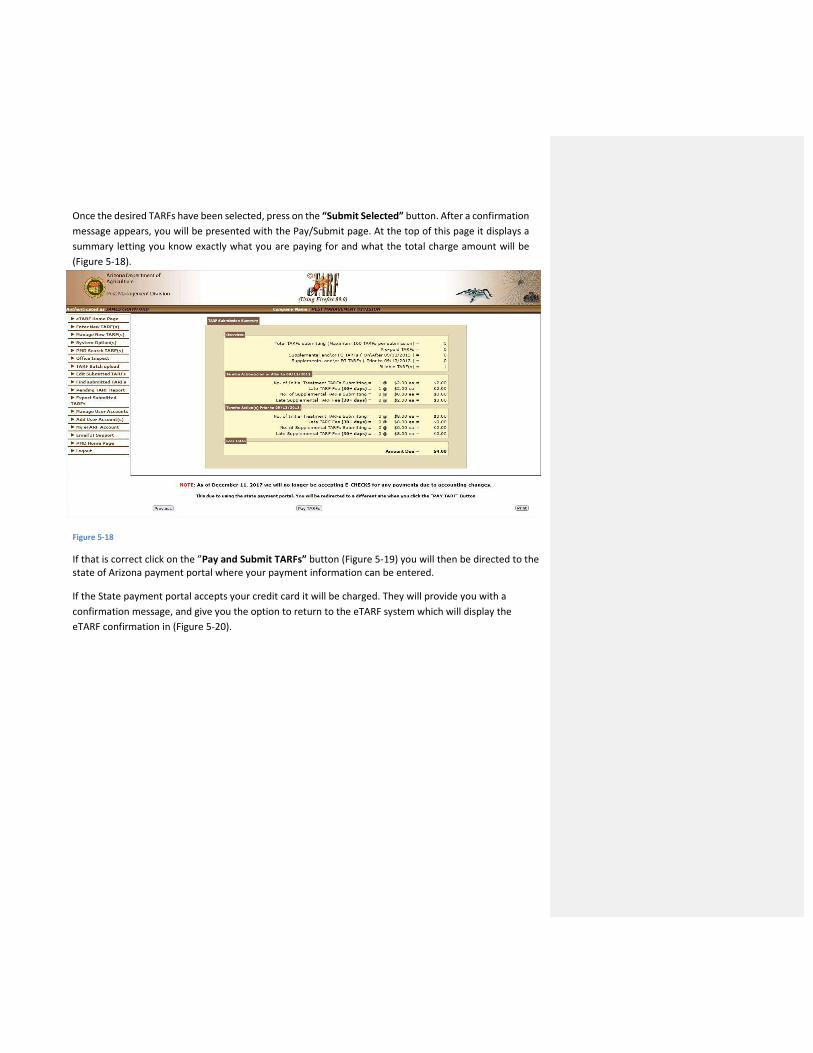
Once the desired TARFs have been selected, press on the “Submit Selected” button. After a confirmation
message appears, you will be presented with the Pay/Submit page. At the top of this page it displays a
summary letting you know exactly what you are paying for and what the total charge amount will be
(Figure 5‐18).
Figure 5‐18
If that is correct click on the ”Pay and Submit TARFs” button (Figure 5‐19) you will then be directed to the state of Arizona payment portal where your payment information can be entered.
If the State payment portal accepts your credit card it will be charged. They will provide you with a
confirmation message, and give you the option to return to the eTARF system which will display the
eTARF confirmation in (Figure 5‐20).
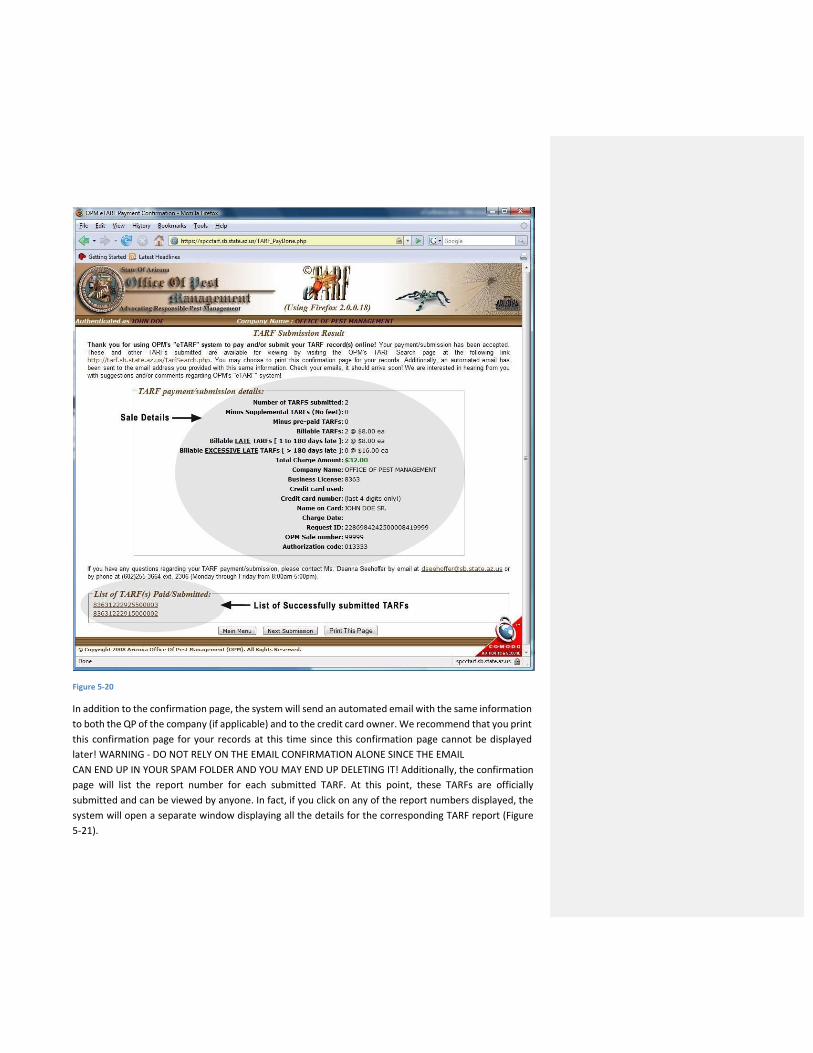
Figure 5‐20
In addition to the confirmation page, the system will send an automated email with the same information
to both the QP of the company (if applicable) and to the credit card owner. We recommend that you print
this confirmation page for your records at this time since this confirmation page cannot be displayed
later! WARNING ‐ DO NOT RELY ON THE EMAIL CONFIRMATION ALONE SINCE THE EMAIL
CAN END UP IN YOUR SPAM FOLDER AND YOU MAY END UP DELETING IT! Additionally, the confirmation
page will list the report number for each submitted TARF. At this point, these TARFs are officially
submitted and can be viewed by anyone. In fact, if you click on any of the report numbers displayed, the
system will open a separate window displaying all the details for the corresponding TARF report (Figure
5‐21).
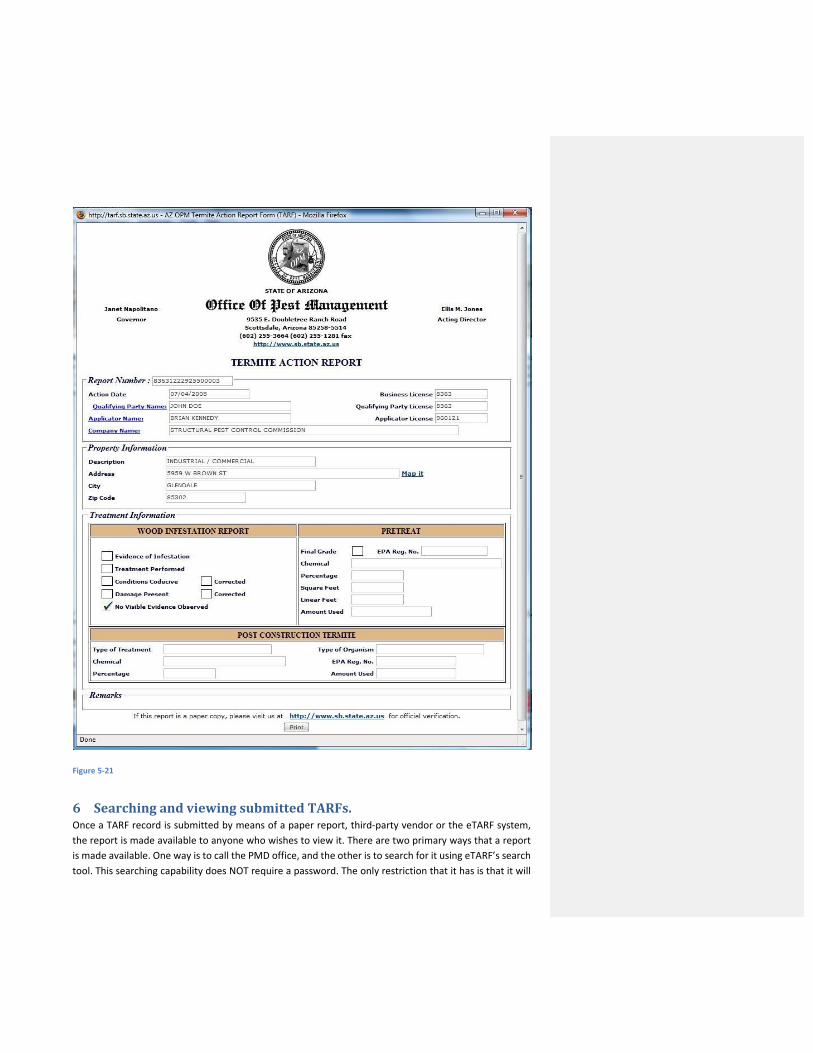
Figure 5‐21
6 SearchingandviewingsubmittedTARFs.Once a TARF record is submitted by means of a paper report, third‐party vendor or the eTARF system,
the report is made available to anyone who wishes to view it. There are two primary ways that a report
is made available. One way is to call the PMD office, and the other is to search for it using eTARF’s search
tool. This searching capability does NOT require a password. The only restriction that it has is that it will
limit the amount of records resulting from a database search. In general, most people will provide the
property address or the TARF report number when conducting a search.
Searching for a TARF report works very much like doing any other internet search.
6.1 BestwaytosearchforTARFrecords.There is a fine line between providing too much information or not enough. For example, if you are too
specific with the information you provide, i.e. “9535 East Doubletree Ranch Road” you may only get a
limited number of records found or none at all! The reason for this is that the eTARF system will try to
find an exact match on those records that contain ALL of the characters you provided.
For example, let’s say that the following TARF records exist in the TARF database:
1. 9535 East Doubletree Ranch Road
2. 9535 E Doubletree Ranch Road
3. 9535 E. Doubletree Ranch Road
4. 9535 East Doubletree Ranch Rd
5. 9535 East Doubletree Ranch
6. 9535 East Doubletre Ranch Rd
Notice that ALL of these records have something different in the way in which the address was entered. If
you were to provide “9535 East Doubletree Ranch Road” as the search criteria, the system will only return
one of the available reports as a match (line 1) even though the other four records are obviously for the
same property and most likely you would want to see them too. The reason for this is that TARF records
are entered by a number of different people and that the same address can be typed in a variety of ways
(including spelling mistakes as in line 6). Therein lies the problem; there is no one standard way in which
to enter a property address.
On the other hand, if you are too vague and only enter “953” as your search criteria, several things will
happen. One, you will be sifting through a large number of records that are not likely to interest you.
Second, you will be waiting longer for the system to retrieve a much larger number of matching records.
Third, you may ultimately not find what you are looking for because you’ve exceeded that system’s limit
as to the number of records to display per search.
Perhaps the best way of getting all of the records you are searching for is to enter “9535 E D” as your
search criteria on this particular property search. The reason for this is that we have limited (for the most
part) the entry of North, South, East, West etc.. Additionally, we have also placed a restriction on the use
of a period i.e. N., S., E., W. (for abbreviations of the words North, South, East, or West). Keep in mind
that sometimes we get TARF records that only have a parcel and\or lot number as well which further
complicates the searches.
To search for a submitted TARF select the “Find Submitted TARFs” menu option while you are logged in
to your eTARF account. When you do this, the eTARF system will open a separate tab or window on your
browser in which it will display the TARF search page (Figure 6‐1). The reason for this is that you are
accessing a non‐restricted page! Remember, this page is accessible by anyone without the need of a
password. You will still be logged in to your protected\restricted eTARF account. It's just that now you
have two pages you can work in. Once you’re done making searches, simply close the search page or tab
page.
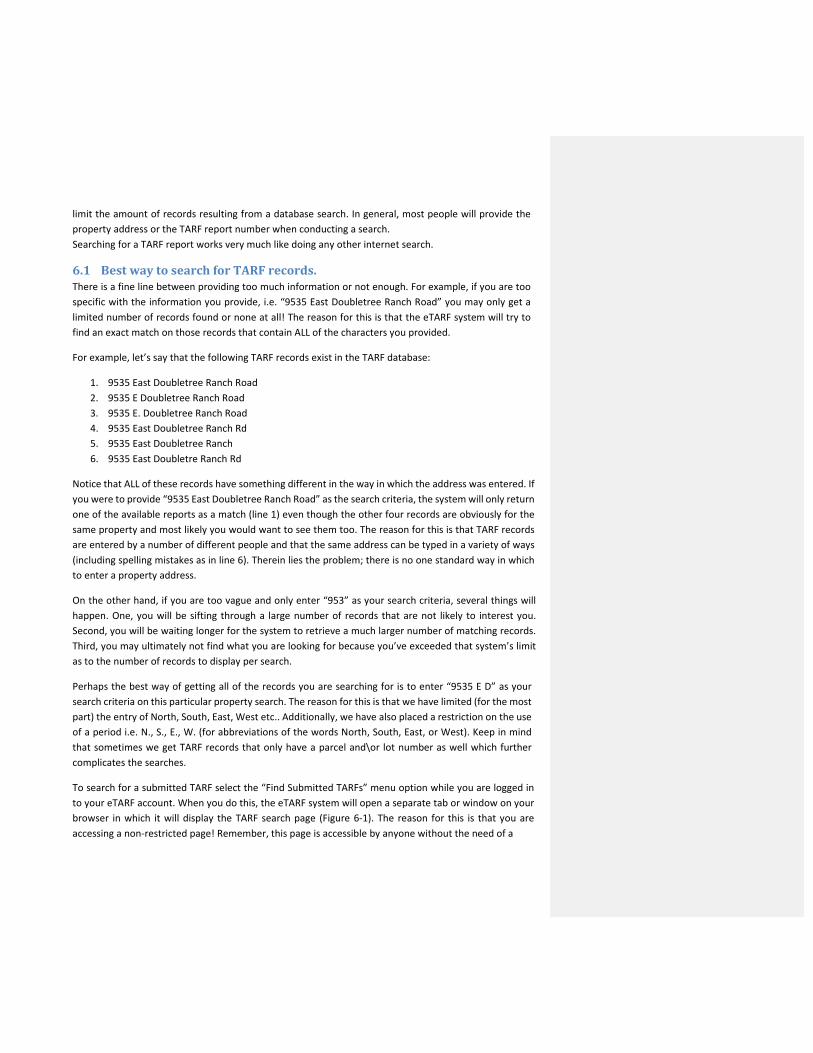
Figure 6‐1
As you can see, the search page provides the option to search based on a property address, TARF report
number, and a range of action dates (date when property was treated or inspected). Additionally, you
may choose to sort the resulting list by the TARF report number, or property address, or treatment type,
or action date, or applicator license number, or Qualifying Party’s (QP) license number AND in ascending
or descending order. The system defaults to the first fifty (50) matching records to display per page. You
may change that to either 100 or 200 records per page.
PLEASE NOTE THAT THE TOTAL NUMBER OF RECORDS THAT ARE DISPLAYED IS LIMITED TO 500 RECORDS
PER SEARCH (AS STATED ON TOP OF PAGE) TO SAFEGUARD THE SYSTEM FROM BEING OVERWHELMED
WITH TOO MANY REQUESTS. THIS NUMBER MAY BE ADJUSTED UP OR DOWN AS NEEDED AND WITHOUT
PREVIOUS NOTICE.
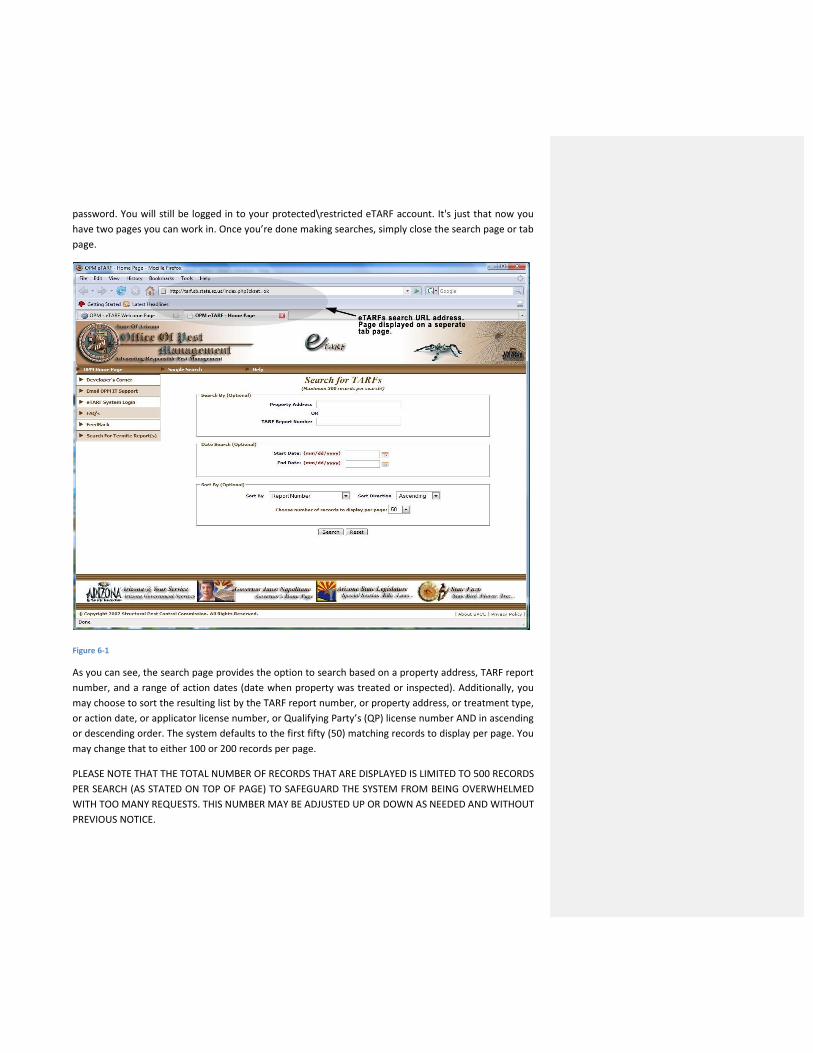
For example, let’s say that you’re looking for TARF actions performed at “9535 E DOUBLETREE RANCH RD”.
Therefore you enter “9535 E” in the property address box and click on the “Search” button. The system
will then return all matching records (Figure 6‐2).
Figure 6‐2
Figure 6‐2 shows the TOP of the resulting search page. Please note that it will give you some basic
information about the search you conducted, the number of available records found and the date of the
search. The “Report Number” column displays the TARF report number of each record and is also a
hyperlink. If you click on any one of these links, it will display the full TARF report on a separate page
(Figure 5‐21). If you scroll to the bottom of this page you may see a small box in the center listing the
number of pages you can look at along with an available button with different options (Figure 6‐3).
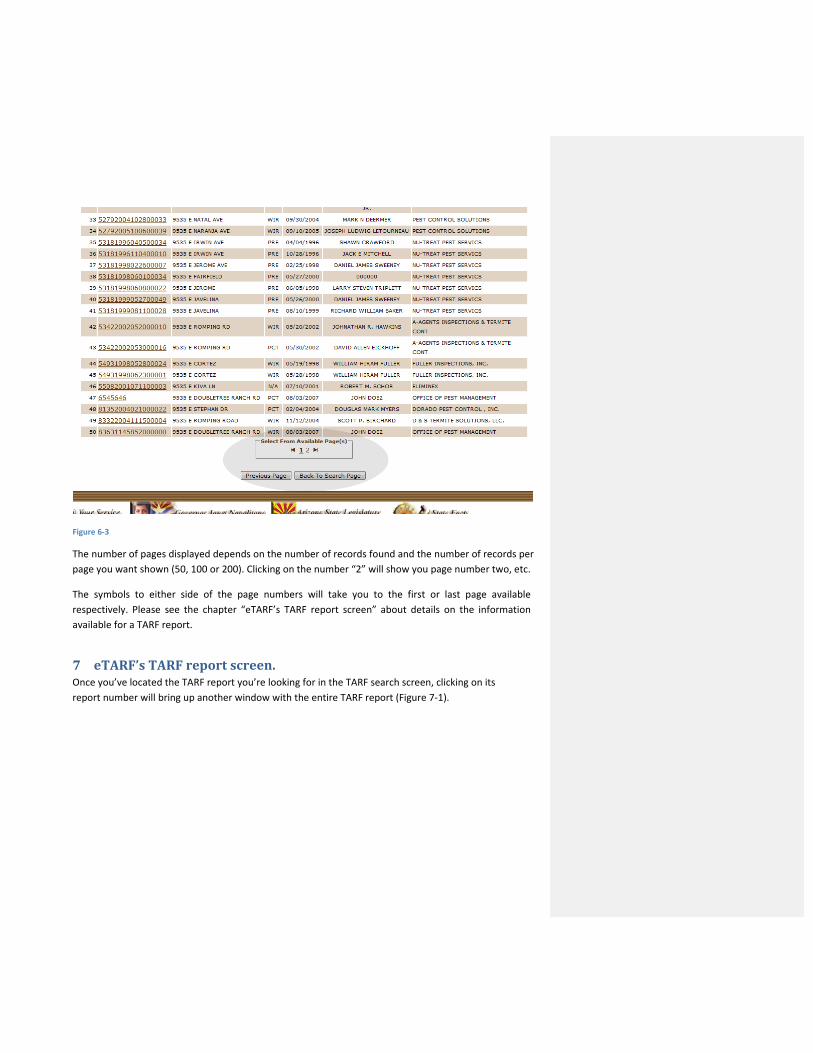
Figure 6‐3
The number of pages displayed depends on the number of records found and the number of records per
page you want shown (50, 100 or 200). Clicking on the number “2” will show you page number two, etc.
The symbols to either side of the page numbers will take you to the first or last page available
respectively. Please see the chapter “eTARF’s TARF report screen” about details on the information
available for a TARF report.
7 eTARF’sTARFreportscreen.Once you’ve located the TARF report you’re looking for in the TARF search screen, clicking on its
report number will bring up another window with the entire TARF report (Figure 7‐1).
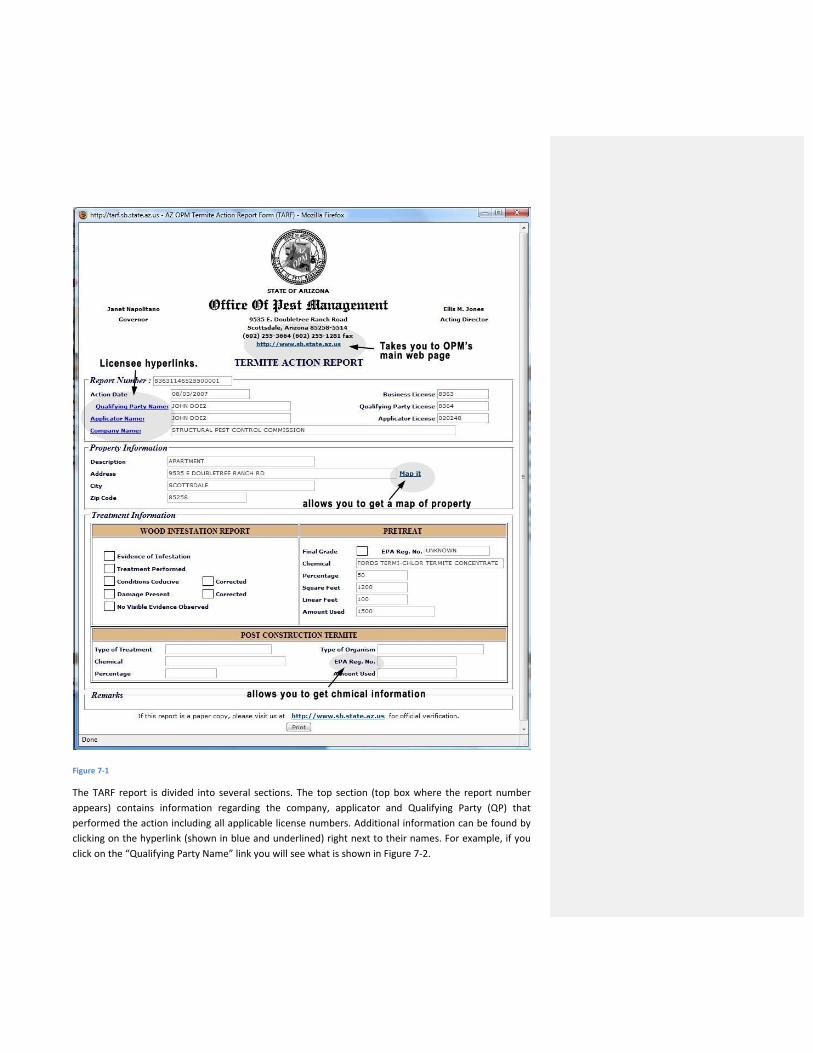
Figure 7‐1
The TARF report is divided into several sections. The top section (top box where the report number
appears) contains information regarding the company, applicator and Qualifying Party (QP) that
performed the action including all applicable license numbers. Additional information can be found by
clicking on the hyperlink (shown in blue and underlined) right next to their names. For example, if you
click on the “Qualifying Party Name” link you will see what is shown in Figure 7‐2.
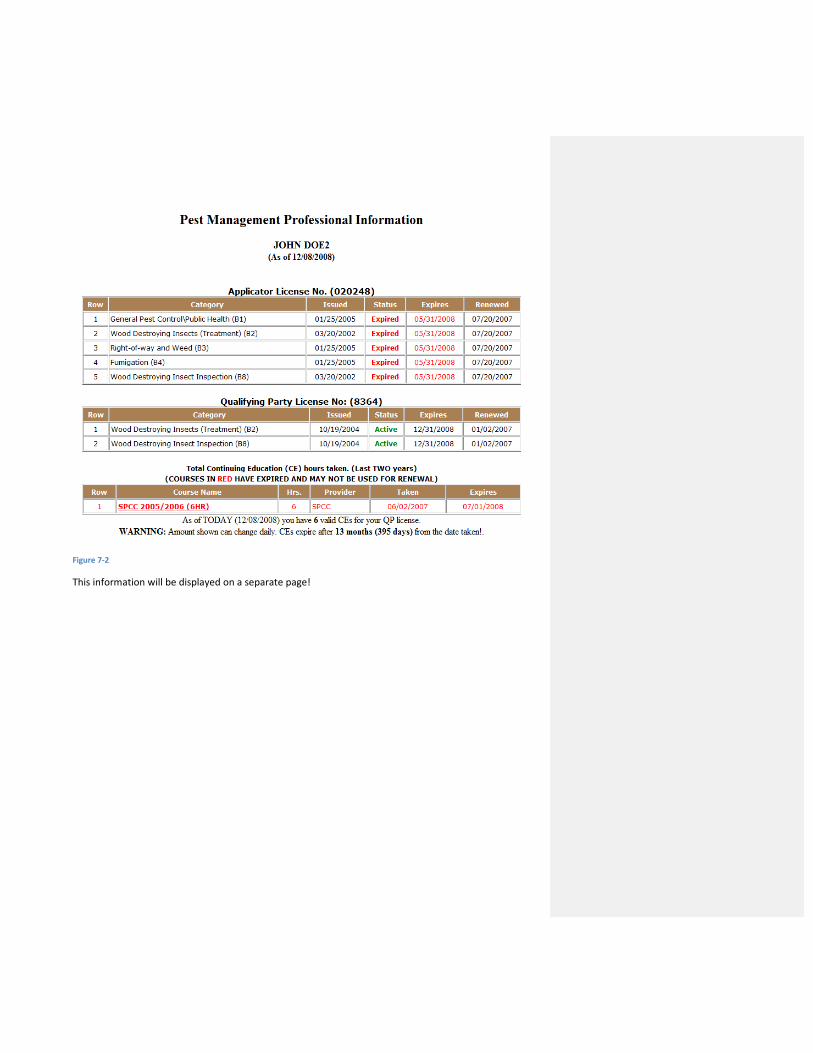
Figure 7‐2
This information will be displayed on a separate page!
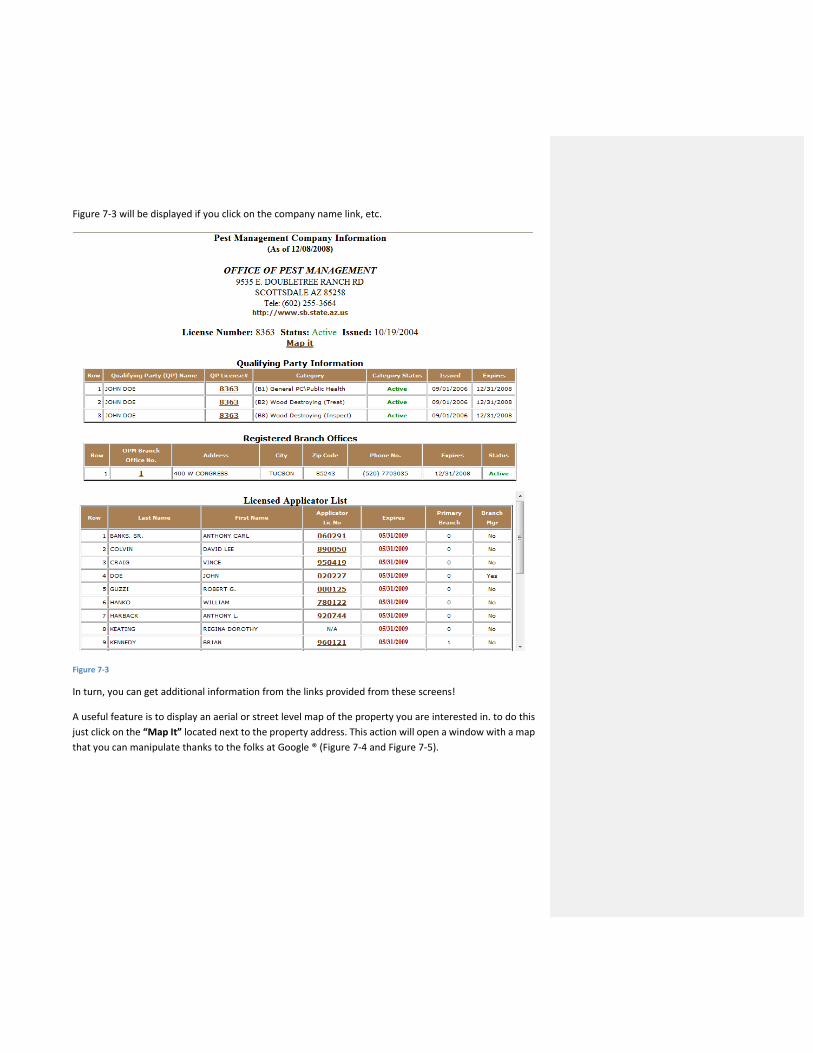
Figure 7‐3 will be displayed if you click on the company name link, etc.
Figure 7‐3
In turn, you can get additional information from the links provided from these screens!
A useful feature is to display an aerial or street level map of the property you are interested in. to do this
just click on the “Map It” located next to the property address. This action will open a window with a map
that you can manipulate thanks to the folks at Google ® (Figure 7‐4 and Figure 7‐5).
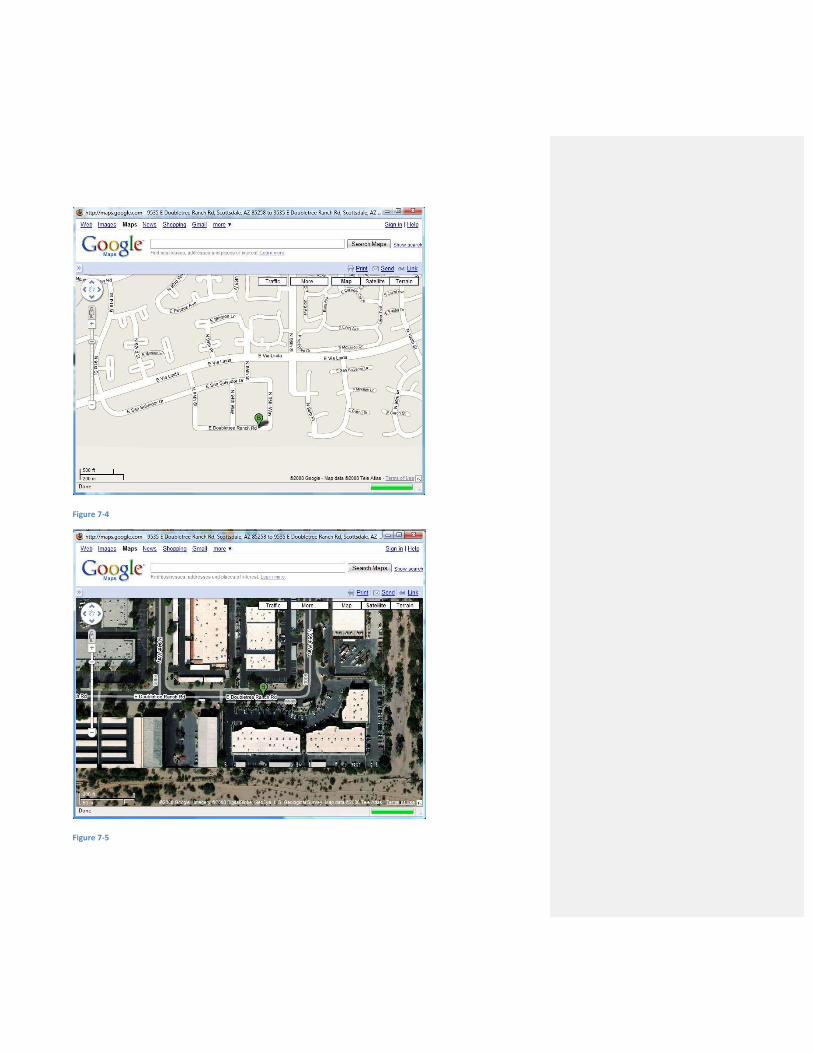
Figure 7‐4
Figure 7‐5
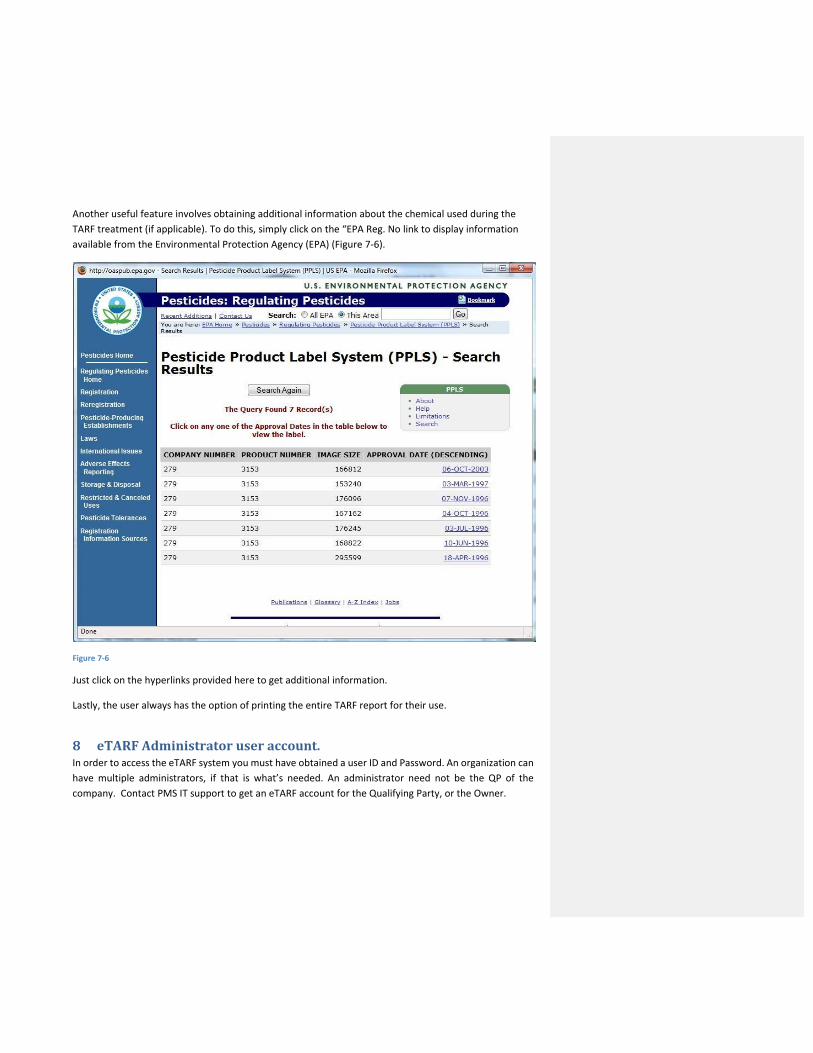
Another useful feature involves obtaining additional information about the chemical used during the
TARF treatment (if applicable). To do this, simply click on the “EPA Reg. No link to display information
available from the Environmental Protection Agency (EPA) (Figure 7‐6).
Figure 7‐6
Just click on the hyperlinks provided here to get additional information.
Lastly, the user always has the option of printing the entire TARF report for their use.
8 eTARFAdministratoruseraccount.In order to access the eTARF system you must have obtained a user ID and Password. An organization can
have multiple administrators, if that is what’s needed. An administrator need not be the QP of the
company. Contact PMS IT support to get an eTARF account for the Qualifying Party, or the Owner.
CARE MUST BE TAKEN WHEN ASSIGNING MULTIPLE ADMINISTRATOR ACCOUNTS BECAUSE THEY WILL
HAVE THE SAME CAPABILITIES AS THE ORIGINAL ADMINISTRATOR ACCOUNT!
8.1 Dutiesand responsibilitiesof theeTARFadministratoraccountowner.Among the first tasks that each eTARF administrator will need to perform is to create other user accounts
for anyone responsible for entering and filling TARF reports with the PMD. In small businesses, this may
not be the same person and thus not needed. Once a user account is created, the eTARF administrator is
responsible to assign the level of permission each user will have, such as; entering new TARFs, making
changes, paying and submitting TARFs, etc. The most important responsibility, however, is to make sure
that the TARFs are being filed with the PMD.
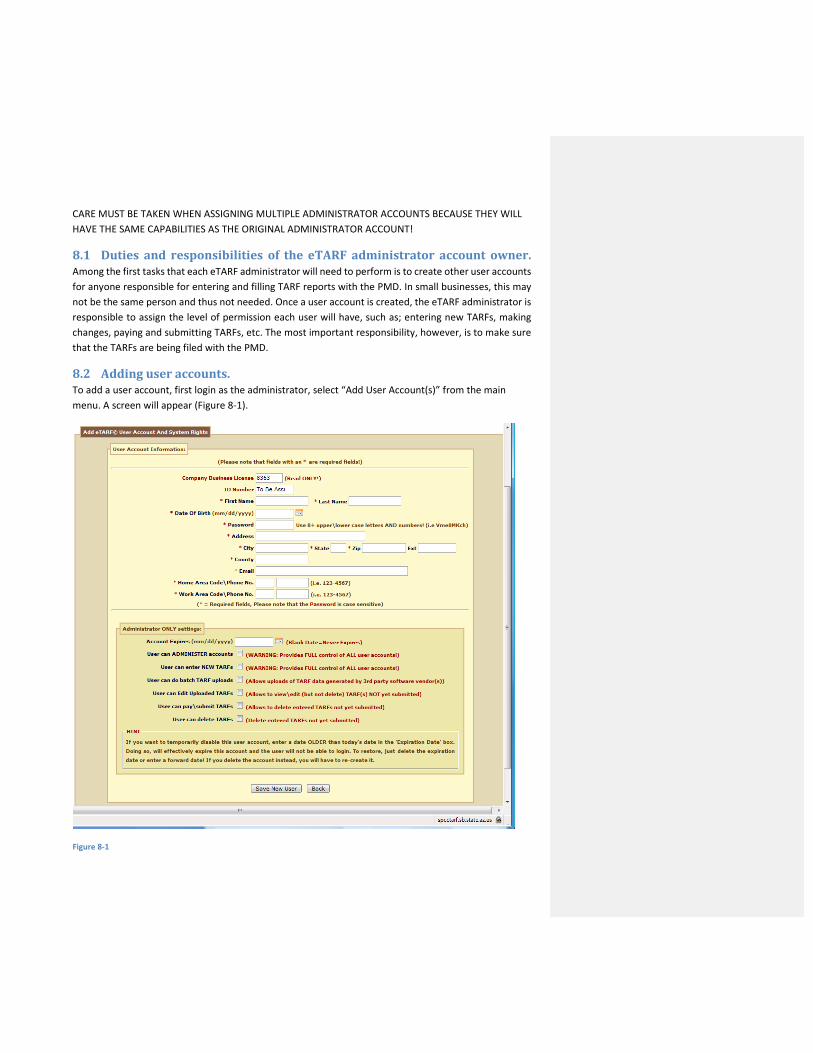
8.2 Addinguseraccounts.To add a user account, first login as the administrator, select “Add User Account(s)” from the main
menu. A screen will appear (Figure 8‐1).
Figure 8‐1
This screen is split up into two areas, the top portion are options that the owner of the user can edit
himself\herself. The boxes with a red asterisk MUST be provided in order to add a new record! The
bottom portion of the screen titled “Administrator ONLY setting” can be selected by the administrator
account only! Fill out the top portion with the new user’s information. Next the administrator will need
to decide the level of permission to assign to this new user.
● Account Expires – if you enter a date in this box, the account will expire on the date provided
and the user will no longer be able to login!
● User can ADMINISTER accounts – if you check this box, this user will become an administrator
within your organization.
● User can do batch TARF uploads – If you use a software package that allows you to manage your
business (usually commercially available) with such things as accounting, routing, payroll, etc. It
may provide the ability to enter a TARF report as part of its functionality. If this is the case, it may
also have the ability to export a specially formatted file that can be used to upload into the eTARF
system and thus eliminate the need to do double‐entry of TARF records. Check with your
software vendor to see if they provide this feature. If you do have this feature, this option will
allow the user to upload this type of file into the eTARF system.
● User can edit uploaded TARFs – This option allows the user to be able to go back and make
changes and\or corrections to previously entered TARF records that have not been submitted
yet.
● User can pay\submit TARFs – This option allows the user to credit card pay and submit entered
TARFs.
● User can delete TARFs – This option allows the user to delete previously entered TARFs that
have not been submitted yet.
After providing all of the necessary information, click on the “Save New User” button to add a new user
account. If there are no errors found, the system will generate a new user ID and display it at the top of
the screen. The new user is now able to login and start using the eTARF system.
8.3 ManaginguseraccountsTo manage eTARF user accounts, first login as the administrator, select “Manage User Accounts” from
the main menus. The “Manage Accounts” page will appear (Figure 8‐2) listing ALL of the user accounts
that have been created for your organization. From here you can select an account to delete or edit it.
8.4 Deleteauseraccount.It is the responsibility of each eTARF administrator to delete or inactivate an account for a user that
no longer works for your organization or is no longer tasked with the responsibility of filing TARFs.
Remember that since this system is web browser based, any of its users can access his\her account
from outside the office.
PLEASE NOTE THAT IF YOU CHOOSE TO DELETE AN ACCOUNT, THE SYSTEM WILL NOT ACTUALLY DELETE
THE ACCOUNT. THE REASON FOR THIS IS THAT THE SYSTEM WILL STILL NEED TO RETRIEVE THE
INFORMATION FOR THE USER THAT ENTERED A REPORT REGARDLESS OF THE STATUS OF THIS USER.
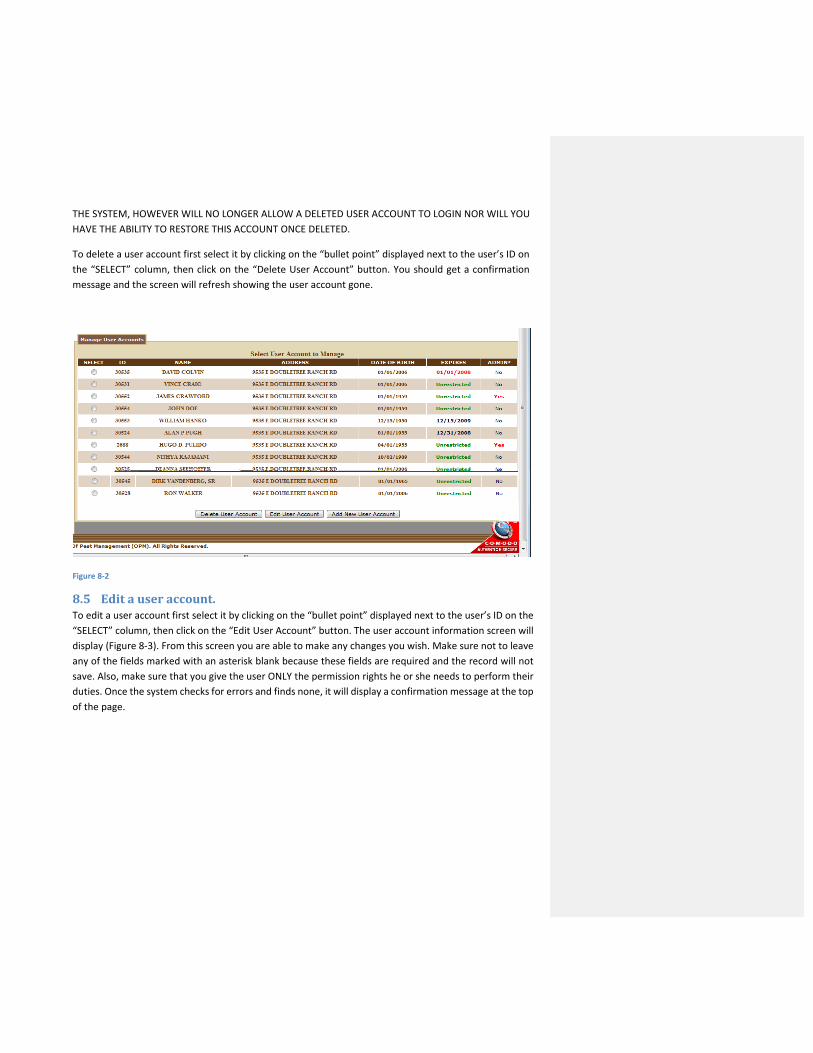
THE SYSTEM, HOWEVER WILL NO LONGER ALLOW A DELETED USER ACCOUNT TO LOGIN NOR WILL YOU
HAVE THE ABILITY TO RESTORE THIS ACCOUNT ONCE DELETED.
To delete a user account first select it by clicking on the “bullet point” displayed next to the user’s ID on
the “SELECT” column, then click on the “Delete User Account” button. You should get a confirmation
message and the screen will refresh showing the user account gone.
Figure 8‐2
8.5 Editauseraccount.To edit a user account first select it by clicking on the “bullet point” displayed next to the user’s ID on the
“SELECT” column, then click on the “Edit User Account” button. The user account information screen will
display (Figure 8‐3). From this screen you are able to make any changes you wish. Make sure not to leave
any of the fields marked with an asterisk blank because these fields are required and the record will not
save. Also, make sure that you give the user ONLY the permission rights he or she needs to perform their
duties. Once the system checks for errors and finds none, it will display a confirmation message at the top
of the page.
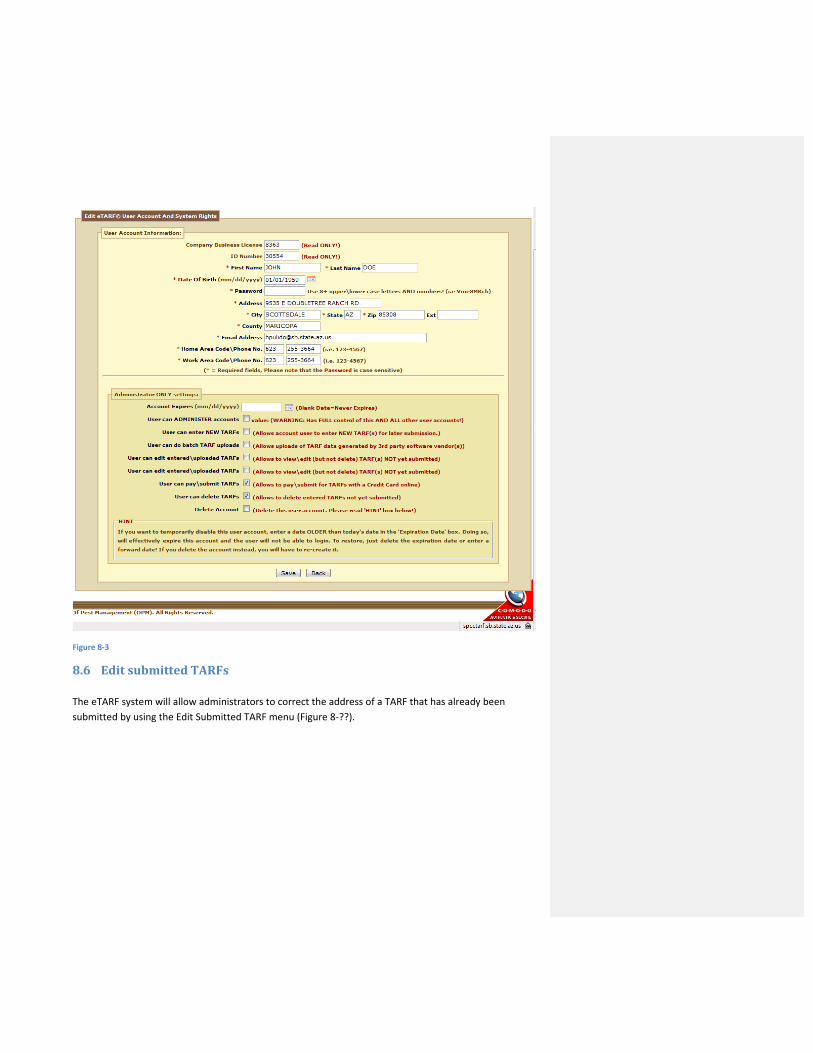
Figure 8‐3
8.6 EditsubmittedTARFsThe eTARF system will allow administrators to correct the address of a TARF that has already been
submitted by using the Edit Submitted TARF menu (Figure 8‐??).
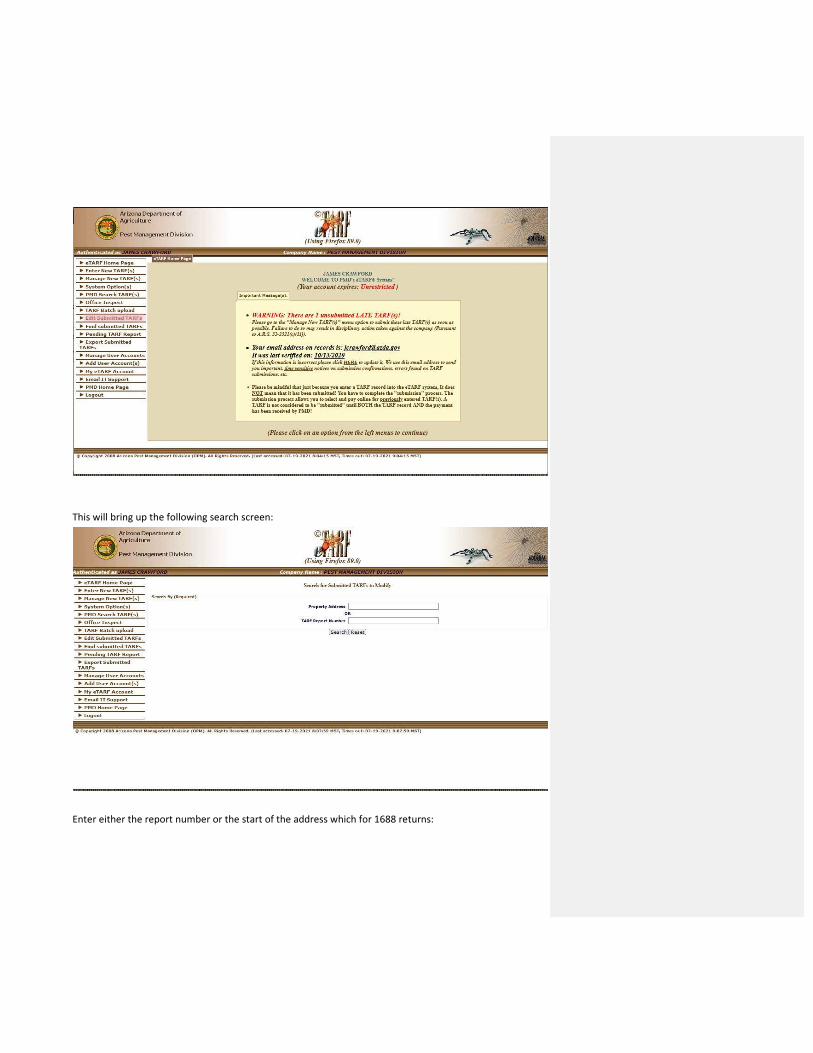
This will bring up the following search screen:
Enter either the report number or the start of the address which for 1688 returns:
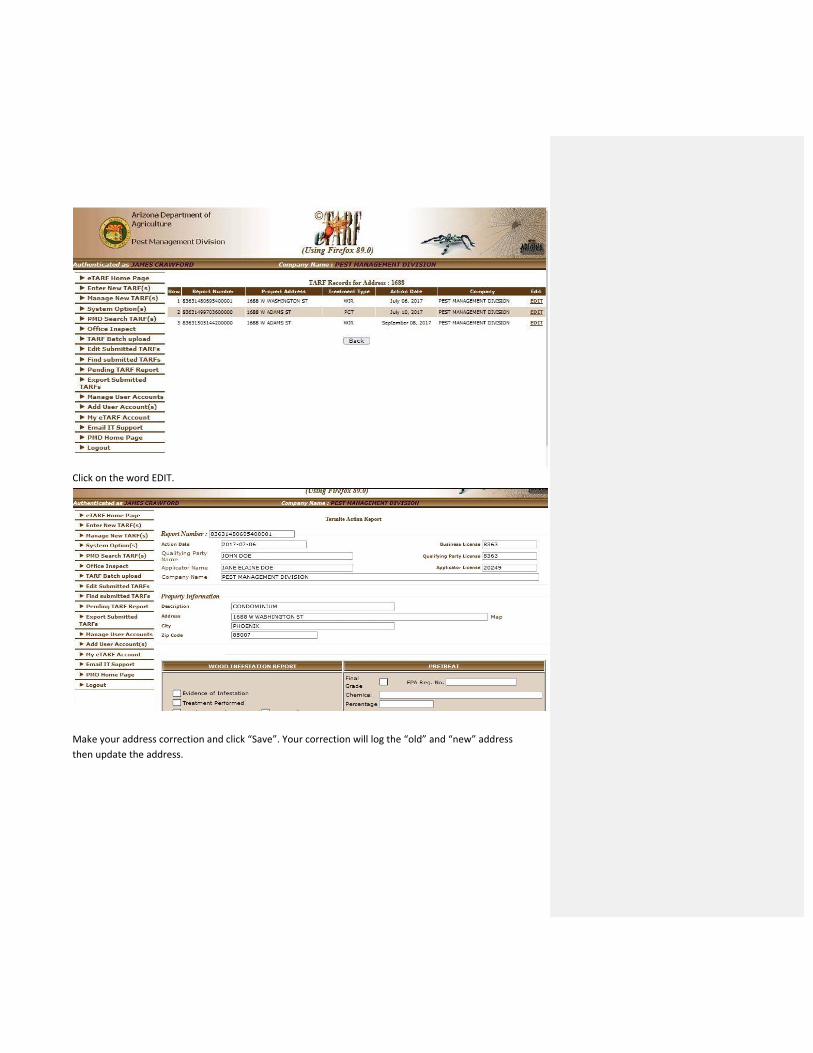
Click on the word EDIT.
Make your address correction and click “Save”. Your correction will log the “old” and “new” address
then update the address.
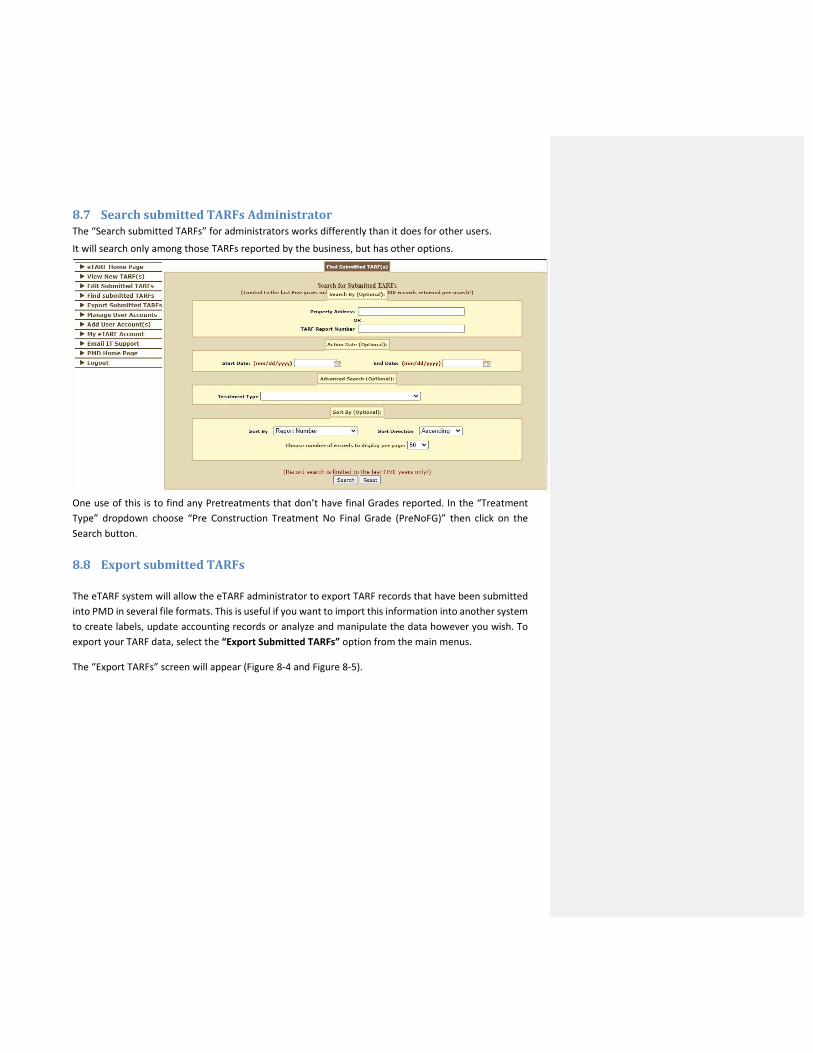
8.7 SearchsubmittedTARFsAdministratorThe “Search submitted TARFs” for administrators works differently than it does for other users.
It will search only among those TARFs reported by the business, but has other options.
One use of this is to find any Pretreatments that don’t have final Grades reported. In the “Treatment
Type” dropdown choose “Pre Construction Treatment No Final Grade (PreNoFG)” then click on the
Search button.
8.8 ExportsubmittedTARFsThe eTARF system will allow the eTARF administrator to export TARF records that have been submitted
into PMD in several file formats. This is useful if you want to import this information into another system
to create labels, update accounting records or analyze and manipulate the data however you wish. To
export your TARF data, select the “Export Submitted TARFs” option from the main menus.
The “Export TARFs” screen will appear (Figure 8‐4 and Figure 8‐5).
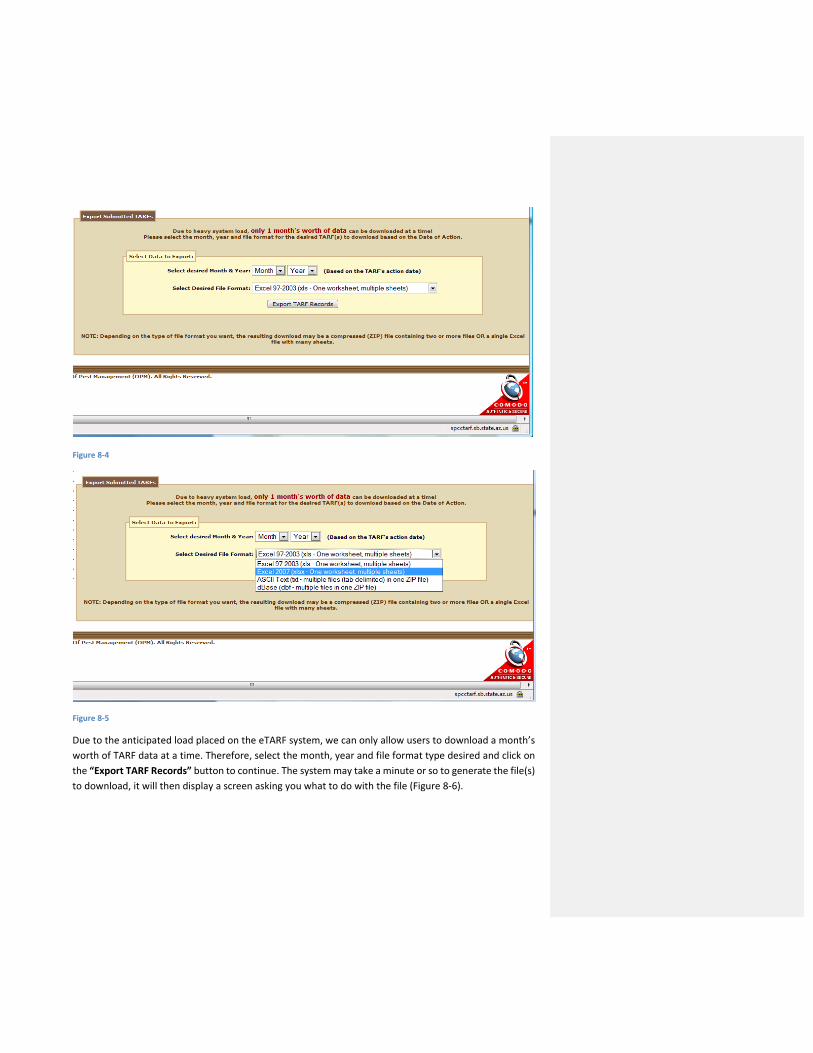
Figure 8‐4
Figure 8‐5
Due to the anticipated load placed on the eTARF system, we can only allow users to download a month’s
worth of TARF data at a time. Therefore, select the month, year and file format type desired and click on
the “Export TARF Records” button to continue. The system may take a minute or so to generate the file(s)
to download, it will then display a screen asking you what to do with the file (Figure 8‐6).
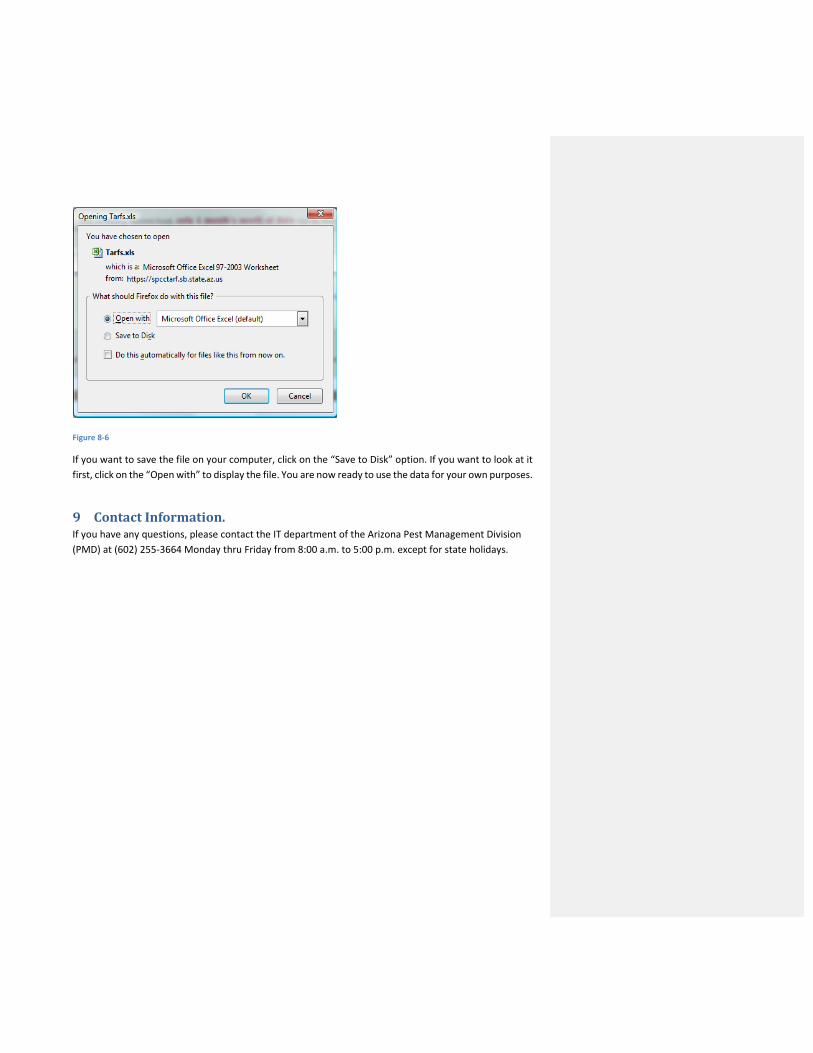
Figure 8‐6
If you want to save the file on your computer, click on the “Save to Disk” option. If you want to look at it
first, click on the “Open with” to display the file. You are now ready to use the data for your own purposes.
9 ContactInformation.If you have any questions, please contact the IT department of the Arizona Pest Management Division
(PMD) at (602) 255‐3664 Monday thru Friday from 8:00 a.m. to 5:00 p.m. except for state holidays.


