Embed Size (px)
Citation preview

H.M.S BRAVE BORDERER
by Rowen
Read more by scanning the QR code below
or by going to:
model-boats.com/40884
model-boats.com model-boats.com
Page 2
8th Apr 2018H.M.S BRAVE BORDERER
Thinking of a future project and decided upon another launch type vessel. Myearlier Daman 4207 project gave an interesting model with good performance.The Brave class of FPBs (Fast Patrol Boats) caught my attention. Can rememberthe incredible performance they offered when entering service. Only two of theclass were used by the RN, although variants were used by other navies. Havedecided to use proprietary Glass fibre hulls in future as they probably cost littlemore than building from scratch using wood and resin. They give a robust andwatertight hull, but one which still requires thought to complete properly. Thereare several companies that offer a “Perkasa” hull, a Brave class derivative withan almost identical hull. From previous experience have decided to limit mymodels to 40” long, larger vessels become difficult to transport and handle. Aftermuch research considered the hull offered by MTB Hulls in Gibraltar met myrequirements best. The inquiry to MTBHulls was well handled; the quotationacceptable, so placed an order. Was pleasantly surprised at the shipping costs.From the UK these often approach the cost of the hull, but from Gibraltar they aremuch more reasonable. Delivery only took 7 days.
Page 31
2nd Jan 2022Brave Borderer
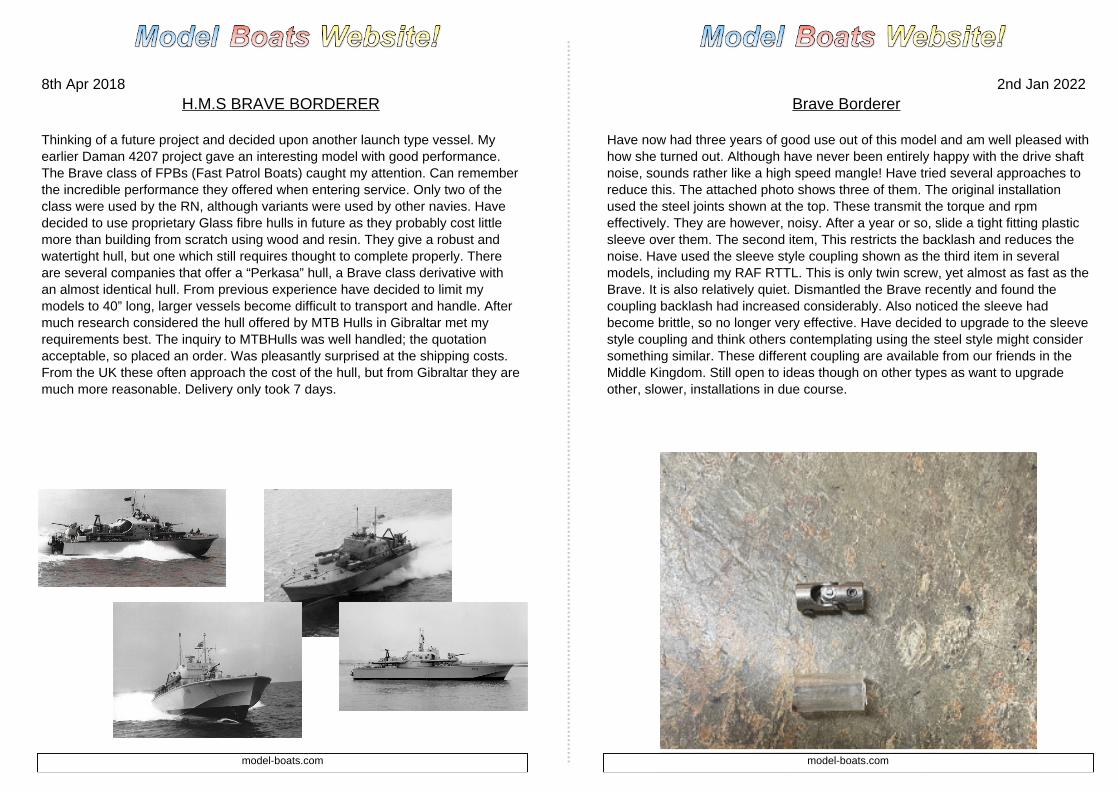
Have now had three years of good use out of this model and am well pleased withhow she turned out. Although have never been entirely happy with the drive shaftnoise, sounds rather like a high speed mangle! Have tried several approaches toreduce this. The attached photo shows three of them. The original installationused the steel joints shown at the top. These transmit the torque and rpmeffectively. They are however, noisy. After a year or so, slide a tight fitting plasticsleeve over them. The second item, This restricts the backlash and reduces thenoise. Have used the sleeve style coupling shown as the third item in severalmodels, including my RAF RTTL. This is only twin screw, yet almost as fast as theBrave. It is also relatively quiet. Dismantled the Brave recently and found thecoupling backlash had increased considerably. Also noticed the sleeve hadbecome brittle, so no longer very effective. Have decided to upgrade to the sleevestyle coupling and think others contemplating using the steel style might considersomething similar. These different coupling are available from our friends in theMiddle Kingdom. Still open to ideas though on other types as want to upgradeother, slower, installations in due course.
model-boats.com model-boats.com
Page 3
13th Apr 2018H.M.S. BRAVE BORDERER
Just to clarify. Shipping was only 7 days to Canada, manufacture slightly longer. Examined the hullclosely and was pleased. it is dimensionally accurate and robust, but light. it had also been reinforcedin strategic areas and trimmed to the correct deck line. My many questions to Christian Sheppard –Capurro of MTBHulls were quickly and knowledgeably answered. A company I would recommendothers. Reviewing the build blogs and U Tube videos of the both the Brave and Perkasa models,shows most use either single or twin screws. The original vessel had a triple screw contra - rotatinglayout. Experience from others suggests the third screw just adds weight and complexity, but little tothe performance. Nevertheless, it was how the Braves were built, so that was how it would be.Christian gave several suggestions for other modelers who have built this vessel. Contacted them andwas readily provided with information and advice. The finished weight of this model is important and atarget of around 6 lbs recommended for a 1:32 scale version. This is to achieve the potentialperformance. Plans for drivetrain are 3 x 2835 4500kVa brushless motors, direct driving 3 x scale 3blade 30mm screws. Decided use a single Li-Po battery for the best performance with minimumweight. It was suggested three batteries, each powering a single motor would be the best layout. Aftersome research, concluded this would introduce a weight penalty and was discounted. There arevarious ideas for the best drivetrain. Unfortunately none for triple screws. Decided the best approachwould be to fit the bare hull out as planned, then try it. Leaving all the finishing features for later. Acontact in Australia had already done this using a single screw layout and kindly sent pictures of hishull layout and then under test. Very informative. The positions of the rudders, propellers and shaftsare established by the scale dimensions and were permanently installed. Everything else was to betemporarily fitted, so it could be moved or replaced if necessary.
Page 30
15th Nov 2020BLOG 29
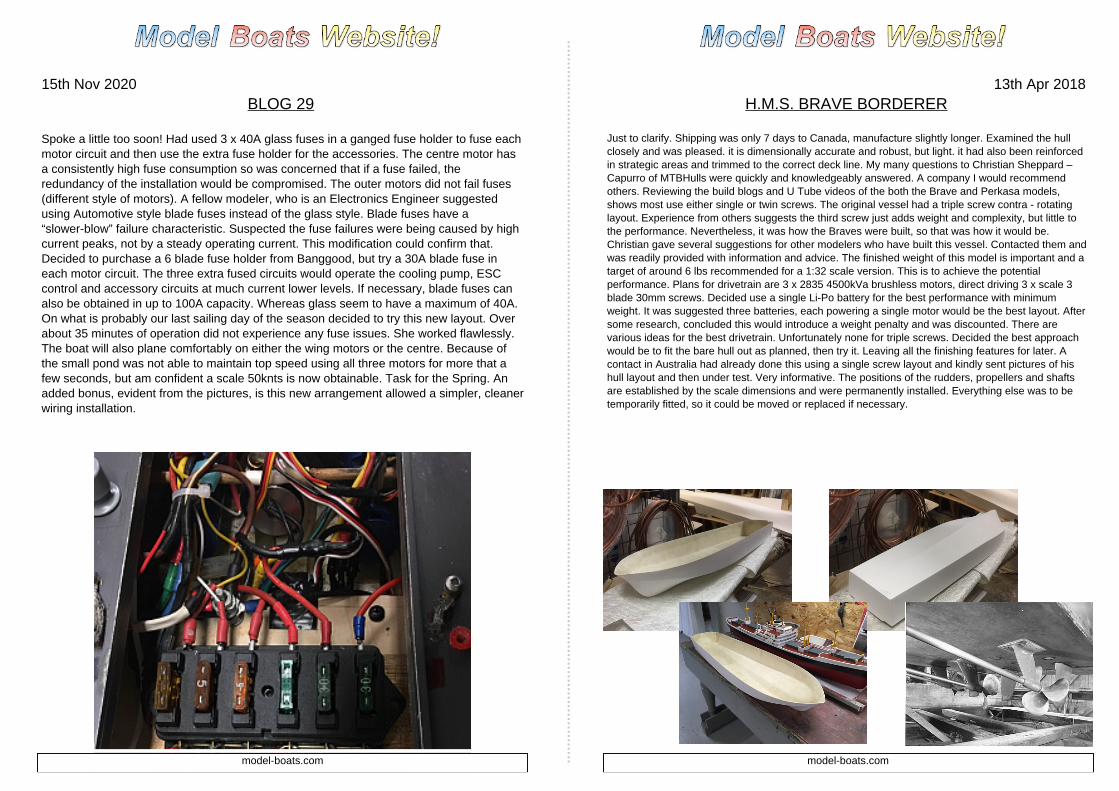
Spoke a little too soon! Had used 3 x 40A glass fuses in a ganged fuse holder to fuse eachmotor circuit and then use the extra fuse holder for the accessories. The centre motor hasa consistently high fuse consumption so was concerned that if a fuse failed, theredundancy of the installation would be compromised. The outer motors did not fail fuses(different style of motors). A fellow modeler, who is an Electronics Engineer suggestedusing Automotive style blade fuses instead of the glass style. Blade fuses have a“slower-blow” failure characteristic. Suspected the fuse failures were being caused by highcurrent peaks, not by a steady operating current. This modification could confirm that.Decided to purchase a 6 blade fuse holder from Banggood, but try a 30A blade fuse ineach motor circuit. The three extra fused circuits would operate the cooling pump, ESCcontrol and accessory circuits at much current lower levels. If necessary, blade fuses canalso be obtained in up to 100A capacity. Whereas glass seem to have a maximum of 40A.On what is probably our last sailing day of the season decided to try this new layout. Overabout 35 minutes of operation did not experience any fuse issues. She worked flawlessly.The boat will also plane comfortably on either the wing motors or the centre. Because ofthe small pond was not able to maintain top speed using all three motors for more that afew seconds, but am confident a scale 50knts is now obtainable. Task for the Spring. Anadded bonus, evident from the pictures, is this new arrangement allowed a simpler, cleanerwiring installation.
model-boats.com model-boats.com
Page 4
19th Apr 2018H.M.S. BRAVE BORDERER
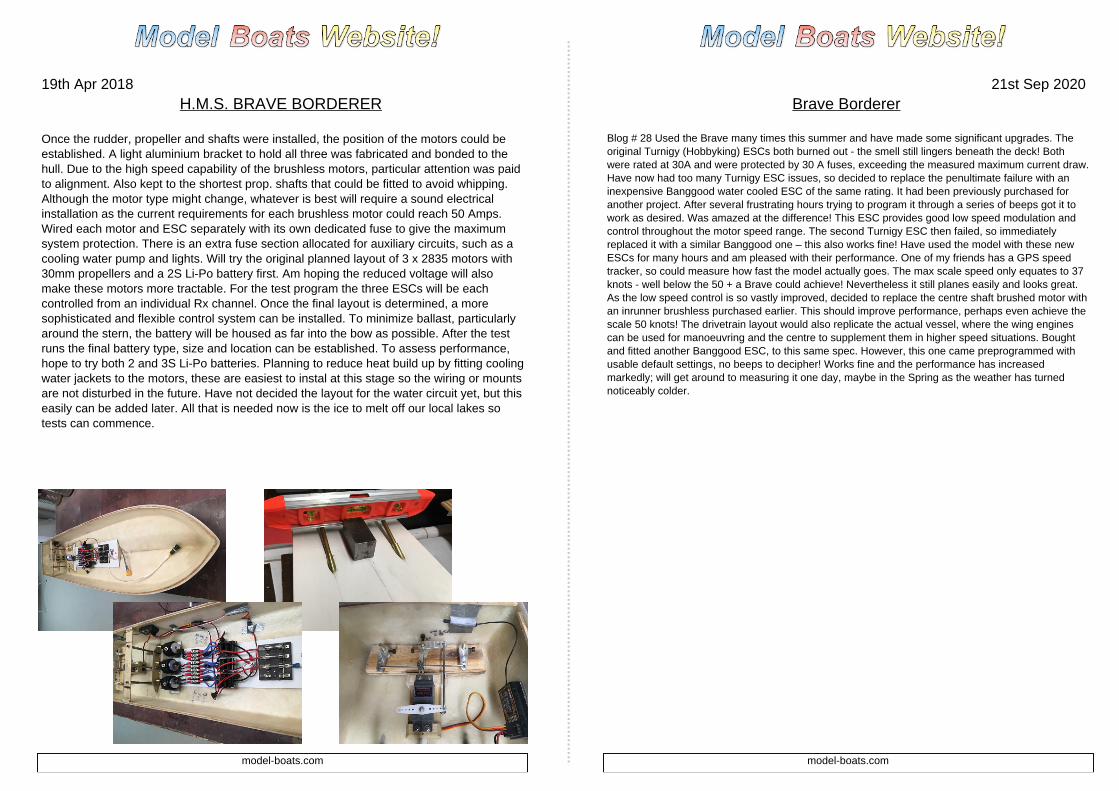
Once the rudder, propeller and shafts were installed, the position of the motors could beestablished. A light aluminium bracket to hold all three was fabricated and bonded to thehull. Due to the high speed capability of the brushless motors, particular attention was paidto alignment. Also kept to the shortest prop. shafts that could be fitted to avoid whipping.Although the motor type might change, whatever is best will require a sound electricalinstallation as the current requirements for each brushless motor could reach 50 Amps.Wired each motor and ESC separately with its own dedicated fuse to give the maximumsystem protection. There is an extra fuse section allocated for auxiliary circuits, such as acooling water pump and lights. Will try the original planned layout of 3 x 2835 motors with30mm propellers and a 2S Li-Po battery first. Am hoping the reduced voltage will alsomake these motors more tractable. For the test program the three ESCs will be eachcontrolled from an individual Rx channel. Once the final layout is determined, a moresophisticated and flexible control system can be installed. To minimize ballast, particularlyaround the stern, the battery will be housed as far into the bow as possible. After the testruns the final battery type, size and location can be established. To assess performance,hope to try both 2 and 3S Li-Po batteries. Planning to reduce heat build up by fitting coolingwater jackets to the motors, these are easiest to instal at this stage so the wiring or mountsare not disturbed in the future. Have not decided the layout for the water circuit yet, but thiseasily can be added later. All that is needed now is the ice to melt off our local lakes sotests can commence.
Page 29
21st Sep 2020Brave Borderer
Blog # 28 Used the Brave many times this summer and have made some significant upgrades. Theoriginal Turnigy (Hobbyking) ESCs both burned out - the smell still lingers beneath the deck! Bothwere rated at 30A and were protected by 30 A fuses, exceeding the measured maximum current draw.Have now had too many Turnigy ESC issues, so decided to replace the penultimate failure with aninexpensive Banggood water cooled ESC of the same rating. It had been previously purchased foranother project. After several frustrating hours trying to program it through a series of beeps got it towork as desired. Was amazed at the difference! This ESC provides good low speed modulation andcontrol throughout the motor speed range. The second Turnigy ESC then failed, so immediatelyreplaced it with a similar Banggood one – this also works fine! Have used the model with these newESCs for many hours and am pleased with their performance. One of my friends has a GPS speedtracker, so could measure how fast the model actually goes. The max scale speed only equates to 37knots - well below the 50 + a Brave could achieve! Nevertheless it still planes easily and looks great.As the low speed control is so vastly improved, decided to replace the centre shaft brushed motor withan inrunner brushless purchased earlier. This should improve performance, perhaps even achieve thescale 50 knots! The drivetrain layout would also replicate the actual vessel, where the wing enginescan be used for manoeuvring and the centre to supplement them in higher speed situations. Boughtand fitted another Banggood ESC, to this same spec. However, this one came preprogrammed withusable default settings, no beeps to decipher! Works fine and the performance has increasedmarkedly; will get around to measuring it one day, maybe in the Spring as the weather has turnednoticeably colder.
model-boats.com model-boats.com
Page 5
24th Apr 2018H.M.S BRAVE BORDERER
Whilst waiting for the ice to melt, decided to make up the deck and transom flaps. The deckwas made from styrene sheet, again for lightness. Made the deck beams out of squarestyrene sections to avoid traditional, heavy, full width bulkheads. Hoped the stiff MTBH hullwould resist twisting without bulkheads. First impressions are that this is the case andwhen the deck is finally bonded to the hull, should be even better.. The transom flap wasmade from thin aluminium plate and added simulated stiffener ribs in styrene. Understandthat about a 2 degree flap down inclination works best on this model. My original plan wasto operate the flap using a servo with another radio channel, however once the best planeis achieved it is unlikely the flaps will need further adjustment. Unlike the real vessel, theoperating weight will remain fairly constant. So, abandoned the servo idea to useadjustable bottle-screws instead. The flap angle can still be adjusted, but not in motion.These screws are much simpler, lighter and cheaper than a servo. One challenge was tomake the very small hinges required for an adjustable flap. After much thinking andinvestigation, decided the simplest and neatest way would be to use thin, self adhesivealuminium tape, as used on forced air heating ducts. Would stick the self adhesive surfaceto the underside of the flap and then onto the inside face of another thin aluminium sheet,which could then be fitted to the transom using double sided tape and small screws. Thisseems to work so far, it also avoids drilling through holes into the transom .
Page 28
24th Jun 2019H.M.S BRAVE BORDERER
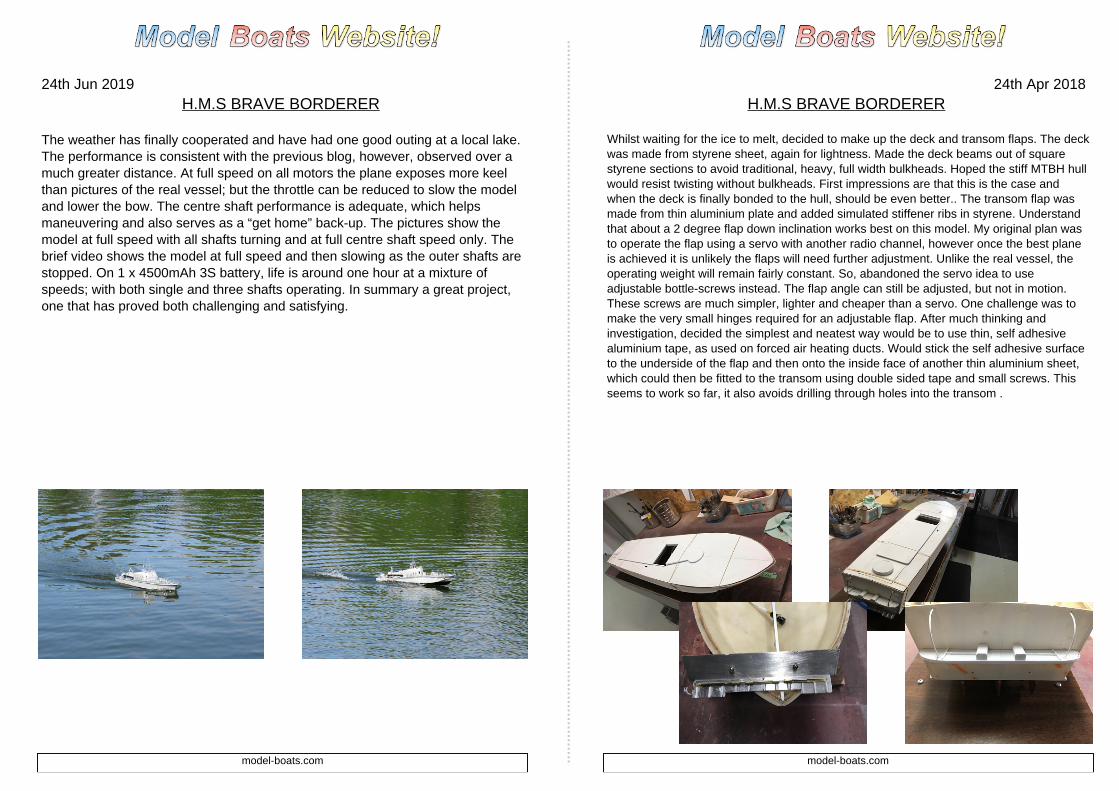
The weather has finally cooperated and have had one good outing at a local lake.The performance is consistent with the previous blog, however, observed over amuch greater distance. At full speed on all motors the plane exposes more keelthan pictures of the real vessel; but the throttle can be reduced to slow the modeland lower the bow. The centre shaft performance is adequate, which helpsmaneuvering and also serves as a “get home” back-up. The pictures show themodel at full speed with all shafts turning and at full centre shaft speed only. Thebrief video shows the model at full speed and then slowing as the outer shafts arestopped. On 1 x 4500mAh 3S battery, life is around one hour at a mixture ofspeeds; with both single and three shafts operating. In summary a great project,one that has proved both challenging and satisfying.
model-boats.com model-boats.com

Page 6
30th Apr 2018H.M.S. BRAVE BORDERER
An unexpected opportunity arose to try the unfinished hull in a small pool. Whilst the performanceenvelope could not be explored, was able to try and measure operating parameters and get a “feel”for the model. Used an electronic scale and a combination voltmeter/ammeter/wattmeter to measurepropeller thrust /bollard pull and motor power requirements. if it is necessary to fit different drivetraincomponents, or a 3S cell this will serve as the baseline. The model floated levelly and well above thewaterline. At about 8 volts the motors drew around 20 amps each at full speed; so only about 35% ofthe potential output capacity was being used. Tested each motor individually and measured thebollard pull at just over 2 lbs. A considerable amount of spray and wash was created making stablereadings difficult. For further testing, will add ballast at the stern to hold the propellers furtherunderwater. Should help reading stability. Currently using 20 A fuses; which as one failed seemmarginal. For sustained use think 25 or 30 Amp better. With these high-speed, low torque motorsestablishing the “dry” propeller rotation is deceptive. Found one motor to be reversed! Nevertheless,the model accelerates quickly and is sensitive to engine speed movements. Left the pool with a list ofmodifications to make before assessing the installation properly on an adequate body of water. Someconclusions can be made though. if it is necessary to add a second cell this needs to be locatedaround midships, not in the bow or stern. Still hoping a 3S cell will not be necessary and that 2S maybe adequate. The suggestion to do testing using the bare hull with a minimum of detail was a goodone. For a models with a sophisticated power train think this is a good approach. Nothing worse thatfinishing a boat just to find the performance disappointing, then have to to rip it apart to make majormodifications or adjustments!
Page 27
26th May 2019H.M.S. BRAVE BORDERER
Did more testing and then reprogrammed the ESCs and Rx. These changesallowed the removal of the brushless motor selection circuitry and improved thetractability of the system. As the videos show, a plane can be achieved with both2S and 3S batteries. With the 3S the plane is flatter and faster. Suspect this isdue to the increased vertical component of the propeller thrust forcing the rear ofthe vessel upwards, lifting it and lowering the bow. Of the two, the 3S resemblesthe original vessel pictures more closely, the bow lifts too far high with the 2S.The videos show the vessel in motion. The first shows a run with 2S batteries, thenext two show similar runs with 3S. Just found cannot upload three videos on oneblog. Anyway, they can all be seen on UTube under 'Brave Borderer blog'.Anticipate further refining of the powertrain with a future running, but doubt anysignificant improvements will be achieved. Performance is great anyway and amvery happy with it. This will be the concluding post for this model.
model-boats.com model-boats.com
Page 7
2nd May 2018H.M.S. BRAVE BORDERER
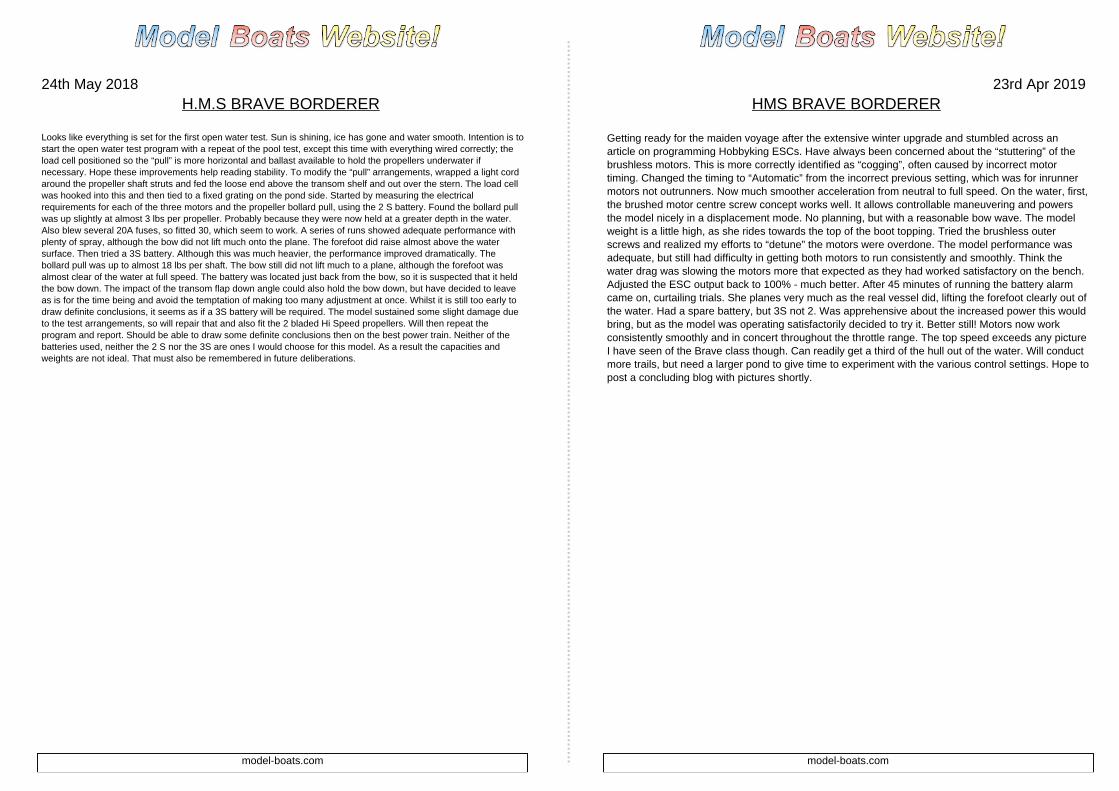
From the brief pool test, had decided that the motors could be susceptible tooverheating, so connected up the water jacket cooling system and powered it witha small pump. Did not leave enough space to fit a scoop behind a propelleranyway, but prefer the positive action of a pump though. From feeling the ESCs,was also concerned they could overheat within a confined space such as the hull.Mounted a couple of small fans in a bridge structure above the ESCs, along withthe ESC switches. Not sure either of these cooling modifications are reallyrequired, but erred on the side of caution. Final weight of the hull, with all electrics(apart from battery) comes to 5.05 lbs. Looks like will not achieve the targetweight of 6 lbs, but am hopeful will be able to get close to it.. Built the deck upwith gun mount bases and a removable decking over the engine area. This limitsaccess to the internals; so will not fit it permanently until the test program iscomplete and all modifications incorporated. Have now reached a point whereany further work will be to start finishing the model, unless drivetrain modificationsare required. Have thus decided to leave it until after the first open water testdate. This will be in late May as am away until then.
Page 26
26th Apr 2019H.M.S BRAVE BORDERER
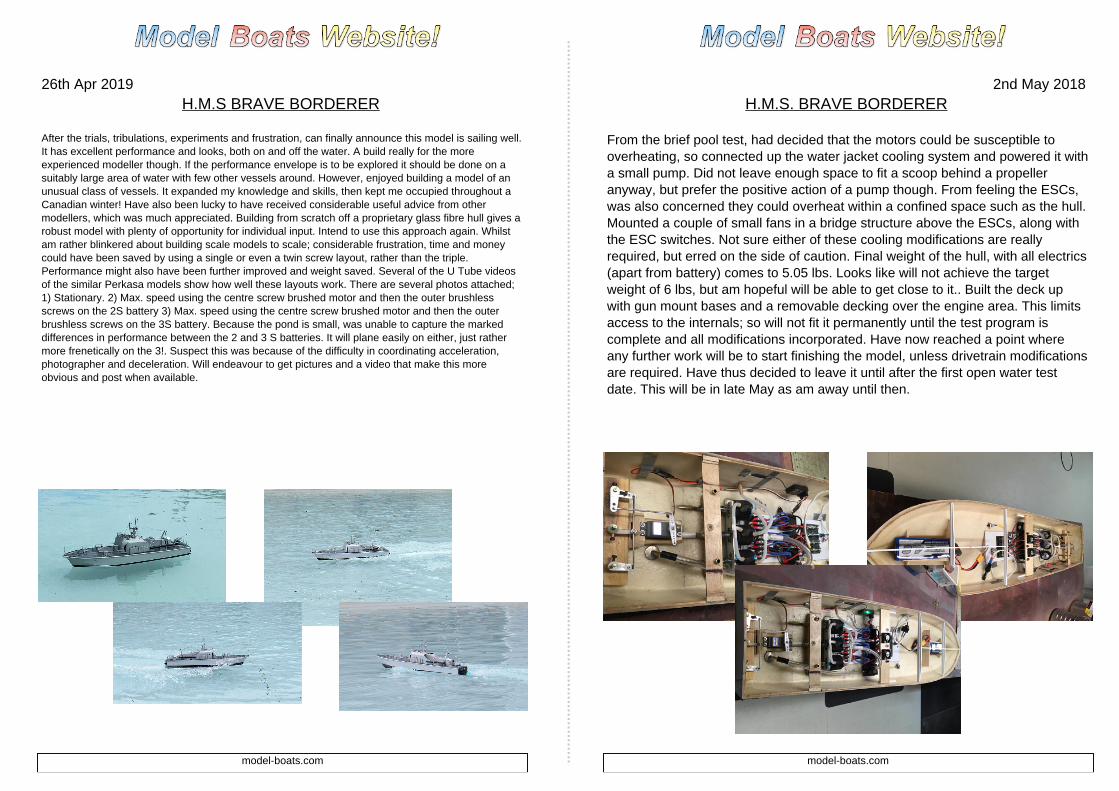
After the trials, tribulations, experiments and frustration, can finally announce this model is sailing well.It has excellent performance and looks, both on and off the water. A build really for the moreexperienced modeller though. If the performance envelope is to be explored it should be done on asuitably large area of water with few other vessels around. However, enjoyed building a model of anunusual class of vessels. It expanded my knowledge and skills, then kept me occupied throughout aCanadian winter! Have also been lucky to have received considerable useful advice from othermodellers, which was much appreciated. Building from scratch off a proprietary glass fibre hull gives arobust model with plenty of opportunity for individual input. Intend to use this approach again. Whilstam rather blinkered about building scale models to scale; considerable frustration, time and moneycould have been saved by using a single or even a twin screw layout, rather than the triple.Performance might also have been further improved and weight saved. Several of the U Tube videosof the similar Perkasa models show how well these layouts work. There are several photos attached;1) Stationary. 2) Max. speed using the centre screw brushed motor and then the outer brushlessscrews on the 2S battery 3) Max. speed using the centre screw brushed motor and then the outerbrushless screws on the 3S battery. Because the pond is small, was unable to capture the markeddifferences in performance between the 2 and 3 S batteries. It will plane easily on either, just rathermore frenetically on the 3!. Suspect this was because of the difficulty in coordinating acceleration,photographer and deceleration. Will endeavour to get pictures and a video that make this moreobvious and post when available.
model-boats.com model-boats.com
Page 8
24th May 2018H.M.S BRAVE BORDERER
Looks like everything is set for the first open water test. Sun is shining, ice has gone and water smooth. Intention is tostart the open water test program with a repeat of the pool test, except this time with everything wired correctly; theload cell positioned so the “pull” is more horizontal and ballast available to hold the propellers underwater ifnecessary. Hope these improvements help reading stability. To modify the “pull” arrangements, wrapped a light cordaround the propeller shaft struts and fed the loose end above the transom shelf and out over the stern. The load cellwas hooked into this and then tied to a fixed grating on the pond side. Started by measuring the electricalrequirements for each of the three motors and the propeller bollard pull, using the 2 S battery. Found the bollard pullwas up slightly at almost 3 lbs per propeller. Probably because they were now held at a greater depth in the water.Also blew several 20A fuses, so fitted 30, which seem to work. A series of runs showed adequate performance withplenty of spray, although the bow did not lift much onto the plane. The forefoot did raise almost above the watersurface. Then tried a 3S battery. Although this was much heavier, the performance improved dramatically. Thebollard pull was up to almost 18 lbs per shaft. The bow still did not lift much to a plane, although the forefoot wasalmost clear of the water at full speed. The battery was located just back from the bow, so it is suspected that it heldthe bow down. The impact of the transom flap down angle could also hold the bow down, but have decided to leaveas is for the time being and avoid the temptation of making too many adjustment at once. Whilst it is still too early todraw definite conclusions, it seems as if a 3S battery will be required. The model sustained some slight damage dueto the test arrangements, so will repair that and also fit the 2 bladed Hi Speed propellers. Will then repeat theprogram and report. Should be able to draw some definite conclusions then on the best power train. Neither of thebatteries used, neither the 2 S nor the 3S are ones I would choose for this model. As a result the capacities andweights are not ideal. That must also be remembered in future deliberations.
Page 25
23rd Apr 2019HMS BRAVE BORDERER
Getting ready for the maiden voyage after the extensive winter upgrade and stumbled across anarticle on programming Hobbyking ESCs. Have always been concerned about the “stuttering” of thebrushless motors. This is more correctly identified as “cogging”, often caused by incorrect motortiming. Changed the timing to “Automatic” from the incorrect previous setting, which was for inrunnermotors not outrunners. Now much smoother acceleration from neutral to full speed. On the water, first,the brushed motor centre screw concept works well. It allows controllable maneuvering and powersthe model nicely in a displacement mode. No planning, but with a reasonable bow wave. The modelweight is a little high, as she rides towards the top of the boot topping. Tried the brushless outerscrews and realized my efforts to “detune” the motors were overdone. The model performance wasadequate, but still had difficulty in getting both motors to run consistently and smoothly. Think thewater drag was slowing the motors more that expected as they had worked satisfactory on the bench.Adjusted the ESC output back to 100% - much better. After 45 minutes of running the battery alarmcame on, curtailing trials. She planes very much as the real vessel did, lifting the forefoot clearly out ofthe water. Had a spare battery, but 3S not 2. Was apprehensive about the increased power this wouldbring, but as the model was operating satisfactorily decided to try it. Better still! Motors now workconsistently smoothly and in concert throughout the throttle range. The top speed exceeds any pictureI have seen of the Brave class though. Can readily get a third of the hull out of the water. Will conductmore trails, but need a larger pond to give time to experiment with the various control settings. Hope topost a concluding blog with pictures shortly.
model-boats.com model-boats.com
Page 9
30th May 2018H.M.S BRAVE BORDERER
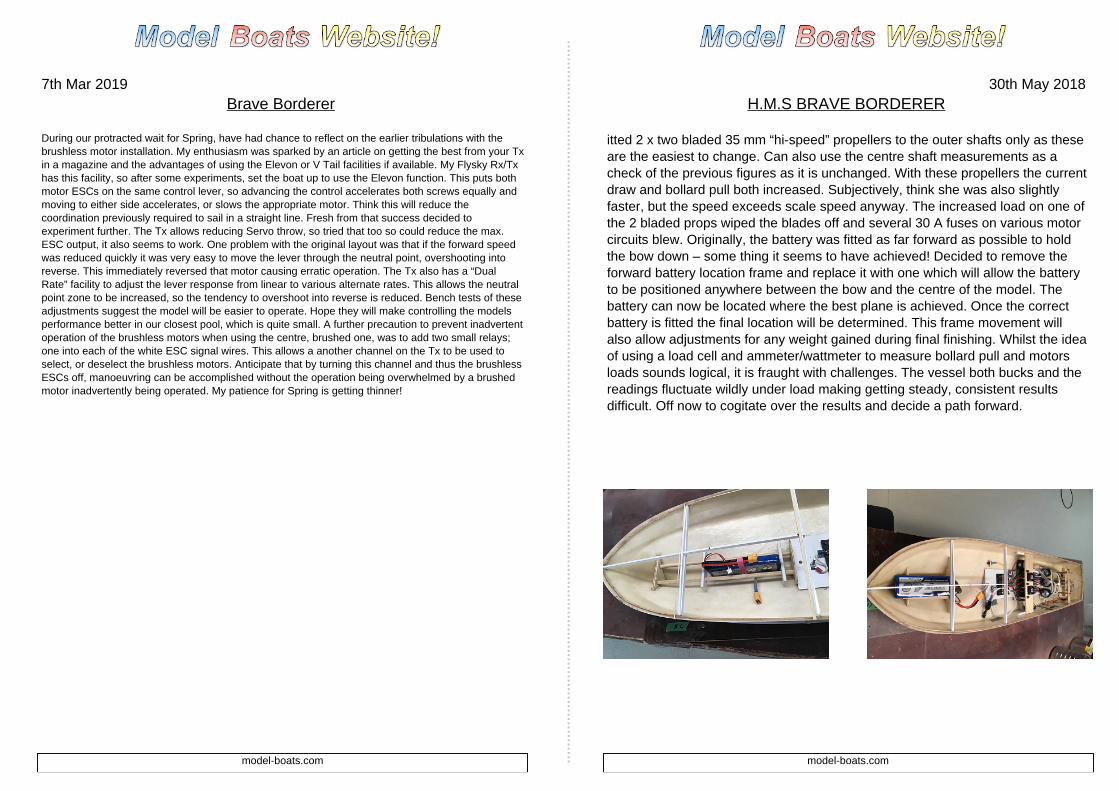
itted 2 x two bladed 35 mm “hi-speed” propellers to the outer shafts only as theseare the easiest to change. Can also use the centre shaft measurements as acheck of the previous figures as it is unchanged. With these propellers the currentdraw and bollard pull both increased. Subjectively, think she was also slightlyfaster, but the speed exceeds scale speed anyway. The increased load on one ofthe 2 bladed props wiped the blades off and several 30 A fuses on various motorcircuits blew. Originally, the battery was fitted as far forward as possible to holdthe bow down – some thing it seems to have achieved! Decided to remove theforward battery location frame and replace it with one which will allow the batteryto be positioned anywhere between the bow and the centre of the model. Thebattery can now be located where the best plane is achieved. Once the correctbattery is fitted the final location will be determined. This frame movement willalso allow adjustments for any weight gained during final finishing. Whilst the ideaof using a load cell and ammeter/wattmeter to measure bollard pull and motorsloads sounds logical, it is fraught with challenges. The vessel both bucks and thereadings fluctuate wildly under load making getting steady, consistent resultsdifficult. Off now to cogitate over the results and decide a path forward.
Page 24
7th Mar 2019Brave Borderer
During our protracted wait for Spring, have had chance to reflect on the earlier tribulations with thebrushless motor installation. My enthusiasm was sparked by an article on getting the best from your Txin a magazine and the advantages of using the Elevon or V Tail facilities if available. My Flysky Rx/Txhas this facility, so after some experiments, set the boat up to use the Elevon function. This puts bothmotor ESCs on the same control lever, so advancing the control accelerates both screws equally andmoving to either side accelerates, or slows the appropriate motor. Think this will reduce thecoordination previously required to sail in a straight line. Fresh from that success decided toexperiment further. The Tx allows reducing Servo throw, so tried that too so could reduce the max.ESC output, it also seems to work. One problem with the original layout was that if the forward speedwas reduced quickly it was very easy to move the lever through the neutral point, overshooting intoreverse. This immediately reversed that motor causing erratic operation. The Tx also has a “DualRate” facility to adjust the lever response from linear to various alternate rates. This allows the neutralpoint zone to be increased, so the tendency to overshoot into reverse is reduced. Bench tests of theseadjustments suggest the model will be easier to operate. Hope they will make controlling the modelsperformance better in our closest pool, which is quite small. A further precaution to prevent inadvertentoperation of the brushless motors when using the centre, brushed one, was to add two small relays;one into each of the white ESC signal wires. This allows a another channel on the Tx to be used toselect, or deselect the brushless motors. Anticipate that by turning this channel and thus the brushlessESCs off, manoeuvring can be accomplished without the operation being overwhelmed by a brushedmotor inadvertently being operated. My patience for Spring is getting thinner!
model-boats.com model-boats.com
Page 10
1st Jun 2018H.M.S BRAVE BORDERER
Now the spray has settled have assessed these first tests; have also reviewed various pictures and U Tube videos ofthe Brave and Pekasas in operation. The actual vessels look to plane rather like mine, whilst some model bows lift upuntil a significant length of keel is exposed. Anyway, have been able to draw some conclusions: 1) Moved the batterytowards the stern and, at speed, the forefoot lifts slightly clear of the water. The plane is now almost flat. The batteryis not well positioned when near the bow. 2) The 2S battery used was a 4000mAh 30C; suspect this battery does nothave the capacity to operate the model. Every motor will run up smoothly until a second one is operated. The firstmotor then “stutters” and a fuse might blow, this could be indicative of a power surge. Any comments from theelectronic experts among the group would be appreciated. 3) The 3S battery was 10,500mAh and 40C; with thisbattery all three motors can be run at full speed together and fuses do not blow. it was also very heavy at 1700g,holding the model down. 4) The motors are 4500 kV. On refection, think a slower motor around, perhaps 2000 kVwould have been a better choice. 5) Would concur with comments by others that a simple single or two bladedpropeller layout for this model is probably best - that is unless you want to capture the true scale layout. The centrepropeller seems to have little effect on overall performance, although it will power the model quite nicely whenoperating by itself. Have had several suggestions about how best to use the centre propeller. Will think about themand decide later how to do this when I start to finish the model. 6) The 2 blade Hi – speed propellers both increasedperformance and current draw. The model is more than fast enough with the original scale layout. 7) Will purchase alighter, 3 S battery as that seems the best choice for performance and weight. 8) Testing using the bare hull with aminimum of detail worked well. For a models with a complex power train, this is a good approach as access to theinternals can be gained easily. Nothing worse that finishing a boat carefully just to find the performancedisappointing. Then having to to rip it apart to make major modifications or adjustments!
Page 23
27th Jan 2019HMS BRAVE BORDERER
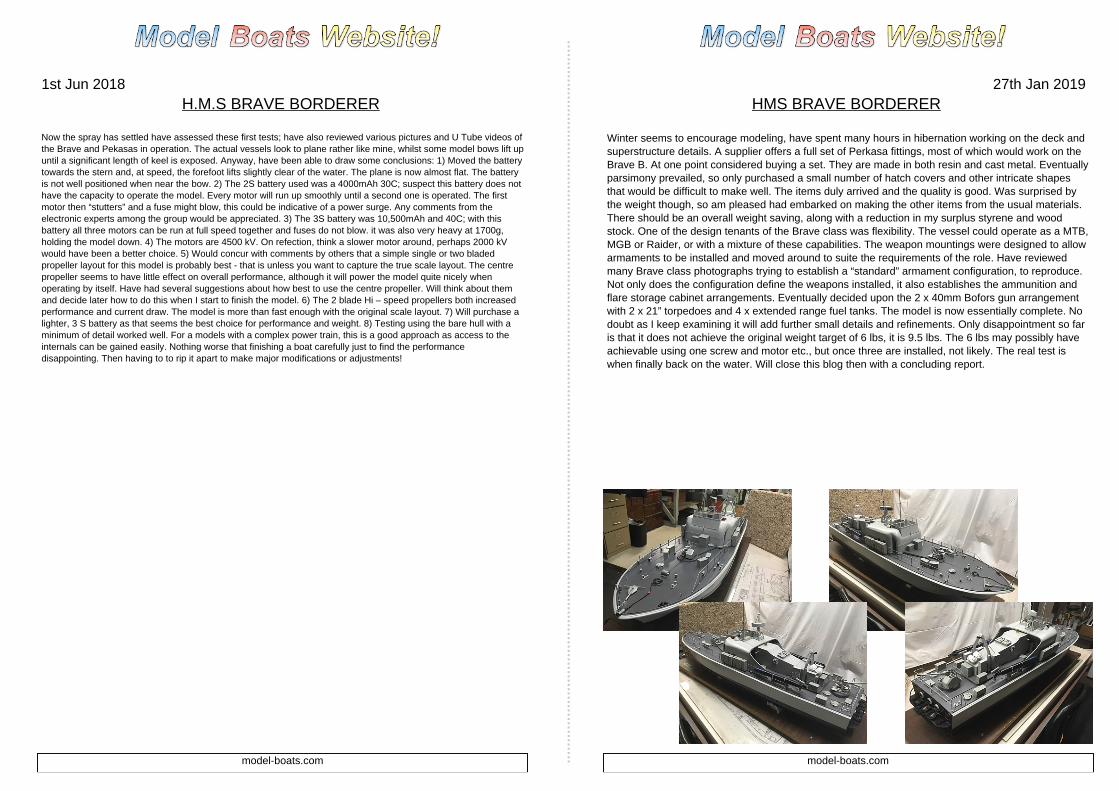
Winter seems to encourage modeling, have spent many hours in hibernation working on the deck andsuperstructure details. A supplier offers a full set of Perkasa fittings, most of which would work on theBrave B. At one point considered buying a set. They are made in both resin and cast metal. Eventuallyparsimony prevailed, so only purchased a small number of hatch covers and other intricate shapesthat would be difficult to make well. The items duly arrived and the quality is good. Was surprised bythe weight though, so am pleased had embarked on making the other items from the usual materials.There should be an overall weight saving, along with a reduction in my surplus styrene and woodstock. One of the design tenants of the Brave class was flexibility. The vessel could operate as a MTB,MGB or Raider, or with a mixture of these capabilities. The weapon mountings were designed to allowarmaments to be installed and moved around to suite the requirements of the role. Have reviewedmany Brave class photographs trying to establish a “standard” armament configuration, to reproduce.Not only does the configuration define the weapons installed, it also establishes the ammunition andflare storage cabinet arrangements. Eventually decided upon the 2 x 40mm Bofors gun arrangementwith 2 x 21” torpedoes and 4 x extended range fuel tanks. The model is now essentially complete. Nodoubt as I keep examining it will add further small details and refinements. Only disappointment so faris that it does not achieve the original weight target of 6 lbs, it is 9.5 lbs. The 6 lbs may possibly haveachievable using one screw and motor etc., but once three are installed, not likely. The real test iswhen finally back on the water. Will close this blog then with a concluding report.
model-boats.com model-boats.com
Page 11
18th Jun 2018H.M.S. BRAVE BORDERER
Decided to retry with the 2S battery and the original scale style propellers. Concluded that the speed is fine,especially in the windy conditions encountered and in a small pool that limited acceleration. The model had a very flatplane, must adjust the transom flap angle to see what effect that has. The forefoot did not rise much from the watersurface. Was frustrated by the “stutter” referred to in the last blog, noticed this occurred on the two out shafts onlyand when the starboard was operated after the port was running. Swopped the starboard motor over with the centreone to see what effect it would have. As started to remove the motor noted that a connector was not tight and thatthe screw had corroded. Exchanged motors, removed all connectors then cleaned and refitted using a water resistantlubricant. The stutter seemed cured. Another lesson learnt, when dealing with these high currents every connectionis tested and all defects exposed. The opportunity to retest using a 3S battery arose so installed it, all worked fine onthe bank. Put the model in the water and a major short occurred. 2 fuses blew and about 6” of wiring melted andburnt through the insulation. At least there was no hull damage! Did an inquest and, apart from the damagedescribed, also found the starboard ESC and motor had failed. These were the ones where the “stutter” originated,but cannot see any correlation between the two problems. Discussed the model with some of fellow scale modelersand concluded that the 4500kV motors are unsuitable for the scale propellers used. Every suggestion points towardmotors in the 1 – 2000kV range. As now needed to obtain a new motor and ESC, decided to reequip both outershafts with 2000kv motors and water cooled ESCs. Felt modifying these outer shafts would allow assessment of thisnew drivetrain combination, could then decide what approach to take with the centre shaft. Due to the mounting anddriveshaft arrangement, the choice of motors was restricted to 28mm O/D with a 1/8” shaft size. Unfortunately,suitable items are on back-order from Hong Kong, so there will be no further updates for a while.
Page 22
23rd Dec 2018HMS BRAVE BORDERER
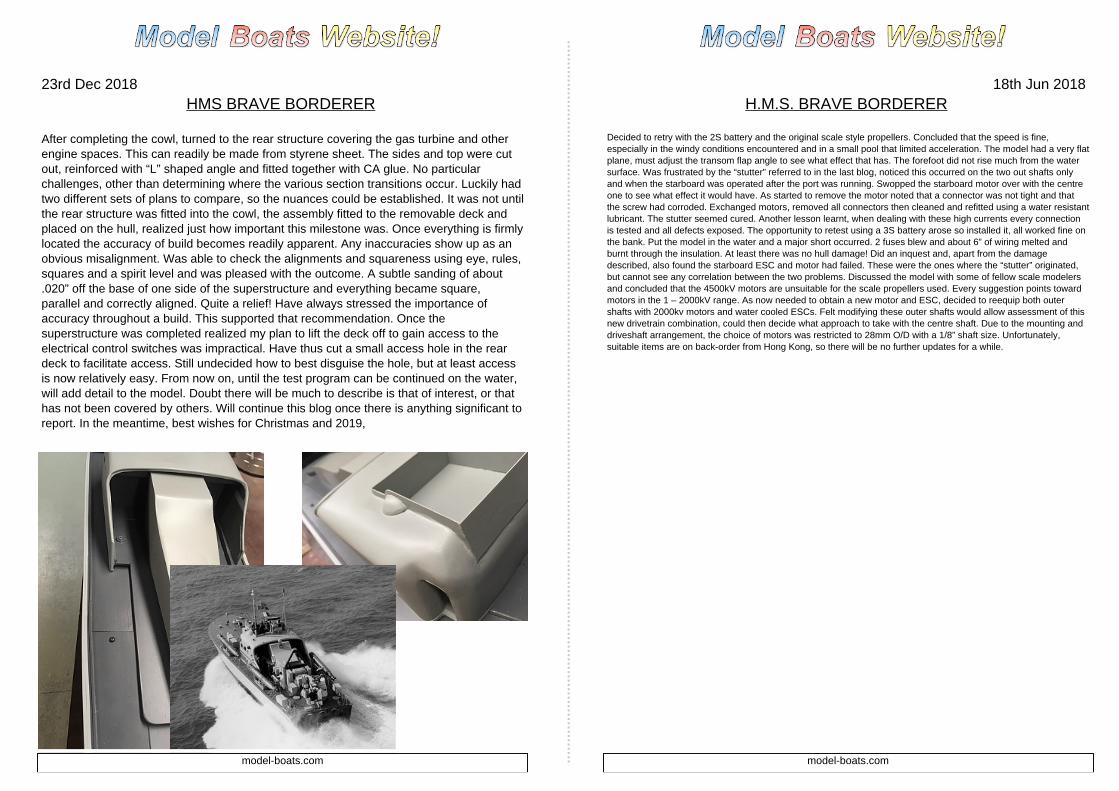
After completing the cowl, turned to the rear structure covering the gas turbine and otherengine spaces. This can readily be made from styrene sheet. The sides and top were cutout, reinforced with “L” shaped angle and fitted together with CA glue. No particularchallenges, other than determining where the various section transitions occur. Luckily hadtwo different sets of plans to compare, so the nuances could be established. It was not untilthe rear structure was fitted into the cowl, the assembly fitted to the removable deck andplaced on the hull, realized just how important this milestone was. Once everything is firmlylocated the accuracy of build becomes readily apparent. Any inaccuracies show up as anobvious misalignment. Was able to check the alignments and squareness using eye, rules,squares and a spirit level and was pleased with the outcome. A subtle sanding of about.020” off the base of one side of the superstructure and everything became square,parallel and correctly aligned. Quite a relief! Have always stressed the importance ofaccuracy throughout a build. This supported that recommendation. Once thesuperstructure was completed realized my plan to lift the deck off to gain access to theelectrical control switches was impractical. Have thus cut a small access hole in the reardeck to facilitate access. Still undecided how to best disguise the hole, but at least accessis now relatively easy. From now on, until the test program can be continued on the water,will add detail to the model. Doubt there will be much to describe is that of interest, or thathas not been covered by others. Will continue this blog once there is anything significant toreport. In the meantime, best wishes for Christmas and 2019,
model-boats.com model-boats.com
Page 12
8th Jul 2018BRAVE BORDERER
Whilst waiting for the new motors and ESCs, reviewed videos of the vessel under power and noted that as the speedincreases, the bow lifts towards a plane. However, as she gathers speed the transom flaps become effective, forcingthe bow down in a cloud of spray. At this point the plane has been lost and the model becomes almostuncontrollable. Decided to temporarily ballast the hull to simulate the new motors and ESCs, then try to establish theoptimum flap angle using just the centre propeller and shaft. This is the original 2838 brushless motor installation witha 30 mm propeller. With this simulated drivetrain it would also be an opportunity to determine the best batterylocations for both 2 and 3S Li-Po batteries. Made up an angle template with a spirit level to get the correct deckinclination with the vessel floating at rest. From this located each type of battery statically - somewhere close to themid-point of the hull. Which also seemed as good a place to start as any! Somewhere in the research for this modelfound a reference to the transom flap angle. This was at a 2 degree -ve (pointing downwards) angle. installed the 2Sbattery and tried the model. The bow dug in at speed. Adjusted the flap to a straight and level position and triedagain. The bow still wanted to dig in, but to a reduced extent. Readjusted the angle to 2 + ve and repeated. The bownow lifted so the forefoot just cleared the water and then remained in that position. Replaced the 2S battery with the3S. The extra power obviously increased speed and the bow lifted slightly further. The spray was deflected by thechine rails and a level plane established. The conclusion is that the transom flap angle is critical to the correct planingof this model and that it should not be negative. Until the new motors and ESCs are fitted will leave the transom flapand battery locations as is. Once these components are installed, intend to repeat the test. Am confident that withsome fine tuning the model can be now made to plane properly at a scale speed. Interesting to note that the modelwill just about plane with only one propeller operating – wonder what it will be like with all three?
Page 21
3rd Dec 2018HMS BRAVE BORDERER
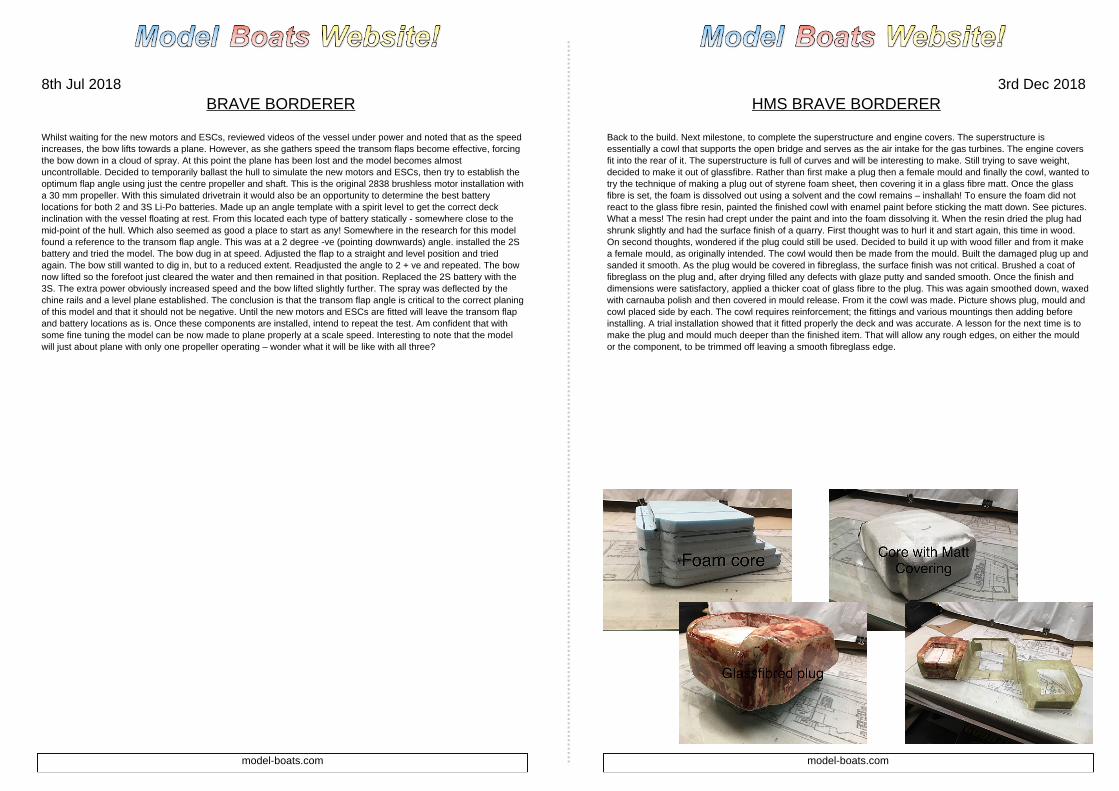
Back to the build. Next milestone, to complete the superstructure and engine covers. The superstructure isessentially a cowl that supports the open bridge and serves as the air intake for the gas turbines. The engine coversfit into the rear of it. The superstructure is full of curves and will be interesting to make. Still trying to save weight,decided to make it out of glassfibre. Rather than first make a plug then a female mould and finally the cowl, wanted totry the technique of making a plug out of styrene foam sheet, then covering it in a glass fibre matt. Once the glassfibre is set, the foam is dissolved out using a solvent and the cowl remains – inshallah! To ensure the foam did notreact to the glass fibre resin, painted the finished cowl with enamel paint before sticking the matt down. See pictures.What a mess! The resin had crept under the paint and into the foam dissolving it. When the resin dried the plug hadshrunk slightly and had the surface finish of a quarry. First thought was to hurl it and start again, this time in wood.On second thoughts, wondered if the plug could still be used. Decided to build it up with wood filler and from it makea female mould, as originally intended. The cowl would then be made from the mould. Built the damaged plug up andsanded it smooth. As the plug would be covered in fibreglass, the surface finish was not critical. Brushed a coat offibreglass on the plug and, after drying filled any defects with glaze putty and sanded smooth. Once the finish anddimensions were satisfactory, applied a thicker coat of glass fibre to the plug. This was again smoothed down, waxedwith carnauba polish and then covered in mould release. From it the cowl was made. Picture shows plug, mould andcowl placed side by each. The cowl requires reinforcement; the fittings and various mountings then adding beforeinstalling. A trial installation showed that it fitted properly the deck and was accurate. A lesson for the next time is tomake the plug and mould much deeper than the finished item. That will allow any rough edges, on either the mouldor the component, to be trimmed off leaving a smooth fibreglass edge.
model-boats.com model-boats.com
Page 13
23rd Jul 2018BRAVE BORDERER
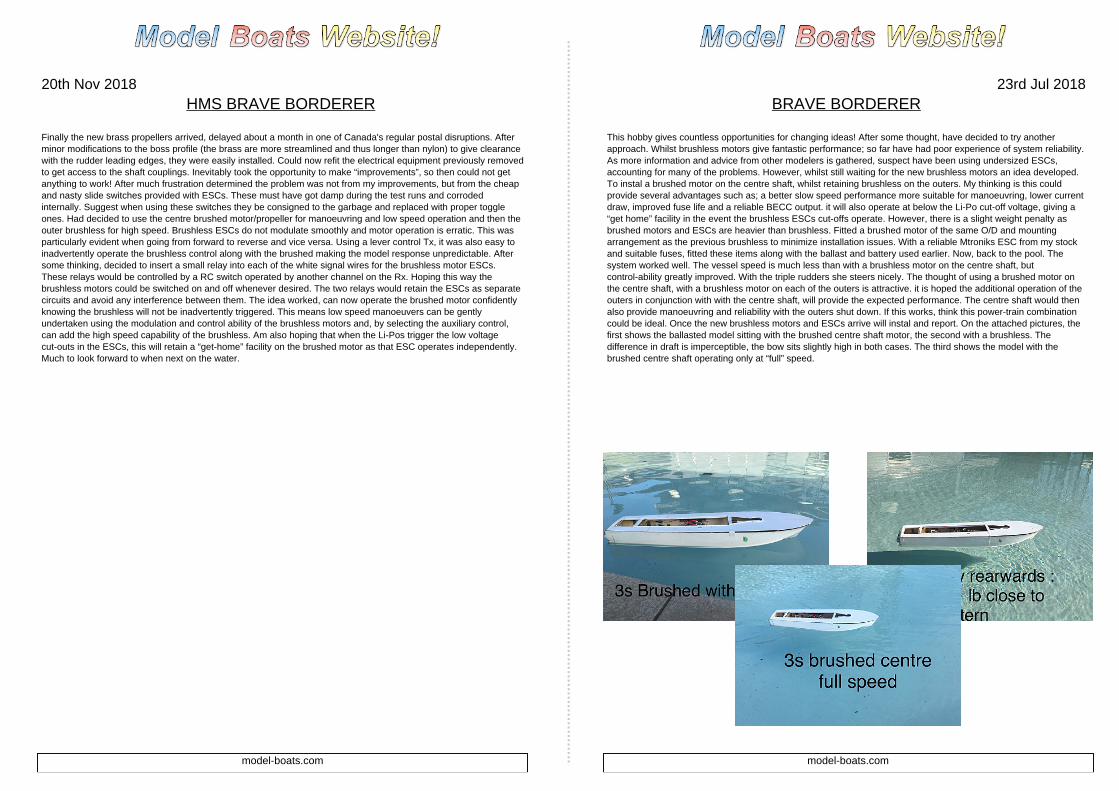
This hobby gives countless opportunities for changing ideas! After some thought, have decided to try anotherapproach. Whilst brushless motors give fantastic performance; so far have had poor experience of system reliability.As more information and advice from other modelers is gathered, suspect have been using undersized ESCs,accounting for many of the problems. However, whilst still waiting for the new brushless motors an idea developed.To instal a brushed motor on the centre shaft, whilst retaining brushless on the outers. My thinking is this couldprovide several advantages such as; a better slow speed performance more suitable for manoeuvring, lower currentdraw, improved fuse life and a reliable BECC output. it will also operate at below the Li-Po cut-off voltage, giving a“get home” facility in the event the brushless ESCs cut-offs operate. However, there is a slight weight penalty asbrushed motors and ESCs are heavier than brushless. Fitted a brushed motor of the same O/D and mountingarrangement as the previous brushless to minimize installation issues. With a reliable Mtroniks ESC from my stockand suitable fuses, fitted these items along with the ballast and battery used earlier. Now, back to the pool. Thesystem worked well. The vessel speed is much less than with a brushless motor on the centre shaft, butcontrol-ability greatly improved. With the triple rudders she steers nicely. The thought of using a brushed motor onthe centre shaft, with a brushless motor on each of the outers is attractive. it is hoped the additional operation of theouters in conjunction with with the centre shaft, will provide the expected performance. The centre shaft would thenalso provide manoeuvring and reliability with the outers shut down. If this works, think this power-train combinationcould be ideal. Once the new brushless motors and ESCs arrive will instal and report. On the attached pictures, thefirst shows the ballasted model sitting with the brushed centre shaft motor, the second with a brushless. Thedifference in draft is imperceptible, the bow sits slightly high in both cases. The third shows the model with thebrushed centre shaft operating only at “full” speed.
Page 20
20th Nov 2018HMS BRAVE BORDERER
Finally the new brass propellers arrived, delayed about a month in one of Canada's regular postal disruptions. Afterminor modifications to the boss profile (the brass are more streamlined and thus longer than nylon) to give clearancewith the rudder leading edges, they were easily installed. Could now refit the electrical equipment previously removedto get access to the shaft couplings. Inevitably took the opportunity to make “improvements”, so then could not getanything to work! After much frustration determined the problem was not from my improvements, but from the cheapand nasty slide switches provided with ESCs. These must have got damp during the test runs and corrodedinternally. Suggest when using these switches they be consigned to the garbage and replaced with proper toggleones. Had decided to use the centre brushed motor/propeller for manoeuvring and low speed operation and then theouter brushless for high speed. Brushless ESCs do not modulate smoothly and motor operation is erratic. This wasparticularly evident when going from forward to reverse and vice versa. Using a lever control Tx, it was also easy toinadvertently operate the brushless control along with the brushed making the model response unpredictable. Aftersome thinking, decided to insert a small relay into each of the white signal wires for the brushless motor ESCs.These relays would be controlled by a RC switch operated by another channel on the Rx. Hoping this way thebrushless motors could be switched on and off whenever desired. The two relays would retain the ESCs as separatecircuits and avoid any interference between them. The idea worked, can now operate the brushed motor confidentlyknowing the brushless will not be inadvertently triggered. This means low speed manoeuvers can be gentlyundertaken using the modulation and control ability of the brushless motors and, by selecting the auxiliary control,can add the high speed capability of the brushless. Am also hoping that when the Li-Pos trigger the low voltagecut-outs in the ESCs, this will retain a “get-home” facility on the brushed motor as that ESC operates independently.Much to look forward to when next on the water.
model-boats.com model-boats.com
Page 14
19th Aug 2018BRAVE BORDERER
Blog 4 update – Adjustable transom flap using metallic tape did not work. Thinkthe vibration caused flexing and fatigue, so it finally split. Fortunately hadestablished the correct angle, so reproduced the flap arrangement with a fixedthin alloy plate. Much more robust. Have installed the new brushless motors andESCs. The current layout is brushless motors on the outer propellers and brushedon the centre, all powered by a single 3S Li-Po battery and Rx. Am hoping tocommence water trails this week, but have found an issue which was also presentwith the original brushless motors. When either brushless motor is powered up itoperates nicely, however, as soon as the second motor is started either motor“stutters” and a pronounced “squeal” can be heard. The brushed motor isunaffected. Have now tried several ESCs but to no avail, the issue remains. It canbe cured though by powering each brushless motor with it's own battery. Whenthis is done everything powers up cleanly and quietly. The obvious solution is touse two Li-Po batteries and abandon the single battery approach. Am reluctant todo this as the model weight will increase yet again. Has anybody experienced thiswhen using twin brushless motors and, if so, how was it resolved?
Page 19
19th Oct 2018HMS BRAVE BORDERER
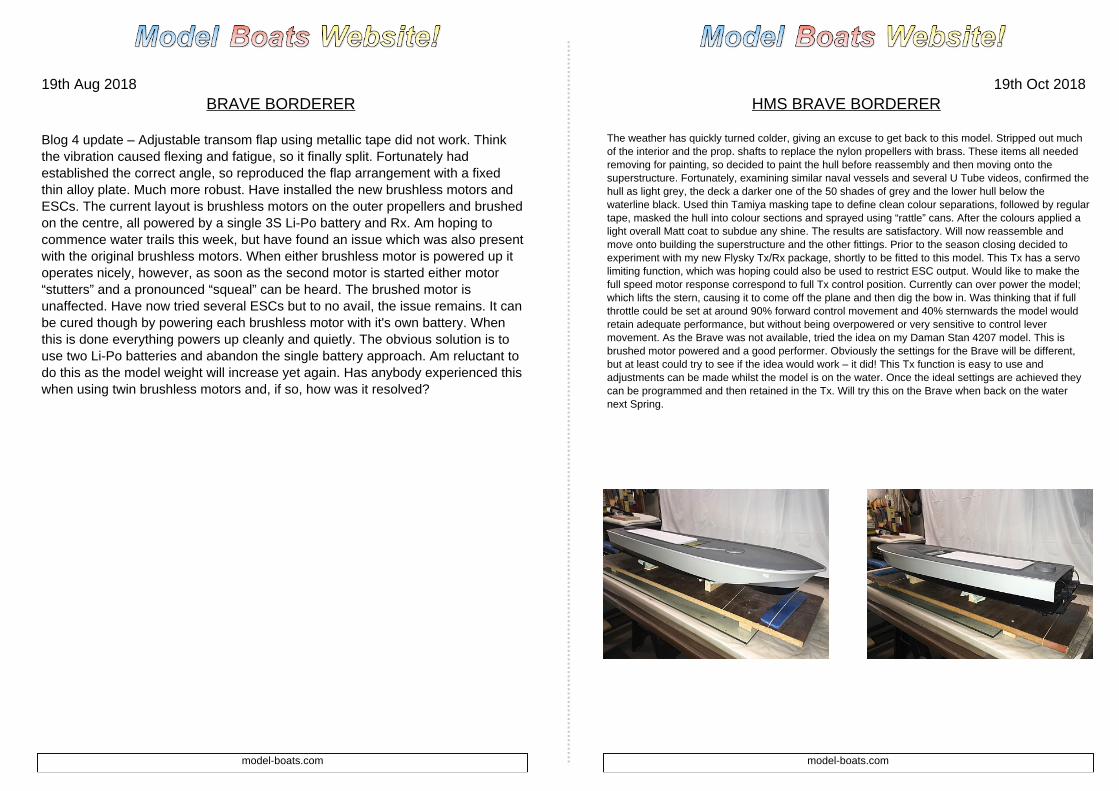
The weather has quickly turned colder, giving an excuse to get back to this model. Stripped out muchof the interior and the prop. shafts to replace the nylon propellers with brass. These items all neededremoving for painting, so decided to paint the hull before reassembly and then moving onto thesuperstructure. Fortunately, examining similar naval vessels and several U Tube videos, confirmed thehull as light grey, the deck a darker one of the 50 shades of grey and the lower hull below thewaterline black. Used thin Tamiya masking tape to define clean colour separations, followed by regulartape, masked the hull into colour sections and sprayed using “rattle” cans. After the colours applied alight overall Matt coat to subdue any shine. The results are satisfactory. Will now reassemble andmove onto building the superstructure and the other fittings. Prior to the season closing decided toexperiment with my new Flysky Tx/Rx package, shortly to be fitted to this model. This Tx has a servolimiting function, which was hoping could also be used to restrict ESC output. Would like to make thefull speed motor response correspond to full Tx control position. Currently can over power the model;which lifts the stern, causing it to come off the plane and then dig the bow in. Was thinking that if fullthrottle could be set at around 90% forward control movement and 40% sternwards the model wouldretain adequate performance, but without being overpowered or very sensitive to control levermovement. As the Brave was not available, tried the idea on my Daman Stan 4207 model. This isbrushed motor powered and a good performer. Obviously the settings for the Brave will be different,but at least could try to see if the idea would work – it did! This Tx function is easy to use andadjustments can be made whilst the model is on the water. Once the ideal settings are achieved theycan be programmed and then retained in the Tx. Will try this on the Brave when back on the waternext Spring.
model-boats.com model-boats.com
Page 15
29th Aug 2018BRAVE BORDERER
Decided to separate the two power systems; one to the port ESC and motor and the other the starboard. Hope thiswill reduce interference between the motor systems. Have also reverted to a remote battery powered Rx rather thanthe BECC system, again to reduce possible interference. The modifications did not resolve the problems. The squealand stutter are still present, but much reduced. Sounds rather like a slipping coupling, but as these have beenchecked many times they can be eliminated. Apart from the squeal and the stutter, everything works well. The squeal/stutter occurs at start up, when it happens the control is returned to neutral, if the motor is immediately reselected,usually the problem goes away and the motor runs up cleanly. it only occurs when both motors are selected at thesame time. Either runs up cleanly when selected individually. Interestingly enough, did some research on variousModel Boats site and found some references to RF interference, no specific solutions though. Also examined someAero modeling sites as they use powerful brushless motors with ESCs. There is some history of the problem there.Evidently when the mosfets (?) of the ESCs convert DC to AC, RF interference is generated. it can often beaddressed by using ferrite rings on the ESC control leads. My latest ESCs actually have ferrite rings, so the problemmust have been anticipated. This might account for the latest reduction in squeal and stutter levels. Am at a loss tothink of any other modifications, so decided to conduct a water test. Maybe it is a characteristic of brushless motors,but their control response seems “ragged”, not smooth as with a brushed. Anyway, the squeal and stutter seemedreduced yet again, perhaps the water load damped them down. Was able to start exploring both the performanceenvelope and the viability of the brushed centre shaft motor. First impressions are that on a 2S battery theperformance is fine, but it sparkles on 3S. On 3S the stutter and squeal are more pronounced though. intend to dofurther trials but, unless something unexpected occurs, now plan to use 2S power. The centre brushed motor ideaworks well, this layout seems a good compromise. Will design a simple switching circuit to ensure the brushlessmotors can selected separately. This will avoid the inadvertent operation of both brushed and brushlessunintentionally as they are on the same control stick. The brushed can then be used for low speed operation.Returning to the problem of squeal and stutter – has anybody else experienced this and how was it resolved?
Page 18
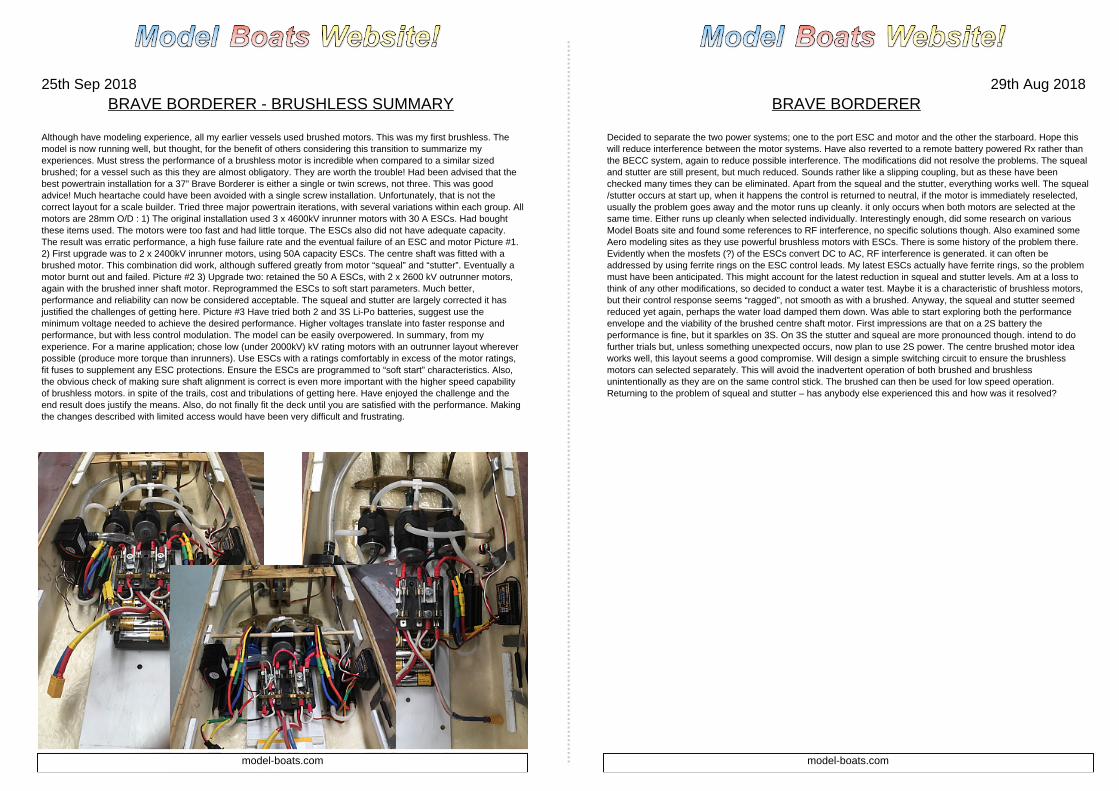
25th Sep 2018BRAVE BORDERER - BRUSHLESS SUMMARY
Although have modeling experience, all my earlier vessels used brushed motors. This was my first brushless. Themodel is now running well, but thought, for the benefit of others considering this transition to summarize myexperiences. Must stress the performance of a brushless motor is incredible when compared to a similar sizedbrushed; for a vessel such as this they are almost obligatory. They are worth the trouble! Had been advised that thebest powertrain installation for a 37” Brave Borderer is either a single or twin screws, not three. This was goodadvice! Much heartache could have been avoided with a single screw installation. Unfortunately, that is not thecorrect layout for a scale builder. Tried three major powertrain iterations, with several variations within each group. Allmotors are 28mm O/D : 1) The original installation used 3 x 4600kV inrunner motors with 30 A ESCs. Had boughtthese items used. The motors were too fast and had little torque. The ESCs also did not have adequate capacity.The result was erratic performance, a high fuse failure rate and the eventual failure of an ESC and motor Picture #1.2) First upgrade was to 2 x 2400kV inrunner motors, using 50A capacity ESCs. The centre shaft was fitted with abrushed motor. This combination did work, although suffered greatly from motor “squeal” and “stutter”. Eventually amotor burnt out and failed. Picture #2 3) Upgrade two: retained the 50 A ESCs, with 2 x 2600 kV outrunner motors,again with the brushed inner shaft motor. Reprogrammed the ESCs to soft start parameters. Much better,performance and reliability can now be considered acceptable. The squeal and stutter are largely corrected it hasjustified the challenges of getting here. Picture #3 Have tried both 2 and 3S Li-Po batteries, suggest use theminimum voltage needed to achieve the desired performance. Higher voltages translate into faster response andperformance, but with less control modulation. The model can be easily overpowered. In summary, from myexperience. For a marine application; chose low (under 2000kV) kV rating motors with an outrunner layout whereverpossible (produce more torque than inrunners). Use ESCs with a ratings comfortably in excess of the motor ratings,fit fuses to supplement any ESC protections. Ensure the ESCs are programmed to “soft start” characteristics. Also,the obvious check of making sure shaft alignment is correct is even more important with the higher speed capabilityof brushless motors. in spite of the trails, cost and tribulations of getting here. Have enjoyed the challenge and theend result does justify the means. Also, do not finally fit the deck until you are satisfied with the performance. Makingthe changes described with limited access would have been very difficult and frustrating.
model-boats.com model-boats.com
Page 16
11th Sep 2018BRAVE BORDERER
Been researching the squeal and stutter on other websites and conclude RFI is probably not the major contributor.Others attribute it to a mismatch in the ESC / motor timing, which seems more likely. Whatever caused it, resulted inthe affected motor failing. Which came first, the failure causing squeal or squeal causing failure is open to conjecture.Much to my surprise the manufacturer has decided to replace the motor under warranty. In the meantime, the motorsI had planned to use originally (2800kV Outrunners) came into stock, so purchased a couple. Until now have had touse the ESC default settings as did not have a programming card. This also arrived with the motors. Following advicefrom another contributor reprogrammed the motors with “softer” start and acceleration settings. Fitted and tried thenew motors and settings. On the bench, the squeal and stutter have almost gone. The motors are also moretractable. As the brushless motors are now going to be used for high speed operation only, with slow on the centrebrushed, thought could simplify the controls by putting the brushless ESCs on one control system using a “Y” lead.However, this introduced inconsistent and erratic motor responses. Reverted to the two previous separate controls,port and starboard. On the water the performance is fine, as is the reliability. The 2S battery gave almost half anhours operation. The bow lifts nicely with both 2 & 3 S Batteries; plenty of spray. Hopefully resembling a 50 knotvessel! Another adjustment is needed to the transom flaps to try to hold the bow down later as she accelerates.Feeling now to finally be making progress with this model. The squeal has not gone, nor has erratic motor operation.The squeal is high pitched screech, rather like treading on a budgie! When it happens, bringing the control back toneutral and advancing it again almost always overcomes it. The erratic operation happens also when starting and israther like the motors are not getting a signal to react to the control. Again, returning through neutral briefly seems tocorrect it. The revised motors and ESCs have increased the weight to 6lbs for the hull including all running gear,excluding batteries and superstructure. Whilst still trying to control weight have concluded this figure is satisfactory asthe performance certainly is.
Page 17
21st Sep 2018HMS BRAVE BORDERER
Adjusted the transom flaps and reprogrammed the ESCs to the softest start settings, retested. Untilnow, the test runs did not have the duration or stability to really examine what was happening. Using 3S batteries acceleration is rapid and a is plane quickly achieved. However, as the accelerationcontinues and speed increases, the bow digs in. A cloud of spray then surrounds the model as theplane is lost. Brushless motors do not modulate as smoothly as brushed and adjusting power tends tobe erratic or exaggerated. This is a scale model and the propeller shaft angles are per the plans. Thethrust from the propeller has two components, horizontal and vertical. The horizontal propels thevessel forward. However, the vertical component forces the stern upwards and, correspondingly, thebow down. Have moved as much weight as possible towards the stern to counteract this, limited bymaintaining the correct displacement and waterline. The easiest solution is to reduce motor power,decreasing both speed and the lifting component. Decided to retry the 2S batteries as they givereduced power. A plane is again achieved, but as the motor response is more docile, it can becontrolled. if the speed gets too high the bow lowers, as before, but the motor output can be moreeasily adjusted. Spent a pleasant half hour or so with the vessel accelerating onto and off a nice,controllable plane. Much less spray and drama than with 3S and much more controllable. Have nowdecided to revise plans and use 2S rather than 3 batteries. A further advantage is the motor noise ismuted and now sounds more like a gas turbine than a dental drill! Finally feeling comfortable with themodel. Will thus shelve further building until the late fall when sailing in Canada concludes. Want toenjoy the rest of my fleet in the meantime! Will summarize my experiences with brushless motors inanother blog shortly for the benefits of others contemplating their use. After restarting the model willresurrect periodic build blogs to advise progress.
Powered by TCPDF (www.tcpdf.org)
model-boats.com model-boats.com


