Embed Size (px)
Citation preview
Part No. Z1-003-152, IB006433
Nov. 2006
Quick Immunity SequencerVer. 1.0
USERʼS MANUALPCR-LA SeriesApplication SoftwareSD003-PCR-LA
Use of This Manual
Please read through and understand this User’s Manual before operating the product. After reading, alwayskeep the manual nearby so that you may refer to it as needed. When moving the product to another loca-tion, be sure to bring the manual as well.If you find any incorrectly arranged or missing pages in this manual, they will be replaced. If the manual itgets lost or soiled, a new copy can be provided for a fee. In either case, please contact Kikusui distributor/agent, and provide the “Kikusui Part No.” given on the cover.This manual has been prepared with the utmost care; however, if you have any questions, or note any errorsor omissions, please contact Kikusui distributor/agent.
Microsoft, and Windows are registered trademarks of Microsoft Corporation, USA.Pentium is a trademark of Intel Corporation, USA.National Instruments is the registered trademark of National Instruments Corporation, USA.NI-488 and NI-488.2 are registered trademarks of National Instruments Corporation, USA.Other company, brand, and product names provided in this manual are trademarks or registered trademarksof their respective holders.
Reproduction and reprinting of this manual, whole or partially, without our permission is prohibited. Both unit specifications and manual contents are subject to change without notice.
Copyright© 2005-2006 Kikusui Electronics Corporation
Contents
Safety Precautions - - - - - - - - - - - - - - - - - - - - - - - - - - - - - - - - - - - - - I
Preface P-1
P.1 About This Manual - - - - - - - - - - - - - - - - - - - - - - - - - - - - - - - - - - - - - - - P-1
P.2 Product Outline - - - - - - - - - - - - - - - - - - - - - - - - - - - - - - - - - - - - - - - - - - P-1
P.3 Required Operating Conditions - - - - - - - - - - - - - - - - - - - - - - - - - - - - - - P-2
P.4 Required Hardware - - - - - - - - - - - - - - - - - - - - - - - - - - - - - - - - - - - - - - - P-3
Chapter 1 Setup 1-1
1.1 Package Contents - - - - - - - - - - - - - - - - - - - - - - - - - - - - - - - - - - - - - - - - 1-2
1.2 Installation - - - - - - - - - - - - - - - - - - - - - - - - - - - - - - - - - - - - - - - - - - - - - 1-21.2.1 Preparing for Installation - - - - - - - - - - - - - - - - - - - - - - - - - - - - - - 1-21.2.2 Installing the KI-VISA Driver - - - - - - - - - - - - - - - - - - - - - - - - - - - - 1-31.2.3 Installing Quick Immunity Sequencer - - - - - - - - - - - - - - - - - - - - - 1-6
Chapter 2 Overall Picture of Test Sequences 2-1
2.1 Outline of Immunity Test - - - - - - - - - - - - - - - - - - - - - - - - - - - - - - - - - - - 2-2
2.2 Test Configuration - - - - - - - - - - - - - - - - - - - - - - - - - - - - - - - - - - - - - - - - 2-3
2.3 Launching Quick Immunity Sequencer - - - - - - - - - - - - - - - - - - - - - - - - - 2-4
2.4 Setting up I/O Configuration - - - - - - - - - - - - - - - - - - - - - - - - - - - - - - - - - 2-5
2.5 Troubleshooting at Startup - - - - - - - - - - - - - - - - - - - - - - - - - - - - - - - - - - 2-62.5.1 Setting up KI-VISA - - - - - - - - - - - - - - - - - - - - - - - - - - - - - - - - - - 2-7
2.6 Overall Picture of Test Sequences - - - - - - - - - - - - - - - - - - - - - - - - - - - 2-10
2.7 Menus and Toolbar - - - - - - - - - - - - - - - - - - - - - - - - - - - - - - - - - - - - - - 2-122.7.1 Menus - - - - - - - - - - - - - - - - - - - - - - - - - - - - - - - - - - - - - - - - - - 2-122.7.2 Toolbar - - - - - - - - - - - - - - - - - - - - - - - - - - - - - - - - - - - - - - - - - 2-15
2.8 Running a Test - - - - - - - - - - - - - - - - - - - - - - - - - - - - - - - - - - - - - - - - - 2-172.8.1 Turning Power on/off in the Test Configuration - - - - - - - - - - - - - 2-172.8.2 Running Procedure - - - - - - - - - - - - - - - - - - - - - - - - - - - - - - - - - 2-182.8.3 Troubleshooting During Running - - - - - - - - - - - - - - - - - - - - - - - 2-192.8.4 Corrective Measures in the Event of Problems - - - - - - - - - - - - - 2-19
2.9 Observing a Test Signal - - - - - - - - - - - - - - - - - - - - - - - - - - - - - - - - - - 2-19
Chapter 3 IEC 61000-4-11 3-1
3.1 Outline of the Test - - - - - - - - - - - - - - - - - - - - - - - - - - - - - - - - - - - - - - - - 3-2
3.2 Preparing the Test Conditions - - - - - - - - - - - - - - - - - - - - - - - - - - - - - - - 3-33.2.1 Voltage Dips and Short Interruptions - - - - - - - - - - - - - - - - - - - - - 3-33.2.2 Voltage Variations - - - - - - - - - - - - - - - - - - - - - - - - - - - - - - - - - - 3-7
3.3 Results of Sequence Running - - - - - - - - - - - - - - - - - - - - - - - - - - - - - - - 3-9
Chapter 4 IEC 61000-4-13 4-1
4.1 Outline of the Test - - - - - - - - - - - - - - - - - - - - - - - - - - - - - - - - - - - - - - - - 4-2
4.2 Preparing the Test Conditions - - - - - - - - - - - - - - - - - - - - - - - - - - - - - - - 4-3
SD003-PCR-LA Contents 3
4.2.1 Combined Harmonics (Flat Curve) - - - - - - - - - - - - - - - - - - - - - - - 4-34.2.2 Combined Harmonics (Over Swing) - - - - - - - - - - - - - - - - - - - - - - 4-74.2.3 Sweep in Frequency - - - - - - - - - - - - - - - - - - - - - - - - - - - - - - - - - 4-94.2.4 Individual Harmonics - - - - - - - - - - - - - - - - - - - - - - - - - - - - - - - - 4-12
4.3 Results of Sequence Running - - - - - - - - - - - - - - - - - - - - - - - - - - - - - - - 4-15
Chapter 5 IEC 61000-4-14 5-1
5.1 Outline of the Test - - - - - - - - - - - - - - - - - - - - - - - - - - - - - - - - - - - - - - - - 5-2
5.2 Preparing the Test Conditions - - - - - - - - - - - - - - - - - - - - - - - - - - - - - - - - 5-35.2.1 Voltage Fluctuation - - - - - - - - - - - - - - - - - - - - - - - - - - - - - - - - - - 5-35.2.2 Interval - - - - - - - - - - - - - - - - - - - - - - - - - - - - - - - - - - - - - - - - - - - 5-6
5.3 Results of Sequence Running - - - - - - - - - - - - - - - - - - - - - - - - - - - - - - - - 5-8
Chapter 6 IEC 61000-4-27 6-1
6.1 Outline of the Test - - - - - - - - - - - - - - - - - - - - - - - - - - - - - - - - - - - - - - - - 6-2
6.2 Preparing the Test Conditions - - - - - - - - - - - - - - - - - - - - - - - - - - - - - - - - 6-3
6.3 Results of Sequence Running - - - - - - - - - - - - - - - - - - - - - - - - - - - - - - - - 6-6
Chapter 7 IEC 61000-4-28 7-1
7.1 Outline of the Test - - - - - - - - - - - - - - - - - - - - - - - - - - - - - - - - - - - - - - - - 7-2
7.2 Preparing the Test Conditions - - - - - - - - - - - - - - - - - - - - - - - - - - - - - - - - 7-3
7.3 Results of Sequence Running - - - - - - - - - - - - - - - - - - - - - - - - - - - - - - - - 7-6
Chapter 8 IEC 61000-4-29 8-1
8.1 Outline of the Test - - - - - - - - - - - - - - - - - - - - - - - - - - - - - - - - - - - - - - - - 8-2
8.2 Preparing the Test Conditions - - - - - - - - - - - - - - - - - - - - - - - - - - - - - - - - 8-28.2.1 DC Voltage Dips and Short Interruptions - - - - - - - - - - - - - - - - - - - 8-28.2.2 DC Voltage Variations - - - - - - - - - - - - - - - - - - - - - - - - - - - - - - - - 8-5
8.3 Results of Sequence Running - - - - - - - - - - - - - - - - - - - - - - - - - - - - - - - - 8-7
Appendix A-1
A.1 Test Standard Selection Guide - - - - - - - - - - - - - - - - - - - - - - - - - - - - - - - A-1
Index I-1
4 Contents SD003-PCR-LA
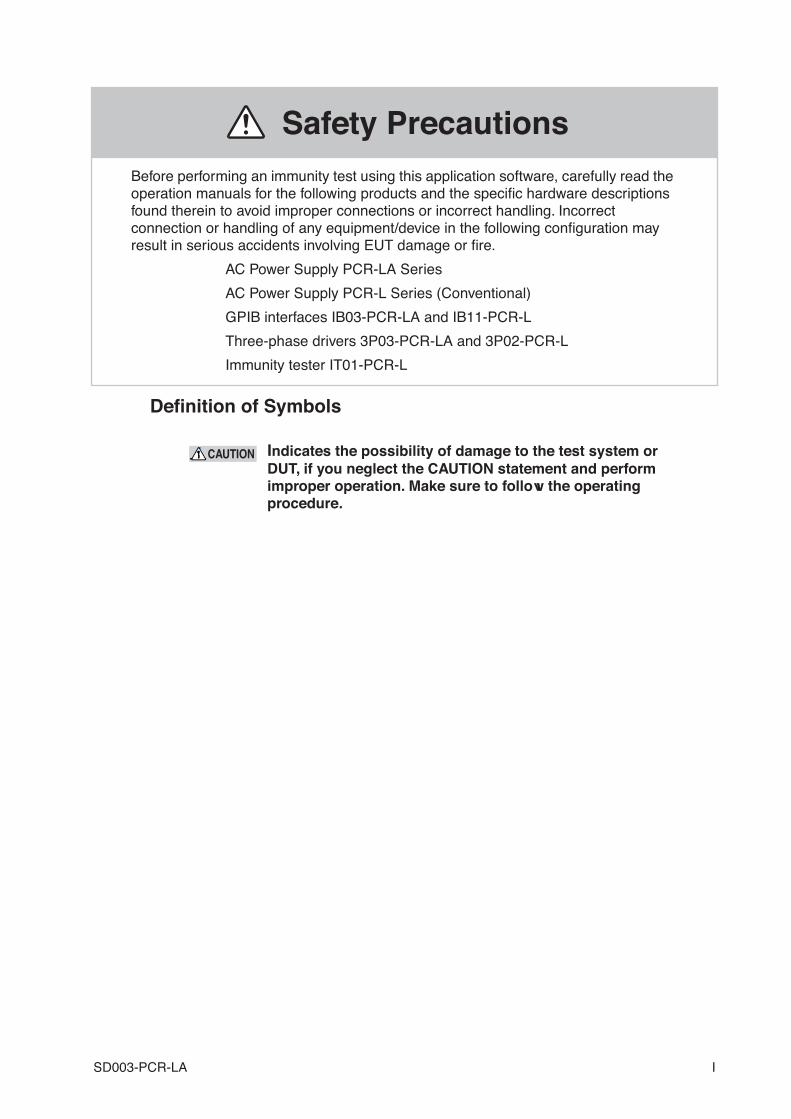
Safety PrecautionsBefore performing an immunity test using this application software, carefully read the operation manuals for the following products and the specific hardware descriptions found therein to avoid improper connections or incorrect handling. Incorrect connection or handling of any equipment/device in the following configuration may result in serious accidents involving EUT damage or fire.
AC Power Supply PCR-LA Series
AC Power Supply PCR-L Series (Conventional)
GPIB interfaces IB03-PCR-LA and IB11-PCR-L
Three-phase drivers 3P03-PCR-LA and 3P02-PCR-L
Immunity tester IT01-PCR-L
Definition of Symbols
Indicates the possibility of damage to the test system or DUT, if you neglect the CAUTION statement and perform improper operation. Make sure to follow the operating procedure.
CAUTION
SD003-PCR-LA I
Arrangement of this manual
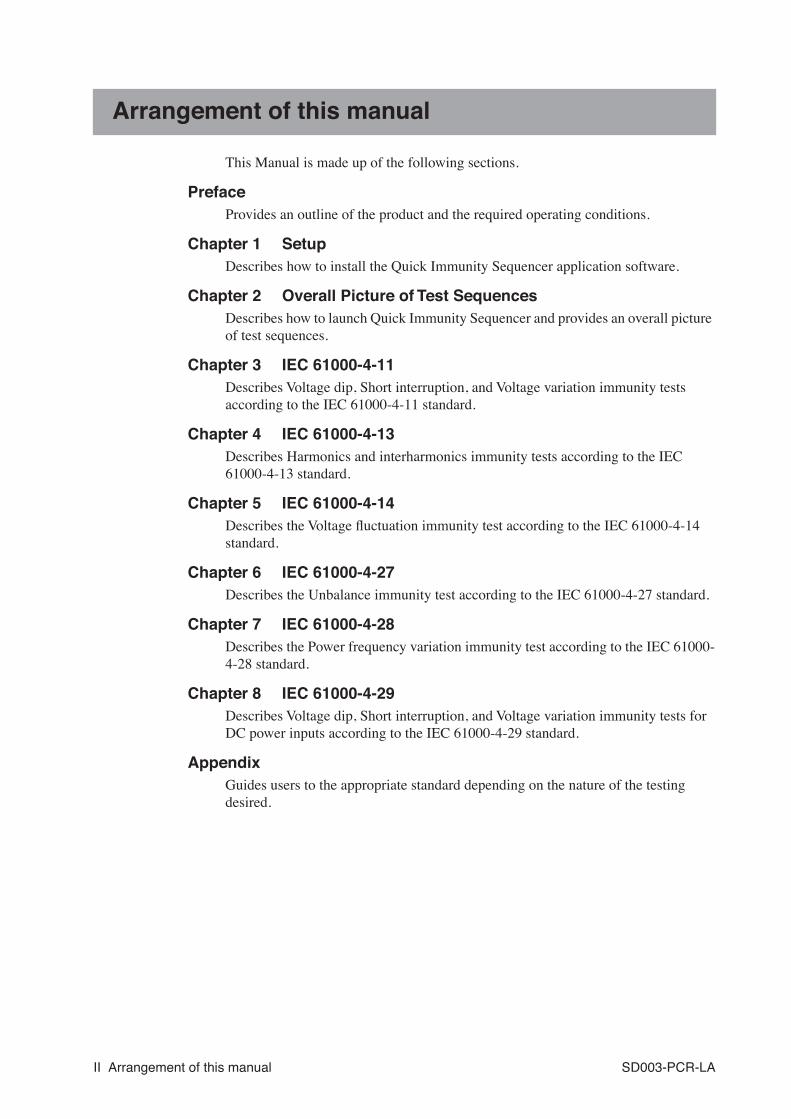
This Manual is made up of the following sections.
PrefaceProvides an outline of the product and the required operating conditions.
Chapter 1 SetupDescribes how to install the Quick Immunity Sequencer application software.
Chapter 2 Overall Picture of Test SequencesDescribes how to launch Quick Immunity Sequencer and provides an overall picture of test sequences.
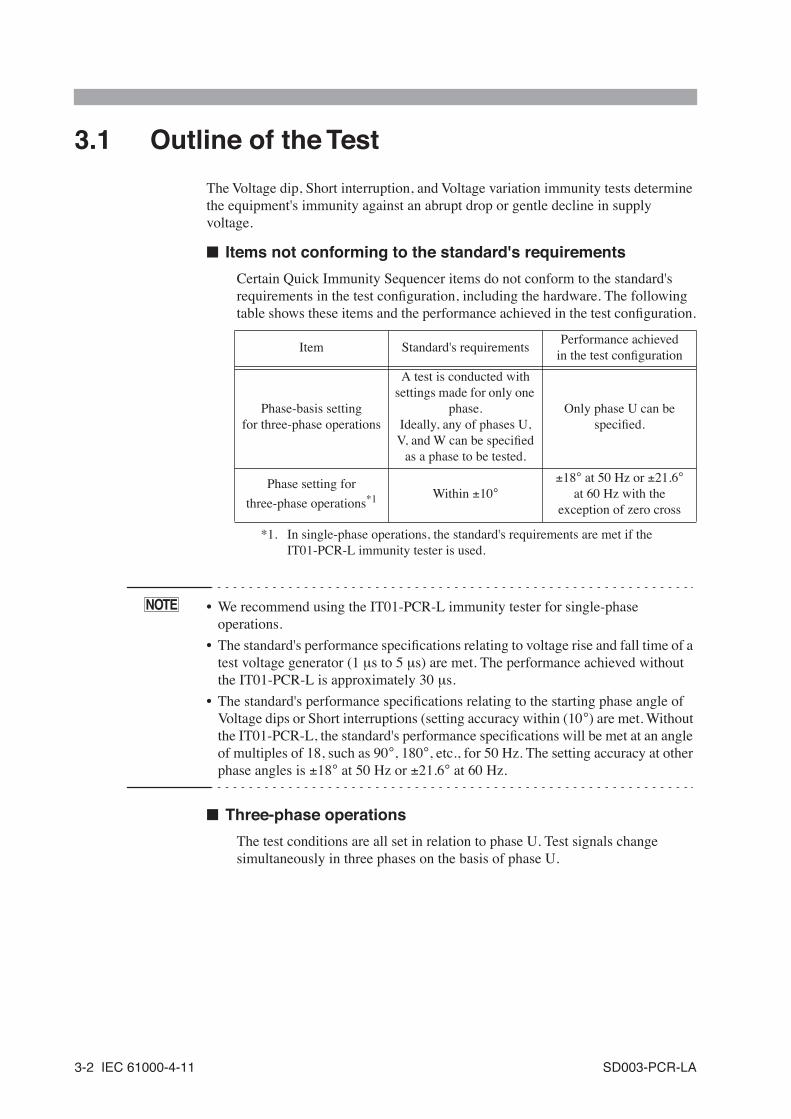
Chapter 3 IEC 61000-4-11Describes Voltage dip, Short interruption, and Voltage variation immunity tests according to the IEC 61000-4-11 standard.
Chapter 4 IEC 61000-4-13Describes Harmonics and interharmonics immunity tests according to the IEC 61000-4-13 standard.
Chapter 5 IEC 61000-4-14Describes the Voltage fluctuation immunity test according to the IEC 61000-4-14 standard.
Chapter 6 IEC 61000-4-27Describes the Unbalance immunity test according to the IEC 61000-4-27 standard.
Chapter 7 IEC 61000-4-28Describes the Power frequency variation immunity test according to the IEC 61000-4-28 standard.
Chapter 8 IEC 61000-4-29Describes Voltage dip, Short interruption, and Voltage variation immunity tests for DC power inputs according to the IEC 61000-4-29 standard.
AppendixGuides users to the appropriate standard depending on the nature of the testing desired.
II Arrangement of this manual SD003-PCR-LA
Preface
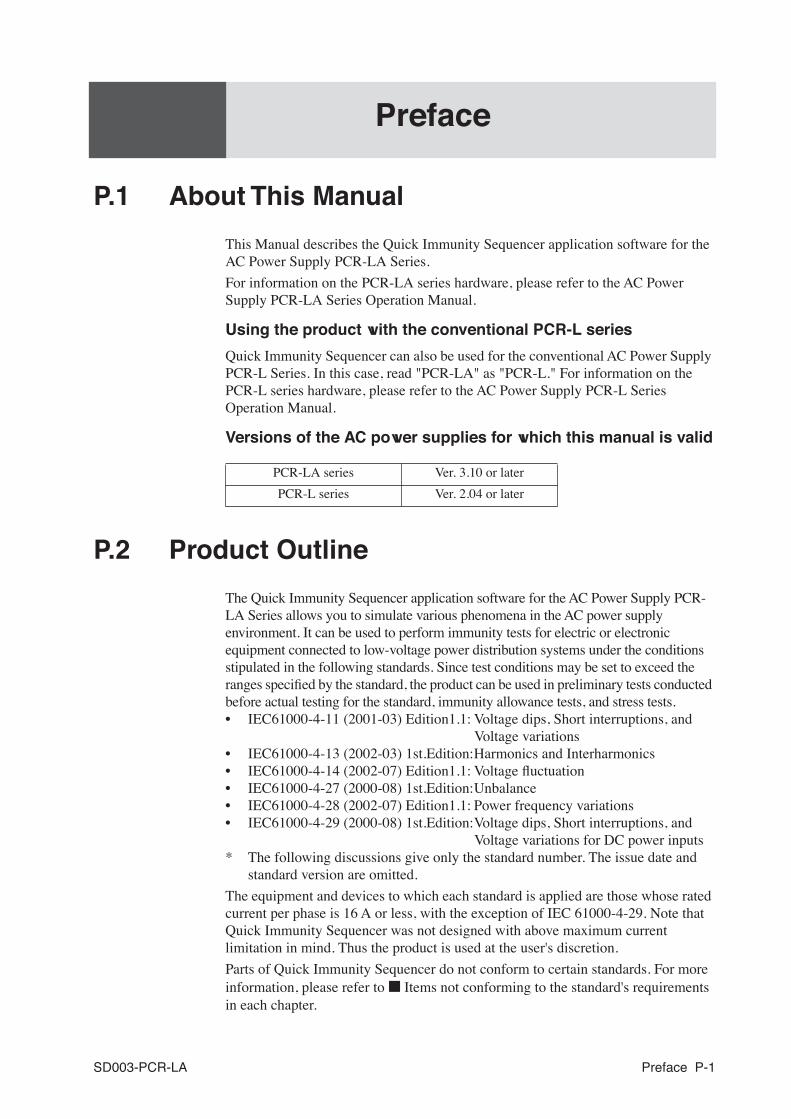
P.1 About This Manual
This Manual describes the Quick Immunity Sequencer application software for the AC Power Supply PCR-LA Series.
For information on the PCR-LA series hardware, please refer to the AC Power Supply PCR-LA Series Operation Manual.
Using the product with the conventional PCR-L series
Quick Immunity Sequencer can also be used for the conventional AC Power Supply PCR-L Series. In this case, read "PCR-LA" as "PCR-L." For information on the PCR-L series hardware, please refer to the AC Power Supply PCR-L Series Operation Manual.
Versions of the AC power supplies for which this manual is valid
P.2 Product Outline
The Quick Immunity Sequencer application software for the AC Power Supply PCR-LA Series allows you to simulate various phenomena in the AC power supply environment. It can be used to perform immunity tests for electric or electronic equipment connected to low-voltage power distribution systems under the conditions stipulated in the following standards. Since test conditions may be set to exceed the ranges specified by the standard, the product can be used in preliminary tests conducted before actual testing for the standard, immunity allowance tests, and stress tests.• IEC61000-4-11 (2001-03) Edition1.1: Voltage dips, Short interruptions, and
Voltage variations• IEC61000-4-13 (2002-03) 1st.Edition:Harmonics and Interharmonics• IEC61000-4-14 (2002-07) Edition1.1: Voltage fluctuation• IEC61000-4-27 (2000-08) 1st.Edition:Unbalance• IEC61000-4-28 (2002-07) Edition1.1: Power frequency variations• IEC61000-4-29 (2000-08) 1st.Edition:Voltage dips, Short interruptions, and
Voltage variations for DC power inputs* The following discussions give only the standard number. The issue date and
standard version are omitted.
The equipment and devices to which each standard is applied are those whose rated current per phase is 16 A or less, with the exception of IEC 61000-4-29. Note that Quick Immunity Sequencer was not designed with above maximum current limitation in mind. Thus the product is used at the user's discretion.
Parts of Quick Immunity Sequencer do not conform to certain standards. For more information, please refer to ■ Items not conforming to the standard's requirements in each chapter.
PCR-LA series Ver. 3.10 or later
PCR-L series Ver. 2.04 or later
SD003-PCR-LA Preface P-1

P.3 Required Operating Conditions
Quick Immunity Sequencer requires the following PC environments:
OS version
Windows 98 SE, Windows Me, Windows 2000, or Windows XP
VISA driver supporting the VISA COM software
One of the following is required:
• KI-VISA 2.2.x or later (latest version may be downloaded from the Kikusuiwebsite.)
• NI-VISA 2.6 or later
• Agilent VISA 2.x (separate Agilent VISA COM setup is required.)
ActiveX instrument driver
pcrldrv Ver. 2.91 or later (latest version may be downloaded from the Kikusuiwebsite.)
I/O interface
One of the following is required:
• RS-232C
• GPIB (National Instruments, Agilent Technologies, CONTEC, or Interface)
• Please disable any PC system features such as Advanced Power Management (APM) or Suspend modes. Interrupts known as SMIs that are periodically issued to the CPU in these modes will prevent normal operation of the product.
Personal computer
CPU Pentium 233 MHz or better
OS Windows 98 SE, Windows Me, Windows 2000, or Windows XP
Memory Minimum of 128 MB
HDDFree space of at least 100 MB is recommended for installation, and additional free space of 10 GB or more for data.
CD-ROM drive Required for product installation
Mouse Required
Display 1024 x 768 or larger
Color 16-bit High Color or better
NOTE
P-2 Preface SD003-PCR-LA
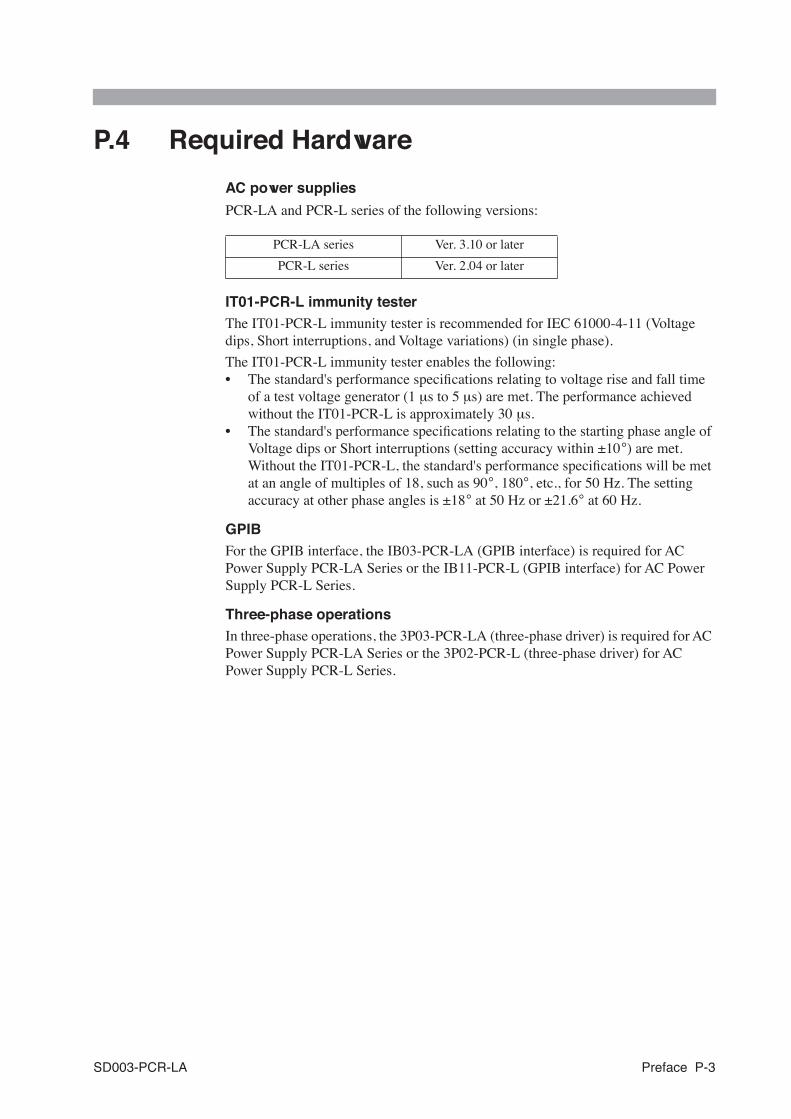
P.4 Required Hardware
AC power supplies
PCR-LA and PCR-L series of the following versions:
IT01-PCR-L immunity testerThe IT01-PCR-L immunity tester is recommended for IEC 61000-4-11 (Voltage dips, Short interruptions, and Voltage variations) (in single phase).
The IT01-PCR-L immunity tester enables the following:• The standard's performance specifications relating to voltage rise and fall time
of a test voltage generator (1 μs to 5 μs) are met. The performance achieved without the IT01-PCR-L is approximately 30 μs.
• The standard's performance specifications relating to the starting phase angle of Voltage dips or Short interruptions (setting accuracy within ±10°) are met. Without the IT01-PCR-L, the standard's performance specifications will be met at an angle of multiples of 18, such as 90°, 180°, etc., for 50 Hz. The setting accuracy at other phase angles is ±18° at 50 Hz or ±21.6° at 60 Hz.
GPIBFor the GPIB interface, the IB03-PCR-LA (GPIB interface) is required for AC Power Supply PCR-LA Series or the IB11-PCR-L (GPIB interface) for AC Power Supply PCR-L Series.
Three-phase operationsIn three-phase operations, the 3P03-PCR-LA (three-phase driver) is required for AC Power Supply PCR-LA Series or the 3P02-PCR-L (three-phase driver) for AC Power Supply PCR-L Series.
PCR-LA series Ver. 3.10 or later
PCR-L series Ver. 2.04 or later
SD003-PCR-LA Preface P-3

P-4 Preface SD003-PCR-LA
Chapter 1 Setup
Describes how to install the Quick Immunity Sequencer application software.
SD003-PCR-LA Setup 1-1
1.1 Package Contents
The Quick Immunity Sequencer package contains the following:
1.2 Installation
1.2.1 Preparing for Installation
The ActiveX instrument driver specially designed for the PCR-LA series requires a VISA driver. You must first install a VISA driver.
The VISA driver required depends on the I/O interface. Refer to Table 1-1 below to choose the necessary VISA driver.
• Use of the wrong VISA driver with the GPIB interface may disable the GPIB interface. Installing multiple VISA drivers may prevent any of the VISA drivers from operating properly.
VISAVISA (Virtual Instrument Software Architecture) is a standard specification for instrument-connecting software established by the VXIplug&play Systems Alliance.
VISA driverDriver software implemented in accordance with VISA specifications
KI-VISAVISA driver originally developed by Kikusui Electronics in compliance with VXIplug&play VISA specification 2.2
Table 1-1 Required VISA Drivers and How to Obtain Them
Item name Quantity
Program CD-ROM 1
User's Manual (this manual: Z1-003-152) 1
I/O interface VISA driver required How to Obtain
RS-232C*1,*2
KI-VISA Ver. 2.2.x or laterProgram CD-ROM or
KIKUSUI websiteInterface GPIB*3
CONTEC GPIB*3
(Continues on the next page.)
NOTE
1-2 Setup SD003-PCR-LA
1.2.2 Installing the KI-VISA Driver
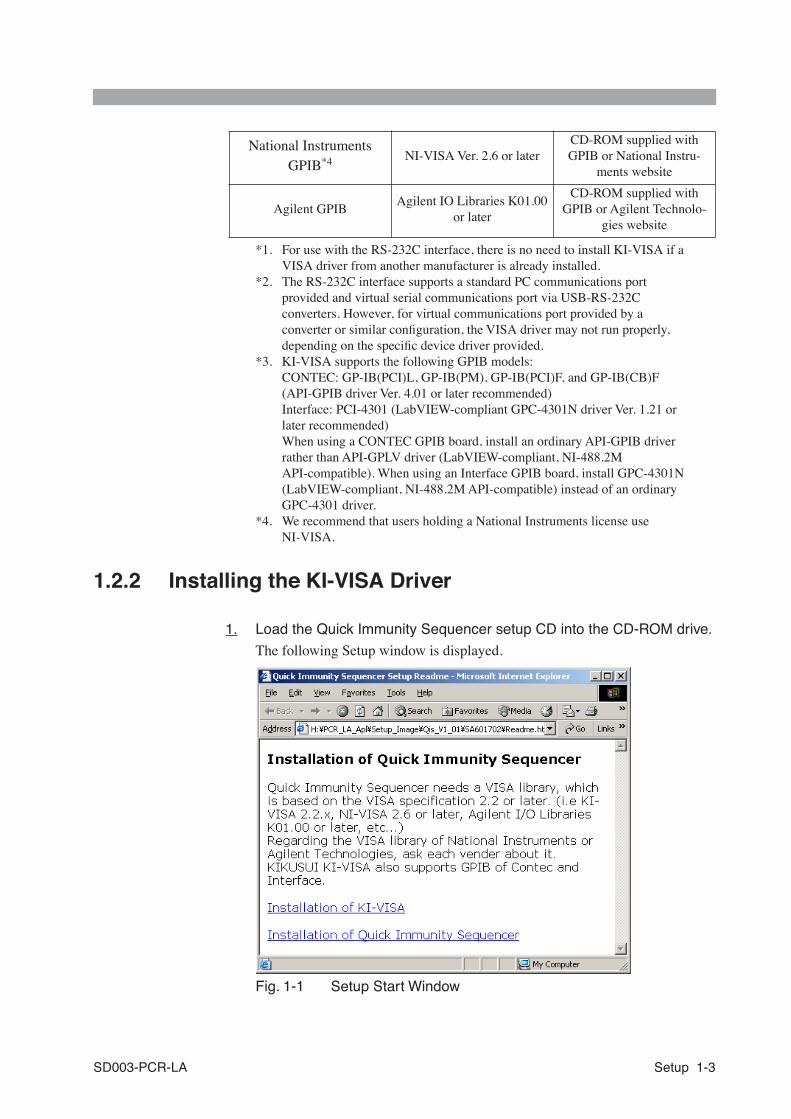
1. Load the Quick Immunity Sequencer setup CD into the CD-ROM drive.
The following Setup window is displayed.
Fig. 1-1 Setup Start Window
National Instruments GPIB*4 NI-VISA Ver. 2.6 or later
CD-ROM supplied with GPIB or National Instru-
ments website
Agilent GPIBAgilent IO Libraries K01.00
or later
CD-ROM supplied with GPIB or Agilent Technolo-
gies website
*1. For use with the RS-232C interface, there is no need to install KI-VISA if a VISA driver from another manufacturer is already installed.
*2. The RS-232C interface supports a standard PC communications port provided and virtual serial communications port via USB-RS-232C converters. However, for virtual communications port provided by a converter or similar configuration, the VISA driver may not run properly, depending on the specific device driver provided.
*3. KI-VISA supports the following GPIB models:CONTEC: GP-IB(PCI)L, GP-IB(PM), GP-IB(PCI)F, and GP-IB(CB)F (API-GPIB driver Ver. 4.01 or later recommended)Interface: PCI-4301 (LabVIEW-compliant GPC-4301N driver Ver. 1.21 or later recommended)When using a CONTEC GPIB board, install an ordinary API-GPIB driver rather than API-GPLV driver (LabVIEW-compliant, NI-488.2M API-compatible). When using an Interface GPIB board, install GPC-4301N (LabVIEW-compliant, NI-488.2M API-compatible) instead of an ordinary GPC-4301 driver.
*4. We recommend that users holding a National Instruments license use NI-VISA.
SD003-PCR-LA Setup 1-3
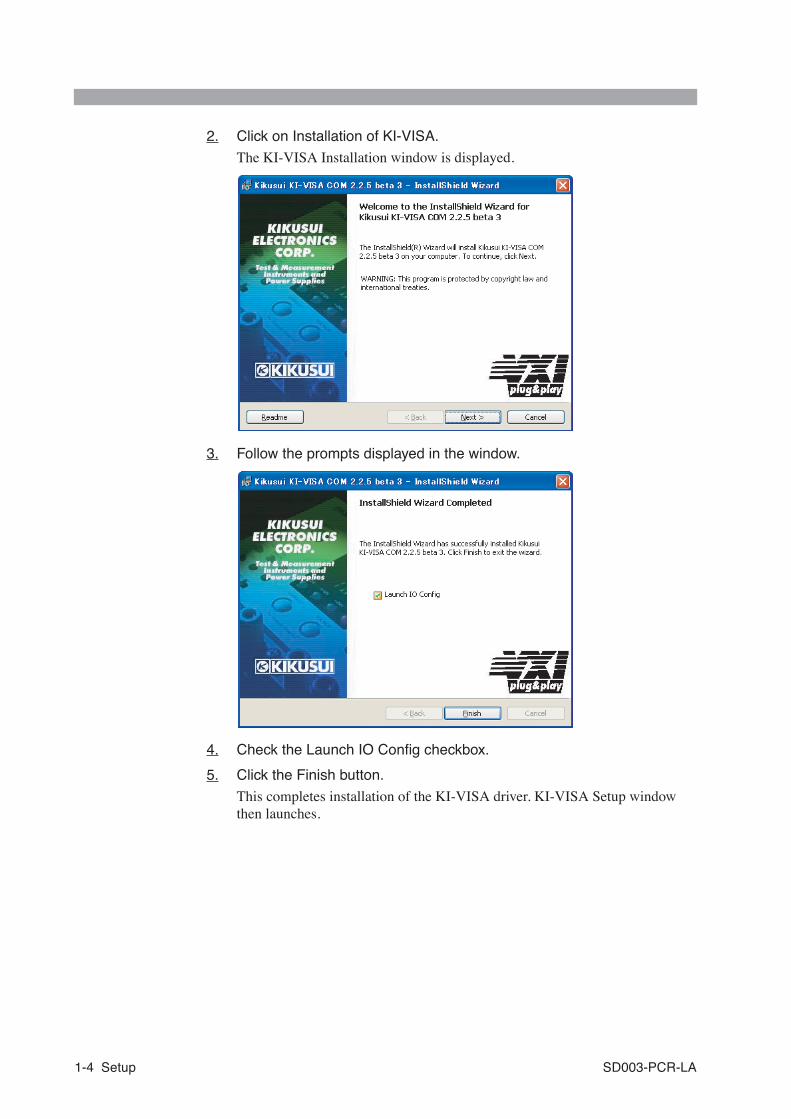
2. Click on Installation of KI-VISA.
The KI-VISA Installation window is displayed.
3. Follow the prompts displayed in the window.
4. Check the Launch IO Config checkbox.
5. Click the Finish button.
This completes installation of the KI-VISA driver. KI-VISA Setup window then launches.
1-4 Setup SD003-PCR-LA
■ When using the RS-232C Interface
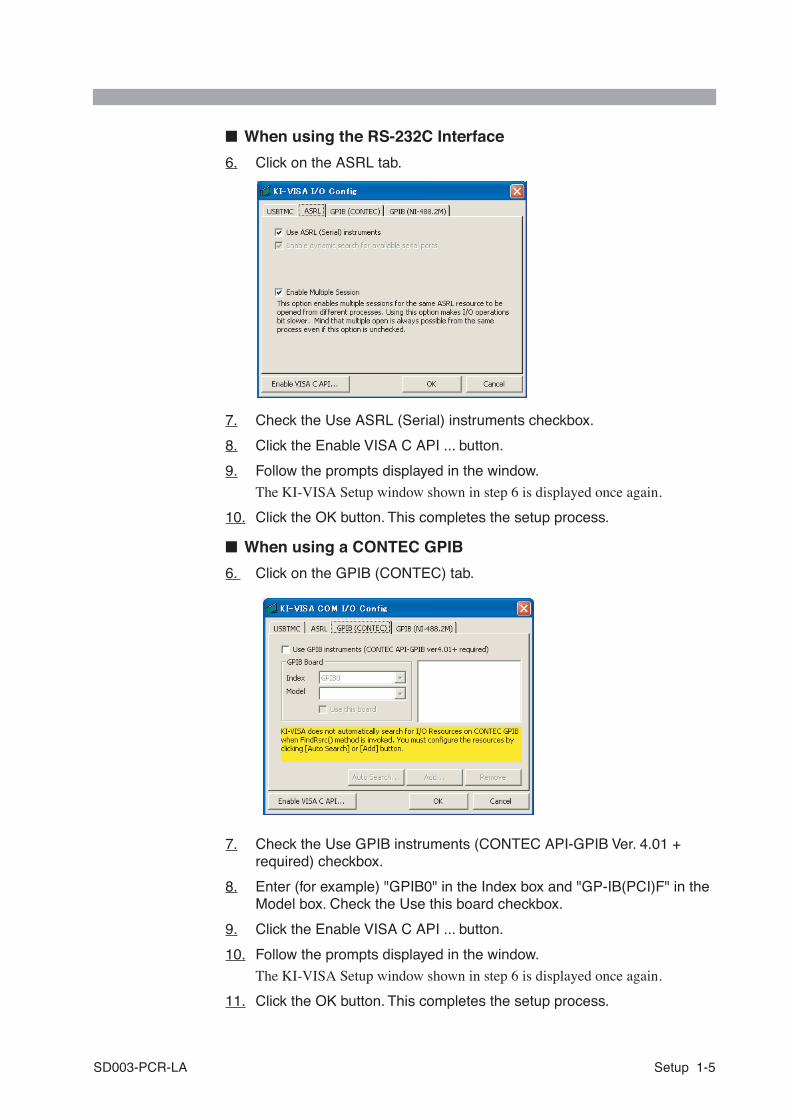
6. Click on the ASRL tab.
7. Check the Use ASRL (Serial) instruments checkbox.
8. Click the Enable VISA C API ... button.
9. Follow the prompts displayed in the window.
The KI-VISA Setup window shown in step 6 is displayed once again.
10. Click the OK button. This completes the setup process.
■ When using a CONTEC GPIB
6. Click on the GPIB (CONTEC) tab.
7. Check the Use GPIB instruments (CONTEC API-GPIB Ver. 4.01 + required) checkbox.
8. Enter (for example) "GPIB0" in the Index box and "GP-IB(PCI)F" in the Model box. Check the Use this board checkbox.
9. Click the Enable VISA C API ... button.
10. Follow the prompts displayed in the window.
The KI-VISA Setup window shown in step 6 is displayed once again.
11. Click the OK button. This completes the setup process.
SD003-PCR-LA Setup 1-5

■ When using an Interface GPIB
6. Click on the GPIB (NI-488.2M) tab.
7. Check the Use GPIB instruments (NI-488.2M compatible API) checkbox.
8. Enter (for example) "GPIB0" in the Index box and "Interface PCI-4301" in the Model box. Check the Use this board checkbox.
9. Click the Enable VISA C API ... button.
10. Follow the prompts displayed in the window.
The KI-VISA Setup window shown in step 6 is displayed once again.
11. Click the OK button. This completes the setup process.
1.2.3 Installing Quick Immunity Sequencer
1. Click on Installation of Quick Immunity Sequencer in the Setup Start Window in Fig. 1-1 (on page 1-3).
This launches the Installation window. The installer program installs Quick Immunity Sequencer and the ActiveX driver for the PCR-LA series.
1-6 Setup SD003-PCR-LA
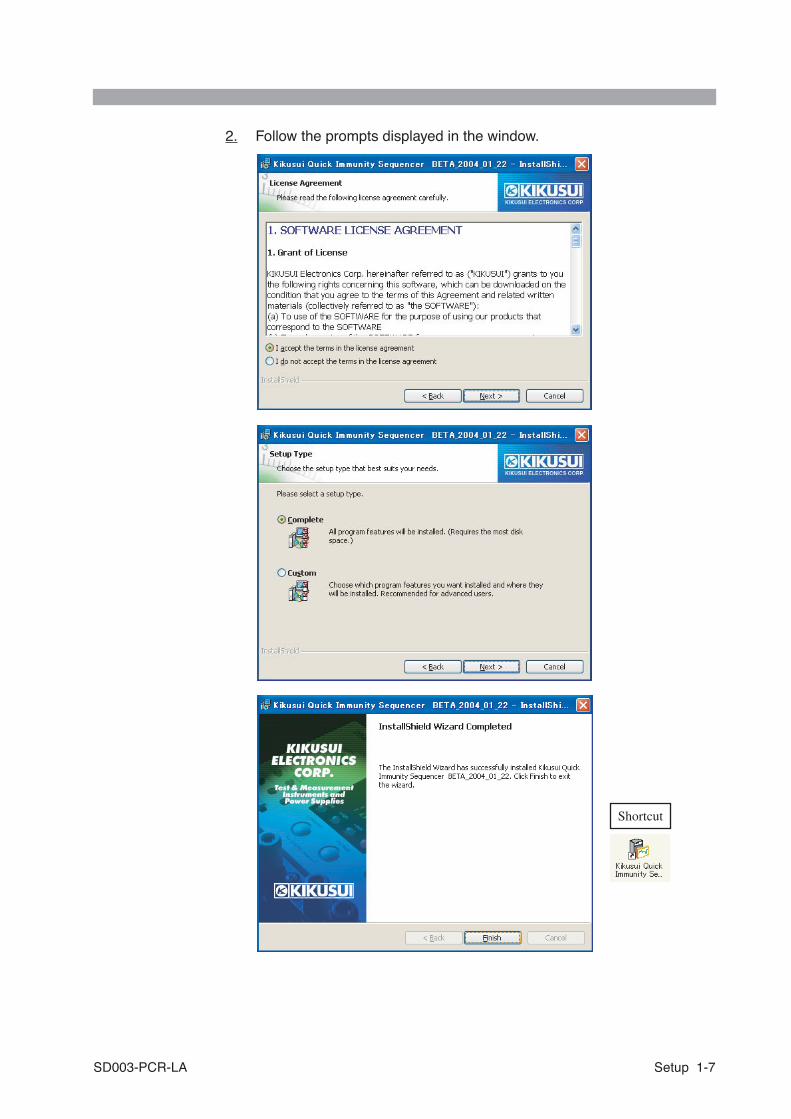
2. Follow the prompts displayed in the window.
Shortcut
SD003-PCR-LA Setup 1-7
3. Click the Finish button. This completes installation of Quick Immunity Sequencer.
When installation is complete, a Quick Immunity Sequencer shortcut is created on the desktop.
1-8 Setup SD003-PCR-LA
22
Chapter 2 Overall Picture ofTest Sequences
Describes how to launch Quick Immunity Sequencer and provides an overall picture of test sequences.
SD003-PCR-LA Overall Picture of Test Sequences 2-1
2.1 Outline of Immunity Test
An immunity test generates a test signal using a voltage generator, applying it to the equipment under test (EUT). EUT operations are classified into the following four performance levels in terms of functional loss or performance degradation in order to assess the test results.
The classification criteria are the performance levels specified by the agreement between the equipment manufacturer and a test requester, or between the equipment manufacturer and a purchaser.
a) Normal performance within the specification limits specified between the manufacturer and a test requester or purchaser
b) Temporary functional loss or performance degradation resolved after interference has been removed. EUT automatically regains normal performance without operator intervention.
c) Temporary functional loss or performance degradation that requires adjustment with operator intervention
d) Unrecoverable functional loss, performance degradation, or data loss caused by hardware failure or software corruption
Quick Immunity Sequencer can be used for testing according to the standard. Since it allows test conditions to be extended and set, it can also be used for preliminary tests conducted before actual testing for the standard, immunity allowance tests, or stress tests.
■ Items not conforming to the standard's requirements
Certain Quick Immunity Sequencer items do not conform to the standard's requirements in the test configuration, including the hardware. For more information, please refer to the chapter relating to the standard in question.
■ Three-phase operations
The test conditions are all set in relation to phase U. Test signals change simultaneously in three phases on the basis of phase U. Note that for IEC 61000-4-27 (unbalance), although a test signal can be set on a phase basis, there is a time lag in the test signal between phases. For IEC 61000-4-29 (Voltage dips, Short interruptions, and Voltage variations for DC power inputs), there are no settings for the three phases.
• The IT01-PCR-L immunity tester cannot be used in three-phase operations with Quick Immunity Sequencer.
NOTE
2-2 Overall Picture of Test Sequences SD003-PCR-LA
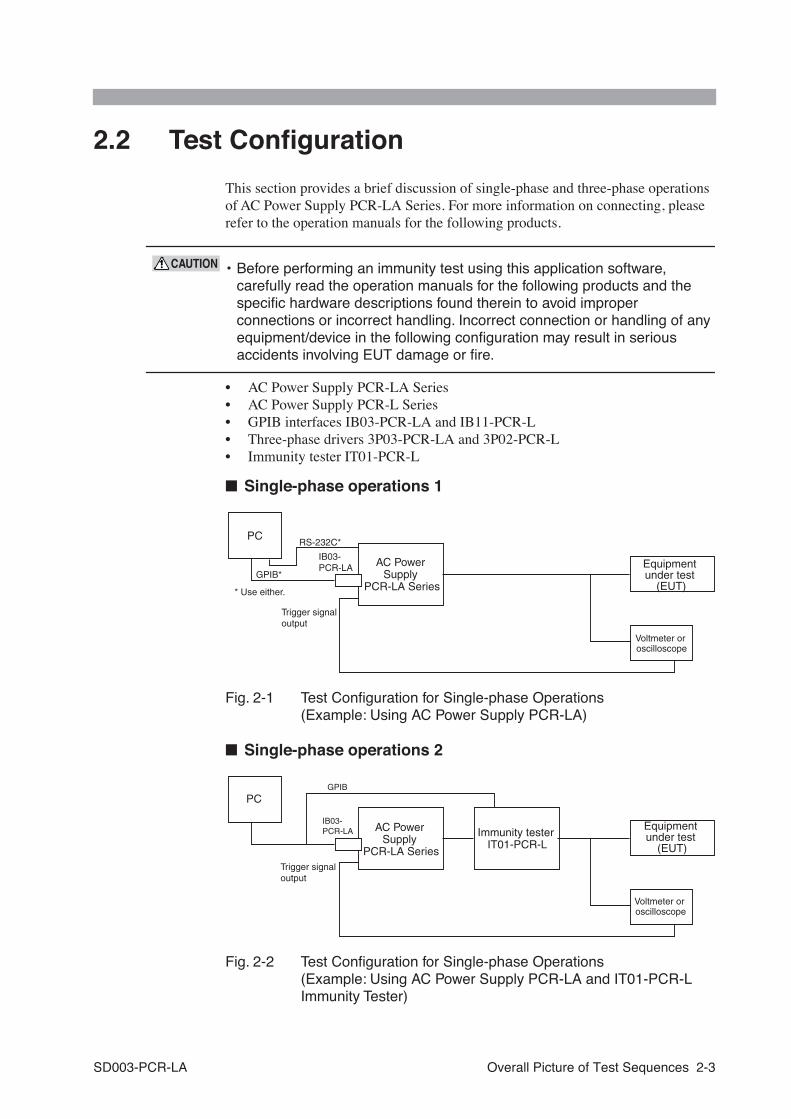
2.2 Test Configuration
This section provides a brief discussion of single-phase and three-phase operations of AC Power Supply PCR-LA Series. For more information on connecting, please refer to the operation manuals for the following products.
• Before performing an immunity test using this application software, carefully read the operation manuals for the following products and the specific hardware descriptions found therein to avoid improper connections or incorrect handling. Incorrect connection or handling of any equipment/device in the following configuration may result in serious accidents involving EUT damage or fire.
• AC Power Supply PCR-LA Series• AC Power Supply PCR-L Series• GPIB interfaces IB03-PCR-LA and IB11-PCR-L• Three-phase drivers 3P03-PCR-LA and 3P02-PCR-L• Immunity tester IT01-PCR-L
■ Single-phase operations 1
Fig. 2-1 Test Configuration for Single-phase Operations (Example: Using AC Power Supply PCR-LA)
■ Single-phase operations 2
Fig. 2-2 Test Configuration for Single-phase Operations (Example: Using AC Power Supply PCR-LA and IT01-PCR-L Immunity Tester)
CAUTION
PC
Equipment under test
(EUT)
Voltmeter or oscilloscope
IB03-PCR-LA
GPIB*
Trigger signal output
RS-232C*
* Use either.
AC Power Supply
PCR-LA Series
PC
IB03-PCR-LA
GPIB
Immunity tester IT01-PCR-L
Equipment under test
(EUT)
Voltmeter or oscilloscope
Trigger signal output
AC Power Supply
PCR-LA Series
SD003-PCR-LA Overall Picture of Test Sequences 2-3
• Before turning on/off the IT01-PCR-L immunity tester, always confirm that the AC Power Supply PCR-LA output is OFF to avoid damaging the equipment. For operating procedures, please refer to 2.8.1, Turning Power on/off in the Test Configuration.
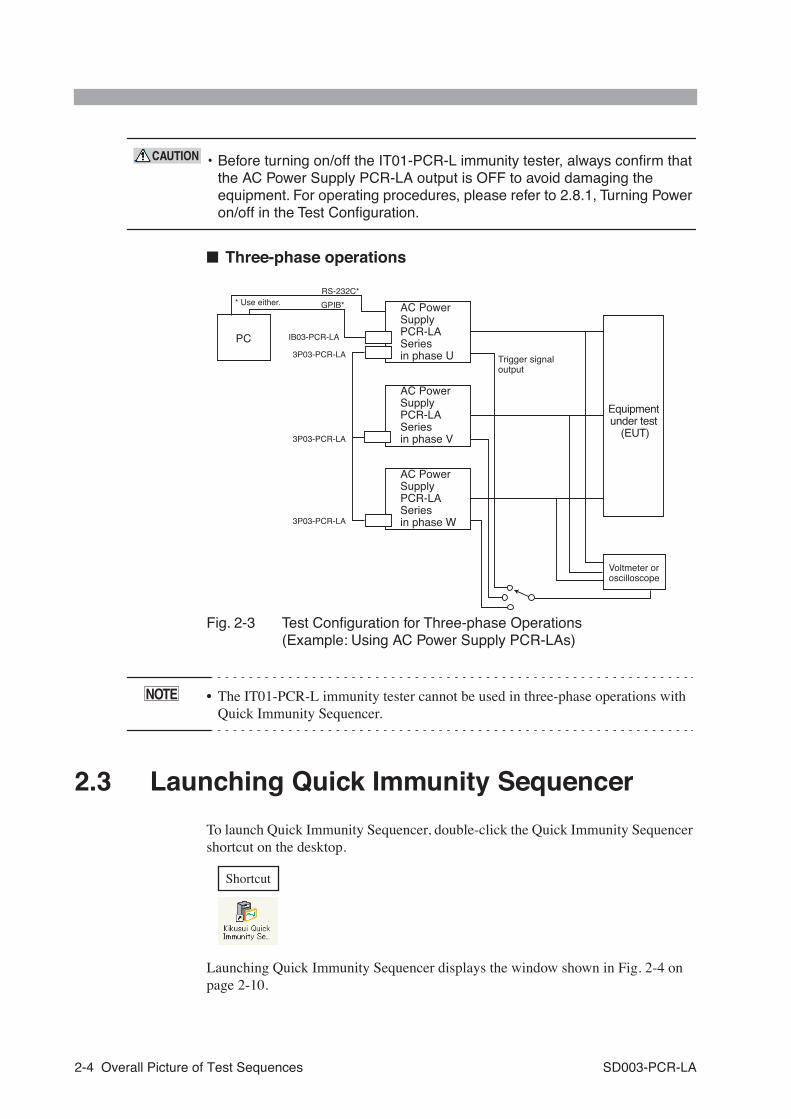
■ Three-phase operations
Fig. 2-3 Test Configuration for Three-phase Operations (Example: Using AC Power Supply PCR-LAs)
• The IT01-PCR-L immunity tester cannot be used in three-phase operations with Quick Immunity Sequencer.
2.3 Launching Quick Immunity Sequencer
To launch Quick Immunity Sequencer, double-click the Quick Immunity Sequencer shortcut on the desktop.
Launching Quick Immunity Sequencer displays the window shown in Fig. 2-4 on page 2-10.
CAUTION
PC
Equipment under test
(EUT)
Voltmeter or oscilloscope
GPIB*
RS-232C** Use either.
Trigger signal output
IB03-PCR-LA
3P03-PCR-LA
3P03-PCR-LA
3P03-PCR-LA
AC Power Supply PCR-LA Seriesin phase U
AC Power Supply PCR-LA Seriesin phase V
AC Power Supply PCR-LA Seriesin phase W
NOTE
Shortcut
2-4 Overall Picture of Test Sequences SD003-PCR-LA
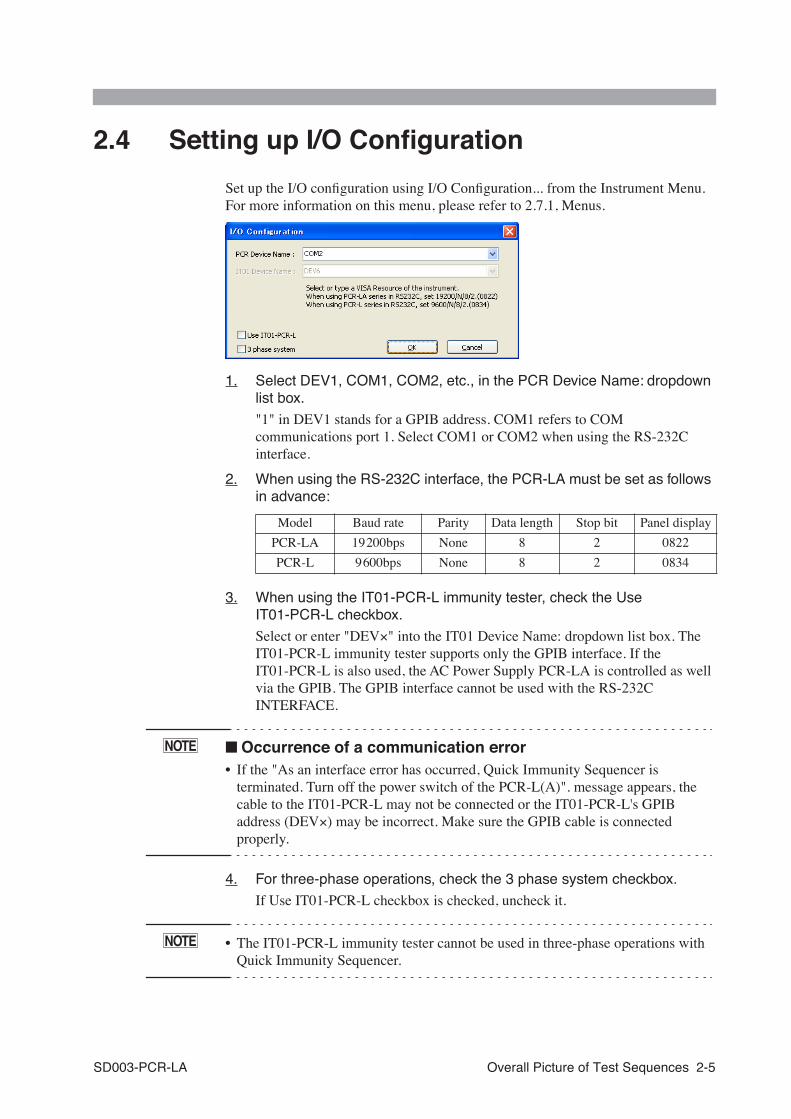
2.4 Setting up I/O Configuration
Set up the I/O configuration using I/O Configuration... from the Instrument Menu. For more information on this menu, please refer to 2.7.1, Menus.
1. Select DEV1, COM1, COM2, etc., in the PCR Device Name: dropdown list box.
"1" in DEV1 stands for a GPIB address. COM1 refers to COM communications port 1. Select COM1 or COM2 when using the RS-232C interface.
2. When using the RS-232C interface, the PCR-LA must be set as follows in advance:
3. When using the IT01-PCR-L immunity tester, check the Use IT01-PCR-L checkbox.
Select or enter "DEV×" into the IT01 Device Name: dropdown list box. The IT01-PCR-L immunity tester supports only the GPIB interface. If the IT01-PCR-L is also used, the AC Power Supply PCR-LA is controlled as well via the GPIB. The GPIB interface cannot be used with the RS-232C INTERFACE.
■ Occurrence of a communication error• If the "As an interface error has occurred, Quick Immunity Sequencer is
terminated. Turn off the power switch of the PCR-L(A)". message appears, the cable to the IT01-PCR-L may not be connected or the IT01-PCR-L's GPIB address (DEV×) may be incorrect. Make sure the GPIB cable is connected properly.
4. For three-phase operations, check the 3 phase system checkbox.
If Use IT01-PCR-L checkbox is checked, uncheck it.
• The IT01-PCR-L immunity tester cannot be used in three-phase operations with Quick Immunity Sequencer.
Model Baud rate Parity Data length Stop bit Panel display
PCR-LA 19200bps None 8 2 0822
PCR-L 9600bps None 8 2 0834
NOTE
NOTE
SD003-PCR-LA Overall Picture of Test Sequences 2-5

2.5 Troubleshooting at Startup
■ It takes a long time to display the startup window.
If the PCR-LA series device driver is used via the RS-232C interface, the timeout is set to 30 seconds. This is because it takes around 30 seconds to detect a communication error caused by an incorrect device name or communication cable connection, or other errors.
Note that the initial setting provided on installation of Quick Immunity Sequencer is the RS-232C interface.
If a communication error is detected when you launch Quick Immunity Sequencer, the I/O Configuration dialog box (please refer to 2.4, Setting up I/O Configuration) will appear. Check the driver settings.
■ Error message: "This application cannot be launched because VISA32.DLL cannot be found. Reinstalling the application may solve this problem."
This may indicate that no VISA driver is installed.Install an appropriate VISA driver. For more information, please refer to 1.2, Installation.
This may indicate that use of KI-VISA as the VISA driver has not been set up.
To use the RS-232C interface, set the driver according to the procedure given in Measure 1 below. To use the GPIB interface, set according to the procedure given in Measure 2 below. For more information, please refer to 2.5.1, Setting up KI-VISA.
■ Error message: "Runtime error XXX at XXXXXXXX"
The PCR-LA series device driver may be installed incorrectly.Re-install Quick Immunity Sequencer, or download and install the device driver for the PCR-LA series from the download page at http://www.kikusui.co.jp/.
■ Error message: "Unable to open instrument in device DEV×"
This may indicate that no GPIB driver has been installed, or that the GPIB driver has not been correctly set.
Check the GPIB driver setting.
■ Error message: "Error write to instrument in device DEV×"
The GPIB cable may be disconnected.Check that the GPIB cable is properly connected.
The device name may be incorrect.Check the device name on the dialog box shown in 2.4, Setting up I/O Configuration.
2-6 Overall Picture of Test Sequences SD003-PCR-LA
This may indicate that the IT01-PCR-L immunity tester has not been connected in a configuration in which the IT01-PCR-L is expected.
Uncheck the Use IT01-PCR-L checkbox in the dialog box shown in 2.4, Setting up I/O Configuration, or connect the IT01-PCR-L to the PCR-LA.
■ Error message: "Different model access in device DEV×"
The setting for single-phase or three-phase system for the connected PCR-LA may be incorrect.
Check the setting for the 3 phase system checkbox in the dialog box shown in 2.4, Setting up I/O Configuration.
■ Error message: "As an interface error has occurred, Quick Immunity Sequencer is terminated. Turn off the power switch of the PCR-L(A)".
This may indicate that the communication cable is disconnected.Turn off the PCR-LA POWER switch.
Reconnect the communication cable, then re-start Quick Immunity Sequencer.
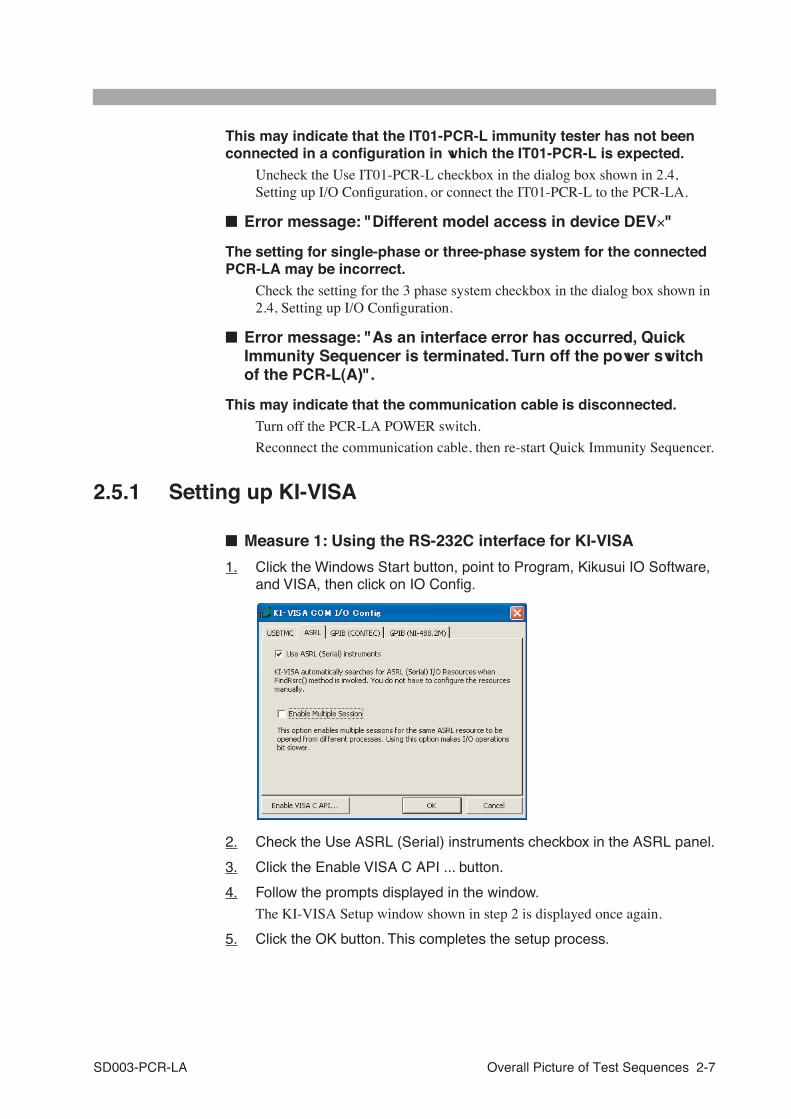
2.5.1 Setting up KI-VISA
■ Measure 1: Using the RS-232C interface for KI-VISA
1. Click the Windows Start button, point to Program, Kikusui IO Software, and VISA, then click on IO Config.
2. Check the Use ASRL (Serial) instruments checkbox in the ASRL panel.
3. Click the Enable VISA C API ... button.
4. Follow the prompts displayed in the window.
The KI-VISA Setup window shown in step 2 is displayed once again.
5. Click the OK button. This completes the setup process.
SD003-PCR-LA Overall Picture of Test Sequences 2-7

■ Measure 2: Using the GPIB interface for KI-VISA
When using National Instruments GPIB or Agilent GPIB, use the VISA driver from the respective manufacturers.
Users using the CONTEC or Interface GPIB should use the KI-VISA.
1. Click the Windows Start button, point to Program, Kikusui IO Software, and VISA, then click on IO Config.
■ When using the CONTEC GPIB board
2. Click on the GPIB (CONTEC) tab.
3. Check the Use GPIB instruments (CONTEC API-GPIB Ver. 4.01 + required) checkbox.
4. Enter (for example) "GPIB0" in the Index box and "GP-IB(PCI)F" in the Model box. Check the Use this board checkbox.
5. Ensure to click the Enable VISA C API ... button.
6. Follow the prompts displayed in the window.
The KI-VISA Setup window shown in step 2 is displayed once again.
7. Click the OK button. This completes the setup process.
2-8 Overall Picture of Test Sequences SD003-PCR-LA
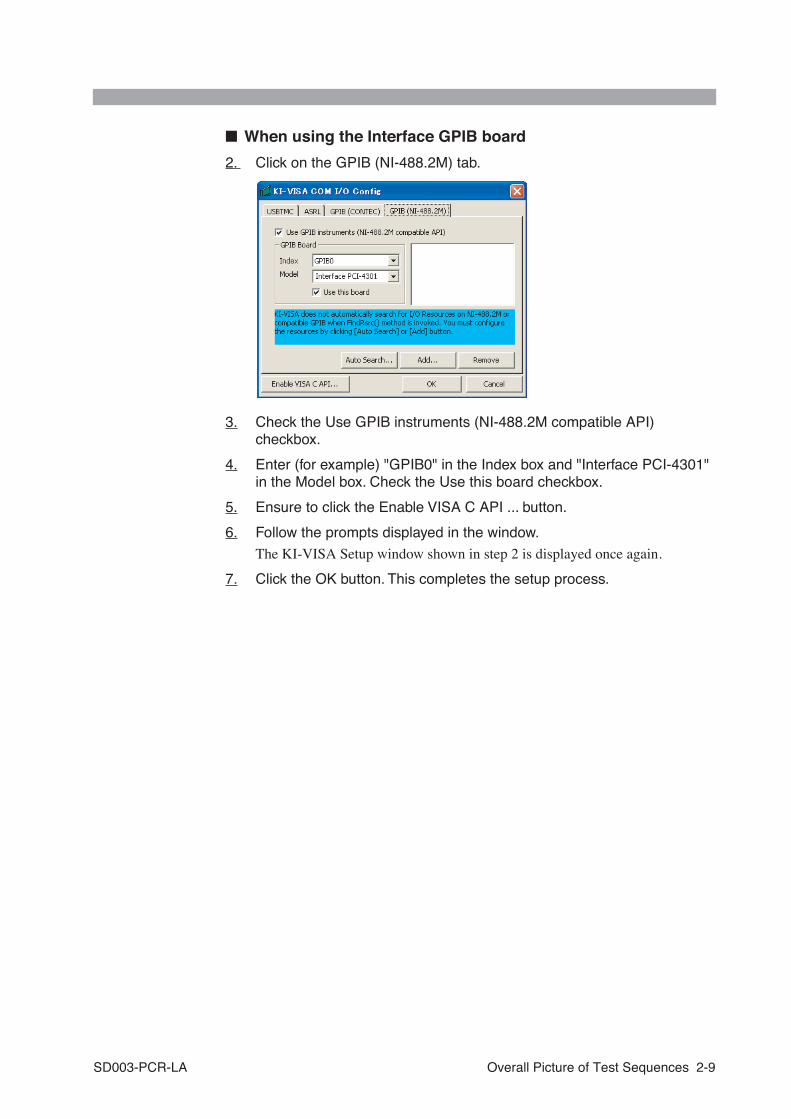
■ When using the Interface GPIB board
2. Click on the GPIB (NI-488.2M) tab.
3. Check the Use GPIB instruments (NI-488.2M compatible API) checkbox.
4. Enter (for example) "GPIB0" in the Index box and "Interface PCI-4301" in the Model box. Check the Use this board checkbox.
5. Ensure to click the Enable VISA C API ... button.
6. Follow the prompts displayed in the window.
The KI-VISA Setup window shown in step 2 is displayed once again.
7. Click the OK button. This completes the setup process.
SD003-PCR-LA Overall Picture of Test Sequences 2-9

2.6 Overall Picture of Test Sequences
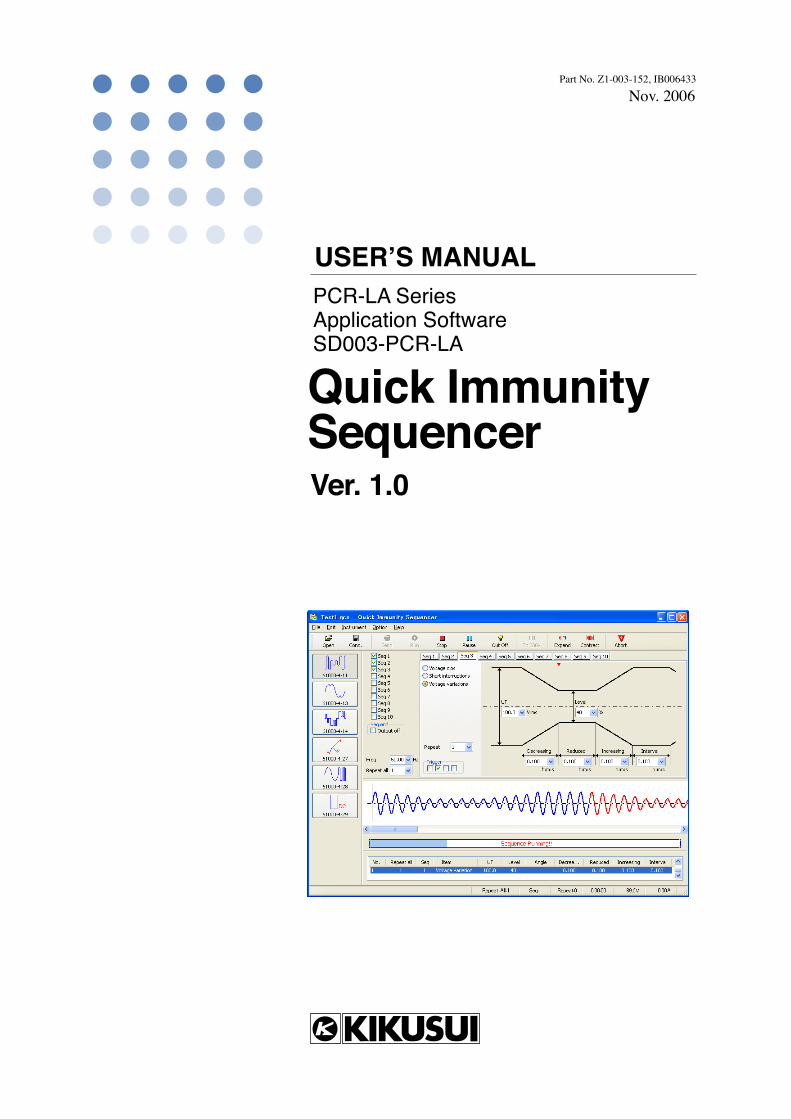
Fig. 2-4 Window Outline (Example of IEC 61000-4-11)
■ Window Outline
[1] Selection of the standard
Select one of the following six standards:• IEC61000-4-11: Voltage dips, Short interruptions, and Voltage variations• IEC61000-4-13: Harmonics and Interharmonics• IEC61000-4-14: Voltage fluctuation• IEC61000-4-27: Unbalance• IEC61000-4-28: Power frequency variations• IEC61000-4-29: Voltage dips, Short interruptions, and Voltage variations for DC
power inputs
[2] Test condition settings
This part consists of the seq tabs (Seq 1 to Seq 10), checkboxes, and edit boxes.
[1] Selection of the standard
[2] Test condition settings
[3] Waveform preview
[4] Running results
2-10 Overall Picture of Test Sequences SD003-PCR-LA
Seq tabs (Seq 1 to Seq 10)Each of the seq tabs (Seq 1 to Seq 10) allows you to set test conditions corresponding to the standards. The color of each tab corresponds to the color of the waveform displayed in the waveform preview. To change colors, use Color... in the Option Menu.
Edit boxesThe edit boxes used to enter a value are of the dropdown type. Click the down arrow head control of an edit box to select a typical value. To enter a value, type the desired value directly into the box (then accept the typed value by pressing the Enter key).
Edit boxes not in the panel area of a seq tab (Seq 1 to Seq 10) are common to all seq tabs. They are used to set voltage, frequency, or repetition count for all sequences. The voltage or frequency edit box is displayed depending on the specific standard in question.
Checkboxes (Seq 1 to Seq 10)Check the corresponding checkboxes of the seq tabs whose test conditions are used to run a test sequence. Test sequences are run in turn starting at Seq 1. seq tabs whose corresponding checkboxes have not been checked are not used to run a test.
Checkboxes (Trigger)
For trigger output selection, the red symbol indicates at a location selected using a checkbox. Use these checkboxes when observing test signals on an oscilloscope. For more information on trigger signals, please refer to 2.9, Observing a Test Signal.
Checkbox (Seq end-Output off)When this checkbox is checked, a test signal is turned off at the end of sequence running. (the AC Power Supply PCR-LA output is turned off.)
[3] Waveform preview
This part displays the waveform selected using seq tabs (Seq 1 to Seq 10). For voltage, this shows relative values, with the initial value set to "1." The Expand and Contract buttons on the toolbar allow the waveform to be horizontally expanded or contracted in ten steps. Note that there may be one period of a deviation from the actual output. The color of the waveform corresponds to the color of the seq tab set. Use Color... in the Option Menu to change colors for a seq tab.
[4] Running results
Progress barDisplays the status of a test sequence run in bar graph form. To change colors, use Color... in the Option Menu.
List of the running resultsDisplays the set values for the seq tab whose sequence has been run. The specific items indicated depend on the standard in question. Please refer to the corresponding chapter.
SD003-PCR-LA Overall Picture of Test Sequences 2-11
2.7 Menus and Toolbar
2.7.1 Menus
File Menu
■ New
Sets the default values and creates a new test condition file under an untitled file name.
■ Open...
Opens the dialog box used to select a test condition file. This menu item has the same function as the Open button on the toolbar. The extension for a test condition filename is "qco."
■ Save (Test Conditions)
Saves the test condition settings under the same name as the currently open test condition file, replacing the earlier version. This menu item is used to save all the settings related to the standard.
■ Save As (Test Conditions)...
Lets you assign a desired name to a test condition file and save it in any folder. This menu item is used to save all the settings related to the standard.
■ Save As (Test Result)...
Allows you to assign a name to a running result file and save it to a selected folder.
■ Exit
Exits the Quick Immunity Sequencer.
Edit Menu
■ Seq tab Copy
Copies all the items of a selected seq tab into memory. This function is slightly similar to copying to the clipboard.
■ Seq tab Paste
Copies the contents of the memory copied using Seq tab Copy to a selected seq tab.
2-12 Overall Picture of Test Sequences SD003-PCR-LA
■ Copy to next Seq tab
This function is a combination of Seq tab Copy and Seq tab Paste. It copies all items of the selected seq tab to memory and pastes them to the next tab.
■ Default data for Class1,2,3,X
Each of classes 1 to 3 and X has submenus for test levels 1 to 6. Inapplicable classes and test levels are grayed out and cannot be selected. Clicking a test level makes it possible to detect the selected standard buttons and option buttons and to set default values conforming to these buttons.
Instrument Menu
■ Send
Sends the set test conditions to the PCR-LA. When transmission is completed, the Run button is enabled. This menu item has the same function as the Send button on the toolbar.
■ Run
Starts the test. This menu item has the same function as the Run button on the toolbar.
■ Stop
Stops the test. Note that output remains enabled. This menu item has the same function as the Stop button on the toolbar.
■ Pause
Entering step toward pause. A test is paused immediately before moving to the next seq tab. Until the sequence of the seq tab running at that time is complete, the menu indication changes to "Cancel." When the test is paused, output can be turned on/off, allowing the EUT to be checked or replaced. While the test is paused, the menu indication changes to "Continue." This menu item has the same function as the Pause button on the toolbar.
• Before connecting or disconnecting the EUT, always confirm that the AC Power Supply PCR-LA output is OFF.
■ Output On
Turns on the PCR-LA output. This allows you to start a test with the PCR-LA output set to ON. This menu item has the same function as the Out On button on the toolbar.
■ Output Off
Turns off the PCR-LA output. This menu item has the same function as the Out Off button on the toolbar.
CAUTION
SD003-PCR-LA Overall Picture of Test Sequences 2-13
■ Abort
This function is assigned to the F9 function key. It disables output change and turns output off. In the event of an emergency, you must also turn off the PCR-LA POWER switch. This menu item has the same function as the Abort button on the toolbar.
■ 100 V range
Sets the PCR-LA voltage range to 100 V. When the voltage range is set to 100 V, a check mark is displayed to the left of this item. This menu item has the same function as the To 100 V button on the toolbar.
■ 200 V range
Sets the PCR-LA voltage range to 200 V. When the voltage range is set to 200 V, a check mark is displayed to the left of this item. This menu item has the same function as the To 200 V button on the toolbar.
■ AC mode
Selects AC mode from AC/AC-S modes. This function is valid only in the PCR-LA series. In the PCR-L series, AC mode is the only valid mode.
■ AC-S mode
Selects AC-S mode from AC/AC-S modes. This function is valid only in the PCR-LA series. In the PCR-L series, AC mode is the only valid mode.
■ I/O Configuration...
Configures settings related to communications with the PCR-LA series and other devices.
When controlling the test system using the RS-232C interface, type "COM1" or "COM2" into the Edit box. To control the test system using the GPIB interface, type "DEV1," "DEV2," and so on into the Edit box. The number following DEV is a GPIB address.
This menu item also lets you select whether to use/not use the IT01-PCR-L immunity tester. If this is set for use, the AC Power Supply PCR-LA is also controlled via the GPIB interface only. In this case, type "DEV1," "DEV2," and so on in the same way into the IT01 Device Name dropdown list box.
• If the Use IT01-PCR-L checkbox is checked, Voltage variation tests according to IEC 61000-4-11 are not possible. Only Voltage dips and Short interruptions may be selected.
For three-phase systems, check the 3 phase system checkbox. In this case, as IT01-PCR-L cannot be used, uncheck the Use IT01-PCR-L checkbox.
NOTE
2-14 Overall Picture of Test Sequences SD003-PCR-LA
Option Menu
■ Default voltage and frequency...
Lets you select the voltage and frequency defaults for the set values entered when creating a new file. The settings configured for the Quick Immunity Sequencer on shipment from the factory are 100 V/50 Hz.
■ Color...
Lets you modify the color for background, progress bars, characters, and preview waveforms for each seq tab.
Help Menu
■ Quick Immunity Sequencer Help...
Opens the Help file.
■ About Quick Immunity Sequencer...
Displays the Quick Immunity Sequencer version information.
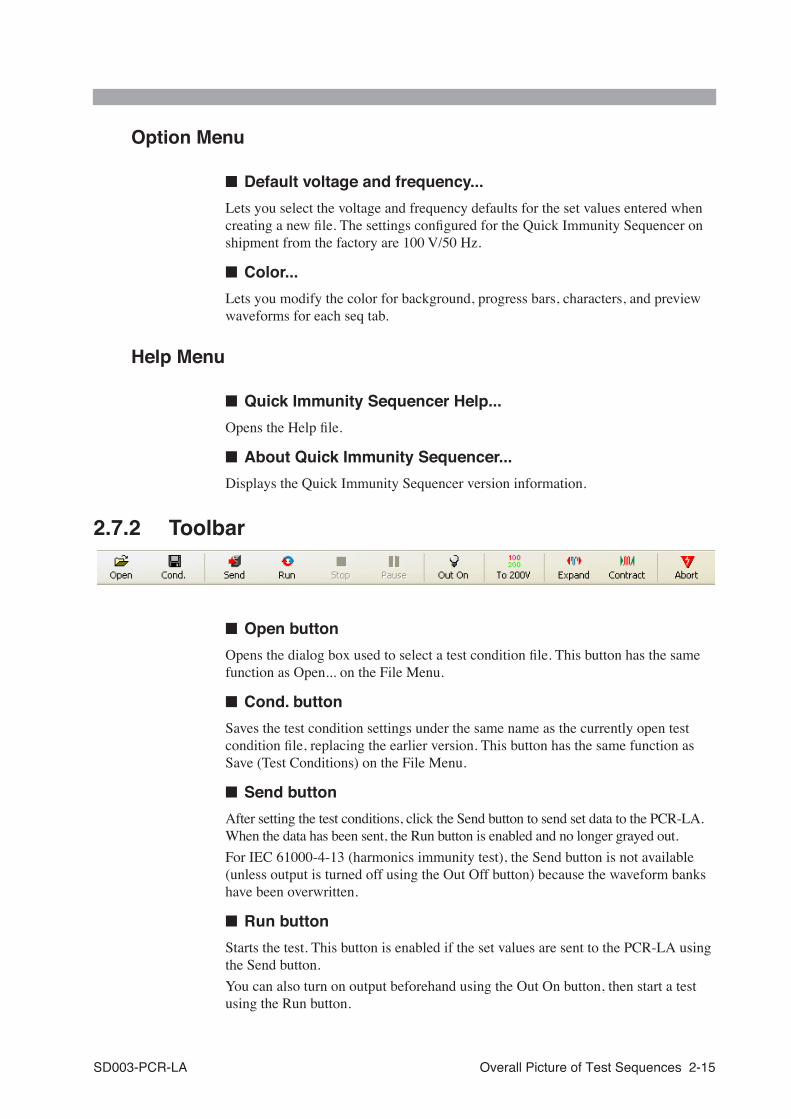
2.7.2 Toolbar
■ Open button
Opens the dialog box used to select a test condition file. This button has the same function as Open... on the File Menu.
■ Cond. button
Saves the test condition settings under the same name as the currently open test condition file, replacing the earlier version. This button has the same function as Save (Test Conditions) on the File Menu.
■ Send button
After setting the test conditions, click the Send button to send set data to the PCR-LA. When the data has been sent, the Run button is enabled and no longer grayed out.
For IEC 61000-4-13 (harmonics immunity test), the Send button is not available (unless output is turned off using the Out Off button) because the waveform banks have been overwritten.
■ Run button
Starts the test. This button is enabled if the set values are sent to the PCR-LA using the Send button.
You can also turn on output beforehand using the Out On button, then start a test using the Run button.
SD003-PCR-LA Overall Picture of Test Sequences 2-15
■ Stop button
Stops the test mid-course . Note that output remains enabled. If you also wish to switch off output, click the Abort button instead.
This button is enabled only while a test is running.
■ Pause button
This button pauses a test immediately before moving to the next tab after completing a sequence in a given seq tab. This function can be used, for example, to check or replace the EUT.
• Before connecting or disconnecting the EUT, always confirm that the AC Power Supply PCR-LA output is OFF.
If you click the Pause button while a test is running, the button indication changes to "Cancel" until the sequence of the seq tab running at that time is complete.
Checking the Cancel button cancels the pause-waiting status and returns the button displayed to the original Pause button.
When the sequence of the relevant seq tab is finished and the test is paused, the button indication changes to "Continue," enabling the Out On/Off button.
Click the Continue button to resume running the sequence.
■ Out On/Off button
When output is off, clicking the Out On button turns output on. When the output is on, the button indication changes to "Out Off."
The initial voltage of the valid seq tab is output, enabling a test based on the output ON state.
■ To 100 V/200 V button
This is a voltage range selector button. If the 100 V range is active, it displays "To 200 V." If the 200 V range is active, it displays "To 100 V."
In the 100 V range, output of up to 152.5 V is available; in the 200 V range, output of up to 305.0 V is available. Note that in the 200 V range, the maximum output current is half that of the 100 V range.
• For IEC 61000-4-29 (Voltage dips, Short interruptions, and Voltage variations for DC power inputs), DC voltage applies. In the 100 V range, output of up to 215.5 V is available; in the 200 V range, output of up to 431.0 V is available.
■ Expand button
Horizontally expands the preview waveform in the middle of the window. This enlarges the beginning of the waveform for a valid seq tab.• Quick Immunity Sequencer was designed so that the preview waveform and
actual output will generally be in agreement. However, in certain rare cases, the preview waveform and the actual output will be off by a single period due to an error in zero-cross detection.
CAUTION
NOTE
2-16 Overall Picture of Test Sequences SD003-PCR-LA
• The time-axis direction of the preview waveform area is finite and extends approx. 7 times the window size. In certain cases, depending on settings, the entire waveform cannot be displayed.
■ Contract button
Horizontally contracts the preview waveform in the middle of the window, allowing you to view the entire condition. However, in certain cases, if a long duration setting has been made, the entire waveform cannot be displayed.
■ Abort button
Disables output change and turns output off. In the event of an emergency, you must also turn off the AC Power Supply PCR-LA POWER switch.
2.8 Running a Test
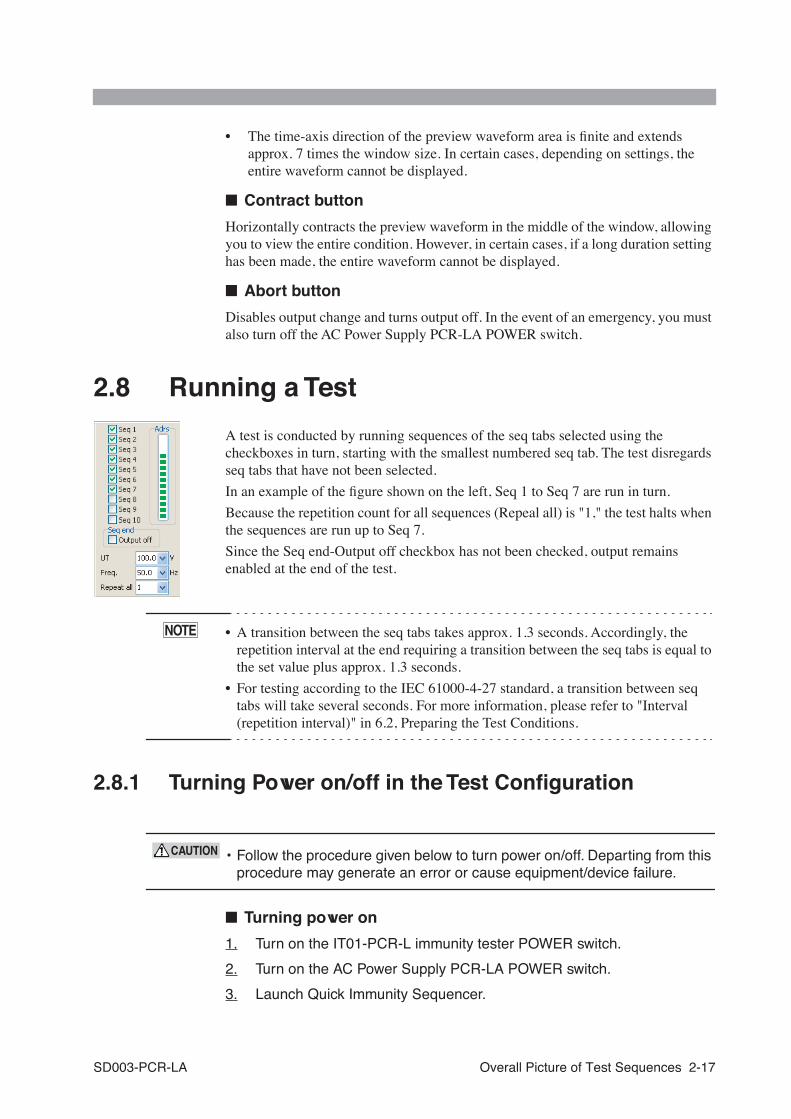
A test is conducted by running sequences of the seq tabs selected using the checkboxes in turn, starting with the smallest numbered seq tab. The test disregards seq tabs that have not been selected.
In an example of the figure shown on the left, Seq 1 to Seq 7 are run in turn.
Because the repetition count for all sequences (Repeal all) is "1," the test halts when the sequences are run up to Seq 7.
Since the Seq end-Output off checkbox has not been checked, output remains enabled at the end of the test.
• A transition between the seq tabs takes approx. 1.3 seconds. Accordingly, the repetition interval at the end requiring a transition between the seq tabs is equal to the set value plus approx. 1.3 seconds.
• For testing according to the IEC 61000-4-27 standard, a transition between seq tabs will take several seconds. For more information, please refer to "Interval (repetition interval)" in 6.2, Preparing the Test Conditions.
2.8.1 Turning Power on/off in the Test Configuration
• Follow the procedure given below to turn power on/off. Departing from this procedure may generate an error or cause equipment/device failure.
■ Turning power on
1. Turn on the IT01-PCR-L immunity tester POWER switch.
2. Turn on the AC Power Supply PCR-LA POWER switch.
3. Launch Quick Immunity Sequencer.
NOTE
CAUTION
SD003-PCR-LA Overall Picture of Test Sequences 2-17
■ Turning power off
1. Exit Quick Immunity Sequencer.
2. Turn off the AC Power Supply PCR-LA POWER switch.
3. Turn off the IT01-PCR-L immunity tester POWER switch.
2.8.2 Running Procedure
1. Select single phase or three phase.
Click on I/O Configuration... from the Instrument Menu and check the 3 phase system checkbox in the dialog displayed.
2. Set the test conditions.
3. Send the set test conditions to the PCR-LA.
Click the Send button on the toolbar.
When transmission is completed, the Run button on the toolbar is enabled.
4. Run the sequences.
Click the Run button on the toolbar.
While the sequences are running, the "Sequence Running" indication appears in a progress bar that graphically represents the status of the sequence in question. When execution of the set test conditions has been completed, the test automatically stops.
5. Stop
There are two ways to stop a test: the Stop button and the Pause button.
Stop buttonStops the test mid-course. Note that output remains enabled. If you also wish to switch off output, click the Abort button instead.
Pause buttonThis button pauses a test immediately before moving to the next tab after completing a sequence in a given seq tab. This function can be used, for example, to check or replace the EUT.
If you click the Pause button while a test is running, the button indication changes to "Cancel" until the sequence of the seq tab running at that time is complete.
Clicking the Cancel button cancels the pause-waiting status and returns the button displayed to the original Pause button.
When the sequence of the relevant seq tab is finished and the test is paused, the button indication changes to "Continue."
Click the Continue button to resume running the sequence.
2-18 Overall Picture of Test Sequences SD003-PCR-LA
2.8.3 Troubleshooting During Running
■ The Run button remains disabled although the Send menu/button was clicked.
With the IT01-PCR-L immunity tester, you must turn on the PCR-LA output before running a test. Click the Out On button to turn on the PCR-LA output.
■ The Send button remains disabled although no test is being run.
If IEC 61000-4-13 has been selected, you must turn off the PCR-LA output. This is because bank calculations were made while the test condition data was being sent.
2.8.4 Corrective Measures in the Event of Problems
If a problem occurs in the equipment under test (EUT), operate Quick Immunity Sequencer and the hardware to abort testing. For better protection of the EUT, we recommend aborting via hardware.
■ Operating Quick Immunity Sequencer
Click the F9 function key or the Abort button on the toolbar to abort testing. The AC Power Supply PCR-LA output is also turned off.
■ Operating the hardware
Turn off the AC Power Supply PCR-LA POWER switch.
2.9 Observing a Test Signal
When observing a test signal using an oscilloscope, use the trigger signal output described below. For trigger signal output from the AC Power Supply PCR-LA, a trigger signal selected under the test conditions for each standard is output. The IT01-PCR-L's trigger signal output is not related to a trigger signal selected in the test condition setting for each standard.
■ Trigger signal output from the AC Power Supply PCR-LA
A trigger signal is output from the SEQ TRIG OUT terminal (BNC connector) at the rear of the AC Power Supply PCR-LA. A low-level signal is output for several 10 μs at a location on the waveform where trigger signal output has been specified. The signal level in cases other than signal output is approx. +5 V. The low level is approx. 0 V.
The BNC connectors are isolated from the INPUT and OUTPUT terminal boards of the AC Power Supply PCR-LA. However, the line for each signal of the PEAK INIT IN, SEQ TRIG OUT, and SEQ STAT OUT terminals (BNC connectors) is shared in the AC Power Supply PCR-LA and is not isolated. The BNC connectors are also not isolated from the SLOTs' internal circuit. Note the slight time lag (approx. 100 μs) between the trigger signal output and actual output change.
SD003-PCR-LA Overall Picture of Test Sequences 2-19
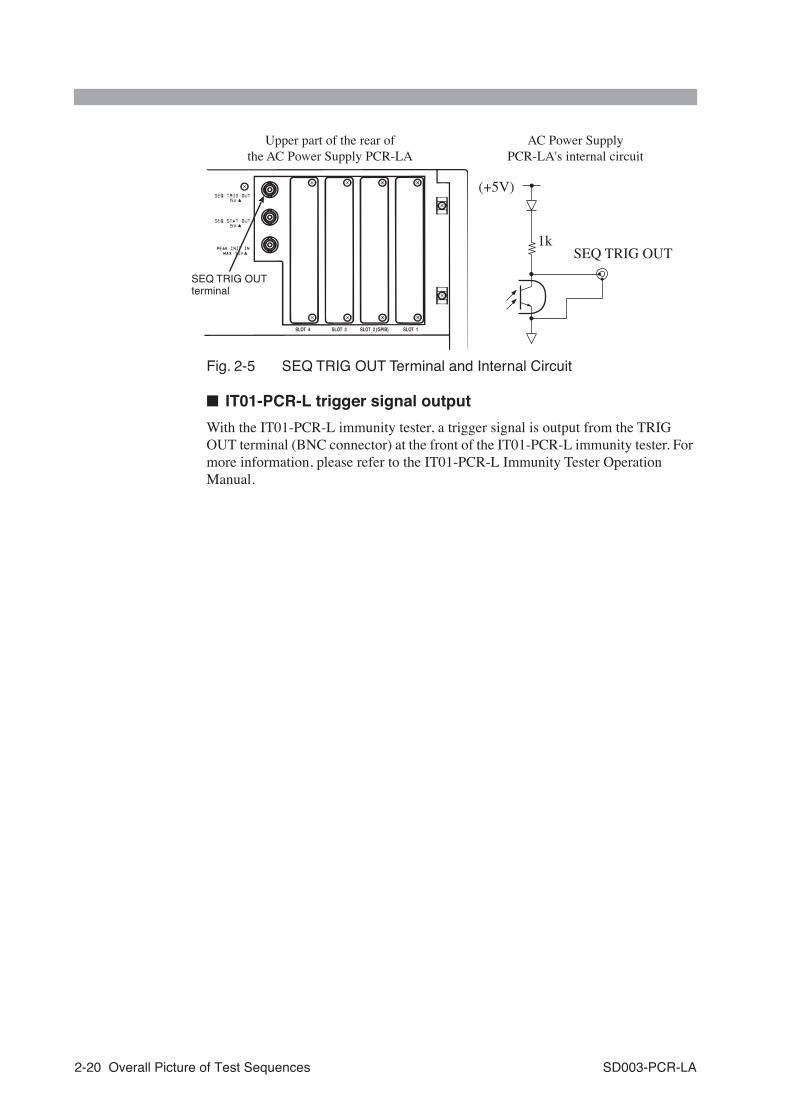
Fig. 2-5 SEQ TRIG OUT Terminal and Internal Circuit
■ IT01-PCR-L trigger signal output
With the IT01-PCR-L immunity tester, a trigger signal is output from the TRIG OUT terminal (BNC connector) at the front of the IT01-PCR-L immunity tester. For more information, please refer to the IT01-PCR-L Immunity Tester Operation Manual.
SLOT 1SLOT 2 (GPIB)SLOT 3SLOT 4
SEQ TRIG OUT terminal
(+5V)
1kSEQ TRIG OUT
Upper part of the rear of the AC Power Supply PCR-LA
AC Power Supply PCR-LA's internal circuit
2-20 Overall Picture of Test Sequences SD003-PCR-LA
33
Chapter 3 IEC 61000-4-11Describes Voltage dip, Short interruption, and Voltage variation immunity tests according to the IEC 61000-4-11 standard.
SD003-PCR-LA IEC 61000-4-11 3-1
3.1 Outline of the Test
The Voltage dip, Short interruption, and Voltage variation immunity tests determine the equipment's immunity against an abrupt drop or gentle decline in supply voltage.
■ Items not conforming to the standard's requirements
Certain Quick Immunity Sequencer items do not conform to the standard's requirements in the test configuration, including the hardware. The following table shows these items and the performance achieved in the test configuration.
• We recommend using the IT01-PCR-L immunity tester for single-phase operations.
• The standard's performance specifications relating to voltage rise and fall time of a test voltage generator (1 μs to 5 μs) are met. The performance achieved without the IT01-PCR-L is approximately 30 μs.
• The standard's performance specifications relating to the starting phase angle of Voltage dips or Short interruptions (setting accuracy within (10°) are met. Without the IT01-PCR-L, the standard's performance specifications will be met at an angle of multiples of 18, such as 90°, 180°, etc., for 50 Hz. The setting accuracy at other phase angles is ±18° at 50 Hz or ±21.6° at 60 Hz.
■ Three-phase operations
The test conditions are all set in relation to phase U. Test signals change simultaneously in three phases on the basis of phase U.
Item Standard's requirementsPerformance achieved
in the test configuration
Phase-basis setting for three-phase operations
A test is conducted with settings made for only one
phase. Ideally, any of phases U, V, and W can be specified
as a phase to be tested.
Only phase U can be specified.
Phase setting for
three-phase operations*1
*1. In single-phase operations, the standard's requirements are met if the IT01-PCR-L immunity tester is used.
Within ±10°±18° at 50 Hz or ±21.6°
at 60 Hz with the exception of zero cross
NOTE
3-2 IEC 61000-4-11 SD003-PCR-LA
3.2 Preparing the Test Conditions
3.2.1 Voltage Dips and Short Interruptions
Fig. 3-1 Voltage Dips and Short Interruptions Setting Window
Set the following items. Select a value provided in the dropdown list or enter a value within the input range into the Edit box. After entering a value, press the Enter key to accept it.
[1] Seq tabs
Allows you to set the test conditions in the panel of each seq tab (Seq 1 to Seq 10). These tabs show the heading numbers of the test conditions to be set in the following:
Test conditions can be copied or pasted between seq tabs. For more information, please refer to Edit Menu in 2.7.1, Menus.
[10] Sequences to run [1] Seq tabs [7] Repetition interval
[5] Starting phase angle
[3]UT [4] Test level
[9] Trigger
[8] Repetition count[12] Freq
[11] Seq end-Output off
[13] Repeat all
[2] Test type [6] Duration
SD003-PCR-LA IEC 61000-4-11 3-3
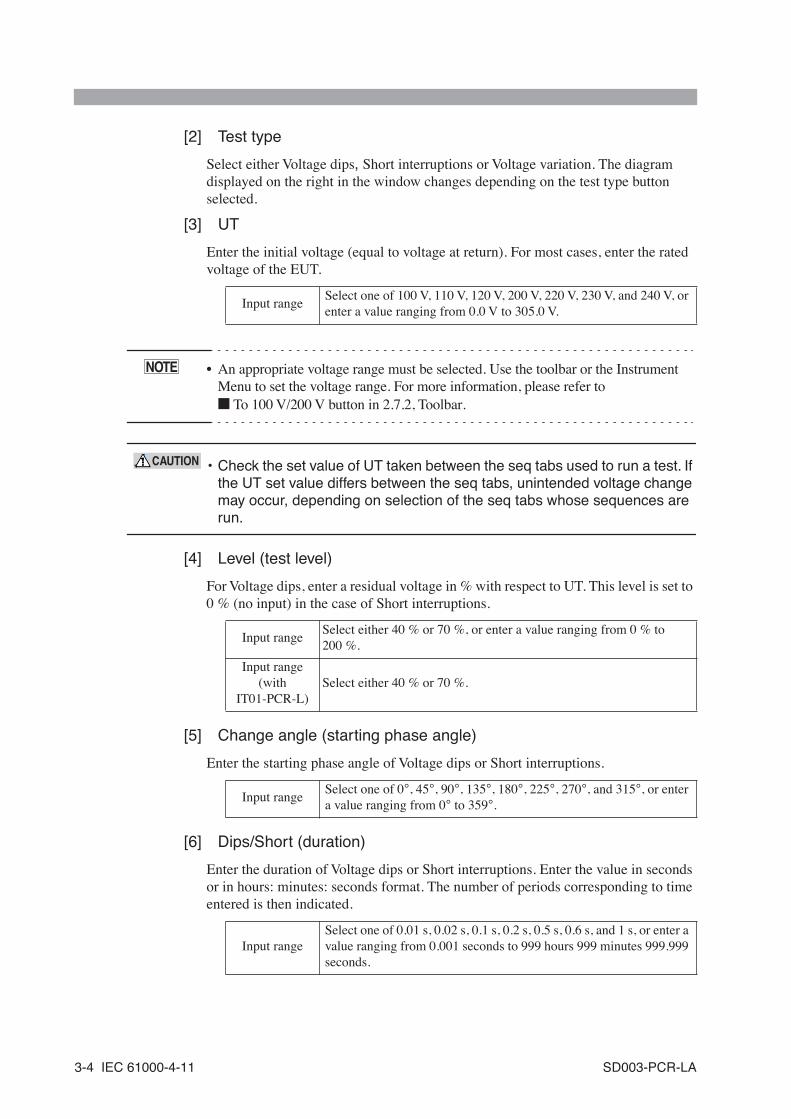
[2] Test type
Select either Voltage dips, Short interruptions or Voltage variation. The diagram displayed on the right in the window changes depending on the test type button selected.
[3] UT
Enter the initial voltage (equal to voltage at return). For most cases, enter the rated voltage of the EUT.
• An appropriate voltage range must be selected. Use the toolbar or the Instrument Menu to set the voltage range. For more information, please refer to ■ To 100 V/200 V button in 2.7.2, Toolbar.
• Check the set value of UT taken between the seq tabs used to run a test. If the UT set value differs between the seq tabs, unintended voltage change may occur, depending on selection of the seq tabs whose sequences are run.
[4] Level (test level)
For Voltage dips, enter a residual voltage in % with respect to UT. This level is set to 0 % (no input) in the case of Short interruptions.
[5] Change angle (starting phase angle)
Enter the starting phase angle of Voltage dips or Short interruptions.
[6] Dips/Short (duration)
Enter the duration of Voltage dips or Short interruptions. Enter the value in seconds or in hours: minutes: seconds format. The number of periods corresponding to time entered is then indicated.
Input rangeSelect one of 100 V, 110 V, 120 V, 200 V, 220 V, 230 V, and 240 V, or enter a value ranging from 0.0 V to 305.0 V.
Input rangeSelect either 40 % or 70 %, or enter a value ranging from 0 % to 200 %.
Input range (with
IT01-PCR-L)Select either 40 % or 70 %.
Input rangeSelect one of 0°, 45°, 90°, 135°, 180°, 225°, 270°, and 315°, or enter a value ranging from 0° to 359°.
Input rangeSelect one of 0.01 s, 0.02 s, 0.1 s, 0.2 s, 0.5 s, 0.6 s, and 1 s, or enter a value ranging from 0.001 seconds to 999 hours 999 minutes 999.999 seconds.
NOTE
CAUTION
3-4 IEC 61000-4-11 SD003-PCR-LA
• How to enter in hours: minutes: seconds format: A time value of up to 999:999:999.999 may be set by delimiting each unit with a colon (:). If only one colon is used, the value is treated as if in minutes: seconds format. Without a colon, it is regarded as a second value. Second values can be entered up to the third decimal place.
[7] Interval (repetition interval)
Enter the interval between the point at which the return voltage (UT) is reached and the next Voltage dip. At the end of repetition intervals, this is the time taken to move to the next seq tab. Enter the value in seconds or in hours: minutes: seconds format.
• If the interval is set to 0.02 seconds at 50 Hz frequency or to 0.18 seconds at 60 Hz frequency, it consists of two periods of the interval. The interval is set as the number of periods in which "1" is added to the number of periods for a test signal contained in the set time. A "1" is added because one period is required to detect a zero cross.
[8] Repeat (repetition count)
Enter the number of repetitions for the test conditions in the seq tab in question.
[9] Trigger
Select trigger signal output. The red symbol indicates at a location selected using a checkbox.
[10] Sequences to run
Check the corresponding checkboxes of the seq tabs whose test conditions are used to run a test sequence. Test sequences are run in turn starting at Seq 1. Seq tabs whose corresponding checkboxes have not been checked are not used to run a test.
Input range (with
IT01-PCR-L)
The IT01-PCR-L allows the setting of a 0.5 period or value ranging from 1 to 3000 periods. Since this item is set as a time value, you must convert the number of periods into a time value to enter.50 Hz: 0.010 s to 60.000 s60 Hz: 0.008 s to 50.000 s
Input rangeFor most cases, select 10.000 s. Alternatively, enter a value ranging from 0.020 seconds to 999 hours 999 minutes 999.999 seconds.
Input range (with
IT01-PCR-L)Enter a value ranging from 10.000 s to 999.000 s (increment: 1 s).
Input rangeSelect one of 1, 3, 5, and 10 times, or enter a value ranging from 1 to 9999.
Input range (with
IT01-PCR-L)
Select one of 3, 6, 9, and 12 times, or enter a multiple of 3 within the range of 3 to 9999.
NOTE
NOTE
SD003-PCR-LA IEC 61000-4-11 3-5
[11] Seq end-Output off
When this checkbox is checked, a test signal is turned off at the end of sequence running. (the AC Power Supply PCR-LA output is turned off.)
[12] Freq
Enter the rated frequency of the EUT.
[13] Repeat all
Enter the repetition count of all the selected seq tabs (Seq 1 to Seq 10).
Input rangeSelect either 50 Hz or 60 Hz, or enter a value ranging from 1 Hz to 999.90 Hz.
Input range (with
IT01-PCR-L)Select either 50 Hz or 60 Hz.
Input rangeSelect one of 1, 3, 5, and 10 times, or enter a value ranging from 1 to 9999.
3-6 IEC 61000-4-11 SD003-PCR-LA
3.2.2 Voltage Variations
Fig. 3-2 Voltage Variations Setting Window
The following items other than 2, 5, 6, 7, and 11 are the same as for Voltage dips and Short interruptions. Please refer to 3.2.1, Voltage Dips and Short Interruptions.
[1] Seq tabs
[2] Test type
Select the Voltage variations.
• If the Use IT01-PCR-L checkbox is checked in the dialog box displayed by clicking on I/O Configuration... from the Instrument Menu, Voltage variations are not possible.
[11] Sequences to run [1] Seq tab [8] Repetition interval
[5] Voltage decreasing time
[3]UT [4] Test level
[10] Trigger
[9] Repetition count[13] Freq
[12] Seq end-Output off
[14] Repeat all
[2] Test type
[7] Voltage increasing time
[6] Reduced voltage time
NOTE
SD003-PCR-LA IEC 61000-4-11 3-7
[3] UT
[4] Level (test level)
[5] Decreasing (voltage decreasing time)
Enter the time taken to reduce voltage from the initial voltage (UT) to the reduced voltage. Enter the value in seconds or in hours: minutes: seconds format.
[6] Reduced (reduced voltage time)
Enter the reduced voltage duration. Enter the value in seconds or in hours: minutes: seconds format.
[7] Increasing (voltage increasing time)
Enter the time taken to return from the reduced voltage to the initial voltage (UT). Enter the value in seconds or in hours: minutes: seconds format.
[8] Interval (repetition interval)
[9] Repeat (repetition count)
[10] Trigger
[11] Sequences to run
Check the corresponding checkboxes of the seq tabs whose test conditions are used to run a test sequence. Test sequences are run in turn starting at Seq 1. seq tabs whose corresponding checkboxes have not been checked are not used to run a test.
• If the Use IT01-PCR-L checkbox is checked in the dialog box displayed by clicking on I/O Configuration... from the Instrument Menu, the seq tabs to which Voltage variation has been set are not used in the test.
[12] Seq end-Output off
[13] Freq
[14] Repeat all
Input rangeFor most cases, select 2.000 s. Alternatively, enter a value ranging from 0.001 seconds to 999 hours 999 minutes 999.999 seconds.
Input rangeFor most cases, select 2.000 s. Alternatively, enter a value ranging from 0.001 seconds to 999 hours 999 minutes 999.999 seconds.
Input rangeFor most cases, select 10.000 s. Alternatively, enter a value ranging from 0.001 seconds to 999 hours 999 minutes 999.999 seconds.
NOTE
3-8 IEC 61000-4-11 SD003-PCR-LA
3.3 Results of Sequence Running
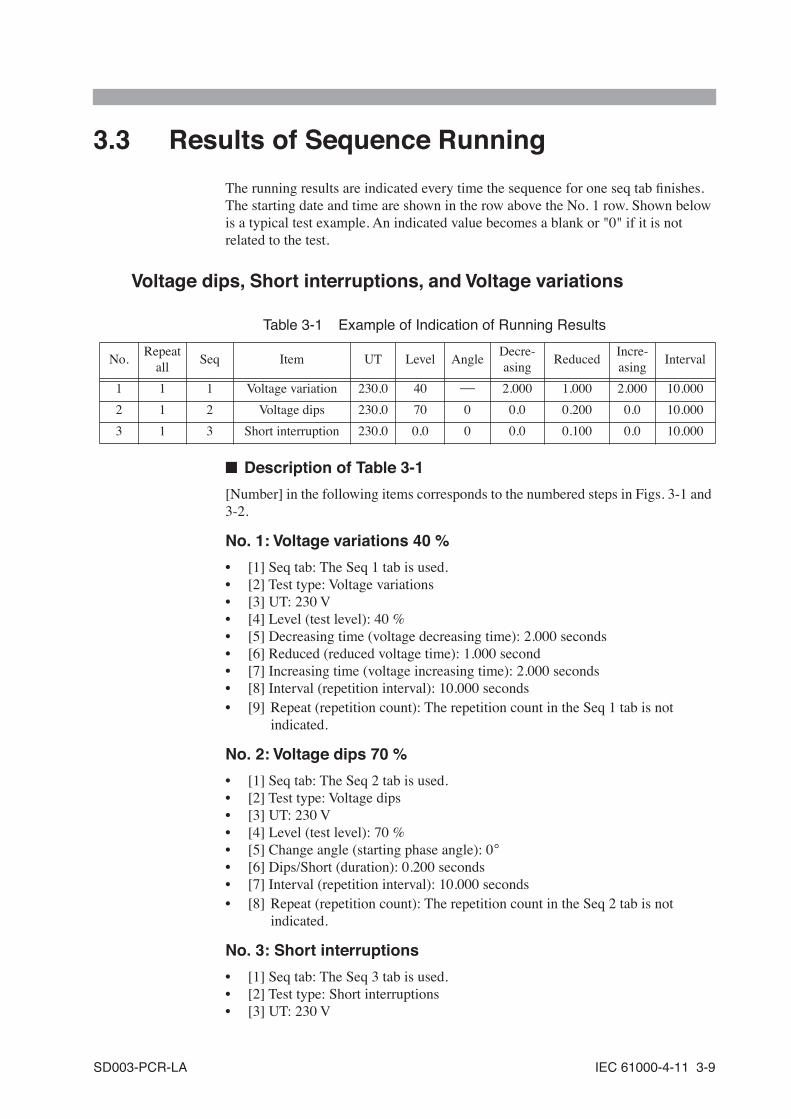
The running results are indicated every time the sequence for one seq tab finishes. The starting date and time are shown in the row above the No. 1 row. Shown below is a typical test example. An indicated value becomes a blank or "0" if it is not related to the test.
Voltage dips, Short interruptions, and Voltage variations
Table 3-1 Example of Indication of Running Results
■ Description of Table 3-1
[Number] in the following items corresponds to the numbered steps in Figs. 3-1 and 3-2.
No. 1: Voltage variations 40 %
• [1] Seq tab: The Seq 1 tab is used.• [2] Test type: Voltage variations• [3] UT: 230 V• [4] Level (test level): 40 %• [5] Decreasing time (voltage decreasing time): 2.000 seconds• [6] Reduced (reduced voltage time): 1.000 second• [7] Increasing time (voltage increasing time): 2.000 seconds• [8] Interval (repetition interval): 10.000 seconds• [9] Repeat (repetition count): The repetition count in the Seq 1 tab is not
indicated.
No. 2: Voltage dips 70 %
• [1] Seq tab: The Seq 2 tab is used.• [2] Test type: Voltage dips• [3] UT: 230 V• [4] Level (test level): 70 %• [5] Change angle (starting phase angle): 0°• [6] Dips/Short (duration): 0.200 seconds• [7] Interval (repetition interval): 10.000 seconds• [8] Repeat (repetition count): The repetition count in the Seq 2 tab is not
indicated.
No. 3: Short interruptions
• [1] Seq tab: The Seq 3 tab is used.• [2] Test type: Short interruptions• [3] UT: 230 V
No.Repeat
allSeq Item UT Level Angle
Decre-asing
ReducedIncre-asing
Interval
1 1 1 Voltage variation 230.0 40 ⎯ 2.000 1.000 2.000 10.000
2 1 2 Voltage dips 230.0 70 0 0.0 0.200 0.0 10.000
3 1 3 Short interruption 230.0 0.0 0 0.0 0.100 0.0 10.000
SD003-PCR-LA IEC 61000-4-11 3-9

• [4] Level (test level): 0 %• [5] Change angle (starting phase angle): 0°• [6] Dips/Short (duration): 0.100 seconds• [7] Interval (repetition interval): 10.000 seconds• [8] Repeat (repetition count): The repetition count in the Seq 3 tab is not
indicated.
Items common to No. 1, No. 2, and No. 3
• Trigger: Not indicated• Sequences to run: Sequences are run in the order of Seq 1, Seq 2, and Seq 3.• Seq end-Output off: Not indicated• Freq: Not indicated• Repeat all: The number of repetitions for the sequences to be run in the order of
Seq 1, Seq 2, and Seq 3 is 1.
3-10 IEC 61000-4-11 SD003-PCR-LA
44
Chapter 4 IEC 61000-4-13Describes Harmonics and interharmonics immunity tests according to the IEC 61000-4-13 standard.
SD003-PCR-LA IEC 61000-4-13 4-1
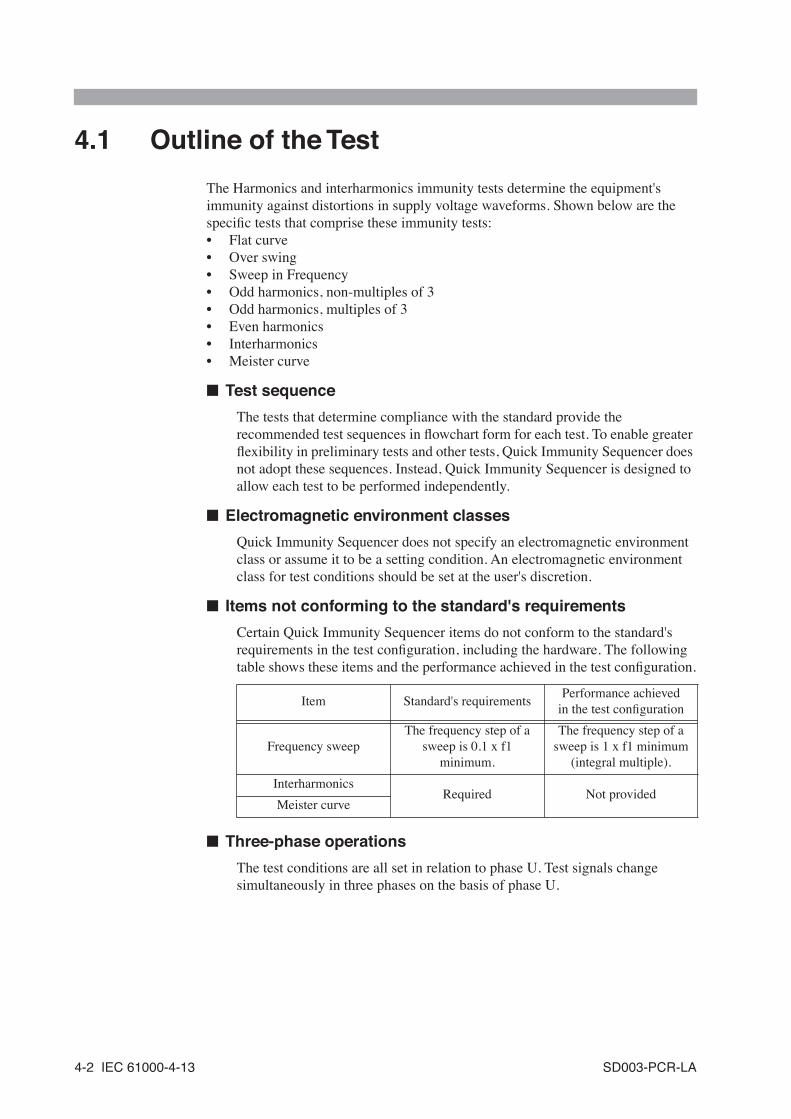
4.1 Outline of the Test
The Harmonics and interharmonics immunity tests determine the equipment's immunity against distortions in supply voltage waveforms. Shown below are the specific tests that comprise these immunity tests:• Flat curve• Over swing• Sweep in Frequency• Odd harmonics, non-multiples of 3• Odd harmonics, multiples of 3• Even harmonics• Interharmonics• Meister curve
■ Test sequence
The tests that determine compliance with the standard provide the recommended test sequences in flowchart form for each test. To enable greater flexibility in preliminary tests and other tests, Quick Immunity Sequencer does not adopt these sequences. Instead, Quick Immunity Sequencer is designed to allow each test to be performed independently.
■ Electromagnetic environment classes
Quick Immunity Sequencer does not specify an electromagnetic environment class or assume it to be a setting condition. An electromagnetic environment class for test conditions should be set at the user's discretion.
■ Items not conforming to the standard's requirements
Certain Quick Immunity Sequencer items do not conform to the standard's requirements in the test configuration, including the hardware. The following table shows these items and the performance achieved in the test configuration.
■ Three-phase operations
The test conditions are all set in relation to phase U. Test signals change simultaneously in three phases on the basis of phase U.
Item Standard's requirementsPerformance achieved
in the test configuration
Frequency sweepThe frequency step of a
sweep is 0.1 x f1 minimum.
The frequency step of a sweep is 1 x f1 minimum
(integral multiple).
InterharmonicsRequired Not provided
Meister curve
4-2 IEC 61000-4-13 SD003-PCR-LA
4.2 Preparing the Test Conditions
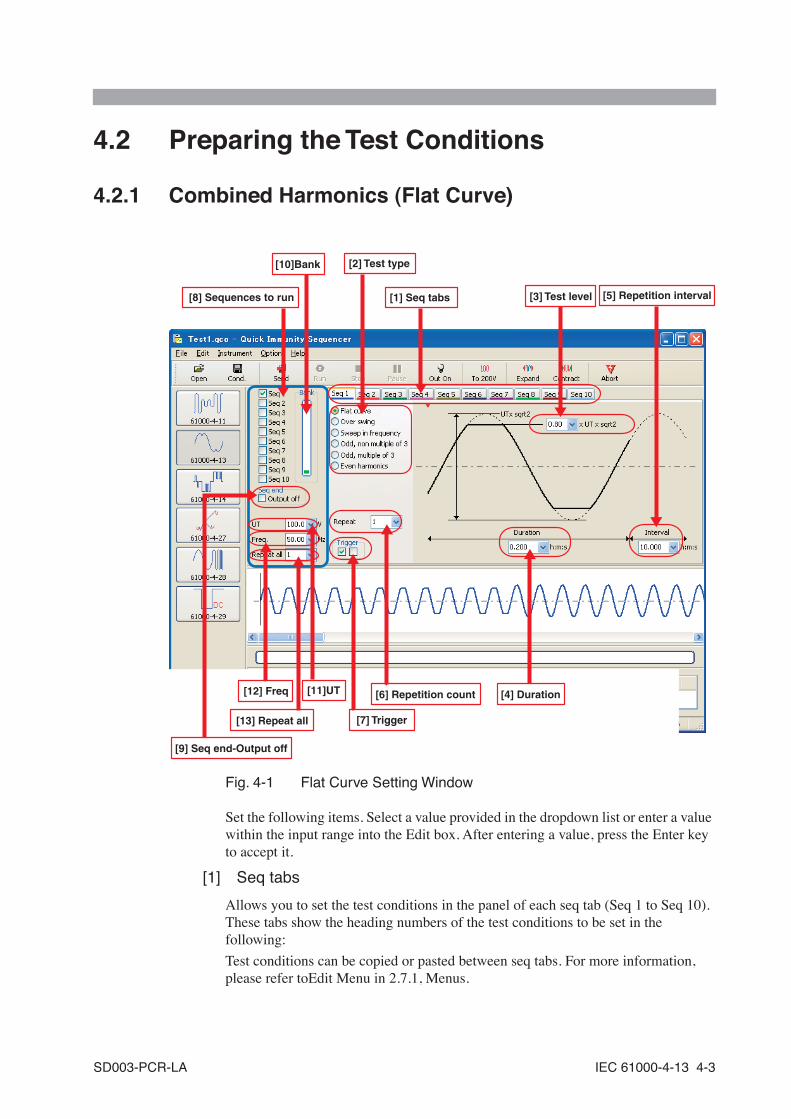
4.2.1 Combined Harmonics (Flat Curve)
Fig. 4-1 Flat Curve Setting Window
Set the following items. Select a value provided in the dropdown list or enter a value within the input range into the Edit box. After entering a value, press the Enter key to accept it.
[1] Seq tabs
Allows you to set the test conditions in the panel of each seq tab (Seq 1 to Seq 10). These tabs show the heading numbers of the test conditions to be set in the following:
Test conditions can be copied or pasted between seq tabs. For more information, please refer toEdit Menu in 2.7.1, Menus.
[8] Sequences to run [1] Seq tabs
[10]Bank
[5] Repetition interval
[4] Duration[11]UT
[3] Test level
[7] Trigger
[6] Repetition count[12] Freq
[9] Seq end-Output off
[13] Repeat all
[2] Test type
SD003-PCR-LA IEC 61000-4-13 4-3
[2] Test type
Select Flat curve from the following:• Flat curve• Over swing• Sweep in frequency• Odd, non-multiple of 3• Odd, multiple of 3• Even harmonics
[3] x UT x sqrt2 (test level)
Enter the ratio of the clipped section to the UT's peak value (UT x ). If no clipping is made, the value should be "1."
Even when the test level is changed, the rms value remains at the UT value.
[4] Duration
Enter the duration of the flat curve waveform. Enter the value in seconds or in hours: minutes: seconds format.
• How to enter in hours: minutes: seconds format: A time value of up to 999:999:999.999 may be set by delimiting each unit with a colon (:). If only one colon is used, the value is treated as if in minutes: seconds format. Without a colon, it is regarded as a second value. Second values can be entered up to the third decimal place.
• Waveform switching timing is at the 0°phase angle of the fundamental wave. That is, the current waveform is not switched at the end of the set time, but at the 0°phase angle of the next fundamental wave.
[5] Interval (repetition interval)
Enter the interval between the point at which the return voltage (UT) is reached and the next clipped voltage. At the end of repetition intervals, this is the time taken to move to the next seq tab. Enter the value in seconds or in hours: minutes: seconds format.
Input rangeSelect one of 0.80, 0.90, and 0.95, or enter a value ranging from 0.78 to 0.99.
Input range (with
IT01-PCR)Select either 0.90 or 0.95, or enter a value ranging from 0.89 to 0.99.
Input rangeSelect 120 s, or enter a value ranging from 0.020 seconds to 999 hours 999 minutes 999.999 seconds.
Input rangeFor most cases, select 10.000 s. Alternatively, enter a value ranging from 0.020 seconds to 999 hours 999 minutes 999.999 seconds.
2
NOTE
4-4 IEC 61000-4-13 SD003-PCR-LA
• Waveform switching timing is at the 0° phase angle of the fundamental wave. That is, the current waveform is not switched at the end of the set time, but at the 0° phase angle of the next fundamental wave.
[6] Repeat (repetition count)
Enter the number of repetitions for the test conditions in the seq tab in question.
[7] Trigger
Select trigger signal output. The red symbol indicates a location selected using the checkbox.
[8] Sequences to run
Check the corresponding checkboxes of the seq tabs whose test conditions are used to run a test sequence. Test sequences are run in turn starting at Seq 1. Seq tabs whose corresponding checkboxes have not been checked are not used to run a test.
[9] Seq end-Output off
When this checkbox is checked, a test signal is turned off at the end of sequence running. (the AC Power Supply PCR-LA output is turned off.)
[10] Bank
This test uses the AC Power Supply PCR-LA's waveform banks. The waveform banks are memory for storing special waveforms. Up to 15 types of waveforms can be stored. One of the stored waveforms (sine wave) is a reference waveform for the AC power supply and cannot be overwritten. Thus, the actual number of waveform types that can be stored is 14.
For the Bank indication, the fluctuating indicated bar is displayed in green. If this bar is displayed in red, the number of waveforms to be stored has exceeded 14 types. In this case, the Send button remains disabled to prevent further testing.
• Waveform bank data is stored temporarily, not backed up. Waveform bank data is lost when the AC Power Supply PCR-LA POWER switch is turned off.
Input rangeSelect one of 1, 3, 5, and 10 times, or enter a value ranging from 1 to 9999.
NOTE
NOTE
SD003-PCR-LA IEC 61000-4-13 4-5
[11] UT
Enter the initial voltage (equal to voltage at return). For most cases, enter the rated voltage of the EUT.
• An appropriate voltage range must be selected. Use the toolbar or the Instrument Menu to set the voltage range. For more information, please refer to ■ To 100 V/200 V button in 2.7.2, Toolbar.
[12] Freq
Enter the rated frequency of the EUT.
[13] Repeat all
Enter the repetition count of all the selected seq tabs (Seq 1 to Seq 10).
Input rangeSelect one of 100 V, 110 V, 120 V, 200 V, 220 V, 230 V, and 240 V, or enter a value ranging from 0.0 V to 305.0 V.
Input rangeSelect either 50 Hz or 60 Hz, or enter a value ranging from 1 Hz to 999.90 Hz.
Input rangeSelect one of 1, 3, 5, and 10 times, or enter a value ranging from 1 to 9999.
NOTE
4-6 IEC 61000-4-13 SD003-PCR-LA
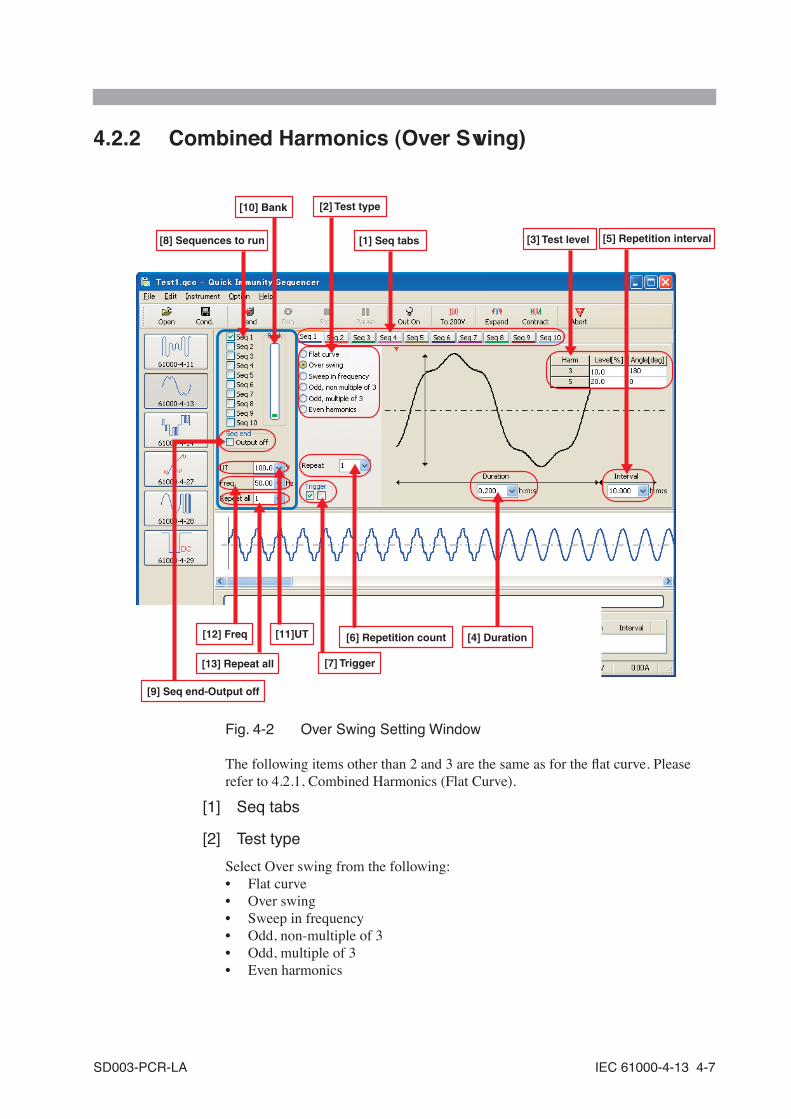
4.2.2 Combined Harmonics (Over Swing)
Fig. 4-2 Over Swing Setting Window
The following items other than 2 and 3 are the same as for the flat curve. Please refer to 4.2.1, Combined Harmonics (Flat Curve).
[1] Seq tabs
[2] Test type
Select Over swing from the following:• Flat curve• Over swing• Sweep in frequency• Odd, non-multiple of 3• Odd, multiple of 3• Even harmonics
[8] Sequences to run [1] Seq tabs
[10] Bank
[5] Repetition interval
[4] Duration[11]UT
[3] Test level
[7] Trigger
[6] Repetition count[12] Freq
[9] Seq end-Output off
[13] Repeat all
[2] Test type
SD003-PCR-LA IEC 61000-4-13 4-7
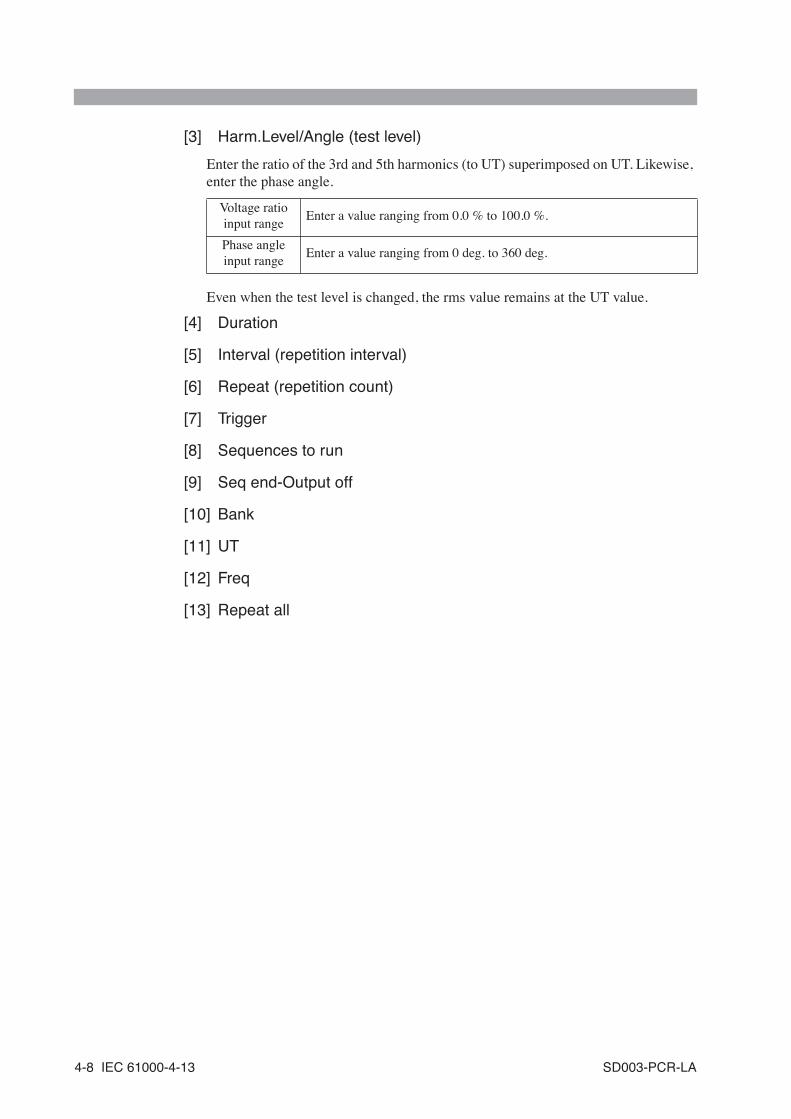
[3] Harm.Level/Angle (test level)
Enter the ratio of the 3rd and 5th harmonics (to UT) superimposed on UT. Likewise, enter the phase angle.
Even when the test level is changed, the rms value remains at the UT value.
[4] Duration
[5] Interval (repetition interval)
[6] Repeat (repetition count)
[7] Trigger
[8] Sequences to run
[9] Seq end-Output off
[10] Bank
[11] UT
[12] Freq
[13] Repeat all
Voltage ratio input range
Enter a value ranging from 0.0 % to 100.0 %.
Phase angle input range
Enter a value ranging from 0 deg. to 360 deg.
4-8 IEC 61000-4-13 SD003-PCR-LA
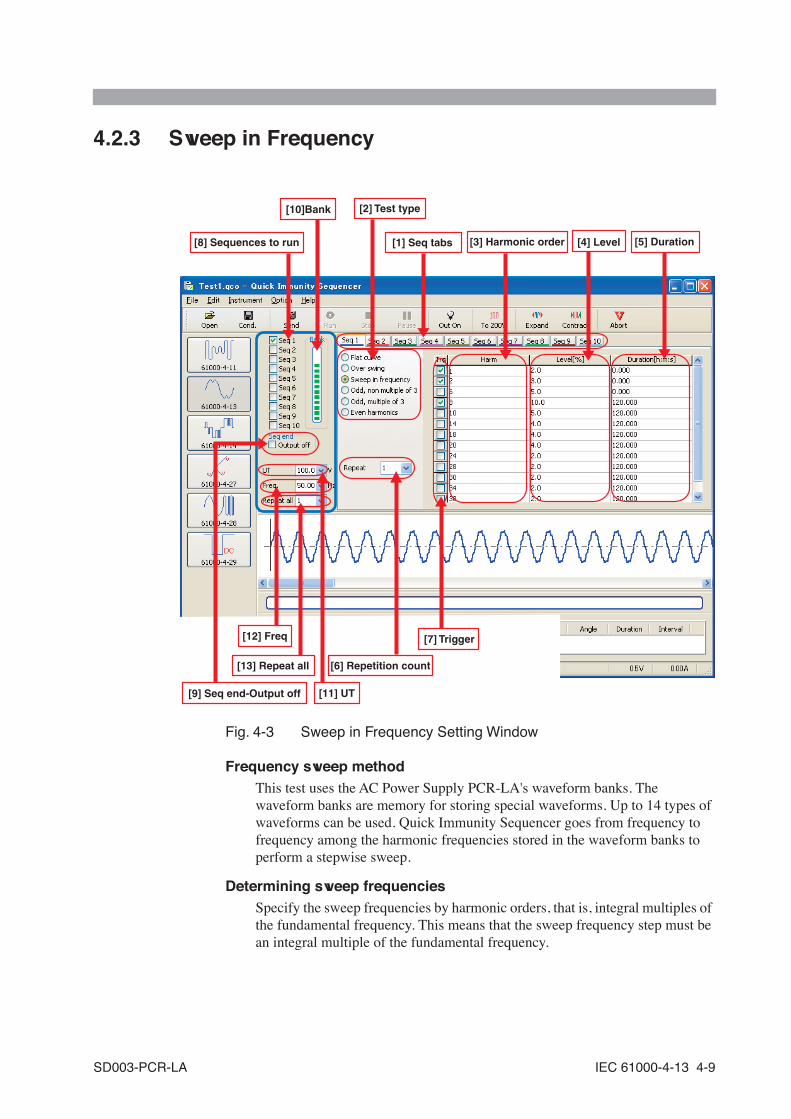
4.2.3 Sweep in Frequency
Fig. 4-3 Sweep in Frequency Setting Window
Frequency sweep methodThis test uses the AC Power Supply PCR-LA's waveform banks. The waveform banks are memory for storing special waveforms. Up to 14 types of waveforms can be used. Quick Immunity Sequencer goes from frequency to frequency among the harmonic frequencies stored in the waveform banks to perform a stepwise sweep.
Determining sweep frequenciesSpecify the sweep frequencies by harmonic orders, that is, integral multiples of the fundamental frequency. This means that the sweep frequency step must be an integral multiple of the fundamental frequency.
[8] Sequences to run [1] Seq tabs
[10]Bank
[5] Duration
[7] Trigger
[3] Harmonic order [4] Level
[11] UT
[6] Repetition count
[12] Freq
[9] Seq end-Output off
[13] Repeat all
[2] Test type
SD003-PCR-LA IEC 61000-4-13 4-9
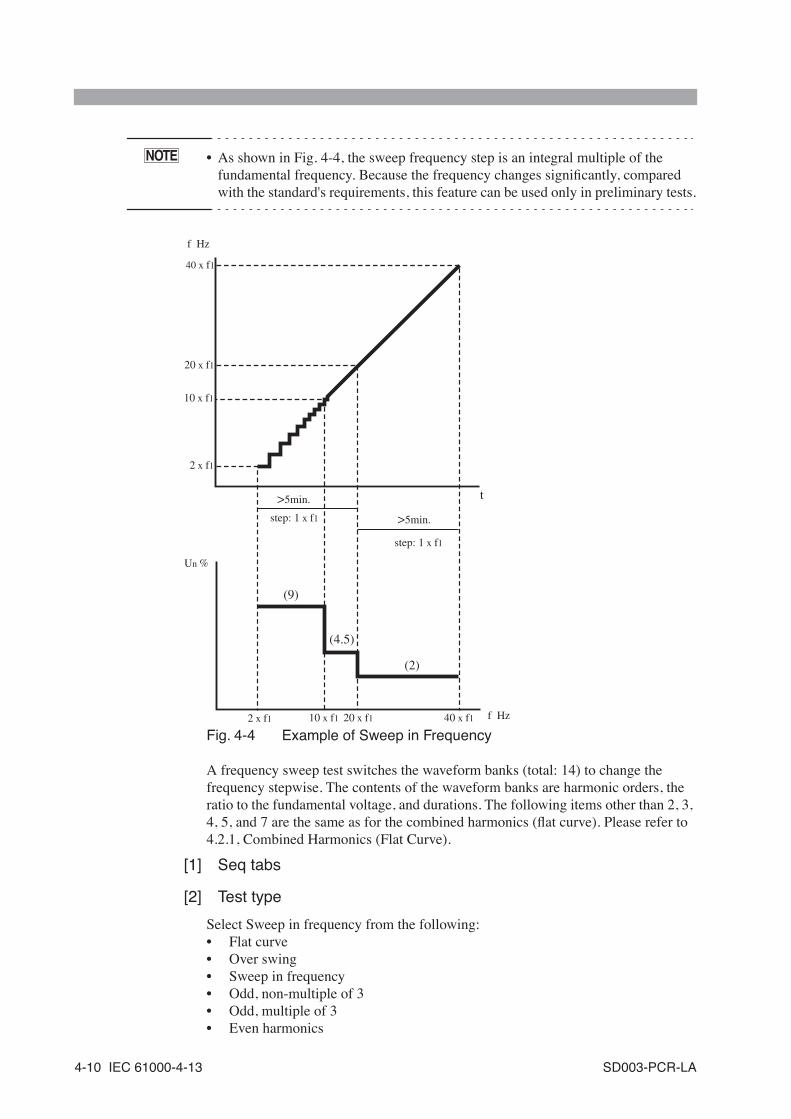
• As shown in Fig. 4-4, the sweep frequency step is an integral multiple of the fundamental frequency. Because the frequency changes significantly, compared with the standard's requirements, this feature can be used only in preliminary tests.
Fig. 4-4 Example of Sweep in Frequency
A frequency sweep test switches the waveform banks (total: 14) to change the frequency stepwise. The contents of the waveform banks are harmonic orders, the ratio to the fundamental voltage, and durations. The following items other than 2, 3, 4, 5, and 7 are the same as for the combined harmonics (flat curve). Please refer to 4.2.1, Combined Harmonics (Flat Curve).
[1] Seq tabs
[2] Test type
Select Sweep in frequency from the following:• Flat curve• Over swing• Sweep in frequency• Odd, non-multiple of 3• Odd, multiple of 3• Even harmonics
NOTE
2 x f1 10 x f1 20 x f1 40 x f1
2 x f1
20 x f1
10 x f1
40 x f1
Un %
f Hz
f Hz
t
>5min.
step: 1 x f1
>5min.
step: 1 x f1
(9)
(4.5)
(2)
4-10 IEC 61000-4-13 SD003-PCR-LA
[3] Harm (harmonic order)
Enter the order of the harmonics superimposed on the fundamental wave. A sweep step progresses downward from the highest row.
[4] Level
Enter the ratio of the harmonic (to the fundamental voltage) superimposed on the fundamental wave.
[5] Duration
Enter the duration of the harmonic superimposed on the fundamental wave.
• Waveform switching timing is at the 0° phase angle of the fundamental wave. That is, the current waveform is not switched at the end of the set time, but at the 0° phase angle of the next fundamental wave.
[6] Repeat (repetition count)
[7] Trigger
Select trigger signal output. A trigger signal is output at the start of the superimposed waveform output of harmonics selected using the checkboxes.
[8] Sequences to run
[9] Seq end-Output off
[10] Bank
For the Bank indication, the fluctuating indicated values are displayed in green. If this value is displayed in red, the number of waveforms to be stored has exceeded 14 types. In this case, the Send button remains disabled to prevent further testing.
Paring down the number of waveforms stored:• Method 1: Reduce the number of checked checkboxes in the seq tabs .• Method 2: Set the Duration setting to 0 (zero).
[11] UT
[12] Freq
[13] Repeat all
Input range Enter a value ranging from 1 to 40.
Input range Enter a value ranging from 0.0 % to 100.0 %.
Input rangeEnter a value ranging from 0.001 seconds to 999 hours 999 minutes 999.999 seconds.
NOTE
SD003-PCR-LA IEC 61000-4-13 4-11

4.2.4 Individual Harmonics
Three harmonics are given below as individual harmonics. Each harmonic is set in the same way for all tests.• Odd harmonics, non-multiples of 3• Odd harmonics, multiples of 3• Even harmonics
Fig. 4-5 Individual Harmonics Setting Window (Odd Harmonics, Non-multiples of 3)
The individual harmonics test switches the waveform banks (total: 14) to change harmonics stepwise. The following items other than 2, 3, 4, 5, 6, 7, and 9 are the same as for the flat curve. Please refer to 4.2.1, Combined Harmonics (Flat Curve).
[1] Seq tabs
[2] Test type
Select Odd, non multiple of 3; Odd, multiple of 3, or Even harmonics from the following:
[10] Sequences to run [1] Seq. tabs
[12] Bank
[6] Duration
[9] Trigger
[4] Level
[13] UT
[8] Repetition count
[14] Freq
[11] Seq end-Output off
[15] Repeat all
[2] Test type [7] Repetition interval[3] Harmonic order [5] Angle
4-12 IEC 61000-4-13 SD003-PCR-LA
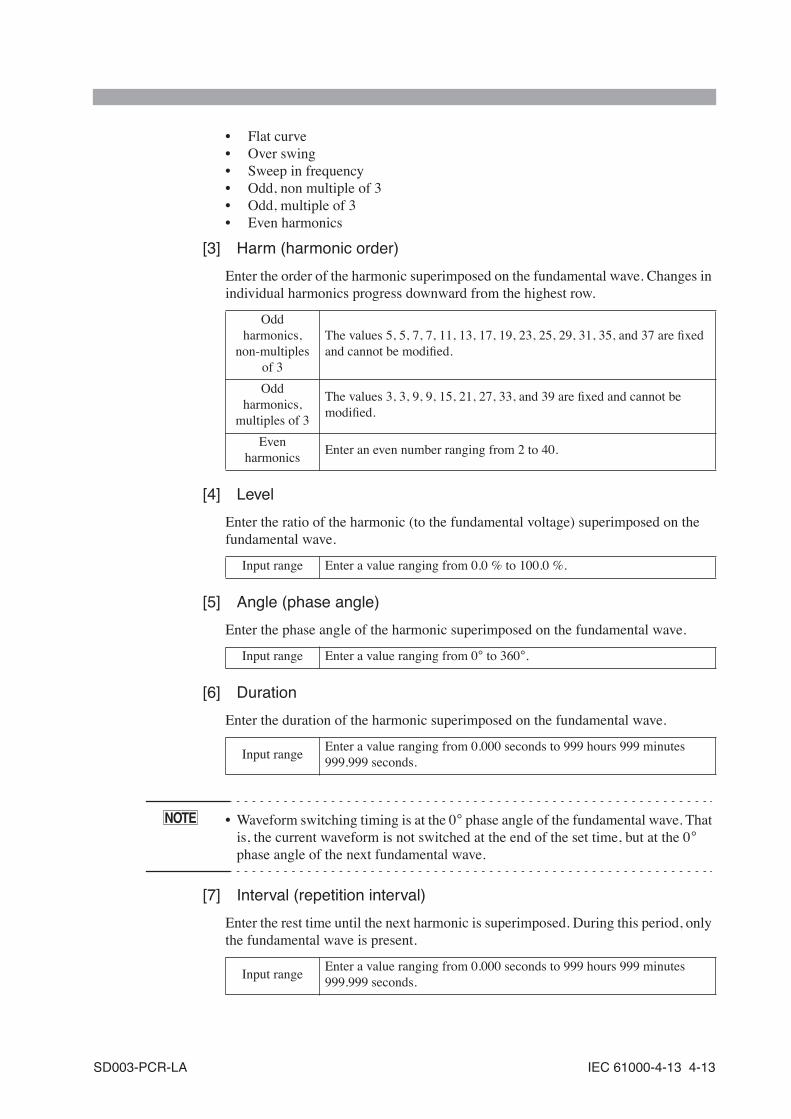
• Flat curve• Over swing• Sweep in frequency• Odd, non multiple of 3• Odd, multiple of 3• Even harmonics
[3] Harm (harmonic order)
Enter the order of the harmonic superimposed on the fundamental wave. Changes in individual harmonics progress downward from the highest row.
[4] Level
Enter the ratio of the harmonic (to the fundamental voltage) superimposed on the fundamental wave.
[5] Angle (phase angle)
Enter the phase angle of the harmonic superimposed on the fundamental wave.
[6] Duration
Enter the duration of the harmonic superimposed on the fundamental wave.
• Waveform switching timing is at the 0° phase angle of the fundamental wave. That is, the current waveform is not switched at the end of the set time, but at the 0° phase angle of the next fundamental wave.
[7] Interval (repetition interval)
Enter the rest time until the next harmonic is superimposed. During this period, only the fundamental wave is present.
Odd harmonics,
non-multiples of 3
The values 5, 5, 7, 7, 11, 13, 17, 19, 23, 25, 29, 31, 35, and 37 are fixed and cannot be modified.
Odd harmonics,
multiples of 3
The values 3, 3, 9, 9, 15, 21, 27, 33, and 39 are fixed and cannot be modified.
Even harmonics
Enter an even number ranging from 2 to 40.
Input range Enter a value ranging from 0.0 % to 100.0 %.
Input range Enter a value ranging from 0° to 360°.
Input rangeEnter a value ranging from 0.000 seconds to 999 hours 999 minutes 999.999 seconds.
Input rangeEnter a value ranging from 0.000 seconds to 999 hours 999 minutes 999.999 seconds.
NOTE
SD003-PCR-LA IEC 61000-4-13 4-13
• Waveform switching timing is at the 0° phase angle of the fundamental wave. That is, the current waveform is not switched at the end of the set time, but at the 0° phase angle of the next fundamental wave.
[8] Repeat (repetition count)
[9] Trigger
Select trigger signal output. A trigger signal is output at the start of the superimposed waveform output of harmonics selected using the checkboxes.
[10] Sequences to run
[11] Seq end-Output off
[12] Bank
For the Bank indication, the fluctuating indicated values are displayed in green. If this value is displayed in red, the number of waveforms to be stored has exceeded 14 types. In this case, the Send button remains disabled to prevent further testing.
Paring down the number of waveforms stored:• Method 1: Reduce the number of checked checkboxes in the seq tabs .• Method 2: Set the settings for Duration and Interval (repetition interval) to
0 (zero).
[13] UT
[14] Freq
[15] Repeat all
NOTE
4-14 IEC 61000-4-13 SD003-PCR-LA
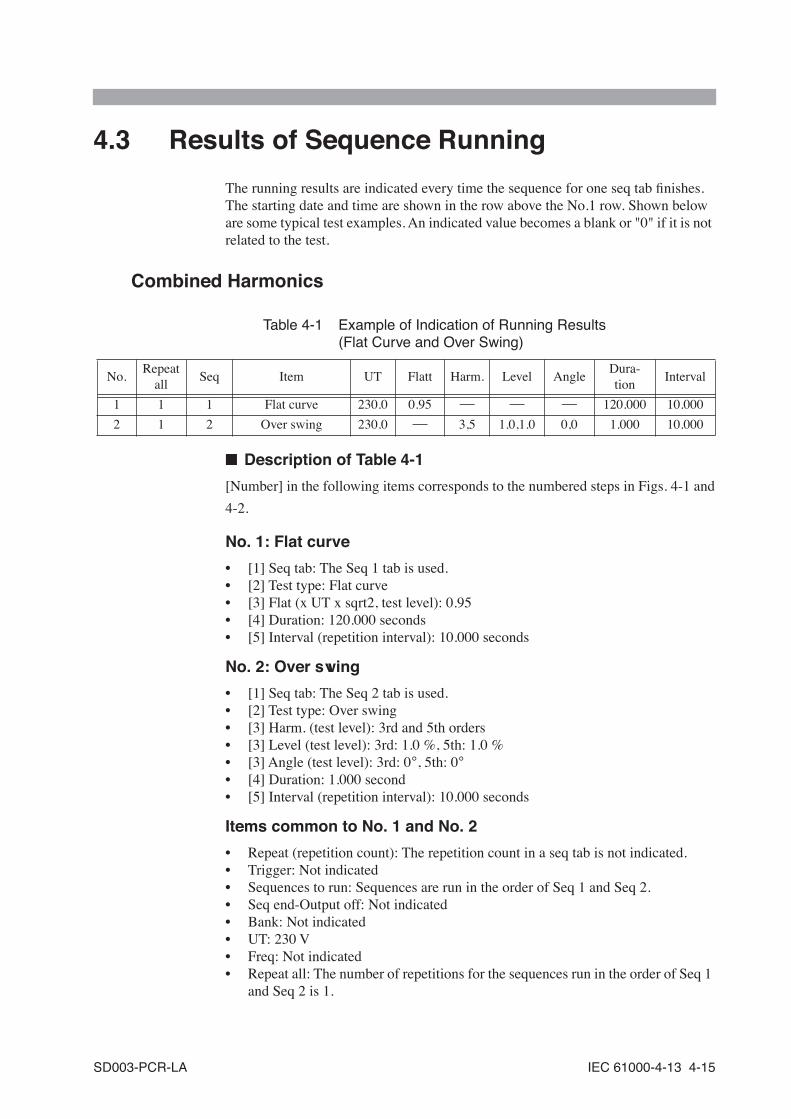
4.3 Results of Sequence Running
The running results are indicated every time the sequence for one seq tab finishes. The starting date and time are shown in the row above the No.1 row. Shown below are some typical test examples. An indicated value becomes a blank or "0" if it is not related to the test.
Combined Harmonics
Table 4-1 Example of Indication of Running Results (Flat Curve and Over Swing)
■ Description of Table 4-1
[Number] in the following items corresponds to the numbered steps in Figs. 4-1 and
4-2.
No. 1: Flat curve
• [1] Seq tab: The Seq 1 tab is used.• [2] Test type: Flat curve• [3] Flat (x UT x sqrt2, test level): 0.95• [4] Duration: 120.000 seconds• [5] Interval (repetition interval): 10.000 seconds
No. 2: Over swing
• [1] Seq tab: The Seq 2 tab is used.• [2] Test type: Over swing• [3] Harm. (test level): 3rd and 5th orders• [3] Level (test level): 3rd: 1.0 %, 5th: 1.0 %• [3] Angle (test level): 3rd: 0°, 5th: 0°• [4] Duration: 1.000 second• [5] Interval (repetition interval): 10.000 seconds
Items common to No. 1 and No. 2
• Repeat (repetition count): The repetition count in a seq tab is not indicated.• Trigger: Not indicated• Sequences to run: Sequences are run in the order of Seq 1 and Seq 2.• Seq end-Output off: Not indicated• Bank: Not indicated• UT: 230 V• Freq: Not indicated• Repeat all: The number of repetitions for the sequences run in the order of Seq 1
and Seq 2 is 1.
No.Repeat
allSeq Item UT Flatt Harm. Level Angle
Dura-tion
Interval
1 1 1 Flat curve 230.0 0.95 ⎯ ⎯ ⎯ 120.000 10.000
2 1 2 Over swing 230.0 ⎯ 3,5 1.0,1.0 0,0 1.000 10.000
SD003-PCR-LA IEC 61000-4-13 4-15
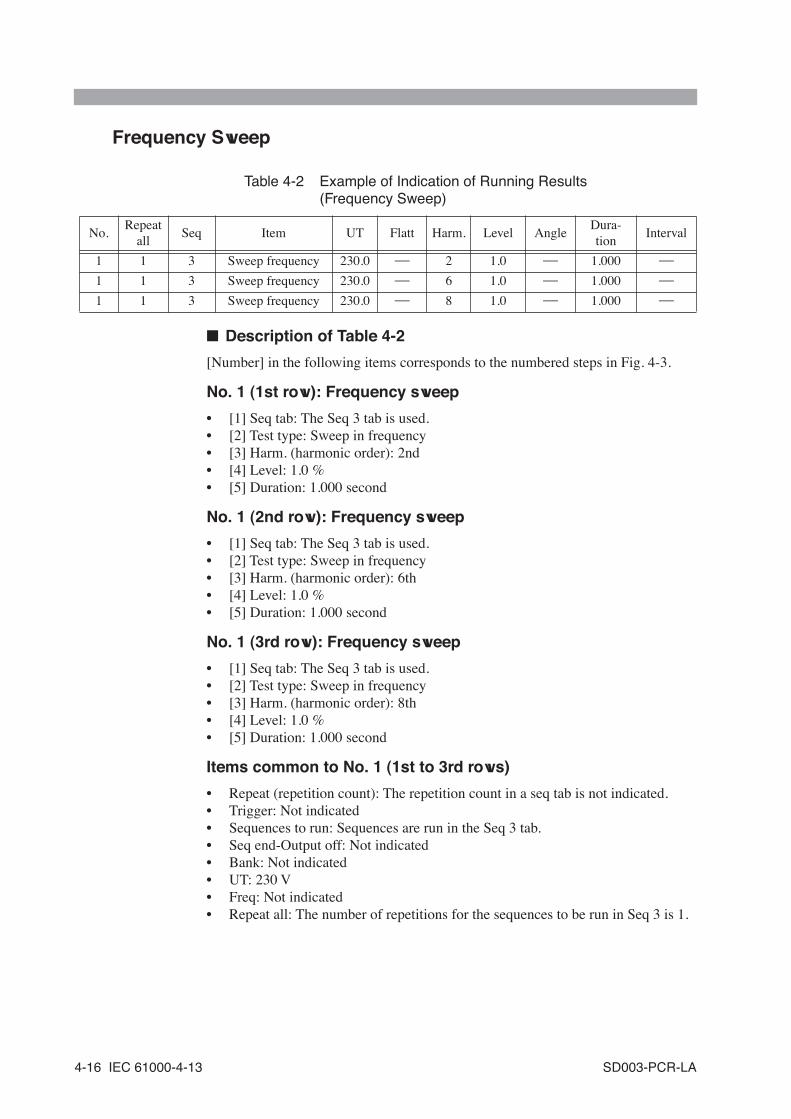
Frequency Sweep
Table 4-2 Example of Indication of Running Results (Frequency Sweep)
■ Description of Table 4-2
[Number] in the following items corresponds to the numbered steps in Fig. 4-3.
No. 1 (1st row): Frequency sweep
• [1] Seq tab: The Seq 3 tab is used.• [2] Test type: Sweep in frequency• [3] Harm. (harmonic order): 2nd• [4] Level: 1.0 %• [5] Duration: 1.000 second
No. 1 (2nd row): Frequency sweep
• [1] Seq tab: The Seq 3 tab is used.• [2] Test type: Sweep in frequency• [3] Harm. (harmonic order): 6th• [4] Level: 1.0 %• [5] Duration: 1.000 second
No. 1 (3rd row): Frequency sweep
• [1] Seq tab: The Seq 3 tab is used.• [2] Test type: Sweep in frequency• [3] Harm. (harmonic order): 8th• [4] Level: 1.0 %• [5] Duration: 1.000 second
Items common to No. 1 (1st to 3rd rows)
• Repeat (repetition count): The repetition count in a seq tab is not indicated.• Trigger: Not indicated• Sequences to run: Sequences are run in the Seq 3 tab.• Seq end-Output off: Not indicated• Bank: Not indicated• UT: 230 V• Freq: Not indicated• Repeat all: The number of repetitions for the sequences to be run in Seq 3 is 1.
No.Repeat
allSeq Item UT Flatt Harm. Level Angle
Dura-tion
Interval
1 1 3 Sweep frequency 230.0 ⎯ 2 1.0 ⎯ 1.000 ⎯
1 1 3 Sweep frequency 230.0 ⎯ 6 1.0 ⎯ 1.000 ⎯
1 1 3 Sweep frequency 230.0 ⎯ 8 1.0 ⎯ 1.000 ⎯
4-16 IEC 61000-4-13 SD003-PCR-LA
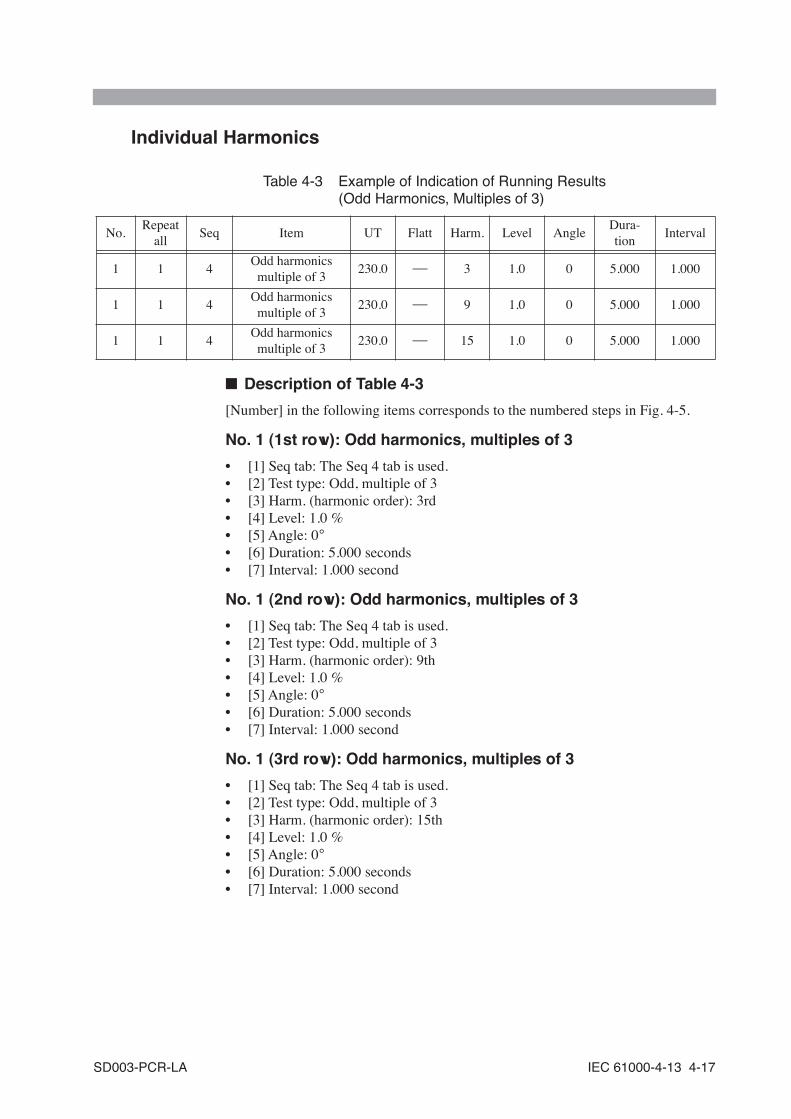
Individual Harmonics
Table 4-3 Example of Indication of Running Results (Odd Harmonics, Multiples of 3)
■ Description of Table 4-3
[Number] in the following items corresponds to the numbered steps in Fig. 4-5.
No. 1 (1st row): Odd harmonics, multiples of 3
• [1] Seq tab: The Seq 4 tab is used.• [2] Test type: Odd, multiple of 3• [3] Harm. (harmonic order): 3rd• [4] Level: 1.0 %• [5] Angle: 0°• [6] Duration: 5.000 seconds• [7] Interval: 1.000 second
No. 1 (2nd row): Odd harmonics, multiples of 3
• [1] Seq tab: The Seq 4 tab is used.• [2] Test type: Odd, multiple of 3• [3] Harm. (harmonic order): 9th• [4] Level: 1.0 %• [5] Angle: 0°• [6] Duration: 5.000 seconds• [7] Interval: 1.000 second
No. 1 (3rd row): Odd harmonics, multiples of 3
• [1] Seq tab: The Seq 4 tab is used.• [2] Test type: Odd, multiple of 3• [3] Harm. (harmonic order): 15th• [4] Level: 1.0 %• [5] Angle: 0°• [6] Duration: 5.000 seconds• [7] Interval: 1.000 second
No.Repeat
allSeq Item UT Flatt Harm. Level Angle
Dura-tion
Interval
1 1 4Odd harmonics multiple of 3
230.0 ⎯ 3 1.0 0 5.000 1.000
1 1 4Odd harmonics multiple of 3
230.0 ⎯ 9 1.0 0 5.000 1.000
1 1 4Odd harmonics multiple of 3
230.0 ⎯ 15 1.0 0 5.000 1.000
SD003-PCR-LA IEC 61000-4-13 4-17
Items common to No. 1 (1st to 3rd rows)
• Repeat (repetition count): The repetition count in a seq tab is not indicated.• Trigger: Not indicated• Sequences to run: Sequences are run in the Seq 4 tab.• Seq end-Output off: Not indicated• Bank: Not indicated• UT: 230 V• Freq: Not indicated• Repeat all: The number of repetitions for the sequences to be run in Seq 4 is 1.
4-18 IEC 61000-4-13 SD003-PCR-LA
55
Chapter 5 IEC 61000-4-14Describes the Voltage fluctuation immunity test according to the IEC 61000-4-14 standard.
SD003-PCR-LA IEC 61000-4-14 5-1
5.1 Outline of the Test
The Voltage fluctuation immunity test determines the equipment's immunity against Voltage fluctuation in the supply voltage.
■ Electromagnetic environment classes
Quick Immunity Sequencer does not specify an electromagnetic environment class or assume it to be a setting condition. An electromagnetic environment class for test conditions should be set at the user's discretion.
■ Items not conforming to the standard's requirements
Certain Quick Immunity Sequencer items do not conform to the standard's requirements in the test configuration, including the hardware. The following table shows these items and the performance achieved in the test configuration.
■ Three-phase operations
The test conditions are all set in relation to phase U. Test signals change simultaneously in three phases on the basis of phase U.
Item Standard's requirementsPerformance achieved in
the test configuration
tf/tr of Voltage fluctuationThe timing for five
periodic transitions must be specified.
The timing for five periodic transitions is not
specified.
Start phase of three-phase operations
270° for each phase270° only at the first
period in phase U
5-2 IEC 61000-4-14 SD003-PCR-LA
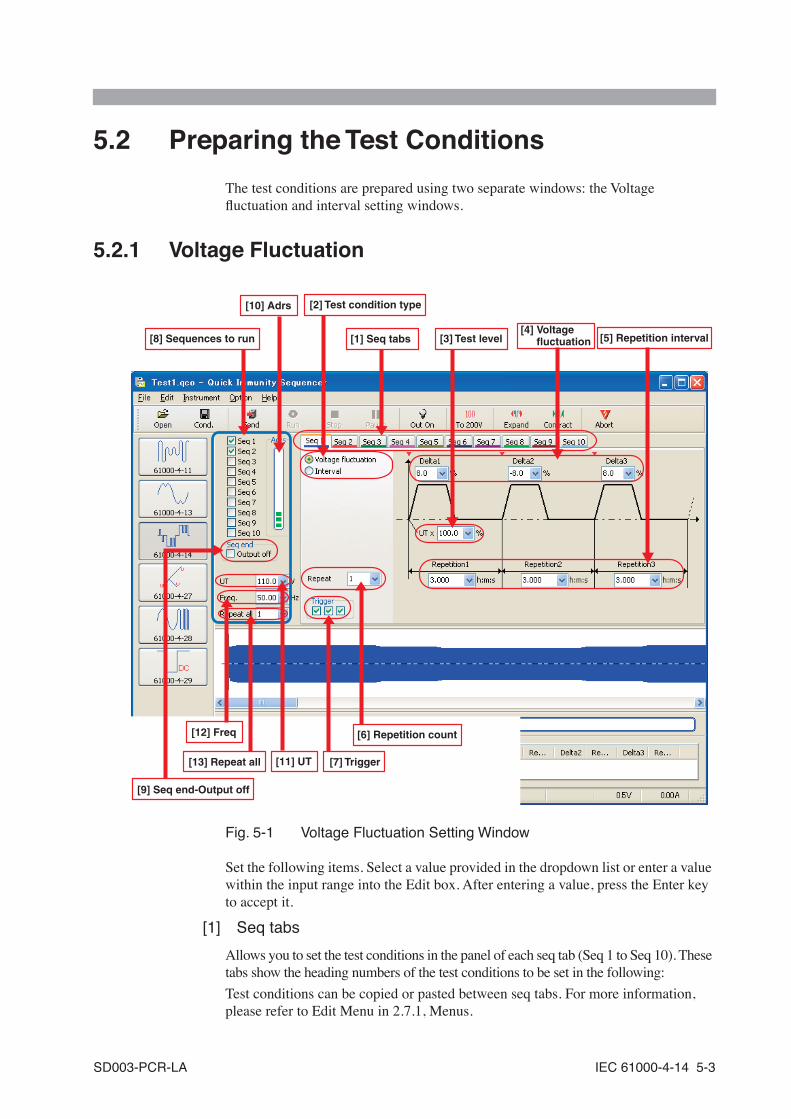
5.2 Preparing the Test Conditions
The test conditions are prepared using two separate windows: the Voltage fluctuation and interval setting windows.
5.2.1 Voltage Fluctuation
Fig. 5-1 Voltage Fluctuation Setting Window
Set the following items. Select a value provided in the dropdown list or enter a value within the input range into the Edit box. After entering a value, press the Enter key to accept it.
[1] Seq tabs
Allows you to set the test conditions in the panel of each seq tab (Seq 1 to Seq 10). These tabs show the heading numbers of the test conditions to be set in the following:
Test conditions can be copied or pasted between seq tabs. For more information, please refer to Edit Menu in 2.7.1, Menus.
[8] Sequences to run [1] Seq tabs
[10] Adrs
[5] Repetition interval
[7] Trigger
[3] Test level[4] Voltage fluctuation
[11] UT
[6] Repetition count[12] Freq
[9] Seq end-Output off
[13] Repeat all
[2] Test condition type
SD003-PCR-LA IEC 61000-4-14 5-3
[2] Test condition type
Select Voltage fluctuation from the following:• Voltage fluctuation• Interval
[3] UT% (test level)
Enter the center value of Voltage fluctuation. This should be a ratio to the rated voltage of the EUT.
• Check the set value of UT taken between the seq tabs used to run a test. If the UT set value differs between the seq tabs, unintended voltage change may occur, depending on selection of seq tabs whose sequences are run.
[4] Delta1/2/3 (Voltage fluctuation)
Enter the Voltage fluctuation range. This should be a ratio to the rated voltage of the EUT.
The duration of Voltage fluctuation is 2 seconds (fixed).
[5] Repetition1/2/3 (repetition interval)
Enter the repetition interval of Voltage fluctuation. Enter the value in seconds or in hours: minutes: seconds format.
• How to enter in hours: minutes: seconds format: A time value of up to 999:999:999.999 may be set by delimiting each unit with a colon (:). If only one colon is used, the value is treated as if in minutes: seconds format. Without a colon, it is regarded as a second value. Second values can be entered up to the third decimal place.
• A transition between the seq tabs takes approx. 1.3 seconds. Accordingly, Repetition 3 (repetition interval) at the end requiring a transition between the seq tabs is equal to the set value plus approx. 1.3 seconds.
[6] Repeat (repetition count)
Enter the number of repetitions for the test conditions in the seq tab in question.
Input rangeSelect one of 90 %, 100 %, and 110 %, or enter a value ranging from 1.0 % to 150.0 %.
Input rangeSelect one of -12 %, -8 %, 8 %, and 12 %, or enter a value ranging from -50 % to 50 %.
Input rangeFor most cases, select 5 s. Alternatively, enter a value ranging from 3 seconds to 999 hours 999 minutes 999.999 seconds.
Input rangeSelect one of 1, 3, 5, and 10 times, or enter a value ranging from 1 to 9999.
CAUTION
NOTE
5-4 IEC 61000-4-14 SD003-PCR-LA
[7] Trigger
Select trigger signal output. The red symbol indicates a location selected using the checkbox.
[8] Sequences to run
Check the corresponding checkboxes of the seq tabs whose test conditions are used to run a test sequence. Test sequences are run in turn starting at Seq 1. Seq tabs whose corresponding checkboxes have not been checked are not used to run a test.
[9] Seq end-Output off
When this checkbox is checked, a test signal is turned off at the end of sequence running. (the AC Power Supply PCR-LA output is turned off.)
[10] Adrs
To implement the Voltage fluctuation immunity test, Quick Immunity Sequencer uses the AC Power Supply PCR-LA sequence function. This sequence function can accommodate up to 100 addresses (adrs).
For Voltage fluctuation, 18 sequence addresses are used for one seq tab, while two sequence addresses are used for one seq tab for Interval. If six or more of the seq tabs for which Voltage fluctuation is specified are selected in the running sequence, the number of sequence addresses will exceed 100.
If this Adrs indicator bar is displayed in red, the number of the sequence addresses has exceeded 100, disabling transmission of the test condition data.
In this case, reduce the number of the seq tabs selected for sequences to run until the indicator bar changes to green, so that the number of sequence addresses becomes 100 or less.
[11] UT
Enter the rated voltage of the EUT.
• An appropriate voltage range must be selected. Use the toolbar or the Instrument Menu to set the voltage range. For more information, please refer to ■ To 100 V/200 V button in 2.7.2, Toolbar.
[12] Freq
Enter the rated frequency of the EUT.
Input rangeSelect one of 100 V, 110 V, 120 V, 200 V, 220 V, 230 V, and 240 V, or enter a value ranging from 0.0 V to 305.0 V.
Input rangeSelect either 50 Hz or 60 Hz, or enter a value ranging from 1 Hz to 999.90 Hz.
NOTE
SD003-PCR-LA IEC 61000-4-14 5-5
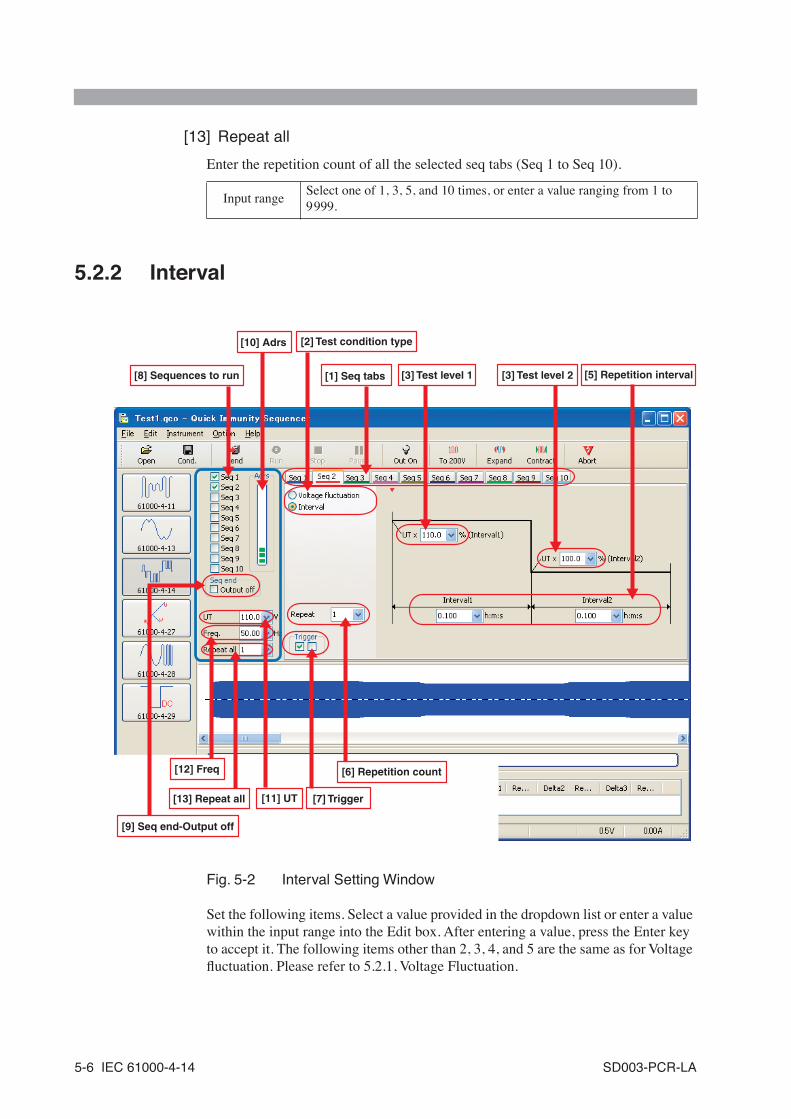
[13] Repeat all
Enter the repetition count of all the selected seq tabs (Seq 1 to Seq 10).
5.2.2 Interval
Fig. 5-2 Interval Setting Window
Set the following items. Select a value provided in the dropdown list or enter a value within the input range into the Edit box. After entering a value, press the Enter key to accept it. The following items other than 2, 3, 4, and 5 are the same as for Voltage fluctuation. Please refer to 5.2.1, Voltage Fluctuation.
Input rangeSelect one of 1, 3, 5, and 10 times, or enter a value ranging from 1 to 9999.
[8] Sequences to run [1] Seq tabs
[10] Adrs
[5] Repetition interval
[7] Trigger
[3] Test level 1
[11] UT
[6] Repetition count[12] Freq
[9] Seq end-Output off
[13] Repeat all
[2] Test condition type
[3] Test level 2
5-6 IEC 61000-4-14 SD003-PCR-LA
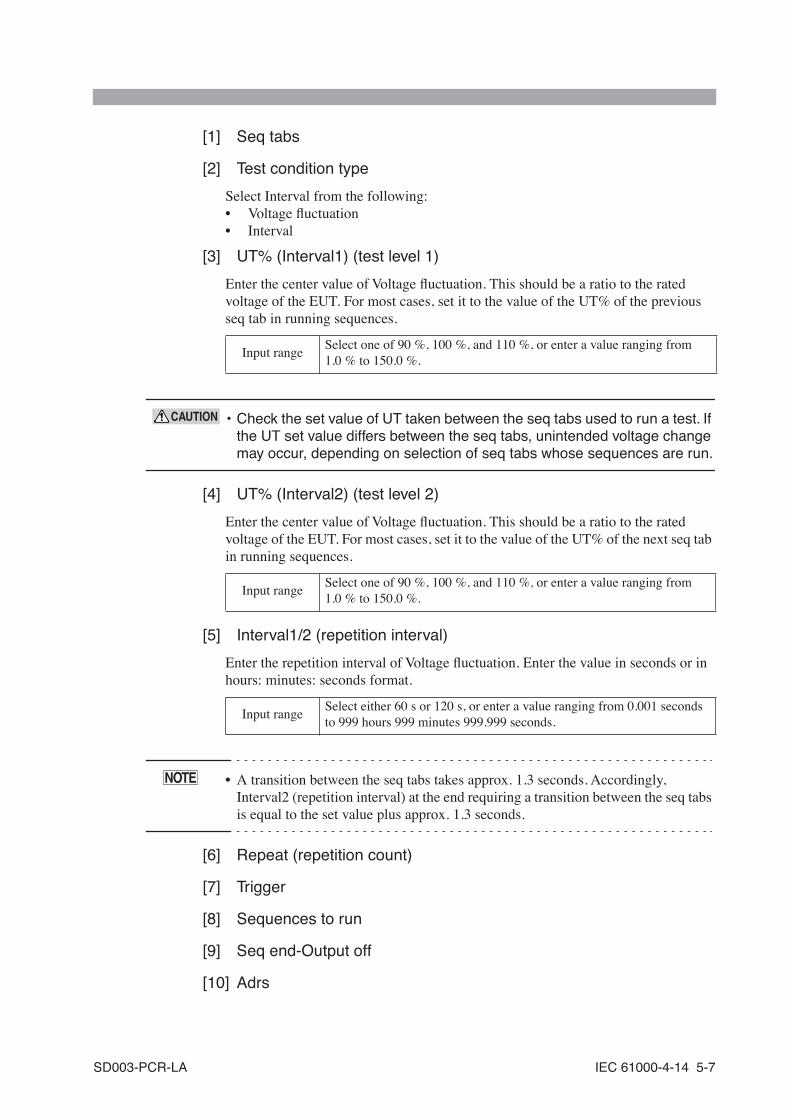
[1] Seq tabs
[2] Test condition type
Select Interval from the following:• Voltage fluctuation• Interval
[3] UT% (Interval1) (test level 1)
Enter the center value of Voltage fluctuation. This should be a ratio to the rated voltage of the EUT. For most cases, set it to the value of the UT% of the previous seq tab in running sequences.
• Check the set value of UT taken between the seq tabs used to run a test. If the UT set value differs between the seq tabs, unintended voltage change may occur, depending on selection of seq tabs whose sequences are run.
[4] UT% (Interval2) (test level 2)
Enter the center value of Voltage fluctuation. This should be a ratio to the rated voltage of the EUT. For most cases, set it to the value of the UT% of the next seq tab in running sequences.
[5] Interval1/2 (repetition interval)
Enter the repetition interval of Voltage fluctuation. Enter the value in seconds or in hours: minutes: seconds format.
• A transition between the seq tabs takes approx. 1.3 seconds. Accordingly, Interval2 (repetition interval) at the end requiring a transition between the seq tabs is equal to the set value plus approx. 1.3 seconds.
[6] Repeat (repetition count)
[7] Trigger
[8] Sequences to run
[9] Seq end-Output off
[10] Adrs
Input rangeSelect one of 90 %, 100 %, and 110 %, or enter a value ranging from 1.0 % to 150.0 %.
Input rangeSelect one of 90 %, 100 %, and 110 %, or enter a value ranging from 1.0 % to 150.0 %.
Input rangeSelect either 60 s or 120 s, or enter a value ranging from 0.001 seconds to 999 hours 999 minutes 999.999 seconds.
CAUTION
NOTE
SD003-PCR-LA IEC 61000-4-14 5-7
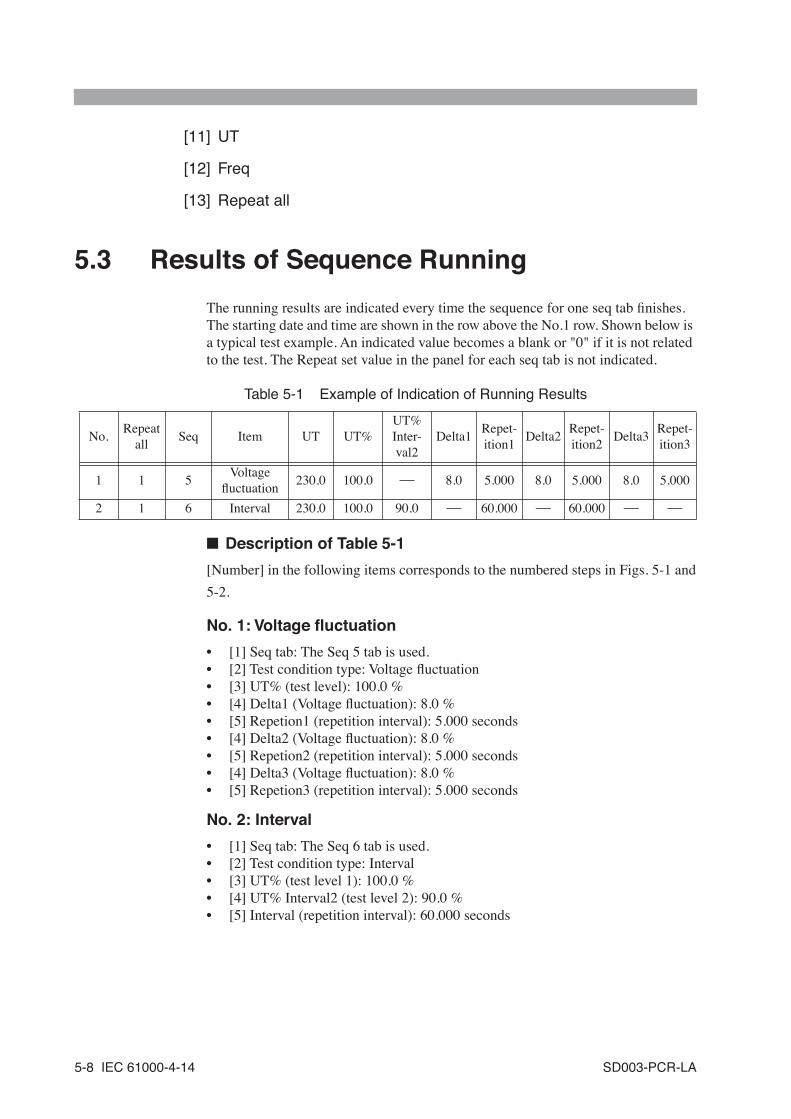
[11] UT
[12] Freq
[13] Repeat all
5.3 Results of Sequence Running
The running results are indicated every time the sequence for one seq tab finishes. The starting date and time are shown in the row above the No.1 row. Shown below is a typical test example. An indicated value becomes a blank or "0" if it is not related to the test. The Repeat set value in the panel for each seq tab is not indicated.
Table 5-1 Example of Indication of Running Results
■ Description of Table 5-1
[Number] in the following items corresponds to the numbered steps in Figs. 5-1 and
5-2.
No. 1: Voltage fluctuation
• [1] Seq tab: The Seq 5 tab is used.• [2] Test condition type: Voltage fluctuation• [3] UT% (test level): 100.0 %• [4] Delta1 (Voltage fluctuation): 8.0 %• [5] Repetion1 (repetition interval): 5.000 seconds• [4] Delta2 (Voltage fluctuation): 8.0 %• [5] Repetion2 (repetition interval): 5.000 seconds• [4] Delta3 (Voltage fluctuation): 8.0 %• [5] Repetion3 (repetition interval): 5.000 seconds
No. 2: Interval
• [1] Seq tab: The Seq 6 tab is used.• [2] Test condition type: Interval• [3] UT% (test level 1): 100.0 %• [4] UT% Interval2 (test level 2): 90.0 %• [5] Interval (repetition interval): 60.000 seconds
No.Repeat
allSeq Item UT UT%
UT% Inter-val2
Delta1Repet-ition1
Delta2Repet-ition2
Delta3Repet-ition3
1 1 5Voltage fluctuation
230.0 100.0 ⎯ 8.0 5.000 8.0 5.000 8.0 5.000
2 1 6 Interval 230.0 100.0 90.0 ⎯ 60.000 ⎯ 60.000 ⎯ ⎯
5-8 IEC 61000-4-14 SD003-PCR-LA

Items common to No. 1 and No. 2
• Repeat (repetition count): The repetition count in a seq tab is not indicated.• Trigger: Not indicated• Sequences to run: Sequences are run in the order of Seq 5 and Seq 6.• Seq end-Output off: Not indicated• Adrs: Not indicated• UT: 230 V• Freq: Not indicated• Repeat all: The number of repetitions for sequences to be run in the order of Seq
5 and Seq 6 is 1.
SD003-PCR-LA IEC 61000-4-14 5-9

5-10 IEC 61000-4-14 SD003-PCR-LA

66
Chapter 6 IEC 61000-4-27Describes the Unbalance immunity test according to the IEC 61000-4-27 standard.
SD003-PCR-LA IEC 61000-4-27 6-1
6.1 Outline of the Test
The Unbalance immunity test determines the equipment's immunity against unbalance in three phases.
■ Electromagnetic environment classes
Quick Immunity Sequencer does not specify an electromagnetic environment class or assume it to be a setting condition. An electromagnetic environment class for test conditions should be set at the user's discretion.
■ Items not conforming to the standard's requirements
Certain Quick Immunity Sequencer items do not conform to the standard's requirements in the test configuration, including the hardware. The following table shows these items and the performance achieved in the test configuration.
Item Standard's requirementsPerformance achieved in
the test configuration
Voltage and phase changes in three-phase operations
Concurrent changes between phases
Presence of a lag of several seconds between
phases
Minimum duration of unbalance
0.1 seconds 1 to several seconds
Responsiveness to voltage changes
1 μs to 5 μs Approx. 30 μs
6-2 IEC 61000-4-27 SD003-PCR-LA
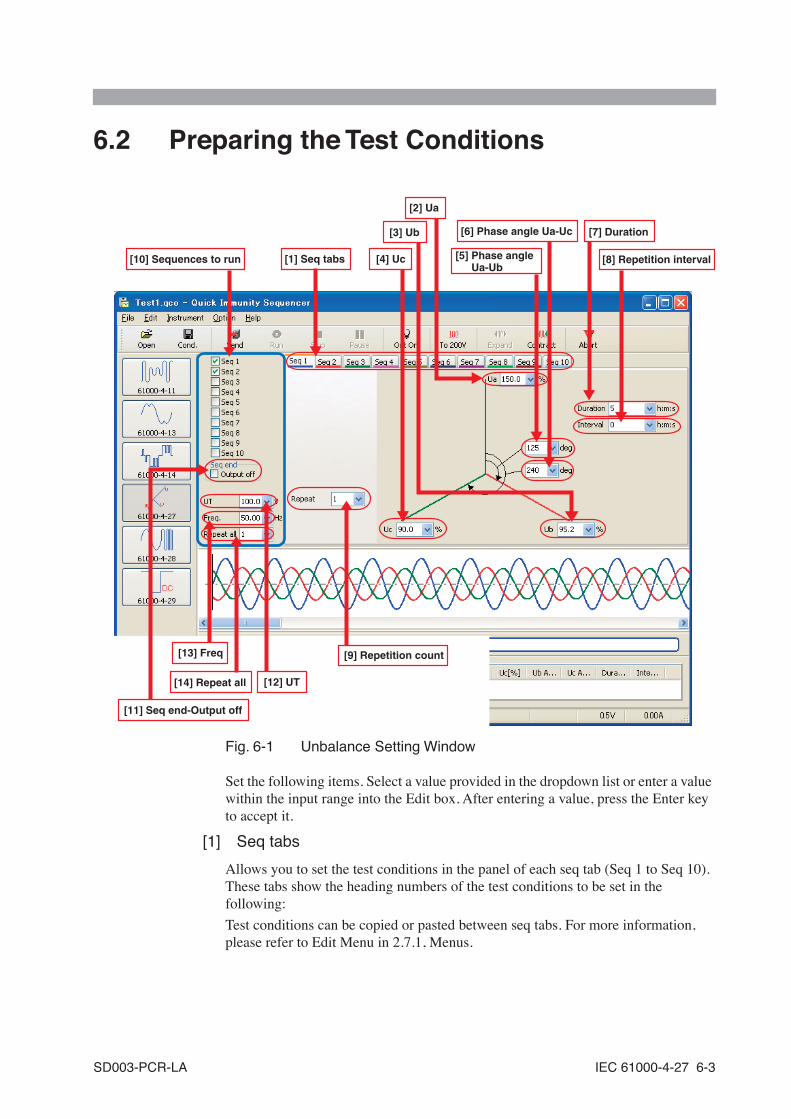
6.2 Preparing the Test Conditions
Fig. 6-1 Unbalance Setting Window
Set the following items. Select a value provided in the dropdown list or enter a value within the input range into the Edit box. After entering a value, press the Enter key to accept it.
[1] Seq tabs
Allows you to set the test conditions in the panel of each seq tab (Seq 1 to Seq 10). These tabs show the heading numbers of the test conditions to be set in the following:
Test conditions can be copied or pasted between seq tabs. For more information, please refer to Edit Menu in 2.7.1, Menus.
[10] Sequences to run [1] Seq tabs [4] Uc [8] Repetition interval
[7] Duration
[12] UT
[9] Repetition count[13] Freq
[11] Seq end-Output off
[14] Repeat all
[3] Ub
[2] Ua
[5] Phase angle Ua-Ub
[6] Phase angle Ua-Uc
SD003-PCR-LA IEC 61000-4-27 6-3
[2] Ua
Enter a ratio of a quantity to the rated voltage of the EUT.
[3] Ub
Enter a ratio of a quantity to the rated voltage of the EUT.
[4] Uc
Enter a ratio of a quantity to the rated voltage of the EUT.
[5] Phase angle Ua-Ub
Enter the Ua-Ub phase angle.
[6] Phase angle Ua-Uc
Enter the Ua-Uc phase angle.
[7] Duration
Enter the duration of unbalance. Enter the value in seconds or in hours: minutes: seconds format.
[8] Interval (repetition interval)
Enter the repetition interval of unbalance. In this period, each phase voltage is set to 100 %, the Ua-Ub phase angle is set to 120°, and the Ua-Uc phase angle is set to 240°. The increment is 1 second. Enter the value in seconds or in hours: minutes: seconds format.
Input rangeSelect either 100 % or 110 %, or enter a value ranging from 0.0 % to 150.0 %.
Input rangeSelect one of 66 %, 87 %, 90 %, 93.5 %, and 95.2 %, or enter a value ranging from 0.0 % to 150.0 %.
Input rangeSelect one of 71 %, 74 %, 80 %, 87 %, and 90 %, or enter a value ranging from 0.0 % to 150.0 %.
Input rangeSelect one of 125°, 127°, 131°, 134°, and 139°, or enter a value ranging from 1° to 360°.
Input rangeSelect one of 235°, 238°, 239°, and 240°, or enter a value ranging from 1° to 360°.
Input rangeSelect one of 2 s, 15 s, 30 s, and 60 s, or enter a value ranging from 1.000 second to 999 hours 999 minutes 1000 seconds.
Input rangeFor most cases, select 180 s. Alternatively, enter a value ranging from 0 seconds to 999 hours 999 minutes 1000 seconds.
6-4 IEC 61000-4-27 SD003-PCR-LA
• How to enter in hours: minutes: seconds format: A time value of up to 999:999:1000 may be set by delimiting each unit with a colon (:). If only one colon is used, the value is treated as if in minutes: seconds format. Without a colon, it is regarded as a second value. Second values after decimal places cannot be entered.
• A transition between the seq tabs takes several seconds. Accordingly, Interval time (repetition time) at the end requiring a transition between the seq tabs is equal to the set value plus several seconds.
[9] Repeat (repetition count)
Enter the number of repetitions for the test conditions in the seq tab in question.
[10] Sequences to run
Check the corresponding checkboxes of the seq tabs whose test conditions are used to run a test sequence. Test sequences are run in turn starting at Seq 1. Seq tabs whose corresponding checkboxes have not been checked are not used to run a test.
[11] Seq end-Output off
When this checkbox is checked, a test signal is turned off at the end of sequence running. (the AC Power Supply PCR-LA output is turned off.)
[12] UT
Enter the rated voltage of the EUT.
• An appropriate voltage range must be selected. Use the toolbar or the Instrument Menu to set the voltage range. For more information, please refer to ■ To 100 V/200 V button in 2.7.2, Toolbar.
[13] Freq
Enter the rated frequency of the EUT.
[14] Repeat all
Enter the repetition count of all the selected seq tabs (Seq 1 to Seq 10).
Input rangeSelect one of 1, 3, 5, and 10 times, or enter a value ranging from 1 to 9999.
Input rangeSelect one of 100 V, 110 V, 120 V, 200 V, 220 V, 230 V, and 240 V, or enter a value ranging from 0.0 V to 305.0 V.
Input rangeSelect either 50 Hz or 60 Hz, or enter a value ranging from 1 Hz to 999.90 Hz.
Input rangeSelect one of 1, 3, 5, and 10 times, or enter a value ranging from 1 to 9999.
NOTE
NOTE
SD003-PCR-LA IEC 61000-4-27 6-5

6.3 Results of Sequence Running
The running results are indicated every time the sequence for one seq tab finishes. The starting date and time are shown in the row above the No.1 row. Shown below is a typical test example. An indicated value becomes a blank or "0" if it is not related to the test. The Repeat set value in the panel for each seq tab is not indicated.
Table 6-1 Example of Indication of Running Results
■ Description of Table 6-1
[Number] in the following items corresponds to the numbered steps in Fig. 6-1.
No. 1 (1st row): Unbalance
• [1] Seq tab: The Seq 1 tab is used.• [2]Ua: 100.0 %• [3]Ub: 95.2 %• [4]Uc: 90.0 %• [5]Ub Angle: 125°• [6]Uc Angle: 240°• [7] Duration: 30.000 seconds• [8] Interval (repetition interval): 60.000 seconds
No. 2 (2nd row): Unbalance
• [1] Seq tab: The Seq 2 tab is used.• [2]Ua: 100.0 %• [3]Ub: 90.0 %• [4]Uc: 80.0 %• [5]Ub Angle: 131°• [6]Uc Angle: 239°• [7] Duration: 15.000 seconds• [8] Interval (repetition interval): 60.000 seconds
No. 3 (3rd row): Unbalance
• [1] Seq tab: The Seq 3 tab is used.• [2]Ua: 110.0 %• [3]Ub: 66.0 %• [4]Uc: 71.0 %• [5]Ub Angle: 139°• [6]Uc Angle: 235°• [7] Duration: 1.000 second• [8] Interval (repetition interval): 60.000 seconds
No.Repeat
allSeq Item UT Freq
Ua(%)
Ub(%)
Uc(%)
Ub Angle
Uc Angle
Dura-tion
Inter-val
1 1 1 Unbalance 230.0 50.0 100.0 95.2 90.0 125 240 30 60
2 1 2 Unbalance 230.0 50.0 100.0 90.0 80.0 131 239 15 60
3 1 3 Unbalance 230.0 50.0 110.0 66.0 71.0 139 235 1 60
6-6 IEC 61000-4-27 SD003-PCR-LA
Items common to No. 1, No. 2, and No. 3
• Repeat (repetition count): The repetition count in a seq tab is not indicated.• Sequences to run: Sequences are run in the order of Seq 1, Seq 2, and Seq 3.• Seq end-Output off: Not indicated• UT: 230 V• Freq: 50.0 Hz• Repeat all: The number of repetitions for the sequences to be run in the order of
Seq 1, Seq 2, and Seq 3 is 1.
SD003-PCR-LA IEC 61000-4-27 6-7

6-8 IEC 61000-4-27 SD003-PCR-LA
77
Chapter 7 IEC 61000-4-28Describes the Power frequency variation immunity test according to the IEC 61000-4-28 standard.
SD003-PCR-LA IEC 61000-4-28 7-1
7.1 Outline of the Test
The Power frequency variation immunity test determines the equipment's immunity against Power frequency variations.
■ Electromagnetic environment classes
Quick Immunity Sequencer does not specify an electromagnetic environment class or assume it to be a setting condition. An electromagnetic environment class for test conditions should be set at the user's discretion.
■ Three-phase operations
The test conditions are all set in relation to phase U. Test signals change simultaneously in three phases on the basis of phase U.
7-2 IEC 61000-4-28 SD003-PCR-LA
7.2 Preparing the Test Conditions
Fig. 7-1 Power Frequency Variation Setting Window
Set the following items. Select a value provided in the dropdown list or enter a value within the input range into the Edit box. After entering a value, press the Enter key to accept it.
[1] Seq tabs
Allows you to set the test conditions in the panel of each seq tab (Seq 1 to Seq 10). These tabs show the heading numbers of the test conditions to be set in the following:
Test conditions can be copied or pasted between seq tabs. For more information, please refer to Edit Menu in 2.7.1, Menus.
[9] Sequences to run [1] Seq tabs [2] f1
[8] Trigger
[5] Transition time
[11] UT
[7] Repetition count
[10] Seq end-Output off
[13] Repeat all
[4] f1 + Δf [6] f2[3] Transition time
SD003-PCR-LA IEC 61000-4-28 7-3
[2] f1 (1st frequency and duration)
Enter the power frequency of the EUT.
Enter the duration of f1. Enter the value in seconds or in hours: minutes: seconds format.
• How to enter in hours: minutes: seconds format: A time value of up to 999:999:999.999 may be set by delimiting each unit with a colon (:). If only one colon is used, the value is treated as if in minutes: seconds format. Without a colon, it is regarded as a second value. Second values can be entered up to the third decimal place.
[3] tp1 (transition time)
Enter the transition time. Enter the value in seconds or in hours: minutes: seconds format.
[4] f1 + Δf (variation ratio and duration)
Enter a variation ratio.
Enter the duration of f1 + Δf. Enter the value in seconds or in hours: minutes: seconds format.
[5] tp2 (transition time)
Enter the return time. Enter the value in seconds or in hours: minutes: seconds format.
[6] f2 (2nd frequency and duration)
Enter the power frequency of the EUT.
Input rangeSelect either 50 Hz or 60 Hz, or enter a value ranging from 1 Hz to 999.90 Hz.
Input rangeFor most cases, select 60 s. Alternatively, enter a value ranging from 0.001 seconds to 999 hours 999 minutes 999.999 seconds.
Input rangeSelect either 1 s or 10 s, or enter a value ranging from 0.001 seconds to 999 hours 999 minutes 999.999 seconds.
Input rangeSelect one of -15 %, -6 %, -3 %, 3 %, 4 %, and 15 %, or enter a value ranging from -50.0 to 50.0
Input rangeFor most cases, select 120 s. Alternatively, enter a value ranging from 0.001 seconds to 999 hours 999 minutes 999.999 seconds.
Input rangeSelect either 1 s or 10 s, or enter a value ranging from 0.001 seconds to 999 hours 999 minutes 999.999 seconds.
Input rangeSelect either 50 Hz or 60 Hz, or enter a value ranging from 1 Hz to 999.90 Hz
NOTE
7-4 IEC 61000-4-28 SD003-PCR-LA
Enter the duration of f2. Enter the value in seconds or in hours: minutes: seconds format. When the test sequence moves to the next tab, it takes approx. 1.3 seconds for its preparation.
[7] Repeat (repetition count)
Enter the number of repetitions for the test conditions in the seq tab in question.
[8] Trigger
Select trigger signal output. The red symbol indicates a location selected using the checkbox.
[9] Sequences to run
Check the corresponding checkboxes of the seq tabs whose test conditions are used to run a test sequence. Test sequences are run in turn starting at Seq 1. Seq tabs whose corresponding checkboxes have not been checked are not used to run a test.
[10] Seq end-Output off
When this checkbox is checked, a test signal is turned off at the end of sequence running. (the AC Power Supply PCR-LA output is turned off.)
[11] UT
Enter the rated voltage of the EUT.
• An appropriate voltage range must be selected. Use the toolbar or the Instrument Menu to set the voltage range. For more information, please refer to ■ To 100 V/200 V button in 2.7.2, Toolbar.
[12] Repeat all
Enter the repetition count of all the selected seq tabs (Seq 1 to Seq 10).
Input rangeFor most cases, select 60 s. Alternatively, enter a value ranging from 0.001 seconds to 999 hours 999 minutes 999.999 seconds.
Input rangeSelect one of 1, 3, 5, and 10 times, or enter a value ranging from 1 to 9999.
Input rangeSelect one of 100 V, 110 V, 120 V, 200 V, 220 V, 230 V, and 240 V, or enter a value ranging from 0.0 V to 305.0 V.
Input rangeSelect one of 1, 3, 5, and 10 times, or enter a value ranging from 1 to 9999.
NOTE
SD003-PCR-LA IEC 61000-4-28 7-5

7.3 Results of Sequence Running
The running results are indicated every time the sequence for one seq tab finishes. The starting date and time are shown in the row above the No.1 row. Shown below is a typical test example. An indicated value becomes a blank or "0" if it is not related to the test. The Repeat set value in the panel for each seq tab is not indicated.
Table 7-1 Example of Indication of Running Results
■ Description of Table 7-1
[Number] in the following items corresponds to the numbered steps in Fig. 7-1.
No. 1 (1st row): Power frequency variations
• [1] Seq tab: The Seq 1 tab is used.• [2] f1: 50.00 Hz• [2] f1 time: 60.000 seconds• [3] tp1 time: 10.000 seconds• [4] tp1 + Deltaf: 3.0 %• [4] Duration: 120.000 seconds• [5] tp2 time: 10.000 seconds• [6] f2: 50.00 Hz• [6] f2 time: 60.000 seconds
No. 2 (2nd row): Power frequency variations
• [1] Seq tab: The Seq 2 tab is used.• [2] f1: 50.00 Hz• [2] f1 time: 60.000 seconds• [3] tp1 time: 10.000 seconds• [4] tp1 + Deltaf: -3.0 %• [4] Duration: 120.000 seconds• [5] tp2 time: 10.000 seconds• [6] f2: 50.00 Hz• [6] f2 time: 60.000 seconds
Items common to No. 1 and No. 2
• Repeat (repetition count): The repetition count in a seq tab is not indicated.• Trigger: Not indicated• Sequences to run: Sequences are run in the order of Seq 1 and Seq 2.• Seq end-Output off: Not indicated• UT: 230 V• Repeat all: The number of repetitions for the sequences to be run in the order of
Seq 1 and Seq 2 is 1.
No.Repeat
allSeq Item UT f1
f1+Deltaf
f1 timetp1 time
Dura-tion
f2tp2 time
f2 time
1 1 1Variation of frequency
230.0 50.00 3.0 60.000 10.000 120.000 50.00 10.000 60.000
2 1 2Variation of frequency
230.0 50.00 -3.0 60.000 10.000 120.000 50.00 10.000 60.000
7-6 IEC 61000-4-28 SD003-PCR-LA
88
Chapter 8 IEC 61000-4-29Describes Voltage dip, Short interruption, and Voltage variation immunity tests for DC power inputs according to the IEC 61000-4-29 standard.
SD003-PCR-LA IEC 61000-4-29 8-1
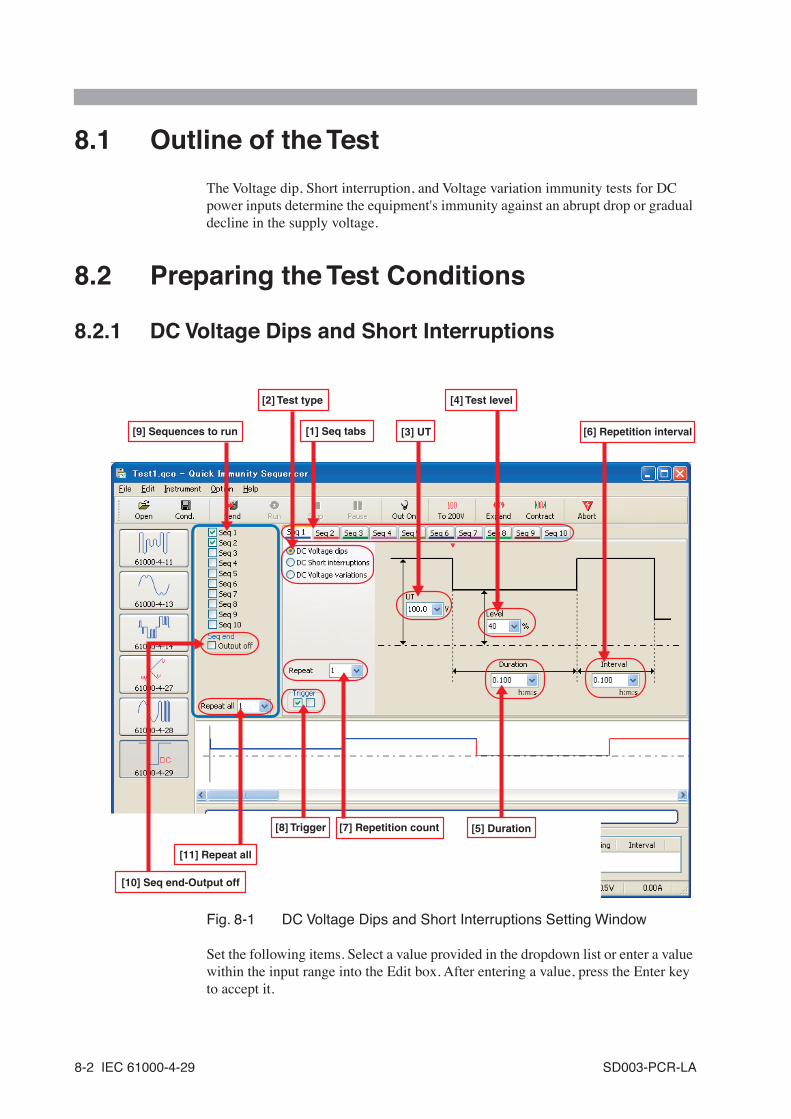
8.1 Outline of the Test
The Voltage dip, Short interruption, and Voltage variation immunity tests for DC power inputs determine the equipment's immunity against an abrupt drop or gradual decline in the supply voltage.
8.2 Preparing the Test Conditions
8.2.1 DC Voltage Dips and Short Interruptions
Fig. 8-1 DC Voltage Dips and Short Interruptions Setting Window
Set the following items. Select a value provided in the dropdown list or enter a value within the input range into the Edit box. After entering a value, press the Enter key to accept it.
[9] Sequences to run [1] Seq tabs
[8] Trigger [7] Repetition count
[10] Seq end-Output off
[11] Repeat all
[3] UT
[2] Test type
[6] Repetition interval
[5] Duration
[4] Test level
8-2 IEC 61000-4-29 SD003-PCR-LA
[1] Seq tabs
Allows you to set the test conditions in the panel of each seq tab (Seq 1 to Seq 10). These tabs show the heading numbers of the test conditions to be set in the following:
Test conditions can be copied or pasted between seq tabs. For more information, please refer to Edit Menu in 2.7.1, Menus.
[2] Test type
Select either DC Voltage dips, DC Short interruptions or DC Voltage variations as an immunity test. The diagram displayed on the right in the window changes depending on the test type button selected.
[3] UT
Enter the initial voltage (equal to voltage at return).
• An appropriate voltage range must be selected. Use the toolbar or the Instrument Menu to set the voltage range. For more information, please refer to ■ To 100 V/200 V button in 2.7.2, Toolbar.
• Check the set value of UT taken between the seq tabs used to run a test. If the UT set value differs between the seq tabs, unintended voltage change may occur, depending on selection of seq tabs whose sequences are run.
[4] Level (test level)
For DC Voltage dips, enter a residual voltage in % with respect to UT. This level is set to 0 % (no input) in the case of DC Short interruptions.
For DC Short interruptions, enter the impedance condition.
When High-impedance is selected, an inverse current from the EUT is blocked. When Low-impedance is selected, an inrush current from the EUT is absorbed.
Input rangeSelect one of 100 V, 110 V, 120 V, 200 V, 220 V, 230 V, and 240 V, or enter a value ranging from 0.0 V to 431.0 V.
Input rangeSelect either 40 % or 70 %, or enter a value ranging from 0 % to 200 %.
Input range Select either High-impedance or Low-impedance.
NOTE
CAUTION
SD003-PCR-LA IEC 61000-4-29 8-3

[5] Duration
Enter the duration of the DC Voltage dip or DC Short interruption. Enter the value in seconds or in hours: minutes: seconds format.
• How to enter in hours: minutes: seconds format: A time value of up to 999:999:999.999 may be set by delimiting each unit with a colon (:). If only one colon is used, the value is treated as if in minutes: seconds format. Without a colon, it is regarded as a second value. Second values can be entered up to the third decimal place.
[6] Interval (repetition interval)
Enter the interval between the point at which the return voltage (UT) is reached and the next voltage drop. At the end of repetition intervals, this is the time taken to move to the next seq tab. Enter the value in seconds or in hours: minutes: seconds format.
[7] Repeat (repetition count)
Enter the number of repetitions for the test conditions in the seq tab in question.
[8] Trigger
Select trigger signal output. The red symbol indicates a location selected using the checkbox.
[9] Sequences to run
Check the corresponding checkboxes of the seq tabs whose test conditions are used to run a test sequence. Test sequences are run in turn starting at Seq 1. Seq tabs whose corresponding checkboxes have not been checked are not used to run a test.
[10] Seq end-Output off
When this checkbox is checked, a test signal is turned off at the end of sequence running. (the AC Power Supply PCR-LA output is turned off.)
[11] Repeat all
Enter the repetition count of all the selected seq tabs (Seq 1 to Seq 10).
Input rangeSelect one of 0.01 s, 0.03 s, 0.1 s, 0.3 s, and 1 s, or enter a value ranging from 0.001 seconds to 999 hours 999 minutes 999.999 seconds.
Input rangeFor most cases, select 10.000 s. Alternatively, enter a value ranging from 0.001 seconds to 999 hours 999 minutes 999.999 seconds.
Input rangeSelect one of 1, 3, 5, and 10 times, or enter a value ranging from 1 to 9999.
Input rangeSelect one of 1, 3, 5, and 10 times, or enter a value ranging from 1 to 9999.
NOTE
8-4 IEC 61000-4-29 SD003-PCR-LA
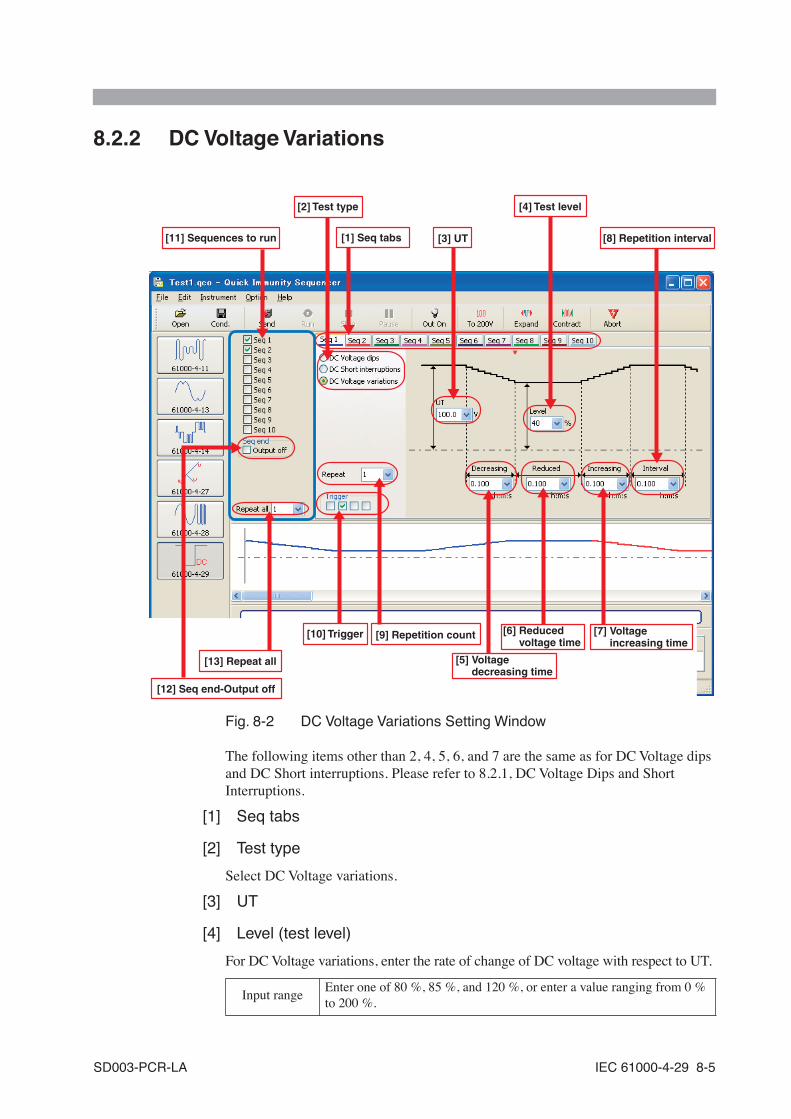
8.2.2 DC Voltage Variations
Fig. 8-2 DC Voltage Variations Setting Window
The following items other than 2, 4, 5, 6, and 7 are the same as for DC Voltage dips and DC Short interruptions. Please refer to 8.2.1, DC Voltage Dips and Short Interruptions.
[1] Seq tabs
[2] Test type
Select DC Voltage variations.
[3] UT
[4] Level (test level)
For DC Voltage variations, enter the rate of change of DC voltage with respect to UT.
Input rangeEnter one of 80 %, 85 %, and 120 %, or enter a value ranging from 0 % to 200 %.
[11] Sequences to run [1] Seq tabs
[10] Trigger [9] Repetition count
[12] Seq end-Output off
[13] Repeat all
[3] UT
[2] Test type
[8] Repetition interval
[4] Test level
[7] Voltage increasing time
[6] Reduced voltage time
[5] Voltage decreasing time
SD003-PCR-LA IEC 61000-4-29 8-5
[5] Decreasing (voltage decreasing time)
Enter the time taken to reduce voltage from the initial voltage (UT) to the reduced voltage. Enter the value in seconds or in hours: minutes: seconds format.
• Voltage rise and drop are approximated stepwise via the PCR-LA sequence function. The sequence function allows up to 100 steps to be set. For example, if there is only one valid seq tab and DC voltage variations have been set to it, both voltage rise and drop are approximated in 48 steps. If all seq tabs are selected (made valid) and configured for DC voltage variations, both voltage rise and drop are approximated in three steps.
[6] Reduced (reduced voltage time)
Enter the reduced voltage duration. Enter the value in seconds or in hours: minutes: seconds format.
[7] Increasing (voltage increasing time)
Enter the time taken to return from the reduced voltage to the initial voltage (UT). Enter the value in seconds or in hours: minutes: seconds format.
[8] Interval (repetition interval)
[9] Repeat (repetition count)
[10] Trigger
[11] Sequences to run
[12] Seq end-Output off
[13] Repeat all
Input rangeFor most cases, select 2.000 s. Alternatively, enter a value ranging from 0.001 seconds to 999 hours 999 minutes 999.999 seconds.
Input rangeSelect one of 0.01 s, 0.03 s, 0.1 s, 0.3 s, and 1 s, or enter a value ranging from 0.001 seconds to 999 hours 999 minutes 999.999 seconds.
Input rangeFor most cases, select 10.000 s. Alternatively, enter a value ranging from 0.001 seconds to 999 hours 999 minutes 999.999 seconds.
NOTE
8-6 IEC 61000-4-29 SD003-PCR-LA
8.3 Results of Sequence Running
The running results are indicated every time the sequence for one seq tab finishes. The starting date and time are shown in the row above the No.1 row. Shown below is a typical test example. An indicated value becomes a blank or "0" if it is not related to the test. The Repeat set value in the panel for each seq tab is not indicated.
Table 8-1 Example of Indication of Running Results
■ Description of Table 8-1
[Number] in the following items corresponds to the numbered steps in Figs. 8-1 and 8-2.
No. 1: DC Voltage variations 40 %
• [1] Seq tab: The Seq 1 tab is used.• [2] Test type: DC Voltage variations• [3] UT: 230 V• [4] Level (test level): 85 %• [5] Decreasing time (voltage decreasing time): 2.000 seconds• [6] Reduced (reduced voltage time): 1.000 second• [7] Increasing time (voltage increasing time): 2.000 seconds• [8] Interval (repetition interval): 10.000 seconds• [9] Repeat (repetition count): The repetition count in the Seq 1 tab is not
indicated.
No. 2: DC Voltage dips 70 %
• [1] Seq tab: The Seq 2 tab is used.• [2] Test type: DC Voltage dips• [3] UT: 230 V• [4] Level (test level): 70 %• [5] Duration: 0.100 seconds• [7] Interval (repetition interval): 10.000 seconds• [8] Repeat (repetition count): The repetition count in the Seq 2 tab is not
indicated.
No. 3: DC Vhort interruptions
• [1] Seq tab: The Seq 3 tab is used.• [2] Test type: DC Short interruptions• [3]UT: 230 V• [4] Level (impedance): Not indicated• [5] Duration: 0.100 seconds
No.Repeat
allSeq Item UT Level
Decre-asing
DurationIncre-asing
Interval
1 1 1DC Voltage
variation230.0 85 2.000 1.000 2.000 10.000
2 1 2 DC Voltage dips 230.0 70 ⎯ 0.100 ⎯ 10.000
3 1 3DC Short
interruption230.0 70 ⎯ 0.100 ⎯ 10.000
SD003-PCR-LA IEC 61000-4-29 8-7
• [7] Interval (repetition interval): 10.000 seconds• [8] Repeat (repetition count): The repetition count in the Seq 3 tab is not
indicated.
Items common to No. 1, No. 2, and No. 3
• Trigger: Not indicated• Sequences to run: Sequences are run in the order of Seq 1, Seq 2, and Seq 3.• Seq end-Output off: Not indicated• Repeat all: The number of repetitions for the sequences to be run in the order of
Seq 1, Seq 2, and Seq 3 is 1.
8-8 IEC 61000-4-29 SD003-PCR-LA
Appendix
Guides users to the appropriate standard depending on the nature of the testing desired.
A.1 Test Standard Selection Guide
Items you wish to test Generic termSingle- or
three-phase or DC
Standard Refer to:
Abrupt voltage changes
Voltage change
Single- or three-phase
IEC61000-4-11
3.2.1, Voltage Dips and Short Interruptions
Abrupt voltage changes and short interruptions falling to 0V
Abrupt voltage changes, and specifying the phase angle at the start of change
Slow voltage changes3.2.2, Voltage Variations
Peak of waveform clipped
Voltage distortion
IEC61000-4-13
4.2.1, Combined Harmonics (Flat Curve)
Waveform with sharp peaks4.2.2, Combined Harmonics (Over Swing)
Superimposing noise on power supply
4.2.3, Sweep in Frequency4.2.4, Individual Harmonics
Fluctuating voltage in relatively low amplitude
Voltage change
IEC61000-4-145.2.1, Voltage Fluctuation, 5.2.2, Interval
Unbalance in three phases
Voltage unbalance or phase angle
change
Three-phase IEC61000-4-276.2, Preparing the Test Conditions
Changes in power frequencyPower
frequencySingle- or
three-phaseIEC61000-4-28
7.2, Preparing the Test Conditions
Abrupt DC voltage changes
Voltage change
DC IEC61000-4-29
8.2.1, DC Voltage Dips and Short InterruptionsAbrupt DC voltage changes and
short interruptions falling to 0V
Slow DC voltage changes8.2.2, DC Voltage Variations
SD003-PCR-LA Appendix A-1

A-2 Appendix SD003-PCR-LA
Index
A
ActiveX instrument driver P-2
Adrs 5-5
B
Bank 4-5
C
Corrective Measures in the Event of Problems 2-19
D
DC Voltage Dips and Short Interruptions 8-2
DC Voltage Variations 8-5
Default voltage and frequency... 2-15
Determining sweep frequency 4-9
E
Edit Menu 2-12
Error message 2-6
Even harmonics 4-12
F
File Menu 2-12
Flat Curve 4-3
H
Harmonics and interharmonics immunity tests 4-2
Help Menu 2-15
High-impedance 8-3
I
I/O interface P-2
Individual Harmonics 4-12
Installation 1-2
Instrument Menu 2-13
interface error 2-7
IT01-PCR-L immunity tester P-3
Items not conforming to the standard’s requirements
2-2, 3-2, 4-2, 5-2, 6-2
K
KI-VISA 1-2
L
Low-impedance 8-3
O
Occurrence of a communication error 2-5
Odd harmonics, multiples of 3 4-12
Odd harmonics, non-multiples of 3 4-12
Option Menu 2-15
OS version P-2
Over Swing 4-7
Overall Picture of Test Sequences 2-10
P
Power frequency variation immunity test 7-2
R
Required Hardware P-3
Required Operating Conditions P-2
S
Save (Test Conditions) 2-12
Save As (Test Conditions)... 2-12
Save As (Test Result)... 2-12
Selection of the standard 2-10
Setting up I/O Configuation 2-5
Short Interruptions 3-3
Sweep in Frequency 4-9
T
Test Configuration 2-3
Test Standard Selection Guide A-1
Three-phase operations P-3, 2-2, 3-2, 4-2, 5-2, 7-2
Toolbar 2-15
Trigger signal output 2-19
Troubleshooting at Startup 2-6
Troubleshooting During Running 2-19
SD003-PCR-LA Index I-1
Turning power off 2-18
Turning power on 2-17
U
Unbalance immunity test 6-2
Using the product with the conventional PCR-L series
P-1
V
Versions of the AC power supplies for which this
manual is valid P-1
VISA 1-2
VISA driver P-2
Voltage dip 3-2
Voltage Dips 3-3
Voltage fluctuation immunity test 5-2
Voltage Variations 3-7
W
waveform banks 4-5, 4-10
Waveform preview 2-11
I-2 Index SD003-PCR-LA

SD
003-PC
R-L
A Q
UIC
K IM
MU
NIT
Y S
EQ
UE
NC
ER
Ap
plicatio
n S
oftw
are User’s M
anu
al


