Embed Size (px)
Citation preview
EUR/UB/JSt2015v2
REFWORKS 2.0
Instructions to get started Prepared by John Steenwinkel

2
Contents
Introduction .............................................................................................................................. 4
PART 1: Creating the Account ................................................................................................... 6
PART 2: Setting the Account Preferences ................................................................................. 8
Folders ......................................................................................................................................................... 8
Create a folder ................................................................................................................................... 8
Last Imported folder .......................................................................................................................... 8
Not in Folder ...................................................................................................................................... 9
References tab ................................................................................................................................... 9
Preferences .................................................................................................................................................. 9
Customize your RefWorks settings .................................................................................................... 9
Set the Output Style for the Bibliography ....................................................................................... 11
PART 3: Reference Types ........................................................................................................ 13
PART 4: Importing References ................................................................................................ 14
sEURch–EUR Library................................................................................................................................... 14
Google Books ............................................................................................................................................. 17
Google Scholar ........................................................................................................................................... 22
25Scopus .................................................................................................................................................... 24
Web of Science .......................................................................................................................................... 26
Jstor ............................................................................................................................................................ 27
PiCarta ........................................................................................................................................................ 28
Other Databases ........................................................................................................................................ 34
Export .............................................................................................................................................. 34
Import .............................................................................................................................................. 35
PART 5: Checking Imported References ................................................................................. 36
PART 6: Entering References Manually ................................................................................... 39
Entering Author’s Names ........................................................................................................................... 40
Arabic names ................................................................................................................................... 41
Spanish names ................................................................................................................................. 41
Entering Reference Titles ........................................................................................................................... 41
Year of Publication ..................................................................................................................................... 41
PART 7: Creating a Bibliography.............................................................................................. 42
PART 8: Important Information .............................................................................................. 43
Referencing Style at ISS ............................................................................................................................. 43
Accessing your ISS RefWorks account ....................................................................................................... 43

3
RefWorks after your study at the ISS ......................................................................................................... 43
Creating the RefWorks alumni account & transferring the contents from the student account ... 44
Temporary Use of Refworks for 30 days ......................................................................................... 45
Annex ....................................................................................................................................... 46
Open Office ................................................................................................................................................ 46
Switches ..................................................................................................................................................... 47

4
Introduction
RefWorks 2.0, the standard bibliographical software at Erasmus University Rotterdam (EUR), allows scholars
(you) to build up a collection of references on a range of academic subjects, organize them in folders, consult
them and use them in your academic writings.
A number of database publishers have co-operated with the makers of RefWorks to let you export
references from their databases straight into your RefWorks account. For other databases, you can import
titles into RefWorks via a standardized text file. It remains possible to create individual references in your
RefWorks account by copying and pasting or entering the required publication information manually.
RefWorks enables researchers to use their references in a manuscript with the help of a complementary
programme, Write-N-Cite. This MS Word “add in”, which can be downloaded from the RefWorks website,
creates the ‘in-text citations’ and generates a list of the references cited in the manuscript, correctly
formatted in the chosen output style. At ISS we use the Harvard–ISS Standard output style which is of course
available in RefWorks at EUR.
When RefWorks is correctly used, the result is consistent referencing and correctly formatted in-text
citations and list of references. Most of us are not able to reach the same level of consistency when inputting
references manually.
A typical example of the use of in-text citations, formatted according to the Harvard-ISS Standard style could
be:
[...]
In a number of countries information literacy is hampered by the limited availability of computers.
Also in the training curriculum for librarians in some countries, information literacy is often not yet
well developed (Baro 2011). In other countries good progress is made and information literacy is
integrated in the overall curriculum.
For South Africa, better material conditions can be found than in a number of other African
countries (Hart 2006, Oberprieler et al. 2005).
[...]
The in-text citations, marked in grey, are within parentheses and have the authors’ surname followed by the
year of publication, according to the Harvard-ISS Standard style.
The automatically generated bibliography at the end of the manuscript for the example above would look
like this:
List of References
Baro, E.E. (2011) 'A Survey of Information Literacy Education in Library Schools in Africa', Library
review: a magazine on libraries and literature 60(3 (22 03)): 202-218.

5
Hart, G. (2006) 'The Information Literacy Education Readiness of Public Libraries in Mpumalanga
Province (South Africa)', Libri: international library review and IFLA communication 56(1): 48-62.
Oberprieler, G., K. Masters and T. Gibbs (2005) 'Information Technology and Information Literacy for
First Year Health Sciences Students in South Africa: Matching Early and Professional Needs',
Medical teacher: the journal for educators in the health sciences 27(7): 595-598.
RefWorks takes care of the formatting (e.g., publication year within parentheses, book and journal titles in
italics, etc.) and sorting the list alphabetically by author’s surname.
RefWorks is therefore a great aid to produce correct and complete referencing (which avoids possible
accusations of plagiarism), but you still need to understand the different ‘Ref Types’ (books, chapters,
journal articles, reports, edited book, etc.) and to verify that references have been correctly imported from
bibliographical databases. In the final analysis, the quality of a research paper depends on your control and
understanding of referencing, not on the tools being used. We strongly recommend that you also consult the
latest ISS Referencing Guide (from http://www.iss.nl/library/iliad/about_referencing/ and for ISS students
from the electronic learning environment, Moodle, Course 3105).
Part 1 will first guide you through creating a RefWorks account, assuming you are an ISS student or
researcher. In Part 2, we then show you how to adjust the default settings of your account, to conform to
your needs.
Part 3 deals with reference types. Part 4 explains how to import references from a few important
bibliographical sources (sEURch, Google Scholar, SCOPUS, JSTOR and PiCarta) to RefWorks. It also shows how
you can import references from other sources via an import filter.
Part 5 ‘Checking Imported References’ offers guidelines for correcting errors in imported references. An
essential feature of modern methodology: save time on acquisition and control quality by carefully checking.
Part 6 explains how to enter references manually. It also includes some problems that you may encounter
with author names and/or publication titles to manage the quality of your references.
Part 7 explains how to create a bibliography ‘on the fly’, and Part 8 provides other important practical
information about preferred output style, backup & restore, and accounts.
I hope this updated guide will serve you well.
We are open to your suggestions at our Library’s Virtual Desk
http://service.ubib.eur.nl/questionpoint/askaquestion_iss.html
(Attention: Information Literacy Team)
John Steenwinkel
September 2015

6
PART 1: Creating the Account
1. Go to http://www.refworks.com/refworks
2. On the left side of the screen you see:
3. Click on Sign up for an individual account
You will now see:
4. Fill in your name, your email address @ eur (e.g. for MA students [email protected] or for PhD
candidates [email protected]) and type in your login name as demonstrated here above.
Enter the password you want to use and confirm the password.
(N.B.: Write down your user name and password for later reference)
5. Click on ‘Next’.

7
You will now see Step 2:
Fill in your name and the following fields when you are an ISS student
Area of Focus: ISS
Type of User: ISS student (or alternatively ISS employee).
6. Click on ‘Create Account’.
An email is sent to your EUR/ISS email account to confirm your account details.
7. Login to your account with the login details you have just created.
You can now set your preferences.

8
PART 2: Setting the Account Preferences
Folders
Create a folder
Create a folder to
which references
can be added.
1. Click on the ‘New Folder’ button. A ‘Create New Folder’ window opens.
Give the folder a name (e.g., ‘research paper’).
2. Click on ‘Create’.
3. When you click on the ‘Organize and Share Folders’ Tab, you will now see the newly created
folder on the list of folders:
You can create as many folders as you wish according to your needs following the instructions above.
Last Imported folder
The result above shows another folder with the name: ‘Last Imported’. This is a system-generated
folder where imported references are parked until you give them a final place in one or more folders
you have created yourself.

9
Not in Folder
Clicking on this will show you the references you have manually entered, or imported but not assigned
to any folder (intentionally or by accident). ‘Not in folder’ is also a system generated folder.
References tab
Clicking on the ‘References’ tab will show you the references you have in your current folder, or in this
case All References, when no folder has been selected. Since we have not yet entered any references
yet, we read ‘No References found’
Preferences
Customize your RefWorks settings
To set your preferences, find and click on ‘Customize’ in the quick access list on your right top of the
screen:
This results in the next window opening:

10
The following should be filled in:
1. References per Page : 50
2. Output Style = Harvard–ISS Standard.
3. Under Startup Options, select your default folder in View Folder (e.g., Research Paper).
4. Language: English (Britain) or (United States).
The Harvard-ISS Standard style of referencing is the house style at ISS. This style is available in RefWorks. While studying at the ISS, you are advised to make this your default style.

11
Click on ‘Save Customized Settings’. Notice the animation ‘Completed’ window in the bottom right
corner. You can now close the ‘Customize’ window (Click ‘X’ at the right top).
Set the Output Style for the Bibliography
In the menu, go to ‘Bibliography’, ‘Output
Style Manager’ to (once again) select the
Harvard–ISS Standard as your preferred
output style.

12
The following window will open:
Click on ‘X Remove All’ under the
Favorites list and confirm with ‘OK’.
In the ‘Search box’, type ‘Harvard’, click ‘Search’ and select ‘Harvard–ISS Standard’ from the list.
Click on the green arrow pointing to the
right to add it to the Favorites.
The Harvard–ISS Standard is now on your
‘Favorites’ list.
Your references will from now on be
displayed in the Harvard–ISS style and the
records will indicate which fields need to
be filled in according to reference type
when you enter references manually.
You can close the Output Style Manager window now at the top right corner ‘X’.
Note: To view references in the Harvard–ISS Standard style, select this style in the ‘Change View’
pull-down menu of the references tab.

13
PART 3: Reference Types
Different types of publications have different formatting in the bibliography. It is therefore important to
establish the type of reference (‘Ref Type’) of a publication and check that it is selected in the ‘Ref Type’
field. RefWorks recognizes the following different Ref Types:
Abstract
Artwork
Bills/Resolutions
Book, Edited
Book, Section
Book, Whole
Case/Court Decisions
Computer Program
Conference Proceedings
Dissertation/Thesis
Dissertation/Thesis, Unpublished
Generic
Grant
Hearing
Journal Article (print)
Journal Article (electronic)
Laws/Statutes
Magazine Article
Map
Monograph
Motion Picture
Music Score
Newspaper Article
Online Discussion Forum/Blogs
Patent
Personal Communication
Report
Sound Recording
Unpublished Material
Video/ DVD
Web Page
This range of types covers most publications. Occasionally, an approximation will have to be made, when
distinctions are absent (as between a conference paper vs. conference proceedings).
Different types of publications also have different bibliographical requirements (i.e. different information
fields included). Some examples of the required information fields of common reference types are:
In the case of a book, ‘bibliographical details’ refers to: author/editor, year of publication, title, edition, volume number, place of publication and publisher, as found on the front and back of the title page.
In the case of a chapter, the bibliographical details of the chapter itself (author, chapter title, page range) and the details of the complete book or report need to be recorded. RefWorks refers to Book, Section for chapters.
In the case of a journal article, the details required include: author of the article, year of publication, title of the article, title of the journal, volume and issue number of the journal, and page numbers.
Bibliographical information systems (Google, Library Catalogues, WorldCat, etc.) are gradually provide information at article level now, but not always at chapter level. In that case you import the bibliographical book details and complement the required chapter information manually from the actual book chapter or its list of contents.
For all electronic information, in addition to the above you should note the date that you accessed the information, and database name or web address (URL).
Please refer to the ISS Referencing Guide for more details.

14
PART 4: Importing References
sEURch–EUR Library
sEURch is a search engine developed for the EUR and ISS libraries, which integrates the collections of
both libraries, including multiple (bibliographic and full-text) databases, e-journals, e-books, etc.
It allows searching many sources simultaneously with just one query.
You will find sEURch at the ISS library page: http://www.iss.nl/Library or at the University library page:
http://www.eur.nl/ub/english/ 1
Type search terms into the box, click on the <search> button.
You may also decide to do an advanced search if you need more
precisely controlled results than what the simple search offers.
Exercise:
Use this example in advanced search:
Terms: ‘Sudan’ or ‘Egypt’
Title: irrigated agriculture
Tick: online full text
Tick: no newspapers, no book reviews
1 During the transition from 2015 to 2016, sEURch may be replaced by another, similar product, but at the time of
writing the time path could not be confirmed.

15
The search for irrigated agriculture in Sudan
results in several publications being found, one
of which is displayed to the left here.
You can make a selection of relevant items from the search results by positioning your cursor on the
title, and then clicking on the icon with the + sign to the right of the title.
On the right-hand top of the screen is a ‘Saved Items’ folder which reflects the
number of items which you have selected from the list.
When done selecting references, click on the ‘Saved Items’ icon.
A ‘Saved Items(x) window’ opens displaying the selected titles.
This window enables the
export of your selected
references to your RefWorks
account.
It also allows you to quickly
format your references in any
of the offered broad output
styles (APA, AMA, MLA,
Uniform, Chicago or Harvard).
It does not offer the Harvard–
ISS style.
To export the selected references to our RefWorks account, click on the
‘Export As…’ button and next on ‘Refworks’.
RefWorks may ask you to log in again.
The import is confirmed with this screen:
Note: References are always imported into
the ‘Last Imported’ folder, from where they can be moved into
the one or more folders
of your choice (e.g., research paper).
16
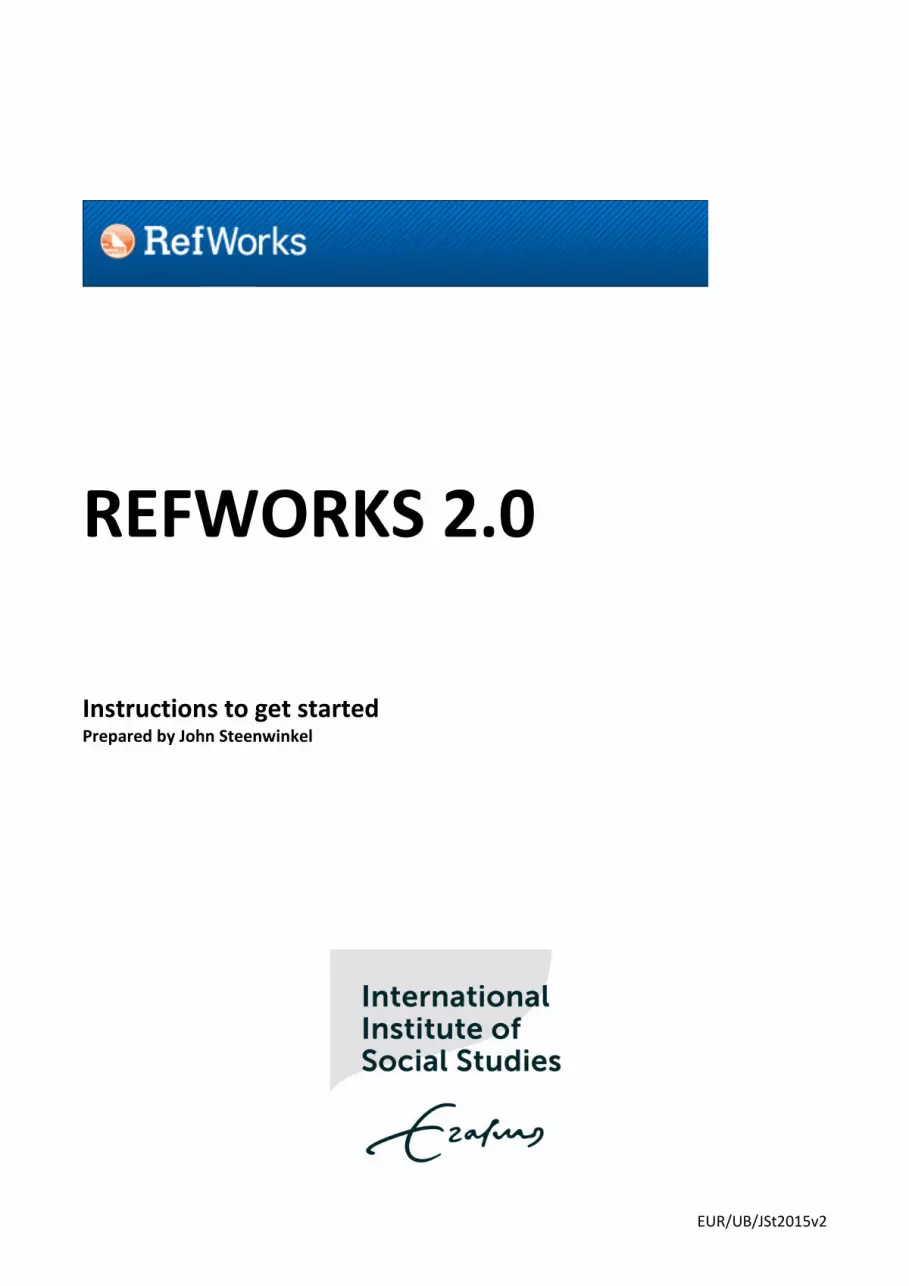
Click on the ‘View Last Imported Folder’ button to see the intermediary result.
This list displays the references which have just been imported.
To move selected
references to the research
paper folder, first select
the titles (tick ‘all in list’
or tick individual items).
Under the tab ‘Organize
& Share Folders’ click on
the ‘Add to’ icon and
select the folder where
you want to add the
references.
The available folders will be displayed (including
‘Research paper’).
Click on ‘Research paper’
to move the chosen
references into that folder.
Click on the ‘Organize & Share Folders’ tab again,
then on the desired folder to view the
references in that folder. Note that the
number of records in the folder is indicated
within parentheses.
17
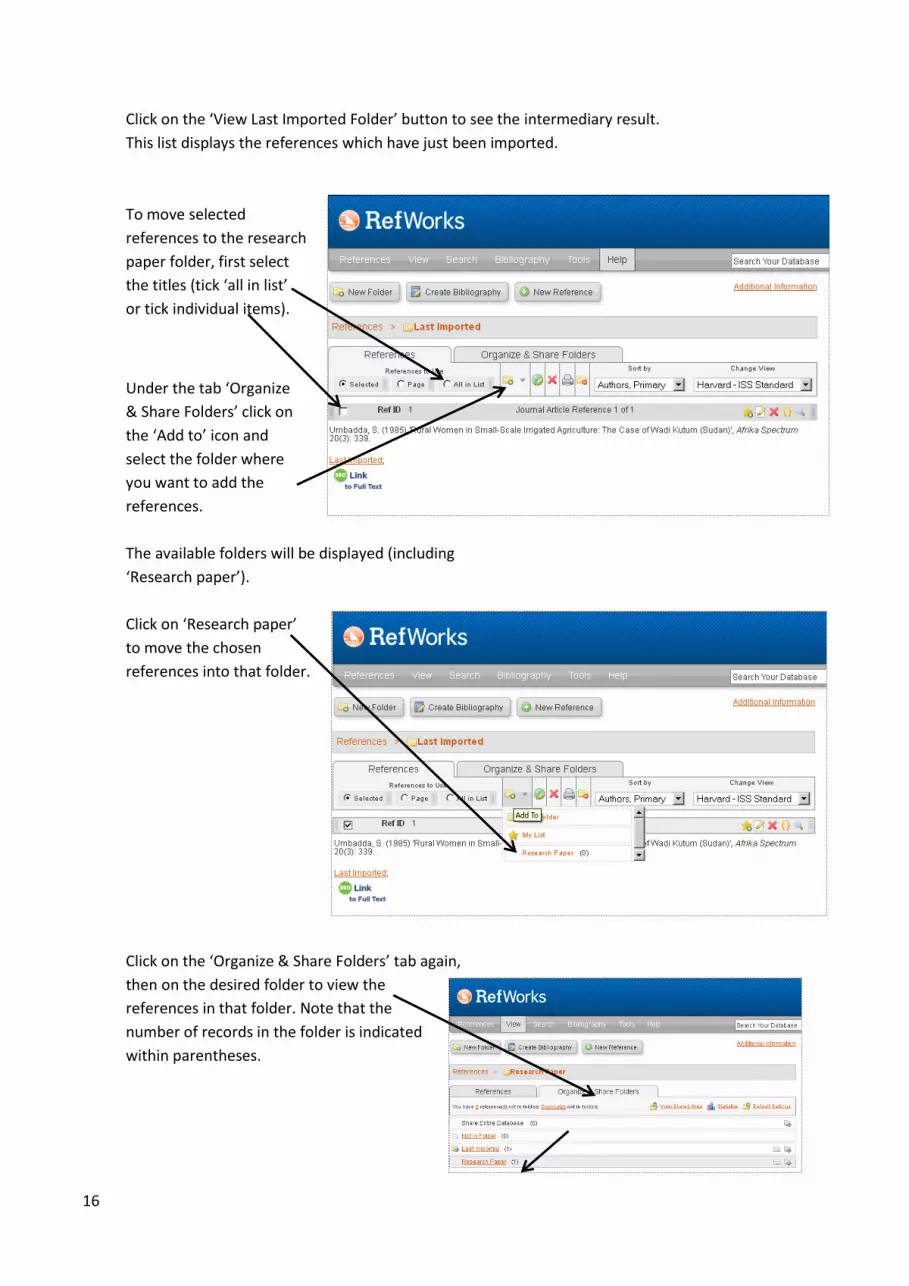
Google Books
Google Books provides a way to broadly search books across many disciplines, interests and
publishers. Google Books covers not only scholarly, but also popular content.
The creators of Google Books hoped to index as many books as possible and make book contents
searchable (as in the Google search engine). This requires access to digital or e-books and the
digitalization of printed books. Everyday more books are coming online. When the copyright of a book
expires, the book becomes available for full-text access and download. Books that still have
commercial rights may only reveal a part of the full contents. Links to Amazon, the publisher and other
book outlets enable you to buy such books; links to libraries (‘find a library’) allow you to locate the
nearest library where they can be borrowed.
http://books.google.com/
The Google Books opening screen offers a simple search (see above).
Once you have done a search and results are displayed, you will find
the Search Help and the Advanced Search on the right top of the
page (see here on the right) under the ‘wheel’ icon. Search settings
can also be set here.

18
To import book references into RefWorks, you need to be aware that only one item at a time can be
imported.
You first save a bibliographical description as ‘RIS’ file, then import the ‘RIS’ file in RefWorks. The
details of this procedure will be given below with the help of an example.
We start with a search term, in this case: ‘evolution sustainable development‘ .
Among the results are:
Next, click the title of your choice, e.g.:

19
Clicking on ‘About this book’ gives you:
Scrolling down the page you will find, among others: Bibliographic information
Click on the <RefMan> button in the Export Citation section to export the bibliographic information
that you would like to have in RefWorks.

20
When you click on the RefMan button, the export
window opens and here you can tick “save file” to
save a “RIS” file.
Click OK to save your reference.
A ‘book title.ris’ file is now in your download folder.
Go to Refworks (www.refworks.com/refworks) and (when asked) login to your account.
From RefWorks’ main menu choose <References>.
Next select <Import>.
The Import References window opens.

21
Change the settings:
1. Import Filter Data Source: change to RIS
Format.
2. Database: change to RIS Format
3. Click on Browse to select your RIS file.
4. If you prefer the reference to be added to a
particular folder, select the folder in the
‘Import Into Folder’ field.
5. Click <Import>
RefWorks responds with a confirmation window:
Click on <View Last imported Folder> to verify that the
reference has been imported and make corrections
where necessary.

22
Google Scholar
Google Scholar provides a way to broadly search
scholarly literature across many disciplines and
different sources, including articles, books, citations,
abstracts and theses.
You can find this service at the Google website under
the ‘more’ option of the menu or directly at:
http://scholar.google.com/
To import references into RefWorks,
you first need to change the preference settings.
On the top right-hand corner of the page,
you will find a wheel icon. Click to open the Scholar
Preferences page.
In the Scholar Preferences page, you can set your
bibliographical manager to RefWorks.
This is the default setting:
Click on the chevron to open the list of referencing software and select RefWorks.
When you have done this, the settings should look like this:
Save your new settings by clicking on ‘Save’

23
Now do a search.
Each search result now includes a link for exporting the reference from Google Scholar to RefWorks.
This is clearly demonstrated in the figure here above.
You can try out each link and export a reference to your account.
Notes:
Google Scholar preferences will remain saved if you are logged into your Google account and you have allowed cookies to be saved in your settings.
If you are not logged in as a Google user, the preferences remain valid for the duration of your
session and may have to be reset each time you start Google Scholar.
Google Scholar exports only one reference at a time. The export technique is a direct export
that brings the reference to your ‘Last Imported Folder’. From here you move the reference to
your ‘Research Paper’ folder’ and/or other folders.

24
Scopus
SCOPUS (a combination of “science” and “opus” – Latin for “work”) is a very large research collection
of peer-reviewed literature with their citations and abstracts. Earlier records date from the 19th
century. However, the makers – Elsevier - point out that 84% of the collection dates is actually from
1996. Scopus has an elaborate search tool.
The database covers social sciences, arts and humanities, medicine, technology and science. Scopus
includes bibliometric tools to track, analyze and visualize research.
Each article is available as full text. For a full list of bibliographical databases available at EUR, please
see page 34.
To find SCOPUS, go to http://www.scopus.com/
New users register first (top right of opening page) with a username and password, preferably on
campus or while connected to the university by VPN.
Fill in the details of your RefWorks account under ‘My Scopus’, ‘Export and reference management
settings’.
The settings will enable the direct export of Scopus search results into RefWorks with a choice of the
bibliographical description, citations and/or abstract.
Like sEURch, Scopus
allows you to ex-
port (a selection of)
multiple references
to RefWorks rather
than an export per
individual
reference.
From the Search menu,
perform a search
(here “land grabbing” in the
title, for publications in
2015: 7 publications).
Select all or choose the
required publications.
Then click on “RefWorks
Export”.

25
Selecting the arrow down button will allow you to modify the contents of what is exported
(bibliographical description, abstract and or references) and results in the following window:
The export button will export the search result to
RefWorks.
In RefWorks you can still indicate a folder to
which the references should go, or accept them
in the ‘last imported’ folder and move references
to the envisaged RefWorks folders.

26
Web of Science
The Web of Science is a multidisciplinary citation database, covering over 10,000 journals worldwide
with topics in the sciences, social sciences, arts, and humanities. Open Access journals and over
110,000 conference proceedings are also included. Web of Science provides bibliographical
information and often includes links to full-text versions. For a full list of available databases see p. 34.
To find Web of Science, go to https://isiknowledge.com/
New users register first (top right of opening page) with their email address and password, first time
on campus or while connected to the university by VPN. Once you have created a personal account,
you can also access the databases without a VPN-connection.
First make a selection and refine your choices. In this example gender and development in titles of
recent publications that are relevant to socio-economic studies and to India.
Export to RefWorks
Select in the export details box ‘Save to Endnote online’ the choice ‘Save to RefWorks’.
This settings will enable the direct export of a Web of Science search results into RefWorks with a
choice of the bibliographical description, source with/without abstract.
Click on <Send> and there
references will be
automatically exported to your
RefWorks account ‘last
imported folder’ (assuming you
have logged-in).

27
Jstor
JSTOR (short for Journal Storage) is a digital archive which holds the complete digitized back issues of
important scholarly journals, starting with the very first issues. Each article is available as full text.
Because of JSTOR's archival mission, there is a gap – the so-called ‘moving wall’ – between the most
recently published journal issue and the back issues available in JSTOR. Publishers determine the
moving wall length in their license agreements with JSTOR. Moving walls may range from zero to ten
years. In calculating the moving wall, the current, incomplete year is not counted.
The ISS Library offers access to the Arts & Sciences Collections I, II, IV, VI and VII as well as the JSTOR
Business Collection.
To find JSTOR go to the library homepage; select databases. Type ‘JSTOR’ in the search box.
Perform a search and select a few items by
checking the boxes to the left of the records.
Click on ‘Export’.
Select the right format to
export: RefWorks.

28
PiCarta
PiCarta is an integrated bibliographic database containing references to books, journal articles and
electronic resources. It provides access to the Dutch Union Catalogue (NCC) and the Online Contents
(OLC).
The NCC contains bibliographic entries of all books and journals in the collections of more than 400
libraries in the Netherlands, including all university libraries, other academic and special libraries, and
all public libraries. The Online Contents contains the tables of content and references to articles in
periodicals.
To find PiCarta, go to the library
web page; choose ‘PiCarta’ in the
search tool.
You can now search in the PiCarta
database.
Note:
When working in PiCarta, click on the English flag icon to switch to the English language interface.
For the purpose
of explanation,
we use here the
example of
‘information
literacy’ in Africa.
To download by
batch, click
on the ‘download’
option at the
bottom of the
screen.

29
You can download titles
per batch.
For ‘Format’ select MOPC.1
You can choose
To receive the data by email,
or you can save it to a disk,
or you can choose the screen
option, which will open a new
browser window with data.
1. Saving the selected references to a text file
(MOPC, a tagged format here on the right) is
practical when importing many references at a
time into RefWorks.
When you need only one or two references, you can
choose the format ‘full title’ and click on ‘screen’ to
display the data (here on the left) which can then
easily be copied and pasted into the fields of a
RefWorks record.
Another way to select and compile titles
from Picarta is the following:

30
1. Click on a title to open a record.
2. Click, at the bottom of the page under the title, the link: ‘add to archive’.
3. Clicking on ‘session archive’ (a
temporary archive) adds this
title to the archive.
4. Repeat this for other titles.

31
5. To view the selected records, repeat adding titles to the
session archive from the results screen.
6. Click on ‘session archive’.
7. Click on ‘My Shelf’ at the top of the
screen.
6. Click ‘Download’ at the bottom
of the screen.
7. You can indicate which titles you want
to download.
For ‘Format’, select MOPC.
You can choose
To receive the data by email,
or you can save it to a disk,
or you can choose the screen option,
which will open a new browser window
with data.

32
Once you have your data, in whichever
form, single or several titles, open your
RefWorks account.
When in RefWorks, click References and
select <Import>.
The Import References window allows you to import
references in three different ways. The first two correspond
with the Picarta options:
either from the text file (1) created with the ‘save’
option,
or from text, in the new browser window using the
‘screen’ option or in an email, that you can copy and
paste (2).
Choose the Import Filter is PICARTA,
the database parameter will automatically
change to PICARTA.
Click on <Browse> to find the saved
text file.
You may want to indicate the folder
where the references should be exported
to, but it is not strictly necessary.
Finally, click on <Import>
If you have chosen option 2 to paste the text from the screen or an email, click on “From Text”.

33
A window then appears into which you
can paste the text.
Note that the import filter and database
fields also have to be PICARTA.
The result is:
RefWorks will display a control window.
Clicking on ‘View Last Imported Folder’, allows
you to review your imported references.

34
Other Databases
Export
The following databases available at ISS, use the ‘direct export’ method. Direct export makes
exporting references into RefWorks relatively easy. This has been made possible by a co-
operation between the publishers and the makers of RefWorks:
o ABI/Inform Global
o ACM Digital Library
o Annual Reviews
o AnthroSource
o Arts and humanities Citation Index
o Bibliography of Asian Studies online
o Bibliography of British and Irish history
o Blackwell Encyclopedia of Management
o Books in Print online
o Brill Journals online
o Business Source Premier
o Cambridge Journals online
o Communication Abstracts
o CINAHL
o Cochrane Library
o Communication Abstracts via EBSCO
o Digital Dissertations Online
o Early English Books Online (EEBO)
o EBSCO
o ECLAS
o EconLit (Ebsco)
o Economist online
o EconPapers
o Emerald Fulltext
o Encyclopedia of Human Behavior
o Ergonomics Abstracts online
o ERIC database via CSA
o Gale Virtual Reference Library on
Management
o GEOBASE
o Google Scholar
o HeinOnline
o Hint
o Historical Abstracts on the web
o Idea Group on Informatics
o IEEE Computer Society
o InformaWorld
o IngentaConnect
o International Bibliography of the Social
Sciences (IBSS)
o International Encyclopedia of the Social &
Behavioral Sciences
o International Encyclopedia of Public Health
o International Political Science Abstracts (IPSA)
o IOS Press
o ISS Proceedings
o ISI Web of Knowledge
o ISI Web of Science
o JSTOR
o Library Information Science & Technologies
Abstracts (LISTA)
o OECD iLibrary
o Online Contents
o OVID
o Oxford Journals
o Palgrave’s Ebooks
o Philosopher's Index
o PiCarta
o POIESIS (Philosophy online)
o Project Muse
o Proquest (+Historical +Statistical)
o PsycARTICLES
o PsycBooks
o PsycINFO
o PubMed/Medline
o Regional Business News
o RePuB
o Sage journals online
o ScienceDirect
o Sciences Citation Index
o Scirus
o Scopus
o sEURch
o Social Sciences Citation Index (SSCI)
o Social Services Abstracts
o Sociological Abstracts
o Springer (+eBooks)
o Swetswise
o Taylor & Francis
o Thieme e-journals
o Web of Science
o Wiley InterScience
o World Bank e-library
o WorldCat

35
Import
For the remaining, other databases, you need to use the ‘import option’ to add references to
RefWorks. The import option can be found in the RefWorks menu under References.
An explanation and a link to an extensive list of import settings for databases that are available at EUR
can be found at the step by step guide for using the Erasmus University Library databases.2
The list provides an overview of the databases for which you have to use the import option in order to add
references to RefWorks. The list includes the import filter and database settings that you need to select for importing the database references in RefWorks.
2 http://www.eur.nl/fileadmin/ASSETS/ub-instructie/UL_Instruction/RefWorks_2.0/Alfabetische_lijst_UB-databanken_RefWorks_2.0_ENG.pdf

36
PART 5: Checking Imported References
References should be checked when they are imported, and in individual cases, fields may have to be corrected, complemented or added manually. Some examples: (Why is there a small letter in the initials: Jager, K.d.?)
(Missing author?) Here is a checklist of things to look out for:
1. Duplicates Check for duplicate titles in RefWorks, as this can cause problems in citing and in the list of references. Titles which have the same author(s), same title, AND same year of publication are duplicates. When you import titles from a database you can already do a check for duplicates. Or you can click on View/Duplicates.

37
2. Reference Type Check if the correct Reference type has been allocated by RefWorks, as an incorrect ‘reftype’ will cause the wrong format to be applied. Predictable problems are for instance: Generic reference
The source of this reference (http://repub.eur.nl) did not pass on the correct reference type for the bibliographic description: a chapter in an edited book: P.A.G. van Bergeijk, A. de Haan & R. van der Hoeven (Eds.), The Financial Crisis and Developing Countries: A Global Multidisciplinary Perspective (pp. 215-230). Cheltenham: Edward Elgar
Correctly identified as ‘Book, Section’ this then is: Schiphorst, F.B.F.M. (2010) 'Defending Vulnerable Workers in South Africa After the Crisis what Role for COSATU?', in P.A.G. van Bergeijk, A. de Haan and R. van der Hoeven (eds) The Financial Crisis and Developing Countries: A Global Multidisciplinary Perspective, pp. 215-230. Cheltenham: Edward Elgar.
Chapters (Book, Section) In general library catalogues hold information about books and rarely about individual chapters in an edited book. This means that when you import the bibliographical information on a book (Book, Whole), you then change the reference type in the record to ‘Book, Section’ to add the information about the chapter.
3. Author’s name a. Correct Format
Author names should be entered last name first followed by a comma, first name (or initials followed by a period each). Each author must be separated by a semi-colon. For example: Spoor, Max; Gasper, Des; Schiphorst, A.B.C.D.; etc. If the Author has a title, place a comma after the last initial. Next, add the title followed by a period. For example: Green, Adam J.,Dr.; Berg, James, II; etc. RefWorks automatically formats the author names correctly. If there isn't an author listed leave the Author field empty. The output style will determine what should be used in this case and correctly insert the anonimous title in the sorting order. Entering author names correctly is important for generating the list of references correctly. RefWorks must know which name is the last name, first name, and middle initial to format the list of references correctly.
b. Capitalize the first letter of surnames, first names and initials E.g. GASPER, DES; must be Gasper, Des; or Gasper, D. ABDALLA, A.A.; SIMPSON, MORAG C.; must be: Abdalla, A.A.; Simpson, Morag C.;
RefWorks will alert you to missing semi –colons. For more details see the help file of RefWorks under ‘Reference Field Descriptions’.

38
4. Title a. Capitalization*
Capitalize the first letter of each significant word. A title, written in ‘ALL CAPITALS’, is not correct. All capitalized titles will make your list of references look very unsystematic. In general, do not capitalize, unless these happen to be the first word of the title:
Articles: a, an, the
Coordinating Conjunctions: and, but, for, nor, or etc.
Prepositions: at, by, from, on, to, etc. Incorrect: THE PRODUCTION AND MARKETING OF VEGETABLES IN KHARTOUM PROVINCE. Correct: The Production and Marketing of Vegetables in Khartoum Province.
b. Transcription and translation Write the title first in the original language (Transcribe this in Roman script, where necessary). Next provide the English translation within parentheses. E.g.: Ursachen Internationaler Landakquirierung in Entwicklungsländern (Causes of International Land Acquisition in Developing Countries). When you read a publication in a translation and not in the original language, then refer to the translation text only.
5. Journal names a. Write the full name of the journal
Correct is: Development and Change Not correct is: D&C
b. Capitalize the first letter of each significant word.* E.g. DEVELOPMENT AND CHANGE should be Development and Change
6. Acronyms/Abbreviations Write full name first, next the acronym within parentheses: IMF write: International Monetary Fund (IMF) UNESCO write: United Nations Educational, Scientific and Cultural Organization (UNESCO) Refer to the ISS Referencing Guide for more details.

39
PART 6: Entering References Manually
It is not always possible to import references
directly or indirectly, although that is the
preferred way. RefWorks offers an option
to enter references manually: select
References from the main menu,
followed by <Add New>.
This opens a new window
‘Add New Reference’.
The default output style
appears in ‘Fields used by’,
which determines the
information fields to be filled
in the ‘Add New Reference’
window. (To set the default
output style, see Part 2B)
Note that the folder ‘Research
Paper’ has been selected here
as the folder where the new
reference should be created.
Not making a choice here
results in a reference ‘Not in
Folder’.
Fields can be typed or use can
be made of ‘copy and paste’.
The heading ‘Additional Fields’
marks field that store complementary information as in abstracts, notes, user defined fields, etc..
The example here is taken from Development and Change.
Note:
View fields used by : Harvard–ISS Standard
Folder : Research Paper
Ref Type : Journal Article
Source type : Printed copy used
Authors : Last name, First name
Multiple Authors : separated by semi-colon (;)
Title : only first letter of significant words in uppercase.

40
Click on the ‘Save Reference’ button.
A small animation on the right bottom of the screen will show if RefWorks is still processing the title
and when the process has been completed.
In ‘View’, ‘View Folder’, ‘Research Paper’ the result is:
Entering Author’s Names
Names of authors can create complications when entering a reference manually. There are official rules for
entering prefixes, suffixes, composite names, etc. and following those rules would require you to study the
AARC2 (Anglo-American Cataloguing Rules, 2nd ed.).
These rules are elaborate, specific to language, country of origin of the author’s name and not always
unambiguous. We therefore offer a few tips.
1. The main purpose of the list of references is to allow the reader to find a publication cited or used in
writing the paper, should he want to know more about its contents. It is advisable therefore to follow
the name convention used in the publication.
2. Authors sometimes make it known how they want to be cited (e.g. ‘maiden name’ for women, an
assumed alias, Arabic names, etc.). This name should, as a rule, be respected.
3. Most publications have a list of references or bibliography from which you can discover the correct
naming convention for an author.
The application of different rules can lead to differing results when authors’ names are sorted in
bibliographies. An illustrative example is the name Gerrie ter Haar (ISS professor). A selection of her
publications shows the diversity in the treatment of her name:
Haar ter, G.
Haar, G.t.
Gerrie ter Haar
ter Haar, G.
Ter Haar, G.
Haar, Gerrie ter
Of these variations, the last one is the correct one for a bibliography.
The author field should be filled as follows: Haar, Gerrie, ter;
Another example is the name of ISS staff member, Joop de Wit, who is referred to as:
de Wit, J.
Joop W. de Wit
De Wit, J.
Wit, Joop W. de
In this case, the last is the correct form and the author field should read: Wit, Joop W., de;

41
Arabic names
In general, you enter the last element of the name as surname. A surname beginning with de prefix Al,
El, Abu, Abou, Abun, Abdul, Abdel, Ben or Ibn should be entered including the prefix.
Al-Hakkim, Muhammed Abu Salih, Ahmed
El-Din (or Al-Din) is a suffix and follows either a first name or a surname: e.g.
Hamoud, Nur al Din Seif el Din, Mohammed
Spanish names
Spanish compound name usually consist of the father’s name, followed by the mother’s name. Enter
compound surnames under the first part of the compound:
Rodriguez Marin, Francisco Ménendez y Pelayo, Marcelino
For other non-English name forms, see Appendix 3 of the ISS Referencing Guide 2013.
Entering Reference Titles
Titles are to be entered in RefWorks in the ‘title case’ which, simply put, means that the first word and
all the ‘main’ words in a title should have initial capitals, and all the 'joining' words should be left in
lower case, e.g.:
A Handbook of Critical Approaches to Literature
The rules for capitalization in title case are:
Always capitalize the first word.
Capitalize all nouns, pronouns, adjectives, verbs, adverbs, and subordinate conjunctions (‘as’,
‘because’, ‘although’).
Use the lowercase for all articles, coordinate conjunctions (‘and’, ‘or’, ‘nor’), and prepositions
(‘of’, ‘to’) regardless of length, when they are other than the first word.
Year of Publication
When a publication is undated, leave the field ‘Publication Year’ empty.

42
PART 7: Creating a Bibliography
The preferred way to create a bibliography is to install Write-N-Cite on your computer. This software is
an add-on to MS Word which allows you to do your in-text citations and generate a bibliography at the
end of the manuscript, making use of the references you stored in RefWorks.
Write-N-Cite can be found in the RefWorks menu under Tools. It installs quite easily. For Apple users,
a separate version is available.
It may also be necessary to create a bibliography of
a RefWorks folder or a selection of references. This
can be done in the menu from the menu:
Bibliography, Create Bibliography
The ‘Create Bibliography’ button
can also be used with the same result.
A new ’Create
Bibliography from a list
of references’ window
opens.
Verify that the Harvard–
ISS Standard output
style is selected and
choose the file type you
would like to have the
bibliography (html, rtf
for Word, etc.).
Select which references should be in the bibliography (all references, a selected list or
a RefWorks folder). You can choose to create a bibliography for your research paper folder.
Clicking on the ‘Create Bibliography’
button in this window will result in
the generation of the bibliography.
A small animated window for
processing appears at the right bottom of the screen.
When completed, you can click to get the file
download, or on a link to send the output to your ISS
email address.
The bibliography will arrive as file attachment in your
mailbox.

43
PART 8: Important Information
Referencing Style at ISS
ISS has developed the Harvard–ISS Standard as its referencing style. It sets the formatting for the
various reference types (books, chapters, articles, theses, etc.) used in academic writing according to
ISS conventions. This style is recommended for use during your studies for assignments and the
research paper.
For further information please consult the ISS Library webpage, click on ‘About Referencing’
(http://www.iss.nl/Library/Library-information/Tutorials-and-Guides/About-referencing)
Accessing your ISS RefWorks account
After you have created your RefWorks account, you can access it on any internet-connected computer
without using the VPN. Log in with your RefWorks’ user name and password.
RefWorks after your study at the ISS
When students graduate and leave ISS, they can continue to use their RefWorks ISS Student account.
The RefWorks account will not be deleted (for as long as the university keeps a license with RefWorks
COS). However, after 6 months student ERNA IDs and ‘@student.eur.nl’ email addresses are no longer
valid.
As long as a user is in possession of the RefWorks username, password and the EUR group code this
does not present a problem. However, he or she will not be able to change the email address after
expiry of the ERNA ID. If the password is lost, the consequence is that you can no longer send yourself
the password information.
Note your personal details here for future reference:
RefWorks Username RefWorks Password or Hint
_____________________ _______________________
The alternative to keeping a RefWorks student account is the creation of a RefWorks Alumni account.
However, this is an account with some restrictions in the size: attachments are deleted upon
conversion. The number of references is not restricted. In addition, only one single account per email

44
address is permitted. Alumni are allowed to link the alumni account with any email address (hotmail,
live, gmail, etc.), whereas student accounts can only be linked to an @student.eur.nl email account.
The RefWorks Alumni account will be kept alive for as long as the university keeps a license with
ProQuest LLC.
To transfer the references from one account to another, you have to make a backup of your student
account and restore the backup to the newly created alumni account.
A detailed step-by-step description follows below.
Creating the RefWorks alumni account & transferring the contents from the
student account
Group codes are being phased out. Should it still be necessary, contact your Librarian.
1. To export the content of your existing RefWorks account, you first have to create a
back-up of this existing account and then later upload it in your new account.
To create an alumni-account, follow these steps before you leave ISS:
2. Go to www.refworks.com/refworks2
3. Click the link 'Sign up for a new account'
4. Enter the requested information. You can enter any email address. You must select
‘Erasmus University Rotterdam’.
When your Alumni account has been created, you get an e-mail from RefWorks with your login
information (Note your Alumni account details for future reference.).
Please note: it's possible that the Ref-IDs, the number of the references in your account, change. This
can cause problems when you want to adjust a Word-document with references made with Write-N-
Cite - because the references have different IDs.
To create a back-up of your existing account:
1. Login to your existing account
2. Click ‘Tools’ in the grey bar on top of the screen
3. Choose ‘Backup & Restore’
4. Mark all relevant options
5. Click ‘Perform Backup’
6. Save the .rwb file on your computer
7. Log out of this account
To upload this .rwb backup file in your new account:
1. Login to your alumni RefWorks-account

45
2. Click ‘Tools’ in the grey bar on top of the screen
3. Choose ‘Backup & Restore’
4. Choose ‘Restore’
5. Mark all options
6. Click browse and select the .rwb file saved before
7. Click ‘Perform Restore’
Temporary Use of Refworks for 30 days
Refworks offers 30 days trial accounts that are not connected with an organization. These accounts are
intended for new users to explore the features of Refworks. They may come handy when internet
connected, but out of reach of your usual mailbox and login account information. To create this account click
on ‘Sign Up for a new Account’ in the login window’; then select ‘I want to create a 30 day trail’
Existing RefWorks users may also request their account details to be sent to the linked email address. When
both Login name and password have been forgotten, the ‘Don’t know your login name?’ link will bring you to
a question for your email address.
46
Annex
Write-N-Cite formats citations and generates bibliographies only in Microsoft Word produced papers. It is
not a priori suitable for other word processors. A general purpose solution has therefore been created by
Proquest to facilitate other word processors as for instance Open Office.org Writer.
Open Office or Office 365 in the cloud
RefWorks can be used ‘across platforms’. Write-N-Cite is unfortunately not compatible with Office 365, nor
with Open Office.
In order to use RefWorks to handle your citations and bibliographies in Open Office, follow these
instructions:
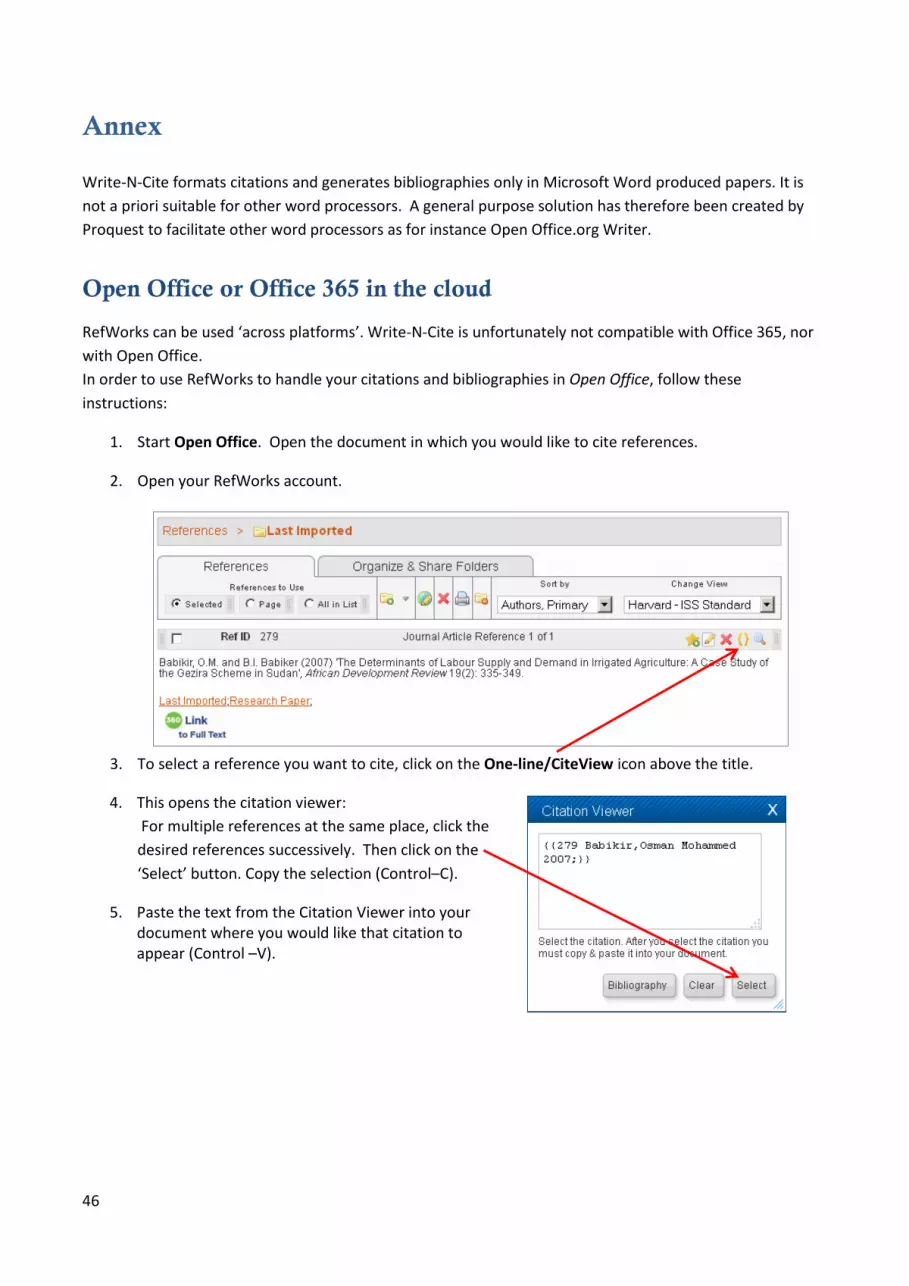
1. Start Open Office. Open the document in which you would like to cite references.
2. Open your RefWorks account.
3. To select a reference you want to cite, click on the One-line/CiteView icon above the title.
4. This opens the citation viewer:
For multiple references at the same place, click the
desired references successively. Then click on the
‘Select’ button. Copy the selection (Control–C).
5. Paste the text from the Citation Viewer into your document where you would like that citation to appear (Control –V).

47
6. For subsequent citations, ‘Clear’ the Citation Viewer and repeat steps 3-5.
7. Save and Close your Office document.
8. In RefWorks, click the Bibliography button at the bottom of the Citation Viewer.
This opens the ‘Create Bibliography’ dialogue window.
Choose the Harvard – ISS Standard output style, select ‘select a file’ (from your computer), and browse to the document you saved in step 7.
Next, click Open. RefWorks will create a new file. The new file with bibliography will have the filename Final-filename (where filename is the name of the original file).
You'll can save or open the document in your (Open or MS) Office 365.
Refworks does not overwrite your original file. You can continue working in the new document and if you make any edits or additional citations, you can repeat the procedure above.
For Office 365 (in the cloud) you best work in a similar way, opening the document and using the one line/cite view from step 2 above.
Switches
The above instructions explain how to make simple in-text citations and generate the bibliography. Most manuscripts also require edited in-text citations where the author’s name or the year of publication is suppressed. In other cases text is added before or after the bibliographical information. RefWorks uses ‘switches’ to express these variations, codes that tell RefWorks to make specific changes to your in-text citation.
Switches are manually added to the temporary citation placeholder RefWorks uses to read and format your in-text citation or footnote, e.g. {{2 Casey Walsh 2009/y ;}}
The switches available for the Harvard – ISS Standard style are3:
3 The following section is largely based on the online help text ‘Modifying an In-Text Citation or Footnote’ which can be found at
https://www.refworks.com/refworks2/help/Modifying_an_In-Text_Citation_or_Footnote.htm and has been modified for the Harvard – ISS standard style characteristics.

48
/ y Suppress the year field. This switch is used to hide the year field of a specific reference. Your
citation should look like this, {{1 Smith 2003/ y}} where the Refid number is 1. After formatting it
would be, (Smith).
/a Suppress the author field. This switch is used to hide the Primary Author field for a specific
reference. Your citation should look like this, {{1 Smith 2003/ a}}. After formatting it would be:
(2003).
/h Hide text. This switch is used to hide an entire citation. This switch takes precedence over all
other switches. It will not only hide the reference it is attached to, but all other references in the
specific citation location as well. The hidden references will, however, still be included in the
bibliography. A hidden citation would look like this, {{1 Smith 2003/ h}}. When formatted it would
not appear at all.
/ f Following text. This switch is used to place text at the end of a specific reference citation in an
output style that does not normally contain page numbers in the in-text citation or footnote. You can
use this switch to add page numbers after the author and year information. Your citation would look
like this, {{1 Smith 2003/ f : 43}}. After formatting it would be, (Smith 2003: 43).
/p Preceding text. This switch is used to place text in front of a specific reference citation. All
text up to the next switch or the end of the reference citation is used as the preceding text, including
spaces and tab characters. Your citation would look like this, {{1 Smith 2003/ p ”Unpublished work
by “}}. After formatting the citation would be (Unpublished work by Smith 2003).
Notes
1: Make sure your switch is placed before the semi-colon in your citation placeholder. Also include any spacing and punctuation you want between the citation and the additional information you are adding. For example: if you want an in-text citation to be (Smith 2003: 43 - 44) your temporary placeholder with the switch would look like this {{1 Smith 2003/f “: 43 – 44”}}.
2: In the bibliography the original page range in your reference will print -- not the specific page number you use in the in-text citation.
3: Authors sometimes write various contributions in different word processors and later merge the components in Ms Word. When copying and pasting, hidden codes may be introduced in the receiving word processor, which are not perfectly understood. This may hamper RefWorks. When pasting, three options are available (i.e. keep source formatting, merge formatting, keep text only). The paste option ‘keep source formatting’ is best not used.
Switches in Footnotes
None of the switches can be used in footnotes for Harvard – ISS Standard style.


